Zone Protection profiles defend zones against flood, reconnaissance, packet-based, and non-IP-protocol-based attacks. Separately, DoS Protection profiles, used in DoS Protection policy rules, defend specific, critical devices against targeted flood and resource-based attacks. A Denial-of-Service (DoS) attack attempts to overload the network or targeted systems with large amounts of unwanted traffic to disrupt services.
Plan defenses against different DoS attack types:
Application-Based Attacks:
Target weaknesses in specific applications to exhaust resources (e.g., Slowloris).
Protocol-Based Attacks:
Exploit protocol weaknesses (state-exhaustion), like SYN floods.
Volumetric Attacks:
Use high traffic volumes to overwhelm network bandwidth or resources (e.g., UDP flood).
There are no default Zone Protection or DoS Protection profiles/policies. Configuration should be based on the specific traffic characteristics of each zone and the criticality of devices within them.
Zone Defense Tools
Effective DoS defense requires a layered approach. Ideally, dedicated DDoS protection devices and perimeter routers/switches with ACLs handle large volumetric attacks before traffic reaches the firewall.
Palo Alto Networks firewalls provide granular layers of DoS protection:
Zone Protection Profiles:
Applied to ingress zones, these provide broad defense against floods (SYN, UDP, ICMP, Other IP), reconnaissance (port scans, host sweeps), packet-based attacks (malformed IP/TCP headers, spoofing), and non-IP protocols based on aggregate traffic entering the zone. They act early in the session setup process. Apply to *every* zone.
DoS Protection Profiles and Policy Rules:
Defend specific, critical endpoints (like web servers) against targeted flood attacks. They offer granular control based on individual device thresholds (Classified) or group thresholds (Aggregate). Apply only to critical devices.
Packet Buffer Protection:
Protects the firewall itself from single-session DoS attacks that try to exhaust the packet buffer. Configured globally and enabled per-zone. Applies to existing sessions.
Security Policy Rules:
The fundamental policy applied to all traffic. Allows or denies traffic based on zones, IPs, users, applications, etc. Applying best practice Vulnerability Protection profiles to Security rules adds another layer against certain DoS exploits.
Zone and DoS Protection only affect dataplane traffic, not traffic originating from the firewall's management interface.
How Do the Zone Defense Tools Work?
When a new packet arrives (doesn't match an existing session), the firewall processes it in the following order:
Zone Protection Profile Check:
The firewall checks the Zone Protection profile applied to the ingress zone. If the profile denies the packet based on aggregate flood thresholds, reconnaissance detection, packet anomalies, or protocol rules, the packet is dropped. If allowed, proceed to the next step. (Applies only to new sessions).
DoS Protection Policy Rule Check:
The firewall evaluates DoS Protection policy rules. If a matching rule with action 'Protect' is found, it checks the thresholds in the associated DoS Protection profile(s). If thresholds are exceeded, the packet may be dropped or the source blocked. If the action is 'Deny', the packet is dropped. If the action is 'Allow' or 'Protect' and thresholds aren't exceeded, proceed to the next step. (Applies only to new sessions).
Security Policy Rule Check:
The firewall performs a Security policy lookup. If a matching rule allows the traffic, a session is created. If no rule matches or the matching rule denies, the packet is dropped. (Applies to new sessions and determines ongoing treatment).
Packet Buffer Protection Check:
For packets belonging to existing sessions, Packet Buffer Protection monitors buffer usage globally and per-zone. If thresholds (based on utilization or latency) are exceeded, it may apply RED or block offending sessions/IPs.
Packet Flow Diagram (New Session)
flowchart TD
A[Packet Arrives] --> B{Session Match?}
B -- Yes --> K[Apply Existing Session Rules]
B -- No --> C{Zone_Protection_Check_Ingress_Zone}
C -- Deny --> D[Drop Packet]
C -- Allow --> E{DoS_Policy_Check}
E -- Deny --> D
E -- Allow/Protect_Threshold_OK --> F{Security_Policy_Check}
F -- Deny_No_Match --> D
F -- Allow --> G[Create Session]
G --> H[Apply_Security_Profiles_Vuln_AV_etc.]
H --> I{Packet_Buffer_Check_Ongoing_for_Session}
I -- OK --> J[Forward Packet]
I -- Exceeds_Threshold --> L[Apply_RED_Block_Session]
style D fill:#f99,stroke:#333,stroke-width:2px
style G fill:#cfc,stroke:#333,stroke-width:2px
style J fill:#cfc,stroke:#333,stroke-width:2px
style L fill:#f99,stroke:#333,stroke-width:2px
This flowchart illustrates the decision-making process for a new incoming packet subject to Zone and DoS protection checks before a session is established.
Firewall Placement for DoS Protection
Firewalls are session-based and not designed for massive volumetric DDoS attacks (millions of CPS). Effective placement is crucial:
Place firewalls used for DoS/Zone protection *behind* dedicated DDoS mitigation devices and perimeter routers/switches handling initial volumetric filtering.
Place firewalls as *close to the resources being protected* as possible. This reduces the session load on the firewall.
Firewalls closer to the internet perimeter require higher capacity.
Network segmentation using smaller zones enhances visibility and limits the impact of internal DoS attacks, as more traffic must cross zones and be subject to policy.
Baseline CPS Measurements for Setting Flood Thresholds
Effective flood protection requires setting appropriate thresholds based on normal and peak Connections Per Second (CPS) for your network. Default thresholds are generally too high and unsafe.
CPS Measurements to Take:
For Zone Protection Profiles:
Measure average and peak aggregate CPS ingressing each zone.
For Aggregate DoS Protection Profiles:
Measure combined average and peak CPS for the group of devices being protected.
For Classified DoS Protection Profiles:
Measure average and peak CPS for each individual critical device being protected.
Measure over at least five business days, including any known peak periods (special events, quarterly closings, etc.). Understand firewall capacity limits.
How to Measure CPS:
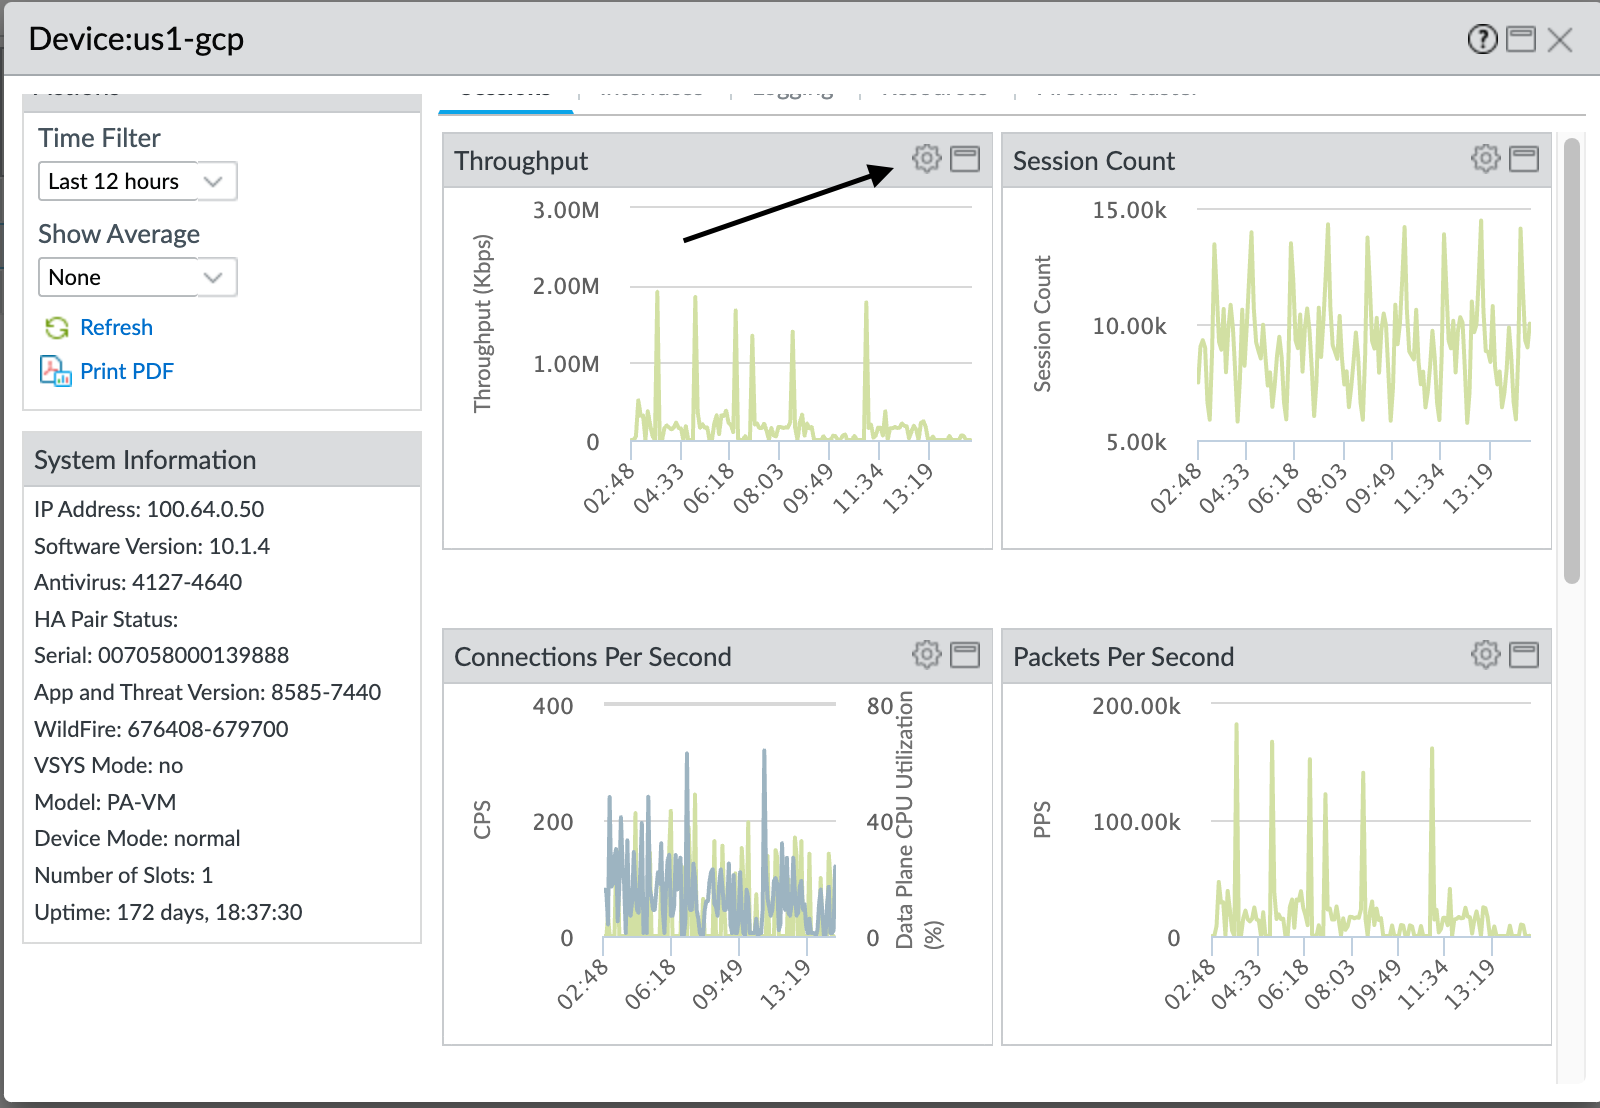
AIOps for NGFW (Recommended for Zone Protection):
If using PAN-OS 10.0+, AIOps provides Threshold Recommendation alerts based on telemetry.
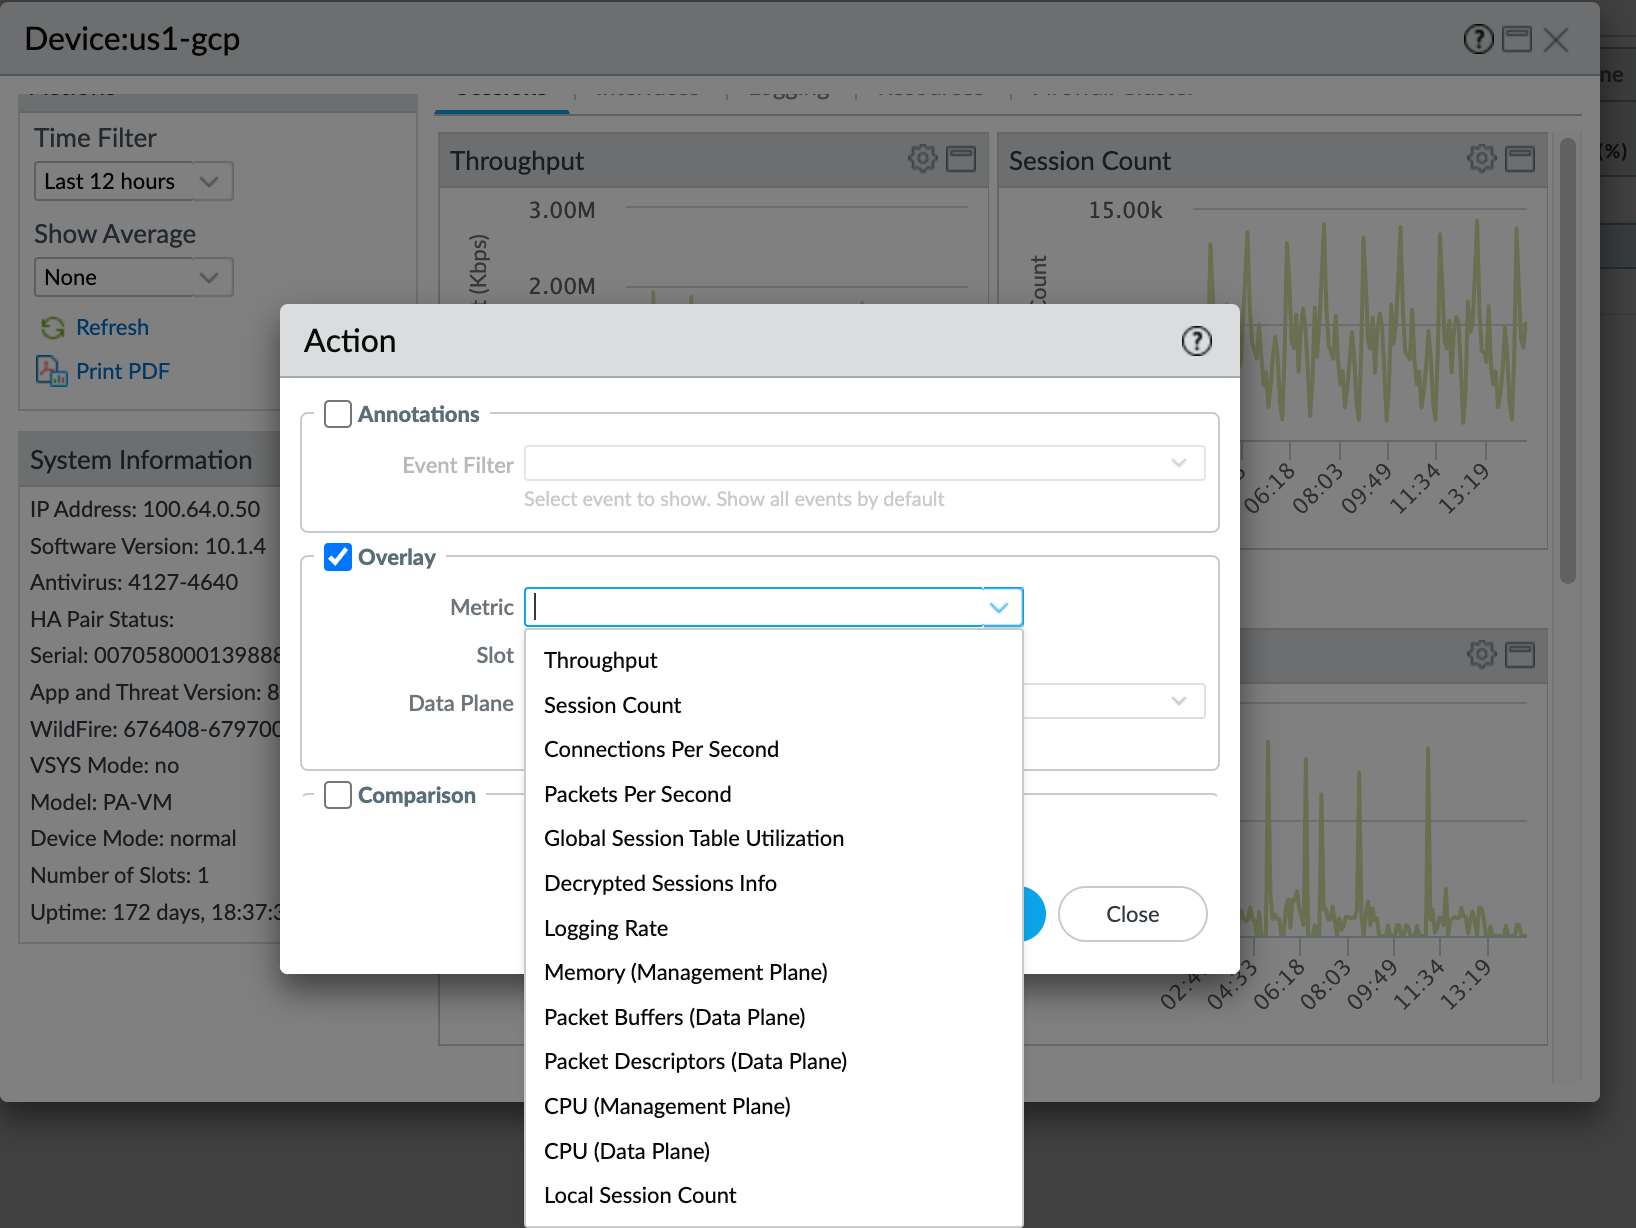
Panorama Device Monitoring:
(
Panorama > Managed Devices > Health
) View CPS, CPU, packet buffer stats over time for individual firewalls. Overlay metrics to see correlations (e.g., CPS vs. CPU).
SNMP MIBs:
Poll
PanZoneActiveTcpCps
,
PanZoneActiveUdpCps
,
PanZoneOtherIpCps
every 10 seconds. *Note: MIB values report double the actual CPS (count C2S and S2C separately); divide by 2.*
CLI Command:
show session info
provides overall session stats.
show counter interface
shows CPS but *also counts C2S/S2C separately (divide by 2)*.
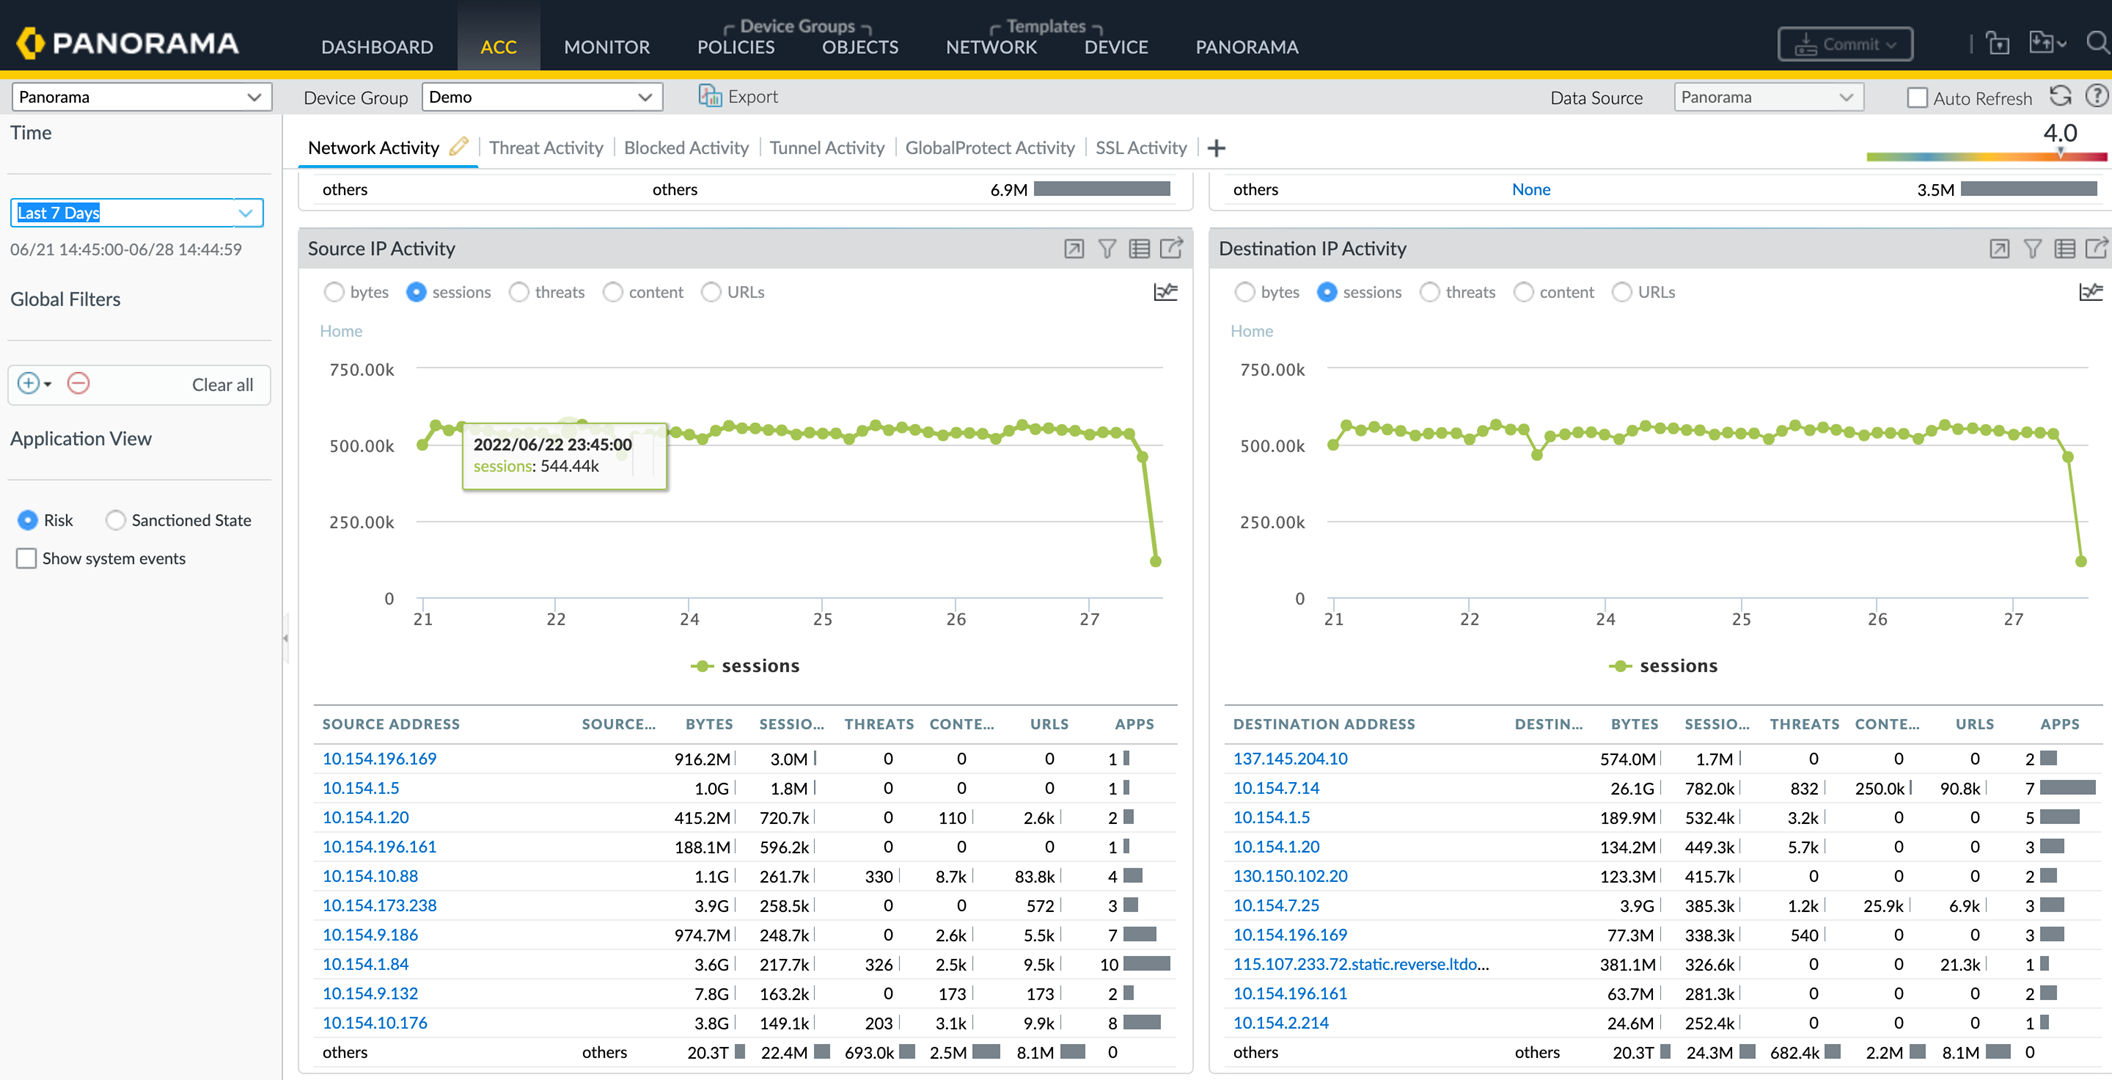
ACC (Application Command Center):
(
ACC
tab) View Source/Destination IP Activity widgets, set to 'sessions' view. Calculate average CPS by dividing session count by the time period in seconds. Useful for individual server baselines (Classified) or summing groups (Aggregate).
Third-Party Tools:
Wireshark, NetFlow analyzers.
Logging:
Ensure Security rules log at session end. While not precise CPS, session counts over time give an approximation.
Application Teams:
Consult teams managing critical servers for expected load/capacity.
Remember firewalls measure aggregate CPS in 10-second intervals, potentially missing short bursts within that window.
Configure specific Log Forwarding profiles for flood events to ensure timely alerts reach the correct administrators.
Zone Protection Profiles
Apply Zone Protection profiles (
Network > Network Profiles > Zone Protection
) to *each* zone to provide broad, aggregate defense at the zone ingress.
In addition to configuring zone protection and DoS protection, apply the best practice Vulnerability Protection profile to each Security policy rule to help defend against DoS attacks.
Flood Protection
Defends against SYN, ICMP, ICMPv6, UDP, and Other IP floods based on aggregate CPS entering the zone. Set three thresholds:
Alarm Rate:
Trigger alerts. Set ~15-20% above average CPS.
Activate Rate:
Start mitigation (RED or SYN Cookies). Set just above peak CPS.
Maximum Rate:
Drop all new connections (if using RED). Set ~80-90% of firewall/zone capacity.
For SYN Floods, choose an
Action:
SYN Cookies (Recommended Start):
Firewall proxies the handshake. Drops only failed handshakes but uses more resources.
Random Early Drop (RED):
Randomly drops incoming SYNs when activated. Less resource-intensive but may drop legitimate connections. Use if SYN Cookies impacts performance or if no upstream DDoS device exists.
When SYN Cookies is activated, the firewall does not honor TCP options like window size and MSS from the server during the handshake, potentially leading to fragmentation if the path MSS is smaller than the firewall's default.
Adjust default thresholds based on baseline measurements. Firewalls distribute thresholds across multiple dataplane processors (DPs).
Reconnaissance Protection
Defends against port scans (TCP/UDP) and host sweeps. Enable on all zones.
Configure thresholds (Interval, Threshold) to detect scans/sweeps.
Set Action (Alert, Block, Block IP) to take when thresholds are exceeded. Alert/Block is common.
Specify Excluded IP Addresses/Objects for legitimate scanners (e.g., internal vulnerability scanners).
Packet-Based Attack Protection
Checks packet headers for anomalies and drops or strips options.
IP Drop:
Drop Unknown, Malformed, Strict/Loose Source Routing. Optionally drop Spoofed IP Address (for internal zones).
TCP Drop:
Keep defaults (SYN/SYNACK with Data). Drop Mismatched Overlapping Segments, Split Handshake. Strip TCP Timestamp. Consider Reject Non-SYN TCP (disable carefully if using Tunnel Content Inspection + Rematch Sessions).
ICMP/ICMPv6 Drop:
Configure based on network needs (e.g., drop ICMP Ping ID 0).
IPv6 Drop:
Drop packets with non-compliant headers/extensions if needed.
Protocol Protection
Controls non-IP protocols (based on Ethertype) on Layer 2 VLANs or Virtual Wires.
Use an
Include List (Allow List - Recommended)
to permit only specific non-IP protocols (e.g., specific SCADA protocols) and block all others.
Use an
Exclude List (Block List)
to block specific protocols and allow all others (less secure).
Supports up to 64 Ethertype entries per list.
IPv4 (0x0800), IPv6 (0x86DD), ARP (0x0806), and VLAN-tagged (0x8100) are always implicitly allowed in Include Lists and cannot be added to Exclude Lists.
If you don’t configure Protocol Protection, the default intrazone-allow rule permits non-IP protocols between Layer 2 interfaces within the same zone.
Ethernet SGT Protection
For Cisco TrustSec integration. Allows dropping packets based on specific Layer 2 Security Group Tag (SGT) values found in 802.1Q headers (Ethertype 0x8909).
Packet Buffer Protection
Packet Buffer Protection defends your firewall and network from single session DoS attacks that can overwhelm the firewall’s packet buffer and cause legitimate traffic to drop. Although you don’t configure Packet Buffer Protection in a Zone Protection profile or in a DoS Protection profile or policy rule, Packet Buffer Protection defends ingress zones. While zone and DoS protection apply to new sessions (connections) and are granular, Packet Buffer Protection applies to existing sessions and is global.
You configure Packet Buffer Protection globally to protect the entire firewall and you also enable Packet Buffer Protection on each zone to protect zones:
Global Packet Buffer Protection (
Device > Setup > Session > Session Settings
):
The firewall monitors sessions from all zones and how they utilize the packet buffer. You must configure Packet Buffer Protection globally to protect the firewall and to enable it on individual zones. When packet buffer consumption reaches the configured
Activate
percentage, the firewall uses Random Early Drop (RED) to drop packets from the offending sessions (the firewall doesn’t drop complete sessions at the global level).
Per-Zone Packet Buffer Protection (
Network > Zones > [Zone Name] > Enable Packet Buffer Protection
):
Enable Packet Buffer Protection on each zone to layer in a second level of protection. When packet buffer consumption crosses the
Activate
threshold and global protection begins to apply RED to session traffic, that starts the
Block Hold Time
timer. The
Block Hold Time
is the amount of time in seconds that the offending session can continue before the firewall blocks the entire session. The offending session remains blocked until the
Block Duration
time expires.
You must enable Packet Buffer Protection globally in order for it to be active in zones.
There are two types of packet buffer protection:
Packet Buffer Protection Based on Buffer Utilization
Packet Buffer Protection Based on Latency
Packet Buffer Protection Based on Buffer Utilization
This type (enabled by default) triggers based on the percentage of the packet buffer being used. Take baseline measurements using CLI commands like
show running resource-monitor [day | hour | minute | second | week]
or custom scripts.
If baseline usage is consistently high, the firewall might be undersized. Otherwise, tune thresholds carefully:
Alert/Activate:
Start with defaults (Alert 50%, Activate 80%). Monitor and adjust. Correctly sized firewalls should have utilization well below 50% normally.
Block Hold Time:
Default 60 seconds. Time an offending session can continue (while subject to RED) before being blocked by the zone setting. Timer resets if usage drops below Activate threshold. Increase for harsher penalty, decrease for less penalty.
Block Duration:
Default 3600 seconds (1 hour). Time an offending session/IP is blocked by the zone setting after Block Hold Time expires. Consider reducing if legitimate traffic from a shared source IP (due to NAT) might be unfairly impacted.
The firewall may also block a source IP if it rapidly creates many sessions, even if none individually trigger high buffer usage.
Packet Buffer Protection Based on Latency
Alternatively, trigger protection based on packet processing latency, which indicates congestion. This can mitigate issues before buffers become full, which is beneficial for latency-sensitive applications.
Latency Alert:
Threshold (ms) to generate Alert log.
Latency Activate:
Threshold (ms) to activate RED.
Latency Max Tolerate:
Threshold (ms) where RED drop probability approaches 100%.
Block Hold Time and Block Duration function similarly as with utilization-based protection.
style H fill:#f99,stroke:#333,stroke-width:2px
packet buffer flow)
graph TD
A[Packet Arrives: Existing Session] --> B{Global Activate Threshold Exceeded?}
B -- No --> Z[Forward Packet Normally]
B -- Yes --> C(Apply Global RED to Offending Sessions)
C --> D{Per-Zone Protection Enabled for Packet's Zone?}
D -- No --> Z_RED[Forward Packet if not dropped by RED]
D -- Yes --> E{Is Session/IP currently Blocked? Block Duration Active?}
E -- Yes --> X[Drop Packet - Blocked]
E -- No --> F(Start/Continue Block Hold Timer for Offending Session/IP)
F --> G{Block Hold Timer Expired?}
G -- Yes --> H[Block Session/IP for Block Duration]
H --> X
G -- No --> Z_RED
style Z fill:#cfc,stroke:#333,stroke-width:2px
style Z_RED fill:#cfc,stroke:#333,stroke-width:2px
style X fill:#f99,stroke:#333,stroke-width:2px
DoS Protection Profiles and Policy Rules
DoS Protection provides granular defense for specific critical resources (servers, services) against session floods, complementing the broader Zone Protection.
In addition to configuring DoS protection and zone protection, apply the best practice Vulnerability Protection profile to each Security policy rule to help defend against DoS attacks.
Classified Versus Aggregate DoS Protection
Aggregate Profile/Policy:
Sets thresholds applying to the *combined* traffic of all devices matching the policy rule. Useful for broadly protecting a group of similar servers. Example: Max Rate 20,000 CPS for the group means the total allowed is 20k; one device could potentially use most of it.
Classified Profile/Policy:
Sets thresholds applying *individually* to each device matching the policy rule. Use Address classification (source-ip-only, destination-ip-only, src-dest-ip-both) carefully. **Do not use source-based classification for internet-facing zones.** Use `destination-ip-only` to protect servers from external attacks. Use `source-ip-only` (with caution) to monitor/limit internal hosts. Example: Max Rate 5,000 CPS means *each* matching device is limited to 5k.
A single DoS policy rule can reference one Aggregate profile AND one Classified profile. The Aggregate profile is checked first. If both are applied, the firewall enforces both limits, potentially blocking based on the aggregate limit first, or blocking an individual device based on the classified limit even if the aggregate limit isn't reached.
Set Flood Protection thresholds (Alarm, Activate, Max Rate) and Block Duration for SYN, UDP, ICMP, ICMPv6, Other IP floods. Thresholds apply per-group (Aggregate) or per-device (Classified).
Optionally set SYN Flood Action (SYN Cookies or RED).
Configure Resource Protection: Set maximum concurrent session limits for the protected resource(s). Applies to all traffic (Aggregate) or based on classification address (Classified). Recommended threshold ~80% of resource capacity.
DoS Protection Policy Rules
(
Policies > DoS Protection > Add
)
Define match criteria (Source/Destination Zone, Interface, Address, User; Service). Limit protection to specified services only.
Set Action:
Protect:
Apply associated DoS Profile(s). (Most common action).
Allow:
Permit matching traffic without DoS protection (for exceptions).
Deny:
Block matching traffic without applying DoS protection (for exceptions).
If Action is Protect, attach Aggregate and/or Classified DoS Protection profiles.