Enable DNS Security
To enable DNS Security, you must create (or modify) an Anti-Spyware security profile to access the DNS Security service, configure the log severity and policy settings for the DNS signature category (or categories), and then attach the profile to a security policy rule.
PAN-OS 10.0 and later supports individually configurable DNS signature sources, which enables you to define separate policy actions as well as a log severity level for a given signature source. This enables you to create discrete, precise security actions based on the threat posture of a domain type according to your network security protocols. The DNS signature source definitions are extensible through PAN-OS content releases so, when new DNS Security analyzers are introduced, you are able to create specific policies based on the nature of the threat. Upon upgrade to PAN-OS 10.0 and later, the DNS Security source gets redefined into new categories to provide extended granular controls; as a result, the new categories will overwrite the previously defined action and acquire default settings. Make sure to reapply any sinkhole, log severity, and packet captures settings appropriate for the newly defined DNS Security Categories.
- Log in to the NGFW.
- To take advantage of DNS Security, you must have an active DNS Security and Threat Prevention (or Advanced Threat Prevention) subscription.
Verify that you have the necessary subscriptions. To verify which subscriptions that you currently have licenses for, select DeviceLicenses and verify that the appropriate licenses display and have not expired.
- Verify that the paloalto-dns-security App-ID in your security policy is configured to enable traffic from the DNS security cloud security service.
If your firewall deployment routes your management traffic though an Internet-facing perimeter firewall configured to enforce App-ID security policies, you must allow the App-IDs on the perimeter firewall; failure to do so will prevent DNS security connectivity.
- Configure DNS Security signature policy settings to send malicious DNS queries to the defined sinkhole.
If you use an external dynamic list as a domain allow list, it does not have precedence over the DNS Security domain policy actions. As a result, when there is a domain match to an entry in the EDL and a DNS Security domain category, the action specified under DNS Security is still applied, even when the EDL is explicitly configured with an action of Allow. If you want to add DNS domain exceptions, either configure an EDL with an Alert action or add them to the DNS Domain/FQDN Allow List located in the DNS Exceptions tab.
- Select ObjectsSecurity ProfilesAnti-Spyware .
- Create or modify an existing profile, or select one of the existing default profiles and clone it.
- Name the profile and, optionally, provide a description.
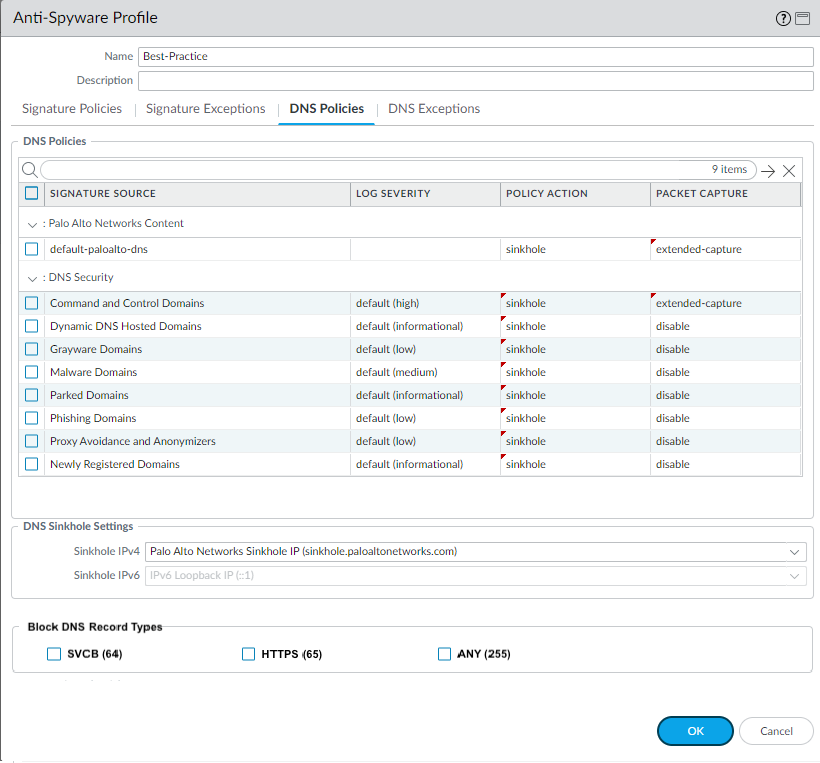
- Select the DNS Policies tab.
- In the Signature Source column, beneath the DNS Security heading, there are individually configurable DNS signature sources, which allow you to define separate policy actions as well as a log severity level.
Palo Alto Networks recommends changing your default DNS Policies settings for signature sources to ensure optimum coverage as well as to assist with incidence response and remediation. Follow the best practices for configuring your DNS Security settings as outlined in the Best Practices for Securing Your Network from Layer 4 and Layer 7 Evasions .
- Specify the log severity level that is recorded when the firewall detects a domain matching a DNS signature. For more information about the various log severity levels, refer to Threat Severity Levels .
- Select an action to be taken when DNS lookups are made to known malware sites for the DNS Security signature source. The options are default, allow, block, or sinkhole. Verify that the action is set to sinkhole.
- You can fully bypass DNS traffic inspection by configuring a policy action of Allow with a corresponding log severity of None for each DNS signature source.
- In the Packet Capture drop-down, select single-packet to capture the first packet of the session or extended-capture to set between 1-50 packets. You can then use the packet captures for further analysis.
- In the DNS Sinkhole Settings section, verify that Sinkhole is enabled. For your convenience, the default Sinkhole address (sinkhole.paloaltonetworks.com) is set to access a Palo Alto Networks server. Palo Alto Networks can automatically refresh this address through content updates.
Sinkhole forges a response to a DNS query for domains that match the DNS category configured for a sinkhole action to the specified sinkhole server, to assist in identifying compromised hosts. When the default sinkhole FQDN (sinkhole.paloaltonetworks.com) is used, the firewall sends the CNAME record as a response to the client, with the expectation that an internal DNS server will resolve the CNAME record, allowing malicious communications from the client to the configured sinkhole server to be logged and readily identifiable. However, if clients are in networks without an internal DNS server, or are using software or tools that cannot be properly resolve a CNAME into an A record response, the DNS request is dropped, resulting in incomplete traffic log details that are crucial for threat analysis. In these instances, you should use the following sinkhole IP address: (72.5.65.111).
If you want to modify the Sinkhole IPv4 or Sinkhole IPv6 address to a local server on your network or to a loopback address, see Configure the Sinkhole IP Address to a Local Server on Your Network .
- (Optional) Block the specified DNS resource record types record types used to exchange keying information during the encryption of the client hello in the subsequent TLS connection. The following DNS RR types are available: SVCB (64), HTTPS (65), and ANY (255).
- While it is not necessary to block ECH in order to enable DNS Security over DoH, Palo Alto Networks currently recommends blocking all DNS record types used by ECH for optimum security.
- Type 64 and type 65 resource record standards are still in flux (in a draft state) and are subject to change. For more information on DNS SVCB and HTTPS RRs, refer to: Service binding and parameter specification via the DNS (DNS SVCB and HTTPS RRs) as defined by the IETF .
- Click OK to save the Anti-Spyware profile.
- Attach the Anti-Spyware profile to a Security policy rule.
- Select PoliciesSecurity .
- Select or create a Security Policy Rule .
- On the Actions tab, select the Log at Session End check box to enable logging.
- In the Profile Setting section, click the Profile Type drop-down to view all Profiles . From the Anti-Spyware drop-down and select the new or modified profile.
- Click OK to save the policy rule.
- Test that the policy action is enforced.
- Access the DNS Security test domains to verify that the policy action for a given threat type is being enforced.
- To monitor the activity on the firewall:
1. Select ACC and add a URL Domain as a global filter to view the Threat Activity and Blocked Activity for the domain you accessed.
2. Select MonitorLogsThreat and filter by (action eq sinkhole) to view logs on sinkholed domains.
3. For more monitoring options, see Monitor DNS Security Subscription Services
- Optional—Create a decryption policy rule to decrypt DNS-over-TLS / port 853 traffic. The decrypted DNS payload can then be processed using the Anti-Spyware profile configuration containing your DNS policy settings. When DNS-over-TLS traffic is decrypted, the resulting DNS requests in the threat logs will appears as a conventional dns-base application with a source port of 853.
- Optional— See Infected Hosts that Attempted to Connect to a Malicious Domain
Enable Advanced DNS Security
Advanced DNS Security supplements your existing DNS Security configuration to provide additional protection against DNS hijacking by inspecting changes to DNS responses. You should have fully configured DNS Security settings before proceeding with this step.
To enable Advanced DNS Security, you must create (or modify) an Anti-Spyware security profile to access the Advanced DNS Security service, configure the log severity and policy settings for the DNS signature category (or categories), and then attach the profile to a security policy rule.
Palo Alto Networks recommends enabling your DNS Security functionality prior to setting up Advanced DNS Security.
- Log in to the NGFW.
- Update the content release version to 8832 or later.
- To prevent access to known and unknown malicious domains using Advanced DNS Security, you must have an active Advanced DNS Security license. This should only be installed after upgrading to PAN-OS 11.2.
Advanced DNS Security supports a licensing model that subsumes DNS Security functionality into the Advanced DNS Security license when installed on a previously unlicensed firewall. If you upgrade from a firewall with an existing DNS Security license, entries indicating the presence of separate DNS Security and Advanced DNS Security licenses are displayed. In this instance, the DNS Security license is a passive entry and all DNS Security and Advanced DNS Security functionality is conferred through the Advanced DNS License, including the relevant expiration date. Firewalls without a previously installed DNS Security license show an Advanced DNS Security license, however, it provides both DNS Security and Advanced DNS Security functionality.
Consequently, if you downgrade from a PAN-OS release operating an Advanced DNS Security license to a release that does not support Advanced DNS Security, the firewall continues to display and confer DNS Security functionality through the Advanced DNS Security license, however, it is limited to base DNS Security features.
To verify subscriptions for which you have currently-active licenses, select DeviceLicenses and verify that the appropriate licenses are available and have not expired.

- Update or create a new Anti-Spyware Security profile to enable real-time Advanced DNS Security queries. Typically, this is your existing Anti-Spyware security profile used for the DNS Security configuration.

- Select an existing Anti-Spyware security profile or Add a new one ( ObjectsSecurity ProfilesAnti-Spyware ).
- Select your Anti-Spyware security profile and then go to DNS Policies .
- For each Advanced DNS Security domain category, specify a Log Severity and Policy Action to take when a domain type is detected using a corresponding analysis engine. There are currently two analysis engines available: DNS Misconfiguration Domains and Hijacking Domains .
Policy Action Options:
- allow —The DNS query is allowed.
You can configure the firewall to generate an alert when the applicable domain type is detected by setting the action to allow and the log severity to informational.
- block —The DNS query is blocked.
- sinkhole —Forges a DNS response for a DNS query targeting a detected malicious domain. This directs the resolution of the malicious domain name to a specific IP address (referred to as the Sinkhole IP), which is embedded as the response. The default Sinkhole IP address is set to access a Palo Alto Networks server. Palo Alto Networks can automatically refresh this IP address through content updates.
Log Severity Options:
- none —The event does not have an associated log severity level.
- low —Warning-level threats that have very little impact on an organization's infrastructure. They usually require local or physical system access and may often result in victim privacy or DoS issues and information leakage.
- informational —Suspicious events that do not pose an immediate threat, but that are reported to call attention to deeper problems that could possibly exist.
- medium —Minor threats in which impact is minimized, such as DoS attacks that do not compromise the target or exploits that require an attacker to reside on the same LAN as the victim, affect only non-standard configurations or obscure applications, or provide very limited access.
- high —Threats that have the ability to become critical but have mitigating factors; for example, they may be difficult to exploit, do not result in elevated privileges, or do not have a large victim pool.
- critical —Serious threats, such as those that affect default installations of widely deployed software, result in root compromise of servers, and the exploit code is widely available to attackers. The attacker usually does not need any special authentication credentials or knowledge about the individual victims and the target does not need to be manipulated into performing any special functions.
- Click OK to exit the Anti-Spyware Security Profile configuration dialog and Commit your changes.
- Optional Specify any public-facing parent domains within your organization that you want Advanced DNS Security to analyze and monitor for the presence of misconfigured domains. Misconfigured domains are inadvertently created by domain owners who point alias records to third party domains using CNAME, MX, NS record types, using entries that are no longer valid, allowing an attacker to take over the domain by registering the expired or unused domains.
TLDs (top-level domains) and root level domains cannot be added to the DNS Zone Misconfigurations list.

- Select an Anti-Spyware security profile ( ObjectsSecurity ProfilesAnti-Spyware ) and go to DNS Policies .
- In the DNS Zone Misconfigurations section, add public-facing parent domains with an optional description to assist you in identifying domain usage or ownership within your organization.
Entries must have a "." contained in the domain using the following format (e.g. paloaltonetworks.com), otherwise it gets parsed as a hostname, which is considered a private domain.
- Click OK to exit the Anti-Spyware Security Profile configuration dialog and Commit your changes.
- Optional Configure the maximum Advanced DNS signature lookup timeout setting . When this value is exceeded, the DNS response passes through without performing analysis using Advanced DNS Security.
- Optional [If you do not have the latest device certificate] Install an updated firewall device certificate used to authenticate to the Advanced Threat Prevention inline cloud analysis service. Repeat for all firewalls enabled for inline cloud analysis.
If you have already installed an updated firewall device certificate as part of your IoT Security, Device Telemetry, Advanced Threat Prevention, or Advanced URL Filtering onboarding process, this step is not necessary.
- Required when the firewall is deployed with an explicit proxy server Configure the proxy server used to access the servers that facilitate requests generated by all configured inline cloud analysis features. A single proxy server can be specified and applies to all Palo Alto Networks update services, including all configured inline cloud and logging services.
- PAN-OS 11.2.3 and later Configure the proxy server through PAN-OS.
1. Select DeviceSetupServices and edit the Services details.
2. Specify the Proxy Server settings and Enable proxy for Inline Cloud Services . You can provide either an IP address or FQDN in the Server field.
The proxy server password must contain a minimum of six characters.
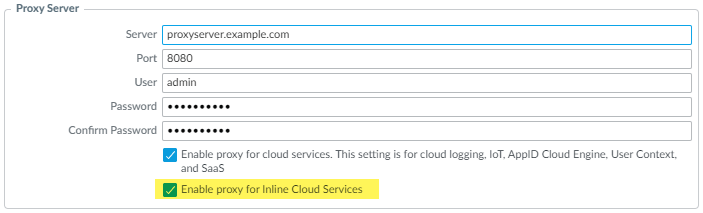
3. Click OK .
- Optional Verify the status of your firewall connectivity to the Advanced DNS Security cloud service.
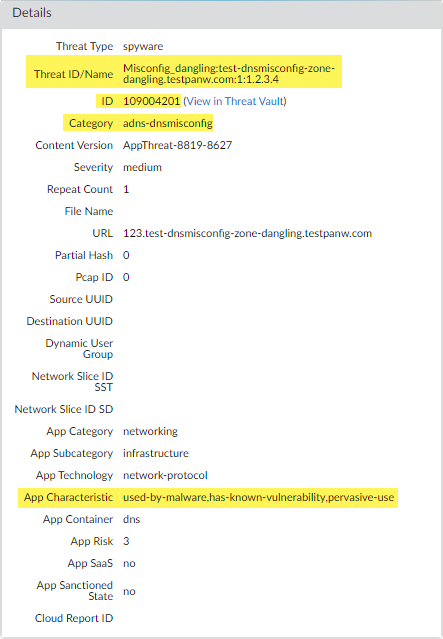
- Optional Monitor activity on the firewall for DNS queries that have been detected using Advanced DNS Security. DNS Security Categories analyzed using Advanced DNS Security real-time analysis of the DNS response packet have the prefix ‘adns’ followed by the category. For example, adns-dnsmisconfig, whereby ‘dnsmisconfig’ indicates the supported DNS category type. If the DNS domain category was determined by analyzing the DNS request packet, the specified category is displayed with the prefix ‘dns’ followed by the category. For example, ‘dns-grayware.’
- Access the Advanced DNS Security test domains to verify that the policy action for a given threat type is being enforced.
- Select MonitorLogsThreat . You can filter the logs based on the specific type of Advanced DNS Security domain category, for example ( category-of-threatid eq adns-hijacking ), whereby the variable adns-hijacking indicates DNS queries that have been categorized as a malicious DNS hijacking attempt by Advanced DNS Security. The following Advanced DNS Security threat categories available in the logs:
Advanced DNS Security Categories
- DNS Hijacking —adns-hijacking
DNS Hijacking domains have a threat ID of (UTID: 109,004,100).
- DNS Misconfiguration —adns-dnsmisconfig
DNS Misconfiguration domains have three threats IDs, which correspond to three variants of DNS misconfiguration domains types: dnsmisconfig_zone (UTID: 109,004,200), dnsmisconfig_zone_dangling (UTID: 109,004,201), and dnsmisconfig_claimable_nx (UTID: 109,004,202). You can constrain the search by cross-referencing a Threat-ID value that corresponds to a specific DNS misconfiguration domain type. For example, ( category-of-threatid eq adns-dnsmisconfig ) and (threatid eq 109004200), whereby 109004200 indicates the Threat ID of a DNS misconfiguration domain that does not route traffic to an active domain due to a DNS server configuration issue.
DNS Categories analyzed using Advanced DNS Security enhanced response analysis.
You must operate a firewall running PAN-OS 11.2 and later to take advantage of enhanced Advanced DNS Security real-time analysis.
- DNS —adns-benign
- Malware Domains —adns-malware
- Command and Control Domains —adns-c2
- Phishing Domains —adns-phishing
- Dynamic DNS Hosted Domains —adns-ddns
- Newly Registered Domains —adns-new-domain
- Grayware Domains —adns-grayware
- Parked Domains —adns-parked
- Proxy Avoidance and Anonymizers —adns-proxy
- Ad Tracking Domains —adns-adtracking
If the DNS query does not complete within the specified timeout period for Advanced DNS Security, the DNS Security categorization will be used, when possible. In those instances, the legacy notation for the category is used, for example, instead of adns-malware, it will be categorized as dns-malware, indicating that the DNS Security categorization value was used.
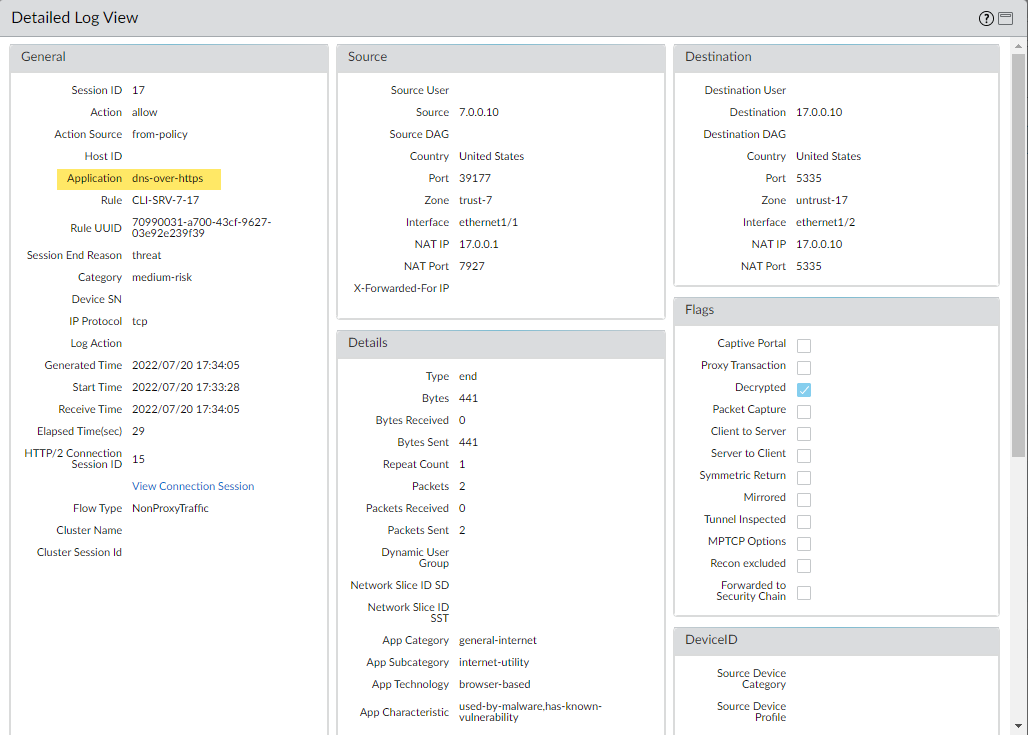
- Select a log entry to view the details of the DNS query.
- The DNS Category is displayed under the Details pane of the detailed log view. In addition, you can see other aspects of the threat, including the Threat ID, which includes the origin domain, the specific threat category, and other associated characteristics, as well as the associated Q type, and R data using the following format: hijacking:<FQDN>:<QTYPE>:<RDATA>, whereby <QTYPE> represents the DNS resource record type and <RDATA> represents the hijacked IP Address.
- Optional Retrieve a list of misconfigured domains and hijacked domains detected by the Advanced DNS Security service. The misconfigured domains are based on the public-facing parent domain entries added to DNS Zone Misconfigurations .
Misconfigured domain entries that are removed from your network are not immediately reflected in the Advanced DNS Security dashboard statistics.
- Use the credentials associated with your Palo Alto Networks support account and log in to Strata Cloud Manager on the hub .
- Select DashboardsMore DashboardsDNS Security to open the DNS Security dashboard.
- From the DNS Security dashboard, refer to the following widgets:
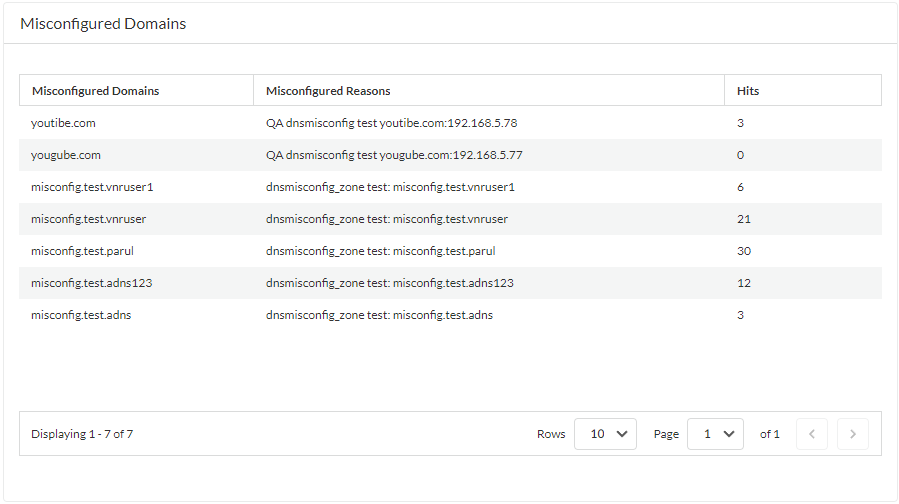
- Misconfigured Domains —View a list of non-resolvable domains associated with the user-specified public-facing parent domain(s). For each entry, there is a misconfiguration reason and a traffic hit count based on the source IP.
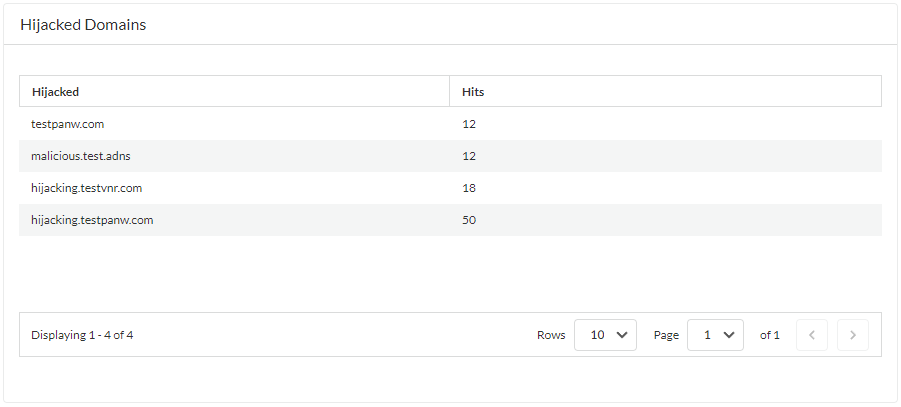
- Hijacked Domains —View a list of hijacked domains as determined by Advanced DNS Security. For each entry, there is a categorization reason and a traffic hit count based on the source IP.
Configure DNS Security Over TLS
You can get visibility and control into DNS Security over TLS requests by decrypting the DNS payload contained within the encrypted DNS request. The decrypted DNS payload can then be processed using the security profile configuration containing your DNS policy settings. DNS requests that have been determined to have originated from TLS sources have a source port of 853 in the threat logs.
- Log in to the NGFW.
- Enable DNS Security is configured to inspect DNS requests. You can use your existing security profile if you want to use the same DNS Policies settings for DNS Security over TLS traffic.
- Create a decryption policy rule (similar to the example below) with an action to decrypt HTTPS traffic on port 853, which includes DNS Security over TLS traffic (refer to the Decryption Best Practices for more information). When DNS Security over TLS traffic is decrypted, the resulting DNS requests in the logs appear as conventional dns-base applications.

- Optional Search for activity on the firewall for decrypted TLS-encrypted DNS queries that have been processed using DNS Security.
- Select MonitorLogsTraffic and filter based on the application using dns-base and port 853 (which is exclusively used for DNS Security over TLS transactions), for example, ( app eq dns-base ) and ( port.src eq 853 ).
- Select a log entry to view the details of a detected DNS threat.
- The Application should display dns-base in the General pane and the Port in the Source pane of the detailed log view. Other relevant details about the threat are displayed in their corresponding windows.
Configure DNS Security Over DoH
You can analyze and categorize the DNS payload contained within encrypted DNS traffic requests to DNS hosts using HTTPS (DoH—[DNS-over-HTTPS]). If your organization currently blocks all DoH requests as Palo Alto Networks recommends, you can transition away from that policy as DNS Security now enables you extract the DNS hostname from the encrypted request and apply your organization’s existing DNS Security policies. This allows you to safely access more websites as support for DoH widens. DNS Security support for DoH is enabled by configuring the firewall to decrypt the payload of DNS requests originating from a user-specified list of DNS resolvers, providing support for a range of server options. The decrypted DNS payload can then be processed using the Anti-spyware profile configuration containing your DNS policy configuration. DNS requests that have been determined to be DoH are labeled as dns-over-https in the traffic logs.
- Log in to the PAN-OS web interface.
- Create a Custom URL Category list that includes all DoH resolvers you want to enable traffic to/from (you will need the DNS server URL(s)).
- Create a Decryption Policy Rule that references the custom URL category list that you created in the previous step.
- Update or create a new anti-spyware security profile used to inspect DoH requests.
- Create or update a security policy rule and reference an anti-spyware profile and a custom URL category list ( ObjectsCustom ObjectsURL Category ) containing the approved list of DoH servers.
- Create a block policy to decrypt HTTPS traffic and block all remaining unsanctioned DoH traffic that is not explicitly allowed by the custom URL category list (referenced in step 5) by using the App-ID : dns-over-https and the following URL category: encrypted-dns .
If you already have an existing block policy to block DoH traffic, verify that the rule is placed below the previous security policy rule used to match with specific DoH resolvers listed in a custom URL category list object.
- (Optional) Search for activity on the firewall for HTTPS-encrypted DNS queries that have been processed using DNS Security.
- Select MonitorLogsTraffic and filter based on the application using dns-over-https , for example, ( app eq dns-over-https ).
- Select a log entry to view the details of a detected DNS threat.
- The Application should display dns-over-https in the General pane of the detailed log view, indicating that this is DoH traffic that has been processed using DNS Security. Other relevant details about the threat are displayed in their corresponding windows.
Create Domain Exceptions and Allow | Block Lists
DNS Security creates threat signatures for domains that have been analyzed by the DNS Security service. For these known domains, the signatures are referenced when a DNS query is received. In some cases, it might be possible that the signature has incorrectly categorized a domain as a threat, due to certain features or qualities present in the domain. In such circumstances, you can add signature exceptions to bypass these false-positives. If there are known safe domains that are categorized as malicious, such as internal domains, you can add a list of domains that will bypass any DNS analysis. If your organization uses third party threat feeds as part of a comprehensive threat intelligence solution, you can also reference those in the form of external dynamic lists (EDLs) in your DNS Security profile.
PAN-OS 10.0 and later releases provide an additional option to explicitly add allowable domains through the Anti-Spyware security profile. You can add domain/FQDN entries for approved domain sources if they trigger a false-positive response from DNS Security.
- Log in to the NGFW.
- Add domain signature exceptions in cases where false-positives occur.
- Select ObjectsSecurity ProfilesAnti-Spyware .
- Select a profile to modify.
- Add or modify the Anti-Spyware profile from which you want to exclude the threat signature, and select DNS Exceptions .
- Search for a DNS signature to exclude by entering the name or FQDN.
- Select the checkbox for each Threat ID of the DNS signature that you want to exclude from enforcement.
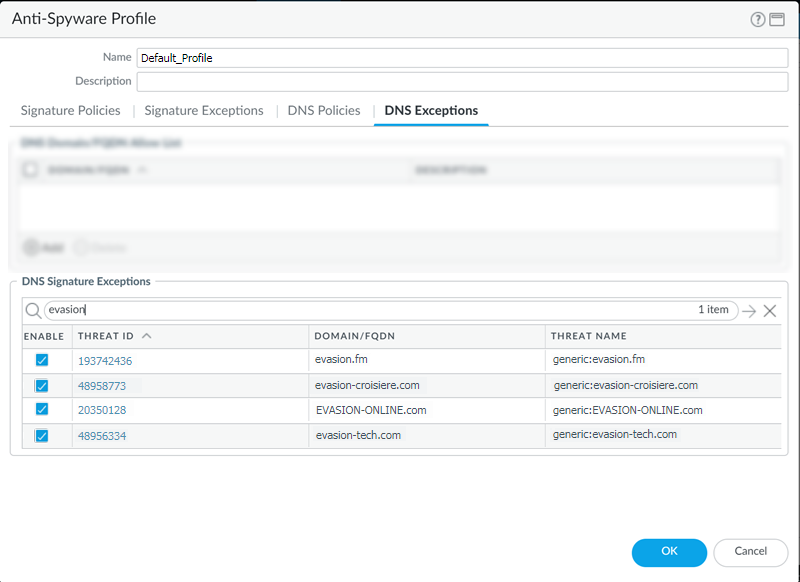
- Click OK to save your new or modified Anti-Spyware profile.
- Add an allow list to specify a list of DNS domains / FQDNs to be explicitly allowed.
- Select ObjectsSecurity ProfilesAnti-Spyware .
- Select a profile to modify.
- Add or modify the Anti-Spyware profile from which you want to exclude the threat signature, and select DNS Exceptions .
- To Add a new FQDN allow list entry, provide the DNS domain or FQDN location and a description.
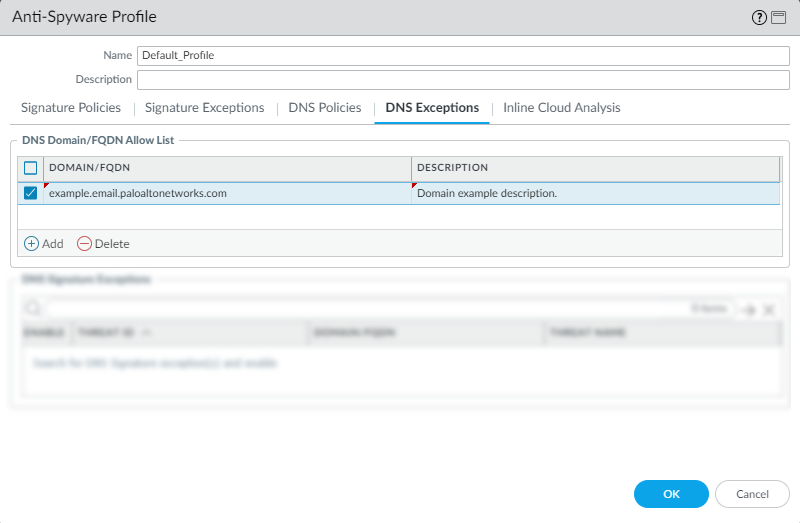
- Click OK to save your new or modified Anti-Spyware profile.
Test Domains
Palo Alto Networks provides the following DNS Security test domains to validate your policy configuration based on the DNS category.
- Access the following test domains to verify that the policy action for a given threat type is being enforced:
DNS Security
- C2— test-c2.testpanw.com
- DNS Tunneling— test-dnstun.testpanw.com
- DGA— test-dga.testpanw.com
- Dynamic DNS*— test-ddns.testpanw.com
- Malware— test-malware.testpanw.com
- Newly Registered Domains*— test-nrd.testpanw.com
- Phishing*— test-phishing.testpanw.com
- Grayware*— test-grayware.testpanw.com
- Parked*— test-parked.testpanw.com
- Proxy Avoidance and Anonymizers*— test-proxy.testpanw.com
- Fast Flux*— test-fastflux.testpanw.com
- Malicious NRD*— test-malicious-nrd.testpanw.com
- NXNS Attack*— test-nxns.testpanw.com
- Dangling*— test-dangling-domain.testpanw.com
- DNS Rebinding*— test-dns-rebinding.testpanw.com
- DNS Infiltration*— test-dns-infiltration.testpanw.com
- Wildcard Abuse*— test-wildcard-abuse.testpanw.com
- Strategically-Aged*— test-strategically-aged.testpanw.com
- Compromised DNS*— test-compromised-dns.testpanw.com
- Ad Tracking*— test-adtracking.testpanw.com
- CNAME Cloaking*— test-cname-cloaking.testpanw.com
- Ransomware*— test-ransomware.testpanw.com
- Stockpile*— test-stockpile-domain.testpanw.com
- Cybersquatting*— test-squatting.testpanw.com
- Subdomain Reputation*— test-subdomain-reputation.testpanw.com
The test domains marked with an * are not supported in PAN-OS 9.1.
Advanced DNS Security
Access the following test domain to verify that the policy action for a given threat type is being enforced:
- DNS Misconfiguration Domain (Claimable)—http://test-dnsmisconfig-claimable-nx.testpanw.com
The following test domain test cases should be added to your DNS server zone file of testpanw.com before accessing the domain. These test cases match against the Advanced DNS Security signatures and will generate the appropriate logs. Verify that the policy action for a given threat type is being enforced.
|
DNS Misconfiguration Domain (Zone Dangling) Test Cases Host |
Record Type |
Record Data |
|
*.test-dnsmisconfig-zone-dangling.testpanw.com |
A |
1.2.3.4 |
|
Hijacking Domain Test Cases Host |
Record Type |
Record Data |
|
test-ipv4.hijacking.testpanw.com |
A |
1.2.3.5 |
|
*.test-ipv4-wildcard.hijacking.testpanw.com |
A |
1.2.3.6 |
|
test-ipv6.hijacking.testpanw.com |
AAAA |
2607:f8b0:4005:80d::2005 |
|
test-cname-rrname.hijacking.testpanw.com |
CNAME |
1.test-cname-wc.hijacking.testpanw.com |
|
test-cname-rrname-wc.hijacking.testpanw.com |
CNAME |
1.test-cname-wildcard-1.hijacking.testpanw.com |
|
*.test-cname-rrname-sub-wc.hijacking.testpanw.com |
CNAME |
2.test-cname-wc.hijacking.testpanw.com |
|
test-ns-rrname.hijacking.testpanw.com |
NS |
test-ns.hijacking.testpanw.com |
|
test-ns-rrname-rdata-wc.hijacking.testpanw.com |
NS |
1.test-ns-wc.hijacking.testpanw.com |
|
1.test-ns-rrname-sub-wc.hijacking.testpanw.com |
NS |
test-ns.hijacking.testpanw.com |
|
test-rrname-wc.hijacking.testpanw.com |
NS |
test-ns-2.hijacking.testpanw.com |
|
For NS records, you must use the following option:" dig +trace NS " |
||
- Verify that the DNS query request has been processed by DNS Security by monitoring the activity .
Test Connectivity to the DNS Security Cloud Services
Verify your firewall connectivity to the DNS Security service. If you cannot reach the service, verify that the following domain is not being blocked: dns.service.paloaltonetworks.com.
- Access the firewall CLI.
- Use the following CLI command to verify your firewall’s connection availability to the DNS Security service.
show dns-proxy dns-signature info
For example:
show dns-proxy dns-signture info
Cloud URL: dns.service.paloaltonetworks.com:443
Telemetry URL: io.dns.service.paloaltonetworks.com:443
Last Result: None
Last Server Address:
Parameter Exchange: Interval 300 sec
Allow List Refresh: Interval 43200 sec
Request Waiting Transmission: 0
Request Pending Response: 0
Cache Size: 0
If your firewall has an active connection to the DNS Security service, the server details display in the response output.
- Retrieve a specified domain’s transaction details, such as latency, TTL, and the signature category.
Use the following CLI command on the firewall to review the details about a domain:
test dns-proxy dns-signature fqdn
For example:
test dns-proxy dns-signature fqdn www.yahoo.com
DNS Signature Query [ www.yahoo.com ]
Completed in 178 ms
DNS Signature Response
Entries: 2
Domain Category GTID TTL
-------------------------------------------------------------------------------------------------
*.yahoo.com Benign 0 86400
www.yahoo.com Benign 0 3600
Advanced DNS Security
Verify your firewall connectivity to the Advanced DNS Security service. If you cannot reach the service, verify that the following domain is not being blocked: adv-dns.service.paloaltonetworks.com. If you have manually configured a regional Advanced DNS Security server , you may need to verify the specific regional domain is also unblocked.
- Verify the status of your firewall connectivity to the Advanced DNS Security cloud service.
Use the following CLI command on the firewall to view the connection status.
show ctd-agent status security-client
For example:
show ctd-agent status security-client
...
Security Client ADNS(1)
Current cloud server: qa.adv-dns.service.paloaltonetworks.com:443
Cloud connection: connected
Config:
Number of gRPC connections: 2, Number of workers: 8
Debug level: 2, Insecure connection: false, Cert valid: true, Key valid: true, CA count: 306
Maximum number of workers: 12
Maximum number of sessions a worker should process before reconnect: 10240
Maximum number of messages per worker: 0
Skip cert verify: false
Grpc Connection Status:
State Ready (3), last err rpc error: code = Unavailable desc = unexpected HTTP status code received from server: 502 (Bad Gateway); transport: received unexpected content-type "text/html"
Pool state: Ready (2)
last update: 2024-01-24 11:15:00.549591469 -0800 PST m=+1197474.129493596
last connection retry: 2024-01-23 00:03:09.093756623 -0800 PST m=+1070762.673658768
last pool close: 2024-01-22 14:15:50.36062031 -0800 PST m=+1035523.940522446
Security Client AdnsTelemetry(2)
Current cloud server: io-qa.adv-dns.service.paloaltonetworks.com:443
Cloud connection: connected
Config:
Number of gRPC connections: 2, Number of workers: 8
Debug level: 2, Insecure connection: false, Cert valid: true, Key valid: true, CA count: 306
Maximum number of workers: 12
Maximum number of sessions a worker should process before reconnect: 10240
Maximum number of messages per worker: 0
Skip cert verify: false
Grpc Connection Status:
State Ready (3), last err rpc error: code = Internal desc = stream terminated by RST_STREAM with error code: PROTOCOL_ERROR
Pool state: Ready (2)
last update: 2024-01-24 11:25:58.340198656 -0800 PST m=+1198131.920100772
last connection retry: 2024-01-23 00:03:36.78141425 -0800 PST m=+1070790.361316421
last pool close: 2024-01-22 14:24:26.954340157 -0800 PST m=+1036040.534242289
...
Verify that the cloud connection status for Security Client AdnsTelemetry(2) and Security Client ADNS(1) are showing active connections.
CLI output shortened for brevity.
If you are unable to connect to the Advanced DNS Security cloud service, verify that the Advanced DNS server is not being blocked: dns.service.paloaltonetworks.com.
Configure Lookup Timeout
If the firewall is unable to retrieve a signature verdict in the allotted time due to connectivity issues, the request, including all subsequent DNS responses, are passed through. You can check the average latency to verify that requests fall within the configured period. If the average latency exceeds the configured period, consider updating the setting to a value that is higher than the average latency to prevent requests from timing out.
- In the CLI, issue the following command to view the average latency.
- show dns-proxy dns-signature
counters
The default timeout is 100 milliseconds.
- Scroll down through the output to the latency section under the Signature query API heading and verify that the average latency falls within the defined timeout period. This latency indicates the amount of time it takes, on average, to retrieve a signature verdict from the DNS security service. Additional latency statistics for various latency periods can be found below the averages.
- Signature query API:
- .
- .
- .
- [latency ] :
- max 1870 (ms) min 16(ms) avg 27(ms)
- 50 or less : 47246
- 100 or less : 113
- 200 or less : 25
- 400 or less : 15
else : 21
- If the average latency is consistency above the default timeout value, you can raise the setting so that the requests fall within a given period. Select Device > Content-ID and update the Realtime Signature Lookup setting.
- Commit the changes.
Advanced DNS Security
- View the record of round trip times (in milliseconds) for Advanced DNS Security requests using the following debug CLI command. These are distributed into latency brackets from 0ms to 450ms. You can use this to determine the ideal max latency setting for your NGFW.
admin@PA-VM debug dataplane show ctd feature-forward stats
In the response output, navigate to the section PAN_CTDF_DETECT_SERVICE_ADNS.
PAN_CTDF_DETECT_SERVICE_ADNS
cli_timeout: 1
req_total: 2
req_timed_out: 0
Hold:
adns rtt>=0ms: 0
adns rtt>=50ms: 2
adns rtt>=100ms: 0
adns rtt>=150ms: 0
adns rtt>=200ms: 0
adns rtt>=250ms: 0
adns rtt>=300ms: 0
adns rtt>=350ms: 0
adns rtt>=400ms: 0
adns rtt>=450ms: 0
- Configure the maximum Advanced DNS signature lookup timeout setting. When this value is exceeded, the DNS response passes through without performing analysis using Advanced DNS Security. DNS signatures (and their associated policies) that are delivered through regular content updates or are part of configured EDLs (external dynamic lists) or DNS exceptions are still applied.

- Select DeviceSetupContent-IDAdvanced DNS Security .
- Specify an updated maximum Advanced DNS signature lookup timeout setting in milliseconds. The default is 100ms and is the recommended setting.
- Click OK to confirm your changes.
Alternatively, you can use the following CLI command to configure the Advanced DNS Security timeout value. You can set a value of 100-15,000ms in 100ms increments. The default value is 100ms and is the recommended setting.
admin@PA-VM# set deviceconfig setting adns-setting max-latency <timeout_value_in_milliseconds>
For example:
admin@PA-VM# set deviceconfig setting adns-setting max-latency 500
You can check the current timeout configuration using the following CLI command (refer to the max-latency entry of the output).
admin@PA-VM show config pushed-template
...
}
deviceconfig {
setting {
dns {
dns-cloud-server dns-qa.service.paloaltonetworks.com;
}
adns-setting {
max-latency 100;
}
}
}
...
Bypass DNS Security Subscriptions Services
DNS Security queries can be bypassed in cases where latency issues or other network issues are present.
In cases where false-positives occur, Palo Alto Networks recommends creating specific exceptions instead of bypassing DNS Security queries.
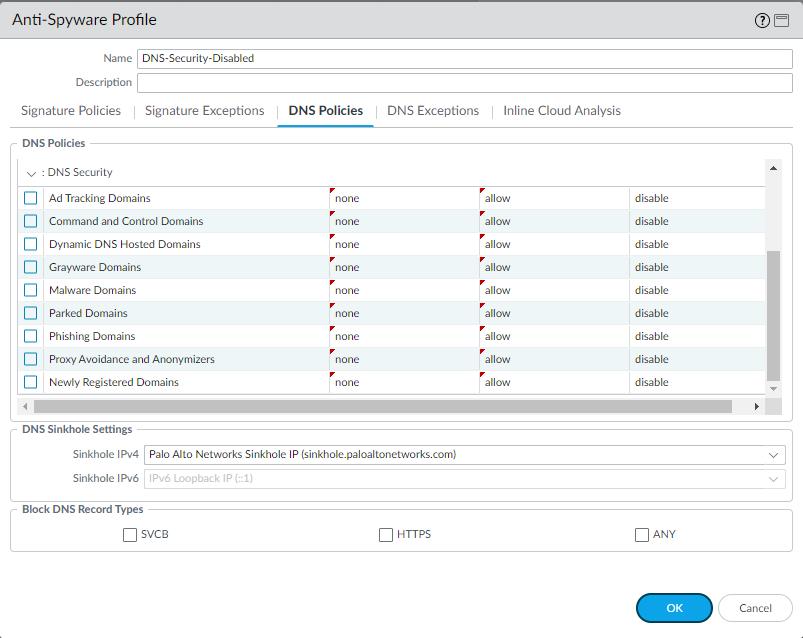
PAN-OS 10.0 and later supports individually configurable DNS signature sources, which enables you to define separate policy actions as well as a log severity level for a given signature source. This requires you to configure both the policy action and the log severity for each available DNS signature source to bypass DNS Security. Additionally, you must also remove the DNS exceptions entries for the DNS Security to be fully bypassed. On PAN-OS 9.1, you can simply set the policy action for Palo Alto Networks DNS Security to an action of allow.
- Log in to the NGFW.
- Configure the DNS Security signature policy settings to bypass DNS Security queries.
- Select ObjectsSecurity ProfilesAnti-Spyware .
- Select the profile containing your active DNS Security policy settings.
- Select the DNS Policies tab.
- For each DNS category, set the log severity to none , the policy action to allow , and packet capture to disable . In the following, the DNS Security categories have been configured to bypass DNS Security queries.
- Select DNS Exceptions and remove all DNS Domain/FQDN Allow List entries.
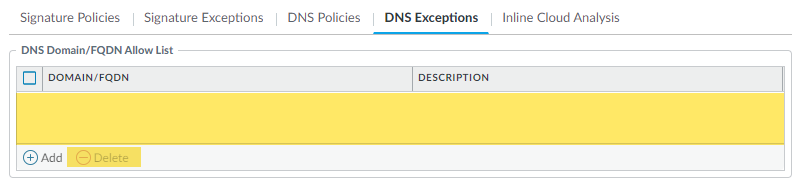
- Click OK to save the Anti-Spyware profile.
Monitor DNS Security Subscription Services
Palo Alto Networks provides several options to monitor DNS Security and Advanced DNS Security activity to accommodate intelligence retrieval for a range of products that rely on DNS Security subscription services and the associated traffic data. Depending on the product platform, you can access high-level dashboards that provide DNS request statistics and usage trends, including context into network activity, to specific DNS request details from specific users in the form of logging data.
You can also view how the DNS Security subscription services integrate with other Palo Alto Networks applications and security services to protect your organization from threats, as well as get a high-level view of the overall operational health of your deployment, through the Strata Cloud Manager Command Center . The command center functions as your NetSec homepage and provides a comprehensive summary of the health, security, and efficiency of your network, in an interactive visual dashboard with multiple data facets for easy, at-a-glace assessment.
For more specific details about DNS Security subscription service operations, the dashboard provides a view into your networks DNS query data as well as the ability to drill down into various DNS trends. Each dashboard card provides a unique view into how DNS requests and responses are processed and categorized in a graphical report format. This allows you to see, at a glance, a high-level view of your organization’s DNS usage statistics. It also provides a list of misconfigured domains and hijacked domains detected by the Advanced DNS Security service, enabling you to correct and rectify any DNS configuration errors. The misconfigured domains are based on the public-facing parent domain entries added to DNS Zone Misconfigurations list.
You can also view the logs that are automatically generated when DNS requests are processed. These event files are time-stamped and provide an audit trail when configured to do, based on the DNS category log configuration. DNS log entries can contain various details about the DNS request, including the nature of the DNS threat posed by the associated domain, as well as action taken when the threat was detected.
Palo Alto Networks provides several methods to monitor the DNS Security activity based on your platform.
- The Strata Cloud Manager Command Center
- View DNS Security Dashboard
- View DNS Security logs for the DNS queries that passed through my network
View DNS Security Dashboard
The DNS Security dashboard shows the statistics data generated by the Advanced DNS Security and DNS Security subscription services in a fast, visual assessment report of your organization’s DNS usage. View and drill down into various DNS trends discovered in your network. Each dashboard card provides a unique view into how DNS requests are processed and categorized. Select dashboard cards to change the context of the dashboard or view more information about a specific trend, domain, or statistic.
The DNS Security dashboard is available on Prisma Access and AIOps for NGFW . You can interact with the DNS Security Dashboard Cards to alter the context of the dashboard or view more information about a specific trend, domain, or statistic. You can also customize the formatting to display current trends or historical data, across relevant data points.
- Use the credentials associated with your Palo Alto Networks support account and log in to the AIOps for NGFW Free application on the hub .
- Select DashboardsMore DashboardsDNS Security to open the DNS Security dashboard.
- From the dashboard, configure your filter options using the available drop downs.

- Filter by time range—Select from Last hour , Last 24 hours , Last 7 days , or Last 30 days to display data for a specific time-frame.
- Filter by DNS category—Select from C2 (DGA, Tunneling, other C2 ), Malware , Newly Registered Domain , Phishing , Dynamic DNS , Allow List , Benign , Grayware , Parked , Proxy , and Any Category , to filter the data set based on a DNS type.
The Allow List category is a list maintained by Palo Alto Networks of explicitly allowable domains based on metrics from PAN-DB and Alexa. These allow list domains are frequently accessed and known to be free from malicious content.
- Filter by DNS action—Select from Allow , Block , and Sinkhole to filter based on the action taken on a DNS query based on your DNS Security profile action settings.
- Optionally, you can also Download, Share, and Schedule Activity Reports .
- You can re-contextualize, interact, and pivot from the data provided by the dashboard cards. For an overview of each of the DNS Security dashboard cards, see DNS Security Dashboard cards.
DNS Security Dashboard Cards
The cards populating the DNS Security dashboard are interactive and allows you to view additional details or pivot to a list of specific requests, events, and domains, as it pertains to how the content is shown.
The following list provides an overview of the DNS Security dashboard cards:
|
Card Name |
Description |
|
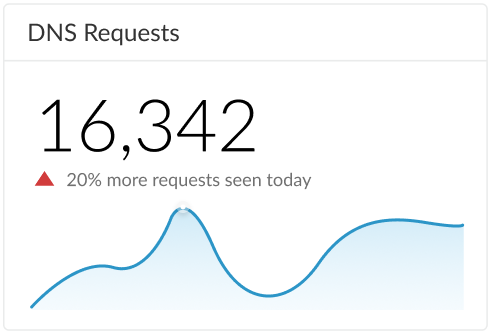
DNS Requests |
Displays the total number of DNS requests that have been processed by DNS Security.
|
|
Malicious DNS Requests |
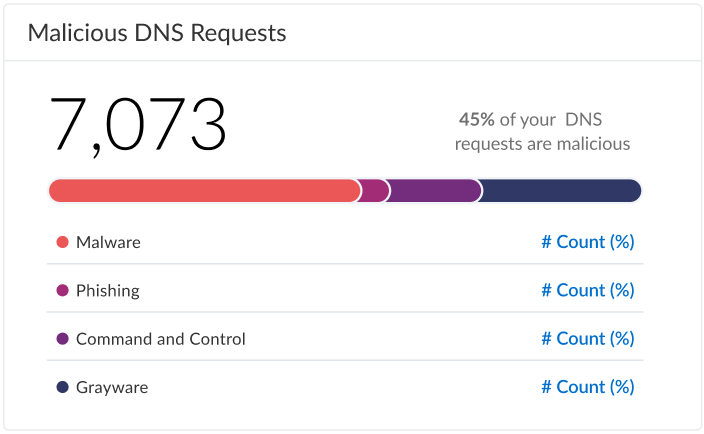
Displays a stacked bar graph showing DNS requests that have been categorized based on the currently available types that are considered malicious. The total number is shown in the upper-left while a breakdown of categorical variables are indicated below.
|
|
Subscription |
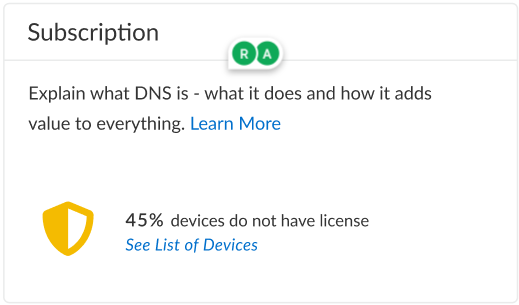
Displays the number of devices in your network with an active DNS Security subscription. A percentage of devices that are not equipped with DNS Security or with an elapsed subscription is also shown with a link to a complete list.
|
|
High-Risk DNS Category Trend |
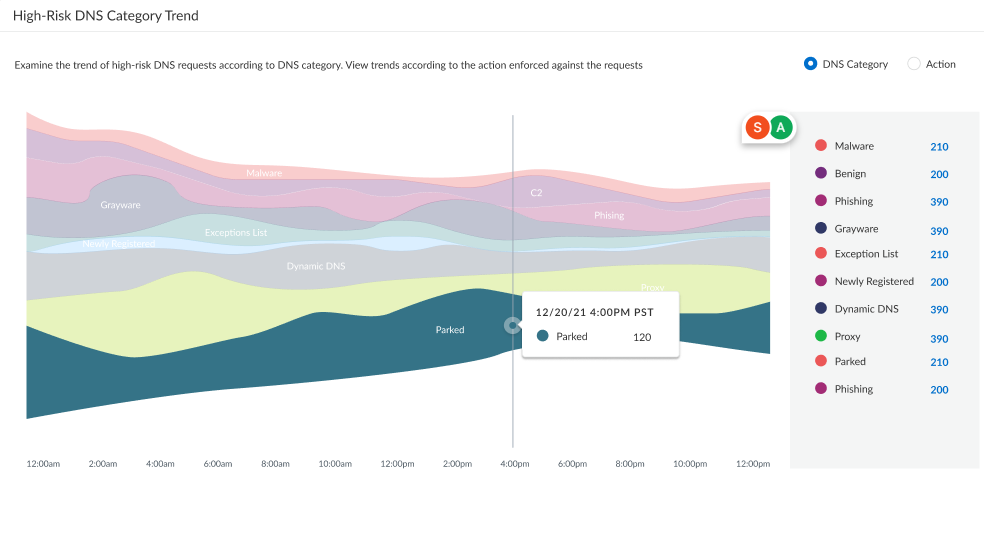
Displays a trend chart showing a breakdown of the DNS requests based on the DNS category or the action applied to the DNS request over the observable time range.
|
|
DNS Category Distribution Across Actions |
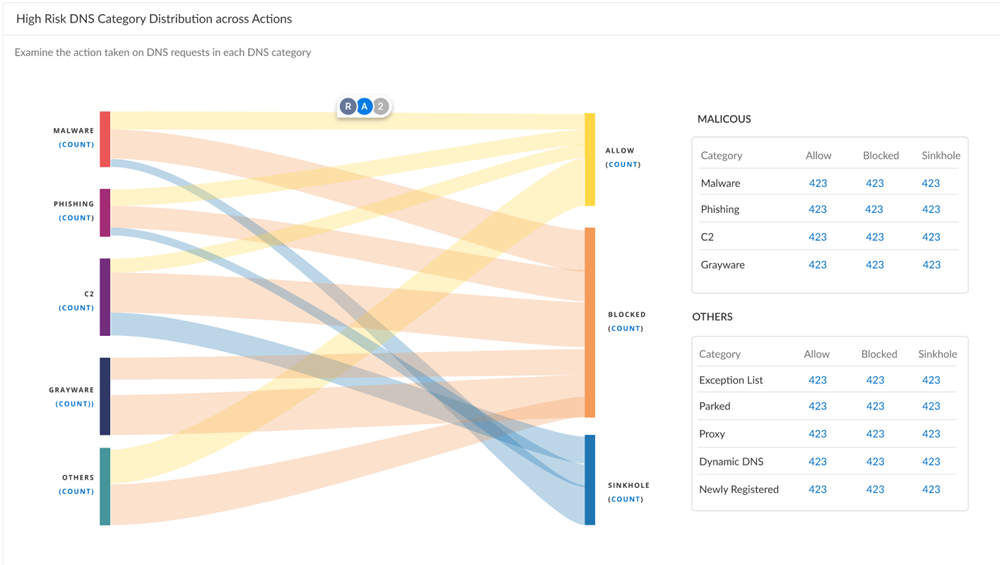
Displays a flow diagram that provides a visualization of the distributions of actions taken for high-risk DNS categories. A secondary table shows the actions taken for lower-priority DNS categories.
Specifying a custom time range updates the flow diagram accordingly.
|
|
Domains |
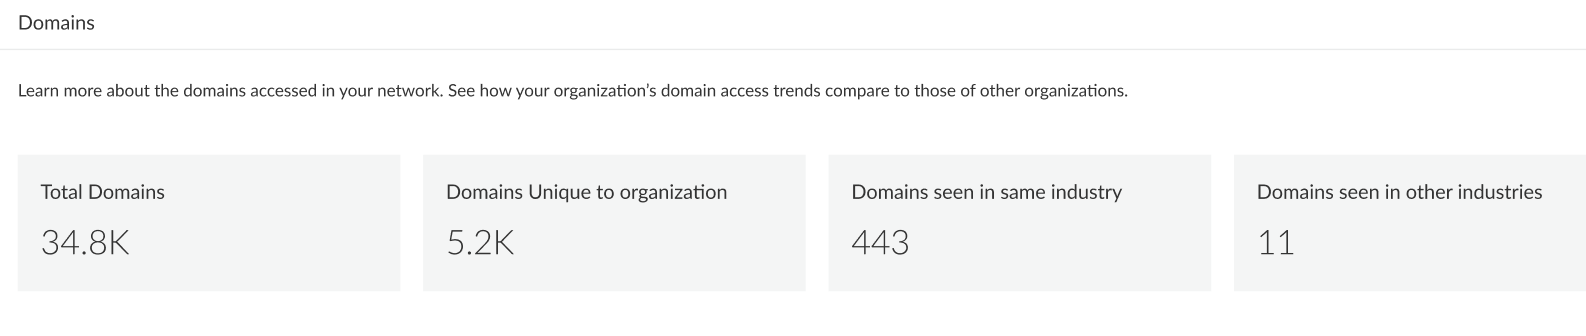
Displays the number of domains seen in your network, within your industry, other industries, as well as the total number, based on the selected DNS category. Allows you to compare your organization’s DNS usage to other organizations within the industry as well as against globally collected data, including a list of domain requests found exclusively in your network.
|
|
Top 10 Domains |
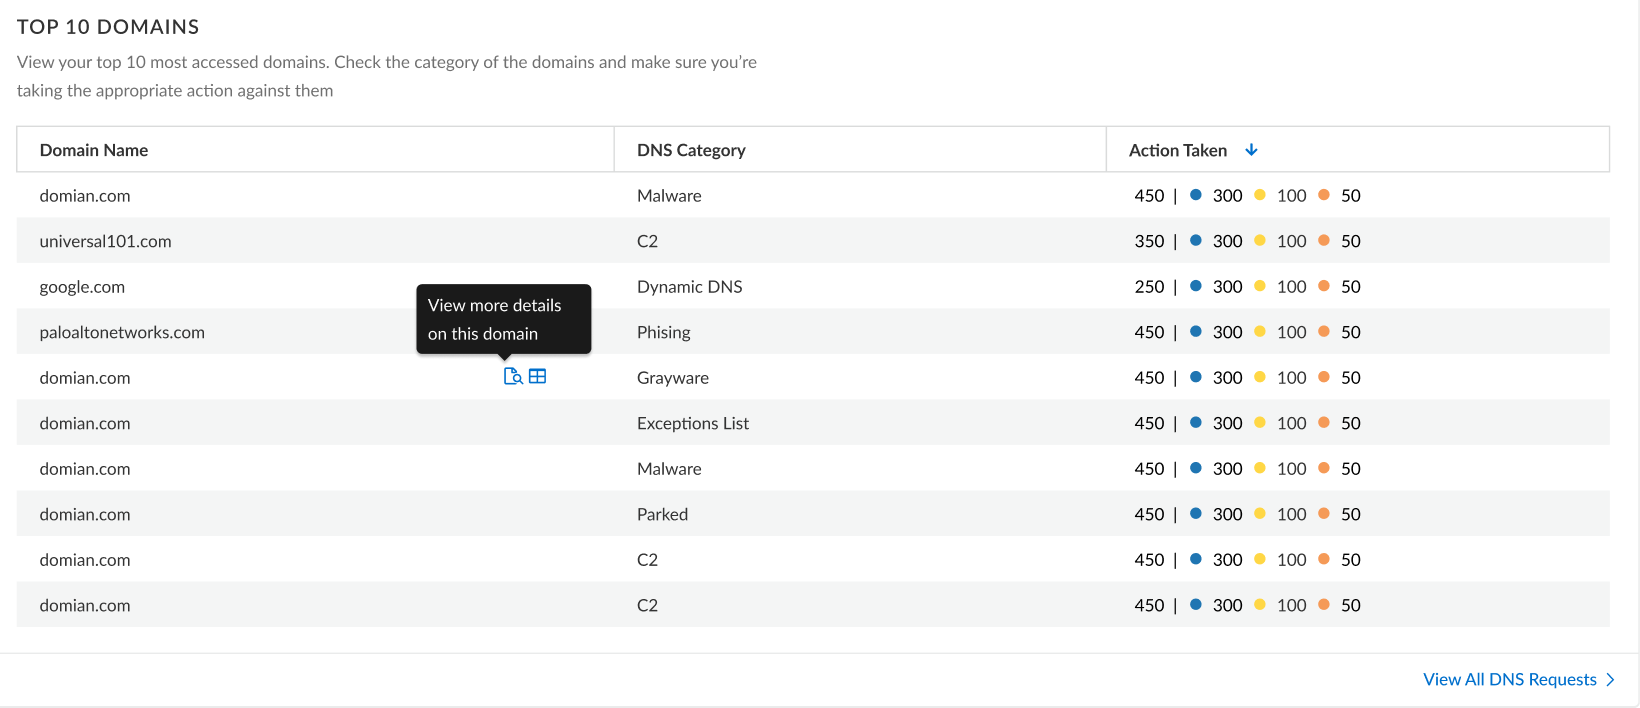
Provides a list of the top 10 most commonly requested domains from your network along with the DNS category and the action taken. You can view more details and the relevant logs for a domain by clicking the appropriate icon. Select View All DNS Requests for a complete list of domains that have been accessed.
|
|
DNS Resolvers |
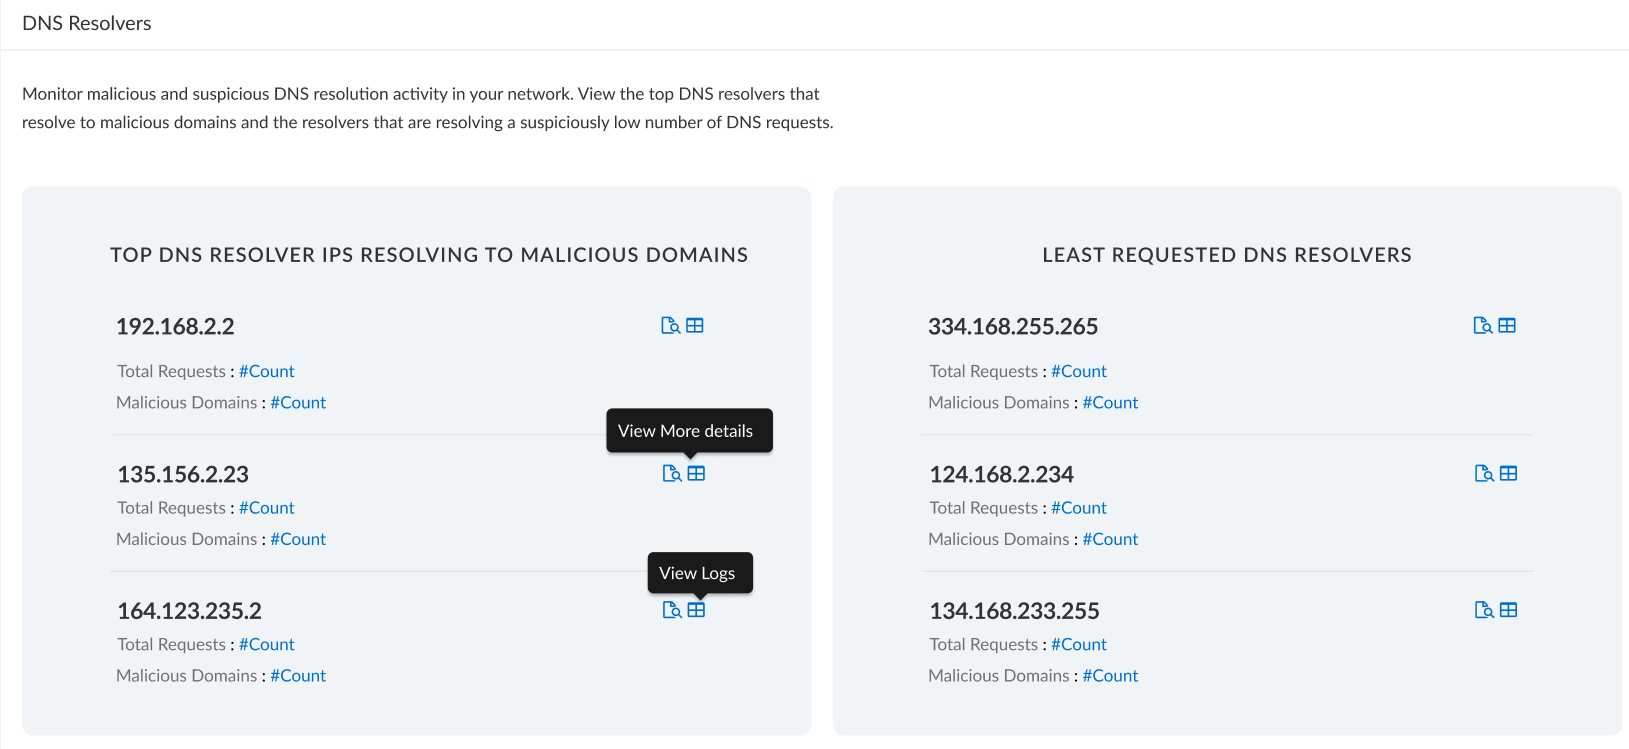
Provides two lists showing the most resolved malicious domains and the least resolved domains in your network.
|
|
Misconfigured Domains (Advanced DNS Security) |
Provides a list of non-resolvable domains associated with the user specified public-facing parent domain(s). For each entry, there is a misconfiguration reason and a traffic hit count based on the source IP.
|
|
Hijacked Domains (Advanced DNS Security) |
Provides a list of hijacked domains as determined by Advanced DNS Security. For each entry, there is a categorization reason and a traffic hit count based on the source IP.
|
View DNS Security Logs
You can browse, search, and view DNS Security logs that are automatically generated when DNS Security encounters a qualifying event. Typically, this includes any domain category that DNS Security analyzes unless it is specifically configured with a log severity level of none. Log entries provide numerous details about the event, including the threat level and, if applicable, the nature of threat.
DNS Security logs are accessible directly on the firewall or through Strata Logging Service-based log viewers (AIOps for NGFW Free, Cloud Management, Strata Logging Service, etc). While the firewall allows you to access malicious threat log entries that are generated when users make DNS queries, benign DNS requests are not recorded. DNS Security data is also forwarded to Strata Logging Service through log forwarding (as threat logs) and DNS Security telemetry (as DNS Security logs), which are then referenced by various activity log viewer applications. DNS Security telemetry operates with minimal overhead, which limits the amount of data sent to Strata Logging Service; as a result, only a subset of DNS queries are forwarded to Strata Logging Service as DNS Security log entries, regardless of the severity level, threat type, or category. The threat logs for malicious DNS requests that are forwarded to Strata Logging Service using log forwarding are available in their entirety. As a result, Palo Alto Networks recommends viewing logs for malicious DNS requests as threat logs instead of DNS Security logs.
- Log in to the PAN-OS web interface.
- Search for activity on the firewall for queries that have been processed using DNS Security.
- Select MonitorLogsThreat and filter based on the DNS category.
Consider the following examples:
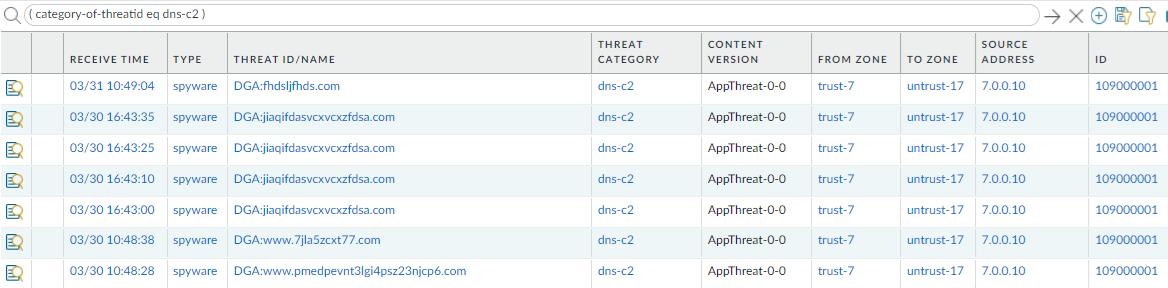
- ( category-of-threatid eq dns-c2 ) to view logs that have been determined to be a C2 domain by DNS Security.
- ( category-of-threatid eq adns-hijacking ), whereby the variable adns-hijacking indicates DNS queries that have been categorized as a malicious DNS hijacking attempt by Advanced DNS Security.
To search for other DNS types, replace c2 with another supported DNS category (ddns, parked, malware, etc).
- Select a log entry to view the details of a detected DNS threat.
- The threat Category is displayed in the Details pane of the detailed log view. Other relevant details about the threat are displayed in their corresponding windows.
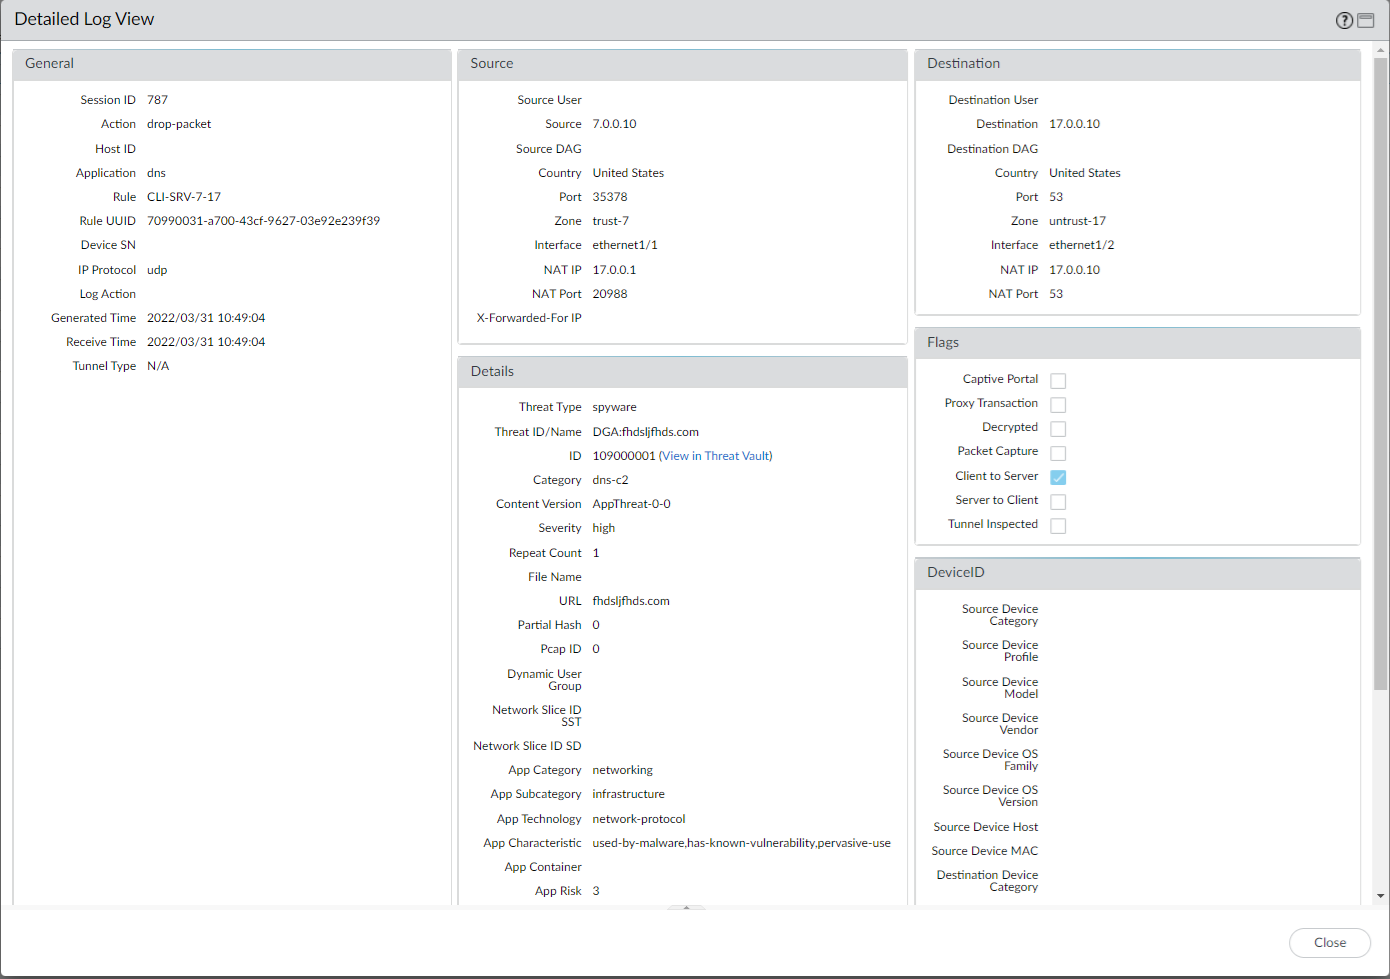
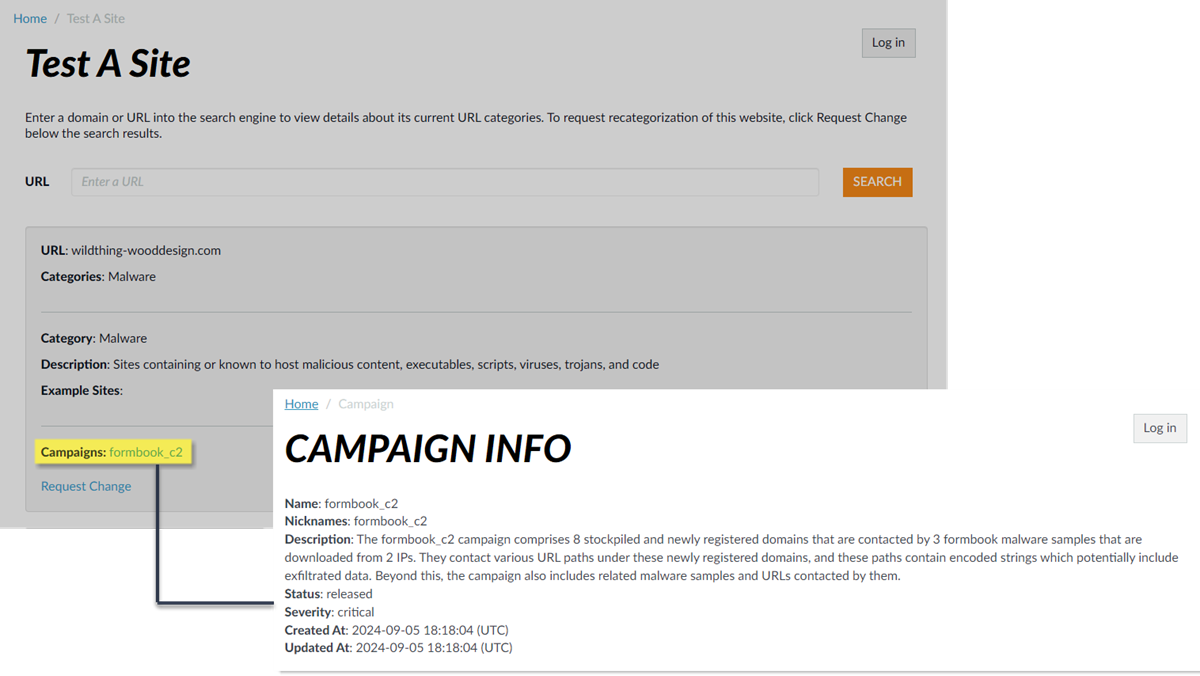
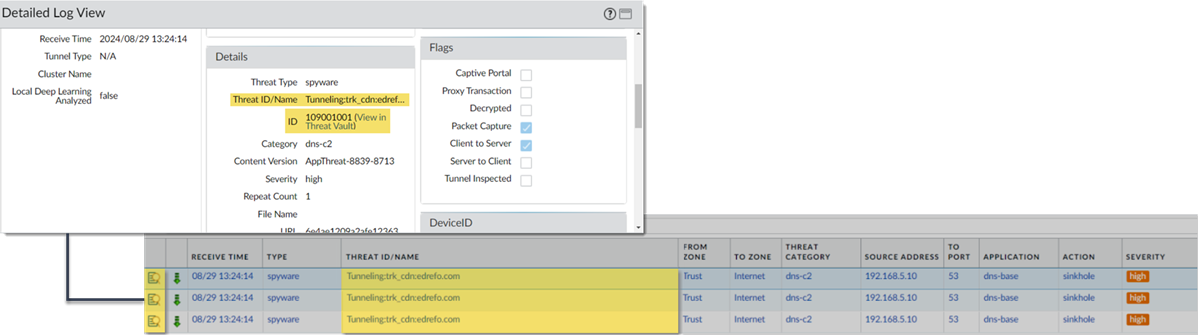
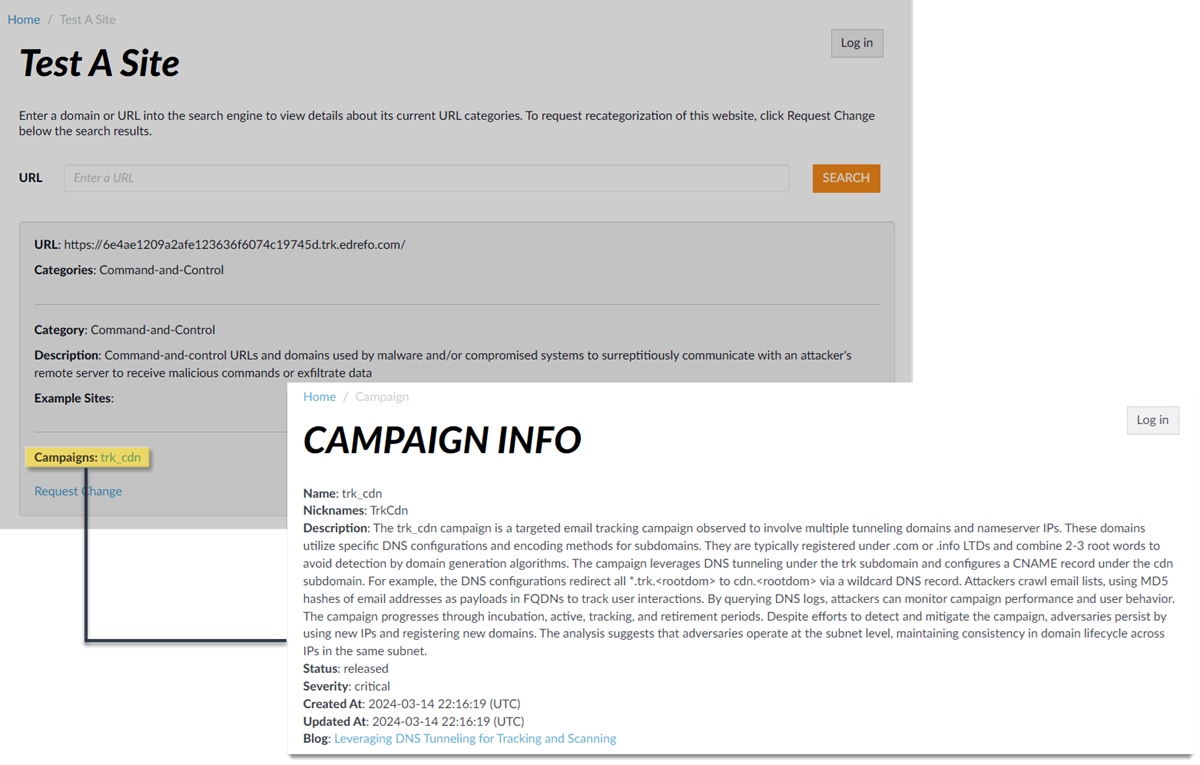
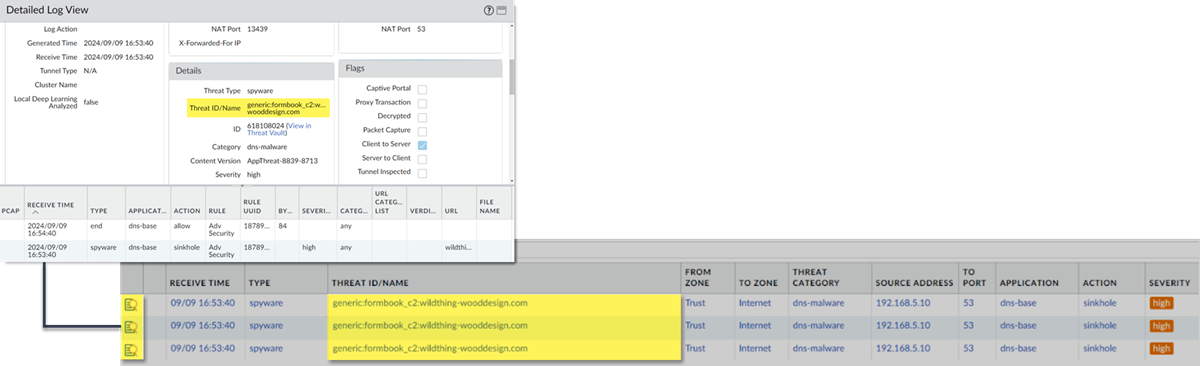
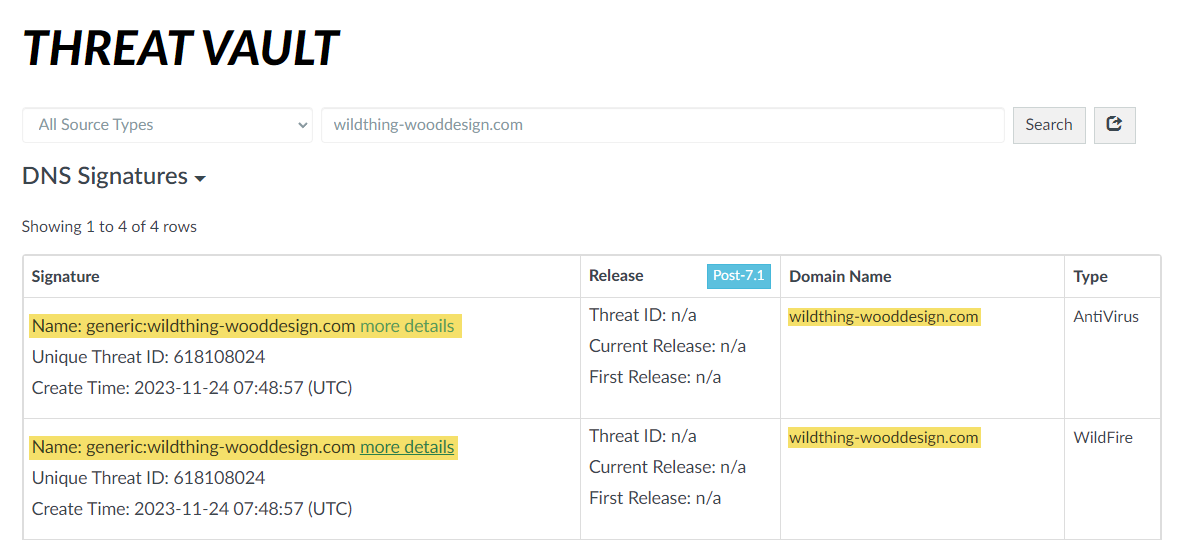
- For stockpiled domains and DNS tunneling domains, including tunneling-based APTs (advanced persistent threats), you can view the various tools used in the attack, as well as the attack campaigns associated with the domain. This is reflected in the Threat ID/Name field for the log entry for a given domain. The Threat ID/Name for DNS domains with attributions use the following format; in this example, for DNS tunnel domains: Tunneling:<tool_name>,<tool_name>,<tool_name>,...:<domain_name>, whereby the tool_name refers to the DNS tunneling tools used to embed data into the DNS queries and responses, but also the cyber threat campaign name, in a comma-separated list. These campaigns can be industry accepted incidents and use the same naming conventions or might be one identified and named by Palo Alto Networks and described in the Unit 42 Threat Research blogs . A blog of such a campaign, in this case, one leveraging DNS tunneling techniques, can be found here: Leveraging DNS Tunneling for Tracking and Scanning . Alternatively, you can also view the attribution information from the Palo Alto Networks ThreatVault and the URL Filtering Test A Site .
The associated tool and campaign attributions might take some time after the initial detection has completed to become viewable in the logs as well as the Palo Alto Networks ThreatVault and Test-A-Site. When the attribution component finishes and has been verified, the complete DNS tunneling tools and campaign details display as expected in the Threat ID/Name and campaign fields.
Consider the following examples:
- DNS Tunneling Domain APT Attribution
- PAN-OS
- ThreatVault

- URL Filtering Test-A-Site
- Stockpiled Domain APT Attribution
- PAN-OS
- ThreatVault
- URL Filtering Test-A-Site