Palo Alto Networks IoT Security: Getting Started & Activation
Licensing Overview
This document covers essential information regarding IoT Security licensing, including extensions, renewals, and conversions.
License Management Options:
Extensions:
Trial or evaluation (eval) licenses (initial 60 days) can be extended in 30-day increments by contacting your Palo Alto Networks sales representative.
Renewals:
Paid licenses (Subscription lab/prod, DRDL lab/prod, Basic/Advanced Third-party Integrations Add-on) can be renewed before expiration to ensure continuous service. Contact sales for renewals.
Conversions:
Licenses can be converted between types (e.g., Trial to Prod, Subscription to DRDL, Basic to Advanced Add-on). Some conversions (upgrades like Trial to Prod, Basic to Advanced Add-on) can happen mid-term; others occur at the end of the term. Converting Trial to Prod involves a new onboarding workflow where you can select your existing trial tenant. Contact sales for conversions.
Note:
Eval licenses cannot be directly converted to Prod licenses as eval firewalls are typically temporary loaner hardware.
graph LR
A[License Nearing Expiry] --> B{Need Continued Service?};
B -- Yes --> C[Contact Sales for Renewal];
B -- No --> D[Let License Expire];
E[Trial/Eval License] --> F{Need More Time?};
F -- Yes --> G[Contact Sales for 30-Day Extension];
F -- No --> H[License Expires or Convert];
I[Need Different License Type?] --> J[Contact Sales for Conversion];
J --> K{Upgrade Conversion?};
K -- Yes --> L[Mid-Term Conversion Possible];
K -- No --> M[End-of-Term Conversion Only];
IoT Security Prerequisites
Ensure your environment meets these requirements before deploying IoT Security:
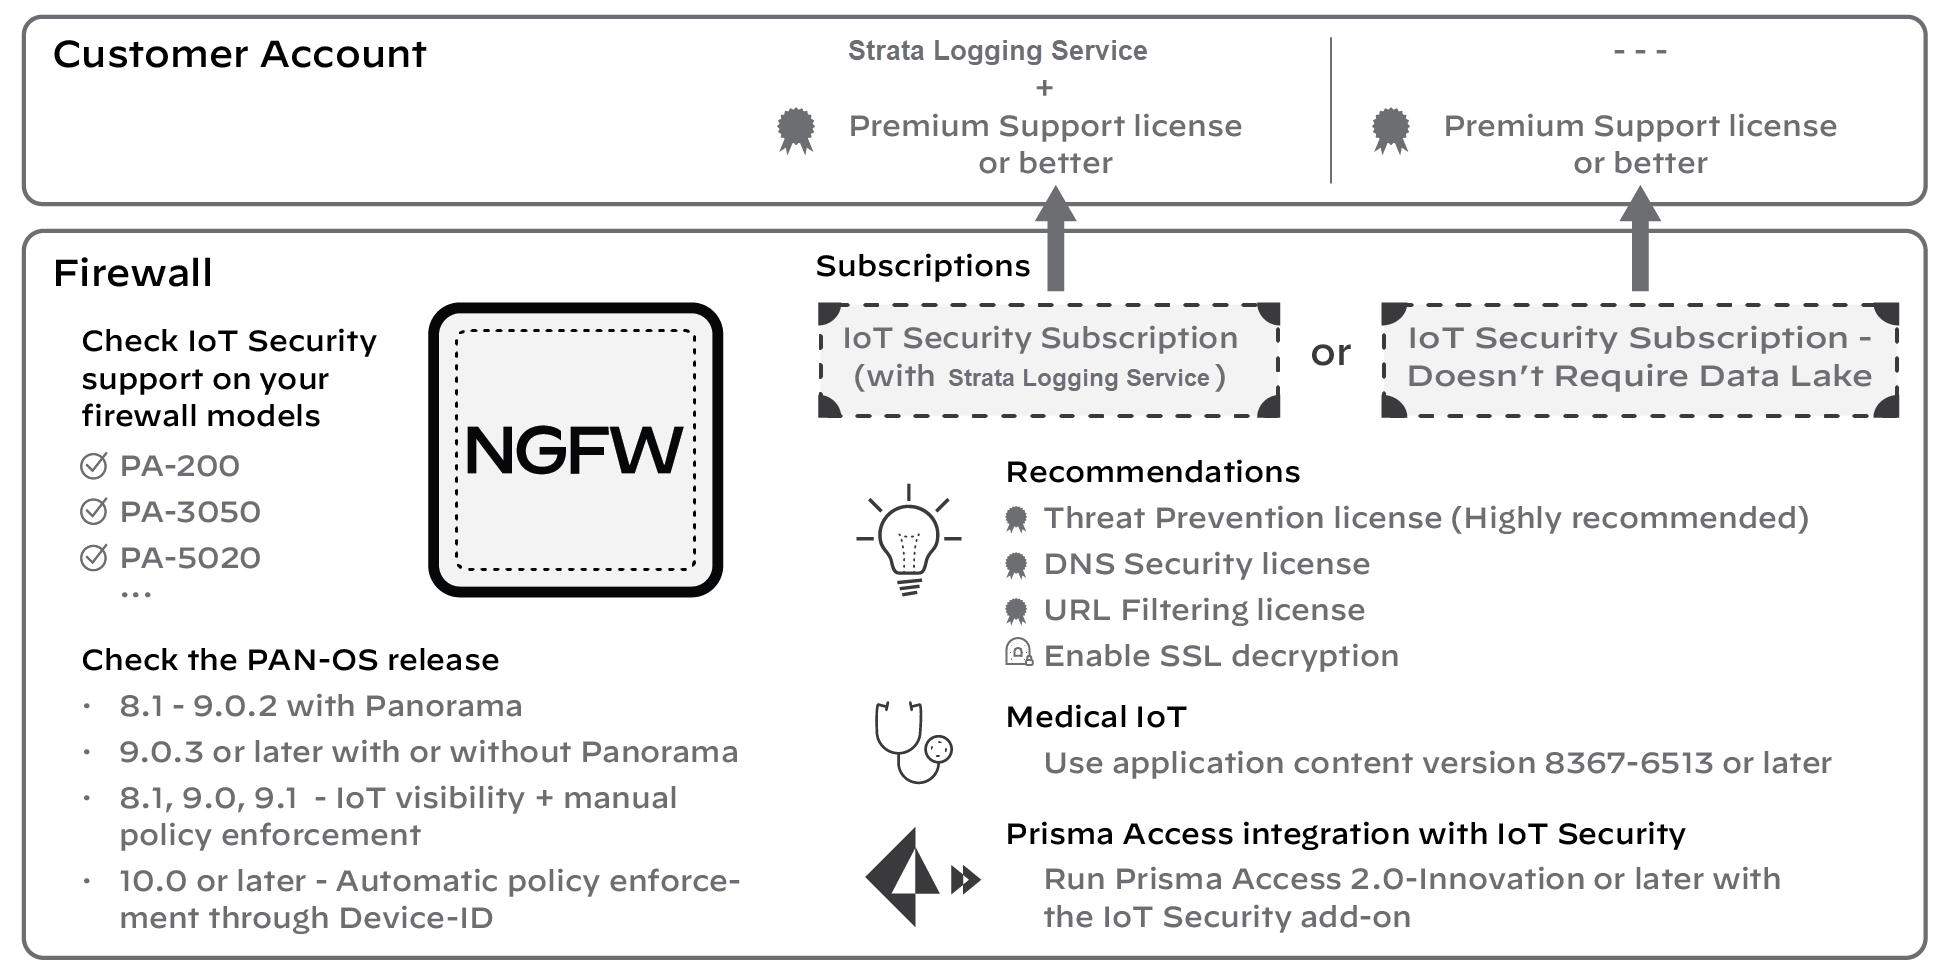
Firewalls:
One or more Palo Alto Networks next-generation firewalls.
PAN-OS 8.1 to 9.0.2 (with Panorama) or PAN-OS 9.0.3+ (with or without Panorama).
PAN-OS 8.1/9.x support visibility and manual policy enforcement.
PAN-OS 10.0+ supports visibility and automated policy enforcement via Device-ID.
IoT Security License:
One license per participating firewall. This controls log ingestion and the firewall's ability to pull mappings/recommendations.
Strata Logging Service (Conditional):
Required for "IoT Security Subscription" (stores data). Not required for "IoT Security, Doesn't Require Data Lake (DRDL) Subscription". Activate before converting from DRDL to a subscription requiring the data lake.
Support License:
Premium Support (or better) required for using the logging service with either subscription type. (Included with Strata Logging Service purchase).
Threat Prevention License:
Required for full risk assessment and vulnerability detection.
Recommended Licenses/Features:
DNS Security, WildFire, URL Filtering, and SSL Decryption enhance IoT Security capabilities.
Application Content (Medical):
For medical equipment visibility, ensure App Content version 8367-6513 or later.
Prisma Access Integration:
Requires Prisma Access 2.0-Innovation or later and the IoT Security add-on.
PAN-OS 8.1, 9.0, 9.1:
Provide device visibility and manual policy enforcement based on IoT Security recommendations. They do not support automated enforcement via Device-ID.
PAN-OS 10.0 and later:
Fully support IoT Security, including automated policy enforcement via Device-ID.
Exceptions (Limited or No Support):
The following have limitations or no support for certain features:
Visibility & Manual Policy Only (No Device-ID even on 10.0+):
Multi-vsys firewalls.
Visibility & Manual Policy Only (Due to PAN-OS version limitations):
PA-200 (PAN-OS 8.1), PA-500 (PAN-OS 8.1), PA-3020/3050/3060 (PAN-OS 8.1/9.0/9.1), PA-5020/5050/5060 (PAN-OS 8.1).
No IoT Security Support:
CN-Series (before PAN-OS 11.1), VM-50, VM-200.
Consider firewall End-of-Life dates. Licenses can be transferred from retired firewalls to new ones.
Activate IoT Security
Activation begins via the "Activate Subscription" link in your Palo Alto Networks email (unless using ELA).
Two primary subscription types exist based on log handling:
IoT Security Subscription - Doesn't Require Data Lake (DRDL):
Logs stream directly to IoT Security, not stored in a data lake.
IoT Security Subscription:
Requires Strata Logging Service to store logs. Logs stream to both Strata Logging Service and IoT Security.
An optional
IoT Security Third-party Integrations Add-on
enables data exchange with systems like NAC, SIEM, etc., via Cortex XSOAR.
graph TD
Start[Receive Activation Email] --> ClickLink{Click 'Activate Subscription'};
ClickLink --> LoginHub[Log in to Hub/CSP];
LoginHub --> ChooseCSP{Select CSP Account};
ChooseCSP --> Allocate[Allocate to Recipient/Tenant];
Allocate --> SelectRegion[Choose Data Ingestion Region];
SelectRegion --> CheckDRDL{DRDL License?};
CheckDRDL -- Yes --> AppSubdomain[Enter App Subdomain];
CheckDRDL -- No --> AddSLS[Add Strata Logging Service Instance];
AddSLS --> AppSubdomain;
AppSubdomain --> Agree[Agree & Activate];
Agree --> Associate[Associate Firewalls in Common Services];
Associate --> UsePortal[Access IoT Security Portal];
Activation Steps (Simplified):
Click
Activate Subscription
in your email.
Log in to the Palo Alto Networks Hub/Customer Support Portal (CSP).
Select your CSP account (if you have multiple).
Allocate the subscription to a Recipient (tenant). You can create subtenants if needed.
Choose the data ingestion
Region
.
Strata Logging Service:
If using the DRDL subscription, skip this.
If using the subscription requiring it, select or activate a Strata Logging Service instance.
Enter a unique
App Subdomain
for your portal URL (e.g., `yourcompany.iot.paloaltonetworks.com`).
Agree to terms and click
Activate
.
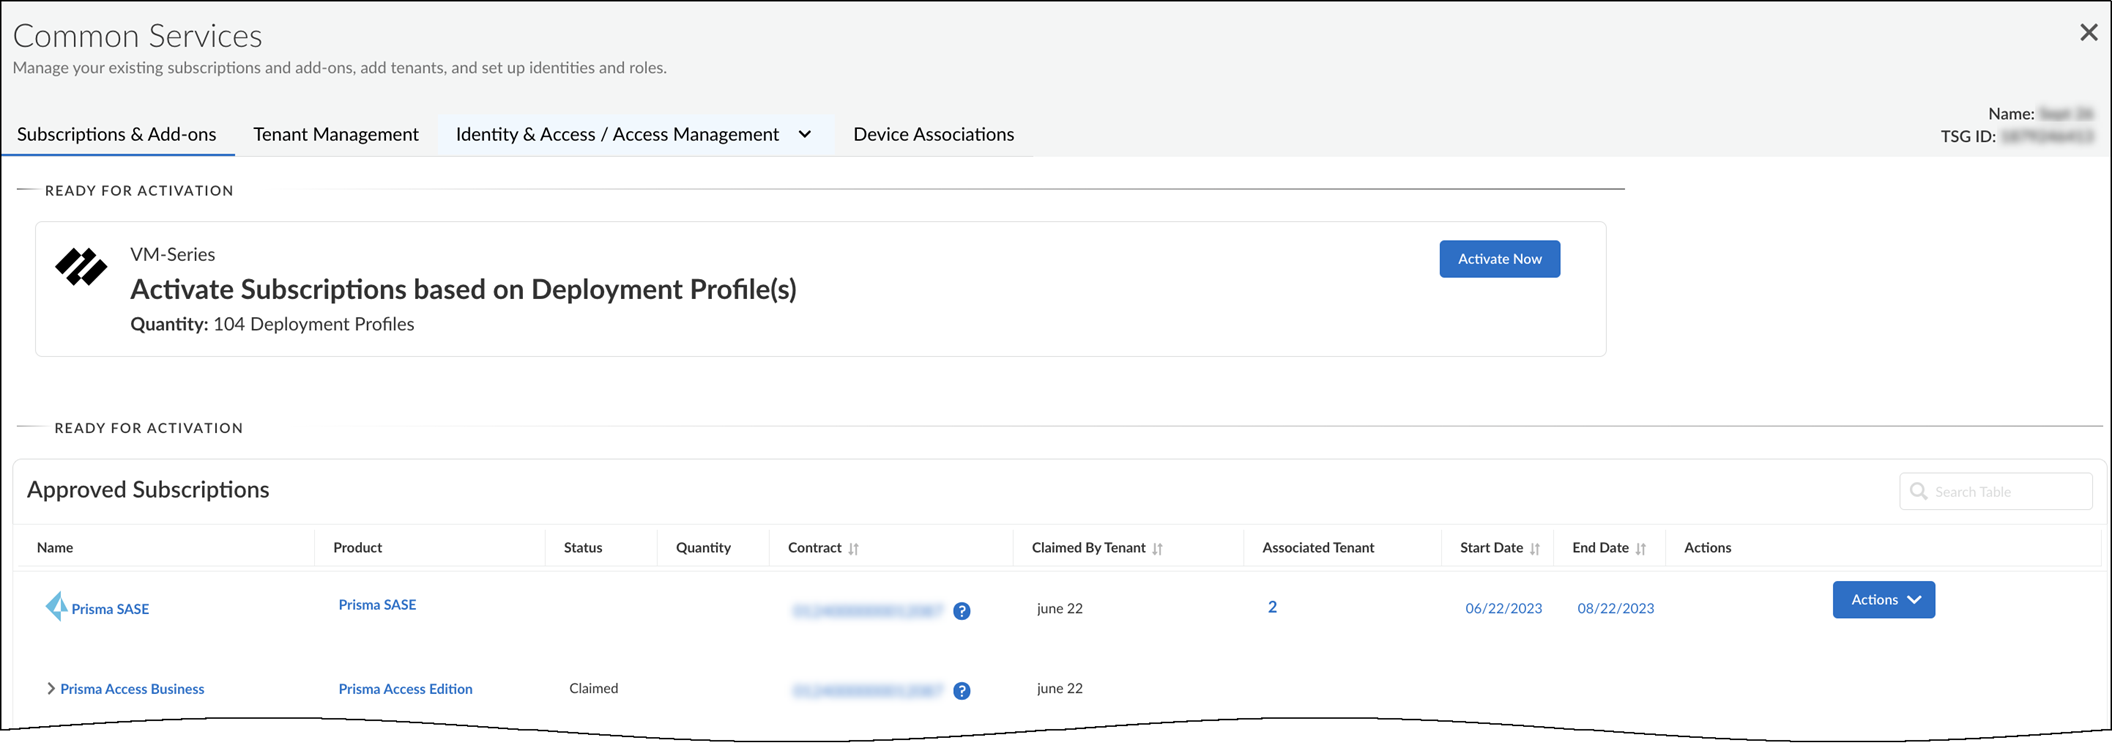
Go to
Common Services > Device Associations
to add firewalls and apply the subscription.
Access your IoT Security portal via the created subdomain.
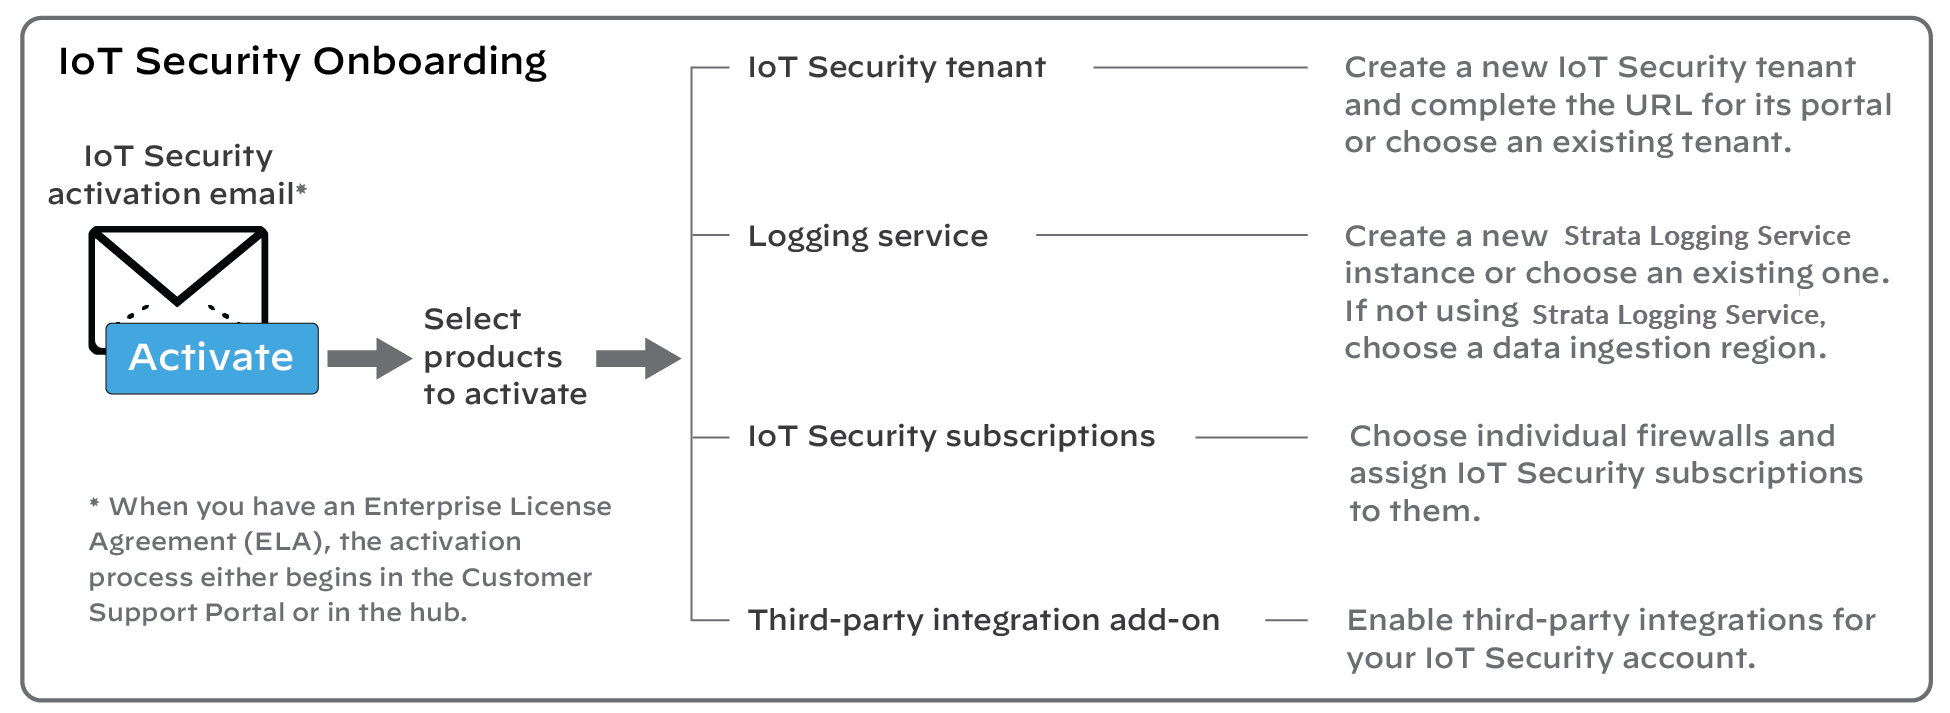
Onboard IoT Security
Onboarding uses the activation process to create your portal URL and apply subscriptions to firewalls. You might also activate Strata Logging Service or third-party integrations during this process.
(Note: Enterprise License Agreement (ELA) activation follows a different process starting with an authorization code in the CSP).
Main Onboarding Steps:
Click
Activate
in the email.
Log in to the Hub.
Follow the
Activate IoT Security
steps detailed above.
Use
Common Services > Device Associations
to add firewalls to the tenant service group (TSG) and associate the IoT Security application.
(Optional) Manage identity and access.
Configure firewalls and IoT Security to work together (see Firewall Preparation section).
(FedRAMP Only) Submit a support case with source IPs allowed to access your FedRAMP portal.
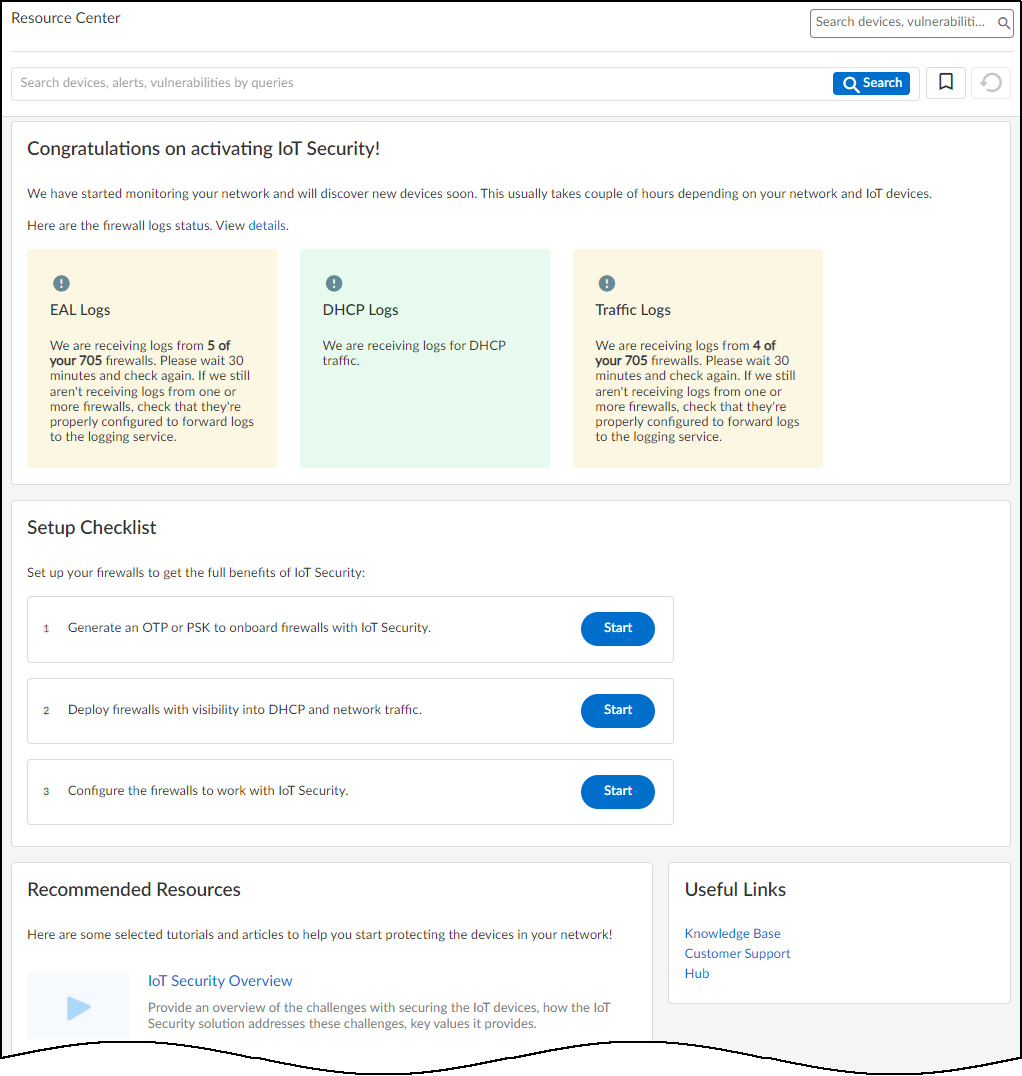
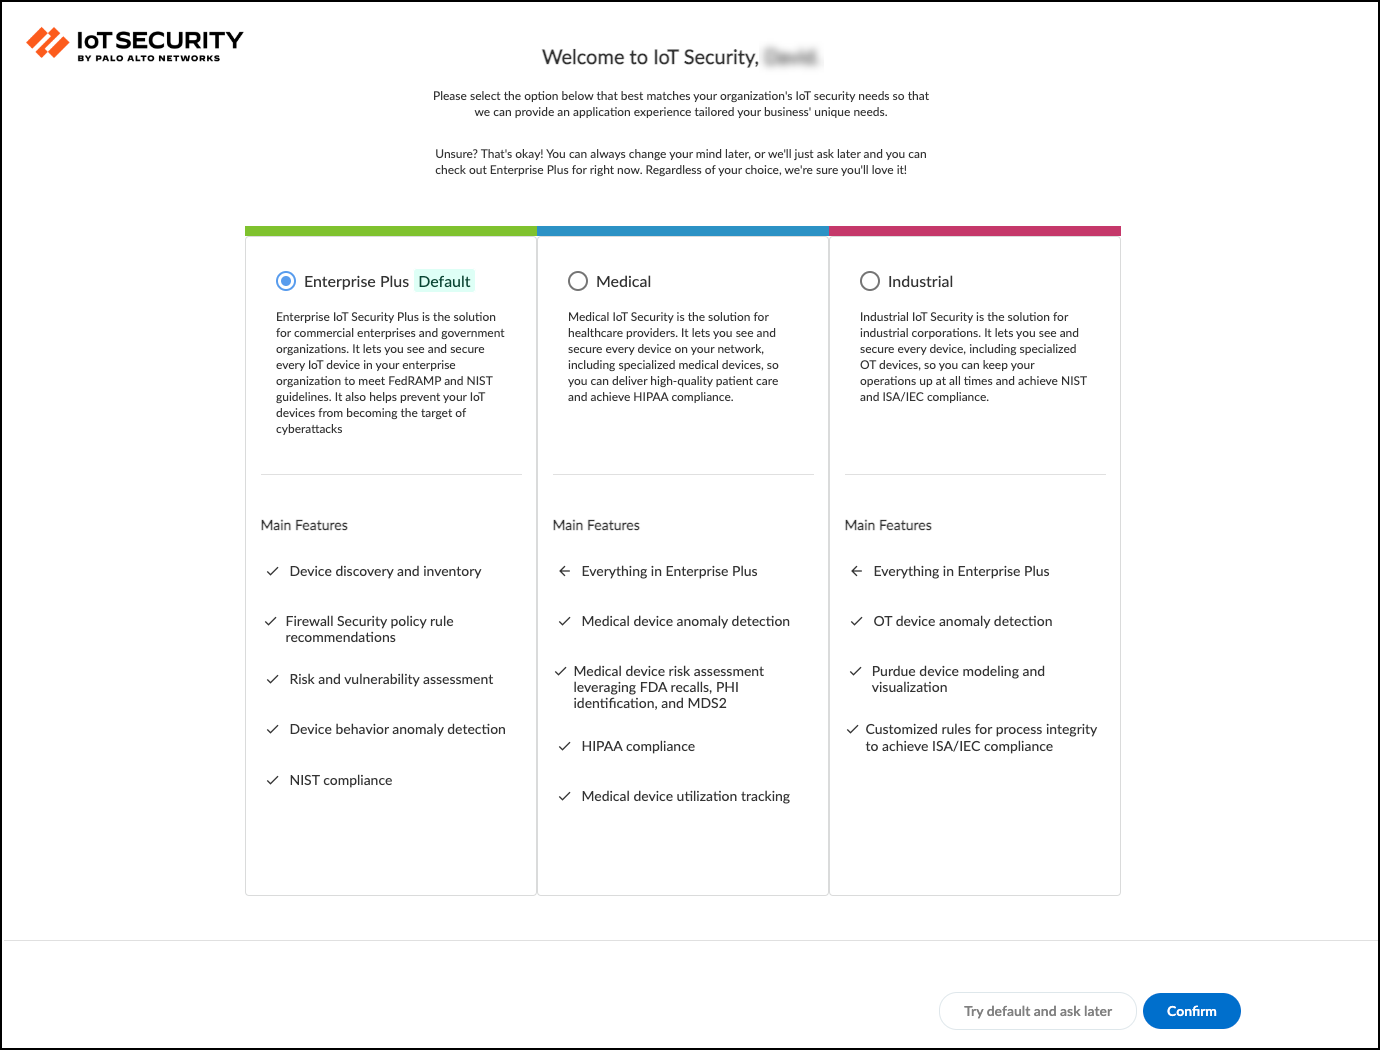
Log in to the IoT Security portal using your subdomain. A welcome page appears initially.
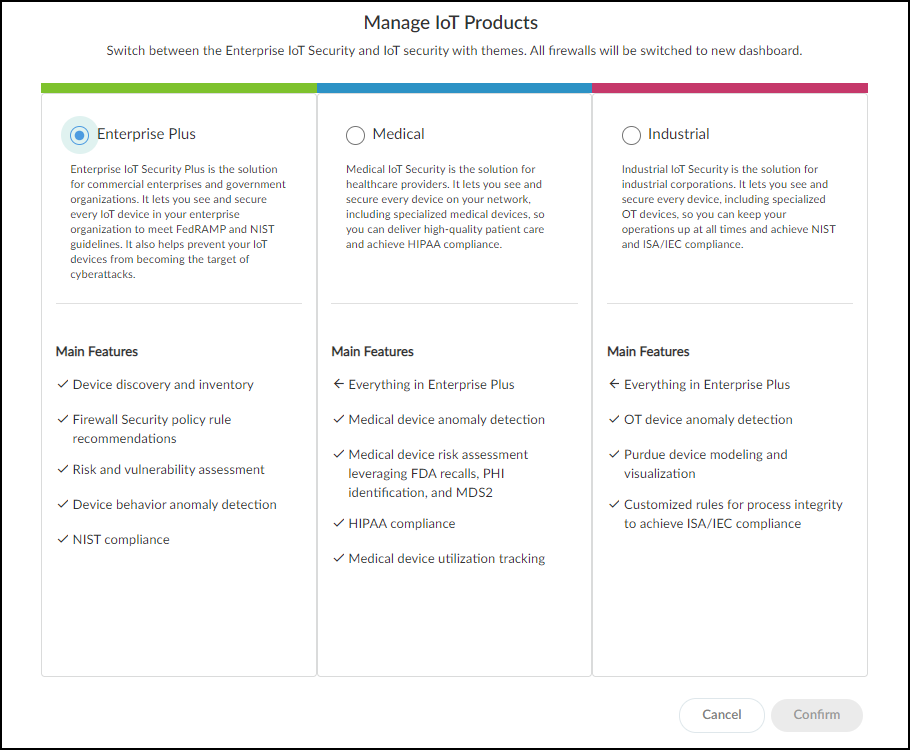
Select a vertical theme (Enterprise Plus, Industrial, Medical) if prompted (owner privilege required). Enterprise Plus is the default if none is selected.
Allow time (minutes to days) for device data to populate in the portal. Check status via
Administration > Sites and Firewalls > Firewalls
.
Explore the portal: Device visibility, applications, vulnerabilities, alerts, policy recommendations.
Proceed to Firewall Preparation steps.
Onboarding VM-Series with Software NGFW Credits
This process uses Software NGFW credits to license VM-Series firewalls with IoT Security.
Create Deployment Profile(s) in CSP:
Go to
Products > Software NGFW Credits
.
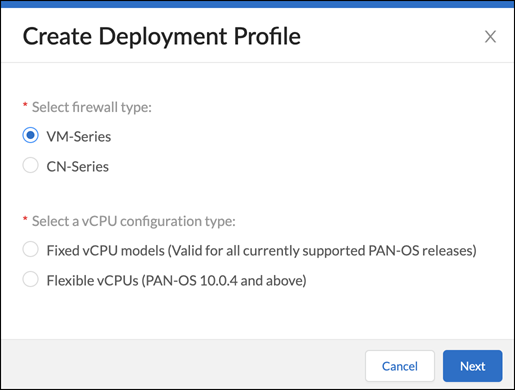
Click
Create Deployment Profile
.
Select
VM Series
(Fixed or Flexible vCPU).
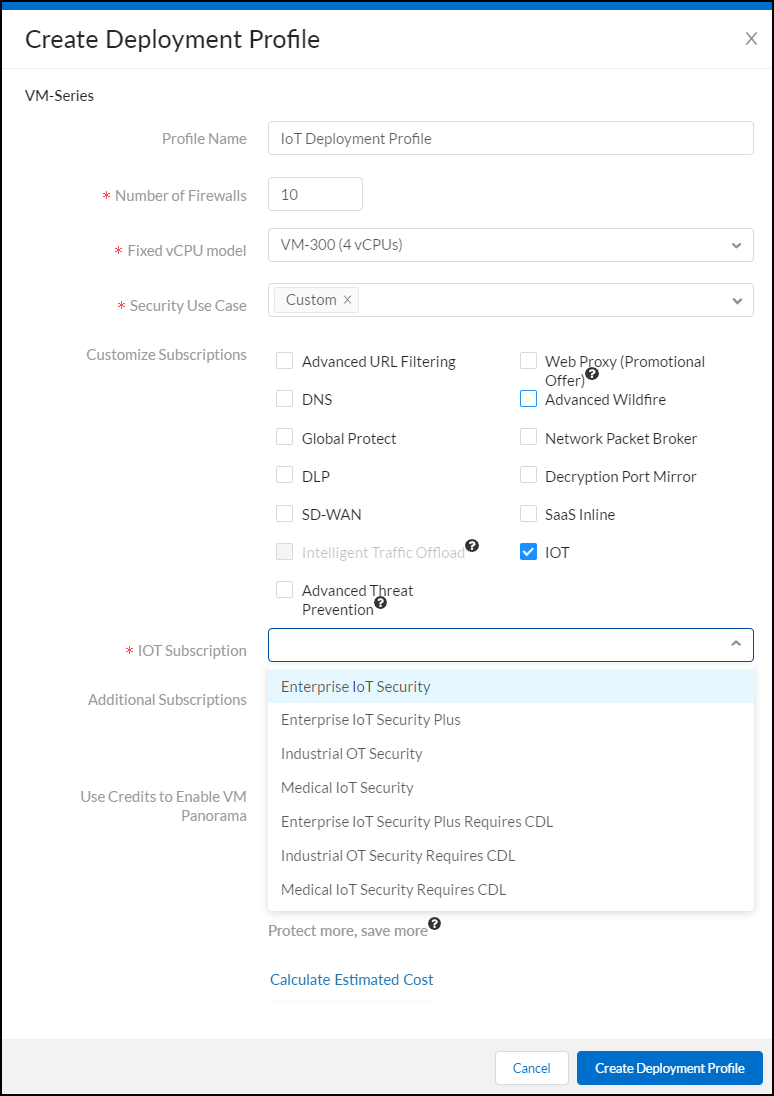
Name the profile, specify firewall count and model.
Choose Security Use Case:
Custom
.
Customize Subscriptions: Select only
IOT
.
Choose the specific
IOT Subscription
type (e.g., Enterprise Plus, Industrial OT, Medical IoT, with or without DRDL).
Create the profile.
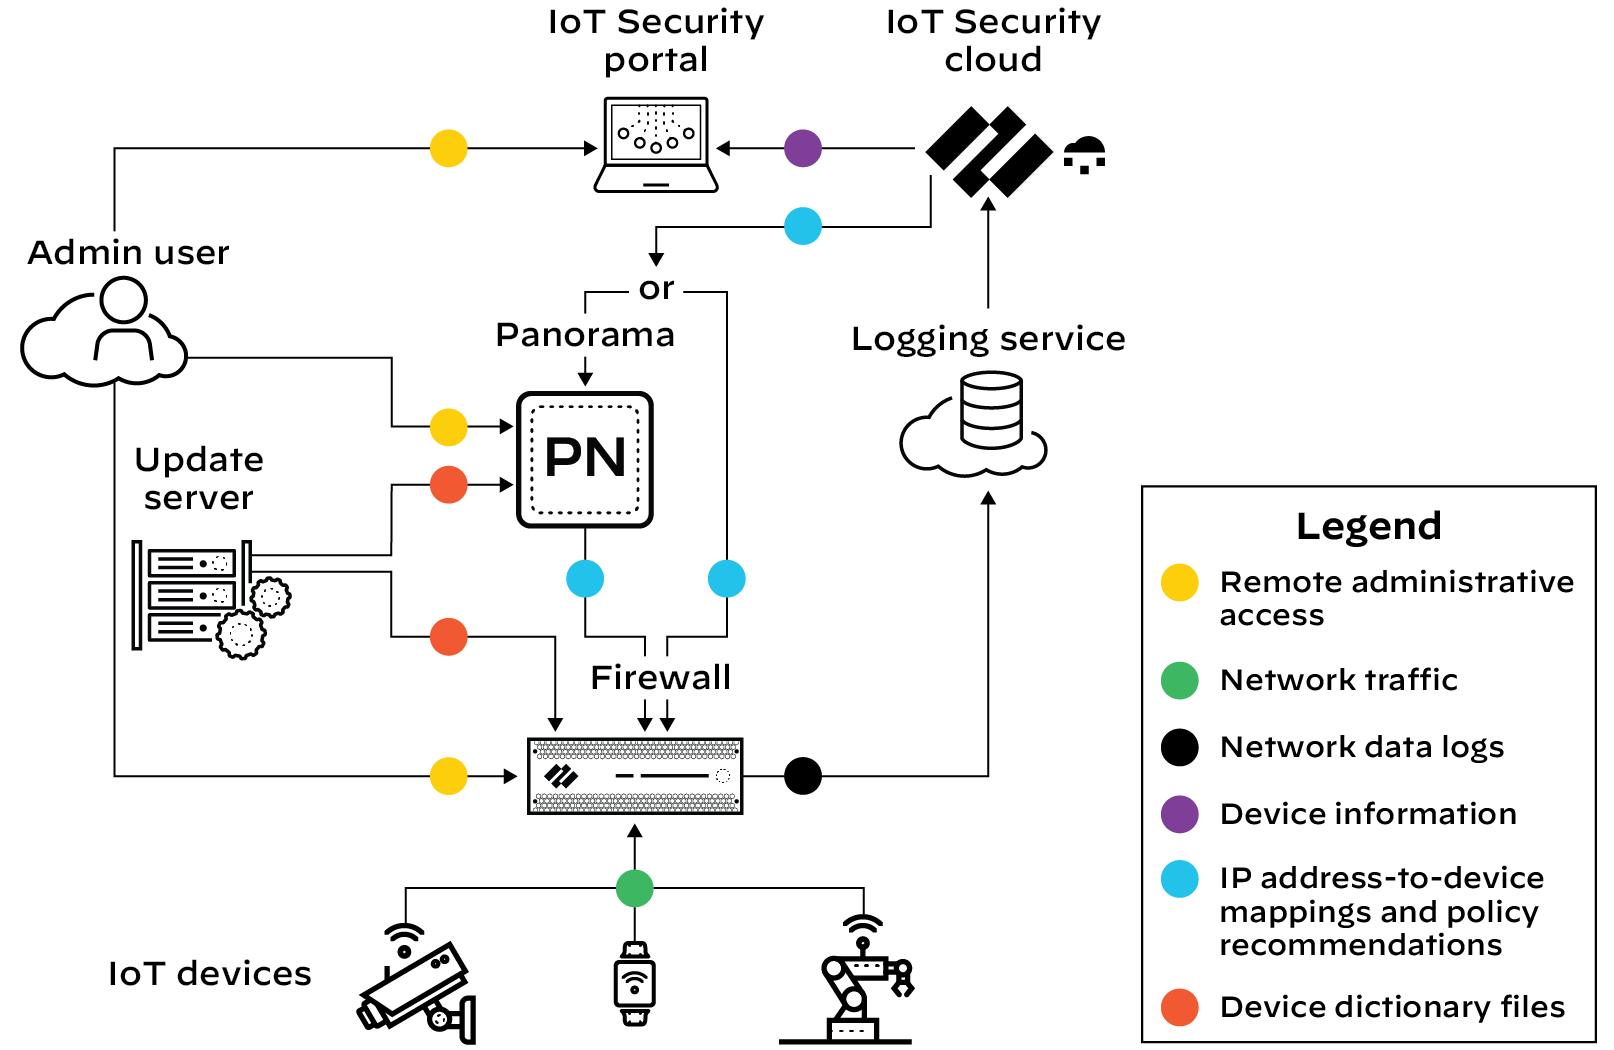
Activate in Common Services (Hub):
Go to
Common Services > Subscriptions & Add-ons
.
Find the profile under "Ready for Activation" and click
Activate Now
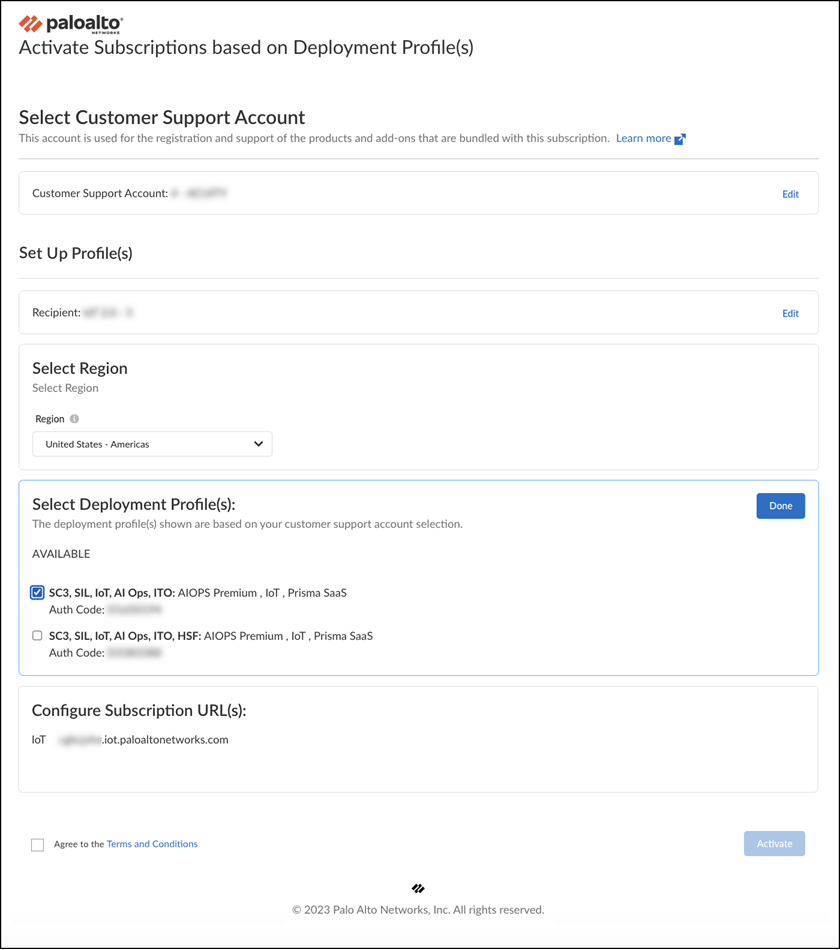
.
Configure activation: Select CSP account, Recipient/Tenant, Region (determined by Strata Logging Service if required), select the Deployment Profile, and enter the App Subdomain URL.
Agree and
Activate
.
Associate Firewalls:
Register VM-Series firewalls in the CSP, associating them with the created deployment profile.
Credits are automatically deducted.
The firewall will appear under
Common Services > Device Associations
.
Configure Firewall:
Proceed with Firewall Preparation steps.
Note:
Currently, extending, renewing, or offboarding IoT Security licenses activated via Software NGFW credits is not directly supported. ELA and FedRAMP licenses are also not supported with this method.
Manage IoT Security Users (RBAC)
Role-Based Access Control (RBAC) defines user privileges. User accounts are created in the Customer Support Portal (CSP), roles are assigned in the Hub, and site access can be limited within the IoT Security portal.
IoT Security Specific Roles:
User Role
Definition
Key Privileges
Owner (Also App/Instance Admin)
Full access to all functions.
All Administrator privileges plus: Global settings (timeout, site assignment method), view all audit logs, set user site access, manage notifications.
Administrator
Access to most functions.
Create/edit/delete configurations, manage own preferences (API keys, contact info, timeout, notifications), view own audit log. Access limited by site if configured by Owner.
Read only
View data only.
View data for accessible sites, manage own preferences, view own audit log. Access limited by site if configured by Owner.
(Note: Prisma Access integration uses specific role mappings).
graph TD
Superuser[CSP Superuser] --> CreateCSPUser[Creates User in CSP];
HubAdmin[Hub Admin] --> AssignHubRole[Assigns Role in Hub Access Management];
AssignHubRole --> Role{Choose Role};
Role -- Owner/AppAdmin/InstAdmin --> FullAccess[Full IoT Portal Access];
Role -- Administrator --> AdminAccess[Admin IoT Portal Access];
Role -- ReadOnly --> ReadAccess[Read-Only IoT Portal Access];
OwnerRole[IoT Portal Owner] --> SetSiteAccess[Sets Site Access for Admin/ReadOnly];
AdminAccess --> SiteLimitedAdmin[Site-Limited Admin Access];
ReadAccess --> SiteLimitedRead[Site-Limited Read Access];
Creating Users (Palo Alto Networks SSO):
Create user account in CSP (requires CSP superuser permissions).
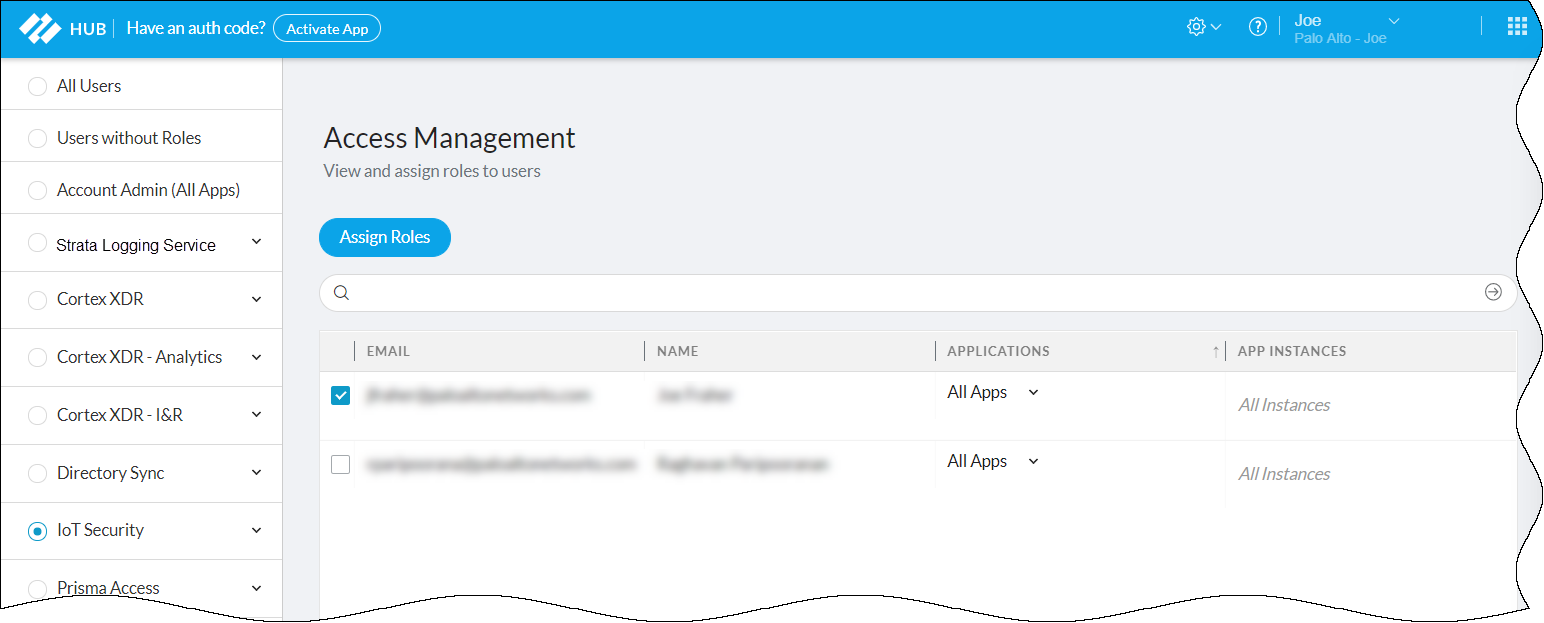
Log in to the Hub, navigate to
Access Management
.
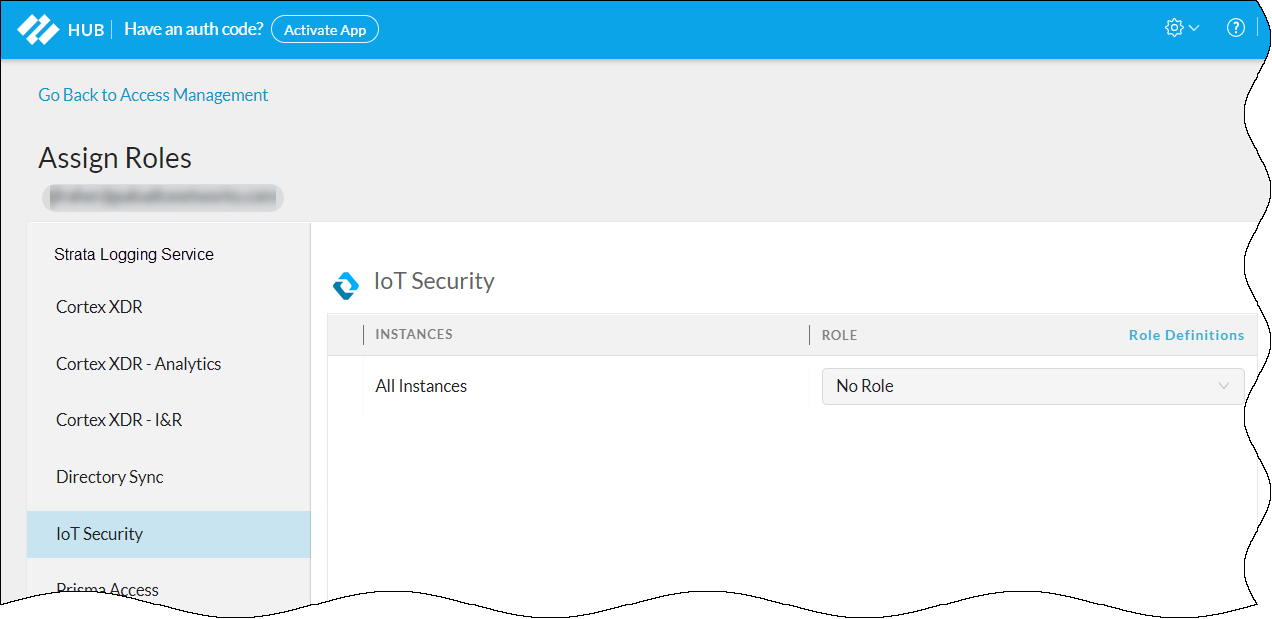
Select the IoT Security instance, select the user, and click
Assign Roles
.
Choose the desired IoT Security role (Owner, Administrator, Read only, etc.).
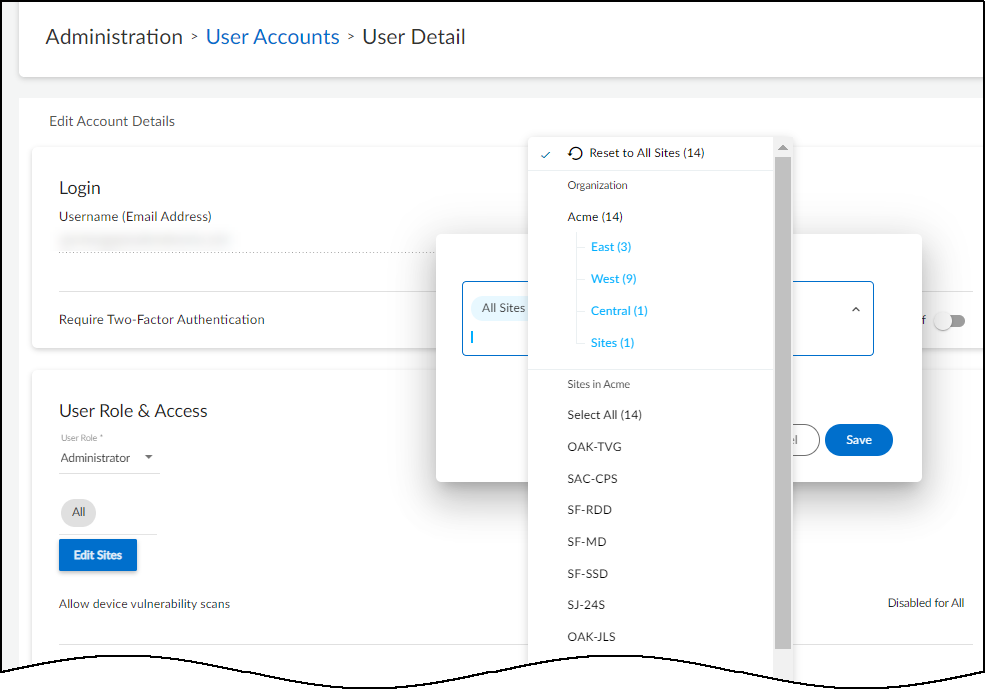
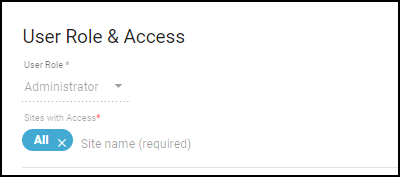
(Optional, performed by Owner in IoT Portal) Limit site access for Administrator/Read only roles via
Administration > User Accounts
.
Using Active Directory SSO:
You can configure IoT Security to authenticate against an external IdP (like Active Directory via SAML) instead of the Palo Alto Networks SSO.
Prepare IdP:
Configure your IdP with IoT Security URLs (ACS, Entity ID). Export IdP metadata (URL or XML file).
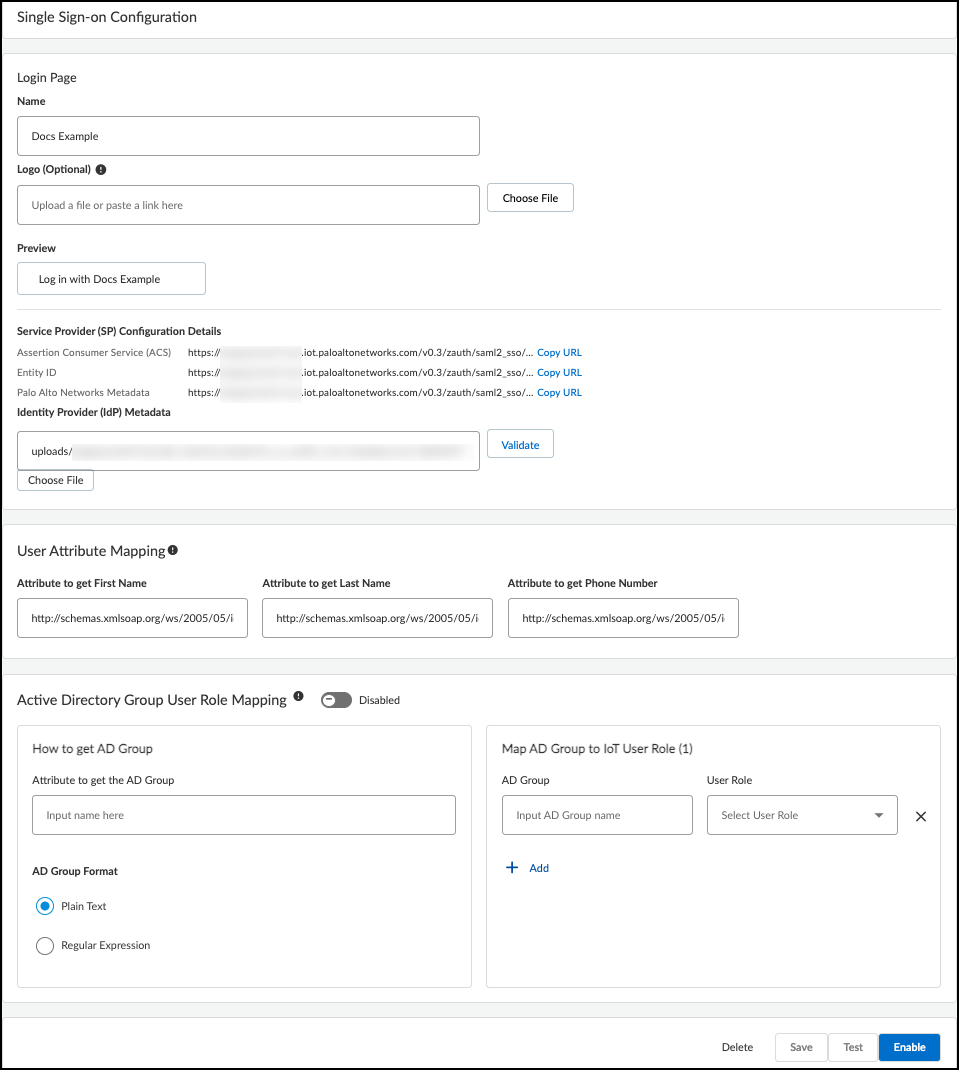
Configure IoT Security SSO:
In the IoT portal (as Owner), go to
Administration > User Accounts > Manage SSO
.
Click
Add New SSO
.
Provide Name, Logo (optional), and IdP Metadata (URL or upload XML).
Validate metadata.
Map SAML attributes for First Name, Last Name, Phone Number.
(Optional - External Role Management) Map AD Groups to IoT Security Roles (Owner, Admin, Read Only) using the "Attribute to get AD Groups" field.
Save and Test the configuration.
Enable the SSO configuration.
Role Management:
Roles can be managed externally (via AD group mapping in SSO setup) or internally (within the IoT portal by an Owner).
If both external and internal roles exist for a user, the *higher* privilege role takes precedence.
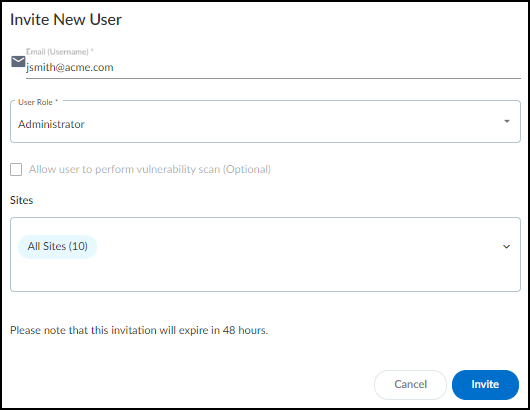
Users without an external role mapped cannot log in until invited and assigned an internal role by an IoT Owner.
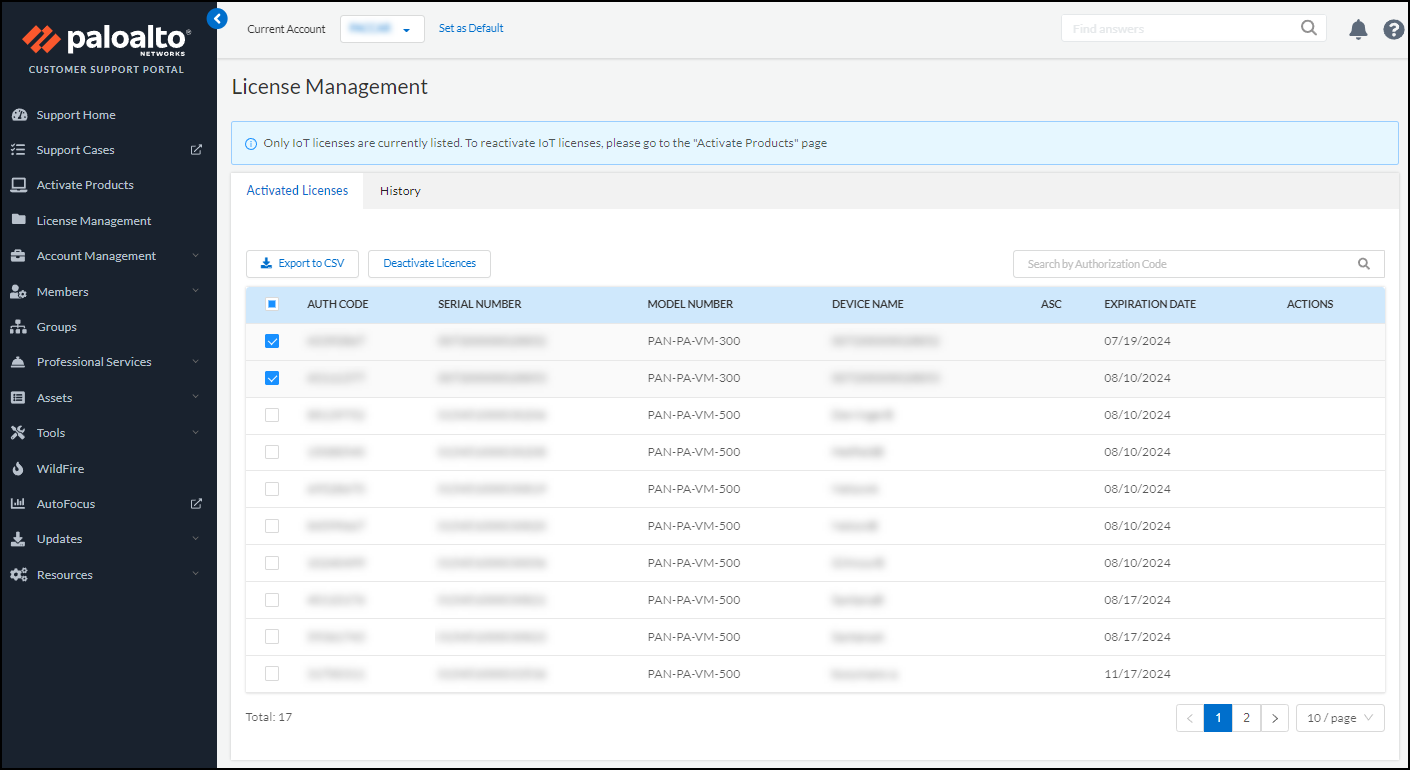
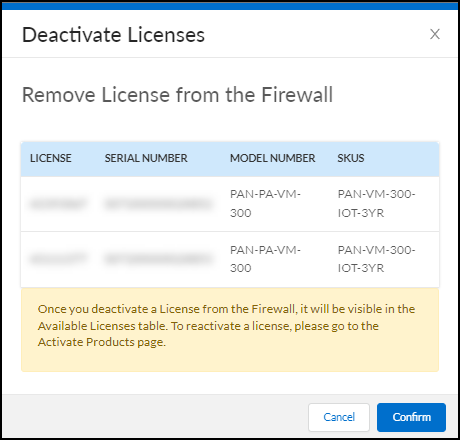
Offboard IoT Security Subscriptions
Methods to remove IoT Security services from a firewall:
Deactivate and Transfer License:
Log in to CSP.
Go to
License Management > Activated Licenses
.
Select the firewall(s) and click
Deactivate Licenses
. Confirm.
Verify disassociation in the Hub (
Common Services > Device Associations
). Contact support if needed.
The license returns to the available pool under
Activate Products > Ready for Activation
.
Re-activate the license on the same or a different firewall following the onboarding process. Note the remaining term duration.
Transfer Firewall between CSP Accounts:
In CSP, go to
Devices
, select the device, click
Transfer Ownership
, and enter the destination account owner's email. All licenses transfer with the firewall.
Let Subscription Expire:
Services stop, IoT Security unsubscribes from logs, firewall stops receiving updates (mappings, recommendations) and clears cached mappings after ~3 hours. Device-ID based rules will cease to function and should be removed.
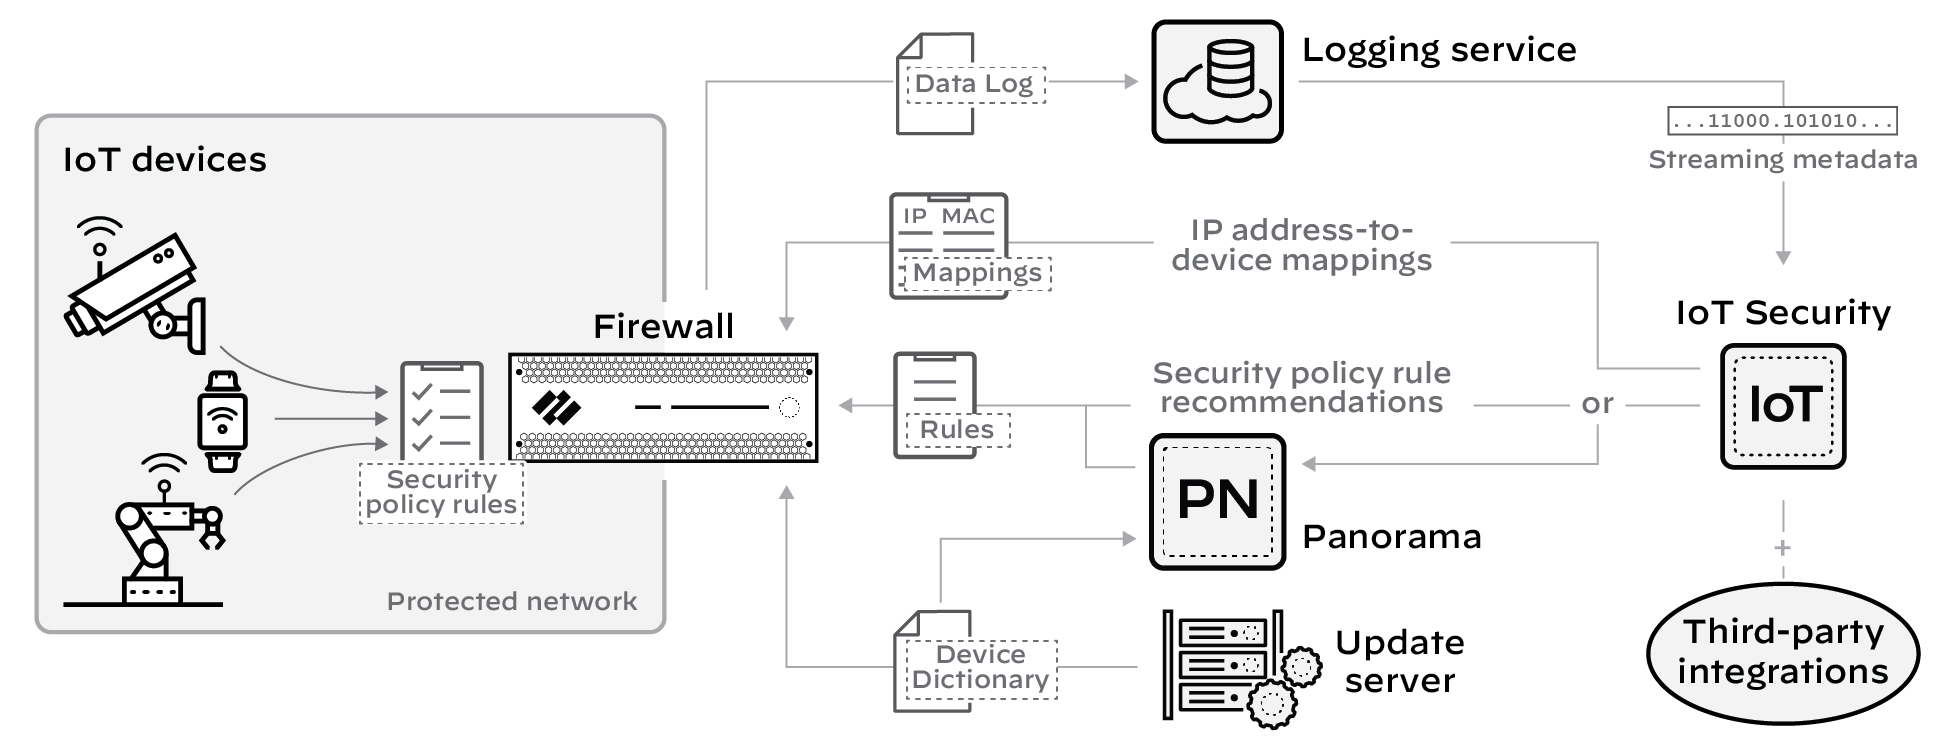
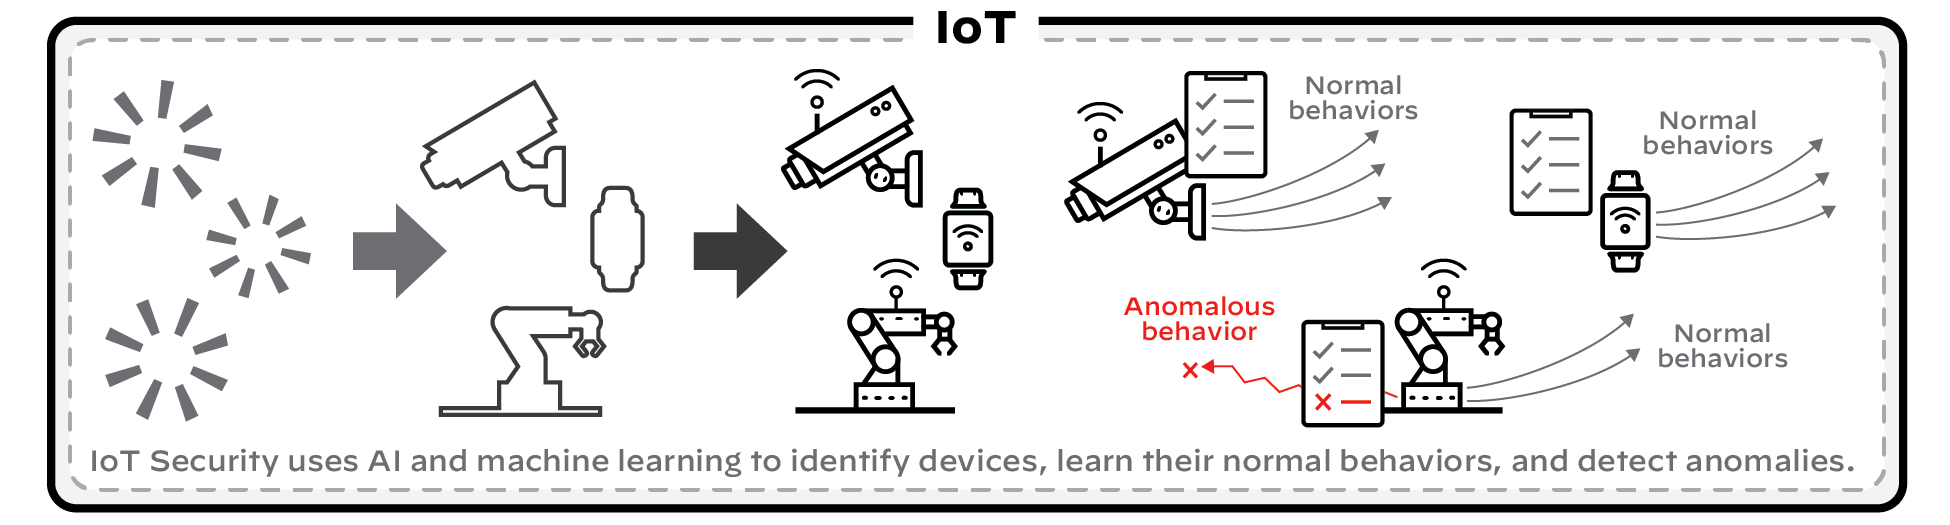
IoT Security Solution Overview
IoT Security uses AI and machine learning to discover, classify, and protect connected devices by analyzing their unique network behavior patterns.
flowchart LR
FW[Firewall] -- Logs EALs --> LS[Logging Service]
LS -- Metadata --> IoT[IoT Security Cloud AI/ML Analysis]
IoT -- Device Dictionary --> US[Update Server]
US -- Dictionary --> FW
US -- Dictionary --> P[Panorama]
IoT -- IP-Device Mappings --> FW
IoT -- Policy Recommendations --> FW
IoT -- Policy Recommendations --> P
P -- Policies --> FW
subgraph Data Collection
FW
LS
end
subgraph Analysis & Identification
IoT
end
subgraph Policy Enforcement
US
P
end
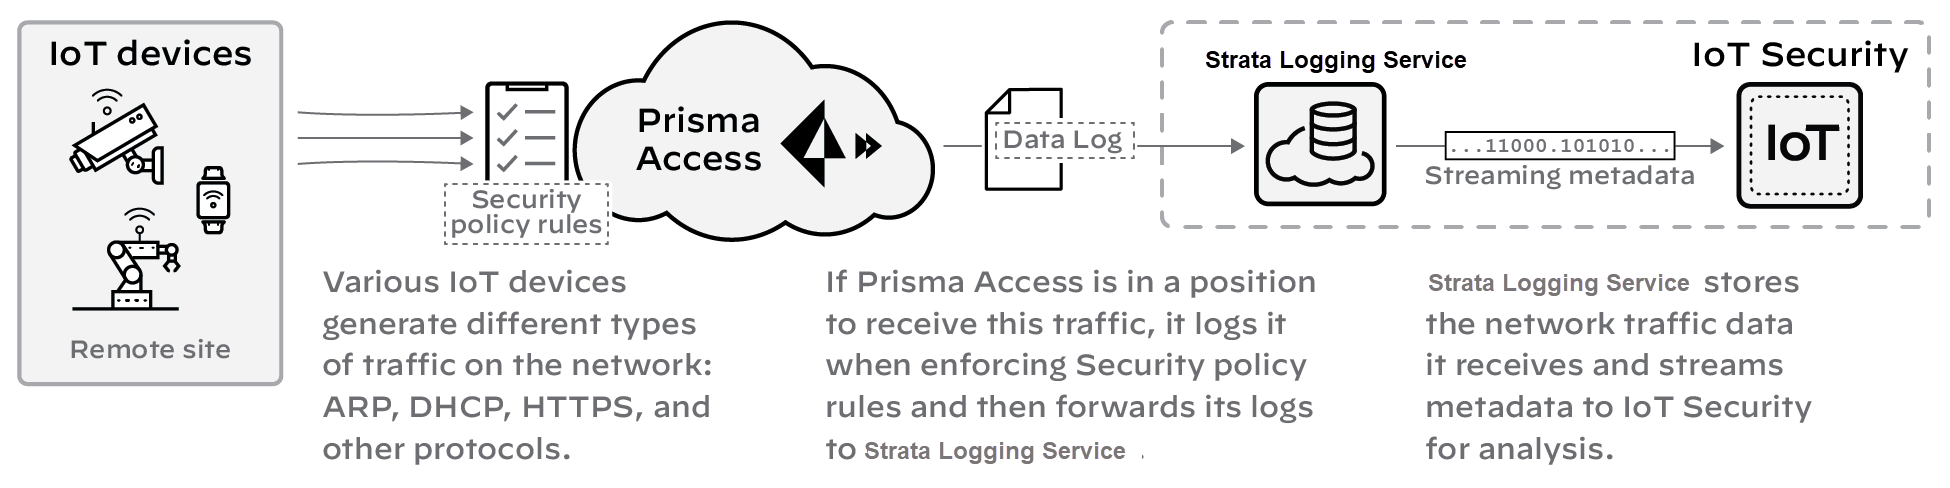
How it Works:
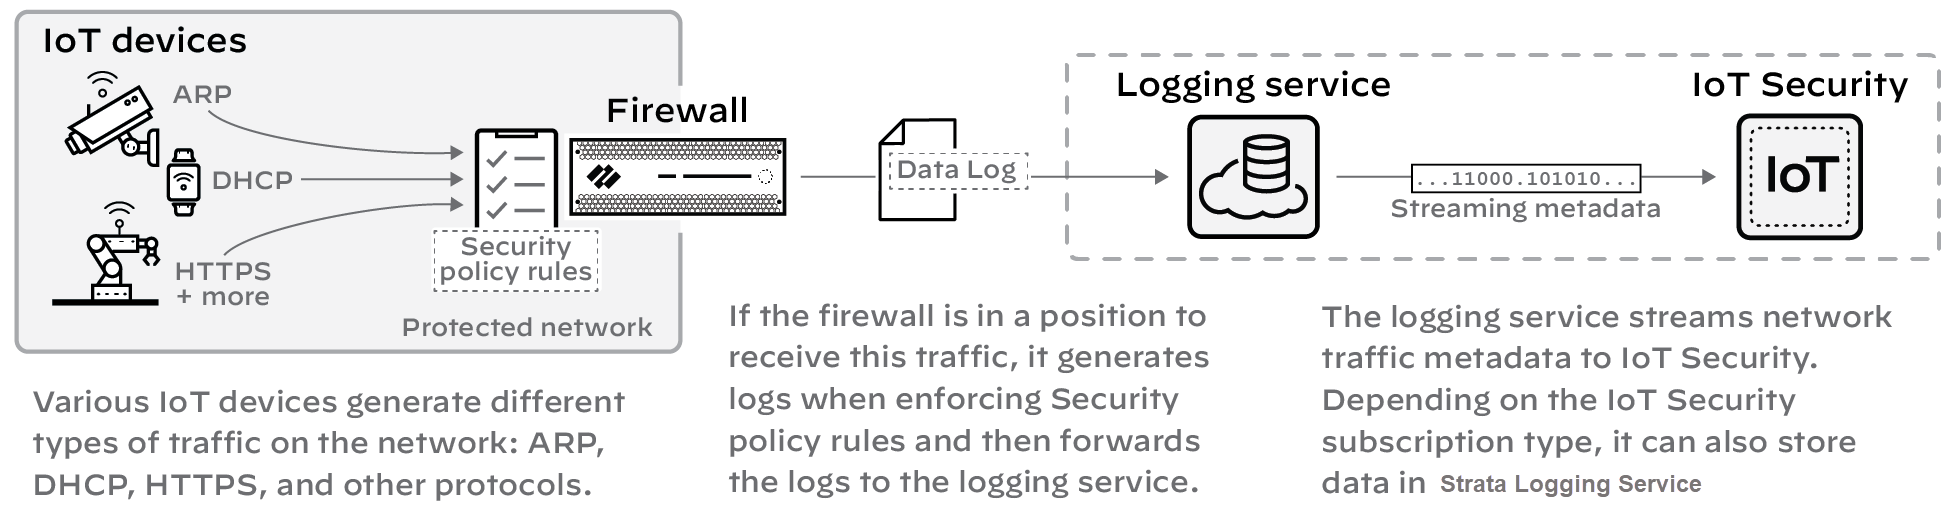
Data Collection:
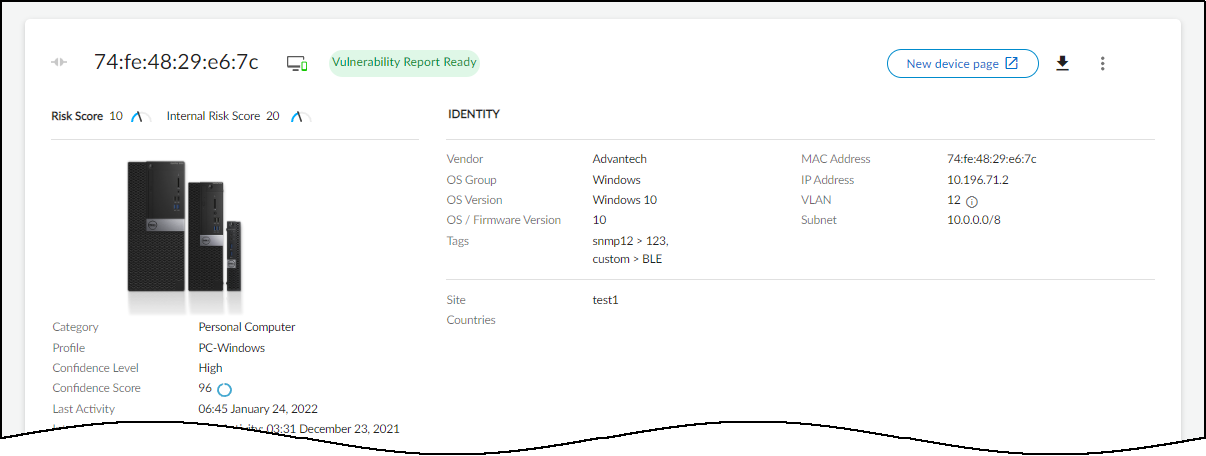
Firewalls collect metadata via Enhanced Application Logs (EALs) and forward them to the Logging Service.
Assigns confidence scores (High, Medium, Low) to identifications.
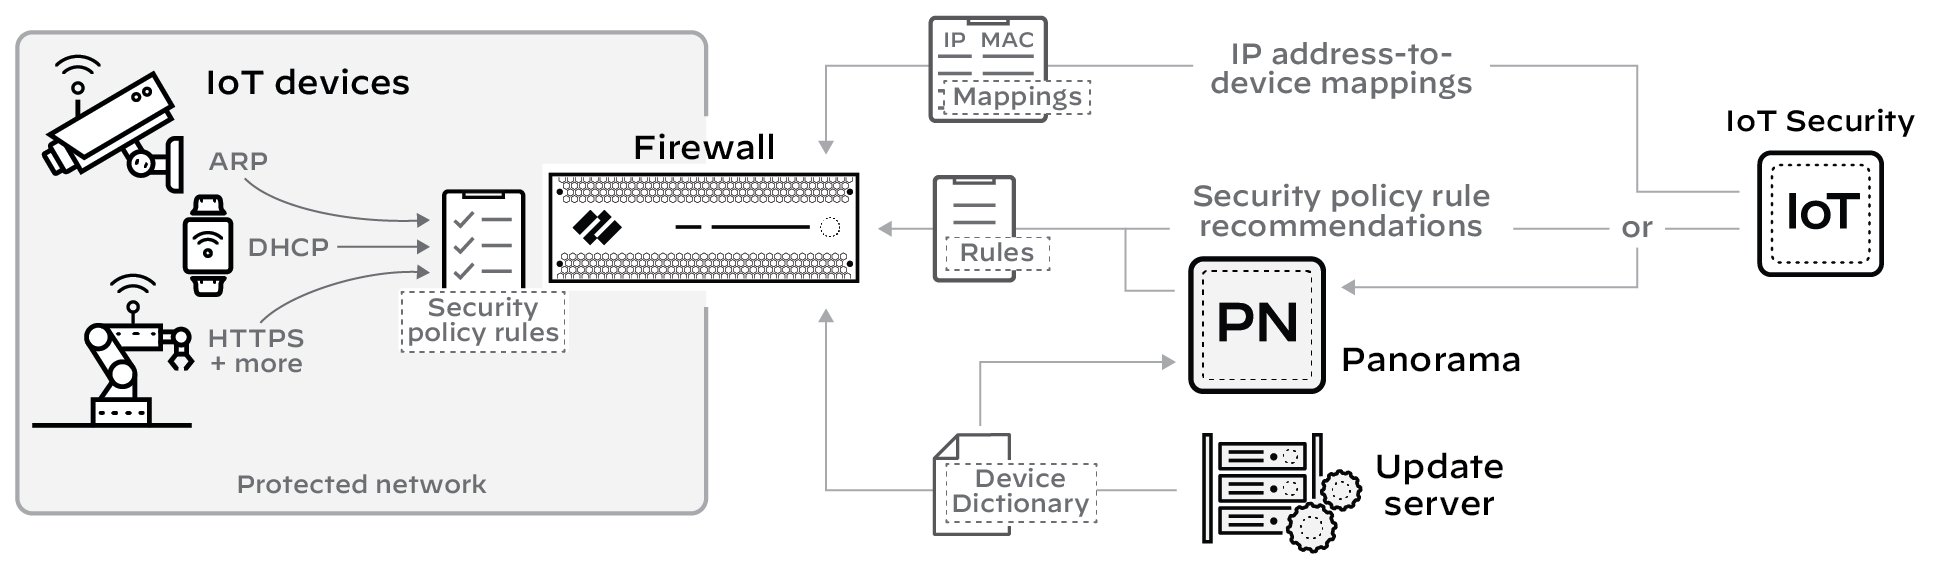
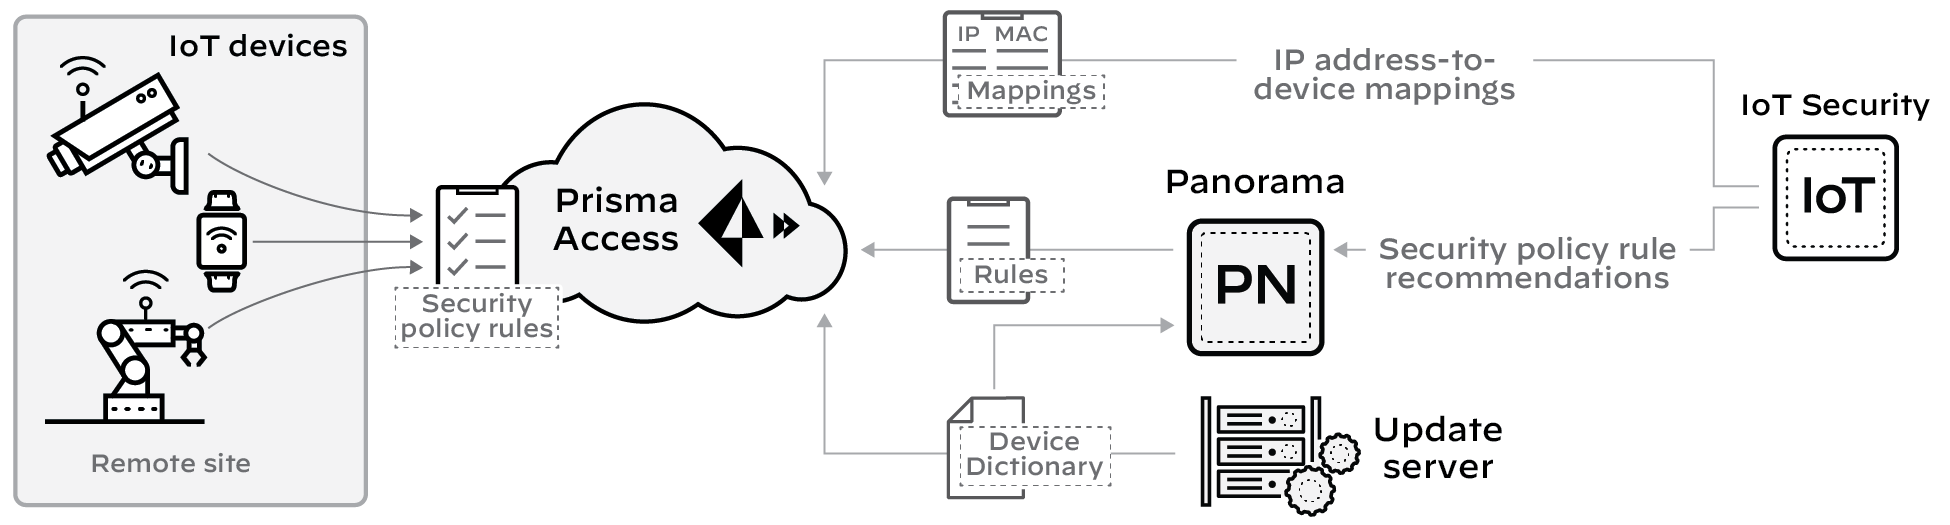
Protection & Enforcement:
Generates Security policy rule recommendations based on observed normal behavior.
Provides firewalls with IP address-to-device mappings for Device-ID enforcement.
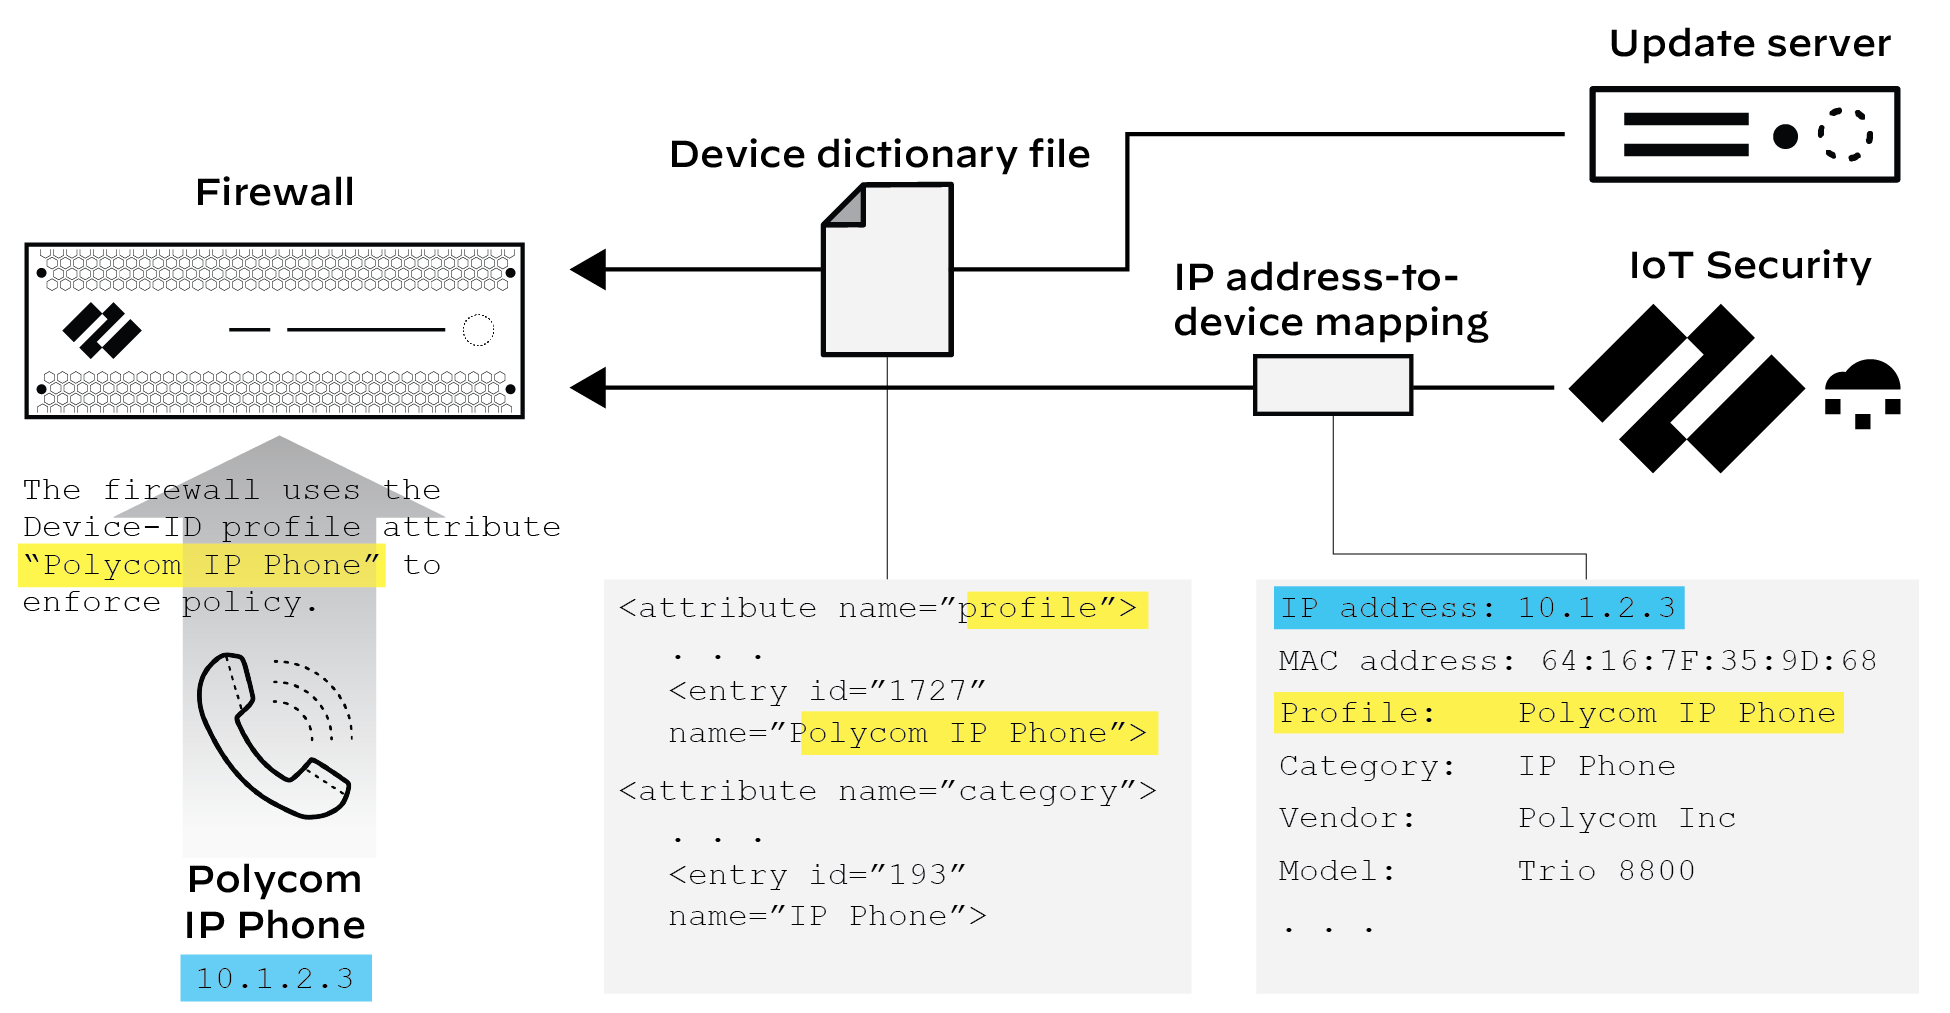
Firewalls download a device dictionary (attributes like profile, vendor, category) from the update server for use in Device-ID rules.
Alerting:
Notifies admins of anomalies and risks via the portal, email, or SMS.
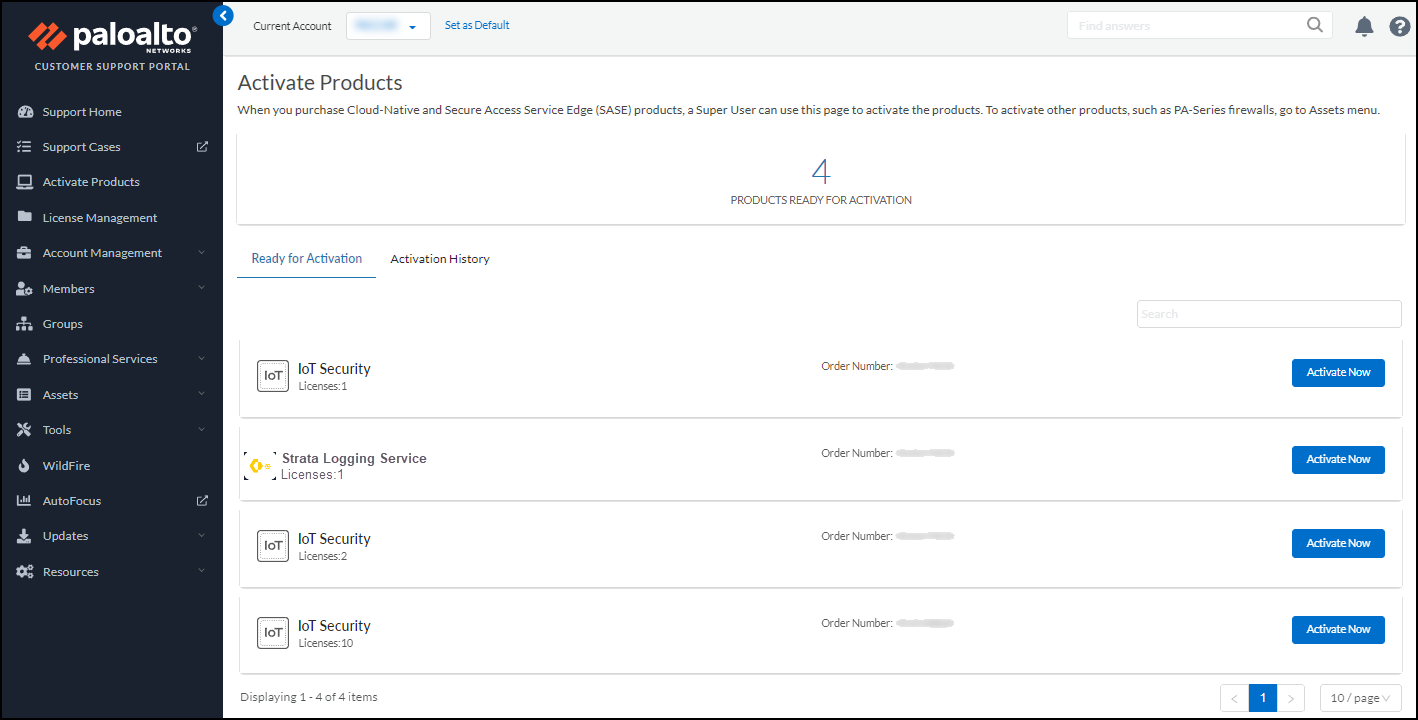
IoT Security Solution Structure & Setup
The solution integrates firewalls, the logging service, and the IoT Security cloud application, utilizing the update server and CSP/Hub for support functions.
Key Components & Flow:
Device Data Collection:
Firewalls log traffic and forward logs to the Logging Service (with or without Strata Logging Service storage).
Data Analysis:
The IoT Security cloud analyzes metadata using AI/ML for identification, baseline establishment, vulnerability/anomaly detection.
IoT Device Protection (Device-ID):
IoT Security coordinates with firewalls via:
Policy rule recommendations.
IP address-to-device mappings.
Device dictionary updates (via Update Server).
Third-party Integrations (Optional):
Uses Cortex XSOAR (cohosted or on-prem) to exchange data with external systems (NAC, SIEM, Asset Management, etc.). Requires an add-on license.
Prisma Access Integration (Alternative):
Prisma Access can substitute for physical firewalls, sending logs via Strata Logging Service. IoT Security provides mappings/recommendations. SD-WAN ION devices can supplement data collection.
Check Support & Prerequisites:
Verify firewall models, PAN-OS versions, and required licenses.
Onboard IoT Security:
Activate subscriptions via email/Hub, create tenant, associate Strata Logging Service (if needed), assign licenses to firewalls.
Prepare Firewalls:
Position firewalls strategically (especially for DHCP visibility) and configure interfaces/zones.
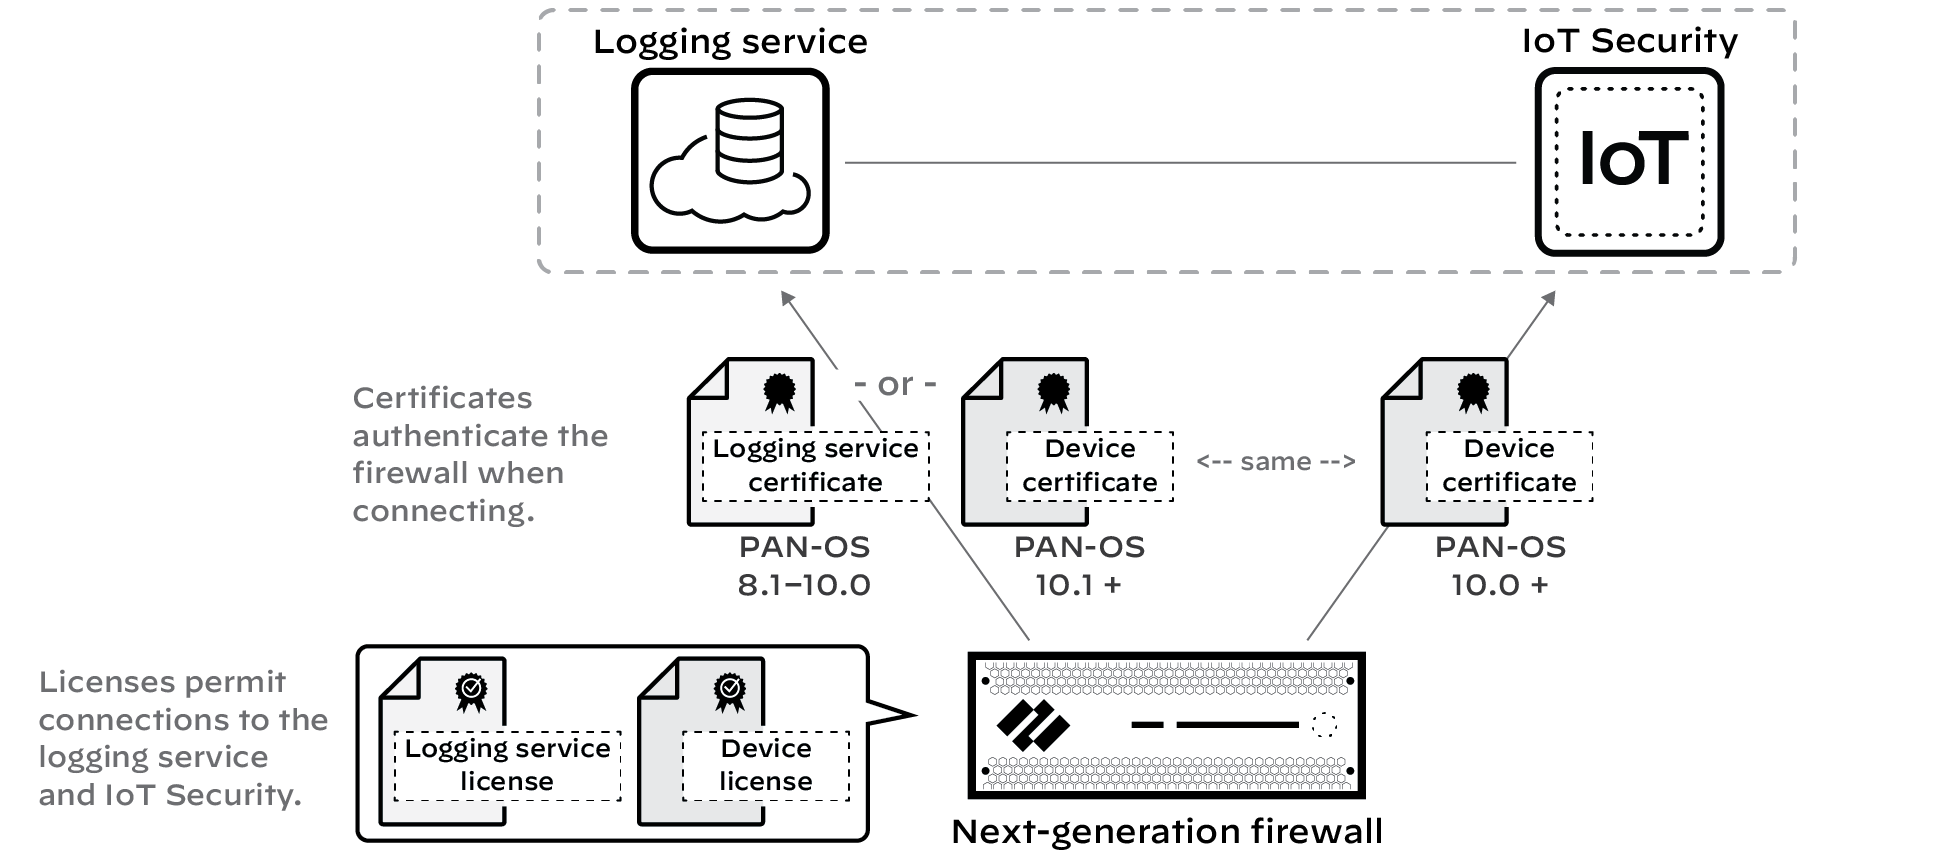
Install Certificates & Licenses:
Retrieve licenses from the server. Install device certificates (if not automatic) for secure communication with logging service and IoT Security.
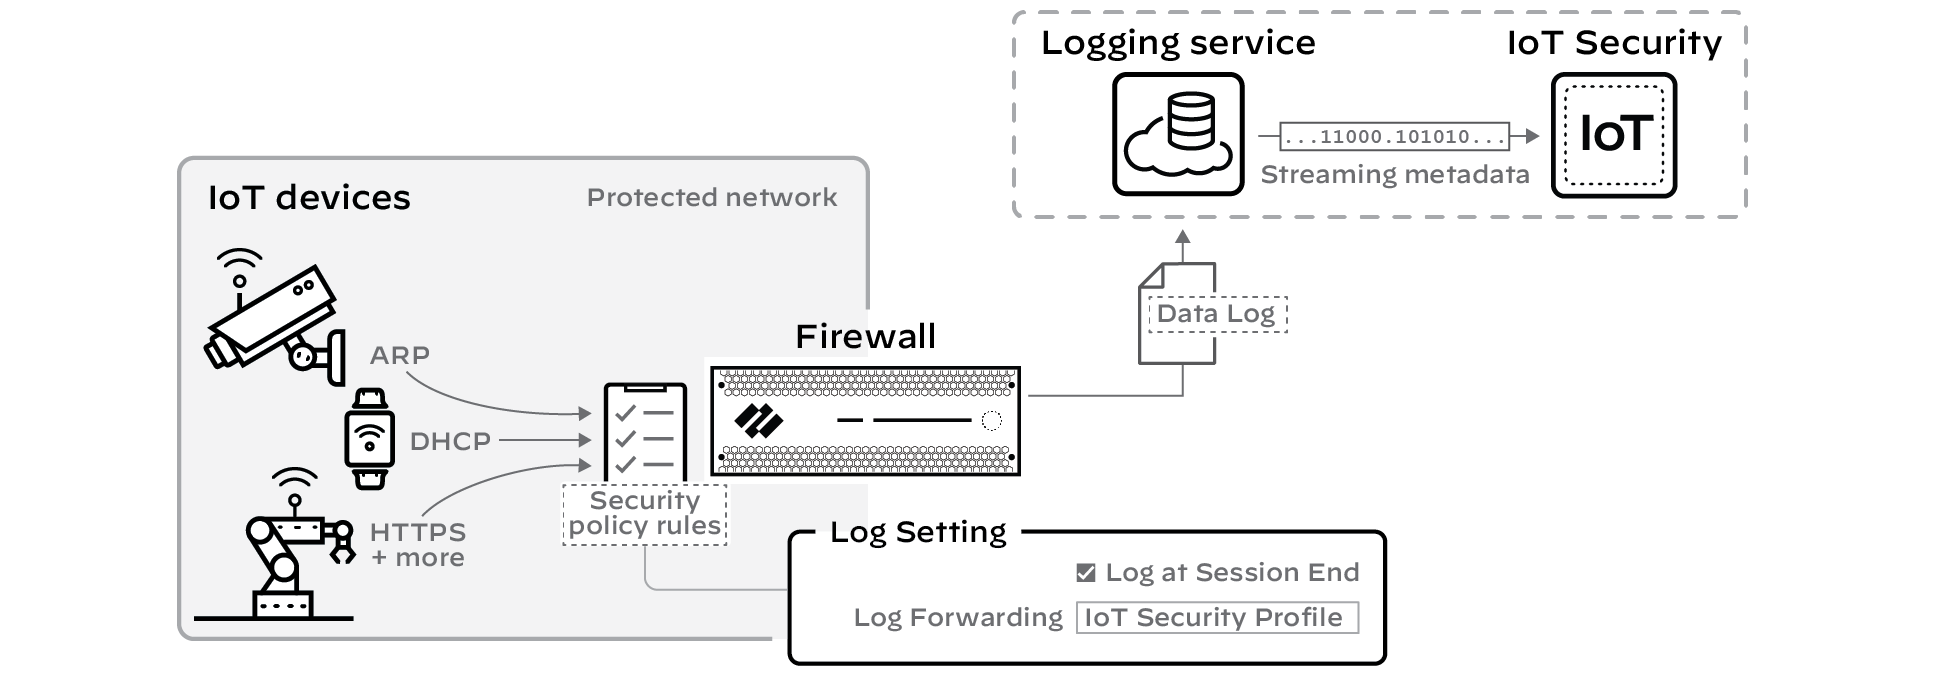
Configure Logging:
Enable Enhanced Application Logging (EALs) and configure Security policy rules with log forwarding profiles to send data to the logging service. Enable Device-ID on relevant zones.
IoT Security Integration with Firewalls (Device-ID)
Integration leverages Device-ID, applying policy based on device attributes identified by IoT Security.
Key Mechanisms:
Device Dictionary:
An XML file downloaded by firewalls/Panorama from the update server. Contains attributes (profile, category, vendor, model, OS) used to define Device-ID policy rules. Updated regularly.
Policy Rule Recommendations:
IoT Security generates rules based on observed behavior for device profiles. Admins can import these into firewalls/Panorama.
IP Address-to-device Mappings:
Continuously sent from IoT Security to firewalls. Links an IP address to device attributes (profile, category, vendor, model, OS, risk). Firewalls use this to match traffic against Device-ID rules. Sent only for high-confidence devices active within the last hour.
Firewalls poll IoT Security for mappings every second. Mappings are cached; if connection is lost, cached mappings are still used. Max 1000 unique Device-ID objects per firewall (mapping count varies by model).
Panorama Log Queries:
To Logging Service (TCP 444).
Prepare Your Firewall for IoT Security
These steps enable log collection and forwarding, crucial for IoT Security analysis.
Install Licenses:
Retrieve IoT Security and Logging Service licenses via
Device > Licenses > Retrieve license keys...
(Firewall) or
Panorama > Device Deployment > Licenses > Refresh
(Panorama).
Install Certificates (if needed):
Required for secure communication. PAN-OS 10.1+ primarily uses a
Device Certificate
. Some older versions/scenarios might need a
Logging Service Certificate
(generated via OTP/PSK).
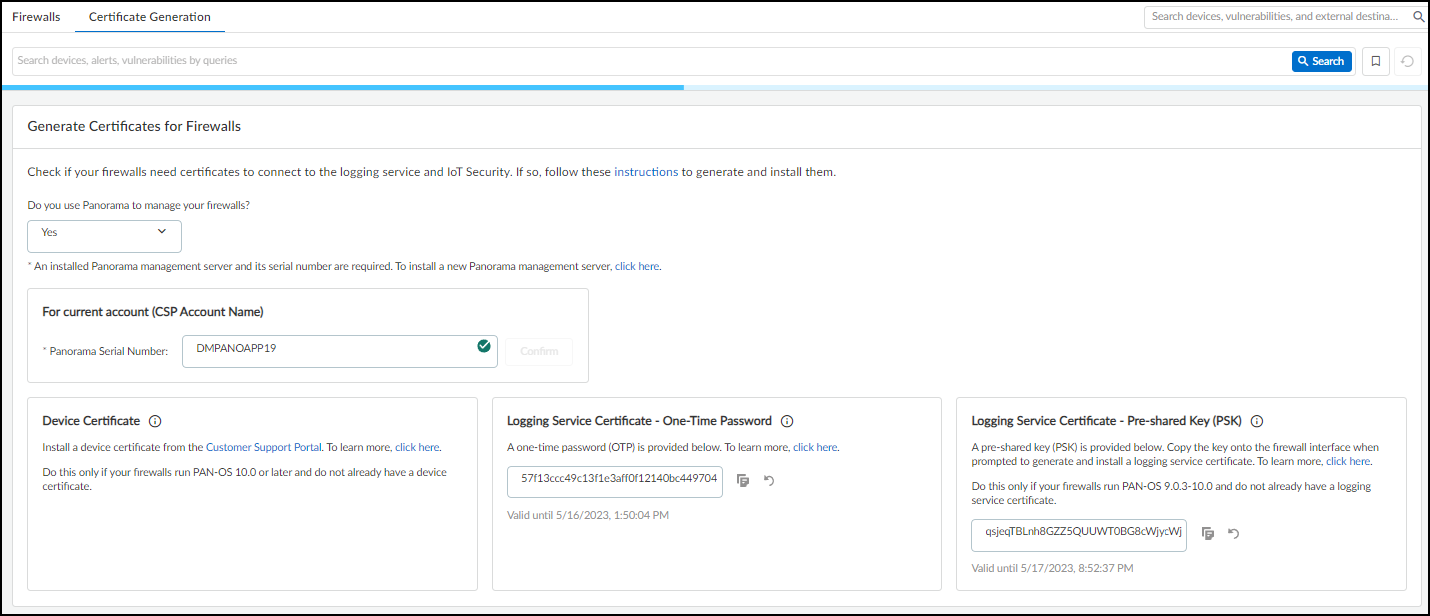
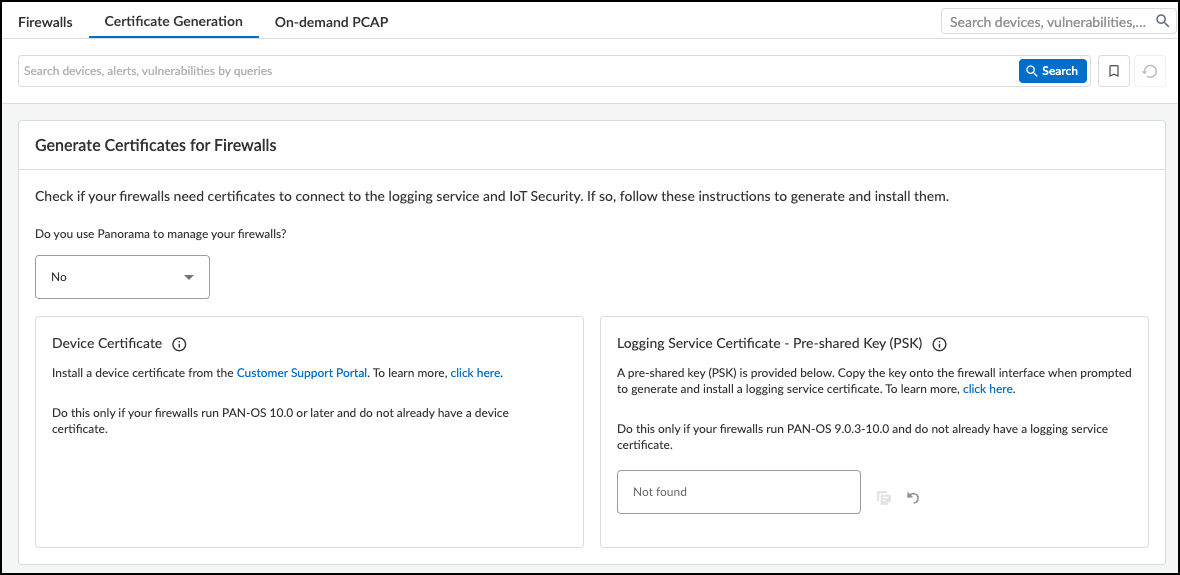
Generate OTP/PSK in the IoT Security portal (
Administration > Firewalls > Certificate Generation
) if manual installation is needed.
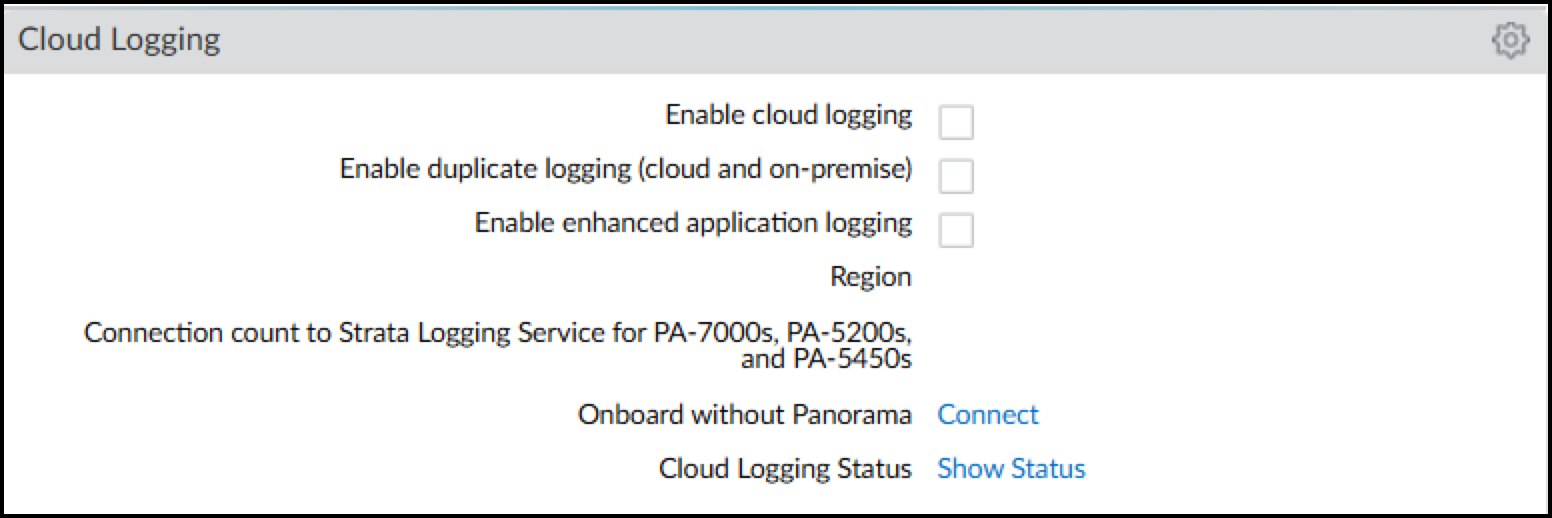
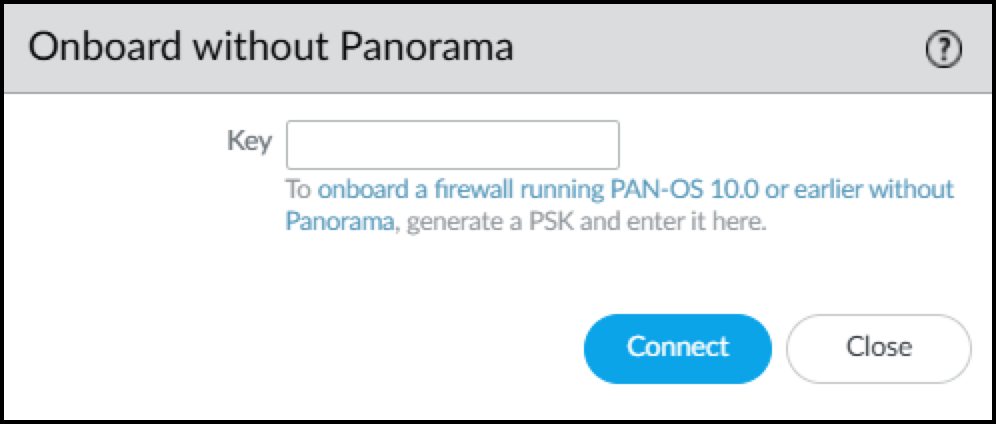
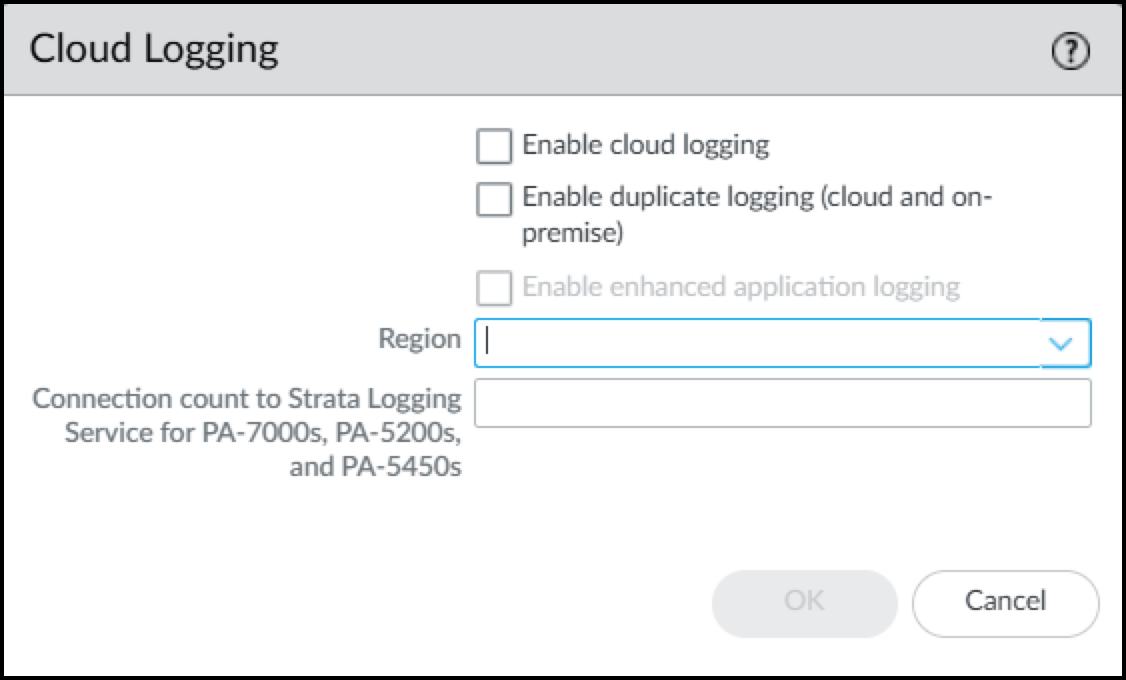
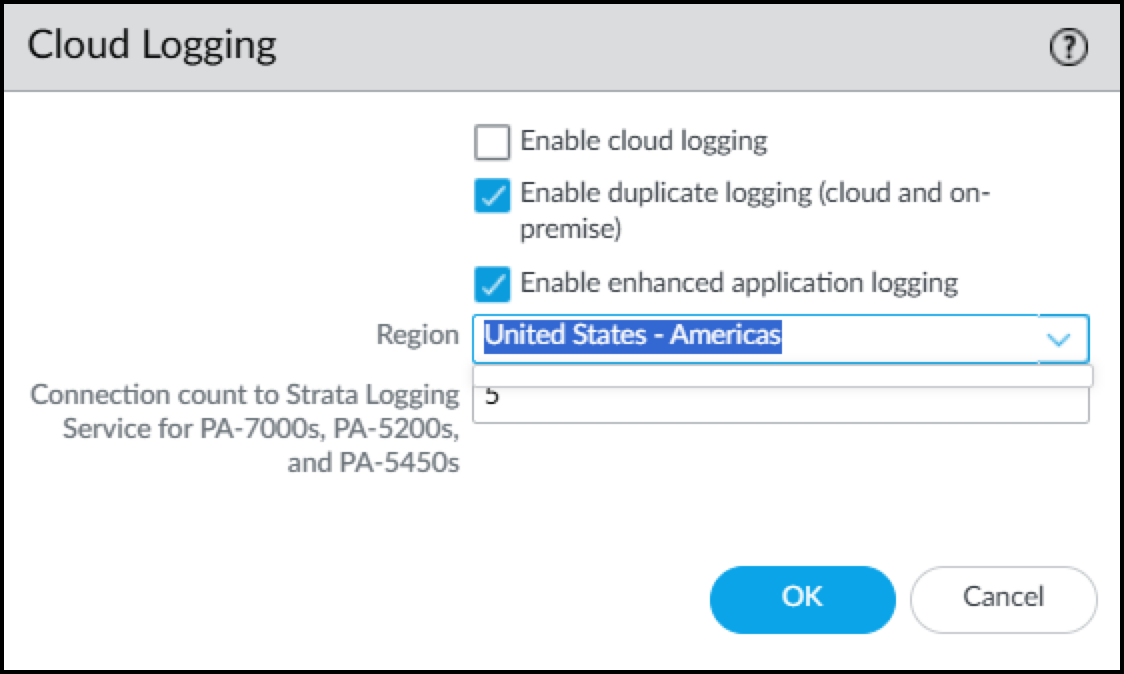
Follow PAN-OS/Panorama guides to install certificates using OTP/PSK. For DRDL subscriptions on PAN-OS 9.0.3-10.0.x without Panorama, use PSK under
Device > Setup > Management > Cloud Logging > Connect
.
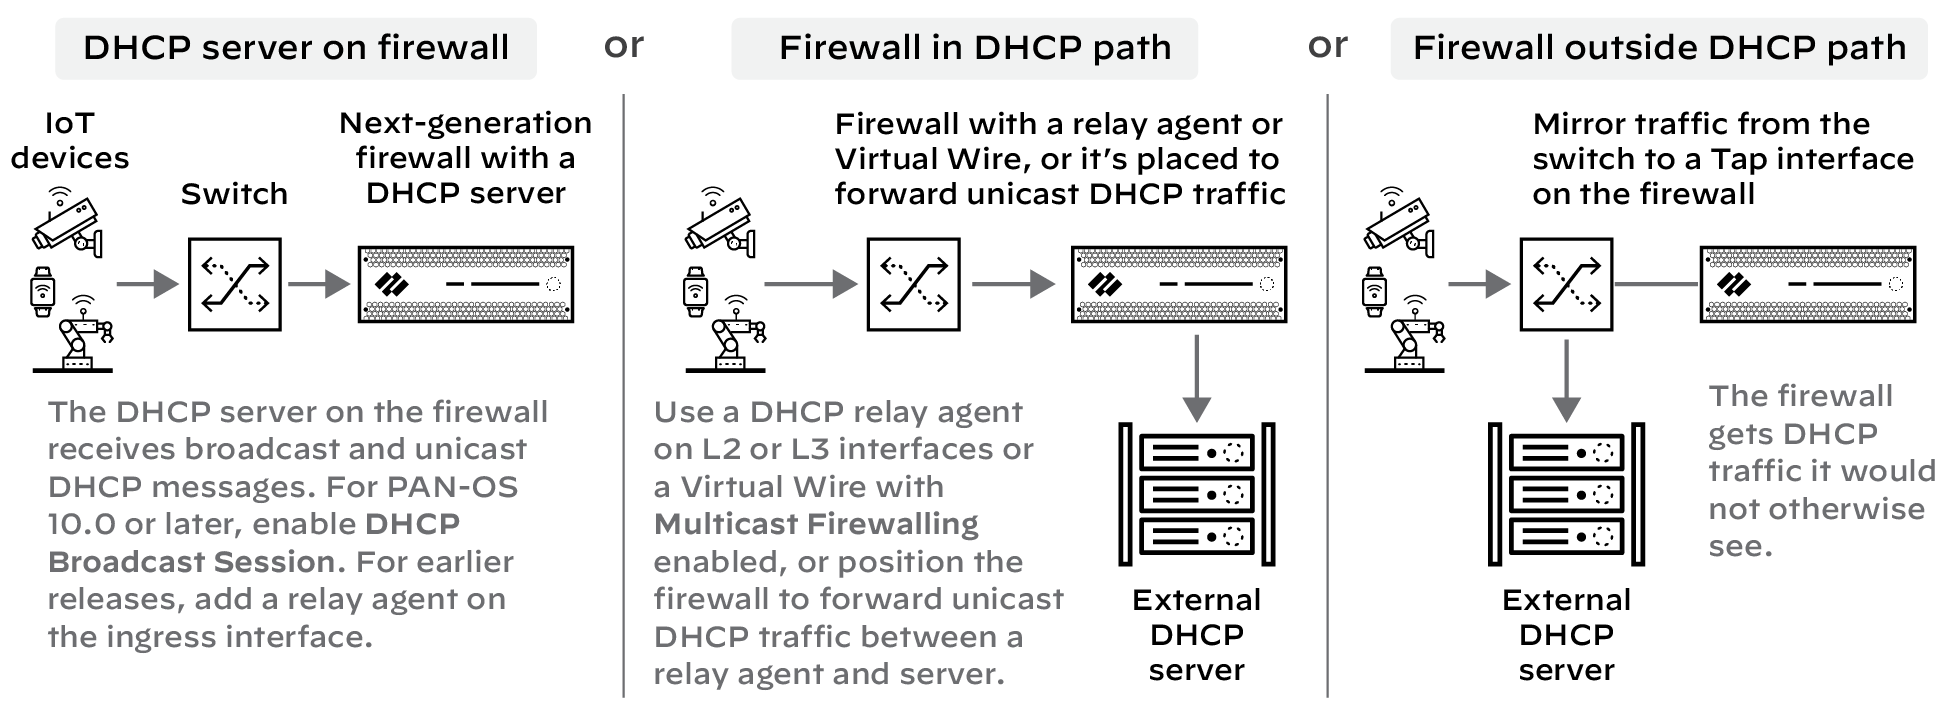
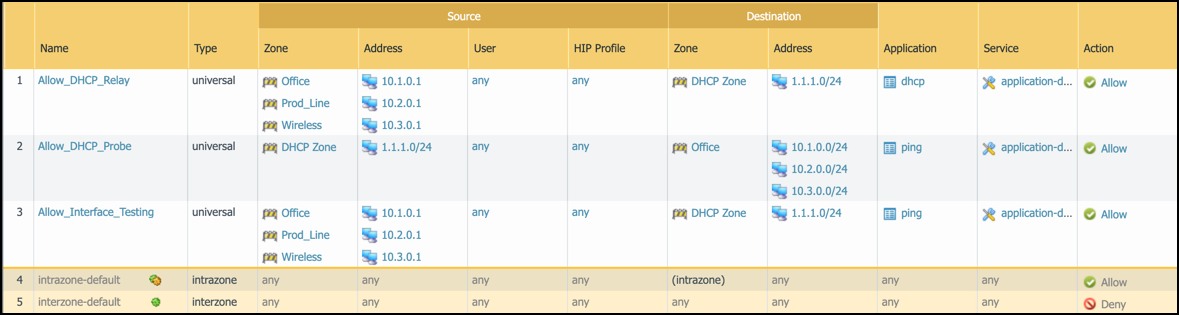
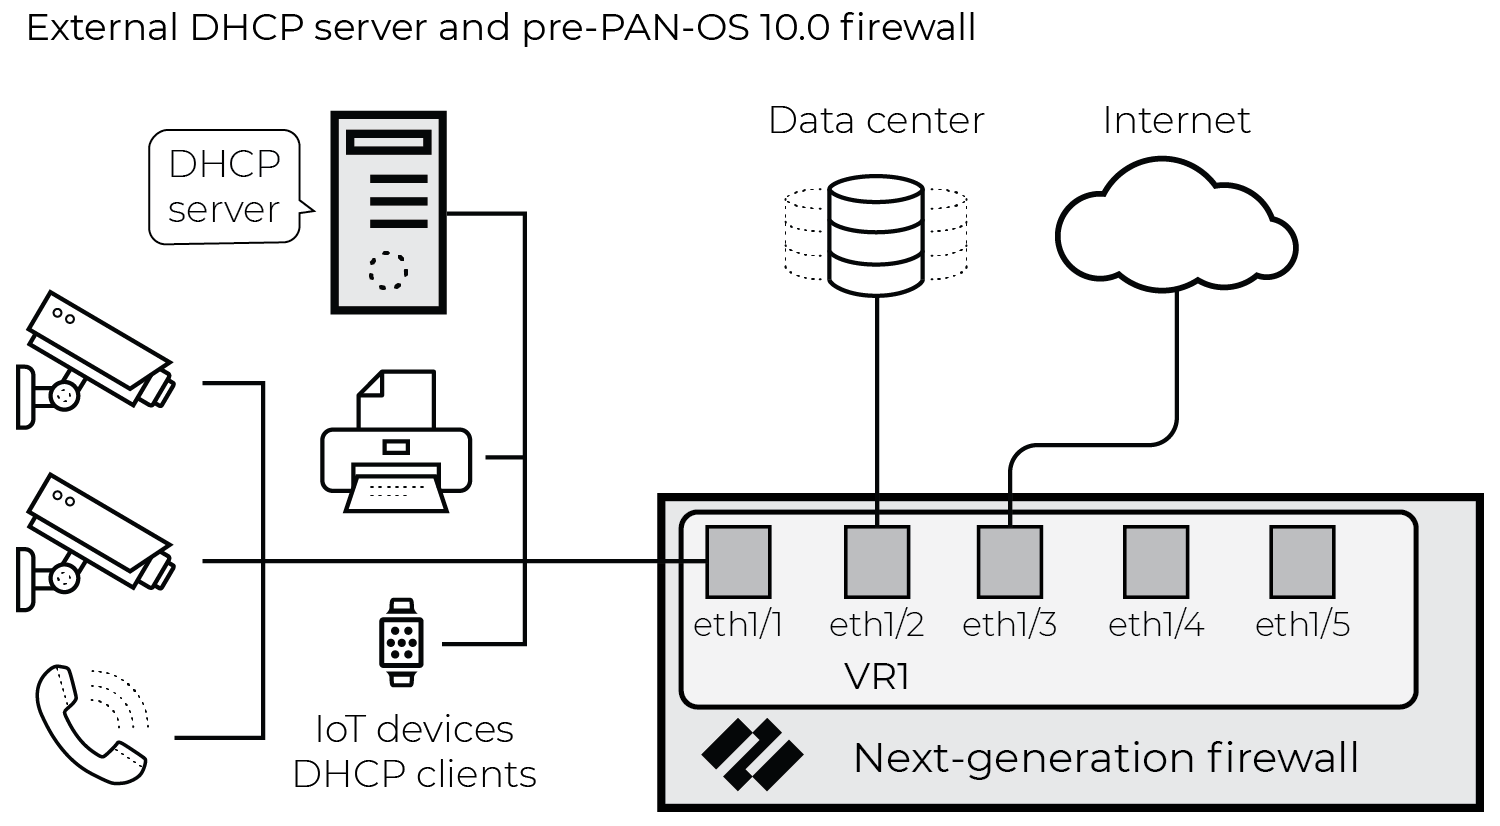
Ensure DHCP Visibility:
Configure firewall placement/policy rules to capture DHCP traffic (unicast usually required, broadcast exceptions exist). Enable
DHCP Broadcast Session
(Device > Setup > Session) if firewall hosts DHCP server (PAN-OS 10.1.10+, 10.2.4+, 11.0.1+).
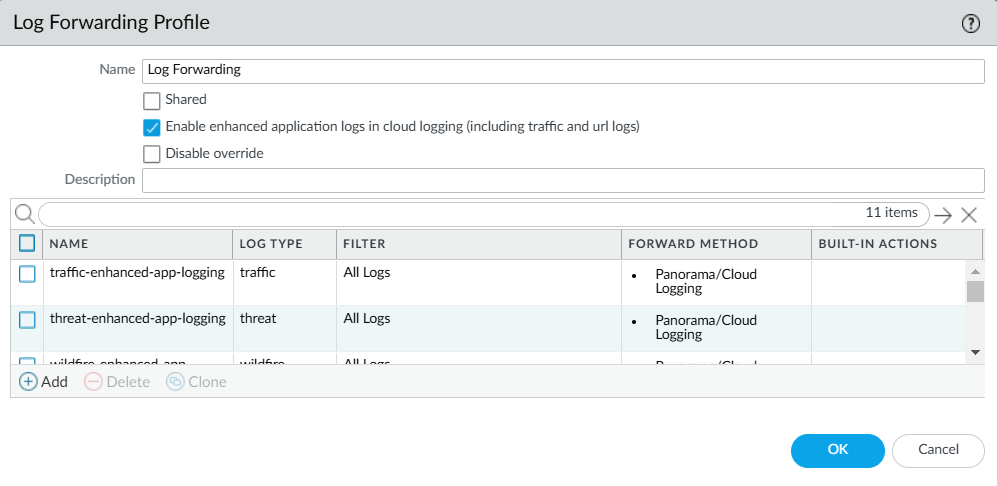
Configure Log Forwarding Profile:
Check/create profile under
Objects > Log Forwarding
.
Ensure
Enable enhanced application logs in cloud logging
is checked. This automatically includes necessary log types (traffic, threat, wildfire, etc.).
Naming a profile "default" (lowercase) auto-applies it to new/imported rules.
Apply Log Forwarding to Security Rules:
On relevant Security policy rules (
Policies > Security
), go to the Actions tab, enable logging (e.g., Log at Session End), and select the configured Log Forwarding profile.
Enable Device-ID on Zones:
Under
Network > Zones
, select zones containing IoT devices and enable Device-ID.
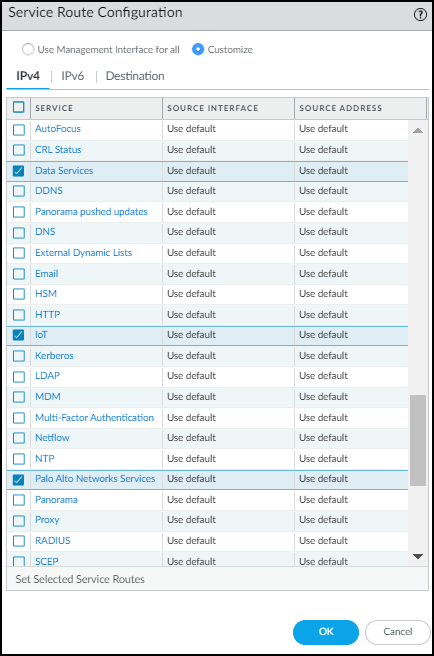
(Optional) Configure Service Routes:
If using a data interface (not MGT) for cloud communication, configure service routes under
Device > Setup > Services > Service Route Configuration
for "Data Services", "IoT", and "Palo Alto Networks Services". Add corresponding Security policy rules allowing traffic from 127.168.0.0/16.
Commit
changes.
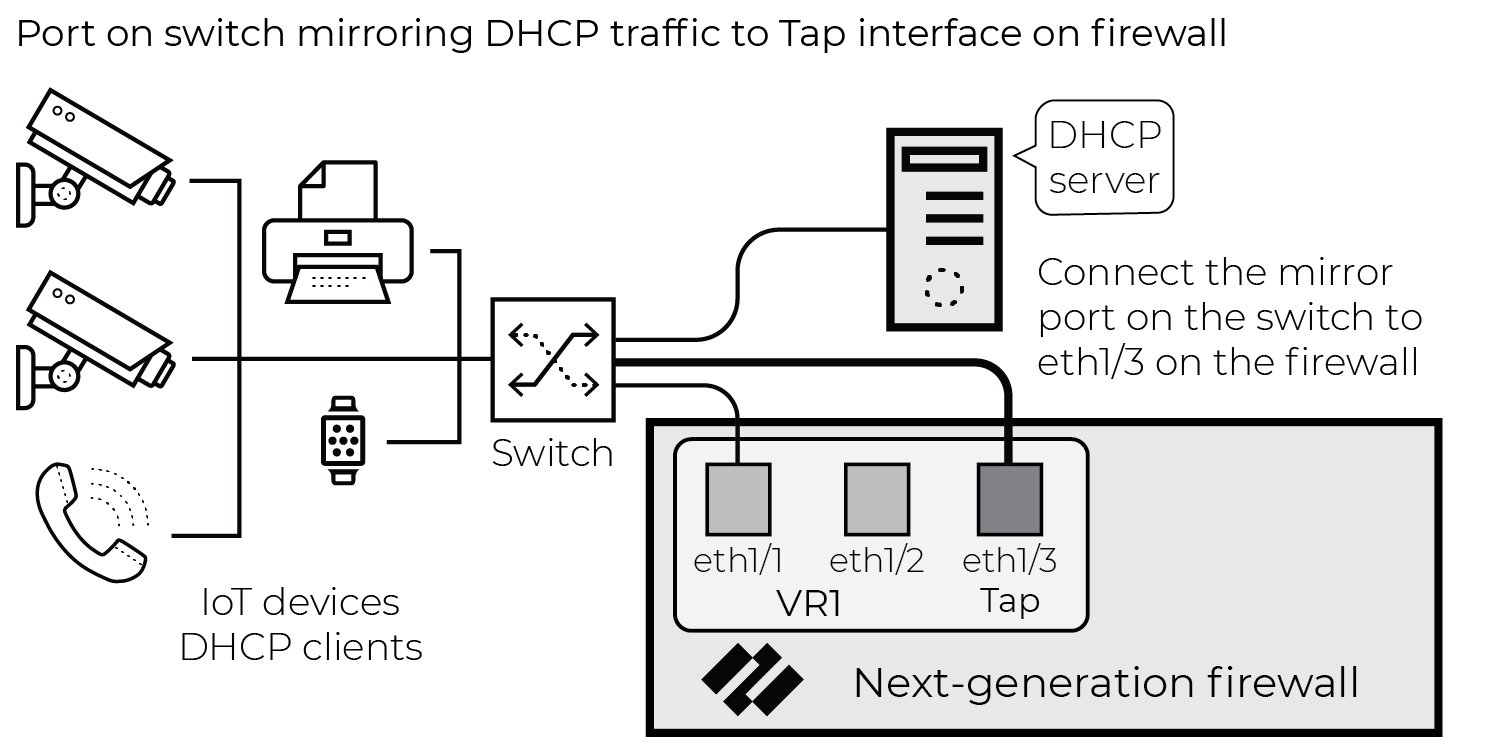
Advanced Firewall Visibility Techniques
Using Tap Interfaces
Mirror traffic (especially DHCP) from a switch to a firewall Tap interface to capture data not normally seen by the firewall. Place tap "north" of routed DHCP boundaries to capture unicast traffic. Minimize performance impact by creating specific policy rules for the Tap zone: allow DHCP (with EAL forwarding), deny/drop other traffic (without logging/forwarding).
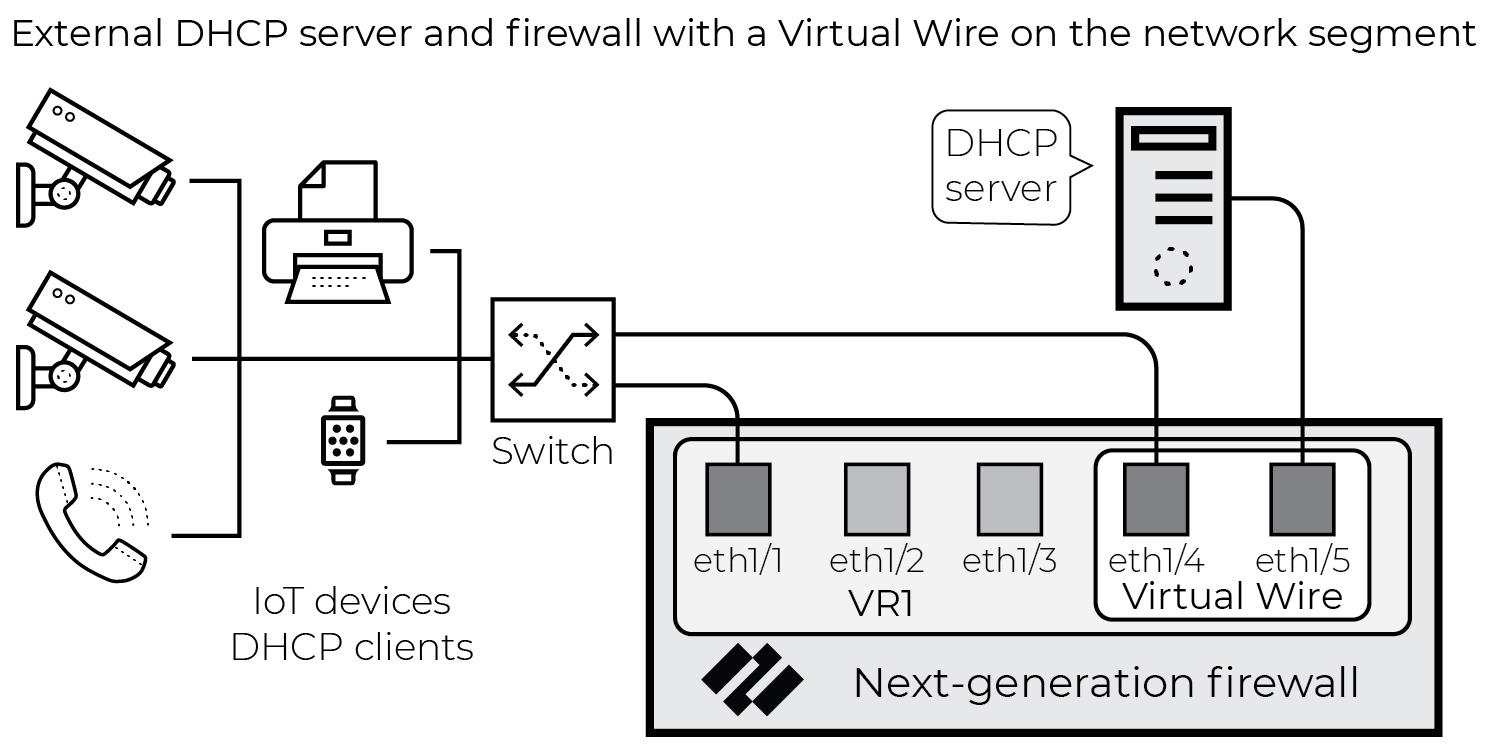
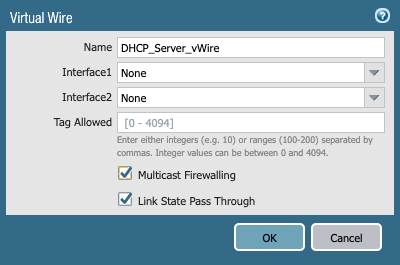
Using Virtual Wire Interfaces
Place a DHCP server behind a Virtual Wire (vWire) interface pair on the firewall. Enable multicast firewalling on the vWire object. This allows the firewall to see and log broadcast DHCP traffic occurring on the same segment as the firewall. Create policy rules allowing necessary traffic (DHCP, ping) between the vWire zones, applying EAL forwarding only to the DHCP rule.
Using SNMP Network Discovery (via Plugin)
Use the free Network Discovery plugin (install via
Device > Plugins
on firewall/Panorama) to query switches via SNMP (v2c or v3) for topology (LLDP/CDP neighbors) and device info (ARP tables for IP-to-MAC bindings, interfaces, VLANs). Helps identify devices when firewall lacks direct traffic visibility. Configure schedule, scope (entry point switch, IP range, hops), and SNMP credentials under
Device > IoT Security > Network Discovery
. Data is converted to EALs and sent to IoT Security.
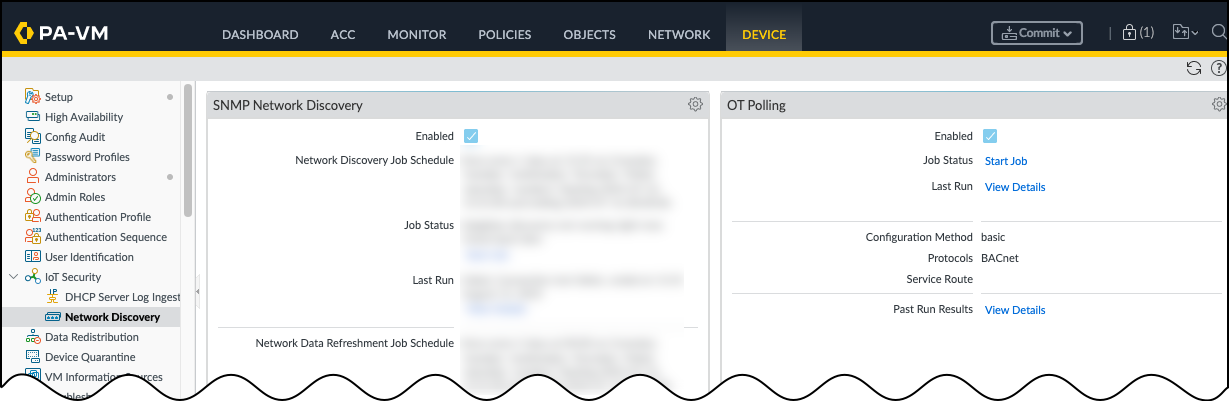
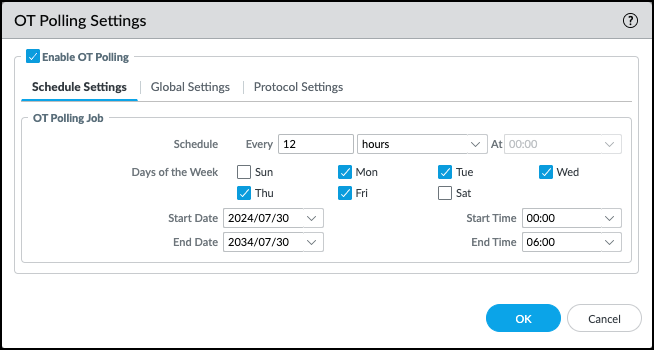
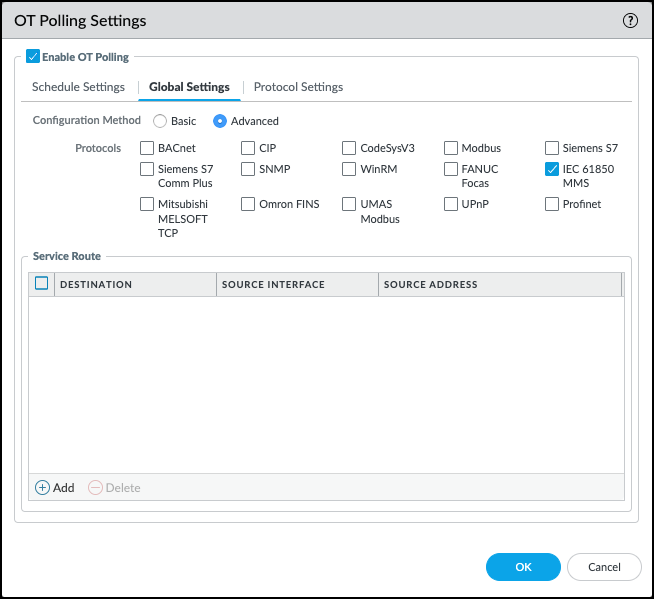
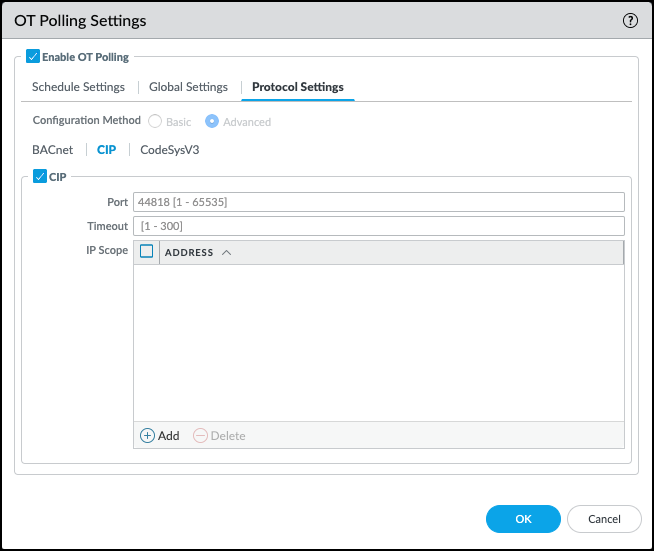
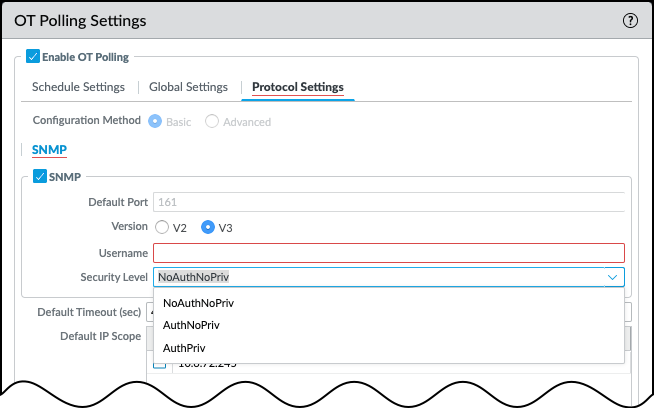
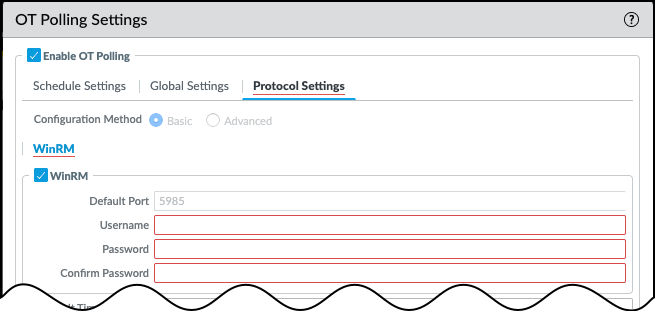
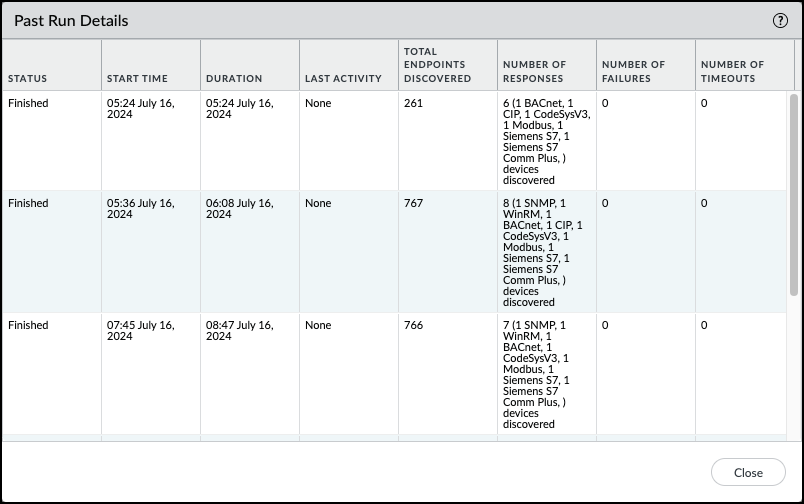
Using Network Discovery Polling (via Plugin)
Use the free Network Discovery plugin (v2.0.1+) to actively poll devices using protocols like BACnet, Modbus, SNMP, Profinet, Siemens-S7, WinRM etc. Helps identify devices missed by passive traffic analysis. Configure schedule, global settings (basic/advanced), protocols, IP scope, and credentials under
Device > IoT Security > Network Discovery > OT Polling
. Data is converted to EALs. Note unsupported firewall models (PA-41x).
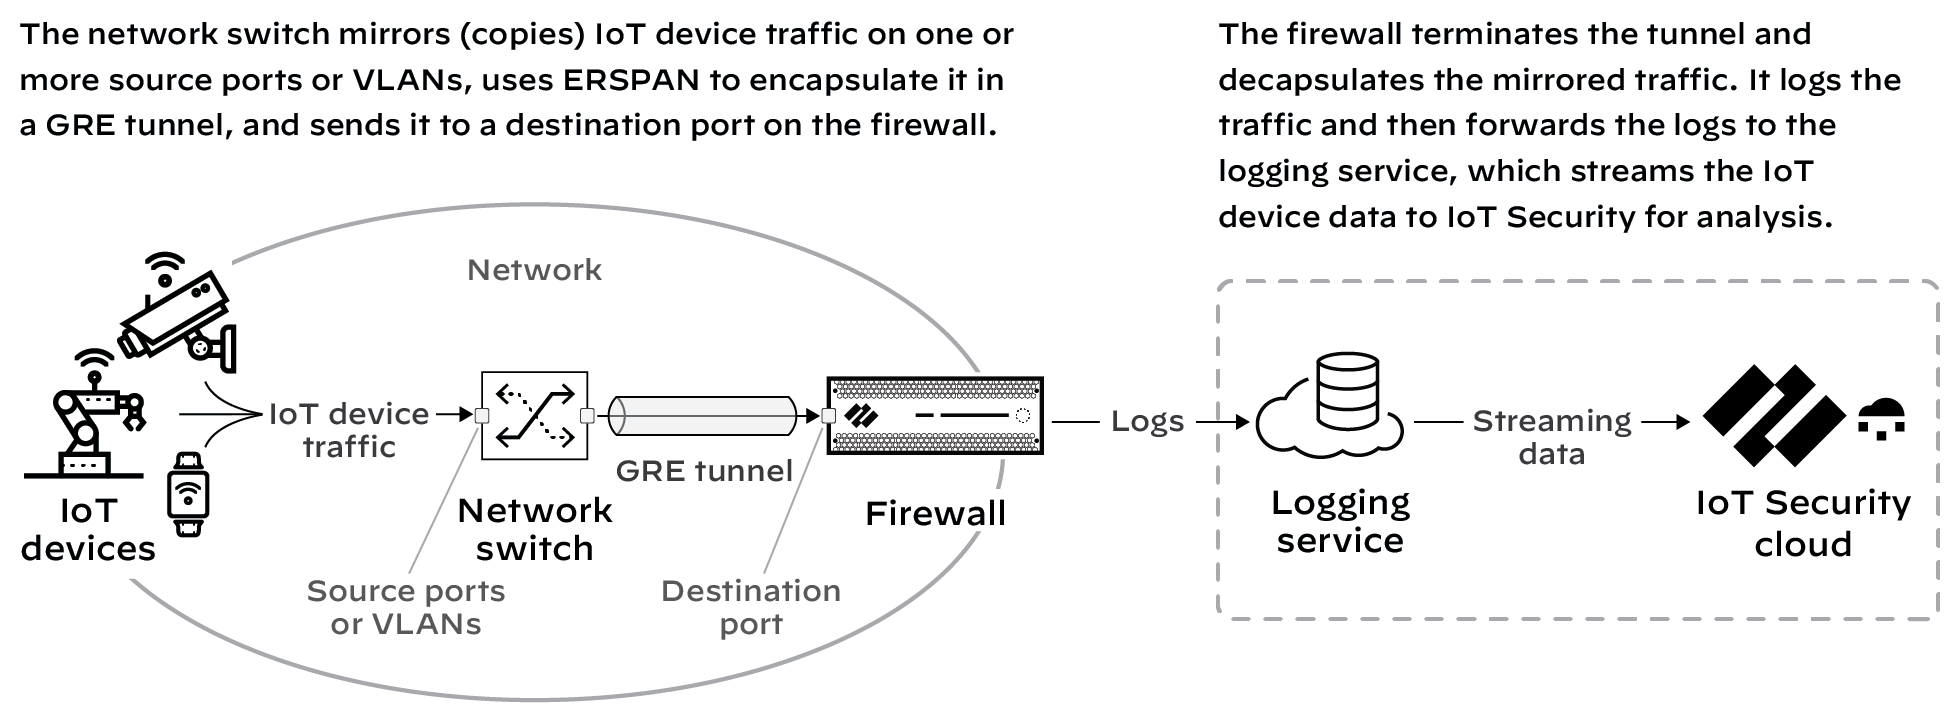
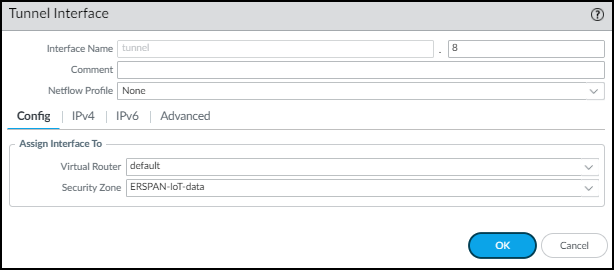
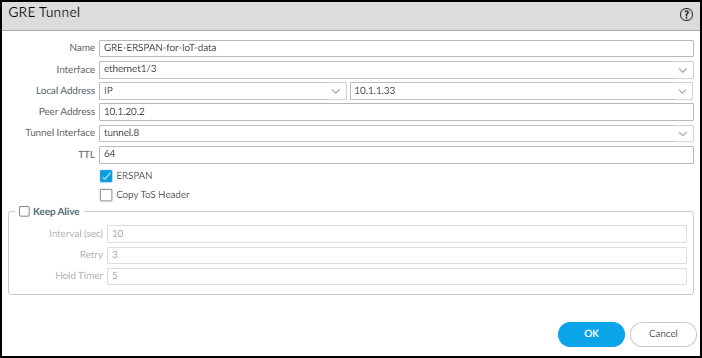
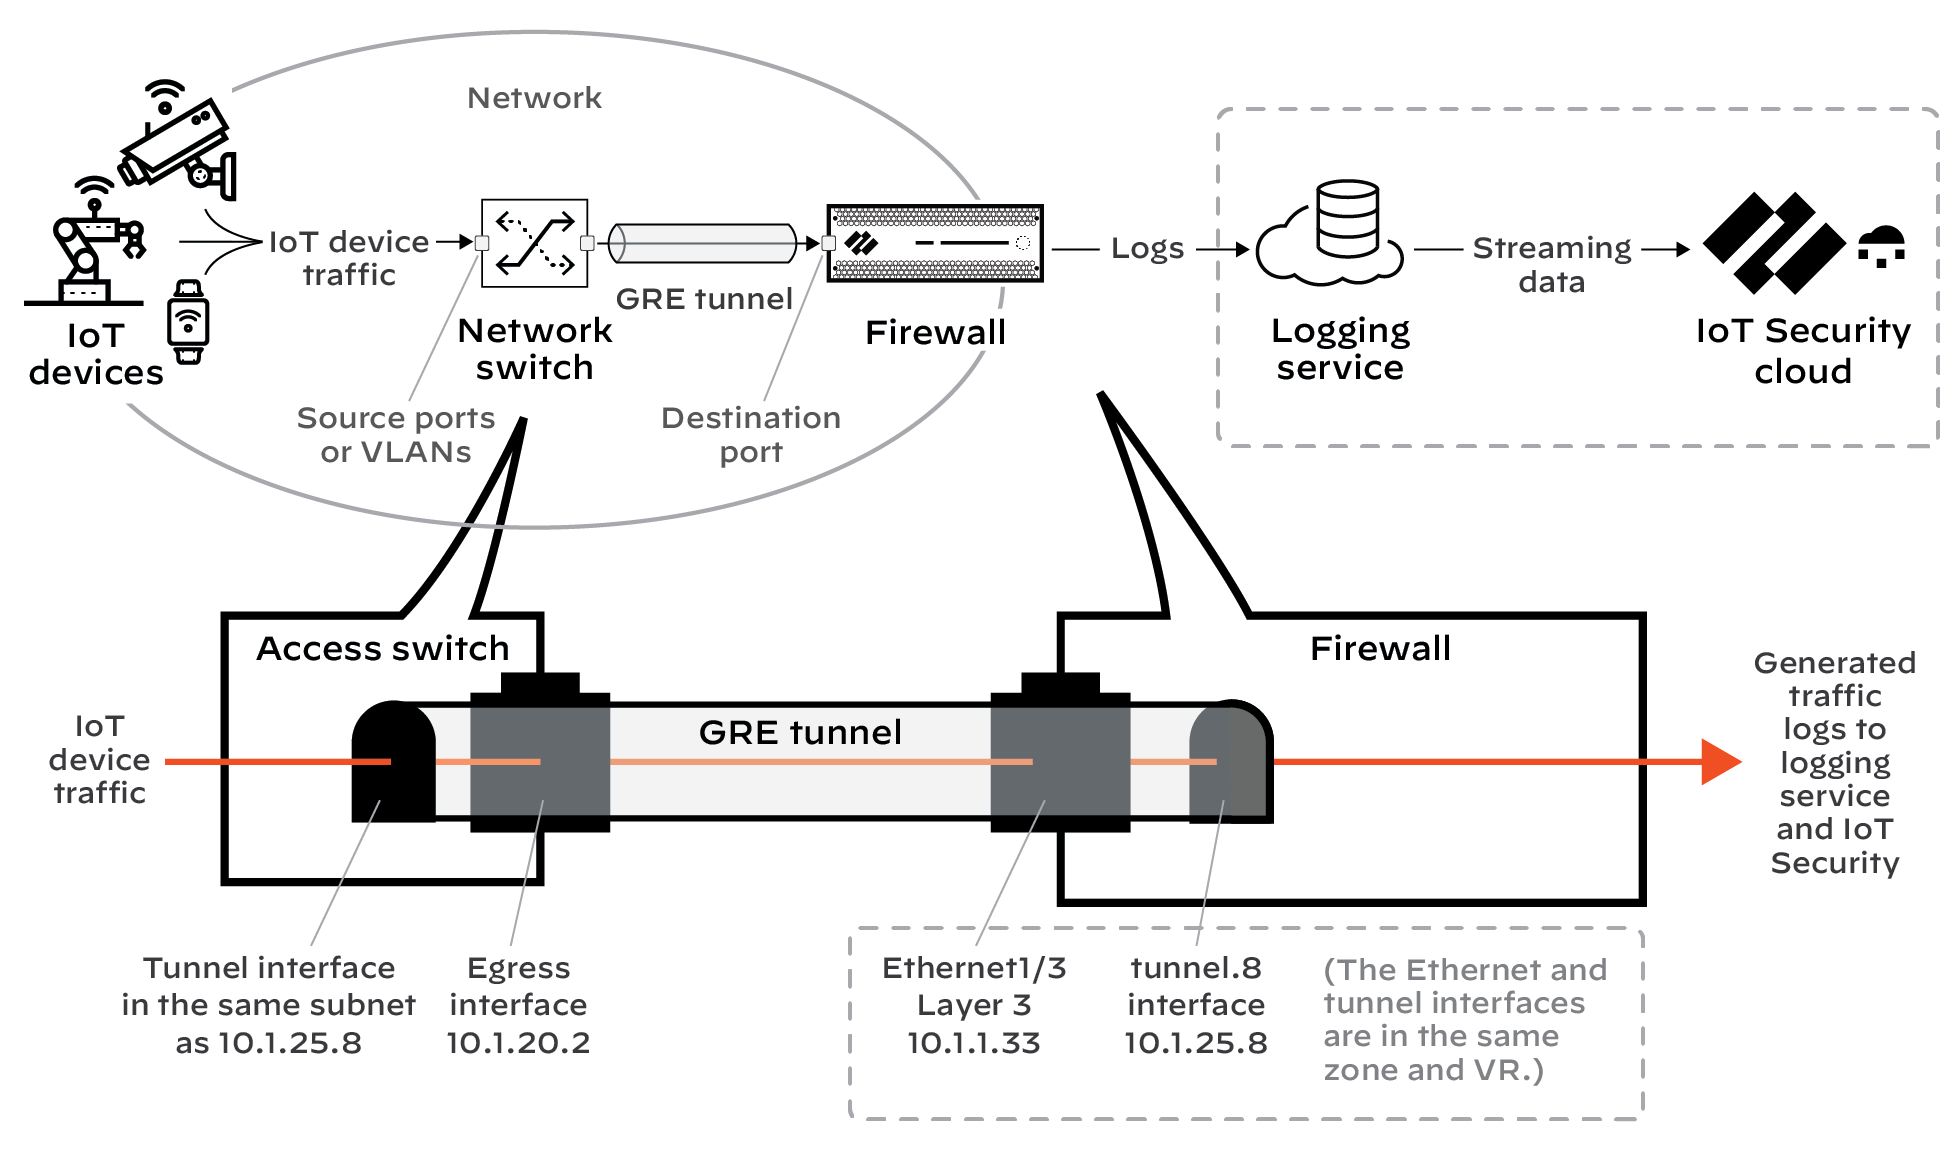
Using ERSPAN over GRE Tunnels
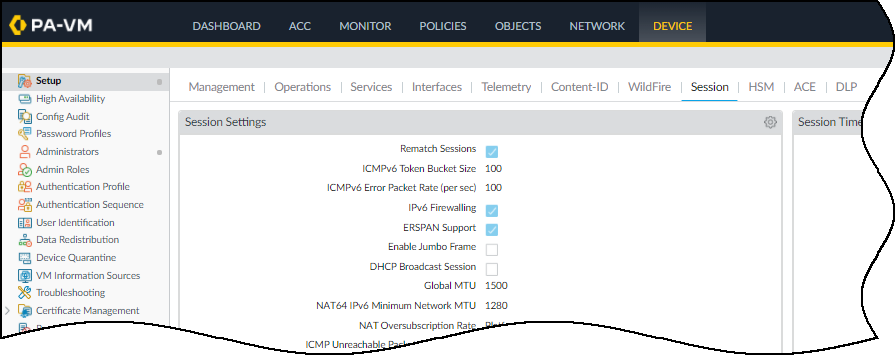
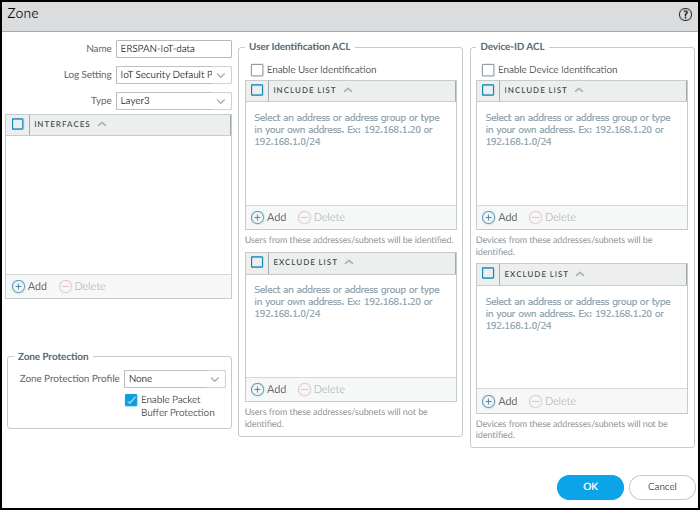
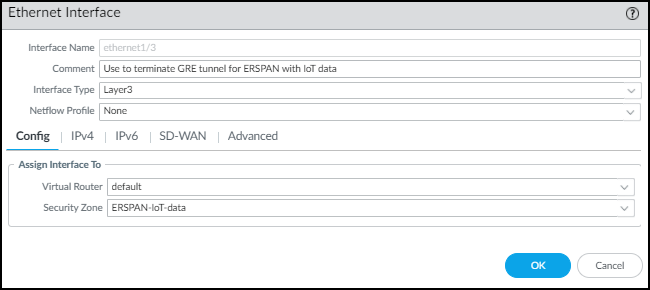
Mirror traffic on remote ERSPAN-capable switches and send it via GRE tunnel to a firewall Layer 3 interface. Enable ERSPAN support (
Device > Session > Session Settings
). Configure L3 interface, zone, tunnel interface, GRE tunnel object (with ERSPAN enabled), and routing. Firewall decapsulates, inspects, logs, and forwards data to IoT Security.
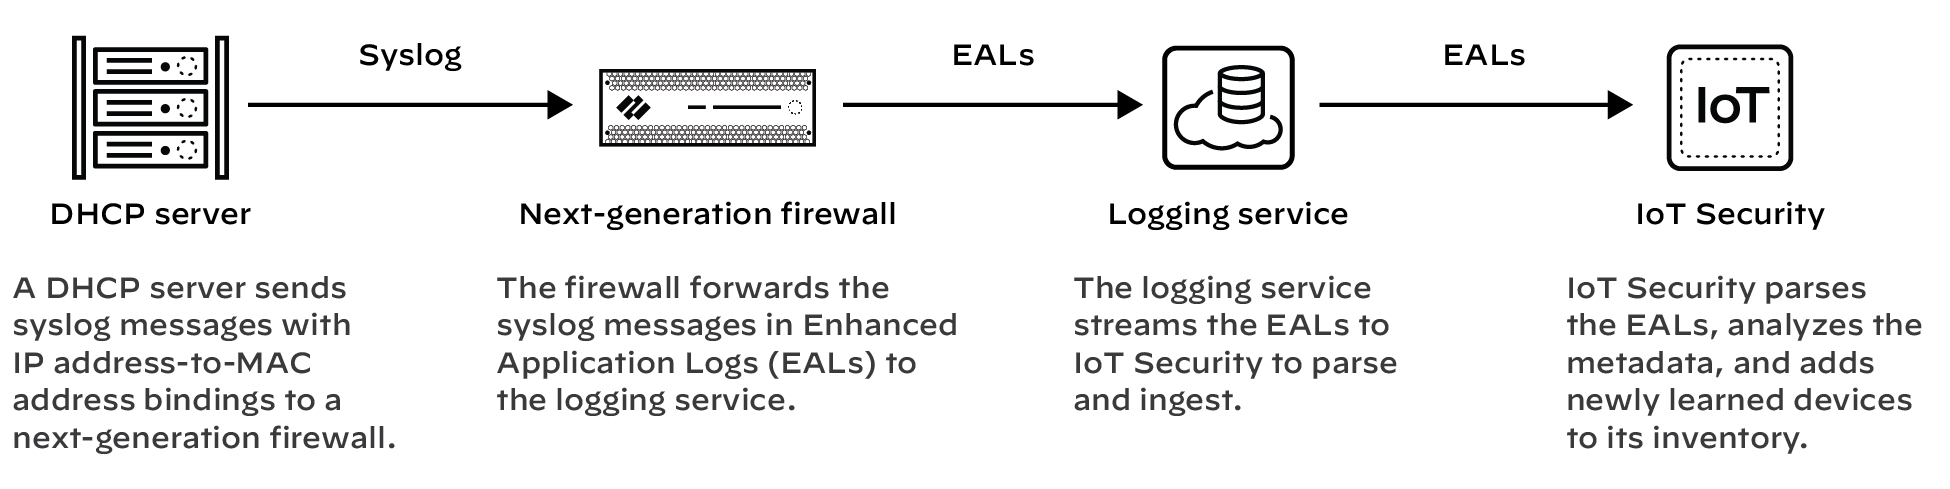
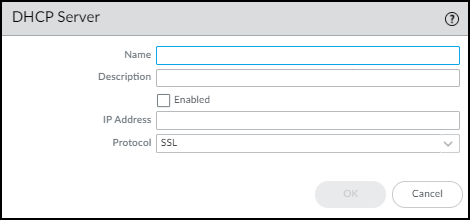
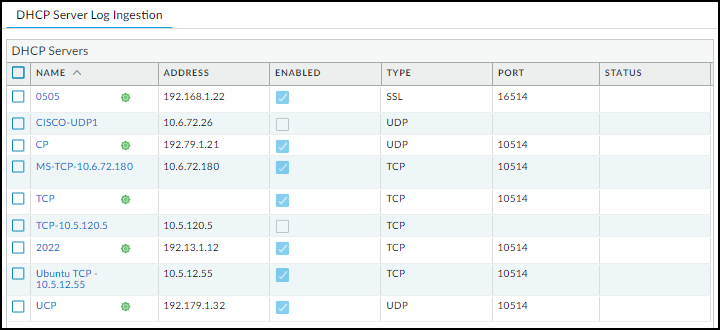
Using DHCP Server Logs
Configure DHCP servers (Windows, Linux, Infoblox etc.) to send syslog messages (TCP, UDP, or SSL) to the firewall's management interface (ports 10514/16514). Configure firewall under
Device > IoT Security > DHCP Server Log Ingestion
to accept logs from specific server IPs. Firewall converts syslogs to EALs (subtype dhcp-syslog) and forwards them. Helps get IP-to-MAC bindings when firewall isn't in DHCP path. Requires PAN-OS 11.0+.
Controlling Traffic for Onboarding Devices
To allow new, unidentified devices necessary network access for identification without compromising Zero Trust:
Create Security policy rules allowing basic/expected traffic for new devices (e.g., per VLAN).
In the rule's Source tab, add a Device-ID match for Category = "Onboarding Device".
In the IoT Security portal (Owner role), go to
Policy Sets > Settings
and enable "Control newly onboarded low-confidence devices...".
Set the onboarding duration (default 7 days). Devices with confidence < 90% are categorized as "Onboarding Device" during this period.
After identification or period expiry, the device moves to its identified category, and standard Device-ID rules apply.
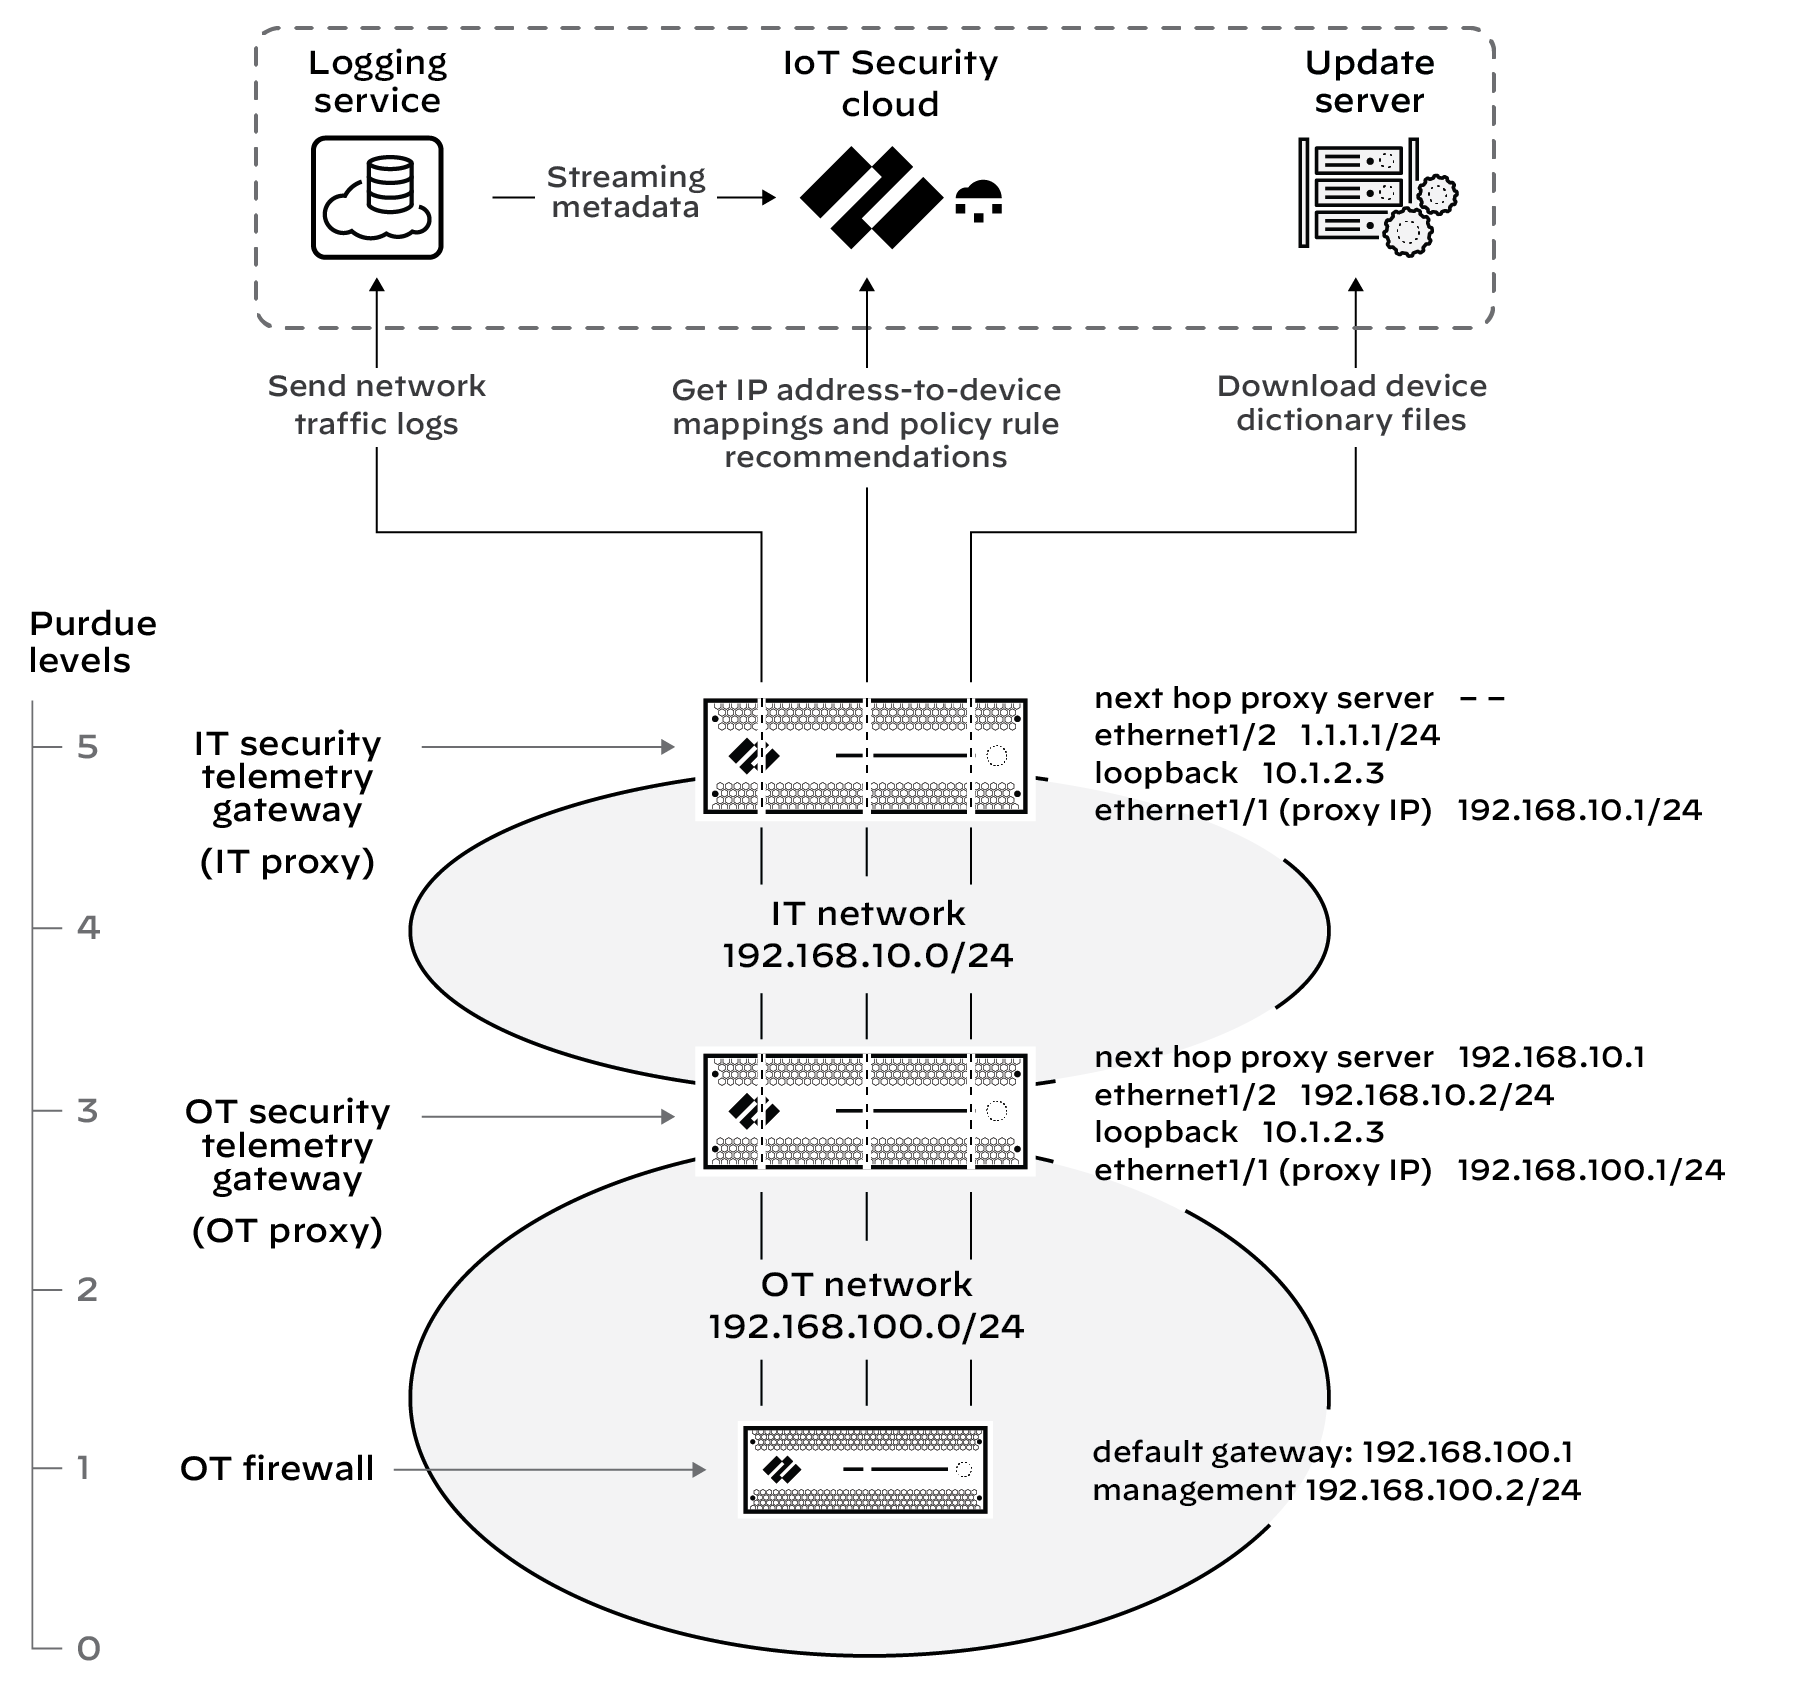
Use designated next-generation firewalls (specific models/PAN-OS versions required) as Security Telemetry Gateways (proxies) to forward logs and service requests (licenses, certs, mappings, recommendations, dictionary files) from isolated firewalls to the cloud via a chain of gateways (e.g., OT Gateway -> IT Gateway -> Cloud).
Enable proxy mode on gateway firewalls via CLI (`set system setting paloalto-networks-service-proxy on`) and reboot.
Configure interfaces (e.g., OT-facing, IT-facing, loopback) and routing on each gateway.
Configure DNS Proxy if needed.
Create URL Category (`iot_cloud_traffic`) with required Palo Alto Networks FQDNs/IPs.
Create Security policy allowing traffic from downstream zone to upstream zone for the `iot_cloud_traffic` URL category. Add NAT policy.
Configure Proxy Settings (
Network > Proxy
): Enable Palo Alto Networks Service Proxy, set listening/upstream interfaces, proxy IP, DNS proxy, allowed URL category, and crucially, the *Next Hop Proxy Server/Port* (IP/port of the *next* gateway in the chain, or leave blank for the final gateway connecting to the cloud).
Configure isolated OT firewalls: Set their Default Gateway (MGT interface) or Service Route (data interface) to point to the first gateway (OT Gateway). Configure Proxy Server settings (
Device > Setup > Services
) to point to the OT Gateway IP and port 8080, enabling "Use proxy to send logs...".
Onboard IoT Security on isolated OT firewalls; they will use the proxy chain for all cloud communications.
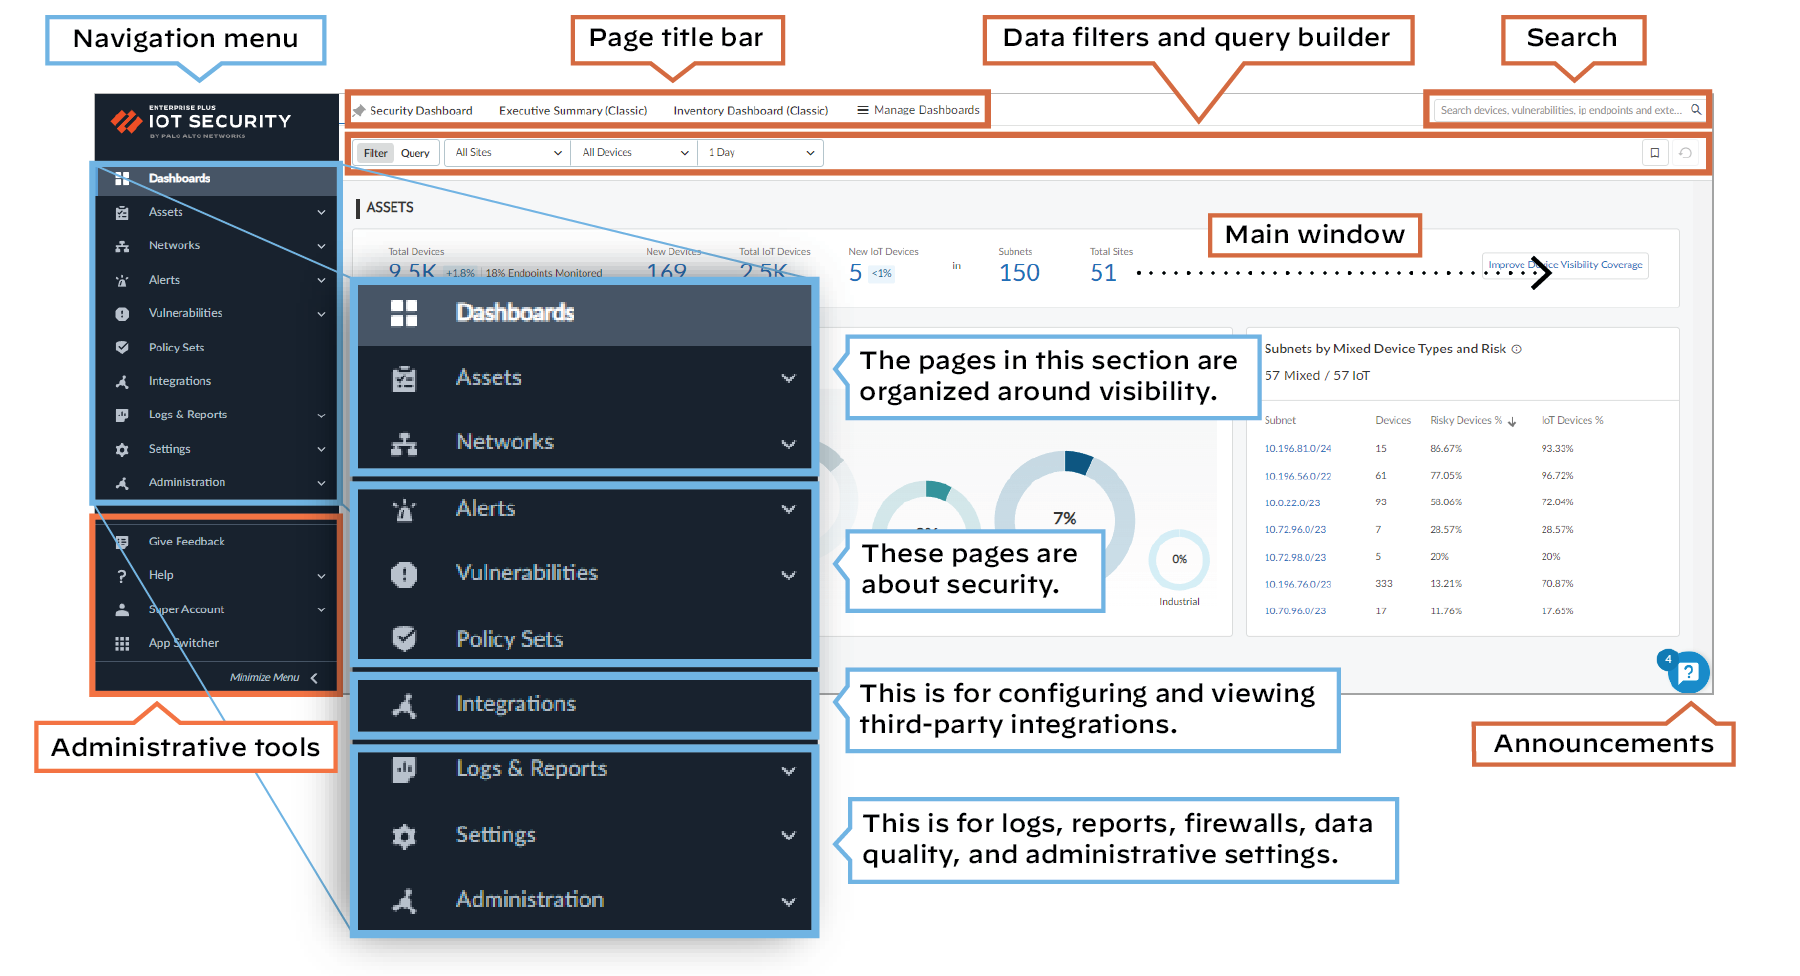
Navigate the IoT Security Portal
Access the portal via your unique subdomain URL. Login uses Palo Alto Networks SSO (or configured external IdP).
Key Areas:
Left Navigation:
Access main sections like Dashboard, Assets, Networks, Alerts, Vulnerabilities, Policy Sets, Integrations, Logs & Reports, Settings, Administration.
Admin Tools (Bottom Left):
Feedback, Help, User Preferences (contact info, timeout, notifications, theme), Resource Center, Logout, App Switcher.
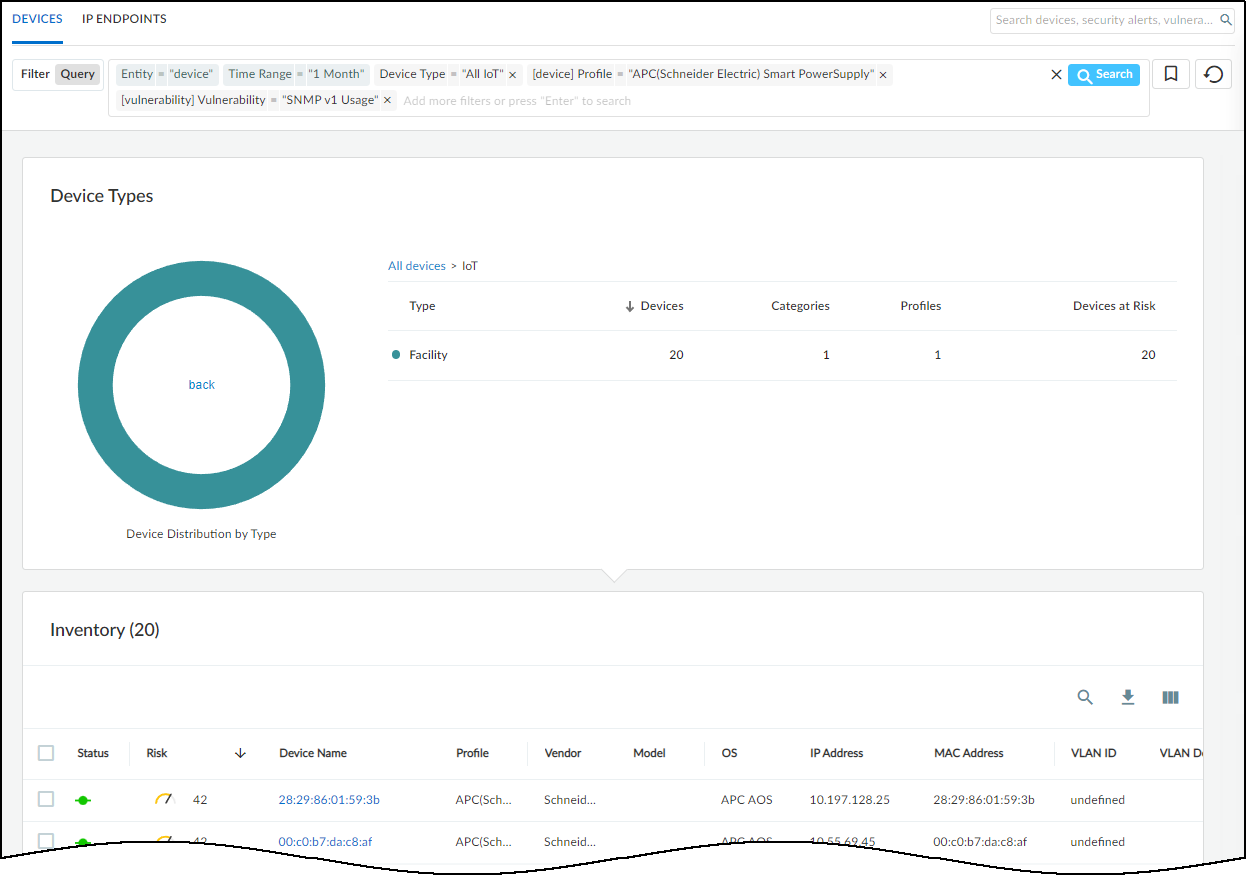
Top Bar:
Search (devices, alerts, vulnerabilities, destinations), Data Filters (Site, Device Type, Time Range - persist across pages), Query Builder.
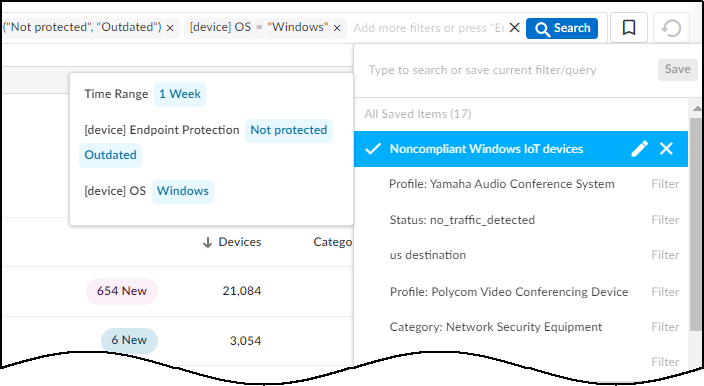
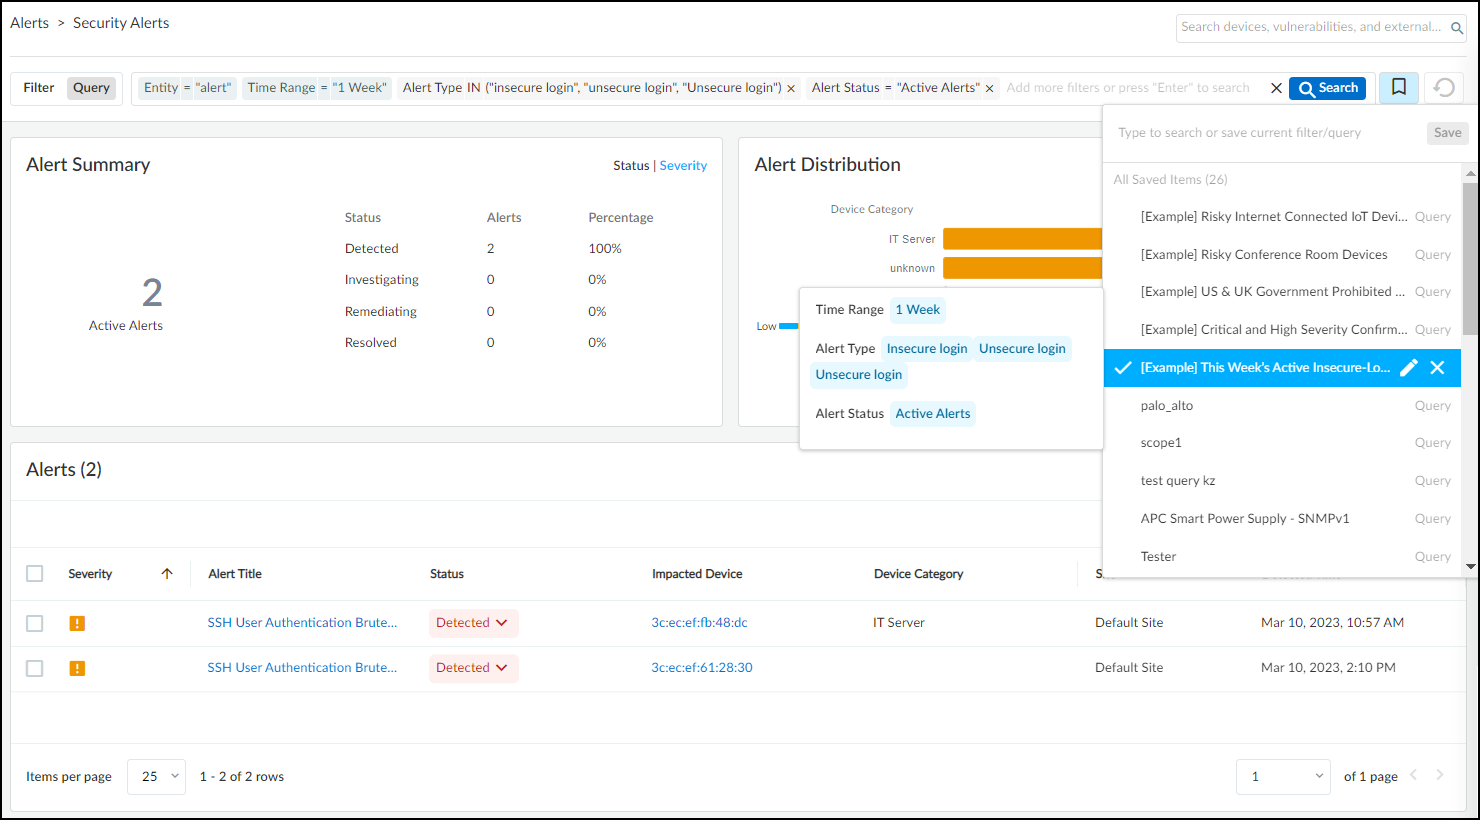
Query Builder:
Construct complex searches combining device, alert, and vulnerability criteria. Save common queries. Example templates provided.
Announcements Panel (Right):
Feature releases and security news.
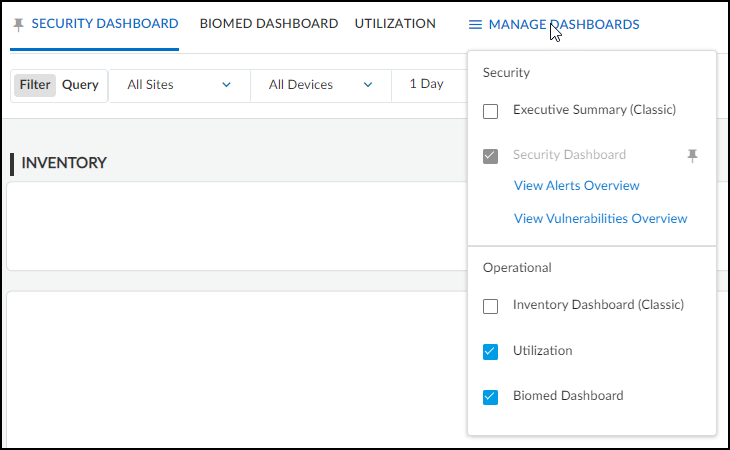
Manage Dashboards (Top Right):
Customize which dashboards are visible as tabs and set the default (pinned) dashboard.
Vertical-themed Portals
The portal adapts based on the purchased product or theme selected by an Owner.
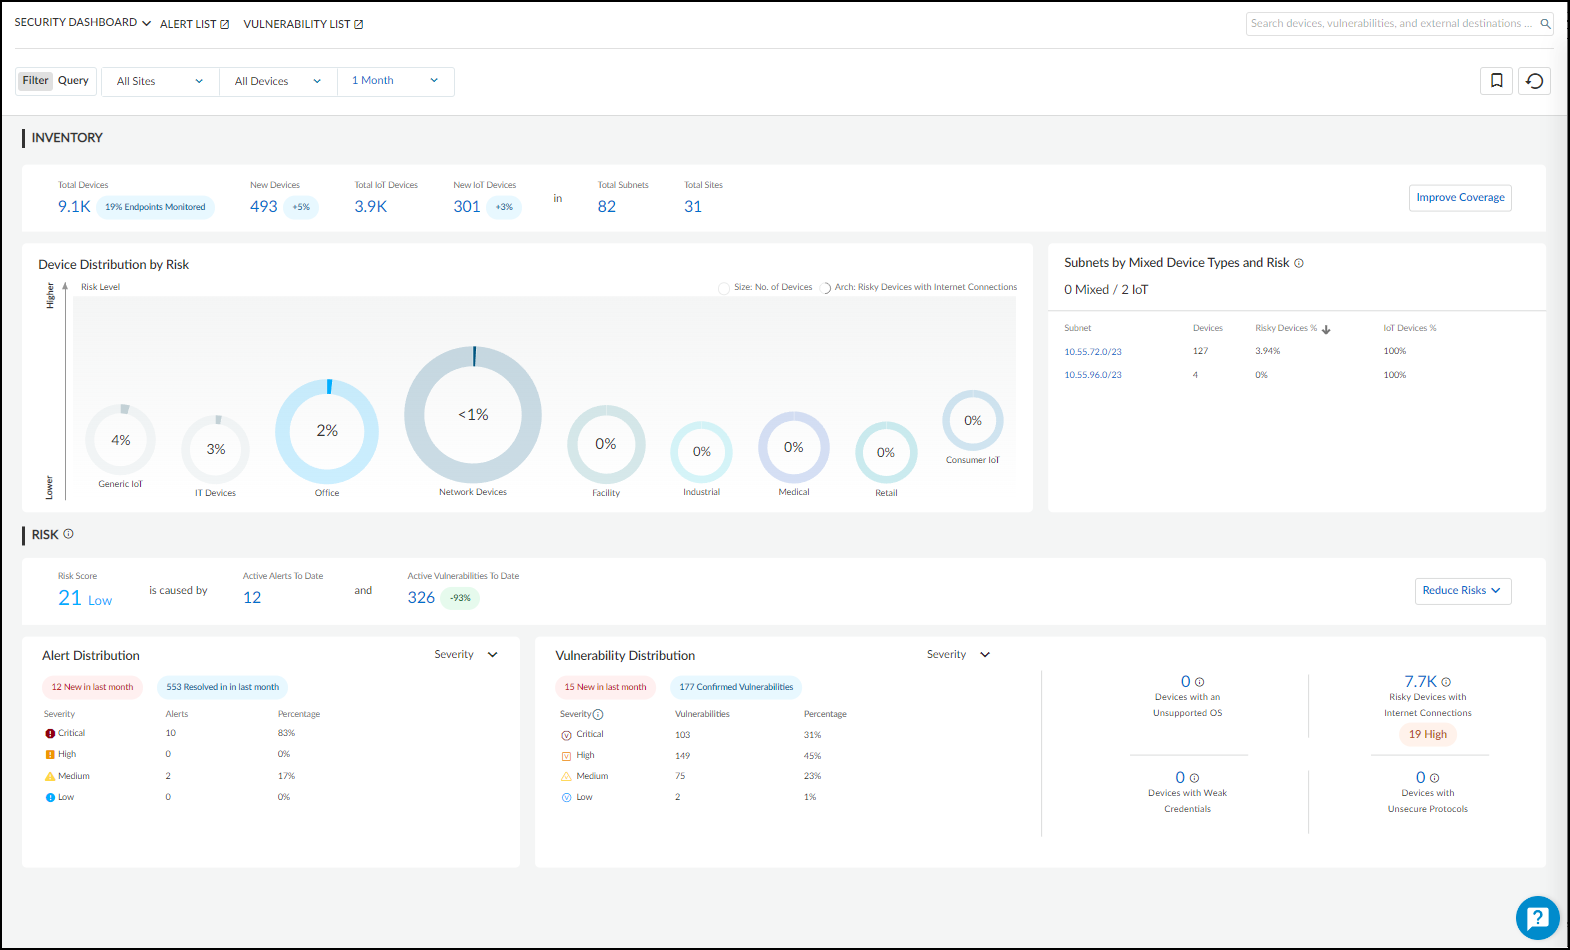
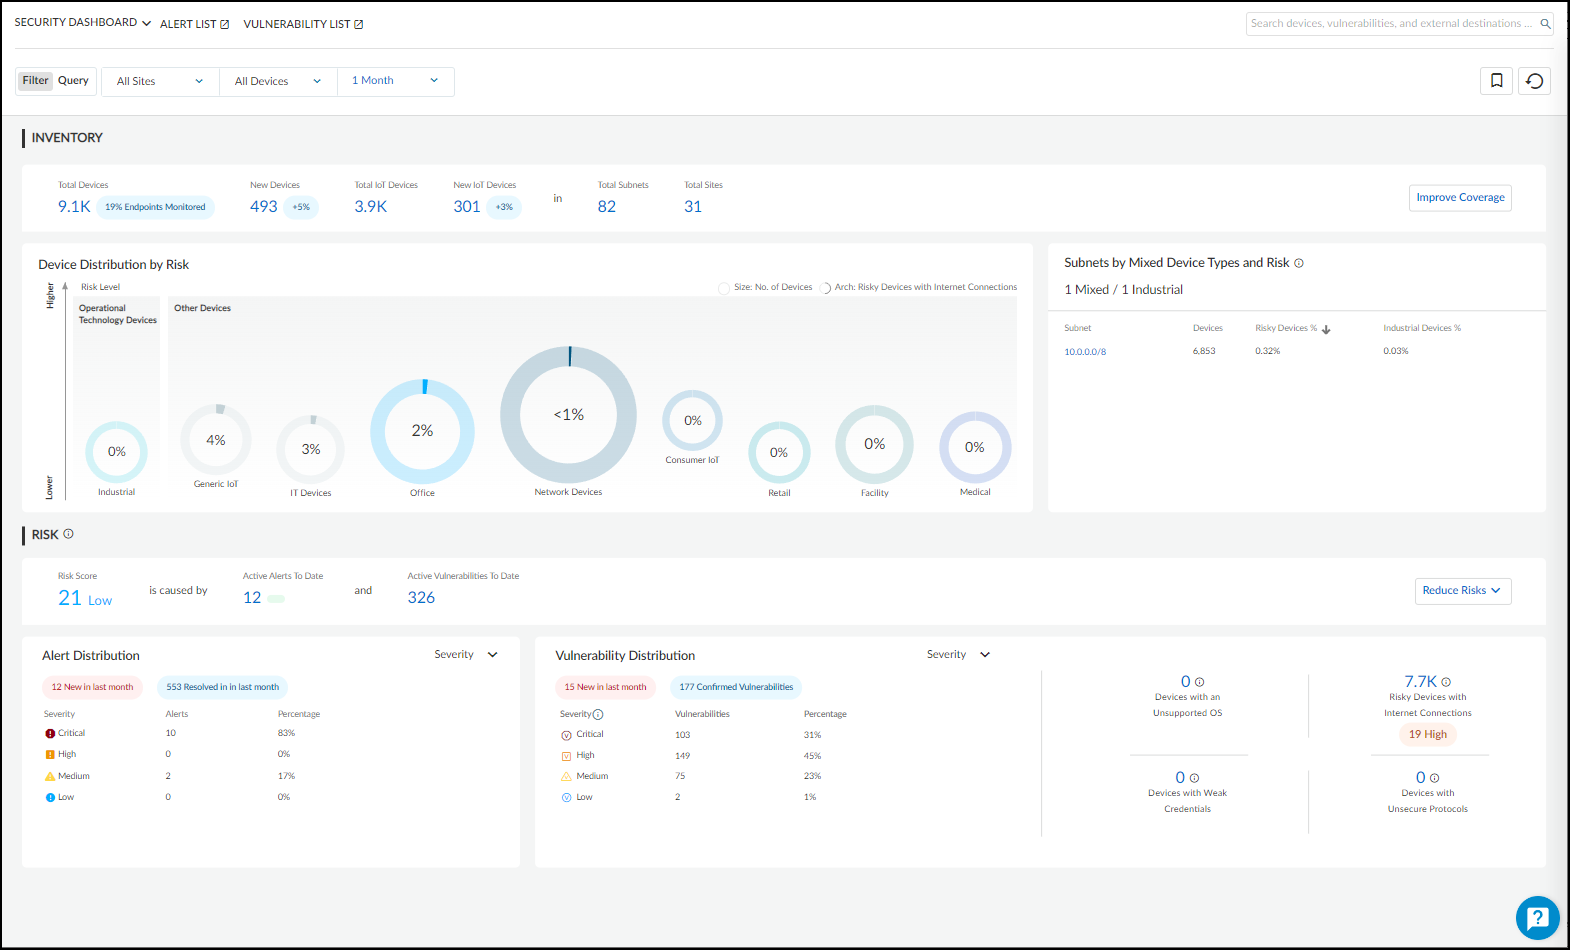
Enterprise IoT Security Plus:
Core offering for enterprises/government. Includes full visibility, risk/vulnerability assessment, alerts, policy recommendations, integrations. Default dashboard is Security Dashboard.
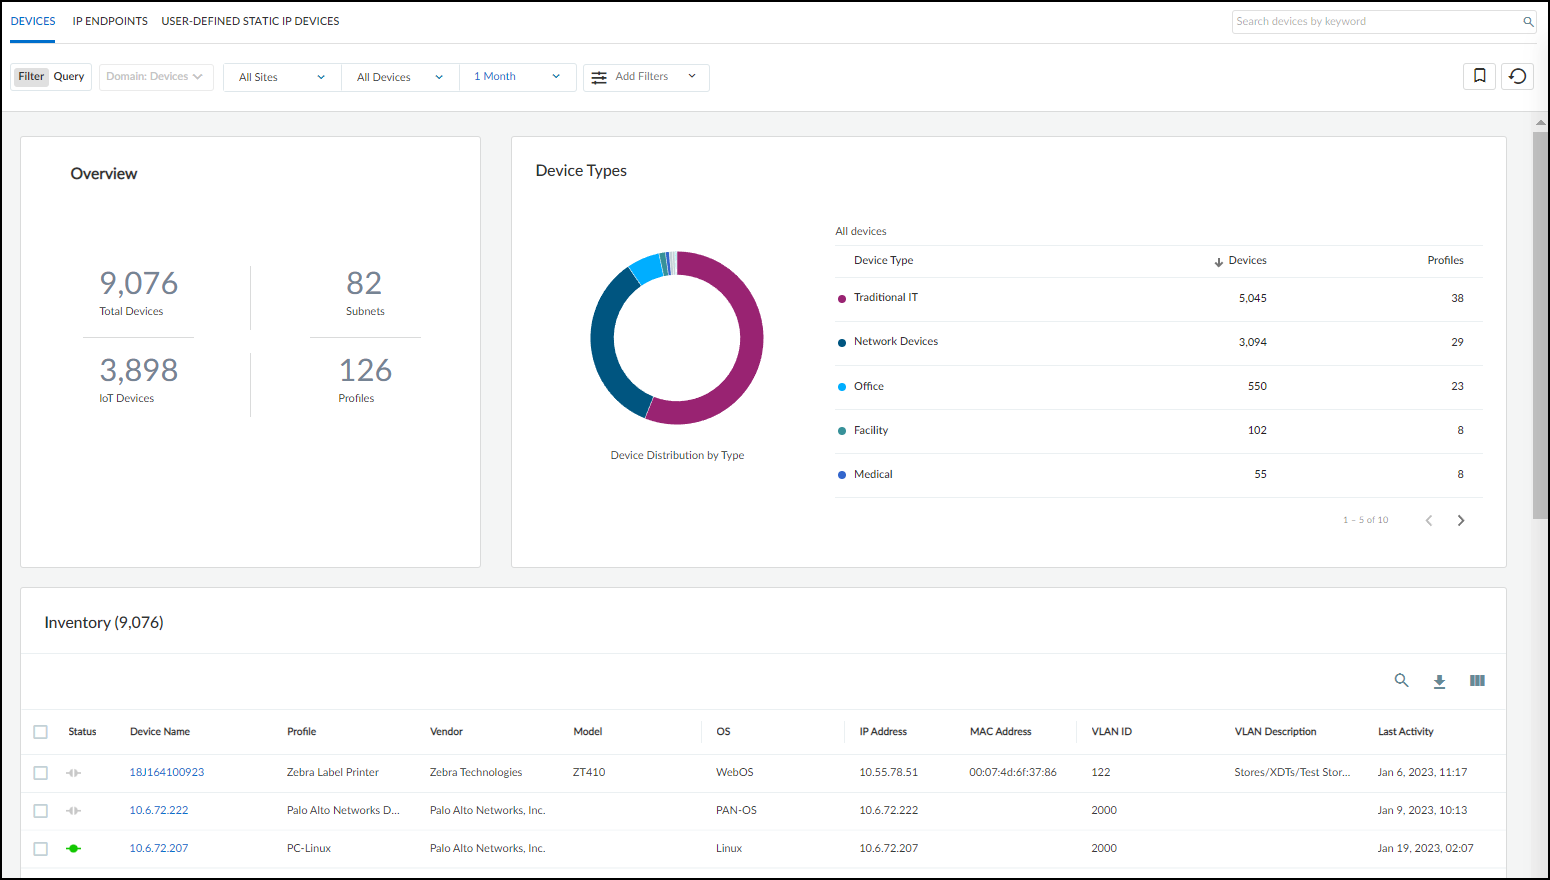
Enterprise IoT Security:
Visibility-focused, limited attributes, no security features/integrations. Default landing page is Devices table.
Industrial IoT Security:
Enterprise Plus features + OT anomaly detection, Purdue level visualization, custom process integrity rules. Includes Security Dashboard.
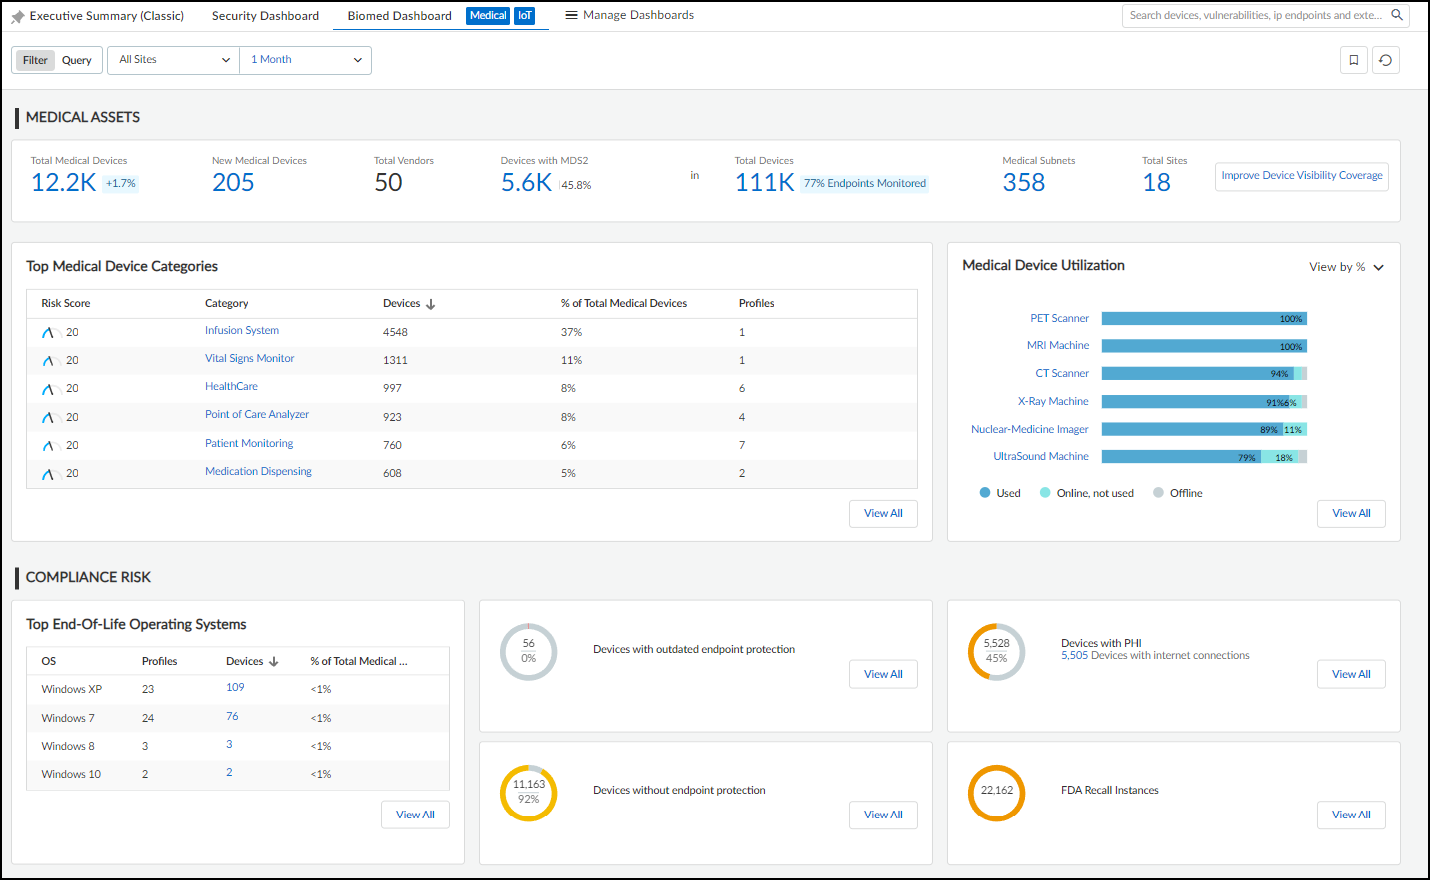
Medical IoT Security:
Enterprise Plus features + medical device anomaly detection, risk assessment using FDA recalls/MDS2, utilization tracking. Includes Security Dashboard, BioMed Dashboard, Utilization Dashboard, FDA Recalls page, MDS2 page.
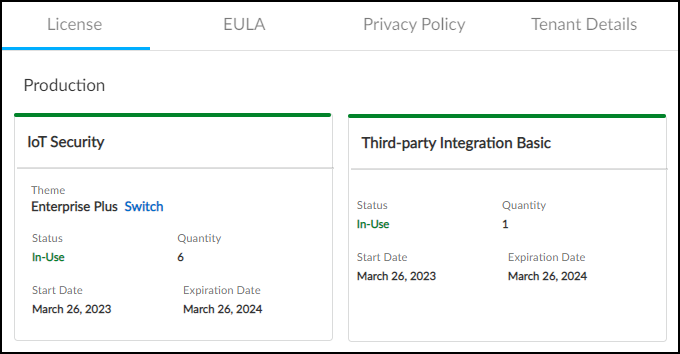
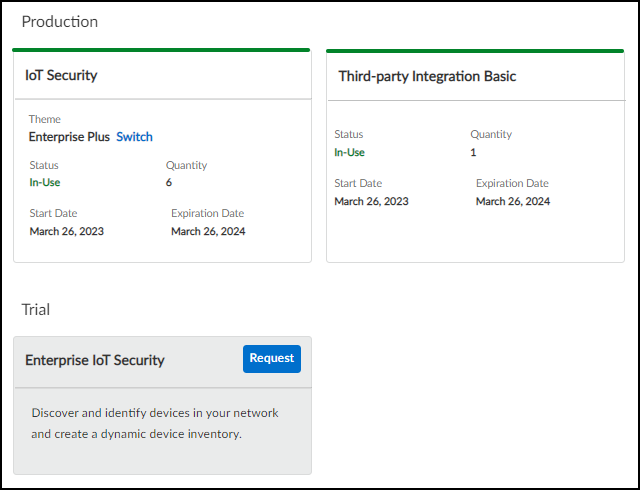
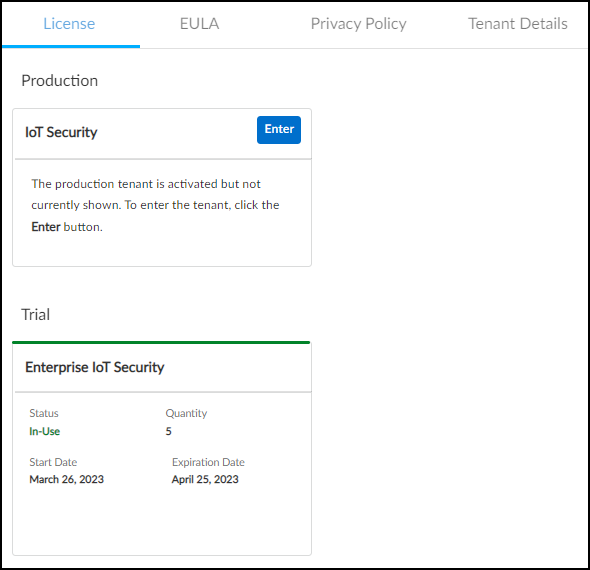
Owners can switch themes via
Administration > About > License > Switch
.
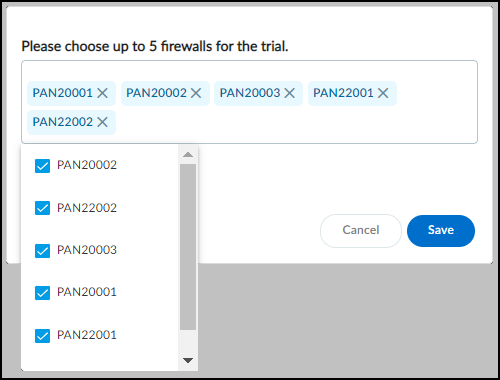
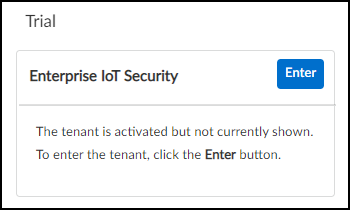
A 30-day trial of Enterprise IoT Security can be requested from the License page if you have a higher-tier license.