NPTv6 Overview
This section describes IPv6-to-IPv6 Network Prefix Translation (NPTv6) and how to configure it. NPTv6 is defined in RFC 6296 . Palo Alto Networks® does not implement all functionality defined in the RFC, but is compliant with the RFC in the functionality it has implemented.
NPTv6 performs stateless translation of one IPv6 prefix to another IPv6 prefix. It is stateless, meaning that it does not keep track of ports or sessions on the addresses translated. NPTv6 differs from NAT66, which is stateful. Palo Alto Networks supports NPTv6 RFC 6296 prefix translation; it does not support NAT66.
With the limited addresses in the IPv4 space, NAT was required to translate private, non-routable IPv4 addresses to one or more globally-routable IPv4 addresses. For organizations using IPv6 addressing, there is no need to translate IPv6 addresses to IPv6 addresses due to the abundance of IPv6 addresses. However, there are reasons to use NPTv6 to translate IPv6 prefixes at the firewall.
It is important to understand that NPTv6 does not provide security. In general, stateless network address translation does not provide any security; it provides an address translation function. NPTv6 does not hide or translate port numbers. You must set up firewall security policies correctly in each direction to ensure that traffic is controlled as you intended.
NPTv6 translates the prefix portion of an IPv6 address but not the host portion or the application port numbers . The host portion is simply copied, and therefore remains the same on either side of the firewall. The host portion also remains visible within the packet header.
NPTv6 is supported on the following firewall models (NPTv6 with hardware lookup but packets go through the CPU):
- PA-7000 Series firewalls
- PA-5200 Series firewalls
- PA-3200 Series firewalls
- PA-800 firewall
- PA-220 firewall
VM-Series firewalls support NPTv6, but with no ability to have hardware perform a session lookup.
Unique Local Addresses (ULA)
RFC 4193 , Unique Local IPv6 Unicast Addresses , defines unique local addresses (ULAs), which are IPv6 unicast addresses. They can be considered IPv6 equivalents of the private IPv4 addresses identified in RFC 1918 , Address Allocation for Private Internets , which cannot be routed globally.
A ULA is globally unique, but not expected to be globally routable . It is intended for local communications and to be routable in a limited area such as a site or among a small number of sites. Palo Alto Networks® does not recommend that you assign ULAs, but a firewall configured with NPTv6 will translate prefixes sent to it, including ULAs.
Reasons to Use NPTv6
Although there is no shortage of public, globally routable IPv6 addresses, there are reasons you might want to translate IPv6 addresses. NPTv6:
- Prevents asymmetrical routing —Asymmetric routing can occur if a Provider Independent address space (/48, for example) is advertised by multiple data centers to the global Internet. By using NPTv6, you can advertise more specific routes from regional firewalls, and the return traffic will arrive at the same firewall where the source IP address was translated by the translator. (PCNSE/PCNSA relevance: Understand use cases for NAT/NPTv6).
- Provides address independence —You need not change the IPv6 prefixes used inside your local network if the global prefixes are changed (for example, by an ISP or as a result of merging organizations). Conversely, you can change the inside addresses at will without disrupting the addresses that are used to access services in the private network from the Internet. In either case, you update a NAT rule rather than reassign network addresses.
- Translates ULAs for routing —You can have Unique Local Addresses assigned within your private network, and have the firewall translate them to globally routable addresses. Thus, you have the convenience of private addressing and the functionality of translated, routable addresses.
- Reduces exposure to IPv6 prefixes —IPv6 prefixes are less exposed than if you didn’t translate network prefixes, however, NPTv6 is not a security measure . The interface identifier portion of each IPv6 address is not translated; it remains the same on each side of the firewall and visible to anyone who can see the packet header. Additionally, the prefixes are not secure; they can be determined by others.
How NPTv6 Works
When you configure a policy for NPTv6, the Palo Alto Networks® firewall performs a static, one-to-one IPv6 translation in both directions . The translation is based on the algorithm described in RFC 6296 .
In one use case, the firewall performing NPTv6 is located between an internal network and an external network (such as the Internet) that uses globally routable prefixes. When datagrams are going in the outbound direction, the internal source prefix is replaced with the external prefix; this is known as source translation .
In another use case, when datagrams are going in the inbound direction, the destination prefix is replaced with the internal prefix (known as destination translation ). The figure below illustrates destination translation and a characteristic of NPTv6: only the prefix portion of an IPv6 address is translated . The host portion of the address is not translated and remains the same on either side of the firewall. In the figure below, the host identifier is 111::55 on both sides of the firewall.
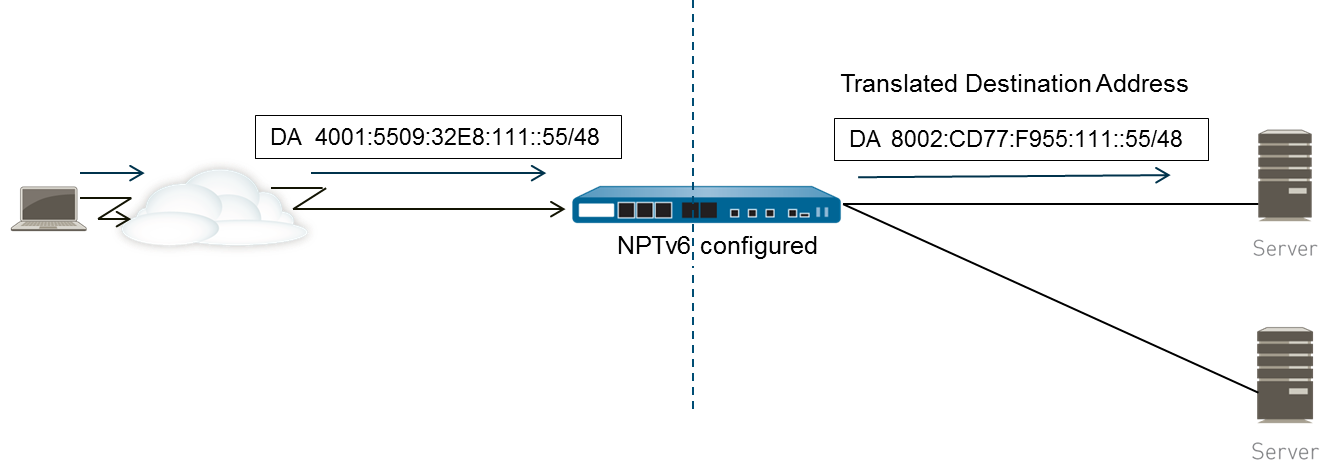
NPTv6 Destination Translation: External prefix 2001:DB8::/48 is translated to internal prefix FDD4:7A3E::/48. The host identifier ::111:55 remains unchanged.
It is important to understand that NPTv6 does not provide security. While you are planning your NPTv6 NAT policies, remember also to configure security policies in each direction.
A NAT or NPTv6 policy rule cannot have both the Source Address and the Translated Address set to Any.
In an environment where you want IPv6 prefix translation, three firewall features work together: NPTv6 NAT policies, security policies, and NDP Proxy.
Checksum-Neutral Mapping
The NPTv6 mapping translations that the firewall performs are checksum-neutral , meaning that “... they result in IP headers that will generate the same IPv6 pseudo-header checksum when the checksum is calculated using the standard Internet checksum algorithm [ RFC 1071 ].” See RFC 6296 , Section 2.6, for more information about checksum-neutral mapping.
If you are using NPTv6 to perform destination NAT, you can provide the internal IPv6 address and the external prefix/prefix length of the firewall interface in the syntax of the test nptv6 CLI command. The CLI responds with the checksum-neutral, public IPv6 address to use in your NPTv6 configuration to reach that destination.
Bi-Directional Translation
When you Create an NPTv6 Policy, the Bi-directional option in the Translated Packet tab provides a convenient way for you to have the firewall create a corresponding NAT or NPTv6 translation in the opposite direction of the translation you configured. By default, Bi-directional translation is disabled.
If you enable Bi-directional translation, it is very important to make sure you have security policies in place to control the traffic in both directions. Without such policies, the Bi-directional feature will allow packets to be automatically translated in both directions, which you might not want.
NPTv6 Applied to a Specific Service
The Palo Alto Networks implementation of NPTv6 offers the ability to filter packets to limit which packets are subject to translation. Keep in mind that NPTv6 does not perform port translation. There is no concept of Dynamic IP and Port (DIPP) translation because NPTv6 translates IPv6 prefixes only. However, you can specify that only packets for a certain service port undergo NPTv6 translation. To do so, Create an NPTv6 Policy that specifies a Service in the Original Packet.
Limitations & Considerations
The firewall does not translate the following:
- Addresses that the firewall has in its Neighbor Discovery (ND) cache. (Critical for NDP Proxy interaction)
- The subnet 0xFFFF (in accordance with RFC 6296 , Appendix B).
- IP multicast addresses.
- IPv6 addresses with a prefix length of /31 or shorter. (Supported range is /32 to /112).
- Link-local addresses. If the firewall is operating in virtual wire mode, there are no IP addresses to translate, and the firewall does not translate link-local addresses. (VWire considerations)
- Addresses for TCP sessions that authenticate peers using the TCP Authentication Option (RFC 5925).
When using NPTv6, performance for fast path traffic is impacted because NPTv6 is performed in the slow path.
NPTv6 will work with IPSec IPv6 only if the firewall is originating and terminating the tunnel. Transit IPSec traffic would fail because the source and/or destination IPv6 address would be modified. A NAT traversal technique that encapsulates the packet would allow IPSec IPv6 to work with NPTv6.
NDP Proxy
Neighbor Discovery Protocol (NDP) for IPv6 performs functions similar to those provided by Address Resolution Protocol (ARP) for IPv4. RFC 4861 defines Neighbor Discovery for IP version 6 (IPv6) . Hosts, routers, and firewalls use NDP to determine the link-layer addresses of neighbors on connected links, to keep track of which neighbors are reachable, and to update neighbors’ link-layer addresses that have changed. Peers advertise their own MAC address and IPv6 address, and they also solicit addresses from peers.
NDP also supports the concept of proxy , when a node has a neighboring device that is able to forward packets on behalf of the node. The device (firewall) performs the role of NDP Proxy.
Palo Alto Networks® firewalls support NDP and NDP Proxy on their interfaces. When you configure the firewall to act as an NDP Proxy for addresses, it allows the firewall to send Neighbor Discovery (ND) advertisements and respond to ND solicitations from peers that are asking for MAC addresses of IPv6 prefixes assigned to devices behind the firewall. You can also configure addresses for which the firewall will not respond to proxy requests (negated addresses).
NDP is enabled by default, and you need to configure NDP Proxy when you configure NPTv6 , for the following reasons:
- The stateless nature of NPTv6 requires a way to instruct the firewall to respond to ND packets sent to specified NDP Proxy addresses, and to not respond to negated NDP Proxy addresses.
It is recommended that you negate your neighbors’ addresses in the NDP Proxy configuration , because NDP Proxy indicates the firewall will reach those addresses behind the firewall, but the neighbors are not behind the firewall.
- NDP causes the firewall to save the MAC addresses and IPv6 addresses of neighbors in its ND cache. The firewall does not perform NPTv6 translation for addresses that it finds in its ND cache because doing so could introduce a conflict. If the host portion of an address in the cache happens to overlap with the host portion of a neighbor’s address, and the prefix in the cache is translated to the same prefix as that of the neighbor (because the egress interface on the firewall belongs to the same subnet as the neighbor), then you would have a translated address that is exactly the same as the legitimate IPv6 address of the neighbor, and a conflict occurs. (If an attempt to perform NPTv6 translation occurs on an address in the ND cache, an informational syslog message logs the event: NPTv6 Translation Failed. )
When an interface with NDP Proxy enabled receives an ND solicitation requesting a MAC address for an IPv6 address, the following sequence occurs:
- The firewall searches the ND cache to ensure the IPv6 address from the solicitation is not there. If the address is there, the firewall ignores the ND solicitation.
- If the source IPv6 address is 0 (::), that means the packet is a Duplicate Address Detection packet, and the firewall ignores the ND solicitation.
- The firewall does a Longest Prefix Match search of the NDP Proxy addresses and finds the best match to the address in the solicitation. If the Negate field for the match is checked (in the NDP Proxy list), the firewall drops the ND solicitation.
- Only if the Longest Prefix Match search matches, and that matched address is not negated, will the NDP Proxy respond to the ND solicitation. The firewall responds with an ND packet, providing its own MAC address as the MAC address of the next hop toward the queried destination.
In order to successfully support NDP, the firewall does not perform NDP Proxy for the following:
- Duplicate Address Detection (DAD).
- Addresses in the ND cache (because such addresses do not belong to the firewall; they belong to discovered neighbors).
NPTv6 and NDP Proxy Example
The following figure illustrates how NPTv6 and NDP Proxy function together.
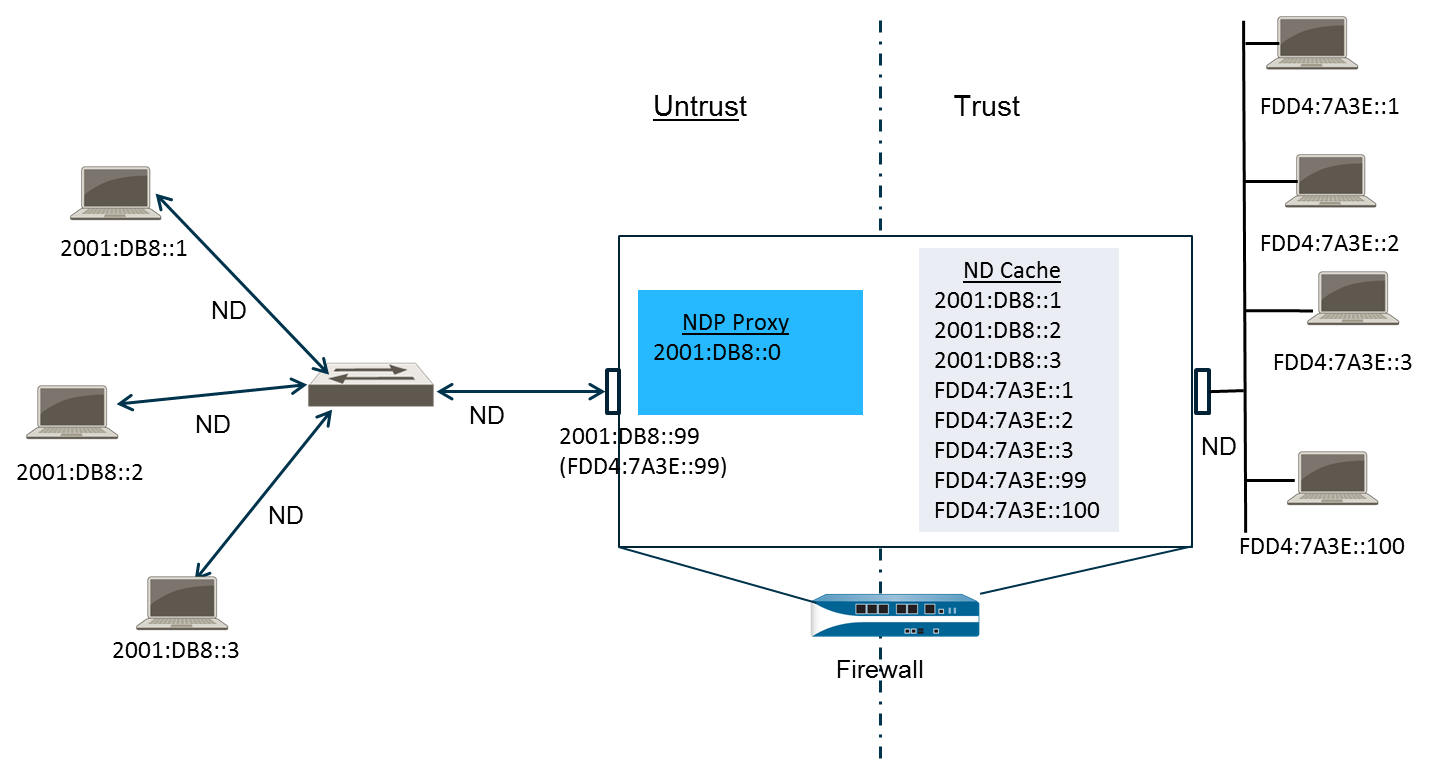
NPTv6 and NDP Proxy Interaction: Shows trusted hosts, firewall with NPTv6 policy, untrusted network with switch, and external peers. Highlights ND Cache and NDP Proxy table interaction.
The ND Cache in NPTv6 Example
In the above example, multiple peers connect to the firewall though a switch, with ND occurring between the peers and the switch, between the switch and the firewall, and between the firewall and the devices on the trust side.
As the firewall learns of peers, it saves their addresses to its ND cache. Trusted peers FDD A :7A3E::1, FDD A :7A3E::2, and FDD A :7A3E::3 are connected to the firewall on the trust side. FDD A :7A3E::99 is the untranslated address of the firewall itself; its public-facing address is 2001:DB8::99. The addresses of the peers on the untrust side have been discovered and appear in the ND cache: 2001:DB8::1, 2001:DB8::2, and 2001:DB8::3.
(Note: Original text had FDD A in some places and FDD 4 in others for the internal prefix. Assuming FDD A based on the diagram's trust-side addresses.)
The NDP Proxy in NPTv6 Example
In our scenario, we want the firewall to act as NDP Proxy for the prefixes on devices behind the firewall. When the firewall is NDP Proxy for a specified set of addresses/ranges/prefixes, and it sees an address from this range in an ND solicitation or advertisement, the firewall will respond as long as a device with that specific address doesn’t respond first, the address is not negated in the NDP proxy configuration, and the address is not in the ND cache. The firewall does the prefix translation (described below) and sends the packet to the trust side, where that address might or might not be assigned to a device.
In this example, the ND Proxy table contains the network address 2001:DB8::/64 (inferred from context, should cover ::100). When the interface sees an ND for 2001:DB8::100, no other devices on the L2 switch claim the packet, so the proxy range causes the firewall to claim it, and after translation to FDDA:7A3E::100 , the firewall sends it out to the trust side.
The NPTv6 Translation in NPTv6 Example
In this example, the Original Packet is configured with a Source Address of FDDA:7A3E::/64 and a Destination of Any . The Translated Packet is configured with the Translated Address (Source Translation Type: Static IP) of 2001:DB8::/64 .
Therefore, outgoing packets with a source prefix of FDDA:7A3E::/64 are translated to 2001:DB8::/64 . Incoming packets with a destination prefix in the network 2001:DB8::/64 (assuming Bi-directional is enabled or a separate rule exists) are translated to FDDA:7A3E::/64 .
Neighbors in the ND Cache are Not Translated
In our example, there are hosts behind the firewall with host identifiers ::1, ::2, and ::3 (FDDA:7A3E::1, etc.). If the prefixes of those hosts ( FDDA:7A3E::/64 ) are translated to a prefix that exists beyond the firewall ( 2001:DB8::/64 ), and if those external devices also have host identifiers ::1, ::2, and ::3 (2001:DB8::1, etc.), because the host identifier portion of the address remains unchanged, the resulting translated address (e.g., 2001:DB8::1) would belong to the existing external device, and an addressing conflict would result. In order to avoid a conflict with overlapping host identifiers, NPTv6 does not translate addresses that it finds it its ND cache.
Create an NPTv6 Policy
Perform this task when you want to configure a NAT NPTv6 policy to translate one IPv6 prefix to another IPv6 prefix. The prerequisites for this task are:
- Enable IPv6: Select Device > Setup > Session . Click Edit and select IPv6 Firewalling .
- Configure Interface: Configure a Layer 3 Ethernet interface with a valid IPv6 address and with IPv6 enabled. Select Network > Interfaces > Ethernet , select an interface, and on the IPv6 tab, select Enable IPv6 on the interface .
- Create Security Policies: NPTv6 does not provide security.
- Decide whether you want source translation, destination translation, or both.
- Identify the zones to which you want to apply the NPTv6 policy.
- Identify your original and translated IPv6 prefixes. (Must be /32 to /112) .
-
Create a new NPTv6 policy.
- Select Policies > NAT and click Add .
- On the General tab, enter a descriptive Name for the NPTv6 policy rule.
- ( Optional ) Enter a Description and Tag .
- For NAT Type , select NPTv6 .
-
Specify the match criteria for incoming packets (
Original Packet
tab); packets that match all of the criteria are subject to the NPTv6 translation.
- Zones are required. Set Source Zone (can be Any) and Destination Zone .
- ( Optional ) Select a Destination Interface .
- ( Optional ) Select a Service to restrict what type of packets are translated.
-
Source/Destination Address Constraints:
- Prefixes must be in the format `xxxx:xxxx::/yy`.
- The IPv6 address cannot have an interface identifier (host) portion defined.
- Supported prefix lengths: /32 to /112 .
- Source Address and Destination Address cannot both be set to Any .
- If doing source translation, enter a Source Address (prefix) or select Any .
- If doing destination translation, Destination Address (prefix) is required. If doing source translation, Destination Address is optional.
-
Specify the translated packet (
Translated Packet
tab).
-
For
Source Address Translation
:
- Select Translation Type : Static IP for NPTv6 source translation, or None .
- If Static IP , enter the Translated Address (IPv6 prefix). Best practice: Use the prefix of the untrust interface.
- ( Optional ) Select Bi-directional to automatically create the reverse translation. Requires corresponding Security Policy rules.
-
For
Destination Address Translation
:
- Select this option if needed.
- Enter the internal Translated Address (IPv6 prefix).
- Click OK .
-
For
Source Address Translation
:
-
Configure NDP Proxy.
(Required for NPTv6 to function correctly)
- Select Network > Interfaces > Ethernet and select the relevant (usually external-facing) interface.
- Go to the Advanced > NDP Proxy tab.
- Select Enable NDP Proxy and click Add .
- Enter the IP Address(es) for which NDP Proxy is enabled (address, range, or prefix). These should generally match the *external* prefixes used in your NPTv6 rules (the Translated Address for source NAT).
- ( Optional but Recommended ) Add entries for neighbor addresses on the same subnet as the interface and select Negate . This prevents the firewall from proxying for its actual neighbors.
-
Commit the configuration.
- Click OK in the interface config, then click Commit .
Mermaid Diagrams
These diagrams illustrate the core concepts visually.
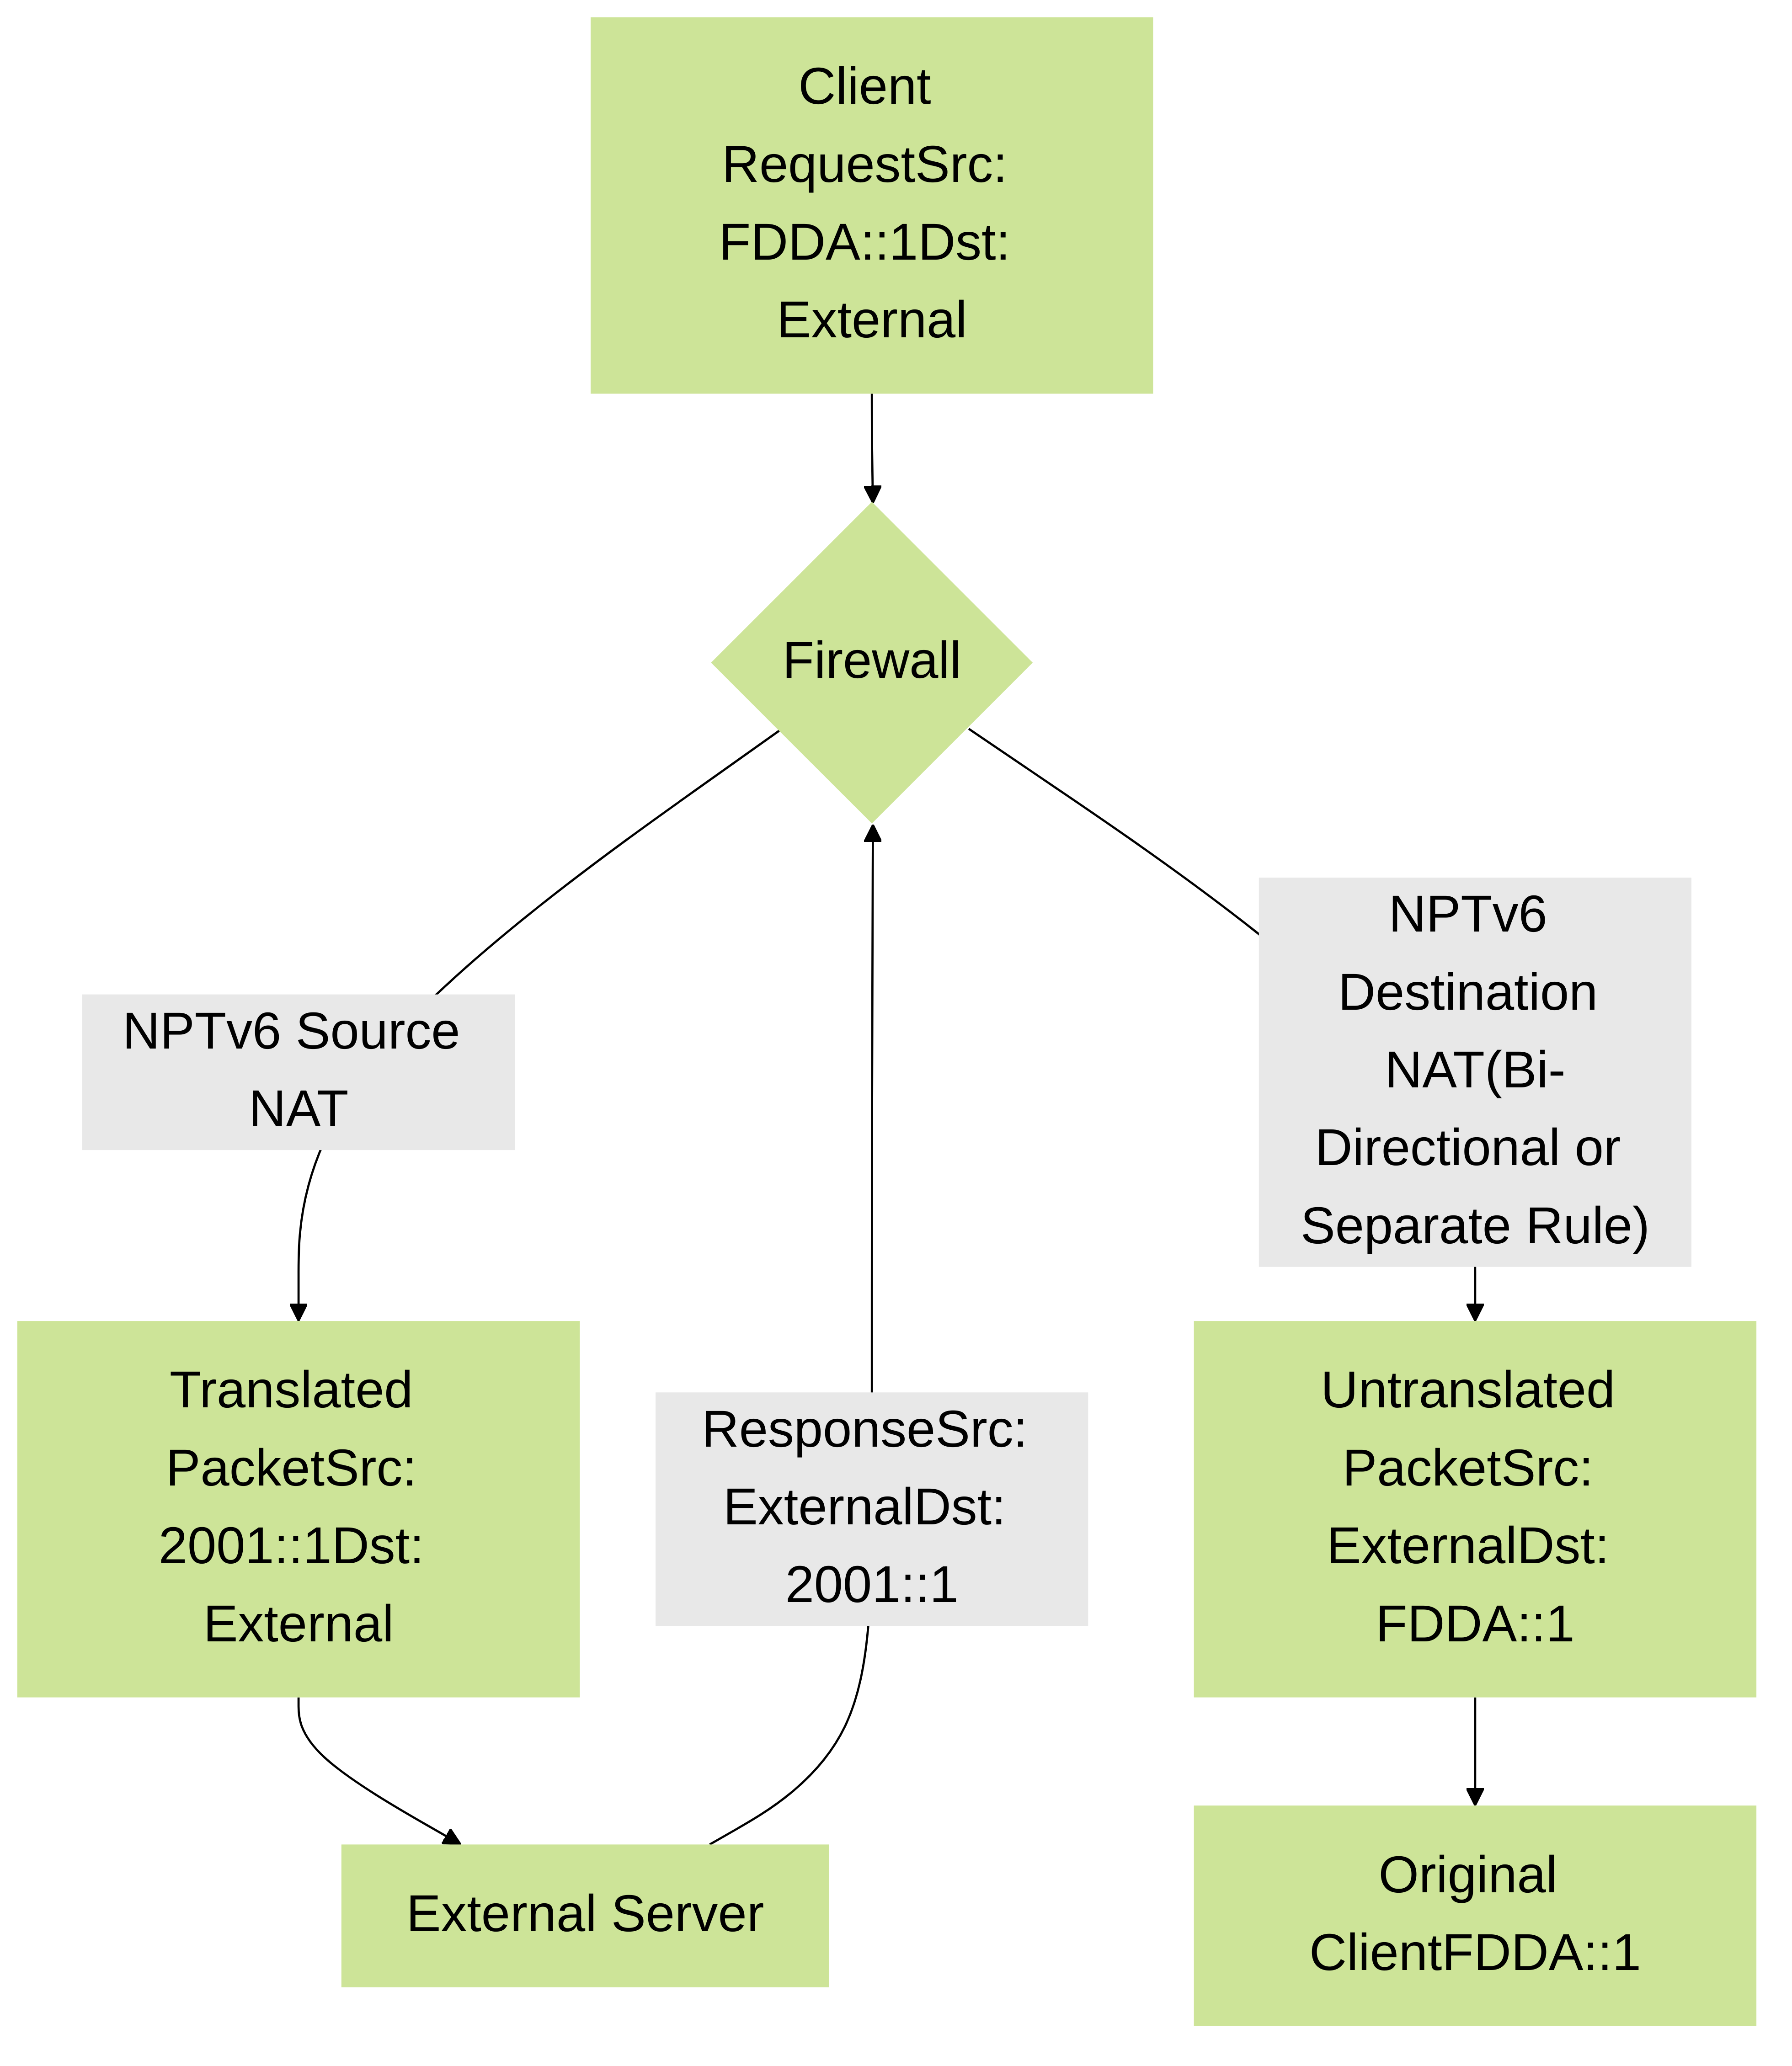
Flowchart illustrating basic NPTv6 translation for an outbound connection and its return traffic.
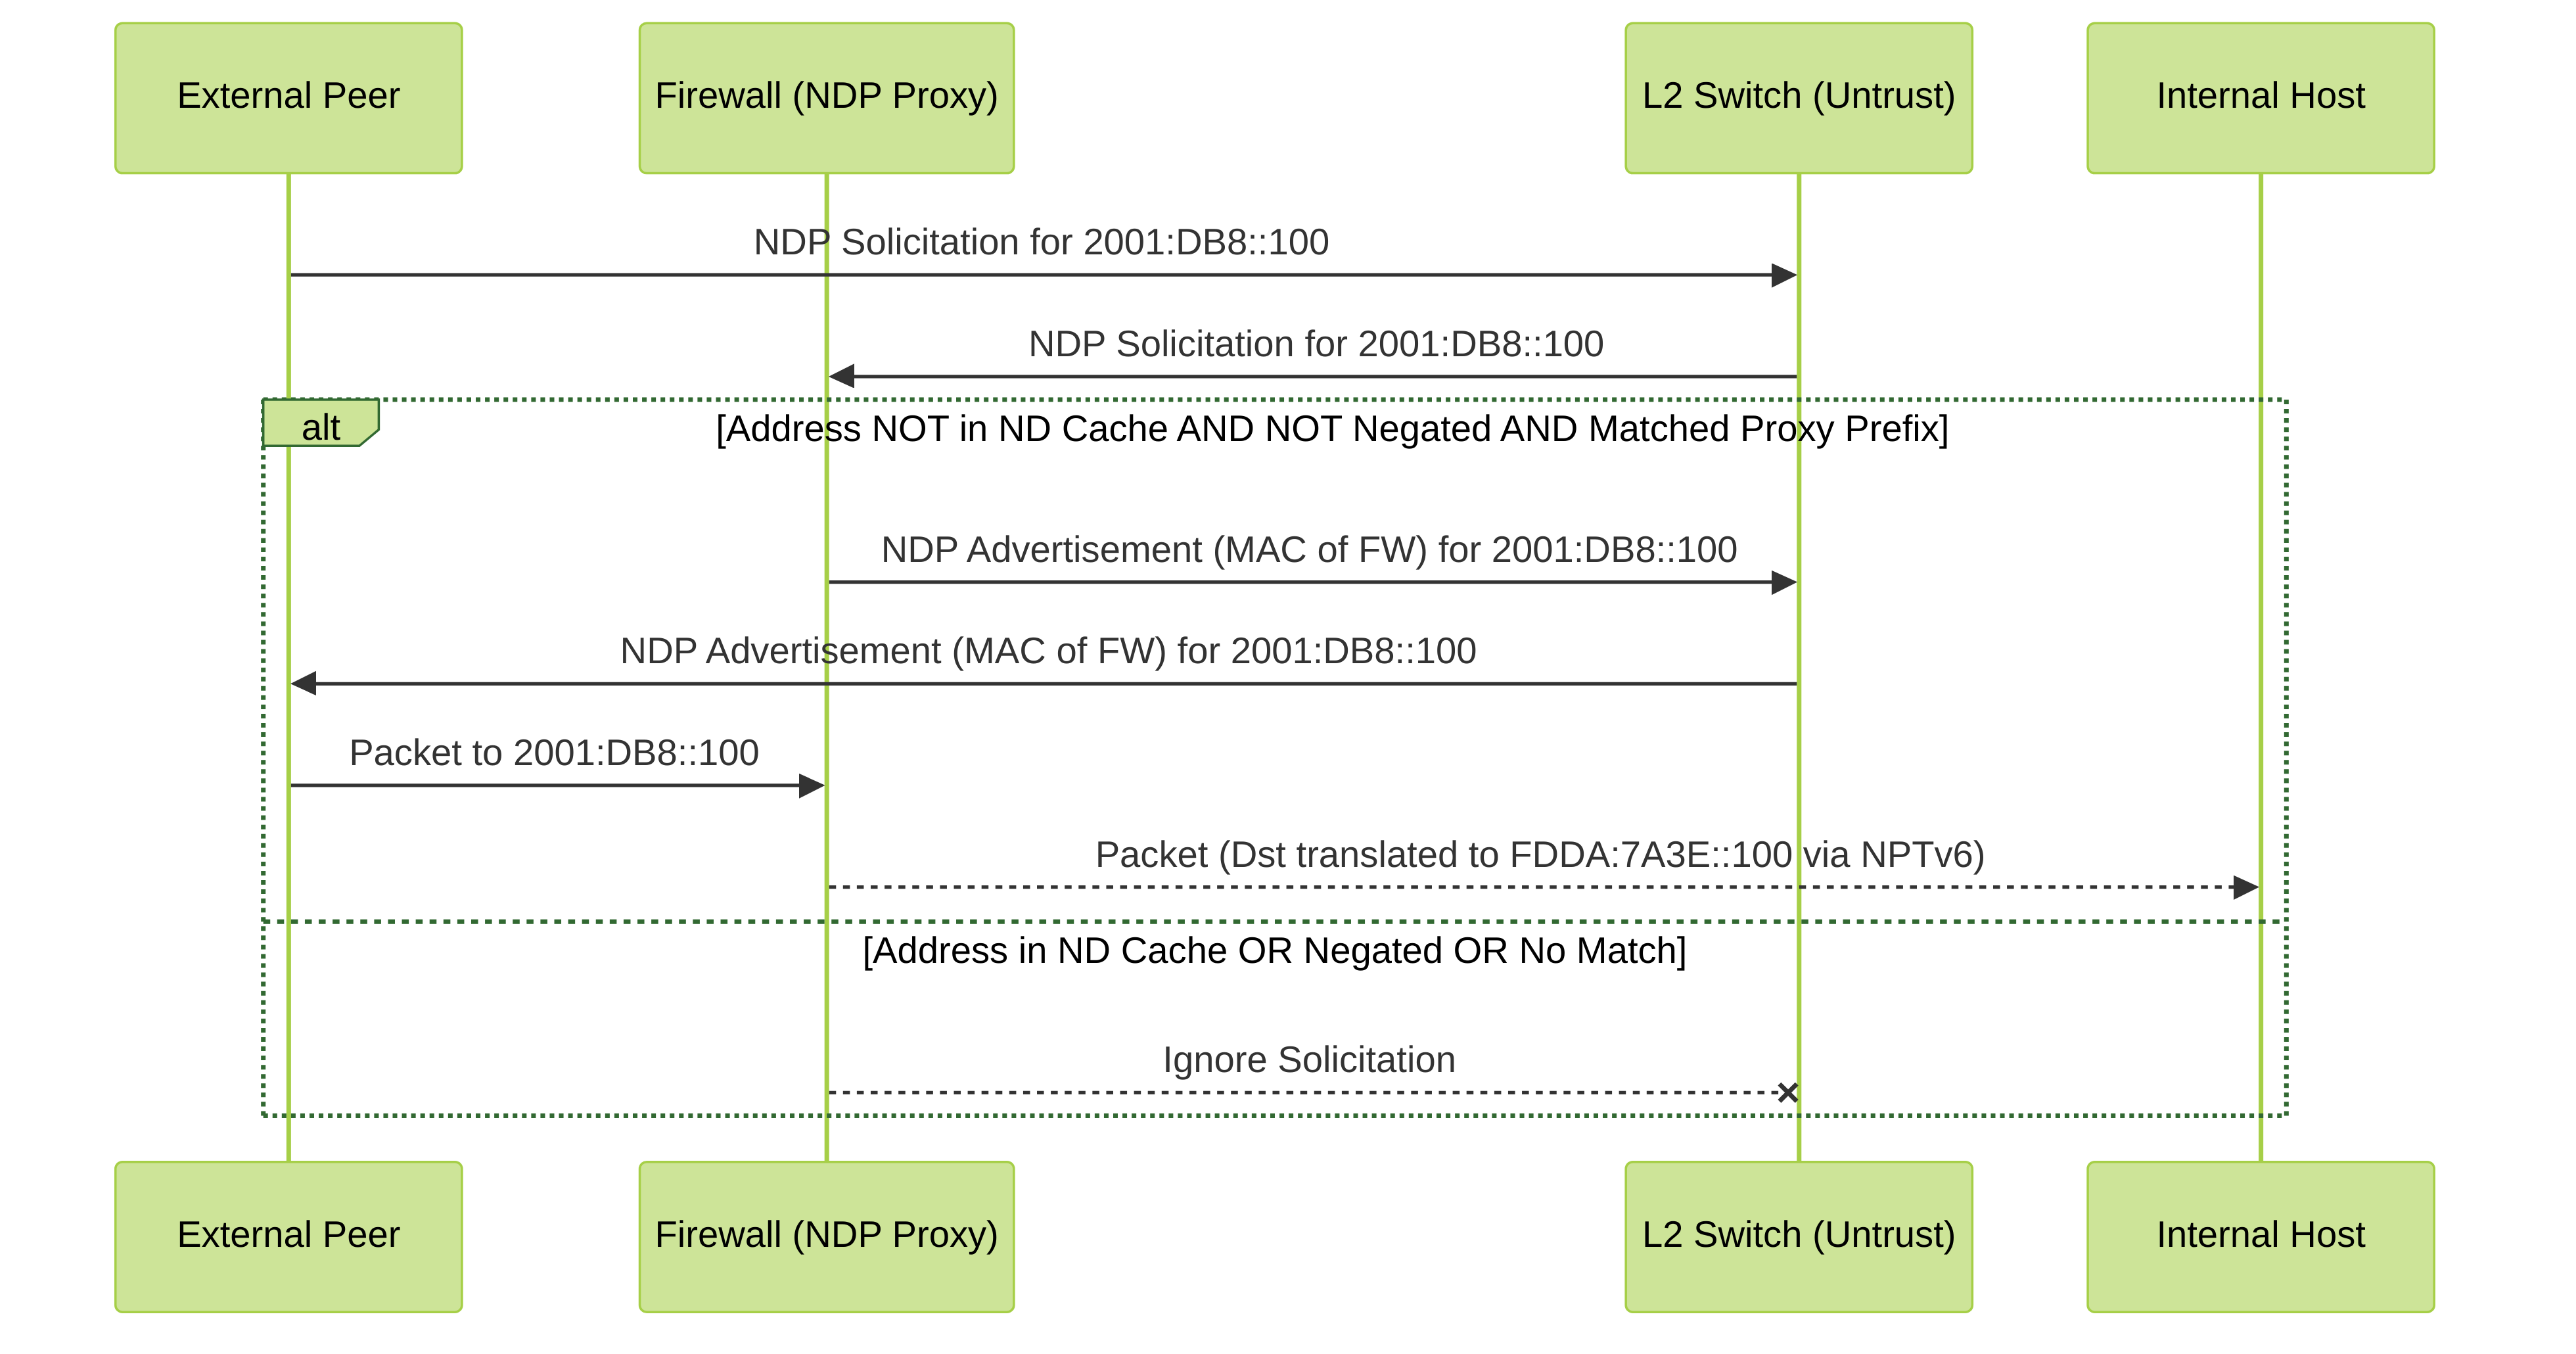
Sequence diagram showing how the NDP Proxy on the firewall responds to a Neighbor Discovery solicitation for an address it is proxying for.
Knowledge Check: NPTv6
Test your understanding of the NPTv6 concepts discussed.