Map IP Addresses to Users
User-ID provides many different methods for mapping IP addresses to usernames. Before you begin configuring user mapping, consider where your users are logging in from, what services they are accessing, and what applications and data you need to control access to. This will inform which types of agents or integrations would best allow you to identify your users.
Once you have your plan, you can begin configuring user mapping using one or more of the following methods as needed to enable user-based access and visibility to applications and resources:
- If you have users with client systems that aren't logged in to your domain servers—for example, users running Linux clients that don't log in to the domain—you can Map IP Addresses to Usernames Using Authentication Portal . Using Authentication Portal in conjunction with Authentication Policy also ensures that all users authenticate to access your most sensitive applications and data.
-
To map users as they log in to your Exchange servers,
domain controllers, eDirectory servers, or Windows clients you must
configure a User-ID agent
:
- Configure User Mapping Using the PAN-OS Integrated User-ID Agent
- Configure User Mapping Using the Windows User-ID Agent
- If you have clients running multi-user systems in a Windows environment, such as Microsoft Terminal Server or Citrix Metaframe Presentation Server or XenApp, Configure the Palo Alto Networks Terminal Server (TS) Agent for User Mapping . For a multi-user system that doesn't run on Windows, you can Retrieve User Mappings from a Terminal Server Using the PAN-OS XML API .
- To obtain user mappings from existing network services that authenticate users—such as wireless controllers, 802.1x devices, Apple Open Directory servers, proxy servers, or other Network Access Control (NAC) mechanisms— Configure User-ID to Monitor Syslog Senders for User Mapping .
High-Level Method Selection Flow
graph TD
    A[Identify User Type/Environment] --> B{Client OS?}
    B -- Windows Domain Client --> C[Use User-ID Agent Windows or Integrated]
    B -- Linux/Non-Domain Client --> D{Need Web Auth?}
    D -- Yes --> E[Use Authentication Portal]
    D -- No --> F[Consider XML API or Syslog]
    B -- Multi-User Windows (Citrix/TS) --> G[Use TS Agent]
    B -- Multi-User Non-Windows --> H[Use XML API for Terminal Servers]
    A --> I{Existing Auth Service?}
    I -- Yes (Wireless Controller, NAC, Proxy) --> J[Monitor Syslog Senders]
    I -- No --> K[Choose Agent or Auth Portal based on OS]
    A --> L{Custom Application?}
    L -- Yes --> M[Use XML API for General]
While you can configure either the Windows agent or the PAN-OS integrated User-ID agent on the firewall to listen for authentication syslog messages from the network services, because only the PAN-OS integrated agent supports syslog listening over TLS, it is the preferred configuration.
- To include the username and domain in the headers for outgoing traffic so other devices in your network can identify the user and enforce user-based policy, you can Insert Username in HTTP Headers.
- To Share User-ID Mappings Across Virtual Systems , you can configure a virtual system as a User-ID hub.
- For other clients that you can't map using the other methods, you can Send User Mappings to User-ID Using the XML API .
- A large-scale network can have hundreds of information sources that firewalls query for user and group mapping and can have numerous firewalls that enforce policies based on the mapping information. You can simplify User-ID administration for such a network by aggregating the mapping information before the User-ID agents collect it. You can also reduce the resources that the firewalls and information sources use in the querying process by configuring some firewalls to redistribute the mapping information . For details, see Deploy User-ID in a Large-Scale Network.
Quiz: User-ID Mapping Methods
Question 1
Which User-ID method maps IP addresses to usernames for users connecting through a web proxy that has already authenticated the user?
Reference: Palo Alto Networks Documentation (General Syslog Concepts)
Question 2
Which source is generally considered the most reliable for collecting User-ID user mapping when available?
Question 3
Which data flow describes redistribution of user mappings?
Create a Dedicated Service Account for the User-ID Agent
To use the Windows-based User-ID agent or the PAN-OS integrated User-ID agent to map users as they log in to your Exchange servers, domain controllers, eDirectory servers, or Windows clients, create a dedicated service account for the User-ID agent on a domain controller in each domain that the agent will monitor.
Service Account Creation & Permission Flow
flowchart TD
    A[Log in to Domain Controller] --> B(Open Active Directory Users & Computers)
    B --> C{Create New User Account}
    C --> D[Define Username/Password]
    D --> E{Assign Required Permissions}
    E -- Windows Agent --> F[Logon as Service Local/GPO and Event Log Readers and DCOM Users Optional for WMI and CIMV2 Optional for WMI and Folder/Registry Permissions]
    E -- PAN-OS Agent --> G[Event Log Readers and Server Operator Optional for Session Mon and DCOM Users Optional for WMI and CIMV2 Optional for WMI]
    F --> H{Deny Unnecessary Permissions}
    G --> H
    H --> I[Deny Interactive Logon and Deny Remote Access]
    I --> J(Service Account Ready)
The User-ID agent maps users based on logs for security events. To ensure that the User-ID agent can successfully map users, verify that the source for your mappings generates logs for Audit Logon, Audit Kerberos Authentication Service, and Audit Kerberos Service Ticket Operations events. At a minimum, the source must generate logs for the following events:
- Logon Success (4624)
- Authentication Ticket Granted (4768)
- Service Ticket Granted (4769)
- Ticket Granted Renewed (4770)
The required permissions for the service account depend on the user mapping methods and settings you plan to use. For example, if you are using the PAN-OS integrated User-ID agent, the service account requires Server Operator privileges to monitor user sessions. If you are using the Windows-based User-ID agent, the service account does not require Server Operator privileges to monitor user sessions. To reduce the risk of compromising the User-ID service account, always configure the account with the minimum set of permissions necessary for the agent.
- If you are installing the Windows-based User-ID agent on a supported Windows server, Configure a Service Account for the Windows User-ID Agent.
- If you are using the PAN-OS integrated User-ID agent on the firewall, Configure a Service Account for the PAN-OS Integrated User-ID Agent.
User-ID provides many methods for safely collecting user mapping information. Some legacy features designed for environments that only required user mapping on Windows desktops attached to the local network require privileged service accounts. If the privileged service account is compromised, this would open your network to attack. As a best practice, avoid using legacy features that require privileges that would pose a threat if compromised, such as client probing and session monitoring.
Configure a Service Account for the Windows User-ID Agent
Create a dedicated Active Directory (AD) service account for the Windows User-ID agent to access the services and hosts it will monitor to collect user mappings. You must create a service account in each domain the agent will monitor. After you enable the required permissions for the service account, Configure User Mapping Using the Windows User-ID Agent.
The following workflow details all required privileges and provides guidance for the User-ID features that require privileges that could pose a threat so that you can decide how to best identify users without compromising your overall security posture.
-
Create an AD service account for the User-ID agent.
You must create a service account in each domain the agent will monitor.
- Log in to the domain controller.
-
Right-click the Windows icon (
 ),
Search
for
Active Directory Users and Computers
, and launch the application.
),
Search
for
Active Directory Users and Computers
, and launch the application.
- In the navigation pane, open the domain tree, right-click Managed Service Accounts and select New User .
- Enter the First Name , Last Name , and User logon name of the user and click Next .
- Enter the Password and Confirm Password , then click Next and Finish .
-
Configure either local or group policy to allow the service account to log on as a service.
The permission to log on as a service is only needed locally on the Windows server that is the agent host.
-
To assign permissions locally:
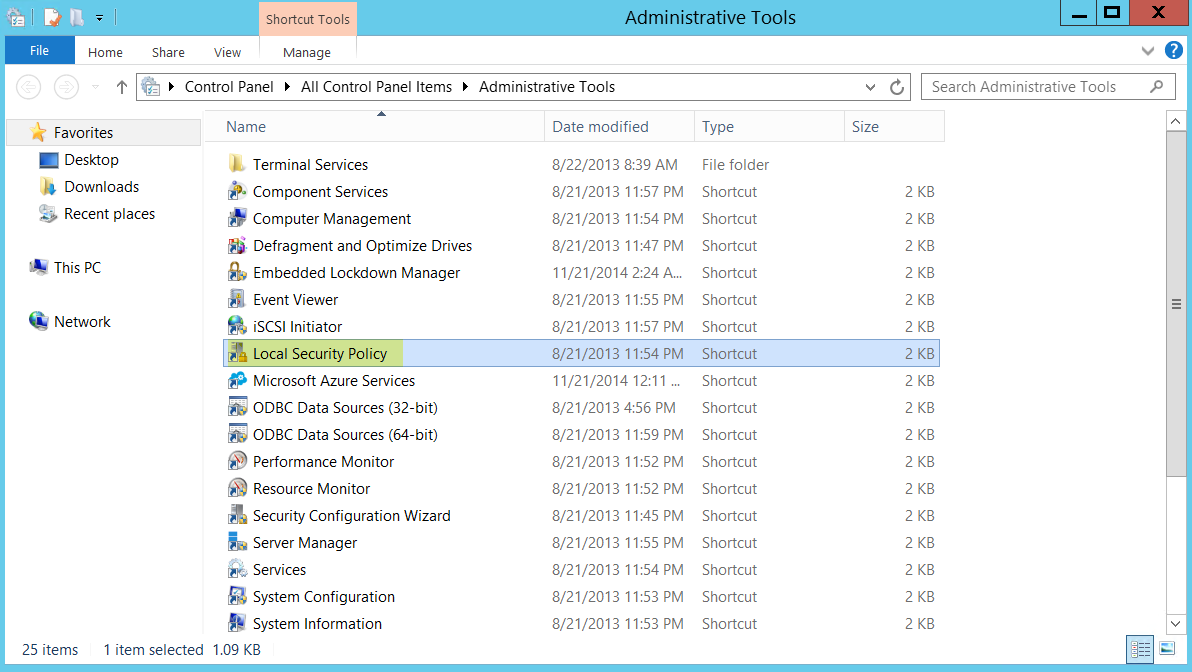
- select Control Panel > Administrative Tools > Local Security Policy .
-
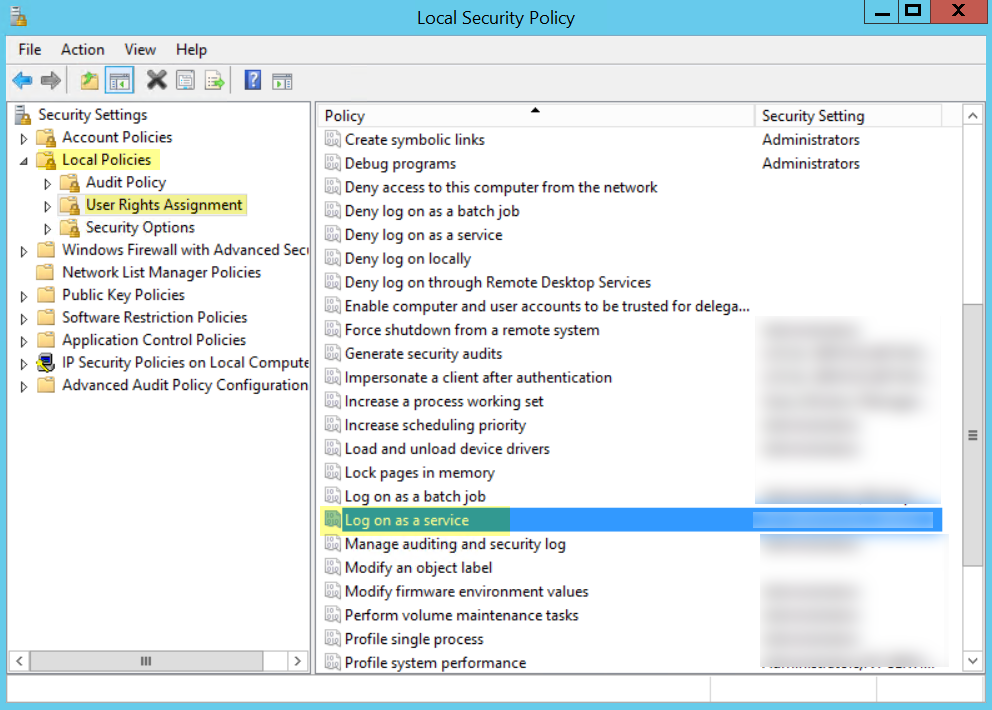
- Select Local Policies > User Rights Assignment > Log on as a service .
-
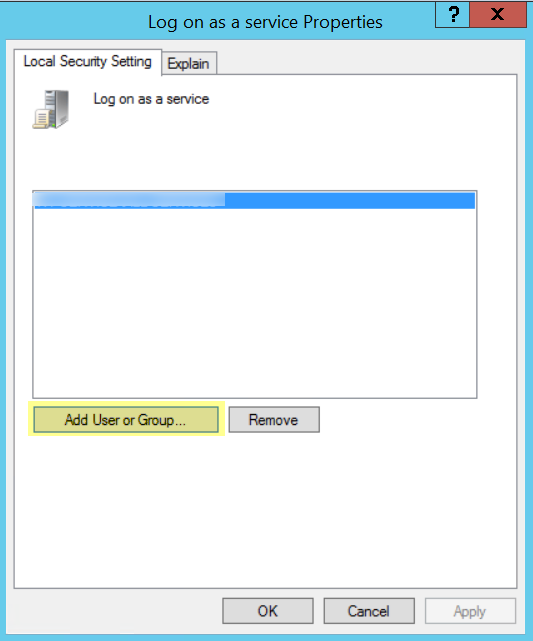
- Click Add User or Group to add the service account.
-
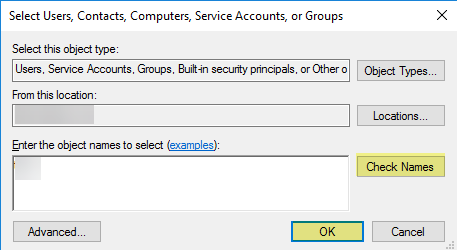
- Enter the object names to select (the service account name) in domain\username format and click OK .
-
-
To configure group policy if you are installing Windows User-ID agents on multiple servers, use the Group Policy Management Editor.
- Select Start > Group Policy Management > <your domain> > Default Domain Policy > Action > Edit for the Windows server that is the agent host.
-
- Select Computer Configuration > Policies > Windows Settings > Security Settings > Local Policies > User Rights Assignment .
-
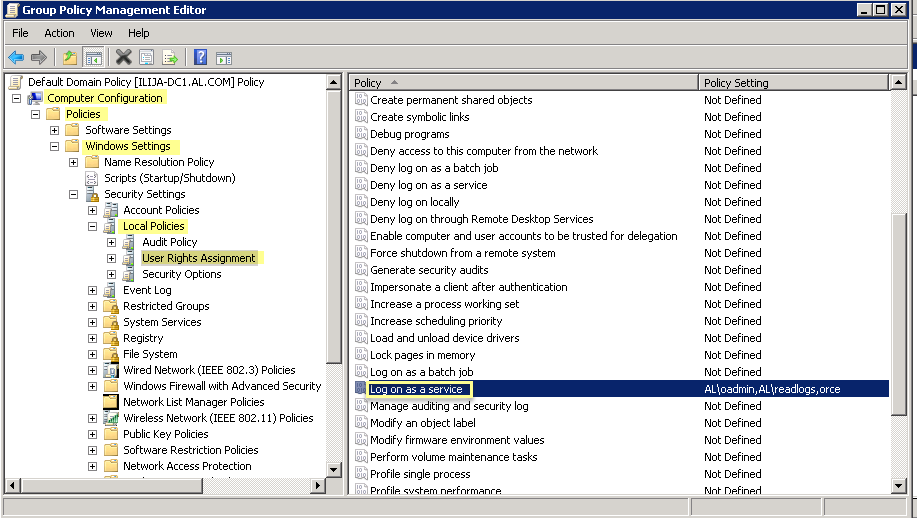
- Right-click Log on as a service , then select Properties .
-
Click
Add User or Group
to add the service account username or builtin group, then click
OK
twice.
(Administrators have this privilege by default.)
-
-
To assign permissions locally:
-
(
Windows Server 2022 with User-ID Credential Detection only
) If you are using Windows Server 2022 and credential detection, assign the following privileges to the service account:
- Replicating Directory Changes
- Replicating Directory Changes All
- Replicating Directory Changes in Filtered Set
For more information, refer to the following documentation.
-
If you want to use WMI to collect user data, assign DCOM privileges
to the service account so that it can use WMI queries on monitored servers.
- Select Active Directory Users and Computers > <your domain> > Builtin > Distributed COM Users .
- Right-click Properties > Members > Add and enter the service account name.
-
If you plan to use WMI probing, enable the account to read the CIMV2 namespace
and assign the required permissions on the client systems to be probed.
Do not enable client probing on high-security networks. Client probing can generate a large amount of network traffic and can pose a security threat when misconfigured. Instead collect user mapping information from more isolated and trusted sources, such as domain controllers and through integrations with Syslog or the XML API, which have the added benefit of allowing you to safely capture user mapping information from any device type or operating system, instead of just Windows clients.
Perform this task on each client system that the User-ID agent will probe for user mapping information:
-
Right-click the Windows icon (
),
Search
for
wmimgmt.msc
, and launch the WMI Management Console.
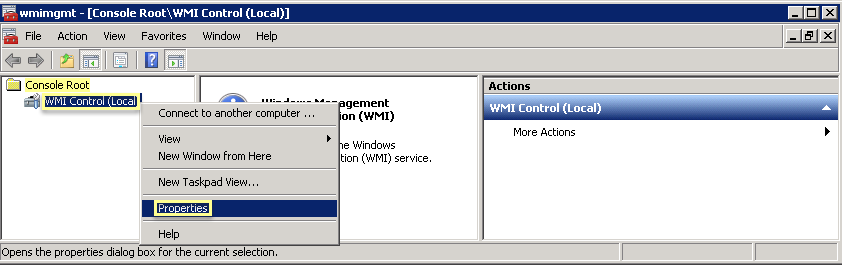
- In the console tree, right-click WMI Control and select Properties .
-
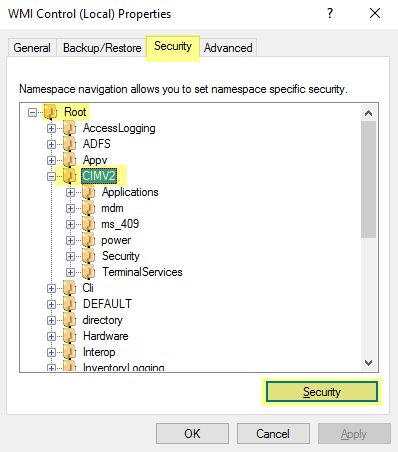
- Select the Security tab, then select Root > CIMV2 , and click the Security button.
-
-
Click
Add
, enter the name of the service account you created, click
Check Names
to verify your entry, and click
OK
.
(You might have to change the Locations or click Advanced to query for account names. See the dialog help for details.)
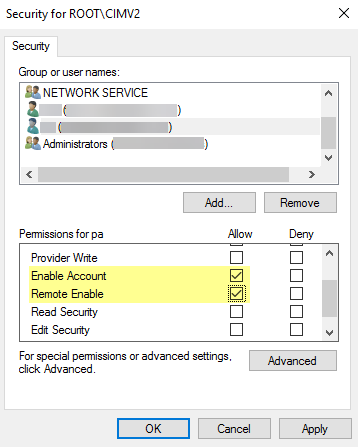
- In the Permissions for <Username> section, Allow the Enable Account and Remote Enable permissions.
-
- Click OK twice.
- Use the Local Users and Groups MMC snap-in (lusrmgr.msc) to add the service account to the local Distributed Component Object Model (DCOM) Users and Remote Desktop Users groups on the system that will be probed.
-
Right-click the Windows icon (
-
If you want to use Server Monitoring to identify users, add the service account to the Event Log Reader builtin group
to allow the service account to read the security log events.
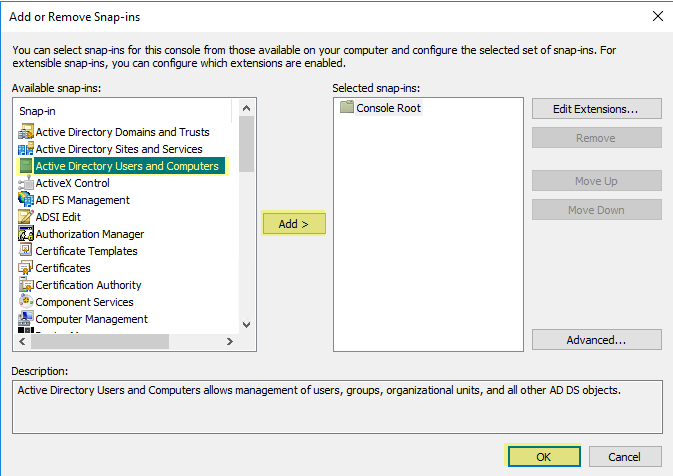
- On the domain controller or Exchange server that contains the logs you want the User-ID agent to read, or on the member server that receives events from Windows log forwarding, select Start > Run , enter MMC .
- Select File > Add/Remove Snap-in > Active Directory Users and Computers > Add , then click OK to run the MMC and launch the Active Directory Users and Computers snap-in.
-
- Navigate to the Builtin folder for the domain, right-click the Event Log Readers group, and select Properties > Members .
-
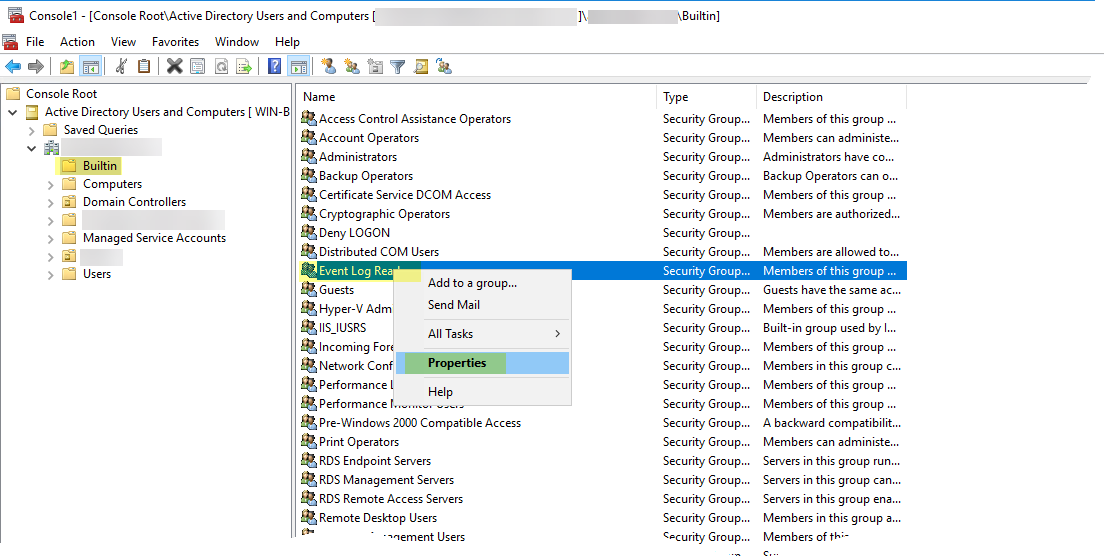
- Click Add , enter the service account name, then click Check Names to validate that you have the proper object name.
-
- Click OK twice to save the settings.
- Confirm that the builtin Event Log Reader group lists the service account as a member ( Event Log Readers > Properties > Members ).
-
Assign account permissions to the installation folder to allow the service account to access the agent's installation folder to read the configuration and write logs.
(You only need to perform this step if the service account you configured for the User-ID agent is not a domain administrator or a local administrator on the User-ID agent server host.)
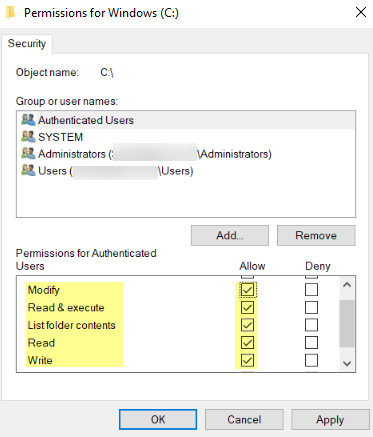
- From the Windows Explorer, navigate to C:\Program Files(x86)\Palo Alto Networks , right-click the folder, and select Properties .
- On the Security tab, click Edit .
-
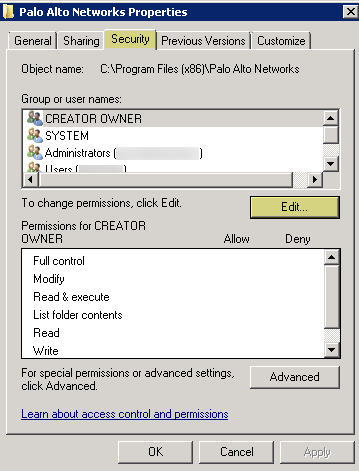
- Click Add , enter the User-ID agent service account name, and Allow permissions for Modify , Read & execute , List folder contents , Read , and Write , and then click OK to save the account settings.
-
-
(If you do not want to configure individual permissions, you can Allow the Full Control permission instead.)
-
To allow the agent to make configuration changes (for example, if you select a different logging level), give the service account permissions to the User-ID agent registry sub-tree.
- Select Start > Run and enter regedt32 and navigate to the Palo Alto Networks sub-tree in HKEY_LOCAL_MACHINE\Software\WOW6432Node\PaloAlto Networks .
- Right-click the Palo Alto Networks node and select Permissions .
-

- Assign the User-ID service account Full Control and then click OK to save the setting.
-

-
Disable service account privileges that are not required.
By ensuring that the User-ID service account has the minimum set of account privileges, you can reduce the attack surface if the account ever becomes compromised.
To ensure that the User-ID account has the minimum privileges necessary, deny the following privileges on the account.
-
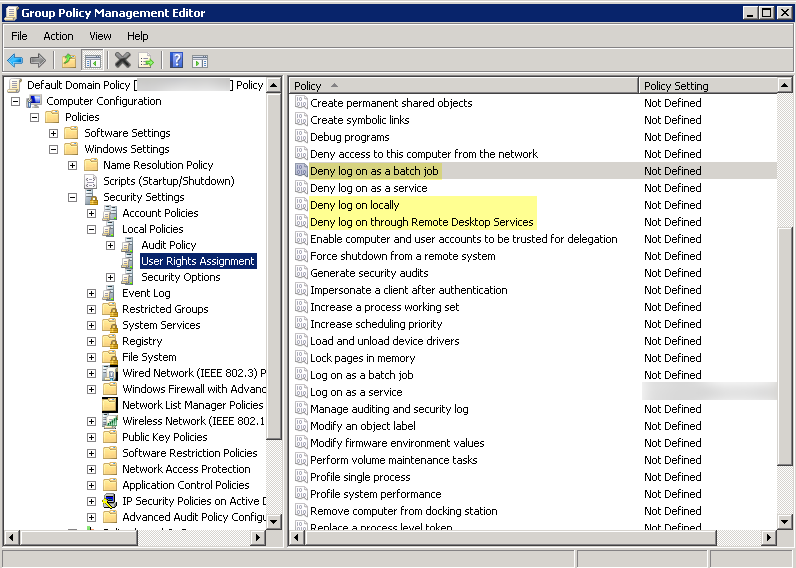
Deny interactive logon for the User-ID service account
—While the User-ID service account does need permission to read and parse Active Directory security event logs, it does not require the ability to logon to servers or domain systems interactively. You can restrict this privilege using Group Policies or by using a Managed Service account (refer to Microsoft TechNet for more information).
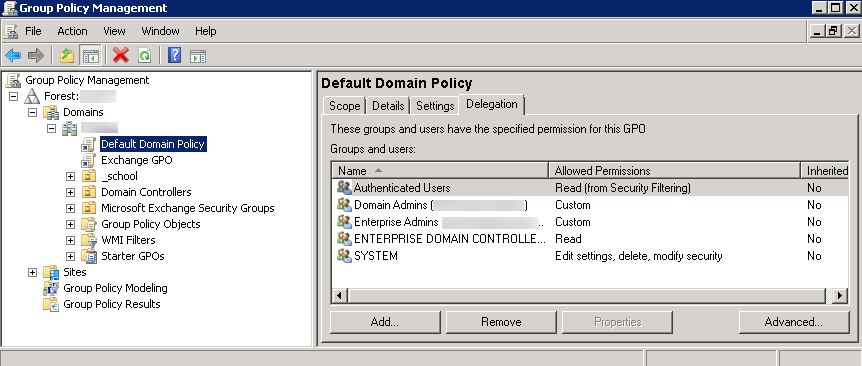
- Select Group Policy Management Editor > Default Domain Policy > Computer Configuration > Policies > Windows Settings > Security Settings > User Rights Assignment .
- For Deny log on as a batch job , Deny log on locally , and Deny log on through Remote Desktop Services , right-click Properties .
- Select Define these policy settings > Add User or Group and add the service account name, then click OK .
-
-
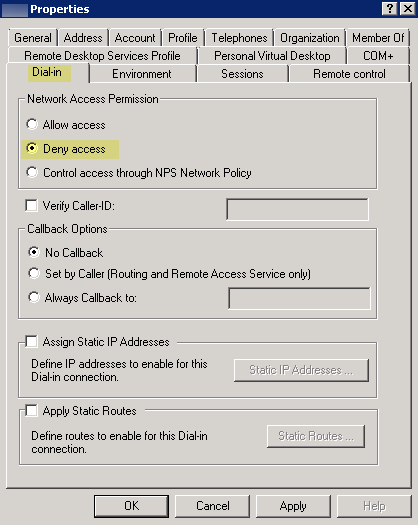
Deny remote access for the User-ID service account
—This prevents an attacker from using the account to access your network from the outside the network.
- Select Start > Run , enter MMC , and select File > Add/Remove Snap-in > Active Directory Users and Computers > Users .
- Right-click the service account name, then select Properties .
- Select Dial-in , then Deny the Network Access Permission .
-
-
Deny interactive logon for the User-ID service account
—While the User-ID service account does need permission to read and parse Active Directory security event logs, it does not require the ability to logon to servers or domain systems interactively. You can restrict this privilege using Group Policies or by using a Managed Service account (refer to Microsoft TechNet for more information).
- As a next step, Configure User Mapping Using the Windows User-ID Agent.
Configure a Service Account for the PAN-OS Integrated User-ID Agent
Create a dedicated Active Directory (AD) service account for the PAN-OS Integrated User-ID agent to access the services and hosts it will monitor to collect user mappings.You must create a service account in each domain the agent will monitor. After you enable the required permissions for the service account, Configure User Mapping Using the PAN-OS Integrated User-ID Agent.
The following workflow details all required privileges and provides guidance for the User-ID features which require privileges that could pose a threat so that you can decide how to best identify users without compromising your overall security posture.
-
Create an AD service account for the User-ID agent.
You must create a service account in each domain the agent will monitor.
- Log in to the domain controller.
-
Right-click the Windows icon (
),
Search
for
Active Directory Users and Computers
, and launch the application.
- In the navigation pane, open the domain tree, right-click Managed Service Accounts and select New User .
- Enter the First Name , Last Name , and User logon name of the user and click Next .
- Enter the Password and Confirm Password , then click Next and Finish .
-
If you want to use Server Monitoring to identify users, add the service account to the Event Log Reader builtin group
to allow the service account to read the security log events.
- On the domain controller or Exchange server that contains the logs you want the User-ID agent to read, or on the member server that receives events from Windows log forwarding, select Start > Run , enter MMC .
- Select File > Add/Remove Snap-in > Active Directory Users and Computers > Add , then click OK to run the MMC and launch the Active Directory Users and Computers snap-in.
-
- Navigate to the Builtin folder for the domain, right-click the Event Log Readers group, and select Properties > Members .
-
- Click Add , enter the service account name, then click Check Names to validate that you have the proper object name.
-
- Click OK twice to save the settings.
- Confirm that the builtin Event Log Reader group lists the service account as a member ( Event Log Readers > Properties > Members ).
-
If you want to use WMI to collect user data, assign DCOM privileges
to the service account so that it can use WMI queries on monitored servers.
- Select Active Directory Users and Computers > <your domain> > Builtin > Distributed COM Users .
- Right-click Properties > Members > Add and enter the service account name.
-
(
Windows Server 2022 with User-ID Credential Detection only
) If you are using Windows Server 2022 and credential detection, assign the following privileges to the service account:
- Replicating Directory Changes
- Replicating Directory Changes All
- Replicating Directory Changes in Filtered Set
For more information, refer to the following documentation.
-
If you plan to use WMI probing, enable the service account to read the CIMV2 namespace
on the domain controllers you want to monitor and assign the required permissions on the client systems to be probed.
Do not enable client probing on high-security networks. Client probing can generate a large amount of network traffic and can pose a security threat when misconfigured. Instead collect user mapping information from more isolated and trusted sources, such as domain controllers and through integrations with Syslog or the XML API, which have the added benefit of allowing you to safely capture user mapping information from any device type or operating system, instead of just Windows clients.
Perform this task on each client system that the User-ID agent will probe for user mapping information:
-
Right-click the Windows icon (
),
Search
for
wmimgmt.msc
, and launch the WMI Management Console.
- In the console tree, right-click WMI Control and select Properties .
-
- Select the Security tab, then select Root > CIMV2 , and click the Security button.
-
-
Click
Add
, enter the name of the service account you created, click
Check Names
to verify your entry, and click
OK
.
(You might have to change the Locations or click Advanced to query for account names. See the dialog help for details.)
- In the Permissions for <Username> section, Allow the Enable Account and Remote Enable permissions.
-
- Click OK twice.
- Use the Local Users and Groups MMC snap-in (lusrmgr.msc) to add the service account to the local Distributed Component Object Model (DCOM) Users and Remote Desktop Users groups on the system that will be probed.
-
Right-click the Windows icon (
-
(
Not Recommended
)
To allow the agent to monitor user sessions to poll Windows servers for user mapping information, assign Server Operator privileges
to the service account.
Because this group also has privileges for shutting down and restarting servers, only assign the account to this group if monitoring user sessions is very important.
- Select Active Directory Users and Computers > <your domain> > Builtin > Server Operators Group .
- Right-click Properties > Members > Add add service account name
-
Disable service account privileges that are not required.
By ensuring that the User-ID service account has the minimum set of account privileges, you can reduce the attack surface should the account be compromised.
To ensure that the User-ID account has the minimum privileges necessary, deny the following privileges on the account:
-
Deny interactive logon for the User-ID service account
—While the User-ID service account does need permission to read and parse Active Directory security event logs, it does not require the ability to logon to servers or domain systems interactively. You can restrict this privilege using Group Policies or by using a Managed Service account (refer to Microsoft TechNet for more information).
- Select Group Policy Management Editor > Default Domain Policy > Computer Configuration > Policies > Windows Settings > Security Settings > User Rights Assignment .
- For Deny log on as a batch job , Deny log on locally , and Deny log on through Remote Desktop Services , right-click Properties , then select Define these policy settings > Add User or Group and add the service account name, then click OK .
-
-
Deny remote access for the User-ID service account
—This prevents an attacker from using the account to access your network from the outside the network.
- Start > Run , enter MMC , and select File > Add/Remove Snap-in > Active Directory Users and Computers > Users .
- Right-click the service account name, then select Properties .
- Select Dial-in , then Deny the Network Access Permission .
-
-
Deny interactive logon for the User-ID service account
—While the User-ID service account does need permission to read and parse Active Directory security event logs, it does not require the ability to logon to servers or domain systems interactively. You can restrict this privilege using Group Policies or by using a Managed Service account (refer to Microsoft TechNet for more information).
- As a next step, Configure User Mapping Using the PAN-OS Integrated User-ID Agent.
Quiz: User-ID Service Accounts
Question 4
Which built-in Active Directory group membership is required for a User-ID service account (Windows or PAN-OS agent) if it needs to perform Server Monitoring by reading security event logs?
Question 5
Which User-ID feature requires assigning the service account to the 'Server Operators' group for the PAN-OS Integrated agent, but is generally NOT recommended due to the high privileges granted?
Question 6
Why is Client Probing (using WMI) generally discouraged in high-security networks?
Configure User Mapping Using the Windows User-ID Agent
In most cases, the majority of your network users will have logins to your monitored domain services. For these users, the Palo Alto Networks User-ID agent monitors the servers for login events and performs the IP address to username mapping. The way you configure the User-ID agent depends on the size of your environment and the location of your domain servers. As a best practice, locate your User-ID agents near the servers it will monitor (that is, the monitored servers and the Windows User-ID agent should not be across a WAN link from each other). This is because most of the traffic for user mapping occurs between the agent and the monitored server, with only a small amount of traffic—the delta of user mappings since the last update—from the agent to the firewall.
Windows User-ID Agent Mapping Flow
sequenceDiagram
    participant Client
    participant WinUserIDAgent as Windows User-ID Agent
    participant DC as Domain Controller/Exchange
    participant Firewall

    Client->>+DC: User Logs In (Event 4624, etc.)
    DC-->>-Client: Authentication Success
    Note over DC: Security Log Updated

    loop Periodically/Event Driven
        WinUserIDAgent->>+DC: Query Security Logs (WMI/RPC)
        DC-->>-WinUserIDAgent: Return New Logon Events (IP, User, Timestamp)
    end

    WinUserIDAgent->>+Firewall: Send User Mapping Update (IP -> User)
    Firewall-->>-WinUserIDAgent: Acknowledge Update
    Note over Firewall: Updates User-ID Mapping Table
The following topics describe how to install and configure the User-ID Agent and how to configure the firewall to retrieve user mapping information from the agent:
Install the Windows-Based User-ID Agent
The following procedure shows how to install the User-ID agent on a member server in the domain and set up the service account with the required permissions. If you are upgrading, the installer will automatically remove the older version; however, it is a good idea to back up the config.xml file before running the installer.
For information about the system requirements for installing the Windows-based User-ID agent and for information on supported server OS versions, refer to the User-ID agent release notes and the Palo Alto Networks Compatibility Matrix.
-
Create a dedicated Active Directory service account for the User-ID agent to access the services and hosts it will monitor to collect user mappings.
Create a Dedicated Service Account for the User-ID Agent and grant the necessary permissions for the Windows User-ID agent.
- (Steps 1a-1e from previous section)
- (Steps 2a-2c from previous section: Logon as Service)
- (Step 6 from previous section: Event Log Readers group)
- (Step 7 from previous section: Installation folder permissions)
- (Step 8 from previous section: Registry permissions)
-
Decide where to install the User-ID agent.
The User-ID agent queries the Domain Controller and Exchange server logs using Microsoft Remote Procedure Calls (MSRPCs). During the initial connection, the agent transfers the most recent 50,000 events from the log to map users. On each subsequent connection, the agent transfers events with a timestamp later than the last communication with the domain controller. Therefore, always install one or more User-ID agents at each site that has servers to be monitored.
- You must install the User-ID agent on a system running one of the supported OS versions: see “Operating System (OS) Compatibility User-ID Agent” in the Compatibility Matrix. The system must also meet the minimum requirements (see the User-ID agent release notes).
- Make sure the system that will host the User-ID agent is a member of the same domain as the servers it will monitor.
- As a best practice, install the User-ID agent close to the servers it will be monitoring : there is more traffic between the User-ID agent and the monitored servers than there is between the User-ID agent and the firewall, so locating the agent close to the monitored servers optimizes bandwidth usage.
- To ensure the most comprehensive mapping of users, you must monitor all domain controllers that process authentication for users you want to map. You might need to install multiple User-ID agents to efficiently monitor all of your resources.
- If you are using the User-ID agent for credential detection, you must install it on the read-only domain controller (RODC). As a best practice deploy a separate agent for this purpose. Do not use the User-ID agent installed on the RODC to map IP addresses to users. The User-ID agent installer for credential detection is named UaCredInstall64-x.x.x.msi.
-
Download the User-ID agent installer.
Install the User-ID agent version that is the same as the PAN-OS version running on the firewalls. If there is not a User-ID agent version that matches the PAN-OS version, install the latest version that is closest to the PAN-OS version.
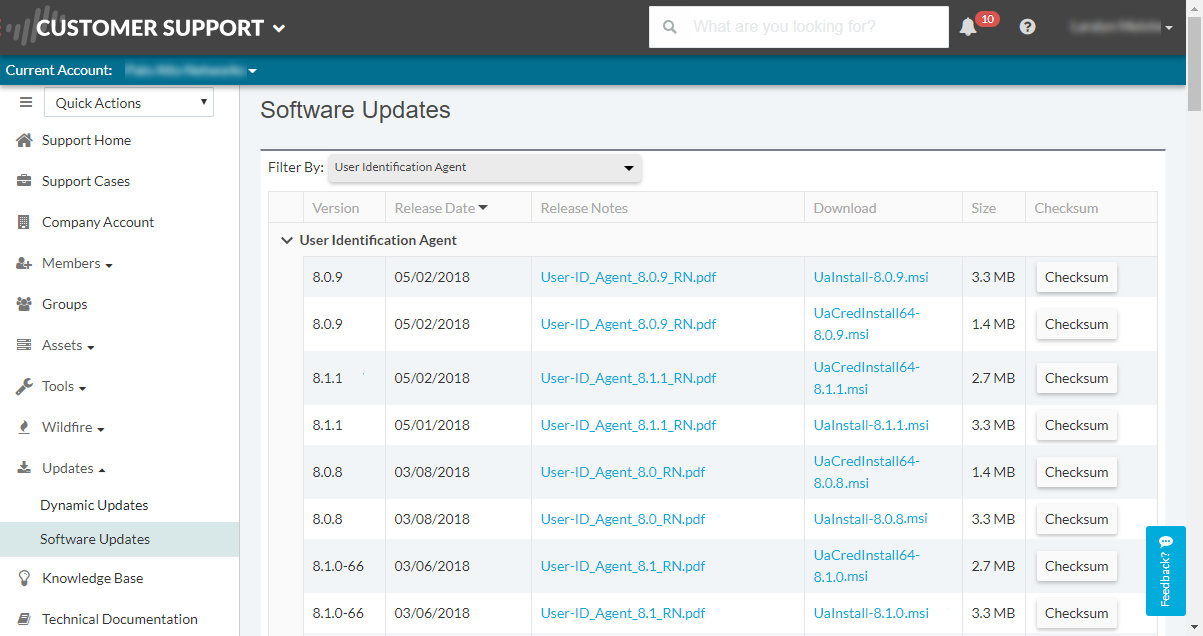
- Log in to the Palo Alto Networks Customer Support Portal.
- Select Updates > Software Updates .
-
Set
Filter By
to
User Identification Agent
and select the version of the User-ID agent you want to install from the corresponding Download column. The file name uses the following format:
UaInstall-x.x.x.msi
(where
x
represents the version number). For example, to download the 10.0 version of the User-ID agent, select
UaInstall-10.0.0-0.msi
.
(If you are using the User-ID agent to prevent credential phishing, download the UaCredInstall64-x.x.x.msi file instead. Only download and install the UaCredInstall64-x.x.x.msi if you are using the User-ID for credential detection.)
- Save the file on the systems where you plan to install the agent.
-
-
Run the installer as an administrator.
- Open the Windows Start menu, right-click the Command Prompt program, and select Run as administrator .
- From the command line, run the .msi file you downloaded. For example, if you saved the .msi file to the Desktop, enter the following:
-
C:\Users\administrator.acme>cd Desktop
-
C:\Users\administrator.acme\Desktop>UaInstall-6.0.0-1.msi
- Follow the setup prompts to install the agent using the default settings. By default, the agent gets installed to C:\Program Files(x86)\Palo Alto Networks , but you can Browse to a different location.
- When the installation completes, Close the setup window.
-
Launch the User-ID Agent application as an administrator.
Open the Windows Start menu, right-click the User-ID Agent program, and select Run as administrator .
You must run the User-ID Agent application as an administrator to install the application, commit configuration changes, or uninstall the application.
-
(
Optional
) Change the service account that the User-ID agent uses to log in.
By default, the agent uses the administrator account used to install the .msi file. To change the account to a restricted account:
- Select User Identification > Setup and click Edit .
- Select the Authentication tab and enter the service account name that you want the User-ID agent to use in the User name for Active Directory field.
- Enter the Password for the specified account.
- Commit the changes to the User-ID agent configuration to restart the service using the service account credentials.
-
(
Optional
) Assign your own certificates for mutual authentication between the Windows User-ID agent and the firewall.
-
Obtain your certificate for the Windows User-ID agent using one of the following methods. Upload the server certificate in Privacy Enhanced Mail (PEM) format and the server certificate's encrypted key.
- Generate a Certificate and export it for upload to the Windows User-ID agent.
- Export a certificate from your enterprise certificate authority (CA) and the upload it to the Windows User-ID agent.
-
Add a server certificate to Windows User-ID agent.
- On the Windows User-ID agent, select Server Certificate and click Add .
- Enter the path and name of the certificate file received from the CA or browse to the certificate file.
- Enter the private key passphrase.
- Click OK and then Commit .
- Upload a certificate to the firewall to validate the Windows User-ID agent's identity.
-
Configure the certificate profile for the client device (firewall or Panorama).
- Select Device > Certificate Management > Certificate Profile .
-
Configure a Certificate Profile.
You can only assign one certificate profile for Windows User-ID agents and Terminal Server (TS) agents. Therefore, your certificate profile must include all certificate authorities that issued certificates uploaded to connected User-ID and TS agents.
-
Assign the certificate profile on the firewall.
- Select Device > User Identification > Connection Security and click the edit button.
- Select the User-ID Certificate Profile you configured in the previous step.
- Click OK .
- Commit your changes.
-
Obtain your certificate for the Windows User-ID agent using one of the following methods. Upload the server certificate in Privacy Enhanced Mail (PEM) format and the server certificate's encrypted key.
-
Prevent credential phishing.
To use the Windows-based User-ID agent to detect credential submissions and prevent credential phishing, you must install the User-ID credential service on the Windows-based User-ID agent. You can only install this add-on on a read-only domain controller (RODC).
Configure the Windows User-ID Agent for User Mapping
The Palo Alto Networks Windows User-ID agent is a Windows service that connects to servers on your network—for example, Active Directory servers, Microsoft Exchange servers, and Novell eDirectory servers—and monitors the logs for login events. The agent uses this information to map IP addresses to usernames. Palo Alto Networks firewalls connect to the User-ID agent to retrieve this user mapping information, enabling visibility into user activity by username rather than IP address and enables user- and group-based security enforcement.
For information about the server OS versions supported by the User-ID agent, refer to “Operating System (OS) Compatibility User-ID Agent” in the User-ID Agent Release Notes.
-
Define the servers the User-ID agent will monitor to collect IP address to user mapping information.
(The User-ID agent can monitor up to 100 servers, of which up to 50 can be syslog senders.)
( To collect all of the required mappings, the User-ID agent must connect to all servers that your users log in to in order to monitor the security log files on all servers that contain login events.)
- Open the Windows Start menu and select User-ID Agent .
- Select User Identification > Discovery .
- In the Servers section of the screen, click Add .
- Enter a Name and Server Address for the server to be monitored. The network address can be a FQDN or an IP address.
- Select the Server Type ( Microsoft Active Directory , Microsoft Exchange , Novell eDirectory , or Syslog Sender ) and then click OK to save the server entry. Repeat this step for each server to be monitored.
-
(
Optional
) To enable the Windows User-ID agent to automatically discover domain controllers on your network using DNS lookups, click
Auto Discover
. If you have new domain controllers that you want the Windows User-ID agent to discover, click
Auto Discover
each time you want to discover the new domain controllers.
(Auto-discovery locates domain controllers in the local domain only; you must manually add Exchange servers, eDirectory servers, and syslog senders.)
-
(
Optional
) To tune the frequency at which the firewall polls configured servers for mapping information, select
User Identification > Setup
and
Edit
the Setup section. On the
Server Monitor
tab, modify the value in the
Server Log Monitor Frequency (seconds)
field. Increase the value in this field to 5 seconds in environments with older Domain Controllers or high-latency links.
Ensure that the Enable Server Session Read setting is not selected. This setting requires that the User-ID agent have an Active Directory account with Server Operator privileges so that it can read all user sessions. Instead, use a syslog or XML API integration to monitor sources that capture login and logout events for all device types and operating systems (instead of just Windows), such as wireless controllers and Network Access Controllers (NACs).
- Click OK to save the settings.
-
Specify the subnetworks the Windows User-ID agent should include in or exclude from User-ID.
(By default, the User-ID maps all users accessing the servers you are monitoring.)
As a best practice, always specify which networks to include and exclude from User-ID to ensure that the agent is only communicating with internal resources and to prevent unauthorized users from being mapped. You should only enable User-ID on the subnetworks where users internal to your organization are logging in.
- Select User Identification > Discovery .
- Click Add an entry to the Include/Exclude list of configured networks and enter a Name for the entry and enter the IP address range of the subnetwork in as the Network Address .
-
Select whether to include or exclude the network:
- Include specified network —Select this option if you want to limit user mapping to users logged in to the specified subnetwork only. For example, if you include 10.0.0.0/8, the agent maps the users on that subnetwork and excludes all others. If you want the agent to map users in other subnetworks, you must repeat these steps to add additional networks to the list.
-
Exclude specified network
—Select this option only if you want the agent to exclude a subset of the subnetworks you added for inclusion. For example, if you include 10.0.0.0/8 and exclude 10.2.50.0/22, the agent will map users on all the subnetworks of 10.0.0.0/8 except 10.2.50.0/22, and will exclude all subnetworks outside of 10.0.0.0/8.
If you add Exclude profiles without adding any Include profiles, the User-ID agent excludes all subnetworks, not just the ones you added.
- Click OK .
-
(
Optional
) If you configured the agent to connect to a Novell eDirectory server, you must specify how the agent should search the directory.
- Select User Identification > Setup and click Edit in the Setup section of the window.
-
Select the
eDirectory
tab and then complete the following fields:
-
Search Base
—The starting point or root context for agent queries, for example:
dc=domain1,dc=example, dc=com. -
Bind Distinguished Name
—The account to use to bind to the directory, for example:
cn=admin,ou=IT, dc=domain1, dc=example, dc=com. - Bind Password —The bind account password. The agent saves the encrypted password in the configuration file.
-
Search Filter
—The search query for user entries (default is
objectClass=Person). - Server Domain Prefix —A prefix to uniquely identify the user. This is only required if there are overlapping name spaces, such as different users with the same name from two different directories.
- Use SSL —Select the check box to use SSL for eDirectory binding.
- Verify Server Certificate —Select the check box to verify the eDirectory server certificate when using SSL.
-
Search Base
—The starting point or root context for agent queries, for example:
-
(
Strongly recommended
) Disable client probing.
Palo Alto Networks strongly recommends disabling client probing on high-security networks. Client probing can pose a security threat if not correctly configured. For more information, see client probing.
-
On the
Client Probing
tab, deselect the
Enable WMI Probing
check box if it is enabled.
Palo Alto Network strongly recommends that you collect user mapping information from isolated and trusted sources, such as domain controllers or integrations with Syslog or the XML API, to safely capture user mapping information from any device type or operating system.
(If you must enable client probing, select the Enable WMI Probing check box and on the Client Probing tab. Then add a remote administration exception to the Windows firewall for each probed client to ensure the Windows firewall will allow client probing. Each probed client PC must allow port 139 in the Windows firewall and must also have file and printer sharing services enabled.)
-
On the
Client Probing
tab, deselect the
Enable WMI Probing
check box if it is enabled.
-
Save the configuration.
Click OK to save the User-ID agent setup settings and then click Commit to restart the User-ID agent and load the new settings.
-
(
Optional
) Define the set of users for which you do not need to provide IP address-to-username mappings, such as kiosk accounts.
Save the
ignore-userlist as a text document on the agent host using the titleignore_user_listand use the .txt file extension to save it to the User-ID Agent folder on the domain server where the agent is installed.List the user accounts to ignore; there is no limit to the number of accounts you can add to the list. Each user account name must be on a separate line. For example:
SPAdmin
SPInstall
TFSReport
You can use an asterisk as a wildcard character to match multiple usernames, but only as the last character in the entry. For example,
corpdomain\it-admin*would match all administrators in thecorpdomaindomain whose usernames start with the stringit-admin. You can also use theignore-userlist to identify users whom you want to force to authenticate using Authentication Portal.After adding entries to the Ignore User list, you must stop and restart the connection to the service.
-
Configure the firewall to connect to the User-ID agent.
(The firewall can connect to only one Windows-based User-ID agent that is using the User-ID credential service add-on to detect corporate credential submissions. See Configure Credential Detection with the Windows User-ID Agent for more details on how to use this service.)
Complete the following steps on each firewall you want to connect to the User-ID agent to receive user mappings:
- Select Device > User Identification > User-ID Agents and click Add . (Note: The GUI path might slightly differ in newer PAN-OS versions, often under Device > User Identification > User Mapping > Palo Alto Networks User-ID Agent Setup > User-ID Agents tab)
- Enter a Name for the agent.
- Enter the IP address of the Windows Host on which the User-ID Agent is installed.
- Enter the Port number (1-65535) on which the agent will listen for user mapping requests. This value must match the value configured on the User-ID agent. By default, the port is set to 5007 on the firewall and on newer versions of the User-ID agent. However, some older User-ID agent versions use port 2010 as the default.
- Make sure that the configuration is Enabled , then click OK .
- Commit the changes.
- Verify that the Connected status displays as connected (a green light).
-
Verify that the User-ID agent is successfully mapping IP addresses to usernames and that the firewalls can connect to the agent.
- Launch the User-ID agent and select User Identification .
- Verify that the agent status shows Agent is running . If the Agent is not running, click Start .
- To verify that the User-ID agent can connect to monitored servers, make sure the Status for each Server is Connected .
- To verify that the firewalls can connect to the User-ID agent, make sure the Status for each of the Connected Devices is Connected .
- To verify that the User-ID agent is mapping IP addresses to usernames, select Monitoring and make sure that the mapping table is populated. You can also Search for specific users, or Delete user mappings from the list.
Quiz: Windows User-ID Agent
Question 7
Your company has 10 Active Directory domain controllers spread across multiple WAN links. The firewall's management plane is highly utilized. Which type of User-ID agent deployment is considered a best practice?
Question 8
An administrator configures a Windows User-ID agent to monitor four Active Directory servers and two Exchange servers. What information is needed in the agent's Discovery settings?
Configure User Mapping Using the PAN-OS Integrated User-ID Agent
The following procedure describes how to configure the PAN-OS® integrated User-ID™ agent on the firewall for IP address-to-username mapping. The integrated User-ID agent performs the same tasks as the Windows-based agent.
PAN-OS Integrated User-ID Agent Mapping Flow
sequenceDiagram
    participant Client
    participant Firewall as Firewall (Integrated Agent)
    participant DC as Domain Controller/Exchange

    Client->>+DC: User Logs In (Event 4624, etc.)
    DC-->>-Client: Authentication Success
    Note over DC: Security Log Updated

    loop Periodically
        Firewall->>+DC: Query Security Logs (WMI/WinRM)
        DC-->>-Firewall: Return New Logon Events (IP, User, Timestamp)
    end
    Note over Firewall: Updates Internal User-ID Mapping Table
-
Create an Active Directory service account for the User-ID agent to access the services and hosts that the firewall will monitor for collecting user mapping information.
Create a Dedicated Service Account for the User-ID Agent.
-
Define the servers that the firewall will monitor to collect user mapping information.
(Within the total maximum of 100 monitored servers per firewall, you can define no more than 50 syslog senders for any single virtual system.)
( To collect all the required mappings, the firewall must connect to all servers that your users log in to so that the firewall can monitor the Security log files on all servers that contain login events.)
- Select Device > User Identification > User Mapping .
- Click Add a server (Server Monitoring section).
- Enter a Name to identify the server.
-
Select the
Type
of server.
- Microsoft Active Directory
- Microsoft Exchange
- Novell eDirectory
- Syslog Sender
-
(
Microsoft Active Directory and Microsoft Exchange only
) Select the
Transport Protocol
you want to use to monitor security logs and session information on the server.
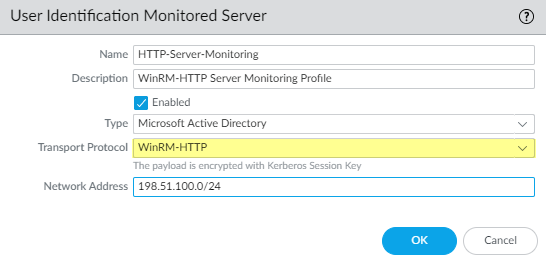
- WMI —The firewall and the monitored servers use Windows Management Instrumentation (WMI) to communicate.
- WinRM-HTTP —The firewall and the monitored servers use Kerberos for mutual authentication and the monitored server encrypts the communication with the firewall using a negotiated Kerberos session key.
- WinRM-HTTPS —The firewall and the monitored servers use HTTPS to communicate and use basic authentication or Kerberos for mutual authentication.
- (If you select a Windows Remote Management (WinRM) option, you must Configure Server Monitoring Using WinRM.)
-
(
Microsoft Active Directory, Microsoft Exchange, and Novell eDirectory only
) Enter the
Network Address
of the server.
(If you are using WinRM with Kerberos, you must enter a fully qualified domain name (FDQN). If you want to use WinRM with basic authentication or use WMI to monitor the server, you can enter an IP address or FQDN.)
(To monitor servers using WMI, specify an IP address, the service account name (if all server monitoring is in the same domain), or a fully qualified domain name (FQDN). If you specify an FQDN, use the down-level logon name in the (DLN)\sAMAccountName format instead of the FQDN\sAMAccountName format. For example, use
example\user.servicesnotexample.com\user.services. If you specify an FQDN, the firewall will attempt to authenticate using Kerberos, which does not support WMI.) - ( Syslog Sender only ) If you select Syslog Sender as the server Type , Configure the PAN-OS Integrated User-ID Agent as a Syslog Listener.
- ( Novell eDirectory only ) Make sure the Server Profile you select is Enabled and click OK .
-
(Optional) Configure the firewall to automatically
Discover
domain controllers on your network using DNS lookups.
(The auto-discovery feature is for domain controllers only; you must manually add any Exchange servers or eDirectory servers you want to monitor.)
-
(Optional) Specify the frequency at which the firewall polls Windows servers for mapping information. This is the interval between the end of the last query and the start of the next query.
(If the domain controller is processing many requests, delays between queries may exceed the specified value.)
- Click Edit the Palo Alto Networks User ID Agent Setup .
-
Select the
Server Monitor
tab and specify the
Server Log Monitor Frequency
in seconds (range is 1 to 3,600; default is 2). In environments with older domain controllers or high-latency links, set this frequency to a minimum of five seconds.
Ensure that the Enable Session option is not enabled. This option requires that the User-ID agent have an Active Directory account with Server Operator privileges so that it can read all user sessions. Instead, use a Syslog or XML API integration to monitor sources that capture login and logout events for all device types and operating systems (instead of just Windows), such as wireless controllers and network access control (NAC) devices.
- Click OK to save your changes.
-
Specify the subnetworks that the PAN-OS integrated User-ID agent should include in or exclude from user mapping.
(By default, the User-ID maps all users accessing the servers you are monitoring.)
As a best practice, always specify which networks to include and, optionally, which networks to exclude from User-ID to ensure that the agent is communicating only with internal resources and to prevent unauthorized users from being mapped. You should enable user mapping only on the subnetworks where users internal to your organization are logging in.
- Select Device > User Identification > User Mapping .
- Click Add an entry to the Include/Exclude Networks and enter a Name for the entry. Ensure that the entry is Enabled .
-
Enter the
Network Address
and then select whether to include or exclude it:
- Include —Select this option to limit user mapping to only users logged in to the specified subnetwork. For example, if you include 10.0.0.0/8, the agent maps the users on that subnetwork and excludes all others. If you want the agent to map users in other subnetworks, you must repeat these steps to add additional networks to the list.
-
Exclude
—Select this option to configure the agent to exclude a subset of the subnetworks you added for inclusion. For example, if you include 10.0.0.0/8 and exclude 10.2.50.0/22, the agent will map users on all the subnetworks of 10.0.0.0/8 except 10.2.50.0/22 and will exclude all subnetworks outside of 10.0.0.0/8.
If you add Exclude profiles without adding any Include profiles, the User-ID agent excludes all subnetworks, not just the ones you added.
- Click OK .
-
Set the domain credentials for the account that the firewall will use to access Windows resources. This is required for monitoring Exchange servers and domain controllers as well as for WMI probing.
- Click Edit the Palo Alto Networks User-ID Agent Setup .
-
Select the
Server Monitor Account
tab and enter the
User Name
and
Password
for the service account that the User-ID agent will use to probe the clients and monitor servers. Enter the username using the
domain\usernamesyntax. -
If you are using WinRM to monitor servers, configure the firewall to authenticate with the server you are monitoring.
- If you want to use WinRM with basic authentication, enable WinRM on the server, configure basic authentication, and specify the service account's Domain’s DNS Name .
- If you want to use WinRM with Kerberos, Configure a Kerberos server profile if you have not already done so and then select the Kerberos Server Profile .
-
(
Optional, not recommended
) Configure WMI probing.
Do not enable WMI probing on high-security networks. Client probing can generate a large amount of network traffic and can pose a security threat when misconfigured.
- On the Client Probing tab, Enable Probing .
-
(
Optional
) Specify the
Probe Interval
to define the interval (in minutes) between the end of the last probe request and the start of the next request.
(If necessary, increase the value to ensure the User-ID agent has sufficient time to probe all the learned IP addresses (range is 1 to 1440; default is 20).)
(If the request load is high, the observed delay between requests might significantly exceed the specified interval.)
- Click OK .
- Make sure the Windows firewall will allow client probing by adding a remote administration exception to the Windows firewall for each probed client.
-
(
Optional
) Define the set of user accounts that don't require IP address-to-username mappings, such as kiosk accounts.
(Define the ignore user list on the firewall that is the User-ID agent, not the client. If you define the ignore user list on the client firewall, the users in the list are still mapped during redistribution.)
On the Ignore User List tab, Add each username you want to exclude from user mapping. You can also use the ignore user list to identify the users you want to force to use Authentication Portal to authenticate. You can use an asterisk as a wildcard character to match multiple usernames but only as the last character in the entry. For example,
corpdomain\it-admin*would match all administrators in thecorpdomaindomain whose usernames start with the stringit-admin. You can add up to 5,000 entries to exclude from user mapping. -
Activate your configuration changes.
Click OK and Commit .
-
Verify the configuration.
- Access the firewall CLI.
- Enter the following operational command:
-
> show user server-monitor state all
- On the Device > User Identification > User Mapping tab in the web interface, verify that the Status of each server you configured for server monitoring is Connected .
Configure Server Monitoring Using WinRM
You can configure the PAN-OS integrated User-ID agent to monitor servers using Windows Remote Management (WinRM) . Using the WinRM protocol improves speed, efficiency, and security when monitoring server events to map user events to IP addresses. The PAN-OS integrated User-ID agent supports the WinRM protocol on Windows Server 2012 Active Directory and Microsoft Exchange Server 2012 or later versions of both.
There are three ways to configure server monitoring using WinRM:
-
Configure WinRM over HTTPS with Basic Authentication
—The firewall authenticates to the monitored server using the username and password of the service account for the User-ID agent and the firewall authenticates the monitored server using the User-ID certificate profile.
-
Configure WinRM over HTTP with Kerberos
—The firewall and the monitored servers use Kerberos for mutual authentication and the monitored server encrypts the communication with the firewall using a negotiated Kerberos session key.
-
Configure WinRM over HTTPS with Kerberos
—The firewall and the monitored server use HTTPS to communicate and use Kerberos for mutual authentication.
Configure WinRM over HTTPS with Basic Authentication
Interaction Flow: WinRM HTTPS Basic Auth
sequenceDiagram
    participant Firewall
    participant WinRMServer as Windows Server (WinRM Service)

    Note over Firewall, WinRMServer: Prerequisite: WinRM Listener configured on Server (HTTPS, Basic Auth Enabled)
    Note over Firewall, WinRMServer: Prerequisite: Server Cert configured for WinRM, Root CA trusted by Firewall
    Note over Firewall, WinRMServer: Prerequisite: Service Account Credentials configured on Firewall

    Firewall->>+WinRMServer: Establish HTTPS Connection (TLS Handshake)
    Note right of Firewall: Firewall validates Server Cert using User-ID Cert Profile
    WinRMServer-->>-Firewall: HTTPS Connection Established

    Firewall->>+WinRMServer: Send WinRM Request (e.g., Query Logs) + Basic Auth Credentials (Username/Password)
    WinRMServer->>+WinRMServer: Authenticate User (Basic)
    WinRMServer->>+WinRMServer: Authorize User (Remote Mgmt Users group, etc.)
    WinRMServer-->>-Firewall: Return WinRM Response (Log Data) / Auth Failure
When you configure WinRM to use HTTPS with basic authentication, the firewall transfers the credentials for the service account in a secure tunnel using SSL.
- Configure the service account with Remote Management User and CIMV2 privileges for the server you want to monitor.
-
On the Windows server you are monitoring, obtain the thumbprint from the certificate for the Windows server to use with WinRM and enable WinRM.
(Ensure that you use an account with administrator privileges to configure WinRM on the server you want to monitor. As a best practice for security, this account should not be the same account as the service account in Step 1.)
-
Verify the certificate is installed in the Local Computer certificate store (
Certificates (Local Computer) > Personal > Certificates
).
(If you do not see the Local Computer certificate store, launch the Microsoft Management Console ( Start > Run > MMC ) and add the Certificates snap-in ( File > Add/Remove Snap-in > Certificates > Add > Computer account > Next > Finish ).)
- Open the certificate and select General > Details > Show: <All> .
- Select the Thumbprint and copy it.
-
To enable the firewall to connect to the Windows server using WinRM, enter the following command:
winrm quickconfig. -
Enter
yto confirm the changes and then confirm the output displaysWinRM service started.(If WinRM is enabled, the output displays
WinRM service is already running on this machine.You will be prompted to confirm any additional required configuration changes.) -
To verify that WinRM is communicating using HTTPS, enter the following command:
winrm enumerate winrm/config/listenerand confirm that the output displaysTransport = HTTPS.(By default, WinRM/HTTPS uses port 5986.)
-
From the Windows server command prompt, enter the following command:
winrm create winrm/config/Listener?Address=*+Transport=HTTPS @{Hostname=”<hostname>”;CertificateThumbprint=”Certificate Thumbprint”}, where<hostname>is the hostname of the Windows server andCertificate Thumbprintis the value you copied from the certificate.Use the command prompt (not Powershell) and remove any spaces in the Certificate Thumbprint to ensure that WinRM can validate the certificate.
-
From the Windows server command prompt, enter the following command:
c:\> winrm set winrm/config/client/auth @{Basic="true"} -
Enter the following command:
winrm get winrm/config/service/Authand confirm thatBasic = true.
-
Verify the certificate is installed in the Local Computer certificate store (
Certificates (Local Computer) > Personal > Certificates
).
-
Enable Basic Authentication between the PAN-OS integrated User-ID agent and the monitored servers.
- Select Device > User Identification > User Mapping > Palo Alto Networks User-ID Agent Setup > Server Monitor Account .
-
In
domain\usernameformat, enter the User Name for the service account that the User-ID agent will use to monitor servers. - Enter the Domain's DNS Name of the server monitor account.
-
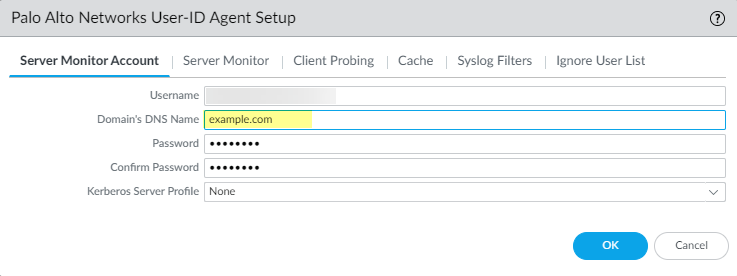
- Enter the Password and Confirm Password for the service account.
- Click OK
-
Configure server monitoring for the PAN-OS integrated User-ID agent.
- Select the Microsoft server Type ( Microsoft Active Directory or Microsoft Exchange ).
- Select Win-RM-HTTPS as the Transport Protocol to use Windows Remote Management (WinRM) over HTTPS to monitor the server security logs and session information.
-
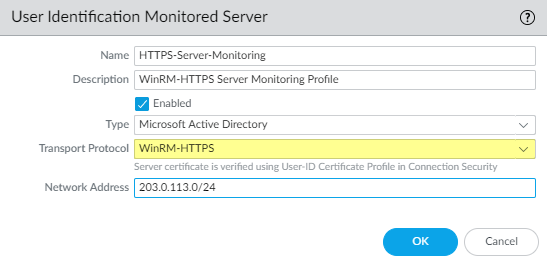
- Enter the IP address or FQDN Network Address of the server.
-
To enable the PAN-OS integrated User-ID agent to communicate with the monitored servers using WinRM-HTTPS, verify that you successfully imported the root certificate for the service certificates that the Windows server uses for WinRM on to the firewall and associate the certificate with the User-ID Certificate Profile.
- Select Device > User Identification > Connection Security .
- Click Edit .
- Select the Windows server certificate to use for the User-ID Certificate Profile .
-
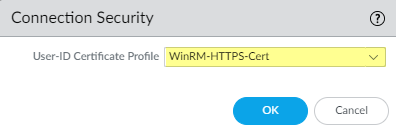
- Click OK .
- Commit your changes.
- Verify that the status of each monitored server is Connected ( Device > User Identification > User Mapping ).
Configure WinRM over HTTP with Kerberos
Interaction Flow: WinRM HTTP Kerberos Auth
sequenceDiagram
    participant Firewall
    participant KDC as Kerberos KDC
    participant WinRMServer as Windows Server (WinRM Service)

    Note over Firewall, WinRMServer: Prerequisite: WinRM Listener configured on Server (HTTP, Kerberos Auth Enabled)
    Note over Firewall, KDC: Prerequisite: Firewall configured with Kerberos Profile, Service Account Credentials, Time Synced

    Firewall->>+KDC: Request Service Ticket for WinRM/ServerFQDN
    KDC-->>-Firewall: Issue Service Ticket

    Firewall->>+WinRMServer: Send WinRM Request (e.g., Query Logs) + Kerberos Ticket (HTTP SPNEGO)
    WinRMServer->>+KDC: Verify Service Ticket (optional, depends on config)
    KDC-->>-WinRMServer: Ticket Valid / Invalid
    alt Ticket Valid
        WinRMServer->>+WinRMServer: Authorize User (Remote Mgmt Users group, etc.)
        WinRMServer-->>-Firewall: Return WinRM Response (Log Data) - Encrypted with Session Key
    else Ticket Invalid or Authz Failed
        WinRMServer-->>-Firewall: Authentication/Authorization Failure
    end
When you configure WinRM over HTTP with Kerberos, the firewall and the monitored servers use Kerberos for mutual authentication and the monitored server encrypts the communication with the firewall using a negotiated Kerberos session key.
WinRM with Kerberos supports the aes128-cts-hmac-sha1-96 and aes256-cts-hmac-sha1-96 ciphers. If the server you want to monitor uses RC4, you must download the Windows update and disable RC4 for Kerberos in the registry settings of the server you want to monitor.
- Configure the service account with Remote Management User and CIMV2 privileges for the server you want to monitor.
-
Confirm that WinRM is enabled on the Windows server you are monitoring.
(Ensure that you use an account with administrator privileges to configure WinRM on the server you want to monitor. As a best practice for security, this account should not be the same account as the service account in Step 1.)
-
To enable the firewall to connect to the Windows server using WinRM, enter the following command:
winrm quickconfig. -
Enter
yto confirm the changes and then confirm the output displaysWinRM service started.(If WinRM is enabled, the output displays
WinRM service is already running on this machine.You will be prompted to confirm any additional required configuration changes.) -
To verify that WinRM is communicating using HTTP, enter the following command:
winrm enumerate winrm/config/listenerand confirm that the output displaysTransport = HTTP.(By default, WinRM/HTTP uses port 5985.)
-
Enter the following command:
winrm get winrm/config/service/Authand confirm thatKerberos = true.
-
To enable the firewall to connect to the Windows server using WinRM, enter the following command:
-
Enable the PAN-OS integrated User-ID agent and the monitored servers to authenticate using Kerberos.
- If you did not do so during the initial configuration, configure date and time (NTP) settings to ensure successful Kerberos negotiation.
- Configure a Kerberos server profile on the firewall to authenticate with the server to monitor the security logs and session information.
- Select Device > User Identification > User Mapping > Palo Alto Networks User-ID Agent Setup > Server Monitor Account .
-
In
domain\usernameformat, enter the User Name for the service account that the User-ID agent will use to monitor servers. -
Enter the
Domain's DNS Name
of the server monitor account.
(Kerberos uses the domain name to locate the service account.)
- Enter the Password and Confirm Password for the service account.
- Select the Kerberos Server Profile you configured in Step 3.2.
-
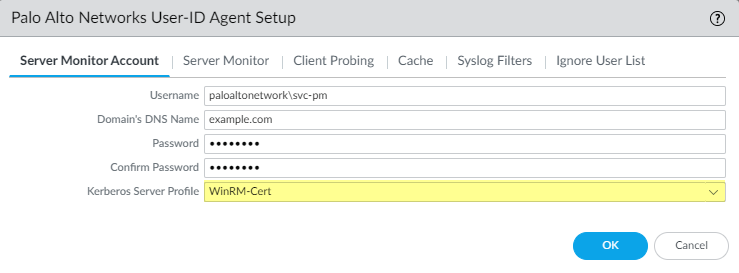
- Click OK .
-
Configure server monitoring for the PAN-OS integrated User-ID agent.
- Configure the Microsoft server type ( Microsoft Active Directory or Microsoft Exchange ).
- Select WinRM-HTTP as the Transport Protocol to use Windows Remote Management (WinRM) over HTTP to monitor the server security logs and session information.
-
-
Enter the FQDN
Network Address
of the server.
( If you are using Kerberos, the network address must be a fully qualified domain name (FDQN). )
- Commit your changes.
- Verify that the status of each monitored server is Connected ( Device > User Identification > User Mapping ).
Configure WinRM over HTTPS with Kerberos
Interaction Flow: WinRM HTTPS Kerberos Auth
sequenceDiagram
    participant Firewall
    participant KDC as Kerberos KDC
    participant WinRMServer as Windows Server (WinRM Service)

    Note over Firewall, WinRMServer: Prerequisite: WinRM Listener configured on Server (HTTPS, Kerberos Auth Enabled)
    Note over Firewall, WinRMServer: Prerequisite: Server Cert configured for WinRM, Root CA trusted by Firewall
    Note over Firewall, KDC: Prerequisite: Firewall configured with Kerberos Profile, Service Account Credentials, Time Synced

    Firewall->>+KDC: Request Service Ticket for WinRM/ServerFQDN
    KDC-->>-Firewall: Issue Service Ticket

    Firewall->>+WinRMServer: Establish HTTPS Connection (TLS Handshake)
    Note right of Firewall: Firewall validates Server Cert using User-ID Cert Profile
    WinRMServer-->>-Firewall: HTTPS Connection Established

    Firewall->>+WinRMServer: Send WinRM Request (e.g., Query Logs) + Kerberos Ticket (SPNEGO over HTTPS)
    WinRMServer->>+KDC: Verify Service Ticket (optional, depends on config)
    KDC-->>-WinRMServer: Ticket Valid / Invalid
    alt Ticket Valid
        WinRMServer->>+WinRMServer: Authorize User (Remote Mgmt Users group, etc.)
        WinRMServer-->>-Firewall: Return WinRM Response (Log Data) over HTTPS
    else Ticket Invalid or Authz Failed
        WinRMServer-->>-Firewall: Authentication/Authorization Failure over HTTPS
    end
When you configure WinRM over HTTPS with Kerberos, the firewall and the monitored server use HTTPS to communicate and use Kerberos for mutual authentication.
WinRM with Kerberos supports the aes128-cts-hmac-sha1-96 and aes256-cts-hmac-sha1-96 ciphers. If the server you want to monitor uses RC4, you must download the Windows update and disable RC4 for Kerberos in the registry settings of the server you want to monitor.
- Configure the service account with Remote Management User and CIMV2 privileges for the server you want to monitor.
-
On the Windows server you are monitoring, obtain the thumbprint from the certificate for the Windows server to use with WinRM and enable WinRM.
(Ensure that you use an account with administrator privileges to configure WinRM on the server you want to monitor. As a best practice for security, this account should not be the same account as the service account in Step 1.)
-
Verify the certificate is installed in the Local Computer certificate store (
Certificates (Local Computer) > Personal > Certificates
).
(If you do not see the Local Computer certificate store, launch the Microsoft Management Console ( Start > Run > MMC ) and add the Certificates snap-in ( File > Add/Remove Snap-in > Certificates > Add > Computer account > Next > Finish ).)
- Open the certificate and select General > Details > Show: <All> .
- Select the Thumbprint and copy it.
-
To enable the firewall to connect to the Windows server using WinRM, enter the following command:
winrm quickconfig. -
Enter
yto confirm the changes and then confirm the output displaysWinRM service started.(If WinRM is enabled, the output displays
WinRM service is already running on this machine.You will be prompted to confirm any additional required configuration changes.) -
To verify that WinRM is communicating using HTTPS, enter the following command:
winrm enumerate winrm/config/listener. Then confirm that the output displaysTransport = HTTPS.(By default, WinRM/HTTPS uses 5986.)
-
From the Windows server command prompt, enter the following command:
winrm create winrm/config/Listener?Address=*+Transport=HTTPS @{Hostname=”<hostname>”;CertificateThumbprint=”Certificate Thumbprint”}, where<hostname>is the hostname of the Windows server andCertificate Thumbprintis the value you copied from the certificate.Use the command prompt (not Powershell) and remove any spaces in the Certificate Thumbprint to ensure that WinRM can validate the certificate.
-
Enter the following command:
winrm get winrm/config/service/Authand confirm thatBasic = falseandKerberos= true.
-
Verify the certificate is installed in the Local Computer certificate store (
Certificates (Local Computer) > Personal > Certificates
).
-
Enable the PAN-OS integrated User-ID agent and the monitored servers to authenticate using Kerberos.
- If you did not do so during the initial configuration, configure date and time (NTP) settings to ensure successful Kerberos negotiation.
- Configure a Kerberos server profile on the firewall to authenticate with the server to monitor the security logs and session information.
- Select Device > User Identification > User Mapping > Palo Alto Networks User-ID Agent Setup > Server Monitor Account .
-
In
domain\usernameformat, enter the User Name for the service account that the User-ID agent will use to monitor servers. -
Enter the
Domain's DNS Name
of the server monitor account.
(Kerberos uses the domain name to locate the service account.)
- Enter the Password and Confirm Password for the service account.
- Select the Kerberos Server Profile you created in Step 3.2.
-
- Click OK .
-
Configure server monitoring for the PAN-OS integrated User-ID agent.
- Configure the Microsoft server type ( Microsoft Active Directory or Microsoft Exchange ).
- Select Win-RM-HTTPS as the Transport Protocol to use Windows Remote Management (WinRM) over HTTPS to monitor the server security logs and session information.
-
-
Enter the FQDN
Network Address
of the server.
( If you are using Kerberos, the network address must be a fully qualified domain name (FDQN). )
-
To enable the PAN-OS integrated User-ID agent to communicate with the monitored servers using WinRM-HTTPS, verify that you successfully imported the root certificate for the service certificates that the Windows server uses for WinRM on to the firewall and associate the certificate with the User-ID Certificate Profile.
(The firewall uses the same certificate to authenticate with all monitored servers.)
- Select Device > User Identification > Connection Security .
- Click Edit .
- Select the Windows server certificate to use for the User-ID Certificate Profile .
-
- Click OK .
- Commit your changes.
- Verify that the status of each monitored server is Connected ( Device > User Identification > User Mapping ).
Configure User-ID to Monitor Syslog Senders for User Mapping
To obtain IP address-to-username mappings from existing network services that authenticate users, you can configure the PAN-OS integrated User-ID agent or Windows-based User-ID agent to parse Syslog messages from those services. To keep user mappings up to date, you can also configure the User-ID agent to parse syslog messages for logout events so that the firewall automatically deletes outdated mappings.
Configure the PAN-OS Integrated User-ID Agent as a Syslog Listener
Syslog Flow (PAN-OS Integrated Agent)
sequenceDiagram
    participant Client
    participant SyslogSender as Syslog Sender (e.g., WiFi Controller)
    participant Firewall as Firewall (Integrated Agent)

    Client->>+SyslogSender: Authenticates (e.g., joins WiFi)
    SyslogSender-->>-Client: Auth Success
    SyslogSender->>+Firewall: Send Syslog Message (Login Event: User, IP) over UDP/SSL
    activate Firewall
    Firewall->>Firewall: Check if Sender IP is configured
    Firewall->>Firewall: Parse Syslog using configured Filter Profile
    Firewall->>Firewall: Extract User and IP Address
    Firewall->>Firewall: Update User-ID Mapping Table (IP -> User)
    deactivate Firewall
    Firewall-->>-SyslogSender: Acknowledge (if TCP/SSL)

    Note over Client, Firewall: Later... User disconnects

    Client->>+SyslogSender: Disconnects/Logs out
    SyslogSender-->>-Client: Acknowledge
    SyslogSender->>+Firewall: Send Syslog Message (Logout Event: User, IP) over UDP/SSL
    activate Firewall
    Firewall->>Firewall: Check if Sender IP is configured
    Firewall->>Firewall: Parse Syslog using configured Filter Profile
    Firewall->>Firewall: Extract User and IP Address
    Firewall->>Firewall: Remove User-ID Mapping (IP -> User)
    deactivate Firewall
    Firewall-->>-SyslogSender: Acknowledge (if TCP/SSL)
To configure the PAN-OS Integrated User-ID agent to create new user mappings and remove outdated mappings through syslog monitoring, start by defining Syslog Parse profiles. The User-ID agent uses the profiles to find login and logout events in syslog messages. In environments where syslog senders (the network services that authenticate users) deliver syslog messages in different formats, configure a profile for each syslog format. Syslog messages must meet certain criteria for a User-ID agent to parse them (see Syslog). This procedure uses examples with the following formats:
-
Login events
—
[Tue Jul 5 13:15:04 2016 CDT] Administratorauthentication success User:johndoe1 Source:192.168.3.212 -
Logout events
—
[Tue Jul 5 13:18:05 2016CDT] User logout successful User:johndoe1 Source:192.168.3.212
After configuring the Syslog Parse profiles, you specify syslog senders for the User-ID agent to monitor.
-
Determine whether there is a predefined Syslog Parse profile for your particular syslog senders.
(Palo Alto Networks provides several predefined profiles through Application content updates. The predefined profiles are global to the firewall, whereas custom profiles apply to a single virtual system only.)
(Any new Syslog Parse profiles in a given content release is documented in the corresponding release note along with the specific regex used to define the filter.)
-
Install the latest Applications or Applications and Threats update:
- Select Device > Dynamic Updates and Check Now .
- Download and Install any new update.
-
Determine which predefined Syslog Parse profiles are available:
- Select Device > User Identification > User Mapping and click Add in the Server Monitoring section.
- Set the Type to Syslog Sender and click Add in the Filter section. If the Syslog Parse profile you need is available, skip the steps for defining custom profiles.
-
Install the latest Applications or Applications and Threats update:
-
Define custom Syslog Parse profiles to create and delete user mappings.
( Each profile filters syslog messages to identify either login events (to create user mappings) or logout events (to delete mappings) , but no single profile can do both.)
-
Review the syslog messages that the syslog sender generates to identify the syntax for login and logout events. This enables you to define the matching patterns when creating Syslog Parse profiles.
(While reviewing syslog messages, also determine whether they include the domain name. If they don't, and your user mappings require domain names, enter the Default Domain Name when defining the syslog senders that the User-ID agent monitors (later in this procedure).)
- Select Device > User Identification > User Mapping and edit the Palo Alto Networks User-ID Agent Setup.
- Select Syslog Filters and Add a Syslog Parse profile.
- Enter a name to identify the Syslog Parse Profile .
-
Select the
Type
of parsing to find login or logout events in syslog messages:
- Regex Identifier —Regular expressions.
- Field Identifier —Text strings.
(The following steps describe how to configure these parsing types.)
-
Review the syslog messages that the syslog sender generates to identify the syntax for login and logout events. This enables you to define the matching patterns when creating Syslog Parse profiles.
-
(
Regex Identifier parsing only
) Define the regex matching patterns.
(If the syslog message contains a standalone space or tab as a delimiter, use
\sfor a space and\tfor a tab.)-
Enter the
Event Regex
for the type of events you want to find:
-
Login events
—For the example message, the regex
(authentication\ success){1}extracts the first{1}instance of the stringauthentication success. -
Logout events
—For the example message, the regex
(logout\ successful){1}extracts the first{1}instance of the stringlogout successful. -
(The backslash (
\) before the space is a standard regex escape character that instructs the regex engine not to treat the space as a special character.)
-
Login events
—For the example message, the regex
-
Enter the
Username Regex
to identify the start of the username.
(In the example message, the regex
User:([a-zA-Z0-9\\\._]+)matches the stringUser:johndoe1and identifiesjohndoe1as the username.) -
Enter the
Address Regex
to identify the IP address portion of syslog messages.
(In the example message, the regular expression
Source:([0-9]{1,3}\.[0-9]{1,3}\.[0-9]{1,3}\.[0-9]{1,3})matches the IPv4 addressSource:192.168.3.212.)(The following is an example of a completed Syslog Parse profile that uses regex to identify login events:)
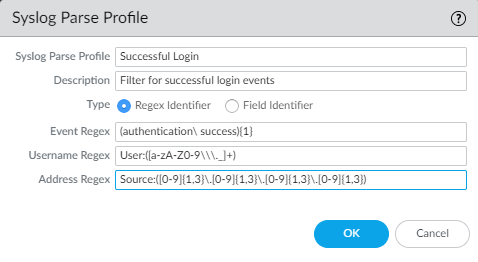
- Click OK twice to save the profile.
-
Enter the
Event Regex
for the type of events you want to find:
-
(
Field Identifier parsing only
) Define string matching patterns.
-
Enter an
Event String
to identify the type of events you want to find.
-
Login events
—For the example message, the string
authentication successidentifies login events. -
Logout events
—For the example message, the string
logout successfulidentifies logout events.
-
Login events
—For the example message, the string
-
Enter a
Username Prefix
to identify the start of the username field in syslog messages. The field does not support regex expressions such as
\s(for a space) or\t(for a tab).(In the example messages,
User:identifies the start of the username field.) -
Enter the
Username Delimiter
that indicates the end of the username field in syslog messages. Use
\sto indicate a standalone space (as in the sample message) and\tto indicate a tab. -
Enter an
Address Prefix
to identify the start of the IP address field in syslog messages. The field does not support regex expressions such as
\s(for a space) or\t(for a tab).(In the example messages,
Source:identifies the start of the address field.) -
Enter the
Address Delimiter
that indicates the end of the IP address field in syslog messages.
(For example, enter
\nto indicate the delimiter is a line break.)(The following is an example of a completed Syslog Parse profile that uses string matching to identify login events:)
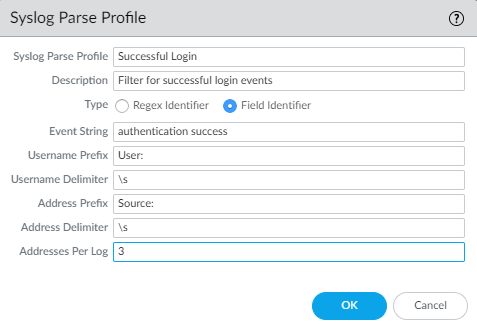
- Click OK twice to save the profile.
-
Enter an
Event String
to identify the type of events you want to find.
-
Specify the syslog senders that the firewall monitors.
(Within the total maximum of 100 monitored servers per firewall, you can define no more than 50 syslog senders for any single virtual system.)
( The firewall discards any syslog messages received from senders that are not on this list. )
- Select Device > User Identification > User Mapping and Add an entry to the Server Monitoring list.
- Enter a Name to identify the sender.
- Make sure the sender profile is Enabled (default is enabled).
- Set the Type to Syslog Sender .
- Enter the Network Address (IP address) of the syslog sender.
-
Select
SSL
(default) or
UDP
as the
Connection Type
.
To select the TLS certificate that the firewall uses to receive syslog messages, select Device > User Identification > User Mapping > Palo Alto Networks User-ID Agent Setup . Edit the settings and select Server Monitor , then select the Syslog Service Profile that contains the TLS certificate you want to the firewall to use to receive syslog messages.
The PAN-OS integrated User-ID agent accepts syslogs over SSL and UDP only. However, you must use caution when using UDP to receive syslog messages because it is an unreliable protocol and as such there is no way to verify that a message was sent from a trusted syslog sender. Although you can restrict syslog messages to specific source IP addresses, an attacker can still spoof the IP address, potentially allowing the injection of unauthorized syslog messages into the firewall.
Always use SSL to listen for syslog messages because the traffic is encrypted (UDP sends the traffic in cleartext). If you must use UDP, make sure that the syslog sender and client are both on a dedicated, secure network to prevent untrusted hosts from sending UDP traffic to the firewall.A syslog sender using SSL to connect will show a Status of Connected only when there is an active SSL connection. Syslog senders using UDP will not show a Status value.
- For each syslog format that the sender supports, Add a Syslog Parse profile to the Filter list. Select the Event Type that each profile is configured to identify: login (default) or logout .
- ( Optional ) If the syslog messages don't contain domain information and your user mappings require domain names, enter a Default Domain Name to append to the mappings.
- Click OK to save the settings.
-
Enable syslog listener services on the interface that the firewall uses to collect user mappings.
- Select Network > Network Profiles > Interface Mgmt and edit an existing Interface Management profile or Add a new profile.
-
Select
User-ID Syslog Listener-SSL
or
User-ID Syslog Listener-UDP
or both, based on the protocols you defined for the syslog senders in the Server Monitoring list.
( The listening ports (514 for UDP and 6514 for SSL) are not configurable ; they are enabled through the management service only.)
-
Click
OK
to save the interface management profile.
Even after enabling the User-ID Syslog Listener service on the interface, the interface only accepts syslog connections from senders that have a corresponding entry in the User-ID monitored servers configuration. The firewall discards connections or messages from senders that are not on the list.
-
Assign the Interface Management profile to the interface that the firewall uses to collect user mappings:
- Select Network > Interfaces and edit the interface.
- Select Advanced > Other info , select the Interface Management Profile you just added, and click OK .
- Commit your changes.
-
Verify that the firewall adds and deletes user mappings when users log in and out.
(You can use CLI commands to see additional information about syslog senders, syslog messages, and user mappings.)
- Log in to a client system for which a monitored syslog sender generates login and logout event messages.
- Log in to the firewall CLI.
-
Verify that the firewall mapped the login username to the client IP address:
> show user ip-user-mapping ip <ip-address>
IP address:    192.0.2.1 (vsys1)
User:          localdomain\username
From:          SYSLOG
- Log out of the client system.
-
Verify that the firewall deleted the user mapping:
> show user ip-user-mapping ip <ip-address>
No matched record
Configure the Windows User-ID Agent as a Syslog Listener
Syslog Flow (Windows Agent)
sequenceDiagram
    participant Client
    participant SyslogSender as Syslog Sender (e.g., WiFi Controller)
    participant WinUserIDAgent as Windows User-ID Agent
    participant Firewall

    Client->>+SyslogSender: Authenticates (e.g., joins WiFi)
    SyslogSender-->>-Client: Auth Success
    SyslogSender->>+WinUserIDAgent: Send Syslog Message (Login Event: User, IP) over TCP/UDP
    activate WinUserIDAgent
    WinUserIDAgent->>WinUserIDAgent: Check if Sender IP is configured
    WinUserIDAgent->>WinUserIDAgent: Parse Syslog using configured Filter Profile
    WinUserIDAgent->>WinUserIDAgent: Extract User and IP Address
    WinUserIDAgent->>WinUserIDAgent: Update Internal Mapping Table
    deactivate WinUserIDAgent

    loop Periodically/Event Driven
        WinUserIDAgent->>+Firewall: Send User Mapping Update (IP -> User)
        Firewall-->>-WinUserIDAgent: Acknowledge Update
        Note over Firewall: Updates User-ID Mapping Table
    end

    Note over Client, Firewall: Later... User disconnects

    Client->>+SyslogSender: Disconnects/Logs out
    SyslogSender-->>-Client: Acknowledge
    SyslogSender->>+WinUserIDAgent: Send Syslog Message (Logout Event: User, IP) over TCP/UDP
    activate WinUserIDAgent
    WinUserIDAgent->>WinUserIDAgent: Check if Sender IP is configured
    WinUserIDAgent->>WinUserIDAgent: Parse Syslog using configured Filter Profile
    WinUserIDAgent->>WinUserIDAgent: Extract User and IP Address
    WinUserIDAgent->>WinUserIDAgent: Remove Internal Mapping (IP -> User)
    deactivate WinUserIDAgent

    WinUserIDAgent->>+Firewall: Send User Mapping Deletion (IP -> User)
    Firewall-->>-WinUserIDAgent: Acknowledge Update
    Note over Firewall: Removes User-ID Mapping
To configure the Windows-based User-ID agent to create new user mappings and remove outdated mappings through syslog monitoring, start by defining Syslog Parse profiles. The User-ID agent uses the profiles to find login and logout events in syslog messages. In environments where syslog senders (the network services that authenticate users) deliver syslog messages in different formats, configure a profile for each syslog format. Syslog messages must meet certain criteria for a User-ID agent to parse them (see Syslog). This procedure uses examples with the following formats:
-
Login events—
[Tue Jul 5 13:15:04 2016 CDT] Administrator authentication success User:johndoe1 Source:192.168.3.212 -
Logout events—
[Tue Jul 5 13:18:05 2016 CDT] User logout successful User:johndoe1 Source:192.168.3.212
After configuring the Syslog Parse profiles, you specify the syslog senders that the User-ID agent monitors.
The Windows User-ID agent accepts syslogs over TCP and UDP only. However, you must use caution when using UDP to receive syslog messages because it is an unreliable protocol and as such there is no way to verify that a message was sent from a trusted syslog sender. Although you can restrict syslog messages to specific source IP addresses, an attacker can still spoof the IP address, potentially allowing the injection of unauthorized syslog messages into the firewall. As a best practice, use TCP instead of UDP. In either case, make sure that the syslog sender and client are both on a dedicated, secure VLAN to prevent untrusted hosts from sending syslogs to the User-ID agent.
-
Deploy the Windows-based User-ID agents if you haven't already.
- Install the Windows-Based User-ID Agent.
- Configure the firewall to connect to the User-ID agent.
-
Define custom Syslog Parse profiles to create and delete user mappings.
(Each profile filters syslog messages to identify either login events (to create user mappings) or logout events (to delete mappings), but no single profile can do both.)
-
Review the syslog messages that the syslog sender generates to identify the syntax for login and logout events. This enables you to define the matching patterns when creating Syslog Parse profiles.
(While reviewing syslog messages, also determine whether they include the domain name. If they don't, and your user mappings require domain names, enter the Default Domain Name when defining the syslog senders that the User-ID agent monitors (later in this procedure).)
- Open the Windows Start menu and select User-ID Agent .
- Select User Identification > Setup and Edit the Setup.
- Select Syslog , Enable Syslog Service , and Add a Syslog Parse profile.
- Enter a Profile Name and Description .
-
Select the
Type
of parsing to find login and logout events in syslog messages:
- Regex —Regular expressions.
- Field —Text strings.
(The following steps describe how to configure these parsing types.)
-
Review the syslog messages that the syslog sender generates to identify the syntax for login and logout events. This enables you to define the matching patterns when creating Syslog Parse profiles.
-
(
Regex parsing only
) Define the regex matching patterns.
(If the syslog message contains a standalone space or tab as a delimiter, use
\sfor a space and\tfor a tab.)-
Enter the
Event Regex
for the type of events you want to find:
-
Login events
—For the example message, the regex
(authentication\ success){1}extracts the first{1}instance of the stringauthentication success. -
Logout events
—For the example message, the regex
(logout\ successful){1}extracts the first{1}instance of the stringlogout successful. - (The backslash before the space is a standard regex escape character that instructs the regex engine not to treat the space as a special character.)
-
Login events
—For the example message, the regex
-
Enter the
Username Regex
to identify the start of the username.
(In the example message, the regex
User:([a-zA-Z0-9\\\._]+)matches the stringUser:johndoe1and identifiesjohndoe1as the username.) -
Enter the
Address Regex
to identify the IP address portion of syslog messages.
(In the example message, the regular expression
Source:([0-9]{1,3}\.[0-9]{1,3}\.[0-9]{1,3}\.[0-9]{1,3})matches the IPv4 addressSource:192.168.3.212.)(The following is an example of a completed Syslog Parse profile that uses regex to identify login events:)
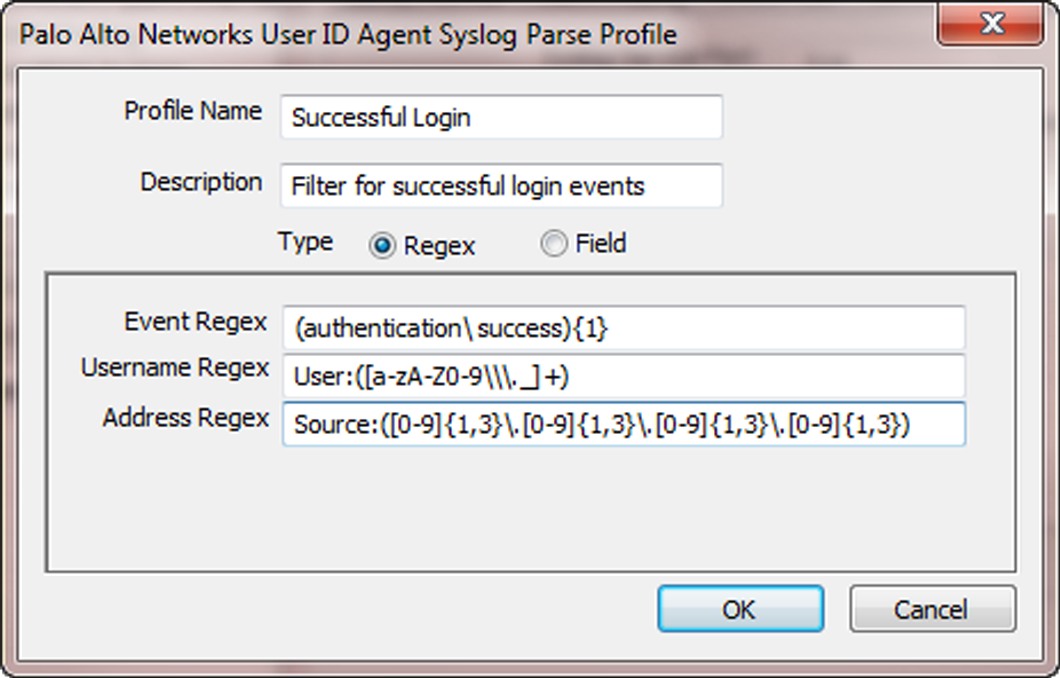
- Click OK twice to save the profile.
-
Enter the
Event Regex
for the type of events you want to find:
-
(
Field Identifier parsing only
) Define string matching patterns.
-
Enter an
Event String
to identify the type of events you want to find.
-
Login events
—For the example message, the string
authentication successidentifies login events. -
Logout events
—For the example message, the string
logout successfulidentifies logout events.
-
Login events
—For the example message, the string
-
Enter a
Username Prefix
to identify the start of the username field in syslog messages. The field does not support regex expressions such as
\s(for a space) or\t(for a tab).(In the example messages,
User:identifies the start of the username field.) -
Enter the
Username Delimiter
that indicates the end of the username field in syslog messages. Use
\sto indicate a standalone space (as in the sample message) and\tto indicate a tab. -
Enter an
Address Prefix
to identify the start of the IP address field in syslog messages. The field does not support regex expressions such as
\s(for a space) or\t(for a tab).(In the example messages,
Source:identifies the start of the address field.) -
Enter the
Address Delimiter
that indicates the end of the IP address field in syslog messages.
(For example, enter
\nto indicate the delimiter is a line break.)(The following is an example of a completed Syslog Parse profile that uses string matching to identify login events:)
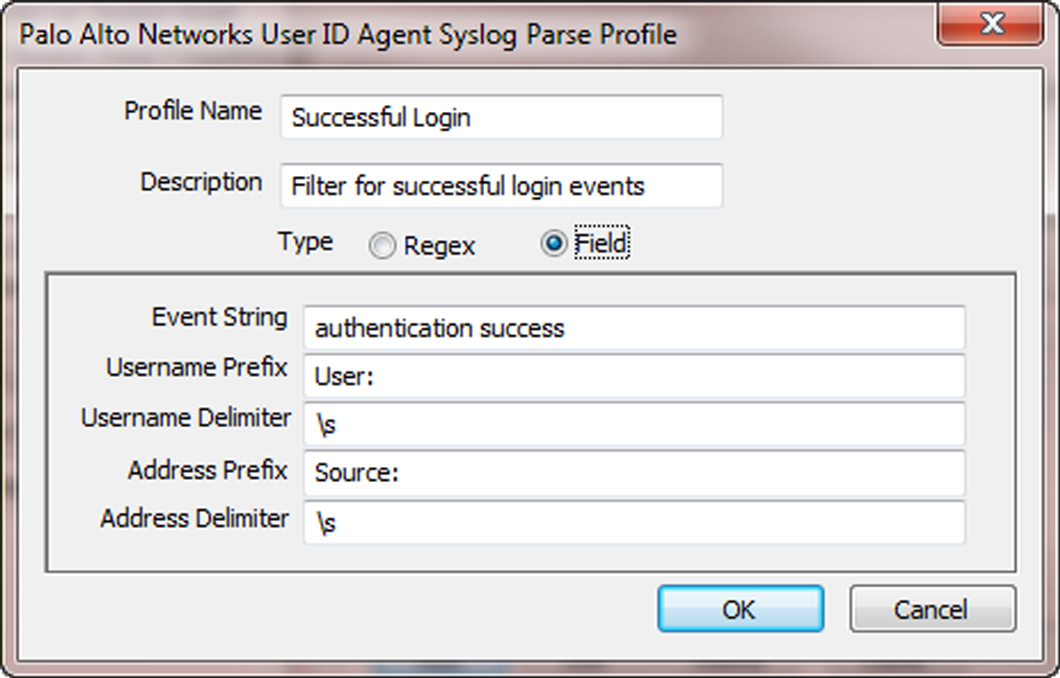
- Click OK twice to save the profile.
-
Enter an
Event String
to identify the type of events you want to find.
-
Specify the syslog senders that the User-ID agent monitors.
(Within the total maximum of 100 servers of all types that the User-ID agent can monitor, up to 50 can be syslog senders.)
( The User-ID agent discards any syslog messages received from senders that are not on this list. )
- Select User Identification > Discovery and Add an entry to the Servers list.
- Enter a Name to identify the sender.
- Enter the Server Address of the syslog sender (IP address or FQDN).
- Set the Server Type to Syslog Sender .
- ( Optional ) If you want to override the current domain in the username of your syslog message or prepend the domain to the username if your syslog message doesn't contain a domain, enter a Default Domain Name .
- For each syslog format that the sender supports, Add a Syslog Parse profile to the Filter list. Select the Event Type that you configured each profile to identify— login (default) or logout —and then click OK .
- Click OK to save the settings.
- Commit your changes to the User-ID agent configuration.
-
Verify that the User-ID agent adds and deletes user mappings when users log in and out.
(You can use CLI commands to see additional information about syslog senders, syslog messages, and user mappings.)
- Log in to a client system for which a monitored syslog sender generates login and logout event messages.
-
Verify that the User-ID agent mapped the login username to the client IP address:
- In the User-ID agent, select Monitoring .
- Enter the username or IP address in the filter field, Search , and verify that the list displays the mapping.
-
Verify that the firewall received the user mapping from the User-ID agent:
- Log in to the firewall CLI.
-
Run the following command:
> show user ip-user-mapping ip <ip-address>
If the firewall received the user mapping, the output resembles the following:
IP address:    192.0.2.1 (vsys1)
User:          localdomain\username
From:          SYSLOG
- Log out of the client system.
-
Verify that the User-ID agent removed the user mapping:
- In the User-ID agent, select Monitoring .
- Enter the username or IP address in the filter field, Search , and verify that the list does not display the mapping.
-
Verify that the firewall deleted the user mapping:
- Access the firewall CLI.
-
Run the following command:
> show user ip-user-mapping ip <ip-address>
If the firewall deleted the user mapping, the output displays:
No matched record
Map IP Addresses to Usernames Using Authentication Portal
When a user initiates web traffic (HTTP or HTTPS) that matches an Authentication Policy rule, the firewall prompts the user to authenticate through Authentication Portal . This ensures that you know exactly who is accessing your most sensitive applications and data. Based on user information collected during authentication, the firewall creates a new IP address-to-username mapping or updates the existing mapping for that user. This method of user mapping is useful in environments where the firewall cannot learn mappings through other methods such as monitoring servers. For example, you might have users who are not logged in to your monitored domain servers, such as users on Linux clients.
Authentication Portal Flow (Redirect Mode Example)
sequenceDiagram
    participant User
    participant ClientBrowser as User's Browser
    participant Firewall
    participant AuthServer as Authentication Server (LDAP/RADIUS/SAML etc.)

    User->>+ClientBrowser: Attempts to access web resource
    ClientBrowser->>+Firewall: HTTP/S Request for resource
    activate Firewall
    Firewall->>Firewall: Evaluate Security Policy (No User-ID mapping initially)
    Firewall->>Firewall: Match Authentication Policy Rule requiring Auth Portal
    Firewall-->>-ClientBrowser: HTTP 302 Redirect to Auth Portal Host (Layer 3 Interface)
    deactivate Firewall

    ClientBrowser->>+Firewall: Request Auth Portal page (HTTPS)
    activate Firewall
    alt Kerberos SSO Enabled & Successful
        Firewall->>ClientBrowser: HTTP 401 Negotiate (Request Kerberos Ticket)
        ClientBrowser->>ClientBrowser: Obtain Kerberos Ticket for Auth Portal Host
        ClientBrowser->>Firewall: Re-request Auth Portal page + Kerberos Ticket
        Firewall->>+AuthServer: Verify Kerberos Ticket (via Kerberos Profile)
        AuthServer-->>-Firewall: Ticket Valid/Invalid
        opt Ticket Valid
            Firewall->>Firewall: Create User-ID Mapping (IP -> User from Ticket)
            Firewall-->>ClientBrowser: Redirect back to original resource URL / Success Page
        end
    else Web Form / Fallback
        Firewall-->>ClientBrowser: Present Auth Portal Login Form (HTML)
        deactivate Firewall
        User->>+ClientBrowser: Enters Credentials
        ClientBrowser->>+Firewall: POST Credentials to Auth Portal
        activate Firewall
        Firewall->>+AuthServer: Validate Credentials (via Auth Profile - LDAP/RADIUS/SAML etc.)
        AuthServer-->>-Firewall: Authentication Success/Failure
        alt Auth Success
            Firewall->>Firewall: Create User-ID Mapping (IP -> User)
            Firewall-->>ClientBrowser: Redirect back to original resource URL / Success Page
        else Auth Failure
             Firewall-->>ClientBrowser: Show Login Failed message
        end
        deactivate Firewall
    else Certificate Auth
        Firewall->>ClientBrowser: Request Client Certificate (TLS Handshake)
        ClientBrowser->>User: Prompt User to select Certificate
        User->>ClientBrowser: Selects Certificate
        ClientBrowser->>Firewall: Present Client Certificate
        Firewall->>Firewall: Validate Cert against Certificate Profile (CA, Username Field)
        alt Cert Valid
            Firewall->>Firewall: Create User-ID Mapping (IP -> User from Cert)
            Firewall-->>ClientBrowser: Redirect back to original resource URL / Success Page
        else Cert Invalid
            Firewall-->>ClientBrowser: Show Authentication Failed message
        end
        deactivate Firewall
    end
Authentication Portal Authentication Methods
Authentication Portal uses the following methods to authenticate users whose web requests match Authentication Policy rules:
| Authentication Method | Description |
|---|---|
| Kerberos SSO |
The firewall uses Kerberos single sign-on (SSO) to transparently obtain user credentials from the browser. To use this method, your network requires a Kerberos infrastructure, including a key distribution center (KDC) with an authentication server and ticket granting service. The firewall must have a Kerberos account. If Kerberos SSO authentication fails, the firewall falls back to web form or client certificate authentication, depending on your Authentication policy and Authentication Portal configuration. |
| Web Form |
The firewall redirects web requests to a web form for authentication. For this method, you can configure Authentication policy to use Multi-Factor Authentication (MFA), SAML, Kerberos, TACACS+, RADIUS, or LDAP authentication. Although users have to manually enter their login credentials, this method works with all browsers and operating systems. |
| Client Certificate Authentication |
The firewall prompts the browser to present a valid client certificate to authenticate the user. To use this method, you must provision client certificates on each user system and install the trusted certificate authority (CA) certificate used to issue those certificates on the firewall. |
Authentication Portal Modes
The Authentication Portal mode defines how the firewall captures web requests for authentication:
| Mode | Description |
|---|---|
| Transparent |
The firewall intercepts the browser traffic per the Authentication policy rule and impersonates the original destination URL, issuing an HTTP 401 to invoke authentication. However, because the firewall does not have the real certificate for the destination URL, the browser displays a certificate error to users attempting to access a secure site. Therefore, use this mode only when absolutely necessary , such as in Layer 2 or virtual wire deployments. |
| Redirect |
The firewall intercepts unknown HTTP or HTTPS sessions and redirects them to a Layer 3 interface on the firewall using an HTTP 302 redirect to perform authentication. This is the preferred mode because it provides a better end-user experience (no certificate errors). However, it does require additional Layer 3 configuration. Another benefit of the Redirect mode is that it provides for the use of session cookies, which enable the user to continue browsing to authenticated sites without requiring re-mapping each time the timeouts expire. This is especially useful for users who roam from one IP address to another (for example, from the corporate LAN to the wireless network) because they won't need to re-authenticate when the IP address changes as long as the session stays open. If you use Kerberos SSO, you must use Redirect mode because the browser will provide credentials only to trusted sites. Redirect mode is also required if you use Multi-Factor Authentication to authenticate Authentication Portal users. |
Configure Authentication Portal
The following procedure shows how to set up Authentication Portal authentication by configuring the PAN-OS integrated User-ID agent to redirect web requests that match an Authentication Policy rule to a firewall interface (redirect host).
SSL Inbound Inspection does not support Authentication Portal redirect . To use Authentication Portal redirect and decryption, you must use SSL Forward Proxy.
Based on their sensitivity, the applications that users access through Authentication Portal require different authentication methods and settings. To accommodate all authentication requirements, you can use default and custom authentication enforcement objects. Each object associates an Authentication rule with an authentication profile and an Authentication Portal authentication method.
- Default authentication enforcement objects —Use the default objects if you want to associate multiple Authentication rules with the same global authentication profile. You must configure this authentication profile before configuring Authentication Portal, and then assign it in the Authentication Portal Settings. For Authentication rules that require Multi-Factor Authentication (MFA), you cannot use default authentication enforcement objects.
- Custom authentication enforcement objects —Use a custom object for each Authentication rule that requires an authentication profile that differs from the global profile. Custom objects are mandatory for Authentication rules that require MFA. To use custom objects, create authentication profiles and assign them to the objects after configuring Authentication Portal—when you Configure Authentication Policy.
Keep in mind that authentication profiles are necessary only if users authenticate through a Authentication Portal Web Form or Kerberos SSO. Alternatively, or in addition to these methods, the following procedure also describes how to implement Client Certificate Authentication.
If you use Authentication Portal without the other User-ID functions (user mapping and group mapping), you don't need to configure a User-ID agent.
-
Configure the interfaces that the firewall will use for incoming web requests, authenticating users, and communicating with directory servers to map usernames to IP addresses.
(When the firewall connects to authentication servers or User-ID agents, it uses the management interface by default. As a best practice, isolate your management network by configuring service routes to connect to the authentication servers or User-ID agents.)
- ( MGT interface only ) Select Device > Setup > Interfaces , edit the Management interface, select User-ID , and click OK .
- ( Non-MGT interface only ) Assign an Interface Management Profile to the Layer 3 interface that the firewall will use for incoming web requests and communication with directory servers. You must enable Response Pages and User-ID in the Interface Management profile.
-
(
Non-MGT interface only
) Configure a service route for the interface that the firewall will use to authenticate users. If the firewall has more than one virtual system (vsys), the service route can be global or vsys-specific. The services must include
LDAP
and potentially the following:
- Kerberos , RADIUS , TACACS+ , or Multi-Factor Authentication —Configure a service route for any authentication services that you use.
- UID Agent —Configure this service only if you Enable User- and Group-Based Policy.
-
(
Redirect mode only
)
Create a DNS address (A) record that maps the IP address on the Layer 3 interface to the redirect host.
If you will use Kerberos SSO, you must also add a DNS pointer (PTR) record that performs the same mapping.
(If your network doesn't support access to the directory servers from any firewall interface, you must Configure User Mapping Using the Windows User-ID Agent.)
-
Make sure Domain Name System (DNS) is configured to resolve your domain controller addresses.
(To verify proper resolution, ping the server FQDN. For example:)
> ping host dc1.acme.com
-
Configure clients to trust Authentication Portal certificates.
(Required for redirect mode—to transparently redirect users without displaying certificate errors. You can generate a self-signed certificate or import a certificate that an external certificate authority (CA) signed.)
(To use a self-signed certificate, create a root CA certificate and use it to sign the certificate you will use for Authentication Portal:)
- Select Device > Certificate Management > Certificates > Device Certificates .
- Create a Self-Signed Root CA Certificate or import a CA certificate (see Import a Certificate and Private Key).
-
Generate a Certificate to use for Authentication Portal. Be sure to configure the following fields:
- Common Name —Enter the DNS name of the intranet host for the Layer 3 interface.
- Signed By —Select the CA certificate you just created or imported.
- Certificate Attributes—Click Add , for the Type select IP and, for the Value , enter the IP address of the Layer 3 interface to which the firewall will redirect requests.
-
Configure an SSL/TLS Service Profile. Assign the Authentication Portal certificate you just created to the profile.
(If you don't assign an SSL/TLS Service Profile, the firewall uses TLS 1.2 by default. To use a different TLS version, configure an SSL/TLS Service Profile for the TLS version you want to use.)
-
Configure clients to trust the certificate:
- Export the CA certificate you created or imported.
- Import the certificate as a trusted root CA into all client browsers , either by manually configuring the browser or by adding the certificate to the trusted roots in an Active Directory (AD) Group Policy Object (GPO).
-
(
Optional
) Configure
Client Certificate Authentication
.
(You don't need an authentication profile or sequence for client certificate authentication. If you configure both an authentication profile/sequence and certificate authentication, users must authenticate using both.)
- Use a root CA certificate to generate a client certificate for each user who will authenticate through Authentication Portal. The CA in this case is usually your enterprise CA, not the firewall.
- Export the CA certificate in PEM format to a system that the firewall can access.
- Import the CA certificate onto the firewall: see Import a Certificate and Private Key. After the import, click the imported certificate, select Trusted Root CA , and click OK .
-
Configure a Certificate Profile.
- In the Username Field drop-down, select the certificate field that contains the user identity information.
- In the CA Certificates list, click Add and select the CA certificate you just imported.
-
(
Optional
) Configure Authentication Portal for the Apple Captive Network Assistant.
(This step is only required if you are using Authentication Portal with the Apple Captive Network Assistant (CNA). To use Authentication Portal with CNA, perform the following steps.)
- Verify you have specified an FQDN for the redirect host (not just an IP address).
- Select an SSL/TLS service profile that uses a publicly-signed certificate for the specified FQDN.
-
Enter the following command to adjust the number of requests supported for Authentication Portal:
set deviceconfig setting ctd cap-portal-ask-requests <threshold-value>(By default, the firewall has a rate limit threshold for Authentication Portal that limits the number of requests to one request every two seconds. The CNA sends multiple requests that can exceed this limit, which can result in a TCP reset and an error from the CNA. The recommended threshold value is 5 (default is one). This value will allow up to 5 requests every two seconds. Based on your environment, you may need to configure a different value. If the current value is not sufficient to handle the number of requests, increase the value.)
-
Configure the Authentication Portal settings.
- Select Device > User Identification > Authentication Portal Settings and edit the settings.
- Enable Authentication Portal (default is enabled).
-
Specify the
Timer
, which is the maximum time in minutes that the firewall retains an IP address-to-username mapping for a user after that user authenticates through Authentication Portal (default is 60; range is 1 to 1,440). After the
Timer
expires, the firewall removes the mapping and any associated Authentication Timestamps used to evaluate the
Timeout
in Authentication policy rules.
When evaluating the Authentication Portal Timer and the Timeout value in each Authentication policy rule, the firewall prompts the user to re-authenticate for whichever setting expires first. Upon re-authenticating, the firewall resets the time count for the Authentication Portal Timer and records new authentication timestamps for the user. Therefore, to enable different Timeout periods for different Authentication rules, set the Authentication Portal Timer to a value the same as or higher than any rule Timeout .
- Select the SSL/TLS Service Profile you created for redirect requests over TLS. See Configure an SSL/TLS Service Profile.
- Select the Mode (in this example, Redirect ).
-
(
Redirect mode only
) Specify the
Redirect Host
, which is the intranet hostname (a hostname with no period in its name) that resolves to the IP address of the Layer 3 interface on the firewall to which web requests are redirected.
(If users authenticate through Kerberos single sign-on (SSO), the Redirect Host must be the same as the hostname specified in the Kerberos keytab.)
-
Select the fall back authentication method to use:
- To use client certificate authentication, select the Certificate Profile you created.
- To use global settings for interactive or SSO authentication, select the Authentication Profile you configured.
- To use Authentication policy rule-specific settings for interactive or SSO authentication, assign authentication profiles to authentication enforcement objects when you Configure Authentication Policy.
- Click OK and Commit the Authentication Portal configuration.
-
Next steps...
The firewall does not display the Authentication Portal web form to users until you Configure Authentication Policy rules that trigger authentication when users request services or applications.
Quiz: Authentication Portal
Question 9
Which Authentication Portal mode must be configured to support MFA authentication?
Reference: Palo Alto Networks Documentation
Question 10
Which Authentication Portal mode is preferred because it avoids browser certificate errors for HTTPS sites and supports session cookies?
Question 14
An Authentication Policy rule requires users to authenticate via Authentication Portal. What determines how long a user's IP-to-username mapping remains active after successful authentication before they might be prompted again?
Configure User Mapping for Terminal Server Users
Individual terminal server users appear to have the same IP address and therefore an IP address-to-username mapping is not sufficient to identify a specific user. To identify specific users on Windows-based terminal servers, the Palo Alto Networks Terminal Server agent (TS agent) allocates a port range to each user . The TS agent then notifies every connected firewall about the allocated port range, which allows the firewall to create an IP address-port-user mapping table and enable user- and group-based security policy enforcement. For non-Windows terminal servers, configure the PAN-OS XML API to extract user mapping information. The following values apply for both methods:
- Default port range: 1025 to 65534
- Per user block size: 200
- Maximum number of multi-user systems: 2,500
For information about the terminal servers supported by the TS agent and the number of TS agents supported on each firewall model, refer to the Palo Alto Networks Compatibility Matrix and the Product Comparison Tool.
Configure the Palo Alto Networks Terminal Server (TS) Agent for User Mapping
Terminal Server Agent Flow
sequenceDiagram
    participant User
    participant TSAgentHost as TS Agent Host (Windows Server)
    participant TSAgent as TS Agent Process/Driver
    participant Firewall

    User->>+TSAgentHost: Logs into Terminal Server Session
    TSAgentHost->>+TSAgent: Notify Agent of New User Session (User, Session ID)
    TSAgent->>TSAgent: Allocate Port Range (e.g., 20000-20199) for User
    TSAgent->>Firewall: Send Mapping Update (TS_IP:PortRange -> User)
    Firewall->>Firewall: Update TS Agent Mapping Table
    TSAgent-->>-TSAgentHost: Acknowledge Port Allocation

    Note over User, TSAgentHost: User launches application, initiates traffic

    User->>+TSAgentHost: Application sends traffic
    TSAgentHost->>+TSAgent: Driver intercepts outbound packet
    TSAgent->>TSAgent: Select source port from User's allocated range (e.g., 20001)
    TSAgent-->>-TSAgentHost: Modify packet source port
    TSAgentHost->>+Firewall: Send traffic (Source: TS_IP:20001)
    activate Firewall
    Firewall->>Firewall: Lookup mapping for TS_IP:20001
    Firewall->>Firewall: Identify User based on TS Agent mapping
    Firewall->>Firewall: Apply User-based Security Policy
    deactivate Firewall
    Firewall->>Internet: Allow/Deny Traffic based on Policy

    Note over User, TSAgentHost: Later... User Logs Out

    User->>+TSAgentHost: Logs out of Terminal Server Session
    TSAgentHost->>+TSAgent: Notify Agent of Session End
    TSAgent->>TSAgent: Deallocate Port Range for User
    TSAgent->>Firewall: Send Mapping Deletion (TS_IP:PortRange -> User)
    Firewall->>Firewall: Remove mapping from TS Agent Table
    TSAgent-->>-TSAgentHost: Acknowledge Session End
Use the following procedure to install and configure the TS agent on the terminal server. To map all your users, you must install the TS agent on all terminal servers to which your users log in.
If you are using TS agent 7.0 or a later version, disable any Sophos antivirus software on the TS agent host. Otherwise, the antivirus software overwrites the source ports that the TS agent allocates.
For information about default values, ranges, and other specifications, refer to Configure User Mapping for Terminal Server Users. For information about the terminal servers supported by the TS agent and the number of TS agents supported on each firewall model, refer to the Palo Alto Networks Compatibility Matrix.
-
Download the TS agent installer.
- Log in to the Palo Alto Networks Customer Support Portal.
- Select Updates > Software Updates .
- Set Filter By to Terminal Services Agent and select the version of the agent you want to install from the corresponding Download column. For example, to download TS agent 9.0, select TaInstall-9.0.msi .
-
Save the
TaInstall.x64-x.x.x-xx.msiorTaInstall-x.x.x-xx.msifile on the systems where you plan to install the agent; be sure to select the appropriate version based on whether the Windows system is running a 32-bit or a 64-bit OS. -
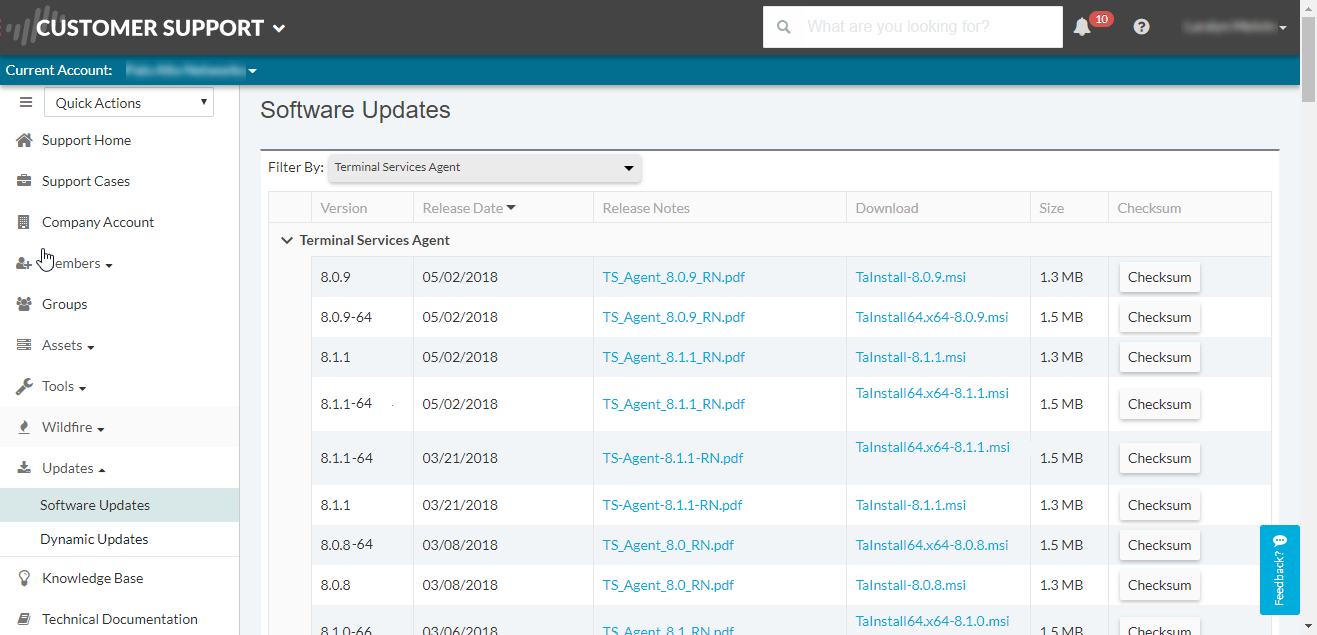
-
Run the installer as an administrator.
- Open the Windows Start menu, right-click the Command Prompt program, and Run as administrator .
-
From the command line, run the .msi file you downloaded. For example, if you saved the
TaInstall-9.0.msifile to the Desktop, then enter the following: -
C:\Users\administrator.acme>cd Desktop
-
C:\Users\administrator.acme\Desktop>TaInstall-9.0.0-1.msi
-
Follow the setup prompts to install the agent using the default settings. The setup installs the agent in
C:\ProgramFiles\Palo Alto Networks\Terminal Server Agent
.
To ensure correct port allocation, you must use the default Terminal Server agent installation folder location.
-
When the installation completes,
Close
the setup dialog.
(If you are upgrading to a TS agent version that has a newer driver than the existing installation, the installation wizard prompts you to reboot the system after you upgrade.)
-
Define the range of ports for the TS agent to allocate to end users.
(The System Source Port Allocation Range and System Reserved Source Ports specify the range of ports that are allocated to non-user sessions. Make sure the values in these fields do not overlap with the ports you designate for user traffic. These values can be changed only by editing the corresponding Windows registry settings. The TS agent does not allocate ports for network traffic emitted by session 0. )
- Open the Windows Start menu and select Terminal Server Agent to launch the Terminal Server agent application.
- Configure (side menu) the agent.
- Enter the Source Port Allocation Range (default is 20,000-39,999). This is the full range of port numbers that the TS agent will allocate for user mapping. The port range you specify cannot overlap the System Source Port Allocation Range .
-
(
Optional
) If there are ports or port ranges within the source port allocation that you do not want the TS agent to allocate to user sessions, specify them as
Reserved Source Ports
. To include multiple ranges, use commas with no spaces (for example:
2000-3000,3500,4000-5000). - Specify the number of ports to allocate to each individual user upon login to the terminal server ( Port Allocation Start Size Per User ); default is 200.
- Specify the Port Allocation Maximum Size Per User , which is the maximum number of ports the Terminal Server agent can allocate to an individual user.
- Specify whether to continue processing traffic from the user if the user runs out of allocated ports. The Fail port binding when available ports are used up option is enabled by default, which indicates that the application will fail to send traffic when all ports are used. To enable users to continue using applications when they run out of ports, disable (clear) this option, but if you do, this traffic may not be identified with User-ID.
- If the terminal server stops responding when you attempt to shut it down, enable the Detach agent driver at shutdown option.
-
(
Optional
) Assign your own certificates for mutual authentication between the TS agent and the firewall.
-
Obtain your certificate for the TS agent from your enterprise PKI or generate one on your firewall. The private key of the server certificate must be encrypted and the certificate must be uploaded in PEM file format. Perform one of the following tasks to upload a certificate:
- Generate a Certificate and export it.
- Export a certificate from your enterprise certificate authority (CA).
-
Add a server certificate to the TS agent.
- On the TS agent, select Server Certificate and Add a new certificate.
- Enter the path and name of the certificate file received from the CA or browse to the certificate file.
- Enter the private key password.
- Click OK .
- Commit your changes.
-
(The TS agent uses a self-signed certificate on port 5009 with following information:
Issuer: CN=Terminal Server Agent, OU=Engineering, O=Palo Alto Networks, L=Santa Clara, S=California, C=US
Subject: CN=Terminal Server Agent, OU=Engineering, O=Palo Alto Networks, L=Santa Clara, S=California, C=US)
-
Configure and assign the certificate profile for the firewall.
-
Select
Device > Certificate Management > Certificate Profile
to Configure a Certificate Profile.
You can assign only one certificate profile for Windows User-ID agents and TS agents. Therefore, your certificate profile must include all certificate authorities that issued certificates uploaded to connected Windows User-ID and TS agents.
- Select Device > User Identification > Connection Security .
-
Edit (
 ) and select the certificate profile you configured in the previous step as the
User-ID Certificate Profile
.
) and select the certificate profile you configured in the previous step as the
User-ID Certificate Profile
.
- Click OK .
- Commit your changes.
-
Select
Device > Certificate Management > Certificate Profile
to Configure a Certificate Profile.
-
Obtain your certificate for the TS agent from your enterprise PKI or generate one on your firewall. The private key of the server certificate must be encrypted and the certificate must be uploaded in PEM file format. Perform one of the following tasks to upload a certificate:
-
Configure the firewall to connect to the Terminal Server agent.
(Complete the following steps on each firewall you want to connect to the Terminal Server agent to receive user mappings:)
- Select Device > User Identification > Terminal Server Agents and Add a new TS agent.
- Enter a Name for the Terminal Server agent.
-
Enter the hostname or IP address of the Windows
Host
on which the Terminal Server agent is installed.
(The hostname or IP address must resolve to a static IP address. If you change the existing hostname, the TS agent resets when you commit the changes to resolve the new hostname. If the hostname resolves to multiple IP addresses, the TS agent uses the first address in the list.)
-
(
Optional
) Enter the hostname or IP address for any
Alternative IP Addresses
that can appear as the source IP address for the outgoing traffic.
(The hostname or IP address must resolve to a static IP address. You can enter up to 8 IP addresses or hostnames.)
- Enter the Port number on which the agent will listen for user mapping requests. This value must match the value configured on the Terminal Server agent. By default, the port is set to 5009 on the firewall and on the agent. If you change it on the firewall, you must also change the Listening Port on the Terminal Server agent Configure dialog to the same port.
- Make sure that the configuration is Enabled and then click OK .
- Commit your changes.
- Verify that the Connected status displays as connected (a green light).
-
Verify that the Terminal Server agent is successfully mapping IP addresses to usernames and that the firewalls can connect to the agent.
- Open the Windows Start menu and select Terminal Server Agent .
- Verify that the firewalls can connect by making sure the Connection Status of each firewall in the Connection List is Connected .
- Verify that the Terminal Server agent is successfully mapping port ranges to usernames ( Monitor in the side menu) and confirm that the mapping table is populated.
-
(
Windows 2012 R2 servers only
) Disable Enhanced Protected Mode in Microsoft Internet Explorer for each user who uses that browser.
(This task is not necessary for other browsers, such as Google Chrome or Mozilla Firefox.)
(To disable Enhanced Protected Mode for all users, use Local Security Policy.)
Perform these steps on the Windows Server:
- Start Internet Explorer.
- Select Settings > Internet options > Advanced and scroll to the Security section.
- Disable (clear) the Enable Enhanced Protected Mode option.
- Click OK .
- (In Internet Explorer, Palo Alto Networks recommends that you do not disable Protected Mode, which differs from Enhanced Protected Mode.)
Quiz: Terminal Server (TS) Agent
Question 11
An administrator has users accessing network resources through Citrix XenApp (a multi-user Windows environment). Which User-ID mapping solution is specifically designed for this scenario?
Question 12
How does the TS Agent allow the firewall to distinguish between different users originating from the same Terminal Server IP address?
Retrieve User Mappings from a Terminal Server Using the PAN-OS XML API
XML API Flow (Terminal Server)
sequenceDiagram
    participant User
    participant TermServer as Terminal Server (Non-Windows)
    participant Script as External Monitoring Script
    participant Firewall

    User->>+TermServer: Logs in
    TermServer-->>-User: Session Established

    Script->>+TermServer: Monitor/Detect User Login (e.g., parse logs, PAM module)
    TermServer-->>-Script: Login Event Details (User, TS_IP)
    Script->>Script: Determine available 'blockstart' port
    Script->>+Firewall: Send XML API Update (type=login, user=..., ip=TS_IP, blockstart=...)
    activate Firewall
    Firewall->>Firewall: Process XML, update User-ID TS Mapping Table
    deactivate Firewall
    Firewall-->>-Script: XML API Response (Success/Failure)

    Note over User, TermServer: User initiates traffic

    User->>+TermServer: Application sends traffic
    TermServer->>TermServer: NAT traffic source port to allocated range (using iptables, etc.)
    TermServer->>+Firewall: Send traffic (Source: TS_IP:AllocatedPort)
    activate Firewall
    Firewall->>Firewall: Lookup mapping for TS_IP:AllocatedPort
    Firewall->>Firewall: Identify User based on TS Mapping Table
    Firewall->>Firewall: Apply User-based Security Policy
    deactivate Firewall
    Firewall->>Internet: Allow/Deny Traffic based on Policy

    Note over User, TermServer: Later... User Logs Out

    User->>+TermServer: Logs out
    TermServer-->>-User: Session Terminated

    Script->>+TermServer: Monitor/Detect User Logout
    TermServer-->>-Script: Logout Event Details (User, TS_IP, blockstart)
    Script->>+Firewall: Send XML API Update (type=logout, user=..., ip=TS_IP, blockstart=...)
    activate Firewall
    Firewall->>Firewall: Process XML, remove mapping from TS Table
    deactivate Firewall
    Firewall-->>-Script: XML API Response (Success/Failure)
The PAN-OS XML API uses standard HTTP requests to send and receive data. API calls can be made directly from command line utilities such as cURL or using any scripting or application framework that supports RESTful services.
To enable a non-Windows terminal server to send user mapping information directly to the firewall, create scripts that extract the user login and logout events and use them for input to the PAN-OS XML API request format. Then define the mechanisms for submitting the XML API request(s) to the firewall using cURL or wget and providing the firewall's API key for secure communication. Creating user mappings from multi-user systems such as terminal servers requires use of the following API messages:
-
<multiusersystem>—Sets up the configuration for an XML API Multi-user System on the firewall. This message allows for definition of the terminal server IP address (this will be the source address for all users on that terminal server). In addition, the<multiusersystem>setup message specifies the range of source port numbers to allocate for user mapping and the number of ports to allocate to each individual user upon login (called the block size ). If you want to use the default source port allocation range (1025-65534) and block size (200), you do not need to send a<multiusersystem>setup event to the firewall. Instead, the firewall will automatically generate the XML API Multi-user System configuration with the default settings upon receipt of the first user login event message. -
<blockstart>—Used with the<login>and<logout>messages to indicate the starting source port number allocated to the user. The firewall then uses the block size to determine the actual range of port numbers to map to the IP address and username in the login message. For example, if the<blockstart>value is 13200 and the block size configured for the multi-user system is 300, the actual source port range allocated to the user is 13200 through 13499. Each connection initiated by the user should use a unique source port number within the allocated range, enabling the firewall to identify the user based on its IP address-port-user mappings for enforcement of user- and group-based security rules. When a user exhausts all the ports allocated, the terminal server must send a new<login>message allocating a new port range for the user so that the firewall can update the IP address-port-user mapping. In addition, a single username can have multiple blocks of ports mapped simultaneously. When the firewall receives a<logout>message that includes a<blockstart>parameter, it removes the corresponding IP address-port-user mapping from its mapping table. When the firewall receives a<logout>message with a username and IP address, but no<blockstart>, it removes the user from its table. And, if the firewall receives a<logout>message with an IP address only, it removes the multi-user system and all mappings associated with it.
The XML files that the terminal server sends to the firewall can contain multiple message types and the messages do not need to be in any particular order within the file. However, upon receiving an XML file that contains multiple message types, the firewall will process them in the following order: multiusersystem requests first, followed by logins, then logouts.
The following workflow provides an example of how to use the PAN-OS XML API to send user mappings from a non-Windows terminal server to the firewall.
-
Generate the API key that will be used to authenticate the API communication between the firewall and the terminal server. To generate the key you must provide login credentials for an administrative account; the API is available to all administrators (including role-based administrators with XML API privileges enabled).
(Any special characters in the password must be URL/percent-encoded.)
(From a browser, log in to the firewall. Then, to generate the API key for the firewall, open a new browser window and enter the following URL:)
https://<Firewall-IPaddress>/api/?type=keygen&user=<username>&password=<password>
(Where
<Firewall-IPaddress>is the IP address or FQDN of the firewall and<username>and<password>are the credentials for the administrative user account on the firewall. For example:)https://10.1.2.5/api/?type=keygen&user=admin&password=admin
(The firewall responds with a message containing the key, for example:)
<response status="success"> <result> <key>k7J335J6hI7nBxIqyfa62sZugWx7ot%2BgzEA9UOnlZRg=</key> </result> </response> -
(
Optional
) Generate a setup message that the terminal server will send to specify the port range and block size of ports per user that your Terminal Server agent uses.
(If the Terminal Server agent does not send a setup message, the firewall will automatically create a Terminal Server agent configuration using the following default settings upon receipt of the first login message:)
- Default port range: 1025 to 65534
- Per user block size: 200
- Maximum number of multi-user systems: 1,000
(The following shows a sample setup message:)
<uid-message>
    <payload>
        <multiusersystem>
            <entry ip="10.1.1.23" startport="20000" endport="39999" blocksize="100"/>
        </multiusersystem>
    </payload>
    <type>update</type>
    <version>1.0</version>
</uid-message>
(where
entry ipspecifies the IP address assigned to terminal server users,startportandendportspecify the port range to use when assigning ports to individual users, andblocksizespecifies the number of ports to assign to each user. The maximum blocksize is 4000 and each multi-user system can allocate a maximum of 1000 blocks.)(If you define a custom blocksize and or port range, keep in mind that you must configure the values such that every port in the range gets allocated and that there are no gaps or unused ports. For example, if you set the port range to 1000–1499, you could set the block size to 100, but not to 200. This is because if you set it to 200, there would be unused ports at the end of the range.)
-
Create a script that will extract the login events and create the XML input file to send to the firewall.
(Make sure the script enforces assignment of port number ranges at fixed boundaries with no port overlaps. For example, if the port range is 1000–1999 and the block size is 200, acceptable blockstart values would be 1000, 1200, 1400, 1600, or 1800. Blockstart values of 1001, 1300, or 1850 would be unacceptable because some of the port numbers in the range would be left unused.)
(The login event payload that the terminal server sends to the firewall can contain multiple login events.)
(The following shows the input file format for a PAN-OS XML login event:)
<uid-message>
    <payload>
        <login>
            <entry name="acme\jjaso" ip="10.1.1.23" blockstart="20000"/>
            <entry name="acme\jparker" ip="10.1.1.23" blockstart="20100"/>
            <entry name="acme\ccrisp" ip="10.1.1.23" blockstart="21000"/>
        </login>
    </payload>
    <type>update</type>
    <version>1.0</version>
</uid-message>
(The firewall uses this information to populate its user mapping table. Based on the mappings extracted from the example above, if the firewall received a packet with a source address and port of 10.1.1.23:20101, it would map the request to user jparker for policy enforcement.)
(Each multi-user system can allocate a maximum of 1,000 port blocks.)
-
Create a script that will extract the logout events and create the XML input file to send to the firewall.
(Upon receipt of a
<logout>event message with a<blockstart>parameter, the firewall removes the corresponding IP address-port-user mapping. If the<logout>message contains a username and IP address, but no<blockstart>parameter, the firewall removes all mappings for the user. If the<logout>message contains an IP address only, the firewall removes the multi-user system and all associated mappings.)(The following shows the input file format for a PAN-OS XML logout event:)
<uid-message>
    <payload>
        <logout>
            <entry name="acme\jjaso" ip="10.1.1.23" blockstart="20000"/>
            <entry name="acme\ccrisp" ip="10.1.1.23"/>
            <entry ip="10.2.5.4"/>
        </logout>
    </payload>
    <type>update</type>
    <version>1.0</version>
</uid-message>
(You can also clear the multiuser system entry from the firewall using the following CLI command:
clear xml-api multiusersystem) -
Make sure that the scripts you create include a way to dynamically enforce that the port block range allocated using the XML API matches the actual source port assigned to the user on the terminal server and that the mapping is removed when the user logs out or the port allocation changes.
(One way to do this would be to use netfilter NAT rules to hide user sessions behind the specific port ranges allocated via the XML API based on the uid. For example, to ensure that a user with the user ID jjaso is mapped to a source network address translation (SNAT) value of 10.1.1.23:20000-20099, the script you create should include the following:)
[root@ts1 ~]# iptables -t nat -A POSTROUTING -m owner --uid-owner jjaso -p tcp -j SNAT --to-source 10.1.1.23:20000-20099
(Similarly, the scripts you create should also ensure that the IP table routing configuration dynamically removes the SNAT mapping when the user logs out or the port allocation changes:)
[root@ts1 ~]# iptables -t nat -D POSTROUTING 1
-
Define how to package the XML input files containing the setup, login, and logout events into wget or cURL messages for transmission to the firewall.
To apply the files to the firewall using wget:
> wget --post file <filename> “https://<Firewall-IPaddress>/api/?type=user-id&key=<key>&file-name=<input_filename.xml>&client=wget&vsys=<VSYS_name>”
(For example, the syntax for sending an input file named
login.xmlto the firewall at 10.2.5.11 using keyk7J335J6hI7nBxIqyfa62sZugWx7ot%2BgzEA9UOnlZRgusing wget would look as follows:)> wget --post file login.xml “https://10.2.5.11/api/?type=user-id&key=k7J335J6hI7nBxIqyfa62sZugWx7ot%2BgzEA9UOnlZRg&file-name=login.xml&client=wget&vsys=vsys1”
To apply the file to the firewall using cURL:
> curl --form file=@<filename> https://<Firewall-IPaddress>/api/?type=user-id&key=<key>&vsys=<VSYS_name>
(For example, the syntax for sending an input file named
login.xmlto the firewall at 10.2.5.11 using keyk7J335J6hI7nBxIqyfa62sZugWx7ot%2BgzEA9UOnlZRgusing cURL would look as follows:)> curl --form file@login.xml “https://10.2.5.11/api/?type=user-id&key=k7J335J6hI7nBxIqyfa62sZugWx7ot%2BgzEA9UOnlZRg&vsys=vsys1”
-
Verify that the firewall is successfully receiving login events from the terminal servers.
(Verify the configuration by opening an SSH connection to the firewall and then running the following CLI commands:)
To verify if the terminal server is connecting to the firewall over XML:
admin@PA-5250> show user xml-api multiusersystem
Host            Vsys    Users   Blocks
----------------------------------------
10.5.204.43     vsys1        5        2
To verify that the firewall is receiving mappings from a terminal server over XML:
admin@PA-5250> show user ip-port-user-mapping all

Global max host index 1, host hash count 1

XML API Multi-user System 10.5.204.43
Vsys 1, Flag 3
Port range: 20000 - 39999
Port size: start 200; max 2000
Block count 100, port count 20000
20000-20199: acme\administrator

Total host: 1
Send User Mappings to User-ID Using the XML API
XML API Flow (General User Mapping)
sequenceDiagram
    participant ExternalSystem as External System / Script
    participant Firewall

    Note over ExternalSystem: Detects user login event (e.g., from custom app, VPN, etc.)
    ExternalSystem->>ExternalSystem: Extract Username and IP Address

    ExternalSystem->>+Firewall: Send XML API Update (type=login, user=..., ip=...)
    activate Firewall
    Firewall->>Firewall: Process XML, add mapping to User-ID Table
    deactivate Firewall
    Firewall-->>-ExternalSystem: XML API Response (Success/Failure)

    Note over ExternalSystem: Later... Detects user logout event

    ExternalSystem->>+Firewall: Send XML API Update (type=logout, user=..., ip=...)
    activate Firewall
    Firewall->>Firewall: Process XML, remove mapping from User-ID Table
    deactivate Firewall
    Firewall-->>-ExternalSystem: XML API Response (Success/Failure)
User-ID provides many out-of-the box methods for obtaining user mapping information. However, you might have applications or devices that capture user information but cannot natively integrate with User-ID. For example, you might have a custom, internally developed application or a device that no standard user mapping method supports. In such cases, you can use the PAN-OS XML API to create custom scripts that send the information to the PAN-OS integrated User-ID agent or directly to the firewall. The PAN-OS XML API uses standard HTTP requests to send and receive data. API calls can be made directly from command line utilities such as cURL or using any scripting or application framework that supports POST and GET requests.
To enable an external system to send user mapping information to the PAN-OS integrated User-ID agent, create scripts that extract user login and logout events and use the events as input to the PAN-OS XML API request. Then define the mechanisms for submitting the XML API requests to the firewall (using cURL, for example) and use the API key of the firewall for secure communication. For more details, refer to the PAN-OS XML API Usage Guide.
Quiz: XML API for User-ID
Question 13
Which User-ID method allows a custom script to push IP-to-user mappings obtained from a non-standard source (like an 802.1x system without native integration) directly to the firewall?