QoS Overview
Use QoS to prioritize and adjust quality aspects of network traffic. You can assign the order in which packets are handled and allot bandwidth, ensuring preferred treatment and optimal levels of performance are afforded to selected traffic, applications, and users.
Service quality measurements subject to a QoS implementation are bandwidth (maximum rate of transfer), throughput (actual rate of transfer), latency (delay), and jitter (variance in latency). The capability to shape and control these service quality measurements makes QoS of particular importance to high-bandwidth, real-time traffic such as voice over IP (VoIP), video conferencing, and video-on-demand that has a high sensitivity to latency and jitter. Additionally, use QoS to achieve outcomes such as the following:
- Prioritize network and application traffic, guaranteeing high priority to important traffic or limiting non-essential traffic.
- Achieve equal bandwidth sharing among different subnets, classes, or users in a network.
- Allocate bandwidth externally or internally or both, applying QoS to both upload and download traffic or to only upload or download traffic.
- Ensure low latency for customer and revenue-generating traffic in an enterprise environment.
- Perform traffic profiling of applications to ensure bandwidth usage.
QoS implementation on a Palo Alto Networks firewall begins with three primary configuration components that support a full QoS solution: a QoS Profile , a QoS Policy , and setting up the QoS Egress Interface . Each of these options in the QoS configuration task facilitate a broader process that optimizes and prioritizes the traffic flow and allocates and ensures bandwidth according to configurable parameters.
The figure
QoS Traffic Flow
shows traffic as it flows from the source, is shaped by the firewall with QoS enabled, and is ultimately prioritized and delivered to its destination.
QoS Traffic Flow
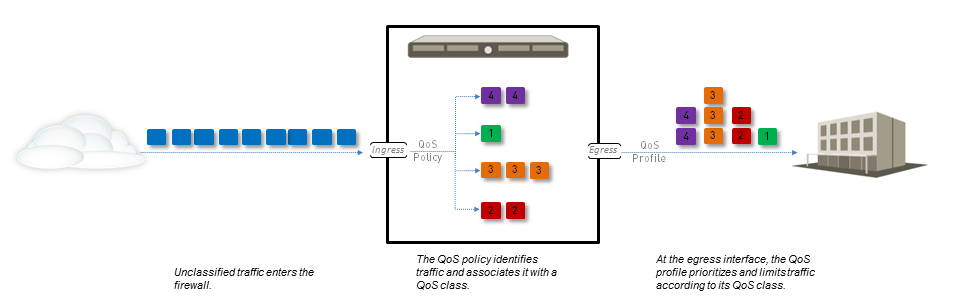
The QoS configuration options allow you to control the traffic flow and define it at different points in the flow. The figure
QoS Traffic Flow
indicates where the configurable options define the traffic flow. A QoS policy rule allows you to define traffic you want to receive QoS treatment and assign that traffic a QoS class. The matching traffic is then shaped based on the QoS profile class settings as it exits the physical interface.
Each of the QoS configuration components influence each other and the QoS configuration options can be used to create a full and granular QoS implementation or can be used sparingly with minimal administrator action.
When a queue is filling faster than it can be emptied, the device has two choices as to where to drop traffic. It can wait until the queue is full and simply drop packets as they arrive (tail dropping), or it can detect incipient congestion and proactively begin to drop packets based on a probability function that is tied to an average depth of the queue. This technique is called random early drop (RED). PAN-OS uses a weighted RED (WRED) algorithm.
Each firewall model supports a maximum number of ports that can be configured with QoS. Refer to the spec sheet for your firewall model or use the product comparison tool to view QoS feature support for two or more firewalls on a single page.
QoS for Applications and Users
A Palo Alto Networks firewall provides basic QoS, controlling traffic leaving the firewall according to network or subnet, and extends the power of QoS to also classify and shape traffic according to application and user. The Palo Alto Networks firewall provides this capability by integrating the features App-ID and User-ID with the QoS configuration. App-ID and User-ID entries that exist to identify specific applications and users in your network are available in the QoS configuration so that you can easily specify applications and users for which you want to manage and/or guarantee bandwidth.
QoS Policy
Use a QoS policy rule to define traffic to receive QoS treatment (either preferential treatment or bandwidth-limiting) and assign such traffic a QoS class of service.
Define a QoS policy rule to match to traffic based on:
- Applications and application groups.
- Source zones, source addresses, and source users.
- Destination zones and destination addresses.
- Services and service groups limited to specific TCP and/or UDP port numbers.
- URL categories, including custom URL categories.
- Differentiated Services Code Point (DSCP) and Type of Service (ToS) values, which are used to indicate the level of service requested for traffic, such as high priority or best effort delivery.
You cannot apply DSCP code points or QoS to SSL Forward Proxy, SSL Inbound Inspection, and SSH Proxy traffic.
Set up multiple QoS policy rules ( PoliciesQoS ) to associate different types of traffic with different QoS Classes of service.
Because QoS is enforced on traffic as it egresses the firewall, the QoS policy rule is applied to traffic after the firewall has enforced all other security policy rules, including Network Address Translation (NAT) rules. However, the firewall evaluates QoS rules based on the contents of the original packet, such as pre-NAT source IP, pre-NAT source zone, pre-NAT destination IP, and post-NAT destination zone. Therefore, do not configure the QoS policy with the post-NAT addresses.
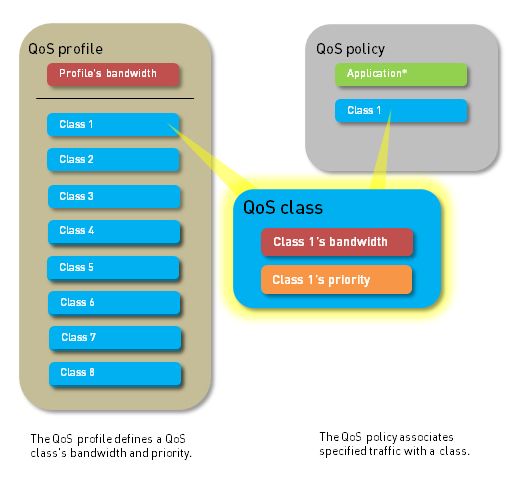
QoS Profile
Use a QoS profile to define values of up to eight QoS Classes contained within that single profile.
With a QoS profile, you can define QoS Priority Queuing and QoS Bandwidth Management for QoS classes. Each QoS profile allows you to configure individual bandwidth and priority settings for up eight QoS classes, as well as the total bandwidth allotted for the eight classes combined. Attach the QoS profile (or multiple QoS profiles) to a physical interface to apply the defined priority and bandwidth settings to the traffic exiting that interface.
A default QoS profile is available on the firewall. The default profile and the classes defined in the profile do not have predefined maximum or guaranteed bandwidth limits.
To define priority and bandwidth settings for QoS classes, see Step Add a QoS profile.
QoS Classes
A QoS class determines the priority and bandwidth for traffic matching a QoS Policy rule. You can use a QoS Profile to define QoS classes. There are up to eight definable QoS classes in a single QoS profile. Unless otherwise configured, traffic that does not match a QoS class is assigned a class of 4.
QoS Priority Queuing and QoS Bandwidth Management , the fundamental mechanisms of a QoS configuration, are configured within the QoS class definition (see Step 4 ). For each QoS class, you can set a priority (real-time, high, medium, and low) and the maximum and guaranteed bandwidth for matching traffic. QoS priority queuing and bandwidth management determine the order of traffic and how traffic is handled upon entering or leaving a network.
QoS Priority Queuing
One of four priorities can be enforced for a QoS class: real-time, high, medium, and low. Traffic matching a QoS policy rule is assigned the QoS class associated with that rule, and the firewall treats the matching traffic based on the QoS class priority. Packets in the outgoing traffic flow are queued based on their priority until the network is ready to process the packets. Priority queuing allows you to ensure that important traffic, applications, and users take precedence. Real-time priority is typically used for applications that are particularly sensitive to latency, such as voice and video applications.
QoS Bandwidth Management
QoS bandwidth management allows you to control traffic flows on a network so that traffic does not exceed network capacity (resulting in network congestion) and also allows you to allocate bandwidth for certain types of traffic and for applications and users. With QoS, you can enforce bandwidth for traffic on a narrow or a broad scale. A QoS profile allows you to set bandwidth limits for individual QoS classes and the total combined bandwidth for all eight QoS classes. As part of the steps to Configure QoS , you can attach the QoS profile to a physical interface to enforce bandwidth settings on the traffic exiting that interface—the individual QoS class settings are enforced for traffic matching that QoS class (QoS classes are assigned to traffic matching QoS Policy rules) and the overall bandwidth limit for the profile can be applied to all clear text traffic, specific clear text traffic originating from source interfaces and source subnets, all tunneled traffic, and individual tunnel interfaces. You can add multiple profile rules to a single QoS interface to apply varying bandwidth settings to the traffic exiting that interface.
The following fields support QoS bandwidth settings:
- Egress Guaranteed —The amount of bandwidth guaranteed for matching traffic. When the egress guaranteed bandwidth is exceeded, the firewall passes traffic on a best-effort basis. Bandwidth that is guaranteed but is unused continues to remain available for all traffic. Depending on your QoS configuration, you can guarantee bandwidth for a single QoS class, for all or some clear text traffic, and for all or some tunneled traffic.
Example:
Class 1 traffic has 5 Gbps of egress guaranteed bandwidth, which means that 5 Gbps is available but is not reserved for class 1 traffic. If Class 1 traffic does not use or only partially uses the guaranteed bandwidth, the remaining bandwidth can be used by other classes of traffic. However, during high traffic periods, 5 Gbps of bandwidth is absolutely available for class 1 traffic. During these periods of congestion, any Class 1 traffic that exceeds 5 Gbps is best effort.
- Egress Max —The overall bandwidth allocation for matching traffic. The firewall drops traffic that exceeds the egress max limit that you set. Depending on your QoS configuration, you can set a maximum bandwidth limit for a QoS class, for all or some clear text traffic, for all or some tunneled traffic, and for all traffic exiting the QoS interface.
The cumulative guaranteed bandwidth for the QoS profile attached to the interface must not exceed the total bandwidth allocated to the interface.
To define bandwidth settings for QoS classes, see Step Add a QoS profile. To then apply those bandwidth settings to clear text and tunneled traffic, and to set the overall bandwidth limit for a QoS interface, see Step Enable QoS on a physical interface.
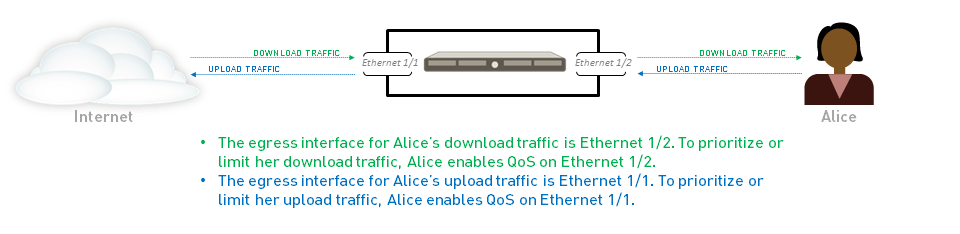
QoS Egress Interface
Enabling a QoS profile on the egress interface of the traffic identified for QoS treatment completes a QoS configuration. The ingress interface for QoS traffic is the interface on which the traffic enters the firewall. The egress interface for QoS traffic is the interface that traffic leaves the firewall from. QoS is always enabled and enforced on the egress interface for a traffic flow. The egress interface in a QoS configuration can either be the external- or internal-facing interface of the firewall, depending on the flow of the traffic receiving QoS treatment.
For example, in an enterprise network, if you are limiting employees’ download traffic from a specific website, the egress interface in the QoS configuration is the firewall’s internal interface, as the traffic flow is from the Internet, through the firewall, and to your company network. Alternatively, when limiting employees’ upload traffic to the same website, the egress interface in the QoS configuration is the firewall’s external interface, as the traffic you are limiting flows from your company network, through the firewall, and then to the Internet.
Because QoS is enforced on traffic as it egresses the firewall, the QoS policy rule is applied to traffic after the firewall has enforced all other security policy rules, including Network Address Translation (NAT) rules. However, the firewall evaluates QoS rules based on the contents of the original packet, such as pre-NAT source IP, pre-NAT source zone, pre-NAT destination IP, and post-NAT destination zone. Therefore, do not configure the QoS policy with the post-NAT addresses.
QoS for Clear Text and Tunneled Traffic
At the minimum, enabling a QoS interfaces requires you to select a default QoS profile that defines bandwidth and priority settings for clear text traffic egressing the interface. However, when setting up or modifying a QoS interface, you can apply granular QoS settings to outgoing clear text traffic and tunneled traffic. QoS preferential treatment and bandwidth limiting can be enforced for tunneled traffic, for individual tunnel interfaces, and/or for clear text traffic originating from different source interfaces and source subnets. On Palo Alto Networks firewalls, tunneled traffic refers to tunnel interface traffic, specifically IPSec traffic in tunnel mode.
Configure QoS
Follow these steps to configure Quality of Service (QoS), which includes creating a QoS profile, creating a QoS policy, and enabling QoS on an interface.
Before you create a QoS policy rule, make sure you understand that the set of IPv4 addresses is treated as a subset of the set of IPv6 addresses, as described in detail in Policy .
- Identify the traffic you want to manage with QoS.
This example shows how to use QoS to limit web browsing.
Select ACC to view the Application Command Center page. Use the settings and charts on the ACC page to view trends and traffic related to Applications, URL filtering, Threat Prevention, Data Filtering, and HIP Matches.
Click any application name to display detailed application information.
- Identify the egress interface for applications that you want to receive QoS treatment.
The egress interface for traffic depends on the traffic flow. If you are shaping incoming traffic, the egress interface is the internal-facing interface. If you are shaping outgoing traffic, the egress interface is the external-facing interface.
Select MonitorLogsTraffic to view the Traffic logs.
To filter and only show logs for a specific application:
- If an entry is displayed for the application, click the underlined link in the Application column then click the Submit icon.
- If an entry is not displayed for the application, click the Add Log icon and search for the application.
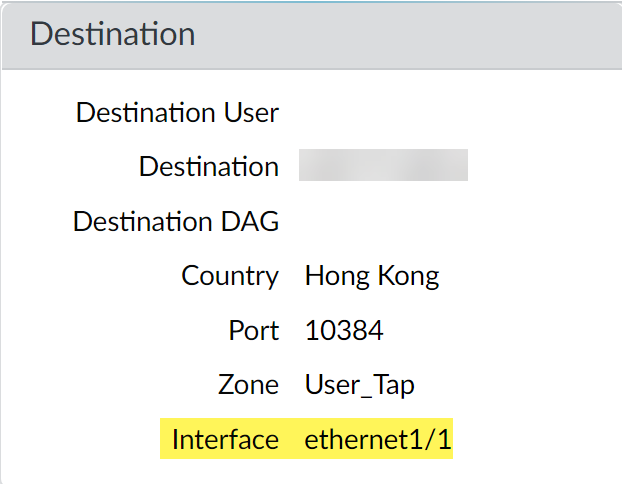
The Egress I/F in the traffic logs displays each application’s egress interface. To display the Egress I/F column if it is not displayed by default:
- Click any column header to add a column to the log:
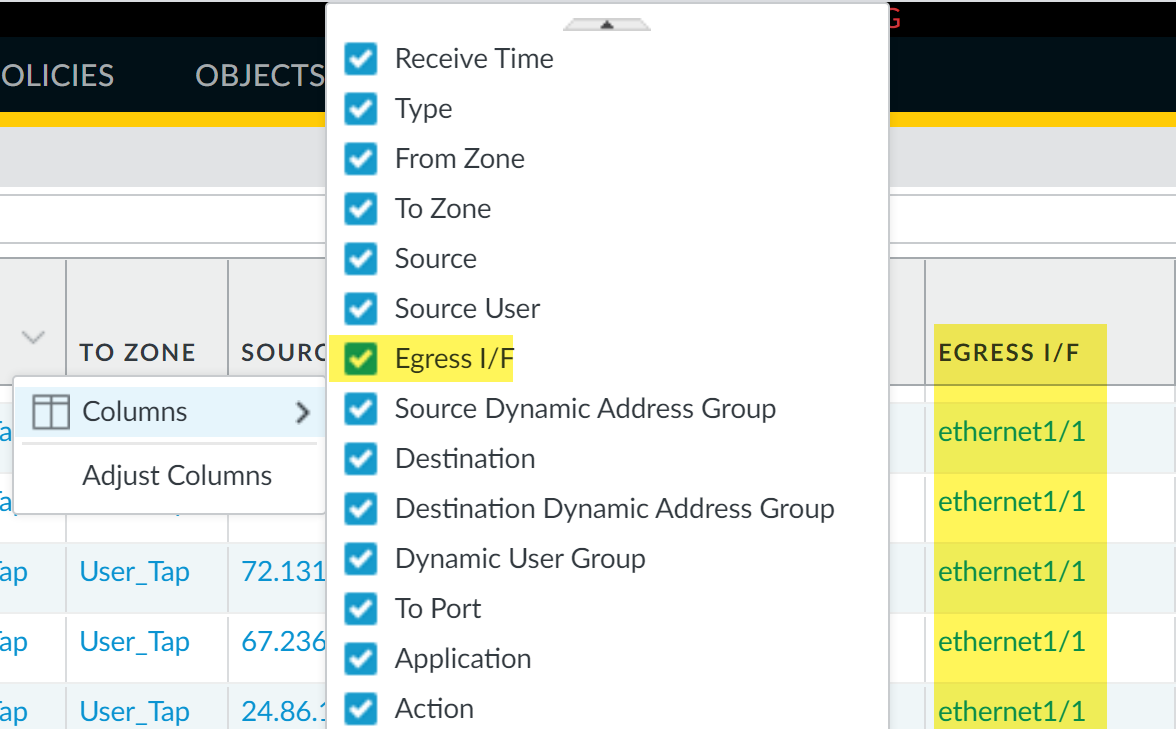
- Click the spyglass icon to the left of any entry to display a detailed log that includes the application’s egress interface listed in the Destination section:
- Add a QoS policy rule.
A QoS policy rule defines the traffic to receive QoS treatment. The firewall assigns a QoS class of service to the traffic matched to the policy rule.
Because QoS is enforced on traffic as it egresses the firewall, your QoS policy rule is applied to traffic after the firewall has enforced all other security policy rules, including Network Address Translation (NAT) rules. If you want to apply QoS treatment to traffic based on source, you must specify the pre-NAT source address (such as pre-NAT source IP, pre-NAT source zone, pre-NAT destination IP, and post-NAT destination zone) in a QoS policy rule. Do not configure the QoS policy with the post-NAT source address if you want to apply QoS treatment for the source traffic.
1. Select PoliciesQoS and Add a new policy rule.
2. On the General tab, give the QoS Policy Rule a descriptive Name .
3. Specify traffic to receive QoS treatment based on Source , Destination , Application , Service/URL Category , and DSCP/ToS values (the DSCP/ToS settings allow you to Enforce QoS Based on DSCP Classification ).
For example, select the Application , click Add , and select web-browsing to apply QoS to web browsing traffic.
4. ( Optional ) Continue to define additional parameters. For example, select Source and Add a Source User to provide QoS for a specific user’s web traffic.
5. Select Other Settings and assign a QoS Class to traffic matching the policy rule. For example, assign Class 2 to the user1’s web traffic.
6. Click OK .
- Add a QoS profile.
A QoS profile allows you to define the eight classes of service that traffic can receive, including priority, and enables QoS Bandwidth Management .
You can edit any existing QoS profile, including the default, by clicking the QoS profile name.
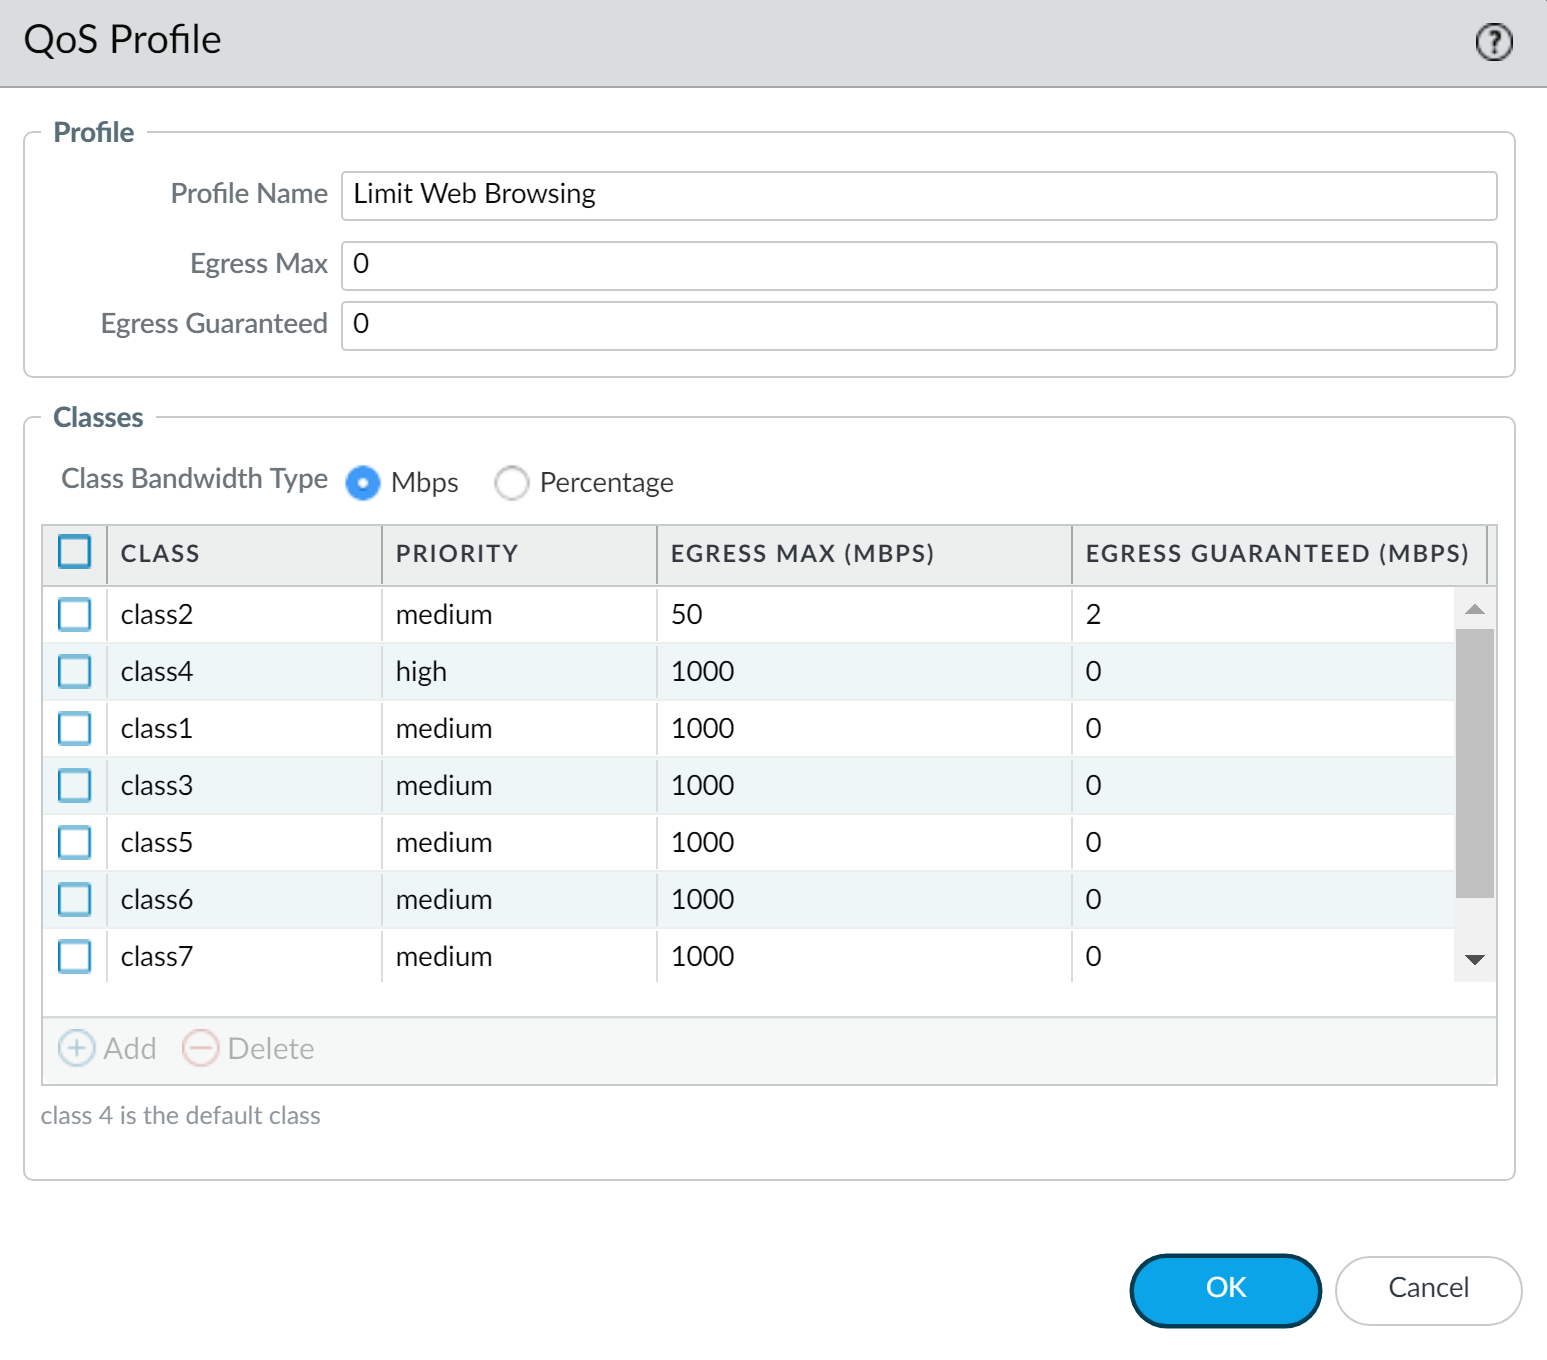
1. Select NetworkNetwork ProfilesQoS Profile and Add a new profile.
2. Enter a descriptive Profile Name .
3. Set the overall bandwidth limits for the QoS profile:
- Enter an Egress Max value to set the overall bandwidth allocation for the QoS profile.
- Enter an Egress Guaranteed value to set the guaranteed bandwidth for the QoS Profile.
Any traffic that exceeds the Egress Guaranteed value is best effort and not guaranteed. Bandwidth that is guaranteed but is unused continues to remain available for all traffic.
You can configure the Egress Guaranteed and Egress Max values in Mbps or percentages. The following considerations should be taken into account when configuring these values in percentages:
- The Egress Guaranteed (%) per class is calculated using the Egress Max value, not the Egress Guaranteed value.
- Profile Egress Guaranteed equals the sum of the Egress Guaranteed (%) per class multiplied by the Egress Max .
For example: The Egress Max is configured as 100Mbps. The guaranteed percentage configured for Class 1 is 30%, for Class 2 it is 20%, for Class 3 it is 5%, and for Class 4 it is 1%. This configuration results in a total percentage guaranteed as 56%. In this case, profile Egress Guaranteed is 56Mbps (56% x Egress Max ). This also means that Class 1 Egress Guaranteed is 30Mbps, Class 2 Egress Guaranteed is 20Mbps, and so on.
4. In the Classes section, specify how to treat up to eight individual QoS classes:
1. Add a class to the QoS Profile.
2. Select the Priority for the class: real-time, high, medium, or low.
3. Enter the Egress Max and Egress Guaranteed bandwidth for traffic assigned to each QoS class.
5. Click OK .
In the following example, the QoS profile Limit Web Browsing limits Class 2 traffic to a maximum bandwidth of 50Mbps and a guaranteed bandwidth of 2Mbps.
- Enable QoS on a physical interface.
Part of this step includes the option to select clear text and tunneled traffic for unique QoS treatment.
Check if the firewall model you’re using supports enabling QoS on a subinterface by reviewing a summary of the Product Specifications .
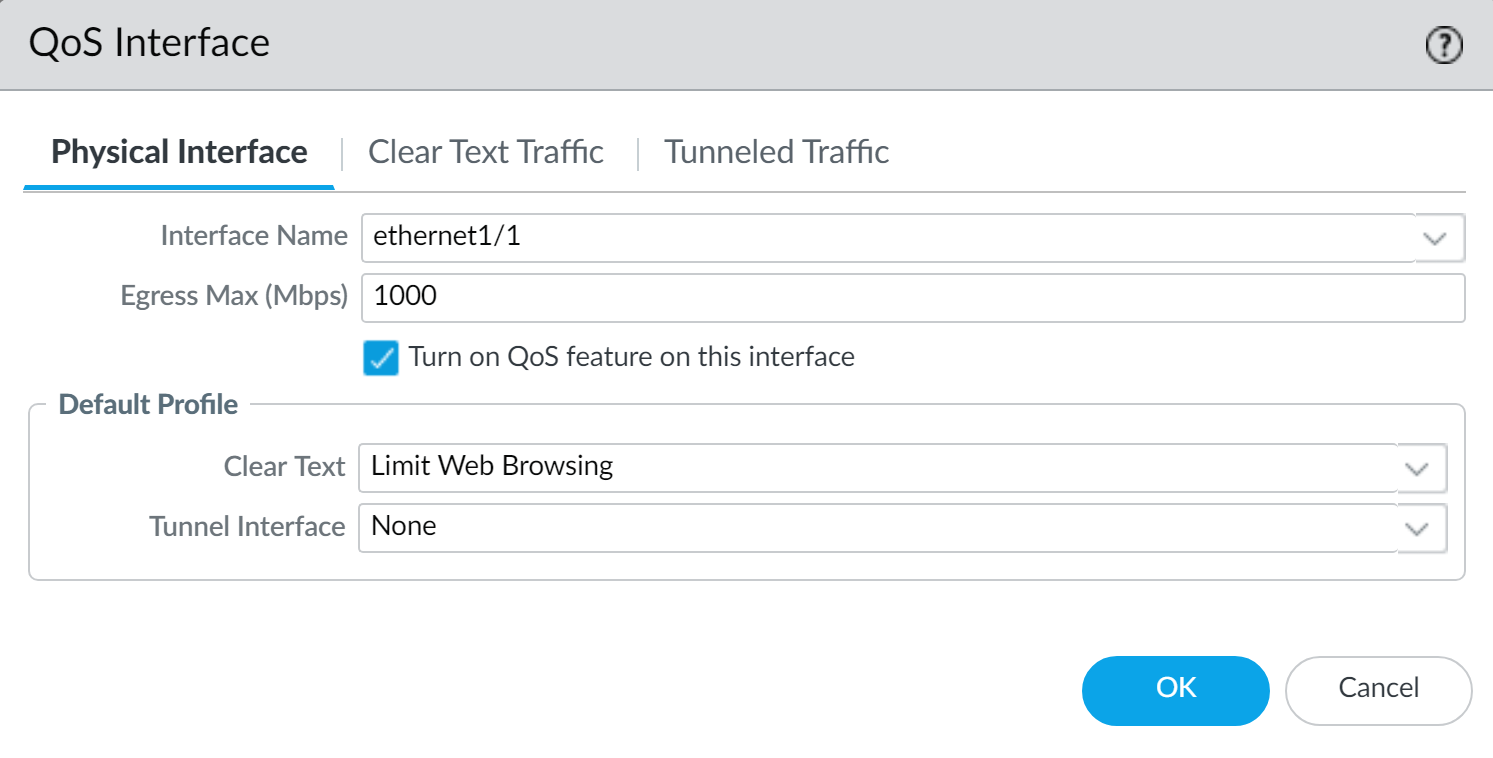
1. Select NetworkQoS and Add a QoS interface.
2. Select Physical Interface and choose the Interface Name of the interface on which to enable QoS.
In the example, Ethernet 1/1 is the egress interface for web-browsing traffic (see Step
2
).
3. Set the Egress Max bandwidth for all traffic exiting this interface.
It is a best practice to always define the Egress Max value for a QoS interface. Ensure that the cumulative guaranteed bandwidth for the QoS profile attached to the interface does not exceed the total bandwidth allocated to the interface.
4. Select Turn on QoS feature on this interface .
5. In the Default Profile section, select a QoS profile to apply to all Clear Text traffic exiting the physical interface.
6. ( Optional ) Select a default QoS profile to apply to all tunneled traffic exiting the interface.
For example, enable QoS on ethernet 1/1 and apply the bandwidth and priority settings you defined for the QoS profile Limit Web Browsing (Step
4
) to be used as the default settings for clear text egress traffic.
7. ( Optional ) Continue to define more granular settings to provide QoS for Clear Text and Tunneled Traffic . Settings configured on the Clear Text Traffic tab and the Tunneled Traffic tab automatically override the default profile settings for clear text and tunneled traffic on the Physical Interface tab.
- Select Clear Text Traffic and:
- Set the Egress Guaranteed and Egress Max bandwidths for clear text traffic.
- Click Add and apply a QoS profile to enforce clear text traffic based on source interface and source subnet.
( PA-3200 Series, PA-5200 Series, PA-5450 firewall, and PA-7000 Series only ) You must also select a destination interface when configuring a QoS policy rule if the rule is applied to a specific subinterface.
- Select Tunneled Traffic and:
- Set the Egress Guaranteed and Egress Max bandwidths for tunneled traffic.
- Click Add and attach a QoS profile to a single tunnel interface.
8. Click OK .
- Commit your changes.
Click Commit .
- Verify a QoS configuration.
Select NetworkQoS and then Statistics to view QoS bandwidth, active sessions of a selected QoS class, and active applications for the selected QoS class.
For example, see the statistics for ethernet 1/3 with QoS enabled:
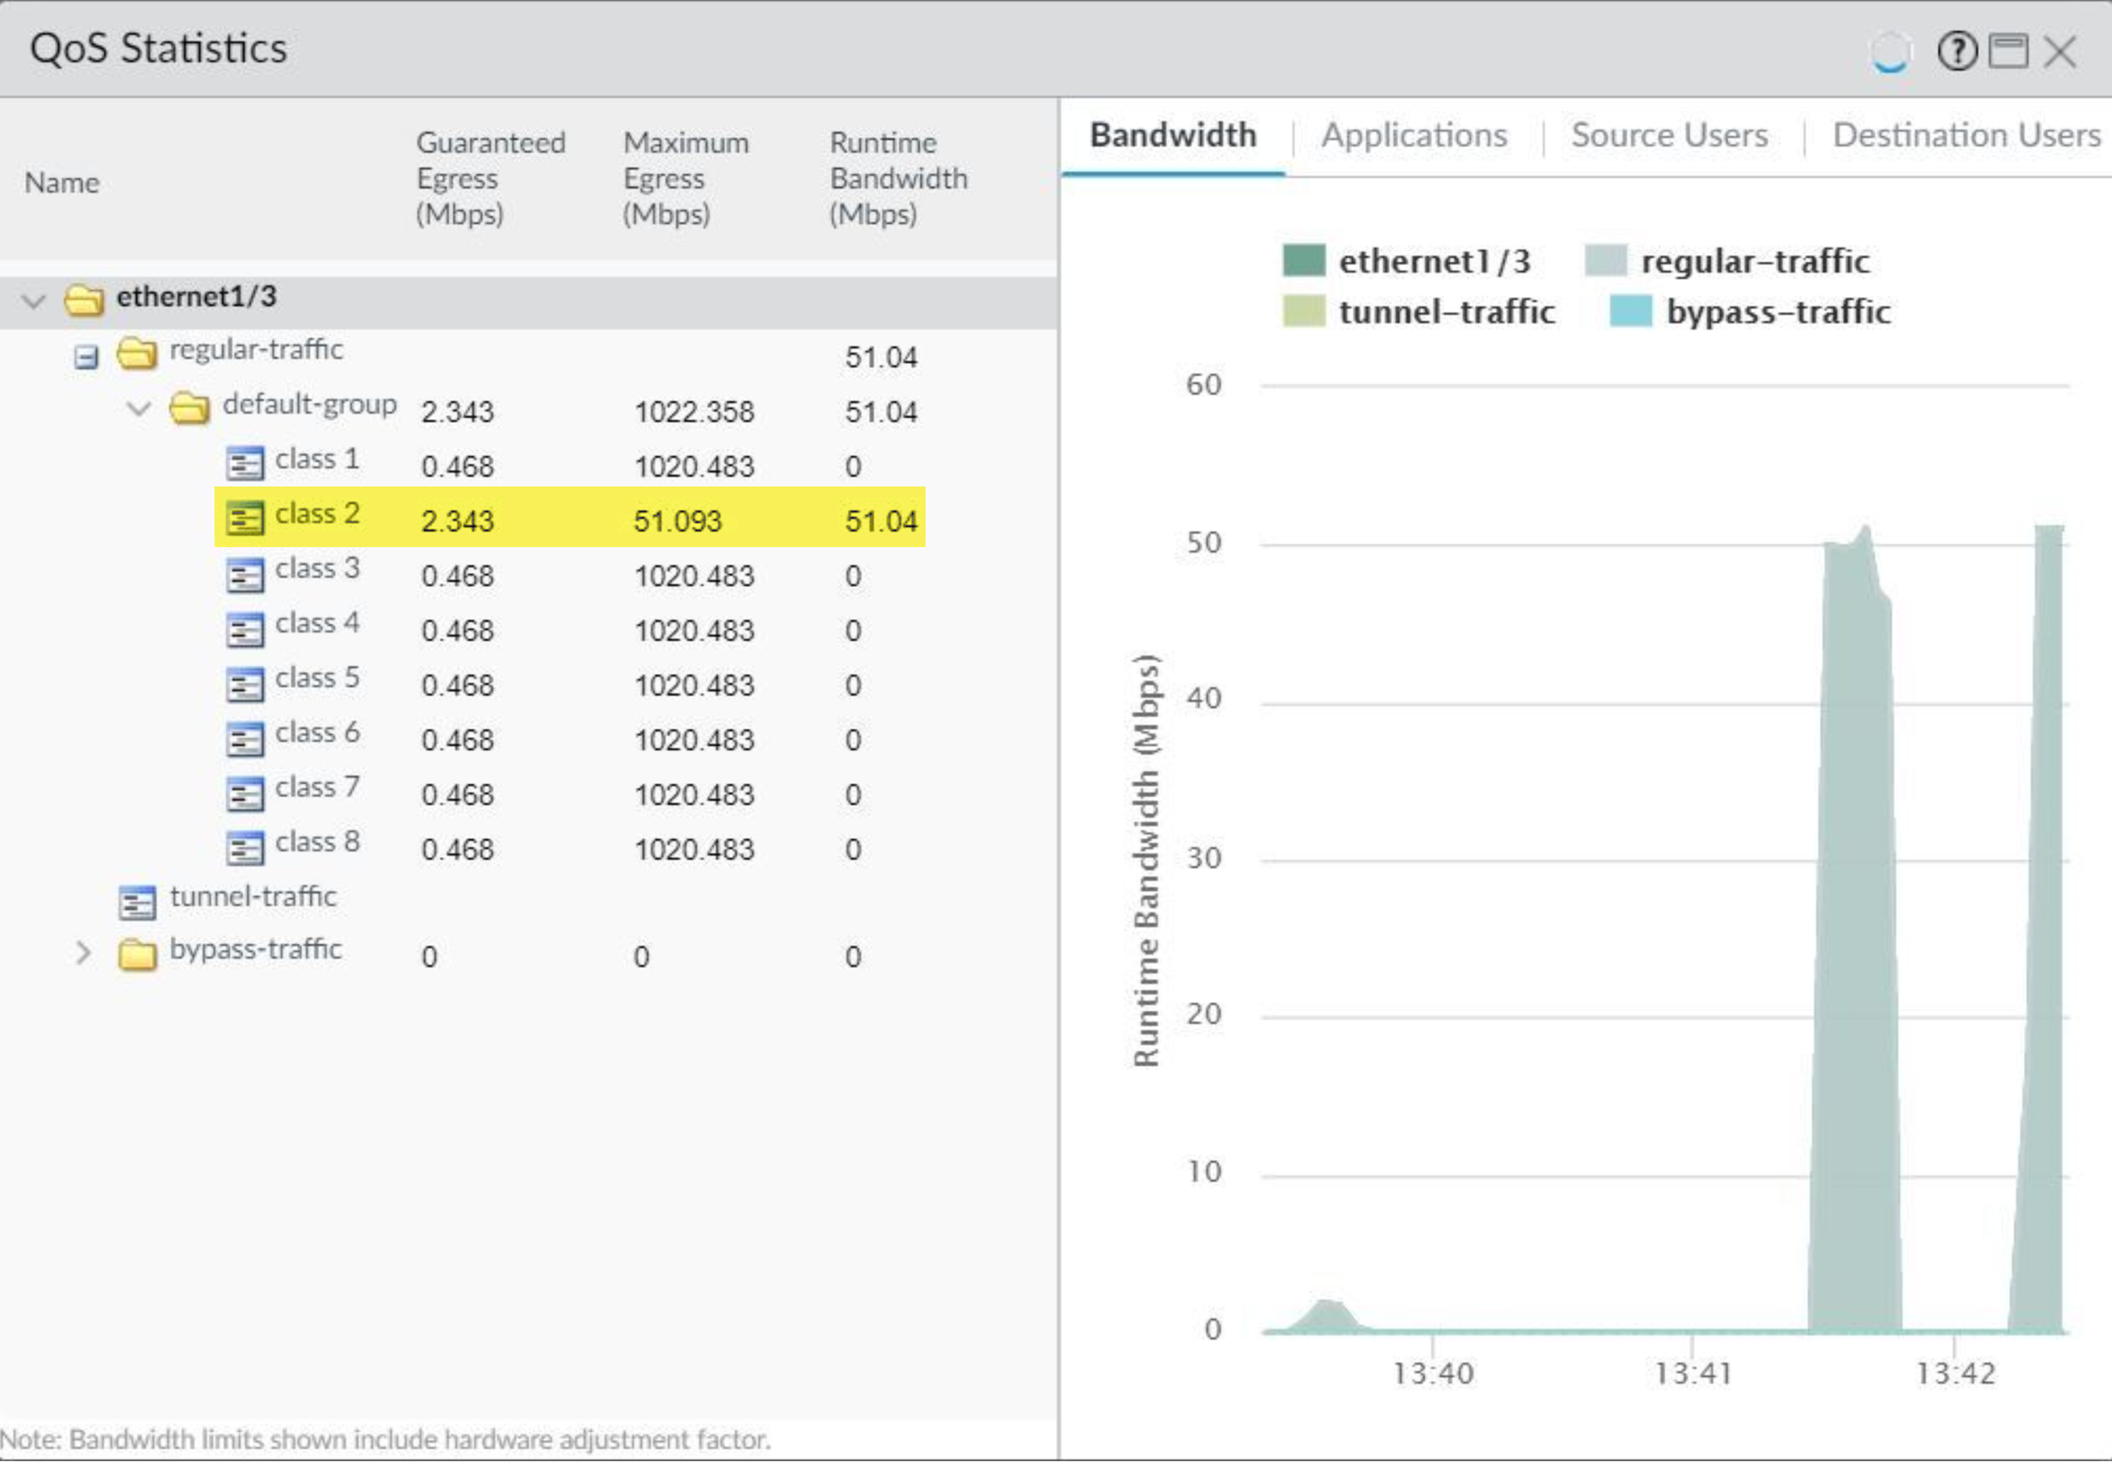
Class 2 traffic limited to 2.343 Mbps of guaranteed bandwidth and a maximum bandwidth of 51.093 Mbps.
Continue to click the tabs to display further information regarding applications, source users, destination users, security rules and QoS rules.
Configure Lockless QoS
The Palo Alto Networks firewalls supports two types of QoS:
- Legacy QoS —In legacy QoS mode, the firewall supports both QoS and non-QoS traffics, where the legacy QoS shapes the QoS traffic.
- ( PAN-OS 11.0.3 and later 11.0 releases ) Lockless QoS —In Lockless QoS mode, the firewall supports both QoS and non-QoS traffics, where the Lockless QoS shapes the QoS traffic. The firewall shapes the packets from the same interface (or port) by the same core for achieving Lockless QoS. For firewalls with higher bandwidth QoS requirements, the Lockless QoS dedicates CPU cores to the QoS function that improves QoS performance, resulting in improved throughput and latency.
In Lockless QoS mode, as the members in a LAG have to be mapped to the same core, the overall LAG QoS throughput is limited by the per core throughput.
- The QoS throughput on a 100G, 40G, and 25G port is limited to a single core throughput.
- Whenever more than two ports are mapped to a single core, the QoS throughput of that core is shared.
We support Lockless QoS mode on the following firewall models. Regardless of the type of QoS configured, the maximum bandwidth (maximum rate of transfer) you can allocate at the port level and QoS profile level for the following platforms is 10G.
- PA-3410 firewall
- PA-3420 firewall
- PA-3430 firewall
- PA-3440 firewall
- PA-5410 firewall
- PA-5420 firewall
- PA-5430 firewall
- PA-5440 firewall
Follow these steps to enable, disable, and view the status of the Lockless QoS.
- Access the CLI
- Use the operational command set lockless-qos yes to enable the Lockless QoS to improve the QoS performance. Commit and reboot the firewall for the changes to take effect.
- username@hostname> set lockless-qos yes
Changing lockless-qos enable requires reboot of the device. Do you want to continue? (y or n)
If you want to configure Lockless QoS where the legacy QoS is already configured, you can do so by running the set lockless-qos yes command and reboot your firewall. If you don't run this command, the firewall retains the legacy QoS behavior. When you disable the Lockless QoS, the firewall falls back to the legacy QoS behavior, if you have already configured legacy QoS before enabling Lockless QoS.
- Use the operational command set lockless-qos no to disable the Lockless QoS. As a result, Lockless QoS isn't supported on the firewall.
- username@hostname> set lockless-qos no
- Use the operational command show lockless-qos enable to view the Lockless QoS enable status.
- username@hostname> show lockless-qos enable
lockless-qos enable : yes
- Use the operational command show lockless-qos if-core-mapping to view the list of ports with the number of cores allocated for the QoS process by the Lockless QoS.
- username@hostname> show lockless-qos if-core-mapping
- interface qos-core
- ethernet1/41 71
ethernet1/42 72
Configure QoS for a Virtual System
QoS can be configured for a single or several virtual systems configured on a Palo Alto Networks firewall. Because a virtual system is an independent firewall, QoS must be configured independently for a single virtual system.
Configuring QoS for a virtual system is similar to configuring QoS on a physical firewall, with the exception that configuring QoS for a virtual system requires specifying the source and destination of traffic. Because a virtual system exists without set physical boundaries and because traffic in a virtual environment spans more than one virtual system, specifying source and destination zones and interfaces for traffic is necessary to control and shape traffic for a single virtual system.
The example below shows two virtual systems configured on firewall. VSYS 1 (purple) and VSYS 2 (red) each have QoS configured to prioritize or limit two distinct traffic flows, indicated by their corresponding purple (VSYS 1) and red (VSYS 2) lines. The QoS nodes indicate the points at which traffic is matched to a QoS policy and assigned a QoS class of service, and then later indicate the point at which traffic is shaped as it egresses the firewall.
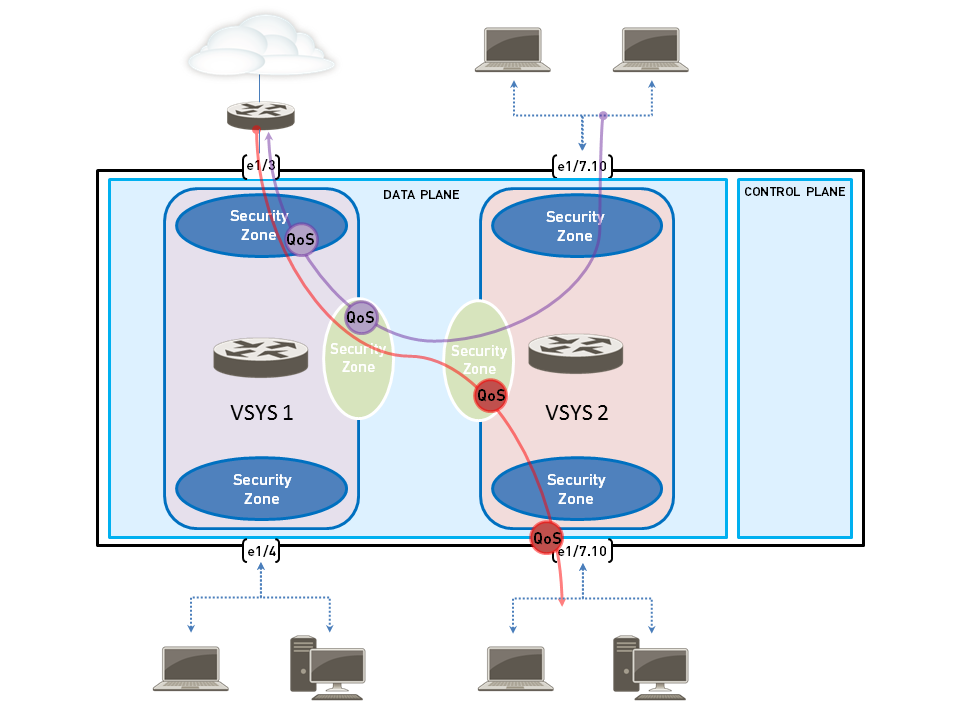
Refer to Virtual Systems for information on virtual systems and how to configure them.
- Confirm that the appropriate interfaces, virtual routers, and security zones are associated with each virtual system.
- To view configured interfaces, select NetworkInterface .
- To view configured zones, select NetworkZones .
- To view information on defined virtual routers, select NetworkVirtual Routers .
- Identify traffic to apply QoS to.
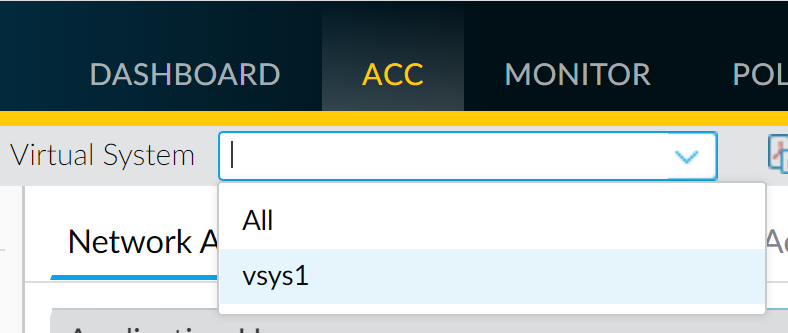
Select ACC to view the Application Command Center page. Use the settings and charts on the ACC page to view trends and traffic related to Applications, URL filtering, Threat Prevention, Data Filtering, and HIP Matches.
To view information for a specific virtual system, select the virtual system from the Virtual System drop-down:
Click any application name to display detailed application information.
- Identify the egress interface for applications that you identified as needing QoS treatment.
In a virtual system environment, QoS is applied to traffic on the traffic’s egress point on the virtual system. Depending the configuration and QoS policy for a virtual system, the egress point of QoS traffic could be associated with a physical interface or could be a zone.
This example shows how to limit web-browsing traffic on vsys 1.
Select MonitorLogsTraffic to view traffic logs. Each entry has the option to display columns with information necessary to configure QoS in a virtual system environment:
- virtual system
- egress interface
- ingress interface
- source zone
- destination zone
To display a column if it is not displayed by default:
- Click any column header to add a column to the log:
- Click the spyglass icon to the left of any entry to display a detailed log that includes the application’s egress interface, as well as source and destination zones, in the Source and Destination sections:
For example, for web-browsing traffic from VSYS 1, the ingress interface is ethernet 1/2, the egress interface is ethernet 1/1, the source zone is trust and the destination zone is untrust.
- Create a QoS Profile.
You can edit any existing QoS Profile, including the default, by clicking the profile name.
1. Select NetworkNetwork ProfilesQoS Profile and click Add to open the QoS Profile dialog.
2. Enter a descriptive Profile Name .
3. Enter an Egress Max to set the overall bandwidth allocation for the QoS profile.
4. Enter an Egress Guaranteed to set the guaranteed bandwidth for the QoS profile.
Any traffic that exceeds the QoS profile’s egress guaranteed limit is best effort but is not guaranteed.
5. In the Classes section of the QoS Profile , specify how to treat up to eight individual QoS classes:
- Click Add to add a class to the QoS Profile.
- Select the Priority for the class.
- Enter an Egress Max for a class to set the overall bandwidth limit for that individual class.
- Enter an Egress Guaranteed for the class to set the guaranteed bandwidth for that individual class.
6. Click OK to save the QoS profile.
- Create a QoS policy.
In an environment with multiple virtual systems, traffic spans more than one virtual system. Because of this, when you are enabling QoS for a virtual system, you must define traffic to receive QoS treatment based on source and destination zones. This ensures that the traffic is prioritized and shaped only for that virtual system (and not for other virtual systems through which the traffic might flow).
1. Select PoliciesQoS and Add a QoS Policy Rule.
2. Select General and give the QoS Policy Rule a descriptive Name .
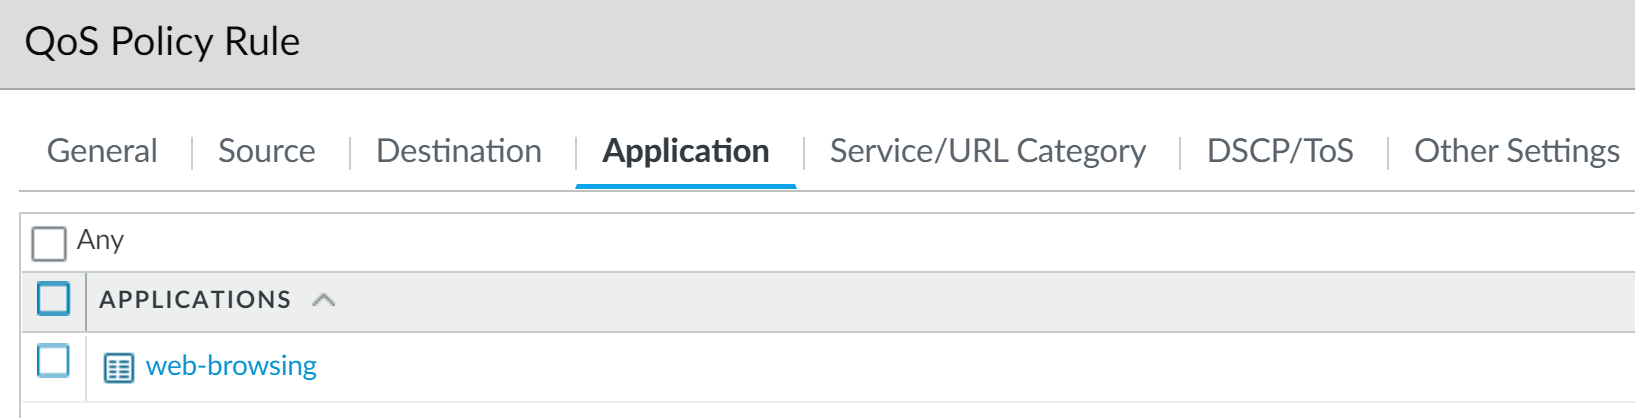
3. Specify the traffic to which the QoS policy rule will apply. Use the Source , Destination , Application , and Service/URL Category tabs to define matching parameters for identifying traffic.
For example, select Application and Add web-browsing to apply the QoS policy rule to that application:
4. Select Source and Add the source zone of vsys 1 web-browsing traffic.
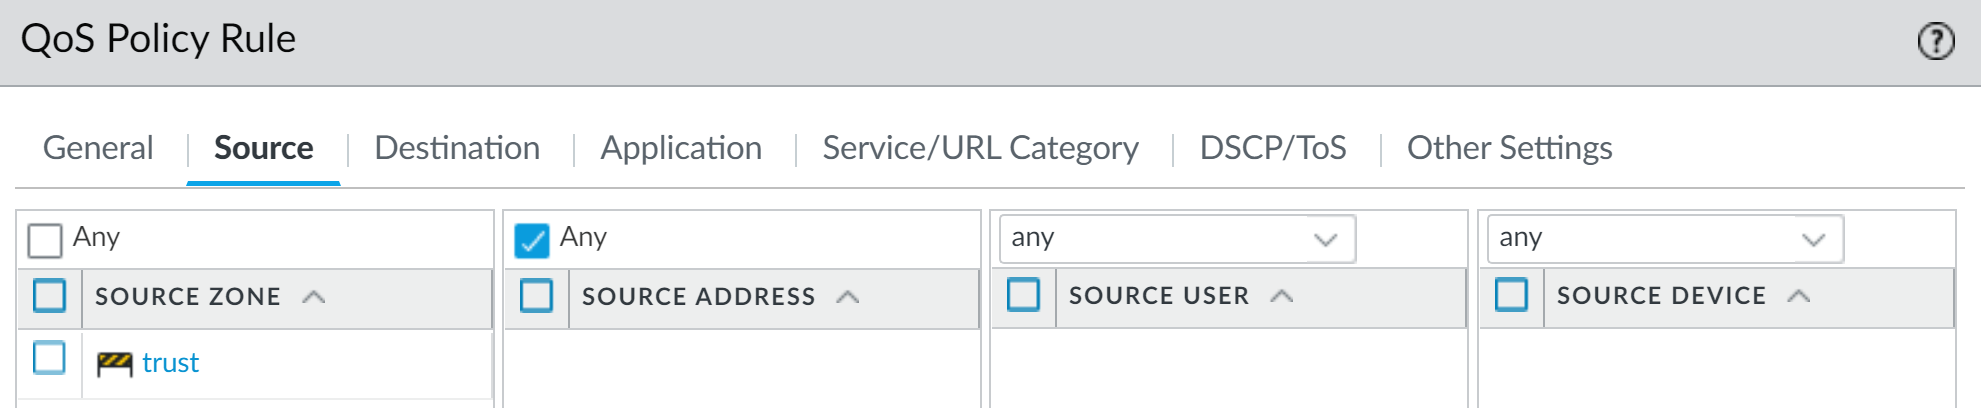
5. Select Destination and Add the destination zone of vsys 1 web-browsing traffic.
6. Select Other Settings and select a QoS Class to assign to the QoS policy rule. For example, assign Class 2 to web-browsing traffic on vsys 1:

7. Click OK to save the QoS policy rule.
- Enable the QoS Profile on a physical interface.
It is a best practice to always define the Egress Max value for a QoS interface.
1. Select NetworkQoS and click Add to open the QoS Interface dialog.
2. Enable QoS on the physical interface:
- On the Physical Interface tab, select the Interface Name of the interface to apply the QoS Profile to.
In this example, ethernet 1/1 is the egress interface for web-browsing traffic on vsys 1 (see Step
2
).
- Select Turn on QoS feature on this interface .
3. On the Physical Interface tab, select the default QoS profile to apply to all Clear Text traffic.
( Optional ) Use the Tunnel Interface field to apply a default QoS profile to all tunneled traffic.
4. ( Optional ) On the Clear Text Traffic tab, configure additional QoS settings for clear text traffic:
- Set the Egress Guaranteed and Egress Max bandwidths for clear text traffic.
- Click Add to apply a QoS Profile to selected clear text traffic, further selecting the traffic for QoS treatment according to source interface and source subnet (creating a QoS node).
5. ( Optional ) On the Tunneled Traffic tab, configure additional QoS settings for tunnel interfaces:
- Set the Egress Guaranteed and Egress Max bandwidths for tunneled traffic.
- Click Add to associate a selected tunnel interface with a QoS Profile.
6. Click OK to save changes.
7. Commit the changes.
- Verify QoS configuration.
- Select NetworkQoS to view the QoS Policies page. The QoS Policies page verifies that QoS is enabled and includes a Statistics link. Click the Statistics link to view QoS bandwidth, active sessions of a selected QoS node or class, and active applications for the selected QoS node or class.
- In a multi-vsys environment, sessions cannot span multiple systems. Multiple sessions are created for one traffic flow if the traffic passes through more than one virtual system. To browse sessions running on the firewall and view applied QoS Rules and QoS Classes, select MonitorSession Browser .
Enforce QoS Based on DSCP Classification
A Differentiated Services Code Point (DSCP) is a packet header value that can be used to request (for example) high priority or best effort delivery for traffic. Session-Based DSCP Classification allows you to both honor DSCP values for incoming traffic and to mark a session with a DSCP value as session traffic exits the firewall. This enables all inbound and outbound traffic for a session to receive continuous QoS treatment as it flows through your network. For example, inbound return traffic from an external server can now be treated with the same QoS priority that the firewall initially enforced for the outbound flow based on the DSCP value the firewall detected at the beginning of the session. Network devices between the firewall and end user will also then enforce the same priority for the return traffic (and any other outbound or inbound traffic for the session).
You cannot apply DSCP code points or QoS to SSL Forward Proxy, SSL Inbound Inspection, and SSH Proxy traffic.
Different types of DSCP markings indicate different levels of service:
Completing this step enables the firewall to mark traffic with the same DSCP value that was detected at the beginning of a session (in this example, the firewall would mark return traffic with the DSCP AF11 value). While configuring QoS allows you to shape traffic as it egresses the firewall, enabling this option in a security rule allows the other network devices intermediate to the firewall and the client to continue to enforce priority for DSCP marked traffic.
- Expedited Forwarding (EF) : Can be used to request low loss, low latency and guaranteed bandwidth for traffic. Packets with EF codepoint values are typically guaranteed highest priority delivery.
- Assured Forwarding (AF) : Can be used to provide reliable delivery for applications. Packets with AF codepoint indicate a request for the traffic to receive higher priority treatment than the best-effort service provides (though packets with an EF codepoint will continue to take precedence over those with an AF codepoint).
- Class Selector (CS) : Can be used to provide backward compatibility with network devices that use the IP precedence field to mark priority traffic.
- IP Precedence (ToS) : Can be used by legacy network devices to mark priority traffic (the IP Precedence header field was used to indicate the priority for a packet before the introduction of the DSCP classification).
- Custom Codepoint : Create a custom codepoint to match to traffic by entering a Codepoint Name and Binary Value .
For example, select the Assured Forwarding (AF) to ensure traffic marked with an AF codepoint value has higher priority for reliable delivery over applications marked to receive lower priority.Use the following steps to enable Session-Based DSCP Classification. Start by configuring QoS based on the DSCP marking detected at the beginning of a session. You can then continue to enable the firewall to mark the return flow for a session with the same DSCP value used to enforce QoS for the initial outbound flow.
- Perform the preliminary steps to Configure QoS .
- Define the traffic to receive QoS treatment based on DSCP value.
- Select PoliciesQoS and Add or modify an existing QoS rule and populate required fields.
- Select DSCP/ToS and select Codepoints .
- Add DSCP/ToS codepoints for which you want to enforce QoS.
- Select the Type of DSCP/ToS marking for the QoS rule to match to traffic:
It is a best practice to use a single DSCP type to manage and prioritize your network traffic.
- Match the QoS policy to traffic on a more granular scale by specifying the Codepoint value. For example, with Assured Forwarding (AF) selected as the Type of DSCP value for the policy to match, further specify an AF Codepoint value such as AF11.
When Expedited Forwarding (EF) is selected as the Type of DSCP marking, a granular Codepoint value cannot be specified. The QoS policy rule matches to traffic marked with any EF codepoint value.
- Select Other Settings and assign a QoS Class to traffic matched to the QoS rule. In this example, assign Class 1 to sessions where a DSCP marking of AF11 is detected for the first packet in the session.
- Click OK to save the QoS rule.
- Define the QoS priority for traffic to receive when it is matched to a QoS rule based the DSCP marking detected at the beginning of a session.
- Select NetworkNetwork ProfilesQoS Profile and Add or modify an existing QoS profile. For details on profile options to set priority and bandwidth for traffic, see QoS Concepts and Configure QoS .
- Add or modify a profile class. For example, because Step
2
showed steps to classify AF11 traffic as Class 1 traffic, you could add or modify a class1 entry.
- Select a Priority for the class of traffic, such as high .
- Click OK to save the QoS Profile.
- Enable QoS on an interface.
Select NetworkQoS and Add or modify an existing interface and Turn on QoS feature on this interface .
In this example, traffic with an AF11 DSCP marking is matched to the QoS rule and assigned Class 1. The QoS profile enabled on the interface enforces high priority treatment for Class 1 traffic as it egresses the firewall (the session outbound traffic).
- Enable DSCP Marking.
Mark return traffic with a DSCP value, enabling the inbound flow for a session to be marked with the same DSCP value detected for the outbound flow.
- Select PoliciesSecurity and Add or modify a security policy.
- Select Actions and in the QoS Marking drop-down, choose Follow Client-to-Server Flow .
- Click OK to save your changes.
Completing this step enables the firewall to mark traffic with the same DSCP value that was detected at the beginning of a session (in this example, the firewall would mark return traffic with the DSCP AF11 value). While configuring QoS allows you to shape traffic as it egresses the firewall, enabling this option in a security rule allows the other network devices intermediate to the firewall and the client to continue to enforce priority for DSCP marked traffic.
- Commit the configuration.
Commit your changes.
Use Case: QoS for a Single User
A CEO finds that during periods of high network usage, she is unable to access enterprise applications to respond effectively to critical business communications. The IT admin wants to ensure that all traffic to and from the CEO receives preferential treatment over other employee traffic so that she is guaranteed not only access to, but high performance of, critical network resources.
- The admin creates the QoS profile CEO_traffic to define how traffic originating from the CEO will be treated and shaped as it flows out of the company network:
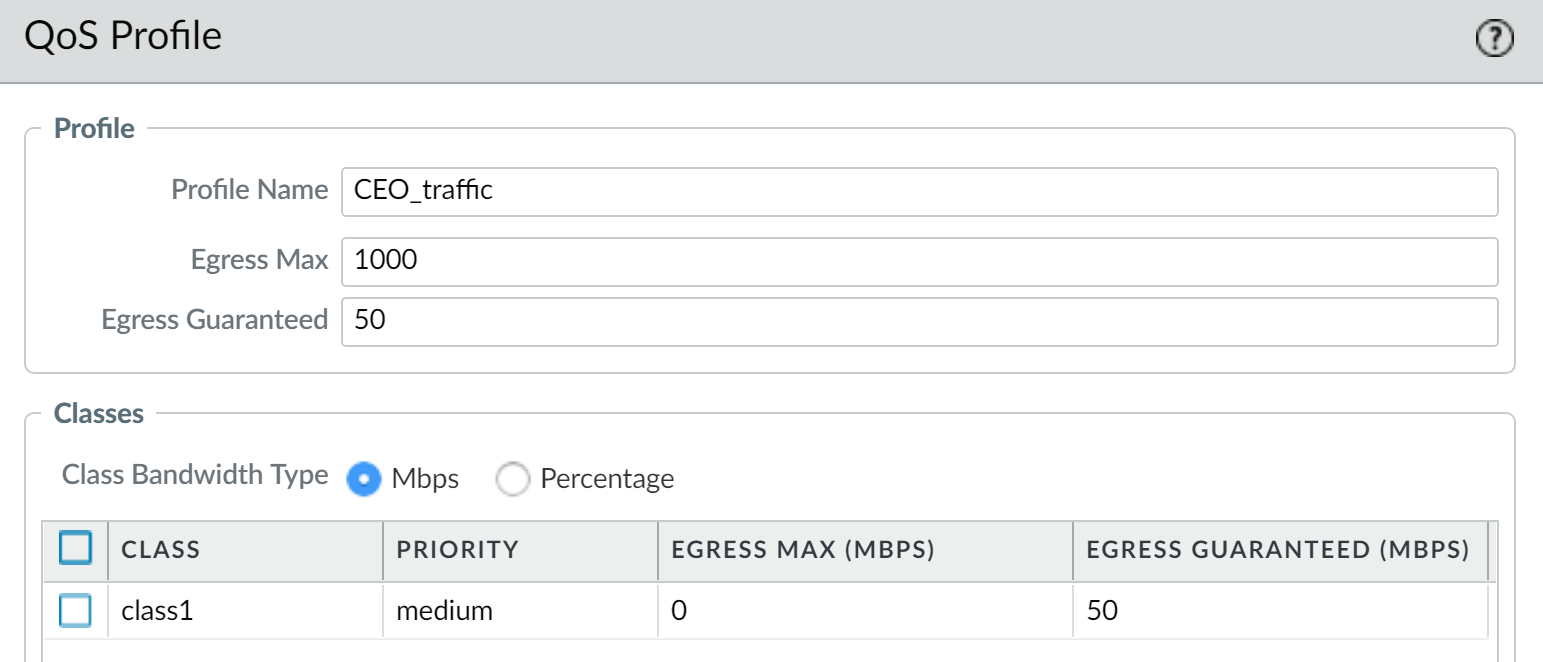
The admin assigns a guaranteed bandwidth ( Egress Guaranteed ) of 50 Mbps to ensure that the CEO will have that amount that bandwidth guaranteed to her at all times (more than she would need to use), regardless of network congestion.
The admin continues by designating Class 1 traffic as high priority and sets the profile’s maximum bandwidth usage ( Egress Max ) to 1000 Mbps, the same maximum bandwidth for the interface that the admin will enable QoS on. The admin is choosing to not restrict the CEO’s bandwidth usage in any way.
It is a best practice to populate the Egress Max field for a QoS profile, even if the max bandwidth of the profile matches the max bandwidth of the interface. The QoS profile’s max bandwidth should never exceed the max bandwidth of the interface you are planning to enable QoS on.
- The admin creates a QoS policy to identify the CEO’s traffic ( PoliciesQoS ) and assigns it the class that he defined in the QoS profile (see prior step). Because User-ID is configured, the admin uses the Source tab in the QoS policy to singularly identify the CEO’s traffic by her company network username. (If User-ID is not configured, the administrator could Add the CEO’s IP address under Source Address . See User-ID .):

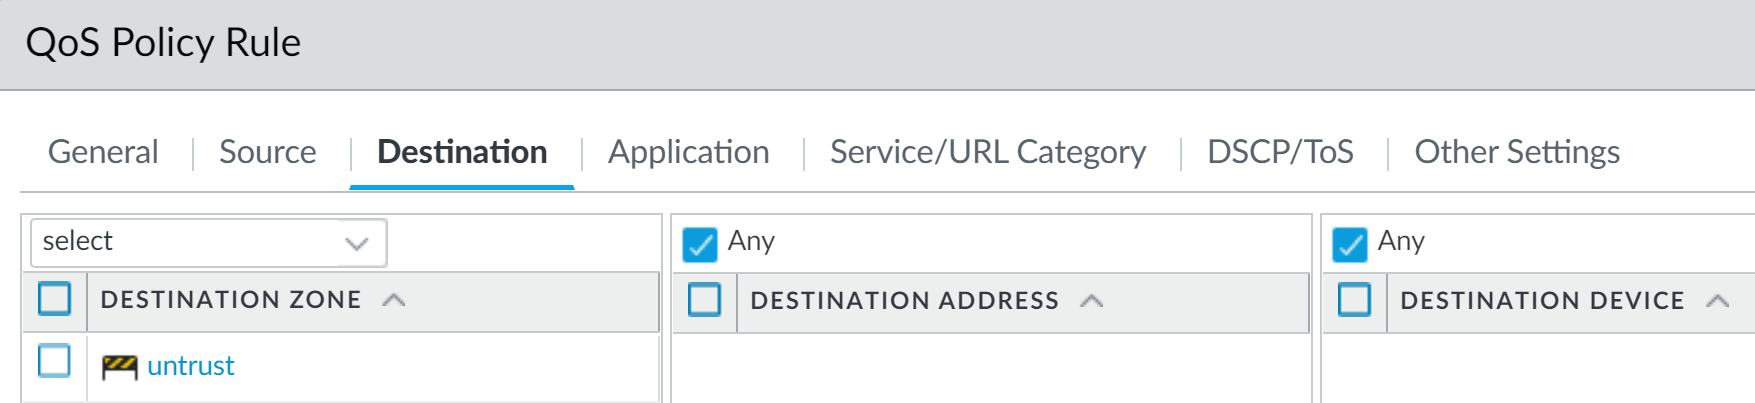
The admin associates the CEO’s traffic with Class 1 ( Other Settings tab) and then continues to populate the remaining required policy fields; the admin gives the policy a descriptive Name ( General tab) and selects Any for the Source Zone ( Source tab) and Destination Zone ( Destination tab):

- Now that Class 1 is associated with the CEO’s traffic, the admin enables QoS by checking Turn on QoS feature on interface and selecting the traffic flow’s egress interface. The egress interface for the CEO’s traffic flow is the external-facing interface, in this case, ethernet 1/2:

Because the admin wants to ensure that all traffic originating from the CEO is guaranteed by the QoS profile and associated QoS policy he created, he selects the CEO_traffic to apply to Clear Text traffic flowing from ethernet 1/2.
- After committing the QoS configuration, the admin navigates to the NetworkQoS page to confirm that the QoS profile CEO_traffic is enabled on the external-facing interface, ethernet 1/2:

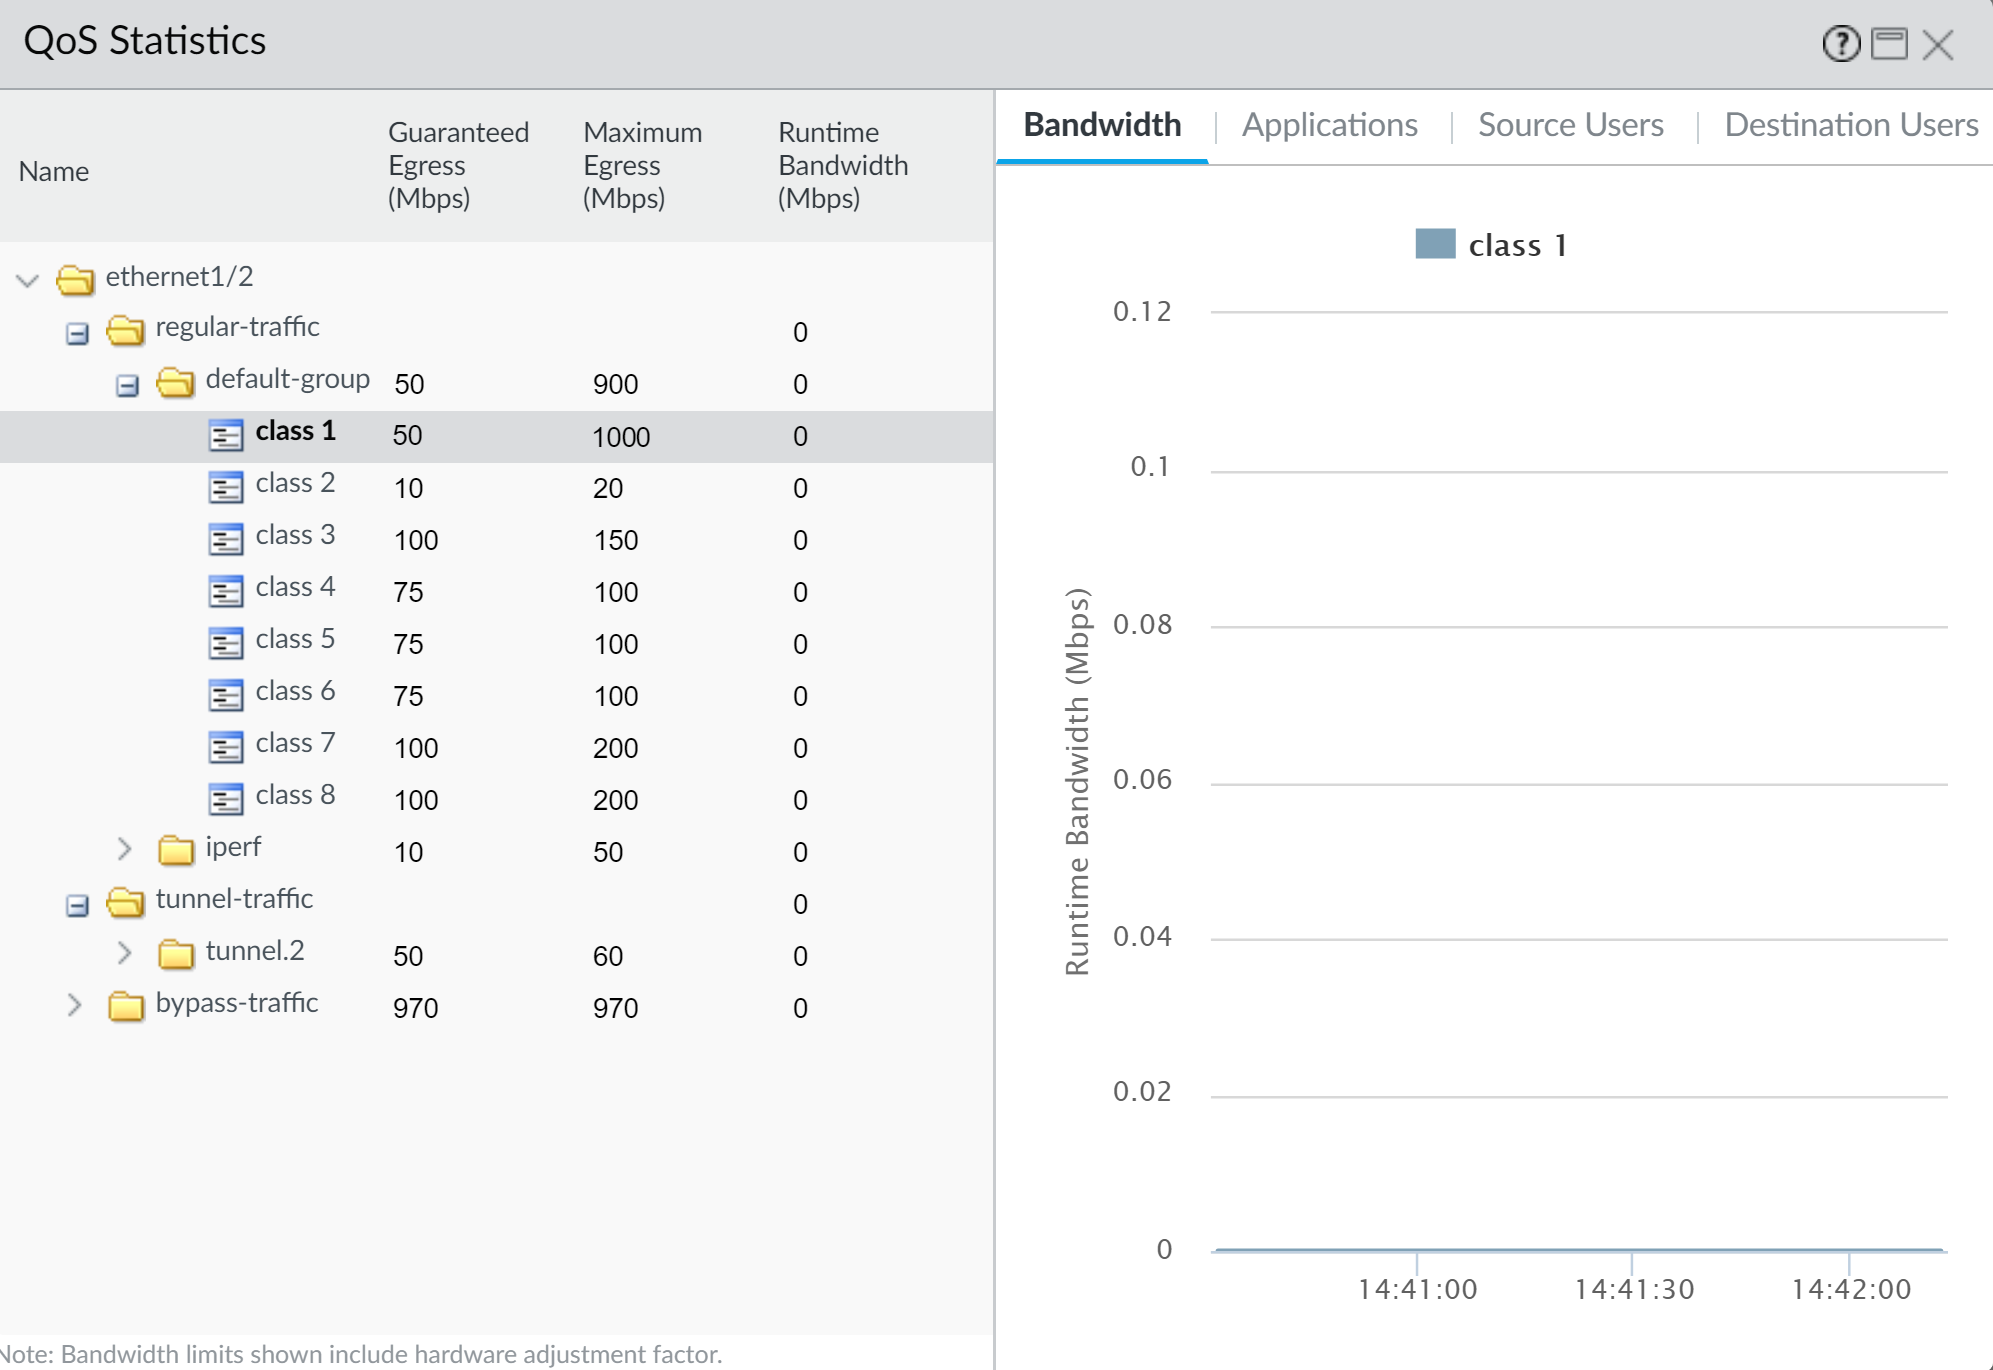
- He clicks Statistics to view how traffic originating with the CEO (Class 1) is being shaped as it flows from ethernet 1/2:
This case demonstrates how to apply QoS to traffic originating from a single source user. However, if you also wanted to guarantee or shape traffic to a destination user, you could configure a similar QoS setup. Instead of, or in addition to this work flow, create a QoS policy that specifies the user’s IP address as the Destination Address on the PoliciesQoS page (instead of specifying the user’s source information) and then enable QoS on the network’s internal-facing interface on the NetworkQoS page (instead of the external-facing interface).
Use Case: QoS for Voice and Video Applications
Voice and video traffic is particularly sensitive to measurements that the QoS feature shapes and controls, especially latency and jitter. For voice and video transmissions to be audible and clear, voice and video packets cannot be dropped, delayed, or delivered inconsistently. A best practice for voice and video applications, in addition to guaranteeing bandwidth, is to guarantee priority to voice and video traffic.
In this example, employees at a company branch office are experiencing difficulties and unreliability in using video conferencing and Voice over IP (VoIP) technologies to conduct business communications with other branch offices, with partners, and with customers. An IT admin intends to implement QoS in order to address these issues and ensure effective and reliable business communication for the branch employees. Because the admin wants to guarantee QoS to both incoming and outgoing network traffic, he will enable QoS on both the firewall’s internal- and external-facing interfaces.
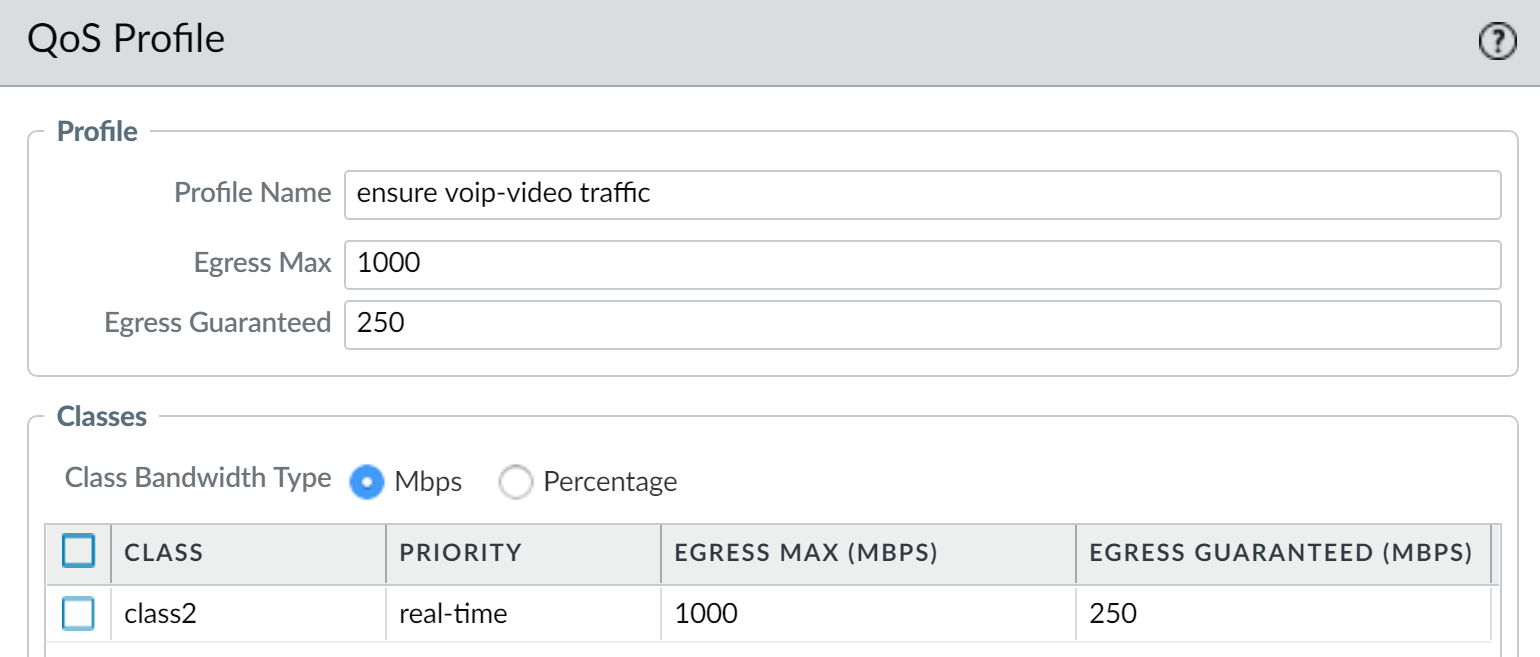
- The admin creates a QoS profile, defining Class 2 so that Class 2 traffic receives real-time priority and on an interface with a maximum bandwidth of 1000 Mbps, is guaranteed a bandwidth of 250 Mbps at all times, including peak periods of network usage.
Real-time priority is typically recommended for applications affected by latency, and is particularly useful in guaranteeing performance and quality of voice and video applications.
On the firewall web interface, the admin selects the NetworkNetwork ProfilesQos Profile page, clicks Add , enters the Profile Name , "ensure voip-video traffic", and defines Class 2 traffic.
- The admin creates a QoS policy to identify voice and video traffic. Because the company does not have one standard voice and video application, the admin wants to ensure QoS is applied to a few applications that are widely and regularly used by employees to communicate with other offices, with partners, and with customers. On the PoliciesQoSQoS Policy RuleApplications tab, the admin clicks Add and opens the Application Filter window. The admin continues by selecting criteria to filter the applications he wants to apply QoS to, choosing the Subcategory voip-video, and narrowing that down by specifying only voip-video applications that are both low-risk and widely-used.
The application filter is a dynamic tool that, when used to filter applications in the QoS policy, allows QoS to be applied to all applications that meet the criteria of voip-video , low risk , and widely used at any given time.
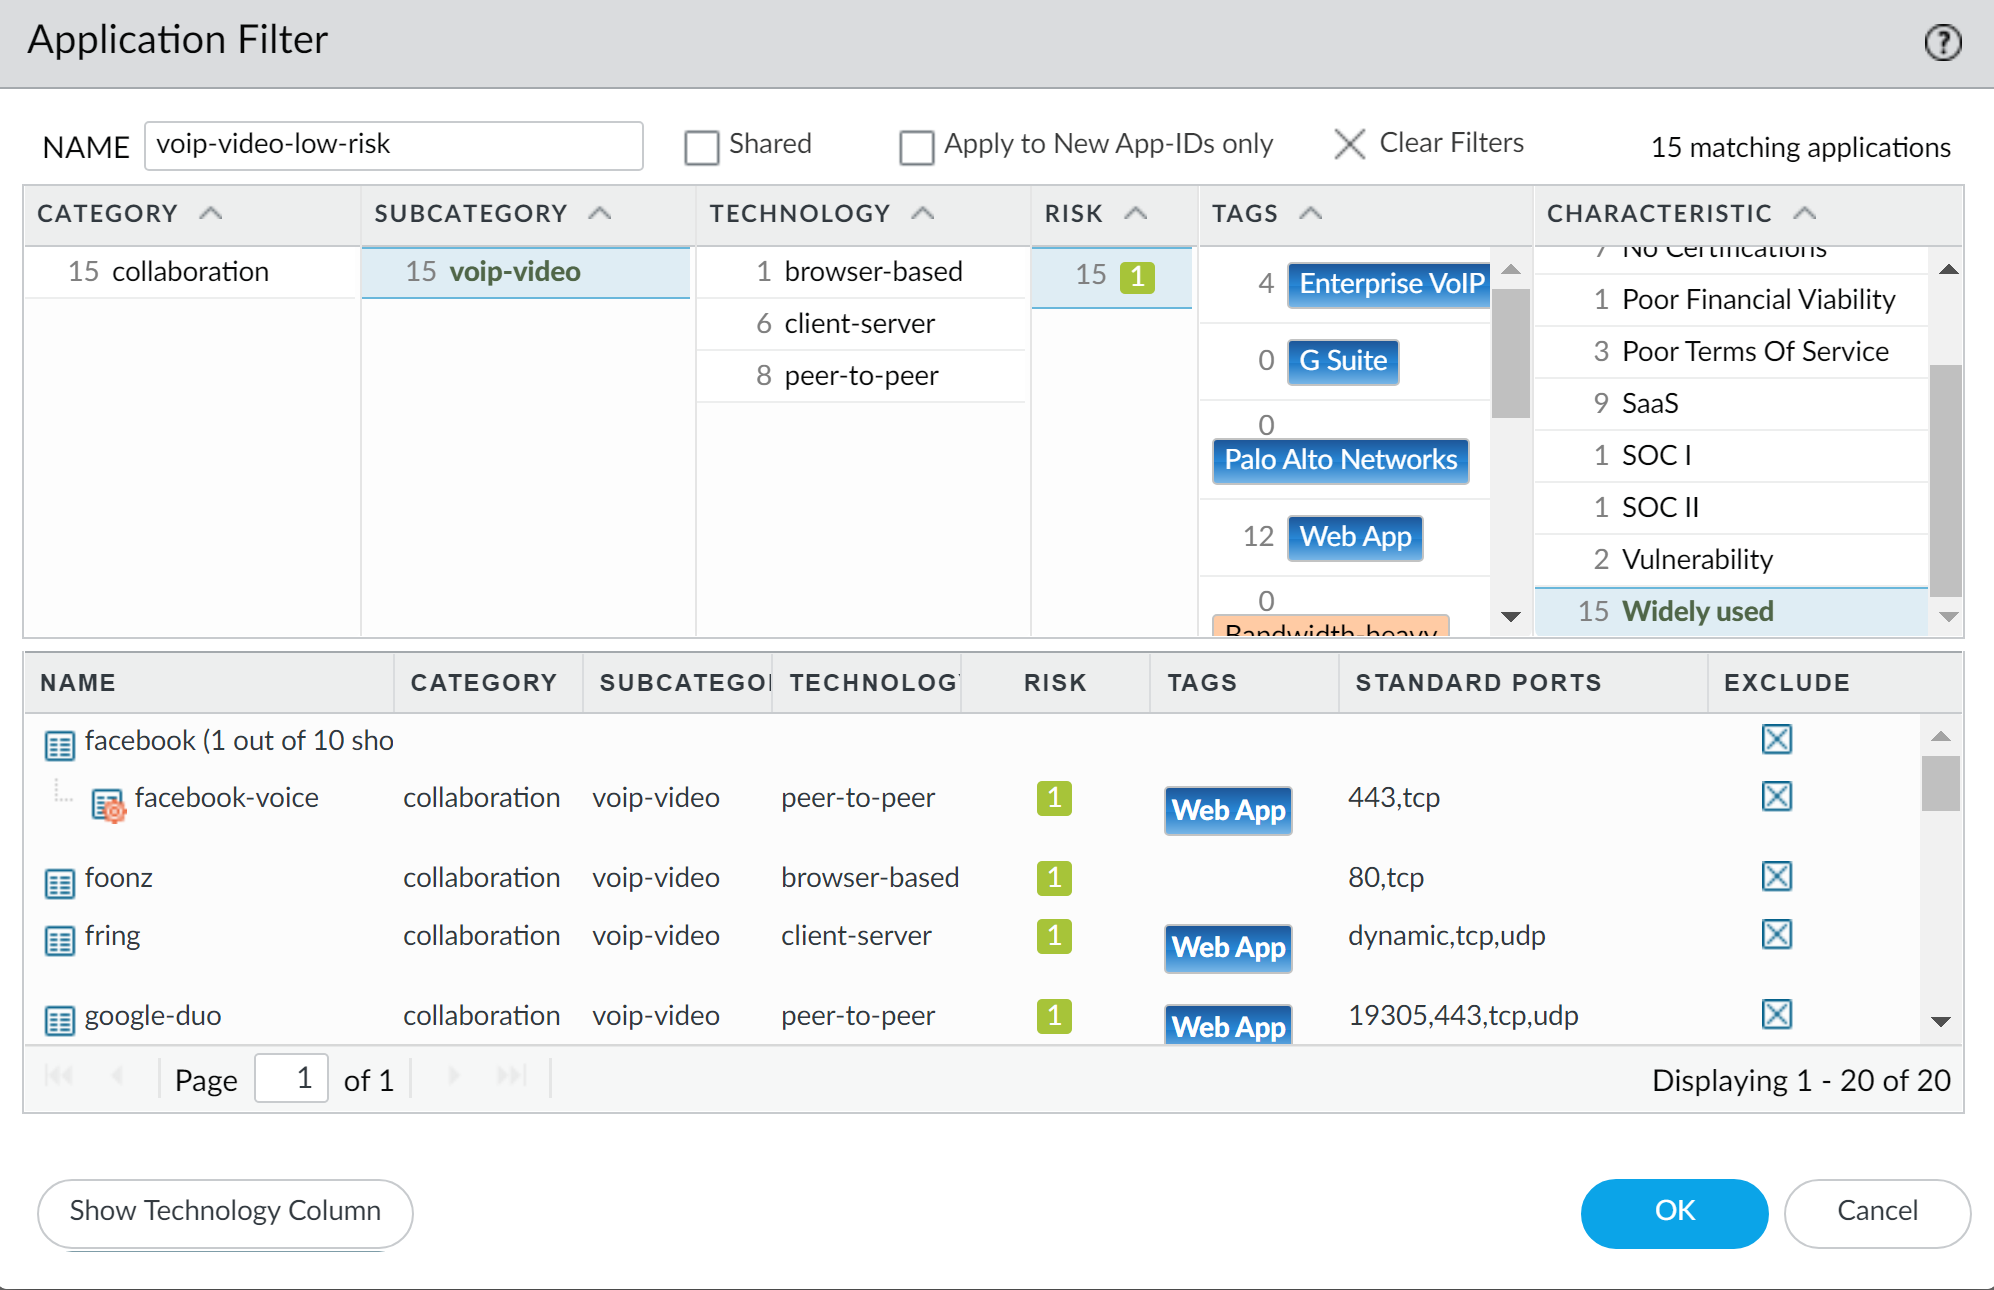
The admin names the Application Filter voip-video-low-risk and includes it in the QoS policy:
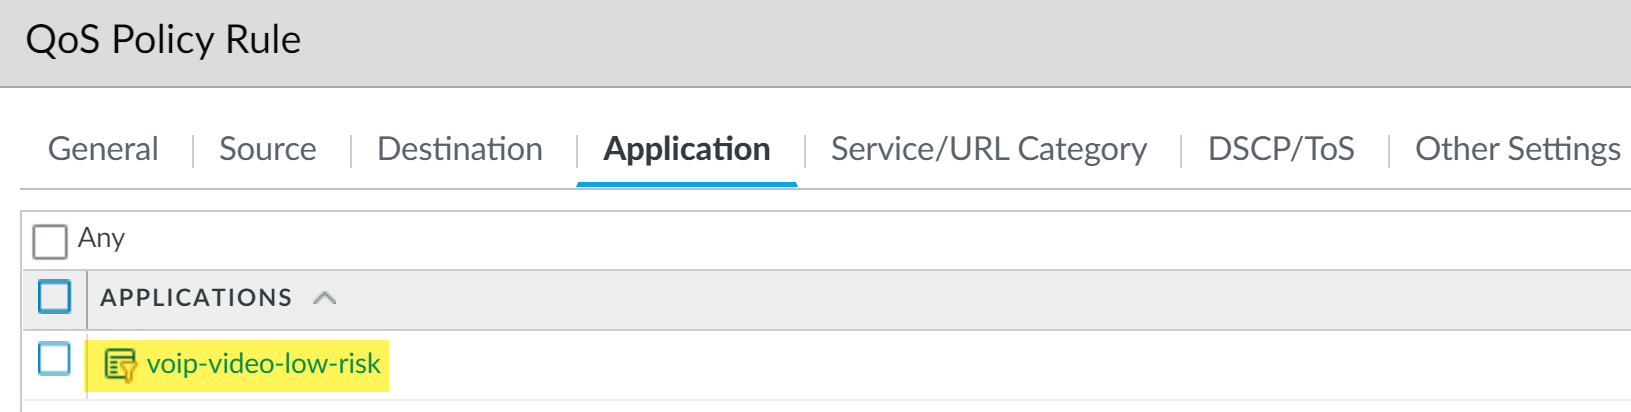
The admin names the QoS policy Voice-Video and selects Other Settings to assign all traffic matched to the policy Class 2. He is going to use the Voice-Video QoS policy for both incoming and outgoing QoS traffic, so he sets Source and Destination information to Any :

- Because the admin wants to ensure QoS for both incoming and outgoing voice and video communications, he enables QoS on the network’s external-facing interface (to apply QoS to outgoing communications) and to the internal-facing interface (to apply QoS to incoming communications).
The admin begins by enabling the QoS profile he created, ensure voice-video traffic (Class 2 in this profile is associated with policy, Voice-Video) on the external-facing interface, in this case, ethernet 1/2.
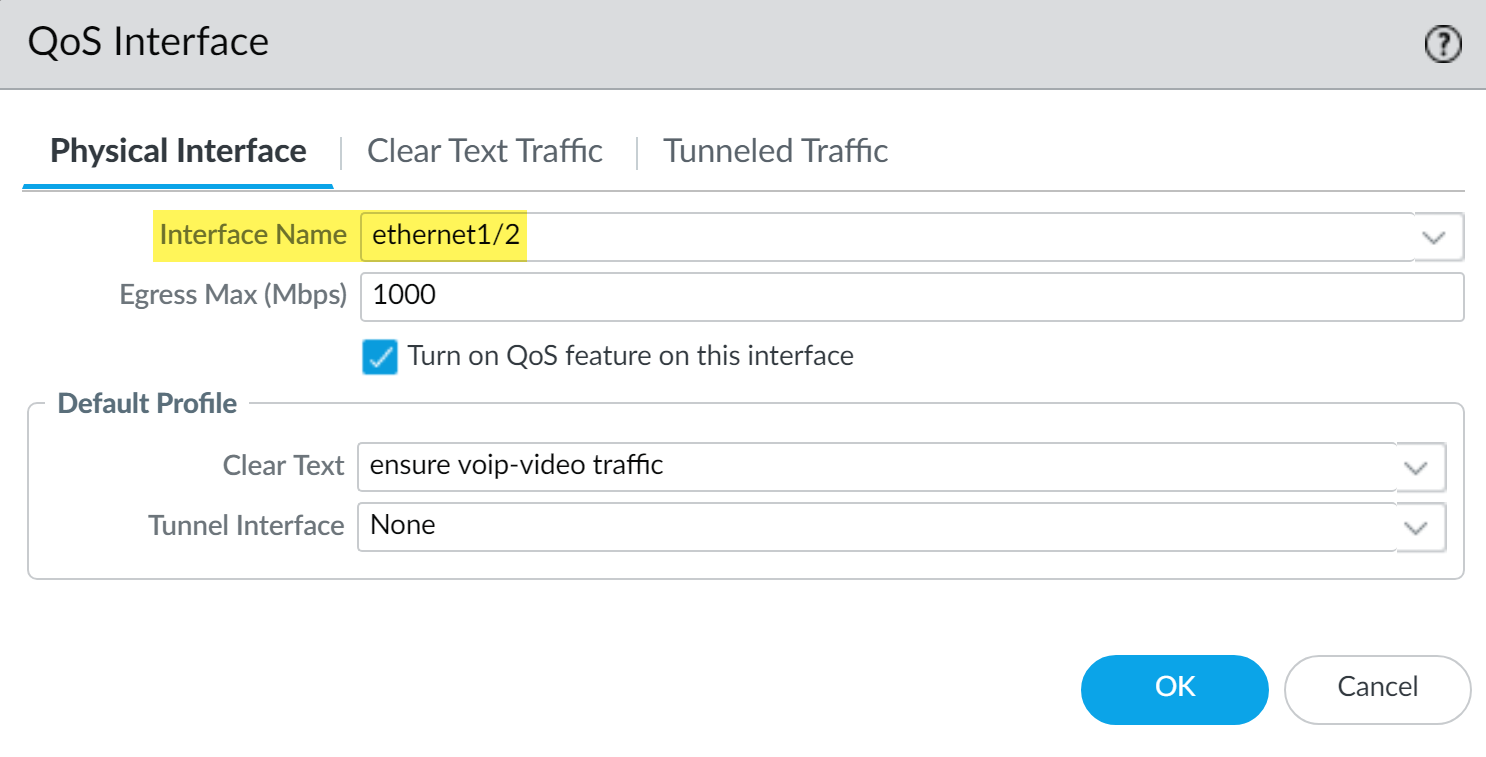
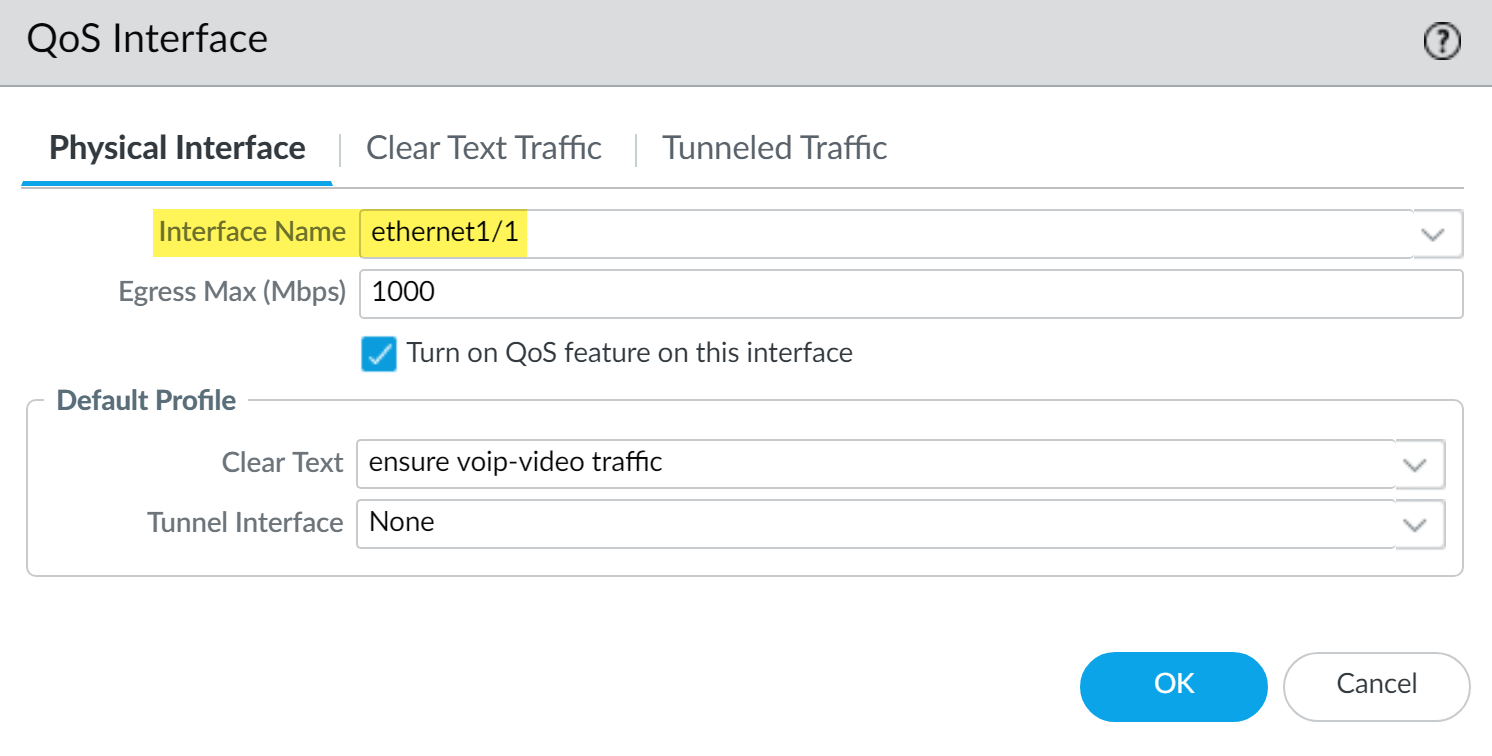
He then enables the same QoS profile ensure voip-video traffic on a second interface, the internal-facing interface (in this case, ethernet 1/1).
- The admin selects NetworkQoS to confirm that QoS is enabled for both incoming and outgoing voice and video traffic:
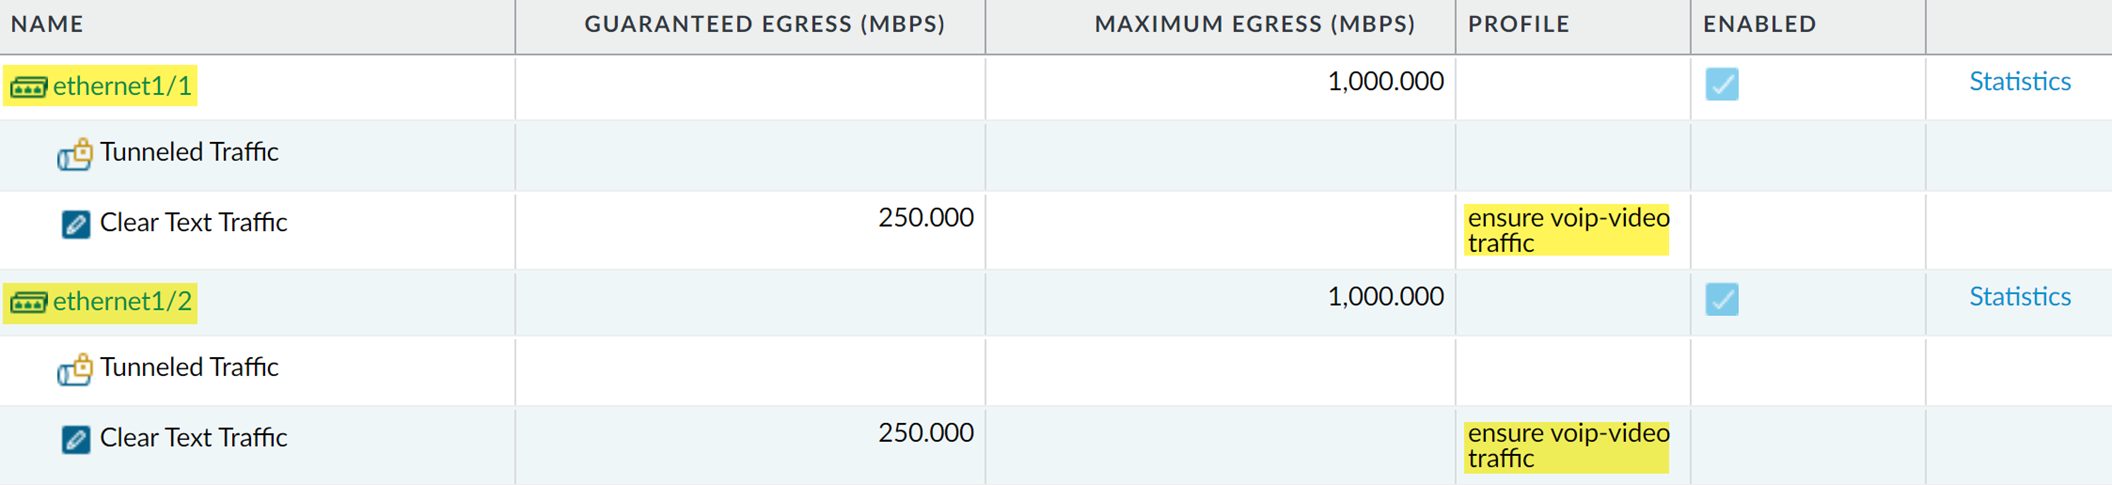
The admin has successfully enabled QoS on both the network’s internal- and external-facing interfaces. Real-time priority is now ensured for voice and video application traffic as it flows both into and out of the network, ensuring that these communications, which are particularly sensitive to latency and jitter, can be used reliably and effectively to perform both internal and external business communications.