Introduction to Zero Touch Provisioning
Set up Zero Touch Provisioning (ZTP) to simplify and streamline initial firewall deployments by automating the new managed firewall on-boarding without the need for network administrators to manually provision the firewall.
ZTP onboarding requires cabling the Eth1/1 interface on the ZTP firewall with an outbound internet connection before the ZTP firewall is powered on. This is required to successfully onboard the ZTP firewall to Panorama management, register your ZTP firewall with the Customer Support Portal (CSP), and push the policy and network configurations from Panorama.
Only Panorama administrators with Superuser privileges can access the ZTP settings required to set up ZTP.
To successfully leverage the ZTP service, on-board your ZTP firewalls with the factory default PAN-OS version before upgrading to PAN-OS 10.0.0 or later release.
The ZTP plugin is supported on PAN-OS 9.1.4 and later releases.
Zero Touch Provisioning (ZTP) is designed to simplify and automate the on-boarding of new firewalls to the Panorama™ management server. ZTP streamlines the initial firewall deployment process by allowing network administrators to ship managed firewalls directly to their branches and automatically add the firewall to the Panorama™ management server after the ZTP firewall successfully connects to the Palo Alto Networks ZTP service. This allows businesses to save on time and resources when deploying new firewalls at branch locations by removing the need for IT administrators to manually provision the new managed firewall. After successful on-boarding, Panorama provides the means to configure and manage your ZTP configuration and firewalls.
The ZTP cloud service supports a direct internet connection to successfully onboard a ZTP firewall to Panorama management. The ZTP cloud service does not support an explicit web proxy and is unable to onboard a ZTP firewall to Panorama management if an explicit web proxy is configured as a gateway to the internet for your ZTP firewalls and Panorama.
Review and subscribe to ZTP Service Status events to be notified about scheduled maintenance windows, outages, and workarounds.
ZTP is supported on the following ZTP firewalls:
-
PA-220-ZTP and PA-220R-ZTP
-
PA-410, PA-440, PA-450, and PA-460
-
PA-820-ZTP and PA-850-ZTP
-
PA-3220-ZTP, PA-3250-ZTP, and PA-3260-ZTP
-
PA-3400 Series Firewalls
-
PA-5410, PA-5420, and PA-5430
-
PA-5450
Before you begin setting up ZTP on Panorama, review the Firewall Hardware Quick Start and Reference Guides to understand how to correctly install your firewall to successfully leverage ZTP.
ZTP Setup Flowchart (Panorama Side)
graph TD
A[Start: Prepare Panorama] --> B(Install Panorama Device Cert);
B --> C{Install ZTP Plugin?};
C -- Yes --> D[Install/Update ZTP Plugin];
C -- No --> E[Verify ZTP Plugin Installed];
D --> F;
E --> F;
F(Register/Associate Panorama in CSP);
F --> G(Configure ZTP Settings in Panorama
- Enable Service
- Set Panorama IP/FQDN);
G --> H{Create New DG/Template?};
H -- Yes --> I[Add ZTP Device Group & Template];
H -- No --> J[Ensure Existing DG/Template are Ready];
I --> K;
J --> K;
K(Configure Installer Admin Account);
K --> L(Commit to Panorama);
L --> M(Sync to ZTP Service);
M --> N[Ready to Add Firewalls];
This flowchart outlines the main steps performed on Panorama to prepare for ZTP onboarding.
ZTP Configuration Elements
The following elements work together to allow you to quickly on-board newly deployed ZTP firewalls by automatically adding them to the Panorama management server using the ZTP service.
-
ZTP Plugin:
Allows Panorama to connect to the ZTP service and claim a ZTP firewall for simplified on-boarding.
-
Customer Support Portal (CSP):
The Palo Alto Networks Customer Support Portal is used to register your Panorama to connect to the CSP to automatically register newly added ZTP firewalls.
-
One-time Password (OTP):
Provided by Palo Alto Networks used to retrieve and install a certificate on Panorama for it to communicate with the CSP and ZTP service. (Note: This OTP process is generally part of initial Panorama setup for cloud services, not specifically ZTP setup itself).
-
Installer:
An administrator user created using the
installeradmin
admin role for ZTP firewall on-boarding. This admin user has limited access to the Panorama web interface, only allowing access to enter the ZTP firewall serial number and claim key.
-
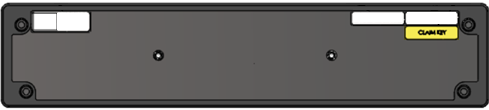
Claim Key:
Eight-digit numeric key physically attached to the ZTP firewall used to register the ZTP firewall with the CSP via Panorama.
-
To-SW-Version:
Designates the target PAN-OS software version for the ZTP firewall in Panorama (
Panorama > Managed Devices > Summary
). If the firewall's current version is lower, it will attempt to upgrade.
Important:
Panorama can only manage firewalls running a PAN-OS release equal to or less than the PAN-OS version installed on Panorama.
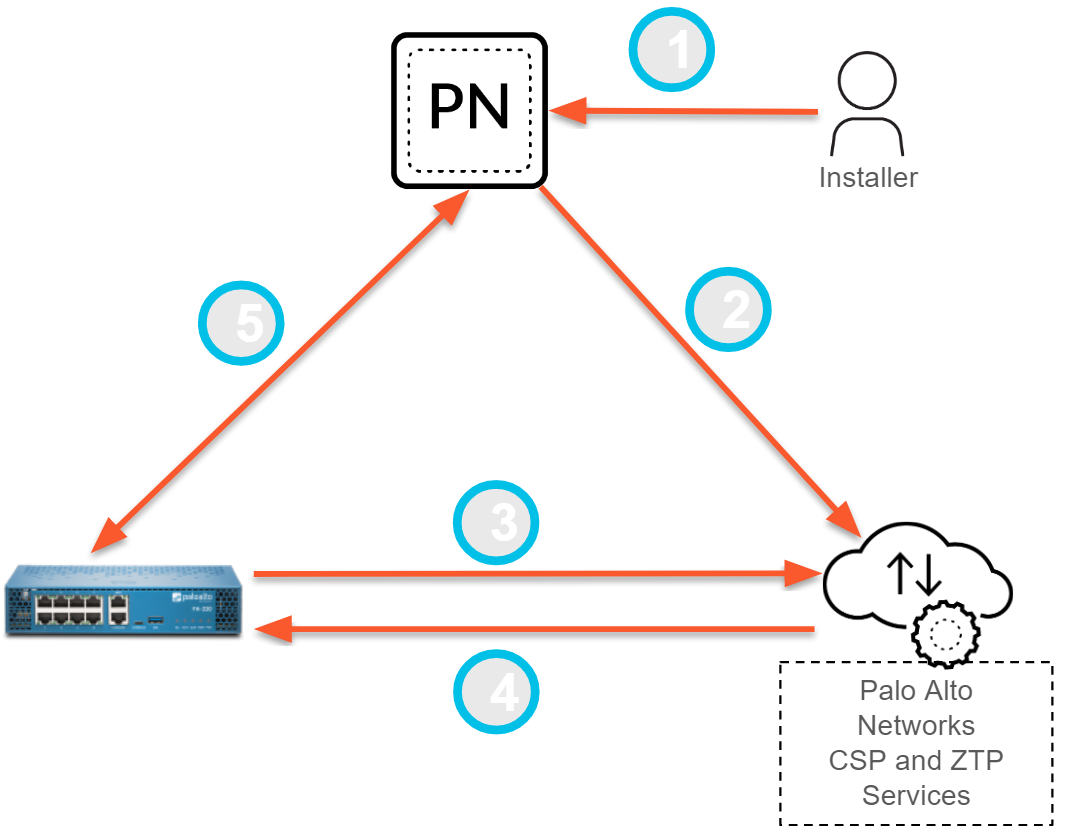
After you successfully install the ZTP plugin on Panorama and register Panorama with the ZTP service, the ZTP onboarding process continues as follows:
-
An Installer or IT administrator registers ZTP firewalls by adding them to Panorama using the firewall serial number and claim key.
-
Panorama registers the firewalls with the CSP. After the firewalls are successfully registered, the firewall is associated with the same ZTP tenant as the Panorama in the ZTP service. ZTP firewalls successfully registered are automatically added as managed devices on Panorama (
Panorama > Managed Devices
).
-
When the firewall connects to the Internet (via DHCP on eth1/1), it requests a device certificate from the CSP in order to connect to the ZTP service.
-
The ZTP service pushes the configured Panorama IP or FQDN to the ZTP firewalls.
-
The ZTP firewalls connect to Panorama, and the assigned device group and template configurations are pushed from Panorama to the ZTP firewalls.
ZTP Onboarding Sequence Diagram
sequenceDiagram
participant Installer
participant Panorama
participant CSP as Customer Support Portal
participant Firewall
participant ZTPService as ZTP Cloud Service
participant DHCP
Installer->>Panorama: Add Firewall SN & Claim Key
Panorama->>CSP: Register Firewall (via ZTP Plugin)
CSP-->>Panorama: Registration Status
Panorama->>Installer: Show Registration Status
Note over Firewall, DHCP: Firewall Powers On & Connects Eth1/1
Firewall->>DHCP: DHCP Request
DHCP-->>Firewall: Provide IP, Gateway, DNS
Firewall->>CSP: Request Device Certificate
CSP-->>Firewall: Provide Device Certificate
Firewall->>ZTPService: Connect using Device Cert (Identify Self)
ZTPService->>CSP: Verify Firewall Association
CSP-->>ZTPService: Confirm Association (to Panorama Tenant)
ZTPService-->>Firewall: Provide Panorama IP/FQDN
Firewall->>Panorama: Initiate Connection
Panorama-->>Firewall: Acknowledge Connection
Note over Panorama, Firewall: Firewall appears as 'Connected'
Panorama->>Firewall: Push Config (Device Group/Template)
Firewall-->>Panorama: Apply Config & Confirm Status
This diagram shows the sequence of interactions between the different components during the ZTP onboarding process for a new firewall.
Install the ZTP Plugin on Panorama
Simplify the on-boarding and management of ZTP firewalls by installing the ZTP plugin on your Panorama management server.
-
Install the Panorama Device Certificate (a prerequisite for many cloud service interactions).
-
Log in to the Panorama web interface as a superuser or Panorama administrator with access to plugins.
-
Navigate to
Panorama > Plugins
and search for the
ztp
plugin.
-
Download
and then
Install
the most recent version of the ZTP plugin.
Register Panorama with the ZTP Service for New Deployments
After installing the ZTP plugin, register Panorama with the ZTP service. For new deployments, this process can also automatically generate the initial device group and template needed for ZTP connectivity.
-
Install the Panorama Device Certificate.
-
Log in to the Palo Alto Networks Customer Support Portal (CSP).
-
Associate your Panorama with the ZTP Service on the CSP:
-
Select
Assets > ZTP Service
and click
Associate Panorama(s)
.
-
Select the serial number of the Panorama managing your ZTP firewalls.
-
(
HA only
) Select the serial number of the Panorama HA peer. (Max 2 Panoramas, must be HA pair).
-
Click
OK
.
-
Log in to the Panorama Web Interface.
-
Navigate to
Panorama > Zero Touch Provisioning > Setup
and edit the
General
ZTP settings.
-
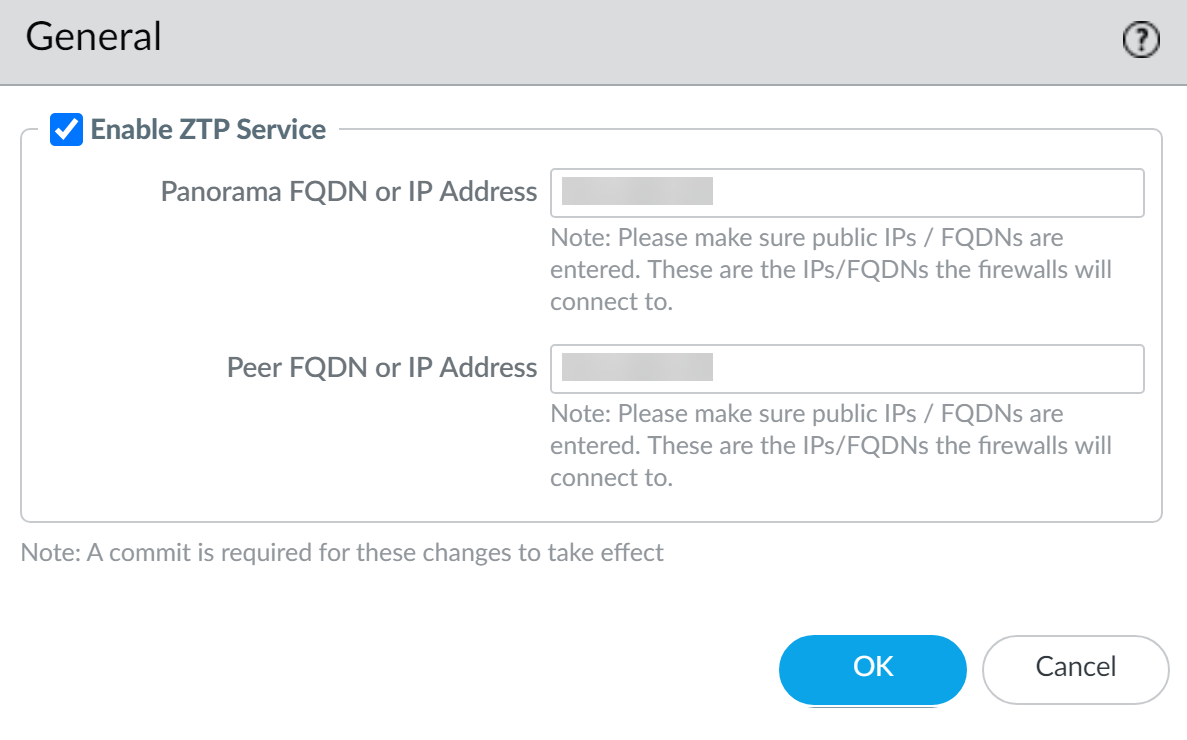
Register Panorama with the ZTP service:
-
Check
Enable ZTP Service
.
-
Enter the
Panorama FQDN or IP Address
. This is the address the ZTP service will provide to firewalls. Use the public-facing address.
Note: For firewalls on PAN-OS 10.1.4 and earlier, using the IP address is recommended to avoid potential disconnects after reboots/upgrades. If using FQDN, configure a static service route.
-
(
HA only
) Enter the
Peer FQDN or IP Address
.
-
Click
OK
.
-
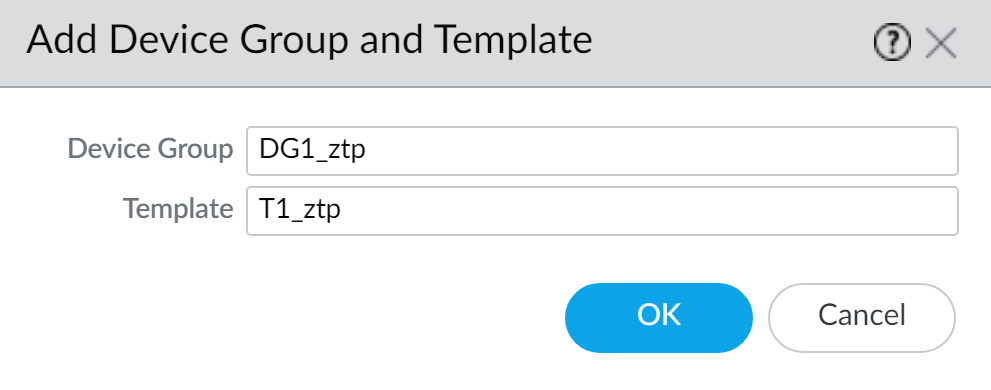
Create the default device group and template to automatically generate the required connectivity configuration:
-
Click
Add Device Group and Template
.
-
Enter a descriptive
Device Group
name (e.g.,
ZTP-Onboarding-DG
).
-
Enter a descriptive
Template
name (e.g.,
ZTP-Onboarding-Template
).
-
Click
OK
.
Warning:
Palo Alto Networks recommends giving the ZTP device group and template descriptive names. Do not modify the core ZTP connectivity settings (Panorama IP, eth1/1 interface, loopback.900, default zones/rules) within this auto-generated template/DG, as it can break future ZTP onboarding.
-
Modify the ZTP device group, templates, and template stack as needed for your policies, but preserve the core ZTP connectivity configuration generated in the previous step. Ensure the ZTP-specific template has priority if stacked with others.
Important:
Moving a ZTP-onboarded firewall to a different device group or template stack *after* onboarding using these auto-generated objects is generally not supported and can cause connectivity issues or config reverts.
-
Select
Commit
and
Commit to Panorama
.
-
Click
Sync to ZTP Service
(in
Panorama > Zero Touch Provisioning > Setup
) and verify that the Panorama Sync Status displays as
In Sync
.

-
Proceed to Add ZTP Firewalls to Panorama.
Register Panorama with the ZTP Service for Existing Deployments
If you already have a suitable device group and template stack configured for ZTP, you can register Panorama without automatically creating new ones.
-
Install the Panorama Device Certificate.
-
Log in to the Palo Alto Networks Customer Support Portal (CSP).
-
Associate your Panorama with the ZTP Service on the CSP (or modify association if needed):
-
Select
Assets > ZTP Service
and click
Associate Panorama(s)
or
Modify Association
.
-
Select the serial number(s) of the Panorama (and HA peer if applicable).
-
Click
OK
.
-
Log in to the Panorama Web Interface.
-
Navigate to
Panorama > Zero Touch Provisioning > Setup
and edit the
General
ZTP settings.
-
Register Panorama with the ZTP service:
-
Check
Enable ZTP Service
.
-
Enter the
Panorama FQDN or IP Address
(publicly reachable).
-
(
HA only
) Enter the
Peer FQDN or IP Address
.
-
Click
OK
.
-
Ensure your existing ZTP device group and template stack contain the necessary configuration for firewall connectivity (eth1/1 config, Panorama address, required security/NAT rules, etc.).
-
Select
Commit
and
Commit to Panorama
.
-
Click
Sync to ZTP Service
and verify the status is
In Sync
.

-
Proceed to Add ZTP Firewalls to Panorama, ensuring you assign them to your pre-existing ZTP device group and template stack.
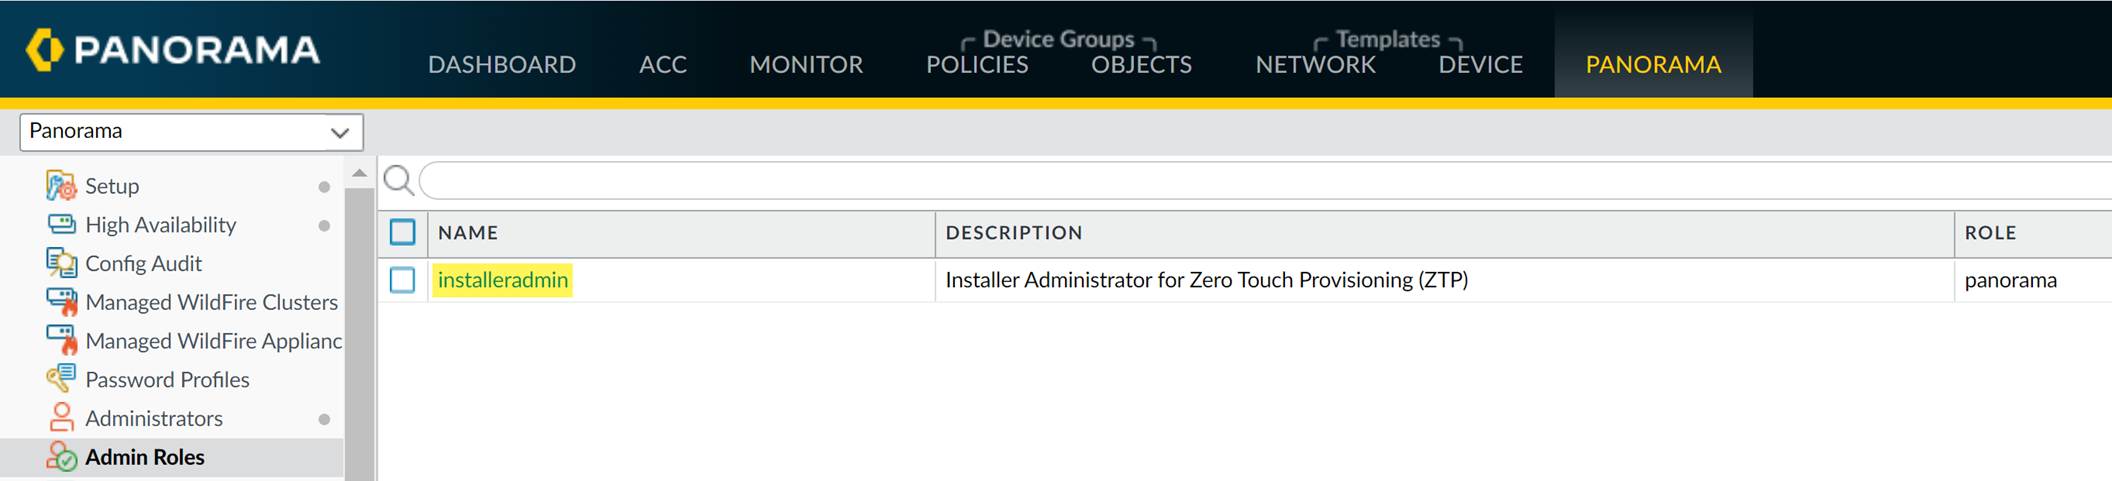
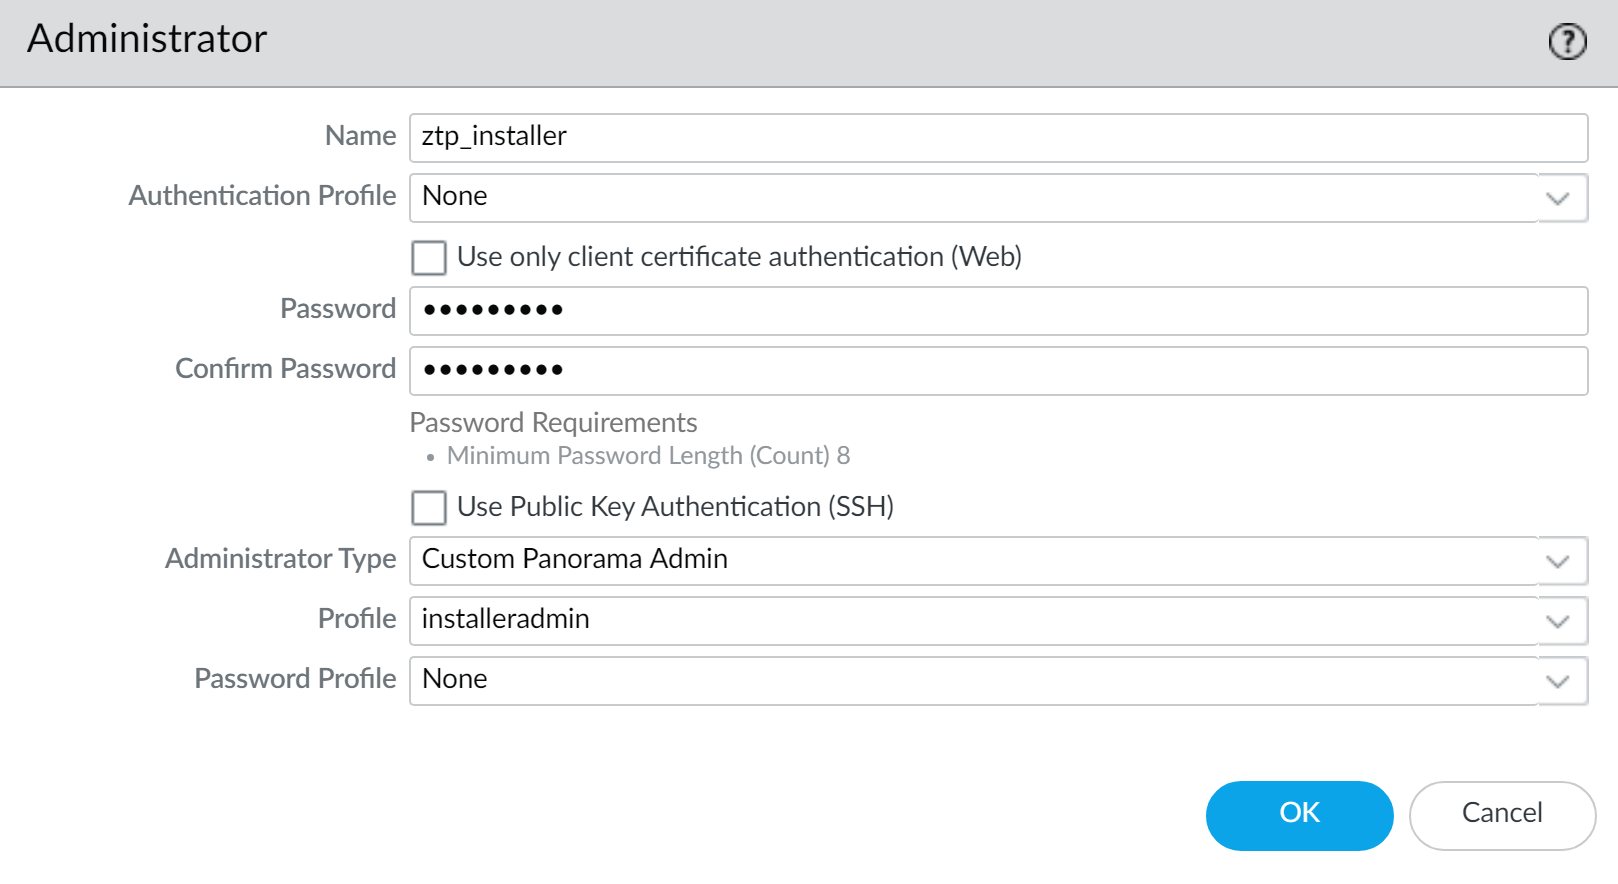
Configure the ZTP Installer Administrator Account
The ZTP installer admin user is an administrator account with limited privileges, designed for non-IT staff or installation contractors to register new ZTP firewalls on Panorama using the serial number and claim key.
-
Log in to the Panorama Web Interface.
-
Navigate to
Panorama > Admin Roles
and verify that the
installeradmin
admin role exists (it's automatically created when the ZTP plugin is installed).
-
Configure the ZTP installer administrator user:
-
Select
Panorama > Administrators
and click
Add
.
-
Enter a descriptive
Name
(e.g.,
ztp-installer
).
-
Enter and confirm a secure
Password
.
-
For the
Administrator Type
, select
Custom Panorama Admin
.
-
For the
Profile
, select
installeradmin
.
-
Click
OK
.
-
Select
Commit
and
Commit to Panorama
.
Add a ZTP Firewall to Panorama
Log in to Panorama as a Superuser, Panorama admin, or the ZTP installer admin to add a ZTP firewall. This involves entering the serial number and claim key, which registers the firewall with the CSP via Panorama and associates it with your ZTP service instance.
Prerequisites:
-
A DHCP server must be available on the network where the ZTP firewall's Eth1/1 interface will be connected.
-
The ZTP firewall's Eth1/1 interface must be connected to the network providing DHCP and internet access before powering on.
Important Notes:
-
Migrating a ZTP-onboarded firewall from one Panorama to another is not supported.
-
ZTP-onboarded firewalls do not support HA configuration. You must disable ZTP on the firewall first (using CLI or factory reset) before configuring HA.
-
Do not perform any local commits on the ZTP firewall before it is fully onboarded and connected to Panorama, as this will disable ZTP functionality.
-
Log in to the Panorama Web Interface (Superuser, Admin, or Installer role).
-
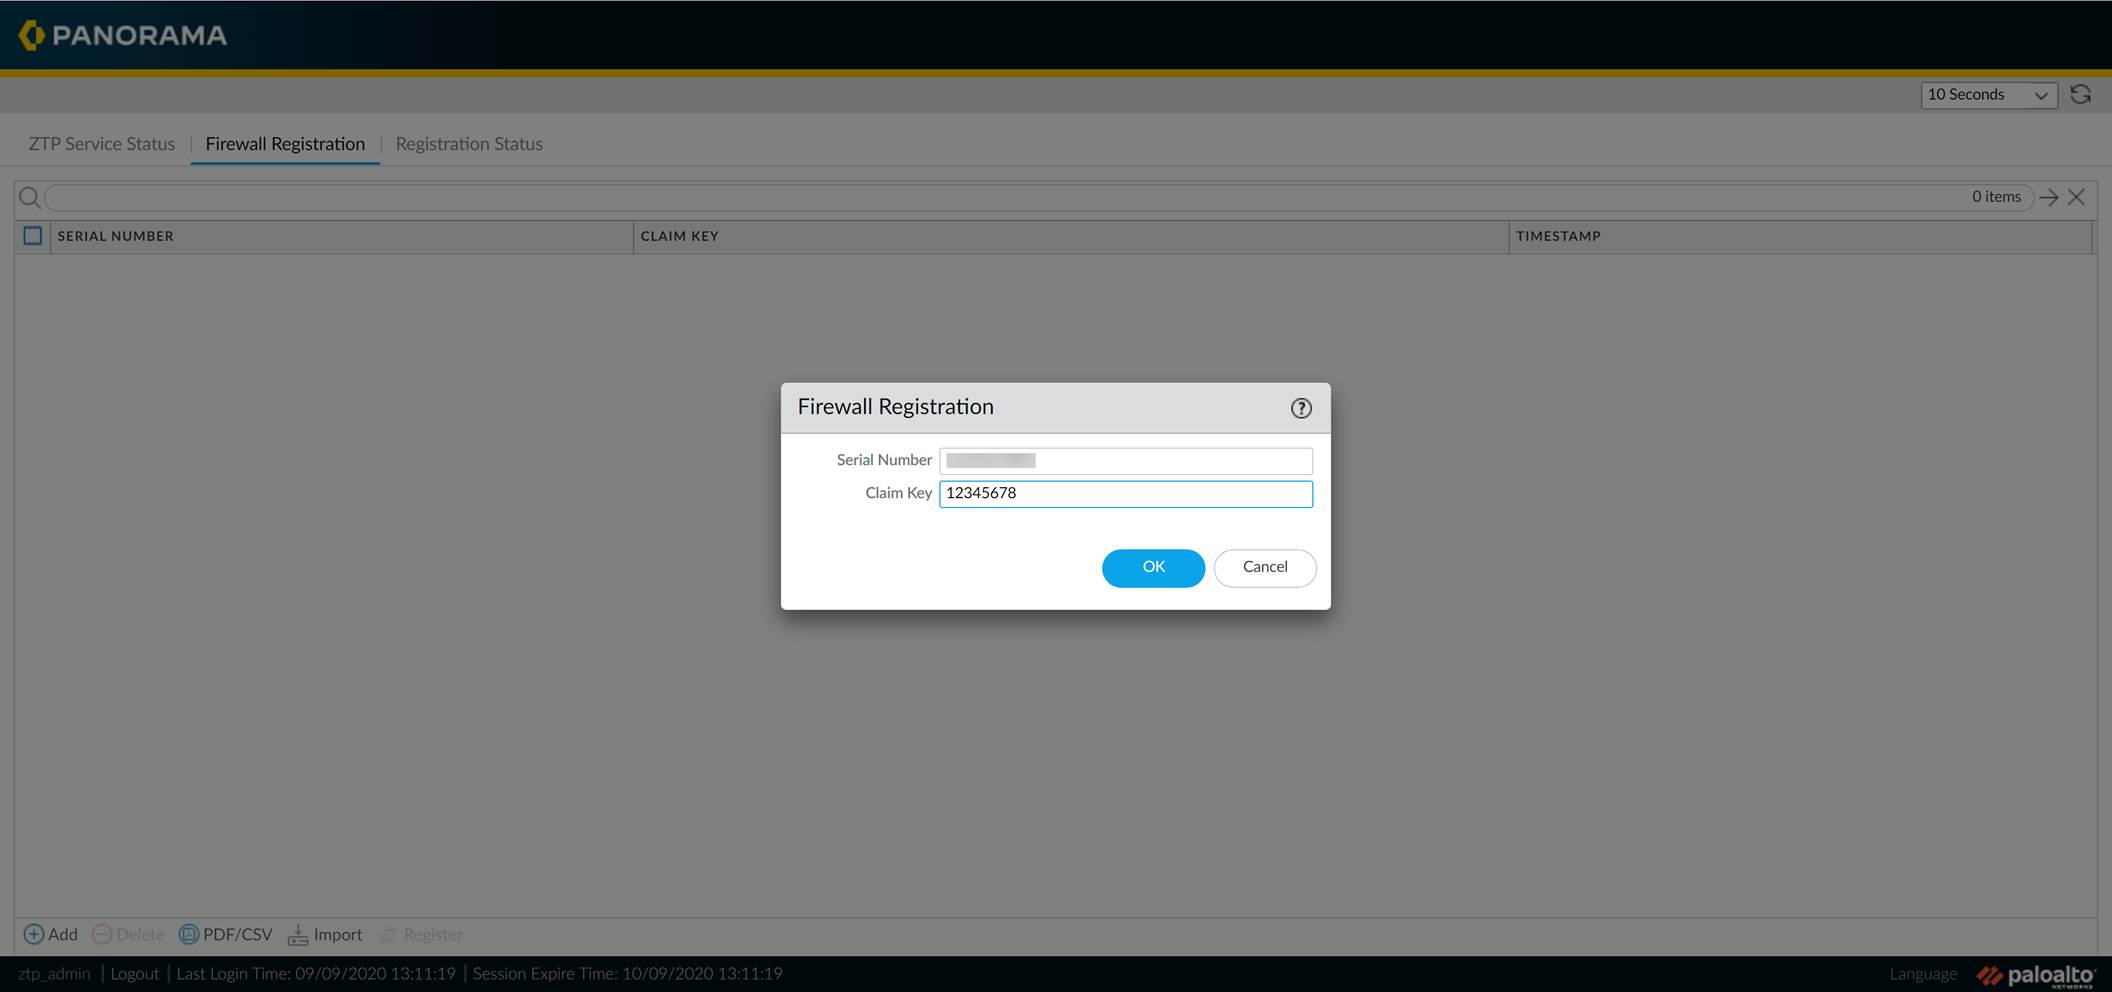
Add the ZTP firewall details:
-
Navigate to
Panorama > Zero Touch Provisioning > Firewall Registration
(or just
Firewall Registration
if logged in as installer).
-
Click
Add
.
-
Enter the
Serial Number
of the ZTP firewall.
-
Enter the
Claim Key
(8-digit numeric key found on the firewall label).
-
Click
OK
.
-
Register the ZTP firewall with the CSP via Panorama:
-
Select the newly added ZTP firewall in the list.
-
Click
Register
.
-
When prompted, click
Yes
to confirm.
-
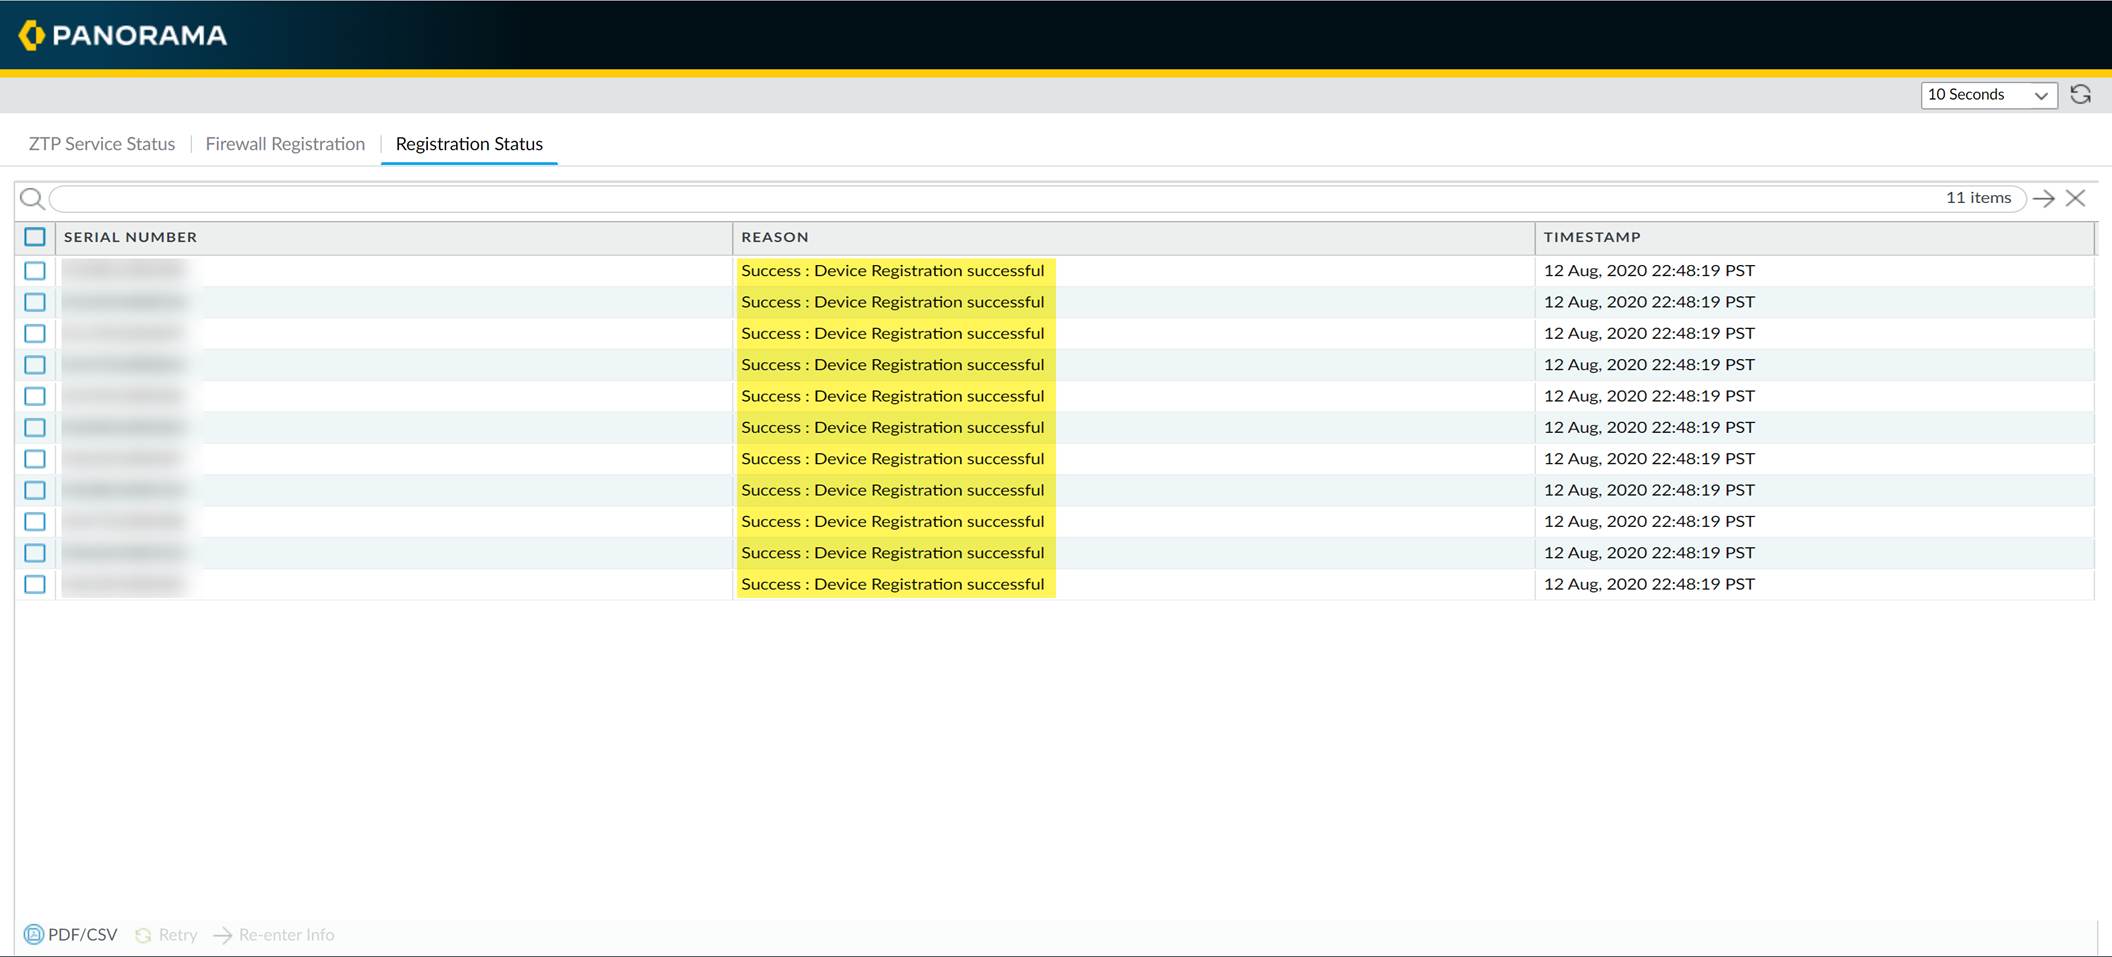
Verify successful registration:
-
Click
Registration Status
and verify the status shows success for the firewall.
-
(Log in as Superuser/Admin) Navigate to
Panorama > Managed Devices > Summary
and verify the ZTP firewall appears in the list. Check the
To SW Version
column and adjust if necessary to prevent unintended upgrades/downgrades (ZTP requires PAN-OS 10.0.1+, and target version must be <= Panorama version).
Note: Upgrading ZTP firewalls from PAN-OS 10.2 to 11.1+ using the 'To SW Version' field may cause issues due to intermediate base versions. Manual upgrades are recommended after initial onboarding in such cases.
-
Assign the ZTP firewall to the appropriate Device Group and Template Stack:
-
(Log in as Superuser/Admin) Go to
Panorama > Device Groups
, select the ZTP device group created earlier, and add the serial number of the new firewall.
-
Go to
Panorama > Templates
, select the ZTP template stack created earlier, and add the serial number of the new firewall.
This step is crucial for the firewall to show as 'Connected' and receive its configuration push.
-
Complete the firewall setup:
-
Log in locally to the firewall web interface and activate the Support license.
-
Log back into Panorama and activate any additional licenses for the firewall (
Panorama > Managed Licenses
or similar path).
-
Install the latest dynamic content updates on the managed firewall via Panorama (
Panorama > Device Deployment > Dynamic Updates
).
-
(Optional) Upgrade the firewall PAN-OS version via Panorama if needed.
Import Multiple ZTP Firewalls to Panorama
You can add multiple ZTP firewalls simultaneously by importing a CSV file containing their serial numbers and claim keys.
Prerequisites and Notes:
Same as for adding a single firewall (DHCP required, eth1/1 connected, no local commits, no HA support with ZTP enabled, migration not supported).
-
Gather the serial numbers and claim keys for all ZTP firewalls.
-
Create a CSV file. The first column must contain the serial numbers, and the second column must contain the corresponding claim keys (no header row needed).
-
Import the ZTP firewalls into Panorama:
-
Log in to the Panorama Web Interface (Superuser, Admin, or Installer role).
-
Navigate to
Panorama > Zero Touch Provisioning > Firewall Registration
(or just
Firewall Registration
).
-
Click
Import
.
-
Browse
and select the CSV file you created, then click
OK
.
-
Register the imported ZTP firewalls:
-
Select all the newly imported firewalls in the list.
-
Click
Register
.
-
When prompted, click
Yes
to confirm.
-
Verify successful registration:
-
Click
Registration Status
and check the status for all imported firewalls.
-
(Log in as Superuser/Admin) Navigate to
Panorama > Managed Devices > Summary
and verify all ZTP firewalls appear. Check and adjust
To SW Version
if needed.
-
Assign the ZTP firewalls to the Device Group and Template Stack:
-
(Log in as Superuser/Admin) Go to
Panorama > Device Groups
, select the ZTP device group, and add the serial numbers of the new firewalls.
-
Go to
Panorama > Templates
, select the ZTP template stack, and add the serial numbers of the new firewalls.
-
Complete the setup for the newly onboarded firewalls:
-
Log in locally to
each
firewall web interface and activate its Support license.
-
Log back into Panorama and activate any additional licenses for the firewalls.
-
Install the latest dynamic content updates on the managed firewalls via Panorama.
-
(Optional) Upgrade the firewalls' PAN-OS versions via Panorama if needed.
Use the CLI for ZTP Tasks
Several CLI commands are available on both the firewall and Panorama for ZTP-related tasks and status checks.
Firewall CLI Commands
|
Task
|
Command
|
|
Display connection status to ZTP service.
|
show system ztp status
|
|
Display connection status to Panorama.
|
show panorama status
|
|
Display ZTP model & system info.
|
show system info
|
Enable ZTP state machine (PA-5400, PA-400 series, PA-1400, PA-3400 only).
Note: Initiates soft factory reset.
|
set system ztp enable
|
Disable ZTP state machine (PA-220-ZTP, PA-8xx-ZTP, PA-32xx-ZTP).
Note: Initiates soft factory reset. Cannot be re-enabled via CLI; requires full factory reset.
|
request disable-ztp
|
Disable ZTP state machine (PA-5400, PA-400 series, PA-1400, PA-3400 only).
Note: Initiates soft factory reset.
|
set system ztp disable
|
Panorama CLI Commands (via ZTP Plugin)
|
Task
|
Command
|
|
Create ZTP device group & template.
|
        request plugins ztp create dgroup-template device-group

         template
|
|
Add a single ZTP firewall for registration.
|
        request plugins ztp firewall-add

         claim-key
|
|
Modify details of an added firewall (before registration).
|
        request plugins ztp firewall-add-modify firewall

         claim-key

          new-serial
|
|
Delete a firewall from the registration list.
|
request plugins ztp firewall-delete firewall
|
|
Re-enter info for a firewall that failed registration.
|
        request plugins ztp firewall-re-enter-info firewall

         claim-key
|
|
Register Panorama with ZTP service (part of initial setup).
|
request plugins ztp panorama-registration
|
|
Register a specific firewall with ZTP service.
|
        request plugins ztp firewall-registration firewall

         claim-key
|
|
Retry registration for a firewall that failed.
|
        request plugins ztp firewall-register-retry firewall

         claim-key
|
|
Import multiple firewalls from CSV.
|
request plugins ztp ztp-add-import import-path
|
|
Retrieve list of registered firewalls from ZTP service.
|
request plugins ztp ztp-service-info
|
|
Show list of firewalls added but pending registration.
|
show plugins ztp device-add-list
|
|
Show registration status of firewalls.
|
show plugins ztp device-reg-status
|
|
Show ZTP service sync status.
|
request plugins ztp ztp-sync-status
|
|
Tail management server log (for troubleshooting ZTP connectivity).
|
tail follow yes mp-log ms.log
|
Uninstall the ZTP Plugin
Follow these steps to remove the ZTP configuration and uninstall the plugin from Panorama. Repeat on HA peers if applicable.
-
Log in to the Panorama Web Interface.
-
Delete the ZTP installer administrator account:
-
Go to
Panorama > Administrators
, select the ZTP installer account, and click
Delete
.
-
Go to
Panorama > Admin Roles
, select the
installeradmin
role, and click
Delete
.
-
Commit to Panorama
.
-
Uninstall the ZTP plugin:
-
Go to
Panorama > Plugins
.
-
Find the ZTP plugin and click
Remove Config
in the Actions column. Confirm when prompted.
-
Commit to Panorama
.
-
Find the ZTP plugin again and click
Uninstall
. Confirm when prompted.