Zone Defense
Zone Protection profiles defend zones against flood, reconnaissance, packet-based, and non-IP-protocol-based attacks. DoS Protection profiles used in DoS Protection policy rules defend specific, critical devices against targeted flood and resource-based attacks. A DoS attack overloads the network or targeted critical systems with large amounts of unwanted traffic an attempt to disrupt network services.
Plan to defend your network against different types of DoS attacks:
- Application-Based Attacks —Target weaknesses in a particular application and try to exhaust its resources so legitimate users can’t use it. An example of this is the Slowloris attack.
- Protocol-Based Attacks —Also known as state-exhaustion attacks, these attacks target protocol weaknesses. A common example is a SYN flood attack .
- Volumetric Attacks —High-volume attacks that attempt to overwhelm the available network resources, especially bandwidth, and bring down the target to prevent legitimate users from accessing those resources. An example of this is a UDP flood attack .
There are no default Zone Protection profiles or DoS Protection profiles and DoS Protection policy rules. Configure and apply zone protection based on each zone’s traffic characteristics and configure DoS protection based on the individual critical systems you want to protect in each zone.
Zone Defense Tools
Effective defense against DoS attacks requires a layered approach. The first layer of defense should be a dedicated, high-volume DDoS protection device at the internet-facing network perimeter and a perimeter router, switch, or other hardware-based packet drop device with appropriate access control lists (ACLs) to defend against volumetric attacks that the session-based firewall isn’t designed to handle. The firewall adds more granular layers of DoS attack defense and also visibility into application traffic that dedicated DDoS devices don’t provide.
Palo Alto Networks firewalls provide four complementary tools to layer in DoS protection for your network zones and critical devices:
- Zone Protection profiles defend the ingress zone edge against IP flood attacks, reconnaissance port scans and host sweeps, IP packet-based attacks, and non-IP protocol attacks. The ingress zone is where traffic enters the firewall in the direction of flow from the client to the server (c2s), where the client is the originator of the flow and the server is the responder. Zone Protection profiles provide a second layer of broad defense against DoS attacks, based on the aggregate traffic entering the zone, by limiting the new connections-per-second (CPS) to the zone. Zone Protection profiles don’t take individual devices (IP addresses) into account because the profiles apply to the aggregate traffic entering the zone.
Zone protection profiles defend the network as a session is formed, before the firewall performs DoS Protection policy and Security policy rule lookups, and consume fewer CPU cycles than a DoS Protection policy or Security policy rule lookup. If a Zone Protection profile denies traffic, the firewall doesn’t spend CPU cycles on policy rule lookups.
Apply Zone Protection profiles to every zone, both internet-facing and internal.
- DoS Protection profiles and policy rules defend specific individual endpoints and resources against flood attacks, especially high-value targets that users access from the internet. While a Zone Protection profile defends the zone from flood attacks, a DoS Protection policy rule with an appropriate DoS Protection profile defends critical individual systems in a zone from targeted flood attacks, providing a granular third layer of defense against DoS attacks.
Because the intent of DoS protection is to defend critical devices and because it consumes resources, DoS protection defends only the devices you specify in a DoS Protection policy rule. No other devices are protected.
DoS Protection profiles set flood protection thresholds (new CPS limits) for individual devices or groups of devices, resource protection thresholds (session limits for specified endpoints and resources), and whether the profile applies to aggregate or classified traffic. DoS Protection policy rules specify match criteria (source, destination, service ports), the action to take when traffic matches the rule, and the aggregate and classified DoS Protection profiles associated with each rule.
Aggregate DoS Protection policy rules apply the CPS thresholds defined in an aggregate DoS Protection profile to the combined traffic of all the devices that meet the DoS Protection policy rule match criteria. For example, if you configure the aggregate DoS Protection profile to limit the CPS rate to 20,000, the 20,000 CPS limit applies to the aggregate number of connections for the entire group. In this case, one device could receive the majority of the allowed connections.
Classified DoS Protection policy rules apply the CPS thresholds defined in a classified DoS Protection profile to each individual device that matches the policy rule. For example, if you configure the classified DoS Protection profile to limit the CPS rate to 4,000, then no device in the group can accept more than 4,000 CPS. A DoS Protection policy can have one aggregate profile and one classified profile.
Classified profiles can classify connections by source IP, destination IP, or both. For internet-facing zones, classify by destination IP only because the firewall can’t scale to hold the internet routing table.
Apply DoS Protection only to critical devices, especially popular attack targets that users access from the internet, such as web servers and database servers.
- For existing sessions, Packet Buffer Protection protects the firewall (and therefore the zone) against single-session DoS attacks that attempt to overwhelm the firewall’s packet buffer, using thresholds and timers to mitigate abusive sessions. You configure Packet Buffer Protection settings globally and apply them per zone.
- Security Policy rules affect both the ingress and egress flows of a session. To establish a session, incoming traffic must match an existing Security policy rule. If there is no match, the firewall discards the packet. A Security policy allows or denies traffic between zones (interzone) and within zones (intrazone) using criteria including zones, IP addresses, users, applications, services, and URL categories.
Apply the best practice Vulnerability Protection profile to each Security policy rule to help defend against DoS attacks.
The default Security policy rules don’t permit traffic to travel between zones, so you need to configure a Security policy rule if you want to allow interzone traffic. All intrazone traffic is allowed by default. You can configure Security policy rules to match and control intrazone, interzone, or universal (intrazone and interzone) traffic.
Zone Protection profiles, DoS Protection profiles and policy rules, and Security policy rules only affect dataplane traffic on the firewall. Traffic originating on the firewall management interface does not cross the dataplane, so the firewall does not match management traffic against these profiles or policy rules.
- You can also search the Palo Alto Networks Threat Vault (requires a valid support account and login) for threats by hash, CVE, signature ID, domain name, URL, or IP address.
How Do the Zone Defense Tools Work?
When a packet arrives at the firewall, the firewall attempts to match the packet to an existing session, based on the ingress zone, egress zone, source IP address, destination IP address, protocol, and application derived from the packet header. If the firewall finds a match, then the packet uses the Security policy rules that already control the session. If the packet doesn’t match an existing session, the firewall uses Zone Protection profiles, DoS Protection profiles and policy rules, and Security policy rules to determine whether to establish a session or discard the packet, and the level of access the packet receives.
After traffic passes through your dedicated DDoS device at the internet-facing network edge, the first protection the firewall applies is the broad defense of the Zone Protection profile, if one is attached to the zone. The firewall determines the zone from the interface on which the packet arrives (each interface is assigned to only one zone and all interfaces that carry traffic must belong to a zone). If the Zone Protection profile denies the packet, the firewall discards the packet and saves resources by not needing to look up the DoS Protection policy or Security policy. The firewall applies Zone Protection profiles only to new sessions (packets that do not match an existing session). After the firewall establishes a session, the firewall bypasses the Zone Protection profile lookup for succeeding packets in that session.
If the Zone Protection profile doesn’t drop the packet, the second protection the firewall applies is a DoS Protection policy rule. If a Zone Protection profile allows a packet based on the total aggregate amount of traffic going to the zone, a DoS Protection policy rule may deny the packet if it is going to a particular destination or coming from a particular source that has exceeded the flood protection or resource protection settings in the rule’s DoS Protection profile. If the packet matches a DoS Protection policy rule, the firewall applies the rule to the packet. If the rule denies access, the firewall discards the packet and doesn’t perform a Security policy lookup. If the rule allows access, the firewall performs a Security policy lookup. Like the Zone Protection profile, the firewall enforces DoS Protection policy only on new sessions.
The third protection the firewall applies is a Security policy lookup, which happens only if the Zone Protection profile and DoS Protection policy rules allow the packet. If the firewall finds no Security policy rule match for the packet, the firewall discards the packet. If the firewall finds a matching Security policy rule, the firewall applies the rule to the packet. The firewall enforces the Security policy rule on traffic in both directions (c2s and s2c) for the life of the session. Apply the best practice Vulnerability Protection profile to all Security policy rules to help defend against DoS attacks.
The fourth protection the firewall applies is packet buffer protection, which you apply globally to protect the device and can also apply individually to zones to prevent single-session DoS attacks that attempt to overwhelm the firewall’s packet buffer. For global protection, the firewall used Random Early Drop (RED) to drop packets (not sessions) when the level of traffic crosses protection thresholds. For per-zone protection, the firewall blocks the source IP address if it violates the packet buffer thresholds. Unlike zone and DoS protection, packet buffer protection applies to existing sessions.
Firewall Placement for DoS Protection
The firewall is a session-based device that isn’t designed to scale to millions of connections-per-second (CPS) to defend against large volumetric DoS attacks. The firewall treats each unique flow (based on ingress and egress zone, source and destination IP, protocol, and application) as a session, spends CPU cycles on packet inspection at the port and the IP level to provide visibility into application traffic, and must count each session for the flood threshold counters, so firewall placement is critical to avoid flooding the firewall.
For the best DoS protection, place firewalls as close to the resources you’re protecting as possible. This reduces the number of sessions the firewall needs to handle and therefore the amount of firewall resources required to provide DoS protection.
At the internet-facing perimeter, do not place firewalls you use for DoS protection or zone protection in front of dedicated DDoS devices and perimeter routers and switches. Make those high-volume devices your first line of DoS defense to mitigate volumetric flood attacks. For zone and DoS protection at the perimeter, use high-capacity firewalls and place them behind the high-volume devices. As a rule, the closer a firewall is to the perimeter, the higher capacity it must be to handle the volume of traffic.
The way you segment your network into zones can help mitigate internal DoS attacks. Smaller zones provide greater visibility into traffic and prevent lateral movement of malware better because more traffic must cross zones, and to allow interzonal traffic requires you to create a specific Security policy rule (all intrazonal traffic is allowed by default). Consider revisiting your segmentation approach if your network is relatively unsegmented.
Baseline CPS Measurements for Setting Flood Thresholds
Flood protection thresholds determine the number of new connections-per-second (CPS) to allow for a zone (Zone Protection profile), for a group of devices in a zone (aggregate DoS Protection policy), or for individual devices in a zone (classified DoS Protection policy), when to throttle new connections to begin mitigating a potential flood attack, and when to drop all new connections. The default Zone Protection profile and DoS Protection profile flood protection thresholds aren’t appropriate for most networks because each network is unique. You need to understand the aggregate normal and peak CPS for each zone to set effective Zone Protection profile thresholds, and for the individual critical systems you want to defend to set effective DoS Protection profile thresholds that don’t inadvertently set thresholds too high and allow flood attacks or set thresholds too low and throttle traffic.
CPS Measurements to Take
Measure average and peak CPS traffic over the course of at least five business days or until you’re confident that the measurements reflect the network’s typical traffic patterns; the longer measurement period, the more accurate the measurements. Take into account special events, quarterly events, and annual events that may spike the number of CPS you need to support. You may need to adjust Zone Protection profiles and schedule adjusted DoS Protection policy rules to accommodate these types of events if your firewalls have the capacity to handle extra traffic. Take the following baseline measurements:
- For Zone Protection profiles, measure the average and peak CPS ingressing each zone.
- For aggregate DoS Protection profiles, measure the combined average and peak CPS for each group of devices you want to protect.
- For classified DoS Protection profiles, measure the average and peak CPS of the individual devices you want to protect.
Also understand the capacity of your firewalls and how other resource-consuming features such as decryption affect the number of connections each firewall can control. As a general rule, the closer a firewall is to the perimeter, the greater its capacity needs to be because it handles more traffic. The datasheet for each firewall model includes the total new sessions per second (CPS) the firewall supports and the Firewall Comparison Tool enables you to compare the CPS (and other metrics) of different firewall models.
How to Measure CPS
There are many ways to measure CPS:
- For Zone Protection profile thresholds , if you run PAN-OS 10.0 or later, the best way to measure CPS is to use the Zone Protection profile Threshold Recommendation alerts from the AIOps cloud service, which use system telemetry to provide accurate estimates of average and average peak CPS values to use in Zone Protection profiles. You can sign up firewalls and Panorama for the service.
When you upgrade to PAN-OS 10.2.1 or later, you can install the AIOps plugin for Panorama to proactively enforce security checks on configurations before you push them to managed firewalls.
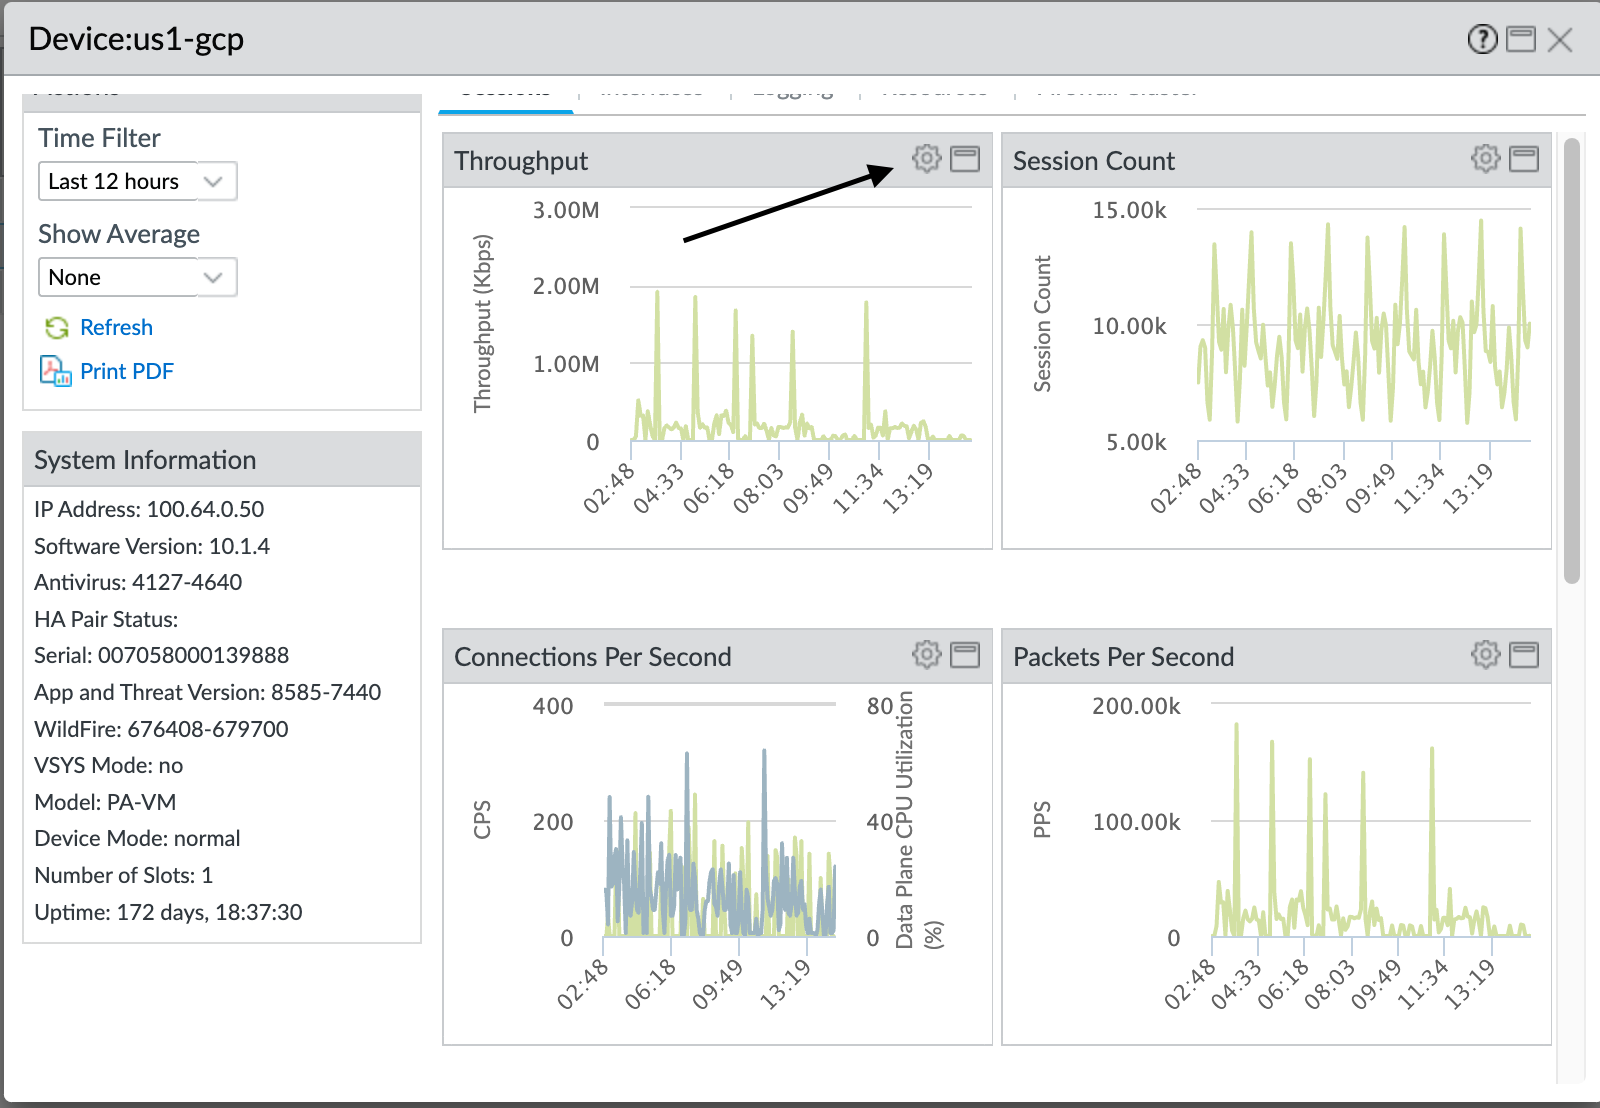
- If you use Panorama to manage your firewalls, use Device Monitoring to measure CPS coming into a firewall. Select a device to see measurements that help you understand the CPS for that device over a configurable time frame to help you understand the capacity of the firewall. Device Monitoring can also show you a 90-day trend line of CPU average and peak use to help you understand the typical available capacity of each firewall. To see how CPS impacts firewall resources, you can overlay CPS on the same timeline with metrics such as CPU utilization, packet buffers, or packet descriptors:
- PanoramaManaged DevicesHealthAll Devices .
- Click a Device Name to select a device and to view and filter device information.
- Select the gear icon (
![]()
) to access Device Monitor annotations, overlay, and comparison actions.
You can select tabs (not shown) at the top of the dialog box to see more metrics. The following illustrations show the Sessions tab. The other tabs are Interfaces , Logging , Resources , and Firewall Cluster . Each tab displays different default metrics and for each default metric, you can overlay other metrics, compare the selected device to other devices, including device slots and data planes, and annotate the metric.
The preceding screen shows the CPS data over the last 12 hours ( Time Filter ) overlaid with Data Plane CPU Utilization. The next step shows you how to overlay metrics on the default metrics in each tab.
- Click the gear icon to see the actions you can take for overlaying other metrics on the default metrics. You can overlay one metric at a time on each default metric over a particular time frame:
- Select Overlay to see the overlay options and then select the Metric drop-down.
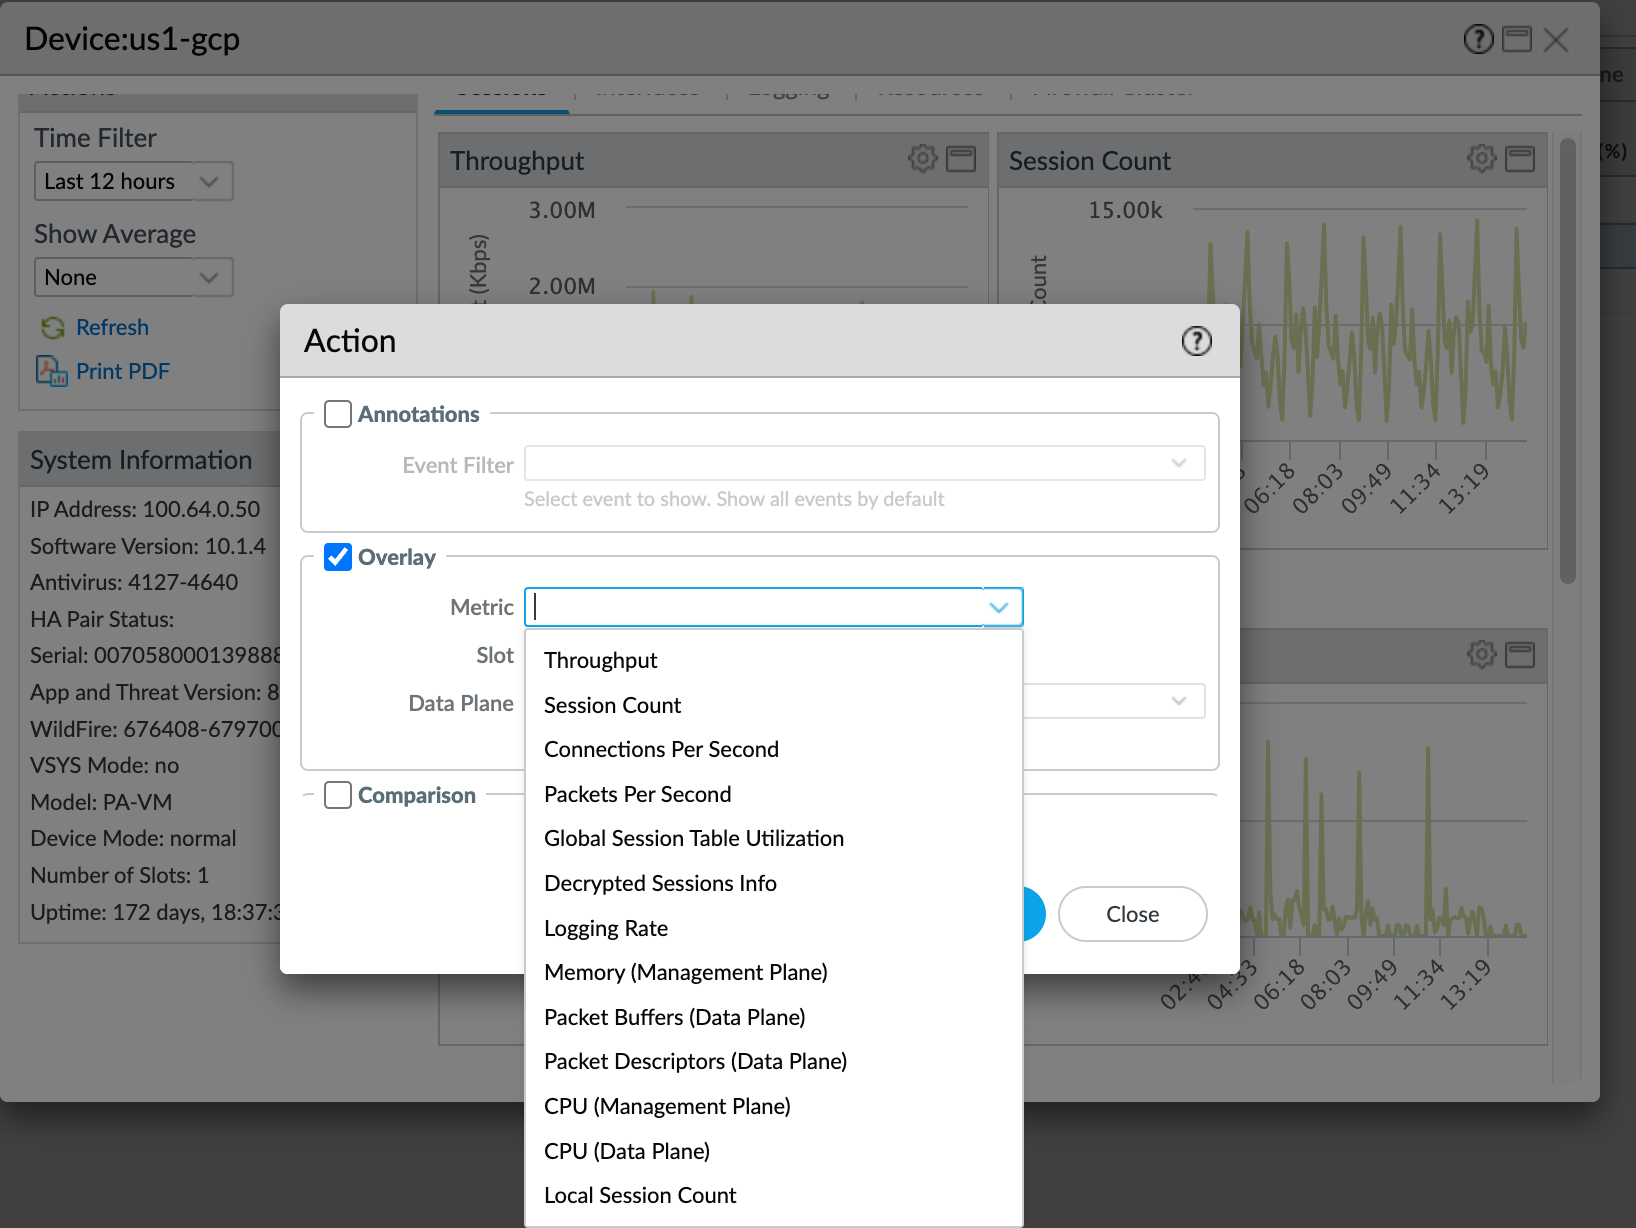
- You can overlay any of these metrics on the default metrics over the same time period to see how the state of one metric affects another metric.
For example, on the Sessions tab, you can overlay Data Plane Packet Buffers or Data Plane Packet Descriptors to see how high CPS, Throughput, Session Count, or Packets Per Second (PPS) conditions affect the packet buffers or packet descriptors.
Another example on the Sessions tab is to overlay CPS Throughput or PPS with the Data Plane CPU and Packet Buffers metrics to see how traffic spikes affect the CPU and buffers.
Another example is to select the Resources tab and then overlay Data Plane CPU over Packet Buffers to see how packet buffer utilization affects the CPU.
Overlays help you see trends and correlations such as whether high buffer utilization is associated with high CPS or PPS rates, and give you an idea of how high CPS and PPS can be before they affect the CPU, packet buffers, or packet descriptors.
- Click OK to see the data overlay and use the information to understand device resource behavior under different CPS loads and conditions.
- To gather CPS data over time to help with setting Zone Protection profile thresholds , if you use an SNMP server, you can use your own management tools to poll SNMP MIBs. However, it is important to understand that the CPS measurements in the MIBs show twice the actual CPS value (for example, if the true CPS measurement is 10,000, the MIBs show 20,000 as the value; this happens because the MIBs count the C2S and S2C session segments separately instead of as a single session). You can still see trends from the MIBs and you can divide the CPS values by two to derive the true values. The SNMP MIB OIDs are: PanZoneActiveTcpCps, PanZoneActiveUdpCps, and PanZoneOtherIpCps. Because the firewall only takes measurements and updates the SNMP server every 10 seconds, poll every 10 seconds.
- Run the operational CLI command show session info .
You can also see CPS values using the operational CLI command show counter interface , but this command displays two times the actual CPS value because it counts the C2S and S2C session segments separately instead of as a single session, so divide the CPS value by two to derive the real CPS value.
- DoS Protection profiles can protect servers from DoS attacks and can also prevent misconfigured or compromised servers from attacking your network. When the DoS Protection policy rule specifies a server as the destination, you’re protecting it from DoS attacks. When a rule specifies a server as the source, you’re protecting your network from inadvertent or malicious attacks on your network from that server.
To measure the CPS for an individual device or to see which devices have the highest CPS rates so that you can set DoS Protection profile thresholds, use the Application Command Center (ACC). The ACC shows you server session rates that enable you to calculate the average CPS for individual devices (for classified DoS Protection policy rules) and for groups of devices (aggregate DoS Protection policy rules). Take measurements over at least a week; longer time periods provide a larger sample size and therefore more representative measurements. Use the measurements to understand the normal and peak number of connections you expect the server to receive and base your threshold settings on those measurements. To find the devices that have the highest CPS rates over a particular time period:
- Select ACC .
- Set the Time period over which to look at session traffic.
- On Network Activity , go to the Source IP Activity widget and/or the Destination IP Activity widget and select sessions ( bytes is the default). You can look at source IP activity and destination IP activity at the same time to see how many sessions the device generates (source IP) and how many sessions the device receives (destination IP).
- In the widget’s source address table, click SESSIONS to show the source IP addresses with the highest session counts during the selected Time .
- To determine the CPS value for a server during the selected Time , divide the number of sessions by the number of seconds in the Time . For example, if the Time is set to Last Hour , then divide the number of sessions by 3,600 seconds to derive the CPS value.
The ACC gives you knowledge of average CPS values over time. You can check the number of sessions over the last week, month, or whatever time period makes sense for your environment to understand the session load for a device. For example, to see the session activity over the last week, set the Time to Last 7 Days and the source and destination IP widgets to sessions :
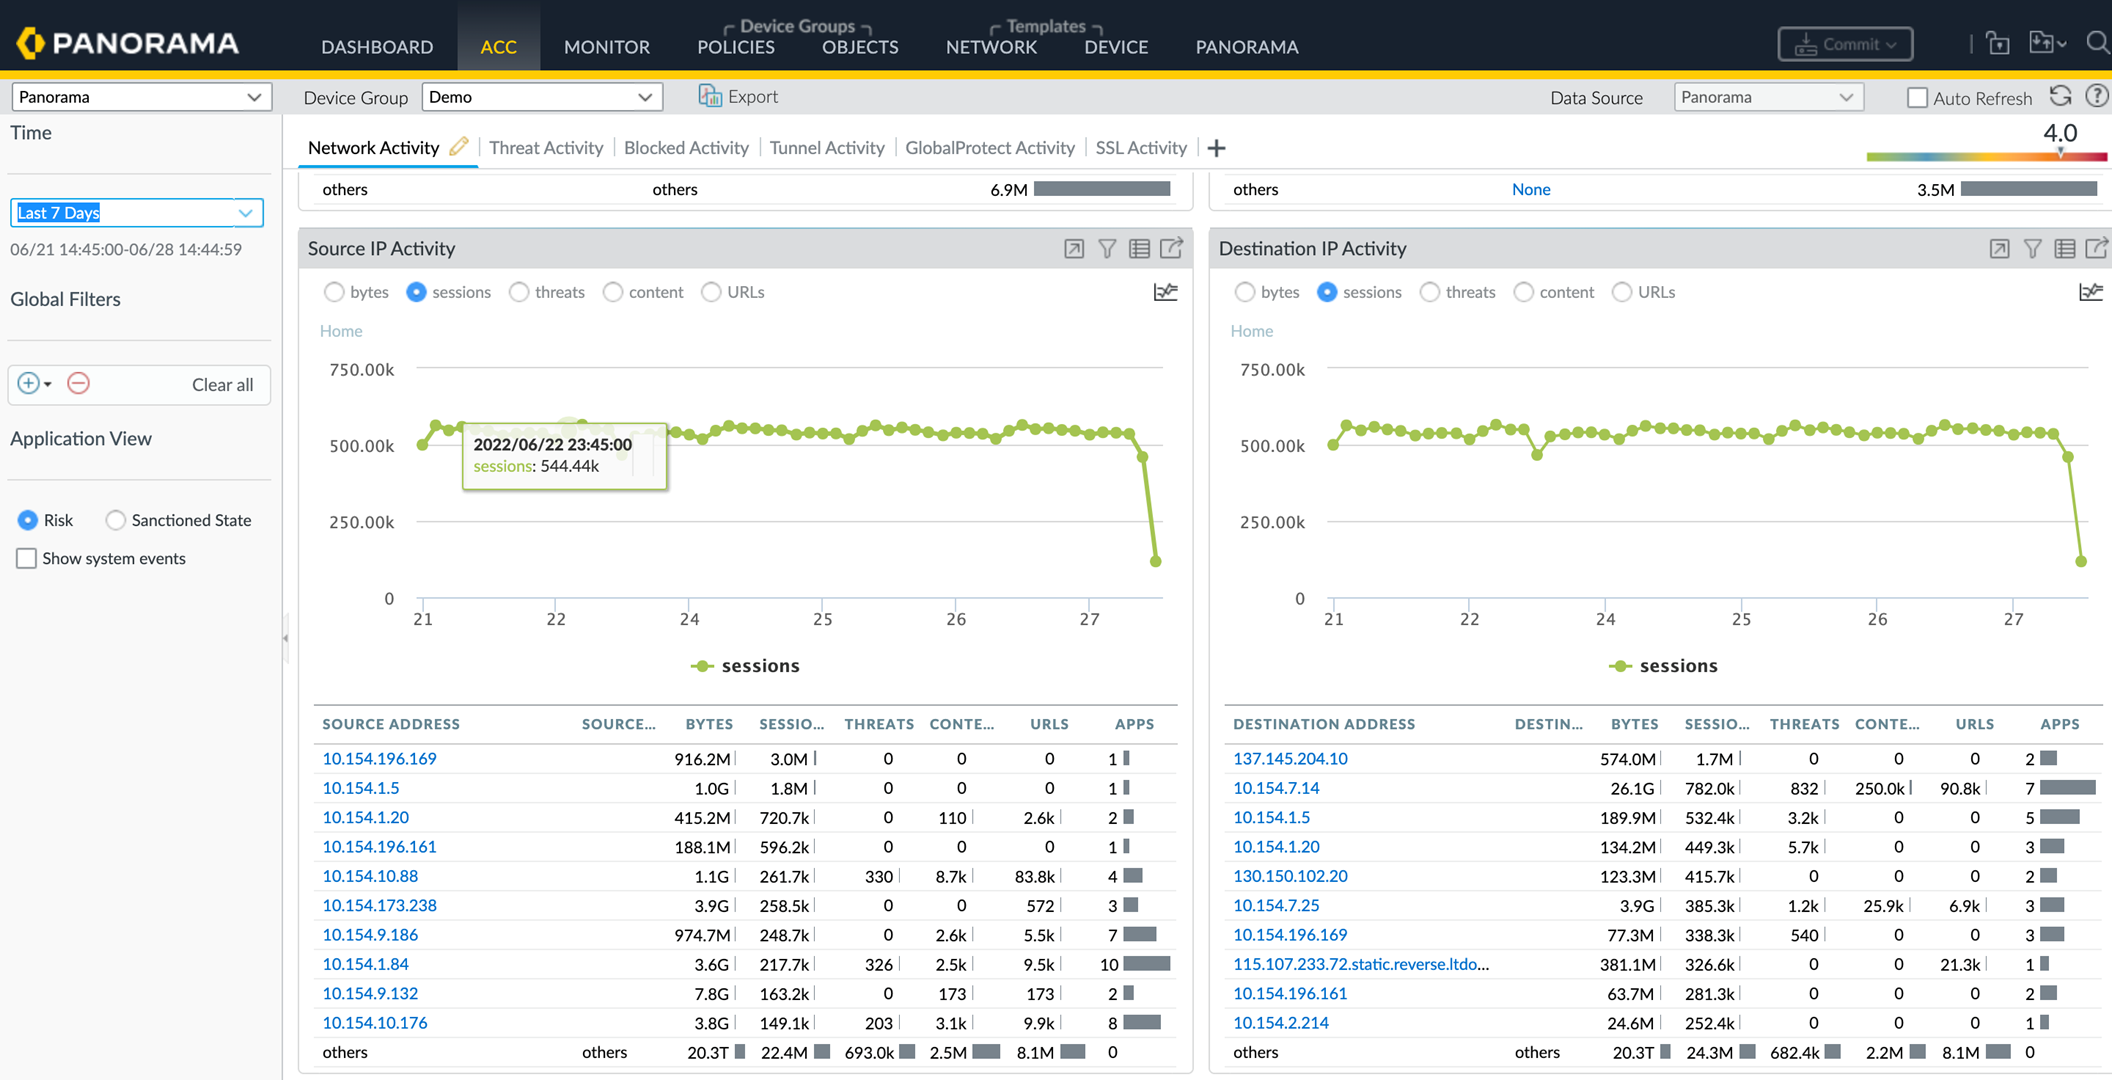
As an example of measuring CPS to protect a server from DoS attacks using ACC information in the illustration, let’s calculate the average CPS value over a seven day time period for the server that receives the most sessions (IP address 137.145.204.10 in the Destination IP Activity widget). We divide the 1.7 million sessions by the number of seconds in seven days (7 days x 24 hours x 60 minutes x 60 seconds = 604,800 seconds). The average is a bit less than three sessions per second for that server. Measure the CPS over time periods that represent normal average and peak traffic for the servers you want to protect and base your initial thresholds on those values. Observe the servers and adjust the thresholds as necessary to tune DoS Protection so that the servers are protected but you don’t throttle legitimate connections unnecessarily.
- Measuring CPS for classified DoS Protection profiles —Classified DoS Protection profiles protect individual devices. The goal is to configure CPS thresholds in the classified DoS Protection profile and attach the profile to a DoS Protection policy rule that applies to specific servers that have similar DoS attack thresholds. For example, you can apply classified DoS Protection profiles to web servers or critical file servers to prevent a DoS attack from disrupting their availability.
The thresholds you set in the profile apply to each individual device specified in the policy rule. For example, if you set a maximum rate of 5,000 CPS in a classified DoS Protection profile, then each device in the associated DoS Protection policy rule can accept up to 5,000 CPS before dropping new connections.
To calculate the average and peak CPS value, specify the IP address of each device to which you want to apply classified DoS protection in Global Filters (you can specify multiple IP addresses).
- Select the Time frame over which to view session activity.
- Select sessions in the Destination IP Activity widget.
- Specify the destination IP address of each device to which you want to apply classified DoS protection in Global Filters (you can specify multiple IP addresses).
You can filter firewall Traffic logs and Threat logs for the destination IP addresses of the critical devices you want to protect to obtain normal and peak session activity information.
- Add the session values together and divide the total into the number of seconds in the time period to derive the CPS value. For example, over a time period of 30 days (2,592,000 seconds), if the total number of sessions is 155,300,000, then the average CPS over that time period is approximately 60 CPS.
- Check if the number of sessions over the time period is close enough that the initial threshold values protect each device from DoS attacks but also don’t underutilize the devices.
- Fine tune the threshold values to ensure that none of the protected servers become DoS attack victims while attaining the highest safe performance for legitimate connections.
To calculate the average peak CPS, use the graphic display in the widget to identify the peak session periods and calculate the average peak CPS from that.
- Measuring CPS for aggregate DoS Protection profiles —Aggregate DoS Protection profiles protect groups of devices. The goal is to configure CPS thresholds in the aggregate DoS Protection profile and attach the profile to a DoS Protection policy rule that applies to an entire group of servers. Aggregate DoS Protection adds another layer of broad protection after your dedicated large-capacity perimeter DDoS device and the firewall’s Zone Protection.
Aggregate profiles don’t apply the configured threshold to each individual device in the way that classified profiles do. Instead, the threshold applies to the entire protected group. For example, if you set a maximum CPS threshold of 20,000 sessions to a group of five servers, then the combined total sessions that the group can support is 20,000 sessions. The only limit for an individual server in the group is how many of the 20,000 sessions are available. One device could receive 15,000 CPS, which leaves up to 5,000 CPS for the other four devices combined.
Adjust the thresholds as needed. You can use the same process for finding normal and peak CPS for classified profiles in the ACC to find average normal and peak CPS for aggregate profiles. Keep in mind that for aggregate profiles, you need to base the thresholds on the group’s total CPS, not on the CPS to individual servers.
- To prevent a server or servers from inadvertently or maliciously attacking your network, base your CPS measurements on the Source IP Activity widget, which shows the session activity that servers generate. Filter by sessions to see the most active servers or use Global Settings to filter by the source IP address of a particular server or servers. In the DoS Protection policy rule for the server(s), apply a DoS Protection profile with low thresholds so that the server can’t disrupt the network. For example, thresholds of 10 CPS for Alarm Rate, 20 CPS for Activate Rate, and 30 CPS for Max Rate ensure that the firewall adds the source address to the hardware block table instead of using other system resources.
- For setting aggregate DoS Protection profile thresholds , you can use Zone Protection profile threshold measurements as a starting point, especially if you intend to cover most of the servers in a zone with aggregate DoS protection. If the zone contains only the devices to which you want to apply an aggregate DoS Protection profile, then the CPS numbers are exactly the same as the Zone Protection profile numbers. If the zone contains both devices that you want to protect with an aggregate DoS Protection profile and devices that you don’t want to protect with an aggregate DoS Protection profile, you can use the Zone Protection CPS measurements as a starting point and experiment with the thresholds to tune them properly.
- Use third-party tools such as Wireshark or NetFlow to collect and analyze network traffic.
- Use scripts to automate CPS information collection and continuous monitoring, and to mine information from the logs.
- Configure every Security policy rule on the firewall to Log at Session End . If you have no monitoring tools such as NetFlow or Wireshark, and cannot obtain or develop automated scripts, Log at Session End captures the number of connections at the session end. While this doesn’t provide CPS information, it does show you the number of sessions ending in the selected time duration and you can make an approximate calculation of the sessions per second from that information.
- Work with application teams to understand the normal and peak CPS to their servers and the maximum CPS those servers can support.
To conserve resources, the firewall measures the aggregate CPS at ten-second intervals. For this reason, measurements you see on the firewall may not catch bursts within the ten-second interval. Although the average CPS measurements aren’t affected, the peak CPS measurements may not be precise. For example, if the firewall logs report a 5,000 CPS average in a ten-second interval, it’s possible that 4,000 CPS came in a one-second burst and the other 1,000 CPS were spread out over the remaining nine seconds.
Create separate log forwarding profiles for flood events so the appropriate administrator receives emails that contain only flood (potential DoS attack) events. Set Log Forwarding for both zone protection and DoS protection threshold events.
After you implement Zone and DoS protection, use these methods to monitor the deployment, so as your network evolves and traffic patterns change, you adjust flood protection thresholds.
Zone Protection Profiles
Apply a Zone Protection profile to each zone to defend it based on the aggregate traffic entering the ingress zone.
In addition to configuring zone protection and DoS protection, apply the best practice Vulnerability Protection profile to each Security policy rule to help defend against DoS attacks.
- Flood Protection
- Reconnaissance Protection
- Packet-Based Attack Protection
- Protocol Protection
- Ethernet SGT Protection
Flood Protection
A Zone Protection profile with flood protection configured defends an entire ingress zone against SYN, ICMP, ICMPv6, UDP, and other IP flood attacks. The firewall measures the aggregate amount of each flood type entering the zone in new connections-per-second (CPS) and compares the totals to the thresholds you configure in the Zone Protection profile. (You protect critical individual devices within a zone with DoS Protection profiles and policy rules .)
Measure and monitor firewall dataplane CPU consumption to ensure that each firewall is properly sized to support DoS and Zone Protection and any other features that consume CPU cycles, such as decryption. If you use Panorama to manage your firewalls, Device Monitoring ( PanoramaManaged DevicesHealthAll Devices ) shows you the CPU and memory consumption of each managed firewall. It can also show you a 90-day trend line of CPU average and peak use to help you understand the typical available capacity of each firewall.
For each flood type, you set three thresholds for new CPS entering the zone, and you can set a drop Action for SYN floods. If you know the baseline CPS rates for the zone, use these guidelines to set the initial thresholds, and then monitor and adjust the thresholds as necessary.
- Alarm Rate —The new CPS threshold to trigger an alarm. Target setting the Alarm Rate to 15-20% above the average CPS rate for the zone so that normal fluctuations don’t cause alerts.
- Activate —The new CPS threshold to activate the flood protection mechanism and begin dropping new connections. For ICMP, ICMPv6, UDP, and other IP floods, the protection mechanism is Random Early Drop (RED, also known as Random Early Detection). For SYN floods only, you can set the drop Action to SYN Cookies or RED. Target setting the Activate rate to just above the peak CPS rate for the zone to begin mitigating potential floods.
- Maximum —The number of connections-per-second to drop incoming packets when RED is the protection mechanism. Target setting the Maximum rate to approximately 80-90% of firewall capacity, taking into account other features that consume firewall resources.
If you don’t know the baseline CPS rates for the zone, start by setting the Maximum CPS rate to approximately 80-90% of firewall capacity and use it to derive reasonable flood mitigation alarm and activation rates. Set the Alarm Rate and Activate rate based on the Maximum rate. For example, you could set the Alarm Rate to half the Maximum rate and adjust it depending on how many alarms you receive and the firewall resources being consumed. Be careful setting the Activate Rate since it begins to drop connections. Because normal traffic loads experience some fluctuation, it’s best not to drop connections too aggressively. Err on the high side and adjust the rate if firewall resources are impacted.
SYN Flood Protection is the only type for which you set the drop Action . Start by setting the Action to SYN Cookies . SYN Cookies treats legitimate traffic fairly and only drops traffic that fails the SYN handshake, while using Random Early Drop drops traffic randomly, so RED may affect legitimate traffic. However, SYN Cookies is more resource-intensive because the firewall acts as a proxy for the target server and handles the three-way handshake for the server. The tradeoff is not dropping legitimate traffic (SYN Cookies) versus preserving firewall resources (RED). Monitor the firewall, and if SYN Cookies consumes too many resources, switch to RED. If you don’t have a dedicated DDoS prevention device in front of the firewall, always use RED as the drop mechanism.
When SYN Cookies is activated, the firewall does not honor the TCP options that the server sends because it does not know these values at the time that it proxies the SYN/ACK. Therefore, values such as the TCP server’s window size and MSS values cannot be negotiated during the TCP handshake and the firewall will use its own default values. In the scenario where the MSS of the path to the server is smaller than the firewall’s default MSS value, the packet will need to be fragmented.
The default threshold values are high so that activating a Zone Protection profile doesn’t unexpectedly drop legitimate traffic. Adjust the thresholds to values appropriate for your network’s traffic. The best method for understanding how to set reasonable flood thresholds is to take baseline measurements of average and peak CPS for each flood type to determine the normal traffic conditions for each zone and to understand the capacity of the firewall, including the impact of other resource-consuming features such as decryption. Monitor and adjust the flood thresholds as needed and as your network evolves.
Firewalls with multiple dataplane processors (DPs) distribute connections across DPs. In general, the firewall divides the CPS threshold settings equally across its DPs. For example, if a firewall has five DPs and you set the Alarm Rate to 20,000 CPS, each DP has an Alarm Rate of 4,000 CPS (20,000 / 5 = 4,000), so if the new sessions on a DP exceeds 4,000, it triggers the Alarm Rate threshold for that DP.
Reconnaissance Protection
Similar to the military definition of reconnaissance, the network security definition of reconnaissance is when attackers attempt to gain information about your network’s vulnerabilities by secretly probing the network to find weaknesses. Reconnaissance activities are often preludes to a network attack. Enable Reconnaissance Protection on all zones to defend against port scans and host sweeps:
- Port scans discover open ports on a network. A port scanning tool sends client requests to a range of port numbers on a host, with the goal of locating an active port to exploit in an attack. Zone Protection profiles defend against TCP and UDP port scans.
- Host sweeps examine multiple hosts to determine if a specific port is open and vulnerable.
You can use reconnaissance tools for legitimate purposes such as pen testing of network security or the strength of a firewall. You can specify up to 20 IP addresses or netmask address objects to exclude from Reconnaissance Protection so that your internal IT department can conduct pen tests to find and fix network vulnerabilities.
You can set the action to take when reconnaissance traffic (excluding pen testing traffic) exceeds the configured threshold when you Configure Reconnaissance Protection . Retain the default Interval and Threshold to log a few packets for analysis before blocking the reconnaissance operation.
Packet-Based Attack Protection
Packet-based attacks take many forms. Zone Protection profiles check IP, TCP, ICMP, IPv6, and ICMPv6 packet headers and protect a zone by:
- Dropping packets with undesirable characteristics.
- Stripping undesirable options from packets before admitting them to the zone.
Select the drop characteristics for each packet type when you Configure Packet Based Attack Protection . The best practices for each IP protocol are:
- IP Drop —Drop Unknown and Malformed packets. Also drop Strict Source Routing and Loose Source Routing because allowing these options allows adversaries to bypass Security policy rules that use the Destination IP address as the matching criteria. For internal zones only, check Spoofed IP Address so only traffic with a source address that matches the firewall routing table can access the zone.
- TCP Drop —Retain the default TCP SYN with Data and TCP SYNACK with Data drops, drop Mismatched overlapping TCP segment and Split Handshake packets, and strip the TCP Timestamp from packets.
Enabling Rematch Sessions ( DeviceSetupSessionSession Settings ) is a best practice that applies committed newly configured or edited Security Policy rules to existing sessions. However, if you configure Tunnel Content Inspection on a zone and Rematch Sessions is enabled, you must also disable Reject Non-SYN TCP (change the selection from Global to No ), or else when you enable or edit a Tunnel Content Inspection policy, the firewall drops all existing tunnel sessions. Create a separate Zone Protection profile to disable Reject Non-SYN TCP only on zones that have Tunnel Content Inspection policies and only when you enable Rematch Sessions .
- ICMP Drop —There are no standard best practice settings because dropping ICMP packets depends on how you use ICMP (or if you use ICMP). For example, if you want to block ping activity, you can block ICMP Ping ID 0 .
- IPv6 Drop —If compliance matters, ensure that the firewall drops packets with non-compliant routing headers, extensions, etc.
- ICMPv6 Drop —If compliance matters, ensure that the firewall drops certain packets if the packets don’t match a Security policy rule.
Protocol Protection
In a Zone Protection profile, Protocol Protection defends against non-IP protocol based attacks. Enable Protocol Protection to block or allow non-IP protocols between security zones on a Layer 2 VLAN or on a virtual wire, or between interfaces within a single zone on a Layer 2 VLAN (Layer 3 interfaces and zones drop non-IP protocols so non-IP Protocol Protection doesn’t apply). Configure Protocol Protection to reduce security risks and facilitate regulatory compliance by preventing less secure protocols from entering a zone, or an interface in a zone.
If you don’t configure a Zone Protection profile that prevents non-IP protocols in the same zone from going from one Layer 2 interface to another, the firewall allows the traffic because of the default intrazone allow Security policy rule. You can create a Zone Protection profile that blocks protocols such as LLDP within a zone to prevent discovery of networks reachable through other zone interfaces.
If you need to discover which non-IP protocols are running on your network, use monitoring tools such as NetFlow, Wireshark, or other third-party tools discover non-IP protocols on your network. Examples of non-IP protocols you can block or allow are LLDP, NetBEUI, Spanning Tree, and Supervisory Control and Data Acquisition (SCADA) systems such as Generic Object Oriented Substation Event (GOOSE), among many others.
Create an Exclude List or an Include List to configure Protocol Protection for a zone. The Exclude List is a block list—the firewall blocks all of the protocols you place in the Exclude List and allows all other protocols. The Include List is an allow list—the firewall allows only the protocols you specify in the list and blocks all other protocols.
Use include lists for Protocol Protection instead of exclude lists. Include lists specifically sanction only the protocols you want to allow and block the protocols you don’t need or didn’t know were on your network, which reduces the attack surface and blocks unknown traffic.
A list supports up to 64 Ethertype entries, each identified by its IEEE hexadecimal Ethertype code. Other sources of Ethertype codes are standards.ieee.org/develop/regauth/ethertype/eth.txt and http://www.cavebear.com/archive/cavebear/Ethernet/type.html . When you configure zone protection for non-IP protocols on zones that have Aggregated Ethernet (AE) interfaces, you can’t block or allow a non-IP protocol on only one AE interface member because AE interface members are treated as a group.
Protocol Protection doesn’t allow blocking IPv4 (Ethertype 0x0800), IPv6 (0x86DD), ARP (0x0806), or VLAN-tagged frames (0x8100). The firewall always implicitly allows these four Ethertypes in an Include List even if you don’t explicitly list them and doesn’t permit you to add them to an Exclude List .
Ethernet SGT Protection
In a Cisco TrustSec network, a Cisco Identity Services Engine (ISE) assigns a Layer 2 Security Group Tag (SGT) of 16 bits to a user’s or endpoint’s session. You can create a Zone Protection profile with Ethernet SGT protection when your firewall is part of a Cisco TrustSec network. The firewall can inspect headers with 802.1Q (Ethertype 0x8909) for specific Layer 2 security group tag (SGT) values and drop the packet if the SGT matches the list you configure for the Zone Protection profile attached to the interface. Determine which SGT values you want to deny access to a zone.
Packet Buffer Protection
Packet Buffer Protection defends your firewall and network from single session DoS attacks that can overwhelm the firewall’s packet buffer and cause legitimate traffic to drop. Although you don’t configure Packet Buffer Protection in a Zone Protection profile or in a DoS Protection profile or policy rule, Packet Buffer Protection defends ingress zones. While zone and DoS protection apply to new sessions (connections) and are granular, Packet Buffer Protection applies to existing sessions and is global.
You Configure Packet Buffer Protection globally to protect the entire firewall and you also enable Packet Buffer Protection on each zone to protect zones:
- Global Packet Buffer Protection —The firewall monitors sessions from all zones (regardless of whether Packet Buffer Protection is enabled in a zone) and how those sessions utilize the packet buffer. You must configure Packet Buffer Protection globally ( DeviceSetupSession Settings ) to protect the firewall and to enable it on individual zones. When packet buffer consumption reaches the configured Activate percentage, the firewall used Random Early Drop (RED) to drop packets from the offending sessions (the firewall doesn’t drop complete sessions at the global level).
- Per-Zone Packet Buffer Protection —Enable Packet Buffer Protection on each zone ( NetworkZones ) to layer in a second level of protection. When packet buffer consumption crosses the Activate threshold and global protection begins to apply RED to session traffic, that starts the Block Hold Time timer. The Block Hold Time is the amount of time in seconds that the offending session can continue before the firewall blocks the entire session. The offending session remains blocked until the Block Duration time expires.
You must enable Packet Buffer Protection globally in order for it to be active in zones.
There are two types of packet buffer protection:
- Packet Buffer Protection Based on Buffer Utilization
- Packet Buffer Protection Based on Latency
Packet Buffer Protection Based on Buffer Utilization
Packet Buffer Protection based on buffer utilization is enabled by default. Take baseline measurements of firewall packet buffer utilization over a period of time until you’re comfortable that you understand typical usage. Take measurements for at least one business week; however, a longer measurement period provides a better baseline. To see packet buffer utilization for a specified period of time, use the operational CLI command:
admin1138@thxvm1>show running resource-monitor [day | hour | minute | second | week]
The CLI command provides a snapshot of buffer utilization for the specified period of time, but is neither automated nor continuous. To automate continuous packet buffer utilization measurements so you can monitor changes in behavior and anomalous events, use a script. Your Palo Alto Networks account team can provide a sample script that you can modify to develop your own script; however, the script is not officially supported and there is no technical support available for script usage or modification.
If baseline measurements consistently show abnormally high packet buffer utilization, then the firewall’s capacity may be undersized for typical traffic loads. In this case, consider resizing the firewall deployment. Otherwise, you need to tune the Packet Buffer Protection thresholds carefully to prevent impacted buffers from overflowing (and to prevent dropping legitimate traffic). When firewall sizing is correct for the deployment, only an attack should cause a large spike in buffer usage.
Overrunning the firewall packet buffer negatively impacts the firewall’s packet forwarding capabilities. When the buffers are full, no packets can enter the firewall on any interface, not just the interface that experienced the attack.
The best practices for setting the thresholds are:
- Alert and Activate —Start with the default threshold values, monitor packet buffer utilization, and adjust the thresholds as necessary. The Alert threshold defaults to 50%; when packet buffer utilization exceeds the threshold for more than 10 seconds, the firewall creates an alert entry in the System log every minute. The Activate threshold defaults to 80%; when the threshold is reached, the firewall begins to mitigate the most abusive sessions. If the firewall is sized correctly, buffer utilization should be well below 50%.
- Block Hold Time —When packet buffer utilization triggers the Activate threshold, the Block Hold Time sets the amount of time the offending session can continue before the firewall blocks the session. During the Block Hold Time , the firewall continues to apply RED to the packets of offending sessions. Start with the default Block Hold Time threshold value (60 seconds), monitor packet buffer utilization, and adjust the threshold as necessary. If the packet buffer utilization percentage falls below the Activate threshold before the Block Hold Time expires, the timer resets and doesn’t start until the Activate threshold is crossed again. Increasing the Block Hold Time imposes a greater penalty on offending sessions and reducing it imposes a lesser penalty on offending sessions.
- Block Duration —When the Block Hold Time expires, the firewall blocks the offending session for the period of time defined by the Block Duration . Start with the default threshold value (3600 seconds), monitor packet buffer utilization, and adjust the threshold as necessary. When you enable Packet Buffer Protection on a zone, Block Duration affects every session from the IP address even if only one session from an IP address overutilizes the packet buffer. If you believe that blocking an IP address for one hour (3600 seconds) is too great a penalty, reduce the Block Duration to an acceptable value.
In addition to monitoring the buffer utilization of individual sessions, Packet Buffer Protection can also block an IP address if certain criteria are met. While the firewall monitors the packet buffers, if it detects a source IP address rapidly creating sessions that would not individually be seen as an attack, it blocks that IP address for the configured Block Duration .
Network Address Translation (NAT) (an external source that has translated its internet-bound traffic using source NAT) can give the appearance of greater packet buffer utilization because of IP address translation activity. If this occurs, adjust the thresholds in a way that penalizes individual sessions but doesn’t penalize the underlying IP addresses (so other sessions from the same IP address aren’t affected). To do this, reduce the Block Hold Time so the firewall blocks individual sessions that overutilize the buffers faster, and reduce the Block Duration so that the underlying IP address is not unduly penalized.
Packet Buffer Protection Based on Latency
As an alternative to packet buffer protection based on utilization, you can trigger packet buffer protection based on packet latency caused by dataplane packet buffering, which indicates congestion on the firewall. Such packet buffer protection mitigates head-of-line blocking by alerting you to the congestion and performing random early drop (RED) on packets. Packet buffer protection based on latency can trigger the protection before latency-sensitive protocols or applications are affected.
If your traffic includes protocols or applications that are latency-sensitive, then packet buffer protection based on latency will be more helpful than packet buffer protection based on buffer utilization.
Packet buffer protection based on latency includes setting a Latency Alert threshold (in milliseconds), above which the firewall starts generating an Alert log event. The Latency Activate threshold indicates when the firewall activates RED on incoming packets and starts generating an Activate log. The Latency Max Tolerate threshold indicates when the firewall uses with RED with almost 100% drop probability.
The Block Hold Time and Block Duration settings function for packet buffer protection based on latency in the same way they do for packet buffer protection based on utilization.
DoS Protection Profiles and Policy Rules
DoS Protection profiles and DoS Protection policy rules combine to protect specific groups of critical resources and individual critical resources against session floods. Compared to Zone Protection profiles, which protect entire zones from flood attacks, DoS protection provides granular defense for specific systems, especially critical systems that users access from the internet and are often attack targets, such as web servers and database servers. Apply both types of protection because if you only apply a Zone Protection profile, then a DoS attack that targets a particular system in the zone can succeed if the total connections-per-second (CPS) doesn’t exceed the zone’s Activate and Maximum rates.
DoS Protection is resource-intensive, so use it only for critical systems. Similar to Zone Protection profiles, DoS Protection profiles specify flood thresholds. DoS Protection policy rules determine the devices, users, zones, and services to which DoS Profiles apply.
In addition to configuring DoS protection and zone protection, apply the best practice Vulnerability Protection profile to each Security policy rule to help defend against DoS attacks.
Classified Versus Aggregate DoS Protection
You can configure aggregate and classified DoS Protection Profiles , and apply one profile or one of each type of profile to DoS Protection Policy Rules when you configure DoS Protection .
- Aggregate —Sets thresholds that apply to the entire group of devices specified in a DoS Protection policy rule instead of to each individual device, so one device could receive the majority of the allowed connection traffic. For example, a Max Rate of 20,000 CPS means the total CPS for the group is 20,000, and an individual device can receive up to 20,000 CPS if other devices don’t have connections. Aggregate DoS Protection policies provide another layer of broad protection (after your dedicated DDoS device at the internet perimeter and Zone Protection profiles) for a particular group of critical devices when you want to apply extra constraints on specific subnets, users, or services.
- Classified —Sets flood thresholds that apply to each individual device specified in a DoS Protection policy rule. For example, if you set an Max Rate of 5,000 CPS, each device specified in the rule can accept up to 5,000 CPS before it drops new connections. If you apply a classified DoS Protection policy rule to more than one device, the devices governed by the rule should be similar in terms of capacity and how you want to control their CPS rates because classified thresholds apply to each individual device. Classified profiles protect individual critical resources.
When you configure a DoS Protection policy rule with a classified DoS Protection profile ( Option/ProtectionClassifiedAddress ), use the Address field to specify whether incoming connections count toward the profile thresholds based on matching the source-ip-only , destination-ip-only , or scr-dest-ip-both (the firewall counts both the source and the destination IP address matches toward the thresholds). Counters consume resources, so the way you count address matches affects firewall resource consumption. You can use classified DoS protection to:
- Protect critical individual devices, especially servers that users access from the internet and are often attack targets, such as web servers, database servers, and DNS servers. Set appropriate flood and resource protection thresholds in a classified DoS Protection profile. Create a DoS Protection policy rule that applies the profile to each server’s IP address by adding the IP addresses as the rule’s destination criteria, and set the Address to destination-ip-only .
Do not use source-IP-only or src-dest-ip-both classification for internet-facing zones in classified DoS Protection policy rules because the firewall doesn’t have the capacity to store counters for every possible IP address on the internet. Increment the threshold counter for source IPs only for internal zone or same-zone rules. In perimeter zones, use destination-ip-only .
- Monitor the CPS rate for a suspect host or group of hosts (the zone that contains the hosts cannot be internet-facing). Set an appropriate alarm threshold in a classified DoS Protection profile to notify you if a host initiates an unusually large number of connections. Create a DoS Protection policy rule that applies the profile to the individual source or source address group and set the Address to source-ip-only . Investigate hosts that initiate enough new connections to set off the alarm.
How you configure the Address ( source-ip-only , destination-ip-only , or src-dest-ip-both ) for classified profiles depends on your DoS protection goals, what you are protecting, and whether the protected device(s) are in internet-facing zones.
The firewall uses more resources to track src-dest-ip-both as the Address than to track source-IP-only or destination-ip-only because the counters consume resources for both the source and destination IP addresses instead of just one of the two.
If you apply both an aggregate and a classified DoS Protection profile to the same DoS Protection policy rule, the firewall applies the aggregate profile first and then applies the classified profile if needed. For example, we protect a group of five web servers with both types of profiles in a DoS Protection policy rule. The aggregate profile configuration drops new connections when the combined total for the group reaches a Max Rate of 25,000 CPS. The classified profile configuration drops new connections to any individual web server in the group when it reaches a Max Rate of 6,000 CPS. There are three scenarios where new connection traffic crosses Max Rate thresholds:
- The new CPS rate exceeds the aggregate Max Rate but doesn’t exceed the classified Max Rate . In this scenario, the firewall applies the aggregate profile and blocks all new connections for the configured Block Duration.
- The new CPS rate doesn’t exceed the aggregate Max Rate , but the CPS to one of the web servers exceeds the classified Max Rate . In this scenario, the firewall checks the aggregate profile and finds that the rate for the group is less than 25,000 CPS, so the firewall doesn’t block new connections based on that. Next, the firewall checks the classified profile and finds that the rate for a particular server exceeds 6,000 CPS. The firewall applies the classified profile and blocks new connections to that particular server for the configured Block Duration. Because the other servers in the group are within the classified profile’s Max Rate , their traffic is not affected.
- The new CPS rate exceeds the aggregate Max Rate and also exceeds the classified Max Rate for one of the web servers. In this scenario, the firewall checks the aggregate profile and finds that the rate for the group exceeds 25,000 CPS, so the firewall blocks new connections to limit the group’s total CPS. The firewall then checks the classified profile and finds that the rate for a particular server exceeds 6,000 CPS (so the aggregate profile enforced the group’s combined limit, but that wasn’t enough to protect this particular server). The firewall applies the classified profile and blocks new connections to that particular server for the configured Block Duration. Because the other servers in the group are within the classified profile’s Max Rate , their traffic is not affected.
If you want both an aggregate and a classified DoS Protection profile to apply to the same traffic, you must apply both profiles to the same DoS Protection policy rule. If you apply the aggregate profile to one rule and the classified profile to a different rule, even if they specify exactly the same traffic, the firewall can apply only one profile because when the traffic matches the first DoS Protection policy rule, the firewall executes the Action specified in that rule and doesn’t compare to the traffic to any subsequent rules, so the traffic never matches the second rule and the firewall can’t apply its action. (This is the same way that Security policy rules work.)
DoS Protection Profiles
DoS Protection profiles set thresholds that protect against new session IP flood attacks and provide resource protection (maximum concurrent session limits for specified endpoints and resources). DoS Protection profiles protect specific devices (classified profiles) and groups of devices (aggregate profiles) against SYN, UDP, ICMP, ICMPv6, and Other IP flood attacks. Configuring Flood Protection thresholds in a DoS Protection profile is similar to configuring Flood Protection in a Zone Protection profile, but Zone Protection profiles protect entire ingress zones, while DoS protection profiles and policy rules are granular and targeted, and can even be classified to a single device (IP address). The firewall measures the aggregate number of connections-per-second (CPS) to a group of devices (aggregate profile) or measures the CPS to individual devices (classified profile).
Measure and monitor firewall dataplane CPU consumption to ensure that each firewall is properly sized to support DoS and Zone Protection and any other features that consume CPU cycles, such as decryption. If you use Panorama to manage your firewalls, Device Monitoring ( PanoramaManaged DevicesHealthAll Devices ) shows you the CPU and memory consumption of each managed firewall. It can also show you a 90-day trend line of CPU average and peak use to help you understand the typical available capacity of each firewall.
For each flood type, you set three thresholds for new CPS to a group of devices (aggregate) or to individual devices (classified) and a Block Duration , and you can set a drop Action for SYN floods:
- Alarm Rate —When new CPS exceeds this threshold, the firewall generates a DoS alarm. For classified profiles, set the rate to 15-20% above the device’s average CPS rate so that normal fluctuations don’t cause alerts. For aggregate profiles, set the rate to 15-20% above the group’s average CPS rate.
- Activate Rate —When new CPS exceeds this threshold, the firewall begins to drop new connections to mitigate the flood until the CPS rate drops below the threshold. For classified profiles, the Max Rate should be an acceptable CPS rate for the device(s) you’re protecting (the Max Rate won’t flood the critical device(s)). You can set the Activate Rate to the same threshold as the Max Rate so that the firewall doesn’t use RED or SYN Cookies to begin dropping traffic before it reaches the Max Rate . Set the Activate Rate lower than the Max Rate only if you want to drop traffic before it reaches the Max Rate . For aggregate profiles, set the threshold just above the average peak CPS rate for the group to begin mitigating floods using RED (or SYN Cookies for SYN floods).
- Max Rate —When new CPS exceeds this threshold, the firewall blocks (drops) all new connections from the offending IP address for the specified Block Duration time period. For classified profiles, base the Max Rate threshold on the capacity of the device(s) you’re protecting so that the CPS rate can’t flood them. For aggregate profiles, set to 80-90% of the group’s capacity.
- Block Duration —When new CPS exceeds the Max Rate , the firewall blocks new connections from the offending IP address. The Block Duration specifies the amount of time the firewall continues to block the IP address’s new connections. While the firewall blocks new connections, it doesn’t count incoming connections and doesn’t increment the threshold counters. For classified and aggregate profiles, use the default value (300 seconds) to block the attacking session without penalizing legitimate sessions from the source for too long a period of time.
SYN Flood Protection is the only type for which you set the drop Action . Start by setting the Action to SYN Cookies . SYN Cookies treats legitimate traffic fairly and only drops traffic that fails the SYN handshake, while using Random Early Drop drops traffic randomly, so RED may affect legitimate traffic. However, SYN Cookies is more resource-intensive because the firewall acts as a proxy for the target server and handles the three-way handshake for the server. The tradeoff is not dropping legitimate traffic (SYN Cookies) versus preserving firewall resources (RED). Monitor the firewall, and if SYN Cookies consumes too many resources, switch to RED. If you don’t have a dedicated DDoS prevention device in front of the firewall, always use RED as the drop mechanism.
The default threshold values are high so that DoS Protection profiles don’t unexpectedly drop legitimate traffic. Monitor connection traffic and adjust the thresholds to values appropriate for your network. Start by taking baseline measurements of average and peak CPS for each flood type to determine the normal traffic conditions for the critical devices you want to protect. Because normal traffic loads experience some fluctuation, it’s best not to drop connections too aggressively. Monitor and adjust the flood thresholds as needed and as your network evolves.
Another method of setting flood thresholds is to use the baseline measurements to set the maximum CPS you want to allow and work back from there to derive reasonable flood mitigation alarm and activation rates.
Firewalls with multiple dataplane processors (DPs) distribute connections across DPs. In general, the firewall divides the CPS threshold settings equally across its DPs. For example, if a firewall has five DPs and you set the Alarm Rate to 20,000 CPS, each DP has an Alarm Rate of 4,000 CPS (20,000 / 5 = 4,000), so if the new sessions on a DP exceeds 4,000, it triggers the Alarm Rate threshold for that DP.
In addition to setting IP flood thresholds, you can also use DoS Protection profiles to detect and prevent session exhaustion attacks in which a large number of hosts (bots) establish as many sessions as possible to consume a target’s resources. On the profile’s Resources Protection tab, you can set the maximum number of concurrent sessions that the device(s) defined in the DoS Protection policy rule to which you apply the profile can receive. When the number of concurrent sessions reaches its maximum limit, new sessions are dropped.
The maximum number of concurrent sessions to set depends on your network context. Understand the number of concurrent sessions that the resources you are protecting (defined in the DoS Protection policy rule to which you attach the profile) can handle. Set the threshold to approximately 80% of the resources’ capacity, then monitor and adjust the threshold as needed.
For aggregate profiles, the Resources Protection threshold applies to all traffic of the devices defined in the policy rule (source and destination). For classified profiles, the Resources Protection threshold applies to the traffic based on whether the classified policy rule applies to the source IP only, to the destination IP only, or to both the source and destination IPs.
DoS Protection Policy Rules
DoS Protection policy rules control the systems to which the firewall applies DoS protection (the flood thresholds configured in DoS Protection profiles that you attach to DoS Protection policy rules), what action to take when traffic matches the criteria defined in the rule, and how to log DoS traffic. Because DoS protection consumes firewall resources, use it only to defend specific critical resources against session floods, especially common targets that users access from the internet, such as web servers and database servers. Use Zone Protection profiles to protect entire zones against floods and other attacks. DoS Protection policy rules provide granular matching criteria so that you have the flexibility to define exactly what you want to protect:
- Source zone, interface, IP address (including whole regions), and user.
- Destination zone, interface, and IP address (including whole regions).
- Services (by port and protocol). DoS protection applies only to the services you specify. However, specifying services doesn’t allow the services and implicitly block all other services. Specifying services limits DoS protection to those services, but doesn’t block other services.
In addition to protecting service ports in use on critical servers, you can also protect against DoS attacks on the unused service ports of critical servers. For critical systems, you can do this by creating one DoS Protection policy rule and profile to protect ports with services running, and a different DoS Protection policy rule and profile to protect ports with no services running. For example, you can protect a web server’s normal service ports, such as 80 and 443, with one policy/profile, and protect all of the other service ports with the other policy/profile. Be aware of the firewall’s capacity so that servicing the DoS counters doesn’t impact performance.
When traffic matches a DoS Protection policy rule, the firewall takes one of three actions:
- Deny —The firewall denies access and doesn’t apply a DoS Protection profile. Traffic that matches the rule is blocked.
- Allow —The firewall permits access and doesn’t apply a DoS Protection profile. Traffic that matches the rule is allowed.
- Protect —The firewall protects the devices defined in the DoS Protection policy rule by applying the specified DoS Protection profile or profiles thresholds to traffic that matches the rule. A rule can have one aggregate DoS Protection profile and one classified DoS Protection profile, and for classified profiles, you can use the source IP, destination IP, or both to increment the flood threshold counters, as described in Classified Versus Aggregate DoS Protection . Incoming packets count against both DoS Protection profile thresholds if the they match the rule.
The firewall applies DoS Protection profiles only if the Action is Protect . If the DoS Protection policy rule’s Action is Protect , specify the appropriate aggregate and/or classified DoS Protection profiles in the rule so that the firewall applies the DoS Protection profile’s thresholds to traffic that matches the rule. Most rules are Protect rules.
The Allow and Deny actions enable you to make exceptions within larger groups but do not apply DoS protection to the traffic. For example, you can deny the traffic from most of a group but allow a subset of that traffic. Conversely, you can allow the traffic from most of a group and deny a subset of that traffic.
You can Schedule when a DoS Protection policy rule is active (start and end time, recurrence period). One use case for scheduling is to apply different flood thresholds at different times of the day or week. For example, if your business experiences significantly less traffic at night than during the day, you may want to apply higher flood thresholds during the day than at night. Another use case is to schedule special thresholds for special events, providing that the firewall supports the CPS rates.
For easier management and granular reporting, configure Log Forwarding to separate DoS protection logs from other threat logs. Forward DoS threshold violation events directly to the administrators via email in addition to forwarding the logs to a server such an SNMP or syslog server. Providing that the firewalls are appropriately sized, threshold breaches should not be frequent and will be strong indicators of an attack attempt.