Palo Alto Networks: Configuring Authentication Policies with Captive Portal and SAML
This document outlines the process and key considerations for configuring Authentication Policies when leveraging Captive Portal in conjunction with SAML authentication on a Palo Alto Networks firewall.
Document ID: 24370
Created On 07/02/20 06:58 AM - Last Modified 08/01/20 02:23 AM
Relevant Concepts:
SAML, Authentication, User-ID, PAN-OS (8.0, 8.1, 9.0), Prisma Access.
Objective and Context
The primary goal is to detail the configuration steps for integrating SAML authentication into the Captive Portal workflow using Authentication Policies. This is particularly relevant for scenarios where users (like guests or BYOD devices) need to authenticate via a web form, and your identity provider supports SAML. The document highlights a crucial configuration caveat to ensure the SAML authentication flow functions correctly when the Identity Provider (IdP) traffic traverses the same firewall.
A fundamental understanding of general SAML concepts and basic Palo Alto Networks Authentication Policy configuration is assumed. For initial SAML and Authentication Policy setup, refer to the official PAN-OS Administrator's Guide sections on "Configure SAML Authentication" and "Configure Authentication Policy".
Environment Considerations
-
Captive Portal is configured to use SAML Authentication.
-
Traffic destined for the SAML Identity Provider (IdP) must pass through the Palo Alto Networks firewall itself.
Note:
The requirement for the IdP traffic to pass through the firewall is key to the caveat discussed in the procedure section, as the firewall will intercept this traffic based on policy evaluation order.
Configuring SAML Authentication for Captive Portal
Configuring SAML Single Sign-On (SSO) involves establishing trust and communication between the Palo Alto Networks firewall (acting as the Service Provider, SP) and your Identity Provider (IdP). Certificates are essential for securing SAML transactions, ensuring the integrity and confidentiality of messages exchanged. Palo Alto Networks requires HTTPS for transport and digital signatures for message integrity.
Step 1: Obtain Required Certificates
You need certificates for both the firewall (to sign messages sent to the IdP) and the IdP (for the firewall to validate signed messages from the IdP).
-
The certificate the firewall uses to sign SAML messages should be imported from your enterprise CA or a third-party CA if it requires the Digital Signature key usage attribute. Certificates generated directly on the firewall or Panorama do not have this attribute.
-
The certificate the IdP uses to sign SAML messages is required for all deployments. This can often be obtained by importing the IdP's metadata file. The IdP certificate must use supported public key algorithms (RSA 1024+ bits, ECDSA) and signature algorithms (SHA1, SHA256, SHA384, SHA512). Note specific FIPS/CC mode requirements if applicable.
Step 2: Add SAML IdP Server Profile
This profile registers the IdP with the firewall and defines connection parameters. The recommended method is to import the IdP's metadata file, which automatically populates most settings and imports the IdP's signing certificate.
-
Export the SAML metadata file from your IdP.
-
On the firewall (Device > Server Profiles > SAML Identity Provider) or Panorama (Panorama > Server Profiles > SAML Identity Provider), import the metadata file.
-
Enter a Profile Name.
-
Browse to the Identity Provider Metadata file.
-
Select "Validate Identity Provider Certificate" (recommended) if the IdP certificate is issued by a CA. You must have a Certificate Profile configured with the relevant CA to use this option. If the IdP uses a self-signed certificate, this option cannot be enabled, but the firewall will still validate the signature against the configured IdP certificate. Ensure PAN-OS 9.1.3+ is used with self-signed IdP certificates due to a known vulnerability (CVE-2020-2021).
-
Configure the Maximum Clock Skew (default 60 seconds) to account for time differences between the firewall and the IdP.
-
Click OK to save. Review the imported settings for accuracy.
-
Verify the correct IdP signing certificate is listed as the Identity Provider Certificate in the profile.
Step 3: Configure an Authentication Profile
This profile defines the authentication settings that apply to a set of users or applications.
-
Navigate to Device > Authentication Profile and Add a new profile.
-
Enter a Name.
-
Set the Type to SAML.
-
Select the IdP Server Profile created in the previous step.
-
Select the Certificate for Signing Requests (the firewall's certificate).
-
(Optional) Enable Single Logout if supported and desired for this application (Note: SLO is not supported for Captive Portal end-users).
-
Select the Certificate Profile to validate the Identity Provider Certificate (if "Validate Identity Provider Certificate" was enabled in the IdP Server Profile).
-
Enter the Username Attribute that the IdP will use in SAML messages (default is "username"). If managing administrative roles via the IdP, specify the Admin Role Attribute and Access Domain Attribute.
-
Under Advanced settings, add the users and user groups that are permitted to authenticate using this profile.
-
Click OK to save.
Step 4: Assign the Authentication Profile
Assign the configured SAML authentication profile to the specific applications or services that require SAML authentication.
-
For administrative access: Assign the profile to local administrator accounts or configure external administrative authentication settings to use the SAML profile.
-
For Captive Portal end-users: Assign the profile within the relevant Authentication Policy rule (as detailed in a later step).
-
For GlobalProtect users: Assign the profile to the GlobalProtect portal and gateway configurations.
Commit your changes after assigning the profile.
Step 5: Create Firewall SAML Metadata for IdP
To register the firewall application (Captive Portal, GlobalProtect, or management interface) with the IdP, you need to generate a SAML metadata file from the firewall and import it into your IdP. This file contains information about the firewall as a Service Provider, such as its assertion consumer service URL and signing certificate details.
-
Go to Device > Authentication Profile and click the Metadata link for the SAML authentication profile you configured.
-
From the Commands drop-down, select the specific application you are registering (captive-portal, global-protect, or management).
-
(For Captive Portal or GlobalProtect in a multi-vsys environment) Select the appropriate Vsys Name.
-
Specify the IP address or hostname the IdP should use to communicate with the firewall for this application (e.g., the Redirect Host IP/hostname for Captive Portal, or the portal/gateway address for GlobalProtect).
-
Click OK and save the metadata file.
-
Import this metadata file into your IdP according to your IdP's documentation.
Configuring the Authentication Policy Rule
The Authentication policy is evaluated early in the traffic flow, before the Security policy. It determines whether a session requires active user authentication via the Captive Portal. For Captive Portal with SAML, you need rules to trigger the portal for unknown users *and* a specific rule to exempt traffic to the IdP.
Crucial Caveat: Excluding IdP Traffic
When the Identity Provider (IdP) is located on the internet or a network segment that requires traffic to pass *through* the same Palo Alto Networks firewall enforcing the Captive Portal policy, a critical configuration is needed. If you configure an Authentication policy rule to intercept all 'unknown' user traffic for Captive Portal authentication, the initial SAML request from the user's browser (redirected by the firewall) to the IdP will also match this rule. This creates a loop where the firewall tries to authenticate the IdP traffic, preventing the SAML handshake from completing.
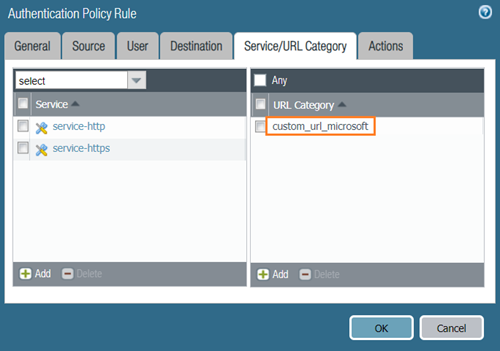
To prevent this, you MUST configure an Authentication policy rule *above* your main Captive Portal rule that specifically permits traffic to your IdP's URL or IP address without triggering the Authentication Portal.
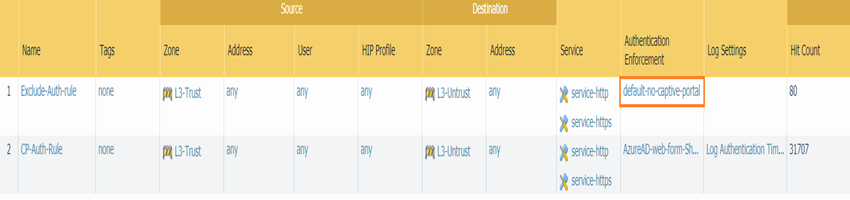
Authentication policy rules showing the 'Exclude-Auth-rule' above the 'CP-Auth-Rule'.
Details of the 'Exclude-Auth-rule' using 'default-no-captive-portal' and a Custom URL Category for the IdP.
Authentication Enforcement Object
An Authentication Enforcement object defines *how* the authentication challenge is presented (e.g., web form) and links it to the specific Authentication Profile (which contains your SAML settings).
-
Go to Objects > Authentication and Add an object.
-
Give it a Name (e.g., 'SAML-Captive-Portal-Enforcement').
-
Select the Authentication Method:
-
web-form:
This is required for SAML and MFA. The firewall displays the Captive Portal web form.
-
browser-challenge: (Less common/suitable for SAML) Uses Kerberos/NTLM browser challenge.
-
Select the Authentication Profile (your SAML profile).
-
(Optional) Enter a Message to display on the Captive Portal web form.
-
Click OK.
For the "Exclude-Auth-rule" mentioned in the caveat, you would typically use the built-in "default-no-captive-portal" enforcement object or create one that has no authentication method defined.
Configuring the Authentication Policy Rule(s)
You need at least two rules for the SAML Captive Portal caveat scenario: one to exclude IdP traffic and one to trigger the portal for unknown users.
-
Navigate to Policies > Authentication and Add rules. Pay close attention to the order.
-
Rule 1 (IdP Exclusion - MUST be first):
-
Name:
Exclude-SAML-IdP
-
Source Zone:
Zone(s) where users initiate traffic from.
-
User:
`any` or the specific user groups that will use SAML authentication.
-
Destination Zone:
Zone where the IdP resides (e.g., Untrust).
-
Service/URL Category:
Create or use a Custom URL Category containing the IdP's FQDN or IP address(es).
-
Action:
Select an Authentication Enforcement object configured NOT to prompt for authentication, such as `default-no-captive-portal`.
-
Rule 2 (Captive Portal Trigger):
-
Name:
Trigger-SAML-Captive-Portal
-
Source Zone:
Zone(s) where unknown users are expected (e.g., Guest-WIFI, BYOD).
-
User:
`unknown`
-
Destination Zone:
Zone(s) users are trying to reach (e.g., Untrust for internet).
-
Service/URL Category:
Typically `service-http` and `service-https`, or broader categories like `any` depending on requirements.
-
Action:
Select the Authentication Enforcement object you created for SAML Captive Portal (e.g., 'SAML-Captive-Portal-Enforcement').
-
Timeout:
Specify how long the user-to-IP mapping should be valid after successful authentication (e.g., 60 minutes).
Arrange the 'Exclude-SAML-IdP' rule to be evaluated *before* the 'Trigger-SAML-Captive-Portal' rule.
Note:
The `unknown` user object is a dynamic identifier used by the firewall when no User-ID mapping currently exists for a source IP. The Authentication Policy is the primary mechanism to transition a user from 'unknown' to a known user identity.
Customizing the MFA Login Page (if applicable)
If your SAML IdP integrates with MFA, the firewall might display a page for the second factor. This page can often be customized.
Refer to the documentation on customizing the MFA login page if you are using integrated MFA services.
Verification Steps
After configuring the SAML Authentication Profile, Authentication Enforcement object, and the Authentication Policy rules (including the IdP exclusion), verify that the setup functions as expected.
-
Ensure you are on a network segment subject to the Captive Portal rule and your IP is not yet mapped to a user.
-
Attempt to access a website (e.g., via HTTP/S) that matches the 'Trigger-SAML-Captive-Portal' rule.
-
Your browser should be redirected to the Captive Portal web form hosted by the firewall.
-
Upon submission of the web form, the firewall initiates the SAML flow, redirecting you to your IdP's login page (this traffic should match and be allowed by your 'Exclude-SAML-IdP' rule).
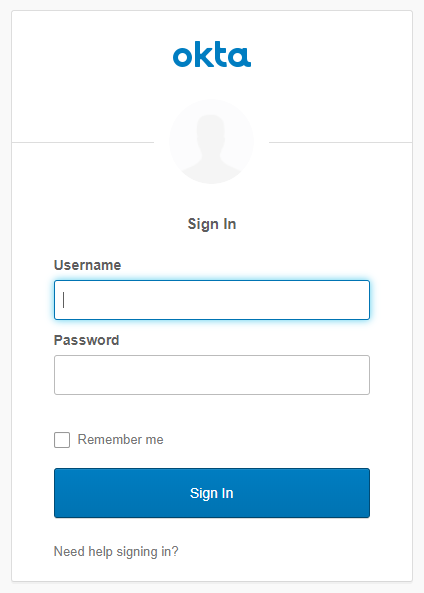
Example of an Identity Provider login page after redirection.
-
Authenticate on the IdP's login page. If MFA is configured, complete the secondary factor(s).
-
After successful authentication at the IdP, you should be redirected back to the firewall, which processes the SAML assertion and creates/updates your user-to-IP mapping.
-
You should then be automatically redirected to the original website you attempted to access.
-
Verify that your user identity appears in the firewall's User-ID mappings (Monitor > Logs > User-ID or `show user ip-user-mapping`).
-
Confirm subsequent sessions within the Authentication rule's Timeout period do not prompt for re-authentication.
-
Confirm sessions initiated after the Timeout period expires *do* prompt for re-authentication.
(Optional) If redistributing user mappings to other firewalls, verify that the user-to-IP mapping and authentication timestamps are correctly synchronized.
Flow Illustrations
SAML Captive Portal Authentication Flow
This diagram illustrates the high-level flow when an unknown user is directed to the Captive Portal using SAML.
graph TD
    A[User Initiates Traffic (e.g., HTTP/S)];
    A --> B{Firewall Evaluates Policy};
    B -- User Unknown & Matches CP Rule --> C[Trigger Authentication Portal];
    C --> D[Firewall Redirects User to CP Web Form];
    D --> E[User Submits Credentials/Initates SAML on CP Form];
    E --> F{Firewall Creates SAML Auth Request};
    F --> G[Firewall Redirects User to IdP Login URL];
    G --> H[User Authenticates at IdP];
    H --> I{IdP Generates SAML Assertion};
    I --> J[IdP Redirects User (Assertion in Browser) back to Firewall URL];
    J --> K{Firewall Receives SAML Assertion};
    K --> L{Firewall Validates Assertion (Signature, Timestamps) & User Identity};
    L -- Validation Successful --> M[Firewall Creates User-to-IP Mapping];
    M --> N[Original User Traffic Allowed Based on Identity Policies];
    L -- Validation Failed --> O[Access Denied];
Authentication Policy Evaluation Flow with IdP Exclusion
This diagram highlights how the IdP exclusion rule prevents the SAML communication from being intercepted by the main Captive Portal rule.
graph TD
    A[User Initiates Traffic]
    A --> B{Firewall Receives Session}
    B --> C{User-ID Mapping Check?}
    C -- Yes, Known --> D[Apply Security Policy based on User]
    C -- No, Unknown --> E[Evaluate Authentication Policy]
    E --> F{Rule 1: Matches Exclude-SAML-IdP Rule?}
    F -- Yes (Traffic to IdP URL) --> G[Action: default-no-captive-portal]
    G --> H[Allow traffic to IdP]
    F -- No --> I{Rule 2: Matches Trigger-SAML-Captive-Portal Rule}
    I -- Yes --> J[Action: SAML-Captive-Portal-Enforcement]
    J --> K[Trigger Captive Portal SAML flow begins]
    I -- No Match or Deny Rule Match --> L[Apply default or subsequent Policy Deny unknown users]
    H --> M[SAML Flow Continues, User Authenticates]
    M --> N[Firewall Creates User-ID Mapping]
    N --> D
Conclusion
Implementing Captive Portal with SAML authentication on Palo Alto Networks firewalls provides a flexible and secure way to onboard and identify users, particularly in guest or BYOD scenarios. The process involves careful configuration of SAML server profiles, authentication profiles, and crucially, the Authentication Policy rules. The key caveat to remember is the necessity of an explicit Authentication policy rule to exempt traffic destined for the SAML Identity Provider, ensuring the authentication flow can complete without being intercepted by the Captive Portal trigger rule itself. By following these steps and correctly ordering your Authentication Policy rules, you can successfully integrate SAML into your Captive Portal workflows, leveraging your existing identity infrastructure.