Palo Alto Networks QoS: Overview & Core Concepts
Quality of Service (QoS) within the Palo Alto Networks ecosystem is a critical mechanism for managing network traffic to ensure that essential applications and users receive the necessary bandwidth and priority, especially during periods of network congestion. PAN-OS provides a robust QoS implementation that leverages its unique capabilities like App-ID and User-ID for granular traffic control.
Why QoS on Palo Alto Networks Firewalls?
Palo Alto Networks firewalls, being at the heart of network security and traffic management, are ideally positioned to enforce QoS policies. Unlike traditional QoS mechanisms that might only rely on IP addresses and port numbers, PAN-OS QoS can differentiate traffic based on:
- App-ID™: Identifies applications regardless of port, protocol, encryption (SSL/TLS), or evasive tactics. This allows precise prioritization of critical business applications (e.g., Salesforce, SAP) over less critical ones (e.g., social media, streaming).
- User-ID™: Integrates with directory services (like Active Directory) to identify users and groups, enabling QoS policies based on user roles or departments. For instance, the executive team or engineering department might receive higher priority for specific applications.
- Content-ID™: While not a primary QoS classifier, it contributes to the overall context by identifying threats and file types, which can indirectly influence decisions about traffic that might be rate-limited or deprioritized (though this is more a security policy function, App-ID is the key for QoS classification of applications).
Key Network Characteristics Managed by PAN-OS QoS
PAN-OS QoS helps manage and optimize the following network characteristics:
-
Bandwidth:
The maximum data transfer rate. QoS ensures that critical applications get their required share of bandwidth.
- Guaranteed Bandwidth: A minimum bandwidth allocation that a specific traffic class will receive, especially under congestion.
- Maximum Bandwidth (Egress Max): An upper limit on the bandwidth a traffic class can consume.
- Latency (Delay): The time it takes for a packet to travel from source to destination. QoS prioritizes latency-sensitive traffic like VoIP and video conferencing.
- Jitter: The variation in packet arrival times. QoS aims to minimize jitter for real-time applications by ensuring consistent packet delivery.
- Packet Loss: The percentage of packets lost during transmission. While QoS primarily manages bandwidth and priority, reducing congestion through QoS can indirectly reduce packet loss. PAN-OS uses Weighted Random Early Detection (WRED) as part of its queuing mechanism to proactively manage queue depths and minimize tail drops.
Common QoS Goals in a Palo Alto Networks Environment
- Prioritizing business-critical applications (e.g., ERP, CRM, custom financial apps) identified by App-ID.
- Guaranteeing bandwidth for latency-sensitive applications like VoIP (e.g., SIP, RTP, H.323) and video conferencing (e.g., WebEx, Zoom, Microsoft Teams).
- Limiting bandwidth for non-essential or recreational applications (e.g., streaming video, P2P file sharing, online gaming) during business hours.
- Ensuring fair bandwidth allocation among different user groups or departments based on User-ID.
- Managing bandwidth for specific tunnels, such as IPsec VPNs connecting to branch offices or GlobalProtect remote access VPNs.
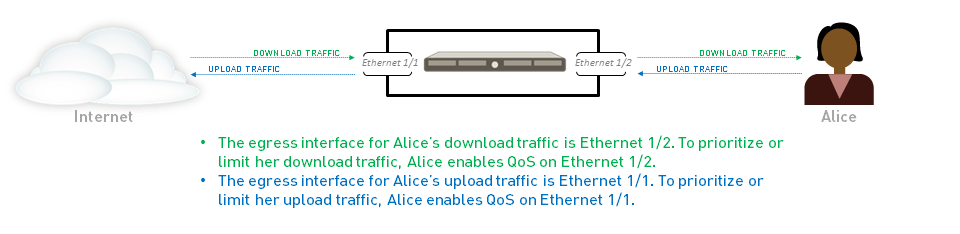
- Differentiating QoS treatment for upload versus download traffic by applying QoS on the respective egress interfaces (e.g., untrust interface for uploads, trust interface for downloads).
Each Palo Alto Networks firewall model has a maximum number of physical interfaces on which QoS can be enabled. Always consult the specific hardware datasheet on the Palo Alto Networks support portal for these limits.

Conceptual flow of traffic identification and QoS processing within a Palo Alto Networks firewall, highlighting the roles of App-ID and User-ID in QoS policy evaluation.
Palo Alto Networks QoS: Key Components & Traffic Flow
A complete QoS solution on a Palo Alto Networks firewall is built using three primary configurable components. Understanding how these components interact is crucial for effective QoS implementation.
Core QoS Components in PAN-OS
-
QoS Policy Rule:
- Purpose: To identify and classify traffic that requires specific QoS treatment.
-
Location:
Policies > QoSin the PAN-OS GUI or Panorama. -
Matching Criteria:
Leverages the full power of PAN-OS identification, including:
- Source/Destination Zones
- Source/Destination Addresses (pre-NAT for source)
- User-ID (source users/groups)
- App-ID (applications, application filters, application groups)
- Service (ports, service groups)
- URL Category
- DSCP/ToS markings
- Action: Assigns matched traffic to one of eight QoS Classes (1-8).
- Evaluation: QoS Policy rules are evaluated after Security Policy and NAT policy evaluation. However, for matching purposes, QoS policies generally use pre-NAT source IP addresses and pre-NAT destination IP addresses but post-NAT destination zones.
-
QoS Profile:
- Purpose: To define the specific bandwidth allocations (guaranteed and maximum) and priority levels for each of the eight QoS Classes.
-
Location:
Network > Network Profiles > QoS Profiles. -
Key Settings per Class (1-8):
- Priority: Real-time, High, Medium, Low. This determines the dequeuing preference from the hardware queues.
- Egress Max: The absolute maximum bandwidth a class can consume on the interface where the profile is applied. Specified in Mbps, Kbps, or as a percentage of the interface's Egress Max bandwidth.
- Egress Guaranteed: The minimum bandwidth reserved for a class during congestion. Specified in Mbps, Kbps, or as a percentage. Unused guaranteed bandwidth can be utilized by other classes.
- Overall Settings: A QoS Profile can also have an overall Egress Max and Egress Guaranteed bandwidth limit that applies to all traffic shaped by that profile on an interface.
-
QoS Egress Interface Configuration:
- Purpose: To enable QoS on a physical egress interface and apply a QoS Profile to shape the traffic exiting that interface.
-
Location:
Network > QoS. Here you associate a physical interface with QoS settings. -
Key Settings:
- Interface Selection: The physical interface (e.g., ethernet1/1) on which QoS will be enforced.
- Turn on QoS: Checkbox to enable QoS processing for this interface.
- Interface Egress Max: The total maximum bandwidth available for QoS shaping on this physical interface. This is a critical value as class percentages are calculated based on this.
- Default QoS Profile (Clear Text): The QoS Profile applied to non-tunneled traffic exiting this interface.
- Default QoS Profile (Tunneled Traffic): The QoS Profile applied to tunneled traffic (e.g., IPsec) exiting this interface.
- Granular Rules: Ability to apply different QoS Profiles for clear text traffic based on source subnets/interfaces, and for tunneled traffic based on specific tunnel interfaces.
PAN-OS QoS Traffic Flow
The general flow is as follows:
- Traffic ingresses the firewall.
- Standard firewall processing occurs: Ingress interface processing, session lookup/creation, Security Policy evaluation, NAT policy evaluation.
- QoS Policy Evaluation: The firewall evaluates QoS Policy rules based on the (mostly) original packet information (pre-NAT source IP, pre-NAT destination IP, post-NAT destination zone, App-ID, User-ID, etc.).
- If a QoS Policy rule is matched, the traffic is assigned the QoS Class specified in that rule.
- If no QoS Policy rule is matched, the traffic is assigned the default QoS Class (Class 4, unless modified globally via CLI, which is rare).
- The traffic is routed to its egress interface.
-
QoS Enforcement on Egress:
If QoS is enabled on the egress interface:
- The QoS Profile associated with that interface (and potentially specific rules for clear text/tunneled traffic) is applied.
- The traffic is placed into one of the eight hardware queues corresponding to its assigned QoS Class.
- Packets are dequeued based on the priority settings (real-time, high, medium, low) and shaped according to the Egress Guaranteed and Egress Max bandwidth limits defined in the QoS Profile for that class.
- Weighted Random Early Detection (WRED) is used to manage queue congestion proactively.
- Traffic egresses the firewall.
Detailed packet flow for QoS processing in PAN-OS, showing policy evaluation stages and enforcement on the egress interface.
Palo Alto Networks QoS: QoS Classes & Priority Queuing
Palo Alto Networks firewalls provide eight distinct QoS classes to categorize and manage traffic. The priority assigned to these classes dictates how traffic is handled, especially during network congestion.
QoS Classes
PAN-OS supports eight QoS classes, numbered 1 through 8. These classes are fundamental to the QoS framework:
- Classification: Traffic is assigned to one of these eight classes by a QoS Policy rule.
-
Default Class:
Traffic that does not match any user-defined QoS Policy rule is automatically assigned to
Class 4
. This default can be changed via a CLI command (
set system setting qos-default-class <value>), but this is generally not recommended unless for very specific scenarios. - Configuration: The behavior of each class (bandwidth limits, priority) is defined within a QoS Profile, which is then applied to an egress interface.
While there are eight classes, it's a common best practice to use a subset of them for distinct traffic types. For example:
- Class 1: Real-time (e.g., VoIP signaling and media)
- Class 2: High (e.g., Critical business applications, interactive video)
- Class 3: Medium (e.g., Important internal applications, preferred web traffic)
- Class 4: Default / Best Effort (General web browsing, non-critical traffic)
- Class 5: Medium-Low (e.g., Bulk data transfers, backups during business hours if necessary)
- Class 6: Low (e.g., Recreational web browsing, software updates)
- Class 7 & 8: Scavenger / Lowest (e.g., P2P, non-business heavy downloads) - often heavily rate-limited.
QoS Priority Queuing
Within a QoS Profile, each of the eight classes is assigned a priority level. This priority determines the order in which packets are dequeued from the hardware queues of the egress interface, especially when the interface is congested.
PAN-OS supports four priority levels:
- Real-time: This is the highest priority. Traffic in classes assigned 'real-time' priority is serviced first. This is typically reserved for extremely latency-sensitive applications like Voice over IP (RTP media streams) and critical interactive video conferencing. It aims for the lowest possible delay and jitter.
- High: The second-highest priority. Used for important business applications that require preferential treatment over standard traffic but are slightly less sensitive than real-time traffic. Examples include transactional applications, critical database access, or important web services.
- Medium: The default priority for many general traffic types. Suitable for standard business applications, general web browsing, and email that do not have stringent low-latency requirements.
- Low: The lowest priority. Used for bulk traffic, non-critical applications, or traffic that can tolerate higher latency and potential delays. Examples include large file downloads, background data transfers, or recreational internet use.
How Priority Works:
Palo Alto Networks firewalls implement a form of strict priority queuing combined with weighted fairness for classes at the same priority level. In essence:
- Packets in 'Real-time' queues are serviced before any packets in 'High', 'Medium', or 'Low' priority queues.
- Packets in 'High' priority queues are serviced before 'Medium' or 'Low'.
- Packets in 'Medium' priority queues are serviced before 'Low'.
- Within the same priority level, if multiple classes share that priority, bandwidth is distributed among them based on their configured guaranteed/maximum rates and current demand, often employing a weighted mechanism.
It's important not to over-assign traffic to 'Real-time' or 'High' priority, as this can starve lower-priority (but still important) traffic. A well-balanced QoS strategy is key.
Conceptual representation of priority queuing on a Palo Alto Networks firewall. Packets are enqueued based on their QoS class's priority, and the scheduler services higher priority queues first.
Palo Alto Networks QoS: Bandwidth Management
Effective bandwidth management is a cornerstone of QoS on Palo Alto Networks firewalls. It involves allocating and limiting bandwidth for different traffic classes to prevent congestion, ensure fairness, and guarantee performance for critical applications. This is primarily achieved through Egress Guaranteed and Egress Max settings within a QoS Profile.
Key Bandwidth Parameters
These parameters are configured per QoS class within a QoS Profile (
Network > Network Profiles > QoS Profiles
) and can also be set for the overall profile or interface.
-
Egress Guaranteed:
- Definition: The minimum amount of bandwidth that is guaranteed to be available for a specific QoS class when the egress interface experiences congestion.
- Behavior: If a class with guaranteed bandwidth is using less than its guaranteed amount, the unused portion is available for other traffic classes to consume (especially those exceeding their own guarantees but below their maximums). During congestion, the firewall will strive to provide at least this amount of bandwidth to the class.
-
Units:
Can be configured in Mbps, Kbps, or as a percentage.
-
If set as a percentage, it's a percentage of the
Interface Egress Max
value defined in the QoS settings for the physical interface (
Network > QoS > select interface) or the Profile Egress Max if one is set on the QoS Profile itself.
-
If set as a percentage, it's a percentage of the
Interface Egress Max
value defined in the QoS settings for the physical interface (
- Purpose: Ensures that critical applications always have a minimum level of service, even when the network is busy.
-
Egress Max:
- Definition: The absolute maximum amount of bandwidth that a specific QoS class is allowed to consume on the egress interface.
- Behavior: Traffic belonging to this class that exceeds this maximum limit will be dropped (subject to WRED behavior which tries to drop packets gracefully before hitting hard limits). This acts as a hard ceiling for the class.
-
Units:
Can be configured in Mbps, Kbps, or as a percentage.
- Percentages are calculated similarly to Egress Guaranteed (based on Interface Egress Max or Profile Egress Max).
- Purpose: Prevents any single traffic class (especially lower priority or bandwidth-hungry applications) from monopolizing the entire link capacity.
Relationship with Interface and Profile Bandwidth
-
Interface Egress Max (
Network > QoS > [Interface]): This is the master bandwidth setting for the physical interface. All percentage-based Egress Guaranteed/Max values for classes are ultimately calculated based on this value (or the Profile Egress Max, if it's lower and set). It should accurately reflect the usable bandwidth of the link connected to that interface (e.g., for a 1 Gbps internet circuit, set this to 1000 Mbps or slightly less to account for overhead). -
Profile Egress Max (
Network > Network Profiles > QoS Profiles > [Profile]): An optional setting on the QoS Profile itself. If set, it acts as an overall cap for all traffic shaped by this specific profile on an interface. If both Interface Egress Max and Profile Egress Max are set, class percentages are typically based on the more restrictive (lower) of these two values when that profile is applied. This can be useful for creating "nested" QoS policies where a profile might manage a subset of the total interface bandwidth.
Weighted Random Early Detection (WRED)
Palo Alto Networks firewalls utilize Weighted Random Early Detection (WRED) as part of their queue management mechanism. WRED is a congestion avoidance algorithm, not a congestion management algorithm. It works by:
- Monitoring the average queue depth for each QoS class queue.
- Proactively dropping packets with increasing probability as the average queue depth grows, *before* the queue becomes completely full (tail drop).
- The "Weighted" aspect means it can be configured (though not directly by users in PAN-OS in fine-grained detail for WRED itself) to drop lower priority packets (or packets from flows contributing most to congestion) more aggressively.
WRED helps to:
- Prevent global synchronization of TCP flows (where multiple TCP sessions back off and ramp up simultaneously after tail drops).
- Maintain lower average queue latency and jitter.
- Provide a more graceful degradation of service during periods of incipient congestion.
While WRED parameters are not typically user-tunable in PAN-OS GUI for QoS, its presence is important for understanding how queues are managed effectively in conjunction with bandwidth limits and priorities.
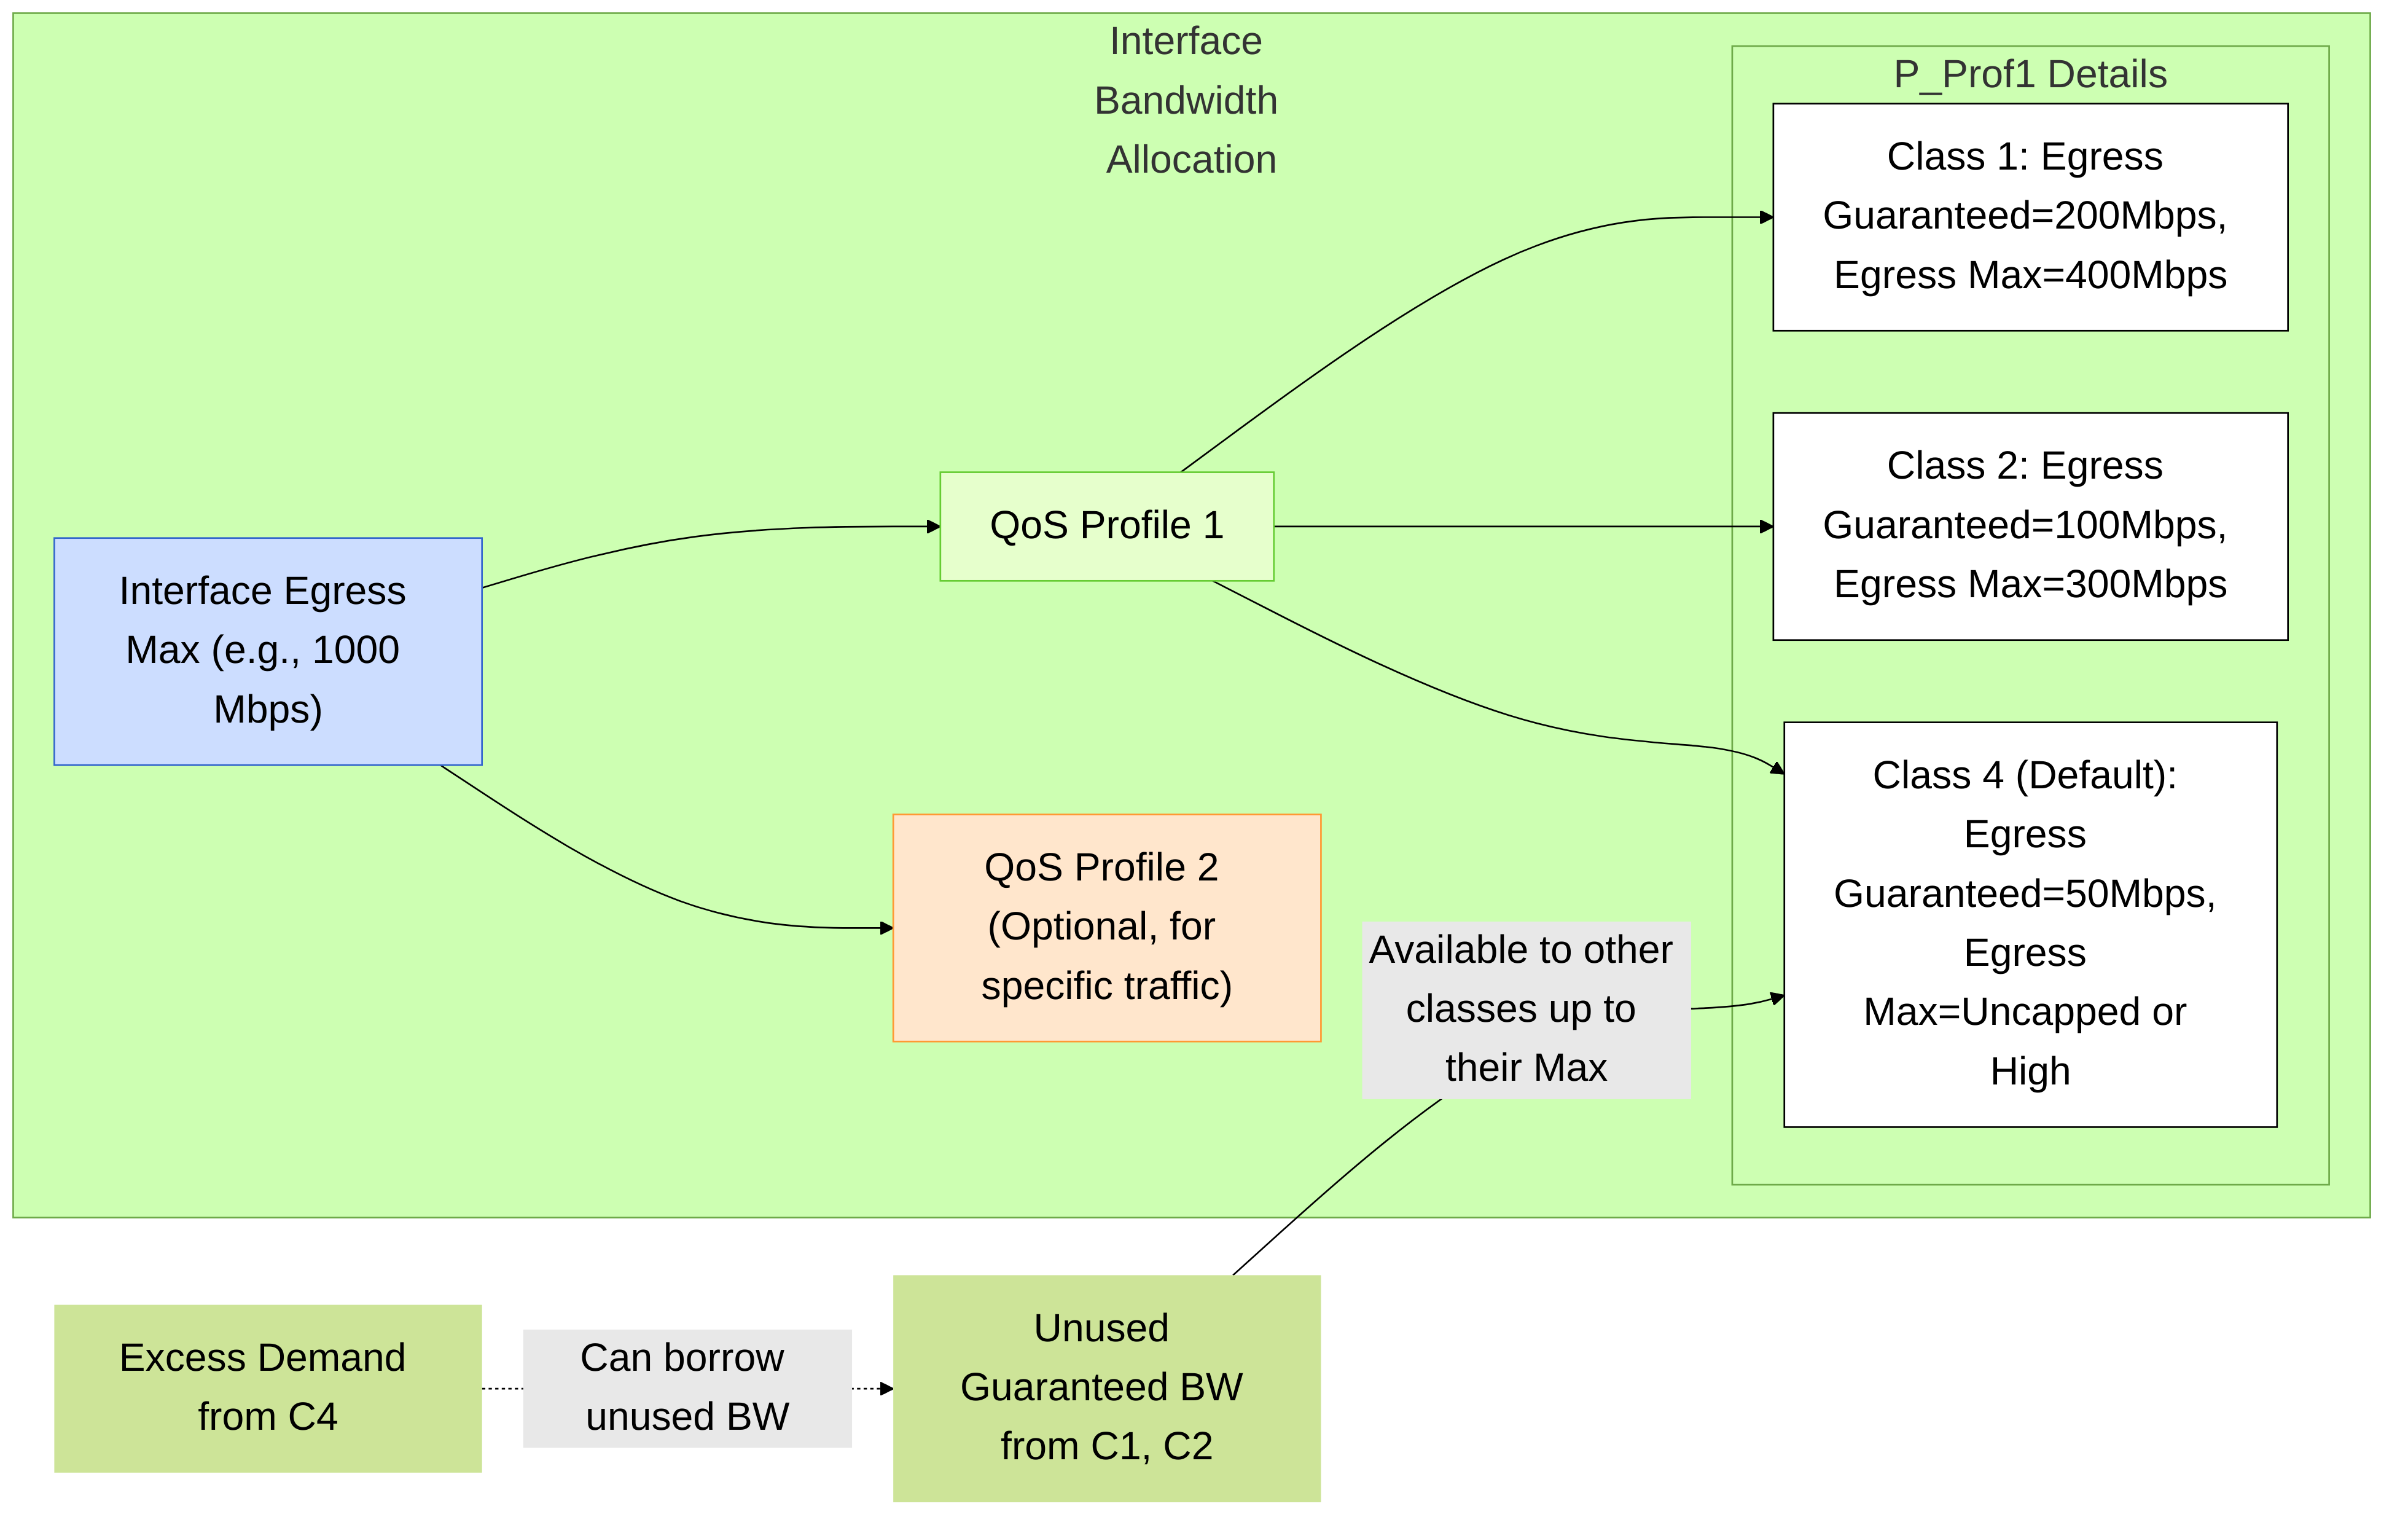
Hierarchical view of bandwidth allocation: Interface Egress Max is the total. QoS Profiles manage this bandwidth, and within profiles, classes have Guaranteed and Max limits. Unused guaranteed bandwidth is dynamically shared.
Palo Alto Networks QoS: General Configuration Steps
Configuring QoS on a Palo Alto Networks firewall involves a systematic approach. Following these steps ensures that traffic is correctly identified, classified, and shaped according to your organization's requirements.
-
Identify Traffic & Determine Egress Interface(s):
- Objective: Understand which applications, users, or services need QoS treatment and which firewall interface(s) this traffic will exit from.
-
Tools:
-
Application Command Center (ACC) (
ACCtab): Provides a graphical overview of traffic patterns, top applications, users, source/destination zones, and interfaces. Filter by time range, zones, applications, etc., to pinpoint the traffic of interest.
Palo Alto Networks ACC tab showing top applications and associated interfaces. This helps identify traffic needing QoS. -
Traffic Logs (
Monitor > Logs > Traffic): Offer detailed, session-level information. Crucially, theEgress Interfacecolumn (add it if not visible) shows the exit interface for each session. You can also see App-ID, User-ID, source/destination IP, and zones.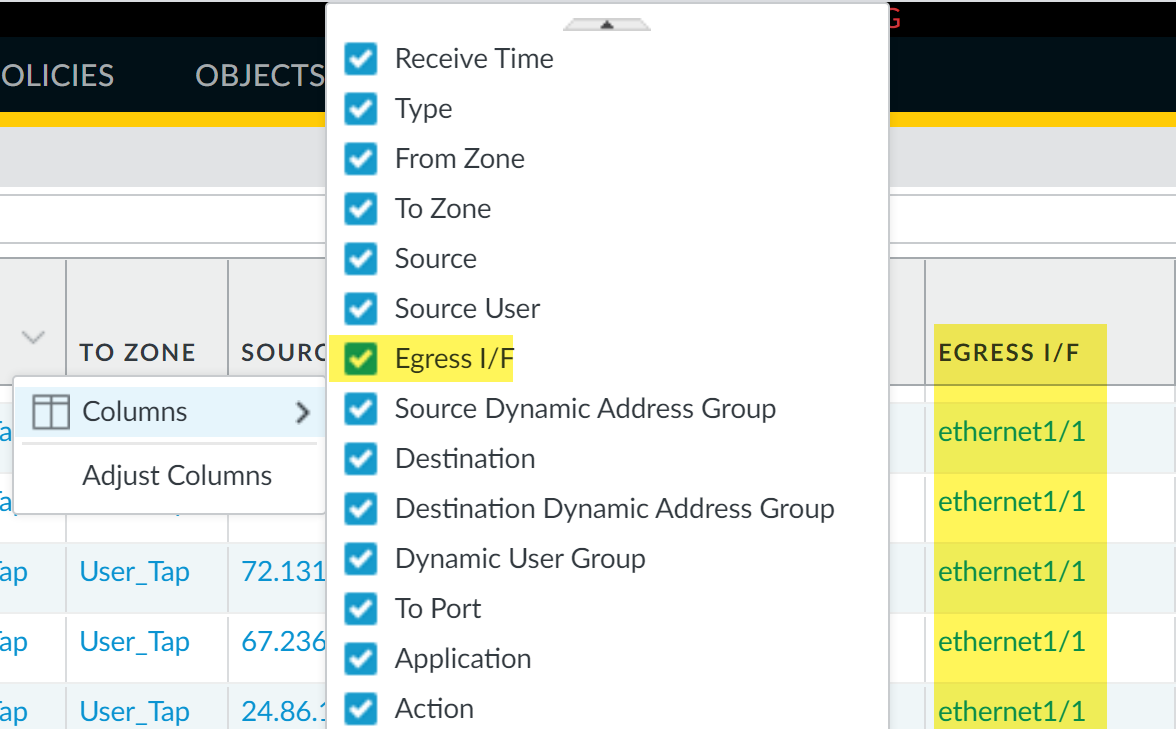
Palo Alto Networks Traffic Logs with the 'Egress I/F' column selected, vital for determining the egress interface for QoS. 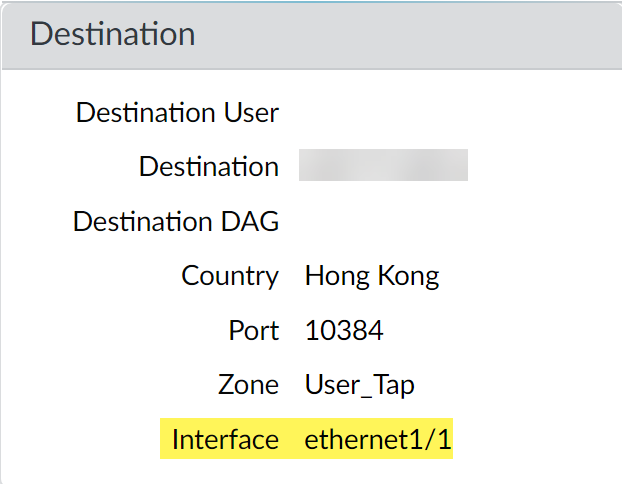
Detailed view of a traffic log entry in PAN-OS, highlighting the Egress Interface field.
-
Application Command Center (ACC) (
- Consideration: Remember that QoS is applied on egress. For traffic from your internal network to the internet (upload), the egress interface is typically your external-facing (e.g., 'untrust') interface. For traffic from the internet to your internal network (download), the egress interface is your internal-facing (e.g., 'trust') interface. You might need QoS on multiple interfaces.
-
Create/Modify QoS Profile(s) (
Network > Network Profiles > QoS Profile):- Objective: Define the bandwidth (Egress Guaranteed, Egress Max) and Priority (Real-time, High, Medium, Low) for each of the eight QoS classes.
-
Steps:
-
Click
Addto create a new profile or select an existing one to modify. - Give the profile a descriptive Name (e.g., "Critical_Apps_QoS", "VoIP_Profile").
- (Optional but recommended) Set an Overall Egress Max and/or Egress Guaranteed for the entire profile if you want to cap the total bandwidth this profile can manage on an interface.
-
For each QoS Class (1-8) that you plan to use in your QoS Policies:
- Select the Priority .
- Set Egress Max (in Mbps, Kbps, or %).
- Set Egress Guaranteed (in Mbps, Kbps, or %).
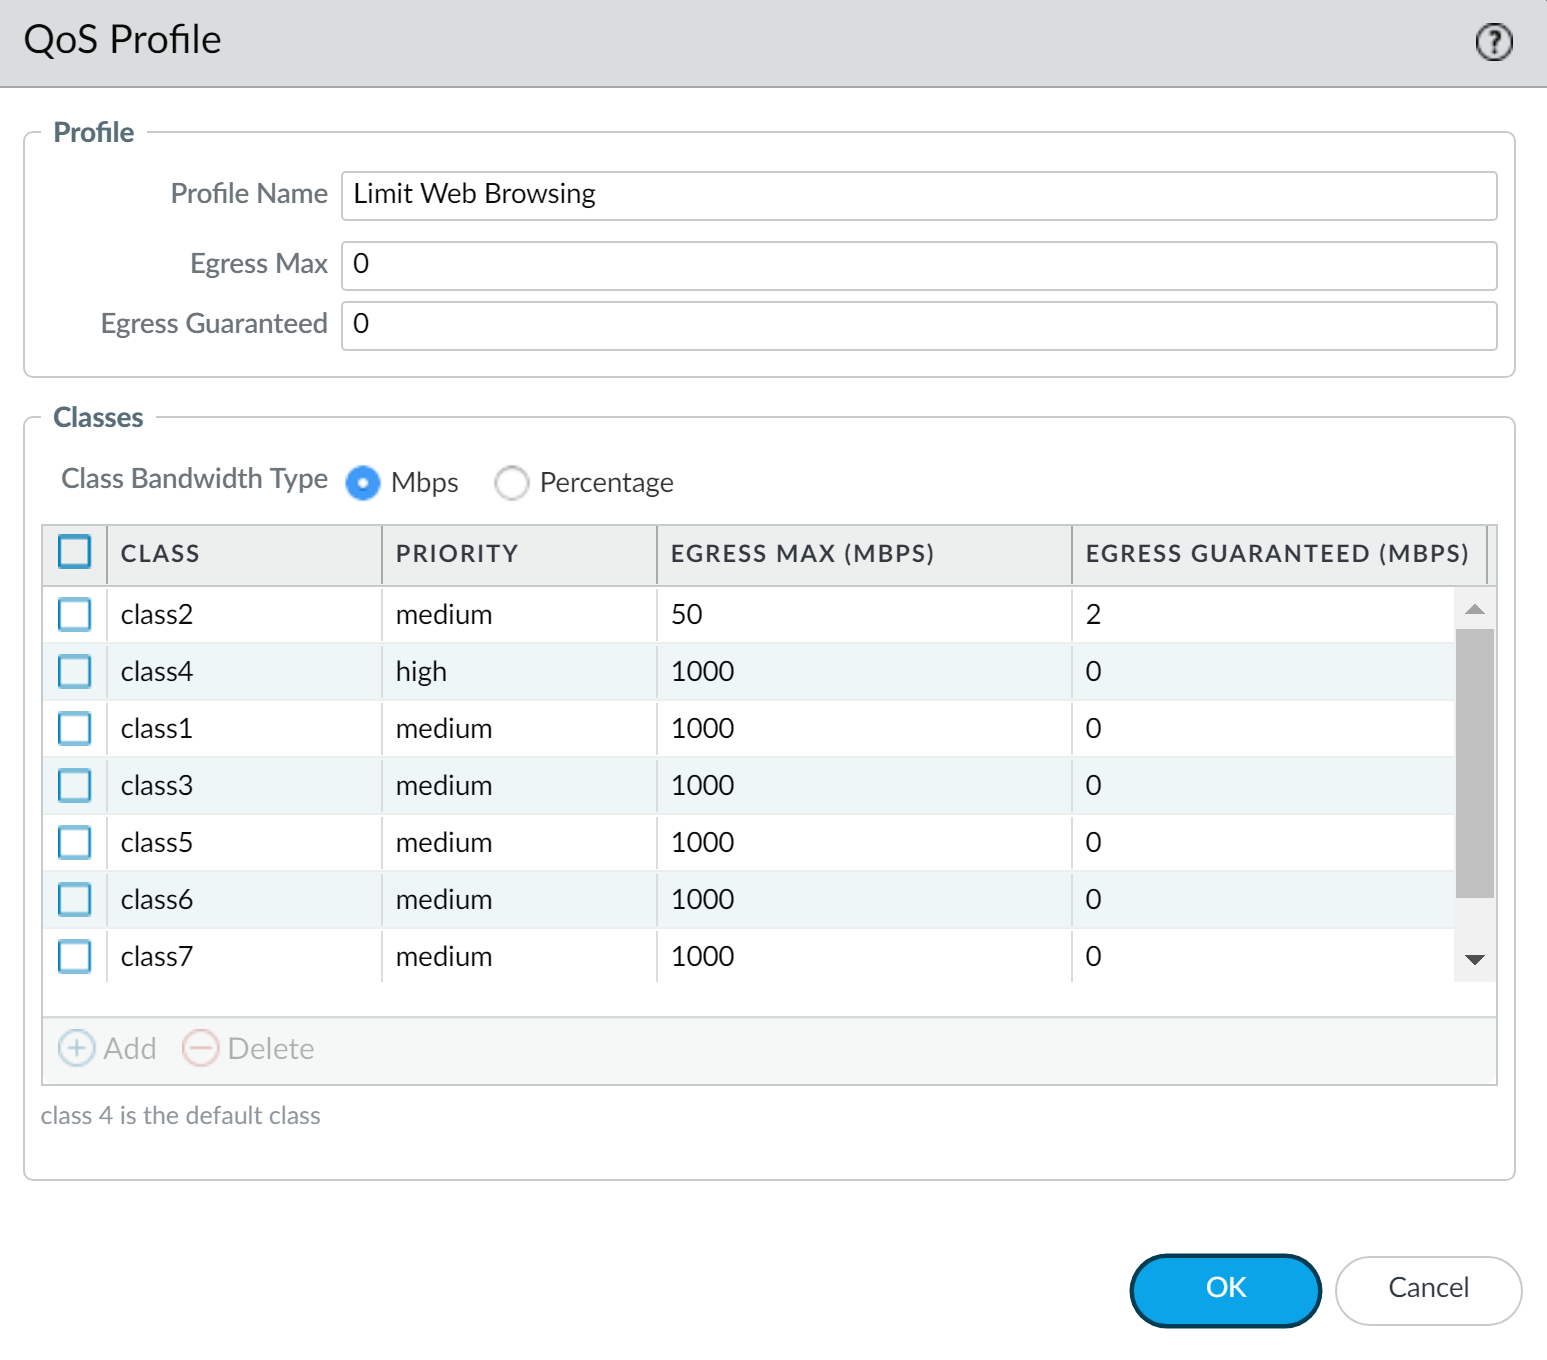
PAN-OS QoS Profile configuration: Setting overall limits and per-class Priority, Egress Max, and Egress Guaranteed values. -
Click
OK.
-
Click
-
Create QoS Policy Rule(s) (
Policies > QoS):- Objective: Classify the identified traffic and assign it to a specific QoS Class (which is then handled by the QoS Profile).
-
Steps:
-
Click
Addto create a new QoS policy rule. - General Tab: Give it a descriptive Name (e.g., "VoIP_to_Class1", "CEO_Web_High_Priority"). Add Tags if used.
- Source Tab: Define Source Zone(s), Source Address(es)/Address Group(s). If using User-ID, specify Source User(s)/Group(s). Remember to use pre-NAT source IP addresses for matching.
- Destination Tab: Define Destination Zone(s) (usually post-NAT for traffic to internet), Destination Address(es)/Address Group(s).
-
Application/Service Tab:
- Application: Specify Applications, Application Filters, or Application Groups (leveraging App-ID). This is a key differentiator for PAN-OS QoS.
- Service/URL Category: Specify Services (TCP/UDP ports), Service Groups, or URL Categories.
- DSCP/ToS Tab (Optional): If classifying based on existing DSCP/ToS markings, configure them here.
-
Other Settings Tab:
- From the Class dropdown, select the QoS Class (1-8) to assign to traffic matching this rule. This class number corresponds to the class configured in your QoS Profile.
-
Click
OK. Arrange rules in the correct order (more specific rules usually go higher).
-
Click
-
Enable QoS on Egress Interface(s) & Apply Profile (
Network > QoS):- Objective: Activate QoS processing on the physical egress interface(s) and link the appropriate QoS Profile.
-
Steps:
-
Click
Addor select an existing interface configuration to modify. - Select the physical Interface Name (e.g., ethernet1/1, ethernet1/2) identified in Step 1.
- Set the Egress Max bandwidth for this physical interface (e.g., 1000 Mbps for a 1Gbps link). This value is critical for percentage-based calculations in QoS Profiles.
- Check the box: Turn on QoS feature on this interface .
-
Clear Text Traffic Tab:
- Select the Default Profile (e.g., the QoS Profile created in Step 2) to apply to all clear text (non-tunneled) traffic exiting this interface that is classified by QoS Policies.
- (Optional) Add specific rules to apply different QoS Profiles based on Source Interface or Source Subnet.
-
Tunneled Traffic Tab (Optional):
- Select a Default Profile for all tunneled traffic (e.g., IPsec VPNs).
- (Optional) Add rules to apply specific QoS Profiles to individual Tunnel Interfaces.
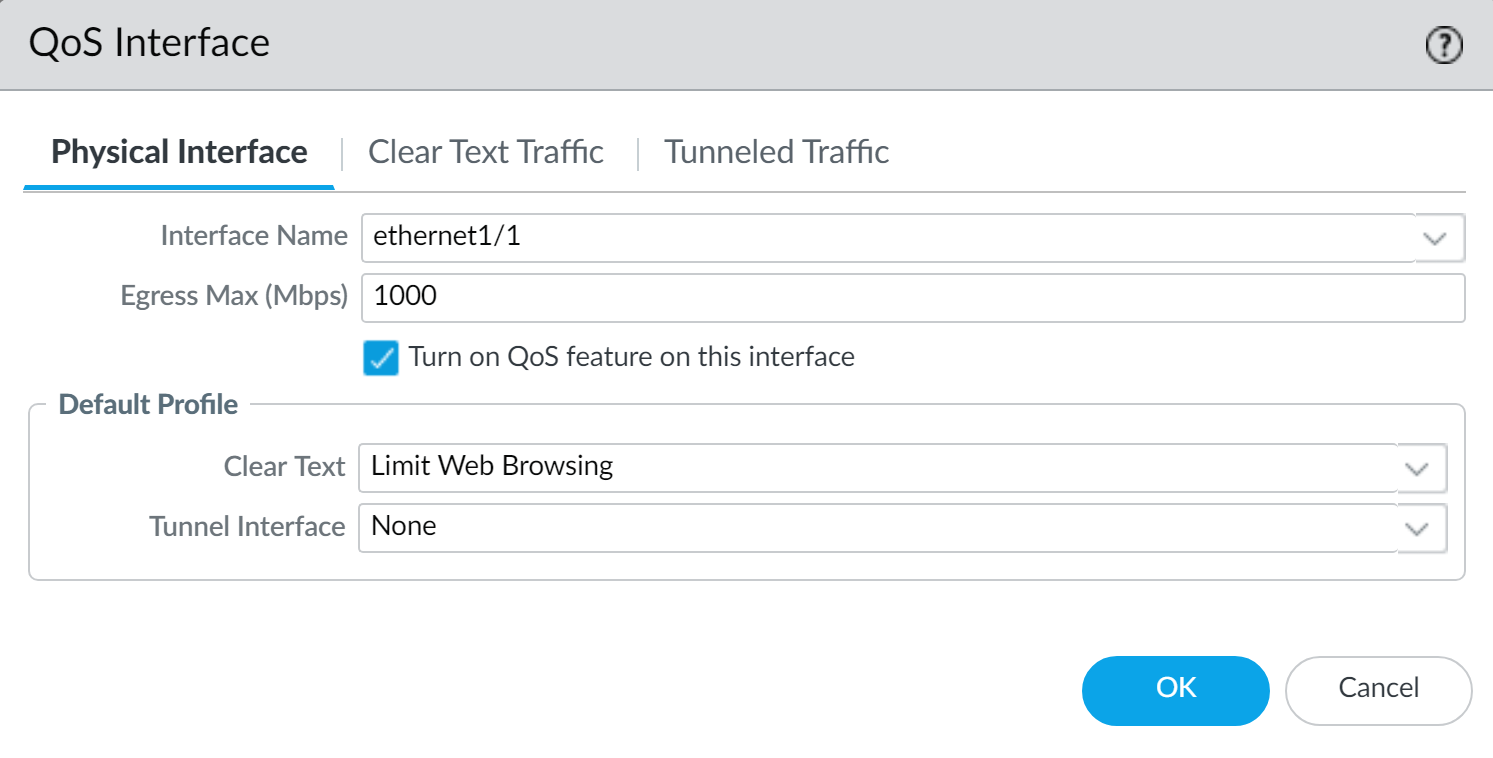
PAN-OS QoS Interface configuration: Enabling QoS, setting Interface Egress Max, and assigning default QoS Profiles for clear text and tunneled traffic. -
Click
OK.
-
Click
-
Commit Changes:
-
Click
Commitin the PAN-OS GUI to apply the configuration. Select "Commit All Changes" or "Commit changes made by me" as appropriate.
-
Click
-
Verify and Monitor QoS Operation:
(Covered in more detail in "Verification & Monitoring" section)
-
QoS Statistics (
Network > QoS > Statisticstab): Select the QoS-enabled interface to view real-time bandwidth usage per class, active sessions, top applications within each class, etc.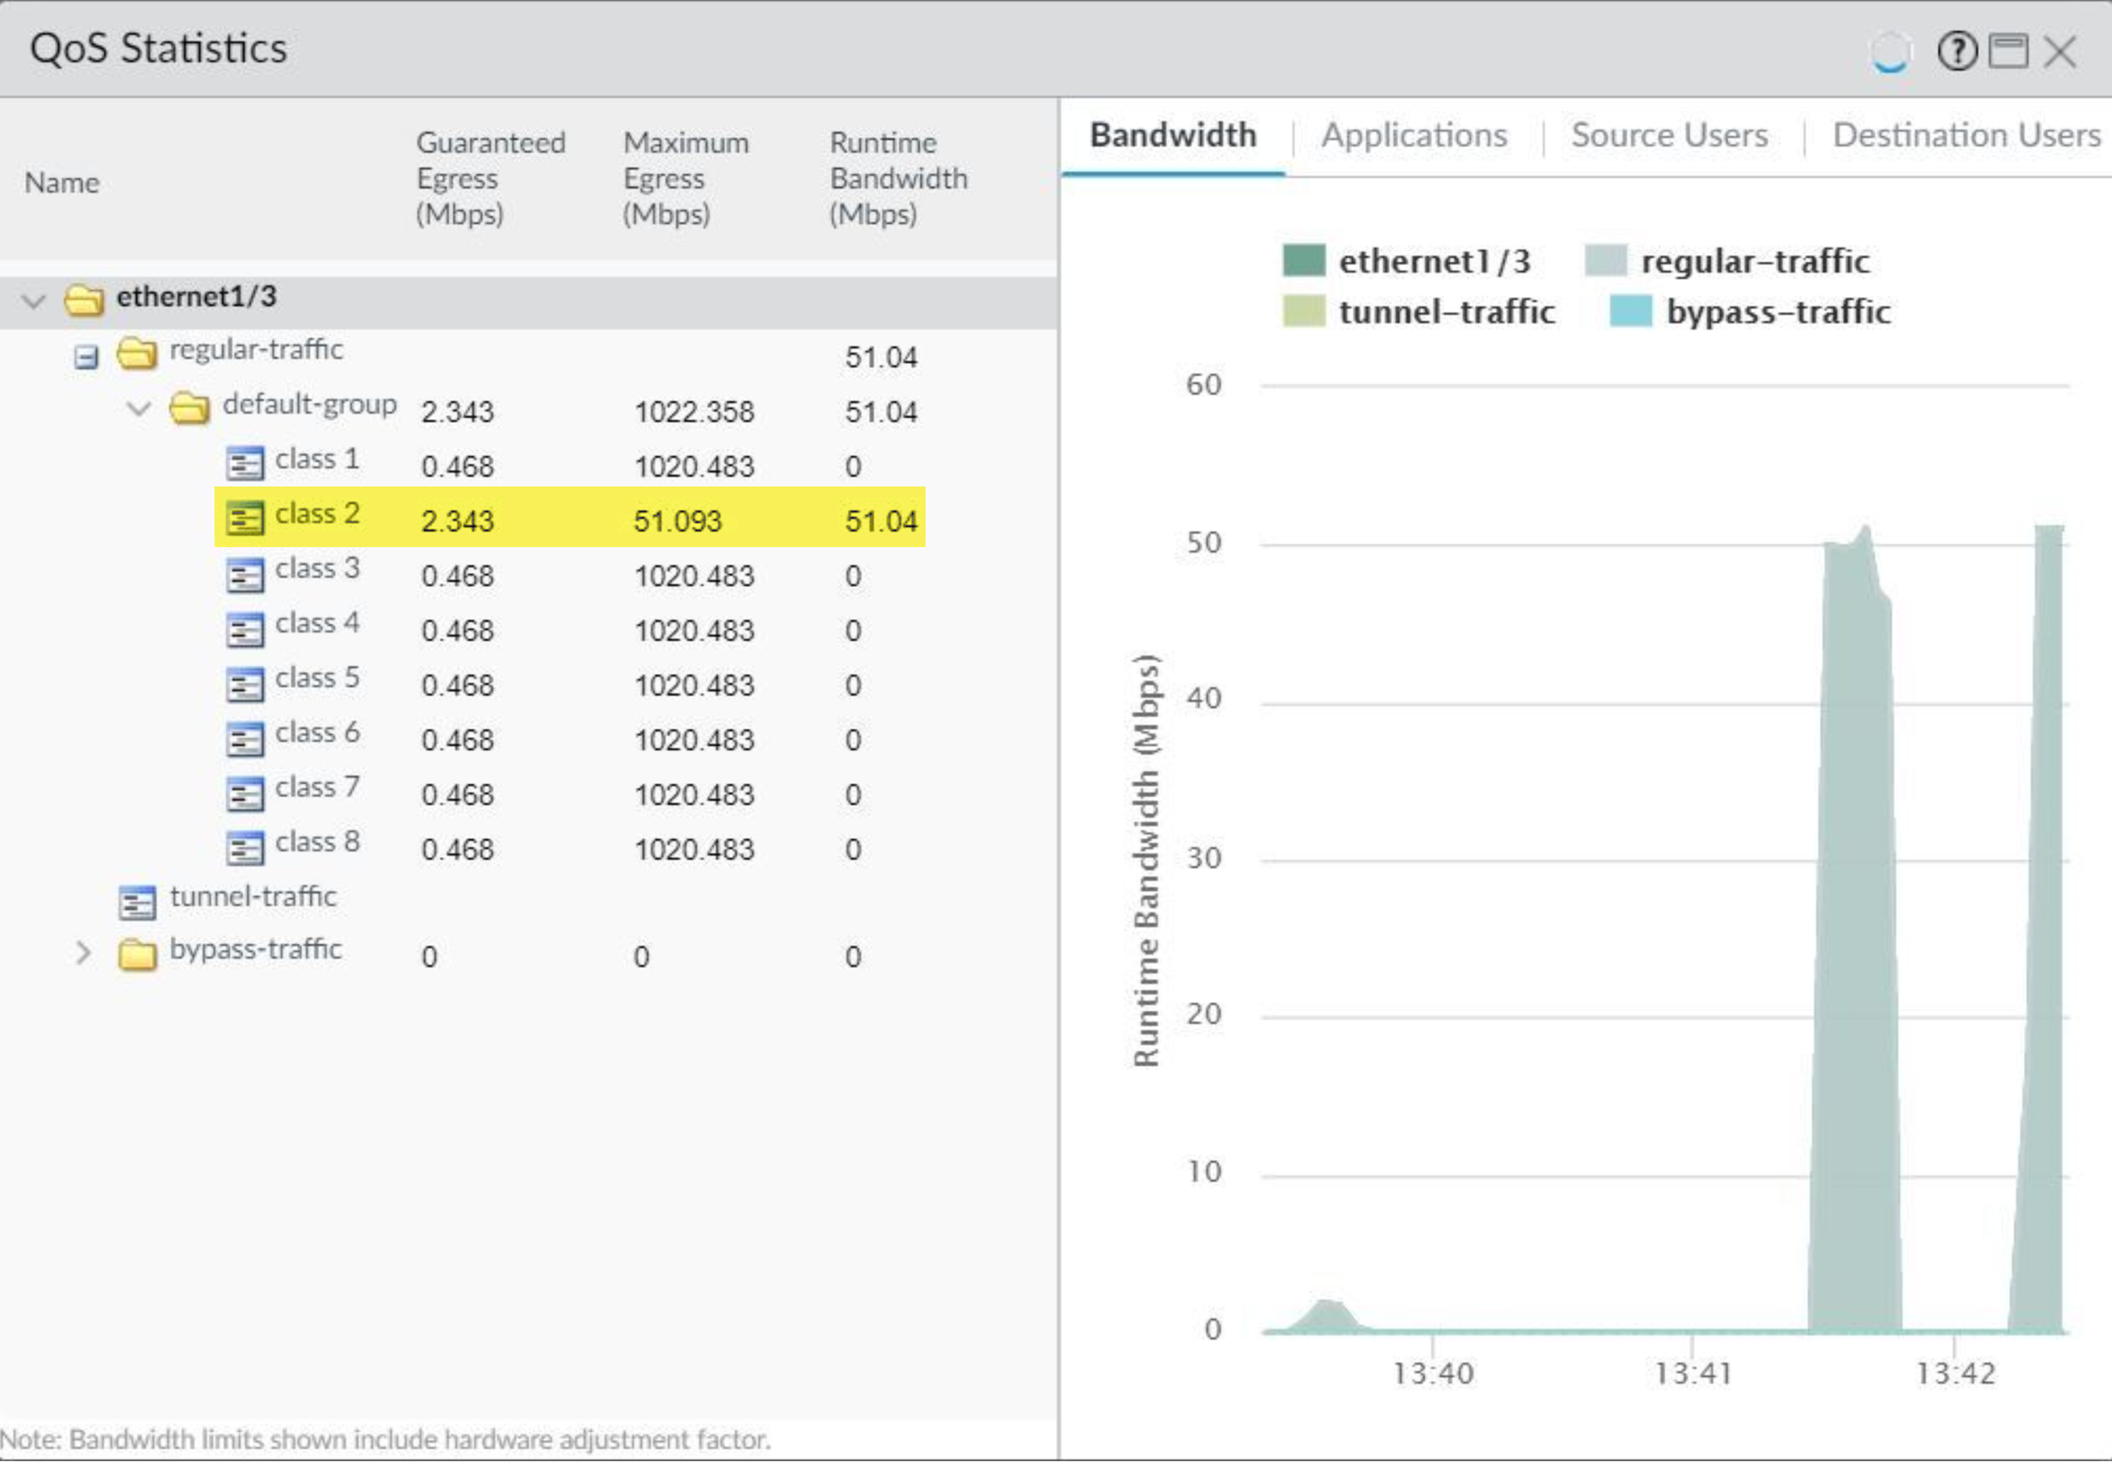
PAN-OS QoS Statistics page, showing bandwidth graphs, session counts, and application details per QoS class for a selected interface. -
Session Browser (
Monitor > Session Browser): Check individual sessions to see if they are being matched by a QoS Policy rule and what QoS Class they have been assigned (look for QoS Rule and QoS Class columns). -
Traffic Logs (
Monitor > Logs > Traffic): Confirm traffic is matching the intended QoS policy rules.
-
QoS Statistics (
Palo Alto Networks QoS: QoS Policy Deep Dive
QoS Policy rules (
Policies > QoS
) are the heart of traffic classification for QoS in PAN-OS. They determine *which* traffic gets *what* QoS Class. A nuanced understanding of their matching criteria and behavior is essential for effective QoS.
QoS Policy Rule Structure and Matching
A QoS Policy rule consists of several tabs to define matching criteria:
- General: Name, Tags, Description.
-
Source:
- Source Zone: The zone from which the traffic originates.
- Source Address: IP addresses, subnets, address groups, regions. Crucially, for traffic subject to Source NAT, these should be the pre-NAT (original) source IP addresses.
- Source User: Leverages User-ID. Can specify individual users or groups (e.g., "Domain Admins", "Engineering_Dept"). This allows for user-centric QoS.
-
Destination:
- Destination Zone: The zone the traffic is going to. For traffic destined for the internet, this is typically the post-NAT destination zone (e.g., your 'untrust' zone).
- Destination Address: IP addresses, subnets, address groups, FQDNs. These are generally post-NAT destination addresses if Destination NAT is involved, or the actual public IP for internet-bound traffic.
-
Application/Service:
-
Application:
This is where App-ID shines. You can select:
-
Specific applications (e.g.,
salesforce-base,ms-teams-audio-video). - Application Filters (dynamic groups based on characteristics like category, subcategory, technology, risk). For example, an filter for "collaboration" subcategory.
- Application Groups (custom static groups of applications).
-
Specific applications (e.g.,
-
Service/URL Category:
-
Service:
TCP/UDP port numbers, service objects (e.g.,
service-http,service-https), or service groups. Useful if App-ID cannot identify an application or for very specific port-based rules. - URL Category: Match based on PAN-DB URL filtering categories (e.g., "business-and-economy", "streaming-media") or custom URL categories. This is powerful for differentiating web traffic.
-
Service:
TCP/UDP port numbers, service objects (e.g.,
-
Application:
This is where App-ID shines. You can select:
-
DSCP/ToS (Differentiated Services):
- Allows matching traffic based on existing DSCP (Differentiated Services Code Point) or ToS (Type of Service - IP Precedence) values in the IP header. This is useful for honoring QoS markings from upstream devices.
-
Other Settings:
- Class: This is the action part of the rule. You select one of the eight QoS Classes (1-8) to assign to traffic that matches all the criteria defined in the preceding tabs.
QoS Policy Evaluation Order
QoS policies are evaluated top-down, similar to Security policies. The first rule that matches the traffic characteristics will be applied, and no further QoS rules are evaluated for that session.
- Place more specific rules above more general rules.
- If traffic does not match any user-defined QoS Policy rule, it is assigned the default QoS Class (Class 4).
Interaction with Security and NAT Policies
The order of operations within the firewall's datapath is important for QoS:
- Ingress Processing
- Session Lookup / Creation
- Security Policy Evaluation (and App-ID, User-ID identification)
- NAT Policy Evaluation (Source NAT, Destination NAT)
- QoS Policy Evaluation (uses results from previous steps, e.g., identified App-ID, User-ID, pre-NAT source, post-NAT destination zone)
- Routing and Egress Interface Determination
- QoS Enforcement (shaping) on Egress Interface
This means that when you write a QoS Policy rule:
- You can rely on App-ID and User-ID already having identified the application and user.
- You must use the pre-NAT source IP address if source NAT is applied to the traffic.
- You typically use the post-NAT destination zone . For example, if traffic from 'trust' to 'untrust' is NATted, the Security Policy might have destination zone 'untrust', and the QoS Policy would also use 'untrust' as the destination zone.
Limitations
Palo Alto Networks explicitly states that QoS (including DSCP marking) cannot be applied to traffic that is being decrypted or inspected via:
- SSL Forward Proxy (outbound SSL decryption)
- SSL Inbound Inspection (decrypting traffic to internal servers)
- SSH Proxy
For such traffic, QoS classification and enforcement would occur on the encrypted traffic before decryption or after re-encryption, based on the outer headers and App-ID of the encrypted protocol (e.g., 'ssl', 'ssh').
Palo Alto Networks QoS: QoS Profile Deep Dive
The QoS Profile (
Network > Network Profiles > QoS Profiles
) is where the actual "shaping" parameters—bandwidth guarantees, maximums, and priorities—are defined for each of the eight QoS classes. A well-configured QoS Profile is essential for translating QoS Policy classifications into tangible traffic management.
QoS Profile Structure
When you create or edit a QoS Profile, you encounter the following key areas:
- Name: A descriptive name for the profile (e.g., "Standard_User_QoS", "VoIP_Dedicated_Profile").
-
Overall Profile Bandwidth Settings (Optional):
- Egress Max (Mbps/Kbps): Sets an absolute maximum bandwidth limit for ALL traffic processed by THIS profile when applied to an interface. If this is set, and is lower than the Interface Egress Max, it becomes the effective ceiling for classes within this profile. Useful for carving out a specific portion of an interface's bandwidth for a particular set of QoS policies.
- Egress Guaranteed (Mbps/Kbps): Sets an overall minimum guaranteed bandwidth for ALL traffic processed by THIS profile. This is less commonly used than the per-class guarantees.
-
Class Settings (for each of Classes 1 through 8):
- Priority: (Real-time, High, Medium, Low) - Determines dequeuing preference.
-
Egress Max:
- Value (Mbps, Kbps, or %): The maximum bandwidth this class can consume.
-
If '%', it's a percentage of:
- The QoS Profile's "Overall Egress Max" (if set and lower than Interface Egress Max).
-
Otherwise, the "Interface Egress Max" set on the physical interface where this profile is applied (
Network > QoS > [Interface]).
-
Egress Guaranteed:
- Value (Mbps, Kbps, or %): The minimum bandwidth this class is assured during congestion.
- Percentage calculation is the same as for Egress Max.
PAN-OS QoS Profile: Configuring Priority, Egress Max, and Egress Guaranteed for individual QoS classes.
Key Considerations for QoS Profile Design
-
Match Interface Capacity:
The "Interface Egress Max" (set under
Network > QoS) should accurately reflect the true available bandwidth of the physical link (e.g., your ISP circuit speed). All percentage-based calculations in the QoS Profile depend on this. - Sum of Guarantees: The total Egress Guaranteed bandwidth across all active classes in a profile should ideally not exceed 100% of the reference bandwidth (Interface Egress Max or Profile Egress Max). Over-subscription means the firewall cannot honor all guarantees simultaneously during peak congestion. PAN-OS allows configuration over 100%, but it's a design flaw.
- Don't Starve Classes: While prioritizing critical traffic, ensure that lower-priority classes still receive some minimal guaranteed bandwidth if they carry essential, albeit less urgent, traffic. Setting a very small Egress Max (e.g., 1 Kbps) can effectively block a class.
- Use Percentages for Scalability: Using percentages for Egress Max and Egress Guaranteed can make profiles more portable if you apply them to interfaces with different total bandwidths, provided the Interface Egress Max is set correctly on each. However, for absolute guarantees (like for a voice system needing exactly 10 Mbps), fixed values are better.
- Default Profile: PAN-OS includes a "default" QoS Profile. This profile has no bandwidth limits or priorities pre-configured (all classes are typically medium priority with no bandwidth constraints). If you apply this default profile, traffic will be classified (e.g., unassigned traffic to Class 4), but no specific shaping will occur unless you modify this default profile. It's generally better to create custom profiles.
Example Scenario: Profile for Mixed Traffic
Imagine an interface with 100 Mbps capacity (Interface Egress Max = 100 Mbps).
| Class | Assigned Traffic (Example) | Priority | Egress Guaranteed | Egress Max | Notes |
|---|---|---|---|---|---|
| Class 1 | VoIP (SIP, RTP) | Real-time | 10 Mbps (or 10%) | 15 Mbps (or 15%) | Dedicated for voice quality. |
| Class 2 | Video Conferencing, Critical Web App | High | 20 Mbps (or 20%) | 40 Mbps (or 40%) | Important interactive apps. |
| Class 3 | General Business Apps, Salesforce | Medium | 30 Mbps (or 30%) | 70 Mbps (or 70%) | Standard business use. Can burst. |
| Class 4 | Default (General Web, Email) | Medium | 10 Mbps (or 10%) | 80 Mbps (or 80%) | Best effort, can use available. |
| Class 6 | Bulk Downloads, Software Updates | Low | 5 Mbps (or 5%) | 20 Mbps (or 20%) | Background, less critical. |
Analysis of Example:
- Total Guaranteed: 10+20+30+10+5 = 75 Mbps (75% of 100 Mbps). This is good, as it's below 100%.
- Each class has a Max limit to prevent it from consuming everything.
- Unused guaranteed bandwidth from one class can be used by another class, up to its Egress Max.
Palo Alto Networks QoS: Egress Interface Configuration
The final step in activating QoS is configuring it on the physical egress interface(s) (
Network > QoS
). This is where you enable the QoS engine for an interface, set its total available bandwidth, and associate QoS Profiles with different types of traffic exiting that interface.
Interface QoS Settings (
Network > QoS
)
When you click
Add
or modify an existing entry in this section, you configure QoS for a specific physical interface:
-
Interface Name:
Select the physical interface (e.g.,
ethernet1/1,ethernet1/2) where QoS will be enforced. This interface must be the one through which the classified traffic egresses the firewall. Aggregate Ethernet (AE) interfaces are also supported. -
Egress Max (Mbps):
This is a critical setting. It defines the
total maximum bandwidth
that the QoS shaping mechanism will manage on this physical interface. All percentage-based bandwidth allocations in the applied QoS Profile(s) are calculated based on this value (unless a Profile Egress Max is set lower in the profile itself).
- Set this to accurately reflect the usable bandwidth of the link connected to this interface (e.g., your Internet connection speed, or the speed of a private WAN link).
- If left at 0, percentage-based QoS will not function correctly.
- Turn on QoS feature on this interface: This checkbox globally enables or disables QoS processing on the selected interface. It must be checked for any QoS to take effect.
Differentiating Clear Text and Tunneled Traffic
PAN-OS allows you to apply different QoS treatments for clear text (unencrypted) traffic versus tunneled traffic (primarily IPsec VPNs) on the same physical egress interface.
-
Clear Text Traffic Tab:
- Default Profile: Select a QoS Profile to be applied by default to all clear text traffic that has been classified by a QoS Policy and is exiting this interface. This is the most common setting.
-
(Optional) Add Rule:
You can create more granular rules to apply
different
QoS Profiles to clear text traffic based on:
- Source Interface: If traffic arrived on a specific logical interface (e.g., a VLAN subinterface) before being routed out this physical egress.
- Source Subnet: Based on the source IP subnet of the traffic.
-
Tunneled Traffic Tab:
- Default Profile: Select a QoS Profile to be applied by default to all tunneled traffic (e.g., traffic within IPsec tunnels) that has been classified by a QoS Policy and is exiting this physical interface (i.e., the encrypted tunnel packet itself is exiting this physical interface).
-
(Optional) Add Rule:
You can create rules to apply specific QoS Profiles to traffic exiting through particular
Tunnel Interfaces
(e.g.,
tunnel.1,tunnel.10). This is very useful for:- Assigning different QoS profiles to different VPN site-to-site tunnels.
- Applying a specific QoS profile to GlobalProtect remote access VPN traffic if it egresses this physical interface.
Network > QoS
ensures the correct profile is applied to these already-classified-but-now-encrypted packets.
QoS on Aggregate Ethernet (AE) Interfaces
QoS is fully supported on Aggregate Ethernet (AE) interfaces. The configuration is similar to a physical interface:
-
Select the AE interface (e.g.,
ae1) as the "Interface Name". - Set the "Egress Max" to the total capacity of the AE bundle.
- Apply QoS Profiles as usual.
The firewall distributes traffic across the member links of the AE interface based on its hashing algorithm. QoS will then shape the traffic on a per-member-link basis according to the total AE interface capacity and profile settings.
Palo Alto Networks QoS: Verification & Monitoring
After configuring QoS, it's crucial to verify that it's working as expected and to monitor its ongoing performance. PAN-OS provides several tools for this purpose.
1. QoS Statistics (
Network > QoS > Statistics
Tab)
This is the primary real-time monitoring tool for QoS.
- Interface Selection: You must first select the QoS-enabled physical interface you want to inspect from the dropdown menu.
-
Information Displayed per Class (for the selected interface):
- Bandwidth Utilization Graphs: Shows real-time and historical (short-term) graphs of bandwidth usage (typically in Mbps or Kbps) for each of the 8 QoS classes. This helps visualize if classes are adhering to their Egress Max and if Egress Guaranteed is being met during congestion.
- Packets Processed/Dropped: Counts of packets processed and potentially dropped by each QoS class queue. Significant drops might indicate insufficient bandwidth allocation or severe congestion.
- Active Sessions: Number of currently active sessions within each QoS class.
- Top Applications: Lists the top applications (identified by App-ID) consuming bandwidth within each QoS class. This is excellent for confirming that your QoS policies are classifying applications correctly.
- Throughput: Current throughput for each class.
What to look for:
- Are critical applications appearing in their designated high-priority classes?
- Is bandwidth for high-priority classes being maintained during periods of congestion, while lower-priority classes might see their bandwidth capped?
- Are any classes consistently hitting their Egress Max and dropping packets? This might necessitate a review of bandwidth allocations or the policy classifying traffic into that class.
2. Session Browser (
Monitor > Session Browser
)
The Session Browser provides details for individual, active sessions passing through the firewall.
-
Relevant Columns:
Add these columns to your Session Browser view if they are not present:
- QoS Rule: Displays the name of the QoS Policy rule that the session matched. If blank, no QoS rule was matched (traffic likely went to Class 4).
- QoS Class: Shows the QoS Class (1-8) assigned to the session.
- Filtering: You can filter the Session Browser by IP address, application, port, etc., to find specific sessions and check their QoS treatment.
What to look for:
- Confirm that specific traffic flows (e.g., a VoIP call, a specific user's web traffic) are matching the intended QoS Policy rule and are assigned the correct QoS Class.
- If a session isn't getting the expected QoS, the Session Browser can help identify if it matched the wrong rule or no rule at all.
3. Traffic Logs (
Monitor > Logs > Traffic
)
Traffic logs record details for every session at its conclusion (or intermittently for long-lived sessions).
-
Relevant Columns:
- Similar to Session Browser, ensure you can see the matched QoS Rule and assigned QoS Class (though these might not be default columns for traffic logs, detailed log view shows this).
- Verify App-ID , User-ID , Source/Destination IP/Zone to ensure the session characteristics align with your QoS Policy.
What to look for:
- Historical confirmation of QoS classification for completed sessions.
- Troubleshooting why certain traffic might not have been classified as expected by reviewing all its parameters.
4. PAN-OS CLI Commands
Several CLI commands can provide insights into QoS status and statistics. These are useful for scripting or quick checks.
show qos interface <interface_name> statistics
show qos interface <interface_name> class <class_id>
show qos policy
show running qos-profile name <profile_name>
-
show qos interface <interface_name> statistics: Provides detailed statistics for a QoS-enabled interface, similar to the GUI's Statistics tab, but in text format. Includes packet counts, byte counts, drops per class. -
show qos interface <interface_name> class <class_id>: Drills down into statistics for a specific class on an interface. -
show qos policy: Displays the configured QoS policy rules. -
show running qos-profile name <profile_name>: Shows the configuration of a specific QoS profile.
Network > QoS > Statistics
) is the primary GUI tool for real-time monitoring. Understand what information it provides (bandwidth per class, apps per class). Be aware that Session Browser can show the QoS Rule and Class for active sessions.
Troubleshooting Common QoS Issues
-
Traffic not being classified correctly:
- Verify QoS Policy rule order (more specific first).
- Check source/destination IP/zone matching (pre-NAT source IP!).
- Ensure App-ID is correctly identifying the application. Use ACC and Traffic Logs.
- Confirm User-ID is mapping users correctly if used in policy.
-
Bandwidth limits not working as expected:
-
Ensure "Interface Egress Max" (
Network > QoS) is set correctly for the physical interface. Percentage-based limits in profiles depend on this. - Verify Egress Max/Guaranteed values in the QoS Profile.
- Check if the sum of Egress Guaranteed exceeds 100% of available bandwidth.
-
Ensure "Interface Egress Max" (
-
Priority not having an effect:
- QoS priority is most evident during congestion . If the link isn't congested, traffic may flow without noticeable prioritization.
- Ensure the QoS Profile is correctly applied to the egress interface.
Palo Alto Networks Advanced QoS: Lockless QoS (PAN-OS 11.0.3+)
Starting with PAN-OS 11.0.3, Palo Alto Networks introduced "Lockless QoS" on specific newer hardware platforms. This feature aims to improve QoS performance and reduce latency by optimizing how CPU resources are utilized for QoS processing.
Understanding Legacy vs. Lockless QoS
- Legacy QoS (Default Mode): In the traditional QoS implementation, QoS processing tasks (like packet classification, queuing, scheduling, and shaping) share CPU cores with other dataplane processes. While efficient, under very high load or with complex QoS configurations on high-speed interfaces, contention for CPU resources could potentially introduce minor latency or limit maximum QoS throughput.
-
Lockless QoS (New Mode):
Lockless QoS dedicates specific CPU cores exclusively to QoS processing for interfaces where it's enabled. By reducing shared resource contention (locks), it can:
- Potentially improve QoS throughput for the assigned interfaces.
- Reduce latency associated with QoS processing.
- Provide more predictable QoS performance under high load.
Lockless QoS is particularly beneficial for environments with high bandwidth requirements and stringent latency demands for QoS-managed traffic.
Supported Platforms and Considerations
- Supported Platforms (as of initial documentation): PA-3400 Series, PA-5400 Series (PA-5410, PA-5420, PA-5430, PA-5440, PA-5445), and PA-5450 firewalls. Always check the latest Palo Alto Networks documentation for an up-to-date list of supported platforms.
-
Performance:
While it can improve performance, there are specific notes:
- The maximum allocatable bandwidth per port/profile for QoS remains 10Gbps on platforms like PA-5410/PA-5420/PA-5430/PA-5440/PA-5445, even with Lockless QoS.
- For Aggregate Ethernet (LAG) interfaces, QoS with Lockless QoS enabled might have its throughput limited to the capacity of a single dedicated QoS core. This is a key difference from legacy QoS on LAGs which could potentially leverage more shared resources.
- Resource Allocation: Enabling Lockless QoS means certain CPU cores are reserved for QoS. This might have implications for other dataplane functions if the system is already heavily loaded.
- Reboot Required: Enabling or disabling Lockless QoS requires a firewall reboot.
Configuration via CLI
Lockless QoS is managed via the PAN-OS command-line interface (CLI). There is no GUI option for this feature.
-
Enable Lockless QoS:
admin@PA-FW> configure
Entering configuration mode
[edit]
admin@PA-FW# set system setting qos lockless-qos yes
[edit]
admin@PA-FW# commit
admin@PA-FW# request restart system
A commit and a system reboot are required for the change to take effect.
-
Disable Lockless QoS (Revert to Legacy):
admin@PA-FW> configure
Entering configuration mode
[edit]
admin@PA-FW# set system setting qos lockless-qos no
[edit]
admin@PA-FW# commit
admin@PA-FW# request restart system
A commit and reboot are also required. If QoS was configured while Lockless QoS was active, it will revert to using the legacy QoS mode.
-
Show Lockless QoS Status:
admin@PA-FW> show system setting qos lockless-qosThis command will indicate if Lockless QoS is currently enabled (
yes) or disabled (no). -
Show Interface-to-Core Mapping (When Enabled):
admin@PA-FW> show qos lockless-qos if-core-mappingThis command (available when Lockless QoS is active) displays which dedicated CPU cores are mapped to which QoS-enabled interfaces. This helps understand resource allocation.

Conceptual difference between Legacy QoS (sharing CPU resources) and Lockless QoS (using dedicated CPU cores for QoS processing) on Palo Alto Networks firewalls.
Palo Alto Networks Advanced QoS: QoS for Virtual Systems (vsys)
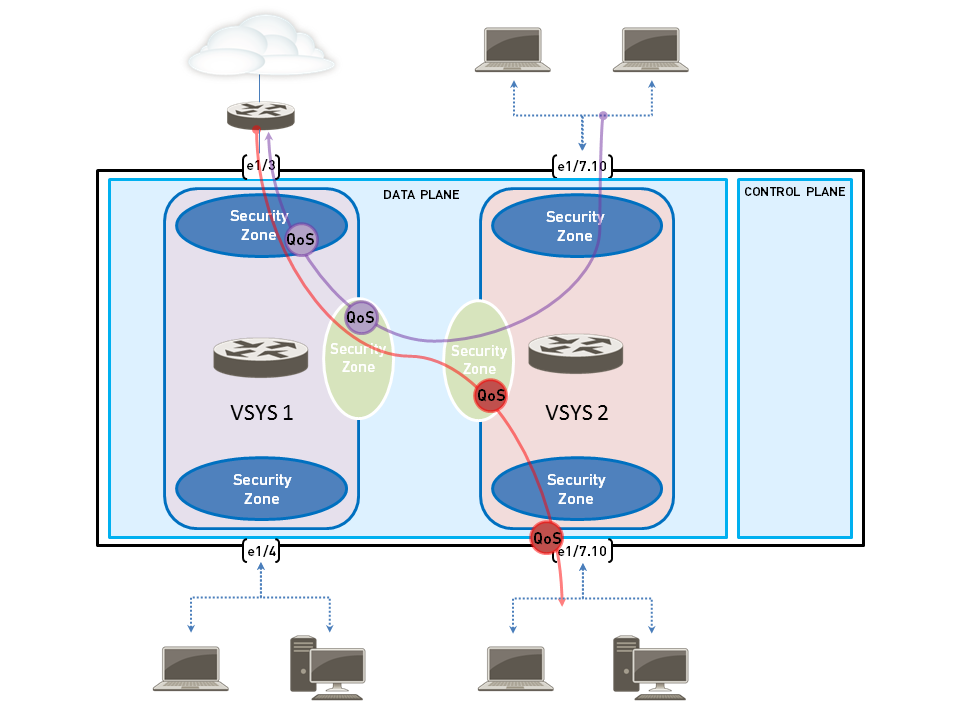
Palo Alto Networks firewalls that support multiple virtual systems (vsys) allow for independent QoS configurations within each vsys. This enables different tenants or logical departments sharing the same physical firewall to have their own tailored QoS policies and bandwidth management without interfering with each other, up to the physical capabilities of the hardware and shared interfaces.
QoS in a Multi-VSYS Environment
When a firewall is in multi-vsys mode:
- Independent Configuration: Each vsys can have its own set of QoS Policy rules and QoS Profiles. These are configured within the context of that specific vsys.
-
Shared Physical Resources:
Physical interfaces, and thus the QoS enforcement point (
Network > QoS), are global resources. However, the QoS Profiles applied on these physical interfaces can be selected based on traffic originating from or destined to specific vsys (often implicitly via zone matching in QoS policies). - Inter-VSYS Traffic: If traffic flows between vsys (e.g., through an external switch or via inter-vsys routing on the firewall using Layer 3 subinterfaces shared between vsys), QoS can be applied at the egress point of the traffic from the physical interface associated with the source or destination vsys.
Configuration Steps for QoS in a VSYS
The process is largely similar to configuring QoS on a non-vsys firewall, but with vsys context awareness:
-
Select VSYS Context:
In the PAN-OS GUI (or Panorama), ensure you are in the context of the specific vsys for which you want to configure QoS.
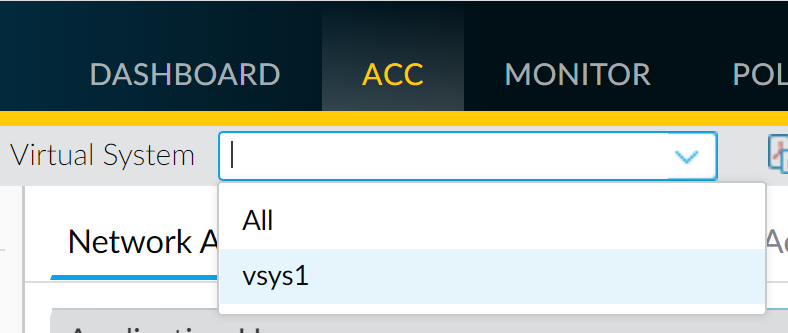
Palo Alto Networks ACC with the Virtual System dropdown, allowing administrators to focus on traffic and configurations for a specific vsys. -
Identify Traffic & Egress Interface (within vsys context):
- Use ACC (filtered by the current vsys) and Traffic Logs to identify applications, users, and egress interfaces for the traffic specific to this vsys.
- The egress interface will be a physical interface allocated to (or shared by) this vsys.
-
Create QoS Profile(s) (
Network > Network Profiles > QoS Profiles- within vsys context):- Define QoS Profiles with class bandwidths and priorities tailored to the needs of this vsys. These profiles are local to this vsys.
-
Create QoS Policy Rule(s) (
Policies > QoS- within vsys context):- Define QoS Policy rules. Critically, the Source Zone and Destination Zone in these rules must be zones that belong to the current vsys.
- Use App-ID, User-ID (if vsys-specific or shared), addresses, etc., relevant to this vsys.
- Assign traffic to QoS Classes defined in the vsys-local QoS Profile.
-
Enable QoS on Egress Interface & Apply Profile (
Network > QoS- global context, but with vsys awareness):- This part is configured globally (not within a specific vsys context switch in GUI typically, but affects all vsys using that interface).
- Select the physical egress interface.
- Enable QoS and set the Interface Egress Max.
- When applying a Default Profile (for Clear Text or Tunneled Traffic), you select a QoS Profile. If you've created vsys-specific profiles, you'd typically create a "master" or "aggregate" QoS profile globally, or use rules on the interface to direct traffic based on source subnets (which might map to vsys) to different profiles. More commonly, the single QoS profile applied to the interface will have classes that are targeted by QoS policies from different vsys. For example, VSYS1 policies send traffic to Class 1, VSYS2 policies send traffic to Class 2, and the single QoS profile on the egress interface defines behavior for both Class 1 and Class 2.
- The key is that the QoS Policy within each vsys correctly classifies its traffic into one of the 8 classes, and the global QoS profile on the egress interface then handles those classes.
- Commit Changes.
-
Verify QoS Operation:
-
Use QoS Statistics (
Network > QoS > Statistics), selecting the relevant physical interface. You'll see aggregate statistics for all vsys using that interface, but you can often infer vsys-specific traffic by observing which classes (mapped by vsys policies) are active. - Use Session Browser and Traffic Logs, filtering by vsys if possible, to check QoS Rule and Class assignment.
-
Use QoS Statistics (
Network > QoS
) is a global setting that affects all vsys using that interface. Proper zone definition within vsys QoS Policies is key to isolating and classifying traffic correctly.
Bandwidth Sharing and Guarantees Between VSYS
While each vsys can define its priorities, the actual bandwidth allocation on a shared physical interface is governed by the single QoS Profile applied to that interface and its class settings. If multiple vsys direct traffic to the same QoS class (e.g., both VSYS1 and VSYS2 policies send their "high priority" traffic to Class 2), they will share the bandwidth allocated to Class 2 in the interface's QoS Profile.
To provide hard bandwidth guarantees per vsys on a shared interface, you would typically need to:
- Dedicate different QoS classes to different vsys in their QoS policies (e.g., VSYS1 uses Classes 1-2, VSYS2 uses Classes 3-4).
- In the QoS Profile applied to the shared physical interface, configure the Egress Guaranteed and Egress Max for those classes (1-4) according to each vsys's needs.
Alternatively, if vsys have dedicated IP subnets, the rule-based QoS profile application on the egress interface (
Network > QoS > Clear Text Traffic > Add Rule by Source Subnet
) could be used to apply entirely different QoS Profiles for traffic originating from subnets belonging to different vsys.
Palo Alto Networks Advanced QoS: Enforce QoS Based on DSCP Classification
Palo Alto Networks firewalls can leverage Differentiated Services Code Point (DSCP) values in IP packet headers for QoS classification. This allows the firewall to honor QoS markings set by upstream devices (like routers, switches, or IP phones) or to mark traffic itself for downstream devices to honor.
Understanding DSCP
DSCP is a 6-bit field in the IP header (formerly the Type of Service - ToS byte) used to specify a per-hop behavior (PHB) for traffic. Common DSCP values and their associated PHBs include:
- Expedited Forwarding (EF - DSCP 46, binary 101110): Highest priority, typically for low-loss, low-latency, low-jitter traffic like VoIP voice bearer.
-
Assured Forwarding (AF):
Provides different levels of forwarding assurances. Defined by AF
xy
, where
x
is the class (1-4) and
y
is the drop precedence (1-3). Higher
x
means higher priority class, lower
y
means lower drop probability. Examples:
- AF41, AF42, AF43 (Class 4)
- AF31, AF32, AF33 (Class 3)
- AF21, AF22, AF23 (Class 2)
- AF11, AF12, AF13 (Class 1)
- Class Selector (CS): Provides backward compatibility with the older IP Precedence values (the first 3 bits of DSCP). CS0 to CS7. CS0 is Best Effort. CS6 and CS7 are often used for network control traffic.
- Best Effort (BE - DSCP 0, binary 000000): Default, no special treatment.
Palo Alto Networks firewalls allow you to match on these standard DSCP values or define custom codepoints.
Using DSCP for QoS Classification (QoS Policy)
You can use incoming DSCP values as a matching criterion in a QoS Policy rule (
Policies > QoS
):
- Navigate to the QoS Policy rule you want to modify or create a new one.
- Go to the DSCP/ToS tab within the rule.
- Under "Codepoints to Match Traffic," click Add .
-
In the "DSCP Match" window:
-
Type:
Select the DSCP type (e.g.,
assured-forwarding,expedited-forwarding,class-selector,custom-binary,custom-hex,ip-precedence). -
Codepoint:
Based on the type, select the specific value (e.g., for
assured-forwarding, selectaf11,af22, etc.; forexpedited-forwarding,efis the option). For custom, enter the binary or hex value.
-
Type:
Select the DSCP type (e.g.,
-
Click
OK. You can add multiple DSCP values to match in a single rule. - On the Other Settings tab of the QoS Policy rule, assign the traffic matching these DSCP values (and other criteria in the rule) to the desired PAN-OS QoS Class (1-8).
This way, the firewall can take traffic already marked by, for example, an IP phone with EF, and map it to your "Real-time" PAN-OS QoS Class for appropriate local shaping.
Marking Traffic with DSCP (Security Policy)
Palo Alto Networks firewalls can also *set* or *modify* DSCP values on traffic egressing the firewall. This is configured within a
Security Policy rule
(
Policies > Security
), not the QoS Policy.
- Navigate to the Security Policy rule that handles the traffic you want to mark.
- Go to the Actions tab.
-
Find the
QoS Marking
section.
-
Type:
Choose
DSCPorIP Precedence/ToS. -
Codepoint:
Select the specific DSCP value you want to apply (e.g.,
ef,af21) or a custom value. - Follow C2S Flow: A very useful option. If checked, the firewall will mark the server-to-client (return) traffic of that session with the same DSCP value it received from the client-to-server flow (if that flow had a DSCP mark that the firewall is recognizing or setting). This ensures symmetrical marking. If you are setting a new mark here, this option ensures the return traffic also gets it.
-
Type:
Choose
Use Case: If you've classified VoIP traffic using App-ID in a QoS Policy and assigned it to Class 1 (Real-time priority), you can then go to the Security Policy rule that allows that VoIP traffic and configure QoS Marking to set the DSCP value to EF (46). This ensures that downstream devices in your network (and potentially across a WAN if the provider supports it) will honor this EF marking.
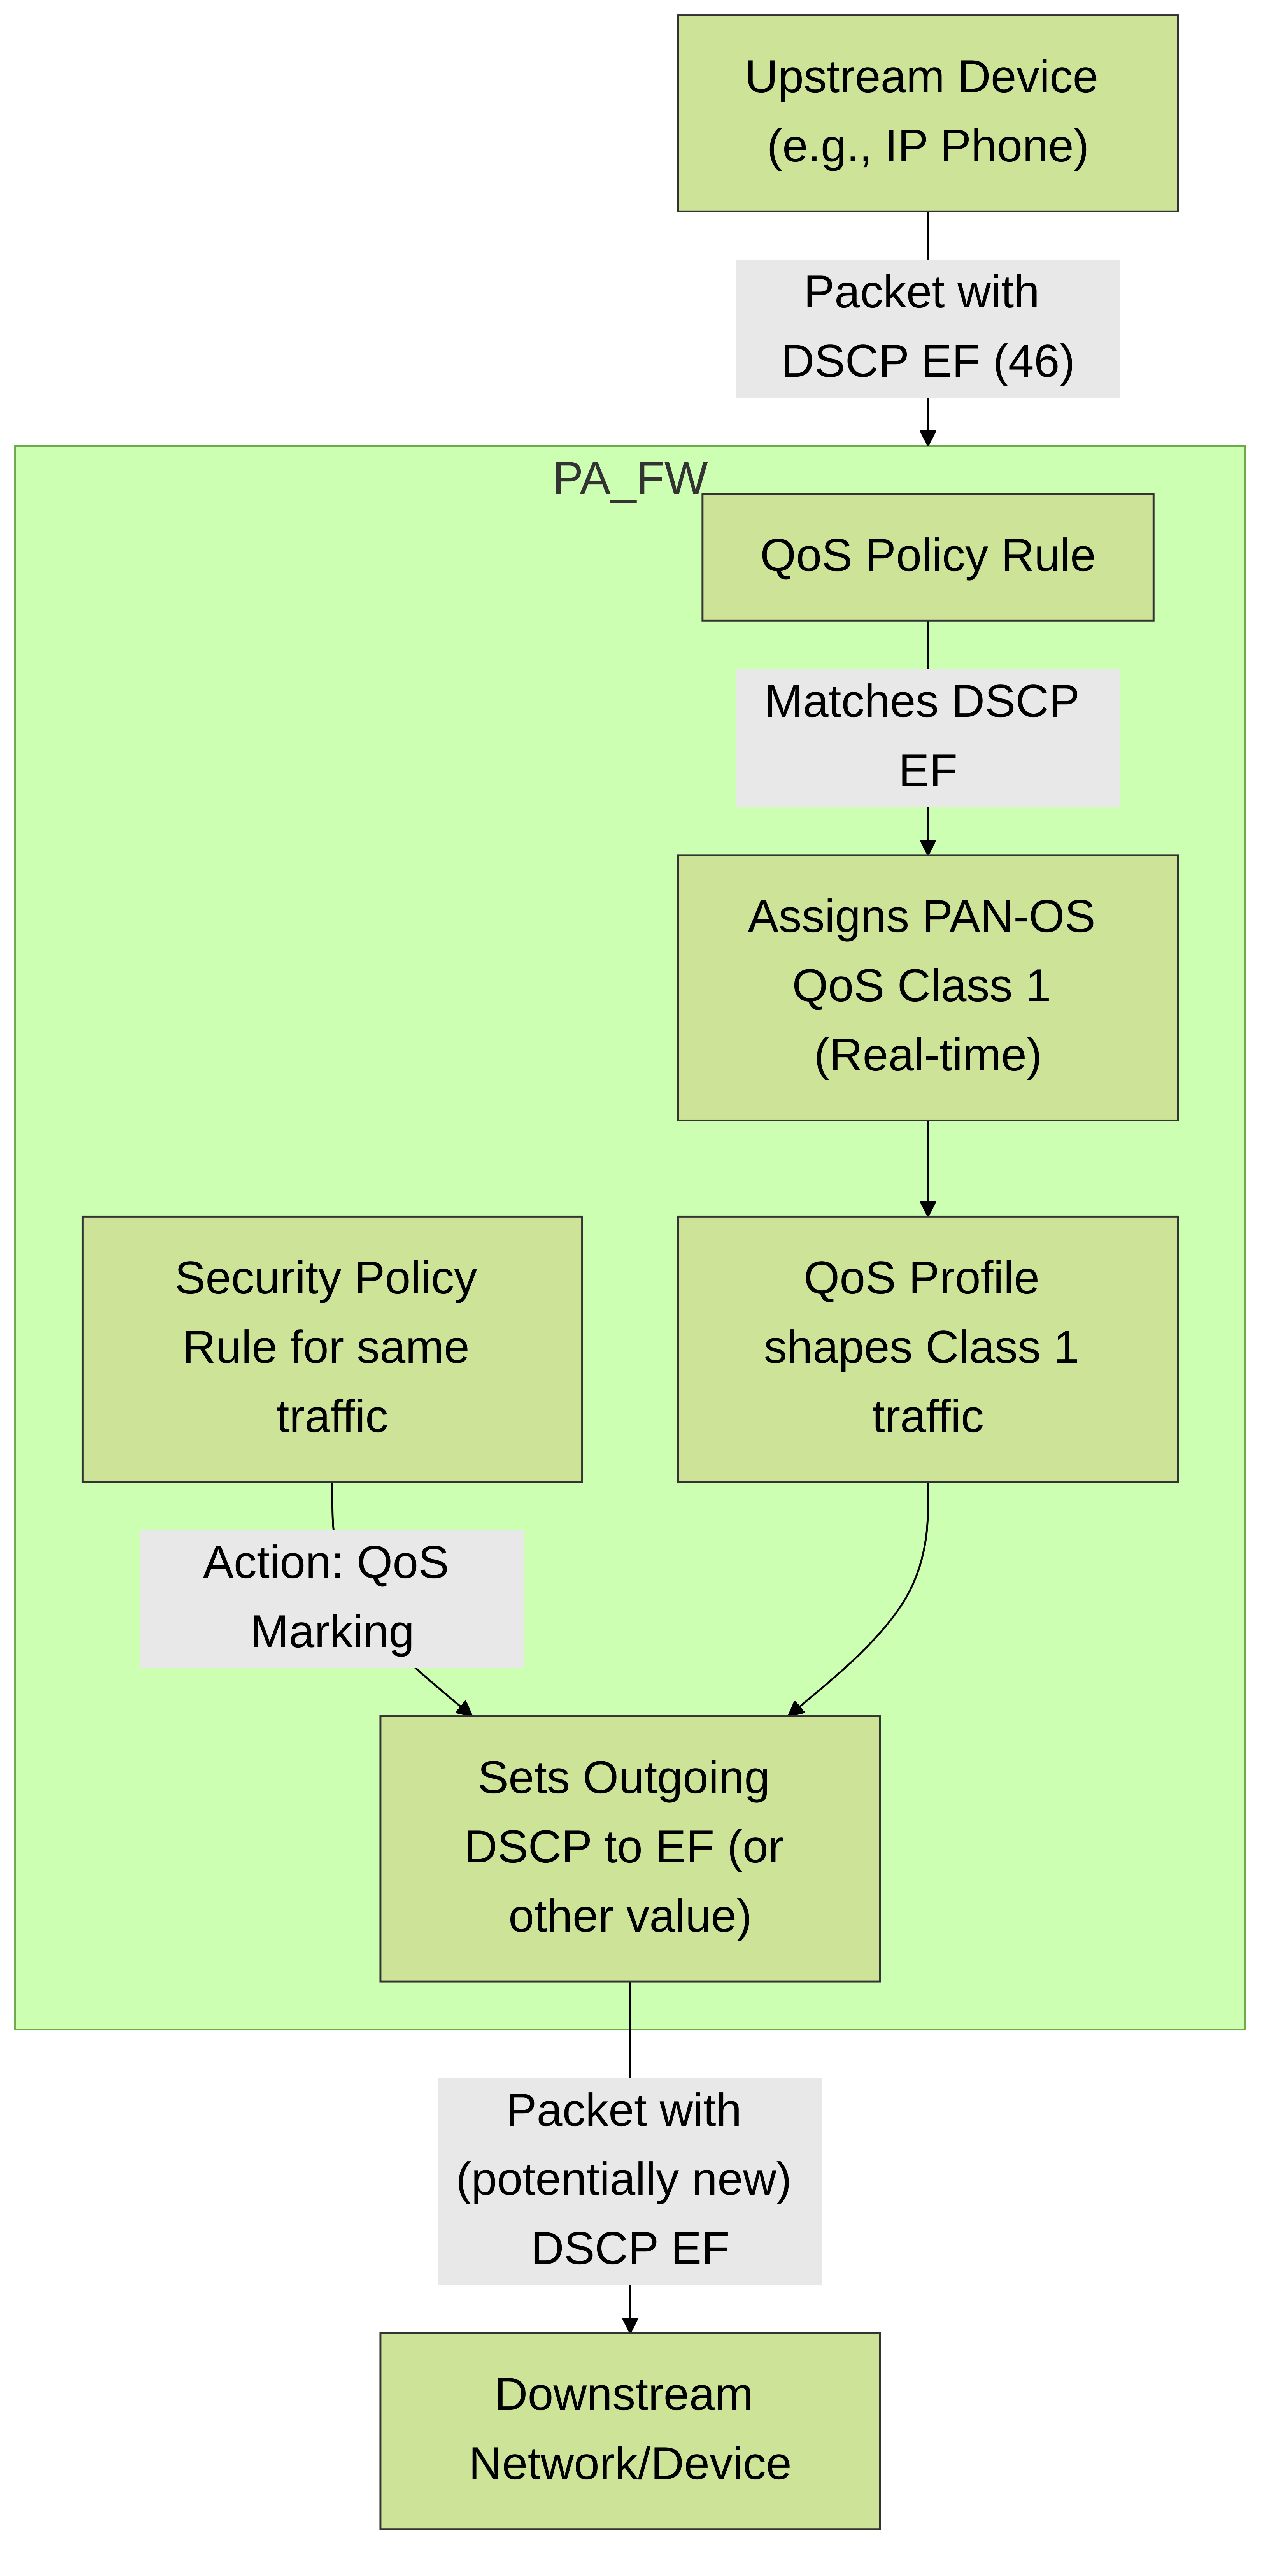
Flow showing how a Palo Alto Networks firewall can honor an incoming DSCP mark for QoS classification (via QoS Policy) and then re-mark or confirm the mark on outgoing traffic (via Security Policy) for downstream devices.
Limitations
As mentioned previously, QoS/DSCP classification and marking cannot be applied to traffic undergoing active SSL Forward Proxy, SSL Inbound Inspection, or SSH Proxy decryption/inspection by the firewall. For such traffic, any DSCP operations would apply to the encrypted envelope.
Palo Alto Networks Advanced QoS: QoS and Tunnels (IPsec/GlobalProtect)
Applying Quality of Service to tunneled traffic, such as IPsec VPNs (site-to-site or remote access) and GlobalProtect, requires special consideration on Palo Alto Networks firewalls. The key is to understand that classification happens on the inner (original) packet, while shaping happens on the outer (encrypted) tunnel packet.
QoS for IPsec VPN Tunnels
For IPsec tunnels:
-
QoS Policy for Inner Traffic:
-
Create QoS Policy rules (
Policies > QoS) that match the original, unencrypted traffic destined to go through the IPsec tunnel. - Use App-ID, User-ID, pre-NAT source/destination IPs of the actual hosts/applications.
- Assign this inner traffic to a specific PAN-OS QoS Class (1-8).
-
Create QoS Policy rules (
-
QoS on the Egress Physical Interface (
Network > QoS):- Identify the physical interface through which the encrypted IPsec tunnel packets will egress the firewall.
- Enable QoS on this physical interface and set its Egress Max bandwidth.
- Navigate to the Tunneled Traffic tab.
-
Here you have two main options:
- Default Profile: Apply a single QoS Profile to ALL tunneled traffic exiting this physical interface. The classes defined in this profile will then shape the encrypted packets based on the QoS class assigned to their inner, original contents.
-
Add Rule (Per Tunnel Interface):
This is more granular and often preferred. Click
Addand specify:-
Tunnel Interface:
Select the logical
tunnel.xinterface corresponding to your IPsec VPN. - Profile: Select a specific QoS Profile to apply *only* to traffic exiting via this particular tunnel interface. This allows different IPsec tunnels to have different QoS treatments.
PAN-OS QoS Interface configuration: Applying a specific QoS Profile to a designated Tunnel Interface (e.g., tunnel.1) under the 'Tunneled Traffic' tab. -
Tunnel Interface:
Select the logical
How it works:
The firewall first classifies the inner packet (e.g., an RDP session from UserA to ServerB over the VPN) and assigns it a QoS Class (say, Class 2). When this packet is encrypted and becomes an ESP packet, the firewall "remembers" that the original contents were Class 2. As the ESP packet (which is now "tunneled traffic") egresses the physical interface, the QoS settings on the "Tunneled Traffic" tab for that physical interface (specifically for that
tunnel.x
if a rule exists, or the default) will apply the shaping parameters defined for Class 2 in the chosen QoS Profile.
tunnel.x
interface itself in its interface configuration (
Network > Interfaces > Tunnel
). QoS for tunneled traffic is managed via the
physical egress interface's
QoS settings under the "Tunneled Traffic" tab.
QoS for GlobalProtect Remote Access VPNs
GlobalProtect traffic is essentially a type of IPsec (or SSL VPN, depending on configuration) tunnel. The principles are similar:
- QoS Policy for User Traffic: Classify the traffic from GlobalProtect users (source zone often being the zone assigned to the GlobalProtect gateway's tunnel interface, source user being the GP user) based on App-ID, destination, etc. Assign it to a QoS Class.
-
QoS on Egress Physical Interface:
-
If GlobalProtect traffic egresses a specific physical interface, you can use the "Tunneled Traffic" tab settings:
- Apply a default profile for all tunneled traffic (which would include GP).
-
Or, if you know the specific
tunnel.xinterface used by the GlobalProtect gateway, create a rule for that tunnel interface. (Note: Dynamic GlobalProtect tunnels might make specific tunnel interface targeting harder than for static site-to-site tunnels).
- Often, GlobalProtect traffic from remote users (client-to-gateway) is shaped on the firewall's external interface where the GP gateway terminates. Traffic *from* internal resources *to* GlobalProtect users (gateway-to-client) is shaped on the internal interface from which that traffic egresses towards the GP user (after decryption by the firewall).
-
If GlobalProtect traffic egresses a specific physical interface, you can use the "Tunneled Traffic" tab settings:
Consider QoS in both directions for GlobalProtect:
- Upload (GP Client to Internal Resources): QoS policy matches traffic from GP users. QoS shaping applied on the physical interface where encrypted GP traffic arrives and is passed to internal network (often the "internal" or "trust" interface is the egress for this decrypted flow).
- Download (Internal Resources to GP Client): QoS policy matches traffic from internal resources to GP users. QoS shaping applied on the physical interface where traffic exits towards the internet to reach the GP client (often the "external" or "untrust" interface is the egress for this to-be-encrypted flow).
DSCP Marking and Tunnels
If you are using DSCP, you can:
- Mark Inner Packet: Use Security Policy to mark the inner, original packet with a DSCP value.
-
Tunnel Behavior (Copying DSCP):
- By default, many IPsec implementations (including PAN-OS) can be configured to copy the DSCP value from the inner IP header to the outer (ESP encrypted) IP header. This is often referred to as "DSCP remarking" or "DSCP propagation" for tunnels. This ensures that intermediate network devices between VPN peers can apply QoS based on the outer header's DSCP.
-
Check your IPsec Crypto Profile settings (
Network > Network Profiles > IPsec Crypto) and tunnel interface settings for options related to DSCP copying or preservation. Some advanced CLI options might also exist.
If DSCP is copied to the outer header, then QoS policies on intermediate Palo Alto Networks firewalls (or other vendor devices) could potentially key off that outer header DSCP for further QoS.
Palo Alto Networks QoS: Use Case - Single User Prioritization
This use case demonstrates how to prioritize network traffic for a specific critical user, such as a CEO or a key executive, ensuring their applications receive preferential treatment even during network congestion. This leverages User-ID and standard QoS components.
Scenario:
The CEO (username:
ceo_user
, IP:
192.168.1.10
) needs guaranteed performance for all their outbound internet traffic, especially for web-browsing and collaboration tools.
-
Create a QoS Profile for CEO Traffic:
-
Navigate to
Network > Network Profiles > QoS Profiles. -
Click
Add.-
Name:
QoS_Profile_CEO -
Define
Class 1
(or any preferred class):
-
Priority:
High(orReal-timeif specific apps warrant it) -
Egress Guaranteed:
e.g.,
20 Mbps(ensure this is reasonable for the interface capacity) -
Egress Max:
e.g.,
50 Mbps(or a higher percentage of interface capacity)
-
Priority:
- Configure other classes as needed for default traffic or leave them at system defaults if this profile is solely for the CEO's high priority.
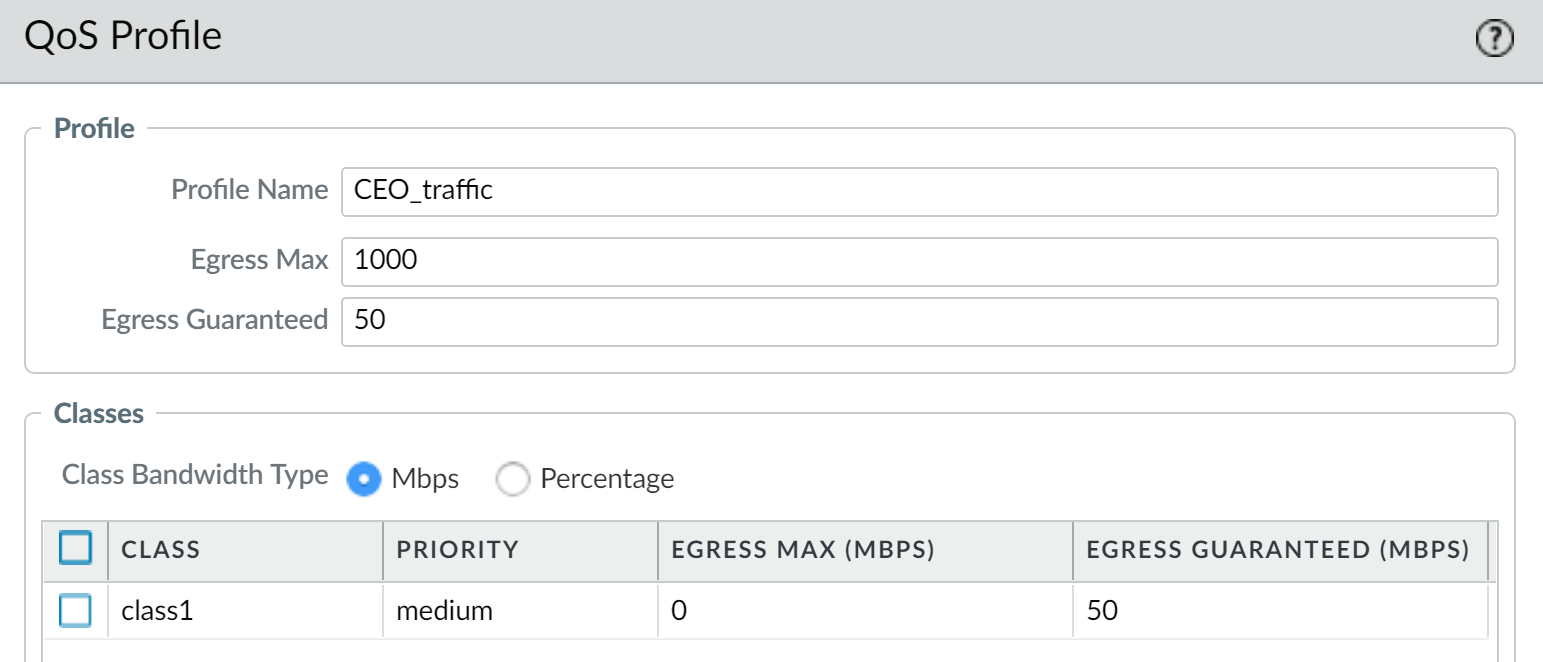
Example QoS Profile "CEO_traffic" (similar to QoS_Profile_CEO) in PAN-OS, with Class 1 configured for high priority and guaranteed bandwidth. -
Name:
-
Click
OK.
-
Navigate to
-
Create a QoS Policy Rule for the CEO:
-
Navigate to
Policies > QoS. -
Click
Add.-
Name:
QoS_Policy_CEO_Traffic -
Source Tab:
-
Source Zone:
e.g.,
trust(where CEO's workstation resides) -
Source Address:
192.168.1.10(CEO's IP, if static and known. User-ID is better if IP can change). -
Source User:
your_domain\ceo_user(Leveraging User-ID is more robust).

Example QoS Policy rule in PAN-OS, matching on Source User "ceo_user" (ensure correct domain format). Source Address can also be used as a fallback or primary identifier. -
Source Zone:
e.g.,
-
Destination Tab:
-
Destination Zone:
e.g.,
untrust(for internet traffic) -
Destination Address:
any
-
Destination Zone:
e.g.,
-
Application/Service Tab:
-
Application:
any(to prioritize all CEO's traffic), or specify critical apps likeweb-browsing,ssl,ms-office365, collaboration app names. -
Service:
anyorapplication-default.
-
Application:
-
Other Settings Tab:
-
Class:
Select
Class 1(matching the class configured inQoS_Profile_CEO).

Assigning the CEO's traffic to QoS Class 1 in the PAN-OS QoS Policy rule. -
Class:
Select
-
Name:
-
Click
OK. Ensure this rule is placed appropriately (e.g., near the top if it's highly critical).
-
Navigate to
-
Enable QoS on the Egress Interface and Apply Profile:
-
Navigate to
Network > QoS. -
Select the external-facing interface (e.g.,
ethernet1/2if that's the internet gateway).-
Set
Egress Max
for the interface (e.g., your total internet bandwidth, say
500 Mbps). - Check Turn on QoS feature on this interface .
-
Clear Text Traffic Tab:
-
Set
Default Profile:
QoS_Profile_CEO. (If other users also use this interface, you might need a more general default profile, and the CEO's traffic gets shaped by Class 1 within that profile). For simplicity here, we assume this profile is broadly applicable or the CEO is the primary concern for this specific setup. A better approach for multiple user types is a single comprehensive profile with different classes for different users/apps.

PAN-OS QoS configuration for interface ethernet1/2, enabling QoS and assigning the "CEO_traffic" profile. -
Set
Default Profile:
-
Set
Egress Max
for the interface (e.g., your total internet bandwidth, say
-
Click
OK.
-
Navigate to
- Commit Changes.
-
Verify:
-
Use
Network > QoS > Statisticsfor the egress interface (e.g.,ethernet1/2). Observe traffic in Class 1 when the CEO is active.
Confirmation in PAN-OS that the "CEO_traffic" profile is enabled on ethernet1/2. 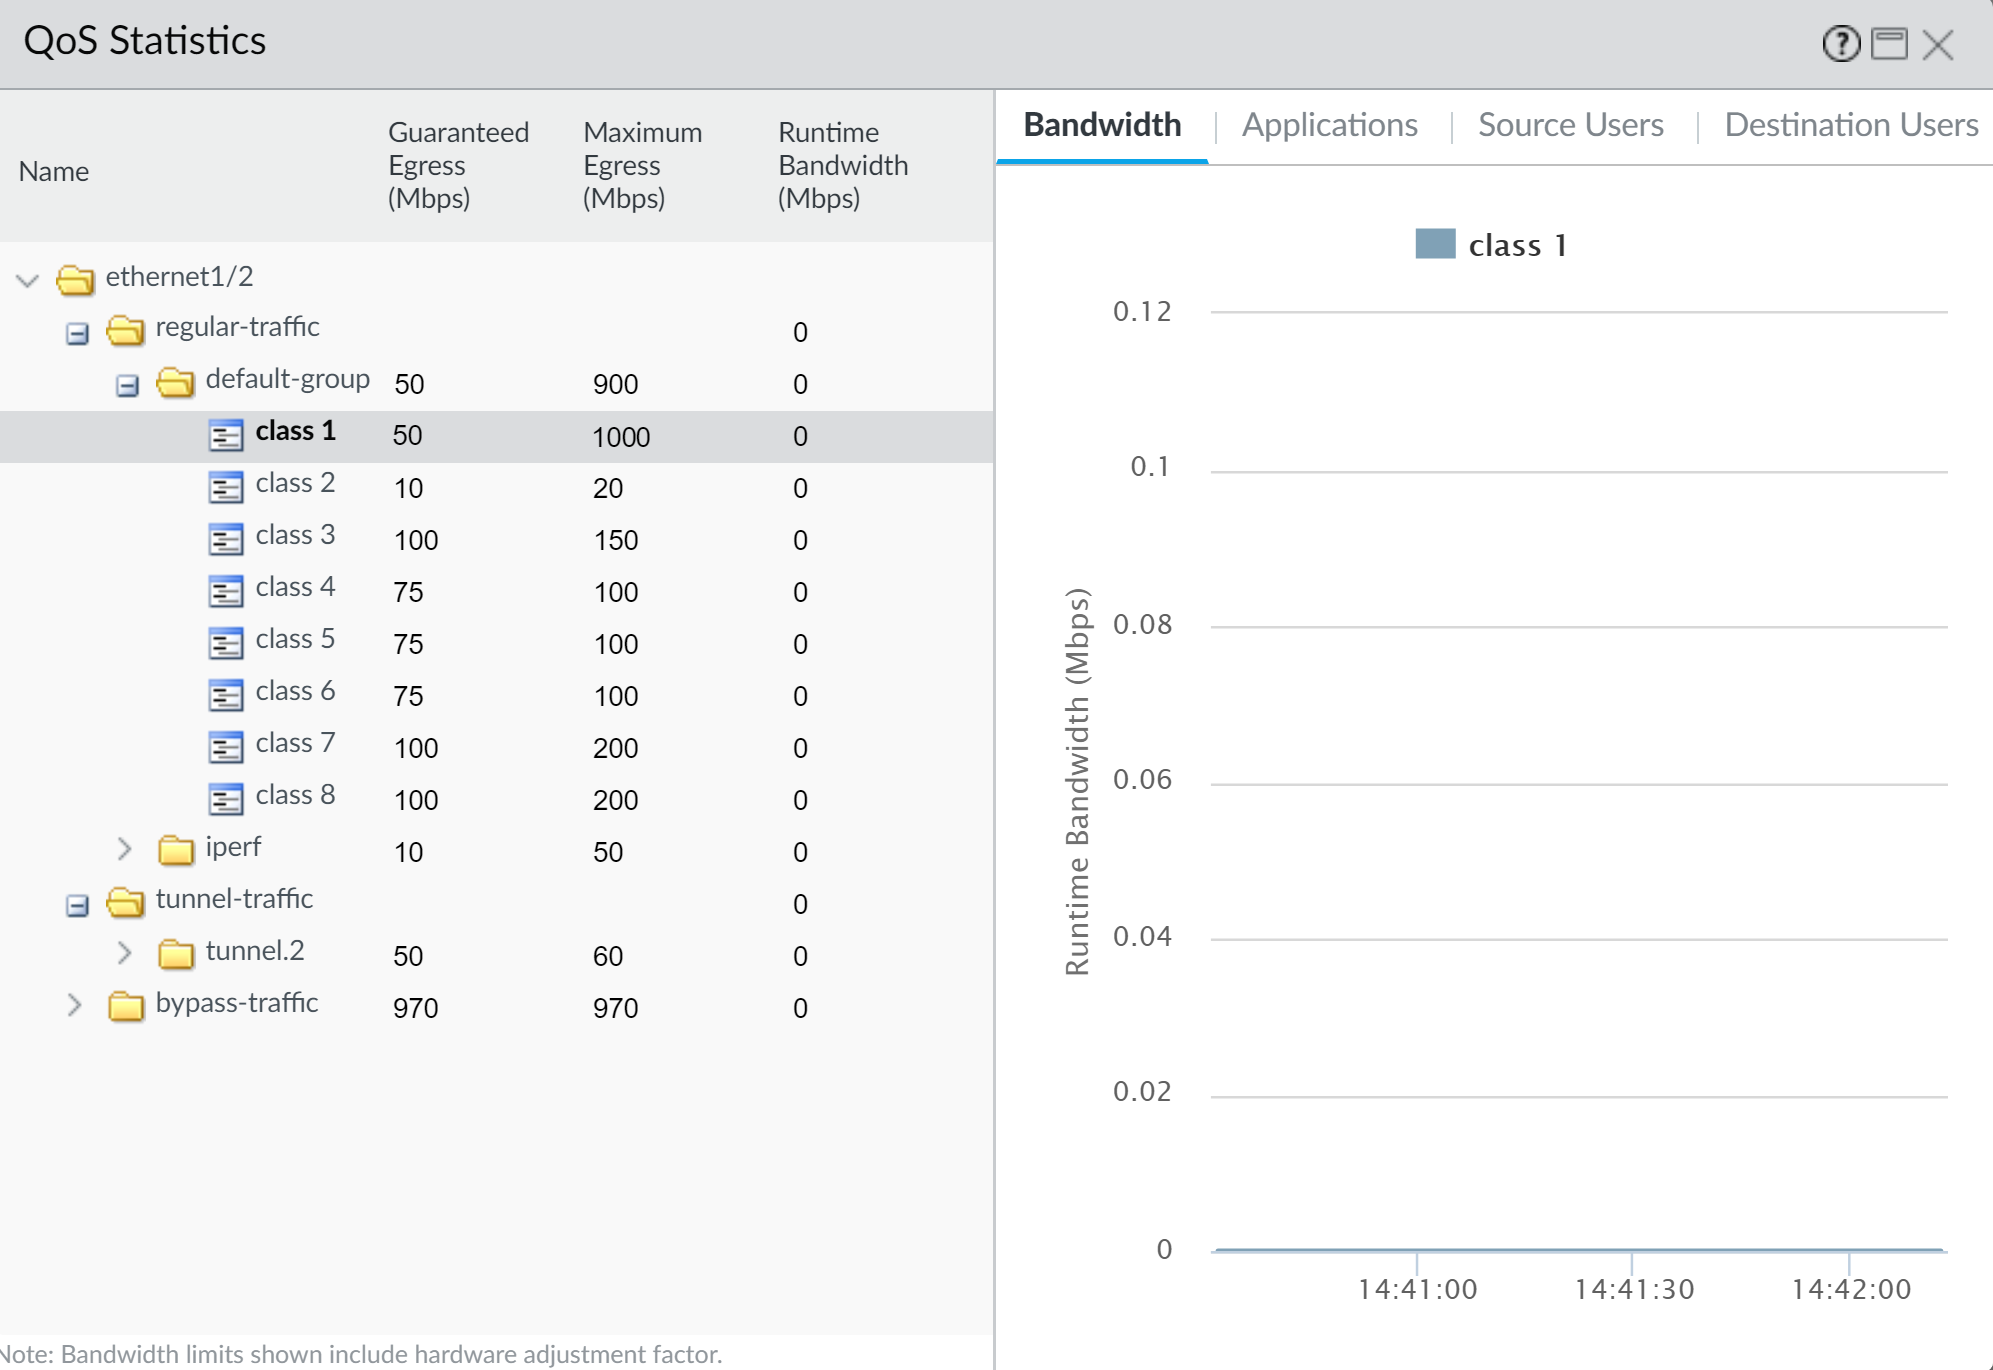
Example QoS statistics on PAN-OS, ideally showing CEO's traffic being processed under Class 1 with its defined bandwidth and priority. -
Check
Monitor > Session Browserfor CEO's sessions to confirm they match theQoS_Policy_CEO_Trafficrule and are assigned to Class 1.
-
Use
This setup ensures that the CEO's traffic, when matched, is placed into Class 1, which the
QoS_Profile_CEO
then gives high priority and guaranteed bandwidth on the
ethernet1/2
interface.
Palo Alto Networks QoS: Use Case - Voice and Video Applications
Prioritizing Voice over IP (VoIP) and video conferencing traffic is one of the most common and critical use cases for QoS. These applications are highly sensitive to latency, jitter, and packet loss. Palo Alto Networks App-ID is instrumental in accurately identifying this traffic.
Scenario: Employees are experiencing poor quality on VoIP calls (e.g., using SIP and RTP) and video conferences (e.g., WebEx, Zoom). The goal is to ensure these applications get top priority and sufficient bandwidth.
-
Create a QoS Profile for Real-time Applications:
-
Navigate to
Network > Network Profiles > QoS Profiles. -
Click
Add.-
Name:
QoS_Profile_Realtime_Apps -
Define
Class 1
(or another dedicated class):
-
Priority:
Real-time -
Egress Guaranteed:
e.g.,
50 Mbps(or a percentage based on expected concurrent call/video volume and interface capacity. This needs careful calculation.) -
Egress Max:
e.g.,
80 Mbps(allowing some burst but preventing runaway consumption)
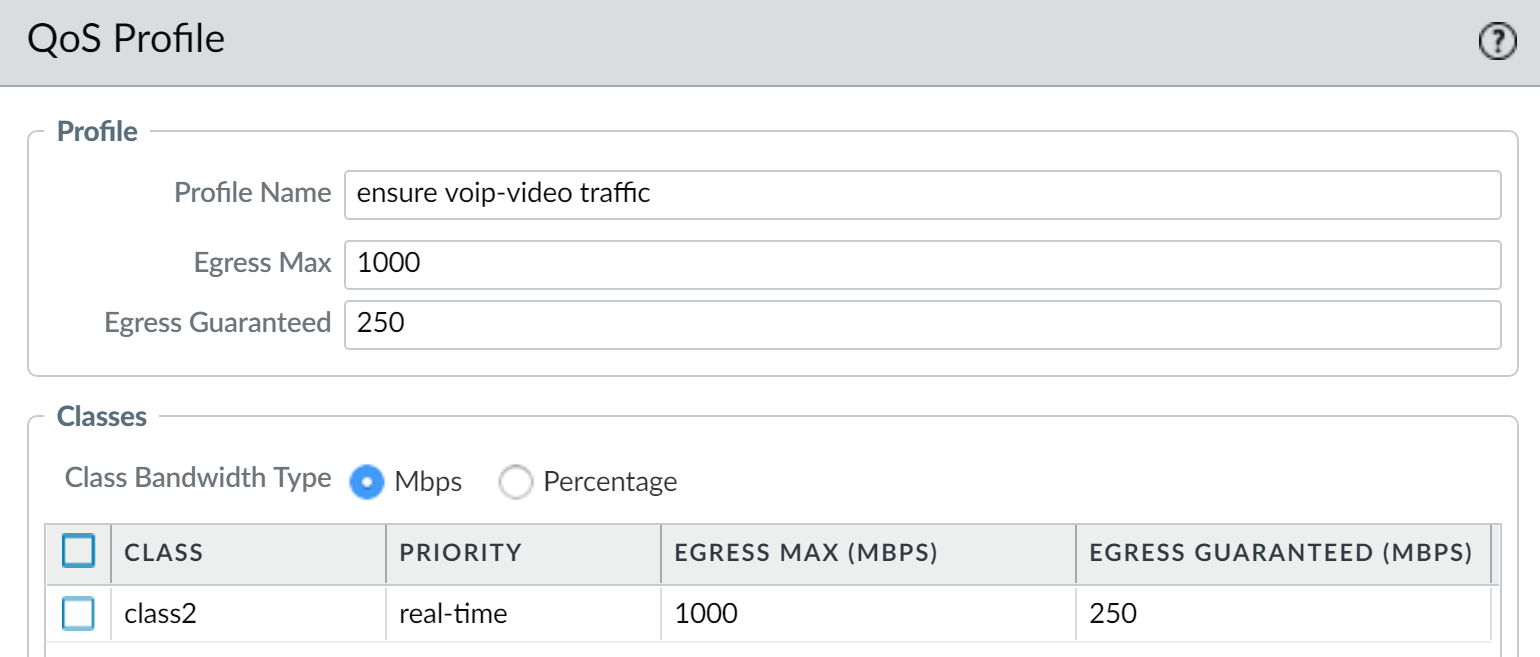
Example QoS Profile "ensure voip-video traffic" in PAN-OS, configuring Class 2 (could be Class 1) with 'real-time' priority for voice and video applications. -
Priority:
- Configure other classes for other traffic types (e.g., Class 4 for default).
-
Name:
-
Click
OK.
-
Navigate to
-
Create a QoS Policy Rule for VoIP and Video Apps:
-
Navigate to
Policies > QoS. -
Click
Add.-
Name:
QoS_Policy_VoIP_Video -
Source Tab:
-
Source Zone:
e.g.,
trust,wifi_users(any zone where users initiate calls/video) -
Source Address:
any(or specific subnets if applicable)
-
Source Zone:
e.g.,
-
Destination Tab:
-
Destination Zone:
e.g.,
untrust(for cloud services), or internal zones if calls are internal. -
Destination Address:
any
-
Destination Zone:
e.g.,
-
Application/Service Tab:
-
Application:
Add specific App-IDs:
-
For VoIP:
sip,rtp,h323,skype, etc. -
For Video:
webex,zoom-meeting,ms-teams-audio-video,google-meet, etc. -
Alternatively, use an Application Filter. Create one (
Objects > Application Filters) with criteria like Subcategory =voip-videoorcollaboration, Technology =client-serverorbrowser-based, Risk = low.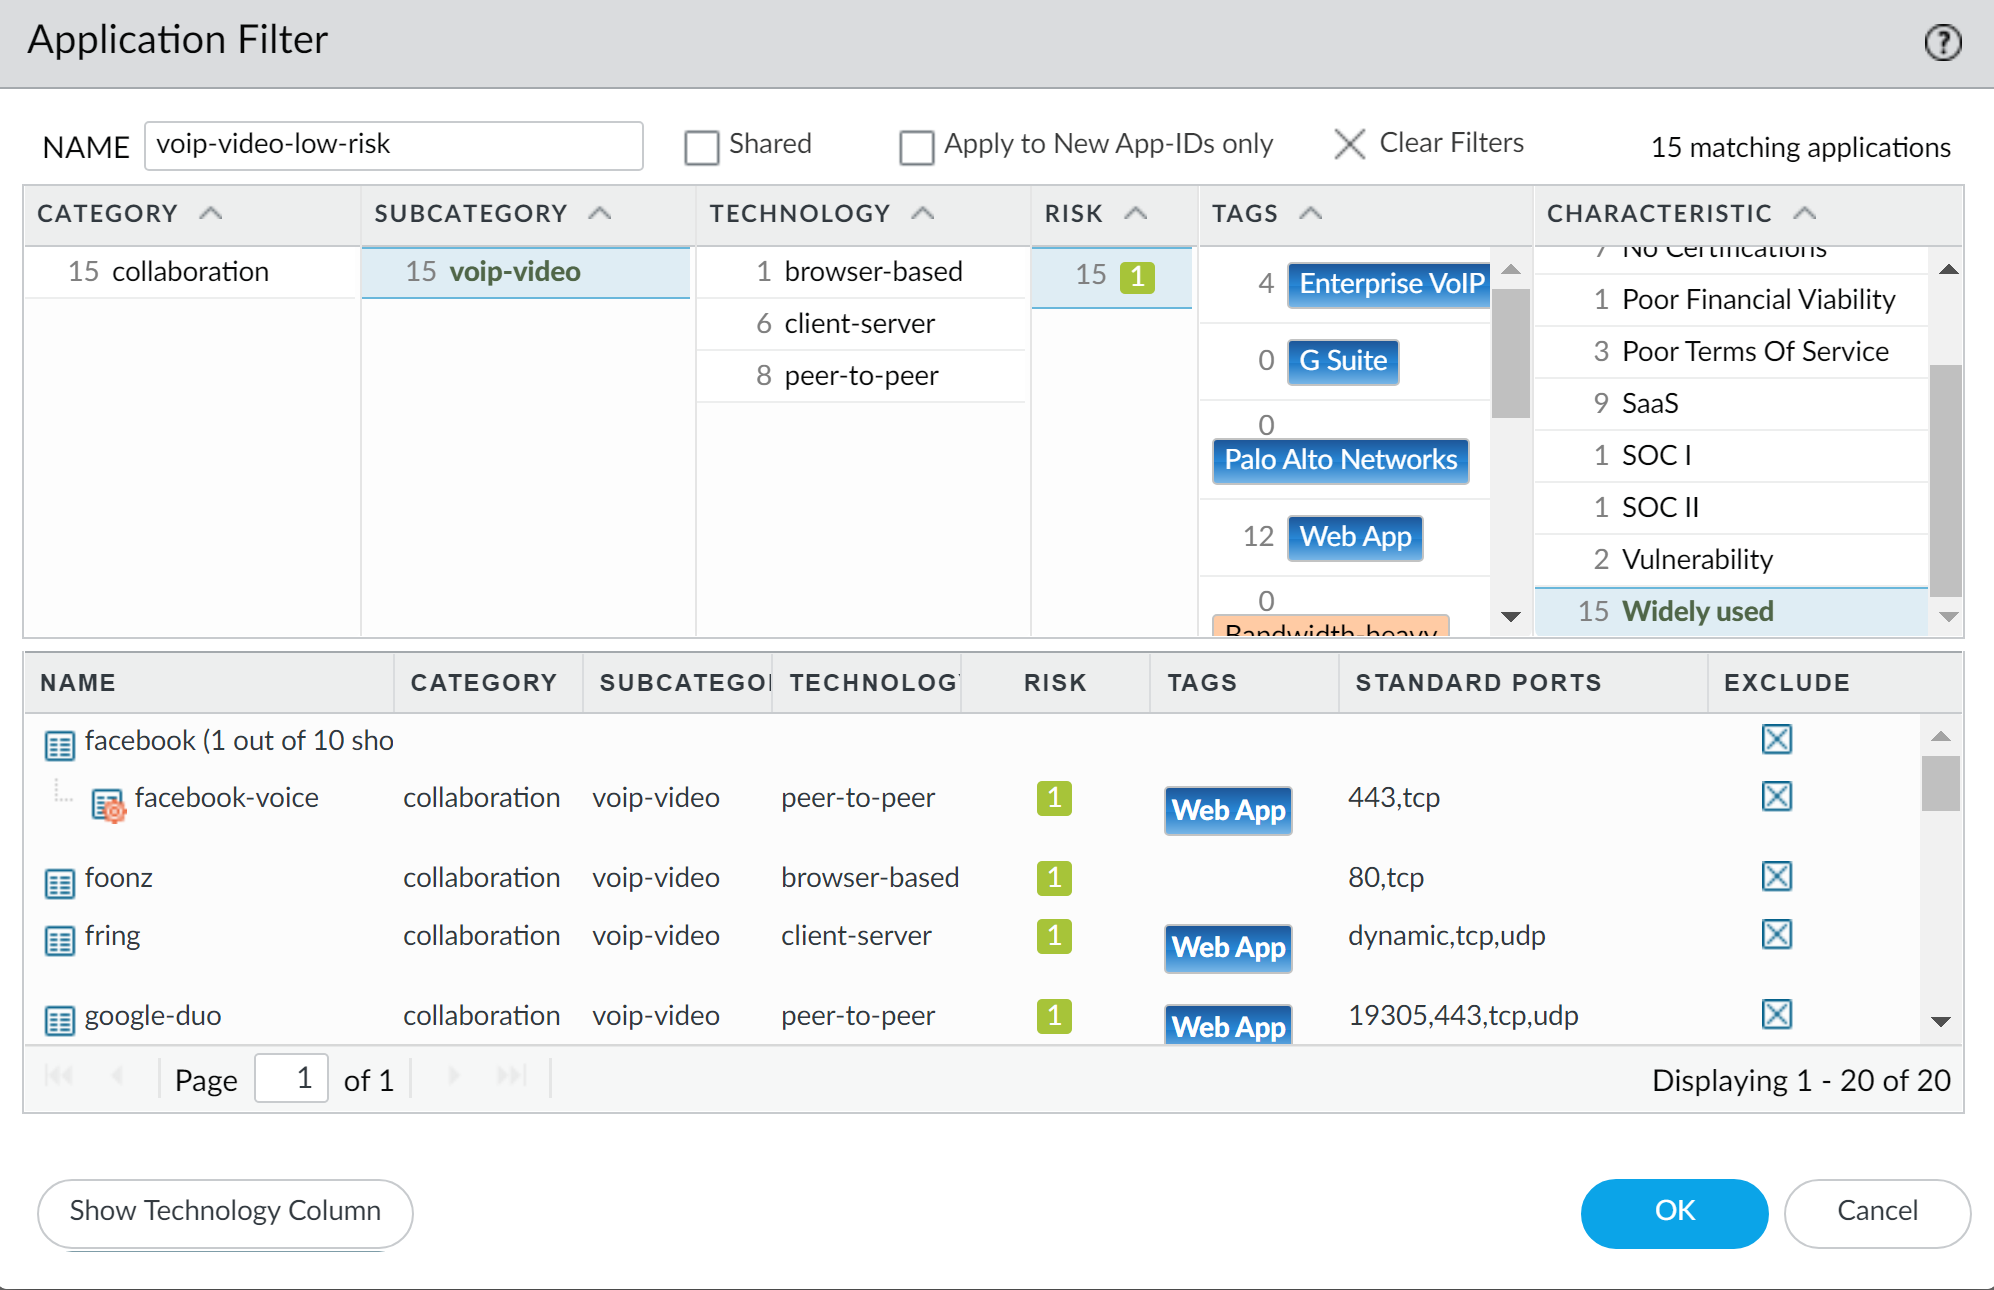
Example Application Filter in PAN-OS targeting applications in the 'voip-video' subcategory.
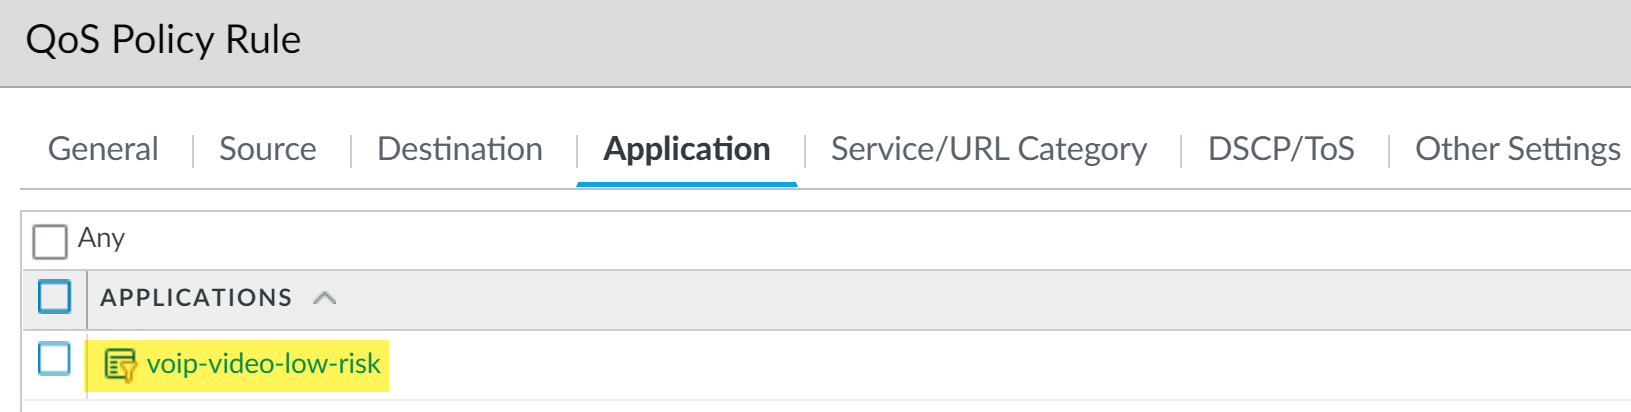
Example PAN-OS QoS Policy rule using an Application Filter to identify VoIP and Video traffic. -
For VoIP:
-
Application:
Add specific App-IDs:
-
Other Settings Tab:
-
Class:
Select
Class 1(matching the class configured inQoS_Profile_Realtime_Apps).

Assigning the identified VoIP/Video traffic to QoS Class 2 (or your designated real-time class) in the PAN-OS QoS Policy rule. -
Class:
Select
-
Name:
-
Click
OK. Place this rule high in the QoS policy list.
-
Navigate to
-
Enable QoS on Egress Interfaces and Apply Profile:
VoIP/Video traffic is bidirectional. You need to apply QoS on egress interfaces for both directions of the flow.
-
Outbound Traffic (e.g., internal user to cloud service):
-
Egress Interface: Your external-facing interface (e.g.,
ethernet1/2- internet link). -
Navigate to
Network > QoS, selectethernet1/2. - Set Egress Max (total internet bandwidth).
- Check Turn on QoS feature on this interface .
-
Clear Text Traffic Tab:
Set
Default Profile
to
QoS_Profile_Realtime_Apps.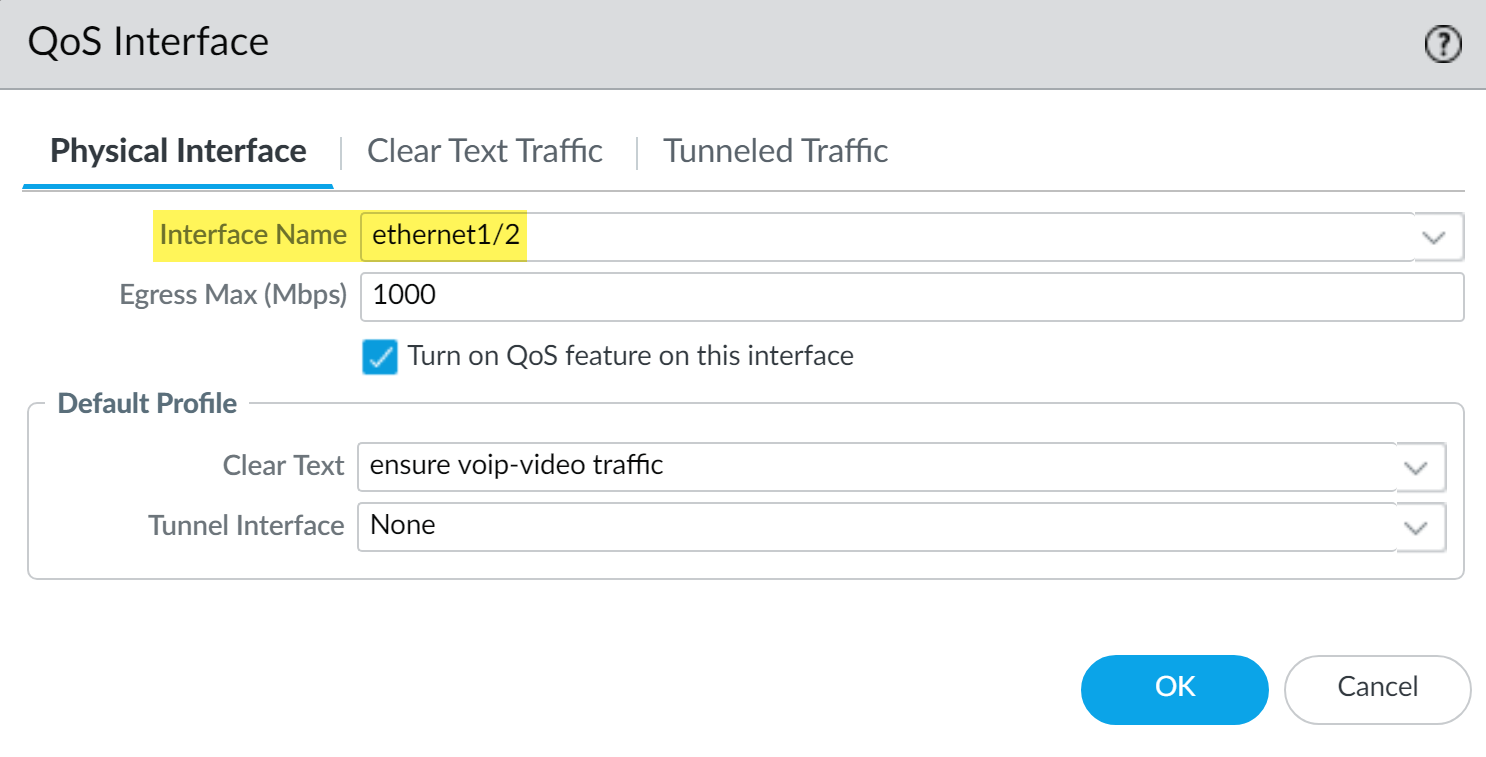
PAN-OS QoS configuration for the external interface (e.g., ethernet1/2), applying the VoIP/Video profile for outbound real-time traffic.
-
Egress Interface: Your external-facing interface (e.g.,
-
Inbound Traffic (e.g., cloud service to internal user, or peer-to-peer call return):
-
Egress Interface: Your internal-facing interface (e.g.,
ethernet1/1- trust interface). -
Navigate to
Network > QoS, selectethernet1/1. - Set Egress Max (e.g., 1000 Mbps for a 1Gbps internal link, or less if it's a bottleneck).
- Check Turn on QoS feature on this interface .
-
Clear Text Traffic Tab:
Set
Default Profile
to
QoS_Profile_Realtime_Apps.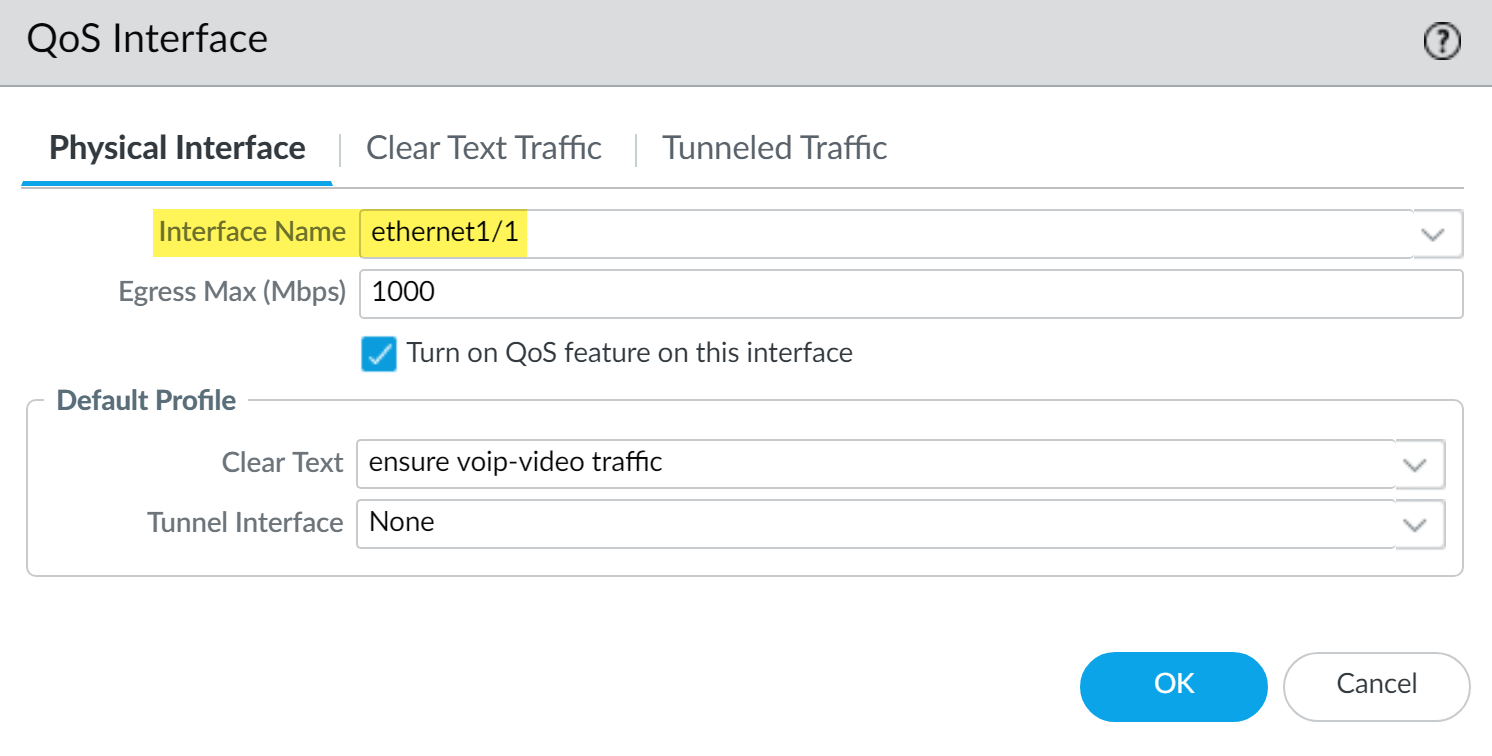
PAN-OS QoS configuration for the internal interface (e.g., ethernet1/1), applying the VoIP/Video profile for inbound real-time traffic shaping.
-
Egress Interface: Your internal-facing interface (e.g.,
-
Click
OKfor both interface configurations.
-
Outbound Traffic (e.g., internal user to cloud service):
- Commit Changes.
-
Verify:
-
Use
Network > QoS > Statisticsfor bothethernet1/1andethernet1/2. During calls/video conferences, you should see traffic in Class 1.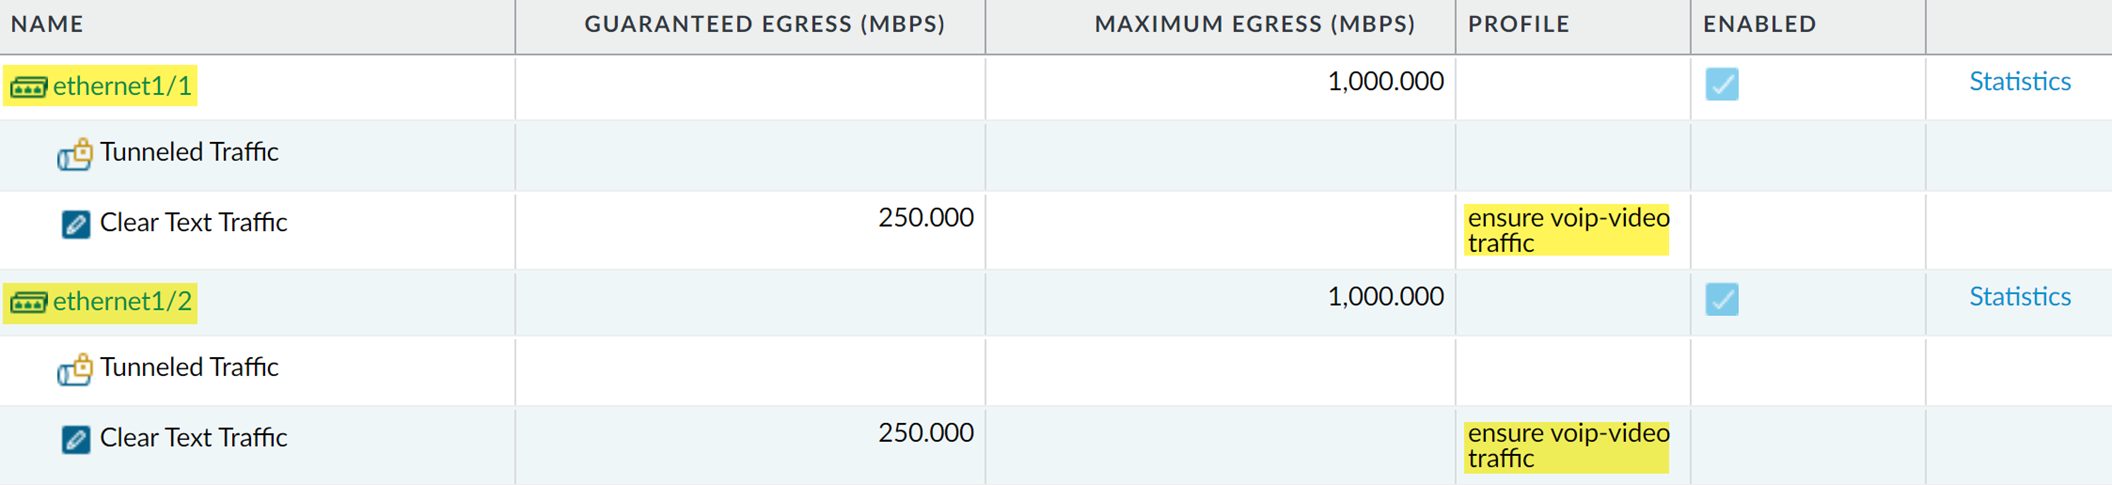
Confirmation in PAN-OS that QoS is enabled on both relevant internal and external interfaces. - Use DSCP marking in Security Policies (e.g., mark VoIP RTP as EF) to signal downstream devices if needed.
-
Use
This comprehensive approach ensures that latency-sensitive voice and video applications receive the highest priority and dedicated bandwidth in both directions of communication, significantly improving user experience.
Palo Alto Networks QoS: Best Practices & Troubleshooting Tips
Implementing QoS effectively requires careful planning, adherence to best practices, and knowing how to troubleshoot common issues within the Palo Alto Networks ecosystem.
Palo Alto Networks QoS Best Practices
-
Understand Your Traffic:
- Use ACC, Traffic Logs, and App-ID to thoroughly understand your network's application mix, peak bandwidth usage, and critical applications before designing QoS policies.
- Identify which applications are latency-sensitive (VoIP, video, VDI) versus bandwidth-intensive (backups, large file transfers).
-
Start Simple, Then Refine:
- Begin with a few broad QoS classes (e.g., Real-time, Business Critical, Best Effort, Low Priority).
- Monitor the results and add more granularity (more classes or more specific App-ID based policies) as needed. Avoid over-complicating with too many classes or rules initially.
-
Accurate Interface Egress Max:
-
Set the "Egress Max" on each QoS-enabled physical interface (
Network > QoS) to accurately reflect the actual usable bandwidth of that link (e.g., ISP subscription rate minus overhead, or internal link speed). All percentage-based calculations in QoS Profiles depend on this.
-
Set the "Egress Max" on each QoS-enabled physical interface (
-
Don't Over-Subscribe Guaranteed Bandwidth:
- The sum of "Egress Guaranteed" bandwidth for all classes in a QoS Profile applied to an interface should not exceed 100% of the Interface Egress Max (or Profile Egress Max). While PAN-OS might allow it, it's logically flawed.
-
Leverage App-ID and User-ID:
- Use App-ID for precise application identification, rather than relying solely on ports.
- Use User-ID to apply QoS based on user roles or departments where appropriate.
-
Prioritize, Don't Just Limit:
- QoS is not just about limiting "bad" traffic; it's more importantly about prioritizing and guaranteeing performance for "good" traffic.
- Use "Real-time" priority sparingly, only for truly latency-critical applications like VoIP media. Overuse can starve other important traffic.
-
QoS in Both Directions:
- For client-server applications (especially those traversing the internet), remember to apply QoS on the egress interface for both upload and download directions. This often means configuring QoS on your external (untrust) interface and your internal (trust) interface.
-
QoS Policy Ordering:
- Place more specific QoS Policy rules above more general ones, as rules are evaluated top-down.
-
Use DSCP Wisely:
- Honor incoming DSCP markings from trusted devices (e.g., VoIP phones) by matching them in QoS Policies.
- Mark outgoing traffic with appropriate DSCP values (via Security Policy > Actions) to inform downstream devices, especially in MPLS or SD-WAN environments.
-
Regular Monitoring and Tuning:
-
Continuously monitor QoS Statistics (
Network > QoS > Statistics). - Review if applications are being classified correctly and if bandwidth allocations are appropriate. Business needs and application usage patterns change over time.
- Adjust QoS Profiles and Policies as necessary.
-
Continuously monitor QoS Statistics (
-
Documentation:
- Document your QoS strategy, policies, profiles, and class definitions. This is invaluable for troubleshooting and future modifications.
-
Test Changes:
- If possible, test significant QoS changes in a lab environment or during a maintenance window to avoid impacting production traffic unexpectedly.
Common Troubleshooting Scenarios & Tips
| Symptom | Potential Palo Alto Networks Cause(s) | Troubleshooting Steps (PAN-OS) |
|---|---|---|
| Critical application (e.g., VoIP) has poor quality. |
- Incorrect QoS Policy (not matching app, wrong class assigned).
- Insufficient Egress Guaranteed bandwidth in QoS Profile. - Incorrect Priority in QoS Profile (not Real-time/High). - Interface Egress Max set too low or incorrectly. - QoS not enabled on the correct egress interface(s). - Congestion elsewhere in the network (outside firewall). |
- Check Session Browser: Is VoIP session matching the correct QoS Rule and Class?
- Verify App-ID for VoIP apps (sip, rtp, specific vendor app) in QoS Policy. - Examine QoS Profile: Is Class for VoIP 'Real-time' with adequate Guaranteed BW? - Check
Network > QoS
: Is Interface Egress Max correct? Is QoS enabled? Is correct Profile applied?
- Check QoS Statistics for drops in the VoIP class. |
| Traffic not being classified into the expected QoS Class. |
- QoS Policy rule order: A more general rule above is matching first.
- Incorrect matching criteria (Source IP pre-NAT, Dest Zone post-NAT, App-ID, User-ID). - Application is 'unknown-tcp/udp' (App-ID not identifying it). |
- Review QoS Policy order. Move specific rule up.
- Verify all matching criteria in the QoS Policy rule against Traffic Logs / Session Browser details for the specific session. - If 'unknown', consider custom app signature or allowing the generic App-ID and Service if trusted. |
| Bandwidth limits (Egress Max) don't seem to be enforced. |
- Interface Egress Max (
Network > QoS
) is 0 or not set.
- QoS Profile not correctly applied to the interface. - Percentage-based Egress Max in Profile is too high relative to Interface Egress Max. - QoS feature not turned on for the interface. |
- Verify Interface Egress Max is accurately set on
Network > QoS
.
- Confirm the correct QoS Profile is selected for Clear Text/Tunneled traffic on the interface. - Double-check Egress Max % in Profile. - Ensure "Turn on QoS feature on this interface" is checked. |
| QoS statistics show no traffic or incorrect traffic in classes. |
- No traffic actually matching QoS Policies.
- QoS not enabled on the monitored interface. - Incorrect interface selected in QoS Statistics view. |
- Test with traffic known to match a policy.
- Ensure QoS is enabled on the interface (
Network > QoS
).
- Select the correct interface in
Network > QoS > Statistics
.
|
| High packet drops in a specific QoS class. |
- Egress Max for that class is too low for the demand.
- Sustained congestion and Egress Guaranteed is also insufficient or shared. - Overall interface saturation. |
- In QoS Profile, increase Egress Max for the class. If possible, increase Egress Guaranteed.
- Consider if overall Interface Egress Max needs to be re-evaluated (link upgrade?). - Identify sources of heavy traffic in that class using QoS Statistics (Top Apps). |