About Custom Application Signatures
Custom application signatures reduce unknown traffic, provide application visibility, and give you more granular control over applications on your network. For example, you may believe office productivity has decreased since the FIFA Women’s World Cup began. You can create custom signatures for the FIFA landing and live streaming pages and view FIFA activity in the ACC and Traffic logs (as long as current security policies allow the traffic). From there, you can create a report, configure a QoS policy, or block the application by adding it to security policy.
An application signature identifies a pattern located within packets from an application or application function. This pattern uniquely identifies the application or function of interest. The
App-ID™
traffic classification system relies on application signatures to accurately identify applications in your network. Palo Alto Networks has developed App-ID signatures for many wellknown applications. (See
Applipedia
for a complete list). However, the volume of commercial applications and the nature of internal applications means that some applications do not have a signature. Such traffic receives “unknown” classification in the ACC and Traffic logs alongside potential threats. To properly classify this traffic and enforce security policy rules, you can
create a custom application signature
.
Custom application signatures enable you to:
-
Minimize “unknown” traffic on your network
-
Identify internal applications or special interest applications, such as a custom payroll application or sports live streaming
-
Monitor application usage in the ACC and Traffic logs
-
Explicitly define allowed applications and application functions (for example, allowing Slack for instant messaging, but blocking file transfer)
-
Perform QoS for a specific application
-
Identify nested applications, such as Words with Friends in Facebook
 Custom applications take precedence over predefined applications when traffic matches both a custom-defined signature and a Palo Alto Networks signature. Accordingly, Traffic logs reflect the custom application name once the new application has been configured.
About Custom Threat Signatures
Our next-generation firewalls allow you to create custom threat signatures to monitor malicious activity or integrate third-party signatures. As with Palo Alto Networks threat signatures, you can detect, monitor, and prevent network-based attacks with custom threat signatures. Build your signature by examining packet captures for regular expression patterns that uniquely identify spyware activity and vulnerability exploits. The firewall will scan network traffic for these patterns and act based on the action specified during configuration upon threat detection. Be sure to use custom threat signatures as part of anti-spyware and vulnerability protection profiles to detect and handle command-and-control (C2) activity and system flaws that an attacker might attempt to exploit.
You can also define a
combination signature for brute force attacks
—a custom threat signature that triggers when traffic matches a specified pattern a certain number of times in a given time interval.
Combination Signatures for Brute Force Attacks
Combination signatures detect and prevent brute force attacks. A combination signature assigns a time attribute to an existing threat signature—the child signature—to form a distinct parent signature. The time attribute specifies the number of pattern matches or “hits” to the child signature and the time frame (in seconds) the hits must occur within for the parent signature to trigger. If a pattern matches the child signature alone, the default action for that signature occurs.
You can narrow the trigger conditions by including aggregation criteria, which define what the parent signature counts as a hit. You can select from “source,” “destination,” and “source-and destination.” If you wanted to count the number of hits to a particular destination IP address, you would set the aggregation criteria to “destination.” To count all hits from a particular source, select “source.” “Source-and-destination” instantiates multiple time-windows that count the n-number of instances when a single source goes to a specific destination.
Create a Custom Application Signature
To create a custom application signature, you must do the following:
-
Research the application using packet capture and analyzer tools
-
Identify patterns in the packet captures
-
Build your signature
-
Validate your signature
Custom application signatures require you to specify the
Scope
—how your signature is applied to the traffic,
Context
—the portion of the file or protocol where you expect to find your pattern, the
Pattern
, and the
Operator
(
Pattern Match
for string contexts and
Greater Than
,
Less Than
, or
Equal To
for integer-based contexts).
Refer to the
Custom Signature Contexts
,
Defining Applications
and
Syntax for Regular Expression Data Patterns
while building your signature.
 Tutorial: How to Configure a Custom App-ID
STEP 1 |
Research the application using packet capture and/or analyzer tools.
-
You should understand how you’d like to control the application before all else. Do you want to limit application functionality? Create a usage report? You’ll want to examine the contents of packet captures to gather context and identify unique characteristics of the application.
 Consider using a tool such as Wireshark or perform a packet capture on the firewall itself
Take a Packet Capture for Unknown Applications
.
Consider using a tool such as Wireshark or perform a packet capture on the firewall itself
Take a Packet Capture for Unknown Applications
.
-
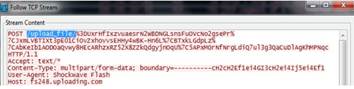
Perform multiple packet captures between the client system and web server.
Generate traffic for various application scenarios once you have launched the capture tool. For example, if you wanted to create a signature for ‘uploading’ on uploading.com, you would upload a file on that site.
 Multiple sessions might be created for the different actions performed in the application. You will need to locate and inspect each type of session in the resulting packet captures.
-
Inspect packet captures for values or patterns that uniquely identify the application or application function.
For example, after you uploaded a file to uploading.com, you would look for HTTP POST request packets in the sessions captured by your packet analyzer tool. Then, you would examine the packet contents for patterns.
STEP 2 |
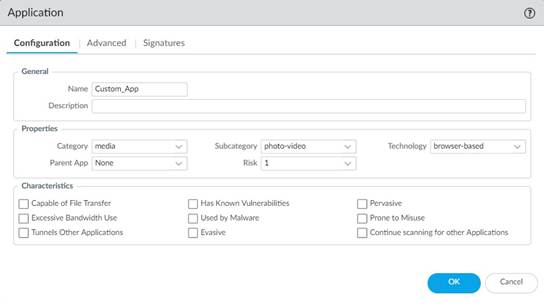
Create the custom application.
-
Select
Objects
>
Applications
and click
Add
.
-
Under
Configuration
, enter a name and optional description for the application. Specify the application’s Properties and Characteristics.
-
 If your custom application has no Parent App that can be identified by regular App-ID or is used in an application override, the application cannot be scanned for threats.
-
If the custom application has scanning options unchecked, the threat engine will stop inspecting the traffic as soon as the custom application is identified.
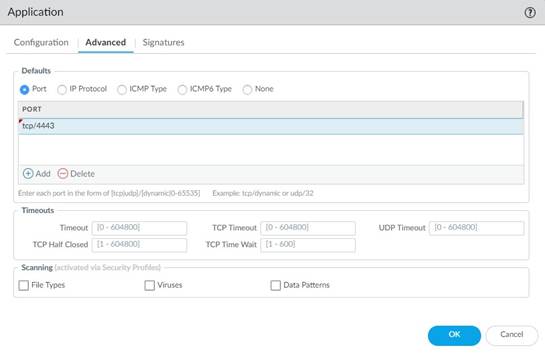
-
Under
Advanced
, define settings that will allow the firewall to identify the application protocol:
-
Specify the default ports or protocol that the application uses. To specify signatures independent of protocol, select None.
-
Specify the session timeout values. If you don’t specify timeout values, the default timeout values will be used.
-
Indicate any type of additional scanning you plan to perform on the application traffic.
STEP 3 |
Define your signature.
Multiple signatures may be necessary to account for all traffic specific to the application.
-
Under
Signatures
, click
Add
and enter a
Signature Name
and optional description.
-
Specify the
Scope
—Select between
Transaction
(e.g. HTTP request and response) or
Session
(e.g. a single POST request).
-
Specify the matching conditions by clicking
Add And Condition
or
Add Or Condition
.
-
Select an
Operator
to define the conditions that must be true for a signature to match traffic.
-
Repeat sub-steps 3 and 4 for each matching condition.
If you leave
Ordered Condition Match
selected, make sure the condition or group of conditions is in the desired order. The most specific conditions should come first. To order the conditions: Select a condition or a group and click
Move Up
or
Move Down
.
 You cannot move conditions from one group to another.
STEP 4 |
Save the custom signature.
-
Click
OK
to save your signature definition.
-
Commit
your signature.
STEP 5 |
Test your custom signature
.
Create a Custom Threat Signature
To create a custom threat signature, you must do the following:
-
Research the application using packet capture and analyzer tools
-
Identify patterns in the packet captures
-
Build your signature
-
Validate your signature
Be sure to
Set Up Antivirus, Anti-Spyware, and Vulnerability Protection
to specify how the firewall responds when it detects a threat.
Refer to the list of
Custom Signature Contexts
,
Threat Details
and
Syntax for Regular Expression Data Patterns
while building your signature.
 Tutorial: Custom Vulnerability
To create a threat signature with time attributes, see
create a combination signature
.
STEP 1 |
Add a custom threat.
-
Click
Objects
>
Custom Objects
>
Spyware/Vulnerability
and then click
Add
.
-
Under
Configuration
, fill out the following required fields in the General and Properties sections.
-
Threat ID
-
For a vulnerability signature, enter a numeric ID between 41000 and 45000. If the firewall runs PAN-OS 10.0 or later, the ID can also be between 6800001 and 6900000.
-
For a spyware signature, the ID should be between 15000 and 18000. If the firewall runs PAN-OS 10.0 or later, the ID can also be between 6900001 and 7000000.
-
Name
—Specify the threat name.
-
Severity
—Select the severity of the threat.
STEP 2 |
Define your signature.
-
Under
Signatures
, leave
Standard
selected unless you wish to
Create a Combination Signature
.
Add
a new signature.
-
Specify the following information:
-
Standard
—Enter a name to identify the signature.
-
Comment
—Enter an optional description.
-
Ordered Condition Match
—If the order in which the firewall attempts to match the signature definitions is important, make sure the check box is selected.
-
Scope
—Indicate whether this signature applies to a full
Session
or a single
Transaction
.
-
Specify the matching conditions by clicking
Add And Condition
or
Add Or Condition
.
-
Select an
Operator
to define the conditions that must be true for a signature to match traffic.
-
If you select
Pattern Match
, specify the following:
-
Context
—Select from available
custom signature contexts
.
-
Pattern
—Use a regular expression to define this attribute.
-
Optionally,
Add
a qualifier/value pair.
-
 Qualifiers are context-dependent and limit the match condition for the given context.
-
Select
Negate
to signal a condition under which the custom signature does not trigger. The custom signature matches to traffic only when this condition is false.
-
 A custom signature cannot be created with only Negate conditions. You must include at least one positive condition in your definition.
-
If the signature’s scope is set to Session, a negative condition cannot be configured as the last condition to match to traffic.
You can define exceptions for custom vulnerability or spyware signatures using the new option to negate signature generation when traffic matches both a signature and the exception to the signature. Use this option to allow certain traffic in your network that might otherwise be classified as spyware or a vulnerability exploit. In this case, the signature is generated for traffic that matches the pattern; traffic that matches the pattern but also matches the exception to the pattern is excluded from signature generation and any associated policy action (such as being blocked or dropped). For example, you can define a signature to be generated for redirected URLs; however, you can now also create an exception where the signature is not generated for URLs that redirect to a trusted domain.
-
If you select an
Equal To
,
Less Than
, or
Greater Than
operator, specify a
Context
and a
Value
.
-
Repeat sub-steps 3 and 4 for each matching condition.
If you leave
Ordered Condition Match
selected, make sure the condition or group of conditions is in the desired order. The most specific conditions should come first. To order the conditions: Select a condition or a group and click
Move Up
or
Move Down
.
 You cannot move conditions from one group to another.
STEP 3 |
Save the custom threat.
-
Click
OK
to save the custom threat.
STEP 4 |
Enable your custom signature.
-
Go to
Security Profiles
>
Anti-Spyware/Vulnerability Protection
and select an existing profile.
-
Under
Exceptions
,
Show All Signatures
, enter the Threat ID you created, and
Enable
it.
-
Click
OK
.
STEP 5 |
Commit
your changes.
STEP 6 |
Test your custom signature
.
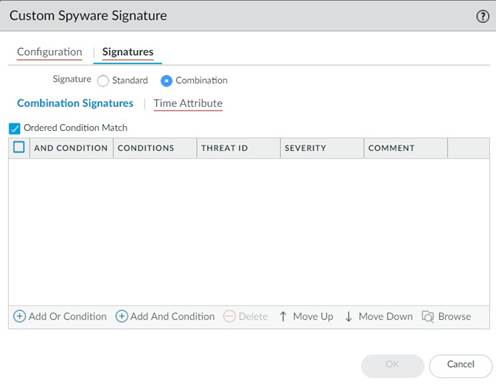
Create a Combination Signature
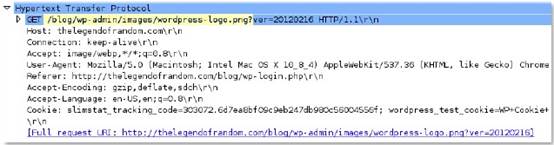
You can create a combination signature to monitor the frequency and rate of matches to a signature on your network. You’ll need to know the Threat ID of an existing threat signature or
create a custom threat signature
that detects a particular event such as a Wordpress login attempt. When you configure your combination signature, you’ll have to specify the time conditions for matches to the threat—x number of hits in y number of seconds. You can adjust the time attribute according to needs and experience.
STEP 1 |
Add a custom threat.
-
Click
Objects
>
Custom Objects
>
Spyware/Vulnerability
and then click
Add
.
-
Under
Configuration
, fill out the following required fields in the General and Properties sections.
-
Threat ID
-
For a vulnerability signature, enter a numeric ID between 41000 and 45000. If the firewall runs PAN-OS 10.0 or later, the ID can also be between 6800001 and 6900000.
-
For a spyware signature, the ID should be between 15000 and 18000. If the firewall runs PAN-OS 10.0 or later, the ID can also be between 6900001 and 7000000.
-
Name
—Specify the threat name.
-
Severity
—Select the severity of the threat.
STEP 2 |
Define your signature.
-
Click
Signatures
and select
Combination
.
-
Under
Combination Signatures
, click
Add And Condition
or
Add Or Condition
.
-
To add a condition within a group, select the group and click
Add Condition
.
-
To move a condition within a group, select the condition and click
Move Up
or
Move Down
.
-
You cannot move conditions from one group to another.
-
To move a group, select the group and click
Move Up
or
Move Down
.
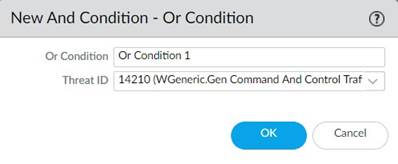
-
Choose the
Threat ID
for the signature you’d like to use. You may also edit the condition name.
-
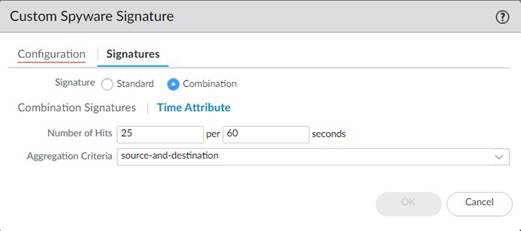
Under
Time Attribute
specify the following:
-
Number of Hits
—Specify the threshold that will trigger any policy-based action as a number of hits (1-1000) in a specified number of seconds (1-3600).
-
Aggregation Criteria
—Specify whether the hits are tracked by source IP address, destination IP address, or a combination of source and destination IP addresses.
-
To move a condition within a group, select the condition and click
Move Up
or
Move Down
.
-
 You cannot move conditions from one group to another.
-
To move a group, select the group and click
Move Up
or
Move Down
.
-
Repeat sub-steps 2, 3, and 4 for each matching condition.
If you leave
Ordered Condition Match
selected, make sure the condition or group of conditions is in the desired order. The most specific conditions should come first. To order the conditions: Select a condition or a group and click
Move Up
or
Move Down
.
 You cannot move conditions from one group to another.
STEP 3 |
Save the custom threat.
-
Click
OK
to save the custom threat.
-
Commit
your signature(s).
STEP 4 |
Test your custom signature
.
Create a Custom Threat Signature from a Snort Signature
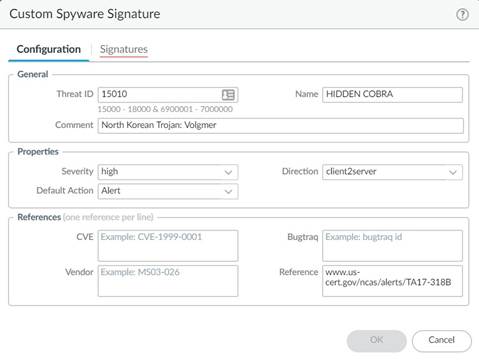
The following steps illustrate the process for converting a Snort signature into a custom spyware signature compatible with Palo Alto Networks firewalls. The use case below uses a Snort rule for a North Korean Trojan malware variant as identified by the Department of Homeland Security, the Federal Bureau of Investigation, and other US government partners.
With Panorama version 10.0 or later, you can use the IPS Signature Converter plugin to automatically convert Snort and Suricata rules into custom Palo Networks threat signatures instead of manually performing the following procedure.
Snort rule:
alert tcp any any -> any any (msg:"Malformed_UA"; content:"UserAgent: Mozillar/"; depth:500; sid:99999999;)
Reference:
https://www.us-cert.gov/ncas/alerts/TA17-318B
IOC List:
https://www.us-cert.gov/sites/default/files/publications/TA-17-318B-IOCs.csv
In this example you can:
-
Use the IP addresses provided as part of the IOC List to detect if a possible infection already exists by searching the firewall logs.
-
The IP addresses provided can be part of an EDL or Address group and added to a Policy to block traffic to and from the suspicious list.
-
Use the provided Snort signature and convert it to a custom spyware signature. This signature will become part of the spyware profile added to the appropriate policy.
For other use cases, see our companion
article
.
STEP 1 |
Create a Custom Spyware Object.
-
Navigate to
Objects
>
Custom Objects
>
Spyware/Vulnerability
.
-
Click
Add
and provide a
Threat ID
, an optional comment, and fill out the Properties section.
-
Under
Signatures
, press
Add
.
-
Specify the following information:
-
Standard
—Enter a name to identify the signature in the field.
-
Comment
—Enter an optional description.
-
If the order in which the firewall attempts to match the signature definitions is important, keep
Ordered Condition Match
selected.
-
Scope
—Indicate whether this signature applies to a full
Session
or a single
Transaction
.
-
Add a condition by clicking
Add And Condition
or
Add Or Condition
.
-
Select an
Operator
from the drop-down menu to define the conditions that must be true for the signature to match traffic.
-
If you select
Pattern Match
, identify a
Context
in the Snort pattern that matches our available
contexts
, provide a regular expression
Pattern
, and optionally,
Add
a qualifier/value pair. Select
Negate
to specify conditions under which the custom signature does not trigger.
-
If you select
Equal To
,
Less Than
, or
Greater Than
, select a
Context
and enter a
Value
.
-
Click
OK
to finish creating the Spyware object.
STEP 2 |
Verify that the custom Spyware object is part of your Anti-Spyware Profile.
-
Go to
Security Profiles
>
Anti-Spyware
. Click an existing profile, then under
Exceptions
, search for your signature’s Threat ID and
Enable
it.
STEP 3 |
Create an EDL object.
-
Navigate to
Objects
>
External Dynamic Lists
. Click
Add
.
-
Add the suspicious IP address provided from the IOC list to a previously created EDL or a new EDL as shown below.
STEP 4 |
Add the EDL and Anti-Spyware profiles to appropriate Policy Objects.
STEP 5 |
Test policy is working as expected by looking at Threat logs.
STEP 6 |
Change the action for the spyware object from alert to drop/reset after verification. Also, change the severity of the object created as needed.
STEP 7 |
Commit
your signature(s).
STEP 8 |
Test your custom signature
.
Create a Custom L3 & L4 Vulnerability Signature
You can create custom threat signatures (vulnerability) based on Layer3 and Layer4 header fields (such as IP flags, acknowledgment numbers, etc). This enables you to provide user-created vulnerability signature coverage for old and deprecated TCP/IP stacks used in embedded / IoT devices that normally would not have any existing threat signature coverage.
Custom L3 & L4 vulnerability signatures are expressed through your Zone and Zone Protection profile configuration. You must specify how the firewall responds when it detects a threat.
STEP 1 |
Log in to the PAN-OS web interface.
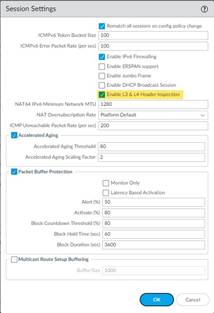
STEP 2 |
Select
Device
>
Setup
>
Session
and enable
L3 & L4 Header Inspection
globally on the firewall.
STEP 3 |
Create a Zone Protection profile and configure your L3 & L4 header inspection settings.
-
Select
Network
>
Network Profiles
>
Zone Protection
and either select an existing profile or
Add
a new profile.
-
If you are creating a new zone protection profile, enter a
Name
for the profile and an optional
Description
.
-
Select
L3 & L4 Header Inspection
to define your custom vulnerability signatures.
-
Add
new custom rules by defining the configuration and signature details for each entry, which are performed in their respective tabs:
Configuration
and
Signature
.
-
Under
Configuration
, fill out the following required fields in the General, Properties, and Reference section.
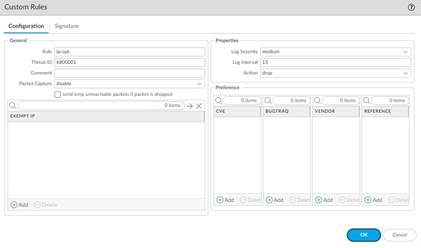
-
Rule
—Specify the custom rule name.
-
Threat ID
—Enter a numeric ID between 41000 and 45000 or 6800001 and 6900000.
-
Comment
—Optionally, add a description of the custom rule.
-
Packet Capture
—Select a packet capture setting.
-
 Optionally, select
send icmp unreachable packets if packet is dropped
to send an ICMP unreachable response to the client upon packet loss.
Optionally, select
send icmp unreachable packets if packet is dropped
to send an ICMP unreachable response to the client upon packet loss.
-
Exempt IP
—Enter the IP address(es) for which you do not want the custom rule to apply to.
-
Log Severity
—Select the severity of the threat.
-
Log Interval
—Indicates how frequently an event is logged.
-
Action
—Choose the action to take when there is a custom signatures match. Options include alert, drop, reset-client, reset-server, and reset-both. Refer to
Security Policy Actions
for more information about these action settings.
-
Reference
—Add references to provide context or related information about the custom threat signature. You can add CVEs, Bugtraq citations, 3rd party vendor IDs, or reference links to additional analysis or background information.
-
From the
Signature
tab, provide a name or description of the custom vulnerability under
Comment
. After specifying a name, select
Add
to provide the custom signature details.
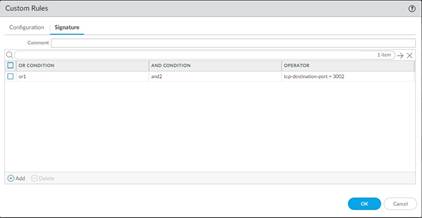
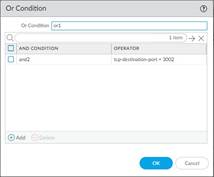
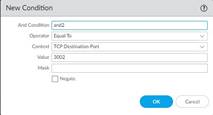
-
Specify a matching Or Condition. When finished, select
Add
to configure an And Condition and the associated values in a new window.
-
If you select a
Less Than
or
Greater Than
operator, specify a
Context
and a
Value
. The
Equal To
operator additionally has
Mask
and
Negate
options. Click OK when you have finished configuring the new and condition.
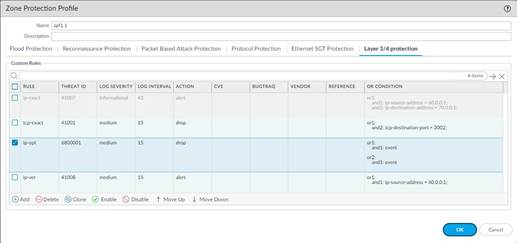
-
Repeat for each matching condition that you want to add.
-
Click
OK
and review your signatures. Click
OK
again to return to the zone protection profile.
-
From the
L3 & L4 Header Inspection
tab, you can reorder, disable, and clone the custom rule entries as necessary. Click
OK
to exit the zone protection profile.
STEP 4 |
Apply the Zone Protection profile to a security zone that is assigned to interfaces you want to protect.
-
Select
Network
>
Zones
and select the zone where you want to assign the Zone Protection profile.
-
Add
the
Interfaces
belonging to the zone.
-
For
Zone Protection Profile
, select the profile you just created.
-
Select
Enable Net Inspection
to enable the L3 & L4 header inspection configuration settings.
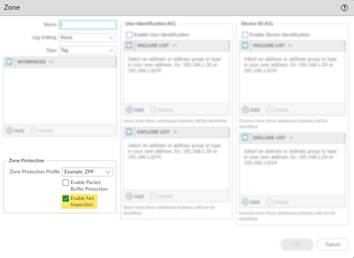
-
Click
OK
.
STEP 5 |
Commit
your changes.
STEP 6 |
Test your custom signature
.
Test a Custom Signature
Custom signatures are particularly at risk for false positives and false negatives—the incorrect identification of traffic or failed detection of applications or threats. You should always test a custom signature after committing its configuration to verify that it functions as expected. Poorly written or outdated custom signatures may only be detected (and improved) through testing. If left unexamined, your signatures can reduce the efficacy of the firewall.
For custom App-ID signatures, generate traffic matching the application or application functions on a client system with a firewall between it and the application. Then, check the Traffic logs to verify that the generated sessions match the signatures you wrote. Your signature is incomplete if any traffic from your session does not match. Look at streams of sessions that do not match your signature with a packet capture tool like Wireshark. Identify unique patterns from those streams and add them to your signature to improve the accuracy of your signature.
For custom threat signatures, run penetration tests to detect system vulnerabilities. Then, view the Threat logs to see threat activity and the actions taken. Investigate any false positives or negatives. You may need to modify your signature, change its default action, or examine security profiles and policies.
Validate that traffic matches your signature as expected.
-
Run application traffic/penetration testing.
-
Navigate to
Monitor
>
Logs
>
Traffic/Threat
. Verify that you see traffic matching the custom application/threat (and that it is being handled per your policy rule).
For example, if you wrote an application signature for uploading on example.com, you would visit example.com and upload a file. In the Traffic logs, you would verify that the session updated from “web-browsing” to “uploading-example” after the file upload.
-
Fine-tune your signature by adding additional patterns or conditions to the signature, if necessary.
-
Repeat.
Custom Signature Pattern Requirements
The pattern requirements and available syntax for custom signatures depends on your firewall version. Firewalls running PAN-OS 10.0 (or a later version) have more flexible pattern requirements and a wider selection of regular expression (regex) syntax.
Refer to
Syntax for Regular Expression Data Patterns
for more details about the differences in syntax and pattern requirements between pre-PAN-OS 10.0 releases and PAN-OS 10.0 (and later) releases. You can switch between documentation releases by using the version switcher located in the left navigation bar.
If you encounter any errors using your custom signatures, verify that they conform to the following requirements.
|
Custom Signature Pattern Requirements
|
Applies To
|
Details
|
|
|
All versions
|
•
|
You can enter hex-based patterns by surrounding the bytes with ‘
\x
’.
|
|
|
All versions
|
•
|
Most signature patterns can contain a maximum of 127 characters.
-
If you need to use a pattern longer than 127 characters, create two separate conditions—one beginning where the other left off —and join them with ‘
AND
’. You can still use
Ordered Condition Match
to require the firewall to consider one condition before the other to ensure a closer match to the full string.
-
PA-220 and PA-800 appliances running PAN-OS 10.2 and later support a maximum pattern length of 64 characters for the following contexts:
tcp-context-free
and
udp-context-free
.
-
 Signature compilation processes can cause other signatures to support a maximum pattern length of 64 characters, however, this is a rare occurrence.
As noted above, you can also create a pattern that is longer that the maximum size of 64 characters by creating two separate conditions.
|
|
|
All versions
|
•
|
Some application decoders may be case-sensitive for a given field, depending on the decoder the firewall uses. For this reason, you should define variations of the pattern. For example,
\.CNN\.com
and
\.cnn\.com
will ensure your signature functions properly regardless of case.
|
|
|
PAN-OS 9.1 and earlier versions
|
•
|
Every pattern you create must contain at least one 7-byte string with fixed values.
-
The 7 bytes cannot include a period (
.
), an asterisk (
*
), a plus sign (
+
), or
[a-z]
(ranges).
-
The 7-byte string can be anywhere in your pattern.
|
|
|
PAN-OS 9.1 and earlier versions
|
•
|
The curly braces (repetition operator) has some limitations.
-
Curly braces must be preceded by a ‘
.
’ (period).
-
You must have 7 static bytes after the braces.
|
|
|
PAN-OS 9.1 and earlier versions
|
•
|
If you have two strings that are both less than 7 bytes and that are separated by a regular expression wildcard element, you must increase the size of at least one of the strings to 7 or more bytes.
|
Testing Pattern Performance Impact
Firewalls running PAN-OS 10.0 or later have an enhanced pattern-matching engine that loosens pattern requirements and offers a richer selection of syntax. Used incorrectly, these features can have consequences that range from higher latency to dropped packets. To help you avoid performance degradation, the firewall enables you to check the performance impact of your signatures before you commit them.
The firewall scores the performance impact of a signature on a scale of 0 to 100%. A score of 0% means the signature severely affects firewall performance and a score of 100% means it minimally affects performance.
Use either of the following two commands to check the performance impact of a signature:
|
Command
|
Description
|
test custom-signature-type pattern <pattern>
|
Calculates the performance impact of a signature without a context and determines whether the pattern is not valid, is valid but in only the new engine (lscan), or is valid in both the old and new engine (pscan/AHO).
Example:
admin@VM-FW-75-252> test custom-signature-type pattern aaaa.

*The pattern is lscan pattern
Performance score: 68%
|
test custom-signature-perf context <context> pattern <pattern>
|
Calculates the performance impact of a signature with a context and displays a warning if the performance score is below 55%.
Example:
admin@VM-FW-75-252> test custom-signature-perf context http-rsp-headers pattern aaaa.*

Performance score: 42%
This signature will have performance impact
|
When you test a custom signature without a context, the score is a function of the literal parts of the pattern. The literal parts are the characters in the string with fixed values, such as “pan” and “net” in
pan.{4}net
. The greater the number and length of the literal parts, the higher the score of the pattern.
When you test a pattern with a context, the firewall performs the above calculation and adjusts it based on the typical length and frequency of the context. The firewall then divides the typical context length by the shortest literal part of the pattern and multiplies the base score of the pattern by this value. Finally, the firewall lowers the score if the context appears frequently and raises the score if the context appears infrequently.
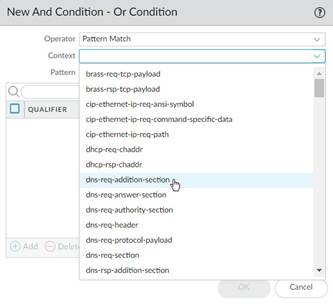
Custom Signature Contexts
Custom signature contexts are available for both string and integer context types.
String Contexts
String Contexts are a type of
custom signature context
. They are used for Pattern Match operators.
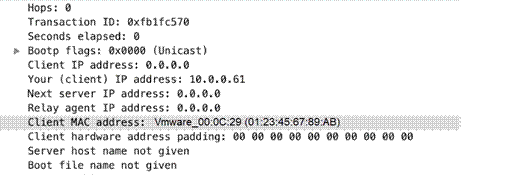
dhcp-req-chaddr
Identifies the DHCP request client hardware address.
Additional Details:
None
Context Capture:
This context provides the highlighted text.

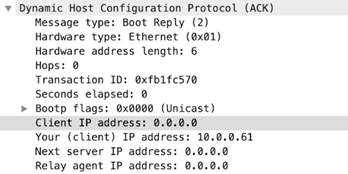
dhcp-req-ciaddr
Identifies the DHCP request client IP address.
Additional Details:
None
Context Capture:
This context provides the highlighted text.
dhcp-rsp-chaddr
Identifies the DHCP response client hardware address.
Additional Details:
None
Context Capture:
This context provides the highlighted text.
dhcp-rsp-ciaddr
Identifies the DHCP response client IP address.
Additional Details:
None
Context Capture:
This context provides the highlighted text.
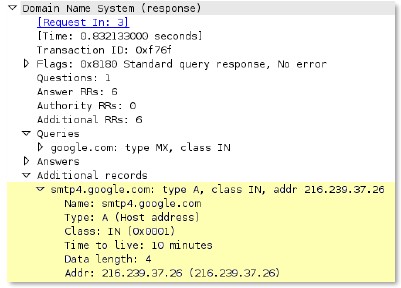
dns-req-addition-section
Additional records section if found in a DNS request (normal DNS requests should not have an additional records section).
Additional Details:
None
Context Capture:
This context provides the text highlighted in yellow.
unknown-rsp-udp-payload
Full UDP payload for unknown UDP traffic originating from the “server”, which is opposite the “client”.
Additional Details:
None
Context Capture:
This context matches the text highlighted in yellow.

Integer Contexts
Integer Contexts are a type of
custom signature context
. They are used for equality operators: less than, greater than, and equal to. They are available for custom IPS signatures, but not custom application signatures.
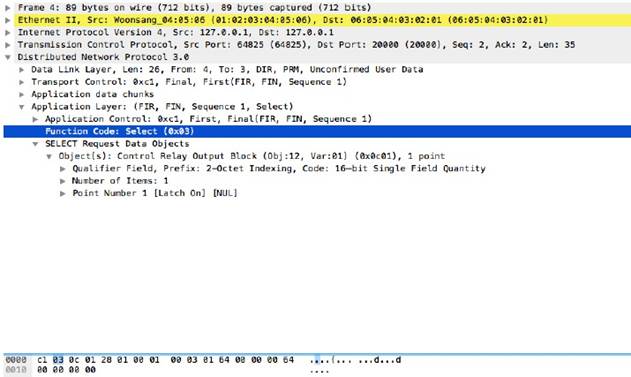
dnp3-req-func-code
DNP3 Application Layer request and response headers contain function codes. The function codes include read, write, select, operate, and direct_operate. The dnp3-req-func-code context identifies these function codes which are 1 byte in length.
Additional Details:
None
Context Capture:
In this example, the function code ‘Select’ has hex value 0x03. In the custom application, a decimal equivalent of 3 will have to be defined.
panav-rsp-zip-compression-ratio
This context detects the zip compression ratio of files downloaded over HTTP.
Additional Details:
The data compression ratio compares the uncompressed size and the compressed size of a file. This context can be used to identify a zip bomb or files with large data compression ratios.
Context Capture:
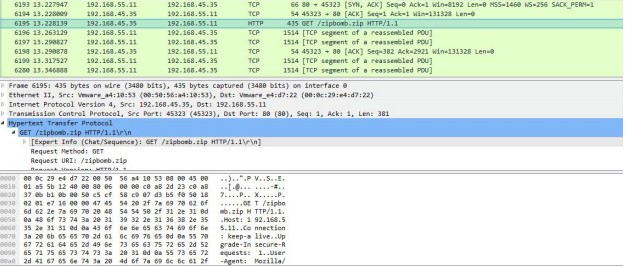
Context Qualifiers
Qualifiers lessen the chance of false positives by restricting the locations where the firewall can find a given pattern. In other words, a signature matches only when the firewall detects the pattern inside a specific qualifier, which corresponds to a specific context. For example, you might use the http-method qualifier to specify that a http-req-uri-path pattern matters when found inside a HTTP GET method.
FTP Command Qualifiers
FTP command qualifiers can be added to custom signatures that use FTP-related contexts to limit a match condition to specific FTP commands.
|
ABOR
|
ACCT
|
ALLO
|
APPE
|
AUTH
|
CDUP
|
CWD
|
|
DELE
|
EHLO
|
ERPT
|
HELO
|
LIST
|
MDTM
|
MKD
|
|
MODE
|
NLIST
|
OPTS
|
PASS
|
PASV
|
PBSZ
|
PORT
|
|
PWD
|
QUIT
|
REIN
|
REST
|
RETR
|
RMD
|
RNFR
|
|
RNTO
|
SITE
|
SIZE
|
SMNT
|
STAT
|
STOR
|
STOU
|
|
STRU
|
SYST
|
TEST
|
TYPE
|
UNKNOWNCOMMAND
|
UNLOCK
|
USER
|
|
XCRC
|
XMD5
|
XSHA1
|
|
|
|
|
FTP Vendor ID Qualifiers
FTP vendor ID qualifiers can be added to custom signatures that use FTP-related contexts to limit a match condition to specific FTP clients.
|
CEASERFTP
|
EASY_FILE_SHARING_FTP
|
FILE_COPA_FTP
|
FREEFTPD
|
MICROSOFTFTP
|
NETTERM
|
|
PROFTPD
|
SERV_U
|
UNKNOWN_FTP_SERVER
|
VSFTPD
|
WARFTPD
|
WS_FTP
|
|
WUFTP
|
|
|
|
|
|
HTTP header field qualifiers can be added to custom signatures that use HTTP-related contexts to limit a match condition to HTTP headers that have specific values for select header fields.
|
ACCEPT_LANGUAGE
|
AUTHORIZATION
|
CONTENT_ENCODING
|
CONTENT_LENGTH
|
CONTENT_TYPE
|
HOST
|
|
IF_MOD_SINCE
|
SUBSCRIBE_HDR
|
TRANSFER_ENCODING
|
UNKNOWN_HDR
|
X_FORWARD_FOR
|
|
HTTP Method Qualifiers
HTTP method qualifiers can be added to custom signatures that use HTTP-related contexts to limit a match condition to HTTP headers that use specific HTTP methods.
|
BCOPY
|
BDELETE
|
BITS_POST
|
BMOVE
|
BPROPFIND
|
BROPPATCH
|
CCM_POST
|
|
CONNECT
|
COPY
|
DELETE
|
GET
|
HEAD
|
LINK
|
LOCK
|
|
MCKCOL
|
MOVE
|
NOTIFY
|
OPTIONS
|
POLL
|
POST
|
PROPFIND
|
|
PROPPATCH
|
PROXY_SUCCESS
|
PUT
|
RPC_CONNECT
|
SEARCH
|
SMS_POST
|
SOURCE
|
|
SUBSCRIBE
|
TRACE
|
TRACK
|
UNKNOWN_METHOD
|
UNLINK
|
UNLOCK
|
UNSUBSCRIBE
|
IMAP Command Qualifiers
IMAP command qualifiers can be added to custom signatures that use IMAP-related contexts to limit a match condition to specific IMAP commands.
|
APPEND
|
AUTHENTICATE
|
CAPABILITY
|
CHECK
|
CLOSE
|
COPY
|
CREATE
|
|
DELETE
|
EXAMINE
|
EXPUNGE
|
FETCH
|
FIND
|
IDLE
|
LIST
|
|
LOGIN
|
LSUB
|
NOOP
|
RENAME
|
SEARCH
|
SELECT
|
STARTTLS
|
|
STATUS
|
SUBSCRIBE
|
UNKNOWN_COMMAND
|
UNSUBSCRIBE
|
|
|
|
RTSP Method Qualifiers
RTSP method qualifiers can be added to custom signatures that use RTSP-related contexts to limit a match condition to specific RTSP methods.
|
ANNOUNCE
|
DESCRIBE
|
GET_PARAMETER
|
OPTIONS
|
PAUSE
|
|
PLAY
|
RECORD
|
REDIRECT
|
SET_PARAMETER
|
SETUP
|
|
SETUP_PARAMETER
|
TEAR_DOWN
|
UNKNOWN_METHOD
|
|
|
SMTP Method Qualifiers
SMTP method qualifiers can be added to custom signatures that use SMTP-related contexts to limit a match condition to specific SMTP methods.
|
AUTH
|
BDAT
|
DATA
|
EHLO
|
HELO
|
MAIL
|
QUIT
|
|
RCPT
|
RSET
|
SAML
|
SEND
|
SOML
|
STARTTLS
|
|
|
USER
|
VRFY
|
XEXCH50
|
XEXPS
|
XLINK2STAT
|
XTELLMAIL
|
UNKNOWN_CMD
|
IPS Signature Converter Plugin for Panorama
Snort and Suricata are open-source intrusion prevention system (IPS) tools that use uniquely formatted rules to detect threats. The IPS Signature Converter enables you to leverage these rules for immediate threat protection by translating the IPS signatures into
custom Palo Alto Networks threat signatures
. You can then register the signatures on Palo Alto Networks firewalls in specified device groups and enforce policy using Vulnerability Protection and Anti-Spyware
Security Profiles
.
Additionally, you can export rules that list IP address indicators of compromise (IOC) and use the resultant text file as an
external dynamic list
to enforce policy on the entries contained in the list.
About the IPS Signature Converter Plugin
The IPS Signature Converter plugin for Panorama provides an automated solution for converting rules from a third-party intrusion prevention system (IPS)—Snort or Suricata—into
custom Palo Alto Networks threat signatures
. You can then register these custom signatures on firewalls that belong to device groups you specify and use the signatures to enforce policy in Vulnerability Protection and Anti-Spyware
Security Profiles
.
Snort and Suricata are open-source IPS tools that use uniquely formatted rules to detect threats. Organizations that share threat intelligence often distribute security advisories with these rules to help you implement the appropriate protections on your firewall. The IPS Signature Converter plugin enables you to immediately act upon these advisories and protect your network against any threats you receive in Snort or Suricata format.
After you install the IPS Signature Converter plugin on Panorama, you can upload rules for conversion and import them to your device groups. You can also export rules containing indicators of compromise (IOC) to a text file that you can use as an
external dynamic list
to enforce policy on the entries contained in the list.
Convert Rules Using the Panorama Web Interface
After you install the intrusion prevention system (IPS) signature converter plugin, you can use it to translate Snort and Suricata rules into
custom Palo Alto Networks threat signatures
. You can then register the custom signatures on Palo Alto Networks firewalls that belong to device groups that you specify and use these customer signatures in your Vulnerability Protection and Anti-Spyware
Security Profiles
.
Additionally, you can export rules that list IP address indicators of compromise (IOC) and use the resultant text file as an
external dynamic list
to enforce policy on the entries contained in the list.
The following example uses this Snort rule:
alert tcp any any -> any any (msg:"Malformed_UA"; content:"UserAgent: Mozillar/"; depth:500; sid:99999999;)
STEP 1 |
Select
Panorama
>
IPS Signature Converter
>
Manage
.
STEP 2 |
Upload Signatures
.
STEP 3 |
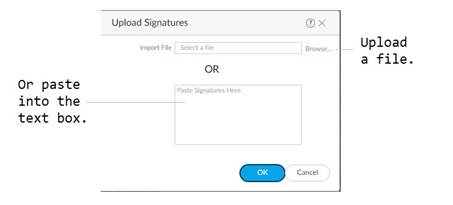
Select one of two methods for uploading your rules:
-
Browse
to and select a text file.
-
 You cannot convert binary file types, such as .pdf or .docx.
-
Paste the rules directly into the text box.
-
 You can upload only 300 rules at a time for conversion.
STEP 4 |
Click
OK
.
Your signatures will populate at least one of the following tabs:
Succeeded
,
Succeeded with Warnings
,
Failed
,
Duplicates
, or
Existing Coverage
.
STEP 5 |
(Optional) Export rules to an indicator of compromise (IOC) list.
Panorama converts a rule that does not contain the keywords
content
or
PCRE
into an
IOC List
.
Export IOC List
to group these rules into a text file that you can use as an
external dynamic list
for your Security policy rules.
-
Select
Export IOC List
.
-
A dialog displays any rules that converted as
IOC List
.
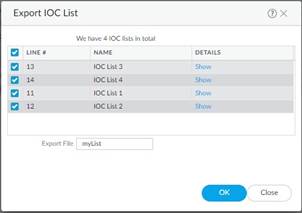
-
Select the rules that you want to export.
-
Enter the name of the file to which you want to export your rules.
-
Click
OK
.
-
The exported text file will appear in your downloads folder.
STEP 6 |
Commit converted signatures to Panorama.
-
Select the signatures you want to upload.

-
Import Custom Signatures
.
-
Select a Device Group from the drop-down.
Select
Shared
to make the signatures available to all device groups.
-
Under the Destination column, select whether to commit the signatures as
Vulnerability
or
Spyware
.
-
Click
OK
.
-
In the top right of the screen, select the Commit icon (
 ) and
Commit to Panorama
.
) and
Commit to Panorama
.
-
Verify that you successfully committed your signatures.
-
Select
Objects
>
Custom Objects
.
-
Select either
Spyware
or
Vulnerability
, depending on how you categorized your signatures in
the previous step
.
STEP 7 |
Push the signatures to managed firewalls.
 The firewalls must be running PAN-OS 10.0 or a later release with an active
Threat Prevention
license.
The firewalls must be running PAN-OS 10.0 or a later release with an active
Threat Prevention
license.
STEP 8 |
Test your signatures
on a firewall in the device group to which you pushed the signatures.
Convert Rules Using the Panorama CLI
In addition to the web interface, you can use the command-line interface (CLI) to convert Snort
®
and Suricata rules into custom PAN-OS threat signatures. This example uses the following Snort rule:
alert tcp $HOME_NET 2589 -> $EXTERNAL_NET any ( msg:"MALWARE-BACKDOOR - Dagger_1.4.0"; flow:to_client,established; content:"2|00 00 00 06| 00 00 00|Drives|24 00|",depth 16; metadata:ruleset community; classtype:misc-activity; sid:105; rev:14; )
You cannot convert rule files through the CLI. If you want to convert a file with multiple rules in it, use the
Panorama web interface
.
The
CLI Quick Start
contains additional CLI commands.
STEP 1 |
Encode the rule in Base64 format.
You can do this using a free, browser-based tool (
example
).
 Before encoding the rule, ensure there are no line breaks. Otherwise, the line breaks are encoded and cause the rule conversion in the subsequent step to fail.
STEP 2 |
Convert the encoded rule:
admin@demo-panorama-vm> request plugins ips-signature-converter convert b64-encode <base64_encoded_rule>

LINE# TITLE                  RESULT    TYPE     CONVERTER_MSG
1     Converted_MALWARE-     Succeed   Plain    None
      BACKDOOR -
      Dagger_1.4.0_105

Summary: Total:1, Succeed:1, Warnings:0, Existing Coverage:0, Duplicated:0, Failed:0
STEP 3 |
(Optional) Change the signature type.
If your signature is for protection against spyware, you can set the type as
spyware
so that Panorama imports it as an Anti-Spyware signature. Otherwise, rules convert as
vulnerability
by default.
admin@demo-panorama-vm> request plugins ips-signature-converter set-properties signature-type <vulnerability/spyware> lines <line_number>

LINE# TITLE                                  SIG_TYPE     ACTION     SEVERITY
1     Converted_MALWARE-BACKDOOR -           spyware      alert      low
      Dagger_1.4.0_105
STEP 4 |
Import the signature to Panorama:
admin@demo-panorama-vm> request plugins ips-signature-converter import-custom-signatures device-group <device_group> lines <line_number>
LINE# TITLE THREAT_ID STATUS DETAIL
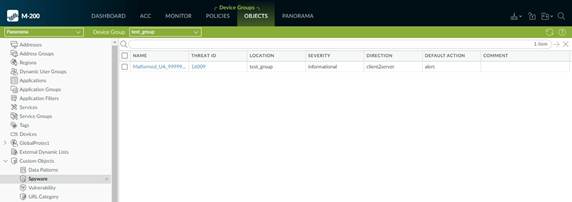
1 Converted_MALWARE-BACKDOOR - 16002 Success Import Succeeded
Dagger_1.4.0_105
If you do not specify a
device-group
, Panorama imports the signature to the Shared location.
STEP 5 |
Commit your changes to Panorama:
admin@demo-panorama-vm# commit

Commit job 707 is in progress. Use Ctrl+C to return to command prompt
...23%.59%80%.......90%.....100%
Configuration committed successfully
STEP 6 |
Push the signatures to a device group:
admin@demo-panorama-vm> commit-all shared-policy device-group <device_group>

Job enqueued with jobid 709
709
STEP 7 |
Log in to a firewall in the device group that you specified in the previous step to verify that the push succeeded:
admin@PA-3220# show threats <vulnerability/spyware> <threat_id>
~ spyware {
   16002 {
     signature {
       standard {
         ips_converted_pattern {
           and-condition {
             "And Condition 1" {
               or-condition {
                 "Or Condition 1" {
                   operator {
                     pattern-match {
                       pattern "2\x00 00 00 06 00 00 00\xDrives\x24 00\x";
                       context tcp-context-free;
                       negate no;
                    }
                  }
                }
              }
            }
          }
          order-free no;
          scope session;
        }
      }
    }
  }
}
Convert Rules Using the Panorama XML API
The Panorama XML API enables you to convert Snort and Suricata, open-source intrusion prevention system (IPS) rules to custom Palo Alto Networks threat signatures. You can then use the XML API to import the custom rules as Vulnerability Protection and Anti-Spyware Security profiles.
Because the PAN-OS XML API uses a tree of XML nodes, you must specify the correct type and action in your API request along with the
XPath Node Selection
. See
Explore the API
to learn how to construct XML requests.
You cannot convert rule files through the CLI. If you want to convert a file with multiple rules in it, use the
Panorama web interface
.
STEP 1 |
Convert Snort or Suricata policy rules to Base64 URL encoded format.
You can use a free, browser-based tool (
example
.
This example uses the following Snort rule:
alert tcp $HOME_NET any -> $EXTERNAL_NET any (msg:"ET CHAT Yahoo IM conference message"; flow: to_server,established; content:"YMSG"; nocase; depth: 4; content:"|00 1D|"; offset: 10; depth: 2; reference:url,doc.emergingthreats.net/2001258; classtype:policy-violation; sid:2001258; rev:7; metadata:created_at 2010_07_30, updated_at 2010_07_30;)
STEP 2 |
Make a request to convert the rule to a custom PAN-OS threat signature.
curl -X POST ’https://<firewall>/api/?key=key&type=op&cmd=<request><plugins><ips-signature-converter><convert><b64-encode>YWxlcnQgdGNwICRIT01FX05FVCBhbnkgLT4gJEVYVEVSTkFMX05FVCBhbnkgKG1zZzoiRVQgQ0hBVCBZYWhvbyBJTSBjb25mZXJlbmNlIG1lc3NhZ2UiOyBmbG93OiB0b19zZXJ2ZXIsZXN0YWJsaXNoZWQ7IGNvbnRlbnQ6IllNU0ciOyBub2Nhc2U7IGRlcHRoOiA0OyBjb250ZW50OiJ8MDAgMUR8Ijsgb2Zmc2V0OiAxMDsgZGVwdGg6IDI7IHJlZmVyZW5jZTp1cmwsZG9jLmVtZXJnaW5ndGhyZWF0cy5uZXQvMjAwMTI1ODsgY2xhc3N0eXBlOnBvbGljeS12aW9sYXRpb247IHNpZDoyMDAxMjU4OyByZXY6NzsgbWV0YWRhdGE6Y3JlYXRlZF9hdCAyMDEwXzA3XzMwLCB1cGRhdGVkX2F0IDIwMTBfMDdfMzA7KQ==</b64-encode></convert></ips-signature-converter></plugins></request>’
The response contains details about the rules (see previous details for more information):
<response status="success">
  <result>
    <result>
      <status>pass</status>
      <msg>
        <convert-result>
          <extra-msg></extra-msg>
          <failed-count>0/1</failed-count>
          <failed></failed>
          <duplicated-count>0/1</duplicated-count>
          <duplicated></duplicated>
          <skipped-count>0/1</skipped-count>
          <skipped></skipped>
          <warned-count>1/1</warned-count>
          <warned>
            <entry name="1">
              <type>plain</type>
              <sig_type>vulnerability</sig_type>
              <line>1</line>
              <title>Converted_ET CHAT Yahoo IM conference message_2001258</title>
              <action>alert</action>
              <severity>low</severity>
              <info>
                <entry name="0">
                  <msg>[performance_impact] use of tcp-context-free (YMSG)</msg>
                  <start_offset>127</start_offset>
                  <end_offset>131</end_offset>
                </entry>
              </info>
            </entry>
          </warned>
          <succeed-count>0/1</succeed-count>
          <succeed></succeed>
        </convert-result>
      </msg>
    </result>
  </result>
</response>
STEP 3 |
Set the properties for rules that you converted.
Use the line number of a converted rule and set the properties. For example:
-
Type set to
spyware
.
-
Action when detected set to
alert
.
-
Severity set to
low
.
curl -X POST 'https://<firewall>/api/?type=op&key=key&cmd=<request><plugins><ips-signature-converter><set-properties><default-action>alert</default-action><lines>1</lines><severity>low</severity><signature-type>spyware</signature-type></set-properties></ips-signature-converter></plugins></request>'
The resulting success message:
<response status="success">
  <result>
    <result>
      <status>pass</status>
      <msg>
        <set-properties-result>
          <entry name="1">
            <line>1</line>
            <sig_type>spyware</sig_type>
            <action>alert</action>
            <severity>low</severity>
            <status>success</status>
            <msg>command succeeded</msg>
          </entry>
        </set-properties-result>
      </msg>
    </result>
  </result>
</response>
STEP 4 |
(Optional) View the results of the converted rules.
The following request results in output that displays all successfully converted rules and the properties associated with each.
curl -X GET ‘https://<firewall>/api/?type=op&key=apikey&cmd=<show><plugins><ips-signature-converter><results></results></ips-signature-converter></plugins></show>
The resulting success message:
<response status="success">
  <result>
    <result>
      <status>pass</status>
      <msg>
        <line>1</line>
        <status>warned</status>
        <rule>alert tcp $HOME_NET any -> $EXTERNAL_NET any (msg:"ET CHAT Yahoo IM conference message"; flow: to_server,established; content:"YMSG"; nocase; depth: 4; content:"|00 1D|"; offset: 10; depth: 2; reference:url,doc.emergingthreats.net/2001258; classtype:policy-violation; sid:2001258; rev:7; metadata:created_at 2010_07_30, updated_at 2010_07_30;)</rule>
        <type>plain</type>
        <sig_type>spyware</sig_type>
        <title>Converted_ET CHAT Yahoo IM conference message_2001258</title>
        <action>alert</action>
        <severity>low</severity>
        <perf_score>10</perf_score>
        <perf_level>high</perf_level>
        <info>
          <entry name="0">
            <msg>[performance_impact] use of tcp-context-free (YMSG)</msg>
            <start_offset>127</start_offset>
            <end_offset>131</end_offset>
          </entry>
        </info>
        <signatures>
          <entry name="0">
            <context>
              <![CDATA[<entry><signature><standard><entry name="ips_converted_pattern"><and-condition><entry name="And Condition 1"><or-condition><entry name="Or Condition 1"><operator><pattern-match><pattern>YMSG</pattern><context>tcp-context-free</context><negate>no</negate></pattern-match></operator></entry></or-condition></entry><entry name="And Condition 2"><or-condition><entry name="Or Condition 1"><operator><pattern-match><pattern>\x00 1D\x</pattern><context>tcp-context-free</context><negate>no</negate></pattern-match></operator></entry></or-condition></entry></and-condition><order-free>no</order-free><scope>session</scope></entry></standard></signature><default-action><alert/></default-action><reference><member>doc.emergingthreats.net/2001258</member><member>Score: 10</member><member>Impact: high</member><member>Reason: use of tcp-context-free</member></reference><threatname>Converted_ET CHAT Yahoo IM conference message_2001258</threatname><severity>low</severity><direction>client2server</direction><affected-host><server>yes</server></affected-host>]]>
            </context>
          </entry>
        </signatures>
      </msg>
    </result>
  </result>
</response>
STEP 5 |
Import the Spyware or Vulnerability rule to your device groups to use in a custom object.
Using the line number of a successfully converted rule, send a request that imports the rule to the shared device group.
curl -X GET ‘https://<firewall>/api/?key=key&type=op&cmd=<request><plugins><ips-signature-converter><import-custom-sig><lines>1</lines></import-custom-sig></ips-signature-converter></plugins></request>
The resulting success message using line one provides an ID number you can use to find the profile in the web interface.
<response status="success">
  <result>
    <result>
      <status>pass</status>
      <msg>
        <import-result>
          <entry name="1">
            <line>1</line>
            <sid>42556</sid>
            <status>success</status>
            <msg>command succeeded</msg>
          </entry>
        </import-result>
      </msg>
    </result>
  </result>
</response>
Install the IPS Signature Converter Plugin
To convert intrusion prevention system (IPS) rules to custom PAN-OS
®
threat signatures, download and install the IPS Signature Converter on Panorama™.
If you have a Panorama high availability (HA) configuration, repeat the installation process on each Panorama peer. When you install the plugin on Panorama peers in an HA pair, install the plugin on the passive peer first and then on the active peer. After you install the plugin on the passive peer, that peer will transition to a non-functional state. When you install the plugin on the active peer, the passive peer will return to a functional state.
Before you install the plugin, ensure that you have the correct
version requirements
and the latest
Applications and Threats content updates
.
STEP 1 |
Select
Panorama
>
Plugins
.
STEP 2 |
Enter
ips_signature_converter
in the search bar.
STEP 3 |
Refresh
(
 ) to retrieve the latest updates.
STEP 4 |
Download
(ACTIONS column) the plugin.
STEP 5 |
Select the version of the plugin that you want to install.
STEP 6 |
Install
the plugin (ACTIONS column).
CLI Quick Start
See the list of basic commands below for the intrusion prevention system (IPS) Signature Converter plugin on Panorama™. For more information about how to use the command line interface (CLI), see how to
Get Started with the CLI
.
|
To do this...
|
Start here...
|
|
Convert, import, check performance impact, and configure the properties of signatures
|
request plugins ips-signature-converter
|
|
Set the type, default action, or severity of a signature
|
request plugins ips-signature-converter set-properties <line numbers>
|
|
View information about your converted signatures
|
show plugins ips-signature-converter
|
|
Delete all signatures (does not delete signatures that you imported to Panorama)
|
clear plugins ips-signature-converter all
|
Troubleshooting the IPS Signature Converter
If your rules fail to convert, use the following command in the Panorama command-line interface (CLI) to see a detailed summary of the failure:
admin@M-200-49> tail follow yes lines 1 plugins-log plugin_ips_signature_converter.log
The output consists of a list of the logs for each rule and a final summary of the status of their conversion.
Rule Logs
The output first lists the logs for each rule that you submitted for conversion. Each log contains the following fields.
|
Field
|
Values
|
Line
|
The line number of the rule.
|
result
|
-
True
—The rule converted successfully.
-
False
—The rule failed to convert.
|
type
|
-
normal
—The rule contains a pattern to search packet payloads.
-
edl
—The rule is a list of suspect URLs, IP addresses, or domains.
|
hash
|
A unique identifier for each rule that successfully converted. This output is
None
if conversion failed.
|
msg
|
Details about a signature with a
result
of
failed
or
warned
.
|
Summary
After listing the logs for each rule, the output displays a summary of the conversion results.
|
Field
|
The number of rules that...
|
Total
|
Were submitted for conversion.
|
Succeed
|
Converted successfully.
|
Warned
|
Converted successfully but contain minor syntax errors or that pose a risk, such as high performance impact or false-positive rate.
|
Skipped
|
Converted successfully and share a common vulnerabilities and exposures (CVE) identifier with a signature that already exists in the Palo Alto Networks
Threat Vault
.
|
Duplicated
|
Were repeated in the submission.
|
Failed
|
Failed to convert.
|
 Qualifiers are context-dependent and limit the match condition for the given context. For example, you might use the http-method qualifier to specify that a http-req-uri-path only matters if it is found inside an HTTP GET method.