Palo Alto Networks Advanced Threat Prevention Study Guide
Overview of Threat Prevention Subscriptions
The Palo Alto Networks® next-generation firewall threat prevention subscriptions protect and defend your network from commodity threats and advanced persistent threats (APTs) using multi-pronged detection mechanisms to combat the entire gamut of the threat landscape. Palo Alto Networks threat prevention solution is comprised of the following subscriptions:
- Advanced Threat Prevention: This cloud service uses inline deep learning and machine learning models for real-time detection of evasive and never before seen, unknown C2 threats and zero day vulnerability exploits . As an ultra low-latency native cloud service, this extensible and infinitely scalable solution is always kept up to date with model training improvements. It also supports Local Deep Learning (LDL) , which complements the cloud-based Inline Cloud Analysis component of Advanced Threat Prevention by providing a mechanism to perform fast, local deep learning-based analysis of zero-day and other evasive threats. The Advanced Threat Prevention license includes all of the benefits included with Threat Prevention.
- Threat Prevention: The base subscription is based on signatures generated from malicious traffic data collected from various Palo Alto Networks services. These signatures are used by the firewall to enforce security policies based on specific threats, which include: command-and-control (C2), various types of known malware, and vulnerability exploits ; and combined with App-ID and User-ID identification technologies on the firewall, you can cross-reference context data to produce fine grained policies. As a part of your threat mitigation policies, you can also identify and block known or risky file types and IP addresses, of which several premade categories are available, including lists specifying bulletproof service providers and known malicious IPs. In cases where specialized tools and software are used, you can create your own vulnerability signatures to customize your intrusion prevention capabilities to your network’s unique requirements.
To maximize your threat prevention, Palo Alto Network also recommends the following subscription services in addition to Advanced | Threat Prevention:
- DNS Security: The DNS Security cloud service designed to protect your organization from advanced DNS-based threats. By applying advanced machine learning and predictive analytics to a diverse range of threat intelligence sources, DNS Security generates an enhanced DNS signature set and provides real-time analysis of DNS requests to defend your network against newly generated malicious domains. DNS Security can detect various C2 threats, including DNS tunneling, DNS rebinding attacks, domains created using auto-generation, malware hosts, and many more. DNS Security requires and works with your Advanced Threat Prevention or Threat Prevention subscription for complete DNS threat coverage.
Palo Alto Networks intrusion prevention subscriptions work together to provide a comprehensive solution that intercepts and breaks the chain at various stages of the attack process and provides visibility to prevent security infringement on your network infrastructure.
Important Point (PCNSE/PCNSA): Understand the key difference between the base Threat Prevention (signature-based) and Advanced Threat Prevention (adds inline ML/DL for unknown threats). Know that ATP includes TP features.
Important Point (PCNSE/PCNSA): DNS Security requires a TP or ATP license and complements them by focusing specifically on DNS-based threats like tunneling and DGA.
Advanced Threat Prevention Detection Services
Advanced Threat Prevention is an intrusion prevention system (IPS) solution that can detect and block malware, vulnerability exploits, and command-and-control (C2) across all ports and protocols, using a multi-layered prevention system with components operating on the firewall and in the cloud. The Threat Prevention cloud operates a multitude of detection services using the combined threat data from Palo Alto Networks services to create signatures.
In addition to the signature-based detection mechanism, Advanced Threat Prevention provides an inline detection system for unknown and evasive C2 threats (like Empire framework), command injection, SQL injection, and DNS relay threats. Cloud-based deep learning models enable inline analysis on a per-request basis to prevent zero-day threats.
Cloud-based engines are updated automatically, not requiring content package downloads for model enhancements. They are continuously monitored and updated using WildFire data and human analysis. ATP's deep learning engines support C2 analysis over HTTP, HTTP2, SSL, unknown-UDP, and unknown-TCP. Additional models are delivered via content updates.
Local Deep Learning (LDL) complements the cloud analysis by providing fast, local analysis of zero-day and evasive threats . Traffic matching known signatures is dropped (or actioned), while suspicious traffic is sent to the Deep Learning Analysis module. If needed, it's sent to the cloud for further analysis and false-positive/negative checks. LDL has the same detection capabilities but can process higher volume with less lag.

Simplified diagram showing traffic flow through a Palo Alto Networks Firewall with Threat Prevention, illustrating the use of signatures and advanced analysis methods.
This diagram illustrates the simplified flow of traffic through the Palo Alto Networks firewall with Threat Prevention and Advanced Threat Prevention enabled. Traffic is evaluated against security policy and relevant profiles. Known threats are handled by signatures, while suspicious or unknown threats can be analyzed locally (LDL) or in the cloud (Inline Cloud Analysis) before an action is applied.
Critical Point (PCNSE/PCNSA): Inline Deep Learning and Local Deep Learning are key features of *Advanced* Threat Prevention for detecting *unknown* threats without relying solely on signatures. Understand their relationship and where processing occurs (Cloud vs. Local).
Important Point (PCNSE/PCNSA): Updates for *existing* cloud models are cloud-side, while updates for *new* LDL models are delivered via content updates.
The base Threat Prevention subscription does not include these cloud-based advanced features.
The threat signatures used by the firewall are broadly categorized into three types: antivirus, anti-spyware, vulnerability and are used by the corresponding security profiles to enforce user-defined policies. Cloud-delivered security services also generate WildFire and DNS C2 signatures for their respective services, as well as file-format signatures.
Threat Signature Categories
There are three types of Palo Alto Networks threat signatures, each designed to detect different types of threats as the network traffic is scanned:
- Antivirus signatures: Detect viruses and malware found in executables and file types.
- Anti-spyware signatures: Detects command-and-control (C2) activity, where spyware on an infected client is collecting data without the user's consent and/or communicating with a remote attacker.
- Vulnerability signatures: Detects system flaws that an attacker might otherwise attempt to exploit.
Each signature has a default severity and action. You must Set Up Antivirus, Anti-Spyware, and Vulnerability Protection profiles and attach them to Security policy rules to define actions.
Signatures are delivered through two update packages:
- Daily Antivirus Content: Includes antivirus and DNS (C2) signatures.
- Weekly Applications and Threats Content: Includes vulnerability and anti-spyware signatures (except DNS C2). Also includes application updates.
Important Point (PCNSE/PCNSA): Know the three main signature types and which content updates deliver them (daily Antivirus, weekly Apps/Threats). DNS C2 signatures come with Antivirus updates.
You can also go to the Palo Alto Networks Threat Vault to Learn More About Threat Signatures or create custom signatures for specialized tools or third-party intelligence feeds.
Threat Category Table Overview
The following table provides a summary of the threat categories by signature type and the content update that provides them, along with a brief description.
| Threat Category | Content Update | Description |
|---|---|---|
| Antivirus Signatures | ||
| apk | Antivirus, WildFire | Malicious Android Application (APK) files. |
| MacOSX | Antivirus, WildFire | Malicious MacOSX files (DMG, Mach-O, PKGs). |
| flash | Antivirus, Wildfire or WildFire Private | Adobe Flash applets and content. |
| jar | Antivirus, Wildfire | Java applets (JAR/class file types). |
| ms-office | Antivirus, Wildfire or WildFire Private | Microsoft Office files (DOC, DOCX, RTF, XLS, XLSX, PPT, PPTX, OOXML). |
| Antivirus, Wildfire or WildFire Private | Portable Document Format (PDF) files. | |
| pe | Antivirus, Wildfire or WildFire Private | Portable executable (PE) files (Object code, FONs, SYS, DRV, CPLs, DLLs, OCXs, SCRs, EFI, PIFs). |
| linux | Antivirus, Wildfire | Executable and Linkable Format (ELF) files. |
| archive | Antivirus, Wildfire | Roshal Archive (RAR) and 7-Zip (7z) archive files. |
| Spyware Signatures | ||
| adware | Applications and Threats | Detects programs displaying unwanted ads, modifying browsers, retrieving updates from C2. Newly-released protections rare. |
| autogen | Antivirus | Payload-based signatures detecting C2 traffic, even when host is unknown or changes rapidly. |
| backdoor | Applications and Threats | Detects programs allowing unauthorized remote access. |
| botnet | Applications and Threats | Indicates botnet activity (network of malware-infected computers controlled by attacker). |
| browser-hijack | Applications and Threats | Detects plugins/software modifying browser settings, tracking activity, or communicating with C2. Newly-released protections rare. |
| cryptominer | Applications and Threats | Detects download/traffic from programs using computing resources for cryptocurrency mining without consent (cryptojacking). |
| data-theft | Applications and Threats | Detects a system sending information to a known C2 server. Newly-released protections rare. |
| dns | Antivirus | Detects DNS requests to malicious domains. (Daily update) |
| dns-security | Antivirus | Includes dns and dns-wildfire signatures plus unique signatures from DNS Security service. |
| dns-wildfire | Wildfire or WildFire Private | Detects DNS requests to malicious domains. (Frequent WildFire updates) |
| downloader | Applications and Threats | Detects programs connecting to a remote server to download and execute malware (droppers, stagers, loaders). |
| fraud | Applications and Threats | Detects access to compromised websites with malicious JavaScript to collect sensitive information (form-jacking, phishing, scams). |
| hacktool | Applications and Threats | Detects traffic from software used for reconnaissance, gaining access, exfiltrating data, or establishing C2 (often associated with malware). May be benign in Red/Blue Team, pentests. May be illegal in some countries regardless of intent. |
| keylogger | Applications and Threats | Detects programs tracking user activity, logging keystrokes, capturing screenshots, and sending data to C2. Can retrieve credentials enabling network access. |
| networm | Applications and Threats | Detects programs that self-replicate and spread from system to system, using shared resources or security failures. |
| phishing-kit | Applications and Threats | Detects attempts to connect to a phishing kit landing page to steal credentials. Enable MFA and Prevent Credential Phishing for comprehensive protection. |
| post-exploitation | Applications and Threats | Detects activity indicating the post-exploitation phase (assessing system value, planning further network compromise). |
| webshell | Applications and Threats | Detects web shells and traffic (implant detection, C2 interaction) on web servers, enabling remote code execution, enumeration, data exfiltration in web server user context. Common types: PHP, .NET, Perl. |
| spyware | Applications and Threats | Detect outbound C2 communication (auto-generated or manually created). Spyware and autogen detect C2; autogen is payload-based and better for rapidly changing hosts. |
| Vulnerability Signatures | ||
| brute force | Applications and Threats | Detects multiple occurrences of a condition in a timeframe (e.g., many failed logins), indicating suspicious frequency. Can tune action and trigger conditions. |
| code execution | Applications and Threats | Detects vulnerabilities allowing attackers to run code on a system with user privileges. |
| code-obfuscation | Applications and Threats | Detects code transformed to conceal data while retaining function, often to hide malware. Rarely used by legitimate developers for privacy, IP protection, or minification (reduced file size). |
| dos | Applications and Threats | Detects denial-of-service (DoS) attacks to render a system unavailable by flooding traffic or causing failure. Deprives legitimate users of service. |
| exploit-kit | Applications and Threats | Detects exploit kit landing pages containing multiple exploits targeting common CVEs for various browsers/plugins. Triggers on landing page, not specific CVEs (as CVEs change quickly). Attempts to silently deliver payloads. |
| info-leak | Applications and Threats | Detects software vulnerabilities exploitable to steal sensitive/proprietary information, often due to lack of comprehensive checks. Exploited by sending crafted requests. |
| insecure-credentials | Applications and Threats | Detects the use of weak, compromised, and manufacturer default passwords for software, network appliances, and IoT devices. |
| overflow | Applications and Threats | Detects an overflow vulnerability exploitable due to lack of proper checks on requests, could lead to remote code execution. |
| phishing | Applications and Threats | Detects attempts to connect to a phishing kit landing page to steal credentials. Enable MFA and Prevent Credential Phishing for comprehensive protection. |
| protocol-anomaly | Applications and Threats | Detects protocol behavior deviations (malformed packet, poorly written app, non-standard port). Can be used as evasion tools. Best practice to block. Can alert first in mission-critical networks to identify legitimate non-standard traffic. |
| sql-injection | Applications and Threats | Detects techniques inserting SQL queries into application requests to read/modify databases, often on sites with unsanitized user input. |
Critical Point (PCNSE/PCNSA): Be familiar with the common threat categories within each signature type (Antivirus, Spyware, Vulnerability) and what they represent (e.g., 'autogen' for payload-based C2, 'protocol-anomaly' for evasions, 'pe' for Windows executables, 'brute force' for repetitive attacks). Know which content update provides which signatures.
Best Practices for Securing Your Network from Layer 4 and Layer 7 Evasions
Recommendations to monitor and protect against Layer 4 and Layer 7 attacks:
- Upgrade PAN-OS and content: Keep software and content updates current for the latest security updates.
-
Enable DNS Security:
If licensed, use DNS Security profiles to sinkhole malicious DNS requests. Recommended action is
sinkhole
for all signature sources in the Anti-Spyware profile. Set packet capture to
extended-capture
for Command and Control Domains.
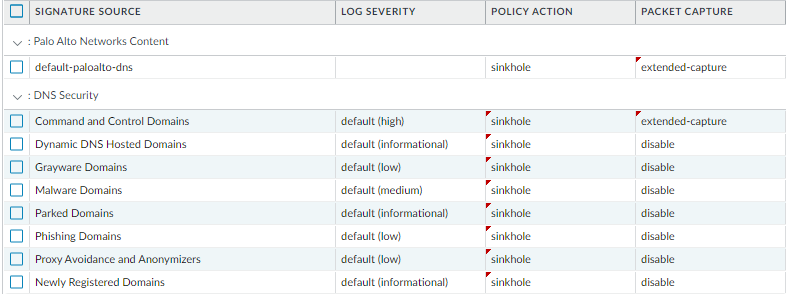
Screenshot showing recommended DNS Security settings within an Anti-Spyware profile, highlighting the 'sinkhole' action and 'extended-capture' for C2 domains.
- Enable Inline Cloud Analysis and Local Deep Learning: For Advanced Threat Prevention subscribers. The default action for each analysis engine is alert; however, Palo Alto Networks recommends setting all analysis model actions to Reset-Both . This drops matching packets and sends an RST to the client and server, breaking the connection, as well as generating a threat log entry.
-
Set up the firewall as a DNS proxy and enable evasion signatures:
-
DNS proxy is not part of the firewall security policy engine; instead, it directs the firewall to resolve DNS hostnames, while maintaining domain to IP mapping, which is crucial for preventing TLS/HTTP evasion. Configure a DNS Proxy Object.
Screenshot showing the configuration interface for a DNS Proxy Object in PAN-OS.
-
Enable Evasion Signatures: Evasion signatures that detect crafted HTTP or TLS requests can send alerts when clients connect to a domain other than the domain specified in the original DNS request. Make sure to configure DNS proxy before you enable evasion signatures. Without DNS proxy, evasion signatures can trigger alerts when a DNS server in the DNS load balancing configuration returns different IP addresses—for servers hosting identical resources—to the firewall and client in response to the same DNS request.
Gotcha (PCNSE): Evasion signatures require the firewall to be a DNS proxy. If the firewall is not the DNS proxy or internal DNS load balancing is used without proper configuration, evasion signatures can trigger false positives.
-
DNS proxy is not part of the firewall security policy engine; instead, it directs the firewall to resolve DNS hostnames, while maintaining domain to IP mapping, which is crucial for preventing TLS/HTTP evasion. Configure a DNS Proxy Object.
-
For Prisma Access or networks without an internal DNS server, configure your DNS policy to use the Palo Alto Networks sinkhole IP address (72.5.65.111 for IPv4, ::1 for IPv6) instead of the default sinkhole FQDN (sinkhole.paloaltonetworks.com)
. When the default sinkhole FQDN is used, the firewall sends the CNAME record as a response to the client, with the expectation that an internal DNS server will resolve the CNAME record, allowing malicious communications from the client to the configured sinkhole server to be logged. However, if clients are operating Prisma Access, are in networks without an internal DNS server, or using other software or tools that cannot be properly resolve a CNAME into an A record response, the DNS request is dropped, resulting in incomplete traffic log details that are crucial for threat analysis.
flowchart TD A[Start: DNS Sinkhole Setup] --> B{Environment Type?} B -- Prisma Access or No Internal DNS --> C[Use Sinkhole IP 72.5.65.111] C --> F[Firewall Returns IP in DNS Response] F --> G[Client Sends Traffic to Sinkhole IP] G --> H[Firewall Logs Malicious Activity] B -- Internal DNS Available --> D[Use Default Sinkhole FQDN: sinkhole.paloaltonetworks.com] D --> I[Firewall Returns CNAME in DNS Response] I --> J[Internal DNS Resolves CNAME to Sinkhole IP] J --> G D -- No Internal DNS --> E[Client Cannot Resolve CNAME] E --> K[DNS Query Fails, Traffic Not Logged] style C fill:#e0f7fa,stroke:#00838f,stroke-width:2px style D fill:#fff3e0,stroke:#f57c00,stroke-width:2px style G fill:#e8f5e9,stroke:#388e3c,stroke-width:2px style K fill:#ffebee,stroke:#d32f2f,stroke-width:2px
Important Point (PCNSE): When internal DNS cannot resolve the sinkhole FQDN (e.g., in Prisma Access or without internal DNS), use the sinkhole IP addresses (72.5.65.111 / ::1) in the Anti-Spyware profile settings instead of the FQDN for proper logging of infected hosts.
- For servers, create Security policy rules to allow only sanctioned applications and verify standard ports. For example, to ensure only SMTP traffic is allowed to your email server, set Application to 'smtp' and Service to 'application-default'. If a subset of standard ports is used, create a custom service object. Restrict access to specific source and destination zones and IP addresses.
- Block all unknown applications and traffic: Typically, the only applications classified as unknown traffic are internal or custom applications on your network and potential threats. Unknown traffic can be either non-compliant applications or protocols that are anomalous or abnormal or it can be known applications that are using non-standard ports, both of which should be blocked.
-
Set Up File Blocking:
Set up File Blocking to block Portable Executable (PE) file types for internet-based SMB traffic from traversing trust to untrust zones (ms-ds-smb applications).
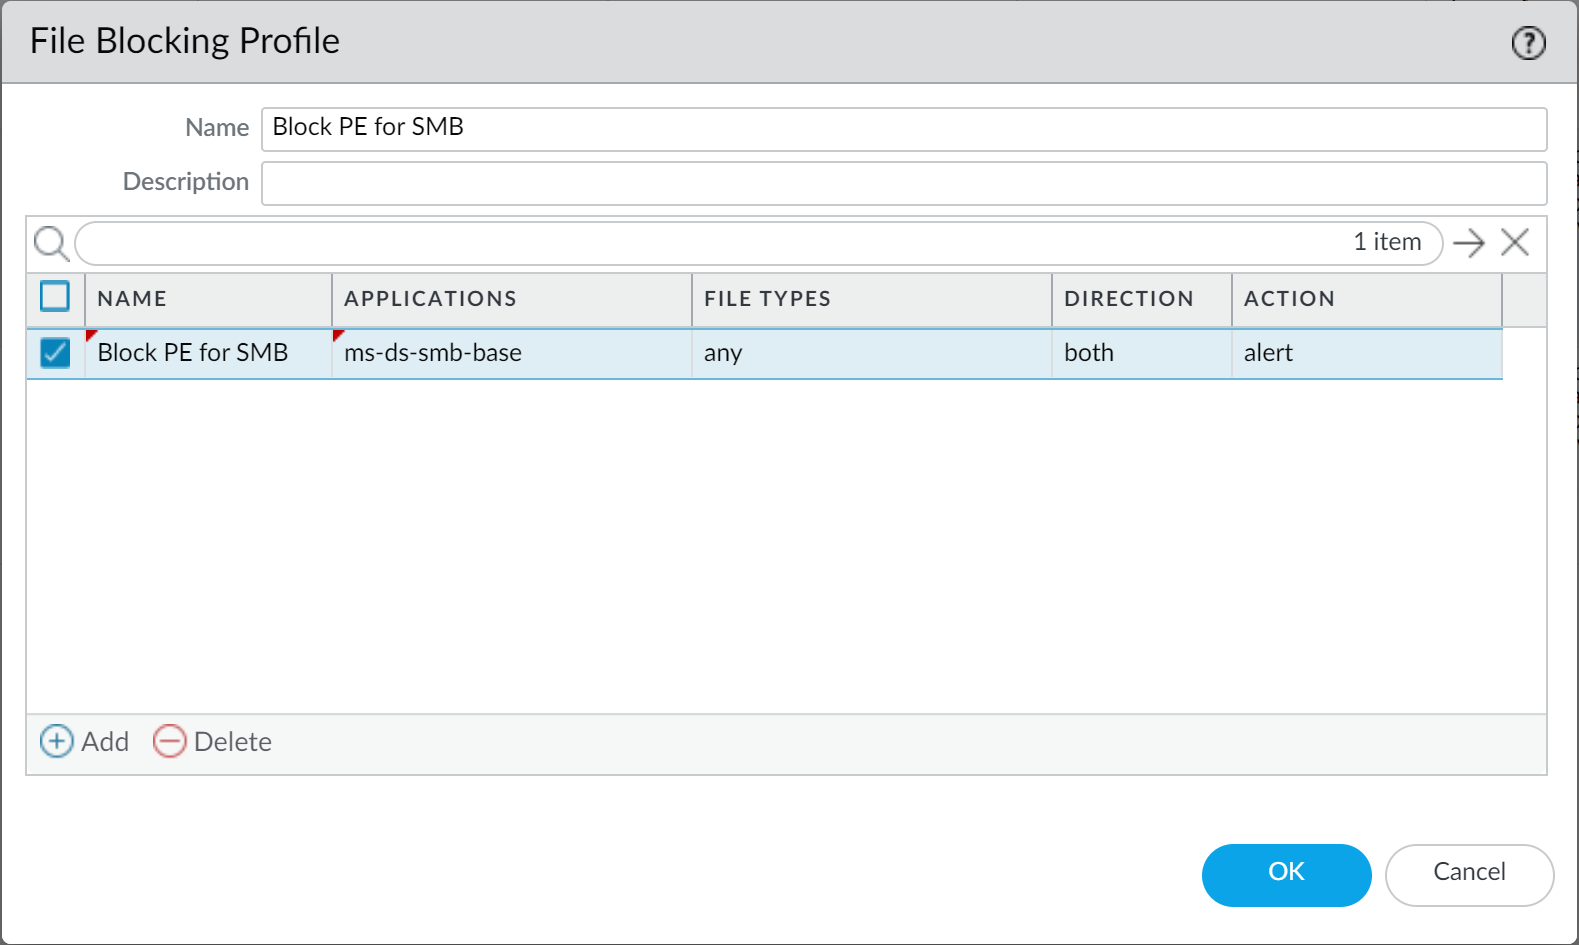
Screenshot showing an example File Blocking profile rule configured to block PE files for SMB traffic.
- Block malicious variants of PE, ELF and MS Office files, and PowerShell and shell scripts in real-time: Enabling WildFire Inline ML allows you to dynamically analyze files using machine learning on the firewall. This additional layer of antivirus protection complements the WildFire-based signatures to provide extended coverage for files of which signatures do not already exist.
-
Create a Zone Protection profile:
Create a Zone Protection profile that is configured to protect against packet-based attacks (Network > Network Profiles > Zone Protection).
-
Select the option to drop
Malformed
IP packets (Packet Based Attack Protection > IP Drop).
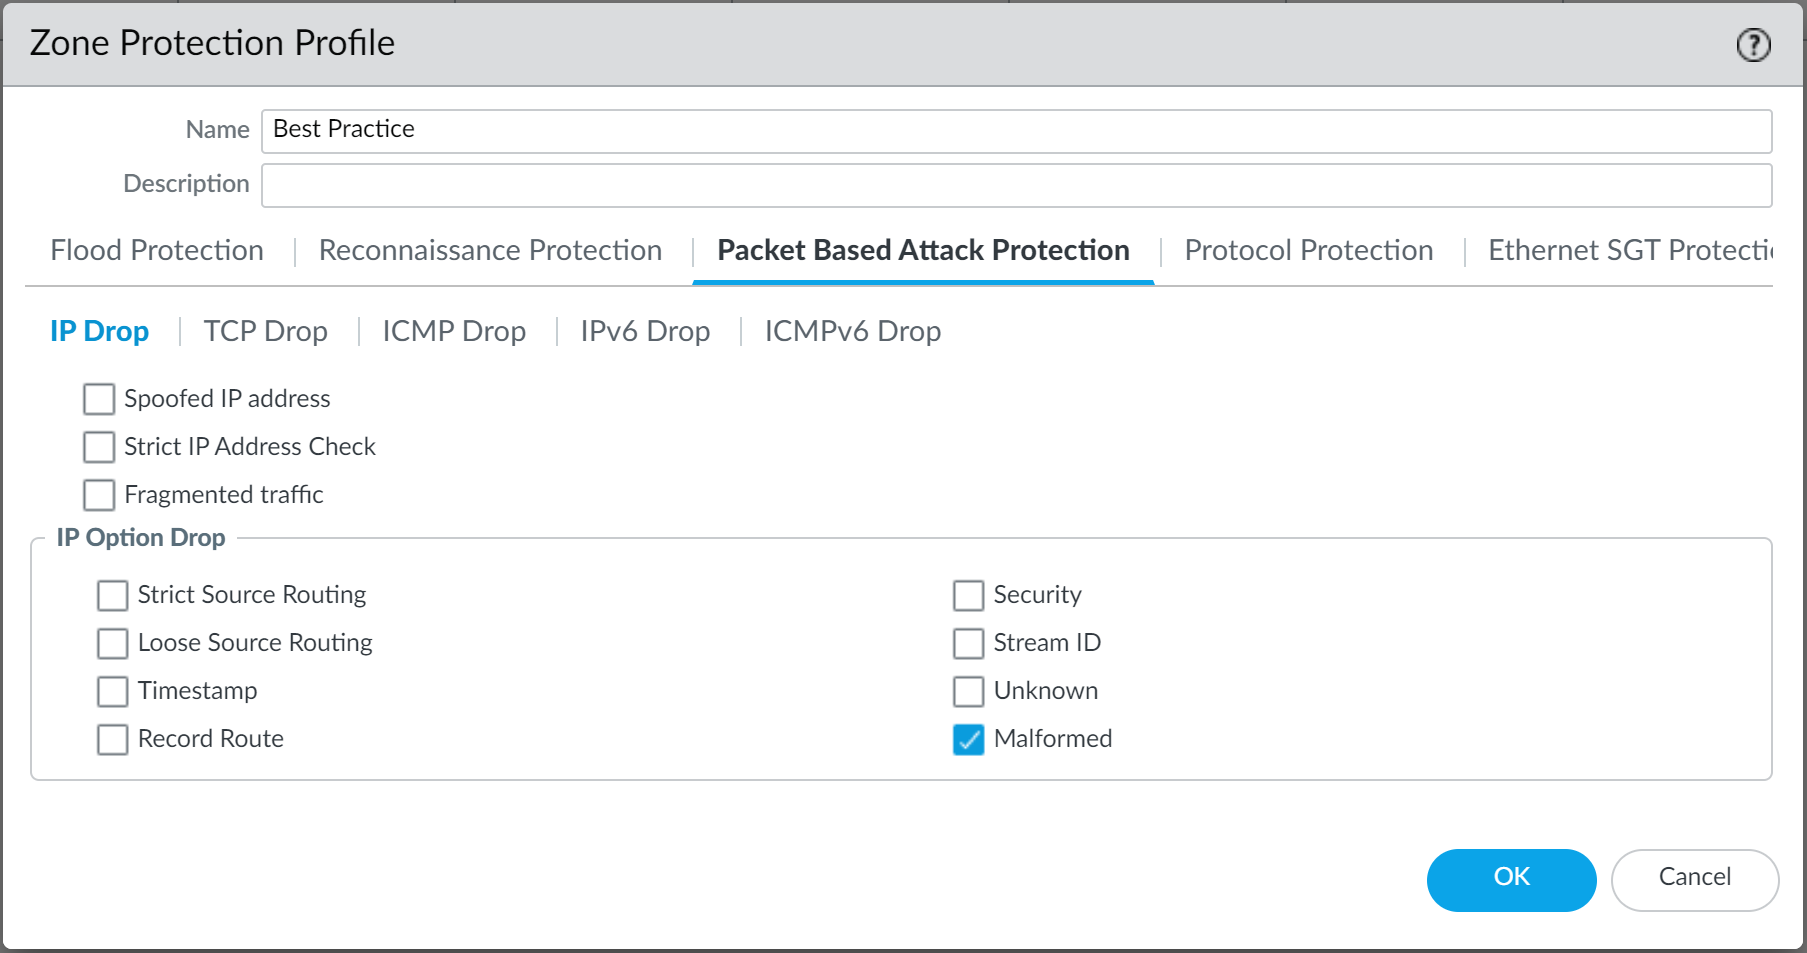
Screenshot showing the Packet Based Attack Protection IP Drop options in a Zone Protection profile.
-
Enable the drop
Mismatched overlapping TCP segment
option (Packet Based Attack Protection > TCP Drop). By deliberately constructing connections with overlapping but different data, attackers attempt to cause misinterpretation or data injection. Discarding these frames prevents this.
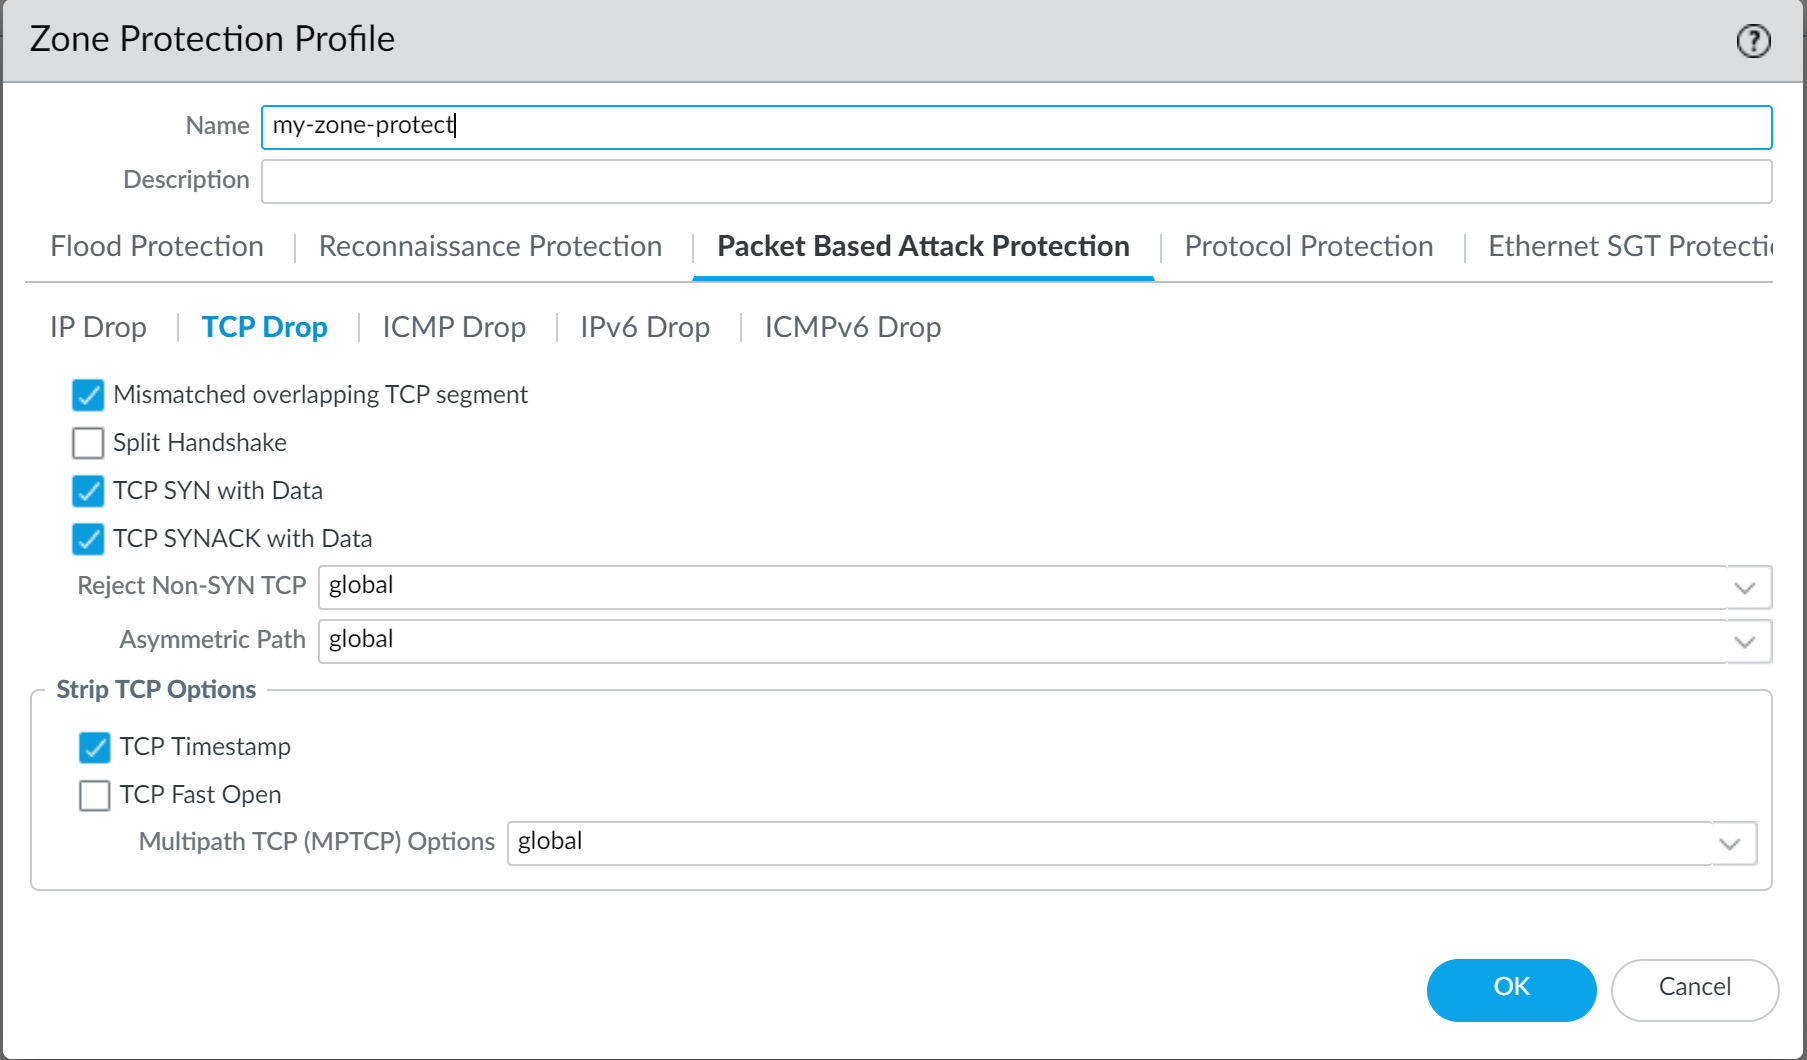
Screenshot showing the Packet Based Attack Protection TCP Drop options in a Zone Protection profile.
- Enable the drop TCP SYN with Data and drop TCP SYNACK with Data options (Packet Based Attack Protection > TCP Drop). Dropping these blocks malware contained in the payload and prevents unauthorized data extraction before the TCP handshake is completed.
- Strip TCP timestamps from SYN packets before the firewall forwards the packet (Packet Based Attack Protection > TCP Drop). This prevents attacks using different timestamps on multiple packets for the same sequence number.
-
Select the option to drop
Malformed
IP packets (Packet Based Attack Protection > IP Drop).
-
If you configure IPv6 addresses on your network hosts, be sure to enable support for IPv6 if not already enabled
(Network > Interfaces > Ethernet > IPv6). Enabling support for IPv6 allows access to IPv6 hosts and also filters IPv6 packets encapsulated in IPv4 packets, which prevents IPv6 over IPv4 multicast addresses from being leveraged for network reconnaissance.
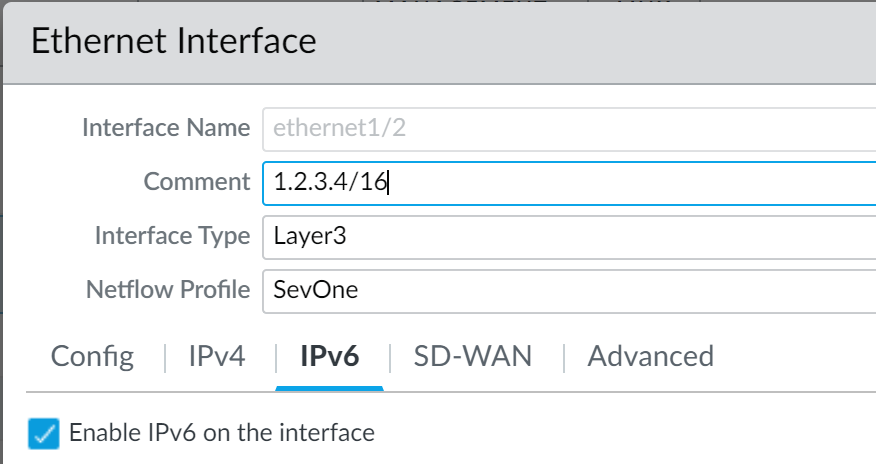
Screenshot showing where to enable IPv6 support and configure IPv6 addresses on a network interface.
-
Enable support for multicast traffic so that the firewall can enforce policy on multicast traffic
(Network > Virtual Router > Multicast).
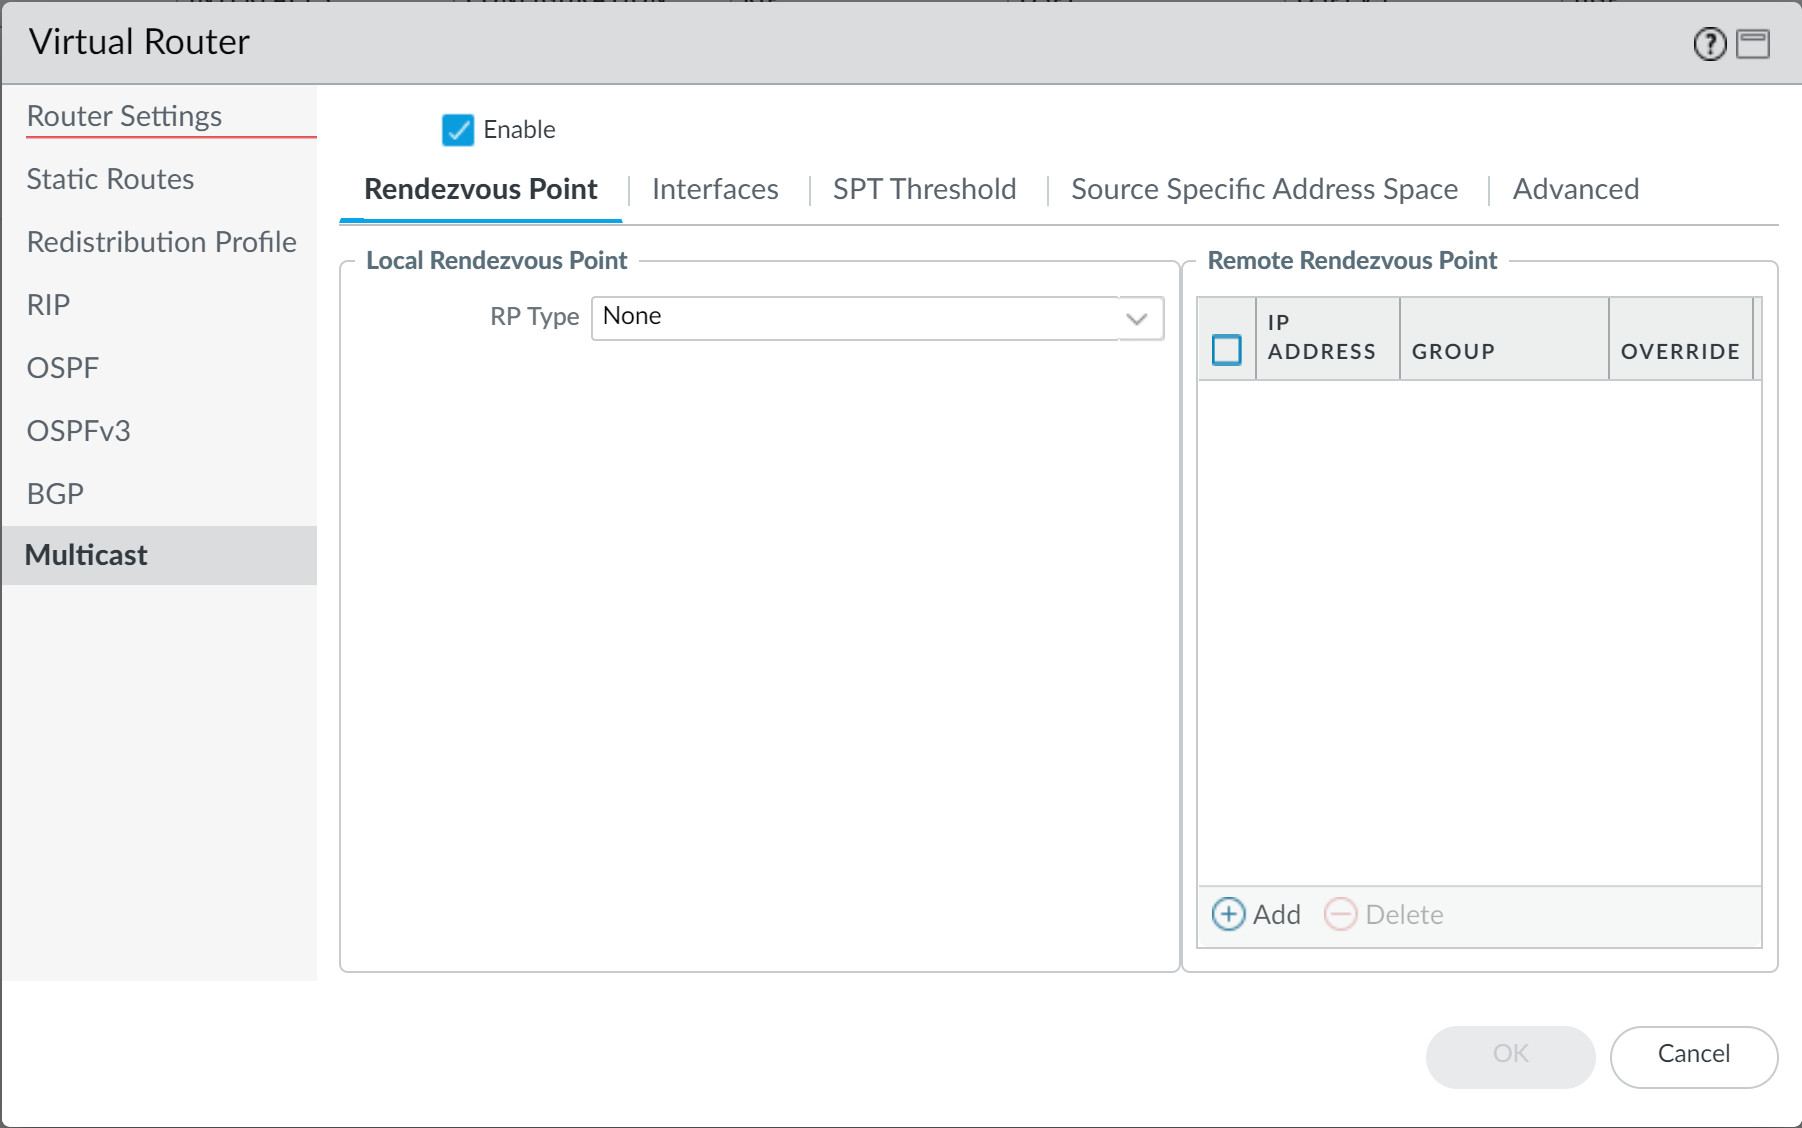
Screenshot showing the Multicast tab within a Virtual Router configuration.
- Disable "Forward datagrams exceeding UDP content inspection queue" and "Forward segments exceeding TCP content inspection queue" (Device > Setup > Content-ID > Content-ID Settings). By default, when queues are full, the firewall skips inspection. Disabling ensures inspection for all allowed traffic, preventing evasion if queues are full (may impact performance if firewall is undersized).
-
Disable "Allow HTTP partial response"
(Device > Setup > Content-ID > Content-ID Settings). The HTTP partial response option allows a client to fetch only part of a file. When a firewall drops a malicious file, it terminates the TCP session. If the web browser uses the HTTP header range option, it can start a new session to fetch only the remaining part, potentially bypassing detection. Disabling this prevents it. Note that disabling this may cause service anomalies for certain applications using the RANGE header. After disabling, validate critical applications. Use Application Override only as a last resort for critical apps, as it bypasses threat inspection.
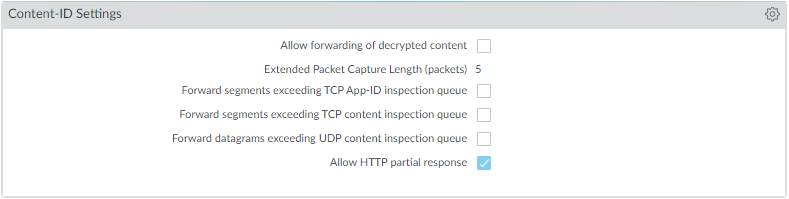
Screenshot showing the Content-ID Settings interface, highlighting the 'Allow HTTP partial response' option.
-
Create a Vulnerability Protection Profile that blocks protocol anomalies and all vulnerabilities with low and higher severities.
Protocol anomalies can be evasion tools. Blocking them is a security best practice. For mission-critical networks, you might initially alert on protocol anomalies to identify legitimate but non-standard traffic before blocking.
-
Begin by alerting on protocol anomalies: Create a rule with Action set to Alert, Category to protocol-anomaly, Severity Any. Monitor traffic.
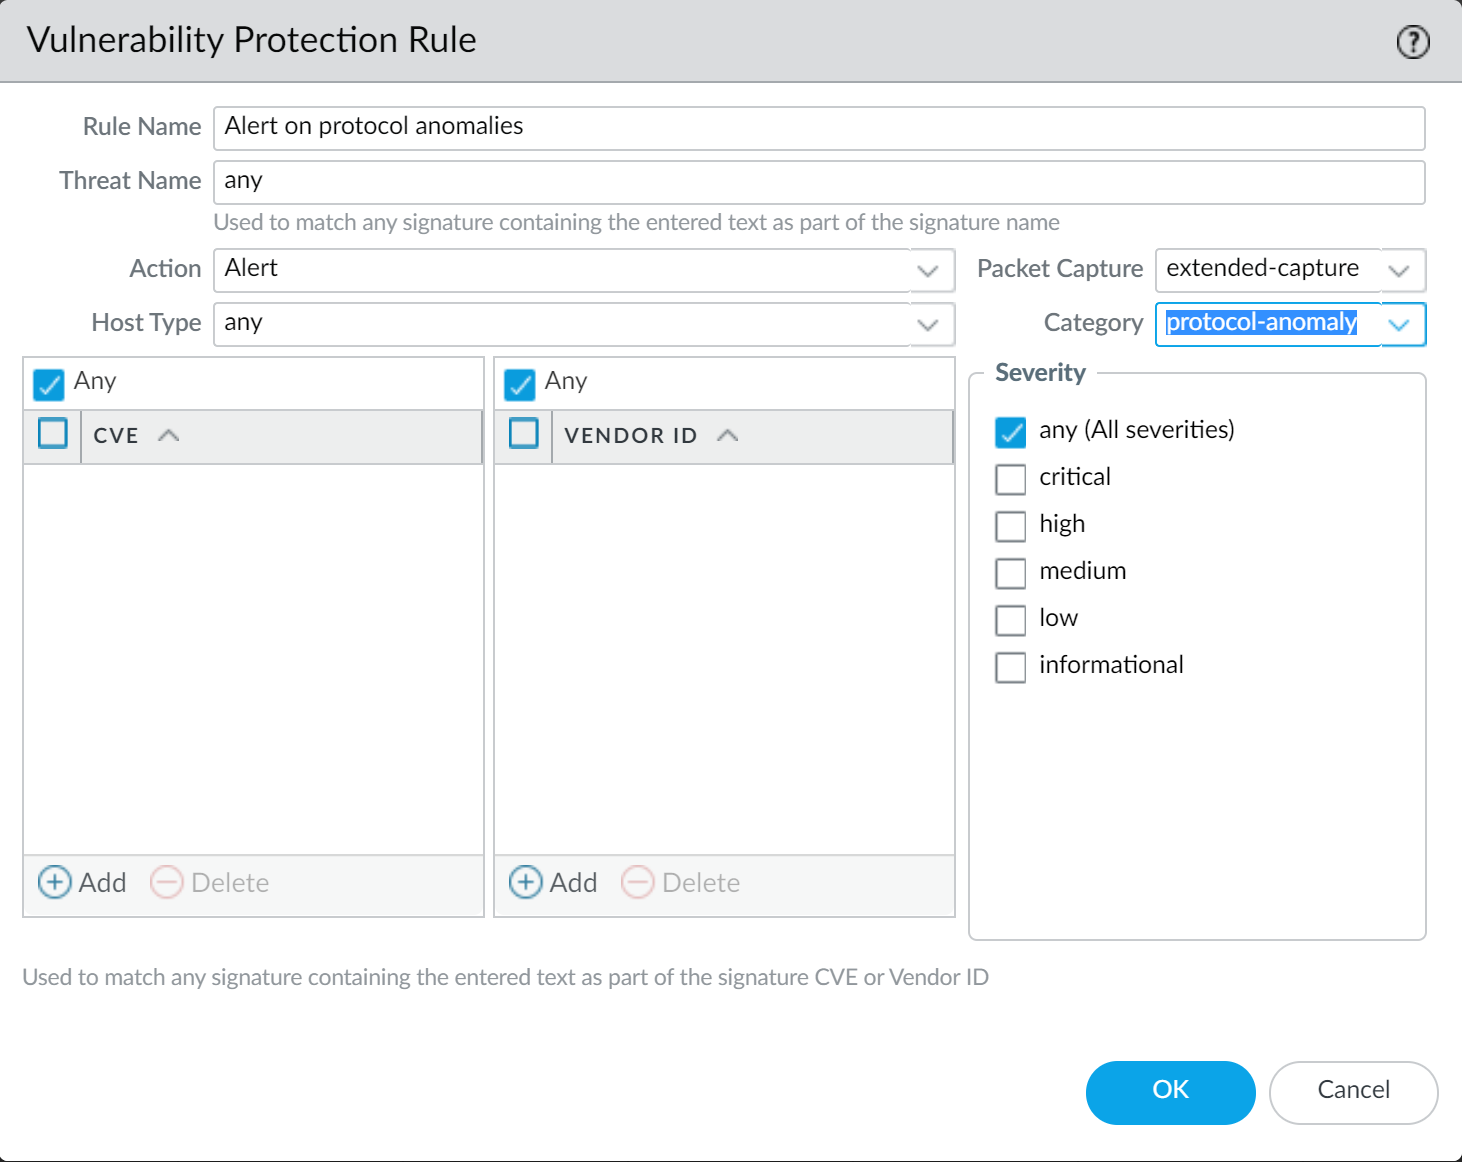
Screenshot showing a rule in a Vulnerability Protection profile with the Action set to 'Alert' for the 'protocol-anomaly' category.
-
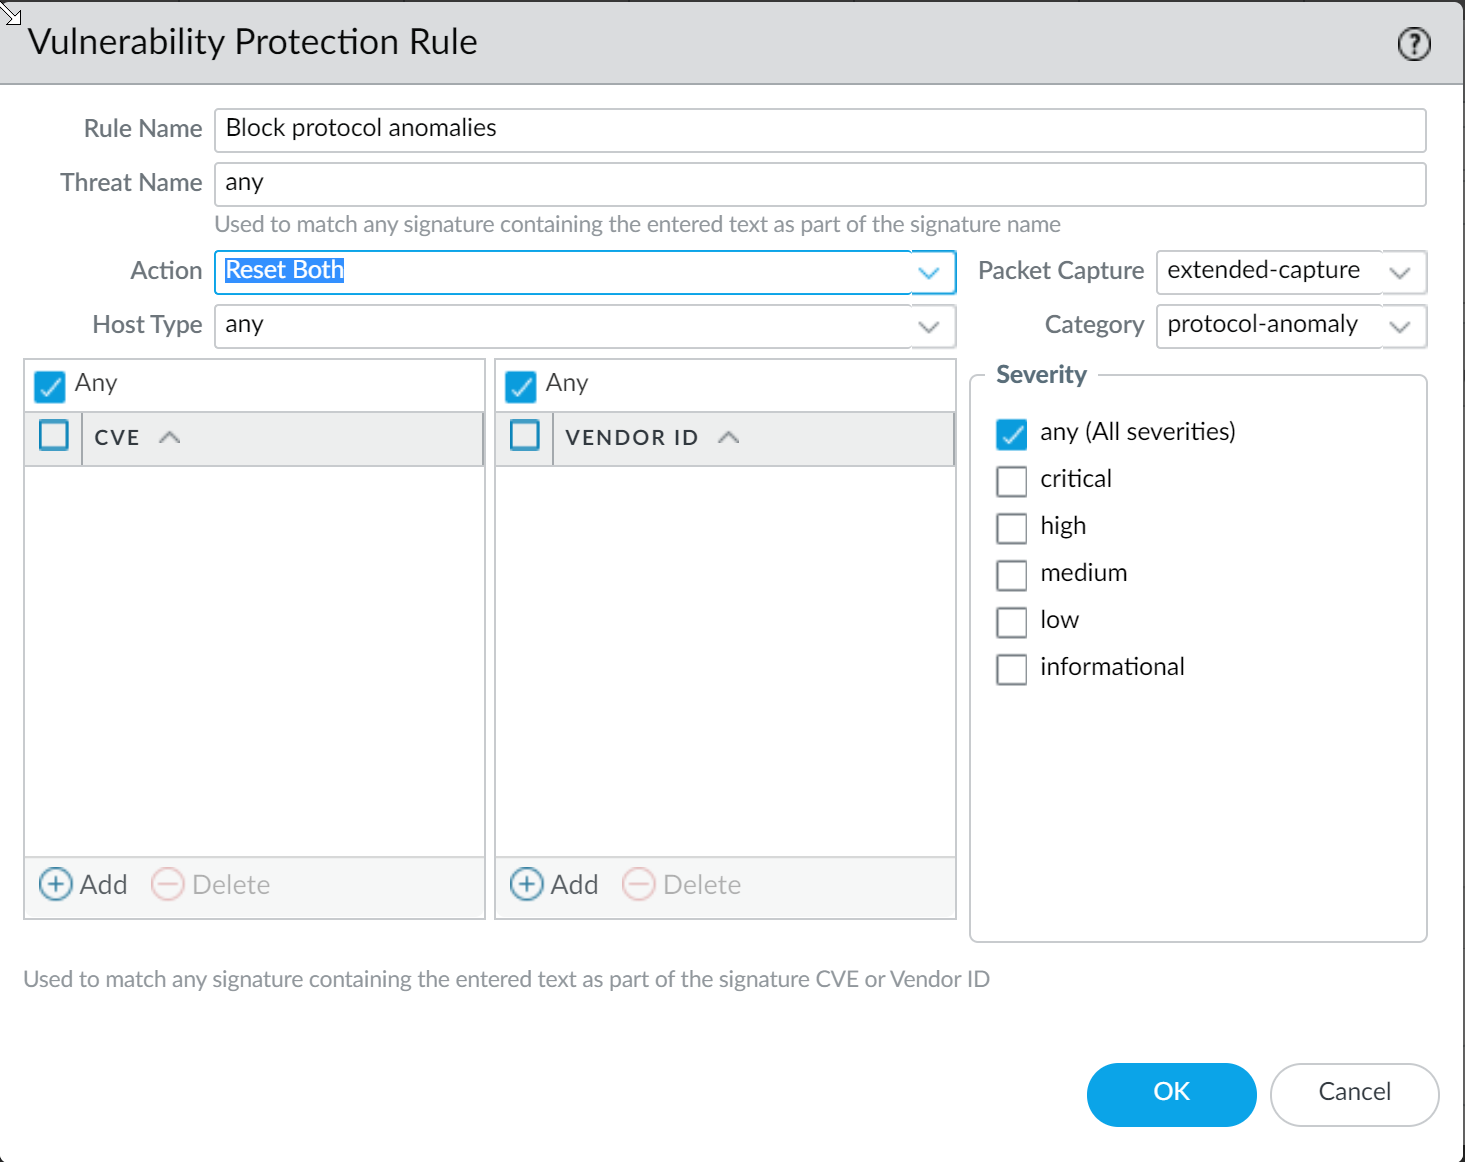
Block protocol anomalies: Create a rule with Category protocol-anomaly, Action Reset Both, Severity Any.
Screenshot showing a rule in a Vulnerability Protection profile with the Action set to 'Reset Both' for the 'protocol-anomaly' category.
-
Optionally allow protocol anomalies for critical applications that use established protocols in a non-standard way: Create a higher-priority rule (listed above block rules) with Action Allow, Category protocol-anomaly, Severity any. Attach this rule to the security policy rule enforcing traffic for those applications.
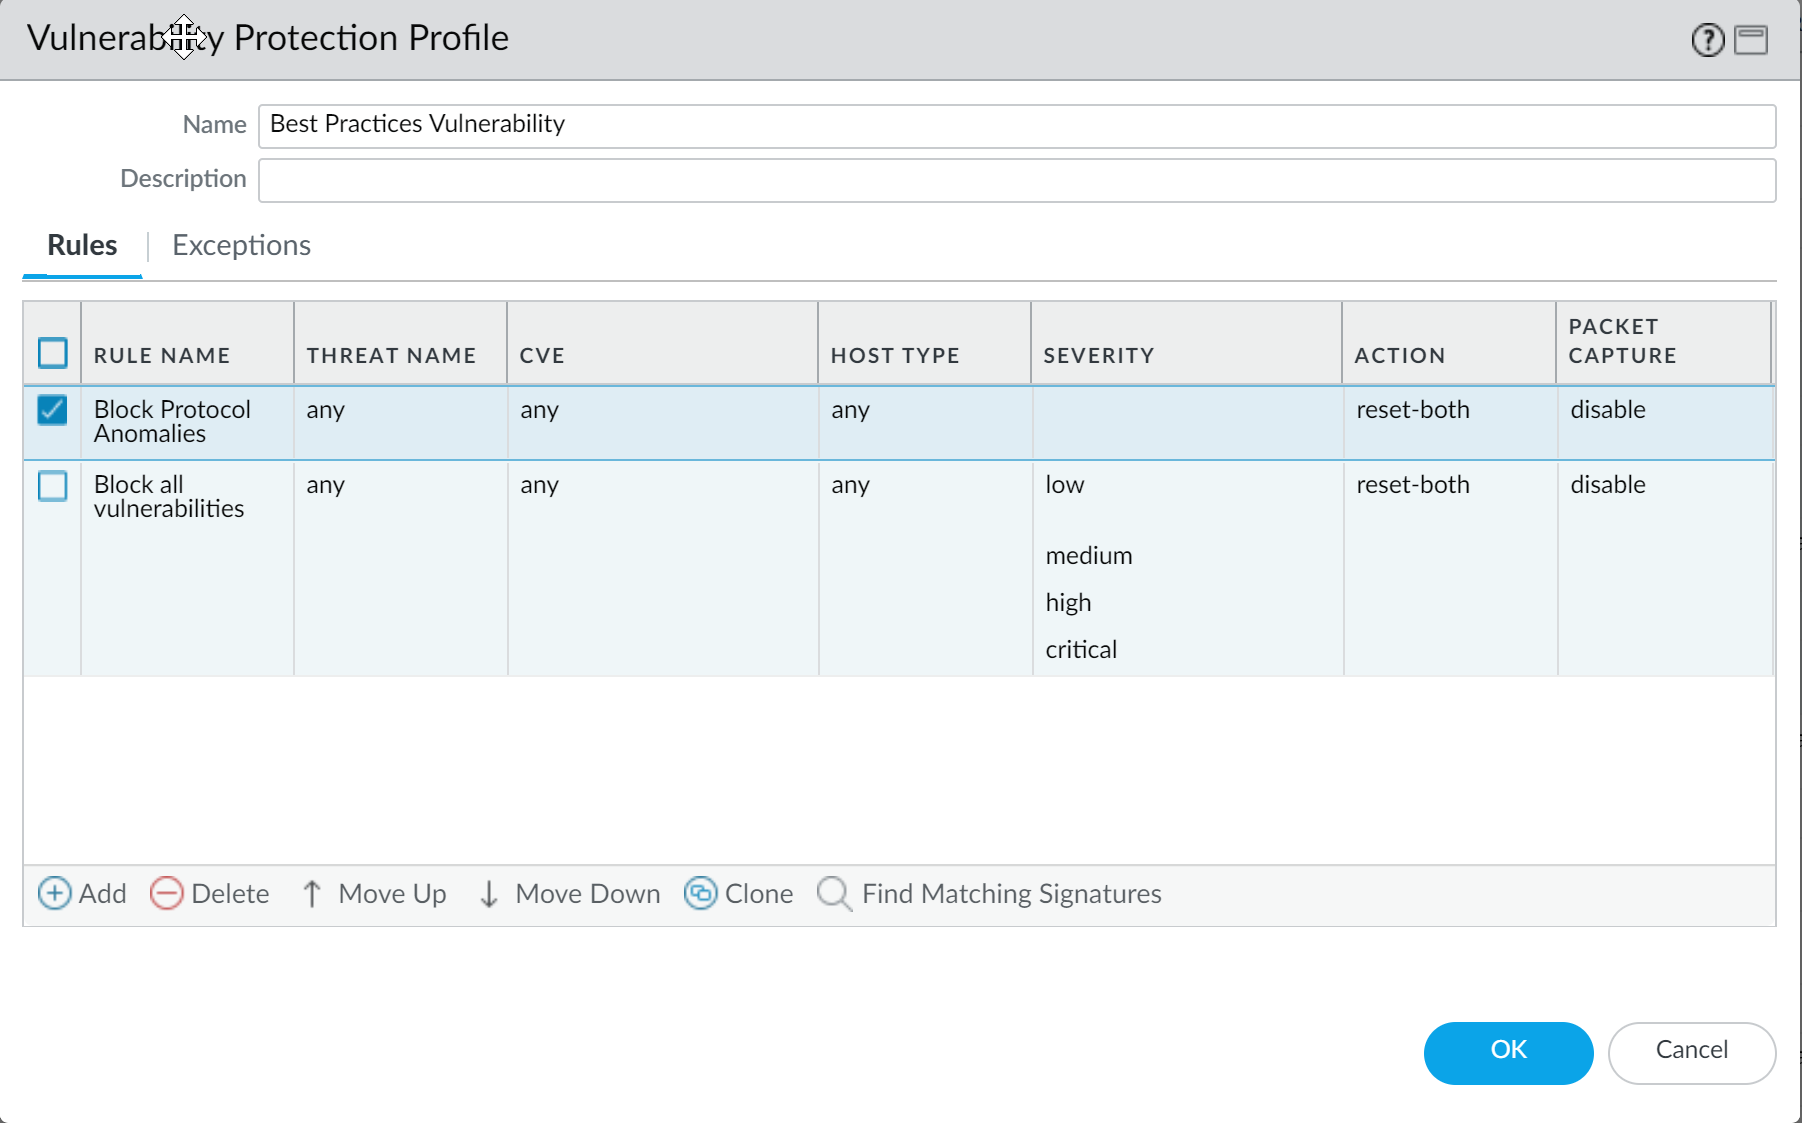
Screenshot illustrating the rule order in a Vulnerability Protection profile, showing an Allow rule before a Reset Both rule.
- Add another rule to the Vulnerability Protection profile to block all vulnerabilities with low and higher severity. This rule must be listed after the rule that blocks protocol anomalies.
-
Begin by alerting on protocol anomalies: Create a rule with Action set to Alert, Category to protocol-anomaly, Severity Any. Monitor traffic.
- Continue to attach the following security profiles to your Security policy rules to provide signature-based protection: An Anti-Spyware profile to block all spyware with severity low and higher. An Antivirus profile to block all content that matches an antivirus signature.
Important Point (PCNSA/PCNSE): Zone Protection profiles are configured under Network > Zones and applied per zone. They offer Layer 2/3/4 protections against floods, reconnaissance, and malformed packets.
Critical Point (PCNSE): Disabling "Forward datagrams exceeding content inspection queue" is a security hardening step to prevent evasion, but can impact performance on busy or undersized firewalls.
Critical Point (PCNSE): Disabling "Allow HTTP partial response" is a strong security measure against evasion, but requires testing as it can break applications using HTTP RANGE requests. Application Override bypasses security profiles, so use it sparingly.
Important Point (PCNSA/PCNSE): Protocol Anomalies in Vulnerability Protection profiles are a key defense against Layer 4/7 evasions. Blocking them is a security best practice, but careful implementation (alerting first, exception rules) is needed in sensitive environments. Policy rule order matters!
Share Threat Intelligence with Palo Alto Networks (Telemetry)
Telemetry is the process of collecting and transmitting data for analysis. When you enable telemetry on the firewall, the firewall periodically collects and sends information that includes applications, threats, and device health to Palo Alto Networks.
Sharing threat intelligence provides the following benefits:
- Enhanced vulnerability and spyware signatures delivered to you and other customers worldwide. For example, when a threat event triggers vulnerability or spyware signatures, the firewall shares the URLs associated with the threat with the Palo Alto Networks threat research team, so they can properly classify the URLs as malicious.
- Rapid testing and evaluation of experimental threat signatures with no impact to your network, so that critical threat prevention signatures can be released to all Palo Alto Networks customers faster.
- Improved accuracy and malware detection abilities within PAN-DB URL filtering, DNS-based command-and-control (C2) signatures, and WildFire.
Palo Alto Networks uses the threat intelligence extracted from telemetry to deliver these benefits to you and other Palo Alto Networks users. All Palo Alto Networks users benefit from the telemetry data shared by each user, making telemetry a community-driven approach to threat prevention. Palo Alto Networks does not share your telemetry data with other customers or third-party organizations.
Important Point (PCNSE/PCNSA): Telemetry is crucial for Palo Alto Networks' shared threat intelligence model, improving protections for all customers. It is not shared with other customers or third parties.
Critical Point (PCNSE): Ensure Telemetry is enabled (Device > Setup > Management > Logging and Reporting) to benefit from and contribute to the shared threat intelligence, which improves detection capabilities across the Palo Alto Networks ecosystem.
Configure Threat Prevention
Before you can enable and configure threat prevention features, you must obtain and install a Threat Prevention or Advanced Threat Prevention license (to access the cloud-based inline cloud analysis features) in addition to any platform licenses. Licenses are activated from the Palo Alto Networks Customer Support Portal and must be active before you can enable any of the threat prevention features. Additionally, Threat Prevention (similar to other Palo Alto Networks security services) is administered through security profiles, which in turn is dependent on the configuration of network enforcement policies as defined through security policy rules. Before enabling Threat Prevention, it is recommended that you familiarize yourself core components of the security platform in which the security subscriptions are enabled.
To enable and configure your Threat Prevention subscription to function optimally within your network security deployment, refer to the tasks below. While it may not be necessary to implement all of the processes shown here, Palo Alto Networks recommends reviewing all of the tasks to familiarize yourself with the available options for a successful deployment. It is additionally recommended that you follow the best practices provided by Palo Alto Networks for the optimum usability and security.
Set Up Antivirus, Anti-Spyware, and Vulnerability Protection
Every Palo Alto Networks next-generation firewall comes with predefined Antivirus, Anti-Spyware, and Vulnerability Protection profiles that you can attach to Security policy rules. There is one predefined Antivirus profile, default , which uses the default action for each protocol (block HTTP, FTP, and SMB traffic and alert on SMTP, IMAP, and POP3 traffic). There are two predefined Anti-Spyware and Vulnerability Protection profiles:
- default —Applies the default action to all client and server critical, high, and medium severity spyware/vulnerability protection events. It does not detect low and informational events.
- strict —Applies the block response to all client and server critical, high and medium severity spyware/vulnerability protection events and uses the default action for low and informational events.
To ensure that the traffic entering your network is free from threats, attach the predefined profiles to your basic web access policies. As you monitor the traffic on your network and expand your policy rulebase, you can then design more granular profiles to address your specific security needs. Transition safely to best practice Security profiles for the best security posture.
Strata Cloud Manager Configuration Steps Overview:
- Log in to Strata Cloud Manager. Check active licenses for Prisma Access (includes TP).
- (Optional) Create custom security profiles. Alternatively, use predefined Best-Practice profiles. Follow transition steps for safety.
-
Attach security profiles to your
Security Policy Rules
(Manage > Configuration > NGFW and Prisma Access > Security Services > Security Policy). Select a rule, go to 'Action and Advanced Inspection', select the Profile Group including WildFire and Antivirus, Anti-Spyware, and Vulnerability Protection. The best-practice profile group is enabled by default with the best-practice configuration.
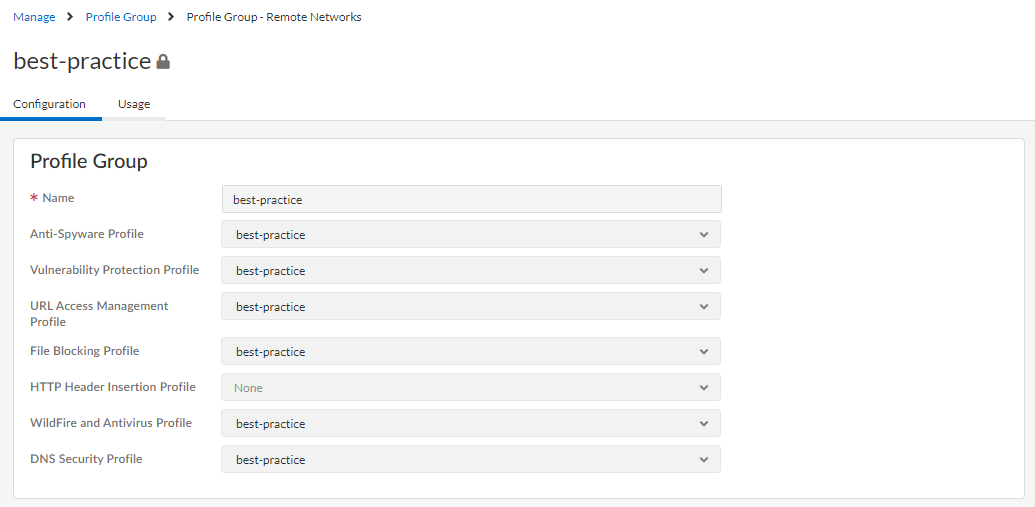
Screenshot showing how to select a Profile Group including various security profiles in a Security Policy rule within Strata Cloud Manager.
PAN-OS & Panorama Configuration Steps Overview:
-
Verify Threat Prevention subscription is active (Device > Licenses).

Screenshot showing the Device > Licenses page in PAN-OS, listing active subscriptions like Threat Prevention.
- Download the latest content: Manually check and download/install latest Antivirus and Applications and Threats updates (Device > Dynamic Updates > Check Now, Download, Install).
-
Schedule content updates:
Configure Antivirus and Applications and Threats updates (Device > Dynamic Updates > Schedule). Specify frequency, timing, action (download-only or download-and-install). Optionally define a
Threshold
(minimum age before download). For HA, configure scheduling on both peers; decide on
Sync To Peer
based on MGT vs Data port usage and HA type.
Gotcha (PCNSE): Content update schedules are *not* automatically synced between HA peers; you must configure them on both. Sync To Peer ensures updates are pushed to the passive device when using data ports for updates or in Active/Active setups with data ports.
- (Optional) Create custom security profiles (Objects > Security Profiles > [Type]). Alternatively, use predefined default or strict profiles. Follow transition steps for safety.
-
Attach security profiles to your Security policy rules
(Policies > Security > [Rule] > Actions tab > Profile Settings). Select 'Profiles' as the Profile Type and choose your Antivirus, Anti-Spyware, and Vulnerability Protection profiles.
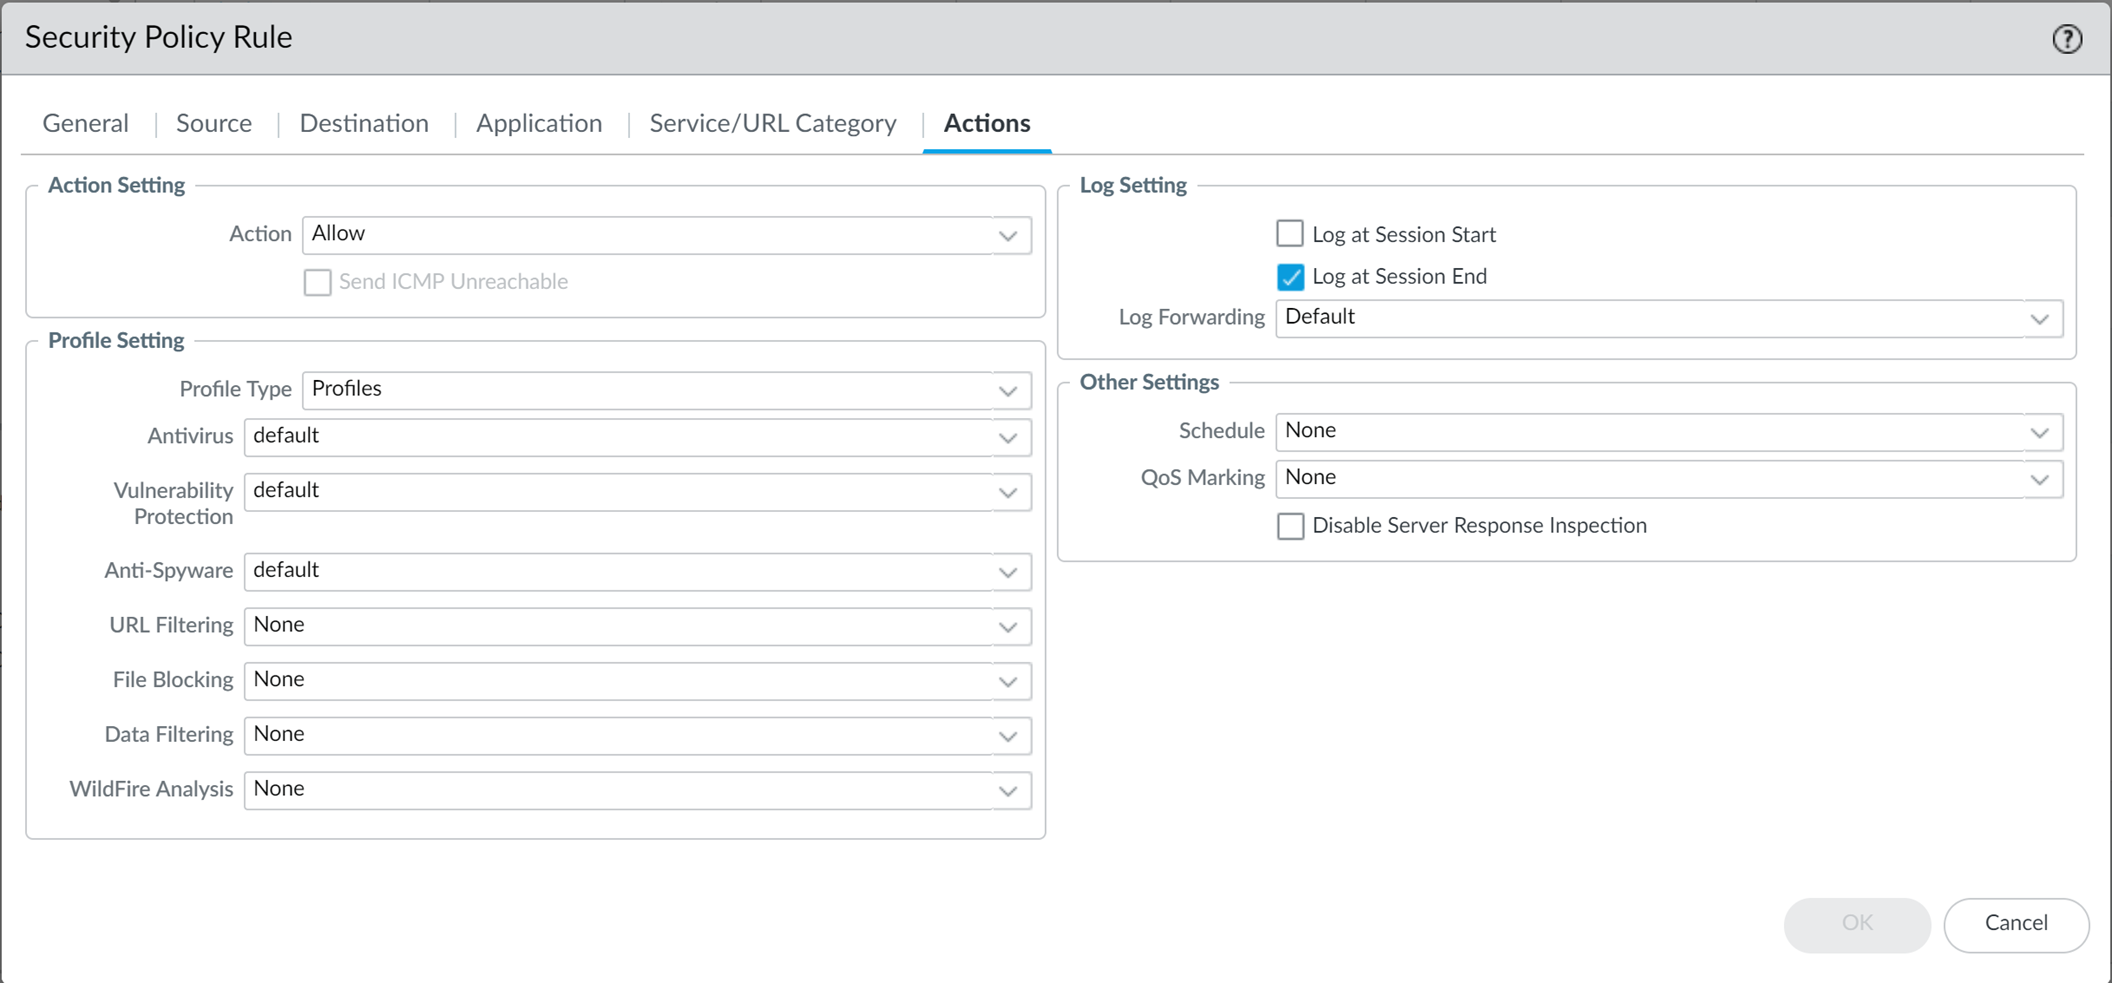
Screenshot showing where to attach security profiles (Antivirus, Anti-Spyware, Vulnerability Protection) to a Security policy rule in PAN-OS.
Important Point (PCNSA/PCNSE): Threat Prevention is enforced by applying security profiles (Antivirus, Anti-Spyware, Vulnerability Protection) to Security policy rules. Rules are evaluated top-down.
- Commit your changes.
Configure Inline Cloud Analysis
Inline Cloud Analysis is an Advanced Threat Prevention feature (requires ATP license) that enables the detection of advanced, highly-evasive zero-day command-and-control (C2) threats, command injection, SQL injection vulnerabilities, and DNS relay threats in real-time by querying the Advanced Threat Prevention cloud service.
Local Deep Learning (LDL) is also configured here (Supported in PAN-OS 11.2 and later deployments on platforms like PA-5400 Series (excluding PA-5450), VM-Series (with at least 16GB memory), VM-Series Public Cloud, VM-Series Private Cloud). LDL complements the cloud-based analysis by providing a mechanism to perform fast, local deep learning-based analysis of zero-day and other evasive threats. Updates to Local Deep Learning models are delivered through content updates.
Inline Cloud Analysis protection is delivered through your Anti-Spyware (advanced C2, spyware, DNS relay threats) and Vulnerability Protection (command injection, SQL injection vulnerabilities) security profiles.
Strata Cloud Manager Configuration Steps Overview:
- Verify Prisma Access subscription (includes ATP). Check active licenses.
- Log in to Strata Cloud Manager.
-
Update or create a new Anti-Spyware security profile (Manage > Configuration > NGFW and Prisma Access > Security Services > Anti-Spyware).
Screenshot showing the Inline Cloud Analysis options within an Anti-Spyware profile in Strata Cloud Manager, including the Enable Inline Cloud Analysis checkbox.
- Enable Inline Cloud Analysis under the 'Inline Cloud Analysis' panel.
- For supported platforms/versions, select 'enable' for each available analysis engine with a Local Deep Learning (LDL) option (e.g., HTTP Command and Control detector and HTTP2 Command and Control detector).
- Specify an Action to take when a threat is detected using a corresponding analysis engine. The default action is 'alert', however, Palo Alto Networks recommends setting all actions to Reset-Both for the best security posture.
- Click OK and Commit changes.
-
(Optional) Add URL and/or IP address exceptions to your Anti-Spyware profile if Inline Cloud Analysis produces false-positives. You can add exceptions by specifying an external dynamic list (URL or IP address list types) or an Addresses policy object (Inline Cloud Analysis pane > Add EDL/URL or Add IP Address).

Screenshot showing where to add URL or IP address exceptions for Inline Cloud Analysis in Strata Cloud Manager.
- Commit changes.
PAN-OS & Panorama Configuration Steps Overview:
- Log in to the PAN-OS web interface.
-
To take advantage of inline cloud analysis, you must have an active Advanced Threat Prevention subscription. Verify licenses (Device > Licenses).

Screenshot of the PAN-OS Device > Licenses page, highlighting the Advanced Threat Prevention license.
-
Update or create a new Anti-Spyware Security profile (Objects > Security Profiles > Anti-Spyware).
Screenshot showing the Inline Cloud Analysis options within an Anti-Spyware profile in PAN-OS.
- Select an existing or add a new profile.
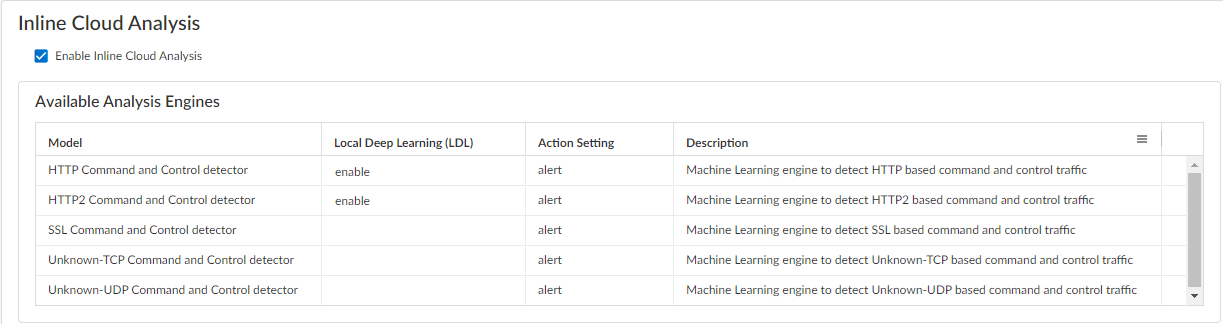
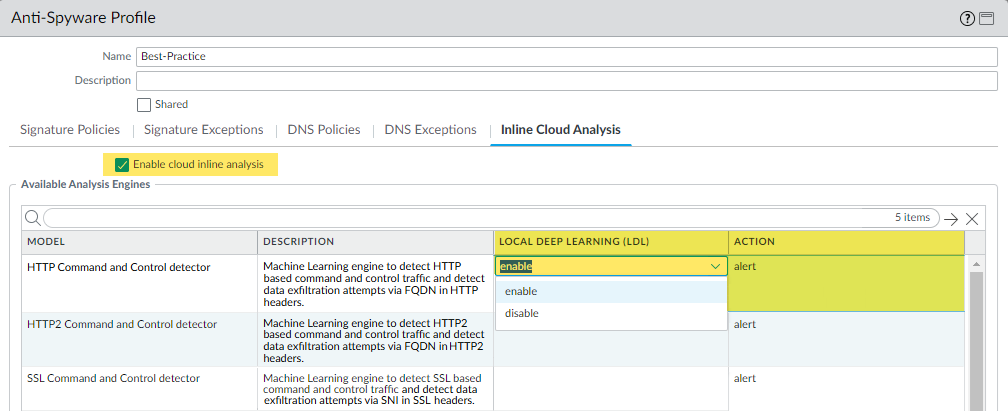
- Enable Inline Cloud Analysis under the 'Inline Cloud Analysis' tab.
- Local Deep Learning [Supported in PAN-OS 11.2 and later]: Select 'enable' for each available analysis engine with a Local Deep Learning (LDL) option. Currently, these are HTTP Command and Control detector and HTTP2 Command and Control detector. Note: LDL does not support data exfiltration detection (DNS relay attacks) even if the model includes it.
- Specify an Action : Recommended action is Reset-Both . Options: Allow, Alert, Drop, Reset-Client, Reset-Server, Reset-Both.
- Commit changes.
-
Supported in PAN-OS 11.0 and later:
Update or create a new Vulnerability Protection Security profile (Objects > Security Profiles > Vulnerability Protection).
Screenshot showing the Inline Cloud Analysis options within a Vulnerability Protection profile in PAN-OS, including the Enable cloud inline analysis checkbox.
- Select an existing or add a new profile.
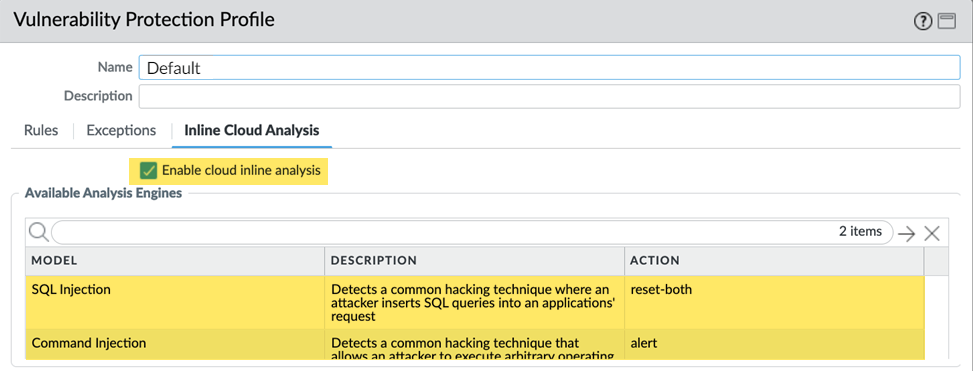
- Enable cloud inline analysis under the 'Inline Cloud Analysis' tab.
- Specify an Action to take when a vulnerability exploit is detected using a corresponding analysis engine (SQL Injection, Command Injection). Recommended action is Reset-Both .
- Commit changes.
-
(Optional) Add URL and/or IP address exceptions to your Anti-Spyware or Vulnerability Protection profile if Inline Cloud Analysis produces false-positives (Inline Cloud Analysis tab > Add EDL URL or IP Address). Note: IP address objects not supported for 'Shared' profiles on Panorama.
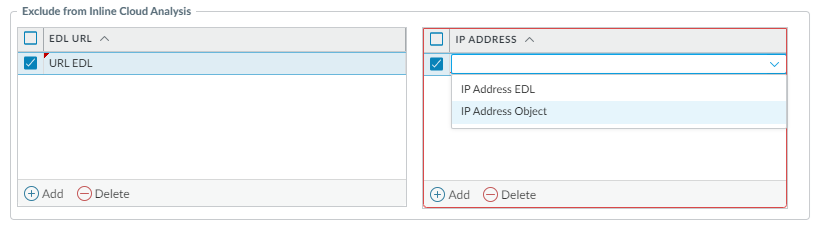
Screenshot showing where to add EDL URL or IP Address exceptions for Inline Cloud Analysis within a security profile in PAN-OS.
- Commit changes.
-
Configure timeout latency and action for Inline Cloud Analysis:
(Device > Setup > Content-ID > Threat Prevention Inline Cloud Analysis). Specify
Max Latency (ms)
and the action ('Allow on Max Latency'). If unchecked, the action is to
block
when max latency is reached (recommended for security). Optionally
Log Traffic Not Scanned
.
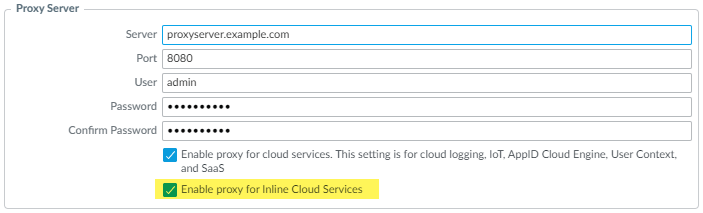
Screenshot showing where to configure Proxy Server settings for Inline Cloud Services under Device > Setup > Services in PAN-OS.
Critical Point (PCNSE): Know where to configure the action if the Inline Cloud Analysis query exceeds the maximum latency (Device > Setup > Content-ID > Threat Prevention Inline Cloud Analysis). Default is Allow, recommended is Block (by unchecking 'Allow on Max Latency').
- Install a Device Certificate (required for cloud communication). Repeat for all firewalls enabled for inline cloud analysis.
-
(Required if firewall is deployed with an explicit proxy server) Configure the proxy server for inline cloud services. Can be done via WebUI (PAN-OS 11.2.3+) or CLI (PAN-OS 10.2.11+, 11.1.5+).
set deviceconfig system secure-proxy-server <FQDN_or_IP>Sets the FQDN or IP address of the explicit proxy server for secure connections.
set deviceconfig system secure-proxy-port <1-65535>Sets the port number of the explicit proxy server.
set deviceconfig system secure-proxy-user <value>Sets the username for authentication to the explicit proxy server.
set deviceconfig system secure-proxy-password <value>Sets the password for authentication to the explicit proxy server.
debug dataplane mica set inline-cloud-proxy enableEnables the dataplane to use the configured secure proxy server for inline cloud services traffic. This is a debug command for enabling the feature.
Important Point (PCNSE): Configuring a proxy for cloud services requires full credentials (username/password). Proxy password needs min 7 characters. CLI commands are available for configuration.
- (Optional) Set the Cloud Content FQDN (Device > Setup > Content-ID > Content Cloud Setting) to a regional server instead of the default global FQDN (hawkeye.services-edge.paloaltonetworks.com). Note regional FQDNs and potential limitations (e.g., SaaS Security support).
-
(Optional) Verify connectivity to ATP cloud service using CLI:
show ctd-agent status security-clientDisplays the status of the connection from the firewall to the cloud-delivered threat prevention service (security client).
Verify necessary FQDNs/ports are not blocked (TCP 80 for OCSP/CRL, TCP 443 for services-edge). - Commit changes.
Prevent Brute Force Attacks
A brute force attack uses a large volume of requests/responses from the same source or destination IP address to break into a system. The attacker employs a trial-and-error method to guess the response to a challenge or a request.
The Vulnerability Protection profile includes signatures to protect against brute force attacks. Each signature has an ID, Threat Name, and Severity and is triggered when a pattern is recorded. The pattern specifies the conditions and interval at which the traffic is identified as a brute-force attack; some signatures are associated with another child signature that is of a lower severity and specifies the pattern to match against. When a pattern matches against the signature or child signature, it triggers the default action for the signature.
Typically, the default action for a child signature is allow because a single event is not indicative of an attack. This ensures that legitimate traffic is not blocked and avoids generating threat logs for non-noteworthy events. Palo Alto Networks recommends that you do not change the default action without careful consideration.
To enforce protection:
- Attach the Vulnerability Protection profile to a Security policy rule.
- Install content updates that include new signatures to protect against emerging threats.
To customize the action and trigger conditions for a brute-force signature:
- Create a new Vulnerability Protection profile (Objects > Security Profiles > Vulnerability Protection > Add). Enter Name, optional Description, Shared setting, and optional Disable override (Panorama only).
-
Create a rule that defines the action for all signatures in a category (Rules tab > Add Rule). Enter Rule Name. (Optional) Specify a specific threat name (default is any). Set the
Action
. Recommended action is
Block IP
for effective mitigation. If blocking, (Optional) specify the
Host Type
(server or client). Set
Category
to
brute-force
.
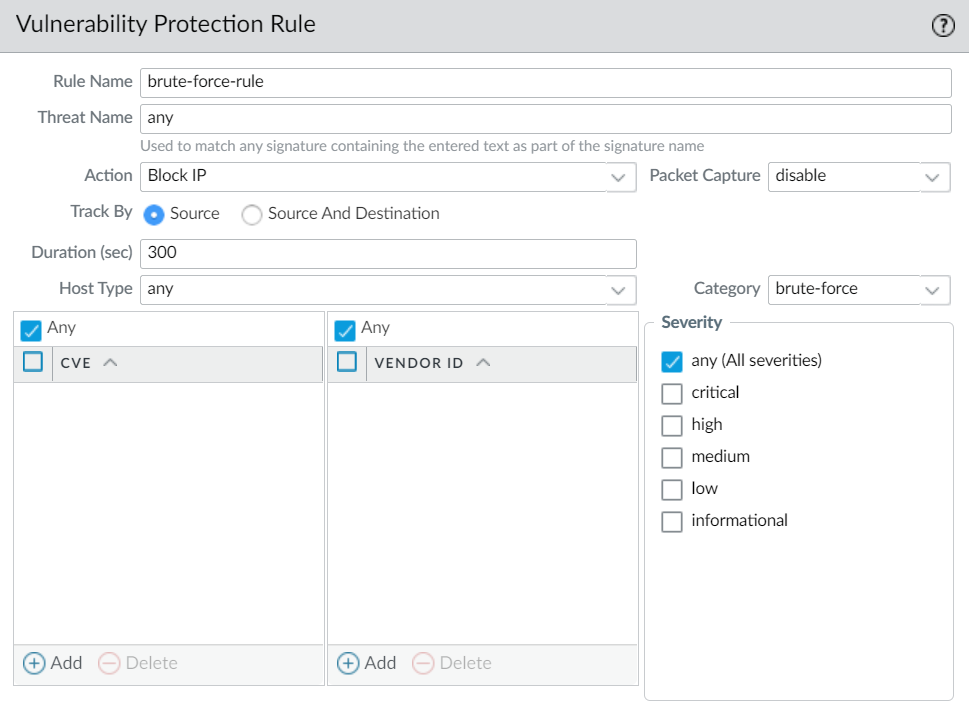
Screenshot showing a rule configured in a Vulnerability Protection profile targeting the 'brute-force' category with action 'Block IP'.
Important Point (PCNSE): 'block-ip address' is often the most effective action for brute force attacks, leveraging hardware blocking capabilities where available.
-
(Optional) Customize the action for a specific signature (Exceptions tab > Show all signatures to find the signature). Filter signatures. Click the predefined default action in the Action column to edit. Set the
action
(Allow, Alert, Block Ip, or Drop). If Block Ip, specify
Time
period and
Track By
(IP source or IP source and destination). For each modified signature, select the check box in the
Enable
column. Click OK.
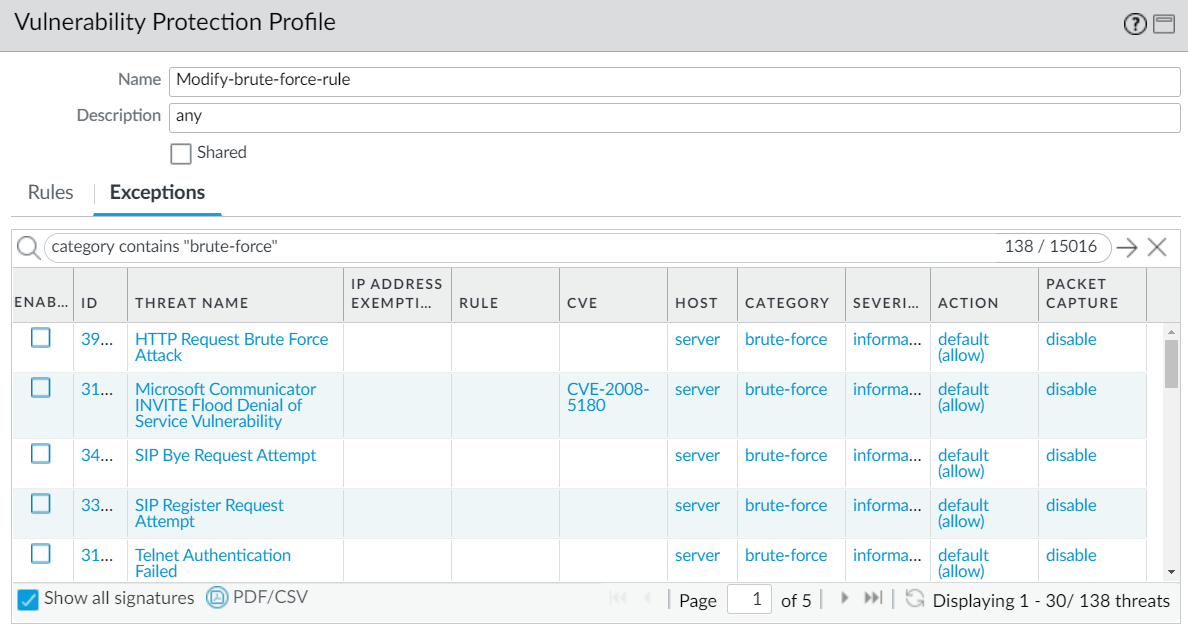
Screenshot showing the Exceptions tab in a Vulnerability Protection profile with the 'Show all signatures' button highlighted.
-
(Optional) Customize the trigger conditions for a parent signature (marked with the edit icon): Edit the time attribute and aggregation criteria. To modify the trigger threshold, specify the
Number of Hits
per number of
seconds
. Specify whether to aggregate by
Aggregation Criteria
(source, destination, or source-and-destination). Click OK.
Important Point (PCNSE): For brute force signatures, you can customize the trigger conditions (Number of Hits, seconds, Aggregation Criteria) for *parent* signatures, but only the action for *child* signatures.
- Click OK to save the profile.
- Attach this new profile to a Security policy rule (Policies > Security > [Rule] > Actions tab > Profile Settings). Select 'Profiles' as the Profile Type and select your Vulnerability Protection profile. Click OK.
- Commit your changes.
Enable Evasion Signatures
Palo Alto Networks evasion signatures detect crafted HTTP or TLS requests, and can alert to instances where a client connects to a domain other than the domain specified in a DNS query. Evasion signatures are effective only when the firewall is also enabled to act as a DNS proxy and resolve domain name queries. As a best practice, take the following steps to enable evasion signatures. Without DNS proxy, evasion signatures can trigger alerts when a DNS server in the DNS load balancing configuration returns different IP addresses—for servers hosting identical resources—to the firewall and client in response to the same DNS request.
Configuration Steps Overview:
- Enable a firewall intermediate to clients and servers to act as a DNS proxy: Configure a DNS Proxy Object (Network > DNS Proxy). Include specifying interfaces, DNS servers, static entries, enabling caching. (Image 003 applies here).
- Get the latest Applications and Threats content version (at least content version 579 or later). (Device > Dynamic Updates > Check Now, Download, Install).
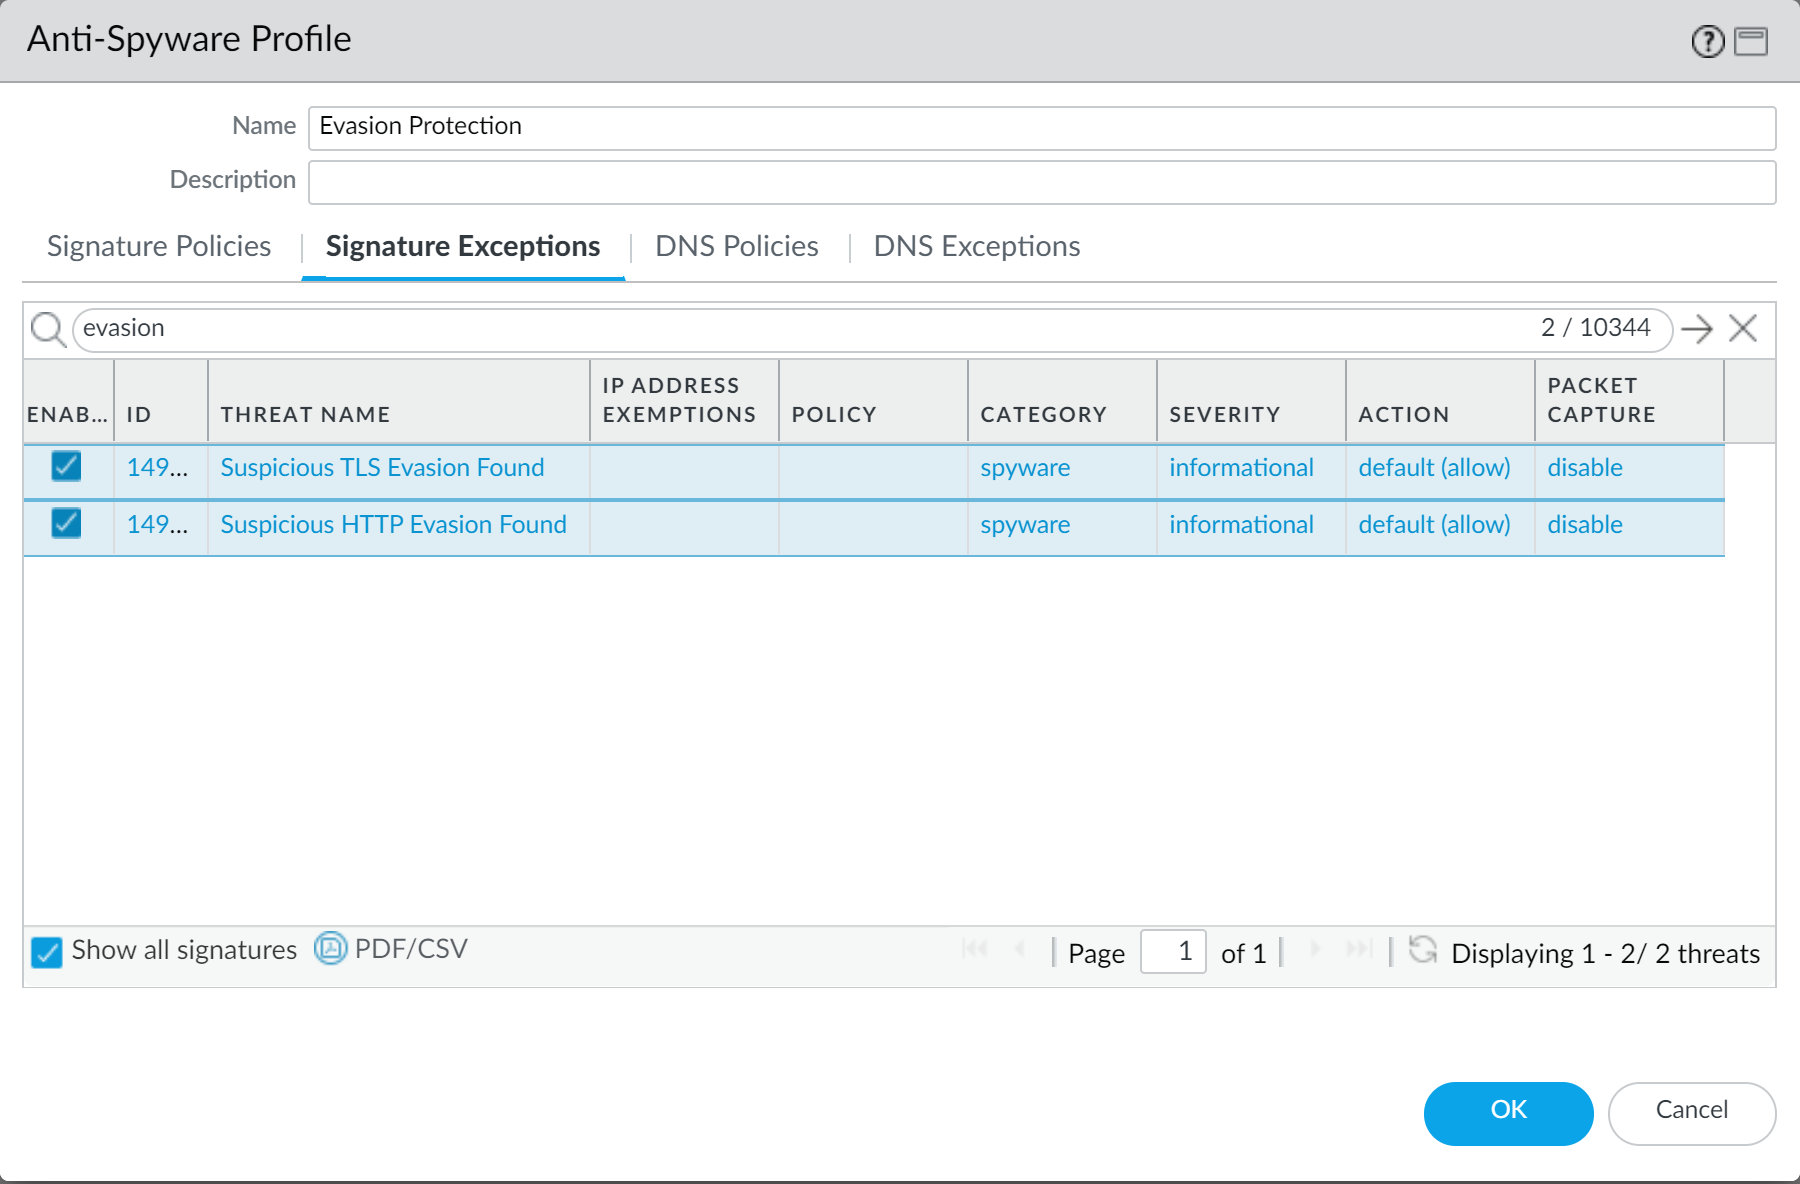
- Define how the firewall should enforce traffic matched to evasion signatures in an Anti-Spyware profile (Objects > Security Profiles > Anti-Spyware > Exceptions). Select 'Show all signatures'. Filter signatures based on the keyword evasion . For all evasion signatures, set the Action to any setting other than allow or the default action (the default action is for evasion signatures is allow). Recommended actions are alert or drop . Click OK.
- Attach the Anti-spyware profile to a security policy rule: Select Policies > Security, select the desired policy to modify and then click the Actions tab. In Profile Settings, click the drop-down next to Anti-Spyware and select the anti-spyware profile you just modified.
- Commit your changes.
Critical Point (PCNSE/PCNSA): Evasion signatures are configured in the Anti-Spyware profile and require the firewall configured as a DNS proxy to function correctly. Set the action to something other than 'allow' (like alert or drop) for effectiveness.
Create Threat Exceptions
Palo Alto Networks defines a recommended default action (such as block or alert) for threat signatures. You can use a threat ID to exclude a threat signature from enforcement or modify the action that is enforced for that threat signature. For example, you can modify the action for threat signatures that are triggering false positives on your network.
Configure threat exceptions for antivirus, vulnerability, spyware, and DNS signatures to change enforcement for a threat. However, before you begin, make sure the threats are being properly detected and enforced based on the default or best practice signature settings for an optimum security posture: Get the latest Antivirus, Threats and Applications, and WildFire signature updates. Set Up Antivirus, Anti-Spyware, and Vulnerability Protection and apply these security profiles to your security policy.
If a signature has been disabled, the signature UTID might be reused for a new signature. Review the content update release notes for notifications regarding new and disabled signatures. Signatures might disabled in cases where: the activity the signature detects has fallen out of use by attackers, the signature generated significant false positives, or the signature was consolidated with other like signatures into a single signature (signature optimization).
Strata Cloud Manager Configuration Steps Overview:
-
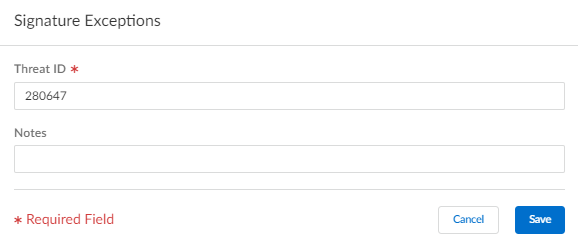
Exclude antivirus signatures: In a WildFire and Antivirus profile (Manage > Configuration > NGFW and Prisma Access > Security Services > WildFire and Antivirus > [Profile] > Advanced Settings > Signature Exceptions), Add Exception and provide the
Threat ID
. You cannot change the action is enforced for a specific antivirus signature here, but you can define the enforceable action when viruses are found in different types of traffic by editing the security profile
Enforcement Actions
. You can optionally add notes. Save the exception. A valid threat signature ID auto-populates the threat name field. You can view/delete exceptions.
Screenshot showing where to add a signature exception by Threat ID in a WildFire and Antivirus profile within Strata Cloud Manager.

Screenshot showing the list of configured signature exceptions in a WildFire and Antivirus profile within Strata Cloud Manager.
-
Modify enforcement for vulnerability and spyware signatures (except DNS signatures, which are handled through DNS Security in Prisma Access): Select Manage > Configuration > NGFW and Prisma Access > Security Services > Anti-Spyware or Vulnerability Protection. Add Profile or select existing. Select
Add Override
. Search for spyware or vulnerability signatures by providing the relevant
Match Criteria
. Select the check box for the signature(s). Provide the updated
Action
,
Packet Capture
, and
IP Addresses
. Save. You can view/delete Overrides.

Screenshot showing the interface for adding a signature override (exception with modified action) in a security profile within Strata Cloud Manager.
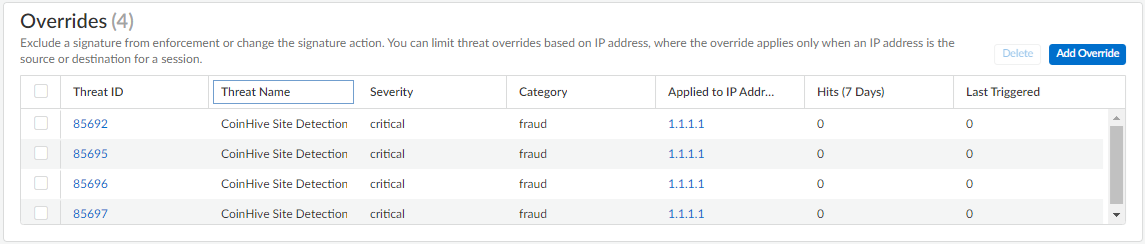
Screenshot showing the list of configured signature overrides in a security profile within Strata Cloud Manager.
- Commit your changes.
PAN-OS & Panorama Configuration Steps Overview:
-
Exclude antivirus signatures from enforcement: In an Antivirus profile (Objects > Security Profiles > Antivirus > [Profile] > Signature Exceptions), Add the
Threat ID
. Cannot change action for specific AV signature here, but can modify the action for viruses found in different types of traffic by editing the Decoders.
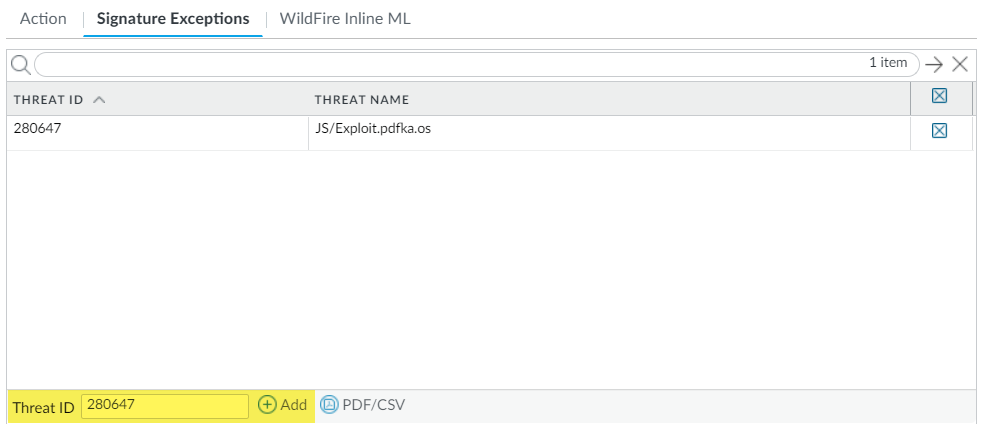
Screenshot showing where to add a signature exception by Threat ID in an Antivirus profile within PAN-OS.
- Click OK.
-
Modify enforcement for vulnerability and spyware signatures (except DNS signatures): Select Objects > Security Profiles > Anti-Spyware or Vulnerability Protection. Add or modify existing. Select either
Signature Exceptions
(Anti-Spyware) or
Exceptions
(Vulnerability Protection).
Show all signatures
and filter. Check the box under
Enable
. Select the
Action
. For false positives, set Action to
Allow
.
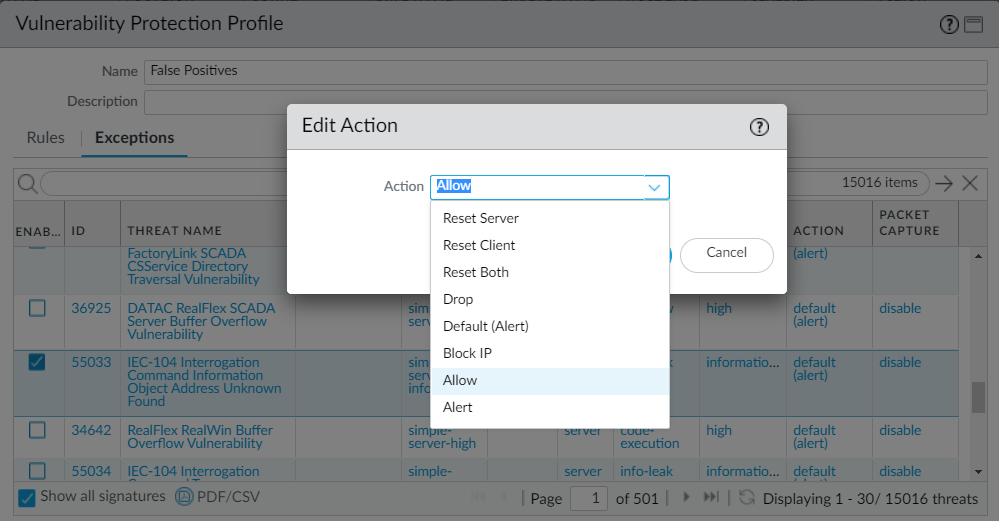
Screenshot showing the list of signatures in a security profile's Exceptions tab in PAN-OS, including the Action column for modifying enforcement.
- Click OK.
-
Modify enforcement for DNS signatures: Select Objects > Security Profiles > Anti-Spyware. Add or modify. Select
DNS Exceptions
. Search for the
DNS Threat ID
and select the box. Default action is sinkholed.

Screenshot showing the DNS Exceptions tab in an Anti-Spyware profile within PAN-OS.
- Click OK.
- Commit changes.
Important Point (PCNSA/PCNSE): Threat Exceptions allow overriding the default action for specific signatures. Antivirus exceptions are added by Threat ID and *cannot* change the action directly, while Spyware/Vulnerability exceptions *can* modify the action (Allow, Block, etc.). DNS exceptions are configured separately in the Anti-Spyware profile.
Use DNS Queries to Identify Infected Hosts on the Network (DNS Sinkholing)
DNS sinkholing helps you to identify infected hosts on the protected network using DNS traffic in situations where the firewall cannot see the infected client's original DNS query (that is, the firewall cannot see the originator of the DNS query). In a typical deployment where the firewall is north of the local DNS server, the threat log will identify the local DNS resolver as the source of the traffic rather than the actual infected host. Sinkholing malware DNS queries solves this visibility problem by forging responses to the client host queries directed at malicious domains, so that clients attempting to connect to malicious domains (for command-and-control, for example) will instead attempt to connect to a default Palo Alto Networks sinkhole IP address (or to IP address that you define if you choose to Configure the Sinkhole IP Address to a Local Server on Your Network). Infected hosts can then be easily identified in the traffic logs.
The firewall has two sources of DNS signatures that it can use to identify malicious and C2 domains:
- (Requires an Advanced | Threat Prevention subscription) Local DNS signatures —A limited, on-box set of DNS signatures, updated daily via antivirus updates.
- (Requires a DNS Security subscription) DNS Security signatures —Accesses the DNS Security cloud service for the complete database. Certain signatures uniquely detect C2 attacks using machine learning (DGAs, tunneling). If you want to specify a sinkhole action for DNS Security signatures, you can configure those settings as part of your DNS Security profile.
DNS queries to domains in the local DNS signature set or the DNS Security signature set are resolved to a Palo Alto Networks server, and the host is unable to access the malicious domain.
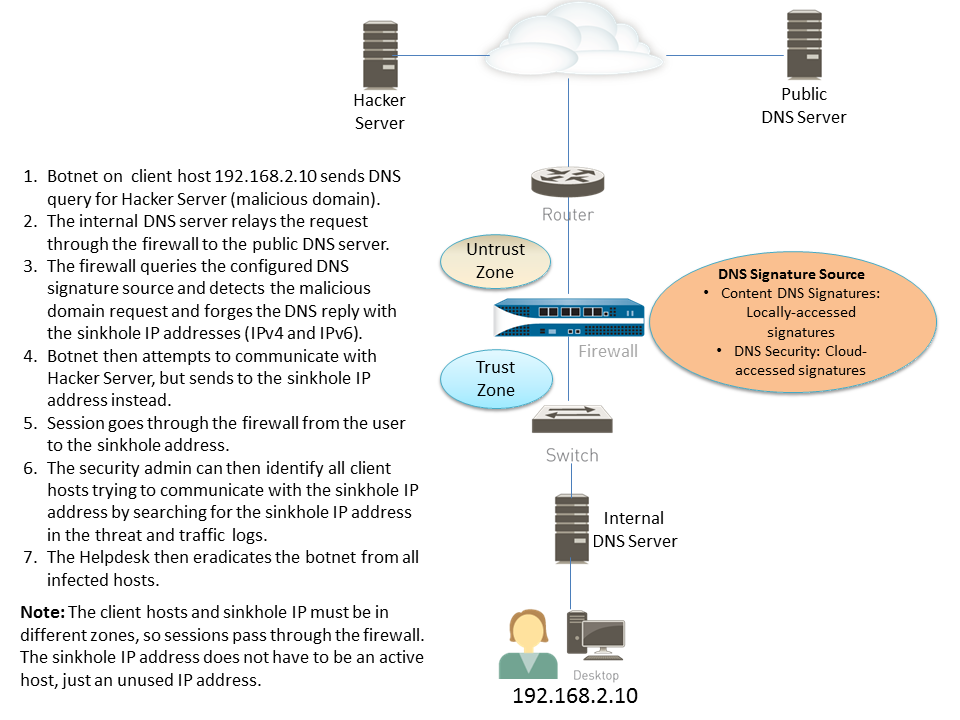
Diagram illustrating how DNS sinkholing works when the firewall is positioned north of the local DNS server, intercepting queries and redirecting clients to a sinkhole IP.
This diagram illustrates the DNS sinkholing process. An infected client queries a malicious domain via a local DNS server. The firewall, seeing the query from the local DNS server, identifies it as malicious based on signatures. Instead of forwarding, it sends a forged response directing the client to a sinkhole IP. The client attempts to connect to the sinkhole IP, generating a traffic log entry that clearly shows the *client* IP as the source trying to reach the known sinkhole IP, allowing easy identification of the infected host.
How DNS Sinkholing Works
Sinkholing helps you to identify infected hosts on the protected network using DNS traffic in situations where the firewall cannot see the infected client's DNS query, enabling visibility into the true source of malicious DNS requests.
Configure DNS Sinkholing
To enable DNS sinkholing, attach the default Anti-Spyware profile to a firewall security policy rule. DNS queries to any domain included in the Palo Alto Networks DNS signature source that you specify are resolved to the default Palo Alto Networks sinkhole IP address. The default IP addresses currently are IPv4— 72.5.65.111 and a loopback address IPv6 address— ::1 . These addresses are subject to change and can be updated with content updates.
Configuration Steps Overview (PAN-OS & Panorama):
- Modify or clone an Anti-Spyware profile (Objects > Security Profiles > Anti-Spyware).
- Go to the DNS Policies tab. Verify that default-paloalto-dns is present in the Signature Source . (Optional) In Packet Capture, select single-packet or extended-capture .
-
In DNS Sinkhole Settings,
verify that Sinkhole is enabled
and
Policy Action
on DNS queries is
sinkhole
. The default Sinkhole IP address is pre-set.
Important Point (PCNSA/PCNSE): The default action for malicious DNS queries in the Anti-Spyware profile is 'sinkhole', redirecting traffic to the Palo Alto Networks sinkhole IPs (72.5.65.111 / ::1) unless configured otherwise.
- Click OK.
- Attach the Anti-Spyware profile to a Security policy rule (Policies > Security > [Rule] > Actions tab). Select 'Log at Session Start'. In Profile Setting, select your Anti-Spyware profile.
- Click OK.
-
Test that the policy action is enforced by monitoring activity. Use ACC and/or Monitor > Logs > Threat filtered by
(action eq sinkhole)
This log filter displays threat log entries where the action taken was 'sinkhole'.
Configure DNS Sinkholing for a List of Custom Domains
To enable DNS Sinkholing for a custom list of domains, you must create an External Dynamic List (EDL) of type Domain List . The firewall will generate DNS-based spyware signatures for each domain.
For each custom domain included in the external dynamic list, the firewall generates DNS-based spyware signatures. The signature is named Custom Malicious DNS Query <domain name>, and is of type spyware with medium severity; each signature is a 24-byte hash of the domain name.
For information about the domain list entry limits, refer to External Dynamic List documentation.
Configuration Steps Overview (PAN-OS & Panorama):
- Modify or clone an Anti-Spyware profile (Objects > Security Profiles > Anti-Spyware).
-
Go to the
DNS Policies
tab. Select an EDL from the
External Dynamic Lists
signature source. (If none exists, configure a new EDL of Type: Domain List).
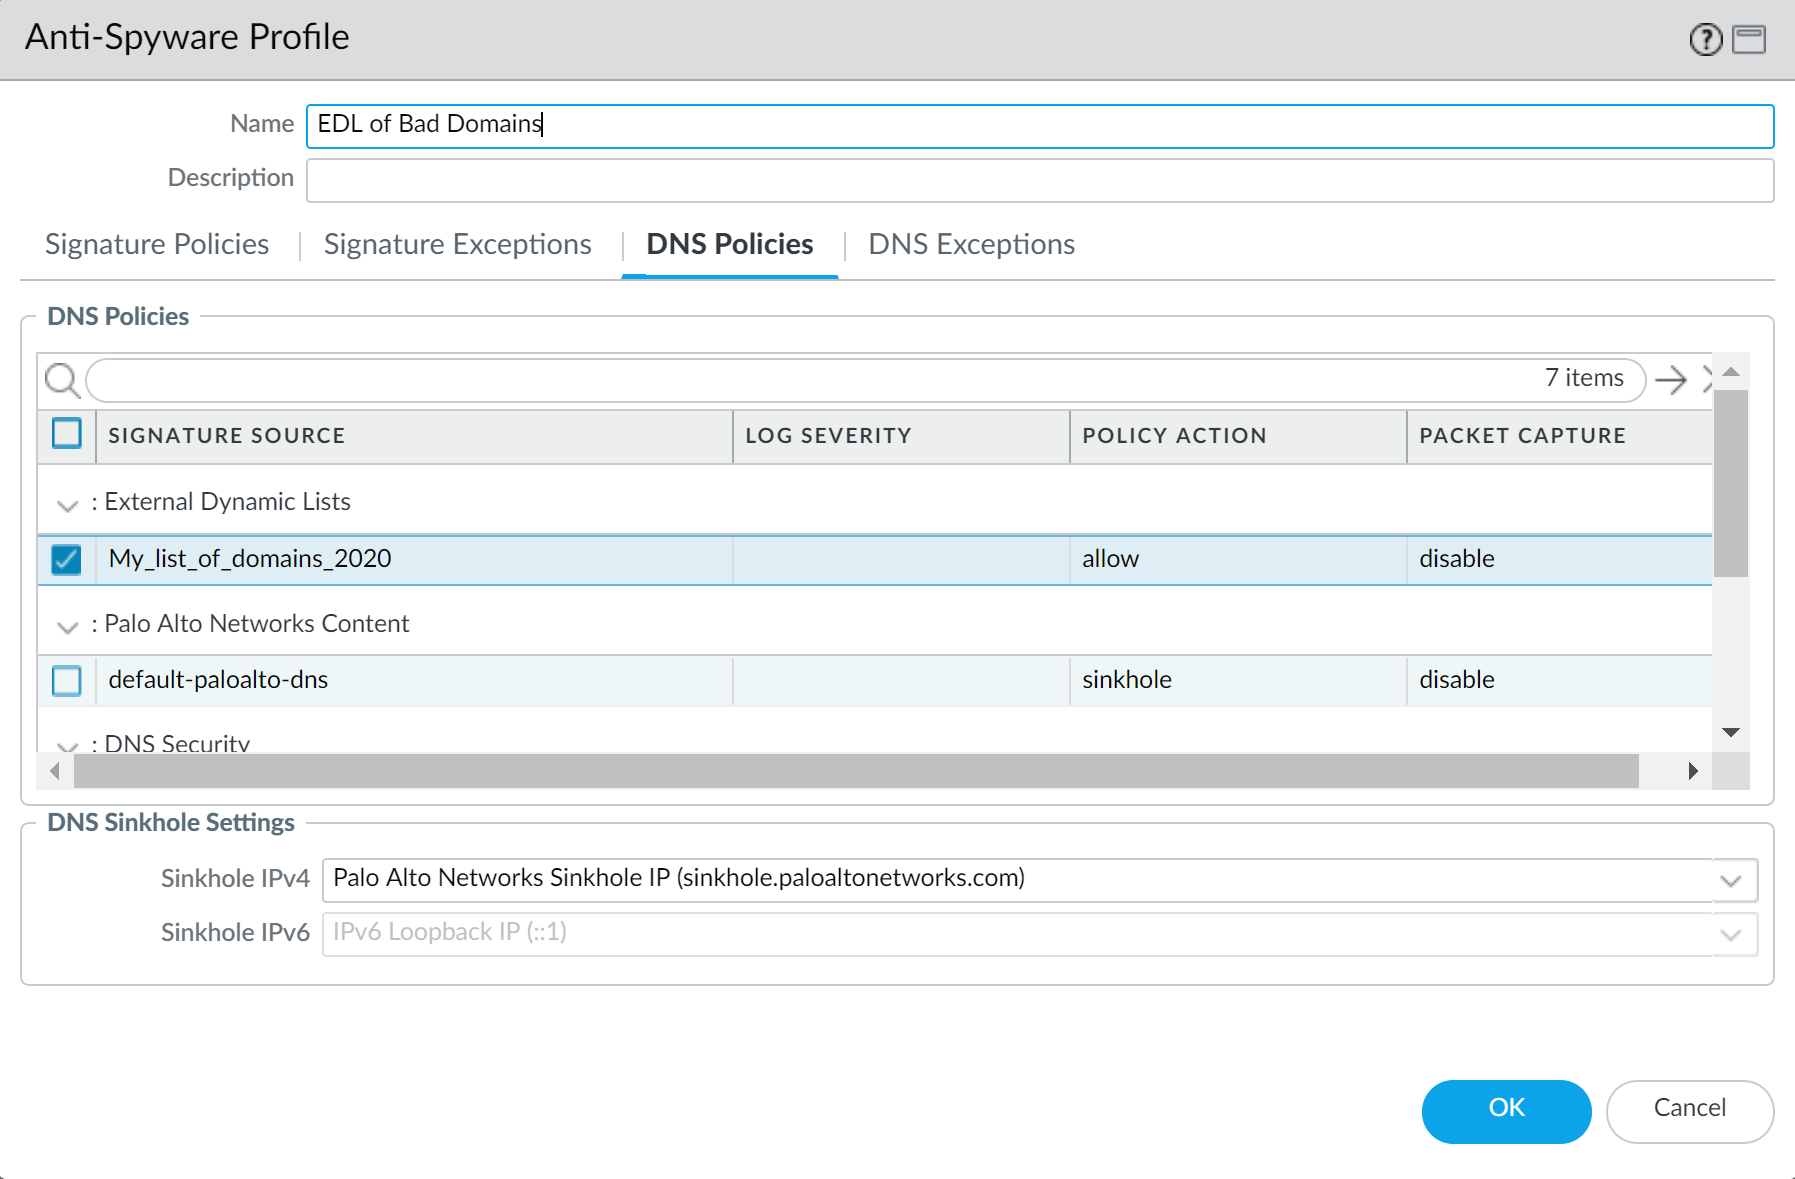
Screenshot showing the DNS Policies tab in an Anti-Spyware profile, with an External Dynamic List selected as a Signature Source.
- (Optional) In Packet Capture, select single-packet or extended-capture .
- In DNS Sinkhole Settings, verify that Sinkhole is enabled and Policy Action on DNS queries is sinkhole .
- Click OK.
- Attach the Anti-Spyware profile to a Security policy rule (Policies > Security > [Rule] > Actions tab). Select 'Log at Session Start'. In Profile Setting, select your Anti-Spyware profile.
- Click OK.
-
Test that the policy action is enforced. View EDL entries and access a domain from the list. Monitor activity via ACC or Monitor > Logs > Threat filtered by
(action eq sinkhole)
This log filter displays threat log entries where the action taken was 'sinkhole'. -
Verify whether entries in the external dynamic list are ignored or skipped via CLI:
request system external-list show type domain name <list_name>Displays details about a configured external dynamic list of a specific type and name.
-
(Optional) Retrieve the external dynamic list on-demand via CLI:
request system external-list refresh type domain name <list_name>Forces the firewall to immediately download the latest version of the specified external dynamic list.
Alternatively, use the firewall interface to Retrieve an External Dynamic List from the Web Server.
Configure the Sinkhole IP Address to a Local Server on Your Network
By default, sinkholing is enabled for all Palo Alto Networks DNS signatures, and the sinkhole IP address is set to access a Palo Alto Networks server. Use the instructions in this section if you want to set the sinkhole IP address to a local server on your network.
You must obtain both an IPv4 and IPv6 address to use as the sinkhole IP addresses. The DNS sinkhole address must be in a different zone than the client hosts to ensure that when an infected host attempts to start a session with the sinkhole IP address, it will be routed through the firewall and logged. The sinkhole addresses must be reserved for this purpose and do not need to be assigned to a physical host. You can optionally use a honey-pot server as a physical host to further analyze the malicious traffic.
Example addresses used: IPv4 10.15.0.20, IPv6 fd97:3dec:4d27:e37c:5:5:5:5.
Configuration Steps Overview (PAN-OS & Panorama):
-
Configure a
dedicated Layer 3 interface and zone
for the sinkhole IP address. Traffic from client zones must route to the sinkhole zone. Select Network > Interfaces, configure Layer3 interface, add Static IPv4 and IPv6 addresses. Select Network > Zones, add Layer3 zone, add the configured interface. (Image 007 applies here)
Important Point (PCNSA/PCNSE): The custom sinkhole IP must reside in a zone different from the clients to ensure traffic is routed through the firewall and logged correctly. Both IPv4 and IPv6 sinkhole addresses must be configured.
- Modify the Anti-Spyware profile's DNS Sinkhole Settings (Objects > Security Profiles > Anti-Spyware > [Profile] > DNS Sinkhole Settings). Specify your custom Sinkhole IPv4 and Sinkhole IPv6 addresses.
- Edit Security policy rule(s) that allows traffic from client zones to include the new sinkhole zone as a destination . Attach the Anti-Spyware profile. Enable 'Log at Session Start'. Commit. This logs client traffic attempting to reach the sinkhole.
-
To confirm you can identify infected hosts, verify traffic from the client host in the Trust zone to the new Sinkhole zone is being logged. From a client host, ping the sinkhole address (it might time out if no physical host). On the firewall, select Monitor > Logs > Traffic and find the log entry (Source: Client IP, Destination: Sinkhole IP). Filter logs using
(addr.dst in 10.15.0.20)
This log filter displays traffic log entries where the destination IP address is the specified sinkhole IP. -
Test that DNS sinkholing is configured properly. Simulate an infected client attempting to call home. Find a malicious domain in the firewall's current Antivirus signature database (Device > Dynamic Updates > Antivirus > Release Notes). From the client, perform an NSLOOKUP to the malicious domain. The output should show the sinkhole IP as the resolved address.
nslookup <malicious_domain>This is a standard OS command used to query DNS servers for hostname-to-IP mappings.
-
Select Monitor > Logs > Threat and locate the corresponding threat log entry to verify the correct action (sinkhole) was taken. Perform a ping to the malicious domain (which will resolve to the sinkhole IP) and check Traffic Logs.
ping <sinkhole_ip_address>This is a standard OS command used to send ICMP packets to a destination IP to test connectivity.
See Infected Hosts that Attempted to Connect to a Malicious Domain
After you have configured DNS sinkholing and verified that traffic to a malicious domain goes to the sinkhole address, you should regularly monitor traffic to the sinkhole address, so that you can track down the infected hosts and eliminate the threat.
-
Use ACC > Threat Monitor > Spyware button. The screenshot shows three instances of Suspicious DNS queries generated when the test client host performed an NSLOOKUP on a known malicious domain. Click the graph to see more details.
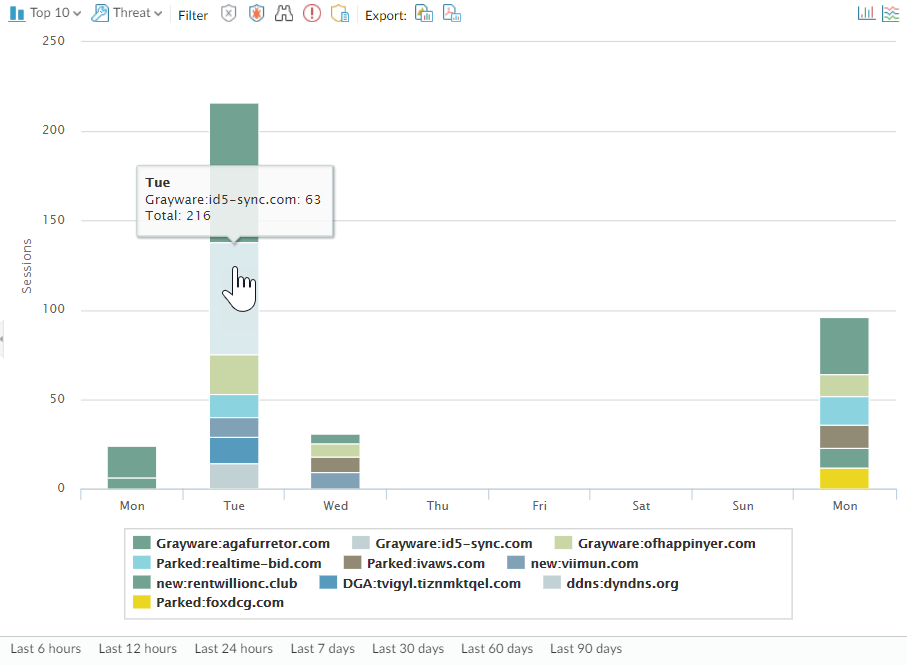
Screenshot of the ACC showing the Threat Activity widget, highlighting Suspicious DNS queries which can indicate sinkholed traffic redirected by DNS sinkholing.
-
Configure a custom report to identify all client hosts that have sent traffic to the sinkhole IP address
(Monitor > Manage Custom Reports > Add). Define a custom report based on the
Traffic Log
filtered by the sinkhole IP address as the destination (
(addr.dst in <sinkhole_ip_address>)
This log filter displays traffic log entries where the destination IP address is the specified sinkhole IP.). Include Source address or Source User in the report columns. Schedule the report (e.g., daily). Forward to SNMP, Syslog, or Panorama for alerts.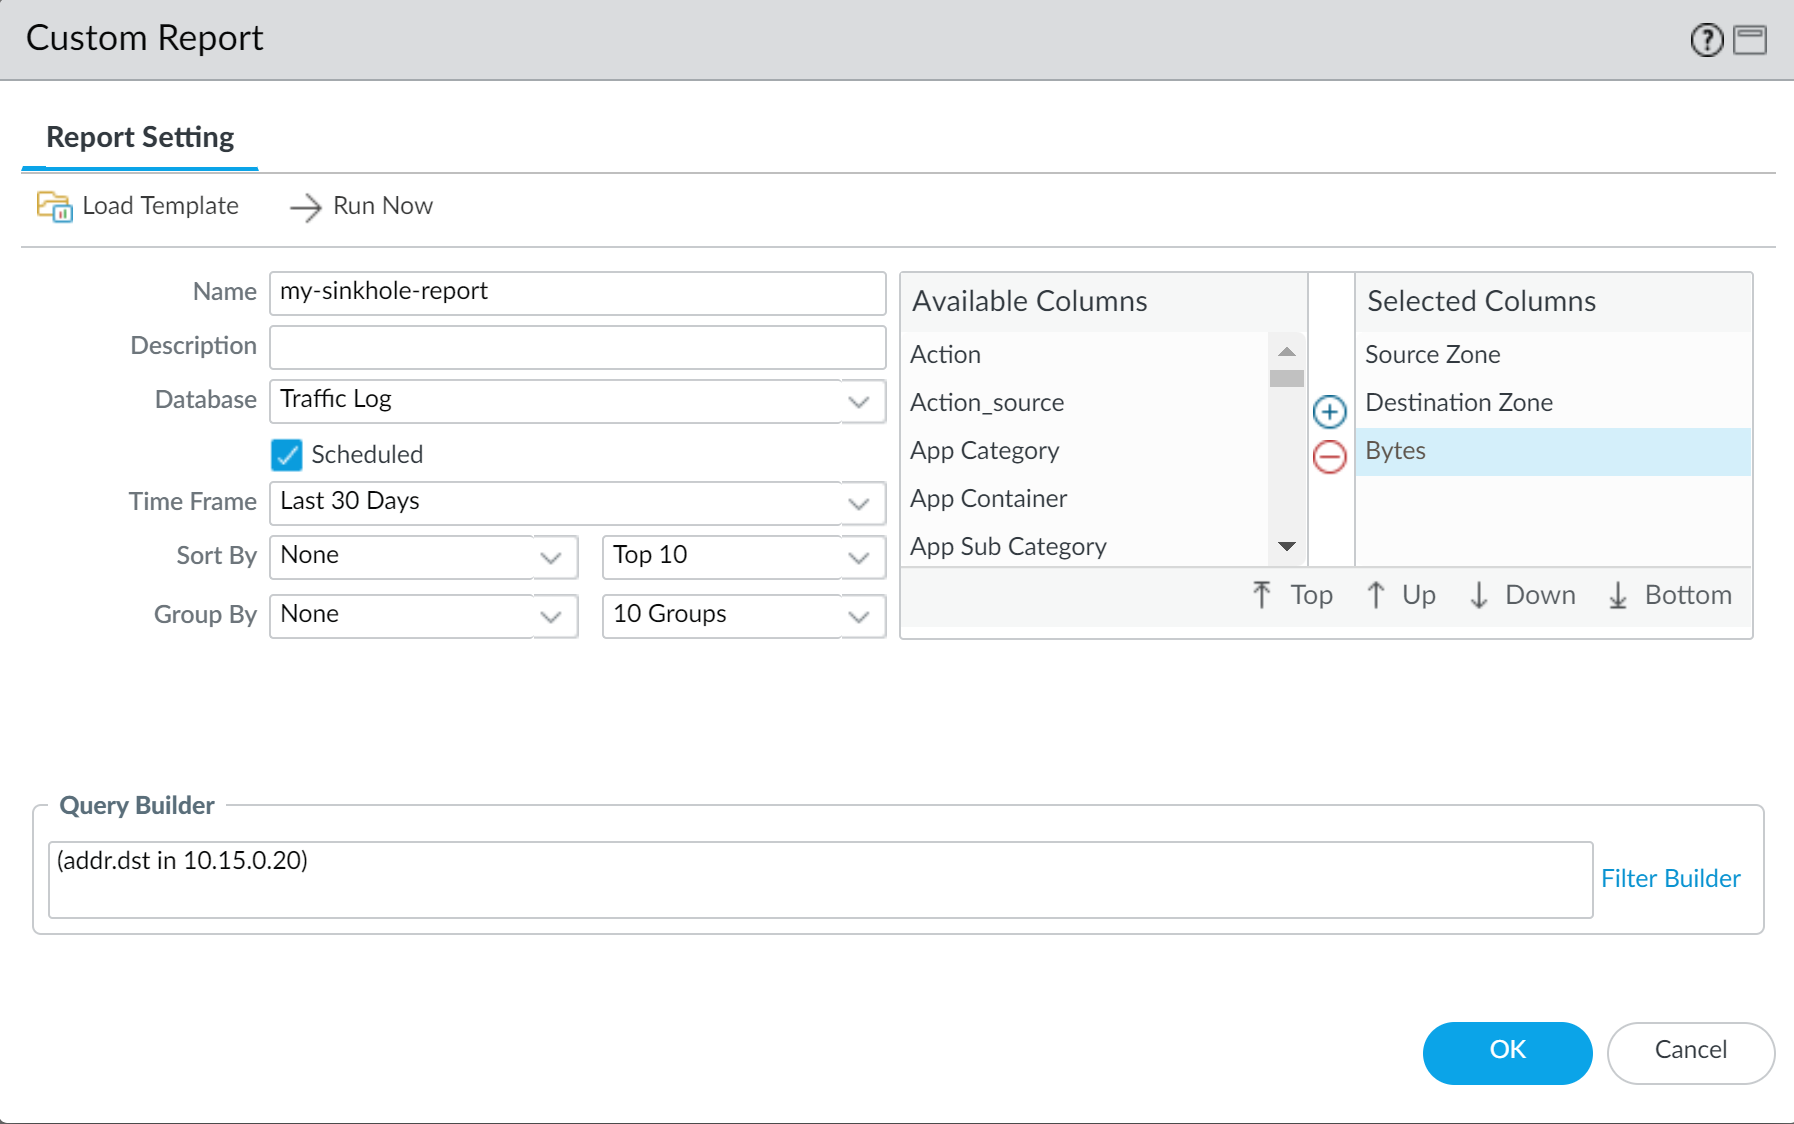
Screenshot showing the Query Builder interface for creating a custom report, filtered by destination address (sinkhole IP).
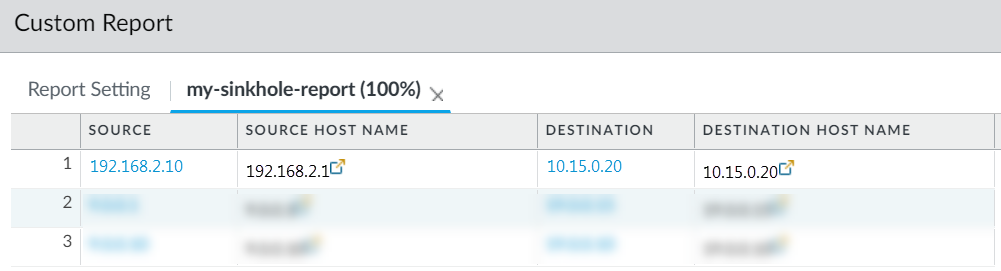
Screenshot showing an example custom report result, listing source addresses (infected hosts) that connected to the sinkhole IP.
Important Point (PCNSA/PCNSE): To identify infected hosts using DNS sinkholing logs, you must look at the *Traffic* logs with the Sinkhole IP as the destination, not the Threat logs (which might show the DNS server as the source). Custom reports help automate this.
Custom Signatures
You can create custom threat signatures to detect and block specific traffic tailored to your environment or integrate third-party intelligence (like Snort/Suricata rules). When the firewall is managed by a Panorama management server, the ThreatID is mapped to the corresponding custom threat on the firewall to enable the firewall to generate a threat log populated with the configured custom ThreatID. Learn more by visiting our guide to Custom Application and Threat Signatures.
Important Point (PCNSE): Custom signatures allow tailoring threat detection beyond the standard Palo Alto Networks content, useful for internal applications or integrating external intelligence feeds.
Monitor Advanced Threat Prevention
Palo Alto Networks provides several options to monitor activity processed by Advanced Threat Prevention.
- Strata Cloud Manager Command Center: High-level summary of network health, security, and efficiency.
-
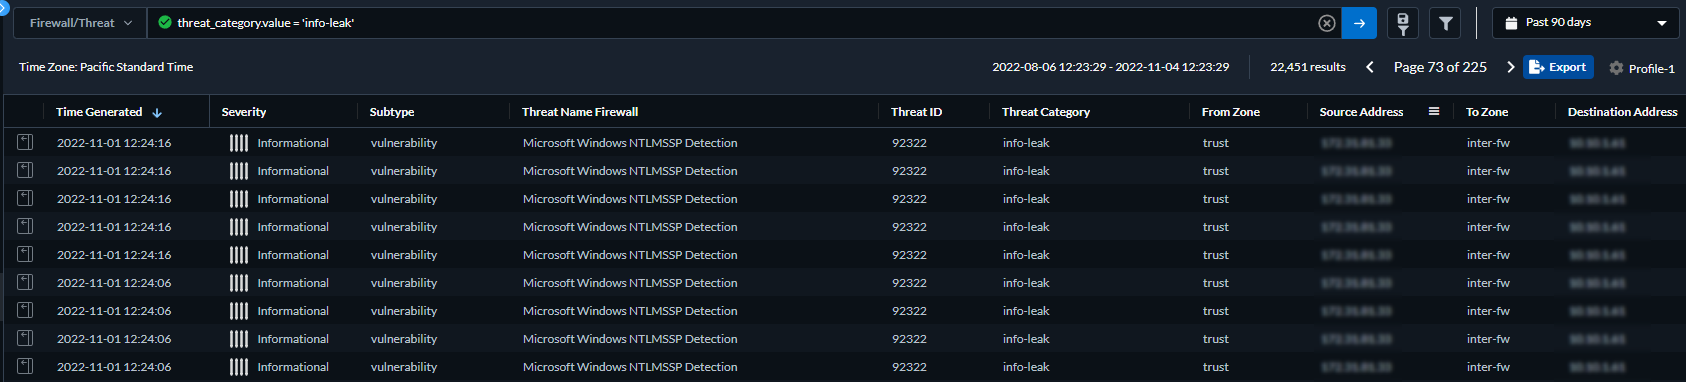
View Threat Logs:
You can browse, search, and view Advanced Threat Prevention logs that are automatically generated when a threat is detected. Typically, this includes any qualifying threat signature match that a Threat Prevention feature, including Inline ML, analyzes unless it is specifically configured with a log severity level of none. Log entries provide numerous details about the event, including the threat level and, if applicable, the nature of threat. Filter by
Threat Category
or
Subtype
(antivirus, spyware, vulnerability).
Screenshot of the Log Viewer in Strata Cloud Manager, showing Threat logs with a filter applied by subtype.
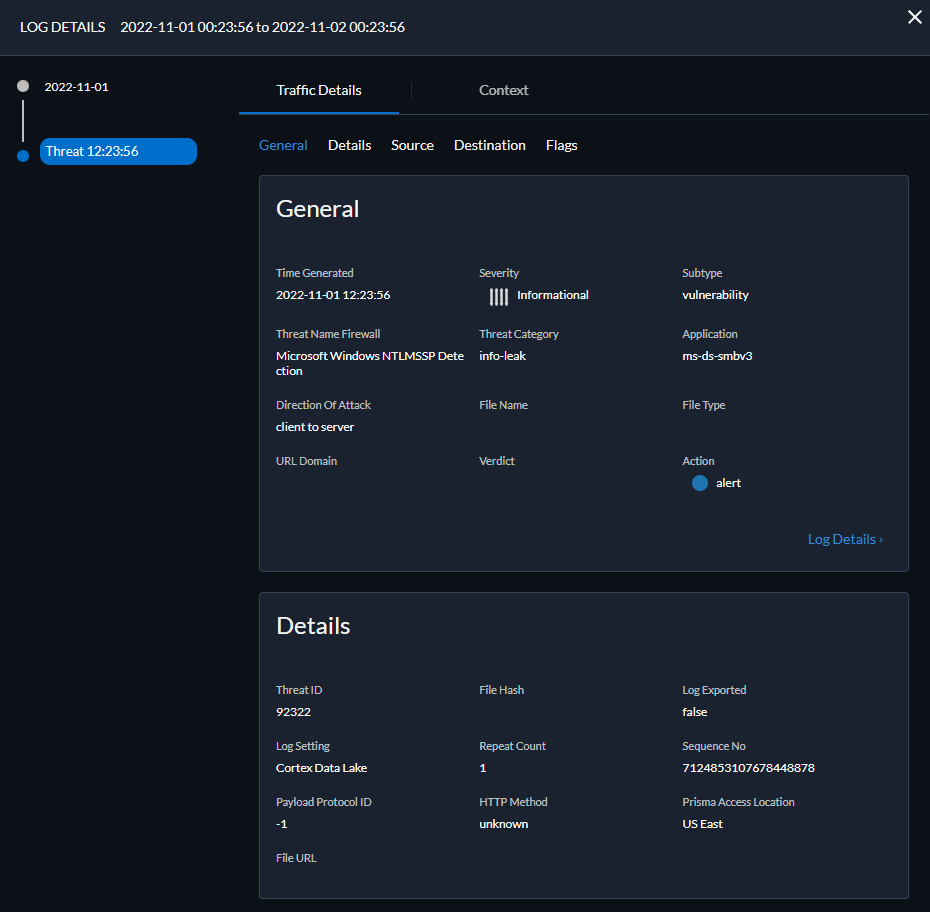
Screenshot showing the detailed view of a Threat log entry in Strata Cloud Manager, including Threat Category.
- View Advanced Threat Prevention Report: Available though the Threat Vault API (using cloud_reportid from logs). For Prisma Access in Strata Cloud Manager, it's viewable from the log viewer. Reports provide detailed analysis, MITRE ATT&CK mapping, session info, and CVE mapping. See table below for report headings.
-
Monitor Blocked IP Addresses:
The firewall maintains a block list of source IP addresses that it’s blocking when you configure Classified DoS Protection policy rules with the action to Protect or Security Policy rules that use a Vulnerability Protection profile (Monitor > Block IP List). Hardware IP address blocking is supported on PA-3200, PA-5200, PA-5450, and PA-7000 Series. You can view the block list, get detailed information (WhoIs), delete entries, disable/re-enable hardware blocking (CLI), tune hardware block duration (CLI), change IP lookup URL (CLI), and view hardware/software block counts (CLI counters).
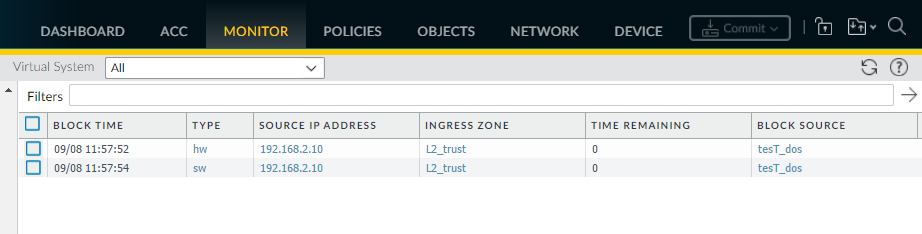
Screenshot of the Monitor > Block IP List page in PAN-OS, showing blocked IPs (marked as hw or sw) and the option to view 'Who Is' information.

This icon represents the filter function in the UI.
show counter global name flow_dos_blk_num_entriesShows the total number of entries in the hardware block table and the software block list (combined total).
show counter global name flow_dos_blk_hw_entriesShows the count of IP address entries currently blocked by hardware.
show counter global name flow_dos_blk_sw_entriesShows the count of IP address entries currently blocked by software.
set system setting hardware-acl-blocking [enable | disable]Enables or disables hardware IP address blocking for troubleshooting (default is enabled).
set system setting hardware-acl-blocking duration <seconds>Configures how long IP addresses blocked by hardware remain on the block list (default is 1 second, range 1-3600).
set deviceconfig system ip-address-lookup-url <url>Sets the URL for the 'Who Is' link used to look up details about IP addresses in logs.
show dos-block-table software filter slot <slot-number>On PA-7000 series firewalls, displays software block list information filtered by a specific slot number.
Important Point (PCNSE): Hardware blocking for DoS and Vulnerability Protection happens before CPU/packet buffer resources are consumed on supported platforms. The 'Block IP List' allows monitoring IPs blocked by these policies. Several CLI commands help monitor and tune this feature.
-
Learn More About Threat Signatures:
Use Threat ID from logs/ACC/profile exceptions to check if a signature is configured as an exception to your security policy or view latest Threat Vault information (details, resources, CVEs). Threat Vault access must be enabled (Device > Setup > Management > Logging and Reporting). Hover over Threat Name or ID to open dropdown, click Exception or View in Threat Vault.
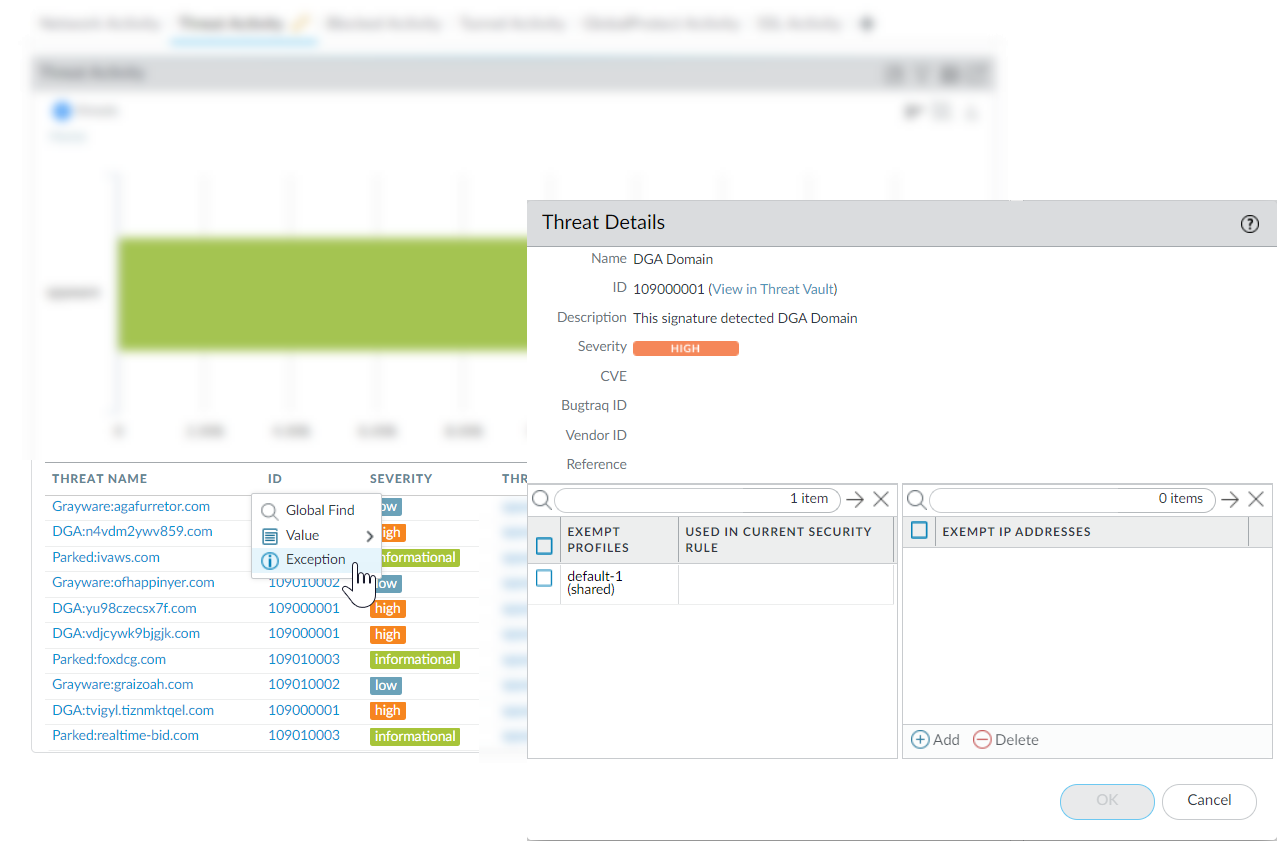
Screenshot of the ACC Threat Activity widget in PAN-OS, showing threat IDs and the option to view Exception details or Threat Vault information by hovering/clicking.
-
Create Custom Reports Based on Threat Categories:
You can create custom reports on the firewall to generate (on demand) or schedule reports based on attributes like Threat Category (Monitor > Manage Custom Reports > Add). Choose 'Threat' database (summary or detailed).
Screenshot showing the Query Builder interface for creating a custom report, filtered by Threat Category.
Important Point (PCNSA/PCNSE): Know how to view and interpret Threat logs (Monitor > Logs > Threat). Understand the significance of Threat Category, Action, and Threat ID. Threat ID links to Threat Vault for more details. Custom reports are useful for focused analysis.
Advanced Threat Prevention Report Headings
The Advanced Threat Prevention Report provides detailed analysis and detection information, as well as information about the transaction, session, and other related processes in JSON format.
| Report Heading | Description |
|---|---|
| General Information | Contains information about the firewall/security platform that processed the threat, including the cloud report ID and potential error messages. |
| PAN-OS Information | Contains detailed information about the firewall processing the threat, such as interface IPs, content version, hostname, model, serial number, and PAN-OS version. |
| Session Information | Contains session details as the traffic traversed the firewall, including Source/Destination IP/Port, Session ID, Timestamp, and Payload Type. |
| Transaction Data | The transaction data provides an overview of the payload details and contains the detection service report(s), including the Transaction ID and SHA256 hash of the payload. |
| Detection Service Results | Contains analysis results from the ATP cloud, including detection service reports, MITRE ATT&CK® classified techniques, and payload details. For Empire C2 and DNS relay detections, includes additional contextual information (Attack Description, Details, Evidences). Empire C2 detections include Evasive HTTP C2 (89950), Evasive Cobalt Strike C2 (89955, 89956, 89957), Evasive Empire C2 (89958). |
| CVE Mapping Information | Advanced Threat Prevention can associate detected vulnerabilities and map them to a CVE. Includes CVE ID, Name, Description, Category, Severity, Score (CVSS), First Published Date, and Confidence Level (3: high, 4: exact). Updates within 24 hours if CVE is available after initial detection. |
Advanced Threat Prevention Quiz
Test your knowledge!