Virtual Systems (vsys) Overview
A virtual system (vsys) is an independent (virtual) firewall instance that you can separately manage within a physical firewall. Each vsys can be an independent firewall with its own Security policy, interfaces, and administrators; a vsys enables you to segment the administration of all policies, reporting, and visibility functions that the firewall provides.
For example, if you want to customize the security features for the traffic that is associated with your Finance department, you can define a Finance vsys and then define security policies that pertain only to that department. To optimize policy administration, you can maintain separate administrator accounts for overall firewall and network functions while creating vsys administrator accounts that allow access to an individual vsys. This allows the vsys administrator in the Finance department to manage the Security policy for only that department.
Critical Point: Networking functions (such as static and dynamic routing, IP addresses of interfaces, and IPSec tunnels) pertain to an entire firewall and all of its virtual systems. A virtual system configuration ( Device > Virtual Systems ) doesn’t control firewall-level and network-level functions (such as static and dynamic routing, IP addresses of interfaces, IPSec tunnels, VLANs, virtual wires, virtual routers, GRE tunnels, DHCP, DNS Proxy, QoS, LLDP and network profiles). If you require routing segmentation for each vsys, you must create and assign additional virtual routers and assign interfaces, VLANs, and virtual wires as needed.
If you use a Panorama template to define your virtual systems, you can configure one vsys to be the default. The default vsys and Multi Virtual System Capability determine whether a firewall accepts vsys-specific configurations during a template commit:
- Firewalls that have Multi Virtual System Capability enabled accept vsys-specific configurations for any vsys that is defined in the template.
- Firewalls that don’t have Multi Virtual System Capability enabled accept vsys-specific configurations only for the default vsys. If you do not configure a default vsys, then these firewalls will not accept vsys-specific configurations.
PCNSE/PCNSA Exam Note: The PA-220 and PA-800 Series firewalls do not support multiple virtual systems. PA-3200 Series, PA-5200 Series, the PA-5450, and PA-7000 Series firewalls support multiple virtual systems. PA-3200 Series firewalls require a license for enabling multiple virtual systems.
Key Considerations Before Enabling Multi-vsys:
- A vsys administrator creates and manages all items needed for Security policy per assigned virtual system.
- Zones are objects within a vsys. Before defining a policy or policy object, select the appropriate Virtual System from the drop-down on the Policies or Objects tab.
- You can set remote logging destinations (SNMP, syslog, and email), applications, services, and profiles to be available to all virtual systems (shared) or to a single vsys.
- If you have multiple virtual systems, you can select a vsys as a User-ID hub to share the IP address-to-username mapping information between virtual systems.
- You can configure globally (to all virtual systems on a firewall) or vsys-specific service routes ( Device > Setup > Services ).
- Gotcha: You can rename a vsys only on the local firewall. On Panorama, renaming a vsys is not supported. If you rename a vsys on Panorama, the result is an entirely new vsys or the new vsys name gets mapped to the wrong vsys on the firewall.
Virtual Systems Configuration
Before defining a vsys, you must first enable the multi-vsys functionality on the firewall. Select Device > Setup > Management , edit the General Settings , select Multi Virtual System Capability , and click OK . This adds a Device > Virtual Systems page. Select the page, Add a vsys, and specify the following information:
| Virtual System Settings | Description |
|---|---|
| ID |
Enter an integer identifier for the vsys. Refer to the data sheet for your firewall model for information on the number of supported virtual systems.
If you use a Panorama template to configure the vsys, this field does not appear. |
| Name |
Enter a name (up to 31 characters) to identify the vsys. The name is case-sensitive and must be unique. Use only letters, numbers, spaces, hyphens, and underscores.
If you use a Panorama template to push vsys configurations, the vsys name in the template must match the vsys name on the firewall. |
| Allow Forwarding of Decrypted Content | Select this option to allow the virtual system to forward decrypted content to an outside service when port mirroring or sending WildFire files for analysis. |
| General Tab |
Select a
DNS Proxy
object if you want to apply DNS proxy rules to this vsys. (
Network > DNS Proxy
).
To include objects of a particular type, select that type (interface, VLAN, virtual wire, virtual router, or visible virtual system), Add an object, and select the object from the drop-down. You can add one or more objects of any type. To remove an object, select and Delete it. |
| Resource Tab |
Specify the following resource limits allowed for this vsys. Each field displays the valid range of values, which varies per firewall model. The default setting is 0, which means the limit for the vsys is the limit for the firewall model. However, the limit for a specific setting isn’t replicated for each vsys. For example, if a firewall has four virtual systems, each virtual system can’t have the total number of Decryption Rules allowed per firewall. After the total number of Decryption Rules for all of the virtual systems reaches the firewall limit, you cannot add more.
|
Share User-ID IP-to-Username Mappings Across Virtual Systems
To simplify User-ID™ source configuration when you have multiple virtual systems, configure the User-ID sources on a single virtual system to share IP address-to-username mappings and username-to-group mappings with all other virtual systems on the firewall.
Configuring a single virtual system as a User-ID hub simplifies user mapping by eliminating the need to configure the sources on multiple virtual systems, especially if traffic will pass through multiple virtual systems based on the resources the user is trying to access (for example, in an academic networking environment where a student will be accessing different departments whose traffic is managed by different virtual systems).
To map the user or group, the firewall uses the mapping table on the local virtual system and applies the policy for that user or group. If the firewall does not find the mapping for a user or group on the virtual system where that user’s traffic originated, the firewall queries the hub to fetch the IP address-to-username information or group mapping information. If the firewall locates the mapping on both the User-ID hub and the local virtual system, the firewall uses the mapping it learns locally. If the mapping on the local firewall differs from the mapping on the virtual system hub, the firewall uses the local mapping.
After you configure the User-ID hub, the virtual system can use the mapping table on the User-ID hub when it needs to identify a user for user-based policy enforcement or to display the username in a log or report but the source is not available locally. When you select a hub, the firewall retains the mappings on other virtual systems so we recommend consolidating the User-ID sources on the hub. However, if you don’t want to share mappings from a specific source, you can configure an individual virtual system to perform user or group mapping.
Configuration Steps:
-
Assign the virtual system as a User-ID hub.
- Select Device > Virtual Systems and then select the virtual system where you consolidated your User-ID sources.
- On the Resource tab, Make this vsys a User-ID data hub and click Yes to confirm. Then click OK .
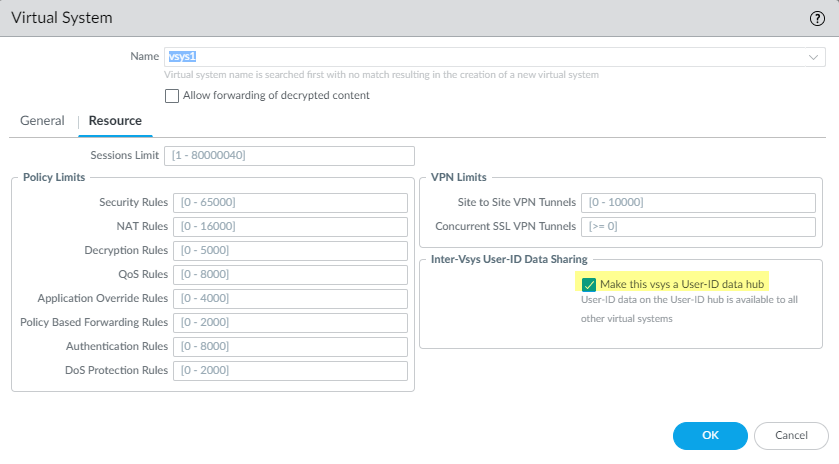 Enabling a Virtual System as a User-ID Data Hub
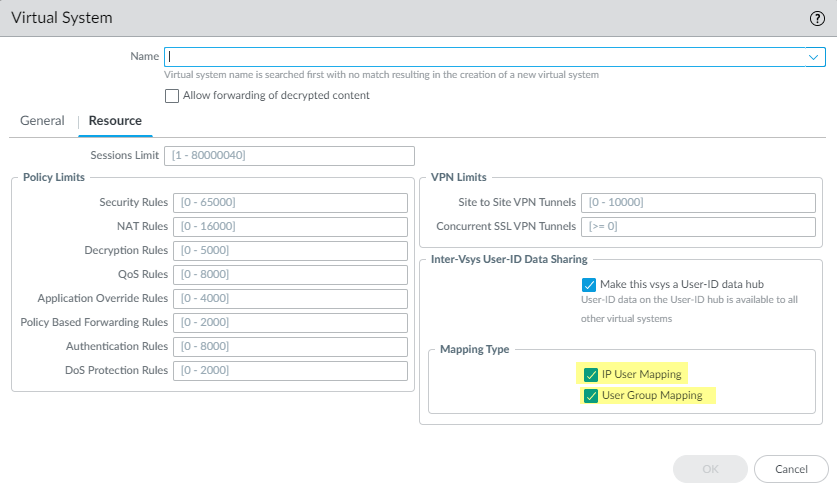
- Click Yes to confirm.
 Confirmation prompt for making a vsys a User-ID hub.
-
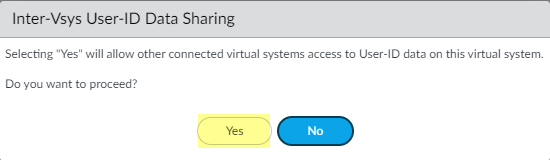
Select the
Mapping Type
that you want to share then click
OK
.
- IP User Mapping —Share IP address-to-username mapping information with other virtual systems.
- User Group Mapping —Share group mapping information with other virtual systems.
You must select at least one mapping type.
 Selecting the User-ID mapping types to share from the hub.
-
Consolidate your User-ID sources and migrate them to the virtual system that you want to use as a User-ID hub.
This consolidates the User-ID configuration for operational simplicity. By configuring the hub to monitor servers and connect to agents that were previously monitored by other virtual systems, the hub collects the user mapping information instead of having each virtual system collect it independently. If you don’t want to share mappings from specific virtual systems, configure those mappings on a virtual system that will not be used as the hub.
Use the same format for the Primary Username across virtual systems and firewalls.
- Remove any sources that are unnecessary or outdated.
- Identify all configurations for your Windows-based or integrated agents and any sources that send user mappings using the XML API and copy them to the virtual system you want to use as a User-ID hub.
Gotcha: IP address-and-port-to-username mapping information from Terminal Server agents are not shared between the User-ID hub and the connected virtual systems.
- Specify the subnetworks that User-ID should include in or exclude from mapping.
- Define the Ignore User List .
- On all other virtual systems, remove any sources that are on the User-ID hub.
- Commit the changes to enable the User-ID hub and begin collecting mappings for the consolidated sources.
-
Confirm the User-ID hub is mapping the users and groups.
- Use the show user ip-user-mapping all command to show the IP address-to-username mappings and which virtual system provides the mappings.
- Use the show user user-id-agent statistics command to show which virtual system is serving as the User-ID hub.
-
Confirm the hub is sharing the group mappings by using the following CLI commands:
- show user group-mapping statistics
- show user group-mapping state all
- show user group list
-
show user group name
Diagram: User-ID Hub Mapping Flow
graph TD
    A[User Traffic] --> B(Virtual System X);
    B --> C{Lookup Local Map};
    C -- Found --> D(Apply Policy);
    C -- Not Found --> E(Query User-ID Hub);
    E --> F[User-ID Hub Map];
    F -- Mapping Found --> G(Apply Policy with Hub Data);
    F -- No Mapping --> H(Default Policy);
    D --> I(Logs/Reporting);
    G --> I;
    H --> I;
    subgraph Firewall
        B; C; E;
        subgraph User-ID Hub VSYS
            F;
        end
    end
Flowchart illustrating how a virtual system uses its local User-ID map and queries the hub if needed.
Share User-ID Group Mappings Across Virtual Systems
To simplify group-based policy configuration and enforcement, you can now share group mappings across virtual systems. When you configure a virtual system as a hub, other virtual systems can refer to the hub for mappings when they need to identify groups instead of each virtual system collecting the information independently.
If the same group mapping on the local firewall differs from the group mapping on the virtual system hub, the firewall uses the local mapping.
Use the same format for the Primary Username across virtual systems and firewalls.
Configuration Steps:
- Assign the virtual system as a User-ID hub.
- Confirm User Group Mapping as the Mapping Type that you want to share then click OK .
You must select at least one mapping type.
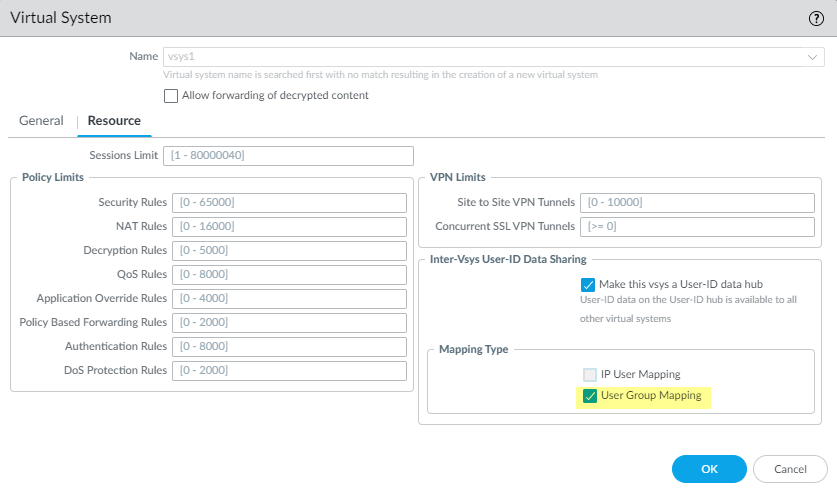 Selecting 'User Group Mapping' when configuring the User-ID hub.
- Follow the best practices to consolidate your User-ID sources on the hub and then remove the duplicate sources from the existing virtual systems.
- Commit your changes to enable the User-ID hub and begin collecting mappings for the consolidated sources.
Gotcha: If the group mapping on a firewall differs from the group mapping on the hub, the group mapping on the firewall overrides the group mapping on the hub.
-
Confirm the User-ID hub is mapping the groups by entering the following commands:
- show user group-mapping statistics
- show user group-mapping state all
- show user group list
-
show user group name
Interactive Quiz: Virtual Systems and User-ID Sharing
Test your knowledge on Palo Alto Networks Virtual Systems and User-ID Sharing concepts.