Overview: Admin Roles & Accounts
This guide covers the configuration and management of administrative access on Palo Alto Networks firewalls using Admin Role Profiles and Administrator Accounts.
Understanding and correctly configuring administrative access is crucial for maintaining the security and integrity of your firewall and network. The principle of least privilege should always be applied.
Key concepts covered include:
- Defining granular permissions using Admin Role Profiles .
- Creating individual Administrator Accounts .
- Configuring various Authentication Methods (Local, External, Certificate, SSH).
- Managing API Key Lifecycles .
- Tracking Administrator Activity .
Proper configuration of admin roles and authentication is a core topic for both PCNSA and PCNSE exams.
Admin Roles: Introduction
Admin Role profiles enable you to define granular administrative access privileges to ensure protection for sensitive company information and privacy for end users.
Follow the principle of least privilege access to create Admin Role profiles that enable administrators to access only the areas of the management interface that they need to access to perform their jobs.
Refer to the Administrative Access Best Practices for comprehensive guidance.
Admin Role profiles determine the specific areas (tabs, functions) within the Web UI, CLI, XML API, and REST API that an administrator can access, and whether that access is read-write, read-only, or disabled.
Scope: Device vs. Virtual System
When creating an Admin Role Profile, you must define its scope:
- Device Scope: Applies permissions across the entire firewall device. This is necessary for managing global settings like network interfaces, virtual routers, and system settings.
- Virtual System (VSYS) Scope: Applies permissions only within the context of one or more specific virtual systems. Administrators with VSYS scope cannot manage device-level settings.
If an Admin Role Profile is scoped to Virtual System , the administrator assigned that role will not have control over virtual routers. Virtual router configuration is a device-level function. To grant virtual router access, the role must be scoped to Device .
Understanding the difference between Device and Virtual System scope for Admin Roles is essential for the exams.
Admin Roles: Configuration Steps
Follow these steps to configure an Admin Role Profile in the Web UI:
- Navigate to Device > Admin Roles and click Add .
- Enter a descriptive Name to identify the role (e.g., `SOC-Manager-ReadOnly`, `Network-Admin-Full`).
- Select the scope of the Role: Device or Virtual System .
-
Configure permissions across the different interfaces:
- Web UI Tab: Click the icons for each functional area (Dashboard, Monitor, Policies, Objects, Network, Device) to toggle permissions: Enable (Read/Write), Read Only , or Disable .
- XML API Tab: Select Enable or Disable for different API command categories.
- Command Line Tab: Choose the appropriate CLI access level based on the role scope (see next section).
- REST API Tab: Similar to Web UI, toggle permissions for various API endpoints.
- Click OK to save the profile.
- Assign the newly created role to an administrator account (covered in the 'Admin Accounts & Auth' section). See Creating Accounts .
Always verify permissions after configuration to ensure they align with the principle of least privilege.
Know the location (Device > Admin Roles) and the main configuration tabs (Web UI, XML API, Command Line, REST API) for creating Admin Role Profiles.
Admin Roles: Permissions (UI/CLI/API)
Permissions can be finely tuned across different management interfaces within the Admin Role profile.
Web UI & REST API Permissions
These tabs offer granular control over specific sections of the management interface. You can enable (read/write), disable, or set read-only access for major tabs (Monitor, Policies, Objects, Network, Device) and their sub-sections.
Carefully consider each permission. Granting write access unnecessarily increases risk.
XML API Permissions
This tab allows enabling or disabling access to different categories of XML API commands (Configuration, Operational Requests, User-ID Agent).
Command Line (CLI) Permissions
The available CLI roles depend on the selected scope (Device or Virtual System):
Device Scope CLI Roles:
- None: CLI access not permitted (default).
- superuser: Full access, including defining new administrators and virtual systems. Only a superuser can create other superusers. Use with extreme caution.
- superreader: Full read-only access to everything.
- deviceadmin: Full access to device settings *except* creating new admins or virtual systems.
- devicereader: Read-only access to most device settings (excludes password profiles, limited admin account visibility).
Virtual System Scope CLI Roles:
- None: Access not permitted (default).
- vsysadmin: Access to manage specific aspects within assigned virtual systems. Cannot manage device-level or network-level functions (routing, interfaces, tunnels, QoS, etc.).
- vsysreader: Read-only access within assigned virtual systems, with the same limitations as vsysadmin regarding device/network functions.
Be familiar with the different CLI roles (superuser, superreader, deviceadmin, devicereader, vsysadmin, vsysreader) and their capabilities, especially the limitations of vsys roles regarding network configuration.
Admin Roles Example: SOC Manager
This example illustrates creating an Admin Role profile for a Security Operations Center (SOC) manager whose primary role is investigation, requiring broad read-only access but minimal write access.
This demonstrates applying the principle of least privilege.
Scenario: SOC Manager Profile
Objective: Grant access necessary for investigation without allowing configuration changes.
Role Scope: Device (to allow viewing network-level config if needed for context, though specific permissions are limited)
Web UI Permissions:
- Dashboard, ACC, Monitor Logs: Enable (These are inherently read-only informational tabs).
- Monitor Reports (PDF, Custom, Predefined): Read-Only for PDF Reports, Enable for Custom Reports (allows creation/management for specific investigations), Enable for Predefined Reports.
- Policies: Read-Only (Allows viewing rules for context). Rule Hit Count Reset: Disable.
- Objects: Read-Only for relevant objects (Addresses, Services, etc.). Disable for items outside SOC scope (e.g., URL Filtering, SD-WAN in this example).
- Network: Read-Only for relevant items (Interfaces, Zones, Virtual Routers for context). Disable for items outside SOC scope (QoS, LLDP, etc.).
- Device: Disable (No device configuration needed for SOC investigation).
- Commit Actions: Disable.
XML API Permissions: Disable (Not used by SOC Manager).
Command Line Permissions: devicereader (Provides necessary read-only access without exposing sensitive admin/password info accessible to superreader).
REST API Permissions: Disable (Not used by SOC Manager).
This example highlights how to tailor access precisely to job functions. Create distinct profiles for different administrative groups (e.g., Network Admins, Security Policy Admins, Auditors).
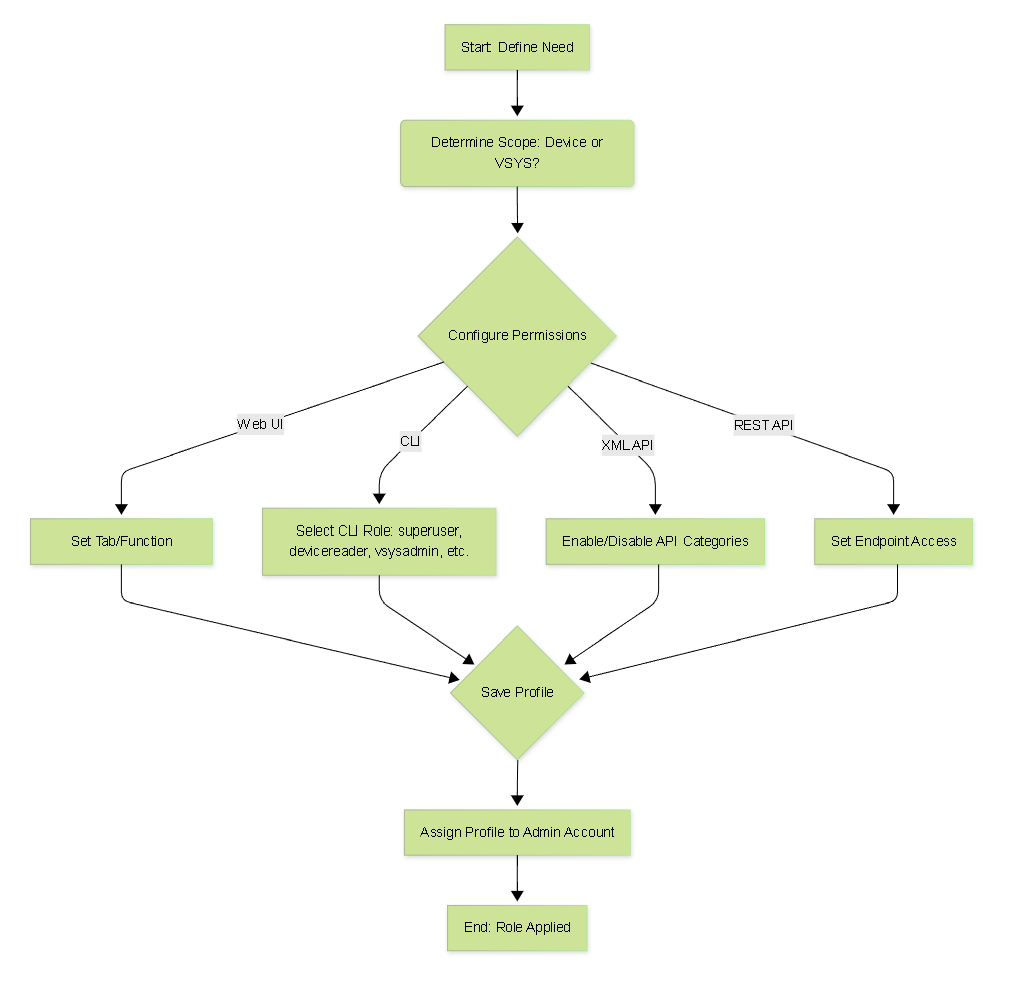
Basic flowchart for configuring an Admin Role Profile.
Relationship: Account, Role, Permissions
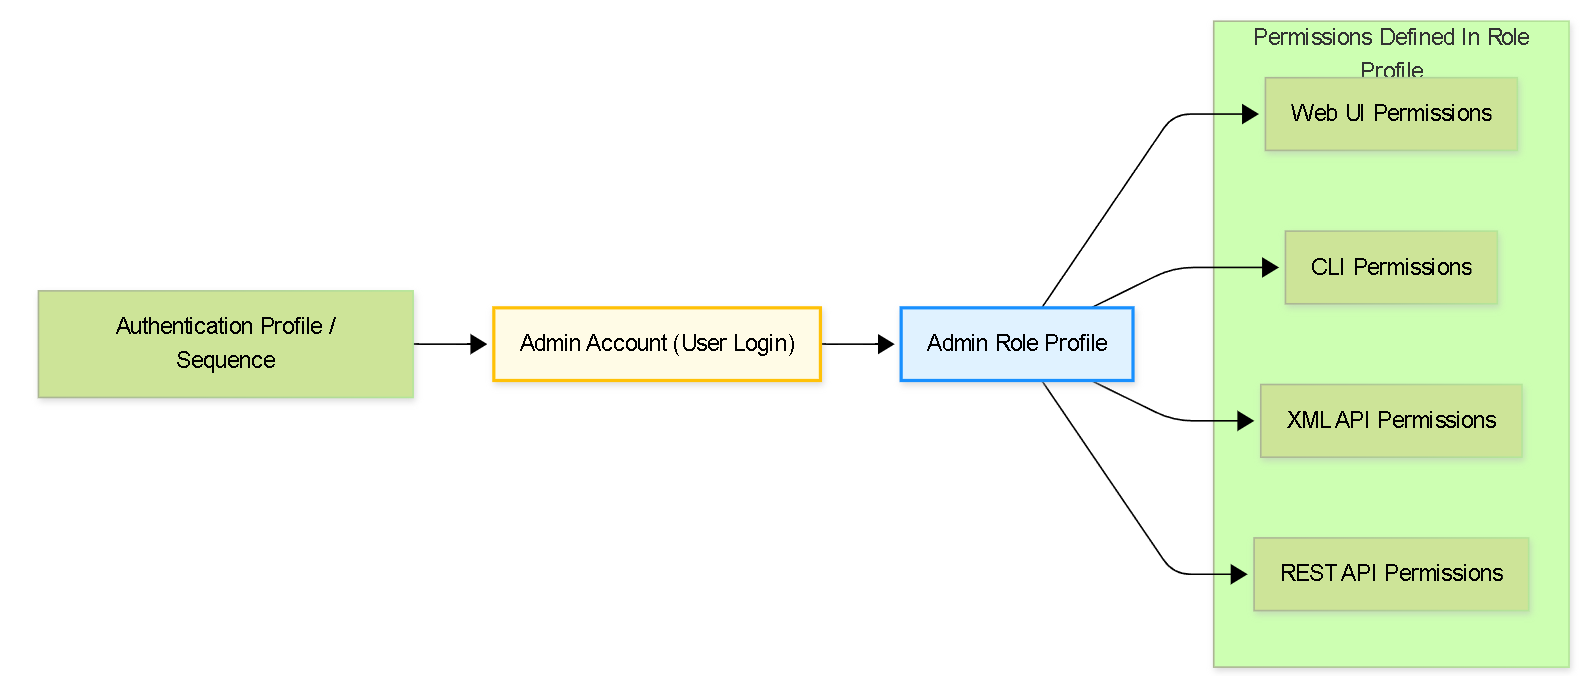
Illustrates how an Admin Account is linked to an Admin Role Profile (which defines permissions) and an Authentication Profile (which defines how the login occurs).
Admin Accounts: Creating Accounts
Administrative accounts specify the roles (defining permissions via Admin Role Profiles) and authentication methods for firewall administrators.
Creating a separate administrative account for each person who needs access is a security best practice. This allows for:
- Applying the principle of least privilege accurately.
- Clear auditing and logging of individual administrator actions.
- Easier revocation of access for specific individuals.
Do not use shared administrator accounts.
Steps to Create an Administrator Account (Web UI):
- Navigate to Device > Administrators and click Add .
-
Enter a unique user
Name
for the administrator.
- If using external authentication (like RADIUS/LDAP), this name often needs to match the username on the external server.
- Select an Authentication Profile (or sequence) if using external or local database authentication. Choose None if using local authentication without a database (password set directly on this account). See Auth Profiles & Sequences for details.
- If Authentication Profile is None , enter and confirm a strong Password .
-
Select the
Administrator Type
:
- Dynamic: Assigns a built-in role ( Superuser , Superreader , Device Administrator , Device Reader , Virtual System Administrator ). If VSYS admin, select the specific VSYS(s).
- Role Based: Allows you to select a custom Admin Role Profile you created previously. This is the recommended method for applying least privilege.
- (Optional) Select a Password Profile if using local authentication without a database to enforce password complexity/expiration (overrides global settings for this user).
- (Optional, for Certificate Auth) Select Use only client certificate authentication . See Certificate Auth .
- (Optional, for SSH Auth) Select Use Public Key Authentication (SSH) and import the public key. See SSH Key Auth .
- Click OK .
- Commit the changes.
Know the location (Device > Administrators) and the key fields: Name, Authentication Profile, Administrator Type (Dynamic vs. Role Based), and Password Profile.
Managing Concurrent Sessions
You can limit the number of concurrent administrative sessions allowed on the firewall:
- Go to Device > Setup > Management .
- Edit the Authentication Settings section.
- Set the Max Session Count (0 for unlimited, 1-4 for specific limits).
- Set the Max Session Time (idle timeout in minutes).
- Click OK and Commit .
This can also be configured via CLI:
     admin> configure


     admin# set deviceconfig setting management admin-session max-session-count <0-4>


     admin# set deviceconfig setting management admin-session max-session-time <0, 60-1499>


     admin# commit
Admin Accounts: Authentication Overview
Palo Alto Networks firewalls support several methods for authenticating administrators and authorizing their access levels (assigning roles).
The key distinction is where the authentication (verifying identity) and authorization (granting permissions) occur:
| Authentication Method | Authorization Method | Description |
|---|---|---|
| Local | Local | Account credentials (password or hash) and role assignments are managed directly on the firewall. Can use a local user database or define passwords per admin account. Simple, but less scalable and lacks central management. |
| SSH Keys | Local | Accounts defined locally, role assignment local, but CLI authentication uses SSH keys instead of passwords. More secure than passwords for CLI. |
| Certificates | Local | Accounts defined locally, role assignment local, but Web UI authentication uses client certificates. Disables password login for *all* admins. Highly secure. |
| External service (e.g., RADIUS, LDAP, Kerberos, SAML, MFA Vendor) | Local | Authentication is performed by an external server. Admin accounts still need to be defined locally on the firewall (often matching external username) to assign the Admin Role Profile (authorization). Common approach balancing central auth with local role control. |
| External service (SAML, TACACS+, RADIUS) | External service | Both authentication and authorization are handled by the external server. The server sends attributes (VSAs for RADIUS/TACACS+, SAML attributes) back to the firewall, which maps them to locally defined Roles, Access Domains, etc. Most centralized approach, requires careful attribute configuration on the server. This method supports dynamic role assignment based on external group membership. |
Choosing the right authentication and authorization strategy depends on your organization's size, security requirements, and existing infrastructure (like Active Directory or RADIUS servers).
Admin Accounts: Authentication Profiles & Sequences
Authentication Profiles are essential components that link an authentication method (like RADIUS, LDAP, SAML, Kerberos, MFA, Local DB, or None) to specific server details and user/group allowances.
Authentication Sequences allow you to chain multiple Authentication Profiles together. The firewall attempts authentication against each profile in the sequence order until one succeeds.
Configuring an Authentication Profile:
- (Required for External Auth) Configure the relevant Server Profile first (e.g., RADIUS Server Profile, LDAP Server Profile). Go to Device > Server Profiles .
- Navigate to Device > Authentication Profile and click Add .
- Enter a descriptive Name .
- Select the authentication Type (RADIUS, LDAP, Kerberos, SAML, Local Database, MFA Vendor, etc.).
-
If applicable, select the corresponding
Server Profile
created in step 1.
-
For LDAP, specify the
Login Attribute
(e.g.,
sAMAccountNamefor Active Directory).
-
For LDAP, specify the
Login Attribute
(e.g.,
- (Optional) Configure Kerberos Single Sign-On (SSO) settings if using Kerberos.
- (Optional, for MFA) Configure additional factors on the Factors tab.
- On the Advanced tab, specify the Allow List of users and/or groups permitted to authenticate using this profile. Selecting `all` is possible but generally discouraged; explicitly list allowed groups/users.
-
(Optional) Configure a
Username Modifier
if the username format needs adjustment before being sent to the authentication server (e.g., adding/removing domain prefixes/suffixes). Common formats:
-
%USERINPUT%(Default - sends as received) -
%USERDOMAIN%\%USERINPUT%(Prepends domain) -
%USERINPUT%@%USERDOMAIN%(Appends domain) -
None(Attempts to intelligently handle domain stripping/formatting, especially for LDAP/Kerberos/RADIUS)
-
- Click OK .
The Allow List on the Authentication Profile is critical. If left empty, *no one* can authenticate using that profile, even if everything else is correct.
Configuring an Authentication Sequence:
- Navigate to Device > Authentication Sequence and click Add .
- Enter a descriptive Name .
- Add the desired Authentication Profiles from the Available list to the sequence list.
- Order the profiles using Move Up/Move Down . The firewall tries them in this order.
- (Optional) Check Use domain from username to select profile if you want the firewall to try matching the domain provided at login (e.g., `domain\user` or `user@domain`) directly to a profile's User Domain/Kerberos Realm, bypassing the sequence order if a match is found.
- Click OK .
- Commit the changes.
Understand the purpose of Authentication Profiles (defining *how* to authenticate for a specific method) and Sequences (defining the *order* in which to try different methods).

Flowchart illustrating how Authentication Sequences work.
Admin Accounts: Local Authentication
Local Authentication uses the firewall itself to store credentials and authenticate administrators. It can be done in two main ways:
-
Without a Local Database:
- Password is set directly on the Administrator Account object ( Device > Administrators ).
- The Authentication Profile assigned to the admin account is set to None .
- Simple for very few users, but passwords managed individually.
- Can optionally use Password Profiles ( Device > Password Profiles ) assigned to the admin account to enforce specific password expiration policies for that user, overriding global settings.
-
With a Local User Database:
- User accounts and (optionally) groups are created under Device > Local User Database . Passwords (or password hashes) are stored here.
- An Authentication Profile with Type = Local Database must be created.
- This Authentication Profile is then assigned to the Administrator Account object ( Device > Administrators ). The username on the Admin Account *must match* the username in the Local User Database.
- Allows grouping users and potentially using password hashes, but still managed locally on the firewall.
- Password complexity/expiration is typically managed globally ( Device > Setup > Management > Minimum Password Complexity ) unless overridden by Password Profiles (which don't apply if using password hashes in the local DB).
Password Complexity Settings
Global password complexity and expiration settings for local accounts (not using external auth or hashes in local DB) are configured under Device > Setup > Management > Minimum Password Complexity .
These global settings can be overridden on a per-user basis (for users *not* in the local DB with hashes) by creating a Password Profile ( Device > Password Profiles ) and assigning it to the specific Administrator Account.
Enforce strong password complexity requirements for all local accounts.
Distinguish between local auth with and without the database, and understand where passwords and policies (complexity/expiration) are configured for each.
Admin Accounts: External Authentication
External Authentication leverages central servers like RADIUS, TACACS+, LDAP, Kerberos, SAML, or MFA providers to validate administrator credentials.
General Workflow (Authorization Local):
- Configure Server Profile: Define connection details for the external server ( Device > Server Profiles > [Type] ). This includes IP/hostname, port, shared secrets/bindings, timeouts, etc.
- Configure Authentication Profile: Create an Authentication Profile ( Device > Authentication Profile ), select the appropriate Type , link it to the Server Profile, and define the Allow List .
- Configure Administrator Account: Create the admin account ( Device > Administrators ), assign the Authentication Profile, and assign the desired Administrator Type (usually Role Based with a custom Admin Role Profile). The username here often needs to match the external server's username.
- Commit changes.
In this model, the external server verifies identity, but the firewall determines permissions based on the assigned Admin Role Profile.
External Authorization (SAML, TACACS+, RADIUS):
For SAML, TACACS+, and RADIUS, the external server can also send back authorization attributes.
- SAML: The Identity Provider (IdP) sends SAML attributes in the assertion.
- TACACS+/RADIUS: The server sends Vendor-Specific Attributes (VSAs). Palo Alto Networks defines specific VSAs for roles, access domains, etc.
Workflow:
- Configure Server Profile and Authentication Profile as above.
- Configure the external server (SAML IdP, TACACS+/RADIUS server) to send the correct attributes/VSAs upon successful user authentication. These attributes typically contain the desired Admin Role Profile name and potentially an Access Domain name defined on the firewall.
- Configure the global Authentication Settings ( Device > Setup > Management ) to use the Authentication Profile for administrative authentication. You typically *do not* create individual admin accounts on the firewall in this model, as the role is determined dynamically from the server attributes.
- Ensure Admin Role Profiles (and Access Domains, if used) mentioned in the server attributes exist on the firewall.
- Commit changes.
Understand the difference between using external auth just for authentication versus using it for both authentication and authorization (dynamic role assignment via attributes/VSAs).
When using external authorization, ensure the attribute values sent by the server exactly match the names of the Admin Role Profiles and Access Domains configured on the firewall. Case sensitivity matters!
Admin Accounts: Certificate-Based Authentication
Certificate-based authentication provides a highly secure method for accessing the firewall's web interface, eliminating the need for passwords for administrators using it.
Enabling certificate-based authentication for *any* administrator disables username/password logins for *all* administrators on the firewall web interface. Ensure all required administrators have certificates before enabling.
Configuration Steps:
-
Obtain/Generate CA Certificate:
You need a Certificate Authority (CA) certificate that the firewall trusts. Either:
- Generate a self-signed root CA on the firewall ( Device > Certificate Management > Certificates > Generate ).
- Import an existing enterprise or third-party CA certificate ( Device > Certificate Management > Certificates > Import ).
-
Create Certificate Profile:
Go to
Device > Certificate Management > Certificate Profile
and click
Add
.
- Give it a Name (e.g., `Admin-Cert-Profile`).
- Set Username Field to Subject (typically uses the Common Name field of the client cert as the username). Other options like `Subject-Alt` might be used in specific scenarios.
- Add the CA certificate from step 1 to the CA Certificates list.
- Click OK .
-
Enable Certificate Authentication Globally:
Go to
Device > Setup > Management
, edit
Authentication Settings
.
- Select the Certificate Profile you just created.
- Click OK .
-
Configure Administrator Accounts:
For each administrator who will use certificate auth:
- Go to Device > Administrators and Add/Edit the account.
- The Name must match the value extracted by the Certificate Profile (usually the Common Name from the certificate's Subject field).
- Check the box Use only client certificate authentication .
- Assign the appropriate Administrator Type (Role Based or Dynamic).
- Click OK .
-
Issue Client Certificates:
Each administrator needs a client certificate signed by the CA configured in the Certificate Profile.
- Generate these on the firewall ( Device > Certificate Management > Certificates > Generate , selecting the CA in 'Signed By'), or
- Obtain them from your enterprise CA.
- Ensure the field used for the username (e.g., Common Name) matches the Administrator Account name on the firewall.
- Export/Import Client Certificates: Export the client certificate (including the private key, usually as a .p12 file) from where it was generated and import it into the administrator's web browser certificate store.
- Commit changes. Commit will likely restart the web service, terminating your current session. You will need the certificate installed in your browser to log back in.
- Verify Access: Administrators should now be prompted by their browser to select their client certificate when accessing the firewall web UI and should gain access without a password prompt.
Know the key components: CA Certificate, Certificate Profile (linking CA and defining username field), global Authentication Settings (enabling the profile), and the per-administrator setting (`Use only client certificate authentication`).
Admin Accounts: SSH Key-Based Authentication
SSH key-based authentication provides a more secure alternative to passwords for administrators accessing the firewall CLI via SSH.
It relies on asymmetric key pairs (public and private keys).
Configuration Steps:
-
Generate SSH Key Pair:
On the administrator's client machine, use an SSH key generation tool (like `ssh-keygen` on Linux/macOS or PuTTYgen on Windows) to create an RSA key pair (public and private key files).
- Supported format: IETF SECSH, OpenSSH.
- Supported algorithm: RSA (768-4096 bits).
- Optionally, protect the private key with a passphrase for two-factor authentication.
-
Configure Administrator Account:
Go to
Device > Administrators
and Add/Edit the account.
- Configure a fallback authentication method (assign an Authentication Profile or set a Password if profile is None).
- Check the box Use Public Key Authentication (SSH) .
- Click Import Key .
- Browse to and select the public key file generated in step 1.
- Click OK on the import window, then OK on the administrator window.
- Commit the changes.
- Configure SSH Client: Configure the administrator's SSH client (e.g., PuTTY, OpenSSH client) to use the corresponding private key file for authentication when connecting to the firewall's management IP address. Refer to your SSH client documentation for specific steps.
-
Verify Access:
- Attempt to SSH into the firewall using the configured administrator username.
- The firewall should indicate it's authenticating with the public key.
- If a passphrase was set on the private key, the client will prompt for it.
- Access should be granted without prompting for the account password.
Ensure the private key file on the client machine is kept secure and has appropriate file permissions (readable only by the user).
Understand the process: generate keys on client, import public key to firewall admin account, configure client to use private key.
Management & Monitoring: API Key Management
API keys allow programmatic access to the firewall or Panorama via the XML API and REST API for automation and integration purposes.
Because API keys grant significant access, managing their lifecycle is crucial for security.
Configuring API Key Lifetime:
By default, API keys never expire. It is a security best practice to enforce a lifetime, forcing regular key rotation.
- Navigate to Device > Setup > Management .
- Edit the Authentication Settings section.
-
Specify the
API Key Lifetime (min)
.
- Enter a value between 1 and 525,600 minutes (1 year).
- Setting it to 0 (the default) means keys never expire (Not Recommended!) .
- Click OK .
- Commit the changes.
Once a lifetime is set, newly generated API keys will expire after that duration. Existing keys are not affected until regenerated.
Know where to configure the API Key Lifetime and understand the security implications of setting a finite lifetime versus the default (0).
Revoking API Keys:
In case of a suspected compromise or as part of a regular security procedure, you can immediately invalidate *all* currently valid API keys.
- Navigate to Device > Setup > Management .
- Edit the Authentication Settings section.
- Click the Expire all API Keys button.
- Confirm the action when prompted.
- Click OK .
- Commit the changes (though the expiration takes effect immediately after confirmation).
Expiring all keys will break any automation or integration relying on those keys until new keys are generated and updated in the respective systems.
Management & Monitoring: Admin Activity Tracking
Tracking administrator activity provides an audit trail for security monitoring and troubleshooting.
You can configure the firewall to send detailed logs to a syslog server whenever administrators perform specific actions.
These audit logs are *only* sent to a configured syslog server. They are not stored locally on the firewall and cannot be viewed directly in the firewall's Monitor > Logs section or forwarded to Strata Logging Service.
Configuration Steps:
- Configure Syslog Server Profile: Ensure you have a Syslog Server Profile configured ( Device > Server Profiles > Syslog ) pointing to the server where you want to collect these audit logs.
- Enable Activity Logging: Navigate to Device > Setup > Management .
- Edit the Logging and Reporting Settings section.
- Select the Log Export and Reporting tab.
-
In the
Log Admin Activity
section:
- Check Operational Commands to log executed CLI operational/debug commands (and equivalent actions triggered from Web UI).
- Check UI Actions to log navigation events within the Web UI (e.g., clicking between tabs or objects). This can generate a high volume of logs.
- Select the target Syslog Server profile configured in step 1.
- Click OK .
- Commit the changes.
Once configured, detailed logs about administrator navigation and command execution will be streamed to the specified syslog server for analysis.
Know where to enable admin activity tracking and the key limitation that these logs are only available via syslog forwarding.
Interactive Quiz: Admin Roles & Accounts
Test your understanding of Palo Alto Networks Administrative Roles and Authentication.