Overview: Palo Alto Networks Authentication
In environments where user accounts reside in multiple directories (such as LDAP, RADIUS, or local databases), Palo Alto Networks' PAN-OS allows the configuration of various authentication methods and sequences.
Understanding these methods is crucial for securing access to the firewall itself (administrative access) and resources protected by the firewall (user access via Authentication Portal or GlobalProtect).
This guide covers:
- Configuring Authentication Profiles and Sequences.
- Details on specific external authentication methods: SAML, Kerberos, TACACS+, RADIUS, LDAP.
- Local Authentication options.
- Multi-Factor Authentication (MFA) integration.
Authentication configuration, including profiles, sequences, and specific methods like SAML and MFA, is a common topic in PCNSE and PCNSA exams.
Authentication Profiles
An authentication profile defines the authentication service that validates the login credentials of administrators who access the firewall web interface and end users who access applications through Authentication Portal or GlobalProtect.
The service can be Local Authentication that the firewall provides or External Authentication Services (like RADIUS, LDAP, Kerberos, SAML, TACACS+, MFA Vendors).
The authentication profile also defines options such as Kerberos single sign-on (SSO).
Configuring an Authentication Profile
- ( External service only ) Enable the firewall to connect to an external server for authenticating users:
- ( Local database authentication only ) Configure a user database that is local to the firewall under Device > Local User Database . Add users and optionally groups.
- ( Kerberos SSO only ) Create a Kerberos keytab for the firewall.
- Navigate to Device > Authentication Profile and click Add .
- Enter a descriptive Name .
- Select the Type of authentication service (RADIUS, LDAP, Kerberos, SAML, Local Database, MFA Vendor, Cloud Authentication Service, etc.).
-
Based on the type:
- If using RADIUS, TACACS+, LDAP, or Kerberos, select the corresponding Server Profile .
-
If using LDAP, also define the
Login Attribute
(e.g.,
sAMAccountNamefor Active Directory). - If using SAML, select the IdP Server Profile .
- If using Cloud Authentication Service, ensure the Cloud Identity Engine is configured.
- If using Local Database, no server profile is needed.
- (Optional, for Kerberos SSO) Enter the Kerberos Realm and Import the Kerberos Keytab .
- ( MFA only ) Select the Factors tab, check Enable Additional Authentication Factors , and Add the MFA server profiles.
-
Select the
Advanced
tab and
Add
the users and groups permitted to authenticate using this profile to the
Allow List
.
An empty Allow List prevents anyone from using this profile! Use specific groups or users instead of 'all' where possible.
-
(Optional) Configure a
Username Modifier
if needed:
-
%USERINPUT%(Default) -
%USERDOMAIN%\%USERINPUT% -
%USERINPUT%@%USERDOMAIN% -
None(Handles domain stripping/formatting intelligently, especially for LDAP/Kerberos/RADIUS)
-
- Click OK .
Know the location (
Device > Authentication Profile
) and key fields like Type, Server Profile, Allow List, and Username Modifier.
Authentication Sequences
Some networks have multiple databases (such as TACACS+ and LDAP) for different users and user groups. To authenticate users in such cases, configure an authentication sequence —a ranked order of authentication profiles that the firewall matches a user against during login.
The firewall checks against each profile in sequence until one successfully authenticates the user. A user is denied access only if authentication fails for all the profiles in the sequence.
The sequence can specify authentication profiles based on any supported authentication service except Multi-Factor Authentication (MFA) and SAML. MFA factors are configured *within* an Authentication Profile, and SAML is typically used as a standalone profile.
How Authentication Sequence Works
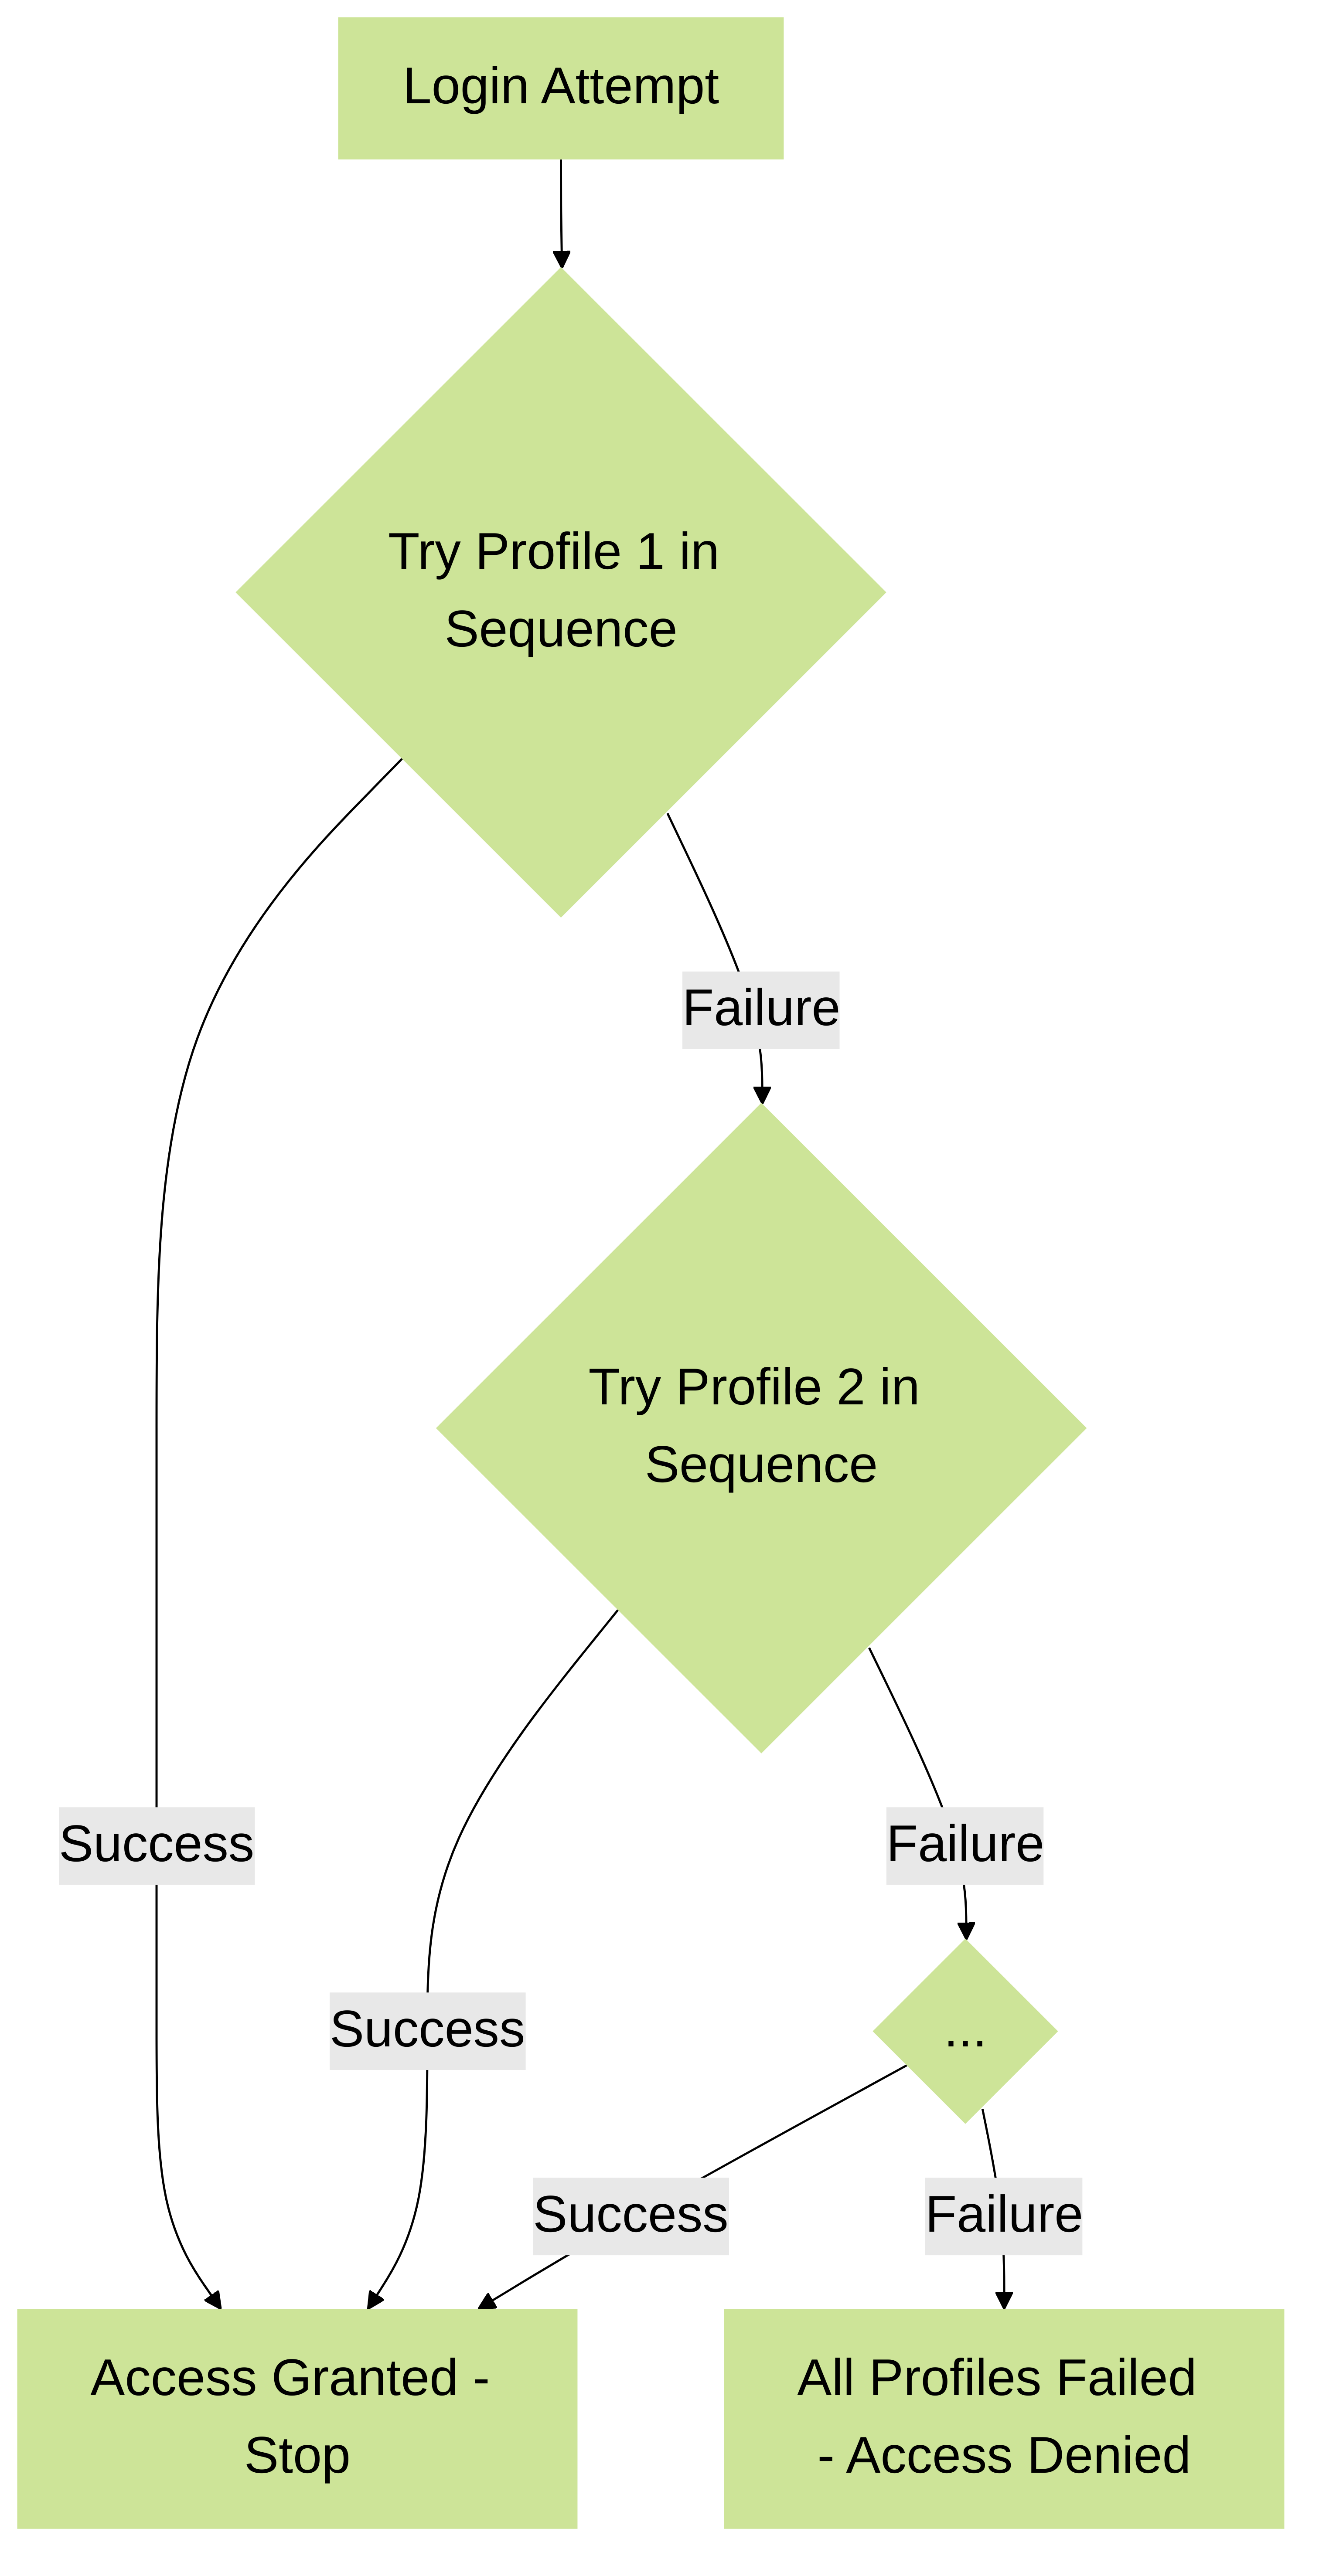
Flowchart illustrating the Authentication Sequence logic.
Configuring an Authentication Sequence
- Navigate to Device > Authentication Sequence and click Add .
- Enter a descriptive Name .
- Add the desired Authentication Profiles from the Available list to the sequence list on the right.
- Order the profiles using Move Up / Move Down . The firewall tries them in this order.
-
(Optional) Check
Use domain from username to determine authentication profile
: If enabled, the firewall attempts to match the domain provided at login (e.g.,
domain\useroruser@domain) to a profile's User Domain or Kerberos Realm. If a match is found, it uses that profile directly, bypassing the sequence order. If no match, it proceeds through the sequence. - Click OK .
- Assign the Authentication Sequence where needed (e.g., Administrator accounts, Authentication Policy).
- Commit the configuration.
Understand that sequences define the *order* of attempts, while profiles define *how* each attempt is made. Know where to configure sequences (
Device > Authentication Sequence
).
Local Authentication
Local Authentication uses the firewall itself to store credentials and authenticate administrators or users. It can be configured in two primary ways:
-
Without a Local Database:
- Password is set directly on the Administrator Account object ( Device > Administrators ).
- The Authentication Profile assigned to the admin account is set to None .
- Simple for very few users, but passwords managed individually per account.
- Can optionally use Password Profiles ( Device > Password Profiles ) assigned to the admin account to enforce specific password complexity/expiration policies for that user, overriding global settings.
-
With a Local User Database:
- User accounts and (optionally) groups are created under Device > Local User Database . Passwords (or password hashes) are stored here.
- An Authentication Profile with Type = Local Database must be created ( Device > Authentication Profile ).
- This "Local Database" Authentication Profile is then assigned to the Administrator Account object ( Device > Administrators ). The username on the Admin Account *must match* the username in the Local User Database.
- Allows grouping users and potentially using password hashes, but still managed locally on the firewall.
- Password complexity/expiration is typically managed globally ( Device > Setup > Management > Minimum Password Complexity ) unless overridden by Password Profiles (which don't apply if using password hashes in the local DB).
Distinguish between local auth with 'None' profile (password on admin object) vs. 'Local Database' profile (password/hash in local DB). Know where password policies are set.
SAML Authentication Configuration
Security Assertion Markup Language (SAML) is an XML-based standard for exchanging authentication and authorization data between an Identity Provider (IdP) and a Service Provider (SP). Palo Alto Networks firewalls can act as an SP.
SAML enables Single Sign-On (SSO), allowing users to log in once to an IdP and gain access to multiple SPs (like the firewall web UI, GlobalProtect, or applications protected by Authentication Portal) without re-entering credentials.
Configuration Steps:
-
Obtain Certificates:
- You need a certificate for the firewall (SP) to sign requests/responses.
- You need the IdP's certificate to verify signatures on responses/assertions from the IdP.
- Certificates should ideally support Digital Signature key usage. Imported certificates from an enterprise/third-party CA are common.
-
Configure SAML IdP Server Profile:
(
Device > Server Profiles > SAML Identity Provider
)
- Often done by Importing metadata provided by the IdP. This populates connection URLs, the IdP certificate, etc.
- Alternatively, manually configure the profile with IdP details (Entity ID, SSO/SLO URLs).
- Ensure Validate Identity Provider Certificate is checked if the IdP certificate is issued by a trusted CA (requires a Certificate Profile referencing the CA). This enhances security. Leave unchecked for self-signed IdP certs.
- Set Maximum Clock Skew (allowed time difference between IdP and firewall).
- Verify the imported/configured IdP certificate is correct.

Example of an Identity Provider (IdP) login page the user might be redirected to. -
Configure Authentication Profile:
(
Device > Authentication Profile
)
- Create a profile with Type = SAML .
- Select the IdP Server Profile created above.
- Select the Certificate for Signing Requests (the firewall's certificate).
- (Optional) Enable Single Logout (SLO).
- (Optional) Select a Certificate Profile to validate the IdP certificate if using the validation option in the server profile.
- Define the Username Attribute (and optionally Admin Role/Access Domain attributes if using IdP for authorization) expected in the SAML assertion from the IdP (e.g., `username`, `email`, `uid`). Case-sensitive!
- Configure the Allow List on the Advanced tab.
-
Assign Authentication Profile:
Apply the SAML Authentication Profile where needed:
- Administrator Accounts ( Device > Administrators ) if managing roles locally.
- Global Authentication Settings ( Device > Setup > Management ) if using IdP for admin role/domain assignment.
- Authentication Policy Rules ( Policies > Authentication ) for user access via Authentication Portal.
- GlobalProtect Portal/Gateway configuration ( Network > GlobalProtect ) for VPN users.
-
Register Firewall (SP) with IdP:
- Go back to Device > Authentication Profile .
- Click Metadata next to your SAML profile.
- Select the Service (management, authentication-portal, global-protect).
- Configure the Hostname/IP that the IdP will use to reach the firewall for this service.
- Click OK to download the firewall's SP metadata file.
- Import this metadata file into your IdP configuration. Consult your IdP documentation.
- Commit the configuration on the firewall.
- Verify by attempting login via the configured service (Web UI, GlobalProtect, etc.).
Understand the roles of SP and IdP, the need for metadata exchange, certificate requirements (signing, validation), and where to configure Server Profiles and Authentication Profiles.
SAML Technical Details
SAML (Security Assertion Markup Language) facilitates Single Sign-On (SSO) by allowing secure exchange of authentication and authorization data between parties, specifically an Identity Provider (IdP) and a Service Provider (SP).
Key Components:
- Principal (User): The individual trying to access a resource.
- Identity Provider (IdP): The entity that authenticates the user and issues assertions (statements) about the user's identity and attributes (e.g., Okta, Azure AD, Ping Identity).
- Service Provider (SP): The entity hosting the resource the user wants to access, which trusts the IdP (e.g., Palo Alto Networks Firewall/Panorama, GlobalProtect, Salesforce).
Authentication Flow (SP-Initiated):
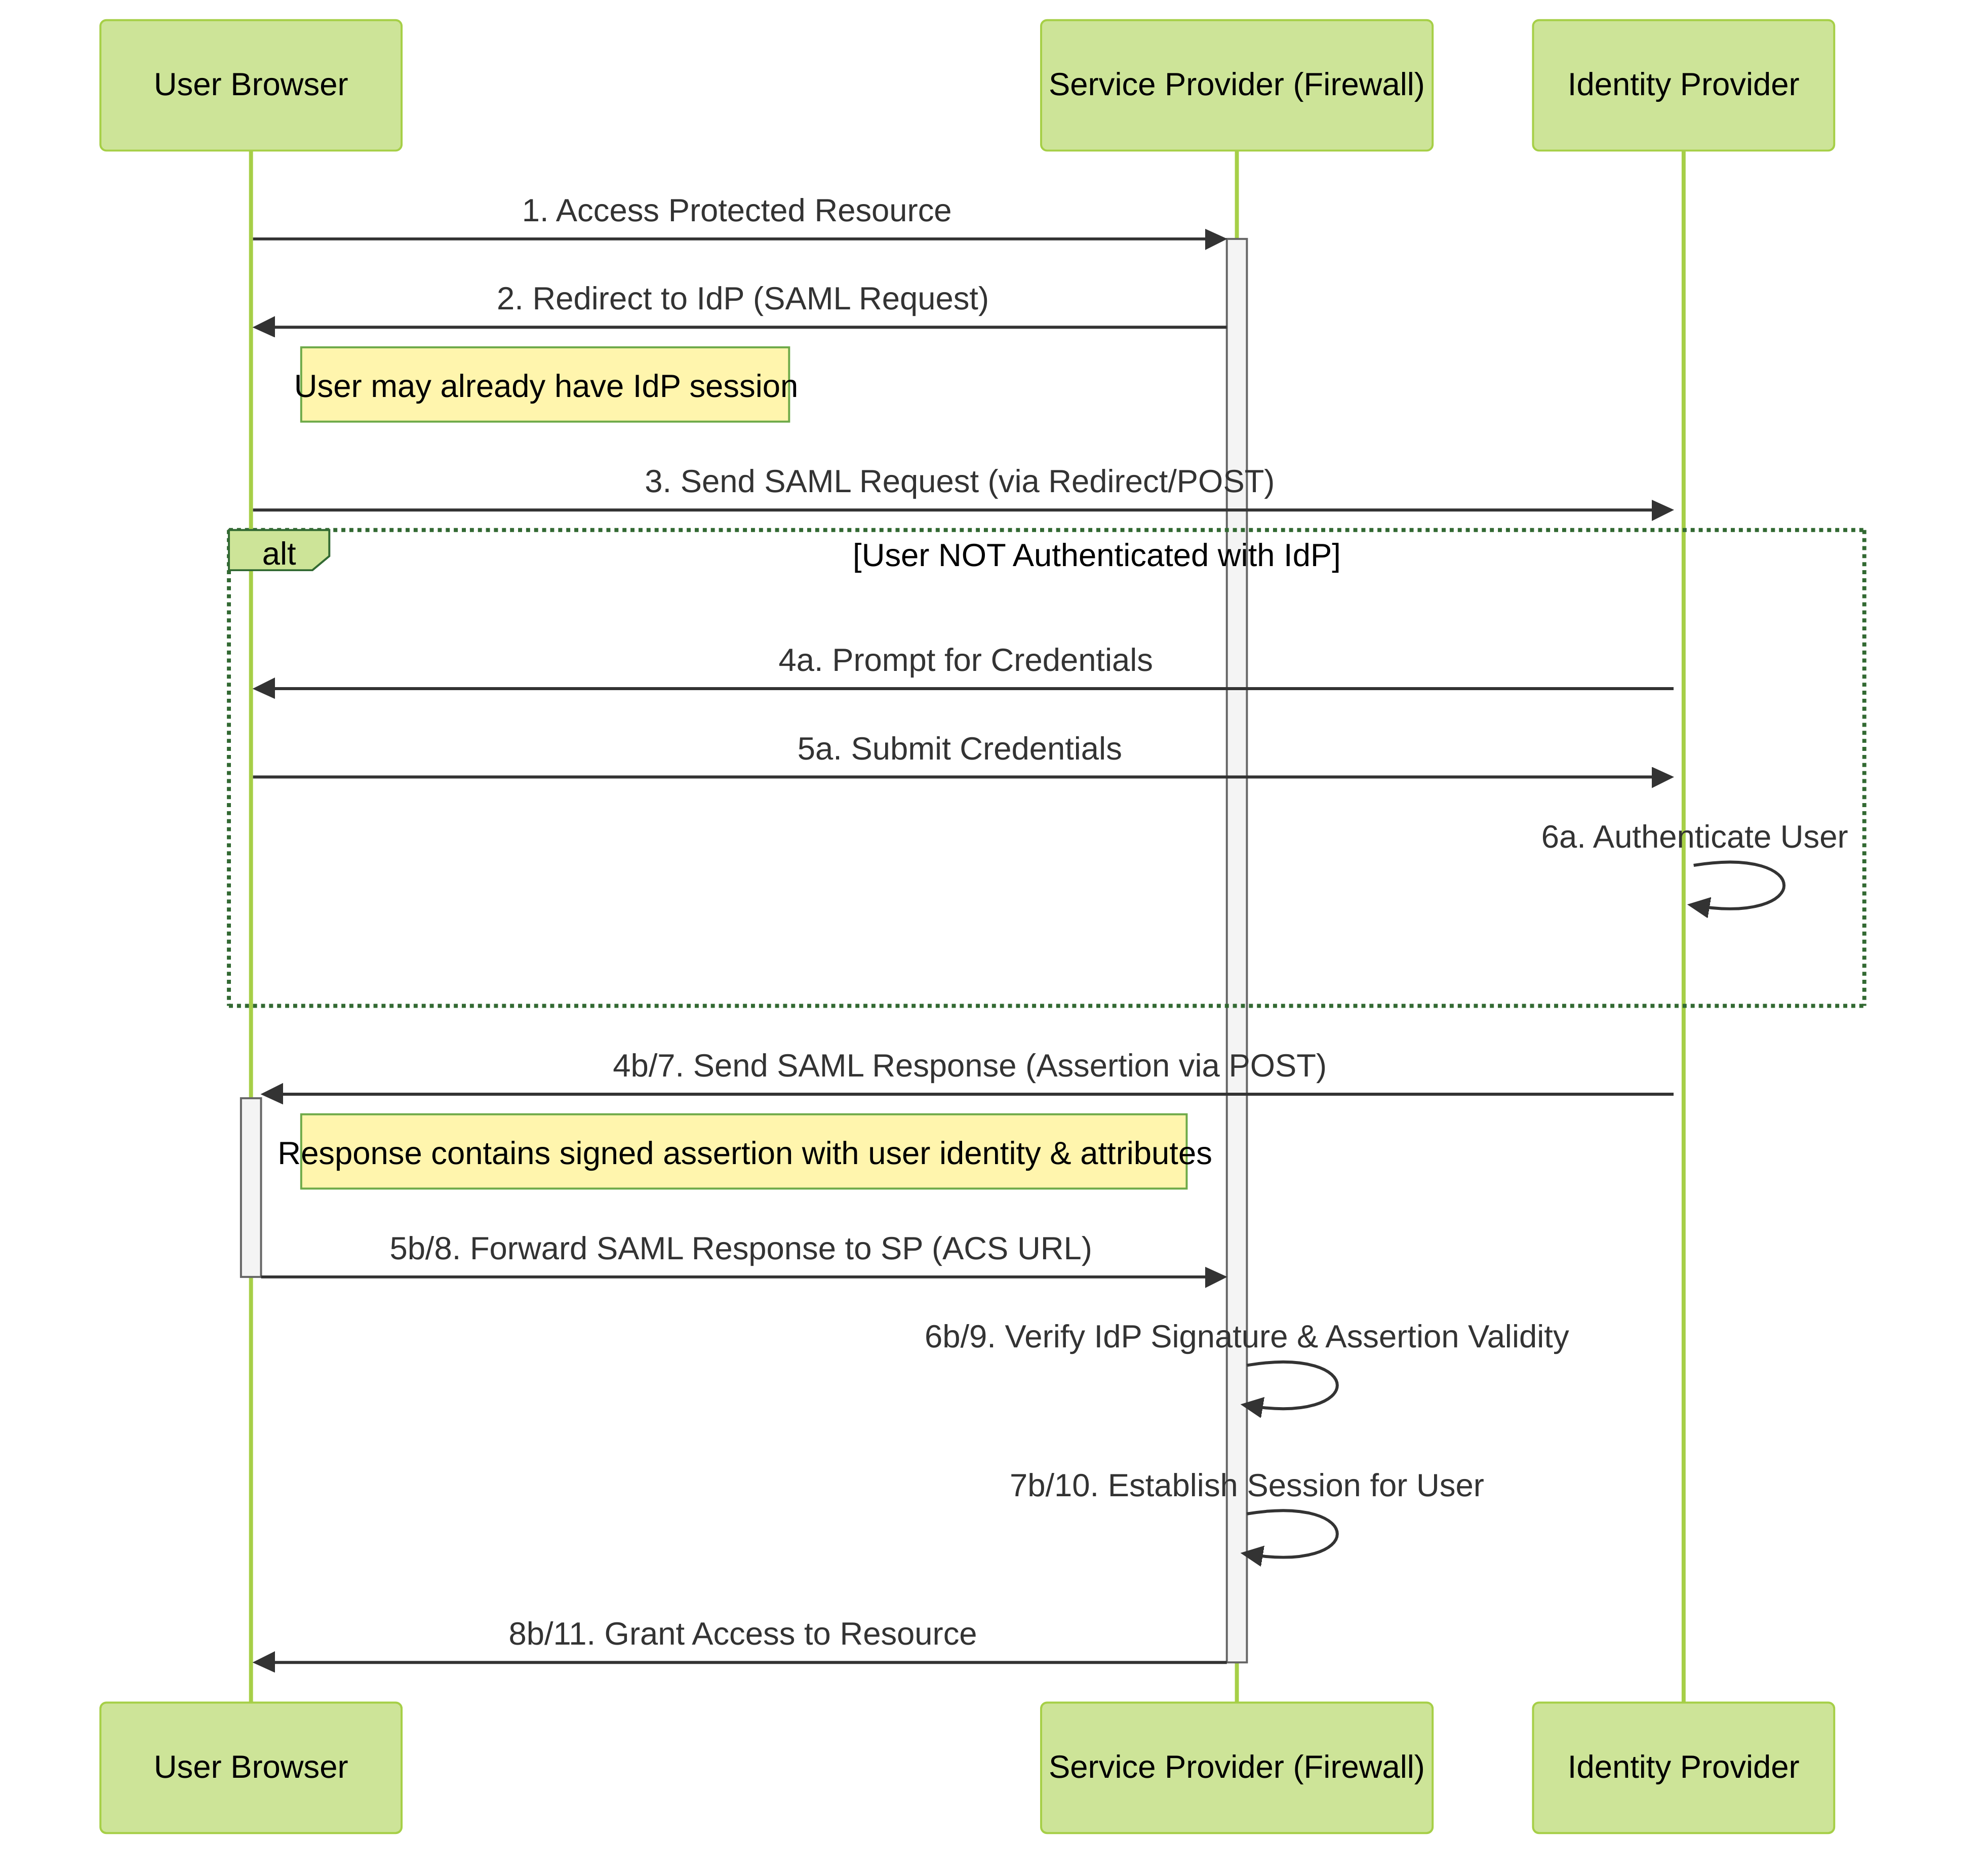
Simplified SAML SP-Initiated Authentication Flow.
- User attempts to access a resource on the SP (Firewall).
- The SP recognizes the user is not authenticated and generates a SAML Authentication Request. It redirects the user's browser to the IdP's SSO URL, including the SAML request.
- The User's browser sends the SAML request to the IdP.
-
The IdP checks if the user has an active session.
- If not, the IdP prompts the user for credentials (e.g., username/password, MFA).
- If authentication is successful (or session already exists), the IdP generates a SAML Response.
-
The SAML Response contains a digitally signed
Assertion
. This assertion typically includes:
- The user's identifier (e.g., username, email - matching the 'Username Attribute' configured in the firewall's Auth Profile).
- Issuer information (the IdP's Entity ID).
- Conditions (validity period, audience restriction - should match the SP's Entity ID).
- Authentication context (how the user was authenticated).
- (Optional) Additional attributes like group memberships, Admin Role, Access Domain (used for authorization).
- The IdP sends the SAML Response back to the user's browser, typically via an HTML form auto-submitted using POST to the SP's Assertion Consumer Service (ACS) URL.
- The browser POSTs the SAML Response to the SP's ACS URL.
-
The SP (Firewall):
- Verifies the signature on the response/assertion using the IdP's public certificate (configured in the SAML IdP Server Profile).
- Checks the validity period and audience restriction.
- Extracts the username and any other relevant attributes.
- If verification succeeds, the SP establishes a local session for the user and grants access to the requested resource.

Key Concepts:
- Metadata: XML files exchanged between SP and IdP containing configuration details like Entity IDs, certificate information, and endpoint URLs (SSO, SLO, ACS). This simplifies configuration.
- Bindings: Define how SAML messages are transported (e.g., HTTP Redirect, HTTP POST). POST is common for responses due to size limitations with Redirect.
- Assertions: The core statements made by the IdP about the user. Can be Authentication, Attribute, or Authorization Decision assertions.
- Digital Signatures: Ensure message integrity and authenticity. Both SP and IdP typically sign relevant parts of the messages.
- Single Logout (SLO): A process where logging out from one service (either SP or IdP) triggers logout requests to other associated services in the session.
Correct configuration of Entity IDs, ACS URLs, signing certificates, and attribute mapping is critical for SAML integration to work.
Kerberos Authentication Configuration
Kerberos is a network authentication protocol designed to provide strong authentication for client/server applications by using secret-key cryptography. It uses tickets to prove identity.
Palo Alto Networks firewalls can use Kerberos to authenticate end users (via Authentication Portal) and administrators (Web UI access) against an Active Directory domain controller or other Kerberos V5-compliant servers.
Kerberos authentication on the firewall is interactive (requires username/password entry) unless configured for Kerberos Single Sign-On (SSO), which uses the user's existing Kerberos ticket from their workstation login.
Kerberos server configuration on the firewall requires IPv4 addresses; IPv6 is not supported for the server connection.
Configuration Steps (Server Authentication):
-
Configure Kerberos Server Profile:
(
Device > Server Profiles > Kerberos
)
- Click Add .
- Enter a Profile Name .
-
Add
server entries:
- Specify a server Name .
- Enter the Kerberos Server IP address or FQDN.
- Specify the Port (default 88).
- Click OK .
-
Configure Authentication Profile:
(
Device > Authentication Profile
)
- Create a profile with Type = Kerberos .
- Select the Server Profile created above.
- Configure the Allow List on the Advanced tab.
- Click OK .
-
Assign Authentication Profile:
Apply the Kerberos Authentication Profile where needed:
- Administrator Accounts ( Device > Administrators ).
- Authentication Policy Rules ( Policies > Authentication ) for user access via Authentication Portal.
- Commit the configuration.
- Verify authentication using the Test Authentication Server Connectivity tool or by attempting login.
Configuration Steps (Kerberos SSO):
Kerberos SSO allows users already logged into a Kerberos domain (like Windows Active Directory) to access firewall resources (Web UI, Authentication Portal) without re-entering their password.
-
Create Kerberos Keytab:
- This file contains the firewall's service principal name (SPN) and its secret key, allowing it to decrypt Kerberos tickets.
- Typically generated on the Key Distribution Center (KDC), usually the Active Directory Domain Controller, using tools like `ktpass.exe`.
- The SPN usually takes the form `HTTP/firewall.hostname@REALM` (e.g., `HTTP/fw.example.com@EXAMPLE.COM`).
- Securely transfer the generated keytab file to a location accessible for upload to the firewall.
- See Create a Kerberos Keytab for details.
-
Configure Authentication Profile (with SSO):
(
Device > Authentication Profile
)
- Edit an existing profile or create a new one. The base Type (e.g., LDAP, RADIUS, Local Database) acts as a fallback if SSO fails.
- Enter the Kerberos Realm (uppercase domain name, e.g., `EXAMPLE.COM`).
- Click Import next to Kerberos Keytab and upload the keytab file generated in step 1.
- Configure the Allow List .
- Click OK .
Kerberos SSO is configured *within* an Authentication Profile, acting as the primary attempt before falling back to the profile's base 'Type'.
- Assign Authentication Profile: Apply the SSO-enabled Authentication Profile where needed (Admin accounts, Authentication Policy).
- Configure User Browsers: Ensure client browsers are configured to trust the firewall's hostname/IP for Integrated Windows Authentication (IWA) / Kerberos ticket forwarding (often involves adding the site to the 'Local Intranet' zone in Internet Options on Windows).
- Commit and Verify .
Distinguish between basic Kerberos server authentication (interactive) and Kerberos SSO (seamless). Understand the role of the KDC, SPN, and keytab file for SSO.
Kerberos Technical Details
Kerberos is a ticket-based authentication protocol developed at MIT. It allows nodes communicating over a non-secure network to prove their identity to one another in a secure manner using secret-key cryptography.
Key Components:
- Client: The user or service requesting authentication.
- Service Server (SS): The server hosting the resource the client wants to access (e.g., file server, web server, the firewall itself acting as a service).
-
Key Distribution Center (KDC):
A trusted third party, typically composed of two logical parts:
- Authentication Server (AS): Authenticates the client initially and issues a Ticket Granting Ticket (TGT).
- Ticket Granting Server (TGS): Issues Service Tickets based on a valid TGT.
- Realm: An administrative domain within which the KDC manages authentication.
- Principal: A unique identity within a realm (e.g., `user@REALM`, `service/hostname@REALM`).
-
Tickets:
Encrypted data structures proving identity or granting access rights.
- Ticket Granting Ticket (TGT): Issued by the AS to a client after initial authentication. Allows the client to request Service Tickets from the TGS without re-entering their password. Encrypted with the TGS's secret key.
- Service Ticket (ST): Issued by the TGS to a client for accessing a specific service. Encrypted with the specific Service Server's secret key.
- Authenticator: A short-lived piece of data created by the client, encrypted with the session key shared between the client and the service, containing a timestamp. Proves the client possesses the session key and prevents replay attacks.
- Session Key: A temporary symmetric key shared between the client and the KDC (for the TGT) or between the client and the Service Server (for the ST). Used to encrypt authenticators and communication.
- Keytab File: Contains pairs of service principal names (SPNs) and their corresponding secret keys. Used by services (like the firewall) to decrypt service tickets presented by clients.
Basic Kerberos Authentication Flow:

Simplified Kerberos Authentication Flow.
-
AS Exchange (Client gets TGT):
- Client sends an AS-REQ (Authentication Service Request) to the KDC's AS, containing its principal name.
- The AS verifies the client exists in its database. It generates a session key (Client-KDC Key) and creates a TGT (containing the Client-KDC Key, client info, timestamp, lifetime), encrypting the TGT with the TGS's secret key.
- The AS sends an AS-REP (Authentication Service Reply) back to the client. This reply contains the encrypted TGT and the Client-KDC Session Key, the latter encrypted using the client's long-term secret key (derived from the user's password).
- The client uses its password-derived key to decrypt the Client-KDC Session Key. It now holds the encrypted TGT and the Client-KDC Session Key, but cannot decrypt the TGT itself.
-
TGS Exchange (Client gets Service Ticket):
- When the client wants to access a specific service (SS), it sends a TGS-REQ (Ticket Granting Service Request) to the KDC's TGS. This request includes the encrypted TGT obtained earlier, the desired Service Principal Name (SPN) (e.g., `HTTP/firewall.example.com@EXAMPLE.COM`), and an Authenticator (containing client info and a timestamp, encrypted with the Client-KDC Session Key).
- The TGS decrypts the TGT using its own secret key, extracting the Client-KDC Session Key. It uses this key to decrypt the Authenticator and verify the timestamp/client info.
- If valid, the TGS generates a new session key (Client-SS Key) for the client and the specific service. It creates a Service Ticket (ST) containing the Client-SS Key, client info, timestamp, lifetime, etc., and encrypts the ST with the requested Service Server's secret key (retrieved from the KDC database).
- The TGS sends a TGS-REP (Ticket Granting Service Reply) back to the client, containing the encrypted ST and the Client-SS Session Key (encrypted with the Client-KDC Session Key).
- The client decrypts the Client-SS Session Key using its stored Client-KDC Session Key. It now holds the encrypted ST and the Client-SS Session Key.
-
Client-Server Exchange (Client accesses Service):
- The client sends an AP-REQ (Application Request) to the Service Server (SS). This request includes the encrypted ST obtained from the TGS and a new Authenticator (client info, timestamp, encrypted with the Client-SS Session Key).
- The Service Server uses its own secret key (obtained from its keytab file) to decrypt the ST, extracting the Client-SS Session Key.
- The SS uses the extracted Client-SS Session Key to decrypt the Authenticator and verifies the timestamp and client information against the ST.
- If verification succeeds, the SS trusts the client's identity and grants access. Optionally, the SS can send an AP-REP back to the client (including a timestamp encrypted with the Client-SS key) for mutual authentication.
Kerberos relies heavily on synchronized time between all parties (Client, KDC, SS). Significant clock skew will cause authentication failures due to timestamp validation in Authenticators and tickets.
TACACS+ Authentication Configuration
Terminal Access Controller Access-Control System Plus (TACACS+) is a protocol primarily used for centralized Authentication, Authorization, and Accounting (AAA) for network device administration.
Palo Alto Networks firewalls support TACACS+ for authenticating end users (less common) and administrators (Web UI and CLI). Crucially, TACACS+ can also manage administrator authorization (role and access domain assignments) using Vendor-Specific Attributes (VSAs).
Configuration Steps (Authentication & External Authorization):
-
Configure TACACS+ Server Profile:
(
Device > Server Profiles > TACACS+
)
- Click Add .
- Enter a Profile Name .
- (Optional) Check Administrator Use Only .
- Set Timeout (seconds).
- Select Authentication Protocol ( CHAP is more secure than PAP, if supported by the server).
-
Add
server entries:
- Specify server Name .
- Enter TACACS+ Server IP or FQDN.
- Enter the shared Secret (must match server configuration).
- Specify Port (default 49).
- Click OK .
-
Configure Authentication Profile:
(
Device > Authentication Profile
)
- Click Add .
- Enter a Name .
- Set Type to TACACS+ .
- Select the Server Profile created above.
- (Optional but common for group-based policy) Check Retrieve user group from TACACS+ .
- Configure the Allow List on the Advanced tab (specify users/groups allowed by this profile).
- Click OK .
-
Configure Global Authentication Settings for Admin Auth:
(
Device > Setup > Management
)
- Edit the Authentication Settings section.
- Select the TACACS+ Authentication Profile you created.
- This step is key when using TACACS+ for *both* authentication and authorization of administrators. The firewall uses this profile globally for admin logins instead of assigning it per-admin account.
- Click OK .
-
Define Roles and Access Domains on Firewall:
- Ensure the Admin Role Profiles ( Device > Admin Roles ) and Access Domains ( Device > Access Domain ) exist on the firewall with names that exactly match the values the TACACS+ server will send in the VSAs. Case sensitivity matters!
- Predefined roles (superuser, superreader, deviceadmin, etc.) can also be used. Use lowercase names (e.g., `superuser`) when configuring the VSA on the TACACS+ server.
-
Configure TACACS+ Server:
(Refer to your TACACS+ server documentation)
- Add the firewall as a TACACS+ client (using its IP and the shared secret).
- Define user accounts.
-
Configure the server to return the Palo Alto Networks specific VSAs upon successful authentication for each user/group:
-
PaloAlto-Admin-Role = <role_name>(e.g.,PaloAlto-Admin-Role = MyCustomRoleorPaloAlto-Admin-Role = superreader) -
PaloAlto-Admin-Access-Domain = <domain_name>(e.g.,PaloAlto-Admin-Access-Domain = MyAccessDomainorPaloAlto-Admin-Access-Domain = all) -
(Optional)
PaloAlto-User-Group = <group_name>(if using 'Retrieve user group from TACACS+' on the firewall)
The VSA names and the role/domain names used as values *must* match exactly what's configured on the firewall.
-
- Commit firewall configuration.
- Verify by logging into the firewall Web UI or CLI with a TACACS+ admin account and checking assigned permissions.
TACACS+ is commonly used for network device administration. Understand the use of VSAs for dynamic role/domain assignment and the critical need for name matching between the server and firewall configurations.
RADIUS Authentication Configuration
Remote Authentication Dial-In User Service (RADIUS) is another common AAA protocol. Palo Alto Networks firewalls support RADIUS for authenticating end users and administrators.
Similar to TACACS+, RADIUS can be used for external authorization of administrators using Vendor-Specific Attributes (VSAs).
Configuration Steps (Example for Admin Auth with External Authorization):
-
Configure RADIUS Server Profile:
(
Device > Server Profiles > RADIUS
)
- Click Add .
- Enter a Profile Name .
- Set Timeout (seconds) and Retries .
-
Add
server entries:
- Specify server Name .
- Enter RADIUS Server IP or FQDN.
- Enter the shared Secret .
- Specify Port (default 1812).
- Click OK .
-
Configure Authentication Profile:
(
Device > Authentication Profile
)
- Click Add .
- Enter a Name .
- Set Type to RADIUS .
- Select the Server Profile created above.
- Configure the Allow List on the Advanced tab.
- Click OK .
-
Configure Global Authentication Settings for Admin Auth:
(
Device > Setup > Management
)
- Edit the Authentication Settings .
- Select the RADIUS Authentication Profile .
- Click OK .
-
Define Roles and Access Domains on Firewall:
- Ensure Admin Role Profiles and Access Domains exist on the firewall with names matching what the RADIUS server will send (case-sensitive). Use lowercase for predefined roles (e.g., `devicereader`).
-
Configure RADIUS Server:
(Refer to your RADIUS server documentation)
- Add the firewall as a RADIUS client (IP, shared secret).
- Define user accounts/groups.
-
Configure the server to return Palo Alto Networks VSAs (Vendor ID 25461) upon successful authentication:
-
Attribute 1:
PaloAlto-Admin-Role(String) =<role_name> -
Attribute 2:
PaloAlto-Admin-Access-Domain(String) =<domain_name> -
(Optional) Attribute 5:
PaloAlto-User-Group(String) =<group_name>
Ensure the VSA types are 'String' and the values match firewall configuration exactly.
-
Attribute 1:
- Commit firewall configuration.
- Verify admin login and permissions.
RADIUS is also commonly used as the first factor when integrating with MFA solutions.
LDAP Authentication Configuration
Lightweight Directory Access Protocol (LDAP) is widely used for accessing and maintaining distributed directory information services, most commonly Microsoft Active Directory.
Palo Alto Networks firewalls use LDAP primarily for authenticating end users (Authentication Portal) and administrators (Web UI), and critically, for mapping users to groups via Group Mapping for policy enforcement.
Configuration Steps:
-
Configure LDAP Server Profile:
(
Device > Server Profiles > LDAP
)
- Click Add .
- Enter a Profile Name .
- Add server entries (IP/FQDN, Port - usually 389/636).
- Select server Type (e.g., `active-directory`).
- Specify the Base DN (e.g., `DC=example,DC=com`).
- Enter the Bind DN (a service account with read permissions, e.g., `CN=svc_paloalto,OU=ServiceAccounts,DC=example,DC=com`) and Password .
- Set Bind Timeout and Search Timeout .
- Check Require SSL/TLS secured connection (highly recommended). Port 636 uses SSL directly; Port 389 typically uses StartTLS.
- (Optional but recommended) Check Verify Server Certificate for SSL sessions (requires the AD CA certificate or the server cert itself to be trusted by the firewall).
- Click OK .
-
Configure Authentication Profile:
(
Device > Authentication Profile
)
- Click Add .
- Enter a Name .
- Set Type to LDAP .
- Select the Server Profile created above.
-
Set the
Login Attribute
(commonly
sAMAccountNamefor Active Directory). - Configure the Allow List on the Advanced tab.
- Consider the Username Modifier if users log in with formats like `user@domain` but AD expects only `sAMAccountName`. Setting it to `None` often works well with AD.
- Click OK .
- Assign Authentication Profile: Apply where needed (Admin accounts, Authentication Policy).
- Configure Group Mapping (Crucial for Policy): ( Device > User Identification > Group Mapping Settings ) - While not strictly authentication, this often uses the same LDAP Server Profile to fetch group memberships for policy enforcement.
- Commit configuration.
- Verify using the Test tool or actual login.
LDAP is fundamental for integrating with Active Directory for both authentication and group mapping. Know the key server profile settings (Base DN, Bind DN, SSL/TLS) and authentication profile settings (Login Attribute, Username Modifier).
Multi-Factor Authentication (MFA) Configuration
MFA adds layers of security by requiring users to provide multiple verification factors to gain access. Palo Alto Networks firewalls integrate with various MFA vendors.
MFA can be integrated via RADIUS (where the MFA server acts as a RADIUS server/proxy) or via specific vendor APIs (supported primarily for end-user Authentication Policy).
Configuration Steps (Example using Vendor API for Authentication Policy):
-
Configure Authentication Portal:
(
Device > User Identification > Authentication Portal Settings
)
- Ensure it's configured in Redirect mode.
- This portal displays the web form for the *first* factor and subsequent MFA challenges.
- Configure Server Profile for First Factor: Set up the Server Profile (e.g., LDAP, RADIUS, Kerberos, SAML) and Authentication Profile for the *initial* authentication method as described in previous sections.
-
Configure MFA Server Profile(s):
(
Device > Server Profiles > Multi Factor Authentication
)
- Click Add for each additional factor/vendor.
- Enter a Name .
- Select a Certificate Profile for the firewall to validate the MFA server's certificate (if using TLS).
- Select the MFA Vendor .
- Configure vendor-specific Attributes (API keys, hostnames, etc. - consult vendor documentation).
- Click OK .
-
Update/Configure Authentication Profile with MFA Factors:
(
Device > Authentication Profile
)
- Edit the Authentication Profile created for the first factor (or create a new one).
- Go to the Factors tab.
- Check Enable Additional Authentication Factors .
- Add the MFA Server Profile(s) configured above. The order listed determines the challenge order.
- Click OK .

Example Authentication Portal login form for the first factor. 
Example MFA challenge page presented after the first factor succeeds. -
Configure Authentication Enforcement Object:
(
Objects > Authentication
)
- Click Add .
- Enter a Name .
- Select the Authentication Profile (the one containing the MFA factors).
- Set the Authentication Method (e.g., `web-form`).
- Enter a user-facing Message .
- Click OK .
-
Configure Authentication Policy Rule:
(
Policies > Authentication
)
- Create a rule matching the desired source/user/destination/service/URL category.
- On the Actions tab, select the Authentication Enforcement object created above.
- Set the inactivity Timeout .
- Click OK .
- Configure Security Policy Rule: Ensure a Security Policy rule ( Policies > Security ) exists to *allow* the traffic for authenticated users matching the source/destination/application after successful MFA.
- (Optional) Customize the MFA response page ( Device > Response Pages > MFA Login Page ).
- Commit configuration.
- Verify by attempting to access a resource protected by the Authentication Policy rule.
MFA via vendor APIs is primarily for end-user authentication policy. For admin or GlobalProtect login MFA, RADIUS or SAML integration with the MFA provider is typically used.
Interactive Quiz: Authentication Methods
Test your understanding of Palo Alto Networks Authentication Profiles, Sequences, and Methods.