Overview: Data Center Best Practice Security Profiles
Security profiles provide fundamental protections by scanning traffic that you allow on the network for threats. Security profiles provide a full suite of coordinated threat prevention tools that block peer-to-peer command and control (C2) application traffic, dangerous file types, attempts to exploit vulnerabilities, and antivirus signatures, and also identify new and unknown malware.
It takes relatively little effort to apply security profiles because Palo Alto Networks provides predefined profiles that you can simply add to security policy allow rules. Customizing security profiles is easy because you can clone a predefined profile and then edit it. Of course, you can also create a security profile from scratch on the firewall or on Panorama.
To detect known and unknown threats in your network traffic, attach security profiles to all security policy rules that allow traffic on the network , so that the firewall inspects all allowed traffic. The firewall applies security profiles to traffic that matches the security policy allow rule, scans traffic in accordance with the security profile settings, and then takes appropriate actions to protect the network. The recommendations for best practice security profiles apply to all four of the data center traffic flows except as noted.
Create the Data Center Best Practice Antivirus Profile
Clone the default Antivirus profile and edit it. To ensure availability for business-critical applications, take safe transition steps as you move from your current state to the best practice profile. To achieve the best practice profile, modify the default profile as shown here and attach it to all security policy rules that allow traffic.
The Antivirus profile has protocol decoders that detect and prevent viruses and malware from being transferred over seven protocols: FTP, HTTP, HTTP2, IMAP, POP3, SMB, and SMTP . You can set WildFire actions for all seven protocols because the Antivirus profile also enforces actions based on WildFire signatures and in-line machine learning .
Configure the cloned best practice Antivirus profile to reset both the client and the server for all seven protocol decoders and WildFire actions , and then attach the profile to the allow rules for all four data center traffic flows.
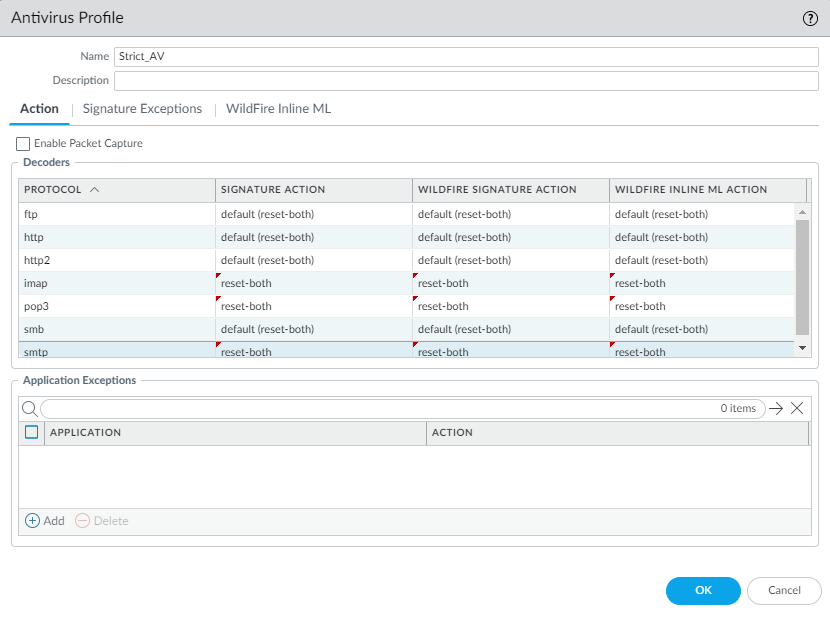
Example of a best practice Antivirus profile ('Strict_AV') configured with 'reset-both' action for all protocols and WildFire actions. Red triangles indicate changes from the default profile.
Attach the best practice Antivirus profile to all security policy rules that allow traffic to block known malicious files (malware, ransomware bots, and viruses) as they attempt to enter the network. For example:
- Intra data center traffic: The Antivirus profile, along with the Vulnerability Protection profile, helps prevent attackers from using exploits to leverage vulnerabilities and spread malware and hacking tools laterally between servers inside the data center network.
- Traffic from the data center to the internet: The Antivirus profile, along with the Anti-Spyware profile, helps identify and block command and control traffic and initial downloads of malware and hacking tools.
Create the Data Center Best Practice Anti-Spyware Profile
Attach an Anti-Spyware profile to all security policy rules that allow data center traffic. The Anti-Spyware profile detects command-and-control (C2) traffic initiated from spyware installed on a server or endpoint, including categories such as adware, backdoor, browser-hijack, data theft, and keylogging, and prevents compromised systems from establishing an outbound connection from your network.
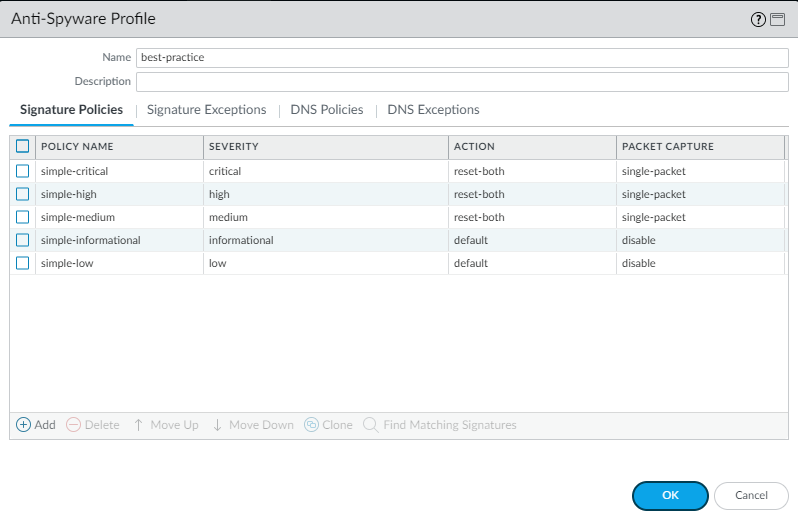
Clone the predefined strict Anti-Spyware profile and edit it. To ensure availability for business-critical applications, take safe transition steps as you move from your current state to the best practice profile. If you have a sinkhole set up to which you can send traffic for analysis, enable DNS sinkhole with packet capture to help you track down the endpoint that attempted to resolve the malicious domain.
The best practice Anti-Spyware profile retains the default Action to reset the connection when the firewall detects a medium, high, or critical severity threat, and enables single packet capture (PCAP) for those threats.
Anti-Spyware profile rules showing 'reset-both' action and 'single-packet' capture enabled for medium, high, and critical severity threats.
Don’t enable PCAP for informational activity because it generates a relatively high volume of that traffic and it’s not particularly useful compared to potential threats. Apply extended PCAP (as opposed to single PCAP) to high-value traffic to which you apply the alert Action. Apply PCAP using the same logic you use to decide what traffic to log—take PCAPs of the traffic you log. Apply single PCAP to traffic you block. The recommended default number of packets for extended PCAP is five.
The best practice Action on DNS Queries is to block or to sinkhole DNS queries for known malicious domains and when you don’t have visibility into DNS queries, and to enable PCAPs.
Allow traffic only to sanctioned DNS servers. Use the DNS Security service to prevent connections to malicious DNS servers.
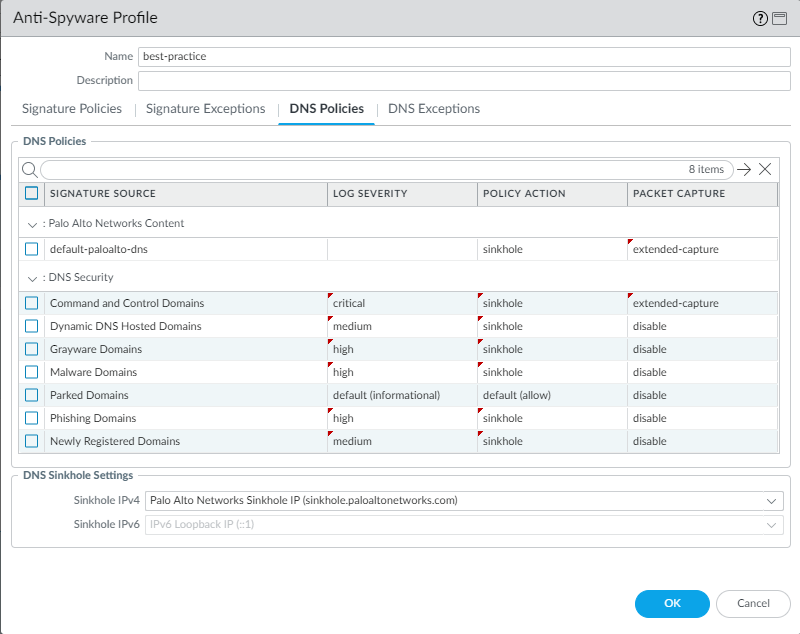
Anti-Spyware profile DNS Signatures tab showing 'sinkhole' action configured for malicious domains, with packet capture enabled.
Enabling DNS sinkhole identifies potentially compromised hosts that attempt to access suspicious domains by tracking the hosts and preventing them from accessing those domains. Enable DNS sinkhole when the firewall can’t see the originator of the DNS query (typically when the firewall is north of the local DNS server). Don’t enable DNS sinkhole when the firewall can see the originator (typically when south of the local DNS server) or on traffic you block.
In addition to protecting hosts with DNS sinkholing, attach the best practice Anti-Spyware profile to all security policy rules that allow traffic to identify infected hosts as traffic leaves the network and to stop attackers by preventing compromised systems from communicating with the malicious C2 network. For example:
- Traffic from users to the data center, intra data center traffic, and traffic from the internet to the data center: The Anti-Spyware profile blocks peer-to-peer C2 traffic.
- Traffic from the data center to the internet: The Anti-Spyware profile, along with the Antivirus profile, helps identify and block C2 traffic and initial downloads of malware and hacking tools.
Create the Data Center Best Practice Vulnerability Protection Profile
Attach a Vulnerability Protection profile to all security policy rules that allow traffic. The Vulnerability Protection profile protects against buffer overflows, illegal code execution, and other attempts to exploit client- and server-side vulnerabilities to breach and move laterally through the data center network.
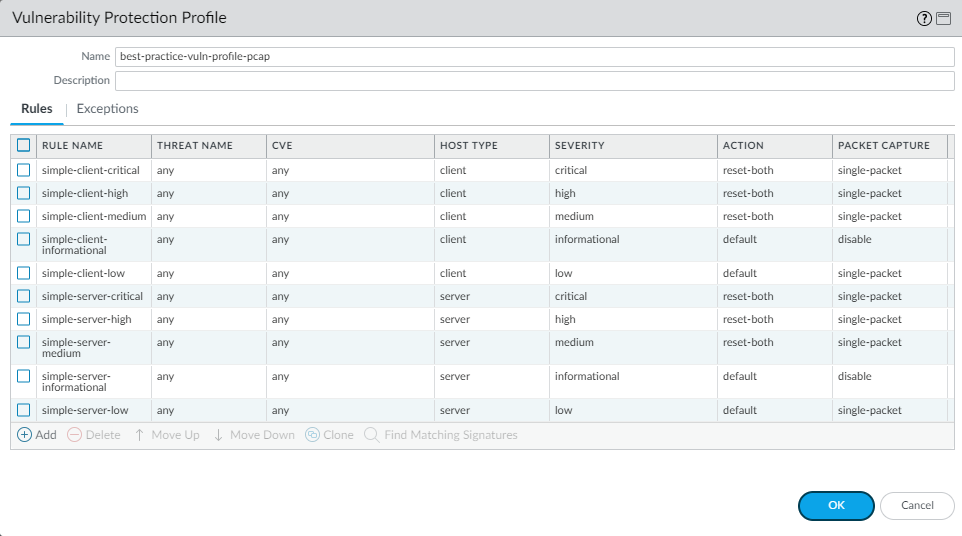
Clone the predefined strict Vulnerability Protection profile. To ensure availability for business-critical applications, take safe transition steps as you move from your current state to the best practice profile. For the best practice profile, for each rule except simple-client-informational and simple-server-informational , double-click the Rule Name and change Packet Capture from disable to single-packet to enable packet capture (PCAP) for each rule so you can track down the source of potential attacks. Don’t change the rest of the settings. Download content updates automatically and install them as soon as possible so that the signature set is always up-to-date.
Vulnerability Protection profile showing rules with 'single-packet' capture enabled for non-informational severities.
Don’t enable PCAP for informational activity because it generates a relatively high volume of that traffic. Apply extended PCAP (recommended 5 packets) to high-value traffic with the alert Action. Apply single PCAP to traffic you block.
The reason to attach the best practice Vulnerability Protection profile to all security policy rules that allow traffic is because if you don’t have strict vulnerability protection, attackers can leverage client- and server-side vulnerabilities to compromise the data center. For example:
- Intra data center traffic: A strict Vulnerability Protection profile, along with the Antivirus profile, helps prevent attackers from using exploits to leverage vulnerabilities and spread malware laterally between servers.
- Traffic from the data center to the internet: Helps prevent infected data center servers from compromising internet servers.
- Traffic from the internet to the data center: Blocks attempts to compromise data center servers with server-side vulnerabilities. If compromised, helps prevent serving exploits to clients (watering hole attacks). Also stops brute force attacks using the Block IP action .
Create the Data Center Best Practice File Blocking Profile
Use the predefined strict File Blocking profile to block files that are commonly included in malware attack campaigns and that have no real use case for upload/download. Blocking these files reduces the attack surface.
The predefined strict profile blocks: batch files, DLLs, Java class files, help files, Windows shortcuts (.lnk), BitTorrent files, .rar files, .tar files, encrypted-rar and encrypted-zip files, multi-level encoded files, .hta files, and Windows Portable Executable (PE) files (including .exe, .cpl, .dll, .ocx, .sys, .scr, .drv, .efi, .fon, and .pif files). The predefined strict profile alerts on all other file types for visibility.
In some cases, the need to support critical applications may prevent you from blocking all of the strict profile’s file types. Follow the safe transition advice . Review data filtering logs ( Monitor > Logs > Data Filtering ) and talk with business stakeholders. If necessary, clone the strict profile and modify it to allow only the specific required file types, possibly restricting by direction (upload/download).

File Blocking profile showing various risky file types set to 'block' action for specified applications and directions.
Attach the best practice File Blocking profile to all security policy rules that allow traffic to help prevent attackers from delivering malicious files. Examples:
- Traffic from users to the data center: Attach the strict profile to rules for applications that don’t involve file sharing to block dangerous file types.
- Intra data center traffic: Attach the strict profile to prevent a compromised server from sharing malicious files laterally.
- Traffic from the data center to the internet: Limit file transfers to only those types required by the application.
If you don’t block all Windows PE files, send all unknown files to WildFire for analysis. For user accounts, consider setting the Action to continue to help prevent drive-by downloads (educate users about the prompt).
Create the Data Center Best Practice WildFire Analysis Profile
While other profiles detect known threats, WildFire protects the data center from unknown threats. Configure the firewall to forward all unknown files to WildFire for analysis using the predefined default profile. Unknown threats can hide in many different file types.
WildFire can identify malware loaded onto a staging server, find vulnerability scanners, and detect lateral movement tools. Any security policy rule that controls traffic that has, will have, or could have file transfer activity should include an enabled WildFire Analysis profile.
Set up WildFire appliance content updates to download and install automatically every minute so that you always have the most recent support.
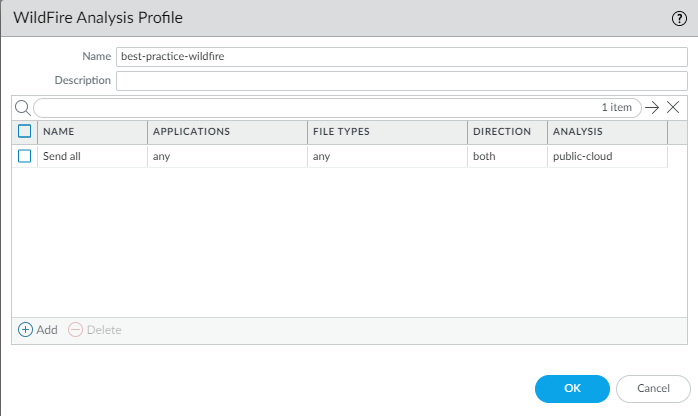
WildFire Analysis profile configured to forward various file types for analysis across different applications and directions.
Attach the default WildFire Analysis profile to all security policy rules that allow traffic because WildFire provides the best defense against unknown threats and advanced persistent threats (APTs). For example:
- Traffic from users to the data center: Identifies unknown malware hosted in the data center (e.g., on Confluence or SharePoint).
- Intra data center traffic: Identifies unknown malware spreading among servers, potentially preventing data exfiltration.
- Traffic from the data center to the internet: Critical for analyzing executables downloaded for software/OS updates.
Set up alerts for malware (email, SNMP, syslog) for immediate notification.
WildFire Action settings in the Antivirus profile may impact traffic if a WildFire signature results in a reset/drop. You might exclude internal software distribution applications during a safe transition , as custom programs might be flagged. Check Monitor > Logs > WildFire Submissions .
Diagrams
Security Profile Application Flow
graph TD
    A[Incoming/Outgoing Traffic] --> B{Security Policy Match? (Allow Action)};
    B -- Yes --> C[Apply Security Profile Group];
    C --> D{Scan with Profiles};
    D --> E[Antivirus Scan (Known Malware)];
    D --> F[Anti-Spyware Scan (C2, Spyware)];
    D --> G[Vulnerability Protection Scan (Exploits)];
    D --> H[File Blocking Scan (Restricted Types)];
    D --> I[WildFire Analysis (Unknown Files)];
    subgraph Profiles Applied
        E --> J{Threat Found?};
        F --> J;
        G --> J;
        H --> J;
        I --> K{Suspicious?};
    end
    J -- Yes --> L[Take Profile Action (Block, Reset, Alert, Sinkhole)];
    J -- No --> M[Allow Traffic];
    K -- Yes --> N[Forward to WildFire Cloud/Appliance];
    K -- No --> M;
    N --> O{WildFire Verdict?};
    O -- Malicious --> P[Generate Signature, Update Firewall];
    P --> L;
    O -- Benign --> M;
    L --> Q[Log Threat];
    M --> R[Log Traffic];
    Q --> S[End Flow];
    R --> S;
    B -- No (Deny/No Match) --> T[Block/Drop Traffic];
    T --> R;
Flowchart illustrating how traffic matching an 'allow' rule is processed through the applied Security Profiles, including scanning, action enforcement, and WildFire analysis.
Layered Threat Prevention
graph LR
    subgraph Threat Vectors
        direction TB
        T1[Known Malware/Viruses]
        T2[Spyware/C2 Communication]
        T3[Exploits/Vulnerabilities]
        T4[Risky/Malicious File Types]
        T5[Unknown/Zero-Day Malware (Files)]
        T6[Malicious Domains (DNS)]
    end

    subgraph Security Profiles
        direction TB
        P1[Antivirus Profile]:::profileStyle
        P2[Anti-Spyware Profile]:::profileStyle
        P3[Vulnerability Protection Profile]:::profileStyle
        P4[File Blocking Profile]:::profileStyle
        P5[WildFire Analysis Profile]:::profileStyle
        P6[DNS Security/Sinkhole (via AS Profile)]:::profileStyle
    end

    T1 --> P1;
    T2 --> P2;
    T3 --> P3;
    T4 --> P4;
    T5 --> P5;
    T6 --> P6;
    P5 --> P1; P5 --> P2; P5 --> P3;  % WildFire Signatures feed other profiles

    classDef profileStyle fill:#f9f,stroke:#333,stroke-width:2px
Diagram showing how different Security Profiles address specific threat vectors, forming a layered defense strategy. WildFire analysis feeds intelligence back into other profiles.
Interactive Quiz
Test your understanding of Data Center Best Practice Security Profiles.