Introduction: DNS Sinkhole Purpose
Objective
This document explains how to configure and utilize the DNS Sinkhole feature on Palo Alto Networks firewalls.
A primary use case arises when an internal DNS server handles queries for internal hosts. If an infected host queries a malicious domain, the query reaching the firewall originates from the internal DNS server, not the actual infected host. This makes identifying the compromised machine difficult solely from the firewall's Threat logs, as they would list the DNS server's IP as the source.
The DNS Sinkhole feature provides a mechanism to overcome this challenge and identify the original source of malicious DNS queries within the network.

Configuration Overview & Important Notes
Overview
The DNS Sinkhole feature allows the Palo Alto Networks firewall to intercept a DNS query for a known malicious domain (identified via Threat Prevention signatures, DNS Security verdicts, or custom EDLs) and forge a response.
Instead of returning the actual malicious IP address, the firewall sends back either:
-
A CNAME record pointing to
sinkhole.paloaltonetworks.com. - A specific IP address (A or AAAA record) configured by the administrator (the "Sinkhole IP").
The core idea is that malware, after resolving the domain, will attempt to initiate subsequent network traffic (TCP, UDP, etc.) to the resolved address. By directing this traffic to a controlled Sinkhole IP, the firewall can log these connection attempts in its Traffic logs , thereby revealing the original source IP address of the infected host.
Important Notes
-
Choosing a Sinkhole IP:
If configuring a custom Sinkhole IP address (A/AAAA record), ensure it's a fictitious RFC1918 IP address (e.g., within 10.0.0.0/8, 172.16.0.0/12, 192.168.0.0/16) that is not actually in use anywhere in your network. Using a loopback interface address on the firewall itself is a common practice. Exception: You might use a real, secured internal IP if you intend to serve custom block pages or perform threat research on the redirected traffic. -
Using the Default CNAME (
sinkhole.paloaltonetworks.com):Using the default CNAME requires an internal DNS server positioned between the client hosts and the firewall. This internal DNS server MUST support and have DNS recursion enabled . The client queries the internal DNS, the firewall injects the CNAME, the internal DNS server receives the CNAME and *must* recursively resolvesinkhole.paloaltonetworks.comto get an actual IP address (provided by Palo Alto Networks' infrastructure) to return to the client.If your internal DNS server does not support recursion, or if clients query the firewall directly without an intermediary recursive DNS server, the CNAME sinkhole method will likely fail. The client will receive the CNAME but won't resolve it further, and no traffic will be directed to the sinkhole IP. In such cases, you must configure a specific Sinkhole IP address (A/AAAA record) instead of using the CNAME. -
External DNS Servers:
If clients use an external DNS server directly (e.g., 8.8.8.8), the firewall can still detect the malicious query via signatures/DNS Security and apply an action. However, the Sinkhole action primarily helps by preventing the client from receiving the *actual* malicious IP. The firewall's Threat log will correctly identify the original client source IP in this case. Injecting a Sinkhole IP/CNAME offers less identification benefit here (as the source IP is already known) but still prevents connection to the real malicious destination. Traffic logs to the sinkhole IP might not be generated if the external resolver doesn't forward the CNAME resolution attempt back through the firewall or if the client doesn't act on the sinkholed A/AAAA record received directly.
Configuration Steps
Follow these steps to configure DNS Sinkholing:
-
Ensure Latest Content Updates
Verify that the firewall has the latest Antivirus content updates (for signature-based detection) and, if licensed, WildFire updates. DNS Security relies on cloud connectivity.
Navigate to Device > Dynamic Updates . Click "Check Now" . Ensure Antivirus and WildFire versions are current. Schedule regular checks (e.g., Antivirus hourly, WildFire every minute or Real-time for PAN-OS 10.0+).
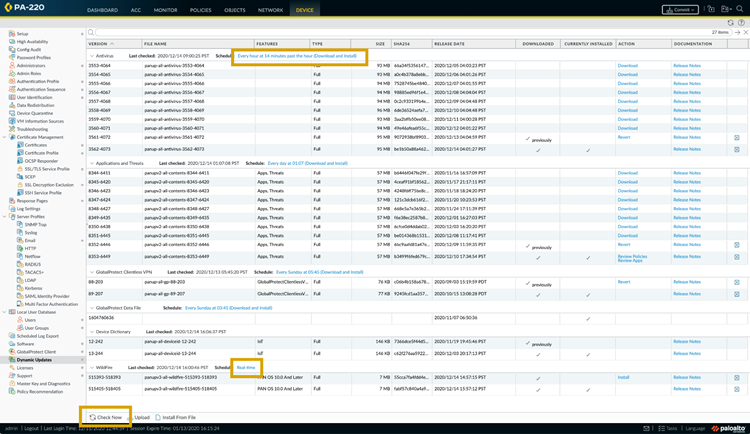
Ensure Antivirus and WildFire content is up-to-date in Device > Dynamic Updates. DNS Sinkhole functionality requires either an active Threat Prevention license (for Anti-Spyware signatures) or a DNS Security license (for cloud verdicts and advanced categories). Sinkholing based on an EDL of type Domain does not require a license. Custom Anti-Spyware DNS signatures cannot trigger the sinkhole action. -
Configure the Sinkhole Action in a Security Profile
Navigate to Objects > Security Profiles > Anti-Spyware . You can edit an existing profile or create a new one. Select the profile you intend to use.
Within the profile, go to the DNS Policies tab.
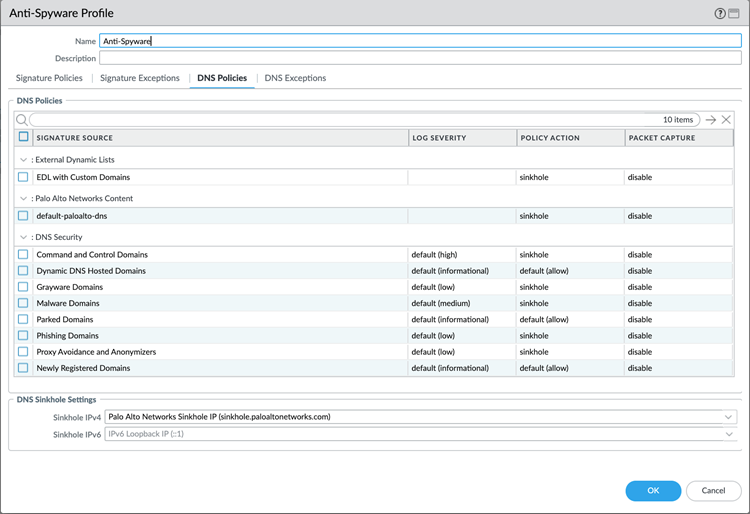
Accessing DNS Policies within the Anti-Spyware profile. Here you can configure the sinkhole action for various threat types:
-
Palo Alto Networks Content DNS Signatures:
Select the rule(s) covering malicious signatures (e.g., the default rules) and change the Action to
sinkhole. -
DNS Security Categories (Requires DNS Security License):
Apply the
sinkholeaction to relevant categories like Malware, Command and Control, DGA, etc. -
External Dynamic Lists (EDL):
If using a Domain EDL for sinkholing, apply the
sinkholeaction here.
In the Sinkhole IPv4 field:
-
Leave the default
sinkhole.paloaltonetworks.comto use the CNAME method (requires internal recursive DNS). -
Select an existing address object or type in a specific, unused RFC1918 address (e.g.,
192.168.254.254) to use a custom Sinkhole IP.
In the Sinkhole IPv6 field:
-
Enter a specific IPv6 sinkhole address if needed. If left blank and IPv6 sinkholing is triggered, the default
::1address is often used.
Remember to apply this Anti-Spyware (or DNS Security) profile to the Security Policy rule(s) that allow outbound DNS traffic from your network. -
Palo Alto Networks Content DNS Signatures:
Select the rule(s) covering malicious signatures (e.g., the default rules) and change the Action to
-
(Conditional) Configure Security Policy for Sinkhole Traffic Logging
This step is primarily needed if you are using the default CNAME
sinkhole.paloaltonetworks.comOR if you want very specific logging/control for traffic going to your custom Sinkhole IP .If using the CNAME:
Since the IP address for
sinkhole.paloaltonetworks.comrotates, you cannot easily filter Traffic logs by a single destination IP. To reliably identify infected hosts, create a specific Security Policy rule:-
Create an Address Object of type FQDN for
sinkhole.paloaltonetworks.com( Objects > Addresses ). - Create a new Security Policy rule ( Policies > Security ). Place this rule *before* any general outbound rules that might match the sinkhole traffic.
-
Set the rule details:
- Name: e.g., "Sinkhole Traffic Log/Deny"
- Source Zone(s): Your internal zones (e.g., Trust)
- Source Address: Any
- Destination Zone: Zone where the sinkhole FQDN resolves (usually External/Untrust)
- Destination Address: Select the FQDN object created above.
- Application: Any (or http, https if you expect specific protocols)
- Service: application-default
-
Action:
Deny(Recommended, as Palo Alto Networks doesn't use received sinkhole packets for telemetry) orAllowif needed for specific reasons. Ensure logging is enabled.
- Now, to find infected hosts, filter the Traffic logs for hits on this specific "Sinkhole Traffic Log/Deny" rule name.
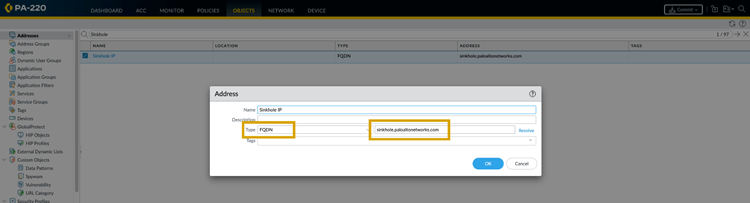
FQDN Address Object for sinkhole.paloaltonetworks.com.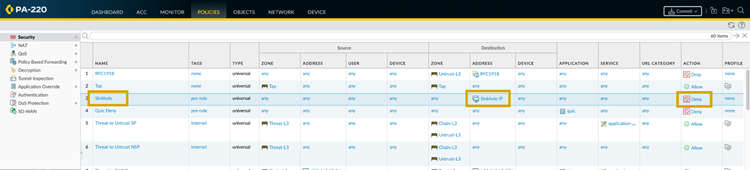
Example Security Policy rule matching traffic destined for the Sinkhole FQDN. 
Filtering Traffic Logs by the Sinkhole policy rule name identifies infected hosts (Source IP). Remember, the CNAME method relies on your internal recursive DNS server successfully resolving the CNAME to an IP. If that fails, clients won't initiate traffic matching this rule.If using a Custom Sinkhole IP:
You can create a similar Security Policy rule targeting your custom Sinkhole IP as the Destination Address. Alternatively, you can simply filter the Traffic logs directly for Destination Address = [Your Custom Sinkhole IP]. Creating a dedicated rule offers cleaner reporting.
-
Create an Address Object of type FQDN for
-
Commit Changes
Commit the configuration changes to the firewall.
Log Analysis & Infected Host Identification
Distinguishing Logs
It's critical to understand which logs provide which pieces of information when dealing with DNS Sinkholing:
-
Threat Logs (Monitor > Logs > Threat):
These logs record the
initial detection
of the malicious DNS query. The Source IP address listed here will be the device that sent the query *to the firewall*.
- If clients query the firewall directly or use an external DNS, this log shows the actual infected client IP.
- If clients use an internal DNS server, this log will show the internal DNS server's IP as the source, *not* the original infected client.
-
Traffic Logs (Monitor > Logs > Traffic):
These logs record actual network sessions (TCP, UDP connections). When DNS Sinkholing is working correctly:
- The infected client receives the fake Sinkhole IP address.
- The client attempts to connect to this Sinkhole IP.
- The firewall logs this connection attempt in the Traffic logs.
- The Source IP in this Traffic log entry IS the actual infected client's IP address .
- The Destination IP will be your configured Sinkhole IP (or an IP resolved from the Sinkhole CNAME).
Finding Infected Hosts
- Navigate to Monitor > Logs > Traffic .
-
Apply a filter:
- If using a Custom Sinkhole IP : Add filter `(addr.dst in [Your Sinkhole IP])`.
- If using the Sinkhole CNAME and created a dedicated rule: Add filter `(rule eq 'NameOfYourSinkholeRule')`. Example: `(rule eq 'Sinkhole Traffic Log/Deny')`.
- Examine the log entries matching the filter. The Source IP column will show the IP addresses of the potentially compromised hosts on your network that attempted to contact the sinkhole.
Conceptual Diagrams
DNS Sinkhole Process Flow (with Internal DNS)
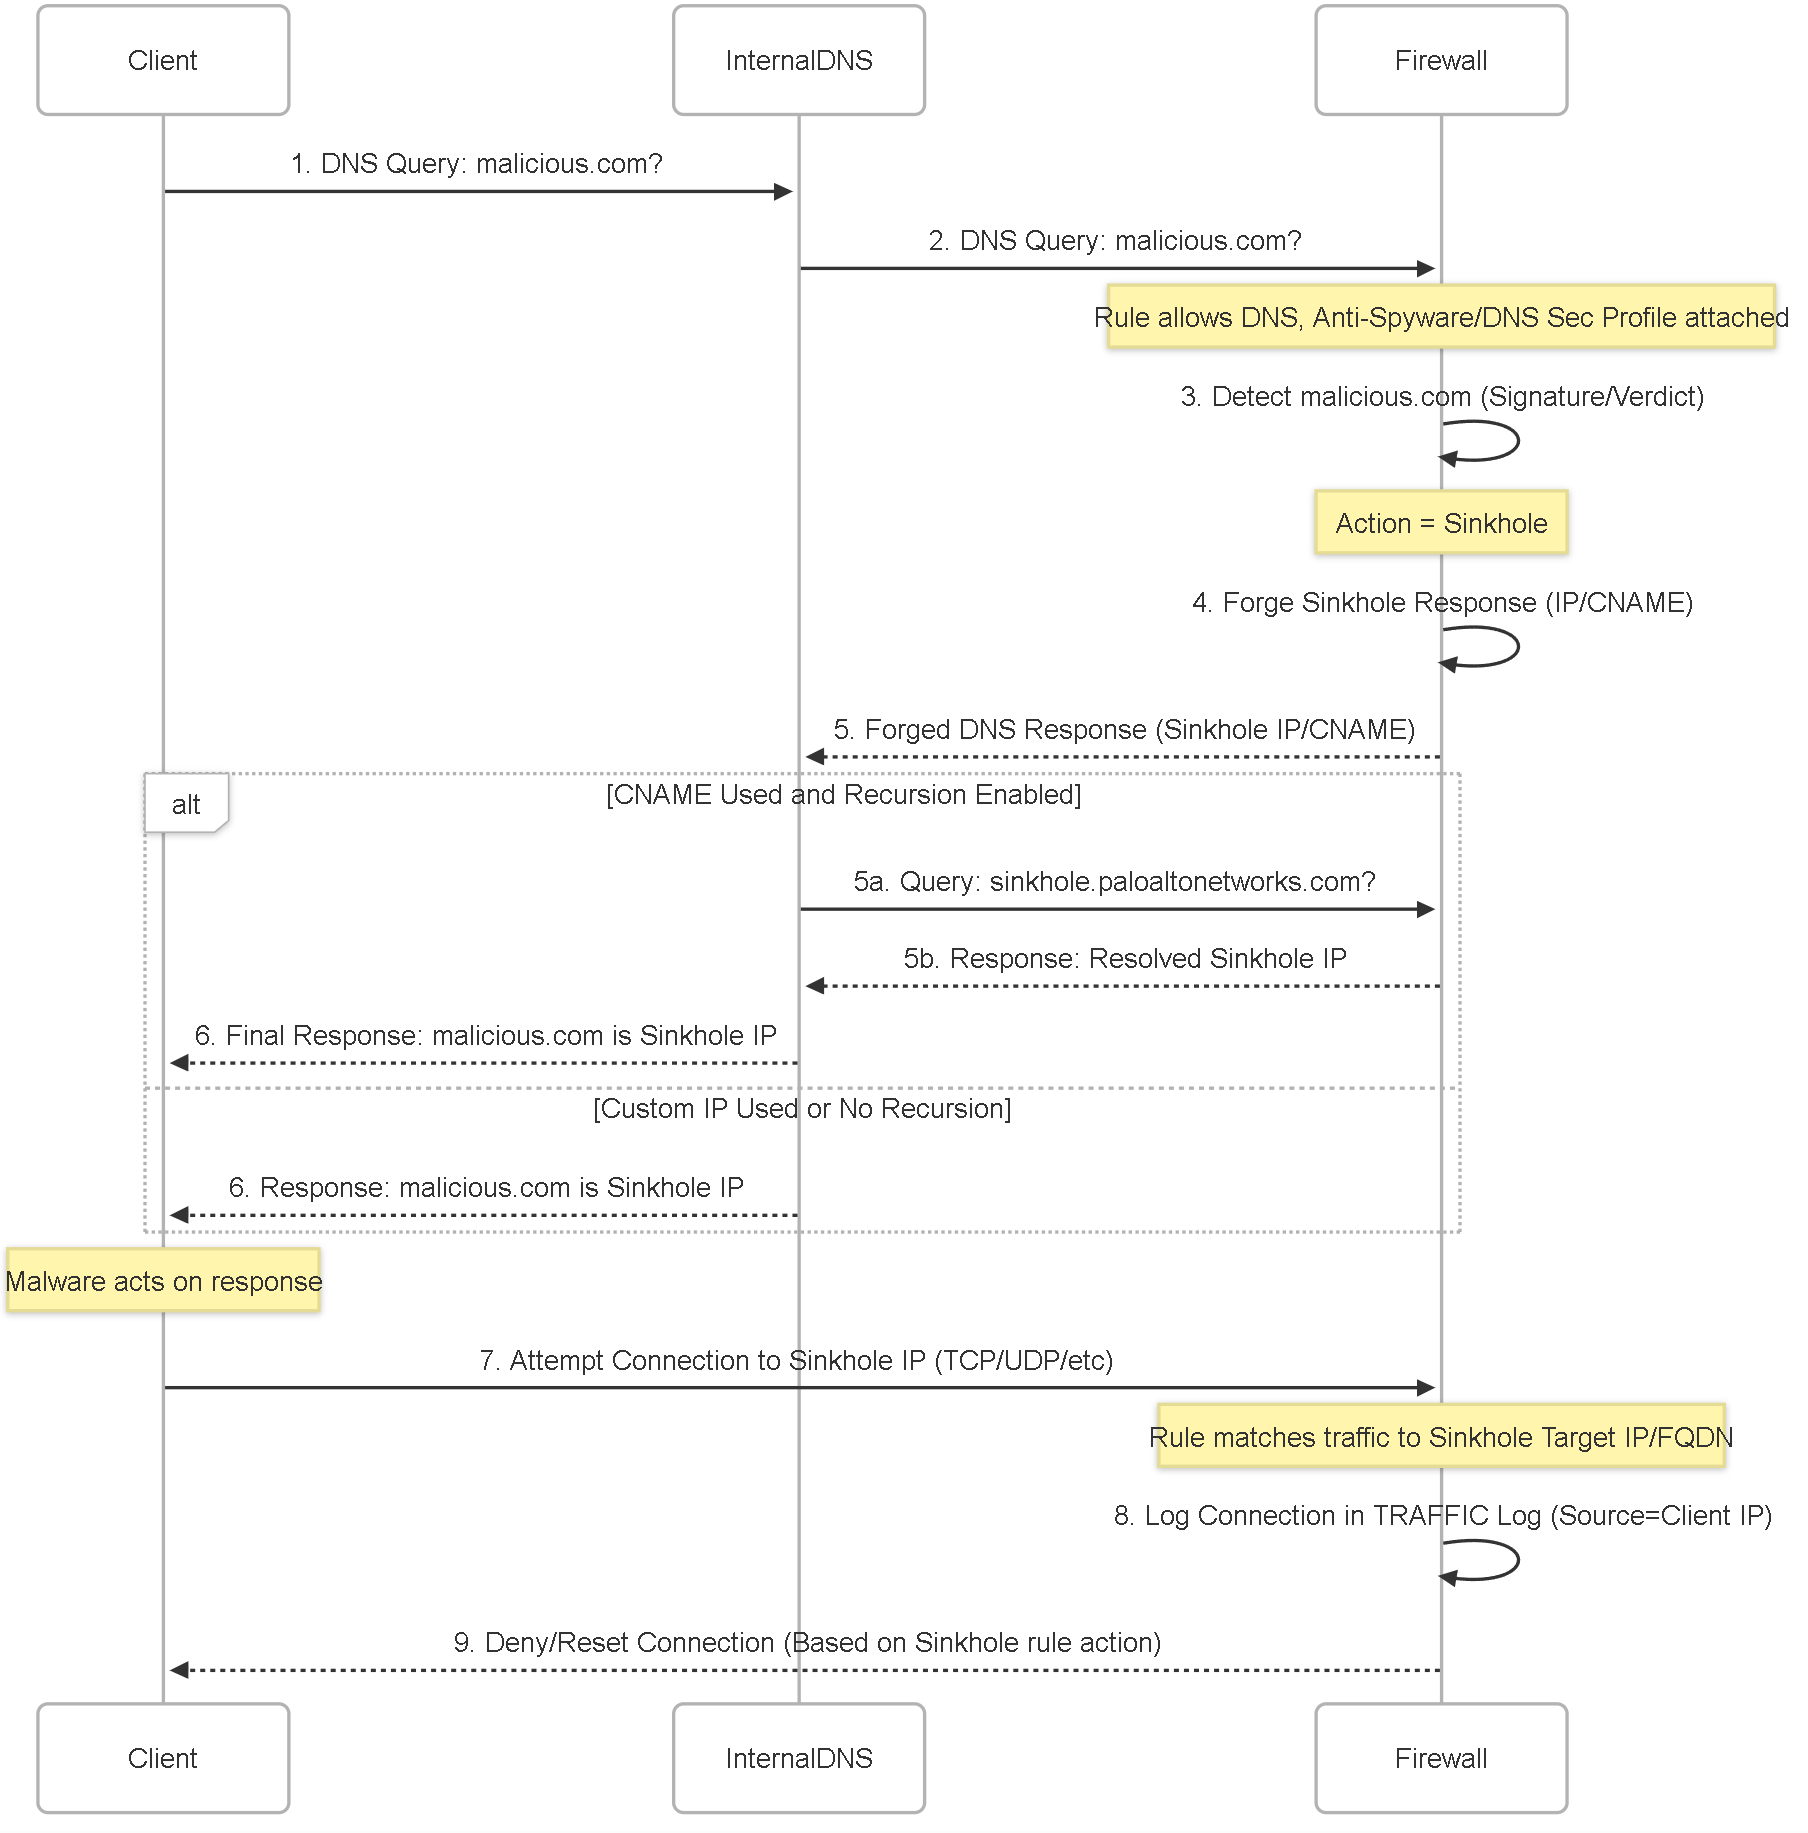
Sequence diagram illustrating the DNS Sinkhole process when an internal DNS server is present.
Simplified Decision Flowchart
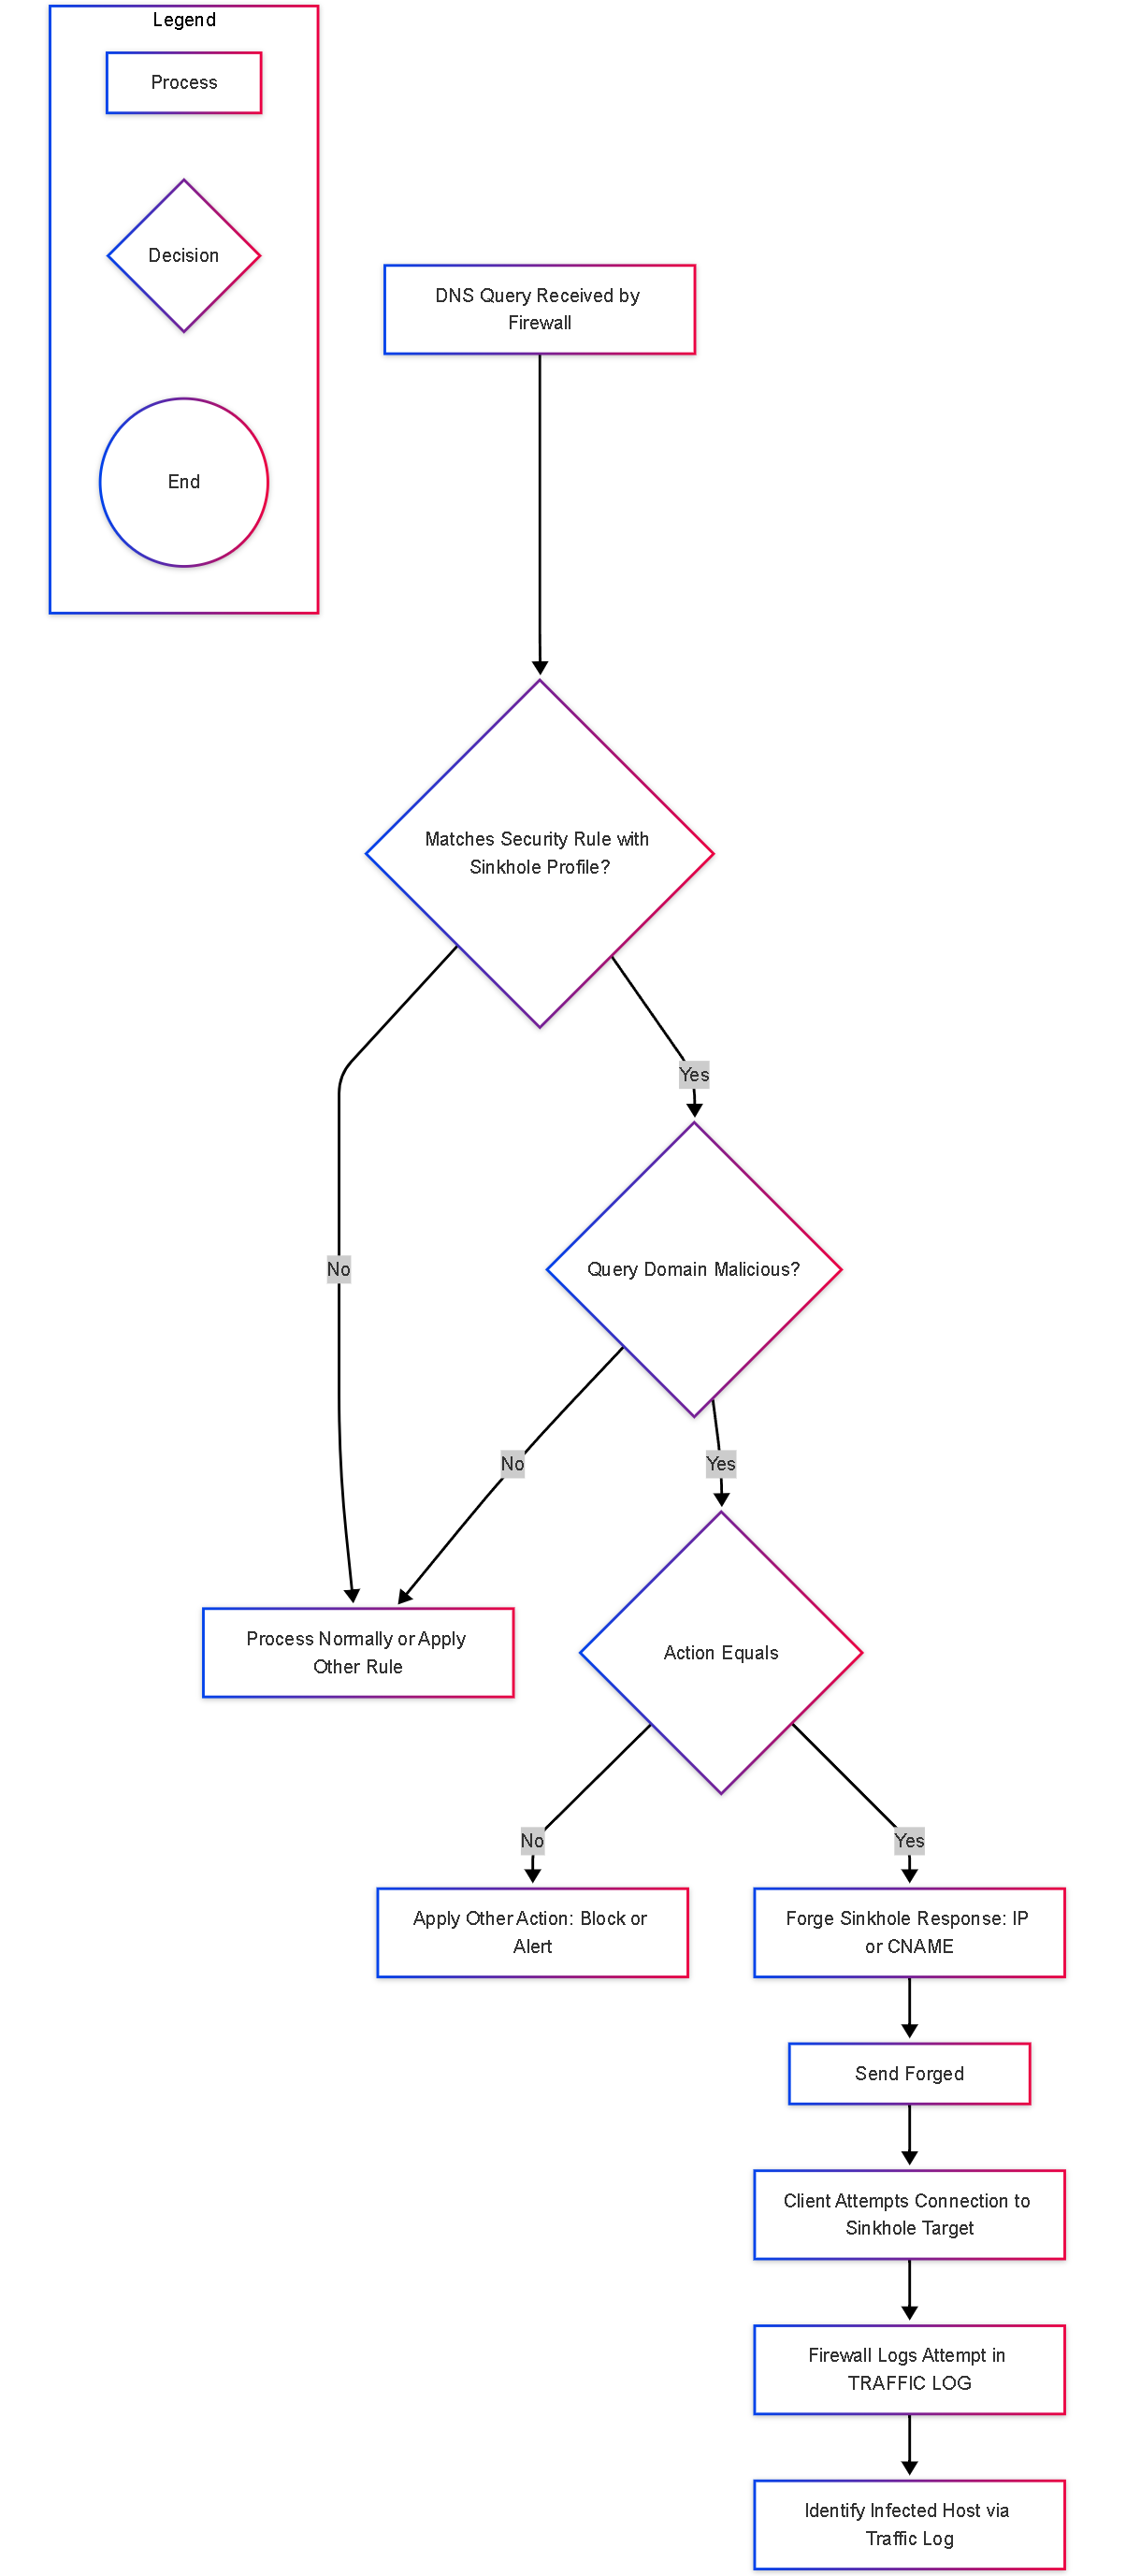
Simplified flowchart showing the DNS Sinkhole decision process.
PCNSE Exam Focus Points
Key takeaways for the PCNSE exam regarding DNS Sinkholing:
- Primary Goal: Understand that DNS Sinkhole's main purpose is infected host identification , especially when internal DNS servers obscure the original source IP in Threat logs.
- Mechanism: Know that it works by intercepting malicious DNS queries (standard DNS, port 53) and returning a forged response pointing to a controlled Sinkhole IP or CNAME.
- Configuration Location: Remember that Sinkhole actions are configured within Security Profiles (Anti-Spyware or DNS Security).
- Trigger Conditions: Sinkholing is triggered by matches against Palo Alto Networks content signatures, DNS Security verdicts, or specific Domain EDLs within the applied profile. (Custom DNS signatures are not supported).
- License Requirements: Know that Threat Prevention or DNS Security license is generally required, except for sinkholing based on Domain EDLs.
-
CNAME vs. Custom IP:
Understand the difference.
-
CNAME (
sinkhole.paloaltonetworks.com) requires an internal, recursive DNS server between client and firewall. Identification requires a dedicated Security Policy rule matching the FQDN. - Custom IP is necessary if no internal recursive DNS exists or if simpler Traffic Log filtering by IP is preferred. The chosen IP must be unused RFC1918.
-
CNAME (
- Identification Log: CRITICAL POINT: Infected hosts are identified by analyzing the Traffic Logs for connections where the Destination Address is the Sinkhole IP (or matches the Sinkhole FQDN rule). Do NOT rely solely on Threat logs for identification when an internal DNS server is present.
- Policy Application: The Security Profile containing the sinkhole configuration must be applied to a Security Policy rule that allows the relevant outbound DNS traffic.
DNS Sinkhole Knowledge Check
Test your understanding of the DNS Sinkhole feature.