Introduction: Basic DNS Security Debugging
Objective
This article covers basic debugging steps for the Palo Alto Networks DNS Security feature. Following these steps can help identify and potentially resolve common issues related to configuration, licensing, and cloud connectivity.
If the issue persists after performing these checks, the collected information will be valuable when opening a support case with Palo Alto Networks Support.
Environment
These steps apply to:
- Any Palo Alto Networks Firewall
- PAN-OS 9.x, 10.x and later versions
- Firewalls with an active DNS Security license
Debugging Workflow Diagram
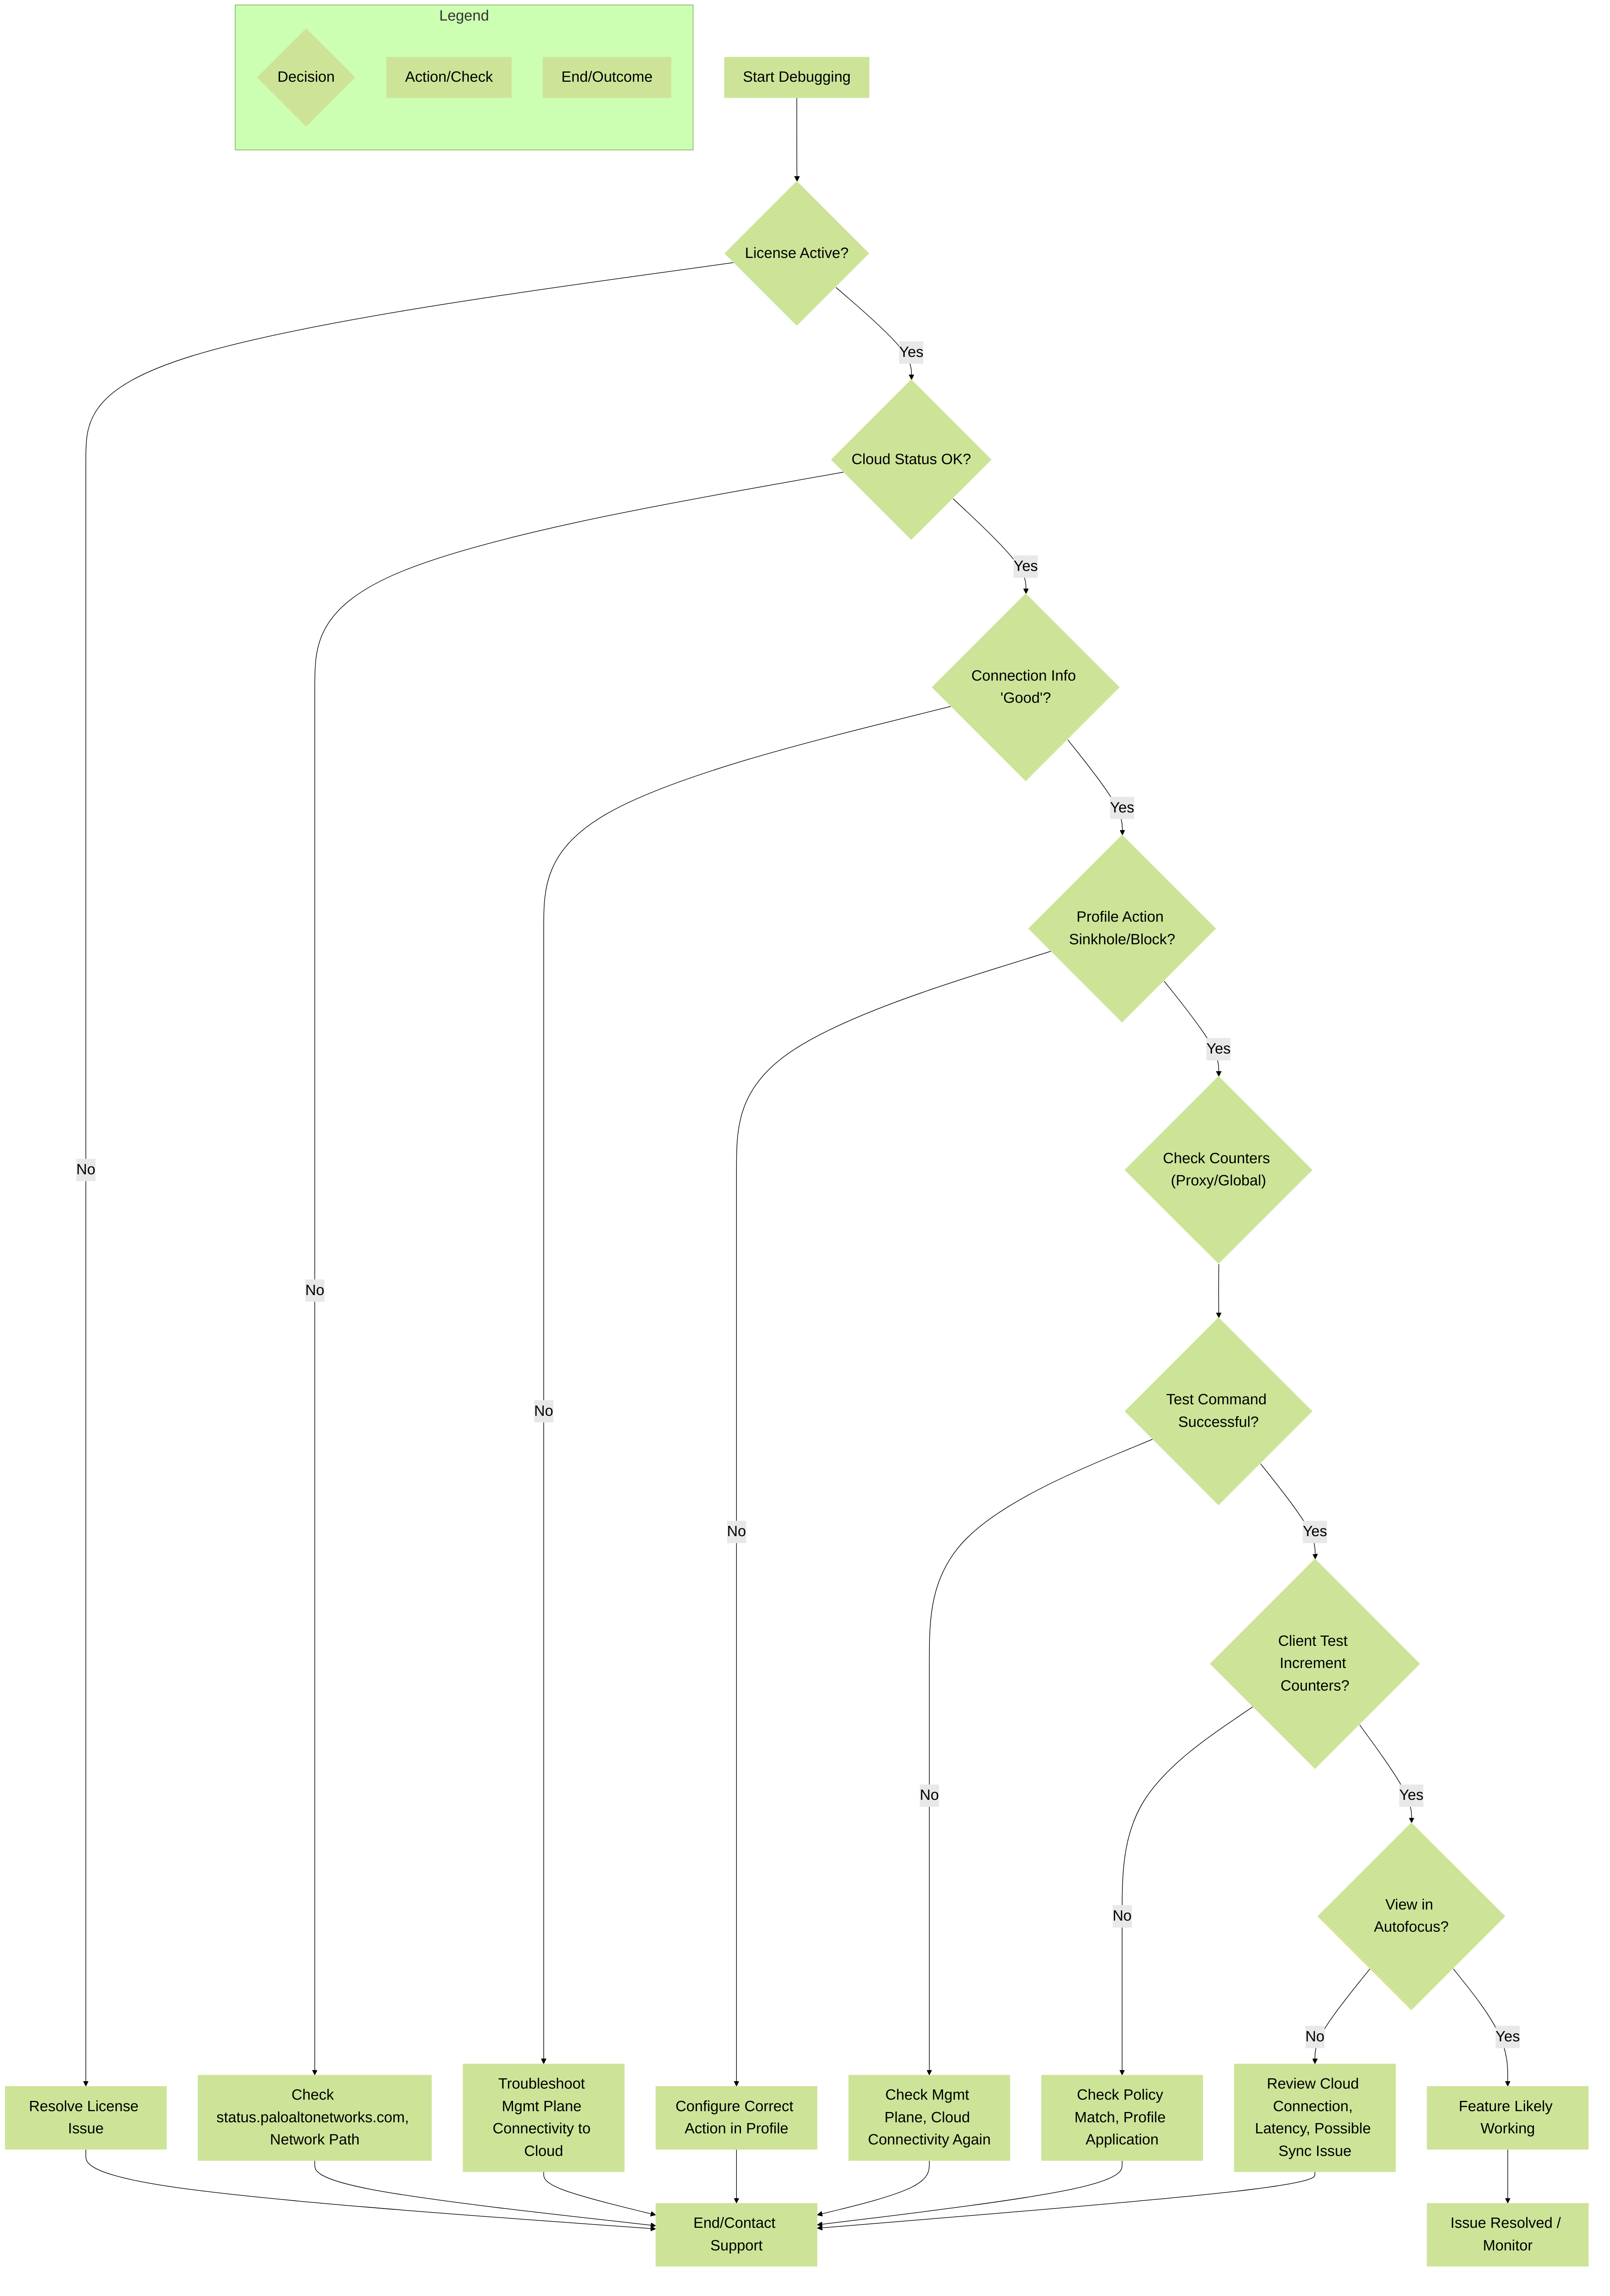
High-level flowchart for debugging DNS Security issues.
Checks & Verification: License
1. Check the DNS Security License Status
The DNS Security feature requires an active license. Verify the license status via the CLI:
> request license info
Look for the "DNS Security" feature entry in the output. Ensure that Expired? shows no .
Example Output:
License entry:
  Feature: DNS Security
  Description: Palo Alto Networks DNS Security License
  Serial: xxxxxxxxxxxx
  Issued: January xx, 2021
  Expires: January xx, 2024
  Expired?: no
Base license: PA-VMChecks & Verification: Cloud Status
2. Check Palo Alto Networks Cloud Service Status
Verify the operational status of the backend cloud services required for DNS Security. Temporary service disruptions can impact functionality.
Visit the official status page:
https://status.paloaltonetworks.com/
Look for the status related to "DNS Security" or relevant core cloud infrastructure components.
Checks & Verification: Firewall-Cloud Connection
3. Check Firewall's Connection to DNS Security Cloud
Verify that the firewall's management plane can successfully connect to the DNS Security cloud service.
> show dns-proxy dns-signature info
Look for the Last Result field. It should indicate Good along with a recent timestamp.
Example Output:
Cloud URL: dns.service.paloaltonetworks.com:443
Last Result: Good ( 46 sec ago )
Last Server Address: 130.211.8.196
Parameter Exchange: Interval 1800 sec
Whitelist Refresh: Interval 86400 sec ( Due 71954 sec )
Request Waiting Transmission: 0
Request Pending Response: 0
Cache Size: 10000
dns.service.paloaltonetworks.com:443
). Troubleshoot management interface routing, security policies allowing this traffic, and potential upstream network issues.
Expected Behavior on Connection Failure:
If the cloud connection fails, the firewall initially attempts a lookup (which fails) and typically forwards the original client DNS query to the upstream server. Since the cloud verdict isn't received, the query might be dropped initially (incrementing
ctd_dns_wait_pkt_drop
). However, after a management plane timeout, the firewall often re-transmits the DNS request (incrementing
ctd_dns_pkt_retransmit
), and this subsequent attempt might succeed if resolved by the upstream server directly.
Checks & Verification: Profile Action
4. Verify Security Profile Action
Ensure that the Anti-Spyware or DNS Security profile applied to your DNS policy rules has an appropriate action configured for the relevant threats or categories. Simply having the profile attached is not enough; the actions within the profile must be set to block or sinkhole to provide protection.
Navigate to Objects > Security Profiles > Anti-Spyware (or DNS Security ).
Edit the profile applied to your DNS Security Policy rule.
- For PAN-OS 9.x: Check the "Palo Alto Networks DNS Security" rule action within the profile.
- For PAN-OS 10.x and later: Check actions for individual DNS Security categories (Malware, C2, DGA, etc.) within the DNS Security profile or the rule actions within the Anti-Spyware profile's DNS Policies tab.
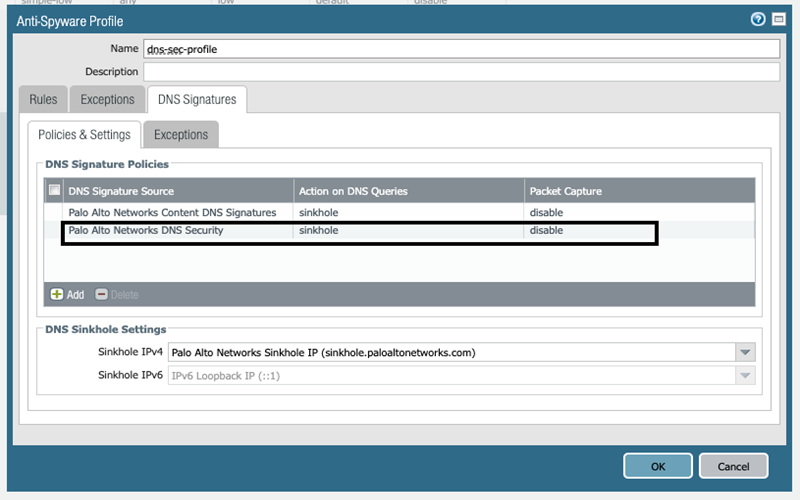
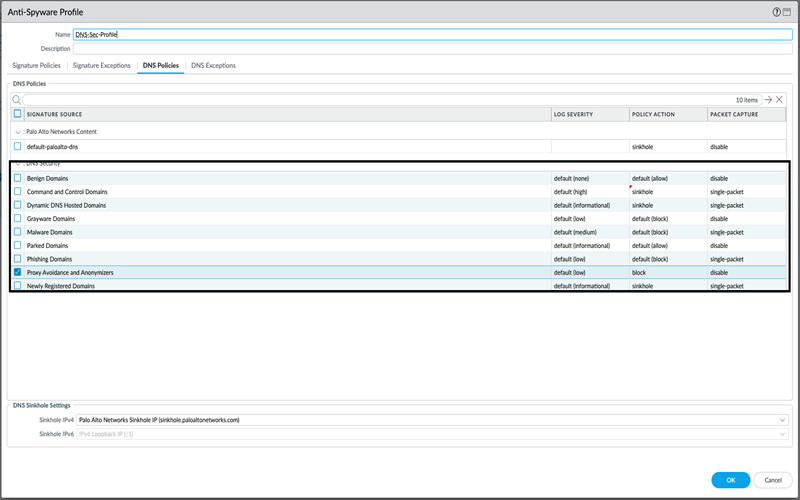
Ensure the action is set to sinkhole (recommended) or block for categories/threats you want to protect against.
Troubleshooting (CLI): DNS Proxy Counters
5. Check DNS Proxy Signature Counters
These counters provide specific insights into the interaction between the firewall's DNS proxy function (
dnsproxyd
process on the data plane) and the DNS Security cloud service (via the management plane).
> show dns-proxy dns-signature counters
Key counters to observe:
-
Signature query API:
-
request: Total number of verdict requests sent to the cloud. Should increment when new FQDNs are queried. -
request_error: Number of errors encountered sending requests. Should ideally be 0. -
response: Total number of responses received from the cloud. Should generally match requests over time.
-
-
latency:
Shows the round-trip time in milliseconds for cloud queries. High latency might indicate network issues.
- Observe the max, min, and average values.
- Check the distribution buckets (e.g., "50 or less", "100 or less"). A high number of queries falling into larger buckets (e.g., > 100ms or 200ms) could indicate performance issues.
Example Output Snippet:
Signature query API:
[request          ] :    59           +7             +0        /sec
[request_error    ] :     0           +0             +0        /sec
[initial_connection ] :    40           +6             +0        /sec
[response         ] :    59           +7             +0        /sec

[latency          ] :
  max         21 (ms)  min          0(ms)  avg     17(ms)
     50 or less : 19
    100 or less : 0
    200 or less : 0
    400 or less : 0
          else : 0
Troubleshooting (CLI): Cloud DNS Timeout
6. Adjust Cloud DNS Timeout (If Necessary)
The default timeout for waiting for a response from the DNS Security cloud is relatively short (often around 100ms, though this may vary slightly by PAN-OS version).
If the latency observed in the `show dns-proxy dns-signature counters` output consistently shows high values (e.g., frequently exceeding 100ms or 200ms), requests might be timing out before a verdict is received. In such cases, you might consider increasing the timeout value.
To check and set the timeout (value in milliseconds):
# set deviceconfig setting ctd cloud-dns-timeout <value>
# commit
Example: Set timeout to 500ms:
# set deviceconfig setting ctd cloud-dns-timeout 500
# commit
Use `<0-60000>` for the value range.
Troubleshooting (CLI): DNS Security Cache
7. Check the DNS Security Verdict Cache
The firewall caches verdicts received from the DNS Security cloud to improve performance and reduce lookup frequency. You can view the cached entries.
To view the entire cache (can be very large):
> show dns-proxy dns-signature cache
To view the cache entry for a specific FQDN:
> show dns-proxy dns-signature cache fqdn <domain-name>
Example:
> show dns-proxy dns-signature cache fqdn italic.com

Domain                           Verdict             GTID          TTL       Hits
---------------------------------------------------------------------------------
*.italic.com                     White list                      31388          0
This shows the domain (or wildcard), the cached verdict (e.g., White list, Malicious, C2), the Global Threat ID (if applicable), the remaining Time-To-Live (TTL) for the cache entry in seconds, and the number of cache hits.
Troubleshooting (CLI): Global Counters
8. Check Global DNS Counters
Global counters provide overall statistics about DNS processing on the data plane, including interactions with the DNS Security feature.
Use the `delta yes` option to see changes since the last time the command was run, which is useful during live testing.
> show counter global filter delta yes | match ctd_dns
Key counters to monitor during testing:
-
ctd_dns_req_lookup_action: Increments when a DNS query matches a signature/verdict resulting in an action (block, sinkhole, alert). -
ctd_dns_req_lookup_noaction: Increments when a query is looked up but yields no specific action (e.g., benign verdict, allow action). -
ctd_dns_req_lookup_miss: Increments when a query is looked up in the cache but no entry is found (triggering potential cloud lookup). -
ctd_dns_malicious_reply/ctd_dns_benign_reply/ctd_dns_failed_reply: Indicate verdicts received from the management plane/cloud. -
ctd_dns_wait_pkt_drop: Packets dropped while waiting for a cloud verdict (might indicate latency/timeout issues). -
ctd_dns_action_block/ctd_dns_action_sinkhole/ctd_dns_action_log: Specific counts for actions taken. -
ctd_dns_pkt_denied: DNS packets denied/dropped based on policy or action.
Example Output Snippet (showing delta changes):
ctd_dns_req_lookup_action             1        +1 info      ctd       pktproc   DNS request signature lookup yield actions
ctd_dns_req_lookup_miss               1        +1 info      ctd       pktproc   DNS request signature lookup not found
ctd_dns_malicious_reply               1        +1 info      ctd       pktproc   MP malicious response received
ctd_dns_action_block                  2        +1 info      ctd       pktproc   DNS signature trigger block action
ctd_dns_action_log                    2        +1 info      ctd       pktproc   DNS signature trigger log action
ctd_dns_action_pktlog                 2        +1 info      ctd       pktproc   DNS signature trigger packet capture action
ctd_dns_request_mp                    1        +1 info      ctd       pktproc   number of requests sent to MP
ctd_dns_pkt_denied                    1        +1 info      ctd       pktproc   number of DNS pkt denied
Troubleshooting (CLI): Test Command
9. Manually Test DNS Security Lookup
You can manually trigger a DNS Security lookup from the firewall's management plane using a `debug` command. This bypasses the data plane and directly tests the management plane's ability to query the cloud service for a specific FQDN.
Use the `bypass-cache yes` option to force a cloud lookup even if the result is cached.
> debug dnsproxyd dns-signature query bypass-cache yes fqdn <domain-to-test>
Example using a known Palo Alto Networks test domain:
> debug dnsproxyd dns-signature query bypass-cache yes fqdn test-malware.testpanw.com
Expected successful output:
Debug dns-signature command successful.After running this command, you can re-check the `show dns-proxy dns-signature counters` (Step 5) to see if the `request` and `response` counters for the "Signature query API" (and potentially the MP counters like `cloud_query`) have incremented by one. This confirms the management plane successfully communicated with the cloud.
Troubleshooting (CLI): Client Testing
10. Test from a Client & Verify Counters
After performing the initial checks and potentially the manual test, initiate a DNS query from a client machine located behind the firewall. Ensure this client's traffic matches the Security Policy rule where your DNS Security / Anti-Spyware profile is applied.
Before testing from the client:
-
Optionally clear the cache for the specific test domain on the firewall:
Caution: Avoid using `clear dns-proxy dns-signature cache all` as it might cause issues. Clear only specific FQDNs needed for testing.
> clear dns-proxy dns-signature cache fqdn test-malware.testpanw.com
-
Capture the current global counters:
> show counter global | match ctd_dns
From the client machine (e.g., Linux/macOS terminal or Windows Command Prompt):
$ nslookup test-malware.testpanw.com
$ nslookup test-dga.testpanw.com
Note: The client might receive a timeout or a sinkhole IP, depending on the configured action. The actual resolution result on the client isn't the primary focus here; we want to see if the firewall processed the query.
Immediately after the client test, check the global counters again using the delta option:
> show counter global filter delta yes | match ctd_dns
Look for increments in relevant counters like:
-
ctd_dns_req_lookup_action(if an action was taken) -
ctd_dns_req_lookup_miss(if it wasn't cached) -
ctd_dns_malicious_reply(if cloud returned malicious) -
ctd_dns_action_sinkholeorctd_dns_action_block(depending on configured action) -
ctd_dns_request_mp(if query was sent to management plane/cloud)
Validation: Check AutoFocus (Optional)
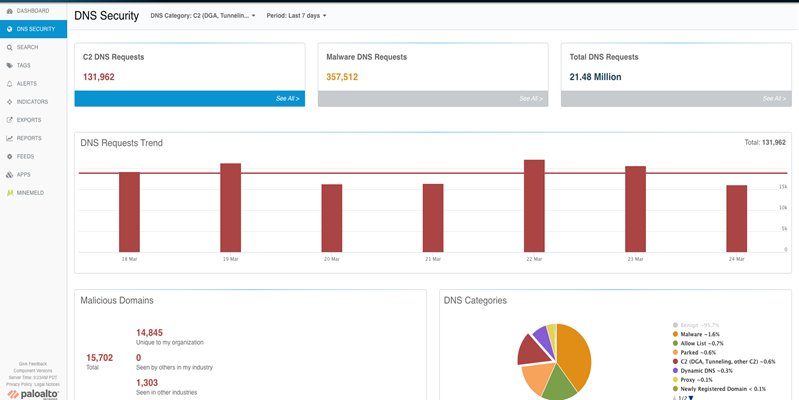
11. Verify Queries in AutoFocus
If you have access to AutoFocus, you can check the DNS Security tab to see if DNS queries processed by your firewall are appearing there. This serves as an external validation that the telemetry data is reaching the Palo Alto Networks cloud infrastructure.
12. Gather Information for Support
If the DNS Security feature is still not working as expected after performing these steps, gather all the collected outputs (license info, connection info, counter outputs before/after testing, cache checks, manual test results, relevant policy/profile screenshots) and open a support case with Palo Alto Networks.
DNS Security Debugging Knowledge Check
Test your understanding of the DNS Security debugging steps.