Introduction to OSPF Concepts
OSPF (Open Shortest Path First) determines routes dynamically by obtaining information from other routers and advertising routes to other routers by way of Link State Advertisements (LSAs) . The router keeps information about the links between it and the destination and can make highly efficient routing decisions.
A cost is assigned to each router interface, and the best routes are determined to be those with the lowest costs, when summed over all the encountered outbound router interfaces and the interface receiving the LSA.
Hierarchical techniques are used to limit the number of routes that must be advertised and the associated LSAs. Because OSPF dynamically processes a considerable amount of route information, it has greater processor and memory requirements than does RIP.
The following topics introduce the OSPF concepts you must understand in order to configure the firewall to participate in an OSPF network.
OSPFv3
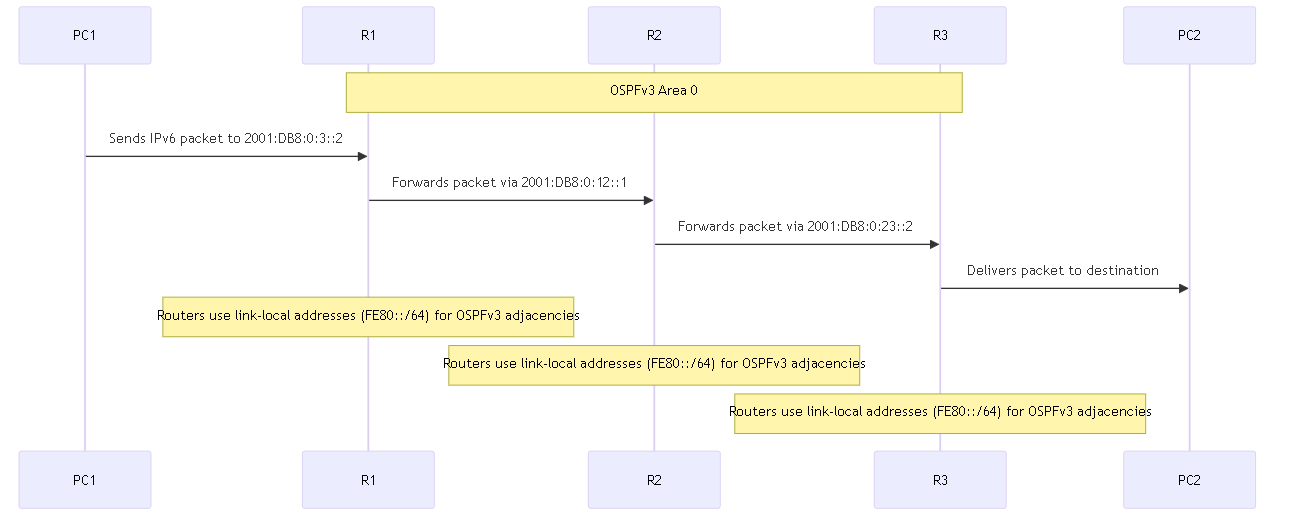
OSPFv3 provides support for the OSPF routing protocol within an IPv6 network. As such, it provides support for IPv6 addresses and prefixes. It retains most of the structure and functions in OSPFv2 (for IPv4) with some minor changes. The following are some of the additions and changes to OSPFv3:
- Support for multiple instances per link: With OSPFv3, you can run multiple instances of the OSPF protocol over a single link. This is accomplished by assigning an OSPFv3 instance ID number. An interface that is assigned to an instance ID drops packets that contain a different ID.
- Protocol Processing Per-link: OSPFv3 operates per-link instead of per-IP-subnet as on OSPFv2.
- Changes to Addressing: IPv6 addresses are not present in OSPFv3 packets, except for LSA payloads within link state update packets. Neighboring routers are identified by the Router ID .
- Authentication Changes: OSPFv3 doesn't include any authentication capabilities of its own. Configuring OSPFv3 on a firewall requires an authentication profile that specifies Encapsulating Security Payload (ESP) or IPv6 Authentication Header (AH) (IPSec). The re-keying procedure specified in RFC 4552 is not supported in this release.
- Support for multiple instances per-link: Each instance corresponds to an instance ID contained in the OSPFv3 packet header. (Note: Duplicate point from source)
- New LSA Types: OSPFv3 supports two new LSA types: Link LSA and Intra Area Prefix LSA .
All additional changes are described in detail in RFC 5340.
OSPF Neighbors
Two OSPF-enabled routers connected by a common network and in the same OSPF area that form a relationship are OSPF neighbors . The connection between these routers can be through a common broadcast domain or by a point-to-point connection. This connection is made through the exchange of hello OSPF protocol packets .
Understanding neighbor states (Down, Init, 2-Way, ExStart, Exchange, Loading, Full) is crucial for troubleshooting OSPF adjacency issues.
These neighbor relationships are used to exchange routing updates between routers.
OSPF LSA Types
Link State Advertisements (LSAs) are the fundamental data packets OSPF routers use to exchange topology information. Each LSA type serves a specific purpose and has a defined flooding scope. Understanding these types is crucial for designing, troubleshooting, and securing OSPF networks.
Recognizing the different LSA types, their purpose, originating router type, and flooding scope is essential knowledge for PCNSE/PCNSA exams.
Common OSPFv2 LSA Types:
| LSA Type | Name | Originated By | Flooding Scope | Description |
|---|---|---|---|---|
| Type 1 | Router LSA | All Routers | Within a single Area | Describes the router's directly connected links (interfaces), their status, cost, and connected neighbors within the area. Identifies the router (Router ID) and flags if it's an ABR or ASBR. |
| Type 2 | Network LSA | Designated Router (DR) | Within a single Area | Generated only for broadcast or NBMA network segments. Lists all routers attached to that specific multi-access segment. Represents the segment itself as a node in the topology graph. |
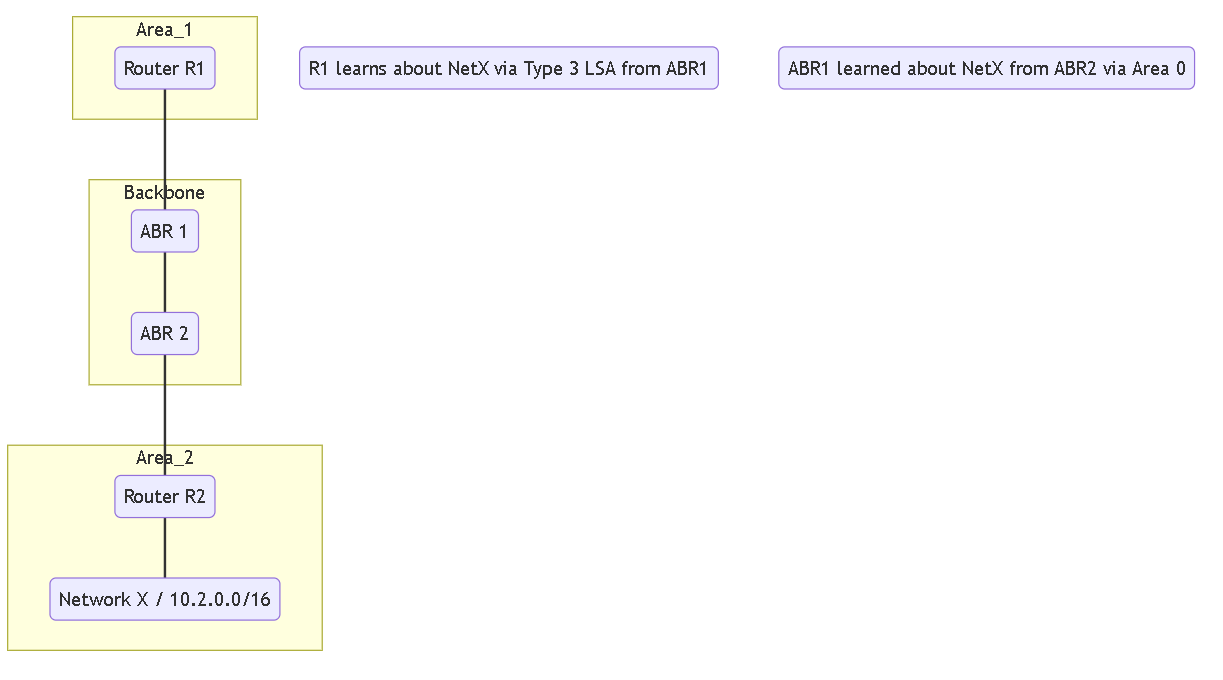
| Type 3 | Summary LSA | Area Border Router (ABR) | Into an Area (from other areas) | Advertises inter-area routes (networks learned from other areas) into an area. Generated by ABRs to inform routers in one area about networks in other areas. Summarization can occur here. Blocked by Totally Stubby Areas. |
| Type 4 | ASBR Summary LSA | Area Border Router (ABR) | Into an Area (from other areas) | Advertises the location (Router ID) of an ASBR that resides in a different area. Allows routers within an area to calculate the path *to* the ASBR to reach external routes advertised by Type 5 LSAs. Blocked by Stub and Totally Stubby Areas. |
| Type 5 | AS External LSA | Autonomous System Boundary Router (ASBR) |
Entire OSPF Domain
(except Stub/NSSA areas) |
Advertises routes external to the OSPF Autonomous System (routes redistributed from other protocols like BGP, EIGRP, or static). Includes the external network prefix, metric, metric-type (E1/E2), and optional Forwarding Address. Blocked by Stub, Totally Stubby, and NSSA areas. |
| Type 7 | NSSA External LSA | ASBR (within an NSSA) | Only within the NSSA Area | Advertises external routes originating from an ASBR within a Not-So-Stubby Area (NSSA). These are translated into Type 5 LSAs by the NSSA ABR for propagation into the rest of the OSPF domain. Allows limited external route injection in stub-like areas. |
Key OSPFv3 LSA Additions/Changes:
OSPFv3 reuses some LSA type numbers but modifies their function codes and content for IPv6. Key additions include:
- Type 8 (Link LSA): Used for link-local purposes, such as advertising link-local addresses and IPv6 options on a link. Flooded only on the local link.
- Type 9 (Intra-Area Prefix LSA): Carries IPv6 prefix information that was previously included in Type 1 and Type 2 LSAs in OSPFv2. Originated by all routers and DRs, flooded within the area.
OSPFv3 separates the topology information (Type 1, 2) from the address prefix information (Type 9), making it more flexible for different address families.

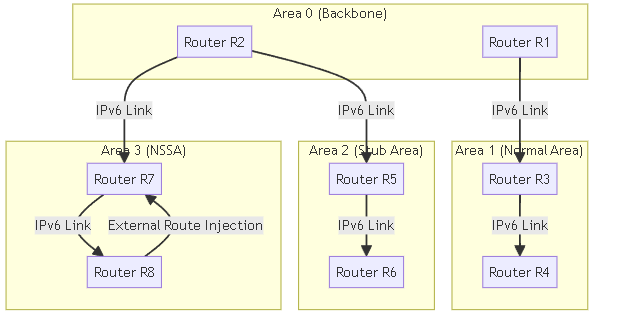
OSPF Areas
OSPF operates within a single autonomous system (AS) . Networks within this single AS, however, can be divided into a number of areas . By default, Area 0 (0.0.0.0) is created. Area 0 can either function alone or act as the OSPF backbone for a larger number of areas. Each OSPF area is named using a 32-bit identifier which in most cases is written in the same dotted-decimal notation as an IPv4 address.
The topology of an area is maintained in its own link state database (LSDB) and is hidden from other areas, which reduces the amount of traffic routing required by OSPF. The topology is then shared in a summarized form between areas by a connecting router (ABR).
Understanding OSPF Area types and their LSA filtering behavior is fundamental for the PCNSE and PCNSA exams.
| OSPF Area Type | Description |
|---|---|
| Backbone Area (Area 0) | The backbone area (Area 0 or 0.0.0.0) is the core of an OSPF network. All other areas must connect to it (directly or via virtual link), and all traffic between areas must traverse it. All routing between areas is distributed through the backbone area. |
| Normal OSPF Area | In a normal OSPF area there are no restrictions; the area can carry all types of routes (Intra-area, Inter-area, External Type 1/2). |
| Stub OSPF Area | A stub area does not receive external routes (Type 5 LSAs) from other autonomous systems. Routing out of the stub area is performed through a default route advertised by the ABR. It does receive intra-area (Type 1/2) and inter-area (Type 3) routes. |
| NSSA Area (Not So Stubby Area) | The NSSA is a type of stub area that can import external routes (as Type 7 LSAs) from a directly connected ASBR within the NSSA, with some limited exceptions. These Type 7 LSAs are translated to Type 5 by the NSSA ABR for propagation into the backbone. Like Stub areas, standard Type 5 LSAs are not flooded into an NSSA. |
| Totally Stubby Area (TSA) | (Not explicitly in source table, but important) A Cisco proprietary concept, implemented on Palo Alto Networks firewalls by configuring a Stub Area and disabling 'Accept Summary' on the ABR. A TSA blocks both external routes (Type 5 LSAs) and inter-area routes (Type 3 LSAs), relying solely on a default route from the ABR. |
OSPF Router Types
Within an OSPF area, routers are divided into the following categories.
Knowing the different OSPF router roles is essential.
- Internal Router: A router that has all its OSPF interfaces within the same single area .
- Area Border Router ( ABR ): A router that has interfaces connected to multiple OSPF areas (typically including Area 0). ABRs are responsible for summarizing routes between areas and filtering LSAs based on area type.
- Backbone Router: A backbone router is a router that runs OSPF and has at least one interface connected to the OSPF backbone area (Area 0) . Since ABRs are always connected to the backbone, they are always classified as backbone routers. Internal routers within Area 0 are also backbone routers.
- Autonomous System Boundary Router ( ASBR ): An ASBR is a router that connects the OSPF domain to an external routing domain (e.g., BGP, EIGRP, static routes) and injects (redistributes) external routes into OSPF as Type 5 or Type 7 LSAs.
Configure OSPF (IPv4)
Where Can I Use This?
- NGFW (Managed by PAN-OS or Panorama)
After you understand OSPF Concepts, perform the following procedure to configure OSPF (for IPv4).
- Configure general virtual router settings (Network > Virtual Routers > select VR).
-
Enable OSPF.
- Select the OSPF tab.
- Select Enable to enable the OSPF protocol.
- Enter the Router ID . This must be unique within the OSPF domain and is typically an IP address on the router (often a loopback), formatted x.x.x.x.
- Select Reject Default Route if you do not want to learn any default routes through OSPF. This is the recommended, default setting. Clear it ONLY if you specifically need to import a default route via OSPF.
-
Configure Areas - Type.
-
On the
Areas
tab,
Add
an
Area ID
(e.g.,
0.0.0.0for backbone,0.0.0.1for Area 1). -
On the
Type
tab, select the area
Type
:
- Normal: No restrictions.
-
Stub:
Blocks Type 5 LSAs. Configure:
- Accept Summary: Checked by default. If unchecked, the area becomes a Totally Stubby Area (TSA), blocking Type 3 LSAs as well.
- Advertise Default Route: Advertises a default route into the stub area with a specific metric (1-255).
-
NSSA
(Not-So-Stubby Area): Blocks Type 5 LSAs but allows Type 7 LSAs from ASBRs within the NSSA. Configure:
- Accept Summary: Same as Stub.
- Advertise Default Route: Same as Stub.
- Type: Select Ext 1 or Ext 2 route type for the advertised default LSA and redistributed routes. Ext 1 adds internal cost, Ext 2 uses only the external cost.
- Ext Ranges: Add ranges of external routes to Advertise or Suppress advertising (summarization/filtering for Type 7 LSAs).
- Click OK .
-
On the
Areas
tab,
Add
an
Area ID
(e.g.,
-
Configure Areas - Range (Optional Route Summarization for ABRs).
- On the Range tab, Add aggregate LSA destination addresses (subnets) within the area.
- Choose to Advertise or Suppress LSAs matching the subnet. This applies to Type 3 Summary LSAs generated by an ABR for routes within this area.
- Click OK . Repeat for additional ranges.
-
Configure Areas - Interfaces.
-
On the
Interface
tab,
Add
each interface participating in OSPF within this area:
- Interface: Select the firewall interface (e.g., ethernet1/1).
- Enable: Check to activate OSPF on this interface.
- Passive: Select if you want the network connected to this interface advertised into OSPF, but do not want the interface to form neighbor relationships or send/receive OSPF packets. Useful for advertising networks towards end-hosts.
-
Link type:
- Broadcast: Default for Ethernet. Uses DR/BDR election. Discovers neighbors via multicast hellos.
- p2p (point-to-point): No DR/BDR election. Discovers neighbor via multicast hellos. Suitable for serial links or dedicated Ethernet links between two routers.
- p2mp (point-to-multipoint): No DR/BDR election. Neighbors must be defined manually. Treats the link as a collection of point-to-point links. Use when multicast isn't reliable or for specific NBMA topologies. Add neighbor IP addresses if selected.
- Metric: OSPF cost for this interface (0-65,535; default 10). Lower is preferred. Cost is often calculated as Reference Bandwidth / Interface Bandwidth.
- Priority: Used for DR/BDR election on Broadcast/NBMA networks (0-255; default 1). Highest priority wins DR election. 0 means the router will never become DR/BDR.
- Auth Profile: Select a pre-defined authentication profile (see step 7).
- Timing: Modify Hello/Dead intervals if needed ( not recommended unless matching neighbors). Timers must match between neighbors to form adjacency.
- Click OK .
-
On the
Interface
tab,
Add
each interface participating in OSPF within this area:
-
Configure Areas - Virtual Links (Only if needed).
- Use Virtual Links only to connect an area to the backbone (Area 0) through a non-backbone transit area.
-
On the
Virtual Link
tab (only available for Area 0),
Add
:
- Name: Descriptive name.
- Enable: Check to activate.
- Neighbor ID: Router ID of the ABR at the other end of the virtual link.
- Transit Area: Area ID of the area the virtual link traverses.
- Timing: Keep defaults unless necessary.
- Auth Profile: Select profile if authentication is needed across the virtual link.
- Click OK .
- Click OK to save the Area configuration.
-
(
Optional
) Configure Auth Profiles.
OSPFv2 supports Plain Text and MD5 authentication. MD5 is recommended.
- Select the Auth Profiles tab and Add a profile name.
-
For Simple Password:
- Select Simple Password as Password Type .
- Enter and confirm the password. Must match on neighboring interfaces. Highly insecure.
-
For MD5:
- Select MD5 as Password Type .
-
Add
one or more entries:
- Key-ID (0-255): Must match on neighboring interfaces.
- Key: The authentication key (password). Must match on neighboring interfaces for the same Key-ID.
- Select Preferred for the key to be used for outgoing messages (allows for key rollover).
- Click OK .
-
Configure Advanced OSPF options.
- On the Advanced tab:
- Select RFC 1583 Compatibility if needed for interoperability with older OSPF implementations (generally leave unchecked).
- SPF Calculation Delay (sec): Time between receiving topology change and running SPF calculation (default is often 2-5 seconds). Lower values speed up convergence but increase CPU load during instability.
- LSA Interval (sec): Minimum time between retransmitting the same LSA (default is often 5 seconds). Protects against LSA flooding storms.
- Click OK .
- Commit your changes.
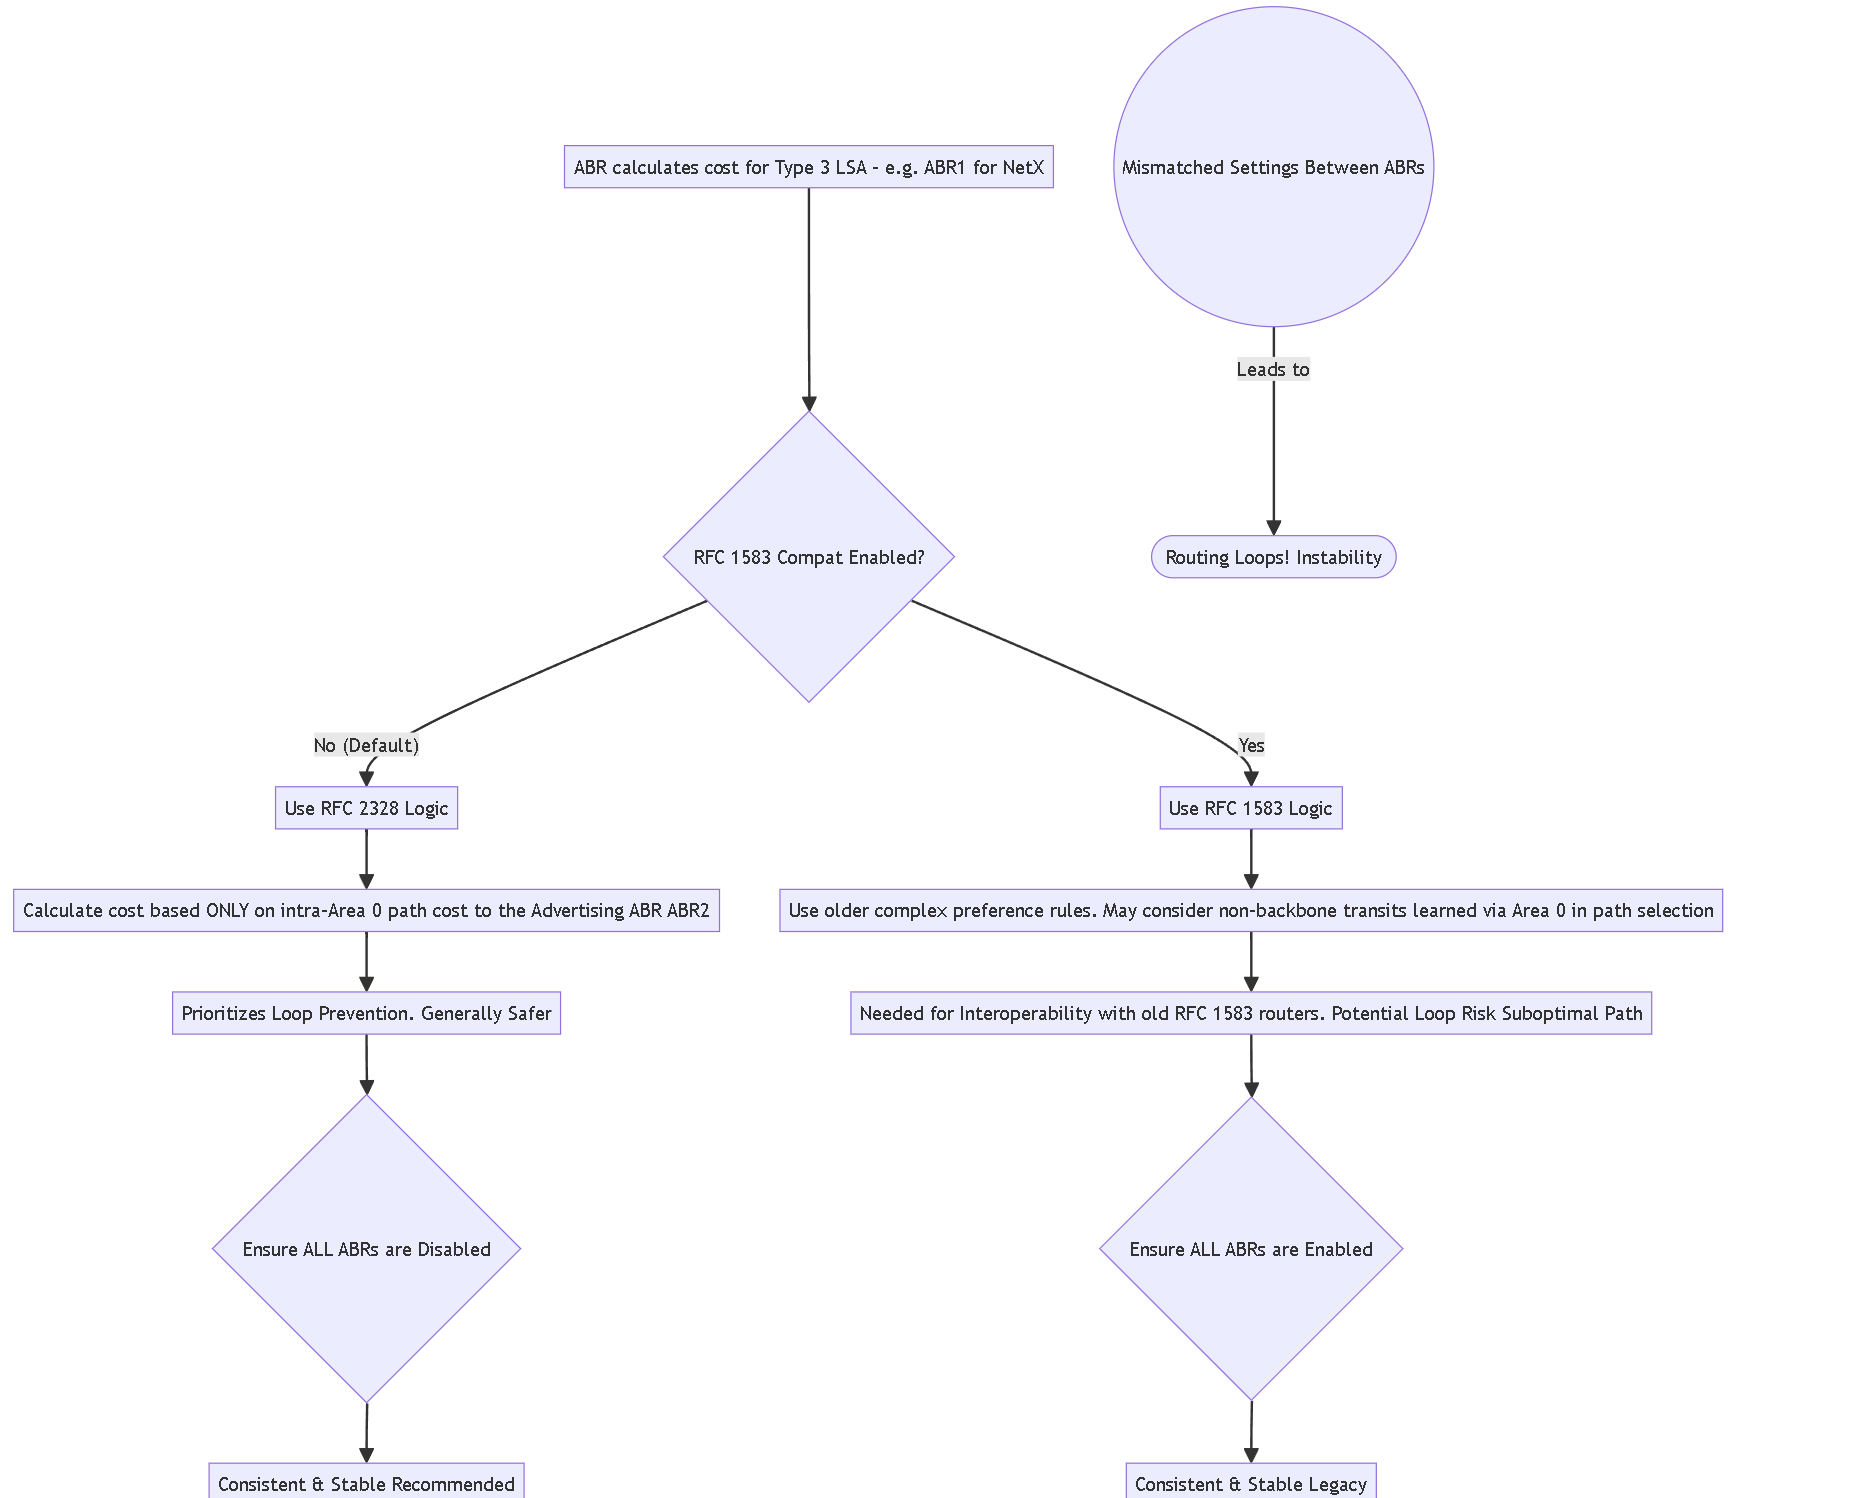
- RFC 2328 (Compatibility Disabled - Default & Preferred): When calculating the cost for a Type 3 LSA, the ABR considers the cost of the intra-area path within Area 0 to reach the *advertising ABR* for that summary. It prioritizes loop prevention and generally uses the most straightforward backbone path cost.
- RFC 1583 (Compatibility Enabled ): Uses the older RFC 1583 logic. This logic had more complex preference rules and, in some scenarios (like virtual links or specific cost setups), could prefer a path learned *via* Area 0 that might actually transit through another non-backbone area, potentially leading to suboptimal routing or routing loops. It essentially had different tie-breaking rules compared to RFC 2328.
OSPF RFC 1583 Compatibility Explained
RFC 1583 compatibility is an OSPF setting primarily relevant in multi-area OSPF topologies. It dictates how an Area Border Router (ABR) calculates the cost of inter-area routes (Type 3 Summary LSAs), specifically regarding paths learned through the backbone area (Area 0).
Key Point: The original OSPF specification (RFC 1583) had a specific way of calculating these paths. A later revision (RFC 2328, which obsoletes 1583 and is the basis for modern OSPFv2) modified this calculation to prevent potential routing loops that could occur under certain complex network topologies or with specific cost configurations when using the older RFC 1583 logic.
The Difference in Calculation (Simplified)
The core difference lies in how an ABR decides the best path when multiple paths exist through Area 0 to reach another ABR that originates a summary route:
CRITICAL: Disabling RFC 1583 compatibility (i.e., using the RFC 2328 standard logic) is the recommended and default behavior for modern networks as it provides better protection against routing loops.
When to Enable RFC 1583 Compatibility
You should typically only enable RFC 1583 compatibility if your OSPF domain includes older routers that strictly adhere to RFC 1583 and cannot be upgraded, or if there's a specific, well-understood design reason requiring interaction with such devices.
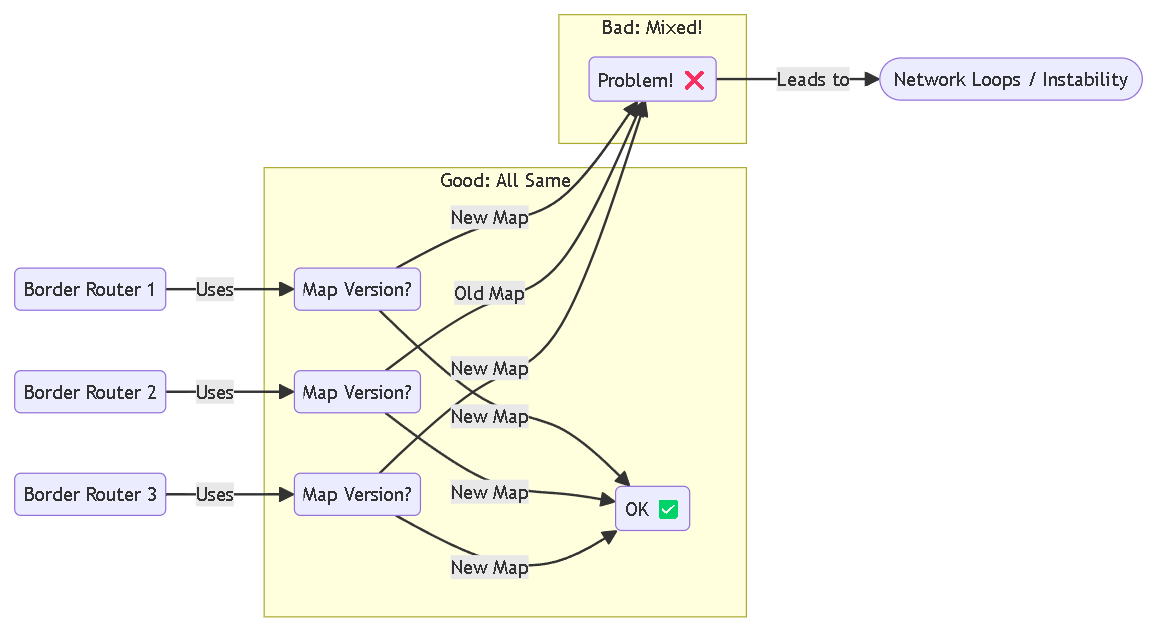
Gotcha! Mixing modes is dangerous! All ABRs within the OSPF domain MUST have the RFC 1583 compatibility setting configured identically (either all enabled or all disabled). Mismatched settings between ABRs can lead to inconsistent routing tables, routing loops, and network instability.
Configuration (Palo Alto Networks Context)
On Palo Alto Networks firewalls, RFC 1583 compatibility is typically configured within the OSPF settings of a Virtual Router.
Example (Conceptual CLI - actual command may vary slightly by PAN-OS version):
set network virtual-router [VR_NAME] protocol ospf rfc1583 compatible [yes|no]
(Default is typically 'no' - disabled)
[PCNSE/PCNSA Exam Note] Understanding the purpose of RFC 1583 compatibility, the default setting (disabled), and the critical requirement for consistency across all ABRs is important for OSPF configuration and troubleshooting questions. Know that enabling it is generally only for legacy interoperability.
Diagrams
1. Basic Multi-Area OSPF Topology
2. RFC Compatibility Decision Logic (Conceptual)
OSPF RFC 1583 Compatibility (The Simple Version)
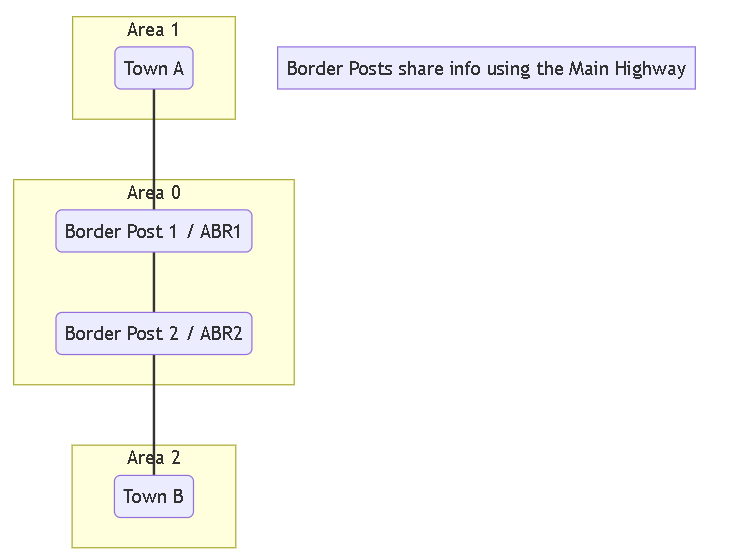
Imagine your network is like a country with different states (these are OSPF "Areas"). There's one main highway system connecting all the states (this is "Area 0" or the backbone).
Routers at the border of states (called "Area Border Routers" or ABRs) tell routers in their state about destinations in other states.
Old Map vs. New Map
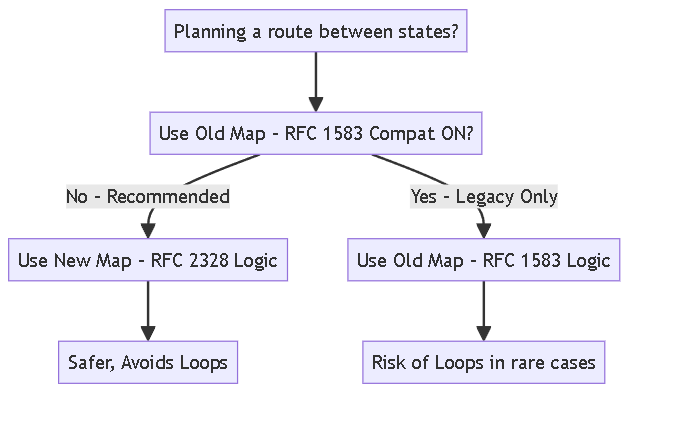
RFC 1583 Compatibility is like choosing between using an old, slightly weird map (RFC 1583 - Compatibility ON) or a new, smarter map (RFC 2328 - Compatibility OFF) for planning routes between states via the main highway.
- New Map (Compatibility OFF - Default & Best): This map is designed to be safe and avoid sending traffic in circles (routing loops). It usually prefers the simplest path using the main highway (Area 0) to get information about other states. This is what you normally want to use.
- Old Map (Compatibility ON): This map was the first version. It mostly works, but in some tricky situations (like weird road closures or detours), it could accidentally suggest a path that leads back where you started, causing a traffic jam (a routing loop). You ONLY use this if you have very old equipment that *only* understands this old map.
The MOST Important Rule: Be Consistent!
CRITICAL GOTCHA!
Imagine giving different drivers different versions of the map for the same trip – chaos!
ALL the border routers (ABRs) in your network MUST use the SAME map version.
Either ALL use the old map (RFC 1583 ON) or ALL use the new map (RFC 1583 OFF).
Mixing map versions (some routers using the old, some using the new) is a recipe for disaster and WILL likely cause major network problems (routing loops)!
In Short:
- It's about how routers calculate paths between different OSPF areas (states).
- The default setting (Compatibility OFF) uses the newer, safer method (RFC 2328).
- Only turn Compatibility ON if you absolutely must connect to very old routers.
- Most importantly: Make sure ALL your border routers use the exact same setting (either all ON or all OFF).
Configure OSPFv3 (IPv6)
Where Can I Use This?
- NGFW (Managed by PAN-OS or Panorama)
OSPF supports both IPv4 and IPv6. You must use OSPFv3 if you are using IPv6.
- Configure general virtual router settings (Network > Virtual Routers > select VR).
-
Configure general OSPFv3 settings.
- Select the OSPFv3 tab.
- Select Enable .
- Enter the Router ID (x.x.x.x format, unique).
- Select Reject Default Route (default, recommended) or clear to allow learning default routes via OSPFv3.
-
Configure Auth Profile for OSPFv3.
OSPFv3 relies entirely on IPSec (AH or ESP) for authentication.
- On the Auth Profiles tab (under OSPFv3), Add a profile name.
- Specify a Security Policy Index ( SPI ) (hex value 00000000-FFFFFFFF). Must match between neighbors.
-
Select
Protocol
:
- ESP (Encapsulating Security Payload - Recommended): Provides encryption and authentication.
- AH (Authentication Header): Provides authentication only.
-
Select a
Crypto Algorithm
:
- For ESP: None (allows ESP Null encryption, requires Auth Algorithm) or a specific encryption algorithm (e.g., AES-CBC, AES-GCM - GCM includes authentication). If using non-GCM, select an Auth Algorithm (SHA1, SHA256, etc.).
- For AH: Select an Auth Algorithm (SHA1, SHA256, SHA384, SHA512, MD5). MD5/SHA1 are generally considered weak.
- Enter and confirm the Key if required by the chosen algorithm(s). Must match between neighbors.
- Click OK .
-
Configure Areas - Type for OSPFv3.
- On the Areas tab, Add an Area ID (x.x.x.x format).
- On the General tab, select the area Type ( Normal , Stub , NSSA ) and configure options ( Accept Summary , Advertise Default Route , Ext Ranges ) similar to OSPFv2 (see Configure OSPF section).
-
Associate an OSPFv3 authentication profile to an area or an interface.
Authentication can be applied per-area or overridden per-interface.
-
To an Area:
- On the Areas tab, select an existing area.
- On the General tab, select the pre-defined profile from the Authentication list.
- Click OK .
-
To an Interface:
- On the Areas tab, select an existing area.
- Select the Interface tab and Add or edit an interface.
- Select the desired profile from the Auth Profile list. This overrides the area-level authentication for this specific interface.
- Click OK .
- Click OK again to save the Area settings.
-
To an Area:
-
(
Optional
) Configure Export Rules (Route Redistribution into OSPFv3).
- On the Export Rules tab, optionally select Allow Redistribute Default Route .
- Click Add to create a rule matching routes to redistribute (e.g., from static, BGP).
- Enter a Name (can match a Redistribution Profile).
- Select New Path Type ( Ext 1 or Ext 2 ).
- Specify a New Tag (optional, 32-bit value x.x.x.x).
- Assign a Metric (1-16,777,215).
- Click OK .
-
Configure Advanced OSPFv3 options.
- On the Advanced tab:
- Select Disable Transit Routing for SPF Calculation if the firewall should advertise topology but not be used as a transit path (makes it act like a stub router).
- Configure SPF Calculation Delay (sec) and LSA Interval (sec) similar to OSPFv2.
- (Optional) Configure OSPF Graceful Restart settings (shared between OSPFv2 and v3 in PAN-OS interface, but configured here affects v3).
- Click OK .
- Commit your changes.
Configure OSPF Graceful Restart
Where Can I Use This?
- NGFW (Managed by PAN-OS or Panorama)
OSPF Graceful Restart directs OSPF neighbors to continue using routes through a firewall during a short transition when its control plane is restarting (e.g., during software upgrade or process restart). This behavior increases network stability by reducing routing churn.
Graceful Restart concepts (Restarting vs Helper role, Grace LSA, Grace Period) are important for high availability scenarios.
For a Palo Alto Networks ® firewall, OSPF Graceful Restart involves the following operations:
- Firewall as a restarting device: If the firewall's OSPF process restarts, it sends Grace LSAs to its neighbors (if they support helper mode). The neighbors continue forwarding traffic based on the firewall's last known LSAs for the duration of the Grace Period configured on the restarting firewall.
- Firewall as a Graceful Restart Helper: If a neighbor sends Grace LSAs, the firewall enters helper mode. It continues using routes learned from the restarting neighbor for up to the neighbor's advertised grace period or the firewall's configured Max Neighbor Restart Time , whichever is shorter.
- Select Network > Virtual Routers and select the virtual router.
- Select OSPF > Advanced or OSPFv3 > Advanced (settings apply to both).
-
Verify that the following are selected (enabled by default):
- Enable Graceful Restart ( Allows the firewall to act as a restarting router )
- Enable Helper Mode ( Allows the firewall to assist a restarting neighbor )
- Enable Strict LSA Checking ( Helps prevent routing loops during restart, generally keep enabled )
- Configure a Grace Period (seconds): The time the firewall requests from neighbors when it restarts (default 120s).
- Configure a Max Neighbor Restart Time (seconds): The maximum time the firewall will wait for a restarting neighbor (default 120s).
- Click OK and Commit .
Confirm OSPF Operation: View the Routing Table
Knowing how to verify OSPF operation via CLI and GUI is essential.
By viewing the routing table, you can see whether OSPF routes have been established. The routing table is accessible from either the web interface or the CLI.
Using the CLI:
Use the following commands:
-
show routing route: Displays the Routing Information Base (RIB). Look for routes with flagA(Active) and ProtocolO(OSPF intra-area),Oi(OSPF inter-area),Oe1(OSPF external type 1), orOe2(OSPF external type 2). For OSPFv3, the protocol codes might be similar or explicitly mention OSPFv3. -
show routing fib: Displays the Forwarding Information Base (FIB), the actual table used for forwarding packets. Verify OSPF routes are installed here.
Using the Web Interface:
- Select Network > Virtual Routers .
- In the row for the relevant virtual router, click the More Runtime Stats link.
- Select Routing > Route Table .
- Examine the Flags column (look for 'O', 'Oi', 'Oe1', 'Oe2') and the Protocol column to identify routes learned by OSPF.
Confirm OSPF Adjacencies
Use the following workflow to confirm that OSPF adjacencies (neighbor relationships in a state ready for LSA exchange) have been established:
- Select Network > Virtual Routers .
- In the row for the relevant virtual router, click the More Runtime Stats link.
- Select OSPF > Neighbor (or OSPFv3 > Neighbor ).
- Examine the Status column. Look for neighbors in the Full state (or potentially 2-Way on broadcast networks if the firewall is not the DR/BDR and is adjacent only to the DR/BDR). States other than Full (like Init, ExStart, Exchange, Loading) indicate a problem forming the adjacency.
Using the CLI:
Use the command:
-
show routing protocol ospf neighbor(for OSPFv2) -
show routing protocol ospfv3 neighbor(for OSPFv3)
Look for the State/Status column indicating 'Full'.
Confirm that OSPF Connections are Established (Logs)
View the System log to confirm that the firewall has established OSPF connections and monitor state changes.
- Select Monitor > Logs > System .
-
Filter the logs for OSPF-related events. Look for messages indicating neighbor state changes, especially reaching the
Full
state. Example filter:
( subtype eq routing ) and ( object eq ospf ) - You can also check the Runtime Stats ( Network > Virtual Routers > More Runtime Stats > OSPF/OSPFv3 > Neighbor ) as described previously to see the current live status.
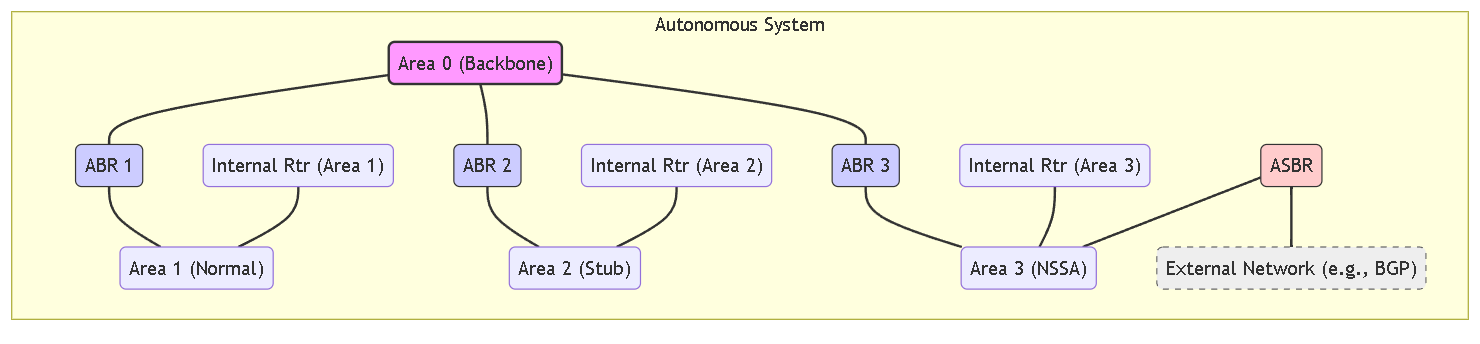
Conceptual diagram showing different OSPF Area types (Backbone, Normal, Stub, NSSA) connected via Area Border Routers (ABRs). An Autonomous System Boundary Router (ASBR) connects the NSSA to an external network.
OSPF Neighbor Adjacency Formation
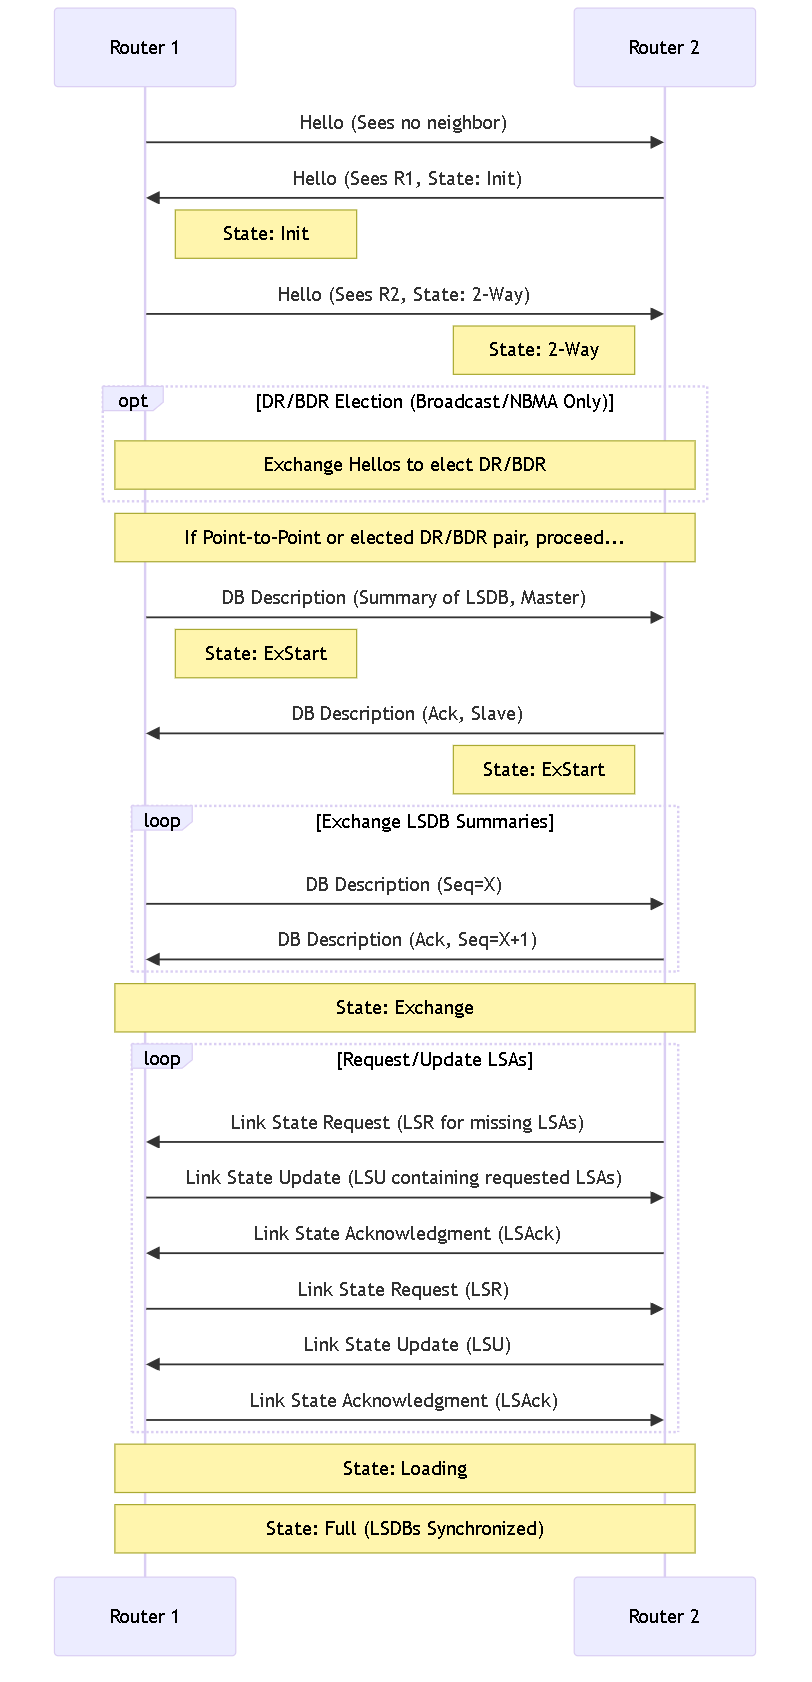
Sequence diagram illustrating the OSPF neighbor state transitions from Init to Full as routers exchange Hello packets, Database Description packets, and Link State Requests/Updates/Acknowledgements to synchronize their Link State Databases.
OSPF Interactive Quiz
Test your understanding of the OSPF concepts and configuration covered.