Configure Route Redistribution and OSPF
Configure route redistribution to make routing information from the firewall available to the external-facing routers attached to your leaf switches. Then configure OSPF on the firewall and assign a router-id, area number, and interface to form adjacencies.
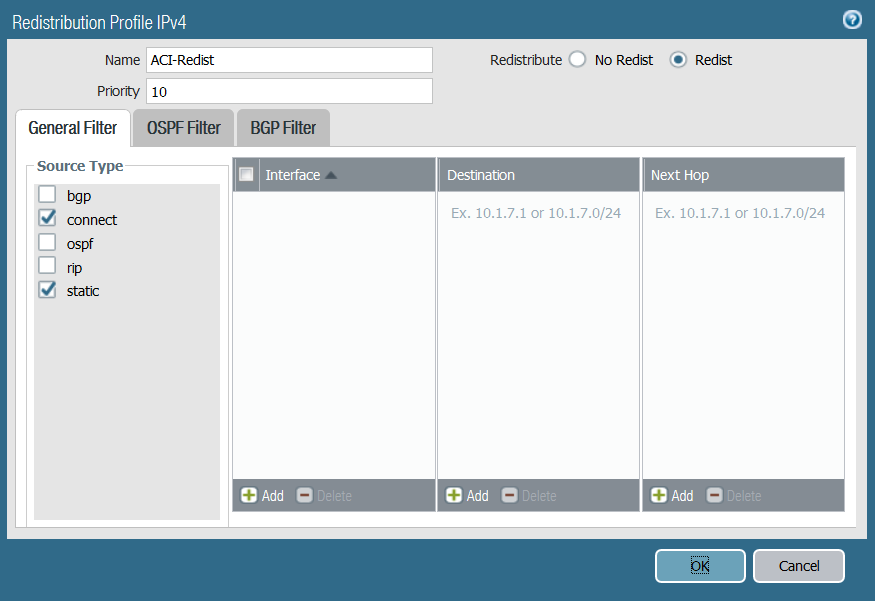
Configure Route Redistribution
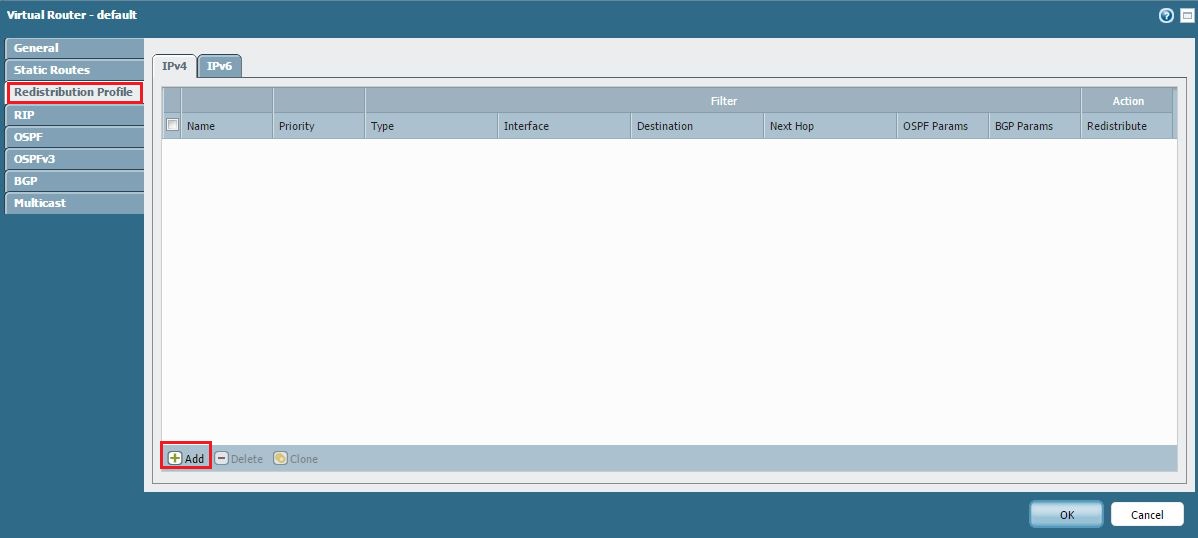
- Select Network > Virtual Routers and click on the virtual router you created earlier.
- Select Redistribution Profile > IPv4 > Add .
- Enter a descriptive Name for your redistribution profile.
- Enter a priority. Lower value means higher priority. Profiles are evaluated according to priority.
- For Redistribute , select Redist .
- Check connect and static under General Filters .
- Click OK .
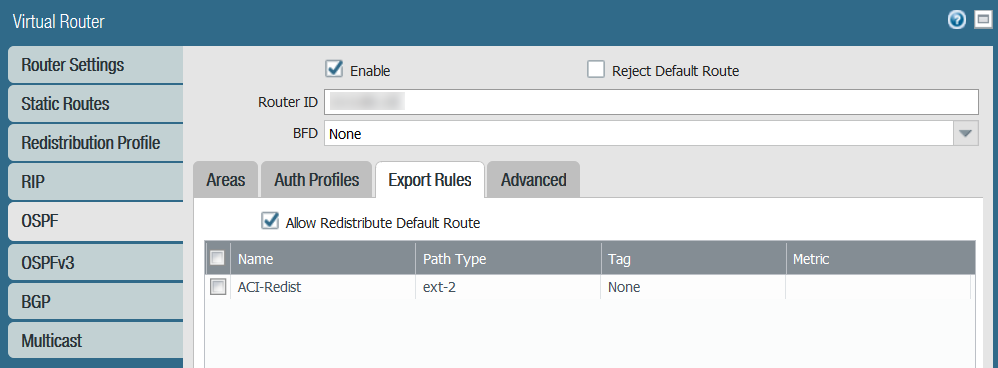
Configure OSPF
- Select Network > Virtual Routers and click on the virtual router you created earlier.
- Select Router Settings > ECMP and select Enable .
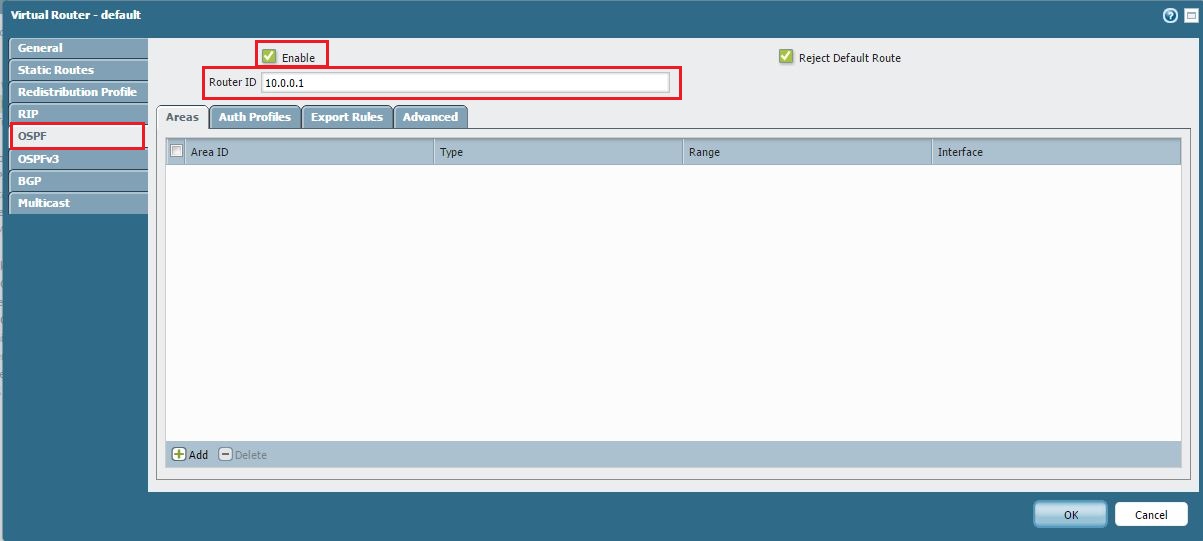
- Select OSPF and choose Enable .
- Enter the OSPF Router ID .
- Under Area , click Add .
- Enter the Area ID . This value must match the value you assigned when you created the external routed network on the APIC. On the firewall, this must be entered in dotted decimal form. For example, if you entered an Area ID of 10 in the APIC, the equivalent on the firewall is 0.0.0.10.
- Select Interface > Add .
- Enter the interface that connects to your external network EPG and click OK .
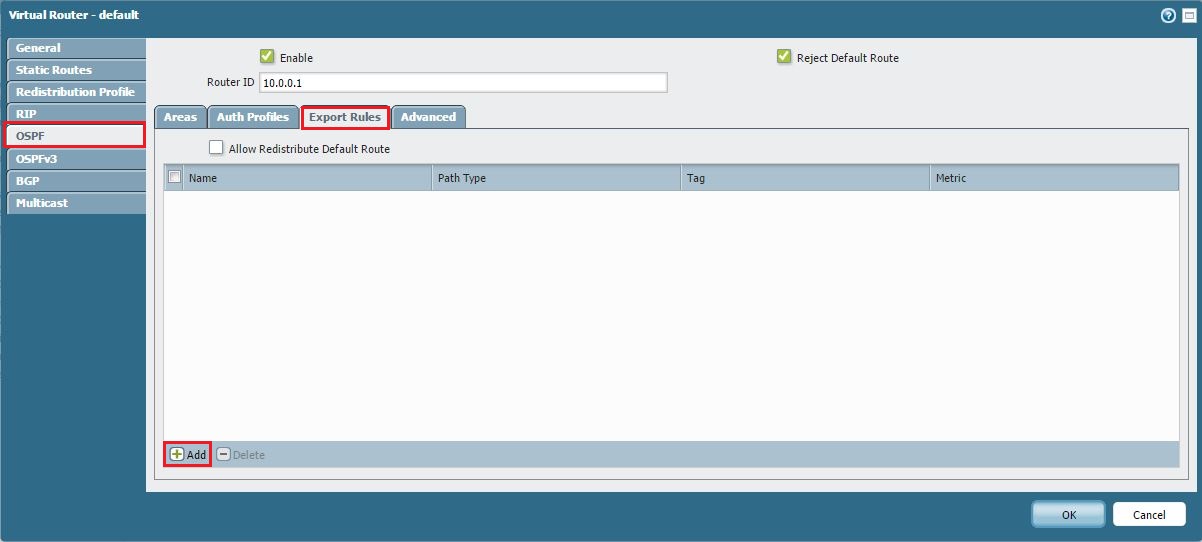
- Select Export Rules > Add .
- Select the Redistribution Profile you created above from the Name drop-down and click OK .
- Select Allow Redistribute Default Route .
- Click OK .
OSPF Route Redistribution Details
OSPF Path Types
OSPF routes to a destination network can be categorized into any of the following four path types:
-
Intra-Area Path:
Path to reach OSPF intra-area routes within the same area denoted by the flag
Oi. -
Inter-Area Path:
Path to reach OSPF inter-area routes in another area denoted by the flag
Oo. -
External Type 1 Path:
Path to reach external destinations outside the OSPF autonomous system denoted by the flag
O1. Ext-Type-1 path metric is the sum of the external route's cost and the cost of the path to reach the AS Boundary Routers (ASBR) advertising the external route. -
External Type 2 Path:
Path to reach external destinations outside the OSPF autonomous system denoted by the flag
O2. Ext-Type-2 path metric is the cost of the external route and does *not* include the cost of the path to reach the ASBR advertising the external route. This is the default type for redistributed routes.
Using Path Type in Redistribution Profiles
To create a redistribution profile, go to
Network > Virtual Router > [VRName] > Redistribution Profile
. Click Add and enter the Name and Priority. Under 'OSPF Filters > Path Type', you can select which path types (Intra-Area, Inter-Area, Ext-1, Ext-2) should match this profile.
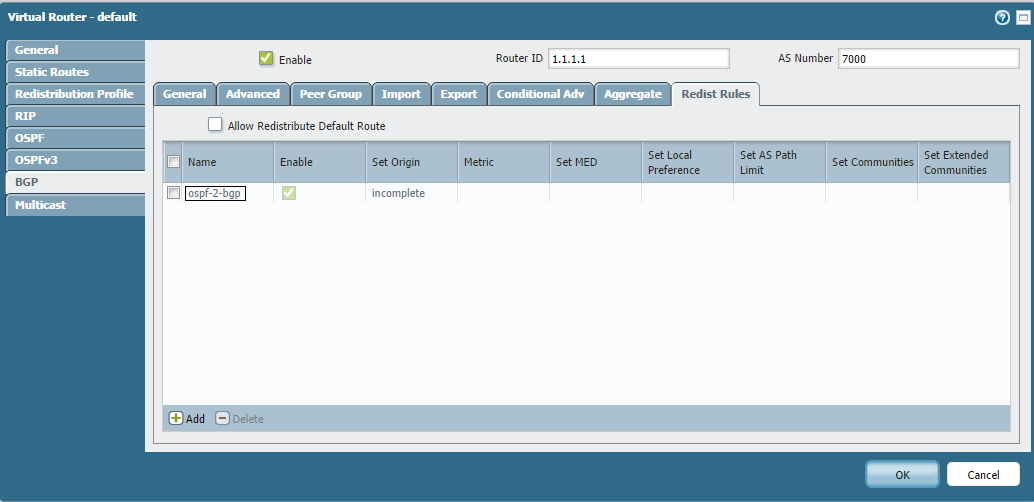
The screenshot below shows this profile applied under BGP Redistribution Rules (
Network > Virtual Router > [VRName] > BGP > Redist Rules
) to redistribute specific OSPF routes into BGP.
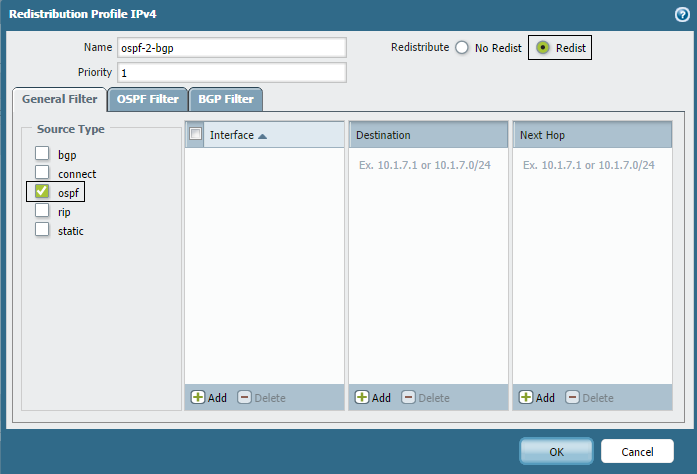
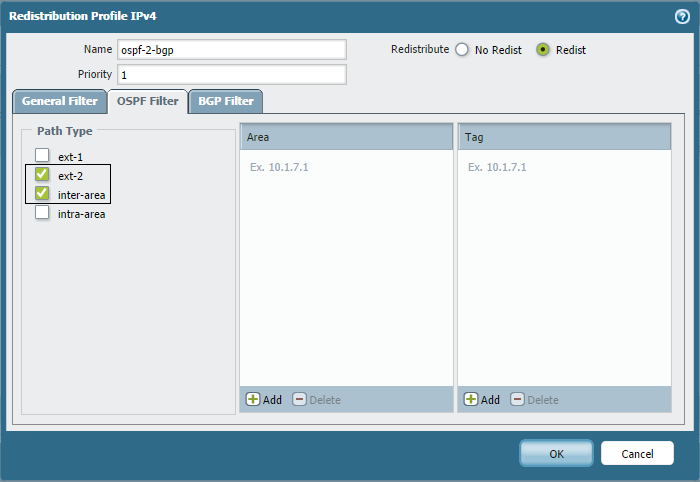
Example: Redistributing Inter-Area and Type-1 Routes
The following example shows configuring a redistribution profile to match only inter-area routes (Oo) and type-1 external routes (O1) from OSPF to be redistributed into BGP.
After applying this profile, the BGP routing table shows only the routes matching these types (inter-area routes 7.7.7.0/24, 192.168.32.0/24 and type-1 external route 1.1.1.1/32 were redistributed in the original example, though the image doesn't show 1.1.1.1/32 as type-1).
Verify from the CLI:
OSPF Route Redistribution Details
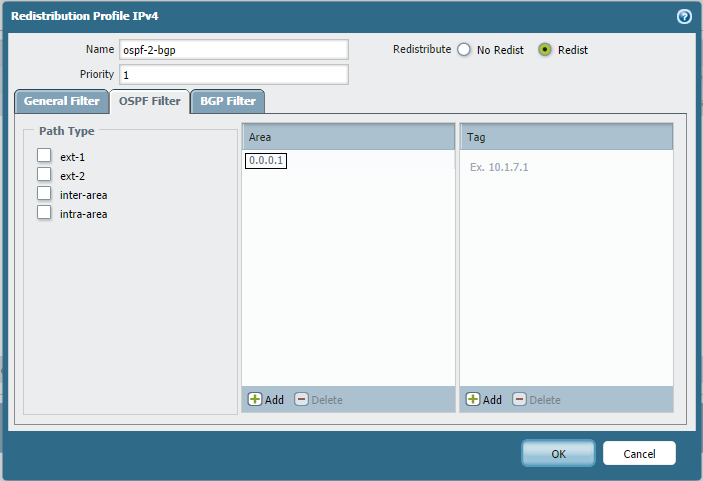
Using Area Filter
The "Area" filter in a Redistribution Profile is useful when redistributing OSPF routes from an Area Border Router (ABR). You can choose which Area's routes can be redistributed by specifying the Area ID.
Remember to enter the Area ID in dotted decimal format (e.g., Area 1 is 0.0.0.1).
In the example below, Area 1 (0.0.0.1) has routes 7.7.7.0/24 and 192.168.32.0/24. The profile is configured to redistribute only routes from Area 0.0.0.1 into BGP.
Now, the BGP routing table shows only the two routes belonging to Area 1 redistributed.
Verify from the CLI:
OSPF Route Redistribution Details
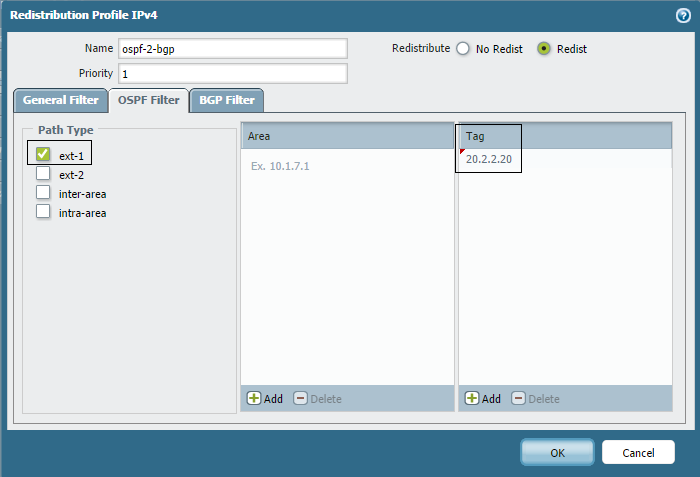
Using Tag Filter
'Tag' or 'External Route Tag' is a 32-bit field associated with an external route (Type 5 AS-External-LSA or Type 7 NSSA-External-LSA) advertised by AS Boundary Routers (ASBRs).
Tags are not used by the OSPF protocol itself for routing decisions but provide a mechanism for external route management and filtering during redistribution.
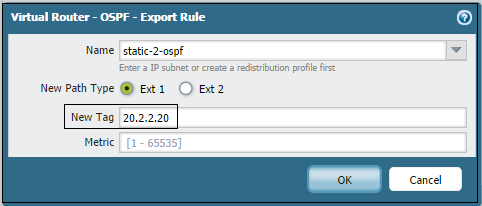
Palo Alto Networks firewalls allow users to specify a tag value when redistributing routes *into* OSPF (under
Network > Virtual Router > [VRName] > OSPF > Export Rules
):
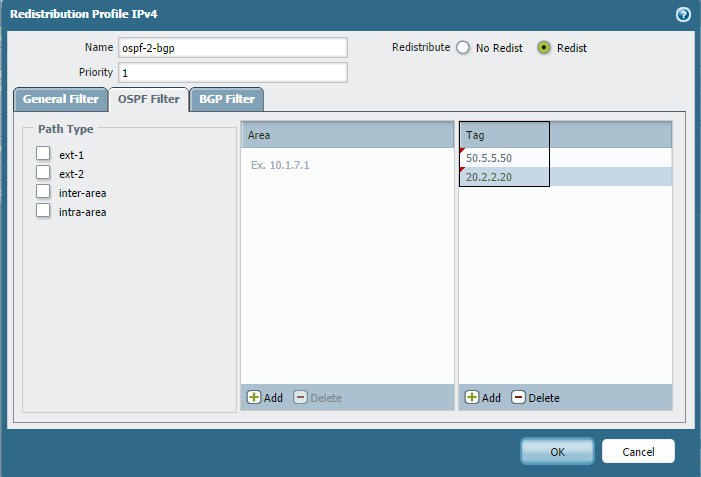
Conversely, when redistributing *from* OSPF into another protocol (like BGP), you can filter based on the tags associated with the external OSPF routes using the Redistribution Profile (
Network > Virtual Router > [VRName] > Redistribution Profile
).
If only specific external routes (identified by their tags) need to be redistributed, specify those tag values in the Redistribution Profile's OSPF Filters section, as shown below. Here, Tag 50.5.5.50 is associated with external route 1.1.1.1/32 and Tag 20.2.2.20 is associated with 2.2.2.2/32.
Now, the BGP routing table shows only these two tagged external routes redistributed.
Verify from the CLI:
Example of using Tag and Path Type together (if needed): If 1.1.1.1/32 (Type 1) and 2.2.2.2/32 (Type 2) both use tag 20.2.2.20, you could filter for tag 20.2.2.20 *and* Path Type Ext-1 to only redistribute 1.1.1.1/32.
Verify from the CLI (only Ext-1 route 1.1.1.1/32 is shown):
Combining Filters with Multiple Profiles
In scenarios requiring complex filtering (e.g., redistributing routes from a specific area *plus* specific external routes based on tags), use multiple redistribution profiles with different priorities .
The example below uses two profiles applied to BGP Redist Rules:
- `ospf-2-bgp`: Redistributes routes from Area 1 (using Area filter).
- `ext-ospf-2-bgp`: Redistributes external routes (using Tag filter, or just matching Ext-1/Ext-2 path types if no tag filter needed).
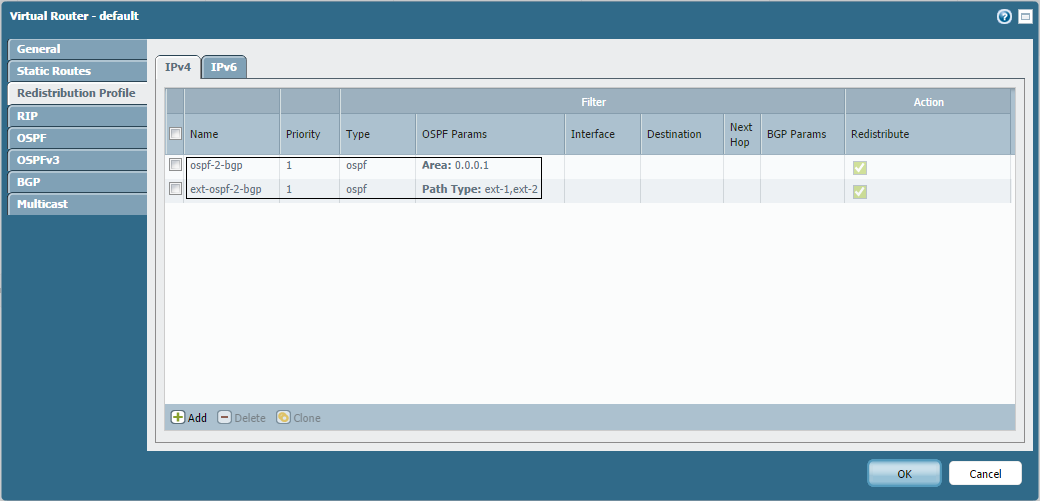
The resulting BGP table shows routes from Area 1 (7.7.7.0/24, 192.168.32.0/24) and the external routes (1.1.1.1/32, 2.2.2.2/32).
Verify from the CLI:
How to Redistribute GlobalProtect Routes into OSPF
This section outlines the steps to redistribute the IP address pool assigned to GlobalProtect clients into your OSPF routing domain.
Steps
-
Create a Redistribution Profile for GlobalProtect Routes:
-
Navigate to
Network > Virtual Router > [Your VR] > Redistribution Profile. - Click Add .
- Give it a descriptive Name (e.g., `GP-to-OSPF`).
- Set Priority (e.g., 100).
- For Action , select Redist .
- Under General Filters , set Source Type to static . GlobalProtect client IP pools are treated like static routes associated with the tunnel interface for redistribution purposes.
- Under General Filters , for Interface , select the tunnel interface used for your GlobalProtect gateway.
- Click OK .
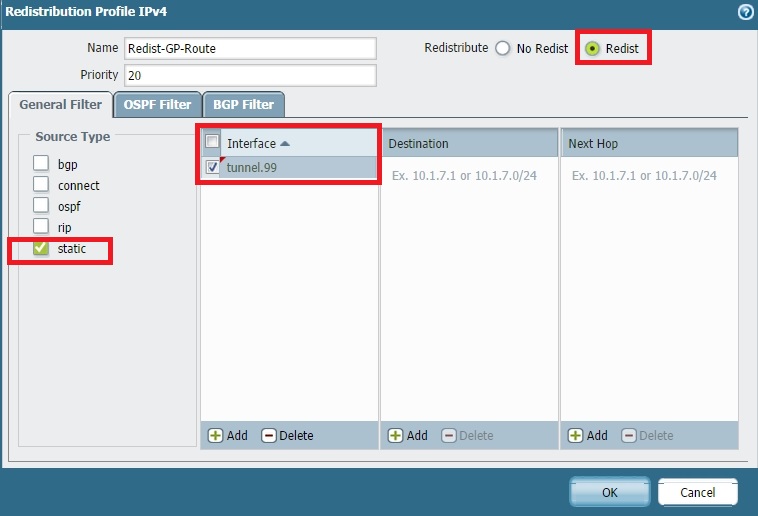
Creating a Redistribution Profile filtering for 'static' routes on the GlobalProtect tunnel interface. -
Navigate to
-
Apply the Redistribution Profile to OSPF Export Rules:
-
Navigate to
Network > Virtual Router > [Your VR] > OSPF > Export Rules. - Click Add .
- Select the Redistribution Profile you just created (`GP-to-OSPF`) from the Name drop-down.
- Choose the desired New Path Type (typically Ext-2 or Ext-1 ).
- Set a Metric value if desired.
- Click OK .
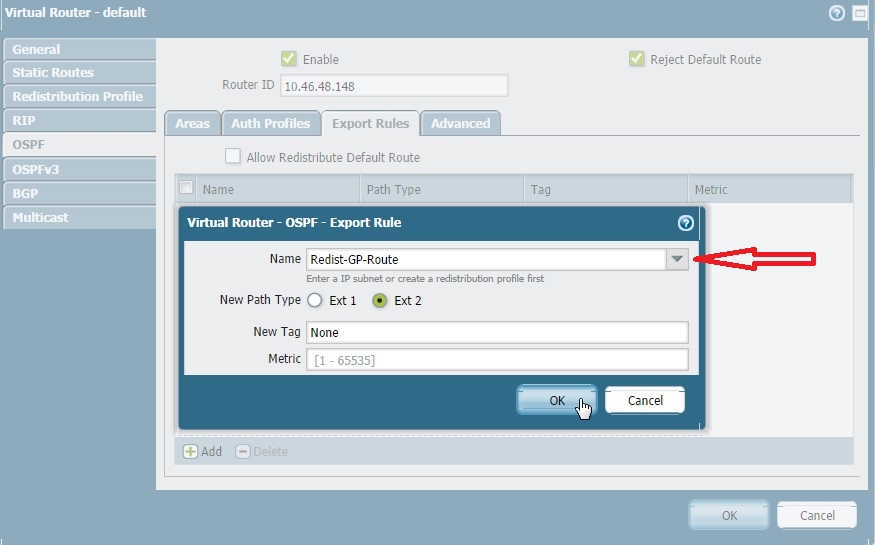
Applying the GlobalProtect Redistribution Profile in the OSPF Export Rules. -
Navigate to
- Commit the configuration changes.
-
Validation:
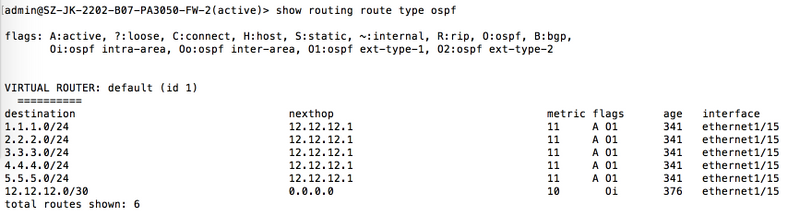
On a neighboring OSPF router (or another firewall participating in OSPF), check the routing table for the GlobalProtect routes. Use the CLI command:
> show routing route type ospf
Example CLI output on a peer device showing the redistributed GlobalProtect IP pool learned via OSPF. Ensure that the firewall policies allow traffic between the internal network and the GlobalProtect client IP pool, and that the OSPF neighbor relationship is correctly established.
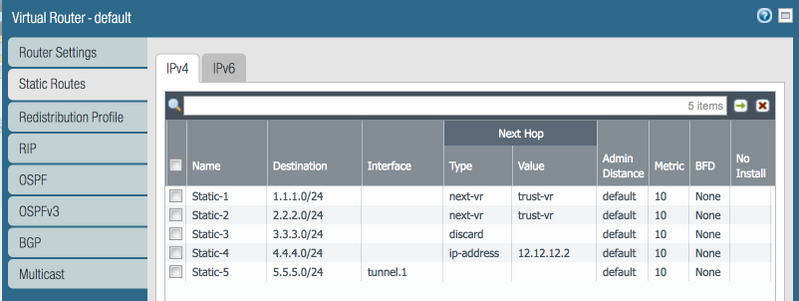
How to Redistribute Static and Connected Routes into OSPF
This document describes how to redistribute existing static routes and directly connected interface subnets into the OSPF routing process on the Palo Alto Networks firewall, making them available to OSPF neighbors.
Steps
-
Ensure Static Route(s) Exist (If Applicable):
-
Navigate to
Network > Virtual Routers > [Your VR] > Static Routes. - Add any necessary static routes if they don't already exist.
Example of Static Route configuration within a Virtual Router. -
Navigate to
-
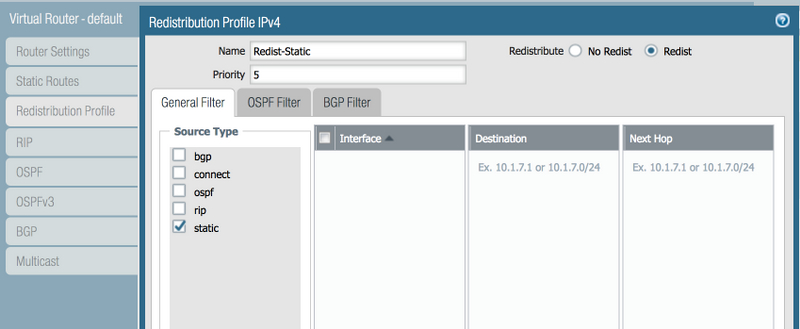
Create a Redistribution Profile:
-
Navigate to
Network > Virtual Routers > [Your VR] > Redistribution Profile. - Click Add .
- Enter a profile Name (e.g., `Static-Conn-to-OSPF`).
- Enter a Priority value (e.g., 100).
- Enable the Redist option for Action .
- Under the General Filters tab, check both static and connected for Source Type . This tells the profile to match both types of routes.
- Click OK .
Navigating to the Redistribution Profile section. 
Adding a new Redistribution Profile. 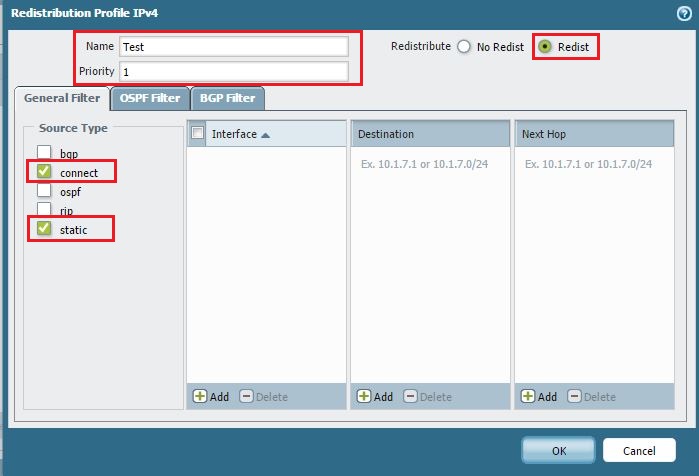
Configuring the Redistribution Profile to match 'static' and 'connected' Source Types. 
The saved Redistribution Profile in the list. -
Navigate to
-
Apply the Profile via an OSPF Export Rule:
-
Navigate to
Network > Virtual Routers > [Your VR] > OSPF > Export Rules. - Click Add .
- Select the Redistribution Profile you created (`Static-Conn-to-OSPF`) from the Name drop-down.
- Choose the desired New Path Type ( Ext-1 or Ext-2 ). Ext-2 is the default for redistributed routes.
- Set a Metric value if needed.
- Click OK .
Navigating to OSPF Export Rules. 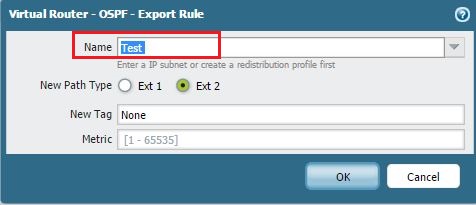
Applying the Redistribution Profile in an OSPF Export Rule. -
Navigate to
- Commit the changes.
After committing, any existing or newly added static routes and directly connected interface subnets associated with this virtual router will be automatically redistributed into OSPF according to the profile and export rule settings.
How to Redistribute Connected Interfaces (Routes) Not Participating in OSPF
This document describes how to advertise the subnets of connected interfaces that are *not* directly participating in the OSPF process (i.e., not listed under
OSPF > Area > [Area ID] > Interface
) into the OSPF domain.
Overview
Sometimes, you might have interfaces configured on the firewall (e.g., connecting to internal LANs or other network segments) whose subnets need to be known by OSPF neighbors, but you don't want those specific interfaces to actively form OSPF adjacencies. You can achieve this by redistributing their 'connected' routes.
Steps
-
Navigate to
Network > Virtual Routers > [Your VR].
Selecting the Virtual Router. -
Ensure OSPF is enabled and configured with a Router ID and at least one Area/Interface that *is* participating in OSPF.
Basic OSPF Router Settings. 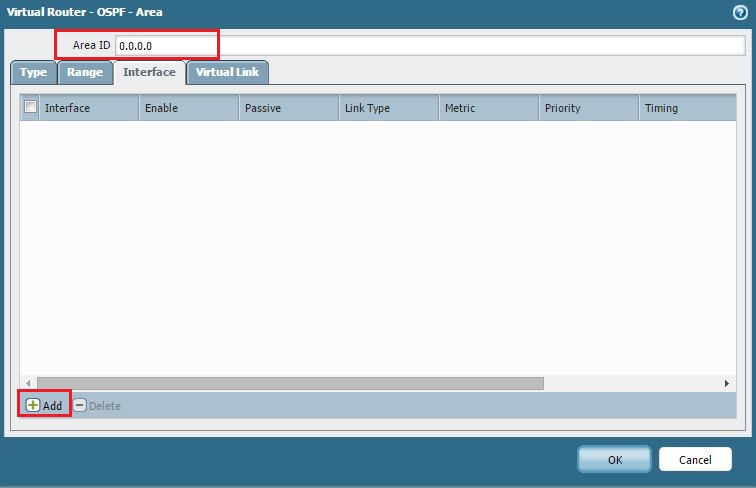
OSPF Area Configuration (showing an Area ID is defined). 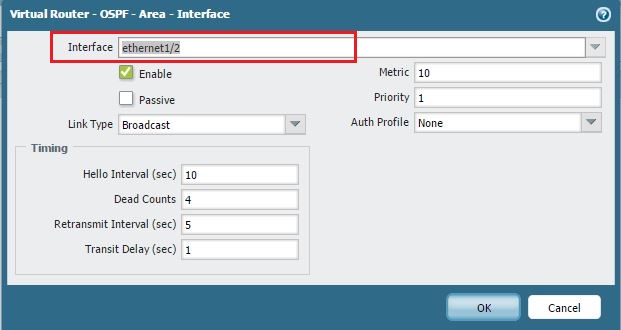
At least one interface actively participating in OSPF within the Area. -
Create a Redistribution Profile:
- Go to the Redistribution Profiles tab within the Virtual Router configuration.
- Click Add .
- Enter a profile Name (e.g., `Non-OSPF-Conn-to-OSPF`).
- Enter a Priority value.
- Enable the Redist option for Action .
-
Under the
General Filters
tab:
- Check connected for Source Type .
- Crucially, select the specific interface(s) whose connected routes you want to advertise under the Interface selection list. Do *not* select the interface(s) already participating in OSPF here unless you intend to redistribute their connected routes explicitly (which OSPF usually handles automatically via Router/Network LSAs).
- Click OK .
Navigating to Redistribution Profiles. 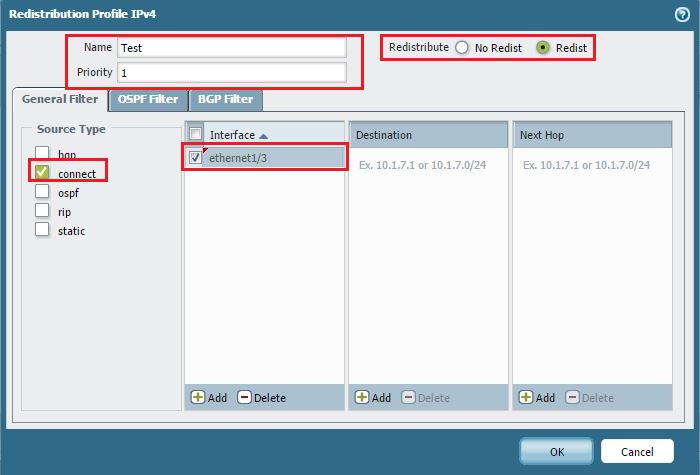
Configuring the Redistribution Profile to match 'connected' Source Type and selecting the specific non-OSPF interface(s) to redistribute. -
Apply the Profile via an OSPF Export Rule:
- Navigate to the OSPF > Export Rules tab.
- Click Add .
- Select the Redistribution Profile you created (`Non-OSPF-Conn-to-OSPF`) from the Name drop-down.
- Choose the New Path Type (e.g., Ext-2).
- Set a Metric if desired.
- Click OK .
Navigating to OSPF Export Rules.
Applying the specific Redistribution Profile in an OSPF Export Rule. - Commit the changes.
The connected subnets of the interfaces specified in the redistribution profile will now be advertised as OSPF external routes (Type 1 or Type 2 based on your export rule configuration).
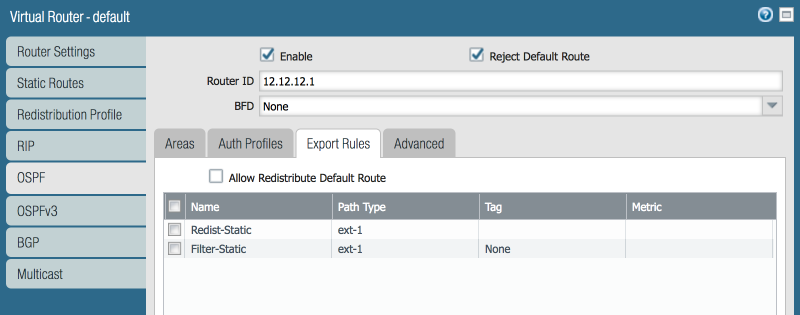
Filter Specific Static Route from Being Advertised to OSPF
This article explains how to prevent specific static routes from being advertised into OSPF while still allowing the redistribution of other static routes. This method is particularly useful when a firewall has many static routes, and only a few need exclusion.
Details
The technique relies on using two Redistribution Profiles with different priorities applied via OSPF Export Rules.
- One profile with a higher priority (lower number) will match the specific route(s) to be filtered and have an action of No Redist .
- Another profile with a lower priority (higher number) will match all static routes (or a broader range) and have an action of Redist .
Because profiles are evaluated in order of priority (lowest number first), the "No Redist" rule for the specific route will be matched first, preventing its redistribution. Other static routes won't match the first rule and will fall through to the second rule, allowing their redistribution.
Scenario
Firewall PA-1 is connected to PA-2 via OSPF. PA-1 has multiple static routes configured:
Initially, a single redistribution profile (`Redist-Static`, Priority 5, Action: Redist) is used, causing all static routes to be advertised:
Validation on PA-2 shows all static routes are learned via OSPF:
Filtering Configuration
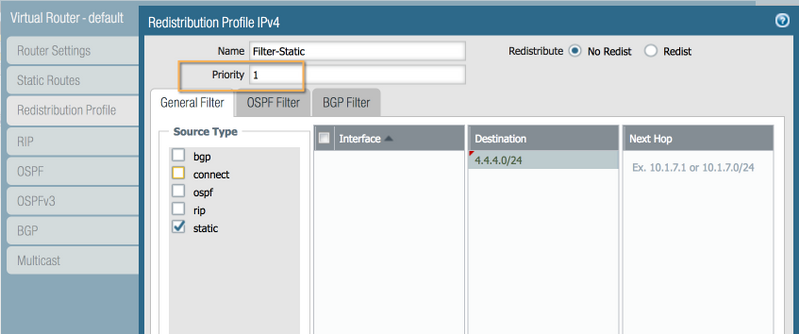
Goal: Prevent the redistribution of only the 4.4.4.0/24 static route.
-
Create a "No Redist" Profile (Higher Priority):
- Name: `Filter-Static`
- Priority: 1 (Lower number = higher priority)
- Action: No Redist
- General Filters: Source Type = static
- Destination Prefix Filter: Add 4.4.4.0/24
Creating the `Filter-Static` profile (Priority 1, Action: No Redist) specifically matching 4.4.4.0/24. -
Keep the "Redist" Profile (Lower Priority):
- Name: `Redist-Static`
- Priority: 5 (Higher number = lower priority)
- Action: Redist
- General Filters: Source Type = static
- (No specific destination prefix filter needed here, it acts as a catch-all for static routes not matched by the higher priority profile).
Both Redistribution Profiles: `Filter-Static` (Priority 1, No Redist for 4.4.4.0/24) and `Redist-Static` (Priority 5, Redist for other static routes). -
Apply Both Profiles in OSPF Export Rules:
- Add *both* `Filter-Static` and `Redist-Static` profiles to the OSPF Export Rules list. The firewall evaluates them based on their internal priority (1 then 5).
Applying both Redistribution Profiles in the OSPF Export Rules. - Commit the changes.
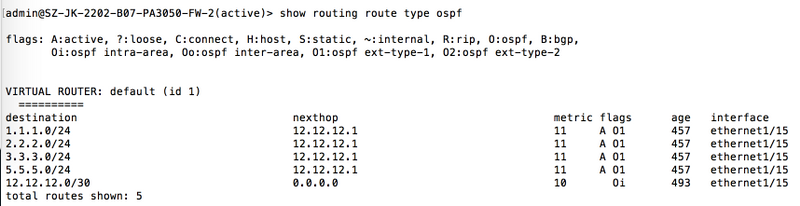
Validation
Check the routing table on the neighbor (PA-2). The route 4.4.4.0/24 should no longer be present, while the other static routes remain.
How to Advertise a Default Route via OSPF Not-So-Stubby-Area (NSSA)
This procedure describes how to configure a Palo Alto Networks firewall acting as an Area Border Router (ABR) or Autonomous System Boundary Router (ASBR) connected to a Not-So-Stubby Area (NSSA) to originate and advertise a default route (0.0.0.0/0) into that NSSA.
NSSA areas allow external routes (typically redistributed from other protocols) to enter the OSPF domain via Type-7 LSAs, which are then translated to Type-5 LSAs by the NSSA ABR for propagation into the backbone area. NSSAs can also receive a default route originated by the NSSA ABR.
Procedure
-
Configure the Area as NSSA:
-
Navigate to
Network > Virtual Router > [Your VR] > OSPF > Areas. - Click Add or modify the existing Area ID that connects to the NSSA routers.
- Enter the Area ID (e.g., 0.0.0.1).
- Select the Type as NSSA .
- (Optional) Configure other NSSA options like 'Accept Summary' or 'Default Route Cost' if needed.
- Go to the Interface tab within the Area configuration and ensure the interface connecting to the NSSA network is added.
- Click OK .
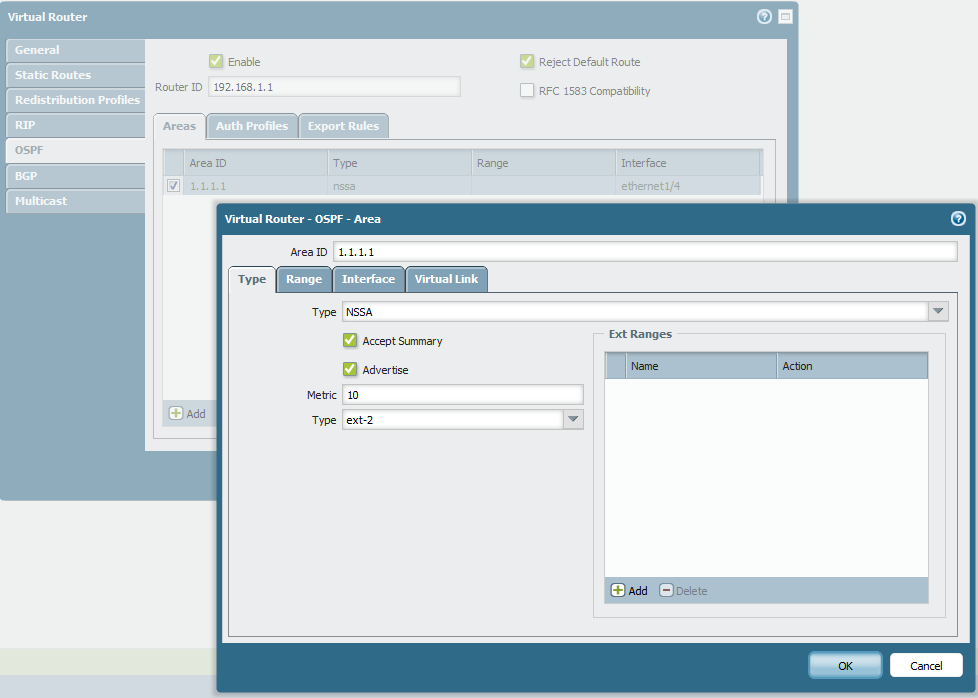
Navigating to OSPF Area configuration. 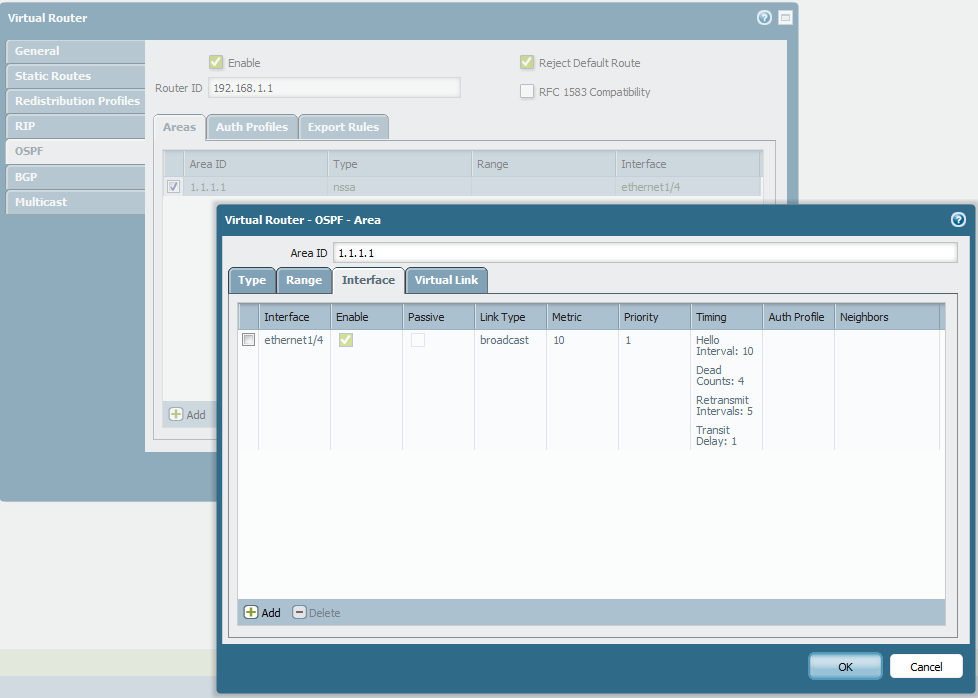
Selecting 'NSSA' as the Area Type. -
Navigate to
-
Configure OSPF Export Rule to Originate Default Route:
-
Navigate to
Network > Virtual Router > [Your VR] > OSPF > Export Rules. - Click Add . You might use an existing redistribution profile or create one, but the key setting is within the OSPF configuration itself, not necessarily the profile for *originating* a default into NSSA. However, the easiest way is often to enable the global option.
-
Go back to the main OSPF configuration tab (
Network > Virtual Router > [Your VR] > OSPF). - Check the box Allow Redistribute Default Route . This option, when checked on an ABR/ASBR connected to an NSSA or Stub area, instructs the firewall to originate a default route into that area if a default route exists in the firewall's routing table or if redistribution policies allow it.
- (Optional) If you need more control (e.g., only originate if a specific condition is met), you might need a more complex setup involving redistribution profiles and potentially static routes, but the global checkbox is the simplest method for standard default route origination into NSSA/Stub areas.
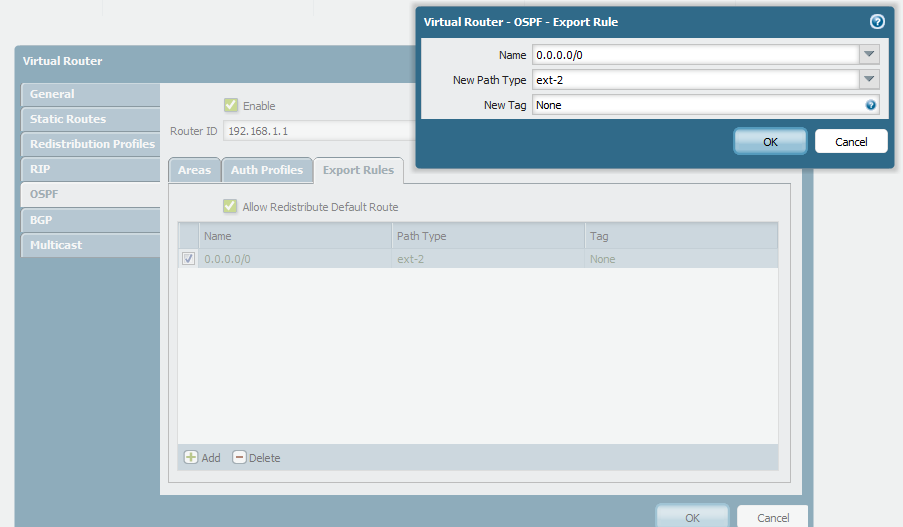
Enabling 'Allow Redistribute Default Route' in the main OSPF configuration settings. -
Navigate to
- Commit the changes.
The firewall will now advertise a Type-7 LSA for the default route into the NSSA, which routers within that NSSA can use to reach destinations outside the OSPF domain.
Remember that NSSA routers will see this as a Type-7 LSA (O N1 or O N2). The NSSA ABR will translate this to a Type-5 LSA (O E1 or O E2) for advertisement into other non-stub areas.
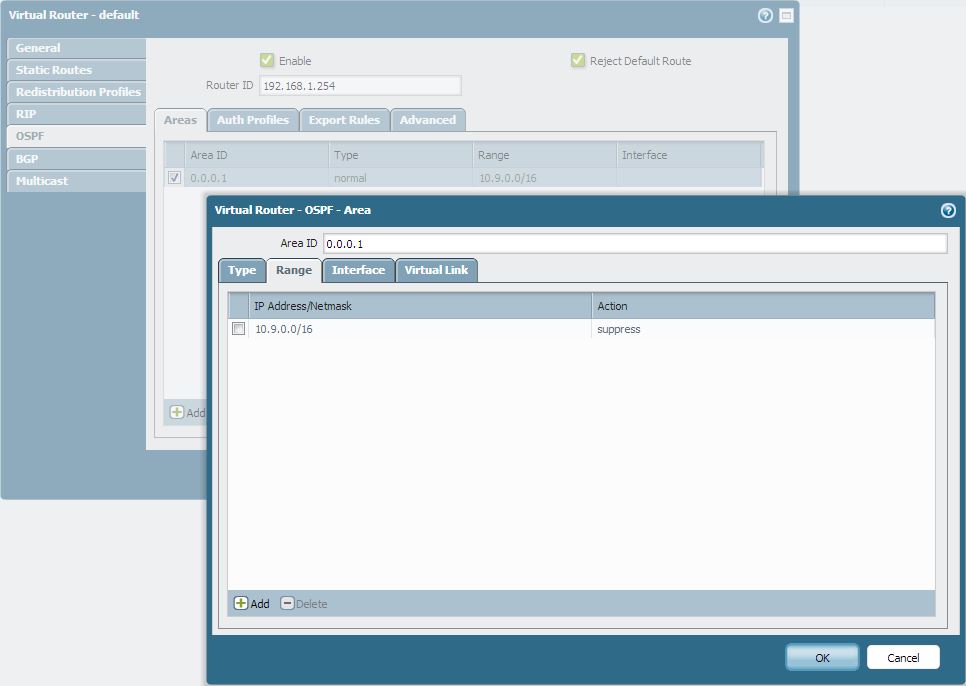
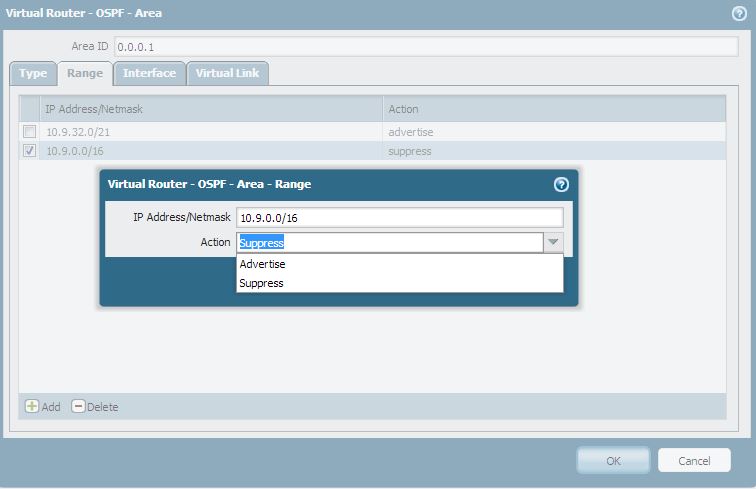
How to Suppress OSPF Routes (Inter-Area Summarization)
This document describes how to prevent specific OSPF network ranges learned in one area from being advertised into another area (specifically, into the backbone area or other non-backbone areas) by an Area Border Router (ABR). This is effectively inter-area route summarization and suppression .
Resolution
By default, an ABR advertises all routes learned from one area into other connected areas as Type-3 Summary LSAs. To suppress specific ranges:
-
Navigate to
Network > Virtual Routers > [Your VR]. - Go to the OSPF > Areas tab.
- Select the Area ID from which the routes originate (the area whose routes you want to prevent from being advertised *elsewhere*). This is the ingress area for the suppression configuration.
- Go to the Range tab within that Area's configuration.
- Click Add .
- Specify the network Address and Netmask that you want to suppress from being advertised *out* of this area into others.
- Select Suppress for the Action .
- Click OK and Commit the configuration.
Example Scenario
Topology: Upstream Device "A" (Area 0.0.0.1) --- (Area 0.0.0.1) Firewall "B" (ABR) (Area 0.0.0.0) --- Downstream Device "C" (Area 0.0.0.0).
Goal: Prevent specific routes learned from Device A in Area 0.0.0.1 from being advertised by Firewall B into Area 0.0.0.0 (to Device C).
Configuration: On Firewall B, edit Area 0.0.0.1 , go to the Range tab, and add the network range(s) to be suppressed with the Action "Suppress".
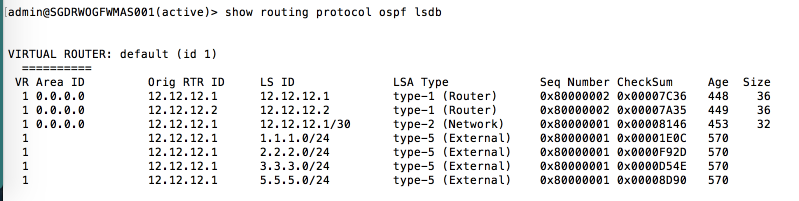
Troubleshooting & Notes
-
Verification:
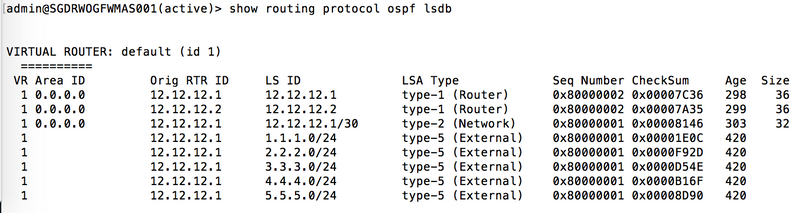
Check the OSPF LSDB on routers in the *other* areas (e.g., Area 0.0.0.0). They should no longer see the Type-3 Summary LSA for the suppressed range originating from the ABR (Firewall B). The LSDB within the originating area (Area 0.0.0.1) will still contain the original Type-1/Type-2 LSAs for the network.
> show routing protocol ospf lsdb
-
Precedence:
Route summarization/suppression using ranges is not processed sequentially based on list order. The
most specific match (longest prefix) takes precedence if using "Advertise", while the least specific match (shortest prefix / largest supernet) takes precedence if using "Suppress"
when ranges overlap.
- Example: If you have `10.9.32.0/21 Advertise` and `10.9.0.0/16 Suppress`, the `/16 Suppress` rule will encompass the `/21` range, and thus the `/21` route *will be suppressed*.
- Subnet Limitation: You cannot use the "Suppress" action on a subnet that is *smaller* than the actual network being advertised as a Type-3 LSA. For example, if the ABR naturally summarizes and advertises `10.9.32.0/21` into the backbone, you cannot specifically suppress `10.9.32.0/24` using this method. You can only suppress the exact `/21` range or a larger range (e.g., `/20`, `/19`) that encompasses it.
Can Next-Generation Firewall Virtual Routers Configure OSPF AS-External LSA (Type-5) Summarization?
A common OSPF feature on Autonomous System Boundary Routers (ASBRs) is the ability to summarize external routes (learned from other protocols like BGP or static routes) before redistributing them into OSPF as a single Type-5 LSA, rather than individual Type-5 LSAs for each external route.
Workaround
A workaround can be implemented using static routes and redistribution filtering to achieve a similar outcome:
Scenario
Goal: Redistribute multiple connected interfaces (e.g., 192.168.0.0/24, 192.168.1.0/24, 192.168.2.0/24, 192.168.3.0/24) as a single summarized external route (192.168.0.0/22) into OSPF.

Initial state (without workaround): Each connected route is redistributed as a separate Type-5 LSA.
Workaround Steps
-
Create a Dummy Loopback Interface:
- Create a loopback interface (e.g., loopback.1) and assign it an IP address (e.g., 1.1.1.1/32). This interface doesn't need to participate in OSPF directly but serves as a valid next-hop target for the static summary route.
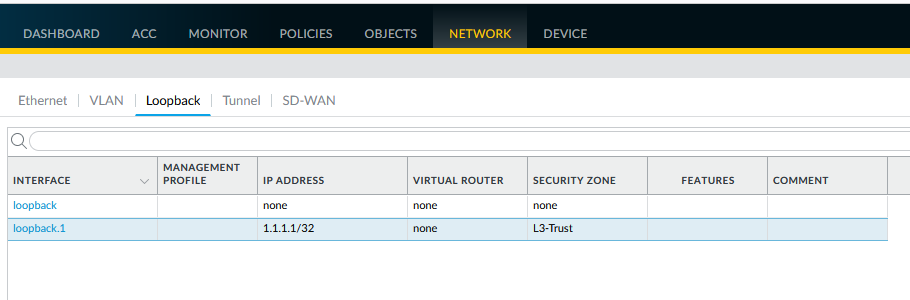
Configuring a loopback interface (e.g., loopback.1 with IP 1.1.1.1). 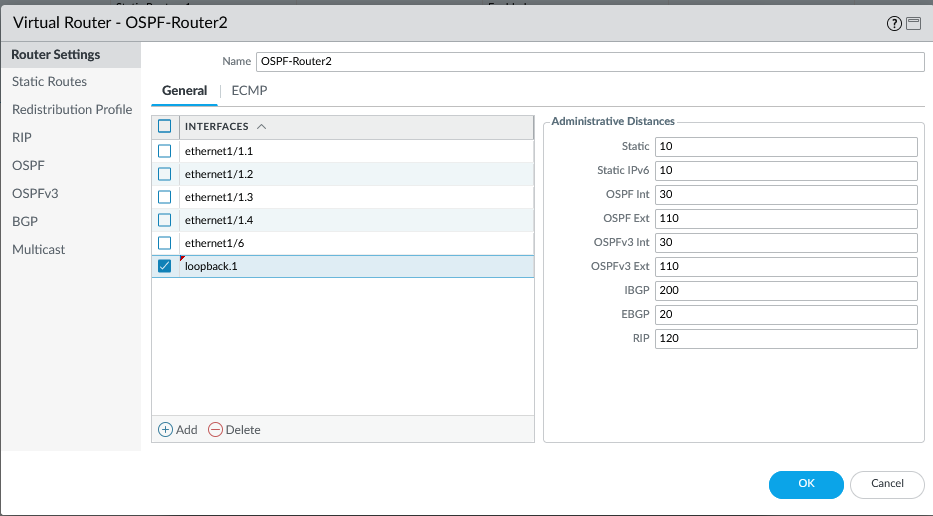
Adding the loopback interface to the Virtual Router. -
Create a Static Summary Route:
- Create a static route for the desired summary prefix (e.g., 192.168.0.0/22).
- Set the next hop to the loopback interface created in step 1 (e.g., loopback.1).
- Assign a high administrative distance/metric (e.g., Metric 100) to this static route. This ensures that the more specific connected routes are preferred for local routing decisions on the firewall itself, preventing routing loops. The static route primarily exists for redistribution.
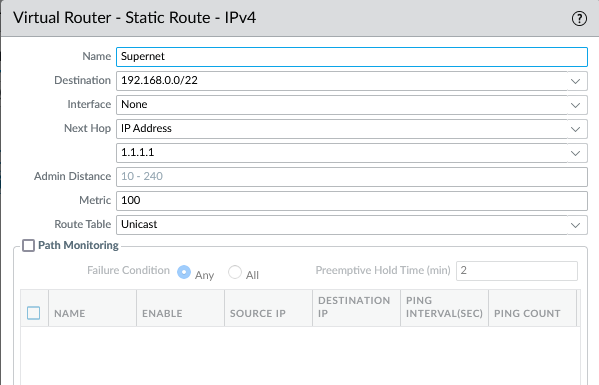
Creating the static summary route (192.168.0.0/22) pointing to loopback.1 with a high metric (100). -
Modify Redistribution Profile:
- Edit the Redistribution Profile used in your OSPF Export Rule.
- Remove "connected" from the Source Type filter.
- Add "static" to the Source Type filter.
- Under Destination Prefixes, add the specific summary static route (192.168.0.0/22) to ensure *only* this static route is matched by the profile.
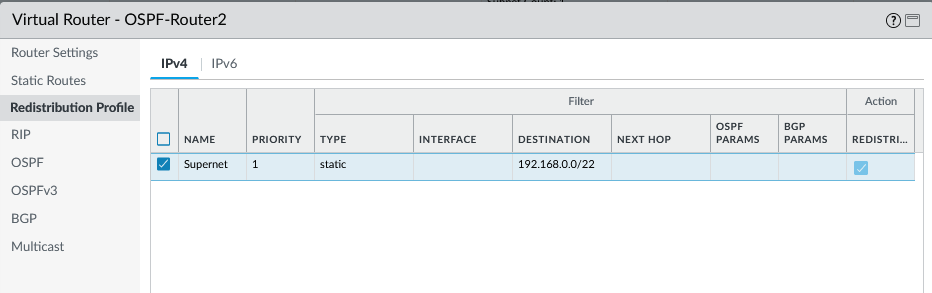
Modifying the Redistribution Profile to match only the specific static summary route (192.168.0.0/22). -
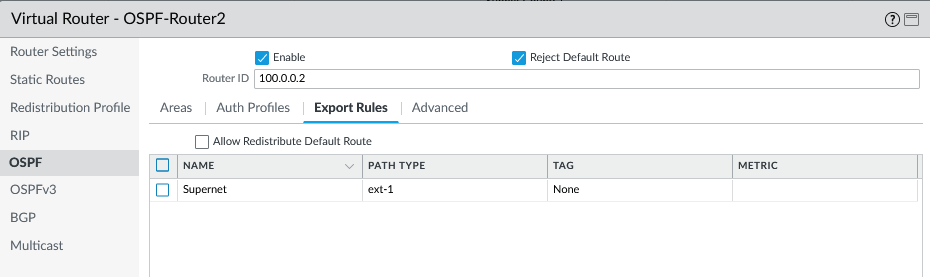
Verify OSPF Export Rule:
- Ensure the OSPF Export Rule is still using the modified Redistribution Profile.
Verifying the OSPF Export Rule applies the correct (modified) Redistribution Profile. - Commit the changes.
Validation
Check the OSPF LSDB and routing table on the neighboring OSPF router. Only the summarized Type-5 LSA (192.168.0.0/22) should be present, originating from the firewall (ASBR).
This workaround effectively achieves Type-5 summarization by manipulating redistribution to only advertise a pre-configured static summary route instead of the individual connected routes.
OSPFv3 Introduction
OSPFv3 provides support for the OSPF routing protocol within an IPv6 network . As such, it provides support for IPv6 addresses and prefixes. It retains most of the structure and functions of OSPFv2 (for IPv4) with some key changes.
Key Differences and Features of OSPFv3:
- Support for multiple instances per link: You can run multiple OSPFv3 processes over a single link, distinguished by an Instance ID in the OSPFv3 header. Interfaces drop packets belonging to different instance IDs.
- Protocol Processing Per-link: OSPFv3 operates on a per-link basis rather than per-IP-subnet as in OSPFv2.
- Addressing Changes: IPv6 addresses are generally not present in OSPFv3 packet headers (except LSA payloads). Neighboring routers are identified primarily by their 32-bit Router ID (which is still formatted like an IPv4 address).
- Authentication Changes: OSPFv3 does not have built-in authentication like OSPFv2. It relies on IPSec (AH or ESP) for securing OSPFv3 messages. Configuring OSPFv3 on a firewall requires an associated authentication profile defining the IPSec parameters. RFC 4552 re-keying procedures are not supported in the documented release.
-
New LSA Types:
OSPFv3 introduces two new LSA types:
- Link LSA (Type 8): Have link-local scope only. Used to advertise link-local addresses and IPv6 prefixes associated with the link.
- Intra-Area Prefix LSA (Type 9): Advertise IPv6 prefix information that previously was included in Router (Type-1) and Network (Type-2) LSAs in OSPFv2.
All detailed changes are described in RFC 5340.
Key takeaways for exams: OSPFv3 is for IPv6, uses Router IDs, relies on IPSec for auth, operates per-link, and has new LSA types (Link and Intra-Area Prefix).
Create OSPFv3 Routing Profiles
When using the Advanced Routing Engine, OSPFv3 requires several types of profiles to be created before configuring the main OSPFv3 settings. These profiles define timers, authentication methods, and redistribution rules.
Profile Types
- OSPFv3 Global Timer Profiles: Specify timers affecting all OSPFv3 areas, such as LSA generation intervals and SPF calculation delays (throttling). Applied globally in the main OSPFv3 configuration.
- OSPFv3 Interface Authentication Profiles: Define the IPSec parameters (SPI, Protocol - AH/ESP, Algorithm, Keys) used to secure OSPFv3 communication between neighbors. Applied per-interface within the OSPFv3 Area configuration. Remember, OSPFv3 itself has no native authentication.
- OSPFv3 Interface Timer Profiles: Specify interface-specific timers like Hello interval, Dead Count (derived from Hello interval), LSA Retransmit interval, and Graceful Restart Hello Delay. Applied per-interface within the OSPFv3 Area configuration.
- OSPFv3 Redistribution Profiles: Control the redistribution of routes (IPv6 Static, Connected, IPv6 BGP, IPv6 Default) *into* the OSPFv3 domain. Applied globally via OSPFv3 Export Rules.
Configuration Steps
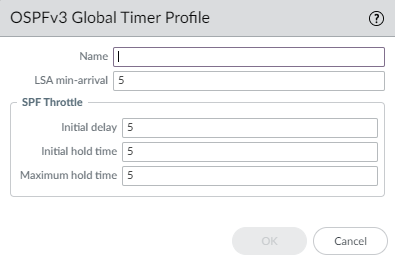
1. Create an OSPFv3 Global Timer Profile
-
Select
Network > Routing > Routing Profiles > OSPFv3. - Click Add under OSPFv3 Global Timer Profile .
- Enter a Name .
-
Configure Timers:
- LSA min-arrival: Smallest interval between SPF recalculations (Default: 5s).
- SPF Throttle - Initial delay: Delay after topology change before SPF runs (Default: 5s).
- SPF Throttle - Initial hold time: Min time between first two SPF runs (Default: 5s). Hold time doubles subsequently.
- SPF Throttle - Maximum hold time: Max time between consecutive SPF runs (Default: 5s).
- Click OK .
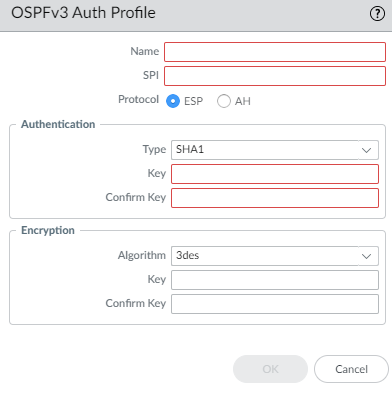
2. Create an OSPFv3 Interface Authentication Profile
-
Select
Network > Routing > Routing Profiles > OSPFv3. - Click Add under OSPFv3 Auth Profile .
- Enter a Name .
- Enter the SPI (Security Policy Index) - must match neighbor.
- Select Protocol : ESP (recommended) or AH .
- Select Authentication Type (e.g., SHA1, SHA256, MD5, None).
- Enter and Confirm the Authentication Key (Hex format).
- If using ESP, select Encryption Algorithm (e.g., 3des, aes-128-cbc).
- If using ESP, Enter and Confirm the Encryption Key (Hex format, length depends on algorithm).
- Click OK .
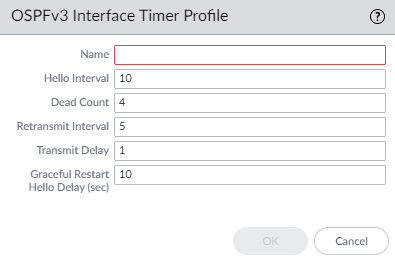
3. Create an OSPFv3 Interface Timer Profile
-
Select
Network > Routing > Routing Profiles > OSPFv3. - Click Add under OSPFv3 Interface Timer Profile .
- Enter a Name .
-
Configure Timers:
- Hello Interval: Frequency of Hello packets (Default: 10s).
- Dead Count: Number of missed Hellos before neighbor declared down (Default: 4). Actual Dead Interval = Hello Interval * Dead Count .
- Retransmit Interval: Time waiting for LSA ACK before retransmit (Default: 5s).
- Transmit Delay: Delay before sending LSA out interface (Default: 1s).
- Graceful Restart Hello Delay (sec): Duration firewall sends Grace LSAs instead of Hellos during HA failover (Default: 10s). Ensure Dead Interval is significantly longer (e.g., >= 4x) than this delay to prevent adjacency drops during graceful restart.
- Click OK .
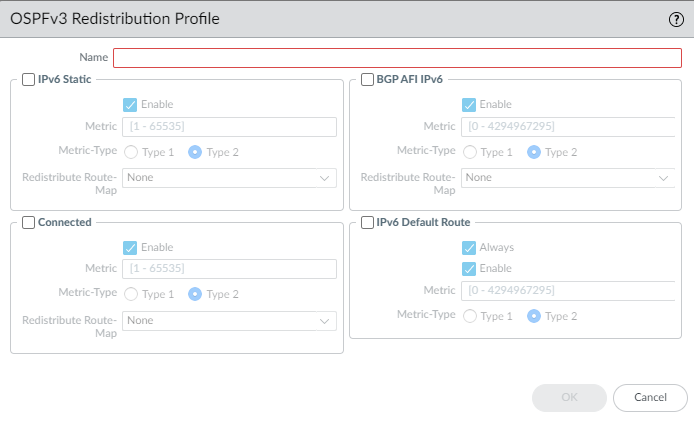
4. Create an OSPFv3 Redistribution Profile
-
Select
Network > Routing > Routing Profiles > OSPFv3. - Click Add under OSPFv3 Redistribution Profile .
- Enter a Name .
-
Configure sections for the route types you want to redistribute (
IPv6 Static
,
Connected
,
BGP AFI IPv6
,
IPv6 Default Route
):
- Enable the section.
- Set default Metric and Metric Type (Type 1 or Type 2).
- (Optional) Apply a Redistribute Route-Map for fine-grained control over which specific routes are redistributed and potentially modify their attributes (metric, type) upon redistribution. Settings in the Route Map override defaults set in the profile.
-
For
IPv6 Default Route
:
- Always: If checked, originate default even if no default exists locally (use with caution).
- Click OK .
These profiles are created first and then referenced when you configure the main OSPFv3 settings under
Network > Virtual Routers > [Your VR] > OSPFv3
.
How to Troubleshoot Flapping OSPF Neighbor Adjacency
An OSPF neighbor adjacency that repeatedly goes up and down ("flaps") indicates instability in the network or issues on the participating routers. Here’s a systematic approach to identify the cause:
1. Check Underlying Reachability and Configuration
- Physical Layer: Is the physical interface flapping? Check interface stats, logs, cabling, and SFP/transceiver health. Use How to troubleshoot physical port flap or link down issue .
- IP Address Conflicts (ARP): Duplicate IP addresses on the network segment can cause instability. Look for "Received conflicting ARP" messages in logs. See Received conflicting ARP on interface ethernetX/X indicating duplicate IP Y.Y.Y.Y . Check ARP table for inconsistencies: Incomplete ARP Entry .
- Bidirectional Forwarding Detection (BFD): If BFD is configured for OSPF, BFD flaps will bring down the OSPF adjacency. Troubleshoot BFD separately. See How to troubleshoot BFD .
- Link Aggregation (LACP): If OSPF runs over an Aggregate Ethernet (AE) interface, instability in LACP can cause flaps. See How to troubleshoot LACP going down or flap issue .
- High Availability (HA) Failover: Did an HA failover occur? While graceful restart aims to minimize disruption, issues during failover can cause flaps.
- OSPF Graceful Restart: Ensure Graceful Restart is configured and enabled consistently on *both* neighbors if used. Mismatched capabilities can cause issues.
- Basic OSPF Parameter Mismatches: Although less likely to cause flapping (more likely to prevent adjacency formation), double-check Area ID, Authentication (Type, Key), MTU, Network Type (broadcast, point-to-point) if flapping occurs immediately after configuration changes.
2. Check Firewall Resource Utilization
Resource exhaustion on the firewall can lead to delayed processing of OSPF packets (Hellos, LSAs), causing dead timers to expire and adjacencies to flap.
- Strata Cloud Manager (AIOps): If monitored, use AIOps dashboards to check for high CPU, Packet Buffer, and Packet Descriptor usage trends correlating with the flaps. See How to identify high CPU, Packet Buffer, and Packet Descriptor in the firewall with Strata Cloud Manager .
-
Manual Checks (CLI/GUI):
- Packet Buffers/Descriptors: Check for exhaustion using CLI commands like `show running resource-monitor`. High or rapidly increasing 'packet buffer' or 'packet descriptor' usage indicates potential dataplane overload. See HowTo Troubleshoot High Packet Buffer Or Packet Descriptors Usage .
- Dataplane CPU: Check `show running resource-monitor` or the Dashboard widget. Sustained high DP CPU utilization can impact routing protocol performance. See How to Troubleshoot High DataPlane CPU .
- Management Plane CPU: While less common to directly cause OSPF flaps unless severely overloaded, high MP CPU can impact configuration changes and monitoring. Check `show system resources follow` or the Dashboard widget. See TIPS & TRICKS: Reducing Management Plane Load .
3. Check OSPF Logs for Specific Errors
Examine the routing process logs for explicit error messages related to the flapping neighbor.
Look for errors like:
- `neighbor does not need to become adjacent` (May indicate network type mismatch or issues in DR/BDR election on broadcast segments). See neighbor does not need to become adjacent .
- `Hello packet dropped because source router ID matches local router ID` (Indicates duplicate Router IDs).
- `Counterfeit packet received` (May indicate authentication issues or packet corruption).
- Messages indicating dropped packets due to rate limiting or resource constraints.
- Messages about Dead timer expiring.
4. Advanced Troubleshooting
- Packet Captures: Capture OSPF traffic (protocol 89) on the relevant interface on both neighbors during the flapping event. Analyze Hello packet timing, sequence numbers, and LSA exchanges.
-
Debugs:
Enable OSPF debugging on the firewall (use with caution in production) to get detailed information about OSPF events, state changes, and packet processing. Example (basic hello debug):
> debug routing ospf hello all enable yes > debug routing engine logging level debug (Remember to disable debugs after troubleshooting) > debug routing ospf hello all enable no > debug routing engine logging level info
How to Troubleshoot OSPF Adjacency Stuck in INIT, EXSTART, EXCHANGE, or LOADING States
OSPF neighbors go through several states before reaching the FULL state. If the adjacency gets stuck in an intermediate state, it indicates a problem preventing the process from completing.
Flowchart illustrating OSPF neighbor states and potential failure points.
Troubleshooting Steps by State:
Stuck in DOWN / No Neighbor Seen
- Cause: Firewall is not receiving Hello packets from the peer, or it's ignoring received Hellos due to parameter mismatches.
-
Checks:
-
L3 Connectivity:
Can the firewall ping the peer's OSPF interface IP? (
ping source [fw_ip] host [peer_ip]) - OSPF Parameters: Verify Area ID, Authentication (type/key), Subnet Mask (must overlap), Hello/Dead Intervals, Stub flags match on both neighbors.
-
Logs:
Check routed logs for Hello reception or mismatch errors (
less mp-log routed.log, search for peer IP or "mismatched"). - Firewall Policy: Ensure intrazone/interzone policy allows OSPF traffic (Protocol 89, destination 224.0.0.5/224.0.0.6 or peer unicast IP). Default intrazone policy usually allows it.
- Packet Captures/Counters: Verify if Hellos (Dest: 224.0.0.5) are being received on the firewall interface. Check global counters for drops.
- Intermediate Devices: Check switches or other devices between the peers for multicast filtering or drops.
-
L3 Connectivity:
Can the firewall ping the peer's OSPF interface IP? (
Stuck in INIT
- Cause: Firewall is receiving Hellos from the peer, but the peer is *not* receiving or acknowledging the firewall's Hellos (the firewall's Router ID is not listed in the neighbor field of the received Hellos).
-
Checks:
- Focus on why the firewall's outbound Hellos aren't reaching or being processed by the peer.
- Firewall Policy/Transmit: Verify firewall isn't blocking outbound OSPF. Check packet captures/counters for transmitted Hellos.
- Intermediate Devices: Check for drops between the firewall and the peer.
- Peer Device: Check logs and captures on the peer router to see if it's receiving the firewall's Hellos and why it might be ignoring them (parameter mismatch, resource issue, etc.).
Stuck in 2-WAY
- Cause: Bidirectional communication established (Hellos seen both ways). This state is normal between DROTHER routers on a broadcast segment. If stuck with the DR or BDR, it usually means the transition to ExStart (DBD exchange) failed.
-
Checks:
-
Network Type:
Is this expected behavior on a broadcast network between non-DR/BDR routers? Check DR/BDR status (
show routing protocol ospf interface [if_name]). - Unicast Communication: The DBD exchange uses unicast. Ensure there's no firewall policy, ACL, or intermediate device blocking unicast IP traffic (Protocol 89) between the OSPF interface IPs of the two neighbors.
- DR/BDR Election Issues: On broadcast networks, ensure DR/BDR election completes successfully. Issues here can prevent further adjacency formation.
-
Network Type:
Is this expected behavior on a broadcast network between non-DR/BDR routers? Check DR/BDR status (
Stuck in EXSTART
- Cause: Initial Database Descriptor (DBD) packets are exchanged to decide the Master/Slave relationship, but the process stalls before actual LSA summaries are exchanged.
-
Checks:
- MTU Mismatch: This is the most common cause. OSPF DBD packets include the interface MTU. If the MTUs don't match between neighbors, the exchange fails. Verify MTU settings on both interfaces. See OSPF NEIGHBORSHIP STUCK IN EXTSTART STATE .
- Duplicate Router IDs: Less common here, but severe issues can manifest.
- Master/Slave Election: Issues determining master (higher Router ID initiates) can stall the process.
- Unicast Communication: Verify unicast OSPF is allowed end-to-end.
Stuck in EXCHANGE or LOADING
- Cause: Master/Slave agreed, MTU likely matches. The problem lies in exchanging the DBD packets containing LSA summaries (Exchange) or exchanging the actual LSA Updates requested based on the DBDs (Loading).
-
Checks:
- MTU Issues (again): While initial DBDs might pass, larger LSAs might exceed the MTU of an intermediate device or the interface itself, causing fragmentation issues or drops if fragmentation is disallowed. Check MTU along the entire path.
- Packet Corruption/Errors: Corrupted LSAs can halt the process. Check interface error counters.
- Unicast Communication: Ensure unicast OSPF traffic (protocol 89) between peers is not blocked.
- Resource Issues: High CPU or memory usage on either device could slow down LSA processing, potentially leading to timeouts or dropped packets.
- Specific LSA Problems: A problematic or corrupted LSA being exchanged can cause the process to stall. Debug logs might indicate issues with a specific LSA.
- Packet Captures: Capture unicast OSPF traffic between peers. Look for DBD sequence number issues, missing LSA Requests, missing LSA Updates, or missing LSA Acks.
FULL State
This is the desired state where routers are fully adjacent, LSDBs are synchronized, and SPF calculations are performed.
What Happens When Graceful Restart Occurs in OSPF?
OSPF Graceful Restart (RFC 3623) is a mechanism designed to minimize routing disruption when an OSPF router undergoes a planned or unplanned restart (like a software process restart or HA failover) without disrupting its forwarding plane.
Process Overview
-
Restart Initiation:
When the OSPF process restarts (e.g., using
debug routing restartordebug software restart process routed, or during HA failover), the restarting router enters graceful restart mode. -
Grace-LSA Transmission:
The restarting router immediately starts sending
Grace-LSAs (Opaque Type-9 LSA with Opaque Type 3)
out of its OSPF interfaces. These LSAs signal to neighbors that it's undergoing a graceful restart and specify the
Grace Period
(how long neighbors should maintain the adjacency and routes through the restarting router).
Example Grace-LSA Packet Detail: Frame XXX: ... LS Update ... LS Type: Opaque LSA, Link-local scope (9) Link State ID Opaque Type: grace-LSA (3) ... Advertising Router: [Restarting Router ID] ... Grace Period: 120 seconds. <<< Indicates duration neighbors should wait ... Restart Reason: Unknown (0) (Or Software Restart, etc.) Restart IP: [Restarting Router Interface IP] - Helper Mode Activation: Graceful Restart capable neighbors receiving the Grace-LSA enter "Helper Mode". They maintain the adjacency with the restarting router and continue advertising routes learned through it , assuming the forwarding plane is still active. They suppress immediate reactions to the OSPF process being down on the restarting router.
- Hello Suppression (Restarting Router): During the initial part of the grace period (defined by the Graceful Restart Hello Delay in the OSPFv3 Interface Timer Profile, or a similar internal timer for OSPFv2), the restarting router *stops* sending regular Hello packets while it sends Grace-LSAs.
- OSPF Re-establishment: The restarting router attempts to re-establish its OSPF adjacencies and synchronize its LSDB within the Grace Period.
- Exit Graceful Restart: Once the restarting router has successfully re-established adjacencies and synchronized, it stops sending Grace-LSAs and resumes normal OSPF operation. Helper routers exit Helper Mode.
- Grace Period Expiry: If the restarting router fails to recover within the Grace Period specified in the Grace-LSA, helper neighbors will tear down the adjacency and trigger normal OSPF convergence (SPF runs, LSA flooding).
Impact on BDR Role During Restart
Consider a firewall acting as the Backup Designated Router (BDR) on a segment:
- If Restart Completes Within Grace Period: If the OSPF process restarts successfully within the Grace Period (e.g., 120 seconds as shown in the example), and it re-establishes adjacency with the DR and other neighbors, it retains its role as BDR . The DR and other routers, acting as helpers, don't trigger a new DR/BDR election.
- If Restart Exceeds Grace Period: If the firewall takes longer than the Grace Period to recover, the neighbors (including the DR) will time out the adjacency. A new DR/BDR election will occur on the segment. When the firewall finally comes back up, it will likely establish adjacency as a DROTHER , as another router would have likely been elected BDR in the meantime.
Graceful Restart is crucial for minimizing downtime during planned maintenance or HA failovers in OSPF environments. Ensure it's enabled and timers (Grace Period, Hello Delay vs Dead Interval) are appropriately configured.
OSPF Concepts Quiz
Test your understanding of the OSPF concepts covered.