Quality of Service (QoS)
What is Quality of Service?
Quality of Service (QoS) encompasses a range of technologies designed to ensure a network can reliably run high-priority applications and manage traffic flow, especially when network capacity is limited. QoS achieves this by providing differentiated handling and capacity allocation to specific traffic flows. This allows network administrators to define the order in which traffic is processed and the amount of bandwidth allocated to it.
Palo Alto Networks Application Quality of Service (QoS) builds upon basic QoS principles, extending these capabilities to provide granular control over applications and users. This means you can prioritize or limit bandwidth not just for networks or subnets, but specifically for critical applications or key users.

QoS Overview
Quality of Service (QoS) is employed to prioritize network traffic and fine-tune various quality aspects, such as bandwidth (maximum transfer rate), throughput (actual transfer rate), latency (delay), and jitter (variance in latency). The ability to manage these metrics makes QoS particularly vital for applications sensitive to delay and jitter, like Voice over IP (VoIP), video conferencing, and video-on-demand.
Implementing QoS on a Palo Alto Networks firewall primarily involves three configuration components:
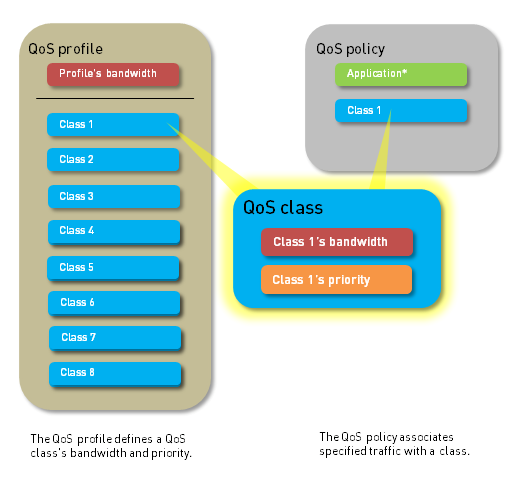
- QoS Profile: Defines traffic classes and their respective bandwidth and priority settings.
- QoS Policy: Identifies specific traffic flows (based on applications, users, zones, etc.) and assigns them to a QoS class.
- QoS Egress Interface: The physical interface where the QoS Profile is applied, and where traffic shaping occurs as packets exit the firewall.

When a queue fills faster than it can be emptied, the firewall uses a Weighted Random Early Detection (WRED) algorithm to manage congestion by proactively dropping packets based on a probability function tied to the average queue depth.
Each firewall model supports a maximum number of ports that can be configured with QoS. Always refer to the product comparison tool or spec sheet for your specific model to understand its QoS capabilities, including support for QoS on subinterfaces.
Simplified QoS Processing Flow on Palo Alto Networks Firewall.
Benefits of QoS
Implementing QoS offers several advantages for network management and performance:
- Prioritization: Guarantees high priority for critical network and application traffic while allowing the option to limit non-essential traffic.
- Bandwidth Sharing: Enables equitable bandwidth distribution among different subnets, classes, or users.
- Bandwidth Allocation: Provides control over bandwidth allocation for both upload and download traffic, or selectively for one direction.
- Performance for Critical Services: Ensures low latency for customer-facing and revenue-generating applications in an enterprise setting.
- Traffic Profiling: Facilitates the analysis of application bandwidth usage to optimize network resources.
These benefits contribute to a more stable, predictable, and efficient network environment, ensuring that essential services perform optimally even under load.
QoS Policy
A QoS Policy rule is fundamental to the QoS configuration. Its primary functions are:
- To define the specific traffic that will receive QoS treatment (either preferential handling or bandwidth limiting).
- To assign the matched traffic to a QoS Class of Service.
You can define a QoS policy rule to match traffic based on a variety of criteria:
- Applications and application groups ( leveraging App-ID).
- Source zones, source addresses, and source users (leveraging User-ID).
- Destination zones and destination addresses.
- Services and service groups (limited to specific TCP and/or UDP port numbers).
- URL categories, including custom URL categories.
- Differentiated Services Code Point (DSCP) and Type of Service (ToS) values.
You cannot apply DSCP code points or QoS to SSL Forward Proxy, SSL Inbound Inspection, and SSH Proxy traffic.
QoS is enforced on traffic as it egresses the firewall. This means the QoS policy rule is applied *after* the firewall has enforced all other security policy rules, including Network Address Translation (NAT) rules. However, the firewall evaluates QoS rules based on the contents of the *original packet* (e.g., pre-NAT source IP, pre-NAT source zone). Therefore, for source-based QoS, configure the QoS policy with pre-NAT addresses.
QoS Profile
A QoS Profile is used to define the treatment for up to eight QoS Classes. Within a single profile, you can configure:
- QoS Priority Queuing: Assigning a priority level (real-time, high, medium, low) to each class.
- QoS Bandwidth Management: Defining guaranteed and maximum bandwidth limits for each class.
Each QoS profile allows individual bandwidth and priority settings for its eight classes, as well as defining the total combined bandwidth allotted for these classes. The QoS profile is then attached to a physical interface (the egress interface) to apply these settings to traffic exiting that interface.
A default QoS profile is available on the firewall, but its classes do not have predefined bandwidth limits.
QoS Classes
A QoS Class determines the priority and bandwidth allocation for traffic that matches a QoS Policy rule. You can define up to eight QoS classes within a single QoS Profile. Traffic that does not match any configured QoS class is, by default, assigned to Class 4.
The fundamental mechanisms of QoS—Priority Queuing and Bandwidth Management—are configured within the QoS class definition in the QoS Profile. For each class, you can set:
- Priority: Real-time, high, medium, or low.
- Egress Max Bandwidth: The maximum bandwidth the class can consume.
- Egress Guaranteed Bandwidth: The minimum bandwidth assured for the class.
QoS Priority Queuing
QoS Priority Queuing allows you to assign one of four priorities to a QoS class: real-time, high, medium, and low . When traffic matches a QoS policy rule, it's assigned the QoS class associated with that rule. The firewall then treats this traffic based on the priority of its assigned class.
Packets in the outgoing traffic flow are queued based on their priority until the network is ready to process them. This ensures that important traffic, applications, and users take precedence.
Real-time priority is typically used for applications highly sensitive to latency, such as voice and video communications.
QoS Bandwidth Management
QoS Bandwidth Management enables control over traffic flows to prevent network congestion (when traffic exceeds capacity) and to allocate specific bandwidth amounts for certain traffic types, applications, or users.
A QoS Profile allows setting bandwidth limits for individual QoS classes and for the total combined bandwidth of all eight classes. Key bandwidth settings include:
-
Egress Guaranteed:
This is the amount of bandwidth guaranteed for matching traffic. If this guaranteed bandwidth is exceeded, the firewall passes the excess traffic on a best-effort basis.
Importantly, bandwidth that is guaranteed but currently unused remains available for all other traffic. It is not strictly reserved if not in use.
- Egress Max: This defines the overall maximum bandwidth allocation for matching traffic. The firewall will drop traffic that exceeds this configured limit.
The cumulative guaranteed bandwidth specified for all classes within a QoS profile attached to an interface must not exceed the total bandwidth allocated to that interface itself (the interface's Egress Max setting).
Conceptual overview of bandwidth allocation with Egress Max and Guaranteed settings.
QoS Egress Interface
A QoS configuration is completed by enabling a QoS Profile on the egress interface of the traffic identified for QoS treatment.
- The ingress interface is where traffic enters the firewall.
- The egress interface is where traffic leaves the firewall.
QoS is always enabled and enforced on the egress interface for a given traffic flow.
The egress interface can be an external-facing interface (e.g., to the Internet) or an internal-facing interface (e.g., to a LAN segment), depending on the direction of the traffic flow you are managing.
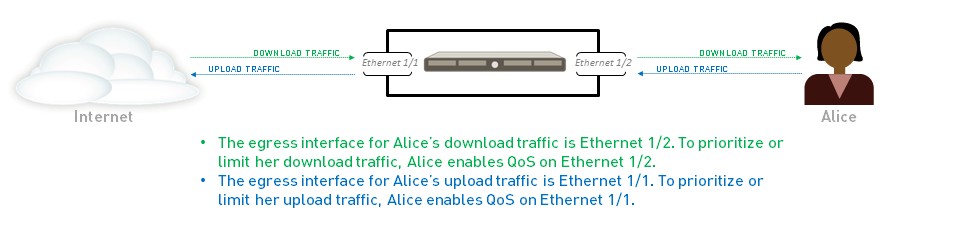
- Example 1 (Limiting Downloads): If limiting employee downloads from a website, the traffic flow is Internet -> Firewall -> Company Network. The egress interface for QoS is the firewall’s internal interface .
- Example 2 (Limiting Uploads): If limiting employee uploads to the same website, the traffic flow is Company Network -> Firewall -> Internet. The egress interface for QoS is the firewall’s external interface .
QoS for Clear Text and Tunneled Traffic
When setting up QoS on an interface, you must select a default QoS profile that defines bandwidth and priority for clear text traffic egressing that interface. However, Palo Alto Networks firewalls allow for more granular control:
- Clear Text Traffic: You can apply specific QoS settings to outgoing clear text traffic originating from different source interfaces and source subnets.
-
Tunneled Traffic:
QoS preferential treatment and bandwidth limiting can be enforced for:
- All tunneled traffic globally on the interface.
- Individual tunnel interfaces (e.g., specific IPSec tunnels).
On Palo Alto Networks firewalls, "tunneled traffic" typically refers to traffic traversing tunnel interfaces, most notably IPSec traffic in tunnel mode.
QoS for Applications and Users (App-ID & User-ID Integration)
A key strength of Palo Alto Networks QoS is its tight integration with App-ID and User-ID technologies. This extends QoS beyond traditional network/subnet-based control to application-specific and user-specific traffic shaping.
- App-ID: Identifies applications regardless of port, protocol, or encryption. This allows QoS policies to prioritize or limit bandwidth for specific applications (e.g., Salesforce, Office 365) or categories of applications (e.g., streaming-media).
- User-ID: Integrates with directory services (like Active Directory) to map IP addresses to user identities. This enables QoS policies based on users or user groups (e.g., guarantee bandwidth for the CEO, limit bandwidth for guest users).
By leveraging App-ID and User-ID, administrators can create highly granular and context-aware QoS policies that align network resource allocation with business priorities.
Core Configuration Steps for QoS
Configuring Quality of Service on a Palo Alto Networks firewall involves several key steps:
-
Identify Traffic for QoS Treatment:
- Use tools like the Application Command Center (ACC) to understand traffic patterns and identify applications or users needing QoS.
-
Identify the Egress Interface:
- Determine the interface through which the identified traffic will exit the firewall. This can be found in Monitor > Logs > Traffic (look for the "Egress I/F" column).
-
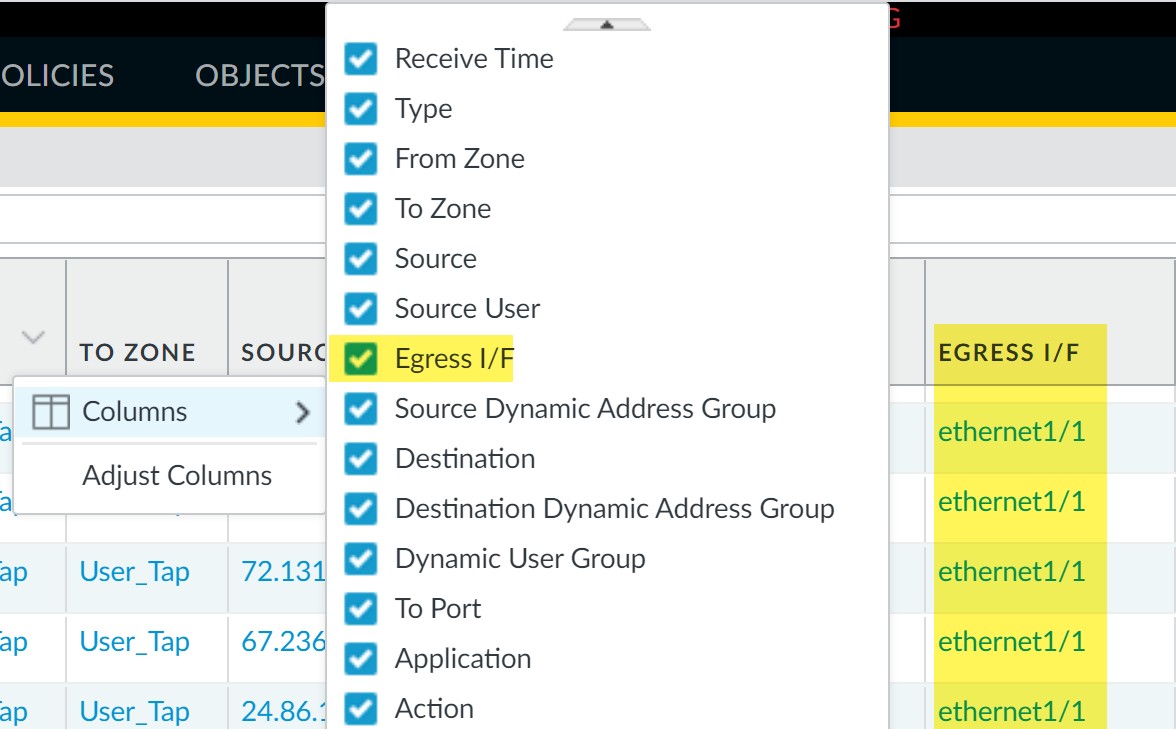
Adding the Egress Interface column in Traffic Logs.
-
Add a QoS Policy Rule (Policies > QoS):
- Define matching criteria (Source, Destination, Application, Service/URL Category, DSCP/ToS).
-
For source-based QoS, ensure you use pre-NAT source addresses/zones.
- Assign a QoS Class (e.g., Class 1, Class 2) to the matched traffic.
-
Add a QoS Profile (Network > Network Profiles > QoS Profile):
- Define overall Egress Max and Egress Guaranteed bandwidth for the profile.
-
For each of the up to eight classes:
- Set Priority (real-time, high, medium, low).
- Set Egress Max and Egress Guaranteed bandwidth.
-
If using percentages for class Egress Guaranteed, it's calculated against the profile's Egress Max value.
-
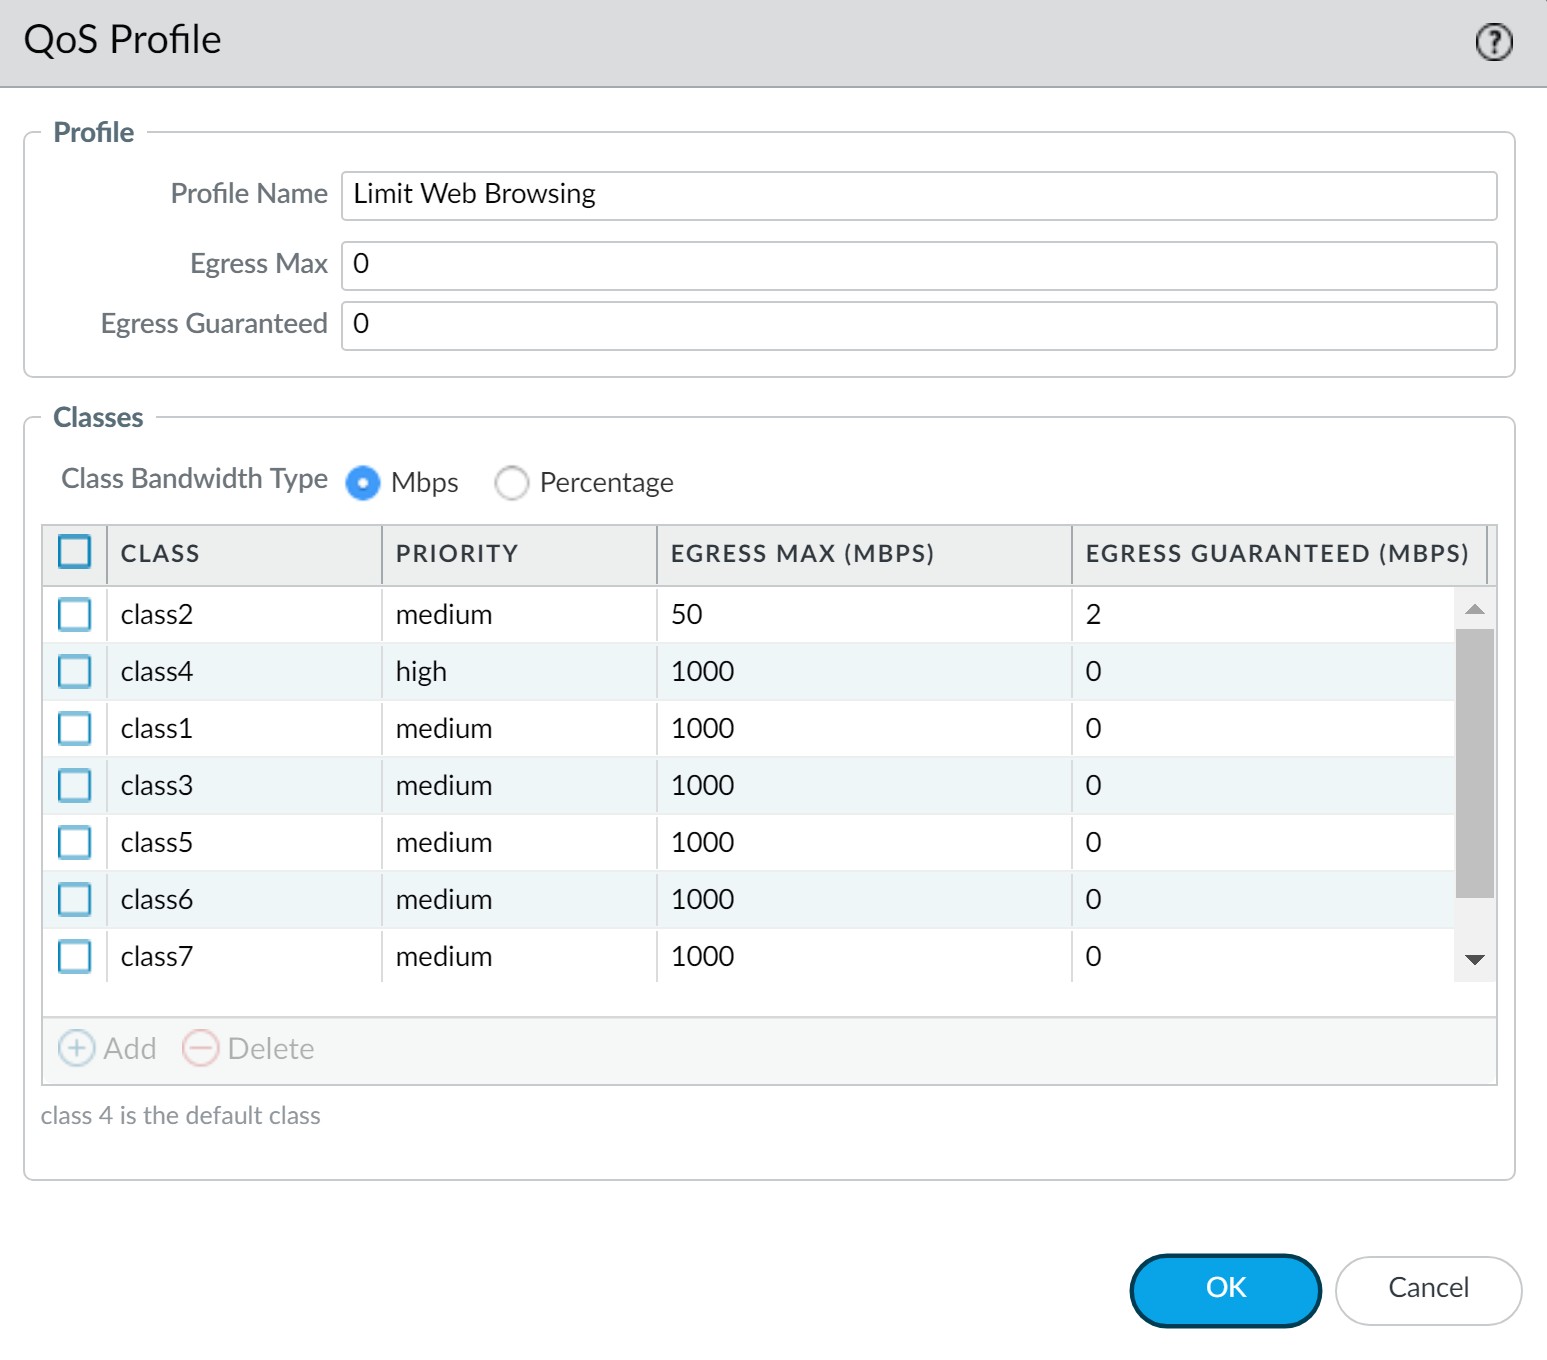
Example QoS Profile defining class bandwidth and priority.
-
Enable QoS on a Physical Interface (Network > QoS):
- Select the identified egress physical interface.
- Set the overall Egress Max bandwidth for this interface (critical best practice).
- Check "Turn on QoS feature on this interface."
- Assign a default QoS Profile for Clear Text traffic (and optionally for Tunneled traffic).
-
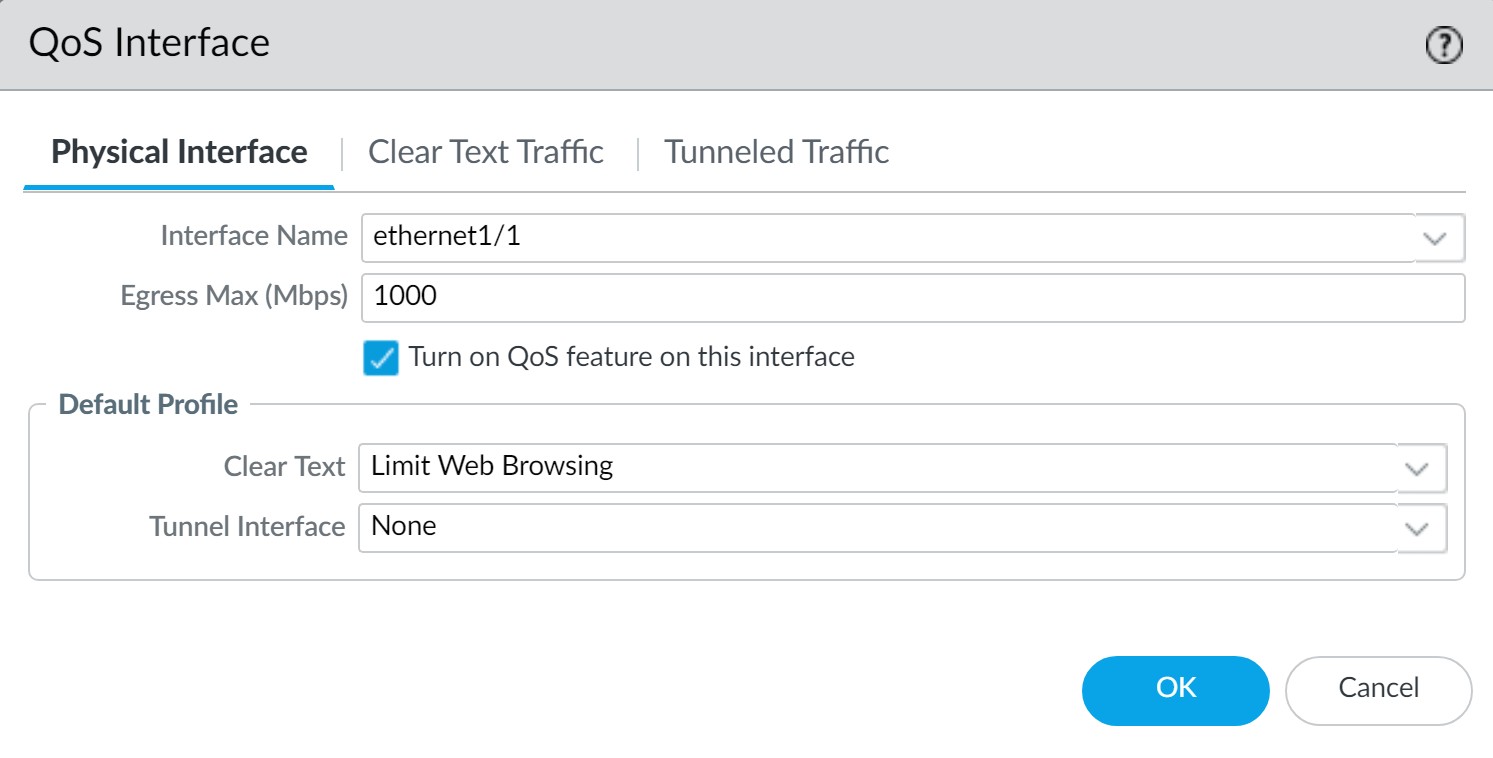
Enabling QoS and assigning a default profile to an interface. - Optionally, configure more granular QoS for specific clear text traffic (by source interface/subnet) or specific tunnel interfaces.
-
For PA-3200, PA-5200, PA-5450, and PA-7000 Series firewalls, if a QoS policy rule is applied to a specific subinterface, you must also select a destination interface when configuring that rule.
-
Commit Changes.
-
Verify Configuration (Network > QoS > Statistics):
- Monitor bandwidth usage, active sessions per class, and active applications.
-

Verifying QoS via the Statistics window. -
Bandwidth limits shown in QoS Statistics include a hardware adjustment factor.
Sequence of QoS Configuration Steps.
Lockless QoS
Palo Alto Networks firewalls support two types of QoS:
- Legacy QoS: The traditional QoS implementation.
- Lockless QoS: Designed to improve QoS performance, especially for firewalls with higher bandwidth requirements. It achieves this by dedicating CPU cores to the QoS function, resulting in improved throughput and lower latency. In Lockless QoS mode, packets from the same interface (or port) are shaped by the same core.
Lockless QoS is supported on specific firewall models (e.g., PA-3400 Series, PA-5400 Series). For these platforms, the maximum bandwidth you can allocate at the port level and QoS profile level is typically 10G when Lockless QoS is used.
Lockless QoS Limitations:
- For Aggregate Ethernet (LAG) interfaces, members must be mapped to the same core. This limits the overall LAG QoS throughput to the per-core throughput.
- QoS throughput on high-speed ports (100G, 40G, 25G) is limited to a single core's throughput.
- If more than two ports are mapped to a single core, the QoS throughput of that core is shared among them.
Configuration (CLI):
-
To enable Lockless QoS:
username@hostname> set lockless-qos yes(Requires commit and reboot) -
To disable Lockless QoS:
username@hostname> set lockless-qos no -
To view status:
username@hostname> show lockless-qos enable -
To view interface-to-core mapping:
username@hostname> show lockless-qos if-core-mapping -
To view number of CPU cores for Lockless QoS (PAN-OS 11.1.3+):
username@hostname> show lockless-qos core-num
If legacy QoS is already configured, enabling Lockless QoS will transition to the new mode after a reboot. Disabling Lockless QoS will revert to legacy QoS behavior if previously configured.
Configure QoS for a Virtual System (VSYS)
QoS can be configured independently for each virtual system (VSYS) on a Palo Alto Networks firewall. Since a VSYS acts as an independent firewall instance, its QoS settings are self-contained.
Configuring QoS for a VSYS is similar to a physical firewall, with a key distinction: due to the nature of virtual environments where traffic might span multiple VSYS, it's crucial to precisely specify source and destination zones and interfaces in QoS policies . This ensures that QoS is applied correctly to the traffic intended for a single VSYS.
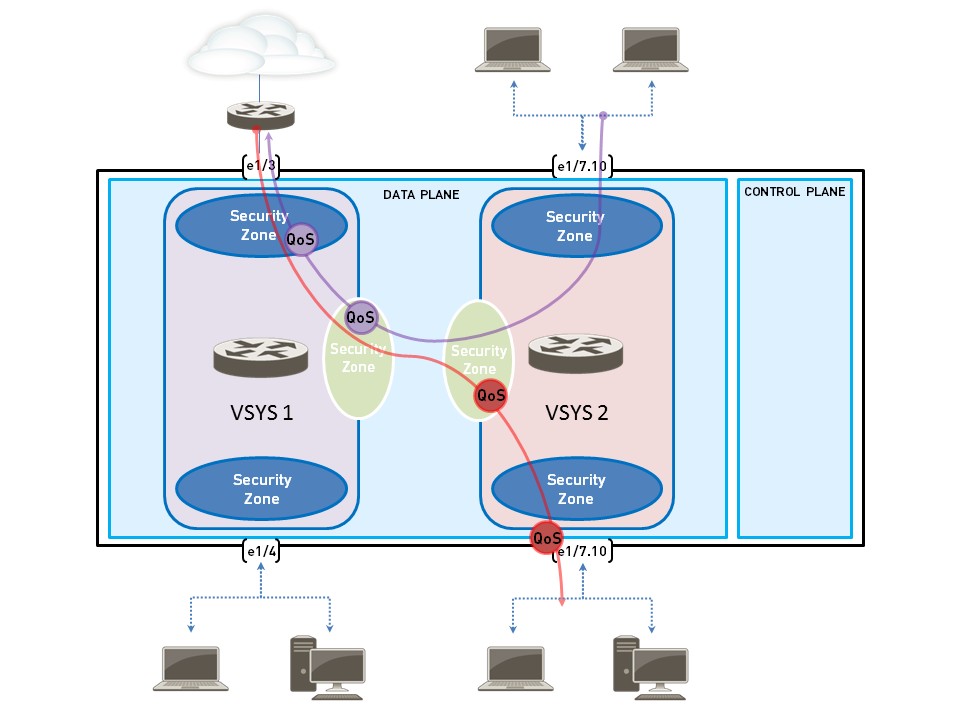
Key Steps for VSYS QoS Configuration:
- Confirm VSYS Setup: Ensure appropriate interfaces, virtual routers, and security zones are associated with each VSYS.
-
Identify Traffic:
Use the ACC (selecting the specific VSYS from the dropdown) to identify traffic needing QoS.
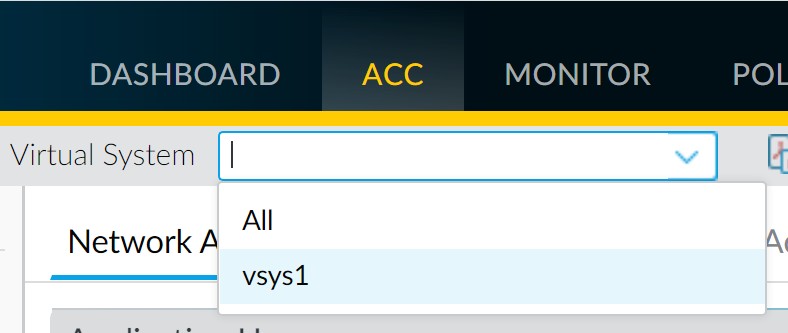
Filtering ACC data by Virtual System. - Identify Egress Point: For a VSYS, the egress point could be a physical interface or a zone, depending on the traffic flow and configuration. Use Traffic logs (filtered for the VSYS) to find egress interface, source zone, and destination zone.
- Create QoS Profile: Same as for a physical firewall (Network > Network Profiles > QoS Profile).
-
Create QoS Policy (Policies > QoS):
- Define traffic matching (Application, Service, etc.).
-
Crucially, specify the Source Zone and Destination Zone relevant to the VSYS to ensure the policy applies only to that VSYS's traffic.
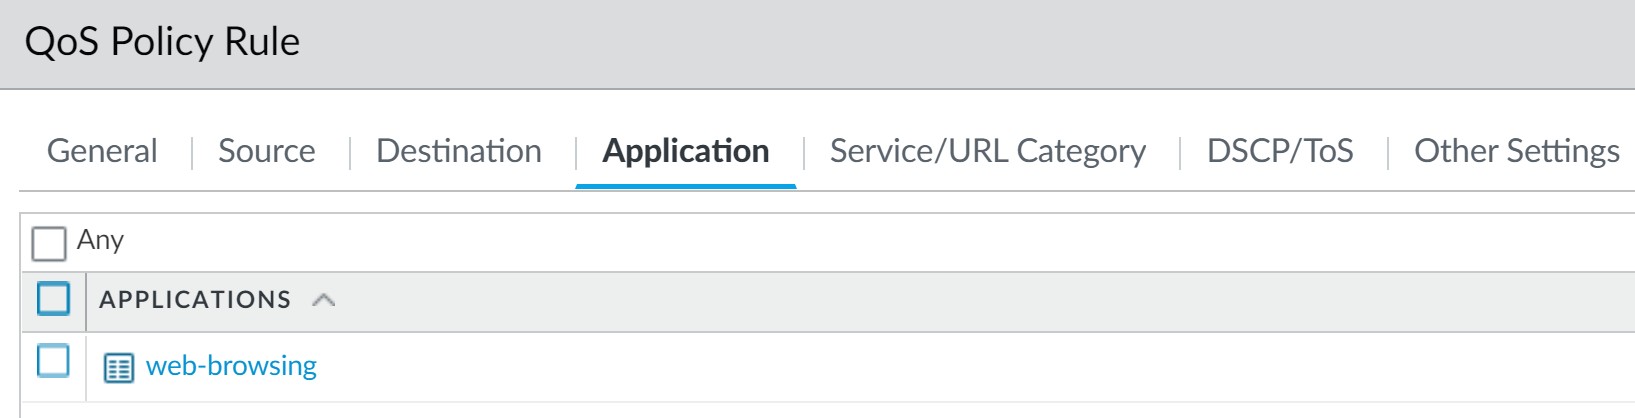
Matching Application in VSYS QoS Policy. 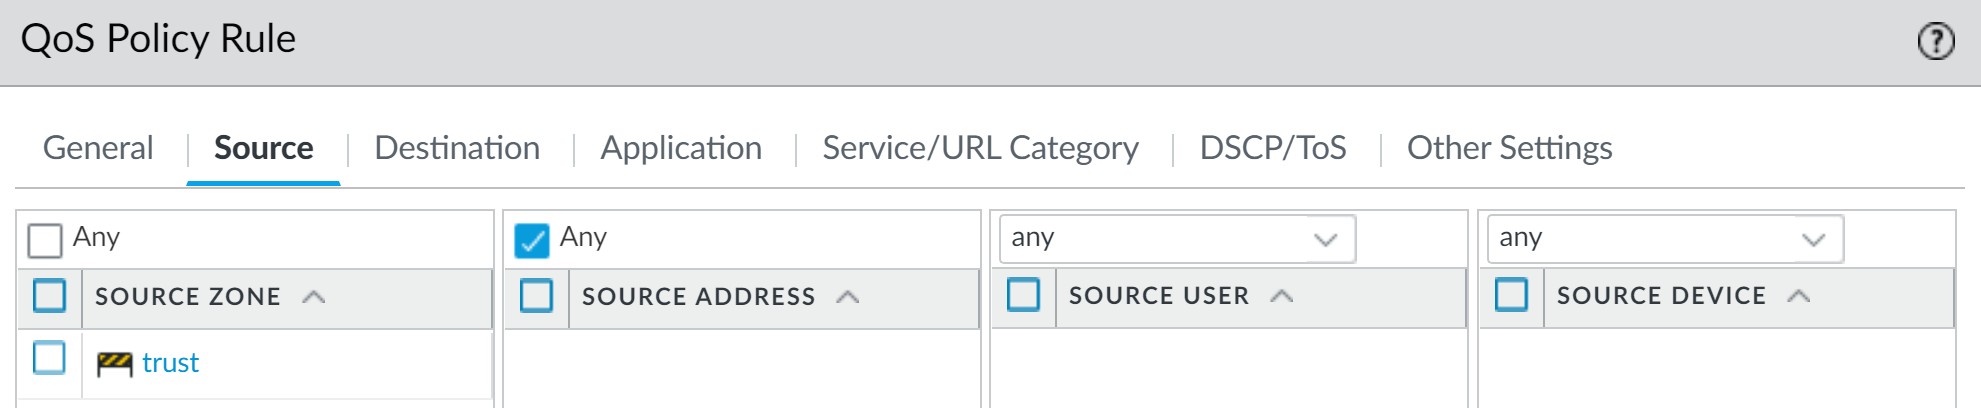
Matching Source Zone in VSYS QoS Policy. 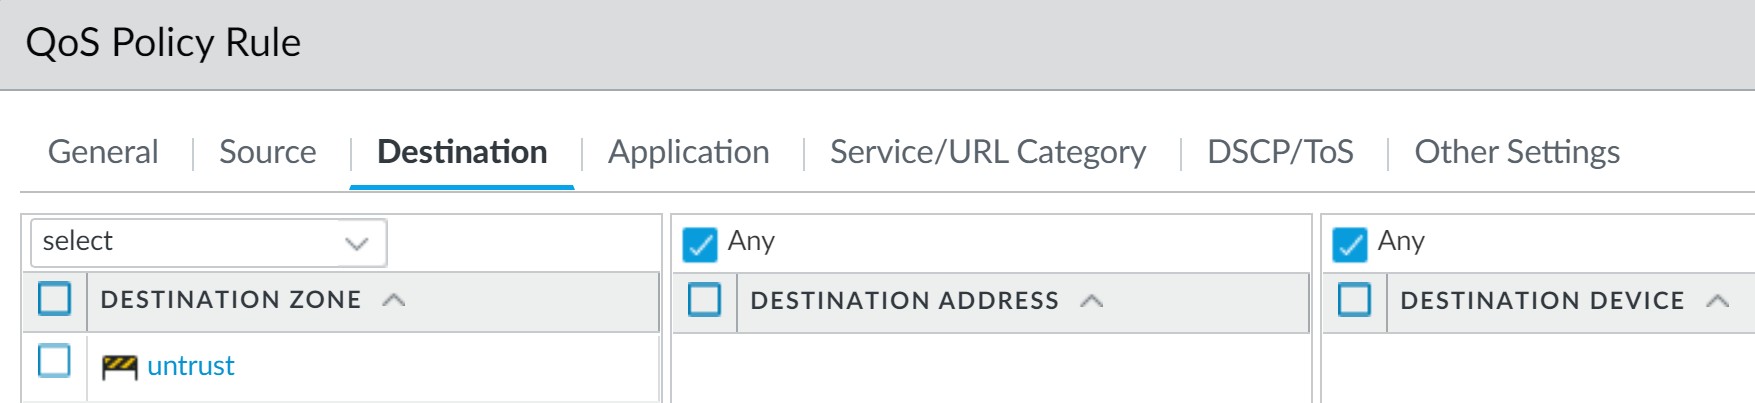
Matching Destination Zone in VSYS QoS Policy. -
Assign a QoS Class.

Assigning QoS Class in VSYS QoS Policy.
- Enable QoS Profile on Physical Interface: Same as for a physical firewall (Network > QoS), applying the profile to the identified physical egress interface.
- Commit and Verify.
Enforce QoS Based on DSCP Classification
Differentiated Services Code Point (DSCP) is a value in a packet header used to request a certain level of service, such as high priority or best-effort delivery. Palo Alto Networks firewalls support Session-Based DSCP Classification, allowing them to:
- Honor incoming DSCP values: Apply QoS treatment based on the DSCP value of traffic entering the firewall.
- Mark outgoing DSCP values: Mark session traffic with a DSCP value as it exits the firewall. This enables consistent QoS treatment by downstream devices.
As a reminder, you cannot apply DSCP code points or QoS to SSL Forward Proxy, SSL Inbound Inspection, and SSH Proxy traffic.
Common DSCP marking types include:
- Expedited Forwarding (EF): For low loss, low latency, guaranteed bandwidth (highest priority).
- Assured Forwarding (AF): For reliable delivery, higher priority than best-effort.
- Class Selector (CS): For backward compatibility with IP precedence.
- IP Precedence (ToS): Legacy marking.
- Custom Codepoint: User-defined.
Configuration Steps for DSCP-based QoS and Marking:
- Preliminary QoS Configuration: Perform the basic steps to configure QoS (Profile, enable on Interface).
-
Define QoS Policy for DSCP:
- In the QoS Policy rule (Policies > QoS), go to the DSCP/ToS tab.
- Add Codepoints: Select the DSCP Type (e.g., AF) and specific Codepoint value (e.g., AF11).
- Assign a QoS Class to this DSCP-matched traffic.
- Define QoS Profile Treatment: In the associated QoS Profile, configure the desired priority and bandwidth for the QoS Class assigned in step 2.
-
Enable DSCP Marking (for return traffic):
- Edit the relevant Security Policy rule (Policies > Security).
- Go to the Actions tab.
- In the QoS Marking drop-down, select Follow Client-to-Server Flow . This tells the firewall to mark return traffic (Server-to-Client) with the same DSCP value it detected or applied on the initial (Client-to-Server) flow.
-
The "Follow Client-to-Server Flow" setting in the Security Policy is crucial for enabling consistent DSCP marking throughout a session's lifecycle across your network.
- Commit Changes.
State diagram illustrating DSCP honoring and marking flow.
Use Case: QoS for a Single User
Scenario: The CEO experiences performance issues with enterprise applications during peak network usage. The IT admin needs to guarantee preferential treatment for all traffic to and from the CEO.
Solution Steps:
-
Create QoS Profile (e.g., "CEO_Traffic"):
- Define a class (e.g., Class 1) with High priority.
- Set a significant Egress Guaranteed bandwidth (e.g., 50 Mbps) for this class.
- Set the profile's Egress Max (e.g., 1000 Mbps, matching the interface capacity if no restriction is desired for the CEO beyond priority).
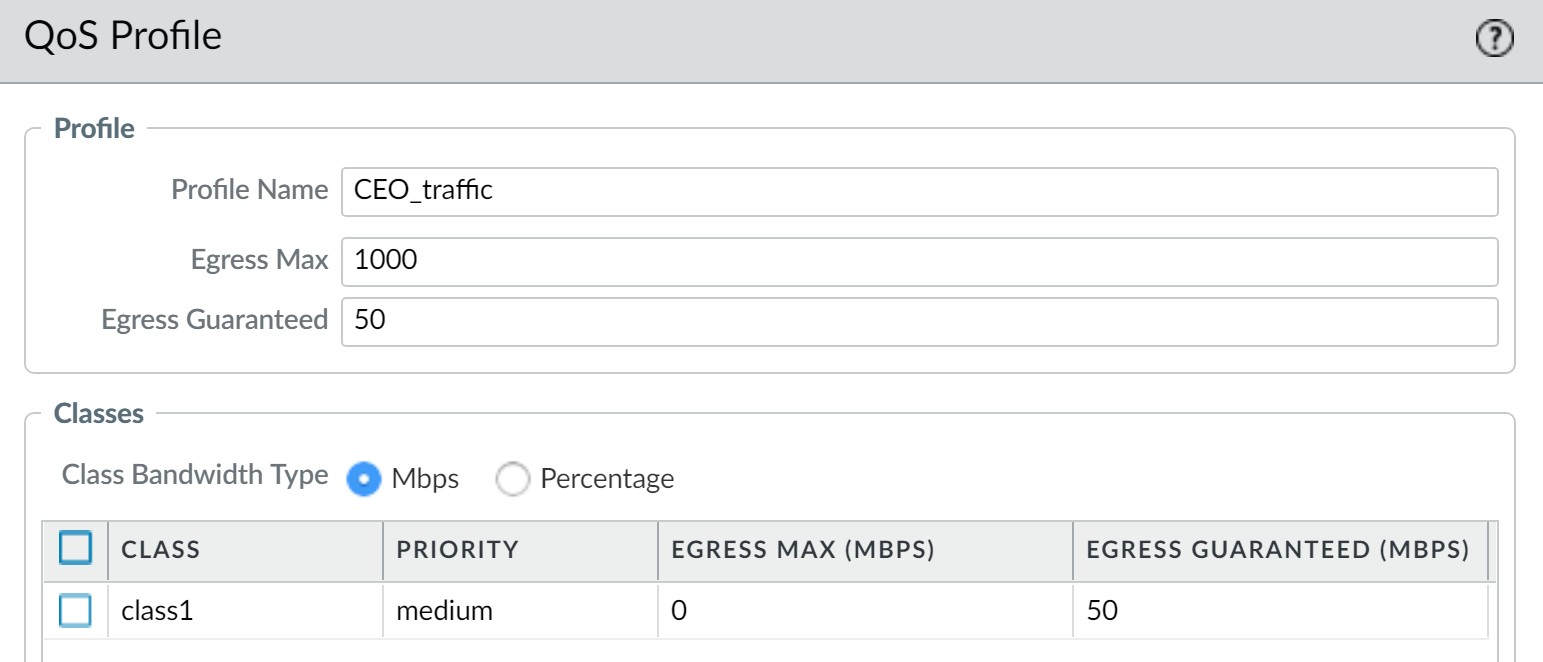
QoS Profile for CEO traffic. -
Create QoS Policy:
- Name: e.g., "CEO_Priority_Traffic".
-
Source: Match the CEO's username (if User-ID is configured) or IP address.

Matching CEO by username in QoS Policy. - Application/Service/Destination: Set to "Any" if all CEO traffic needs priority, or be more specific.
-
Other Settings: Assign the traffic to the previously defined class (e.g., Class 1).

Assigning Class 1 to CEO's traffic.
-
Enable QoS on Egress Interface:
- Select the external-facing interface (e.g., ethernet1/2 for outbound CEO traffic).
- Set the interface Egress Max.
- Turn on QoS and select the "CEO_Traffic" profile as default for Clear Text traffic.
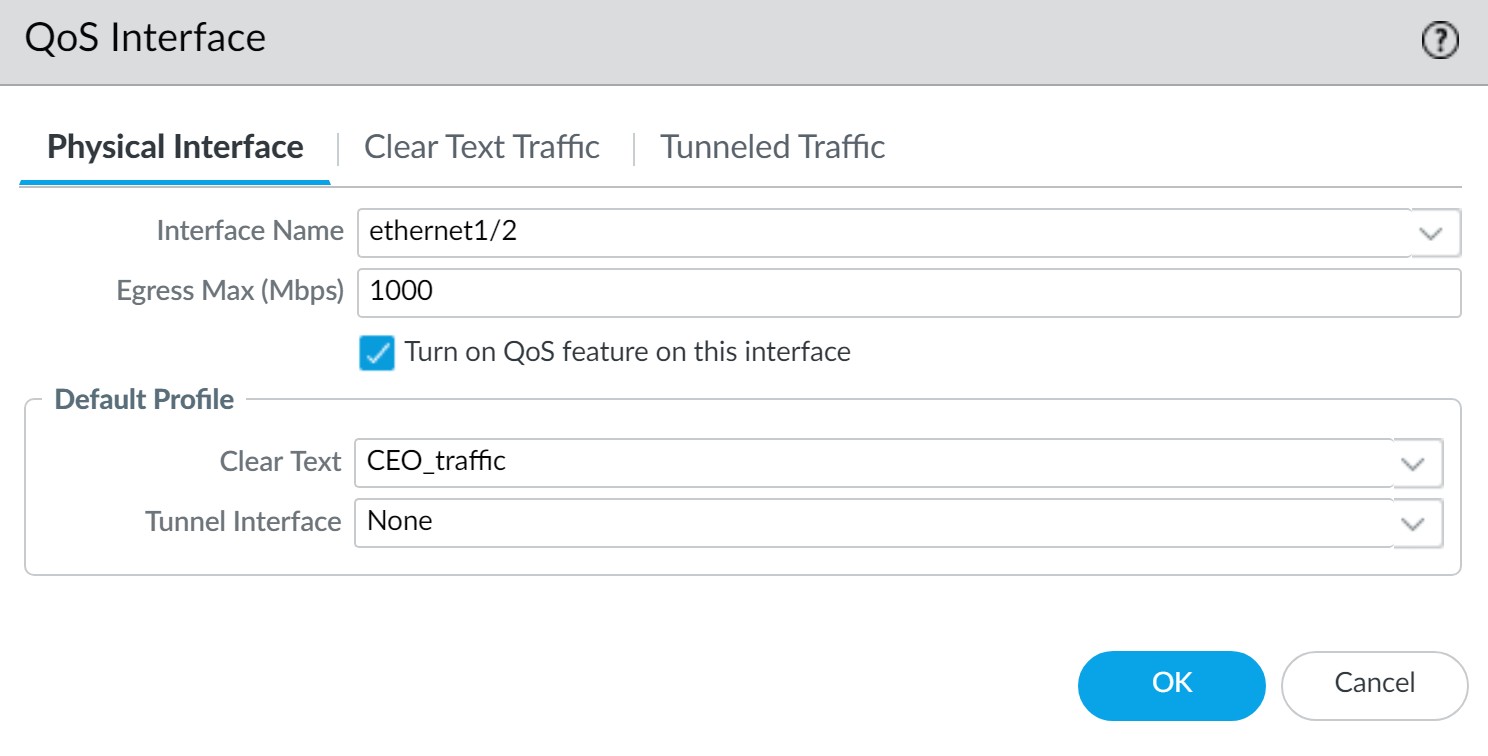
Enabling QoS on the egress interface with CEO's profile. -
Commit and Verify:
-
Check Network > QoS page.

-
View statistics for the interface and class.
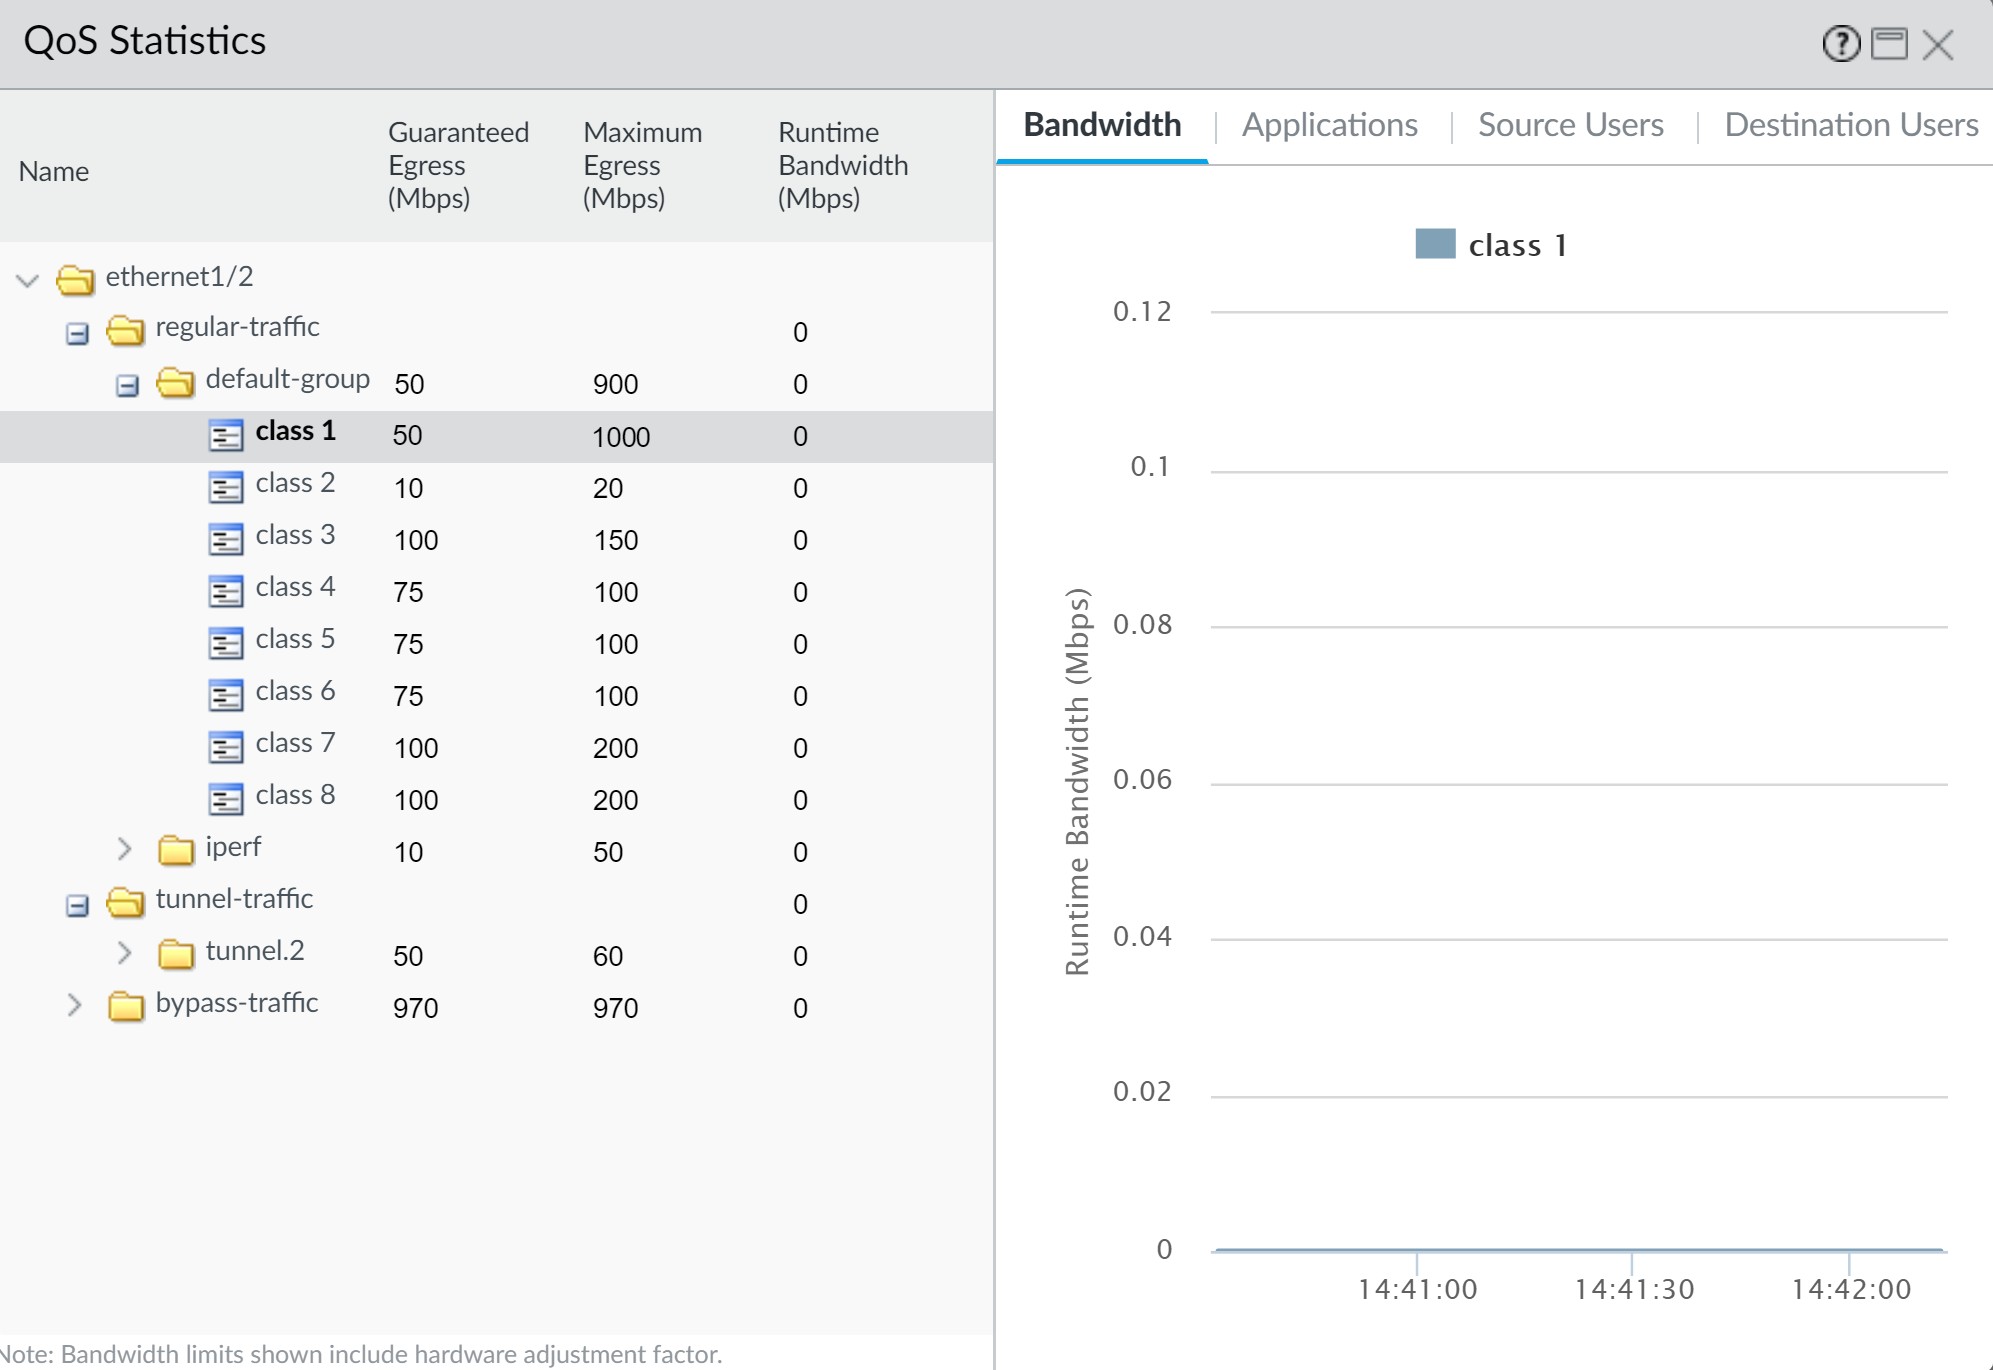
Monitoring CEO's Class 1 traffic statistics.
-
Check Network > QoS page.
This example focuses on outbound traffic from the CEO. To prioritize inbound traffic *to* the CEO, a similar setup would be needed, but the QoS policy would match the CEO's IP as the Destination Address, and QoS would be enabled on the internal-facing egress interface for that traffic flow.
Use Case: QoS for Voice and Video Applications
Scenario: Employees at a branch office experience unreliable video conferencing and VoIP calls. The IT admin needs to ensure these latency-sensitive applications perform effectively.
Solution Steps:
-
Create QoS Profile (e.g., "VoIP_Video_Priority"):
- Define a class (e.g., Class 2) with Real-time priority.
- Set an appropriate Egress Guaranteed bandwidth (e.g., 250 Mbps on a 1000 Mbps interface).
- Set the profile's Egress Max .
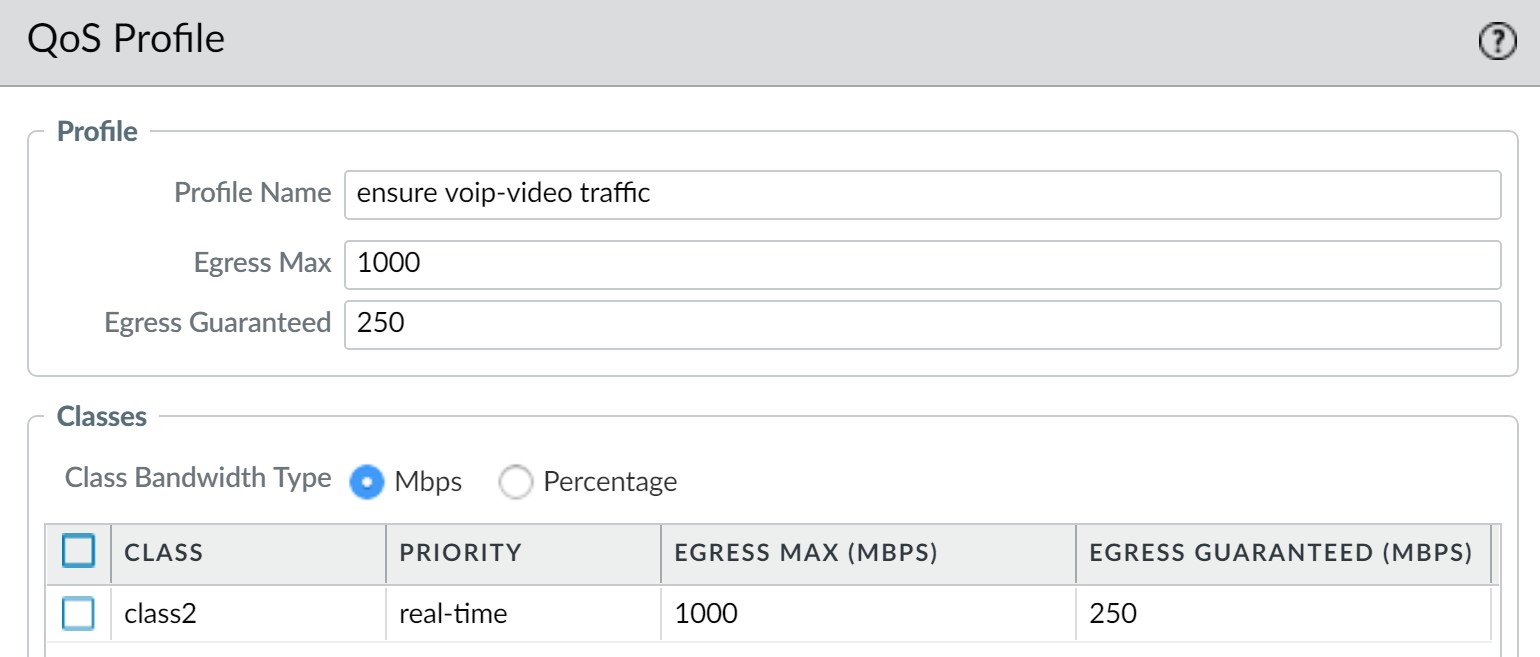
QoS Profile with Real-time priority for VoIP/Video. -
Create QoS Policy (e.g., "Voice-Video_Traffic"):
-
Application: Match relevant voice and video applications. An Application Filter can be used to dynamically include apps matching criteria (e.g., Subcategory: voip-video, Low Risk, Widely Used).
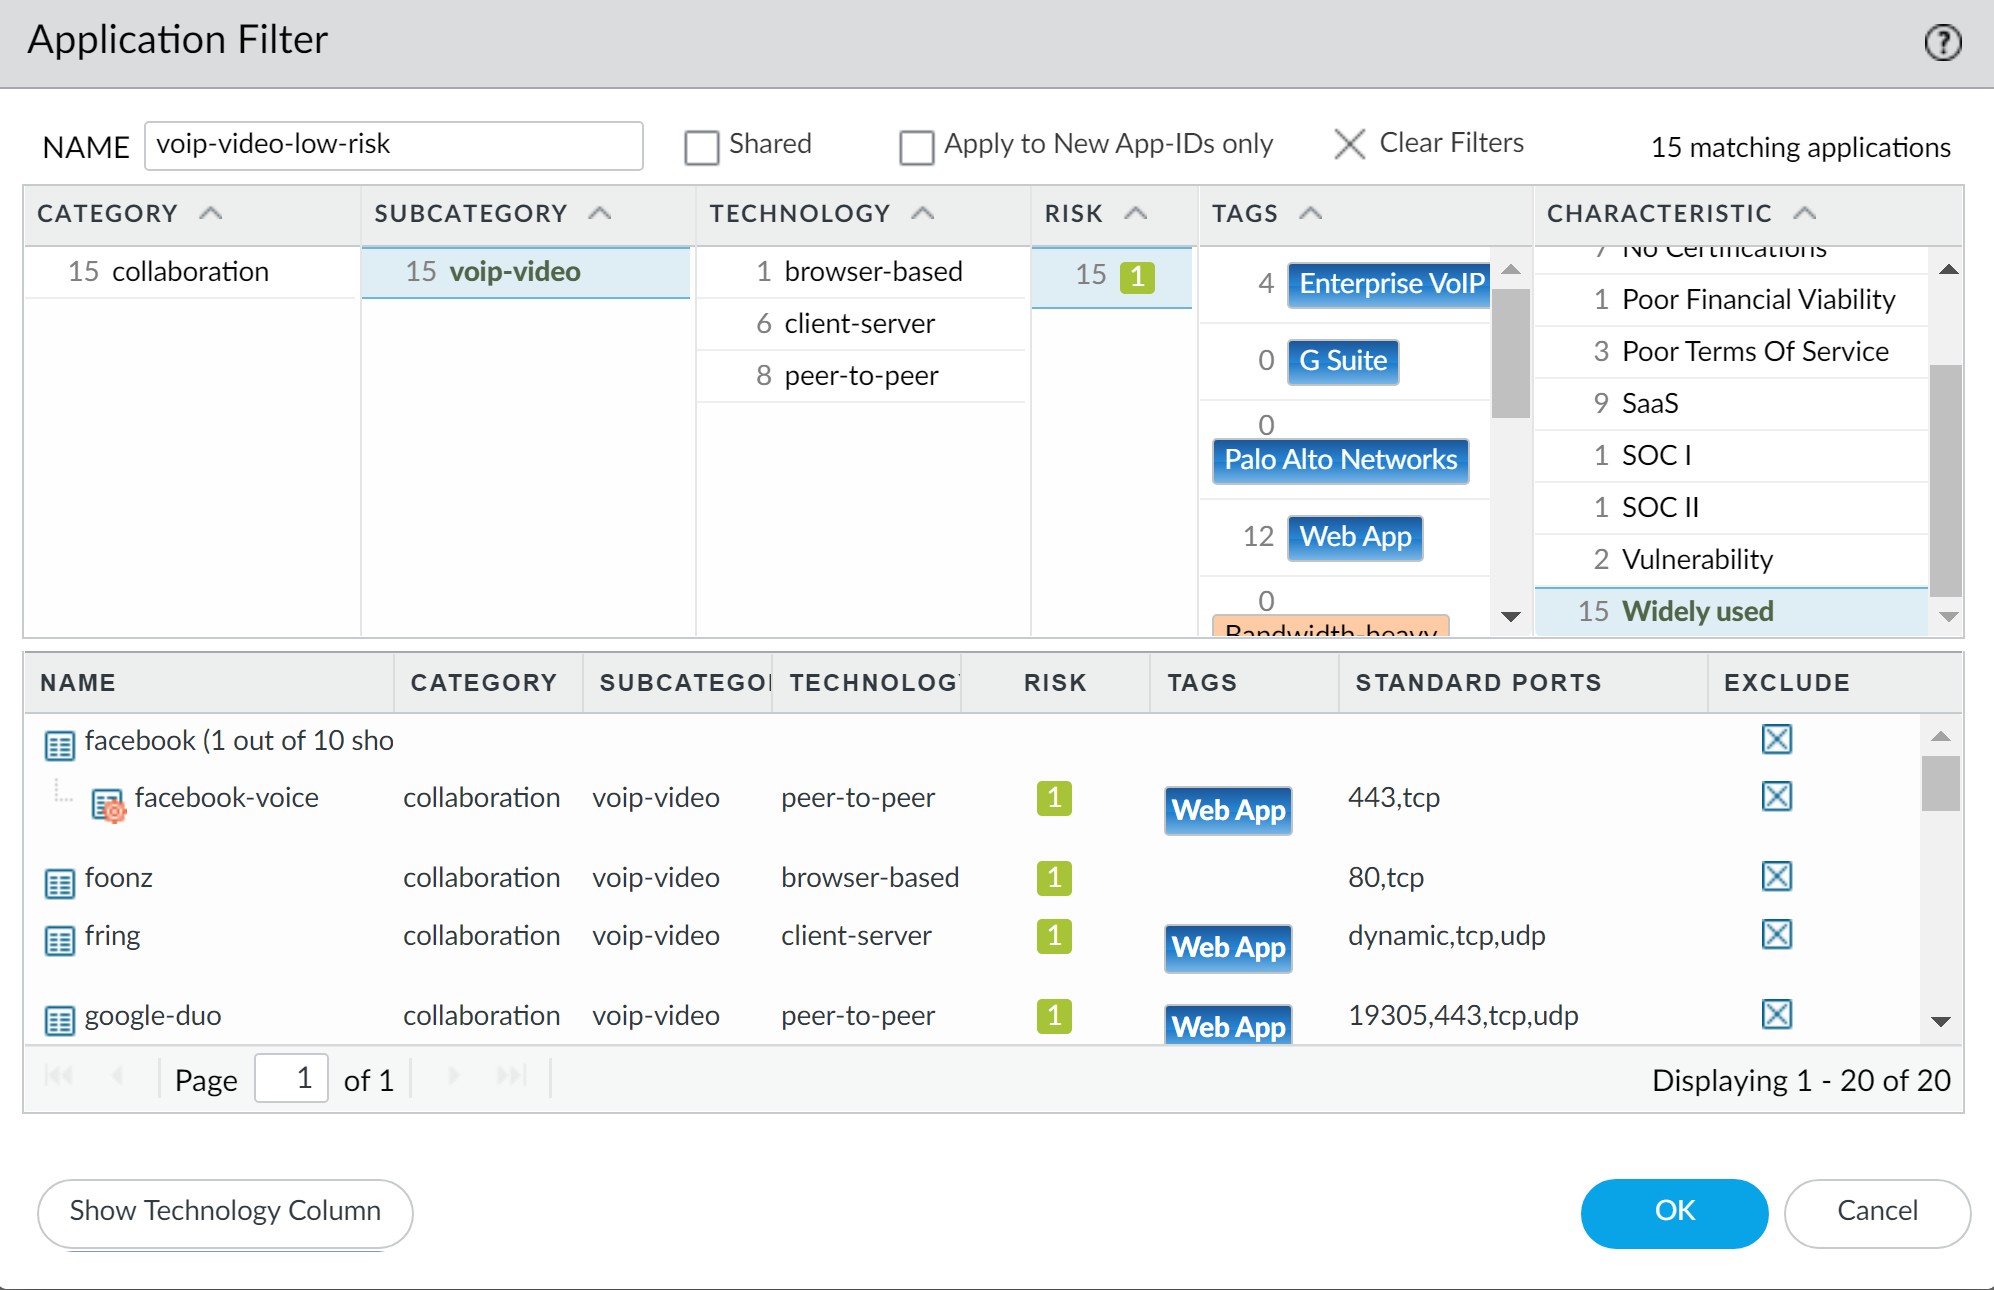
Using an Application Filter for VoIP/Video applications. 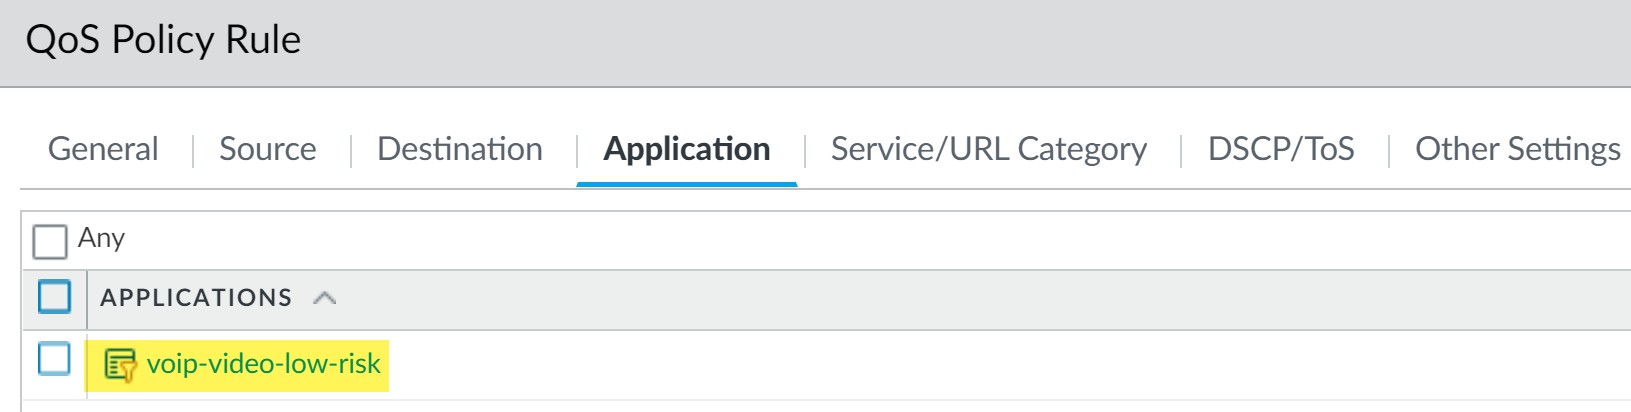
Application Filter in QoS Policy. - Source/Destination: Set to "Any" if this policy applies network-wide for these apps.
-
Other Settings: Assign traffic to the Real-time class (e.g., Class 2).

QoS Policy for Voice/Video assigning Class 2.
-
Application: Match relevant voice and video applications. An Application Filter can be used to dynamically include apps matching criteria (e.g., Subcategory: voip-video, Low Risk, Widely Used).
-
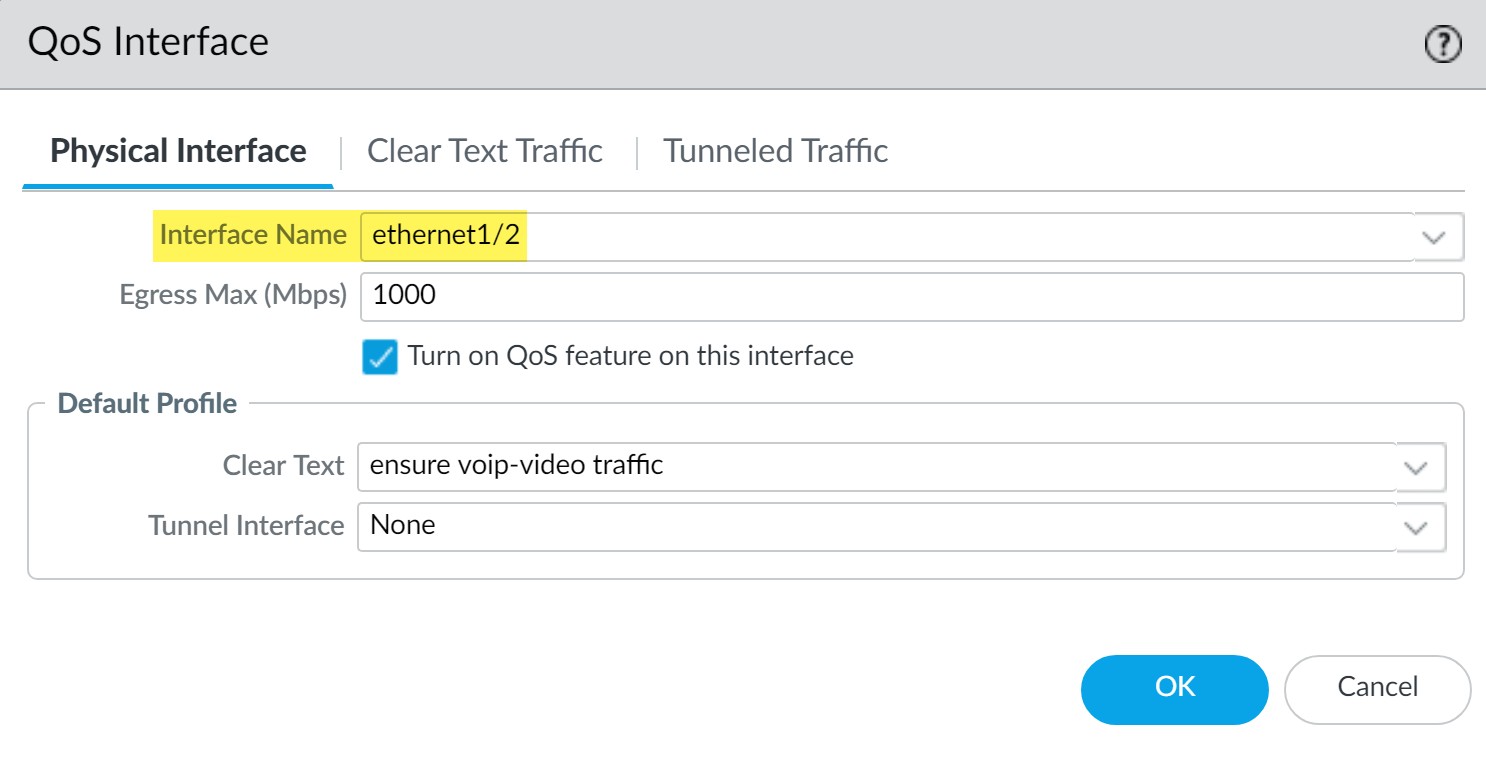
Enable QoS on Egress Interfaces (Bidirectional QoS):
-
External-facing interface (e.g., ethernet1/2 for outgoing calls):
Enable QoS, apply the "VoIP_Video_Priority" profile.
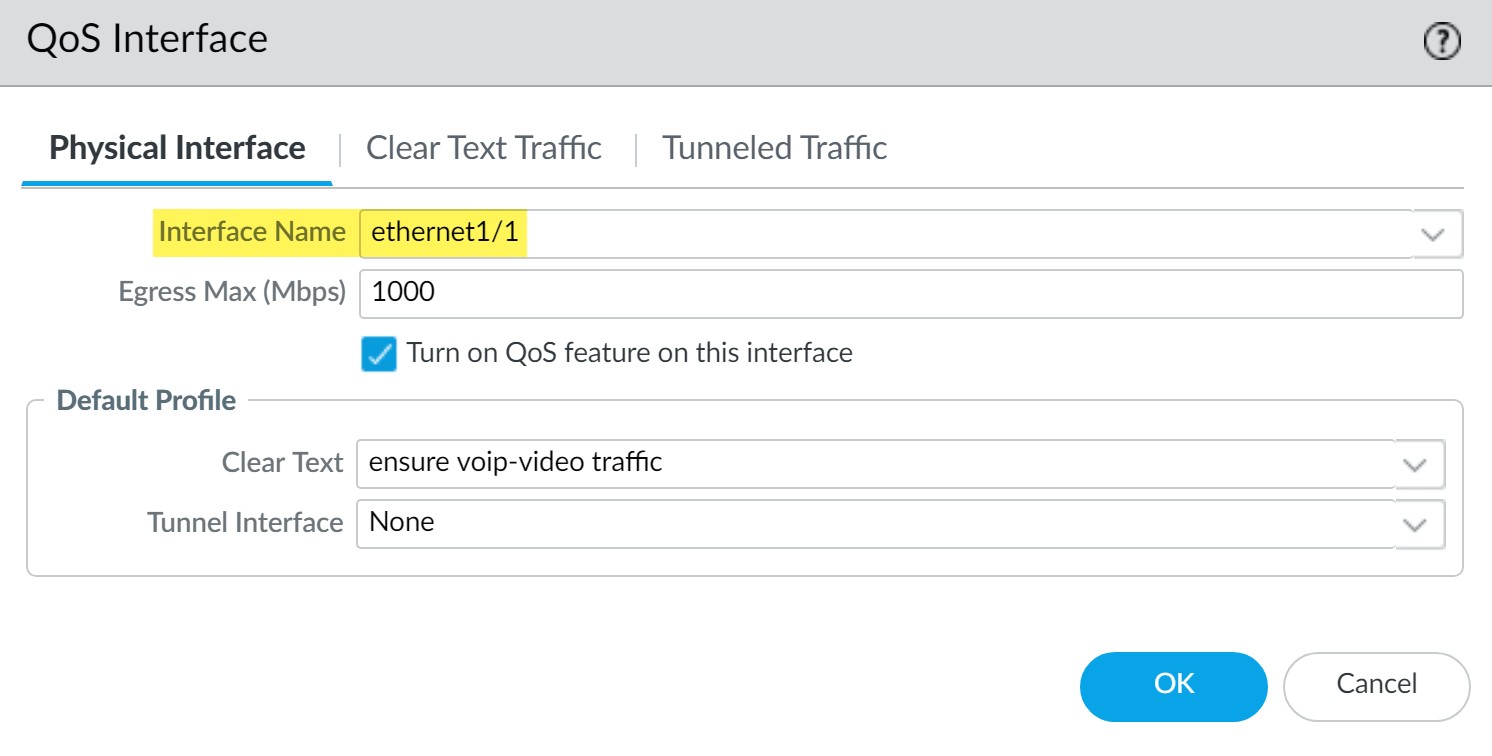
-
Internal-facing interface (e.g., ethernet1/1 for incoming calls):
Enable QoS, apply the same "VoIP_Video_Priority" profile.
-
External-facing interface (e.g., ethernet1/2 for outgoing calls):
Enable QoS, apply the "VoIP_Video_Priority" profile.
-
Commit and Verify:
-
Confirm QoS is enabled on both interfaces (Network > QoS).
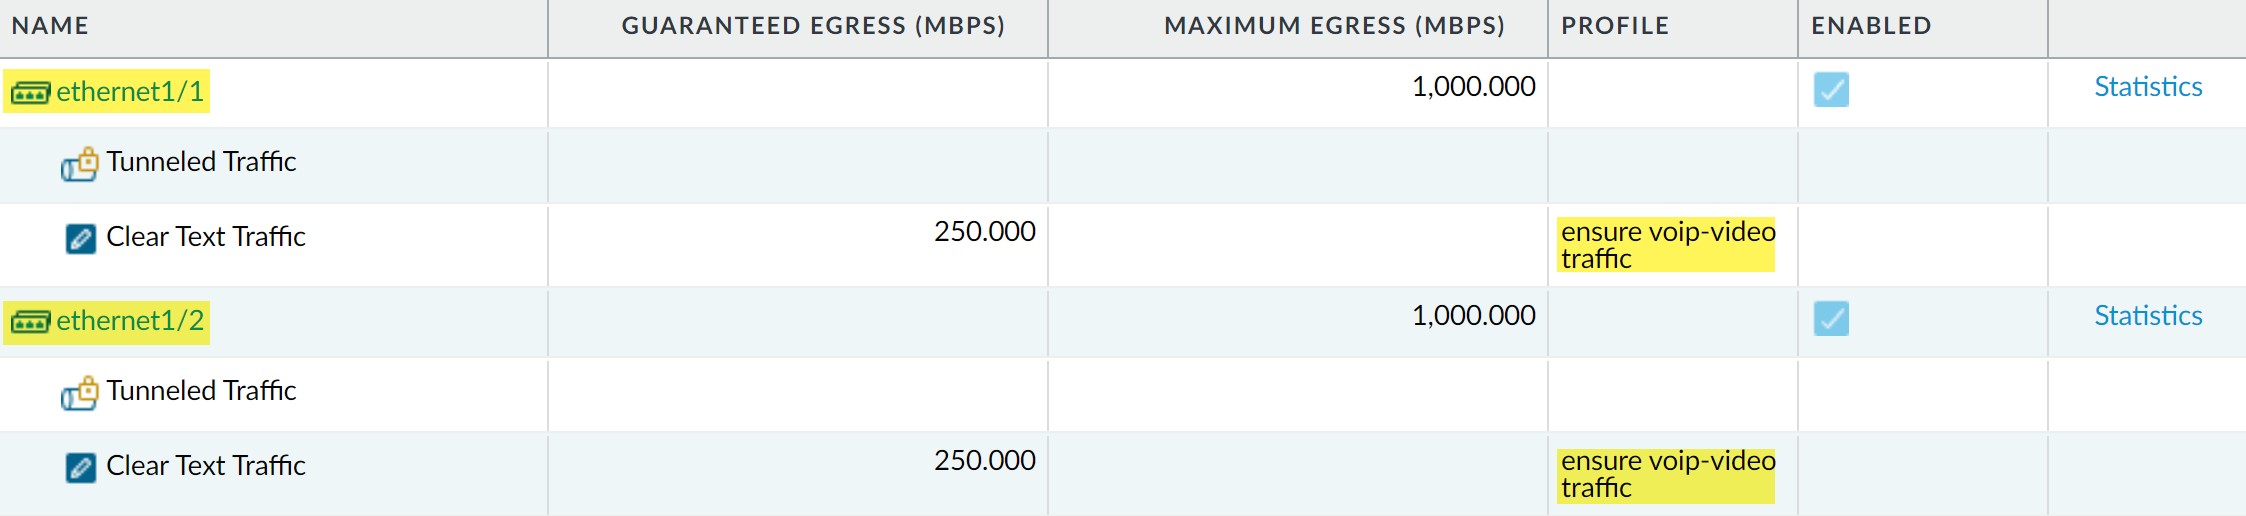
QoS enabled on both internal and external interfaces for comprehensive VoIP/Video quality. - Monitor statistics.
-
Confirm QoS is enabled on both interfaces (Network > QoS).
This ensures real-time priority for voice and video applications, improving reliability for both internal and external communications.