PAN-OS Routing Redistribution Guide
Introduction
Welcome to this guide on routing redistribution within Palo Alto Networks PAN-OS, specifically tailored for candidates preparing for the PCNSE certification. Routing redistribution is a fundamental networking concept that allows different routing domains, using potentially different protocols, to exchange routing information.
PAN-OS firewalls, acting as central points in the network, often need to facilitate this exchange.
Core Concepts: What is Routing Redistribution?
Routing redistribution is the process of taking routes learned via one routing source (like OSPF, BGP, static routes, or directly connected interfaces) and advertising them into a different routing protocol domain running on the same router (or virtual router in PAN-OS).
Imagine a scenario where a company acquires another, each using different routing protocols (e.g., OSPF and EIGRP, although EIGRP isn't natively supported on PAN-OS).
In PAN-OS, redistribution is controlled centrally through Redistribution Profiles within a virtual router configuration.
Core Concepts: Administrative Distance & Metrics
When a router learns about the same destination prefix from multiple routing sources, it needs a way to decide which route is more trustworthy or preferred. This is where Administrative Distance (AD) comes in.
PAN-OS uses specific default AD values:
- Connected: 0
- Static: 10
- eBGP: 20
- OSPF Intra-Area / Inter-Area: 110
- RIP: 120
- iBGP: 200
- OSPF External: 110 (Note: While often 110 in PAN-OS, be aware other vendors might differentiate external OSPF AD).
While AD determines the trustworthiness *between* different routing sources, Metric is used *within* a single dynamic routing protocol to determine the best path among multiple paths learned via that *same* protocol.
When redistributing routes from one protocol (Source Protocol) into another (Destination Protocol), the metric from the Source Protocol is usually lost because the Destination Protocol doesn't understand it.
Core Concepts: Redistribution Profiles
Redistribution Profiles are the cornerstone of route redistribution in PAN-OS.
Key elements of a Redistribution Profile include:
- Name: A unique identifier for the profile.
- Priority: A numerical value (1-255) determining the order of evaluation when multiple profiles exist. Lower numbers have higher priority (are evaluated first).
-
Action:
Either
Redist(to redistribute matching routes) orNo Redist(to explicitly prevent redistribution of matching routes). - Filter (Type): Specifies the source of the routes to consider for redistribution (e.g., Static, Connected, OSPF, BGP, RIP).
- Filter (General / OSPF / BGP): Allows for more granular filtering based on criteria like destination prefixes, interfaces, next hops, OSPF area/path type, or BGP community/AS path attributes.
- New Metric: Assigns a specific metric value to the routes as they are redistributed into the target protocol.
- Set OSPF Path Type: (For OSPF) Specifies whether redistributed routes should be advertised as External Type 1 (E1) or External Type 2 (E2).
- Set BGP Attributes: (For BGP) Allows modification of attributes like Origin, Local Preference, MED, Community, etc., for routes redistributed into BGP.
Once created, a Redistribution Profile must be applied under the specific protocol's configuration where you want the routes *exported* or *redistributed into*. For example:
- To redistribute static routes into OSPF, apply the profile under OSPF > Export Rules.
- To redistribute OSPF routes into BGP, apply the profile under BGP > Redist Rules.
- To redistribute BGP routes into OSPF, apply the profile under OSPF > Export Rules.
Core Concepts: Filtering and Priority
Redistribution Profiles offer powerful filtering capabilities to precisely control which routes are shared. You can filter based on:
- Source Protocol/Type: The fundamental filter (Static, Connected, OSPF, BGP, etc.).
- Destination Prefix: Match specific network addresses/masks.
- Interface: Match routes learned via or exiting a specific interface.
- Next Hop: Match routes using a particular next-hop address.
- OSPF Specific Filters: Area ID, Path Type (Intra-Area, Inter-Area, External-1, External-2), Tag.
- BGP Specific Filters: Community, Extended Community, AS Path.
The Priority field is critical when multiple Redistribution Profiles might potentially match the same route. PAN-OS evaluates profiles in ascending order of priority (lower number = higher priority = evaluated first).
This allows for sophisticated include/exclude logic. For example:
- Create a profile with Priority 10 , Action No Redist , filtering a specific sensitive prefix (e.g., 10.10.10.0/24) from being redistributed from OSPF into BGP.
- Create a second profile with Priority 100 , Action Redist , filtering all OSPF routes (Source Type: OSPF).
In this case, the sensitive prefix 10.10.10.0/24 will match the first, higher-priority profile and will *not* be redistributed. All other OSPF routes will fall through to the second profile and *will* be redistributed.

Flowchart illustrating Redistribution Profile priority and action processing.
Core Concepts: Default Route Handling
Redistributing a default route (0.0.0.0/0) often requires special attention. In both OSPF and BGP configurations within the virtual router, there's a specific checkbox labeled "Allow Redistribute Default Route".
To successfully redistribute a default route into OSPF or BGP:
- The default route must exist in the firewall's routing table (either learned dynamically or configured as a static route).
- A Redistribution Profile must be configured that matches the default route (either by source type 'static' if it's a static default, or via a specific destination filter for 0.0.0.0/0).
- This Redistribution Profile must be applied to the relevant protocol's export/redistribution rules (e.g., OSPF Export Rules, BGP Redist Rules).
- Crucially, the "Allow Redistribute Default Route" checkbox must be enabled within the OSPF or BGP configuration section where the profile is applied.
Configuration: General Steps
Configuring route redistribution in PAN-OS generally follows these steps, regardless of the specific protocols involved:
- Identify Need: Determine which routes (from which source: static, connected, OSPF, BGP) need to be advertised into which destination protocol.
-
Navigate to Virtual Router:
Go to
Network > Virtual Routersand select the virtual router where redistribution is required. -
Create Redistribution Profile(s):
-
Go to the
Redistribution Profilestab within the virtual router configuration. -
Click
Addto create a new profile. - Give it a descriptive Name .
- Set the Priority (lower number = higher precedence).
-
Choose the
Action
(
RedistorNo Redist). - Select the Source Type under the Filter tab (e.g., 'static', 'connected', 'ospf', 'bgp').
- Optionally, add more specific filters (Destination, Interface, Next Hop, protocol-specific attributes).
- Define the New Metric appropriate for the destination protocol.
- Configure any necessary protocol-specific options (e.g., OSPF Path Type, BGP attributes).
-
Click
OKto save the profile.
-
Go to the
-
Apply Profile to Destination Protocol:
-
Navigate to the configuration section of the protocol you are redistributing *into* (e.g.,
OSPForBGPwithin the virtual router). -
Find the relevant section for applying redistribution/export rules (e.g.,
OSPF > Export Rulestab,BGP > Redist Rulestab). -
Click
Add. - Select the Redistribution Profile you created.
- If redistributing a default route, ensure the "Allow Redistribute Default Route" checkbox is enabled in this section.
-
Click
OK.
-
Navigate to the configuration section of the protocol you are redistributing *into* (e.g.,
-
Commit Changes:
Click
Commitin the top-right corner of the Web UI to apply the configuration changes.
Configuration Example: Redistributing Static Routes into OSPF
This is a common requirement, often used to advertise specific internal networks or a default route into the OSPF domain.
Steps:
-
Ensure Static Route Exists:
Verify the static route you want to redistribute is configured under
Network > Virtual Routers > [Your VR] > Static Routes. -
Create Redistribution Profile:
-
Go to
Redistribution Profilesand clickAdd. -
Name: e.g.,
Redist_Static_to_OSPF -
Priority: e.g.,
10(adjust as needed). -
Action:
Redist. -
Filter Tab: Source Type: Select
static. - Filter Tab (Optional): Add the specific static route prefix(es) under Destination if you don't want to redistribute *all* static routes.
-
Metric: Set an appropriate OSPF metric (e.g.,
20). -
Set OSPF Path Type: Choose
Ext 1orExt 2(Default is typically Ext 2). -
Click
OK.
-
Go to
-
Apply Profile to OSPF:
-
Go to
OSPFconfiguration within the same virtual router. -
Navigate to the
Export Rulestab. - If redistributing a default route (0.0.0.0/0), check the "Allow Redistribute Default Route" box.
-
Click
Add. -
Select the
Redist_Static_to_OSPFprofile created earlier. -
Click
OK.
-
Go to
- Commit Changes.
Configuration Example: Redistributing BGP Routes into OSPF
This scenario involves taking routes learned via BGP (typically from external peers like ISPs or other ASNs) and making them known within your internal OSPF domain.
Steps:
-
Ensure BGP Routes Exist:
Verify that the firewall is successfully peering with its BGP neighbors and receiving the desired routes. Check under
Network > Virtual Routers > [Your VR] > More Runtime Stats > BGP > RIB In. -
Create Redistribution Profile:
-
Go to
Redistribution Profilesand clickAdd. -
Name: e.g.,
Redist_BGP_to_OSPF -
Priority: e.g.,
20(adjust relative to other profiles). -
Action:
Redist. -
Filter Tab: Source Type: Select
bgp. - Filter Tab (Optional): Add specific filters if needed (e.g., match specific prefixes, AS paths, or communities learned via BGP).
-
Metric: Set an appropriate OSPF metric (e.g.,
50). -
Set OSPF Path Type: Choose
Ext 1orExt 2. -
Click
OK.
-
Go to
-
Apply Profile to OSPF:
-
Go to
OSPFconfiguration. -
Navigate to the
Export Rulestab. - If redistributing a default route learned via BGP, check the "Allow Redistribute Default Route" box.
-
Click
Add. -
Select the
Redist_BGP_to_OSPFprofile. -
Click
OK.
-
Go to
- Commit Changes.
Configuration Example: Redistributing OSPF Routes into BGP
This involves advertising routes learned via OSPF (typically internal networks) into the BGP domain, often to advertise them to external peers or across different parts of a large BGP-based network.
Steps:
-
Ensure OSPF Routes Exist:
Verify the desired OSPF routes are present in the firewall's routing table (
show routing protocol ospf routeor via Web UI Runtime Stats). -
Create Redistribution Profile:
-
Go to
Redistribution Profilesand clickAdd. -
Name: e.g.,
Redist_OSPF_to_BGP -
Priority: e.g.,
30. -
Action:
Redist. -
Filter Tab: Source Type: Select
ospf(for IPv4) orospfv3(for IPv6). - Filter Tab (Optional): Filter based on OSPF Area, Path Type, Tag, or specific destination prefixes.
-
Metric: Set a BGP metric (MED - Multi-Exit Discriminator), if desired (e.g.,
100). - Set BGP Attributes (Optional): Modify attributes like Origin (often set to 'incomplete' for redistributed routes), Local Preference, or add Communities.
-
Click
OK.
-
Go to
-
Apply Profile to BGP:
-
Go to
BGPconfiguration. -
Navigate to the
Redist Rulestab. - If redistributing a default route learned via OSPF (less common, but possible), check the "Allow Redistribute Default Route" box.
-
Click
Add. -
Select the
Redist_OSPF_to_BGPprofile. - Choose the Address Family Identifier (typically 'ipv4' or 'ipv6').
- Optionally set a metric here as well (overrides profile if set).
- Ensure 'Enable' is checked for the rule.
-
Click
OK.
-
Go to
- Commit Changes.
Configuration Example: Redistributing Connected Routes into OSPF
Sometimes you need to advertise the subnets configured directly on the firewall's interfaces (connected routes) into your OSPF domain, especially if those interfaces aren't participating directly in OSPF.
Steps:
-
Identify Connected Interfaces:
Determine which directly connected interface subnets need to be advertised. These are visible in the routing table with a 'C' flag (
show routing route). -
Create Redistribution Profile:
-
Go to
Redistribution Profilesand clickAdd. -
Name: e.g.,
Redist_Connected_to_OSPF -
Priority: e.g.,
15. -
Action:
Redist. -
Filter Tab: Source Type: Select
connect. - Filter Tab (Optional): Add specific interface names or destination prefixes if you only want to redistribute specific connected routes.
-
Metric: Set an appropriate OSPF metric (e.g.,
10). -
Set OSPF Path Type: Choose
Ext 1orExt 2. -
Click
OK.
-
Go to
-
Apply Profile to OSPF:
-
Go to
OSPFconfiguration. -
Navigate to the
Export Rulestab. -
Click
Add. -
Select the
Redist_Connected_to_OSPFprofile. -
Click
OK.
-
Go to
- Commit Changes.
Configuration Note: Advanced Routing Engine (PAN-OS 10.0+)
Starting with PAN-OS 10.0, Palo Alto Networks introduced an optional "Advanced Routing Engine".
Key differences relevant to redistribution:
- Logical Routers: Routing protocols and interfaces are configured under Logical Routers, not Virtual Routers.
- Profiles and Filters: While profiles are still used extensively, the filtering mechanisms are enhanced with standard constructs like prefix lists, AS path lists, community lists, and route maps.
- Route Maps: Route maps provide more complex conditional logic for manipulating routes during redistribution (e.g., setting attributes based on specific matches).
- UI Changes: The Web UI structure for advanced routing configuration differs from the traditional virtual router setup.
Configuration within the Advanced Routing Engine involves defining routing profiles (like BGP redistribution profiles, OSPF redistribution profiles) and filter profiles (prefix lists, route maps, etc.) and then applying them within the protocol configuration under the Logical Router.
PCNSE Focus: Key Exam Points
For the PCNSE exam, focus on these critical aspects of PAN-OS redistribution:
- Redistribution Profiles are Central: Understand that all redistribution logic flows through these profiles. Know their components: Priority, Action, Filters (Source Type, Destination, etc.), Metric/Attributes.
- Priority Matters: Lower number = higher priority = first match wins. Understand how to use `No Redist` with higher priority to exclude specific routes.
- Application Point: Know where to apply the profile: OSPF Export Rules for redistributing *into* OSPF, BGP Redist Rules for redistributing *into* BGP.
- Default Route Checkbox: Remember the "Allow Redistribute Default Route" checkbox within the OSPF/BGP configuration sections is mandatory for default route redistribution, in addition to the profile itself.
- Source Types: Be familiar with the common source types: `static`, `connected`, `ospf`, `bgp`, `rip`.
- Metric/Path Type/Attributes: Understand that metrics need to be set for the receiving protocol and that attributes (OSPF path type, BGP attributes) can be modified.
- Administrative Distance: Know the PAN-OS default AD values and how they influence route selection when routes are learned via multiple sources.
- Verification: Be familiar with basic CLI commands to verify routing tables and redistribution. (`show routing route`, `show routing protocol ospf|bgp ...`)
-
Troubleshooting Logic:
If redistribution isn't working, systematically check:
- Does the source route exist in the RIB?
- Is the Redistribution Profile configured correctly (Action, Filter, Metric)?
- Is the profile applied to the correct protocol's export/redist rules?
- Is the Priority correct relative to other profiles?
- For default routes, is the "Allow Redistribute Default Route" box checked?
- Are there any upstream/downstream filters blocking the advertisement?
PCNSE Focus: Common Pitfalls
Be aware of potential issues when implementing route redistribution:
- Routing Loops: Redistributing routes in multiple directions between protocols without careful filtering can create routing loops. This happens because the loop prevention mechanisms inherent in one protocol might be lost when routes are translated into another. For example, redistributing OSPF routes into BGP at one point, and BGP routes back into OSPF at another point, requires careful metric/AD manipulation and filtering to prevent routes learned from one protocol being preferred back via the other protocol.
- Suboptimal Routing: Incorrect metric settings during redistribution can lead to traffic taking inefficient paths. Setting an artificially low metric for a redistributed route might make it seem more preferable than a native, potentially better path within the destination protocol.
- Inconsistent Information: If redistribution is configured inconsistently across multiple border routers, different parts of the network might have conflicting views of the topology.
- Forgetting the Metric: Failing to set a seed metric for redistributed routes can cause them to be ignored or treated as unreachable by the receiving protocol.
- Missing Default Route Checkbox: As mentioned, forgetting to enable "Allow Redistribute Default Route" will prevent default route advertisement even with a correct profile.
- Incorrect Profile Priority: Placing a general "Redist" rule with a higher priority (lower number) than a specific "No Redist" rule will cause the "No Redist" rule to never be evaluated for routes matching the general rule.
- Filtering Too Broadly or Narrowly: Overly broad filters can leak unintended routes, while overly narrow filters might block necessary routes. Precision in filter definition is key.
PCNSE Focus: Verification Commands (CLI)
Verifying redistribution involves checking routing tables on the firewall itself and, critically, on downstream neighbors.
Common PAN-OS CLI commands:
-
show routing route: Displays the main routing table (RIB). Look for routes learned via different protocols and check their AD and metric. Redistributed routes should appear here with the AD of the protocol they were redistributed *into*. -
show routing fib: Displays the Forwarding Information Base, the actual table used for packet forwarding. Useful to confirm the active route being used. -
show routing protocol ospf route: Shows routes learned specifically via OSPF. -
show routing protocol ospf lsdb: Displays the OSPF Link-State Database. Look for External LSAs (Type 5 or Type 7) which often represent redistributed routes.-
show routing protocol ospf lsdb type extern | match
-
-
show routing protocol ospf neighbor: Check OSPF adjacency state. Needs to be Full (or 2-Way for DR/BDR election) for routes to exchange. -
show routing protocol bgp peer: Check BGP peer status (should be 'Established'). -
show routing protocol bgp rib-in: Shows routes received from BGP peers before local policies/filtering. -
show routing protocol bgp rib-out: Shows routes advertised *to* BGP peers after local policies/redistribution. This is key for verifying what you are sending out via BGP redistribution.-
show routing protocol bgp rib-out | match
-
-
show routing redistribution: Provides information about the configured redistribution profiles and potentially statistics (depending on version/context). -
test routing redistribution profile <profile_name> route <prefix>: (Potentially available, command syntax may vary) Simulates how a specific prefix would be handled by a given redistribution profile.
Remember to also check the routing table on the neighboring router that *should* be receiving the redistributed routes. This is the ultimate confirmation that redistribution is working end-to-end.
PCNSE Focus: Conceptual Diagrams
Visualizing the flow helps solidify understanding.
Diagram 1: Basic Redistribution Flow (Static to OSPF)
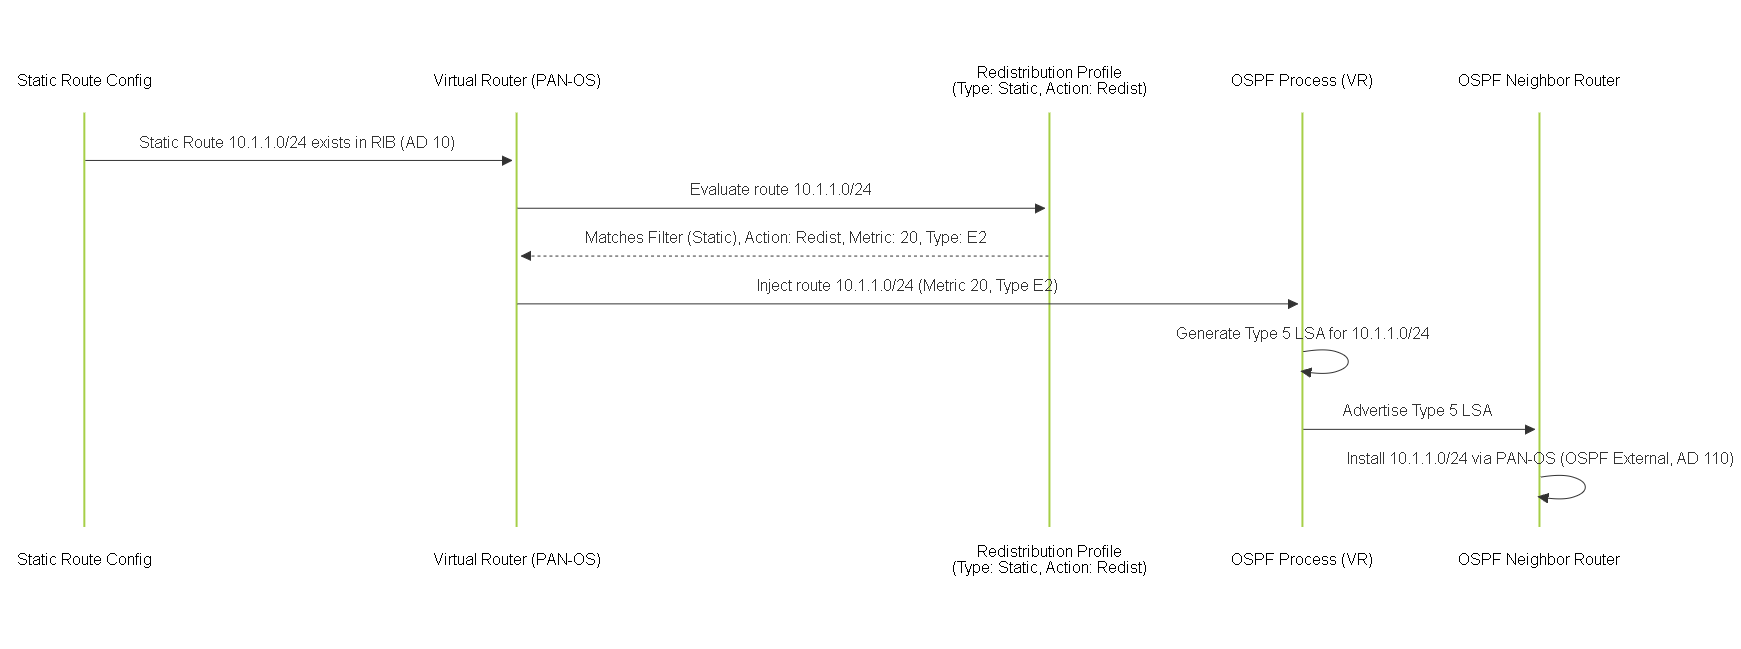
Sequence of events for redistributing a static route into OSPF.
Diagram 2: Redistribution Profile Logic Flowchart
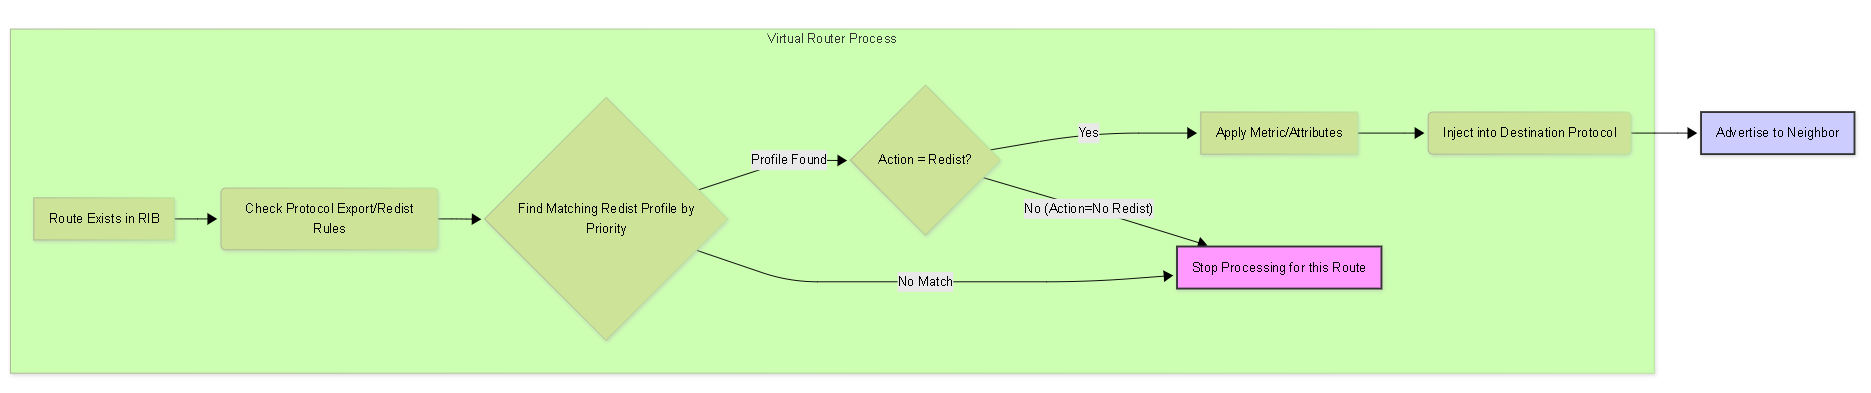
Simplified flowchart of how a route is processed for redistribution.
Diagram 3: Potential Redistribution Loop Scenario
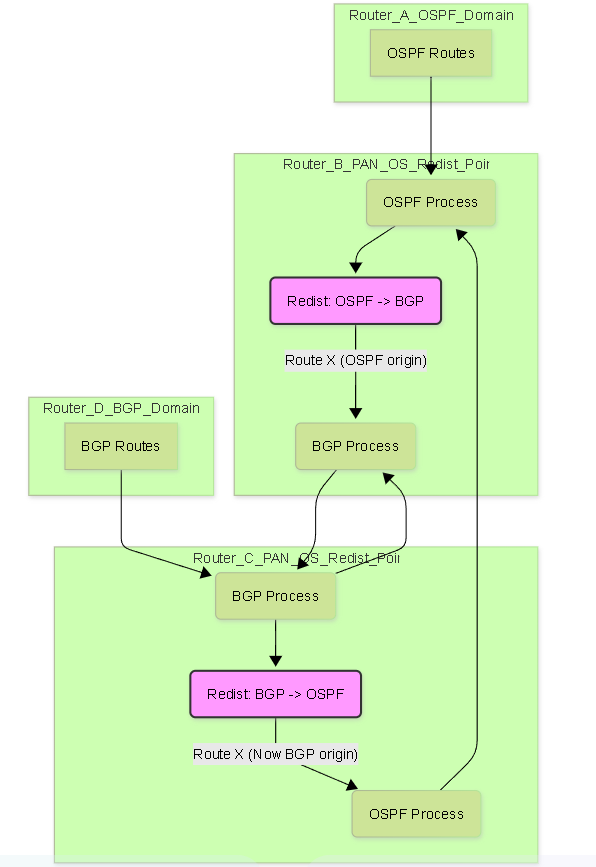
High-level illustration of how mutual redistribution can lead to loops if not managed carefully.
Redistribution Quiz (PCNSE Focus)
Test your knowledge of PAN-OS route redistribution concepts.