Mastering Static Routing in Palo Alto Networks
Static routing remains a fundamental networking concept, even in environments dominated by dynamic routing protocols. On Palo Alto Networks firewalls, static routes provide a simple and direct way to define paths for network traffic, especially for destinations not learned through dynamic protocols or for specific traffic engineering purposes. While basic static routing is straightforward, PAN-OS offers advanced capabilities like path monitoring and flexible next-hop options that significantly enhance its utility and reliability.
This article provides a comprehensive overview of static routing on Palo Alto Networks firewalls, focusing on:
- Core concepts and configuration.
- Different next-hop types (IP Address, Next VR, None/Discard).
- Implementing backup paths using Floating Static Routes.
- Advanced reliability using Path Monitoring for conditional routing.
- The role of static routes in tunnel configurations (IPSec/GRE).
- Redistributing static routes into dynamic protocols for traffic engineering.
- Troubleshooting tips and key considerations for the PCNSE exam.
Understanding these features is crucial for designing robust, resilient, and efficient network architectures using Palo Alto Networks firewalls.
Static Routing Fundamentals: Basic Configuration
Static routes are manually configured entries in the firewall's routing table (specifically, the Forwarding Information Base or FIB after route selection). They tell the firewall how to reach a specific destination network or host.
Configuration Steps (GUI)
- Navigate to Network > Virtual Routers .
- Select the virtual router (e.g., `default`) where you want to add the static route.
- Go to the Static Routes tab.
- Click Add to create a new static route.
-
Enter the required parameters:
- Name: A descriptive name for the route (e.g., `To_Internal_Server_Subnet`).
- Destination: The network address and subnet mask (CIDR notation) of the destination (e.g., `192.168.100.0/24`). A default route is represented as `0.0.0.0/0`.
- Interface: The egress interface on the firewall through which traffic for this destination should be sent (e.g., `ethernet1/2`).
-
Next Hop:
Select the type of next hop (discussed in detail later). For basic routing, this is typically
IP Address
.
- IP Address: Enter the IP address of the next router or device in the path towards the destination (e.g., `10.1.1.1`). This IP must be reachable via the selected Interface .
- Administrative Distance (AD): (Optional) Lower values are preferred. Default is 10.
- Metric: (Optional) Used as a tie-breaker if multiple routes to the same destination have the same AD. Default is 10.
- Click OK .
- Commit the changes.
CLI Equivalent (Conceptual):
      configure
                set network virtual-router default routing-table ip static-route To_Internal_Server_Subnet destination 192.168.100.0/24 nexthop ip-address 10.1.1.1 interface ethernet1/2
                commit
Static routes are suitable for simple networks, stub networks (networks with only one exit point), or when precise control over routing paths is required without the overhead of dynamic routing protocols.
Static Routing Fundamentals: Administrative Distance & Metric
When the firewall learns about the same destination network via multiple routing methods (static, OSPF, BGP, etc.), it needs a way to choose the "best" route to install into the FIB. This selection process primarily uses Administrative Distance (AD) and Metric.
Administrative Distance (AD)
- AD represents the trustworthiness or preference level of a routing source.
- Lower AD values are preferred.
- If the firewall learns routes to the exact same destination prefix from different sources, the route with the lowest AD is selected and installed in the FIB.
-
Default AD values in PAN-OS:
Route Source Default AD Connected 0 Static Route 10 External BGP (eBGP) 20 Internal BGP (iBGP) 200 OSPF Internal 30 OSPF External 110 RIP 120 - You can modify the AD for static routes during configuration. This is key for implementing floating static routes.
Metric
- Metric is used as a tie-breaker when multiple routes to the same destination have the same AD .
- Lower Metric values are preferred.
- For static routes, the default metric is 10. You can modify this value.
- For dynamic routing protocols, the metric is usually calculated based on factors like hop count (RIP), cost (OSPF), or other path attributes (BGP).
- While you can set the metric for a static route, it's less commonly used for preference than AD, unless comparing two static routes to the same destination.
In summary, the firewall selects the best route using this logic:
- Prefer the route with the lowest AD.
- If ADs are equal, prefer the route with the lowest Metric.
- If both AD and Metric are equal (less common for different route sources, possible with multiple static routes or ECMP in dynamic protocols), the firewall might load balance (ECMP) if configured, or use other internal tie-breakers.
Static Routing Fundamentals: Next Hop Types
When configuring a static route in PAN-OS, the "Next Hop" parameter defines what the firewall should do with packets matching the destination prefix. PAN-OS offers several options beyond just specifying the next router's IP address.
1. IP Address
- This is the most common type.
- You specify the IP address of the next-hop router that is directly reachable via the selected egress Interface .
- The firewall performs an ARP lookup (or uses the neighbor cache) for this IP address to find the Layer 2 MAC address needed to forward the packet.
- Use Case: Standard routing to the next router in the path towards the destination.
2. Next VR (Next Virtual Router)
- Used for inter-VR routing (routing traffic between different virtual routers configured on the same firewall).
- Instead of specifying an IP address, you select another virtual router on the firewall as the next hop.
- The firewall internally forwards the packet to the routing table of the specified "Next VR". That VR then performs its own route lookup to determine the final egress interface and next-hop IP (if applicable).
- No egress interface is specified for a "Next VR" route, as the handoff is internal.
- Use Case: Segmenting networks using VRs (e.g., separating guest and corporate traffic) while allowing controlled communication between them.
3. Discard / None
- Instructs the firewall to drop (discard) any packets matching the destination prefix.
- This is often referred to as creating a "null route" or "blackhole route".
- No egress interface or next-hop IP is needed.
-
Use Cases:
- Security: Preventing traffic from reaching specific known-malicious or unwanted destinations.
- DDoS Mitigation: Temporarily routing traffic destined for a specific host under attack to null, protecting the target (often done upstream, but possible on the firewall).
- Loop Prevention: In certain redistribution scenarios, null routing summary routes can help prevent routing loops.
- Advertising Aggregates (BGP): Creating a null route for an aggregate prefix ensures the firewall always has a route for it, allowing BGP to advertise the aggregate even if all specific subnets within it go down.
Other (Less Common for Standard Static Routes)
- FQDN: Allows specifying a Fully Qualified Domain Name as the next hop. The firewall resolves this FQDN to an IP address. Use with caution due to potential DNS resolution delays or failures.
Choosing the correct next-hop type is crucial for implementing the desired routing behavior, whether it's standard forwarding, inter-VR communication, or intentionally dropping traffic.
Path Monitoring: Overview & Purpose
A significant limitation of standard static routes is their inability to adapt to network failures beyond the directly connected link. If the firewall's interface (`ethernet1/2`) connected to the next-hop router (`10.1.1.1`) goes down, the firewall knows to remove the static route. However, if `ethernet1/2` is up and `10.1.1.1` is reachable, but a link *further down the path* fails, the standard static route remains active, potentially blackholing traffic.
Path Monitoring solves this problem. It allows the firewall to actively check the reachability of a target IP address further along the path (or the immediate next-hop itself) and conditionally remove the associated static route from the FIB if the target becomes unreachable.
Why Use Path Monitoring?
- Improved Reliability: Ensures traffic isn't sent down a path that is known to be broken beyond the immediate next hop.
- Faster Failover: Enables quicker detection of path failures compared to waiting for dynamic routing protocol convergence (if dynamic routing isn't used or is slow).
- Conditional Routing: Allows static routes to be active only when the specified path is viable.
- Essential for Static Route Failover: It's the mechanism that triggers the switch from a primary static route to a backup (floating) static route when the primary path fails.
How It Works (Conceptual)
- You configure path monitoring on a specific static route.
- You define a target IP address to monitor (often the next-hop router, but can be a reliable IP further downstream).
- You define failure conditions (e.g., number of consecutive missed pings).
- The firewall periodically sends probes (typically ICMP pings) from the VR associated with the static route towards the target IP.
- If the probes fail according to the defined condition, the firewall marks the monitored static route as "down".
- A route marked "down" by path monitoring is removed from the FIB (Forwarding Information Base), meaning it's no longer used for forwarding decisions.
- If a backup route (like a floating static route with a higher AD) exists for the same destination, it can then be installed in the FIB.
- When the probes start succeeding again, the monitored static route is marked "up" and re-installed in the FIB (potentially displacing the backup route if it has a better AD).
Path Monitoring: Configuration
Path monitoring is configured as part of a static route definition within a virtual router.
Configuration Steps (GUI)
- Navigate to Network > Virtual Routers and select the relevant virtual router.
- Go to the Static Routes tab.
- Either Add a new static route or Edit an existing one.
- In the static route configuration window, go to the Path Monitoring tab.
- Check the Enable box to activate path monitoring for this specific route.
-
Configure the monitoring parameters:
-
Source IP:
Select the source IP address the firewall should use for sending probes.
- Use Interface IP Address: (Default) Uses the primary IP of the egress interface specified in the main static route config.
- Specify IP Address: Allows you to select a specific IP address configured on the egress interface (useful for secondary IPs).
- None: (Use with caution) Sends probes without a specific source IP, relying on routing lookup. Usually, specifying a source is recommended.
- Destination IP: Enter the IP address of the target device you want to monitor for reachability. This is the crucial IP that determines the path's health. Often, this is the immediate next-hop IP, but could be a more distant, stable IP if you need to verify reachability beyond the first hop.
- Proxy ARP: (Rarely needed for path monitoring itself) Controls proxy ARP behavior on the interface.
-
Monitor Profile:
(Optional but recommended for customization) Select or create a Path Monitor Profile (under Network > Network Profiles > Monitor). Profiles define:
- Interval: How often to send probes (e.g., default 3 seconds).
- Count: Number of consecutive probes that must fail before declaring the path down (e.g., default 5 probes).
- Action: (Applies to Policy Based Forwarding, not static route removal directly, but part of the profile). For static routes, failure always triggers route removal from FIB.
-
Failure Condition:
Determines when the path is considered down.
- All: (Default) All configured destination IPs (if multiple were allowed in older versions/different contexts) must fail. For typical static route monitoring with one Destination IP, this is the standard setting.
- Any: If any configured destination IP fails.
-
Source IP:
Select the source IP address the firewall should use for sending probes.
- Configure the main static route parameters (Destination, Interface, Next Hop IP, AD, Metric) on the General tab as usual.
- Click OK .
- Commit the changes.
Once committed, the firewall will start sending probes according to the interval. You can monitor the status of path-monitored routes via CLI commands.
Path Monitoring: Logic & Diagrams
Path Monitoring provides statefulness to static routes. The firewall actively tracks the reachability of the monitored destination and adjusts the route's status in the FIB accordingly.
Operational Logic
- Initialization: When a static route with path monitoring enabled is committed and activated, the firewall starts sending probes (ICMP echo requests) to the configured Destination IP using the specified Source IP at the configured Interval .
- Monitoring (Up State): As long as the firewall receives timely ICMP echo replies, the path is considered "Up". The static route remains active in the FIB.
- Failure Detection: If the firewall fails to receive replies for a number of consecutive probes equal to the Count (defined in the Monitor Profile or default), the path is declared "Down".
- Action (Path Down): When the path transitions to the "Down" state, the firewall removes the associated static route from the FIB . It still exists in the configuration, but it's inactive for forwarding.
- Failover (If Configured): If a backup route (e.g., a floating static route with a higher AD) exists for the same destination prefix, the removal of the primary route allows the backup route to be selected and installed in the FIB.
- Recovery Detection: The firewall continues sending probes even when the path is "Down". If it starts receiving successful replies again, it marks the path as "Up".
- Action (Path Up): When the path transitions back to the "Up" state, the firewall re-installs the static route into the FIB , provided its AD and metric make it preferable to any currently active route for that destination (it will typically displace the backup floating static route).
State Diagram
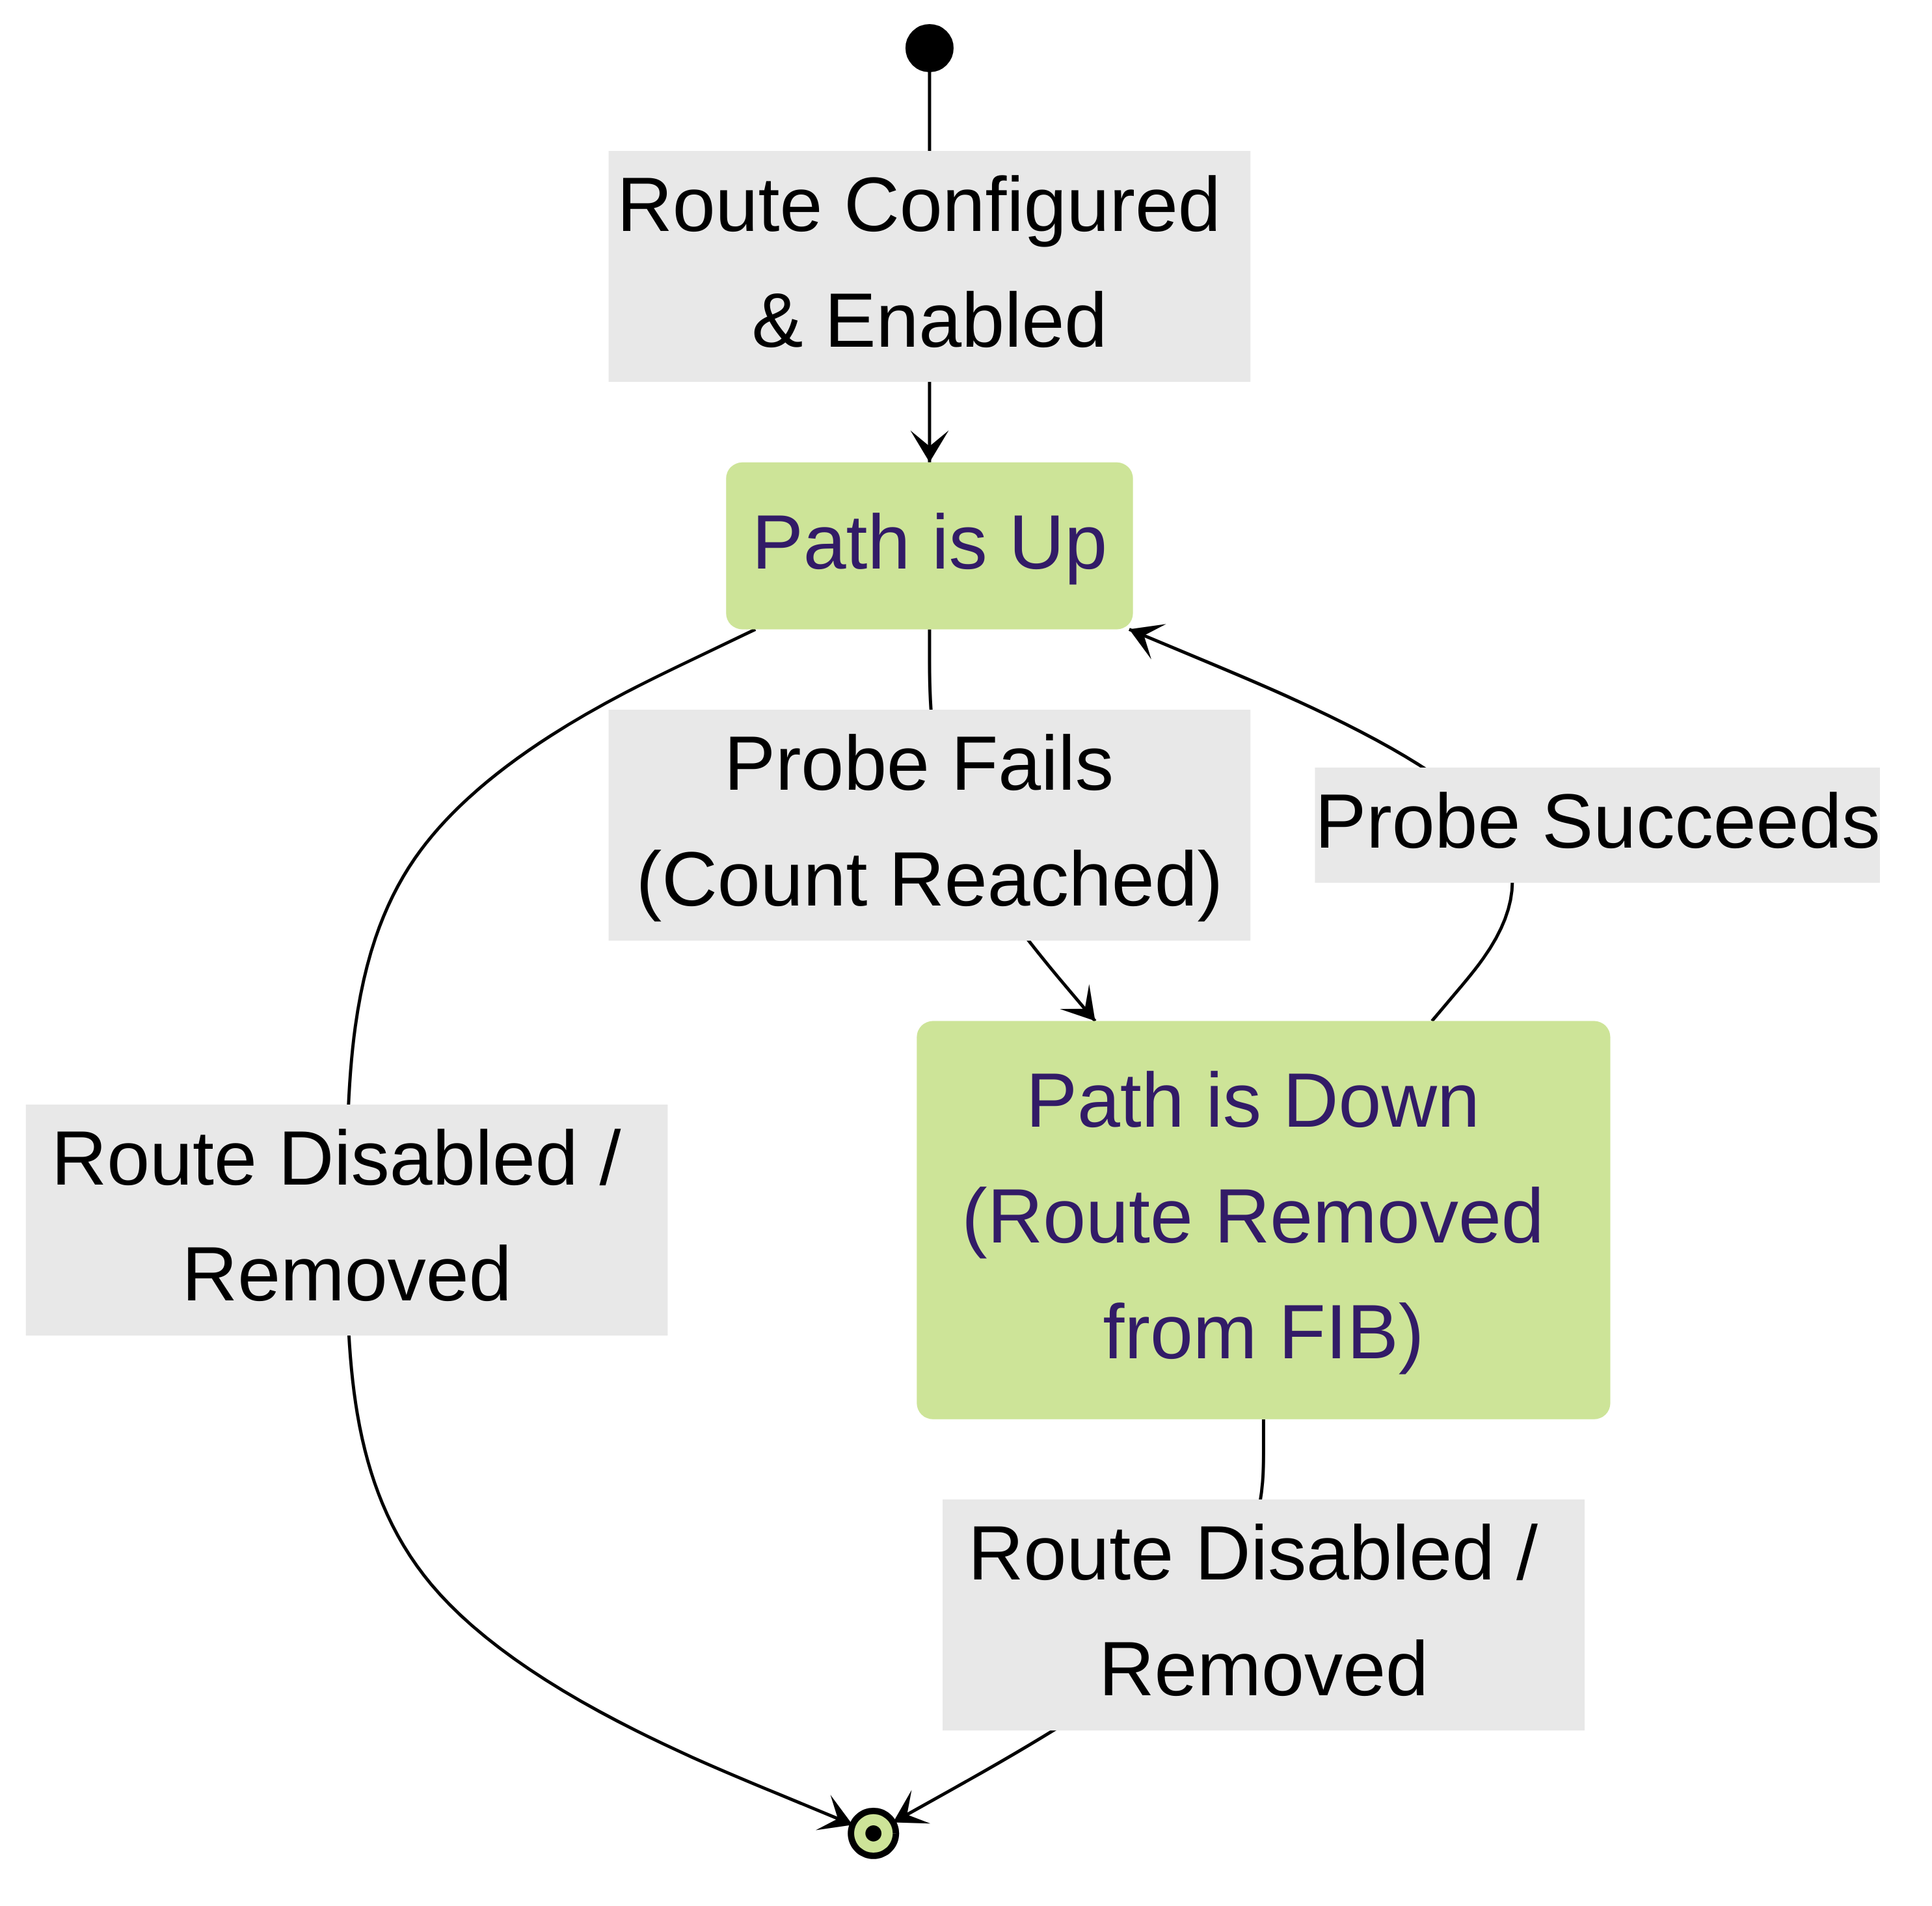
State diagram illustrating the lifecycle of a path-monitored static route.
Flowchart of Decision Process
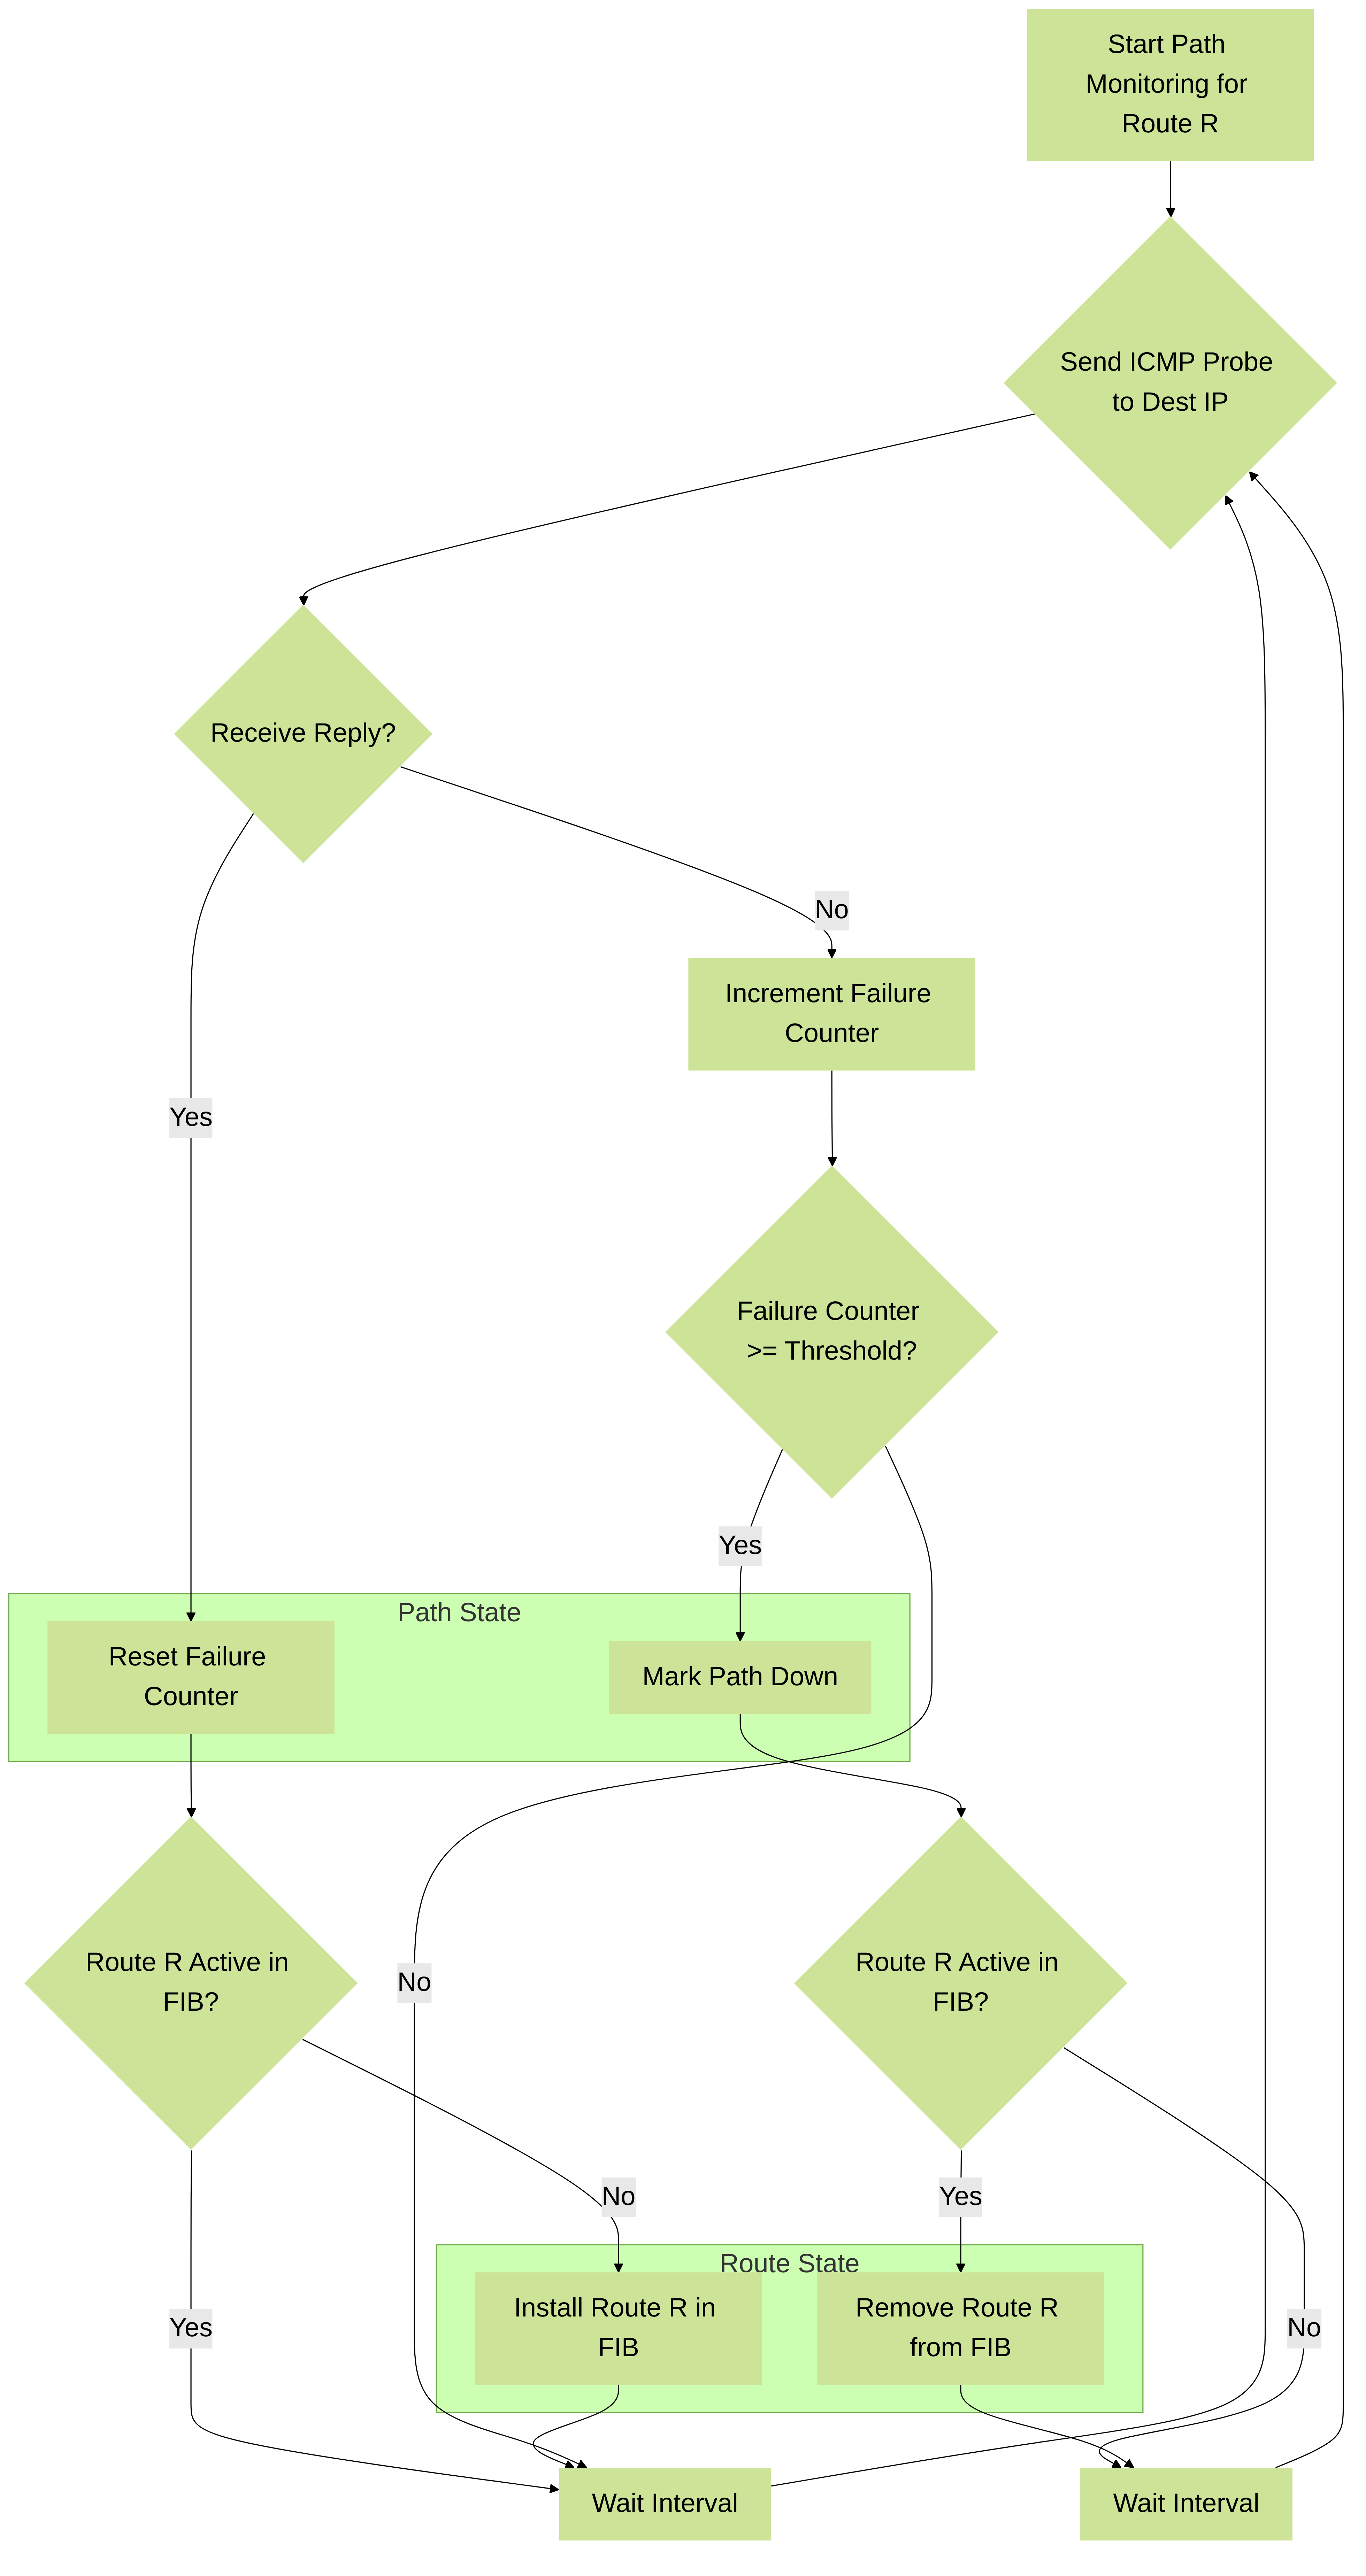
Flowchart showing the logic the firewall uses for each probe cycle.
Advanced Uses: Floating Static Routes
A floating static route is a backup route that only becomes active in the FIB when a more preferred (primary) route to the same destination fails. This is achieved by configuring the floating route with a higher Administrative Distance (AD) than the primary route.
Concept
- You configure two static routes to the same destination prefix (e.g., `0.0.0.0/0` for default routes).
- Primary Route: Configured with a standard (lower) AD, e.g., the default 10. This route points to the preferred path (e.g., primary ISP).
- Floating (Backup) Route: Configured with a higher AD, e.g., 20 or higher. This route points to the alternate path (e.g., backup ISP).
How it Works
- Initially, both routes exist in the configuration.
- The firewall's routing process compares the two routes for the destination `0.0.0.0/0`.
- Since the primary route has a lower AD (10) than the floating route (e.g., 20), the primary route is selected as the best path.
- The primary route is installed into the FIB and used for forwarding traffic. The floating route remains in the configuration but is inactive in the FIB.
- Failure Scenario: If the primary route becomes unavailable (either the interface goes down, or path monitoring marks it as down), it is removed from the FIB.
- The routing process re-evaluates the best path to `0.0.0.0/0`. With the primary route gone, the floating route (AD 20) is now the only available static route (or the best among remaining options).
- The floating route is installed into the FIB, and traffic starts flowing over the backup path.
- Recovery Scenario: If the primary route becomes available again (interface comes up, or path monitoring marks it up), it is re-inserted into the FIB candidate pool.
- The routing process compares the recovered primary route (AD 10) and the active floating route (AD 20). The primary route wins due to its lower AD.
- The primary route is re-installed in the FIB, replacing the floating route, and traffic reverts to the primary path.
Configuration Example (Conceptual)
-
Primary Default Route:
- Name: `Primary_ISP_Default`
- Destination: `0.0.0.0/0`
- Interface: `ethernet1/1` (To Primary ISP)
- Next Hop IP: `1.1.1.1` (Primary ISP Gateway)
- AD: 10 (Default)
- Path Monitoring: Enabled (Monitoring `1.1.1.1` or another reliable IP on primary path)
-
Floating Default Route:
- Name: `Backup_ISP_Default`
- Destination: `0.0.0.0/0`
- Interface: `ethernet1/2` (To Backup ISP)
- Next Hop IP: `2.2.2.2` (Backup ISP Gateway)
- AD: 20 (Higher than primary)
- Path Monitoring: Optional (can be enabled if desired, but not strictly required for the floating logic itself, though recommended for reliability).
Diagram: Primary vs Floating Route Preference
_as_long_as_it's__May_20_2025_11-18AM.png)
Firewall prefers the route via ISP1 (AD 10) as long as it's available. The route via ISP2 (AD 20) 'floats' until needed.
Advanced Uses: Failover with Path Monitoring
Combining floating static routes with path monitoring provides a robust and reliable mechanism for automatic failover between redundant paths, such as dual ISP connections.
Scenario: Dual ISP Failover
A company has two internet connections from different providers connected to the Palo Alto Networks firewall:
- Primary ISP: Connected to `ethernet1/1`, gateway `1.1.1.1`.
- Backup ISP: Connected to `ethernet1/2`, gateway `2.2.2.2`.
The goal is to use the Primary ISP by default and automatically switch to the Backup ISP only if the primary path becomes unusable, then switch back when the primary path recovers.
Configuration Steps
-
Configure Primary Default Route:
- Name: `Primary_ISP_Default`
- Destination: `0.0.0.0/0`
- Interface: `ethernet1/1`
- Next Hop IP: `1.1.1.1`
- AD: `10` (Default, preferred)
-
Path Monitoring:
- Enable: Checked
- Source IP: Interface IP of `ethernet1/1`
- Destination IP: `1.1.1.1` (or a reliable public IP like `8.8.8.8` if monitoring beyond the gateway is desired)
- Monitor Profile: Default or custom (e.g., 3s interval, 5 failures)
-
Configure Floating (Backup) Default Route:
- Name: `Backup_ISP_Default`
- Destination: `0.0.0.0/0`
- Interface: `ethernet1/2`
- Next Hop IP: `2.2.2.2`
- AD: `20` (Higher than primary, less preferred)
- Path Monitoring: (Optional but recommended) Can be enabled to monitor `2.2.2.2`. If the backup path also fails, traffic stops, preventing blackholing if both links are down.
- Commit the changes.
Failover Sequence
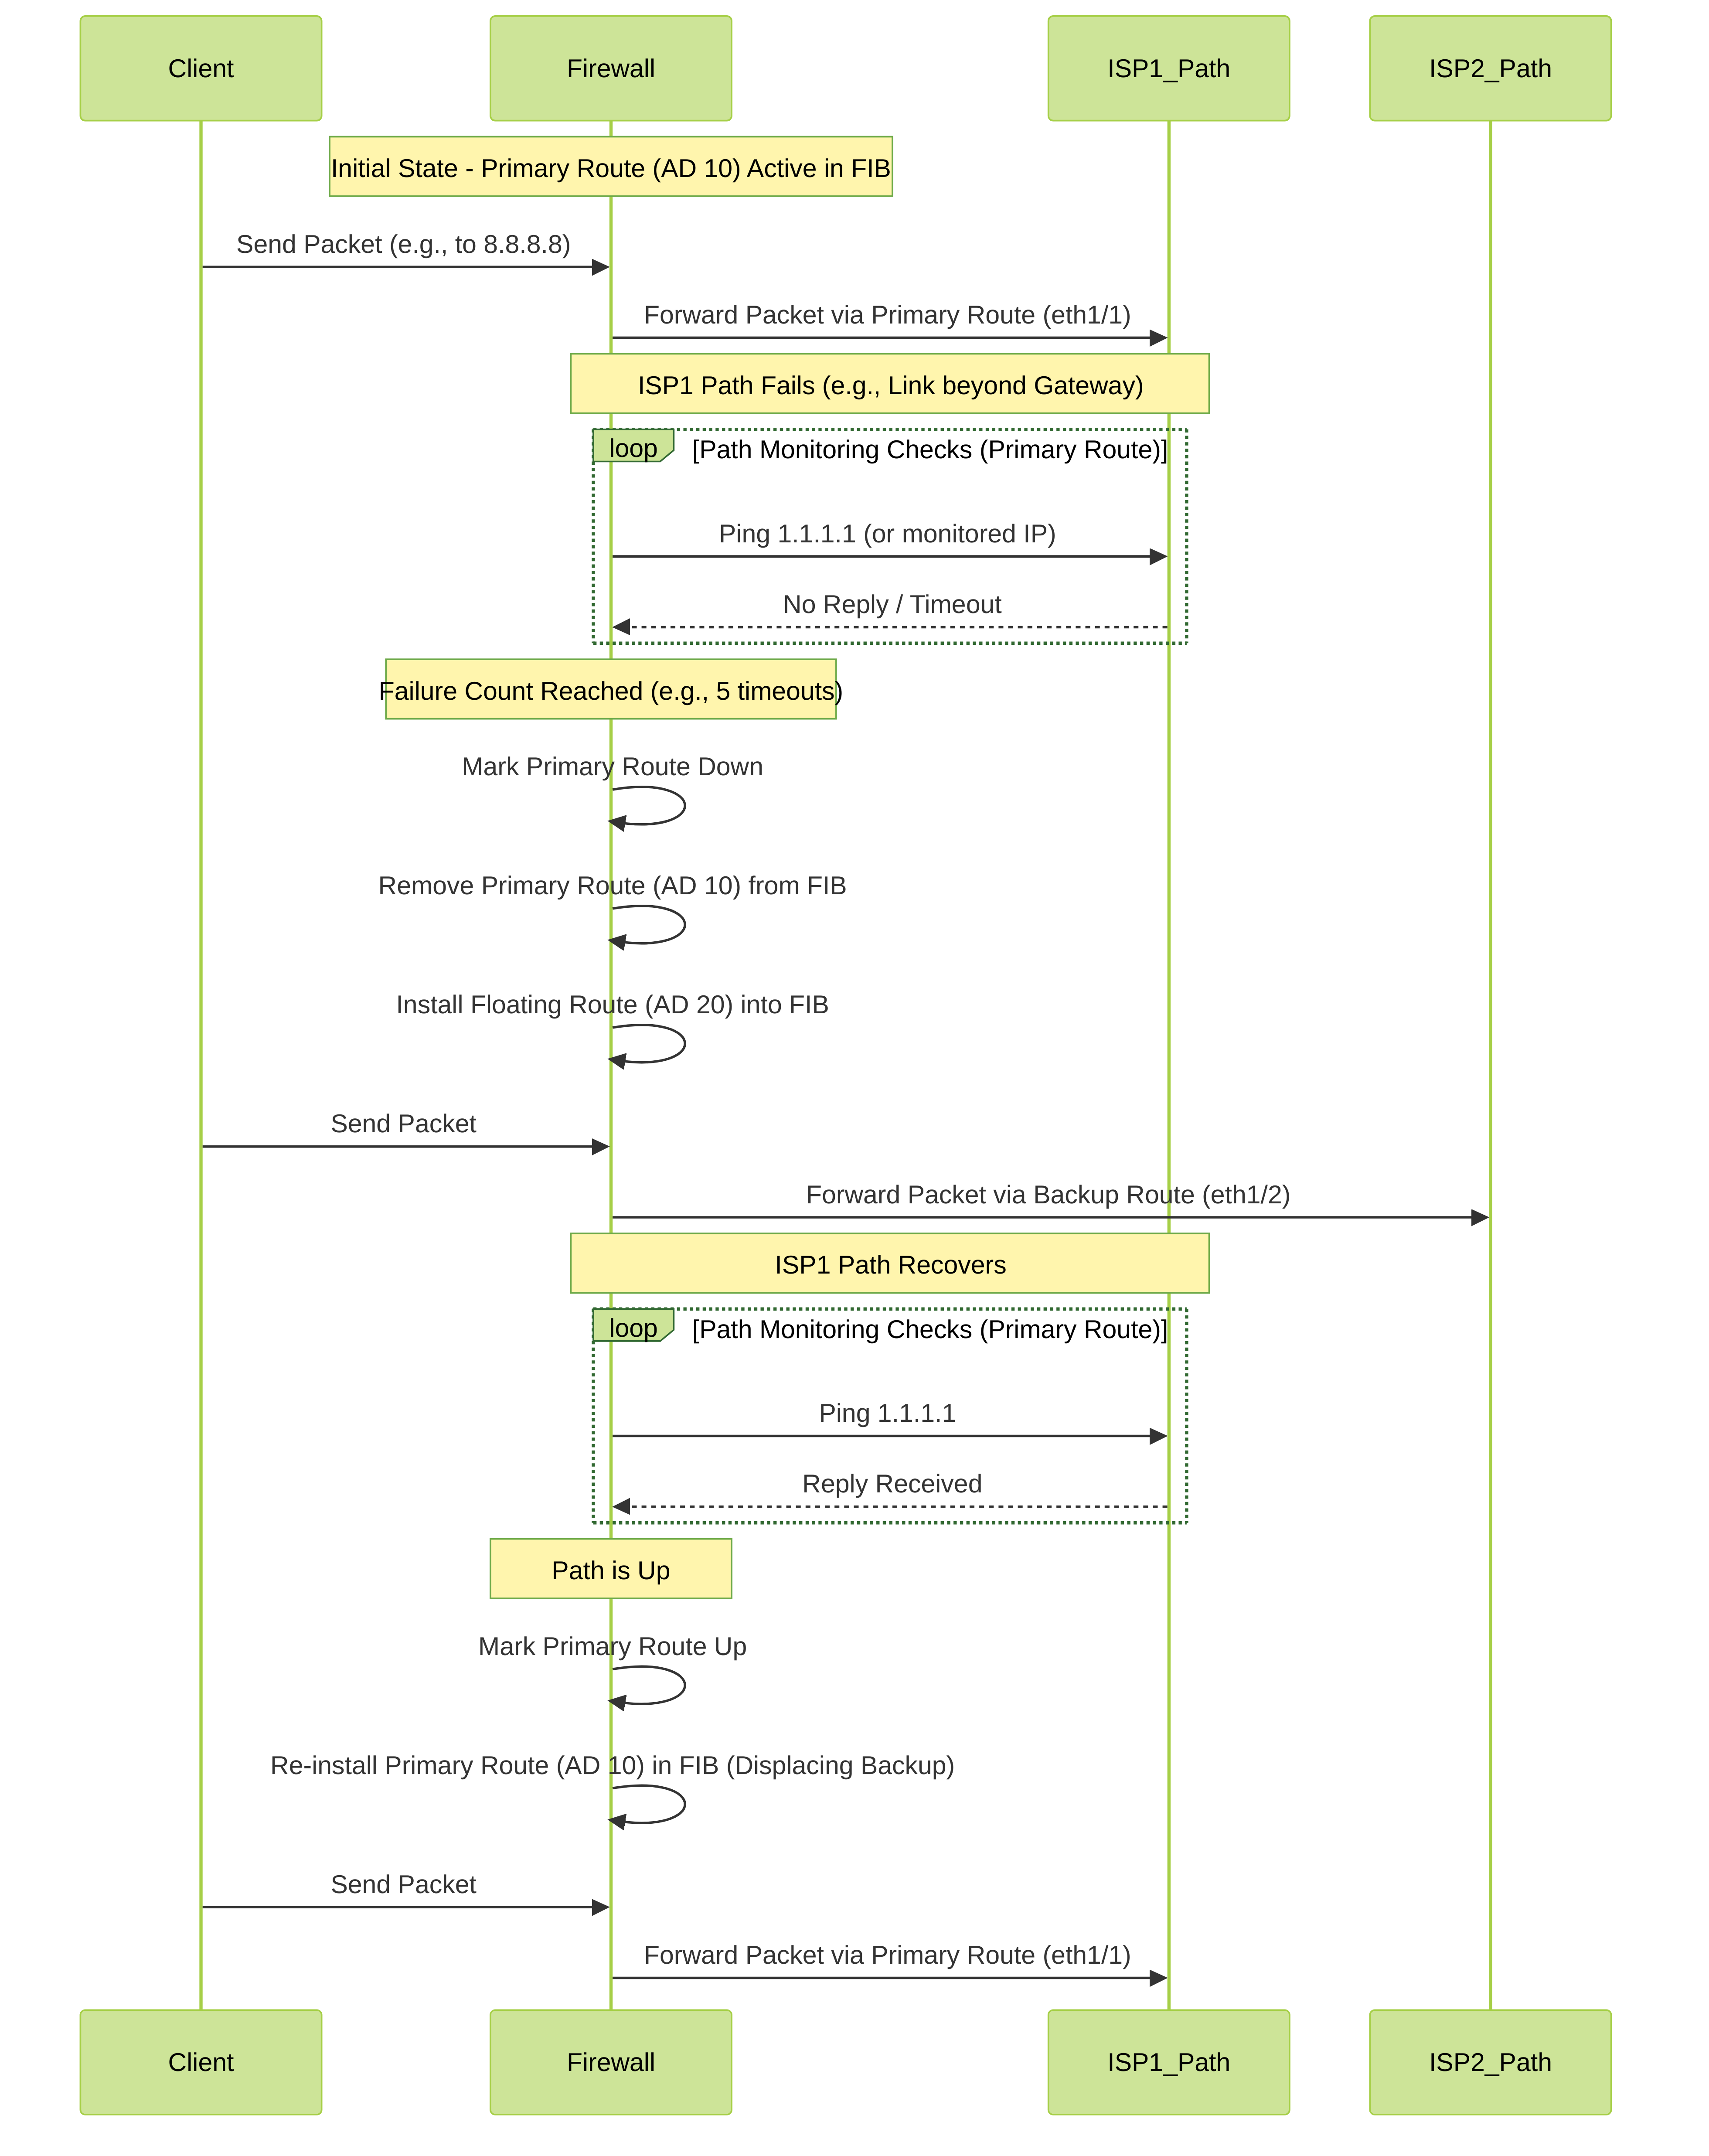
Sequence diagram illustrating the failover and failback process using static routes and path monitoring.
Advanced Uses: Static Route Redistribution
In networks using both static and dynamic routing protocols (like OSPF or BGP), you might need to advertise networks learned via static routes to your dynamic routing neighbors. This process is called **redistribution**.
Purpose of Redistributing Static Routes
- Connecting Stub Networks: Allowing internal dynamic routing domains to learn how to reach networks connected via static routes (e.g., a partner network connected via VPN with static routing, or a specific DMZ segment).
- Traffic Engineering: Injecting specific static routes into a dynamic protocol to influence path selection (though often PBR or BGP attributes are more flexible for complex engineering).
- Default Route Propagation: Redistributing a static default route (`0.0.0.0/0`) into an internal dynamic protocol (like OSPF) to provide internet access information to internal routers.
- Migration: During migration from static to dynamic routing, redistribution allows gradual transition.
Configuration (Conceptual Example for OSPF)
- Ensure the static route you want to redistribute exists (Network > Virtual Routers > Static Routes).
- Navigate to Network > Virtual Routers and select the virtual router running the dynamic protocol (e.g., OSPF).
- Go to the configuration section for the dynamic protocol (e.g., OSPF > Redist Rules ).
- Click Add to create a redistribution profile/rule.
- Name: Give the rule a descriptive name (e.g., `Redist_Static_Into_OSPF`).
- Enable: Check the box.
- Priority: Determines the order if multiple rules match (lower number = higher priority).
- Type of Routes to Redistribute: Select Static .
- Metric Type (OSPF specific): Choose how the redistributed route's metric should be presented in OSPF (e.g., Type 1 or Type 2). Default is Type 2.
- Metric Value: Assign an initial OSPF metric to the redistributed static route (e.g., 20).
- Address Based Filters / Route Map (Optional but Recommended): Use these to selectively redistribute only specific static routes, rather than all of them. You can filter based on destination prefix. This prevents unwanted routes from entering your dynamic domain. Create a Route Map (Network > Network Profiles > Route Maps) to define match criteria (e.g., specific prefixes) and actions (permit/deny).
- Click OK .
- Commit the changes.
CLI Equivalent (Conceptual OSPF):
      configure
                set network virtual-router default protocol ospf redistribution-profile Redist_Static_Into_OSPF enable yes priority 100 type static metric-type 2 metric 20
                # Optionally apply a route map for filtering:
                set network virtual-router default protocol ospf redistribution-profile Redist_Static_Into_OSPF route-map MyStaticFilterMap
                commit
Considerations
- Filtering is Crucial: Avoid redistributing unnecessary or potentially harmful routes (like a default route received from an untrusted source) into your core routing domain. Use Route Maps or filters.
- Metric Control: Set appropriate metrics during redistribution to influence path selection within the dynamic routing domain.
- Loop Prevention: Be extremely careful when doing two-way redistribution (dynamic into static and static back into dynamic) as it can easily create routing loops. Design carefully and use mechanisms like route tagging and filtering.
- Administrative Distance: Remember that redistributed static routes will appear in the dynamic protocol with the AD of that protocol (e.g., OSPF External AD 110), not the original static route AD (10).
Advanced Uses: Static Routes & Tunnels (IPSec/GRE)
Static routes play a critical role in directing traffic into route-based VPN tunnels, such as IPSec and GRE tunnels configured on Palo Alto Networks firewalls.
Route-Based VPNs
In a route-based VPN, a Tunnel Interface is created (e.g., `tunnel.1`). This interface acts as a logical endpoint for the VPN tunnel. Unlike policy-based VPNs that rely on Proxy IDs within the crypto map to determine interesting traffic, route-based VPNs rely on the firewall's routing table.
Role of Static Routes
- Directing Traffic to the Tunnel: To send traffic destined for the remote network(s) across the VPN tunnel, you need a route pointing towards the Tunnel Interface. A static route is commonly used for this.
-
Configuration Example (IPSec Tunnel):
-
Assume:
- Local Network: `192.168.10.0/24`
- Remote Network (across VPN): `10.10.0.0/16`
- IPSec Tunnel Interface: `tunnel.1` (configured within the `default` VR)
-
Configure a static route:
- Name: `Route_To_Remote_Site`
- Destination: `10.10.0.0/16`
- Interface: `tunnel.1`
- Next Hop: None (or IP Address if the tunnel interface requires a next-hop, which is less common for standard numbered tunnel interfaces but might apply in specific GRE or unnumbered scenarios). Often, just specifying the tunnel interface is sufficient. Check the specific tunnel configuration requirements.
- AD: 10 (Default)
- Metric: 10 (Default)
-
Assume:
- Traffic Flow: When the firewall receives a packet destined for `10.10.50.5`, it performs a route lookup in the `default` VR's FIB. It matches the static route for `10.10.0.0/16` via `tunnel.1`. The firewall then knows to encrypt/encapsulate the packet according to the IPSec or GRE configuration associated with `tunnel.1` and send it out the physical interface associated with the tunnel's gateway.
GRE Tunnels
The principle is identical for GRE tunnels. You create a GRE tunnel interface (`tunnel.x`) and configure static routes for remote networks pointing to that `tunnel.x` interface.
Static Routes vs. Dynamic Routing over Tunnels
While static routes are simple for point-to-point tunnels, you can also run dynamic routing protocols (like OSPF or BGP) *over* the Tunnel Interface. In this case:
- You would configure the dynamic protocol on the `tunnel.x` interface.
- Neighbors would form across the tunnel.
- Routes learned dynamically via the tunnel interface would be preferred based on AD/Metric rules.
- You might still need an initial static route to establish connectivity *to* the remote tunnel endpoint if BGP multihop or specific OSPF network types aren't used, but dynamic routing handles advertising the networks *behind* each endpoint.
Troubleshooting Static Routes
When static routes aren't behaving as expected, several CLI commands and GUI checks are essential.
Common Issues
- Route not appearing in the FIB (Forwarding Information Base).
- Route in FIB, but traffic not flowing correctly.
- Path monitoring marking a route down unexpectedly.
- Floating route not taking over when primary fails.
- Traffic not entering a VPN tunnel.
Key CLI Commands
-
show routing route type static [vr] Verifies the static route configuration exists in the specified virtual router (default if VR not specified). Shows AD, metric, next hop, interface, and path monitoring status (Up/Down).
-
show routing fib [vr] [match ] Displays the Forwarding Information Base. This is the *actual* table used for forwarding. Check if your static route (or the floating route) is present and active here. Filter with `match` for specific destinations.
This is critical. If the route isn't in the FIB, it won't be used, even if configured. -
show routing path-monitor [vr] [route ] Shows the detailed status of path monitoring for static routes, including probe counts, successes, failures, and the current state (Up/Down).
-
test routing fib-lookup virtual-routerip Simulates a route lookup for a specific destination IP address within a VR. Shows which route in the FIB would be used and the resulting egress interface and next hop.
-
show counter interfaceCheck interface statistics for errors or packet drops on the physical or tunnel interface.
-
ping vrsource host Tests basic reachability from a specific VR and source IP. Useful for testing the next hop or path monitoring target.
-
traceroute vrsource host Identifies the path taken towards a destination.
GUI Checks
- Network > Virtual Routers > More Runtime Stats (select VR): Provides a GUI view of the FIB, RIB (Routing Information Base - candidates before FIB selection), and path monitoring status.
- Monitor > Traffic Log: Check if traffic is hitting the firewall and what action is being taken (e.g., allowed, denied by policy, dropped). Filter by source/destination IP.
- Policy > Security: Ensure security policies allow the traffic flow, especially if using Tunnel Interfaces or Next VR routing which involve different zones.
- Network > Interfaces: Verify interface status (Link State, IP address).
- Network > Network Profiles > Monitor: Check path monitor profile settings (Interval, Count).
Troubleshooting Steps
- Verify Configuration: Double-check the static route parameters (Destination, Interface, Next Hop, AD, Metric) in `Network > Virtual Routers`.
- Check FIB: Use `show routing fib` or the GUI Runtime Stats. Is the *intended* route active? If not, why? (Higher AD route active? Interface down? Path monitoring down?).
- Check Path Monitoring: If using PM, use `show routing path-monitor`. Is it Up or Down? If Down, why? Can the firewall ping the monitored IP (`ping vr ...`)? Check probe counts.
- Check Interface Status: Is the egress interface (physical or tunnel) Up?
-
Check Next Hop Reachability:
Can the firewall ping the configured next-hop IP address (`ping vr ...`)? Check ARP entry (`show arp entry
`). - Test Route Lookup: Use `test routing fib-lookup` to confirm the firewall selects the correct route for a test destination IP.
- Check Security Policy: Are there Security Policies allowing the traffic between the relevant zones (source zone to egress/tunnel zone)? Check the Traffic Log.
- Check NAT Policy: Is NAT required? Is it configured correctly? Check the Traffic Log for NAT translations.
PCNSE/PCNSA Exam Focus: Static Routing
Static routing, including its advanced features, is a common topic in Palo Alto Networks certification exams (PCNSA and particularly PCNSE). Here’s a summary of key areas to focus on:
- Default Administrative Distances (AD): Memorize the default AD for Static Routes (10) and know how it compares to Connected (0), OSPF Internal (30), OSPF External (110), and eBGP (20). Understand that lower AD is preferred.
- Route Selection Process: Know that AD is the primary factor, and Metric (default 10 for static) is the tie-breaker when ADs are equal.
- Static Route Configuration: Be familiar with the required parameters: Destination (CIDR), Interface, Next Hop Type, and specific Next Hop info (IP, VR name).
-
Next Hop Types:
Understand the distinct use cases for:
- IP Address: Standard forwarding.
- Next VR: Internal routing between Virtual Routers on the *same* firewall without requiring interfaces between them.
- Discard/None: Blackholing traffic (null routing).
- Floating Static Routes: Understand the concept of using a *higher AD* on a backup route to the same destination. Know how failover and failback work based on AD comparison when the primary route becomes unavailable/available.
- Path Monitoring Purpose: Know *why* path monitoring is used – to detect reachability issues *beyond* the immediate next-hop interface status and make static routes conditional.
- Path Monitoring Configuration: Recognize the key settings: Enable checkbox (within the static route config), Source IP, Destination IP (the target to ping), and the role of Monitor Profiles (Interval, Count).
- Path Monitoring Action: Understand the critical outcome: when path monitoring detects a failure (Count threshold met), the associated static route is removed from the FIB (not just marked down in config, actually removed from forwarding).
- Failover Scenario (Static + PM): Be able to explain or analyze scenarios involving a primary static route (low AD, path monitoring enabled) and a floating static route (high AD). Understand how PM failure triggers the use of the floating route.
- Route-Based VPNs (IPSec/GRE): Understand that static routes pointing to the logical Tunnel Interface are used to direct traffic destined for the remote network *into* the tunnel.
- Static Route Redistribution: Know the concept of injecting static routes into dynamic protocols (OSPF, BGP). Understand the purpose and the importance of using Redistribution Profiles/Rules and filtering (Route Maps) within the dynamic protocol configuration.
- Troubleshooting Commands: Be familiar with the purpose of key commands like `show routing route type static`, `show routing fib`, `show routing path-monitor`, and `test routing fib-lookup`. Recognize the difference between the configured routes (RIB candidates) and the active routes (FIB).
Focus on understanding the *why* and *how* these features work together, especially the interplay between AD, floating routes, and path monitoring for achieving high availability.
PCNSE Level Quiz: Static Routing & Path Monitoring
Test your understanding of Palo Alto Networks static routing concepts.