Overview: Custom Certificates for Authentication
By default, Palo Alto Networks devices use predefined certificates for mutual authentication to establish the SSL connections used for management access and inter-device communication. However, you can configure authentication using custom certificates instead. Additionally, you can use custom certificates to secure the High Availability (HA) connections between Panorama HA peers.
Custom certificates allow you to establish a unique chain of trust to ensure mutual authentication between Panorama and the managed firewalls and log collectors. See Certificate Management for detailed information about the certificates and how to deploy them on Panorama, Log Collectors, and firewalls.
The following topics describe how to configure and manage custom certificates using Panorama.
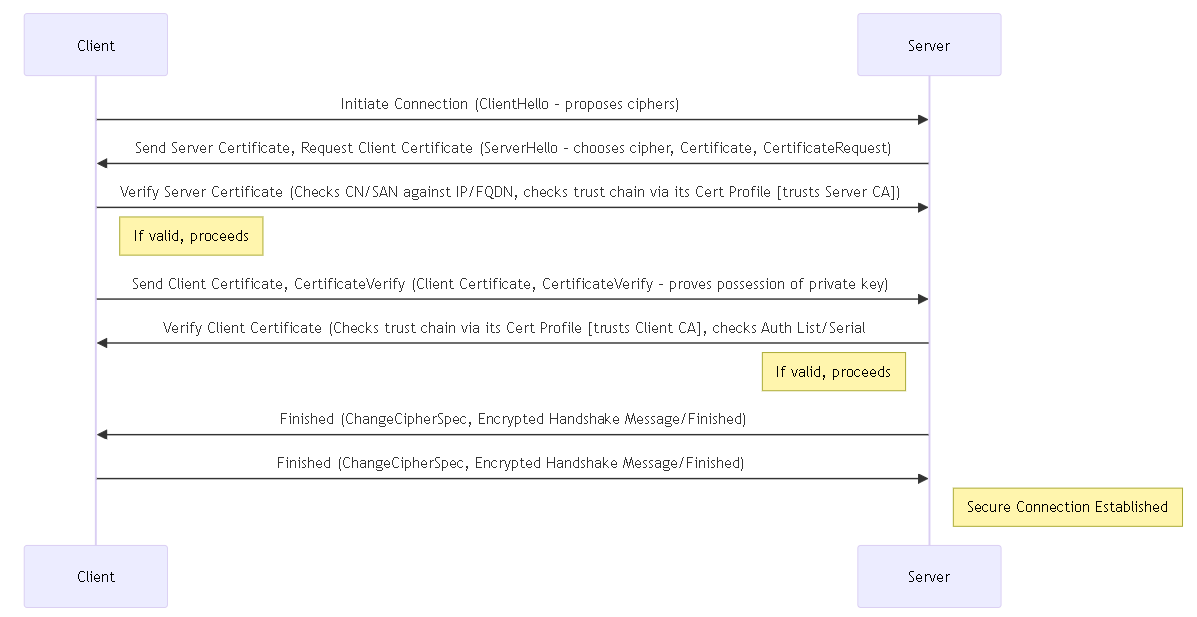
How Are SSL/TLS Connections Mutually Authenticated?
In a regular SSL connection, only the server needs to identify itself to the client by presenting its certificate. However, in mutual SSL authentication , the client presents its certificate to the server as well. Panorama, the primary Panorama HA peer, Log Collectors, WildFire appliances, and PAN-DB appliances can act as the server. Firewalls, Log Collectors, WildFire appliances, and the secondary Panorama HA peer can act as the client. The role that a device takes on depends the deployment. For example, in the diagram below, Panorama manages a number of firewalls and a collector group and acts as the server for the firewalls and Log Collectors. The Log Collector acts as the server to the firewalls that send logs to it.
To deploy custom certificates for mutual authentication in your deployment, you need:
- SSL/TLS Service Profile — An SSL/TLS service profile defines the security of the connections by referencing your custom certificate and establishing the SSL/TLS protocol versions used by the server device to communicate with client devices.
- Server Certificate and Profile — Devices in the server role require a certificate and certificate profile to identify themselves to the client devices. You can deploy this certificate from your enterprise public key infrastructure (PKI), purchase one from a trusted third-party CA, or generate a self-signed certificate locally. The server certificate must include the IP address or FQDN of the device’s management interface in the certificate common name (CN) or Subject Alt Name. The client firewall or Log Collector matches the CN or Subject Alt Name in the certificate the server presents against the server’s IP address or FQDN to verify the server’s identity.
Additionally, use the certificate profile to define certificate revocation status (OCSP/CRL) and the actions taken based on the revocation status.
- Client Certificates and Profile — Each managed device requires a client certificate and certificate profile . The client device uses its certificate to identify itself to the server device. You can deploy certificates from your enterprise PKI, using Simple Certificate Enrollment Protocol (SCEP) , purchase one from a trusted third-party CA, or generate a self-signed certificate locally.
Custom certificates can be unique to each client device or common across all devices. The unique device certificates uses a hash of the serial number of the managed device and CN . The server matches the CN or the subject alt name against the configured serial numbers of the client devices. For client certificate validation based on the CN to occur, the username must be set to Subject common-name. The client certificate behavior also applies to Panorama HA peer connections.
You can configure the client certificate and certificate profile on each client device or push the configuration from Panorama to each device as part of a template.
Configure an SSL/TLS Service Profile
| Where Can I Use This? | What Do I Need? |
|---|---|
|
For cloud-managed NGFWs: |
Palo Alto Networks firewalls and Panorama appliances use SSL/TLS to secure connections to the Authentication Portal, GlobalProtect portals and gateways, the management interface, HTTPS websites that require password access (URL admin override), and the User-ID™ syslog listening service. You can create an SSL/TLS service profile to define the server certificate, SSL/TLS protocol versions, and ciphers supported for connections to these services. Cipher suites are automatically selected based on the protocol versions chosen. However, you can disable individual ciphers as needed. If a service request involves a protocol version outside the specified range, the firewall or Panorama appliance downgrades or upgrades the connection to a supported version. To activate an SSL/TLS service profile, attach the profile to the settings for a specific service.
In the client systems that request firewall services, the certificate trust list (CTL) must include the certificate authority (CA) certificate that issued the certificate specified in the SSL/TLS service profile. Otherwise, users will see a certificate error when requesting firewall services. Most third-party CA certificates are present by default in client browsers. If an enterprise or firewall-generated CA certificate is the issuer, you must deploy that CA certificate to the CTL in client browsers.
TLSv1.3 support is limited to administrative access to management interfaces and GlobalProtect portals and gateways. You can only attach SSL/TLS service profiles that allow TLSv1.3 to the settings for these services.
Steps (PAN-OS & Panorama)
-
For each desired service, generate or import a certificate on the firewall (see
Obtain Certificates
).
Use only signed certificates, not CA certificates, in SSL/TLS service profiles.
- Select Device > Certificate Management > SSL/TLS Service Profile .
- If the firewall has more than one virtual system (vsys), select the Location (vsys or Shared ) where the profile is available.
- Click Add and enter a Name to identify the profile.
- Select the Certificate you obtained in step one.
-
Under
Protocol Settings
, define the range of TLS versions that the service can use.
TLSv1.3 support is limited to administrative access to management interfaces and GlobalProtect portals and gateways. You can only attach SSL/TLS service profiles that allow TLSv1.3 to the settings for these services.
-
Administrative Access and GlobalProtect Portals and Gateways:
- For the Min Version , select the earliest allowed TLS version: TLSv1.0 , TLSv1.1 , TLSv1.2 , or TLSv1.3 .
- For the Max Version , select the latest allowed TLS version: TLSv1.0 , TLSv1.1 , TLSv1.2 , or TLSv1.3 .
- Recommendation: Min TLSv1.2, Max TLSv1.3 (if supported by clients) or TLSv1.2.
-
All Other Services:
- For the Min Version , select the earliest allowed TLS version: TLSv1.0 , TLSv1.1 , or TLSv1.2 .
- For the Max Version , select the latest allowed TLS version: TLSv1.0 , TLSv1.1 , or TLSv1.2 .
- Recommendation: Min TLSv1.2, Max TLSv1.2. Avoid TLSv1.0/1.1 unless legacy compatibility is strictly required.
-
Administrative Access and GlobalProtect Portals and Gateways:
- (Optional) Deselect any Key Exchange Algorithms , Encryption Algorithms , or Authentication Algorithms to restrict cipher suites further.
- Click OK and Commit your changes.
Configure a Certificate Profile
Certificate profiles define user and device authentication for Authentication Portal, multi-factor authentication (MFA), GlobalProtect, site-to-site IPSec VPN, external dynamic list validation, dynamic DNS (DDNS), User-ID agent and TS agent access, and web interface access to Palo Alto Networks firewalls or Panorama. The profiles specify which certificates to use, how to verify certificate revocation status, and how that status constrains access. Configure a certificate profile for each application.
Enable Online Certificate Status Protocol (OCSP) and certificate revocation list (CRL) status verification in certificate profiles to verify that a certificate hasn’t been revoked. Enable both OCSP and CRL so that if the OCSP server isn’t available, the firewall uses CRL. For details on these methods, see Certificate Revocation .
Steps
-
Obtain the certificate authority (CA) certificates you will assign to the profile.
Assign at least one certificate to a certificate profile. Choose one of the following options to obtain the CA certificates you will assign to the profile.
- Generate a certificate locally on the device.
- Export a certificate from your enterprise CA, then import it onto the firewall (refer to step 3.2 below).
-
Identify the certificate profile.
- Select Device > Certificate Management > Certificate Profile , and then Add a profile.
- Enter a Name to identify the profile. (Case-sensitive, unique, up to 63 chars on FW / 31 on Panorama. Letters, numbers, spaces, hyphens, underscores allowed).
- If the firewall has more than one virtual system (vsys), select a Location (vsys or Shared ) for the certificate.
-
Assign one or more CA certificates to the profile. Repeat the following steps for each CA certificate:
- In the CA Certificates table, click Add .
-
Select a
CA Certificate
from the dropdown (must be imported previously).
Alternatively, you can Import a certificate directly here. To import, enter a Certificate Name , Browse for a Certificate File you exported from an enterprise CA, and then click OK .
-
(Optional) If the firewall uses OCSP to verify certificate revocation status, configure the following fields to override the default behavior. For most deployments, these fields do not apply.
-
By default, the firewall uses the Authority Information Access (AIA) information from the certificate to extract the OCSP responder information. To override the AIA information, enter a
Default OCSP URL
(starting with
http://orhttps://). - By default, the firewall uses the certificate selected in the CA Certificate field to validate OCSP responses. To use a different certificate for validation, select it in the OCSP Verify CA Certificate field.
-
By default, the firewall uses the Authority Information Access (AIA) information from the certificate to extract the OCSP responder information. To override the AIA information, enter a
Default OCSP URL
(starting with
- Click OK . The CA Certificates table displays the assigned certificate.
-
Define the methods for verifying certificate revocation status and the associated blocking behavior.
- Select Use CRL or Use OCSP . If you select both, the firewall first tries OCSP and falls back to the CRL method only if the OCSP responder is unavailable.
- Depending on the verification method, specify a CRL Receive Timeout or OCSP Receive Timeout value in seconds (range is 1 to 60). After these intervals, the firewall stops waiting for a response from the CRL or OCSP service.
-
Specify a
Certificate Status Timeout
in seconds (range is 1 to 60). After this interval, the firewall stops waiting for a response from either certificate status service and applies any session-blocking logic you define. The
Certificate Status Timeout
relates to the OCSP or CRL
Receive Timeout
setting as follows:
- If both OCSP and CRL enabled: Timeout occurs after lesser of ( Certificate Status Timeout ) or ( OCSP Receive Timeout + CRL Receive Timeout ).
- If only OCSP enabled: Timeout occurs after lesser of ( Certificate Status Timeout ) or ( OCSP Receive Timeout ).
- If only CRL enabled: Timeout occurs after lesser of ( Certificate Status Timeout ) or ( CRL Receive Timeout ).
- Block sessions if certificate status is unknown . If selected, the firewall blocks sessions when the OCSP or CRL service returns a status of unknown. Otherwise, the firewall allows these sessions.
- Block sessions if certificate status cannot be retrieved within timeout . If selected, the firewall blocks sessions after the firewall registers the timeout of an OCSP or CRL request. Otherwise, the firewall allows these sessions.
- ( GlobalProtect only ) Block sessions if the certificate was not issued to the authenticating device . If selected, the firewall blocks sessions when the serial number attribute in the subject of the client certificate does not match the host ID that the GlobalProtect app reports for the endpoint.
- Block sessions with expired certificates . (Generally recommended to keep enabled).
- Click OK , then Commit your changes.
Configure Authentication Using Custom Certificates on Panorama (Server Side)
Complete the following procedure to configure the server side (Panorama) to use custom certificates instead of predefined certificates for mutual authentication with managed devices in your deployment. See the HA documentation for configuring custom certificates on a Panorama HA pair.
-
Deploy the server certificate.
You can deploy certificates on Panorama or a server Log Collector by generating a self-signed certificate on Panorama or obtaining a certificate from your enterprise certificate authority (CA) or a trusted third-party CA.
Ensure the server certificate contains the Panorama management interface IP address or FQDN in its Common Name (CN) or Subject Alternative Name (SAN).
-
On Panorama, configure a certificate profile. This certificate profile defines which CAs are trusted to sign the *client* certificates connecting to Panorama.
- Select Panorama > Certificate Management > Certificate Profile .
- Configure a certificate profile , adding the CA(s) that signed (or will sign) your managed device certificates. Configure revocation checking as needed.
If you configure an intermediate CA as part of the certificate profile, you must include the root CA as well.
-
Configure an SSL/TLS service profile.
- Select Panorama > Certificate Management > SSL/TLS Service Profile .
- Configure an SSL/TLS profile that references the *server certificate* deployed in step 1 and specifies the desired TLS versions/ciphers for management connections.
-
Configure Secure Server Communication on Panorama or a Log Collector in the server role.
-
Select one of the following navigation paths:
- For Panorama: Panorama > Setup > Management and Edit the Secure Communications Settings
- For a Log Collector: Panorama > Managed Collectors > Add > Communication (or Edit existing)
- Select the Customize Secure Server Communication option.
- Verify that the Allow Custom Certificate Only check box is *not* selected initially. This allows you to continue managing all devices while migrating to custom certificates.
- When the Custom Certificate Only check box is selected, Panorama does not authenticate and cannot manage devices using predefined certificates.
- Select the SSL/TLS Service Profile created in step 3. This profile applies to all SSL connections between Panorama, firewalls, Log Collectors, and Panorama HA peers.
- Select the Certificate Profile created in step 2. This profile is used by Panorama to validate the certificates presented by connecting clients (firewalls, log collectors).
-
(Optional) Configure an authorization list. This adds security beyond certificate authentication by checking the client certificate Subject or Subject Alt Name against an identifier list.
- Add an Authorization List.
- Select the Subject or Subject Alt Name configured in the certificate profile as the Identifier type.
- Enter the Common Name if the identifier is Subject or an IP address, hostname or email if the identifier is Subject Alt Name.
- Click OK .
- Select Check Authorization List to enforce it.
You can also authorize client devices based on their serial number.
- Select Authorize Client Based on Serial Number to authenticate clients based on managed device serial numbers. The CN or subject in the client certificate must have the special keyword $UDID to enable this.
- (If applicable) Select the Data Redistribution option in the Customize Communication section to use a custom certificate for outgoing communication with data redistribute clients.
- In Disconnect Wait Time (min) , specify how long Panorama should wait before terminating the current session and reestablishing the connection (0 to 44,640 minutes, blank=0). This is useful when rolling out certificate changes.
- The disconnect wait time does not begin counting down until you commit the new configuration.
- Click OK .
- Commit your changes on Panorama.
-
Select one of the following navigation paths:
Configure Authentication Using Custom Certificates on Managed Devices (Client Side)
Complete the following procedure to configure the client side (firewall or Log Collector) to use custom certificates instead of predefined certificates for mutual authentication with Panorama (or a server Log Collector).
-
Upgrade each managed firewall or Log Collector. All managed devices must be running PAN-OS 8.0 or later to enforce custom certificate authentication.
Upgrade the firewall . After upgrade, each firewall connects to Panorama using the default predefined certificates initially.
-
Obtain or generate the device certificate (client certificate).
You can deploy certificates via self-signed generation or obtaining from a CA.
Set the common name to
$UDIDor subject toCN=$UDID(in the SCEP profile) if authorizing client devices based on serial number on the Panorama side.- You can generate a self-signed certificate on Panorama (and push it) or obtain one from your enterprise CA or a trusted third-party CA.
- If using SCEP for the device certificate, configure a SCEP profile . SCEP allows automatic certificate deployment to managed devices.
-
Configure the certificate profile for the client device. This profile is used by the client to *validate the server's (Panorama's) certificate*.
You can configure this on each client device individually or push it via a template .
-
Select one of the following navigation paths:
- For firewalls—Select Device > Certificate Management > Certificate Profile (or configure within a Panorama Template).
- For Log Collectors—Select Panorama > Certificate Management > Certificate Profile (applied via Collector Group config later).
- Configure the certificate profile . Add the CA certificate(s) that signed the *Panorama server certificate*. Configure revocation checking as needed.
-
Select one of the following navigation paths:
-
Deploy the client certificate settings on each firewall or Log Collector.
-
Select one of the following navigation paths:
- For firewalls: Select Device > Setup > Management and Edit the Panorama Settings (or configure within a Panorama Template/Template Stack).
- For Log Collectors: Select Panorama > Managed Collectors and Add a new Log Collector or select an existing one. Select Communication .
- Select the Secure Client Communication check box (firewall only, under Panorama Settings).
-
Select the
Certificate Type
.
- If using a local device certificate: Select the Certificate (client cert) and the Certificate Profile (created in step 3, validates Panorama cert).
- If using SCEP: Select the SCEP Profile and the Certificate Profile (created in step 3).
- If reverting or initially connecting: Select Predefined .
- (Optional, Recommended) Enable Check Server Identity . The client checks the CN/SAN in the server certificate against Panorama’s IP/FQDN configured in Panorama Settings.
- Click OK .
- Commit your changes (locally or Push from Panorama).
After committing your changes, the managed device does not terminate its current session with Panorama until the Disconnect Wait Time (configured on Panorama) is complete.
-
Select one of the following navigation paths:
-
(If applicable on Log Collectors) Select the incoming communication types for which you want to use a custom certificate:
- HA Communication
- WildFire Communication
- Data Redistribution
-
After deploying custom certificates on ALL managed devices, enforce authentication using custom certificates on Panorama.
The WildFire appliance does *not* currently support custom certificates for its management connection. If your Panorama is managing a WildFire appliance, do *not* select Allow Custom Certificates Only .
- Select Panorama > Setup > Management and Edit the Panorama settings.
- Select Allow Custom Certificate Only .
- Click OK .
- Commit your changes on Panorama.
After committing this change, all devices managed by Panorama MUST use custom certificates. If not, authentication between Panorama and the device fails.
Add New Client Devices
When adding a new firewall or Log Collector to Panorama, the workflow depends on whether Panorama is configured to use custom certificates only for mutual authentication.
- If Allow Custom Certificates Only is not selected on Panorama: You can add the device to Panorama first using predefined certificates, and then deploy the custom certificate by following the process in Configure Authentication Using Custom Certificates on Managed Devices .
-
If
Allow Custom Certificates Only
is
selected on Panorama:
You MUST deploy the custom certificates on the firewall *BEFORE* adding it to Panorama.
If not, the managed device will not be able to authenticate with Panorama. This can be done manually through the firewall web interface or through
bootstrapping
as part of the
bootstrap.xmlfile .
If a custom certificate in your deployment has expired or been revoked and needs to be replaced, see the Certificate Replacement sections.
WildFire Appliance Mutual SSL Authentication
| Where Can I Use This? | What Do I Need? |
|---|---|
|
|
When a firewall or Panorama sends a sample to a WildFire appliance for analysis, the firewall acts as the client and the WildFire appliance acts as the server. To mutually authenticate, each device presents a certificate to identify itself to the other device.
To deploy custom certificates for mutual authentication in your deployment, you need:
- SSL/TLS Service Profile (on WF Appliance) —An SSL/TLS service profile defines the security of the connections by referencing the WildFire appliance's custom server certificate and establishing the SSL/TLS protocol version.
- Server Certificate and Profile (on WF Appliance) —The WildFire appliance requires a certificate and certificate profile to identify itself to firewalls. You can deploy this certificate from your enterprise PKI, purchase one, or generate a self-signed certificate. The server certificate must include the IP address or FQDN of the WildFire appliance’s management interface in the certificate common name (CN) or Subject Alt Name. The firewall matches the CN/SAN against the WildFire appliance’s IP/FQDN to verify its identity. The Certificate Profile on the WF appliance defines trusted CAs for validating *client* (firewall) certificates and revocation checking.
- Client Certificates and Profile (on Firewall/Panorama) —Each firewall requires a client certificate and certificate profile . The firewall uses its certificate to identify itself to the WildFire appliance. Deploy certificates via PKI (SCEP), purchase, or generate self-signed. The Certificate Profile on the firewall defines the trusted CA for validating the *WildFire appliance's* server certificate.
Configure Authentication with Custom Certificates on the WildFire Appliance (CLI)
Use the following workflow to replace predefined certificates with custom certificates in your WildFire deployment using the WildFire appliance CLI.
- Obtain key pairs and certificate authority (CA) certificates for the WildFire appliance (server) and the connecting firewalls/Panorama (clients).
-
Import the CA certificate(s) used to validate the *firewall client certificates* onto the WildFire appliance.
-
Log in to the CLI on the WildFire appliance and enter configuration mode.
admin@WF-500> configure -
Use TFTP or SCP to import the CA certificate(s).
admin@WF-500# {tftp | scp} import certificate from <host> file <remote-path/filename> certificate-name <local-cert-name> [format pem] ...
-
Log in to the CLI on the WildFire appliance and enter configuration mode.
-
Import the keypair (server certificate and private key) for the WildFire appliance.
admin@WF-500# {tftp | scp} import keypair from <host> file <remote-path/filename> certificate-name <local-cert-name> [passphrase <pwd>] [format {pkcs12 | pem}] ...Ensure this server certificate has the WF appliance management IP/FQDN in its CN or SAN.
-
Configure a certificate profile on the WildFire appliance. This profile defines how the appliance validates *client* (firewall) certificates.
-
Name the certificate profile.
admin@WF-500# set shared certificate-profile <profile-name> -
Add the CA certificate(s) (imported in step 2) that signed the firewall client certificates.
admin@WF-500# set shared certificate-profile <profile-name> ca <imported-ca-cert-name> - Configure revocation checking (OCSP/CRL) within the profile as needed (commands omitted for brevity, similar to GUI options).
-
Name the certificate profile.
-
Configure an SSL/TLS service profile for the WildFire appliance. This profile defines the *server certificate* the appliance uses and the TLS settings.
-
Identify the SSL/TLS profile name.
admin@WF-500# set shared ssl-tls-service-profile <ssltls-profile-name> -
Select the WildFire appliance's server certificate (imported in step 3).
admin@WF-500# set shared ssl-tls-service-profile <ssltls-profile-name> certificate <wf-server-cert-name> -
Define the SSL/TLS protocol range.
PAN-OS supports TLS 1.2 and later TLS versions only. You must set the max version to TLS 1.2 or max.
admin@WF-500# set shared ssl-tls-service-profile <ssltls-profile-name> protocol-settings min-version {tls1-2}admin@WF-500# set shared ssl-tls-service-profile <ssltls-profile-name> protocol-settings max-version {tls1-2 | max}
-
Identify the SSL/TLS profile name.
-
Configure secure server communication on the WildFire appliance to use the new profiles.
-
Set the SSL/TLS service profile (from step 5). This profile applies to all incoming SSL connections from firewalls.
admin@WF-500# set deviceconfig setting management secure-conn-server ssl-tls-service-profile <ssltls-profile-name> -
Set the certificate profile (from step 4). This profile is used to validate incoming client certificates.
admin@WF-500# set deviceconfig setting management secure-conn-server certificate-profile <profile-name>
-
Set the SSL/TLS service profile (from step 5). This profile applies to all incoming SSL connections from firewalls.
-
Commit the changes on the WildFire appliance.
admin@WF-500# commit -
On the connecting firewalls/Panorama, configure the WildFire settings (
Device > Setup > WildFire
) to:
- Point to the WildFire appliance IP/FQDN.
- Select the firewall's Client Certificate .
- Select the firewall's Certificate Profile (which trusts the WildFire appliance's server CA).
- Enable Validate Server Certificate .
- Commit changes on the firewall/Panorama.
Change a Server Certificate (Panorama or Server Log Collector)
Complete the following task to replace an expired or revoked server certificate on Panorama or a server Log Collector acting as the server in mutual authentication.
-
Deploy the new server certificate.
Generate or obtain the new certificate. Ensure it contains the correct IP/FQDN in the CN or SAN.
Import the new certificate onto Panorama ( Panorama > Certificate Management > Certificates > Import ).
-
Change the certificate in the SSL/TLS Service Profile used for server communication.
- Select Panorama > Certificate Management > SSL/TLS Service Profile and select the profile used in the Secure Server Communication settings.
- Select the new Certificate from the dropdown.
- Click OK .
-
Reestablish the connection between the server and client devices.
-
Navigate to the Secure Communication Settings:
- For Panorama: Panorama > Setup > Management > Edit Panorama Settings.
- For a Log Collector: Panorama > Managed Collectors > select collector > Communication .
- Set the Disconnect Wait Time (e.g., to 1 minute) to force reconnection relatively quickly after the commit.
- Click OK .
- Commit your changes on Panorama. Panorama will disconnect and reconnect with managed devices using the new server certificate after the wait time expires post-commit.
-
Navigate to the Secure Communication Settings:
Change a Client Certificate (Managed Firewall or Log Collector)
Complete the following task to replace an expired or revoked client certificate on a managed device (Firewall or Client Log Collector).
-
Obtain or generate the new device certificate (client certificate).
Ensure the CN or subject is correct, especially if using
$UDIDfor serial number authentication.If using SCEP, ensure the SCEP server provides the new certificate upon request.
-
Change the certificate associated with the client device's configuration. This step depends on how the client certificate was initially deployed:
-
If using a local certificate (not SCEP) deployed via Template:
- Import the new certificate to Panorama ( Panorama > Certificate Management > Certificates > Import ).
- Push the new certificate to the managed device(s) via the Template ( Panorama > Templates > select template > Device > Certificate Management > Certificates ). Add the new cert here.
- Update the Panorama Settings within the Template Stack ( Panorama > Templates > select template stack > Templates > select template > Device > Setup > Management > Panorama Settings ). Change the selected Certificate under Secure Client Communication to the new one.
- Commit and Push the template changes.
-
If using a local certificate (not SCEP) configured directly on the device:
- Import the new certificate directly onto the firewall/log collector ( Device > Certificate Management > Certificates > Import ).
- Update the device's Panorama Settings ( Device > Setup > Management > Panorama Settings ). Change the selected Certificate under Secure Client Communication .
- Commit the changes on the device.
-
If using SCEP:
- Ensure the SCEP server is configured to issue the new certificate.
- The device should automatically attempt to renew or retrieve the certificate based on the SCEP profile settings. You may need to trigger this manually (e.g., via CLI `request certificate enroll ...`) or wait for the renewal interval. Check the SCEP logs on the device (e.g., `less mp-log scep.log`).
- No change is typically needed in the Panorama Settings on the device/template itself, as it points to the SCEP profile, not a specific certificate.
-
If using a local certificate (not SCEP) deployed via Template:
- The connection should re-establish using the new certificate automatically upon the next connection attempt after the certificate is updated on the client. You might force a reconnect by setting the 'Disconnect Wait Time' on Panorama if needed.
Change a Root or Intermediate CA Certificate
Replacing a CA certificate that signs either the server or client certificates requires careful steps to avoid breaking communication. This is the most complex replacement scenario.
-
Temporarily disable strict custom certificate enforcement on Panorama.
- Select Panorama > Setup > Management and Edit the Panorama Settings.
- Uncheck Allow Custom Certificate Only .
- (Optional but recommended for safety during transition) Set the Certificate Profile under Secure Server Communication to None temporarily. This allows clients to connect even if their CA validation fails initially.
- Click OK .
- Commit your changes on Panorama.
-
Deploy the
new
root or intermediate CA certificate to Panorama.
( Panorama > Certificate Management > Certificates > Import )
-
Update the
server's certificate profile
on Panorama to trust the new CA (for validating client certs).
- Select Panorama > Certificate Management > Certificate Profile and select the profile used for Secure Server Communication .
- Under CA Certificates , Add the new CA certificate.
- Keep the old CA certificate listed for now to allow clients still using certificates signed by the old CA to connect.
- Click OK .
- If you set the Certificate Profile to None in step 1c, re-select the updated Certificate Profile now under Panorama > Setup > Management > Panorama Settings > Secure Server Communication.
- Commit your changes on Panorama.
-
Deploy the
new
root or intermediate CA certificate to all managed devices (firewalls/log collectors).
This can be done via Template push ( Panorama > Templates > ... > Device > Certificate Management > Certificates ) or manually on each device.
- Generate or import new client certificates for all managed devices, signed by the new CA.
- Deploy these new client certificates to the managed devices using the methods described in the "Change a Client Certificate" section.
-
Update the
client's certificate profile
(used for validating the Panorama server certificate) to trust the new CA.
- Update the certificate profile used in the Panorama Settings on the client devices (or in the Template). This profile is used by the client to validate the server.
- Select Device > Certificate Management > Certificate Profile (or via Template path) and select the profile used by the client to validate Panorama.
- Under CA Certificates , Add the new CA certificate.
- Keep the old CA certificate listed for now if the Panorama server certificate hasn't been re-signed by the new CA yet.
- Click OK .
- Commit and Push changes if using Templates, or Commit locally.
- (Optional but recommended) Generate or import a new server certificate for Panorama/Server Log Collector signed by the new CA. Deploy it using the steps in "Change a Server Certificate". If you do this, ensure clients trust the new CA (Step 7) before applying the new server cert.
-
Once ALL clients and the server are using certificates signed by the new CA AND their respective certificate profiles trust the new CA:
- Remove the old CA certificate from the server's certificate profile on Panorama.
- Remove the old CA certificate from the client's certificate profile on managed devices (or template).
-
Re-enable strict custom certificate enforcement on Panorama.
- Select Panorama > Setup > Management and Edit the Panorama Settings.
- Check Allow Custom Certificate Only .
- Ensure the correct (updated) Certificate Profile is selected for validating clients.
- Click OK .
- Commit your changes on Panorama.
Replacing a CA certificate is complex. Plan carefully and perform steps during a maintenance window. Ensure rollback procedures are in place.
Diagrams
Mutual SSL/TLS Authentication Flow
Configuration Process Overview
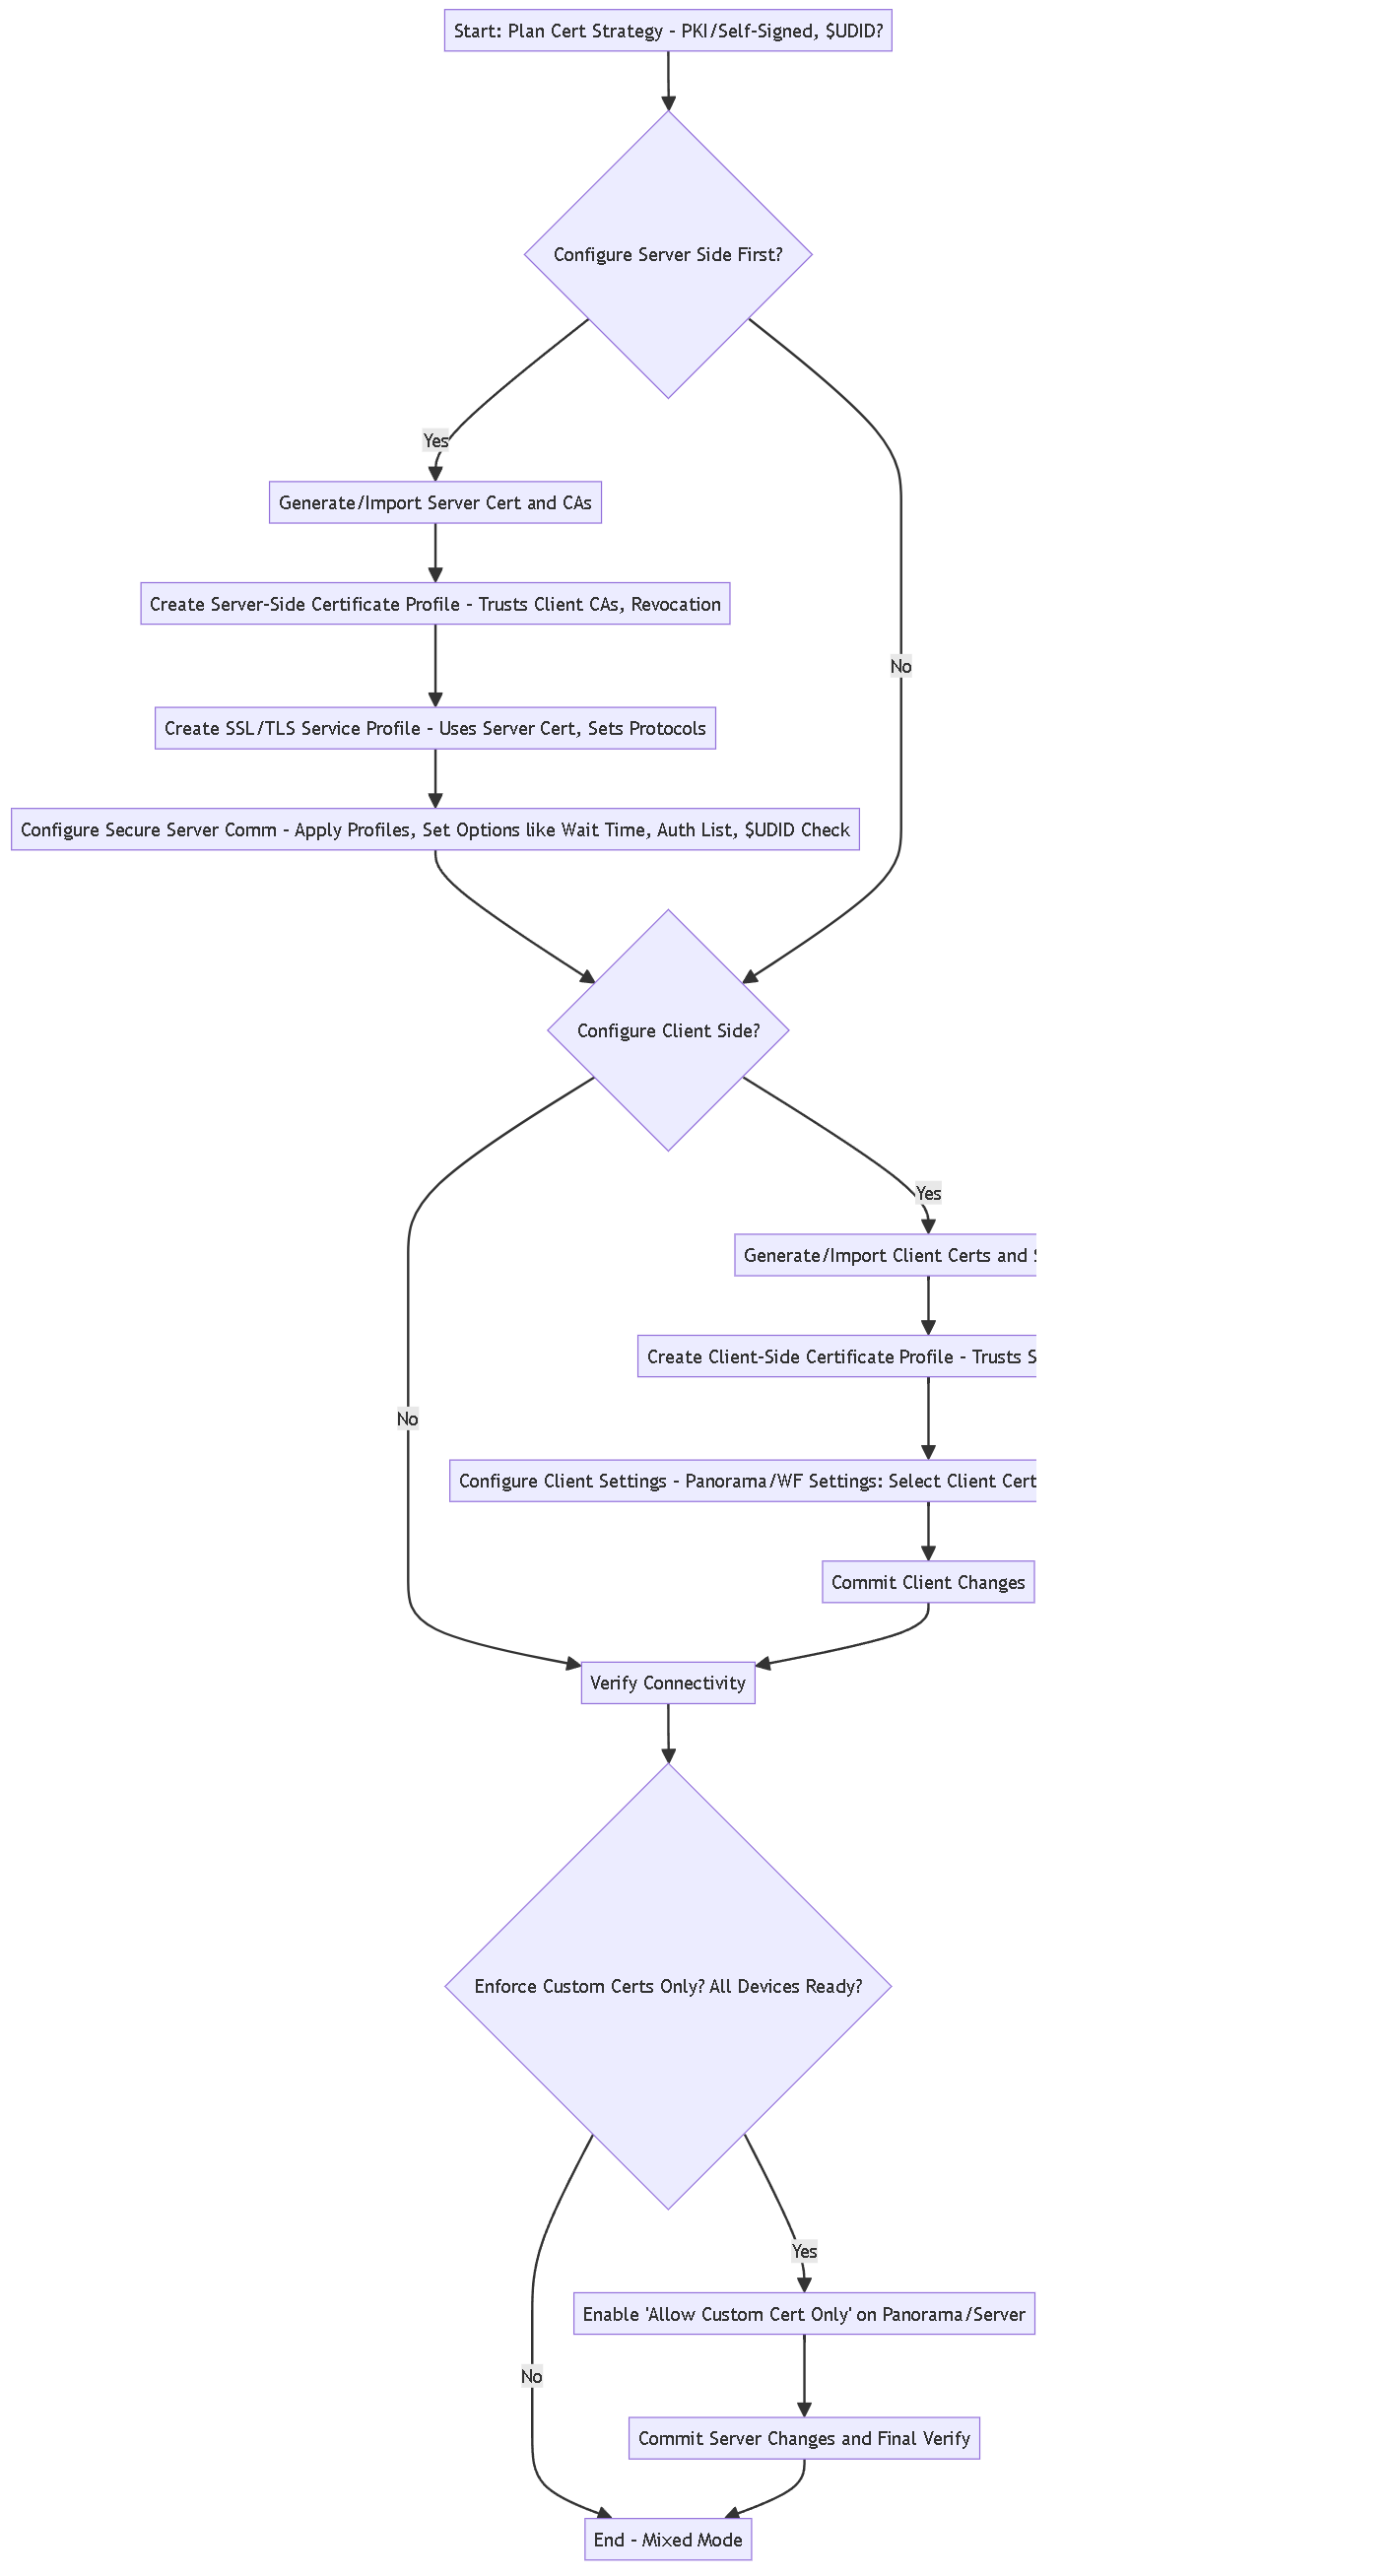
Flowchart showing the general steps involved in configuring custom certificates for both the server (Panorama) and client (Managed Device) sides.
Interactive Quiz
Test your understanding of configuring custom certificates and profiles.