GlobalProtect Gateways
GlobalProtect gateways provide security enforcement for traffic from the GlobalProtect apps. Additionally, if the Host Information Profile (HIP) feature is enabled, the gateway generates a HIP report from the raw host data that the endpoints submit, which it can use for policy enforcement. PCNSE/PCNSA: Understand the primary function of a GP Gateway is traffic enforcement and optionally HIP report generation/enforcement.
Configure a GlobalProtect Gateway on any Palo Alto Networks NGFW or on Prisma Access. On the NGFW, you can run both a gateway and portal on the same firewall, or you can have multiple distributed gateways throughout your enterprise. On Prisma Access, all gateways in your Prisma Access locations are available to users. If you have additional GlobalProtect gateways that you’d like your users to be able to connect to, you can add those gateways.
Gateway Types
GlobalProtect supports the following gateway types:
- Internal: An internal gateway is an interface on the internal network that is configured as a GlobalProtect gateway and applies security policies for internal resource access. When used in conjunction with User-ID and/or HIP checks, an internal gateway can provide a secure, accurate method of identifying and controlling traffic based on user and/or device state. Internal gateways are useful in sensitive environments where authenticated access to critical resources is required. You can configure an internal gateway in either tunnel mode or non-tunnel mode. The GlobalProtect app connects to the internal gateway after performing internal host detection to determine the location of the endpoint. If internal host detection is not configured, the GlobalProtect app first connects to the internal gateway followed by the external gateway upon connection failure. PCNSA: Know the purpose of an internal gateway (secure internal access, User-ID/HIP) and its location (internal network).
Gotcha: If an internal gateway and internal host detection are configured without an external gateway and internal host detection fails, the GlobalProtect app will retry network discovery if the Enable Intelligent Internal Host Detection parameter is set yes (GP App 6.3.1+, Content 8890-8951+). This helps when internal host detection initially fails due to a 3rd party VPN establishing its tunnel.
- External gateway (auto discovery): An external gateway resides outside of the corporate network and provides security enforcement and/or virtual private network (VPN) access for your remote users. By default, the GlobalProtect app automatically connects to the Best Available external gateway , based on the priority you assign to the gateway, source region, and the response time. PCNSE/PCNSA: Understand that "Best Available" depends on Priority, Source Region, and Response Time.
- External gateway (manual): A manual external gateway also resides outside of the corporate network. The difference is that the GlobalProtect app only connects to a manual external gateway when the user initiates a connection. You can also configure different authentication requirements for manual external gateways. To configure a manual gateway, you must identify the gateway as Manual in the Agent Configuration. PCNSA: Know the key difference between Auto and Manual external gateways (user-initiated connection).
Gateway Priority in a Multiple Gateway Configuration
To enable secure access for your mobile workforce, deploy additional Palo Alto Networks next-generation firewalls and configure them as GlobalProtect gateways. To determine the preferred gateway, add the gateways to a portal agent configuration, and assign each gateway a connection priority.
If a GlobalProtect portal agent configuration contains more than one gateway, the app attempts to communicate with all gateways listed. The app uses the priority and response time to determine the gateway to which to connect.
Gotcha (App 4.0.2 and earlier): The app connects to a lower priority gateway *only if* the response time for the higher priority gateway is greater than the *average response time* across all gateways.
Example 1 (App 4.0.2 and earlier):
| Name | Priority | Response Time |
|---|---|---|
| gw1 | Highest | 80 ms |
| gw2 | High | 25 ms |
Average response time = (80 + 25) / 2 = 52.5 ms. Since gw1's response time (80ms) is greater than the average (52.5ms), the app connects to gw2, even though gw1 has higher priority.
Example 2 (App 4.0.2 and earlier):
| Name | Priority | Response Time |
|---|---|---|
| gw1 | Highest | 30 ms |
| gw2 | High | 25 ms |
| gw3 | Medium | 50 ms |
Average response time = (30 + 25 + 50) / 3 = 35 ms. Gateways faster than average are gw1 (30ms) and gw2 (25ms). Between these two, the app connects to gw1 because it has the highest priority.
Critical Point (App 4.0.3 and later): The GlobalProtect app prioritizes gateways assigned Highest, High, and Medium priority ahead of gateways assigned a Low or Lowest priority, *regardless of response time*. The app then appends any gateways assigned a low or lowest priority to the list. This ensures connection attempts prioritize gateways you configure with higher priority levels.
In addition to gateway priority, source region can be configured. Source region is considered FIRST, then gateway priority. GlobalProtect recognizes the source region and only allows users to connect to gateways configured for that region.
Best Gateway Selection Criteria
Prerequisites
- GlobalProtect Subscription License or Prisma Access
- GlobalProtect 6.3.1 or later versions
- GlobalProtect endpoints running on Windows and macOS
- Content Version: 8903-9009
GlobalProtect uses network discovery to select the best gateway. Criteria include priority, load, and response time. Suboptimal endpoint conditions (e.g., high CPU) can impact response time measurement, leading to incorrect gateway selection.
The Best Gateway Selection Criteria feature (configurable in Portal -> Agent -> App settings) allows changing how response time is measured to mitigate endpoint condition effects.
Options for Best Gateway Selection Criteria :
- Load & response time (Default): Uses the time taken for a successful TLS handshake . This reflects gateway load and network latency.
- Response Time: Uses the time taken for a successful TCP connection (handshake) . This primarily reflects network latency, minimizing the impact of endpoint or gateway load on the selection. PCNSE: Know the difference between the two selection criteria and where to configure it (Portal Agent App settings).
Configuration Steps:
- Configure the GlobalProtect Portal.
- Configure the GlobalProtect Gateway(s).
-
Configure the App settings for Best Gateway Selection:
- Navigate to Network > GlobalProtect > Portals > <portal-config> > Agent > <agent-config> > App .
- In the App Configurations area, select the desired Best Gateway Selection Criteria ( Response Time or Load & response time ).
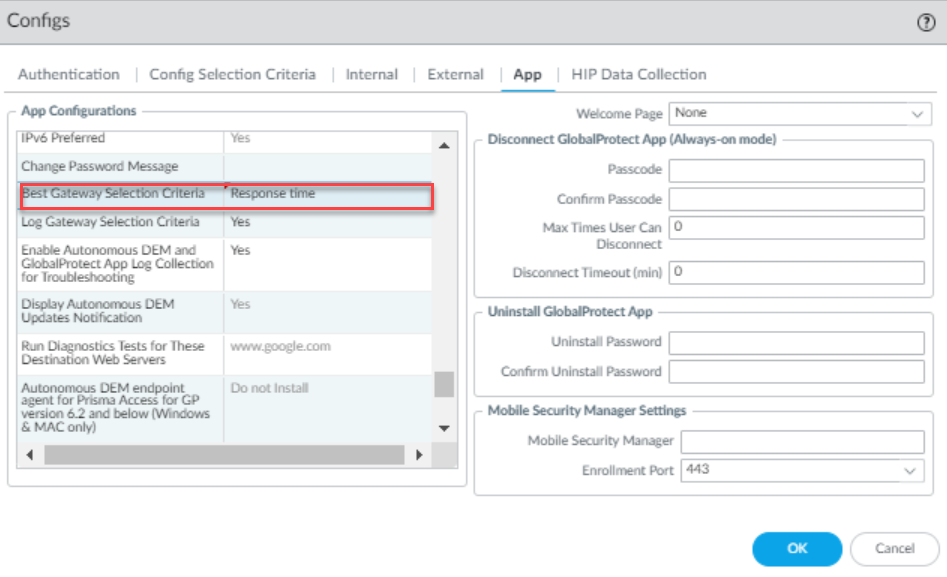
- Click OK .
- Commit the configuration.
Configure a GlobalProtect Gateway
Recommendation: Configure gateways *before* configuring the portal, as the portal configuration includes the list of gateways.
GlobalProtect Gateways provide two main functions:
- Enforce security policy for connecting apps. HIP collection can be enabled for enhanced granularity.
- Provide VPN access (IPSec or SSL) to the internal network via a tunnel interface.
Prerequisites:
- Network Interfaces (and Zones) created for the gateway firewall (physical and tunnel interfaces).
- Gateway Server Certificates and SSL/TLS Service Profile set up for SSL connection establishment.
- Authentication Profiles and/or Certificate Profiles defined for user authentication.
Gateway Configuration Steps:
-
Add Gateway:
- Navigate to Network > GlobalProtect > Gateways and click Add .
- Provide a unique Name (no spaces). Best practice: include location.
- (Optional) Select virtual system Location .
-
Network Information:
(
General
tab)
Gotcha: Do not attach an interface management profile allowing HTTP, HTTPS, Telnet, or SSH to the gateway interface. Follow Administrative Access Best Practices.
- Select the physical Interface for endpoint communication.
- Specify IP Address Type (IPv4 Only, IPv6 Only, IPv4 and IPv6) and the corresponding IP Address(es) .
-
Decryption Log Settings (Optional but Recommended):
(
General
tab)
- Best Practice: Log successful TLS handshakes (default is unsuccessful only) for visibility. Check Log successful TLS handshakes .
- Create and assign a Log Forwarding profile for Decryption logs using the Decryption Log Forwarding dropdown.
- Increase log storage quota for Decryption logs if logging successful handshakes ( Device > Setup > Management > Logging and Reporting Settings > Log Storage ).
-
User Authentication (
Authentication
tab):
Critical: An SSL/TLS Service Profile *must* be selected.
Gotcha: Max TLS version supported for GP/Clientless VPN is TLSv1.2. Set Min Version to TLSv1.2 for best security.
- Select the gateway's SSL/TLS Service Profile .
-
Click
Add
under
Client Authentication
to configure authentication methods (can be OS-specific):
- Assign a Name .
- Specify OS (or Any).
- Select an Authentication Profile (LDAP, RADIUS, SAML, Kerberos, Local DB, etc.). PCNSE/PCNSA: Know the supported authentication methods.
- (Optional) Customize Username Label , Password Label , Authentication Message .
-
Define Authentication Method Requirement using
Allow Authentication with User Credentials OR Client Certificate
:
- No (User Credentials AND Client Certificate Required) (Default): Requires both (2FA).
- Yes (User Credentials OR Client Certificate Required) : Allows either. If set to Yes, gateway checks for cert first. If none or cert profile not configured, prompts for credentials. Do not use a Cert Profile with Username Field = None if using the 'OR' option. Do not configure Username Field in Cert Profile if using SAML.
- (Optional/Required based on above) Select a Certificate Profile for client certificate/smart card auth. PCNSE: Understand how Certificate Profiles are used with Authentication Profiles for 2FA or cert-only/either-or auth.
- (Optional) Select Block login for quarantined devices to integrate with device quarantine features.
Gotcha (ChromeOS): For 2FA (Cert + LDAP) on ChromeOS 47+, configure a policy in Google Admin Console to auto-select the client cert to prevent excessive prompts.
-
Tunnel Settings (
Agent > Tunnel Settings
tab):
(Required for External Gateways, Optional for Internal Gateways in Tunnel Mode)
- Enable Tunnel Mode .
- Select the configured Tunnel Interface .
- (Optional) Set Max User limit.
-
Enable IPSec
(default, preferred) and select a
GlobalProtect IPSec Crypto
profile (or create a new one).
PCNSE: Know that IPSec is preferred over SSL, and understand the components of the crypto profile (Encryption: AES-GCM/CBC; Auth: SHA1 - used only for AES-CBC).
IPSec is NOT supported with Windows 10 UWP endpoints. Source NAT on the same firewall for the client's public IP will cause IPSec fallback to SSL.
- To force SSL-VPN only, *disable* IPSec.
- (Optional) Enable X-Auth Support for third-party VPN clients (e.g., Linux VPNC). Requires Group Name/Password. If enabled, GlobalProtect IPSec Crypto profiles are NOT used. X-Auth is NOT supported for Prisma Access. For strongSwan, also disable 'Skip Auth on IKE Rekey'.
-
Client Settings Selection Criteria (
Agent > Client Settings
tab):
(Tunnel Mode Only, cannot be used with X-Auth)
PCNSE: Understand that Client Settings allow different configurations (IP pools, split tunnel, etc.) based on user/group, OS, or source IP/region.
- Click Add to create a client settings configuration. (Up to 64 per gateway).
- In the Config Selection Criteria tab: Define criteria: Source User (or group, or 'pre-logon'), OS , Source Region / IP address .
- Order Matters: Configure other tabs (Authentication Override, IP Pools, Split Tunnel, Network Services) within this specific client settings configuration. More specific config criteria blocks must be ordered *above* more general ones using Move Up/Down in the main Client Settings list.
-
Authentication Override (Cookies) (
Agent > Client Settings > <config> > Authentication Override
tab):
(Tunnel Mode Only)
PCNSE: Understand cookie authentication allows users to avoid re-entering credentials frequently.
- Generate cookie for authentication override : Enables gateway to issue cookies.
- Accept cookie for authentication override : Enables gateway to accept valid cookies for authentication.
- Set Cookie Lifetime (hours/days/weeks).
- Select the Certificate to Encrypt/Decrypt Cookie . Must be the same RSA certificate used on the portal.
- See Cookie Authentication Details for how the app uses cookies.
-
Client IP Pools (
Agent > Client Settings > <config> > IP Pools
tab OR
Agent > Client IP Pool
tab):
(Tunnel Mode Only)
PCNSE/PCNSA: Know that IP pools assign addresses to the client's virtual adapter.
Critical: Configure IP pools at EITHER the Client Settings level OR the global Gateway level, *not both*. Address objects are not supported here.
-
Client Settings Level:
Configure pools specific to criteria (User/OS/Location).
- (Optional) Retrieve Framed-IP-Address attribute from authentication server : Use RADIUS/TACACS+ assigned IPs. Add the corresponding subnet/range to Authentication Server IP Pool .
- Add IPv4/IPv6 subnets/ranges to the IP Pool list for dynamic assignment.
- Gateway Level ( Agent > Client IP Pool ): Define global pools applied to all users connecting to this gateway (unless overridden by client-level settings, which shouldn't be configured if using global). Click Add and specify IPv4/IPv6 ranges.
Recommendation: Use a private IP addressing scheme, distinct from your LAN addresses.
-
Client Settings Level:
Configure pools specific to criteria (User/OS/Location).
- Split Tunneling: Configure under Agent > Client Settings > <config> > Split Tunnel . See Split Tunneling Section .
-
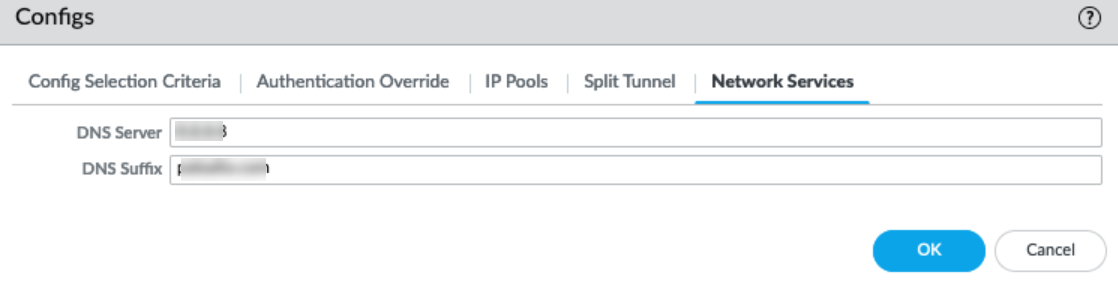
Network Services (DNS/WINS):
(Tunnel Mode Only)
- Client Settings Level ( Agent > Client Settings > <config> > Network Services ): Define DNS Server(s) and DNS Suffix(es) specific to client criteria. If *any* DNS server or suffix is configured here, it overrides the global settings below for matching clients.
- Gateway Level ( Agent > Network Services ): Define global Primary/Secondary DNS, Primary/Secondary WINS, and DNS Suffix(es) for all clients (unless overridden by client-level settings). Can also inherit from a DHCP client interface on the firewall.
- Connection Settings ( Agent > Connection Settings tab): See Session Timeout section for details.
- HIP Notification ( Agent > HIP Notification tab): (Optional) Define messages displayed to users when HIP profiles are matched or not matched in policy. Click Add , select HIP Object/Profile, choose Match/Not Match Message, enable, set display type, enter text.
- Save and Commit: Click OK on Client Settings configs, OK on Gateway config, then Commit .
-
(Optional) Specify Gateway Location (CLI/API only):
Allows the GP app to display the connected gateway's location to the user.
-
CLI:
set deviceconfig setting global-protect location <location-string> - API: Use XML API to set `/config/devices/entry[@name='<device-name>']/deviceconfig/setting/global-protect/location`.
-
CLI:
Endpoint Session Timeout Customization
Prerequisites (Feature Specific)
- Extend User Session: GP App 6.2+, PAN-OS 11.0.2+ (Win/macOS), Content 8692+
- Session Logout Notifications: GP App 6.1+, PAN-OS 11.0+ (Win/macOS/Linux), Content 8692+
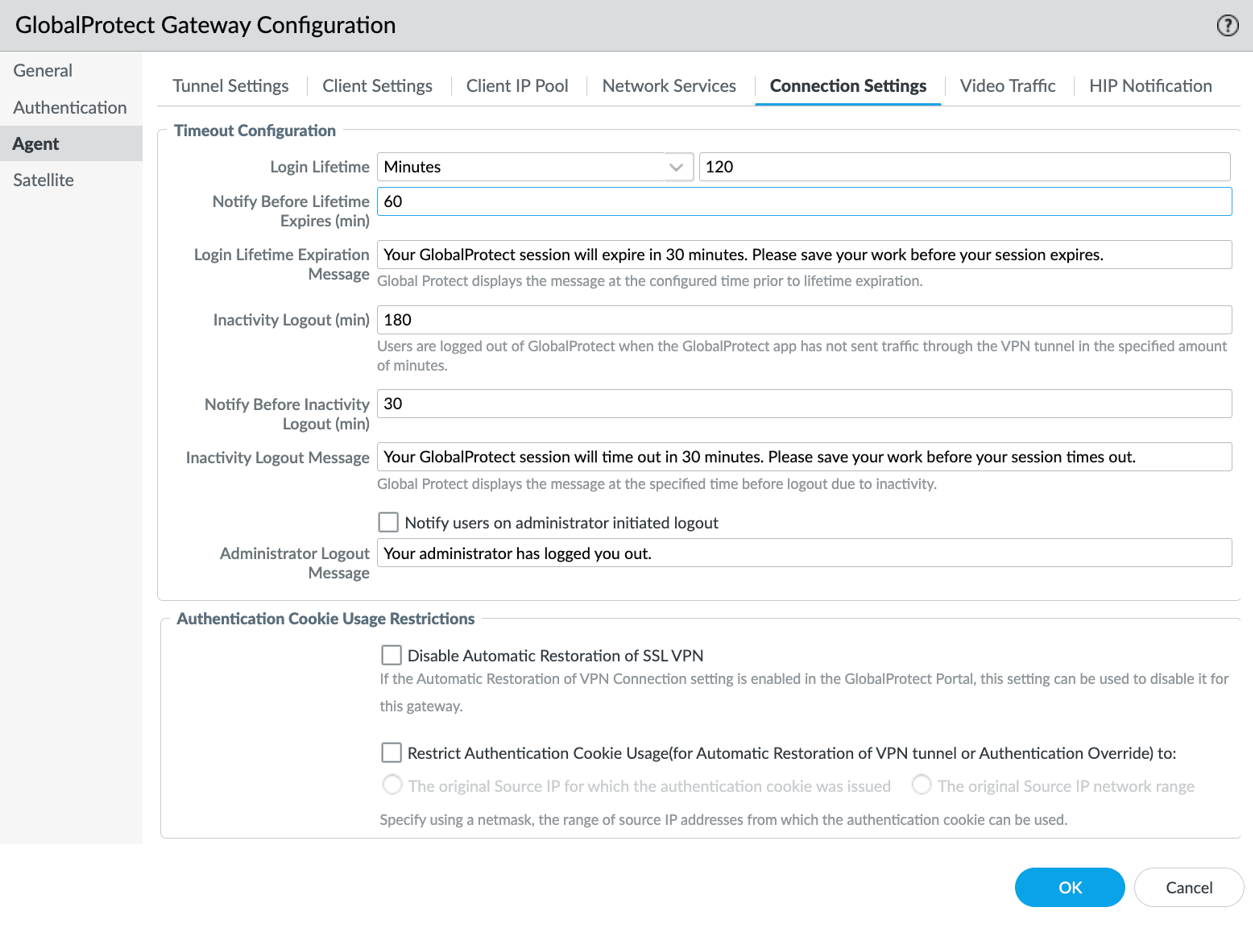
Customize session behavior under Network > GlobalProtect > Gateways > <gateway-config> > Agent > Connection Settings :
-
Modify Login Lifetime and Inactivity Logout:
- Login Lifetime: Max session duration (default 30 days). User stays logged in if active within Inactivity Logout period. After this time, the login session ends automatically.
- Inactivity Logout: Time after which idle users are logged out (default 180 minutes). Idle means no tunnel traffic or HIP check received within the configured time period. Must be greater than Automatic Restoration timeout (if enabled) and HIP check interval (for non-tunnel internal gateways).
-
Enable End User Notifications about GlobalProtect Session Logout:
- Set Notify Before Lifetime Expires (minutes, default 30): Time before expiry to show notification. Set to 0 to disable. Must be less than Login Lifetime. If Extend Session is enabled, this notification includes the extend button.
- Set Notify Before Inactivity Logout (minutes, default 30): Time before inactivity logout to show notification. Set to 0 to disable. Must be less than Inactivity Logout period.
- (Optional) Modify the default Login Lifetime Expiration Message (max 127 chars).
- (Optional) Modify the default Inactivity Logout Message (max 127 chars).
- Enable Notify users on administrator initiated logout to inform users when an admin manually terminates their session.
- (Optional) Modify the default Administrator Logout Message (max 127 chars).
-
Automatic Restoration of SSL VPN:
- Check Disable Automatic Restoration of SSL VPN to prevent auto-reconnect for this gateway. Uncheck (default) to allow.
-
Authentication Cookie Usage Restrictions:
PCNSE: Understand how to restrict cookie usage for enhanced security.
- Check Restrict Authentication Cookie Usage...
-
Choose condition:
- The original Source IP... : Cookie only valid if client IP matches the IP when the cookie was issued.
- The original Source IP network range : Cookie valid if client IP is within the subnet of the original IP (define IPv4/IPv6 netmask).
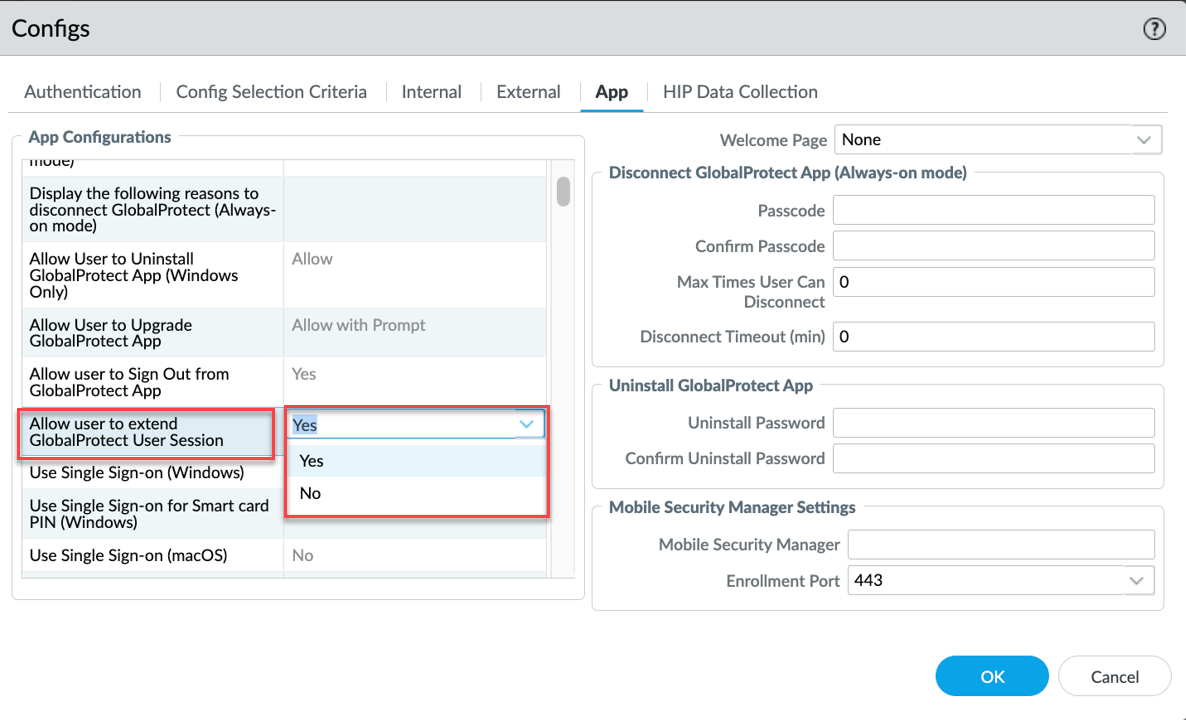
Configure Extend User Session (Requires Portal Config): PCNSE: Know that the *ability* to extend is enabled on the Portal, while the *timing* is based on Gateway settings.
- Navigate to Network > GlobalProtect > Portals > <portal-config> > Agent > <agent-config> > App .
- Set Allow User to Extend GlobalProtect User Session to Yes .
- Ensure the gateway's Notify Before Lifetime Expires setting (under Connection Settings) is configured appropriately to trigger the notification with the extend option.
- Click OK on Portal config and Commit .
Click OK on the gateway's Connection Settings tab when done, then OK on the gateway config, and Commit .
Session Timeout Details
This section's content has been integrated into the Session Timeout configuration section above.
DHCP Based IP Address Assignment and Management for GlobalProtect
Prerequisites
- GlobalProtect Subscription License
- PAN-OS 11.2.1+ (Hardware & VM-Series) OR PAN-OS 11.2.0 (VM-Series ONLY)
- GlobalProtect app 6.0.8, 6.2.1 or later versions
- GlobalProtect endpoints (Windows, macOS, Android, iOS, Linux)
Configure a DHCP server profile on the GlobalProtect gateway to use an enterprise DHCP server for managing and assigning IP addresses to remotely connected endpoints, instead of using the gateway's static IP pools. PCNSE: Understand this feature allows centralized IP management via existing DHCP infrastructure for GP clients.
Process:
- Configure DHCP Server Profile on the gateway firewall.
- Gateway communicates with the configured DHCP member server.
- Gateway obtains DHCP IP addresses from the server.
- Gateway acts as a relay/proxy and assigns these IPs as tunnel IPs to connecting GlobalProtect apps.
Optional Feature: Dynamic DNS (DDNS): If the DHCP server (Windows IPAM, Infoblox, etc.) is configured for DDNS, the gateway assignment process can trigger the creation of DNS A and PTR records for the connected users, aiding troubleshooting.
Fallback Mechanism: If the gateway fails to communicate with the DHCP server (based on configured timeout/retries), it can fall back to using its configured static IP pool for address allocation (if a static pool is configured).
Limitations:
- Supports IPv4 assignment only . IPv6 is not supported via DHCP.
- Configuring a static IP pool on the gateway is optional when using DHCP assignment, but recommended for fallback.
Configure DHCP Server on the GlobalProtect Gateway
Gotcha: DHCP feature in PAN-OS 11.2.0 is VM-Series ONLY. PAN-OS 11.2.1+ supports hardware NGFW.
Overall Steps:
- Configure the external DHCP Server (Windows or Infoblox - see specific sections).
- Configure the GlobalProtect Portal.
- Create DHCP Profile(s) on the Firewall.
- Configure the GlobalProtect Gateway.
- Enable DHCP Server usage on the GlobalProtect Gateway IP Pool settings.
- (Optional) Configure Service Route for DHCP traffic.
- Verify using Logs/CLI.
1. Configure External DHCP Server
Set up your Windows or Infoblox DHCP server with appropriate scopes, options, and potentially relay agent information (using the Circuit ID from the firewall). The DHCP lease time configured on the server must not be less than 5 minutes.
2. Configure GlobalProtect Portal
Standard portal configuration is required.
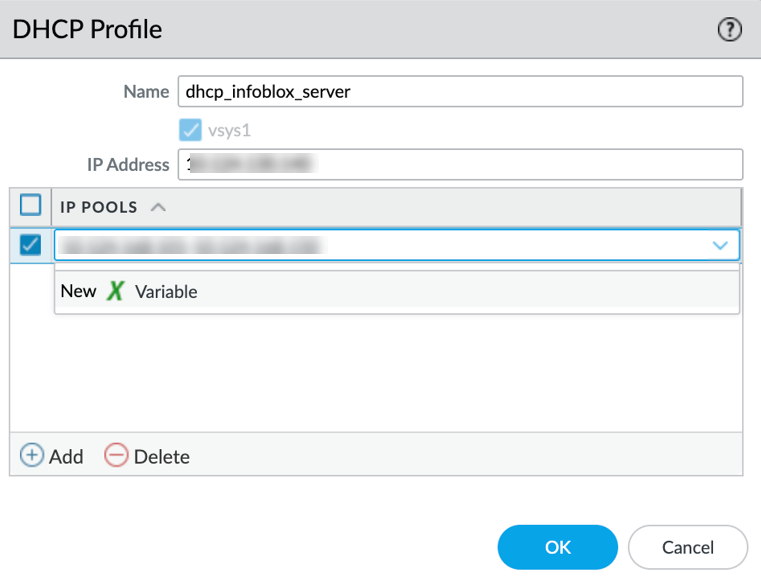
3. Create DHCP Profiles on Firewall
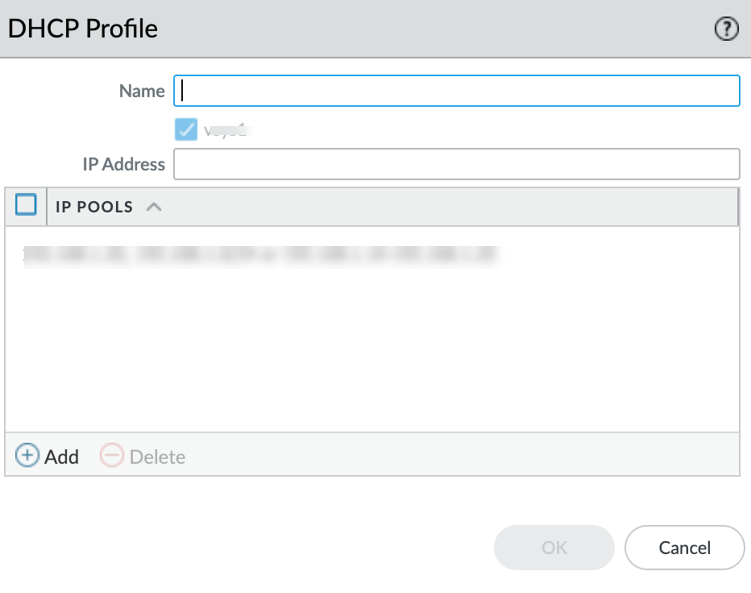
- Navigate to Network > GlobalProtect > DHCP Profile . (Max 5 profiles).
- Click Add .
- Enter a Name .
- Specify the DHCP Server IP address.
- Under DHCP IP Pool , click Add and enter the range(s) of IP addresses the gateway should request from this specific DHCP server for its clients. This pool MUST match a scope/range configured on the actual DHCP server.
- Click OK .
4. Configure GlobalProtect Gateway
Standard gateway configuration is required.
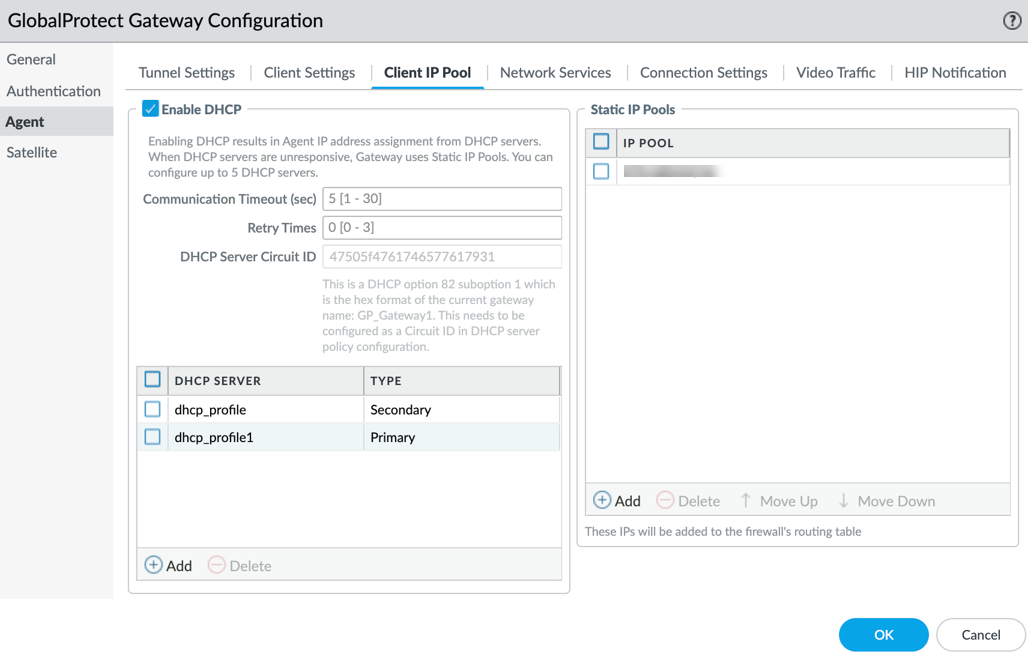
5. Enable DHCP on Gateway Client IP Pool
- Navigate to Network > GlobalProtect > Gateways > <gateway-config> > Agent > Client IP Pool .
- Check the DHCP checkbox to enable the feature.
- Set Communication Timeout (seconds, default 5): Max time gateway waits for DHCP server response. Must be less than or equal to the 'TCP Receive Timeout (sec)' configured in the Portal Agent App settings.
- Set Retry (default 0): Number of retries if timeout occurs.
- Note the auto-populated DHCP Server Circuit ID . This is the gateway name in hex. This Circuit ID needs to be used when configuring policy/filtering on the DHCP server (Windows/Infobox) if relay agent filtering is used.
- Under DHCP Server Profile , click Add .
- Select a previously created DHCP Profile from the dropdown.
-
Choose
Server Type
:
Primary
or
Secondary
.
- If multiple Primary servers exist, requests go to all; first response is used.
- If Primary/Secondary exist, Secondary is used only if Primary fails after timeout/retries.
- Click OK .
- Commit changes.
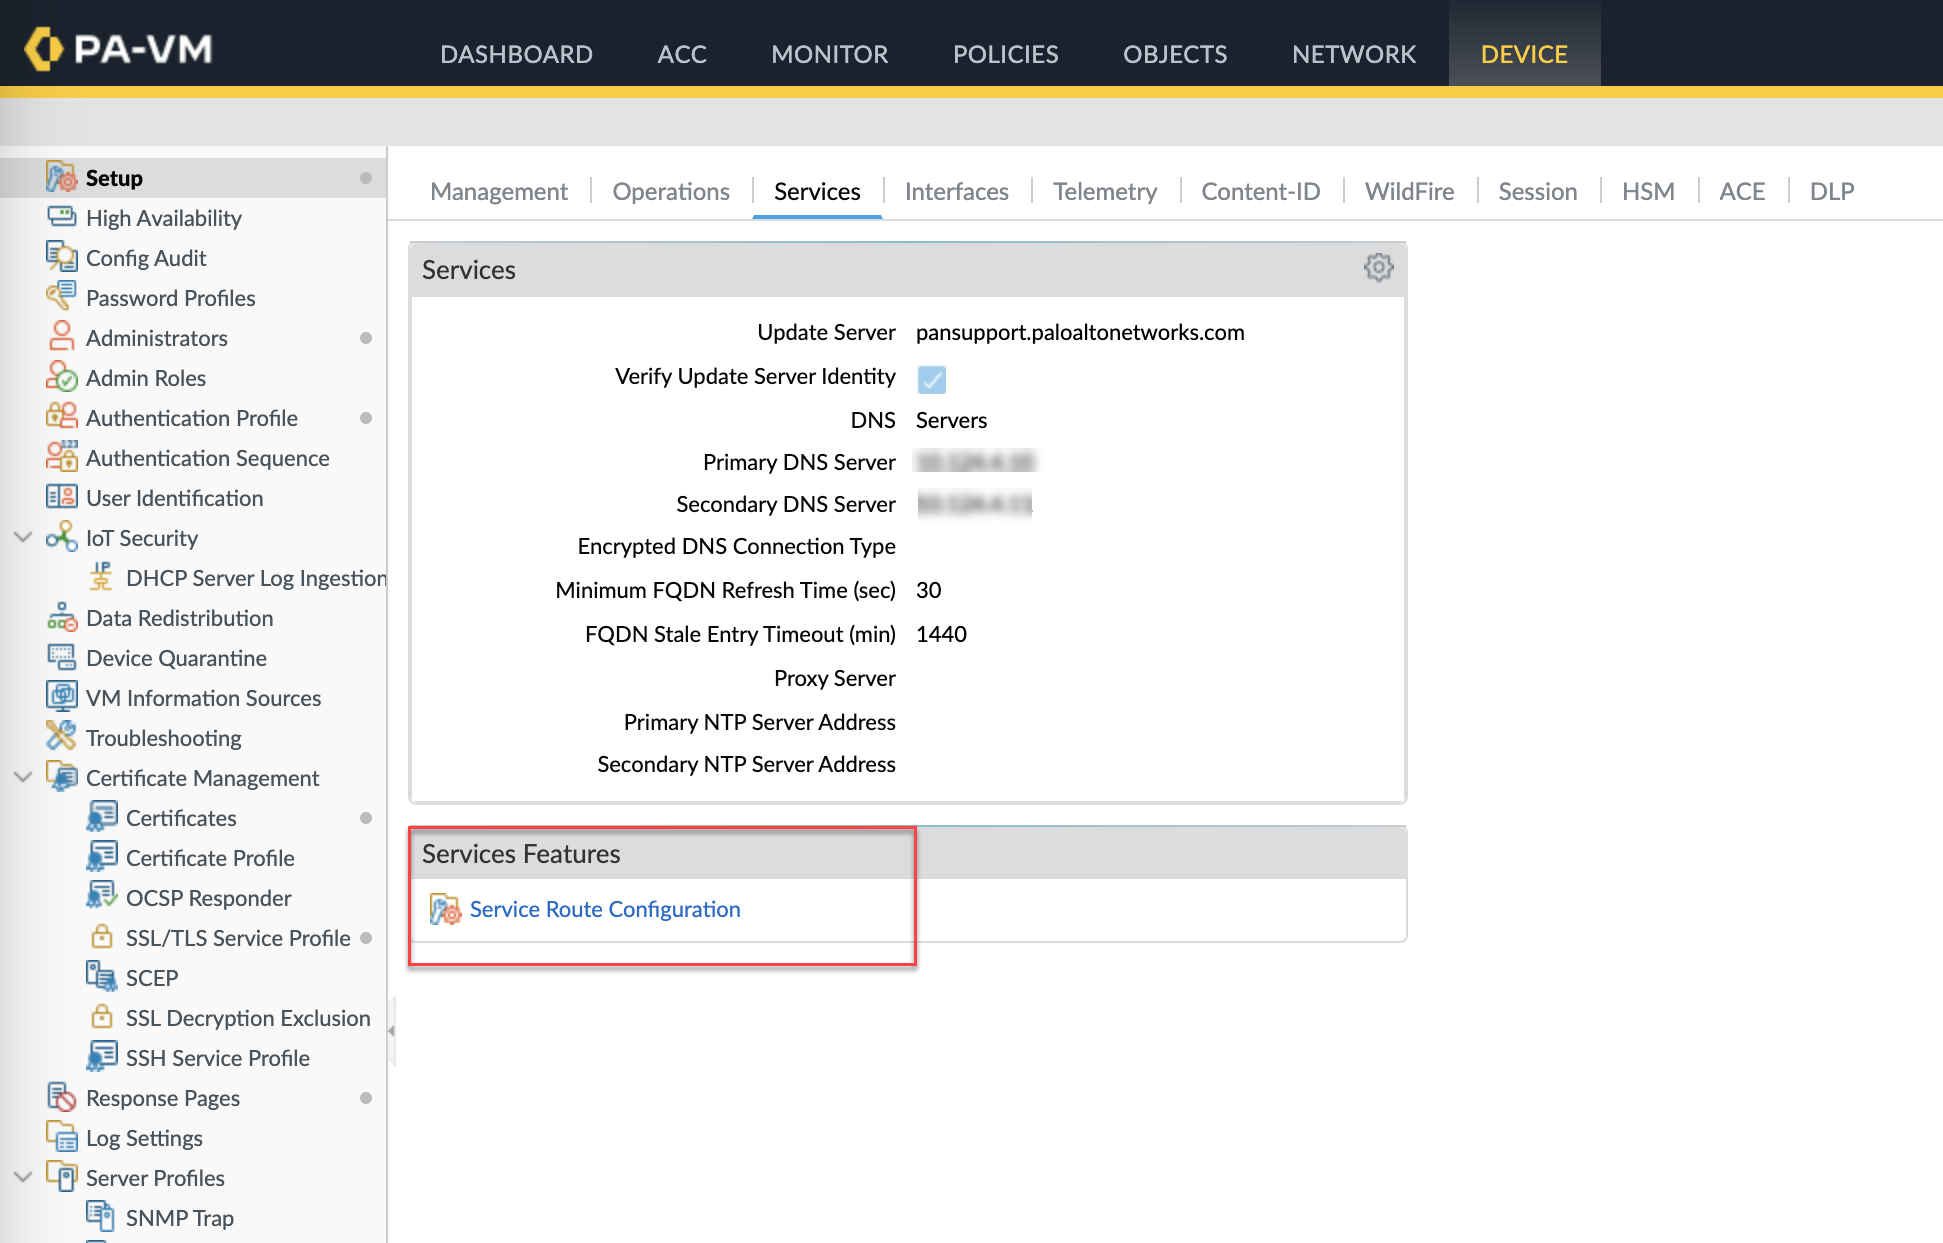
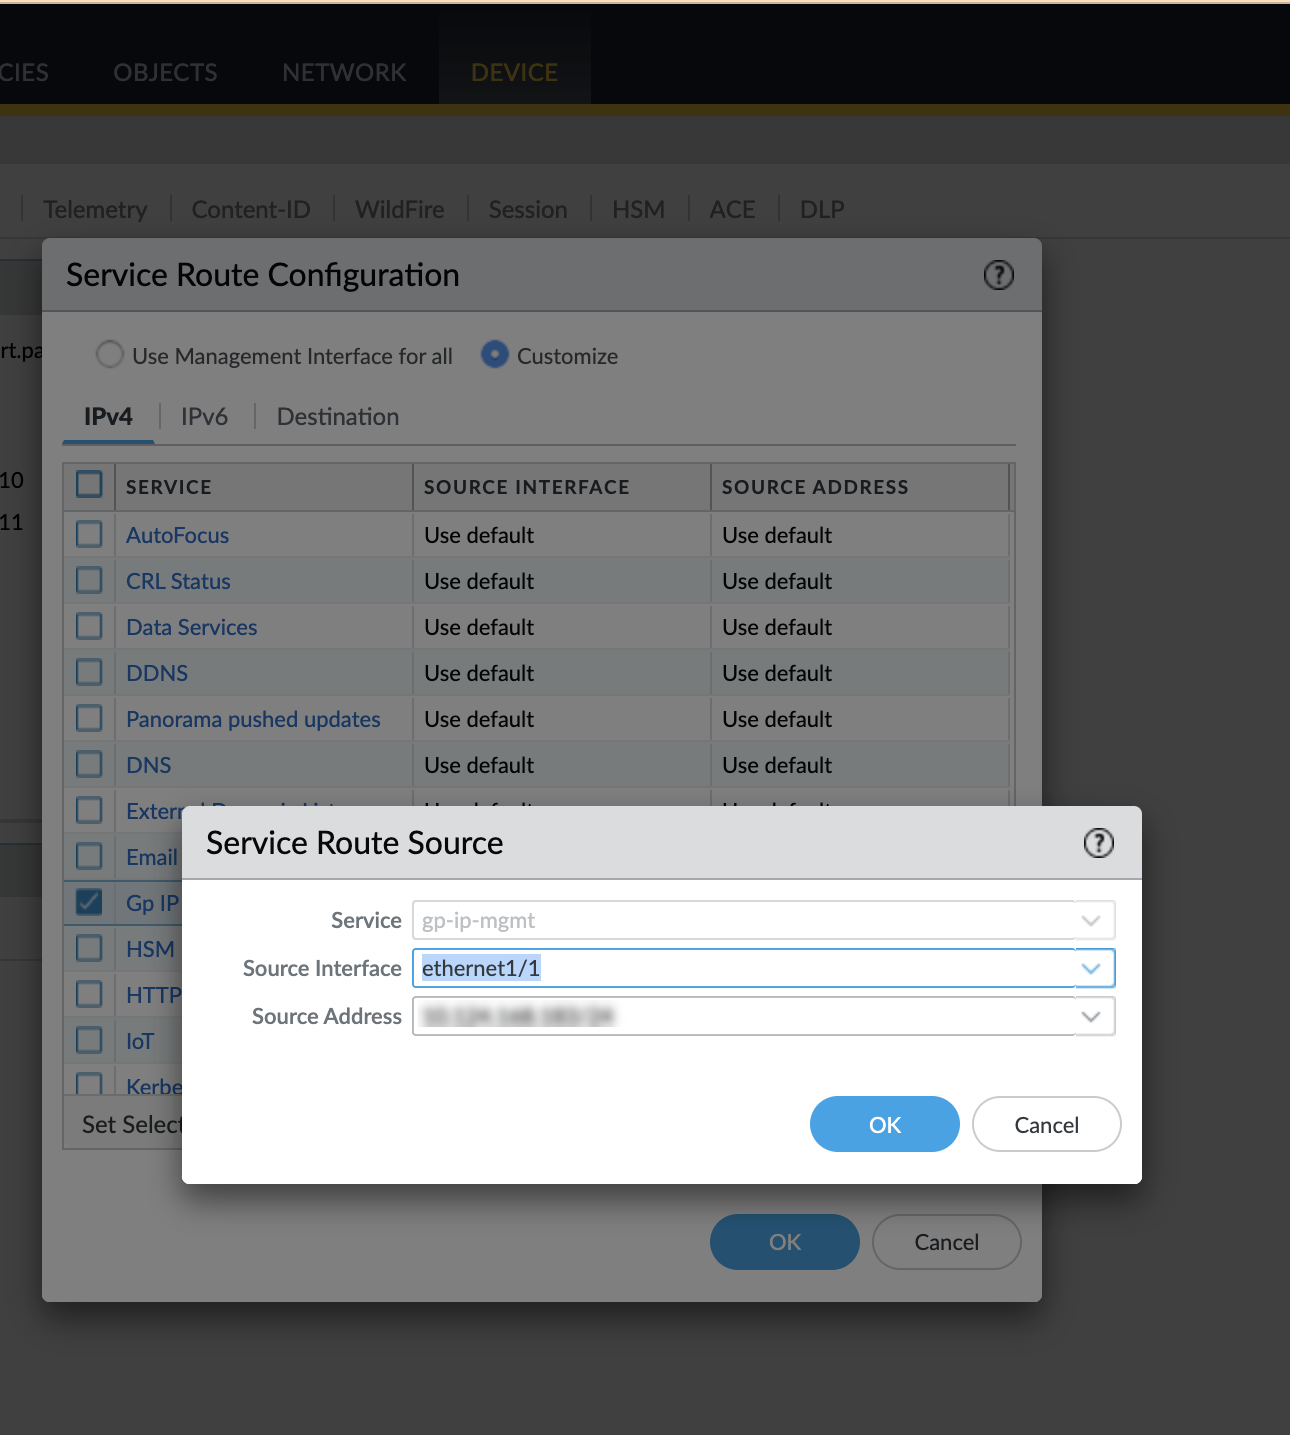
6. Configure Service Route for DHCP (Optional)
By default, DHCP communication uses the firewall's management interface. To use a dataplane interface instead:
- Go to Device > Setup > Services .
- Click the Service Route Configuration link.
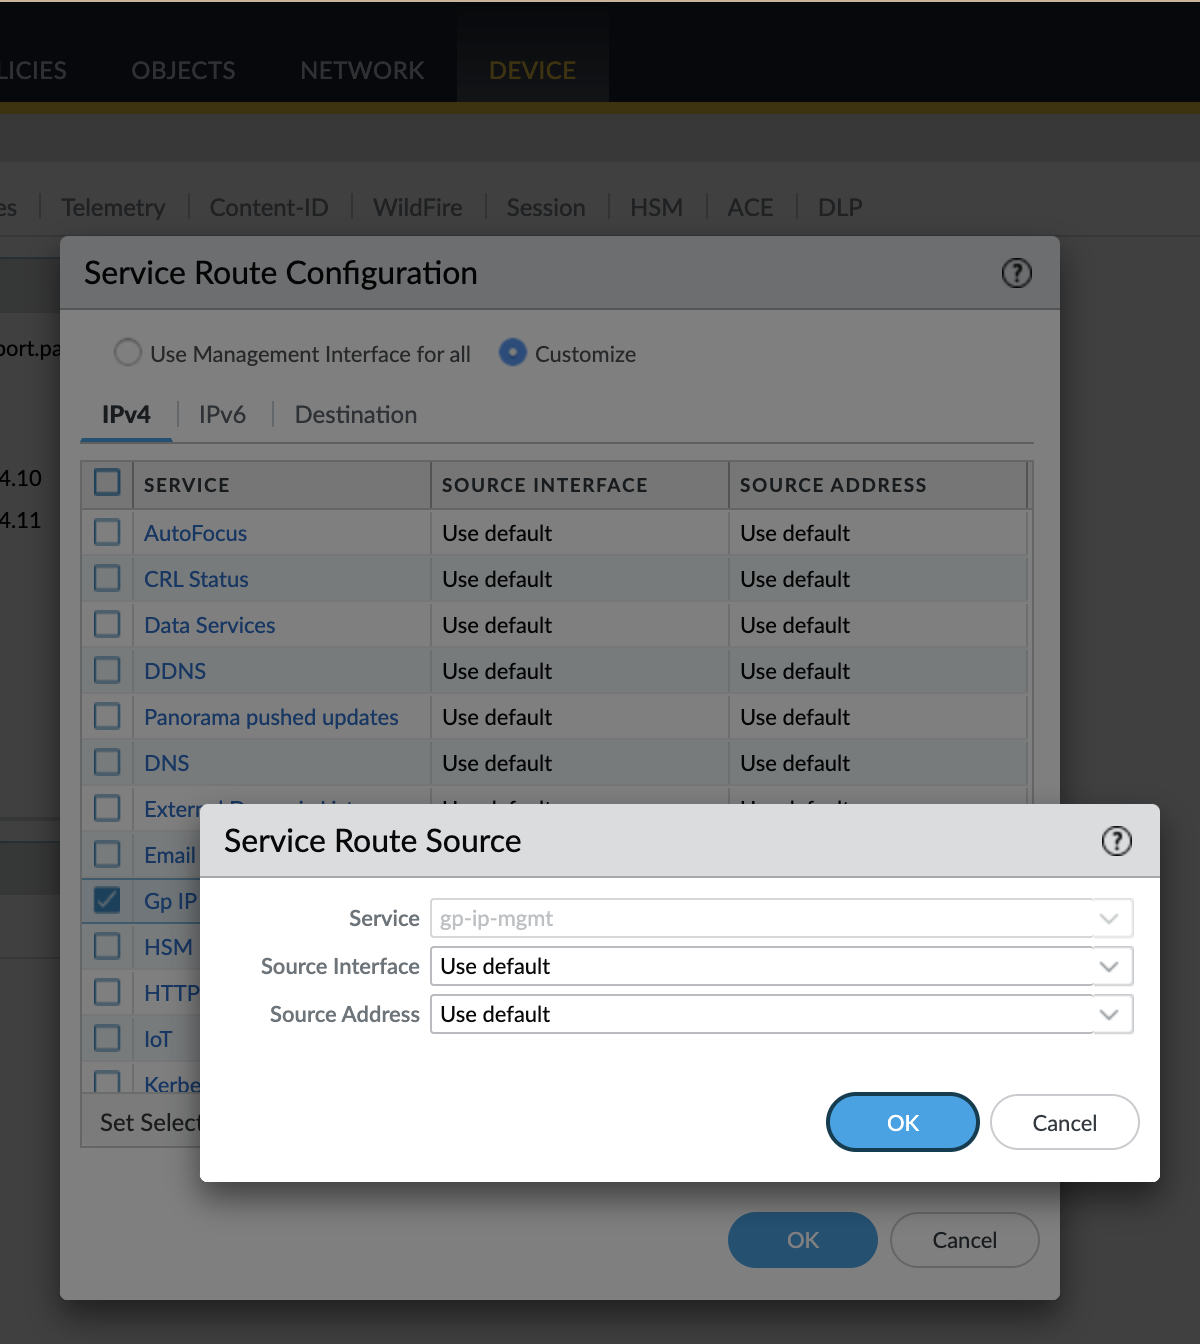
- Select the Gp IP Mgmt service row.
- Check the box for Gp IP Mgmt .
- Select the desired dataplane Source Interface (e.g., ethernet1/1). Cannot be 'Any'.
- Enter the Source Address (IP of the chosen interface).
- Click OK .
- Click OK again.
- Commit changes.

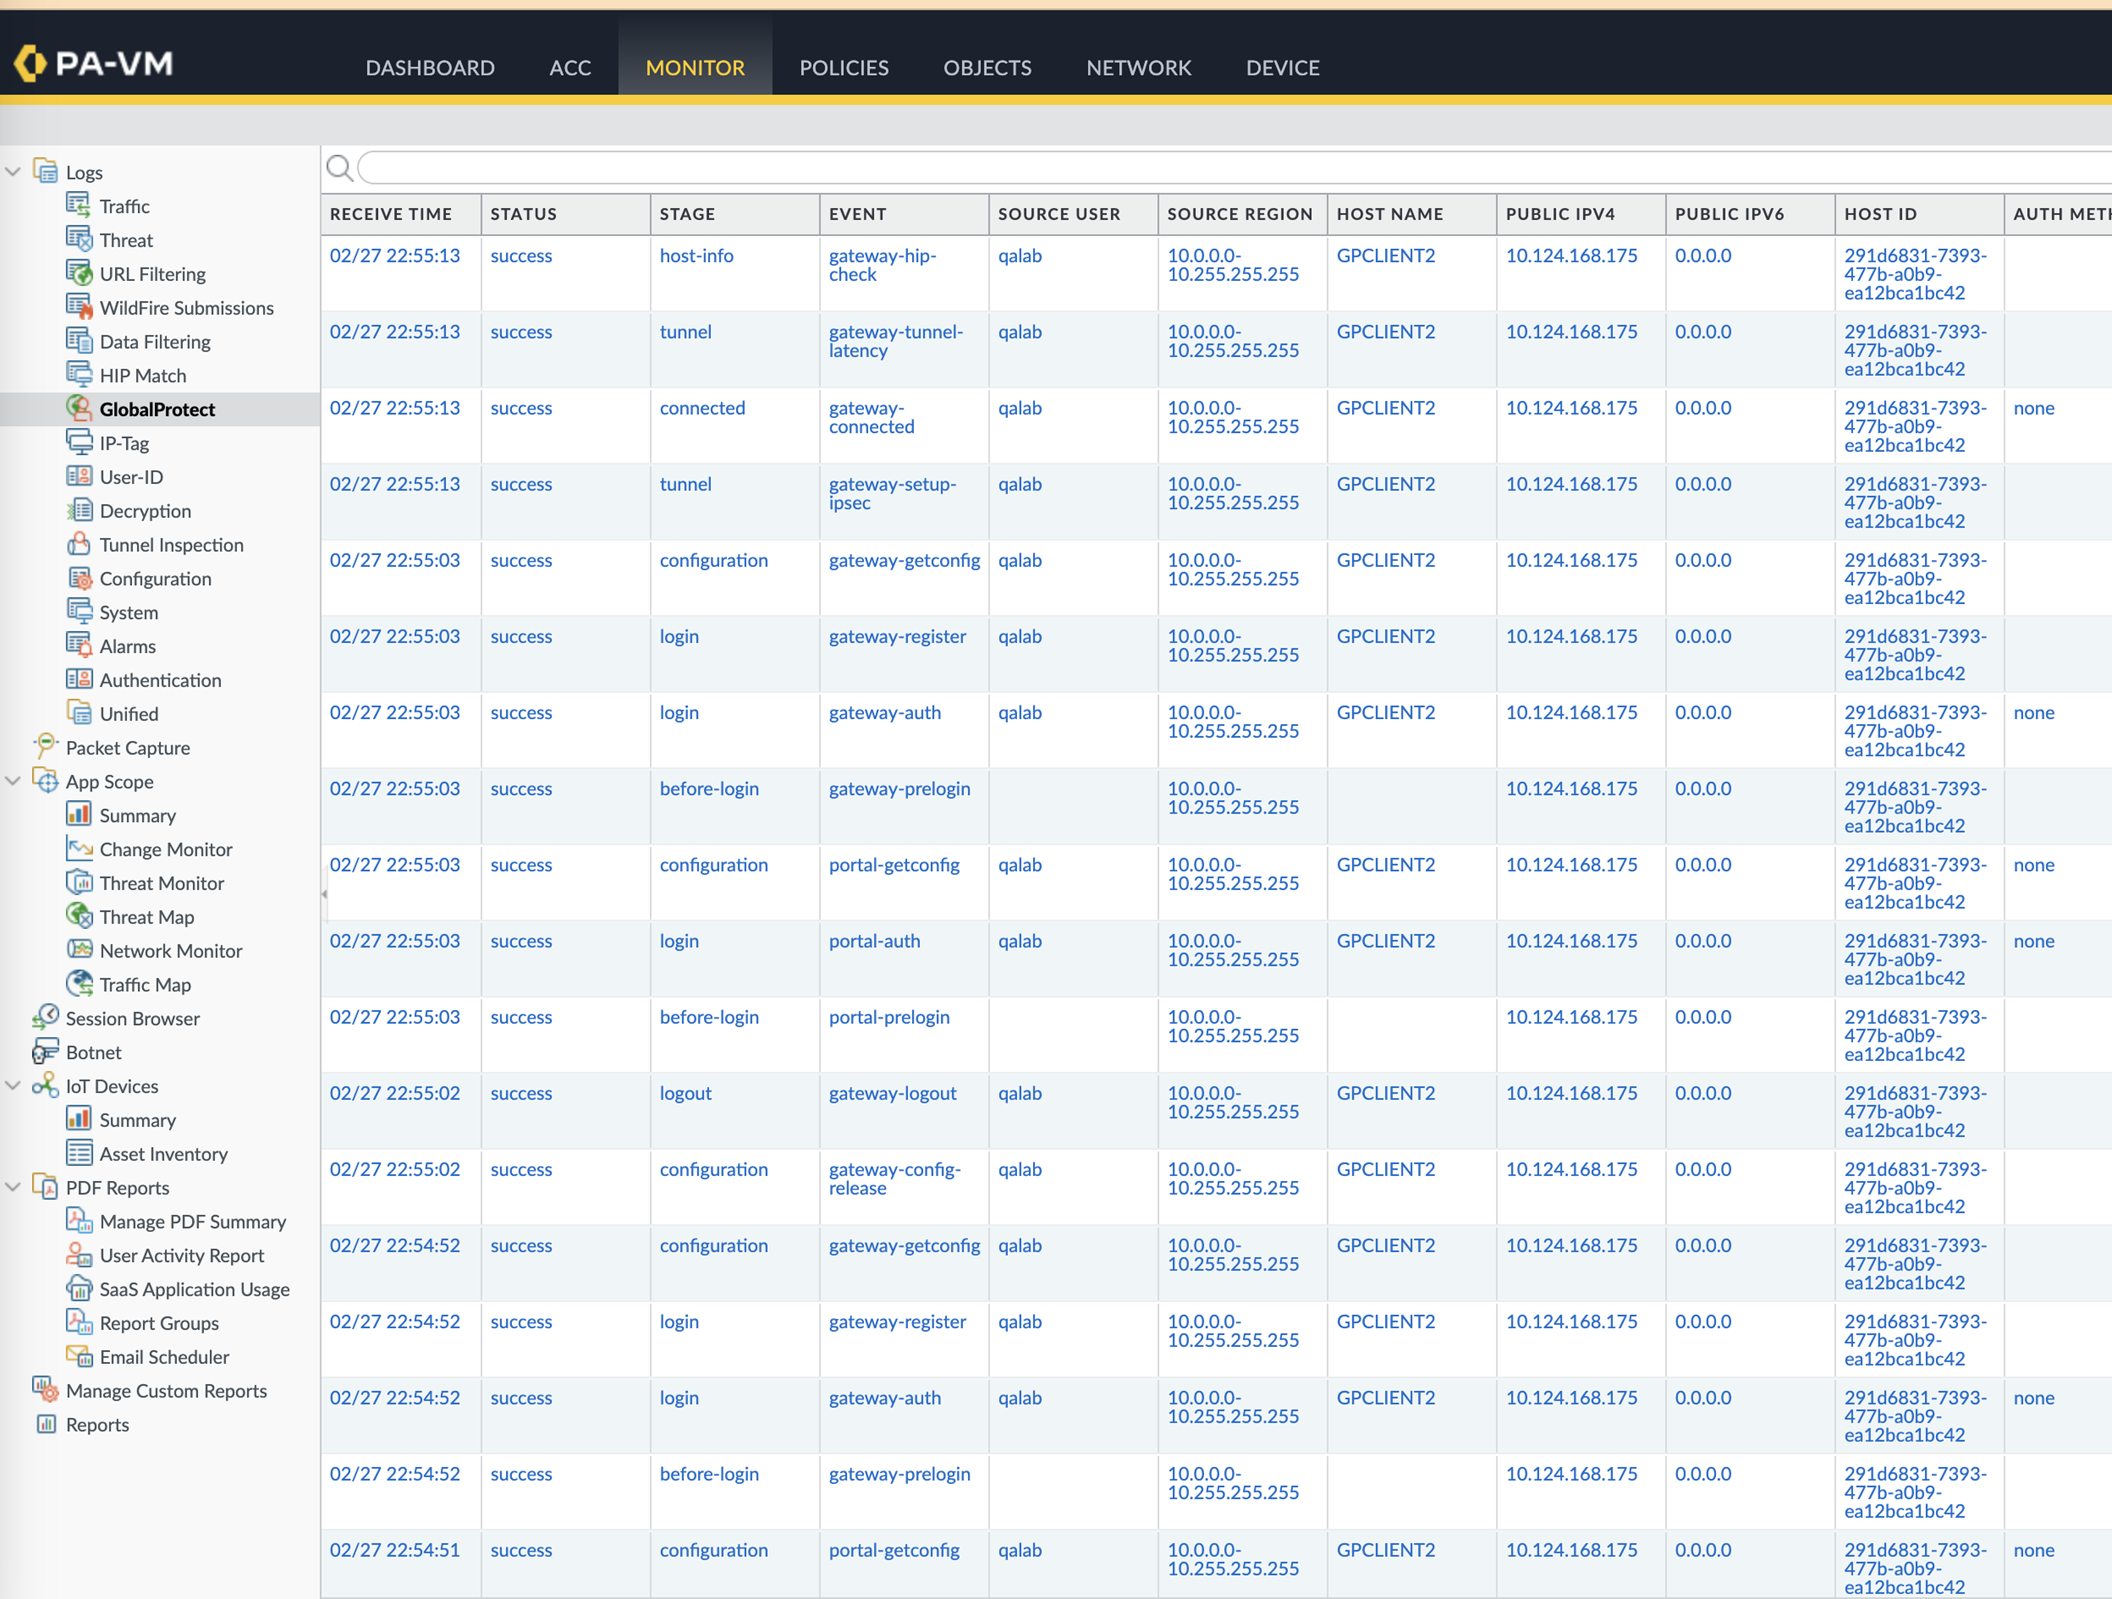
7. View and Verify DHCP Assignment
- Check GlobalProtect Logs: Monitor > Logs > GlobalProtect . Look for DHCP-related events.
-
Check CLI Logs:
-
less mp-log gpsvc.log -
less mp-log rasmgr.log -
less mp-log gp_broker.log
-
Configure DHCP Server on the Infobox Server
(Refer to official Infobox documentation for the most current steps)
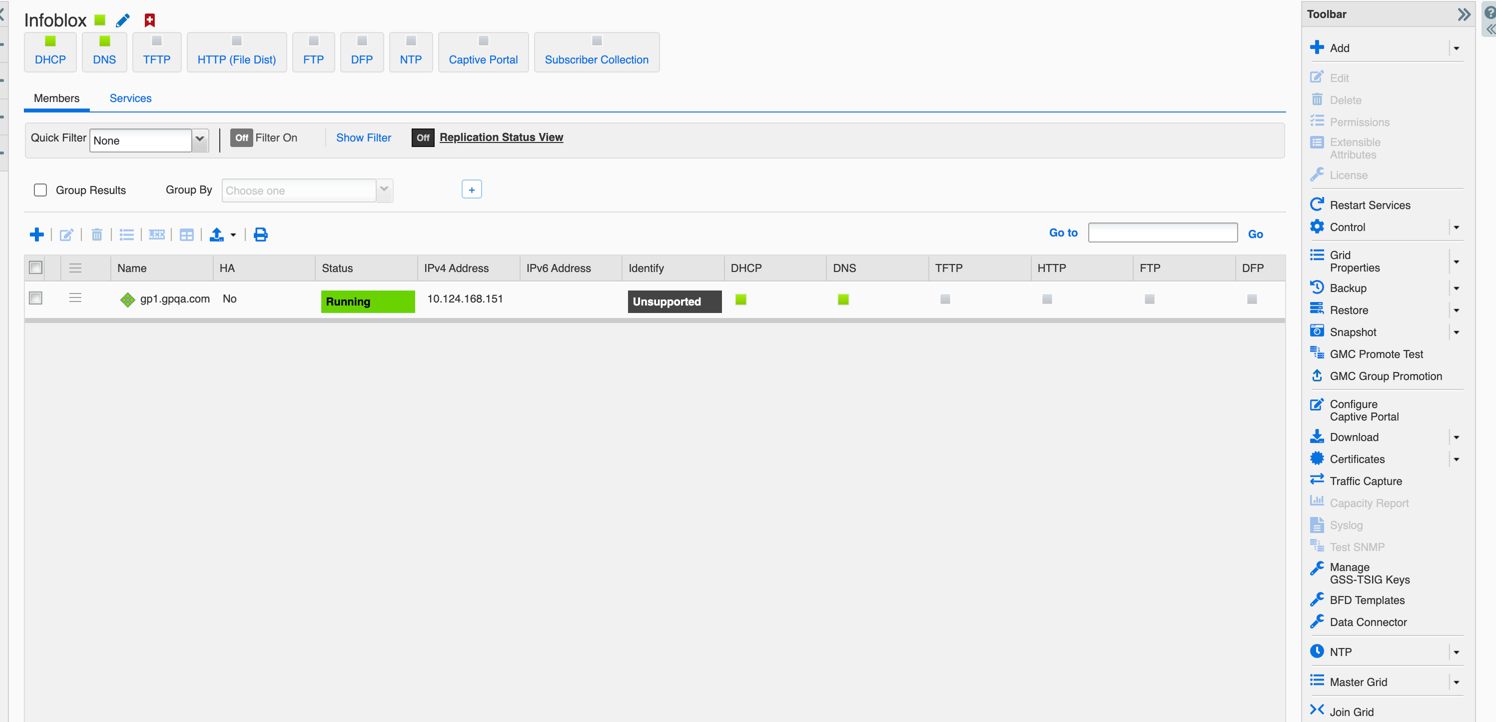
- Log into Infobox Grid Manager.
- Ensure DHCP and DNS services are running on the Grid.
-
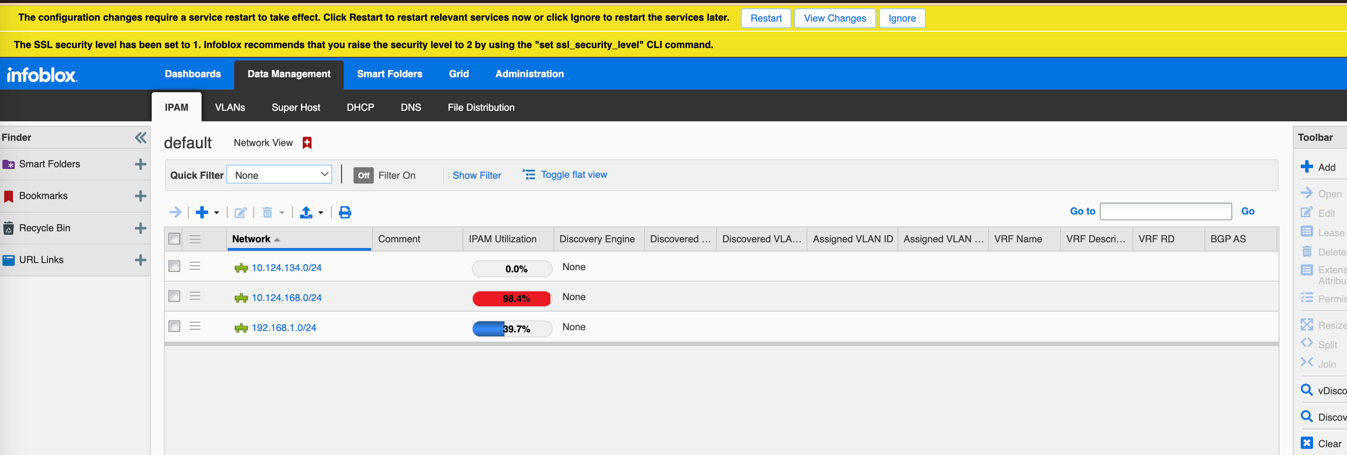
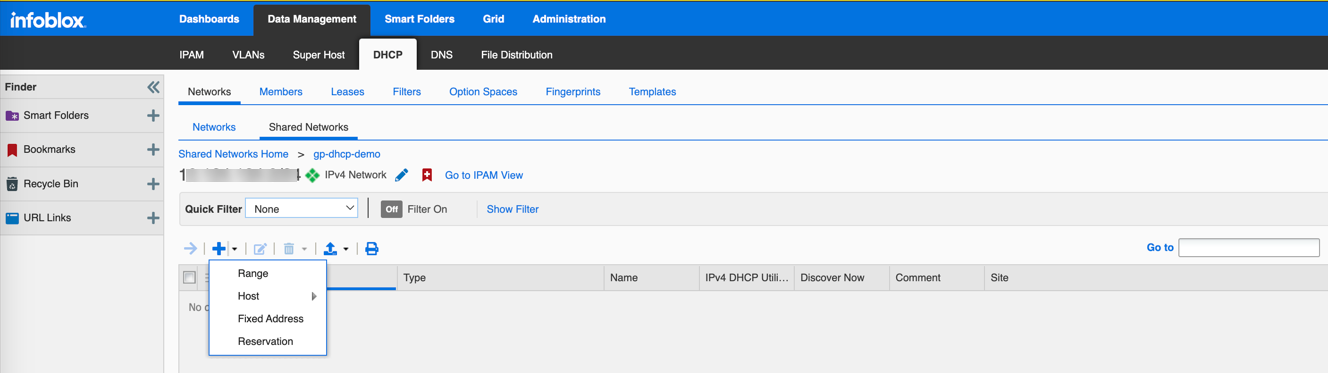
Add Network(s): Go to
Data Management > DHCP > Networks
. Click
Add > IPv4 Network
.
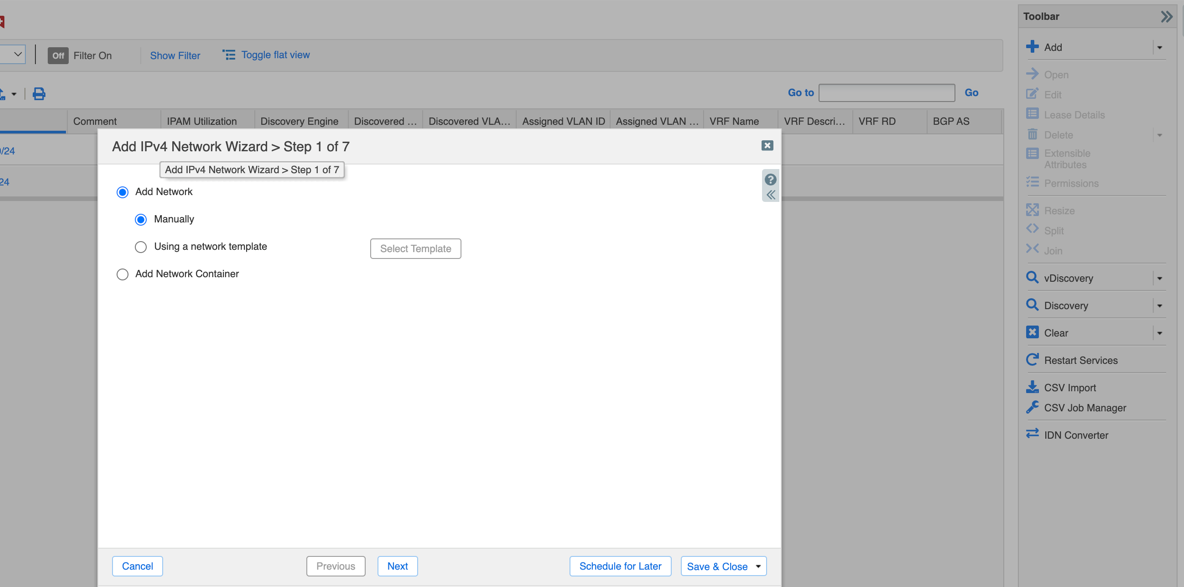
-
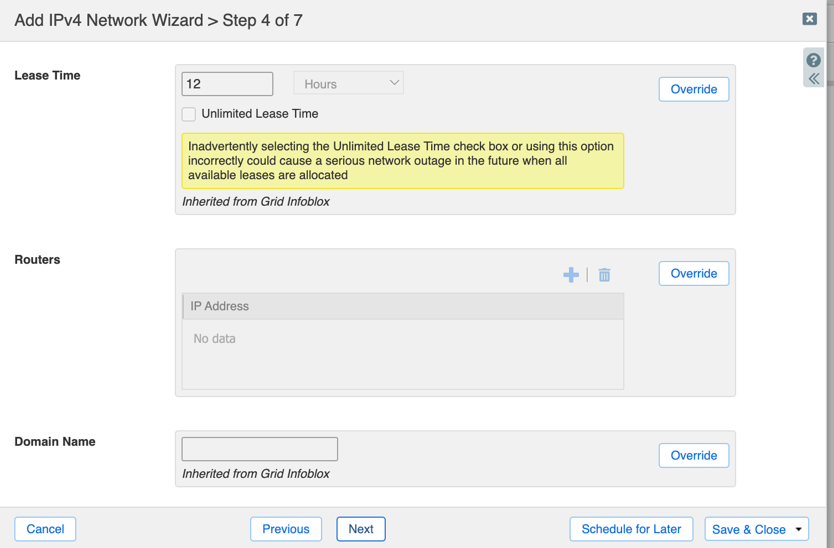
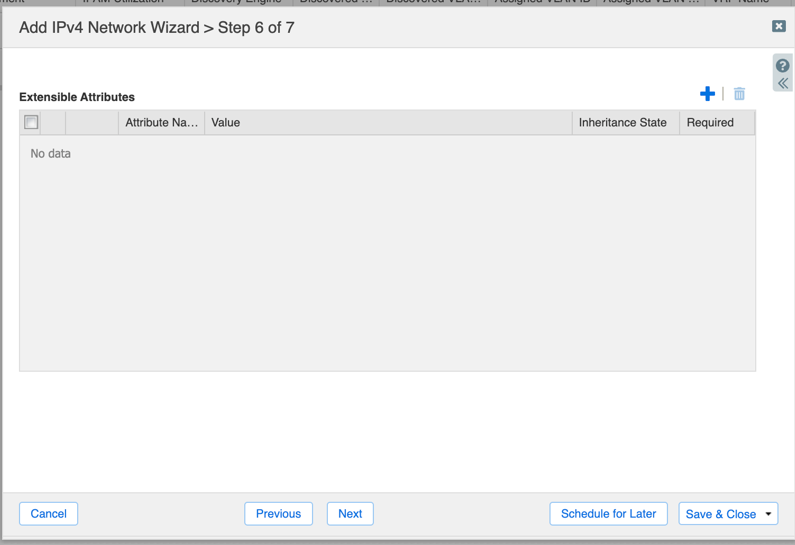
Follow the wizard:
- Enter Network Address/CIDR.
- Assign Grid Members to serve DHCP for this network.
- (Optional) Modify Lease Time ( must be >= 5 minutes ).
- Complete the wizard and restart services if prompted.


-
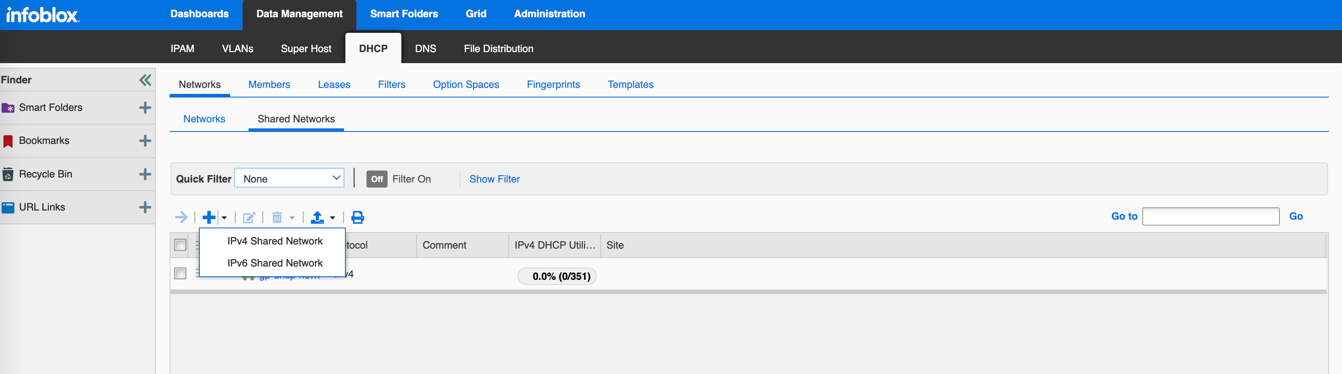
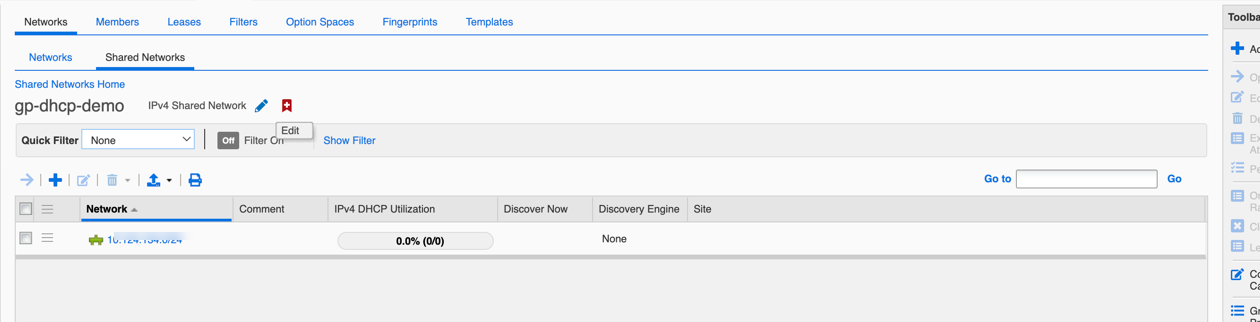
(Optional but common) Create a
Shared Network
: Go to
Data Management > DHCP > Networks > Shared Networks
. Add a shared network and assign your previously created network(s) to it. This allows managing options across multiple subnets easily.
-
Add IP Address Range(s): Select the Network or Shared Network, go to the
Ranges
tab (or similar depending on view), and click
Add > IPv4 Range
.
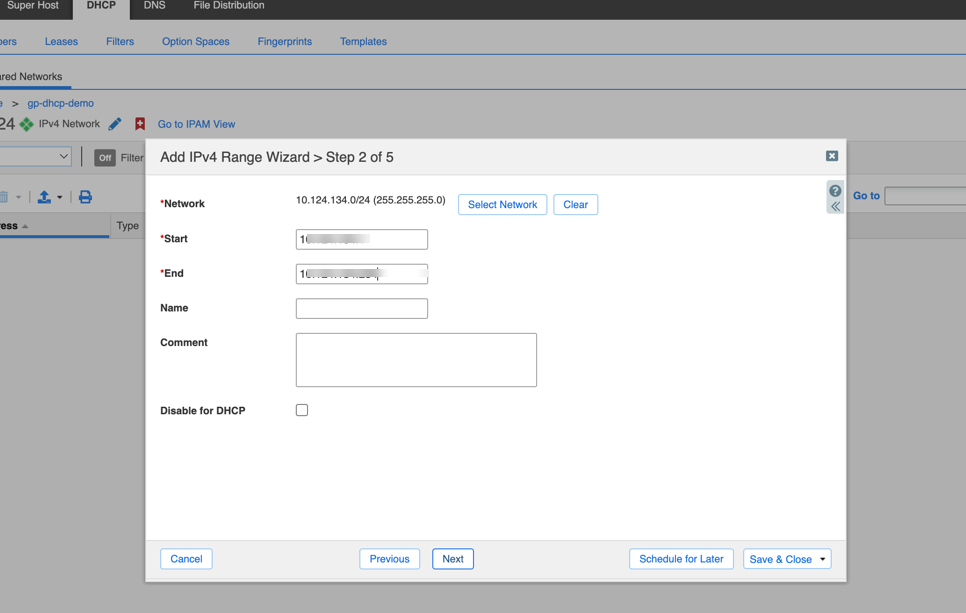
- Define the Start and End IP addresses for the pool.
- Follow the wizard, assigning members.
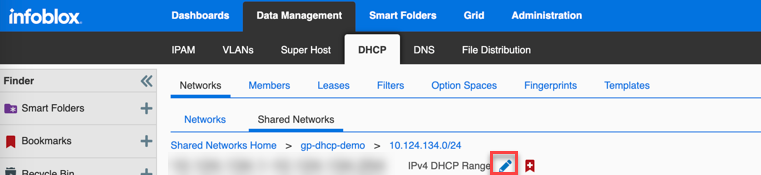
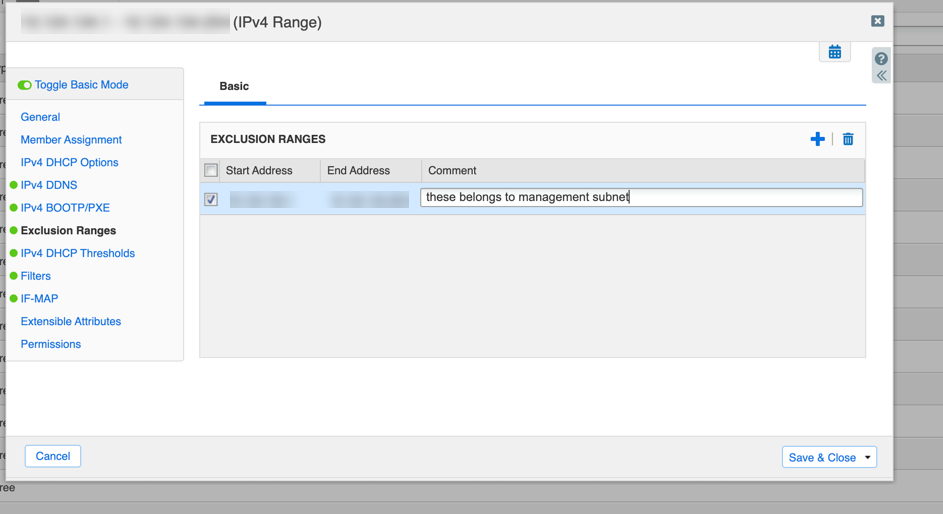
- (Optional) Define Exclusion Ranges within the main range under the range's Edit properties.
- Complete the wizard and restart services if prompted.

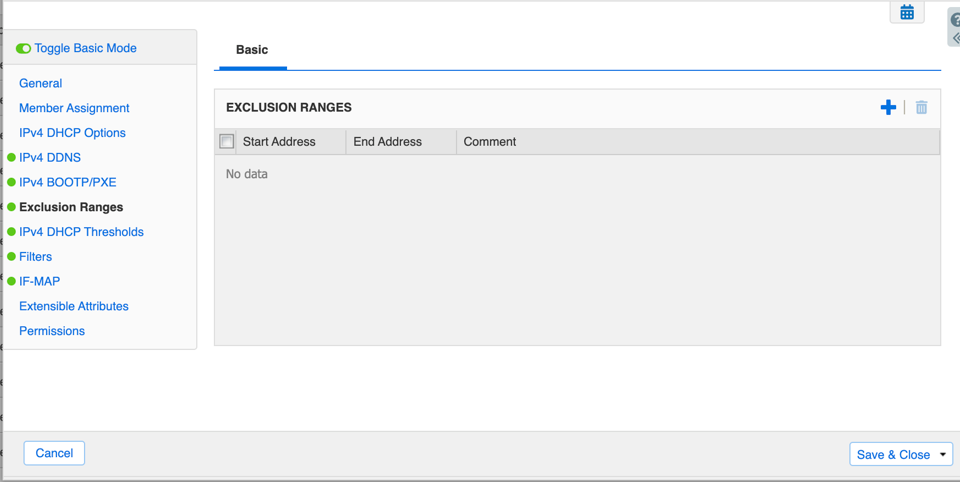
-
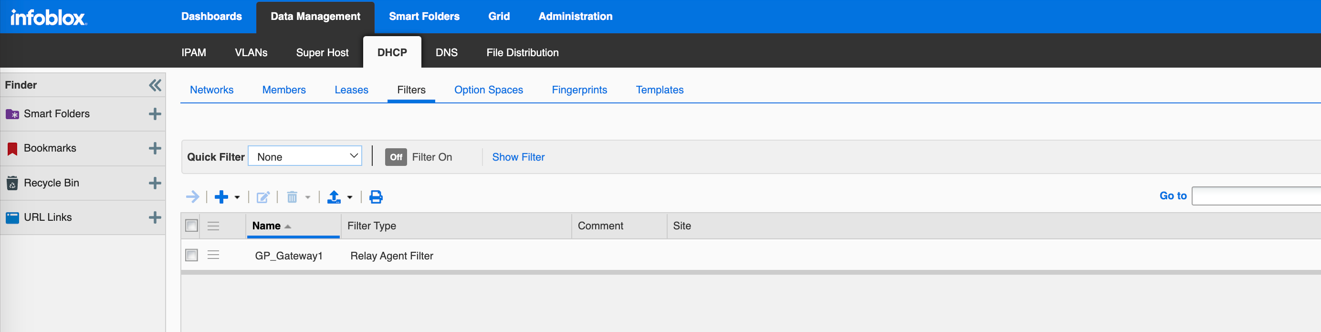
(Optional) Create Filters based on Relay Agent Information (Circuit ID):
- Go to Data Management > DHCP > Filters > IPv4 Filters . Click Add > IPv4 Option Filter .
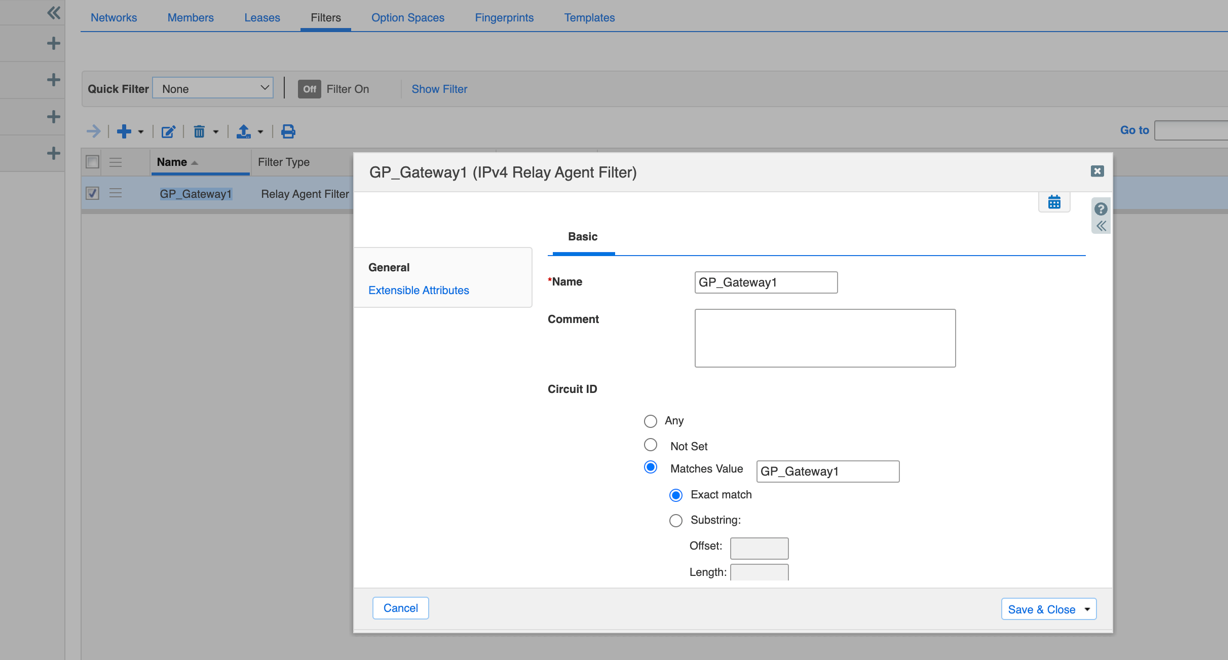
- Give it a name (e.g., GP_Gateway_Filter).
- Under Match Rules, click Add .
- Select Option Space: DHCP .
- Select Option Name: relay-agent-info (82) .
- In the Sub-Option list, find and select agent-circuit-id (1) .
- Operator: Equals .
- Match Value Type: Hexadecimal .
- Match Value: Paste the DHCP Server Circuit ID from the Palo Alto Networks gateway configuration ( Network > GlobalProtect > Gateways > ... > Agent > Client IP Pool ).
- Click Add rule, then Save & Close the filter.
- Apply this filter to the specific Network, Shared Network, or Range where needed (under its DHCP Properties > Filters tab). This ensures only requests relayed by that specific gateway receive IPs from this pool/scope if needed.
Configure DHCP Server on the Windows Server
(Refer to official Microsoft documentation for the most current steps)
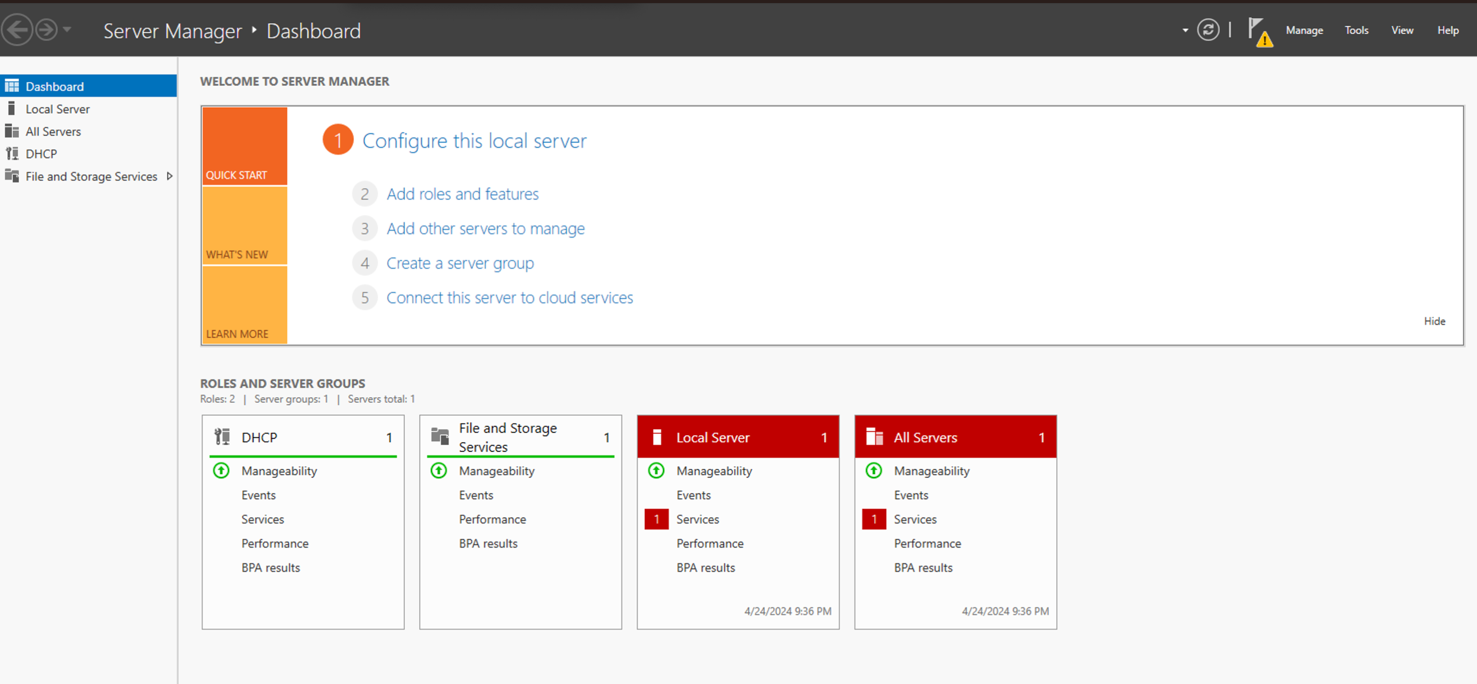
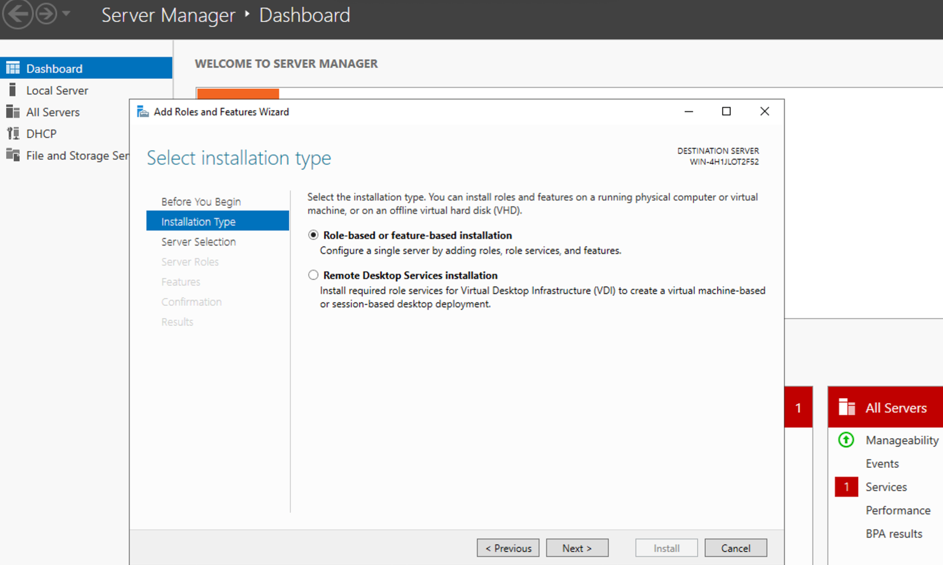
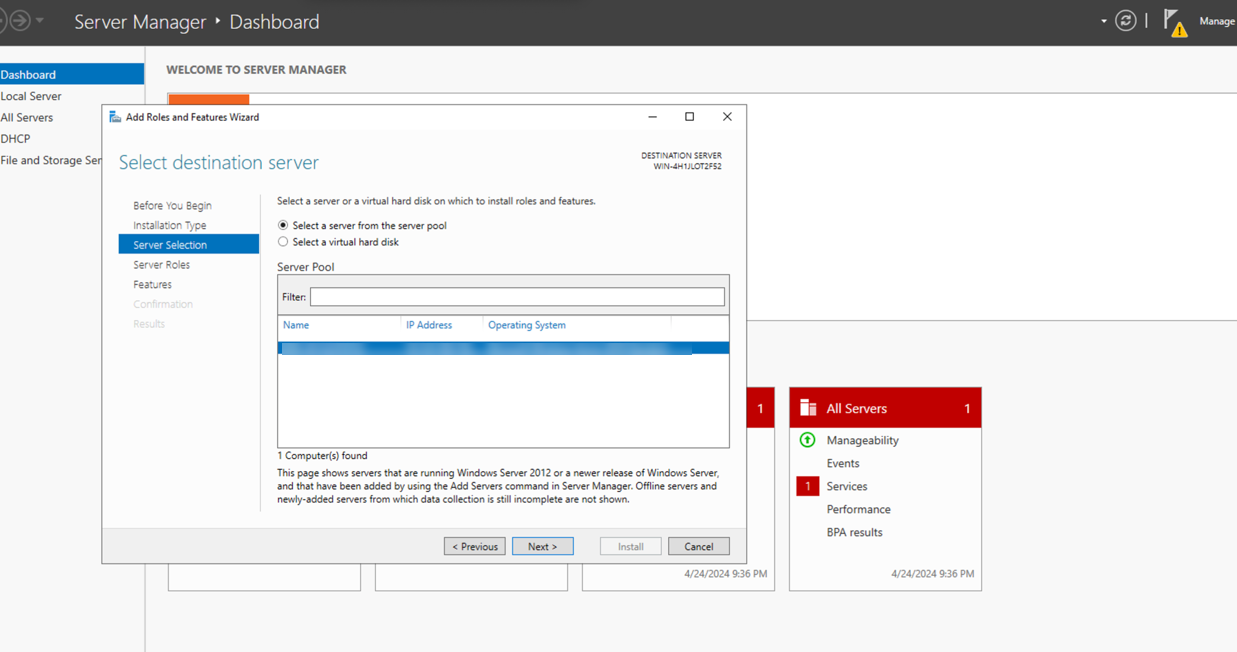
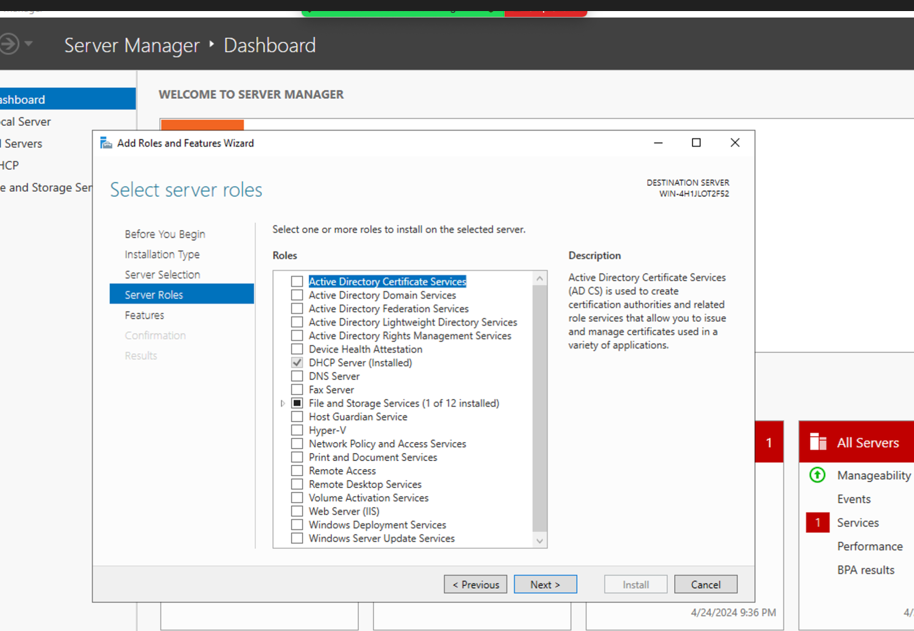
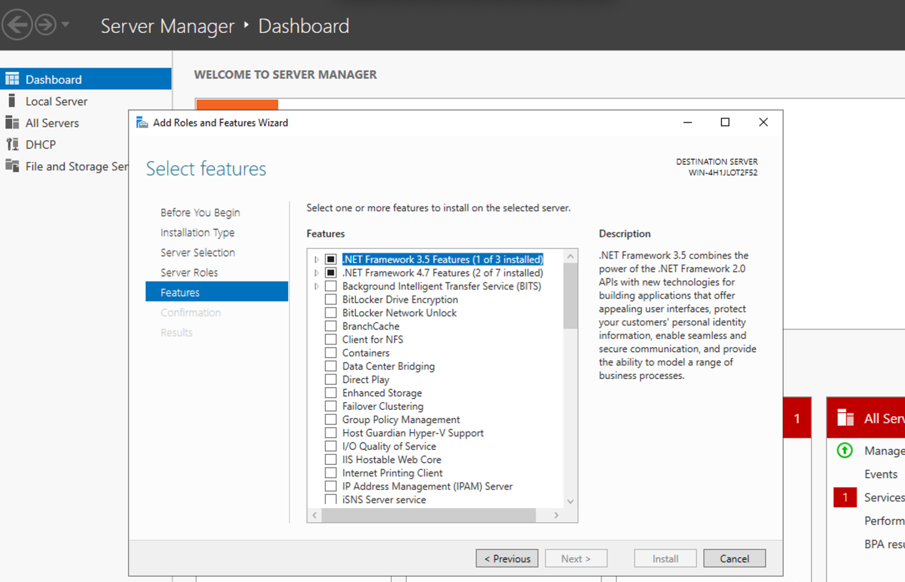
- Open Server Manager. If DHCP role is not installed, click Add roles and features .
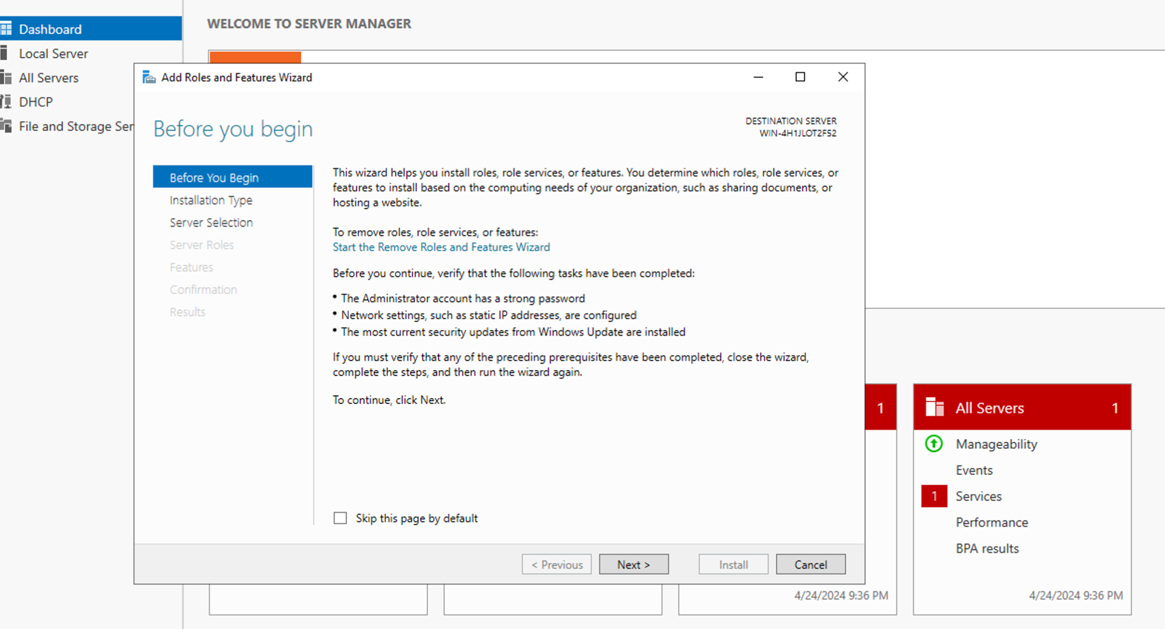
- Follow the wizard: Select Role-based installation, select the server, check DHCP Server role, add required features, and complete installation.
- Complete the DHCP post-installation configuration (authorize DHCP server in Active Directory if applicable).
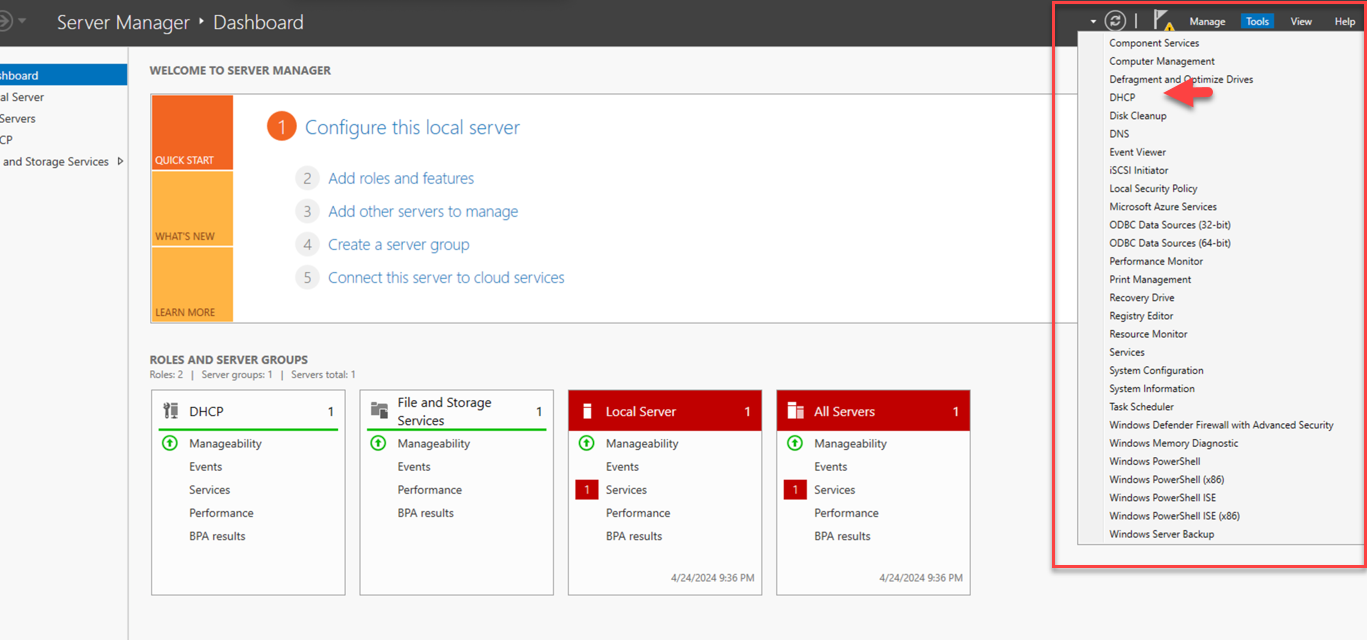
- Open the DHCP management console (from Server Manager > Tools > DHCP).
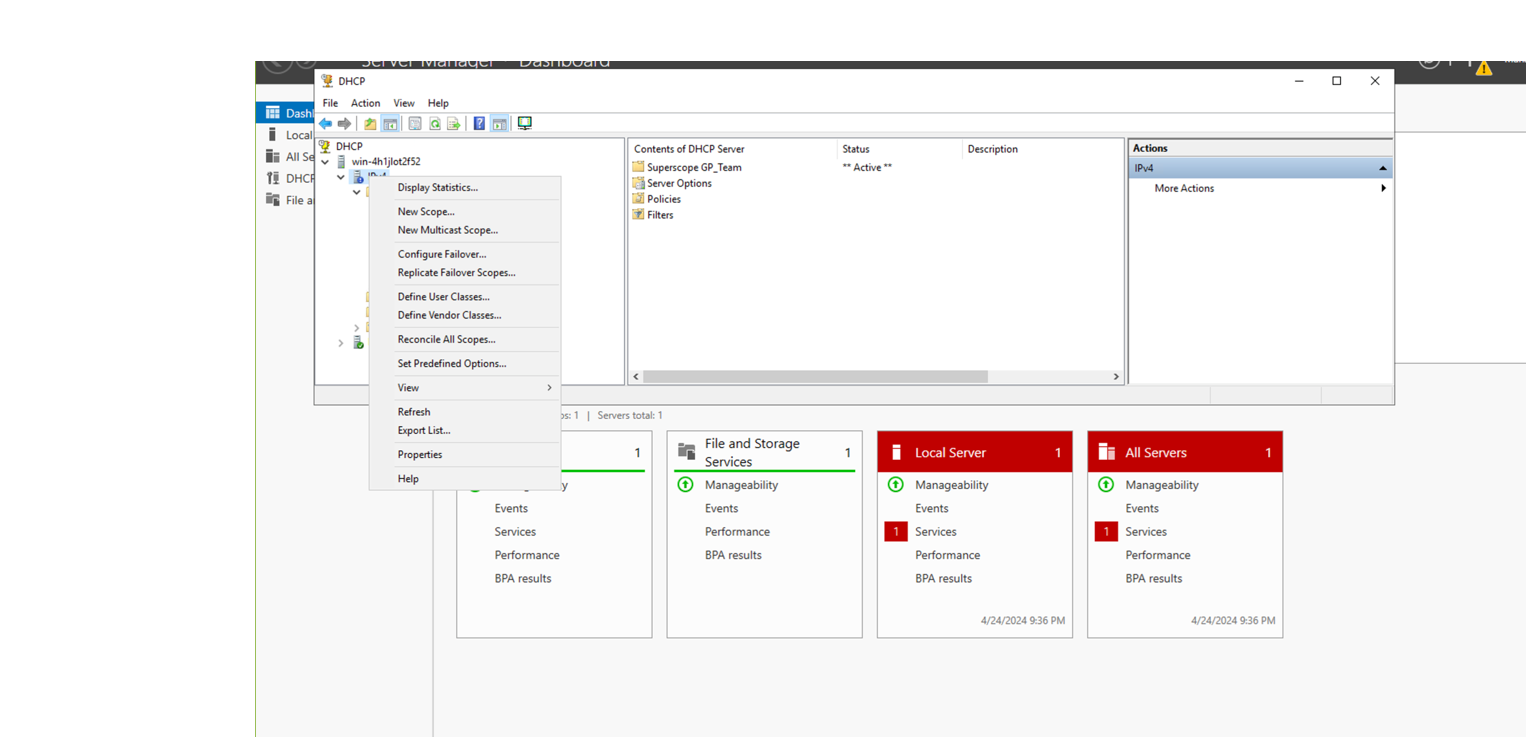
- Expand the server name, right-click on IPv4 , and select New Scope... .
-
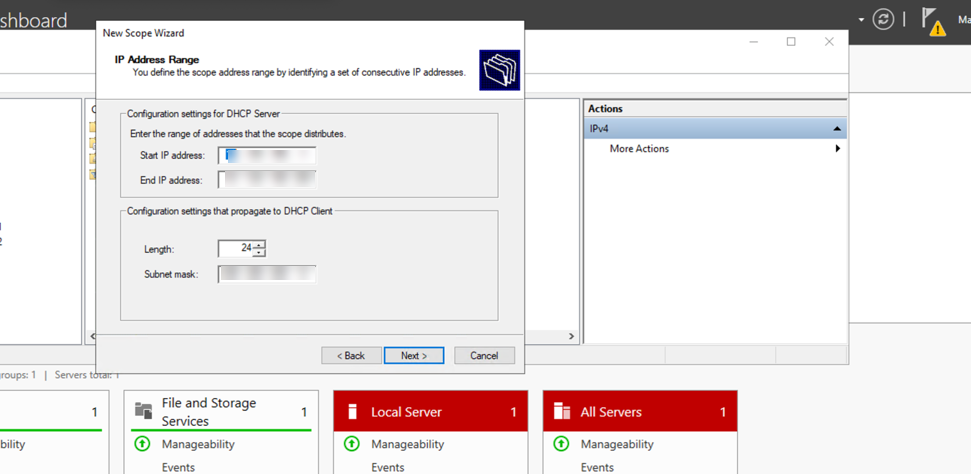
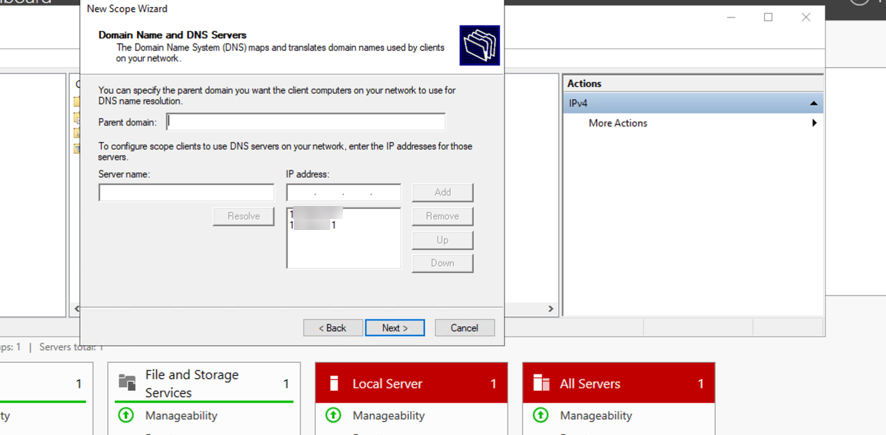
Follow the New Scope Wizard:
- Enter a Name and Description.
- Define the IP Address Range (Start IP, End IP, Subnet Mask). This range must encompass the DHCP IP Pool configured in the Palo Alto Networks DHCP Profile.
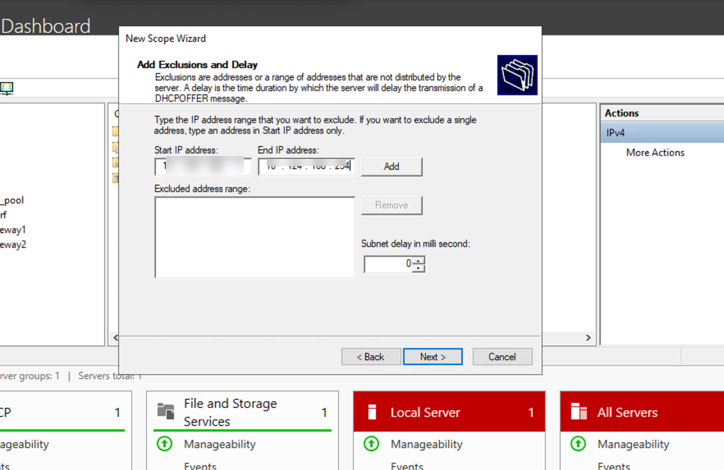
- (Optional) Define Exclusions and Delay .
- Configure Lease Duration ( must be >= 5 minutes ).
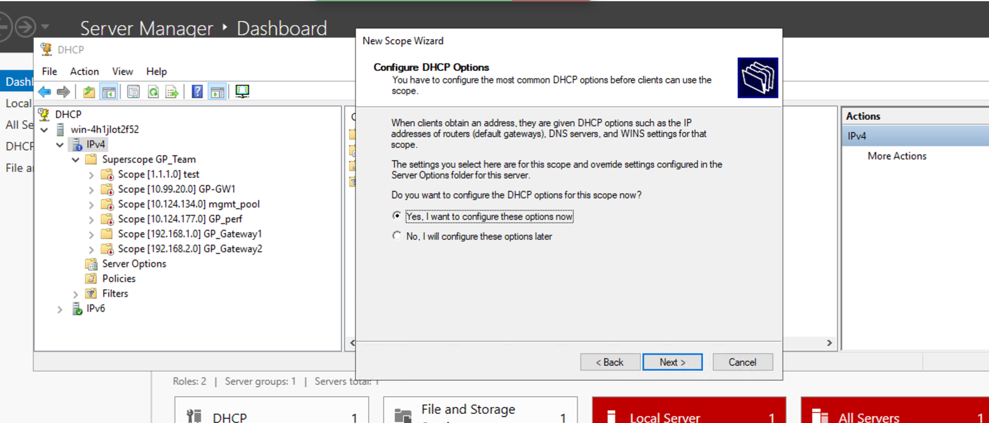
- Configure DHCP Options (Router, DNS Servers, Domain Name) - select Yes, configure now.
- Add Router (Default Gateway) - This is typically the gateway's internal interface IP if clients need to route beyond their subnet.
- Configure DNS Servers and Domain Name.
- Activate the scope now.
- Finish the wizard.
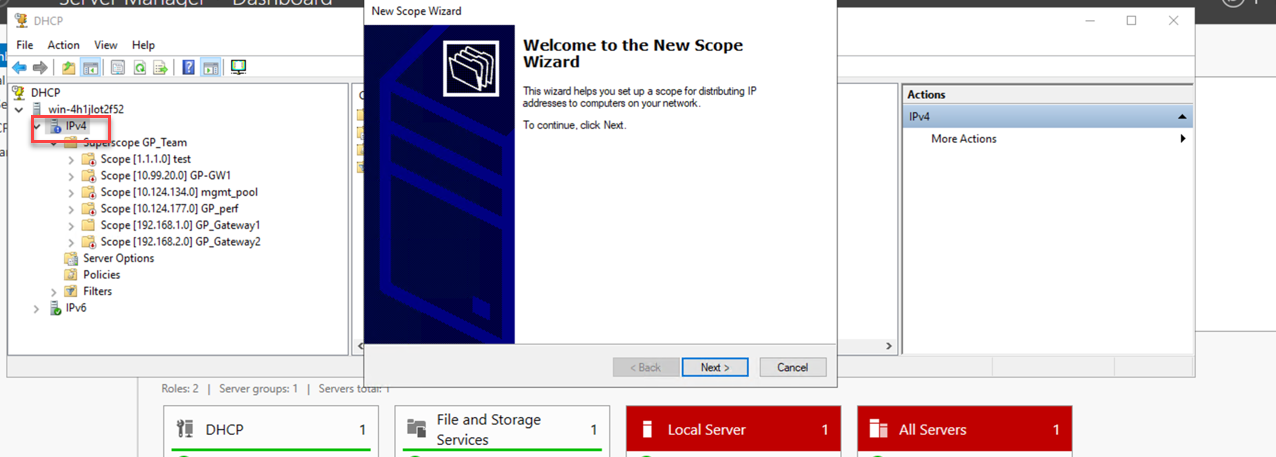
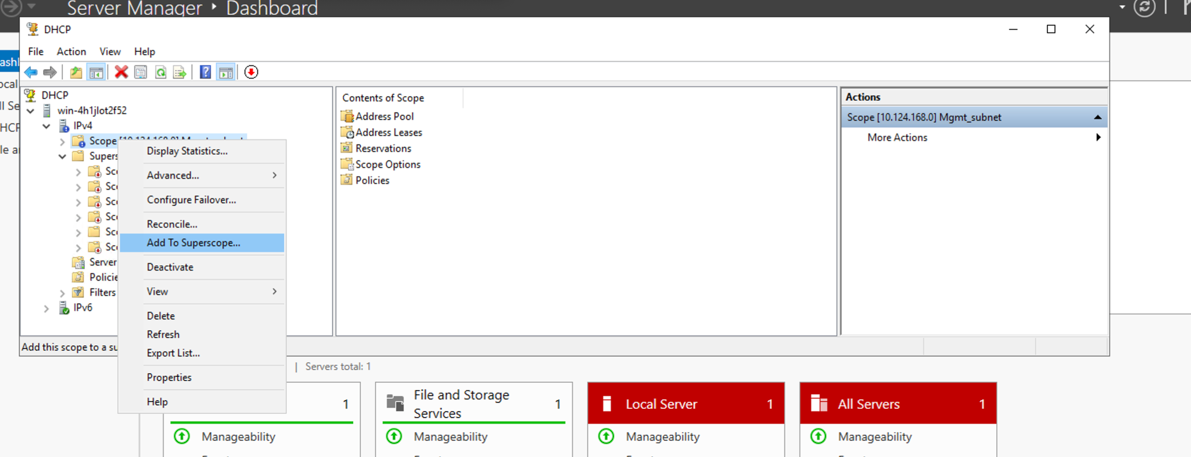
- (Optional but common for multiple scopes) Create a Superscope : Right-click IPv4, select New Superscope, follow wizard to add existing scopes.
-
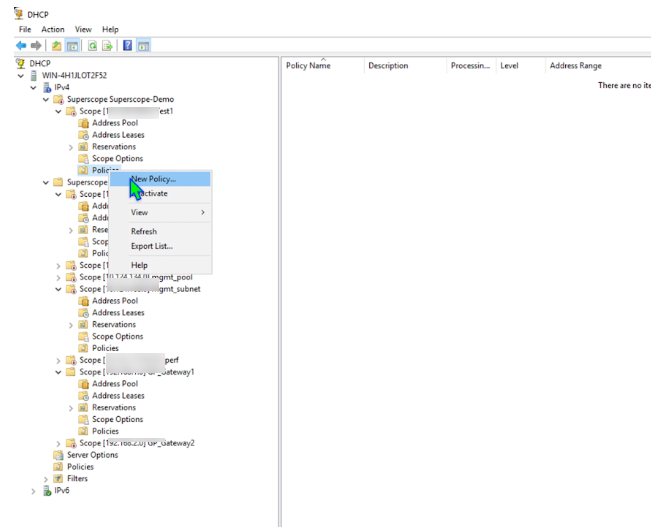
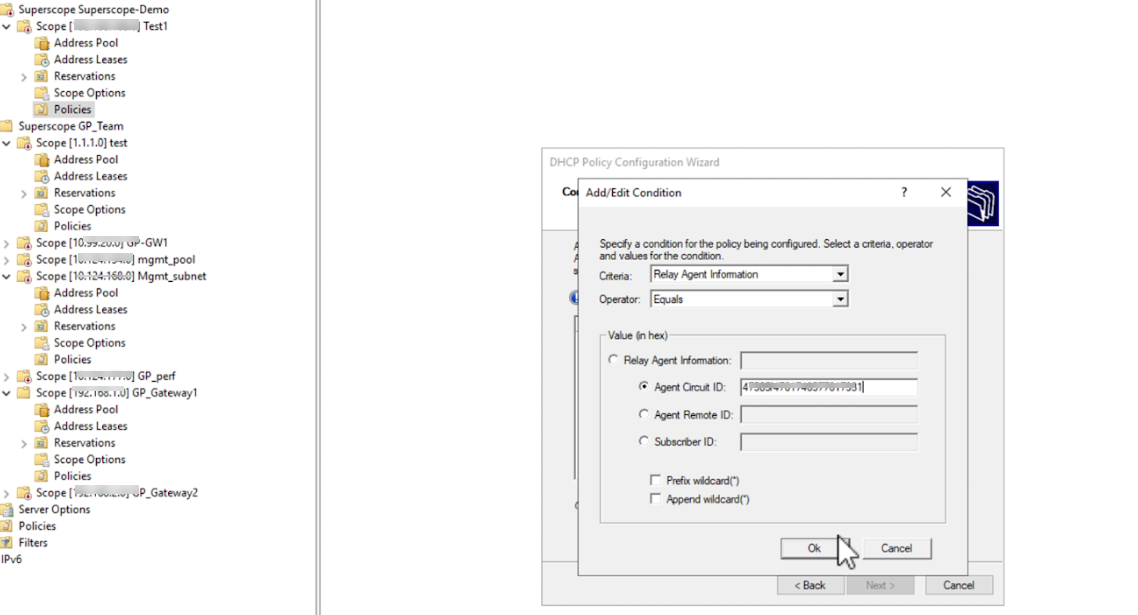
(Optional) Configure Policy Based Assignment using Relay Agent Information (Circuit ID):
- Expand the newly created scope under IPv4.
- Right-click on Policies and select New Policy... .
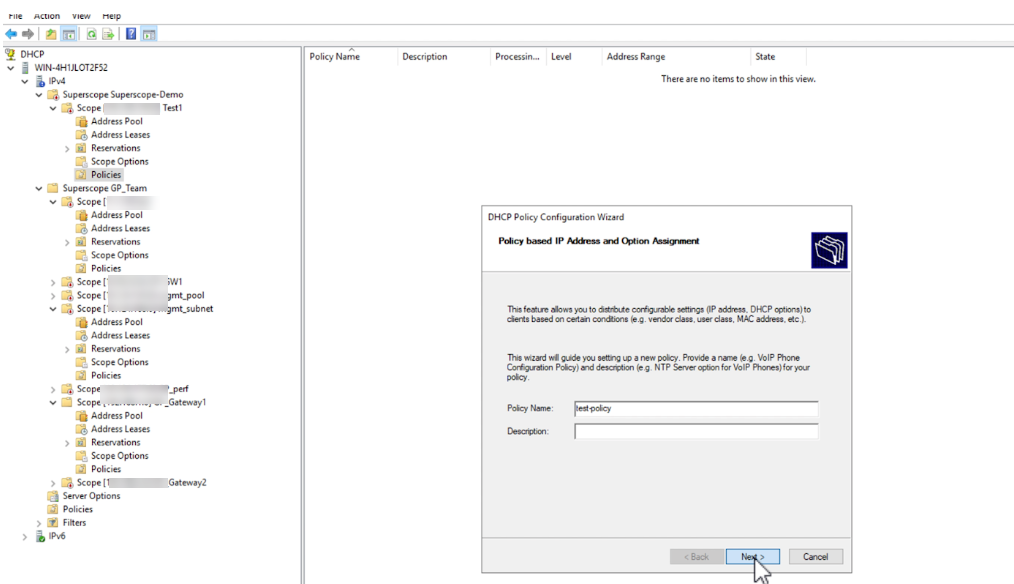
- Enter a Policy Name. Click Next .
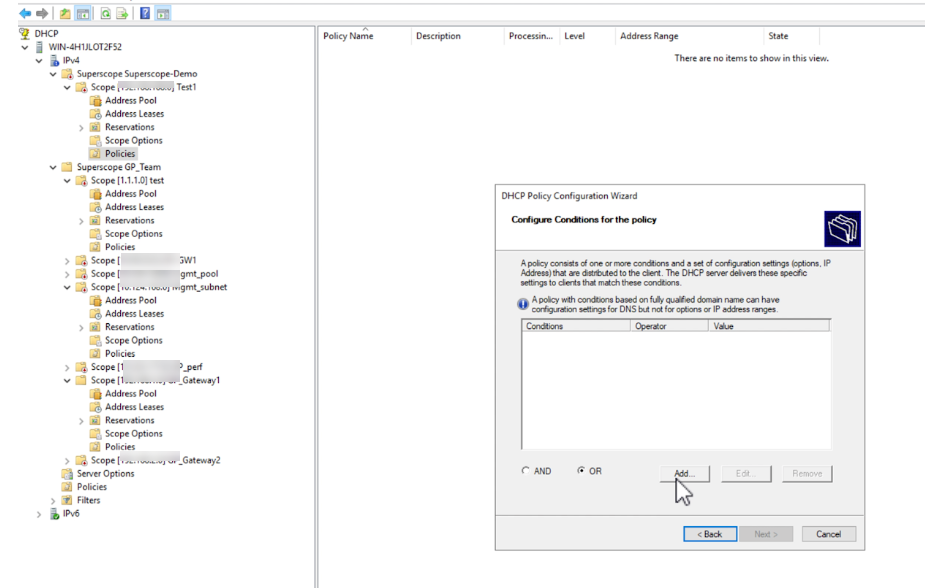
- Configure conditions for the policy. Click Add... .
- Criteria: Select Relay Agent Information .
- Operator: Select Equals .
- Check the Append wildcard(*) box if needed (usually not for exact match).
- Value: Enter the DHCP Server Circuit ID from the Palo Alto Networks gateway configuration ( Network > GlobalProtect > Gateways > ... > Agent > Client IP Pool ) in hexadecimal format (e.g., if the ID is 'gateway1', convert ASCII 'gateway1' to hex: 6761746577617931).
- Click Add , then OK .
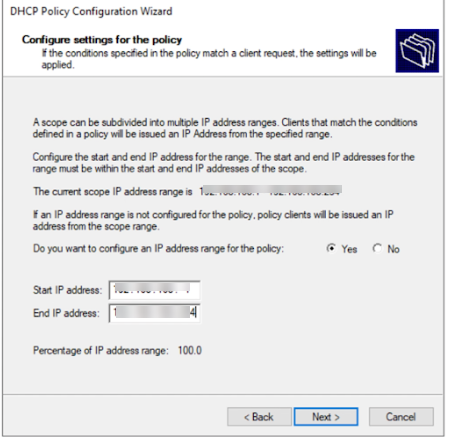
- Click Next .
- Configure settings for clients matching this policy. You can specify a specific IP range within the scope's main range *only* for clients matching this policy (Circuit ID). Check Set IP address range for this policy and define the Start/End IP.
- Click Next .
- Configure DHCP options specific to this policy (optional). Click Next .
- Review the summary and click Finish .
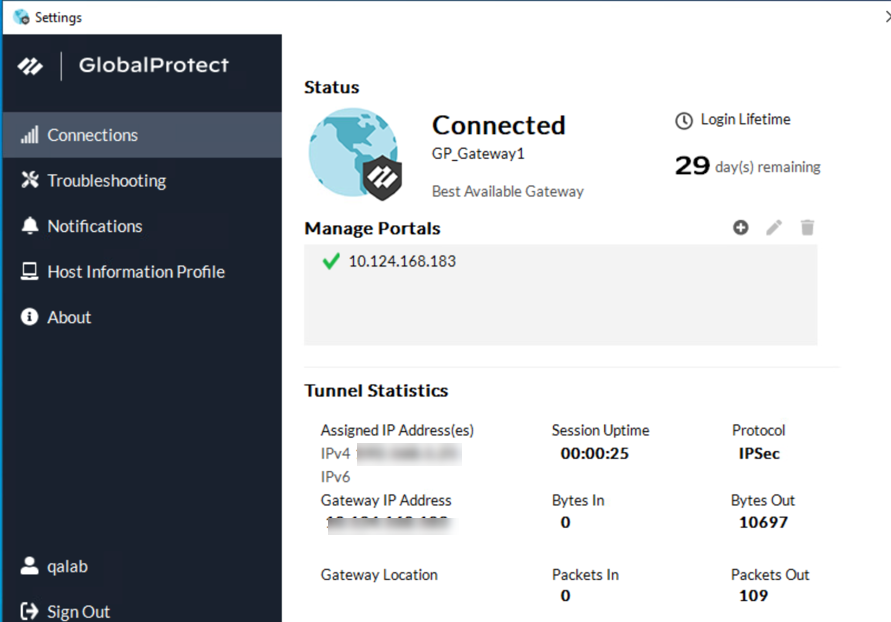
Verify client connection on app:
Split Tunnel Traffic on GlobalProtect Gateways
Platform Support
- macOS & Windows: Access Route, Domain, Application, Video Exclude
- Linux (GP App 6.1+): Access Route, Domain (Application & Video Exclude NOT supported)
Prerequisites
- GlobalProtect gateway subscription
Split tunneling allows specific traffic to bypass the VPN tunnel and go directly out the endpoint's physical interface. This conserves gateway bandwidth and can improve performance for certain traffic types.
You can configure split tunneling based on:
- Access Route: Destination IP subnets (Include or Exclude).
- Destination Domain: Specific domain names (e.g., *.salesforce.com) (Include or Exclude).
- Application: Specific application process paths (Include or Exclude).
- HTTP/HTTPS Video Streaming: Exclude known video applications.
Order of Rule Application: Split tunnel rules are applied in the following order of precedence (highest first):
- Video Traffic Exclude
- Application Rule (Include/Exclude)
- Domain Rule (Include/Exclude)
- Access Route Rule (Include/Exclude)
- Default Action (Tunnel All if configured, otherwise determined by presence/absence of includes/excludes)
(Linux endpoints only apply Domain and Access Route rules).
Use Cases:
- Tunnel specific SaaS/cloud apps for visibility while allowing other internet traffic direct access.
- Send latency-sensitive traffic (VoIP) direct, tunnel other traffic.
- Exclude high-bandwidth video streaming (YouTube, Netflix) to save gateway resources.
Configuration Sections:
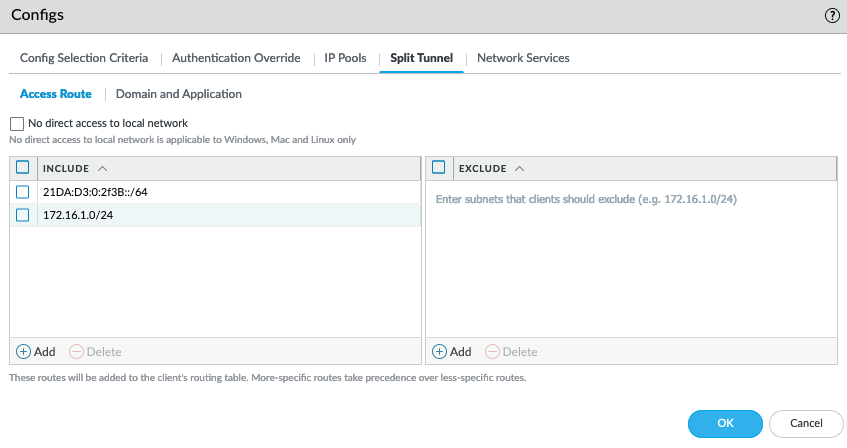
Configure a Split Tunnel Based on the Access Route
Define specific destination IP subnets to either include in (send through) or exclude from (send direct) the VPN tunnel.
Default Behavior: If no include/exclude routes are defined, *all* traffic goes through the tunnel (no split tunnel).
Rule Precedence: More specific routes take precedence over less specific routes (e.g., 192.168.1.0/24 exclude overrides 0.0.0.0/0 include for that specific subnet).
Gotcha: Avoid specifying the same route as both include and exclude.
No Direct Access to Local Network
By default (split tunnel enabled), users can still reach local resources (printers, local proxies) directly via the physical adapter. To prevent potential policy bypass on untrusted networks, enable the No direct access to local network setting.
Supported on: Windows, macOS, Linux (GP App 6.0.0+).
When enabled, traffic to the local subnet is forced through the tunnel (IPv4 outgoing, IPv6 outgoing except link-local). Existing connections might be terminated (Windows) or allowed (macOS/Linux). Split tunnel rules for domain/app/route still function as expected.
IPv4 Traffic Behavior Comparison:
| IPv4 Traffic to Local Subnet | No Direct Access Enabled (After Tunnel) | No Direct Access Disabled (After Tunnel) |
|---|---|---|
| New Incoming | Windows 10 (no domain/app split): Tunnel enforced. Windows 10 (with domain/app split): Allowed via physical. macOS/Linux: Allowed via physical. | Allowed via physical. |
| New Outgoing | Sent via Tunnel. | Allowed via physical. |
| Existing | Windows: Terminated. macOS/Linux: Allowed via physical. | Allowed via physical. |
IPv6 Traffic Behavior Comparison:
| IPv6 Traffic to Local Subnet | No Direct Access Enabled (After Tunnel) | No Direct Access Disabled (After Tunnel) |
|---|---|---|
| New Incoming | Allowed via physical. | Allowed via physical. |
| New Outgoing | Sent via Tunnel (except fe80::/10 link-local). | Allowed via physical. |
| Existing | Allowed via physical. | Allowed via physical. |
Configuration Steps (Access Route):
- Ensure Gateway and Tunnel Mode are configured ( Agent > Tunnel Settings ).
- Navigate to Network > GlobalProtect > Gateways > <gateway-config> > Agent > Client Settings > <client-setting-config> .
- Select the Split Tunnel tab, then the Access Route sub-tab.
- (Optional) To disable local access: Check the No direct access to local network box.
-
Define Routes:
- Include: Click Add in the Include area. Enter IPv4/IPv6 subnets (e.g., 10.0.0.0/8) or select an Address Object (type IP Netmask) for traffic that MUST go through the tunnel. (Limit: 1000 routes).
- Exclude: Click Add in the Exclude area. Enter IPv4/IPv6 subnets or select an Address Object for traffic that should bypass the tunnel. (Limit: 200 routes). Exclude routes should be more specific than includes. Not supported for Android on Chromebooks.
- Click OK on the Client Settings.
- Click OK on the Gateway config.
- Commit changes.
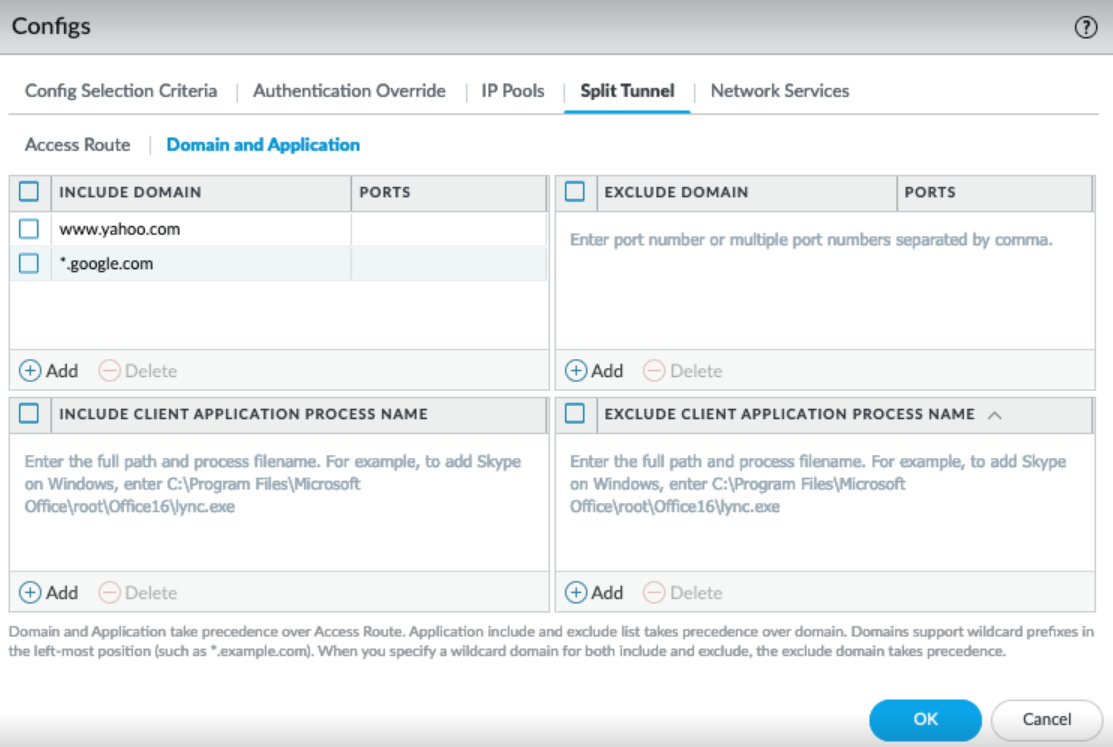
Configure a Split Tunnel Based on the Domain and Application
Allows including or excluding traffic based on the destination domain name (e.g., *.salesforce.com) or the application process path, rather than just IP address. Useful for dynamic IP services like SaaS.
PCNSE: Know that domain/app split tunneling is useful for SaaS/cloud apps with changing IPs.Recommendations & Limitations:
- Requires GlobalProtect license.
- Domain/App supported on Windows/macOS.
- Domain only supported on Linux (GP App 6.1+). App split tunnel NOT supported on Linux.
- Windows Domain-based: TCP only (UDP not supported).
- ICMP (ping, traceroute) not supported for domain-based split tunnel.
- Requires Win 7 SP2+ / macOS 10.10+.
- Safari traffic cannot be added to application-based split tunnel on macOS.
- Environment variables can be used in application paths (Win/macOS).
Configuration Steps (Domain/Application):
- Ensure Gateway and Tunnel Mode are configured.
- Navigate to Network > GlobalProtect > Gateways > <gateway-config> > Agent > Client Settings > <client-setting-config> .
- Select the Split Tunnel tab, then the Domain and Application sub-tab.
-
Domain-Based Split Tunnel:
- (Optional) Include Domain: Click Add . Enter domain names (wildcard '*' allowed at the start, e.g., *.paloaltonetworks.com ) and optionally a port number. Traffic to these domains goes through the tunnel. (Limit: 200, see hosting config file for more).
- (Optional) Exclude Domain: Click Add . Enter domain names (wildcard '*' allowed at the start, e.g., *.youtube.com ) and optionally a port number. Traffic to these domains bypasses the tunnel. (Limit: 200, see hosting config file for more).
DNS Handling: If the Portal Agent App setting Split-Tunnel Option is set to Both Network Traffic and DNS , these domain rules apply to DNS lookups as well as the subsequent traffic.
-
Application-Based Split Tunnel:
- (Optional) Include Client Application Process Name: Click Add . Enter the full path to the application executable (e.g., C:\Program Files\ExampleApp\app.exe or /Applications/Example.app/Contents/MacOS/Example ). Traffic generated by this process goes through the tunnel. (Limit: 200).
- (Optional) Exclude Client Application Process Name: Click Add . Enter the full path to the application executable. Traffic generated by this process bypasses the tunnel. (Limit: 200).
- See Wildcard Support section for using '*' in paths.
- Click OK on the Client Settings.
- Click OK on the Gateway config.
- Commit changes.
Wildcard Support for Split Tunnel Settings Based on the Application
Prerequisites
- GlobalProtect app version 6.3.1+
- Windows and macOS endpoints
- GlobalProtect Subscription License or Prisma Access
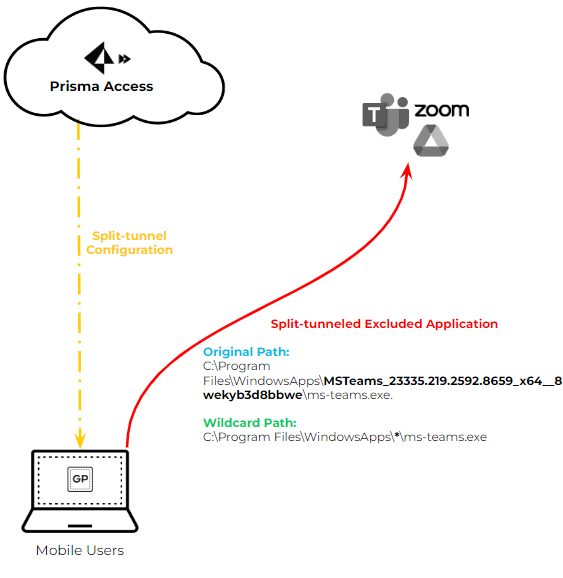
Starting with GP App 6.3.1, a single wildcard character (*) can be used within the application path for application-based split tunneling (include or exclude).
This is useful for applications whose paths change frequently due to updates (e.g., version numbers in the path), like Microsoft Teams or Symantec WSS.
PCNSE: Understand the use case for wildcards in application paths (handling version changes).Example:
- Old Path (might change): C:\Program Files\WindowsApps\MSTeams_23335.219.2592.8659_x64__8wekyb3d8bbwe\ms-teams.exe
- New Path with Wildcard: C:\Program Files\WindowsApps\*\ms-teams.exe
Configuration:
- Follow steps for Application-Based split tunnel.
- When adding an Include or Exclude application path ( Network > GlobalProtect > Gateways > ... > Agent > Client Settings > Split Tunnel > Domain and Application ), insert a single '*' where the path segment varies.
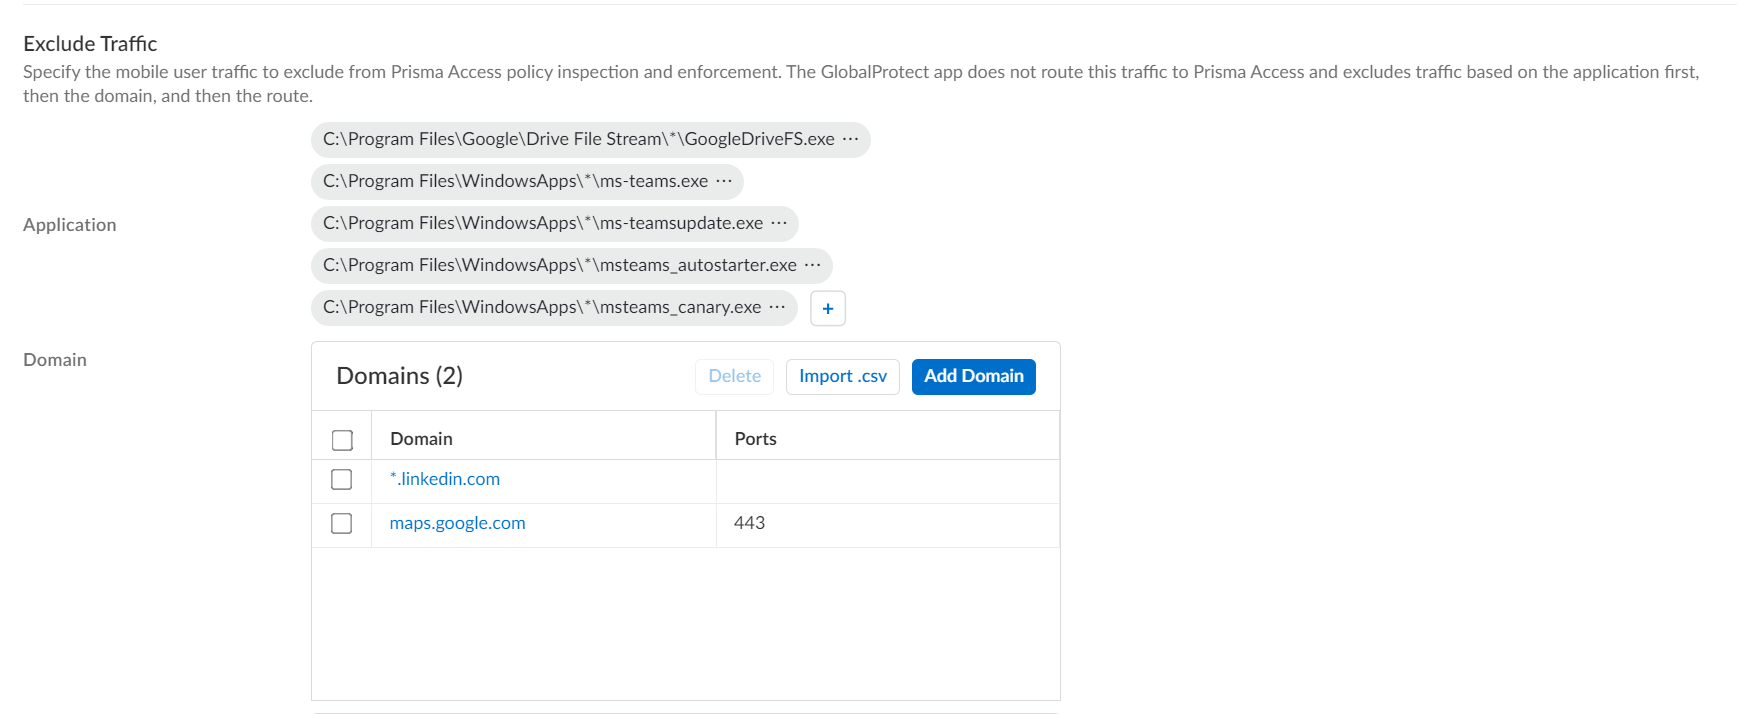
Windows Example:
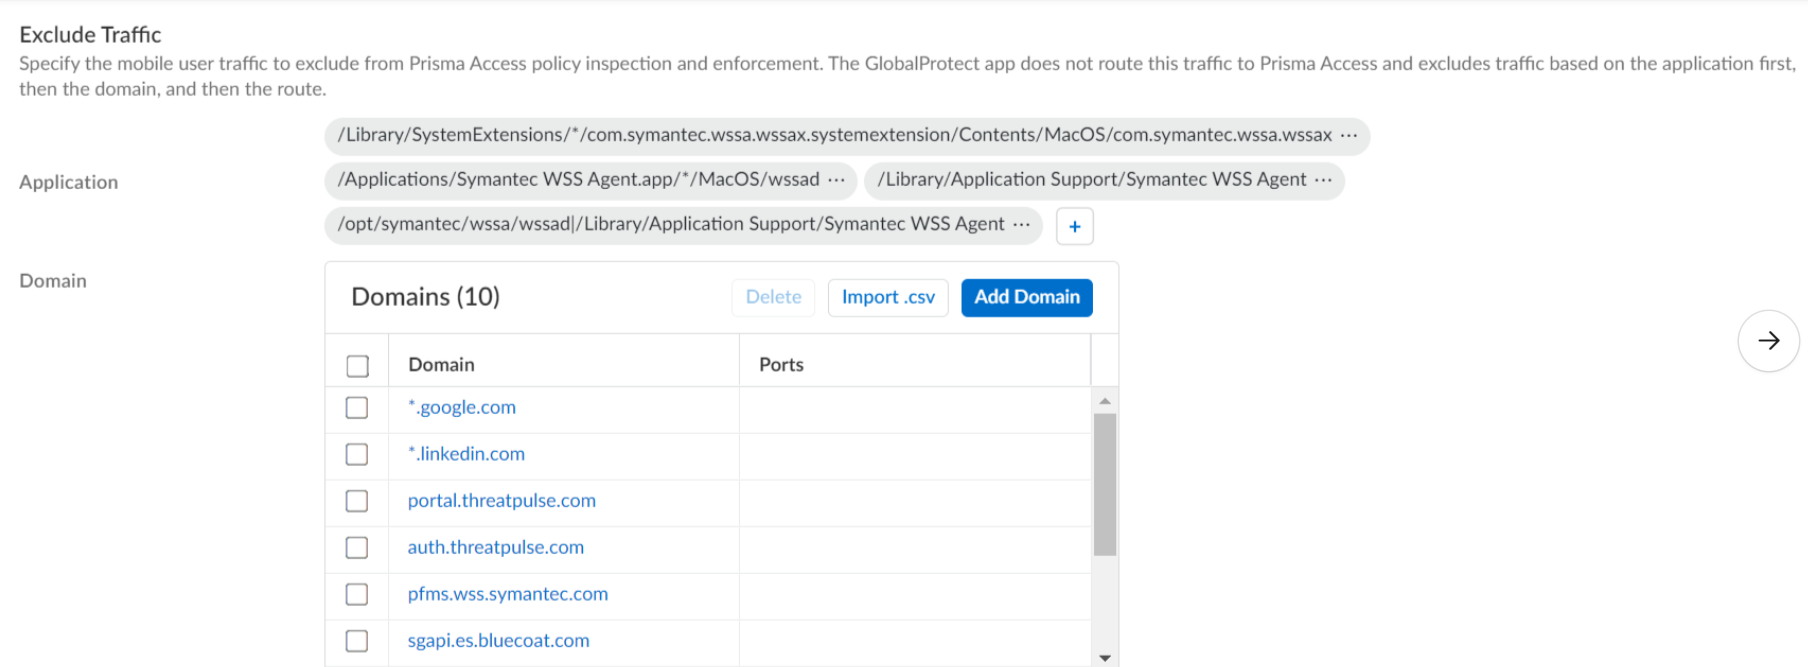
macOS Example:
Limitations:
- Only one wildcard (*) is supported per path. (e.g., C:\Users\*\AppData\*\Zoom.exe is NOT supported).
- The path must end with the application executable name , not a folder name containing '*'. (e.g., C:\Path\*\app.exe is OK, C:\Path\* is NOT OK).
Configure Split DNS for GlobalProtect App on iOS Endpoints
Prerequisites
- GlobalProtect app 6.1.6+
- iOS endpoints
- GlobalProtect Subscription License
- Content Version: 8911-9049+
Split DNS allows specifying which domains are resolved by the gateway's DNS servers and which by the endpoint's local DNS servers. For iOS, GlobalProtect app 6.1.6+ supports Split DNS - Include functionality.
Split DNS - Exclude functionality is NOT supported on iOS.
This applies when using On-demand or Always-On connect methods. (Per-App VPN config bypasses this).
PCNSE: Know that iOS Split DNS supports 'Include' only and has specific configuration requirements compared to Win/macOS.iOS Specific Behavior & Configuration Requirements:
- Default iOS Behavior: By default, *all* DNS queries go through the tunnel, regardless of the Portal's 'Split-Tunnel Option' setting.
- Traffic vs. DNS Handling: Unlike Win/macOS where traffic often follows DNS resolution path automatically, on iOS, IP Access Routes control traffic tunneling, while Domain rules control DNS query tunneling. You must configure *both* if you want both traffic and DNS for a site to be included/excluded.
-
To Enable Split DNS Include on iOS, you MUST:
- Configure at least one Access Route Include rule (even if it's just a specific internal network). This prevents GlobalProtect from becoming the default route for all traffic.
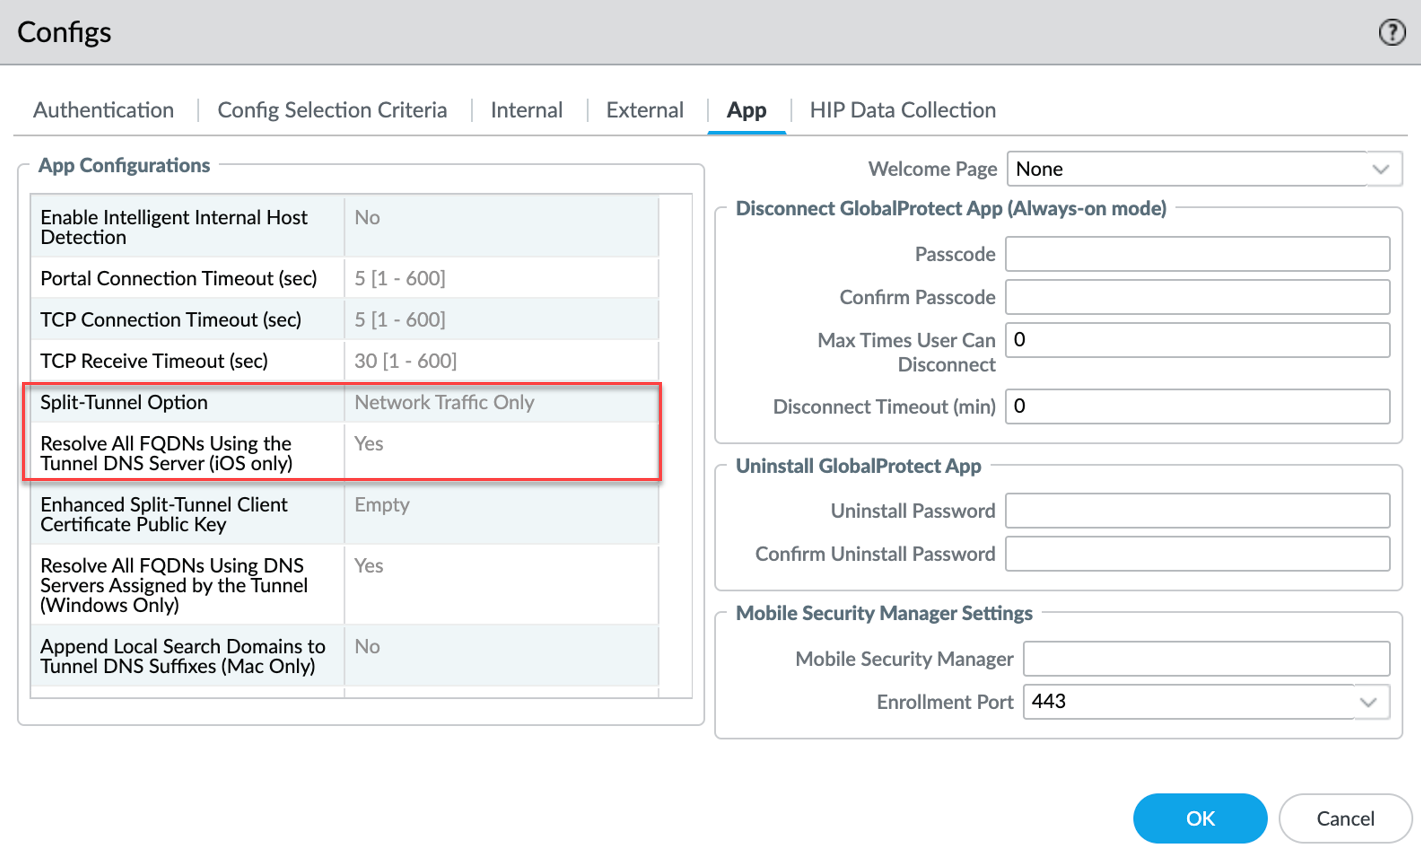
- Set the Portal Agent App setting Resolve all FQDNs using the Tunnel DNS Server (iOS only) to No . (Default is Yes). This is crucial!
- Configure Domain Include rules ( Gateway > Agent > Client Settings > Split Tunnel > Domain and Application > Include Domain ) for the specific domains you want resolved by the tunnel DNS.
- The Portal Agent App setting Split-Tunnel Option has no impact on iOS DNS splitting.
Configuration Steps (Split DNS Include for iOS):
Assume Portal and Gateway are already configured.
-
Configure Portal Setting:
- Navigate to Network > GlobalProtect > Portals > <portal-config> > Agent > <agent-config> > App .
- Set Resolve All FQDNS Using the Tunnel DNS Server (iOS only) to No .
- Click OK .
-
Configure Gateway Client Settings:
- Navigate to Network > GlobalProtect > Gateways > <gateway-config> > Agent > Client Settings > <client-setting-config> .
-
Access Route Tab:
- In the Include area, click Add and define at least one specific subnet that should go through the tunnel (e.g., your internal corporate network 10.0.0.0/8). Do NOT include 0.0.0.0/0 here if you want split DNS.
-
Domain and Application Tab:
- In the Include Domain area, click Add and enter the specific domains (e.g., *.mycorp.local , internalapp.mycorp.local ) whose DNS queries should be resolved by the tunnel DNS servers.
- Leave the Exclude Domain area empty for iOS Split DNS Include.
-
Network Services Tab:
- Ensure Tunnel DNS Server(s) are configured here (or at the global Agent > Network Services level).
- Click OK on Client Settings.
- Click OK on Gateway config.
- Commit changes.
Verification Example Log Snippet (PanGPS.log on iOS):
DNSSettings = {
 protocol = cleartext
 server = ( x.x.x.x ) // Tunnel DNS
 searchDomains = ()
 matchDomains = (       // Domains to use Tunnel DNS
     paloaltonetworks.com,
     *.paloaltonetworks.com,
 )
 matchDomainsNoSearch = YES
}
IPv4Settings = {
 configMethod = manual
 addresses = ( xxx.xx.xx.xx )
 subnetMasks = ( xxx.xxx.xxx.xxx )
 includedRoutes = (      // Traffic to tunnel
     { destinationAddress = 10.0.0.0 destinationSubnetMask = 255.0.0.0 },
     // ... other includes ...
 )
 excludedRoutes = ()    // Excludes if any were configured (not typical for iOS split DNS)
 overridePrimary = NO
}
// ... IPv6Settings similar ...
Note the `matchDomains` reflecting the Include Domain rules and `includedRoutes` reflecting the Include Access Route rules.
Exclude Video Traffic from the GlobalProtect VPN Tunnel
Allows excluding HTTP/HTTPS video streams (identified by App-ID) from the tunnel to conserve gateway bandwidth.
PCNSE: Know this feature uses App-ID to identify video and requires a GP license.Supported Applications & Traffic Types:
- Full Redirect (All video types): YouTube, Dailymotion, Netflix.
- Partial Redirect (MP4, WebM, MPEG only): All other video-streaming App-IDs you choose to exclude.
Prerequisites & Limitations:
- Requires GlobalProtect license.
- Supported on Win 7 SP2+ / macOS 10.10+.
- Endpoint IP Pool MUST NOT include IPv6 addresses if using video exclude. If the gateway assigns IPv6 addresses, excluded video streaming might fail if the endpoint's physical adapter only has IPv4.
- Do not include web browsers (Firefox, Chrome) in an Application-based Include rule if also using Video Exclude , as this creates conflicting logic.
- Sling TV app requires Application-based exclude, not Video exclude.
Configuration Steps (Video Exclude):
- Ensure Gateway and Tunnel Mode are configured.
- Navigate to Network > GlobalProtect > Gateways > <gateway-config> > Agent > Client Settings > <client-setting-config> .
- Select the Split Tunnel tab, then the Video Traffic sub-tab.
- Check the box Exclude video applications from the tunnel . (If checked but no specific apps added below, *all* identifiable video traffic is excluded).
-
(Optional) To exclude only specific video apps:
- Click Add under the Applications list.
- Select the desired video streaming App-IDs (e.g., youtube-streaming , netflix-streaming ). Add up to 200.
- Click OK on the Client Settings.
- Click OK on the Gateway config.
- Commit changes.
Host a Split Tunnel Configuration File on a Web Server
Prerequisites
- Prisma Access or GlobalProtect Subscription
- GlobalProtect app version 6.2+ (Windows/macOS)
- Content release version 8699-7991+
- Web server reachable by endpoints via HTTPS
- Mechanism for mutual TLS authentication (client/server certificates)
- Private/Public key pair for signing the config file
Instead of configuring split tunnel rules directly on the gateway, you can host a larger configuration in an XML file on your own web server. This allows for significantly more entries than the gateway GUI permits. PCNSE: Understand this method allows scaling split tunnel rules beyond GUI limits and requires hosting/signing/authentication setup.
Configuration Limits Comparison:
| Split Tunnel By... | Type | Configured on Gateway | Hosted on Web Server |
|---|---|---|---|
| Access Route | Include | 1000 | 1000 |
| Exclude | 200 | 1000 | |
| Domain | Include | 200 | 1000 |
| Exclude | 200 | 1000 | |
| Application | Include | 200 | 200 |
| Exclude | 200 | 200 |
Fallback: If the GlobalProtect app cannot fetch or validate the configuration file from the web server, it falls back to using the split tunnel configuration defined directly on the gateway (if any).
Configuration Steps (Hosting Config File):
-
Create and Sign the Split Tunnel Configuration File:
-
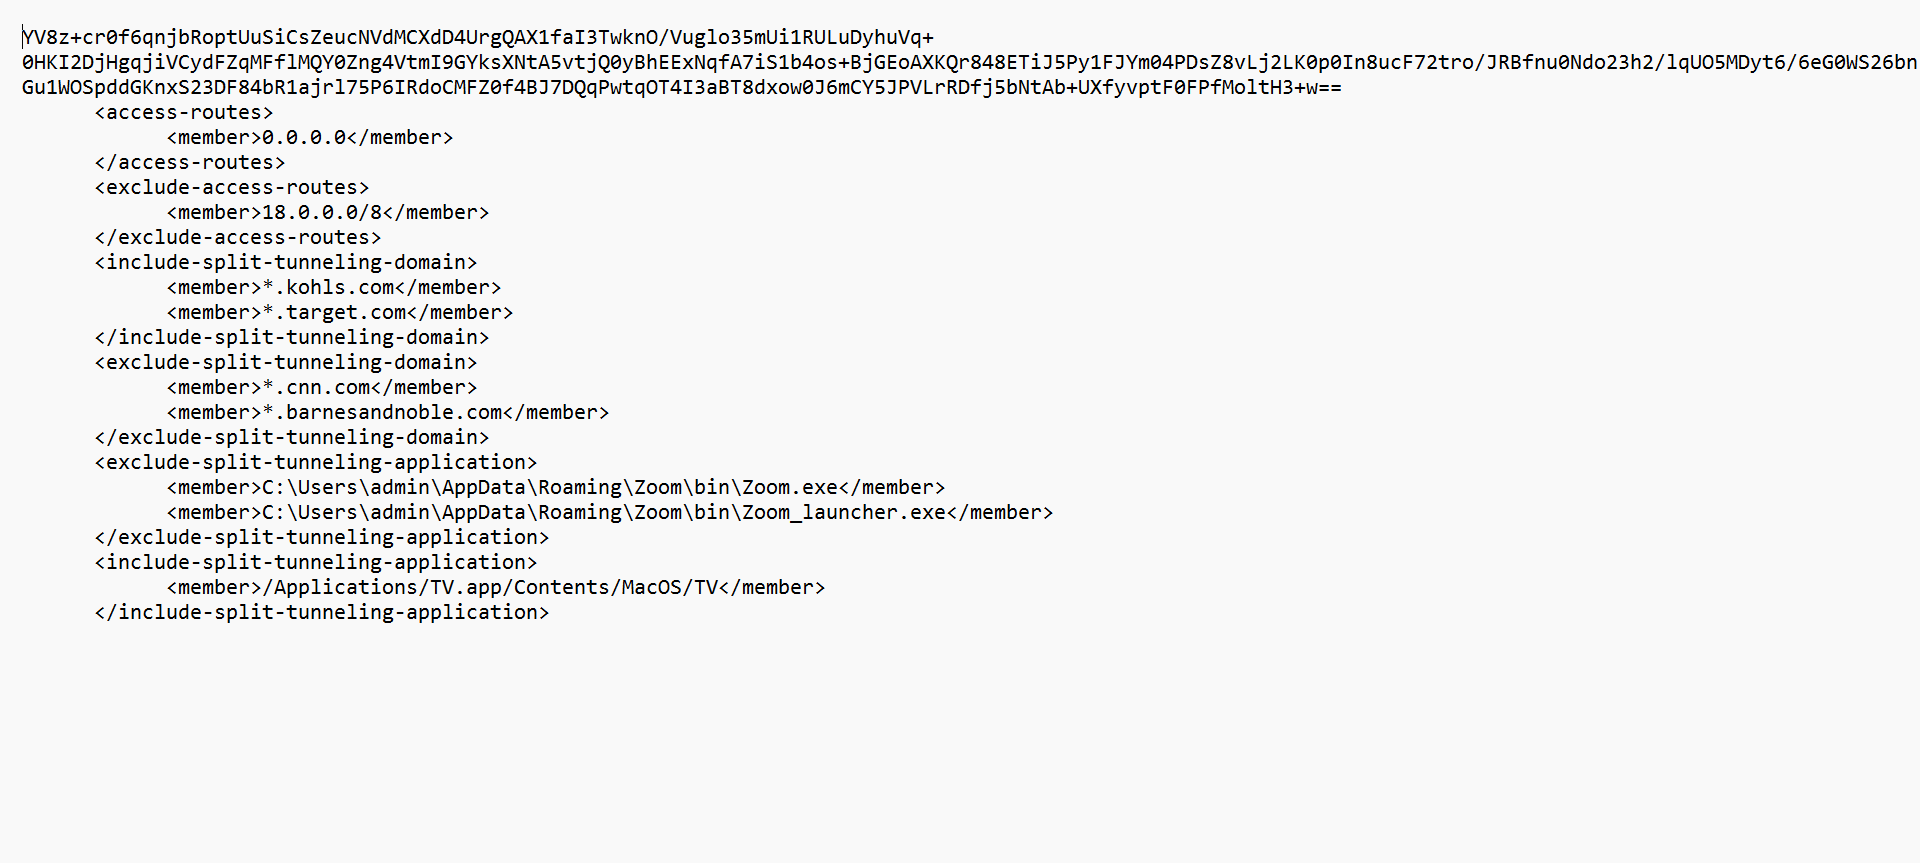
Create the XML file (`config.xml` or similar) containing your split tunnel rules. Structure includes `
`, ` `, ` `, ` ` with ` ` and ` ` sub-tags containing ` ` entries. Example: 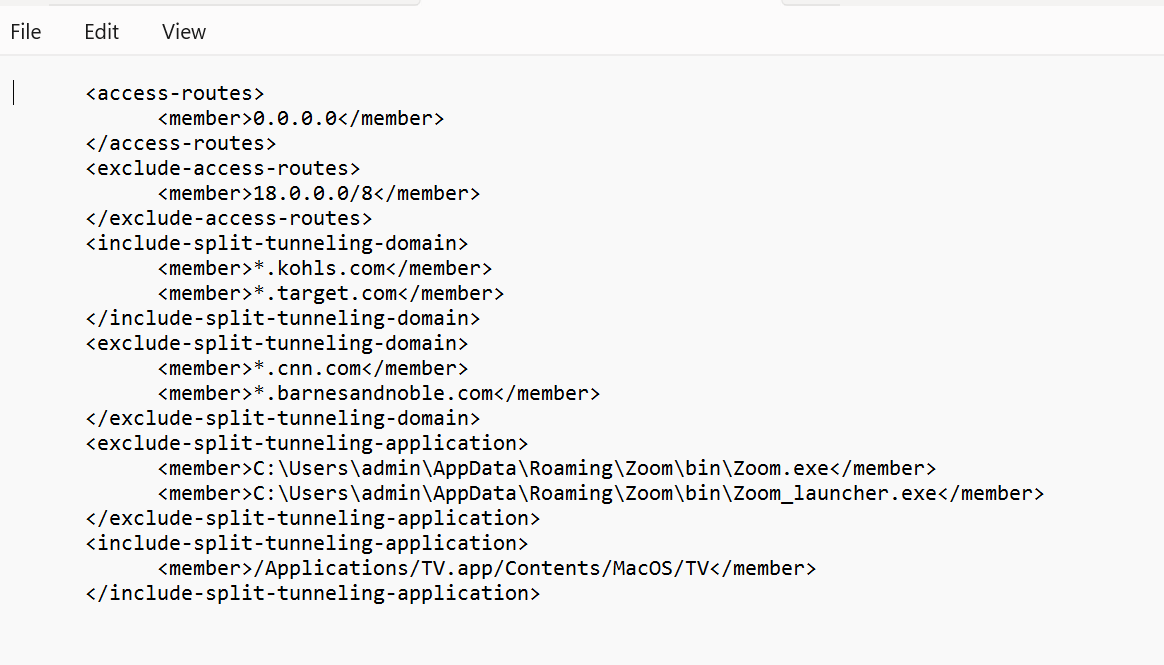
Tip: Include `
0.0.0.0/0 ` in the `` section if you want non-excluded traffic to go through the tunnel by default. - Generate a private/public key pair (e.g., RSA `private_key.pem`, `public_key.pem`) if you don't have one for signing.
-
Sign the XML file using the private key to create a signature digest (e.g., SHA256). Example using OpenSSL:
openssl dgst -sha256 -sign private_key.pem -out config_signature.sha256 config.xml -
Base64 encode the signature digest file (ensure no line wrapping `-A` flag in openssl). Example using OpenSSL:
openssl base64 -A -in config_signature.sha256 -out encoded_signature.txt -
Create the final file to host (e.g., `gp_split_tunnel.cfg`). Prepend the Base64 encoded signature (from `encoded_signature.txt`) as the *first line*. The XML content (`config.xml`) starts on the *second line*. Ensure no trailing NULL characters.
-
Create the XML file (`config.xml` or similar) containing your split tunnel rules. Structure includes `
-
Host the Signed File on a Web Server:
- Place the final file (e.g., `gp_split_tunnel.cfg`) on a web server accessible via HTTPS.
- Configure the web server for mutual TLS authentication (mTLS). The server must be configured to *require* a client certificate and validate it against a trusted CA. The GlobalProtect app must present a valid client certificate issued by that CA. The app must also trust the web server's certificate.
- You will need the public certificate of the CA that issues the *client certificates* for the Portal config later.
-
Configure Portal with Client Cert CA Public Key:
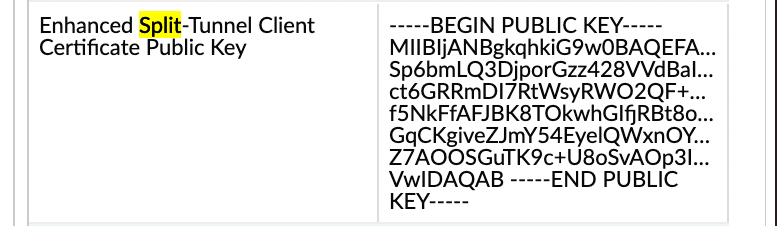
- Navigate to Network > GlobalProtect > Portals > <portal-config> > Agent > <agent-config> > App .
- In the Enhanced Split Tunnel Client Certificate Public Key field, paste the public key certificate (PEM format) of the CA that issues the client certificates used for mTLS with your web server. This allows the app to identify which client certificate to present during the mTLS handshake with the web server.
- Click OK .
Note: The verification of the *signature* itself within the downloaded file likely relies on a separate mechanism or pre-shared trust, possibly related to the client cert CA or another configured certificate/key on the firewall/portal, though not explicitly detailed here how the *signing* public key is distributed/used by the app. Focus on configuring the client cert CA public key as shown.
-
Configure Gateway to Use the Hosted File:
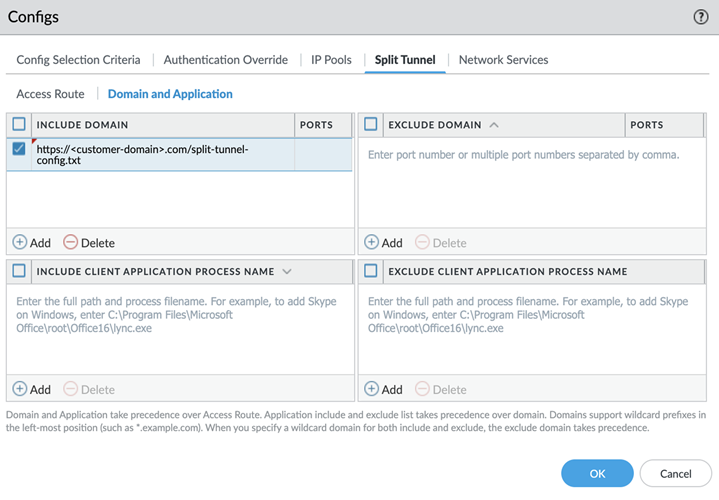
- Navigate to Network > GlobalProtect > Gateways > <gateway-config> > Agent > Client Settings > <client-setting-config> .
- Select the Split Tunnel tab, then the Domain and Application sub-tab.
- In the Include Domain list, click Add and enter the HTTPS URL of your hosted split tunnel configuration file (e.g., `https://yourserver.com/path/gp_split_tunnel.cfg`) as the *very first entry*. Order matters here.
- Click OK on Client Settings.
- Click OK on Gateway config.
- Commit changes.
GlobalProtect Gateways Quiz
Test your knowledge! Answer all questions and click Submit.