GlobalProtect Apps Overview
The GlobalProtect™ app runs on your users’ endpoints (desktop computer, laptop, tablet, or smart phone) to extend the security policy you use on your corporate network to your mobile users to ensure that their traffic is secured, whether they are accessing resources in your data center, private cloud, public cloud, or on the internet.
In addition to providing secure connectivity and remote access like traditional VPN products, the GlobalProtect app also:
- Protects your internal networks
- Provides app- and service-level control
- Secures IoT devices
- Protects against data loss and credential theft
- Provides advanced threat prevention
- Enables automatic quarantine of compromised devices
Deploy the GlobalProtect App to End Users
To connect to GlobalProtect™, an endpoint must be running the GlobalProtect app. Use the GlobalProtect app compatibility matrix to determine what version of the GlobalProtect app you want your users to run on their endpoints.
Because the version that an end user must download and install to enable successful connectivity to your network depends on your environment, there is no direct download link for the GlobalProtect app on the Palo Alto Networks site.
The app deployment method depends on the type of endpoint as follows:
| Platform | Deployment Options |
|---|---|
| macOS and Windows endpoints |
There are several options you can use to distribute and install the software on macOS and Windows endpoints:
|
| Windows 10 phone and Windows 10 UWP |
|
| iOS and Android endpoints |
Starting with GlobalProtect app 5.0, the GlobalProtect app for Chrome OS is not supported; use the GlobalProtect app for Android instead. |
| Chromebooks |
The GlobalProtect app for Android is supported only on certain Chromebooks . Chromebooks that do not support Android applications must continue to run the GlobalProtect app for Chrome, which is not supported starting with GlobalProtect app 5.0 and later.
|
| Linux |
After you download the GlobalProtect app for Linux from the Support Site , you can distribute and install the app:
|
As an alternative to deploying the GlobalProtect app software, you can configure the GlobalProtect portal to provide secure remote access to common enterprise web applications that use HTML, HTML5, and Javascript technologies. Users have the advantage of secure access from SSL-enabled web browsers without installing the GlobalProtect app software. Refer to GlobalProtect Clientless VPN.
The GlobalProtect app runs on a variety of operating systems. To determine the minimum GlobalProtect app version required for a specific operating system, refer to the Compatibility Matrix .
GlobalProtect App Minimum Hardware Requirements
The hardware requirements for each endpoint OS are detailed in the following sections:
- Minimum Hardware Requirements for GlobalProtect App on Windows
- Minimum Hardware Requirements for GlobalProtect App on macOS
- Minimum Hardware Requirements for GlobalProtect App on Linux
Minimum Hardware Requirements for GlobalProtect App on Windows
You can install the GlobalProtect app on Windows endpoints that meet the following hardware requirements:
| Requirement | Specification |
|---|---|
| Processor |
|
| RAM | 2GB minimum |
| Hard disk space | 200 MB minimum (for log storage) |
Minimum Hardware Requirements for GlobalProtect App on macOS
You can install the GlobalProtect app on macOS endpoints that meet the following hardware requirements:
| Requirement | Specification |
|---|---|
| Processor |
|
| RAM | 512 MB minimum; 2 GB recommended |
| Hard disk space | 200 MB minimum (for log storage) |
Minimum Hardware Requirements for GlobalProtect App on Linux
You can install the GlobalProtect app on Linux endpoints that meet the following hardware requirements:
Support for Linux endpoints also requires a GlobalProtect Gateway License.
| Requirement | Specification |
|---|---|
| Processor | x86 instruction set with 64-bit processor |
| RAM | 256 MB minimum |
| Hard disk space | 100 MB minimum |
Download the GlobalProtect App Software Package for Hosting on the Portal
Palo Alto Networks does not provide a direct download link for the GlobalProtect app for end users. To successfully connect to your network, end users must be running an app version that is compatible with your environment .
If you are an end user, please contact your IT Administrator for the latest supported GlobalProtect software.
Before you can deploy the GlobalProtect app for your end users, you must upload the new app installation package to the firewall that is hosting your portal, and then activate the software for download to the apps connecting to the portal. This deployment method is available for all non-mobile app versions. To download the mobile version of the GlobalProtect app see the app store for your mobile device.
To download the latest app directly to the firewall, the firewall must have a service route that enables it to access the Palo Alto Networks Update Server. If the firewall does not have internet access, you can download the app software package from the Palo Alto Networks Software Updates support site using an internet-connected computer, and then manually upload it to the firewall.
To manually download the app software package:
- Log in to the Palo Alto Networks Customer Support Portal ( https://support.paloaltonetworks.com/ ).
You must have a valid Palo Alto Networks Customer Support Portal account to log in to and download software from the Software Updates page.
- Select Updates > Software Updates .
- Select the GlobalProtect app version by operating system.
- Review the Release Notes for the app version, and then select the download link to proceed with the download.
- Proceed to Deploy the GlobalProtect App to End Users (referencing the Deployment Methods section).
See the Palo Alto Networks Compatibility Matrix for the operating systems on which you can install each release of the GlobalProtect app.
Host App Updates on the Portal
The simplest way to deploy the GlobalProtect app software is to download the new app installation package to the firewall that is hosting your portal, and then activate the software for download to the apps connecting to the portal.
To do this automatically, the firewall must have a service route that enables it to access the Palo Alto Networks Update Server.
If the firewall does not have internet access, you must manually download the software image from the Palo Alto Networks Software Updates support site using an internet-connected computer, and then manually upload it to the firewall.
You define how the app software updates are deployed in the portal agent configurations—whether they occur automatically when the app connects to the portal, whether the user is prompted to upgrade the app, or whether the end user can manually check for and download a new app version. For details on creating an agent configuration, see Define the GlobalProtect Agent Configurations.
- On the firewall hosting the GlobalProtect portal, check for new app software images.
Select Device > GlobalProtect Client to view the list of available app software images.
- If the firewall has access to the Update Server, click Check Now for the latest updates. If the value in the Action column is Download , it indicates that a new version of the app is available.
- If the firewall does not have access to the Update Server, you must manually download the software image from the Palo Alto Networks Software Updates support site, as described in the previous section. After you download the software image, go back to the Device > GlobalProtect Client page of the firewall to Upload it.
- Download the app software image.
- If the firewall has access to the Update Server, locate the app version you want, and then click Download . When the download completes, the value in the Action column changes to Activate .
- If the firewall does not have access to the Update Server, manually download the package (as described previously). After you download the software image, go back to the Device > GlobalProtect Client page of the firewall to Upload it.
- Activate the app software image so that end users can download it from the portal.
Only one version of the app software image can be activated at a time. If you activate a new version, but have some apps that require a previously activated version, you must activate the required version again to enable it for download.
- If the software image was automatically downloaded from the Update Server, click Activate .
- If you manually uploaded the software image to the firewall, click Activate From File , and then select the GlobalProtect Client File you uploaded from the drop-down. Click OK to activate the selected image. You may need to refresh the page before the version displays as Currently Activated .
Host App Updates on a Web Server
If a large number of your endpoints must install and/or update the GlobalProtect app software, consider hosting the GlobalProtect app software images on an external web server. This helps reduce the load on the firewall when users connect to and download the app.
- Download and activate the version of the GlobalProtect app that you plan to host on the web server to the firewall.
Follow the steps for downloading and activating the app software on the firewall, as described in Host App Updates on the Portal.
- Download the GlobalProtect app software image that you want to host on your web server.
Download the same image that you activated on the portal.
From a web browser, manually download the GlobalProtect App Software Package for Hosting on the Portal.
- Publish the software image files to your web server.
- Redirect end users to the web server.
On the firewall hosting the portal, enter the following CLI commands in operational mode:
> set global-protect redirect on
> set global-protect redirect location <path>
where <path> is the URL to the folder hosting the image (for example, https://acme/GP ).
- Test the redirect.
- From a web browser, go to the following URL:
https://<portal address or name>
For example, https://gp.acme.com .
- On the portal login page, enter your user Name and Password , and then click LOGIN . After successful login, the portal should redirect you to the download.
Test the App Installation
Use the following procedure to test the GlobalProtect app installation.
- Create an agent configuration for testing the app installation.
When initially installing the GlobalProtect app software on the endpoint, the end user must be logged in to the system using an account that has administrative privileges. Subsequent app software updates do not require administrative privileges.
As a best practice, create an agent configuration that is limited to a small group of users, such as administrators in the IT department responsible for administering the firewall:
- Select Network > GlobalProtect > Portals .
- Select an existing portal configuration that you want to modify or Add a new one.
- On the Agent tab, select an existing configuration or Add a new one to deploy to the test users/group.
- On the User/User Group tab, Add the User/User Group who will be testing the app.
- On the App tab, set Allow User to Upgrade GlobalProtect App to Allow with Prompt . Click OK to save the configuration.
- ( Optional ) On the Agent tab, select the agent configuration that you just created or modified, and then click Move Up so that it is higher on the list than the more generic configurations you have created.
When a GlobalProtect app connects, the portal compares the source information in the packet against the agent configurations you have defined. As with security rule evaluation, the portal looks for a match starting from the top of the list. When it finds a match, it delivers the corresponding configuration to the app.
- Commit the changes.
- Log in to the GlobalProtect portal.
- Launch your web browser and go to the following URL:
https://<portal address or name>
For example, https://gp.acme.com .
- On the portal login page, enter your user Name and Password , and then click LOG IN .
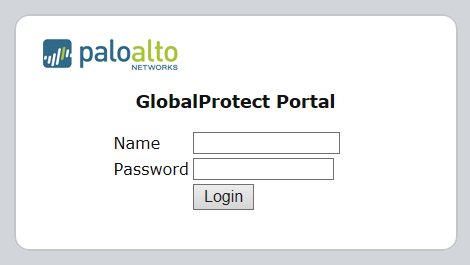 Figure: GlobalProtect Portal Login Screen
- Navigate to the app download page.
In most cases, the app download page appears immediately after you log in to the portal. Use this page to download the latest app software package.
If you have enabled GlobalProtect Clientless VPN access, the applications page opens after you log in to the portal (instead of the agent download page) when you log in to the portal. Select GlobalProtect Agent to open the download page.
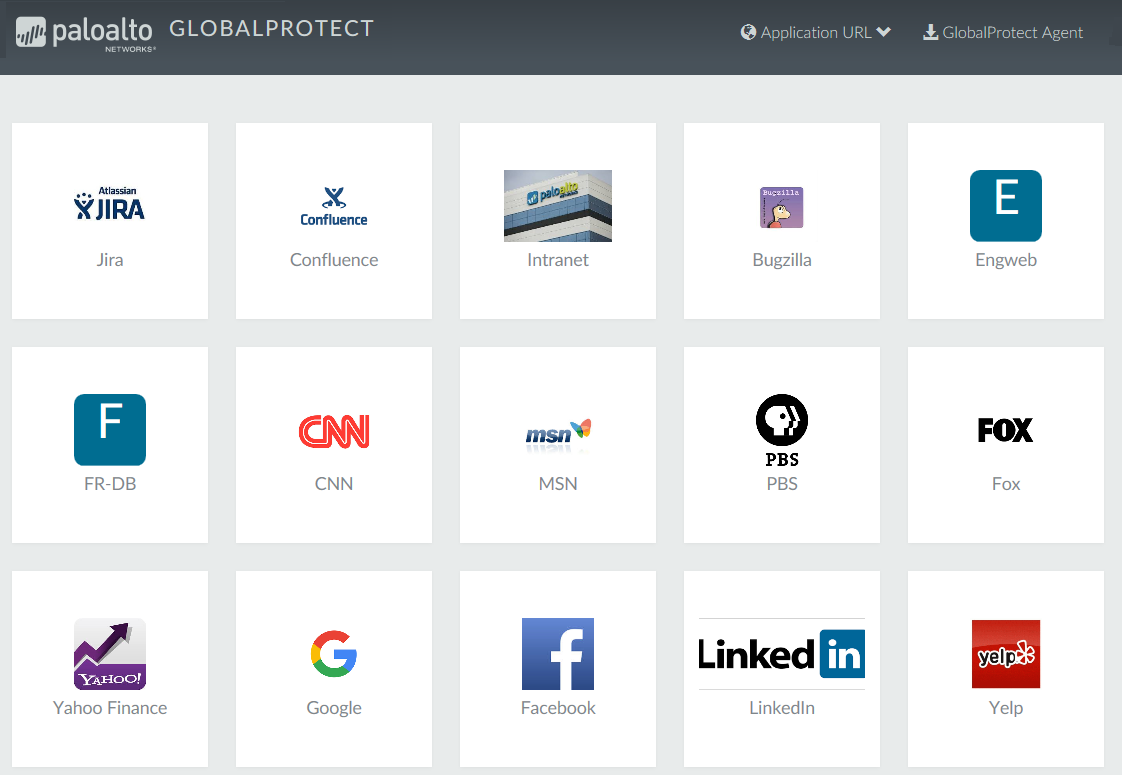 Figure: GlobalProtect Applications Page showing the option to download the agent
- Download the app.
- To begin the download, click the link that corresponds to the operating system running on your computer.
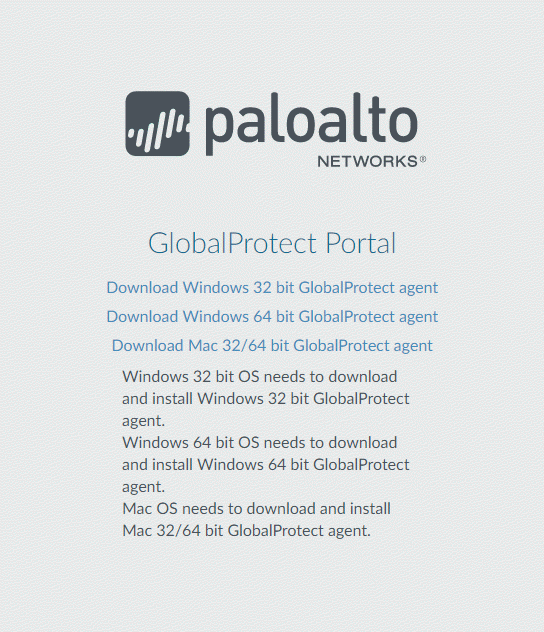 Figure: GlobalProtect Agent Download Page showing platform options
- Open the software installation file.
- When prompted to run or save the software, click Run .
- When prompted, click Run to launch the GlobalProtect Setup Wizard.
When initially installing the GlobalProtect app software on the endpoint, the end user must be logged in to the system using an account that has administrative privileges. Subsequent app software updates do not require administrative privileges.
- Complete the GlobalProtect app setup.
- From the GlobalProtect Setup Wizard, click Next .
- Click Next to accept the default installation folder ( C:\Program Files\Palo Alto Networks\GlobalProtect ) and then click Next twice.
Although you can Browse to select a different location in which to install the GlobalProtect app, the best practice is to install it in the default location. The default installation location is read-only for non-privileged users and therefore installing to this location protects against malicious access to the app.
- After the installation is complete, Close the wizard.
- Log in to GlobalProtect.
- Launch the GlobalProtect app by clicking the system tray icon. The status panel opens.
- Enter the FQDN or IP address of the portal, and then click Connect .
- ( Optional ) By default, you are automatically connected to the Best Available gateway, based on the configuration that the administrator defines and the response times of the available gateways. To connect to a different gateway, select the gateway from the Gateway drop-down (for external gateways only).
This option is only available if you enable manual gateway selection.
- ( Optional ) Depending on the connection mode, click Connect to initiate the connection.
- ( Optional ) If prompted, enter your Username and Password , and then click Sign In .
If authentication is successful, you are connected to your corporate network, and the status panel displays the Connected or Connected - Internal status. If you set up a GlobalProtect welcome page, it displays after you log in successfully.
Download and Install the GlobalProtect Mobile App
The GlobalProtect app provides a simple way to extend the enterprise security policies out to mobile endpoints. As with other remote endpoints running the GlobalProtect app, the mobile app provides secure access to your corporate network over an IPsec or SSL VPN tunnel. The app automatically connects to the gateway that is closest to the end user’s current location. In addition, traffic to and from the endpoint is automatically subject to the same security policy enforcement as other hosts on your corporate network. The mobile app also collects information about the host configuration and can use this information for enhanced HIP-based security policy enforcement.
There are two primary methods for installing the GlobalProtect app: You can deploy the app from your third-party MDM and transparently push the app to your managed endpoints; or, you can install the app directly from the official store for your endpoint:
- iOS endpoints— App Store
- Android endpoints and Chromebooks— Google Play
- Windows 10 phones and Windows 10 UWP endpoints— Microsoft Store
Starting with GlobalProtect app 5.0, the GlobalProtect app for Chrome OS is not supported; use the GlobalProtect app for Android instead.
This workflow describes how to install the GlobalProtect app directly on the mobile endpoint.
- Create an agent configuration for testing the app installation.
As a best practice, create an agent configuration that is limited to a small group of users, such as administrators in the IT department responsible for administering the firewall:
- Select Network > GlobalProtect > Portals .
- Select an existing portal configuration to modify or Add a new one.
- On the Agent tab, either select an existing configuration or Add a new configuration to deploy to the test users/group.
- On the User/User Group tab, Add the User/User Group who will be testing the app.
- Select the OS for the app you are testing ( iOS , Android , or WindowsUWP ).
- ( Optional ) Select the agent configuration that you just created/modified, and then click Move Up so that it is higher on the list than the more generic configurations you have created.
- Commit the changes.
- From the endpoint, follow the prompts to download and install the app.
- On Android endpoints, search for the app on Google Play.
- On iOS endpoints, search for the app at the App Store.
- On Windows 10 UWP endpoints, search for the app at the Microsoft Store.
- Launch the app.
When successfully installed, the GlobalProtect app icon displays on the endpoint’s Home screen. To launch the app, tap the icon. When prompted to enable GlobalProtect VPN functionality, tap OK .
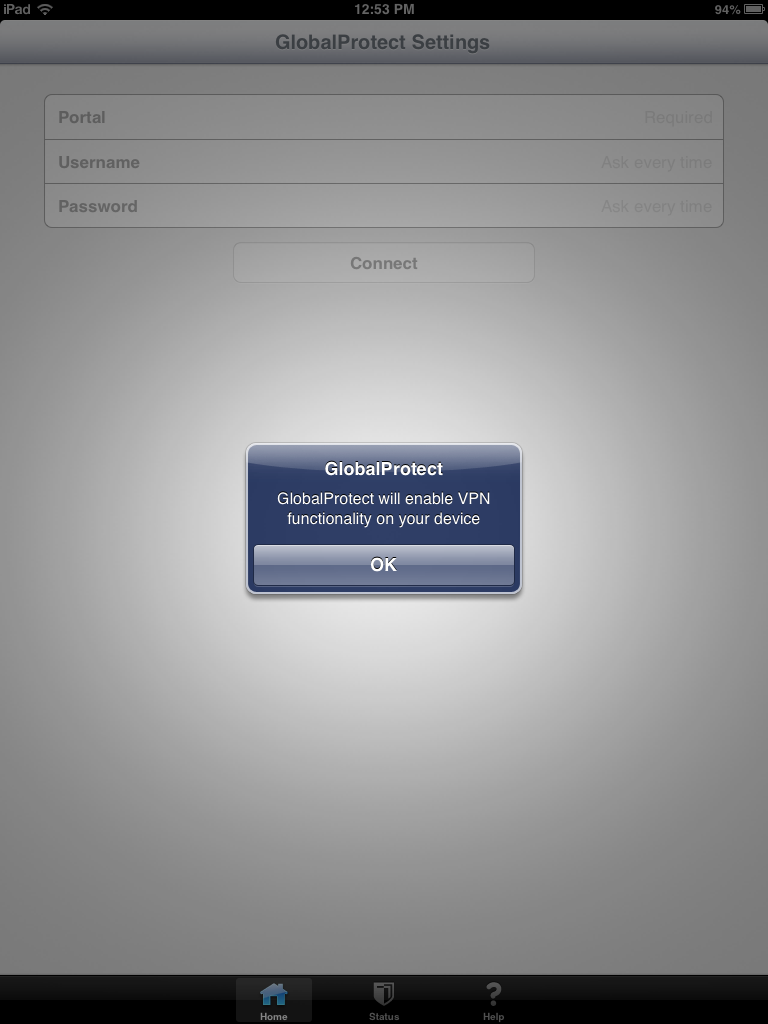 Figure: Prompt on a mobile device to enable GlobalProtect VPN functionality
- Connect to the portal.
- When prompted, enter the Portal name or address, User Name , and Password . The portal name must be an FQDN and it should not include the https:// at the beginning.
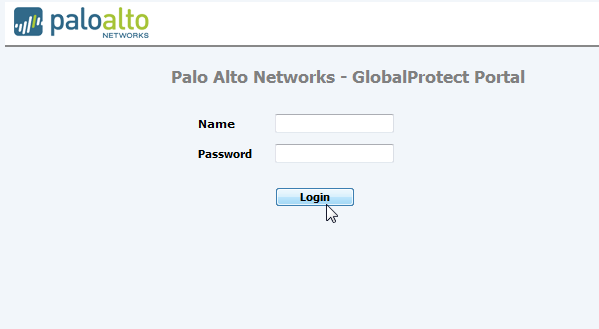 Figure: Mobile app login screen for GlobalProtect
- Tap Connect and verify that the app successfully establishes a connection to GlobalProtect.
If a third-party mobile endpoint management system is configured, the app prompts you to enroll.
View and Collect GlobalProtect App Logs
You have two options for collecting GlobalProtect™ app logs from the end users’ endpoints:
- Collect logs—End users must manually collect the GlobalProtect app logs.
- Report an issue—End users report an issue directly to Strata Logging Service to which the administrator can access when they experience unusual behavior such as poor network performance or a connection is not established with the portal and gateway.
In order for the GlobalProtect app to send troubleshooting logs, diagnostic logs, or both to Strata Logging Service for further analysis, you must configure the GlobalProtect portal to enable the GlobalProtect app log collection for troubleshooting. Additionally, you can configure the HTTPS-based destination URLs that can contain IP addresses or fully qualified domain names of the web servers/resources that you want to probe, and to determine issues such as latency or network performance on the end user’s endpoint.
Use the following steps to view or collect GlobalProtect logs:
- Launch the GlobalProtect app.
- From the status panel, open the settings dialog.
 Figure: GlobalProtect Settings gear icon
- Select Settings .
- From the GlobalProtect Settings panel, select Troubleshooting .
- Select either Debug or Dump from the Logging Level drop-down.
- ( Optional — Windows only ) View your GlobalProtect logs:
- Select Logs .
- Choose a Log type.
- Start viewing logs.
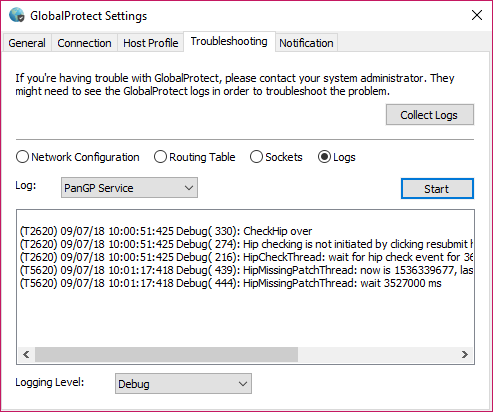 Figure: GlobalProtect Troubleshooting section showing log options
- ( Optional ) Collect Logs to send to your GlobalProtect administrator for troubleshooting.
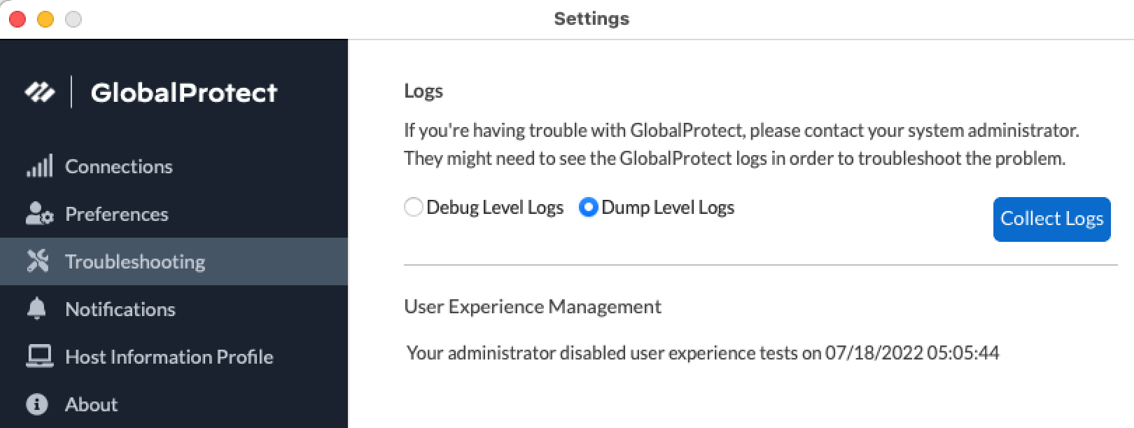 Figure: GlobalProtect Collect Logs button
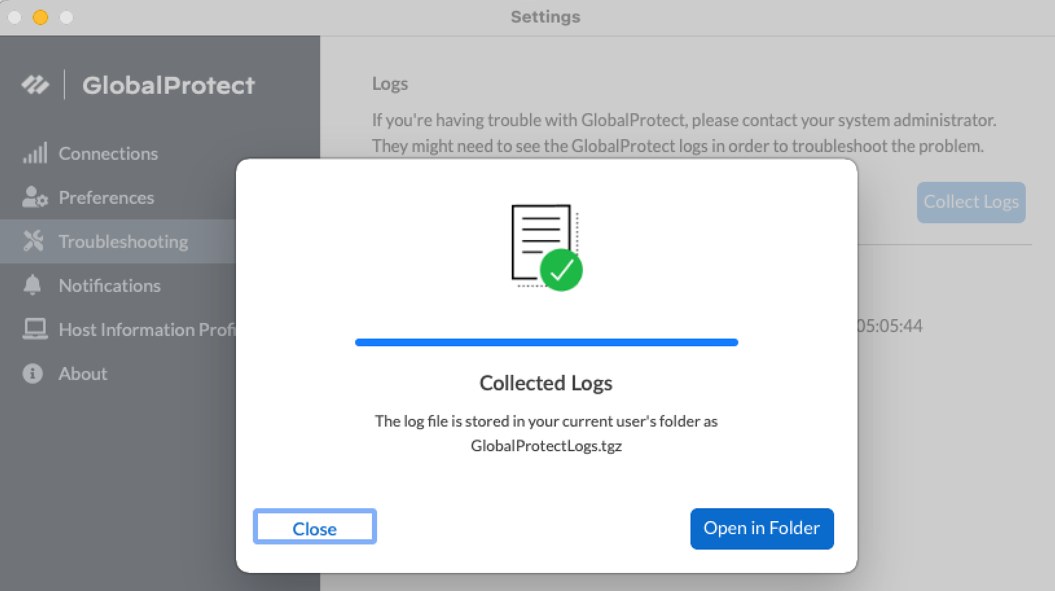 Figure: GlobalProtect log collection confirmation message
Deploy App Settings Transparently
As an alternative to deploying app settings from the portal configuration, you can define them directly from the following endpoints:
- Windows—Registry or Windows Installer (Msiexec)
- macOS—global macOS plist
- Linux—pre-deployment configuration file ( pangps.xml )
The benefit of this alternative is that you can enable deployment of GlobalProtect app settings to endpoints prior to their first connection to the GlobalProtect portal.
Some settings do not have a corresponding portal configuration setting on the web interface and must be configured using the Windows Registry, Msiexec, or macOS plist. These settings are listed in the Customizable App Settings as “Not in portal.”
Settings defined in the portal configuration always override settings defined in the Windows Registry, macOS plist, or pre-deployment configuration file ( pangps.xml ) for Linux.
If you define settings in the registry, plist, or pangps.xml , but the portal configuration specifies different settings, the settings that the app receives from the portal overrides the settings defined on the endpoint. This override also applies to login-related settings, such as whether to connect on-demand, whether to use single sign-on (SSO), and whether the app can connect if the portal certificate is invalid. Therefore, you should avoid conflicting settings. In addition, the portal configuration is cached on the endpoint, and that cached configuration is used anytime the GlobalProtect app restarts or the endpoint reboots.
The following sections describe what customizable app settings are available and how to deploy these settings transparently to Windows, macOS, and Linux endpoints:
- Customizable App Settings
- Deploy App Settings to Windows Endpoints
- Deploy App Settings to macOS Endpoints
- Deploy App Settings to Linux Endpoints
In addition to using the Windows Registry, macOS plist, or Linux pre-deployment configuration to deploy GlobalProtect app settings, you can enable the GlobalProtect app to collect specific Windows Registry or macOS plist information from the endpoints, including data on applications installed on the endpoints, processes running on the endpoints, and attributes or properties of those applications and processes. You can then monitor the data and add it to a security rule to use as matching criteria. Endpoint traffic that matches the registry settings you define can be enforced according to the security rule.
Customizable App Settings (Overview)
In addition to pre-deploying the portal address, you can also define the app settings. To Deploy App Settings to Windows Endpoints you define keys in the Windows Registry (path HKEY_LOCAL_MACHINE\SOFTWARE\Palo Alto Networks\GlobalProtect\Settings\ unless otherwise stated). To Deploy App Settings to macOS Endpoints you define entries in the Settings dictionary of the macOS plist ( /Library/Preferences/com.paloaltonetworks.GlobalProtect.settings.plist ). To Deploy App Settings to Linux Endpoints you define entries under <Settings> of the /opt/paloaltonetworks/globalprotect/pangps.xml pre-deployment configuration file. On Windows endpoints only, you can also use the Windows Installer to Deploy App Settings from Msiexec.
The following topics describe each customizable app setting. Settings defined in the GlobalProtect portal agent configuration take precedence over settings defined in the Windows Registry or the macOS plist.
Some settings do not have a corresponding portal configuration setting on the web interface and must be configured using the Windows Registry or Msiexec. These include, but are not limited to, settings such as the following: can-prompt-user-credential , wrap-cp-guid , and filter-non-gpcp . They are listed in the following options as “Not in portal.”
App Display Options
The following table lists the options that you can configure in the Windows Registry or macOS plist to customize the display of the GlobalProtect app.
| Portal Agent Configuration | Windows Registry/macOS Plist | Msiexec Parameter | Default |
|---|---|---|---|
| Display GlobalProtect Icon | show-agent-icon yes | no | SHOWAGENTICON=”yes | no” | yes |
| Enable Advanced View | enable-advanced-view yes | no | ENABLEADVANCEDVIEW=”yes | no” | yes |
| Enable Rediscover Network Option | rediscover-network yes | no | REDISCOVERNETWORK=”yes | no” | yes |
| Enable Resubmit Host Profile Option | resubmit-host-info yes | no | n/a | yes |
| Show System Tray Notifications | show-system-tray-notifications yes | no | SHOWSYSTEMTRAYNOTIFICATIONS=”yes | no” | yes |
User Behavior Options
The following table lists the options that you can configure in the Windows registry and macOS plist to customize how the user interacts with the GlobalProtect app.
Some settings do not have a corresponding portal configuration setting on the web interface and must be configured using the Windows Registry, Msiexec, or macOS plist. These settings are listed in the table as “Not in portal.” They include, but are not limited to, settings such as the following: ShowPrelogonButton and can-save-password .
| Portal Agent Configuration | Windows Registry/macOS Plist | Msiexec Parameter | Default |
|---|---|---|---|
| Allow User to Change Portal Address | can-change-portal yes | no | CANCHANGEPORTAL=”yes | no” | yes |
| Allow User to Dismiss Welcome Page | enable-hide-welcome-page yes | no | ENABLEHIDEWELCOMEPAGE= ”yes | no” | yes |
| Allow User to Continue with Invalid Portal Server Certificate | can-continue-if-portal-cert-invalid yes | no | CANCONTINUEIFPORTALCERTINVALID= ”yes | no” | yes |
| Allow User to Disable GlobalProtect App | disable-allowed yes | no | DISABLEALLOWED="yes | no" | no |
Allow User to Uninstall GlobalProtect App
|
Uninstall 0 | 1 | n/a | n/a |
|
Save User Credentials
Specify a 0 to prevent GlobalProtect from saving credentials, a 1 to save both username and password, or a 2 to save the username only. |
save-user-credentials 0 | 1 | 2 | n/a | n/a |
|
Not in portal
The Allow user to save password setting is deprecated in the web interface in PAN-OS 7.1 and later releases but is configurable from the Windows registry and macOS plist. Any value specified in the Save User Credentials field overwrites a value specified here. |
can-save-password yes | no | CANSAVEPASSWORD=”yes | no” | yes |
|
Windows only/Not in portal
This setting enables the GlobalProtect credential provider to display the Start GlobalProtect Connection button, which allows users to initiate the GlobalProtect pre-logon connection manually. |
ShowPrelogonButton yes | no | n/a | no |
|
Windows 10 only/Not in portal
This setting is used in conjunction with GlobalProtect SSO and enables the GlobalProtect credential provider to be set as the default sign-in option at the next Windows login and for subsequent logins. |
MakeGPCPDefault yes | no | MAKEGPCPDEFAULT=”yes | no” | n/a |
| Windows only/Not in portal This setting is used in conjunction with GlobalProtect SSO and sets the number of seconds for users to wait to log in to Windows before establishing a tunnel connection. | LogonWaitTime <5-30 seconds> | n/a | n/a |
| Windows only/Not in portal This setting is used in conjunction with GlobalProtect SSO and sets the number of seconds to delay users from logging in to Windows after establishing a tunnel connection. | LogonPostWaitTime <3-10 second> | n/a | n/a |
App Behavior Options
The following table lists the options that you can configure in the Windows Registry and macOS plist to customize the behavior of the GlobalProtect app.
Some settings do not have a corresponding portal configuration setting on the web interface and must be configured using the Windows Registry, Msiexec, or macOS plist. These settings are listed in the table as “Not in portal.” They include, but are not limited to, settings such as the following: portal <IPaddress> , prelogon 1 , and can-prompt-user-credential .
| Portal Agent Configuration | Windows Registry/macOS Plist | Msiexec Parameter | Default |
|---|---|---|---|
| Connect Method | connect-method on-demand | pre-logon | user-logon | CONNECTMETHOD=”on-demand | pre-logon | user-logon” | user-logon |
| Conditional Connect Method Based on Network Type | conditional-connect yes | no | n/a | no |
| Not supported on the portal | intelligent-portal yes | no | INTELLIGENTPORTAL=”yes | no” | no |
| Portal IP Address for USA and China | portal-country-map "<IP address>(US);<IP address>(CN)" | PORTALCOUNTRYMAP = "<Portal IP address>(US);<Portal IP address>(CN)" | n/a |
| User Location | intelligent-portal-service "URL" | INTELLIGENTPORTALSERVICE = "<IP location URL>" | n/a |
| GlobalProtect App Config Refresh Interval (hours) | refresh-config-interval <hours> | REFRESHCONFIGINTERVAL= ”<hours>” | 24 |
| Send HIP Report Immediately if Windows Security Center (WSC) State Changes (Windows Only) | wsc-autodetect yes | no | n/a | no |
| Detect Proxy for Each Connection (Windows Only) | proxy-multiple-autodetect yes | no | n/a | no |
| Clear Single Sign-On Credentials on Logout (Windows Only) | logout-remove-sso yes | no | LOGOUTREMOVESSO=”yes | no” | yes |
|
Disable Single Sign-On on local machines
This setting allows you to disable the SSO feature even if it is configured on the portal. It overwrites the portal configuration when you manually add the key to the Windows registry or macOS plist and set the value as Yes . |
For Windows endpoints, you must manually add this setting to the Windows registry:
Windows Path:
Key Name/Value:
macOS Path:
Add the setting under Palo Alto Networks > GlobalProtect > Settings
Key Name/Value:
|
This setting is not supported in msiexec. | n/a |
| Use Default Authentication on Kerberos Authentication Failure (Windows Only) | krb-auth-fail-fallback yes | no | KRBAUTHFAILFALLBACK= ”yes | no” | no |
| Use Default Browser for SAML Authentication |
(
macOS plist
)
default-browser yes | no |
DEFAULTBROWSER= “yes | no” | no |
| Custom Password Expiration Message (LDAP Authentication Only) |
(
Deprecated
)
PasswordExpiryMessage <message> |
n/a | Password expires in <number> days |
| Portal Connection Timeout (sec) | portal-timeout <portaltimeout> | n/a | 5 |
| TCP Connection Timeout (sec) | connect-timeout <connect-timeout> | n/a | 5 |
| TCP Receive Timeout (sec) | receive-timeout <receive-timeout> | n/a | 30 |
| Client Certificate Store Lookup | certificate-store-lookup user | machine | user and machine | invalid | CERTIFICATESTORELOOKUP= "user | machine | user and machine | invalid" | user and machine |
| SCEP Certificate Renewal Period (days) | scep-certificate-renewal-period <renewalPeriod> | n/a | 7 |
| Maximum Internal Gateway Connection Attempts | max-internal-gateway-connection-attempts <maxValue> | MIGCA="<maxValue>" | 0 |
| Extended Key Usage OID for Client Certificate | ext-key-usage-oid-for-client-cert <oidValue> | EXTCERTOID=”<oidValue>” | n/a |
| User Switch Tunnel Rename Timeout (sec) | user-switch-tunnel-rename-timeout <renameTimeout> | n/a | 0 |
|
Use Single Sign-On
(Windows Only) |
use-sso yes | no | USESSO="yes | no" | yes |
| Use Single Sign-On for Smart Card (Windows Only) | use-sso-pin yes | no | USESSOPIN="yes | no" | no |
| Inbound Authentication Message | authentication-message | n/a | n/a |
| Allow Overriding Username from Client Certificate | override-cc-username yes | no | n/a | no |
|
Not in portal
This setting specifies the default portal IP address (or hostname). |
portal <IPaddress> | PORTAL="<IPaddress>" | n/a |
|
Not in portal
This setting enables GlobalProtect to initiate a VPN tunnel before a user logs in to the device and connects to the GlobalProtect portal. |
prelogon 1 | PRELOGON="1" | 1 |
|
Not in portal
This setting is used in conjunction with single sign-on (SSO) and indicates whether or not to prompt the user for credentials if SSO fails. |
(
Windows
)
can-prompt-user-credential yes | no |
CANPROMPTUSERCREDENTIAL= ”yes | no” | yes |
|
Windows only/Not in portal
This setting filters the third-party credential provider’s tile from the Windows login page so that only the native Windows tile is displayed.* |
wrap-cp-guid {third party credential provider guid} | WRAPCPGUID=”{guid_value]" FILTERNONGPCP=”yes | no” | no |
|
Windows only/Not in portal
This setting is an additional option for the setting wrap-cp-guid, and allows the third-party credential provider tile to be displayed on the Windows login page, in addition to the native Windows logon tile.* |
filter-non-gpcp no | n/a | n/a |
|
Windows only/Not in portal
This setting allows you to assign static IP addresses to Windows endpoints. |
reserved-ipv4 <reserved-ipv4>
reserved-ipv6 <reserved-ipv6> |
RESERVEDIPV4=”<reserved-ipv4>”
RESERVEDIPV6=”<reserved-ipv6>” |
n/a |
|
(Windows Only)
This setting allows you to set a valid default gateway on GlobalProtect virtual adapter when you configure GlobalProtect app in Full-Tunnel mode. |
fake-default-gateway yes | no | FIXDEFAULTGATEWAY yes | no | n/a |
|
(Windows Only)
This setting allows you to collect HIP data on Windows endpoints. |
collect-hip-data yes | no | COLLECTHIPDATA= ”yes | no” | n/a |
|
(Windows Only)
This setting allows you to save gateway passwords on Windows endpoints. |
save-gateway-password yes | no | SAVEGATEWAYPASSWORD= ”yes | no” | n/a |
|
Windows Only/Not in portal
This setting allows you to press the Enter key to log in to GlobalProtect from the embedded browser on Windows endpoints during SAML authentication. In some cases, enabling this setting will prevent the Enter key press from being accepted during sign on. If this occurs, change the setting to no . |
Windows Registry Path:
HKEY_CURRENT_USER\SOFTWARE\Palo Alto Networks\GlobalProtect\Settings Key Name/Value translate-enter-key yes | no |
TRANSLATEENTERKEY= "yes | no" | yes |
Script Deployment Options
The following table displays options that enable GlobalProtect to initiate scripts before and after establishing a connection and before disconnecting. Because these options are not available in the portal, you must define the values for the relevant key—either pre-vpn-connect , post-vpn-connect , or pre-vpn-disconnect —from the Windows registry or macOS plist.
If you are allowing end users to establish the VPN connection to the corporate network before logging in to the Windows endpoint by using Connect Before Logon, you must run VPN connect scripts with the context admin value specified the Windows registry. You cannot specify the default context user value because there is no user prior to Windows logon.
| Portal Agent Configuration | Windows Registry/macOS Plist | Msiexec Parameter | Default |
|---|---|---|---|
|
Execute the script specified in the command setting (including any parameters passed to the script).
Environmental variables are supported. Specify the full path in commands. |
command <parameter1> <parameter2> [...]
Windows example: command %userprofile%\vpn_script.bat c: test_user macOS example: command $HOME/vpn_script.sh /Users/test_user test_user |
PREVPNCONNECTCOMMAND= ”<parameter1> <parameter2> [...]”
POSTVPNCONNECTCOMMAND= ”<parameter1> <parameter2> [...]” PREVPNDISCONNECTCOMMAND= ”<parameter1> <parameter2> [...]” |
n/a |
| ( Optional ) Specify the privileges under which the command(s) can run (default is user: if you do not specify the context, the command runs as the current active user). | context admin | user |
PREVPNCONNECTCONTEXT= ”admin | user”
POSTVPNCONNECTCONTEXT= ”admin | user” PREVPNDISCONNECTCONTEXT= ”admin | user” |
user |
|
(
Optional
) Specify the number of seconds the GlobalProtect app waits for the command to execute (range is 0-120). If the command does not complete before the timeout, the app proceeds to establish a connection or disconnect. A value of 0 (the default) means the app does not wait to execute the command.
Not supported for post-vpn-connect . |
timeout <value>
Example: timeout 60 |
PREVPNCONNECTTIMEOUT= ”<value>”
PREVPNDISCONNECTTIMEOUT= ”<value>” |
0 |
|
(
Optional
) Specify the full path of a file used in a command. The GlobalProtect app verifies the integrity of the file by checking it against the value specified in the checksum key.
Environmental variables are supported. |
file <path_file> |
PREVPNCONNECTFILE= ”<path_file>”
POSTVPNCONNECTFILE= ”<path_file>” PREVPNDISCONNECTFILE= ”<path_file>” |
n/a |
| ( Optional ) Specify the sha256 checksum of the file referred to in the file key. If the checksum is specified, the GlobalProtect app executes the command(s) only if the checksum generated by the GlobalProtect app matches the checksum value specified here. | checksum <value> |
PREVPNCONNECTCHECKSUM= ”<value>”
POSTVPNCONNECTCHECKSUM= ”<value>” PREVPNDISCONNECTCHECKSUM =”<value>” |
n/a |
|
(
Optional
) Specify an error message to inform the user that either the command(s) cannot be executed or the command(s) exited with a non-zero return code.
The message must be 1,024 or fewer ANSI characters. |
error-msg <message>
Example: error-msg Failed executing pre-vpn-connect action! |
PREVPNCONNECTERRORMSG= ”<message>”
POSTVPNCONNECTERRORMSG= ”<message>” PREVPNDISCONNECTERRORMSG =”<message>” |
n/a |
Configure Conditional Connect Method Based on Network Type
| Where Can I Use This? | What Do I Need? |
|---|---|
|
|
Configure Conditional Connect to enable the GlobalProtect app to change the connect method dynamically based on whether the internal host detection determines that the user is on the internal network or working from a remote location. You deploy the conditional-connect setting transparently from the macOS plist or the Windows Registry. Before enabling Conditional Connect, make sure that you have:
- Enabled internal host detection
- Configured the endpoints to use the on-demand connect method
graph TD
    A[Endpoint Starts] --> B{Is Internal?};
    B -- Yes --> C[No VPN Connection Needed];
    B -- No --> D[Establish VPN Tunnel];
    D --> E[Access Resources Securely];
    C --> F[Monitor Internal Network];
    F --> B;
    E --> F;
    D --> G{Connection Mode?};
    G -- On-demand --> D;
    G -- User-logon --> D;
    G -- Pre-logon --> D;
- Deploy Conditional Connect to Windows endpoints.
- In the Windows Registry, go to: \HKEY_LOCAL_MACHINE > SOFTWARE> Palo Alto Networks > GlobalProtect > Settings .
- Set the key as conditional-connect and the value to Yes .
- Deploy Conditional Connect to macOS endpoints.
- In the plist file ( /Library/Preferences/com.paloaltonetworks.GlobalProtect.settings.plist ), go to /Palo Alto Networks/GlobalProtect/Settings .
- Set conditional-connect to Yes .
Deploy App Settings to Windows Endpoints (Overview)
Use the Windows Registry or Windows Installer ( Msiexec ) to transparently deploy the GlobalProtect app and settings to Windows endpoints.
- Deploy Agent Settings in the Windows Registry
- Deploy Agent Settings from Msiexec
- Deploy Scripts Using the Windows Registry
- Deploy Scripts Using Msiexec
- Deploy Connect Before Logon Settings in the Windows Registry
- Deploy GlobalProtect Credential Provider Settings in the Windows Registry
- SSO Wrapping for Third-Party Credential Providers on Windows Endpoints (Overview)
- Enable SSO Wrapping for Third-Party Credentials with the Windows Registry
- Enable SSO Wrapping for Third-Party Credentials with the Windows Installer
Deploy App Settings in the Windows Registry
You can enable deployment of GlobalProtect app settings to Windows endpoints prior to their first connection to the GlobalProtect portal by using the Windows Registry. Use the options described in the Customizable App Settings table to use the Windows Registry to customize app settings for Windows endpoints.
In addition to using the Windows Registry to deploy GlobalProtect app settings, you can enable the GlobalProtect app to collect specific Windows Registry information from Windows endpoints. You can then monitor the data and add it to a security rule to use as matching criteria. Endpoint traffic that matches registry settings you define can be enforced according to the security rule.
- Locate the GlobalProtect app customization settings in the Windows Registry.
Open the Windows Registry (enter regedit on the command prompt) and go to:
HKEY_LOCAL_MACHINE\SOFTWARE\Palo Alto Networks\GlobalProtect\Settings\
- Set the portal name.
If you do not want the end user to manually enter the portal address even for the first connection, you can pre-deploy the portal address through the Windows Registry.
If you want to define all other app settings, you can define keys in the Windows Registry ( HKEY_LOCAL_MACHINE\SOFTWARE\Palo Alto Networks\GlobalProtect\Settings\
- In the Window Registry, go to:
HKEY_LOCAL_MACHINE\SOFTWARE\Palo Alto Networks\GlobalProtect\PanSetup
- Right-click Portal and then select Modify .
- Enter the portal name in the Value data field, and then click OK .
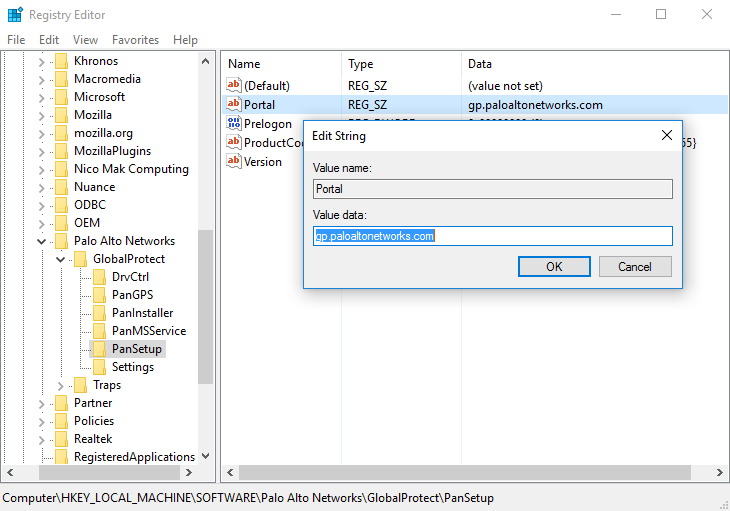 Figure: Windows Registry Editor showing the GlobalProtect PanSetup key and Portal value
- Deploy various settings to the Windows endpoint, including the connect method for the GlobalProtect app and SSO.
View Customizable App Settings for a full list of the commands and values you can set up using the Windows Registry.
You have the option to deploy connect before logon settings to the Windows endpoints prior to enabling end users to log in to the VPN before logging into the endpoint.
You have the option to deploy GlobalProtect credential provider settings to the Windows endpoints to delay the GlobalProtect credential provider Windows sign-in request or enforce the GlobalProtect credential provider as the default sign-in option.
- Enable the GlobalProtect app to wrap third-party credentials on the Windows endpoint, allowing for SSO when using a third-party credential provider.
Refer to Enable SSO Wrapping for Third-Party Credentials with the Windows Registry .
Deploy App Settings from Msiexec
On Windows endpoints, you have the option of automatically deploying the GlobalProtect app and the app settings from the Windows Installer ( Msiexec ) by using the following syntax:
msiexec.exe /i GlobalProtect.msi <SETTING>="<value>"
Msiexec is an executable program that installs or configures a product from the command line. On endpoints running Microsoft Windows XP or a later OS, the maximum string length that you can use at the command prompt is 8,191 characters.
| Msiexec Example | Description |
|---|---|
| msiexec.exe /i GlobalProtect.msi /quiet PORTAL=”portal.acme.com” | Install GlobalProtect in quiet mode (no user interaction) and configure the portal address. |
| msiexec.exe /i GlobalProtect.msi CANCONTINUEIFPORTALCERTINVALID=”no” | Install GlobalProtect with the option to prevent users from connecting to the portal if the certificate is not valid. |
For a complete list of settings and the corresponding default values, see Customizable App Settings .
You can also Enable SSO Wrapping for Third-Party Credentials with the Windows Installer .
Deploy Scripts Using the Windows Registry
You can enable deployment of custom scripts to Windows endpoints using the Windows Registry.
You can configure the GlobalProtect app to initiate and run a script for any or all of the following events: before and after establishing the tunnel, and before disconnecting the tunnel. To run the script at a particular event, reference the batch script from a command registry entry for that event.
Depending on the configuration settings, the GlobalProtect app can run a script before and after the app establishes a connection to the gateway, and before the app disconnects. Use the following workflow to use the Windows Registry to customize app settings for Windows endpoints.
The registry settings that enable you to deploy scripts are supported on endpoints running GlobalProtect App 2.3 and later releases.
- Open the Windows registry, and locate the GlobalProtect app customization settings.
Open the Windows registry (enter regedit in the command prompt) and go to one of the following key locations, depending on when you want to execute scripts (pre/post connect or pre disconnect):
HKEY_LOCAL_MACHINE\SOFTWARE\Palo Alto Networks\GlobalProtect\Settings\pre-vpn-connect
HKEY_LOCAL_MACHINE\SOFTWARE\Palo Alto Networks\GlobalProtect\Settings\post-vpn-connect
HKEY_LOCAL_MACHINE\SOFTWARE\Palo Alto Networks\GlobalProtect\Settings\pre-vpn-disconnect
If the key does not exist within the Settings key, create it by right-clicking Settings and selecting New > Key ).
- Enable the GlobalProtect app to run scripts by creating a new String Value named command .
The batch file specified here should contain the specific script (including any parameters passed to the script) that you want run on the device.
- If the command string does not already exist, create it by right-clicking the pre-vpn-connect , post-vpn-connect , or pre-vpn-disconnect key, selecting New > String Value , and naming it command ).
- Right click command , and then select Modify .
- Enter the commands or script that the GlobalProtect app should run. For example:
%userprofile%\pre_vpn_connect.bat c: test_user
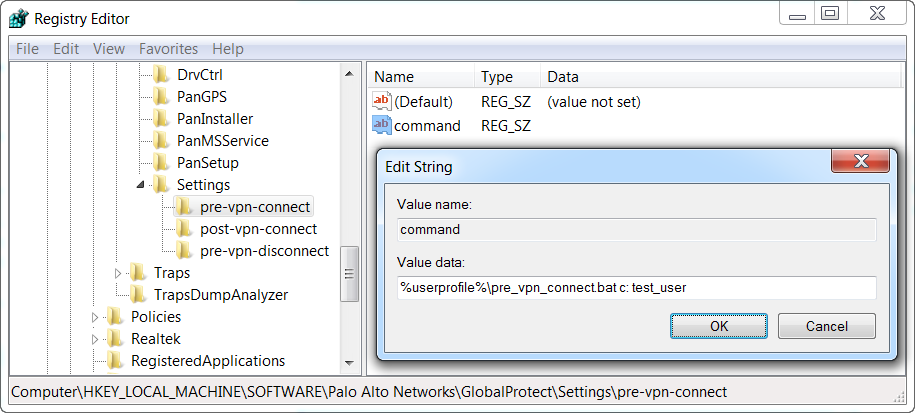 Figure: Windows Registry Editor showing the value data for a pre-vpn-connect script command
- ( Optional ) Add additional registry entries as needed for each command.
Create or modify registry strings and their corresponding values, including context , timeout , file , checksum , or error-msg . For additional information, see Script Deployment Options .
Deploy Scripts Using Msiexec
On Windows endpoints, you can use the Windows Installer ( Msiexec ) to deploy the GlobalProtect app, app settings, and scripts that the app will run automatically (see Script Deployment Options ). To do so, use the following syntax:
msiexec.exe /i GlobalProtect.msi <SETTING>="<value>"
Msiexec is an executable program that installs or configures a product from a command line. On systems running Microsoft Windows XP or later releases, the maximum string length that you can use at the command prompt is 8,191 characters.
This limitation applies to the command line, individual environment variables (such as the USERPROFILE variable) that are inherited by other processes, and all environment variable expansions. If you run batch files from the command line, this limitation also applies to batch file processing.
For example, to deploy scripts that run at specific connect or disconnect events, you can use syntax similar to the following examples:
Example: Use Msiexec to Deploy Scripts that Run Before a Connect Event
For a script that you can copy and paste, go here .
msiexec.exe /i GlobalProtect.msi
PREVPNCONNECTCOMMAND="%userprofile%\pre_vpn_connect.bat c: test_user"
PREVPNCONNECTCONTEXT="user"
PREVPNCONNECTTIMEOUT="60"
PREVPNCONNECTFILE="C:\Users\test_user\pre_vpn_connect.bat"
PREVPNCONNECTCHECKSUM="a48ad33695a44de887bba8f2f3174fd8fb01a46a19e3ec9078b0118647ccf599"
PREVPNCONNECTERRORMSG="Failed executing pre-vpn-connect action."
For a complete list of settings and the corresponding default values, see Script Deployment Options .
Example: Use Msiexec to Deploy Scripts that Run at Pre-Connect, Post-Connect, and Pre-Disconnect Events
For a script that you can copy and paste, go here .
msiexec.exe /i GlobalProtect.msi
PREVPNCONNECTCOMMAND="%userprofile%\pre_vpn_connect.bat c: test_user"
PREVPNCONNECTCONTEXT="user"
PREVPNCONNECTTIMEOUT="60"
PREVPNCONNECTFILE="C:\Users\test_user\pre_vpn_connect.bat"
PREVPNCONNECTCHECKSUM="a48ad33695a44de887bba8f2f3174fd8fb01a46a19e3ec9078b0118647ccf599"
PREVPNCONNECTERRORMSG="Failed executing pre-vpn-connect action."
POSTVPNCONNECTCOMMAND="c:\users\test_user\post_vpn_connect.bat c: test_user"
POSTVPNCONNECTCONTEXT="admin"
POSTVPNCONNECTFILE="%userprofile%\post_vpn_connect.bat"
POSTVPNCONNECTCHECKSUM="b48ad33695a44de887bba8f2f3174fd8fb01a46a19e3ec9078b0118647ccf598"
POSTVPNCONNECTERRORMSG="Failed executing post-vpn-connect action."
PREVPNDISCONNECTCOMMAND="%userprofile%\pre_vpn_disconnect.bat c: test_user"
PREVPNDISCONNECTCONTEXT="admin"
PREVPNDISCONNECTTIMEOUT="0"
PREVPNDISCONNECTFILE="C:\Users\test_user\pre_vpn_disconnect.bat"
PREVPNDISCONNECTCHECKSUM="c48ad33695a44de887bba8f2f3174fd8fb01a46a19e3ec9078b0118647ccf597"
PREVPNDISCONNECTERRORMSG="Failed executing pre-vpn-disconnect action."
For a complete list of settings and the corresponding default values, see Script Deployment Options .
Deploy Connect Before Logon Settings in the Windows Registry
You can deploy Connect Before Logon settings to Windows 10 endpoints prior to enabling end users to log in to the VPN before logging into the endpoint by using the Windows Registry. GlobalProtect retrieves the registry keys only once, when the GlobalProtect app initializes.
Follow these guidelines when deploying the Connect Before Logon settings:
- The Pre-logon and Pre-logon then On-demand connection methods are not supported simultaneously with Connect Before Logon.
- If you are using smart card authentication or username/password-based authentication for user login using an authentication service such as LDAP, RADIUS, or OTP, you must configure exclusions for specific fully qualified domain names for the portal and gateway by entering them to Allow traffic to specified FQDN when Enforce GlobalProtect Connection for Network Access is enabled and GlobalProtect Connection is not established as an app setting in the App Configurations area of the GlobalProtect portal. If you are using SAML authentication for user login and using the configured SAML identity providers (ldPs) such as Okta, you must also configure exclusions for *okta.com and *oktacdn.com. For other ldPs, you must configure exclusions for the URLs that contain IP addresses or fully qualified domain names only if the Enforcer status is enabled.
- Configure the registry keys on the end user Windows endpoints.
You must change the Windows registry on the end users’ Windows endpoints before you can enable Connect Before Logon. You can automatically add the registry keys or manually add the keys.
- To automatically add the registry keys for PanPlapProvider and PanPlapProvider.dll in PanGPS.exe ( C:\Program Files\Palo Alto Networks\GlobalProtect ), use the -registerplap command to run as an administrator by using the following syntax:
PanGPS.exe -registerplap
- To automatically unregister the keys for PanPlapProvider and PanPlapProvider.dll in PanGPS.exe ( C:\Program Files\Palo Alto Networks\GlobalProtect ), use the -unregisterplap command to run as an administrator by using the following syntax:
PanGPS.exe -unregisterplap
To manually add the registry keys, open the Windows Registry Editor and enter regedit on the command prompt.
You must create the CLSID folder.
- In the Windows Registry, go to HKEY_CLASSES_ROOT\CLSID\{20A29589-E76A-488B-A520-63582302A285} . Add the PanPlapProvider value in the format @=PanPlapProvider .
- In the Windows Registry, go to HKEY_CLASSES_ROOT\CLSID\{20A29589-E76A-488B-A520-63582302A285}\InprocServer32@="PanPlapProvider.dll" . Verify that the ThreadingModel value is set to Apartment . This is the default value.
- In the Windows Registry, go to HKEY_LOCAL_MACHINE\SOFTWARE\Microsoft\Windows\CurrentVersion\Authentication\PLAP Providers\{20A29589-E76A-488B-A520-63582302A285}@="PanPlapProvider" . Add the PanPlapProvider value in the format @=PanPlapProvider .
- ( Optional ) Configure additional portal addresses or names to display.
If configured, Connect Before Logon will use the default portal address or name in the Windows Registry ( HKEY_LOCAL_MACHINE\SOFTWARE\PaloAlto Networks\GlobalProtect\PanSetup with key Portal ).
You can configure additional portal addresses or names that you want to display in the Portal drop-down by changing the registry keys on the end user Windows endpoints. You can add up to five portal addresses or names. You must change the Windows registry on the end users’ Windows endpoints before you can define the portal addresses or names.
Open the Windows Registry Editor and enter regedit on the command prompt.
- In the Windows Registry, create the CBL folder under HKEY_LOCAL_MACHINE\SOFTWARE\Palo Alto Networks\GlobalProtect .
- In the Windows Registry, go to HKEY_LOCAL_MACHINE\SOFTWARE\Palo Alto Networks\GlobalProtect\CBL .
- Select Edit > New > String Value to create a registry entry for each portal that you want to add. You must specify each entry as Portal1 , Portal2 , Portal3 , Portal4 , and Portal5 . Each entry cannot contain spaces.
- Right-click the portal registry value, and then select Modify .
- Enter the IP address or name of the GlobalProtect portal in the Value Data field, and then click OK .
- Repeat steps 3 and 4 for each portal that you want to add.
- ( Optional ) Display the predefined portal addresses or names.
You must change the Windows registry on the end users’ Windows endpoints before you can display the portal addresses or names.
Open the Windows Registry Editor and enter regedit on the command prompt.
- In the Windows Registry, create the CBL folder under HKEY_LOCAL_MACHINE\SOFTWARE\Palo Alto Networks\GlobalProtect .
- In the Windows Registry, go to HKEY_LOCAL_MACHINE\SOFTWARE\Palo Alto Networks\GlobalProtect\CBL .
- Select Edit > New > String Value to create a registry entry for AlwaysShowPortal .
- Enter the value as yes in the Value Data field, and then click OK .
By default, Connect Before Logon does not display the portal address or name if only one portal is defined.
- ( Optional ) Enable end users to authenticate using a smart card.
You must change the Windows registry on the end users’ Windows endpoints before you can enable smart card authentication.
Open the Windows Registry Editor and enter regedit on the command prompt.
- In the Windows Registry, create the CBL folder under HKEY_LOCAL_MACHINE\SOFTWARE\Palo Alto Networks\GlobalProtect .
- In the Windows Registry, go to HKEY_LOCAL_MACHINE\SOFTWARE\Palo Alto Networks\GlobalProtect\CBL .
- Select Edit > New > String Value to create a registry entry for UseSmartCard .
- Enter the value as yes in the Value Data field, and then click OK .
- Reboot the endpoint.
You must reboot the endpoint in order for the PLAP and Connect Before Logon registry keys to take effect.
- Verify the configuration.
After you have configured the settings in the Windows registry and to use Connect Before Logon starting with GlobalProtect™ app 5.2, choose the authentication method:
- Connect Before Logon Using Smart Card Authentication
- Connect Before Logon Using SAML Authentication
- Connect Before Logon Using Username/Password-Based Authentication
Deploy GlobalProtect Credential Provider Settings in the Windows Registry
You can deploy the GlobalProtect credential provider settings to delay the GlobalProtect credential provider Windows sign-in request or to enforce the GlobalProtect credential provider as the default sign-in option for Windows 10 by using the Windows Registry.
- Delay the GlobalProtect credential provider Windows sign-in request.
Establishing the GlobalProtect tunnel before Windows login can be useful in certain situations. For example, you may want to enforce the Windows device to synchronize data with the Active Directory or want to delay the GlobalProtect credential provider Windows sign-in request.
You can configure the amount of time (in seconds) that the GlobalProtect credential provider waits for the tunnel to be established before submitting a Windows sign-in request when single sign on (SSO) is enabled. By default, the GlobalProtect Credential Provider Support to Delay Windows Login Before Establishing the Tunnel Connection feature is disabled and the GlobalProtect credential provider submits the sign-in requests without any delay.
- From the command prompt, enter the regedit command to open the Windows Registry Editor.
- In the Windows Registry, go to HKEY_LOCAL_MACHINE\SOFTWARE\Palo Alto Networks\GlobalProtect\PanSetup
- Right-click PreLogonState and then select New > DWORD (32-bit) Value .
- Right-click New Value #1 and then select Rename .
Enter LogonWaitTime . Right-click LogonWaitTime and then select Modify . In the Value Data field, set the number of seconds (range is 5-30) for end users to wait to log in to Windows before establishing a tunnel connection. Click OK .
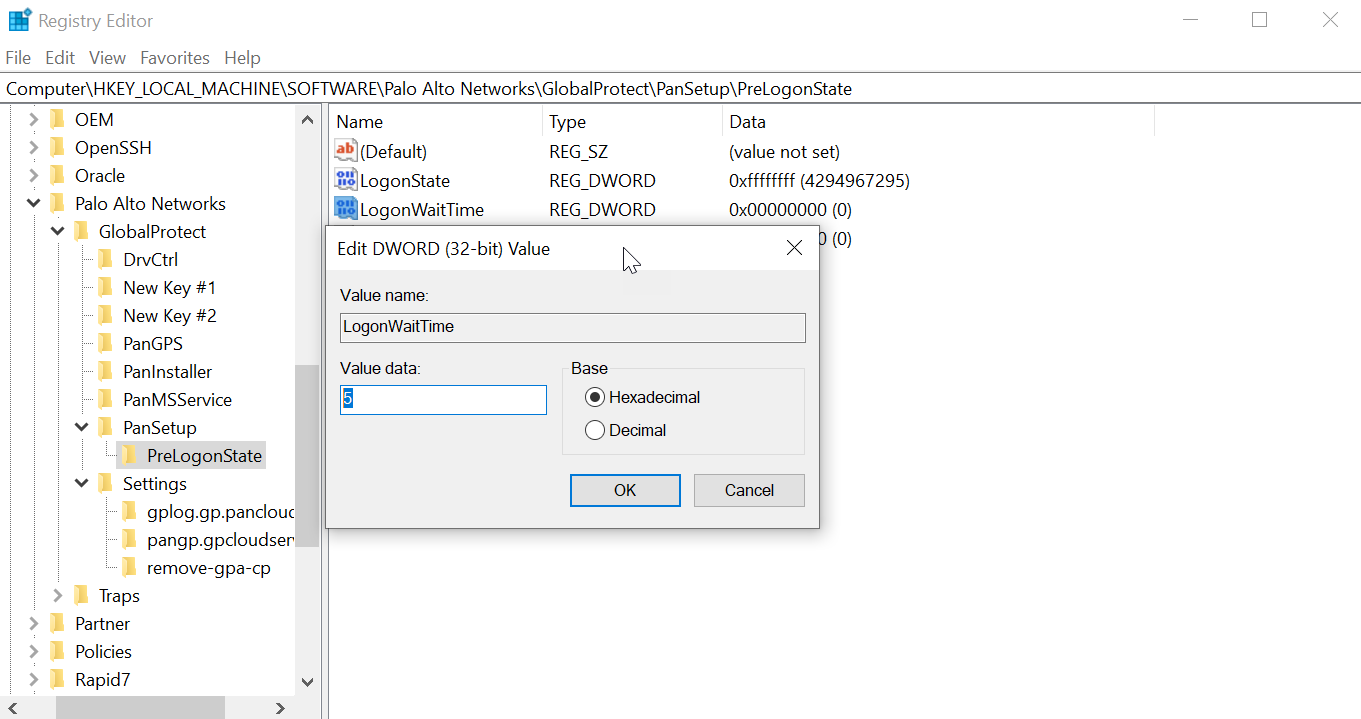 Figure: Windows Registry Editor showing the LogonWaitTime DWORD value
- Repeat substeps 1, 2, and 3 to delay the GlobalProtect credential provider from submitting the Windows sign-in request after the tunnel is established.
Enter LogonPostWaitTime . Right-click LogonPostWaitTime and then select Modify . In the Value Data field, set the number of seconds (range is 3-10) for end users to wait to log in to Windows. Click OK .
You are required to first enter the amount of time (in seconds) for LogonWaitTime , and then enter the amount of time (in seconds) for LogonPostWaitTime .
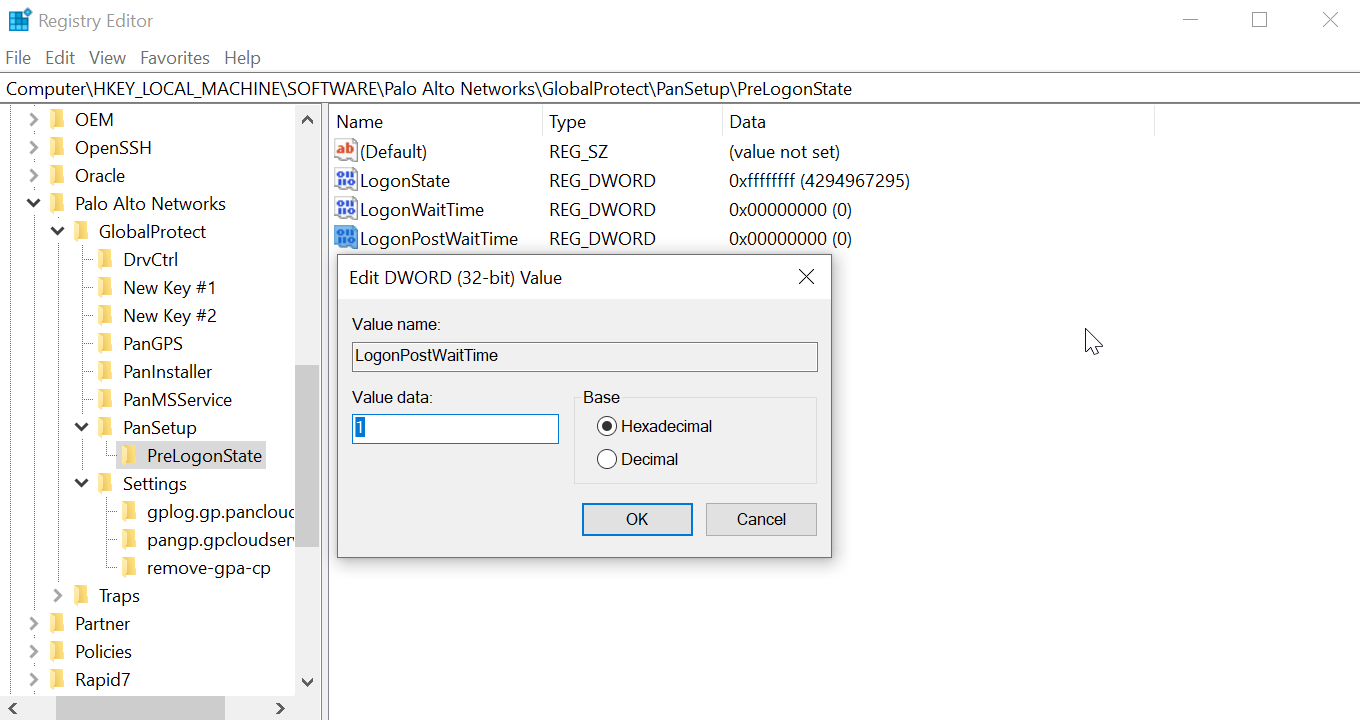 Figure: Windows Registry Editor showing the LogonPostWaitTime DWORD value
- Enforce GlobalProtect credential provider as the default sign-in option for Windows 10.
When GlobalProtect SSO is enabled on Windows devices, users can have more than one sign-in option in addition to using the GlobalProtect credential provider options such as a third-party credential, smart card, Windows Hello PIN, Windows Hello Password, or Windows Hello Fingerprint. Users can use any of these sign-in options to sign in to their Windows device and set it as the default sign-in option at the next Windows login making GlobalProtect SSO unavailable. Users must manually switch to the GlobalProtect credential provider again to enable GlobalProtect SSO. When the GlobalProtect credential provider is enabled as the default sign-in option even when users can login with any other sign-in option, the GlobalProtect credential provider sign-in option is selected at the next Windows login and for subsequent logins.
When GlobalProtect is installed on Windows devices, users cannot log in to the device using the User Principal Name (UPN)- for example, username@domain - when the GlobalProtect credential provider is selected and the device is offline.
Follow these guidelines when you are enforcing the GlobalProtect credential provider to be the default-sign option on Windows devices:
- While the GlobalProtect app is installed or SSO is enabled, the GlobalProtect credential provider is set as the default sign-in option for all users even when the MakeGPCPDefault setting is disabled.
- When SSO is enabled and the MakeGPCPDefault setting is enabled, users can use any sign-in options such as a third-party credential provider, smart card, Windows Hello PIN, Windows Hello password, or Windows Fingerprint to sign in to their Windows device. Regardless of the sign-in option selected, the GlobalProtect credential provider will be used as the default sign-in option at the next Windows login.
- When SSO is enabled and the MakeGPCPDefault setting is disabled or empty, the user selected sign-in option will be used as the default at the next Windows login.
- When SSO is disabled, the GlobalProtect credential provider is unavailable. The Windows default sign-in option will work as expected.
- The Enforce GlobalProtect Credential Provider as the Default Sign-In for Windows 10 feature does not support the Other user login option. You can configure the Other user login option by using the Group Policy Object (GPO) on the Windows device.
- From the command prompt, enter the regedit command to open the Windows Registry Editor.
- In the Window Registry, go to:
HKEY_LOCAL_MACHINE\SOFTWARE\Palo Alto Networks\GlobalProtect
- Right-click the GlobalProtect folder, then select New > String Value to add a new string value.
- Enter the MakeGPCPDefault string value. Right-click MakeGPCPDefault and then select Modify .
In the Value data field, enter yes to enable the GlobalProtect credential provider to be the default sign-in option at the next Windows login. If you set the Value data to no , the MakeGPCPDefault setting is disabled and the user selected sign-in option will be used as the default at the next Windows login. Click OK .
 Figure: Windows Registry Editor showing the MakeGPCPDefault string value
SSO Wrapping for Third-Party Credential Providers on Windows Endpoints (Overview)
On Windows 7 endpoints, the GlobalProtect app utilizes the Microsoft credential provider framework to support single sign-on (SSO). With SSO, the GlobalProtect credential provider wraps the Windows native credential provider, enabling GlobalProtect to use Windows login credentials to automatically authenticate and connect to the GlobalProtect portal and gateway. In addition, SSO wrapping enables Windows 10 users to update their Active Directory (AD) password using the GlobalProtect credential provider when their password expires or an administrator requires a password change at the next login.
When other third-party credential providers also exist on the endpoint, the GlobalProtect credential provider is unable to gather the user's Windows login credentials. As a result, GlobalProtect fails to connect to the GlobalProtect portal and gateway automatically. If SSO fails, you can identify the third-party credential provider and configure the GlobalProtect app to wrap those third-party credentials, which enables users to successfully authenticate to Windows, GlobalProtect, and the third-party credential provider using only their Windows login credentials.
Optionally, you can configure Windows to display separate login tiles: one for each third-party credential provider and another for the native Windows login. This is useful when a third-party credential provider adds additional functionality that does not apply to GlobalProtect.
If you want to remove the GlobalProtect credential provider from your Windows endpoint, execute the GlobalProtectPanGPS.exe -u command in the Command Prompt.
Use the Windows registry or the Windows Installer ( msiexec ) to allow GlobalProtect to wrap third-party credentials:
- Enable SSO Wrapping for Third-Party Credentials with the Windows Registry
- Enable SSO Wrapping for Third-Party Credentials with the Windows Installer
GlobalProtect SSO wrapping for third-party credential providers (CPs) is dependent on the third-party CP settings. In some cases, GlobalProtect SSO wrapping might not work correctly if the third-party CP implementation does not allow GlobalProtect to successfully wrap their CP.
Enable SSO Wrapping for Third-Party Credentials with the Windows Registry
Use the following steps in the Windows Registry to enable SSO to wrap third-party credentials on Windows 7 endpoints.
- Open the Windows Registry and locate the globally unique identifier (GUID) for the third-party credential provider that you want to wrap.
- From the command prompt, enter the regedit command to open the Windows Registry Editor.
- Go to the following Windows Registry location to view the list of currently installed credential providers:
HKEY_LOCAL_MACHINE\SOFTWARE\Microsoft\Windows\CurrentVersion\Authentication\Credential Providers.
- Copy the GUID key for the credential provider that you want to wrap (including the curly brackets — { and } — on either end of the GUID):
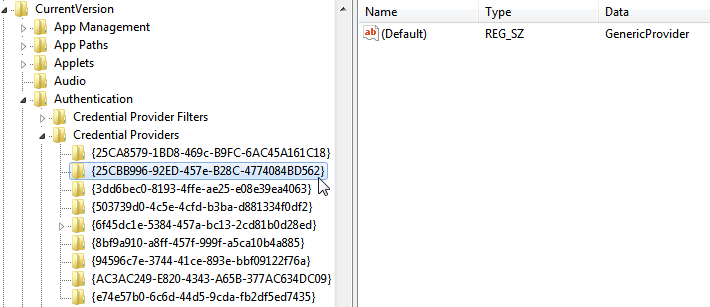 Figure: Windows Registry Editor showing the list of installed Credential Providers and their GUIDs
- Enable SSO wrapping for third-party credential providers by adding the wrap-cp-guid setting to the GlobalProtect Registry.
- Go to the following Windows Registry location:
HKEY_LOCAL_MACHINE\SOFTWARE\Palo Alto Networks\GlobalProtect:
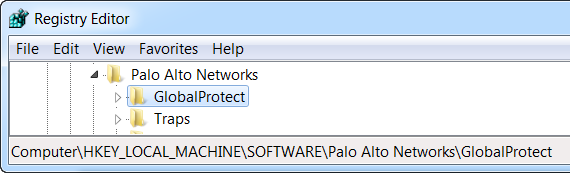 Figure: Windows Registry Editor showing the GlobalProtect key location
- Right-click the GlobalProtect folder, and then select New > String Value to add a new string value:
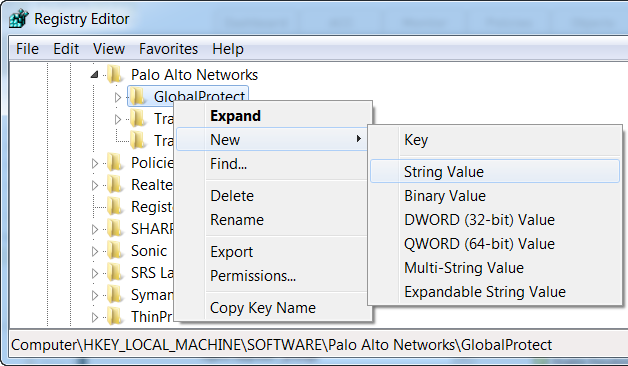 Figure: Windows Registry Editor showing the option to create a new String Value
- Configure the following String Value fields:
- Name : wrap-cp-guid
- Value data : {<third-party credential provider GUID>}
For the Value data field, the GUID value that you enter must be enclosed with curly brackets: { and } .
The following is an example of what a third-party credential provider GUID in the Value data field might look like:
{A1DA9BCC-9720-4921-8373-A8EC5D48450F}
- For the new String Value , wrap-cp-guid is displayed as the string value’s Name and the GUID is displayed as the Value Data .
 Figure: Windows Registry Editor showing the wrap-cp-guid string value and its data
- Next Steps:
- With this setup, the native Windows logon tile is displayed to users on the logon screen. When users click the tile and log in to the system with their Windows credentials, that single login authenticates the users to Windows, GlobalProtect, and the third-party credential provider.
- ( Optional ) If you want to display multiple tiles on the logon screen (for example, the native Windows tile and the tile for the third-party credential provider), continue to step 4.
- ( Optional ) If you want to assign a default credential provider for users, continue to step 5.
- ( Optional ) If you want to hide a third-party credential provider tile from the logon screen, continue to step 6.
- ( Optional ) Allow the third-party credential provider tile to be displayed to users at login.
Add a second String Value with the Name filter-non-gpcp and enter no for the string’s Value data :
 Figure: Windows Registry Editor showing the filter-non-gpcp string value set to 'no'
After you add this string value to the GlobalProtect settings, two login options are presented to users on the Windows logon screen: the native Windows tile and the third-party credential provider’s tile.
- Assign a default credential provider for user login.
- Open the Windows Registry to locate the globally unique identifier (GUID) for the third-party credential provider that you want to assign as the default credential provider.
- From the command prompt, enter the regedit command to open the Windows Registry Editor.
- Go to the following Windows Registry location to view the list of currently installed credential providers:
HKEY_LOCAL_MACHINE\SOFTWARE\Microsoft\Windows\CurrentVersion\Authentication\Credential Providers.
- Copy the complete GUID key for the credential provider (including the curly brackets — { and } —on either end of the GUID).
- Open the Local Group Policy Editor to enable and assign a default credential provider.
- From the command prompt, enter the gpedit.msc command to open the Local Group Policy Editor.
- Select Computer Configuration > Administrative Templates > System > Logon .
- Under Setting , double-click Assign a default credential provider to open the Assign a default credential provider window.
- Set the policy to Enabled .
- Under Assign the following credential provider as the default credential provider , enter the GUID of the credential provider (copied from the Windows Registry).
- Click Apply , and the click OK to save your changes.
- ( Optional ) Hide a third-party credential provider tile from the Windows logon screen.
- Open the Windows Registry to locate the globally unique identifier (GUID) for the third-party credential provider that you want to hide.
- From the command prompt, enter the regedit command to open the Windows Registry Editor.
- Go to the following Windows Registry location to view the list of currently installed credential providers:
HKEY_LOCAL_MACHINE\SOFTWARE\Microsoft\Windows\CurrentVersion\Authentication\Credential Providers.
- Copy the complete GUID key for the credential provider that you want to hide (including the curly brackets — { and } — on either end of the GUID).
- Open the Local Group Policy Editor to hide the third-party credential provider.
- From the command prompt, enter the gpedit.msc command to open the Local Group Policy Editor.
- Select Computer Configuration > Administrative Templates > System > Logon .
- Under Setting , double-click Exclude credential providers to open the Exclude credential providers window.
- Set the policy to Enabled .
- Under Exclude the following credential providers , enter the GUID of the credential provider you want to hide (copied from the Windows Registry).
To hide multiple credential providers, separate each GUID with a comma.
- Click Apply , and then click OK to save your changes.
- Finalize your changes.
Once your changes are finalized, reboot your system for the changes to take effect.
Enable SSO Wrapping for Third-Party Credentials with the Windows Installer
Use the following options in the Windows Installer ( Msiexec ) to enable SSO to wrap third-party credential providers on Windows 7 endpoints.
- Wrap third-party credentials and display the native tile to users at login. Users can click the tile to log in to the endpoint using their native Windows credentials. With that single login, users can authenticate to Windows, GlobalProtect, and the third-party credential provider.
Use the following syntax from the Windows Installer ( Msiexec ):
msiexec.exe /i GlobalProtect.msi WRAPCPGUID=”{guid_value}” FILTERNONGPCP=”yes”
In the syntax above, the FILTERNONGPCP parameter simplifies authentication for the user by filtering the option to log in to the system using the third-party credentials.
- If you would like users to have the option of logging in using the third-party credentials, use the following syntax from the Windows Installer ( Msiexec ):
- msiexec.exe /i GlobalProtect.msi WRAPCPGUID=”{guid_value}”
FILTERNONGPCP=”no”
In the syntax above, the FILTERNONGPCP parameter is set to “no” , which filters out the third-party credential provider’s logon tile so that only the native tile displays. In this case, both the native Windows tile and the third-party credential provider tile are displayed to users when logging in to the Windows endpoint.
Deploy App Settings to macOS Endpoints (Overview)
Use the macOS global plist (property list) file to set the GlobalProtect app customization settings or to deploy scripts to macOS endpoints.
Deploy App Settings in the macOS Plist
You can set the GlobalProtect app customization settings in the macOS global plist (Property list) file. This enables deployment of GlobalProtect app settings to macOS endpoints prior to their first connection to the GlobalProtect portal.
On macOS endpoints, plist files are either located in /Library/Preferences or in ~/Library/Preferences . The tilde ( ~ ) symbol indicates that the location is in the current user's home folder. The GlobalProtect app on a macOS endpoint first checks for the GlobalProtect plist settings. If the plist does not exist at that location, the GlobalProtect app searches for plist settings in ~/Library/Preferences .
In addition to using the macOS plist to deploy GlobalProtect app settings, you can enable the GlobalProtect app to collect specific macOS plist information from the endpoints. You can then monitor the data and add it to a security rule to use as matching criteria. Endpoint traffic that matches registry settings you define can be enforced according to the security rule.
- Open the GlobalProtect plist file and locate the GlobalProtect app customization settings.
Use Xcode or an alternate plist editor to open the plist file:
/Library/Preferences/com.paloaltonetworks.GlobalProtect.settings.plist
Then go to:
/Palo Alto Networks/GlobalProtect/Settings
If the Settings dictionary does not exist, create it. Add each key to the Settings dictionary as a string.
- Set the portal name.
If you do not want the end user to manually enter the portal address even for the first connection, you can pre-deploy the portal address through the plist. In the PanSetup dictionary, configure an entry for Portal .
- Deploy various settings to the macOS endpoint, including the connect method for the GlobalProtect app.
View Customizable App Settings for a full list of the keys and values that you can configure using the macOS plist.
- ( Optional ) If you are using system extensions and need to switch to kernel extensions, set the key value to UseKextAnyway in the macOS plist ( /Library/Preferences/com.paloaltonetworks.GlobalProtect.settings.plist ) for the GlobalProtect app.
Follow these guidelines when you are using system extensions and need to switch to kernel extensions:
- After you have enabled system extensions, you must first uninstall the existing app to use the UseKextAnyway plist key to enable kernel extensions on macOS.
- You later have the option to revert to use system extensions. You must delete the UseKextAnyway plist key in the macOS plist. After you have deleted this plist key, you must restart the GlobalProtect app in order for the change to take effect.
- By switching to kernel extensions, you can no longer use the Split DNS and Enforce GlobalProtect Connections with FQDN Exclusions features.
- If you have configured split tunnel settings based on the application on macOS endpoints, all Safari-based traffic, Microsoft Teams-based traffic, or Slack-based traffic that are defined in the split tunnel configuration would be dropped. We recommend that you use Chrome instead of Safari so that traffic defined in the split tunnel configuration will not be dropped. All traffic that was created based on the WebKit framework such as Safari, Microsoft Teams, or Slack might have problems using kernel extensions.
You must specify UseKextAnyway as the plist key before installing GlobalProtect app 5.2.6 or later releases or upgrading from an earlier release to GlobalProtect app 5.2.6 or later releases running Catalina 10.15.4 or later. However, if you are upgrading from an earlier release to GlobalProtect app 5.2.6 or later releases running macOS Big Sur 11 or later, you must enable system extensions.
Deploy Scripts Using the macOS Plist
When a user connects to the GlobalProtect gateway for the first time, the GlobalProtect app downloads the configuration file and stores app settings in a GlobalProtect macOS property file (plist). In addition to making changes to the app settings, you use the plist to deploy scripts at any or all of the following events: before and after establishing the tunnel, and before disconnecting the tunnel. Use the following workflow to use the plist to deploy scripts to macOS endpoints.
The macOS plist settings that enable you to deploy scripts are supported on endpoints running GlobalProtect App 2.3 and later releases.
- ( Endpoints running Mac OS X 10.9 or a later OS ) Flush the settings cache. This prevents the OS from using the cached preferences after making changes to the plist.
To clear the default preferences cache, run the killall cfprefsd command from a macOS terminal.
- Open the GlobalProtect plist file, and locate or create the GlobalProtect dictionary associated with the connect or disconnect event. The dictionary under which you will add the settings determines when the GlobalProtect app runs the script(s).
Use Xcode or an alternate plist editor to open the plist file ( /Library/Preferences/com.paloaltonetworks.GlobalProtect.settings.plist ) and go to one of the following dictionary locations:
- /Palo Alto Networks/GlobalProtect/Settings/pre-vpn-connect
- /Palo Alto Networks/GlobalProtect/Settings/post-vpn-connect
- /Palo Alto Networks/GlobalProtect/Settings/pre-vpn-disconnect
If Settings dictionary does not exist, create it. Then, in Settings , create a new dictionary for the event or events at which you want to run scripts.
- Enable the GlobalProtect app to run scripts by creating a new String named command .
The value specified here should reference the shell script (and the parameters to pass to the script) that you want run on your endpoints.
If the command string does not already exist, add it to the dictionary and specify the script and parameters in the Value field. For example:
$HOME/pre_vpn_connect.sh
/Users/username username
Environmental variables are supported.
As a best practice, specify the full path in commands.
- ( Optional ) Add additional settings related to the command, including administrator privileges, a timeout value for the script, checksum value for the batch file, and an error message to display if the command fails to execute successfully.
Create or modify additional strings in the plist ( context , timeout , file , checksum , and/or error-msg) and enter their corresponding values. For additional information, see Script Deployment Options .
- Save the changes to the plist file.
Save the plist.
Deploy App Settings to Linux Endpoints
You can set the GlobalProtect app customization settings in the pre-deployment configuration file ( pangps.xml ). This enables deployment of GlobalProtect app settings to Linux endpoints prior to their first connection to the GlobalProtect portal.
On Linux endpoints, the pre-deployment configuration file ( pangps.xml ) is located in /opt/paloaltonetworks/globalprotect .
The following table lists the pre-deployment settings for Linux endpoints that you can add to the pangps.xml file to customize the behavior of the GlobalProtect app and how the user interacts with the GlobalProtect app.
| Portal Agent Configuration | Linux | Default |
|---|---|---|
| Connect Method | connect-method on-demand | user-logon | user-logon |
| Allow User to Change Portal Address | can-change-portal yes | no | yes |
| Allow User to Continue with Invalid Portal Server Certificate | can-continue-if-portal-cert-invalid yes | no | yes |
| Use Default Browser for SAML Authentication | default-browser yes | no | no |
| Portal Connection Timeout (sec) | portal-timeout <portaltimeout> | 5 |
| TCP Connection Timeout (sec) | connect-timeout <connect-timeout> | 5 |
| TCP Receive Timeout (sec) | receive-timeout <receive-timeout> | 30 |
|
Not in portal
This setting is used to predeploy the full chain certificate verification flag. |
full-chain-cert-verify
<Settings> <full-chain-cert-verify>yes</full-chain-cert-verify> </Settings> |
n/a |
|
Not in portal
This setting specifies the default portal IP address (or hostname). |
Portal <IPaddress> | n/a |
If you have already installed the GlobalProtect app on the Linux endpoint, follow these instructions:
- Modify the pre-deployment setting you want to edit for the pangps.xml file in /opt/paloaltonetworks/globalprotect .
- Reboot the Linux endpoint in order for the pre-deployment configuration changes to take effect.
If you are installing the GlobalProtect app for the first time, follow these instructions to deploy various settings to the Linux endpoint.
- Create the /opt/paloaltonetworks/globalprotect/pangps.xml pre-deployment configuration file.
- Add the pre-deployment settings to the pangps.xml file, including the connect method for the GlobalProtect app and the default browser for SAML authentication.
The following example shows the XML configuration of the pre-deployment changes that you deployed on the Linux endpoint, including the portal IP address (or hostname) under <PanSetup> .
<?xml version="1.0" encoding="UTF-8"?>
<GlobalProtect>
    <Settings>
        <connect-method>on-demand</connect-method>
        <can-continue-if-portal-cert-invalid>yes</can-continue-if-portal-cert-invalid>
        <can-change-portal>no</can-change-portal>
        <portal-timeout>100</portal-timeout>
        <connect-timeout>100</connect-timeout>
        <receive-timeout>100</receive-timeout>
        <default-browser>yes</default-browser>
    </Settings>
    <PanSetup>
        <Portal>portal.acme.com</Portal>
    </PanSetup>
    <PanGPS>
    </PanGPS>
</GlobalProtect>
GlobalProtect Processes to be Whitelisted on EDR Deployments
To ensure seamless operation of GlobalProtect, we suggest configuring your antivirus, EDR (Endpoint Detection and Response), or firewall applications to recognize GlobalProtect processes as safe. These security applications may sometimes mistakenly identify GlobalProtect processes as malicious. To prevent this, it is advisable to whitelist or create security exceptions for the following GlobalProtect processes before installation.
Here are the GlobalProtect processes that you must whitelist on your EDR deployments.
| macOS Process |
|---|
| /Library/SystemExtensions/[UUID]/com.paloaltonetworks.GlobalProtect.client.extension.systemextension/Contents/MacOS/com.paloaltonetworks.GlobalProtect.client.extension |
| /Applications/GlobalProtect.app/Contents/Resources/PanGPS |
| /Applications/GlobalProtect.app/Contents/Resources/PanGpHip |
| /Applications/GlobalProtect.app/Contents/Resources/PanGpHipMp |
| /Applications/GlobalProtect.app/Contents/MacOS/GlobalProtect |
| /Applications/GlobalProtect.app/Contents/Resources/gp_support.sh |
| /Applications/GlobalProtect.app/Contents/Resources/systemext_gp.sh |
| /Applications/GlobalProtect.app/Contents/Resources/uninstall_gp.sh |
| /Applications/GlobalProtect.app/Contents/Resources/gplogin.bundle/Contents/MacOS/gplogin |
| Windows Process |
|---|
| C:\Program Files\Palo Alto Networks\GlobalProtect\PanGPA.exe |
| C:\Program Files\Palo Alto Networks\GlobalProtect\PanGPS.exe |
| C:\Program Files\Palo Alto Networks\GlobalProtect\PanGpHip.exe |
| C:\Program Files\Palo Alto Networks\GlobalProtect\PanGpHipMp.exe |
| C:\Program Files\Palo Alto Networks\GlobalProtect\wa_3rd_party_host_32.exe |
| C:\Program Files\Palo Alto Networks\GlobalProtect\wa_3rd_party_host_64.exe |
| C:\Program Files\Palo Alto Networks\GlobalProtect\PanVcrediChecker.exe |
| C:\Program Files\Palo Alto Networks\GlobalProtect\PanGPSupport.exe |
| C:\Windows\System32\PanPlapApp.exe |