GlobalProtect Portals
The GlobalProtect portal provides the management functions for your GlobalProtect infrastructure.
Every endpoint that participates in the GlobalProtect network receives configuration information from the portal, including information about available gateways and any client certificates that may be required to connect to the gateways.
In addition, the portal controls the behavior and distribution of the GlobalProtect app software to both macOS and Windows endpoints.
The portal does not distribute the GlobalProtect app for use on mobile endpoints.
To get the GlobalProtect app for mobile endpoints, end users must download the app from the device store: App Store for iOS, Google Play for Android, Chrome Web Store for Chromebooks, or Microsoft Store for Windows 10 UWP.
However, the agent configurations that are deployed to mobile app users control the gateway(s) to which the mobile endpoints have access.
In addition to distributing GlobalProtect app software, you can configure the GlobalProtect portal to provide secure remote access to common enterprise web applications that use HTML, HTML5, and JavaScript technologies using GlobalProtect Clientless VPN.
Users have the advantage of secure access from SSL-enabled web browsers without installing the GlobalProtect app software. This is useful when you need to enable partner or contractor access to applications, and to safely enable unmanaged assets, including personal endpoints.
PCNSE/PCNSA Key Point: Understand the core function of the GlobalProtect Portal as the central management point that provides configuration (gateway lists, certificates, app behavior) to endpoints.
Mermaid Diagram: Basic Portal Interaction
This sequence diagram shows the basic interaction when a GlobalProtect endpoint connects to the portal to receive its configuration.
Set Up Access to the GlobalProtect Portal
Configure the GlobalProtect portal as follows:
-
Before you begin configuring the portal make sure you have:
- Created the interfaces (and zones) for the firewall where you plan to configure the portal.
- Set up the portal server certificate, gateway server certificate, SSL/TLS service profiles, and, optionally, any client certificates to deploy to end users to enable SSL/TLS connections for the GlobalProtect services.
- Defined the authentication profiles and certificate profiles that the portal can use to authenticate GlobalProtect users.
- Configured a GlobalProtect Gateway and understand Gateway Priority in a Multiple Gateway Configuration.
-
Add the portal.
- Select Network > GlobalProtect > Portals , and then Add a portal.
- Enter a Name for the portal.
The gateway name cannot contain spaces and must be unique for each virtual system.
- ( Optional ) Select the virtual system to which this portal belongs from the Location field.
- Specify network settings to enable the GlobalProtect app to communicate with the portal.
If you have not yet created a network interface for the portal, see Create Interfaces and Zones for GlobalProtect.
If you have not yet created an SSL/TLS service profile for the portal, see Deploy Server Certificates to the GlobalProtect Components.
Do not attach an interface management profile that allows HTTP, HTTPS, Telnet, or SSH on the interface where you have configured a GlobalProtect portal or gateway because this enables access to your management interface from the internet. Follow the Adminstrative Access Best Practices to ensure that you are securing administrative access to your firewalls in a way that will prevent successful attacks.
- Select General .
- In the Network Settings area, select an Interface .
-
Specify the
IP Address Type
and
IP address
for the portal web service:
- The IP address type can be IPv4 Only , IPv6 Only , or IPv4 and IPv6. Use IPv4 and IPv6 if your network supports dual stack configurations, where IPv4 and IPv6 run at the same time.
- The IP address must be compatible with the IP address type. For example, 172.16.1.0 for IPv4 addresses or 21DA:D3:0::2F3b for IPv6 addresses. For dual stack configurations, enter both an IPv4 and IPv6 address.
- Select an SSL/TLS Service Profile .
- Select General and configure Decryption log settings.
You can log successful and unsuccessful TLS/SSL handshakes and you can forward Decryption logs to Log Collectors, other storage devices, and to specific administrators.
- By default, the firewall logs only unsuccessful TLS handshakes. It is a best practice to log successful handshakes as well so that you gain visibility into as much decrypted traffic as available resources permit (but don’t decrypt private or sensitive traffic; follow decryption best practices and decrypt as much traffic as you can).
- If you have not already done so, create a Log Forwarding profile to forward Decryption logs and specify it in the Gateway configuration.
- If you log successful TLS handshakes in addition to unsuccessful TLS handshakes, configure a larger log storage space quota for the Decryption log ( Device > Setup > Management > Logging and Reporting Settings > Log Storage ).
- Select custom login and help pages or disable the login and help pages entirely. See Customize the GlobalProtect Portal Login, Welcome, and Help Pages for more details on creating a custom login page and help page.
- Select General .
-
In the Appearance area, configure any of the following settings:
- To set the Portal Login Page for user access to the portal, select the factory-default login page, Import a custom login page, or Disable access to the login page.
- To set the App Help Page to provide assistance to users with the GlobalProtect app, select the factory-default help page, Import a custom help page, or select None to remove the Help option from the Settings menu of the GlobalProtect status panel.
- Specify how the portal authenticates users.
- Select Authentication .
- Configure any of the following portal authentication settings:
If you have not yet created a server certificate for the portal and issued gateway certificates, see Deploy Server Certificates to the GlobalProtect Components.
- To secure communication between the portal and the GlobalProtect app, select the SSL/TLS Service Profile that you configured for the portal.
- To authenticate users through a local user database or an external authentication service, such as LDAP, Kerberos, TACACS+, SAML, or RADIUS (including OTP), Define the GlobalProtect Client Authentication Configurations .
-
To authenticate users based on a client certificate or a smart card/CAC, select the corresponding
Certificate Profile
. You must pre-deploy the client certificate or Deploy User-Specific Client Certificates for Authentication using the Simple Certificate Enrollment Protocol (SCEP).
- If you want to require users to authenticate to the portal using both user credentials AND a client certificate, both a Certificate Profile and Authentication Profile are required.
- If you want to allow users to authenticate to the portal using either user credentials OR a client certificate, and you select an Authentication Profile for user authentication, the Certificate Profile is optional.
- If you want to allow users to authenticate to the portal using either user credentials OR a client certificate, and you do not select an Authentication Profile for user authentication, the Certificate Profile is required.
- If you do not configure any Authentication Profile that matches a specific OS, the Certificate Profile is required.
If you allow users to authenticate to the portal using either user credentials OR a client certificate, select a Certificate Profile with the Username Field set to Subject or Subject Alt .
- Define the data that the GlobalProtect app collects from connecting endpoints after users successfully authenticate to the portal.
The GlobalProtect app sends this data to the portal to match against the selection criteria that you define for each portal agent configuration. Based on this criteria, the portal delivers a specific agent configuration to the GlobalProtect apps that connect.
- Select Portal Data Collection .
-
Configure any of the following data collection settings:
- If you want the GlobalProtect app to collect machine certificates from connecting endpoints, select the Certificate Profile that specifies the machines certificates that you want to collect.
-
If you want the GlobalProtect app to collect custom host information from connecting endpoints, define the following registry, plist, or process list data in the Custom Checks area:
- To collect registry data from Windows endpoints, select Windows and then Add the Registry Key and corresponding Registry Value .
- To collect plist data from macOS endpoints, select Mac and then Add the Plist key and corresponding Key value.
- Save the portal configuration.
- Click OK to save the settings.
- Commit the changes.
PCNSE/PCNSA Key Point: Setting up the portal involves configuring network interfaces, SSL/TLS profiles, authentication profiles (user and/or certificate-based), specifying the IP/FQDN, and optionally configuring appearance and data collection.
PCNSE/PCNSA Key Point: Be aware of the interplay between user credential authentication profiles and certificate profiles for portal access (AND vs. OR logic).
Define the GlobalProtect Client Authentication Configurations
Each GlobalProtect client authentication configuration specifies the settings that enable the user to authenticate with the GlobalProtect portal.
You can customize the settings for each OS or you can configure the settings to apply to all endpoints. For example, you can configure Android users to use RADIUS authentication and Windows users to use LDAP authentication. You can also customize client authentication for users who access the portal from a web browser (to download the GlobalProtect app) or for third-party IPsec VPN (X-Auth) access to GlobalProtect gateways.
- Set Up Access to the GlobalProtect Portal.
- Specify how the portal authenticates users.
You can configure the GlobalProtect portal to authenticate users through a local user database or an external authentication service, such as LDAP, Kerberos, TACACS+, SAML, or RADIUS (including OTP).
If you have not yet set up the authentication profiles and/or certificate profiles, see GlobalProtect User Authentication for instructions.
On the GlobalProtect Portal Configuration dialog ( Network > GlobalProtect > Portals > <portal-config> ), select Authentication to Add a new Client Authentication configuration with the following settings:
- Enter a Name to identify the client authentication configuration.
- Specify the endpoints to which you want to deploy this configuration. To apply this configuration to all endpoints, accept the default OS of Any . To apply this configuration to endpoints running a specific operating system, select an OS such as Android . Alternatively, you can apply this configuration to endpoints that connect to a Clientless VPN portal from a web Browser .
-
To enable users to authenticate to the portal or gateway using their user credentials, select or add an
Authentication Profile
.
- If you want to require users to authenticate to the portal or gateway using both user credentials AND a client certificate, both the Authentication Profile and Certificate Profile are required.
- If you want to allow users to authenticate to the portal or gateway using either user credentials OR a client certificate, and you select a Certificate Profile for user authentication, the Authentication Profile is optional.
- If you want to allow users to authenticate to the portal or gateway using either user credentials OR a client certificate, but you do not select a Certificate Profile for user authentication (or you set the Certificate Profile to None ), the Authentication Profile is required.
- ( Optional ) Enter a custom Username Label for GlobalProtect portal login (for example, Email Address (username@domain ).
- ( Optional ) Enter a custom Password Label for GlobalProtect portal login (for example, Passcode for two-factor, token-based authentication).
- ( Optional ) Enter an Authentication Message to help end users understand which credentials to use when logging in. The message can be up to 256 characters in length (default is Enter login credentials ).
-
Select one of the following options to define whether users can authenticate to the portal using credentials and/or client certificates:
- To require users to authenticate to the portal using both user credentials AND a client certificate, set the Allow Authentication with User Credentials OR Client Certificate option to No (User Credentials AND Client Certificate Required) (default).
- To allow users to authenticate to the portal using either user credentials OR a client certificate, set the Allow Authentication with User Credentials OR Client Certificate option to Yes (User Credentials OR Client Certificate Required) .
When you set this option to Yes , the GlobalProtect portal first searches the endpoint for a client certificate. If the endpoint does not have a client certificate or you do not configure a certificate profile for your client authentication configuration, the end user must then authenticate to the portal using his or her user credentials.
-
Arrange the client authentication configurations with OS-specific configurations at the top of the list, and configurations that apply to
Any
OS at the bottom of the list (
Network > GlobalProtect > Portals > <portal-config> > Authentication
). As with security rule evaluation, the portal looks for a match starting from the top of the list. When it finds a match, it delivers the corresponding configuration to the app.
- To move a client authentication configuration up on the list of configurations, select the configuration and click Move Up .
- To move a client authentication configuration down on the list of configurations, select the configuration and click Move Down .
- ( Optional ) To enable two-factor authentication using an authentication profile and a certificate profile, configure both in this portal configuration.
The portal must authenticate the endpoint by using both methods before the user can gain access.
(Chrome only) If you configure the portal to use client certificates and LDAP for two-factor authentication, Chromebooks that run Chrome OS 47 or later versions encounter excessive prompts to select the client certificate. To prevent excessive prompts, configure a policy to specify the client certificate in the Google Admin console and then deploy that policy to your managed Chromebooks:
- Log in to the Google Admin console and select Device management > Chrome management > User settings .
- In the Client Certificates section, enter the following URL pattern to Automatically Select Client Certificate for These Sites :
{"pattern": "https://[*.]", "filter":{}}
- Click Save . The Google Admin console deploys the policy to all devices within a few minutes.
On the GlobalProtect Portal Configuration dialog ( Network > GlobalProtect > Portals > <portal-config> ), select Authentication to choose the Certificate Profile to authenticate users based on a client certificate or smart card.
The Common Name (CN) and, if applicable, the Subject Alternative Name (SAN) fields of the certificate must exactly match the IP address or FQDN of the interface where you configure the portal or HTTPS connections to the portal will fail.
-
Save the portal configuration.
- Click OK to save your configuration.
- Commit the changes.
PCNSE/PCNSA Key Point: Client Authentication configurations are critical for *who* can connect to the portal and *how* they prove their identity. The order of configurations matters (most specific first).
PCNSE/PCNSA Key Point: Understand the interplay between user credential authentication profiles and certificate profiles for portal access (AND vs. OR logic).
Mermaid Diagram: Client Authentication Flow
This flowchart illustrates the logic the portal uses to select a client authentication configuration and determine the required authentication method(s).
Define the GlobalProtect Agent Configurations
After a GlobalProtect user connects to the portal and is authenticated by the GlobalProtect portal, the portal sends the agent configuration to the app, based on the settings you define.
If you have different roles for users or groups that need specific configurations, you can create a separate agent configuration for each user type or user group.
The portal uses the OS of the endpoint and the username or group name to determine which agent configuration to deploy. As with other security rule evaluations, the portal starts to search for a match at the top of the list. When it finds a match, the portal sends the configuration to the app.
The configuration can include the following:
- A list of gateways to which the endpoint can connect.
- Among the external gateways, any gateway that the user can manually select for the session.
- The root CA certificate required to enable the app to establish an SSL connection with the GlobalProtect gateway(s).
- The root CA certificate for SSL forward proxy decryption.
- The client certificate that the endpoint should present to the gateway when it connects. This configuration is required only if mutual authentication between the app and the portal or gateway is required.
- A secure encrypted cookie that the endpoint should present to the portal or gateway when it connects. The cookie is included only if you enable the portal to generate one.
- The settings the endpoint uses to determine whether it is connected to the local network or to an external network.
- App behavior settings, such as what the end users can see in their display, whether users can save their GlobalProtect password, and whether users are prompted to upgrade their software.
If the portal is down or unreachable, the app uses the cached version of its agent configuration from its last successful portal connection to obtain settings, including the gateway(s) to which the app can connect, what root CA certificate(s) to use to establish secure communication with the gateway(s), and what connect method to use.
Use the following procedure to create an agent configuration.
- Add one or more trusted root CA certificates to the portal agent configuration to enable the GlobalProtect app to verify the identity of the portal and gateways.
The portal deploys the certificate in a certificate file which is read only by GlobalProtect.
- Select Network > GlobalProtect > Portals .
- Select the portal configuration to which you are adding the agent configuration, and then select the Agent tab.
- In the Trusted Root CA field, Add and select the CA certificate that was used to issue the gateway and/or portal server certificates.
The web interface presents a list of CA certificates that are imported on the firewall serving as the GlobalProtect portal. The web interface also excludes end-entity certificates, sometimes referred to as leaf certificates, from the list of certificates you can select.
You can also Import a new CA certificate.
Use the following best practices when creating and adding certificates:
- Use the same certificate issuer to issue certificates for all of your gateways.
- PCNSE/PCNSA Key Point: Add the entire certificate chain (trusted root CA and intermediate CA certificates) to the portal agent configuration.
- ( Optional ) Deploy additional CA certificates for purposes other than GlobalProtect (for example, SSL forward proxy decryption).
This option enables you to use the portal to deploy certificates to the endpoint and the agent to install them in the local root certificate store. This can be useful if you do not have another method for distributing these server certificates or prefer to use the portal for certificate distribution.
For SSL forward proxy decryption, you specify the forward trust certificate that the firewall uses (on Windows and macOS endpoints only) to terminate the HTTPS connection, inspect the traffic for policy compliance, and re-establish the HTTPS connection to forward the encrypted traffic.
- Add the certificate as described in the previous step.
- Enable the option to Install in Local Root Certificate Store .
The portal automatically sends the certificate when the user logs in to the portal and installs it in the endpoint's local store, thus eliminating the need for you to install the certificate manually.
- Add an agent configuration.
The agent configuration specifies the GlobalProtect configuration settings to deploy to the connecting apps.
You must define at least one agent configuration. You can add up to 512 agent configuration entries for each portal.
- From your portal configuration ( Network > GlobalProtect > Portals > <portal-config> ), Add a new agent configuration.
- Enter a Name to identify the configuration. If you plan on creating multiple configurations, make sure the name you define for each configuration is descriptive enough to distinguish them.
- ( Optional ) Configure settings to specify how users with this configuration authenticate with the portal.
If the gateway authenticates endpoints using a client certificate, you must select the source that distributes the certificate.
Configure any of the following Authentication settings:
-
To enable users to authenticate with the portal using client certificates, select the
Client Certificate
source (
SCEP
,
Local
, or
None
) that distributes the certificate and its private key to an endpoint.
- If you use an internal CA to distribute certificates to endpoints, select None (default).
- To enable the portal to generate and send a machine certificate to the app for storage in the local certificate store and use the certificate for portal and gateway authentication, select SCEP and the associated SCEP profile. These certificates are device-specific and can only be used on the endpoint to which it was issued.
- To use the same certificate for all endpoints, select a certificate that is Local to the portal.
- With None , the portal does not push a certificate to the endpoint, but you can use can other ways to get a certificate to the endpoint.
- Specify whether to Save User Credentials . Select Yes to save the username and password (default), Save Username Only to save only the username, Only with User Fingerprint to save the user’s biometric (fingerprint) or, on iOS X endpoints only, face ID credentials, or No to never save credentials.
When you set Save User Credentials to No , and if the portal and the gateway are configured to use the same authentication methods, the GlobalProtect app can authenticate to the gateway transparently using the credentials provided by the user to authenticate to the portal. The user is not required to re-enter their credentials to authenticate to the gateway.
If you configure the portal or gateways to prompt for a dynamic password, such as a one-time password (OTP), the user must enter a new password at each login. In this case, the GlobalProtect app ignores the selection to save both the username and password, if specified, and saves only the username.
If you select GlobalProtect to Save User Credentials Only with User Fingerprint , GlobalProtect can leverage the app’s operating system capabilities for validating the user before allowing authentication with GlobalProtect.
- If the GlobalProtect endpoint does not require tunnel connections when it is on the internal network, configure internal host detection.
- Select Internal .
- Enable Internal Host Detection ( IPv4 or IPv6 ).
- Enter the IP Address of a host that can be reached from the internal network only. The IP address you specify must be compatible with the IP address type ( IPv4 or IPv6 ). For example, 172.16.1.0 for IPv4 or 21DA:D3:0:2F3b for IPv6.
- Enter the DNS Hostname for the IP address you enter. Endpoints that try to connect to GlobalProtect attempt to do a reverse DNS lookup on the specified address. If the lookup fails, the endpoint determines that it is on the external network and then initiates a tunnel connection to a gateway on its list of external gateways.
- ( Optional ) Enter a source address pool for endpoints. When users connect, GlobalProtect recognizes the source address of the device. Only GlobalProtect apps with IP addresses that are included in the source IP address pool can authenticate with the gateway and send HIP reports.
IPv4 subnet must be /30 or larger. Otherwise, a specific IP range must be specified. For example, 192.168.1.0/30 or 192.168.2.6-192.168.2.7
- Set up access to a third-party mobile endpoint management system.
This step is required if the mobile endpoints using this configuration will be managed by a third-party mobile endpoint management system. All endpoints initially connect to the portal and, if a third-party mobile endpoint management system is configured on the corresponding portal agent configuration, the endpoint is redirected to it for enrollment.
- Enter the IP address or FQDN of the endpoint check-in interface associated with your mobile endpoint management system. The value you enter here must exactly match the value of the server certificate associated with the endpoint check-in interface. You can specify an IPv6 or IPv4 address.
- Specify the Enrollment Port on which the mobile endpoint management system listens for enrollment requests. This value must match the value set on the mobile endpoint management system (default=443).
- Specify the selection criteria for your portal agent configuration.
The portal uses the selection criteria that you specify to determine which configuration to deliver to the GlobalProtect apps that connect. Therefore, if you have multiple configurations, you must make sure to order them properly. As soon as the portal finds a match, it delivers the configuration. Therefore, more specific configurations must precede more general ones. See step 12 for instructions on ordering the list of agent configurations.
Select Config Selection Criteria and then configure any of the following options:
-
To specify the user, user group, and/or operating system to which this configuration applies, select
User/User Group
and then configure any of the following options:
- To deliver this configuration to apps running on a specific operating system, Add and select the OS ( Android , Chrome , iOS , Linux , Mac , Windows , or WindowsUWP ) to which this configuration applies. Set the OS to Any to deploy the configuration to all operating systems.
- To restrict this configuration to a specific user and/or group, Add and then select the User/User Group you want to receive this configuration. Repeat this step for each user/group you want to add. To restrict the configuration to users who have not yet logged in to their endpoints, select pre-logon from the User/User Group drop-down. To deploy the configuration to any user regardless of login status (both pre-logon and logged in users), select any from the User/User Group drop-down.
Before you can restrict the configuration to specific groups, you must map users to groups as described in Enable Group Mapping.
-
To deliver this configuration to apps based on specific device attributes, select
Device Checks
and then configure any of the following options:
- To deliver this configuration based on the presence of the endpoint serial number in the Active Directory or Azure AD, select an option from the Machine account exists with device serial number drop-down. If you set this option to Yes , the agent configuration applies only to endpoints with a serial number that exists (managed endpoints). If you set this option to No , the agent configuration applies only to endpoints for which a serial number does not exist (unmanaged endpoints). If you set this option to None , the configuration is not delivered to apps based on the presence of the endpoint serial number.
- To deliver this configuration based on the endpoint’s machine certificate, select a Certificate Profile to match against the machine certificate installed on the endpoint.
PCNSE/PCNSA Key Point: Device checks are supported on Windows and Mac operating systems.
-
To deliver this configuration to apps based on custom host information, select
Custom Checks
. Enable
Custom Checks
and then define any of the following registry and plist data:
-
To verify whether Windows endpoints have a specific registry key, use the following steps:
- Add a new registry key ( Custom Checks > Registry Key ).
- When prompted, enter the Registry Key to match.
- ( Optional ) To deliver this configuration only if the endpoint does not have the specified registry key or key value, select Key does not exist or match the specified value data .
- ( Optional ) To deliver this configuration based on specific registry values, Add the Registry Value and corresponding Value Data . To deliver this configuration only endpoints that do not have the specified Registry Value or Value Data , select Negate .
-
To verify whether macOS endpoints have a specific entry in the plist, use the following steps:
- Add a new plist ( Custom Checks > Plist ).
- When prompted, enter the Plist name.
- ( Optional ) To deliver this configuration only if the endpoint does not have the specified plist, select Plist does not exist .
- ( Optional ) To deliver this configuration based on specific key-value pairs within the plist, click Add and then enter the Key and corresponding Value . To match only endpoints that do not have the specified key or value, select Negate .
- To verify
-
To verify whether Windows endpoints have a specific registry key, use the following steps:
- Specify the external gateways to which users with this configuration can connect.
Consider the following best practices when you configure the gateways:
- If you are adding both internal and external gateways to the same configuration, make sure you enable Internal Host Detection (step 4).
- To learn more about how the GlobalProtect app determines the gateway to which it should connect, see Gateway Priority in a Multiple Gateway Configuration.
- Select External .
- Add the External Gateways to which users can connect.
- Enter a descriptive Name for the gateway. The name you enter here should match the name you defined when you configured the gateway and should be descriptive enough for users to know the location of the gateway to which they are connected.
- Enter the FQDN or IP address of the interface where the gateway is configured in the Address field. You can configure an IPv4 or IPv6 address. The address you specify must exactly match the Common Name (CN) in the gateway server certificate.
- Add one or more Source Regions for the gateway, or select Any to make the gateway available to all regions. When users connect, GlobalProtect recognizes the region and only allows users to connect to gateways that are configured for that region. For gateway selection, source region is considered first, then gateway priority.
-
Set the
Priority
of the gateway by clicking the field and selecting one of the following values:
- If you have only one external gateway, you can leave the value set to Highest (the default).
- If you have multiple external gateways, you can modify the priority values (ranging from Highest to Lowest ) to indicate a preference for the specific user group to which this configuration applies. For example, if you prefer that the user group connects to a local gateway you would set the priority higher than that of more geographically distant gateways. The priority value is then used to weight the agent’s gateway selection algorithm.
- If you do not want apps to automatically establish connections with the gateway, select Manual only . This setting is useful in testing environments.
- Select the Manual check box to allow users to manually switch to the gateway.
- Specify the internal gateways to which users with this configuration can connect.
Make sure you do not use on-demand as the connect method if your configuration includes internal gateways.
- Select Internal .
- Add the Internal Gateways to which users can connect.
- Enter a descriptive Name for the gateway. The name you enter here should match the name you defined when you configured the gateway and should be descriptive enough for users to know the location of the gateway they are connected to.
- Enter the FQDN or IP address of the interface where the gateway is configured in the Address field. You can configure an IPv4 or IPv6 address. The address you specify must exactly match the Common Name (CN) in the gateway server certificate.
- ( Optional ) Add one or more Source Addresses to the gateway configuration. The source address can be an IP subnet, range, or predefined address. GlobalProtect supports both IPv6 and IPv4 addresses. When users connect, GlobalProtect recognizes the source address of the endpoint and only allows users to connect to gateways that are configured for that address.
- Click OK to save your changes.
- ( Optional ) Add a DHCP Option 43 Code to the gateway configuration. You can include one or more sub-option codes associated with the vendor-specific information (Option 43) that the DHCP server has been configured to offer the client. For example, you might have a sub-option code 100 that is associated with an IP address of 192.168.3.1.
When a user connects, the GlobalProtect portal sends the list of option codes in the portal configuration to the GlobalProtect app, and the app selects gateways indicated by these options.
When both the source address and DHCP options are configured, the list of available gateways presented to the endpoint is based on the combination (union) of the two configurations.
DHCP options are supported on Windows and macOS endpoints only. DHCP options cannot be used to select gateways that use IPv6 addressing.
- ( Optional ) Select Internal Host Detection to allow the GlobalProtect app to determine if it is inside the enterprise network. When a user attempts to log in, the app performs a reverse DNS lookup of the internal Hostname to the specified IP Address .
The host serves as a reference point that is reachable if the endpoint is inside the enterprise network. If the app finds the host, the endpoint is inside the network and the app connects to an internal gateway; if the app fails to find the internal host, the endpoint is outside the network and the app connects to one of the external gateways.
You can configure IPv4 or IPv6 addressing for Internal Host Detection . The IP address you specify must be compatible with the IP address type. For example, 172.16.1.0 for IPv4 or 21DA:D3:0:2F3b for IPv6.
- Customize the GlobalProtect app behavior for users with this configuration.
Modify the App settings as desired. For more details about each option, see Customize the GlobalProtect App.
- ( Optional ) Define any custom host information profile (HIP) data that you want the app to collect and/or exclude from collection.
This step applies only if you plan on using the HIP feature, there is information you want to collect that cannot be collected using the standard HIP objects, or if there is HIP information that you are not interested in collecting. See Host Information for details on setting up and using the HIP feature.
See Collect Application and Process Data From Endpoints for additional information on collecting custom HIP data.
- Select HIP Data Collection .
- Enable the GlobalProtect app to Collect HIP Data .
- Specify the Max Wait Time (sec) that the app should search for HIP data before submitting the available data (range is 10-60 seconds; default is 20 seconds).
- Select the Certificate Profile that the GlobalProtect portal uses to match the machine certificate send by the GlobalProtect app.
- Select Exclude Categories to exclude specific categories and/or vendors, applications, or versions within a category. For more details, see Configure HIP-Based Policy Enforcement.
- Select Custom Checks to define any custom data you want to collect from hosts running this agent configuration.
- Save the agent configuration.
Click OK to save the agent configuration.
- Arrange the agent configurations so that the proper configuration is deployed to each app.
When an app connects, the portal compares the source information in the packet against the agent configurations you have defined. As with security rule evaluation, the portal looks for a match starting from the top of the list. When it finds a match, it delivers the corresponding configuration to the app.
- To move an agent configuration up on the list of configurations, select the configuration and click Move Up .
- To move an agent configuration down on the list of configurations, select the configuration and click Move Down .
-
Save the portal configuration.
- Click OK to save the portal configuration.
- Commit the changes.
PCNSE/PCNSA Key Point: Agent Configurations define the user experience and connectivity options. Ordering of Agent Configurations is crucial, similar to security policies (most specific first).
PCNSE/PCNSA Key Point: Key settings include Gateway lists (Internal/External), Internal Host Detection, Save User Credentials, and HIP Data Collection.
PCNSE/PCNSA Key Point: Understand the difference between Internal and External gateways and when Internal Host Detection is required.
Mermaid Diagram: Agent Configuration Selection
This flowchart illustrates how the portal evaluates agent configurations based on defined criteria to determine which one to send to the endpoint.
Customize the GlobalProtect App
The portal agent configuration allows you to customize how your end users interact with the GlobalProtect apps installed on their endpoints.
You can customize the display and behavior of the app, and define different app settings for the different GlobalProtect agent configurations you create.
For example, you can specify the following:
- What menus and views users can access.
- Whether users can uninstall or disable the app (user-logon connect method only).
- Whether to display a welcome page upon successful login. You can also configure whether or not the user can dismiss the welcome page, and you can Customize the GlobalProtect Portal Login, Welcome, and Help Pages to explain how to use GlobalProtect within your environment.
- Whether the GlobalProtect app upgrades automatically or prompts users to upgrade manually.
- Whether to prompt users if multi-factor authentication is required to access sensitive network resources.
You can also define app settings in the Windows Registry, Windows Installer (Msiexec), and global macOS plist. Settings that are defined in the web interface (portal agent configuration) take precedence over settings that are defined in the Windows Registry, Msiexec, and macOS plist. For more details, see Deploy App Settings Transparently.
Some settings do not have a corresponding portal configuration setting on the web interface and must be configured using the Windows Registry, Msiexec, or macOS plist. These settings are listed in the Customizable App Settings as “Not in portal.”
The additional settings that are available only through the Windows Registry, Msiexec, or macOS plist enable you to customize options including, but not limited to, the following:
- Specify whether the app prompts the end user for credentials when Windows SSO fails.
- Specify the default portal IP address (or hostname).
- Enable GlobalProtect to initiate a connection before the user logs into the endpoint.
- Deploy scripts that run before or after GlobalProtect establishes a connection or after GlobalProtect disconnects.
- Configure the GlobalProtect app to wrap third-party credentials on Windows endpoints, enabling SSO when using a third-party credential provider.
- Select the agent configuration that you want to customize.
You can also configure most app settings from the Windows Registry, Windows Installer (Msiexec), and macOS plist. However, settings that are defined in the web interface take precedence over settings that are defined in the Windows Registry, Msiexec, and macOS plist. See Deploy App Settings Transparently for more details.
- Select Network > GlobalProtect > Portals .
- Select the portal on which you want to add the agent configuration, or Add a new one.
- On the Agent tab, select the agent configuration that you want to modify, or Add a new one.
- Select the App tab.
The App Configurations area displays the app settings with default values that you can customize for each agent configuration. When you change the default behavior, the text color changes from gray to the default color.
- Specify the Connect Method that an app uses for its GlobalProtect connection.
Use the Pre-logon (Always On) , Pre-logon then On-demand , or User-log on (Always On) connect method to access the network using an internal gateway.
In the App Configurations area, select one of the following Connect Method options:
- User-logon (Always On) —The GlobalProtect app automatically connects to the portal as soon as the user logs in to the endpoint (or domain). When used in conjunction with SSO (Windows endpoints only), GlobalProtect login is transparent to the end user.
On iOS endpoints, this setting prevents one-time password (OTP) applications from working because GlobalProtect forces all traffic to go through the tunnel.
- Pre-logon (Always On) —The GlobalProtect app authenticates the user and establishes a VPN tunnel to the GlobalProtect gateway before the user logs in to the endpoint. This option requires that you use an external PKI solution to pre-deploy a machine certificate to each endpoint that receives this configuration. See Remote Access VPN with Pre-Logon for details about pre-logon.
- On-demand (Manual user initiated connection) —Users must manually launch the app to connect to GlobalProtect. Use this connect method for external gateways only.
- Pre-logon then On-demand —Similar to the Pre-logon (Always On) connect method, this connect method (which requires Content Release version 590-3397 or later) enables the GlobalProtect app to authenticate the user and establish a VPN tunnel to the GlobalProtect gateway before the user logs in to the endpoint. Unlike the pre-logon connect method, after the user logs in to the endpoint, users must manually launch the app to connect to GlobalProtect if the connection is terminated for any reason. The benefit of this option is that you can allow users to specify a new password after their password expires or they forget their password, but still require users to manually initiate the connection after they log in.
- Conditional Connect Method Based on Network Type (Using Windows Registry/macOS Plist) —Using Windows Registry/macOS Plist, you can dynamically change the connect method from Always-On to On-Demand mode and vice-versa based on the network type (internal or external) to which the end user is connected. To use this functionality you must enable internal host detection and set the connect method for endpoints to On-demand.
- ( Windows 10, ARM64-Based Windows 10, macOS 11 and later releases, and ARM-Based macOS 11 and later releases; Content Release version 8450-6909 or later; Requires GlobalProtect app 6.0 or later ) Configure endpoint traffic policy enforcement to block malicious inbound connections using the physical adapter on the remote endpoint.
By enforcing endpoint traffic policy on the GlobalProtect endpoint, you can perform the following functions:
- Block malicious inbound connections outside of the VPN tunnel to guard against data exfiltration.
- Restrict any applications from bypassing the GlobalProtect tunnel by binding their connections directly to the physical adapter on the remote endpoint.
- Prevent end users from tampering with the routing table to bypass the GlobalProtect tunnel.
When used in conjunction with the No direct access to local network option, you can also control access to the local network. By default, the endpoint traffic policy enforcement is disabled.
In the App Configurations area, select one of the following Endpoint Traffic Policy Enforcement options:
- No —Specifies that the Endpoint Traffic Policy Enforcement feature is disabled and that this feature is not applied. This is the default option.
- TCP/UDP Traffic Based on Tunnel IP Address Type —Enables endpoint traffic policy enforcement for TCP/UDP traffic. This feature is enabled for traffic based on the tunnel IP address type. If the tunnel is IPv4, this feature applies only to IPv4 traffic. If the tunnel is IPv6, this features applies only to IPv6 traffic.
- All TCP/UDP Traffic —Enables endpoint traffic policy enforcement for all TCP/UDP traffic regardless of the tunnel IP address type. If the tunnel IP address type is IPv4, endpoint traffic policy enforcement applies to all TCP/UDP (IPv4 or IPv6) traffic. If the tunnel IP address type is IPv6, endpoint traffic policy enforcement applies to all TCP/UDP (IPv4 or IPv6) traffic.
- All Traffic —Enables endpoint traffic policy enforcement for all TCP, UDP, ICMP, and all other protocols regardless of the tunnel IP address type.
- Specify whether to enforce GlobalProtect connections for network access.
( Windows 10 only ) When Enforce GlobalProtect Connection for Network Access is enabled, the following application types are bypassed and all other outbound and inbound connections are blocked:
- GlobalProtect agent ( PanGPA.exe ), GlobalProtect service ( PanGPS.exe ), and Local Security Authority Subsystem Service ( lsass.exe ) processes
- DHCP, DNS, NetBIOS (Network Basic Input/Output System), and Link-Local Multicast Name Resolution (LLMNR) protocols
- Loopback interface traffic
( macOS only ) When Enforce GlobalProtect Connection for Network Access is enabled, the following application types are bypassed and all other outbound and inbound connections are blocked:
- GlobalProtect application and GlobalProtect service (PanGPS)
- DHCP and DNS protocols
- Loopback interface traffic
- ocspd , syspolicyd , ntpd , apsd , and trustd processes
To enforce GlobalProtect for network access, we recommend that you enable this feature only for users that connect in User-logon or Pre-logon modes. Users that connect in On-demand mode may not be able to establish a connection within the permitted grace periods.
In the App Configurations area, configure any of the following options:
- To force all network traffic to traverse a GlobalProtect tunnel, set Enforce GlobalProtect Connection for Network Access to Yes . By default, GlobalProtect is not required for network access, meaning users can still access the internet when GlobalProtect is disabled or disconnected. To provide instructions to users before traffic is blocked, configure GlobalProtect to Displays Traffic Blocking Notification Message , and optionally specify when to display the message ( Traffic Blocking Notification Delay ).
When Enforce GlobalProtect Connection for Network Access is enabled, you may want to consider allowing users to disable the GlobalProtect app with a passcode.
- Configure exclusions for specific local IP addresses or network segments for network access by entering these IP addresses to Allow traffic to specified hosts/networks when Enforce GlobalProtect Connection for Network Access is enabled and GlobalProtect Connection is not established . Specify up to twenty IP addresses or network segments for which you want to allow access when you enforce GlobalProtect for network access and GlobalProtect cannot establish a connection.
This option requires a Content Release version of 8196-5685 or later.
If you are using Connect Before Logon in conjunction with the enforcer for smart card authentication or username/password-based authentication for user login using an authentication service such as LDAP, RADIUS, or OTP, you must configure exclusions for specific IP addresses or network segments for the portal and gateway by entering them to Allow traffic to specified FQDN when Enforce GlobalProtect Connection for Network Access is enabled and GlobalProtect Connection is not established .
By configuring exclusions, you can improve the user experience by allowing users to access local resources when GlobalProtect is disconnected. For example, when GlobalProtect is not connected, GlobalProtect can allow access to link-local addresses. This allows a user to access a local network segment or broadcast domain.
- ( Windows 10 and macOS running macOS Catalina 10.15.4 or later only; Requires GlobalProtect™ app 5.2 or later ) Configure exclusions for specific fully qualified domain names for which you want to allow access when you enforce GlobalProtect connections for network access by entering these fully qualified domain names to Allow traffic to specified FQDN when Enforce GlobalProtect Connection for Network Access is enabled and GlobalProtect Connection is not established .
Specify up to 40 fully qualified domain names for which you want to allow access when you enforce GlobalProtect connections for network access and GlobalProtect cannot establish a connection.
If you are using Connect Before Logon in conjunction with the enforcer for smart card authentication or username/password-based authentication for user login using an authentication service such as LDAP, RADIUS, or OTP, you must configure exclusions for specific fully qualified domain names for the portal and gateway by entering them to Allow traffic to specified FQDN when Enforce GlobalProtect Connection for Network Access is enabled and GlobalProtect Connection is not established .
The fully qualified domain names that you provide are used only when Enforce GlobalProtect Connection for Network Access is set to Yes . Use commas to separate multiple fully qualified domain names (for example, google.com, gmail.com). Use the wildcard character (*) for domain names (for example, *.gmail.com). The maximum length is 1,024 characters.
This option requires a Content Release version of 8284-6139 or later.
By configuring FQDN exclusions, you can improve the user experience by allowing users to access specific resources when GlobalProtect is disconnected. For example, the endpoint can communicate with a cloud-hosted identity provider (ldP) for authentication purposes or a remote device management server even when the Enforce GlobalProtect for Network Access feature is enabled.
- If your users must log in to a captive portal to access the internet, specify a Captive Portal Exception Timeout (sec) to indicate the amount of time (in seconds) within which users can log in to the captive portal (range is 0 to 3600 seconds; default is 0 seconds). If users do not log in within this time period, the captive portal login page times out and users will be blocked from using the network.
To enable the GlobalProtect app to display a notification message when it detects a captive portal, set the Display Captive Portal Detection Message to Yes . In the Captive Portal Notification Delay (sec) field, enter the amount of time (in seconds) after which the GlobalProtect app displays this message (range is 1 to 120 seconds; default is 5 seconds). GlobalProtect initiates this timer after the captive portal has been detected but before the internet becomes reachable.
You can also provide additional instructions by configuring a Captive Portal Detection Message .
To automatically launch your default web browser upon captive portal detection so that users can log in to the captive portal seamlessly, in the Automatically Launch Webpage in Default Browser Upon Captive Portal Detection field, enter the fully qualified domain name (FQDN) or IP address of the website that you want to use for the initial connection attempt that initiates web traffic when the default web browser launches (maximum length is 256 characters). The captive portal then intercepts this website connection attempt and redirects the default web browser to the captive portal login page. If this field is empty (default), GlobalProtect does not launch the default web browser automatically upon captive portal detection.
These options require Content Release version 607-3486 or later. The Captive Portal Notification Delay requires Content Release version 8118-5277 or later. The Automatically Launch Webpage in Default Browser Upon Captive Portal Detection option requires Content Release version released on July 8th, 2019 or later.
- Specify additional GlobalProtect connection settings.
When single sign-on (SSO) is enabled (default), the GlobalProtect app uses the user’s Windows login credentials to automatically authenticate and connect to the GlobalProtect portal and gateway. This also allows the GlobalProtect app to wrap third-party credentials to ensure that Windows users can authenticate and connect even with a third-party credential provider.
In the App Configurations area, configure any of the following options:
- ( Windows and macOS only; macOS support requires Content Release version 8196-5685 or later ) Set Use Single Sign-On (Windows) or Use Single Sign-On (macOS) to No to disable single sign-on.
If you configure the GlobalProtect gateway to authenticate users through SAML authentication and also generate and accept cookies for authentication override, you must set the Use Single Sign-On option to No when the user’s Windows username is different from his or her SAML username (for example, the Windows username is “user” and the SAML username is “user123”) or if one username contains a fully qualified domain name (for example, the Windows username is “user” and the SAML username is “user@example.com”).
- ( Windows 10 only; Content Release version 8451-6911 or later; Requires GlobalProtect app 6.0 or later ) Set Use Single Sign-On for Smart Card PIN (Windows) to Yes to enable the GlobalProtect app to use SSO for smart card PIN. The default is No .
You must set the pre-deployed setting on the end user endpoints before you can enable SSO for smart card PIN. GlobalProtect retrieves this entry only once, when the GlobalProtect app initializes.
If you set both Use Single Sign-On (Windows) and Use Single Sign-On for Smart Card PIN (Windows) options to yes in the portal configuration, the Use Single Sign-On for Smart Card PIN (Windows) option takes precedence over the Use Single Sign-On (Windows) option.
- ( Content Release version 8284-6139 or later; Requires GlobalProtect app 5.2 or later ) Set Use Default Browser for SAML Authentication to Yes to enable the GlobalProtect app to open the default system browser for SAML authentication. The default is No . The app will open an embedded browser.
If you have configured the GlobalProtect portal to authenticate users through Security Assertion Markup Language (SAML) authentication, end users can connect to the app or other SAML-enabled applications without having to re-enter their credentials, for a seamless single sign-on (SSO) experience. You can enable the GlobalProtect app so that end users can leverage the same login for GlobalProtect and use their default system browser for SAML authentication such as Chrome, Firefox, or Safari.
- Specify the amount of time (in hours) during which you want the GlobalProtect app to Automatically Use SSL When IPSec Is Unreliable (range is 0-168 hours). If you configure this option, the GlobalProtect app does not attempt to establish an IPSec tunnel during the specified time period. This timer initiates each time an IPSec tunnel goes down due to a tunnel keepalive timeout.
If you accept the default value of 0 , the app does not fall back to establishing an SSL tunnel if it can establish an IPSec tunnel successfully. It falls back to establishing an SSL tunnel only when the IPSec tunnel cannot be established.
This option requires Content Release version released on July 8th, 2019 or later.
- ( Content Release version 8387-6595 or later; Requires GlobalProtect app 5.2.6 or later ) Set Display IPSec to SSL Fallback Notification to Yes to enable the GlobalProtect app to display an SSL fallback notification only when GlobalProtect falls back to using SSL after attempting IPSec. Set Display IPSec to SSL Fallback Notification to No to disable the app from displaying the notification. By default, this option is set to Yes . If you specify the amount of time (in hours) during which you want the GlobalProtect app to Automatically Use SSL When IPSec Is Unreliable , for example 5 hours, the app will not display this notification during the specified time period because it will not attempt to establish an IPSec tunnel and instead establish an SSL tunnel.
- Choose the network connection protocol for the GlobalProtect app.
In the App Configuration area, choose the Advanced Control for Tunnel Mode Behavior options you want to allow.
This option requires GlobalProtect app 6.3 or later.
- No ——Clients to connect with IPSec by default if IPSec is enabled on the gateway and fallback to SSL if if IPSec is not enabled on the gateway . This is the default selection.
- Connect with SSL Only —Require that all GlobalProtect clients connect using SSL only.
- Connect with SSL Only - User can Change —GlobalProtect clients to connect using SSL but user can change whether they want to use IPSec or stay with SSL on the GlobalProtect app.
On the app, the user can navigate to Settings > Preferences to enable Connect with SSL Only and Settings > Connection to verify that the Protocol is SSL .
- This option is available with Content Release version 8846-8732 or later; Requires GlobalProtect app 6.3 or laterIPSec Only —Require that all GlobalProtect clients connect using IPSec only. If IPSec is not enabled on the gateway, GlobalProtect stays disconnected and will not fall back to SSL.
On the app, the user can select Settings > Connection to verify that the Protocol being used.
The following table describes the upgrade behavior for this feature.
| Connect with SSL Only Option Selected in Pre-6.3 Environment | Advanced Control for Tunnel Mode Behavior Default Option after Upgrade to 6.3 |
| Yes | SSL |
| No | None |
| User can Change | SSL - User can Change |
The following table describes the downgrade behavior for this feature.
| Advanced Control for Tunnel Mode Behavior Option Selected in 6.3 Environment | Connect with SSL Only Default Option after Downgrade |
| None | No |
| SSL | Yes |
| SSL - User can Change | User can Change |
| IPSec | 3 |
The user can manually select the appropriate option.
- ( Content Release version 8346-6423 or later; Requires GlobalProtect app 5.2.4 or later ) Enter the GlobalProtect Connection MTU (bytes) value that is used by the app for gateway connections. You can specify the MTU range from 1000 to 1420 bytes instead of the preset default MTU value of 1400 bytes. The default value is 1400 bytes.
( Windows UWP only ) After you manually configure the GlobalProtect Connection MTU (bytes) value using the netsh command, the GlobalProtect client is unable to set the GlobalProtect Connection MTU (bytes) value in the portal configuration greater than the manually configured value.
If the MTU value is less than 1280 bytes and IPv6 is enabled, the GlobalProtect adapter automatically changes the value to 1280 bytes as per the minimum supported MTU requirement for IPv6.
You can optimize the connection experience for end users connecting over networks that require maximum transmission unit (MTU) values lower than the standard of 1500 bytes by configuring the MTU value that is used by the GlobalProtect app to connect to the gateway.
In Pre-Logon (Always On) deployments, GlobalProtect must recreate the user tunnel in order for the new configured MTU value in the user’s portal configuration to take effect. This deployment requires the Pre-logon Tunnel Rename Timeout value be set to 0 in the GlobalProtect portal configuration.
- Enter the Maximum Internal Gateway Connection Attempts to specify the number of times the GlobalProtect app can retry the connection to an internal gateway after the first attempt fails (range is 0-100; 4 or 5 is recommended; the default value of 0 indicates that the GlobalProtect app does not retry the connection). By increasing this value, you can enable the app to connect to an internal gateway that is temporarily down or unreachable but comes back up before the specified number of retries are exhausted. Increasing the value also ensures that the internal gateway receives the most up-to-date user and host information.
- Enter the GlobalProtect App Config Refresh Interval to specify the number of hours that the GlobalProtect portal waits before it initiates the next refresh of a client’s configuration (range is 1-168; default is 24).
- ( Windows only ) Depending on your security requirements, specify whether to Retain Connection on Smart Card Removal . By default, this option is set to Yes , meaning GlobalProtect retains the tunnel when a user removes a smart card containing a client certificate. To terminate the tunnel, set this option to No .
This feature requires Content Release version 590-3397 or later.
- Configure an Automatic Restoration of VPN Connection Timeout to specify the action GlobalProtect takes when the tunnel is disconnected. Set this option to a non-zero value to allow GlobalProtect to attempt to reestablish the connection after the tunnel is disconnected. If the tunnel downtime exceeds the configured timeout value (range is 0 to 180 minutes; default is 30), tunnel restoration will not be performed, and the result is the same as if you set this option to 0 . Set this option to 0 to prevent GlobalProtect from attempting to reconnect after the tunnel is disconnected. If you configure the connection setting as Always-On , GlobalProtect will perform network discovery again. If you configure the connection setting as On-Demand , the user must manually connect again. Configure the Wait Time Between VPN Connection Restore Attempts to adjust the amount of time (in seconds) that GlobalProtect waits between attempts to restore the connection (range is 1 to 60 seconds; default is 5). The GlobalProtect client tries several times to restore the connection, and uses this wait time as the connection timeout value.
With the Always On connect method, if a user switches from an external network to an internal network before the timeout value expires, GlobalProtect does not perform network discovery. As a result, GlobalProtect restores the connection to the last known external gateway. To trigger internal host detection, the user must select Refresh Connection from the settings menu on the GlobalProtect status panel.
- Configure the menus and UI views that are available to users who have this agent configuration.
In the App Configurations area, configure any of the following options:
-
If you want users to see only basic status information within the application, set
Enable Advanced View
to
No
. When you disable this option, users can view information from the following tabs:
- General —Displays the username and portal(s) associated with the GlobalProtect account.
- Notification —Displays any GlobalProtect notifications.
The default is Yes . When you enable this option, users can view the following additional tabs:
- Connection —Lists the gateways configured for the GlobalProtect app and information about each gateway.
- Host Profile —Displays the endpoint data that GlobalProtect uses to monitor and enforce security policies using HIP.
- Troubleshooting —Displays information about the network configuration, route settings, active connections, and logs. You can also collect logs generated by GlobalProtect and set the logging level.
In order for the GlobalProtect app to send troubleshooting logs, diagnostic logs, or both to Strata Logging Service for further analysis, you must configure the GlobalProtect portal to enable the GlobalProtect app log collection for troubleshooting. Additionally, you can configure the HTTPS-based destination URLs that can contain IP addresses or fully qualified domain names of the web servers/resources that you want to probe, and to determine issues such as latency or network performance on the end user’s endpoint.
- If you want hide the GlobalProtect system tray icon on endpoints, set Display GlobalProtect Icon to No . When the icon is hidden, users cannot perform tasks such as changing saved passwords, rediscovering the network, resubmitting host information, viewing troubleshooting information, or initiating on-demand connections. However, HIP notification messages, login prompts, and certificate dialogs still display as necessary.
- To prevent users from performing network discovery, set the Enable Rediscover Network Option to No . When you disable this option, the Refresh Connection option is grayed out in the settings menu of the GlobalProtect status panel.
- To prevent users from manually resubmitting HIP data to the gateway, set Enable Resubmit Host Profile Option to No . This option, which is enabled by default, is useful in cases where HIP-based security policy prevents users from accessing resources because it allows the user to fix the compliance issue on the computer before resubmitting the HIP data.
- Windows and macOS only To allow GlobalProtect to automatically route users to the appropriate Prisma Access portal based on their location, set Enable Intelligent Portal Selection to Yes . The default value for this field is No .
- ( Windows only ) To allow GlobalProtect to display notifications in the system tray, set Show System Tray Notifications to Yes .
- To create a custom message to display to users when their passwords are about to expire, enter a Custom Password Expiration Message (LDAP Authentication Only) . The maximum message length is 200 characters.
- To create a custom message to specify password policies or requirements when users change their Active Directory (AD) password, enter a Change Password Message . The maximum message length is 255 characters.
- Define what end users with this configuration can do in their app.
- Set Allow User to Change Portal Address to No to disable the Portal field on the status panel of the GlobalProtect app. Because the user will not be able to specify the portal to which to connect, you must supply the default portal address in the Windows Registry (HKEY_LOCAL_MACHINE\SOFTWARE\PaloAlto Networks\GlobalProtect\PanSetup with key Portal ) or the macOS plist ( /Library/Preferences/com.paloaltonetworks.GlobalProtect.settings.plist with key Portal under dictionary PanSetup ). For more information, see Deploy App Settings Transparently.
- To prevent users from dismissing the welcome page, set Allow User to Dismiss Welcome Page to No . When this option is set to Yes , the user can dismiss the welcome page and prevent GlobalProtect from displaying the page after subsequent logins.
- To require the end user to accept terms of use to comply with corporate policies and to see a page to review your company’s terms of service before connecting to GlobalProtect, set Have User Accept Terms of Use Before Creating Tunnel to Yes . When this option is set to No , the end user is not required to accept terms of use to comply with corporate policies before connecting to GlobalProtect.
- Specify whether users can disable the GlobalProtect app.
The Allow User to Disable GlobalProtect option applies to agent configurations with the User-Logon (Always On) Connect Method .
By default, this option is set to Allow , which permits users to disable GlobalProtect without providing a comment, passcode, or ticket number. However,
If the GlobalProtect system tray icon is not visible, users cannot disable the GlobalProtect app. See Step 6 for more details.
- To prevent users with the user-logon connect method from disabling GlobalProtect, set Allow User to Disable GlobalProtect App to Disallow .
- To allow users to disable GlobalProtect only if they need to respond to one or more reasons such as Internet speed slow or App not working (if required). The reasons for disconnecting are displayed only if you configure Display the following reasons to disconnect GlobalProtect (Always-on mode) . If you did not configure the GlobalProtect app to display the reasons for disconnecting, end users are prompted to provide a reason for disconnecting from the app.
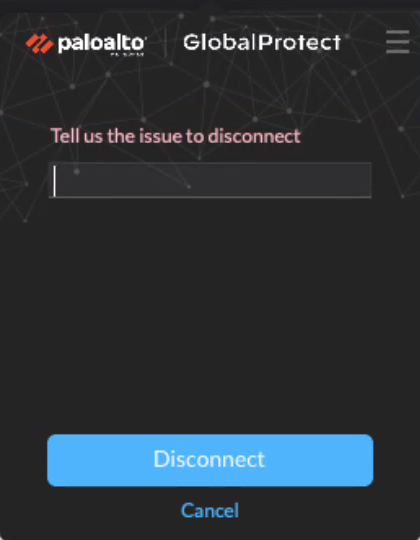
Screenshot of the GlobalProtect disconnect reasons options.
- To allow end users to provide a reason a reason for disconnecting, set Allow User to Disable GlobalProtect App to Allow with Comment . With this option, end users can select Other reason in the GlobalProtect app to supply a reason for disconnecting.
- To allow users to disable GlobalProtect only if they provide a passcode, set Allow User to Disable GlobalProtect App to Allow with Passcode . Then, in the Disable GlobalProtect App area, enter (and confirm) the Passcode that the end users must supply.
- To allow users to disable GlobalProtect only if they provide a ticket, set Allow User to Disable GlobalProtect to Allow with Ticket . With this option, the disable action triggers the app to generate a Request Number, which the end user must communicate to the administrator. The administrator then clicks Generate Ticket on the Network > GlobalProtect > Portals page and enters the request number from the user to generate the ticket. The administrator provides the ticket to the end user, who enters it into the Disable GlobalProtect dialog to disable the app.
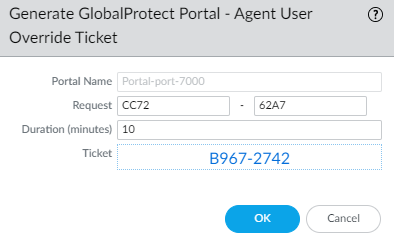
Screenshot of the GlobalProtect 'Generate Ticket' option on the portal configuration page.
- To limit the number of times users can disable the GlobalProtect app, specify the Max Times User Can Disable value in the Disable GlobalProtect App area. A value of 0 (default) indicates that users are not limited in the number of times they can disable the app.
This setting is applicable only with the Allow , Allow with Comment , and Allow with Passcode disable options.
If your users disable the GlobalProtect app the maximum number of times and must continue to have the ability to disable the app thereafter:
- You can increase the Max Times User Can Disable value in the GlobalProtect portal agent configuration ( Network > GlobalProtect > Portals > <portal-config> > Agent > <agent-config> > App ). The user must then select Refresh Connection from the settings menu of the GlobalProtect status panel or establish a new GlobalProtect connection in order for the new value to take effect.
- Users can reset the counter by reinstalling the app.
- To restrict the amount of time for which the app can be disabled, enter a Disable Timeout (min) value in the Disable GlobalProtect App area. A value of 0 (default) indicates that there is no restriction for how long the user can keep the app disabled.
This setting is applicable only with the Allow , Allow with Comment , and Allow with Passcode disable options.
- Specify whether users can uninstall the GlobalProtect app.
Use the Allow User to Uninstall GlobalProtect App option to allow users to uninstall the GlobalProtect app, prevent them from uninstalling the GlobalProtect app, or allow them to uninstall if they specify a password you create.
This setting gets pushed to the endpoint device registry when it connects to portal for the first time, and is saved for each portal to which it connects.
This option requires Content Release version 8207-5750 or later.
- To allow users to uninstall the GlobalProtect app with no restrictions, select Allow .
When you set it to Allow in the Windows registry, the value for that portal is set to 0 under Computer\\HKEY_LOCAL_MACHINE\\SOFTWARE\\Palo Alto Networks\\GlobalProtect\\Settings\\<portal> 'Uninstall = 0' .
- To prevent users from uninstalling the GlobalProtect app, select Disallow .
When you set it to Disallow in the Windows registry, the value for that portal is set to 1 under Computer\\HKEY_LOCAL_MACHINE\\SOFTWARE\\Palo Alto Networks\\GlobalProtect\\Settings\\<portal> 'Uninstall = 1' .
- To allow users to uninstall the GlobalProtect app with a password, select Allow with Passcode ; then, in the Uninstall GlobalProtect App section, enter an Uninstall Password and Confirm Uninstall Password .
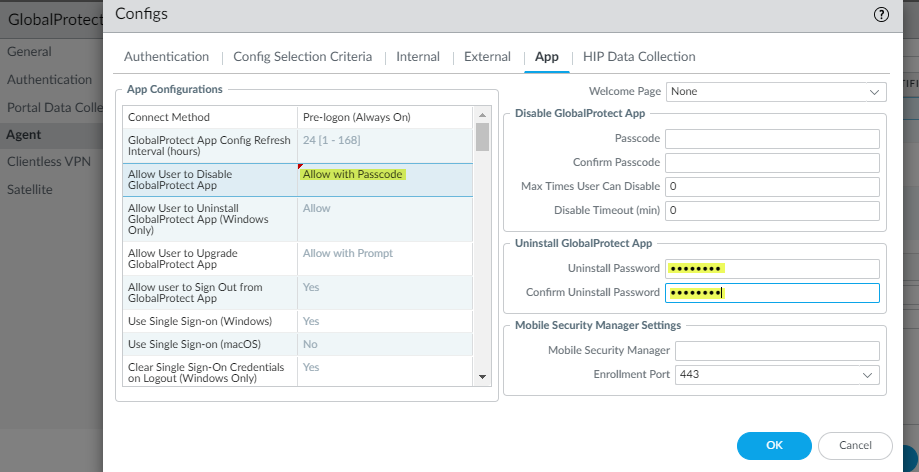
Screenshot of the Uninstall GlobalProtect App settings on the portal configuration.
- Specify whether users can sign out of the GlobalProtect app.
In the App Configurations area, set Allow user to Sign Out from GlobalProtect App to No to prevent users from logging out of the GlobalProtect app; set Allow user to Sign Out from GlobalProtect App to Yes to allow users to log out.
This option requires a Content Release version of 8196-5685 or later.
- Configure the certificate settings and behavior for the users that receive this configuration.
In the App Configurations area, configure any of the following options:
- Client Certificate Store Lookup —Select which store the app should use to look up client certificates. User certificates are stored in the Current User certificate store on Windows and in the Personal Keychain on macOS. Machine certificates are stored in the Local Computer certificate store on Windows and in the System Keychain on macOS. By default, the app looks for User and machine certificates in both places.
- SCEP Certificate Renewal Period (days) —With SCEP, the portal can request a new client certificate before the certificate expires. This time before the certificate expires is the optional SCEP certificate renewal period . During a configurable number of days before a client certificate expires, the portal can request a new certificate from the SCEP server in your enterprise PKI (range is 0-30; default is 7). A value of 0 means the portal does not automatically renew the client certificate when it refreshes the agent configuration.
For the GlobalProtect app to obtain the new certificate during the renewal period, the user must log in to the app. For example, if a client certificate has a lifespan of 90 days, the certificate renewal period is 7 days, and the user logs in during the final 7 days of the certificate lifespan, the portal acquires a new certificate and deploys it along with a fresh agent configuration.
- Extended Key Usage OID for Client Certificate ( Windows and macOS endpoints only )—Use this option only if you enabled client authentication, expect multiple client certificates to be present on the endpoint, and have identified a secondary purpose by which you can filter the client certificates. This option enables you to specify a secondary purpose for a client certificate using the associated object identifier (OID). For example, to display only client certificates that also have a purpose of Server Authentication, enter the OID 1.3.6.1.5.5.7.3.1. When the GlobalProtect app finds only one client certificate that matches the secondary purpose, GlobalProtect automatically selects and authenticates using that certificate. Otherwise, GlobalProtect prompts the user to select the client certificate from the list of filtered client certificates that match the criteria. For more information, including a list of common certificate purposes and OIDs, see Enable Certificate Selection Based on OID.
-
(
Starting with GlobalProtect™ app 6.2.8 on Windows and
macOS endpoints only
)
Enable Strict Certificate Check
—Use
this option to enforce certificate validation for Windows and macOS
clients. For information on certificate checks performed by
GlobalProtect, refer to Resolve FIPS-CC Mode Issues.
- No disables strict certificate checks.
- Yes enables strict certificate checks.
- Use Pre-Deployed Settings retains the value of the enable-strict-certificate-check registry key.
- If you do not want the app to establish a connection with the portal when the portal certificate is not valid, set Allow User to Continue with Invalid Portal Server Certificate to No . Keep in mind that the portal provides the agent configuration only; it does not provide network access. Therefore, security to the portal is less critical than security to the gateway. However, if you have deployed a trusted server certificate for the portal, disabling this option can help prevent man-in-the-middle (MITM) attacks.
- Specify whether users receive login prompts when multi-factor authentication is required to access sensitive network resources.
For internal gateway connections, sensitive network resources (such as financial applications or software development applications) may require additional authentication. You can Configure GlobalProtect to Facilitate Multi-Factor Authentication Notifications that are required to access these resources.
In the App Configurations area, configure any of the following options:
- Set Enable Inbound Authentication Prompts from MFA Gateways to Yes . To support multi-factor authentication (MFA), the GlobalProtect app must receive and acknowledge UDP prompts that are inbound from the gateway. Select Yes to enable GlobalProtect apps to receive and acknowledge the prompt. By default, the value is set to No , meaning GlobalProtect will block UDP prompts from the gateway.
- Specify the Network Port for Inbound Authentication Prompts (UDP) that the GlobalProtect app uses to receive inbound authentication prompts from MFA gateways. The default port is 4501. To change the port, specify a number from 1 to 65535.
- Specify the Trusted MFA Gateways that the GlobalProtect app can trust for multi-factor authentication. When a GlobalProtect app receives a UDP message on the specified network port, GlobalProtect displays an authentication message only if the UDP prompt comes from a trusted gateway.
- Configure the Inbound Authentication Message ; for example, You have attempted to access a protected resource that requires additional authentication. Proceed to authenticate at: . When users attempt to access a resource that requires additional authentication, GlobalProtect receives and displays an inbound authentication message. GlobalProtect automatically appends the URL for the Authentication Portal page that you specify when you configure multi-factor authentication to the inbound authentication message.
- ( Windows only ) Configure settings for Windows endpoints that receive this configuration.
- Resolve All FQDNs Using DNS Servers Assigned by the Tunnel (Windows Only) — Configure the DNS resolution preferences for the GlobalProtect tunnel. Select No to allow Windows endpoints to send DNS queries to the DNS server set on the physical adapter if the initial query to the DNS server configured on the gateway is not resolved. This option retains the native Windows behavior to query all DNS servers on all adapters recursively but can result in long wait times to resolve some DNS queries. Select Yes (default) to allow Windows endpoints to resolve all DNS queries with the DNS servers you configure on the gateway instead of allowing the endpoint to send some DNS queries to the DNS servers set on the physical adapter.
This feature does not support DNS over TCP.
- Send HIP Report Immediately if Windows Security Center (WSC) State Changes —Select No to prevent the GlobalProtect app from sending HIP data when the status of the Windows Security Center (WSC) changes. Select Yes (default) to immediately send HIP data when the status of the WSC changes.
- Clear Single Sign-On Credentials on Logout —Select No to keep single sign-on credentials when the user logs out. Select Yes (default) to clear them and force users to enter credentials upon the next login.
- Use Default Authentication on Kerberos Authentication Failure —Select No to use only Kerberos authentication. Select Yes (default) to retry using the default authentication method after Kerberos authentication fails.
- ( Starting with GlobalProtect™ app 6.1 ) Specify the Proxy Auto-Configuration (PAC) File URL that you want to push to the endpoint to configure proxy settings via the GlobalProtect portal. You can deploy different PAC URLs to different endpoints based username or group membership. Once the endpoint has the proxy settings, it uses the proxy server to access the internet.The maximum URL length is 256 characters. The following Proxy Auto-Configuration (PAC) File URL methods are supported:
- Proxy Auto-Config (PAC) standard (for example, http://pac.<hostname or IP>/proxy.pac).
- Web Proxy Auto-Discovery Protocol (WPAD) standard (for example, http://wpad.<hostname or IP>/wpad.dat).
- ( Windows only ) Configure the GlobalProtect app for Windows endpoints to Detect Proxy for Each Connection .
For more details about network traffic behavior based on proxy use, see Tunnel Connections Over Proxies.
- Select No to auto-detect the proxy for the portal connection and use that proxy for subsequent connections.
- Select Yes (default) to auto-detect the proxy for every connection.
- ( Windows and macOS only ) Specify whether GlobalProtect must use proxies or bypass proxies.
With this setting, you can configure network traffic behavior based on GlobalProtect proxy use. See Tunnel Connections Over Proxies for more information.
- To require GlobalProtect to use proxies, set the Set Up Tunnel Over Proxy (Windows & Mac only) option to Yes .
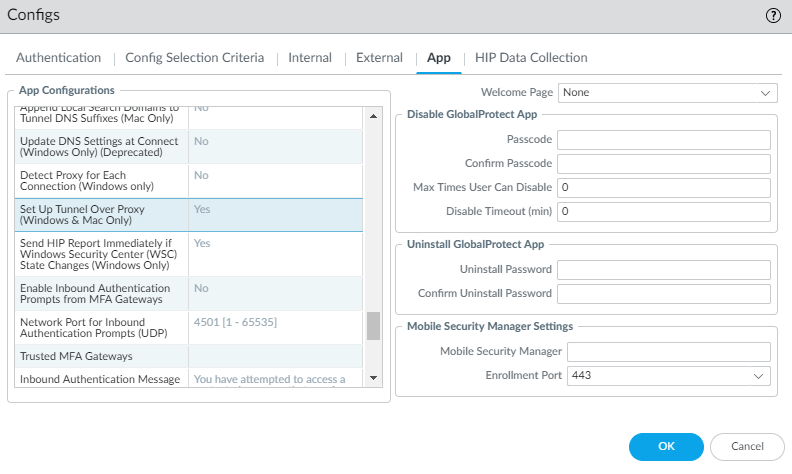
Illustration showing SSL tunnel setup going through a proxy when "Set Up Tunnel Over Proxy" is enabled (Windows/Mac, SSL tunnel).
- To require GlobalProtect to bypass proxies, set the Set Up Tunnel Over Proxy (Windows & Mac only) option to No .
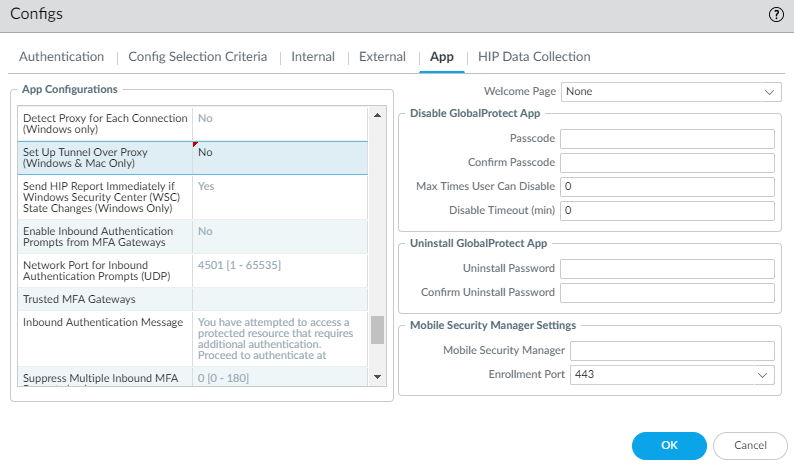
Illustration showing SSL tunnel setup bypassing a proxy when "Set Up Tunnel Over Proxy" is disabled (Windows/Mac, SSL tunnel).
- ( Starting with GlobalProtect™ app 6.1 ) Set Enable Advance Host Detection to Yes to add an additional security layer during the internal host detection by the app. With the advanced internal host detection, the app validates the server certificate of the internal gateways in addition to performing a reverse DNS lookup of the internal host to determine whether the app is inside the enterprise network. Select No (default) for GlobalProtect app to perform internal host detection without validating the server certificate of the internal gateways.
- ( Starting with GlobalProtect app 6.3.1 or later and Content Release version 8890-8951 or later ) Set Enable Intelligent Internal Host Detection to Yes to enable GlobalProtect to retry network discovery if internal host detection fails. This setting applies if an internal gateway and internal host detection are configured without an external gateway. By default, the parameter is set to No .
- If your endpoints frequently experience latency or slowness when connecting to the GlobalProtect portal or gateways, consider adjusting the portal and TCP timeout values.
To allow more time for your endpoints to connect to or receive data from the portal or gateway, increase the timeout values as needed. Keep in mind that increasing the values can result in longer wait times if the GlobalProtect app is unable to establish the connection. In contrast, decreasing the values can prevent the GlobalProtect app from establishing a connection when the portal or gateway does not respond before the timeout expires.
In the App Configurations area, configure any of the following timeout options:
- Portal Connection Timeout (sec) —The number of seconds (between 1 and 600) before a connection request to the portal times out due to no response from the portal. When your firewall is running Applications and Threats content versions earlier than 777-4484, the default is 30. Starting with content version 777-4484, the default is 5.
- TCP Connection Timeout (sec) —The number of seconds (between 1 and 600) before a TCP connection request times out due to unresponsiveness from either end of the connection. When your firewall is running Applications and Threats content versions earlier than 777-4484, the default is 60. Starting with content version 777-4484, the default is 5.
- TCP Receive Timeout (sec) —The number of seconds before a TCP connection times out due to the absence of some partial response of a TCP request (range is 1-600; default is 30).
- ( Windows 10 and macOS running macOS Catalina 10.15.4 or later; Requires GlobalProtect™ app 5.2 or later ) Specify whether to enable split DNS to allow users to direct their DNS queries for applications and resources over the VPN tunnel or outside the VPN tunnel in addition to network traffic by specifying the Split-Tunnel Option .
Select Network Traffic Only to include and exclude rules that are applied only to network application traffic and not to DNS traffic. All DNS traffic goes through the VPN tunnel irrespective of the split tunnel based on the destination domain that you specified for inclusions and exclusions on a best effort basis. On Windows endpoints, the split DNS feature can be used along with Resolve All FQDNs Using DNS Servers Assigned by the Tunnel (Windows Only) to enforce and resolve all DNS queries over the tunnel.
When you select Both Network Traffic and DNS , the split tunnel based on the destination domain that you specified for inclusions and exclusions are applied to the DNS traffic and the associated network application traffic for that domain.
- GlobalProtect app 6.2 and later You can optionally push split tunnel configurations to endpoints through the gateway using a split tunnel configuration file hosted on a web server, which allows you to add more excluded/included domains, applications, or routes to split tunnel functionality without manually modifying the gateway configuration.
If you selected Both Network Traffic and DNS , you must add at least one fake domain to the exclude list.
With Split DNS, you can configure which domains are resolved by the VPN assigned DNS servers and which domains are resolved by the local DNS servers.
This option requires a Content Release version of 8284-6139 or later.
- ( Optional—Requires GlobalProtect app 6.2 ) Set the HIP Remediation Process Timeout (sec) within which the GlobalProtect app will run a script to complete the HIP remediation process. After you Configure HIP Process Remediation the GlobalProtect app provides a specified timeout period in which the endpoint can run a remediation script if an endpoint fails a process check. After the timeout period expires, the GlobalProtect app resubmits the HIP report.
- ( Optional—Requires GlobalProtect app 6.2 ) Set the Allow User to Extend GlobalProtect User Session to Yes to extend the login lifetime session of the GlobalProtect app before it expires
- Specify whether remote desktop connections are permitted over existing VPN tunnels by specifying the User Switch Tunnel Rename Timeout . When a new user connects to a Windows machine using Remote Desktop Protocol (RDP), the gateway reassigns the VPN tunnel to the new user. The gateway can then enforce security policies on the new user.
Allowing remote desktop connections over VPN tunnels can be useful in situations where an IT administrator needs to access a remote end-user system using RDP.
By default, the User Switch Tunnel Rename Timeout value is set to 0, meaning the GlobalProtect gateway terminates the connection if a new user authenticates over the VPN tunnel. To modify this behavior, configure a timeout value from 1 to 7200 seconds. If the new user does not log in to the gateway before the timeout value expires, the GlobalProtect gateway terminates the VPN tunnel assigned to the first user.
Changing the User Switch Tunnel Rename Timeout value only affects the RDP tunnel and does not rename a pre-logon tunnel when configured.
- To enable GlobalProtect to preserve the existing VPN tunnel after users log out of their endpoint, specify a Preserve Tunnel on User Logoff Timeout value (range is 0 to 600 seconds; default is 0 seconds). If you accept the default value of 0 , GlobalProtect does not preserve the tunnel following user logout.
This option requires Content Release version released on July 8th, 2019 or later.
Consider the following GlobalProtect connection behaviors when you configure GlobalProtect to preserve the VPN tunnel:
- If the same user logs out and then logs back in to an endpoint within the specified timeout period in either Always On or On-Demand mode, GlobalProtect remains connected without requiring any user interaction (including portal and gateway authentication). If the user does not log back in within the specified timeout period, the tunnel disconnects and he or she must reestablish the GlobalProtect connection.
- If a user logs out of an endpoint and then a different user logs in to the same endpoint in either Always On or On-Demand mode, the existing tunnel is renamed for the new user only if the new user authenticates to GlobalProtect successfully within the specified timeout period. If the new user does not log in and authenticate successfully within the specified timeout period, the existing tunnel disconnects and a new GlobalProtect connection must be established. If the new user is in Always On mode, GlobalProtect attempts to establish a new connection automatically. If the new user is in On-Demand mode, he or she must establish a new GlobalProtect connection manually.
- Specify how GlobalProtect app upgrades occur.
If you want to control when users can upgrade, you can customize the app upgrade on a per-configuration basis.
By default, the Allow User to Upgrade GlobalProtect App option is set to Allow with Prompt , which means end users are prompted to upgrade when a new version of the app is activated on the firewall. To modify this behavior, select one of the following options:
- Allow Transparently —Upgrades occur automatically without user interaction. Upgrades can occur when the user is working remotely or connected within the corporate network.
- Internal —Upgrades occur automatically without user interaction, provided the user is connected within the corporate network. This setting is recommended to prevent slow upgrades in low-bandwidth situations. When a user connects outside the corporate network, the upgrade is postponed and re-activated when the user connects within the corporate network. You must configure internal gateways and internal host detection to use this option.
- Disallow —This option prevents app upgrades.
- Allow Manually —End users initiate app upgrades. In this case, the user must select Check Version from the settings menu on the GlobalProtect status panel to determine if there is a new app version available, and then upgrade if desired.
Note that the Allow Manually option will not work if the GlobalProtect app is hidden from the user. See Step 6 for details on the Display GlobalProtect Icon settings.
Upgrades for Allow Transparently and Internal occur only if the GlobalProtect software version on the portal is more recent than the GlobalProtect software version on the endpoint. For example, a GlobalProtect 6.0.3 agent connecting to a GlobalProtect 6.0.1 portal is not upgraded.
Starting with GlobalProtect app 6.0, configurations set to Allow with Prompt do not prompt users to downgrade their app version when the app version that is activated on the portal is an earlier version. To see the prompt to downgrade, users must Check for Updates on the About tab.
- Add a Change Password Message to specify password policies or requirements your users must follow when they change their passwords (for example, passwords must contain at least one number and one uppercase letter).
- Specify whether you want the GlobalProtect app to send gateway selection criteria logs to the firewall by specifying the Log Gateway Selection Criteria option.
Select Yes to enable the GlobalProtect app to send the enhanced logs for the gateway selection criteria to the firewall. The default is No . The app does not send the enhanced logs to the firewall.
To help you to identify details as to why the GlobalProtect app chose to connect to a specific gateway, the GlobalProtect app collects and reports information to identify gateway selection criteria and latency between the gateway and the endpoint. Information about the gateway selection criteria can help you to identify the priority and response time of the selected gateway, the list of gateway connection attempts, and statistics about the pre-tunnel and post-tunnel network latency. The enhanced log fields for the gateway selection criteria have been added to the GlobalProtect logs in Monitor > Logs > GlobalProtect .
- Specify whether to display a welcome page upon successful login.
A welcome page can be a useful way to direct users to internal resources that they can only access when connected to GlobalProtect, such as your Intranet or other internal servers.
By default, the only indication that the app has successfully connected is a balloon message that displays in the system tray/menubar.
To display a welcome page after a successful login, select factory-default from the Welcome Page drop-down. GlobalProtect displays the welcome page in the GlobalProtect app. You can also select a custom welcome page that provides information specific to your users, or to a specific group of users (based on which portal configuration gets deployed).
- Configure the GlobalProtect app log collection settings.
You can configure the GlobalProtect app to send troubleshooting logs, diagnostic logs, or both to Strata Logging Service.
- ( Content Release version 8350-14191 or later; Requires GlobalProtect app 5.2.5 ) Set Enable Autonomous DEM and GlobalProtect App Log Collection for Troubleshooting to Yes to enable the GlobalProtect app to display the Report an Issue option on the GlobalProtect app to allow end users to send the troubleshooting and diagnostic logs directly to Strata Logging Service. You must configure the Strata Logging Service certificate that is pushed from the portal as a client certificate to display the Report an Issue option. This certificate is used for the client to authenticate to Strata Logging Service when sending the logs. When this setting is set to No (default), the GlobalProtect app will not display the Report an Issue option and end users cannot send the troubleshooting and diagnostic logs to Strata Logging Service.
- ( Content Release version 8350-14191 or later; Requires GlobalProtect app 5.2.5 ) Enter up to ten HTTPS-based destination URLs that can contain IP addresses or fully qualified domain names (for example, https://10.10.10.10/resource.html, https://webserver/file.pdf, or https://google.com) to Run Diagnostics Tests for These Destination Web Servers on the GlobalProtect portal.
The HTTPS-based destination URLs that can contain IP addresses or fully qualified domain names that you provide are used only when Enable Autonomous DEM and GlobalProtect App Log Collection for Troubleshooting is set to Yes and when diagnostics are performed. These HTTPS-based destination URLs are not used when the GlobalProtect app creates troubleshooting reports when encountering an issue. Use commas, semi-colons, or separate lines to separate multiple fully qualified domain names (for example, google.com, gmail.com).
- Specify whether you want to install the Autonomous DEM (ADEM) endpoint agent during the GlobalProtect app installation and allow end users to enable or disable user experience tests from the app.
- ( Windows 10 and macOS only; Content Release version 8845-8731 or later ) The available options depend on the GlobalProtect version in your environment.
| GlobalProtect Version | Configuration Name | Configuration Values |
| GlobalProtect 6.2 and earlier | Autonomous DEM endpoint agent for Prisma Access for GP version 6.2 and below |
|
| GlobalProtect 6.3 and later | Access Experience (ADEM, App Acceleration, End user coaching) for GP 6.3 and above (Windows & MAC only) |
|
- Windows 10 and macOS only; Content Release version earlier than 8845-8731 Select Install and user can enable/disable agent from GlobalProtect to install the ADEM endpoint agent during the GlobalProtect app installation, and allow end users to enable or disable user experience tests from the GlobalProtect app. Select Install and user cannot enable/disable agent from GlobalProtect to install the ADEM endpoint agent during the GlobalProtect app installation, and not allow end users to enable or disable user experience tests from the GlobalProtect app. Select Do Not Install (default) to not install the ADEM endpoint agent during the GlobalProtect app installation.
For details about getting started with ADEM on Panorama Managed Prisma Access, see Get Started with Autonomous DEM. For details about getting started with ADEM on Cloud Managed Prisma Access, see Get Started with Autonomous DEM.
- ( Windows only ) Specify whether you want the GlobalProtect app to Display Status Panel at Startup .
- To suppress the status panel when users establish a GlobalProtect connection for the first time, select No .
- To automatically display the status panel when users establish a GlobalProtect connection for the first time, select Yes . With this option, users must click outside the status panel to close it manually.
- ( Windows 10 and macOS only; Content Release version 8450-6909 or later; Requires GlobalProtect app 6.0 ) Set Allow GlobalProtect UI to Persist for User Input to Yes to allow the status panel to continue to be displayed on the screen while the end user is entering their credentials when logging in or cancels the request. When this setting is set to No (default) and the end user must enter their credentials, they must click outside the status panel to minimize it manually.
-
Save the agent configuration.
- If you are done customizing your agent configurations, click OK to save your agent configuration. Otherwise, return to Define the GlobalProtect Agent Configurations to complete the agent configuration.
- Click OK to save your portal configuration.
- Commit the changes.
PCNSE/PCNSA Key Point: App customization covers a wide range of user experience settings, from connection methods (Always On, On-Demand, Pre-logon) and visibility (Advanced View, Icon Display) to critical security controls like Enforce Network Access, Uninstall/Disable options, and certificate handling.
PCNSE/PCNSA Key Point: Understand the implications of "Enforce GlobalProtect Connection for Network Access" and the necessary exclusions (IPs, FQDNs, Captive Portal). It's a key security feature to prevent bypassing the tunnel.
PCNSE/PCNSA Key Point: Know how to configure app upgrades and the different methods available (Transparently, Internal, Manually, Disallow).
PCNSE/PCNSA Key Point: SCEP certificate renewal, MTU settings, and tunnel persistence/timeout options are also important configuration details.
Tunnel Connections Over Proxies
On Windows and macOS platforms, you can configure GlobalProtect to bypass proxies so that all HTTP/HTTPS traffic that matches the proxy/PAC file rules is required to traverse the GlobalProtect VPN tunnel before reaching the intended destination.
When you configure the option to bypass proxies, you can prevent users from setting up a personal proxy to access web resources without going through the VPN tunnel for inspection and policy enforcement.
If you enable GlobalProtect to use proxies on Windows endpoints, only the HTTP/HTTPS traffic that matches the proxy/PAC file rules goes through the proxy directly after users establish the GlobalProtect connection. All other traffic that matches the access routes configured on the GlobalProtect gateway goes through the tunnel established over the proxy.
On macOS endpoints, proxies are disabled after users establish the GlobalProtect connection. This occurs because proxy settings are not copied from the physical network adapter of the endpoint to the virtual network adapter of the endpoint, and the virtual network adapter becomes the primary adapter from which the macOS endpoint receives proxy settings.
The following tables describe network traffic behavior based on the endpoint OS, tunnel type, and GlobalProtect proxy use.
Network Traffic Behavior on Windows Endpoints
| Tunnel Type | GlobalProtect Uses Proxies | GlobalProtect Bypasses Proxies |
| SSL |
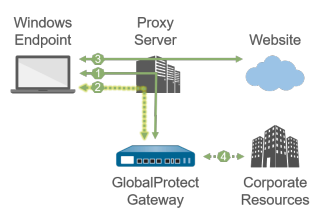
Illustration: Windows endpoint with SSL tunnel configured to *use* proxies. Shows login and tunnel setup via proxy, HTTP/S matching proxy rules bypassing tunnel, other traffic through tunnel over proxy. |
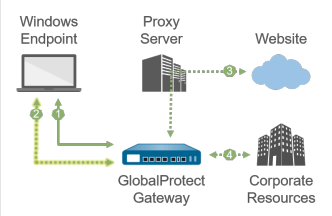
Illustration: Windows endpoint with SSL tunnel configured to *bypass* proxies. Shows login and tunnel setup bypassing proxy, HTTP/S matching proxy rules going through tunnel THEN proxy, other traffic through tunnel bypassing proxy. |
| 1 —All login requests go through the proxy. | 1 —All login requests bypass the proxy and go directly to the gateway. | |
| 2 —SSL tunnel setup goes through the proxy. | 2 —SSL tunnel setup bypasses the proxy and goes directly to the gateway. | |
| 3 —HTTP/HTTPS traffic that matches the proxy/PAC file rules goes through the proxy and bypasses the SSL tunnel. |
3 —HTTP/HTTPS traffic that matches the proxy/PAC file rules goes through the SSL tunnel and then through the proxy. If the proxy is unreachable from the gateway, HTTP/HTTPS traffic is dropped, and users cannot access the intended destination. |
|
| 4 —Other traffic that matches the access routes configured on the gateway goes through the SSL tunnel built over the proxy. | 4 —Other traffic that matches the access routes configured on the gateway bypasses the proxy and goes through the SSL tunnel. | |
| IPSec |
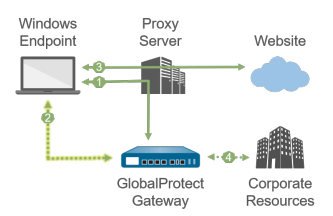
Illustration: Windows endpoint with IPSec tunnel. Shows login via proxy. Note that IPSec tunnel setup bypasses the proxy. You cannot set up an IPSec tunnel through a proxy because proxies do not support UDP traffic. |
|
| 1 —All login requests go through the proxy. | ||
| 2 —IPSec tunnel setup bypasses the proxy and goes directly to the gateway. | ||
| 3 —HTTP/HTTPS traffic that matches the proxy/PAC file rules goes through the proxy and bypasses the IPSec tunnel. | ||
| 4 —Other traffic that matches the access routes configured on the gateway bypasses the proxy and goes through the IPSec tunnel. | ||
Network Traffic Behavior on Mac Endpoints
| Tunnel Type | GlobalProtect Uses Proxies | GlobalProtect Bypasses Proxies |
| SSL |
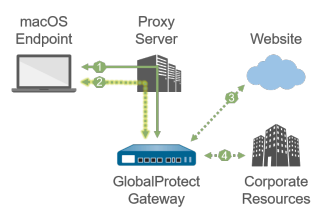
Illustration: macOS endpoint with SSL tunnel configured to *use* proxies. Shows login and tunnel setup via proxy, HTTP/S matching proxy rules going through tunnel over proxy, other traffic through tunnel over proxy. |
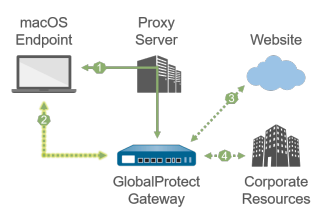
Illustration: macOS endpoint with SSL tunnel configured to *bypass* proxies. Shows login via proxy, tunnel setup bypassing proxy, HTTP/S matching proxy rules bypassing proxy through tunnel, other traffic through tunnel bypassing proxy. |
| 1 —All login requests go through the proxy. | 1 —All login requests go through the proxy. | |
| 2 —SSL tunnel setup goes through the proxy. | 2 —SSL tunnel setup bypasses the proxy and goes directly to the gateway. | |
| 3 —HTTP/HTTPS traffic that matches the proxy/PAC file rules goes through the SSL tunnel built over the proxy. | 3 —HTTP/HTTPS traffic that matches the proxy/PAC file rules bypasses the proxy and goes through the SSL tunnel. | |
| 4 —Other traffic that matches the access routes configured on the gateway goes through the SSL tunnel built over the proxy. | 4 —Other traffic that matches the access routes configured on the gateway bypasses the proxy and goes through the SSL tunnel. | |
| IPSec |
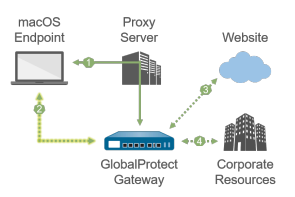
Illustration: macOS endpoint with IPSec tunnel. Shows login via proxy. Note that IPSec tunnel setup bypasses the proxy. You cannot set up an IPSec tunnel through a proxy because proxies do not support UDP traffic. |
|
| 1 —All login requests go through the proxy. | ||
| 3 —IPSec tunnel setup bypasses the proxy and goes directly to the gateway. | ||
| 3 —HTTP/HTTPS traffic that matches the proxy/PAC file rules bypasses the proxy and goes through the IPSec tunnel. | ||
| 4 —Other traffic that matches the access routes configured on the gateway bypasses the proxy and goes through the IPSec tunnel. | ||
PCNSE/PCNSA Key Point: Understand how GlobalProtect interacts with proxies, especially the difference between SSL and IPSec tunnels and how traffic is routed depending on whether GlobalProtect is configured to use or bypass proxies.
PCNSE/PCNSA Key Point: IPSec tunnels cannot be established *through* proxies because proxies typically only handle TCP traffic (HTTP/HTTPS).
Configure Intelligent Portal Selection
| Where Can I Use This? | What Do I Need? |
|
Prisma Access
PAN-OS |
Prisma Access Mobile Users license (for use with Prisma Access)
GlobalProtect gateway license (for use with PAN-OS) GlobalProtect app 6.3 and later OS Support: Windows and macOS Content release version: 8833-8679 and later |
The intelligent portal selection feature enables automatic selection of the appropriate portal when a user travels across multiple countries for seamless and secure connectivity.
After you configure intelligent portal in your environment, you're automatically routed to the appropriate Prisma Access portal based on your country location.
For example, when you travel to China, you are directed to the China Prisma Access portal and to the North America portal when you're in the United States. This eliminates the need for manual selection of portals and improves the end user experience.
The intelligent portal feature is supported for the following modes.
- Always-On and Always-On (Pre-logon)
- Connect Before Logon if there is no additional portal list for Connect Before Logon
Intelligent portal is not supported for Connect Before Logon if a portal list is defined and for On-Demand mode.
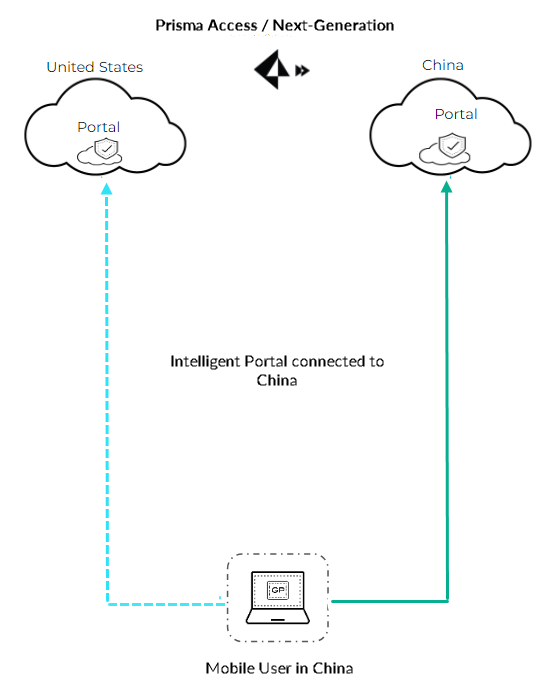
Illustration showing a user connecting to different regional GlobalProtect portals automatically based on location.
Follow the steps below to configure and use the intelligent portal feature in your environment.
- Configure intelligent portal.
| Current Environment | Deployment Steps |
| Fresh install of GlobalProtect 6.3 and later on Windows and macOS |
Deploy GlobalProtect with a command line option to add the intelligent portal feature:
For example, the following command deploys GlobalProtect with intelligent portal and defines the portals for USA and China. You can define multiple portals for a country.
The portal map must not exceed 255 characters. |
| Existing installation of GlobalProtect 6.3 and later for Windows |
If GlobalProtect 6.3 or higher is already installed in your environment, you can add the following keys to the Windows Registry (path HKEY_LOCAL_MACHINE\SOFTWARE\Palo Alto Networks\GlobalProtect\Settings\).
The portal map must not exceed 255 characters.
This entry enables the intelligent portal feature the first time the end user logs in to the GlobalProtect app.
Add this entry if you want to host the API service to provide user location. |
| Existing installation of GlobalProtect 6.3 and later for macOS |
If GlobalProtect 6.3 or higher is already installed in your environment, you can define the following entries in the macOS plist.
|
| Upgrade to GlobalProtect 6.3 and later |
If you uninstall the previous GlobalProtect release and do a fresh install, follow the fresh install procedure describes above.
If you upgrade GlobalProtect through the portal, add the intelligent portal settings to the Windows Registry or macOS plist. |
- For additional information on app settings, see Customizable App Settings.
- Enable the intelligent portal feature on the portal. See step 6 in the Customize the GlobalProtect App.
You must enable intelligent portal on the portal even if you defined the optional key REG ADD "HKLM\Software\Palo Alto Networks\GlobalProtect\Settings" /v intelligent-portal /t REG_SZ /d yes in the Windows Registry or macOS plist.
The following section describes how intelligent portal works after it is configured.
- When the end user logs in to the GlobalProtect app, GlobalProtect automatically selects the portal defined in the portal country map for that location. If there are multiple portals defined for a country, GlobalProtect selects the first portal for that country.
- If the user manually selects a different portal for that country from the portal map, GlobalProtect directs the user to this portal for subsequent sessions. The portal is retained when the app is refreshed or the computer goes to sleep.
- If the user manually selects a portal that isn't defined in the country map, this portal is retained for the session. When the GlobalProtect app is refreshed or the computer wakes up from sleep, GlobalProtect automatically directs them to the portal defined in the portal country map for that location. If there are multiple portals defined for that portal, GlobalProtect selects the first portal for that country.
Logs for the intelligent portal feature are included in the GlobalProtectLogs.tgz file. See the highlighted rows in the screenshot below.

Screenshot of GlobalProtect logs showing entries related to Intelligent Portal selection.
For information on how to access the log file, see View and Collect GlobalProtect App Logs.
PCNSE/PCNSA Key Point: Intelligent Portal Selection routes users to the geographically appropriate portal automatically based on their public IP, improving latency and user experience, especially with Prisma Access.
PCNSE/PCNSA Key Point: It requires configuring a portal-country map and enabling the feature on the portal itself (even if configured via registry/plist).
Customize the GlobalProtect Portal Login, Welcome, and Help Pages
GlobalProtect provides default login, welcome, and/or help pages. However, you can create your own custom pages with your corporate branding, acceptable use policies, and links to your internal resources.
You can alternatively disable browser access to the portal login page in order to prevent unauthorized attempts to authenticate to the GlobalProtect portal (configure the Portal Login Page > Disable option from Network > GlobalProtect > Portals > <portal_config> > General) .
With the portal login page disabled, you can instead use a software distribution tool, such as Microsoft’s System Center Configuration Manager (SCCM), to allow your users to download and install the GlobalProtect app.
-
Export the default portal login, home, welcome, or help page.
- Select Device > Response Pages .
- Select the link for the corresponding GlobalProtect portal page, such as GlobalProtect Portal Login Page .
- Select the predefined Default page and click Export .
-
Edit the exported page.
- Use the HTML text editor of your choice to open and edit the page.
-
To edit the login or home page, configure any of the following variables:
- GlobalProtect Portal Login Page :
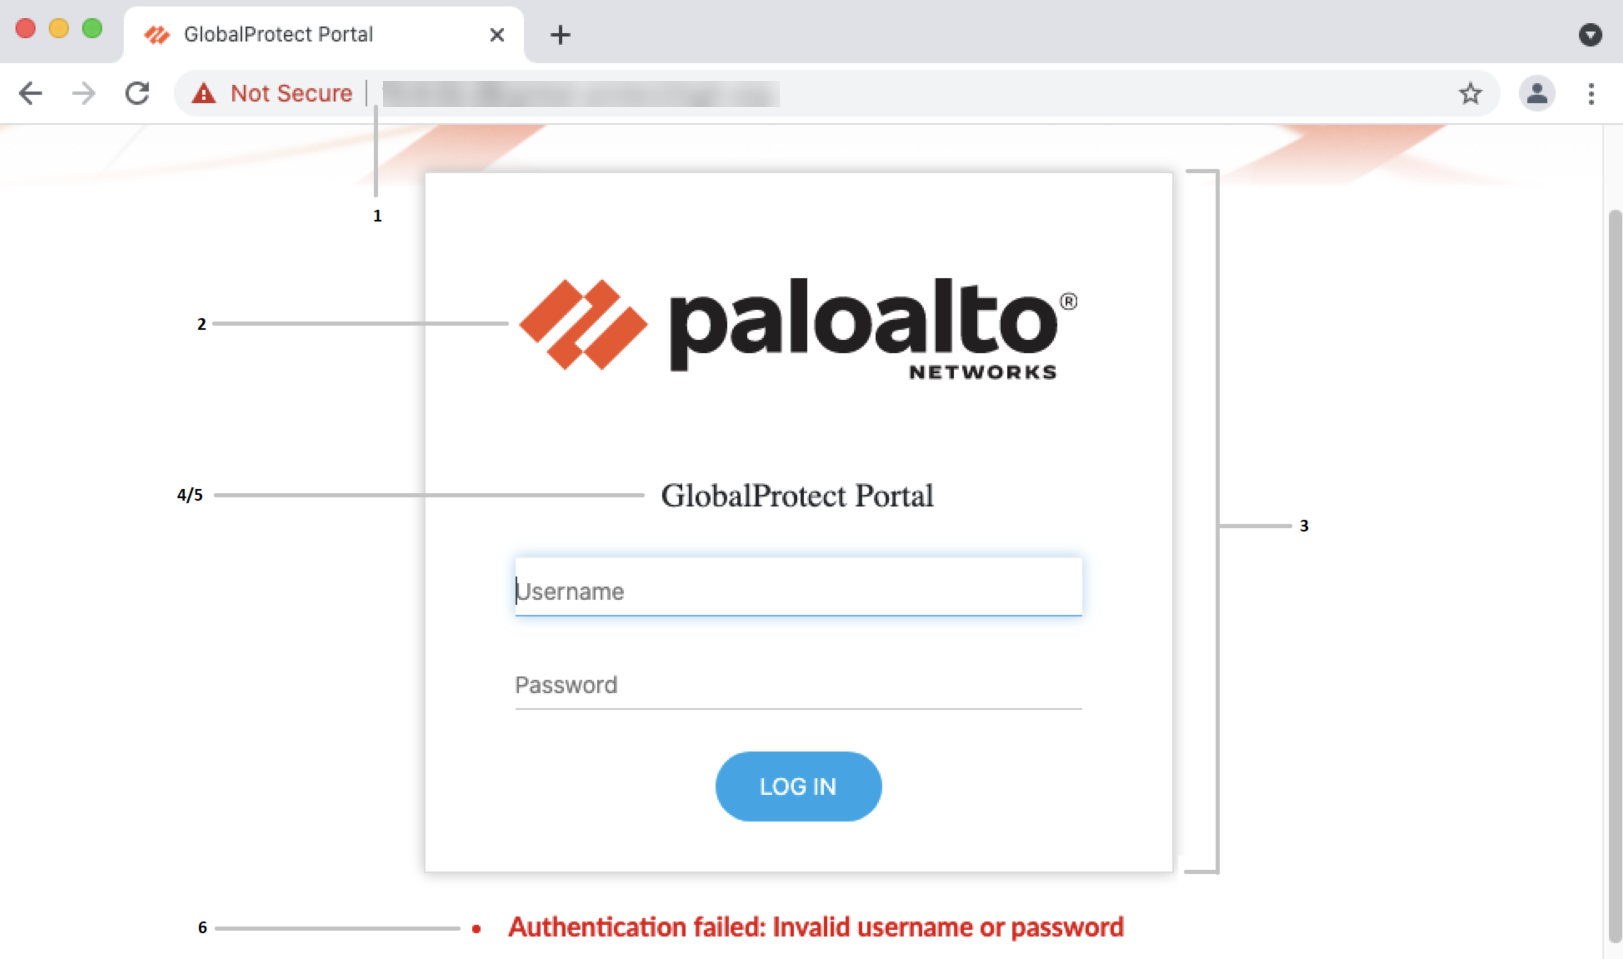
Screenshot showing the default GlobalProtect Portal Login Page with labels pointing to customizable elements.
| Label Number | Variable | Description | Example |
| 1 | favicon | URL of the icon displayed in the address bar of the web browser. |
var favicon = 'http://
cdn.slidesharecdn. com/logo-24x24. jpg?3975762018'; |
| 2 | logo | URL of the company logo. |
var logo = 'http://
cdn.slidesharecdn. com/logo-96x96. jpg?1382722588'; |
| 3 | bg_color | Login page background color. |
var bg_color =
'#D3D3D3'; |
| 4 | gp_portal_name | Text displayed under the company logo. |
var gp_portal_name
= 'GlobalProtect Portal'; |
| 5 | gp_portal_name_color | Color of the text displayed under the company logo. |
var gp_portal_name_
color = '#000000'; |
| 6 | error_text_color | Text color for logon failure messages. |
var error_text_
color = '#196390'; |
- GlobalProtect Portal Home Page :
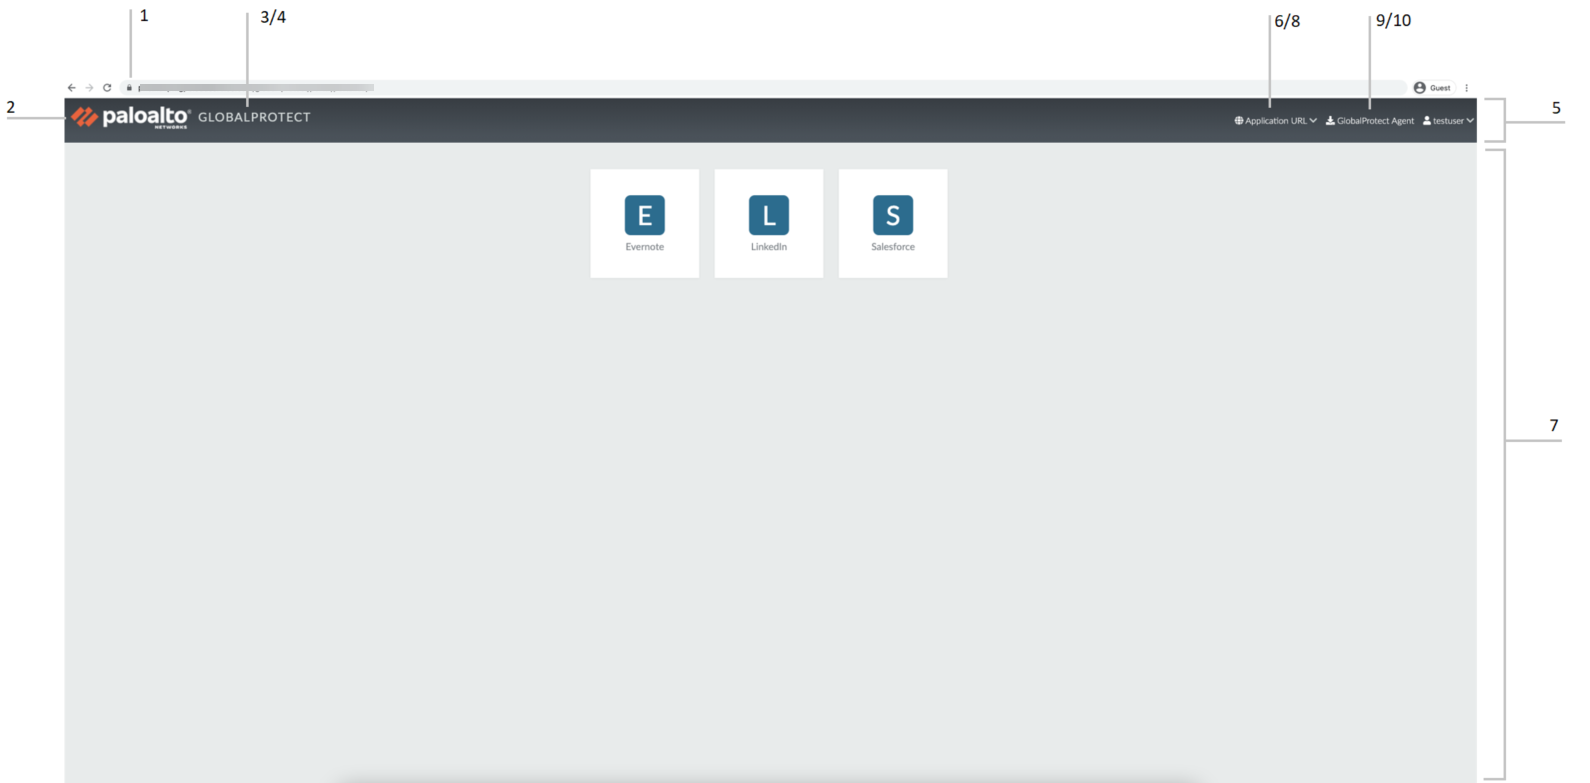
Screenshot showing the default GlobalProtect Portal Home Page (top section) with labels pointing to customizable elements.
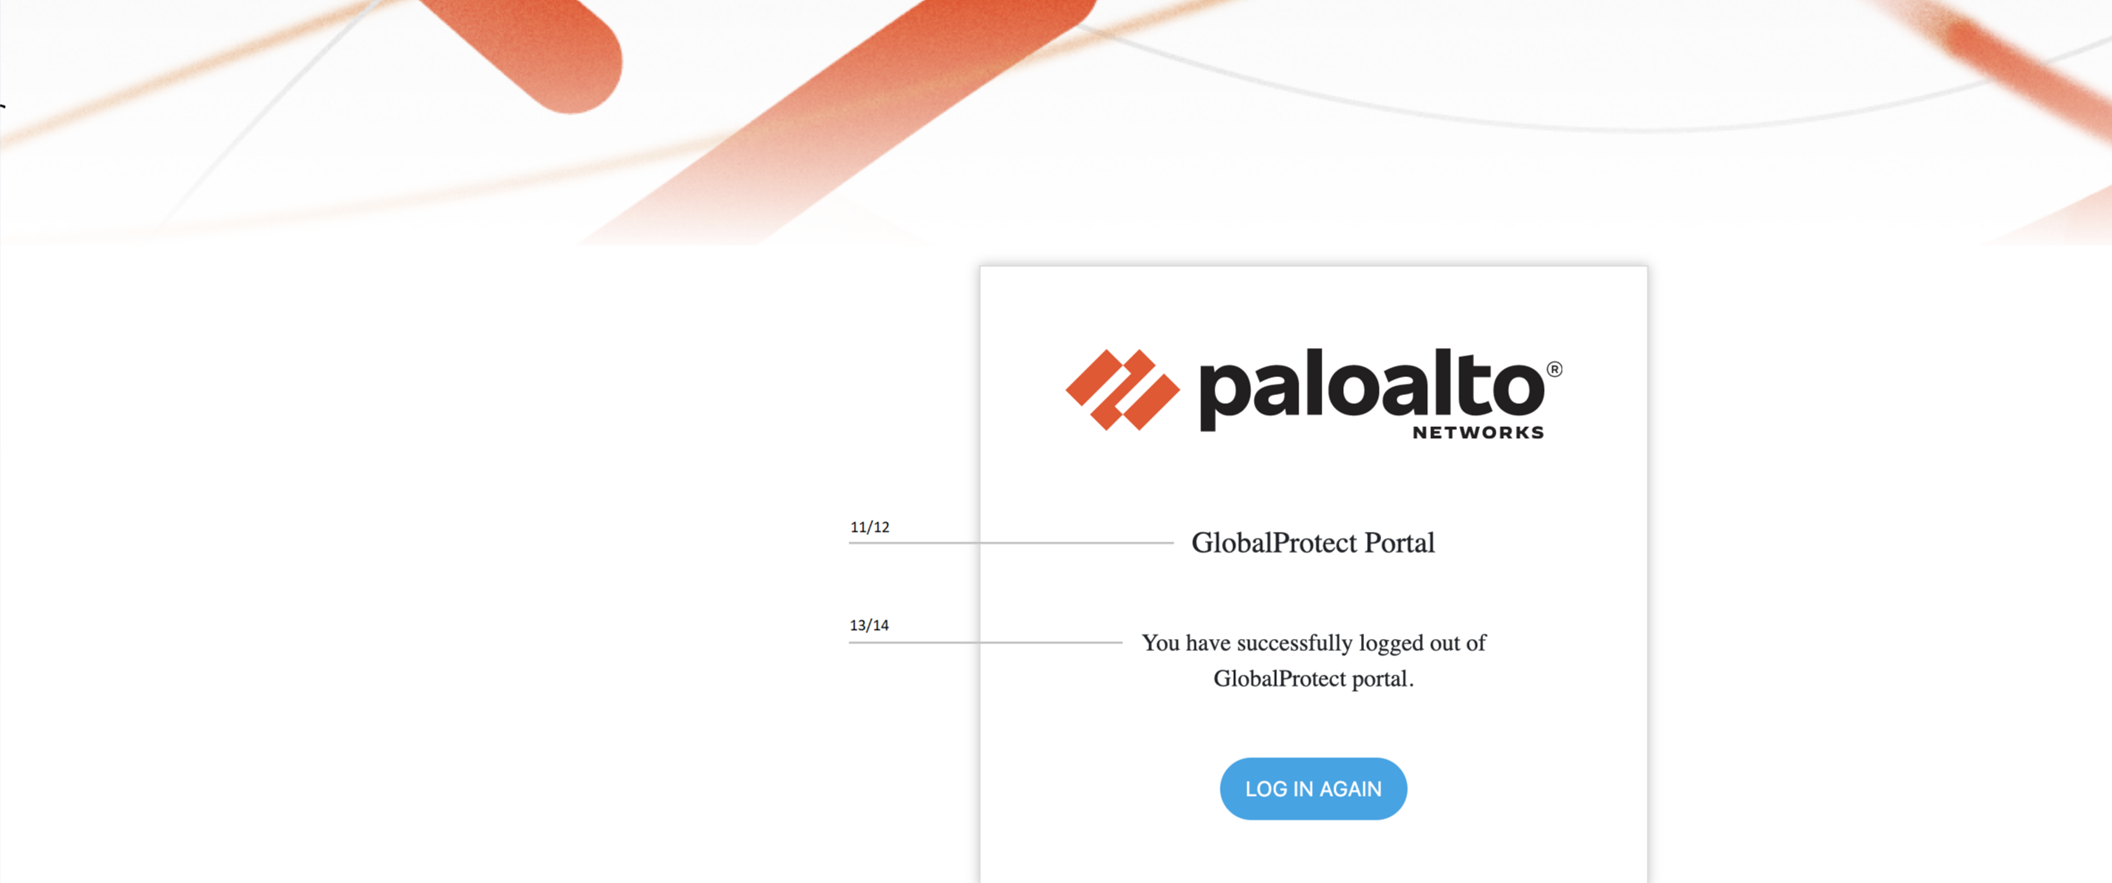
Screenshot showing the default GlobalProtect Portal Home Page (bottom section - logout page) with labels pointing to customizable elements.
| Label Number | Variable | Description | Example |
| 1 | favicon | URL of the icon displayed in the address bar of the web browser. |
var favicon = 'http://
cdn.slidesharecdn. com/logo-24x24. jpg?3975762018'; |
| 2 | logo | URL of the company logo. |
var logo = 'http://
cdn.slidesharecdn. com/logo-96x96. jpg?1382722588'; |
| 3 | navbar_text | Navigation bar text. |
var navbar_text =
'GlobalProtect'; |
| 4 | navbar_text_color | Navigation bar text color. |
var navbar_text_
color = '#D3D3D3'; |
| 5 | navbar_bg_color | Navigation bar background color. |
var navbar_bg_color
= '#A9A9A9'; |
| 6 | dropdown_bg_color | Drop-down menu background color. |
var dropdown_bg_
color = '#FFFFFF'; |
| 7 | bg_color | Home page background color. |
var bg_color =
'#D3D3D3'; |
| 8 | label_custom_app_url | Label for custom/internal application URLs. |
var label_custom_
app_url = 'Application URL'; |
| 9 |
display_
globalprotect_agent |
Option to display or hide the GlobalProtect app download button. Enter 1 to display the download button. Enter 0 to hide the download button. |
var display_
globalprotect_agent = 1; |
| 10 |
label_globalprotect_
agent |
Label for the GlobalProtect app download button. |
var label_
globalprotect_agent = 'GlobalProtect Agent'; |
| 11 | gp_portal_name | Text displayed under the company logo on the portal logout page. |
var gp_portal_name
= 'GlobalProtect Portal'; |
| 12 | gp_portal_name_color | Color of the text displayed under the company logo on the portal logout page. |
var gp_portal_name_
color = '#000000'; |
| 13 | logout_text_array |
Messages displayed on the portal logout page after users log out of the portal.
You can only modify the existing messages; you cannot add new messages or delete any existing messages. |
var logout_text_
array = ["You have successfully logged out of GlobalProtect portal.", "GlobalProtect Gateway is not licensed. Contact system administrator.", "User not authenticated to GlobalProtect portal.", "System error, contact system administrator.", "System error, failed to delete user session. Contact system administrator.", "Can not create user session. Max-capacity reached. Contact system administrator."]; |
| 14 | logout_text_color | Text color for messages displayed on the portal logout page after users log out of the portal. |
var logout_text_
color = '#000000'; |
- Save the edited page with a new filename. Make sure that the page retains its UTF-8 encoding.
- To set the GlobalProtect App Help Page to provide assistance to users with the GlobalProtect app:
- Select Network > GlobalProtect > Portals , and then Add a portal.
- Select General .
- In the Appearance area, select the factory-default help page, Import a custom help page, or select None to remove the Help option from the Settings menu of the GlobalProtect status panel.
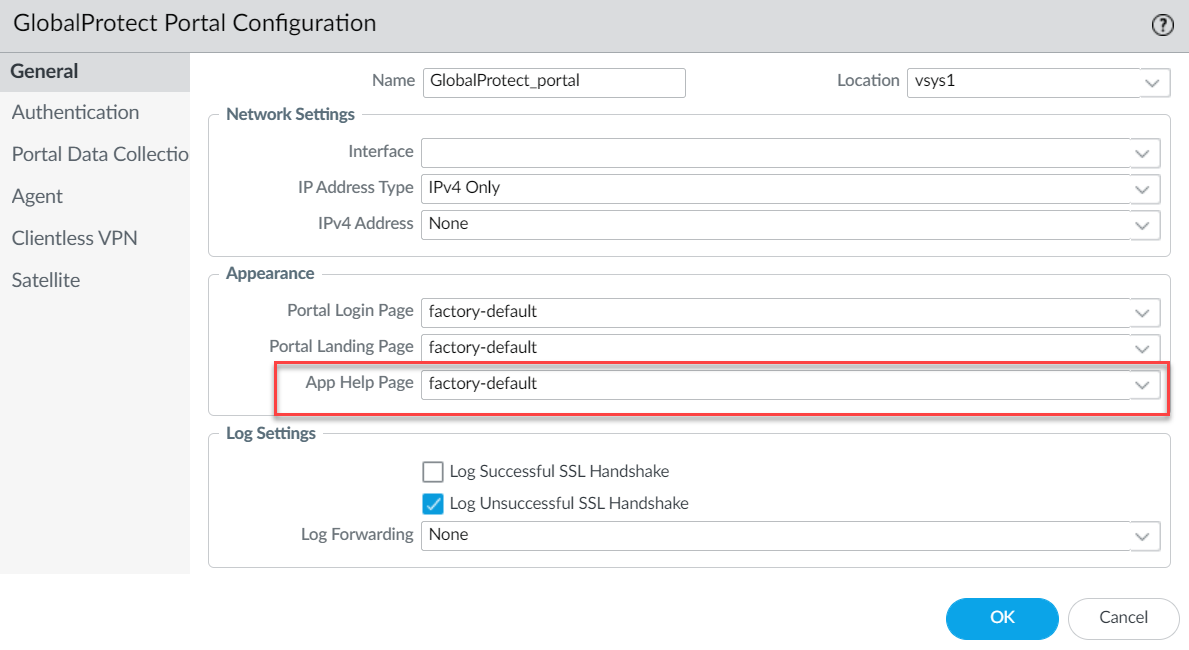
Screenshot showing the customization options for Portal Login Page, Portal Landing Page, and App Help Page.
- Click OK and Commit the changes.
-
Import the new page(s).
- Select Device > Response Pages .
- Select the link for the corresponding GlobalProtect portal page.
- Import the new portal page. Enter the path and filename in the Import File field or Browse to locate and select the file.
- ( Optional ) Select the virtual system on which this page will be used from the Destination drop-down or select shared (default) to make it available to all virtual systems.
- Click OK to import the file.
- Configure the portal to use the new page(s).
-
Portal Login Page
,
Portal Landing Page
, and
App Help Page
:
- Select Network > GlobalProtect > Portals .
- Select the portal to which you want to add the login, landing (home), or app help page.
- In the Appearance area of the General tab, select the new page from the relevant drop-down.
-
Custom Welcome Page
:
- Select Network > GlobalProtect > Portals .
- Select the portal to which you want to add the welcome page.
- On the Agent tab, select the agent configuration to which you want to add the welcome page.
- On the App tab, select the new page from the Welcome Page drop-down.
- Click OK to save the agent configuration.
- Save the portal configuration.
Click OK to save the portal configuration, and then Commit your changes.
-
Verify that the new page displays.
- Test the login page —Open a web browser and go to the URL for your portal (do not add the :4443 port number to the end of the URL or you will be directed to the web interface for the firewall). For example, enter https://myportal rather than https://myportal:4443 . The new portal login page will display.
- Test the home page —Open a web browser and go to the URL for your portal (do not add the :4443 port number to the end of the URL or you will be directed to the web interface for the firewall). For example, enter https://myportal rather than https://myportal:4443 . Enter your Username and Password , and then LOG IN to the portal. The new portal home page will display.
-
Test the help page
—Click the GlobalProtect system tray icon to launch the GlobalProtect app. When the status panel opens, click the settings icon (
 ) to open the settings menu. Select
Help
to view the new help page.
) to open the settings menu. Select
Help
to view the new help page.
-
Test the welcome page
—Click the GlobalProtect system tray icon to launch the GlobalProtect app. When the status panel opens, click the settings icon (
) to open the settings menu. Select
Welcome Page
to view the new welcome page.
PCNSE/PCNSA Key Point: Portal pages (Login, Home, Help) can be customized for branding and user guidance. Welcome pages are configured within Agent Configurations.
PCNSE/PCNSA Key Point: Custom pages are managed under Device > Response Pages. They are edited outside the firewall/panorama and then imported.
Enforce GlobalProtect for Network Access
To reduce the security risk of exposing your enterprise when a user is off-premise, you can force users on endpoints running Windows 7 or Mac OS 10.9 and later releases to connect to GlobalProtect to access the network.
When this feature is enabled, GlobalProtect blocks all traffic until the agent is internal or connects to an external gateway.
After the agent establishes a connection, GlobalProtect permits internal and external network traffic according to your security policy thus subjecting the traffic to inspection by the firewall and security policy enforcement. This feature also prevents the use of proxies as a means to bypass the firewall and access the internet.
If users must connect to the network using a captive portal (such as at a hotel or airport), you can also configure a grace period that provides users enough time to connect to the captive portal and then connect to GlobalProtect.
Because GlobalProtect blocks traffic unless the GlobalProtect agent can connect to a gateway, we recommend that you enable this feature only for users that connect in User-logon mode.
Keep in mind that if you configure the app to use User-logon mode and the user disables or disconnects from GlobalProtect they will be able to connect to the network because the enforcement feature only works when GlobalProtect is enabled. To prevent users from accessing the network without a GlobalProtect connection make sure you do not enable the users in User-logon mode to disable or disconnect GlobalProtect.
- Configure the GlobalProtect portal.
-
Create or modify an agent configuration.
- Select Network > GlobalProtect > Portals and select the portal configuration for which you want to add a client configuration or Add a new one.
- From the Agent tab, select the agent configuration you want to modify or Add a new one.
- Select the App tab.
- Configure GlobalProtect to force all network traffic to traverse a GlobalProtect tunnel.
In the App Configuration area, set Enforce GlobalProtect Connection for Network access to Yes . By default this option is set to No meaning that users can still access the internet if GlobalProtect is disabled or disconnected.
- (Optional) To provide additional information, configure a traffic blocking notification message.
The message can indicate the reason for blocking the traffic and provide instructions on how to connect, such as To access the network, you must first connect to GlobalProtect . If you enable a message, GlobalProtect will display the message when GlobalProtect is disconnected but detects the network is reachable.
- In the App Configuration area, make sure Display Captive Portal Detection Message is set to Yes . The default is No .
- Specify the message text in the Captive Portal Detection Message field. The message must be 512 or fewer characters.
- To specify the amount of time in which the user has to authenticate with a captive portal, enter the Captive Portal Exception Timeout in seconds (default is 0; range is 0 to 3600). For example, a value of 60 means that the user must log in to the captive portal within one minute after GlobalProtect detects the captive portal. A value of 0 means GlobalProtect does not allow users to connect to a captive portal and immediately blocks access.
- If you have a Captive Portal Detection Message enabled, the message appears 85 seconds before the Captive Portal Exception Timeout occurs. If the Capture Portal Exception Timeout is 90 seconds or less, the message appears 5 seconds after a captive portal is detected.
- Click OK twice to save the configuration and then Commit your change
PCNSE/PCNSA Key Point: "Enforce GlobalProtect Connection for Network Access" is a strong security posture that forces users to connect to the VPN for internet access. It's configured per Agent Configuration.
PCNSE/PCNSA Key Point: Proper configuration of Captive Portal Exception Timeout is essential when this feature is enabled to allow users to authenticate on networks requiring a captive portal.
GlobalProtect Portals Quiz
Test your knowledge on Palo Alto Networks GlobalProtect Portals!