How Do I Get Visibility into the State of the Endpoints?
Whenever an endpoint connects to GlobalProtect, the app presents its HIP data to the gateway. The gateway then uses this data to determine which HIP objects and/or HIP profiles the host matches. For each match, it generates a HIP Match log entry . Unlike a traffic log—which only creates a log entry if there is a policy match—the HIP Match log generates an entry whenever the raw data submitted by an app matches a HIP object and/or a HIP profile you have defined. This makes the HIP Match log a good resource for monitoring the state of the endpoints in your network over time —before attaching your HIP profiles to security policies—in order to help you determine exactly what policies you believe need enforcement.
Because a HIP Match log is only generated when the host state matches a HIP object you have created, for full visibility into the endpoint state, you may need to create multiple HIP objects to log HIP matches for endpoints that are in compliance with a particular state (for security policy enforcement purposes) as well as endpoints that are non-compliant (for visibility) . For example, suppose you want to prevent an endpoint that does not have antivirus or anti-spyware software installed from connecting to the network. In this case, you would create a HIP object that matches hosts that have a particular antivirus or anti-spyware software installed. By including this object in a HIP profile and attaching it to the security policy rule that allows access from your VPN zone, you can ensure that only hosts that are protected with antivirus or anti-spyware software can connect.
In this example, you would not be able to view which endpoints are not in compliance with this requirement in the HIP Match log. If you want to view a log for endpoints that do not have antivirus or anti-spyware software installed so that you can follow up with these users, you can also create a HIP object that matches the condition where the antivirus or anti-spyware software is not installed . Because this object is only required for logging purposes, you do not need to add it to a HIP profile or attach it to a security policy rule.
Configure HIP-Based Policy Enforcement
To enable the use of host information in policy enforcement, you must complete the following steps. For more information on the HIP feature, see About Host Information . See What Data Does the GlobalProtect App Collect on Each Operating System? for more details about the data that is collected for the device.
Steps:
- Verify proper licensing for HIP checks.
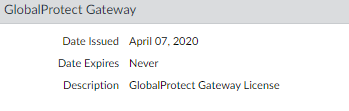
Screenshot showing where to verify GlobalProtect subscription licenses on the firewall device tab.
To use the HIP feature, you must purchase and install a GlobalProtect subscription license on each gateway that will perform HIP checks. To verify the status of your licenses on each portal and gateway, select Device > Licenses .
Contact your Palo Alto Networks Sales Engineer or Reseller if you do not have the required licenses. For more information on licensing, see About GlobalProtect Licenses .
- ( Optional ) Define any custom host information that you want the app to collect.
For example, if you have any required applications that are not included in the Vendor and/or Product lists for creating HIP objects, you could create a custom check that allows you to determine whether that application is installed (has a corresponding registry or plist key) or is running (has a corresponding running process).
Step 2 and 3 assume that you have already configured a GlobalProtect portal. If you have not yet configured your portal, see Set Up Access to the GlobalProtect Portal for instructions.
Screenshot illustrating the configuration of custom HIP data collection settings on the GlobalProtect Portal Agent tab.
- On the firewall hosting your GlobalProtect portal, select Network > GlobalProtect > Portals .
- Select the portal configuration that you want to modify.
- On the Agent tab, select the agent configuration to which you want to add a custom HIP check, or Add a new one.
- Select HIP Data Collection , and then enable the option to Collect HIP Data .
-
Under
Custom Checks
, define the following data that you want to collect from hosts running this agent configuration:
- To collect information about specific registry keys (Windows) : On the Windows tab, Add the name of a Registry Key . Optionally, Add specific Registry Value(s) .
- To collect information about running processes (Windows, Mac, Linux) : Select the appropriate tab and then Add a process to the Process List . You can optionally Configure HIP Process Remediation .
- To collect information about specific property lists (Mac) : On the Mac tab, Add the Plist . Optionally, Add Key values.
- If this is a new agent configuration, Define the GlobalProtect Agent Configurations as desired.
- Click OK to save the configuration.
- Commit the changes.
- ( Optional ) Exclude categories from collection.
- On the firewall that is hosting your GlobalProtect portal, select Network > GlobalProtect > Portals .
- Select the portal configuration that you want to modify.
- On the Agent tab, select the agent configuration from which to exclude categories, or Add a new one.
- Select Data Collection , and then verify that Collect HIP Data is enabled.
- Under Exclude Categories , Add a new exclude category.
- Select the Category you want to exclude from the drop-down.
- ( Optional ) If you want to exclude specific vendors and/or products within the selected category, click Add . On the Edit Vendor dialog, select the Vendor , and then click Add to exclude specific products. You can also Configure HIP Exceptions for Patch Management .
- Repeat steps 5-7 for each category that you want to exclude.
- If this is a new agent configuration, Define the GlobalProtect Agent Configurations as desired.
- Click OK to save the configuration.
- Commit the changes.
- Create the HIP objects to filter the raw host data collected by the app.
The best way to determine what HIP objects you need is to determine how you will use the host information you collect to enforce policy. Keep in mind that the HIP objects themselves are merely building blocks that allow you to create the HIP profiles that are used in your security policies. Therefore, you may want to keep your objects simple, matching on one item , such as the presence of a particular type of required software, membership in a specific domain, or the presence of a specific OS.
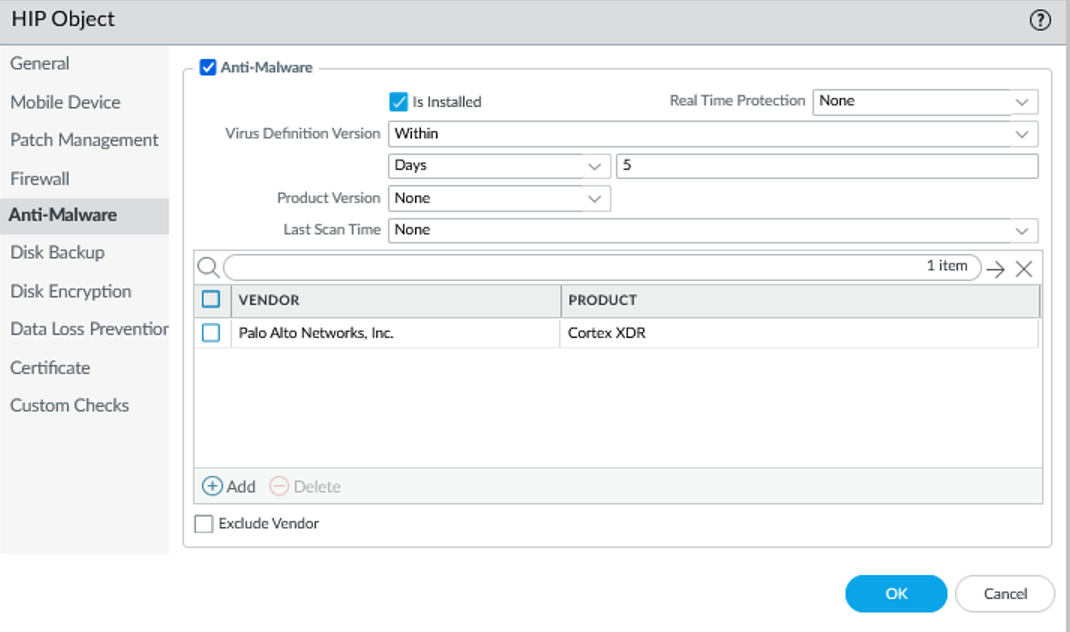
Screenshot showing configuration of a HIP object for Anti-Malware, matching specific software and update status.
For details on a specific HIP category or field, refer to the online help. See Table: Data Collection Categories .
- On the firewall that is hosting your GlobalProtect gateway(s) (or on Panorama), select Objects > GlobalProtect > HIP Objects , and then Add a new HIP object.
- Enter a Name for the object.
- Select the tab that corresponds to the category (e.g., Anti-Malware ) and enable the object to match against it. Complete the fields to define the desired matching criteria.
- ( Optional ) Configure tags to match against the ownership category or compliance status of the endpoint.
For example, you can create a tag to match against employee-owned endpoints so that you can prevent users from accessing sensitive network resources on their personal endpoints.
The User-ID agent for Windows queries the MDM server for the following information: Mobile device compliance status, Smart group (ownership category). The User-ID agent converts this information into tags that are incorporated into the HIP report. For more information, see Configure Windows User-ID Agent to Collect Host Information .
- Select the Mobile Device check box.
- On the Device tab, select a match operator from the Tag drop-down.
- ( Optional ) Enter one of the following ownership category values: Employee Owned , Corporate-Dedicated , Corporate-Shared .
- ( Optional ) Enter one of the following compliance status values: Compliant , NonCompliant , NotAvailable .
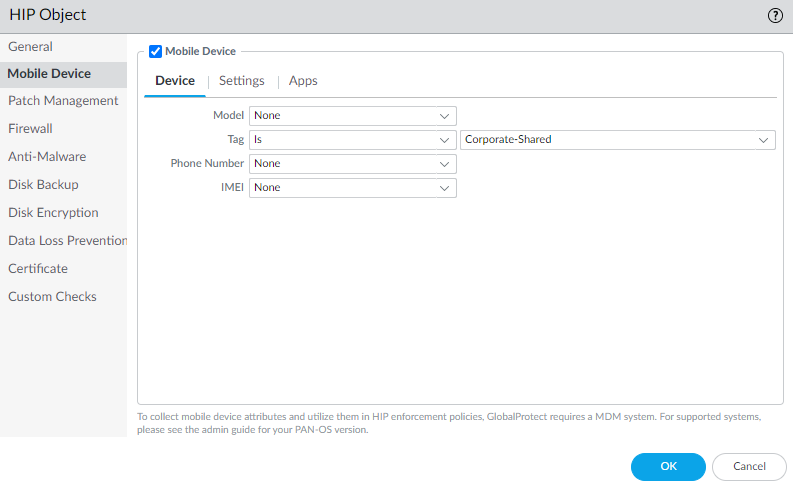
Screenshot showing configuration of a HIP object matching Mobile Device tags for ownership or compliance status.
- Click OK to save the HIP object.
- Repeat these steps to create each additional HIP object you require.
- Commit the changes.
- Create the HIP profiles that you plan to use in your policies.
When you create your HIP profiles, you can combine the HIP objects you previously created (as well as other HIP profiles) using Boolean logic ( AND , OR , NOT ).
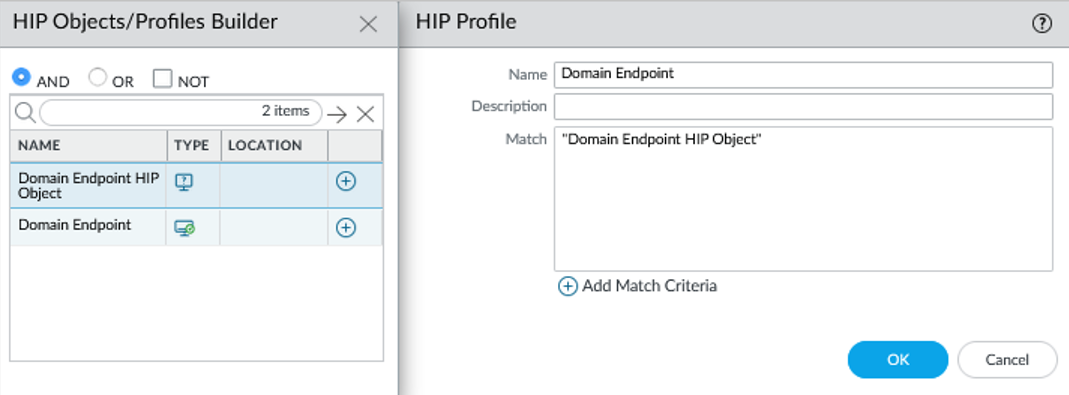
Screenshot illustrating how to build a HIP profile using the HIP Object/Profiles Builder with Boolean operators.

The icon used to add selected criteria to the match text box.
- On the firewall (or Panorama), select Objects > GlobalProtect > HIP Profiles , and then Add a new HIP profile.
- Enter a Name and Description .
- Click Add Match Criteria .
- Select a HIP object or profile and click the add icon. Use the NOT check box if needed.
- Continue adding criteria, selecting the appropriate Boolean operator ( AND or OR ). The HIP profile can be up to 2048 characters.
- If creating complex Boolean expressions, manually add parenthesis () in the Match text box.
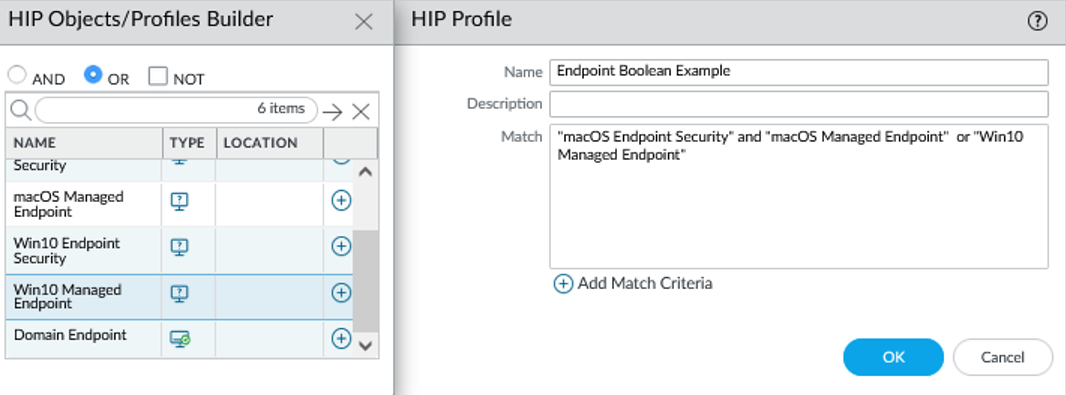
Example of a complex HIP profile using parenthesis and multiple criteria.
- After you add all match criteria, click OK .
- Repeat these steps to create each additional HIP profile you require.
- Commit the changes.
- Verify that the HIP objects and HIP profiles you created match your GlobalProtect traffic as expected.
Consider monitoring HIP objects and profiles as a means to monitor the security state and activity of your host endpoints. By monitoring the host information over time, you can better understand where your security and compliance issues are, which can guide you in creating useful policy. For more details, see How Do I Get Visibility into the State of the Endpoints?
On the gateway(s), select Monitor > Logs > HIP Match . This log shows all of the matches identified by the gateway when evaluating the raw HIP data reported by the app against the defined HIP objects and HIP profiles. Unlike other logs, a HIP match does not require a security policy match in order to be logged.
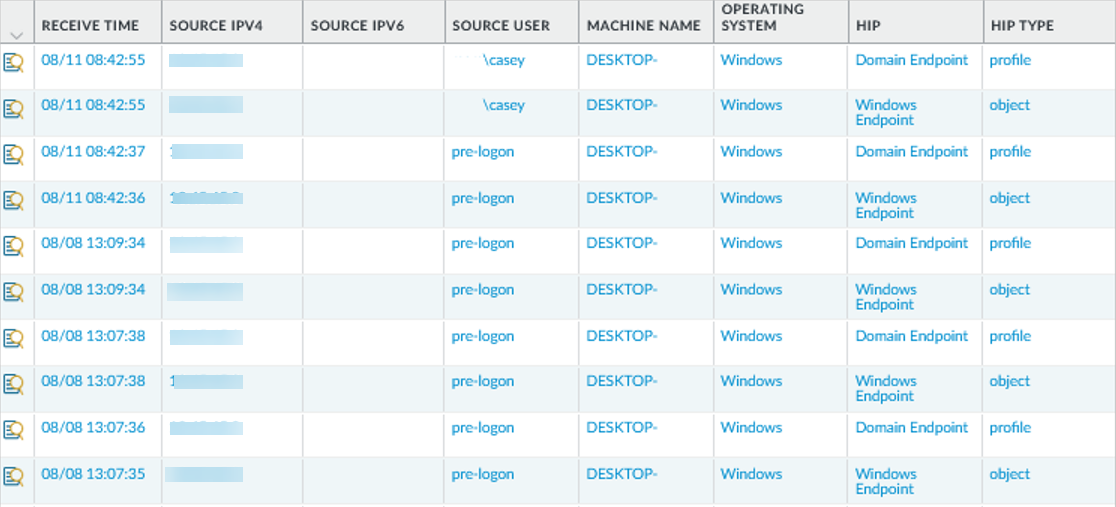
Screenshot of the HIP Match log on the firewall monitor tab, showing matches against defined HIP objects and profiles.
- Enable User-ID on the source zones containing the GlobalProtect users that send requests requiring HIP-based access controls. You must enable User-ID even if you do not plan on using the user identification feature, otherwise the firewall cannot generate any HIP Match logs entries.
- Select Network > Zones .
- Click the Name of the zone on which you want to enable User-ID.
- Enable User Identification , and then click OK .
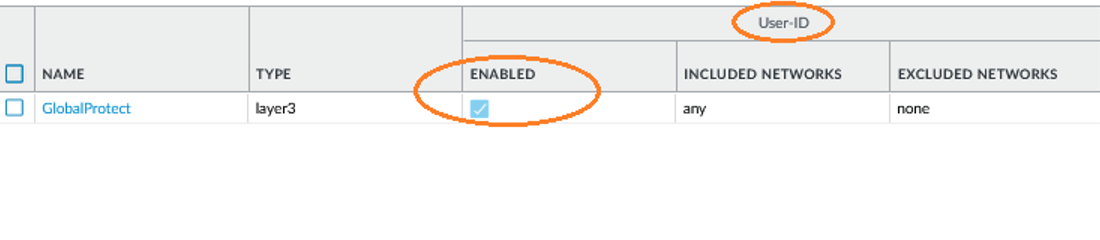
Screenshot showing where to enable User Identification on a network zone configuration.
- Create the HIP-enabled security rules on your gateway(s).
As a best practice, you should create your security rules and test that they match the expected flows (based on the source and destination criteria) before adding your HIP profiles.
- Select Policies > Security , and the select the rule to which you want to add a HIP profile.
- On the Source tab, make sure the Source Zone is a zone for which you enabled User-ID.
- On the Source tab under Source Device , Add the HIP Profiles used to identify devices (you can add up to 63 HIP profiles).
- Click OK to save the rule.
- Commit the changes.

Screenshot showing where to add HIP profiles to the Source Device criteria in a security policy rule.
- Define the notification messages end-users see when a security rule with a HIP profile is enforced.

Icon to toggle Source Edit for HTML.

Icon to add a hyperlink.
The decision as to when you want to display a notification message depends on your policy and what a HIP match (or non-match) means for the user.
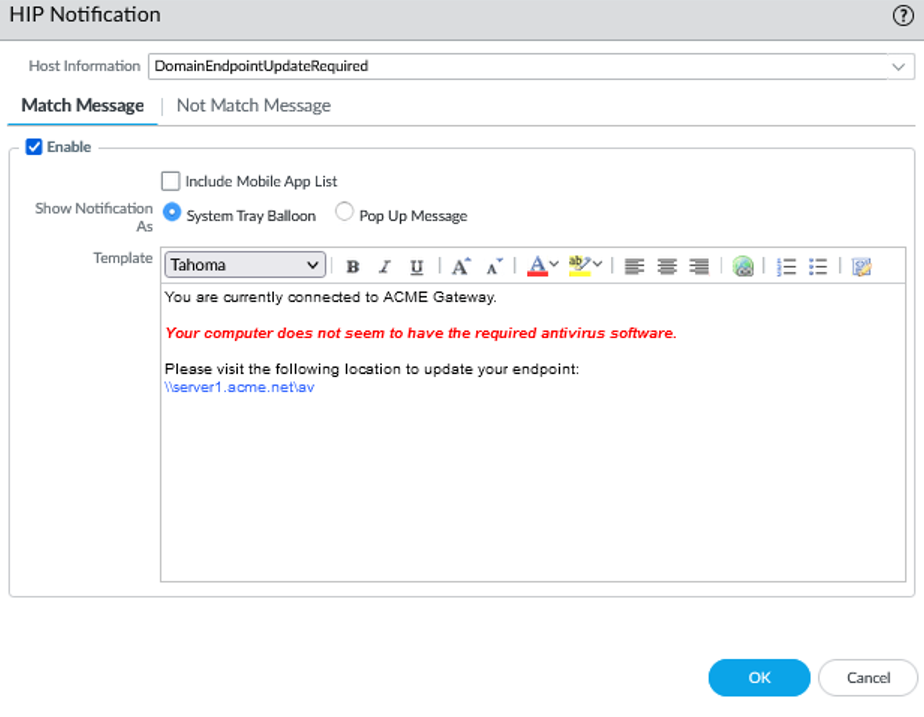
Screenshot showing the configuration of a HIP notification message, including text formatting options.
- On the firewall (or Panorama), select Network > GlobalProtect > Gateways .
- Select the gateway configuration.
- Select Agent > HIP Notification , and then click Add .
- Select the HIP profile from the Host Information drop-down.
- Select Match Message or Not Match Message .
- Enable the message and select whether to display as a Pop Up Message or System Tray Balloon .
- Enter message text in the Template text box. Use the icons for formatting or adding hyperlinks.
- Repeat for each message.
- Commit the changes.
- Verify that your HIP profiles are working as expected.
Monitor the traffic that is hitting your HIP-enabled policies using the Traffic log:
- On the firewall, select Monitor > Logs > Traffic .
- Filter the log to display traffic that matches the rule with the HIP profile you are interested in monitoring. For example, enter ( rule eq 'iOS Apps' ) .
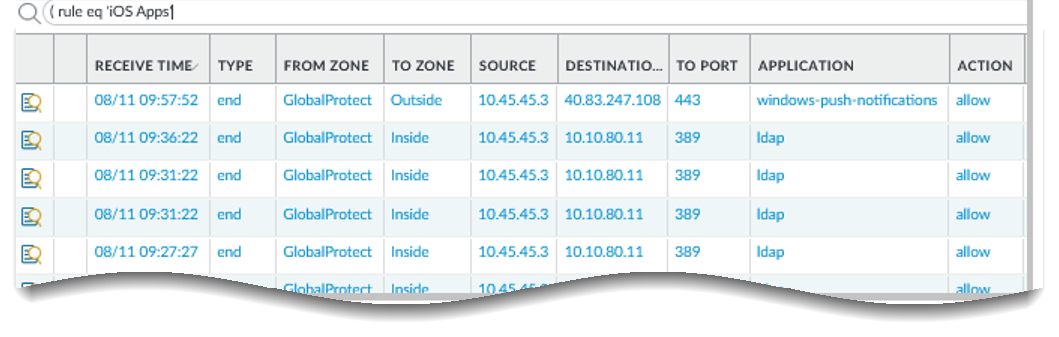
Screenshot showing how to filter the traffic log to view traffic matching a specific security rule.
Configure HIP Exceptions for Patch Management
| Where Can I Use This? | What Do I Need? |
|---|---|
|
|
Use this procedure to configure the GlobalProtect app to exempt specific security patches from being reported as missing from the endpoint HIP report to prevent the endpoint from failing the HIP check in cases where patch updates happen frequently.
- Configure HIP-Based Policy Enforcement .
- Define the patches you want to exclude from the HIP report and the date until which to exclude them.
- On the firewall hosting your GlobalProtect portal, select Network > GlobalProtect > Portals .
- Select the portal configuration.
- On the Agent tab, select the agent configuration or Add a new one.
- Under Exclude Categories , Add a new exclude category.
- Select patch-management as the Vendor and then Add the vendor.
- Specify the patch name or number <kb-article-id value> and optionally a date <MM/DD/YYYY> until which to exclude the patch updates from the HIP report.
Use the following format: Exclude:[kb-article-id1: MM/DD/YYYY], [kb-article-id2: MM/DD/YYYY]
Where kb-article value is the number in the attribute, example <kb-article-id>2267602</kb-article-id> and the MM/DD/YYYY specifies the date up to which the patch is excluded. If you do not set a date, the patch will be excluded indefinitely.
The Kb-article id should be in the same format displayed in the logs, for example:
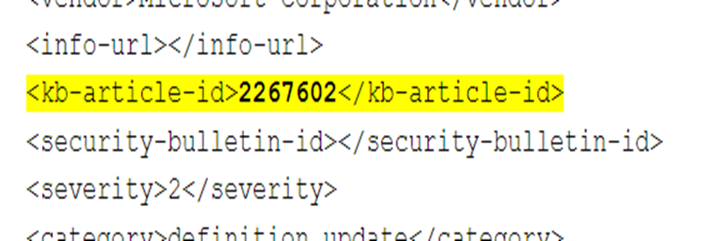
Screenshot showing how KB article IDs appear in log data.
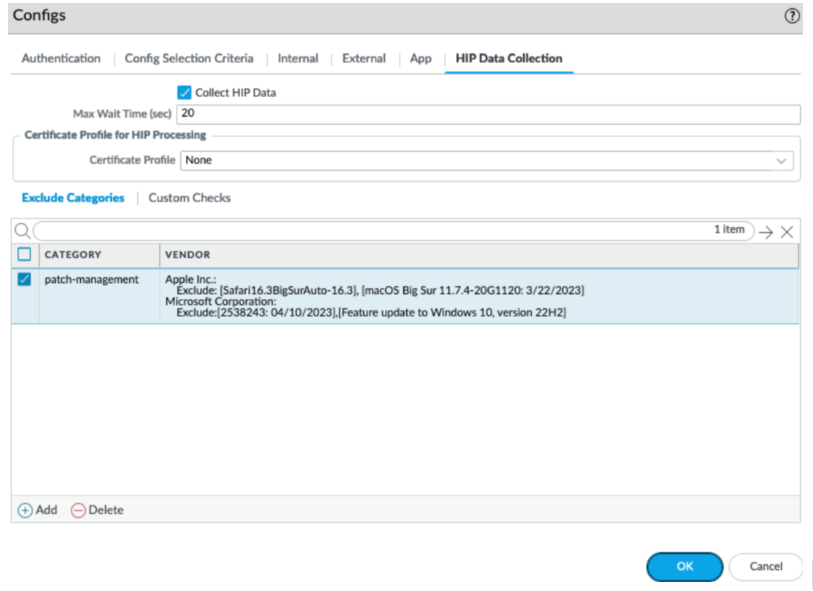
Screenshot showing how to configure patch management exclusions by KB article ID and optional date.
Repeat this step for each patch you want to exclude.
If you want to exclude all patches from a specific vendor, you would just exclude the entire category instead of specifying specific patches.
- To save the settings, click OK and then Commit your changes.
Collect Application and Process Data From Endpoints
The Windows Registry, macOS plist, and Linux process list can be used to configure and store settings. You can create a custom check that allows you to determine whether an application is installed (has a corresponding registry or plist key) or is running (has a corresponding running process).
Enabling custom checks instructs the GlobalProtect app to collect specific registry information (Registry Keys and Registry Key Values from Windows endpoints) or preference list (plist) information (plist and plist keys from macOS endpoints) or has a corresponding process (name of the process from Linux endpoints). The data collected is included in the raw Host Information data submitted to the gateway. For more information on defining app settings directly from the OS, see Deploy App Settings Transparently .
To monitor the data collected with custom checks, you can create a HIP object . You can then add the HIP object to a HIP profile to use the collected data to match to endpoint traffic and enforce security rules.
On Windows, macOS, and Linux devices, when you configure Custom Checks , GlobalProtect hides this information in the Host Profile summary of the GlobalProtect app.
Steps:
- Enable the GlobalProtect app to collect Windows Registry information, plist information from macOS, or process list from Linux.
Collect data from a Windows endpoint:
- Select Network > GlobalProtect > Portals .
- Select an existing portal configuration or Add a new one.
- On the Agent tab, select the agent configuration that you want to modify or Add a new one.
- Select HIP Data Collection .
- Enable the GlobalProtect app to Collect HIP Data .
- Select Custom Checks > Windows , and then Add the Registry Key . Optionally, add the corresponding Registry Value .
Screenshot showing where to configure collection of specific Windows Registry Keys and Values in the GlobalProtect Portal Agent settings.
Collect data from a macOS endpoint:
- Select Network > GlobalProtect > Portals .
- Select an existing portal configuration or Add a new one.
- On the Agent tab, select the agent configuration that you want to modify or Add a new one.
- Select HIP Data Collection .
- Enable the GlobalProtect app to Collect HIP Data
- Select Custom Checks > Mac , and then Add the Plist and the corresponding plist Key .

Screenshot showing where to configure collection of specific macOS Plist Keys and Values in the GlobalProtect Portal Agent settings.
For example, Add the Plist com.apple.screensaver and the Key askForPassword .
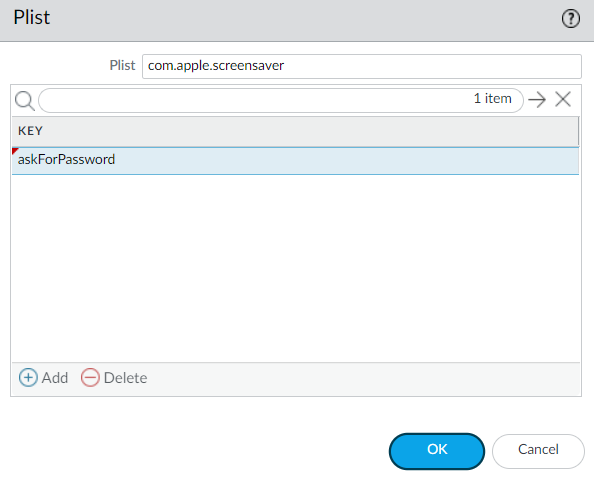
Screenshot illustrating collection of a specific macOS screensaver setting via Plist key.
Collect data from a Linux endpoint:
- Select Network > GlobalProtect > Portals .
- Select an existing portal configuration or Add a new one.
- On the Agent tab, select the agent configuration that you want to modify or Add a new one.
- Select HIP Data Collection .
- Enable the GlobalProtect app to Collect HIP Data .
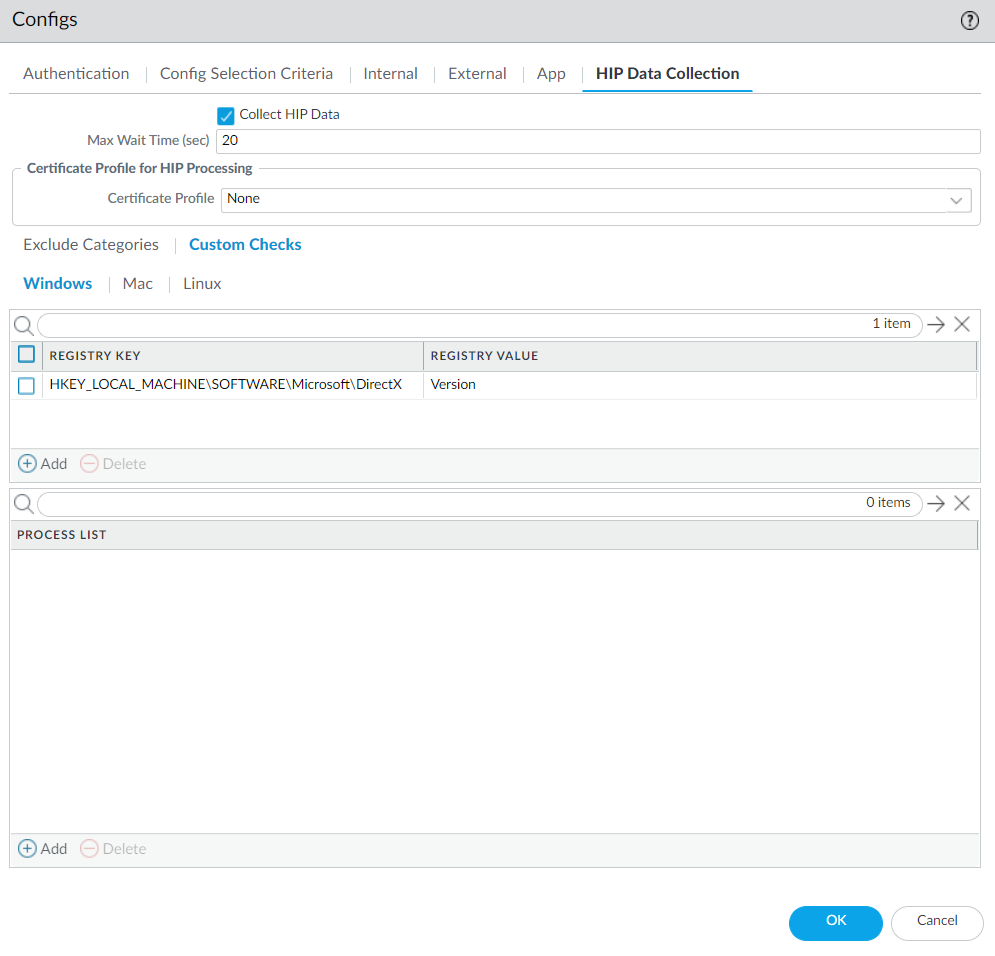
- Select Custom Checks > Linux , and then Add the Process List .
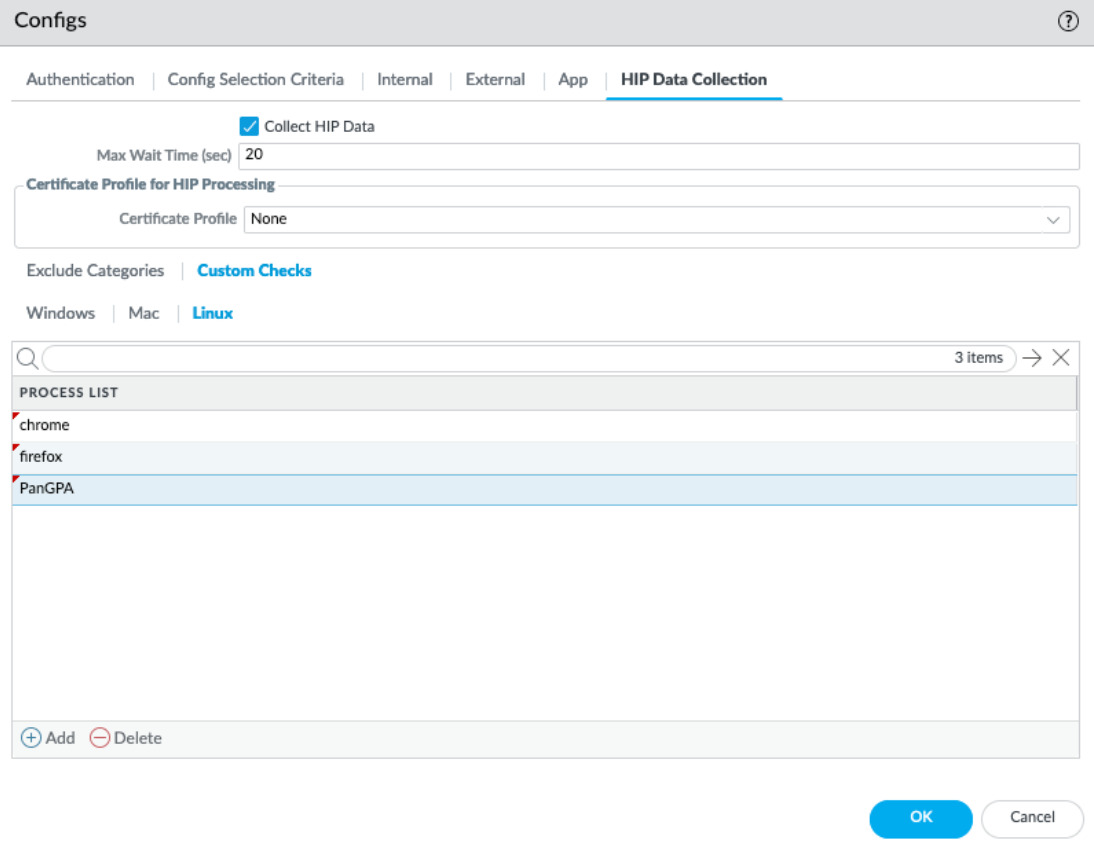
Screenshot showing where to configure collection of specific Linux Process List items in the GlobalProtect Portal Agent settings.
- ( Optional ) Check if a specific process is running on the endpoint.
- Select Network > GlobalProtect > Portals .
- Select an existing portal configuration or Add a new one.
- On the Agent tab, select the agent configuration that you want to modify or Add a new one.
- Select HIP Data Collection .
- Enable Collect HIP Data .
- Select Custom Checks > Windows, Mac, or Linux .
- Add the name of the process to the Process List .
- Save the custom check.
Click OK and Commit the changes.
- ( Optional ) Create a HIP Object to match the collected data.
With a HIP object defined, the gateway matches the raw data to the object, and a HIP Match log entry is generated.
For Windows, macOS, and Linux endpoints:
- Select Objects > GlobalProtect > HIP Objects .
- Select an existing HIP object or Add a new one.
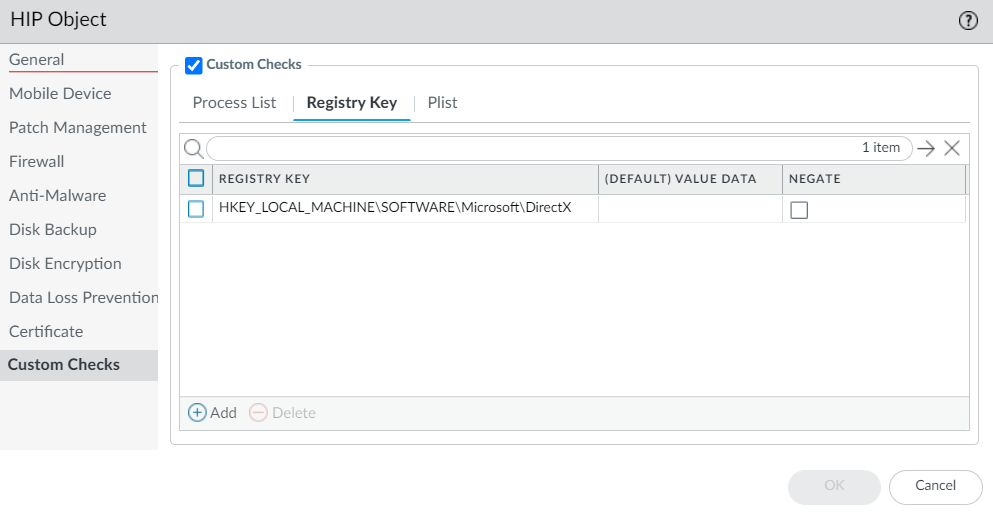
- On the Custom Checks tab, enable Custom Checks .
For Windows endpoints only:
-
To check for a specific registry key, select
Custom Checks > Registry Key
,
Add
the key, and configure:
- (Default) Value Data to match on default value data, OR
- Key does not exist or match the specified value data .
Do not configure both simultaneously.
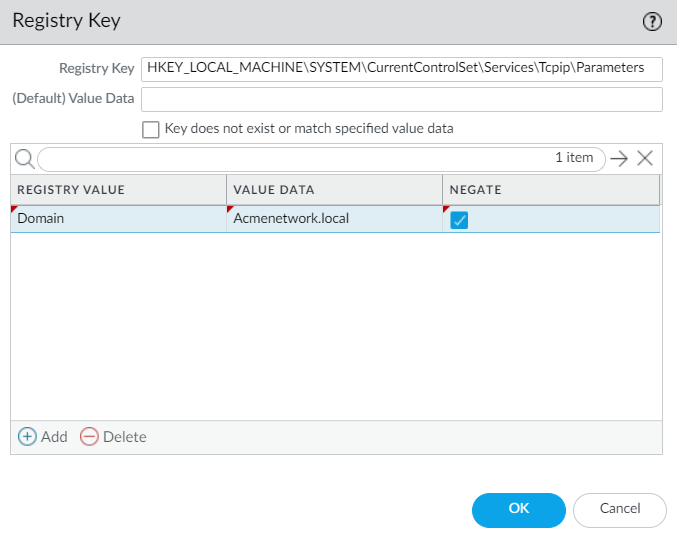
- To match on specific values within the key, select Custom Checks > Registry Key , Add the key, and then Add the Registry Value and corresponding Value Data . Or, use Negate to match endpoints without the value.
To use the negate option, do not enter any Value Data for your Registry Key .
- If you add more than one registry value, the gateway checks for all specified values.
Screenshot showing creation of a HIP object to match Windows Registry keys and values.
- Click OK to save the HIP object. Commit the changes to view data in HIP Match logs or continue.
For macOS endpoints only:
- To check for a specific plist, select Plist , Add the plist, and enter the name. Optionally, enable Plist does not exist .
- To match on a specific key-value pair, select Plist , Add the plist, and then Add a Key and corresponding Value . Or, use Negate .
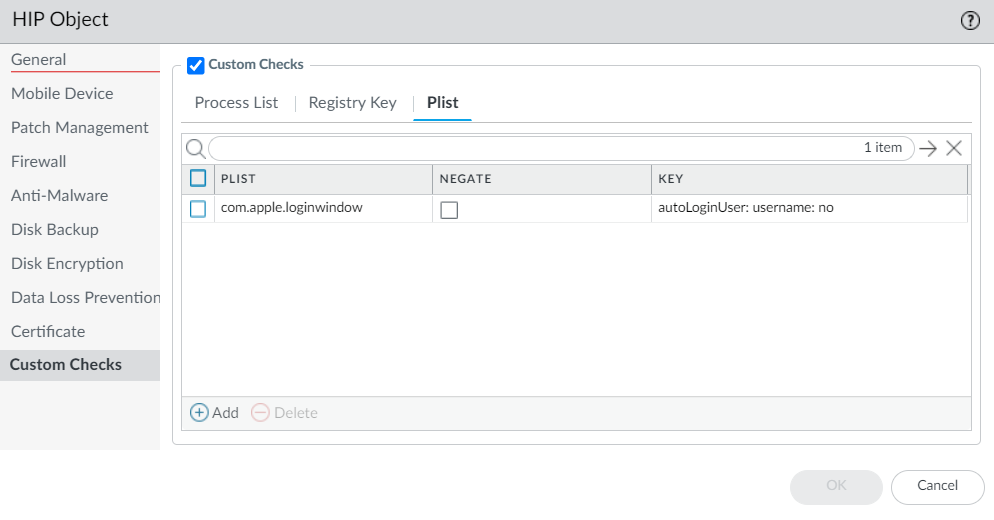
Screenshot showing creation of a HIP object to match macOS Plist keys and values.
- Click OK to save the HIP object. Commit the changes to view data in HIP Match logs or continue.
For Linux endpoints only:
- To check if a specific process is running, select Process List , Add the process, and enter the name.
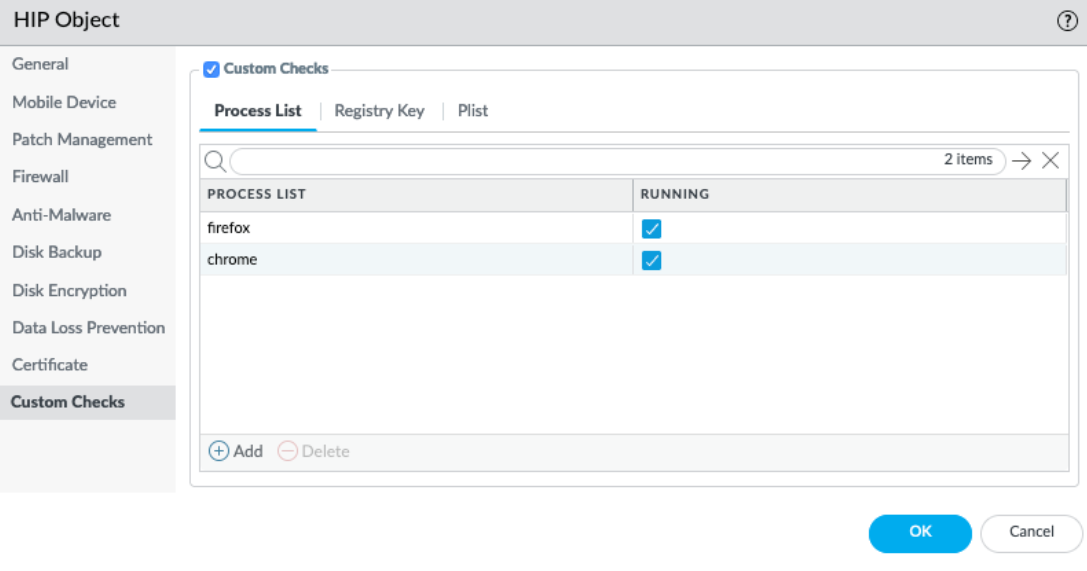
Screenshot showing creation of a HIP object to match Linux Process List entries.
- Click OK to save the HIP object. Commit the changes to view data in HIP Match logs or continue.
- ( Optional ) Create a HIP profile to allow the HIP object to be evaluated against traffic.
The HIP profile can be added to a security policy. See Configure HIP-Based Policy Enforcement for details.
- Select Objects > GlobalProtect > HIP Profiles .
- Select an existing HIP profile or Add a new one.
- Click Add Match Criteria .
-
Select the
HIP object
and click the add icon
to move it to the
Match
area.
- Click OK , and then Commit the changes.
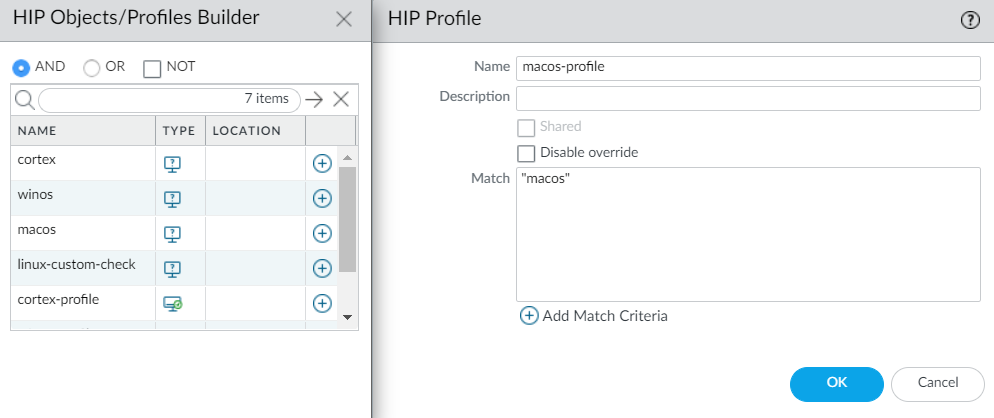
Screenshot showing how to add a custom checks HIP object to a HIP profile.
- Add the HIP profile to a security policy.
Select Policies > Security . On the User tab, Add the HIP Profiles . See Security Policy for more details.
Configure HIP Process Remediation
| Where Can I Use This? | What Do I Need? |
|---|---|
|
|
Configure the GlobalProtect app to run a remediation script whenever an endpoint fails one or more process checks to help the endpoint recover from HIP check failures. The app provides a specified timeout period for the script to run before resubmitting the HIP report.
Steps:
- Set up custom process checks .
The remediation scripts should check if the configured processes are running and, if not, execute the script to start them.
- Configure a HIP remediation timeout on the portal.
- Select Network > GlobalProtect > Portals .
- Select the portal configuration, then the Agent tab.
- Select the agent configuration or Add a new one.
- Select the App tab.
- Set a HIP Remediation Process Timeout (sec) .
By default, this field is set to 0, indicating that the feature is disabled. Enter a value from 1-600 seconds .
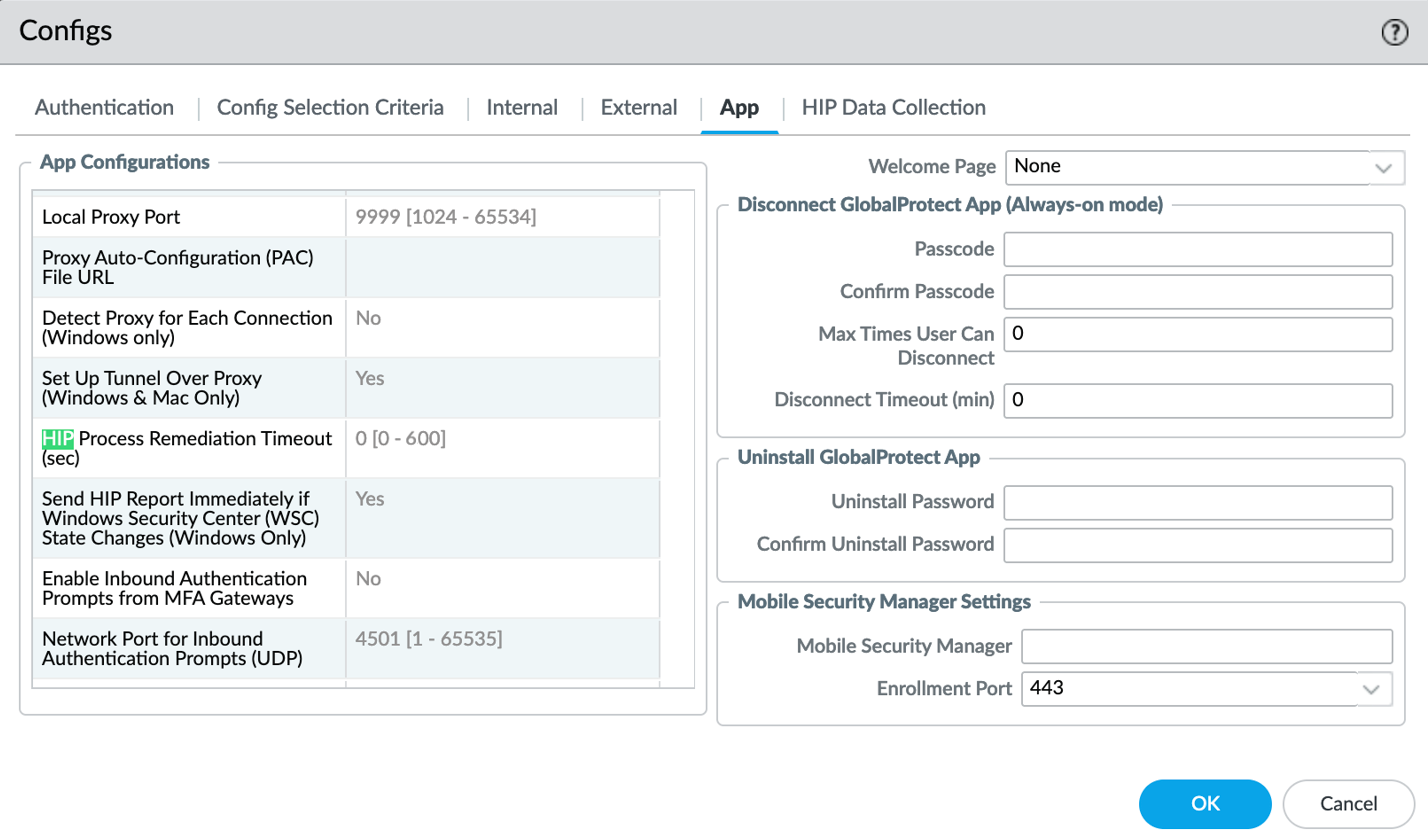
Screenshot showing where to set the HIP Remediation Process Timeout on the GlobalProtect Portal Agent App tab.
- Click OK twice.
- Commit the changes.
- Deploy the remediation script to your endpoints using mobile device management (MDM).
As a best practice, use standard formats for the scripts (shell scripts on macOS, batch scripts on Windows). The script name and location are case-sensitive and must use predefined paths:
- Windows: Location: \Program Files\Palo Alto Networks\GlobalProtect\ , Naming convention: hip-remediation-script.bat
- macOS: Location: /Applications/GlobalProtect.app/Contents/Resources/ , Naming convention: hip-remediation-script.sh
- ( Optional ) Customize how the script runs on the endpoint by setting a checksum and/or a custom error message and defining the context.
macOS:
- Calculate the sha 256 checksum: shasum -a 256 hip-remediation-script.sh .
-
Edit the following values in the plist as needed:
- checksum —Specify the generated checksum.
- error-msg —Custom error message on failure.
- success-msg —Custom message on success.
- context —Set to admin or user . Default is user context.
- Replace the GlobalProtect plist: sudo cp modified.plist /Library/Preferences/com.paloaltonetworks.GlobalProtect.settings.plist .
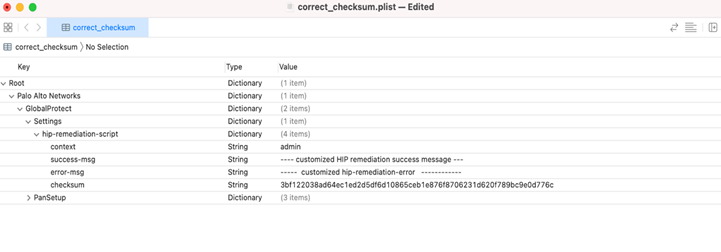
Example of a macOS GlobalProtect settings plist with remediation script customization options.
- Stop/start PanGPS: launchctl stop com.paloaltonetworks.gp.pangps , launchctl start com.paloaltonetworks.gp.pangps .
Windows:
- Create the checksum: certutil -hashfile hip-remediation-script.bat HASH256 .
- Deploy registry settings using the Windows Registry Editor.
Navigate to: \HKEY_LOCAL_MACHINE > SOFTWARE > Palo Alto Networks > GlobalProtect > Settings > hip-remediation-script and set the following keys:
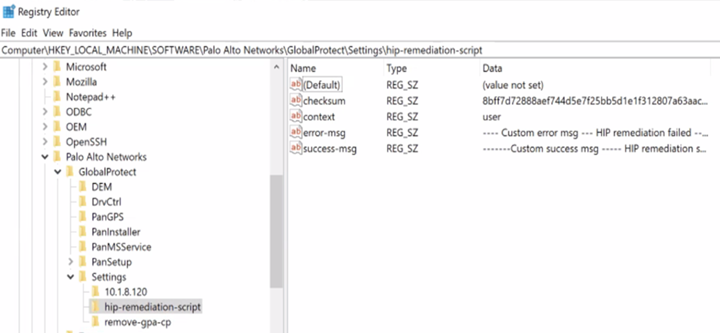
Screenshot showing the Windows Registry path and keys for customizing the HIP remediation script settings.
- checksum —Specify the generated checksum
- error-msg —Custom error message on failure
- success-msg —Custom message on success
- context —set to admin or user . Default is user context.
- To restart GlobalProtect, find the PanGPS service in Windows Services and click Restart the service .
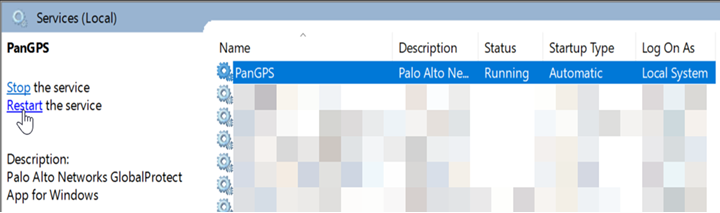
Screenshot showing how to restart the PanGPS service in Windows Services.
Enhanced HIP Remediation Process
| Where Can I Use This? | What Do I Need? |
|---|---|
|
|
You can now configure the GlobalProtect app to rerun the HIP remediation script whenever the endpoint fails the process check after running the configured HIP remediation process .
With this feature enabled, the GlobalProtect app will rerun the remediation script when the process fails after the set HIP remediation timeout period to help the endpoint recover from a HIP check failure. The app reruns the remediation script based on the HIP remediation process retry count you configure through the app settings of the GlobalProtect portal.
For example, if retry count is 3 and timeout is 5 mins, the app runs the script three times and waits up to 5 mins before submitting the HIP report after a process check failure.
Flowchart illustrating the enhanced HIP remediation process with retries.
Steps:
- Set up custom process checks .
- Configure a HIP remediation process .
- Configure a HIP remediation timeout on the portal.
- Configure a HIP Process Remediation Retry.
- Select Network > GlobalProtect > Portals .
- Select the portal configuration, then the Agent tab.
- Select the agent configuration or Add a new one.
- Select the App tab.
- Set a HIP Process Remediation Retry count.
By default, this field is set to 0. Enter a value from 1-3 .
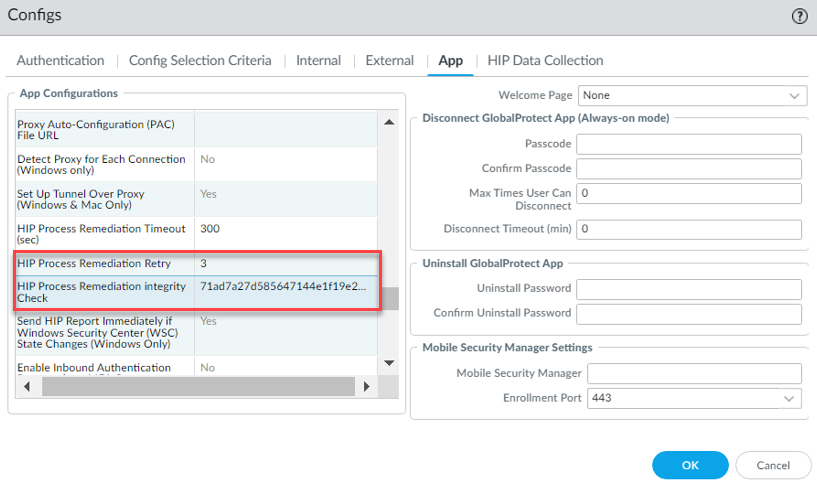
Screenshot showing where to set the HIP Process Remediation Retry count on the GlobalProtect Portal Agent App tab.
This feature will be disabled after you upgrade or downgrade the GlobalProtect app versions.
- In the HIP Process Remediation Integrity Check field, specify the checksum that you generated for the HIP remediation process.
- Click OK twice.
- Commit the changes.
- Deploy the remediation script to your endpoints using mobile device management (MDM).
Use standard formats (shell scripts on macOS, batch scripts on Windows) and the predefined name and location:
- Windows: \Program Files\Palo Alto Networks\GlobalProtect\hip-remediation-script.bat
- macOS: /Applications/GlobalProtect.app/Contents/Resources/hip-remediation-script.sh
- Optional Customize how the script runs on the endpoint by setting a checksum and/or a custom error message and defining the context.
- Connect the GlobalProtect app. The hip remediation script runs automatically on process check failure. If it fails, it retries based on the configured retry count. After retries, the report is submitted regardless of success.
- View the GlobalProtect logs to view the hip_remediation_script log.
The remediation log name and locations are:
- Windows: %AppData%\Local\Palo Alto Networks\GlobalProtect\hip_remediation_scripts.log
- macOS: ~/Library/Logs/PaloAltoNetworks/GlobalProtect/hip_remediation_scripts.log
The hip_remediation_scripts.log will be part of the GlobalProtect logs bundle.
Redistribute HIP Reports
| Where Can I Use This? | What Do I Need? |
|---|---|
|
|
To ensure consistent HIP policy enforcement and simplify management, you can distribute HIP reports from a gateway to other firewalls and Panorama appliances.
HIP report redistribution can be useful when:
- You want to apply consistent policies to both internal and external gateways.
- You want to apply consistent HIP policies for traffic for a specific user who goes through multiple firewalls.
The best practice is to use your Panorama appliance as your redistribution point. Configure gateways to send HIP reports to Panorama, and Panorama forwards them to firewalls.
Flowchart illustrating the recommended HIP report redistribution architecture using Panorama as the central point.
GlobalProtect internal and external gateways don't support bi-directional HIP redistribution.
Steps:
- Configure HIP-Based Policy Enforcement for your gateways and firewalls.
- Configure HIP report redistribution.
- Select Device > Agents > Data Redistribution .
- Select an existing or Add a new data redistribution agent (Palo Alto Networks firewall, GlobalProtect gateway, or Panorama).
- Select HIP Report .
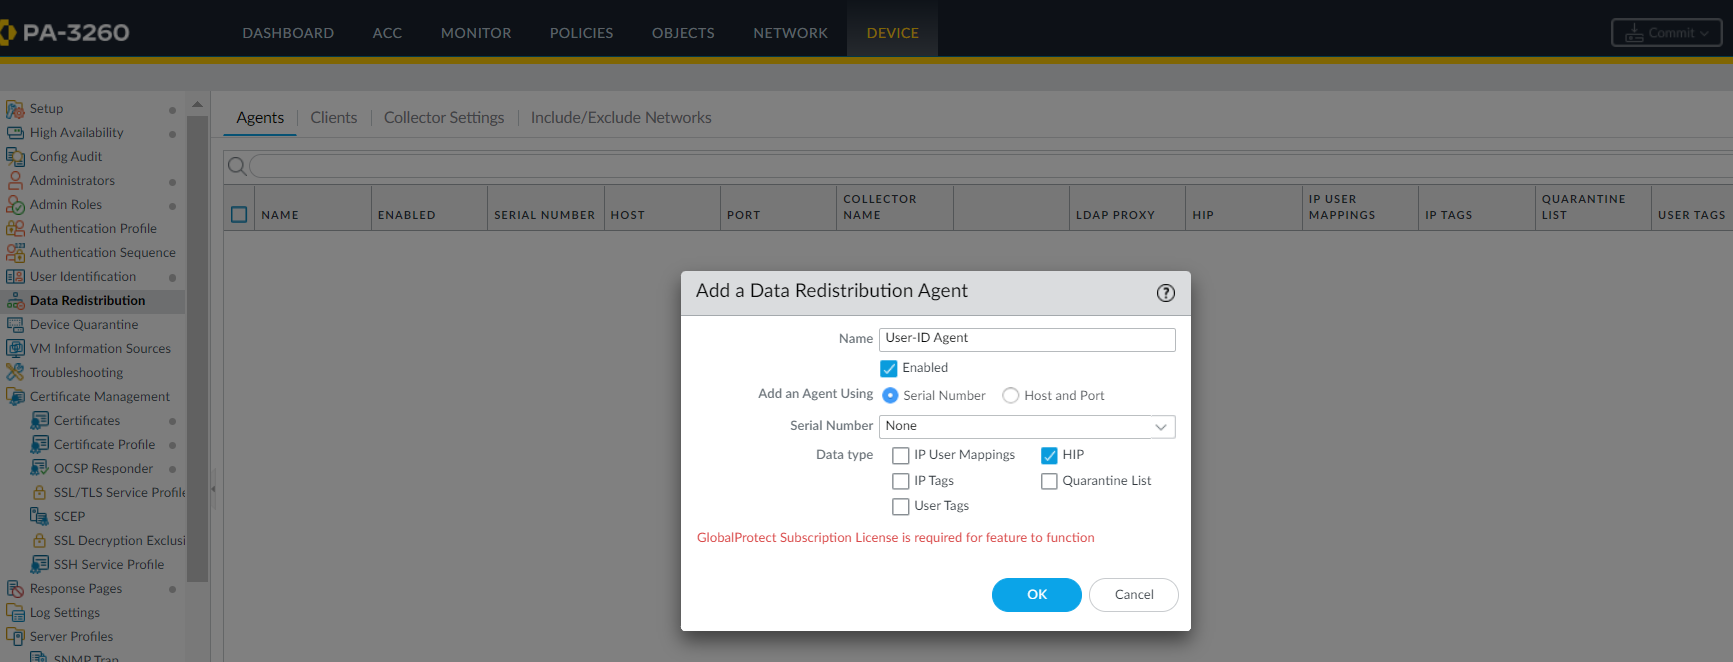
Screenshot showing where to configure a Data Redistribution Agent to distribute HIP Reports.
- Click OK .
- If you use GlobalProtect firewalls or gateways to distribute HIP reports, make sure that the group mapping settings on the redistribution firewalls/gateways match the following attributes on the firewalls/gateways where User-ID is configured.
If using Panorama for distribution, skip this step.
- User attributes (e.g., Primary attribute, Alternate Username). They don't have to be in the same order.
- User domain attributes (if configured). Must be consistent.
- Common user groups (connecting to the same authentication servers and retrieving the same groups).
Configure Windows User-ID Agent to Collect Host Information
The Windows-based User-ID agent supports Workspace ONE MDM integration service, enabling GlobalProtect to use host information collected by the app and MDM for HIP-based policies on devices managed by Workspace ONE. It uses the Workspace ONE API to collect data and translate it into host information.
For Android endpoints managed by Workspace ONE, this feature supports Android for Work endpoints but not other types.
Sub-topics:
- MDM Integration Overview
- Information Collected
- System Requirements
- Configure GlobalProtect to Retrieve Host Information
- Troubleshoot the MDM Integration Service
Flowchart illustrating the flow of host information from the GlobalProtect app and Workspace ONE MDM via the User-ID agent to the firewall for policy enforcement.
Information Collected (MDM Integration)
The MDM integration service translates information collected from Workspace ONE managed endpoints into HIP report attributes. The mapping is automatic.
| Workspace ONE Attributes | HIP Report Attributes |
|---|---|
| Device Information | |
| SerialNumber | serial-number |
| MacAddress | wifimac |
| Imei | IMEI |
| OperatingSystem | version |
| Model | model |
| DeviceFriendlyName | devname |
| IsSupervised | supervised |
| Udid (Unique Device Identifier) | udid |
| UserName | user |
| LastEnrolledOn | enroll-time |
| Platform | os |
| EnrollmentStatus | managed-by-mdm |
| LastSeen | last-checkin-time |
|
ComplianceStatus
( User-ID agent 8.0.3 and later ) |
Compliant
NonCompliant NotAvailable |
|
Ownership
( User-ID agent 8.0.3 and later ) |
Employee Owned
Corporate-Dedicated Corporate-Shared |
| Security Information | |
| DataProtectionEnabled | disk-encrypted |
| IsPasscodePresent | passcode-set |
| IsPasscodeCompliant | passcode-compliant |
| Network Information | |
| DataRoamingEnabled | data-roaming |
| GPS Coordinates | |
| Latitude | latitude |
| Longitude | longitude |
| SampleTime | last-location-time |
| Application Details | |
| ApplicationName | appname |
| Version | version |
| ApplicationIndentifier | package |
Table mapping attributes collected from Workspace ONE to corresponding HIP report attributes.
System Requirements (MDM Integration)
This section is not present in the provided raw HTML content. If system requirements were provided, they would be listed here.
Configure GlobalProtect to Retrieve Host Information (MDM)
Use these instructions to configure GlobalProtect to retrieve host information from devices managed by Workspace ONE via the Windows-based User-ID agent.
Steps:
- Install the User-ID Agent . It must be located where it can connect securely to VMware Workspace ONE MDM. The Workspace ONE MDM integration service is included with the Windows-based User-ID agent.
- Configure SSL authentication between the Windows-based User-ID agent and the GlobalProtect gateway.
Make sure:
- The server certificate on the agent has the same Common Name (CN) as the agent host hostname/IP.
- The server certificate is trusted by the firewall (in the trusted CA list in the MDM config).
- The root CA certificate of the MDM client certificate on the firewall must be imported into the Windows trust store of the Windows server.
- Obtain a server certificate and private key (PEM format) for authentication.
- Open the Windows-based User-ID agent and select Server Certificate .
- Add the server certificate.
- Browse to the certificate file and Open .
- Enter a Private Key Password .
- Click OK.
The agent verifies the certificate and stores the password in the Windows credential store. If successful, certificate details appear.
- Restart the Windows-based User-ID agent.
- Configure the MDM integration service on the Windows-based User-ID agent.
- Select MDM Integration in the agent.
- Specify a Gateway Connection TCP Port (default 5008).
- On the Setup tab, click Edit .
- Choose Workspace ONE for the MDM Vendor .
- Specify the MDM Event Notification settings. These must match settings in the Workspace ONE console under Groups & Settings > All Settings > System > Advanced > API > Event Notifications .
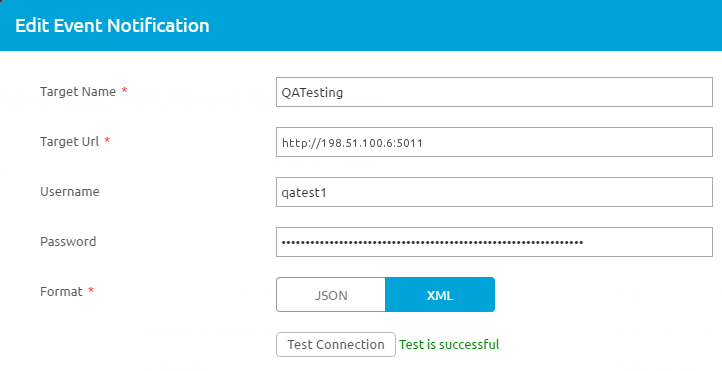
Screenshot showing the Workspace ONE console section for configuring Event Notifications API.
- Set the TCP Port for event communication (default 5011). Format: http://<external_hostname>/<ip_address>:<port> .
- Enter Username and Password for incoming requests.
- Enter Permitted IP addresses (comma-separated list, e.g., Workspace ONE server IP). Contact Workspace ONE support for guidance.
- Add MDM API Authentication settings.
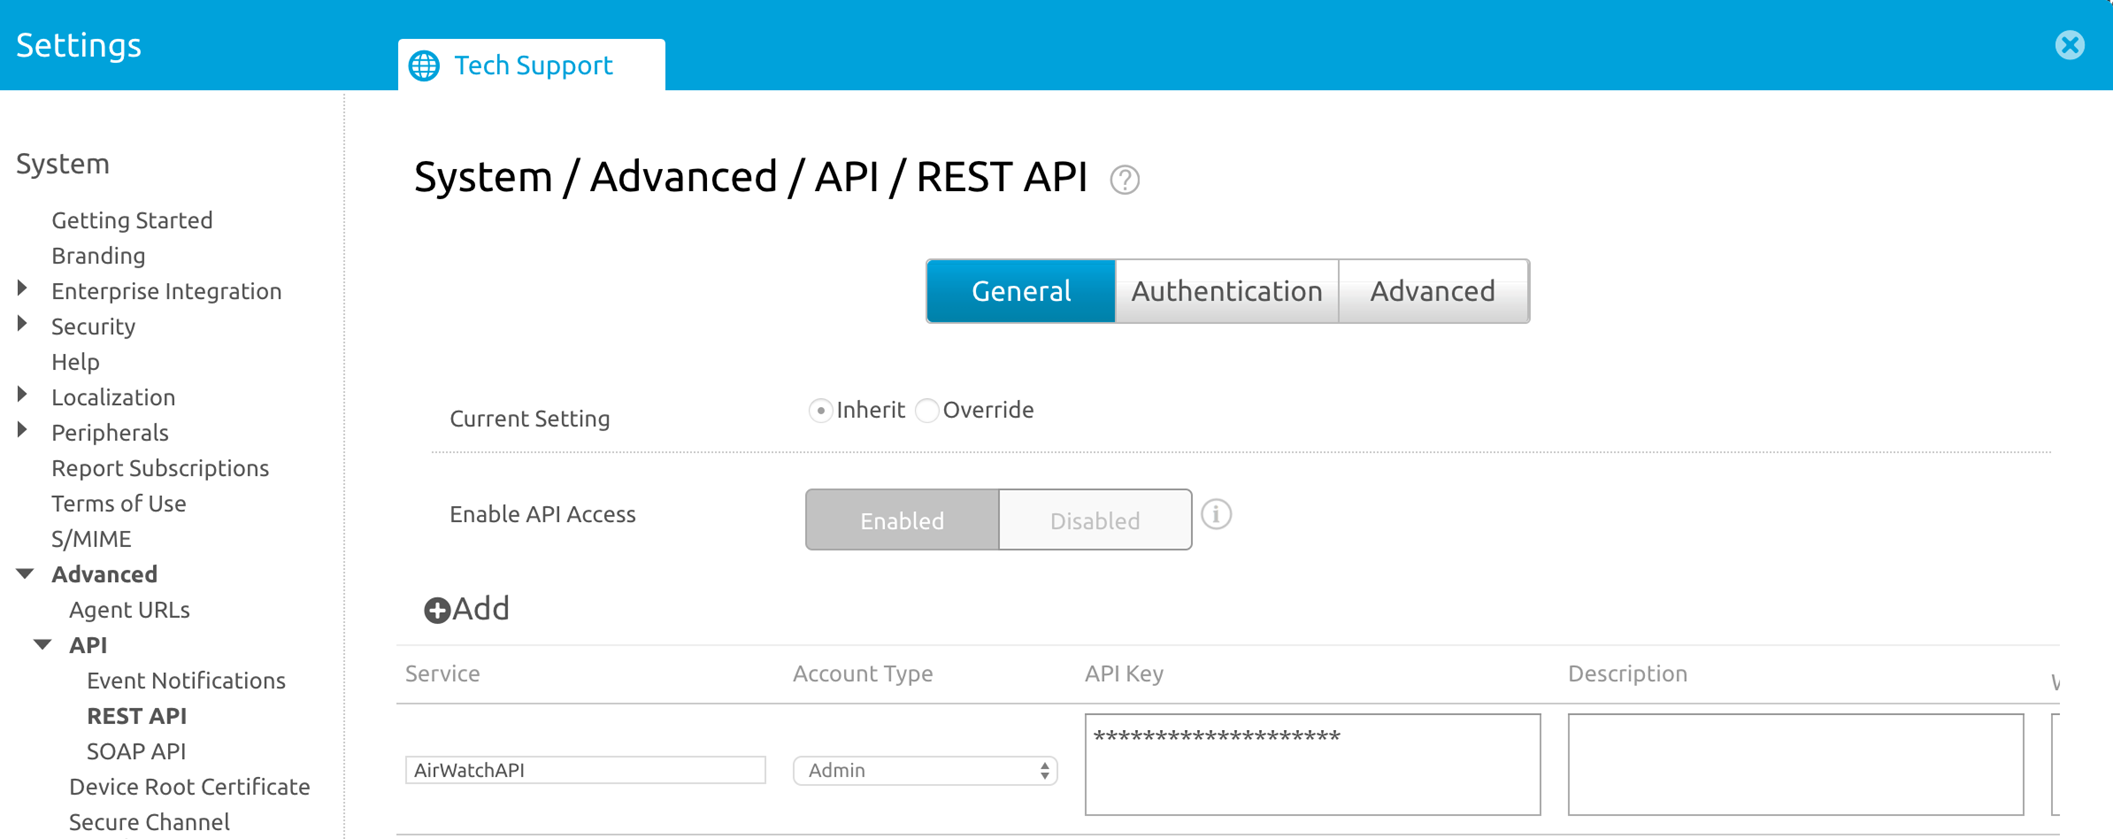
Screenshot showing the Workspace ONE console section where the Tenant Code (API Key) is located.
- Enter the Server Address (e.g., api.awmdm.com ).
- Enter the Username and Password .
- Enter the Tenant Code (hexadecimal, found in Workspace ONE console under System > Advanced > API > REST API > API Key ).
- Enter the Mobile Device State Retrieval Interval (default 30 minutes, 1-600).
- Commit your changes.
- Click Test Connection .
- Configure the GlobalProtect gateway to communicate with the MDM integration service.
- In the PAN-OS web interface, select Network > GlobalProtect > MDM .
-
Add
the following information:
- Name (unique, up to 31 characters)
- ( Optional ) Virtual system
- Server (IP or FQDN of the MDM integration service interface)
- Connection Port (default 5008, must match agent)
- Client Certificate (for gateway HTTPS connection, Purpose must be client auth)
The root CA certificate of the client certificate must be imported into the Windows trust store of the User-ID Agent server.
- Add the root CA certificate associated with the server certificate on the MDM integration service host.
- Click OK .
- Commit your changes.
- Check your connection to make sure data is transferred.
- Open the Windows-based User-ID agent and select MDM Integration > Mobile Devices . You should see a list of device IDs and user names.
- ( Optional ) Filter the list.
- ( Optional ). Select a device and click Retrieve Device State to see the latest info and how it maps to HIP profiles.
Troubleshoot the MDM Integration Service
Follow these instructions if you have trouble with event notifications or authenticating to the Workspace ONE REST API.
Troubleshooting Steps:
- Event notifications from the Workspace ONE MDM server are not received by the MDM integration service.
- Set the Debug option (in the File menu) to Debug or Verbose .
- Go the User-ID agent installation folder and open the MaDebug file. Look for messages like: The address x.x.x.x is not in the permitted ip list for event notifications.
- Add this IP address as a Permitted IP address ( MDM Integration > Setup > Permitted IP ).
- Authentication to the Workspace ONE REST API is unsuccessful.
Make sure that:
- The credentials used for the MDM integration service are valid.
- The user account used to access the Workspace ONE REST API has API access permissions and read-only permissions (at minimum).
- The Tenant Code (API key) is correctly associated with the user account. Remove all unused API keys.
Quarantine Devices Using Host Information
GlobalProtect allows you to either manually or automatically add compromised devices to a quarantine list using their Host ID (and optionally serial number) instead of just the source IP address. After quarantine, you can block users from logging into the network or restrict traffic. With Panorama, you can also redistribute the quarantined device information .
Sub-topics:
- Identification and Quarantine Overview and License Requirements
- View Quarantined Device Information
- Manually Add and Delete Devices From the Quarantine List
- Automatically Quarantine a Device
- Use GlobalProtect and Security Policies to Block Access
- Redistribute Device Quarantine Information from Panorama
Identification and Quarantine of Compromised Devices Overview and License Requirements
Using the Host ID is preferable to blocking by IP address , as IP addresses can change.
After identifying a device as compromised (e.g., infected with malware), you can manually add its Host ID to a quarantine list or automatically quarantine using log forwarding profiles with security policies or HIP Match log settings .
Starting with Android 8.0, the app is unable to retrieve the device serial number. Use ANDROID_ID instead. ANDROID_ID is app-specific and may change on factory reset.
Before quarantining, ensure GlobalProtect app version 5.1+ is running and a valid GlobalProtect subscription license is present on the firewall.
License Requirements:
- A GlobalProtect subscription license is required to manually or automatically add devices to the quarantine list. An error occurs if you attempt to add without a license.
- You can delete quarantined devices without a license.
- If your license expires, the quarantine list is retained. GlobalProtect checks licenses hourly.
- If you do not have a valid GlobalProtect license and one of the following conditions is true, your firewall or Panorama displays a warning message when you commit the change:
- You selected Quarantine List in a Data Redistribution Agent.
- You selected Quarantine as a built-in action for a Log Forwarding Profile .
View Quarantined Device Information
You view quarantined device information from the Device Quarantine page.
- In next-generation firewalls: Device > Device Quarantine .
- For Panorama appliances: Panorama > Device Quarantine .
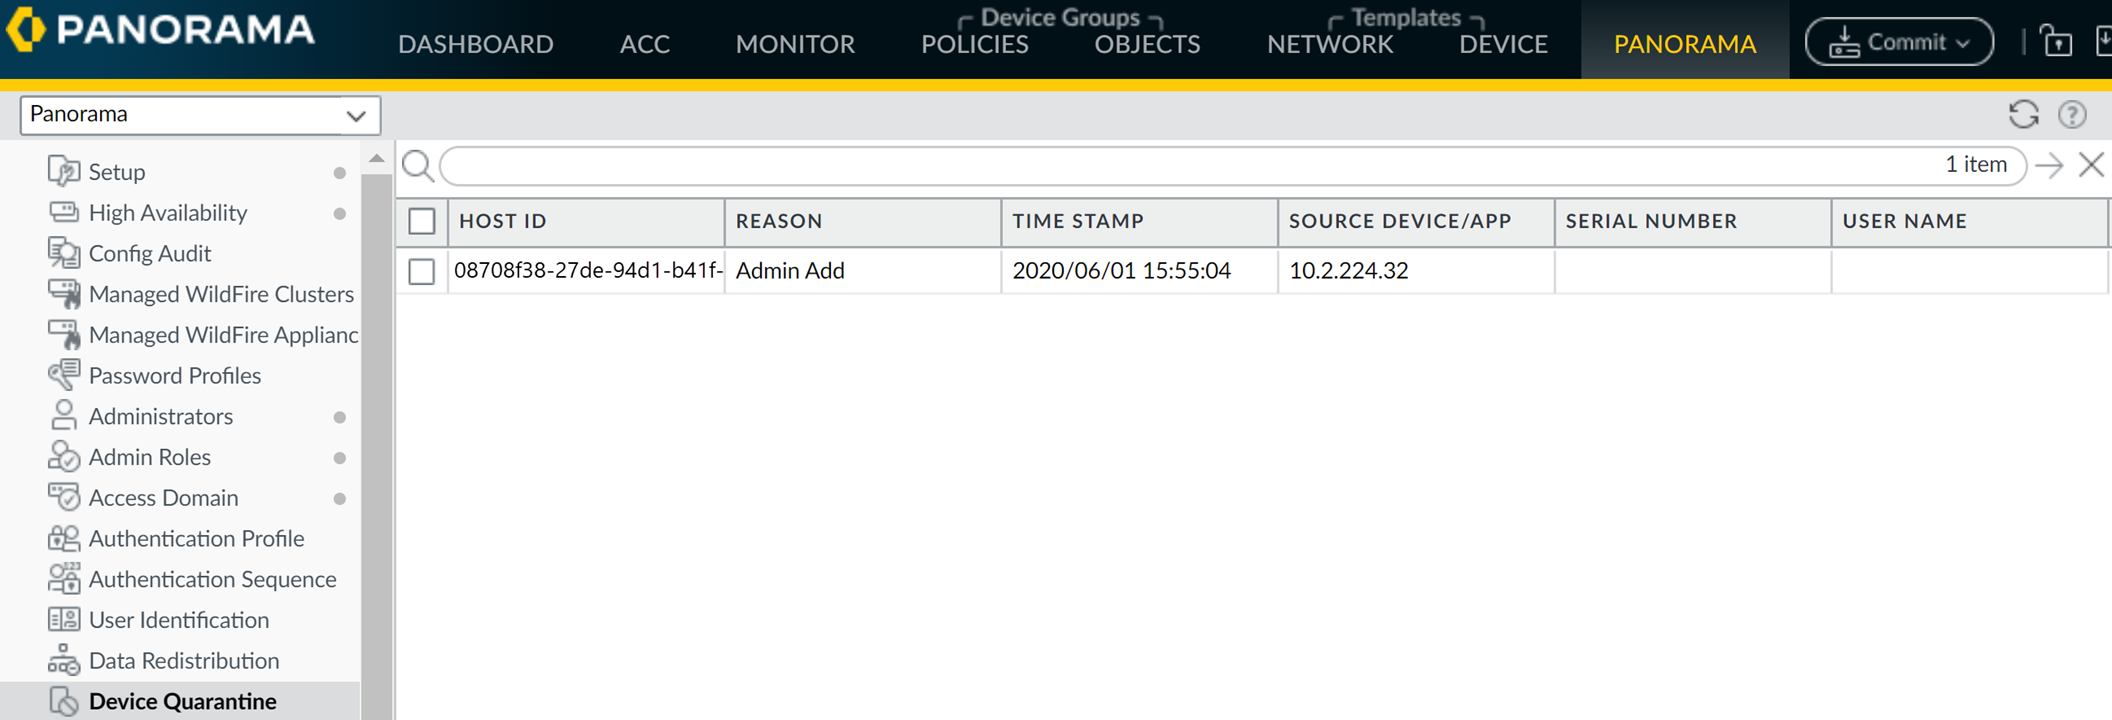
Screenshot of the Device Quarantine page showing the list of quarantined devices.
- You can also view GlobalProtect quarantine activity from the ACC (Application Command Center). The GlobalProtect Quarantine Activity tab in the ACC has a pane with a chart view summary. Use the toggle to view by actions, reason, or location.
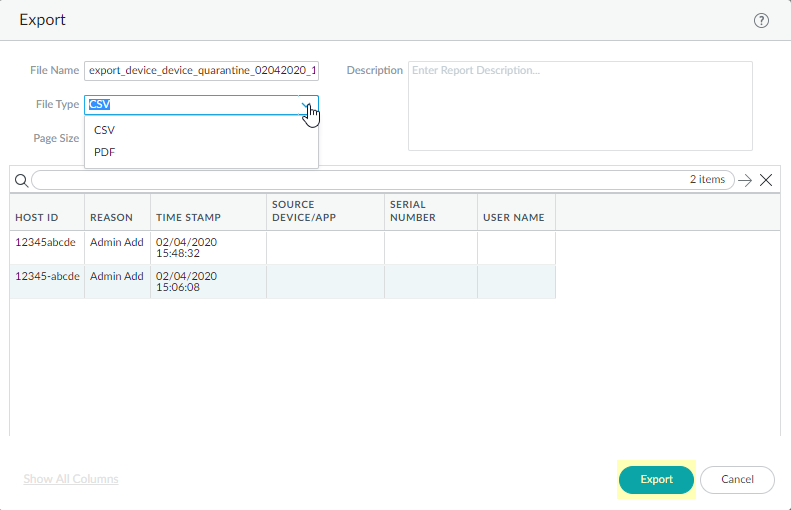
- To export the list to PDF or CSV, select PDF/CSV at the bottom of the Device Quarantine page.
Screenshot showing the export options for the quarantined devices list.
Manually Add and Delete Devices From the Quarantine List
You can add a device manually from either the quarantine pages, from the GlobalProtect, Threat, Traffic, or Unified logs, or by using an API. You can also manually delete the device from the quarantine pages.
Steps:
- To manually add a device from the Device Quarantine page:
Select Device > Device Quarantine (firewall) or Panorama > Device Quarantine (Panorama) and Add the device.
Add the Host ID and, optionally, the Serial Number . GlobalProtect uses the Host ID.
- To add a device from the GlobalProtect, Threat, Traffic, or Unified logs:
(Threat, Traffic, and Unified Logs Only) To add Host ID information to these logs, select Policies > Security and Add a security policy rule; then, select Quarantine as the Source Device for Source traffic.
A Host ID is required to add a device to the quarantine list. When a user connects with the GlobalProtect app, GlobalProtect automatically adds Host ID info to the GlobalProtect log. The Host ID value varies by endpoint type:
- Windows —Machine GUID (HKEY_Local_Machine\Software\Microsoft\Cryptography\MachineGuid)
- macOS —MAC address of the first built-in physical network interface
- Android —Android ID
- iOS —UDID
- Chrome —GlobalProtect assigned unique alphanumeric string (32 characters)
If you don't know the host ID, you can correlate the user-ID to the host ID in the HIP Match logs:
- Select Monitor > Logs > HIP Match .
- Filter the HIP match logs for the source user.
- Open the log and identify the host ID under OS > Host ID and optionally the hostname under Host Information > Machine Name .
For GlobalProtect to automatically add Host ID info to the Traffic, Threat, or Unified logs, you must add a policy rule that has Quarantine selected for source traffic.
To ensure you get the Host ID for all devices you might quarantine (either manually or automatically), create a security policy that allows all traffic and specify Quarantine as the Source Device . Policy order doesn't matter for this specific purpose.
- Right-click the Host ID associated with the device in the log and click Block Device .
If the Host ID column doesn't display, select the header of any column and then select the Host ID field to display it.
- To create an API to manually add devices, see the PAN-OS and Panorama API Usage Guide.
- After remediation, you can delete the device from the list.
Select Device > Device Quarantine (firewall) or Panorama > Device Quarantine (Panorama), select one or more devices, then select Delete .
Automatically Quarantine a Device
You can automatically quarantine a device using a log forwarding profile with a security policy rule or HIP match log settings.
Steps:
- To quarantine using a log forwarding profile:
- Select Object > Log Forwarding and either Add a new log forwarding profile or select an existing one.
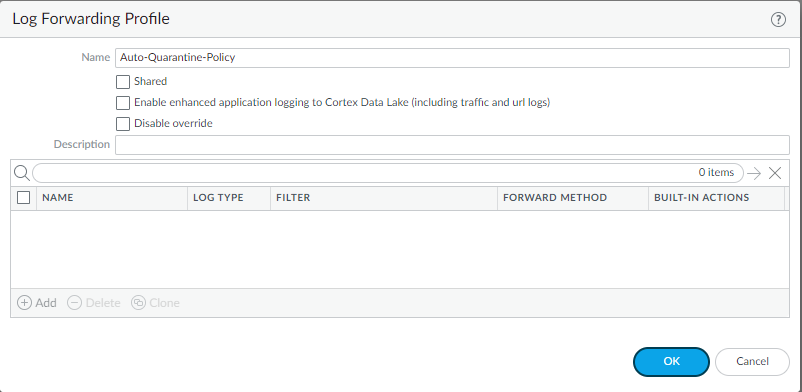
Screenshot showing where to select 'Quarantine' as a Built-in Action in a Log Forwarding Profile.
- Add a Log Forwarding Profile Match List and, in the Built-in Actions section, select Quarantine .
Specify a Log Type of GlobalProtect , Threat , or Traffic .
If using Threat or Traffic, make sure a Host ID is associated by having a security policy rule with Quarantine as the Source Device for Source traffic. Without a Host ID, you cannot add a device to the quarantine list automatically from these logs.
Example using Log Type: Threat , severity critical:
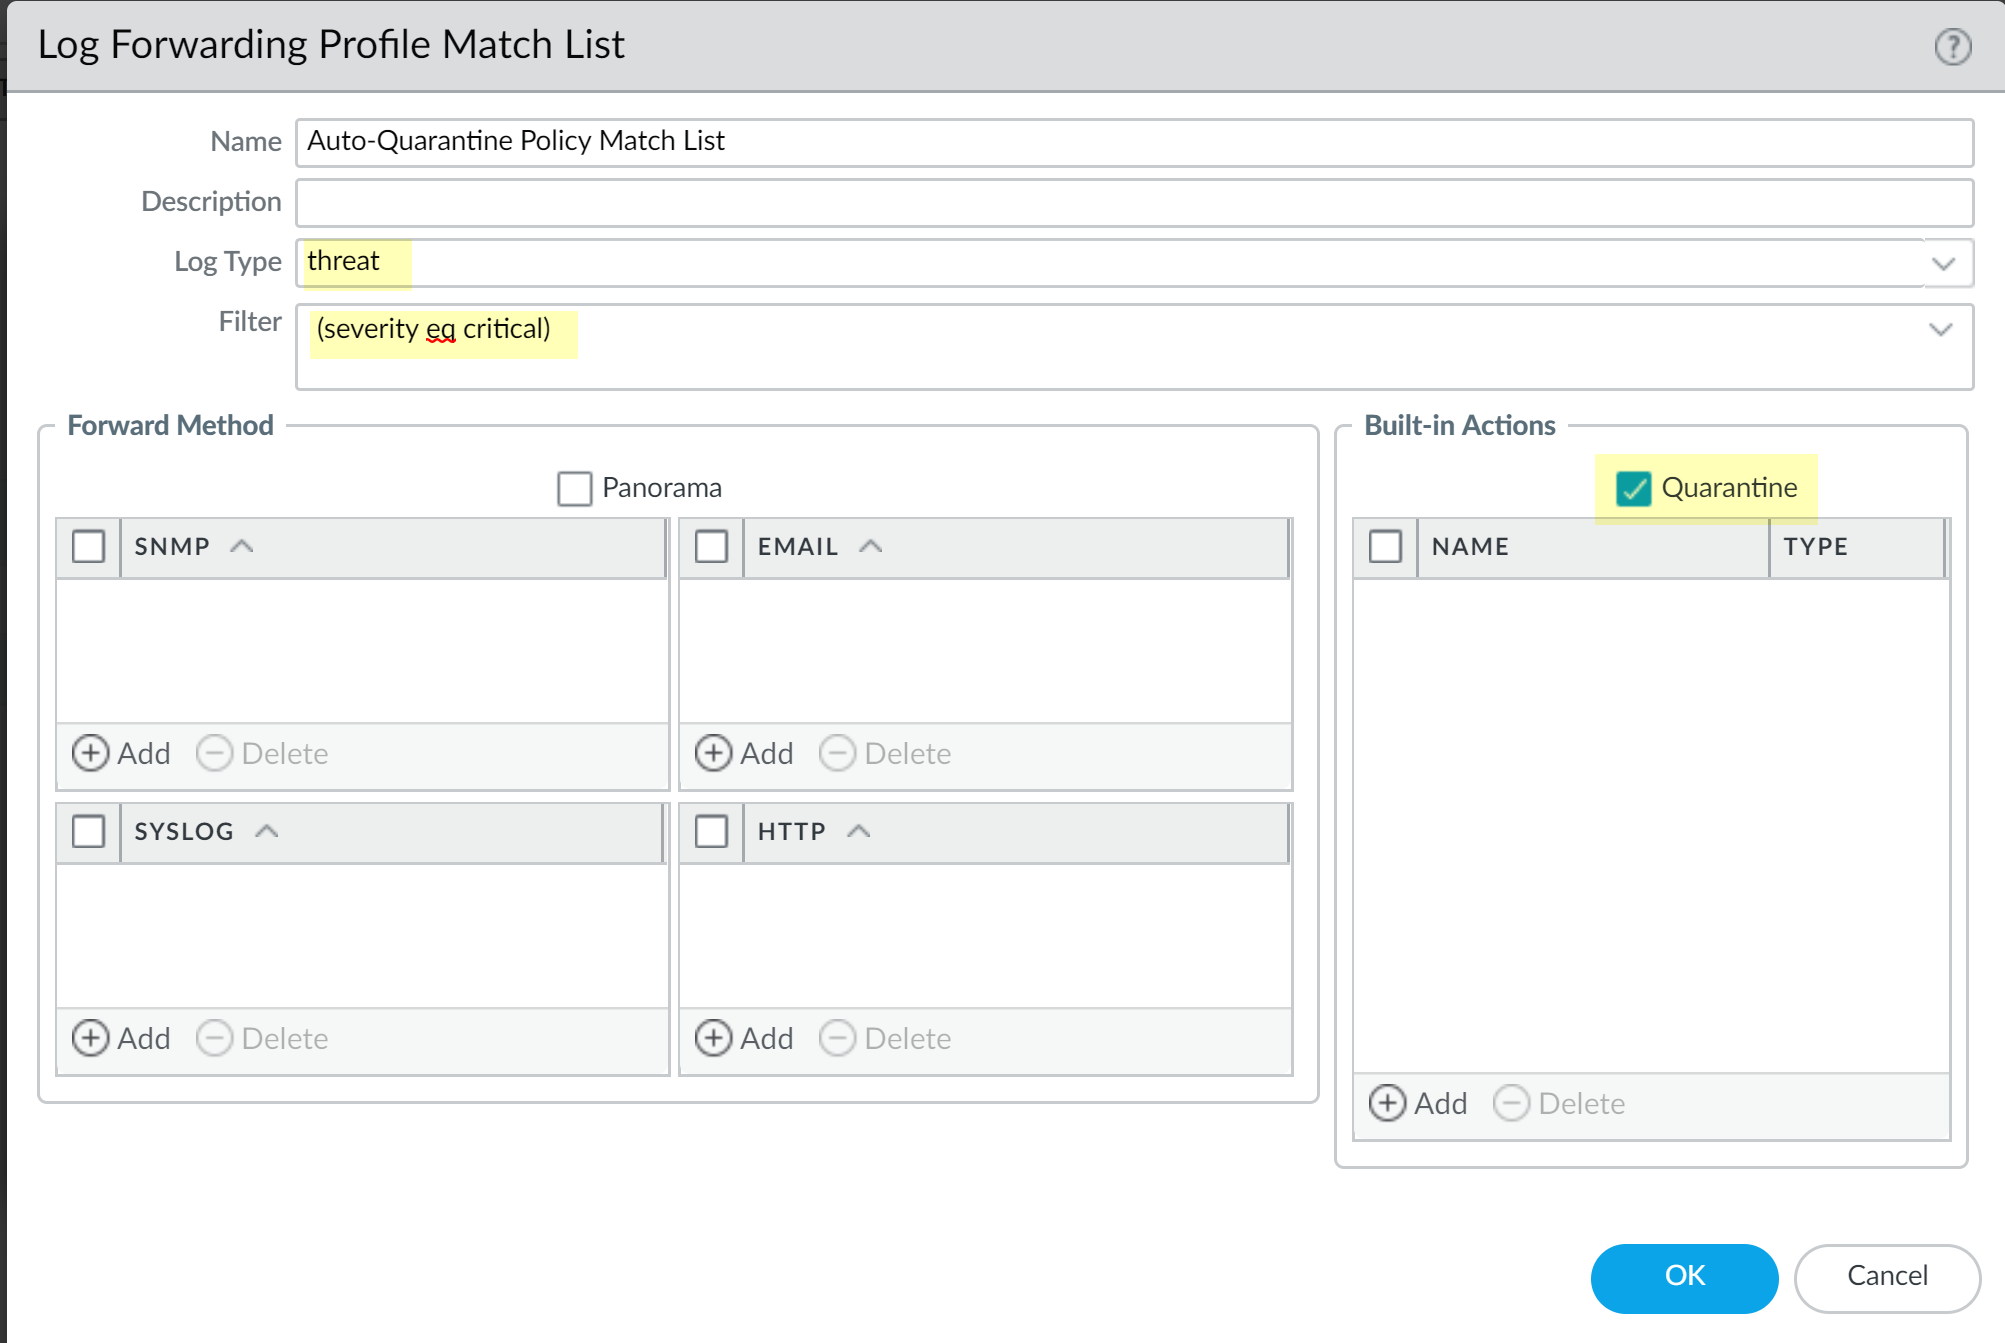
Screenshot illustrating the configuration of a Log Forwarding Profile Match List to quarantine devices based on critical Threat logs.
After adding the match list, the profile displays Quarantine under Built-In Actions .
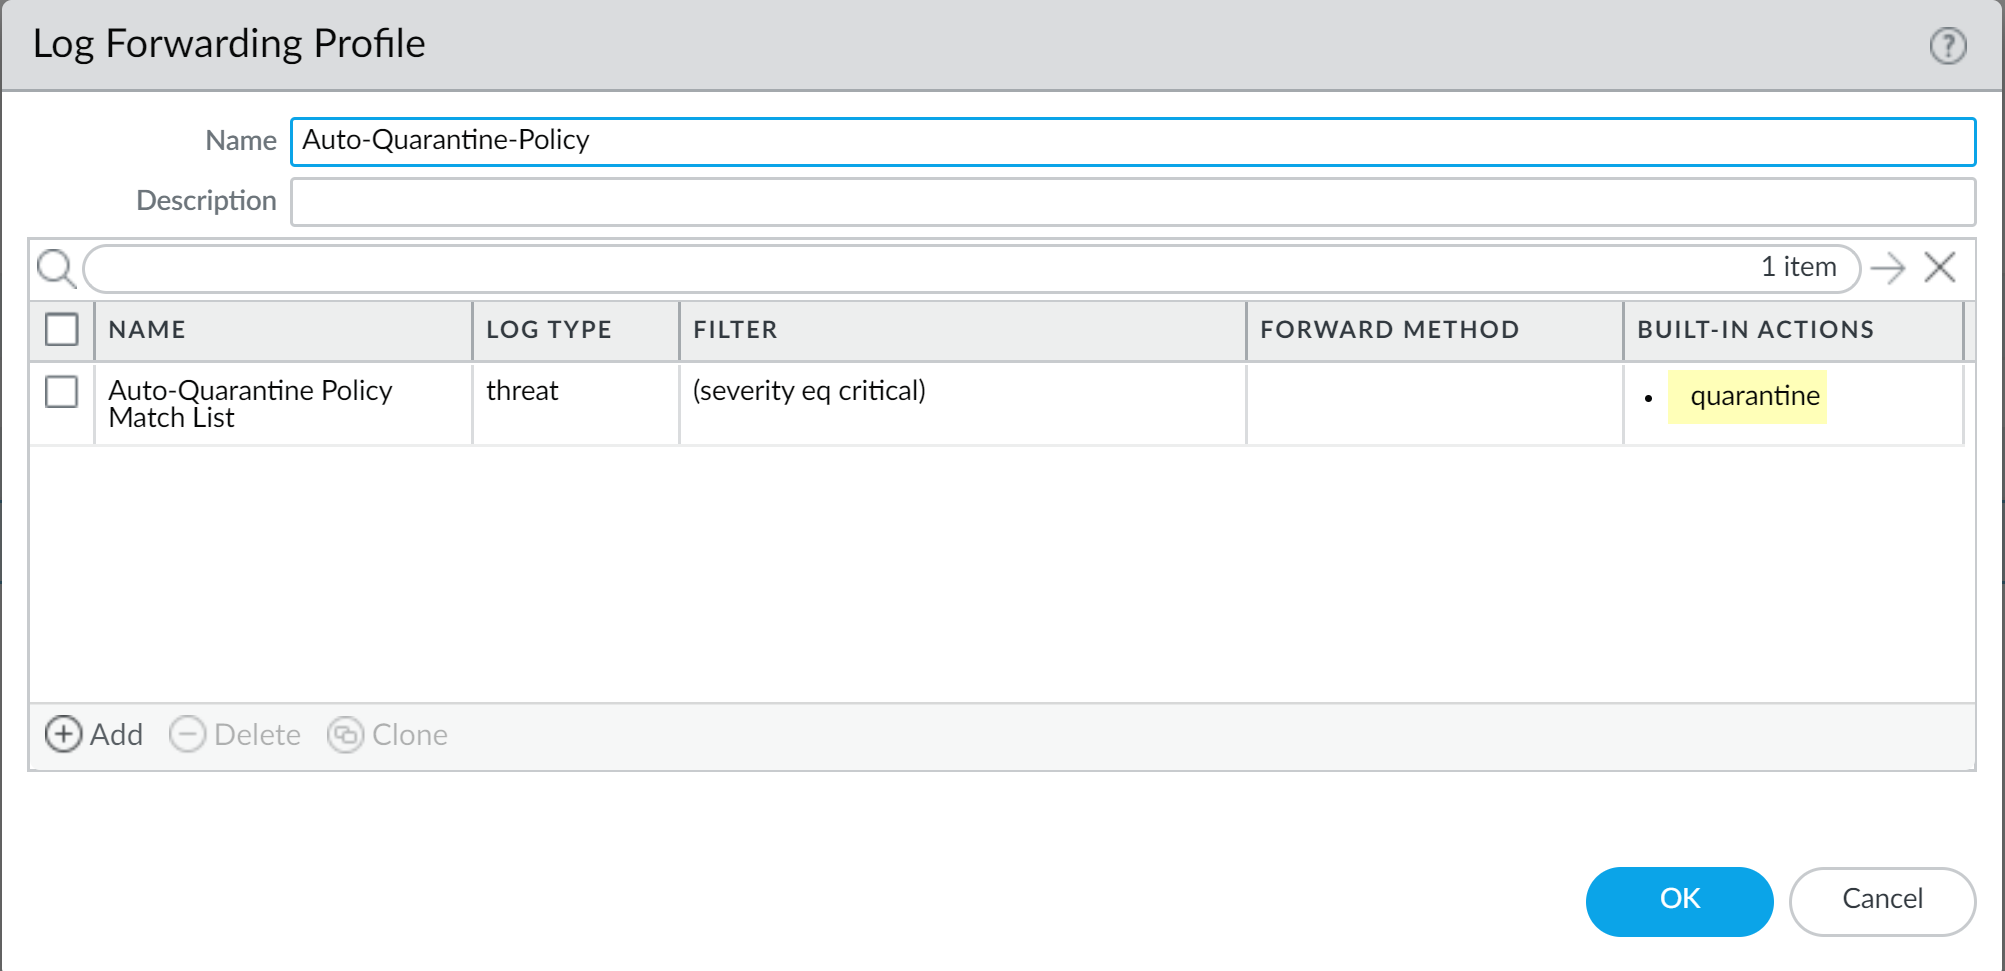
Screenshot showing the summary of a Log Forwarding Profile with the 'Quarantine' Built-in Action configured.
- Select Policies > Security and Add a security policy.
- Select Actions , then select the Log Forwarding profile you created.
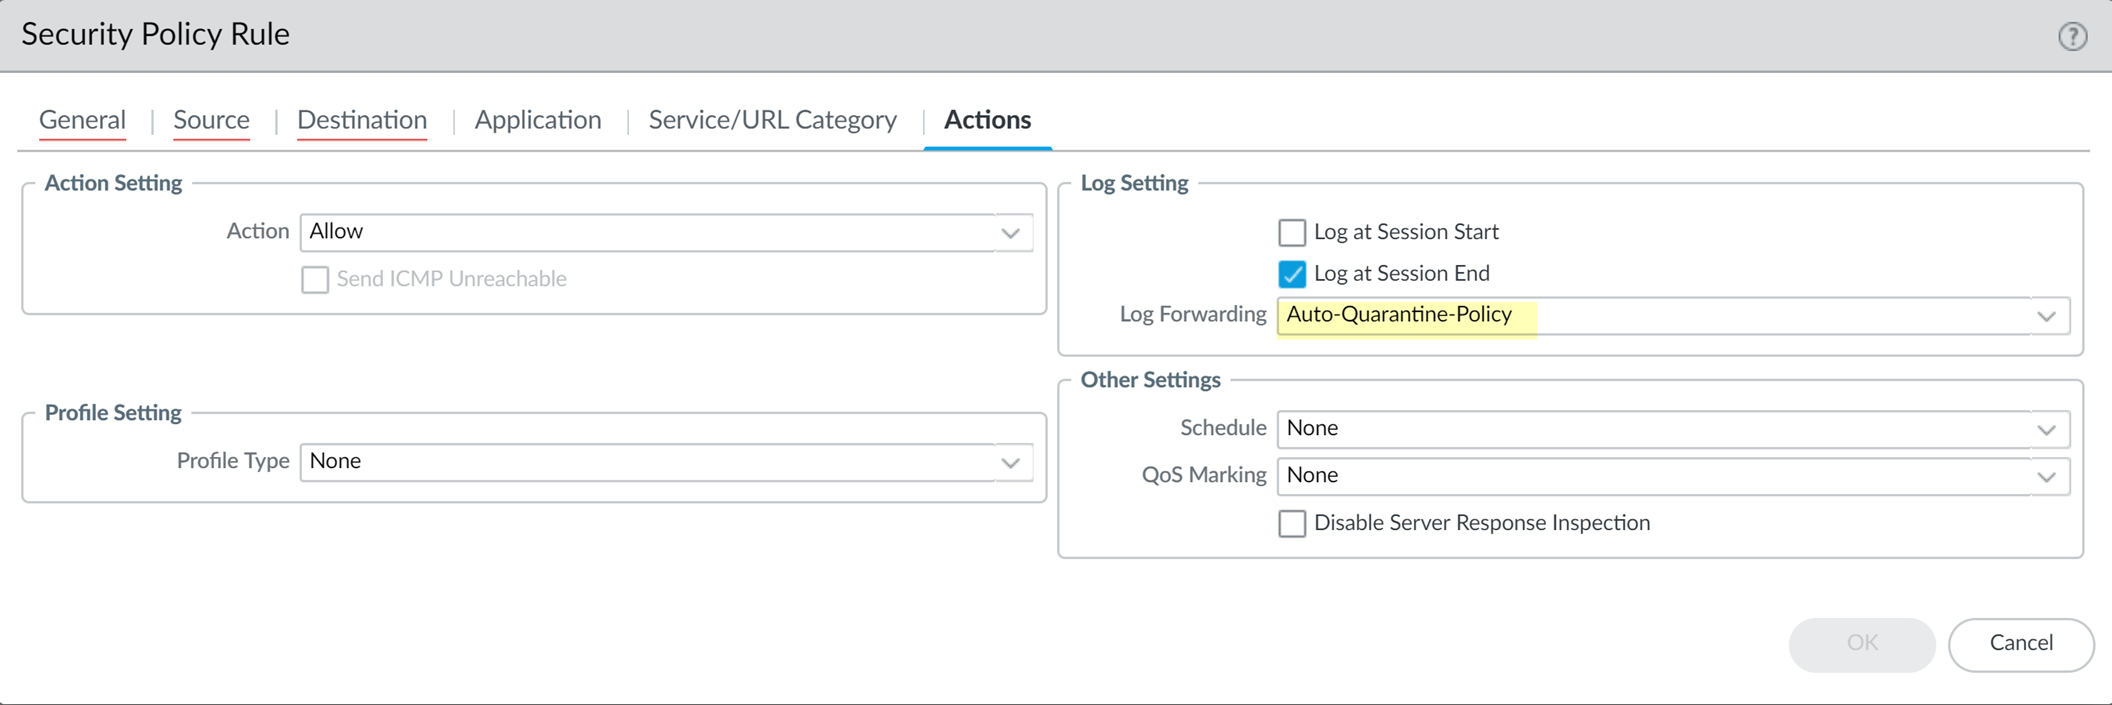
Screenshot showing where to attach a Log Forwarding profile to the Actions tab of a security policy rule.
- To automatically quarantine using HIP Match log settings:
Select Device > Log Settings > HIP Match and Add a log setting with Built-In Actions of Quarantine .

Screenshot showing the configuration of a HIP Match Log Setting to automatically quarantine a device based on a Filter (e.g., Host ID).
This log setting takes effect without attaching it to a security policy. Example filter for a specific host ID: host-id eq 08708f38-27de-94d1-b41f-10e48752567g .
Use GlobalProtect and Security Policies to Block Access to Quarantined Devices
You can prevent users from logging into GlobalProtect from a quarantined device and/or block traffic using security policy rules.
Steps:
- To block users from logging in to GlobalProtect from a quarantined device:
Configure gateway authentication ( Network > GlobalProtect > Gateways > gateway-configuration > Authentication ) and select Block login for quarantined devices .
If enabled, the user receives a notification and cannot log in. If not enabled, they receive the notification but can still log in.
- To block access from a quarantined device using a security policy rule:
Specify Quarantine for either source or destination traffic (in Source Device or Destination Device ) and specify an action like Deny .
Example: Source Device = Quarantine , Destination IP = HQ server, Action = Deny . Any device in the quarantine list cannot access the HQ server.
Source: Quarantine
Action: Deny] SecurityRule -- Deny Traffic --> HQServer[HQ Server] QuarantinedDevice -- Attempts Connection --> HQServer style QuarantinedDevice fill:#fcc,stroke:#333 style SecurityRule fill:#f9f,stroke:#333,stroke-width:2px style HQServer fill:#ccf,stroke:#333
Flowchart illustrating how a security policy rule with 'Quarantine' as the Source Device can block traffic from quarantined endpoints.
For a quarantined device to be valid in a policy on a firewall (not Panorama distributing the list), a GlobalProtect user must successfully log in from that device, and the firewall must be aware of the login. If the firewall is a gateway, the user must log in to that gateway. If login is blocked ( Block login for quarantined devices enabled), it is NOT counted as successful for policy validation. After a successful login, you can redistribute the info via Panorama.
Redistribute Device Quarantine Information from Panorama
If you manage firewalls using Panorama, you can create a central quarantine list ( Panorama > Device Quarantine ) and distribute it to managed firewalls. This uses the same mechanism as redistributing User-ID information.
Steps:
- Enable User-ID on the agent server (Panorama or firewall used for redistribution).
If using the management interface: Device > Setup > Interfaces > Management and select User-ID .
If using a dataplane interface: Network > Interface Mgmt , select/Add a management profile, and select User-ID .
- Create a data redistribution agent.
Select Panorama > Data Redistribution and Add the agent.
Example: Panorama distributes Quarantine List info to firewall 10.1.1.1 using port 5007.
Flowchart illustrating how Panorama distributes the central quarantine list to managed firewalls for consistent enforcement.
Troubleshoot HIP Issues
| Where Can I Use This? | What Do I Need? |
|---|---|
|
|
HIP issues usually occur when the GlobalProtect app endpoint posture evaluation doesn't match expected HIP objects/profiles, causing traffic to match unexpected policies. Issues also occur if vendors are not supported by the OPSWAT module used by GlobalProtect app for HIP.
HIP issues are most often on the client side (OPSWAT module, app version), but can also be misconfigured objects/profiles or redistribution problems on the gateway/firewall side.
Steps to Identify/Narrow Down:
- Ensure the GlobalProtect app correctly identifies HIP attributes/software.
Each GlobalProtect app version has a fixed OPSWAT database. New products/versions might not be detected. Refer to the OPSWAT chart of supported products .
- From the GlobalProtect app, select Settings > Host Information Profile .
- Check the exact HIP category.
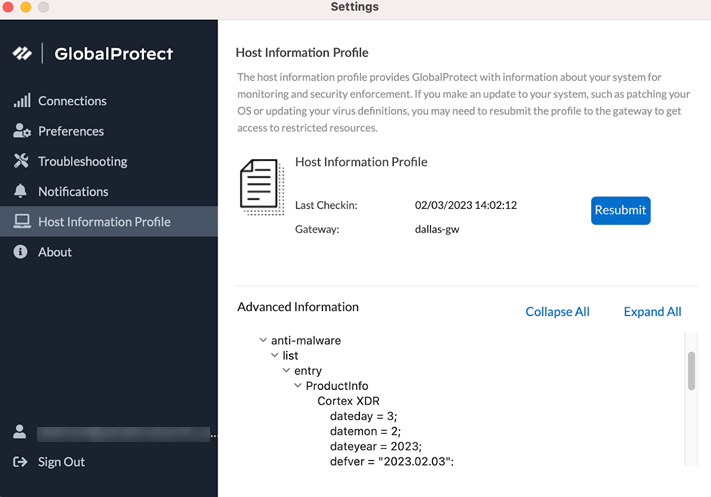
Screenshot of the GlobalProtect App's Host Information Profile, showing collected HIP data categories.
- If a product is unidentified, try installing a new GlobalProtect app version with an updated OPSWAT database. Check the release notes for updated/fixed detection capabilities.
- Ensure that GlobalProtect app has sent the HIP report.
- View and collect GlobalProtect app logs .
- Verify if the app passed the report to the gateway after connecting.
- If the HIP process gets stuck, the app might disconnect due to Idle Timeout (PAN-OS 10.0 or below).
- Delay might come from evaluating Missing Patches (PanGpHipMp), which is time-consuming. A partial report is sent after "Max Wait Time" (default 20s), the full report later.
- Ensure the gateway or firewall has received the HIP report.
- Verify if the HIP report exchange happened by checking Monitor > Logs > GlobalProtect on the gateway. If yes:
- Check for corresponding HIP objects and profiles matched from Monitor > Logs > HIP .
- Select the magnifying glass to see the full report.
- If you are a Prisma Access customer, view logs in the embedded Log Viewer (SASE platform) or embedded Explore (CDL). Further details about Explore .
- If you are an NGFW customer, verify by running the following CLI command on the firewall:
> show user hip-report computer PAN00965 user admin ip 172.24.10.1
This example shows XML output including user, host, IP, time, and categories like host-info and firewall. The user name format must be correct.
- If there is a delay in sending, the gateway uses the cache file ( hip_report_base ) until the new report arrives.
If you don't see the report on the firewall after the max wait time, check app logs. Refresh Connection might help but doesn't identify the cause.
- Ensure the GlobalProtect app end user is matching the correct HIP profile based on the report submitted.
Interactive Quiz: GlobalProtect HIP
Test your knowledge of GlobalProtect Host Information Profile (HIP).