GlobalProtect Portals
The GlobalProtect portal provides the management functions for your GlobalProtect infrastructure.
Every endpoint that participates in the GlobalProtect network receives configuration information from the portal, including information about available gateways and any client certificates that may be required.
The portal controls the behavior and distribution of the GlobalProtect app software to both macOS and Windows endpoints.
[Important] The portal does not distribute the GlobalProtect app for use on mobile endpoints. Mobile users must download the app from their device store.
However, the agent configurations deployed to mobile app users control the gateway(s) to which they have access.
In addition to distributing GlobalProtect app software, you can configure the GlobalProtect portal to provide secure remote access to common enterprise web applications that use HTML, HTML5, and JavaScript technologies using GlobalProtect Clientless VPN . This is useful for partner or contractor access and unmanaged assets without installing the app.
Set Up Access to the GlobalProtect Portal
Configure the GlobalProtect portal by following these steps:
-
Before you begin configuring the portal make sure you have:
- Created the interfaces (and zones) for the firewall.
- Set up the portal server certificate, gateway server certificate, SSL/TLS service profiles , and optionally client certificates.
- Defined the authentication profiles and certificate profiles that the portal can use to authenticate GlobalProtect users.
- Configured a GlobalProtect Gateway and understand Gateway Priority in a Multiple Gateway Configuration.
-
Add the portal.
- Select Network > GlobalProtect > Portals, and then Add a portal.
- Enter a Name for the portal.
[Important] The gateway name cannot contain spaces and must be unique for each virtual system.
-
Specify network settings to enable the GlobalProtect app to communicate with the portal.
[Critical Point] Do not attach an interface management profile that allows HTTP, HTTPS, Telnet, or SSH on the interface where you have configured a GlobalProtect portal or gateway because this enables access to your management interface from the internet.Follow the Adminstrative Access Best Practices.
- Select General.
- In the Network Settings area, select an Interface.
- Specify the IP Address Type (IPv4 Only, IPv6 Only, or IPv4 and IPv6) and IP address for the portal web service. For dual stack, enter both.
- Select an SSL/TLS Service Profile.
-
Select General and configure Decryption log settings.
- It is a best practice to log successful handshakes as well so that you gain visibility.
- Configure a Log Forwarding profile to forward Decryption logs.
- [Important] Configure a larger log storage space quota for the Decryption log if logging successful handshakes.
-
Select custom login and help pages or disable them.
- Select General.
-
In the Appearance area, configure:
- Portal Login Page: select factory-default, Import custom, or Disable access.
- App Help Page: select factory-default, Import custom, or None.
-
Specify how the portal authenticates users.
- Select Authentication.
-
Configure settings:
- Select the SSL/TLS Service Profile for secure communication.
- To authenticate users through a local user database or an external authentication service (LDAP, Kerberos, TACACS+, SAML, RADIUS/OTP), Define GlobalProtect Client Authentication Configurations.
-
To authenticate users based on a client certificate or smart card/CAC, select the corresponding Certificate Profile.
You must pre-deploy or Deploy User-Specific Client Certificates for Authentication using SCEP.
- [Important] Require both user credentials AND client certificate: Both Authentication Profile and Certificate Profile are required.
- [Important] Allow either user credentials OR client certificate: Certificate Profile is optional if Authentication Profile is selected. Certificate Profile is required if Authentication Profile is NOT selected.
- [Gotcha] If Certificate Profile is used for 'either/or' auth, Certificate Profile Username Field should be Subject or Subject Alt.
- (Optional) Custom Username Label, Password Label, Authentication Message.
- Allow Authentication with User Credentials OR Client Certificate: No (default is No, requiring AND). When set to Yes, portal first searches for client cert, then prompts for credentials if not found.
-
Define the data that the GlobalProtect app collects from connecting endpoints after users successfully authenticate.
This data is used to match against agent configuration selection criteria.
- Select Portal Data Collection.
-
Configure settings:
- Collect machine certificates: Select the Certificate Profile.
- Collect custom host information: Define registry (Windows) or plist (macOS) data.
-
Save the portal configuration.
- Click OK.
- Commit the changes.
[Critical Point] The Common Name (CN) and Subject Alternative Name (SAN) fields of the portal server certificate must exactly match the IP address or FQDN of the interface where you configure the portal or HTTPS connections to the portal will fail.
Define the GlobalProtect Client Authentication Configurations
Each client authentication configuration specifies settings to enable user authentication with the GlobalProtect portal.
You can customize settings per OS or apply to all endpoints (e.g., RADIUS for Android, LDAP for Windows). You can also customize for browser access (for app download) or third-party IPsec VPN.
- Set Up Access to the GlobalProtect Portal first (Prerequisite).
-
Specify how the portal authenticates users.
You can configure authentication through local user database or external services (LDAP, Kerberos, TACACS+, SAML, RADIUS/OTP).
On the GlobalProtect Portal Configuration dialog (Network > GlobalProtect > Portals > <portal-config>), select Authentication to Add a new Client Authentication configuration with the following settings:
- Enter a Name.
- Specify OS (Any, Android, Browser, etc.) to apply this configuration.
-
To enable users to authenticate with user credentials, select or add an Authentication Profile.
- [Important] Require both user credentials AND client certificate: Both Authentication Profile and Certificate Profile are required.
- [Important] Allow either user credentials OR client certificate: Authentication Profile is optional if Certificate Profile is selected. Authentication Profile is required if Certificate Profile is NOT selected.
- (Optional) Custom Username Label, Password Label, Authentication Message.
- Allow Authentication with User Credentials OR Client Certificate: No (default, requires AND) or Yes (allows OR).
[Important] When set to Yes, portal first searches for client cert. If not found, user must authenticate with credentials.
-
Arrange the client authentication configurations with OS-specific configurations at the top, and configurations that apply to Any OS at the bottom.
As with security rule evaluation, the portal looks for a match starting from the top. When it finds a match, it delivers the configuration.
- Move Up/Move Down buttons are used for ordering.
-
(Optional) Enable two-factor authentication using an authentication profile and a certificate profile.
The portal must authenticate the endpoint by using both methods.
(Chrome only) If using client certs and LDAP for 2FA on Chromebooks (Chrome OS 47+), configure a policy in Google Admin console to Automatically Select Client Certificate for These Sites:
{"pattern": "https://[*.]", "filter":{}}to prevent excessive prompts.[Gotcha] Certificate Profile: The Common Name (CN) and Subject Alternative Name (SAN) of the certificate must exactly match the IP address or FQDN of the interface where you configure the portal or HTTPS connections to the portal will fail.
-
Save the portal configuration.
- Click OK.
- Commit the changes.
Define the GlobalProtect Agent Configurations
After a GlobalProtect user connects to the portal and is authenticated, the portal sends the agent configuration to the app, based on defined settings.
If you have different roles or groups needing specific configurations, create a separate agent configuration for each.
The portal uses the OS, username, or group name to determine which configuration to deploy. As with other security rule evaluation, the portal searches from the top of the list for a match.
The configuration can include:
- List of available gateways (external and manually selectable).
- Root CA certificate for SSL connection with gateways.
- Root CA certificate for SSL forward proxy decryption.
- Client certificate for mutual authentication (if required).
- Secure encrypted cookie (if enabled by portal).
- Settings to determine if endpoint is on local or external network.
- App behavior settings (UI visibility, saving password, upgrade prompts).
[Important] If the portal is down or unreachable, the app uses the cached version of its agent configuration from its last successful portal connection.
Use the following procedure to create an agent configuration:
-
Add one or more trusted root CA certificates to enable the app to verify the identity of the portal and gateways.
The portal deploys the certificate in a read-only certificate file.
- Select Network > GlobalProtect > Portals.
- Select the portal config, then the Agent tab.
- In Trusted Root CA, Add and select the CA certificate used to issue gateway/portal server certificates.
[Important] Best Practices: Use the same certificate issuer for all gateways. Add the entire certificate chain (root and intermediates).
-
(Optional) Deploy additional CA certificates (e.g., for SSL forward proxy decryption).
- Add the certificate.
- Enable Install in Local Root Certificate Store. The portal automatically sends and installs it.
-
Add an agent configuration.
You must define at least one.
- From your portal config, Add a new agent configuration.
- Enter a descriptive Name.
-
(Optional) Configure authentication settings (Authentication tab).
- Client Certificate source (SCEP, Local, None) : Distributes client cert and private key. Select SCEP for device-specific certs generated by portal, Local for same cert on all endpoints, None if distributing via other means.
- Save User Credentials (Yes, Save Username Only, Only with User Fingerprint, No). Yes is default. No allows transparent gateway auth if portal/gateway use same methods. Only with User Fingerprint leverages OS biometric validation.
-
If endpoint doesn't require tunnel when on internal network, configure internal host detection (Internal tab).
- Select Internal.
- Enable Internal Host Detection (IPv4 or IPv6).
- Enter the IP Address of a host reachable from internal network only.
- Enter the DNS Hostname for the IP address. Endpoint performs reverse DNS lookup. If lookup fails, it determines it's external and initiates tunnel.
- (Optional) Enter a source address pool for endpoints. Only apps with IPs in pool can authenticate and send HIP reports.
-
Set up access to a third-party mobile endpoint management system (Mobile tab).
Required if mobile endpoints will be managed externally.
- Enter IP/FQDN of endpoint check-in interface (must match server cert CN).
- Specify Enrollment Port (default 443).
-
Specify the selection criteria for your portal agent configuration (Config Selection Criteria tab).
The portal uses this to determine which configuration to deliver. Order specific configurations before general ones.
- User/User Group: Specify OS (Any, Android, etc.) and/or User/User Group (specific user/group, pre-logon, any).
- Device Checks (Windows/macOS): Based on endpoint serial number in AD/Azure AD (managed/unmanaged) or machine certificate (select Certificate Profile).
- Custom Checks: Define registry (Windows) or plist (macOS) checks. Can negate checks (Key/Plist does not exist or value does not match).
[Important] Must map users to groups before restricting configs to groups.
-
Specify the external gateways (External tab).
Best practices: Enable Internal Host Detection if using both internal and external gateways.
- Select External.
- Add External Gateways.
- Enter a descriptive Name.
- [Critical] Enter the FQDN or IP Address (must exactly match gateway server certificate CN).
- Add Source Regions, or select Any. Gateway selection considers source region first, then priority.
- Set the Priority (Highest to Lowest, Manual only). Priority weights the gateway selection algorithm. Manual only useful for testing.
- Select Manual check box to allow users to switch manually.
-
Specify the internal gateways (Internal tab).
[Gotcha] Do not use on-demand connect method if configuration includes internal gateways.
- Select Internal.
- Add Internal Gateways.
- Enter a descriptive Name.
- [Critical] Enter the FQDN or IP Address (must exactly match gateway server certificate CN).
- (Optional) Add Source Addresses (IP subnet, range, predefined). GlobalProtect allows connection only if source address is configured.
- Click OK.
- (Optional) Add DHCP Option 43 Code. App selects gateways indicated by these options. [Important] When both source address and DHCP options are configured, available gateways list is union of both. DHCP options supported on Windows/macOS only, cannot be used for IPv6 gateways.
- (Optional) Select Internal Host Detection (IPv4 or IPv6). Host serves as reference point reachable from internal network only. If found, connects to internal gateway; if fails, connects to external.
- Customize the GlobalProtect app behavior (App tab). See Customize the GlobalProtect App section for details.
-
(Optional) Define any custom host information profile (HIP) data to collect/exclude (HIP Data Collection tab).
Applies if using HIP feature.
- Select HIP Data Collection.
- Enable Collect HIP Data.
- Specify Max Wait Time (sec) for HIP data search (10-60, default 20).
- Select Certificate Profile to match machine certificate sent by app.
- Select Exclude Categories.
- Select Custom Checks to define custom data (registry, plist, process list - though process list isn't detailed here).
- Save the agent configuration. Click OK.
-
Arrange the agent configurations so the proper one is deployed. Order from most specific to most general (like security rules).
When an app connects, portal compares source information against configurations top-down and delivers the first match.
- Move Up/Move Down buttons for ordering.
-
Save the portal configuration.
- Click OK.
- Commit the changes.
[Gotcha] IPv4 subnet must be /30 or larger, or specify a range.
Configure Intelligent Portal Selection
The intelligent portal selection feature enables automatic selection of the appropriate portal when a user travels across multiple countries for seamless and secure connectivity.
Users are automatically routed to the appropriate Prisma Access portal based on country location.
Supported modes: Always-On and Always-On (Pre-logon).
[Gotcha] Not supported for Connect Before Logon if a portal list is defined, and for On-Demand mode.
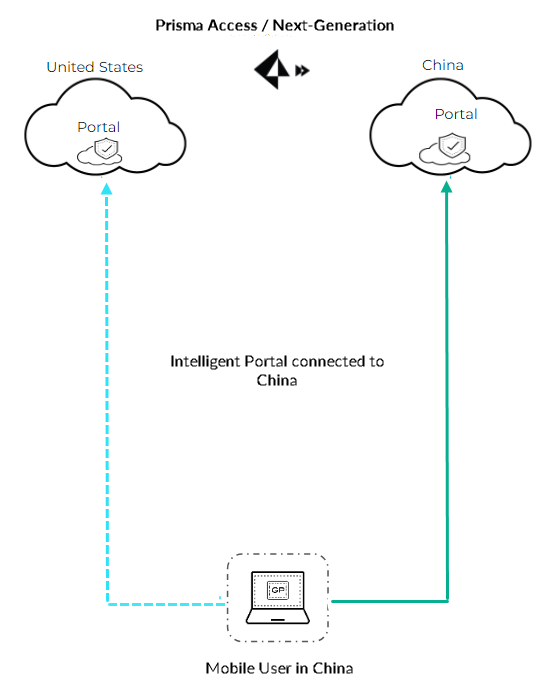
Illustration showing a user connecting to different regional GlobalProtect portals automatically based on location.
Configure and use the intelligent portal feature:
- Configure intelligent portal.
- (Required) REG ADD "HKLM\Software\Palo Alto Networks\GlobalProtect\Settings" /v portal-country-map /t REG_SZ /d portal_1(country1_code);portal_2(country2_code) [Important] Portal map must not exceed 255 characters.
- (Optional) REG ADD "HKLM\Software\Palo Alto Networks\GlobalProtect\Settings" /v intelligent-portal /t REG_SZ /d yes (enables feature on first login)
- (Optional) REG ADD "HKLM\Software\Palo Alto Networks\GlobalProtect\Settings" /v intelligent-portal-service /t REG_SZ /d "geoip.gpcloudservice.com/getIPLocation" (add if hosting API service for user location)
- Type sudo vi /Library/Preferences/com.paloaltonetworks.GlobalProtect.settings.plist
- Navigate to the /Palo Alto Networks/GlobalProtect/Settings dictionary.
- Add the following entries:
- For additional information on app settings, see Customizable App Settings.
- Enable the intelligent portal feature on the portal. See step 6 in the Customize the GlobalProtect App section. [Important] You must enable intelligent portal on the portal even if you defined the optional registry/plist key.
|
Current Environment |
Deployment Steps |
| Fresh install of GlobalProtect 6.3 and later on Windows and macOS |
Deploy GlobalProtect with a command line option to add the intelligent portal feature:
Example:
[Important] The portal map must not exceed 255 characters. |
| Existing installation of GlobalProtect 6.3 and later for Windows |
Add the following keys to the Windows Registry (path HKEY_LOCAL_MACHINE\SOFTWARE\Palo Alto Networks\GlobalProtect\Settings\).
|
| Existing installation of GlobalProtect 6.3 and later for macOS |
Define entries in the macOS plist (/Library/Preferences/com.paloaltonetworks.GlobalProtect.settings.plist).
|
| Upgrade to GlobalProtect 6.3 and later | If fresh install, follow fresh install procedure. If upgrading through portal, add registry/plist keys manually. |
How intelligent portal works:
- On login, GlobalProtect automatically selects the portal defined in the portal country map for that location. If multiple portals for a country, selects the first.
- If user manually selects a different portal *for that country* from the map, it's retained for subsequent sessions (persists across refresh/sleep).
- If user manually selects a portal *not* defined in the country map, it's retained for the session. [Important] After refresh/sleep, GlobalProtect automatically directs them back to the first portal defined in the country map for that location.
Logs are included in the GlobalProtectLogs.tgz file.

Screenshot of GlobalProtect logs showing entries related to Intelligent Portal selection.
See View and Collect GlobalProtect App Logs for log access.
Customize the GlobalProtect App
The portal agent configuration allows you to customize how end users interact with the GlobalProtect apps on their endpoints. You can define different app settings for different agent configurations (user types/groups).
Customizations include:
- Menu and view access.
- Whether users can uninstall or disable (user-logon only).
- Welcome page display.
- Automatic or manual app upgrades.
- Prompts for multi-factor authentication (MFA).
Settings defined in the web interface (portal agent configuration) take precedence over settings defined in the Windows Registry, Msiexec, and macOS plist.
[Important] Some settings are only available via Registry/Msiexec/plist ("Not in portal"). Examples: prompt if Windows SSO fails, default portal address, enable Connect Before Logon, run scripts, wrap third-party credentials.
-
Select the agent configuration you want to customize.
- Select Network > GlobalProtect > Portals, then the portal.
- On the Agent tab, select the agent configuration, or Add a new one.
- Select the App tab.
The App Configurations area displays settings with default values (gray text). Changed values are in default color.
-
Specify the Connect Method (App Configurations area).
Use Pre-logon (Always On), Pre-logon then On-demand, or User-log on (Always On) connect method to access the network using an internal gateway.
- User-logon (Always On) : App connects automatically when user logs in to endpoint. Transparent with Windows SSO. [Gotcha - iOS only] Prevents OTP apps from working as all traffic is forced through tunnel.
- Pre-logon (Always On) : App authenticates and establishes VPN tunnel before user logs in. [Critical] Requires external PKI to pre-deploy a machine certificate.
- On-demand (Manual user initiated connection) : Users must manually launch app to connect. [Important] Use for external gateways only.
- Pre-logon then On-demand : Pre-logon tunnel before login, but user must manually reconnect if tunnel terminates after login. Allows password changes after expiry while requiring manual post-login connection.
- Conditional Connect Method Based on Network Type (Windows Registry/macOS Plist): Dynamically change between Always-On and On-Demand based on internal/external network. [Important] Requires internal host detection enabled and portal Connect Method set to On-demand.
-
(Windows 10, ARM64 Windows 10, macOS 11+, ARM macOS 11+; GP App 6.0+; Content 8450-6909+) Configure endpoint traffic policy enforcement.
Block malicious inbound connections using the physical adapter.
Enables blocking malicious inbound connections, restricting app bypass (binding to physical adapter), preventing routing table tampering to bypass tunnel.
Options (Endpoint Traffic Policy Enforcement):
- No (Default): Disabled.
- TCP/UDP Traffic Based on Tunnel IP Address Type: Enabled for TCP/UDP matching tunnel IP type (IPv4 tunnel -> IPv4 TCP/UDP).
- All TCP/UDP Traffic: Enabled for all TCP/UDP (IPv4/IPv6) regardless of tunnel IP type.
- All Traffic: Enabled for all protocols (TCP, UDP, ICMP, etc.) regardless of tunnel IP type.
-
Specify whether to enforce GlobalProtect connections for network access (Windows 10 only).
Force all network traffic to traverse a GlobalProtect tunnel.
[Critical] When enabled, blocks all traffic until agent is internal or connected to external gateway. Prevents using proxies to bypass inspection.
When enabled, GlobalProtect bypasses PanGPA.exe, PanGPS.exe, lsass.exe, DHCP, DNS, NetBIOS, LLMNR, Loopback interface traffic (Windows). Similar list for macOS.
[Important] Recommend enabling only for User-logon or Pre-logon modes. On-demand users may fail connections.
[Gotcha] In User-logon mode with enforcement, if user *can* disable/disconnect, they can access the network without the tunnel. To prevent this, *disallow* disable/disconnect for these users.
- Enforce GlobalProtect Connection for Network access: Yes or No (default).
- (Optional) Displays Traffic Blocking Notification Message (requires Yes above).
- Allow traffic to specified hosts/networks when Enforce GlobalProtect Connection... is enabled and GlobalProtect Connection is not established. (Content 8196-5685+). Specify IP addresses/segments (up to 20). Useful for allowing access to local resources when disconnected.
- Allow traffic to specified FQDN when Enforce GlobalProtect Connection... is enabled and GlobalProtect Connection is not established. (Win 10/macOS Catalina 10.15.4+, GP App 5.2+, Content 8284-6139+). Specify FQDNs (up to 40, max 1024 chars, supports wildcard *). Useful for allowing access to IdP or management server when disconnected.
- Captive Portal Exception Timeout (sec) : Time users has to log in to captive portal (0-3600, default 0). 0 means immediate block.
- (Optional) Display Captive Portal Detection Message, Captive Portal Notification Delay (sec), Automatically Launch Webpage in Default Browser Upon Captive Portal Detection (enter FQDN/IP).
[Gotcha] If using Connect Before Logon with enforcer and smart card/username auth, you *must* configure FQDN/IP exclusions for the portal and gateway addresses.
-
Specify additional GlobalProtect connection settings (App Configurations area).
- Use Single Sign-On (Windows/macOS): Yes (default) or No. Disable if Windows/SAML username differs or one uses FQDN format, and using cookies for auth override.
- Use Single Sign-On for Smart Card PIN (Windows 10 only, Content 8451-6911+, GP 6.0+): Yes or No (default). Enables seamless SSO with smart card PIN. [Important] Requires pre-deployed setting (USESSOPIN=yes) on endpoint. If portal and pre-deployed settings conflict, user experience suffers. If both Use Single Sign-On (Windows) and Use Single Sign-On for Smart Card PIN (Windows) are Yes, Smart Card PIN option takes precedence.
- Use Default Browser for SAML Authentication (Content 8284-6139+, GP 5.2+): Yes or No (default). Yes uses system browser for SAML SSO, No uses embedded browser.
- Automatically Use SSL When IPSec Is Unreliable (0-168 hours, default 0). If > 0, app avoids IPSec during timeout after keepalive failure. [Important] Default 0 means falls back to SSL only if IPSec *cannot be established*, not just unreliable.
- Display IPSec to SSL Fallback Notification (Content 8387-6595+, GP 5.2.6+): Yes (default) or No. Controls notification display when falling back to SSL.
-
Advanced Control for Tunnel Mode Behavior (GP App 6.3+):
- No (default): IPSec by default if enabled, fallback to SSL.
- Connect with SSL Only: Require SSL only.
- Connect with SSL Only - User can Change: Start with SSL, user can switch to IPSec/SSL.
- IPSec Only (Content 8846-8732+, GP 6.3+): Require IPSec only. [Critical] If IPSec not enabled on gateway, app stays disconnected. No SSL fallback.
- GlobalProtect Connection MTU (bytes) (Content 8346-6423+, GP 5.2.4+): 1000-1420, default 1400. Optimize connection over networks with lower MTU to prevent fragmentation issues. [Gotcha - Windows UWP only] Manual netsh MTU setting can limit GP setting. [Gotcha] If MTU < 1280 and IPv6 enabled, adapter sets to 1280. [Gotcha - Pre-Logon] Requires Pre-logon Tunnel Rename Timeout = 0 for new MTU to take effect on user tunnel.
- Maximum Internal Gateway Connection Attempts (0-100, default 0). Number of retries after first attempt fails. Recommend 4 or 5. 0 = no retries.
- GlobalProtect App Config Refresh Interval (1-168 hours, default 24). How often portal initiates config refresh.
- Retain Connection on Smart Card Removal (Windows only, Content 590-3397+): Yes (default) or No. Yes keeps tunnel on smart card removal, No terminates.
- Automatic Restoration of VPN Connection Timeout (0-180 min, default 30). If > 0, app attempts to reestablish connection if tunnel disconnects. If downtime > timeout, no restoration. 0 = no attempt. [Gotcha - Always On] If network changes before timeout, no discovery, reconnects to last external gateway. Must Refresh Connection manually to trigger internal detection.
- Wait Time Between VPN Connection Restore Attempts (1-60 sec, default 5). Wait time between retries.
-
Configure menus and UI views available to users (App Configurations area).
- Enable Advanced View: Yes (default) or No. No limits users to General and Notification tabs. Yes adds Connection, Host Profile (HIP), Troubleshooting tabs.
- Display GlobalProtect Icon: Yes (default) or No. No hides tray icon, limiting user actions (change password, rediscover, resubmit HIP, view info, on-demand connect). HIP/login/cert dialogs still display.
- Enable Rediscover Network Option: Yes (default) or No. No grays out Refresh Connection.
- Enable Resubmit Host Profile Option: Yes (default) or No. No prevents manual HIP resubmit.
- Enable Intelligent Portal Selection (Windows/macOS only): Yes or No (default). Yes allows automatic portal selection based on location (requires portal-country-map config).
- Show System Tray Notifications (Windows only): Yes or No.
- Custom Password Expiration Message (LDAP Only) (max 200 chars).
- Change Password Message (max 255 chars) (for AD password changes).
[Important] To send logs to Strata Logging Service, configure GlobalProtect app log collection for troubleshooting and Enable Advanced View. Configure HTTPS-based destination URLs for diagnostics tests.
-
Define what end users can do in their app (App Configurations area).
- Allow User to Change Portal Address: Yes (default) or No. No disables the field, requires default portal address to be supplied via Windows Registry or macOS plist.
- Allow User to Dismiss Welcome Page: Yes (default) or No. No prevents dismissing the page.
- Have User Accept Terms of Use Before Creating Tunnel: Yes or No (default). Yes requires user acceptance of terms page before connecting.
-
Specify whether users can disable the GlobalProtect app.
Applies to User-Logon (Always On) Connect Method.
Options (Allow User to Disable GlobalProtect App):
- Allow (default): Can disable without comment/passcode/ticket.
- Disallow: Cannot disable. [Gotcha] If Display GlobalProtect Icon is No, users cannot disable even if set to Allow.
- Allow with Comment: Must provide a reason (select from list or Other reason). List configured via Display the following reasons... (Always-on mode).
- Allow with Passcode: Must enter Passcode defined in portal config.
- Allow with Ticket: Disable action generates Request Number. Admin generates Ticket from portal config using Request Number. User enters Ticket.
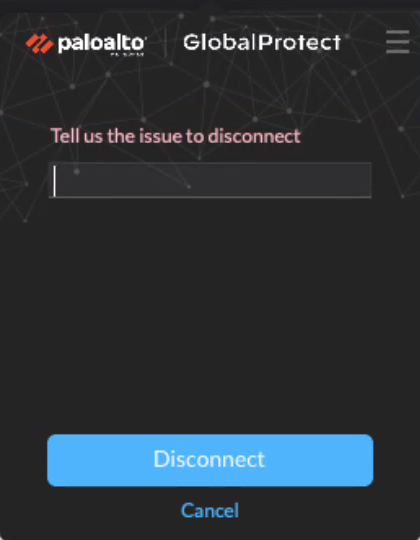
Screenshot of the GlobalProtect disconnect reasons options.
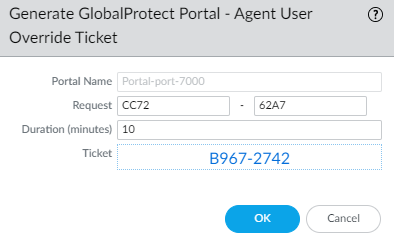
Screenshot of the GlobalProtect 'Generate Ticket' option on the portal configuration page.
- Max Times User Can Disable (0-inf, default 0): Limit number of disables. 0 = no limit. Applicable with Allow, Allow with Comment, Allow with Passcode. [Important] Reset counter by increasing value in portal config (user must Refresh Connection or reconnect), or by reinstalling app.
- Disable Timeout (min) (0-inf, default 0): Restrict time app can be disabled. 0 = no restriction. Applicable with Allow, Allow with Comment, Allow with Passcode.
-
Specify whether users can uninstall the GlobalProtect app (Content 8207-5750+).
Controls whether users can uninstall, prevent uninstallation, or require password for uninstall. Setting pushed to endpoint registry per portal.
Options (Allow User to Uninstall GlobalProtect App):
- Allow: No restrictions. (Registry value 0).
- Disallow: Cannot uninstall. (Registry value 1).
- Allow with Passcode: Must enter Uninstall Password defined in portal config.
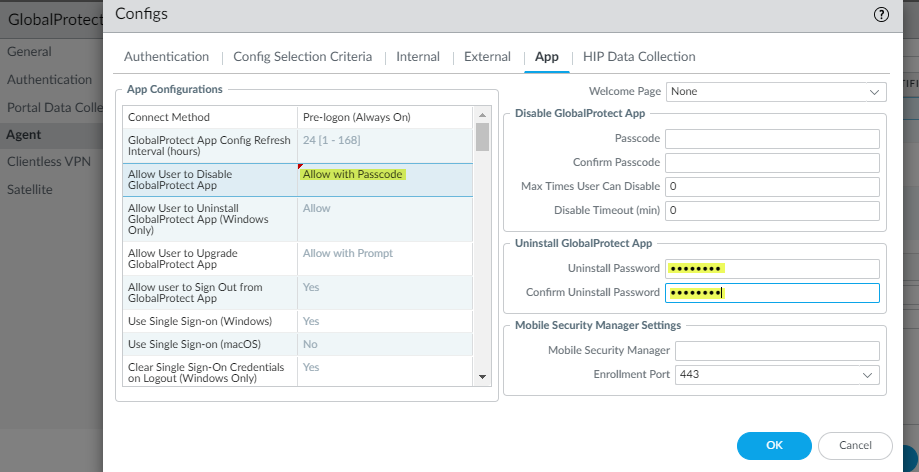
Screenshot of the Uninstall GlobalProtect App settings on the portal configuration.
- Specify whether users can sign out (Content 8196-5685+). Allow user to Sign Out from GlobalProtect App: Yes or No.
-
Configure certificate settings and behavior (App Configurations area).
- Client Certificate Store Lookup: User, Machine, User and machine (default). Where app looks for client certs (Windows: Current User, Local Computer; macOS: Personal Keychain, System Keychain).
- SCEP Certificate Renewal Period (days) (0-30, default 7). Portal requests new cert from SCEP server this many days before expiration. 0 = no automatic renewal. [Important] User must log in during this period to obtain new cert.
- Extended Key Usage OID for Client Certificate (Windows/macOS): Filter client certs based on secondary purpose OID. If only one matches, auto-selects. If multiple, prompts user.
- Enable Strict Certificate Check (GP App 6.2.8+ Windows/macOS): No, Yes, Use Pre-Deployed Settings. Enforce certificate validation.
- [Critical] If you do not want the app to establish a connection with the portal when the portal certificate is not valid, set Allow User to Continue with Invalid Portal Server Certificate to No. [Important] Disabling can help prevent MITM attacks if using trusted portal cert.
-
Specify whether users receive login prompts from MFA Gateways (App Configurations area).
For internal gateways, sensitive resources may require additional authentication (MFA). Configure GlobalProtect to Facilitate Multi-Factor Authentication Notifications.
- Enable Inbound Authentication Prompts from MFA Gateways: Yes or No (default). Yes allows app to receive/acknowledge UDP prompts from gateway.
- Network Port for Inbound Authentication Prompts (UDP) (1-65535, default 4501).
- Trusted MFA Gateways: Specify gateways app trusts for MFA prompts. App displays prompt only if UDP comes from a trusted gateway.
- Inbound Authentication Message (max 256 chars). Message displayed before appending Authentication Portal URL.
-
(Windows only) Configure settings for Windows endpoints (App Configurations area).
- Resolve All FQDNs Using DNS Servers Assigned by the Tunnel (Windows Only): Yes (default) or No. Yes enforces all DNS queries through gateway DNS. No allows fallback to physical adapter DNS (native Windows behavior, can be slow). [Gotcha] Does not support DNS over TCP.
- Send HIP Report Immediately if Windows Security Center (WSC) State Changes: Yes (default) or No. Yes sends HIP on WSC status change.
- Clear Single Sign-On Credentials on Logout: Yes (default) or No. Yes clears SSO creds on logout, forces reentry next login.
- Use Default Authentication on Kerberos Authentication Failure: Yes (default) or No. Yes retries with default auth if Kerberos fails.
- (GP App 6.1+) Specify Proxy Auto-Configuration (PAC) File URL. Push PAC URL to endpoint to configure proxy settings. (max 256 chars). Supported: PAC standard (http://...), WPAD standard (http://wpad...).
-
(Windows only) Configure Detect Proxy for Each Connection.
See Tunnel Connections Over Proxies for traffic behavior details.
- No: Auto-detect proxy for portal connection, use for subsequent.
- Yes (default): Auto-detect proxy for every connection.
-
(Windows/macOS only) Specify whether GlobalProtect must use or bypass proxies.
Controls tunnel traffic behavior over proxies.
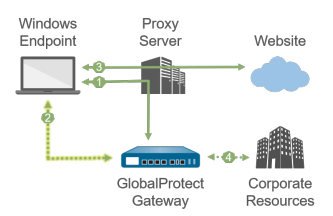
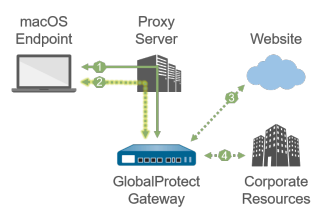
- Set Up Tunnel Over Proxy (Windows & Mac only): Yes or No. Yes requires tunnel use proxies, No bypasses proxies.
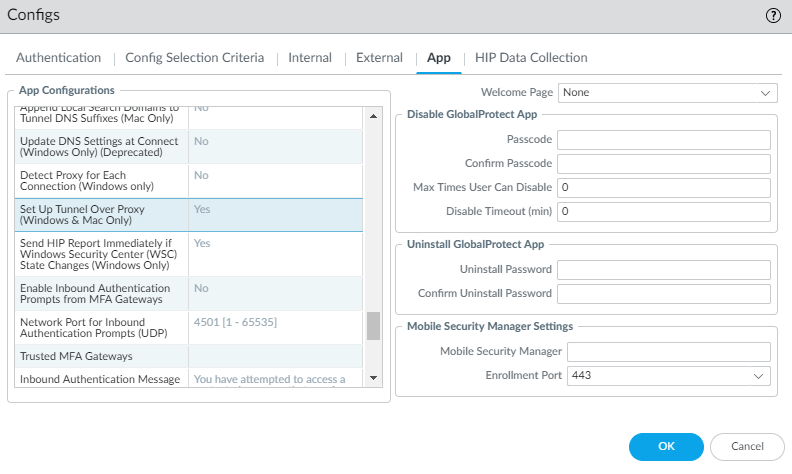
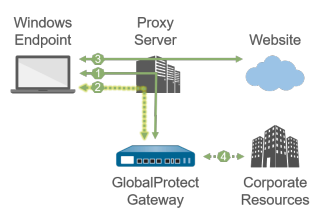
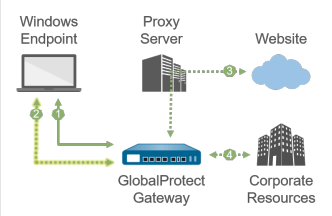
Illustration showing SSL tunnel setup going through a proxy when "Set Up Tunnel Over Proxy" is enabled (Windows/Mac, SSL tunnel).
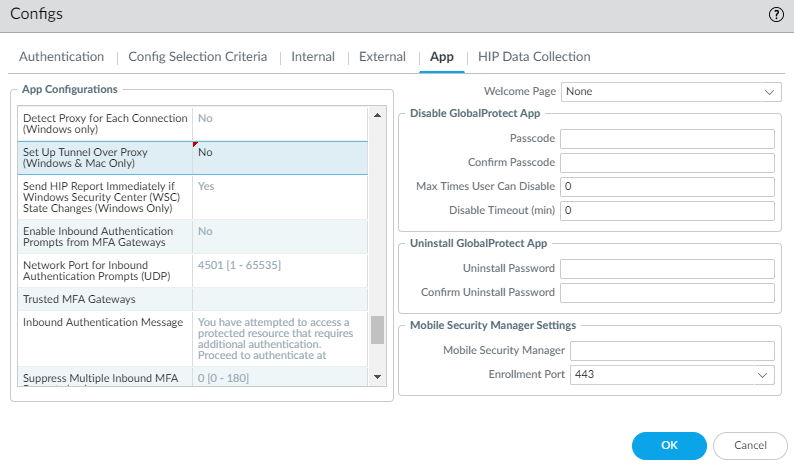
Illustration showing SSL tunnel setup bypassing a proxy when "Set Up Tunnel Over Proxy" is disabled (Windows/Mac, SSL tunnel).
- (GP App 6.1+) Set Enable Advance Host Detection: Yes or No (default). Yes adds certificate validation for internal gateways during internal host detection. No only performs reverse DNS lookup.
- (GP 6.3.1+, Content 8890-8951+) Set Enable Intelligent Internal Host Detection: Yes or No (default). Yes retries network discovery if internal host detection fails (when internal gateway and detection configured without external gateway).
-
Adjust portal and TCP timeout values if experiencing latency/slowness (App Configurations area).
Increase values to allow more time, decrease to detect failures faster.
- Portal Connection Timeout (sec) (1-600, default 5 - newer content). Timeout waiting for portal response.
- TCP Connection Timeout (sec) (1-600, default 5 - newer content). Timeout waiting for TCP unresponsiveness.
- TCP Receive Timeout (sec) (1-600, default 30). Timeout waiting for partial TCP response.
-
(Windows 10/macOS Catalina 10.15.4+, GP 5.2+) Specify Split-Tunnel Option (App Configurations area).
Enable split DNS to direct DNS queries over/outside VPN tunnel based on domain.
- Network Traffic Only: Rules apply only to network traffic, not DNS. All DNS through tunnel. [Important - Windows only] Can be used with Resolve All FQDNs... Yes to enforce all DNS over tunnel.
- Both Network Traffic and DNS: Rules apply to DNS traffic and associated network traffic based on destination domain inclusion/exclusion. [Gotcha] If Both... selected, must add at least one fake domain to exclude list. Split DNS configures which domains are resolved by VPN DNS vs local DNS.
- (Optional—GP App 6.2+) Push split tunnel configurations via file hosted on web server.
- (Optional—GP App 6.2) Set HIP Remediation Process Timeout (sec). Timeout for running a script for HIP remediation if process check fails. After timeout, app resubmits HIP report.
- (Optional—GP App 6.2) Set Allow User to Extend GlobalProtect User Session: Yes or No (default). Yes allows extending login lifetime session.
- Specify User Switch Tunnel Rename Timeout (0-7200 sec, default 0). When new user RDPs to Windows machine, gateway reassigns tunnel. Timeout for new user to authenticate. 0 = terminates connection. Useful for IT admin remote access. [Gotcha] Only affects RDP tunnel, not pre-logon tunnel rename.
- Preserve Tunnel on User Logoff Timeout (0-600 sec, default 0). If > 0, preserves existing tunnel after user logs off endpoint for specified time. 0 = no preservation. [Important] Same user logs back in within timeout: stays connected (Always On/On-Demand). Different user logs in within timeout: tunnel renamed *only if new user authenticates successfully*. If not, tunnel disconnects.
-
Specify how GlobalProtect app upgrades occur (App Configurations area).
Customize upgrades per configuration.
Options (Allow User to Upgrade GlobalProtect App):
- Allow with Prompt (default): Prompts user when new version activated on firewall.
- Allow Transparently: Upgrades automatically without interaction (remote or internal).
- Internal: Upgrades automatically only when connected within corporate network. Recommended for low-bandwidth. [Critical] Requires internal gateways and internal host detection.
- Disallow: Prevents upgrades.
- Allow Manually: User initiates via Check Version. [Gotcha] Won't work if Display GlobalProtect Icon is No.
[Important] Upgrades (Transparently, Internal) only occur if portal version > endpoint version.
[Important - GP 6.0+] Allow with Prompt does not prompt for downgrade. Must Check for Updates on About tab for downgrade prompt.
- Add Change Password Message (max 255 chars) to specify password policies.
- Specify whether to send gateway selection criteria logs (Log Gateway Selection Criteria). Yes or No (default). Yes sends enhanced logs to firewall (Monitor > Logs > GlobalProtect) to identify reasons for gateway selection, latency info.
-
Specify whether to display a welcome page upon successful login.
Useful to direct users to internal resources.
Select factory-default or Import custom Welcome Page from Welcome Page drop-down (App tab). Customize page variables similar to login/home pages.
-
Configure the GlobalProtect app log collection settings.
Send troubleshooting/diagnostic logs to Strata Logging Service.
See Checklist for setup.
- Enable Autonomous DEM and GlobalProtect App Log Collection for Troubleshooting (Content 8350-14191+, GP 5.2.5+): Yes or No (default). Yes displays Report an Issue option in app. [Critical] Requires Strata Logging Service certificate pushed from portal as client cert for authentication to Strata Logging Service.
- Run Diagnostics Tests for These Destination Web Servers (Content 8350-14191+, GP 5.2.5+): Enter HTTPS URLs (IPs/FQDNs, max 10, comma/semicolon separated). Used when diagnostics are performed. [Important] Not used when app creates troubleshooting reports on issue. Suggest download file location with relevant size (e.g., 10-50MB) for accurate speed tests.
-
Specify whether to install ADEM endpoint agent and allow user control (App Configurations area). (Windows 10/macOS only, Content 8845-8731+). Options depend on GP version.
GlobalProtect Version
Configuration Name
Configuration Values
GlobalProtect 6.2 and earlier Autonomous DEM endpoint agent for Prisma Access for GP version 6.2 and below - Install and user cannot enable/disable agent from GlobalProtect
- Install and user can enable/disable agent from GlobalProtect
- Do not install (default)
GlobalProtect 6.3 and later Access Experience (ADEM, App Acceleration, End user coaching) for GP 6.3 and above (Windows & MAC only) - Install the Agent
- Uninstall the Agent
- No action (The agent state remains as is) (default)
(Content earlier than 8845-8731) Options: Install and user can enable/disable..., Install and user cannot..., Do Not Install (default).
See Get Started with Autonomous DEM for Panorama Managed or Cloud Managed Prisma Access.
- (Windows only) Specify whether to Display Status Panel at Startup. Yes or No. Yes auto-displays, No suppresses on first connection.
- (Windows 10/macOS, Content 8450-6909+, GP 6.0) Set Allow GlobalProtect UI to Persist for User Input: Yes or No (default). Yes keeps status panel visible during credential entry/cancel. No hides it, requiring manual closing.
-
Save the agent configuration.
- Click OK to save agent config. Return to Define the GlobalProtect Agent Configurations if needed.
- Click OK to save portal config.
- Commit the changes.
Tunnel Connections Over Proxies
On Windows and macOS, you can configure GlobalProtect to bypass proxies so HTTP/HTTPS traffic matching proxy/PAC rules *must* traverse the VPN tunnel. This prevents users from using personal proxies to bypass inspection.
If GlobalProtect uses proxies (Windows): HTTP/HTTPS matching rules go directly through proxy *after* connection. Other traffic matching access routes goes through tunnel over proxy. If proxy unreachable from gateway, traffic dropped.
[Gotcha - macOS] If GlobalProtect uses proxies (macOS): Proxies are disabled after connection because settings aren't copied to virtual adapter.
[Gotcha] You cannot set up an IPSec tunnel through a proxy because proxies do not support UDP traffic.
Network Traffic Behavior on Windows Endpoints
Network Traffic Behavior on Windows EndpointsTunnel Type |
GlobalProtect Uses Proxies | GlobalProtect Bypasses Proxies |
| SSL |
Windows endpoint with SSL tunnel configured to *use* proxies. |
Windows endpoint with SSL tunnel configured to *bypass* proxies. |
| 1 —All login requests go through the proxy. | 1 —All login requests bypass the proxy and go directly to the gateway. | |
| 2 —SSL tunnel setup goes through the proxy. | 2 —SSL tunnel setup bypasses the proxy and goes directly to the gateway. | |
| 3 —HTTP/HTTPS traffic that matches the proxy/PAC file rules goes through the proxy and bypasses the SSL tunnel. | 3 —HTTP/HTTPS traffic that matches the proxy/PAC file rules goes through the SSL tunnel and then through the proxy. If the proxy is unreachable from the gateway, traffic is dropped. | |
| 4 —Other traffic matching access routes goes through the SSL tunnel built over the proxy. | 4 —Other traffic matching access routes bypasses the proxy and goes through the SSL tunnel. | |
| IPSec |
Windows endpoint with IPSec tunnel. You cannot set up an IPSec tunnel through a proxy because proxies do not support UDP traffic. |
|
| 1 —All login requests go through the proxy. | ||
| 2 —IPSec tunnel setup bypasses the proxy and goes directly to the gateway. | ||
| 3 —HTTP/HTTPS traffic matching proxy/PAC rules bypasses the proxy and goes through the IPSec tunnel. | ||
| 4 —Other traffic matching access routes bypasses the proxy and goes through the IPSec tunnel. | ||
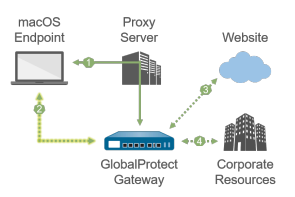
Network Traffic Behavior on Mac Endpoints
Network Traffic Behavior on Mac EndpointsTunnel Type |
GlobalProtect Uses Proxies | GlobalProtect Bypasses Proxies |
| SSL |
macOS endpoint with SSL tunnel configured to *use* proxies. |
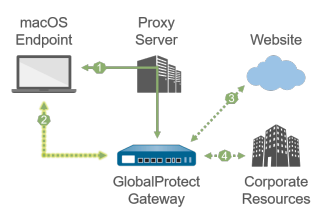
macOS endpoint with SSL tunnel configured to *bypass* proxies. |
| 1 —All login requests go through the proxy. | 1 —All login requests go through the proxy. | |
| 2 —SSL tunnel setup goes through the proxy. | 2 —SSL tunnel setup bypasses the proxy and goes directly to the gateway. | |
| 3 —HTTP/HTTPS traffic matching proxy/PAC rules goes through the SSL tunnel built over the proxy. | 3 —HTTP/HTTPS traffic matching proxy/PAC rules bypasses the proxy and goes through the SSL tunnel. | |
| 4 —Other traffic matching access routes goes through the SSL tunnel built over the proxy. | 4 —Other traffic matching access routes bypasses the proxy and goes through the SSL tunnel. | |
| IPSec |
macOS endpoint with IPSec tunnel. You cannot set up an IPSec tunnel through a proxy because proxies do not support UDP traffic. |
|
| 1 —All login requests go through the proxy. | ||
| 3 —IPSec tunnel setup bypasses the proxy and goes directly to the gateway. | ||
| 3 —HTTP/HTTPS traffic matching proxy/PAC rules bypasses the proxy and goes through the IPSec tunnel. | ||
| 4 —Other traffic matching access routes bypasses the proxy and goes through the IPSec tunnel. | ||
Customize the GlobalProtect Portal Login, Welcome, and Help Pages
GlobalProtect provides default login, welcome, and help pages, but you can create custom pages with corporate branding, acceptable use policies, and links.
Alternatively, disable browser access to the portal login page (Portal Login Page -> Disable) and use a software distribution tool (e.g., SCCM) for app installation.
-
Export the default portal page (login, home, welcome, or help).
- Select Device > Response Pages.
- Select the link for the corresponding page (e.g., GlobalProtect Portal Login Page).
- Select Default and click Export.
-
Edit the exported page (HTML editor).
- Open the file.
- Edit variables for Login or Home page:
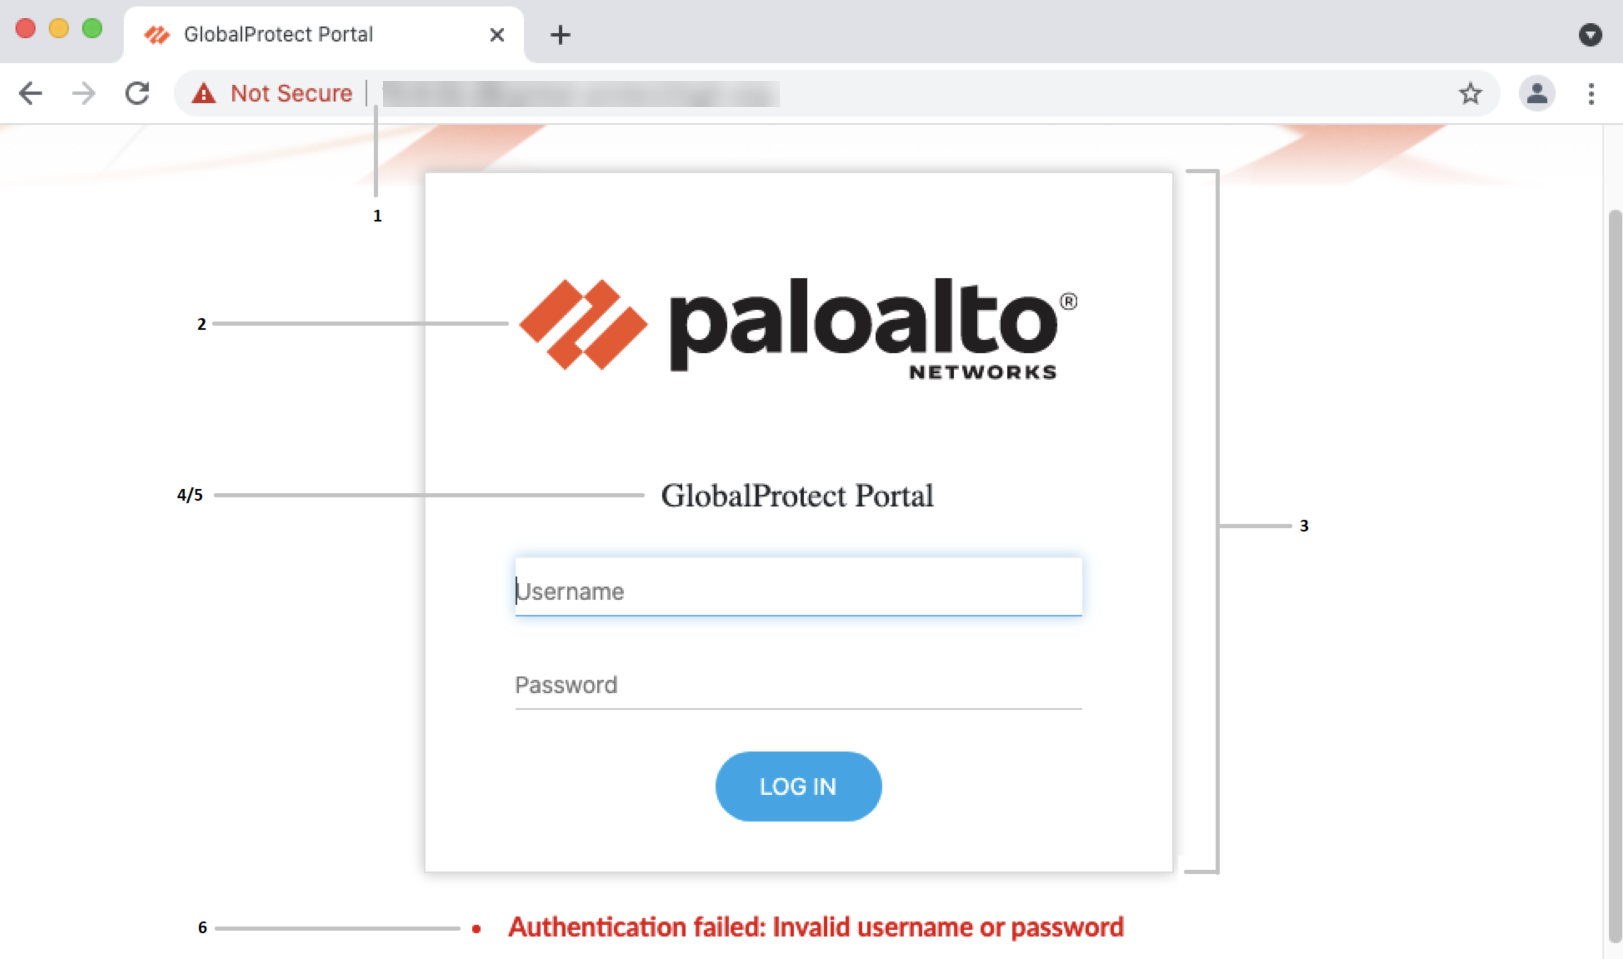
Screenshot showing the default GlobalProtect Portal Login Page with labels pointing to customizable elements.
GlobalProtect Portal Login Page Variables:
Label Variable Description Example 1 favicon URL of browser address bar icon. var favicon = '...'; 2 logo URL of company logo. var logo = '...'; 3 bg_color Login page background color. var bg_color = '#D3D3D3'; 4 gp_portal_name Text under company logo. var gp_portal_name = '...'; 5 gp_portal_name_color Color of text under logo. var gp_portal_name_color = '#000000'; 6 error_text_color Text color for logon failure messages. var error_text_color = '#196390'; 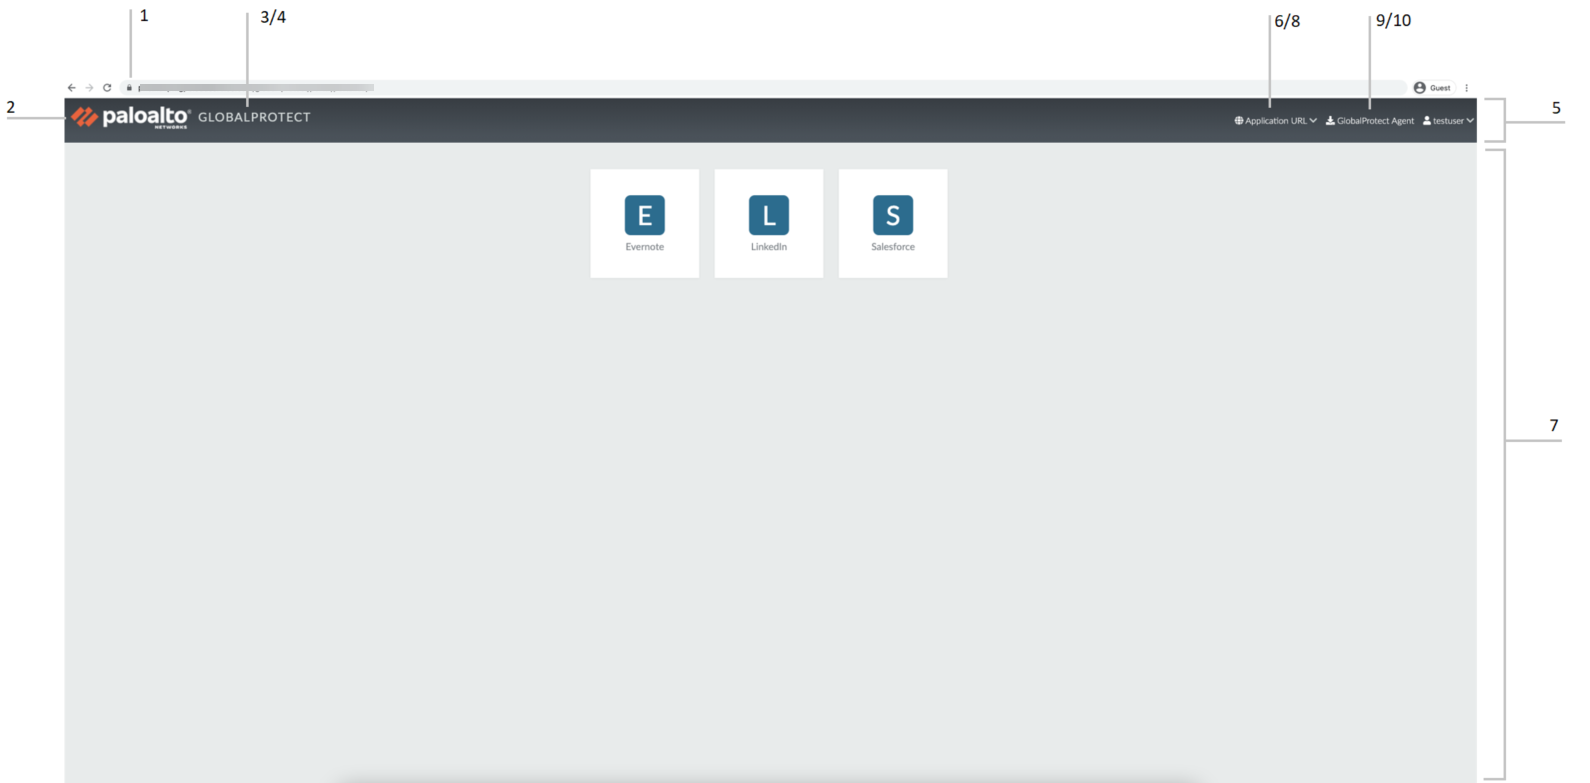
Screenshot showing the default GlobalProtect Portal Home Page (top section) with labels pointing to customizable elements.
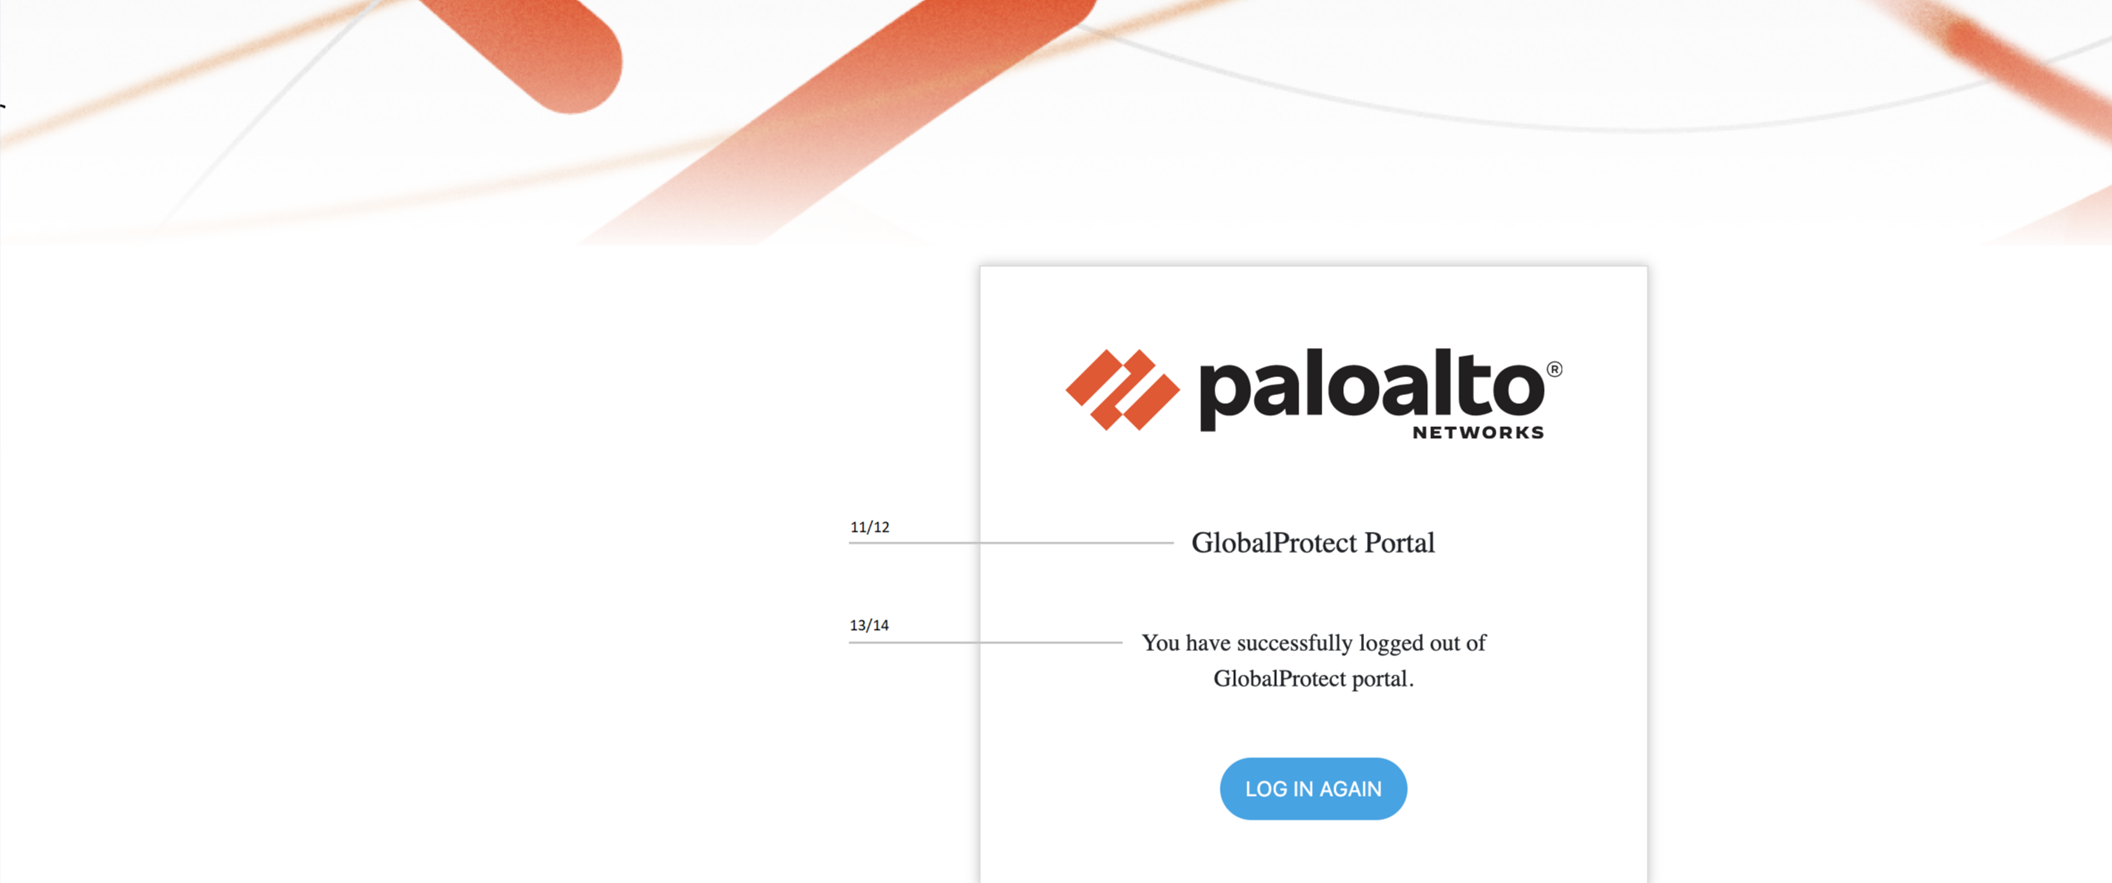
Screenshot showing the default GlobalProtect Portal Home Page (bottom section - logout page) with labels pointing to customizable elements.
GlobalProtect Portal Home Page Variables:
Label Variable Description Example 1 favicon URL of browser address bar icon. var favicon = '...'; 2 logo URL of company logo. var logo = '...'; 3 navbar_text Navigation bar text. var navbar_text = 'GlobalProtect'; 4 navbar_text_color Navigation bar text color. var navbar_text_color = '#D3D3D3'; 5 navbar_bg_color Navigation bar background color. var navbar_bg_color = '#A9A9A9'; 6 dropdown_bg_color Drop-down menu background color. var dropdown_bg_color = '#FFFFFF'; 7 bg_color Home page background color. var bg_color = '#D3D3D3'; 8 label_custom_app_url Label for custom/internal application URLs. var label_custom_app_url = '...'; 9 display_globalprotect_agent Option to display or hide the GlobalProtect app download button. 1 to display, 0 to hide. var display_globalprotect_agent = 1; 10 label_globalprotect_agent Label for the app download button. var label_globalprotect_agent = '...'; 11 gp_portal_name Text under logo on logout page. var gp_portal_name = 'GlobalProtect Portal'; 12 gp_portal_name_color Color of text under logo on logout page. var gp_portal_name_color = '#000000'; 13 logout_text_array Messages displayed on logout page. [Important] You can only modify existing messages; cannot add/delete. var logout_text_array = [...] 14 logout_text_color Text color for logout messages. var logout_text_color = '#000000'; - Save the edited page with a new filename (must retain UTF-8 encoding).
To set the GlobalProtect App Help Page:
- Select Network > GlobalProtect > Portals, and Add a portal.
- Select General.
- In the Appearance area, select the factory-default, Import custom, or None (removes Help option).
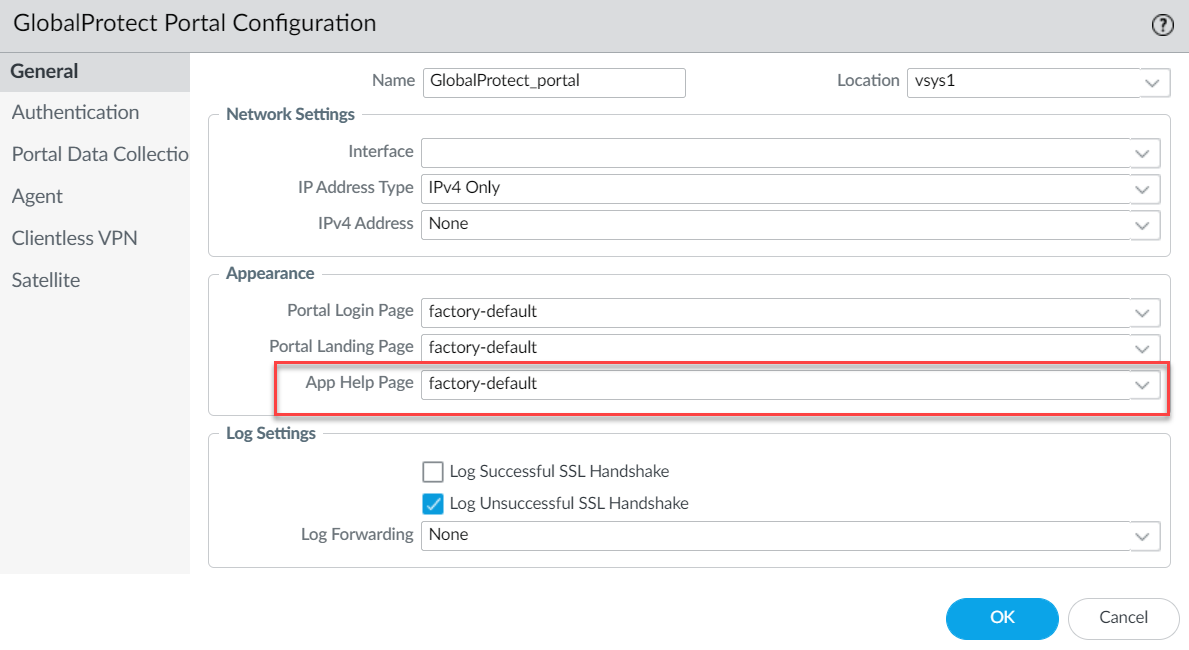
Screenshot showing the customization options for Portal Login Page, Portal Landing Page, and App Help Page.
- Click OK and Commit the changes.
-
Import the new page(s).
- Select Device > Response Pages.
- Select the link for the corresponding portal page.
- Import the new page. Enter path/filename or Browse.
- (Optional) Select Destination (virtual system) or shared (default).
- Click OK.
-
Configure the portal to use the new page(s).
-
Portal Login Page, Portal Landing Page, and App Help Page:
- Select Network > GlobalProtect > Portals.
- Select the portal.
- In the Appearance area of the General tab, select the new page from the relevant drop-down.
-
Custom Welcome Page:
- Select Network > GlobalProtect > Portals.
- Select the portal.
- On the Agent tab, select the agent configuration.
- On the App tab, select the new page from the Welcome Page drop-down.
- Click OK to save the agent configuration.
-
Portal Login Page, Portal Landing Page, and App Help Page:
- Save the portal configuration. Click OK to save, and then Commit changes.
-
Verify that the new page displays.
- Test the login page: Go to portal URL in browser (e.g., https://myportal, *not* https://myportal:4443).
- Test the home page: Go to portal URL, log in.
- Test the help page: GlobalProtect app tray icon -> Settings -> Help.
- Test the welcome page: GlobalProtect app tray icon -> Settings -> Welcome Page.

GlobalProtect app settings icon.
Enforce GlobalProtect for Network Access
To reduce security risk off-premise, force users on Windows 7/macOS 10.9+ to connect to GlobalProtect to access the network.
[Critical] When enabled, GlobalProtect blocks all traffic until the agent is internal or connects to an external gateway. Prevents using proxies to bypass inspection.
If users need captive portal access, configure a grace period.
[Important] Recommend enabling only for users in User-logon mode.
[Gotcha] In User-logon mode with enforcement, if user *can* disable/disconnect, they can access network without GP. Disallow disable/disconnect to prevent this.
In App Configuration area, set Enforce GlobalProtect Connection for Network access to Yes.
Default is No (allows internet access when disconnected).
Message can indicate reason for blocking and connection instructions.
GlobalProtect Workflow Diagrams
GlobalProtect App Connection Sequence
This sequence diagram illustrates the basic steps a GlobalProtect app takes to connect, from portal configuration retrieval to tunnel establishment with a gateway.
This sequence diagram shows the basic interaction when a GlobalProtect endpoint connects to the portal and then a gateway.
Agent Configuration Selection Flow
This diagram shows how the GlobalProtect portal determines which agent configuration to deliver to a connecting app.
Note: The diagram simplifies the process; fallback logic and specific check details are described in the text.
GlobalProtect Portal & Agent Quiz
Test your knowledge on GlobalProtect Portals and Agent Configurations.