About the GlobalProtect Components
GlobalProtect provides a complete infrastructure for managing your mobile workforce to enable secure access for all your users, regardless of what endpoints they are using or where they are located. This infrastructure includes the following components:
GlobalProtect Portal
The GlobalProtect portal provides the management functions for your GlobalProtect infrastructure. Every endpoint that participates in the GlobalProtect network receives configuration information from the portal, including information about available gateways as well as any client certificates that may be required to connect to the GlobalProtect gateway. In addition, the portal controls the behavior and distribution of the GlobalProtect app software to both macOS and Windows endpoints. On mobile endpoints, the GlobalProtect app is distributed through the Apple App Store for iOS endpoints, Google Play for Android endpoints and Chromebooks, and the Microsoft Store for Windows 10 UWP endpoints.
If you're using the Host Information Profile (HIP) feature, the portal also defines what information to collect from the host, including any custom information you require.
You can Set Up Access to the GlobalProtect Portal on an interface on any Palo Alto Networks Next-Generation Firewall.
GlobalProtect Gateways
GlobalProtect gateways provide security enforcement for traffic from GlobalProtect apps. Additionally, if the HIP feature is enabled, the gateway generates a HIP report from the raw host data the apps submit and can use this information in policy enforcement.
You can configure different Types of Gateways to provide security enforcement and virtual private network (VPN) access for your remote users, or to apply security policy for access to internal resources.
You can Configure a GlobalProtect Gateway on an interface on any Palo Alto Networks Next-Generation Firewall. You can run both a gateway and a portal on the same firewall, or you can have multiple distributed gateways throughout your enterprise.
GlobalProtect App
The GlobalProtect app software runs on endpoints and enables access to your network resources through the GlobalProtect portals and gateways that you have deployed.
The GlobalProtect app for Windows and macOS endpoints is deployed from the GlobalProtect portal. You can configure the behavior of the app—for example, which tabs the users can see—in the client configurations that you define on the portal. See Define the GlobalProtect Agent Configurations, Customize the GlobalProtect App, and Deploy the GlobalProtect App Software for details.
The GlobalProtect app for mobile endpoints (iOS, Android, and Windows UWP) is available through the official store for the endpoint—the Apple App Store for iOS, Google Play for Android, and the Microsoft Store for Windows UWP. You can alternatively deploy the GlobalProtect Mobile App Using Workspace ONE or other supported third-party mobile endpoint management systems.
See What OS Versions are Supported with GlobalProtect? for more details.
The following diagram illustrates how the GlobalProtect portals, gateways, and apps work together to enable secure access for all your users, regardless of what endpoints they are using or where they are located.
graph TD
    A[Endpoint
(GlobalProtect App)] --> B(GlobalProtect Portal);
    B --> C[Configuration Info
(Gateways, Certificates, HIP)];
    C --> A;
    A --> D(GlobalProtect Gateway);
    D --> E[Security Enforcement
VPN Tunnel
HIP Report];
    E --> A;
    D --> F[Internal/External Network Resources];
    A -- Secured Traffic --> D;
    D -- Policy Enforcement --> F;
    F --> D;
GlobalProtect app features operate as intended only when the integrity of the endpoints and end users is intact. If malicious end users or malware compromise these elements, they may undermine the proper functioning of these features.
About GlobalProtect Licenses
If you want to use GlobalProtect to provide a secure remote access or VPN solution via single or multiple internal/external gateways, you don't need any GlobalProtect licenses. However, to use some of the more advanced features (such as HIP checks and associated content updates, support for the GlobalProtect mobile app, or IPv6 support) you must purchase an annual GlobalProtect Gateway license.
This license must be installed on each firewall running a gateway that:
- Performs HIP checks
- Supports the GlobalProtect app for mobile endpoints
- Supports the GlobalProtect app for Linux endpoints
- Supports the GlobalProtect app for IoT endpoints
- Provides IPv6 connections
- Split tunnels traffic based on the destination domain, application process name, or HTTP/HTTPS video streaming application
- Supports adding a compromised device to the quarantine list.
- Supports identification of managed devices using the endpoint's serial number on gateways
- Enforces GlobalProtect connections with FQDN exclusions
For GlobalProtect Clientless VPN, you must also install a GlobalProtect gateway license on the firewall that hosts the Clientless VPN from the GlobalProtect portal. You also need the GlobalProtect Clientless VPN dynamic updates to use this feature.
Similarly, for any firewall or GlobalProtect gateway which is acting as HIP redistribution agent or client and collector requires a GlobalProtect Gateway license. The only exception is Panorama.
| Feature | Gateway License Required? |
|---|---|
| Single external gateway (Windows and macOS) | — |
| Single or multiple internal gateways | — |
| Multiple external gateways | — |
| Internet of things (IoT) devices |

|
| HIP Checks |
|
| Identification of managed devices using the endpoint serial number on gateways |
|
| HIP-based policy enforcement based on the endpoint status |
|
| App for endpoints running Windows and macOS | — |
| Mobile app for endpoints running iOS, Android, Chrome OS, and Windows 10 UWP |
|
| App for endpoints running Linux |
|
| App for endpoints running IoT |
|
| IPv6 for external gateways |
|
| IPv6 for internal gateways (change to default behavior—starting with GlobalProtect app 4.1.3, a GlobalProtect subscription isn't required for this use case) | — |
| Clientless VPN (Not supported on multi-VSYS firewalls if the traffic must traverse multiple virtual systems) |
|
| Split tunneling based on destination domain, client process, and video streaming application |
|
| Split DNS |
|
| Adding a compromised device to the quarantine list |
|
| GlobalProtect App Log Collection for Troubleshooting (Panorama appliance running 9.0 or later and PAN-OS 8.1 or later) |
|
| Enforces GlobalProtect connections with FQDN exclusions |
|
| Redistribute HIP Reports |
|
| DHCP Based IP Address Assignment and Management for GlobalProtect |
|
See Activate Licenses for information on installing licenses on the firewall.
Get Started with GlobalProtect Infrastructure Setup
In order for GlobalProtect™ to run, you must set up the infrastructure that allows all components to communicate. At a basic level, this means setting up the interfaces and zones to which the GlobalProtect end users connect to access the portal and the gateways to the network. Because the GlobalProtect components communicate over secure channels, you must acquire and deploy the required SSL certificates to the various components. The following sections guide you through the GlobalProtect infrastructure setup:
Create Interfaces and Zones for GlobalProtect
You must configure the following interfaces and zones for your GlobalProtect infrastructure:
- GlobalProtect portal —Requires a Layer 3 or loopback interface for the GlobalProtect apps’ connection. If the portal and gateway are on the same firewall, they can use the same interface. The portal must be in a zone that is accessible from outside your network, such as a DMZ.
- GlobalProtect gateways —The interface and zone requirements for the gateway depend on whether the gateway you're configuring is external or internal, as follows:
- External gateways —Requires a Layer 3 or loopback interface and a logical tunnel interface for the app to establish a connection. The Layer 3/loopback interface must be in an external zone, such as a DMZ. A tunnel interface can be in the same zone as the interface connecting to your internal resources (for example, trust ). For added security and better visibility, you can create a separate zone, such as corp-vpn . If you create a separate zone for your tunnel interface, you must create security policies that enable traffic to flow between the VPN zone and the trust zone.
- Internal gateways —Requires a Layer 3 or loopback interface in your trust zone. You can also create a tunnel interface for access to your internal gateways, but this isn't required.
For tips on how to use a loopback interface to provide access to GlobalProtect on different ports and addresses, refer to Can GlobalProtect Portal Page be Configured to be Accessed on any Port?
For more information about portals and gateways, see About the GlobalProtect Components.
- Configure a Layer 3 interface for each portal and/or gateway you plan to deploy.
If the gateway and portal are on the same firewall, you can use a single interface for both.
As a best practice, use static IP addresses for the portal and gateway.
Don't attach an interface management profile that allows HTTP, HTTPS, Telnet, or SSH on the interface where you have configured a GlobalProtect portal or gateway because this enables access to your management interface from the internet. Follow the Adminstrative Access Best Practices to ensure that you're securing administrative access to your firewalls in a way that will prevent successful attacks.
- Select Network > Interfaces > Ethernet or Network > Interfaces > Loopback , and then select the interface you want to configure for GlobalProtect. In this example, we are configuring ethernet1/1 as the portal interface.
- ( Ethernet only ) Set the Interface Type to Layer3 .
- On the Config tab, select the Security Zone to which the portal or gateway interface belongs, as follows:
- Place portals and external gateways in an untrust zone for access by hosts outside your network, such as l3-untrust .
- Place internal gateways in an internal zone, such as l3-trust .
- If you have not yet created the zone, add a New Zone . In the Zone dialog, define a Name for the new zone and then click OK .
- Select the default Virtual Router .
- Assign an IP address to the interface:
- For an IPv4 address, select IPv4 and Add the IP address and network mask to assign to the interface, for example 203.0.11.100/24 .
- For an IPv6 address, select IPv6 , Enable IPv6 on the interface , and Add the IP address and network mask to assign to the interface, for example 2001:1890:12f2:11::10.1.8.160/80 .
- Click OK to save the interface configuration.
- On the firewall(s) hosting GlobalProtect gateway(s), configure the logical tunnel interface that will terminate VPN tunnels established by the GlobalProtect apps.
IP addresses are not required on the tunnel interface unless you require dynamic routing. In addition, assigning an IP address to the tunnel interface can be useful for troubleshooting connectivity issues.
Be sure you enable User-ID in the zone where the VPN tunnels terminate.
- Select Network > Interfaces > Tunnel , and Add a tunnel interface.
- In the Interface Name field, enter a numeric suffix, such as .2 .
- On the Config tab, select the Security Zone for VPN tunnel termination, as follows:
- To use your trust zone as the termination point for the tunnel, select the zone from the drop-down.
- ( Recommended ) To create a separate zone for VPN tunnel termination, add a New Zone . In the Zone dialog, define a Name for new zone (for example, corp-vpn ), Enable User Identification , and then click OK .
- Set the Virtual Router to None .
- Assign an IP address to the interface:
- For an IPv4 address, select IPv4 and Add the IP address and network mask to assign to the interface, for example 203.0.11.100/24 .
- For an IPv6 address, select IPv6 , Enable IPv6 on the interface , and Add the IP address and network mask to assign to the interface, for example 2001:1890:12f2:11::10.1.8.160/80 .
- Click OK to save the interface configuration.
- If you created a separate zone for tunnel termination of VPN connections, create a security policy to enable traffic flow between the VPN zone and your trust zone.
For example, the following policy rule enables traffic between the corp-vpn zone and the l3-trust zone.
 Figure: Example Security Policy Rule for VPN traffic between zones
- Commit the configuration.
Enable SSL Between GlobalProtect Components
All interaction between the GlobalProtect components occurs over an SSL/TLS connection. Therefore, you must generate and install the required certificates before configuring each component so that you can reference the appropriate certificate in the configurations. The following sections describe the supported methods of certificate deployment, descriptions and best practice guidelines for the various GlobalProtect certificates, and provide instructions for generating and deploying the required certificates:
About GlobalProtect Certificate Deployment
There are three basic approaches to Deploy Server Certificates to the GlobalProtect Components:
- ( Recommended ) Combination of third-party certificates and self-signed certificates —Because the GlobalProtect app will be accessing the portal prior to GlobalProtect configuration, the app must trust the certificate to establish an HTTPS connection.
- Enterprise CA —If you already have your own enterprise CA, you can use this internal CA to issue certificates for each of the GlobalProtect components and then import them onto the firewalls hosting your portal and gateway. In this case, you must also ensure that the endpoints trust the root CA certificate used to issue the certificates for the GlobalProtect services to which they must connect.
- Self-Signed Certificates —You can generate a self-signed CA certificate on the portal and use it to issue certificates for all the GlobalProtect components. However, this solution is not recommended since it's less secure than the other options. If you do choose this option, end users will see a certificate error the first time they connect to the portal. To prevent this, you can deploy the self-signed root CA certificate to all endpoints manually or using some sort of centralized deployment, such as an Active Directory Group Policy Object (GPO).
GlobalProtect Certificate Best Practices
The GlobalProtect components must have valid certificates to establish connection using SSL/TLS. The connection fails if you have invalid or expired certificates.
The following table summarizes the SSL/TLS certificates you will need, depending on which features you plan to use:
| Certificate | Usage | Issuing Process and Best Practices |
|---|---|---|
| CA certificate | Used to sign certificates issued to the GlobalProtect components. | If you plan on using self-signed certificates, generate a CA certificate using your dedicated CA server or Palo Alto Networks firewall, and then issue GlobalProtect portal and gateway certificates signed by the CA or an intermediate CA. |
| Portal server certificate | Enables GlobalProtect apps to establish an HTTPS connection with the portal. |
|
| Gateway server certificate | Enables GlobalProtect apps to establish an HTTPS connection with the gateway. |
|
| ( Optional ) Client certificate | Used to enable mutual authentication when establishing an HTTPS session between the GlobalProtect apps and the gateways and portal. This ensures that only endpoints with valid client certificates are able to authenticate and connect to the network. |
|
| ( Optional ) Machine certificates |
A machine certificate is a client certificate that is issued to an endpoint that resides in the local machine store or system keychain. Each machine certificate identifies the endpoint in the subject field (for example, CN=laptop1.example.com) instead of the user. The certificate ensures that only trusted endpoints can connect to gateways or the portal.
Machine certificates are required for users configured with the pre-logon connect method. |
For more information, see Remote Access VPN with Pre-Logon . |
Deploy Server Certificates to the GlobalProtect Components
The GlobalProtect components must have valid certificates to establish connection using SSL/TLS. The connection fails if you have invalid or expired certificates.
The following are the best practice steps for deploying SSL/TLS certificates to the GlobalProtect components:
Import a Server Certificate from a Well-known, Third-party CA
Use a server certificate from a well-known, third-party CA for the GlobalProtect portal. This practice ensures that the end users are able to establish an HTTPS connection without seeing warnings about untrusted certificates.
The CN and, if applicable, the SAN fields of the certificate must match the FQDN or IP address of the interface where you plan to configure the portal or the device check-in interface on a third-party mobile endpoint management system. Wildcard matches are supported.
Before you import a certificate, make sure the certificate and key files are accessible from your management system and that you have the passphrase to decrypt the private key.
- Select Device > Certificate Management > Certificates > Device Certificates and Import a new certificate.
- Use the Local certificate type (default).
- Enter a Certificate Name .
- Enter the path and name to the Certificate File received from the CA, or Browse to find the file.
- Set the File Format to Encrypted Private Key and Certificate (PKCS12) .
- Enter the path and name to the PKCS#12 file in the Key File field or Browse to find it.
- Enter and reenter the Passphrase that was used to encrypt the private key.
- Click OK to import the certificate and key.
Create Root CA Certificate for Issuing Self-signed Certificates for GlobalProtect Components
Create the root CA certificate on the portal and use it to issue server certificates for the gateways and, optionally, for clients.
Before deploying self-signed certificates, you must create the root CA certificate that signs the certificates for the GlobalProtect components:
- Select Device > Certificate Management > Certificates > Device Certificates and Generate a new certificate.
- Use the Local certificate type (default).
- Enter a Certificate Name , such as GlobalProtect_CA . The certificate name can't contain spaces.
- Don't select a value in the Signed By field. Without a selection for Signed By , the certificate is self-signed.
- Enable the Certificate Authority option.
- Click OK to generate the certificate.
Use Root CA on the Portal to Generate a Self-signed Server Certificate
Generate server certificates for each gateway you plan to deploy and optionally for the management interface of the third-party mobile endpoint management system (if this interface is where the gateways retrieve HIP reports).
In the gateway server certificates, the values in the CN and SAN fields must be identical. If the values differ, the GlobalProtect agent detects the mismatch and does not trust the certificate. Self-signed certificates contain a SAN field only if you add a Host Name attribute.
Alternatively, you can use the Simple Certificate Enrollment Protocol (SCEP) to request a server certificate from your enterprise CA.
- Select Device > Certificate Management > Certificates > Device Certificates and Generate a new certificate.
- Use the Local certificate type (default).
- Enter a Certificate Name . This name can't contain spaces.
- In the Common Name field, enter the FQDN ( recommended ) or IP address of the interface where you plan to configure the gateway.
- In the Signed By field, select the GlobalProtect_CA you created.
- In the Certificate Attributes area, Add and define the attributes that uniquely identify the gateway. Keep in mind that if you add a Host Name attribute (which populates the SAN field of the certificate), it must be the same as the value you defined for the Common Name .
- Configure cryptographic settings for the server certificate, including the encryption Algorithm , key length ( Number of Bits ), Digest algorithm, and Expiration (days).
- Click OK to generate the certificate.
Use Simple Certificate Enrollment Protocol (SCEP) to Request a Server Certificate from Your Enterprise CA
Configure separate SCEP profiles for each portal and gateway you plan to deploy. Then use the specific SCEP profile to generate the server certificate for each GlobalProtect component.
In portal and gateway server certificates, the value of the CN field must include the FQDN ( recommended ) or IP address of the interface where you plan to configure the portal or gateway and must be identical to the SAN field.
To comply with the U.S. Federal Information Processing Standard (FIPS), you must also enable mutual SSL authentication between the SCEP server and the GlobalProtect portal. (FIPS-CC operation is indicated on the firewall login page and in its status bar.)
After you commit the configuration, the portal attempts to request a CA certificate using the settings in the SCEP profile. If successful, the firewall hosting the portal saves the CA certificate and displays it in the list of Device Certificates .
- Configure a SCEP Profile for each GlobalProtect portal or gateway:
- Enter a Name that identifies the SCEP profile and the component to which you deploy the server certificate. If this profile is for a firewall with multiple virtual systems capability, select a virtual system or Shared as the Location where the profile is available.
- ( Optional ) Configure a SCEP Challenge , which is a response mechanism between the PKI and portal for each certificate request. Use either a Fixed challenge password that you obtain from the SCEP server or a Dynamic password where the portal-client submits a username and OTP of your choice to the SCEP Server. For a Dynamic SCEP challenge, this can be the credentials of the PKI administrator.
- Configure the Server URL that the portal uses to reach the SCEP server in the PKI (for example, http://10.200.101.1/certsrv/mscep/ ).
- Enter a string (up to 255 characters in length) in the CA-IDENT Name field to identify the SCEP server.
- Enter the Subject name to use in the certificates generated by the SCEP server. The subject must be a distinguished name in the <attribute>=<value> format and must include a common name (CN) attribute ( CN=<variable> ). The CN supports the following dynamic tokens:
- $USERNAME —Use this token to enable the portal to request certificates for a specific user. To use this variable, you must also Enable Group Mapping. The username entered by the user must match the name in the user-group mapping table.
- $EMAILADDRESS —Use this token to request certificates associated with a specific email address. To use this variable, you must also Enable Group Mapping and configure the Mail Attributes in the Mail Domains area of the server profile. If GlobalProtect cannot identify an email address for the user, it generates a unique ID and populates the CN with that value.
- $HOSTID —To request certificates for the endpoint only, specify the host ID token. When a user attempts to log in to the portal, the endpoint sends identifying information that includes its host ID value.
- Select the Subject Alternative Name Type :
- RFC 822 Name —Enter the email name in a certificate’s subject or Subject Alternative Name extension.
- DNS Name —Enter the DNS name used to evaluate certificates.
- Uniform Resource Identifier —Enter the name of the resource from which the app will obtain the certificate.
- None —Do not specify attributes for the certificate.
- Configure additional cryptographic settings, including the key length ( Number of Bits ), and the Digest algorithm for the certificate signing request.
- Configure the permitted uses of the certificate, either for signing ( Use as digital signature ) or encryption ( Use for key encipherment ).
- To ensure that the portal is connecting to the correct SCEP server, enter the CA Certificate Fingerprint . Obtain this fingerprint from the Thumbprint field of the SCEP server interface.
- Enable mutual SSL authentication between the SCEP server and the GlobalProtect portal.
- Click OK and then Commit the configuration.
- Select Device > Certificate Management > Certificates > Device Certificates and then click Generate .
- Enter a Certificate Name . This name can't contain spaces.
- Select the SCEP Profile to use to automate the process of issuing a server certificate that is signed by the enterprise CA to a portal or gateway, and then click OK to generate the certificate. The GlobalProtect portal uses the settings in the SCEP profile to submit a CSR to your enterprise PKI.
Assign Server Certificate You Imported or Generated to a SSL/TLS Service Profile
| Where Can I Use This? | What Do I Need? |
|---|---|
| GlobalProtect™ Subscription |
For
TLSv1.3
:
|
GlobalProtect supports SSL/TLS service profiles with a maximum TLS version as TLSv1.3. You can create SSL/TLS service profiles on the firewall that is hosting the portal or gateway by specifying the range of supported SSL/TLS versions (from minimum supported version to maximum supported version) for communication between GlobalProtect components.
Configure SSL/TLS service profiles with TLSv1.3 to provide enhanced security and faster TLS handshake while establishing connection between GlobalProtect components. TLSv1.3 is the maximum version supported and, when used, delivers increased security by removing the weak ciphers supported in the earlier TLS versions and adding more secure cipher suites.
- To enable SSL connection between GlobalProtect components, you need to generate or import a certificate.
- On the firewall that is hosting the GlobalProtect portal and gateway, select Device > Certificate Management > SSL/TLS Service Profile and Add a new SSL/TLS service profile.
- Specify a Name for the new profile.
- Select the Certificate you imported.
- In Protocol Settings, define the range of SSL/TLS versions ( Min Version to Max Version ) for communication between GlobalProtect components. The maximum supported TLS version is TLSv1.3.
To provide the strongest security, set both the Min Version and the Max Version as TLSv1.3.
The Encryption Algorithms and Authentication Algorithms are populated automatically from the available ciphers based on your TLS protocol settings.
The TLSv1.3 aes-chacha20-poly1305 cipher isn't enabled by default on devices running Windows 11. You must manually enable the cipher on GlobalProtect endpoints running Windows 11.
- Optional Modify the ciphers in the Encryption Algorithms and Authentication Algorithms section as needed.
 Figure: Example configuration of an SSL/TLS Service Profile
- Click OK and Commit your changes.
Deploy the Self-Signed Server Certificates
- Export the self-signed server certificates issued by the root CA on the portal and import them onto the gateways.
- Be sure to issue a unique server certificate for each gateway.
- If specifying self-signed certificates, you must distribute the root CA certificate to the end clients in the portal client configurations.
- Export the certificate from the portal:
- Select Device > Certificate Management > Certificates > Device Certificates .
- Select the gateway certificate you want to deploy, and then click Export Certificate .
- Set the File Format to Encrypted Private Key and Certificate (PKCS12) .
- Enter and confirm a Passphrase to encrypt the private key.
- Click OK to download the PKCS12 file to a location of your choice.
- Import the certificate on the gateway:
- Select Device > Certificate Management > Certificates > Device Certificates and Import the certificate.
- Enter a Certificate Name .
- Browse to find and select the Certificate File you downloaded in the previous step.
- Set the File Format to Encrypted Private Key and Certificate (PKCS12) .
- Enter and confirm the Passphrase you used to encrypt the private key when you exported it from the portal.
- Click OK to import the certificate and key.
- Commit the changes for the gateway.
Replace an Expired GlobalProtect Portal or Gateway Certificate
If your GlobalProtect portal or gateway certificate has expired or is about to expire, you have several options to replace it.
For Prisma Access deployments, the portal and gateway certificates and their renewals are managed automatically as part of the infrastructure, so you don't have to do anything to replace an expired certificate.
If you're using third-party certificates for your portal or gateway, you will need to manage and renew your certificates when they expire.
If the firewall is the certificate authority (CA) that issued the certificate for your portal and gateways, the firewall replaces the expired certificate with a new certificate that has the same attributes as the old certificate but with a different serial number. From the web interface that is hosting the portal or gateway, Renew the Certificate , and commit the changes to push the certificate to the portal or the gateway.
For on-premises deployments that use third party CA-issued SSL certificates, you must import the renewed certificate that you downloaded from your CA using the following procedure:
- Note the name and expiration date of the portal or gateway certificate.
- From the firewall that is hosting the gateway or portal with the expiring certificate, log on to the web interface.
- Select Device > Certificate Management > Certificates .
- Locate the certificate in the Device Certificates tab and note the name of the certificate and expiration date.
 Figure: Device Certificates list showing certificate details
- Download the renewed certificate from your third-party CA. As an example, the following steps show how to download the renewed certificate from GoDaddy:
- Log in to the godaddy.com portal.
- Go to the Certificates tab.
- Select the certificate and click Download .
 Figure: Downloading a certificate from GoDaddy
- In the Download Certificate window, for Server type , select Other and download the certificate in .crt format.
The certificate is saved to your downloads folder.
- Import the downloaded certificate on the firewall that is hosting your portal or gateway.
If you deployed two firewalls in an HA pair in an active/passive deployment, you must import the certificate on each firewall.
- From the web interface, go to Device > Certificate Management > Certificates > Device Certificates > Import .
- Enter the exact Certificate Name for the portal or gateway certificate that you're replacing.
- For the Certificate File , browse to and select the certificate that you downloaded from the CA.
- For the File Format , select Base64 Encoded Certificate (PEM) .
 Figure: Importing a certificate using the web interface
- Click OK .
After the certificate has been imported, you will see the new expiration date for the certificate.
- Commit your changes to push the certificate to the portal or gateway.
Deploy the GlobalProtect App to End Users
To connect to GlobalProtect™, an endpoint must be running the GlobalProtect app. Use the GlobalProtect app compatibility matrix to determine what version of the GlobalProtect app you want your users to run on their endpoints.
Because the version that an end user must download and install to enable successful connectivity to your network depends on your environment, there is no direct download link for the GlobalProtect app on the Palo Alto Networks site.
The app deployment method depends on the type of endpoint as follows:
| Platform | Deployment Options |
|---|---|
| macOS and Windows endpoints |
There are several options you can use to distribute and install the software on macOS and Windows endpoints:
|
| Windows 10 phone and Windows 10 UWP |
|
| iOS and Android endpoints |
Starting with GlobalProtect app 5.0, the GlobalProtect app for Chrome OS is not supported; use the GlobalProtect app for Android instead. |
| Chromebooks |
The GlobalProtect app for Android is supported only on certain Chromebooks . Chromebooks that do not support Android applications must continue to run the GlobalProtect app for Chrome, which is not supported starting with GlobalProtect app 5.0 and later.
|
| Linux |
After you download the GlobalProtect app for Linux from the Support Site , you can distribute and install the app:
|
As an alternative to deploying the GlobalProtect app software, you can configure the GlobalProtect portal to provide secure remote access to common enterprise web applications that use HTML, HTML5, and Javascript technologies. Users have the advantage of secure access from SSL-enabled web browsers without installing the GlobalProtect app software. Refer to GlobalProtect Clientless VPN.
GlobalProtect App Minimum Hardware Requirements
The GlobalProtect app runs on a variety of operating systems. To determine the minimum GlobalProtect app version required for a specific operating system, refer to the Compatibility Matrix . The hardware requirements for each endpoint OS are detailed in the following sections:
- Minimum Hardware Requirements for GlobalProtect App on Windows
- Minimum Hardware Requirements for GlobalProtect App on macOS
- Minimum Hardware Requirements for GlobalProtect App on Linux
Minimum Hardware Requirements for GlobalProtect App on Windows
You can install the GlobalProtect app on Windows endpoints that meet the following hardware requirements:
| Requirement | Specification |
|---|---|
| Processor |
|
| RAM | 2GB minimum |
| Hard disk space | 200 MB minimum (for log storage) |
Minimum Hardware Requirements for GlobalProtect App on macOS
You can install the GlobalProtect app on macOS endpoints that meet the following hardware requirements:
| Requirement | Specification |
|---|---|
| Processor |
|
| RAM | 512 MB minimum; 2 GB recommended |
| Hard disk space | 200 MB minimum (for log storage) |
Minimum Hardware Requirements for GlobalProtect App on Linux
You can install the GlobalProtect app on Linux endpoints that meet the following hardware requirements:
Support for Linux endpoints also requires a GlobalProtect Gateway License.
| Requirement | Specification |
|---|---|
| Processor | x86 instruction set with 64-bit processor |
| RAM | 256 MB minimum |
| Hard disk space | 100 MB minimum |
Download the GlobalProtect App Software Package for Hosting on the Portal
Palo Alto Networks does not provide a direct download link for the GlobalProtect app for end users. To successfully connect to your network, end users must be running an app version that is compatible with your environment .
If you are an end user, please contact your IT Administrator for the latest supported GlobalProtect software.
Before you can deploy the GlobalProtect app for your end users, you must upload the new app installation package to the firewall that is hosting your portal, and then activate the software for download to the apps connecting to the portal. This deployment method is available for all non-mobile app versions. To download the mobile version of the GlobalProtect app see the app store for your mobile device.
To download the latest app directly to the firewall, the firewall must have a service route that enables it to access the Palo Alto Networks Update Server. If the firewall does not have internet access, you can download the app software package from the Palo Alto Networks Software Updates support site using an internet-connected computer, and then manually upload it to the firewall.
To manually download the app software package:
- Log in to the Palo Alto Networks Customer Support Portal ( https://support.paloaltonetworks.com/ ).
You must have a valid Palo Alto Networks Customer Support Portal account to log in to and download software from the Software Updates page.
- Select Updates > Software Updates .
- Select the GlobalProtect app version by operating system.
- Review the Release Notes for the app version, and then select the download link to proceed with the download.
- Proceed to Deploy the GlobalProtect App to End Users (referencing the Deployment Methods section).
See the Palo Alto Networks Compatibility Matrix for the operating systems on which you can install each release of the GlobalProtect app.
Host App Updates on the Portal
The simplest way to deploy the GlobalProtect app software is to download the new app installation package to the firewall that is hosting your portal, and then activate the software for download to the apps connecting to the portal.
To do this automatically, the firewall must have a service route that enables it to access the Palo Alto Networks Update Server.
If the firewall does not have internet access, you must manually download the software image from the Palo Alto Networks Software Updates support site using an internet-connected computer, and then manually upload it to the firewall.
You define how the app software updates are deployed in the portal agent configurations—whether they occur automatically when the app connects to the portal, whether the user is prompted to upgrade the app, or whether the end user can manually check for and download a new app version. For details on creating an agent configuration, see Define the GlobalProtect Agent Configurations.
- On the firewall hosting the GlobalProtect portal, check for new app software images.
Select Device > GlobalProtect Client to view the list of available app software images.
- If the firewall has access to the Update Server, click Check Now for the latest updates. If the value in the Action column is Download , it indicates that a new version of the app is available.
- If the firewall does not have internet access, manually download the package (as described previously). After you download the software image, go back to the Device > GlobalProtect Client page of the firewall to Upload it.
- Download the app software image.
- If the firewall has access to the Update Server, locate the app version you want, and then click Download . When the download completes, the value in the Action column changes to Activate .
- If the firewall does not have internet access, manually download the package (as described previously). After you download the software image, go back to the Device > GlobalProtect Client page of the firewall to Upload it.
- Activate the app software image so that end users can download it from the portal.
Only one version of the app software image can be activated at a time. If you activate a new version, but have some apps that require a previously activated version, you must activate the required version again to enable it for download.
- If the software image was automatically downloaded from the Update Server, click Activate .
- If you manually uploaded the software image to the firewall, click Activate From File , and then select the GlobalProtect Client File you uploaded from the drop-down. Click OK to activate the selected image. You may need to refresh the page before the version displays as Currently Activated .
Host App Updates on a Web Server
If a large number of your endpoints must install and/or update the GlobalProtect app software, consider hosting the GlobalProtect app software images on an external web server. This helps reduce the load on the firewall when users connect to and download the app.
- Download and activate the version of the GlobalProtect app that you plan to host on the web server to the firewall.
Follow the steps for downloading and activating the app software on the firewall, as described in Host App Updates on the Portal.
- Download the GlobalProtect app software image that you want to host on your web server.
Download the same image that you activated on the portal.
From a web browser, manually download the GlobalProtect App Software Package for Hosting on the Portal.
- Publish the software image files to your web server.
- Redirect end users to the web server.
On the firewall hosting the portal, enter the following CLI commands in operational mode:
> set global-protect redirect on
> set global-protect redirect location <path>
where <path> is the URL to the folder hosting the image (for example, https://acme/GP ).
- Test the redirect.
- From a web browser, go to the following URL:
https://<portal address or name>
For example, https://gp.acme.com .
- On the portal login page, enter your user Name and Password , and then click LOGIN . After successful login, the portal should redirect you to the download.
Test the App Installation
Use the following procedure to test the GlobalProtect app installation.
- Create an agent configuration for testing the app installation.
When initially installing the GlobalProtect app software on the endpoint, the end user must be logged in to the system using an account that has administrative privileges. Subsequent app software updates do not require administrative privileges.
As a best practice, create an agent configuration that is limited to a small group of users, such as administrators in the IT department responsible for administering the firewall:
- Select Network > GlobalProtect > Portals .
- Select an existing portal configuration that you want to modify or Add a new one.
- On the Agent tab, select an existing configuration or Add a new one to deploy to the test users/group.
- On the User/User Group tab, Add the User/User Group who will be testing the app.
- On the App tab, set Allow User to Upgrade GlobalProtect App to Allow with Prompt . Click OK to save the configuration.
- ( Optional ) On the Agent tab, select the agent configuration that you just created or modified, and then click Move Up so that it is higher on the list than the more generic configurations you have created.
When a GlobalProtect app connects, the portal compares the source information in the packet against the agent configurations you have defined. As with security rule evaluation, the portal looks for a match starting from the top of the list. When it finds a match, it delivers the corresponding configuration to the app.
- Commit the changes.
- Log in to the GlobalProtect portal.
- Launch your web browser and go to the following URL:
https://<portal address or name>
For example, https://gp.acme.com .
- On the portal login page, enter your user Name and Password , and then click LOG IN .
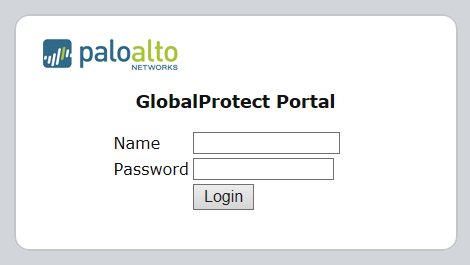 Figure: GlobalProtect Portal Login Screen
- Navigate to the app download page.
In most cases, the app download page appears immediately after you log in to the portal. Use this page to download the latest app software package.
If you have enabled GlobalProtect Clientless VPN access, the applications page opens after you log in to the portal (instead of the agent download page) when you log in to the portal. Select GlobalProtect Agent to open the download page.
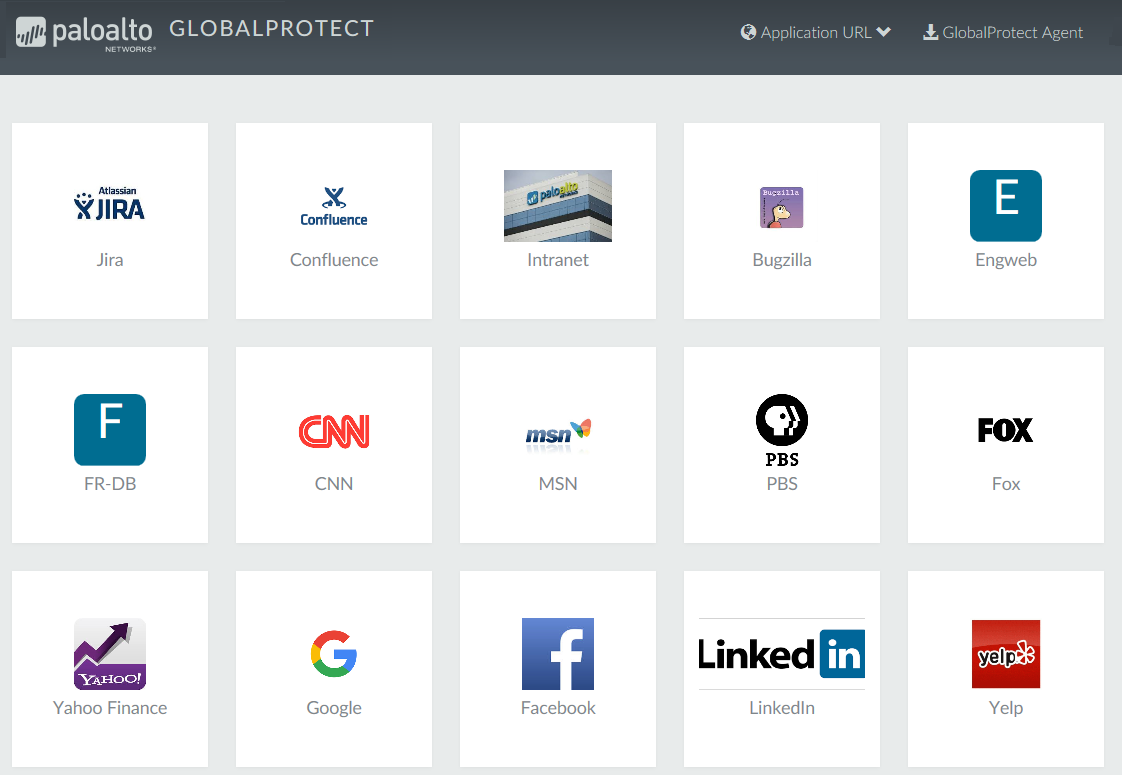 Figure: GlobalProtect Applications Page showing the option to download the agent
- Download the app.
- To begin the download, click the link that corresponds to the operating system running on your computer.
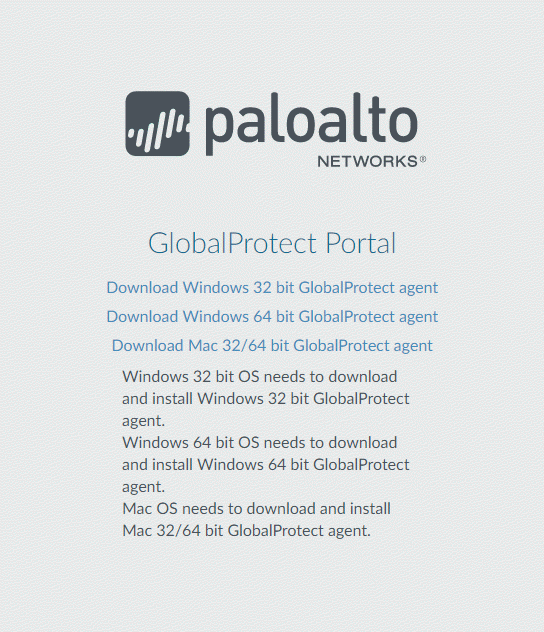 Figure: GlobalProtect Agent Download Page showing platform options
- Open the software installation file.
- When prompted to run or save the software, click Run .
- When prompted, click Run to launch the GlobalProtect Setup Wizard.
When initially installing the GlobalProtect app software on the endpoint, the end user must be logged in to the system using an account that has administrative privileges. Subsequent app software updates do not require administrative privileges.
- Complete the GlobalProtect app setup.
- From the GlobalProtect Setup Wizard, click Next .
- Click Next to accept the default installation folder ( C:\Program Files\Palo Alto Networks\GlobalProtect ) and then click Next twice.
Although you can Browse to select a different location in which to install the GlobalProtect app, the best practice is to install it in the default location. The default installation location is read-only for non-privileged users and therefore installing to this location protects against malicious access to the app.
- After the installation is complete, Close the wizard.
- Log in to GlobalProtect.
- Launch the GlobalProtect app by clicking the system tray icon. The status panel opens.
- Enter the FQDN or IP address of the portal, and then click Connect .
- ( Optional ) By default, you are automatically connected to the Best Available gateway, based on the configuration that the administrator defines and the response times of the available gateways. To connect to a different gateway, select the gateway from the Gateway drop-down (for external gateways only).
This option is only available if you enable manual gateway selection.
- ( Optional ) Depending on the connection mode, click Connect to initiate the connection.
- ( Optional ) If prompted, enter your Username and Password , and then click Sign In .
If authentication is successful, you are connected to your corporate network, and the status panel displays the Connected or Connected - Internal status. If you set up a GlobalProtect welcome page, it displays after you log in successfully.
Download and Install the GlobalProtect Mobile App
The GlobalProtect app provides a simple way to extend the enterprise security policies out to mobile endpoints. As with other remote endpoints running the GlobalProtect app, the mobile app provides secure access to your corporate network over an IPsec or SSL VPN tunnel. The app automatically connects to the gateway that is closest to the end user’s current location. In addition, traffic to and from the endpoint is automatically subject to the same security policy enforcement as other hosts on your corporate network. The mobile app also collects information about the host configuration and can use this information for enhanced HIP-based security policy enforcement.
There are two primary methods for installing the GlobalProtect app: You can deploy the app from your third-party MDM and transparently push the app to your managed endpoints; or, you can install the app directly from the official store for your endpoint:
- iOS endpoints— App Store
- Android endpoints and Chromebooks— Google Play
- Windows 10 phones and Windows 10 UWP endpoints— Microsoft Store
Starting with GlobalProtect app 5.0, the GlobalProtect app for Chrome OS is not supported; use the GlobalProtect app for Android instead.
This workflow describes how to install the GlobalProtect app directly on the mobile endpoint.
- Create an agent configuration for testing the app installation.
As a best practice, create an agent configuration that is limited to a small group of users, such as administrators in the IT department responsible for administering the firewall:
- Select Network > GlobalProtect > Portals .
- Select an existing portal configuration to modify or Add a new one.
- On the Agent tab, either select an existing configuration or Add a new configuration to deploy to the test users/group.
- On the User/User Group tab, Add the User/User Group who will be testing the app.
- Select the OS for the app you are testing ( iOS , Android , or WindowsUWP ).
- ( Optional ) Select the agent configuration that you just created/modified, and then click Move Up so that it is higher on the list than the more generic configurations you have created.
- Commit the changes.
- From the endpoint, follow the prompts to download and install the app.
- On Android endpoints, search for the app on Google Play.
- On iOS endpoints, search for the app at the App Store.
- On Windows 10 UWP endpoints, search for the app at the Microsoft Store.
- Launch the app.
When successfully installed, the GlobalProtect app icon displays on the endpoint’s Home screen. To launch the app, tap the icon. When prompted to enable GlobalProtect VPN functionality, tap OK .
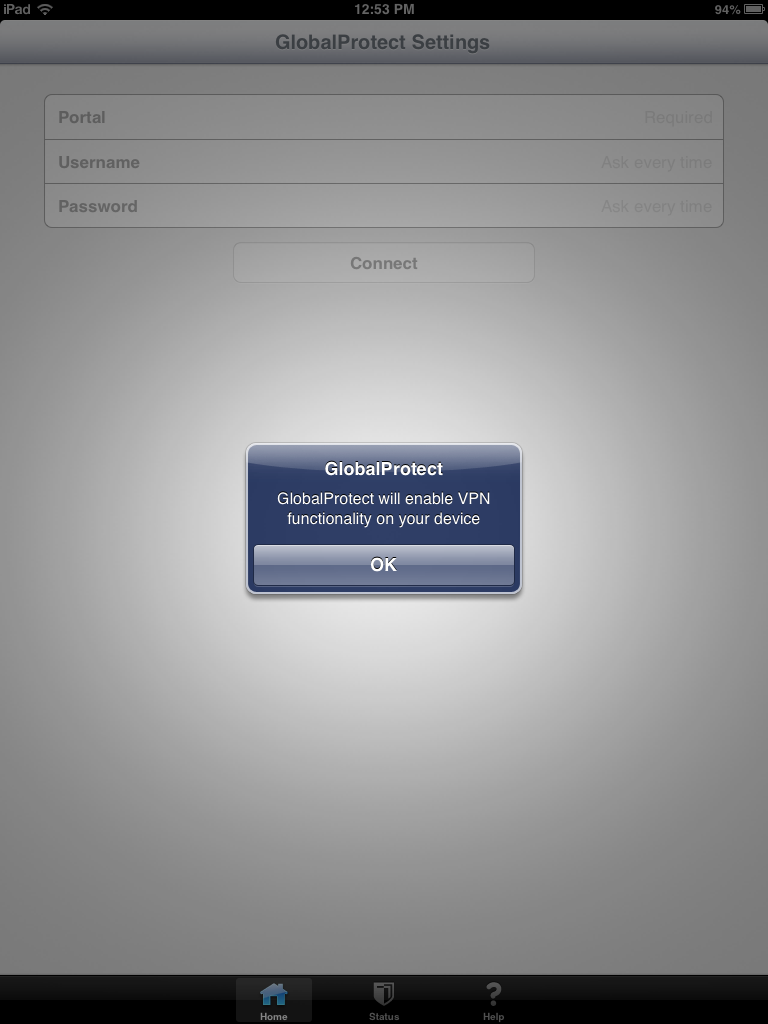 Figure: Prompt on a mobile device to enable GlobalProtect VPN functionality
- Connect to the portal.
- When prompted, enter the Portal name or address, User Name , and Password . The portal name must be an FQDN and it should not include the https:// at the beginning.
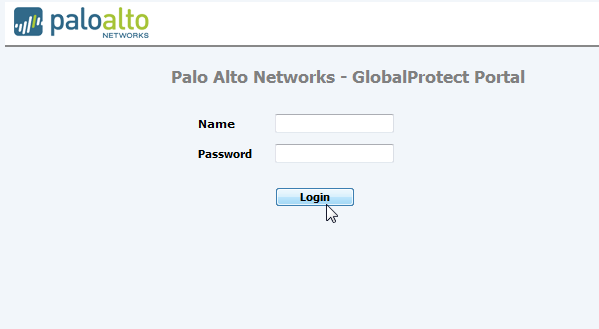 Figure: Mobile app login screen for GlobalProtect
- Tap Connect and verify that the app successfully establishes a connection to GlobalProtect.
If a third-party mobile endpoint management system is configured, the app prompts you to enroll.
View and Collect GlobalProtect App Logs
You have two options for collecting GlobalProtect™ app logs from the end users’ endpoints:
- Collect logs—End users must manually collect the GlobalProtect app logs.
- Report an issue—End users report an issue directly to Strata Logging Service to which the administrator can access when they experience unusual behavior such as poor network performance or a connection is not established with the portal and gateway.
In order for the GlobalProtect app to send troubleshooting logs, diagnostic logs, or both to Strata Logging Service for further analysis, you must configure the GlobalProtect portal to enable the GlobalProtect app log collection for troubleshooting. Additionally, you can configure the HTTPS-based destination URLs that can contain IP addresses or fully qualified domain names of the web servers/resources that you want to probe, and to determine issues such as latency or network performance on the end user’s endpoint.
Use the following steps to view or collect GlobalProtect logs:
- Launch the GlobalProtect app.
- From the status panel, open the settings dialog.
 Figure: GlobalProtect Settings gear icon
- Select Settings .
- From the GlobalProtect Settings panel, select Troubleshooting .
- Select either Debug or Dump from the Logging Level drop-down.
- ( Optional — Windows only ) View your GlobalProtect logs:
- Select Logs .
- Choose a Log type.
- Start viewing logs.
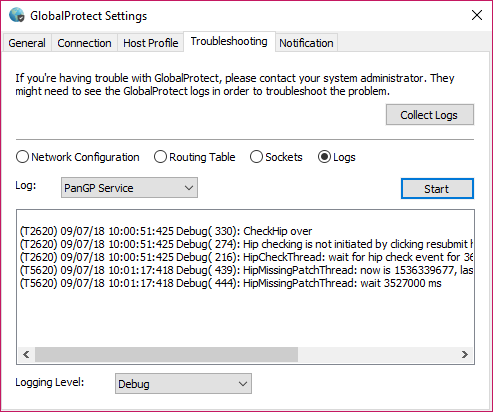 Figure: GlobalProtect Troubleshooting section showing log options
- ( Optional ) Collect Logs to send to your GlobalProtect administrator for troubleshooting.
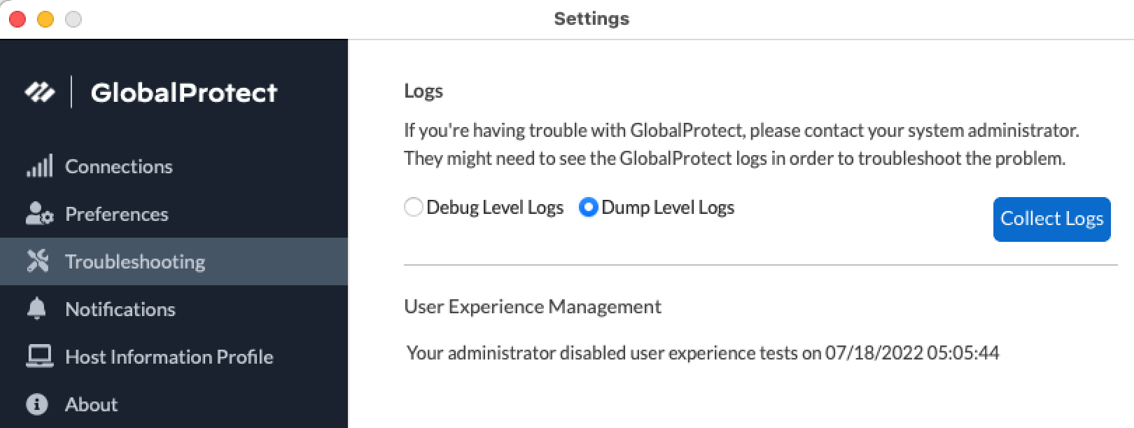 Figure: GlobalProtect Collect Logs button
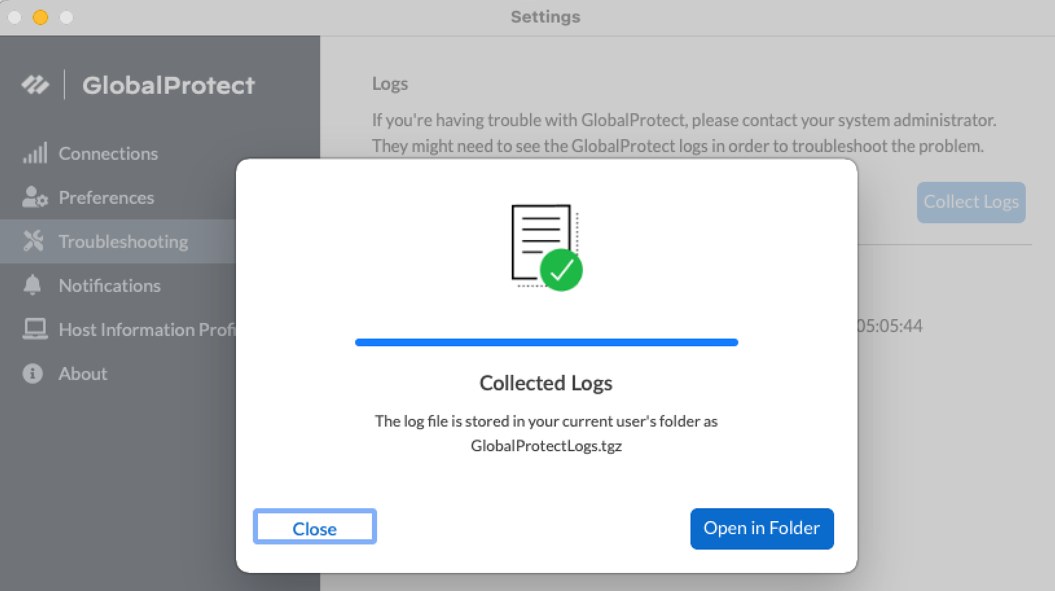 Figure: GlobalProtect log collection confirmation message
Deploy App Settings Transparently (Overview)
As an alternative to deploying app settings from the portal configuration, you can define them directly from the following endpoints:
- Windows—Registry or Windows Installer (Msiexec)
- macOS—global macOS plist
- Linux—pre-deployment configuration file ( pangps.xml )
The benefit of this alternative is that you can enable deployment of GlobalProtect app settings to endpoints prior to their first connection to the GlobalProtect portal.
Some settings do not have a corresponding portal configuration setting on the web interface and must be configured using the Windows Registry, Msiexec, or macOS plist. These settings are listed in the Customizable App Settings table as “Not in portal.”
Settings defined in the portal configuration always override settings defined in the Windows Registry, macOS plist, or pre-deployment configuration file ( pangps.xml ) for Linux.
If you define settings in the registry, plist, or pangps.xml , but the portal configuration specifies different settings, the settings that the app receives from the portal overrides the settings defined on the endpoint. This override also applies to login-related settings, such as whether to connect on-demand, whether to use single sign-on (SSO), and whether the app can connect if the portal certificate is invalid. Therefore, you should avoid conflicting settings. In addition, the portal configuration is cached on the endpoint, and that cached configuration is used anytime the GlobalProtect app restarts or the endpoint reboots.
The following sections describe what customizable app settings are available and how to deploy these settings transparently to Windows, macOS, and Linux endpoints:
- Customizable App Settings Overview
- App Display Options
- User Behavior Options
- App Behavior Options
- Script Deployment Options
- Configure Conditional Connect Method
In addition to using the Windows Registry, macOS plist, or Linux pre-deployment configuration to deploy GlobalProtect app settings, you can enable the GlobalProtect app to collect specific Windows Registry or macOS plist information from the endpoints, including data on applications installed on the endpoints, processes running on the endpoints, and attributes or properties of those applications and processes. You can then monitor the data and add it to a security rule to use as matching criteria. Endpoint traffic that matches registry settings you define can be enforced according to the security rule.
Customizable App Settings (Overview)
In addition to pre-deploying the portal address, you can also define the app settings. To Deploy App Settings to Windows Endpoints you define keys in the Windows Registry (path HKEY_LOCAL_MACHINE\SOFTWARE\Palo Alto Networks\GlobalProtect\Settings\ unless otherwise stated). To Deploy App Settings to macOS Endpoints you define entries in the Settings dictionary of the macOS plist ( /Library/Preferences/com.paloaltonetworks.GlobalProtect.settings.plist ). To Deploy App Settings to Linux Endpoints you define entries under <Settings> of the /opt/paloaltonetworks/globalprotect/pangps.xml pre-deployment configuration file. On Windows endpoints only, you can also use the Windows Installer to Deploy App Settings from Msiexec.
The following topics describe each customizable app setting. Settings defined in the GlobalProtect portal agent configuration take precedence over settings defined in the Windows Registry or the macOS plist.
Some settings do not have a corresponding portal configuration setting on the web interface and must be configured using the Windows Registry or Msiexec. These include, but are not limited to, settings such as the following: can-prompt-user-credential , wrap-cp-guid , and filter-non-gpcp . They are listed in the following options as “Not in portal.”
App Display Options
The following table lists the options that you can configure in the Windows Registry or macOS plist to customize the display of the GlobalProtect app.
| Portal Agent Configuration | Windows Registry/macOS Plist | Msiexec Parameter | Default |
|---|---|---|---|
| Display GlobalProtect Icon | show-agent-icon yes | no | SHOWAGENTICON=”yes | no” | yes |
| Enable Advanced View | enable-advanced-view yes | no | ENABLEADVANCEDVIEW=”yes | no” | yes |
| Enable Rediscover Network Option | rediscover-network yes | no | REDISCOVERNETWORK=”yes | no” | yes |
| Enable Resubmit Host Profile Option | resubmit-host-info yes | no | n/a | yes |
| Show System Tray Notifications | show-system-tray-notifications yes | no | SHOWSYSTEMTRAYNOTIFICATIONS=”yes | no” | yes |
User Behavior Options
The following table lists the options that you can configure in the Windows registry and macOS plist to customize how the user interacts with the GlobalProtect app.
Some settings do not have a corresponding portal configuration setting on the web interface and must be configured using the Windows Registry, Msiexec, or macOS plist. These settings are listed in the table as “Not in portal.” They include, but are not limited to, settings such as the following: ShowPrelogonButton and can-save-password .
| Portal Agent Configuration | Windows Registry/macOS Plist | Msiexec Parameter | Default |
|---|---|---|---|
| Allow User to Change Portal Address | can-change-portal yes | no | CANCHANGEPORTAL=”yes | no” | yes |
| Allow User to Dismiss Welcome Page | enable-hide-welcome-page yes | no | ENABLEHIDEWELCOMEPAGE= ”yes | no” | yes |
| Allow User to Continue with Invalid Portal Server Certificate | can-continue-if-portal-cert-invalid yes | no | CANCONTINUEIFPORTALCERTINVALID= ”yes | no” | yes |
| Allow User to Disable GlobalProtect App | disable-allowed yes | no | DISABLEALLOWED="yes | no" | no |
Allow User to Uninstall GlobalProtect App
|
Uninstall 0 | 1 | n/a | n/a |
|
Save User Credentials
Specify a 0 to prevent GlobalProtect from saving credentials, a 1 to save both username and password, or a 2 to save the username only. |
save-user-credentials 0 | 1 | 2 | n/a | n/a |
|
Not in portal
The Allow user to save password setting is deprecated in the web interface in PAN-OS 7.1 and later releases but is configurable from the Windows registry and macOS plist. Any value specified in the Save User Credentials field overwrites a value specified here. |
can-save-password yes | no | CANSAVEPASSWORD=”yes | no” | yes |
|
Windows only/Not in portal
This setting enables the GlobalProtect credential provider to display the Start GlobalProtect Connection button, which allows users to initiate the GlobalProtect pre-logon connection manually. |
ShowPrelogonButton yes | no | n/a | no |
|
Windows 10 only/Not in portal
This setting is used in conjunction with GlobalProtect SSO and enables the GlobalProtect credential provider to be set as the default sign-in option at the next Windows login and for subsequent logins. |
MakeGPCPDefault yes | no | MAKEGPCPDEFAULT=”yes | no” | n/a |
| Windows only/Not in portal This setting is used in conjunction with GlobalProtect SSO and sets the number of seconds for users to wait to log in to Windows before establishing a tunnel connection. | LogonWaitTime <5-30 seconds> | n/a | n/a |
| Windows only/Not in portal This setting is used in conjunction with GlobalProtect SSO and sets the number of seconds to delay users from logging in to Windows after establishing a tunnel connection. | LogonPostWaitTime <3-10 second> | n/a | n/a |
App Behavior Options
The following table lists the options that you can configure in the Windows Registry and macOS plist to customize the behavior of the GlobalProtect app.
Some settings do not have a corresponding portal configuration setting on the web interface and must be configured using the Windows Registry, Msiexec, or macOS plist. These settings are listed in the table as “Not in portal.” They include, but are not limited to, settings such as the following: portal <IPaddress> , prelogon 1 , and can-prompt-user-credential .
| Portal Agent Configuration | Windows Registry/macOS Plist | Msiexec Parameter | Default |
|---|---|---|---|
| Connect Method | connect-method on-demand | pre-logon | user-logon | CONNECTMETHOD=”on-demand | pre-logon | user-logon” | user-logon |
| Conditional Connect Method Based on Network Type | conditional-connect yes | no | n/a | no |
| Not supported on the portal | intelligent-portal yes | no | INTELLIGENTPORTAL=”yes | no” | no |
| Portal IP Address for USA and China | portal-country-map "<IP address>(US);<IP address>(CN)" | PORTALCOUNTRYMAP = "<Portal IP address>(US);<Portal IP address>(CN)" | n/a |
| User Location | intelligent-portal-service "URL" | INTELLIGENTPORTALSERVICE = "<IP location URL>" | n/a |
| GlobalProtect App Config Refresh Interval (hours) | refresh-config-interval <hours> | REFRESHCONFIGINTERVAL= ”<hours>” | 24 |
| Send HIP Report Immediately if Windows Security Center (WSC) State Changes (Windows Only) | wsc-autodetect yes | no | n/a | no |
| Detect Proxy for Each Connection (Windows Only) | proxy-multiple-autodetect yes | no | n/a | no |
| Clear Single Sign-On Credentials on Logout (Windows Only) | logout-remove-sso yes | no | LOGOUTREMOVESSO=”yes | no” | yes |
|
Disable Single Sign-On on local machines
This setting allows you to disable the SSO feature even if it is configured on the portal. It overwrites the portal configuration when you manually add the key to the Windows registry or macOS plist and set the value as Yes . |
For Windows endpoints, you must manually add this setting to the Windows registry:
Windows Path:
Key Name/Value:
macOS Path:
Add the setting under Palo Alto Networks > GlobalProtect > Settings
Key Name/Value:
|
This setting is not supported in msiexec. | n/a |
| Use Default Authentication on Kerberos Authentication Failure (Windows Only) | krb-auth-fail-fallback yes | no | KRBAUTHFAILFALLBACK= ”yes | no” | no |
| Use Default Browser for SAML Authentication |
(
macOS plist
)
default-browser yes | no |
DEFAULTBROWSER= “yes | no” | no |
| Custom Password Expiration Message (LDAP Authentication Only) |
(
Deprecated
)
PasswordExpiryMessage <message> |
n/a | Password expires in <number> days |
| Portal Connection Timeout (sec) | portal-timeout <portaltimeout> | n/a | 5 |
| TCP Connection Timeout (sec) | connect-timeout <connect-timeout> | n/a | 5 |
| TCP Receive Timeout (sec) | receive-timeout <receive-timeout> | n/a | 30 |
| Client Certificate Store Lookup | certificate-store-lookup user | machine | user and machine | invalid | CERTIFICATESTORELOOKUP= "user | machine | user and machine | invalid" | user and machine |
| SCEP Certificate Renewal Period (days) | scep-certificate-renewal-period <renewalPeriod> | n/a | 7 |
| Maximum Internal Gateway Connection Attempts | max-internal-gateway-connection-attempts <maxValue> | MIGCA="<maxValue>" | 0 |
| Extended Key Usage OID for Client Certificate | ext-key-usage-oid-for-client-cert <oidValue> | EXTCERTOID=”<oidValue>” | n/a |
| User Switch Tunnel Rename Timeout (sec) | user-switch-tunnel-rename-timeout <renameTimeout> | n/a | 0 |
|
Use Single Sign-On
(Windows Only) |
use-sso yes | no | USESSO="yes | no" | yes |
| Use Single Sign-On for Smart Card (Windows Only) | use-sso-pin yes | no | USESSOPIN="yes | no" | no |
| Inbound Authentication Message | authentication-message | n/a | n/a |
| Allow Overriding Username from Client Certificate | override-cc-username yes | no | n/a | no |
|
Not in portal
This setting specifies the default portal IP address (or hostname). |
portal <IPaddress> | PORTAL="<IPaddress>" | n/a |
|
Not in portal
This setting enables GlobalProtect to initiate a VPN tunnel before a user logs in to the device and connects to the GlobalProtect portal. |
prelogon 1 | PRELOGON="1" | 1 |
|
Not in portal
This setting is used in conjunction with single sign-on (SSO) and indicates whether or not to prompt the user for credentials if SSO fails. |
(
Windows
)
can-prompt-user-credential yes | no |
CANPROMPTUSERCREDENTIAL= ”yes | no” | yes |
|
Windows only/Not in portal
This setting filters the third-party credential provider’s tile from the Windows login page so that only the native Windows tile is displayed.* |
wrap-cp-guid {third party credential provider guid} | WRAPCPGUID=”{guid_value]" FILTERNONGPCP=”yes | no” | no |
|
Windows only/Not in portal
This setting is an additional option for the setting wrap-cp-guid, and allows the third-party credential provider tile to be displayed on the Windows login page, in addition to the native Windows logon tile.* |
filter-non-gpcp no | n/a | n/a |
|
Windows only/Not in portal
This setting allows you to assign static IP addresses to Windows endpoints. |
reserved-ipv4 <reserved-ipv4>
reserved-ipv6 <reserved-ipv6> |
RESERVEDIPV4=”<reserved-ipv4>”
RESERVEDIPV6=”<reserved-ipv6>” |
n/a |
|
(Windows Only)
This setting allows you to set a valid default gateway on GlobalProtect virtual adapter when you configure GlobalProtect app in Full-Tunnel mode. |
fake-default-gateway yes | no | FIXDEFAULTGATEWAY yes | no | n/a |
|
(Windows Only)
This setting allows you to collect HIP data on Windows endpoints. |
collect-hip-data yes | no | COLLECTHIPDATA= ”yes | no” | n/a |
|
(Windows Only)
This setting allows you to save gateway passwords on Windows endpoints. |
save-gateway-password yes | no | SAVEGATEWAYPASSWORD= ”yes | no” | n/a |
|
Windows Only/Not in portal
This setting allows you to press the Enter key to log in to GlobalProtect from the embedded browser on Windows endpoints during SAML authentication. In some cases, enabling this setting will prevent the Enter key press from being accepted during sign on. If this occurs, change the setting to no . |
Windows Registry Path:
HKEY_CURRENT_USER\SOFTWARE\Palo Alto Networks\GlobalProtect\Settings Key Name/Value translate-enter-key yes | no |
TRANSLATEENTERKEY= "yes | no" | yes |
Script Deployment Options
The following table displays options that enable GlobalProtect to initiate scripts before and after establishing a connection and before disconnecting. Because these options are not available in the portal, you must define the values for the relevant key—either pre-vpn-connect , post-vpn-connect , or pre-vpn-disconnect —from the Windows registry or macOS plist.
If you are allowing end users to establish the VPN connection to the corporate network before logging in to the Windows endpoint by using Connect Before Logon, you must run VPN connect scripts with the context admin value specified the Windows registry. You cannot specify the default context user value because there is no user prior to Windows logon.
| Portal Agent Configuration | Windows Registry/macOS Plist | Msiexec Parameter | Default |
|---|---|---|---|
|
Execute the script specified in the command setting (including any parameters passed to the script).
Environmental variables are supported. Specify the full path in commands. |
command <parameter1> <parameter2> [...]
Windows example: command %userprofile%\vpn_script.bat c: test_user macOS example: command $HOME/vpn_script.sh /Users/test_user test_user |
PREVPNCONNECTCOMMAND= ”<parameter1> <parameter2> [...]”
POSTVPNCONNECTCOMMAND= ”<parameter1> <parameter2> [...]” PREVPNDISCONNECTCOMMAND= ”<parameter1> <parameter2> [...]” |
n/a |
| ( Optional ) Specify the privileges under which the command(s) can run (default is user: if you do not specify the context, the command runs as the current active user). | context admin | user |
PREVPNCONNECTCONTEXT= ”admin | user”
POSTVPNCONNECTCONTEXT= ”admin | user” PREVPNDISCONNECTCONTEXT= ”admin | user” |
user |
|
(
Optional
) Specify the number of seconds the GlobalProtect app waits for the command to execute (range is 0-120). If the command does not complete before the timeout, the app proceeds to establish a connection or disconnect. A value of 0 (the default) means the app does not wait to execute the command.
Not supported for post-vpn-connect . |
timeout <value>
Example: timeout 60 |
PREVPNCONNECTTIMEOUT= ”<value>”
PREVPNDISCONNECTTIMEOUT= ”<value>” |
0 |
|
(
Optional
) Specify the full path of a file used in a command. The GlobalProtect app verifies the integrity of the file by checking it against the value specified in the checksum key.
Environmental variables are supported. |
file <path_file> |
PREVPNCONNECTFILE= ”<path_file>”
POSTVPNCONNECTFILE= ”<path_file>” PREVPNDISCONNECTFILE= ”<path_file>” |
n/a |
| ( Optional ) Specify the sha256 checksum of the file referred to in the file key. If the checksum is specified, the GlobalProtect app executes the command(s) only if the checksum generated by the GlobalProtect app matches the checksum value specified here. | checksum <value> |
PREVPNCONNECTCHECKSUM= ”<value>”
POSTVPNCONNECTCHECKSUM= ”<value>” PREVPNDISCONNECTCHECKSUM =”<value>” |
n/a |
|
(
Optional
) Specify an error message to inform the user that either the command(s) cannot be executed or the command(s) exited with a non-zero return code.
The message must be 1,024 or fewer ANSI characters. |
error-msg <message>
Example: error-msg Failed executing pre-vpn-connect action! |
PREVPNCONNECTERRORMSG= ”<message>”
POSTVPNCONNECTERRORMSG= ”<message>” PREVPNDISCONNECTERRORMSG =”<message>” |
n/a |
Configure Conditional Connect Method Based on Network Type
| Where Can I Use This? | What Do I Need? |
|---|---|
|
|
Configure Conditional Connect to enable the GlobalProtect app to change the connect method dynamically based on whether the internal host detection determines that the user is on the internal network or working from a remote location. You deploy the conditional-connect setting transparently from the macOS plist or the Windows Registry. Before enabling Conditional Connect, make sure that you have:
- Enabled internal host detection
- Configured the endpoints to use the on-demand connect method
graph TD
    A[Endpoint Starts] --> B{Is Internal?};
    B -- Yes --> C[No VPN Connection Needed];
    B -- No --> D[Establish VPN Tunnel];
    D --> E[Access Resources Securely];
    C --> F[Monitor Internal Network];
    F --> B;
    E --> F;
    D --> G{Connection Mode?};
    G -- On-demand --> D;
    G -- User-logon --> D;
    G -- Pre-logon --> D;
- Deploy Conditional Connect to Windows endpoints.
- In the Windows Registry, go to: \HKEY_LOCAL_MACHINE > SOFTWARE> Palo Alto Networks > GlobalProtect > Settings .
- Set the key as conditional-connect and the value to Yes .
- Deploy Conditional Connect to macOS endpoints.
- In the plist file ( /Library/Preferences/com.paloaltonetworks.GlobalProtect.settings.plist ), go to /Palo Alto Networks/GlobalProtect/Settings .
- Set conditional-connect to Yes .
Deploy App Settings to Windows Endpoints (Overview)
Use the Windows Registry or Windows Installer ( Msiexec ) to transparently deploy the GlobalProtect app and settings to Windows endpoints.
- Deploy Agent Settings in the Windows Registry
- Deploy Agent Settings from Msiexec
- Deploy Scripts Using the Windows Registry
- Deploy Scripts Using Msiexec
- Deploy Connect Before Logon Settings in the Windows Registry
- Deploy GlobalProtect Credential Provider Settings in the Windows Registry
- SSO Wrapping for Third-Party Credential Providers on Windows Endpoints (Overview)
- Enable SSO Wrapping for Third-Party Credentials with the Windows Registry
- Enable SSO Wrapping for Third-Party Credentials with the Windows Installer
Deploy App Settings in the Windows Registry
You can enable deployment of GlobalProtect app settings to Windows endpoints prior to their first connection to the GlobalProtect portal by using the Windows Registry. Use the options described in the Customizable App Settings table to use the Windows Registry to customize app settings for Windows endpoints.
In addition to using the Windows Registry to deploy GlobalProtect app settings, you can enable the GlobalProtect app to collect specific Windows Registry information from Windows endpoints. You can then monitor the data and add it to a security rule to use as matching criteria. Endpoint traffic that matches registry settings you define can be enforced according to the security rule.
- Locate the GlobalProtect app customization settings in the Windows Registry.
Open the Windows Registry (enter regedit on the command prompt) and go to:
HKEY_LOCAL_MACHINE\SOFTWARE\Palo Alto Networks\GlobalProtect\Settings\
- Set the portal name.
If you do not want the end user to manually enter the portal address even for the first connection, you can pre-deploy the portal address through the Windows Registry.
If you want to define all other app settings, you can define keys in the Windows Registry ( HKEY_LOCAL_MACHINE\SOFTWARE\Palo Alto Networks\GlobalProtect\Settings\
- In the Window Registry, go to:
HKEY_LOCAL_MACHINE\SOFTWARE\Palo Alto Networks\GlobalProtect\PanSetup
- Right-click Portal and then select Modify .
- Enter the portal name in the Value data field, and then click OK .
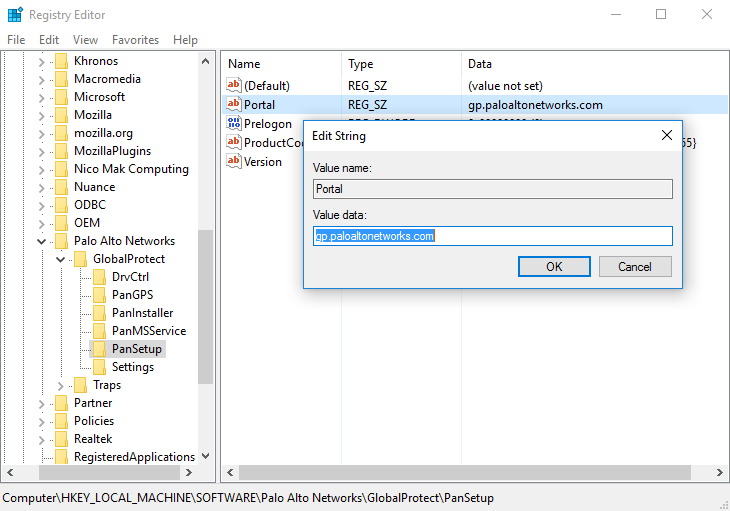 Figure: Windows Registry Editor showing the GlobalProtect PanSetup key and Portal value
- Deploy various settings to the Windows endpoint, including the connect method for the GlobalProtect app and SSO.
View Customizable App Settings for a full list of the commands and values you can set up using the Windows Registry.
You have the option to deploy connect before logon settings to the Windows endpoints prior to enabling end users to log in to the VPN before logging into the endpoint.
You have the option to deploy GlobalProtect credential provider settings to the Windows endpoints to delay the GlobalProtect credential provider Windows sign-in request or enforce the GlobalProtect credential provider as the default sign-in option.
- Enable the GlobalProtect app to wrap third-party credentials on the Windows endpoint, allowing for SSO when using a third-party credential provider.
Refer to Enable SSO Wrapping for Third-Party Credentials with the Windows Registry .
Deploy App Settings from Msiexec
On Windows endpoints, you have the option of automatically deploying the GlobalProtect app and the app settings from the Windows Installer ( Msiexec ) by using the following syntax:
msiexec.exe /i GlobalProtect.msi <SETTING>="<value>"
Msiexec is an executable program that installs or configures a product from the command line. On endpoints running Microsoft Windows XP or a later OS, the maximum string length that you can use at the command prompt is 8,191 characters.
| Msiexec Example | Description |
|---|---|
| msiexec.exe /i GlobalProtect.msi /quiet PORTAL=”portal.acme.com” | Install GlobalProtect in quiet mode (no user interaction) and configure the portal address. |
| msiexec.exe /i GlobalProtect.msi CANCONTINUEIFPORTALCERTINVALID=”no” | Install GlobalProtect with the option to prevent users from connecting to the portal if the certificate is not valid. |
For a complete list of settings and the corresponding default values, see Customizable App Settings .
You can also Enable SSO Wrapping for Third-Party Credentials with the Windows Installer .
Deploy Scripts Using the Windows Registry
You can enable deployment of custom scripts to Windows endpoints using the Windows Registry.
You can configure the GlobalProtect app to initiate and run a script for any or all of the following events: before and after establishing the tunnel, and before disconnecting the tunnel. To run the script at a particular event, reference the batch script from a command registry entry for that event.
Depending on the configuration settings, the GlobalProtect app can run a script before and after the app establishes a connection to the gateway, and before the app disconnects. Use the following workflow to use the Windows Registry to customize app settings for Windows endpoints.
The registry settings that enable you to deploy scripts are supported on endpoints running GlobalProtect App 2.3 and later releases.
- Open the Windows registry, and locate the GlobalProtect app customization settings.
Open the Windows registry (enter regedit in the command prompt) and go to one of the following key locations, depending on when you want to execute scripts (pre/post connect or pre disconnect):
HKEY_LOCAL_MACHINE\SOFTWARE\Palo Alto Networks\GlobalProtect\Settings\pre-vpn-connect
HKEY_LOCAL_MACHINE\SOFTWARE\Palo Alto Networks\GlobalProtect\Settings\post-vpn-connect
HKEY_LOCAL_MACHINE\SOFTWARE\Palo Alto Networks\GlobalProtect\Settings\pre-vpn-disconnect
If the key does not exist within the Settings key, create it by right-clicking Settings and selecting New > Key ).
- Enable the GlobalProtect app to run scripts by creating a new String Value named command .
The batch file specified here should contain the specific script (including any parameters passed to the script) that you want run on the device.
- If the command string does not already exist, create it by right-clicking the pre-vpn-connect , post-vpn-connect , or pre-vpn-disconnect key, selecting New > String Value , and naming it command ).
- Right click command , and then select Modify .
- Enter the commands or script that the GlobalProtect app should run. For example:
%userprofile%\pre_vpn_connect.bat c: test_user
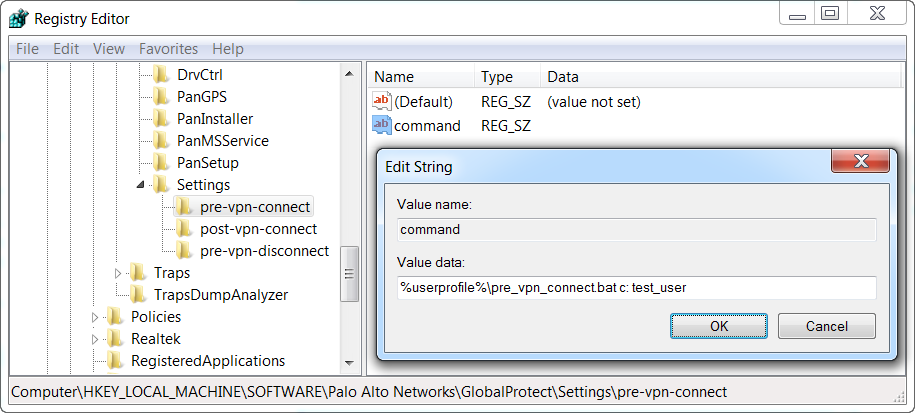 Figure: Windows Registry Editor showing the value data for a pre-vpn-connect script command
- ( Optional ) Add additional registry entries as needed for each command.
Create or modify registry strings and their corresponding values, including context , timeout , file , checksum , or error-msg . For additional information, see Script Deployment Options .
Deploy Scripts Using Msiexec
On Windows endpoints, you can use the Windows Installer ( Msiexec ) to deploy the GlobalProtect app, app settings, and scripts that the app will run automatically (see Script Deployment Options ). To do so, use the following syntax:
msiexec.exe /i GlobalProtect.msi <SETTING>="<value>"
Msiexec is an executable program that installs or configures a product from the command line. On systems running Microsoft Windows XP or later releases, the maximum string length that you can use at the command prompt is 8,191 characters.
This limitation applies to the command line, individual environment variables (such as the USERPROFILE variable) that are inherited by other processes, and all environment variable expansions. If you run batch files from the command line, this limitation also applies to batch file processing.
For example, to deploy scripts that run at specific connect or disconnect events, you can use syntax similar to the following examples:
Example: Use Msiexec to Deploy Scripts that Run Before a Connect Event
For a script that you can copy and paste, go here .
msiexec.exe /i GlobalProtect.msi
PREVPNCONNECTCOMMAND="%userprofile%\pre_vpn_connect.bat c: test_user"
PREVPNCONNECTCONTEXT="user"
PREVPNCONNECTTIMEOUT="60"
PREVPNCONNECTFILE="C:\Users\test_user\pre_vpn_connect.bat"
PREVPNCONNECTCHECKSUM="a48ad33695a44de887bba8f2f3174fd8fb01a46a19e3ec9078b0118647ccf599"
PREVPNCONNECTERRORMSG="Failed executing pre-vpn-connect action."
For a complete list of settings and the corresponding default values, see Script Deployment Options .
Example: Use Msiexec to Deploy Scripts that Run at Pre-Connect, Post-Connect, and Pre-Disconnect Events
For a script that you can copy and paste, go here .
msiexec.exe /i GlobalProtect.msi
PREVPNCONNECTCOMMAND="%userprofile%\pre_vpn_connect.bat c: test_user"
PREVPNCONNECTCONTEXT="user"
PREVPNCONNECTTIMEOUT="60"
PREVPNCONNECTFILE="C:\Users\test_user\pre_vpn_connect.bat"
PREVPNCONNECTCHECKSUM="a48ad33695a44de887bba8f2f3174fd8fb01a46a19e3ec9078b0118647ccf599"
PREVPNCONNECTERRORMSG="Failed executing pre-vpn-connect action."
POSTVPNCONNECTCOMMAND="c:\users\test_user\post_vpn_connect.bat c: test_user"
POSTVPNCONNECTCONTEXT="admin"
POSTVPNCONNECTFILE="%userprofile%\post_vpn_connect.bat"
POSTVPNCONNECTCHECKSUM="b48ad33695a44de887bba8f2f3174fd8fb01a46a19e3ec9078b0118647ccf598"
POSTVPNCONNECTERRORMSG="Failed executing post-vpn-connect action."
PREVPNDISCONNECTCOMMAND="%userprofile%\pre_vpn_disconnect.bat c: test_user"
PREVPNDISCONNECTCONTEXT="admin"
PREVPNDISCONNECTTIMEOUT="0"
PREVPNDISCONNECTFILE="C:\Users\test_user\pre_vpn_disconnect.bat"
PREVPNDISCONNECTCHECKSUM="c48ad33695a44de887bba8f2f3174fd8fb01a46a19e3ec9078b0118647ccf597"
PREVPNDISCONNECTERRORMSG="Failed executing pre-vpn-disconnect action."
For a complete list of settings and the corresponding default values, see Script Deployment Options .
Deploy Connect Before Logon Settings in the Windows Registry
You can deploy Connect Before Logon settings to Windows 10 endpoints prior to enabling end users to log in to the VPN before logging into the endpoint by using the Windows Registry. GlobalProtect retrieves the registry keys only once, when the GlobalProtect app initializes.
Follow these guidelines when deploying the Connect Before Logon settings:
- The Pre-logon and Pre-logon then On-demand connection methods are not supported simultaneously with Connect Before Logon.
- If you are using smart card authentication or username/password-based authentication for user login using an authentication service such as LDAP, RADIUS, or OTP, you must configure exclusions for specific fully qualified domain names for the portal and gateway by entering them to Allow traffic to specified FQDN when Enforce GlobalProtect Connection for Network Access is enabled and GlobalProtect Connection is not established as an app setting in the App Configurations area of the GlobalProtect portal. If you are using SAML authentication for user login and using the configured SAML identity providers (ldPs) such as Okta, you must also configure exclusions for *okta.com and *oktacdn.com. For other ldPs, you must configure exclusions for the URLs that contain IP addresses or fully qualified domain names only if the Enforcer status is enabled.
- Configure the registry keys on the end user Windows endpoints.
You must change the Windows registry on the end users’ Windows endpoints before you can enable Connect Before Logon. You can automatically add the registry keys or manually add the keys.
- To automatically add the registry keys for PanPlapProvider and PanPlapProvider.dll in PanGPS.exe ( C:\Program Files\Palo Alto Networks\GlobalProtect ), use the -registerplap command to run as an administrator by using the following syntax:
PanGPS.exe -registerplap
- To automatically unregister the keys for PanPlapProvider and PanPlapProvider.dll in PanGPS.exe ( C:\Program Files\Palo Alto Networks\GlobalProtect ), use the -unregisterplap command to run as an administrator by using the following syntax:
PanGPS.exe -unregisterplap
To manually add the registry keys, open the Windows Registry Editor and enter regedit on the command prompt.
You must create the CLSID folder.
- In the Windows Registry, go to HKEY_CLASSES_ROOT\CLSID\{20A29589-E76A-488B-A520-63582302A285} . Add the PanPlapProvider value in the format @=PanPlapProvider .
- In the Windows Registry, go to HKEY_CLASSES_ROOT\CLSID\{20A29589-E76A-488B-A520-63582302A285}\InprocServer32@="PanPlapProvider.dll" . Verify that the ThreadingModel value is set to Apartment . This is the default value.
- In the Windows Registry, go to HKEY_LOCAL_MACHINE\SOFTWARE\Microsoft\Windows\CurrentVersion\Authentication\PLAP Providers\{20A29589-E76A-488B-A520-63582302A285}@="PanPlapProvider" . Add the PanPlapProvider value in the format @=PanPlapProvider .
- ( Optional ) Configure additional portal addresses or names to display.
If configured, Connect Before Logon will use the default portal address or name in the Windows Registry ( HKEY_LOCAL_MACHINE\SOFTWARE\PaloAlto Networks\GlobalProtect\PanSetup with key Portal ).
You can configure additional portal addresses or names that you want to display in the Portal drop-down by changing the registry keys on the end user Windows endpoints. You can add up to five portal addresses or names. You must change the Windows registry on the end users’ Windows endpoints before you can define the portal addresses or names.
Open the Windows Registry Editor and enter regedit on the command prompt.
- In the Windows Registry, create the CBL folder under HKEY_LOCAL_MACHINE\SOFTWARE\Palo Alto Networks\GlobalProtect .
- In the Windows Registry, go to HKEY_LOCAL_MACHINE\SOFTWARE\Palo Alto Networks\GlobalProtect\CBL .
- Select Edit > New > String Value to create a registry entry for each portal that you want to add. You must specify each entry as Portal1 , Portal2 , Portal3 , Portal4 , and Portal5 . Each entry cannot contain spaces.
- Right-click the portal registry value, and then select Modify .
- Enter the IP address or name of the GlobalProtect portal in the Value Data field, and then click OK .
- Repeat steps 3 and 4 for each portal that you want to add.
- ( Optional ) Display the predefined portal addresses or names.
You must change the Windows registry on the end users’ Windows endpoints before you can display the portal addresses or names.
Open the Windows Registry Editor and enter regedit on the command prompt.
- In the Windows Registry, create the CBL folder under HKEY_LOCAL_MACHINE\SOFTWARE\Palo Alto Networks\GlobalProtect .
- In the Windows Registry, go to HKEY_LOCAL_MACHINE\SOFTWARE\Palo Alto Networks\GlobalProtect\CBL .
- Select Edit > New > String Value to create a registry entry for AlwaysShowPortal .
- Enter the value as yes in the Value Data field, and then click OK .
By default, Connect Before Logon does not display the portal address or name if only one portal is defined.
- ( Optional ) Enable end users to authenticate using a smart card.
You must change the Windows registry on the end users’ Windows endpoints before you can enable smart card authentication.
Open the Windows Registry Editor and enter regedit on the command prompt.
- In the Windows Registry, create the CBL folder under HKEY_LOCAL_MACHINE\SOFTWARE\Palo Alto Networks\GlobalProtect .
- In the Windows Registry, go to HKEY_LOCAL_MACHINE\SOFTWARE\Palo Alto Networks\GlobalProtect\CBL .
- Select Edit > New > String Value to create a registry entry for UseSmartCard .
- Enter the value as yes in the Value Data field, and then click OK .
- Reboot the endpoint.
You must reboot the endpoint in order for the PLAP and Connect Before Logon registry keys to take effect.
- Verify the configuration.
After you have configured the settings in the Windows registry and to use Connect Before Logon starting with GlobalProtect™ app 5.2, choose the authentication method:
- Connect Before Logon Using Smart Card Authentication
- Connect Before Logon Using SAML Authentication
- Connect Before Logon Using Username/Password-Based Authentication
Deploy GlobalProtect Credential Provider Settings in the Windows Registry
You can deploy the GlobalProtect credential provider settings to delay the GlobalProtect credential provider Windows sign-in request or to enforce the GlobalProtect credential provider as the default sign-in option for Windows 10 by using the Windows Registry.
- Delay the GlobalProtect credential provider Windows sign-in request.
Establishing the GlobalProtect tunnel before Windows login can be useful in certain situations. For example, you may want to enforce the Windows device to synchronize data with the Active Directory or want to delay the GlobalProtect credential provider Windows sign-in request.
You can configure the amount of time (in seconds) that the GlobalProtect credential provider waits for the tunnel to be established before submitting a Windows sign-in request when single sign on (SSO) is enabled. By default, the GlobalProtect Credential Provider Support to Delay Windows Login Before Establishing the Tunnel Connection feature is disabled and the GlobalProtect credential provider submits the sign-in requests without any delay.
- From the command prompt, enter the regedit command to open the Windows Registry Editor.
- In the Windows Registry, go to HKEY_LOCAL_MACHINE\SOFTWARE\Palo Alto Networks\GlobalProtect\PanSetup
- Right-click PreLogonState and then select New > DWORD (32-bit) Value .
- Right-click New Value #1 and then select Rename .
Enter LogonWaitTime . Right-click LogonWaitTime and then select Modify . In the Value data field, set the number of seconds (range is 5-30) for end users to wait to log in to Windows before establishing a tunnel connection. Click OK .
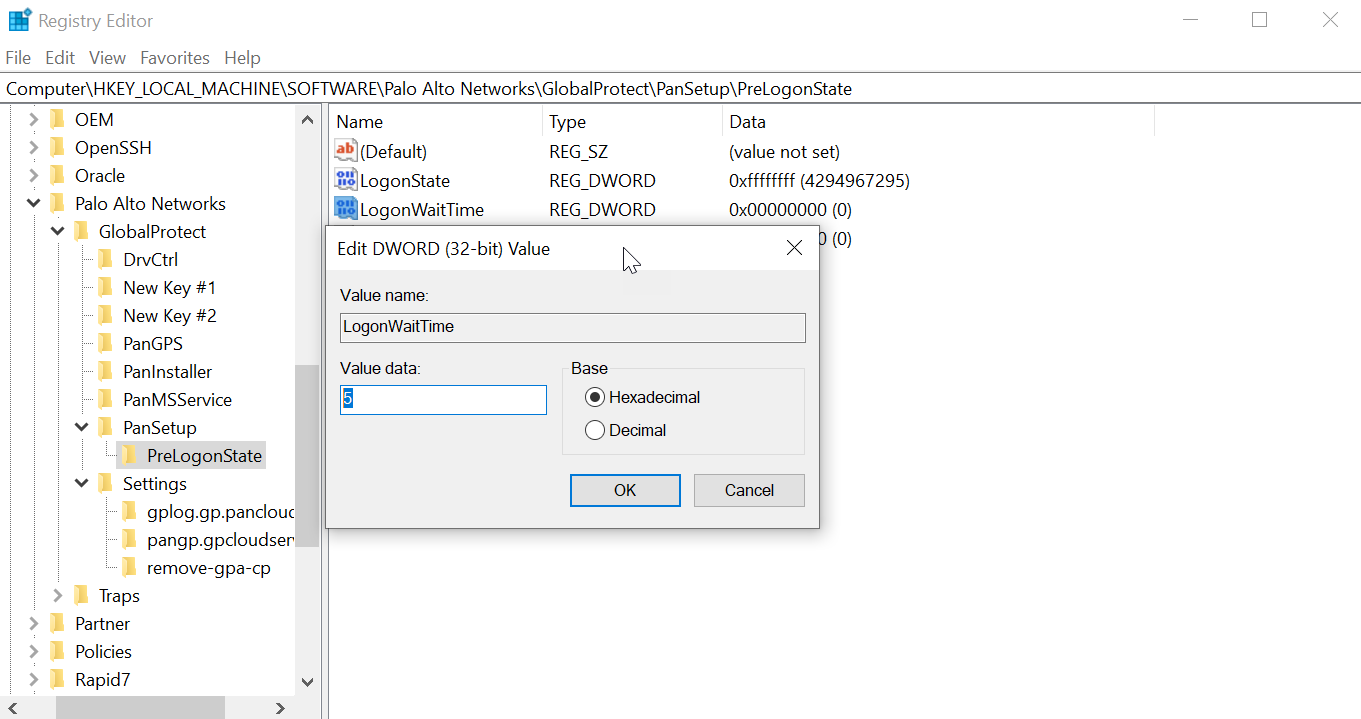 Figure: Windows Registry Editor showing the LogonWaitTime DWORD value
- Repeat substeps 1, 2, and 3 to delay the GlobalProtect credential provider from submitting the Windows sign-in request after the tunnel is established.
Enter LogonPostWaitTime . Right-click LogonPostWaitTime and then select Modify . In the Value data field, set the number of seconds (range is 3-10) for end users to wait to log in to Windows. Click OK .
You are required to first enter the amount of time (in seconds) for LogonWaitTime , and then enter the amount of time (in seconds) for LogonPostWaitTime .
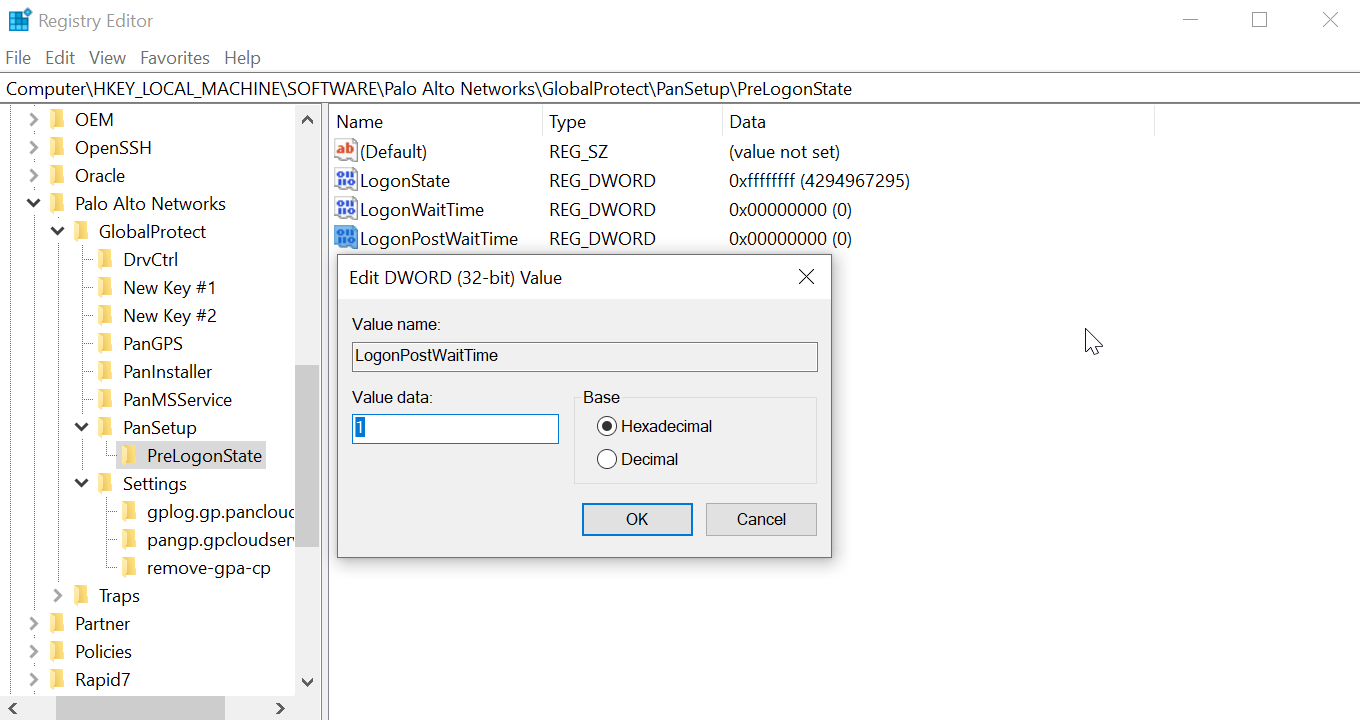 Figure: Windows Registry Editor showing the LogonPostWaitTime DWORD value
- Enforce GlobalProtect credential provider as the default sign-in option for Windows 10.
When GlobalProtect SSO is enabled on Windows devices, users can have more than one sign-in option in addition to using the GlobalProtect credential provider options such as a third-party credential, smart card, Windows Hello PIN, Windows Hello Password, or Windows Hello Fingerprint. Users can use any of these sign-in options to sign in to their Windows device and set it as the default sign-in option at the next Windows login making GlobalProtect SSO unavailable. Users must manually switch to the GlobalProtect credential provider again to enable GlobalProtect SSO. When the GlobalProtect credential provider is enabled as the default sign-in option even when users can login with any other sign-in option, the GlobalProtect credential provider sign-in option is selected at the next Windows login and for subsequent logins.
When GlobalProtect is installed on Windows devices, users cannot log in to the device using the User Principal Name (UPN)- for example, username@domain - when the GlobalProtect credential provider is selected and the device is offline.
Follow these guidelines when you are enforcing the GlobalProtect credential provider to be the default-sign option on Windows devices:
- While the GlobalProtect app is installed or SSO is enabled, the GlobalProtect credential provider is set as the default sign-in option for all users even when the MakeGPCPDefault setting is disabled.
- When SSO is enabled and the MakeGPCPDefault setting is enabled, users can use any sign-in options such as a third-party credential provider, smart card, Windows Hello PIN, Windows Hello password, or Windows Fingerprint to sign in to their Windows device. Regardless of the sign-in option selected, the GlobalProtect credential provider will be used as the default sign-in option at the next Windows login.
- When SSO is enabled and the MakeGPCPDefault setting is disabled or empty, the user selected sign-in option will be used as the default at the next Windows login.
- When SSO is disabled, the GlobalProtect credential provider is unavailable. The Windows default sign-in option will work as expected.
- The Enforce GlobalProtect Credential Provider as the Default Sign-In for Windows 10 feature does not support the Other user login option. You can configure the Other user login option by using the Group Policy Object (GPO) on the Windows device.
- From the command prompt, enter the regedit command to open the Windows Registry Editor.
- In the Window Registry, go to:
HKEY_LOCAL_MACHINE\SOFTWARE\Palo Alto Networks\GlobalProtect
- Right-click the GlobalProtect folder, then select New > String Value to add a new string value.
- Enter the MakeGPCPDefault string value. Right-click MakeGPCPDefault and then select Modify .
In the Value data field, enter yes to enable the GlobalProtect credential provider to be the default sign-in option at the next Windows login. If you set the Value data to no , the MakeGPCPDefault setting is disabled and the user selected sign-in option will be used as the default at the next Windows login. Click OK .
 Figure: Windows Registry Editor showing the MakeGPCPDefault string value
SSO Wrapping for Third-Party Credential Providers on Windows Endpoints (Overview)
On Windows 7 endpoints, the GlobalProtect app utilizes the Microsoft credential provider framework to support single sign-on (SSO). With SSO, the GlobalProtect credential provider wraps the Windows native credential provider, enabling GlobalProtect to use Windows login credentials to automatically authenticate and connect to the GlobalProtect portal and gateway. In addition to this, SSO wrapping enables Windows 10 users to update their Active Directory (AD) password using the GlobalProtect credential provider when their password expires or an administrator requires a password change at the next login.
When other third-party credential providers also exist on the endpoint, the GlobalProtect credential provider is unable to gather the user's Windows login credentials. As a result, GlobalProtect fails to connect to the GlobalProtect portal and gateway automatically.
If SSO fails, you can identify the third-party credential provider and configure the GlobalProtect app to wrap those third-party credentials, which enables users to successfully authenticate to Windows, GlobalProtect, and the third-party credential provider using only their Windows login credentials.
Optionally, you can configure Windows to display separate login tiles: one for each third-party credential provider and another for the native Windows login. This is useful when a third-party credential provider adds additional functionality that does not apply to GlobalProtect.
If you want to remove the GlobalProtect credential provider from your Windows endpoint, execute the GlobalProtectPanGPS.exe -u command in the Command Prompt.
Use the Windows registry or the Windows Installer ( msiexec ) to allow GlobalProtect to wrap third-party credentials:
- Enable SSO Wrapping for Third-Party Credentials with the Windows Registry
- Enable SSO Wrapping for Third-Party Credentials with the Windows Installer
GlobalProtect SSO wrapping for third-party credential providers (CPs) is dependent on the third-party CP settings. In some cases, GlobalProtect SSO wrapping might not work correctly if the third-party CP implementation does not allow GlobalProtect to successfully wrap their CP.
Enable SSO Wrapping for Third-Party Credentials with the Windows Registry
Use the following steps in the Windows Registry to enable SSO to wrap third-party credentials on Windows 7 endpoints.
- Open the Windows Registry and locate the globally unique identifier (GUID) for the third-party credential provider that you want to wrap.
- From the command prompt, enter the regedit command to open the Windows Registry Editor.
- Go to the following Windows Registry location to view the list of currently installed credential providers:
HKEY_LOCAL_MACHINE\SOFTWARE\Microsoft\Windows\CurrentVersion\Authentication\Credential Providers.
- Copy the GUID key for the credential provider that you want to wrap (including the curly brackets — { and } — on either end of the GUID):
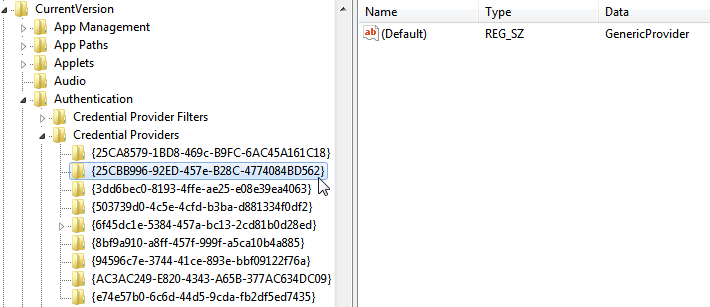 Figure: Windows Registry Editor showing the list of installed Credential Providers and their GUIDs
- Enable SSO wrapping for third-party credential providers by adding the wrap-cp-guid setting to the GlobalProtect Registry.
- Go to the following Windows Registry location:
HKEY_LOCAL_MACHINE\SOFTWARE\Palo Alto Networks\GlobalProtect:
 Figure: Windows Registry Editor showing the GlobalProtect key location
- Right-click the GlobalProtect folder, and then select New > String Value to add a new string value:
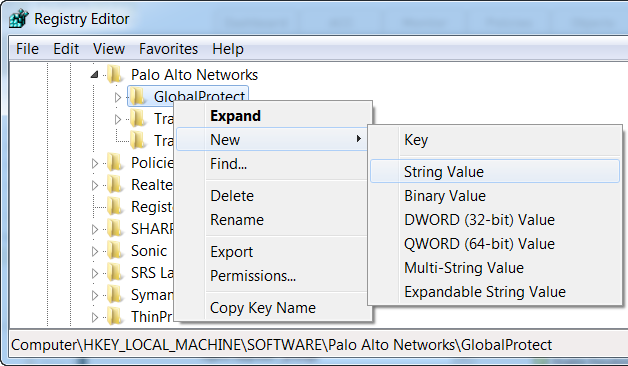 Figure: Windows Registry Editor showing the option to create a new String Value
- Configure the following String Value fields:
- Name : wrap-cp-guid
- Value data : {<third-party credential provider GUID>}
For the Value data field, the GUID value that you enter must be enclosed with curly brackets: { and } .
The following is an example of what a third-party credential provider GUID in the Value data field might look like:
{A1DA9BCC-9720-4921-8373-A8EC5D48450F}
- For the new String Value , wrap-cp-guid is displayed as the string value’s Name and the GUID is displayed as the Value Data .
 Figure: Windows Registry Editor showing the wrap-cp-guid string value and its data
- Next Steps:
- With this setup, the native Windows logon tile is displayed to users on the logon screen. When users click the tile and log in to the system with their Windows credentials, that single login authenticates the users to Windows, GlobalProtect, and the third-party credential provider.
- ( Optional ) If you want to display multiple tiles on the logon screen (for example, the native Windows tile and the tile for the third-party credential provider), continue to step 4.
- ( Optional ) If you want to assign a default credential provider for users, continue to step 5.
- ( Optional ) If you want to hide a third-party credential provider tile from the logon screen, continue to step 6.
- ( Optional ) Allow the third-party credential provider tile to be displayed to users at login.
Add a second String Value with the Name filter-non-gpcp and enter no for the string’s Value data :
 Figure: Windows Registry Editor showing the filter-non-gpcp string value set to 'no'
After you add this string value to the GlobalProtect settings, two login options are presented to users on the Windows logon screen: the native Windows tile and the third-party credential provider’s tile.
- Assign a default credential provider for user login.
- Open the Windows Registry to locate the globally unique identifier (GUID) for the third-party credential provider that you want to assign as the default credential provider.
- From the command prompt, enter the regedit command to open the Windows Registry Editor.
- Go to the following Windows Registry location to view the list of currently installed credential providers:
HKEY_LOCAL_MACHINE\SOFTWARE\Microsoft\Windows\CurrentVersion\Authentication\Credential Providers.
- Copy the complete GUID key for the credential provider (including the curly brackets — { and } —on either end of the GUID).
- Open the Local Group Policy Editor to enable and assign a default credential provider.
- From the command prompt, enter the gpedit.msc command to open the Local Group Policy Editor.
- Select Computer Configuration > Administrative Templates > System > Logon .
- Under Setting , double-click Assign a default credential provider to open the Assign a default credential provider window.
- Set the policy to Enabled .
- Under Assign the following credential provider as the default credential provider , enter the GUID of the credential provider (copied from the Windows Registry).
- Click Apply , and the click OK to save your changes.
- ( Optional ) Hide a third-party credential provider tile from the Windows logon screen.
- Open the Windows Registry to locate the globally unique identifier (GUID) for the third-party credential provider that you want to hide.
- From the command prompt, enter the regedit command to open the Windows Registry Editor.
- Go to the following Windows Registry location to view the list of currently installed credential providers:
HKEY_LOCAL_MACHINE\SOFTWARE\Microsoft\Windows\CurrentVersion\Authentication\Credential Providers.
- Copy the complete GUID key for the credential provider that you want to hide (including the curly brackets — { and } — on either end of the GUID).
- Open the Local Group Policy Editor to hide the third-party credential provider.
- From the command prompt, enter the gpedit.msc command to open the Local Group Policy Editor.
- Select Computer Configuration > Administrative Templates > System > Logon .
- Under Setting , double-click Exclude credential providers to open the Exclude credential providers window.
- Set the policy to Enabled .
- Under Exclude the following credential providers , enter the GUID of the credential provider you want to hide (copied from the Windows Registry).
To hide multiple credential providers, separate each GUID with a comma.
- Click Apply , and then click OK to save your changes.
- Finalize your changes.
Once your changes are finalized, reboot your system for the changes to take effect.
Enable SSO Wrapping for Third-Party Credentials with the Windows Installer
Use the following options in the Windows Installer ( Msiexec ) to enable SSO to wrap third-party credential providers on Windows 7 endpoints.
- Wrap third-party credentials and display the native tile to users at login. Users can click the tile to log in to the endpoint using their native Windows credentials. With that single login, users can authenticate to Windows, GlobalProtect, and the third-party credential provider.
Use the following syntax from the Windows Installer ( Msiexec ):
msiexec.exe /i GlobalProtect.msi WRAPCPGUID=”{guid_value}” FILTERNONGPCP=”yes”
In the syntax above, the FILTERNONGPCP parameter simplifies authentication for the user by filtering the option to log in to the system using the third-party credentials.
- If you would like users to have the option of logging in using the third-party credentials, use the following syntax from the Windows Installer ( Msiexec ):
- msiexec.exe /i GlobalProtect.msi WRAPCPGUID=”{guid_value}”
FILTERNONGPCP=”no”
In the syntax above, the FILTERNONGPCP parameter is set to “no” , which filters out the third-party credential provider’s logon tile so that only the native tile displays. In this case, both the native Windows tile and the third-party credential provider tile are displayed to users when logging in to the Windows endpoint.
Deploy App Settings to macOS Endpoints (Overview)
Use the macOS global plist (property list) file to set the GlobalProtect app customization settings or to deploy scripts to macOS endpoints.
Deploy App Settings in the macOS Plist
You can set the GlobalProtect app customization settings in the macOS global plist (Property list) file. This enables deployment of GlobalProtect app settings to macOS endpoints prior to their first connection to the GlobalProtect portal.
On macOS endpoints, plist files are either located in /Library/Preferences or in ~/Library/Preferences . The tilde ( ~ ) symbol indicates that the location is in the current user's home folder. The GlobalProtect app on a macOS endpoint first checks for the GlobalProtect plist settings. If the plist does not exist at that location, the GlobalProtect app searches for plist settings in ~/Library/Preferences .
In addition to using the macOS plist to deploy GlobalProtect app settings, you can enable the GlobalProtect app to collect specific macOS plist information from the endpoints. You can then monitor the data and add it to a security rule to use as matching criteria. Endpoint traffic that matches registry settings you define can be enforced according to the security rule.
- Open the GlobalProtect plist file and locate the GlobalProtect app customization settings.
Use Xcode or an alternate plist editor to open the plist file:
/Library/Preferences/com.paloaltonetworks.GlobalProtect.settings.plist
Then go to:
/Palo Alto Networks/GlobalProtect/Settings
If the Settings dictionary does not exist, create it. Add each key to the Settings dictionary as a string.
- Set the portal name.
If you do not want the end user to manually enter the portal address even for the first connection, you can pre-deploy the portal address through the plist. In the PanSetup dictionary, configure an entry for Portal .
- Deploy various settings to the macOS endpoint, including the connect method for the GlobalProtect app.
View Customizable App Settings for a full list of the keys and values that you can configure using the macOS plist.
- ( Optional ) If you are using system extensions and need to switch to kernel extensions, set the key value to UseKextAnyway in the macOS plist ( /Library/Preferences/com.paloaltonetworks.GlobalProtect.settings.plist ) for the GlobalProtect app.
Follow these guidelines when you are using system extensions and need to switch to kernel extensions:
- After you have enabled system extensions, you must first uninstall the existing app to use the UseKextAnyway plist key to enable kernel extensions on macOS.
- You later have the option to revert to use system extensions. You must delete the UseKextAnyway plist key in the macOS plist. After you have deleted this plist key, you must restart the GlobalProtect app in order for the change to take effect.
- By switching to kernel extensions, you can no longer use the Split DNS and Enforce GlobalProtect Connections with FQDN Exclusions features.
- If you have configured split tunnel settings based on the application on macOS endpoints, all Safari-based traffic, Microsoft Teams-based traffic, or Slack-based traffic that are defined in the split tunnel configuration would be dropped. We recommend that you use Chrome instead of Safari so that traffic defined in the split tunnel configuration will not be dropped. All traffic that was created based on the WebKit framework such as Safari, Microsoft Teams, or Slack might have problems using kernel extensions.
You must specify UseKextAnyway as the plist key before installing GlobalProtect app 5.2.6 or later releases or upgrading from an earlier release to GlobalProtect app 5.2.6 or later releases running Catalina 10.15.4 or later. However, if you are upgrading from an earlier release to GlobalProtect app 5.2.6 or later releases running macOS Big Sur 11 or later, you must enable system extensions.
Deploy Scripts Using the macOS Plist
When a user connects to the GlobalProtect gateway for the first time, the GlobalProtect app downloads the configuration file and stores app settings in a GlobalProtect macOS property file (plist). In addition to making changes to the app settings, you use the plist to deploy scripts at any or all of the following events: before and after establishing the tunnel, and before disconnecting the tunnel. Use the following workflow to use the plist to deploy scripts to macOS endpoints.
The macOS plist settings that enable you to deploy scripts are supported on endpoints running GlobalProtect App 2.3 and later releases.
- ( Endpoints running Mac OS X 10.9 or a later OS ) Flush the settings cache. This prevents the OS from using the cached preferences after making changes to the plist.
To clear the default preferences cache, run the killall cfprefsd command from a macOS terminal.
- Open the GlobalProtect plist file, and locate or create the GlobalProtect dictionary associated with the connect or disconnect event. The dictionary under which you will add the settings determines when the GlobalProtect app runs the script(s).
Use Xcode or an alternate plist editor to open the plist file ( /Library/Preferences/com.paloaltonetworks.GlobalProtect.settings.plist ) and go to one of the following dictionary locations:
- /PaloAlto Networks/GlobalProtect/Settings/pre-vpn-connect
- /Palo Alto Networks/GlobalProtect/Settings/post-vpn-connect
- /Palo Alto Networks/GlobalProtect/Settings/pre-vpn-disconnect
If Settings dictionary does not exist, create it. Then, in Settings , create a new dictionary for the event or events at which you want to run scripts.
- Enable the GlobalProtect app to run scripts by creating a new String named command .
The value specified here should reference the shell script (and the parameters to pass to the script) that you want run on your endpoints.
If the command string does not already exist, add it to the dictionary and specify the script and parameters in the Value field. For example:
$HOME/pre_vpn_connect.sh
/Users/username username
Environmental variables are supported.
As a best practice, specify the full path in commands.
- ( Optional ) Add additional settings related to the command, including administrator privileges, a timeout value for the script, checksum value for the batch file, and an error message to display if the command fails to execute successfully.
Create or modify additional strings in the plist ( context , timeout , file , checksum , and/or error-msg) and enter their corresponding values. For additional information, see Script Deployment Options .
- Save the changes to the plist file.
Save the plist.
Deploy App Settings to Linux Endpoints
You can set the GlobalProtect app customization settings in the pre-deployment configuration file ( pangps.xml ). This enables deployment of GlobalProtect app settings to Linux endpoints prior to their first connection to the GlobalProtect portal.
On Linux endpoints, the pre-deployment configuration file ( pangps.xml ) is located in /opt/paloaltonetworks/globalprotect .
The following table lists the pre-deployment settings for Linux endpoints that you can add to the pangps.xml file to customize the behavior of the GlobalProtect app and how the user interacts with the GlobalProtect app.
| Portal Agent Configuration | Linux | Default |
|---|---|---|
| Connect Method | connect-method on-demand | user-logon | user-logon |
| Allow User to Change Portal Address | can-change-portal yes | no | yes |
| Allow User to Continue with Invalid Portal Server Certificate | can-continue-if-portal-cert-invalid yes | no | yes |
| Use Default Browser for SAML Authentication | default-browser yes | no | no |
| Portal Connection Timeout (sec) | portal-timeout <portaltimeout> | 5 |
| TCP Connection Timeout (sec) | connect-timeout <connect-timeout> | 5 |
| TCP Receive Timeout (sec) | receive-timeout <receive-timeout> | 30 |
|
Not in portal
This setting is used to predeploy the full chain certificate verification flag. |
full-chain-cert-verify
<Settings> <full-chain-cert-verify>yes</full-chain-cert-verify> </Settings> |
n/a |
|
Not in portal
This setting specifies the default portal IP address (or hostname). |
Portal <IPaddress> | n/a |
If you have already installed the GlobalProtect app on the Linux endpoint, follow these instructions:
- Modify the pre-deployment setting you want to edit for the pangps.xml file in /opt/paloaltonetworks/globalprotect .
- Reboot the Linux endpoint in order for the pre-deployment configuration changes to take effect.
If you are installing the GlobalProtect app for the first time, follow these instructions to deploy various settings to the Linux endpoint.
- Create the /opt/paloaltonetworks/globalprotect/pangps.xml pre-deployment configuration file.
- Add the pre-deployment settings to the pangps.xml file, including the connect method for the GlobalProtect app and the default browser for SAML authentication.
The following example shows the XML configuration of the pre-deployment changes that you deployed on the Linux endpoint, including the portal IP address (or hostname) under <PanSetup> .
<?xml version="1.0" encoding="UTF-8"?>
<GlobalProtect>
    <Settings>
        <connect-method>on-demand</connect-method>
        <can-continue-if-portal-cert-invalid>yes</can-continue-if-portal-cert-invalid>
        <can-change-portal>no</can-change-portal>
        <portal-timeout>100</portal-timeout>
        <connect-timeout>100</connect-timeout>
        <receive-timeout>100</receive-timeout>
        <default-browser>yes</default-browser>
    </Settings>
    <PanSetup>
        <Portal>portal.acme.com</Portal>
    </PanSetup>
    <PanGPS>
    </PanGPS>
</GlobalProtect>
GlobalProtect User Authentication
The first time a GlobalProtect app connects to the portal, the user is prompted to authenticate to the portal. If authentication succeeds, the GlobalProtect portal sends the GlobalProtect configuration, which includes the list of gateways to which the app can connect, and optionally a client certificate for connecting to the gateways. After successfully downloading and caching the configuration, the app attempts to connect to one of the gateways specified in the configuration.
Because these components provide access to your network resources and settings, they also require the end user to authenticate. The appropriate security level required on the portal and gateways varies with the sensitivity of the resources that the gateway protects.
GlobalProtect provides a flexible authentication framework that allows you to choose the authentication profile and certificate profile that are appropriate to each component. GlobalProtect provides the following authentication methods:
- Local Authentication —Both the user account credentials and the authentication mechanisms are local to the firewall. This authentication mechanism isn't scalable because it requires an account for every GlobalProtect user and is, therefore, advisable for small deployments only.
- External Authentication —User authentication functions are performed by external LDAP, Kerberos, TACACS+, SAML, or RADIUS services (including support for two-factor, token-based authentication mechanisms, such as one-time password (OTP) authentication). To Set Up External Authentication you must create a server profile with settings for access to the external authentication service, create an authentication profile that refers to the server profile, and specify client authentication in the portal and gateway configurations. As an optional step, you can specify the OS of the endpoint that will use these settings. You can use different authentication profiles for each GlobalProtect component.
- Client Certificate Authentication —For enhanced security, you can configure the portal or gateway to use a client certificate to obtain the username and authenticate the user before granting access to the system. GlobalProtect also supports authentication by common access cards (CACs) and smart cards, which rely on a certificate profile. With these cards, the certificate profile must contain the root CA certificate that issued the certificate to the smart card or CAC.
- Two-Factor Authentication —With two-factor authentication, the portal or gateway authenticates users through two mechanisms, such as a one-time password (OTP) and Active Directory (AD) login credentials. You can enable two-factor authentication by configuring and adding both a certificate profile and authentication profile to the portal and gateway configuration. You can configure the portal and gateways to use either the same authentication method or different authentication methods. Regardless, users must successfully authenticate through the two mechanisms that the component demands before they can gain access to the network resources.
- ( Windows and macOS only ) Multi-Factor Authentication for Non-Browser-Based Applications —For sensitive, non-browser-based network resources (for example, financial applications or software development applications) that may require additional authentication, the GlobalProtect app can notify and prompt the user to perform the timely, multi-factor authentication required to access these resources.
- ( Windows and macOS only ) Single Sign-On —With single sign-on (SSO), which is enabled by default, the GlobalProtect app uses the user’s OS login credentials to automatically authenticate and connect to the GlobalProtect portal and gateway. You can also configure the app to wrap third-party credentials to ensure that Windows users can authenticate and connect using a third-party credential provider.
SAML SSO is supported with Windows Hello for Business. SAML SSO is not supported on macOS.
- ( Prisma Access only ) Cloud Identity Engine —The Cloud Identity Engine provides both user identification and user authentication for mobile users in a Panorama Managed Prisma Access—GlobalProtect deployment. Using the Cloud Identity Engine for user authentication and username-to-user group mapping allows you to write security policy based on users and groups, not IP addresses, and helps secure your assets by enforcing behavior-based security actions. By continually syncing the information from your directories, the Cloud Identity Engine ensures that your user information is accurate and up to date and policy enforcement continues based on the mappings even if the SAML identity provider (IdP) is temporarily unavailable. Prisma Access users must be running GlobalProtect app 6.0 or later with a Prisma Access Innovation release 3.0 or later.
Cloud Identity Engine supports the following authentication methods for GlobalProtect:
- SAML
- Client Certificate
- OIDC (Starting from GlobalProtect app versions 6.2.6 & later and 6.3.2 & later)
How Does the App Know What Credentials to Supply?
By default, the GlobalProtect app attempts to use the same login credentials for the gateway that it used for portal login. In the simplest case, where the gateway and the portal use the same authentication profile or certificate profile, the app connects to the gateway transparently.
On a per-app configuration basis, you can also customize which GlobalProtect portal and gateways—internal, external, or manual only—require different credentials (such as unique OTPs). This enables the GlobalProtect portal or gateway to prompt for the unique OTP without first prompting for the credentials specified in the authentication profile.
There are two options for modifying the default app authentication behavior so that authentication is both stronger and faster:
Cookie Authentication on the Portal or Gateway
Cookie authentication simplifies the authentication process for end users because they will no longer be required to log in to both the portal and the gateway in succession or enter multiple OTPs for authenticating to each. This improves the user experience by minimizing the number of times that users must enter credentials. In addition, cookies enable use of a temporary password to re-enable VPN access after the user’s password expires.
You can configure cookie authentication settings independently for the portal and for individual gateways (for example, you can impose a shorter cookie lifetime on gateways that protect sensitive resources). After the portal or gateways deploy an authentication cookie to the endpoint, the portal and gateways both rely on the same cookie to authenticate the user. When the app presents the cookie, the portal or gateway evaluates whether the cookie is valid based on the configured cookie lifetime. If the cookie expires, GlobalProtect automatically prompts the user to authenticate with the portal or gateway. When authentication is successful, the portal or gateway issues the replacement authentication cookie to the endpoint, and the validity period starts over.
Consider the following example where you configure the cookie lifetime for the portal—which does not protect sensitive information—as 15 days, but configure the cookie lifetime for gateways—which do protect sensitive information—as 24 hours. When the user first authenticates with the portal, the portal issues the authentication cookie. If the user attempted to connect to the portal after five days, the authentication cookie would still be valid. However, if the user attempted to connect to the gateway after five days, the gateway would evaluate the cookie lifetime and determine it expired (5 days > 24 hours). The agent would then automatically prompt the user to authenticate with the gateway and, on successful authentication, receive a replacement authentication cookie. The new authentication cookie would then be valid for another 15 days on the portal and another 24 hours on the gateways.
For an example of how to use this option, see Set Up Two-Factor Authentication.
Credential Forwarding to Some or All Gateways
With two-factor authentication, you can specify the portal and types of gateways (internal, external, or manual only) that prompt for their own set of credentials. This option speeds up the authentication process when the portal and the gateway require different credentials (either different OTPs or different login credentials entirely). For each portal or gateway that you select, the app does not forward credentials, allowing you to customize the security for different GlobalProtect components. For example, you can have the same security on your portals and internal gateways, while requiring a second factor OTP or a different password for access to those gateways that provide access to your most sensitive resources.
For an example of how to use this option, see Set Up Two-Factor Authentication.
How Does the App Know Which Certificate to Supply?
When you configure GlobalProtect to use client certificates for authentication on macOS or Windows endpoints, GlobalProtect must present a valid client certificate to authenticate with the portal and gateways.
For a client certificate to be valid, it must meet the following requirements:
- The certificate is issued by the certificate authority (CA) you defined in the Certificate Profile of your portal and gateway configurations.
- The certificate specifies the client authentication purpose, which the certificate administrator specifies when creating the certificate.
- The certificate is located in the certificate store, as configured in the GlobalProtect portal agent configuration. By default, the GlobalProtect app first looks for a valid certificate in the user store. If none exist, the app then looks in the machine store. If the GlobalProtect app locates a certificate in the user store, it won't look in the machine store because the user store takes precedence. To force the GlobalProtect app to look for certificates in only one certificate store, configure the Client Certificate Store Lookup option in the appropriate GlobalProtect portal agent configuration.
- The certificate matches additional purposes specified in the GlobalProtect portal agent configuration. To specify an additional purpose, you must identify the object identifier (OID) for the certificate and configure the Extended Key Usage OID value in the appropriate GlobalProtect portal agent configuration. An OID is a numeric value that identifies the application or service for which to use a certificate and that is automatically attached to a certificate when it's created by a certificate authority (CA). For more information on specifying a common or custom OID, see Enable Certificate Selection Based on OID.
When only one client certificate meets the requirements above, the app automatically uses that client certificate for authentication. However, when multiple client certificates meet these requirements, GlobalProtect prompts the user to select the client certificate from a list of valid client certificates on the endpoint.
While GlobalProtect requires users to select the client certificate only when they first connect, users might not know which certificate to select. In this case, we recommend you to narrow the list of available client certificates by certificate purpose (as indicated by the OID) and certificate store.
For more information on these and other settings you can configure to customize your app, see Customize the GlobalProtect Agent.
Set Up External Authentication
The following workflows describe how to set up the GlobalProtect portal and gateways to use an external authentication service. The supported authentication services include LDAP, Kerberos, RADIUS, SAML, and TACACS+.
GlobalProtect also supports local authentication. To use local authentication, create a local user database ( Device > Local User Database ) that contains the users and groups to which you want to allow GlobalProtect access, and then refer to that database in the authentication profile.
For more information, see GlobalProtect User Authentication.
The options for setting up external authentication include:
- Set Up LDAP Authentication
- Set Up SAML Authentication
- Set Up Kerberos Authentication
- Set Up RADIUS or TACACS+ Authentication
Set Up LDAP Authentication
Organizations often use LDAP as an authentication service and a central repository for user information. They can also use LDAP to store the role information for application users.
- Create a server profile.
The server profile identifies the external authentication service and instructs the firewall how to connect to that authentication service and access the authentication credentials for your users.
When you use LDAP to connect to Active Directory (AD), you must create a separate LDAP server profile for every AD domain.
- Select Device > Server Profiles > LDAP , and then Add an LDAP server profile.
- Enter a Profile Name , such as GP-User-Auth .
- If this profile is for a firewall with multiple virtual systems capability, select a virtual system or Shared as the Location where the profile is available.
- Click Add in the Server List area, and then enter the necessary information for connecting to the authentication server, including the server Name , IP address or FQDN of the LDAP Server , and Port .
- Select the LDAP server Type .
- Enter the Bind DN and Password to enable the authentication service to authenticate the firewall.
- ( Optional ) If you want the endpoint to use SSL or TLS for a more secure connection with the directory server, enable the option to Require SSL/TLS secured connection (enabled by default). The protocol that the endpoint uses depends on the server port:
- 389 (default)—TLS (Specifically, the device uses the StartTLS operation , which upgrades the initial plaintext connection to TLS).
- 636—SSL.
- Any other port—The device first attempts to use TLS. If the directory server does not support TLS, the device falls back to SSL.
- ( Optional ) For additional security, enable to the option to Verify Server Certificate for SSL sessions so that the endpoint verifies the certificate that the directory server presents for SSL/TLS connections. To enable verification, you must also enable the option to Require SSL/TLS secured connection . For verification to succeed, the certificate must meet one of the following conditions:
- It's in the list of device certificates: Device > Certificate Management > Certificates > Device Certificates. If necessary, import the certificate into the device.
- The certificate signer is in the list of trusted certificate authorities: Device > Certificate Management > Certificates > Default Trusted Certificate Authorities .
- Click OK to save the server profile.
- ( Optional ) Create an authentication profile.
The authentication profile specifies the server profile that the portal or gateways use when they authenticate users. On a portal or gateway, you can assign one or more authentication profiles to one or more client authentication profiles. For descriptions of how an authentication profile within a client authentication profile supports granular user authentication, see Configure a GlobalProtect Gateway and Set Up Access to the GlobalProtect Portal.
To enable users to connect and change their expired passwords without administrative intervention, consider using Remote Access VPN with Pre-Logon.
If a user’s password expires, you can assign a temporary LDAP password to enable them to log in to GlobalProtect. In this case, the temporary password may be used to authenticate to the portal, but the gateway login can fail because the same temporary password can't be reused. To prevent this issue, configure an authentication override in the portal configuration ( Network > GlobalProtect > Portal ) to enable the GlobalProtect app to use a cookie to authenticate to the portal and the temporary password to authenticate to the gateway.
- Select Device > Authentication Profile , and then Add a new profile.
- Enter a Name for the profile.
- Set the Authentication Type to LDAP .
- Select the LDAP authentication Server Profile that you created in step 1.
- Enter sAMAccountName as the Login Attribute .
- Set the Password Expiry Warning to specify the number of days before password expiration that users are notified. By default, users are notified seven days prior to password expiration (range is 1-255). Because users must change their passwords before the end of the expiration period, you must provide a notification period that is adequate for your users in order to ensure continued access to GlobalProtect. To use this feature, you must specify one of the following LDAP server types in your LDAP server profile: active-directory , e-directory , or sun .
Unless you enable pre-logon, users can't access GlobalProtect when their passwords expire.
- Specify the User Domain and Username Modifier . The endpoint combines the User Domain and Username Modifier values to modify the domain and username string that a user enters during login. The endpoint uses the modified string for authentication and the User Domain value for User-ID group mapping. Modifying user input is useful when the authentication service requires domain\username strings in a particular format but you don't want to rely on users to enter the domain correctly. You can select from the following options:
- To send only the unmodified user input, leave the User Domain blank (the default) and set the Username Modifier to the variable %USERINPUT% (the default).
- To prepend a domain to the user input, enter a User Domain and set the Username Modifier to %USERDOMAIN%\%USERINPUT% .
- To append a domain to the user input, enter a User Domain and set the Username Modifier to %USERINPUT%@%USERDOMAIN% .
- On the Advanced tab, Add an Allow List to select the users and user groups that are allowed to authenticate with this profile. The all option allows every user to authenticate with this profile. By default, the list has no entries, which means no users can authenticate.
- Click OK .
- Commit the configuration.
Click Commit .
Set Up SAML Authentication
Security Assertion Markup Language (SAML) is an XML-based, open-standard data format used to exchange authentication and authorization data between parties, specifically between an identity provider (IdP) and a service provider. SAML is a product of the OASIS Security Services Technical Committee.
- Create a server profile.
The server profile identifies the external authentication service and instructs the firewall on how to connect to that authentication service and access the authentication credentials for your users.
The following steps describe how you can import a SAML metadata file from the IdP so that the firewall can automatically create a server profile and populate the connection, registration, and IdP certificate information. If the IdP does not provide a metadata file, select Device > Server Profiles > SAML Identity Provider , and then Add a server profile manually.
- Export the SAML metadata file from the IdP to an endpoint that the firewall can access.
Refer to your IdP documentation for instructions on how to export the file.
- Select Device > Server Profiles > SAML Identity Provider .
- Import the metadata file onto the firewall.
- Enter a Profile Name to identify the server profile, such as GP-User-Auth .
- Browse for the metadata file.
- Select Validate Identity Provider Certificate (default) so that the firewall validates the IdP certificate.
Validation occurs only after you assign the server profile to an authentication profile and Commit the changes. The firewall uses the certificate profile within the authentication profile to validate the certificate.
- Enter the Maximum Clock Skew , which is the allowed system time difference (in seconds) between the IdP and the firewall when the firewall validates IdP messages. The default value is 60 seconds, and the range is 1-900 seconds. If the difference exceeds this value, authentication fails.
- Click OK to save the server profile.
- (Optional) Create an authentication profile.
The authentication profile specifies the server profile that the portal or gateways use when they authenticate users. On a portal or gateway, you can assign one or more authentication profiles to one or more client authentication profiles. For more information on how an authentication profile within a client authentication profile supports granular user authentication, see Configure a GlobalProtect Gateway and Set Up Access to the GlobalProtect Portal.
SAML authentication supports Remote Access VPN with Pre-Logon with GlobalProtect app 5.0 and later releases.
- Select Device > Authentication Profile , and then Add a new authentication profile.
- Enter a Name for the authentication profile.
- Set the Authentication Type to SAML .
- Select the SAML IdP Server Profile that you created in step 1.
- Configure the following options to enable certificate authentication between the firewall and the SAML identity provider.
- The Certificate for Signing Requests that the firewall uses to sign messages that it sends to the IdP.
- The Certificate Profile that the firewall uses to validate the IdP certificate.
- Specify the username and admin role formats.
- Specify the Username Attribute and User Group Attribute .
Unlike other external authentication types, the SAML authentication profile does not have a User Domain attribute.
- ( Optional ) If you plan to use this profile to authenticate the administrative accounts that you manage in the IdP identity store, specify the Admin Role Attribute and Access Domain Attribute .
- On the Advanced tab, Add an Allow List to select the users and groups that are allowed to authenticate with this profile. The all option allows every user to authenticate with this profile. By default, the list has no entries, which means no users can authenticate.
Make sure the username in the Allow List matches the username returned from the SAML IdP server.
- Click OK .
- Commit the configuration.
- (Chromebooks only ) Enable SAML SSO for Chromebooks.
These steps allow you to set up SAML SSO for the GlobalProtect app for Android on Chromebooks.
- Sign in to the Google Admin Console and select Security .
 Figure: Google Admin Console Security Page
- Select Set up single sign-on (SSO) .
- ( Optional ) If you want to set up SSO with any other provider besides Google, select Setup SSO with third party identity provider and specify the Sign-in page URL and Sign-out page URL and upload a valid Verification certificate .
 Figure: Google Admin Console SSO Setup options
- Configure the SAML identity provider in GlobalProtect.
- In the GlobalProtect console, select Device > Server Profiles > SAML Identity Provider .
- Match the values you entered for the IdP in the Google Admin Console.
 Figure: GlobalProtect SAML Identity Provider Configuration matching Google Admin Console settings
About the Embedded Browser for SAML Authentication
Beginning with the GlobalProtect app 6.0.9 and later, 6.2.3 and later, and 6.3 and later releases, the embedded browser framework for SAML authentication has been upgraded to Microsoft Edge WebView2 (Windows) and WKWebView (macOS). This provides a consistent experience between the embedded browser and the GlobalProtect client.
By default, tenants using SAML authentication are configured to utilize the embedded WebView2 (Windows) or WKWebView (macOS) instead of relying on the system's default browser. With this enhancement, there's no need for end users to configure a SAML landing page, eliminating the necessity to manually close the browser. This streamlines the authentication process.
Windows endpoints only: In a Microsoft Entra-joined environment with SSO enabled, users are not required to enter their credentials in order to authenticate to Prisma Access using GlobalProtect. This seamless experience is true whether the user is logging in to their environment for the first time or whether they have logged in before. If there is an error during the authentication, it is displayed in the embedded browser. This authentication process works across all device states.
In a non-Entra-joined environment with SSO enabled, users must enter their credentials during the initial login. On subsequent logins, the credentials are auto-filled as long as the SAML identity provider (IdP) session is active and has not timed out.
Use the Default System Browser for SAML Authentication
If you have configured the GlobalProtect portal to authenticate users through SAML authentication, end users can connect to the app or other SAML-enabled applications without having to re-enter their credentials, for a seamless single sign-on (SSO) experience. End users can benefit from using the default system browser for SAML authentication because they can leverage the same login for GlobalProtect with their saved user credentials on the default system browser such as Chrome, Firefox, or Safari.
In addition, on any browser that supports the Web Authentication ( WebAuthn ) API, you can use the Universal 2nd Factor (U2F) security tokens such as YubiKeys for multi-factor authentication (MFA) to identify providers ( IdPs ) such as Onelogin or Okta.
This feature is supported for Windows, macOS, Linux, and Android, and iOS devices starting with GlobalProtect™ app 5.2.
- Change the pre-deployed settings on Windows, macOS, Linux, and Android, and iOS endpoints to use the default system browser for SAML authentication.
You must set the pre-deployed settings on the client endpoints before you can enable the default system browser for SAML authentication. GlobalProtect retrieves these entries only once, when the GlobalProtect app initializes.
If there is no pre-deployed value specified on the end users’ Windows or macOS endpoints when using the default system browser for SAML authentication, the Use Default Browser for SAML Authentication option is set to Yes in the portal configuration, and users upgrade the app from release 5.0.x or release 5.1.x to release 5.2.0 for the first time, the app will open an embedded browser instead of the default system browser. After users connect to the GlobalProtect app and the Use Default Browser for SAML Authentication option is set to Yes in the portal configuration, the app will open the default system browser on Windows and macOS endpoints at the next login.
If the default browser value is set to Yes in the pre-deployed setting of the client machine and the Use Default Browser for SAML Authentication option is set to No in the portal configuration, end users will not have the best user experience. The app will open the default system browser for SAML authentication for the first time. Because the default browser values differ between the client machine and the portal, the app detects a mismatch and opens an embedded browser at the next login.
The Use Default Browser for SAML Authentication option of the GlobalProtect portal and the pre-deployed settings in the client machine must have the same value to provide the best user experience.
- On Windows endpoints, you can use the System Center Configuration Manager (SCCM) to pre-deploy the GlobalProtect app 5.2 and set the DEFAULTBROWSER value to yes from the Windows Installer ( Msiexec ) using the following syntax:
msiexec.exe /i GlobalProtect.msi DEFAULTBROWSER=YES
- On macOS endpoints, set the default-browser value to yes in the macOS plist ( /Library/Preferences/com.paloaltonetworks.GlobalProtect.settings.plist ) for the GlobalProtect app using the following syntax:
sudo defaults write /Library/Preferences/com.paloaltonetworks.GlobalProtect.settings.plist '{"Palo Alto Networks" ={GlobalProtect={Settings={default-browser=yes;};};};}'
You must specify the plist key to launch the default system browser for SAML authentication after GlobalProtect app 5.2 is installed.
After you add the plist key, you must restart the GlobalProtect app in order for the plist key to take effect. After you restart the GlobalProtect app, the default system browser for SAML authentication launches. To restart the GlobalProtect app:
- Launch the Finder.
- Open the Applications folder:
- From the Finder sidebar, select Applications . If you do not see Applications in the Finder sidebar, select Go > Applications from the Finder menu bar.
- Open the Utilities folder.
- Launch Terminal.
- Execute the following commands:
username>$ launchctl unload -S Aqua /Library/LaunchAgents/com.paloaltonetworks.gp.pangpa.plist
username>$ launchctl unload -S Aqua /Library/LaunchAgents/com.paloaltonetworks.gp.pangps.plist
username>$ launchctl load -S Aqua /Library/LaunchAgents/com.paloaltonetworks.gp.pangpa.plist
username>$ launchctl load -S Aqua /Library/LaunchAgents/com.paloaltonetworks.gp.pangps.plist
- On Linux endpoints, set the default-browser value to yes in the /opt/paloaltonetworks/globalprotect/pangps.xml pre-deployment configuration file under <Settings> . After you add the default-browser value, follow the pre-deployment instructions before you reboot the Linux endpoint in order for the change to take effect.
Starting from GlobalProtect Linux version 6.2.1, end users have the option to use the command-line interface (CLI) to connect to the GlobalProtect app when it is configured with SAML authentication and the default browser. Previously, the only way to connect to the GlobalProtect app configured with SAML authentication and the default browser was through the GUI version. To connect to the GlobalProtect app configured with SAML authentication using either the CLI or GUI version, it is mandatory to have the Firefox browser installed on the Linux endpoint. Use the latest Firefox ESR release version to ensure a seamless connection with SAML authentication on the default browser using either the CLI or GUI version.
- On Android and iOS endpoints, create a VPN profile by using the supported mobile device management system (MDM) such as Workspace ONE.
- Log in to Workspace ONE UEM as an administrator.
- Select an existing VPN profile ( Devices > Profiles & Resources > Profiles ) in the list.
- Select VPN to add a VPN profile.
On Android endpoints, enter the Custom Data Key ( use_default_browser_for_saml ). Enter the Custom Data Value ( true ).
On iOS endpoints, enter the Custom Data Key ( saml-use-default-browser ). Enter the Custom Data Value ( true ).
 Figure: Workspace ONE VPN Profile configuration for SAML default browser setting
- Click Save and Publish to save your changes.
- Set up SAML authentication to authenticate users.
In order for the default system browser for SAML authentication to not open multiple tabs for each connection, we recommend that you configure an authentication override.
- Enable the GlobalProtect app so that end users can leverage the same login for GlobalProtect and their default system browser for SAML authentication.
- Select Network > GlobalProtect > Portals > <portal-config> > Agent > <agent-config> > App > Use Default Browser for SAML Authentication .
- Select Yes to enable the GlobalProtect app to open the default system browser for SAML authentication.
If single-sign-on (SSO) is enabled, we recommend that you disable it. Set Use Single Sign-On (Windows) or Use Single Sign-On (macOS) to No to disable single sign-on when using the default system browser for SAML authentication.
- Click OK twice.
- Commit the configuration.
- Verify that end users can successfully authenticate to the IdP using their saved credentials.
- Select Refresh Connection , Connect , or Enable on the GlobalProtect app to initiate the connection. A new tab on the default browser of the system will open for SAML authentication.
- Login using the username and password to authenticate on the IdP.
- After end users can successfully authenticate on the IdP, click Open GlobalProtect .
- Connect to the GlobalProtect app or other SAML-enabled applications without re-entering the user credentials.
Enable Default Browser for SAML Authentication Using Client Authentication Setting
This feature is available starting from the PAN-OS 11.1.0 version.
This feature enables you to configure the GlobalProtect app to use the default browser to authenticate to the GlobalProtect portal through the Client Authentication setting ( Network > GlobalProtect > Portals > <portal-config> > Authentication > <client-authentication-config> ) of the portal configuration.
You can now select the Use Default Browser option on the Client Authentication screen for the app to use the default browser for SAML/CAS authentication to authenticate to the portal for the first time. The Use Default Browser option is displayed on the Client Authentication screen only when you choose SAML/CAS as the authentication profile.
Starting from PAN-OS 11.1.0, you do not need to set the pre-deployment keys/plist entries to configure the app to choose whether the app should use the default browser or embedded browser instead you can configure it through the Client Authentication setting of the portal configuration.
Consider the following while performing upgrade or downgrade of the PAN-OS versions:
Upgrade PAN-OS version from 11.0.x to 11.1.0:
- When you upgrade the PAN-OS version from 11.0.x to 11.1.0, then:
- The Use Default-Browser option is enabled (check box selected) in the Client Authentication setting of the portal configuration if any of the portal agent configuration has Use Default Browser for SAML Authentication option enabled.
- when you upgrade the PAN-OS version from 11.0.x to 11.1.0 and if the Use Default Browser for SAML Authentication option is set to No in the app settings, then:
- The Use Default Browser option is not added and the option is not displayed on the Client Authentication screen.
Downgrade PAN-OS version from 11.1.0 to an earlier version
If you downgrade the PAN-OS version from 11.1.0 to an earlier version, the Use Default Browser configuration that you have configured in the Client Authentication setting of the portal will be removed.
GlobalProtect gateway authentication configurations are not affected during the upgrade/downgrade scenarios.
Customize the SAML/CAS ACS Landing Page
| Where Can I Use This? | What Do I Need? |
|---|---|
|
|
You can now customize the SAML/CAS ACS landing page displayed on the default browser when you are using the SAML/CAS authentication method to authenticate to the GlobalProtect app. You can configure to rebrand or debrand the SAML/CAS ACS landing page on the default browser by using command-line interface (CLI) commands. By default, the feature is not enabled for the app.
This feature is not available on Panorama.
Before you customize the SAML/CAS ACS landing page, you must:
- Ensure that the GlobalProtect Portal is configured.
- Ensure that the GlobalProtect Gateway is configured.
- Ensure that the default browser for SAML authentication is enabled in the portal configuration through either or both of the following methods:
- Set the Use Default Browser for SAML Authentication option to Yes in the app settings of the GlobalProtect portal configuration.
- Enable the Use Default-Browser option in the client authentication setting of the portal configuration.
To configure the GlobalProtect portal to rebrand or debrand the SAML/CAS ACS landing page on the default browser, use the following CLI commands:
On the firewall hosting the portal, enter the following CLI command.
<username@hostname> set global-protect auth-response-page
The screen displays the CLI commands for the SAML/CAS ACS page customization feature:
 Figure: CLI output showing options for `set global-protect auth-response-page`
Use the following CLI commands to customize the SAML/CAS ACS landing page:
set global-protect auth-response-page type <default | none | custom>
- To continue using the default ACS page, leave the type empty or use the CLI command:
-
set global-protect auth-response-page type <default>
When you configure the global-protect auth-response-page type as <default> and the authentication is successful, the default ACS page is displayed with Authentication Complete message. If the Authentication fails, the screen displays the Authentication Failed message.
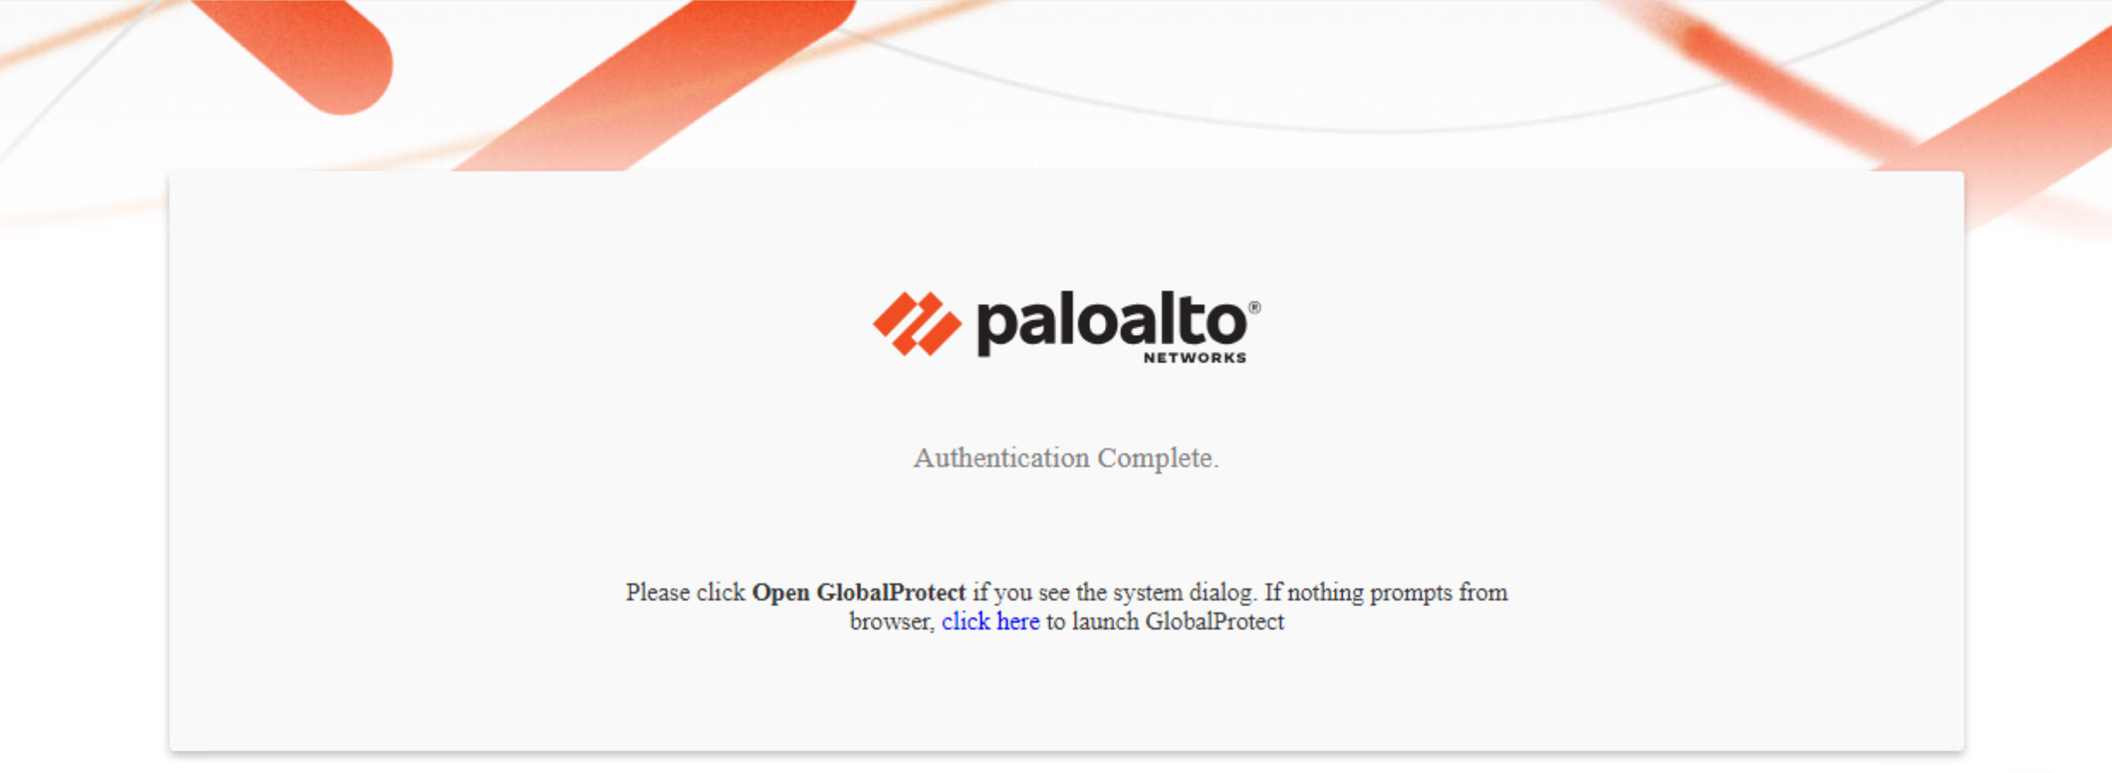 Figure: Default Authentication Complete landing page
- To remove the default logo, background image, footer logo, and footer text, use the CLI command:
-
set global-protect auth-response-page type <none>
 Figure: Blank Authentication Complete landing page after removing default elements
- To customize the page, use the CLI command:
-
set global-protect auth-response-page type <custom>
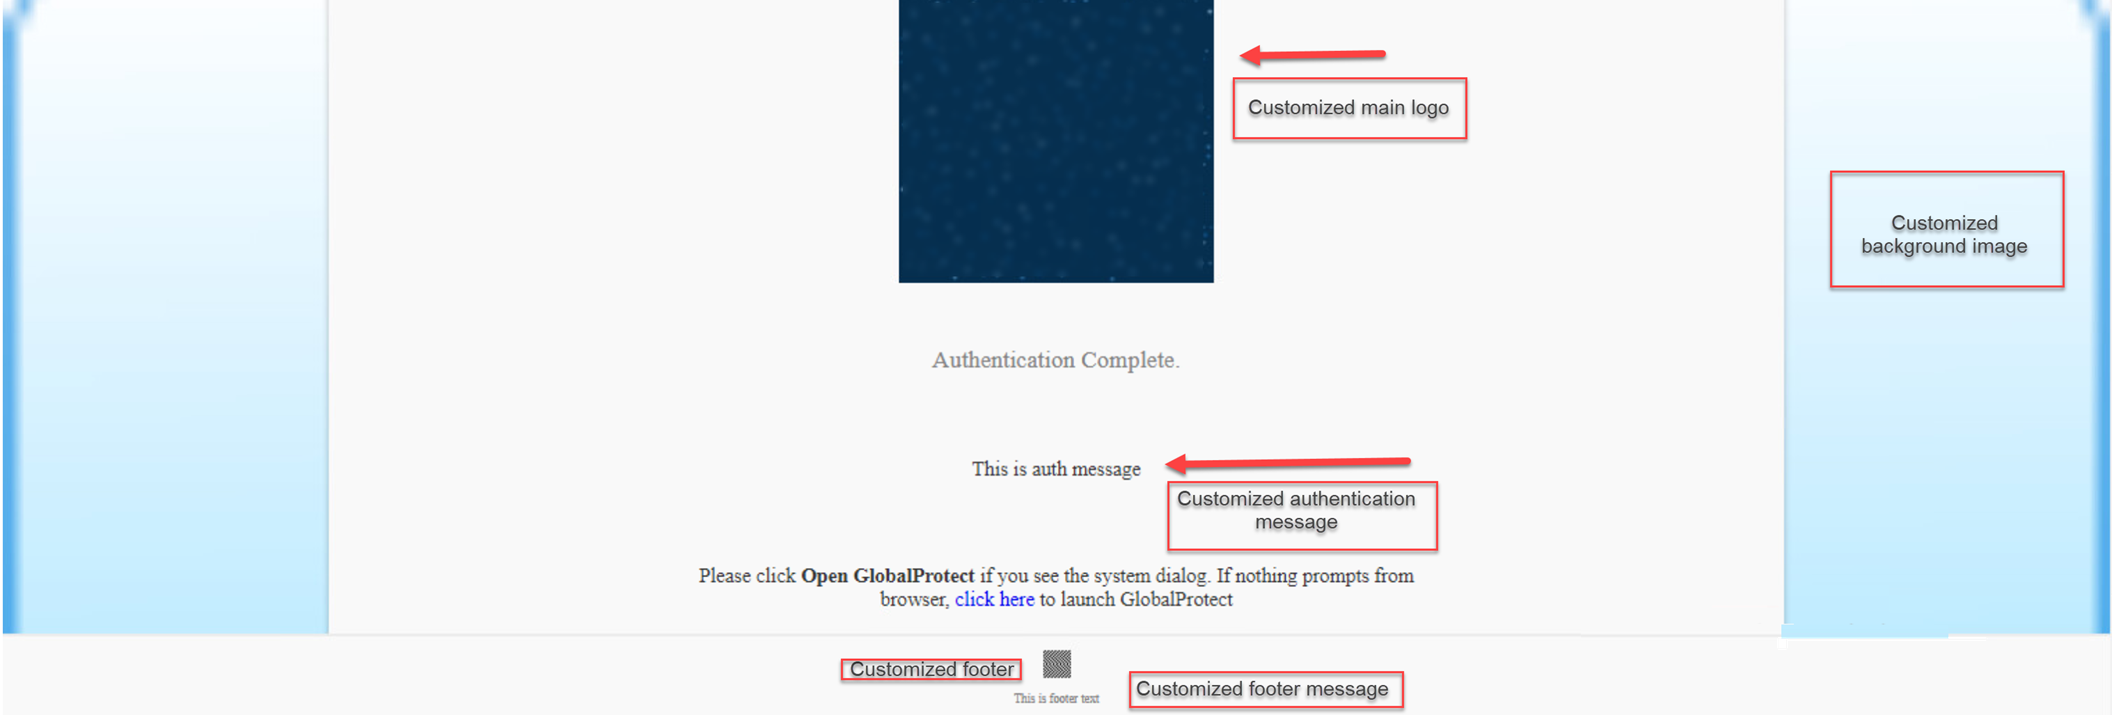 Figure: Example of a customized Authentication Complete landing page
Use the following CLI commands to customize the fields of the SAML/CAS ACS landing page:
set global-protect auth-response-page background-image <value>
set global-protect auth-response-page main-logo <value>
set global-protect auth-response-page auth-message <value>
set global-protect auth-response-page footer-logo <value>
set global-protect auth-response-page footer-text <value>
 Figure: CLI commands to set custom fields for the ACS landing page
- You can leave the values empty for all the fields except for the type <value>
- For image <value> , you must enter a valid HTTP or HTTPS URL
- For text <value> , do not enter any control characters such as \n, \r, \t, \0 or characters whose ascii value is < 0x1F
Use the following CLI command to view the current authentication response page settings:
set global-protect auth-response-page <show>
 Figure: CLI output showing current customized authentication response page settings
Character Limits for the Customized Fields
The following table lists the maximum character limits for the fields that you can customize and the screen displays error messages when you enter a value that exceeds the character limit.
| Field | Character Limit | Error Messages (When the Character Limit Exceeds) |
|---|---|---|
| Background Image URL | 2000 | Should be less than or equal to 2000 characters |
| Main Logo URL | 2000 | Should be less than or equal to 2000 characters |
| Footer Logo URL | 2000 | Should be less than or equal to 2000 characters |
| Authentication Message | 500 | Should be less than or equal to 500 characters |
| Footer Text | 256 | Should be less than or equal to 256 characters |
Image Resolution and Types for the Customized Fields
The feature supports all image types such as . png , .jpeg/.jpg, and . svg based on the browser compatibility. You must use proper image resolution (width x height) depending on the dimensions of the devices.
The following table lists the image resolution that you can apply while customizing the page:
| Image | Image Resolution |
|---|---|
| Background Image | Background image block width is 100% of the device/browser window width, and the height is calculated by the browser using the image aspect ratio. |
| Main Logo | Main logo image block width is around 50% of the device/browser window width with maximum width of 340 px , and the height is calculated by the browser using the image aspect ratio. |
| Footer Logo | Footer logo image block width is fixed to 30 px , and the height is calculated by the browser using the image aspect ratio. |
|
For the footer logo image the aspect ratio for the width: height must not be more than three times of the width (1:3). If the height ratio increases such as 1:4, the footer text may not be properly displayed on the screen. |
Set Up Kerberos Authentication
Kerberos is a computer network authentication protocol that uses tickets to allow nodes that communicate over a non-secure network to prove their identity to one another in a secure manner. Kerberos SSO maintains a seamless logon experience by providing accurate User-ID information without user interaction. Networks that support Kerberos SSO require end users to log in only during initial network access. After the initial login, end users can access any Kerberos-enabled service in the network (such as webmail) without having to log in again until the SSO session expires (the SSO session duration is established by the Kerberos administrator). This authentication method helps identify users for user and HIP policy enforcement.
Kerberos authentication is supported on Windows (7, 8, and 10) and macOS (10.10 and later releases) endpoints. Kerberos authentication for macOS endpoints requires a minimum GlobalProtect app version of 4.1.0.
Kerberos authentication is not supported in FIPS-CC mode.
If you enable both Kerberos SSO and an External Authentication (such as RADIUS), GlobalProtect attempts SSO first. You can configure GlobalProtect to fall back to an external authentication service when SSO fails or you can configure GlobalProtect to use only Kerberos SSO for authentication.
In this implementation, the GlobalProtect portal and gateway act as Kerberos service principals and the GlobalProtect app acts as a user principal that authenticates end users with a Kerberos service ticket from the Key Distribution Center (KDC).
The following items must be in place for the GlobalProtect app for macOS endpoints to support Kerberos SSO:
- A Kerberos infrastructure, which includes a KDC with an authentication server (AS) and a ticket-granting service (TGS).
The KDC must be reachable from the endpoints on which the GlobalProtect app is running. In most instances, the KDC is reachable only from inside the enterprise network, which means the GlobalProtect app can use Kerberos authentication only when the endpoint is internal. However, if the KDC is reachable from outside the enterprise network (from the Internet), the GlobalProtect app can use Kerberos authentication when the endpoint is external.
If the user certificate store contains at least one certificate that is issued by the same CA as the certificate used for pre-logon tunnel establishment, you can also use Kerberos authentication with pre-logon to enable the GlobalProtect app to use Kerberos authentication when the endpoint is external.
When an end user attempts to access protected network resources using Kerberos authentication, the AS grants the user a Ticket to Get Tickets (TGT), which is a service request used to generate service tickets from the TGS. The service ticket is then used to authenticate the end user and establish a service session.
- A Kerberos service account for each GlobalProtect portal and gateway.
Service accounts are required for creating Kerberos keytabs , which are files that contain the principal name and password of each GlobalProtect portal or gateway.
- Create a Kerberos keytab file.
- Log in to the KDC using your Kerberos service account credentials.
- Open a command prompt and then enter the following command:
ktpass /princ <principal_name> /pass <password> /crypto <algorithm> /ptype KRB5_NT_PRINCIPAL /out <file_name>.keytab
The <principal_name> and <password> are the principal name and password of the GlobalProtect portal or gateway. The <algorithm> must match the algorithm in the service ticket issued by the TGS, which is determined by the Kerberos administrator. If the GlobalProtect portal or gateway is running in FIPS or CC mode, the algorithm must be aes128-cts-hmac-sha1-96 or aes256-cts-hmac-sha1-96 . If the portal or gateway is not running in FIPS or CC mode, you can also use des3-cbc-sha1 or arcfour-hmac .
- Create a server profile for Kerberos authentication.
The server profile identifies the external authentication service and instructs the firewall on how to connect to that authentication service and access the authentication credentials for your users.
- Select Device > Server Profiles > Kerberos , and then Add a Kerberos server profile.
- Enter a Profile Name , such as GP-User-Auth .
- If this profile is for a firewall with multiple virtual systems capability, select a virtual system or Shared as the Location where the profile is available.
- Click Add in the Servers area, and then enter the following information for connecting to the authentication server:
- Server Name
- IP address or FQDN of the Kerberos Server
- Port
- Click OK to save the server profile.
- ( Optional ) Create an authentication profile.
The authentication profile specifies the server profile that the portal or gateways use when they authenticate users. On a portal or gateway, you can assign one or more authentication profiles in one or more client authentication profile. For information on how an authentication profile within a client authentication profile supports granular user authentication, see Configure a GlobalProtect Gateway and Set Up Access to the GlobalProtect Portal.
To enable users to connect and change their expired passwords without administrative intervention, consider using Remote Access VPN with Pre-Logon.
- Select Device > Authentication Profile , and then Add a new profile.
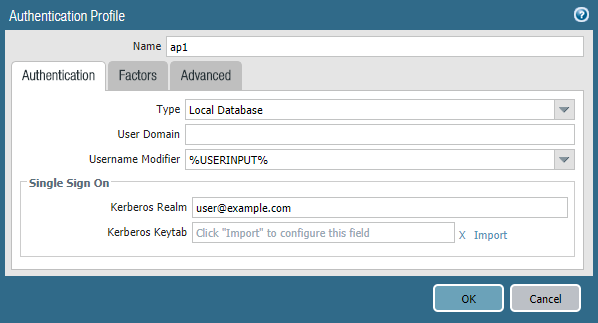 Figure: Authentication Profile Configuration window
- Enter a Name for the profile, and then select Kerberos as the authentication Type .
- Select the Kerberos authentication Server Profile that you created in step 1.
- Specify the User Domain and Username Modifier . The endpoint combines these values to modify the domain/username string that a user enters during login. The endpoint uses the modified string for authentication and the User Domain value for User-ID group mapping. Modifying user inputs is useful when the authentication service requires domain/username strings in a particular format but you do not want to rely on users entering the domain correctly. You can select from the following options:
- To send the unmodified user input, leave the User Domain blank (default) and set the Username Modifier to the variable %USERINPUT% (default).
- To prepend a domain to the user input, enter a User Domain and set the Username Modifier to %USERDOMAIN%\%USERINPUT% .
- To append a domain to the user input, enter a User Domain and set the Username Modifier to %USERINPUT%@%USERDOMAIN% .
- Configure Kerberos single sign-on (SSO) if your network supports it.
- Enter the Kerberos Realm (up to 127 characters) to specify the hostname portion of the user login name. For example, the user account name user@EXAMPLE.LOCAL has the realm EXAMPLE.LOCAL.
- Import a Kerberos Keytab file. When prompted, Browse for the keytab file, and then click OK .
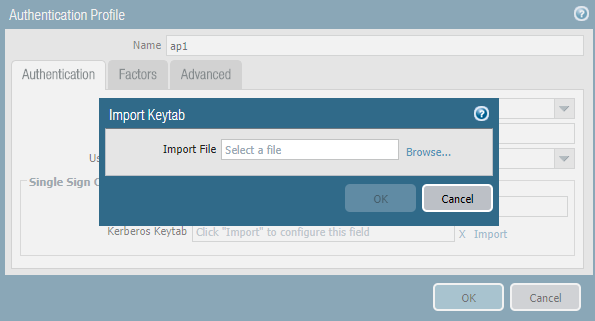 Figure: Importing a Kerberos Keytab file
- On the Advanced tab, Add an Allow List to select the users and user groups that are allowed to authenticate with this profile. The all option allows every user to authenticate with this profile. By default, the list has no entries, which means no users can authenticate.
During authentication, the endpoint first attempts to establish SSO using the keytab . If it is successful, and the user attempting access is in the Allow List , authentication succeeds immediately. Otherwise, the authentication process falls back to manual (username/password) authentication using the specified authentication Type . The Type does not have to be Kerberos. To change this behavior so users can authenticate using only Kerberos, set Use Default Authentication on Kerberos Authentication Failure to No in the GlobalProtect portal agent configuration.
- Click OK .
- Assign the authentication profile a gateway.
- Select Network > GlobalProtect > Gateways to modify an existing gateway or Add a new one.
 Figure: GlobalProtect Gateway Authentication Tab
- Select an existing SSL/TLS Service Profile for securing the gateway, or Add a new service profile ( Network > GlobalProtect > Gateways > <gateway-config> > Authentication ).
- Add a Client Authentication configuration ( Network > GlobalProtect > Gateways > <gateway-config> > Authentication ), and then configure the following settings:
- Name —Name of the client authentication configuration.
- OS —Operating systems on which the gateway can be accessed.
- Authentication Profile —Authentication profile to which your Kerberos keytab file was imported.
- ( Optional ) Username Label —Custom username label for GlobalProtect gateway login.
- ( Optional ) Password Label —Custom password label for GlobalProtect gateway login.
- ( Optional ) Authentication Message —Message that is displayed when end users authenticate to the gateway.
- Click OK to save your changes.
- Assign the authentication profile to the GlobalProtect portal.
- Select Network > GlobalProtect > Portals .
- Select an existing portal or Add a new one.
 Figure: GlobalProtect Portal Authentication Tab
- Select an existing SSL/TLS Service Profile for securing the portal, or Add a new service profile ( Network > GlobalProtect > Portals > <portal-config> > Authentication ).
- Add a Client Authentication configuration ( Network > GlobalProtect > Portals > <portal-config> > Authentication ), and then configure the following settings:
- Name —Name of the client authentication configuration.
- OS —Operating systems on which the portal can be accessed.
- Authentication Profile —Authentication profile to which your Kerberos keytab file is imported.
- ( Optional ) Username Label —Custom username label for GlobalProtect portal login.
- ( Optional ) Password Label —Custom password label for GlobalProtect portal login.
- ( Optional ) Authentication Message —Message that is displayed when end users log in to the portal.
- Click OK to save your changes.
- Commit the configuration.
Click Commit .
Set Up RADIUS or TACACS+ Authentication
RADIUS is a client/server protocol and software that enables remote access servers to communicate with a central server to authenticate dial-in users and authorize their access to the requested system or service. TACACS+ is a well-established authentication protocol, common to UNIX networks, that allows a remote access server to forward a user's login password to an authentication server to determine whether access can be allowed to a given system.
- Create a server profile.
The server profile identifies the external authentication service and instructs the firewall how to connect to that authentication service and access the authentication credentials for your users.
If you want to Enable Delivery of VSAs to a RADIUS Server, you must create a RADIUS server profile.
- Select Device > Server Profiles , and then select the profile type ( RADIUS or TACACS+ ).
- Add a new RADIUS or TACACS+ server profile.
- Enter a Profile Name , such as GP-User-Auth .
- If this profile is for a firewall with multiple virtual systems capability, select a virtual system or Shared as the Location where the profile is available.
- Configure the following Server Settings :
- Timeout (sec) —The number of seconds before a server connection request times out due to lack of response from the authentication server.
- Authentication Protocol —The protocol used to connect to the authentication server. Options include CHAP , PAP , PEAP-MSCHAPv2 , PEAP with GTC , or EAP-TTLS with PAP .
If you configure PEAP-MSCHAPv2 (Protected Extensible Authentication Protocol Microsoft Challenge Handshake Authentication Protocol version 2) as the authentication protocol, remote users can change their RADIUS or Active Directory (AD) passwords through the GlobalProtect app when their password expires or a RADIUS/AD administrator requires a password change at the next login.
- ( RADIUS Only ) Retries —The number of times the firewall attempts to connect to the authentication server before dropping the request.
- ( TACACS+ only ) Use single connection for all authentication —Option that allows all TACACS+ authentication requests to occur over a single TCP session rather than separate sessions for each request.
- Click Add in the Servers area, and then enter the following information for connecting to the authentication server:
- Name
- RADIUS or TACACS+ Server (IP address or FQDN of the server)
- Secret (shared secret that enables the authentication service to authenticate the firewall)
- Port
- Click OK to save the server profile.
- (Optional) Create an authentication profile.
The authentication profile specifies the server profile that the portal or gateways use when they authenticate users. On a portal or gateway, you can assign one or more authentication profiles in one or more client authentication profiles. For information on how an authentication profile within a client authentication profile supports granular user authentication, see Configure a GlobalProtect Gateway and Set Up Access to the GlobalProtect Portal.
To enable users to connect and change their own expired passwords without administrative intervention, consider using Remote Access VPN with Pre-Logon.
- Select Device > Authentication Profile , and then Add a new profile.
- Enter a Name for the profile.
- Select the Authentication Type ( RADIUS or TACACS+ ).
- Select the RADIUS or TACACS+ authentication Server Profile that you created in step 1 from the drop-down.
- ( RADIUS only ) Enable Retrieve user group from RADIUS if you want to include this information in the authentication profile.
- Specify the User Domain and Username Modifier . The endpoint combines these values to modify the domain/username string that a user enters during login. The endpoint uses the modified string for authentication and the User Domain value for User-ID group mapping. Modifying user inputs is useful when the authentication service requires domain/username strings in a particular format and but you do not want to rely on users entering the domain correctly. You can select from the following options:
- To send the unmodified user input, leave the User Domain blank (the default) and set the Username Modifier to the variable %USERINPUT% (the default).
- To prepend a domain to the user input, enter a User Domain and set the Username Modifier to %USERDOMAIN%\%USERINPUT% .
- To append a domain to the user input, enter a User Domain and set the Username Modifier to %USERINPUT%@%USERDOMAIN% .
- On the Advanced tab, Add an Allow List to select the users and user groups that are allowed to authenticate with this profile. The all option allows every user to authenticate with this profile. By default, the list has no entries, which means no users can authenticate.
- Click OK .
- Commit the configuration.
Set Up Client Certificate Authentication
With the optional client certificate authentication, the user presents a client certificate along with a connection request to the GlobalProtect portal or gateway. The portal or gateway can use either a shared or unique client certificate to validate that the user or endpoint belongs to your organization.
- To authenticate the user, one of the certificate fields, such as the Subject Name field, must identify the username.
- To authenticate the endpoint, the Subject field of the certificate must identify the device type instead of the username. (With the pre-logon connect methods, the portal or gateway authenticates the endpoint before the user logs in.)
If you configure the portal or gateway to authenticate users through client certificate authentication, users will not have the option to Sign Out of the GlobalProtect app if they authenticate successfully using only a client certificate.
Starting from GlobalProtect for Governments app 6.0.12 version (FIPS-CC mode), certificate-based authentication is supported on iOS endpoints.
For an agent configuration profile that specifies client certificates, each user receives a client certificate. The mechanism for providing the certificates determines whether a certificate is unique to each user or the same for all users under that agent configuration:
- To deploy client certificates that are unique to each user and endpoint, use SCEP . When a user first logs in, the portal requests a certificate from the enterprise’s PKI. The portal obtains a unique certificate and deploys it to the endpoint.
- To deploy the same client certificate to all users that receive an agent configuration, deploy a certificate that is Local to the firewall.
Use an optional certificate profile to verify the client certificate that the endpoint presents with a connection request. The certificate profile specifies the contents of the username and user domain fields; lists CA certificates; criteria for blocking a session; and offers ways to determine the revocation status of CA certificates.
Because the certificate is part of the authentication of the endpoint or user for a new session, you must pre-deploy certificates used in certificate profiles to the endpoints before the users’ initial portal login.
The certificate profile specifies which certificate field contains the username. If the certificate profile specifies Subject in the Username Field, the certificate presented by the endpoint must contain a common-name for the endpoint to connect. If the certificate profile specifies a Subject-Alt with an Email or Principal Name as the Username Field, the certificate from the endpoint must contain the corresponding fields, which will be used as the username when the GlobalProtect app authenticates to the portal or gateway.
GlobalProtect also supports authentication by common access cards (CACs) and smart cards, which rely on a certificate profile. With these cards, the certificate profile must contain the root CA certificate that issued the certificate to the smart card or CAC.
If you specify client certificate authentication, you should not configure a client certificate in the portal configuration because the endpoint provides it when the user connects.
For an example of how to configure client certificate authentication, see Remote Access VPN (Certificate Profile).
The methods for deploying client certificates depend on the security requirements for your organization:
- Deploy Shared Client Certificates for Authentication
- Deploy Machine Certificates for Authentication
- Deploy User-Specific Client Certificates for Authentication
Deploy Machine Certificates for Authentication
To confirm that the endpoint belongs to your organization, use your own public-key infrastructure (PKI) to issue and distribute machine certificates to each endpoint (recommended) or generate a self-signed machine certificate for export. With the pre-logon connect methods, a machine certificate is required and must be installed on the endpoint before GlobalProtect components grant access.
To confirm that the endpoint belongs to your organization, you must also configure an authentication profile to authenticate the user (see Two-Factor Authentication).
Use the following workflow to create the client certificate and manually deploy it to an endpoint. For more information, see GlobalProtect User Authentication. For an example configuration, see Remote Access VPN (Certificate Profile).
- Issue client certificates to GlobalProtect apps and endpoints.
This enables the GlobalProtect portal and gateways to validate that the endpoint belongs to your organization.
- Create the root CA certificate for issuing self-signed certificates for the GlobalProtect components.
- Select Device > Certificate Management > Certificates > Device Certificates , and then click Generate .
- Enter a Certificate Name . The certificate name cannot contain any spaces.
- Enter the IP address or FQDN that will appear on the certificate in the Common Name field.
- Select your root CA from the Signed By drop-down.
- Select an OCSP Responder to verify the revocation status of certificates.
- Configure the Cryptographic Settings for the certificate, including the encryption Algorithm , key length ( Number of Bits ), Digest algorithm (use sha1, sha256, sha384, or sha512), and Expiration (in days) for the certificate.
If the firewall is in FIPS-CC mode and the key generation algorithm is RSA, the RSA keys must be 2,048 bits or 3072 bits.
- In the Certificate Attributes area, Add and define the attributes that uniquely identify the endpoints as belonging to your organization. Keep in mind that if you add a Host Name attribute (which populates the SAN field of the certificate), it must be the same as the Common Name value you defined.
- Click OK to generate the certificate.
- Install certificates in the personal certificate store on the endpoints.
If you are using unique user certificates or machine certificates, you must install each certificate in the personal certificate store on the endpoint prior to the first portal or gateway connection.
- Windows —Install machine certificates to the Local Computer certificate store and install user certificates to the Current User certificate store.
- macOS —Install machine certificates in the System Keychain and install user certificates in the Keychain on macOS.
- Linux —If you use the Cloud Identity Engine for authentication, import the client certificate into any browsers that access web pages that require authentication.
For example, to install a certificate on a Windows system using the Microsoft Management Console:
- From the command prompt, enter mmc to launch the Microsoft Management Console.
- Select File > Add/Remove Snap-in .
- From the list of Available snap-ins , select Certificates , and then Add and select one of the following certificate snap-ins, depending on what type of certificate you are importing:
- Computer account —Select this option if you are importing a machine certificate.
- My user account —Select this option if you are importing a user certificate.
 Figure: Microsoft Management Console Add or Remove Snap-ins window
- From the Console Root , expand Certificates , and then select Personal .
- In the Actions column, select Personal > More Actions > All Tasks > Import and follow the steps in the Certificate Import Wizard to import the PKCS file you received from the CA.
 Figure: Certificate Import Wizard
- Browse to and select the .p12 certificate file to import (select Personal Information Exchange as the file type to browse for) and enter the Password that you used to encrypt the private key. Set the Certificate store to Personal .
- Verify that the certificate has been added to the personal certificate store.
Navigate to the personal certificate store from the Console Root ( Certificates > Personal > Certificates ):
 Figure: Personal Certificate Store view in Microsoft Management Console
- Import the root CA certificate used to issue the client certificates onto the firewall.
This step is required only if an external CA issued the client certificates, such as a public CA or an enterprise PKI CA. If you are using self-signed certificates, the root CA is already trusted by the portal and gateways.
- Download the root CA certificate used to issue the client certificates (Base64 format).
- Import the root CA certificate from the CA that generated the client certificates onto the firewall:
- Select Device > Certificate Management > Certificates > Device Certificates and click Import
- Set the Certificate Type to Local (default).
- Enter a Certificate Name that identifies the certificate as your client CA certificate.
- Browse to and select the Certificate File you downloaded from the CA.
- Set the File Format to Base64 Encoded Certificate (PEM) , and then click OK .
- On the Device Certificates tab, select the certificate you just imported to open the Certificate Information.
- Select Trusted Root CA and then click OK .
- Create a client certificate profile.
When you configure two-factor authentication to use client certificates, the external authentication service uses the username value to authenticate the user, if specified, in the client certificate. This ensures that the user who is logging is in is actually the user to whom the certificate was issued.
- Select Device > Certificates > Certificate Management > Certificate Profile to Add a new certificate profile.
- Enter a profile Name .
- Select one of the following Username Field values:
- If you intend for the client certificate to authenticate individual users, select the certificate field that identifies the user.
- If you are deploying the client certificate from the portal, select None .
- If you are setting up a certificate profile for use with a pre-logon connect method, select None .
- Add the CA Certificates that you want to assign to the profile, and then configure the following settings:
- Select the CA certificate , either a trusted root CA certificate or the CA certificate from a SCEP server. If necessary, import the certificate.
- ( Optional ) Enter the Default OCSP URL .
- ( Optional ) Select a certificate for OCSP Verify Certificate .
- ( Optional ) Enter the Template Name for the template that was used to sign the certificate.
- ( Optional ) Select the following options to specify when to block the user’s requested session:
- Status of certificate is unknown.
- GlobalProtect component does not retrieve certificate status within the number of seconds in Certificate Status Timeout .
- Serial number attribute in the subject of a client certificate does not match the host ID that the GlobalProtect app reports for the endpoint.
- Certificates have expired.
- Click OK .
- Save the configuration.
Commit the changes.
Deploy User-Specific Client Certificates for Authentication
To authenticate individual users, you must issue a unique client certificate to each GlobalProtect user and deploy the client certificate to the endpoints prior to enabling GlobalProtect. To automate the generation and deployment of user-specific client certificates, you can configure your GlobalProtect portal to act as a Simple Certificate Enrollment Protocol (SCEP) client to a SCEP server in your enterprise PKI.
If you include a client certificate in the portal configuration for mobile devices, you can only use client certificate authentication in the gateway configuration because the client certificate passphrase is saved in the portal configuration. Additionally, the client certificate can only be used after the certificate is retrieved from the portal configuration.
SCEP operation is dynamic in that the enterprise PKI generates a user-specific certificate when the portal requests it and sends the certificate to the portal. The portal then deploys the certificate to the app transparently. When a user requests access, the app can then present the client certificate to authenticate with the portal or gateway.
The GlobalProtect portal or gateway uses identifying information about the endpoint and the user to evaluate whether to permit access to the user. GlobalProtect blocks access if the host ID is on a device block list or if the session matches any blocking options specified in a certificate profile.
If authentication fails due to an invalid SCEP-based client certificate, the GlobalProtect app tries to authenticate with the portal (based on the settings in the authentication profile) and retrieve the certificate. If the app cannot retrieve the certificate from the portal, the endpoint is not able to connect.
- Create a SCEP profile.
- Select Device > Certificate Management > SCEP , and then Add a new SCEP profile.
- Enter a Name to identify the SCEP profile.
- If this profile is for a firewall with multiple virtual systems capability, select a virtual system or Shared as the Location where the profile is available.
- ( Optional ) To make the SCEP-based certificate generation more secure, configure a SCEP challenge-response mechanism between the PKI and portal for each certificate request.
After you configure this mechanism, its operation is invisible, and no further input is necessary.
To comply with the U.S. Federal Information Processing Standard (FIPS), use a Dynamic SCEP Challenge and specify a Server URL that uses HTTPS (see step 7).
Select one of the following SCEP Challenge options:
- None —( Default ) The SCEP server does not challenge the portal before it issues a certificate.
- Fixed —Enter the enrollment challenge Password obtained from the SCEP server in the PKI infrastructure.
- Dynamic —Enter a Username and Password of your choice (possibly the credentials of the PKI administrator) and the SCEP Server URL where the portal-client submits these credentials. The credentials are used to authenticate with the SCEP server, which transparently generates an OTP password for the portal upon each certificate request (you can see this OTP change after a screen refresh in The enrollment challengepassword is field after each certificate request). The PKI transparently passes each new password to the portal, which then uses the password for its certificate request.
- Specify the connection settings between the SCEP server and the portal to enable the portal to request and receive client certificates.
You can include additional information about the endpoint or user by specifying tokens in the Subject name of the certificate.
In the Subject field of the CSR to the SCEP server, the portal includes the token value as CN and Host-ID as SerialNumber . The host ID varies by endpoint type: GUID (Windows), MAC address of the interface (macOS), Android ID (Android endpoints), UDID (iOS endpoints), or a unique name that GlobalProtect assigns (Chrome).
- In the Configuration area, enter the Server URL that the portal uses to reach the SCEP server in the PKI (for example, http://10.200.101.1/certsrv/mscep/ ).
- Enter a CA-IDENT Name (up to 255 characters in length) to identify the SCEP server.
- Enter the Subject name to use in the certificates generated by the SCEP server. The subject must be a distinguished name in the <attribute>=<value> format and must include a common name (CN) attribute ( CN=<variable> ). The CN supports the following dynamic tokens:
- $USERNAME —Use this token to enable the portal to request certificates for a specific user. To use this variable, you must also Enable Group Mapping. The username entered by the user must match the name in the user-group mapping table.
- $EMAILADDRESS —Use this token to request certificates associated with a specific email address. To use this variable, you must also Enable Group Mapping and configure the Mail Attributes in the Mail Domains area of the server profile. If GlobalProtect cannot identify an email address for the user, it generates a unique ID and populates the CN with that value.
- $HOSTID —To request certificates for the endpoint only, specify the host ID token. When a user attempts to log in to the portal, the endpoint sends identifying information that includes its host ID value.
When the GlobalProtect portal pushes the SCEP settings to the app, the CN portion of the subject name is replaced with the actual value (username, host ID, or email address) of the certificate owner (for example, O=acme,CN=johndoe ).
- Select the Subject Alternative Name Type :
- RFC 822 Name —Enter the email name in a certificate’s subject or Subject Alternative Name extension.
- DNS Name —Enter the DNS name used to evaluate certificates.
- Uniform Resource Identifier —Enter the name of the resource from which the app will obtain the certificate.
- None —Do not specify attributes for the certificate.
- ( Optional ) Configure Cryptographic Settings for the certificate.
- Select the Number of Bits (key length) for the certificate.
If the firewall is in FIPS-CC mode and the key generation algorithm is RSA. The RSA keys must be 2,048 bits or larger.
- Select the Digest for CSR which indicates the digest algorithm for the certificate signing request (CSR): sha1, sha256, sha384, or sha512.
- ( Optional ) Configure the permitted uses of the certificate, either for signing or encryption.
- To use this certificate for signing, select the Use as digital signature check box. This option enables the endpoint to use the private key in the certificate to validate a digital signature.
- To use this certificate for encryption, select the Use for key encipherment check box. This option enables the app to use the private key in the certificate to encrypt data exchanged over the HTTPS connection established with the certificates issued by the SCEP server.
- ( Optional ) To ensure that the portal is connecting to the correct SCEP server, enter the CA Certificate Fingerprint . Obtain this fingerprint from the Thumbprint field of the SCEP server interface.
- Enter the URL for the SCEP server’s administrative UI (for example, http://<hostname or IP>/CertSrv/mscep_admin/ ).
- Copy the thumbprint and enter it in the CA Certificate Fingerprint field.
- Enable mutual SSL authentication between the SCEP server and the GlobalProtect portal. This is required to comply with the U.S. Federal Information Processing Standard (FIPS).
FIPS-CC operation is indicated on the firewall login page and its status bar.
Select the SCEP server’s root CA Certificate . Optionally, you can enable mutual SSL authentication between the SCEP server and the GlobalProtect portal by selecting a Client Certificate .
- Save and commit the configuration.
- Click OK to save the settings.
- Commit the configuration.
The portal attempts to request a CA certificate using the settings in the SCEP profile, and then saves it to the firewall hosting the portal. If successful, the CA certificate is shown in Device > Certificate Management > Certificates .
- ( Optional ) If the portal fails to obtain the certificate after saving the SCEP profile, you can manually generate a certificate signing request (CSR) from the portal.
- Select Device > Certificate Management > Certificates > Device Certificates , and then Generate a new certificate.
- Select SCEP as the Certificate Type .
- Enter a Certificate Name . This name cannot contain spaces.
- Select the SCEP Profile to use to submit a CSR to your enterprise PKI.
- Click OK to submit the request and generate the certificate.
- Set Up Two-Factor Authentication.
Assign the SCEP profile a GlobalProtect portal agent configuration to enable the portal to transparently request and deploy client certificates to apps that receive the configuration.
Enable Certificate Selection Based on OID
If you deploy multiple certificates to your end user devices for distinct use cases--for example machine certificates, user certificates, and email encryption certificates all issued by the same certificate authority--it can be difficult to distinguish which certificate to use in which use case. To help with this, you can designate a specific object identifier (OID) that you want GlobalProtect to use to identify which certificate to use. This simplifies and improves the certificate selection process when your macOS or Windows endpoints have multiple certificates installed.
An OID is a numeric value that identifies the application or service for which a certificate is used. When the certificate authority (CA) creates the certificate, the CA automatically includes the OID in the Enhanced Key Usage field.
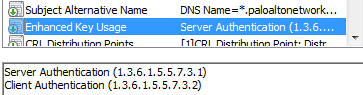 Figure: Certificate Details showing Enhanced Key Usage field with OIDs
When you create the certificate, you can specify the OID to identify the certificate’s purpose. By default, GlobalProtect automatically filters the certificates for those that specify a Client Authentication purpose (OID 1.3.6.1.5.5.7.3.2) so it is not necessary to specify the OID associated with Client Authentication. However, if you want to use a different OID to distinguish the certificate you want GlobalProtect to select, you can specify a different certificate usage when you create the certificate and then instruct GlobalProtect to select the certificate with the corresponding OID. Some of the most commonly used OIDs are:
- 1.3.6.1.5.5.7.3.1—Server Authentication
- 1.3.6.1.5.5.7.3.3—Code Signing
- 1.3.6.1.5.5.7.3.4—Email Protection
- 1.3.6.1.5.5.7.3.5—IPSec End System
- 1.3.6.1.5.5.7.3.6—IPSec Tunnel
- 1.3.6.1.5.5.7.3.7—IPSec User
- 1.3.6.1.5.5.7.3.8—Time Stamping
- 1.3.6.1.5.5.7.3.9—OCSP Signing
For example, say your endpoints have four client certificates installed, but the one you want your users to select has the OID 1.3.6.1.5.5.7.3.1. Rather than having the GlobalProtect app to present all four client certificates to the user, you can specify the Extended Key Usage OID in the GlobalProtect portal app configuration for the users whose endpoints have multiple client certificates.
Keep in mind that if multiple client certificates on the endpoint have the matching OID, GlobalProtect will prompt the user to select the client certificate from the filtered list.
GlobalProtect uses only the Extended Key Usage OID field of the certificate and does not evaluate any other certificate fields such as Subject Name to determine whether to present the certificates.
Note that the Extended Key Usage OID value is different from the Certificate Template Information OID. For other certificate selection requirements, see How Does the App Know Which Certificate to Supply?
To configure the OID as a requirement for certificate selection:
- ( Optional ) Create or edit the client certificate and note the associated OID.
- Open the Certificate Templates snap-in.
- In the Details pane, create or edit the certificate template you want to modify, and then click Properties.
- On the Extensions tab, select Application Policies > Edit .
- In the Edit Application Policies Extension dialog box, click Add .
- In Add Application Policy, ensure that the application you are creating does not exist, and then click New .
- In the New Application Policy dialog box, provide the name for the new application policy (for example GlobalProtect Authentication).
- Note the generated object identifier, and then click OK .
- Specify the certificate’s object identifier (OID) in the Extended Key Usage OID field as part of the appropriate GlobalProtect portal app configuration.
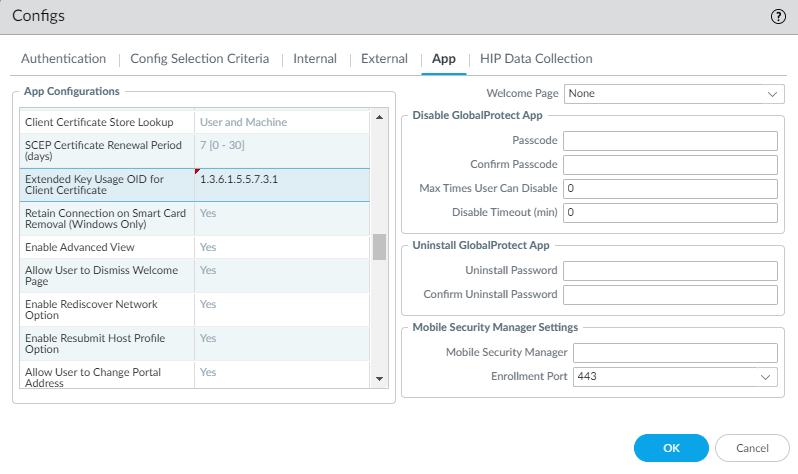 Figure: GlobalProtect Portal App Configuration showing Extended Key Usage OID field
Support for Native Certificate Store for Prisma Access and GlobalProtect App on Linux Endpoints
| Where Can I Use This? | What Do I Need? |
|---|---|
|
|
The support for native certificate store enables the GlobalProtect app installed on the Linux endpoints to use certificates from the certificate store for:
- Client cert authentication to the portal and gateway
- GlobalProtect app log reporting
Previously the GlobalProtect app used the client certificates installed using the GlobalProtect CLI command, which is available only in the /opt/paloaltonetworks/globalprotect/ file directory on Linux endpoints.
To configure GlobalProtect app to use the certificate in the native certificate store, you must:
- Place the certificate in the native store location.
For example:
sudo cp xxxxx.cert.pem /etc/ssl/certs
sudo cp xxxxx.key.pem /etc/ssl/private
The following are the cert store locations for various Linux platforms:
- Ubuntu :
- Cert: /etc/ssl/certs
- Key: /etc/ssl/private
- Fedora :
- Cert: /etc/ssl/certs
- Key: /etc/ssl/private
- Red Hat
- Cert: /etc/pki/tls/certs
- Key: /etc/pki/tls/private
The supported formats are:
- .pem
- .p12
- When the certificate is .pem format, the certificate will reside in /etc/ssl/certs location and the key will reside in /etc/ssl/private location. The key file in /etc/ssl/private can be either .pem or .key format
- When the certificate is .p12 format, the format already contains the key and there will only be a certificate containing the key in /etc/ssl/certs location.
Root access is required to place the certificate using sudo cp command in the locations as mentioned in Step 1 for various Linux platforms, for example, for Ubuntu:
 Figure: Linux CLI showing the use of `sudo cp` to place certificate files
- Optional Store the key in the /etc/ssl/private folder if the certificate is .pem format.
- Connect GlobalProtect, select your client certificate, and proceed with the next steps. End users must enter the passcode to authenticate to the app for the first time. The app will not prompt end users to enter the passcode for the subsequent authentication attempts unless the app is uninstalled or the user is signed out of GlobalProtect from the portal.
If the certificate format used is .pem and when there is more than one certificate matching the criteria, the GlobalProtect app filters the certificates and displays the list of certificates in the Certificate Selection pop-up window. For the Certificate Selection pop-up window to display the certificate in the list, it should;
- Match the CA list
- Match the Client Authentication OID
- Not be in Pending or Expired status.
If the format used is .p12 , the app does not filter the certificates and the Certificate Selection pop-up window displays all the certificates.
Upgrade Scenario:
- When you are using Client Certificate Authentication and upgrade to the GlobalProtect app version 6.2.0, you must reboot your system after a successful version upgrade.
Set Up Two-Factor Authentication
If you require strong authentication to protect sensitive assets or comply with regulatory requirements, such as PCI, SOX, or HIPAA, configure GlobalProtect to use an authentication service that uses a two-factor authentication scheme. A two-factor authentication scheme requires two things: something the end user knows (such as a PIN or password) and something the end user has (a hardware or software token/OTP, smart card, or certificate).
You can also enable two-factor authentication using a combination of external authentication services, and client and certificate profiles.
Two-factor authentication supports Remote Access VPN with Pre-Logon with GlobalProtect app 5.0 and later releases.
The following topics provide examples on how to set up two-factor authentication on GlobalProtect:
- Enable Two-Factor Authentication Using Certificate and Authentication Profiles
- Enable Two-Factor Authentication Using One-Time Passwords (OTPs)
- Enable Two-Factor Authentication Using Smart Cards
- Enable Two-Factor Authentication Using a Software Token Application
Enable Two-Factor Authentication Using Certificate and Authentication Profiles
The following workflow describes how to configure GlobalProtect to require users to authenticate to both a certificate profile and an authentication profile. The user must successfully authenticate using both methods in order to connect to the portal/gateway. For more details on this configuration, see Remote Access VPN with Two-Factor Authentication.
If the certificate profile specifies a Username Field , from which GlobalProtect can obtain a username, the external authentication service automatically uses that username to authenticate the user to the external authentication service specified in the authentication profile. For example, if the Username Field in the certificate profile is set to Subject , the common-name field value of the certificate is used as the username when the authentication server tries to authenticate the user. If you do not want to force users to authenticate with a username from the certificate, make sure the Username Field in the certificate profile is set to None .
See Remote Access VPN with Two-Factor Authentication for an example configuration.
- Create an authentication server profile.
The authentication server profile determines how the firewall connects to an external authentication service and retrieves the authentication credentials for your users.
If you are using LDAP to connect to Active Directory (AD), you must create a separate LDAP server profile for every AD domain.
- Select Device > Server Profiles and a profile type ( LDAP , Kerberos , RADIUS , or TACACS+ ).
- Add a new server profile.
- Enter a Profile Name , such as gp-user-auth .
- ( LDAP Only ) Select the LDAP server Type ( active-directory , e-directory , sun , or other ).
- Click Add in the Servers or Servers List area (depending on the type of server profile), and then enter the following information for connections to the authentication service:
- Name of the server
- IP address of FQDN of the Server
- Port
- ( RADIUS, TACACS+, and LDAP only ) Specify the following settings to enable the firewall to authenticate to the authentication service:
- RADIUS and TACACS+—Enter the shared Secret when adding the server entry.
- LDAP—Enter the Bind DN and Password .
- ( LDAP only ) If you want the endpoint to use SSL or TLS for a more secure connection with the directory server, enable the option to Require SSL/TLS secured connection (enabled by default). The protocol that the endpoint uses depends on the server Port in the Server list :
- 389 (default)—TLS (specifically, the endpoint uses the StartTLS operation to upgrade the initial plaintext connection to TLS).
- 636—SSL.
- Any other port—The endpoint first attempts to use TLS. If the directory server does not support TLS, the endpoint uses SSL.
- ( LDAP only ) For additional security, enable the option to Verify Server Certificate for SSL sessions so that the endpoint verifies the certificate that the directory server presents for SSL/TLS connections. To enable verification, you also must enable the option to Require SSL/TLS secured connection . In order for verification to succeed, one of the following conditions must be true:
- The certificate is in the list of device certificates: Device > Certificate Management > Certificates > Device Certificates . Import the certificate into the endpoint if necessary.
- The certificate signer is in the list of trusted certificate authorities: Device > Certificate Management > Certificates > Default Trusted Certificate Authorities .
- Click OK to save the server profile.
- Create an authentication profile that identifies the service for authenticating users. You later have the option of assigning the profile on the portal and gateways.
- Select Device > Authentication Profile , and then Add a new profile.
- Enter a Name for the profile.
- Select the Authentication Type .
- Select the Server Profile you created in step 1.
- ( LDAP Only ) Enter sAMAccountName as the Login Attribute .
- Click OK to save the authentication profile.
- Create a client certificate profile that the portal uses to authenticate the client certificates that come from user endpoints.
When you configure two-factor authentication to use client certificates, the external authentication service uses the username value to authenticate the user, if specified, in the client certificate. This ensures that the user who is logging is in is actually the user to whom the certificate was issued.
- Select Device > Certificates > Certificate Management > Certificate Profile , and then Add a new certificate profile.
- Enter a Name for the profile.
- Select one of the following Username Field values:
- If you intend for the client certificate to authenticate individual users, select the certificate field that identifies the user.
- If you are deploying the client certificate from the portal, select None .
- If you are setting up a certificate profile for use with a pre-logon connect method, select None .
- Add the CA Certificates that you want to assign to the profile, and then configure the following settings:
- Select the CA certificate , either a trusted root CA certificate or the CA certificate from a SCEP server. If necessary, import the certificate.
- ( Optional ) Enter the Default OCSP URL .
- ( Optional ) Select a certificate for OCSP Verify Certificate .
- ( Optional ) Enter the Template Name for the template that was used to sign the certificate.
- ( Optional ) Select the following options to specify when to block the user’s requested session:
- Status of certificate is unknown.
- GlobalProtect component does not retrieve certificate status within the number of seconds in Certificate Status Timeout .
- Serial number attribute in the subject of a client certificate does not match the host ID that the GlobalProtect app reports for the endpoint.
- Certificates have expired.
- Click OK .
- ( Optional ) Issue client certificates to GlobalProtect clients and endpoints.
To deploy client certificates transparently, configure your portal to distribute a shared client certificate to your endpoints or configure the portal to use SCEP to request and deploy unique client certificates for each user.
- Use your enterprise PKI or a public CA to issue a client certificate to each GlobalProtect user.
- For the pre-logon connect methods, install certificates in the personal certificate store on the endpoint.
- Save the GlobalProtect configuration.
Click Commit .
Enable Two-Factor Authentication Using One-Time Passwords (OTPs)
Use this workflow to configure two-factor authentication using one-time passwords (OTPs) on the portal and gateways. When a user requests access, the portal or gateway prompts the user to enter an OTP. The authentication service sends the OTP as a token to the user’s RSA device.
Setting up a two-factor authentication scheme is similar to setting up other types of authentication. The two-factor authentication scheme requires you to configure:
- A server profile (usually for a RADIUS service for two-factor authentication) assigned to an authentication profile.
- A client authentication profile that includes the authentication profile for the service that these components use.
By default, the app supplies the same credentials used to log in to the portal and gateway. In the case of OTP authentication, this behavior causes the authentication to initially fail on the gateway and, because of the delay this causes in prompting the user for a login, the user’s OTP may expire. To prevent this, you must configure the portals and gateways that prompt for the OTP instead of using the same credentials on a per-app configuration basis.
You can also reduce the frequency in which users are prompted for OTPs by configuring an authentication override. This enables the portals and gateways to generate and accept a secure encrypted cookie to authenticate the user for a specified amount of time. The portals and/or gateways do not require a new OTP until the cookie expires, thus reducing the number of times users must provide an OTP.
- After you have configured the back-end RADIUS service to generate tokens for the OTPs and ensured users have any necessary devices (such as a hardware token), set up a RADIUS server to interact with the firewall.
For specific instructions, refer to the documentation for your RADIUS server. In most cases, you need to set up an authentication agent and a client configuration on the RADIUS server to enable communication between the firewall and the RADIUS server. You must also define the shared secret to use for encrypting sessions between the firewall and the RADIUS server.
- On each firewall that hosts the gateways and/or portal, create a RADIUS server profile. (For a small deployment, one firewall can host the portal and gateways.)
- Select Device > Server Profiles > RADIUS .
- Add a new profile.
- Enter a Profile Name for this RADIUS profile.
- In the Servers area, Add a RADIUS instance, and then enter the following:
- A descriptive Name to identify this RADIUS server.
- The IP address of the RADIUS Server .
- The shared Secret for encrypting sessions between the firewall and the RADIUS server.
- The Port number on which the RADIUS server listens for authentication requests (default 1812).
- Click OK to save the profile.
- Create an authentication profile.
- Select Device > Authentication Profile and Add a new profile.
- Enter a Name for the profile. The name cannot contain spaces.
- Select RADIUS as the authentication service Type .
- Select the Server Profile you created for accessing your RADIUS server.
- Enter the User Domain name. The firewall uses this value for matching authenticating users against Allow List entries and for User-ID group mapping.
- Select a Username Modifier to modify the username/domain format expected by the RADIUS server.
- Click OK to save the authentication profile.
- Assign the authentication profile to the GlobalProtect portal and/or gateway.
You can configure multiple client authentication configurations for the portal and gateways. For each client authentication configuration, you can specify the authentication profile to apply to endpoints of a specific OS.
This step describes how to add the authentication profile to the portal or gateway configuration. For additional details on setting up these components, see GlobalProtect Portals and GlobalProtect Gateways.
- Select Network > GlobalProtect > Portals or Gateways .
- Select an existing portal or gateway configuration, or Add a new one. If you are adding a new portal or gateway, specify its name, location, and network parameters.
- On the Authentication tab, select an SSL/TLS service Profile or Add a new profile.
- Add a new Client Authentication configuration, and then configure the following settings:
- The Name of the client authentication configuration.
- The endpoint OS to which this configuration applies.
- The Authentication Profile you created in step 3.
- ( Optional ) A custom Username Label .
- ( Optional ) A custom Password Label .
- ( Optional ) A custom Authentication Message .
- Click OK to save the configuration.
- ( Optional ) Configure the portal or gateway to prompt for a username and password or only a password each time the user logs in. Saved passwords are not supported with two-factor authentication using OTPs because the user must enter a dynamic password each time they log in.
This step describes how to configure the password setting in a portal agent configuration. For additional details, see Customize the GlobalProtect App.
- Select Network > GlobalProtect > Portals , and then select an existing portal configuration.
- On the GlobalProtect Portal Configuration dialog, select Agent .
- Select an existing agent configuration or Add a new one.
- On the Authentication tab, set Save User Credentials to Save Username Only or No . This setting enables GlobalProtect to prompt users for dynamic passwords on each component that you select in the following step.
- Click OK twice to save the configuration.
- Select the GlobalProtect components—portal and types of gateways—that prompt for dynamic passwords, such as OTPs.
- Select Network > GlobalProtect > Portals , and then select an existing portal configuration.
- On the GlobalProtect Portal Configuration dialog, select Agent .
- Select an existing agent configuration or Add a new one.
- On the Authentication tab, select the Components that Require Dynamic Passwords (Two-Factor Authentication) . When selected, the portal and/or types of gateways prompt for OTPs.
Do not select the Components that Require Dynamic Passwords (Two-Factor Authentication) option for any components that use SAML authentication.
- Click OK twice to save the configuration.
- If single sign-on (SSO) is enabled, disable it. Because the agent configuration specifies RADIUS as the authentication service, Kerberos SSO is not supported.
This step describes how to disable SSO. For more details, see Define the GlobalProtect Agent Configurations.
- Select Network > GlobalProtect > Portals , and then select an existing portal configuration.
- On the GlobalProtect Portal Configuration dialog, select Agent .
- Select an existing agent configuration or Add a new one.
- On the App tab, set Use Single Sign-on (Windows Only) to No .
- Click OK twice to save the configuration.
- ( Optional ) To minimize the number of times a user must provide credentials, configure an authentication override.
By default, the portal or gateways authenticate the user with an authentication profile and optional certificate profile. With authentication override, the portal or gateway authenticates the user with an encrypted cookie that it has deployed to the endpoint. While the cookie is valid, the user can log in without entering regular credentials or an OTP. For more information, see Cookie Authentication on the Portal or Gateway.
If you must immediately block access to an endpoint whose cookie has not yet expired (for example, if the endpoint is lost or stolen), you can Identification and Quarantine of Compromised Device by adding the device to a quarantine list.
For more details, see GlobalProtect Portals and GlobalProtect Gateways.
- Select Network > GlobalProtect > Portals or Gateways .
- Select an existing portal or gateway configuration, or Add a new one.
- Depending on whether you are configuring a portal or gateway, select one of the following:
- GlobalProtect Portal Configuration —On the GlobalProtect Portal Configuration dialog, select Agent > <agent-config> > Authentication .
- GlobalProtect Gateway Configuration —On the GlobalProtect Gateway Configuration dialog, select Agent > Client Settings > <client-setting> > Authentication Override .
- Configure the following Authentication Override settings:
- Name of the authentication override.
- Generate cookie for authentication override —Enables the portal or gateway to generate encrypted, endpoint-specific cookies. After users successfully authenticate, the portal or gateway issue the authentication cookie to the endpoint.
The authentication cookie includes the following fields:
- user —Username that is used to authenticate the user.
- domain —Domain name of the user.
- os —Application name that is used on the device.
- hostID —Unique ID that is assigned by GlobalProtect to identify the host.
- gen time —Date and time that the authentication cookie was generated.
- ip —IP address of the device that is used to successfully authenticate to GlobalProtect and to obtain the cookie.
- Accept cookie for authentication override —Instructs the portal or gateway to authenticate the user through a valid, encrypted cookie. When the endpoint presents a valid cookie, the portal or gateway verifies that the cookie was encrypted by the portal or gateway, decrypts the cookie, and then authenticates the user.
The GlobalProtect app must know the username of the connecting user in order to match and retrieve the associated authentication cookies from the user’s endpoint. After the app retrieves the cookies, it sends them to the portal or gateway for user authentication.
( Windows only ) If you set the Use Single Sign-On option to Yes (SSO is enabled) in the portal agent configuration ( Network > GlobalProtect > Portals > <portal-config> > Agent > <agent-config> > .App ), the GlobalProtect app uses the Windows username to retrieve the local authentication cookie for the user. If you set the Use Single Sign-On option to No (SSO is disabled), you must enable the GlobalProtect app to Save User Credentials in order for the app to retrieve the authentication cookie for the user. Set the Save User Credentials option to Yes to save both the username and password or Save Username Only to save only the username.
( macOS only ) Because macOS endpoints do not support single sign-on, you must enable the GlobalProtect app to Save User Credentials in order for the app to retrieve the authentication cookie for the user. Set the Save User Credentials option to Yes to save both the username and password or Save Username Only to save only the username.
- Cookie Lifetime —Specifies the hours, days, or weeks that the cookie is valid. Typical lifetime is 24 hours for gateways—which protect sensitive information—or 15 days for the portal. The range for hours is 1–72; for weeks, 1–52; and for days, 1–365. After the cookie expires on either the portal or gateway (whichever occurs first), the portal or gateway prompts the user to authenticate, and subsequently encrypts a new cookie to send to the endpoint.
If you have set the Authentication Override Cookie Lifetime value higher than the Tunnel Login Lifetime , review the tables below.
| PAN-OS Version | Cookie Lifetime Value |
|---|---|
| PAN-OS 10.1 | On PAN-OS 10.1.x versions, the Authentication Override Cookie Lifetime cannot exceed the Tunnel Login Lifetime value. Even if you set the authentication override cookie lifetime to be higher, it will remain valid only for the duration of the tunnel login lifetime. |
| PAN-OS 10.2 | On PAN-OS versions 10.2 through 10.2.13, the Authentication Override Cookie Lifetime can exceed the Tunnel Login Lifetime value. On PAN-OS versions 10.2.14 and later 10.2.x versions, the Authentication Override Cookie Lifetime cannot exceed the Tunnel Login Lifetime value. Even if you set the authentication override cookie lifetime to be higher, it will remain valid only for the duration of the tunnel login lifetime. |
| PAN-OS 11.0 | On PAN-OS versions 11.0 through 11.0.6, the Authentication Override Cookie Lifetime can exceed the Tunnel Login Lifetime value. On PAN-OS versions 11.0.7 and later 11.0.x versions, the Authentication Override Cookie Lifetime cannot exceed the Tunnel Login Lifetime value. Even if you set the authentication override cookie lifetime to be higher, it will remain valid only for the duration of the tunnel login lifetime. |
| PAN-OS 11.1 | On PAN-OS 11.1.x versions, the Authentication Override Cookie Lifetime cannot exceed the Tunnel Login Lifetime value. Even if you set the authentication override cookie lifetime to be higher, it will remain valid only for the duration of the tunnel login lifetime. |
- Certificate to Encrypt/Decrypt Cookie —Specifies the RSA certificate to use to encrypt and decrypt the cookie. You must use the same certificate on the portal and gateways.
As a best practice, configure the RSA certificate to use the strongest digest algorithm that your network supports.
The portal and gateways use the RSA encrypt padding scheme PKCS#1 V1.5 to generate the cookie (using the public key of the certificate) and decrypt the cookie (using the private key of the certificate).
- Click OK twice to save the configuration.
- Commit the configuration.
- Verify the configuration.
From an endpoint running the GlobalProtect app, try to connect to the gateway or portal on which you enabled OTP authentication. You should see prompts similar to the following:
OTP Pop-Up Prompt
 Figure: GlobalProtect App OTP Pop-up Prompt
OTP Prompt on the GlobalProtect Status Panel
 Figure: GlobalProtect App Status Panel showing OTP Prompt
Enable Two-Factor Authentication Using Smart Cards
If you want to enable your end users to authenticate using a smart card or common access card (CAC), you must import the Root CA certificate that issued the certificates contained on the CAC or smart cards onto the portal and gateway. You can then create a certificate profile that includes that Root CA and apply it to your portal and/or gateway configurations to enable use of the smart card in the authentication process.
Two-factor authentication using smart cards is supported on macOS and Windows endpoints.
- Set up your smart card infrastructure.
This procedure assumes that you have deployed smart cards and smart card readers to your end users.
For specific instructions, refer to the documentation for the authentication provider software.
In most cases, the smart card infrastructure setup involves the generating of certificates for end users and participating servers, which are the GlobalProtect portal and gateway(s) in this use case.
- Import the Root CA certificate that issued the client certificates contained on the end user smart cards.
Make sure the certificate is accessible from your management system, and then complete the following steps:
- Select Device > Certificate Management > Certificates > Device Certificates , and then Import a certificate.
- Enter a Certificate Name .
- Enter the path and name of the Certificate File received from the CA, or Browse to locate the file.
- Select Base64 Encoded Certificate (PEM) from the File Format drop-down, and then click OK to import the certificate.
- Create the certificate profile on each portal/gateway on which you plan to use CAC or smart card authentication.
For details on other certificate profile fields, such as whether to use CRL or OCSP, refer to the online help.
- Select Device > Certificate Management > Certificate Profile .
- Select an existing certificate profile or Add a new one.
- Enter a Name for the certificate profile.
- Select the certificate Username Field that PAN-OS uses to match the IP address for User-ID—either Subject to use a common name, Subject Alt: Email to use an email address, or Subject Alt: Principal Name to use the Principal Name.
- In the CA Certificates area, Add the trusted root CA certificate you imported in step 2 to the certificate profile. When prompted, select the CA Certificate , and then click OK .
- Click OK to save the certificate profile.
- Assign the certificate profile to the portal or gateway. This step describes how to add the certificate profile to the portal or gateway configuration. For details on setting up these components, see GlobalProtect Portals and GlobalProtect Gateways.
- Select Network > GlobalProtect > Portals or Gateways
- Select an existing portal or gateway configuration or Add a new one.
- On the GlobalProtect Gateway Configuration dialog, select Authentication .
- Select the Certificate Profile you just created.
- Click OK to save the configuration.
- Commit the configuration.
- Verify the configuration.
From an endpoint running the GlobalProtect app, try to connect to the gateway or portal on which you set up smart card-enabled authentication. When prompted, insert your smart card and verify that you can successfully authenticate to GlobalProtect.
Enhancements for Authentication Using Smart Cards - Removal of Multiple PIN Prompts
| Where Can I Use This? | What Do I Need? |
|---|---|
|
|
When Connect Before Logon (CBL) is configured for the GlobalProtect app, you can now use the app with smart card and ActivClient software without entering the smart card PIN multiple times.
Previously, when ActivClient software was installed on the devices and Connect Before Logon was configured for the GlobalProtect app, end-users were prompted to enter the smart card PIN multiple times while trying to connect using the CBL method.
This new enhancement removes the multiple smart card PIN prompts received by the end-users from the Windows identity provider and ActivClient while connecting the GlobalProtect app with smart card along with ActivClient software. The GlobalProtect app now asks for a PIN only once and the PIN prompt is from ActivClient software.
To use this feature, you must set the following prerequisites:
- Ensure that GlobalProtect portal is pre-deployed.
- Ensure that Connect Before Logon (CBL) mode is configured for the GlobalProtect app.
- Ensure that the Use Single Sign-On for Smart Card PIN (Windows) option is No (default value) in the app settings of the GlobalProtect portal configuration.
End users have to reenter the smart card PIN in the following scenarios because the ActivClient software clears the PIN cache when the user:
- Logged out of the system
- Switched user on the device
- System was rebooted by the user
End users do not have to reenter the PIN when the system wakes up from sleep mode or hibernation mode.
Enhancements for Authentication Using Smart Cards - Authentication Fallback
| Where Can I Use This? | What Do I Need? |
|---|---|
|
|
If you have configured On-demand mode for the GlobalProtect app running on Windows or macOS endpoints with smart card authentication as the authentication method, the app now displays the authentication profile options with or without the PIV smart card.
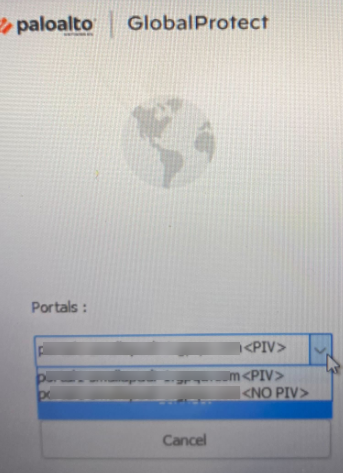 Figure: GlobalProtect App showing PIV Smart Card options on Windows
If Always-On connect method is configured for the GlobalProtect app and authentication profile keys are pre-deployed, the default profile option <smartcard> will be selected. The end user has the option to disconnect the app and change the profile option if required.
If On-Demand connect method is configured for the GlobalProtect app and authentication profile keys are pre-deployed, the end user can choose either <smartcard> or <no smartcard> option from the app user interface ( Portals drop-down).
If you have configured Connect Before Logon - On-demand mode for the GlobalProtect app with smart card authentication as the authentication method, the app now displays the authentication profile options with or without the PIV smart card.
For the GlobalProtect app to display the authentication profile options with or without the PIV smart card, you must:
- Ensure that Connect Before Logon (CBL) is configured with On-demand mode for the GlobalProtect app.
- Select the Allow Authentication with User Credentials OR Client Certificate option while configuring the GlobalProtect gateway and portal. This option defines whether users can authenticate to the portal or gateway using credentials and/or client certificates.
- In the Windows Registry, define the pre-deployment settings for the app to display the authentication profile options with <smartcard> and <no smartcard> .
- Launch the Command Prompt and enter regedit to open the Windows Registry.
- In the Windows Registry, go to: HKEY_LOCAL_MACHINE\SOFTWARE\Palo Alto Networks\GlobalProtect\Settings .
- Click Edit and then select New > String Value .
- When prompted, specify the Name of the new registry value as PIV-profile .
- Right-click the new registry value and Modify it.
- Set the Value Data to yes
- Click OK .
To pre-deploy the setting from Windows Installer ( Msiexec ) use the following syntax:
msiexec.exe / globalprotect64.msi /i PIVPROFILE=yes
Customize the Windows Registry Keys for Profile Options
Starting with GlobalProtect version 6.3.1, you can pre-deploy the customized registry key values for the profile options; <PIV> and <NO PIV> .
- The <PIVString> key is available in the Windows Registry path: HKEY_LOCAL_MACHINE\SOFTWARE\Palo Alto Networks\GlobalProtect\Settings
- The <NoPIVString> key is available in the Windows Registry path: HKEY_LOCAL_MACHINE\SOFTWARE\Palo Alto Networks\GlobalProtect\Settings
Enhancements for Authentication Using Smart Cards on macOS Endpoints
| Where Can I Use This? | What Do I Need? |
|---|---|
|
|
If you have configured On-demand mode for the GlobalProtect app running on macOS endpoints with smart card authentication as the authentication method, the app now displays the authentication profile options with or without the PIV smart card.
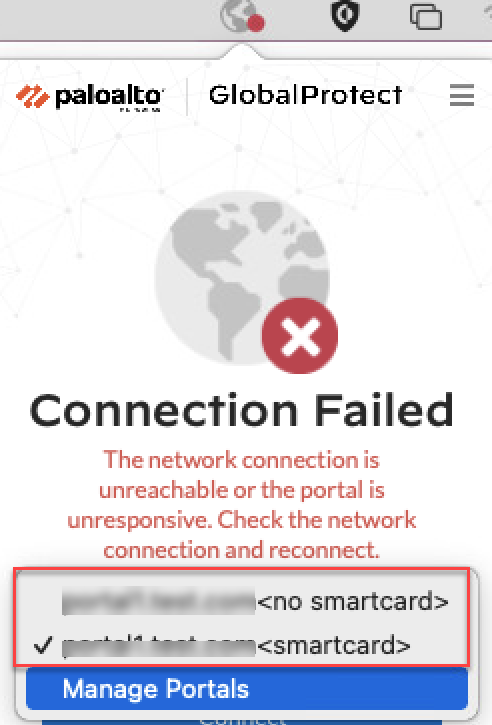 Figure: GlobalProtect App showing PIV Smart Card options on macOS
If Always-On connect method is configured for the GlobalProtect app and authentication profile keys are pre-deployed, the default profile option <smartcard> will be selected. The end user has the option to disconnect the app and change the profile option if required.
If On-Demand connect method is configured for the GlobalProtect app and authentication profile keys are pre-deployed, the end user can choose either <smartcard> or <no smartcard> option from the app user interface ( Portals drop-down).
For the GlobalProtect app to display the authentication profile options with or without the Smart Card on macOS endpoints, you must:
- Ensure that the connect method is configured with On-demand mode for the GlobalProtect app.
- Select the Allow Authentication with User Credentials OR Client Certificate option while configuring the GlobalProtect gateway and portal. This option defines whether users can authenticate to the portal or gateway using credentials and/or client certificates.
- In the macOS GlobalProtect plist file, define the pre-deployment settings for the app to display the authentication profile options with <smartcard> and <nO smartcard> .
- Open the GlobalProtect plist file and locate the GlobalProtect customization settings.
- Launch a plist editor, such as Xcode.
- In the plist editor, open the following plist file: /Library/Preferences/ com.paloaltonetworks.GlobalProtect.settings.plist .
- Locate the GlobalProtect Settings dictionary: /Palo Alto Networks/ GlobalProtect/Settings . If the Settings dictionary does not exist, create it. You can add each key to the Settings dictionary as a string.
- In the Settings dictionary, add the following key-value pair to enable the authentication PIV profile with or without PIV smartcard:
<key>PIV-profile</key>
<string>yes</string>
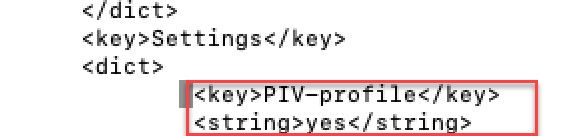 Figure: macOS Plist editor showing the PIV-profile key-value pair
To pre-deploy the customized keys, use:
- <key>PIVString</key>
- <key>noPIVString</key>
Enable Two-Factor Authentication Using a Software Token Application
If your organization uses a software token (soft token) application, such as RSA SecurID, to implement two-factor authentication, users are required to first open their software token app and enter their PIN to obtain a passcode, then enter the passcode in their GlobalProtect app in the Password field. This two-step process complicates the login process.
To simplify the login process and improve the users’ experience, GlobalProtect offers seamless soft-token authentication. The user enters the RSA PIN in the GlobalProtect Password field, and GlobalProtect retrieves the passcode from RSA and proceeds with the connection without the user taking the extra step of opening the RSA application.
This feature is supported for all three RSA modes: PinPad Style (PIN integrated with token code), Fob Style (PIN followed by token code) and Pinless mode. For PinPad and Fob Style, the user enters the PIN in the Password field and GlobalProtect retrieves the passcode. In Pinless mode, the Password field is grayed out and users enter their username.
This feature is supported for Windows devices starting with GlobalProtect™ app 5.1.
- Change the registry keys on the client Windows devices to enable seamless soft-token authentication.
You must change the Windows registry on the clients’ Windows devices before you can enable seamless soft-token authentication. GlobalProtect retrieves this registry entry only once, when the GlobalProtect app initializes.
- Open the Windows Registry Editor and select HKEY_LOCAL_MACHINE\SOFTWARE\Palo Alto Networks\GlobalProtect\Settings .
- Change the auth-api value to yes .
Because auth-api is set as yes in the client machine, you should configure the portal and gateways with RSA-based authentication. No other authentication profile is supported because GlobalProtect will attempt to retrieve the passcode.
Because the portal and gateway use RSA Authentication, we recommend that you enable cookie-based authentication on gateways. The token that is retrieved for the portal may still be active when GlobalProtect tries to get passcode for the gateway, and authentication may fail because the passcode was already used. Therefore, we suggest that you generate an Authentication Override cookie on the portal and Accept the cookie on the gateway.
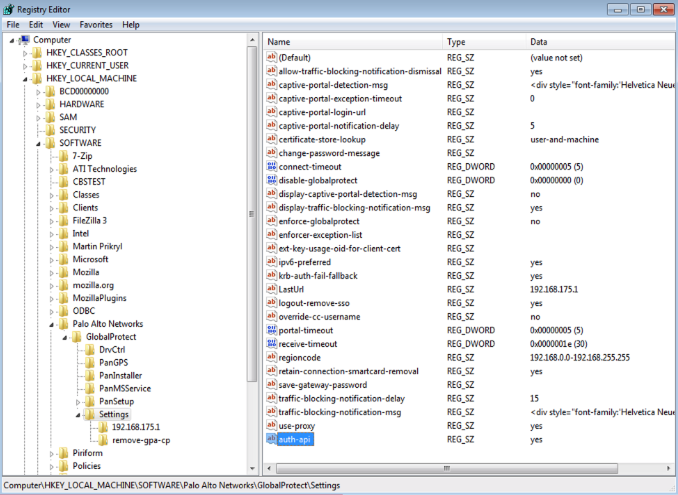 Figure: Windows Registry Editor showing the auth-api setting
- Configure the portal and gateway with RSA-based authentication.
- Enable cookie-based authentication on the GlobalProtect portal.
Specifying GlobalProtect to override an existing authentication allows GlobalProtect to overwrite an existing passcode with a newly-created passcode.
- Select Network > GlobalProtect > Portals > <portal-config> ; then select the Agent tab.
- Add an Agent config or select an existing one.
- Select Generate cookie for authentication override .
The authentication cookie includes the following fields:
- user —Username that is used to authenticate the user.
- domain —Domain name of the user.
- os —Application name that is used on the device.
- hostID —Unique ID that is assigned by GlobalProtect to identify the host.
- gen time —Date and time that the authentication cookie was generated.
- ip —IP address of the device that is used to successfully authenticate to GlobalProtect and to obtain the cookie.
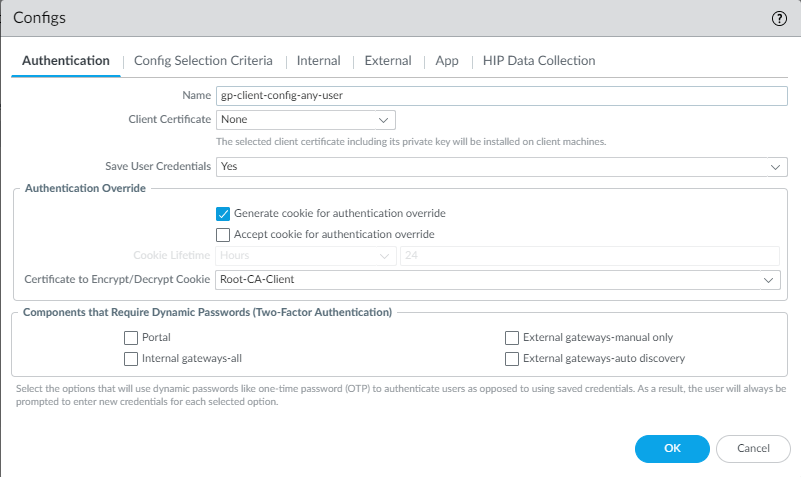 Figure: GlobalProtect Portal Authentication Override Configuration
- Enable the GlobalProtect gateway to accept cookies for authentication overrides.
- Select Network > GlobalProtect > Gateways > <gateway> and select the Agent tab.
- Select Client Settings , then select the GlobalProtect client config or add a new one.
- Select Authentication Override ; then, select Accept cookie for authentication override .
The authentication cookie includes the following fields:
- user —Username that is used to authenticate the user.
- domain —Domain name of the user.
- os —Application name that is used on the device.
- hostID —Unique ID that is assigned by GlobalProtect to identify the host.
- gen time —Date and time that the authentication cookie was generated.
- ip —IP address of the device that is used to successfully authenticate to GlobalProtect and to obtain the cookie.
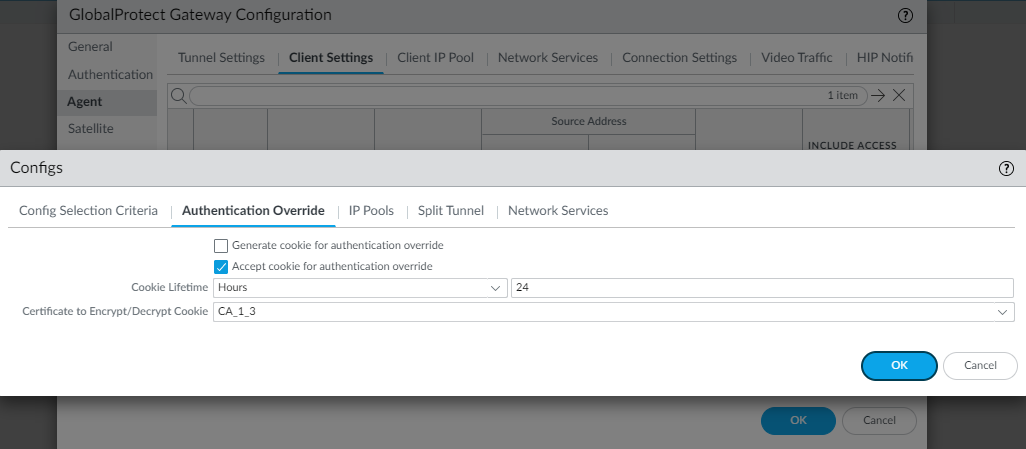 Figure: GlobalProtect Gateway Authentication Override Configuration
- Select Network > GlobalProtect > Portals > <portal-config> ; then select the Authentication tab.
- Add a new client authentication profile or select an existing one; then, select Automatically retrieve passcode from SoftToken application .
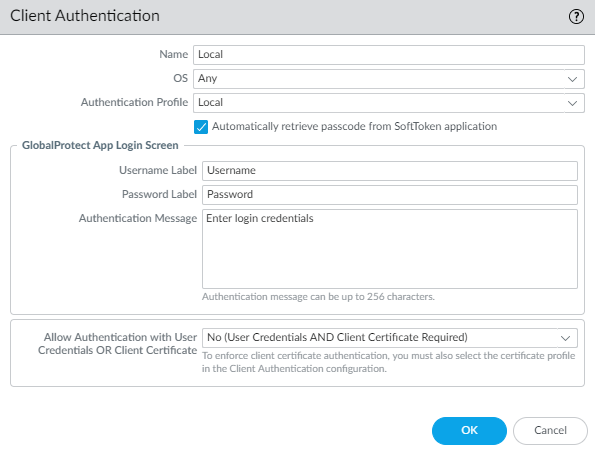 Figure: Client Authentication Configuration showing the option for automatic passcode retrieval
Set Up Authentication for strongSwan Ubuntu and CentOS Endpoints
To extend GlobalProtect access to strongSwan Ubuntu and CentOS endpoints, set up authentication for these endpoints.
To view the minimum GlobalProtect release version that supports strongSwan on Ubuntu Linux and CentOS, see What OS Versions are Supported with GlobalProtect?.
To connect to the GlobalProtect gateway, the user must successfully authenticate.
The following workflows show examples of how to enable authentication for strongSwan endpoints. For complete information about strongSwan, see the strongSwan wiki .
- Enable Certificate Authentication for strongSwan Endpoints
- Enable X-Auth Support for strongSwan Endpoints
- Enable Two-Factor Authentication for strongSwan Endpoints
Enable Certificate Authentication for strongSwan Endpoints
The following workflow shows how to enable authentication for strongSwan clients using a certificate profile.
- Configure an IPsec tunnel for the GlobalProtect gateway for communicating with a strongSwan client.
Extended authentication (X-Auth) is not supported for Prisma Access deployments.
- Select Network > GlobalProtect > Gateways .
- Select an existing gateway or Add a new one.
- On the Authentication tab of the GlobalProtect Gateway Configuration dialog, select the Certificate Profile that you want to use for authentication.
- Select Agent > Tunnel Settings to enable Tunnel Mode and specify the following settings to set up the tunnel:
- Select the check box to Enable X-Auth Support .
- If a Group Name and Group Password are already configured, remove them.
- Click OK to save the settings.
- Verify that the default connection settings in the conn %default section of the IPsec tunnel configuration file ( ipsec.conf ) are correctly defined for the strongSwan client.
The ipsec.conf file is usually found in the /etc folder.
The configurations in this procedure are tested and verified for the following releases:
- Ubuntu 14.0.4 with strongSwan 5.1.2 and CentOS 6.5 with strongSwan 5.1.3 for PAN-OS 6.1.
- Ubuntu 14.0.4 with strongSwan 5.2.1 for PAN-OS 7.0.
The configurations in this procedure can be used for reference if you are using a different version of strongSwan. Refer to the strongSwan wiki for more information.
Modify the following settings in the conn %default section of the ipsec.conf file to these recommended settings.
ikelifetime=20m
reauth=yes
rekey=yes
keylife=10m
rekeymargin=3m
rekeyfuzz=0%
keyingtries=1
type=tunnel
- Modify the strongSwan client’s IPsec configuration file ( ipsec.conf ) and the IPsec password file ( ipsec.secrets ) to use recommended settings.
The ipsec.secrets file is usually found in the /etc folder.
Use the strongSwan client username as the certificate’s common name.
Modify the following items in the ipsec.conf file to these recommended settings.
conn <connection name>
keyexchange=ikev1
authby=rsasig
ike=aes-sha1-modp1024,aes256
left=<strongSwan/Linux-client-IP-address>
leftcert=<client certificate with the strongSwan client username used as the certificate’s common name>
leftsourceip=%config
leftauth2=xauth
right=<GlobalProtect-Gateway-IP-address>
rightid=“CN=<Subject-name-of-gateway-certificate>”
rightsubnet=0.0.0.0/0
auto=add
Modify the following items in the ipsec.conf file to these recommended settings.
:RSA
<private key file> “<passphrase if used>”
- Start strongSwan IPsec services and connect to the IPsec tunnel that you want the strongSwan client to use when authenticating to the GlobalProtect gateway.
Use the config <name> variable to name the tunnel configuration.
- Ubuntu:
-
ipsec start
ipsec up <name>
- CentOS:
-
strongSwan start
strongswan up <name>
- Verify that the tunnel is set up correctly and the VPN connection is established to both the strongSwan client and the GlobalProtect gateway.
- Verify the detailed status information on a specific connection (by naming the connection) or verify the status information for all connections from the strongSwan client:
- Ubuntu:
ipsec statusall [<connection name>]
- CentOS:
strongswan statusall [<connection name>]
- Select Network > GlobalProtect > Gateways . In the Info column, select Remote Users for the gateway configured for the connection to the strongSwan client. The strongSwan client should be listed under Current Users .
Enable X-Auth Support for strongSwan Endpoints
The following workflow shows how to enable authentication for strongSwan clients using an authentication profile. The authentication profile specifies which server profile to use when authenticating strongSwan clients.
- Set up the IPsec tunnel that the GlobalProtect gateway will use for communicating with a strongSwan client.
Extended authentication (X-Auth) is not supported for Prisma Access deployments.
- Select Network > GlobalProtect > Gateways .
- Select an existing gateway or Add a new one.
- On the Authentication tab of the GlobalProtect Gateway Configuration dialog, select the Authentication Profile you want to use.
- Select Agent > Tunnel Settings to enable Tunnel Mode and specify the following settings to set up the tunnel:
- Select the check box to Enable X-Auth Support .
- Enter a Group Name and Group Password if they are not yet configured.
- Click OK to save these tunnel settings.
- Verify that the default connection settings in the conn %default section of the IPsec tunnel configuration file ( ipsec.conf ) are correctly defined for the strongSwan client.
The ipsec.conf file usually resides in the /etc folder.
The configurations in this procedure are tested and verified for the following releases:
- Ubuntu 14.0.4 with strongSwan 5.1.2 and CentOS 6.5 with strongSwan 5.1.3 for PAN-OS 6.1.
- Ubuntu 14.0.4 with strongSwan 5.2.1 for PAN-OS 7.0.
Use the configurations in this procedure as a reference if you are using a different version of strongSwan. Refer to the strongSwan wiki for more information.
In the conn %default section of the ipsec.conf file, configure the following recommended settings:
ikelifetime=20m
reauth=yes
rekey=yes
keylife=10m
rekeymargin=3m
rekeyfuzz=0%
keyingtries=1
type=tunnel
- Modify the strongSwan client’s IPsec configuration file ( ipsec.conf ) and the IPsec password file ( ipsec.secrets ) to use recommended settings.
The ipsec.secrets file is usually found in the /etc folder.
Use the strongSwan client username as the certificate’s common name.
Configure the following recommended settings in the ipsec.conf file:
conn <connection name>
keyexchange=ikev1
ikelifetime=1440m
keylife=60m
aggressive=yes
ike=aes-sha1-modp1024,aes256
esp=aes-sha1
xauth=client
left=<strongSwan/Linux-client-IP-address>
leftid=@#<hex of Group Name configured in the GlobalProtect gateway>
leftsourceip=%modeconfig
leftauth=psk
rightauth=psk
leftauth2=xauth
right=<gateway-IP-address>
rightsubnet=0.0.0.0/0
xauth_identity=<LDAP username>
auto=add
Configure the following recommended settings in the ipsec.secrets file:
: PSK <Group Password configured in the gateway>
<username> : XAUTH “<user password>”
- Start strongSwan IPsec services and connect to the IPsec tunnel that you want the strongSwan client to use when authenticating to the GlobalProtect gateway.
Use the config <name> variable to name the tunnel configuration.
- Ubuntu:
-
ipsec start
ipsec up <name>
- CentOS:
-
strongSwan start
strongswan up <name>
- Verify that the tunnel is set up correctly and the VPN connection is established to both the strongSwan client and the GlobalProtect gateway.
- Verify the detailed status information on a specific connection (by naming the connection) or verify the status information for all connections from the strongSwan client:
- Ubuntu:
ipsec statusall [<connection name>]
- CentOS:
strongswan statusall [<connection name>]
- Select Network > GlobalProtect > Gateways . In the Info column, select Remote Users for the gateway configured for the connection to the strongSwan client. The strongSwan client should be listed under Current Users .
Enable Two-Factor Authentication for strongSwan Endpoints
With two-factor authentication, the strongSwan client needs to successfully authenticate using both a certificate profile and an authentication profile to connect to the GlobalProtect gateway. The following workflow shows how to enable authentication for strongSwan clients using two-factor authentication.
- Set up the IPsec tunnel that the GlobalProtect gateway will use for communicating with a strongSwan client.
Extended authentication (X-Auth) is not supported for Prisma Access deployments.
- Select Network > GlobalProtect > Gateways .
- Select an existing gateway or Add a new one.
- On the Authentication tab of the GlobalProtect Gateway Configuration dialog, select the Certificate Profile and Authentication Profile that you want to use.
- Select Agent > Tunnel Settings to enable Tunnel Mode and specify the following settings to set up the tunnel:
- Select the check box to Enable X-Auth Support .
- If a Group Name and Group Password are already configured, remove them.
- Click OK to save these tunnel settings.
- Verify that the default connection settings in the conn %default section of the IPsec tunnel configuration file ( ipsec.conf ) are correctly defined for the strongSwan client.
The ipsec.conf file usually resides in the /etc folder.
The configurations in this procedure are tested and verified for the following releases:
- Ubuntu 14.0.4 with strongSwan 5.1.2 and CentOS 6.5 with strongSwan 5.1.3 for PAN-OS 6.1.
- Ubuntu 14.0.4 with strongSwan 5.2.1 for PAN-OS 7.0.
Use the configurations in this procedure as a reference if you are using a different version of strongSwan. Refer to the strongSwan wiki for more information.
Configure the following recommended settings in the conn %default section of the ipsec.conf file:
ikelifetime=20m
reauth=yes
rekey=yes
keylife=10m
rekeymargin=3m
rekeyfuzz=0%
keyingtries=1
type=tunnel
- Modify the strongSwan client’s IPsec configuration file ( ipsec.conf ) and the IPsec password file ( ipsec.secrets ) to use recommended settings.
The ipsec.secrets file is usually found in the /etc folder.
Use the strongSwan client username as the certificate’s common name.
Configure the following recommended settings in the ipsec.conf file:
conn <connection name>
keyexchange=ikev1
authby=xauthrsasig
ike=aes-sha1-modp1024
esp=aes-sha1
xauth=client
left=<strongSwan/Linux-client-IP-address>
leftcert=<client-certificate-without-password>
leftsourceip=%config
leftauth2=xauth
right=<GlobalProtect-gateway-IP-address>
rightid=%anyCN=<Subject-name-of-gateway-cert>”
rightsubnet=0.0.0.0/0
leftauth2=xauth
xauth_identity=<LDAP username>
auto=add
Configure the following recommended settings in the ipsec.secrets file:
<username> :XAUTH “<user password>”
::RSA <private key file> “<passphrase if used>”
- Start strongSwan IPsec services and connect to the IPsec tunnel that you want the strongSwan client to use when authenticating to the GlobalProtect gateway.
Use the config <name> variable to name the tunnel configuration.
- Ubuntu:
-
ipsec start
ipsec up <name>
- CentOS:
-
strongSwan start
strongswan up <name>
- Verify that the tunnel is set up correctly and the VPN connection is established to both the strongSwan client and the GlobalProtect gateway.
- Verify the detailed status information on a specific connection (by naming the connection) or verify the status information for all connections from the strongSwan client:
- Ubuntu:
ipsec statusall [<connection name>]
- CentOS:
strongswan statusall [<connection name>]
- Select Network > GlobalProtect > Gateways . In the Info column, select Remote Users for the gateway configured for the connection to the strongSwan client. The strongSwan client should be listed under Current Users .
Set Up Cloud Identity Engine Authentication
| Where Can I Use This? | What Do I Need? |
|---|---|
|
|
Cloud Identity Engine supports the following authentication methods for GlobalProtect:
- SAML
- Client Certificate
- OIDC
- Set Up an Authentication Profile.
- In your environment, navigate to the Add Authentication screen for GlobalProtect.
- Select Cloud Identity Engine as the authentication method and the profile you created in step 1.
- Follow the on-screen prompts to set up the desired Cloud Identity authentication.
Cloud Identity Engine SAML Authentication with Embedded Web-View
The system browser is the default browser for Cloud Identity Engine SAML Authentication.
Follow the steps below to use the embedded web-view:
- Disable the Use Default Browser for SAML Authentication option in the app settings of the portal configuration.
- Select Network > GlobalProtect > Portals > <portal-config> > Agent > <agent-config> > App .
- In the App Configurations area, set Use Default Browser for SAML Authentication option to No to enable the GlobalProtect app to open the embedded browser for CIE authentication. After you set the option as No and when the GlobalProtect app tries to reconnect, the app prompts the end users to reauthenticate using CIE as the authentication method.
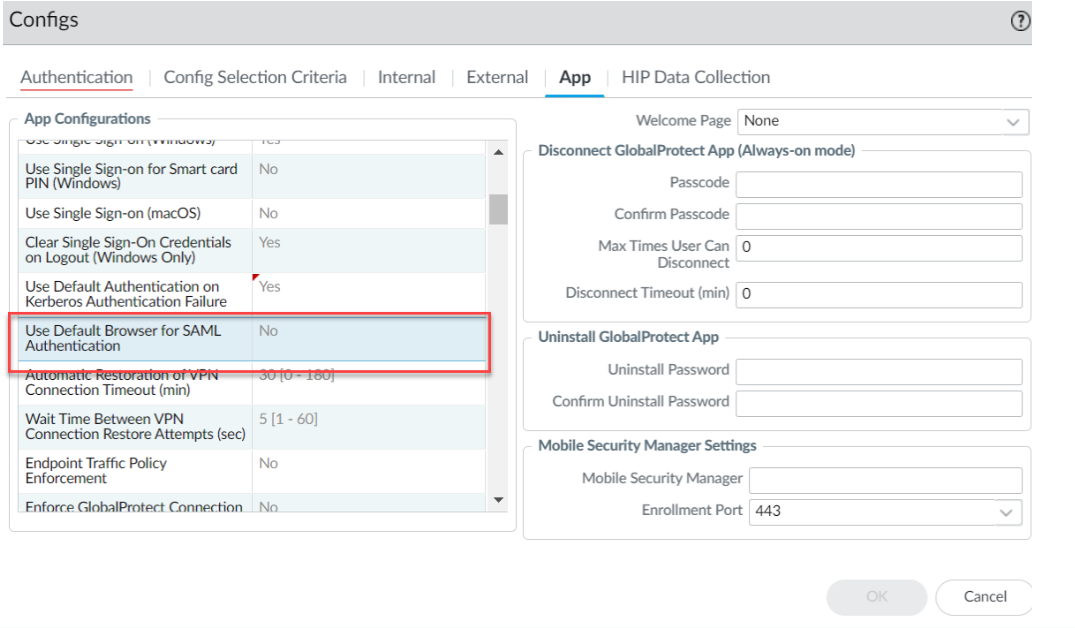 Figure: GlobalProtect App Configuration showing the option to disable the default browser for SAML
- Set the browser option in the Client Authentication settings of the portal configuration.
- Select Network > GlobalProtect > Portals > <portal-config> > Authentication > <client-authentication-config> .
- Uncheck the Use default browser option in the Client Authentication window to use the embedded browser for CIE authentication.
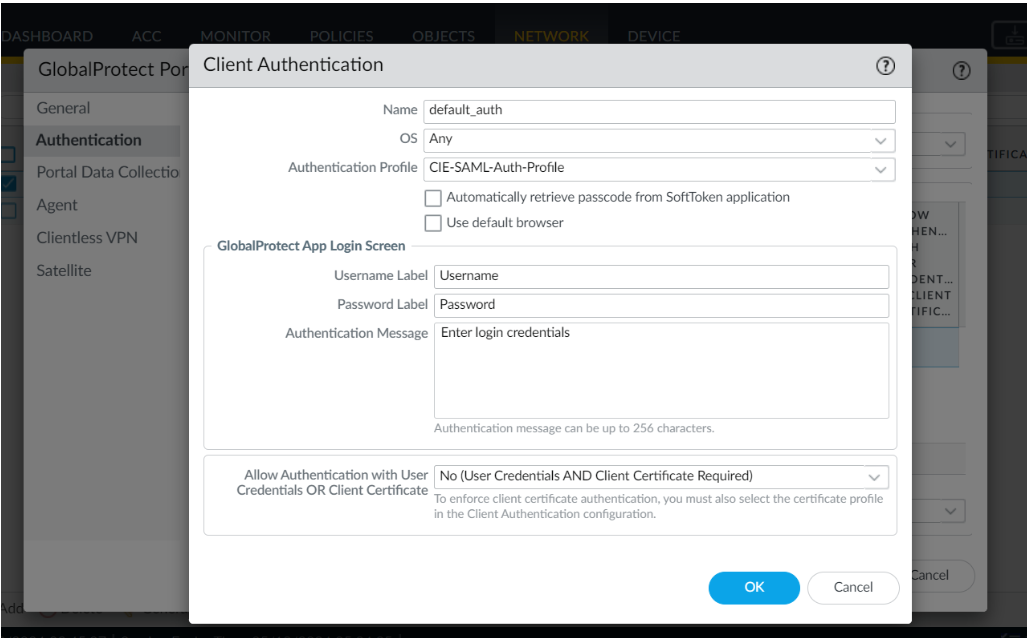 Figure: Client Authentication settings showing the "Use default browser" checkbox
- Click OK .
- Commit the configuration.
Cloud Identity Engine Multi-Authentication
You can create an authentication profile that redirects users to the authentication type (either a client certificate or a SAML 2.0-compliant identity provider) you configure for authentication. For more information, see Configure Cloud Identity Engine Authentication on the Firewall or Panorama .
With Cloud Identity Engine multi-authentication, you can enable the end user to bypass the SSO hub page (which prompts the user for their SAML username) on Windows endpoints by pre-deploying the following registry key:
CASSKIPHUBPAGE
using the following syntax:
msiexec.exe /i globalprotect64.msi CASSKIPHUBPAGE=yes
The registry key is displayed in the Windows registry path \HKEY_LOCAL_MACHINE\SOFTWARE\Palo Alto Networks\GlobalProtect\Settings .
This feature is supported on the default browser and embedded web-view for the following actions:
- User unlocks the device
- Device wakes up from sleep mode
- After a system reboot
For the GlobalProtect app with Connect Before Logon (CBL) installed on Windows endpoints, you must use the default browser for Cloud Identity Engine SAML authentication.
Before enabling this feature, ensure the following:
- Username is configured in UPN format in CIE or the Windows endpoints are joined to Azure domain (AAD or Active Directory).
- The cloud identity engine is configured without the Force authentication option in the authentication profile.
- IDP/SAML session is active.
Configure GlobalProtect to Facilitate Multi-Factor Authentication Notifications
| Where Can I Use This? | What Do I Need? |
|---|---|
|
|
To protect critical applications and stop attackers from using stolen credentials to conduct lateral movement throughout your network, you can configure policy-based multi-factor authentication. This ensures that each user responds to multiple authentication challenges of different types (factors) before they can access highly sensitive services and applications.
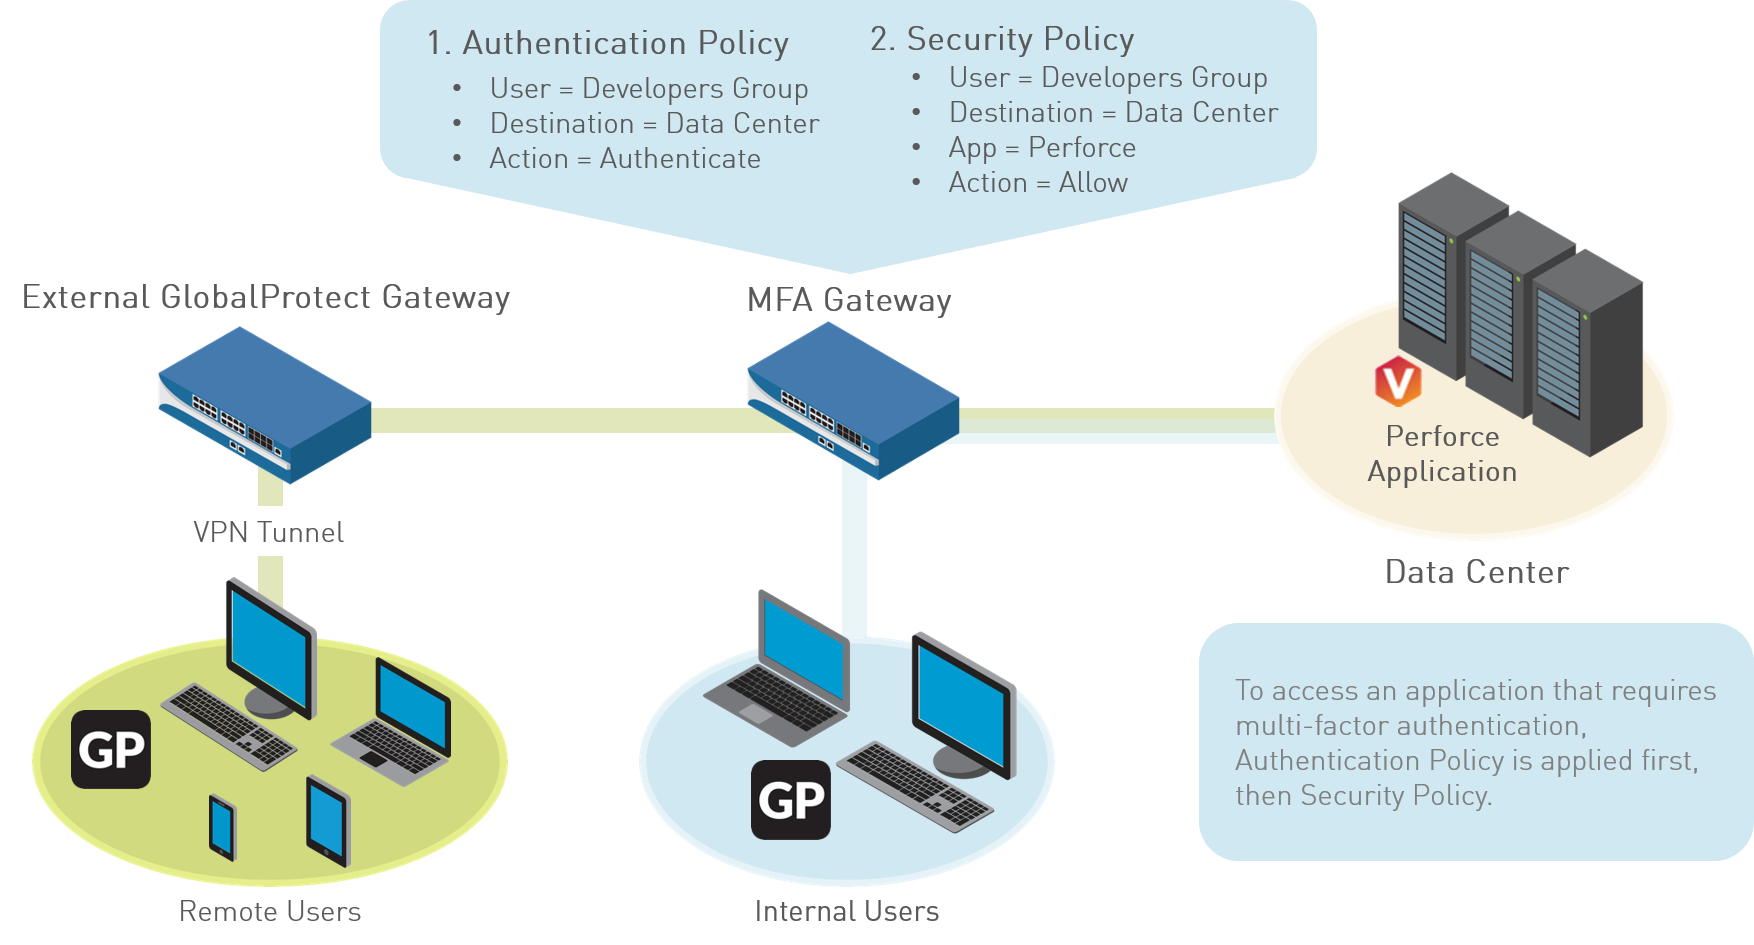 Figure: Diagram illustrating the flow of Multi-Factor Authentication
If a user session matches the Authentication policy, the type of application or service determines the user experience for notifications about the authentication challenge:
- ( Windows or macOS endpoints only ) Non-browser-based applications —To facilitate MFA notifications for non-HTTP applications (such as Perforce) on Windows or macOS endpoints, a GlobalProtect app is required. When a session matches an Authentication policy rule, the firewall sends a UDP notification to the GlobalProtect app with an embedded URL link to the Authentication Portal page. The GlobalProtect app then displays this message as a pop up notification to the user.
- Browser-based applications —Browser-based applications do not require GlobalProtect to display notification messages to the user. When the firewall identifies a session as web-browsing traffic (based on App-ID), the firewall automatically presents the user with Authentication Portal page (previously called the Captive Portal page) specified in the Authentication policy rule.
To configure GlobalProtect to display MFA notifications for non-browser-based applications, use the following workflow:
- Before you configure GlobalProtect, configure multi-factor authentication on the firewall.
If you are using two-factor authentication with GlobalProtect to authenticate to the gateway or portal, a RADIUS server profile is required. If you are using GlobalProtect to notify the user about an authentication policy match (UDP message), a Multi Factor Authentication server profile is sufficient.
To use multi-factor authentication for protecting sensitive resources, the easiest solution is to integrate the firewall with an MFA vendor that is already established in your network.
When your MFA structure is ready, you can start configuring the components of your authentication policy.
- Enable Captive Portal to record authentication timestamps and update user mappings.
- Create server profiles that define how the firewall will connect to the services that authenticate users.
- Assign the server profiles to an Authentication profile which specifies authentication parameters.
- Configure a Security policy rule that allows users to access the resources that require authentication.
- ( External gateways only ) For GlobalProtect to support multi-factor authentication on external gateways, you must configure a response page for the ingress tunnel interface on the firewall:
- Select Device > Response Pages > MFA Login Page .
- Select and then Export the Predefined template to a location of your choice.
- On your endpoint, use an HTML editor to customize the downloaded response page and save it with a unique filename.
- Return to the MFA Login Page dialog on the firewall, Import your customized page, Browse to select the Import File , and select the Destination (virtual system or shared location). Click OK , and then click Close .
- ( External gateways only ) Enable Response Pages as a permitted service on the Interface Mgmt profile:
- Select Network > Network Profiles > Interface Mgmt and then select the profile.
- In the Permitted Services area, select Response Pages and click OK .
- ( External gateways only ) Attach the Interface Mgmt profile to a tunnel interface:
- Select Network > Interfaces > Tunnel , and the tunnel interface on which you want to use the response page.
- Select Advanced , and then select the Interface Mgmt profile you configured in the previous step as the Management Profile .
- ( External gateways only ) Enable User Identification on the Zone associated with the tunnel interface ( Network > Zones > <tunnel-zone ).
- Configure GlobalProtect clients to support multi-factor authentication notifications for non-browser-based applications.
- Select Network > GlobalProtect > Portals and select a portal configuration (or Add one).
- Select Agent , and then select an existing agent configuration or Add a new one.
- On the App tab, specify the following:
- Set Enable Inbound Authentication Prompts from MFA Gateways to Yes . To support multi-factor authentication (MFA), the GlobalProtect app must receive and acknowledge UDP authentication prompts that are inbound from the gateway. Select Yes to enable the GlobalProtect app to receive and acknowledge the prompt. By default, this value is set to No , meaning GlobalProtect will block UDP authentication prompts from the gateway.
- In the Network Port for Inbound Authentication Prompts (UDP) field, specify the port number that the GlobalProtect app uses to receive inbound UDP authentication prompts from MFA gateways. The default port is 4501. To change the port, specify a number from 1 to 65535.
- In the Trusted MFA Gateways field, specify the gateway address and port number (required only for non-default ports, such as 6082) of the redirect URL that the GlobalProtect app will trust for multi-factor authentication. When a GlobalProtect app receives a UDP authentication prompt with a redirect URL destined for the specified network port, GlobalProtect displays an authentication message only if the redirect URL is trusted.
- Configure the Default Message for Inbound Authentication Prompts . When users try to access a resource that requires additional authentication, GlobalProtect receives a UDP packet containing the inbound authentication prompt and displays this message. The UDP packet also contains the URL for the Authentication Portal page you specified when you set up multi-factor authentication. GlobalProtect automatically appends the URL to the message. For example, to display the notification shown in the beginning of this topic enter the following message:
You have attempted to access a protected resource that requires additional authentication. Proceed to authenticate at:
- Save the agent configuration (click OK twice), and then Commit your changes.
Enable Delivery of VSAs to a RADIUS Server
When communicating with portals or gateways, GlobalProtect endpoints send information that includes the endpoint IP address, operating system (OS), hostname, user domain, and GlobalProtect app version. You can enable the firewall to send this information as Vendor-Specific Attributes (VSAs) to a RADIUS server during authentication (by default, the firewall does not send the VSAs). RADIUS administrators can then perform administrative tasks based on those VSAs. For example, RADIUS administrators might use the OS attribute to define a policy that mandates regular password authentication for Microsoft Windows users and one-time password (OTP) authentication for Google Android users.
The following are prerequisites for this procedure:
- Import the Palo Alto Networks RADIUS dictionary into your RADIUS server.
- Configure a RADIUS server profile and assign it to an authentication profile. See Set Up External Authentication for more details.
- Assign the authentication profile to a GlobalProtect portal or gateway. See Set Up Access to the GlobalProtect Portal or Configure a GlobalProtect Gateway for more details.
- Log in to the firewall CLI.
- Enter the command for each VSA you want to send:
-
username@hostname> set authentication radius-vsa-on client-source-ip -
username@hostname> set authentication radius-vsa-on client-os -
username@hostname> set authentication radius-vsa-on client-hostname -
username@hostname> set authentication radius-vsa-on user-domain
username@hostname> set authentication radius-vsa-on client-gp-version
If you later want to stop the firewall from sending particular VSAs, run the same commands but use the radius-vsa-off option instead of radius-vsa-on .
Enable Group Mapping
Because the agent or app running on your end-user systems requires the user to successfully authenticate before being granted access to GlobalProtect, the identity of each GlobalProtect user is known. However, if you want to be able to define GlobalProtect configurations and/or security policies based on group membership, the firewall must retrieve the list of groups and the corresponding list of members from your directory server. This is known as group mapping .
To enable this functionality, you must create an LDAP server profile that instructs the firewall how to connect and authenticate to the directory server and how to search the directory for the user and group information. After the firewall connects to the LDAP server and retrieves the group mappings, you can select groups when you define the agent configurations and security policies. The firewall supports a variety of LDAP directory servers, including Microsoft Active Directory (AD), Novell eDirectory, and Sun ONE Directory Server.
Use the following procedure to connect to your LDAP directory to enable the firewall to retrieve user-to-group mapping information:
- Create an LDAP Server Profile that specifies how to connect to the directory servers to which the firewall should connect to obtain group mapping information.
- Select Device > Server Profiles > LDAP and click Add .
- Enter a Profile Name to identify the server profile.
- If this profile is for a firewall with multiple virtual systems capability, select a virtual system or Shared as the Location where the profile is available.
- For each LDAP server (up to four), Add and enter a Name (to identify the server), server IP address ( LDAP Server field), and server Port (default 389).
- Select the server Type from the drop-down: active-directory , e-directory , sun , or other .
- If you want the device to use SSL or TLS for a more secure connection with the directory server, select the Require SSL/TLS secured connection check box (it is selected by default). The protocol that the device uses depends on the server Port :
- 389 (default)—TLS (Specifically, the device uses the StartTLS operation , which upgrades the initial plaintext connection to TLS.)
- 636—SSL
- Any other port—The device first attempts to use TLS. If the directory server doesn’t support TLS, the device falls back to SSL.
- For additional security, you can select the Verify Server Certificate for SSL sessions check box (it is cleared by default) so that the device verifies the certificate that the directory server presents for SSL/TLS connections. To enable verification, you also have to select the Require SSL/TLS secured connection check box. For verification to succeed, one of the following conditions must be true:
- It is in the list of device certificates: Device > Certificate Management > Certificates > Device Certificates . Import the certificate into the device, if necessary.
- The certificate signer is in the list of trusted certificate authorities: Device > Certificate Management > Certificates > Default Trusted Certificate Authorities .
- Click OK .
- Add the LDAP server profile to the User-ID Group Mapping configuration.
- Select Device > User Identification > Group Mapping Settings and then Add a new group mapping configuration.
- Select Server Profile .
- Enter a Name for the group mapping configuration.
- Select the Server Profile you just created.
- Specify the Update Interval (in seconds) after which the firewall initiates a connection with the LDAP directory server to obtain any updates that are made to the groups that the firewall policies use (range of 60 to 86,400 seconds).
- Make sure the server profile is Enabled for group mapping.
- ( Optional ) Enable GlobalProtect to retrieve serial numbers from the directory server.
GlobalProtect can identify the status of connecting endpoints and enforce HIP-based security policies based on the presence of the endpoint serial number. If an endpoint is managed, you can bind the serial number of the endpoint to the machine account of the endpoint in your directory server. The firewall can then pre-fetch the serial numbers for these managed endpoints when it retrieves group mapping information from the directory server.
- From your group mapping configuration, select Server Profile .
- Enable the option to Fetch list of managed devices .
- ( Optional ) Specify attributes to identify users and user groups.
- From your group mapping configuration, select User and Group Attributes .
- In the User Attributes area, specify the Primary Username , E-Mail , and Alternate Username 1-3 used to identify individual users.
- In the Group Attributes area, specify the Group Name , Group Member , and E-Mail used to identify user groups.
- ( Optional ) Limit which groups can be selected in policy rules.
By default, if you don’t specify groups, all groups are available in policy rules.
- Add existing groups from the directory service:
- From your group mapping configuration, select Group Include List .
-
In the Available Groups list, select the groups you want to appear in policy rules, and then click the Add (
 ) icon to move the group to the Included Groups list.
- If you want to base policy rules on user attributes that don’t match existing user groups, create custom groups based on LDAP filters:
- From your group mapping configuration, select Custom Group .
- Add a new custom group.
- Enter a group Name that is unique in the group mapping configuration for the current firewall or virtual system. If the Name has the same value as the Distinguished Name (DN) of an existing AD group domain, the firewall uses the custom group in all references to that name (for example, in policies and logs).
- Specify an LDAP Filter of up to 2,048 UTF-8 characters, then click OK . The firewall doesn’t validate LDAP filters.
To optimize LDAP searches and minimize the performance impact on the LDAP directory server, use indexed attributes and reduce the search scope to include the user and group objects that you require for policy or visibility. Alternatively, you can create custom groups based on LDAP filters.
- Commit your changes.
Click OK and Commit .
GlobalProtect Processes to be Whitelisted on EDR Deployments
To ensure seamless operation of GlobalProtect, we suggest configuring your antivirus, EDR (Endpoint Detection and Response), or firewall applications to recognize GlobalProtect processes as safe. These security applications may sometimes mistakenly identify GlobalProtect processes as malicious. To prevent this, it is advisable to whitelist or create security exceptions for the following GlobalProtect processes before installation.
Here are the GlobalProtect processes that you must whitelist on your EDR deployments.
| macOS Process |
|---|
| /Library/SystemExtensions/[UUID]/com.paloaltonetworks.GlobalProtect.client.extension.systemextension/Contents/MacOS/com.paloaltonetworks.GlobalProtect.client.extension |
| /Applications/GlobalProtect.app/Contents/Resources/PanGPS |
| /Applications/GlobalProtect.app/Contents/Resources/PanGpHip |
| /Applications/GlobalProtect.app/Contents/Resources/PanGpHipMp |
| /Applications/GlobalProtect.app/Contents/MacOS/GlobalProtect |
| /Applications/GlobalProtect.app/Contents/Resources/gp_support.sh |
| /Applications/GlobalProtect.app/Contents/Resources/systemext_gp.sh |
| /Applications/GlobalProtect.app/Contents/Resources/uninstall_gp.sh |
| /Applications/GlobalProtect.app/Contents/Resources/gplogin.bundle/Contents/MacOS/gplogin |
| Windows Process |
|---|
| C:\Program Files\Palo Alto Networks\GlobalProtect\PanGPA.exe |
| C:\Program Files\Palo Alto Networks\GlobalProtect\PanGPS.exe |
| C:\Program Files\Palo Alto Networks\GlobalProtect\PanGpHip.exe |
| C:\Program Files\Palo Alto Networks\GlobalProtect\PanGpHipMp.exe |
| C:\Program Files\Palo Alto Networks\GlobalProtect\wa_3rd_party_host_32.exe |
| C:\Program Files\Palo Alto Networks\GlobalProtect\wa_3rd_party_host_64.exe |
| C:\Program Files\Palo Alto Networks\GlobalProtect\PanVcrediChecker.exe |
| C:\Program Files\Palo Alto Networks\GlobalProtect\PanGPSupport.exe |
| C:\Windows\System32\PanPlapApp.exe |