Understanding Custom Application/Threat Signatures & IPS Converter
Palo Alto Networks next-generation firewalls empower administrators to develop custom application and threat signatures. This capability allows for fine-grained detection, monitoring, and control over network traffic that might otherwise go unidentified or uncontrolled. By building pattern-based signatures using packet capture information and available contexts, you can tailor the firewall's behavior to your specific network environment and security policies.
Custom signatures are stored in a separate database from the predefined App-ID™ or threat signatures, which are regularly updated by Palo Alto Networks. This guide delves into the creation, testing, and management of these custom signatures, as well as the IPS Signature Converter plugin for Panorama, which facilitates the use of third-party Snort and Suricata rules.
Overview of Custom Signatures
Palo Alto next-generation firewalls allow you to develop custom application and threat signatures for network traffic you want to detect, monitor, and control. You can build these pattern-based signatures using information from packet captures and our available contexts. The firewall stores the custom signatures in a database separate from our predefined App-ID™ or threat signatures, which are updated on a regular basis.
Application signatures identify web-based and client-server applications such as Gmail. You can create custom application signatures for proprietary applications, commercial applications without an App-ID, or traffic you want to identify by a custom name. Threat signatures detect malicious activity and prevent network-based attacks. You can create custom threat signatures to incorporate third-party security advisories and signatures or to identify threat activity such as brute force login attempts. The resulting application and threat visibility allows you to exercise a greater level of control over network traffic and reduces the attack surface of your enterprise.
Weekly content releases periodically include new decoders and contexts from which you can develop signatures.
About Custom Application Signatures
Custom application signatures reduce unknown traffic, provide application visibility, and give you more granular control over applications on your network. For example, you may believe office productivity has decreased since the FIFA Women’s World Cup began. You can create custom signatures for the FIFA landing and live streaming pages and view FIFA activity in the ACC and Traffic logs (as long as current security policies allow the traffic). From there, you can create a report, configure a QoS policy, or block the application by adding it to security policy.
An application signature identifies a pattern located within packets from an application or application function. This pattern uniquely identifies the application or function of interest. The App-ID ™ traffic classification system relies on application signatures to accurately identify applications in your network. Palo Alto Networks has developed App-ID signatures for many wellknown applications. (See Applipedia for a complete list). However, the volume of commercial applications and the nature of internal applications means that some applications do not have a signature. Such traffic receives “unknown” classification in the ACC and Traffic logs alongside potential threats. To properly classify this traffic and enforce security policy rules, you can create a custom application signature.
Custom application signatures enable you to:
-
Minimize “unknown” traffic on your network
-
Identify internal applications or special interest applications, such as a custom payroll application or sports live streaming
-
Monitor application usage in the ACC and Traffic logs
-
Explicitly define allowed applications and application functions (for example, allowing Slack for instant messaging, but blocking file transfer)
-
Perform QoS for a specific application
-
Identify nested applications, such as Words with Friends in Facebook
Custom applications take precedence over predefined applications when traffic matches both a custom-defined signature and a Palo Alto Networks signature. Accordingly, Traffic logs reflect the custom application name once the new application has been configured.
About Custom Threat Signatures
Our next-generation firewalls allow you to create custom threat signatures to monitor malicious activity or integrate third-party signatures. As with Palo Alto Networks threat signatures, you can detect, monitor, and prevent network-based attacks with custom threat signatures. Build your signature by examining packet captures for regular expression patterns that uniquely identify spyware activity and vulnerability exploits. The firewall will scan network traffic for these patterns and act based on the action specified during configuration upon threat detection. Be sure to use custom threat signatures as part of anti-spyware and vulnerability protection profiles to detect and handle command-and-control (C2) activity and system flaws that an attacker might attempt to exploit.
You can also define a combination signature for brute force attacks—a custom threat signature that triggers when traffic matches a specified pattern a certain number of times in a given time interval.
Combination Signatures for Brute Force Attacks
Combination signatures detect and prevent brute force attacks. A combination signature assigns a time attribute to an existing threat signature—the child signature—to form a distinct parent signature. The time attribute specifies the number of pattern matches or “hits” to the child signature and the time frame (in seconds) the hits must occur within for the parent signature to trigger. If a pattern matches the child signature alone, the default action for that signature occurs.
You can narrow the trigger conditions by including aggregation criteria, which define what the parent signature counts as a hit. You can select from “source,” “destination,” and “source-and destination.” If you wanted to count the number of hits to a particular destination IP address, you would set the aggregation criteria to “destination.” To count all hits from a particular source, select “source.” “Source-and-destination” instantiates multiple time-windows that count the n-number of instances when a single source goes to a specific destination.
Creating Custom Application Signatures
To create a custom application signature, you must do the following:
- Research the application using packet capture and analyzer tools
- Identify patterns in the packet captures
- Build your signature
- Validate your signature
Custom application signatures require you to specify the Scope —how your signature is applied to the traffic, Context —the portion of the file or protocol where you expect to find your pattern, the Pattern , and the Operator ( Pattern Match for string contexts and Greater Than , Less Than , or Equal To for integer-based contexts).
Refer to the Custom Signature Contexts , Defining Applications and Syntax for Regular Expression Data Patterns while building your signature.
Tutorial: How to Configure a Custom App-ID
Workflow for Creating a Custom Application Signature.
STEP 1 | Research the application using packet capture and/or analyzer tools.
- You should understand how you’d like to control the application before all else. Do you want to limit application functionality? Create a usage report? You’ll want to examine the contents of packet captures to gather context and identify unique characteristics of the application.
- Consider using a tool such as Wireshark or perform a packet capture on the firewall itself Take a Packet Capture for Unknown Applications .
-
Perform multiple packet captures between the client system and web server.
Generate traffic for various application scenarios once you have launched the capture tool. For example, if you wanted to create a signature for ‘uploading’ on uploading.com, you would upload a file on that site.
Multiple sessions might be created for the different actions performed in the application. You will need to locate and inspect each type of session in the resulting packet captures.
-
Inspect packet captures for values or patterns that uniquely identify the application or application function.
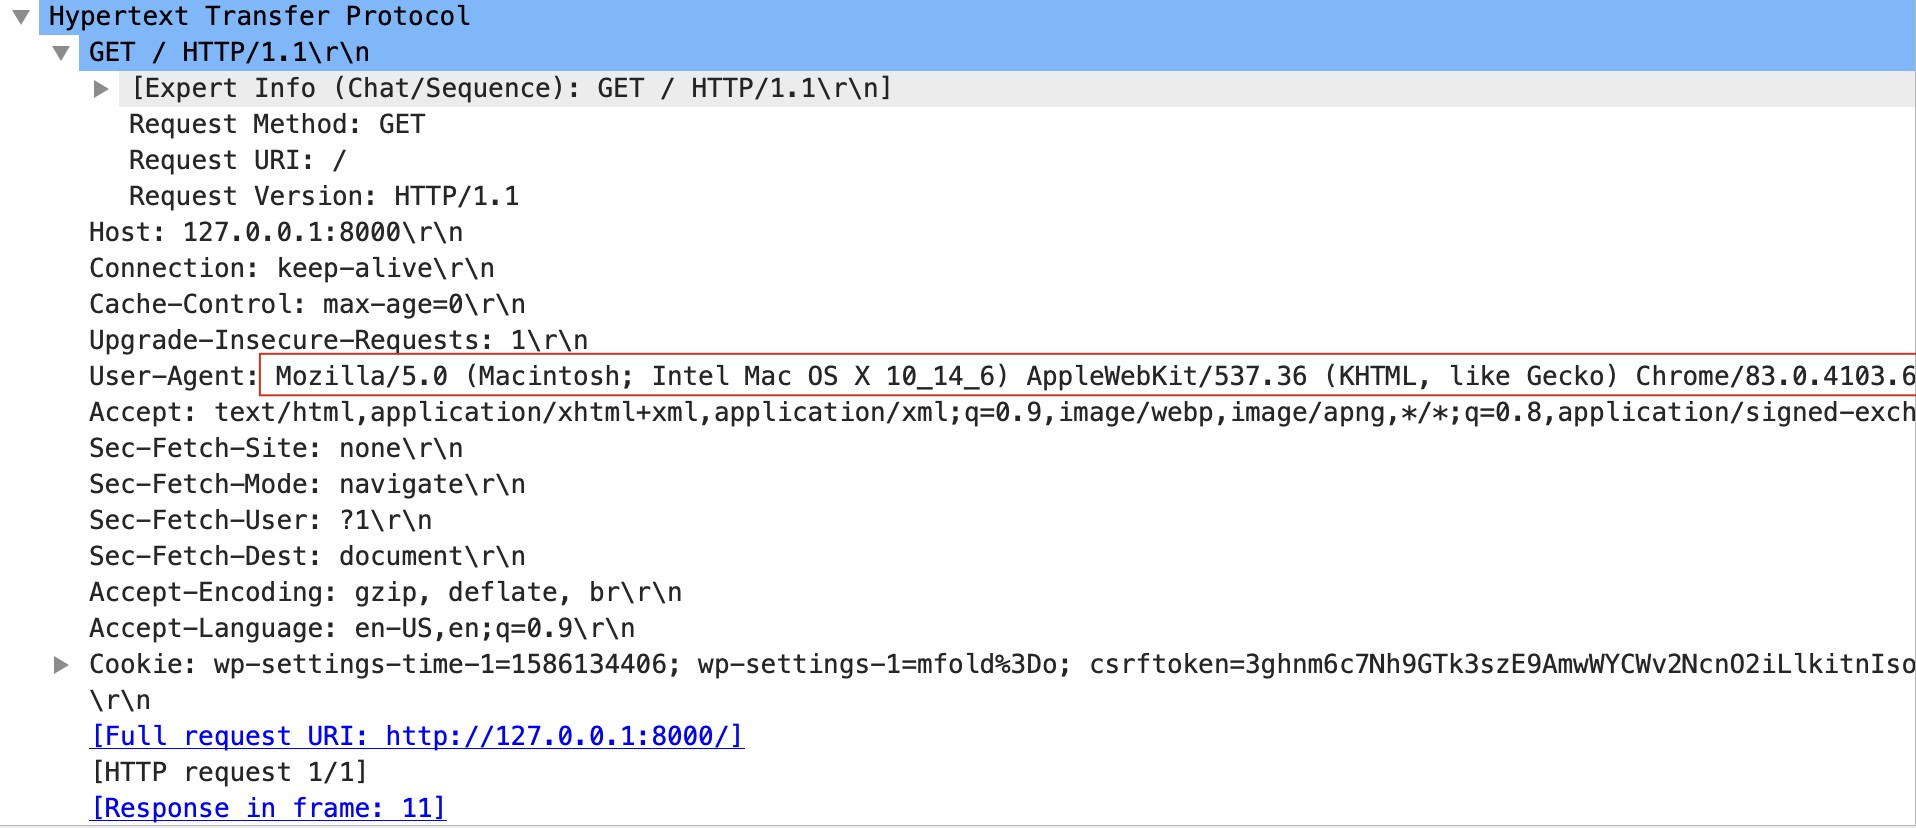
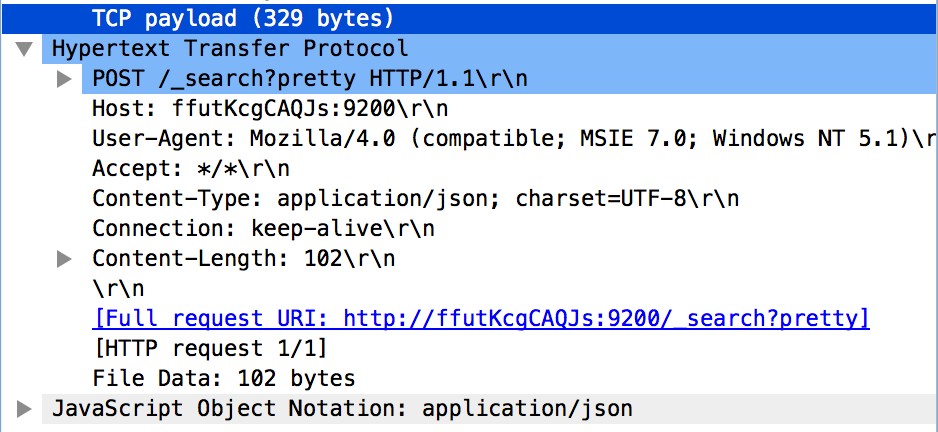
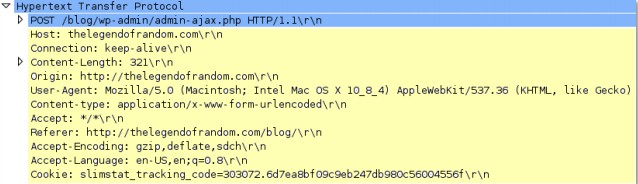
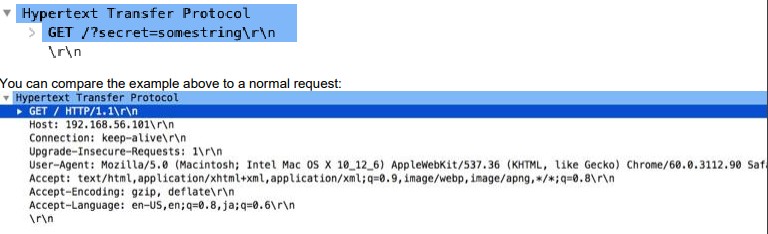
For example, after you uploaded a file to uploading.com, you would look for HTTP POST request packets in the sessions captured by your packet analyzer tool. Then, you would examine the packet contents for patterns.

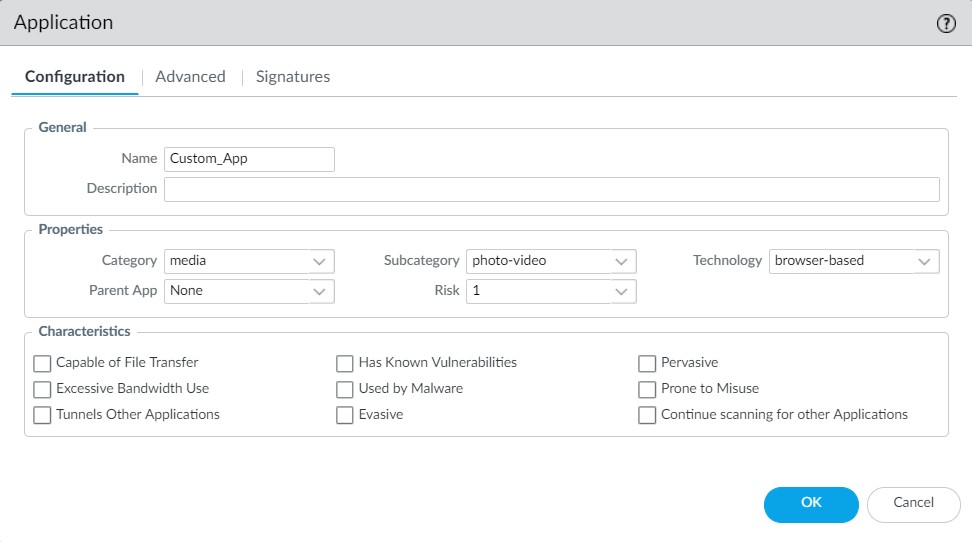
STEP 2 | Create the custom application.
-
Select Objects > Applications and click Add .
-
Under Configuration , enter a name and optional description for the application. Specify the application’s Properties and Characteristics.
- If your custom application has no Parent App that can be identified by regular App-ID or is used in an application override, the application cannot be scanned for threats.
- If the custom application has scanning options unchecked, the threat engine will stop inspecting the traffic as soon as the custom application is identified.
-
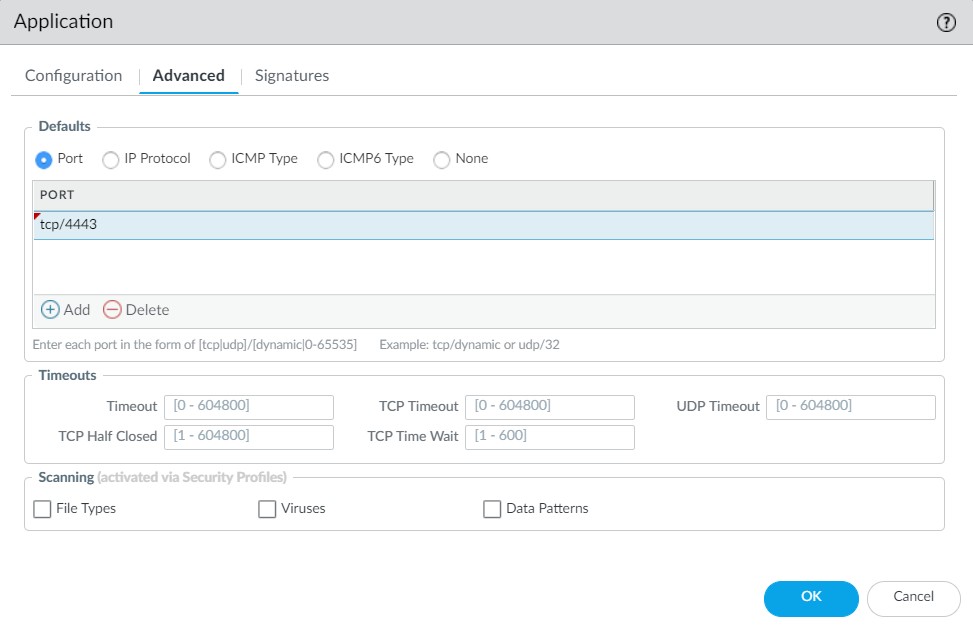
Under Advanced , define settings that will allow the firewall to identify the application protocol:
- Specify the default ports or protocol that the application uses. To specify signatures independent of protocol, select None.
- Specify the session timeout values. If you don’t specify timeout values, the default timeout values will be used.
- Indicate any type of additional scanning you plan to perform on the application traffic.
STEP 3 | Define your signature.
Multiple signatures may be necessary to account for all traffic specific to the application.
-
Under Signatures , click Add and enter a Signature Name and optional description.
-
Specify the Scope —Select between Transaction (e.g. HTTP request and response) or Session (e.g. a single POST request).
Scope: Transaction vs. Session
- Transaction: The signature must match within a single transaction (e.g., one HTTP request and its corresponding response). Useful for stateless or request-response protocols.
- Session: The signature can match patterns across multiple packets or transactions within the same session. Useful for stateful applications or when patterns are distributed.
-
Specify the matching conditions by clicking Add And Condition or Add Or Condition .
-
Select an Operator to define the conditions that must be true for a signature to match traffic.
-
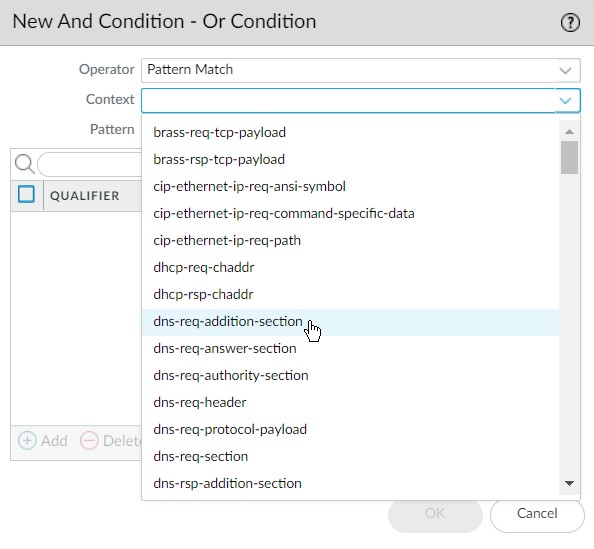
If you select Pattern Match , select a Context and then use a regular expression to specify the Pattern . Optionally, Add a qualifier/value pair.
Qualifiers are context-dependent and limit the match condition for the given context. For example, you might use the http-method qualifier to specify that a http-req-uri-path only matters if it is found inside an HTTP GET method.
- If you select Equal To , Less Than , or Greater Than , select an integer Context , and enter a Value .
-
-
Repeat sub-steps 3 and 4 for each matching condition.
If you leave Ordered Condition Match selected, make sure the condition or group of conditions is in the desired order. The most specific conditions should come first. To order the conditions: Select a condition or a group and click Move Up or Move Down .You cannot move conditions from one group to another.
STEP 4 | Save the custom signature.
-
Click OK to save your signature definition.
-
Commit your signature.
STEP 5 | Test your custom signature. (Covered in more detail later)
Creating Custom Threat Signatures
To create a custom threat signature, you must do the following:
- Research the threat using packet capture and analyzer tools
- Identify patterns in the packet captures
- Build your signature
- Validate your signature
Refer to the list of Custom Signature Contexts , Threat Details and Syntax for Regular Expression Data Patterns while building your signature.
Tutorial: Custom Vulnerability
To create a threat signature with time attributes, see create a combination signature.
Workflow for Creating a Custom Threat Signature (Standard).
STEP 1 | Add a custom threat.
-
Click Objects > Custom Objects > Spyware/Vulnerability and then click Add .
-
Under Configuration , fill out the following required fields in the General and Properties sections.
-
Threat ID
- For a vulnerability signature, enter a numeric ID between 41000 and 45000. If the firewall runs PAN-OS 10.0 or later, the ID can also be between 6800001 and 6900000.
- For a spyware signature, the ID should be between 15000 and 18000. If the firewall runs PAN-OS 10.0 or later, the ID can also be between 6900001 and 7000000.
- Name —Specify the threat name.
- Severity —Select the severity of the threat.
-
Threat ID
STEP 2 | Define your signature.
-
Under Signatures , leave Standard selected unless you wish to Create a Combination Signature. Add a new signature.
-
Specify the following information:
- Standard —Enter a name to identify the signature.
- Comment —Enter an optional description.
- Ordered Condition Match —If the order in which the firewall attempts to match the signature definitions is important, make sure the check box is selected.
- Scope —Indicate whether this signature applies to a full Session or a single Transaction .
-
Specify the matching conditions by clicking Add And Condition or Add Or Condition .
-
Select an Operator to define the conditions that must be true for a signature to match traffic.
-
If you select Pattern Match , specify the following:
Context —Select from available custom signature contexts .
Pattern —Use a regular expression to define this attribute.
Optionally, Add a qualifier/value pair.
Qualifiers are context-dependent and limit the match condition for the given context.-
Select Negate to signal a condition under which the custom signature does not trigger. The custom signature matches to traffic only when this condition is false.
- A custom signature cannot be created with only Negate conditions. You must include at least one positive condition in your definition.
- If the signature’s scope is set to Session, a negative condition cannot be configured as the last condition to match to traffic.
You can define exceptions for custom vulnerability or spyware signatures using the new option to negate signature generation when traffic matches both a signature and the exception to the signature. Use this option to allow certain traffic in your network that might otherwise be classified as spyware or a vulnerability exploit. In this case, the signature is generated for traffic that matches the pattern; traffic that matches the pattern but also matches the exception to the pattern is excluded from signature generation and any associated policy action (such as being blocked or dropped). For example, you can define a signature to be generated for redirected URLs; however, you can now also create an exception where the signature is not generated for URLs that redirect to a trusted domain.
-
If you select an Equal To , Less Than , or Greater Than operator, specify a Context and a Value .
-
-
Repeat sub-steps 3 and 4 for each matching condition.
If you leave Ordered Condition Match selected, make sure the condition or group of conditions is in the desired order. The most specific conditions should come first. To order the conditions: Select a condition or a group and click Move Up or Move Down .
| STEP 3 | |
Save the custom threat. 1. Click OK to save the custom threat. |
|---|---|
| STEP 4 | |
Enable your custom signature.
|
| STEP 5 | | Commit your changes. |
| STEP 6 | | Test your custom signature. |
Create a Combination Signature
You can create a combination signature to monitor the frequency and rate of matches to a signature on your network. You’ll need to know the Threat ID of an existing threat signature or create a custom threat signature that detects a particular event such as a Wordpress login attempt. When you configure your combination signature, you’ll have to specify the time conditions for matches to the threat—x number of hits in y number of seconds. You can adjust the time attribute according to needs and experience.
STEP 1 | Add a custom threat. (As described previously, ensuring Threat ID ranges are respected)
-
Click Objects > Custom Objects > Spyware/Vulnerability and then click Add .
-
Under Configuration , fill out the required fields (Threat ID, Name, Severity).
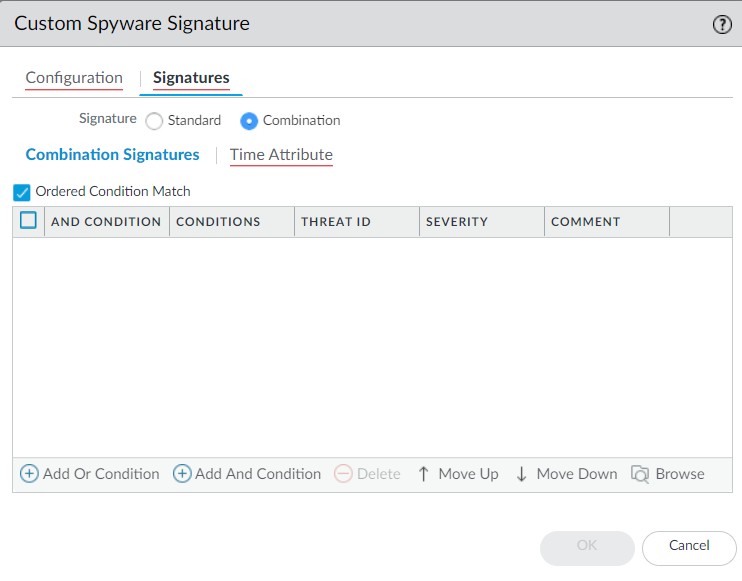
STEP 2 | Define your signature.
-
Click Signatures and select Combination .
-
Under Combination Signatures , click Add And Condition or Add Or Condition .
- To add a condition within a group, select the group and click Add Condition .
- To move a condition within a group, select the condition and click Move Up or Move Down .
- To move a group, select the group and click Move Up or Move Down .
-
Choose the Threat ID for the signature you’d like to use (this is the "child" signature). You may also edit the condition name.
-
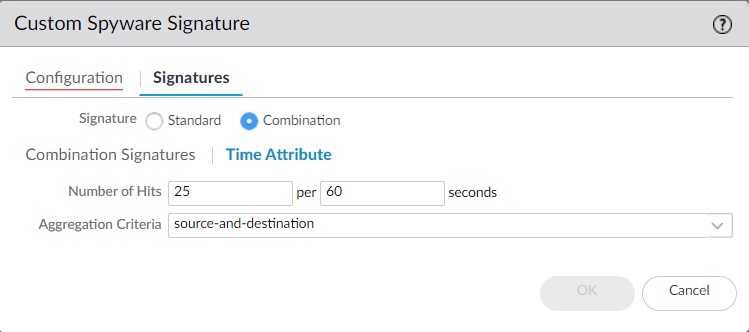
Under Time Attribute specify the following:
- Number of Hits —Specify the threshold that will trigger any policy-based action as a number of hits (1-1000) in a specified number of seconds (1-3600).
- Aggregation Criteria —Specify whether the hits are tracked by source IP address, destination IP address, or a combination of source and destination IP addresses.
-
Repeat sub-steps 2, 3, and 4 for each matching condition if building a complex combination.
If you leave Ordered Condition Match selected, make sure the condition or group of conditions is in the desired order.
| STEP 3 | |
Save the custom threat.
|
|---|---|
| STEP 4 | | Test your custom signature. (Remember to enable it in a relevant Security Profile). |
Create a Custom Threat Signature from a Snort Signature
The following steps illustrate the process for converting a Snort signature into a custom spyware signature compatible with Palo Alto Networks firewalls.
With Panorama version 10.0 or later, you can use the IPS Signature Converter plugin to automatically convert Snort and Suricata rules into custom Palo Alto Networks threat signatures instead of manually performing this procedure.Snort rule example:
alert tcp any any -> any any (msg:"Malformed_UA"; content:"User-Agent: Mozillar/"; depth:500; sid:99999999;)Reference: https://www.us-cert.gov/ncas/alerts/TA17-318B
IOC List: https://www.us-cert.gov/sites/default/files/publications/TA-17-318B-IOCs.csv
In this example you can:
-
Use the IP addresses provided as part of the IOC List to detect if a possible infection already exists by searching the firewall logs.
-
The IP addresses provided can be part of an EDL or Address group and added to a Policy to block traffic to and from the suspicious list.
-
Use the provided Snort signature and convert it to a custom spyware signature. This signature will become part of the spyware profile added to the appropriate policy.
For other use cases, see our companion article .
STEP 1 | Create a Custom Spyware Object.
-
Navigate to Objects > Custom Objects > Spyware/Vulnerability .
-
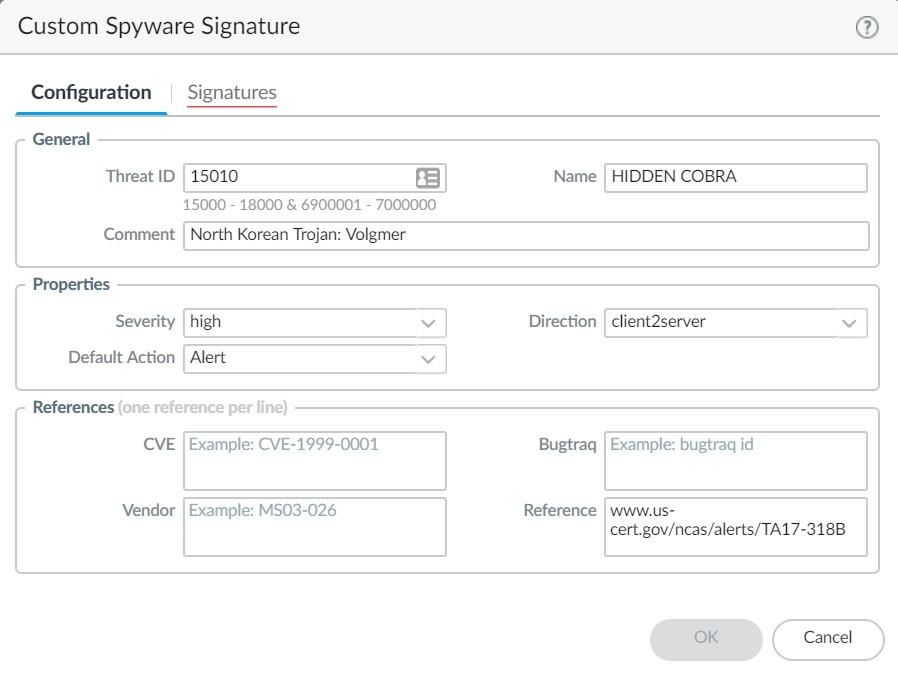
Click Add and provide a Threat ID (e.g., within spyware range 15000-18000 or 6900001-7000000 for PAN-OS 10.0+), an optional comment, and fill out the Properties section (Name, Severity).
-
Under Signatures , press Add .
-
Specify the following information:
- Standard —Enter a name to identify the signature in the field.
- Comment —Enter an optional description.
- If the order in which the firewall attempts to match the signature definitions is important, keep Ordered Condition Match selected.
- Scope —Indicate whether this signature applies to a full Session or a single Transaction . (For `content:"User-Agent: Mozillar/"`, `http-req-user-agent-header` context in a `Transaction` scope might be appropriate).
- Add a condition by clicking Add And Condition or Add Or Condition .
- Select an Operator (likely `Pattern Match`).
- If you select Pattern Match , identify a Context in the Snort pattern that matches available PAN-OS contexts (e.g., `http-req-user-agent-header` for "User-Agent:"). Provide a regular expression Pattern (e.g., `Mozillar/`). Snort's `depth` option might translate to careful context selection or regex constraints if possible, or might be partly lost.
7. Click OK to finish creating the Spyware object.
| STEP 2 | |
Verify that the custom Spyware object is part of your Anti-Spyware Profile.
|
|---|---|
| STEP 3 | |
(Optional based on IOC list) Create an EDL object.
|
| STEP 4 | | Add the EDL (if used) and Anti-Spyware profiles to appropriate Policy Objects. |
| STEP 5 | | Test policy is working as expected by looking at Threat logs. |
| STEP 6 | | Change the action for the spyware object from alert to drop/reset after verification. Also, change the severity of the object created as needed. |
| STEP 7 | | Commit your signature(s). |
| STEP 8 | | Test your custom signature. |
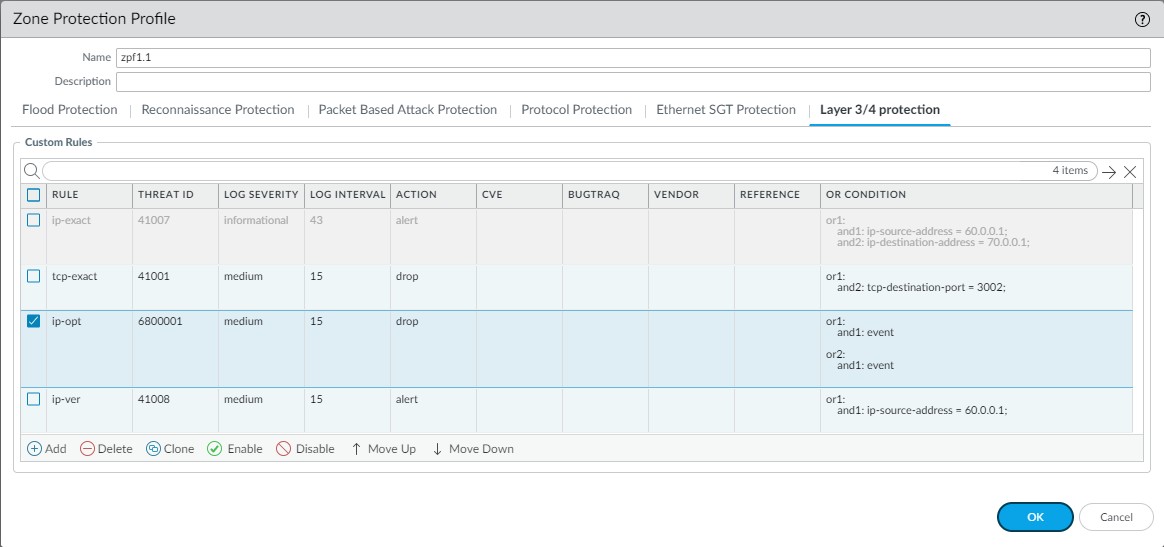
Create a Custom L3 & L4 Vulnerability Signature
You can create custom threat signatures (vulnerability) based on Layer3 and Layer4 header fields (such as IP flags, acknowledgment numbers, etc). This enables you to provide user-created vulnerability signature coverage for old and deprecated TCP/IP stacks used in embedded / IoT devices that normally would not have any existing threat signature coverage.
Custom L3 & L4 vulnerability signatures are configured within Zone Protection profiles, not as standard custom threat objects.
STEP 1 | Log in to the PAN-OS web interface.
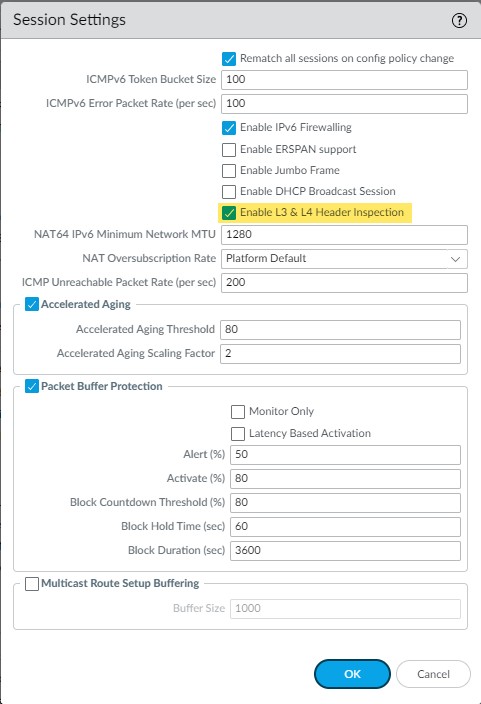
STEP 2 | Select Device > Setup > Session and enable L3 & L4 Header Inspection globally on the firewall.
STEP 3 | Create a Zone Protection profile and configure your L3 & L4 header inspection settings.
-
Select Network > Network Profiles > Zone Protection and either select an existing profile or Add a new profile.
-
If you are creating a new zone protection profile, enter a Name for the profile and an optional Description .
-
Select L3 & L4 Header Inspection to define your custom vulnerability signatures.
-
Add new custom rules by defining the configuration and signature details for each entry, which are performed in their respective tabs: Configuration and Signature .
-
Under Configuration , fill out the following required fields in the General, Properties, and Reference section.
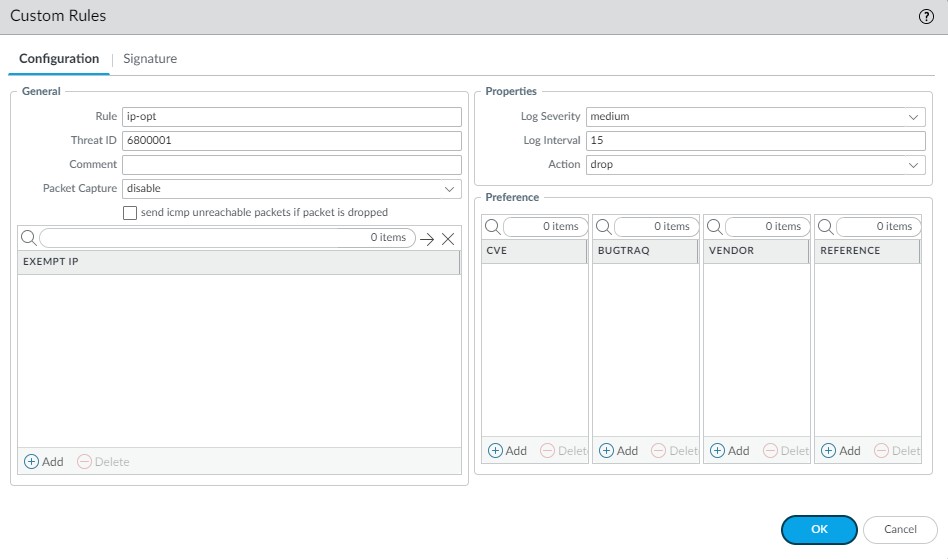
- Rule —Specify the custom rule name.
- Threat ID —Enter a numeric ID between 41000 and 45000 or 6800001 and 6900000.
- Comment —Optionally, add a description of the custom rule.
- Packet Capture —Select a packet capture setting.
- Exempt IP —Enter the IP address(es) for which you do not want the custom rule to apply to.
- Log Severity —Select the severity of the threat.
- Log Interval —Indicates how frequently an event is logged.
- Action —Choose the action to take when there is a custom signatures match. Options include alert, drop, reset-client, reset-server, and reset-both. Refer to Security Policy Actions for more information about these action settings.
- Reference —Add references to provide context or related information about the custom threat signature.
-
From the Signature tab, provide a name or description of the custom vulnerability under Comment . After specifying a name, select Add to provide the custom signature details.
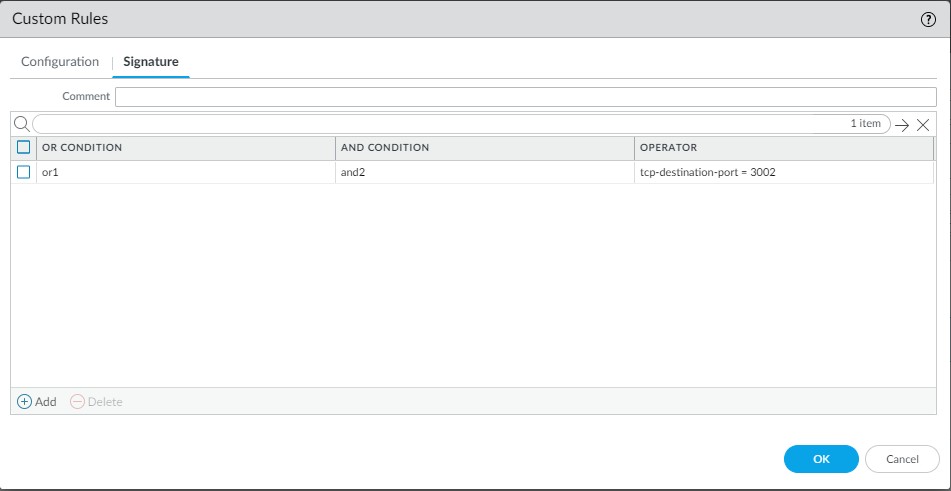
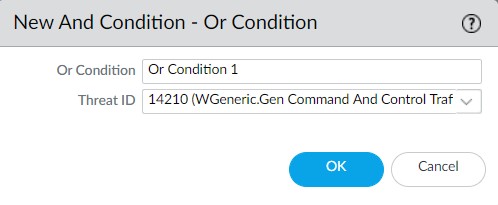
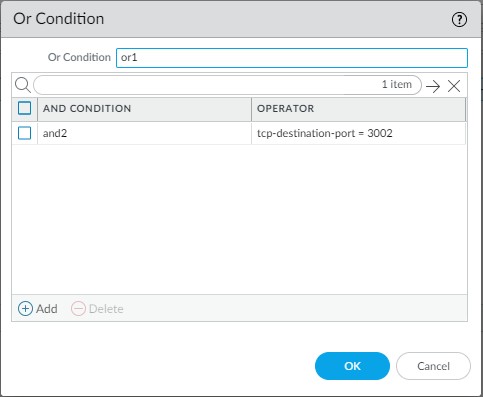
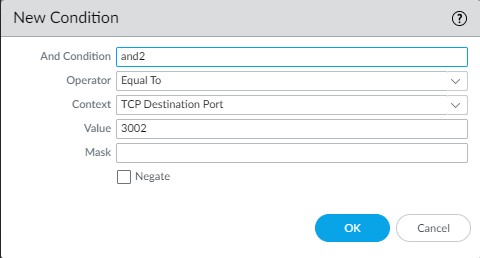
- Specify a matching Or Condition. When finished, select Add to configure an And Condition and the associated values in a new window.
- If you select a Less Than or Greater Than operator, specify a Context and a Value . The Equal To operator additionally has Mask and Negate options. Click OK when you have finished configuring the new and condition.
-
Repeat for each matching condition that you want to add.
-
Click OK and review your signatures. Click OK again to return to the zone protection profile.
-
From the L3 & L4 Header Inspection tab, you can reorder, disable, and clone the custom rule entries as necessary. Click OK to exit the zone protection profile.
STEP 4 | Apply the Zone Protection profile to a security zone that is assigned to interfaces you want to protect.
-
Select Network > Zones and select the zone where you want to assign the Zone Protection profile.
-
Add the Interfaces belonging to the zone.
-
For Zone Protection Profile , select the profile you just created.
-
Select Enable Packet Based Attack Protection to enable the L3 & L4 header inspection configuration settings (the exact wording might vary slightly by PAN-OS version, typically it's about enabling the protections within the profile for the zone).
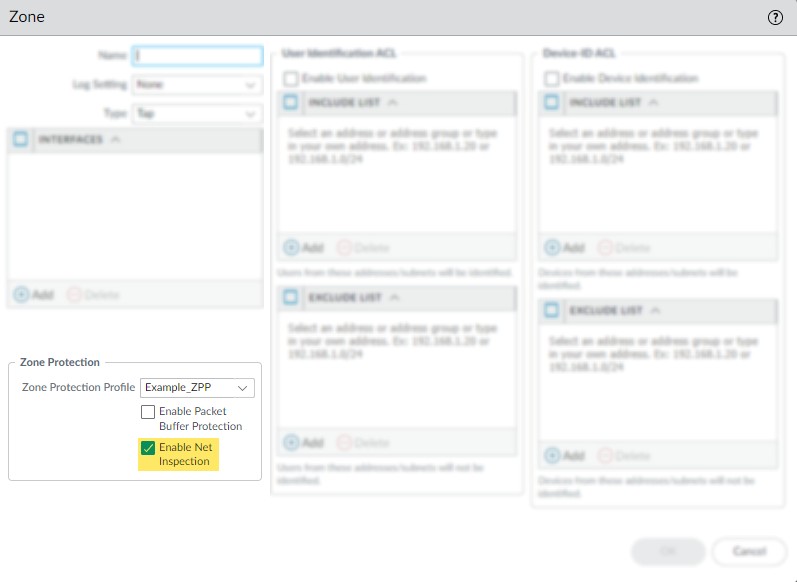
- Click OK .
| STEP 5 | | Commit your changes. |
|---|---|
| STEP 6 | | Test your custom signature. |
Testing Signatures & Pattern Requirements
Test a Custom Signature
Custom signatures are particularly at risk for false positives and false negatives—the incorrect identification of traffic or failed detection of applications or threats. You should always test a custom signature after committing its configuration to verify that it functions as expected. Poorly written or outdated custom signatures may only be detected (and improved) through testing. If left unexamined, your signatures can reduce the efficacy of the firewall.
For custom App-ID signatures, generate traffic matching the application or application functions on a client system with a firewall between it and the application. Then, check the Traffic logs to verify that the generated sessions match the signatures you wrote. Your signature is incomplete if any traffic from your session does not match. Look at streams of sessions that do not match your signature with a packet capture tool like Wireshark. Identify unique patterns from those streams and add them to your signature to improve the accuracy of your signature.
For custom threat signatures, run penetration tests to detect system vulnerabilities. Then, view the Threat logs to see threat activity and the actions taken. Investigate any false positives or negatives. You may need to modify your signature, change its default action, or examine security profiles and policies.
Validate that traffic matches your signature as expected.
-
Run application traffic/penetration testing.
-
Navigate to Monitor > Logs > Traffic/Threat . Verify that you see traffic matching the custom application/threat (and that it is being handled per your policy rule).
For example, if you wrote an application signature for uploading on example.com, you would visit example.com and upload a file. In the Traffic logs, you would verify that the session updated from “web-browsing” to “uploading-example” after the file upload.
-
Fine-tune your signature by adding additional patterns or conditions to the signature, if necessary.
-
Repeat.
Custom Signature Pattern Requirements
The pattern requirements and available syntax for custom signatures depends on your firewall version. Firewalls running PAN-OS 10.0 (or a later version) have more flexible pattern requirements and a wider selection of regular expression (regex) syntax.
Refer to Syntax for Regular Expression Data Patterns for more details about the differences in syntax and pattern requirements between pre-PAN-OS 10.0 releases and PAN-OS 10.0 (and later) releases. You can switch between documentation releases by using the version switcher located in the left navigation bar.
If you encounter any errors using your custom signatures, verify that they conform to the following requirements.
| Custom Signature Pattern Requirements | Details |
|---|---|
| All versions |
|
| PAN-OS 9.1 and earlier versions |
|
Testing Pattern Performance Impact
The firewall scores the performance impact of a signature on a scale of 0 to 100%. A score of 0% means the signature severely affects firewall performance and a score of 100% means it minimally affects performance.
Use either of the following two commands to check the performance impact of a signature:
| Command | Description |
|---|---|
test custom-signature-type pattern <pattern>
|
Calculates the performance impact of a signature without a context and determines whether the pattern is not valid, is valid but in only the new engine (lscan), or is valid in both the old and new engine (pscan/AHO). Example: admin@VM-FW-75-252> test custom-signature-type pattern aaaa.* *The pattern is lscan pattern Performance score: 68% |
test custom-signature-perf context <context> pattern <pattern>
|
Calculates the performance impact of a signature with a context and displays a warning if the performance score is below 55%. Example: admin@VM-FW-75-252> test custom-signature-perf context http-rsp-headers pattern aaaa.* Performance score: 42% This signature will have performance impact |
When you test a custom signature without a context, the score is a function of the literal parts of the pattern. The literal parts are the characters in the string with fixed values, such as “pan” and “net” in pan.{4}net . The greater the number and length of the literal parts, the higher the score of the pattern.
When you test a pattern with a context, the firewall performs the above calculation and adjusts it based on the typical length and frequency of the context. The firewall then divides the typical context length by the shortest literal part of the pattern and multiplies the base score of the pattern by this value. Finally, the firewall lowers the score if the context appears frequently and raises the score if the context appears infrequently.
Custom Signature Contexts
Custom signature contexts are available for both string and integer context types. These define specific parts of network traffic or file data where the firewall should look for your defined patterns or values. Choosing the correct context is crucial for accurate and efficient signature matching.
Understanding available contexts is key for PCNSE. You might be asked to choose an appropriate context for a given scenario.
String Contexts
String Contexts are used for Pattern Match operators. They allow you to specify a regular expression pattern to be found within the data provided by the context.
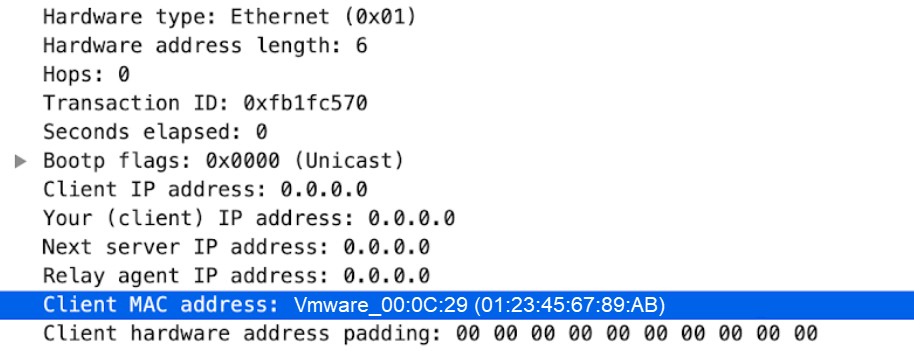
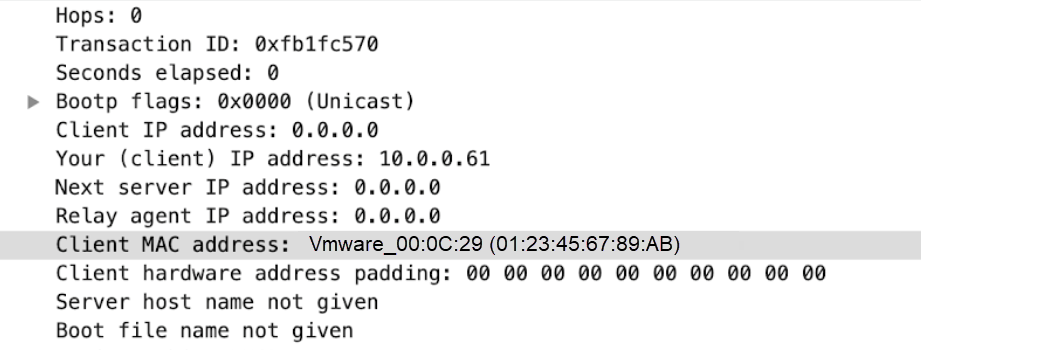
dhcp-req-chaddr
Identifies the DHCP request client hardware address.
Additional Details
None
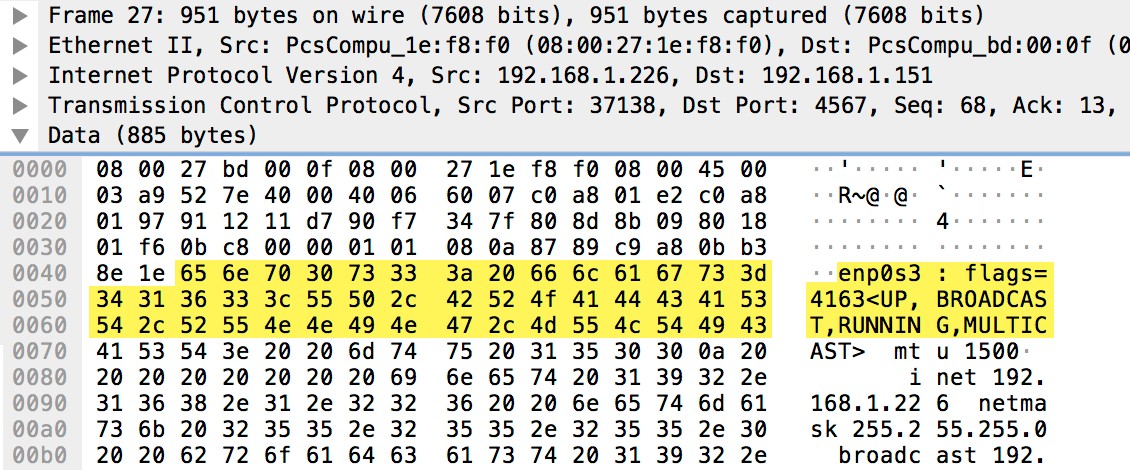
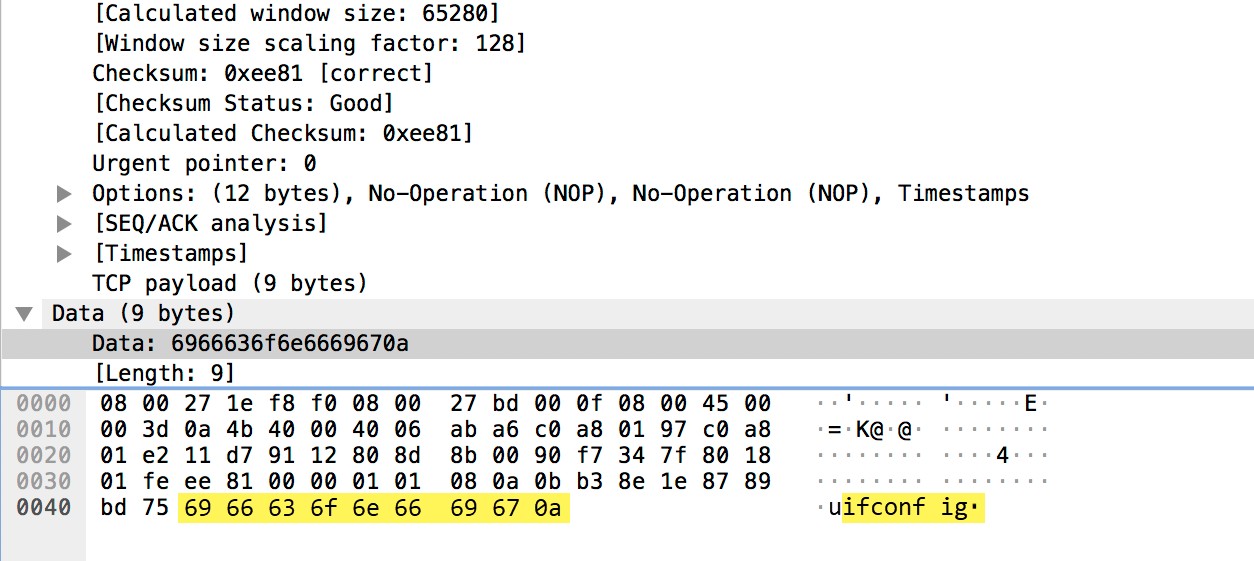
Context Capture
This context provides the highlighted text.
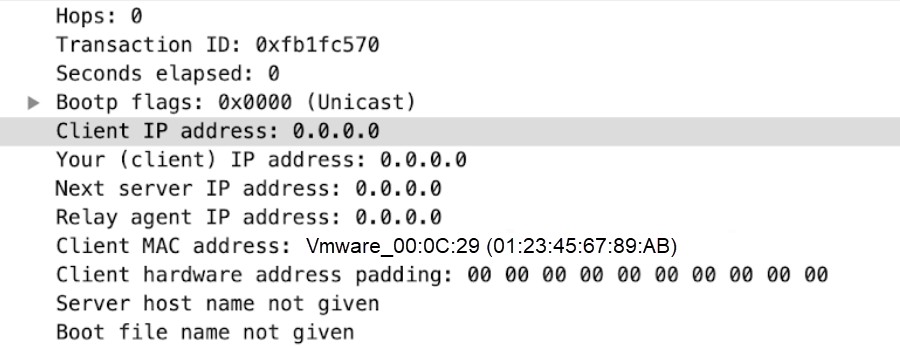
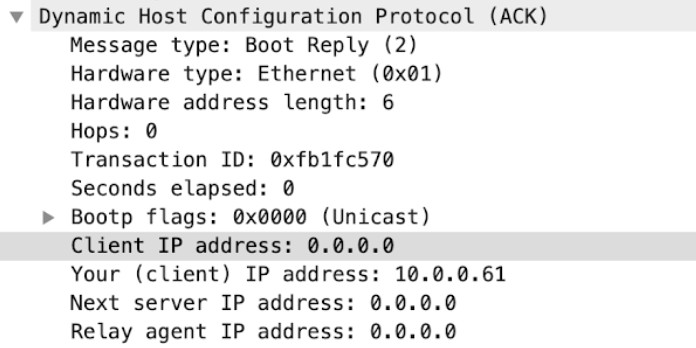
dhcp-req-ciaddr
Identifies the DHCP request client IP address.
Additional Details
None
Context Capture
This context provides the highlighted text.
dhcp-rsp-chaddr
Identifies the DHCP response client hardware address.
Context Capture
dhcp-rsp-ciaddr
Identifies the DHCP response client IP address.
Context Capture
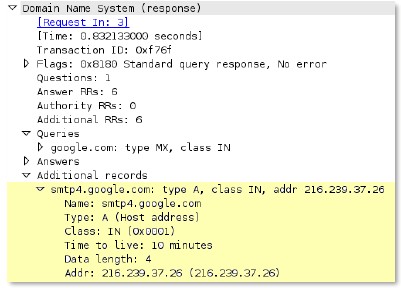
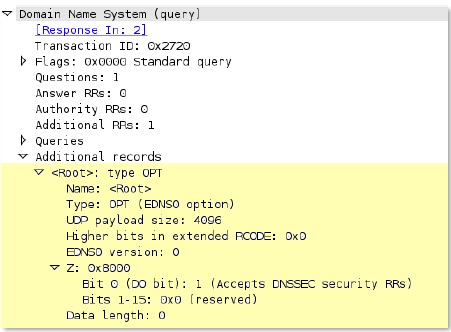
dns-req-addition-section
Additional records section if found in a DNS request (normal DNS requests should not have an additional records section).
Context Capture
dns-req-answer-section
Answer section if found in a DNS request (normal DNS requests should not have an answer section).
Context Capture
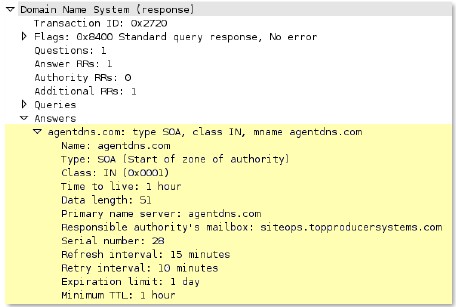
dns-req-authority-section
Authority section if found in a DNS request (normal DNS requests should not have an authority section).
Context Capture
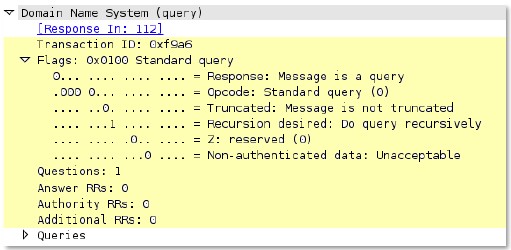
dns-req-header
Full DNS request header (12 bytes) with the transaction ID, query flags, number of questions, and the Resource Record (RR) values in a DNS request.
Context Capture
dns-req-protocol-payload
The payload of a DNS request.
Context Capture

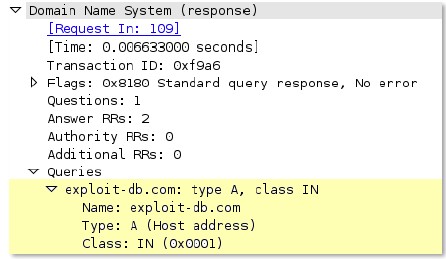
dns-req-section
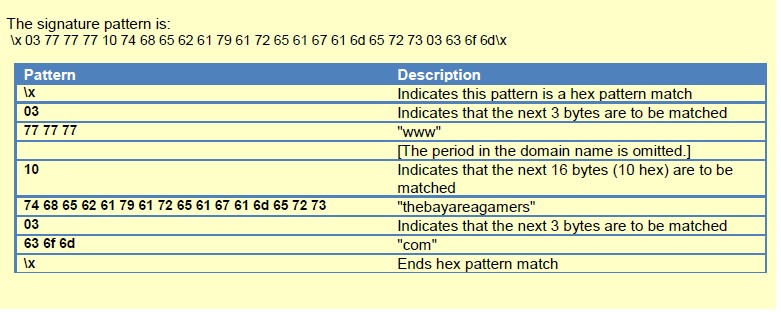
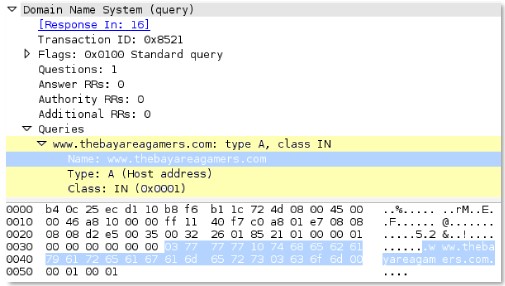
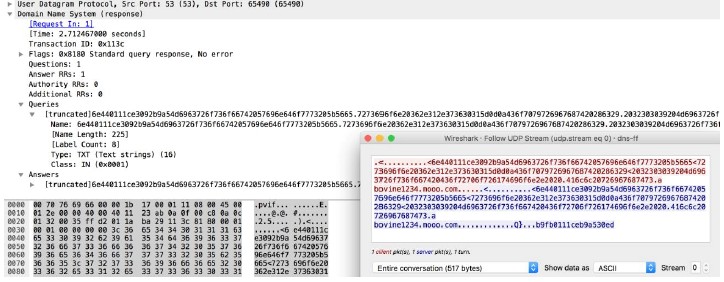
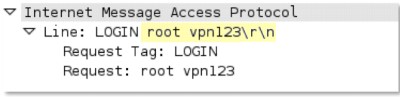
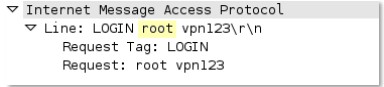
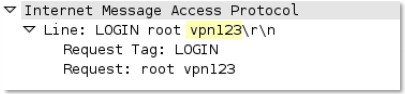
This context matches the DNS questions of a DNS query so that patterns can be written against one or more domains in a given DNS query.
Additional Details
This context is a direct pattern match against the format of a DNS query, so patterns must adhere to the DNS question structure. A recommended approach to create a DNS pattern is to capture the DNS request with Wireshark and copy the DNS Request field (make sure to remove the ending period in the request).
Context Capture
This example illustrates how to build a signature for a DNS query for the domain www.thebayareagamers.com.
The Wireshark representation of the above table. Everything highlighted yellow and blue is provided by this context. The blue section is where the hexadecimal string is pulled from for the above table.
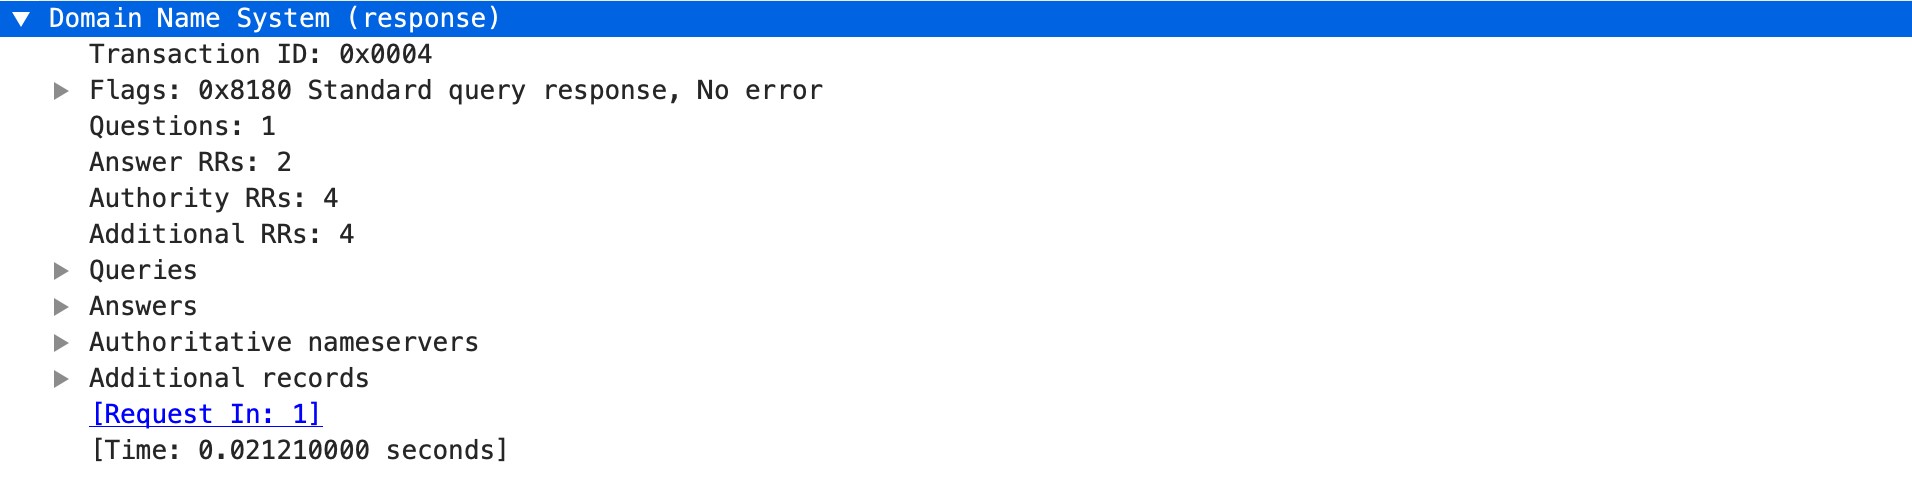
dns-rsp-addition-section
Additional records section of a DNS response.
Context Capture
dns-rsp-answer-section
All of the DNS Answers section with the exception of PTR records. PTR records are matched in a separate context.
Context Capture (Note: Image reference might be duplicated in original source, using original image ref 'image28.jpg')
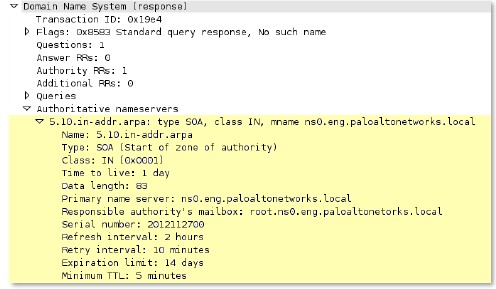
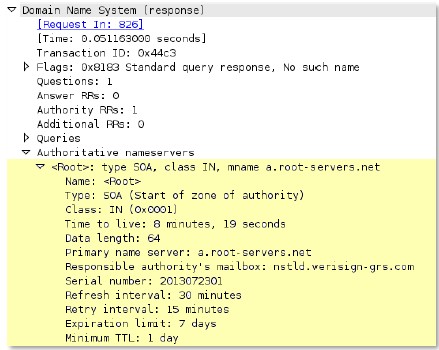
dns-rsp-authority-section
The complete authority section of a DNS response.
Context Capture
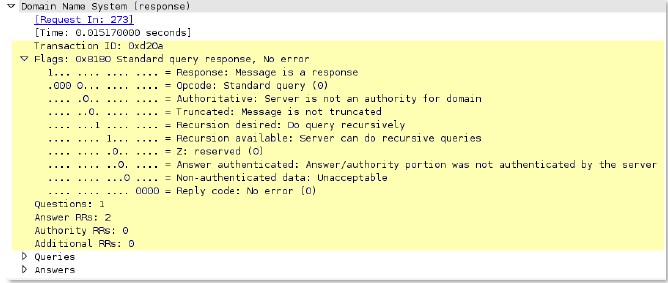
dns-rsp-header
Full DNS response header, which includes the transaction ID, query flags, the number of questions, and the Resource Record (RR) values.
Context Capture
dns-rsp-protocol-payload
The payload of a DNS response.
Context Capture
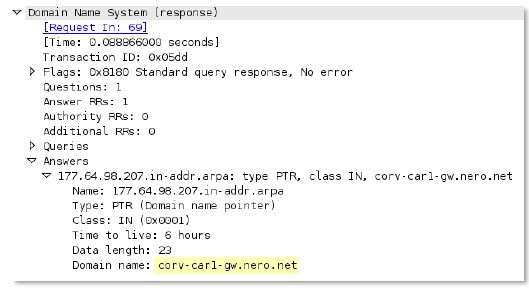
dns-rsp-ptr-answer-data
FQDN for a type PTR DNS response.
Context Capture
dns-rsp-queries-section
Name, type, and class of the queries section in a DNS response.
Context Capture
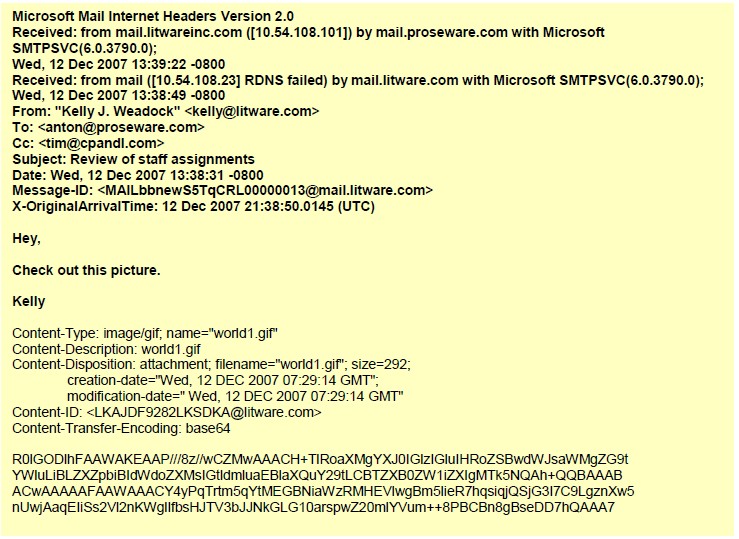
email-headers
All email headers and the plain text email body. Attachments are not included in this context as they are provided elsewhere.
Context Capture
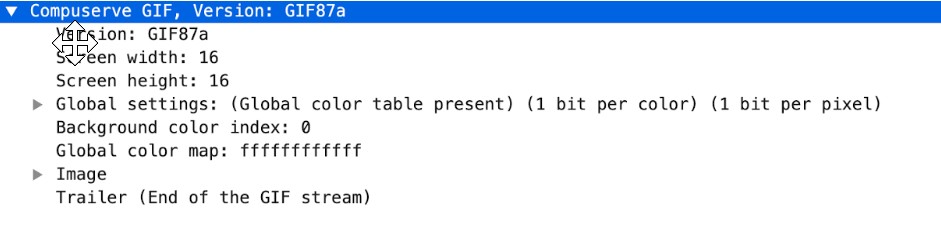
file-data
Covers the data of transferred files.
Additional Details
This context supports numerous file types including 7z, ACE, ASF, BAT, BMP, CAB, CSV, DOC, ELF, FLV, GIF, GZip, HTML, Java, JPEG, MSOFFICE, PDF, PNG, RAR, RIFF, SWF, TIFF, ZIP, and many more.
Context Capture
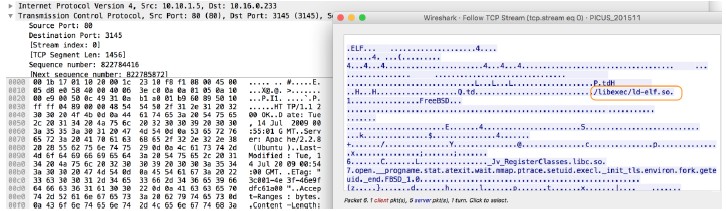
file-elf-body
Identifies an executable and linkable formatted (ELF) file type contained in a protocol or application response and checks the ELF file body.
Context Capture
file-flv-body
Full body of a flash video file minus the first 9 bytes, which are reserved for the header.
Context Capture

file-html-body
Full body of a HTML file, minus the first 8 bytes as they’re reserved for the header.
Context Capture

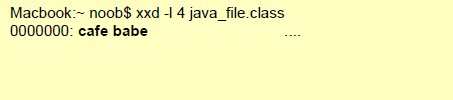
file-java-body
Full body of a Java file, minus the first 4 bytes, which is always 0xCAFEBABE (“cafebabe”).
Context Capture
file-mov-body
Full body of a MOV file, minus the first 8 bytes as they’re reserved for the header.
Context Capture

file-office-content
Full body of a Microsoft Office Document file, minus the first 8 bytes as they’re reserved for the header.
Context Capture

file-pdf-body
The full body of a PDF file minus the first 8 bytes, which are reserved for the header.
Additional Details : Compressed data is provided as decompressed data by the decoder.
Context Capture

file-riff-body
Full body of a RIFF file, minus the first 8 bytes as they’re reserved for the header.
Context Capture

file-swf-body
Full body of a SWF file, minus the first 8 bytes as they’re reserved for the header.
Context Capture

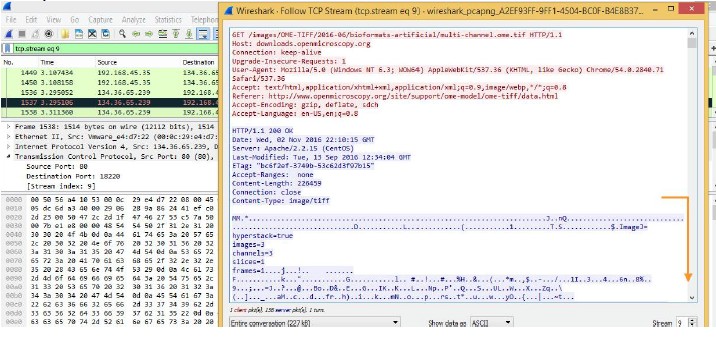
file-tiff-body
When the firewall detects a tagged image file format (TIFF) file, this context returns data contained within the body of the file.
Context Capture
file-unknown-body
This context provides data after the first 8 bytes and up to 7 packets of an unknown file we couldn’t otherwise identify.
Context Capture

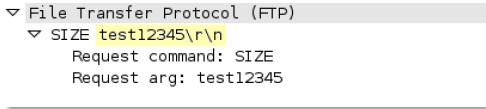
ftp-req-params
Parameters following an FTP command.
Additional Details : Qualifiers: This context can use FTP command and FTP vendor ID qualifiers.
Context Capture
ftp-req-protocol-payload
The payload of an FTP request.
Context Capture

ftp-rsp-protocol-payload
The payload of an FTP response.
Context Capture

ftp-rsp-banner
FTP welcome banner shown before authentication.
Context Capture
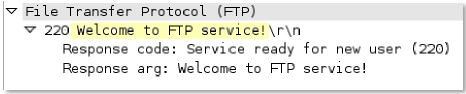
ftp-rsp-message
FTP server response code and the code itself.
Context Capture

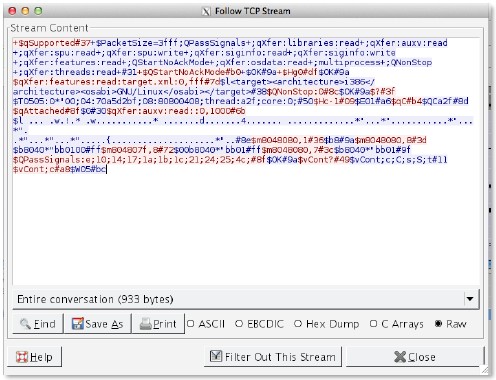
gdbremote-req-context
GDB (GNU Debugger) remote protocol request data.
Context Capture
gdbremote-rsp-context
GDB (GNU Debugger) remote protocol response data.
Context Capture
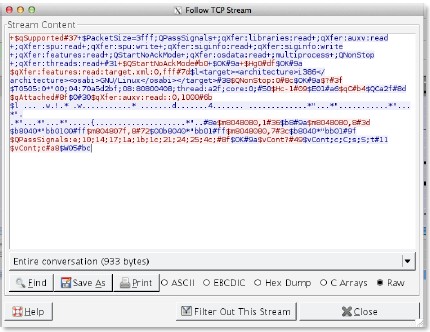
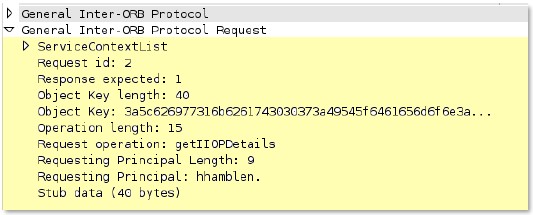
giop-req-message-body
Everything in the GIOP (General Inter-ORB Protocol) request.
Context Capture
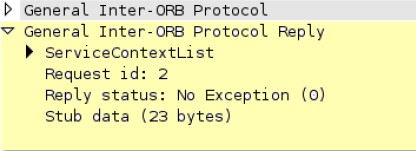
giop-rsp-message-body
Data after the GIOP header in a GIOP response.
Context Capture
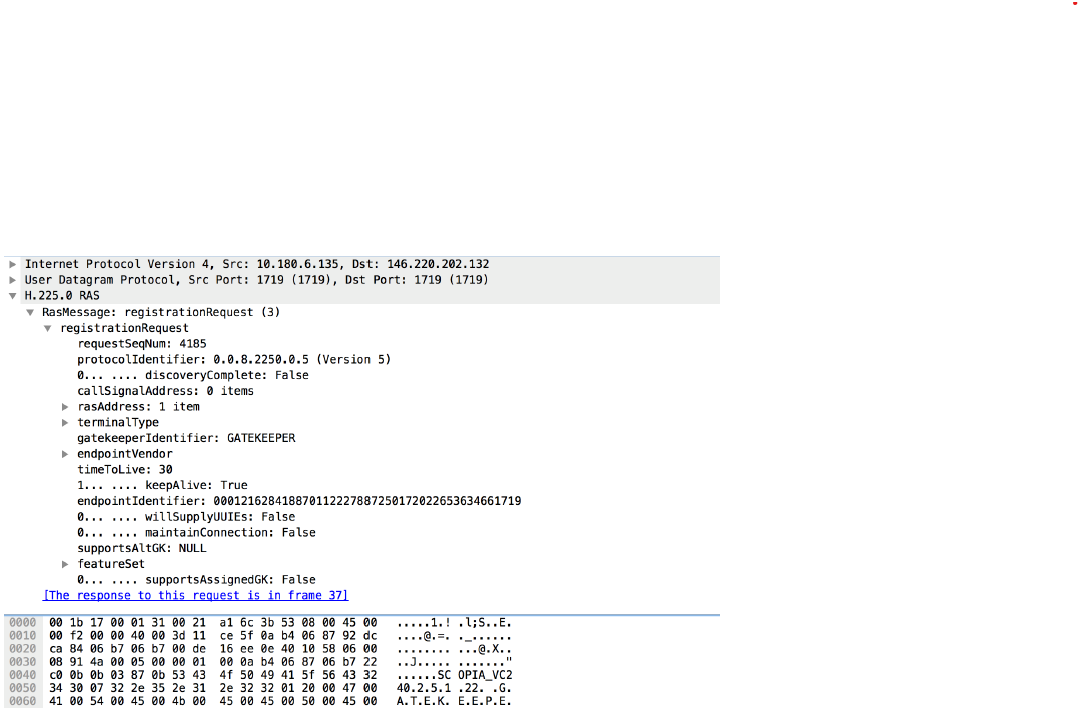
h225-payload
Extracts any data contained in an H.225.0 (App-ID: h.225) request.
Context Capture
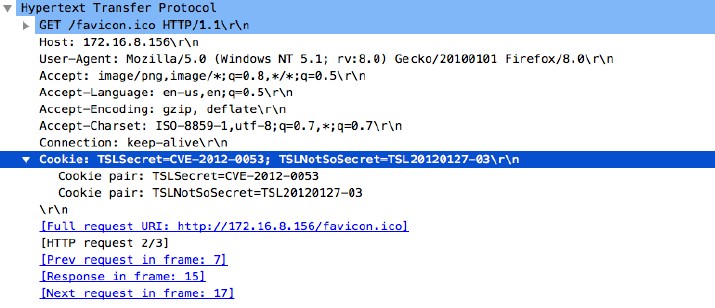
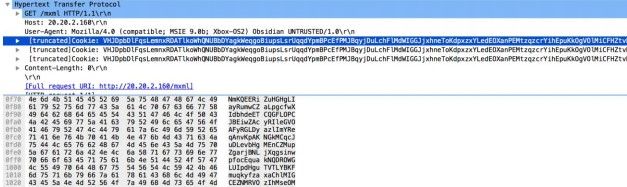
http-req-cookie
Returns the Cookie header value contained in an HTTP request header.
Context Capture
http-req-headers
HTTP request header, not including the method, path, HTTP version, or host.
Additional Details : Can use HTTP header field and HTTP method qualifiers.
Context Capture
http-req-host-header
Host field in a HTTP request header.
Context Capture

http-req-message-body
Body content of an HTTP request when not URL encoded or MIME.
Additional Details : Can use HTTP method qualifier.
Context Capture
http-req-mime-form-data
MIME header data in the body of an HTTP request, not including embedded file contents.
Context Capture

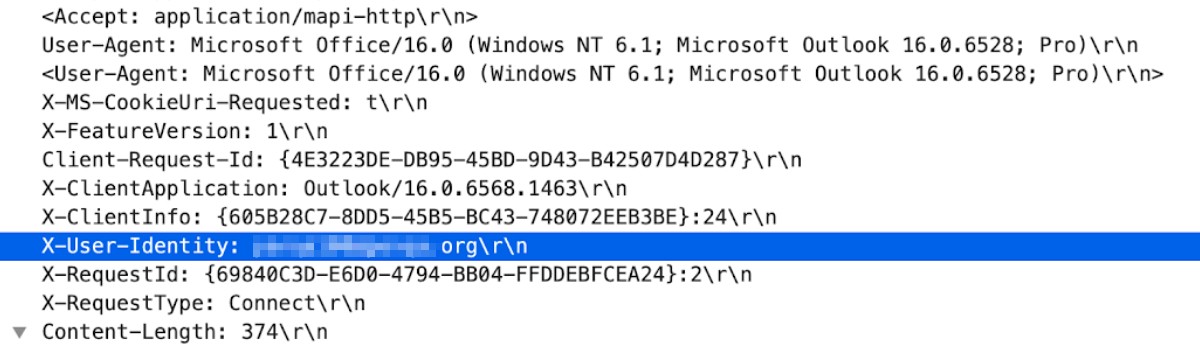
http-req-ms-subdomain
Identifies request headers/params for Office365 enterprise access (e.g., X-User-Identity).
Context Capture
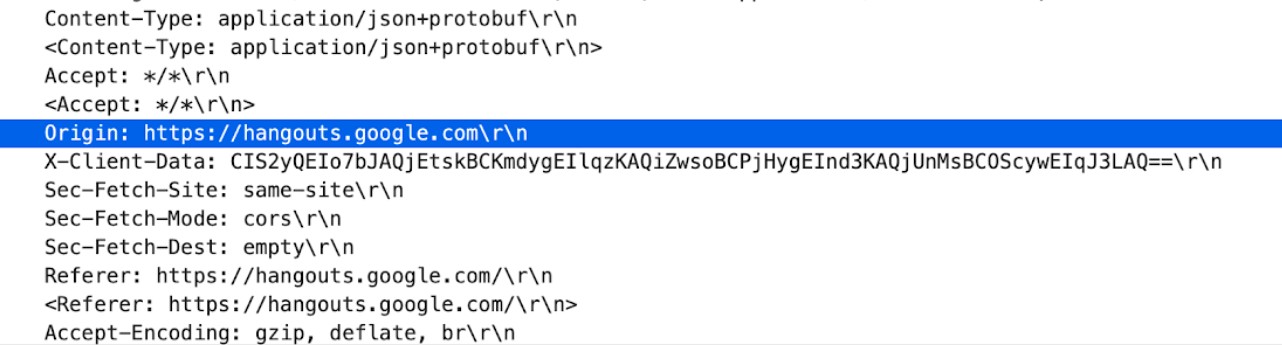
http-req-origin-headers
Identifies strings from the Origin field (PAN-OS 8.1+).
Context Capture
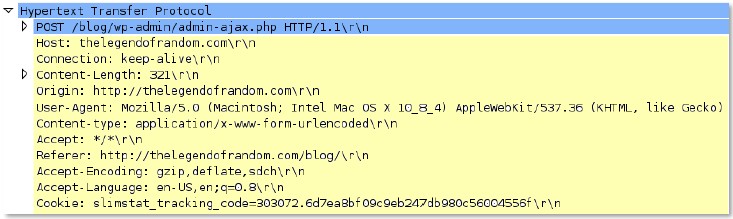
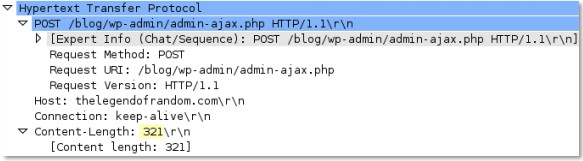
http-req-params
Query string and HTTP POST body parameters (after ‘?’).
Additional Details : Can use HTTP method qualifier.
Context Capture
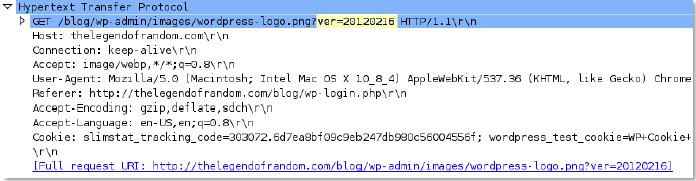
http-req-uri
The URI path and parameters in an HTTP header request (PAN-OS 10.0+).
Additional Details : Can use HTTP method qualifier.
Context Capture
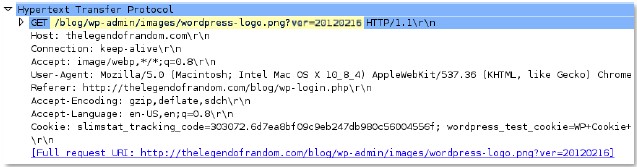
http-req-uri-path
Path in an HTTP request header (up to and including the ‘?’).
Additional Details : Can use HTTP method qualifier.
Context Capture

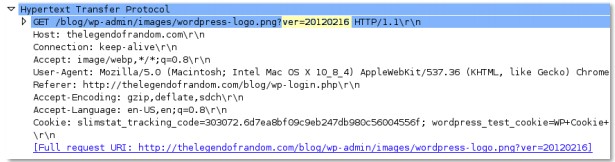
http-req-user-agent-header
The user agent field in an HTTP request header.
Context Capture
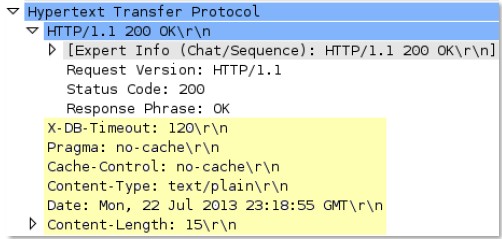
http-rsp-headers
Full HTTP response header, not including the HTTP banner.
Context Capture
http-rsp-non-2xx-response-body
Body of non-2xx HTTP response, excluding HTTP 406.
Context Capture

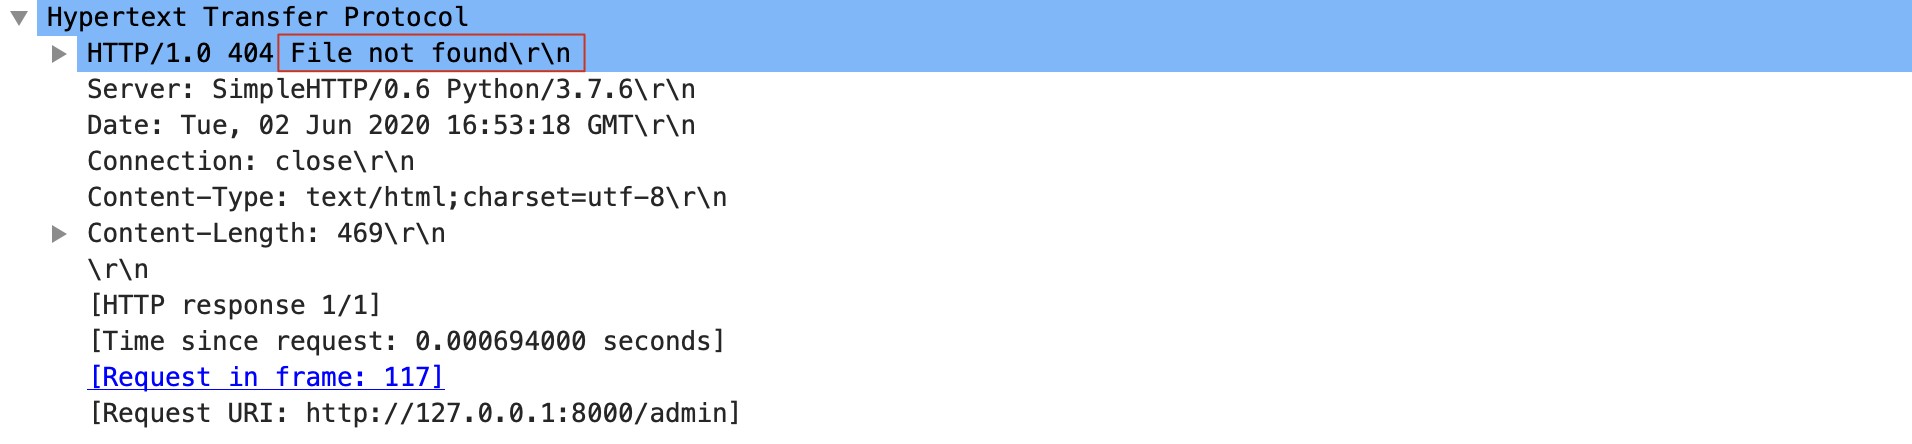
http-rsp-reason
The HTTP response status reason.
Context Capture
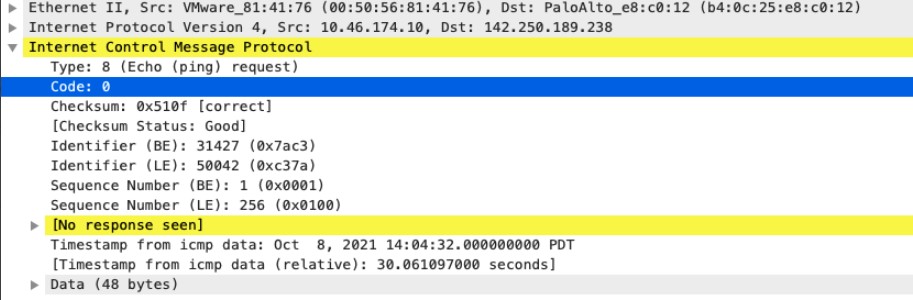
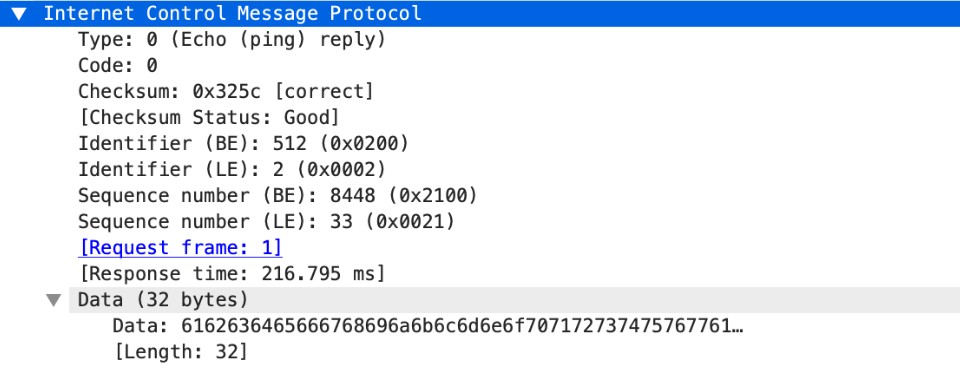
icmp-req-code
Identifies the ICMP request message code number.
Context Capture
icmp-req-data
Identifies the ICMP payload request message.
Context Capture
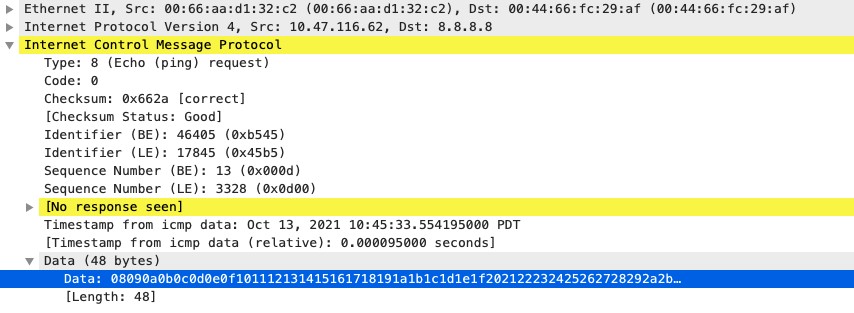
icmp-req-type
Identifies the ICMP request message type number.
Context Capture
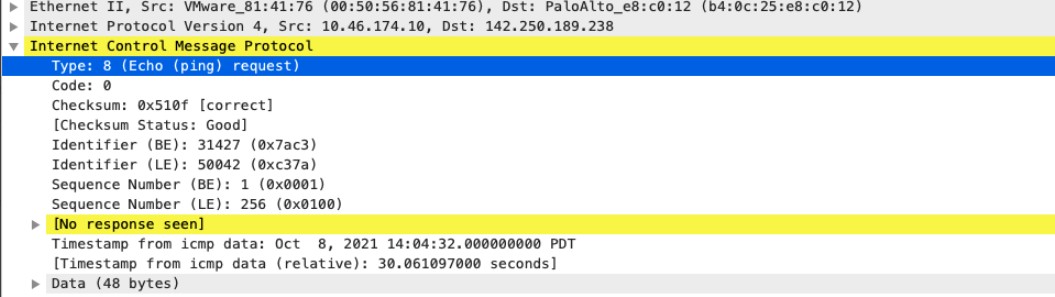
icmp-req-protocol-payload
The payload of an ICMP request.
Context Capture
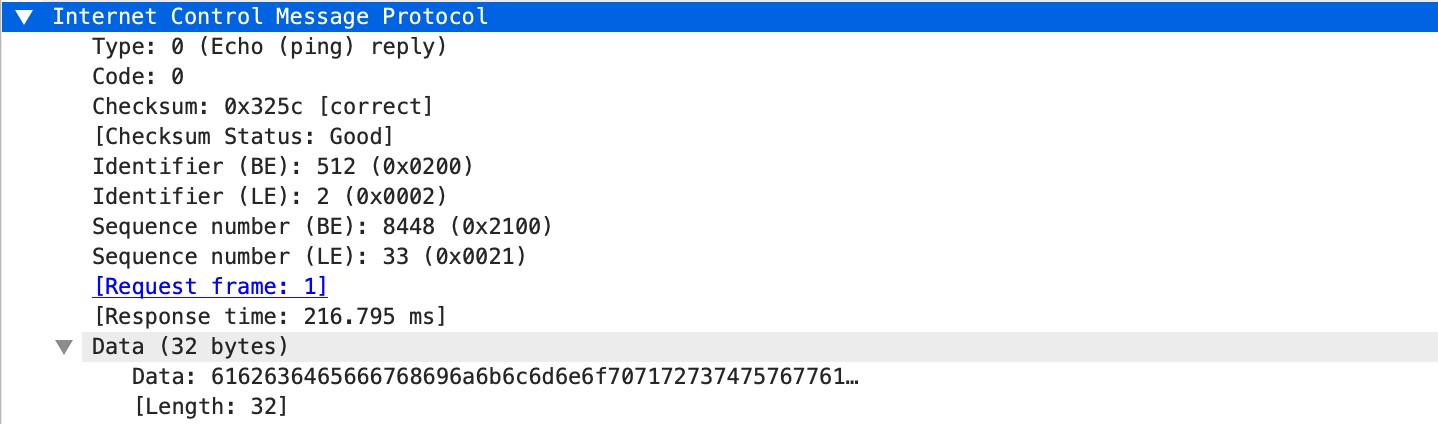
icmp-rsp-data
Identifies the ICMP payload response message.
Context Capture
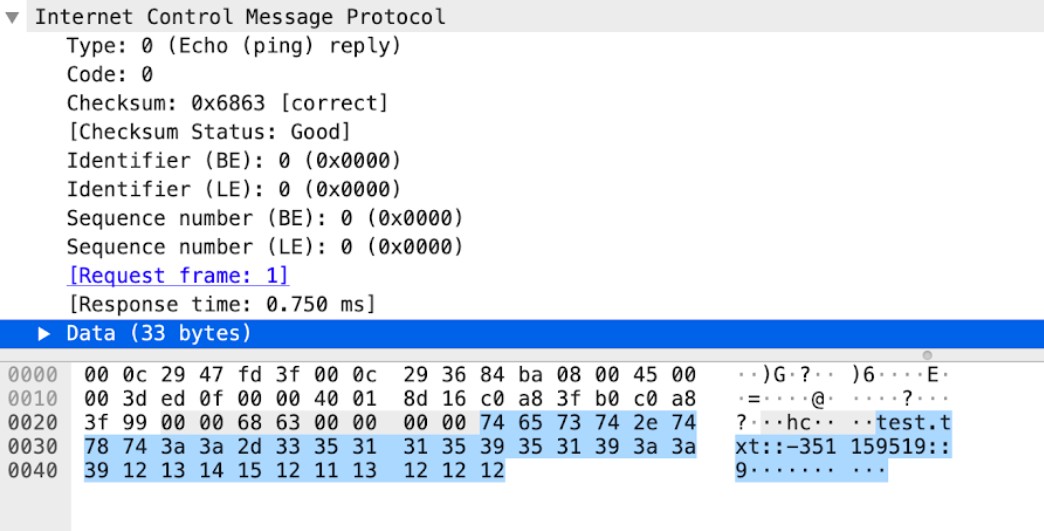
icmp-rsp-protocol-payload
The payload of an ICMP response.
Context Capture
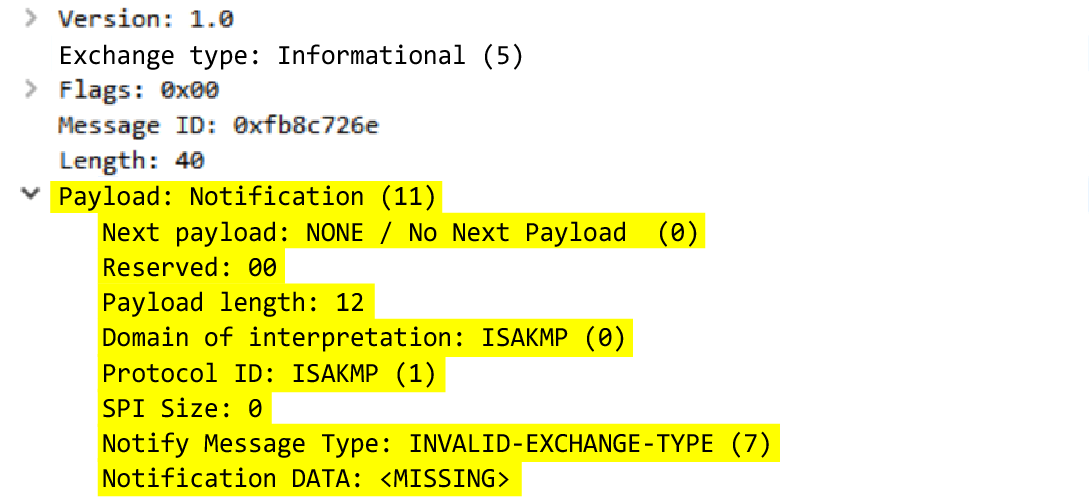
ike-req-headers
Full IKE header from the requester.
Context Capture
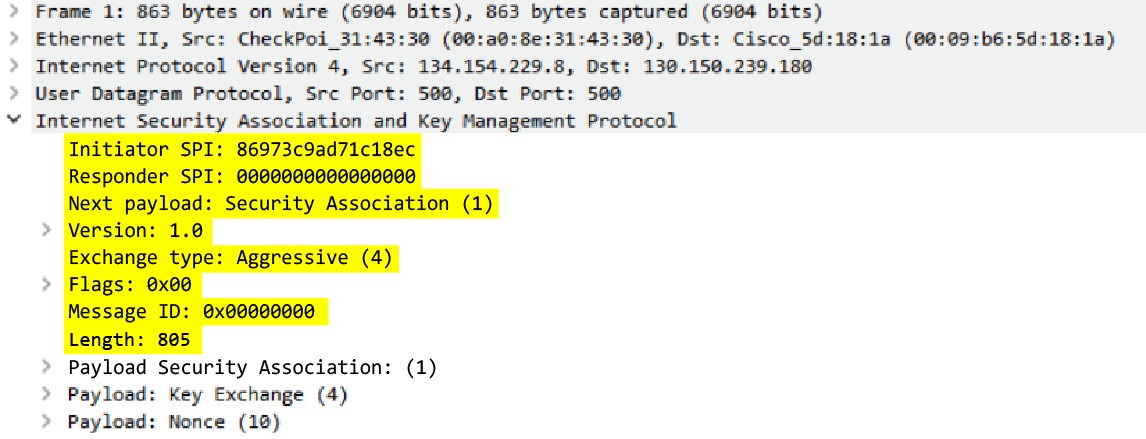
ike-rsp-headers
Full IKE header from the responder.
Context Capture
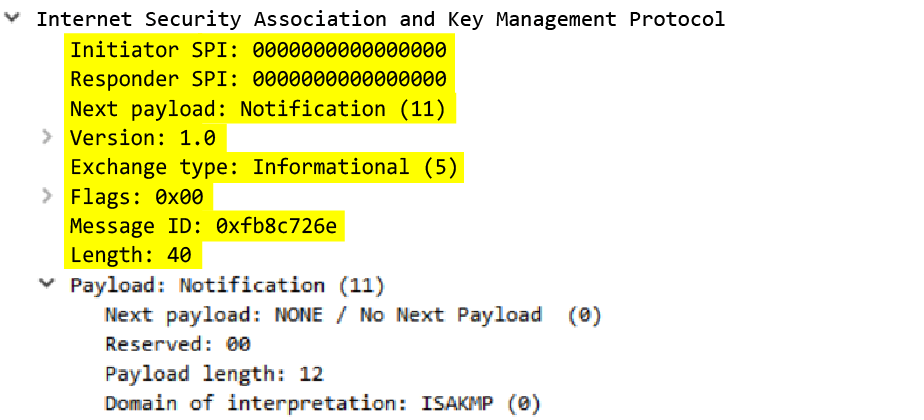
ike-req-payload-text
Full security association request payload.
Context Capture
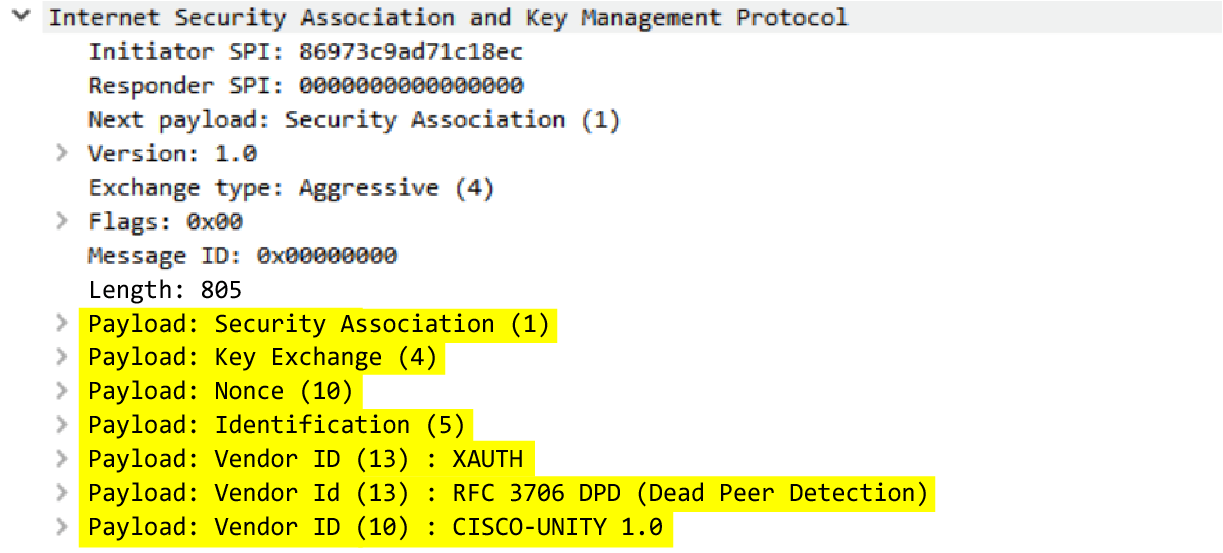
ike-rsp-payload-text
Full security association response payload.
Context Capture
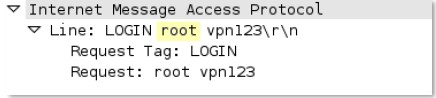
imap-req-cmd-line
IMAP command used.
Context Capture

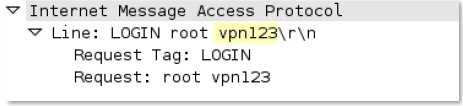
imap-req-first-param
First parameter to an IMAP command.
Additional Details : Can use IMAP command qualifier.
Context Capture
imap-req-params-after-first-param
Every parameter to an IMAP command, not including the first parameter.
Context Capture
imap-req-protocol-payload
The payload of an IMAP request.
Context Capture

imap-rsp-protocol-payload
The payload of an IMAP response.
Context Capture

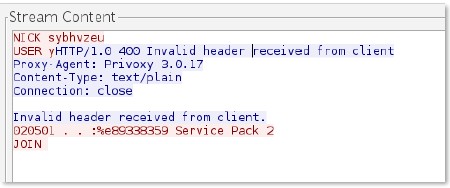
irc-req-params
Argument after the actual IRC command and space.
Context Capture

irc-req-prefix
Data before an IRC command, typically used to indicate the true origin of a message.
Context Capture
jpeg-file-scan-data
This context provides all of the scan data within a JPEG file.
jpeg-file-segment-data
This context provides all of the segment data within a JPEG file.
jpeg-file-segment-header
This context provides the segment header data within a JPEG file.
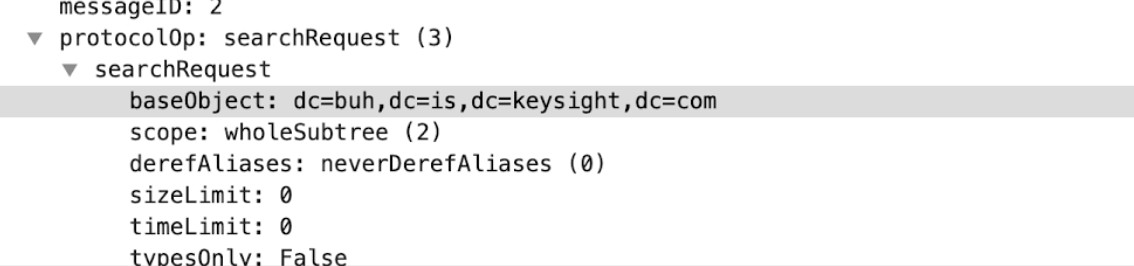
ldap-req-searchrequest-baseobject
Identifies the base object for the LDAP searchRequest entry.
Context Capture
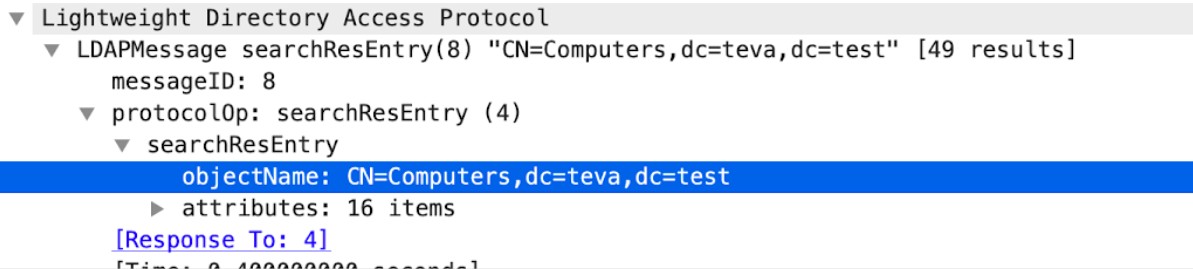
ldap-rsp-searchresentry-objectname
Identifies the objectName for the LDAP searchResEntry.
Context Capture
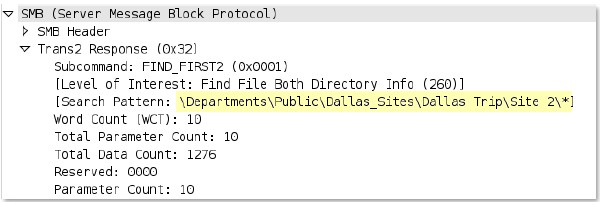
ms-ds-smb-req-share-name
Full path to a file that is read or written using SMB.
Context Capture
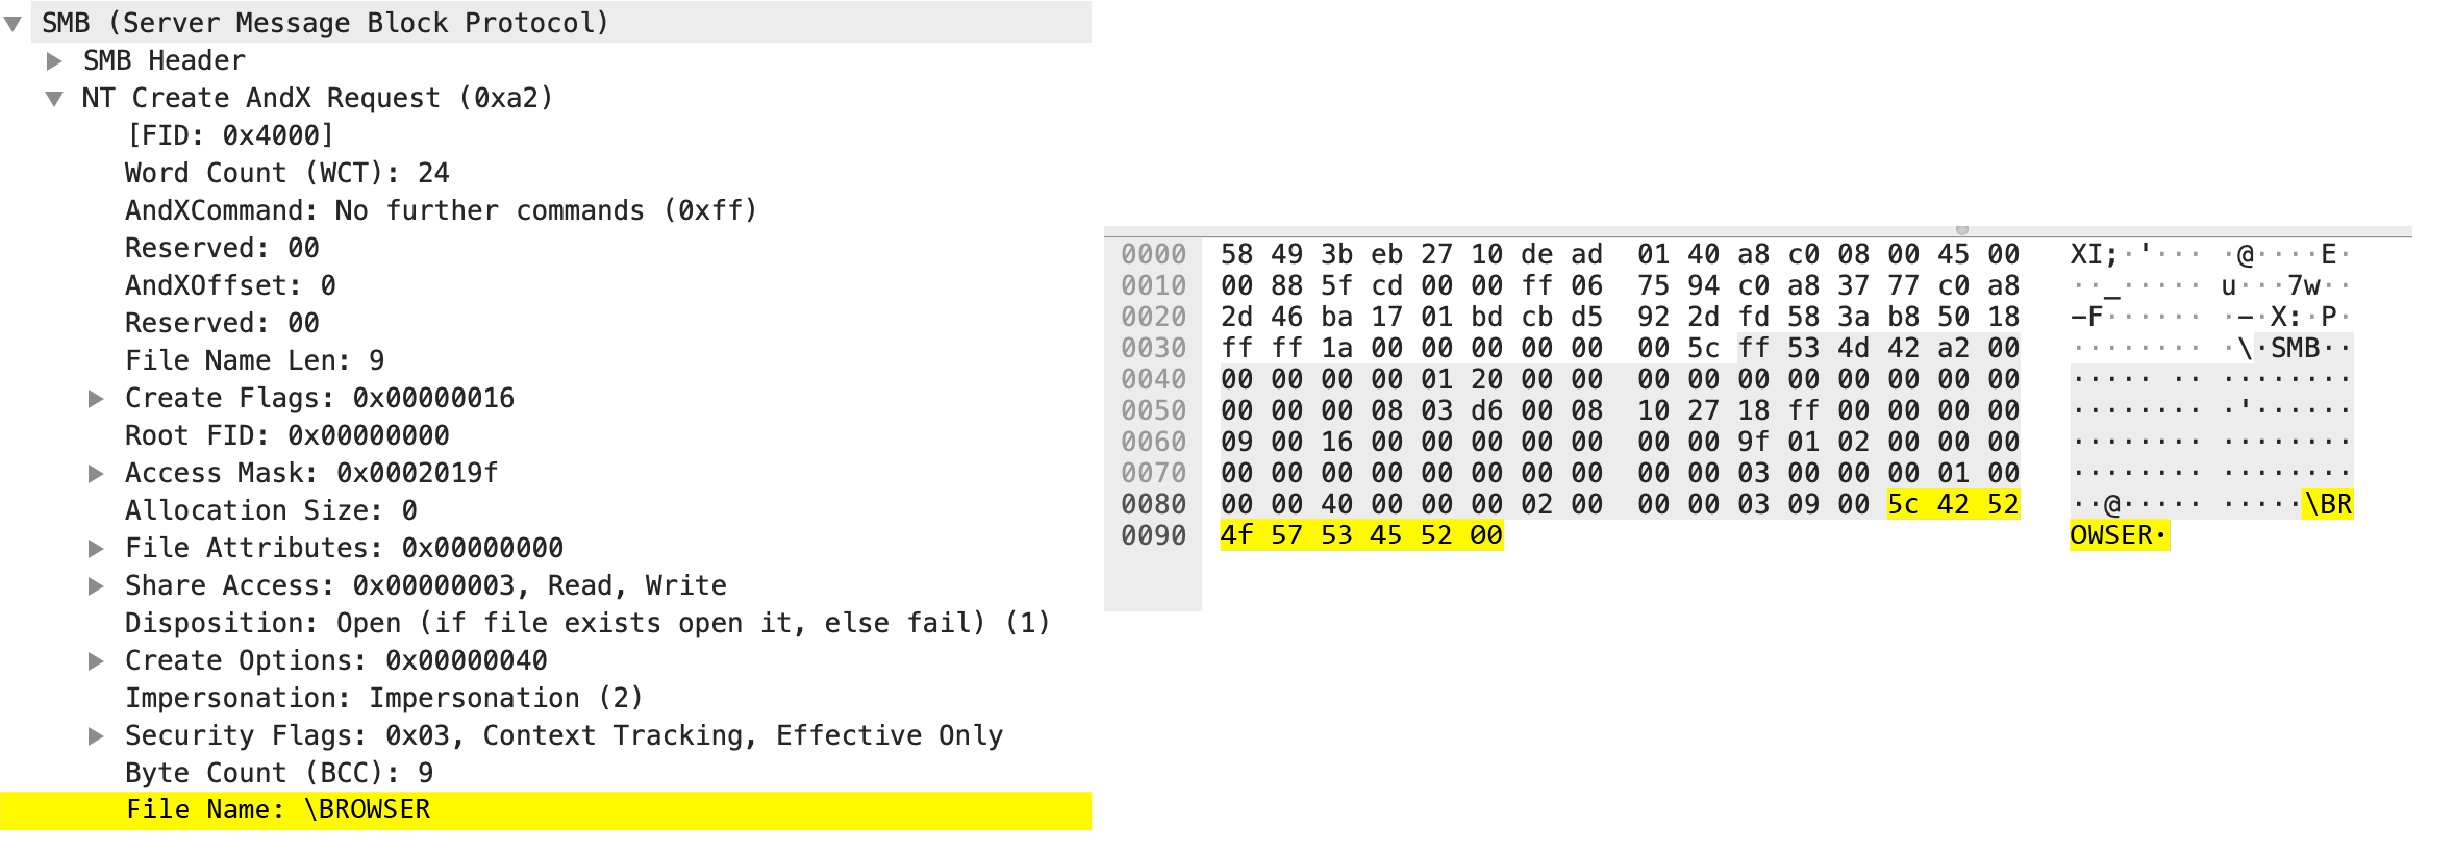
ms-ds-smb-req-v1-create-filename
This field identifies the SMBv1 NT Create AndX filename.
Context Capture
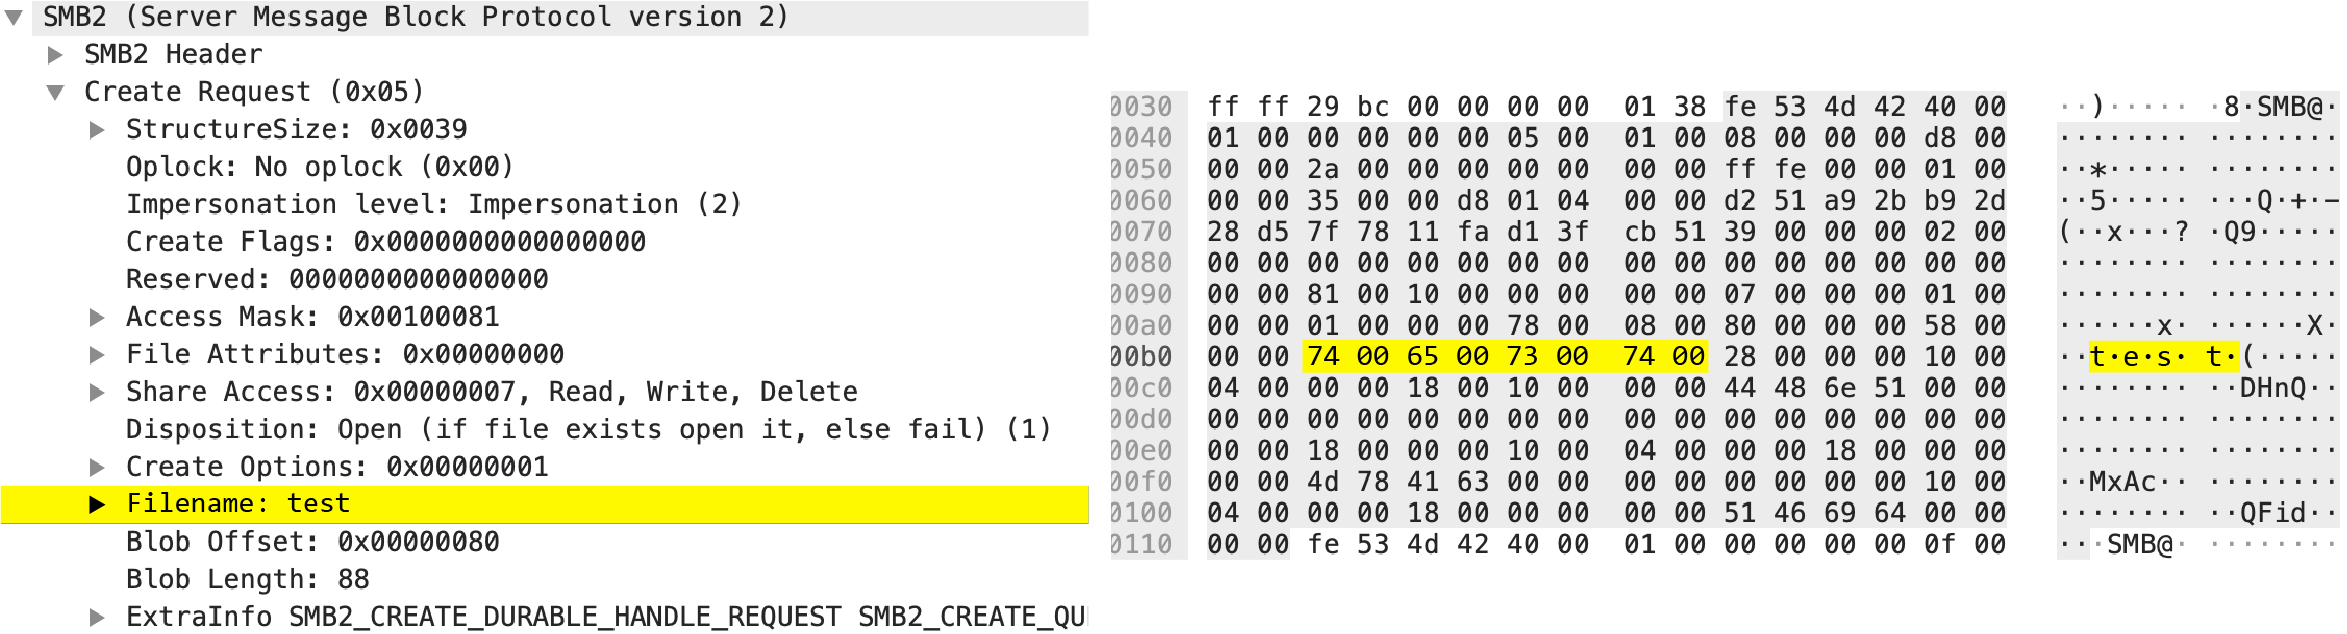
ms-ds-smb-req-v2-create-filename
This field identifies the SMBv2/SMBv3 Create filename.
Context Capture
msrpc-req-bind-data
Data payload of a MS RPC Bind request.
Context Capture
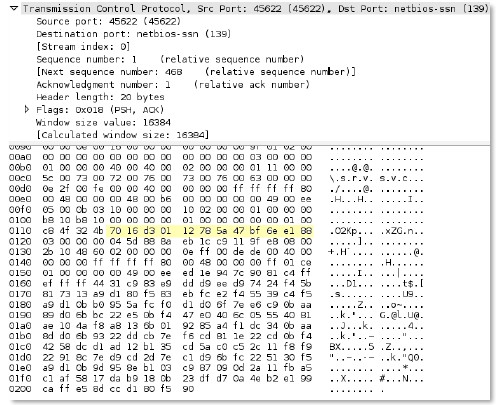
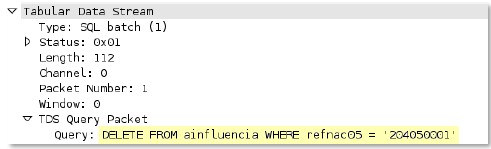
mssql-db-req-body
Request to a Microsoft SQL server, excluding the request header.
Context Capture
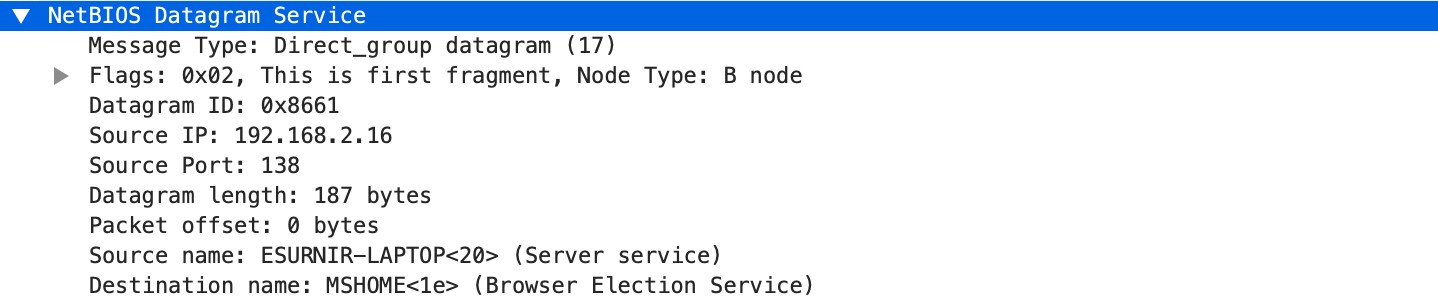
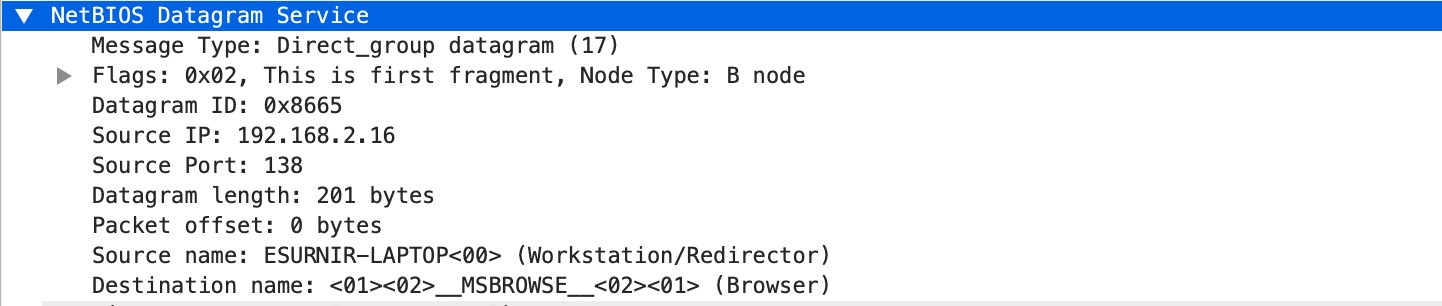
netbios-dg-req-protocol-payload
The payload of a NetBIOS Datagram Service request.
Context Capture
netbios-dg-rsp-protocol-payload
The payload of a NetBIOS Datagram Service response.
Context Capture
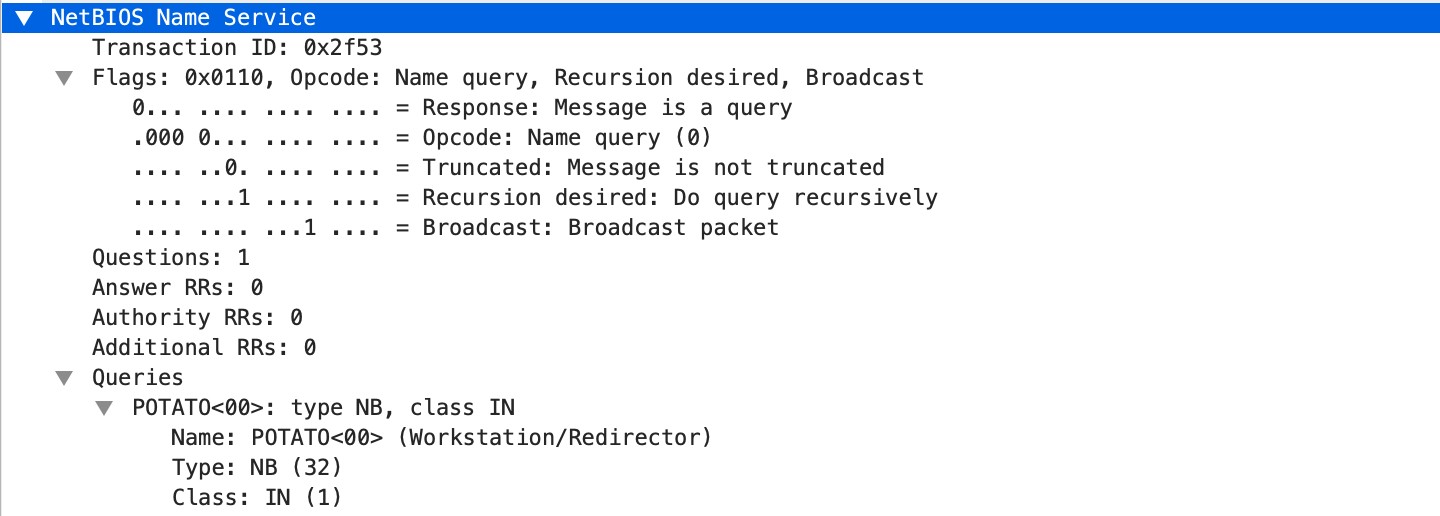
netbios-ns-req-protocol-payload
The payload of a NetBIOS Name Service request.
Context Capture
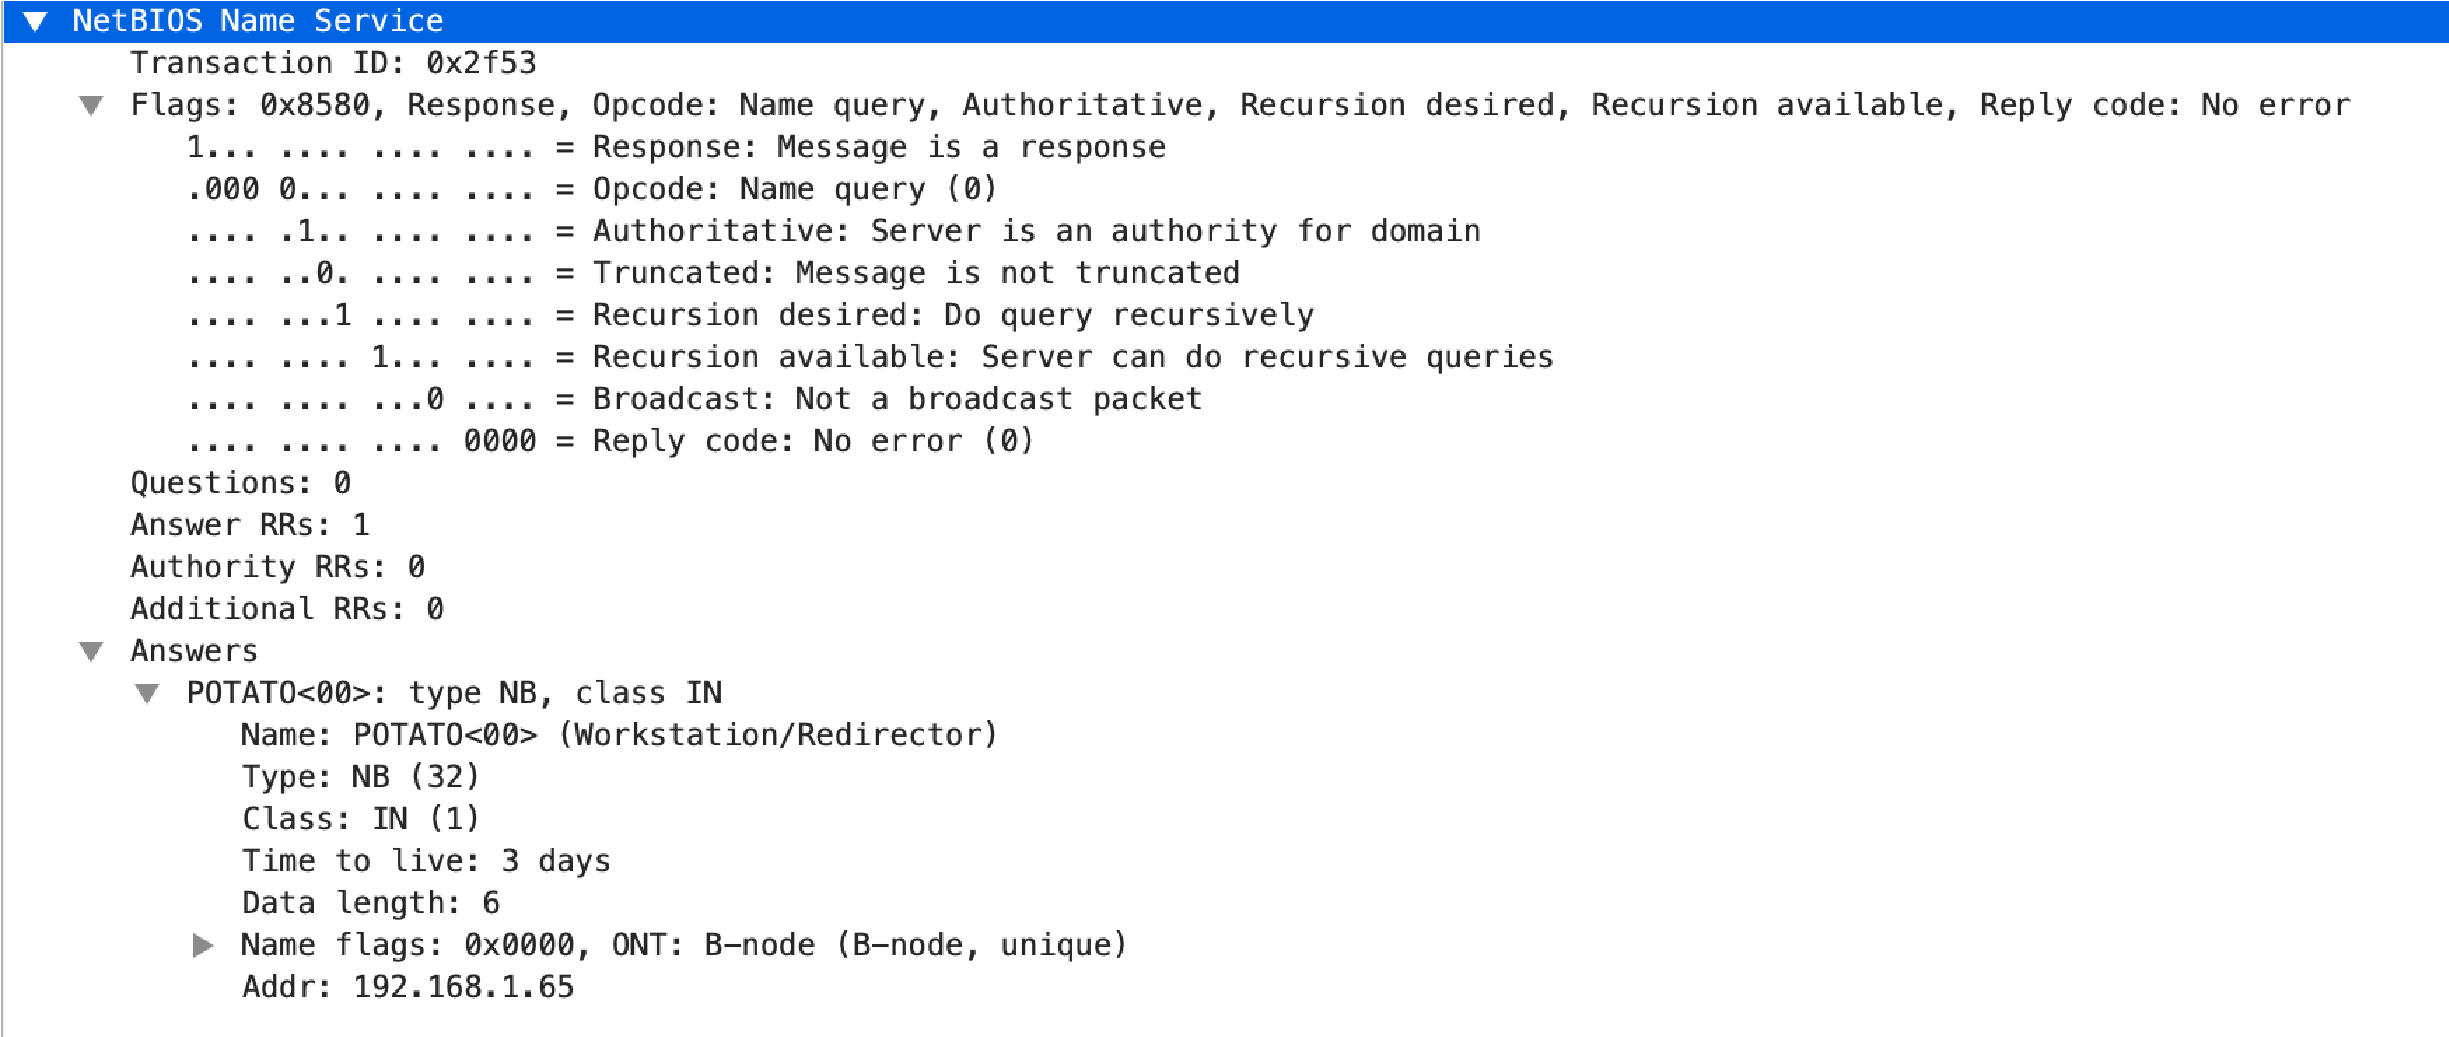
netbios-ns-rsp-protocol-payload
The payload of a NetBIOS Name Service response.
Context Capture
nettcp-req-context
Checks the RequestContext field in Net.TCP (App-ID: net.tcp) requests.
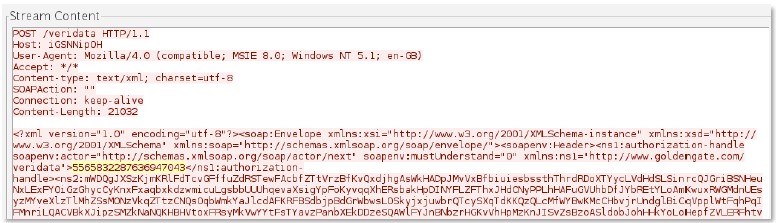
oracle-req-data-text
When the firewall detects an Oracle request and the request type is DATA, this context returns the data contained in the request.
Context Capture
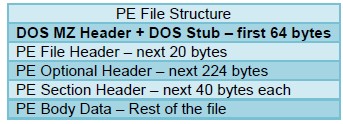
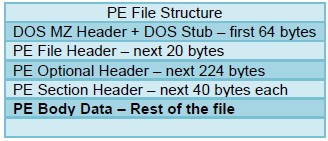
pe-dos-headers
The DOS MZ header and the DOS stub (first 64 bytes of a PE file).
Context Capture
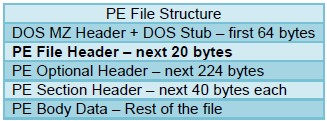
pe-file-header
The PE file header (20 bytes, starts at 65th byte).
Context Capture
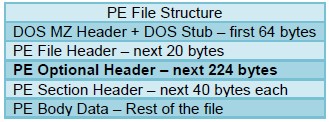
pe-optional-header
The optional header of a PE file (typically 224 bytes, starts at 86th byte).
Context Capture
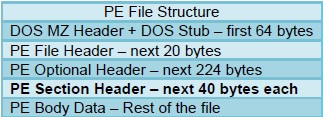
pe-section-header
This context provides the section headers for a PE file (40 bytes each).
Context Capture
pe-body-data
This context provides the body data of a PE file (content within sections).
Context Capture
pop3-req-protocol-payload
The payload of a POP3 request.
Context Capture

pop3-rsp-protocol-payload
The payload of a POP3 response.
Context Capture

pre-app-req-data
Request data before App-ID identifies traffic (often "insufficient data").
Context Capture
pre-app-rsp-data
Response data before App-ID identifies traffic.
Context Capture
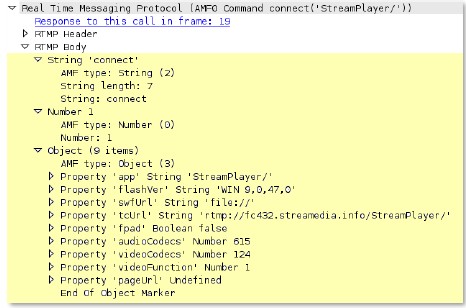
rtmp-req-message-body
RTMP body up until twenty packets have been sent.
Context Capture
rtsp-req-headers
Full RTSP request headers, not including the command line.
Additional Details : Can use RTSP method qualifier.
Context Capture
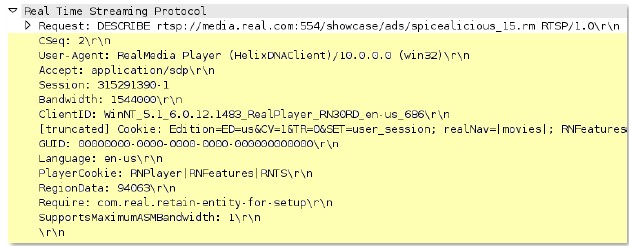
rtsp-req-uri-path
Path of an RTSP request, not including the command line.
Additional Details : Can use RTSP method qualifier.
Context Capture
sip-req-headers
This field identifies the message header for a SIP request.
Context Capture

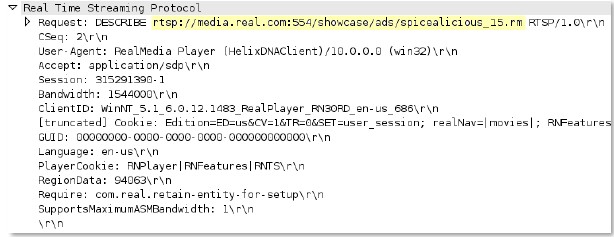
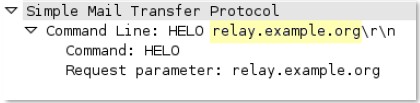
snmp-req-community-text
Value of the "community" field in the SNMP request header.
Context Capture
smtp-req-argument
Argument of an SMTP command.
Additional Details : Can use SMTP method qualifier.
Context Capture
smtp-rsp-content
SMTP server response content.
Context Capture

smtp-req-protocol-payload
The payload of an SMTP request.
Context Capture

smtp-rsp-protocol-payload
The payload of an SMTP response.
Context Capture

ssh-req-banner
SSH banner of the client, not including comments.
Context Capture

ssh-rsp-banner
SSH banner of the server, not including comments.
Context Capture

ssl-req-certificate
Certificate request message of an SSL negotiation when initiated from the client.
Context Capture
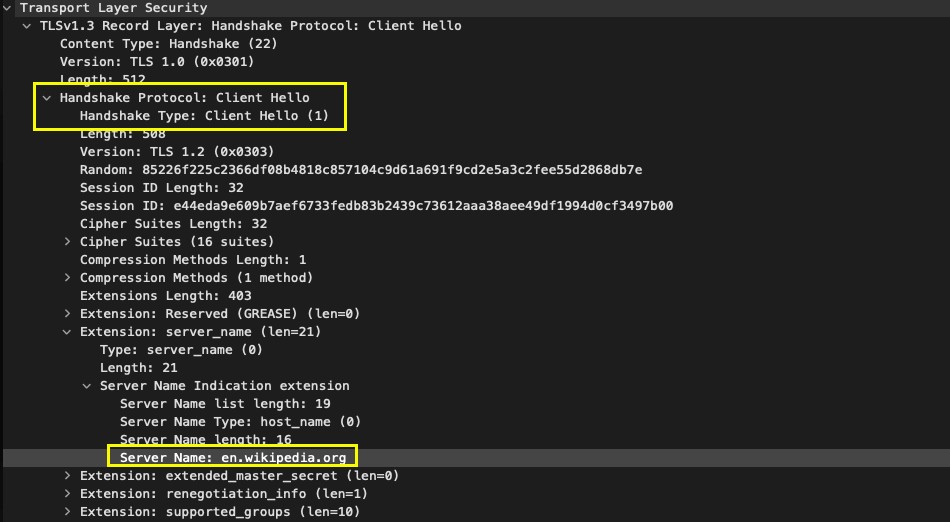
ssl-req-chello-sni
Detects and identifies the SNI (Server Name Indication) in the client hello message.
Context Capture
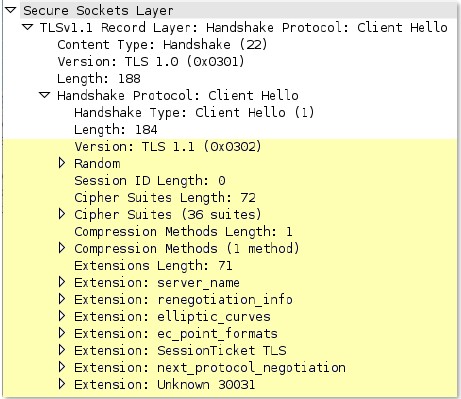
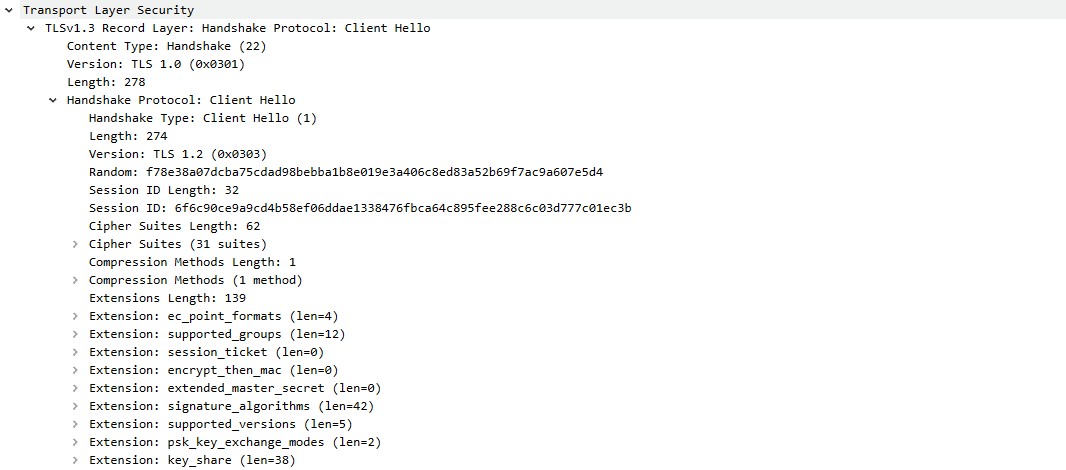
ssl-req-client-hello
Client hello message of an SSL negotiation.
Context Capture
ssl-req-protocol-payload
The payload of an SSL request.
Context Capture

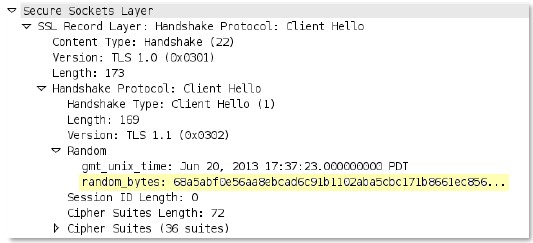
ssl-req-random-bytes
Random bytes field in the SSL client hello.
Context Capture
ssl-rsp-cert-subjectpublickey
Certificate subject public key from SSL server hello.
Context Capture

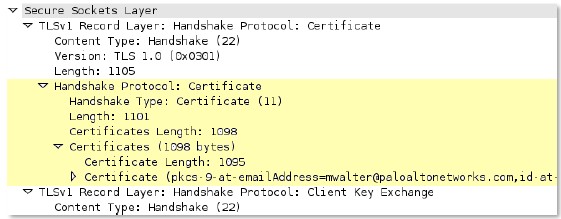
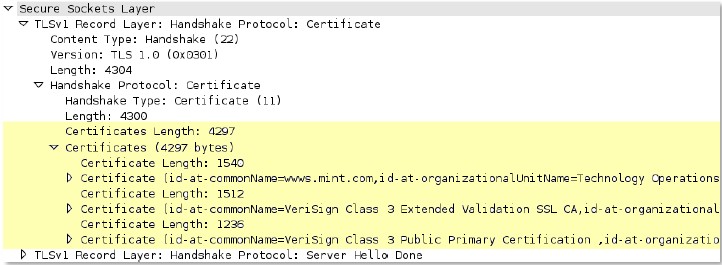
ssl-rsp-certificate
Certificate response message from the server in SSL negotiation.
Context Capture
ssl-rsp-protocol-payload
The payload of an SSL response.
Context Capture
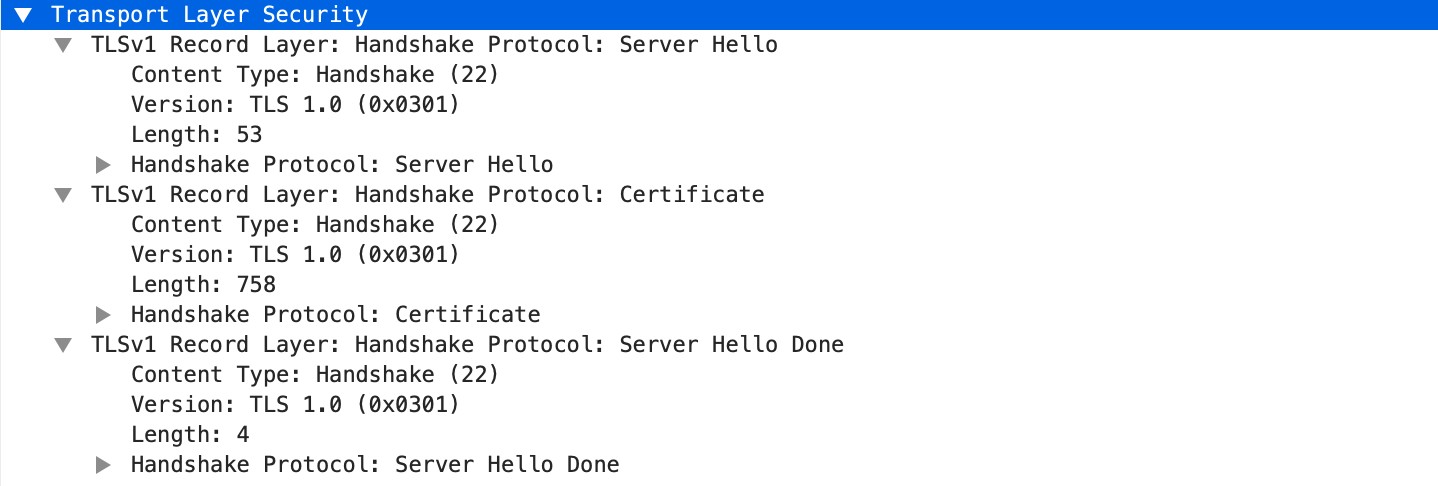
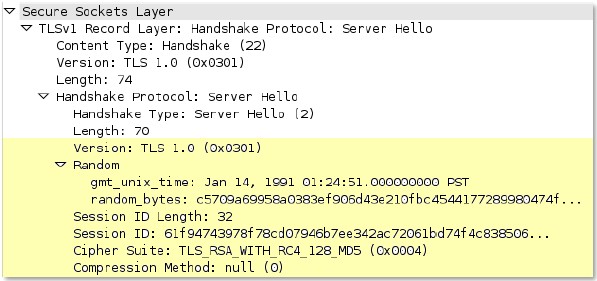
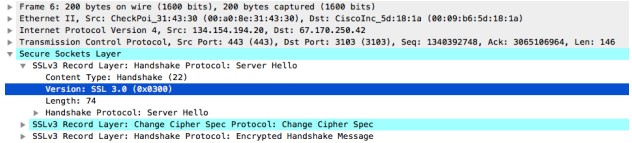
ssl-rsp-server-hello
Server hello message of an SSL negotiation.
Context Capture
tcp-context-free
The entire payload of a TCP packet.
Available only on PAN-OS 10.0 or later.
- Using this context is not recommended and results in severe performance degradation.
- Upon upgrade to PAN-OS 10.2 and later, PA-220 and PA-800 appliances support a maximum pattern length of 64 characters for this context.
Context Capture
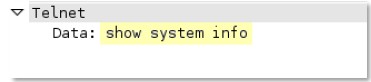
telnet-req-client-data
All telnet data for traffic originating from the client.
Context Capture
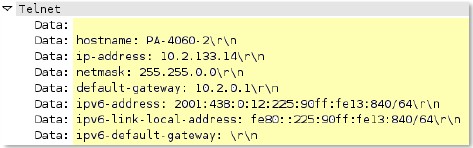
telnet-rsp-server-data
All telnet data for traffic originating from the server.
Context Capture
udp-context-free
The entire payload of a UDP packet.
Available only on PAN-OS 10.0 or later.
- Using this context is not recommended and results in severe performance degradation.
- Upon upgrade to PAN-OS 10.2 and later, PA-220 and PA-800 appliances support a maximum pattern length of 64 characters for this context.
Context Capture

unknown-req-tcp-payload
Full TCP payload for unknown TCP traffic originating from the client.
Context Capture

unknown-rsp-tcp-payload
Full TCP payload for unknown TCP traffic originating from the server.
Context Capture

unknown-req-udp-payload
Full UDP payload for unknown UDP traffic originating from the “client”.
Context Capture

unknown-rsp-udp-payload
Full UDP payload for unknown UDP traffic originating from the “server”.
Context Capture

Integer Contexts
Integer Contexts are used for equality operators: less than, greater than, and equal to. They are available for custom IPS signatures, but not custom application signatures. They allow matching against numerical values within specific parts of traffic.
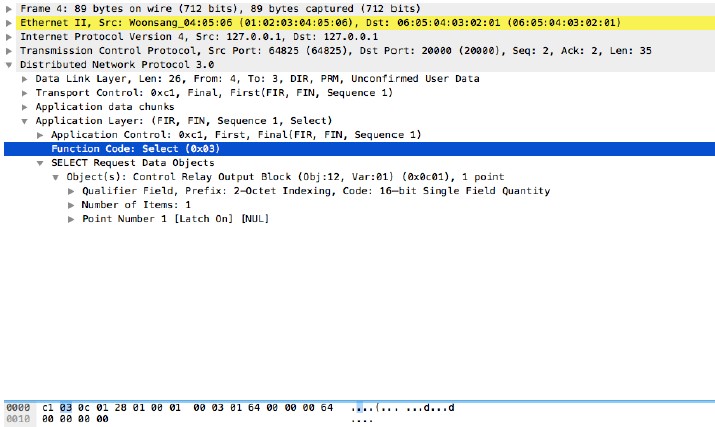
dnp3-req-func-code
DNP3 Application Layer request and response headers contain function codes (1 byte).
Context Capture
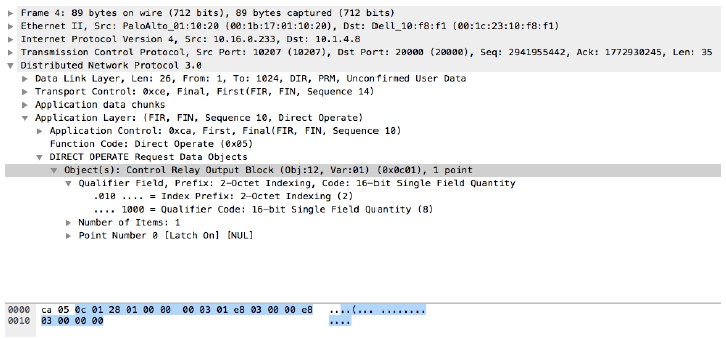
dnp3-req-object-type
Identifies group and variation objects in the DNP3 library (2-byte hex value).
Context Capture
dns-rsp-tcp-over-dns
Checks multiple conditions of a DNS response to detect TCP-over-DNS. Set to 1 if detected.
Context Capture
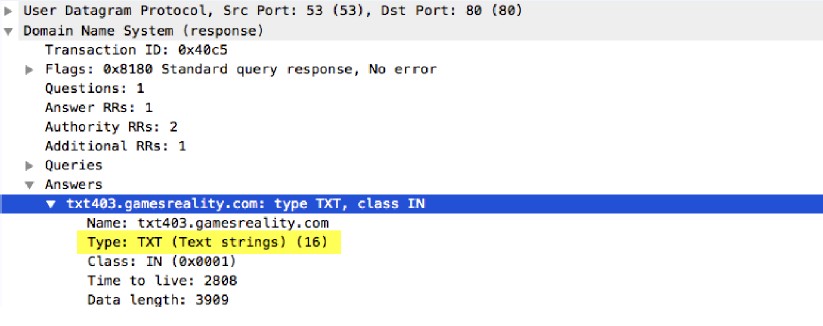
dns-rsp-txt-found
Checks if DNS response Answer section Type field is TXT. Set to 1 if TXT found.
Context Capture
ftp-req-params-len
Length of the arguments to an FTP command.
Additional Details : Can use FTP command and FTP vendor ID qualifiers.
Context Capture
http-req-connect-method
Identifies if HTTP CONNECT method is used. Set to 1 if used.
Context Capture

http-req-content-length
Content length of an HTTP request.
Context Capture
http-req-cookie-length
Number of bytes in the Cookie string of an HTTP request header.
Context Capture
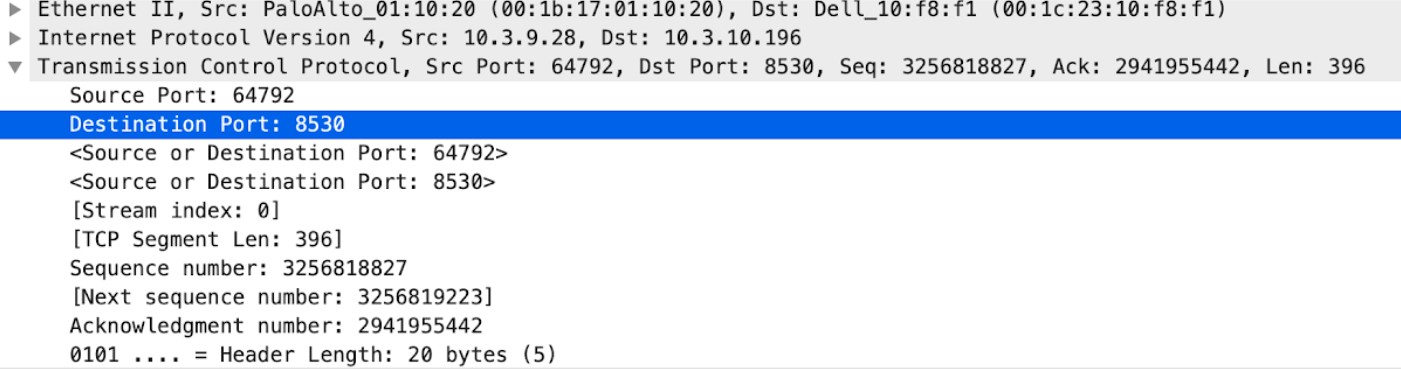
http-req-dst-port
Identifies the destination port for an HTTP request.
Context Capture
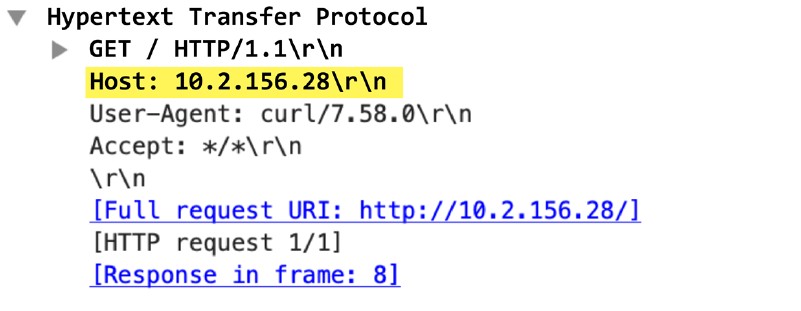
http-req-host-ipv4-address-found
When an HTTP request host header contains an IPv4 address, the value is set to 1.
Context Capture
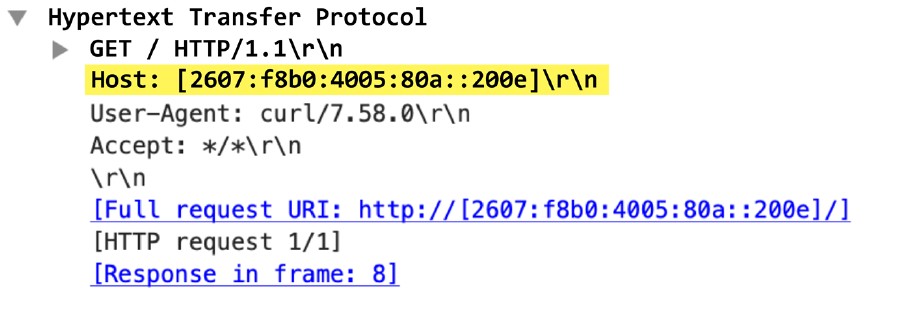
http-req-host-ipv6-address-found
When an HTTP request host header contains an IPv6 address, the value is set to 1.
Context Capture
http-req-header-length
Length of an HTTP request header, excluding method, path, and HTTP version.
Additional Details : Can use HTTP header field and HTTP method qualifiers.
Context Capture
http-req-param-length
Length of the URL query string.
Context Capture
http-req-no-host-header
If set to 1, an HTTP request with no host header has been found.
Context Capture
http-req-no-version-string-small-pkt
If set to 1, an HTTP request < 50 bytes and missing "HTTP/x.y" has been found.
Context Capture
http-req-simple-request
If set to 1, an HTTP simple request missing "HTTP/x.y" has been found.
Context Capture
http-req-uri-path-length
Length of the URI path (up to and including '?').
Additional Details : Can use HTTP method qualifier.
Context Capture
http-req-uri-tilde-count-num
Number of "~" characters in the URI path.
Additional Details : Can use HTTP method qualifier.
Context Capture
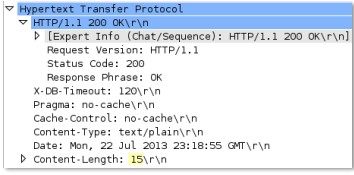
http-rsp-code
The number corresponding to the HTTP response code.
Context Capture
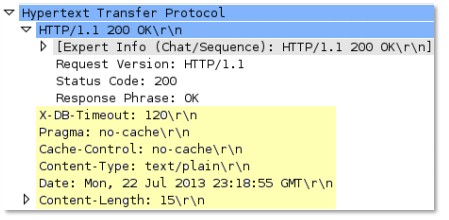
http-rsp-content-length
Content length of an HTTP response.
Context Capture
http-rsp-total-headers-len
Length of HTTP response headers, not including status banner.
Context Capture
iccp-req-func-code
ICCP function codes (e.g., read, write) (1-byte value).
Context Capture
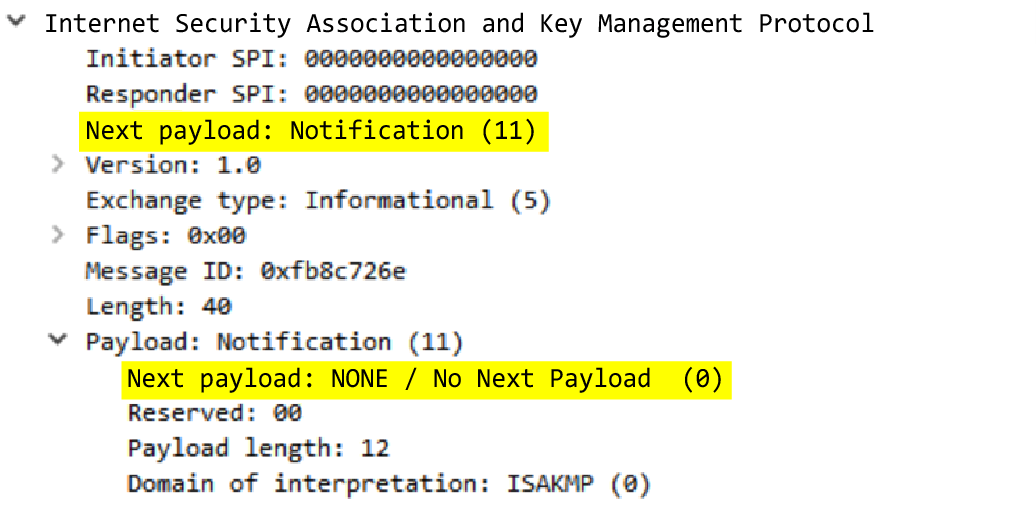
ike-req-payload-type
IKE payload type (Next payload entry) in requester's IKE message.
Context Capture
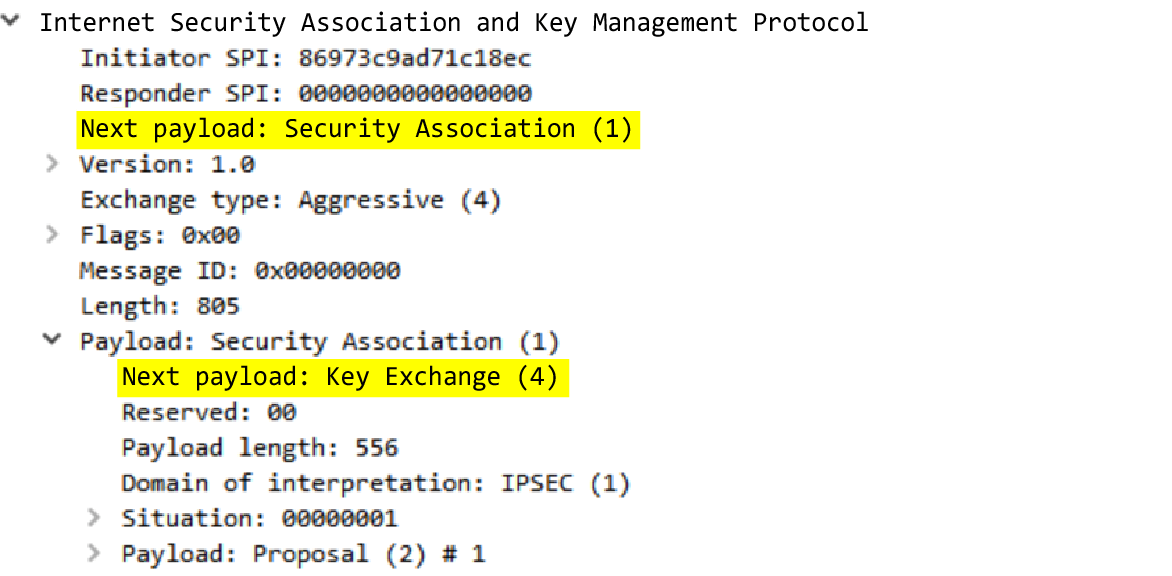
ike-rsp-payload-type
IKE payload type in responder's IKE message.
Context Capture
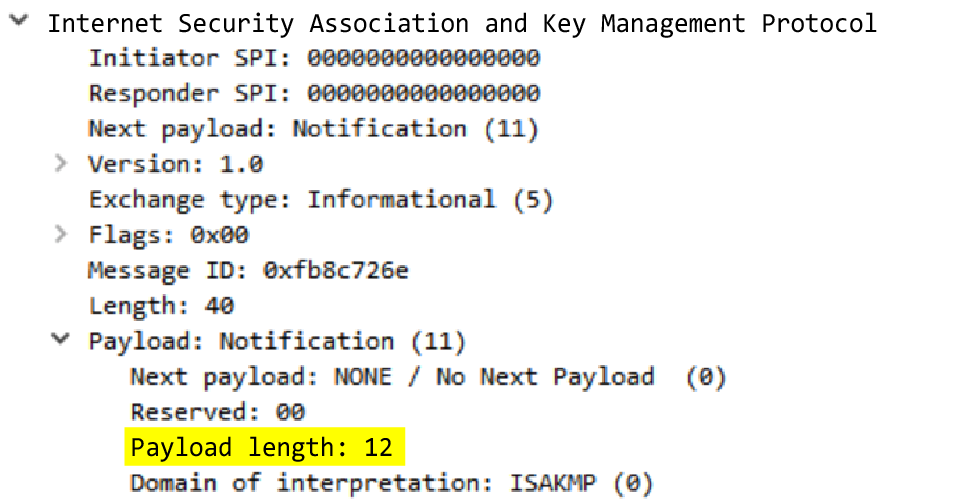
ike-req-payload-length
Length of a single payload entry in requester's IKE packet.
Context Capture
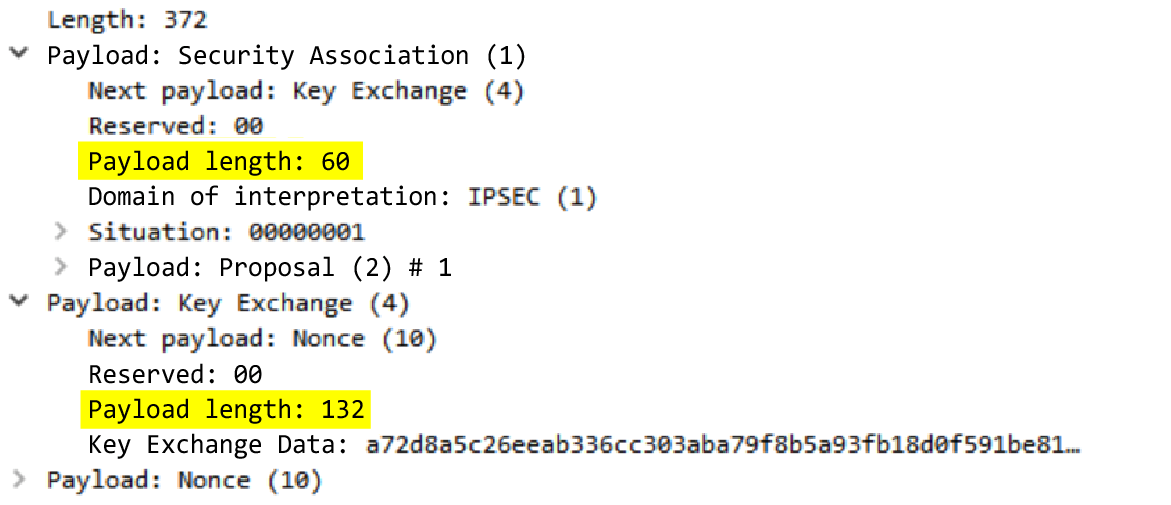
ike-rsp-payload-length
Length of a single payload entry in responder's IKE packet.
Context Capture
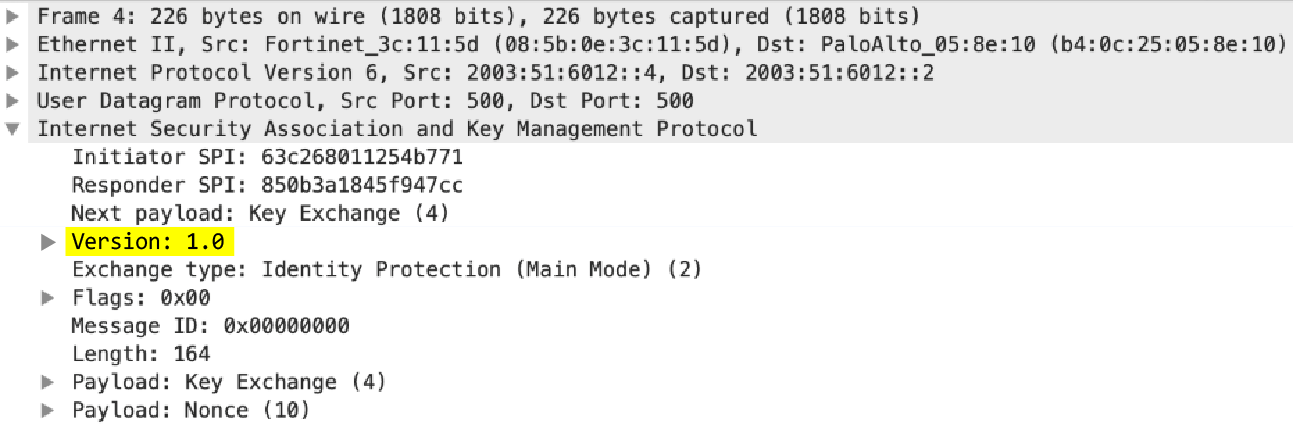
ike-version
Version of the IKE protocol used.
Context Capture
imap-req-cmd-param-len
Total length of all parameters of an IMAP command.
Additional Details : Can use IMAP command qualifier.
Context Capture
imap-req-first-param-len
Length of the first parameter of an IMAP command.
Additional Details : Can use IMAP command qualifier.
Context Capture
imap-req-param-len-from-second
Total length of all parameters of an IMAP command, not including the first.
Additional Details : Can use IMAP command qualifier.
Context Capture
irc-req-protocol-payload
Payloads of prefix, commands, parameters of an IRC request (not entire payload).
Context Capture

irc-rsp-protocol-payload
Payloads of prefix, commands, parameters of an IRC response (not entire payload).
Context Capture

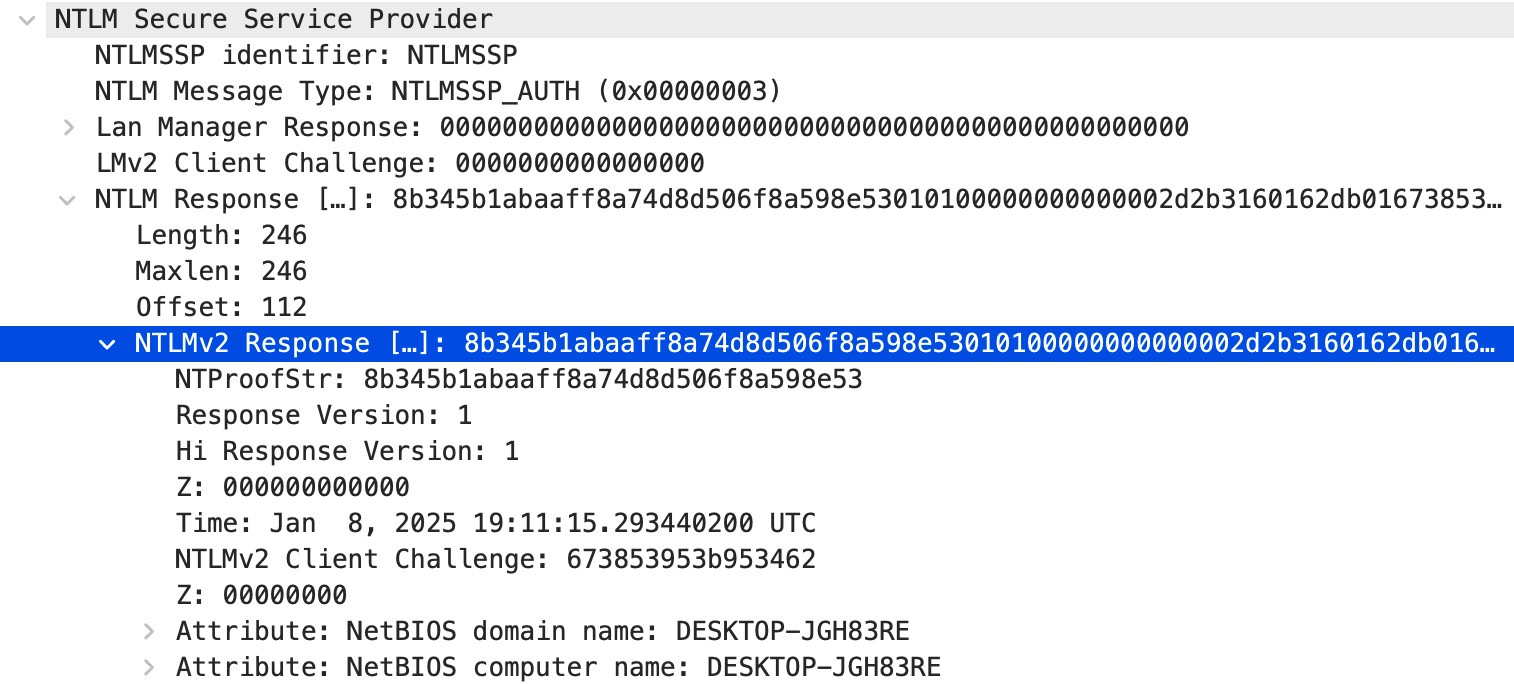
ntlm-req-auth-v1
Detects NTLMv1 in NTLM response. Set to 1 if detected.
Context Capture
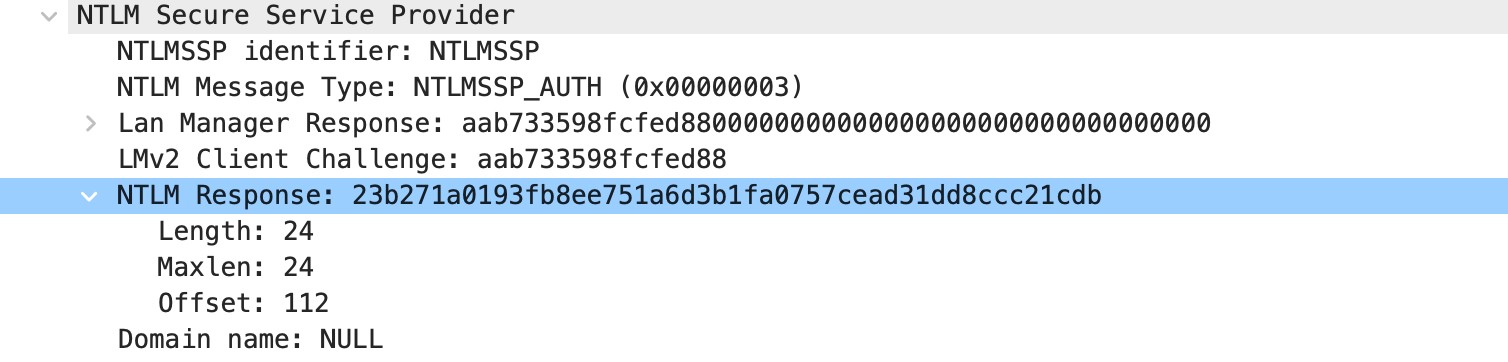
ntlm-req-auth-v2
Detects NTLMv2 in NTLM response. Set to 1 if detected.
Context Capture
open-vpn-req-protocol-payload
The payload of an OpenVPN request.
Context Capture

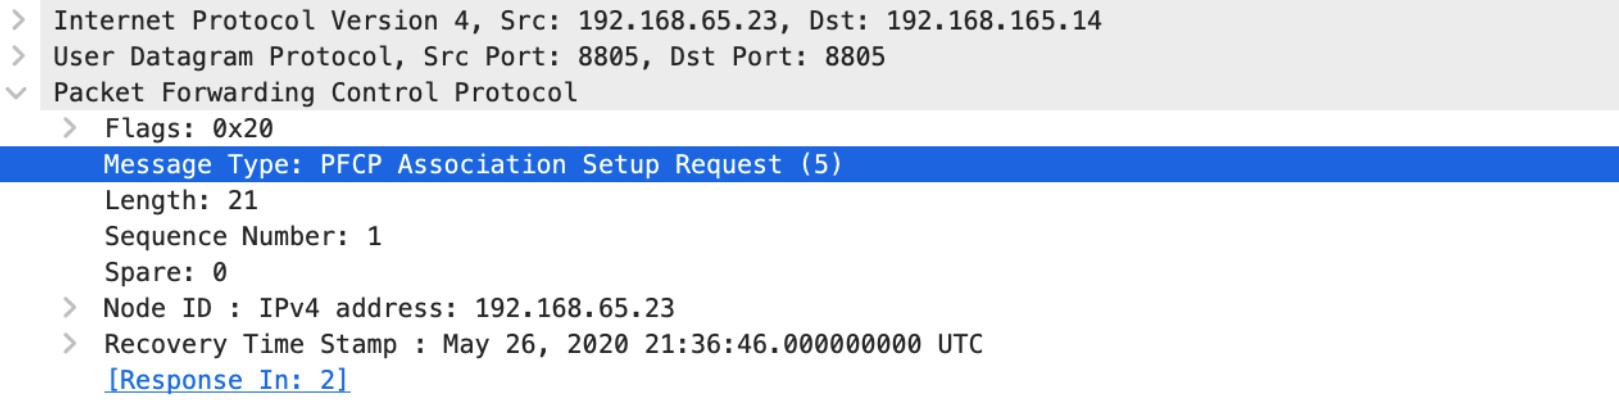
pfcp-req-msg-type
PFCP message type value in requester's PFCP message header.
Context Capture
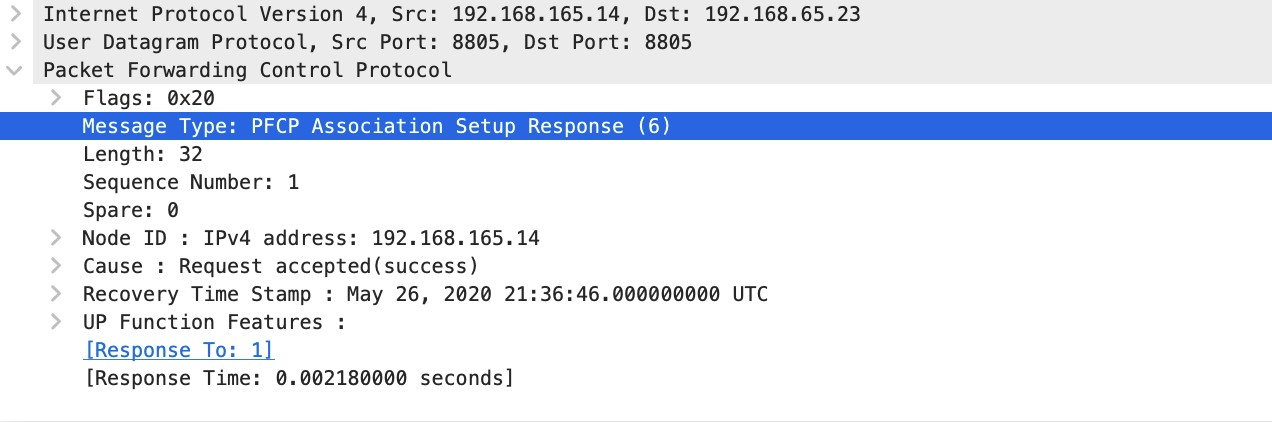
pfcp-rsp-msg-type
PFCP message type value in responder's PFCP message header.
Context Capture
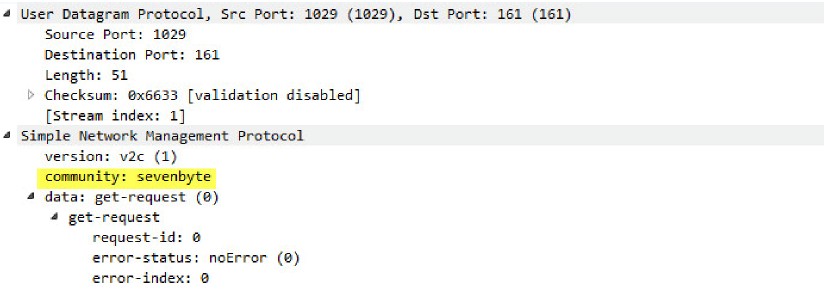
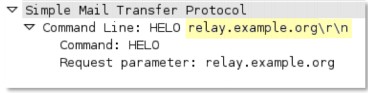
smtp-req-helo-argument-length
Length of the argument to the SMTP “HELO” command.
Context Capture
smtp-req-mail-argument-length
Length of the argument to the SMTP “MAIL FROM” command.
Context Capture
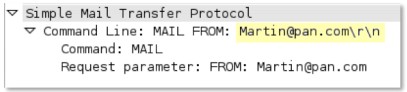
smtp-req-rcpt-argument-length
Length of the argument to the SMTP “RCPT TO” command.
Context Capture
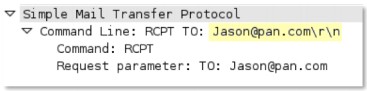
sctp-req-ppid
Matches an SCTP Payload Protocol Identifier (PPID) (32-bit unsigned integer).
Context Capture
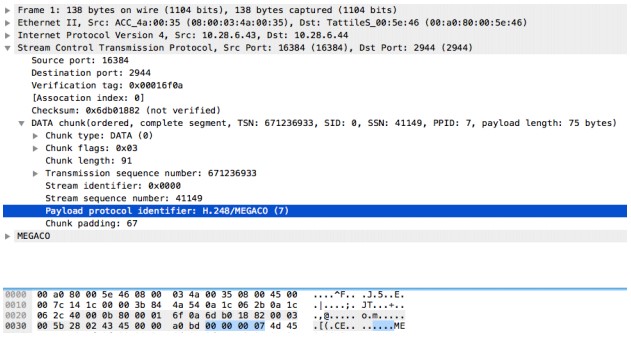
ssl-req-client-hello-ext-type
Detects the extension type listed in the TLS client hello message.
Context Capture
ssl-req-client-hello-missing-sni
Set to 1 if SSL client hello is missing SNI entry.
Context Capture
ssl-rsp-version
Detects the SSL version listed in the SSL server hello handshake.
Context Capture
stun-req-attr-type
Identifies the 2-byte attribute type value in STUN server requests and responses.
Context Capture
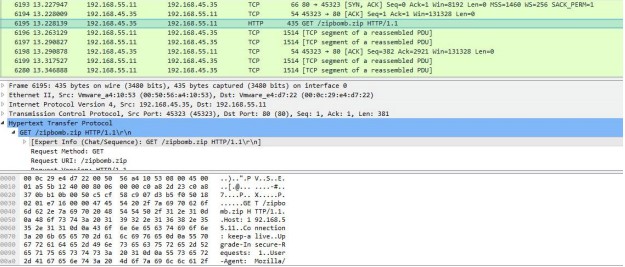
panav-rsp-zip-compression-ratio
Detects the zip compression ratio of files downloaded over HTTP. Used to identify zip bombs.
Context Capture
Context Qualifiers
Qualifiers lessen the chance of false positives by restricting the locations where the firewall can find a given pattern. In other words, a signature matches only when the firewall detects the pattern inside a specific qualifier, which corresponds to a specific context. For example, you might use the http-method qualifier to specify that a http-req-uri-path pattern matters when found inside a HTTP GET method.
Available qualifiers include:
- FTP Command Qualifiers
- FTP Vendor ID Qualifiers
- HTTP Header Field Qualifiers
- HTTP Method Qualifiers
- IMAP Command Qualifiers
- RTSP Method Qualifiers
- SMTP Method Qualifiers
(Detailed lists of qualifier values for each type are available in the official Palo Alto Networks documentation.)
About the IPS Signature Converter Plugin (Panorama)
Snort and Suricata are open-source intrusion prevention system (IPS) tools that use uniquely formatted rules to detect threats. The IPS Signature Converter plugin for Panorama enables you to leverage these rules for immediate threat protection by translating the IPS signatures into custom Palo Alto Networks threat signatures . You can then register the signatures on Palo Alto Networks firewalls in specified device groups and enforce policy using Vulnerability Protection and Anti-Spyware Security Profiles .
Additionally, you can export rules that list IP address indicators of compromise (IOC) and use the resultant text file as an external dynamic list to enforce policy on the entries contained in the list.
Organizations that share threat intelligence often distribute security advisories with these rules to help you implement the appropriate protections on your firewall. The IPS Signature Converter plugin enables you to immediately act upon these advisories and protect your network against any threats you receive in Snort or Suricata format.
The IPS Signature Converter plugin requires Panorama and is used to convert Snort/Suricata rules into custom PAN-OS threat signatures. These can then be pushed to managed firewalls.
IPS Signature Converter Workflow.
Convert Rules Using the Panorama Web Interface
After you install the intrusion prevention system (IPS) signature converter plugin, you can use it to translate Snort and Suricata rules into custom Palo Alto Networks threat signatures.
The following example uses this Snort rule:
alert tcp any any -> any any (msg:"Malformed_UA"; content:"User-Agent: Mozillar/"; depth:500; sid:99999999;)
STEP 1 | Select Panorama > IPS Signature Converter > Manage .
STEP 2 | Upload Signatures.
STEP 3 | Select one of two methods for uploading your rules:
-
Browse to and select a text file.
You cannot convert binary file types, such as .pdf or .docx. -
Paste the rules directly into the text box.
You can upload only 300 rules at a time for conversion.
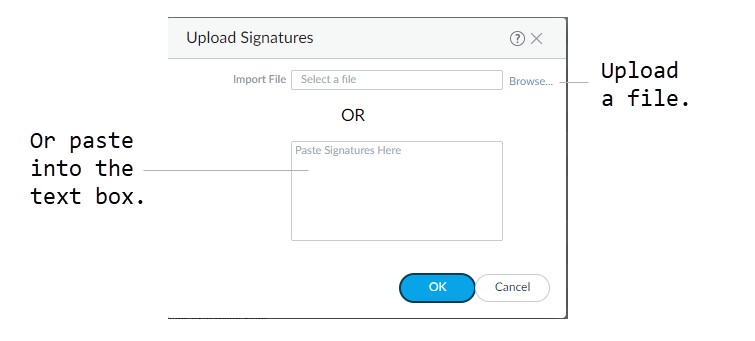
STEP 4 | Click OK.
Your signatures will populate at least one of the following tabs: Succeeded , Succeeded with Warnings , Failed , Duplicates , or Existing Coverage .
STEP 5 | (Optional) Export rules to an indicator of compromise (IOC) list.
Panorama converts a rule that does not contain the keywords
contentorPCREinto an IOC List . Export IOC List to group these rules into a text file that you can use as an external dynamic list for your Security policy rules.
-
Select Export IOC List .
A dialog displays any rules that converted as IOC List .
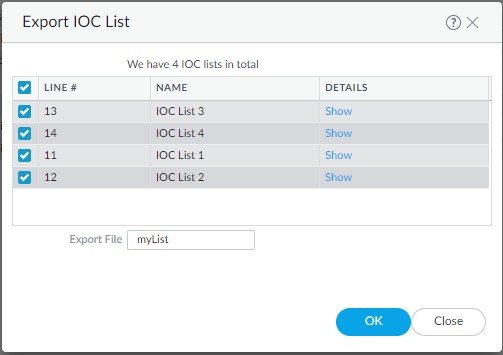
-
Select the rules that you want to export.
-
Enter the name of the file to which you want to export your rules.
-
Click OK .
The exported text file will appear in your downloads folder.
STEP 6 | Commit converted signatures to Panorama.
-
Select the signatures you want to upload from the Succeeded or Succeeded with Warnings tabs.

-
Import Custom Signatures .
-
Select a Device Group from the drop-down.
Select Shared to make the signatures available to all device groups. -
Under the Destination column, select whether to commit the signatures as Vulnerability or Spyware .
-
Click OK .
-
In the top right of the screen, select the commit icon and Commit to Panorama .
-
Verify that you successfully committed your signatures.
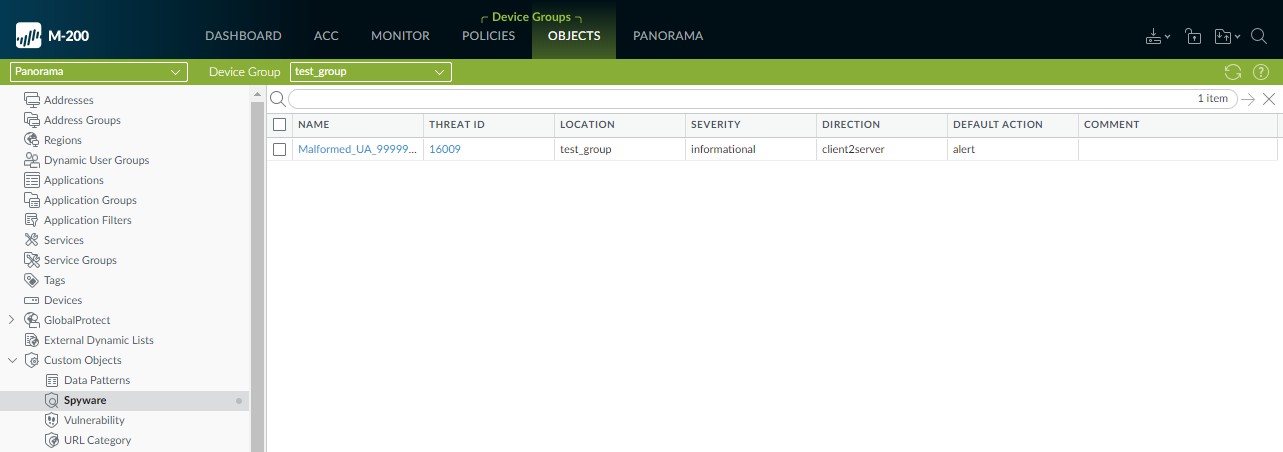
-
Select Objects > Custom Objects .
-
Select either Spyware or Vulnerability , depending on how you categorized your signatures in the previous step.
-
STEP 7 | Push the signatures to managed firewalls.
STEP 8 | Test your signatures on a firewall in the device group to which you pushed the signatures.
Convert Rules Using the Panorama CLI
In addition to the web interface, you can use the command-line interface (CLI) to convert Snort® and Suricata rules into custom PAN-OS threat signatures. This example uses the following Snort rule:
alert tcp $HOME_NET 2589 -> $EXTERNAL_NET any ( msg:"MALWARE-BACKDOOR - Dagger_1.4.0"; flow:to_client,established; content:"2|00 00 00 06 00 00 00|Drives|24 00|",depth 16; metadata:ruleset community; classtype:misc-activity; sid:105; rev:14; )
The CLI Quick Start contains additional CLI commands.
STEP 1 | Encode the rule in Base64 format.
You can do this using a free, browser-based tool or a command-line utility.
Before encoding the rule, ensure there are no line breaks. Otherwise, the line breaks are encoded and cause the rule conversion in the subsequent step to fail.
STEP 2 | Convert the encoded rule:
admin@demo-panorama-vm> request plugins ips-signature-converter convert b64-encode <base64_encoded_rule>
LINE# TITLE                                RESULT   TYPE  CONVERTER_MSG
1     Converted_MALWARE-BACKDOOR - Dagger_1.4.0_105 Succeed Plain None
Summary: Total:1, Succeed:1, Warnings:0, Existing Coverage:0, Duplicated:0, Failed:0
STEP 3 | (Optional) Change the signature type.
If your signature is for protection against spyware, you can set the type as spyware so that Panorama imports it as an Anti-Spyware signature. Otherwise, rules convert as vulnerability by default.
admin@demo-panorama-vm> request plugins ips-signature-converter set-properties signature-type <vulnerability/spyware> lines <line_number>
LINE# TITLE                                SIG_TYPE ACTION SEVERITY
1     Converted_MALWARE-BACKDOOR - Dagger_1.4.0_105 spyware  alert  low
STEP 4 | Import the signature to Panorama:
admin@demo-panorama-vm> request plugins ips-signature-converter import-custom-signatures device-group <device_group> lines <line_number>
LINE# TITLE                                THREAT_ID STATUS  DETAIL
1     Converted_MALWARE-BACKDOOR - Dagger_1.4.0_105 16002     Success Import Succeeded
STEP 5 | Commit your changes to Panorama:
admin@demo-panorama-vm# commit
Commit job 707 is in progress. Use Ctrl+C to return to command prompt
...23%.59%80%.......90%.....100%
Configuration committed successfully
STEP 6 | Push the signatures to a device group:
admin@demo-panorama-vm> commit-all shared-policy device-group <device_group>
Job enqueued with jobid 709
709
STEP 7 | Log in to a firewall in the device group that you specified in the previous step to verify that the push succeeded:
admin@PA-3220# show threats spyware 16002
~ spyware {
  16002 {
    signature {
      standard {
        ips_converted_pattern {
          and-condition {
            "And Condition 1" {
              or-condition {
                "Or Condition 1" {
                  operator {
                    pattern-match {
                      pattern "2\x00 00 00 06 00 00 00\xDrives\x24 00\x";
                      context tcp-context-free;
                      negate no;
                    }
                  }
                }
              }
            }
          }
          order-free no;
          scope session;
        }
      }
    }
  }
}
Convert Rules Using the Panorama XML API
The Panorama XML API enables you to convert Snort® and Suricata, open-source intrusion prevention system (IPS) rules to custom Palo Alto Networks threat signatures. You can then use the XML API to import the custom rules as Vulnerability Protection and Anti-Spyware Security profiles.
Because the PAN-OS XML API uses a tree of XML nodes, you must specify the correct type and action in your API request along with the XPath Node Selection. See Explore the API to learn how to construct XML requests.
You cannot convert rule files directly through the API for multiple rules in one go like the web interface; each rule or a small batch would typically be processed per API call structure.
STEP 1 | Convert Snort or Suricata policy rules to Base64 URL encoded format.
You can use a free, browser-based tool or programming libraries.
This example uses the following Snort rule:
alert tcp $HOME_NET any -> $EXTERNAL_NET any (msg:"ET CHAT Yahoo IM conference message"; flow: to_server,established; content:"YMSG"; nocase; depth: 4; content:"|00 1D|"; offset: 10; depth: 2; reference:url,doc.emergingthreats.net/2001258; classtype:policyviolation; sid:2001258; rev:7; metadata:created_at 2010_07_30, updated_at 2010_07_30;)
STEP 2 | Make a request to convert the rule to a custom PAN-OS threat signature.
curl -X POST 'https://<panorama_ip>/api/?key=YOUR_API_KEY&type=op&cmd=<request><plugins><ips-signature-converter><convert><b64-encode>BASE64_ENCODED_RULE_HERE</b64-encode></convert></ips-signature-converter></plugins></request>'
The response contains details about the rules. Example success structure:
<response status="success">
  <result>
    <result>
      <status>pass</status>
      <msg>
        <convert-result>
          <warned>
            <entry name="1">
              <title>Converted_ET CHAT Yahoo IM conference message_2001258</title>
              <!-- other details -->
            </entry>
          </warned>
        </convert-result>
      </msg>
    </result>
  </result>
</response>
STEP 3 | Set the properties for rules that you converted.
Use the line number of a converted rule and set the properties. For example type, action, severity.
curl -X POST 'https://<panorama_ip>/api/?type=op&key=YOUR_API_KEY&cmd=<request><plugins><ips-signature-converter><set-properties><default-action>alert</default-action><lines>1</lines><severity>low</severity><signature-type>spyware</signature-type></set-properties></ips-signature-converter></plugins></request>'
STEP 4 | (Optional) View the results of the converted rules.
curl -X GET 'https://<panorama_ip>/api/?type=op&key=YOUR_API_KEY&cmd=<show><plugins><ips-signature-converter><results></results></ips-signature-converter></plugins></show>'
STEP 5 | Import the Spyware or Vulnerability rule to your device groups to use in a custom object.
curl -X GET 'https://<panorama_ip>/api/?key=YOUR_API_KEY&type=op&cmd=<request><plugins><ips-signature-converter><import-custom-sig><lines>1</lines><device-group>your_device_group</device-group></import-custom-sig></ips-signature-converter></plugins></request>'
The resulting success message using line one provides an ID number (Threat ID) you can use to find the profile.
IPS Converter: Installation & Troubleshooting
Install the IPS Signature Converter Plugin
To convert intrusion prevention system (IPS) rules to custom PAN-OS® threat signatures, download and install the IPS Signature Converter on Panorama™.
If you have a Panorama high availability (HA) configuration, repeat the installation process on each Panorama peer. Install the plugin on the passive peer first, then on the active peer.Before you install the plugin, ensure that you have the correct version requirements and the latest Applications and Threats content updates .
| STEP 1 | | Select Panorama > Plugins . |
|---|---|
| STEP 2 | | Enter ips_signature_converter in the search bar. |
| STEP 3 | | Refresh to retrieve the latest updates. |
| STEP 4 | | Download (ACTIONS column) the plugin. |
| STEP 5 | | Select the version of the plugin that you want to install. |
| STEP 6 | | Install the plugin (ACTIONS column). |
CLI Quick Start (IPS Signature Converter)
See the list of basic commands below for the intrusion prevention system (IPS) Signature Converter plugin on Panorama™. For more information about how to use the command line interface (CLI), see how to Get Started with the CLI .
| To do this... | Start here... |
|---|---|
| Convert, import, check performance impact, and configure the properties of signatures |
request plugins ips-signature-converter ...
|
| Set the type, default action, or severity of a signature |
request plugins ips-signature-converter set-properties <line numbers> ...
|
| View information about your converted signatures |
show plugins ips-signature-converter results
|
| Delete all signatures (does not delete signatures that you imported to Panorama) |
clear plugins ips-signature-converter all
|
Troubleshooting the IPS Signature Converter
If your rules fail to convert, use the following command in the Panorama command-line interface (CLI) to see a detailed summary of the failure:
admin@M-200-49> tail follow yes lines 1000 plugin_ips_signature_converter.logThe output consists of a list of the logs for each rule and a final summary of the status of their conversion.
Rule Logs Fields: Line, result (True/False), type (normal/edl), hash, msg (details for failed/warned).
Summary Fields: Total, Succeed, Warned, Skipped (CVE already in Threat Vault), Duplicated, Failed.
Key Concepts & Best Practices
This section summarizes important concepts and best practices related to custom signatures and the IPS converter, particularly relevant for PCNSE/PCNSA exam preparation.
PCNSE/PCNSA Highlights
Custom App-ID Precedence: Custom application signatures take precedence over predefined Palo Alto Networks App-IDs if traffic matches both.
Threat ID Ranges: Know the specific numeric ranges for custom vulnerability and spyware signatures. These differ, and PAN-OS 10.0+ introduced additional ranges.
Signature Scope (Transaction vs. Session): Understand when to use 'Transaction' (single request/response) versus 'Session' (multiple packets/transactions over time) for both App-ID and Threat signatures.
Ordered Condition Match: When enabled, the firewall processes conditions in the specified order. The most specific conditions should typically come first.
PAN-OS 10.0+ Enhancements: More flexible pattern requirements (no mandatory 7-byte fixed string for new engine) and richer regex syntax. Also, CLI tools for testing pattern performance impact.
Contexts are Crucial:
Choosing the most specific and appropriate context minimizes false positives and improves performance. Avoid overly broad contexts like
tcp-context-free
or
udp-context-free
unless absolutely necessary due to significant performance impact.
IPS Signature Converter:
- Requires Panorama.
- Converts Snort and Suricata rules to custom PAN-OS threat signatures.
- Can export IOCs (rules without 'content' or 'PCRE') as lists for EDLs.
- Converted signatures must be imported into Panorama (Shared or Device Group) and then pushed to firewalls (PAN-OS 10.0+ with Threat Prevention license).
L3/L4 Custom Signatures: Configured in Zone Protection Profiles, not as standard custom threat objects. Requires global L3/L4 Header Inspection to be enabled.
Common Gotchas
Forgetting to Enable Signatures: Custom threat signatures, once created, must be explicitly enabled within an Anti-Spyware or Vulnerability Protection profile, which is then applied to security policy rules.
Impact of `tcp-context-free`/`udp-context-free`: These contexts inspect the entire TCP/UDP payload and can severely degrade firewall performance. Use with extreme caution and only when no other more specific context is suitable.
Pattern Length Limits: Be aware of the maximum pattern length (typically 127 characters, but can be 64 characters for some contexts/platforms like PA-220/PA-800 on PAN-OS 10.2+ for `tcp-context-free`). Longer patterns need to be split using AND conditions.
Case Sensitivity: Some decoders/contexts are case-sensitive. Test patterns accordingly or use regex for case-insensitivity if appropriate.
IPS Converter File Upload Limits: The web interface has a limit of 300 rules per upload.
Application Override vs. Custom App-ID: If a custom application has no Parent App identifiable by App-ID or is used in an application override, it might not be scanned for threats. Scanning options on the custom app definition also affect threat inspection.
Negate Conditions: A custom signature cannot consist solely of negated conditions. At least one positive condition is required. For session-scoped signatures, a negated condition cannot be the last one.
Workflow Diagrams
(Mermaid diagrams for signature creation and IPS converter are included within their respective sections for better contextual understanding.)
Simplified State Diagram of Traffic Processing with Custom Signatures.
PCNSE Exam Trivia Points
- Custom App-IDs take precedence over predefined App-IDs when traffic matches both.
-
Know the specific
Threat ID ranges
for custom Vulnerability (
41000-45000,6800001-6900000) and Spyware (15000-18000,6900001-7000000) signatures, noting PAN-OS 10.0+ additions. - Understand the difference between signature Scope : Transaction (single request/response) vs. Session (multiple packets/transactions).
- The IPS Signature Converter requires Panorama and converts Snort/Suricata rules for firewalls running PAN-OS 10.0+ with an active Threat Prevention license.
-
Avoid broad contexts like
tcp-context-freeorudp-context-free(PAN-OS 10.0+) due to significant performance impact . Use the most specific context possible. Test performance using CLI commands liketest custom-signature-perf. - Custom L3/L4 Vulnerability signatures are configured in Zone Protection Profiles (under L3 & L4 Header Inspection), not standard custom threat objects. Global L3/L4 inspection must be enabled.
- Custom Threat Signatures (Spyware/Vulnerability) must be explicitly enabled (by Threat ID) in an Anti-Spyware or Vulnerability Protection profile, which is then applied to Security Policy rules.
- Pre-PAN-OS 10.0 signature patterns required a 7-byte fixed string without wildcards within those 7 bytes. This requirement is relaxed in 10.0+ for the enhanced pattern-matching engine.
- Combination Signatures use a child Threat ID and add time/aggregation criteria (hits over time) primarily for detecting brute force attacks .
- Rules converted by the IPS Converter without 'content' or 'PCRE' can be exported as an IOC list for use with External Dynamic Lists (EDLs).