PAN-OS: Configuring Authentication for Explicit Web Proxy
Panorama Management Best Practice
If using Panorama to manage the firewall acting as the web proxy:
-
Configure shared objects (Authentication Profiles, Server Profiles, Address Objects, etc.) in a shared location within Panorama.
-
Place the web proxy firewall in its own dedicated Device Group (or a child group) separate from other firewalls/vsys to avoid configuration conflicts or unintended inheritance.
Configure Kerberos Authentication
Overview
Kerberos Single Sign-On (SSO) allows domain-joined clients, whose users are logged into the domain, to authenticate transparently to the explicit proxy without needing to re-enter credentials.
Prerequisites:
-
Create a dedicated
service account
in Active Directory for the proxy service.
-
Enable support for
AES128 and AES256 encryption
in the service account's properties within AD.
-
Register a
Service Principal Name (SPN)
for the proxy's Fully Qualified Domain Name (FQDN) associated with the service account (e.g., `HTTP/proxy.example.com@EXAMPLE.COM`).
-
Generate a Kerberos keytab file
for this SPN using the service account's credentials. The principal name in the keytab must match the hostname clients use to resolve the proxy interface IP address.
Firewall Configuration Steps:
-
Create a
Kerberos Server Profile
(
Device > Server Profiles > Kerberos
) pointing to your Key Distribution Center (KDC), usually your Domain Controllers.
-
Configure an
Authentication Profile
(
Device > Authentication Profile
):
-
Set Type to
Kerberos
.
-
Select the Kerberos Server Profile created above.
-
Import the
keytab
file generated in the prerequisites.
-
(Optional but Recommended) Configure a
Log Forwarding Profile
(
Objects > Log Forwarding
) to send Authentication logs to Panorama or
Strata Logging Service
for easier troubleshooting. Apply this profile later in the Authentication Policy.
-
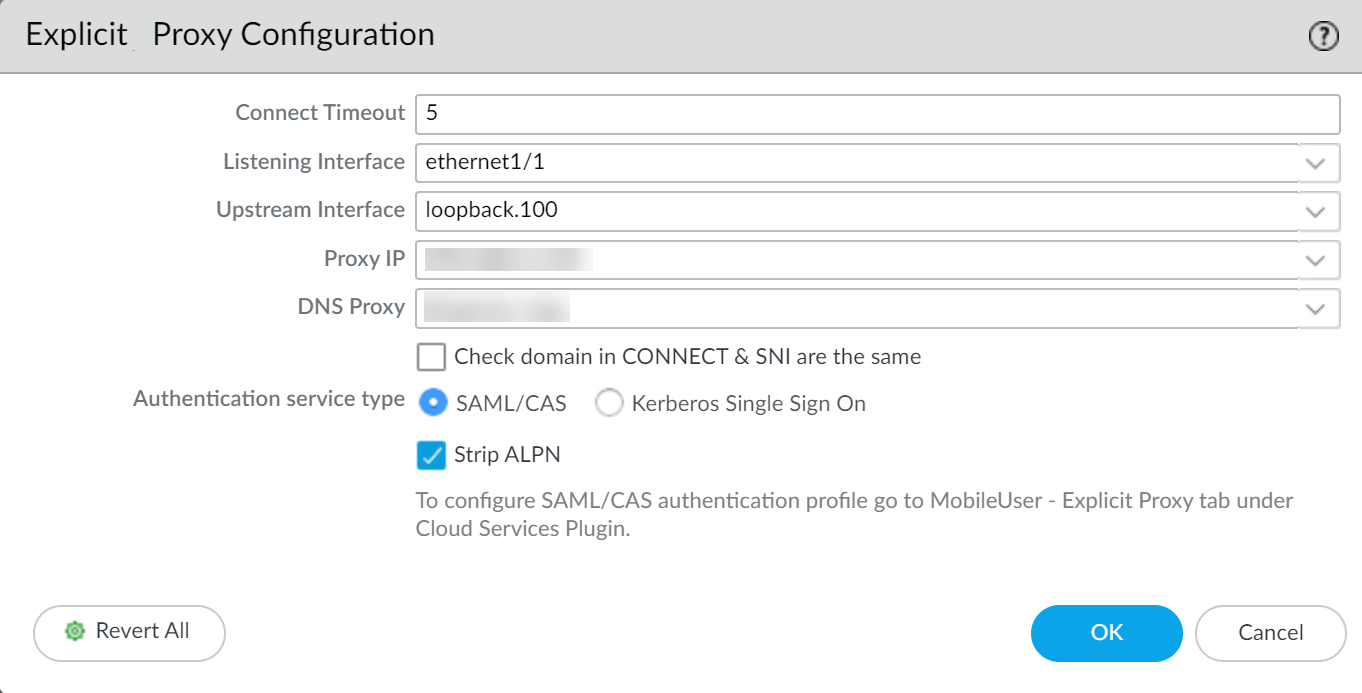
Navigate to the
Explicit Proxy Configuration
(
Network > Proxy > Explicit Proxy
).
-
Select
Kerberos Single Sign On
as the
Authentication service type
.

-
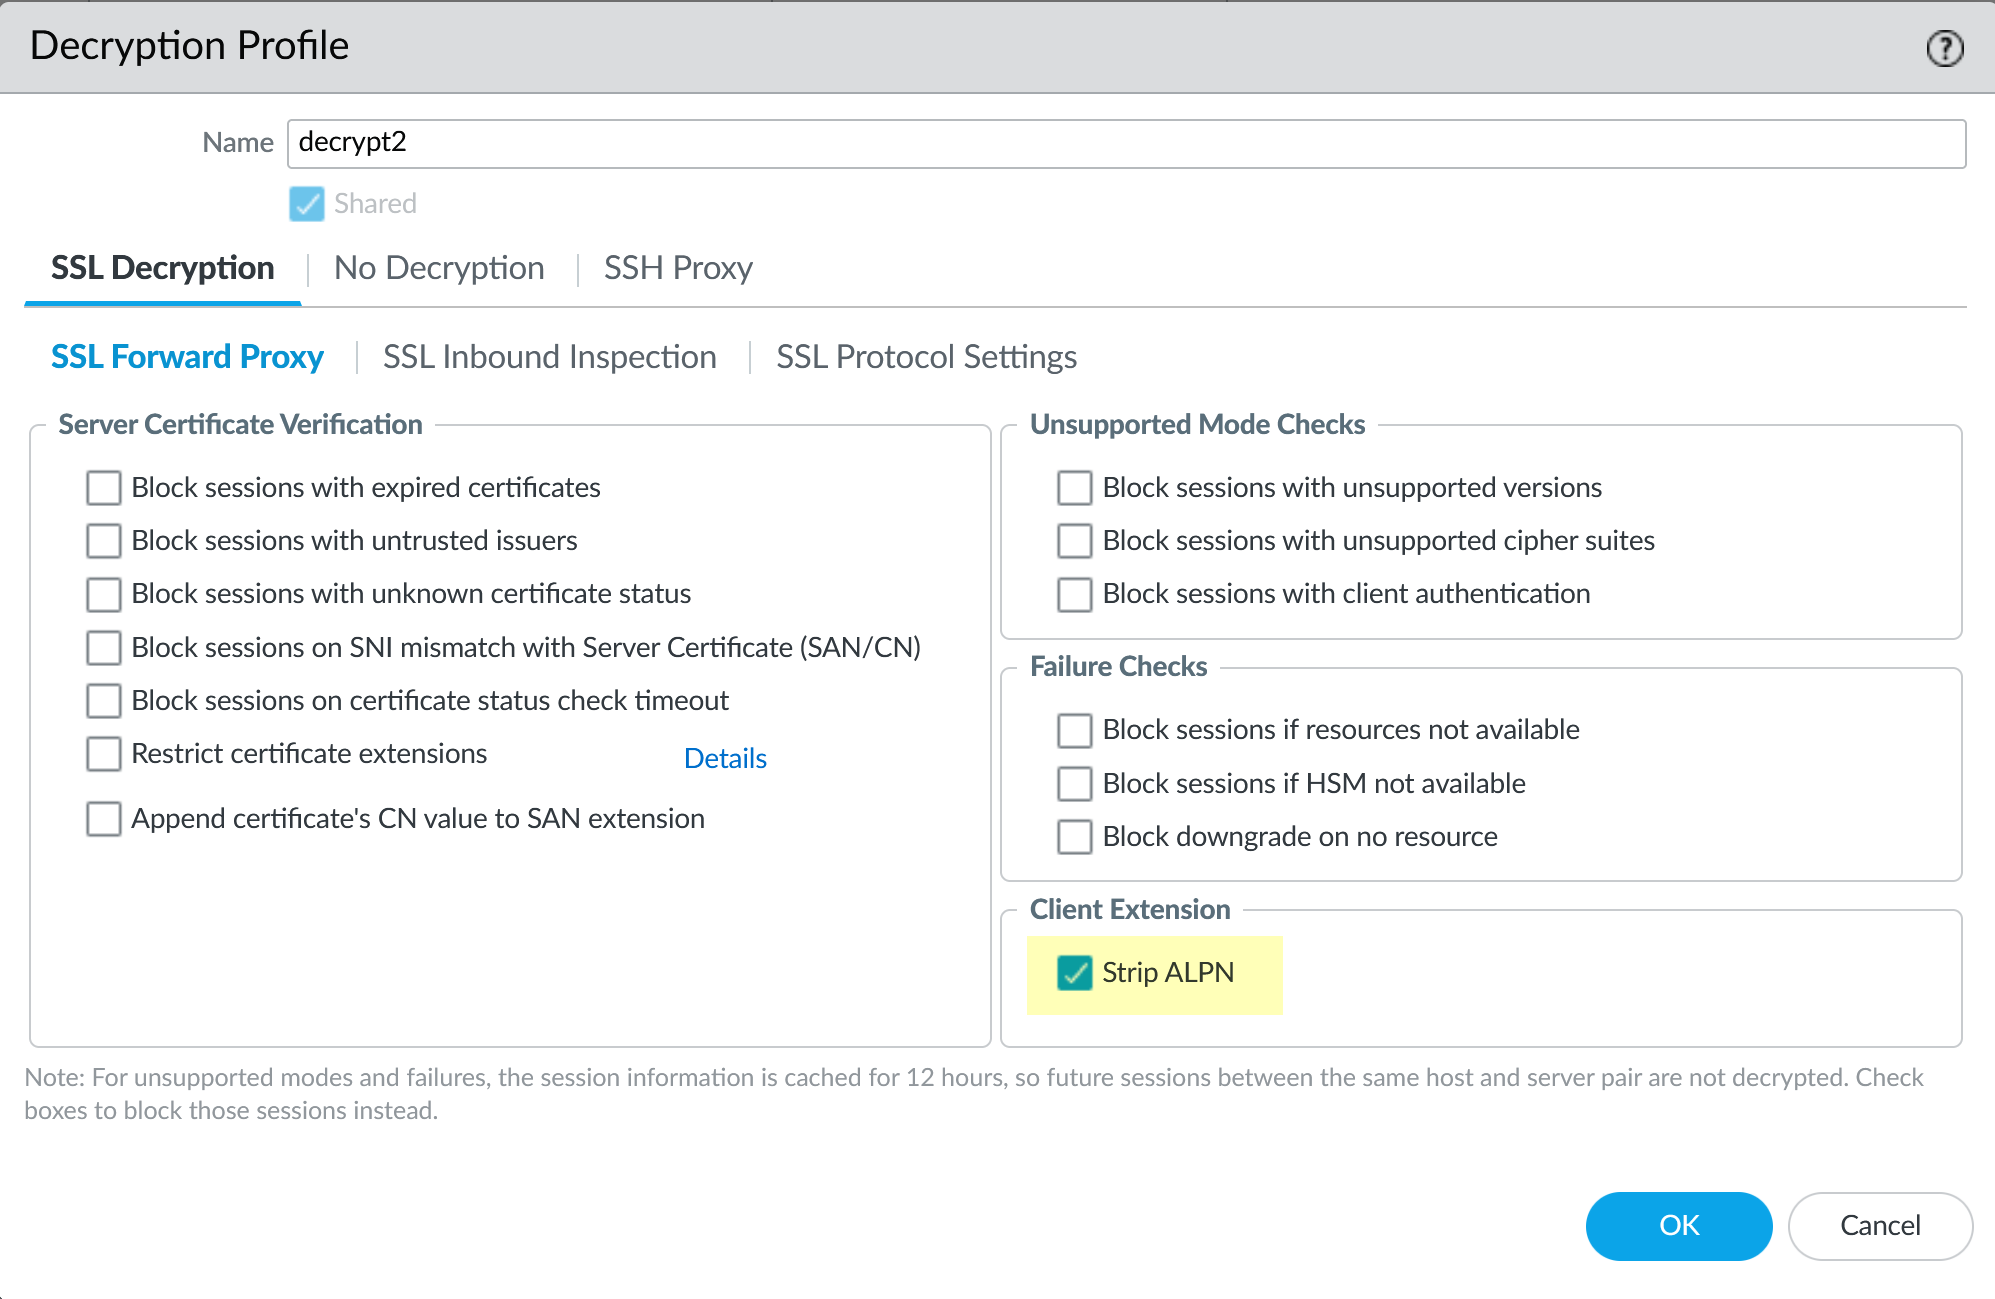
(Optional) If using SSL Decryption for proxy traffic, check
Strip ALPN
to remove Application-Layer Protocol Negotiation values. (Requires HTTPS proxying enabled).
-
Select the
Authentication Profile
(using Kerberos) created in Step 4.
-
Complete the remaining
Explicit Proxy configuration steps
(interfaces, ports, etc.).
-
Configure an
Authentication Policy
rule (
Policies > Authentication
) matching the proxy traffic and setting the Authentication Enforcement to use the Kerberos Authentication Profile. Apply the Log Forwarding profile here if configured.
-
Commit the changes.
If users experience issues with browser challenges, particularly with Chrome, testing an alternate browser may be helpful during troubleshooting.
Configure SAML Authentication
Overview
SAML allows leveraging an external Identity Provider (IdP) like Okta, Azure AD, Ping Identity, etc., for user authentication, often enabling Single Sign-On (SSO) and Multi-Factor Authentication (MFA).
SAML authentication for explicit web proxy requires Panorama and the Cloud Services plugin (version 3.2.1 or later).
Prerequisites:
-
Configure
Explicit Proxy for mobile users
via Prisma Access/Panorama (even if not using Prisma Access for tunnels, the framework might be leveraged). Commit and push changes.
-
Configure a
SAML Identity Provider Server Profile
(
Device > Server Profiles > SAML Identity Provider
) and an
Authentication Profile
(
Device > Authentication Profile
) using Type `SAML` and referencing the IdP profile.
Firewall Configuration Steps:
-
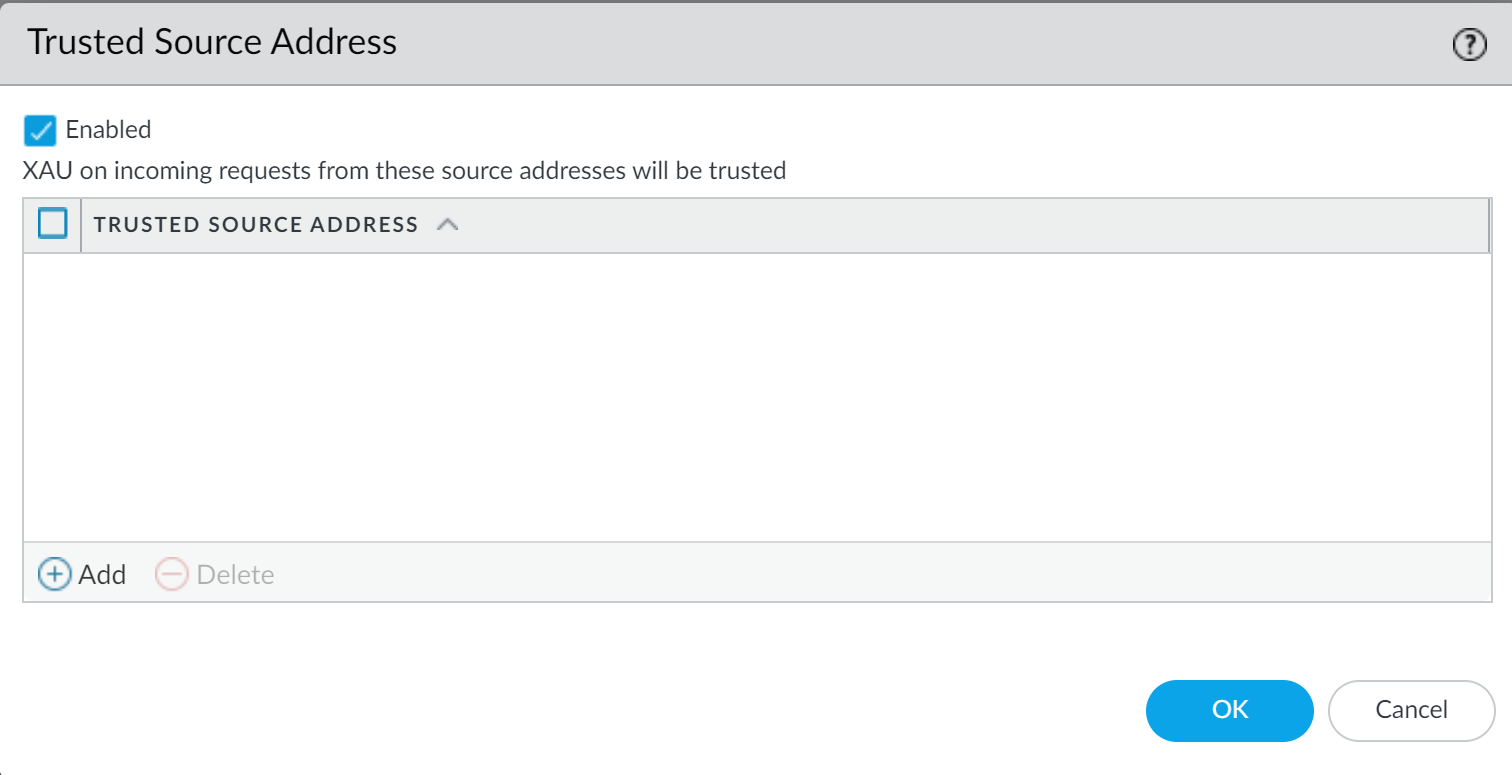
(Optional - Required for XAU) If receiving authentication information from a downstream proxy via the X-Authenticated-User header, configure the downstream proxy's IP as a
Trusted Source Address
:
-
Select
Device > User Identification > User Identification > Settings (Cog icon) > Trusted Authentication Gateways
(path may vary slightly by version).
-
Enable the feature and Add the IP address object(s) of the downstream proxy server(s).
-
Navigate to the
Explicit Proxy Configuration
(
Network > Proxy > Explicit Proxy
).
-
Select
SAML/CAS
as the
Authentication service type
.
-
(Optional but recommended) If using SSL Decryption, check
Strip ALPN
.
-
Select the
Authentication Profile
(using SAML) created previously.
-
Complete the remaining
Explicit Proxy configuration steps
.
-
Configure an
Authentication Policy
rule (
Policies > Authentication
) matching the proxy traffic and setting the Authentication Enforcement to use the SAML Authentication Profile. Apply Log Forwarding if desired.
-
Commit the changes.
Configure Cloud Identity Engine Authentication
Overview
The Cloud Identity Engine (CIE) provides a cloud-based service to centralize identity information from various sources (like Azure AD, Okta, GCP) and simplifies authentication and group mapping configuration on the firewall.
Prerequisites:
-
Configure
Explicit Proxy for mobile users
via Prisma Access/Panorama. Commit and push changes.
-
Set up the
Cloud Identity Engine
and configure a
Cloud Identity Engine Authentication Profile
(
Device > Authentication Profile
) using Type `Cloud Identity Engine`.
Firewall Configuration Steps:
-
(Optional - Required for XAU) Configure Trusted Source Addresses as described in the SAML section if needed.
-
Navigate to the
Explicit Proxy Configuration
(
Network > Proxy > Explicit Proxy
).
-
Select
SAML/CAS
as the
Authentication service type
(CIE authentication leverages SAML flows).
-
(Optional but recommended) Check
Strip ALPN
if using SSL Decryption.
-
Select the
Authentication Profile
(using Cloud Identity Engine) created previously.
-
Complete the remaining
Explicit Proxy configuration steps
.
-
Configure an
Authentication Policy
rule (
Policies > Authentication
) matching the proxy traffic and setting the Authentication Enforcement to use the CIE Authentication Profile. Apply Log Forwarding if desired.
-
Commit the changes.