How to Implement and Test SSL Decryption
Objective
This document describes how to implement and test SSL Decryption on Palo Alto Networks Firewalls.
Overview
- PAN-OS can decrypt and inspect inbound and outbound SSL connections going through a Palo Alto Networks Firewall.
- SSL decryption can occur on interfaces in virtual wire, Layer 2, or Layer 3 mode by using the SSL rule base to configure which traffic to decrypt.
- In particular, decryption can be based upon URL categories, source users, and source/destination IP addresses.
- Once traffic is decrypted, tunneled applications can be detected and controlled, and the decrypted data can be inspected for threats, URL filtering, file blocking, or data filtering.
- Decrypted traffic can also be sent off the device by using a Decryption Port mirror (see Configure Decryption Port Mirroring ).
Inbound SSL Decryption
- In the case of inbound traffic to an internal web server or device, the administrator imports a copy of the protected server’s certificate and private key.
- When the SSL server certificate is loaded on the firewall and an SSL decryption policy is configured for the inbound traffic, the device then decrypts and reads the traffic as it is forwarded.
- No changes are made to the packet data, and the secure channel is from the client system to the internal server.
- The firewall can then detect malicious content and control applications running over this secure channel.
Outbound SSL Decryption (SSL Forward Proxy)
- In this case, the firewall proxies outbound SSL connections by intercepting outbound SSL requests and generating a certificate on the fly for the site that the user wants to visit.
- The validity date on the PA-generated certificate is taken from the validity date on the real server certificate.
- The issuing authority of the PA-generated certificate is the Palo Alto Networks device.
- If the firewall’s certificate is not part of an existing hierarchy or is not added to a client’s browser cache, then the client receives a warning when browsing to a secure website.
- If the real server certificate has been issued by an authority not trusted by the Palo Alto Networks firewall, then the decryption certificate is using a second “untrusted” Certificate Authority (CA) key to ensure the user is warned of any subsequent man-in-the-middle attacks.
Environment
- Palo Alto Networks Firewalls.
- Any PAN-OS.
- SSL Decryption.
Procedure
To configure SSL decryption:
- Configure the firewall to handle traffic and place it in the network
- Make sure the proper Certificate Authority (CA) is on the firewall
- Configure SSL decryption rules
- Enable SSL decryption notification page (optional)
- Commit changes and test decryption
Steps to Configure SSL Decryption
1. Configure the Firewall to Handle Traffic and Place it in the Network
Make sure the Palo Alto Networks firewall is already configured with working interfaces (i.e., Virtual Wire, Layer 2, or Layer 3), Zones, Security Policy, and already passing traffic.
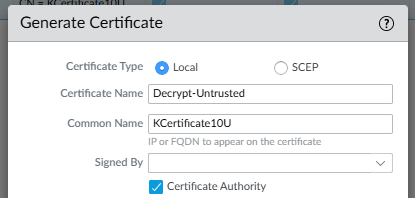
2. Load or Generate a CA Certificate on the Palo Alto Networks Firewall
A Certificate Authority (CA) is required to decrypt traffic properly by generating SSL certificates on the fly. Create a self-signed CA on the firewall or import a Subordinate CA (from your own PKI infrastructure). Select one CA for the Forward Trust Certificate and a different CA for the Forward Untrust Certificate to enable the firewall to decrypt traffic.
From the firewall web interface, go to Device > Certificates . Load or generate a certificate for either inbound inspection or outbound (forward proxy) inspection.
Generating a Self-Signed Certificate
Using a Self-Signed Certificate is recommended. For information on generating a Self-Signed Certificate, please review the following article: Create a Self-Signed Root CA Certificate .
Generating and Importing a Certificate from Microsoft Certificate Server
- On the Microsoft Certificate Server for your organization, request an advanced certificate using the certificate template “subordinate CA.” Download the cert.
- After downloading, export the certificate from the local certificate store. In Internet Explore (IE), access the Internet Options dialog, select the Content tab , then click the Certificates button . The new certificate can be exported from the personal certificates store. Select Certificate Export Wizard , export the private key, then select the format. Enter a passphrase and a file name and location for the resulting file. The certificate will be in a PFX format (PKCS #12).
-
To extract the certificate, use this openSSL[4] command:
openssl pkcs12 –in pfxfilename.pfx –out cert.pem –nokeys -
To extract the key, use this openSSL command:
openssl pkcs12 –in pfxfilename.pfx –out keyfile.pem -nocerts - Import the cert.pem file and keyfile.pem file into the Palo Alto Networks firewall on the Device tab > Certificates screen .
- In the case of a High Availability (HA) Pair, also load these files into the second Palo Alto Networks firewall, or copy the certificate and key via the High Availability widget on the dashboard.
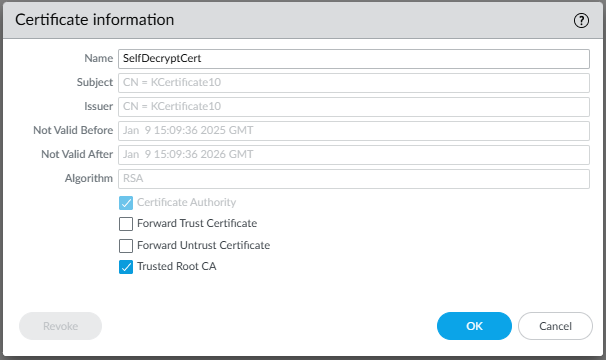
Example - Certificates needed using a Self-Signed Certificate (SSL Forward Proxy)
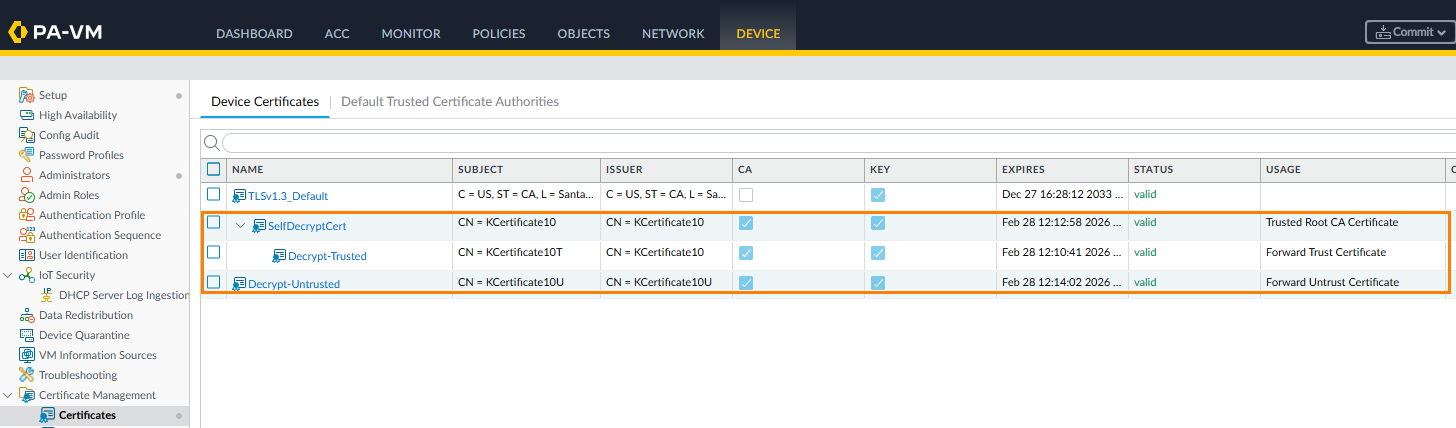
The self-signed "
Trusted Root CA
":
please review the following article:
Create a Self-Signed Root CA Certificate

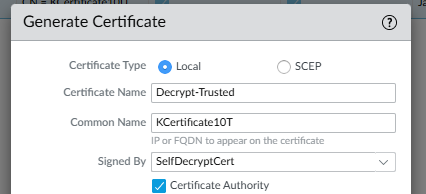
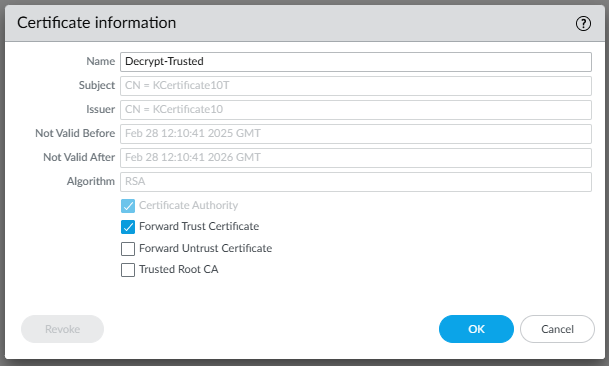
The " Forward Trust " certificate (signed by above Trusted Root CA):
The " Forward Untrust " certificate (not signed)
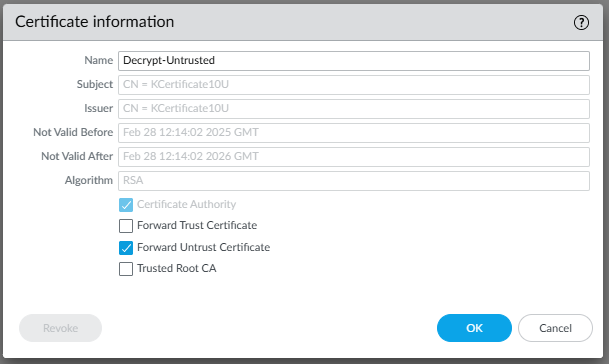
| IMPORTANT NOTE : Never set both checkboxes "Forward Trust Certificate" and "Forward Untrust Certificate" in the same certificate, and do not have the "Forward Untrust Certificate" deployed under a trusted certificate chain. If you do this, it will cause the firewall to present client devices with a CA certificate they trust, even when they connect to websites or applications that are presenting with invalid certificates to the firewall. |
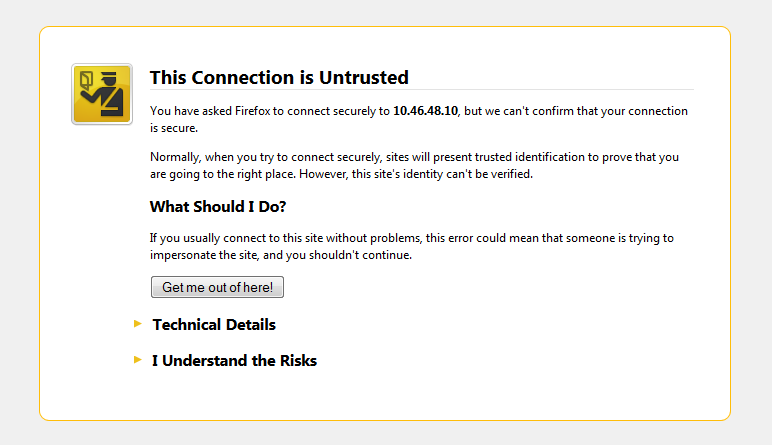
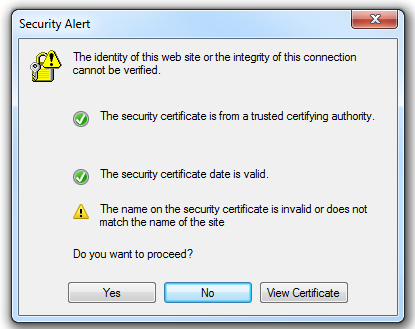
Below are some examples of browser errors if the self-signed CA Certificate is not trusted.
Firefox untrusted CA error:
Chrome untrusted CA error:

Internet Explorer untrusted CA error:
3. Configure SSL Decryption Rules
The network administrator determines what needs to be decrypted. A few suggestions for configuring SSL decryption rules:
- Implement rules in a phased approach. Start with specific rules for decryption, and monitor the typical number of SSL connections being decrypted by the device.
-
Avoid decrypting the following URL categories, as users may consider this an invasion of privacy:
- Financial services
- Health and medicine
-
Do not decrypt applications where the server requires client-side certificates (for identification).
- You can either block or allow connections requiring client authentication via the decryption profile feature introduced in PAN-OS 5.0.
Here is an example of an outbound rule base following suggestions for decryption:

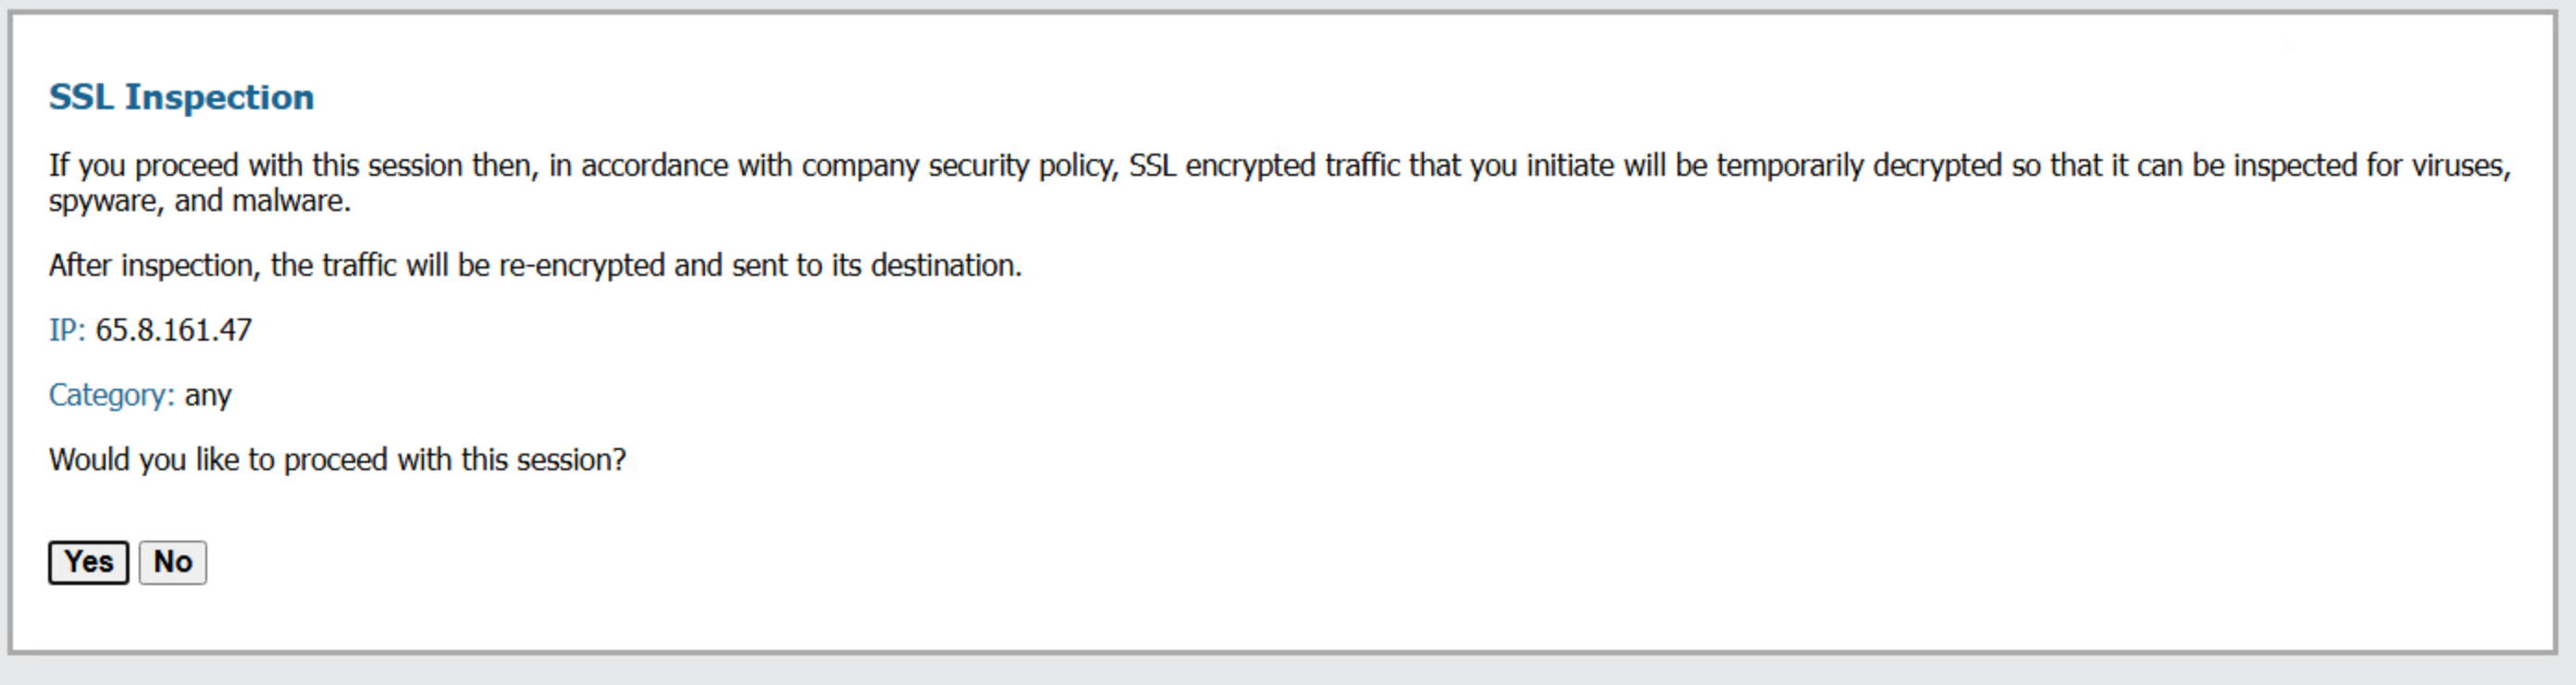
4. Enable SSL Decryption Notification Web Page (optional)
-
The user can be notified that their SSL connection will be decrypted using the response page found on the
Device tab
>
Response Pages screen
. Click
Disabled
, check the
Enable SSL Opt-out Page
option, and click
OK
.

The default SSL Opt-out page can be exported, edited via an HTML editor, and imported to provide company-specific information:
5. Test Outbound Decryption
To test outbound decryption:
- In the outbound policy, make sure the action is set to alert for any viruses found. Also, enable packet capture on that anti-virus security profile. Commit any changes made.
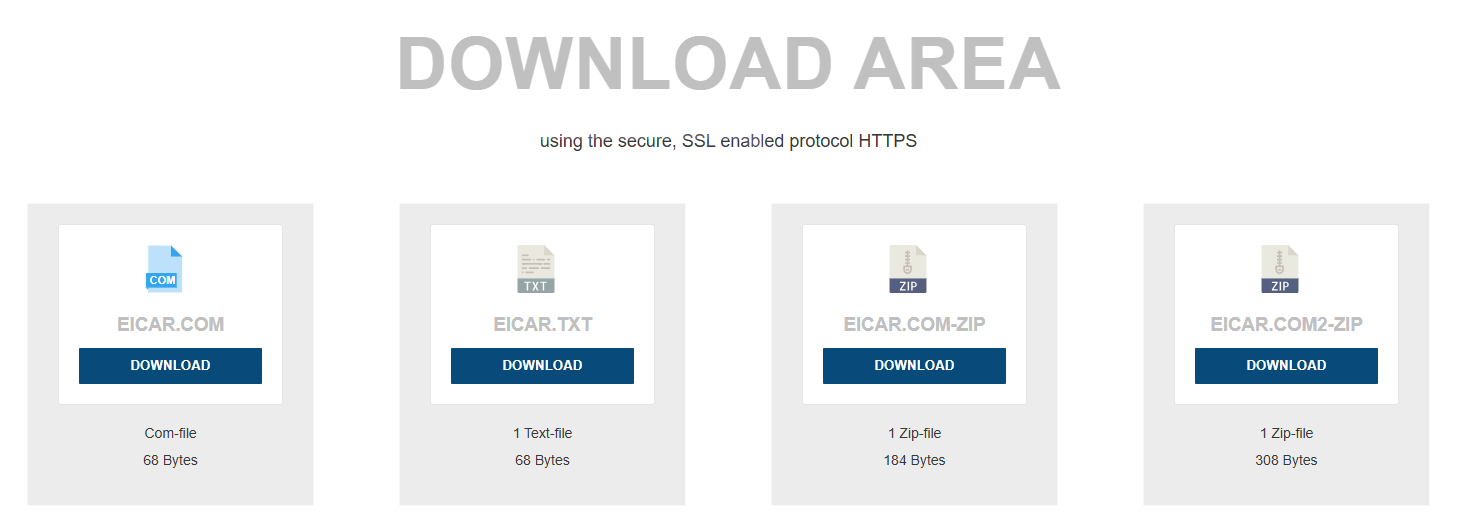
-
On a PC internal to the firewall, go to
www.eicar.org
. In the top right corner, you should see this:

- Click “Download Anti Malware Test File."
-
In the screen that appears, scroll to the bottom. Download the left most file.
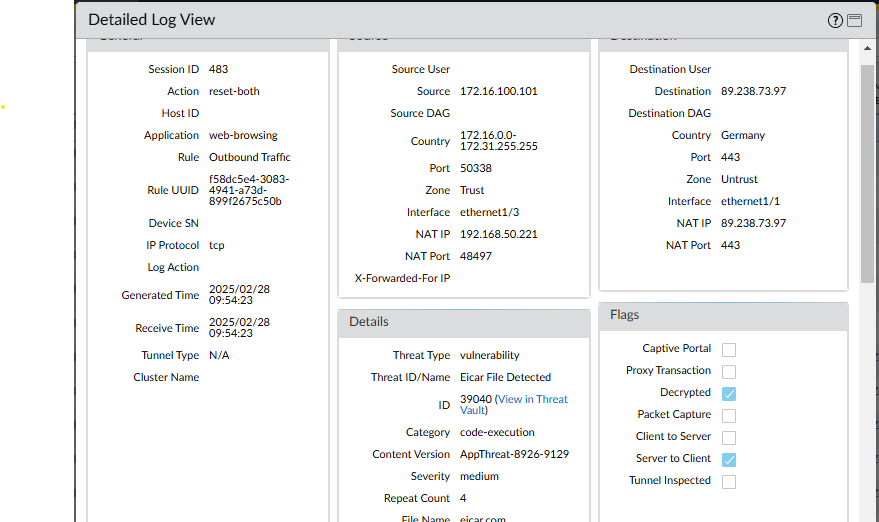
-
Examine the threat logs. The virus should have been detected since the SSL connection was decrypted. A log message that shows eicar was detected in web browsing on port 443 will be visible.

-
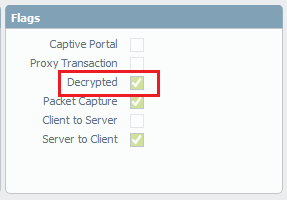
To the left of that log entry, click the magnifying glass. Scroll to the bottom. Under Flags, check to see if the “Decrypted” box is checked:
The file was successfully detected by one of our threat prevention signatures in an SSL-encrypted session.
To test the “no-decrypt” rule:
- First, determine what URLs fall into financial services, health and medicine categories, and any categories that decryption is not enabled. Use Palo Alto Networks URL Filtering - Test A Site and enter a URL to identify the category.
- Once websites are classified into categories and will not be decrypted are found, use a browser to go to those websites using HTTPS. There should be no certificate error when going to those sites. The web pages will be displayed properly. Traffic logs will show the sessions where application SSL traverses port 443, as expected.
To Test Inbound Decryption:
- Examine the traffic logs dated before enabling SSL for inbound decryption on the firewall. Look at traffic targeted for the internal servers. In those logs, the application detected should be “ssl" going over port 443.
- From a machine outside the network, connect via SSL to a server in the DMZ. There will be no certificate errors, as the connection is not being proxied—just inspected.
-
Examine the logs for this inbound connection. The applications will not be “ssl" but the actual applications found inside the SSL tunnel. Click the magnifying glass icon in those log entries to confirm decrypted connections.
Helpful CLI Commands
-
To see how many existing SSL decryption sessions are going through the device, use this CLI command:
> show session all filter ssl-decrypt yes count yes -
To see the active sessions that have been decrypted, use this CLI command:
> show session all filter ssl-decrypt yes state active -
To check if there are any sessions hitting the limit of the device, use this CLI command:
> show counter global name proxy_flow_alloc_failure -
To view the SSL decryption certificate, use this CLI command:
> show system setting ssl-decrypt certificate Certificates for Global SSL Decryption CERT global trusted ssl-decryption x509 certificate version 2 cert algorithm 4 valid 150310210236Z -- 210522210236Z cert pki 1 subject: 172.16.77.1 issuer: 172.16.77.1 serial number(9) 00 b6 96 7e c9 99 1f a8 f7 ...~.... . rsa key size 2048 siglen 2048 basic constraints extension CA 1 global untrusted ssl-decryption x509 certificate version 2 cert algorithm 4 valid 150310210236Z -- 210522210236Z cert pki 1 subject: 172.16.77.1 issuer: 172.16.77.1 serial number(9) 00 b6 96 7e c9 99 1f a8 f7 ...~.... . rsa key size 2048 siglen 2048 basic constraints extension CA 1 -
To view SSL decryption settings, use this CLI command:
> show system setting ssl-decrypt setting vsys : vsys1 Forward Proxy Ready : yes Inbound Proxy Ready : no Disable ssl : no Disable ssl-decrypt : no Notify user : no Proxy for URL : no Wait for URL : no Block revoked Cert : yes Block timeout Cert : no Block unknown Cert : no Cert Status Query Timeout : 5 URL Category Query Timeout : 5 Fwd proxy server cert's key size: 0 Use Cert Cache : yes Verify CRL : no Verify OCSP : no CRL Status receive Timeout : 5 OCSP Status receive Timeout : 5 Block unknown Cert : no