SSH Proxy Decryption Overview
SSH Proxy is a Palo Alto Networks feature designed to provide visibility into Secure Shell (SSH) encrypted traffic. While SSH is vital for secure remote administration and file transfers (SCP, SFTP), its encryption can be exploited by malicious actors to evade security detection.
By decrypting SSH traffic, the firewall can apply security services like App-ID (for tunneled applications), Threat Prevention (Anti-Spyware, Vulnerability Protection), and File Blocking to the content of SSH sessions.
Why is SSH Proxy Needed?
Traditional security devices struggle to inspect encrypted traffic. SSH, like SSL/TLS, creates a blind spot. Adversaries leverage this by:
- Establishing covert Command and Control (C2) channels.
- Exfiltrating sensitive data using SCP or SFTP.
- Tunneling other malicious protocols or malware traffic.
- Performing unauthorized lateral movement or accessing internal systems.
SSH Proxy allows the firewall to break this encryption, bringing the traffic payload into the realm of inspectable data for security profiles.
This feature specifically targets SSH (typically TCP/22) and is separate from SSL/TLS decryption methods.
How SSH Proxy Works: Man-in-the-Middle (MITM)
SSH Proxy operates using a technique similar to SSL Forward Proxy, acting as a Man-in-the-Middle between the client and the server.
- Client Initiates Connection: An internal client attempts to establish an SSH connection to a destination server.
- Firewall Intercepts: A configured Decryption Policy rule matching the SSH traffic (based on zone, address, application 'ssh', service/port) intercepts the connection attempt.
- Firewall Connects to Server: The firewall initiates its own separate SSH connection to the legitimate destination server. It performs a standard SSH handshake, including receiving and validating the real server's public host key .
- Firewall Presents Its Key to Client: Instead of forwarding the real server's host key, the firewall presents its own unique SSH public host key (generated on the firewall) to the client. To the client, the firewall is now acting as the destination server.
-
Client Host Key Verification (Critical Step):
The client's SSH software checks the presented public key against its local
known_hostsfile (or its configured trust store).- If the firewall's key matches a previously stored key for that server's IP/hostname (which would only happen if the firewall's key was previously accepted or manually added), or if strict checking is disabled, the client accepts the key.
- If the firewall's key does not match the key the client expects for the destination server (because the client previously connected directly and stored the real server's key), the client will typically issue a warning about a potential MAN-IN-THE-MIDDLE ATTACK and may terminate the connection, depending on client configuration.
- Session Establishment: If the client accepts the firewall's key, two separate SSH sessions are established: Client<->Firewall and Firewall<->Server.
- Decryption and Inspection: With two sessions, the firewall sits in the middle, decrypting traffic from one side, inspecting the payload for threats or policy violations based on Security Profiles, re-encrypting it, and sending it to the other side.
The firewall acts as an SSH proxy server, terminating the client-side SSH connection and initiating a new server-side connection.
Simplified SSH Proxy Flow (Sequence Diagram)
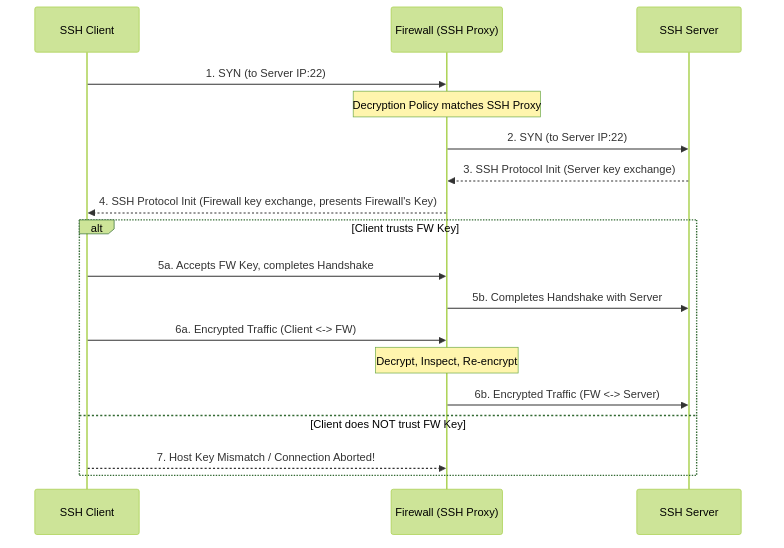
The firewall intercepts, establishes connections to both sides, and presents its own key to the client.
SSH Proxy Configuration Steps
PCNSE/PCNSA Exam Focus: Know the policy types (Decryption, Security), where key settings live (Decryption Profile, Decryption Policy), and which App-ID/Service to use.
-
Configure SSH Proxy Settings in Decryption Profile:
This profile defines the security parameters for the proxied session itself, such as allowed versions and algorithms.
-
GUI Path:
Objects > Decryption > Decryption Profile -
Create a new profile (e.g.,
SSH-Proxy-Strict) or edit an existing one. - Navigate to the SSH Proxy tab.
-
Configure failure checks to enforce strong security:
-
Check
Block sessions with unsupported versions: Prevents legacy SSHv1 or older, insecure versions. -
Check
Block sessions with unsupported algorithms: Ensures only modern, strong key exchange, encryption (ciphers), and Message Authentication Code (MAC) algorithms are used.
-
Check
- Click OK.
These checks protect against clients or servers attempting to negotiate weak cryptographic parameters.
-
GUI Path:
-
Create a Decryption Policy Rule:
This rule directs specific SSH traffic to undergo SSH Proxy decryption.
-
GUI Path:
Policies > Decryption -
Click
Add. -
Name:
Give it a descriptive name (e.g.,
Decrypt-Outbound-SSH-Internet). -
Source Tab:
Define the source zone(s) (e.g.,
Trust) and optionally users/addresses. -
Destination Tab:
Define the destination zone(s) (e.g.,
Untrust) and optionally addresses. -
Service/URL Category Tab:
-
Service:
Select
service-ssh(which maps to TCP/22). If SSH runs on a non-standard port, create a custom Service object for that port and select it here. - URL Category: Not relevant for SSH Proxy.
-
Service:
Select
-
Options Tab (Crucial):
-
Action:
Select
Decrypt. -
Type:
Select
SSH Proxy. -
Decryption Profile:
Select the profile created in Step 1 (e.g.,
SSH-Proxy-Strict).
-
Action:
Select
- Click OK.
- Policy Order: Ensure this rule is placed correctly. Rules are evaluated top-down. Any "No Decrypt" rules for specific destinations (like internal servers where you don't need inspection or have compatibility issues) should be placed *above* this rule.
-
GUI Path:
-
Configure Supporting Security Policy & Security Profiles:
Decryption alone doesn't inspect; it just makes the traffic visible. Inspection requires Security Policy and attached profiles.
-
Ensure a corresponding
Security Policy
rule exists (
Policies > Security) that allows the SSH traffic (e.g., Source Zone `Trust`, Dest Zone `Untrust`, Application `ssh` , Service `service-ssh` or custom, Action `Allow`). - Attach relevant Security Profiles (e.g., Anti-Spyware, Vulnerability Protection, File Blocking, Antivirus/WildFire) to this *allowing* Security Policy rule. The inspection engines apply these profiles to the *decrypted* traffic payload.
-
Ensure a corresponding
Security Policy
rule exists (
-
Address Client Host Key Checking: (External Step / Critical Consideration)
This is often the most complex part operationally.
-
As explained in the 'How it Works' section, the firewall presents its own key. Standard SSH clients (like OpenSSH) perform strict host key checking by default, comparing the presented key to the one stored in
~/.ssh/known_hostsfor that destination. This will cause a mismatch warning or failure. -
You MUST have a strategy to manage this:
- Option A (Least Secure): Disable strict host key checking on client machines. This significantly reduces security as clients will then accept *any* key presented for *any* server, making them vulnerable to actual MITM attacks elsewhere.
-
Option B (Complex):
Pre-populate or centrally manage client
known_hostsfiles to include the firewall's public proxy key associated with the proxied destination IPs/hostnames. This can be difficult to scale and manage across many clients and destinations. - Option C (Training): Train users to manually accept the new key presented by the firewall. This teaches users to ignore security warnings and is highly problematic.
- Option D (Alternative Auth): Use SSH Certificate Authentication instead of host key verification. This is a more advanced setup but can bypass the host key checking challenge if configured correctly.
- Failure to address client host key management will result in widespread SSH connection failures and user complaints after enabling SSH Proxy.
-
As explained in the 'How it Works' section, the firewall presents its own key. Standard SSH clients (like OpenSSH) perform strict host key checking by default, comparing the presented key to the one stored in
-
Commit Changes:
Commit the configuration to the firewall to apply it.
Impact and Benefits of SSH Proxy
Successfully implementing SSH Proxy provides significant security benefits, though with associated impacts.
Security Benefits:
- Threat Prevention within SSH: Allows Anti-Spyware (detecting C2 channels or data exfiltration patterns) and Vulnerability Protection (detecting exploits targeting SSH or applications using SSH) profiles to inspect the decrypted payload.
- File Blocking within SSH: Enables File Blocking profiles to control or prevent the transfer of specific file types over SCP and SFTP protocols tunneled within the decrypted SSH session. This is crucial for preventing malware ingress or sensitive data egress.
- Data Filtering (Limited): Can potentially apply simple Data Filtering profiles to the decrypted stream, though advanced DLP typically requires dedicated solutions.
- Enhanced Logging & Monitoring: While App-ID might still show 'ssh', the session logs will indicate that decryption occurred, and Threat, URL, and Data Filtering logs will show hits based on the inspected content, providing valuable forensic data.
Operational Impacts:
- Client Host Key Management: As discussed, this is the primary hurdle. Requires careful planning and potential client-side configuration or user education.
- Performance: Decrypting and inspecting encrypted traffic, especially high-volume transfers like large SCP/SFTP sessions, consumes significant CPU resources on the firewall. This can impact overall firewall throughput and latency.
- Application Compatibility: Some custom or non-standard SSH clients, tunnel setups (e.g., complex port forwarding), or applications relying on specific SSH protocol nuances might encounter compatibility issues or unexpected behavior when proxied.
- Visibility Limitations: App-ID primarily identifies the session as 'ssh'. Identifying the *specific* application tunneled inside (like RDP over SSH) is not guaranteed or common, unlike with SSL decryption where App-ID has better capabilities for nested protocols.
PCNSE/PCNSA Exam Focus: Understand that the main benefit is applying Security Profiles to the *decrypted payload*. Be aware of the performance cost and the critical client-side host key challenge.
SSH Proxy Challenges & Gotchas
Implementing SSH Proxy decryption is not always straightforward. Be prepared for these common issues:
Client Host Key Mismatches
This is the #1 issue you will encounter. Clients expect the server's key. The firewall provides its own. Unless the client already trusts the firewall's key for that destination (which is rare initially), strict host key checking will cause errors (e.g., "WARNING: REMOTE HOST IDENTIFICATION HAS CHANGED!", "Man in the middle attack!").
In troubleshooting, look for these errors on the client side. On the firewall, decryption logs might show sessions being blocked due to client failures, but the most explicit indicator is the client error message.
Performance Degradation
SSH decryption is resource-intensive. High volumes of SSH traffic, particularly large file transfers via SCP/SFTP, can significantly increase firewall CPU load. This is especially true on older or lower-end models.
Monitor firewall performance metrics (System > Resources) after enabling SSH decryption. Look for spikes in CPU usage or drops in session throughput.
Application/Client Compatibility Issues
While rare for standard OpenSSH, some non-standard clients, embedded SSH implementations, or applications using complex SSH tunneling features might not work correctly when proxied.
Examples might include specific SSH agent forwarding scenarios or unusual port forwarding configurations.
Clients reporting connection errors or unexpected behavior even after addressing host key issues could indicate a compatibility problem. Check packet captures if possible.
Limited Internal Application Visibility
While App-ID identifies the outer protocol as `ssh`, it typically does NOT identify applications tunneled inside the decrypted SSH session (e.g., RDP, VNC, etc.). The Traffic log will still show `ssh` as the application.
Don't rely on SSH Proxy decryption to give you granular App-ID visibility into nested protocols. Its primary benefit is content inspection via Security Profiles (Threat, File Blocking).
Managing Firewall's Proxy Host Key
The firewall uses its own host key(s) for proxying. While less frequently an issue than client trust, consider if your organization requires key rotation policies for security devices. Managing this key is done within the firewall's system settings (Device > Setup > Services > SSH -> Session Proxy Host Keys).
Be aware of where the firewall's proxy key is generated and managed if a need arises to regenerate or understand its lifecycle.
PCNSE/PCNSA Exam Focus: Be able to identify 'client host key mismatch' as the *most common* problem and understand *why* it happens. Know that performance and limited App-ID for tunneled apps are also considerations.
Conceptual Diagram: Host Key Mismatch
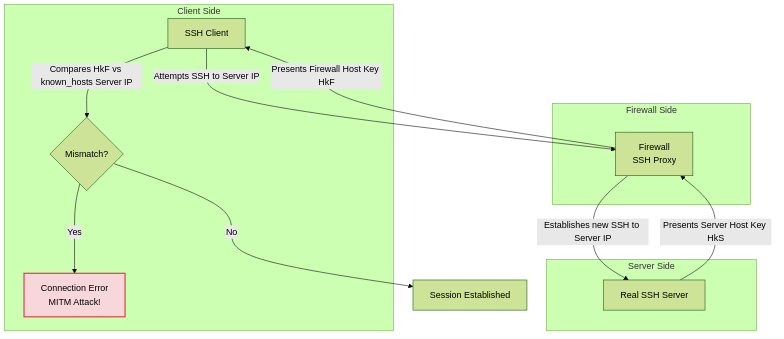
The core problem: The client sees HkF, but expects HkS based on its known_hosts file.
Solutions & Best Practices for SSH Proxy
Addressing the challenges of SSH Proxy requires a thoughtful approach, balancing security requirements with operational feasibility.
Solutions for Client Host Key Issues:
-
Automated Known_Hosts Management:
For managed endpoints, consider using configuration management tools (like Group Policy, SCCM, Ansible, Chef, Puppet, scripting) to automatically distribute the firewall's public proxy key and add it to client
known_hostsfiles for relevant destinations. This is the most secure enterprise solution, though complex to implement. - Selective Decryption: Instead of decrypting all SSH traffic, only decrypt sessions to untrusted destinations (e.g., outbound to the internet) or specific high-risk internal segments. Exclude trusted internal server-to-server traffic via a "No Decrypt" rule. This limits the scope of the client host key issue.
- SSH Certificate Authentication: Implement SSH certificates (where clients trust a CA, and servers/firewall have certificates signed by that CA) instead of relying solely on host key verification. This is a more advanced PKI setup but can streamline trust management.
- Careful Use of Strict Host Key Checking Exceptions: If automation isn't feasible, disabling strict host key checking is the least recommended option due to security implications. If used, restrict it ONLY to specific known destination IPs/ranges relevant to the proxy, using client-side configuration options where possible, rather than globally disabling it.
Best Practices for Implementation:
- Decrypt Selectively: Only enable SSH Proxy for traffic flows where you have a clear security need for inspection (e.g., outbound internet access, access to critical infrastructure from potentially untrusted zones).
- Use Strong Profiles: Always enable "Block sessions with unsupported versions" and "Block sessions with unsupported algorithms" in your Decryption Profile.
- Apply Full Security Inspection: Ensure the Security Policy rule allowing the decrypted `ssh` traffic has comprehensive Security Profiles attached (Threat Prevention, File Blocking, Antivirus/WildFire).
- Plan Client Management: Before enabling SSH Proxy for production users, have a documented strategy for managing client host key trust. Pilot with a small group first.
- Monitor Resources: Keep a close eye on firewall CPU and session usage during and after implementation. Scale firewall resources if necessary based on traffic volume.
- Document & Communicate: Clearly document which traffic is subject to SSH Proxy and communicate potential issues (like initial key acceptance prompts) to users or system administrators whose workflows might be affected.
- Leverage Logging: Ensure both Decryption and Security policy logs are monitored to identify blocked sessions (decryption failures, threat/file blocks) and troubleshoot issues.
PCNSE/PCNSA Exam Focus: Recognize "selective decryption" and "addressing client host keys" as key best practices. Understand that applying Security Profiles is necessary for inspection *after* decryption.
Conceptual Diagram: Selective Decryption
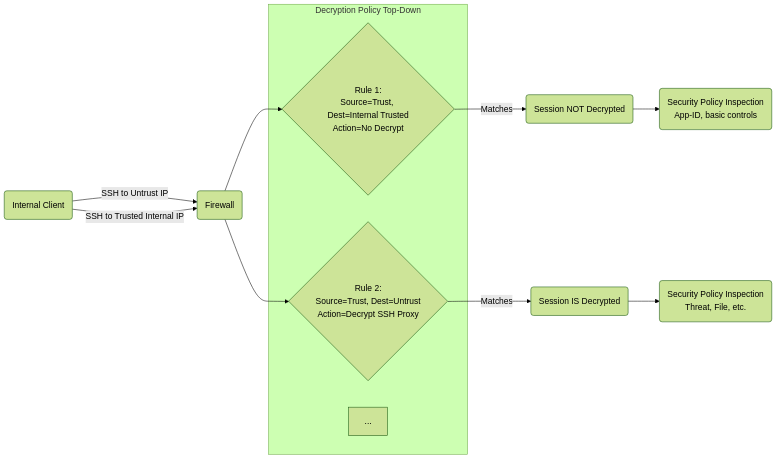 Selective decryption prevents unnecessary proxying and client issues for trusted internal traffic.
User-ID Overview: Connecting Users to IP Addresses
Palo Alto Networks' User-ID feature is fundamental to enabling user-based policy enforcement, reporting, and visibility.
This allows administrators to write Security policy rules, create reports, and view logs based on user identity rather than just IP, which is crucial in dynamic network environments, especially those with DHCP, VPNs, or multiple users sharing systems (like terminal servers).
Why is User-ID Important?
- Granular Policy Enforcement: Create security rules based on groups (e.g., "Allow Marketing to access Social Media", "Block Developers from accessing Gambling Sites").
- Improved Visibility & Reporting: See who is doing what on the network ("User John.Doe downloaded malware", "User Jane.Smith visited malicious URL"), rather than just an IP address.
- Simplified Policies: Policies can be written once for user groups, applying regardless of which IP address a user is assigned.
- Enhanced Forensics: Quickly identify the user associated with a specific IP address at the time an event occurred.
PCNSE/PCNSA Exam Focus: User-ID is a core concept! Know *what* it does (maps IP to user), *why* it's important (user-based policy/visibility), and the *different methods* for gathering mapping information.
Basic User-ID Flow (Conceptual)
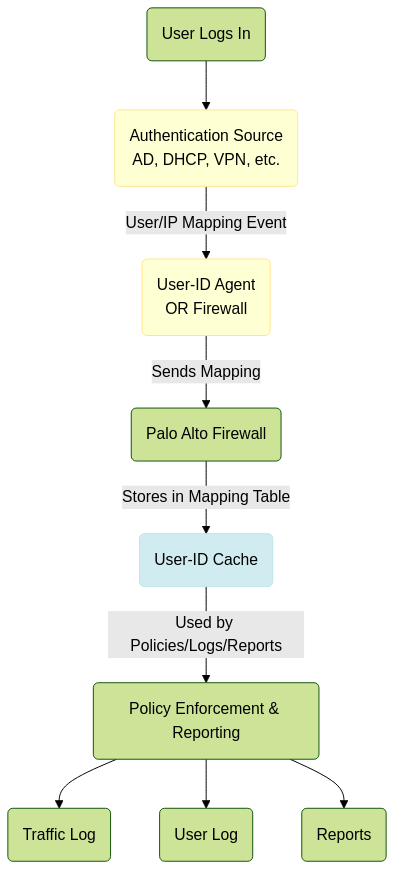
User login events are collected, processed, and stored in the firewall's User-ID cache for policy lookup.
User-ID Identification Methods
The firewall can obtain user-to-IP mappings through various methods, broadly categorized as Agent-based and Agentless.
Agent-based User-ID
This method involves installing and configuring dedicated software (the User-ID agent) on servers within the network (typically domain controllers).
-
Windows-based Agent:
Installed on a Windows server (often a Domain Controller).
- Mechanism: Reads security event logs on specified Domain Controllers (Event IDs 4624 for successful login, 4634/4647 for logoff). Can also collect info from Syslog, WMI, Exchange, etc.
- Pros: Generally considered the most reliable method for Windows environments, provides timely logoff detection, minimal overhead on the firewall, can scale by using multiple agents.
- Cons: Requires installation and maintenance of agent software, needs administrative privileges on domain controllers, potential performance impact on agent server (minimal typically).
- PCNSE/PCNSA: Know it's the classic, reliable method for Windows AD. Requires installation. Good for logoff detection.
-
Terminal Server Agent:
Special agent installed on Windows Terminal Services (RDS) or Citrix servers.
- Mechanism: Monitors sessions on the terminal server itself to distinguish between multiple users logged in simultaneously under the same IP address.
- Pros: Essential for accurate user identification on terminal servers where multiple users share one IP.
- Cons: Requires agent installation, specific configuration.
- PCNSE/PCNSA: Critical for environments with shared IPs (RDS/Citrix). Maps user to source port on the terminal server IP.
- Other Agents: There are also agents/connectors for Linux, Syslog parsing, etc., but the Windows-based and Terminal Server agents are the most common AD-related ones.
Agentless User-ID
This method involves the firewall directly querying or listening for user-mapping information from authentication sources without requiring agent software installation on those sources (though administrative credentials for querying are still needed).
-
Active Directory (AD) Server Monitoring:
The firewall directly queries Domain Controllers.
- Mechanism: Uses protocols like WMI (Windows Management Instrumentation), NetBIOS, and Server Message Block (SMB) to read security event logs or query login sessions on DCs.
- Pros: No agent software to install/maintain on DCs, simpler setup for basic scenarios.
- Cons: Can place more load on the firewall's management plane, potential performance impact on DCs due to querying, logoff detection is typically less timely or reliable than agent-based due to reliance on polling login events rather than immediate logoff notifications. Can be problematic with complex AD setups or firewalls far from DCs.
- PCNSE/PCNSA: Know it requires credentials but no agent installation on DCs. Relies on WMI/NetBIOS/SMB. Logoff detection is a common limitation/gotcha.
-
Syslog Listener:
The firewall listens for Syslog messages from various devices (e.g., authenticated proxies, network access control (NAC) systems, other servers) that contain user and IP information.
- Mechanism: Parses structured syslog messages for user/IP patterns.
- Pros: Versatile, can collect mappings from non-Windows sources, leverages existing logging infrastructure.
- Cons: Requires devices to be configured to send detailed syslog, requires careful parsing rule configuration on the firewall, quality of mapping depends on the source device's logs.
- PCNSE/PCNSA: Good for non-Windows sources or integrating with other security tools. Requires parsing rules.
-
X-Forwarded-For (XFF) Header:
Collects username from HTTP headers inserted by upstream proxy servers.
- Mechanism: Reads the XFF header in HTTP traffic.
- Pros: Useful in specific proxy deployments.
- Cons: Only works for HTTP traffic and requires compatible upstream proxies.
- PCNSE/PCNSA: Specific method for environments with authenticated web proxies. HTTP only.
-
Captive Portal:
Direct authentication mechanism on the firewall itself.
- Mechanism: Forces users to authenticate via a web page when they attempt to access resources.
- Pros: Provides mappings directly from the firewall, useful for guest networks or unmanaged devices.
- Cons: Requires user interaction, disruptive for users, not suitable for headless devices or automated traffic.
- PCNSE/PCNSA: Firewall acts as the authentication source. Requires user action. Common for guest access.
- Client Probing: (Passive/Fallback method) Firewall attempts to identify users by probing client machines using NTLM. Less common as a primary method.
Summary Table: Agent vs Agentless (AD)
| Feature | Agent-based (Windows) | Agentless (AD Monitoring) |
|---|---|---|
| Installation on DC | Yes (Agent software) | No (Requires credentials) |
| Logoff Detection | Timely (reads logoff events) | Less timely/reliable (relies on polling login events, session timeouts) |
| Load Distribution | Agent offloads processing from firewall | More load on firewall (management plane) |
| DC Impact | Minimal (agent reads logs locally) | Potential impact from WMI/NetBIOS querying |
| Scalability | Highly scalable (multiple agents) | Can become complex with many DCs/firewalls |
| Complexity | Requires agent installation/patching | Simpler setup, potentially harder troubleshooting |
Key differences between the two primary methods for Windows AD environments.
Understanding the pros and cons, especially logoff detection timeliness and load implications, is vital for choosing the right method and for exam questions.
Troubleshooting User-ID
User-ID issues are common troubleshooting scenarios. The goal is always to determine why a specific IP address isn't mapping to the expected user in the firewall's cache.
Common Steps & Commands:
-
show user ip-user-mapping all: This is the most fundamental command. It displays the current user-to-IP mappings in the firewall's cache. Check if the problematic IP exists and maps to the correct user. -
show user group list/show user group name <group-name>: Verify that the firewall is successfully importing user groups from your directory service. User-ID policies often rely on group membership. -
debug user-id dump ip-mapping <ip-address>: Provides detailed information about how a specific IP address was mapped, including the source of the mapping (which agent, which method). -
debug user-id reset ip-mapping <ip-address>: Clears the mapping for a specific IP, forcing the firewall to re-learn it. Useful for testing. -
Check System Logs (
Monitor > System): Look for User-ID related errors, warnings, or information messages (e.g., failures connecting to DCs, issues processing logs, agent connection status). - Check User-ID Agent Logs (if agent-based): Agent logs provide details about its connection status to the firewall, its ability to read DC event logs, and the mappings it is sending.
- Verify Connectivity & Credentials: Ensure the firewall (for agentless) or the agent (for agent-based) can reach the Domain Controllers and that the configured service account has the necessary permissions to read security logs or query WMI/NetBIOS.
- Check Event Viewer on DCs: For agentless, confirm that security audit logging is enabled and events 4624 (login) and 4634/4647 (logoff - though logoff is less reliable for agentless) are being generated and accessible.
- Check Security Policy Rules: Ensure the Security Policy rule is actually configured to use users/groups. The 'Source User' field must be set to 'any', a specific user, or a user group.
PCNSE/PCNSA Exam Focus: Know the purpose of `show user ip-user-mapping all` and `debug user-id dump ip-mapping`. Understand that troubleshooting involves verifying mappings, group import, connectivity, credentials, and checking relevant logs (firewall system logs, agent logs, DC event logs).
A common troubleshooting step is ensuring that 'Source User' is NOT set to 'unknown' or left blank in the security policy rule if you intend to use User-ID for that rule.
Mermaid Diagram: User-ID Troubleshooting Flowchart (Simplified)
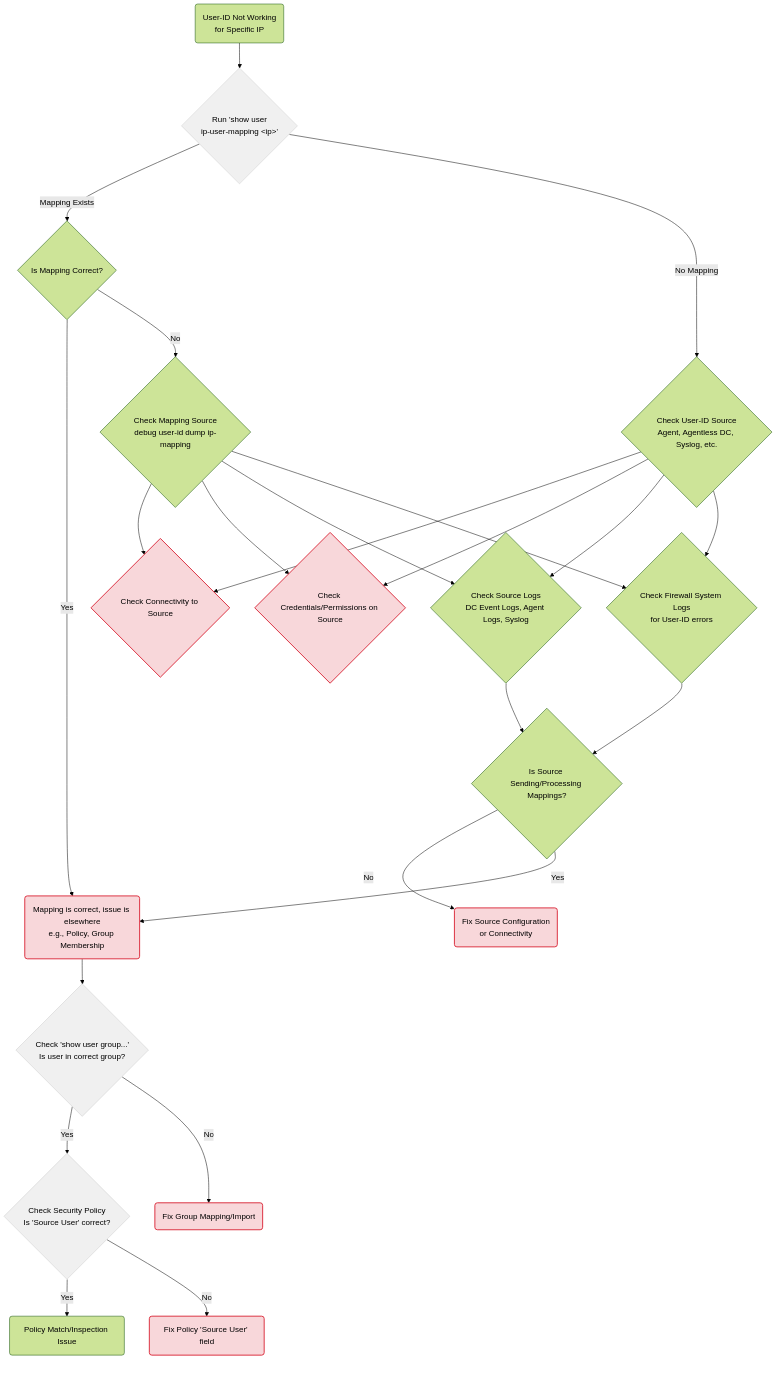
A simplified troubleshooting flow for User-ID mapping issues.
Practice Quiz: SSH Proxy & User-ID
Test your understanding of SSH Proxy decryption and User-ID in PAN-OS.