GlobalProtect User Authentication Fundamentals
When a GlobalProtect app first connects to the portal, the user must authenticate. Successful portal authentication leads to the download of the GlobalProtect configuration, which includes a list of gateways and optionally, a client certificate for gateway connections. Subsequently, the app attempts to connect to a gateway from this list, requiring another authentication step. The security level for portal and gateway authentication should match the sensitivity of the protected resources. GlobalProtect offers a flexible authentication framework, allowing tailored authentication and certificate profiles for each component.
Initial GlobalProtect Connection & Authentication Flow
How the App Handles Credentials
By default, the GlobalProtect app tries to use the same login credentials for the gateway that it used for the portal login. If the portal and gateway use the same authentication or certificate profile, the app connects to the gateway transparently after the initial portal authentication. However, configurations can be customized on a per-app basis to require different credentials (like unique OTPs) for specific GlobalProtect portals and gateways (internal, external, or manual only). This allows prompts for unique OTPs without first prompting for standard credentials.
Two main options modify this default behavior for stronger and faster authentication:
- Cookie Authentication on the Portal or Gateway
- Credential Forwarding to Some or All Gateways
Cookie Authentication on the Portal or Gateway
Cookie authentication simplifies the user experience by reducing the need to log in to both the portal and gateway successively or enter multiple OTPs. This minimizes credential entry. Cookies also facilitate VPN access re-enablement with a temporary password if the user's main password expires.
Cookie authentication can be configured independently for the portal and individual gateways, allowing for different cookie lifetimes (e.g., shorter for gateways protecting sensitive resources). Once an authentication cookie is deployed to an endpoint, both portal and gateways can rely on it. If a cookie expires, GlobalProtect automatically prompts for re-authentication, and a new cookie is issued upon success.
Example: Portal cookie lifetime: 15 days; Gateway cookie lifetime: 24 hours. If a user connects to the portal after 5 days, the cookie is valid. If they try the gateway after 5 days, the gateway cookie (24-hour lifetime) is expired, prompting re-authentication for the gateway. A new cookie is then issued, valid for 15 days (portal) and 24 hours (gateways).
State Diagram for Cookie Authentication Lifecycle
Credential Forwarding to Some or All Gateways
With two-factor authentication, you can specify which portal and types of gateways (internal, external, manual only) prompt for their own credentials. This speeds up authentication when the portal and gateway require different credentials (e.g., different OTPs or entirely different logins). For selected components, the app won't forward credentials, enabling customized security. For instance, maintain consistent security for portals and internal gateways but require a second factor (OTP) or a different password for gateways accessing highly sensitive resources.
How the App Handles Certificates
When GlobalProtect uses client certificates for authentication on macOS or Windows, it must present a valid client certificate. Validity requires:
- Issued by the CA defined in the Certificate Profile of your portal/gateway.
- Specifies client authentication purpose (defined during certificate creation).
- Located in the configured certificate store (default: user store, then machine store; user store takes precedence). The Client Certificate Store Lookup option in the portal agent config can force a specific store.
- Matches additional purposes (Extended Key Usage OID) if specified in the portal agent config. An OID is a numeric value identifying the certificate's application/service.
If only one certificate meets these criteria, it's used automatically. If multiple match, the user is prompted to select one (usually only on the first connection). It's recommended to narrow the list by OID and certificate store to guide users.
- Issuing CA must be trusted by the firewall (in the Certificate Profile).
- Certificate must have "Client Authentication" EKU (or a custom OID specified).
- Certificate must be in the correct store on the endpoint.
- Certificate must not be expired or revoked (CRL/OCSP check).
Core Authentication Methods Overview
GlobalProtect supports a variety of authentication methods to cater to different security needs and infrastructure setups.
Local Authentication
User accounts and authentication mechanisms are local to the firewall. This method isn't scalable as it requires an account for every GlobalProtect user. It's advisable only for small deployments.
External Authentication
Authentication is performed by external services such as LDAP, Kerberos, TACACS+, SAML, or RADIUS. This includes support for two-factor, token-based mechanisms (e.g., OTP). Setup involves creating a server profile for the external service, an authentication profile referencing it, and specifying client authentication in portal/gateway configs. Optionally, settings can be OS-specific. Different authentication profiles can be used for portal and gateways.
Client Certificate Authentication
For enhanced security, the portal or gateway can use a client certificate to obtain the username and authenticate the user. This also supports Common Access Cards (CACs) and smart cards, which rely on a certificate profile. The certificate profile must contain the root CA that issued the smart card/CAC certificate.
Two-Factor Authentication (2FA)
The portal or gateway authenticates users via two mechanisms, such as an OTP and Active Directory (AD) credentials. This is enabled by configuring and adding both a certificate profile and an authentication profile to the portal/gateway. Users must pass both authentication challenges.
(Windows and macOS only) Multi-Factor Authentication for Non-Browser-Based Applications
For sensitive, non-browser-based network resources (e.g., financial or software development apps) requiring additional authentication, the GlobalProtect app can notify and prompt users for timely MFA challenges.
(Windows and macOS only) Single Sign-On (SSO)
Enabled by default, the GlobalProtect app uses the OS login credentials to automatically authenticate and connect to the portal and gateway. The app can also be configured to wrap third-party credentials for Windows users using third-party credential providers.
SAML SSO is supported with Windows Hello for Business.
SAML SSO is not supported on macOS for GlobalProtect app native SSO (though SAML as an authentication method itself works on macOS via browser/webview).
(Prisma Access only) Cloud Identity Engine (CIE)
The Cloud Identity Engine provides user identification and authentication for mobile users in Panorama Managed Prisma Access—GlobalProtect deployments. It enables security policies based on users/groups rather than IP addresses and supports behavior-based security actions. CIE continually syncs directory information, ensuring accuracy and policy enforcement even if the SAML IdP is temporarily unavailable.
Requirements: GlobalProtect app 6.0+ with Prisma Access Innovation release 3.0+.
CIE supports these authentication methods for GlobalProtect:
- SAML
- Client Certificate
- OIDC (Starting from GlobalProtect app versions 6.2.6+ & 6.3.2+)
External Authentication Setup Details
This section delves into the specific configurations for common external authentication services.
Set Up LDAP Authentication
LDAP is commonly used for authentication and as a central user information repository, including role information.
STEP 1 | Create a server profile.
This profile identifies the LDAP service and tells the firewall how to connect and access user credentials.
- Select Device > Server Profiles > LDAP , then Add .
- Enter a Profile Name (e.g., GP-User-Auth ).
- (Multi-VSYS) Select Location .
- In Server List , Add server details: Name , LDAP Server (IP/FQDN), Port .
- Select LDAP server Type .
- Enter Bind DN and Password for firewall authentication to the LDAP service.
- (Optional) Require SSL/TLS secured connection (default enabled). Port 389 uses StartTLS, Port 636 uses SSL. Other ports attempt TLS, then SSL.
- (Optional) Verify Server Certificate for SSL sessions . Requires SSL/TLS to be enabled. The server cert must be in Device Certificates or signed by a Default Trusted CA.
- Click OK .
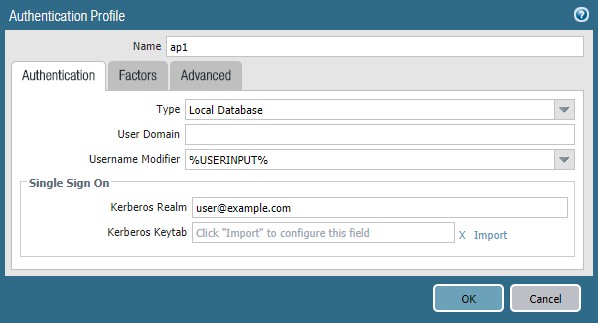
STEP 2 | (Optional) Create an authentication profile.
Specifies the server profile for portal/gateway user authentication. Can be assigned to client authentication profiles for granular control.
- Select Device > Authentication Profile , then Add .
- Enter a Name .
- Set Authentication Type to LDAP .
- Select the LDAP Server Profile from Step 1.
- Enter sAMAccountName as the Login Attribute for Active Directory.
- Set Password Expiry Warning (days before expiration users are notified, default 7). Requires LDAP server type: active-directory , e-directory , or sun .
-
Specify
User Domain
and
Username Modifier
to format the username string (e.g.,
%USERDOMAIN%\%USERINPUT%or%USERINPUT%@%USERDOMAIN%). If User Domain is blank, any user-entered domain is removed. - On the Advanced tab, Add an Allow List for permitted users/groups. Default (no entries) means no users can authenticate. all allows everyone.
- Click OK .
STEP 3 | Commit the configuration.
Set Up SAML Authentication
SAML (Security Assertion Markup Language) is an XML-based open standard for exchanging authentication and authorization data between an Identity Provider (IdP) and a Service Provider (SP - the firewall in this case).
Simplified SAML Authentication Flow with GlobalProtect
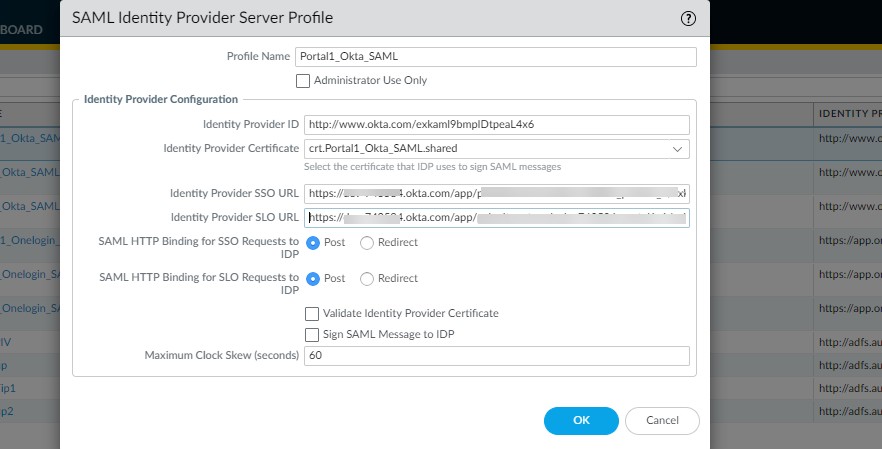
STEP 1 | Create a server profile.
This can be done by importing IdP metadata or manually.
- Export SAML metadata from the IdP.
- Select Device > Server Profiles > SAML Identity Provider .
- Import the metadata file.
- Enter a Profile Name (e.g., GP-User-Auth-SAML ).
- Browse for the metadata file.
- Validate Identity Provider Certificate (default enabled). Validation uses the certificate profile in the authentication profile.
- Enter Maximum Clock Skew (allowed time difference between IdP and firewall, default 60s).
- Click OK .
STEP 2 | (Optional) Create an authentication profile.
- Select Device > Authentication Profile , then Add .
- Enter a Name .
- Set Authentication Type to SAML .
- Select the SAML IdP Server Profile .
-
Configure:
- Certificate for Signing Requests (firewall uses to sign messages to IdP).
- Certificate Profile (firewall uses to validate IdP certificate).
- Specify Username Attribute and User Group Attribute from SAML assertion.
- (Optional for admin accounts) Specify Admin Role Attribute and Access Domain Attribute .
- On Advanced tab, Add Allow List . Username must match username from SAML IdP.
- Click OK .
STEP 3 | Commit the configuration.
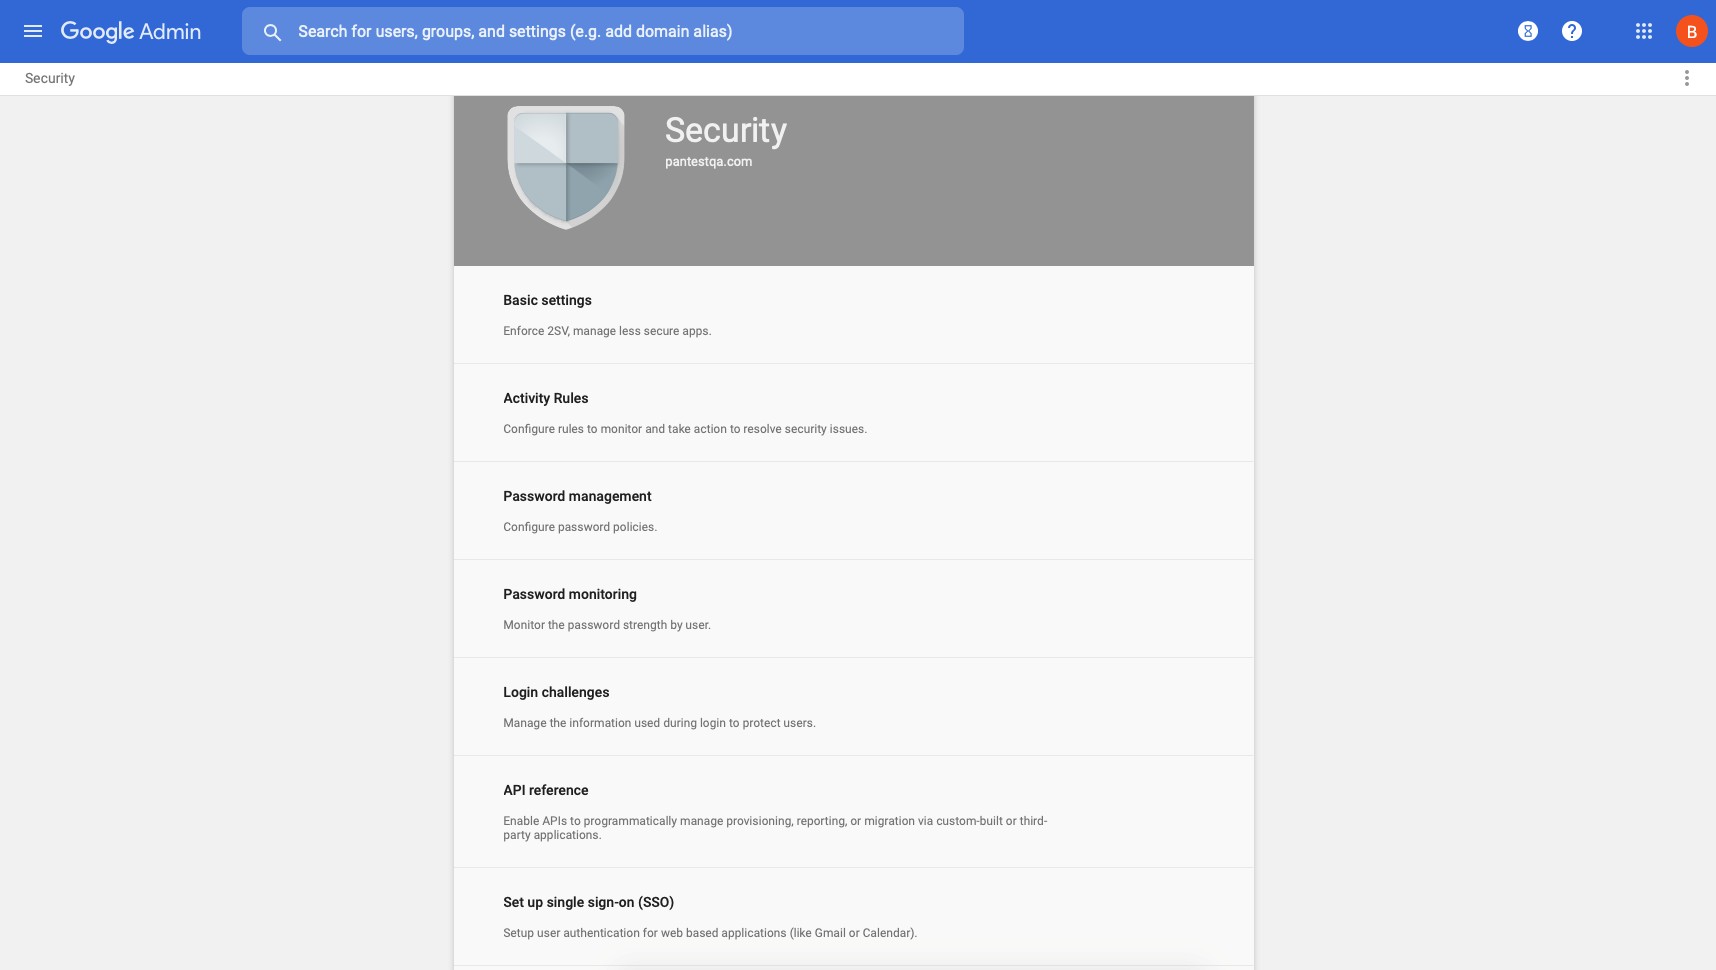
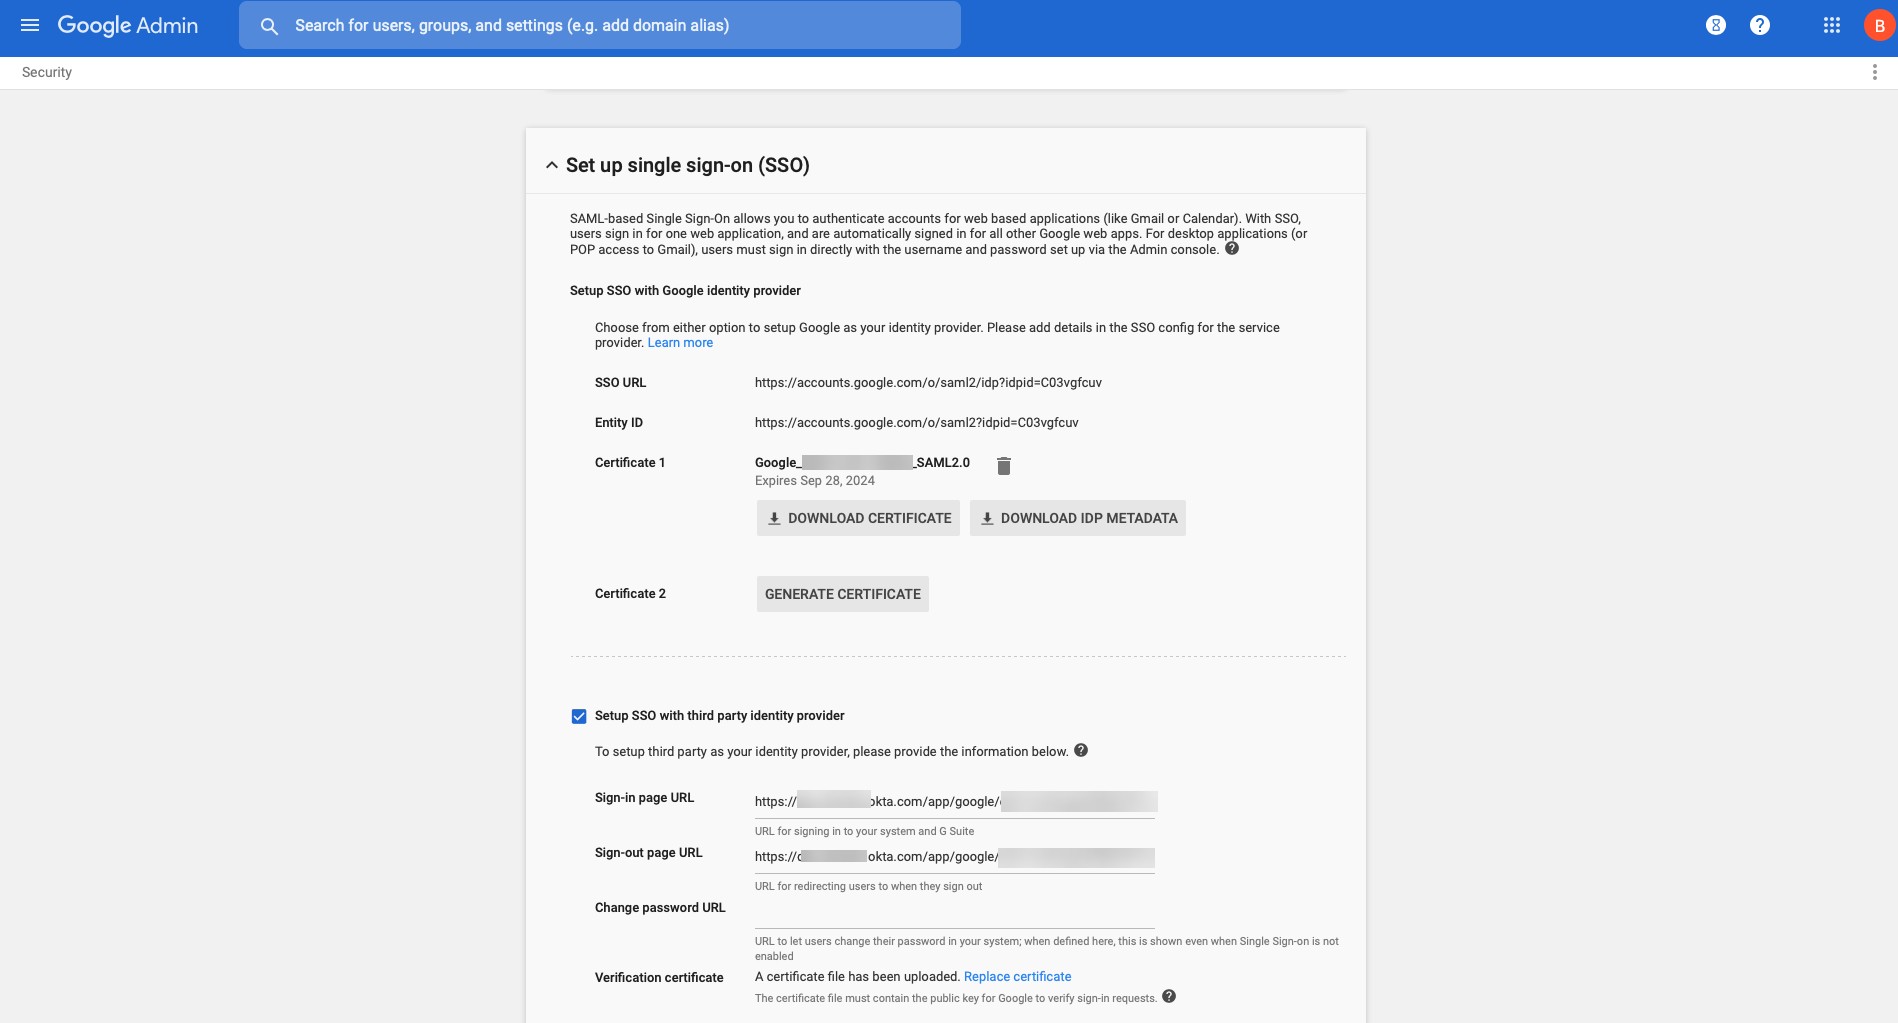
STEP 4 | (Chromebooks only) Enable SAML SSO for Chromebooks.
- In Google Admin Console, select Security > Set up single sign-on (SSO) .
- (Optional) If using a third-party IdP, select Setup SSO with third party identity provider and configure URLs and verification certificate.
- Configure SAML IdP in GlobalProtect ( Device > Server Profiles > SAML Identity Provider ) to match Google Admin Console values.
Enforce SAML Authentication from Trusted IP Addresses
Requires GlobalProtect app 6.3.3+ on Windows. SAML authentication can be enforced to succeed only from trusted IP addresses by specifying a proxy server or PAC file via the
SAMLAUTHPROXY
predeployment parameter.
About the Embedded Browser for SAML Authentication
Starting with GP app 6.0.9+, 6.2.3+, and 6.3+, the embedded browser for SAML uses Microsoft Edge WebView2 (Windows) and WKWebView (macOS) by default, providing a consistent experience and eliminating the need for users to configure a SAML landing page or manually close browsers. In Microsoft Entra-joined environments with SSO, users may not need to enter credentials. In non-Entra-joined SSO environments, credentials entered initially may be auto-filled on subsequent logins if the IdP session is active.
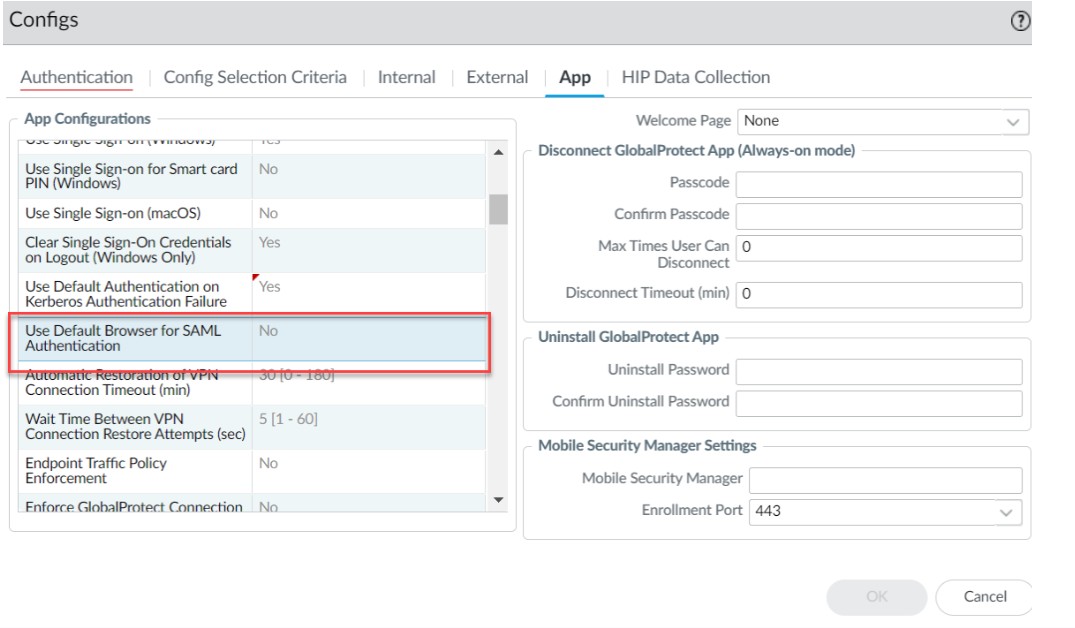
Use the Default System Browser for SAML Authentication
Supported for Windows, macOS, Linux, Android, iOS with GP app 5.2+. Allows leveraging saved browser credentials and U2F security tokens (e.g., YubiKeys) with IdPs like Okta or Onelogin if the browser supports WebAuthn.
STEP 1 | Change pre-deployed settings on endpoints.
-
Windows:
Use Msiexec:
msiexec.exe /i GlobalProtect.msi DEFAULTBROWSER=YES -
macOS:
Set
default-browsertoyesin/Library/Preferences/com.paloaltonetworks.GlobalProtect.settings.plist. Restart app. -
Linux:
Set
default-browsertoyesin/opt/paloaltonetworks/globalprotect/pangps.xml. Firefox is mandatory for GP Linux 6.2.1+ using CLI/GUI with SAML default browser. -
Android/iOS:
Use MDM (e.g., Workspace ONE).
-
Android: Key
use_default_browser_for_saml, Valuetrue. -
iOS: Key
saml-use-default-browser, Valuetrue.
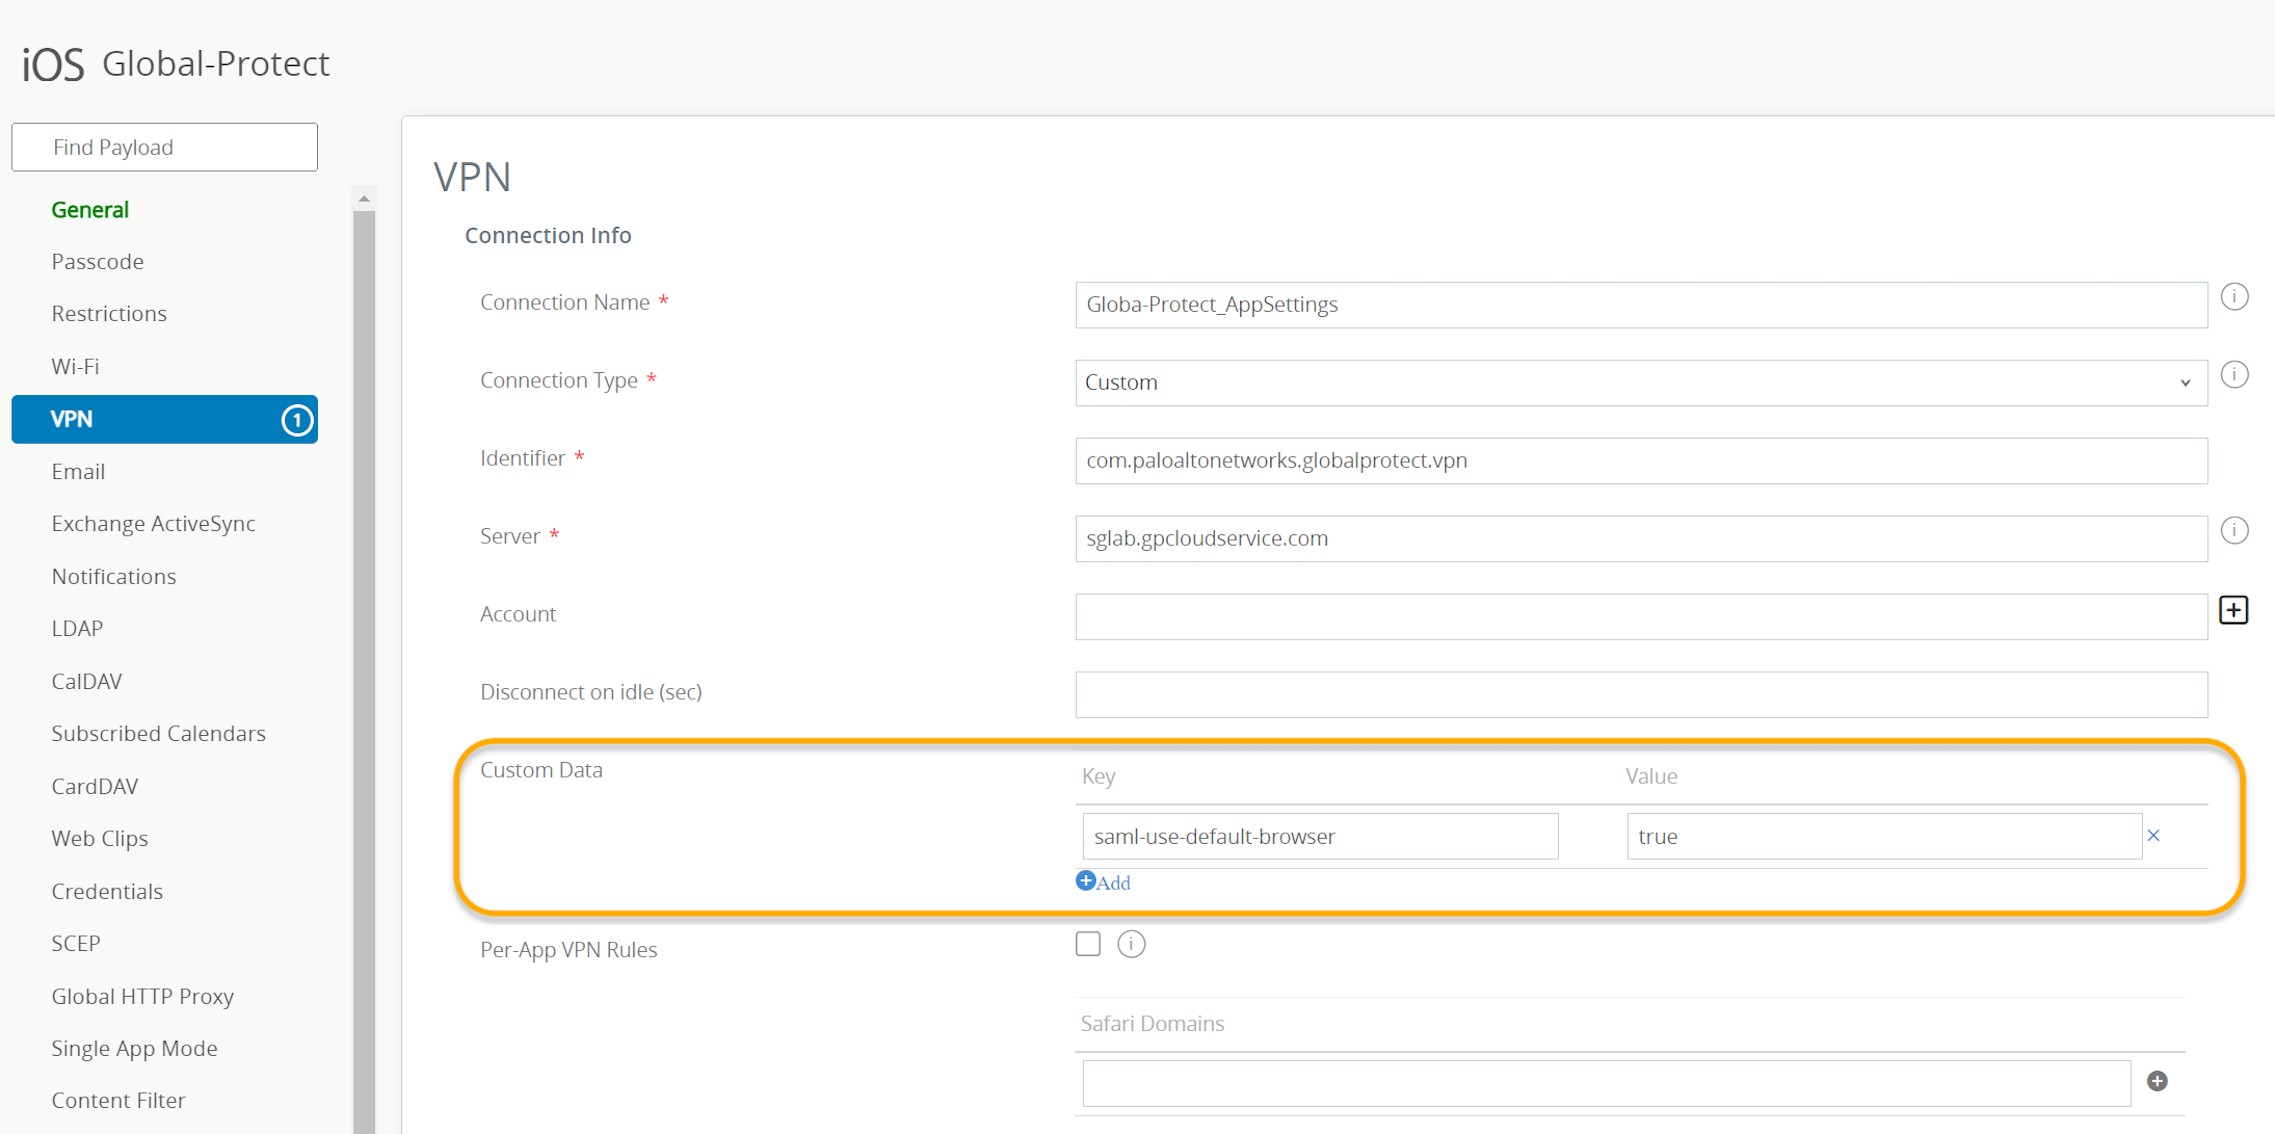
-
Android: Key
STEP 2 | Set up SAML authentication. (Covered above)
STEP 3 | Enable default browser use in Portal Agent App settings.
- Network > GlobalProtect > Portals > <portal-config> > Agent <agent-config> > App > Use Default Browser for SAML Authentication . Select Yes .
STEP 4-6 | OK, Commit, Verify.
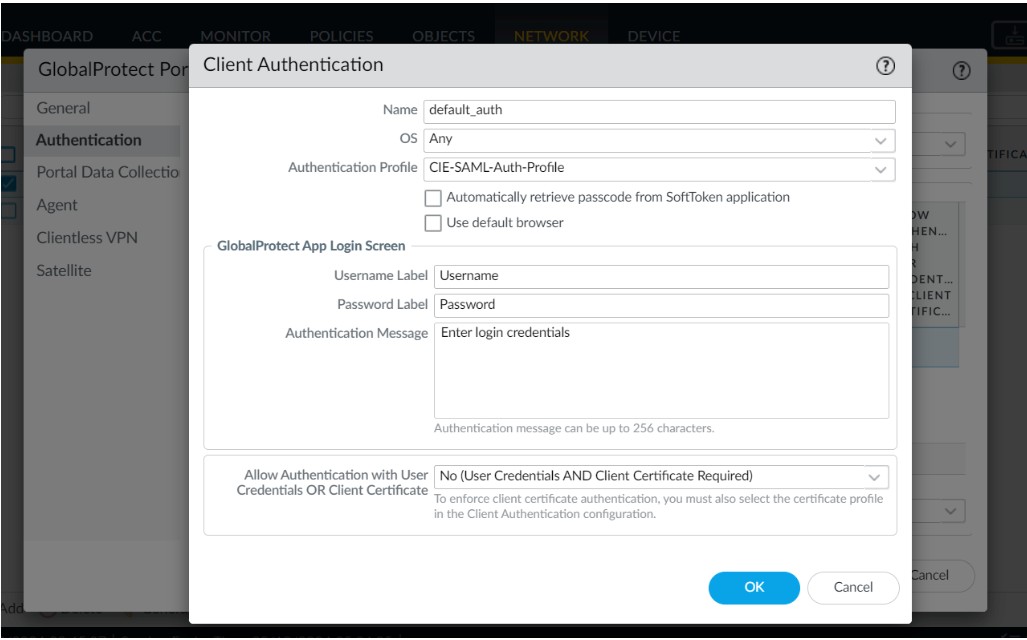
Enable Default Browser for SAML Authentication Using Client Authentication Setting (PAN-OS 11.1.0+)
PAN-OS 11.1.0+ allows configuring default browser use for SAML via Portal Client Authentication settings ( Network > GlobalProtect > Portals > <portal-config> > Authentication > <client-auth-config> ), selecting Use Default Browser . This removes the need for pre-deployment keys/plist entries for this specific setting.
- Upgrade 11.0.x to 11.1.0: If any portal agent config had "Use Default Browser for SAML Authentication" enabled, the new Client Authentication setting "Use Default-Browser" will be enabled. If all agent configs had it as "No", the new option won't be added/displayed.
- Downgrade 11.1.0 to earlier: The "Use Default Browser" config in Client Authentication is removed.
Customize the SAML/CAS ACS Landing Page
Requires PAN-OS 10.2.11+, GlobalProtect app on various platforms. Not available on Panorama. Allows rebranding/debranding the SAML/CAS Assertion Consumer Service (ACS) landing page on the default browser using CLI commands.
Prerequisites: GP Portal & Gateway configured, default browser for SAML enabled in portal.
CLI Commands on firewall hosting the portal:
set global-protect auth-response-page type <default | none | custom>
-
default: Standard Palo Alto Networks ACS page. -
none: Removes default logo, background, footer. -
custom: Allows customization of background image, main logo, auth message, footer logo, footer text using respectiveset global-protect auth-response-page <field> <value>commands.
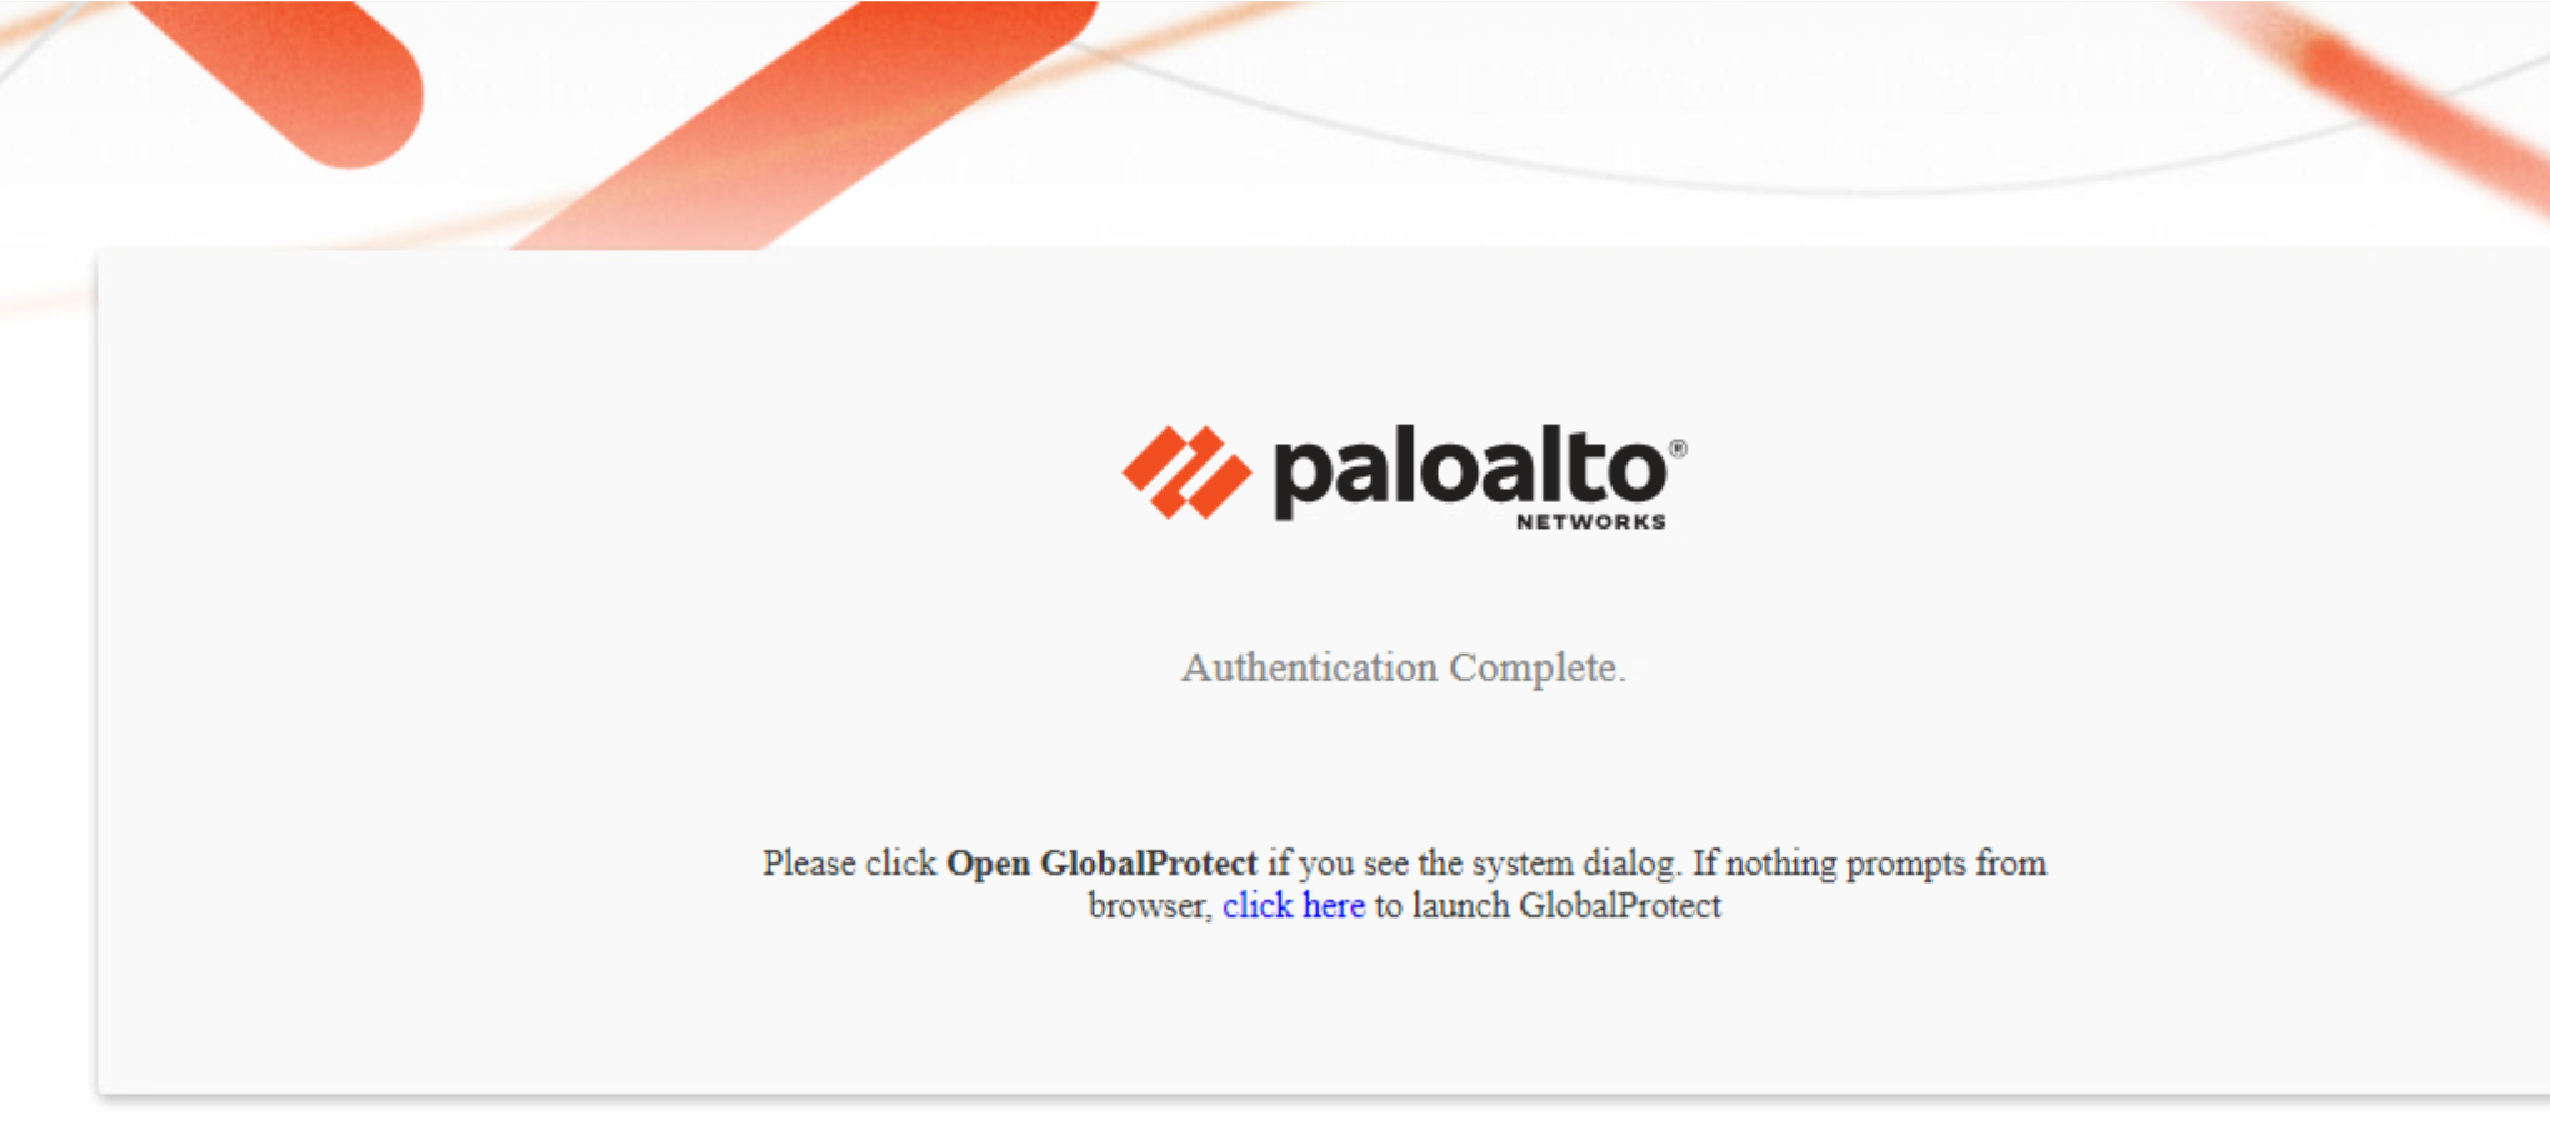
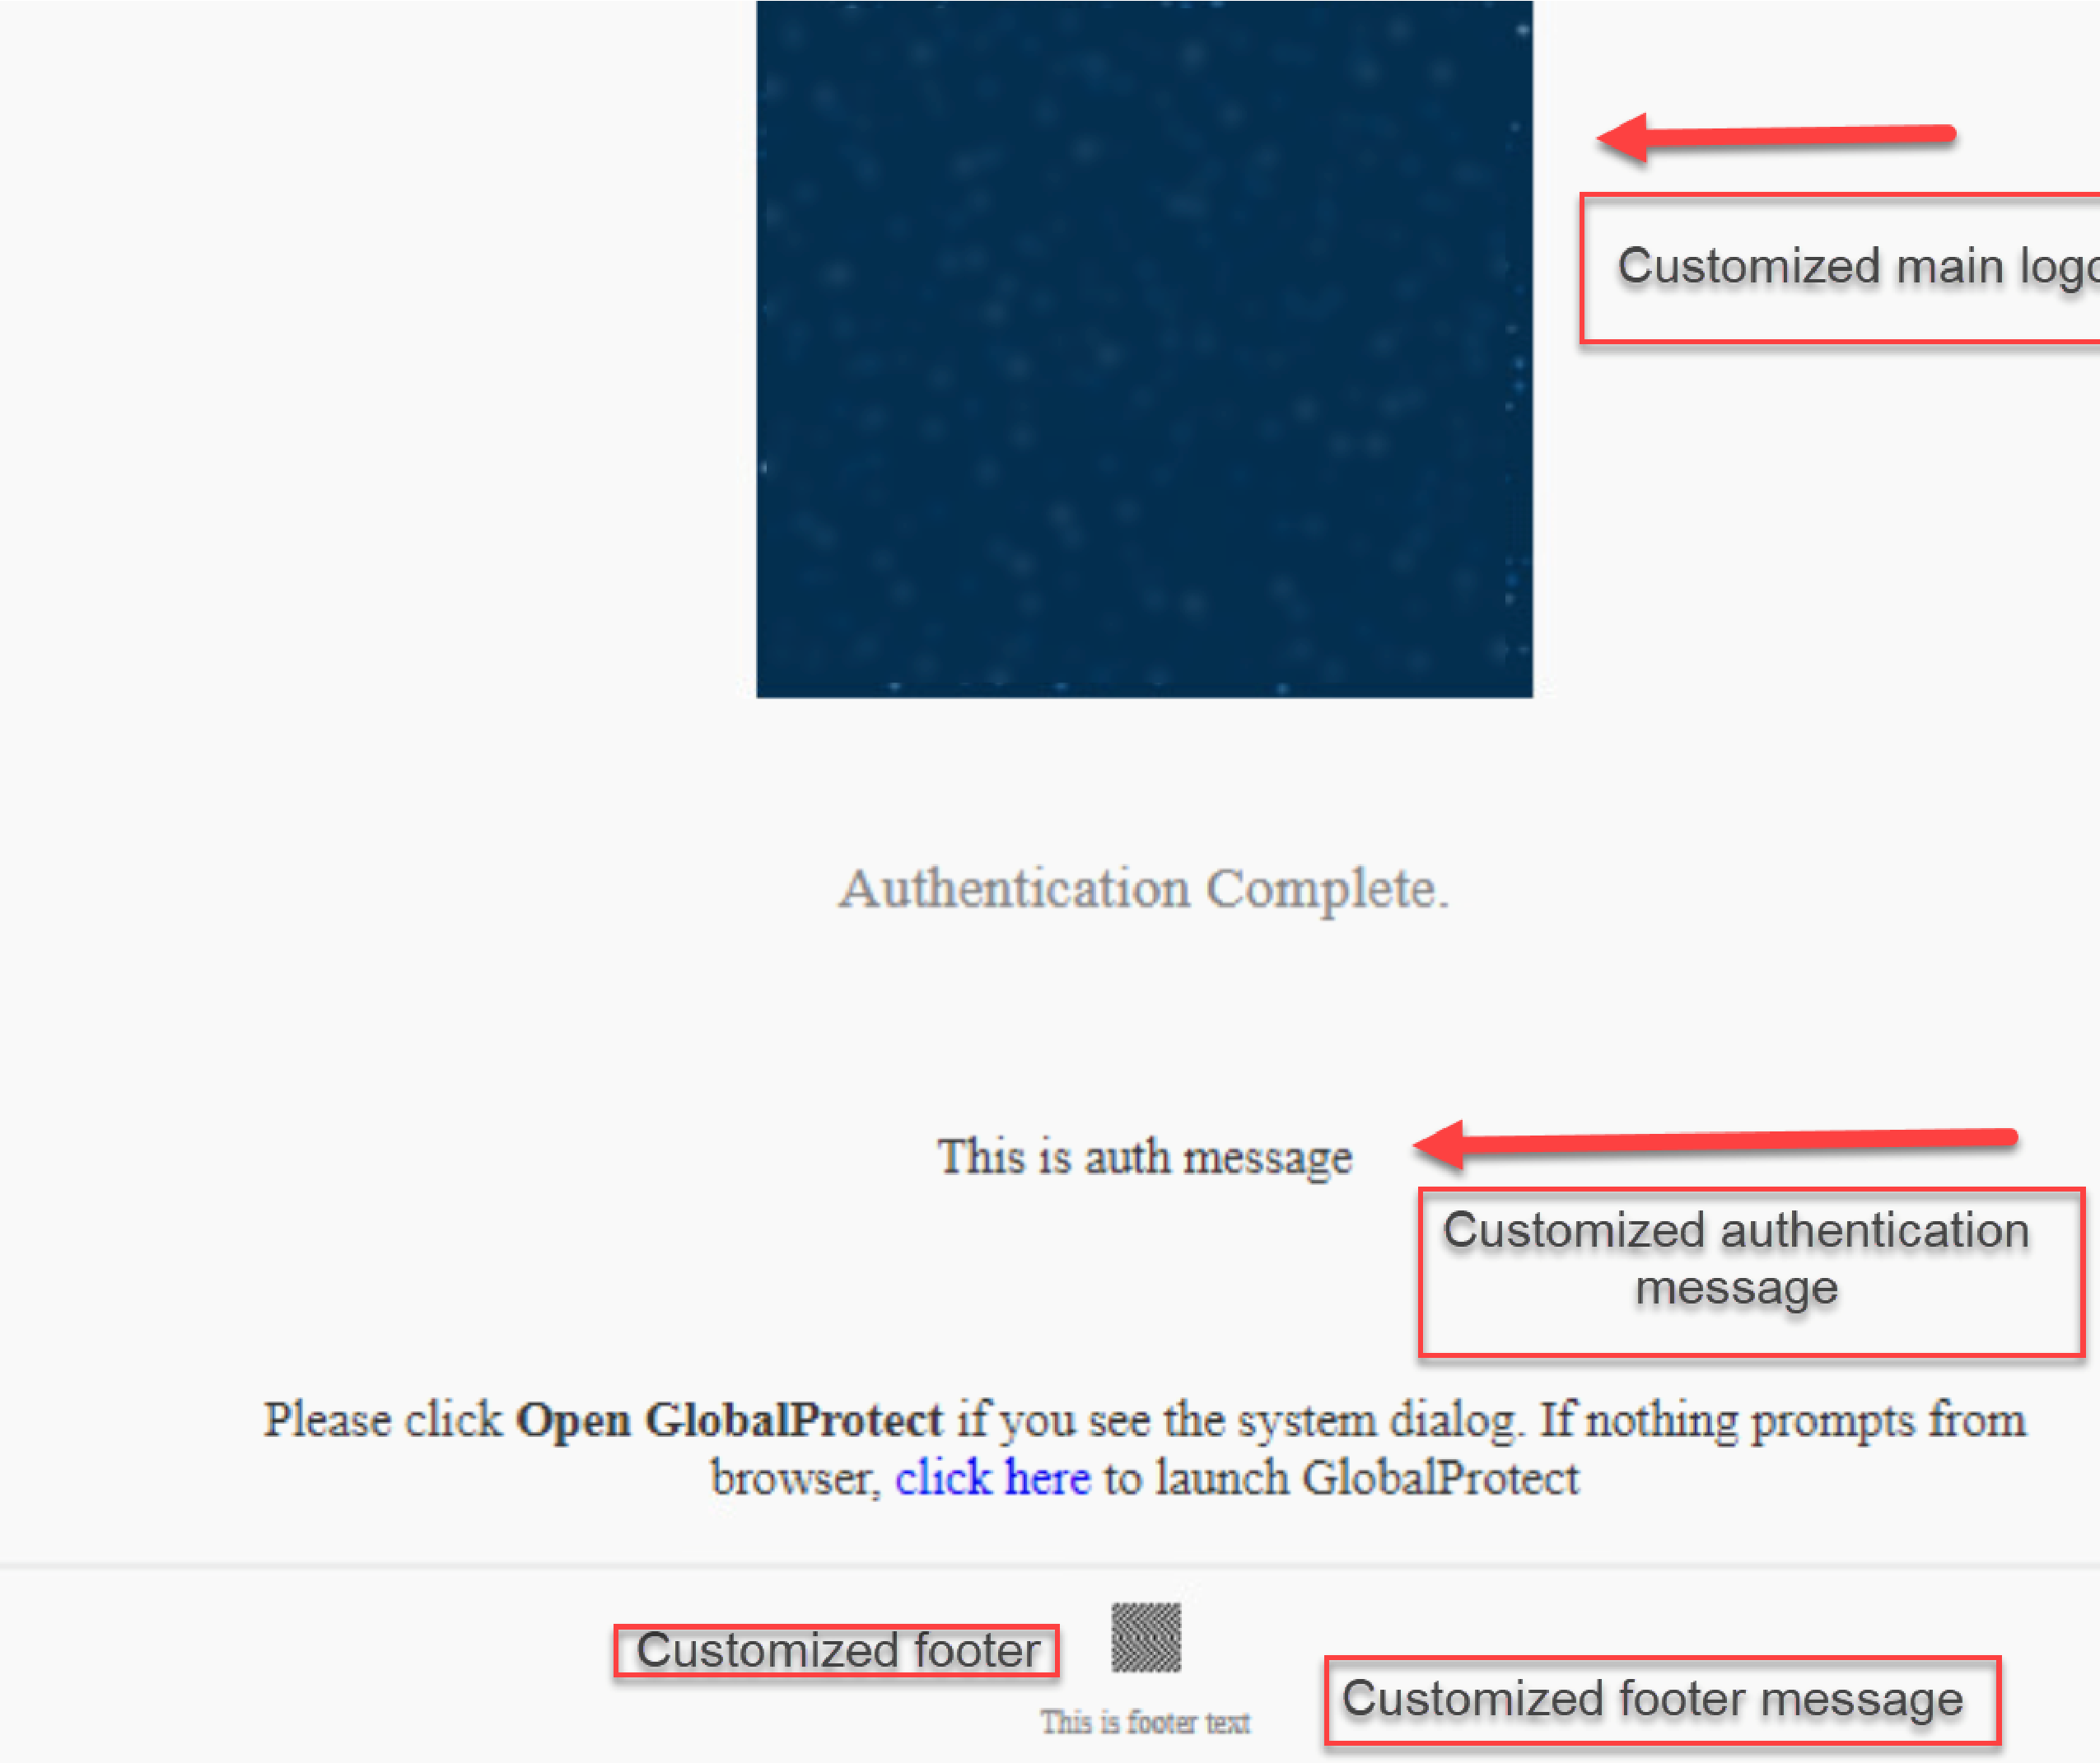
Image values are HTTP/HTTPS URLs. Text values should not contain control characters. Character limits and image resolution guidelines apply (see original doc for specifics).

Set Up Kerberos Authentication
Kerberos uses tickets for secure authentication over non-secure networks. Kerberos SSO provides seamless logon. Supported on Windows (7, 8, 10) and macOS (10.10+, GP app 4.1.0+).
If Kerberos SSO and another external auth (e.g., RADIUS) are enabled, GlobalProtect attempts SSO first. Fallback or Kerberos-only can be configured.
Prerequisites for Kerberos SSO (especially macOS):
- Kerberos infrastructure (KDC with AS and TGS), reachable by endpoints. Often only reachable internally, limiting Kerberos auth to internal endpoints unless KDC is internet-accessible or pre-logon VPN is used.
- Kerberos service account for each GP portal and gateway (for keytabs).
Simplified Kerberos Authentication Flow
STEP 1 | Create a Kerberos keytab file.
On the KDC, using ktpass:
ktpass /princ <principal_name> /pass <password> /crypto <algorithm> /ptype KRB5_NT_PRINCIPAL /out <file_name>.keytab
<principal_name>
and
<password>
are for the GP portal/gateway. Algorithm must match TGS-issued ticket. FIPS/CC mode requires
aes128-cts-hmac-sha1-96
or
aes256-cts-hmac-sha1-96
.
STEP 2 | Create a Kerberos server profile.
- Device > Server Profiles > Kerberos , then Add .
- Profile Name (e.g., GP-User-Auth-Kerberos ).
- (Multi-VSYS) Location .
- In Servers , Add : Name , Kerberos Server (IP/FQDN), Port .
- Click OK .
STEP 3 | (Optional) Create an authentication profile.
- Device > Authentication Profile , then Add .
- Name , Type : Kerberos .
- Select Kerberos Server Profile .
- Specify User Domain and Username Modifier .
-
Configure Kerberos SSO:
- Enter Kerberos Realm (e.g., EXAMPLE.LOCAL for user@EXAMPLE.LOCAL).
- Import Kerberos Keytab file.
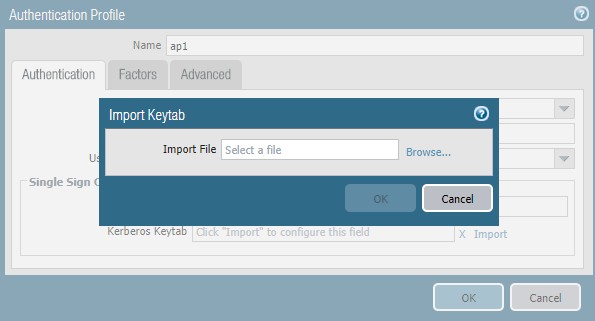
- On Advanced tab, Add Allow List .
STEP 4 | Assign authentication profile to a gateway.
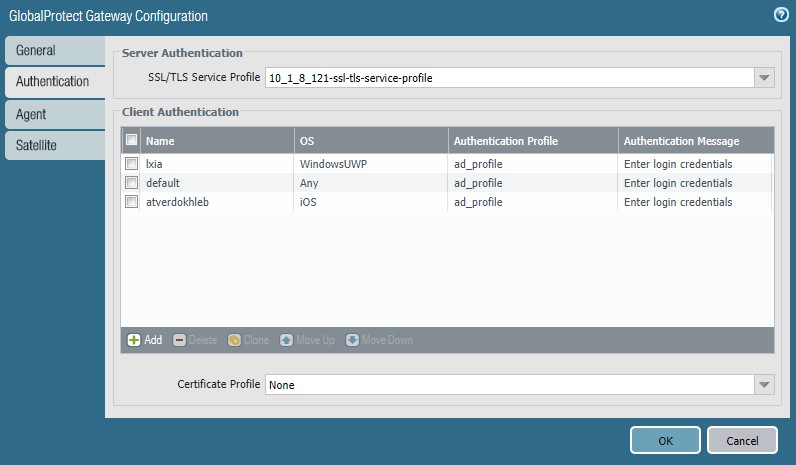
- Network > GlobalProtect > Gateways , modify/add gateway.
- Select/Add SSL/TLS Service Profile .
- Add Client Authentication config: Name , OS , Authentication Profile (with keytab). Customize labels/messages if needed.
- Click OK .
STEP 5 | Assign authentication profile to the GlobalProtect portal.
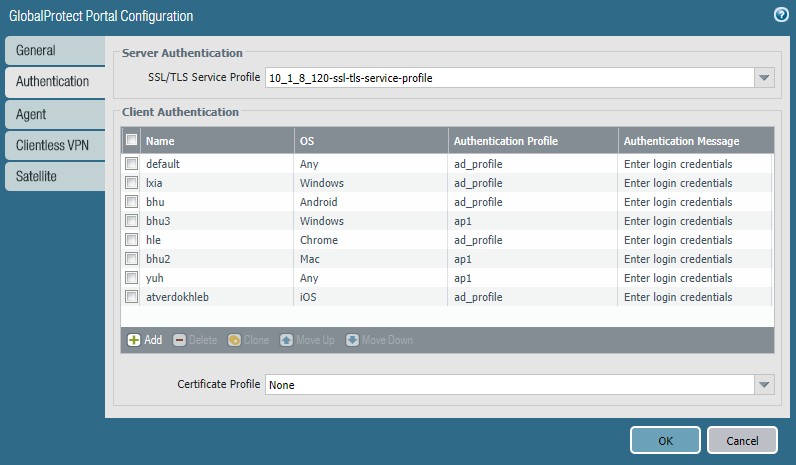
Similar to gateway: Select/Add portal, SSL/TLS profile, Add Client Authentication config referencing the Kerberos auth profile.
STEP 6 | Commit the configuration.
Set Up RADIUS or TACACS+ Authentication
RADIUS and TACACS+ are common protocols for centralized authentication.
STEP 1 | Create a server profile.
- Device > Server Profiles , select RADIUS or TACACS+ , then Add .
- Profile Name (e.g., GP-User-Auth-RADIUS ).
- (Multi-VSYS) Location .
-
Configure
Server Settings
:
- Timeout (sec) .
-
Authentication Protocol
(e.g., CHAP, PAP, PEAP-MSCHAPv2).
PEAP-MSCHAPv2 for RADIUS allows remote users to change expired RADIUS or AD passwords via GlobalProtect.
- (RADIUS Only) Retries .
- (TACACS+ only) Use single connection for all authentication .
- In Servers , Add : Name , RADIUS/TACACS+ Server (IP/FQDN), Secret (shared), Port .
- Click OK .
STEP 2 | (Optional) Create an authentication profile.
- Device > Authentication Profile , then Add .
- Name , Authentication Type (RADIUS/TACACS+).
- Select Server Profile .
- (RADIUS only) Enable Retrieve user group from RADIUS if needed.
- Specify User Domain and Username Modifier .
- On Advanced tab, Add Allow List .
- Click OK .
STEP 3 | Commit the configuration.
Client Certificate & Two-Factor Authentication Deep Dive
This section covers detailed setup for client certificate-based authentication and various two-factor authentication schemes.
Set Up Client Certificate Authentication
With client certificate authentication, the user presents a client certificate with their connection request. The portal/gateway validates it. It can authenticate the user (if cert field identifies username) or the endpoint (if cert field identifies device type, e.g., for pre-logon).
Starting with GlobalProtect for Governments app 6.0.12 (FIPS-CC mode), certificate-based authentication is supported on iOS.
Client certificates can be unique per user (via SCEP) or shared (local to firewall).
A certificate profile is used to verify the client certificate, specifying username field, CA certs, blocking criteria, and revocation status methods. Pre-deploy certificates used in certificate profiles before initial login.
Deploy Machine Certificates for Authentication
Use your PKI to issue machine certs to endpoints (recommended) or generate self-signed machine certs for export. Required for pre-logon connect methods; must be installed before GP components grant access. Also configure an authentication profile for user auth (e.g., for 2FA).
STEP 1 | Issue client certificates.
- Create root CA if self-signing.
- Device > Certificate Management > Certificates > Device Certificates , then Generate .
- Certificate Name (no spaces).
- Common Name (IP/FQDN of endpoint).
- Signed By : Your root CA.
- (Optional) OCSP Responder .
- Configure Cryptographic Settings (Algorithm, Bits, Digest, Expiration). FIPS-CC RSA keys: 2048/3072 bits.
- In Certificate Attributes , add attributes identifying endpoints. If Host Name attribute (SAN) is added, it must match Common Name.
- Click OK .
STEP 2 | Install certificates on endpoints.
Install in personal certificate store before first portal/gateway connection.
-
Windows:
Machine certs to Local Computer store, user certs to Current User store.
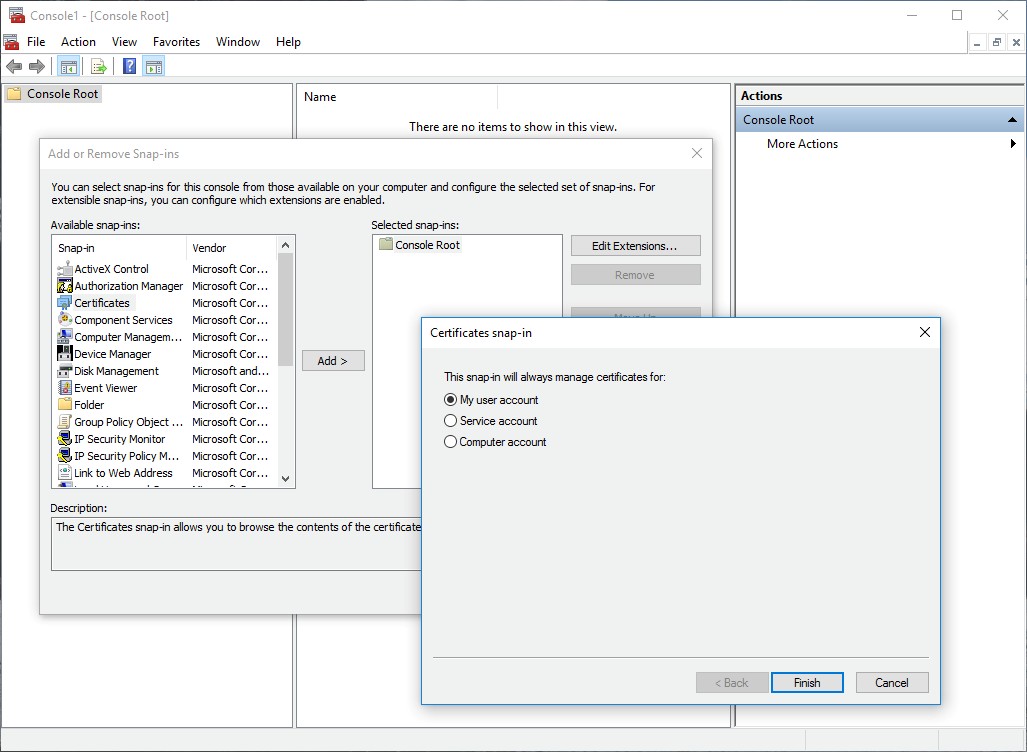
Windows: Adding Certificate Snap-in via MMC 
Windows: Certificate Import Wizard - macOS: Machine certs in System Keychain, user certs in login Keychain.
- Linux: If using CIE for auth, import client cert into browsers.
STEP 3 | Import root CA onto firewall (if external CA issued client certs).
- Download root CA (Base64 format).
- Device > Certificate Management > Certificates > Device Certificates , click Import .
- Certificate Name , select Certificate File , File Format : Base64 Encoded Certificate (PEM) .
- Select imported cert, check Trusted Root CA . Click OK .
STEP 4 | Create a client certificate profile.
- Device > Certificate Management > Certificate Profile , then Add .
- Name .
- Select Username Field (e.g., Subject for Common Name, SubjectAlt Email/Principal Name, or None). This maps a cert field to a username. If using cert-only auth, this is required. For 2FA, it adds a layer of validation.
- In CA Certificates , Add the Trusted Root CA imported in Step 3.
- Click OK .
STEP 5 | Commit the configuration.
Deploy User-Specific Client Certificates for Authentication (SCEP)
To authenticate individual users with unique client certificates, deploy them prior to enabling GlobalProtect. Automate this by configuring the GP portal as a SCEP (Simple Certificate Enrollment Protocol) client to your enterprise PKI's SCEP server.
The PKI generates a user-specific certificate upon portal request and sends it to the portal, which deploys it to the app. The app then presents this cert for authentication.
SCEP Certificate Enrollment Flow
STEP 1 | Create a SCEP profile.
- Device > Certificate Management > SCEP , then Add .
- Name , (Multi-VSYS) Location .
STEP 2 | (Optional) Configure SCEP challenge-response for security.
Options: None (default), Fixed (static password), Dynamic (username/password for SCEP admin URL to get OTP for each request - FIPS compliant if HTTPS used).
STEP 3 | Specify SCEP server connection settings.
- Server URL (e.g., http://10.200.101.1/certsrv/mscep/).
- CA-IDENT Name (to identify SCEP server).
-
Subject
name for certs (distinguished name format, must include CN attribute). CN supports dynamic tokens:
-
$USERNAME(requires Group Mapping, username must match table). -
$EMAILADDRESS(requires Group Mapping & Mail Attributes in server profile). -
$HOSTID(for endpoint-only certs).
-
- Subject Alternative Name Type (RFC 822 Name, DNS Name, Uniform Resource Identifier, None).
STEP 4 | (Optional) Configure Cryptographic Settings.
Number of Bits (RSA keys 2048+ for FIPS-CC), Digest for CSR (sha1, sha256, sha384, sha512).
STEP 5 | (Optional) Configure permitted certificate uses (signing, encryption).
STEP 6 | (Optional) Enter CA Certificate Fingerprint (Thumbprint from SCEP server UI) for server validation.
STEP 7 | Enable mutual SSL authentication between SCEP server and GP portal (FIPS required).
Select SCEP server's root CA Certificate . Optionally, a Client Certificate for mutual auth.
STEP 8 | Save and commit. Portal attempts to get CA cert from SCEP server.
STEP 9 | (Optional) If portal fails to get CA cert, manually generate CSR from portal.
- Device > Certificate Management > Certificates > Device Certificates , then Generate .
- Certificate Type : SCEP .
- Certificate Name , select SCEP Profile . Click OK .
STEP 10 | Assign SCEP profile to a GP portal agent configuration.
This enables the portal to request and deploy client certs to apps. (Found in Portal > Agent > Client Certificates).
Enable Certificate Selection Based on OID
If multiple certificates from the same CA exist on an endpoint (e.g., machine, user, email certs), use an Object Identifier (OID) to help GlobalProtect identify the correct certificate. An OID is a numeric value in the certificate's Enhanced Key Usage (EKU) field identifying its purpose.
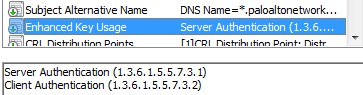
GlobalProtect automatically filters for Client Authentication OID (1.3.6.1.5.5.7.3.2). If you use a different OID, specify it in the GP portal app configuration ( Extended Key Usage OID field).
Common OIDs:
- 1.3.6.1.5.5.7.3.1 — Server Authentication
- 1.3.6.1.5.5.7.3.3 — Code Signing
- 1.3.6.1.5.5.7.3.4 — Email Protection
To configure OID-based selection:
STEP 1 | (Optional) Create/edit client certificate and note its OID.
In Certificate Templates snap-in (Windows CA), edit Application Policies on Extensions tab to add/note OID.
STEP 2 | Specify certificate's OID in Extended Key Usage OID field in the GP portal app config.

Support for Native Certificate Store for Prisma Access and GlobalProtect App on Linux Endpoints
GP app 6.2+ on Linux can use certificates from the native certificate store for client cert authentication and log reporting. Previously, certs were installed via GP CLI command only.
STEP 1 | Place certificate in native store location.
Examples:
-
Ubuntu: Cert:
/etc/ssl/certs, Key:/etc/ssl/private -
Fedora: Cert:
/etc/ssl/certs, Key:/etc/ssl/private -
Red Hat: Cert:
/etc/pki/tls/certs, Key:/etc/pki/tls/private
Supported formats: .pem, .p12. For .pem, key file (.pem or .key) goes in private location. For .p12, key is included. Root access needed (
sudo cp
).

STEP 2 | (Optional) Store key in private folder if .pem format.
STEP 3 | Connect GlobalProtect, select certificate. Passcode needed on first auth. App filters .pem certs based on CA list, Client Auth OID, and status (not Pending/Expired). .p12 certs are not pre-filtered in the selection pop-up.
Set Up Two-Factor Authentication (2FA)
For strong authentication (e.g., PCI, SOX, HIPAA compliance), configure GlobalProtect for 2FA, requiring something the user knows (PIN/password) and something they have (token/OTP, smart card, certificate). Can combine external auth services with client/certificate profiles.
Enable Two-Factor Authentication Using Certificate and Authentication Profiles
Configure GP to require users to authenticate to both a certificate profile and an authentication profile (e.g., LDAP password).
STEP 1 | Create an authentication server profile (LDAP, Kerberos, RADIUS, TACACS+). (Covered in External Auth Setup)
STEP 2 | Create an authentication profile referencing the server profile. (Covered in External Auth Setup)
STEP 3 | Create a client certificate profile.
- Device > Certificate Management > Certificate Profile , then Add .
- Name .
- Select Username Field as needed (see note above).
- Add CA Certificates (trusted root CA or SCEP CA). Configure OCSP/CRL details if needed.
- (Optional) Select blocking options (unknown status, timeout, S/N mismatch, expired).
- Click OK .
STEP 4 | (Optional) Issue client certificates. (Deploy shared, machine, or SCEP user-specific certs).
STEP 5 | Assign both the Authentication Profile and Certificate Profile to the GlobalProtect Portal/Gateway's Client Authentication configuration.
STEP 6 | Commit the configuration.
Enable Two-Factor Authentication Using One-Time Passwords (OTPs)
Typically uses RADIUS as the backend for OTPs. User is prompted for OTP, sent to their token device.
STEP 1 | Set up backend RADIUS service for OTPs.
STEP 2 | Create RADIUS server profile on firewall.
- Device > Server Profiles > RADIUS , then Add .
- Profile Name .
- In Servers , Add : Name , RADIUS Server IP, Secret , Port (default 1812).
- Click OK .
STEP 3 | Create an authentication profile (Type: RADIUS). (Covered in RADIUS setup)
STEP 4 | Assign authentication profile to GP portal/gateway. (In Client Authentication config)
STEP 5 | (Optional) Configure portal agent to not save passwords.
In Portal > Agent > Authentication tab: Set Save User Credentials to Save Username Only or No .
STEP 6 | Select components requiring dynamic passwords.
In Portal > Agent > Authentication tab: Select Components that Require Dynamic Passwords (Two-Factor Authentication) for portal and/or gateway types. Do NOT select for components using SAML.
STEP 7 | If SSO enabled, disable it (Kerberos SSO not supported with RADIUS).
In Portal > Agent > App tab: Set Use Single Sign-on (Windows Only) to No .
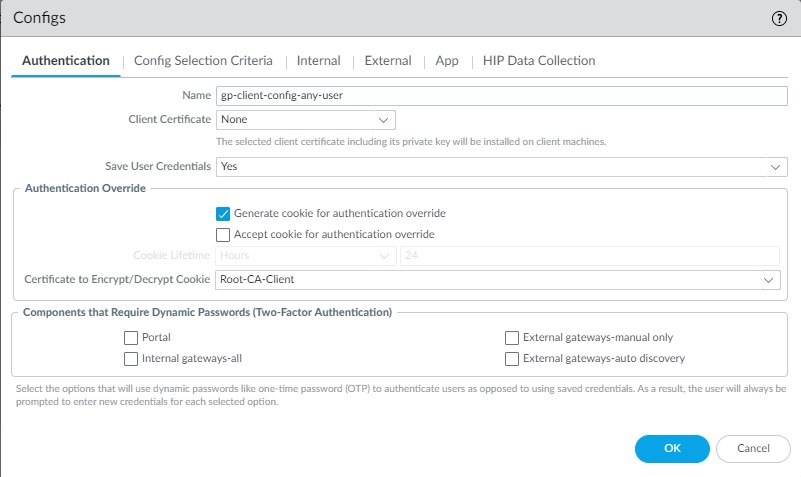
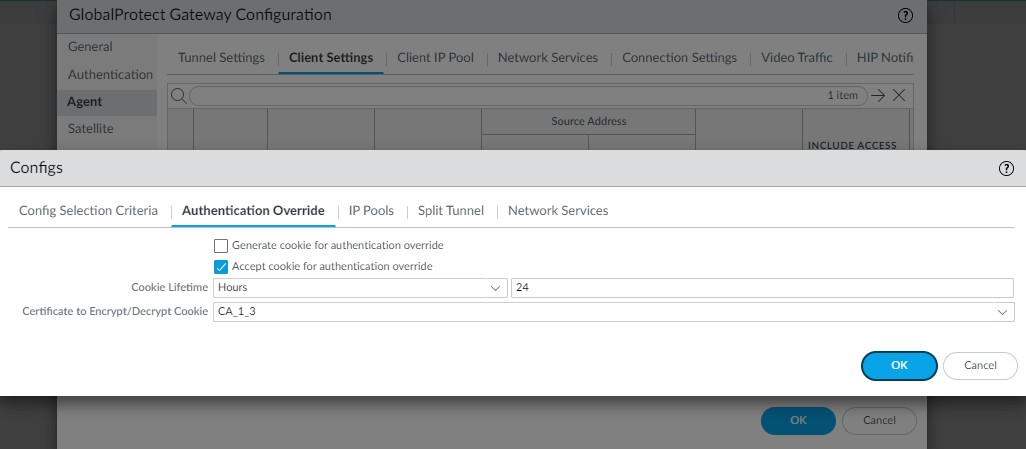
STEP 8 | (Optional) Configure authentication override (cookie auth) to minimize OTP prompts.
In Portal/Gateway > Agent > Client Settings > Authentication Override: Generate cookie , Accept cookie , set Cookie Lifetime , select Certificate to Encrypt/Decrypt Cookie (must be same on portal/gateways, RSA recommended).
STEP 9 | Commit.
STEP 10 | Verify. Expect OTP prompts.
Enable Two-Factor Authentication Using Smart Cards
For smart card/CAC auth, import the Root CA that issued smart card certs onto portal/gateway. Create a certificate profile with this Root CA. Supported on macOS and Windows.
STEP 1 | Set up smart card infrastructure (cards, readers, software).
STEP 2 | Import Root CA for smart card certs onto firewall. (As Trusted Root CA, PEM format).
STEP 3 | Create certificate profile.
- Device > Certificate Management > Certificate Profile , then Add .
- Name .
- Select Username Field (Subject, Subject Alt: Email, or Subject Alt: Principal Name) for User-ID mapping.
- In CA Certificates , Add the imported Root CA.
- Click OK .
STEP 4 | Assign certificate profile to portal/gateway. (In Client Authentication config, select the Certificate Profile).
STEP 5 | Commit.
STEP 6 | Verify. Insert smart card when prompted.
Enhancements for Smart Cards
Removal of Multiple PIN Prompts (GP App 6.3.0+ Windows, with ActivClient):
When Connect Before Logon (CBL) is configured, users are prompted for PIN only once by ActivClient. Prerequisites: GP portal predeployed, CBL configured, "Use Single Sign-On for Smart Card PIN (Windows)" is No (default) in portal agent app settings. PIN re-entry needed after logout, user switch, reboot.
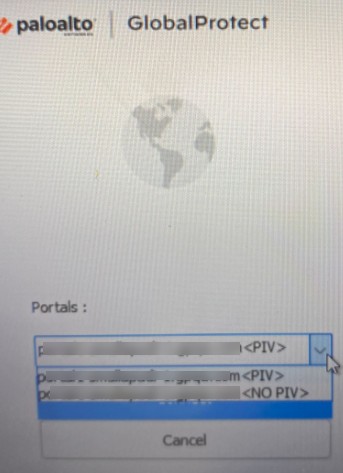
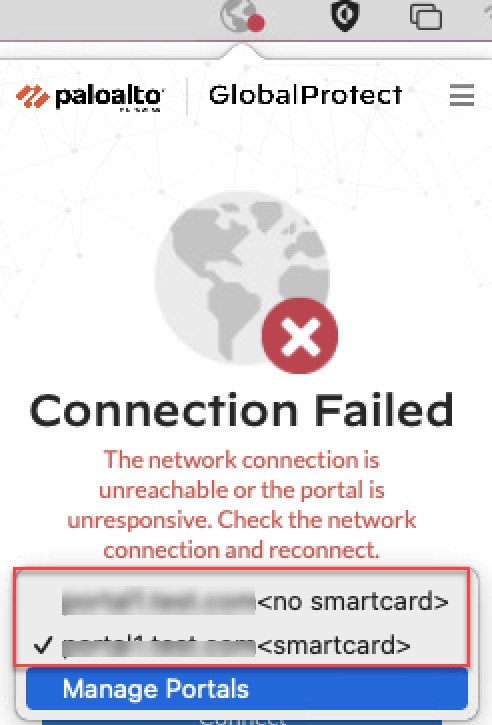
Display Auth Profile Options with/without PIV Smart Card (GP App 6.3.0+ Windows, 6.3.1+ macOS, On-demand mode):
App displays options like "<smartcard>" and "<no smartcard>" allowing users to choose auth method (smart card or username/password).
Prerequisites:
- Connect method: On-demand .
- Gateway/Portal Client Auth: Select "Allow Authentication with User Credentials OR Client Certificate".
-
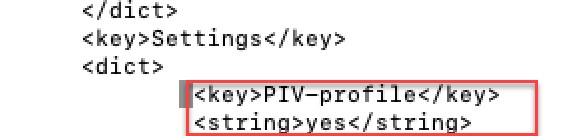
Windows Registry:
HKEY_LOCAL_MACHINE\SOFTWARE\Palo Alto Networks\GlobalProtect\Settings\PIV-profile(String Value) toyes. Ormsiexec.exe /i globalprotect64.msi PIVPROFILE=yes. (Customizable strings<PIVString>,<NoPIVString>in GP 6.3.1+). -
macOS plist:
In
/Library/Preferences/com.paloaltonetworks.GlobalProtect.settings.plistunderPalo Alto Networks/GlobalProtect/Settings, add keyPIV-profile(string) with valueyes. (Customizable strings<PIVString>,<noPIVString>).
Enable Two-Factor Authentication Using a Software Token Application
Simplifies login with soft token apps (e.g., RSA SecurID) on Windows (GP App 5.1+). User enters RSA PIN in GP Password field; GP retrieves passcode from RSA app.
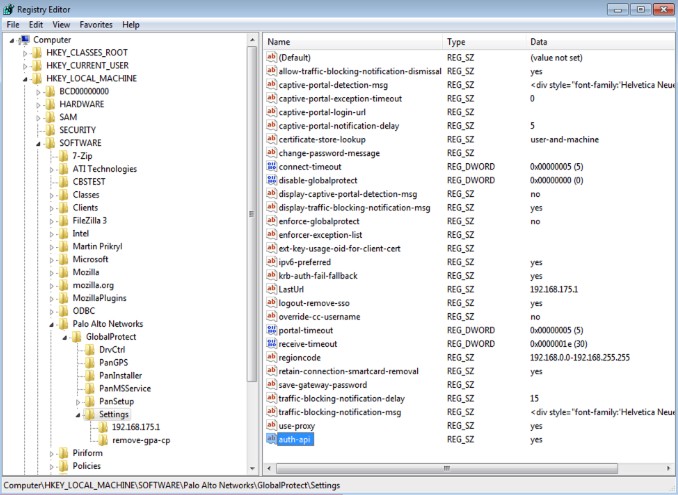
STEP 1 | Change registry keys on client Windows devices.
HKEY_LOCAL_MACHINE\SOFTWARE\Palo Alto Networks\GlobalProtect\Settings\auth-api
(String Value) to
yes
.
STEP 2 | Configure portal and gateway with RSA-based authentication (typically RADIUS).
STEP 3 | Enable cookie-based authentication on GP portal.
Portal > Agent > Add/Select Agent Config > Authentication tab: Select Generate cookie for authentication override .
STEP 4 | Enable GP gateway to accept cookies for auth overrides.
Gateway > Agent > Client Settings > Add/Select Config > Authentication Override tab: Select Accept cookie for authentication override .
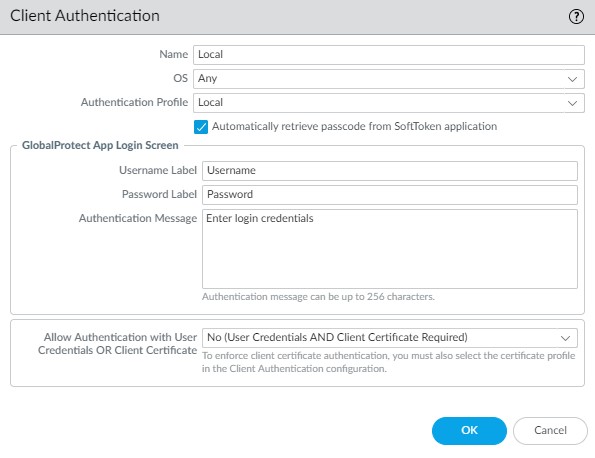
STEP 5 | In Portal Client Authentication settings, enable soft token integration.
Portal > Authentication > Add/Select Client Authentication profile: Select Automatically retrieve passcode from SoftToken application .
Advanced Scenarios & Integrations
Set Up Authentication for strongSwan Ubuntu and CentOS Endpoints
Extend GlobalProtect access to strongSwan (IPsec-based VPN client) on Ubuntu and CentOS endpoints.
Enable Certificate Authentication for strongSwan Endpoints
STEP 1 | Configure IPsec tunnel on GP gateway.
- Gateway > Authentication tab: Select Certificate Profile .
- Gateway > Agent > Tunnel Settings: Enable Tunnel Mode . Select Enable X-Auth Support . Remove Group Name/Password if configured.
STEP 2 | Verify strongSwan client
ipsec.conf
default connection settings.
Recommended in
conn %default
section:
ikelifetime=20m reauth=yes rekey=yes keylife=10m rekeymargin=3m rekeyfuzz=0% keyingtries=1 type=tunnel
STEP 3 | Modify strongSwan client
ipsec.conf
and
ipsec.secrets
.
Use strongSwan client username as certificate's common name.
ipsec.conf
for specific connection:
     conn <connection_name>
  keyexchange=ikev1
  authby=rsasig
  ike=aes-sha1-modp1024,aes256  # Adjust ciphers as needed
  left=<strongSwan_client_IP>
  leftcert=<client_certificate_filename_with_path> # CN should be username
  leftsourceip=%config
  leftauth2=xauth # Still needed even for cert-based primary auth if X-Auth is enabled on gateway
  right=<GP_Gateway_IP>
  rightid="CN=<Subject_name_of_gateway_certificate>" # Or %any
  rightsubnet=0.0.0.0/0
  auto=add
ipsec.secrets
:
: RSA <private_key_filename_with_path> ["<passphrase_if_used>"]
STEP 4 | Start strongSwan services and connect.
ipsec start
(or
strongswan start
), then
ipsec up <connection_name>
(or
strongswan up ...
).
STEP 5 | Verify tunnel status on client and remote users on gateway.
Enable X-Auth Support for strongSwan Endpoints
Uses an authentication profile (e.g., LDAP via RADIUS) for strongSwan clients.
STEP 1 | Configure IPsec tunnel on GP gateway.
- Gateway > Authentication tab: Select Authentication Profile .
- Gateway > Agent > Tunnel Settings: Enable Tunnel Mode . Select Enable X-Auth Support . Enter Group Name and Group Password .
STEP 2 | Verify strongSwan client
ipsec.conf
default connection settings (same as above).
STEP 3 | Modify strongSwan client
ipsec.conf
and
ipsec.secrets
.
ipsec.conf
:
     conn <connection_name>
  keyexchange=ikev1
  ikelifetime=1440m
  keylife=60m
  aggressive=yes # Often used with PSK + X-Auth
  ike=aes-sha1-modp1024,aes256
  esp=aes-sha1
  xauth=client
  left=<strongSwan_client_IP>
  leftid=@#<hex_of_Group_Name_from_gateway> # e.g. if Group Name is "VPNGroup", convert "VPNGroup" to hex
  leftsourceip=%modeconfig
  leftauth=psk
  rightauth=psk
  leftauth2=xauth # Indicates X-Auth for second phase
  right=<GP_Gateway_IP>
  rightsubnet=0.0.0.0/0
  xauth_identity=<LDAP_username> # This will be sent as X-Auth username
  auto=add
ipsec.secrets
:
     : PSK "<Group_Password_from_gateway>"
<LDAP_username> : XAUTH "<user_password>"
STEP 4 & 5 | Start services, connect, verify (same as above).
Enable Two-Factor Authentication for strongSwan Endpoints
Client authenticates using both a certificate profile and an authentication profile.
STEP 1 | Configure IPsec tunnel on GP gateway.
- Gateway > Authentication tab: Select both Certificate Profile AND Authentication Profile .
- Gateway > Agent > Tunnel Settings: Enable Tunnel Mode . Select Enable X-Auth Support . Remove Group Name/Password if configured.
STEP 2 | Verify strongSwan client
ipsec.conf
default settings (same as above).
STEP 3 | Modify strongSwan client
ipsec.conf
and
ipsec.secrets
.
ipsec.conf
:
     conn <connection_name>
  keyexchange=ikev1
  authby=xauthrsasig # For RSA Sig (cert) + XAuth
  ike=aes-sha1-modp1024
  esp=aes-sha1
  xauth=client
  left=<strongSwan_client_IP>
  leftcert=<client_certificate_filename_no_password>
  leftsourceip=%config
  right=<GP_Gateway_IP>
  rightid=%any # Or specific CN="

      "
  rightsubnet=0.0.0.0/0
  leftauth2=xauth
  xauth_identity=<LDAP_username>
  auto=add
ipsec.secrets
:
     <LDAP_username> : XAUTH "<user_password_or_OTP>"
: RSA <private_key_filename> ["<passphrase_if_used>"] # Private key for the leftcert
STEP 4 & 5 | Start services, connect, verify (same as above).
Set Up Cloud Identity Engine (CIE) Authentication (Detailed)
CIE supports SAML, Client Certificate, and OIDC for GlobalProtect on NGFW (Panorama/Strata Cloud Manager) and Prisma Access (Panorama/SCM). Requirements:
- GP endpoints: Windows, macOS.
- GP app 6.3.0+ for SAML/Client Cert; 6.2.6+ for OIDC.
- GP app 6.3.1+ for CIE multi-auth SSO hub skip.
- PAN-OS 10.2+ for Client Cert/OIDC; PAN-OS 11.2+ for SAML with Embedded WebView.
STEP 1 | Set Up an Authentication Profile (in Panorama/Firewall for CIE).
This profile will point to the Cloud Identity Engine service.
STEP 2 | Navigate to Add Authentication screen for GlobalProtect (Portal/Gateway).
STEP 3 | Select Cloud Identity Engine as auth method and the profile from Step 1.
STEP 4 | Follow on-screen prompts for SAML, Client Certificate, or OIDC setup via CIE.
Cloud Identity Engine Authentication Brokerage
Cloud Identity Engine SAML Authentication with Embedded WebView
Default for CIE SAML is system browser. To use embedded webview (PAN-OS 11.2+):
- Disable "Use Default Browser for SAML Authentication" in Portal > Agent > App settings (set to No).
- Uncheck "Use default browser" in Portal > Authentication > Client Authentication settings.
- OK, Commit.
Cloud Identity Engine Multi-Authentication
Create an auth profile redirecting users to configured type (client cert or SAML 2.0 IdP). (See "Configure Cloud Identity Engine Authentication on Firewall or Panorama" docs).
Bypass SSO hub page (SAML username prompt) on Windows endpoints (GP App 6.3.1+) by predeploying registry key:
msiexec.exe /i globalprotect64.msi CASSKIPHUBPAGE=yes
Registry key:
HKEY_LOCAL_MACHINE\SOFTWARE\Palo Alto Networks\GlobalProtect\Settings\CASSKIPHUBPAGE
Supported on default browser and embedded webview for user unlock, wake from sleep, reboot.
Prerequisites for CASSKIPHUBPAGE:
- Username in UPN format in CIE OR Windows endpoints Azure AD/AD joined.
- CIE configured without "Force authentication" in auth profile.
- IdP/SAML session active.
Configure GlobalProtect to Facilitate Multi-Factor Authentication Notifications
For policy-based MFA to protect critical apps (especially non-browser-based), GlobalProtect app (Windows/macOS) can display MFA notifications.
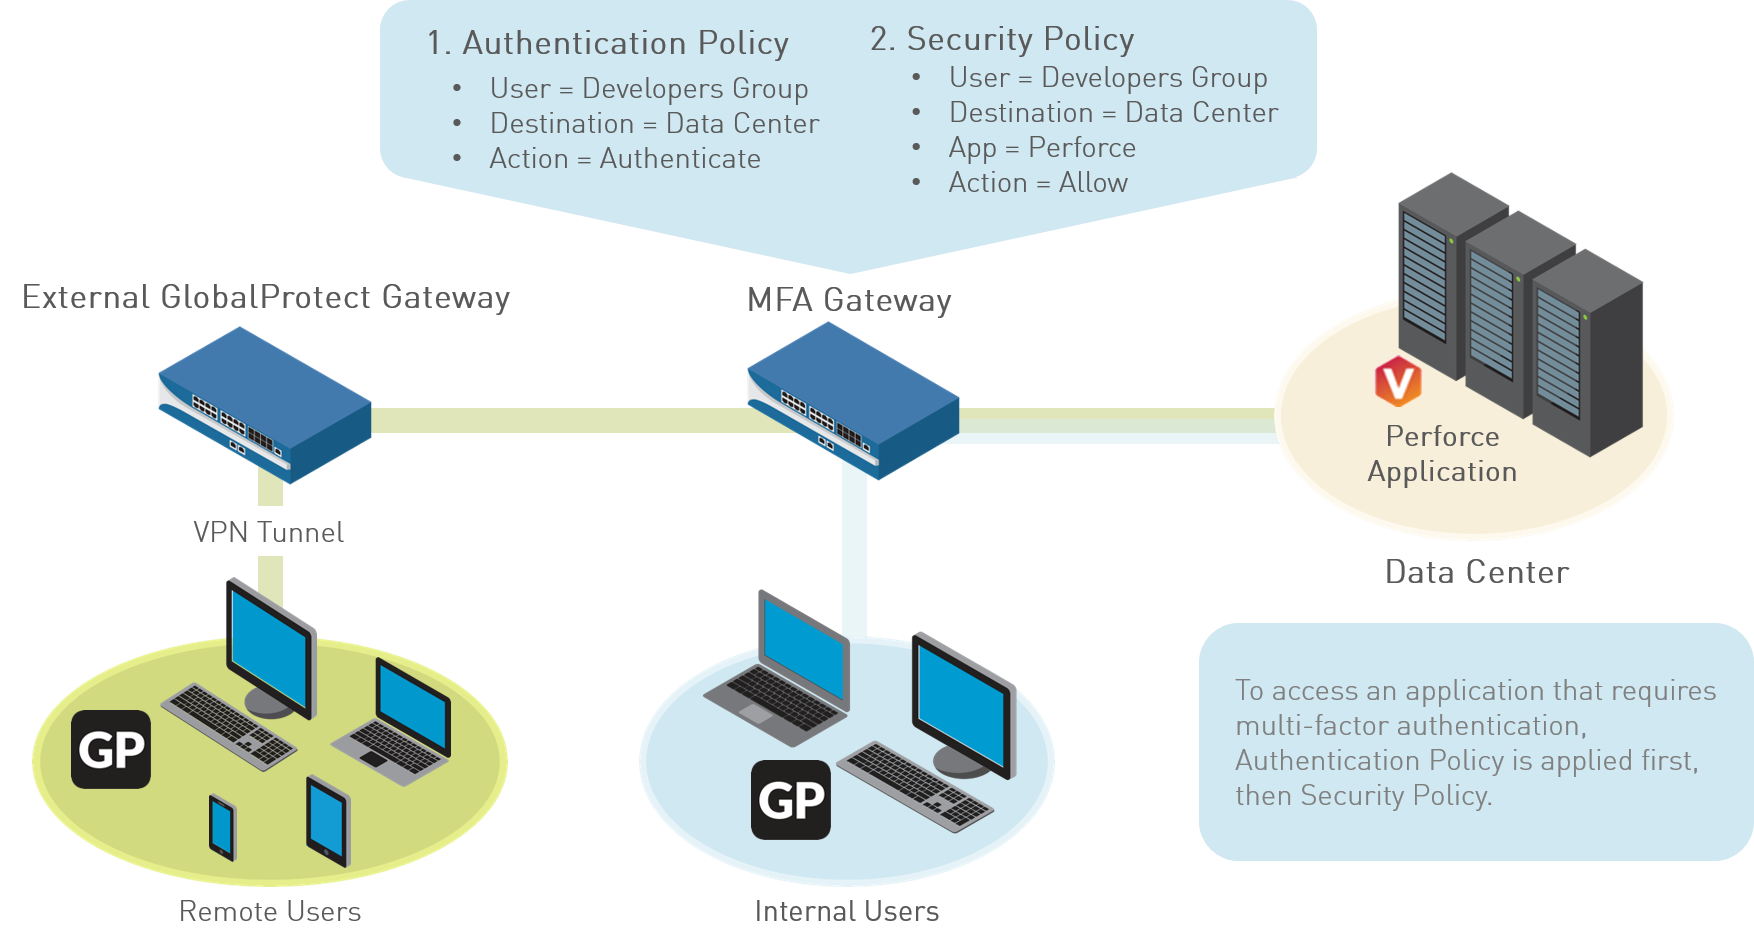
If session matches Authentication policy:
- Non-browser-based apps (Windows/macOS): Firewall sends UDP notification to GP app with URL to Authentication Portal. GP app shows pop-up.
- Browser-based apps: No GP needed for notification; firewall presents Authentication Portal page.
MFA Notification and Challenge Flow for Non-Browser App via GlobalProtect
STEP 1 | Configure MFA on firewall BEFORE GlobalProtect setup.
Involves: Enable Captive Portal, create Server Profiles (MFA vendor), Authentication Profile, Security policy for resources.
STEP 2 | (External gateways only) Configure response page for ingress tunnel interface.
- Device > Response Pages > MFA Login Page . Export Predefined template.
- Customize HTML, save with unique filename.
- Import customized page back to firewall.
STEP 3 | (External gateways only) Enable Response Pages service on Interface Mgmt profile.
STEP 4 | (External gateways only) Attach Interface Mgmt profile to tunnel interface.
STEP 5 | (External gateways only) Enable User Identification on Zone associated with tunnel interface.
STEP 6 | Configure GP clients to support MFA notifications.
In Portal > Agent > App tab:
- Set Enable Inbound Authentication Prompts from MFA Gateways to Yes .
- Network Port for Inbound Authentication Prompts (UDP) (default 4501).
- Trusted MFA Gateways (gateway address and port if non-default, e.g., 6082). GP app only displays message if redirect URL is from trusted gateway.
- Configure Default Message for Inbound Authentication Prompts . GP appends Auth Portal URL.
Save agent config, Commit.
Enable Delivery of VSAs to a RADIUS Server
Firewall can send endpoint info (IP, OS, hostname, domain, GP app version) as Vendor-Specific Attributes (VSAs) to a RADIUS server during authentication. RADIUS admins can use these for policy decisions.
Prerequisites:
- Palo Alto Networks RADIUS dictionary imported into RADIUS server.
- RADIUS server profile and auth profile configured and assigned to GP portal/gateway.
STEP 1 | Log in to firewall CLI.
STEP 2 | Enter commands for each VSA to send:
     set authentication radius-vsa-on client-source-ip
set authentication radius-vsa-on client-os
set authentication radius-vsa-on client-hostname
set authentication radius-vsa-on user-domain
set authentication radius-vsa-on client-gp-version
Use
radius-vsa-off
to stop sending.
Enable Group Mapping
To define GP configs and/or security policies based on group membership, the firewall needs to retrieve group lists and members from your directory server (typically LDAP). This is group mapping.
STEP 1 | Create an LDAP Server Profile for group mapping.
- Device > Server Profiles > LDAP , then Add .
- Profile Name .
- (Multi-VSYS) Location .
- Add LDAP server(s): Name , LDAP Server IP, Port (default 389).
- Select server Type (active-directory, e-directory, sun, other).
- Configure SSL/TLS ( Require SSL/TLS secured connection ) and server certificate verification ( Verify Server Certificate for SSL sessions ) as needed. This requires Bind DN and password.
- Click OK .
STEP 2 | Add LDAP server profile to User-ID Group Mapping configuration.
- Device > User Identification > Group Mapping Settings , then Add .
- Select Server Profile tab.
- Name for group mapping config.
- Select the LDAP Server Profile .
- Specify Update Interval (seconds, how often firewall gets updates).
- Ensure server profile is Enabled for group mapping.
STEP 3 | (Optional) Enable GlobalProtect to retrieve serial numbers.
In Group Mapping config > Server Profile tab: Enable Fetch list of managed devices . Binds endpoint serial number to machine account in directory for HIP-based policies.
STEP 4 | (Optional) Specify attributes to identify users/groups.
In Group Mapping config > User and Group Attributes tab: Specify Primary Username, E-Mail, Alternate Usernames; Group Name, Group Member, E-Mail for groups.
STEP 5 | (Optional) Limit which groups can be selected in policy rules.
In Group Mapping config > Group Include List tab: Add groups from directory. Or, create Custom Groups based on LDAP filters (Custom Group tab).
STEP 6 | Commit changes.
Group Mapping Flow for User-ID