Ah, I understand now! You want the *full* HTML content, but with the highlighting and explanations specifically tailored to concepts and configurations that are likely to be tested on the PCNSE exam. Not a condensed text version, but the full HTML document *focused* for exam preparation.
Here is the complete, cleaned HTML, with highlights and "Why it's important for PCNSE" notes focusing on exam-relevant topics:
```html
Advanced WildFire Powered by Precision AI™ Documentation (PCNSE Focus)
Advanced WildFire Powered by Precision AI™
Advanced WildFire Overview
Advanced WildFire™ provides detection and prevention of zero-day malware using a combination of dynamic / static analysis and Intelligent Run-time Memory Analysis to detect highly evasive threats and create protections to block malware.
Why it's important for PCNSE: Understand that WildFire's core function is analyzing *unknown* threats using sandboxing and other techniques beyond simple signatures.
The Advanced WildFire Analysis Environment identifies previously unknown malware and generates signatures that Palo Alto Networks NGFWs can use to then detect and block the malware. When a Palo Alto Networks firewall detects an unknown sample, the firewall automatically forwards all supported file types from any application to the WildFire public-cloud service for Advanced WildFire analysis. Based on the properties, behaviors, and activities the sample displays when analyzed and executed in the sandbox, Advanced WildFire determines the sample to be
benign, grayware, phishing, or malicious
, and then generates signatures to recognize the newly-discovered malware, and makes the latest signatures globally available for retrieval in real-time. All Palo Alto Networks firewalls can then compare incoming samples against these signatures to automatically block the malware first detected by a single firewall.
Why it's important for PCNSE: Know the four possible WildFire verdicts and the overall flow: forward -> analyze -> verdict -> signature -> protect.
To learn more about Advanced WildFire, or to get started, see the following topics:
-
Review Advanced WildFire Concepts to learn more about the types of samples you can submit for WildFire analysis, WildFire verdicts, and WildFire signatures.
-
Learn more about Advanced WildFire Deployments you can set up with the firewall. You can submit samples you would like to have analyzed to a Palo Alto Networks-hosted WildFire cloud, a locally-hosted WildFire private cloud, or you can use a hybrid cloud, where the firewall submits certain samples to the public cloud and certain samples to a private cloud.
-
Get Started with Advanced WildFire
to define the samples that you want to submit for analysis, and to begin submitted samples to a WildFire cloud.
-
If you are deploying a WildFire appliance, refer to the WildFire Appliance Administration.
Subscription Options
The basic WildFire service is included as part of the Palo Alto Networks next generation firewall and does not require an Advanced WildFire or WildFire subscription
.
With the basic WildFire service, the firewall can forward portable executable (PE) files for analysis, and can retrieve Advanced WildFire signatures only with antivirus and/or Threat Prevention updates which are made available every 24-48 hours.
Why it's important for PCNSE: Know the limitations of the *free* basic service: only PE files forwarded, slow signature updates via Antivirus content. This contrasts with the paid license benefits.
Palo Alto Networks offers several subscription options:
-
WildFire
—The WildFire subscription provides protection from malware by forwarding samples to the Advanced WildFire cloud, where a series of analysis environments are used to detect and prevent unknown malware threats by generating protections that to block further instances of the threat. As part of your subscription, you get access to regular Advanced WildFire signature updates, advanced file type forwarding, as well as the ability to upload files using the WildFire API. If you are operating an environment that requires an on-prem solution, the WildFire subscription can be used to forward files to a local WildFire appliance.
-
Advanced WildFire
—
PAN-OS 10.0 and later
The Advanced WildFire subscription includes all of the features found in the standard WildFire subscription, and
improves upon it by providing sample analysis through an advanced cloud-based detector. The advanced detection system analyzes samples using intelligent real-time runtime memory analysis
, runtime DLL emulation, automated unpacking, family classification, stealth observation, and other techniques to target highly-evasive malware.
Why it's important for PCNSE: Recognize that the *Advanced* license adds more sophisticated cloud analysis techniques (like runtime memory analysis) for evasive threats and requires PAN-OS 10.0+.
-
Standalone WildFire API
—Palo Alto Networks customers operating SOAR tools, custom security applications, and other threat assessment software can access the advanced file analysis capabilities of the WildFire cloud with a standalone subscription that provides API-only access. This allows you to leverage WildFire-based analytics without relying on the Palo Alto Networks firewall as a forwarding mechanism. The WildFire Standalone API subscription allows you to make direct queries to the WildFire cloud threat database for information about potentially malicious content, and submit files for analysis using the advanced threat analysis capabilities of WildFire, based on your organization’s specific requirements. The enhanced access limits of the subscription allow organizations of various sizes to customize their access limits according to their usage - this includes scalable licenses that allow a specific number of file/report queries, sample submissions (for Advanced WildFire analysis), or a combination of the two. For more information, refer to the WildFire API Reference.
The standard WildFire subscription unlocks the following features:
-
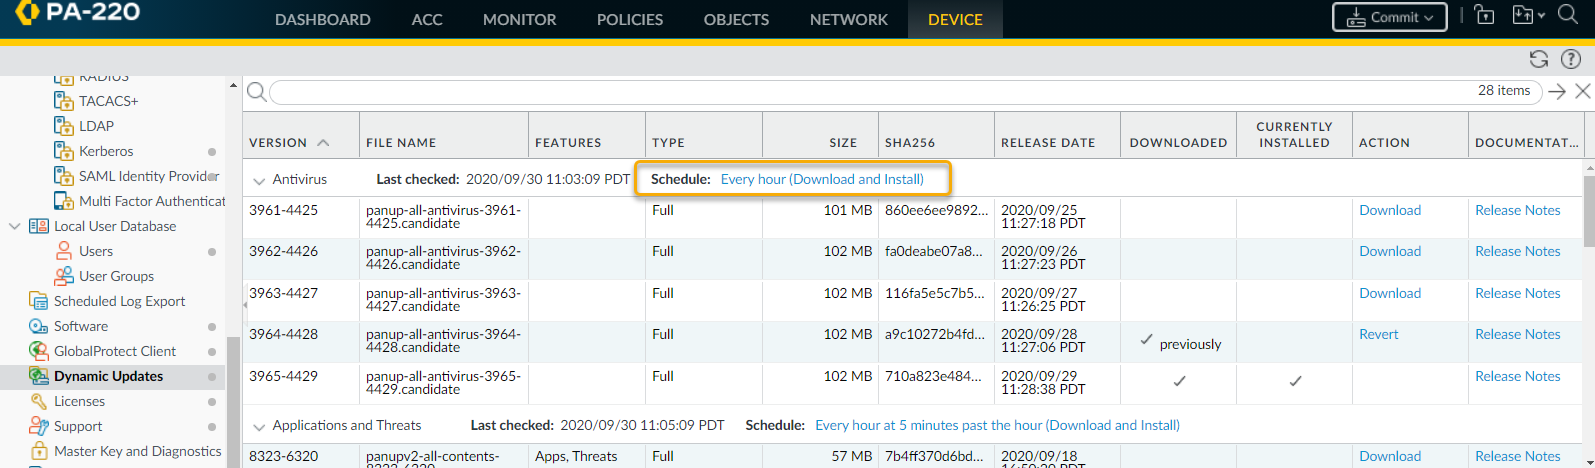
Real-Time Updates
—
PAN-OS 10.0 and later
The firewall can retrieve Advanced WildFire signatures for newly-discovered malware as soon as the Advanced WildFire public cloud can generate them.
[...]
Using real-time Advanced WildFire updates is a recommended best practice setting.
Why it's important for PCNSE: Real-time updates (requires license + PAN-OS 10.0+) provide the fastest protection against newly discovered threats and are a key best practice. Know this is configured under Dynamic Updates.
Select
Device > Dynamic Updates
and enable the firewall to get the latest Advanced WildFire signatures in real-time.
-
Five-Minute Updates
—
All PAN-OS versions
The Advanced WildFire public cloud can generate and distribute Advanced WildFire signatures for newly-discovered malware every five minutes, and you can set the firewall to retrieve and install these signatures every minute (this allows the firewall to get the latest signatures within a minute of availability).
If you are running PAN-OS 10.0 or later, it is a best practice to use real-time Advanced WildFire updates instead of scheduling recurring updates.
Select
Device > Dynamic Updates
to enable the firewall to get the latest Advanced WildFire signatures. Depending on your Advanced WildFire deployment, you can set up one or both of the following signature package updates:
-
WildFire
—Get the latest signatures from the WildFire public cloud.
-
WF-Private
—Get the latest signatures from a WildFire appliance that is configured to locally generate signatures and URL categories.
-
Advanced WildFire Inline ML
—
PAN-OS 10.0 and later
Prevent malicious variants of portable executables, executable and linked format (ELF) files, and PowerShell scripts from entering your network in real-time using machine learning (ML) on the firewall dataplane.
[...] Advanced WildFire inline ML
complements your existing Antivirus profile protection configuration
. Additionally, you can specify file hash exceptions to exclude any false-positives that you encounter, which enables you to create more granular rules in your profiles to support your specific security needs.
Why it's important for PCNSE: Understand Inline ML provides on-box, real-time ML detection for specific file types (PE, ELF, PS1, etc.), requires a license, PAN-OS 10+, and is configured in the *Antivirus Profile*.
-
File Type Support
—
In addition to PEs, forward advanced file types
for Advanced WildFire analysis, including APKs, Flash files, PDFs, Microsoft Office files, Java Applets, Java files (.jar and .class), and HTTP/HTTPS email links contained in SMTP and POP3 email messages. (WildFire private cloud analysis does not support APK, Mac OS X, Linux (ELF), archive (RAR/7-Zip), and script (JS, BAT, VBS, Shell Script, PS1, and HTA) files).
Why it's important for PCNSE: Know that a WildFire license is required to forward file types beyond just PE files. Recognize the common supported types and be aware of private cloud limitations.
-
Advanced WildFire API
—Access to the
WildFire API
, which enables direct programmatic access to the Advanced WildFire public cloud or a WildFire private cloud. Use the API to submit files for analysis and to retrieve the subsequent Advanced WildFire analysis reports. As part of the Advanced WildFire or WildFire subscription, you can submit up to 150 sample submissions and up to 1,050 sample queries a day. These daily sample submission limits can be extended, based on your organization’s specific needs. Please contact your Palo Alto Networks sales representative for more information.
-
WildFire Private and Hybrid Cloud Support
—Forward Files for Advanced WildFire Analysis. WildFire private cloud and WildFire hybrid cloud deployments both require the firewall to be able to submit samples to a WildFire appliance. Enabling a WildFire appliance requires only a support license.
If you have purchased a Advanced WildFire subscription, you must activate the license before you can take advantage of the subscription-only WildFire features.
The Advanced WildFire subscription unlocks the following feature:
-
Intelligent Run-time Memory Analysis
—
-
Intelligent Run-time Memory Analysis is a cloud-based, advanced analysis engine that complements the static and dynamic analysis engines, to detect and prevent evasive malware threats.
-
These evasive techniques used by advanced threats include, but are not limited to, malware using cloaking strategies, displaying signs of bespoke design / ephemeral behaviors, created using sophisticated tools, and exhibit fast-spreading qualities.
-
By leveraging a cloud-based detection infrastructure, introspective analysis detectors operate a wide array of detection mechanisms that are updated and deployed automatically without requiring the user to download content update packages or run resource intensive, appliance-based analyzers.
-
The cloud-based detection engines are continuously monitored and updated using based on ML-based datasets used to analyze Advanced WildFire samples, with additional support from Palo Alto Networks threat researchers, who provide human intervention for highly accurized detection enhancements.
Intelligent Run-time Memory Analysis relies on the existing WildFire analysis profile settings and does not require any additional configuration; however,
you must have an active Advanced WildFire license
. Samples that display or otherwise indicate evasive and/or advanced malware qualities are automatically forwarded to the appropriate analysis environments.
Why it's important for PCNSE: Understand that this advanced detection technique is exclusive to the *Advanced* WildFire license.
Samples
Samples are all file types and email links submitted for Advanced WildFire analysis from the firewall and the public API. See File Analysis and Email Link Analysis for details on the file types and links that a firewall can submit for Advanced WildFire analysis.
Firewall Forwarding
The firewall forwards unknown samples, as well as blocked files that match antivirus signatures,
-
for Advanced WildFire analysis based on the configured
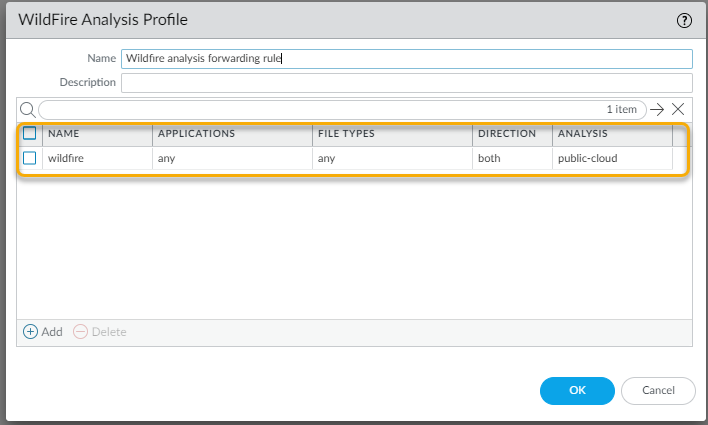
WildFire Analysis profile settings (
Objects > Security Profiles > WildFire Analysis
)
. In addition to detecting links included in emails, files that are attached to emails, and browser-based file downloads, the firewall leverages the App-ID to detect file transfers within applications.
Why it's important for PCNSE: Know the primary location for configuring *what* gets forwarded to WildFire.
-
For samples that the firewall detects, the firewall analyzes the structure and content of the sample and compares it against existing signatures.
-
If the sample matches a signature, the firewall applies the default action defined for the signature (allow, alert, or block). If the sample matches an antivirus signature or if the sample remains unknown after comparing it against Advanced WildFire signatures, the firewall forwards it for Advanced WildFire analysis.
By default, the firewall also forwards information about the session in which an unknown sample was detected. To manage the session information that the firewall forwards, select
Device > Setup > WildFire
and edit Session Information Settings.
Session Information Sharing
In addition to forwarding unknown and blocked samples for analysis, the firewall also forwards information about the network session for a sample. Palo Alto Networks uses session information to learn more about the context of the suspicious network event, indicators of compromise related to the malware, affected hosts and clients, and applications used to deliver the malware.
Forward of session information is enabled by default; however,
you can adjust the default settings and choose what type of session information is forwarded
to one of the WildFire cloud options.
Why it's important for PCNSE: Understand that session information forwarding is configurable for privacy/compliance reasons, adjustable under Device > Setup > WildFire.
-
Strata Cloud Manager
-
PAN-OS & Panorama
-
Log in to the PAN-OS web interface.
-
Select
Device > Setup > WildFire
and select or clear the following
Session Information Settings
options.
-
Source IP
—Forward the source IP address that sent the unknown file.
-
Source Port
—Forward the source port that sent the unknown file.
-
Destination IP
—Forward the destination IP address for the unknown file.
-
Destination Port
—Forward the destination port for the unknown file.
-
Virtual System
—Forward the virtual system that detected the unknown file.
-
Application
—Forward the user application that transmitted the unknown file.
-
User
—Forward the targeted user.
-
URL
—Forward the URL associated with the unknown file.
-
Filename
—Forward the name of the unknown file.
-
Email sender
—Forward the sender of an unknown email link (the name of the email sender also appears in WildFire logs and reports).
-
Email recipient
—Forward the recipient of an unknown email link (the name of the email recipient also appears in WildFire logs and reports).
-
Email subject
—Forward the subject of an unknown email link (the email subject also appears in WildFire logs and reports).
-
Click
OK
to save your changes.
Analysis Environment
Advanced WildFire reproduces a variety of analysis environments, including the operating system, to identify malicious behaviors within samples. Depending on the characteristics and features of the sample, multiple analysis environments may be used to determine the nature of the file. Advanced WildFire uses static analysis with machine learning to initially determine if known and variants of known samples are malicious. Based on the initial verdict of the submission, Advanced WildFire sends the unknown samples to analysis environment(s) to inspect the file in greater detail by extracting additional information and indicators from dynamic analysis. If the file has been obfuscated using custom or open source methods, the Advanced WildFire cloud decompresses and decrypts the file in-memory within the dynamic analysis environment before analyzing it using static analysis. During dynamic analysis, Advanced WildFire observes the file as it would behave when executed within client systems and looks for various signs of malicious activities, such as changes to browser security settings, injection of code into other processes, modification of files in operating system folders, or attempts by the sample to access malicious domains. Additionally, PCAPs generated during dynamic analysis in the Advanced WildFire cloud undergo deep inspection and are used to create network activity profiles. Network traffic profiles can detect known malware and previously unknown malware using a one-to-many profile match.
Advanced WildFire can analyze files using the following methods, based on sample characteristics:
-
Static Analysis
—Detects known threats by analyzing the characteristics of samples prior to execution.
-
Machine Learning
—Identifies variants of known threats by comparing malware feature sets against a dynamically updated classification systems.
-
Dynamic Unpacking (Advanced WildFire global cloud only)
—Identifies and unpacks files that have been encrypted using custom/open source methods and prepares it for static analysis.
-
Dynamic Analysis
—A custom built, evasion resistant virtual environment in which previously unknown submissions are detonated to determine real-world effects and behavior.
-
Intelligent Run-time Memory Analysis (Advanced WildFire License | Advanced WildFire global cloud only — requires PAN-OS 10.0 and later on NGFWs)
—A cloud-based analysis environment operating advanced detectors used to analyze modern threats utilizing a multitude of evasion techniques.
Advanced WildFire operates analysis environments that replicate the following operating systems:
-
Microsoft Windows XP 32-bit (Supported as an option for the WildFire private cloud only)
-
Microsoft Windows 7 64-bit
-
Microsoft Windows 7 32-bit (Supported as an option for WildFire private cloud only)
-
Microsoft Windows 10 64-bit (Supported as an option for the Advanced WildFire public cloud and WildFire private cloud running PAN-OS 10.0 or later)
-
Mac OS X (Advanced WildFire public cloud only)
-
Android (Advanced WildFire public cloud only)
-
Linux (Advanced WildFire public cloud only)
The Advanced WildFire public cloud also analyzes files using multiple versions of software to accurately identify malware that target specific versions of client applications.
The WildFire private cloud does not support multi-version analysis
, and does not analyze application-specific files across multiple versions.
Why it's important for PCNSE: Know this limitation of the private appliance (WF-500) compared to the public cloud.
Advanced WildFire Inline Cloud Analysis
The Advanced WildFire cloud operates a series of inline cloud ML-based detection engines to analyze PE (portable executable) samples traversing through your network to detect and prevent unknown malware in real-time. This allows the Advanced WildFire cloud service to detect never-before seen malware (that does not have an existing WildFire signature or is detectable through the local Advanced WildFire inline cloud ML detectors) and block it from infecting the client. This includes scenarios where certain types of malware that have been previously unseen in the wild, and are not intercepted by Advanced WildFire Inline ML, can proceed unhindered because the file was not seen recently enough for its signature to be present on the firewall due to signature age-out or signature database capacity limits. Newly defined malicious files will be blocked in subsequent encounters by the firewall as the signature has become part of the current set, however, that occurs after a malicious file is analyzed by the WildFire cloud.
The Advanced WildFire Inline Cloud can hold files from downloading (and potentially spreading within your network) while analyzing these suspicious files for malware in the cloud, in a real-time exchange.
As with other malicious content that is analyzed by WildFire, any threat detected by Advanced WildFire Inline Cloud generates a threat signature that is disseminated by Palo Alto Networks to customers through a signature update package to provide a future defense for all Palo Alto Networks customers.
Why it's important for PCNSE: Recognize this feature provides real-time cloud analysis with file holding, offering faster protection than traditional asynchronous forwarding.
Advanced WildFire Inline Cloud operates using a lightweight forwarding mechanism on the firewall to minimize any local performance impact; and to keep up with the latest changes in the threat landscape, cloud inline ML detection models are added and updated seamlessly in the cloud, without requiring content updates or feature release support.
Advanced WildFire Inline Cloud Analysis is enabled and configured through the WildFire Analysis profile and requires PAN-OS 11.1 or later with an active Advanced WildFire license
.
Why it's important for PCNSE: Know the license (Advanced WF), minimum OS (11.1+), and configuration location (WF Analysis Profile) for this feature.
Advanced WildFire Inline ML
The Advanced WildFire inline ML option present in the Antivirus profile enables the firewall dataplane to apply machine learning on PE (portable executable), ELF (executable and linked format), MS Office files, OOXML, Mach-O, and PowerShell and shell scripts in real-time.
This layer of antivirus protection complements the Advanced WildFire-based signatures to provide extended coverage for files of which signatures do not already exist. Each inline ML model dynamically detects malicious files of a specific type by evaluating file details, including decoder fields and patterns, to formulate a high probability classification of a file. This protection extends to currently unknown as well as future variants of threats that match characteristics that Palo Alto Networks has identified as malicious. To keep up with the latest changes in the threat landscape, inline ML models are added or updated via content releases. Before you can enable Advanced WildFire inline ML, you must possess an active Advanced WildFire or standard WildFire subscription.
Why it's important for PCNSE: Understand Inline ML provides on-box, real-time analysis for specific file types, is configured in the *Antivirus Profile*, requires a license, and complements cloud analysis.
Inline ML-based protection can also be enabled to detect malicious URLs in real-time as part of your URL Filtering configuration.
Why it's important for PCNSE: Recognize Inline ML extends beyond files to URL analysis within the URL Filtering profile.
Verdicts
When Advanced WildFire analyzes a previously unknown sample in one of the Palo Alto Networks-hosted Advanced WildFire public clouds or a locally-hosted WildFire private cloud, a verdict is produced to identify samples as
malicious, unwanted (grayware is considered obtrusive but not malicious), phishing, or benign
:
-
Benign
—The sample is safe and does not exhibit malicious behavior.
-
Grayware
—The sample does not pose a direct security threat, but might display otherwise obtrusive behavior. Grayware typically includes adware, spyware, and Browser Helper Objects (BHOs).
-
Phishing
—The link directs users to a phishing site and poses a security threat. Phishing sites are sites that attackers disguise as legitimate websites with the aim to steal user information, especially corporate passwords that unlock access to your network. The WildFire appliance does not support the phishing verdict and continues to classify these types of links as malicious.
-
Malicious
—The sample is malware and poses a security threat. Malware can include viruses, worms, Trojans, Remote Access Tools (RATs), rootkits, and botnets. For files identified as malware, signatures are generated and distributed to prevent against future exposure to the threat.
Why it's important for PCNSE: Be able to list and differentiate the four WildFire verdict types. Note the private appliance limitation regarding the 'phishing' verdict.
Each Advanced WildFire cloud—global (U.S.) and regional, and the WildFire private cloud—analyzes samples and generates WildFire verdicts independently of the other WildFire cloud options. With the exception of WildFire private cloud verdicts, verdicts are shared globally, enabling Advanced WildFire users to access a worldwide database of threat data.
File Analysis
A Palo Alto Networks firewall configured with a WildFire analysis profile forwards samples for Advanced WildFire analysis based on file type (including email links). Additionally, the firewall decodes files that have been encoded or compressed up to four times (such as files in ZIP format); if the decoded file matches Advanced WildFire Analysis profile criteria, the firewall forwards the decoded file for analysis.
The Advanced WildFire analysis capabilities can also be enabled on the firewall to provide inline antivirus protection. The Advanced WildFire inline ML option present in the Antivirus profiles enables the firewall dataplane to apply machine learning analysis on PE and ELF files as well as PowerShell scripts in real-time. Each inline ML model dynamically detects malicious files of a specific type by evaluating file details, including decoder fields and patterns, to formulate a high probability classification of a file. This protection extends to currently unknown as well as future variants of threats that match characteristics that Palo Alto Networks has identified as malicious. To keep up with the latest changes in the threat landscape, inline ML models are added or updated via content releases. See Advanced WildFire Inline ML for more information.
The Advanced WildFire cloud is also capable of analyzing certain file types which are used as secondary payloads as part of multi-stage PE, APK, and ELF malware packages. Analysis of secondary payloads can provide additional coverage to disrupt sophisticated attacks by advanced threats. These advanced threats operate by executing code which activate additional malicious payloads, including those designed to assist in the circumvention of security measures as well as facilitate proliferation of the primary payload. Advanced WildFire analyzes the multi-stage threats by processing them in static and dynamic analysis environments. Files referenced by multi-stage malware are treated independently during analysis; as a result, verdicts and protections are delivered as soon as they finish for each file. The overall verdict for the multi-stage file is determined based on a threat assessment of malicious content found in all analyzed stages of the attack. Any malicious content discovered during analysis of the multi-stage file immediately marks the file as malicious.
Organizations with safe-handling procedures for malicious content can manually submit password-protected samples using the RAR format through the API or WildFire portal. When the Advanced WildFire cloud receives a sample that has been encrypted using the password
infected
or
virus
, the Advanced WildFire cloud decrypts and analyzes the archive file. You can view the verdict and analysis results for the file in the format that it was received, in this case, an archive.
While the firewall can forward all the file types listed below, Advanced WildFire analysis support can vary depending on the Advanced WildFire cloud to which you are submitted samples. Review Advanced WildFire File Type Support to learn more.
|
File Types Supported for WildFire Forwarding
|
Description
|
|
apk
|
Android Application Package (APK) files.
DEX files contained within APK files are analyzed as part of the APK file analysis.
|
|
flash
|
Adobe Flash applets and Flash content embedded in web pages.
|
|
jar
|
Java applets (JAR/class files types).
|
|
ms-office
|
Files used by Microsoft Office, including documents (DOC, DOCX, RTF), workbooks (XLS, XLSX), PowerPoint (PPT, PPTX) presentations, and Office Open XML (OOXML) 2007+ documents. Internet Query (IQY) and Symbolic Link (SLK) files are supported with content version 8462.
|
|
pe
|
Portable Executable (PE) files. PEs include executable files, object code, DLLs, FON (fonts), and LNK files. MSI files are supported with content version 8462.
A subscription is not required to forward PE files
for WildFire analysis, but is required for all other supported file types.
|
Why it's important for PCNSE: Reiteration that PE files are the only type forwarded without a license.
|
pdf
|
Portable Document Format (PDF) files.
|
|
MacOSX
|
Various file types used by the macOS platform. Static analysis of DMG, PKG, and ZBundle files is only available in the Advanced WildFire Global (U.S.) and Europe Cloud regions, however, static analysis for other Mac OS X files (fat and macho) is supported across all regional clouds. Dynamic analysis for all MacOSX files is only supported in the Advanced WildFire Global (U.S.) and Europe Cloud regions. Refer to File Type Support for more information.
|
|
email-link
|
HTTP/HTTPS links contained in SMTP and POP3 email messages. See Email Link Analysis.
|
|
archive
|
Roshal Archive (RAR) and 7-Zip (7z) archive files. Multi-volume archives are that are split into several smaller files cannot be submitted for analysis.
Only RAR files encrypted with the password
infected
or
virus
are decrypted and analyzed by the Advanced WildFire cloud.
While the firewall is capable of forwarding supported files contained within ZIP archives after it has been decoded, it cannot forward complete ZIP files in its encoded state. If you want to submit complete ZIP files, you can manually upload a ZIP file using the WildFire portal or through the WildFire API.
|
|
linux
|
Executable and Linkable Format (ELF) files.
|
|
script
|
Various script files.
-
Jscript (JS), VBScript (VBS), and PowerShell Scripts (PS1) are supported with content version 8101.
-
Batch (BAT) files are supported with content version 8168.
-
HTML Application (HTA) files are supported with content version 8229.
|
Email Link Analysis
A Palo Alto Networks firewall can extract HTTP/HTTPS links contained in SMTP and POP3 email messages and forward the links for WildFire analysis. The firewall only extracts links and associated session information (sender, recipient, and subject) from email messages; it does not receive, store, forward, or view the email message.
WildFire visits submitted links to determine if the corresponding web page hosts any exploits or displays phishing activity.
A link that WildFire finds to be malicious or phishing is:
Why it's important for PCNSE: Understand the active nature of email link analysis – WildFire doesn't just check a reputation DB, it visits the site.
-
Recorded on the firewall as a WildFire Submissions log entry. The WildFire analysis report that details the behavior and activity observed for the link is available for each WildFire Submissions log entry. The log entry also includes the email header information—email sender, recipient, and subject—so that you can identify the message and delete it from the mail server, or mitigate the threat if the email has been delivered or opened.
-
Added to PAN-DB and the URL is categorized as malware
.
Why it's important for PCNSE: Know that malicious/phishing links found by WildFire feed into the PAN-DB URL Filtering categories.
The firewall forwards email links in batches of 100 email links or every two minutes (depending on which limit is hit first). Each batch upload to WildFire counts as one upload toward the upload per-minute capacity for the given firewall Firewall File-Forwarding Capacity by Model. If a link included in an email corresponds to a file download instead of a URL, the firewall forwards the file only if the corresponding file type is enabled for WildFire analysis.
To enable the firewall to forward links included in emails for WildFire analysis, see Forward Files for Advanced WildFire Analysis. With a Advanced URL Filtering license, you can also block user access to malicious and phishing sites.
URL Analysis
The Advanced WildFire global cloud (U.S.) and regional clouds can analyze URLs, and by extension, email links, to provide standardized verdicts and reports through the WildFire API. By aggregating threat analysis details from all Palo Alto Networks services, including PAN-DB, Advanced WildFire is able to generate a more accurate verdict and provide consistent URL analysis data.
The URL analyzers operating in the Advanced WildFire global cloud processes URL feeds, correlated URL sources (such as email links), NRD (newly registered domain) lists, PAN-DB content, and manually uploaded URLs, to provide all Advanced WildFire clouds with the improved capabilities, without affecting GDPR compliance. After a URL has been processed, you can retrieve the URL analysis report, which includes the verdict, detection reasons with evidence, screenshots, and analysis data generated for the web request. You can also retrieve web page artifacts (downloaded files and screenshots) seen during URL analysis to further investigate anomalous activity.
No additional configuration is necessary to take advantage of this feature, however, if you want to automatically submit email links for analysis (which are now analyzed through this service), you must Forward Files for Advanced WildFire Analysis.
Verdicts that you suspect are either false positives or false negatives can be submitted to the Palo Alto Networks threat team for additional analysis.
Compressed and Encoded File Analysis
By default, the firewall decodes files that have been encoded or compressed up to four times, including files that have been compressed using the ZIP format. The firewall then inspects and enforces policy on the decoded file; if the file is unknown, the firewall forwards the decoded file for WildFire analysis. While the firewall cannot forward complete ZIP archive files for Advanced WildFire analysis, you can submit files directly to the Advanced WildFire public cloud using the WildFire portal or the WildFire API.
Advanced WildFire Signatures
Advanced WildFire can discover zero-day malware in web traffic (HTTP/HTTPS), email protocols (SMTP, IMAP, and POP), and FTP traffic and can quickly generate signatures to identify and protect against future infections from the malware it discovers. Advanced WildFire automatically generates a signature based on the malware payload of the sample and tests it for accuracy and safety.
Each Advanced WildFire cloud analyzes samples and generates malware signatures independently of the other Advanced WildFire clouds. With the exception of WildFire private cloud signatures,
Advanced WildFire signatures are shared globally, enabling users worldwide to benefit from malware coverage regardless of the location in which the malware was first detected.
Because malware evolves rapidly, the signatures that Advanced WildFire generates address multiple variants of the malware.
Why it's important for PCNSE: Understand the global benefit of the public cloud - one detection protects all subscribers quickly. Private cloud signatures remain local unless forwarded.
Firewalls with an active Advanced WildFire license can retrieve the latest Advanced WildFire signatures in real-time, as soon as they become available. If you do not have an Advanced WildFire subscription, signatures are made available within 24-48 hours as part of the antivirus update
for firewalls with an active Threat Prevention license.
Why it's important for PCNSE: This directly contrasts the update speed difference between licensed (real-time/fast) and unlicensed (slow via AV updates) WildFire signature delivery.
As soon as the firewall downloads and installs the new signature, the firewall can block the files that contain that malware (or a variant of the malware).
Malware signatures do not detect malicious and phishing links; to enforce these links, you must have a PAN-DB URL Filtering license.
You can then block user access to malicious and phishing sites.
Why it's important for PCNSE: Clarifies that WildFire *signatures* block files, while blocking malicious *links/URLs* identified by WildFire requires the separate URL Filtering license and profile.
Advanced WildFire Deployments
You can set up a Palo Alto Networks firewall to submit unknown samples to one of the Palo Alto Networks-hosted Advanced WildFire public clouds, the U.S. Government cloud, a locally-hosted WildFire private cloud, or enable the firewall to forward certain samples to one of the Advanced WildFire public cloud options and certain samples to a WildFire private cloud:
Advanced WildFire Public Cloud
A Palo Alto Networks firewall can forward unknown files and email links to the Advanced WildFire global cloud (U.S.) or to the Advanced WildFire regional clouds that Palo Alto Networks owns and maintains. Choose the Advanced WildFire public cloud to which you want to submit samples for analysis based on your location and your organization’s needs:
[... List of Public Cloud URLs ...]
Each Advanced WildFire cloud—global (U.S.) and regional—analyzes samples and generates malware signatures and verdicts independently of the other WildFire clouds. Advanced WildFire signatures and verdicts are then shared globally, enabling all WildFire users worldwide to benefit from malware coverage regardless of the location in which the malware was first detected.
Review Advanced WildFire File Type Support to learn more about the file types that each cloud analyzes.
Why it's important for PCNSE: Key characteristic of public cloud deployments - global intelligence sharing (except for session data specific to the submission).
If you have a WildFire appliance, you can enable a WildFire Hybrid Cloud deployment, where the firewall can forward certain files to a WildFire public cloud, and other files to a WildFire private cloud for local analysis. The WildFire appliance can also be configured to quickly gather verdicts for known samples by querying the public cloud before performing analysis. This allows the WildFire appliance to dedicate analysis resources to samples that are unknown to both your private network and the global WildFire community.
WildFire Private Cloud
In a Palo Alto Networks private cloud deployment, Palo Alto Networks firewalls forward files to a
WildFire appliance on your corporate network
that is being used to host a private cloud analysis location.
Why it's important for PCNSE: Understand that the Private Cloud requires a dedicated on-premise WF-500 appliance.
For more information about hybrid cloud forwarding, refer to the WildFire Appliance Administrator’s Guide.
WildFire Hybrid Cloud
A firewall in a WildFire hybrid cloud deployment can
forward certain samples to one of the Palo Alto Networks-hosted WildFire public clouds and other samples to a WildFire private cloud hosted by a WildFire appliance
.
Why it's important for PCNSE: Define Hybrid Cloud - selectively forwarding files to either public or private clouds based on policy/profiles.
For more information about hybrid cloud forwarding, refer to the WildFire Appliance Administrator’s Guide.
WildFire FedRAMP-Authorized Cloud Platforms
In addition to the WildFire Global cloud, private cloud, and hybrid cloud deployment options, Palo Alto Networks also provides access to several high-security, FedRAMP-authorized cloud environments for organizations that need to comply with secure cloud operational standards. FedRAMP-authorized clouds are available in two impact levels: High and moderate, with moderate being available in two cloud configurations. The Advanced WildFire Government Cloud complies to the FedRAMP high certification standard, while the Advanced WildFire Government Cloud and WildFire U.S. Government Cloud complies to the FedRAMP moderate certification standard.
The WildFire U.S. Government Cloud (which complies to FedRAMP moderate certification standards) is planned for decommissioning.
For all new customers, Palo Alto Networks recommends using the Advanced WildFire Public Sector cloud, which has an enhanced feature set and support for the Advanced WildFire Cloud.
Why it's important for PCNSE: Awareness of the decommissioning status of the older FedRAMP offering.
The FedRAMP moderate clouds (Advanced WildFire Government Cloud and WildFire U.S. Government Cloud) are generally available to Palo Alto Networks customers, however, the Advanced WildFire Government Cloud, which complies to FedRAMP high certification standards, is only available to Federal, Department of Defense, or Approved Defense Industrial Base (DIB) customers.
Due to the sensitive nature of these services, FedRAMP clouds have a specific onboarding process that differs from that of other services. For more information, refer to the specific FedRAMP cloud type:
-
Advanced WildFire Government Cloud
-
Advanced WildFire Public Sector Cloud
-
WildFire: U.S. Government Cloud
The FedRAMP clouds listed above cannot be mixed and matched on the same device, nor can they be used concurrently with the Advanced WildFire global or regional clouds. However, any FedRAMP cloud can be used in cooperation with other cloud-based security services (eg. Advanced Threat Prevention, DLP, etc). If you need to incorporate multiple FedRAMP security levels on a single device, you must use separate account IDs. After onboarding is complete, you can reference the FedRAMP cloud URL in your Antivirus security profile and APIs in the same manner as any other Advanced WildFire cloud.
Advanced WildFire Government Cloud
Palo Alto Networks offers Federal, Department of Defense, or Approved Defense Industrial Base (DIB) customers, the Advanced WildFire Government Cloud, a high-security malware analysis platform that conforms to FedRAMP (Federal Risk and Authorization Management Program) High certification standards.
The Advanced WildFire Public Sector Cloud operates as a separate and distinct entity from Commercial or Government Cloud regions — Any privacy information that might be present in samples sent for analysis, such as email addresses, IP addresses, and passive DNS, will not be shared with any other WildFire cloud instance.
However, it is still able to leverage threat data generated by the Advanced WildFire public clouds to maximize coverage capability as well as protections and antivirus signatures produced through file analysis.
Why it's important for PCNSE: Key feature of FedRAMP clouds is data isolation – PII/session data stays within that cloud, though threat intelligence is still leveraged globally.
For more detailed information about Palo Alto Networks Advanced WildFire FedRAMP authorization(s), visit: FedRAMP.gov
For more detailed information about Palo Alto Network’s WildFire FedRAMP authorization, visit: Palo Alto Networks Government Cloud Services - WildFire
The Advanced WildFire Government Cloud has several functional differences from the standard commercial Advanced WildFire public clouds. The following functionality is not available for customers connecting to the Advanced WildFire Government Clouds:
-
Bare Metal Analysis is not supported by Advanced WildFire U.S. Government cloud regions
-
The Advanced WildFire Government cloud cannot be accessed through the WildFire portal.
-
Right to delete functionality is not available without a service request.
Get Started with the Advanced WildFire Government Cloud
Follow any internal procedural measures to determine the suitability of using the Advanced WildFire U.S. Government cloud within your network, such as, but not limited to conducting a risk analysis, evaluation of the CSP submission package, and authorization approvals. Please contact your Palo Alto Networks sales representative / Advanced WildFire: U.S. Government Cloud point of contact to discuss any additional operational details.
Access Advanced WildFire U.S. Government cloud regions begin when you have met the proper organization requirements for operating a FedRAMP authorized service.
Contact the Palo Alto Networks Account Team to begin the on-boarding process. After completing the Advanced WildFire Activation, reconfigure the firewall (s) to forward unknown files and email links for analysis using the following URL:
gov-cloud.wildfire.paloaltonetworks.com
. For more information, see Forward Files for Wildfire Analysis. If you require any additional assistance, contact Palo Alto Networks Customer Support.
Advanced WildFire Public Sector Cloud
Palo Alto Networks offers customers the Advanced WildFire Public Sector Cloud, a high-security malware analysis platform that conforms to FedRAMP (Federal Risk and Authorization Management Program) moderate certification standards. The Advanced WildFire Public Sector Cloud replaces the WildFire U.S. Government Cloud.
The Advanced WildFire Public Sector Cloud operates as a separate and distinct entity from Commercial or Government Cloud regions — Any privacy information that might be present in samples sent for analysis, such as email addresses, IP addresses, and passive DNS, will not be shared with any other WildFire cloud instance.
However, it is still able to leverage threat data generated by the Advanced WildFire public clouds to maximize coverage capability as well as protections and antivirus signatures produced through file analysis.
Why it's important for PCNSE: Same as above - confirms data isolation for this specific FedRAMP cloud.
For more detailed information about Palo Alto Networks Advanced WildFire FedRAMP authorization(s), visit: FedRAMP.gov
The Advanced WildFire Public Sector Cloud has a few functional differences from the standard commercial Advanced WildFire public clouds. The following functionality is not available for customers connecting to the Advanced WildFire Public Sector Clouds:
-
Bare Metal Analysis is not supported by Advanced WildFire U.S. Government cloud regions.
-
The Advanced WildFire U.S. Public Sector cloud region cannot be accessed through the WildFire portal.
-
Right to delete functionality is not available without a service request.
Get Started with the Advanced WildFire Public Sector Cloud
Follow any internal procedural measures to determine the suitability of using the Advanced WildFire Public Sector cloud within your network, such as, but not limited to conducting a risk analysis, evaluation of the CSP submission package, and authorization approvals. Please contact your Palo Alto Networks sales representative / Advanced WildFire: U.S. Public Sector Cloud point of contact to discuss any additional operational details.
Access Advanced WildFire Public Sector cloud regions begin when you have met the proper organization requirements for operating a FedRAMP authorized service.
Contact the Palo Alto Networks Account Team to begin the on-boarding process. After completing the Advanced WildFire Activation, reconfigure the firewall (s) to forward unknown files and email links for analysis using the following URL:
pubsec-cloud.wildfire.paloaltonetworks.com
.
For more information, see Forward Files for Wildfire Analysis. If you require any additional assistance, contact Palo Alto Networks Customer Support.
WildFire: U.S. Government Cloud
As of July 15, 2024, the Palo Alto Networks WildFire U.S. Government Cloud has been superseded by the Advanced WildFire Government Cloud and Advanced WildFire Public Sector Cloud
, which provides access to high-security Advanced WildFire Cloud environments operating a newer codebase with an enhanced feature set. As a result,
Palo Alto Networks no longer onboards new customers to the WildFire U.S. Government Cloud
. Existing customers can continue to access the WildFire U.S. Government Cloud until the
decommission date of November 30, 2024
, at which point, the existing URI will be redirected to the Advanced WildFire Public Sector Cloud.
Why it's important for PCNSE: Explicit dates and end-of-life status for this specific FedRAMP offering are key details.
The Palo Alto Networks WildFire U.S. Government cloud is a high-security malware analysis platform that is FedRAMP (Federal Risk and Authorization Management Program) authorized. This WildFire cloud environment is intended for use only by U.S. Federal agencies requiring a standardized approach to security assessment, authorization, and continuous monitoring for cloud products and services. The WildFire: U.S. Government cloud operates as a separate and distinct entity — Any privacy information that might be present in samples sent for analysis, such as email addresses, IP addresses, and passive DNS, will not be shared with any other WildFire cloud instance. However, it is still able to leverage threat data generated by the WildFire public cloud to maximize coverage capability as well as protections and antivirus signatures produced through file analysis.
For more detailed information about Palo Alto Network’s WildFire FedRAMP authorization, visit: Palo Alto Networks Government Cloud Services - WildFire
The WildFire public cloud (the global and regional clouds) and the WildFire U.S. Government cloud has several functional differences from the public cloud. The following functionality is not available for customers connecting to the WildFire: U.S. Government cloud:
-
Bare Metal Analysis is not supported by the U.S. Government cloud.
-
Script file (Bat, JS, BVS, PS1, Shell script, and HTA) analysis is currently not supported.
-
The WildFire: U.S. Government cloud cannot be accessed through the WildFire portal.
-
The WildFire: U.S Government cloud cannot be integrated with other cloud-based services.
-
Right to delete functionality is not available.
-
The WildFire: U.S Government cloud does not currently support Advanced WildFire analysis.
Get Started with the WildFire: U.S. Government Cloud
In order to connect to the WildFire: U.S. Government cloud, you must apply for access. Follow any internal procedural measures to determine the suitability of using the WildFire: U.S Government cloud within your network, such as, but not limited to conducting a risk analysis, evaluation of the CSP submission package, and authorization approvals. Please contact your Palo Alto Networks sales representative / WildFire: U.S. Government Cloud point of contact to discuss any additional operational details.
File Type Support
The following table lists the file types that are supported for analysis in the WildFire cloud environments.
For a comprehensive list of specific file types supported by WildFire, refer to Supported File Types (Complete List).
|
File Types Supported for Analysis
|
Advanced WildFire Public Cloud (all regions)
|
WildFire U.S. Government Cloud
|
Advanced WildFire Portal | API (direct upload; all regions)
|
|
Links contained in emails
|

|
|
|
|
Android application package (APK) files
|
|
|
|
|
Adobe Flash files
|
|
|
|
|
Java Archive (JAR) files
|
|
|
|
|
Microsoft Office files (includes SLK and IQY files)
|
|
|
|
|
Portable executable files (includes MSI files)
|
|
|
|
|
Portable document format (PDF) files
|
|
|
|
|
Mac OS X* files
|
|
|
|
|
Linux (ELF files and Shell scripts) files
|
|
|
|
|
Archive (RAR, 7-Zip, ZIP**) files
|
|
|
|
|
Script (BAT, JS, VBS, PS1, and HTA) files
|
|

|
|
|
Python scripts
|
|
|
|
|
Perl scripts
|
|
|
|
|
Archive (ZIP [direct upload] and ISO) files
|
|
|
|
|
Image (JPG and PNG) files
|
|
|
|
* Static analysis of DMG, PKG, and ZBundle files is only available in the Advanced WildFire Global (U.S.) and Europe Cloud regions, however, static analysis for other Mac OS X files (fat and macho) is supported across all regional clouds. Dynamic analysis for all Mac OS X files is only supported in the Advanced WildFire Global (U.S.) and Europe Cloud regions.
** ZIP files are not directly forwarded to the Advanced Wildfire cloud for analysis. Instead, they are first decoded by the firewall, and files that match the WildFire Analysis profile criteria are separately forwarded for analysis.
Looking for more?
-
For details on each Advanced WildFire cloud deployments, see Advanced WildFire Deployments.
-
For details about each file type supported for WildFire analysis, see File Analysis.
Supported File Types (Complete List)
The following table lists the file types supported by WildFire analysis. For files marked Yes in the Forwarding Support column, this includes files that are MIME encoded in web traffic (HTTP/HTTPS) and email protocols (SMTP, IMAP, POP).
|
Supported Content Type
|
Extension Example
|
Forwarding Support
|
|
7zip Archive
|
7z
|
Yes
|
|
Adobe Flash File
|
swf
|
Yes
|
|
Android APK
|
apk
|
Yes
|
|
Android DEX
|
dex
|
Yes
|
|
batch
|
bat
|
Yes
|
|
bzip2 Archive
|
bz
|
Yes
|
|
Comma-Separated Values
|
csv
|
No
|
|
DLL, DLL64
|
dll
|
Yes
|
|
ELF
|
elf
|
Yes
|
|
Gzip Archive
|
gz
|
No
|
|
HTML Application
|
hta
|
Yes
|
|
ISO
|
iso
|
No
|
|
JAVA Class
|
class
|
Yes
|
|
JAVA JAR
|
jar
|
Yes
|
|
Javascript/JScript
|
js, jse, wsf
|
Yes (JS only)
|
|
Joint Photographic Experts Group
|
jpg
|
No
|
|
Link
|
elink
|
Yes
|
|
Mach-O
|
macho
|
Yes
|
|
macOS App Installer
|
pkg
|
Yes
|
|
macOS App Bundle in ZIP Archive
|
zbundle
|
No
|
|
macOS Universal Binary File
|
fat
|
No
|
|
macOS Disk Image
|
dmg
|
Yes
|
|
Microsoft Excel 97 - 2003 Document
|
xls
|
Yes
|
|
Microsoft Excel Document
|
xlsx
|
Yes
|
|
Microsoft One Note Document
|
one
|
Yes
|
|
Microsoft PowerPoint 97 - 2003 Document
|
ppt
|
Yes
|
|
Microsoft PowerPoint Document
|
pptx
|
Yes
|
|
Microsoft Symbolic Link file
|
slk
|
Yes
|
|
Microsoft Web Query File
|
iqy
|
Yes
|
|
Microsoft Word 97 - 2003 Document
|
doc
|
Yes
|
|
Microsoft Word Document
|
docx
|
Yes
|
|
OpenDocument Spreadsheet Document
|
ods
|
No
|
|
OpenDocument Text Document
|
odt
|
No
|
|
PDF
|
pdf
|
Yes
|
|
PE, PE64
|
exe
|
Yes
|
|
Perl Script
|
pl
|
No
|
|
Portable Network Graphics file
|
png
|
No
|
|
PowerShell
|
ps1
|
Yes
|
|
Python Script
|
py
|
Yes
|
|
RAR Archive
|
rar
|
Yes
|
|
RTF
|
rtf
|
Yes
|
|
Shell Script
|
sh
|
Yes
|
|
Tar Archive
|
tar
|
No
|
|
VBScript
|
vbs, vbe
|
Yes (VBS only)
|
|
Windows Installer Package
|
msi
|
Yes
|
|
Windows Link File
|
lnk
|
Yes
|
|
Windows Script
|
wsf
|
No
|
|
Zip Archive
|
zip
|
No
|
|
Active Server Pages
|
asp
|
No
|
|
Active Server Pages Extended
|
aspx
|
No
|
|
Extensible Markup Language
|
xml
|
No
|
|
HyperText Markup Language
|
html
|
No
|
Advanced WildFire Example
The following example scenario summarizes the full Advanced WildFire™ lifecycle. In this example, a sales representative from Palo Alto Networks downloads a new software sales tool that a sales partner uploaded to Dropbox. The sales partner unknowingly uploaded an infected version of the sales tool install file and the sales rep then downloads the infected file.
This example will demonstrate how a Palo Alto Networks firewall in conjunction with Advanced WildFire can discover zero-day malware downloaded by an end user, even if the traffic is SSL encrypted. After Advanced WildFire identifies the malware a log is sent to the firewall and the firewall alerts the administrator who then contacts the user to eradicate the malware. Advanced WildFire then generates a new signature for the malware, after which firewalls automatically download the signature to protect against future exposure. Although some file sharing web sites have an antivirus feature that checks files as they are uploaded, they can only protect against known malware.
This example uses a web site that uses SSL encryption. In this case, the firewall has decryption enabled, including the option to forward decrypted content for analysis.
-
The sales person from the partner company uploads a sales tool file named
sales-tool.exe
to his Dropbox account and then sends an email to the Palo Alto Networks sales person with a link to the file.
-
The Palo Alto sales person receives the email from the sales partner and clicks the download link, which takes her to the Dropbox site. She then clicks
Download
to save the file to her desktop.
-
The firewall that is protecting the Palo Alto sales rep has a WildFire Analysis profile rule attached to a security policy rule that will look for files in any application that is used to download or upload any of the supported file types. The firewall can also be configured to forward the
email-link
file type, which enables the firewall to extract HTTP/HTTPS links contained in SMTP and POP3 email messages. As soon as the sales rep clicks download, the firewall forwards the
sales-toole.exe
file to Advanced WildFire, where the file is analyzed for zero-day malware. Even though the sales rep is using Dropbox, which is SSL encrypted, the firewall is configured to decrypt traffic, so all traffic can be inspected. The following screen shots show the WildFire Analysis profile rule, the security policy rule configured with the WildFire analysis profile rule attached, and the option to allow forwarding of decrypted content enabled.

-
At this point, Advanced WildFire has received the file and is analyzing it for more than 200 different malicious behaviors.
-
After Advanced WildFire has completed the file analysis, it sends an Advanced WildFire log back to the firewall with the analysis results. In this example, the log shows that the file is malicious.

-
The firewall is configured with a log forwarding profile that will send alerts to the security administrator when malware is discovered.

-
The security administrator identifies the user by name (if User-ID is configured), or by IP address if User-ID is not enabled. At this point, the administrator can shut down the network or VPN connection that the sales representative is using and will then contact the desktop support group to work with the user to check and clean the system.
By using the Advanced WildFire detailed analysis report, the desktop support person can determine if the user system is infected with malware by looking at the files, processes, and registry information detailed in the Advanced WildFire analysis report. If the user runs the malware, the support person can attempt to clean the system manually or re-image it.
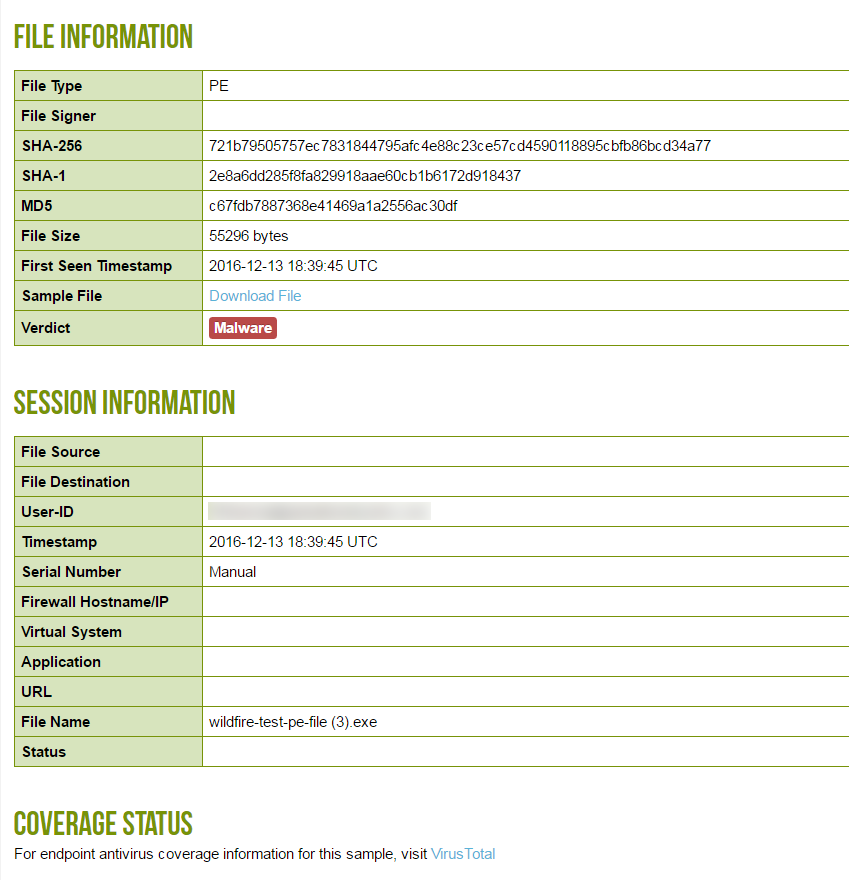
-
Now that the administrator has identified the malware and the user system is being checked, how do you protect from future exposure? Answer: In this example, the administrator set a schedule on the firewall to download and install Advanced WildFire signatures every 15 minutes and to download and install Antivirus updates once per day. In less than an hour and a half after the sales rep downloaded the infected file, Advanced WildFire identified the zero-day malware, generated a signature, added it to the Advanced WildFire update signature database provided by Palo Alto Networks, and the firewall downloaded and installed the new signature. This firewall and any other Palo Alto Networks firewall configured to download Advanced WildFire and antivirus signatures is now protected against this newly discovered malware. The following screenshot shows the Advanced WildFire update schedule:
All of this occurs well before most antivirus vendors are even aware of the zero-day malware. In this example, within a very short period of time, the malware is no longer considered zero-day because Palo Alto Networks has already discovered it and has provided protection to customers to prevent future exposure.
Get Started with Advanced WildFire
The following steps provide a quick workflow to get started with Advanced WildFire™ on the firewall. If you’d like to learn more about Advanced WildFire before getting started, take a look at the Advanced WildFire Overview and review the Advanced WildFire Best Practices.
For information about using the WildFire private cloud or hybrid cloud, refer to the WildFire Appliance administration.
If you are using Advanced WildFire on Prisma Access, familiarize yourself with the product before configuring your WildFire Analysis Security Profile to Forward Files for Advanced WildFire Analysis.
-
Get your Advanced WildFire or WildFire subscription. If you do not have a subscription, you can still forward PEs for WildFire analysis.
-
Decide which of the Advanced WildFire Deployments works for you:
-
Advanced WildFire Public Cloud—Forward samples to a Palo Alto Networks-hosted Advanced WildFire public cloud.
-
WildFire U.S. Government cloud—Forward samples to a Palo Alto Networks-hosted WildFire U.S. Government cloud.
If you are deploying a WildFire private or hybrid cloud, refer to the WildFire Appliance administration.
-
Confirm your license is active
on the firewall.
-
Log in to the firewall.
-
Select
Device > Licenses
and check that the WildFire License is active.
If the WildFire License is not displayed, select one of the License Management options to activate the license.
Why it's important for PCNSE: Essential first step - many WildFire features depend on an active, appropriate license. Know where to check this (Device > Licenses).
-
Connect the firewall to WildFire and configure WildFire settings.
-
Select
Device > Setup > WildFire
and edit General Settings.
-
Use
WildFire Public Cloud
field to forward samples to the Advanced WildFire public cloud.
-
Define the size limits for files the firewall forwards and configure WildFire logging and reporting settings.
It is a Advanced WildFire Best Practices to set the
File Size
for PEs to the maximum size limit of 10 MB, and to leave the
File Size
for all other file types set to the default value.
-
Click
OK
to save the WildFire General Settings.
Why it's important for PCNSE: Know the location (Device > Setup > WildFire) for core settings like selecting the cloud server and file size limits.
-
Enable the firewall to
forward decrypted SSL traffic for Advanced WildFire analysis
.
This is a recommended Advanced WildFire best practice.
Why it's important for PCNSE: Critical configuration step found under Device > Setup > Content-ID. WildFire cannot analyze threats hidden in encrypted traffic without this.
-
Start submitting samples for analysis.
-
Define traffic to forward for WildFire analysis. (Select
Objects > Security Profiles > WildFire Analysis
and modify or
Add
a WildFire Analysis profile).
Why it's important for PCNSE: Know where WildFire Analysis profiles are created/modified.
As a best practice, use the WildFire Analysis default profile to ensure complete coverage for traffic the firewall allows. If you still decide to create a custom WildFire Analysis profile, set the profile to forward
Any
file type—this enables the firewall to automatically start forwarding newly-supported file types for analysis.
-
For each profile rule, set
public-cloud
as the
Destination
to forward samples to the Advanced WildFire cloud for analysis.
-
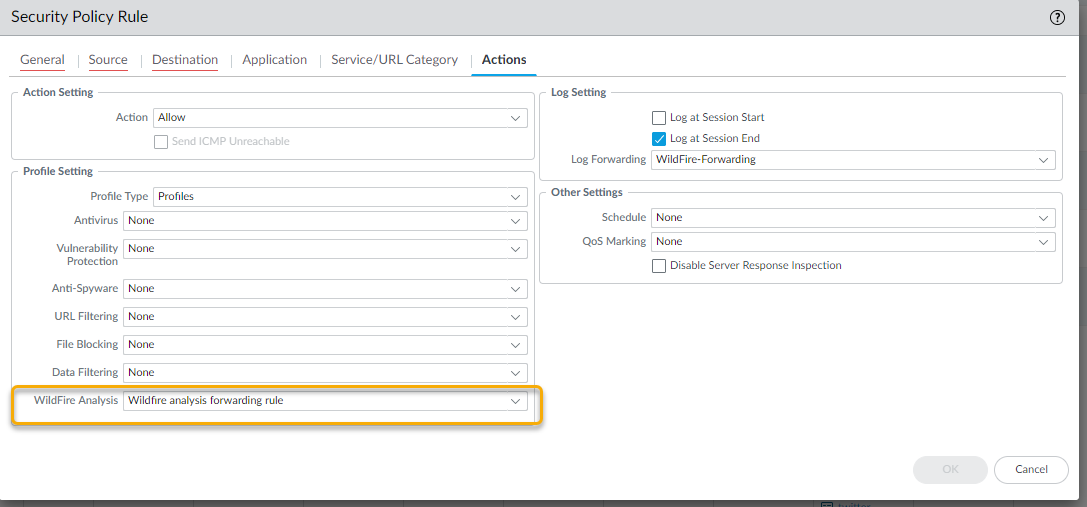
Attach the WildFire analysis profile to a security policy rule
. Traffic matched to the policy rule is forwarded for WildFire analysis (
Policies > Security
and
Add
or modify a security policy rule).
Why it's important for PCNSE: WildFire forwarding only happens if the profile is applied to a Security Policy rule that allows the traffic.
-
Enable the firewall to get the latest Advanced WildFire signatures.
New Advanced WildFire signatures are retrieved in real-time to detect and identify malware. If you are operating PAN-OS 9.1 or earlier, you can receive new signatures every five minutes.
-
Start scanning traffic for threats, including malware that Advanced WildFire identifies.
Attach the
default
Antivirus profile to a security policy rule
to scan traffic the rules allows based on WildFire antivirus signatures (select
Policies > Security
and add or a modify the defined
Actions
for a rule).
Why it's important for PCNSE: Blocking based on WildFire *signatures* requires an Antivirus profile applied to the Security Policy rule.
-
Control site access to web sites where Advanced WildFire has identified the associated link as malicious or phishing.
This option
requires a PAN-DB URL Filtering license
. Learn more about URL Filtering and how it enables you to control web site access and corporate credential submissions (to prevent phishing attempts) based on URL category.
Why it's important for PCNSE: Blocking malicious *URLs* identified by WildFire requires the separate URL Filtering license and profile applied to the policy.
To configure URL Filtering:
-
Select
Objects > Security Profiles > URL Filtering
and
Add
or modify a URL Filtering profile.
-
Select
Categories
and define
Site Access
for the phishing and malicious URL categories.
-
Block
users from accessing sites in these categories altogether, or instead, allow access but generate an
Alert
when users access sites in these categories, to ensure you have visibility into such events.
-
Enable credential phishing prevention to stop users from submitting credentials to untrusted sites, without blocking their access to these sites.
-
Apply the new or updated URL Filtering profile, and attach it to a security policy rule to apply the profile settings to allowed traffic:
-
Select
Policies > Security
and
Add
or modify a security policy rule.
-
Select
Actions
and in the Profile Setting section, set the
Profile Type
to profiles.
-
Attach the new or updated
URL Filtering
profile to the security policy rule.
-
Click
OK
to save the security policy rule.
-
Confirm that the firewall is successfully forwarding samples.
-
If you enabled logging of benign files, select
Monitor > Logs > WildFire Submissions
and check that entries are being logged for benign files submitted for analysis. (If you’d like to disable logging of benign files after confirming that the firewall is connected to a WildFire cloud, select
Device > Setup > WildFire
and clear
Report Benign Files
).
-
Other options to allow you to confirm that the firewall forwarded a specific sample, view samples the firewall forwards according to file type, and to view the total number of samples the firewall forwards.
-
Test a Sample Malware File to test your complete WildFire configuration.
Why it's important for PCNSE: Know where to check if files are actually being submitted (Monitor > Logs > WildFire Submissions) and how enabling benign logging helps verification.
-
Investigate analysis results.
-
Find analysis results:
-
Use the firewall to monitor malware and view WildFire analysis reports for a sample.
-
View reports on the Advanced WildFire portal for all samples submitted to the Advanced WildFire public cloud, including samples that you manually submitted to the WildFire public cloud.
-
Use the Advanced WildFire API to retrieve sample verdicts and reports from a WildFire appliance.
-
Next step:
Review and implement Advanced WildFire Best Practices.
Advanced WildFire Deployment Best Practices
The following topics describe deployments and configurations that Palo Alto Networks recommends when you are using WildFire
®
hardware or services as part of your network threat detection and prevention solution.
Advanced WildFire Best Practices
Prisma Access users—Refer to the Prisma Access for product-specific information about the user-interface.
-
Follow the best practices to secure your network from Layer 4 and Layer 7 evasions to ensure reliable content identification and analysis. Specifically, make sure that you implement the best practices for TCP settings (
Device > Setup > Session > TCP Settings
) and Content-ID™ settings (
Device > Setup > Content-ID > Content-ID Settings
).
-
Also make sure that you have an active Threat Prevention subscription. Together, Advanced WildFire
®
and Threat Prevention enable comprehensive threat detection and prevention.
-
Download and install content updates on a daily basis to receive the latest product updates and threat protections generated by Palo Alto Networks. Review the instructions for installing content and software updates for more information about what is included in the update packages.
-
If you are running PAN-OS 10.0 or later,
configure your firewall to retrieve Advanced WildFire signatures in real-time
. This provides access to newly-discovered malware signatures as soon as the Advanced WildFire public cloud can generate them, thereby preventing successful attacks by minimizing your exposure time to malicious activity.
Why it's important for PCNSE: Reinforces real-time updates as a best practice for licensed users on supported OS versions.
-
If you configured your firewall to decrypt SSL traffic, then
enable the firewall to Forward Decrypted SSL Traffic for WildFire Analysis
. Only a superuser can enable this option.
Why it's important for PCNSE: Critical best practice. Without decrypting and forwarding, threats in SSL/TLS are missed by WildFire. Know the config location.
-
Use the default WildFire Analysis profile
to define the traffic that the firewall should forward for analysis (
Objects > Security Profiles > WildFire Analysis
). The default WildFire Analysis profile ensures complete coverage for all traffic that your Security policy allows—it specifies that all supported file types across all applications are forwarded for Advanced WildFire analysis regardless whether the files are uploaded or downloaded.
Why it's important for PCNSE: Recommends the 'default' profile or setting file types to 'any' in custom profiles for maximum coverage and future-proofing.
If you choose to create a custom WildFire Analysis profile, it is a best practice to still set the profile to forward
any
file type. This enables the firewall to automatically begin forwarding file types as they become supported for analysis.
For details on applying a WildFire Analysis profile to firewall traffic, review how to Forward Files for Advanced WildFire Analysis.
WildFire Action settings in the Antivirus profile may impact traffic if the traffic generates an Advanced WildFire signature that results in a reset or a drop action. You can exclude internal traffic, such as software distribution applications through which you deploy custom-built programs, to transition safely to best practices because Advanced WildFire may identify custom-built programs as malicious and generate a signature for them. Check
Monitor > Logs > WildFire Submissions
to see if any internal custom-built programs trigger Advanced WildFire signatures.
-
While you are configuring the firewall to Forward Files for Advanced WildFire Analysis, review the file
Size Limit
for all supported file types. Set the
Size Limit
for all file types to the default limits. (Select
Device > Setup > WildFire
and edit the General Settings to adjust file size limits based on file type. You can view the Help information to find the default size limit for each file type).
About the Default File Size Limits for WildFire Forwarding
The default file size limits on the firewall are designed to include the majority of malware in the wild (which is smaller than the default size limits) and to exclude large files that are very unlikely to be malicious and that can impact WildFire file-forwarding capacity. Because the firewall has a specific capacity reserved to forward files for Advanced WildFire analysis, forwarding high numbers of large files can cause the firewall to skip forwarding of some files. This condition occurs when the maximum file size limits are configured for a file type that is traversing the firewall at a high rate. In this case, a potentially malicious file might not get forwarded for Advanced WildFire analysis. Consider this possible condition if you would like to increase the size limit for files other than PEs beyond their default size limit.
The following graph is a representative illustration of the distribution of file sizes for malware as observed by the Palo Alto Networks threat research team. You can increase the firewall default file size settings to the maximum file size setting to gain a relatively small increase in the malware catch rate for each file type.
Recommended File Size Limits to Catch Uncommonly Large Malicious Files
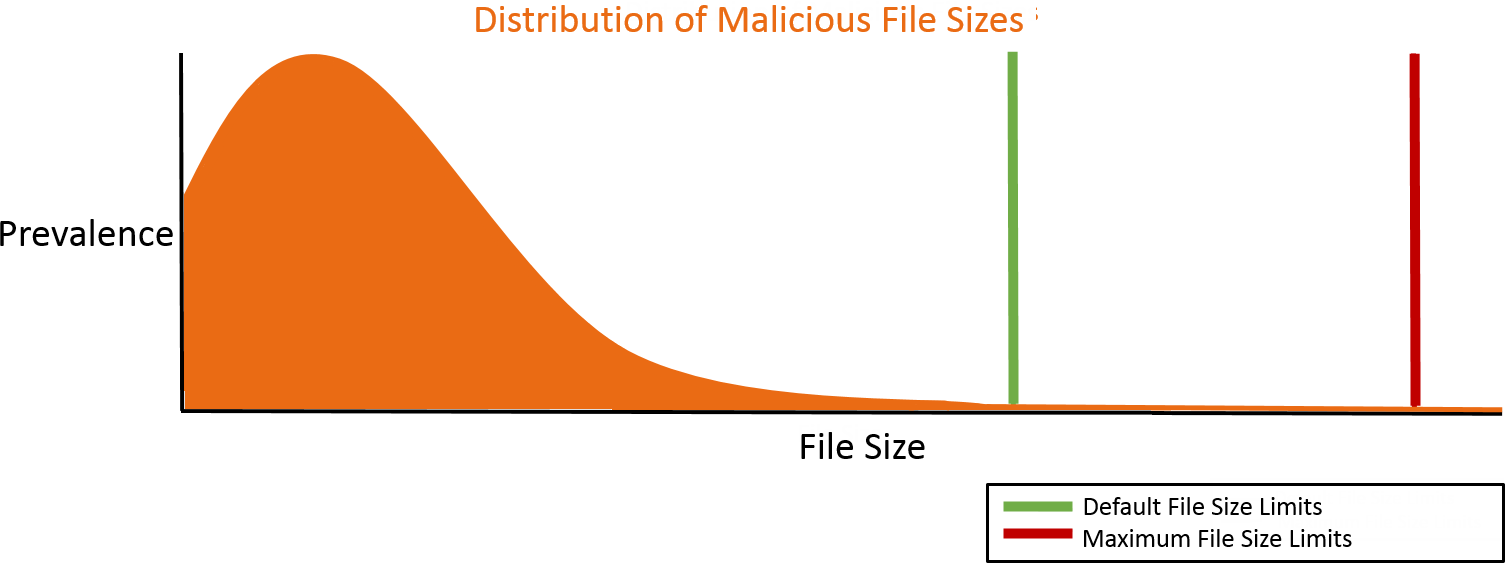
If you are concerned specifically about uncommonly large malicious files, then you can increase file size limits beyond the default settings. In these cases, the following settings are recommended to catch rare, very large malicious files.
Select
Device > Setup > WildFire
and edit General Settings to adjust the
Size Limit
for each file type:
|
File Type
|
PAN-OS 9.0 and later File-Forwarding Maximum Size Recommendations
|
PAN-OS 8.1 File-Forwarding Maximum Size Recommendations
|
|
pe
|
16MB
|
10MB
|
|
apk
|
10MB
|
10MB
|
|
pdf
|
3,072KB
|
1,000KB
|
|
ms-office
|
16,384KB
|
2,000KB
|
|
jar
|
5MB
|
5MB
|
|
flash
|
5MB
|
5MB
|
|
MacOSX
|
10MB
|
1MB
|
|
archive
|
50MB
|
10MB
|
|
linux
|
50MB
|
10MB
|
|
script
|
20KB
|
20KB
|
Configure Advanced WildFire Analysis
The following topics describe how to enable Advanced WildFire™ analysis in your network deployment. You can set up Palo Alto Networks firewalls to automatically forward unknown files to the Advanced WildFire public cloud or a WildFire private cloud, and you can also manually submit files for analysis using the Advanced WildFire portal. Samples submitted for analysis receive a verdict of benign, grayware, malicious, or phishing, and a detailed analysis report is generated for each sample.
Forward Files for Advanced WildFire Analysis
Configure Palo Alto Networks firewalls to forward unknown files or email links and blocked files that match existing antivirus signatures for analysis. Use the
WildFire Analysis
profile to define files to forward to one of the Advanced WildFire public cloud options and then
attach the profile to a security rule
to trigger inspection for zero-day malware.
Why it's important for PCNSE: Reiterates that the profile must be applied to a Security Policy Rule to take effect.
Specify traffic to be forwarded for analysis based on the application in use, the file type detected, links contained in email messages, or the transmission direction of the sample (upload, download, or both). For example, you can set up the firewall to forward Portable Executables (PEs) or any files that users attempt to download during a web-browsing session. In addition to unknown samples, the firewall forwards blocked files that match existing antivirus signatures. This provides Palo Alto Networks a valuable source of threat intelligence based on malware variants that signatures successfully prevented but has not been seen before.
If you are using a WildFire appliance to host a WildFire private cloud, you can extend WildFire analysis resources to a WildFire hybrid cloud, by configuring the firewall to continue to forward sensitive files to your WildFire private cloud for local analysis, and forward less sensitive or unsupported file types to the WildFire public cloud. For more information about using and configuring the WildFire appliance, refer to the WildFire Appliance Administration.
Before you begin:
-
File analysis support can have minor differences between Advanced WildFire cloud regions. Refer to File Type Support for more information.
-
If a firewall resides between the firewall you are configuring to forward files and the Advanced WildFire cloud, make sure that the firewall in the middle allows the following ports:
|
Port
|
Usage
|
|
443
|
Registration, PCAP Downloads, Sample Downloads, Report Retrieval, File Submission, PDF Report Downloads
|
|
10443
|
Dynamic Updates
|
-
Strata Cloud Manager
-
PAN-OS & Panorama
-
(
PA-7000 Series Firewalls Only
) To enable a PA-7000 Series firewall to forward samples for analysis, you must first configure a data port on an NPC as a Log Card interface. If you have a PA-7000 series appliance equipped with an LFC (log forwarding card), you must configure a port used by the LFC. When configured, the log card port or the LFC interface takes precedence over the management port when forwarding samples.
-
Specify the Advanced WildFire Deployments to which you want to forward samples.
Select
Device > Setup > WildFire
and edit the General Settings based on your WildFire cloud deployment (public, government, private, or hybrid).
The WildFire U.S. Government Cloud is only available to U.S. Federal agencies as an optional analysis environment.
Advanced WildFire Public Cloud:
-
Enter the
WildFire Public Cloud
URL:
-
Make sure the
WildFire Private Cloud
field is clear.
WildFire FedRAMP Cloud options:
-
Enter the
WildFire FedRAMP Cloud
URL:
-
U.S. Government Cloud:
wildfire.gov.paloaltonetworks.com
-
Advanced WildFire Government Cloud:
gov-cloud.wildfire.paloaltonetworks.com
-
Advanced WildFire Public Sector Cloud:
pubsec-cloud.wildfire.paloaltonetworks.com
-
Make sure the
WildFire Private Cloud
field is clear.
-
Define the size limits for files the firewall forwards and configure logging and reporting settings.
Continue editing General Settings (
Device > Setup >WildFire
).
-
Review the
File Size Limits
for files forwarded from the firewall.
It is a Advanced WildFire Best Practices to set the
File Size
for PEs to the maximum size limit of 10 MB, and to leave the
File Size
for all other file types set to the default value.
-
Select
Report Benign Files
to allow logging for files that receive a verdict of benign.
-
Select
Report Grayware Files
to allow logging for files that receive a verdict of grayware.
-
Define what session information is recorded in WildFire analysis reports by editing the Session Information Settings. By default, all session information is displayed in WildFire analysis reports. Clear the check boxes to remove the corresponding fields from WildFire analysis reports and click
OK
to save the settings.
-
Define traffic to forward for analysis.
-
Select
Objects > Security Profiles > WildFire Analysis
,
Add
a new WildFire analysis profile, and give the profile a descriptive
Name
.
-
Add
a profile rule to define traffic to be forwarded for analysis and give the rule a descriptive
Name
, such as
local-PDF-analysis
.
-
Define the profile rule to match to unknown traffic and to forward samples for analysis based on:
-
Applications
—Forward files for analysis based on the application in use.
-
File Types
—Forward files for analysis based on file types, including links contained in email messages. For example, select
PDF
to forward unknown PDFs detected by the firewall for analysis.
-
Direction
—Forward files for analysis based the transmission direction of the file (upload, download, or both). For example, select
both
to forward all unknown PDFs for analysis, regardless of the transmission direction.
-
Click
OK
to save the WildFire analysis profile.
Why it's important for PCNSE: Understand the components of a WildFire Analysis profile rule: Application, File Type, and Direction.
-
Attach the WildFire Analysis profile to a security policy rule.
Traffic allowed by the security policy rule is evaluated against the attached WildFire analysis profile; the firewalls forwards traffic matched to the profile for WildFire analysis.
-
Select
Policies > Security
and
Add
or modify a policy rule.
-
Click the
Actions
tab within the policy rule.
-
In the Profile Settings section, select
Profiles
as the
Profile Type
and select a
WildFire Analysis
profile to attach to the policy rule
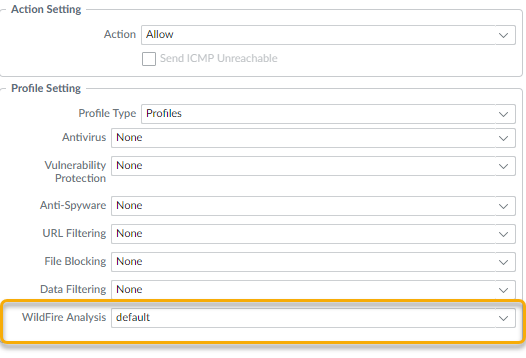
Why it's important for PCNSE: Know exactly where in the Security Policy rule (Actions tab -> Profile Setting) the WildFire Analysis profile is applied.
-
Make sure to enable the firewall to also Forward Decrypted SSL Traffic for Advanced WildFire Analysis.
This is a recommended best practice.
-
(
Optional
) Enable Advanced WildFire Inline ML
-
(
Optional
) Enable Hold Mode for Real-Time Signature Lookup
-
Review and implement Advanced WildFire Best Practices.
-
Click
Commit
to apply the updated settings.
-
(
Optional
) Install a Device Certificate to update to the latest version of the certificate used by the firewall to communicate with Palo Alto Networks cloud services.
-
(
Optional
) Configure the Content Cloud FQDN Settings.
-
Choose what to do next...
-
Verify WildFire Submissions to confirm that the firewall is successfully forwarding files for analysis.
-
Monitor WildFire Activity to assess alerts and details reported for malware.
Forward Decrypted SSL Traffic for Advanced WildFire Analysis
Enable the firewall to forward decrypted SSL traffic for Advanced WildFire analysis. Traffic that the firewall decrypts is evaluated against security policy rules; if it matches the WildFire analysis profile attached to the security rule, the decrypted traffic is forwarded for analysis before the firewall re-encrypts it.
Only a super user can enable this option.
Why it's important for PCNSE: Notes the administrative privilege required for this setting.
Forwarding decrypted SSL traffic for analysis is a Advanced WildFire Best Practices.
-
On a firewall that does not have multiple virtual systems enabled:
-
If you have not already, enable the firewall to perform decryption and Forward Files for Advanced WildFire Analysis.
-
Select
Device > Setup > Content-ID
.
-
Edit the Content-ID settings and
Allow Forwarding of Decrypted Content
.
-
Click
OK
to save the changes.
Why it's important for PCNSE: Know the exact GUI path (Device > Setup > Content-ID) to enable forwarding of decrypted content.
-
On a firewall with virtual systems enabled:
-
If you have not already, enable decryption and Forward Files for Advanced WildFire Analysis.
-
Select
Device > Virtual Systems
, click the virtual system you want to modify, and
Allow Forwarding of Decrypted Content
.
Why it's important for PCNSE: Know the configuration path differs slightly when using virtual systems.
-
For Prisma Access, this is configured as part of your
WildFire and Antivirus
security profile settings. For more information, refer to Forward Files for Advanced WildFire Analysis for Prisma Access.
Enable Advanced WildFire Inline Cloud Analysis
Palo Alto Networks Advanced WildFire operates a series of cloud-based ML detection engines that provide inline analysis of PE (portable executable) files traversing your network to detect and prevent advanced malware in real-time. As with other malicious content that WildFire detects, threats detected by Advanced WildFire Inline Cloud Analysis generate a signature that is then disseminated to customers through an update package, providing a future defense for all Palo Alto Networks customers.
The cloud-based engines enable the detection of never-before-seen malware (e.g., a Palo Alto Networks zero-day - malware previously unseen in the wild or by Palo Alto Networks) and block it from entering your environment. Advanced WildFire Inline Cloud Analysis uses a lightweight forwarding mechanism on the firewall to minimize performance impact. The cloud-based ML models are updated seamlessly, to address the ever-changing threat landscape without requiring content updates or feature release support.
Advanced WildFire Inline Cloud Analysis is enabled and configured through the WildFire Analysis profile and requires PAN-OS 11.1 or later with an active Advanced WildFire license.
Why it's important for PCNSE: Know the OS version (11.1+), license (Advanced WF), and configuration profile (WildFire Analysis) for this feature.
-
Install an updated firewall device certificate used to authenticate to the Advanced WildFire cloud analysis service. Repeat for all firewalls enabled for inline cloud analysis.
This step is not necessary if you already installed the current version of the device certificate on your firewall.
-
Log in to the PAN-OS web interface.
-
To enable Advanced WildFire Inline Cloud Analysis, you must have an active Advanced WildFire subscription. For more information, refer to: Licensing, Registration, and Activation.
To verify subscriptions for which you have currently-active licenses, select
Device > Licenses
and verify that the appropriate licenses are available and have not expired.

If your current WildFire license has expired and you are installing an Advanced WildFire license, you must first remove the WildFire license from the NGFW before installing the Advanced WildFire license.
-
Update or create a new WildFire Analysis Security profile to enable Advanced WildFire Inline Cloud Analysis.
-
Select an existing
WildFire Analysis Profile
or
Add
a new one (
Objects > Security Profiles > WildFire Analysis
).
-
Select your WildFire analysis profile and then go to
Inline Cloud Analysis
and
Enable cloud inline analysis
.
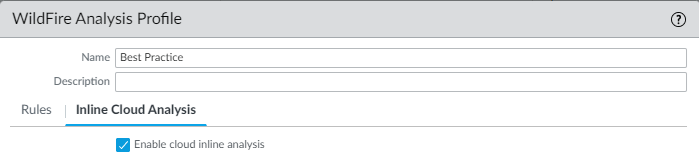
-
Specify a rule defining an action to take when Advanced WildFire Inline Cloud Analysis detects advanced malware.
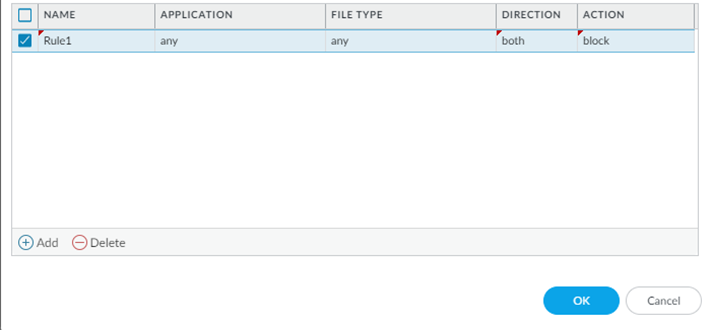
-
Name—Enter a descriptive Name for any rules you add to the profile (up to 31 characters).
-
Application—Add application traffic to match against for which the rules defining the Inline Cloud ML actions are governed.
-
File Type—Select a File Type to be analyzed at the defined analysis destination for the rule.
Only PE (portable executable) are supported at this time
.
Why it's important for PCNSE: Note the current file type limitation (PE only) for Inline Cloud Analysis.
-
Direction—Apply the rule to traffic depending on the transmission Direction. You can apply the rule to
download
traffic.
-
Action—Configure the action to take when a threat is detected using Advanced WildFire Inline Cloud Analysis. You can
allow
the application traffic to continue to the destination or
block
traffic from either a source or a source-destination.
Palo Alto Networks recommends setting the action to block for optimal security.
-
Click
OK
to exit the WildFire Analysis Profile configuration window.
-
Review the maximum file size that can be forwarded for analysis using Advanced WildFire Inline Cloud Analysis.
Advanced WildFire Inline Cloud Analysis provides a fast WildFire verdict, however, a full report for a malicious sample is only available after the sample undergoes full dynamic analysis, which can take up to 30 minutes.
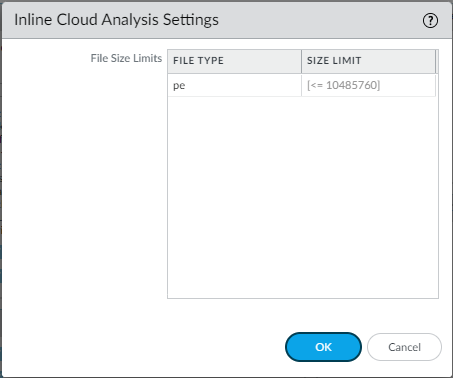
-
Select
Device > Setup > WildFire > Inline Cloud Analysis Settings
and review the file size limits.
-
Click
OK
to confirm your changes.
-
Specify the network session information that the firewall forwards about a given sample. Palo Alto Networks uses session information to learn more about the context of the suspicious network event, indicators of compromise related to the malware, affected hosts and clients, and applications used to deliver the malware. These options are enabled by default.
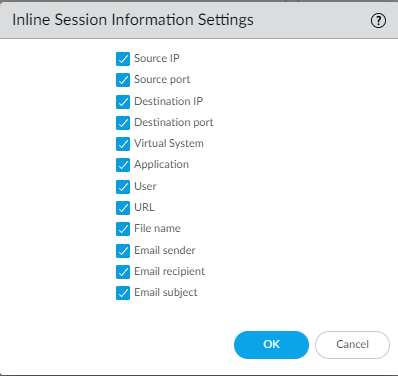
-
Select
Device > Setup > WildFire > Inline Session Information Settings
and select or clear the options as necessary.
[... Session Info options ...]
-
Click
OK
to confirm your changes.
-
Configure the timeout latency and action to take when the request exceeds the max latency.
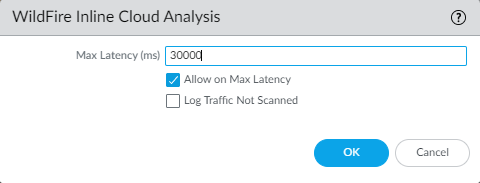
-
Specify the action to take when latency limits are reached for Advanced WildFire Inline Cloud Analysis requests:
-
Max Latency (ms)—Specify the maximum acceptable processing time, in seconds, for Advanced WildFire Inline Cloud Analysis to return a result.
-
Allow on Max Latency—Enables the firewall to take the action of allow, when the maximum latency is reached. De-selecting this option sets the firewall action to block.
-
Log Traffic Not Scanned— Enables the firewall to log Advanced WildFire Inline Cloud Analysis requests that exhibit the presence of advanced malware, but have not been processed by the Advanced WildFire cloud.
-
Click
OK
to confirm your changes.
-
(
Required when the firewall is deployed with an explicit proxy server
) Configure the proxy server used to access the servers that facilitate requests generated by all configured inline cloud analysis features. A single proxy server can be specified and applies to all Palo Alto Networks update services, including all configured inline cloud and logging services.
-
PAN-OS 11.2.3 and later
Configure the proxy server through PAN-OS.
-
Select
Device > Setup > Services
and edit the
Services
details.
-
Specify the
Proxy Server
settings and
Enable proxy for Inline Cloud Services
. You can provide either an IP address or FQDN in the
Server
field.
The proxy server password must contain a minimum of seven characters.
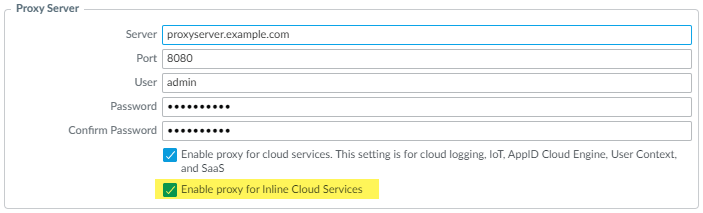
-
Click
OK
.
-
PAN-OS 11.1.5 and later
Configure the proxy server through the firewall CLI.
-
Access the firewall CLI.
-
Configure the base proxy server settings using the following CLI commands:
-
set deviceconfig system secure-proxy-server <FQDN_or_IP>
-
set deviceconfig system secure-proxy-port <1-65535>
-
set deviceconfig system secure-proxy-user <value>
set deviceconfig system secure-proxy-password <value>
The proxy server password must contain a minimum of seven characters.
-
Enable the proxy server to send requests to the inline cloud service servers using the following CLI command:
debug dataplane mica set inline-cloud-proxy enable
-
View the current operational status of proxy support for inline cloud services using the following CLI command:
debug dataplane mica show inline-cloud-proxy
For example:
debug dataplane mica show inline-cloud-proxy

Proxy for Advanced Services is Disabled
-
(Recommended) Configure the firewall to disable the client from fetching part of a file and subsequently starting a new session to fetch the rest of a file after the firewall terminates the original session due to detected malicious activity. This occurs when a web browser implements the HTTP Range option. While enabling
Allow HTTP partial response
provides maximum availability, it can also increase the risk of a successful cyberattack. Palo Alto Networks recommends disabling
Allow HTTP partial response
for maximum security.
Allow HTTP partial response
is a global setting and affects HTTP-based data transfers which use the RANGE header, which may cause service anomalies for certain applications. After you disable
Allow HTTP partial response
, validate the operation of your business-critical applications.
-
Select
Device > Setup > Content-ID > Content-ID Settings
.
-
De-select
Allow HTTP partial response
and click
OK
.
-
Commit
your changes.
-
(
Optional
) Configure the Content Cloud FQDN Settings.
Enable Advanced WildFire Inline ML
You can prevent malicious variants of portable executables and PowerShell scripts from entering your network in real-time using machine learning (ML) based analytics on the firewall dataplane. By utilizing WildFire® Cloud analysis technology on your security platform, Advanced WildFire Inline ML dynamically detects malicious files of a specific type by evaluating various file details, including decoder fields and patterns, to formulate a high probability classification of a file. This protection extends to currently unknown as well as future variants of threats that match characteristics that Palo Alto Networks identified as malicious. Advanced WildFire inline ML complements your existing Antivirus profile protection configuration. Additionally, you can specify file hash exceptions to exclude any false-positives that you encounter, which enables you to create more granular rules in your profiles to support your specific security needs.
To enable Advanced WildFire Inline ML, you must have an active Advanced WildFire or WildFire subscription, create (or modify) an
Antivirus (or WildFire and Antivirus for Prisma Access) security profile
to configure and enable the service, and then
attach the Antivirus profile to a security policy rule
.
Why it's important for PCNSE: Clearly states that Inline ML is configured within the *Antivirus Profile* (not WildFire Analysis Profile) and must be applied via a Security Policy Rule.
Advanced WildFire Inline ML is not currently supported on the VM-50 or VM50L virtual appliance.
Why it's important for PCNSE: Platform limitations are common exam topics.
-
Strata Cloud Manager
-
PAN-OS & Panorama
To enable your WildFire inline ML configuration, attach the Antivirus profile configured with the inline ML settings to a security policy rule.
To bypass Advanced WildFire Inline ML, you must set the
Action Setting
to
disable (for all protocols)
on a per-model basis or create a WildFire Inline ML file exception using the partial hash. Do not configure your antivirus profile with signature exceptions based off of WildFire Inline ML Threat IDs. This will cause the firewall to block all traffic from your network to the IP address.
WildFire inline ML is not currently supported on the VM-50 or VM50L virtual appliance.
-
To take advantage of WildFire inline ML, you must have an active WildFire subscription to analyze Windows executables.
Verify that you have a WildFire subscription. To verify which subscriptions that you currently have licenses for, select
Device > Licenses
and verify that the appropriate licenses display and have not expired.

-
Create a new or update your existing Antivirus security profile(s) to use the real-time WildFire inline ML models.
-
Select an existing
Antivirus Profile
or create a new one (select
Objects > Security Profiles > Antivirus
and
Add
a new profile.
-
Configure your Antivirus profile.
-
Select the
WildFire Inline ML
tab and apply an
Action Setting
for each WildFire Inline ML model. This enforces the WildFire Inline ML Actions settings configured for each protocol on a per model basis. The following classification engines available:
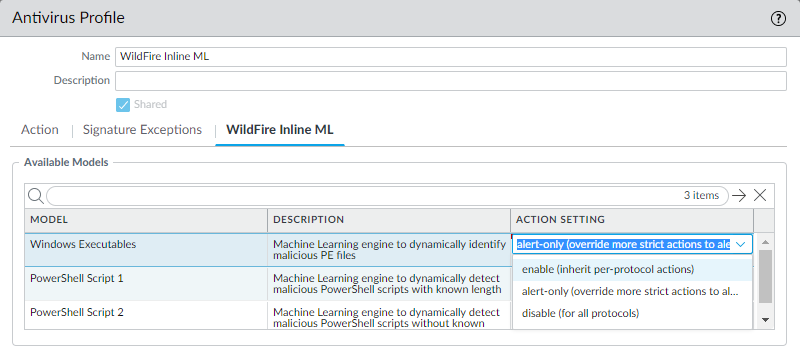
The following action settings are available:
[... Action Settings ...]
-
Click
OK
to exit the Antivirus Profile configuration window and
Commit
your new settings.
-
(
Optional
) Add file exceptions to your Antivirus security profile if you encounter false-positives. This is typically done for users who are not forwarding files to WildFire for analysis. You can add the file exception details directly to the exception list or by specifying a file from the threat logs.
If your WildFire Analysis security profile is configured to forward the filetypes analyzed using WildFire inline ML, false-positives are automatically corrected as they are received. If you continue to see ml-virus alerts for files that have been classified as benign by WildFire Analysis, please contact Palo Alto Networks Support.
-
(
Optional
) Verify the status of your firewall’s connectivity to the Inline ML cloud service.
Use the following CLI command on the firewall to view the connection status.
show mlav cloud-status
For example:
show mlav cloud-status

MLAV cloud
Current cloud server:     ml.service.paloaltonetworks.com
Cloud connection:         connected
If you are unable to connect to the Inline ML cloud service, verify that the following domain is not being blocked:
ml.service.paloaltonetworks.com
.
Why it's important for PCNSE: Know the CLI command to verify connectivity specifically for the Inline ML service.
-
(
Optional
) Configure the Content Cloud FQDN Settings.
To view information about files that have been detected using WildFire Inline ML, examine the threat logs (
Monitor > Logs > Threat
, then select the log type from the list). Files that have been analyzed using WildFire inline ML are labeled with the threat type
ml-virus
:
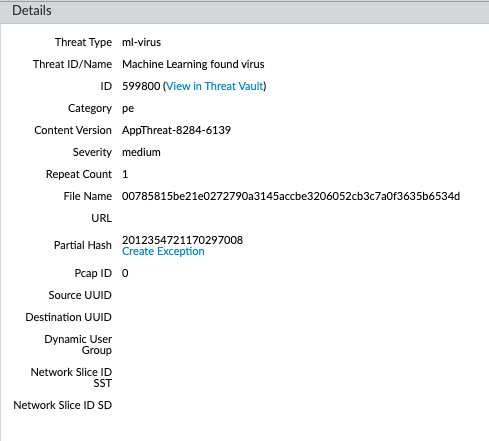
Why it's important for PCNSE: Recognize the specific Threat Log subtype (`ml-virus`) associated with Inline ML detections.
Enable Hold Mode for Real-Time Signature Lookup
You can configure the NGFW to hold the transfer of a sample while the real-time signature cloud performs a signature lookup. When the lookup is completed, the file is released to the requesting client (or blocked), based on your organization's security policy for specific WildFire verdicts, preventing the initial transfer of known malware. You can configure hold mode on a per antivirus profile basis and apply a global setting for the signature lookup timeout and the associated action.
This feature is available to all users with an active WildFire or Advanced WildFire license running PAN-OS 11.0.2 or later.
Why it's important for PCNSE: Know the license and OS requirements for this specific hold mode feature.
-
To enable hold mode for WildFire real-time signature lookups, you must have either a WildFire or Advanced WildFire subscription service license. Make sure to activate the license on the firewall if you have not done so already. To verify subscriptions for which you have currently-active licenses, select
Device Licenses
and verify that the appropriate licenses display and are not expired. The example below shows the description for the standard WildFire license.

-
Set the schedule for the firewall to retrieve WildFire signatures in real-time.
Even when the firewall is configured to use real-time signatures, supplemental signature packages are still installed on a regular basis. This provides an up-to-date signature source when you experience connectivity issues, as well as a speed benefit, where signatures are available locally.
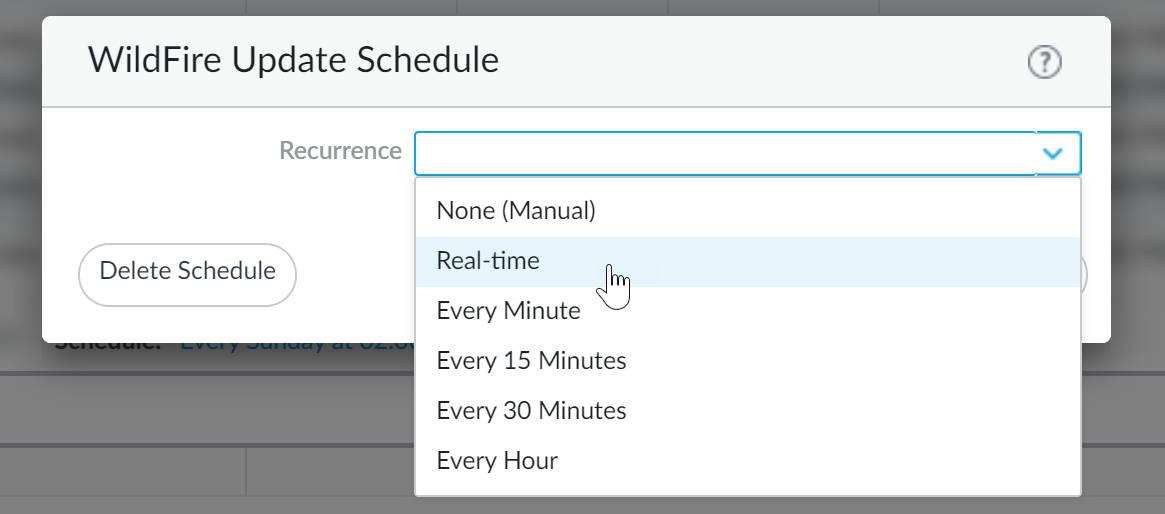
-
Select
Device > Dynamic Updates
.
-
Select the
Schedule
for WildFire updates.
-
Set the
Recurrence
(how often the firewall checks the Palo Alto Networks update server for new signatures) for
Real-time
updates.
-
Click
OK
to save the WildFire update schedule and then
Commit
your changes.
-
Configure the timeout setting and action when the request exceeds the timeout.
You must enable hold mode globally before you enable hold mode for WildFire real-time signature lookups on a per-Antivirus profile basis.
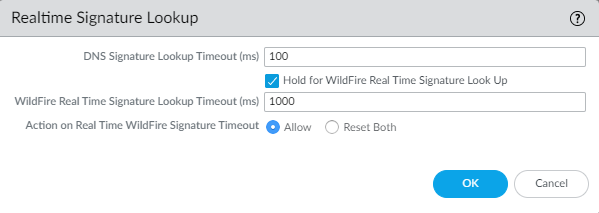
-
Select
Device > Setup > Content-ID > Realtime Signature Lookup
-
Enable
Hold for WildFire Real Time Signature Look Up
.
-
Specify the
WildFire Real Time Signature Lookup Timeout (ms)
in milliseconds (the default value is 1000).
Palo Alto Networks recommends using the default value of 1000ms unless you experience repeated timeouts during testing.
-
Specify the
Action On Real Time WildFire Signature Timeout
. The default value is
Allow
, however, Palo Alto Networks recommends setting this to
Reset-Both when
hold mode is enabled. The options include the following:
-
Allow—The NGFW allows packets through when the hold timeout threshold is reached.
-
Reset Both—The NGFW resets the connection on both the client and server ends when the hold timeout threshold is reached.
-
Select
OK
when finished.
Why it's important for PCNSE: Know the global configuration location (Device > Setup > Content-ID) for enabling hold mode and setting the timeout/action.
-
Update or create a new Antivirus Security profile to enable hold mode for WildFire real-time signature lookups.

-
Select an existing antivirus security profile or
Add
a new one (
Objects > Security > Profiles > Antivirus
).
-
Select your antivirus security profile and then go to
Action
.
-
Select
Hold for WildFire Real Time Signature Look Up
.
-
Repeat steps 4.1-4.3 for all active antivirus profiles for which you want to enable hold mode for WildFire real-time signature lookups.
Why it's important for PCNSE: Know that hold mode is activated *per-profile* within the Antivirus profile's Action tab, after being enabled globally.
-
Commit
your changes.
-
(Optional) You can view a summary of your antivirus security profile settings, including hold mode enablement, on the antivirus summary view page.
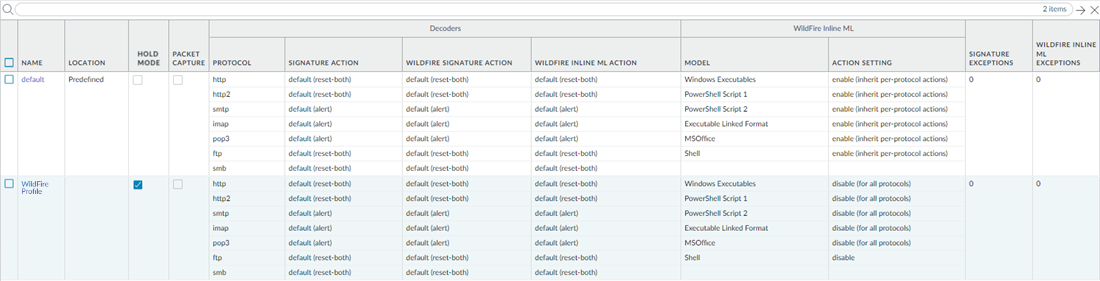
Configure the Content Cloud FQDN Settings
You can specify the cloud content Fully Qualified Domain Name (FQDN) used by the NGFW to handle Advanced WildFire service requests. The default FQDN connects to
hawkeye.services-edge.paloaltonetworks.com
and then resolves to the closest cloud services server. You can override the automatic server selection by specifying a regional cloud content server that best meets your data residency and performance requirements.
Keep in mind, the cloud content FQDN is a globally used resource and affects how other services that rely on this connection sends traffic payloads.
Why it's important for PCNSE: Understand this setting impacts more than just WildFire and changing it requires careful consideration of all cloud-connected services.
In some cases, the cloud content FQDN might not fully support the functionality of a particular Palo Alto Networks product in certain regions. Verify that the product is fully supported before changing the cloud content FQDN.
Depending on which services you use, the cloud content FQDN facilitates analysis service requests, including traffic payloads, which sends data to the servers in the selected region. If you specify a content cloud FQDN that is outside of your region (for example, if you are in the EU region but you specify the APAC region FQDN), you may be in violation of your organization’s privacy and legal regulations.
Please refer to the specific product documentation for information about how the cloud content FQDN is used by your Palo Alto Networks products.
Why it's important for PCNSE: Be aware of the data residency and compliance implications when selecting a non-default Content Cloud FQDN.
If you are experience service connectivity issues, verify that the configured cloud content FQDN is not being blocked.
-
Log in to the PAN-OS web interface.
-
Select (
Device > Setup > Content-ID > Content Cloud Settings
) and change the FQDN as desired:
-
Click
OK
.
Verify Sample Submissions
Test your deployment using malware test samples, and also verify that the firewall is correctly forwarding files for WildFire analysis.
Test a Sample Malware File
Palo Alto Networks provides sample malware files that you can use to test an Advanced WildFire configuration. Take the following steps to download the malware sample file, verify that the file is forwarded for Advanced WildFire analysis, and view the analysis results.
-
Download one of the malware test files. You can select from PE, APK, MacOSX, and ELF.
Before downloading an encrypted WildFire sample malware file, you must temporarily disable the
*.wildfire.paloaltonetworks.com
entry from the exclude from decryption list on the
Device > Certificate Management > SSL Decryption Exclusion
page, otherwise the sample will not download correctly. After conducting a verification test, be sure to re-enable the
*.wildfire.paloaltonetworks.com
entry on the SSL decryption exclusion page.
The test file is named
wildfire-test-file_type-file.exe
and each test file has a unique SHA-256 hash value.
You can also use the WildFire API to retrieve a malware test file. See the WildFire API Reference for details.
-
On the firewall web interface, select
Monitor > Logs > WildFire Submissions
to confirm that the file was forwarded for analysis.
Please wait at least five minutes for analysis results to be displayed for the file on the
WildFire Submissions
page. The verdict for the test file will always display as malware.
Why it's important for PCNSE: Know how to test the WildFire setup using the provided test files and where to look for the results (WildFire Submissions Log).
Verify File Forwarding
After the firewall is set up to Forward Files for Advanced WildFire Analysis, use the following options to verify the connection between the firewall and the Advanced WildFire public or WildFire private cloud, and to monitor file forwarding.
Several of the options to verify that a firewall is forwarding samples for analysis are CLI commands; for details on getting started with and using the CLI, refer to the PAN-OS CLI Quick Start Guide.
-
Verify the status of the firewall connection to the Advanced WildFire public and/or WildFire private cloud, including the total number of files forwarded by the firewall for analysis.
Use the
show wildfire status
command to:
-
Check the status of the Advanced WildFire public and/or WildFire private cloud to which the firewall is connected. The status
Idle
indicates that the Advanced WildFire cloud (public or private) is ready to receive files for analysis.
-
Confirm the configured size limits for files forwarded by the firewall (
Device > Setup > WildFire
).
-
Monitor file forwarding, including how the total count of files forwarded by the firewall for analysis. If the firewall is in a WildFire hybrid cloud deployment, the number of files forwarded to the WildFire public cloud and the WildFire private cloud are also displayed.
Why it's important for PCNSE: Know this fundamental CLI command for checking WildFire connectivity and basic forwarding statistics.
The following example shows the
show wildfire status
output for a firewall in a WildFire private cloud deployment:
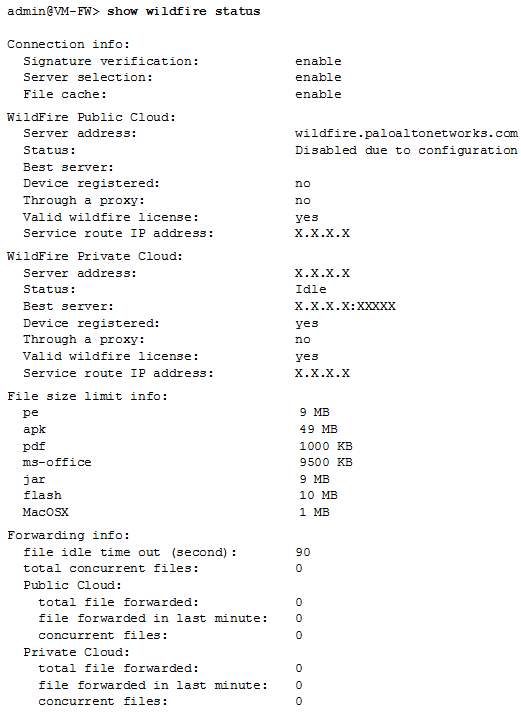
To view forwarding information for only the Advanced WildFire public cloud or WildFire private cloud, use the following commands:
-
show wildfire status channel public
-
show wildfire status channel private
-
View samples forwarded by the firewall according to file type (including email links).
Use this option to confirm that email links are being forwarded for analysis, since only email links that receive a malicious or phishing verdict are logged as
WildFire Submissions
entries on the firewall, even if logging for benign and grayware samples is enabled. This is due to the sheer number of WildFire Submissions entries that would be logged for benign email links.
Use the
show wildfire statistics
command to confirm the file types being forwarded to the Advanced WildFire public or WildFire private cloud:
Why it's important for PCNSE: Know this CLI command to see detailed counts per file type being forwarded, useful for verifying profile rules.
-
The command displays the output of a working firewall and shows counters for each file type that the firewall forwards for analysis. If a counter field shows 0, the firewall is not forwarding that file type.
-
Confirm that email links are being forwarded for analysis by checking that the following counters do not show zero:
-
FWD_CNT_APPENDED_BATCH
—Indicates the number of email links added to a batch waiting for upload to an Advanced WildFire public or WildFire private cloud.
-
FWD_CNT_LOCAL_FILE
— Indicates the total number of email links uploaded to an Advanced WildFire public or WildFire private cloud.
-
Verify that a specific sample was forwarded by the firewall and check that status of that sample.
This option can be helpful when troubleshooting to:
-
Confirm that samples that have not yet received a verdict were correctly forwarded by the firewall. Because
WildFire Submissions
are logged on the firewall only when analysis is complete and the sample has received a verdict, use this option to verify the firewall forwarded a sample that is currently undergoing analysis.
-
Track the status for a single file or email link that was allowed according to your security policy, matched to a WildFire Analysis profile, and then forwarded for analysis.
-
Check that a firewall in a hybrid cloud deployment is forwarding the correct file types and email links to either the Advanced WildFire public cloud or a WildFire private cloud.
Execute the following CLI commands on the firewall to view samples the firewall has forwarded for analysis:
-
View all samples forwarded by the firewall with the CLI command
debug wildfire upload-log
.
-
View only samples forwarded to the Advanced WildFire public cloud with the CLI command
debug wildfire upload-log channel public
.
-
View only samples forwarded to the WildFire private cloud with the CLI command
debug wildfire upload-log channel private
.
Why it's important for PCNSE: Know this `debug` command is used to see logs of files *currently* being uploaded or queued, before a verdict appears in the GUI logs. Crucial for troubleshooting forwarding issues.
The following example shows the output for the three commands listed above when issued on a firewall in an Advanced WildFire public cloud deployment:

-
Monitor samples successfully submitted for analysis.
Using the firewall web interface, select
Monitor > Logs > WildFire Submissions
. All files forwarded by a firewall to the Advanced WildFire public or WildFire private cloud for analysis are logged on the WildFire Submissions page.
Why it's important for PCNSE: Know the primary GUI location to view completed analysis results and verdicts from WildFire.
-
Check the verdict for a sample:
By default, only samples that receive malicious or phishing verdicts are displayed as
WildFire Submissions
entries. To enable logging for benign and/or grayware samples, select
Device> Setup > WildFire > Report Benign Files/ Report Grayware Files
.
Enable logging for benign files as a quick troubleshooting step to verify that the firewall is forwarding files. Check the
WildFire Submissions
logs to verify that files are being submitted for analysis and receiving verdicts (in this case, a benign verdict).
-
Confirm the analysis location for a sample:
The
WildFire Cloud
column displays the location to which the file was forwarded and where it was analyzed. This is useful when deploying a hybrid cloud.
Sample Removal Request
Unique samples sent to the Advanced WildFire cloud for analysis can be deleted at the discretion of the user. This allows users who are subject to data protection policies, including those who must comply with GDPR, to permanently dispose of sample data based on their organization’s retention policies. Sample data includes session / upload data and the sample file itself.
-
Create a text file with a list of SHA256 or MD5 hashes of the samples to be deleted. Each hash must be on an individual line in the file and can include up to 100 samples.
Only files that are unique to your environment can be deleted. If files are found to be available in other public or private feeds, only the session and upload data for a given account is removed.
Why it's important for PCNSE: Understand the limitation of sample removal - only truly unique files submitted by the user can be fully deleted from the cloud backend.
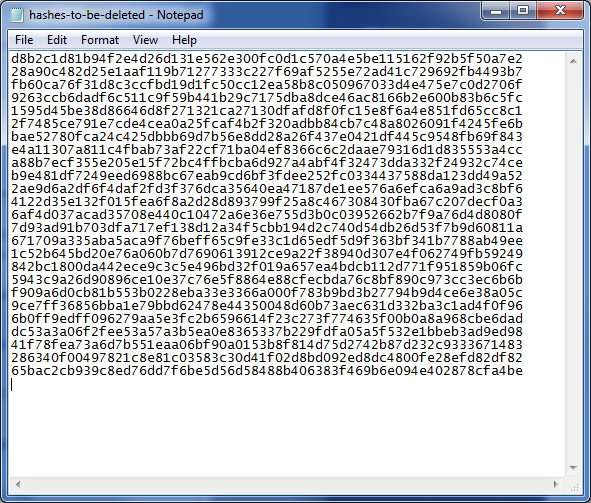
-
Log in to the WildFire portal using your Palo Alto Networks support credentials or your WildFire account.
-
Select
Settings
on the menu bar.
-
Click
Choose File
and select the hash list text file that you created in step 1 and then
Remove Samples
. You will receive a confirmation upon a successful file upload.

-
After the samples are removed from the WildFire cloud, you will receive a confirmation email with the details of the request. This includes a list of the samples that were requested to be deleted, and the removal status of each sample. This process can take up to 7 days.

Samples that do not exist or are not unique to your environment will return statuses of
Not found
and
Rejected
, respectively.
Firewall File-Forwarding Capacity by Model
File-forwarding capacity is the maximum rate per minute at which each Palo Alto Networks firewall model can submit files to the Advanced WildFire® cloud for analysis. If the firewall reaches the per-minute limit, it queues any remaining samples.
The Reserved Drive Space in the following table represents the amount of drive space on the firewall that is reserved for queuing files. If the firewall reaches the drive space limit, it cancels forwarding of new files to WildFire until more space in the queue is available.
The speed at which the firewall can forward files to the Advanced WildFire cloud also depends on the bandwidth of the upload link from the firewall.
|
Platform
|
Maximum Files Per Minute
|
Reserved Drive Space
|
|
VM-50
|
5
|
100MB
|
|
VM-100
|
10
|
100MB
|
|
VM-200
|
15
|
200MB
|
|
VM-300
|
25
|
200MB
|
|
VM-500
|
30
|
250MB
|
|
VM-700
|
40
|
250MB
|
|
PA-220
|
20
|
100MB
|
|
PA-400
|
20
|
100MB
|
|
PA-820
|
75
|
300MB
|
|
PA-850
|
75
|
300MB
|
|
PA-1400 Series
|
20
|
100MB
|
|
PA-3220
|
100
|
200MB
|
|
PA-3250/3260
|
100
|
500MB
|
|
PA-3400 Series
|
100
|
500MB
|
|
PA-5200 Series
|
250
|
1500MB
|
|
PA-5400 Series
|
250
|
1500MB
|
|
PA-7000 Series
|
300
|
1GB
|
Why it's important for PCNSE: Be aware that forwarding limits exist per firewall model and can impact analysis if capacity is exceeded. Specific numbers are less likely, but the concept is important.
About WildFire Logs and Reporting
You can Monitor Activity on the firewall, with the WildFire portal, Strata Cloud Manager, or with the WildFire API.
For each sample WildFire analyzes, WildFire categorizes the sample as malware, phishing, grayware, or benign and details sample information and behavior in the WildFire analysis report. WildFire analysis reports can be found on the firewall that submitted the sample and the WildFire cloud (public or private) that analyzed the sample, or can be retrieved using the WildFire API:
Advanced WildFire Analysis Reports—Close Up
Access Advanced WildFire analysis reports on the firewall, the WildFire portal, and the WildFire API.
Advanced WildFire analysis reports display detailed sample information, as well as information on targeted users, email header information (if enabled), the application that delivered the file, and all URLs involved in the command-and-control activity of the file. Advanced WildFire reports contain some or all of the information described in the following table based on the session information configured on the firewall that forwarded the file and depending on the observed behavior for the file.
When viewing an Advanced WildFire report for a file that was manually uploaded to the WildFire portal or by using the WildFire API, the report will not show session information because the traffic did not traverse the firewall. For example, the report would not show the Attacker/Source and Victim/Destination.
|
Report Heading
|
Description
|
|
File Information
|
-
File Type
—Flash, PE, PDF, APK, JAR/Class, archive, linux, script, or MS Office. This field is named URL for HTTP/HTTPS email link reports and will display the URL that was analyzed.
-
File Signer
—The entity that signed the file for authenticity purposes.
-
Hash Value
—A file hash is much like a fingerprint that uniquely identifies a file to ensure that the file has not been modified in any way. The following lists the hash versions that WildFire generates for each file analyzed:
-
SHA-1
—Displays the SHA-1 value for the file.
-
SHA-256
—Displays the SHA-256 value for the file.
-
MD5
—Displays the MD5 information for the file.
-
File Size
—The size (in bytes) of the file that WildFire analyzed.
-
First Seen Timestamp
—If the WildFire system has analyzed the file previously, this is the date/time that it was first observed.
-
Verdict
—Displays analysis verdicts.
-
Sample File
—Click the
Download File
link to download the sample file to your local system. Note that you can only download files with the malware verdict, not benign.
|
|
Coverage Status
|
Click the
Virus Total
link to view endpoint antivirus coverage information for samples that have already been identified by other vendors. If the file has never been seen by any of the listed vendors, file not found appears.
In addition, when the report is rendered on the firewall, up-to-date information about what signature and URL filtering coverage that Palo Alto Networks currently provides to protect against the threat will also be displayed in this section. Because this information is retrieved dynamically, it will not appear in the PDF report.
The following coverage information is provided for active signatures:
-
Coverage Type
—The type of protection provided by Palo Alto Networks (virus, DNS, WildFire, or malware URL).
-
Signature ID
—A unique ID number assigned to each signature that Palo Alto Networks provides.
-
Detail
—The well-known name of the virus.
-
Date Released
—The date that Palo Alto Networks released coverage to protect against the malware.
-
Latest Content Version
—The version number for the content release that provides protection against the malware.
|
|
Session Information
|
Contains session information based on the traffic as it traversed the firewall that forwarded the sample. To define the session information that WildFire will include in the reports, select
Device > Setup > WildFire > Session Information Settings
.
The following options are available:
-
Source IP
-
Source Port
-
Destination IP
-
Destination Port
-
Virtual System (If multi-vsys is configured on the firewall)
-
Application
-
User (If User-ID is configured on the firewall)
-
URL
-
Filename
-
Email sender
-
Email recipient
-
Email subject
By default, session information includes the field Status, which indicates if the firewall allowed or blocked the sample.
|
|
Dynamic Analysis
|
If a file is low risk and WildFire can easily determine that it is safe, only static analysis is performed on the file, instead of dynamic analysis.
When dynamic analysis is performed, this section contains tabs showing analysis results for each environment type that the sample was run in. For example, the Virtual Machine 4 tab might show an analysis environment operating Windows 7, Adobe Reader 11, Flash 11, and Office 2010.
On the WildFire appliance, only one virtual machine is used for the analysis, which you select based on analysis environment attributes that best match your local environment. For example, if most users have Windows 7 32-bit, that virtual machine would be selected.
|
|
Behavior Summary
|
Each Virtual Machine tab summarizes the behavior of the sample file in the specific environment. Examples include whether the sample created or modified files, started a process, spawned new processes, modified the registry, or installed browser helper objects.
The Severity column indicates the severity of each behavior. The severity gauge will show one bar for low severity and additional bars for higher severity levels. This information is also added to the dynamic and static analysis sections.
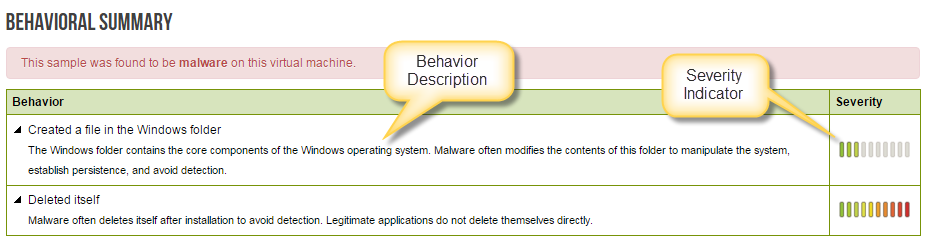
The following describes the various behaviors that are analyzed:
-
Network Activity
—Shows network activity performed by the sample, such as accessing other hosts on the network, DNS queries, and phone-home activity. A link is provided to download the packet capture.
-
Host Activity (by process)
—Lists activities performed on the host, such as registry keys that were set, modified, or deleted.
-
Process Activity
—Lists files that started a parent process, the process name, and the action the process performed.
-
File
—Lists files that started a child processes, the process name, and the action the process performed.
-
Mutex
—If the sample file generates other program threads, the mutex name and parent process is logged in this field.
-
Activity Timeline
—Provides a play-by-play list of all recorded activity of the sample. This will help in understanding the sequence of events that occurred during the analysis.
The activity timeline information is only available in the PDF export of the WildFire reports.
|
|
Submit Malware
|
Use this option to manually submit the sample to Palo Alto Networks. The WildFire cloud will then re-analyze the sample and generate a signatures if it determines that the sample is malicious. This is useful on a WildFire appliance that does not have signature generation or cloud intelligence enabled, which is used to forward malware from the appliance to the WildFire cloud.
|
|
Report an Incorrect Verdict
|
Click this link to submit the sample to the Palo Alto Networks threat team if you feel the verdict is a false positive or false negative. The threat team will perform further analysis on the sample to determine if it should be reclassified. If a malware sample is determined to be safe, the signature for the file is disabled in an upcoming antivirus signature update or if a benign file is determined to be malicious, a new signature is generated. After the investigation is complete, you will receive an email describing the action that was taken.
|
Configure WildFire Submission Log Settings
A WildFire submissions log is an automatically generated, time-stamped file that provides an audit trail to track events when a Palo Alto Networks network security platform forwards samples (files and emails links) to the WildFire cloud for analysis based on WildFire Analysis profile settings (Objects > Security Profiles > WildFire Analysis). WildFire Submissions log entries are generated for each sample forwarded to the WildFire cloud that has completed static and/or dynamic analysis of the sample. WildFire Submissions log entries include the Action taken on the sample (allow or block), the WildFire verdict for the submitted sample as determined through WildFire analysis, the severity level of the sample, and other details.
By default, WildFire submissions logs are created for Benign and Malicious samples; while Grayware and Benign samples generate no logs. You can change the WildFire submission log settings to include Grayware and Benign samples as well as additional session information contained in email links.
Enable the following options for
WildFire Submissions
logs
Enable Logging for Benign and Grayware Samples
Logging for benign and grayware samples is disabled by default. Email links that receive benign or grayware verdicts are not logged.
-
Select
Device > Setup > WildFire
, edit
General Settings
.
-
Select
Report Benign Files
and/or
Report Grayware Files
and click
OK
to save the settings.
Why it's important for PCNSE: Know that logging benign/grayware files (not links) is optional and configured under Device > Setup > WildFire. Useful for troubleshooting forwarding.
Include Email Header Information in WildFire Logs and Reports
Use the following steps to include email header information—email sender, recipient(s), and subject—in WildFire logs and reports.
Session information is forwarded to the WildFire cloud along with the sample, and used to generate the WildFire analysis report. Neither the firewall nor the WildFire cloud receive, store, or view actual email contents.
Session information can help you to quickly track down and remediate threats detected in email attachments or links, including how to identify recipients who have downloaded or accessed malicious content.
-
Select
Device > Setup > WildFire
.
-
Edit the Session Information Settings section and enable one or more of the options (
Email sender
,
Email recipient
, and
Email subject
).
-
Click
OK
to save.
Why it's important for PCNSE: Understand that including email header info is optional (privacy) and configured under Device > Setup > WildFire > Session Information Settings.
Set Up Alerts for Malware
You can configure a Palo Alto Networks firewall to send an alert when WildFire identifies a malicious or phishing sample. You can configure alerts for benign and grayware files as well, but not for benign and grayware email links. This example describes how to configure an email alert; however, you could also configure log forwarding to set up alerts to be delivered as syslog messages, SNMP traps, or Panorama alerts.
-
Configure an email server profile.
-
Select
Device > Server > Profiles > Email
.
-
Click
Add
and then enter a
Name
for the profile. For example,
WildFire-Email-Profile
.
-
(
Optional
) Select the virtual system to which this profile applies from the
Location
drop-down.
-
Click
Add
to add a new email server entry and enter the information required to connect to the Simple Mail Transport Protocol (SMTP) server and send email (up to four email servers can be added to the profile):
[... Email Server details ...]
-
Click
OK
to save the server profile.
-
Click
Commit
to save the changes to the running configuration.
-
Test the email server profile.
-
Select
Monitor > PDF Reports > Email Scheduler
.
-
Click
Add
and select the new email profile from the
Email Profile
drop-down.
-
Click the
Send test email
button and a test email should be sent to the recipients defined in the email profile.
-
Configure a log forwarding profile to enable WildFire logs to be forwarded to Panorama, an email account, SNMP, a syslog server, and as HTTP requests.
In this example you will set up email logs for when a sample is determined to be malicious. You can also enable Benign and Grayware logs to be forwarded, which will produce more activity if you are testing.
The firewall does not forward WildFire logs for blocked files to an email account.
-
Select
Objects > Log Forwarding
.
-
Add
and name the profile, for example,
WildFire-Log-Forwarding
. Optionally, you can add a
Description
of the log forwarding profile.
-
Add
to configure forwarding methods.
-
Provide a name for the
Log Fowarding Profile Match List
.
-
Select the
WildFire
Log Type.
-
Filter
the logs using
(verdict eq malicious)
query.
-
Under the
Forward Method
options, choose the Email profile that was created in step 1 (in this case,
WildFire-Email-Profile
), and click
OK
to save the match list updates.
Why it's important for PCNSE: Know how to use Log Forwarding Profiles (Objects > Log Forwarding) to trigger actions (like email alerts) based on WildFire log attributes (e.g., verdict eq malicious).
-
Click
OK
again to save the Log Forwarding Profile updates.
-
Add the log forwarding profile to a security policy being used for WildFire forwarding (with a WildFire Analysis profile attached).
The WildFire Analysis profile defines the traffic that the firewall forwards for Advanced WildFire analysis. To set up a WildFire analysis profile and attach it to a security policy rule, see Forward Files for Advanced WildFire Analysis.
-
Select
Policies > Security
and click on the policy that is used for WildFire forwarding.
-
In the
Actions
tab
Log Setting
section, select the
Log Forwarding
profile you configured.
-
Click
OK
to save the changes and then
Commit
the configuration.
Why it's important for PCNSE: Understand that the Log Forwarding profile is applied within the Security Policy rule's Actions tab, similar to security profiles.
View WildFire Logs and Analysis Reports
WildFire logs contain information on samples (files and email links) uploaded to the WildFire cloud for analysis. It includes artifacts, which are properties, activities, or behaviors associated with the logged event, such as the application type or the IP address of an attacker as well as WildFire-specific qualities, such as high-level analysis results including categorization of the sample as malware, phishing, grayware, or benign and details sample information. Reviewing the WildFire Submissions logs can also indicate whether a user in your networks downloaded a suspicious file. The WildFire analysis report displays detailed sample information, as well as information on targeted users, email header information (if enabled), the application that delivered the file, and all URLs involved in the command-and-control activity of the file. It informs you if the file is malicious, if it modified registry keys, read/wrote into files, created new files, opened network communication channels, caused application crashes, spawned processes, downloaded files, or exhibited other malicious behavior.
WildFire logs are displayed as WildFire submissions logs on NGFW firewalls, while on Cloud Management platforms, you must first configure log forwarding to upload relevant logs to Strata Logging Service, which will then show the WildFire logs as threat logs (type WildFire).
-
Strata Cloud Manager
-
PAN-OS & Panorama
Samples that firewalls submit for WildFire analysis are displayed as entries in the
WildFire Submissions
log on the firewall web interface. For each WildFire entry, you can open an expanded log view which displays log details and the WildFire analysis report for the sample.
Mozilla Firefox users: The WildFire Analysis Report displays correctly only in Firefox v54 and earlier releases. If you experience issues viewing the report, consider using a different web browser such as Google Chrome. Alternatively, you can download and open the PDF version or view the report through the WildFire portal.
-
Forward Files for Advanced WildFire Analysis.
-
Configure WildFire Submissions Log Settings.
-
To view samples submitted by a firewall to a WildFire public, private, or hybrid cloud, select
Monitor > Logs > WildFire Submissions
. When WildFire analysis of a sample is complete, the results are sent back to the firewall that submitted the sample and are accessible in the WildFire Submissions logs. The submission logs include details about a given sample, including the following information:
-
The Verdict column indicates whether the sample is benign, malicious, phishing, or grayware.
-
The Action column indicates whether the firewall allowed or blocked the sample.
-
The Severity column indicates how much of a threat a sample poses to an organization using the following values: critical, high, medium, low, and informational.
Why it's important for PCNSE: Know the primary GUI location for viewing WildFire results and understand the meaning of the Verdict, Action, and Severity columns.
The values for the following severity levels are determined by a combination of verdict and action values.
-
Low—Grayware samples with the action set to allow.
-
High—Malicious samples with the action set to allow.
-
Informational:
-
Benign samples with the action set to allow.
-
Samples with any verdict with the action set to block.
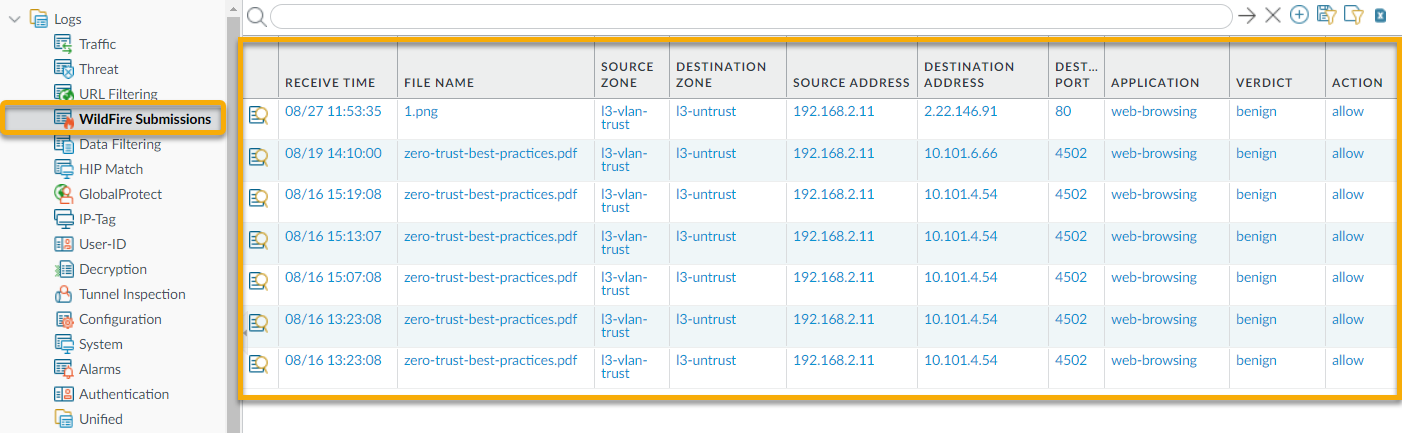
-
For any entry, select the Log Details icon to open a detailed log view for each entry:
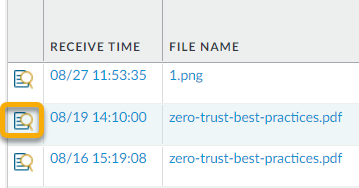
The detailed log view displays Log Info and the WildFire Analysis Report for the entry. If the firewall has packet captures (PCAPs) enabled, the sample PCAPs are also displayed.
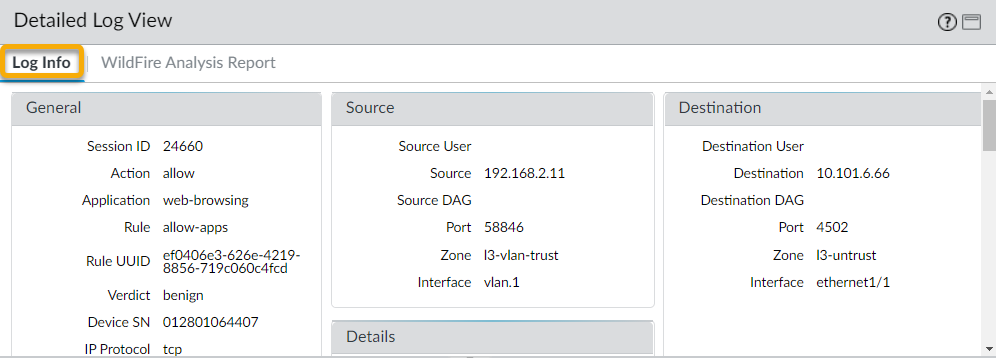
For all samples, the WildFire analysis report displays file and session details. For malware samples, the WildFire analysis report is extended to include details on the file attributes and behavior that indicated the file was malicious.
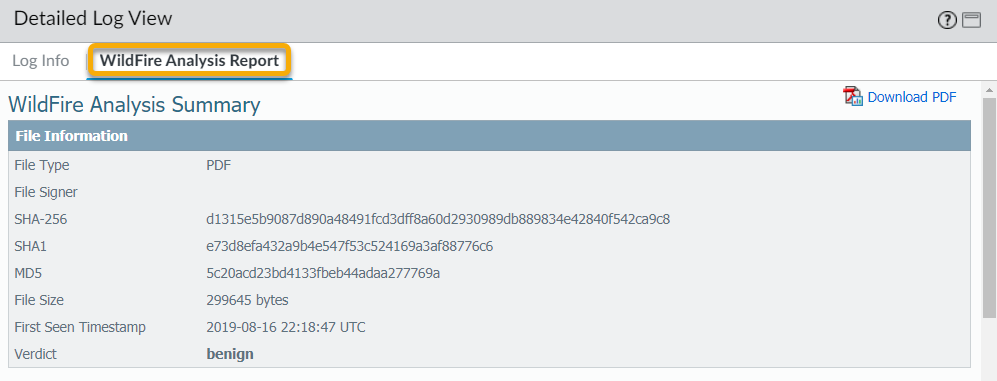
-
(
Optional
)
Download PDF
of the WildFire Analysis Report.
Use the WildFire Portal to Monitor Malware
Log in to the Palo Alto Networks WildFire portal using your Palo Alto Networks support credentials or your WildFire account. The portal opens to display the dashboard, which lists summary report information for all of the firewalls associated with the specific WildFire subscription or support account. For each device listed, the portal displays statistics for the number of malware samples that have been detected, benign samples that have been analyzed, and the number of pending files that are waiting to be analyzed. Your WildFire portal account displays data for all samples submitted by firewalls on your network that are connected to the WildFire public cloud, as well as data for samples manually submitted to the portal. Additionally, if you have enabled a WildFire appliance to forward malware to the WildFire public cloud for signature generation and distribution, reports for those malware samples can also be accessed on the portal.
See the following sections for details on using the WildFire portal to monitor WildFire activity:
Configure WildFire Portal Settings
This section describes the settings that can be customized for a WildFire cloud account, such as time zone and email notifications for each firewall connected to the account. You can also delete firewall logs stored in the cloud.
-
Access the portal settings.
-
Log in to the WildFire portal.
-
Select
Settings
on the menu bar.
-
Configure the time zone for the WildFire cloud account.
Select a time zone from the
Set Time Zone
drop-down and
Update Time Zone
to save the change.
The time stamp that appears on WildFire analysis reports is based on the time zone configured for the WildFire cloud account.
-
(
Optional
) Delete WildFire logs hosted on the cloud for specific firewalls.
-
In the
Delete WildFire Reports
drop-down, select a firewall (by serial number) and
Delete Reports
to remove logs for that firewall from WildFire portal. This action does not delete logs stored on the firewall.
-
Click
OK
to proceed with the deletion.
-
(
Optional
) Configure email notifications based on WildFire analysis verdicts.
The WildFire portal does not send alerts for blocked files that the firewall forwarded for WildFire analysis.
-
In the Configure Alerts section, select
Malware, Phishing
,
Grayware
, and/or
Benign
check boxes to receive email notifications based on those verdicts:
-
Select the verdict check boxes in the
All
row to receive verdict notifications for all samples uploaded to the WildFire cloud.
-
Select the verdict check boxes in the
Manual
row to receive verdict notifications for all samples that are manually uploaded to the WildFire public cloud using the WildFire portal.
-
Select the verdict check boxes for one or several firewall serial numbers to receive verdict notifications for samples submitted by those firewalls.
-
Select
Update Notification
to enable verdict notifications to be emailed to the email address associated with your support account.
Add WildFire Portal Users
WildFire portal accounts are created by a super user (the registered owner of a Palo Alto Networks device) to give additional users the ability to log in to the WildFire cloud and view device data for which they are granted access by the super user. A WildFire user can be a user associated with an existing Palo Alto Networks account or a user not associated with a Palo Alto Networks support account, to whom you can allow access to just the WildFire public clouds and a specific set of firewall data.
-
Select the account for which you want to add users who can access the WildFire portal.
WildFire portal users can view data for all firewalls associated with the support account.
-
Log in to the Palo Alto Networks Support Portal.
-
Under
Manage Account
, click on
Users and Accounts
.
-
Select an existing account or sub-account.
-
Add a WildFire user.
-
Click
Add WildFire User
.
-
Enter the email address for the user you would like to add.
The only restriction when adding a user is that the email address cannot be from a free web-based email account (such as Gmail, Hotmail, and Yahoo). If an email address is entered for a domain that is not supported, a pop-up warning is displayed.
-
Assign firewalls to the new user account and access the WildFire cloud.
Select the firewall(s) by serial number for which you want to grant access and fill out the optional account details.
Users with an existing support account will receive an email with a list of the firewalls that are now available for WildFire report viewing. If the user does not have a support account, the portal sends an email with instructions on how to access the portal and how to set a new password.
The new user can now log in to the WildFire cloud and view WildFire reports for the firewalls to which they have been granted access. Users can also configure automatic email alerts for these devices in order to receive alerts on files analyzed. They can choose to receive reports on malicious and/or benign files.
View Reports on the WildFire Portal
The Wildfire portal displays reports for samples that are submitted from firewalls, manually uploaded, or uploaded using the WildFire API. Select
Reports
to display the latest reports for samples analyzed by the WildFire cloud. For each sample listed, the report entry shows the date and time the sample was received by the cloud, the serial number of the firewall that submitted the file, the file name or URL, and the verdict delivered by WildFire (benign, grayware, malware, or phishing).
Use the search option to search for reports based on the file name or the sample hash value. You can also narrow the results displayed by viewing only reports for samples submitted by a specific
Source
(view only results submitted manually or by a specific firewall) or for samples that received a specific WildFire
Verdict
(any, benign, malware, grayware, phishing, or pending).
To view an individual report from the portal, click the
Reports
icon to the left of the report name. To save the detailed report, click the
Download as PDF
button on the upper right of the report page. For details on WildFire analysis reports, see WildFire Analysis Reports—Close Up.
The following shows a list of sample files submitted by a specific firewall: