Managing Device Groups in Panorama
Panorama uses Device Groups to manage firewall configurations and policies centrally. Understanding how to create, organize, and utilize device groups is fundamental for efficient network security management.
Key aspects include:
- Hierarchy: Device groups can be arranged in a hierarchical structure, allowing for inheritance of policies and objects.
- Objects: Create shared objects (available to all device groups) or device-group-specific objects.
- Policies: Define security, NAT, and other policies at different levels of the hierarchy (Shared, parent device group, child device group).
- Overrides: Child device groups can override inherited object values, providing flexibility.
Create a Device Group Hierarchy
A well-planned device group hierarchy is crucial for scalable and manageable firewall configurations.
Example Device Group Hierarchy.
Steps to Create a Hierarchy:
-
Plan the Hierarchy:
- Determine device group levels and assign firewalls/virtual systems. A firewall/vsys can only belong to one device group.
- Remove existing assignments if they don't fit the new plan.
- Add new firewalls to Panorama if needed.
- Device groups with firewalls using different hypervisor plugins (for endpoint monitoring) cannot be parent/child of each other.
-
Add Top-Level Device Groups:
- In Panorama > Device Groups, click Add.
- Enter a Name. Assign firewalls/virtual systems.
- Leave Parent Device Group as "Shared" (default).
-
Add Lower-Level Device Groups:
- Repeat the process, but set the Parent Device Group to an appropriate higher-level device group.
- For existing device groups, edit them to assign a Parent Device Group.
Moving a device group to a different parent moves all its descendants, firewalls, policies, and objects. Access domain membership might change.
-
Configure Objects and Policy Rules: Account for inheritance. Create or edit objects and policies at their appropriate location.
-
Override Inherited Object Values (Optional):
- Applicable if object values in a device group must differ from inherited values.
- Shared or predefined objects cannot be overridden.
- In the Objects tab, select the device group, select the inherited object (green icon), and click Override. Edit values (Name and Shared settings are locked). The icon changes to yellow-overlapping-green.
-
Save and Commit: Commit to Panorama and push to device groups after any hierarchy change. Push changes to templates if they reference objects in a modified device group.
Create Objects for Use in Shared or Device Group Policy
Objects (like addresses, services, security profiles) can be created at the Shared level or within a specific device group.
- Shared Objects: Visible and usable in all device groups and their policies.
- Device Group Objects: Usable in the device group where they are created and in all its descendant device groups.
Be aware of the scope of objects. Using Dynamic Address Groups (DAGs) requires checking supported registered IP addresses on Panorama.
Creating a Shared Object (Example: URL Filtering Profile for Alerts):
- Navigate to Objects > Security Profiles > URL Filtering.
- Click Add. Enter Name and Description.
- Select Shared .
- The Disable Override option (cleared by default) allows descendant device groups to override this object. Select it to prevent overrides.
- Configure categories and set their Action to Alert.
- Click OK, then Commit to Panorama.
Creating a Device Group Object (Example: Address Object for Web Servers):
- Navigate to Objects > Addresses. Select the target Device Group.
- Click Add. Enter a Name.
- Ensure Shared option is cleared.
- Configure Disable Override as needed for descendant device groups.
- Select Type (e.g., IP Range) and enter the value.
- Click OK, then Commit and Push to Panorama and the device group.
The Objects tab only appears after at least one device group is added. The Location column indicates if an object is Shared or specific to a device group.
Revert to Inherited Object Values
If you've overridden an object's values in a device group, you can revert it to inherit values from its ancestor device group. Overridden objects display a yellow-overlapping-green icon in the Name column.
This is different from managing precedence for all objects (covered later).
Steps to Revert a Specific Overridden Object:
- In the Objects tab, select the object type (e.g., Addresses) and the Device Group containing the overridden object.
- Select the overridden object.
- Click Revert and confirm. The icon will change back to green (indicating it's inherited).
- Commit and Push changes to Panorama and the affected device group.
Manage Unused Shared Objects
By default, Panorama pushes all shared objects to firewalls in a device group, regardless of whether they are referenced in policy rules. You can change this behavior.
The Share Unused Address and Service Objects with Devices option (Panorama > Setup > Management > Panorama Settings) controls this:
- Enabled (Default): All shared objects are pushed.
- Disabled: Only shared objects referenced by rules in the device group are pushed.
Considerations:
- Lower-end Firewalls (e.g., PA-220): Disabling this option is recommended to conserve resources, as these models have limited object storage.
-
Commit Times:
- Disabling can reduce commit times on firewalls (smaller configuration).
- Disabling might increase commit time on Panorama (Panorama needs to check object references).
- Best Practice: If disabling, limit the number of shared configuration objects to help reduce Panorama commit times.
Steps to Configure:
- Select Panorama > Setup > Management, and edit Panorama Settings.
- Clear or select the "Share Unused Address and Service Objects with Devices" option.
- Click OK.
- Commit to Panorama.
Manage Precedence of Inherited Objects
By default, if device groups at different hierarchy levels have an object with the same name but different values (due to overrides), a descendant device group uses its own (or closest ancestor's overridden) object values.
You can reverse this: make object values from the highest ancestor containing the object take precedence over any overridden values in descendant device groups.
Steps to Configure Precedence:
- Select Panorama > Setup > Management and edit Panorama Settings.
-
To give ancestor objects higher precedence:
- Select Objects defined in ancestors will take higher precedence .
- A "Find Overridden Objects" link appears, showing how many objects will be affected.
-
To revert to default (descendant/local override takes precedence):
- Clear "Objects defined in ancestors will take higher precedence".
- Click OK.
- Commit to Panorama.
- (Optional but Important) If you enabled ancestor precedence, you must Push to Devices for the change to take effect on the firewalls. Panorama does not automatically push these ancestor objects until this explicit push.
"Find Overridden Objects" only detects a Shared device group object that shares a name with another object in the device group.
Move or Clone a Policy Rule or Object to a Different Device Group
When moving or cloning policy rules or objects between device groups (or to/from Shared), ensure that any referenced objects are available in the destination. This might involve moving/cloning referenced objects in the same operation.
In a Device Group Hierarchy, referenced objects might be available through inheritance (e.g., Shared objects). Use Global Find to check references.
Key Considerations:
- Audit Comments: Do not move with the rule when moving to a different device group.
- Overridden Objects: If moving/cloning an overridden object, ensure overrides are enabled for that object in the parent of the destination.
- Cloning Multiple Rules: The selection order determines their copied order in the destination, though they can be reorganized later.
General Steps:
- Log in to Panorama and select the rulebase (e.g., Policy > Security > Pre Rules) or object type (e.g., Objects > Addresses).
- Select the source Device Group and the rule(s)/object(s).
- Choose Move or Clone.
- Select the Destination device group (or Shared).
- (Rules only) Select the Rule order in the destination (top, bottom, before/after rule).
- The "Error out on first detected error in validation" option (selected by default) stops checking on the first error (e.g., missing referenced object). Clearing it finds all errors before displaying. Panorama won't move/clone until all errors are fixed.
- Click OK. Fix errors if any and retry.
- Commit and Push: Edit Selections in Push Scope, select Device Groups (both original and destination), then Commit and Push.
Push a Policy Rule to a Subset of Firewalls
A policy target allows you to specify which firewalls within a device group should receive a particular policy rule. You can include or exclude firewalls/virtual systems. This centralizes policy management on Panorama.
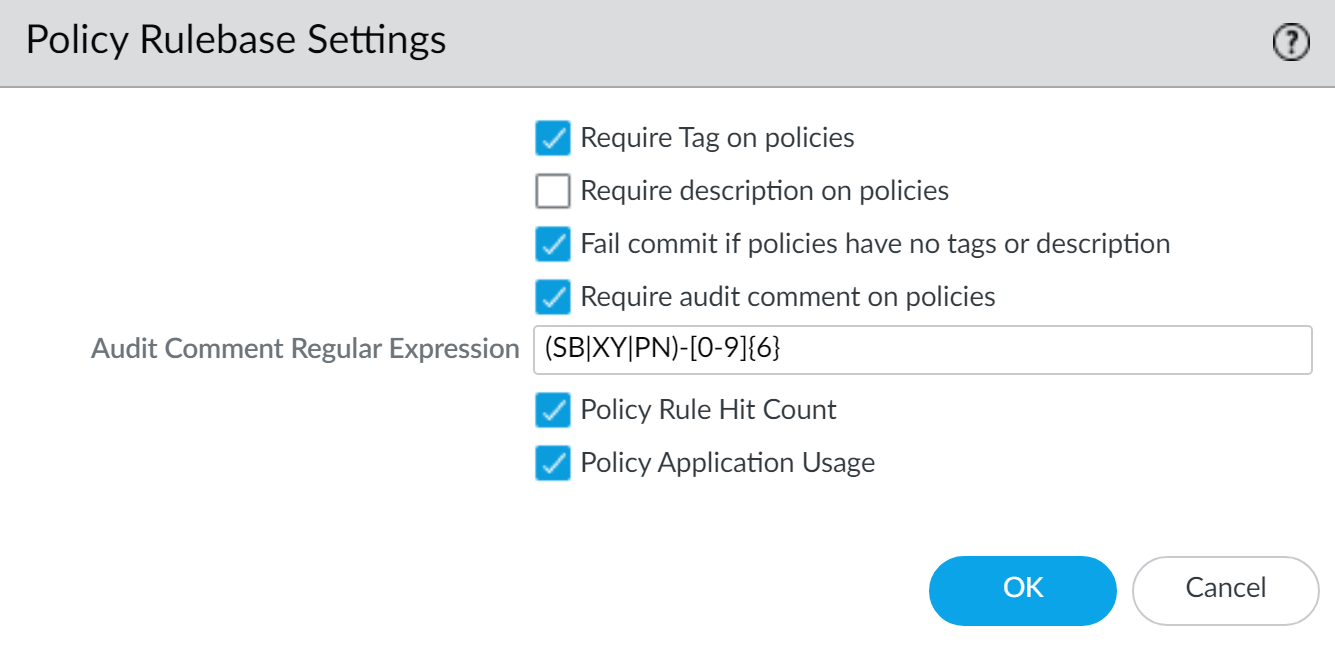
Best Practice: Enforce Audit Comments
- Go to Panorama > Setup > Management, edit Policy Rulebase Settings.
- Enable "Require audit comment on policies."
-
(Optional) Configure Audit Comment Regular Expression for specific formats (e.g.,
Reason-[0-9]{6}). - Click OK and Commit to Panorama.
Targeting a Rule:
- When creating or editing a policy rule (e.g., Security Pre-Rule):
- Go to the Target tab in the Policy Rule dialog.
-
To apply to selected firewalls:
Select the specific firewalls/vsys.
Select either target tags OR target devices. Selecting both may cause push failure.
- To exclude firewalls: Select "Install on all but specified devices" and then select the firewalls/vsys to exclude.
- If no firewalls are selected in the Target tab, the rule applies to all firewalls in the device group.
- If "Install on all but specified devices" is checked and no firewalls are selected, the rule is not pushed to any firewall in the device group.
- Click OK to save the rule.
Commit and Push:
- Select Commit > Commit and Push.
- Edit Selections in Push Scope, select Device Groups, choose the relevant device group, and click OK.
- (Optional) Disable "Merge with Device Candidate Config" if local firewall changes are managed independently. By default, it's enabled and merges pending local configs.
- Commit and Push.
Device Group Push to a Multi-VSYS Firewall
When Panorama pushes device group configuration changes to a multi-VSYS firewall (PAN-OS 10.1+), it automatically bundles commit jobs for all affected VSYS on that firewall into a single job.
Key Points:
- Bundling: Reduces overall commit job completion time on the multi-VSYS firewall.
-
Failure Impact:
- If one bundled commit job (for one VSYS) fails, the entire push to that multi-VSYS firewall fails. The entire device group configuration for that firewall needs to be pushed again.
- If multiple multi-VSYS firewalls are in a push, and one push fails, the entire push to ALL firewalls in that operation fails.
- Monitoring: Locally on the firewall, a single job is displayed. Error descriptions will indicate the impacted VSYS.
This bundling behavior is default for PAN-OS 10.1 and later. Be aware of the "all-or-nothing" nature of pushes involving multi-VSYS firewalls in this context.
Manage the Rule Hierarchy
Policy rule order is critical. The firewall evaluates rules from top to bottom within each rulebase layer (Shared, Device Group, Local). The first matching rule is applied. More specific rules should generally be placed above more generic rules.
Simplified Policy Evaluation Order in Panorama.
Steps to Manage Rule Hierarchy:
-
View Rule Hierarchy:
- Select Policies tab > Preview Rules.
- Filter by Rulebase (e.g., Security), Device Group (must have firewalls assigned), and specific Device (for local rules).
- Apply filters to see the combined rule view.
-
Delete or Disable Rules:
- To find unused rules: On Panorama, select firewall context, rulebase, and check "Highlight Unused Rules" (dotted orange background).
- Select rulebase, Device Group, select rule(s), then Delete or Disable. Disabled rules appear italicized.
-
Reposition Rules:
- For local firewall rules, access its web interface first (via Panorama context switch or direct IP).
- Select rulebase, Device Group, select rule.
- Use Move options: Move Top, Move Up, Move Down, Move Bottom (within its current DG context, not above inherited rules from Shared/ancestors).
- "Move to other device group" for cross-DG moves.
-
Commit and Push: If rules were modified, Commit and Push to the Panorama configuration and affected device groups.
Introduction to Templates and Template Stacks
Templates and Template Stacks in Panorama are used to define common base configurations for network and device settings, enabling consistent setup across multiple firewalls.
- Templates: Contain specific configuration settings (e.g., network interfaces, zones, server profiles). They are modular and reusable.
- Template Stacks: A collection of one or more templates, ordered by priority. A stack is assigned to firewalls. Settings from templates higher in the stack override settings from lower templates if they conflict. A stack can also have its own direct configurations.
Every managed firewall must belong to a template stack. Panorama supports up to 1,024 templates and 1,024 template stacks. Each stack can have up to 8 templates.
Key planning considerations:
- Which firewalls to add to which templates/stacks.
- Ordering templates within a stack to manage layers of common and group-specific settings.
- Overriding template settings with firewall-specific values or stack-level values.
Template Capabilities and Exceptions
Templates and Template Stacks can define a wide array of settings. However, some tasks can only be performed locally on each managed firewall:
- Configuring a device block list.
- Clearing logs.
- Enabling operational modes (normal, multi-vsys, FIPS-CC).
- Configuring IP addresses of firewalls in an HA pair.
- Configuring a master key and diagnostics.
- Comparing configuration files (Config Audit).
To manage licenses and updates (software, content) for firewalls, use the Panorama > Device Management tab, not templates.
Add a Template
At least one template must be added before Panorama displays the Device and Network tabs used for defining these settings.
Steps to Add a Template:
- Select Panorama > Templates.
- Click Add. Enter a unique Name and optional Description. Click OK.
- (Optional) If the template has a VSYS with configurations (e.g., interfaces) to push to firewalls without VSYS, select the template, choose the VSYS from the Default VSYS drop-down, and click OK.
- Commit and Push changes to Panorama and the template.
After adding the first template, the Device and Network tabs will appear with a Template drop-down.
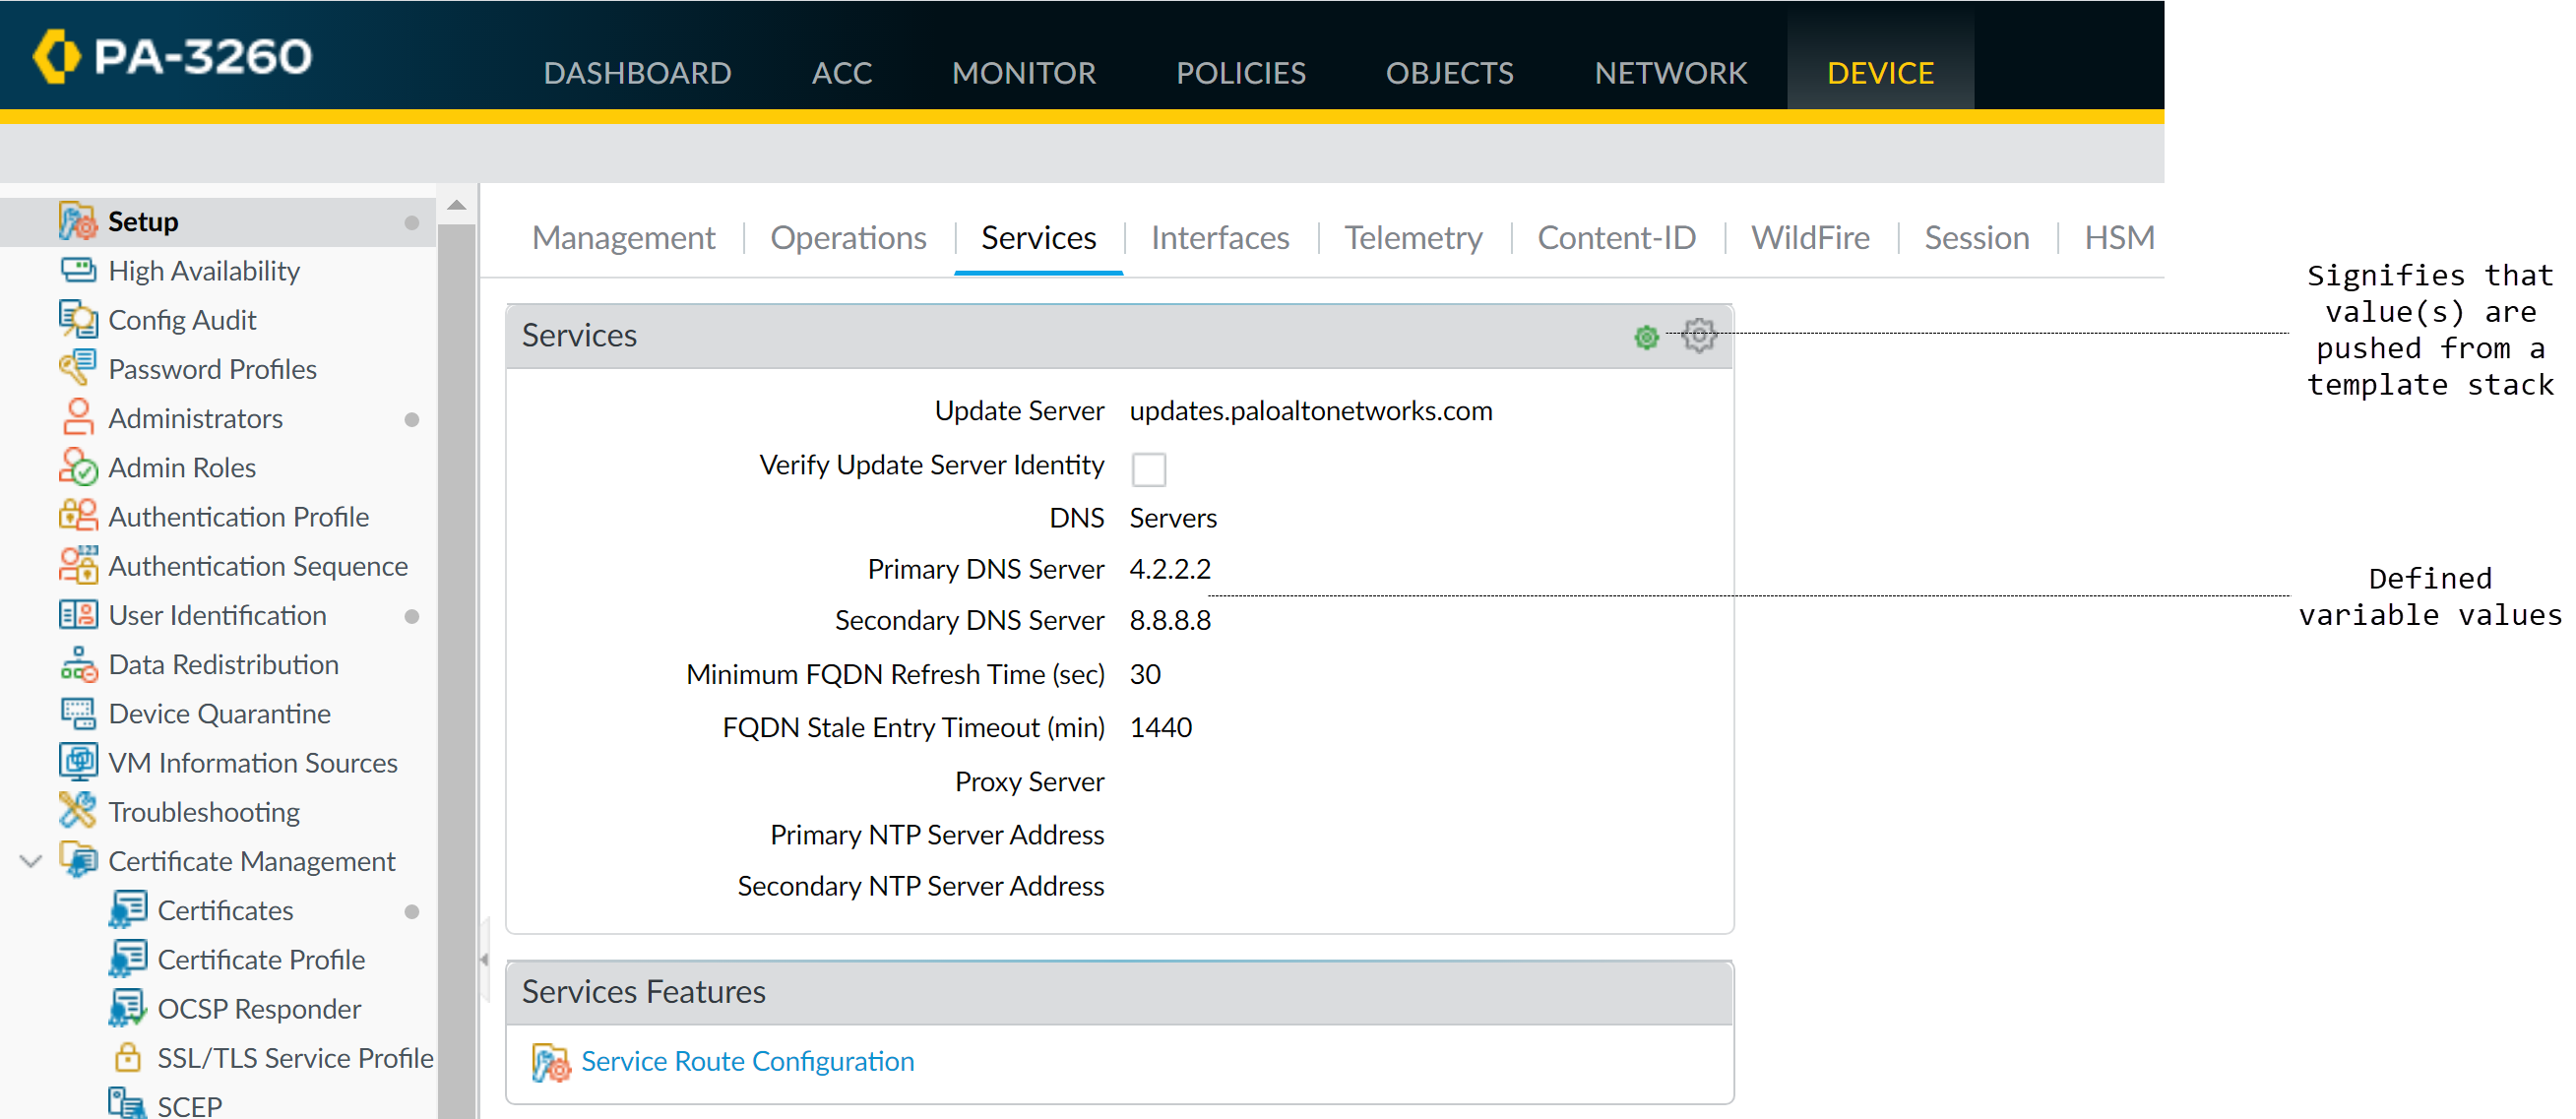
Using the Template (Example: Define Primary DNS):
- In the Device tab, select your Template from the drop-down.
- Navigate to Device > Setup > Services > Global, and edit the Services section.
-
Enter an IP address for the Primary DNS Server.
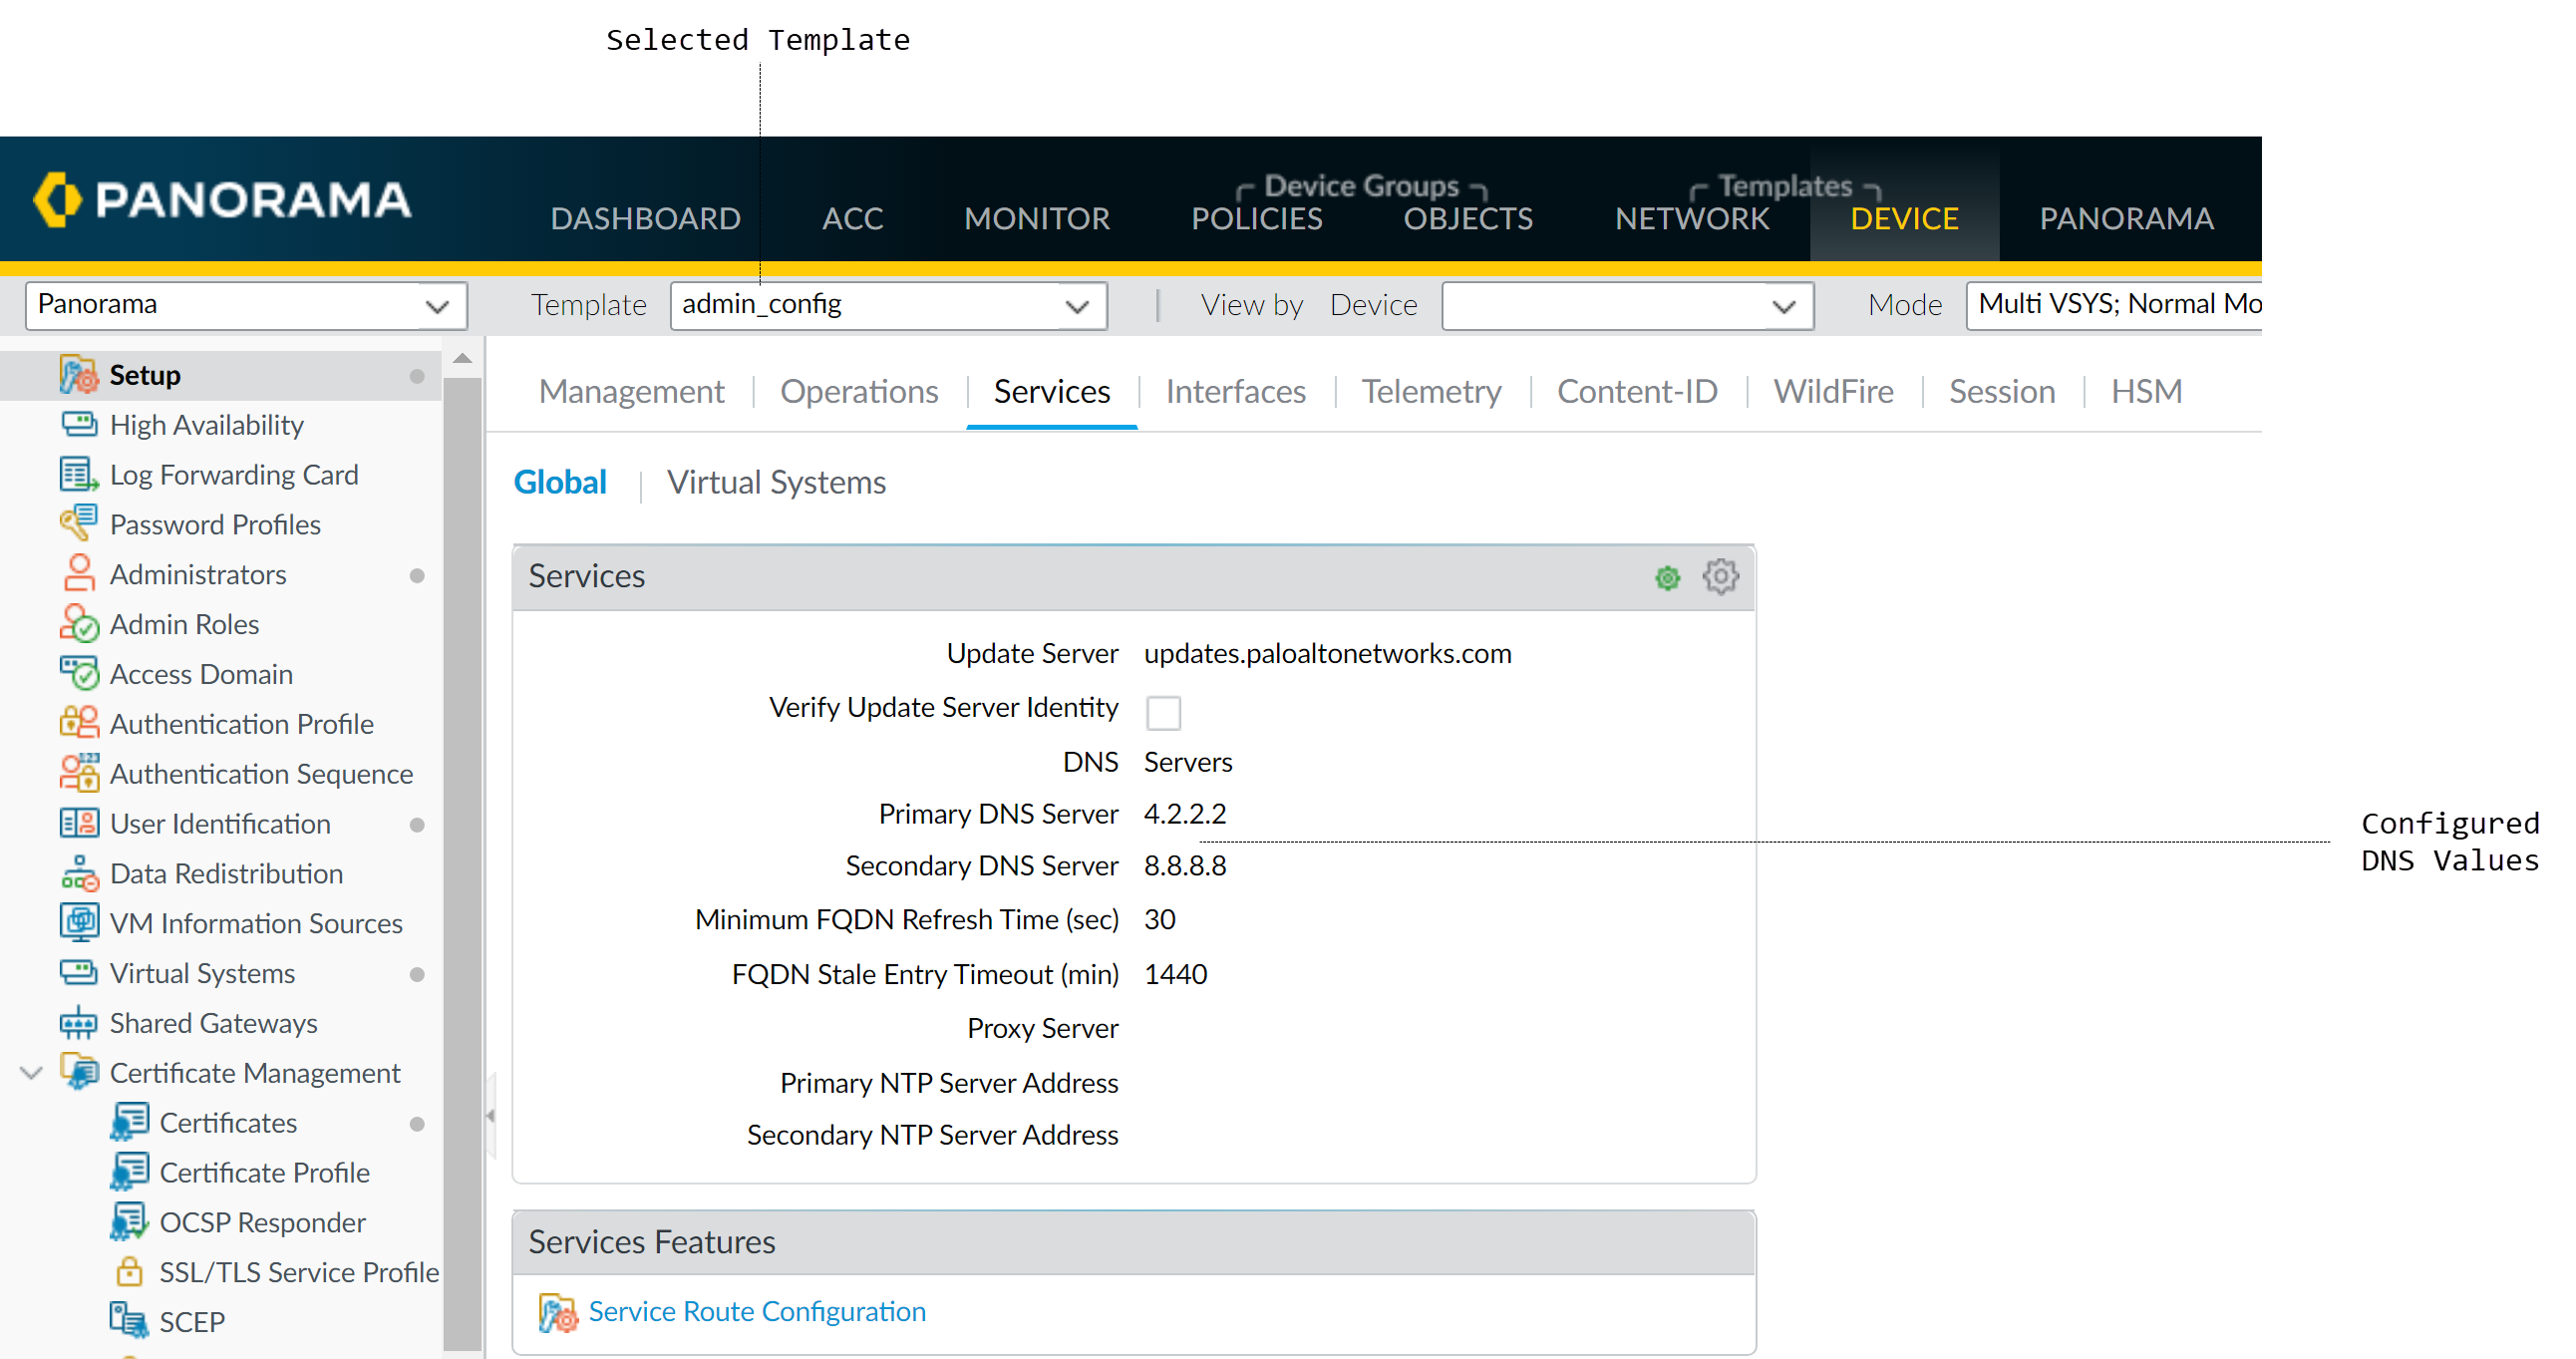
Setting Primary DNS Server in a template. - Commit and Push changes to Panorama and the template.
-
Verify on a managed firewall (switch context in Panorama or log in directly): Device > Setup > Services > Global. The pushed DNS IP should appear, and the section header will show a template icon.
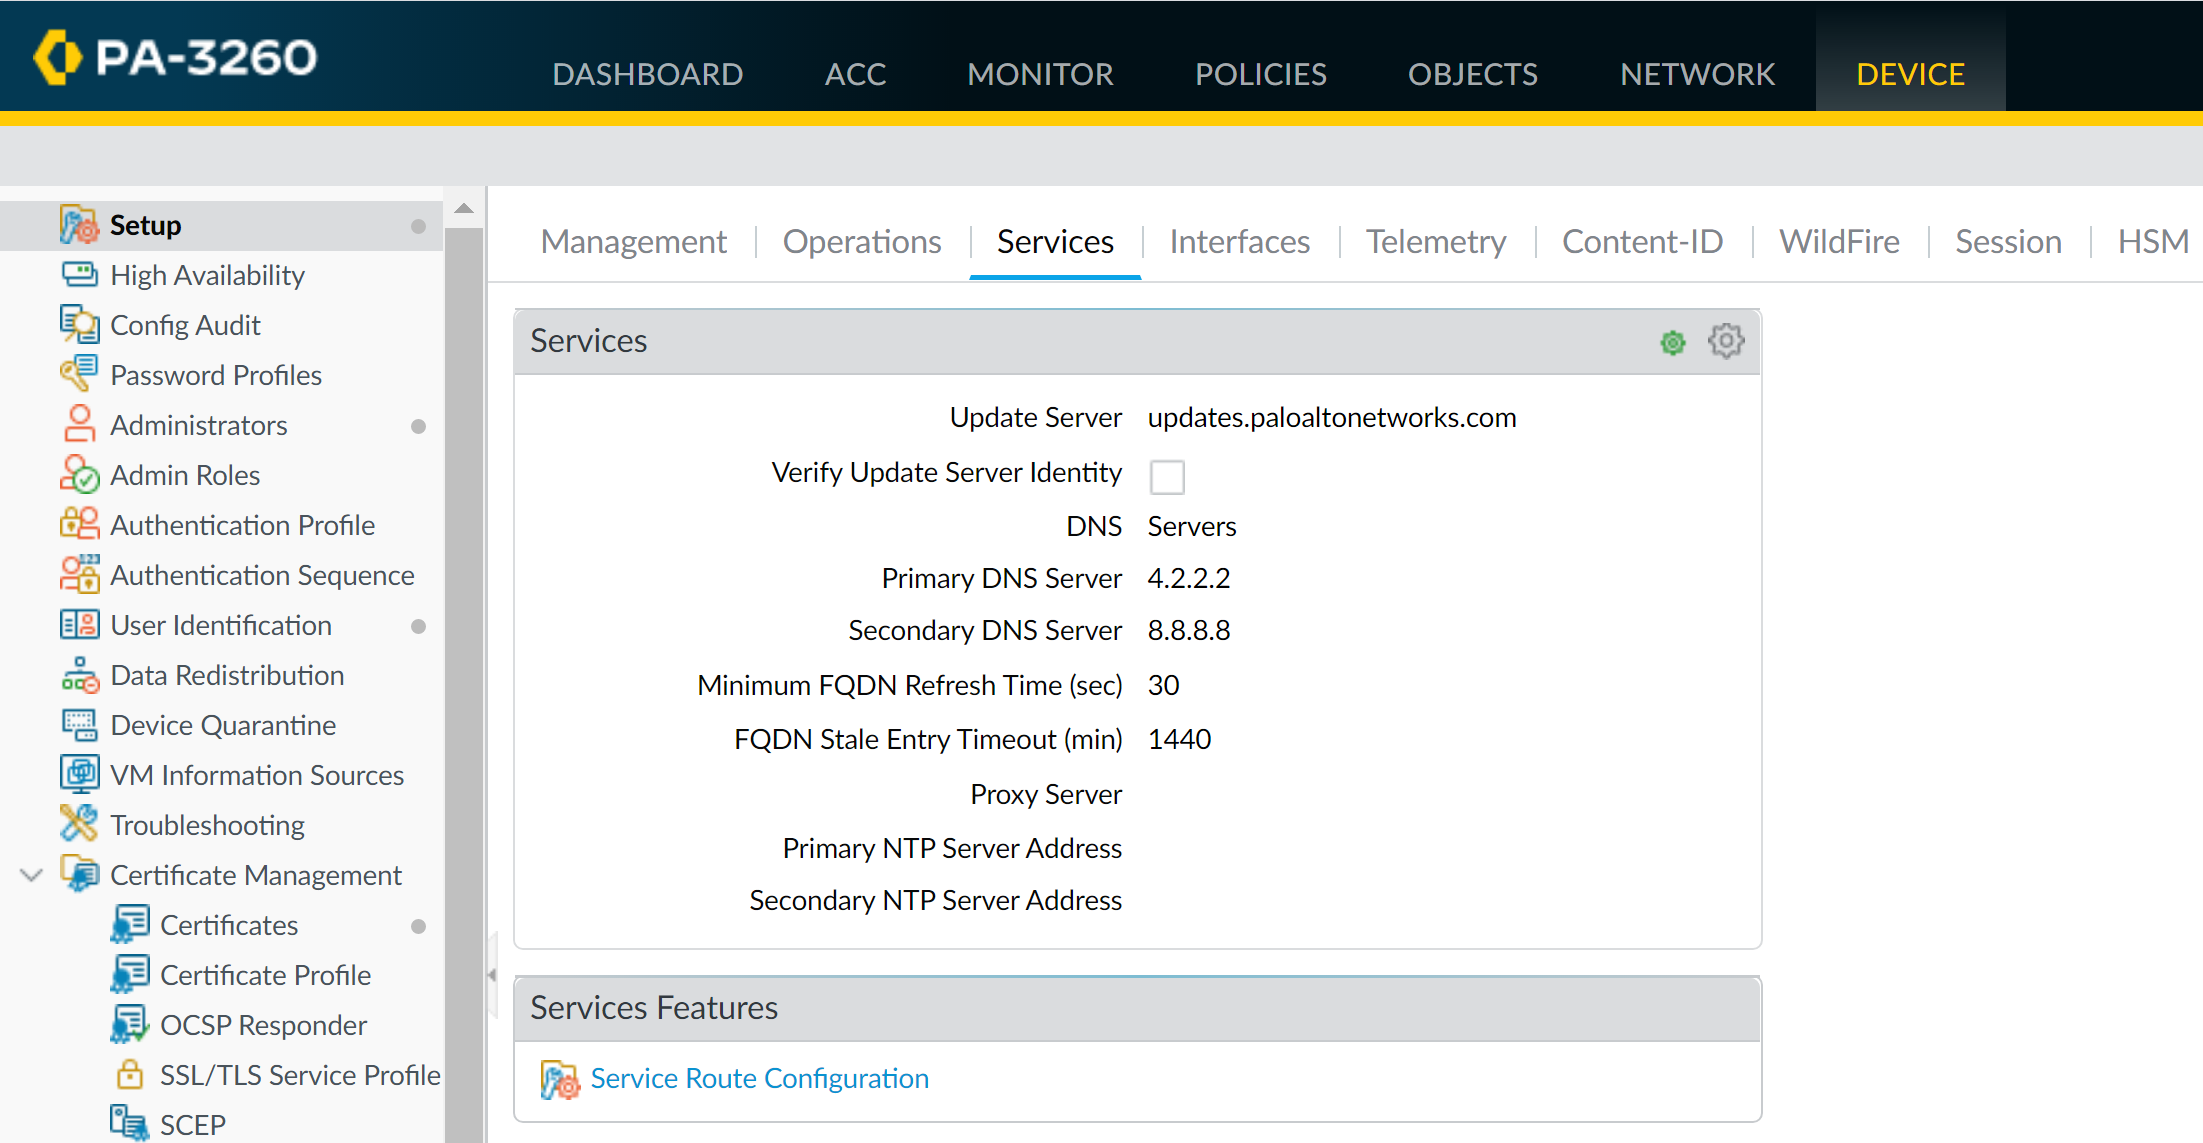
Firewall showing DNS setting inherited from a template (template icon visible).
Configure a Template Stack
A template stack combines multiple templates (up to 8) to push a full configuration to managed firewalls. The order of templates in a stack determines precedence for overlapping settings.
Template Stack Creation and Priority.
Steps to Configure a Template Stack:
-
Plan Templates and Order:
Add necessary templates first. Carefully check template order for overlapping settings to prevent misconfigurations (e.g., interface type conflicts).
A template configuration cannot reference a configuration in another template, even if both are in the same stack (e.g., a zone in Template_A cannot reference a zone protection profile in Template_B).
-
Create Template Stack:
- Select Panorama > Templates and click Add Stack. (Cloning stacks is not supported).
- Enter a unique Name.
-
Add templates. The list shows them in priority order (top is highest). Use Move Up/Move Down to reorder.
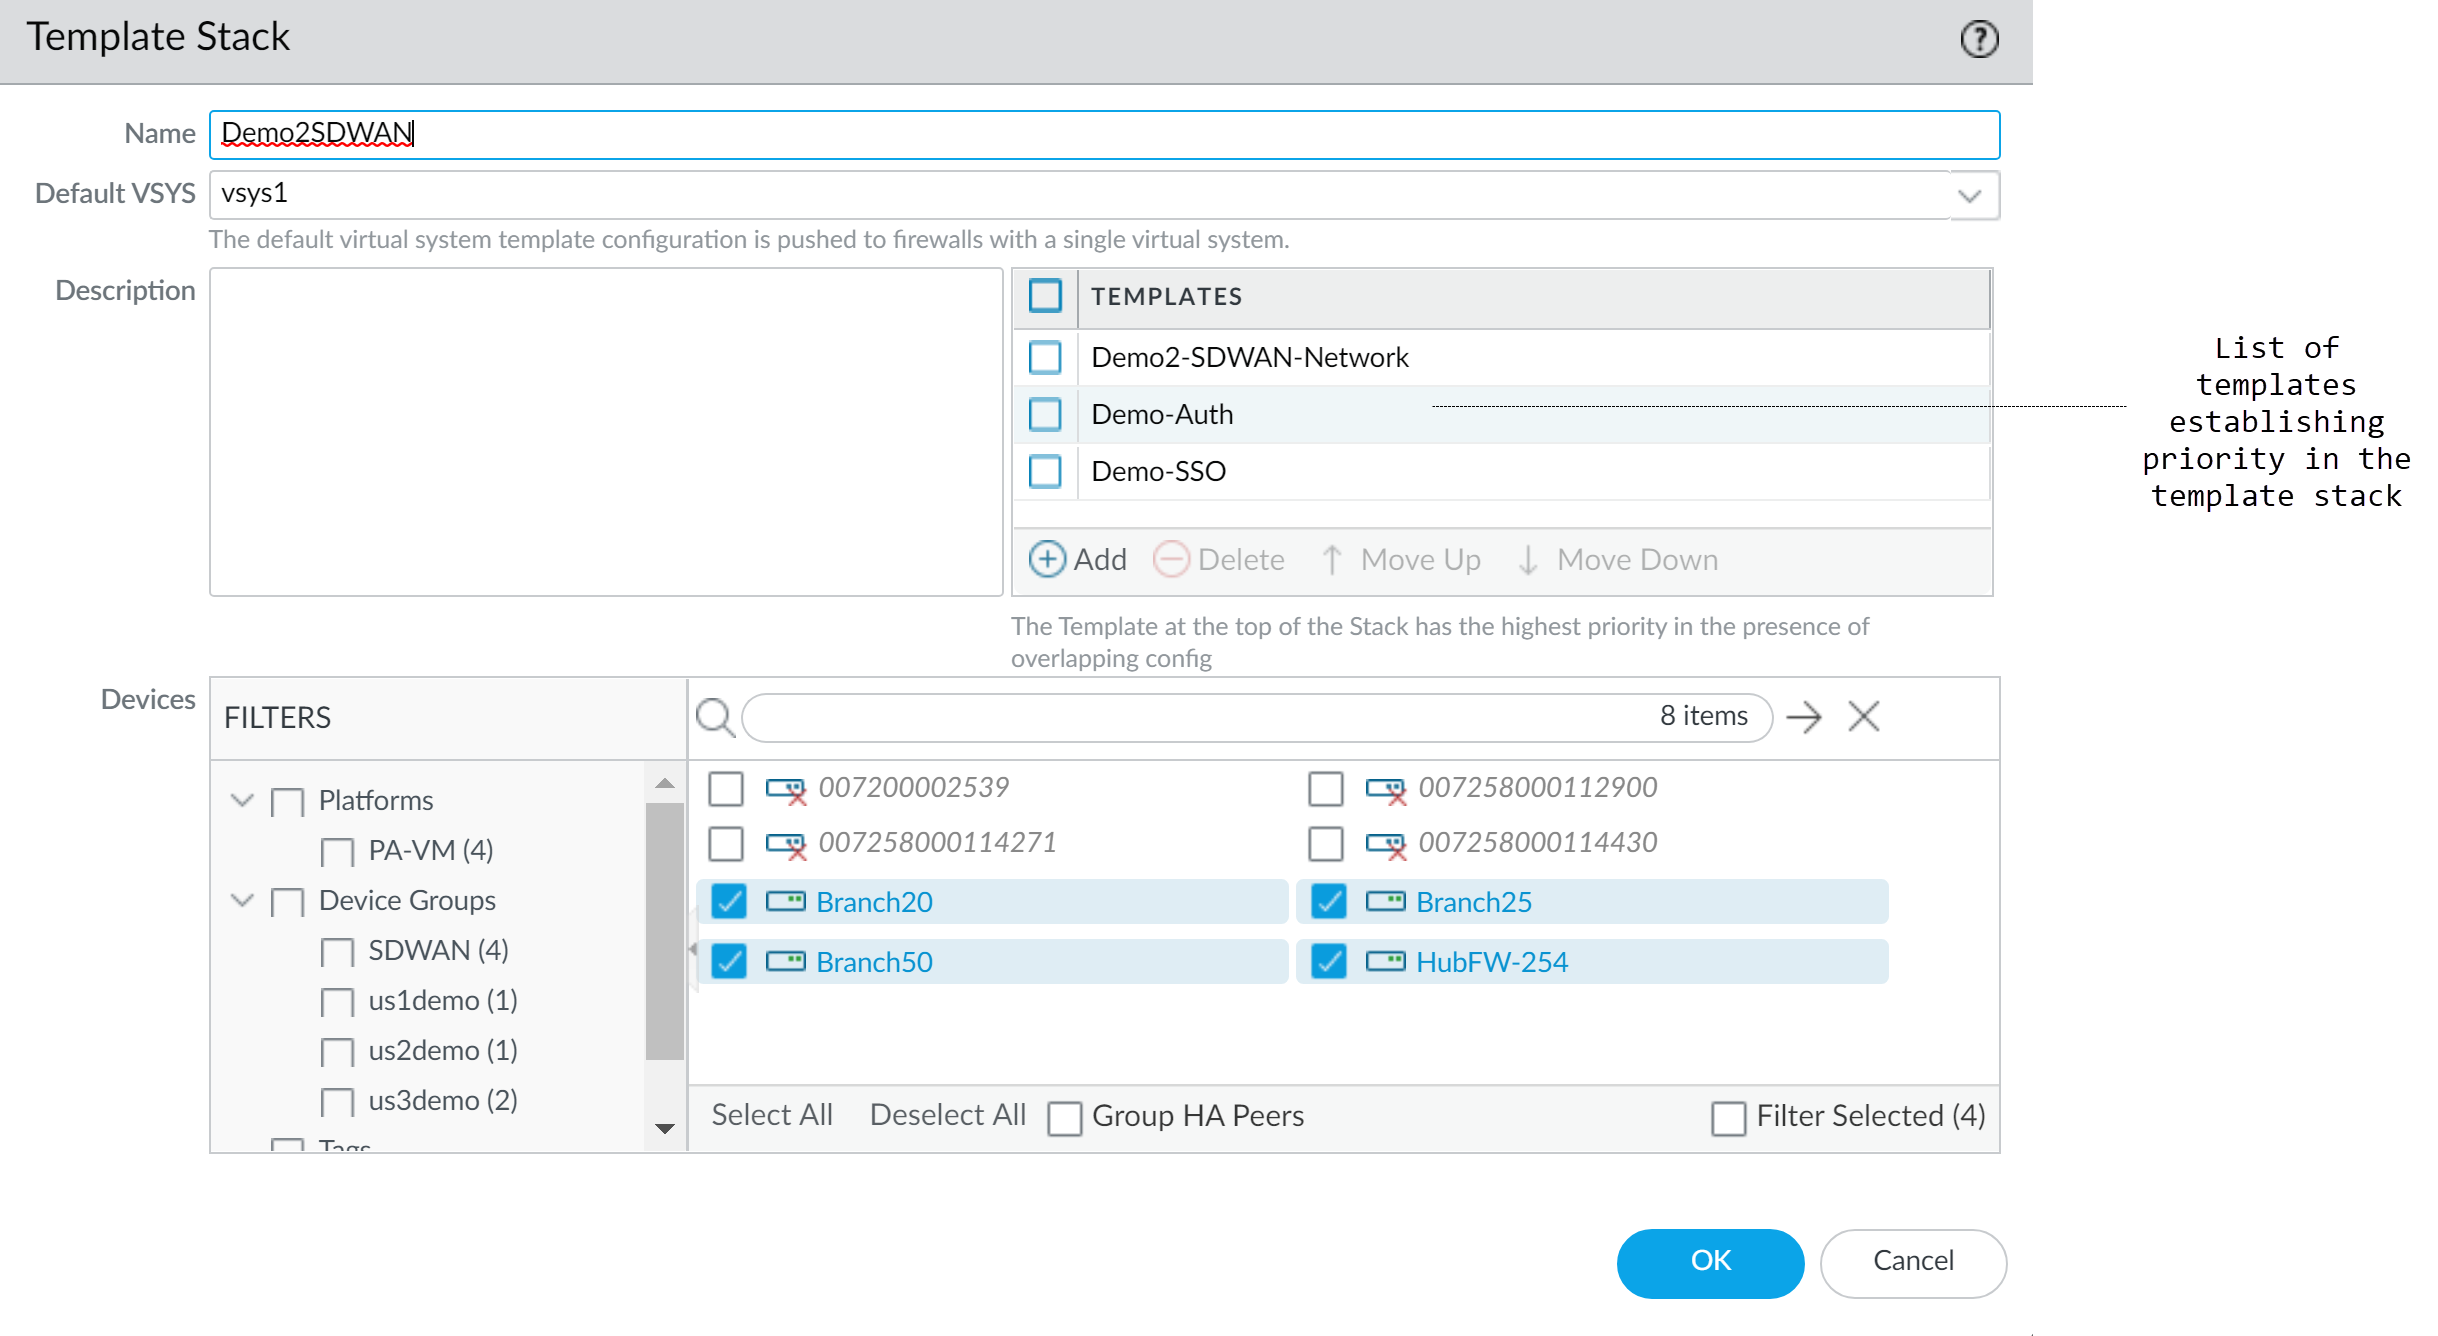
Configuring templates within a stack and their order. - In the Devices section, assign firewalls to the stack. (For multi-VSYS firewalls, assign the entire firewall, not individual VSYS). A firewall belongs to only one stack.
- (Optional) Select Group HA Peers to simplify selection for HA pairs.
- Click OK.
- (Optional) Configure Template Stack Variables.
-
Edit Network and Device settings within the stack context if needed.
- Use the Mode drop-down (Multi VSYS, Operational Mode, VPN Mode) in Network/Device tabs to filter settings and avoid push errors for firewalls in specific modes (e.g., FIPS).
- Commit and Push: Select Templates in Push Scope, select firewalls assigned to the stack, then Commit and Push.
-
Verify:
On a managed firewall, settings pushed from a stack show a template icon. Hover to see the source stack.
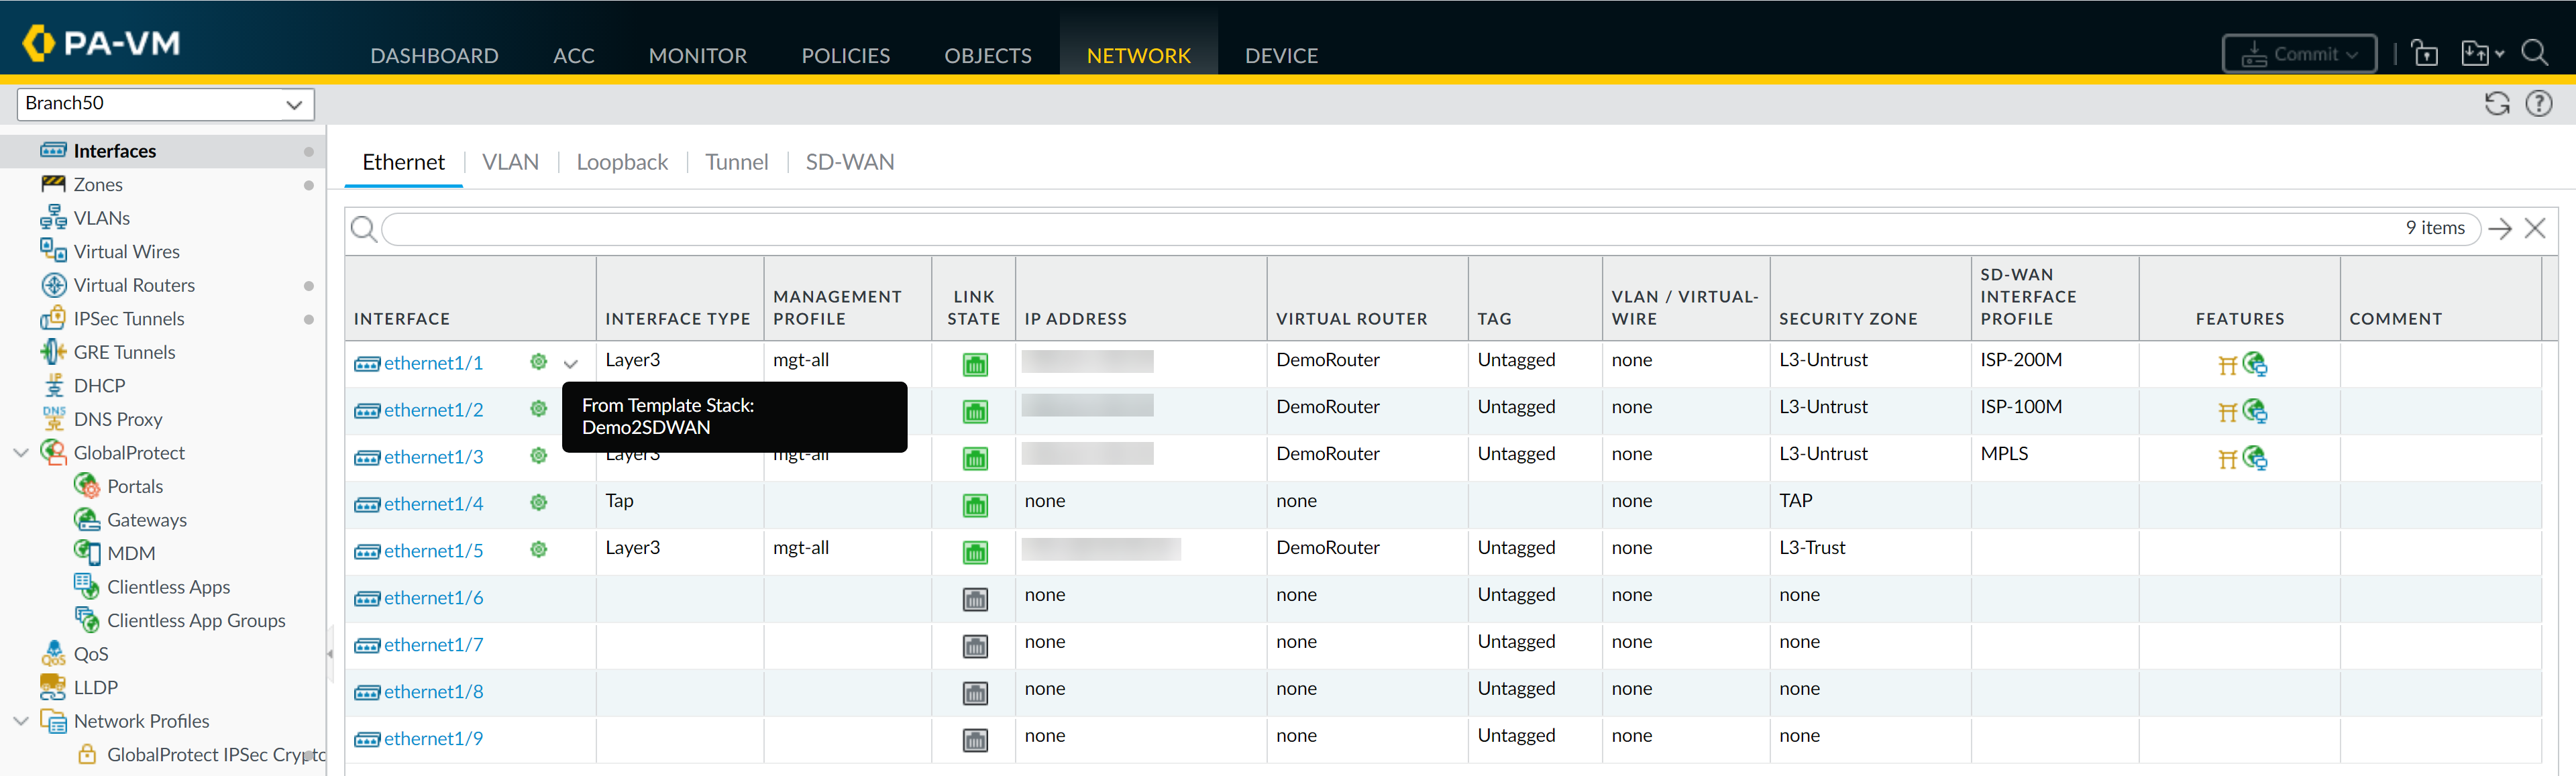
Firewall showing settings inherited from a template stack.
Configure Template or Template Stack Variables
Variables (starting with
$
) allow you to replace values like IP addresses, IP ranges, FQDNs, interfaces, and Group IDs in template or stack configurations. This reduces the need for many similar templates/stacks by allowing device-specific values.
If multiple templates in a stack use different variables for the same object, the value inherited by the stack is based on template order. Variables can also be used in a stack to override template values.
Steps to Configure Variables:
- Ensure you have a template and a template stack created.
- Select Panorama > Templates. In the Variables column, click Manage for the desired template or stack.
-
Click Add.
-
Name:
Must start with
$(e.g.,$DNS-primary). - Type: Select type (IP Netmask, FQDN, etc.) and enter the value.
- (Optional) Description.
-
Click OK.
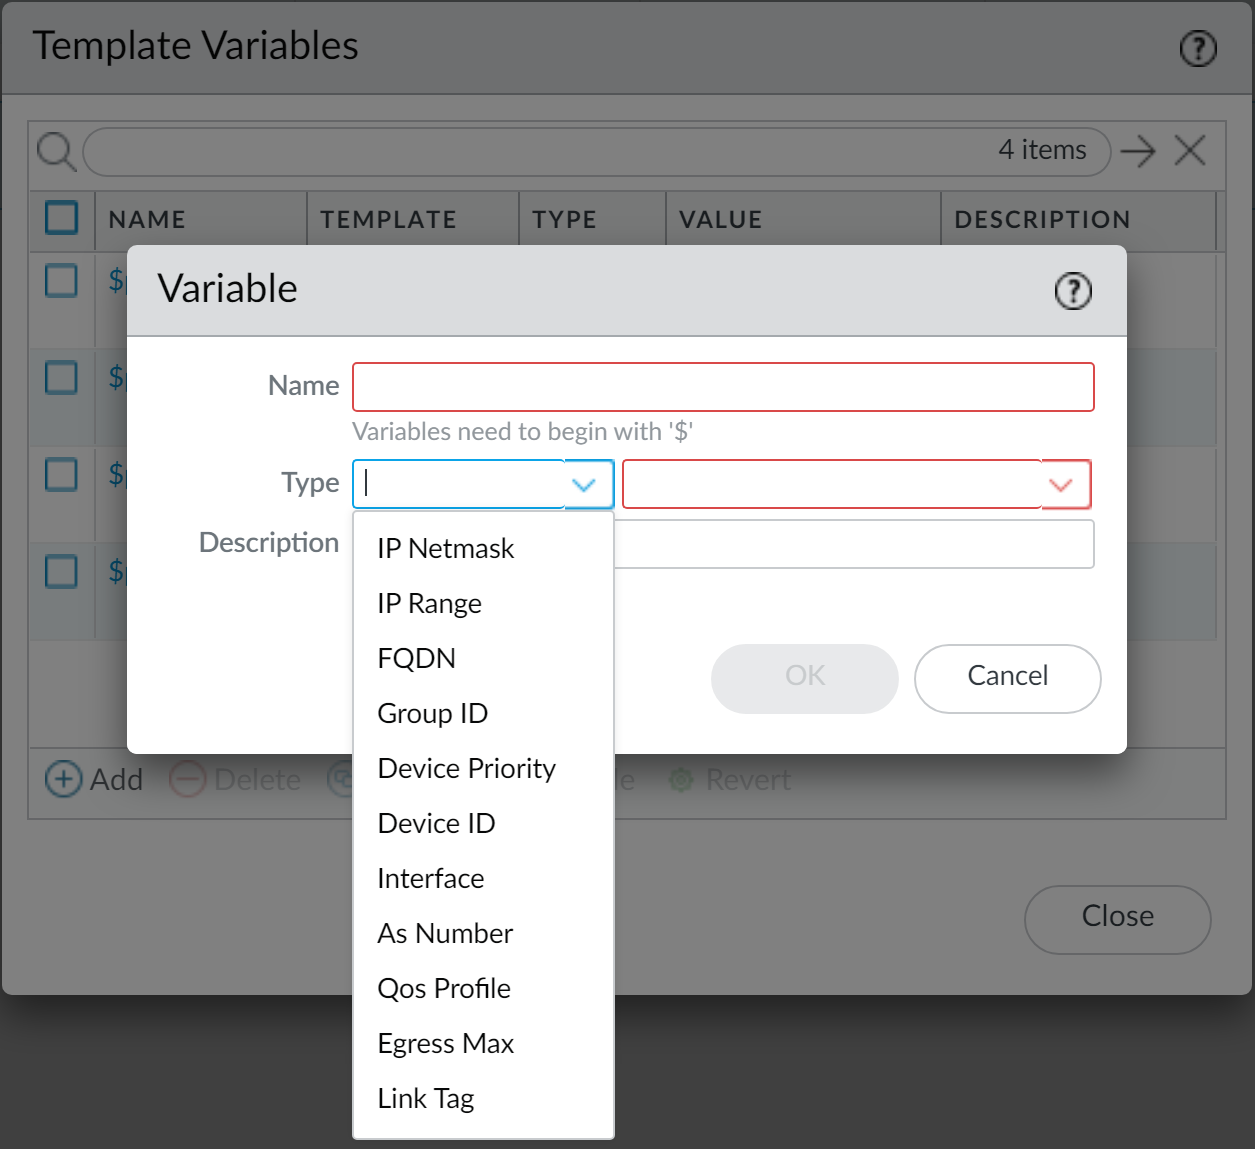
Defining variables within a template or stack.
-
Name:
Must start with
- From the Template drop-down in Network/Device tabs, select the template/stack where the variable was defined.
-
Enter the variable in the appropriate configuration field (e.g.,
$DNS-primaryfor Primary DNS Server).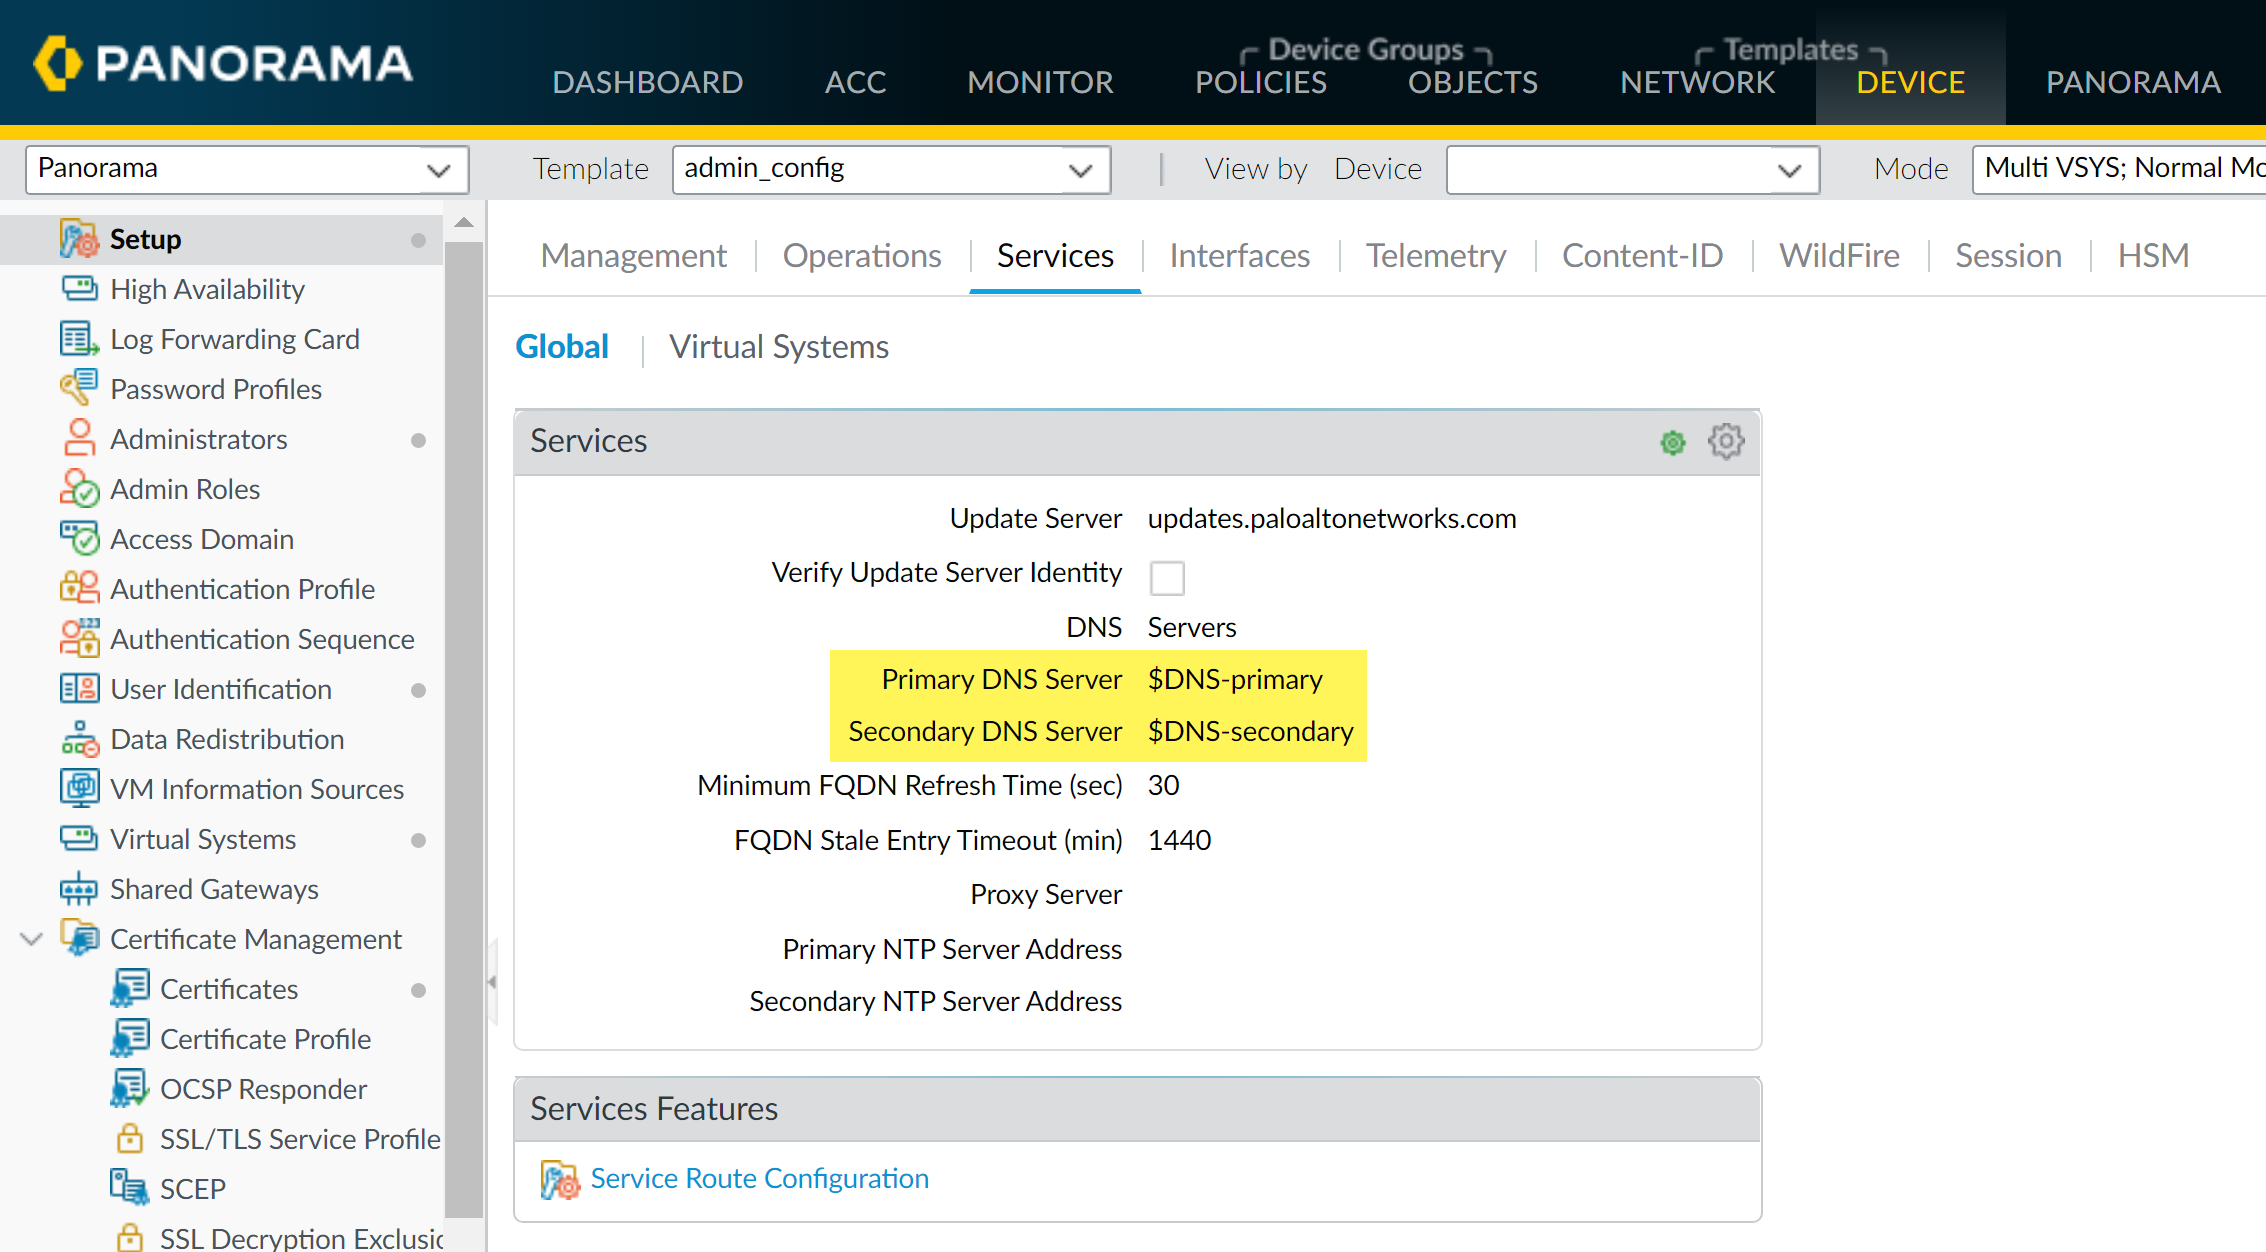
Applying variables to configuration fields. -
Commit and Push.
When pushing a device group configuration that references template/stack variables, you must Edit Selections and Include Device and Network Templates.
-
Verify on managed device: The pushed value (not the variable name) will appear. A template icon indicates inheritance; hover to see source.
Firewall showing the resolved value of a template variable.
Import and Overwrite Existing Template Stack Variables
You can import a CSV file to overwrite the values of multiple existing template stack variables for different firewalls. This does not create new variables; it only updates existing ones.
Steps:
-
Export Existing Variables:
- Select Panorama > Templates. Select the template stack.
- Click Variable CSV > Export. A CSV file is downloaded.
-
Edit the CSV File:
-
Values shown as
#inherited#are defined in the template stack itself (not per device). -
Correct Serial Numbers:
Format cells containing serial numbers as Text. If leading zeros are missing, add them.
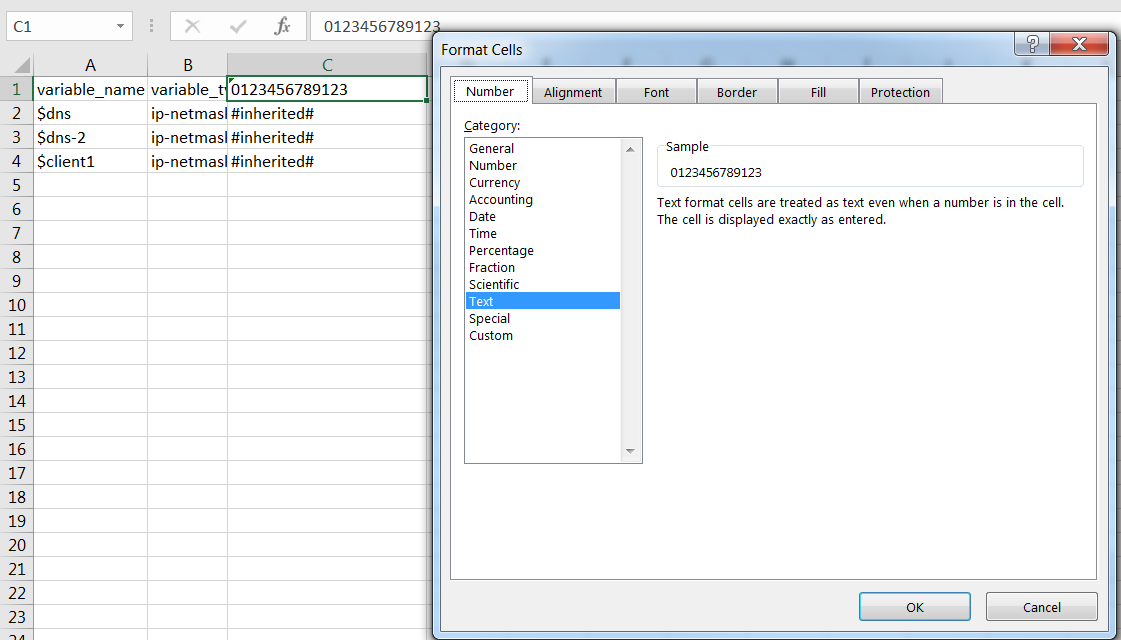
Ensure firewall serial numbers are correctly formatted as text in the CSV. - Enter new values for the desired template variables for specific firewalls.
-
Save the file as CSV UTF-8.
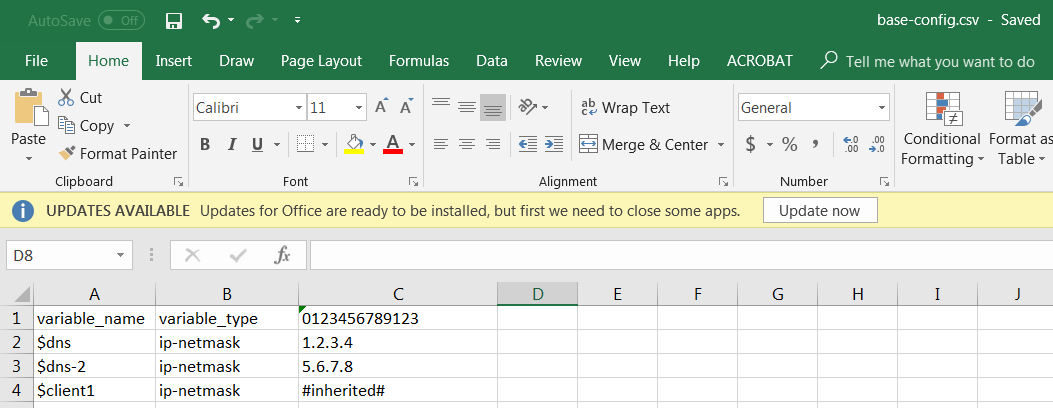
Updating variable values in the CSV for import.
-
Values shown as
-
Import the CSV File:
- Select Panorama > Templates. Select the same template stack.
- Click Variable CSV > Import. Browse for your edited CSV file.
- Click OK.
- Commit to Panorama.
- Enter/confirm variables are used in the appropriate locations in the template stack configuration.
- Commit and Push (remember to "Include Device and Network Templates" if device groups are affected).
Override a Template Setting
Overrides allow for exceptions or modifications to settings pushed from templates or template stacks to meet specific configuration needs for individual firewalls or for the stack itself.
Methods to Override:
-
Override on the Firewall (Local Override):
Modify a setting directly on the firewall's web interface that was pushed from a template/stack.
- Access firewall web interface (direct IP or Panorama context switch).
- Navigate to the setting (e.g., Device > Setup > Services).
- Click the template icon next to the field to enable override.
- Enter the new value. A template override icon (yellow-over-green, or similar) appears.
- Commit changes on the firewall.
-
Override Template Value Using Template Stack Configuration:
Define a value directly in the template stack to override what a template within that stack provides.
- In Panorama, select the Template Stack from the Template drop-down.
- Navigate to the setting (e.g., Device > Setup > Services).
- Configure the new value. This becomes the stack's value for that setting, overriding any template below it.
- Commit and Push the stack.
Panorama supports using a template stack to override interfaces configured in a template, except for Layer2 sub-interfaces of an aggregated interface. -
Override Template Value Using a Template Stack Variable:
Create/modify a variable at the template stack level to override a variable value pushed from a template within that stack.
- Select Panorama > Templates. Manage Variables for the template stack.
-
Find the template variable (e.g.,
$DNS) that is inherited from a template. - Select the variable and click Override.
- Enter the new value for the variable at the stack level.
- Commit and Push.
-
Override Template/Stack Value Using Firewall-Specific Variables (in Panorama):
Define a variable value for a specific firewall that overrides the template or stack's variable value.
- Select Panorama > Managed Devices > Summary.
- Edit Variables for the specific firewall.
-
Find the template/stack variable (e.g.,
$DNS). - Select Override. Enter the new firewall-specific value.
- Commit and Push.
If a variable is already overridden at a higher level (e.g., stack overriding template), you might need to Revert that override before creating a firewall-specific one, or ensure the firewall-specific override targets the correct variable instance.
Disable/Remove Template Settings
If you want to stop using a template or template stack for managing a firewall's configuration, you can disable it. This action requires Superuser administrative role on the firewall.
Steps to Disable Template/Stack on a Firewall:
- Access the web interface of the managed firewall (direct IP or via Panorama context switch) as a Superuser.
- Select Device > Setup > Management and edit Panorama Settings.
- Click Disable Device and Network Template .
-
(Optional but CRITICAL choice):
- Select Import Device and Network Template before disabling : This copies the Panorama-pushed settings into the local configuration of the firewall.
- If NOT selected: All Panorama-pushed template/stack settings will be deleted from the firewall's configuration.
- Click OK twice, then Commit the changes on the firewall.
PCNSE Exam Essentials: Device Groups
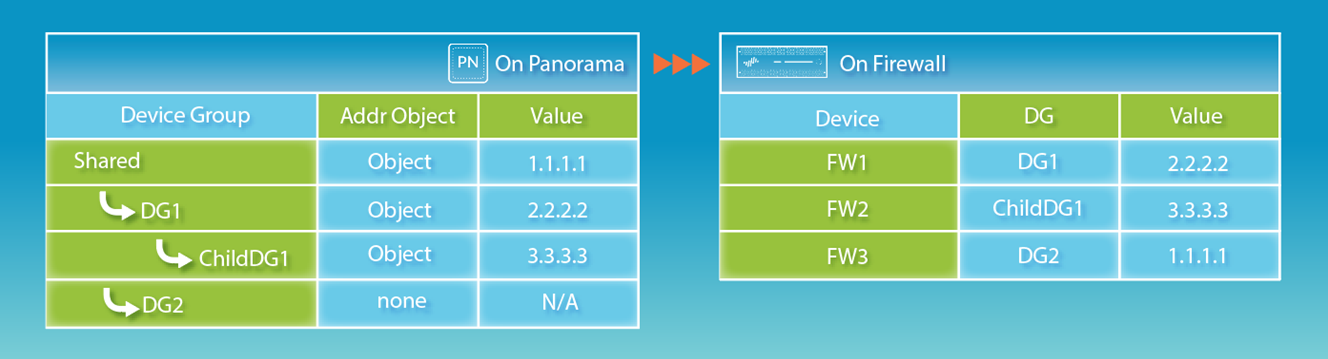
Device Groups are fundamental to Panorama's centralized management capabilities. Here are key points for the PCNSE exam:
-
Hierarchy and Scope:
- Device Groups can be nested up to four levels deep below 'Shared'.
- A firewall or virtual system can only belong to one Device Group.
- 'Shared' is the highest level; objects and policies here are available to all Device Groups.
-
Object Inheritance:
- Objects (Addresses, Services, Custom URL Categories, Profiles etc.) are inherited from parent Device Groups and 'Shared'.
- Child Device Groups can override inherited objects unless 'Disable Override' is checked on the object at its definition point.
- Overridden objects have a distinct icon (yellow-overlapping-green).
- Shared objects cannot be overridden at the Device Group level; they are global.
-
Policy Rule Evaluation Order:
- Shared Pre-Rules
- Device Group Pre-Rules (from highest parent to current DG)
- Local Firewall Rules
- Device Group Post-Rules (from current DG to highest parent)
- Shared Post-Rules
- Default Rules
The "Preview Rules" feature in Panorama is essential to verify the final, effective rulebase on a managed firewall. -
Object Precedence:
- Default: A local or lower-level (more specific) Device Group object/override takes precedence over an identically named object from a higher-level Device Group or 'Shared'.
- Panorama Setting: "Objects defined in ancestors will take higher precedence" reverses this, making the highest-level definition win. Requires a subsequent "Push to Devices".
-
Commit and Push Operations:
- Changes to Device Groups, policies, or objects require a Commit to Panorama.
- To apply to firewalls, a "Push to Devices" is necessary, targeting specific Device Groups.
- "Merge with Device Candidate Config" (default on) merges Panorama's push with any uncommitted local changes on the firewall.
- Moving/Cloning: When moving or cloning rules/objects, ensure all referenced objects are available in the destination Device Group (either directly or via inheritance). Audit comments do not move with rules.
- Targeting Rules: Policy rules can be targeted to a subset of firewalls within a Device Group, enhancing granularity.
PCNSE Exam Essentials: Templates & Template Stacks
Templates and Template Stacks manage Network and Device configurations.
- Purpose: Templates manage Network (Interfaces, Zones, VLANs, Virtual Routers, VPN Tunnels etc.) and Device (Setup, Management Profile, Log Settings, Server Profiles etc.) settings.
- Separation of Concerns: Templates for Network/Device settings; Device Groups for Policies/Objects.
-
Templates:
- Modular, reusable configuration blocks.
- A firewall is NOT directly assigned to a Template; it's assigned to a Template Stack.
-
Template Stacks:
- A collection of up to 8 templates, ordered by priority.
- A firewall MUST belong to exactly one Template Stack.
- Template order is crucial: settings in higher templates override conflicting settings in lower templates.
- A stack can also have its own direct configurations, which override all templates within it.
-
Variables:
-
Start with '$' (e.g.,
$gateway_ip). - Allow for device-specific values within a common template/stack structure.
- Can be defined in templates, template stacks, or per-device (in Panorama).
- When pushing Device Group configs that reference template variables (e.g., a zone referencing an interface defined by a variable), you must "Include Device and Network Templates" in the push scope.
-
Start with '$' (e.g.,
-
Overrides:
- Local Firewall: Highest precedence for that specific firewall. Click template icon to override.
- Template Stack Direct Config: Overrides all templates within the stack.
- Template Stack Variable: Can override a variable from a template within the stack.
- Firewall-Specific Variable (Panorama): Overrides template/stack variable for that device.
- Limitations: Some settings are local-only (HA IP addresses, master key, operational mode changes). Licenses/Updates are via Panorama's Device Management tab.
- Deleting Templates: Requires settings to be disabled/removed locally on firewalls first (Superuser role).
PCNSE Exam Essentials: Common Gotchas
Be mindful of these common pitfalls related to Panorama Device Groups and Templates:
- Firewall Membership: A firewall/VSYS can only be in ONE Device Group and ONE Template Stack.
- Renaming Shared Objects: Renaming a Shared object in any Device Group context renames it globally. This can break configurations on firewalls expecting the old name, leading to commit failures.
- Object/Policy Precedence vs. Template Stack Order: Don't confuse Device Group object/policy precedence (Shared > Parent DG > Child DG or Ancestor Precedence setting) with Template Stack template order (higher template overrides lower). They manage different configuration aspects.
- "Include Device and Network Templates" during Push: If Device Group policies reference objects whose values depend on template variables (e.g., a policy using a zone whose interface is defined by a variable), this option must be checked during Commit and Push.
- Pushing After Ancestor Precedence Change: Selecting "Objects defined in ancestors will take higher precedence" in Panorama settings requires a Commit to Panorama AND a subsequent "Push to Devices" for it to affect firewalls.
- HA Pair IP Configuration: Management and HA interface IP addresses for firewalls in an HA pair are configured locally on each firewall, not typically via Panorama templates.
- VSYS Renaming: Renaming a VSYS should be done on the local firewall, not via Panorama templates, to avoid creating new/unintended VSYS instances.
- Moving Rules/Objects Dependencies: When moving policies or objects, ensure all referenced items are available in the destination Device Group (either directly or inherited). Use Global Find.
- "Share Unused Address and Service Objects with Devices" Disabled: If this Panorama setting is disabled, pushing a targeted rule (to a subset of firewalls) will still push ALL objects referenced by ANY rule in that DG to ALL firewalls in that DG, effectively ignoring the rule target for object distribution.
- Deleting a Template: Requires prior local disassociation from firewalls (Disable Device and Network Template), which needs Superuser rights on the firewall.
- Multi-VSYS Push Failures: If any part of a bundled commit job to a multi-VSYS firewall fails, the entire push to that firewall fails. If one multi-VSYS firewall in a larger push fails, the entire push to all firewalls in that operation fails.