Introduction to Panorama
Panorama™ enables centralized management of Palo Alto Networks firewalls. It provides a single pane of glass for managing configurations, deploying policies, and monitoring network activity across multiple firewalls.
Panorama simplifies the administration of a large number of firewalls by allowing administrators to group devices, share configurations, and enforce consistent security policies. Key benefits include operational efficiency, consistent security posture, and comprehensive visibility.
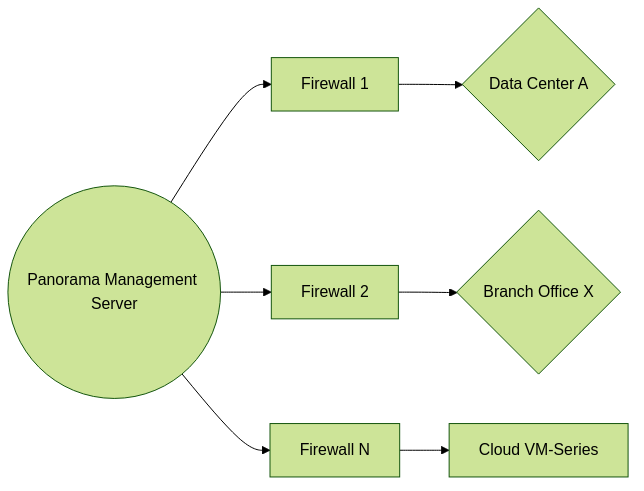
Panorama centrally manages multiple firewalls across different locations.
Key Capabilities
- Centralized Configuration: Use Device Groups and Templates to manage policies and network/device settings.
- Policy Management: Create and manage security, NAT, decryption, and other policies across multiple firewalls.
- Log Collection & Reporting: Aggregate logs from managed firewalls for centralized analysis and reporting (often involves dedicated Log Collectors).
- Software & Content Updates: Centrally manage and deploy PAN-OS software updates and content updates (Applications and Threats, Antivirus, WildFire).
- High Availability (HA): Panorama itself can be deployed in an HA pair for redundancy.
Panorama Licensing
To manage firewalls, Panorama requires a Device Management License . This license dictates the maximum number of firewalls Panorama can manage.
- The total count of managed firewalls must not exceed the activated device management license limit on Panorama.
- If adding a firewall exceeds the limit, the operation is blocked, and a warning is displayed.
- You can view the active license and maximum supported firewalls by selecting Panorama > Licenses .
For the PCNSE exam, understand that Panorama's capacity to manage firewalls is tied to its licensing. Each firewall in an HA pair counts as one managed device towards the license limit.
While Panorama can manage licenses for the firewalls themselves (e.g., Threat Prevention, WildFire), Panorama itself needs its own Device Management license to function as a manager.
Device Registration & Initial Connection
To manage a firewall with Panorama, a secure connection must be established. This involves mutual authentication using a Device Registration Authentication Key .
Key Steps:
-
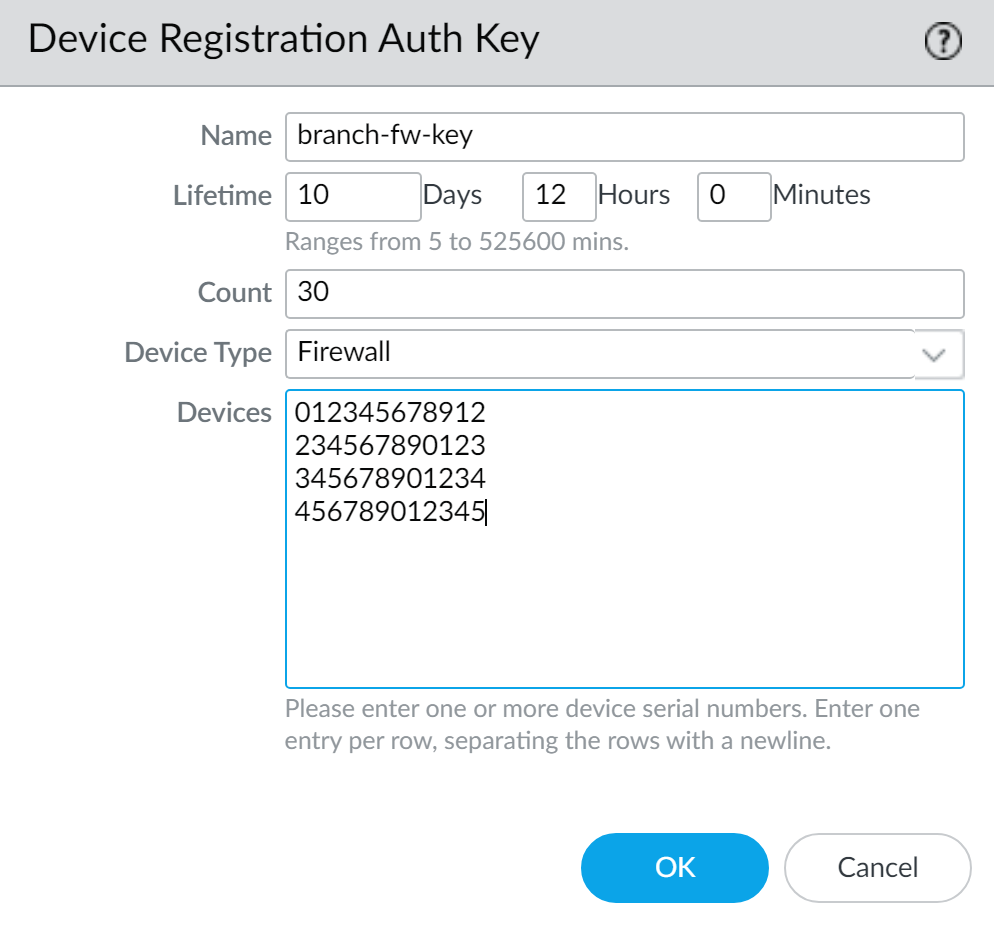
On Panorama: Create Device Registration Authentication Key
- Navigate to Panorama > Device Registration Auth Key .
- Specify Name , Lifetime (how long the key is valid), Count (how many times it can be used), and Device Type (Firewall).
- Optionally, specify device serial numbers for which the key is valid.
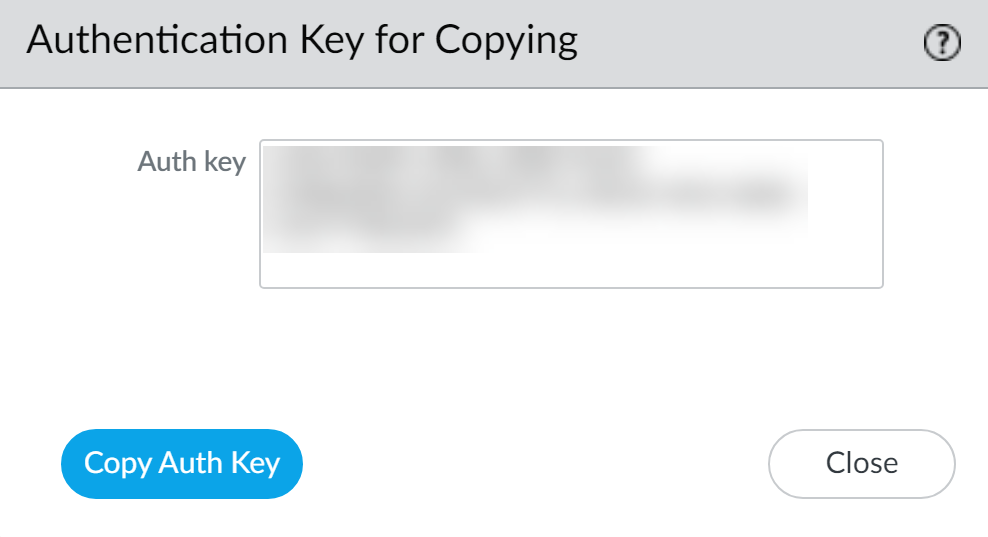
- Copy the generated authentication key.
- This key ensures mutual authentication for the first connection.
-
On Panorama: Add Firewall Serial Number
- Navigate to Panorama > Managed Devices > Summary and click Add .
- Enter the firewall's serial number.
- Enter the device registration authentication key created in the previous step.
- Optionally, associate with Device Group, Template Stack, Collector Group during initial deployment.
- Optionally, enable "Auto Push on 1st connect" (for PAN-OS 8.1+ firewalls) to push configuration immediately upon connection.
-
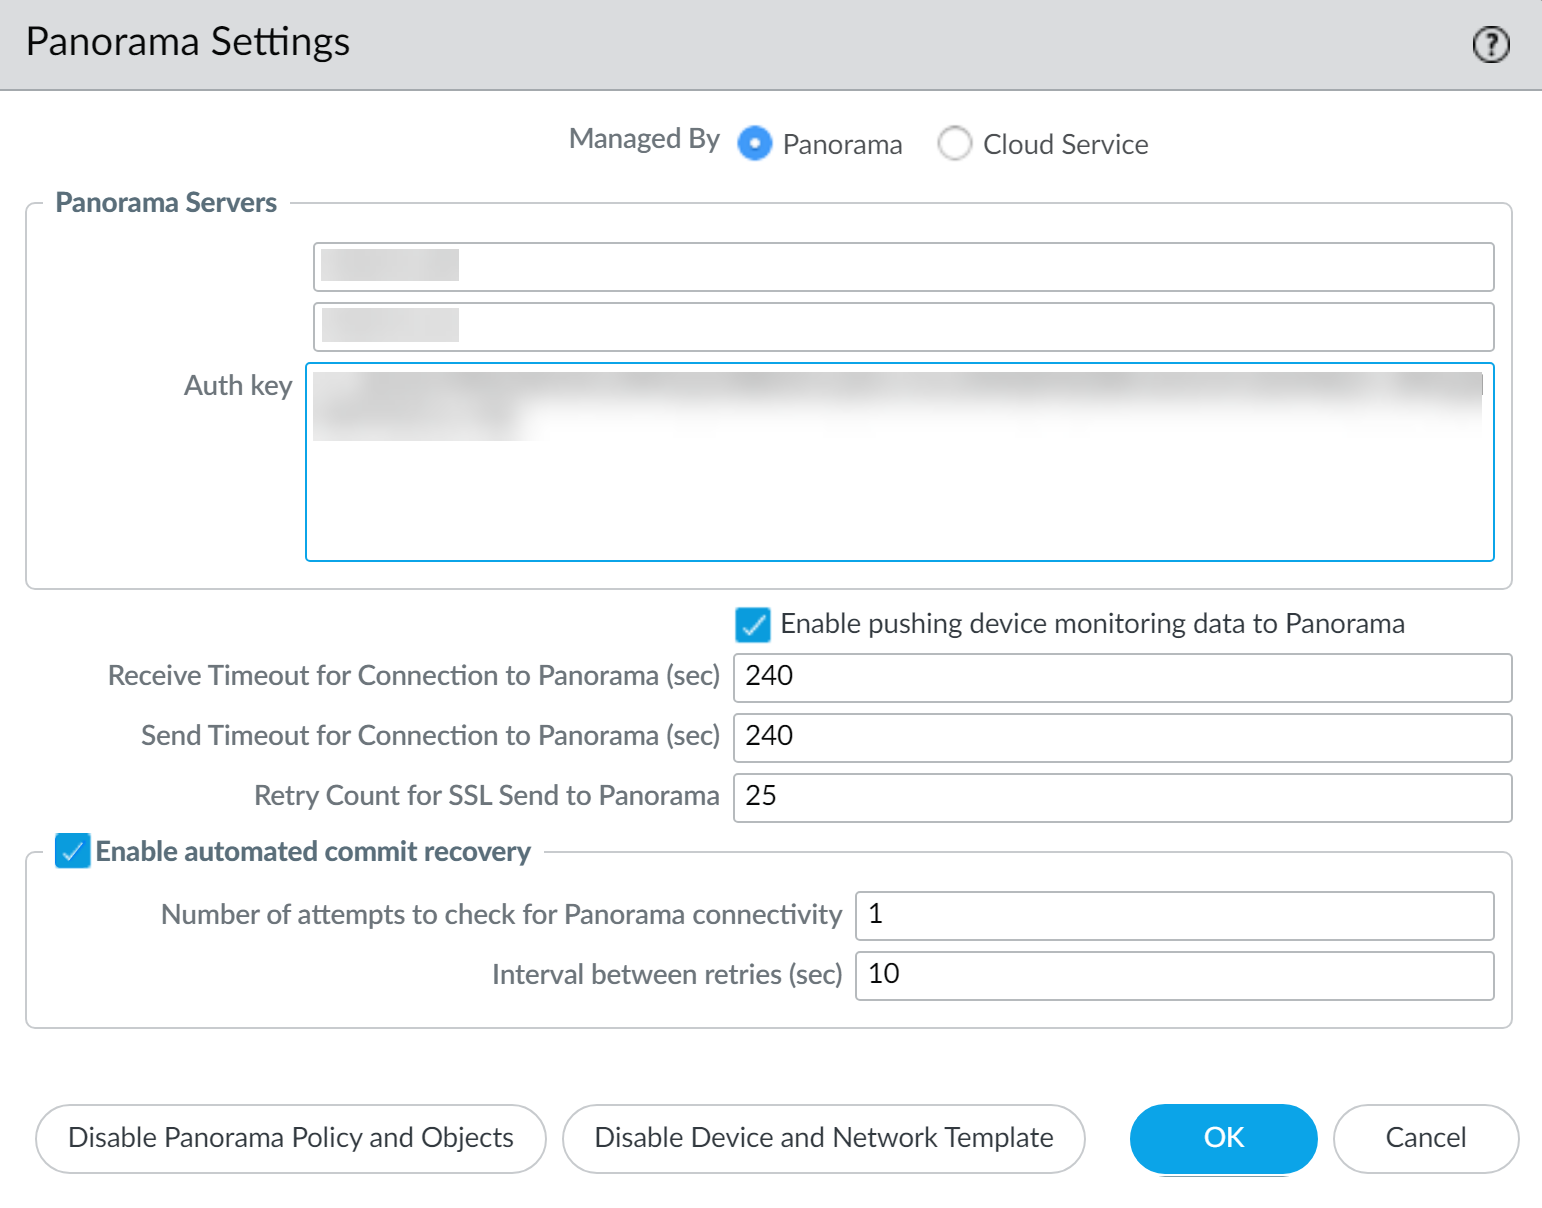
On Firewall: Configure Panorama Settings
- Log in to the firewall's web interface.
- Navigate to Device > Setup > Management and edit Panorama Settings.
- Select "Panorama" for "Managed By".
- Enter the Panorama IP address(es) (primary and optional secondary for HA).
- Paste the authentication key copied from Panorama.
- Commit changes on the firewall.
-
On Panorama: Commit Changes
- Commit changes to Panorama ( Commit > Commit to Panorama ).
-
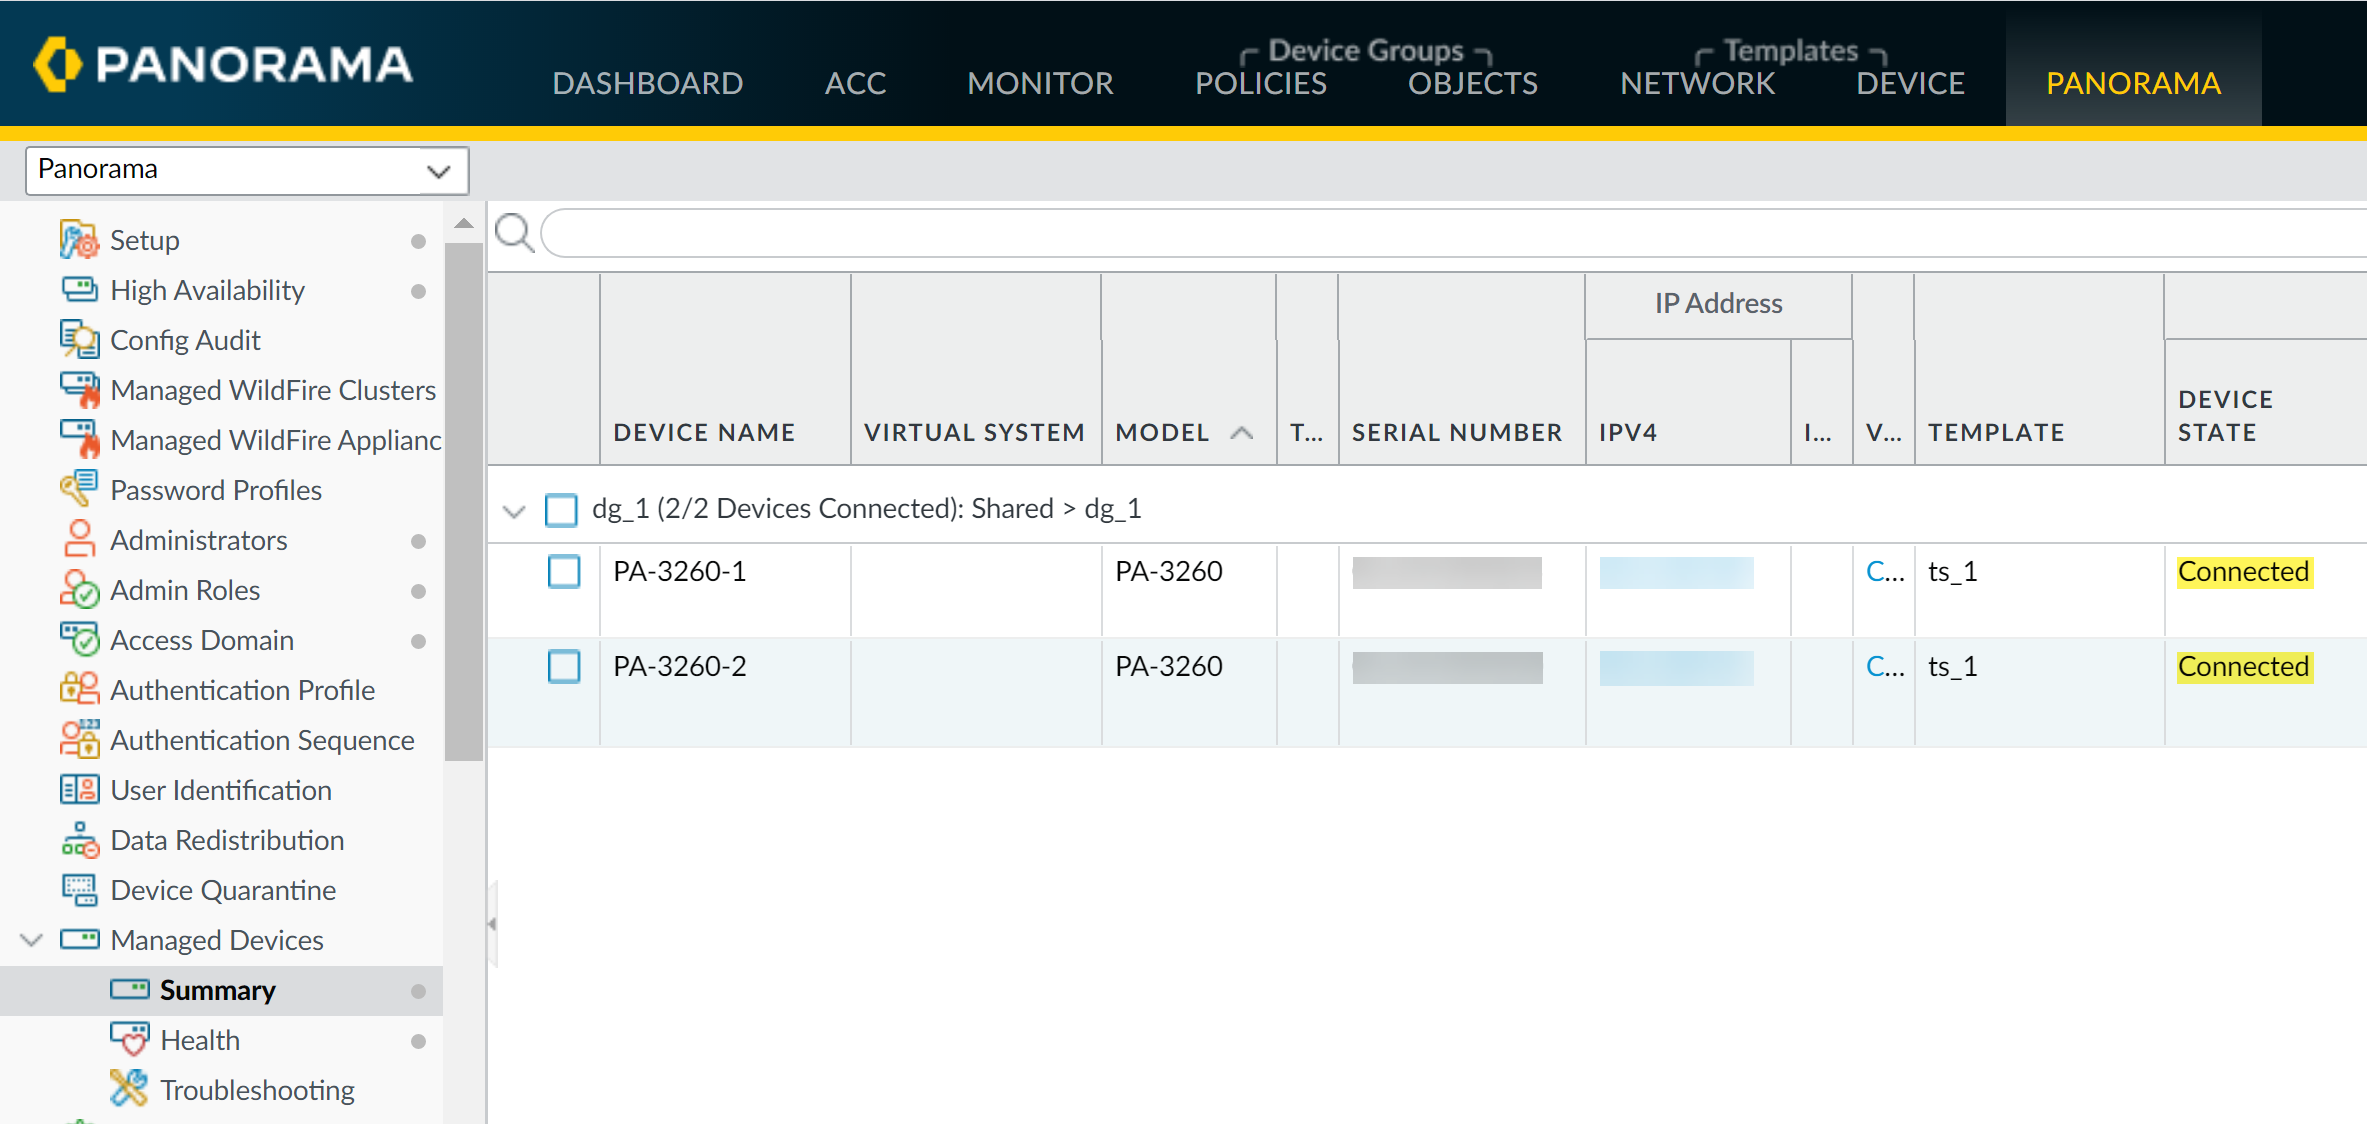
Verify Connection
- On Panorama, navigate to Panorama > Managed Devices > Summary .
- Verify the Device State for the new device shows as Connected .
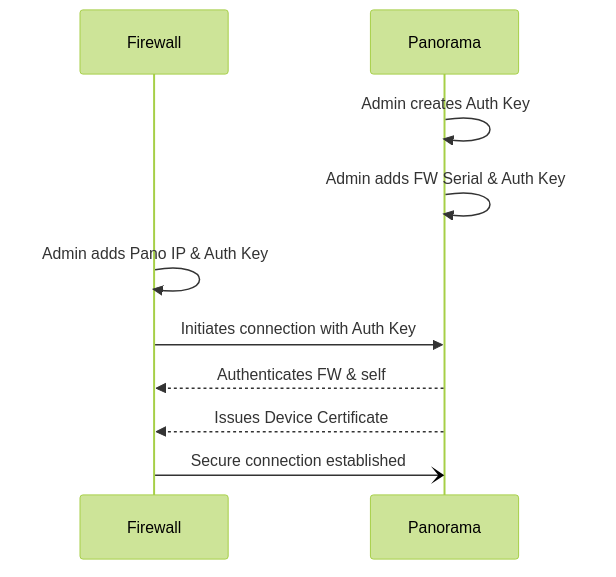
Firewall to Panorama Registration and Connection Sequence.
The authentication key is used for the *first connection* for mutual authentication. Subsequent communications use 2,048-bit certificates and AES-256 encrypted SSL connections. For Panorama HA, the auth key is only needed for the primary Panorama; the CA certificate is synchronized for the secondary.
PAN-OS Version Compatibility
Panorama and its managed firewalls must run compatible PAN-OS versions.
- General Rule: Panorama should run the same or a newer PAN-OS version than its managed firewalls.
-
Specifics for Panorama on PAN-OS 11.0.0 or later:
- Can onboard new firewalls running PAN-OS 10.1.3 or later.
- Cannot onboard new firewalls running PAN-OS 10.1.2 or earlier PAN-OS 10.1 releases.
- Continues to manage firewalls running PAN-OS 10.0 or earlier PAN-OS releases that were already managed.
- Upgrading Panorama to PAN-OS 10.2 or later does not impact already managed firewalls.
Always check the Palo Alto Networks compatibility matrix for the most current version compatibility information before performing upgrades or adding new devices. Attempting to manage a firewall with an incompatible Panorama version can lead to commit failures or unpredictable behavior.
Adding Firewalls to Panorama
After the initial setup, firewalls are added to Panorama's list of managed devices. This can be done manually or by importing a CSV file.
Manual Addition:
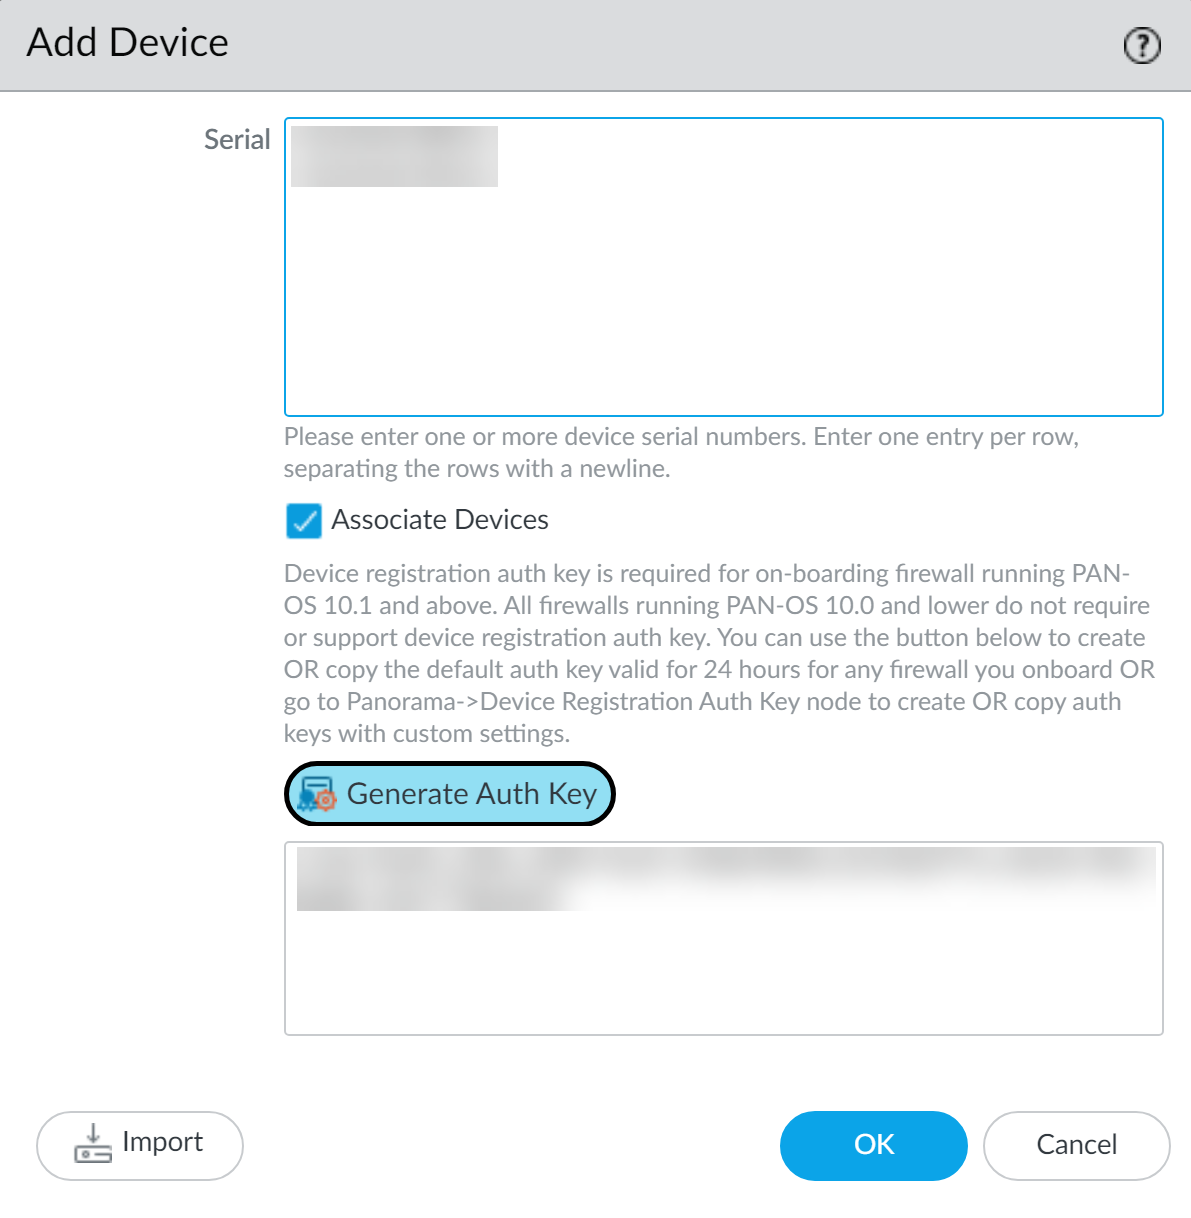
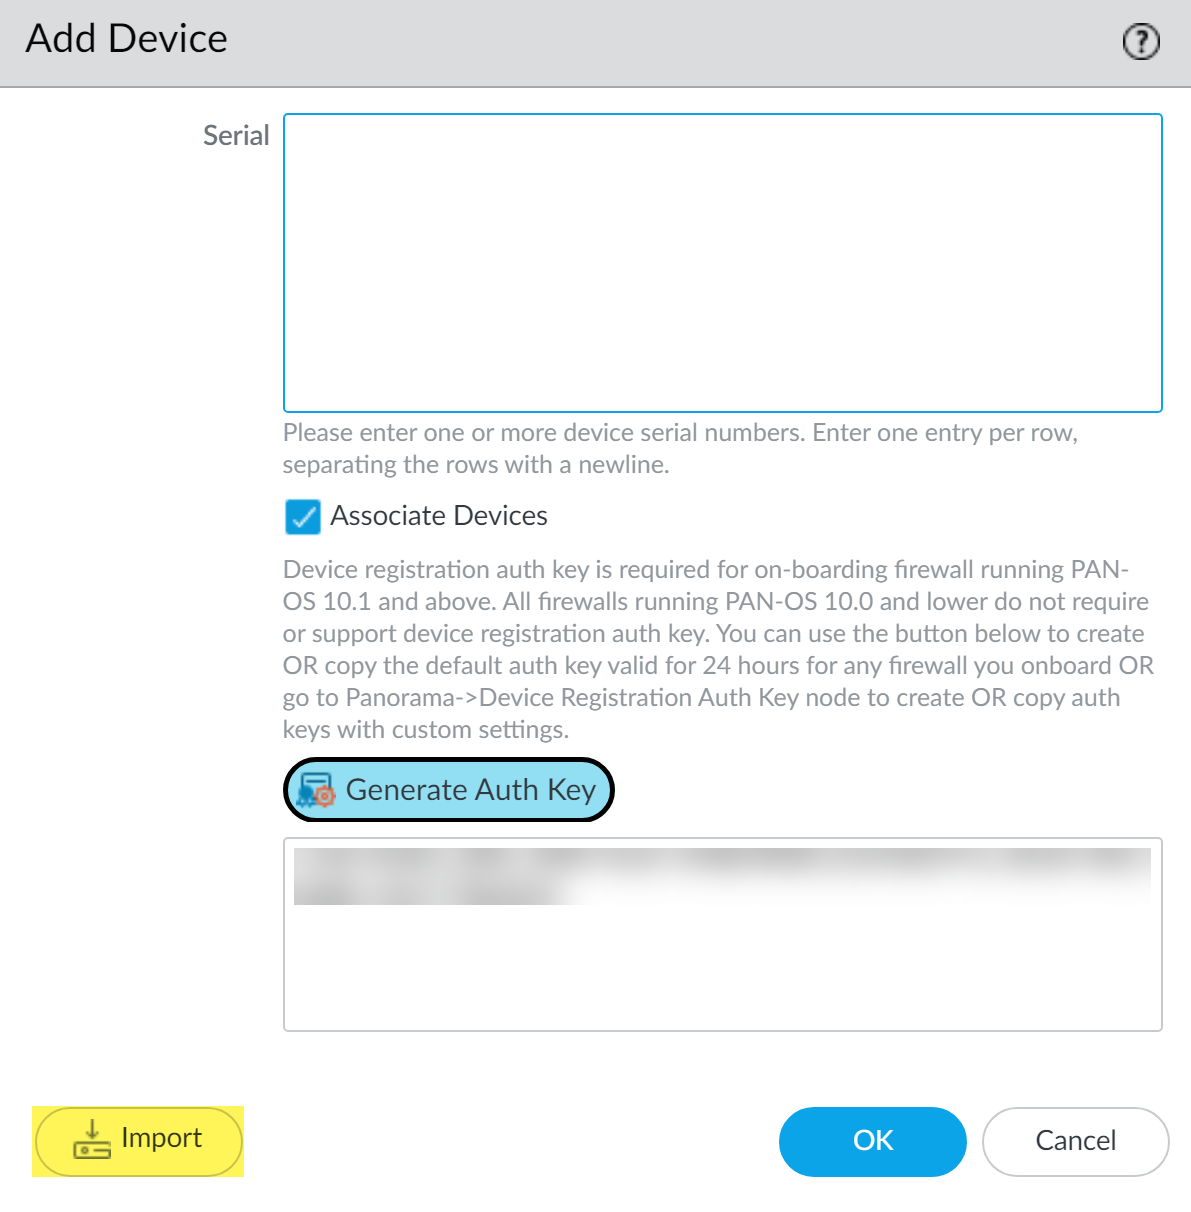
- Go to Panorama > Managed Devices > Summary and click Add .
- Enter firewall Serial number(s) (one per line for multiple).
- Enter the pre-configured Device Registration Authentication Key .
-
(Optional) Select
Associate Devices
to link the firewall to a Device Group, Template Stack, Log Collector, or Collector Group upon first connection.
- If associated, you can enable Auto Push on 1st connect (for PAN-OS 8.1+) to automatically push the configuration.
- (Optional) Specify a target PAN-OS software version ( To SW Version ) for automatic upgrade on first connect. (Requires prior content installation on the firewall).
- Click OK .
- Commit changes to Panorama.
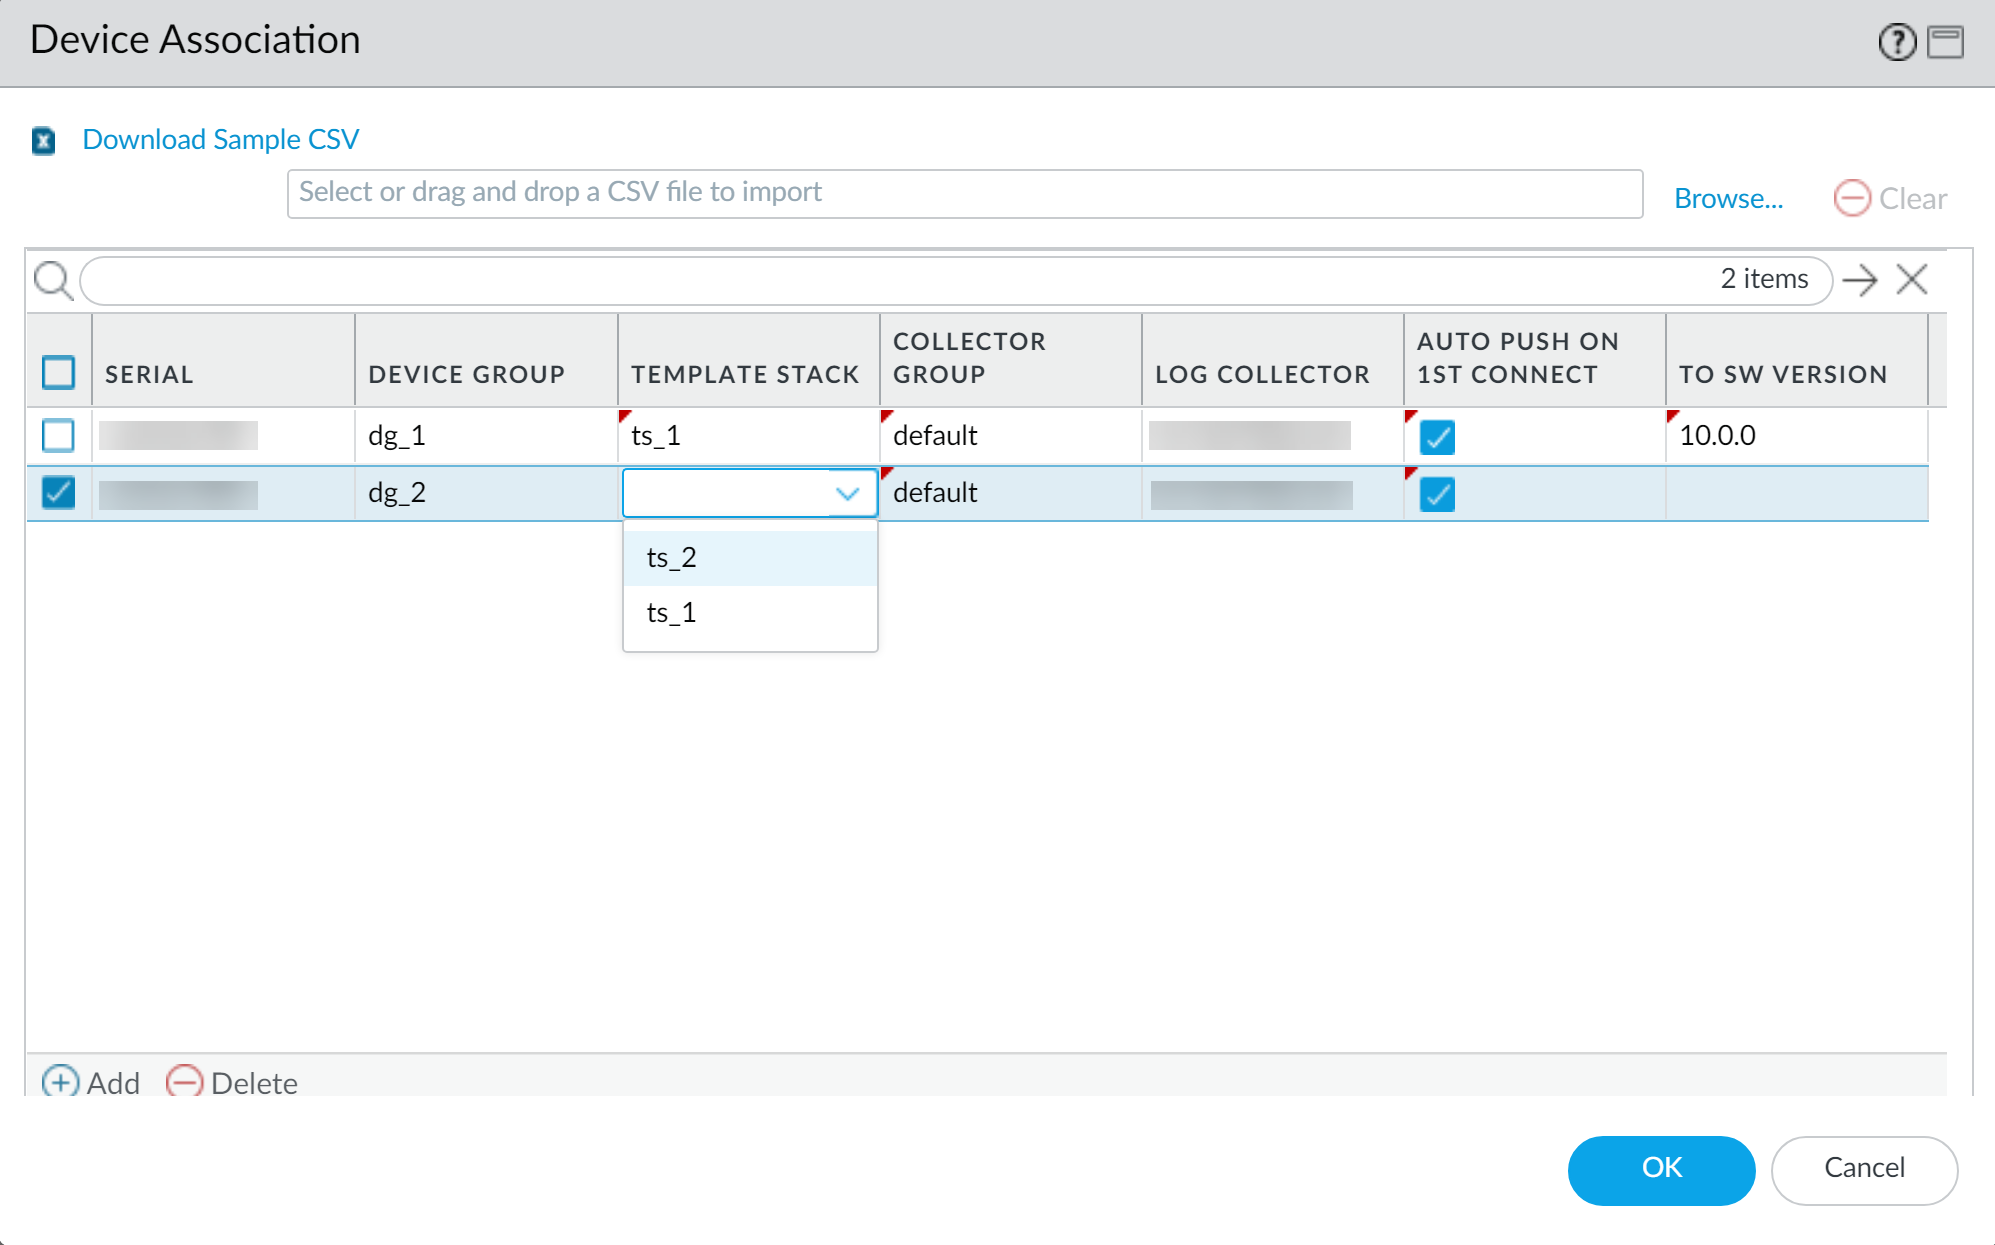
Bulk Import via CSV:
- Go to Panorama > Managed Devices > Summary and click Add .
- Enter the Device Registration Authentication Key .
- Click Import .
- Download Sample CSV , edit it with firewall serial numbers and optional associations (Device Group, Template Stack, Collector Group, Log Collector, Auto Push, Target SW Version).
- Browse to your edited CSV file and select it.
- Review and assign any remaining associations if not in CSV.
- Click OK .
- Commit changes to Panorama.
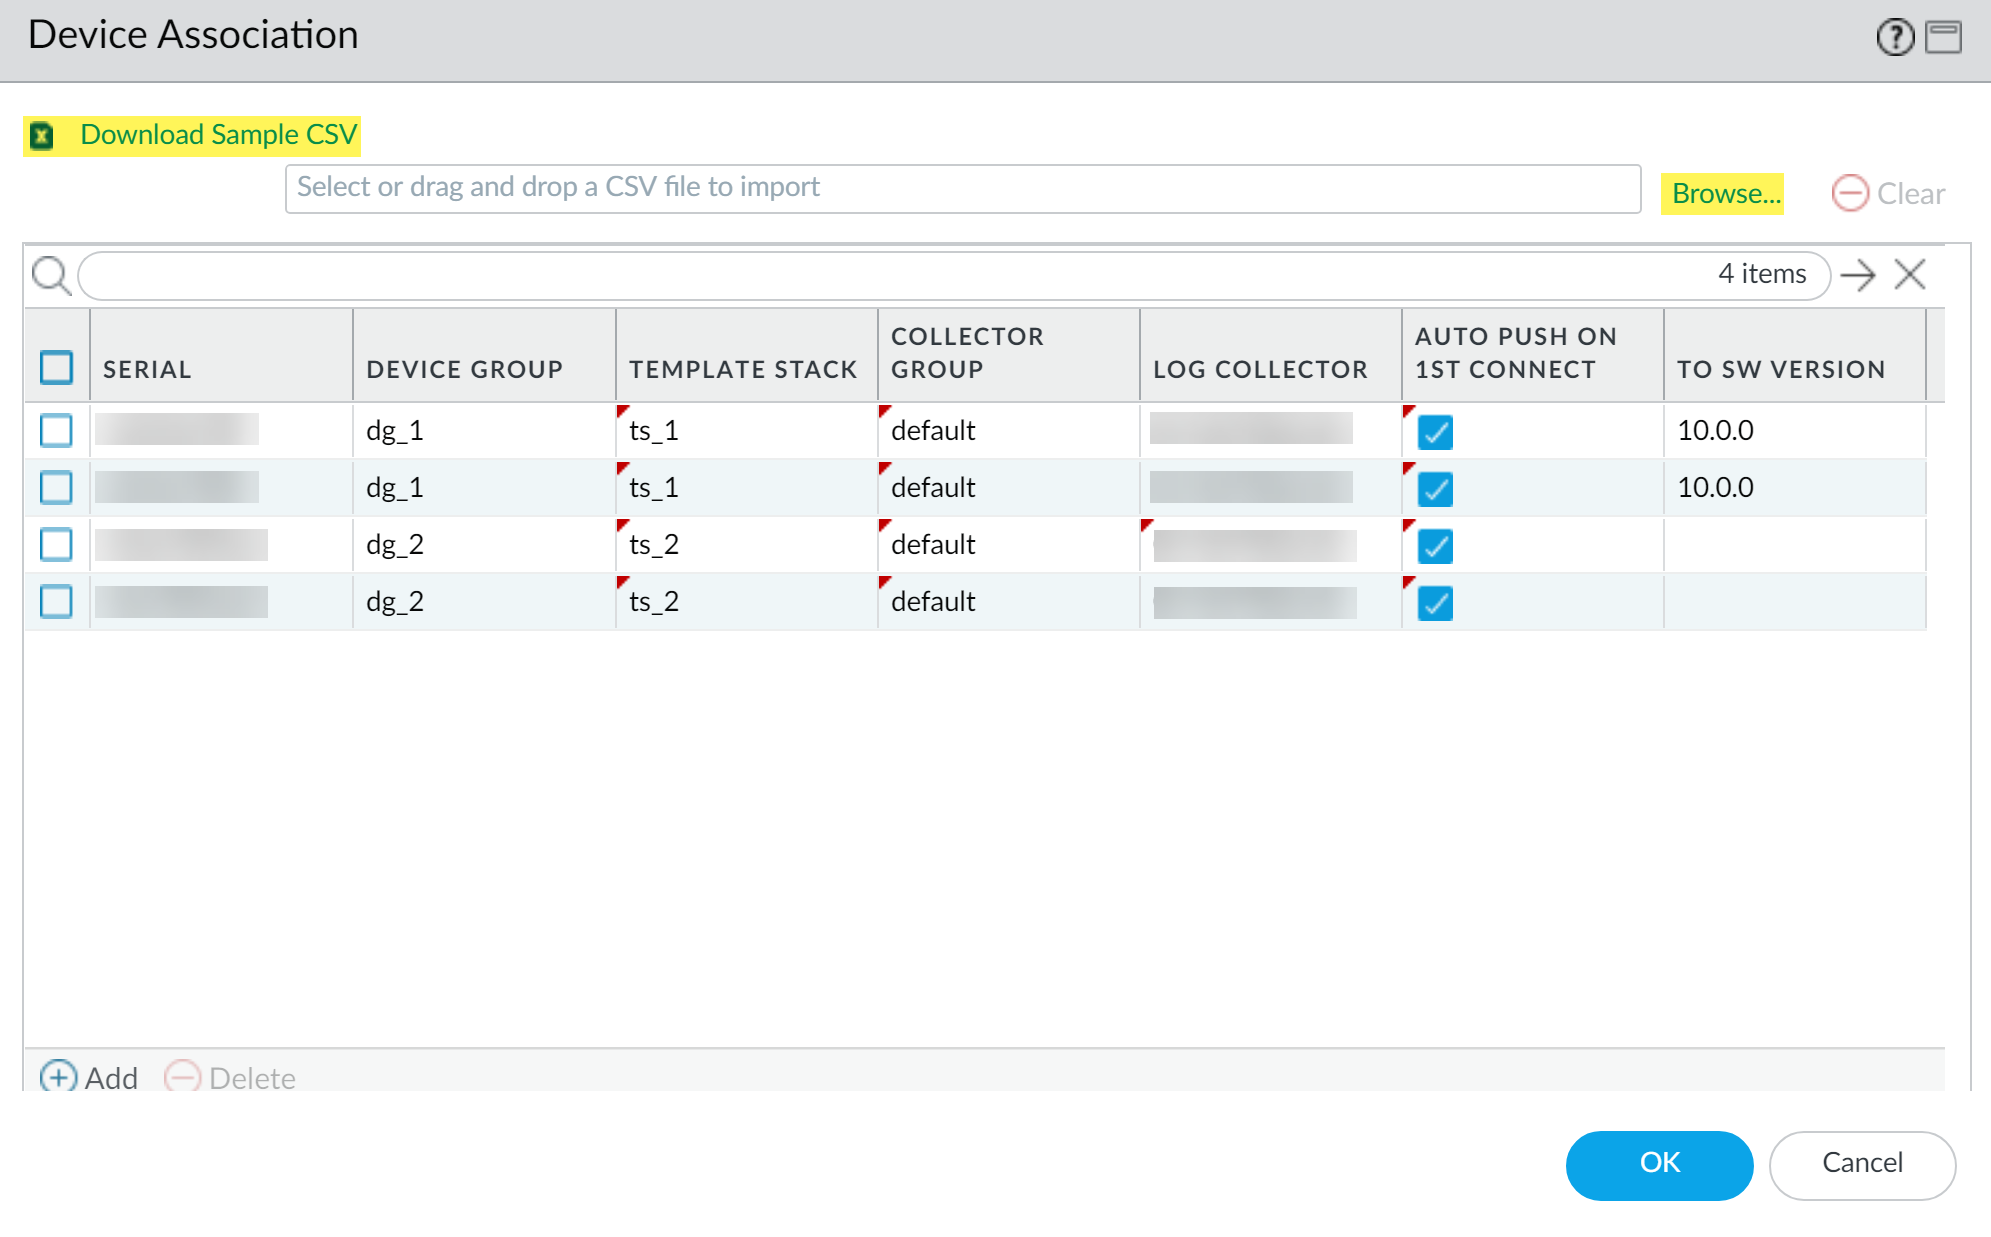
Bulk import using CSV is only supported for single-vsys firewalls. You cannot bulk import firewalls with multiple virtual systems (multi-vsys).
Remember to configure the firewall itself to point to Panorama (Device > Setup > Management > Panorama Settings) using the same auth key.
Device Groups: Concepts & Hierarchy
Device Groups in Panorama are used to manage policies and objects for a set of firewalls. Firewalls with similar policy requirements are typically grouped together.
- A firewall (or a virtual system on a multi-vsys firewall) can belong to only one device group.
- Panorama supports up to 1,024 device groups.
- HA peers (active/passive) should be in the same device group to receive the same policies.
Device Group Hierarchy:
Device groups can be arranged in a hierarchy, with a top-level "Shared" location.
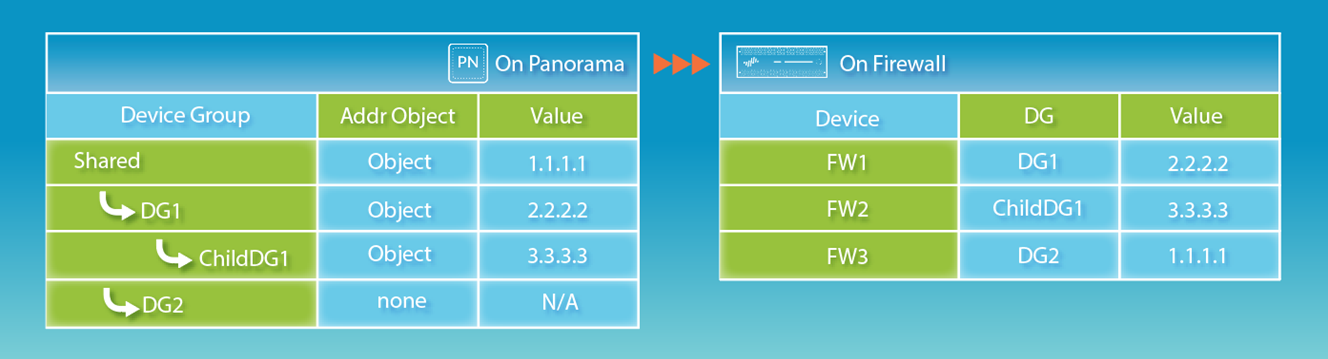
- Inheritance: Descendant (child) device groups inherit policies and objects from their ancestor (parent) device groups, including "Shared".
-
Order of Precedence (Default):
- Device Group-specific objects/policies
- Inherited objects/policies from parent Device Group
- Inherited objects/policies from "Shared"
- This means a more specific configuration at a lower level overrides a general configuration from a higher level.
- You can change the precedence so that objects defined in ancestors take higher precedence ( Panorama > Setup > Management > Panorama Settings ).
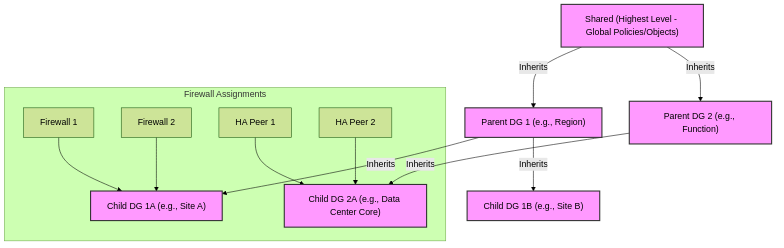
Example of a Device Group Hierarchy with Inheritance.
Creating a Device Group:
- Go to Panorama > Device Groups and click Add .
- Enter a Name and Description .
- Assign Devices (firewalls or virtual systems) to the group.
- (Optional) Add Reference Template(s) if objects in the device group configuration refer to objects defined in those templates (e.g., zones defined in a template).
- (Optional) Select Group HA Peers for visual grouping.
- Select the Parent Device Group (default is "Shared").
- (Optional) Assign a Master firewall if policy rules will reference users/groups (for User-ID information gathering).
- Click OK and commit changes.
Device groups are fundamental for policy management. Understanding inheritance and object scope (Shared vs. Device Group-specific) is crucial. Remember that Reference Templates allow a device group to "see" network objects (like zones or interfaces) from a template that its member firewalls might not be directly assigned to, which is useful for policy creation.
Templates & Template Stacks: Concepts
Templates in Panorama are used to manage network and device settings for firewalls. This includes configurations for interfaces, zones, virtual routers, server profiles, services, etc.
Template Stacks are ordered collections of templates. A firewall is assigned to a single template stack, and the stack pushes the combined configuration of its member templates to the firewall.
Key Concepts:
-
Templates:
- Define common base configurations (Network and Device tabs).
- Can be reused across multiple template stacks.
- Panorama supports up to 1,024 templates.
- The Device and Network tabs in Panorama become available only after the first template is added.
-
Template Stacks:
- An ordered list of up to 8 templates.
- A firewall (or entire multi-vsys firewall) is assigned to only one template stack.
- Settings from templates higher in the stack override conflicting settings from templates lower in the stack. Be careful with template order to avoid misconfigurations (e.g., interface type conflicts).
- Panorama supports up to 1,024 template stacks.
- You can override template settings directly within a template stack or on an individual firewall.
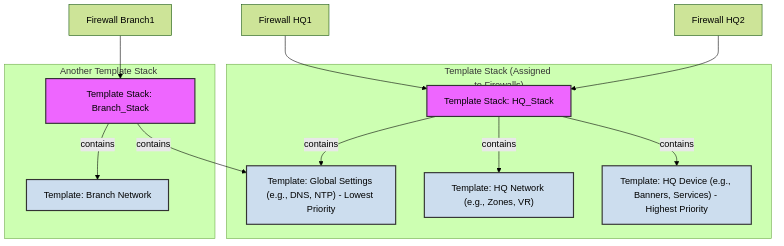
Templates are combined into a Template Stack, which is then assigned to firewalls. Order within the stack determines precedence for overlapping settings.
What Templates Manage:
- Interfaces (Ethernet, Aggregate, VLAN, Tunnel, Loopback)
- Virtual Routers, Virtual Wires
- Zones
- Server Profiles (Syslog, SNMP, Email, LDAP, RADIUS, TACACS+, DNS)
- Services (DNS, NTP, GlobalProtect settings)
- Device-wide settings (Management interface, Log settings, Banners)
- High Availability (HA) configuration (though some aspects like specific HA IP addresses are local to the firewall)
Templates are for network and device settings, while Device Groups are for policies and objects. A firewall must be in a template stack to receive template configurations. HA peers in active/passive mode are typically in the same template stack; active/active peers might be in different template stacks if their network configs differ significantly.
Renaming a VSYS is allowed only on the local firewall, not on Panorama. Doing so on Panorama can lead to a new VSYS being created or incorrect mappings.
Exceptions (Local Firewall Configuration Only):
Some settings can only be configured locally on each managed firewall and not via Panorama templates:
- Device block list.
- Clearing logs.
- Enabling operational modes (normal, multi-vsys, FIPS-CC).
- IP addresses of firewalls in an HA pair (control/data link IPs).
- Master key (though Panorama can *deploy* a new master key, the initial key or change process has local aspects).
- Comparing configuration files (Config Audit on the firewall).
Configuring Templates & Template Stacks
Adding a Template:
- Go to Panorama > Templates , click Add .
- Enter a unique Name and optional Description .
- (Optional) If the template has a VSYS with configurations (e.g., interfaces) to push to firewalls without VSYS, select the template and a Default VSYS from the drop-down.
- Commit to Panorama.
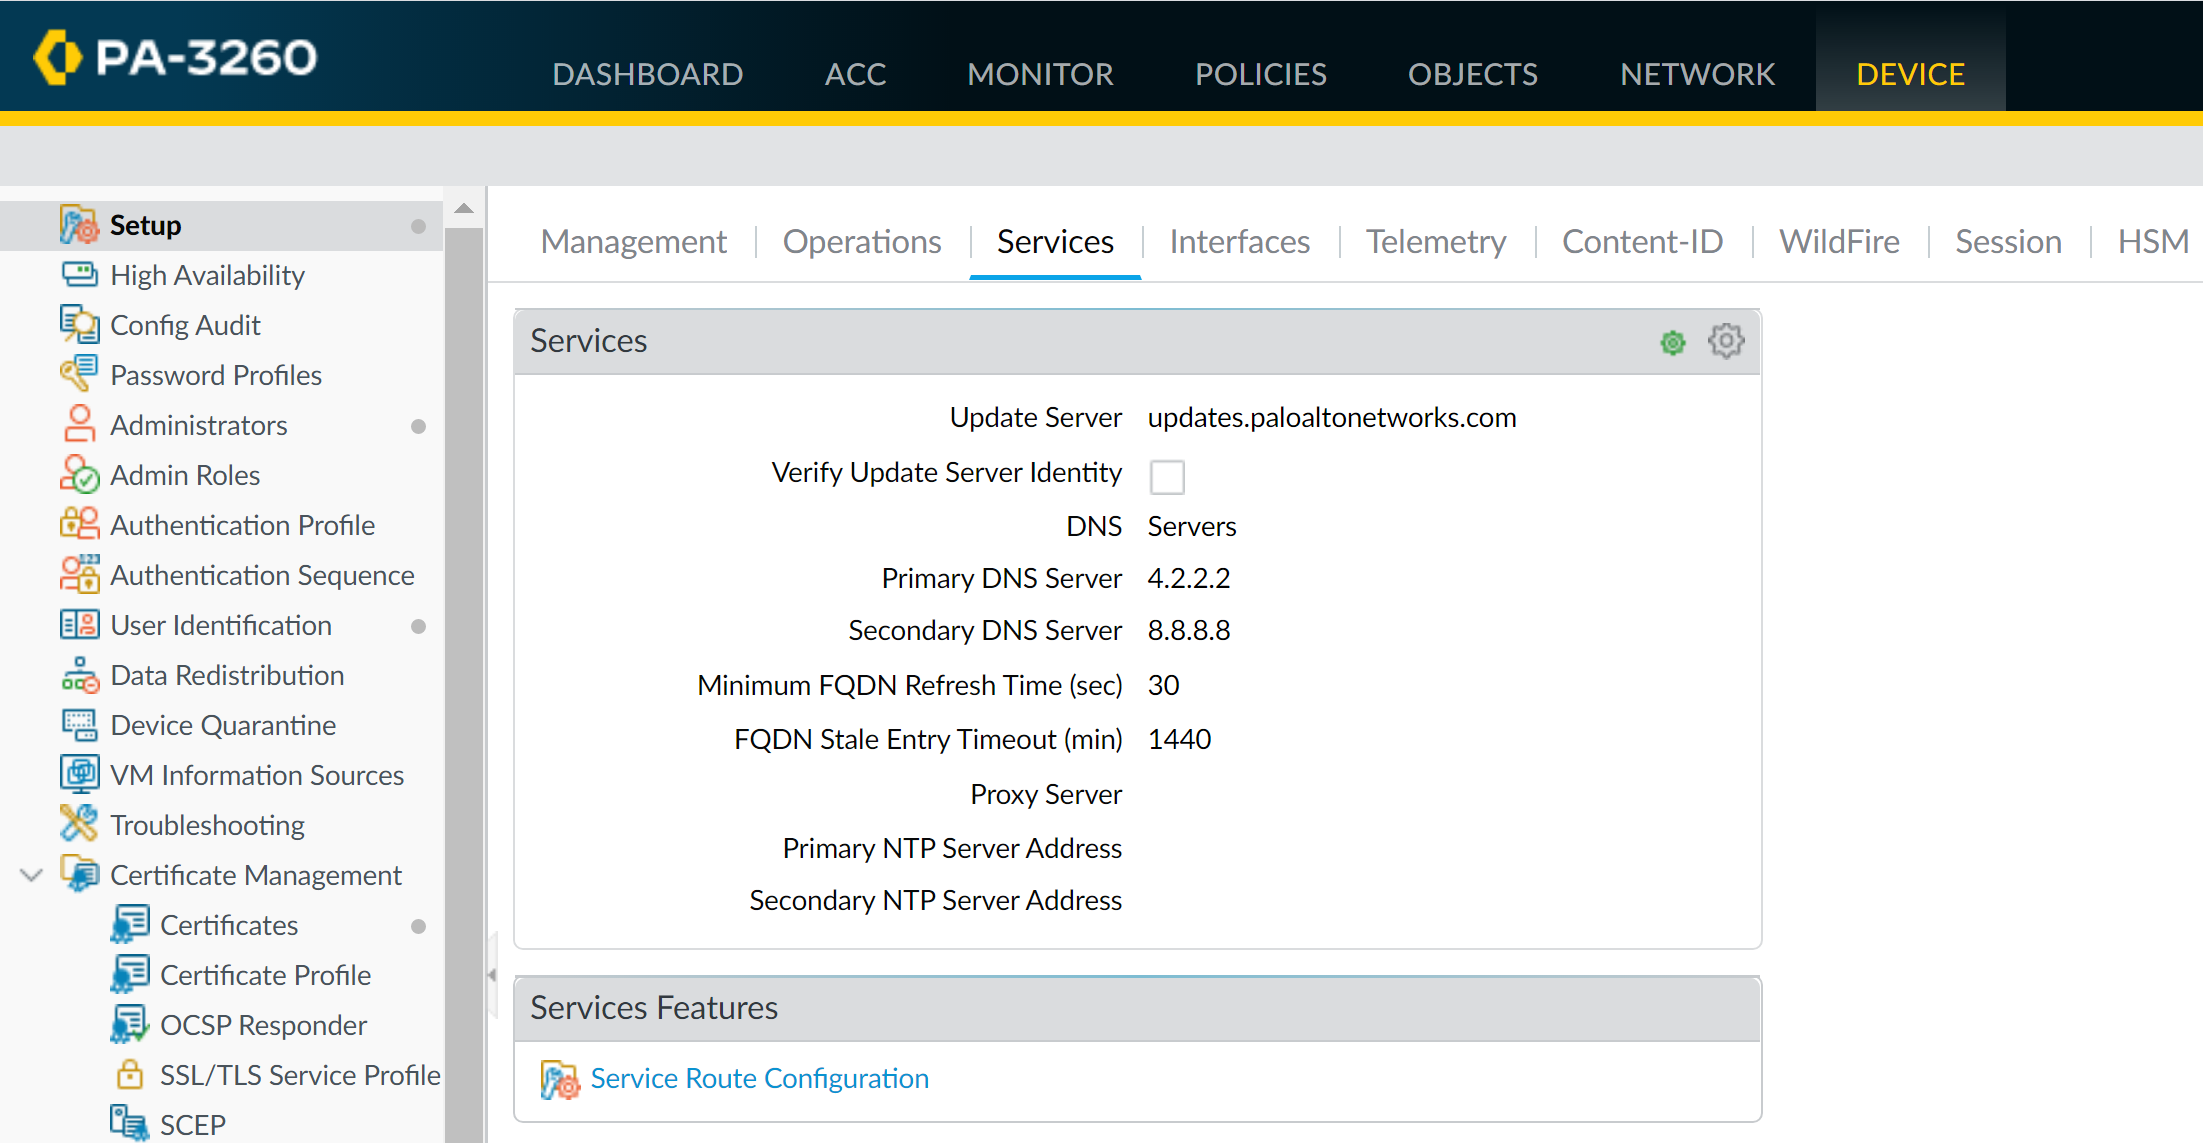
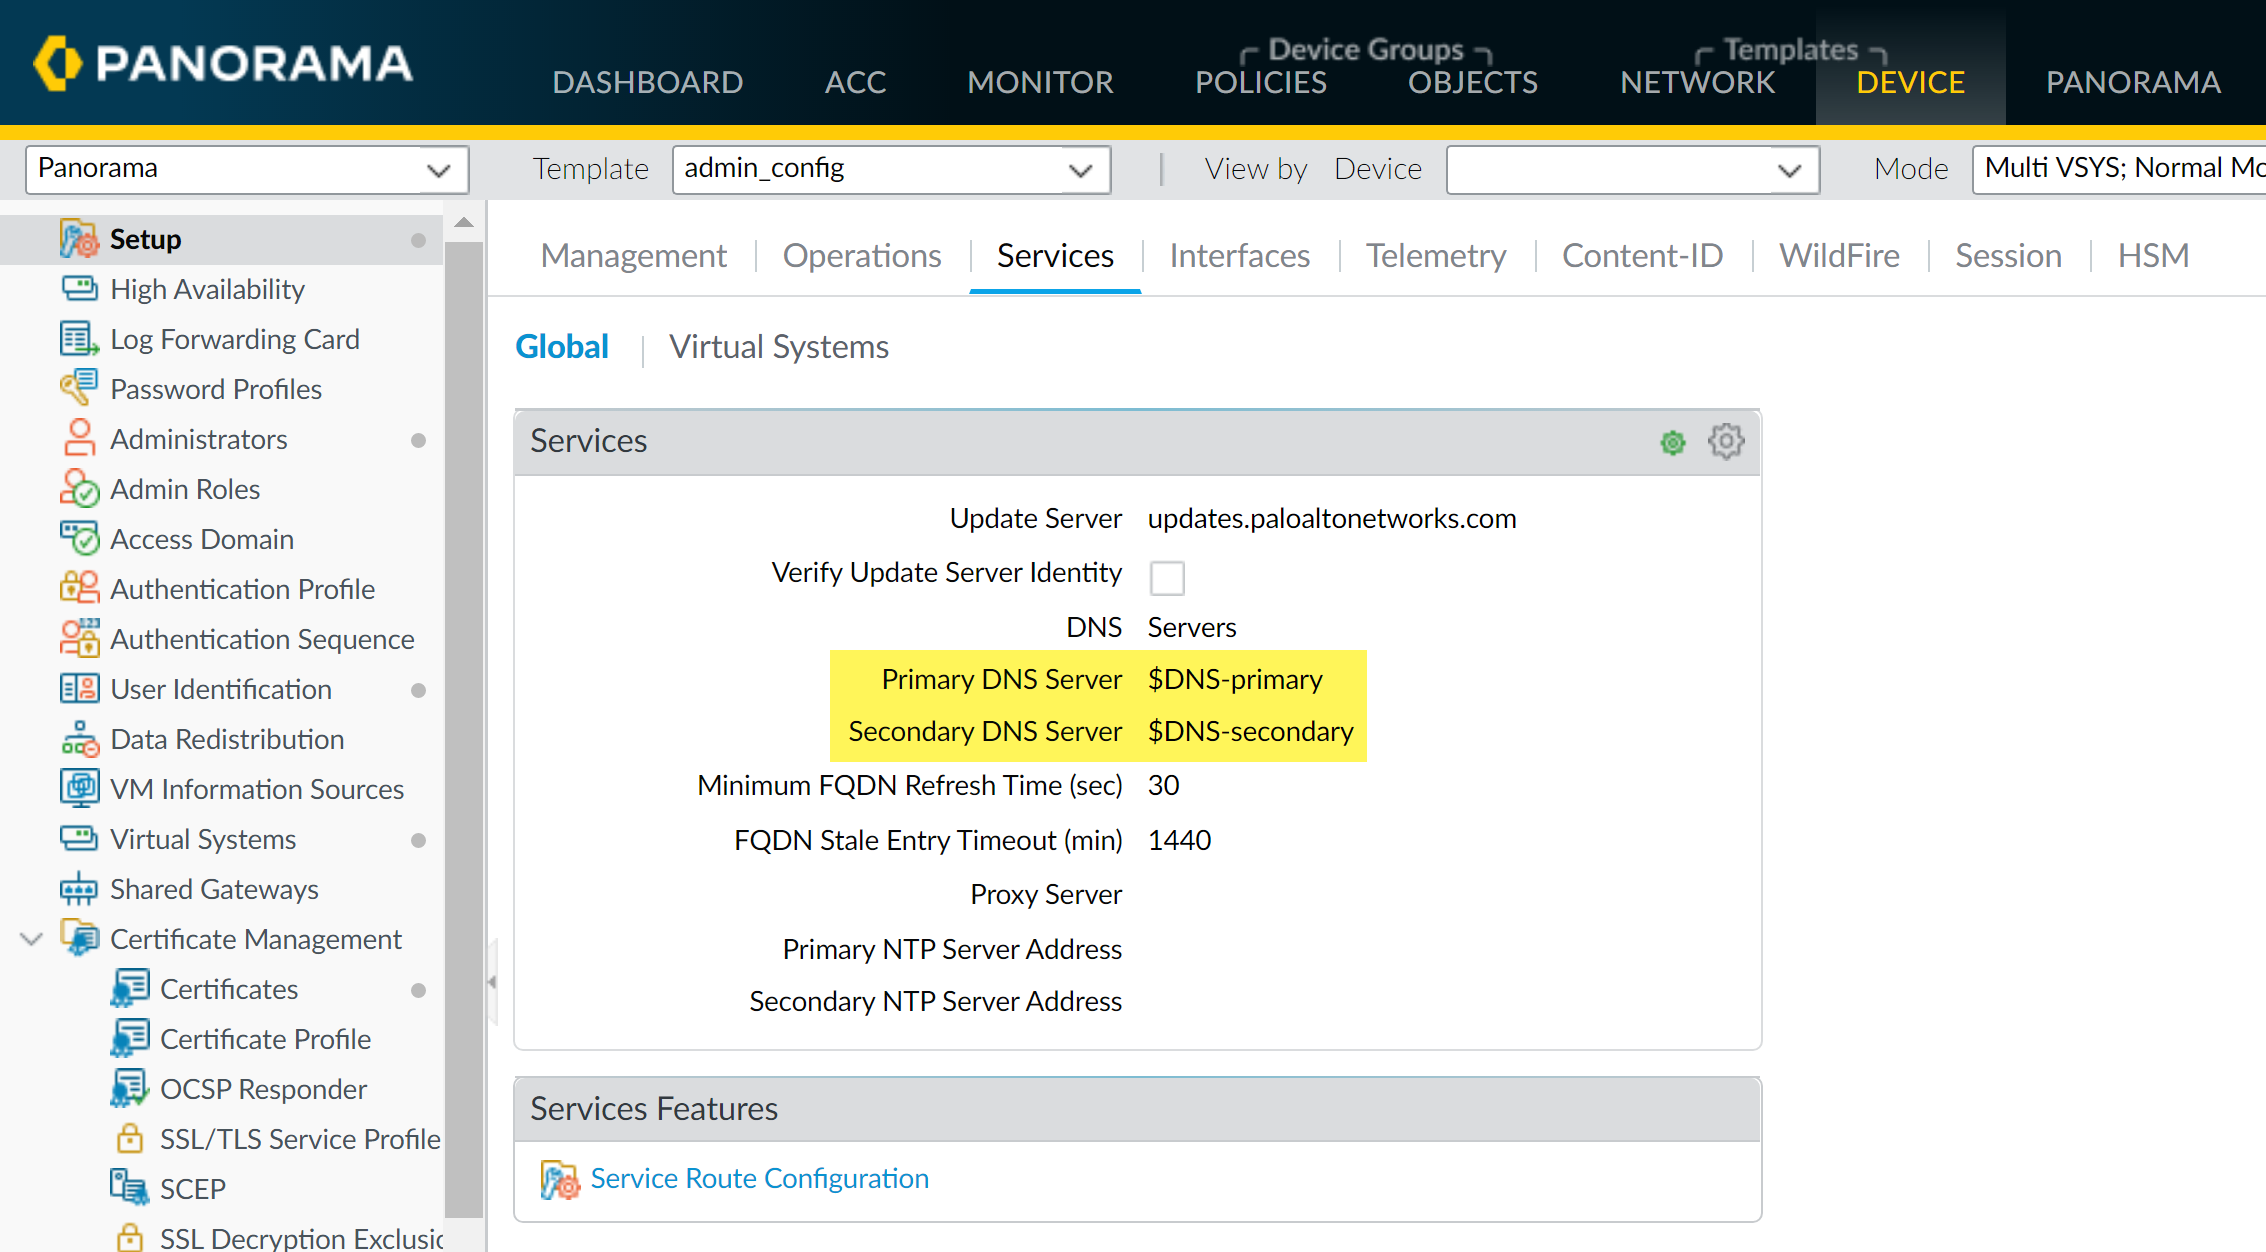
- Use the Device and Network tabs, selecting your template from the dropdown, to define settings (e.g., Primary DNS Server under Device > Setup > Services ).

Configuring a Template Stack:
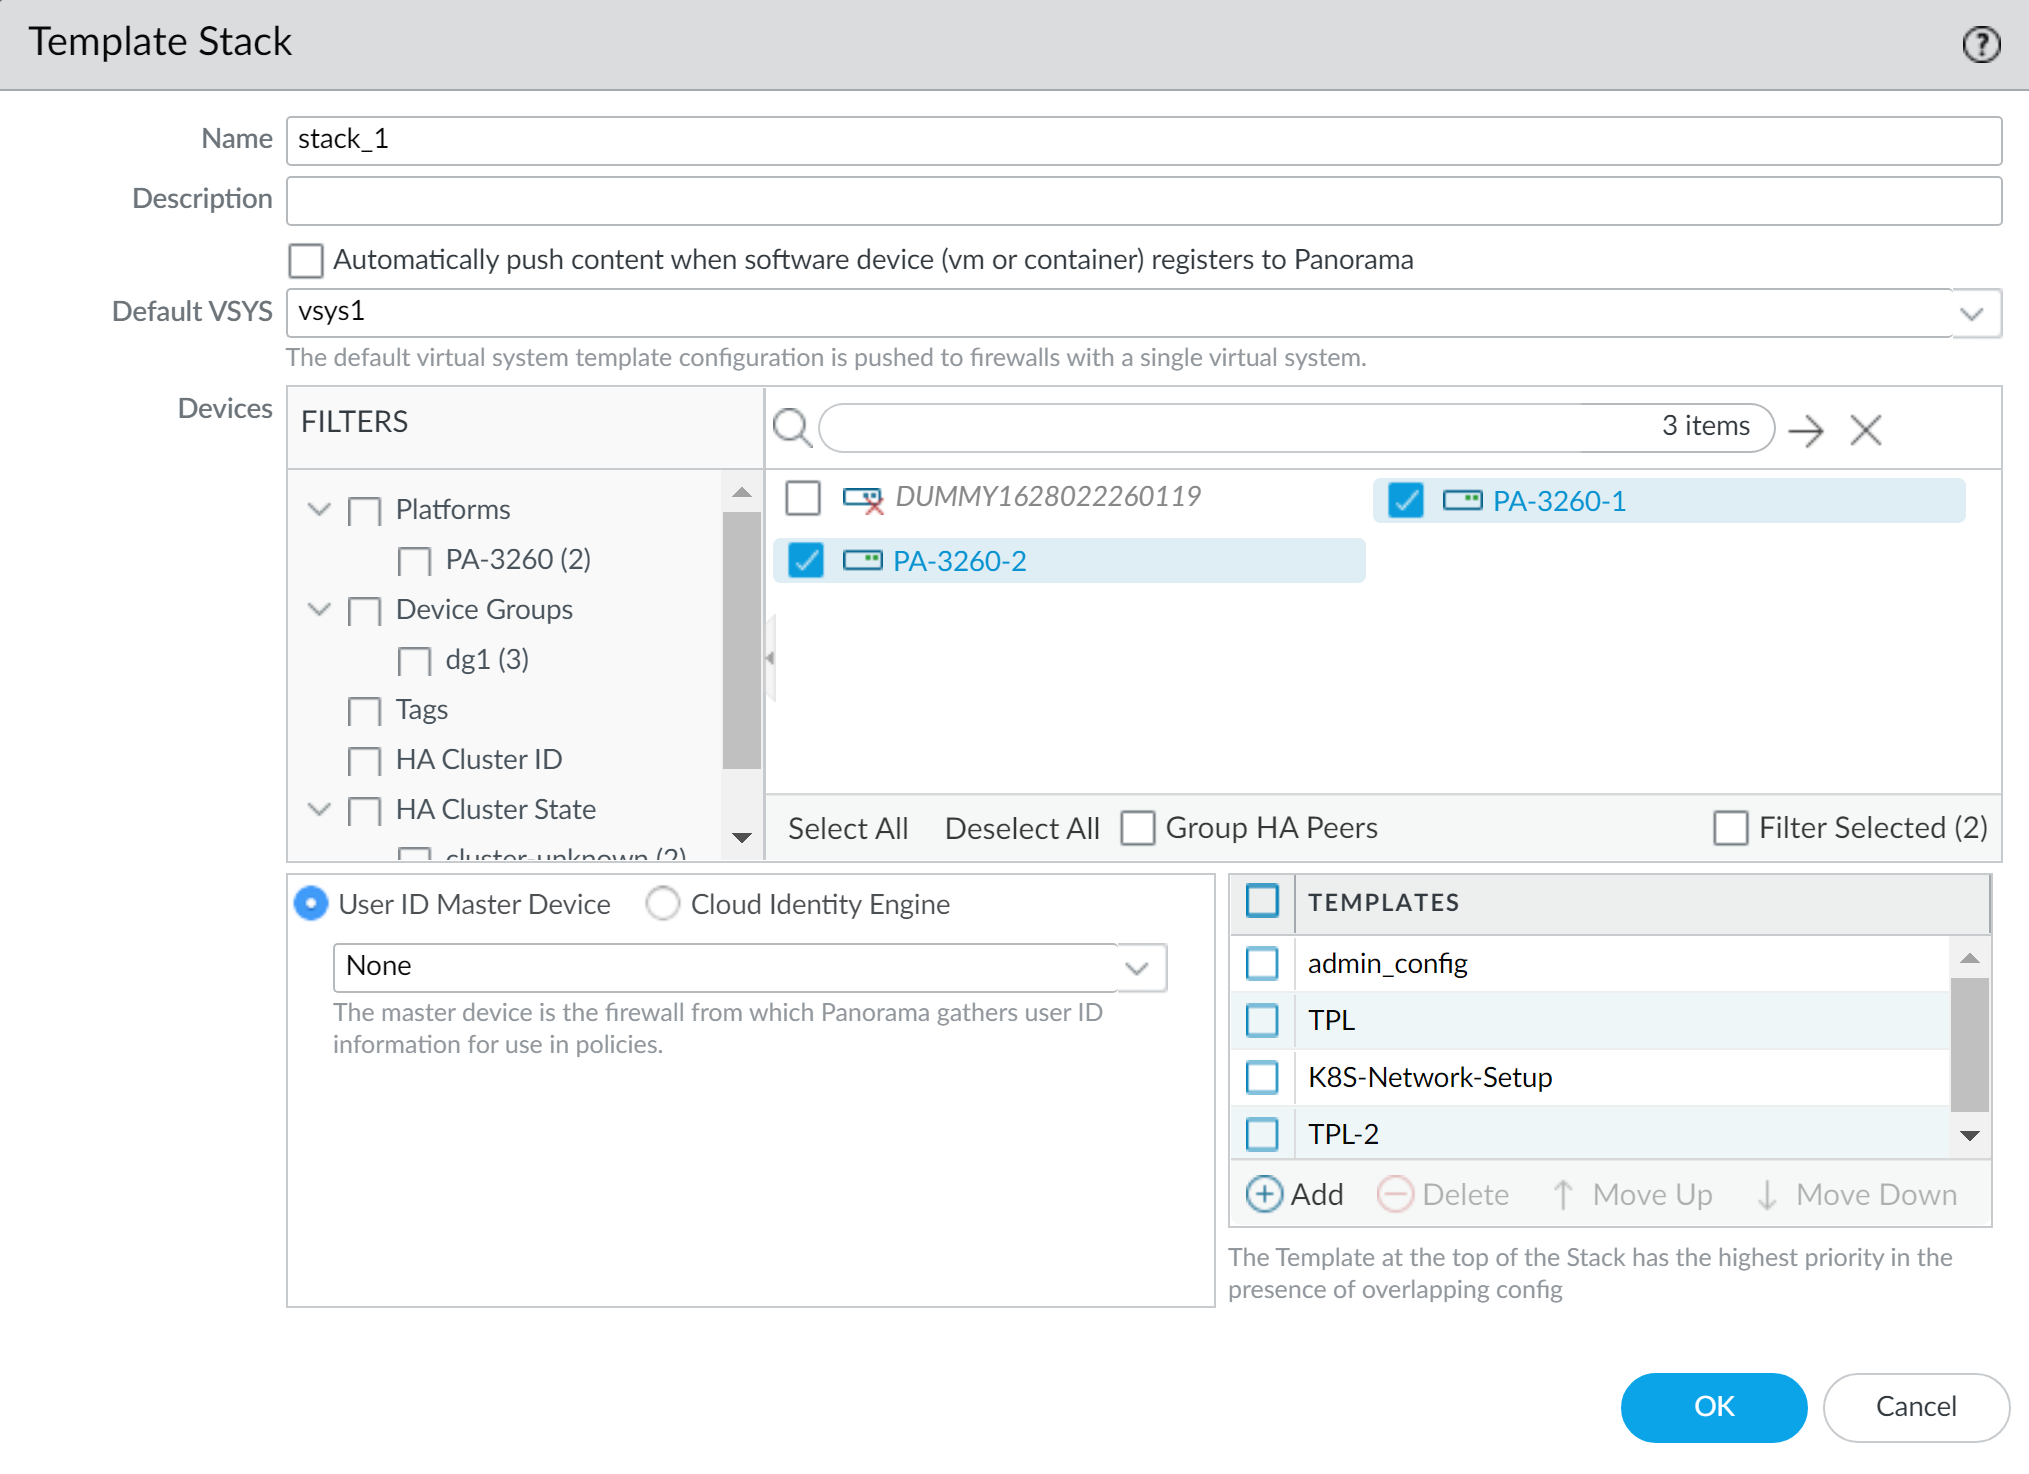
- Go to Panorama > Templates and click Add Stack . (Cloning stacks is not supported).
- Enter a unique Name and optional Description .
- (Optional for VM-Series/CN-Series) Check Automatically push content when software device registers to Panorama .
- Add up to 8 Templates to the stack. Order them by priority (higher templates override lower ones for duplicate settings). Use Move Up/Down .
- In the Devices section, select firewalls to assign to this stack. (Entire firewall for multi-vsys).
- (Optional) Select Group HA Peers for visual grouping.
- Click OK .
-
Edit
Network
and
Device
settings for the stack if needed (stack-level overrides or configurations).
- Use the Mode drop-down (Multi VSYS, Operational Mode, VPN Mode) to filter settings relevant to specific firewall operational modes to avoid push errors.
- Commit and Push ( Commit > Commit and Push , select Templates in Push Scope, select firewalls assigned to the stack).
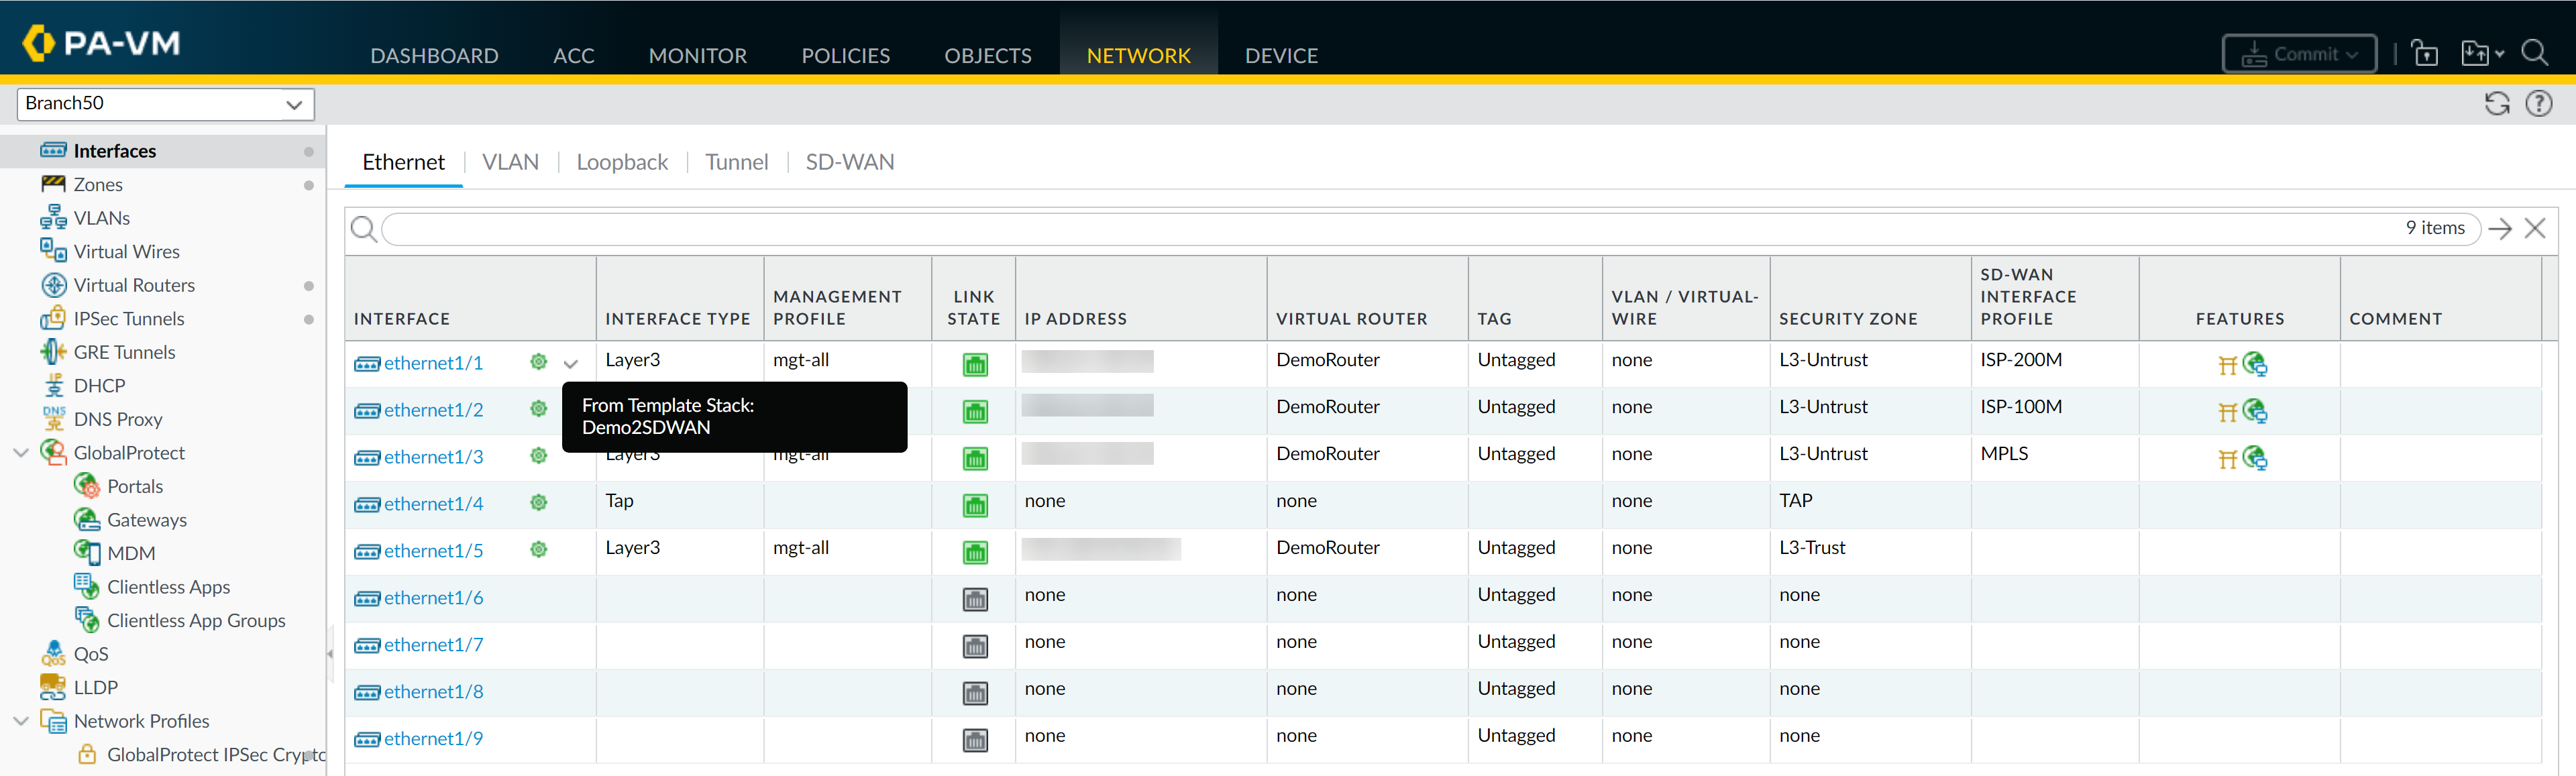
Every managed firewall must belong to a template stack. When you push changes to a template, Panorama pushes the configuration to every firewall assigned to any template stack that includes that template.
A template configuration cannot reference a configuration in another template directly, even if both are in the same stack (e.g., a zone in Template_A can't reference a zone protection profile in Template_B unless that profile is in Template_A or inherited by the stack).
Template & Stack Variables
Variables allow you to create reusable template/stack configurations where certain values (like IP addresses, FQDNs, interface names) can differ per firewall or device group, without needing separate templates for each variation.
Key Features:
-
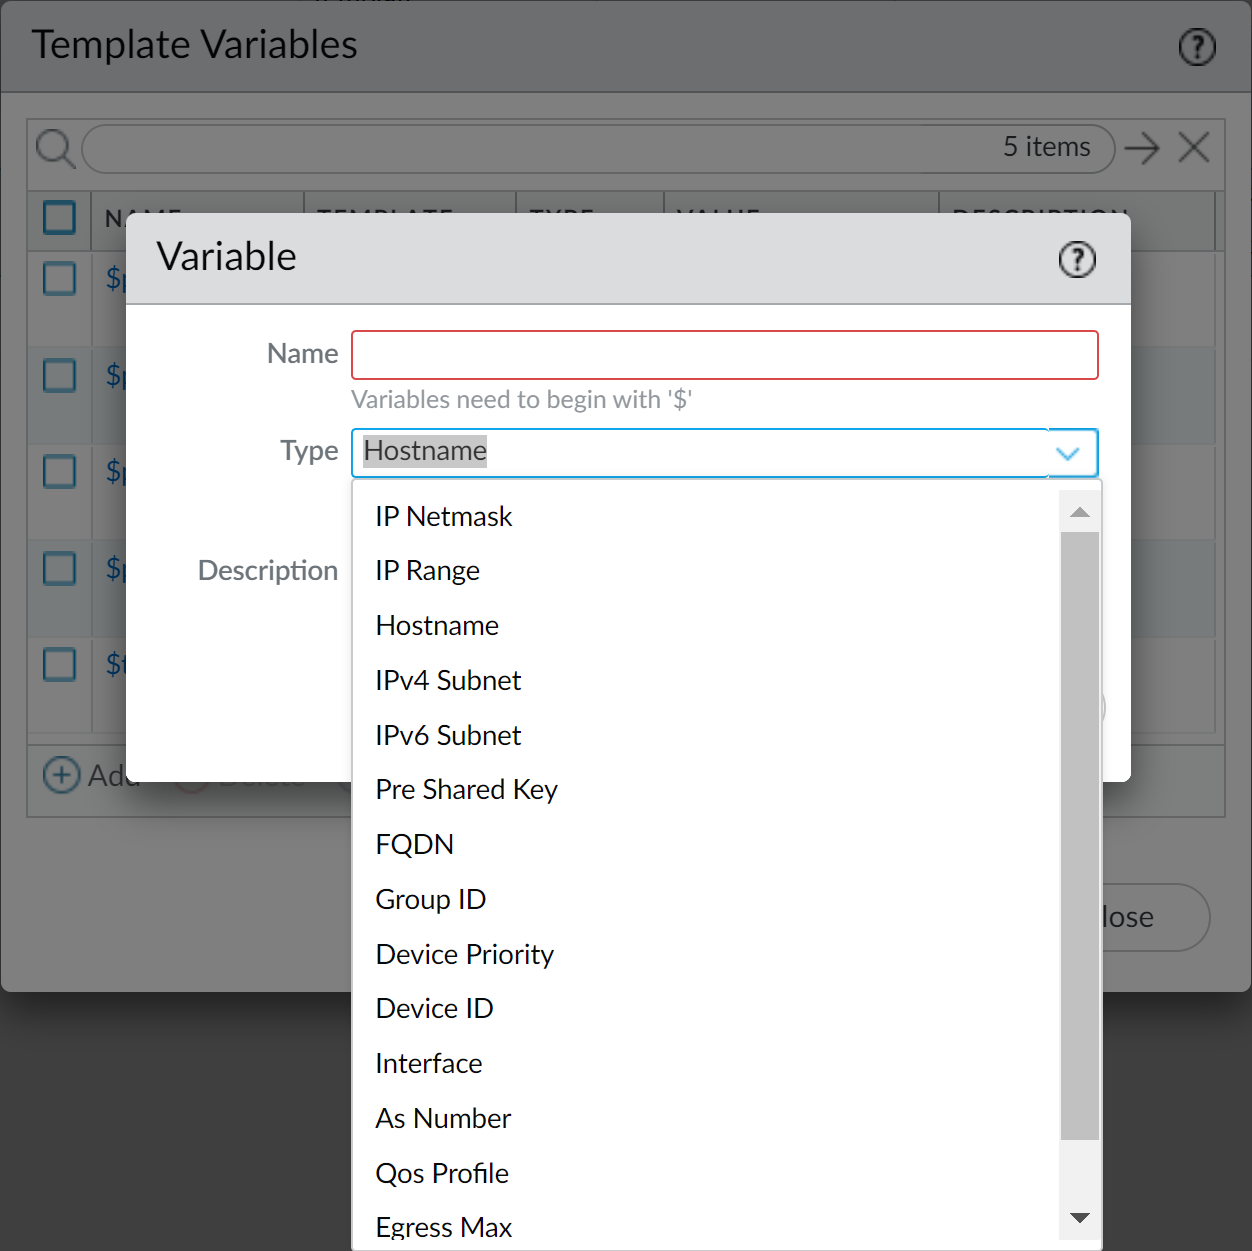
Variables start with a dollar sign (
$), e.g.,$DNS-primary. - Supported types: IP Address, IP Netmask, IP Range, FQDN, Group ID, Interface, Hostname, IPv4/IPv6 Subnet, Pre-Shared Key.
- Defined at the Template, Template Stack, or individual Device level (in Panorama > Managed Devices > Summary > Edit Variables).
-
Inheritance & Override:
- A variable defined in a Template can be used by firewalls assigned to a Stack containing that Template.
- The Stack can override the Template's variable value.
- An individual Device can override the Stack's (or Template's) variable value.
- Reduces the number of templates/stacks needed.
Creating and Using Variables:
-
Define the Variable:
- Go to Panorama > Templates .
- Click Manage (Variables column) for the desired template or template stack. OR
- Go to Panorama > Managed Devices > Summary , select a device, and click Edit (Variables column) for device-specific variables.
-
Click
Add
. Enter Name (e.g.,
$mgmt_ip), select Type (e.g., IP Netmask), and provide the Value.
-
Reference the Variable:
-
In the template/stack configuration (e.g.,
Device > Setup > Services
), enter the variable name (e.g.,
$DNS-primaryfor Primary DNS Server).
-
In the template/stack configuration (e.g.,
Device > Setup > Services
), enter the variable name (e.g.,
-
Commit and Push:
- Commit changes to Panorama.
- When pushing a device group configuration that references template/stack variables, ensure to Edit Selections in the Push Scope and Include Device and Network Templates .
-
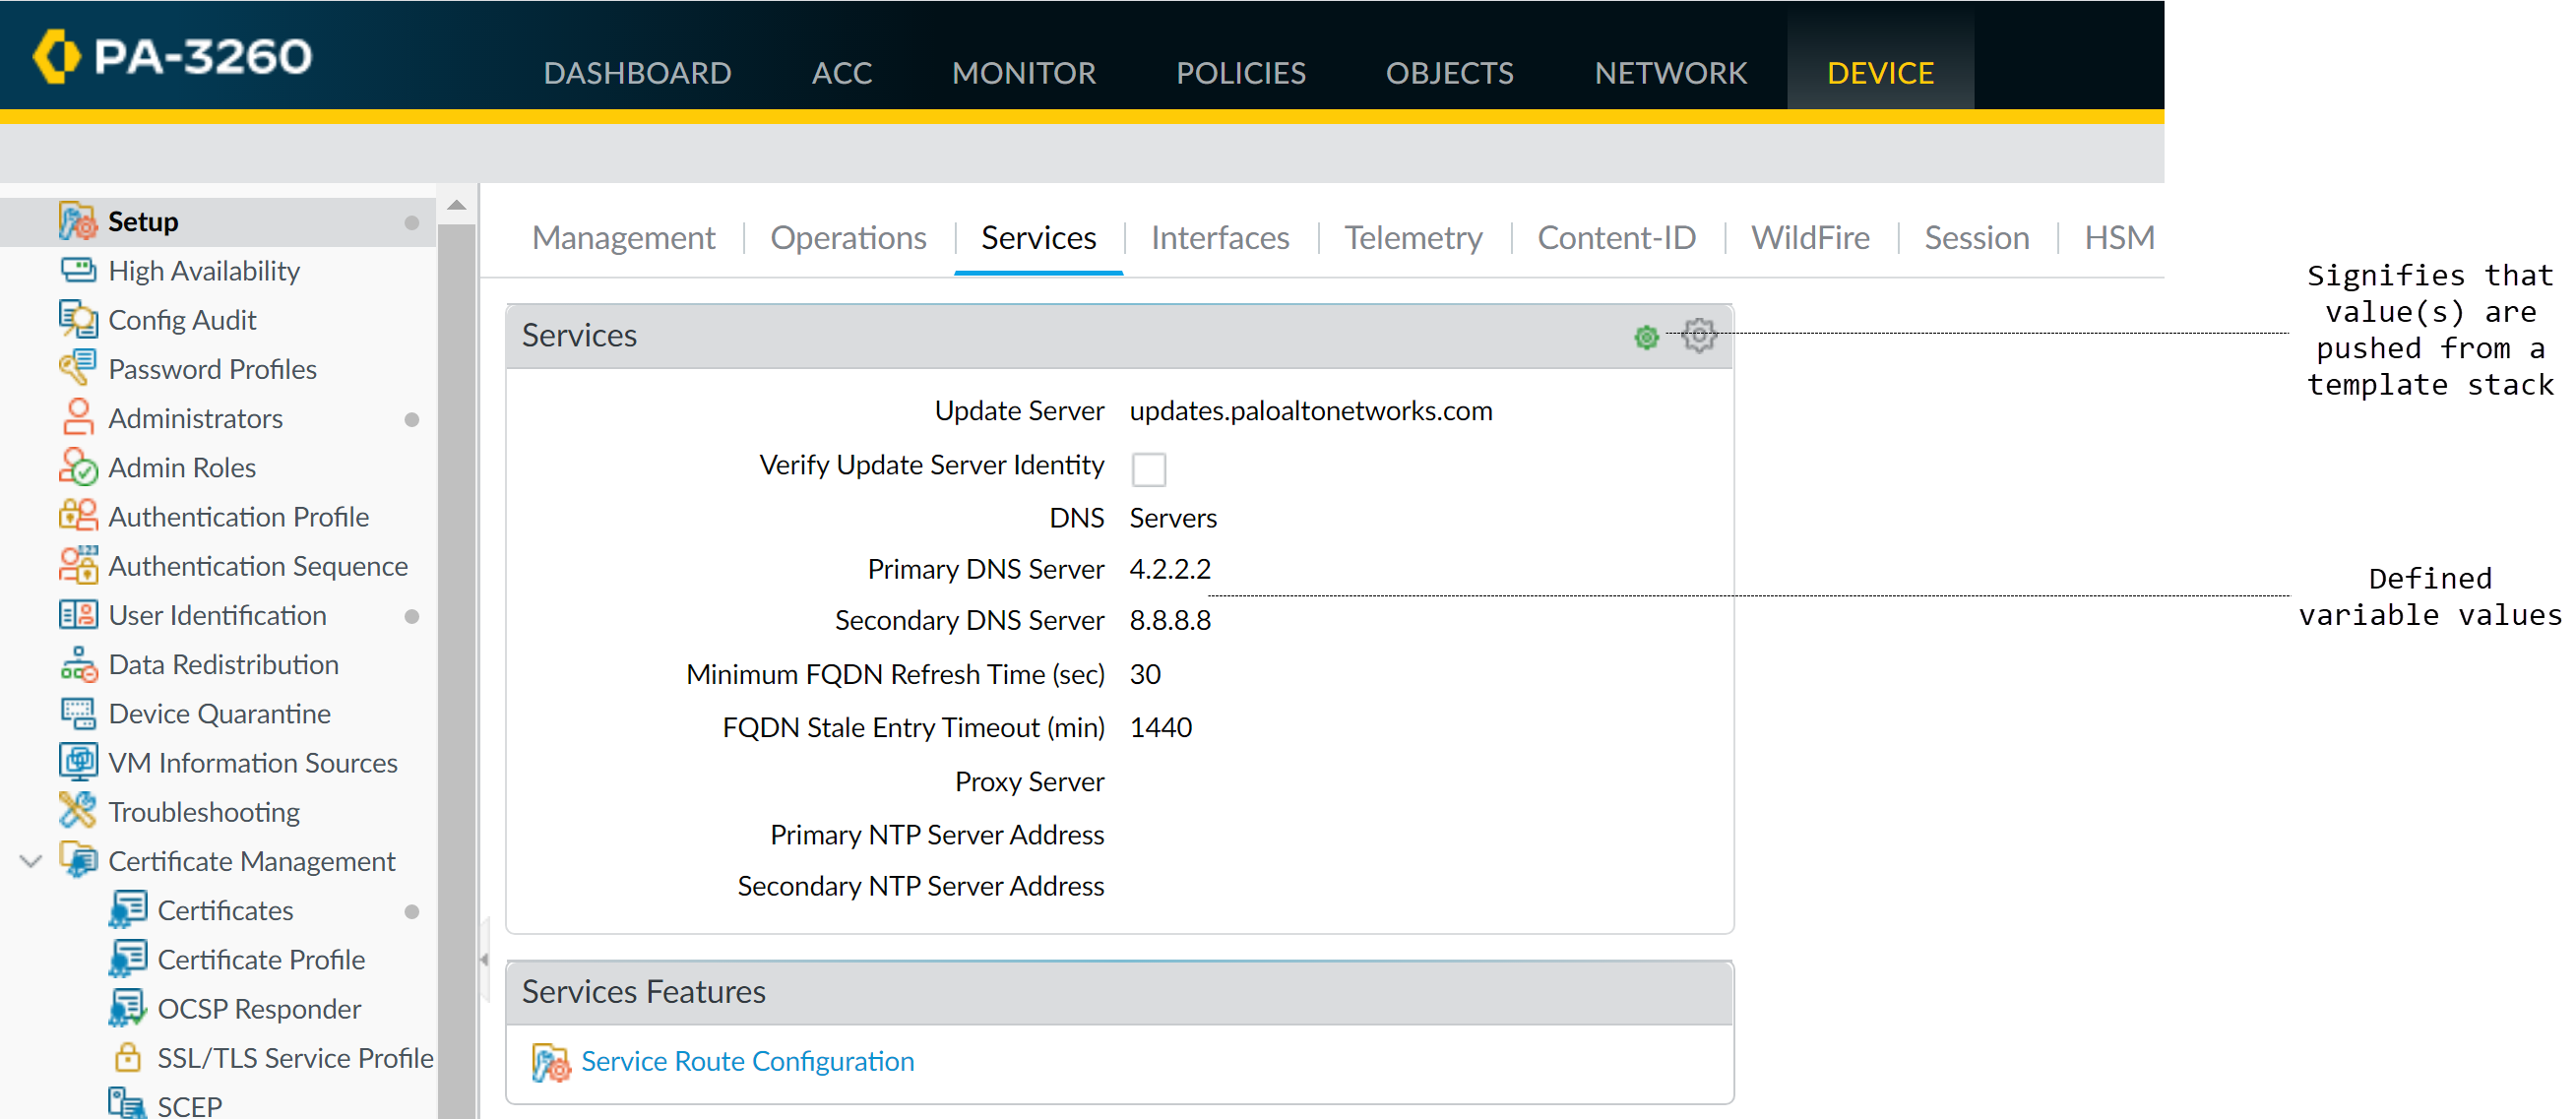
Verify:
Check the firewall context to see the resolved variable values.
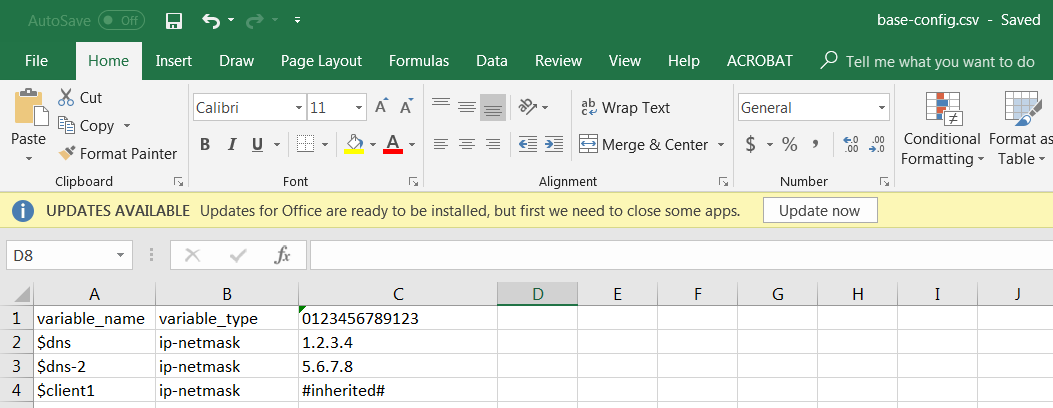
Importing/Overwriting Variables via CSV:
You can export existing template stack variables to a CSV, modify values, and re-import to overwrite. This cannot be used to create new variables, only update existing ones.
- Panorama > Templates , select a template stack.
- Select Variable CSV > Export .
-
Edit the downloaded CSV. Correct serial number formatting if needed (format as Text, add leading '0' if Excel removed it). Update variable values. Values showing as
#inherited#are defined in the template stack (not device-specific overrides).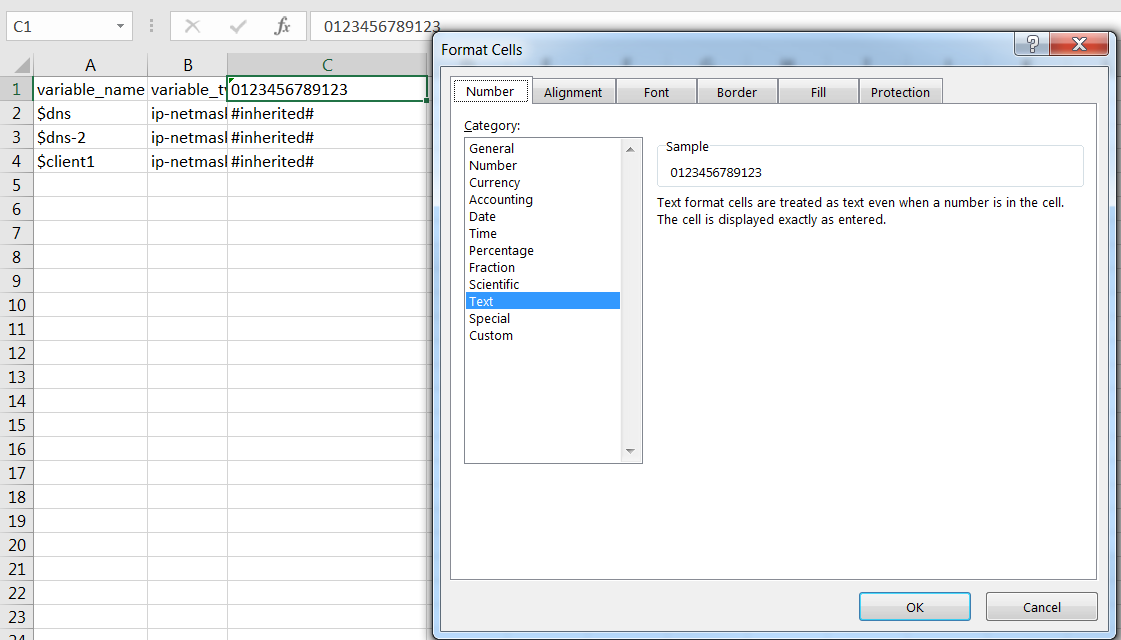
-
Save as
CSV UTF-8
.
- In Panorama, select Variable CSV > Import , browse to your file, and click OK .
- Commit to Panorama, then Commit and Push.
Variables are powerful for scaling configurations. Understand the hierarchy: Device-specific overrides Template Stack, which overrides Template.
Overriding Template Settings
Overrides allow for exceptions to the base configuration pushed by templates or template stacks. This provides flexibility for firewall-specific settings.
Methods to Override:
-
Override on the Firewall (Local Override):
- Access the firewall's web interface (directly or via Panorama context switch).
- Navigate to the setting (e.g., Device > Setup > Services ).
-
Click the template icon (
 ) next to the field to enable override.
-
Enter the new firewall-specific value. The icon changes to an override symbol (
 ).
).
- Commit changes on the firewall.
- This creates a local setting that takes precedence over the Panorama-pushed value for that specific firewall.
-
Override Template Value using a Template Stack (Stack-level Override):
- In Panorama, select the Template Stack from the Template drop-down.
- Navigate to the setting (e.g., Device > Setup > Services ).
- Configure the desired value. This value in the stack will override the value from any template lower in its hierarchy for all firewalls assigned to this stack.
- Commit and Push.
-
Override Template Value using a Template Stack Variable:
- In Panorama, go to Panorama > Templates .
- Click Manage (Variables column) for the Template Stack.
- Select the variable inherited from a template and click Override .
- Enter the new value for the variable at the stack level.
- Commit and Push.
-
Override Template/Stack Value using Device-Specific Variables (Panorama Managed):
- In Panorama, go to Panorama > Managed Devices > Summary .
- Click Edit (Variables column) for the specific firewall.
- Select an inherited variable (from template or stack) and click Override .
- Enter the new firewall-specific IP address and click OK .
- Commit and Push.

Understanding override precedence is key: Device-specific overrides beat Template Stack overrides, which beat Template values. Use overrides judiciously to maintain clarity.
To disable/remove all template settings from a firewall (reverting to local management or preparing for migration):
- Access the firewall's web interface.
- Go to Device > Setup > Management , edit Panorama Settings.
- Click Disable Device and Network Template .
- (Optional) Check Import Device and Network Template before disabling to save current settings locally. Otherwise, Panorama-pushed settings are deleted.
- Click OK .
Master Key Management
The master key encrypts sensitive configuration elements (passwords, private keys). It's crucial for security to replace the default master key.
- Default Algorithm: AES-256-CBC (for compatibility with older PAN-OS versions).
- Recommended Algorithm: AES-256-GCM (if all managed devices run PAN-OS 10.0+).
- Uniqueness: Best practice is to configure unique master keys for Panorama and for each managed firewall (or HA pair). Log Collectors and WildFire appliances must share the same master key as Panorama.
- HA Pairs: Both Panorama HA peers and firewall HA peers require the same master key configured manually on each peer; it's not synchronized.
- Expiration: Master keys have a lifetime. If a key expires, you'll need the current key to set a new one. Losing the master key may require a factory reset.
Configuring a Unique Master Key for a Managed Firewall:
- (Firewall HA only) Disable Config Sync on the firewall HA pair via template.
- Panorama > Managed Devices > Summary , click Deploy Master Key .
-
Select managed firewall(s) and click
Change
.

-
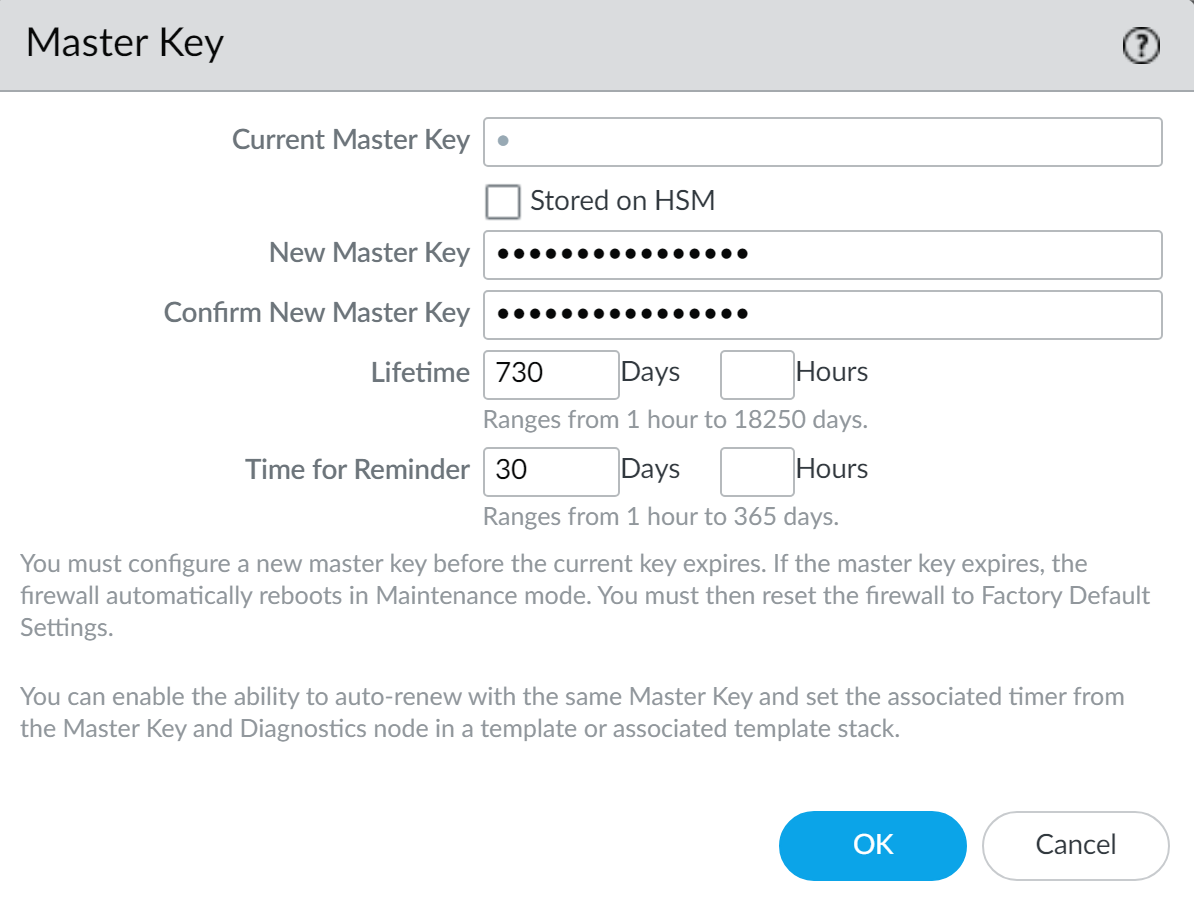
Configure the master key: New key, Confirm, Lifetime, Reminder.
- Click OK (key is pushed automatically). Verify System log.
- (Optional) Configure auto-renewal via template.
Configuring Master Key on Panorama:
- (Panorama HA only) Disable Panorama HA.
- Panorama > Master Key and Diagnostics , configure new key, lifetime, reminder. Click OK.
- (Optional) Configure auto-renewal for Panorama's master key. Commit to Panorama.
- (Panorama HA only) Repeat steps on the secondary Panorama peer with the identical key.
Deploying Master Key to Log Collectors / WildFire Appliances:
Similar process via Panorama > Managed Collectors or Panorama > Managed WildFire Appliances . Key must be identical to Panorama's.
Commit any pending configuration changes *before* deploying a new master key to ensure all elements are re-encrypted correctly.
Always store master keys securely. They cannot be recovered if lost.
Scheduled Configuration Push
Panorama allows scheduling configuration pushes to managed firewalls, reducing operational overhead. This can be a one-time or recurring event.
- Supported for firewalls running any PAN-OS release.
- Superusers or custom Panorama admins with appropriate roles can create scheduled pushes.
- In Panorama HA, scheduled pushes are synchronized.
- Minimum Interval: If creating multiple scheduled pushes, ensure at least a 5-minute interval between them to allow Panorama to validate configurations.
- Panorama pushes if Device Group or Template "Last Commit Status" is "out-of-sync".
Creating a Scheduled Push:
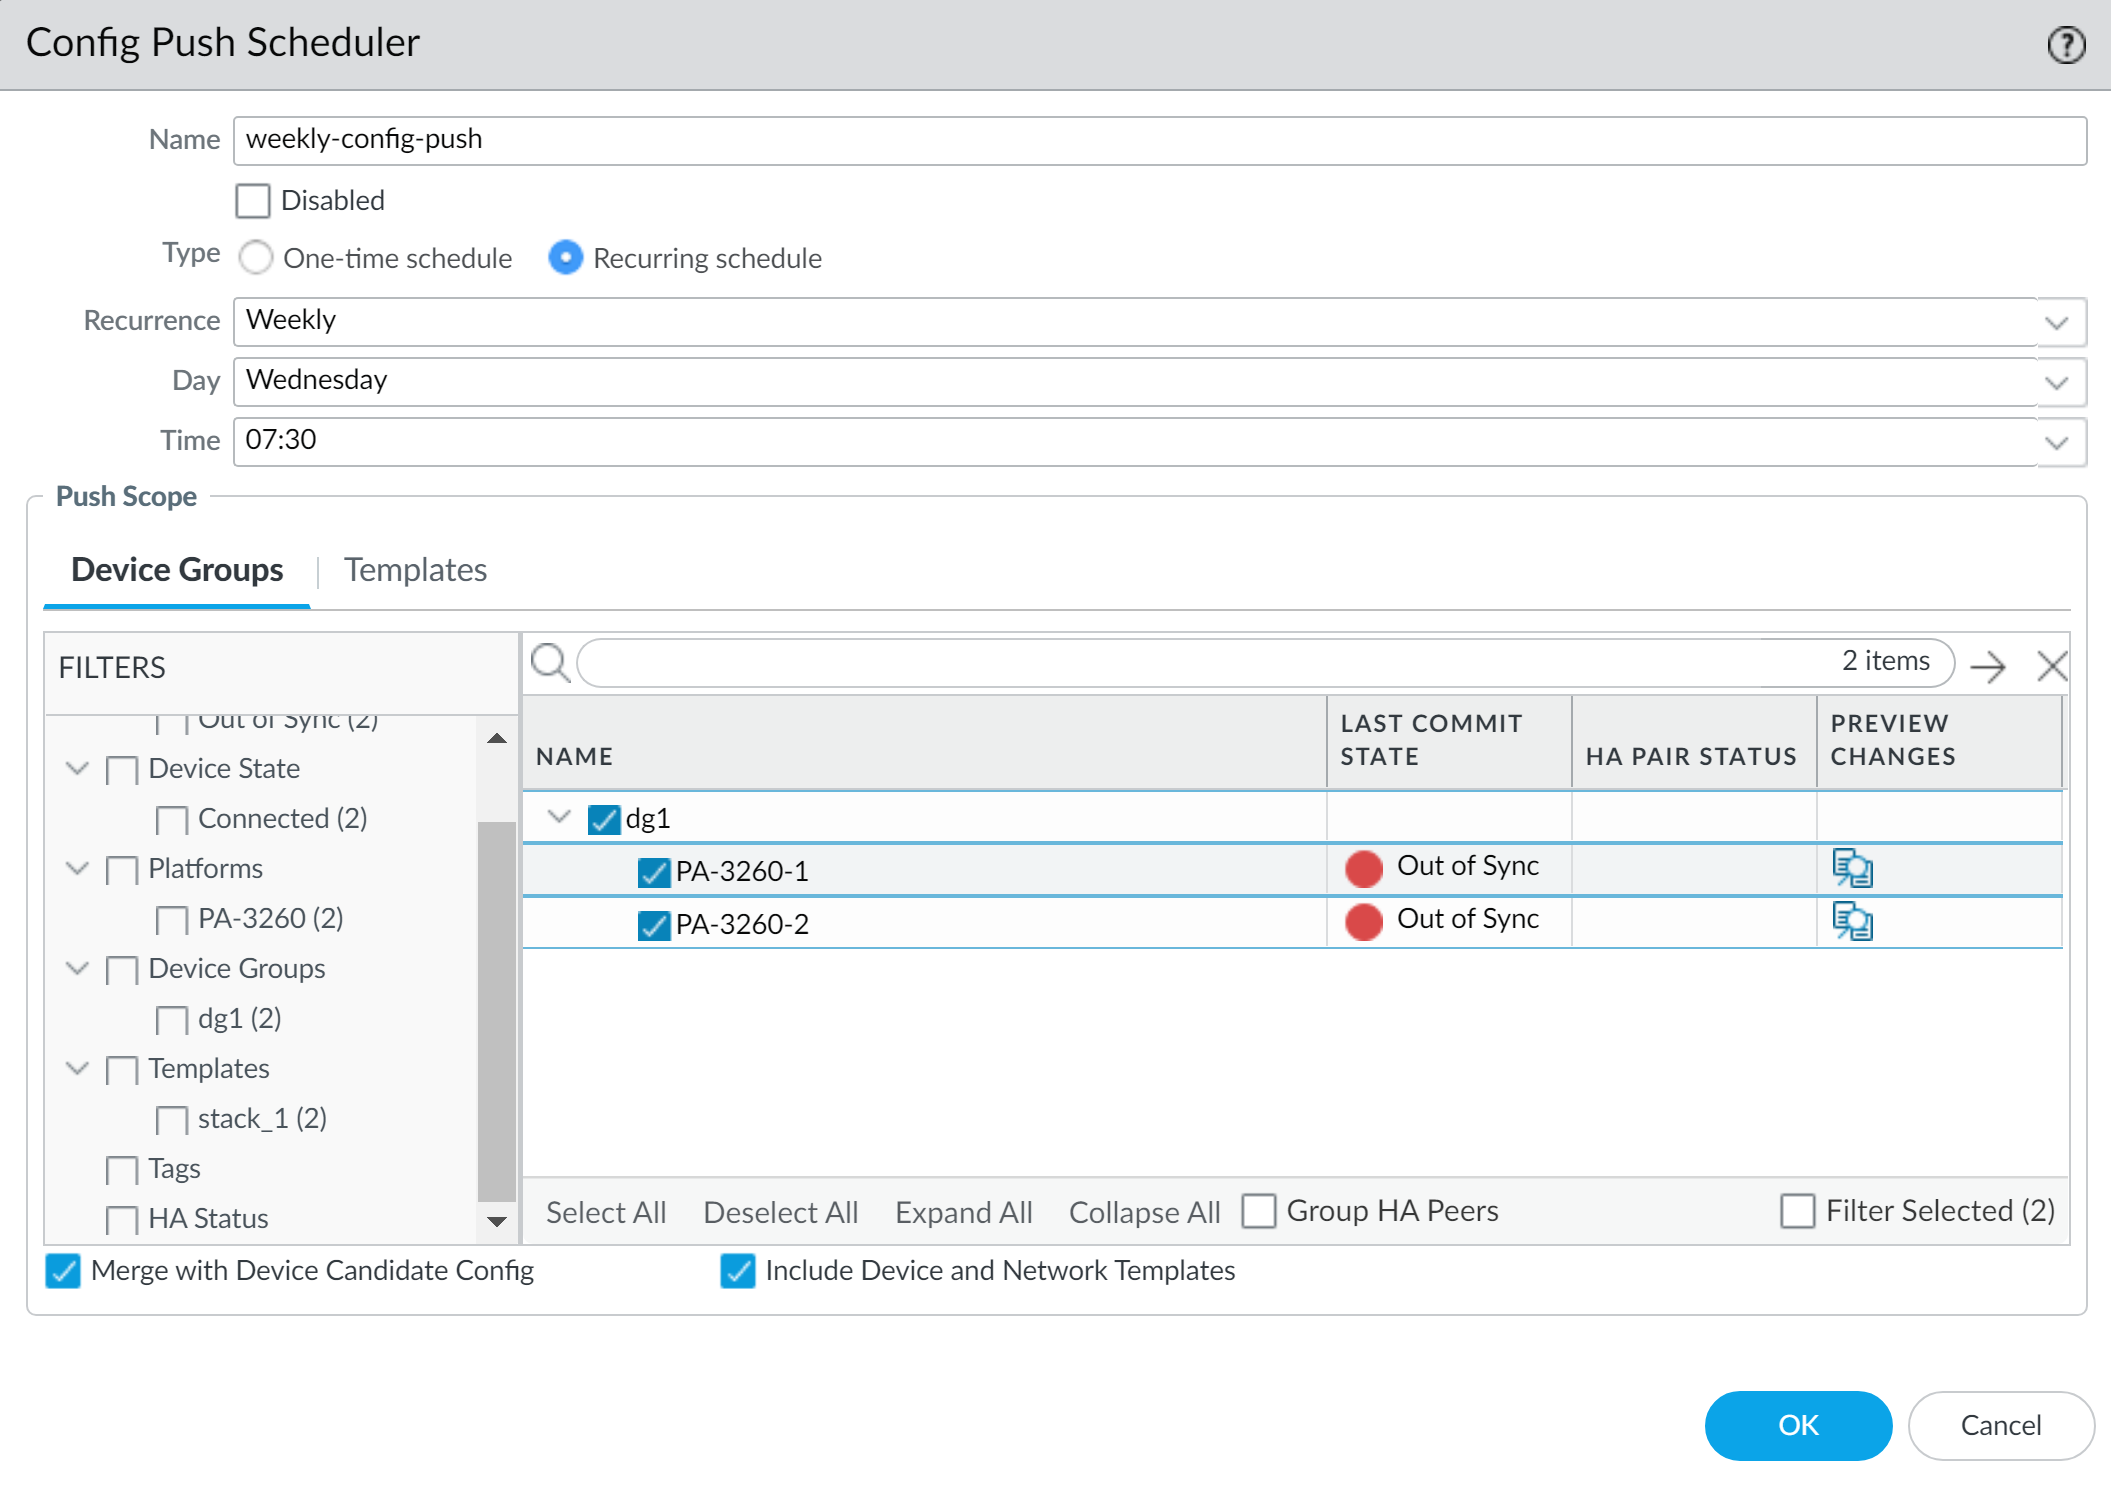
- Go to Panorama > Scheduled Config Push and click Add (or via Commit > Push to Devices ).
- Configure: Name, Admin Scope, Date & Time, Recurrence.
-
Push Scope Selection:
Select Device Groups, Templates, or Template Stacks.
- Merge with Device Candidate config: (Default: enabled).
- Include Device and Network Templates: (Default: enabled).
- Force Template Values is NOT supported for scheduled pushes.
- Click OK , then Commit to Panorama .
Viewing Execution History:
Go to Panorama > Scheduled Config Push and click the timestamp in the Status column. Click Tasks for full details.
Scheduled pushes are useful for applying changes during maintenance windows without manual intervention.
Data Redistribution
Panorama can redistribute User-ID and other contextual data (IP-User Mappings, IP Tags, User Tags, HIP, Quarantine List) among managed firewalls and User-ID agents. This ensures consistent data for policy enforcement.
Configure Panorama to Redistribute Data:
- Add Redistribution Agents to Panorama: ( Panorama > Data Redistribution > Add ). Specify Host, Port, Data types.
- Enable Panorama MGT Interface for Queries: ( Panorama > Setup > Interfaces > Management , select User-ID).
- Commit to Panorama .
Configure Firewalls to Receive Redistributed Data (via Template):
- Device > Data Redistribution > Agents (select Template). Add agent (Panorama serial or Host/Port).
- Commit and Push .
Verification:
- Agent status: Panorama > Data Redistribution > Agents > Status .
- Logs on firewalls: User-ID logs, IP-Tag logs.
-
CLI:
show user ip-user-mapping all.
Data redistribution ensures all firewalls in a device group have consistent User-ID mappings for policy enforcement.
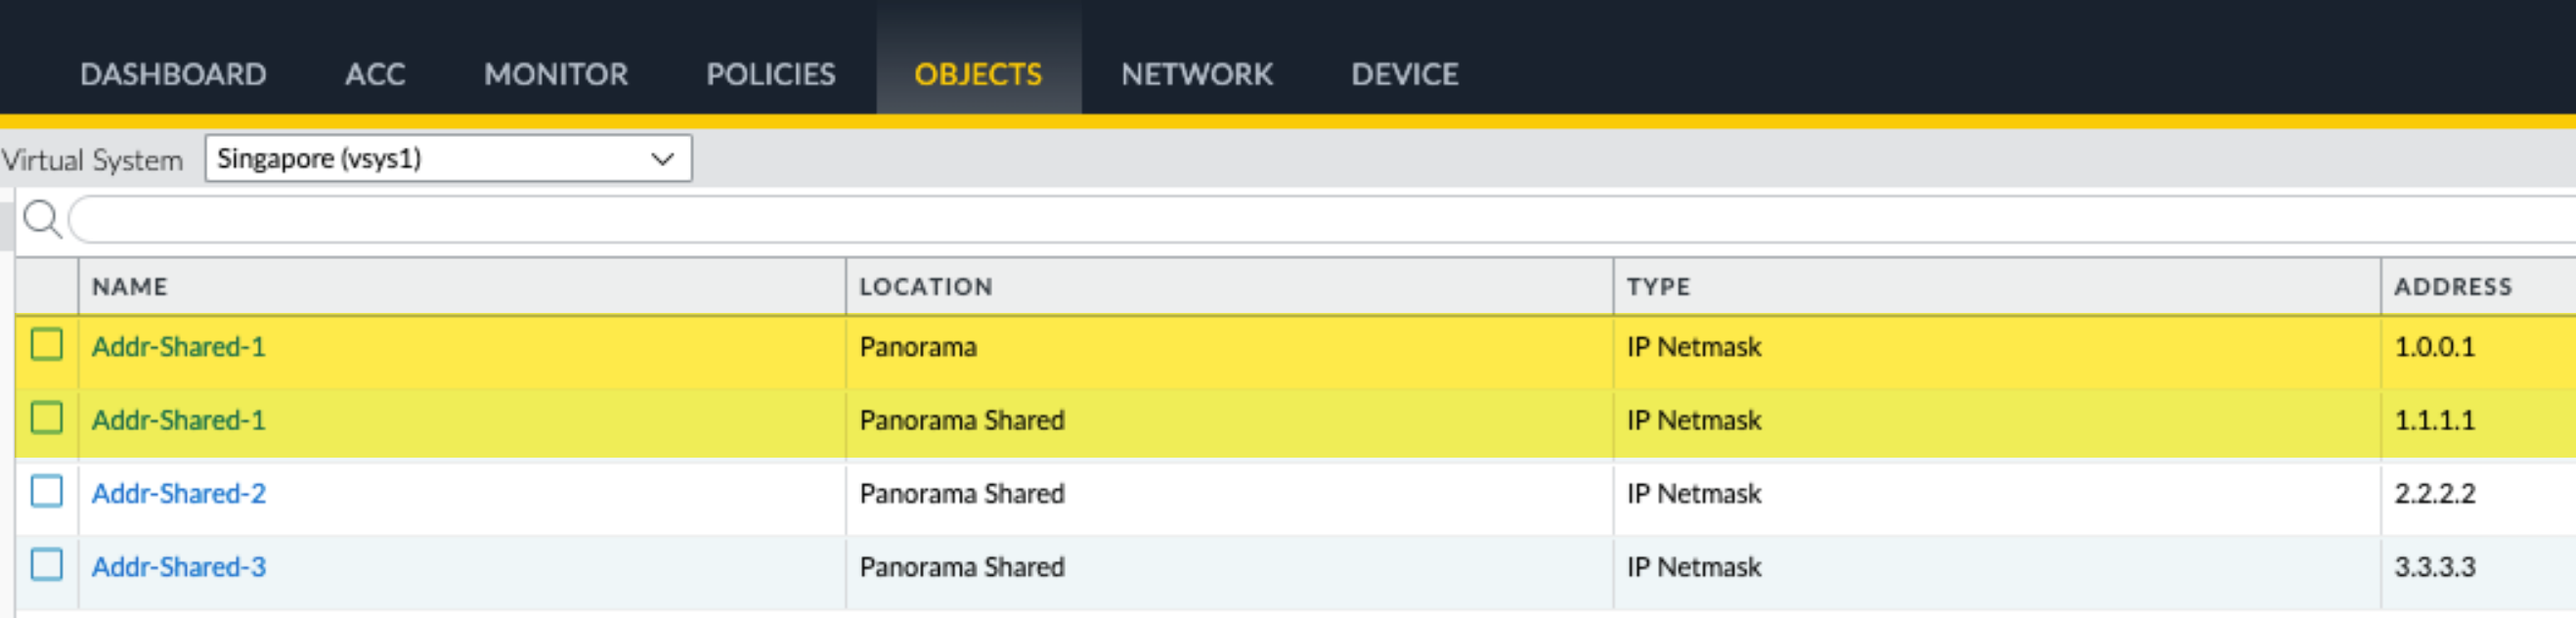
Device Group Objects (Shared vs. DG)
Objects (Addresses, Services, URL Categories, Security Profiles, etc.) are configuration elements referenced by policies. In Panorama, objects can be created at the Shared level or within specific Device Groups .
- Shared Objects: Visible and usable by all device groups. Changes affect all. Cannot be overridden.
- Device Group Objects: Visible to that DG and its descendants. Can be overridden in descendants (unless "Disable Override" is checked).
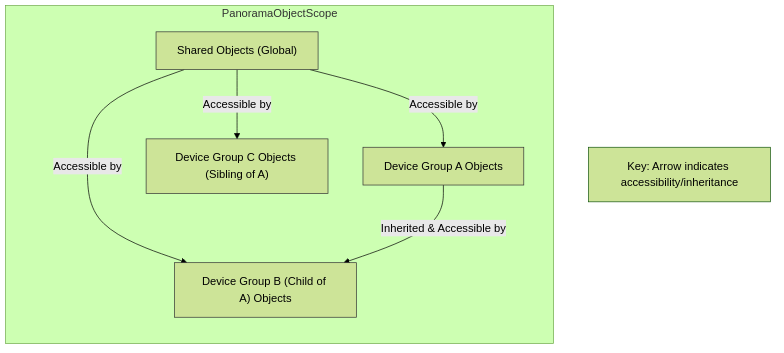
Object Scope and Inheritance in Device Groups.
Managing Unused Shared Objects:
Default: Panorama pushes all shared objects. To push only referenced shared objects: Panorama > Setup > Management , edit Panorama Settings, clear Share Unused Address and Service Objects with Devices . This may increase Panorama commit time.
Use Shared objects for global items, DG-specific for granular control.
Object Management (Create, Override, Revert)
Creating Objects:
- Shared Object: Select Shared in DG drop-down during creation.
- Device Group Object: Select target Device Group during creation.
Overriding Inherited Object Values:
Applicable to DG objects inherited from an ancestor (not Shared objects).
- In Objects , select the DG and the inherited object (green icon). Click Override .
-
Edit values. Icon becomes yellow-overlapping-green (
). Commit and Push.
Reverting to Inherited Object Values:
- Select the overridden object. Click Revert . Icon turns green. Commit and Push.
Managing Precedence of Inherited Objects:
Default: Lower-level DG objects take precedence. To reverse: Panorama > Setup > Management , edit Panorama Settings, check Objects defined in ancestors will take higher precedence . Commit to Panorama, then Push to Devices.
Object overrides offer flexibility. The "Find Overridden Objects" link (when changing precedence) is helpful.
Policy Rule Hierarchy & Evaluation
Panorama manages policies in layers. Understanding evaluation order is critical.
Rule Evaluation Order (e.g., Security Rulebase):
- Panorama Pre-Rules (Shared -> Parent DGs -> Local DG)
- Local Firewall Rules
- Panorama Post-Rules (Local DG -> Parent DGs -> Shared)
- Default Rules
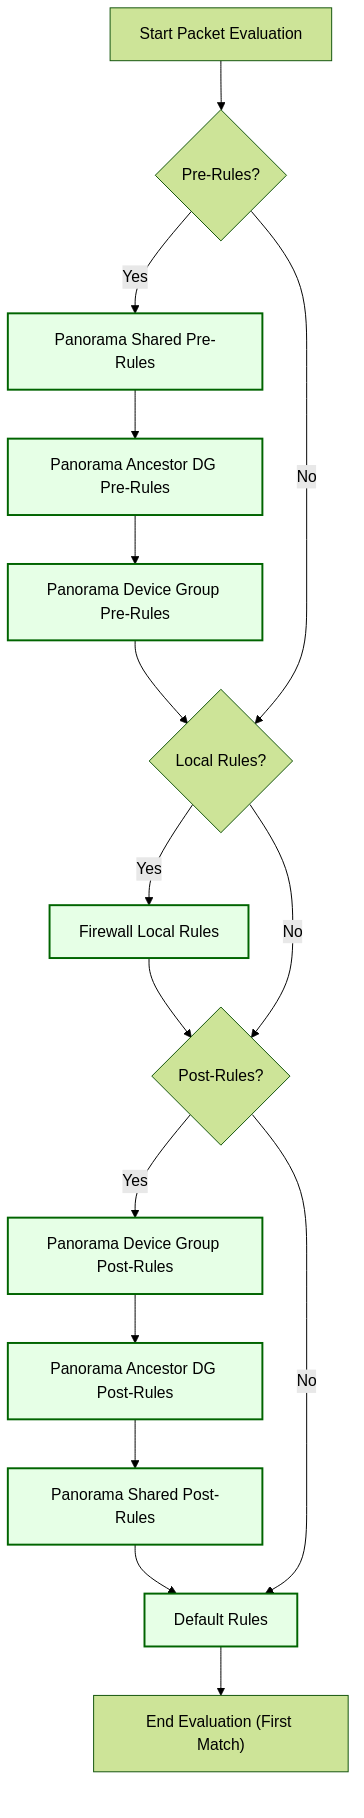
Simplified Policy Rule Evaluation Order.
Use Policies > Preview Rules in Panorama to see the effective rulebase for a specific device.
"Preview Rules" is invaluable. Place specific rules before general ones.
Policy Targeting & Rule Usage
Pushing Policy Rules to a Subset of Firewalls (Targeting):
Within a device group, target specific policy rules to apply only to certain firewalls.
- In policy rule, Target tab: Select firewalls to apply OR select "Install on all but specified devices" to exclude.
- Select EITHER target tags OR target devices, not both.
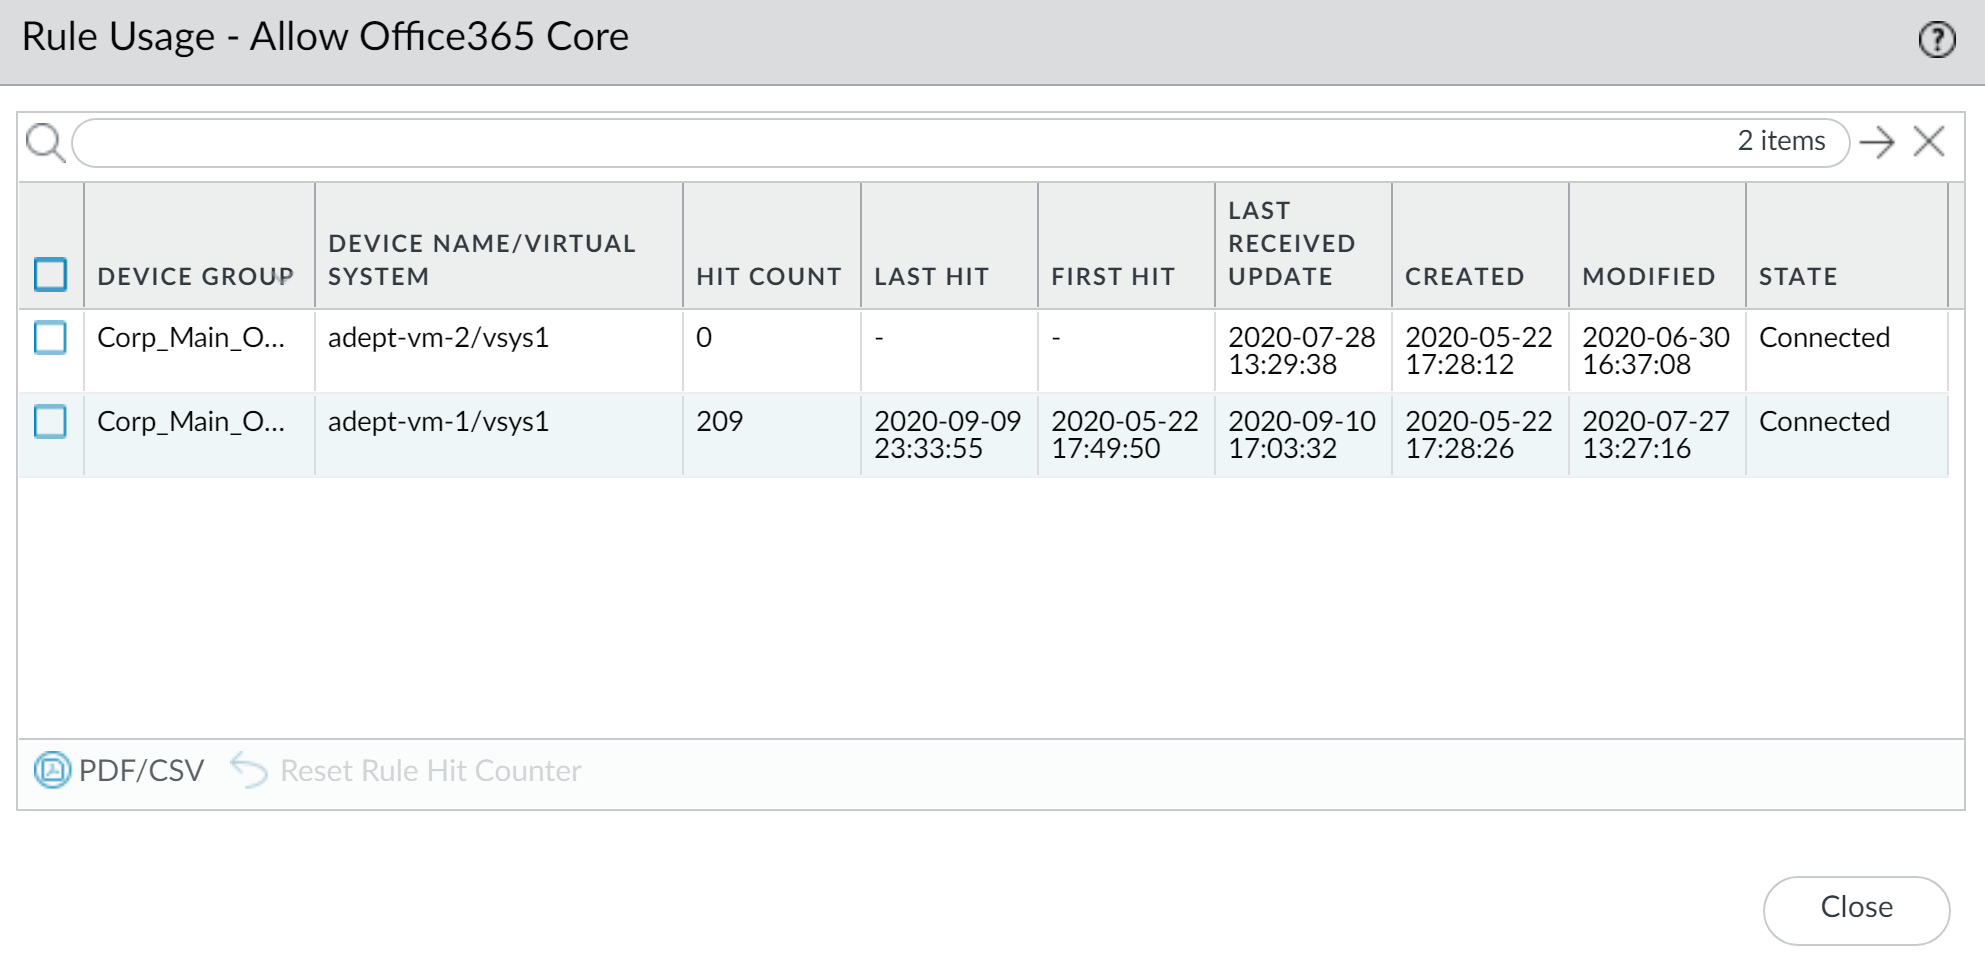
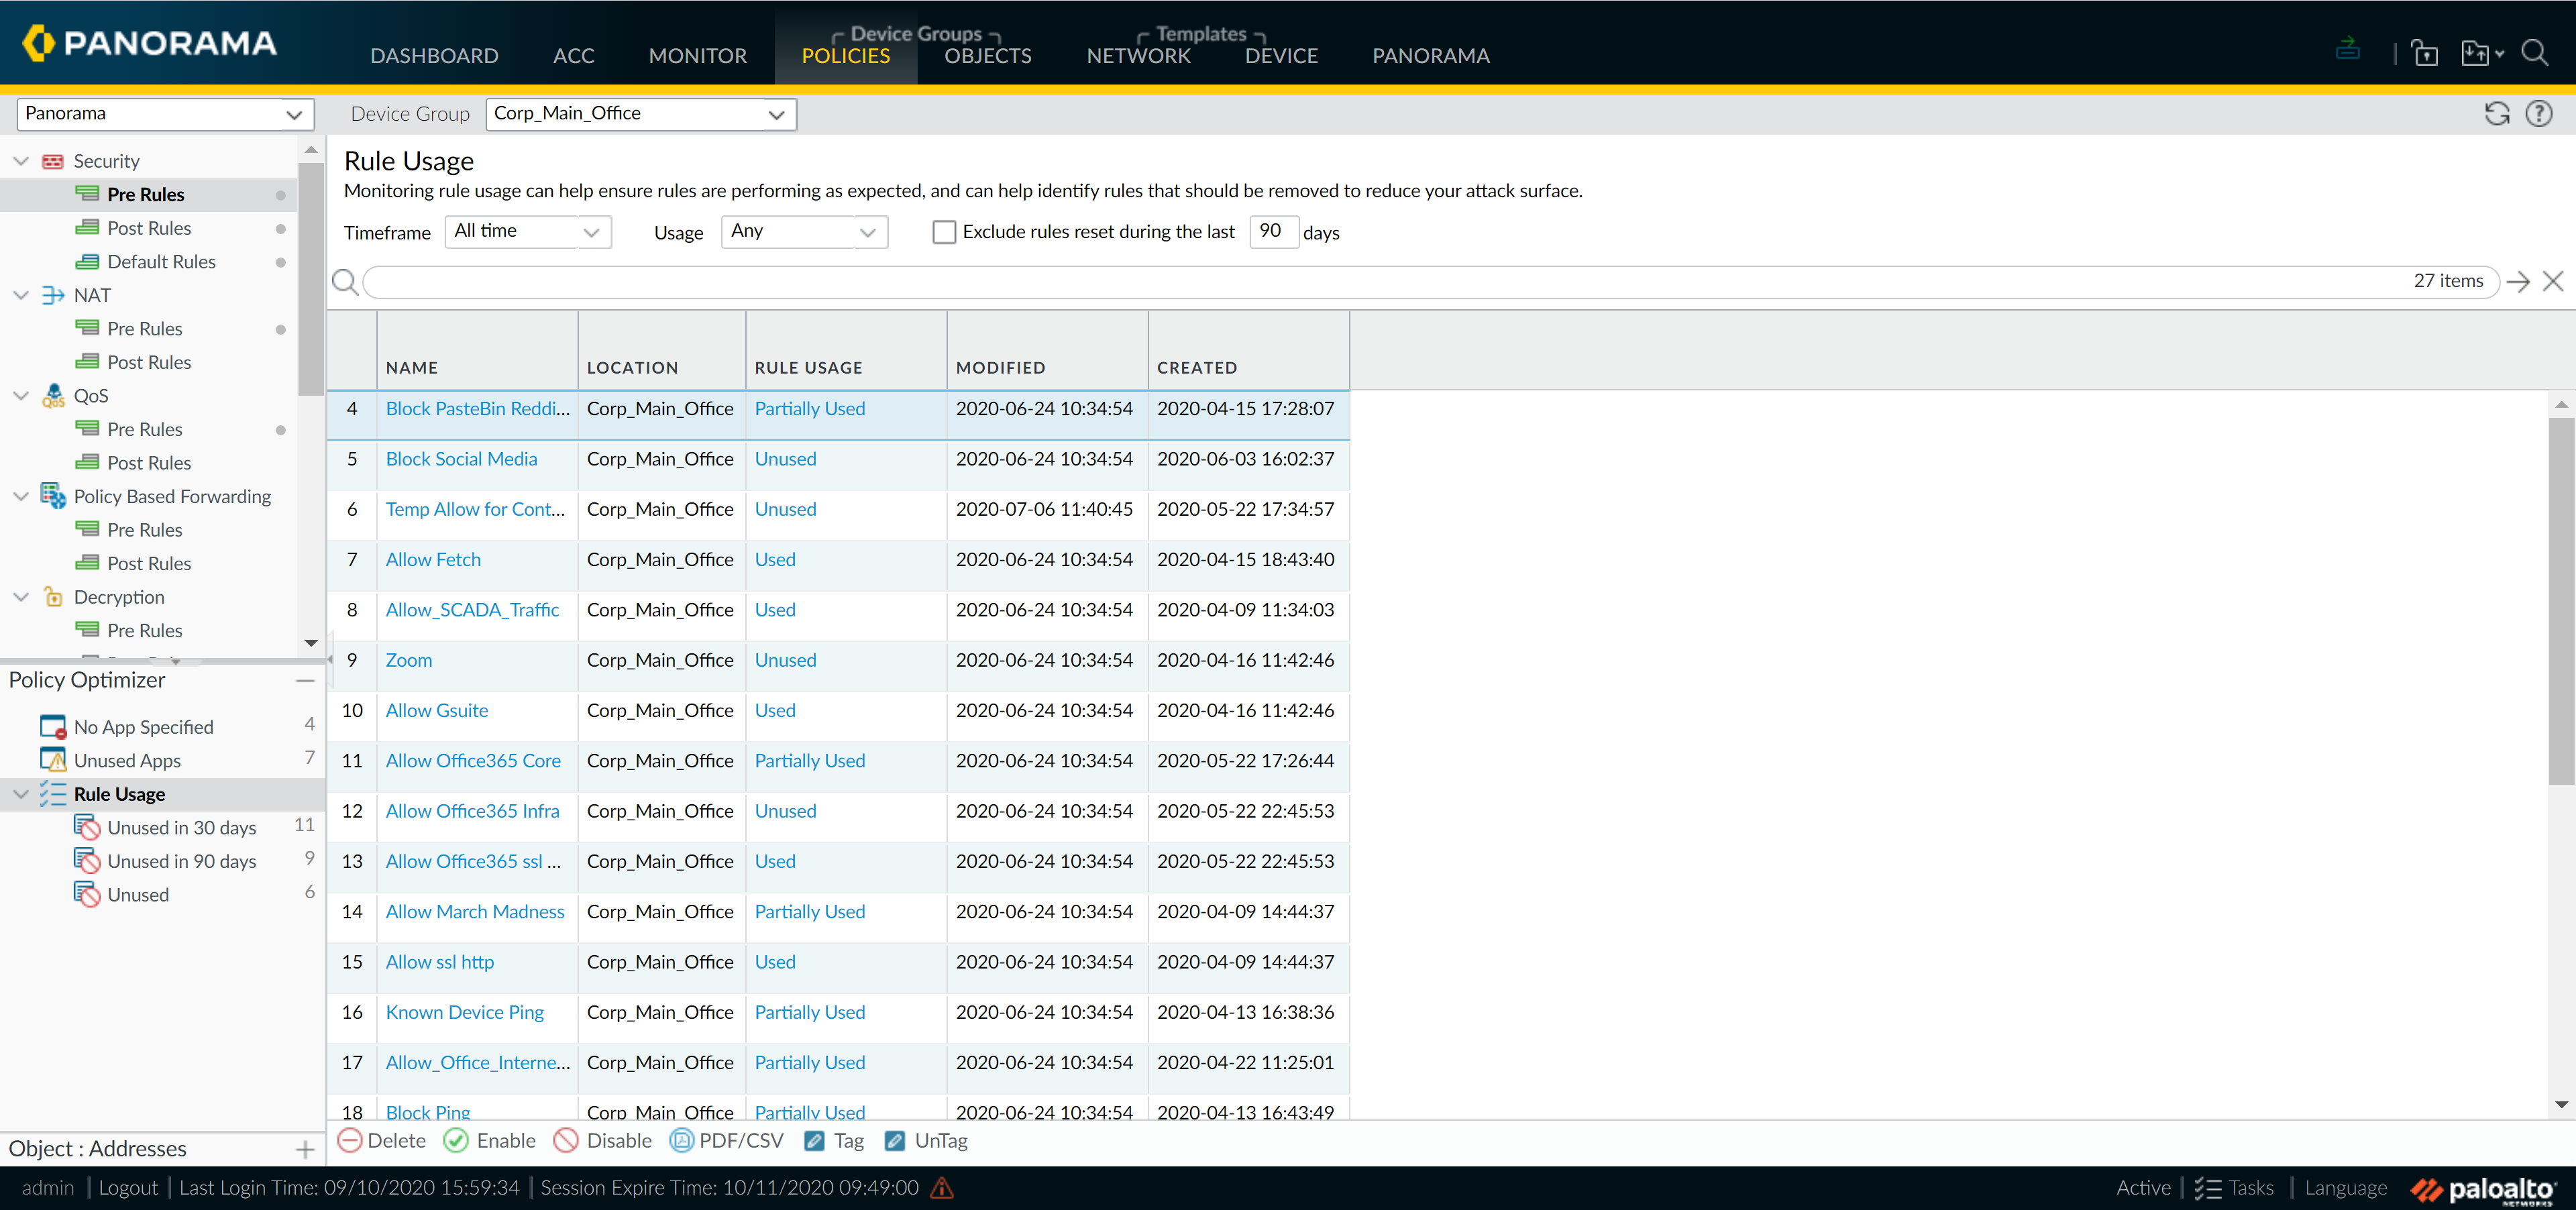
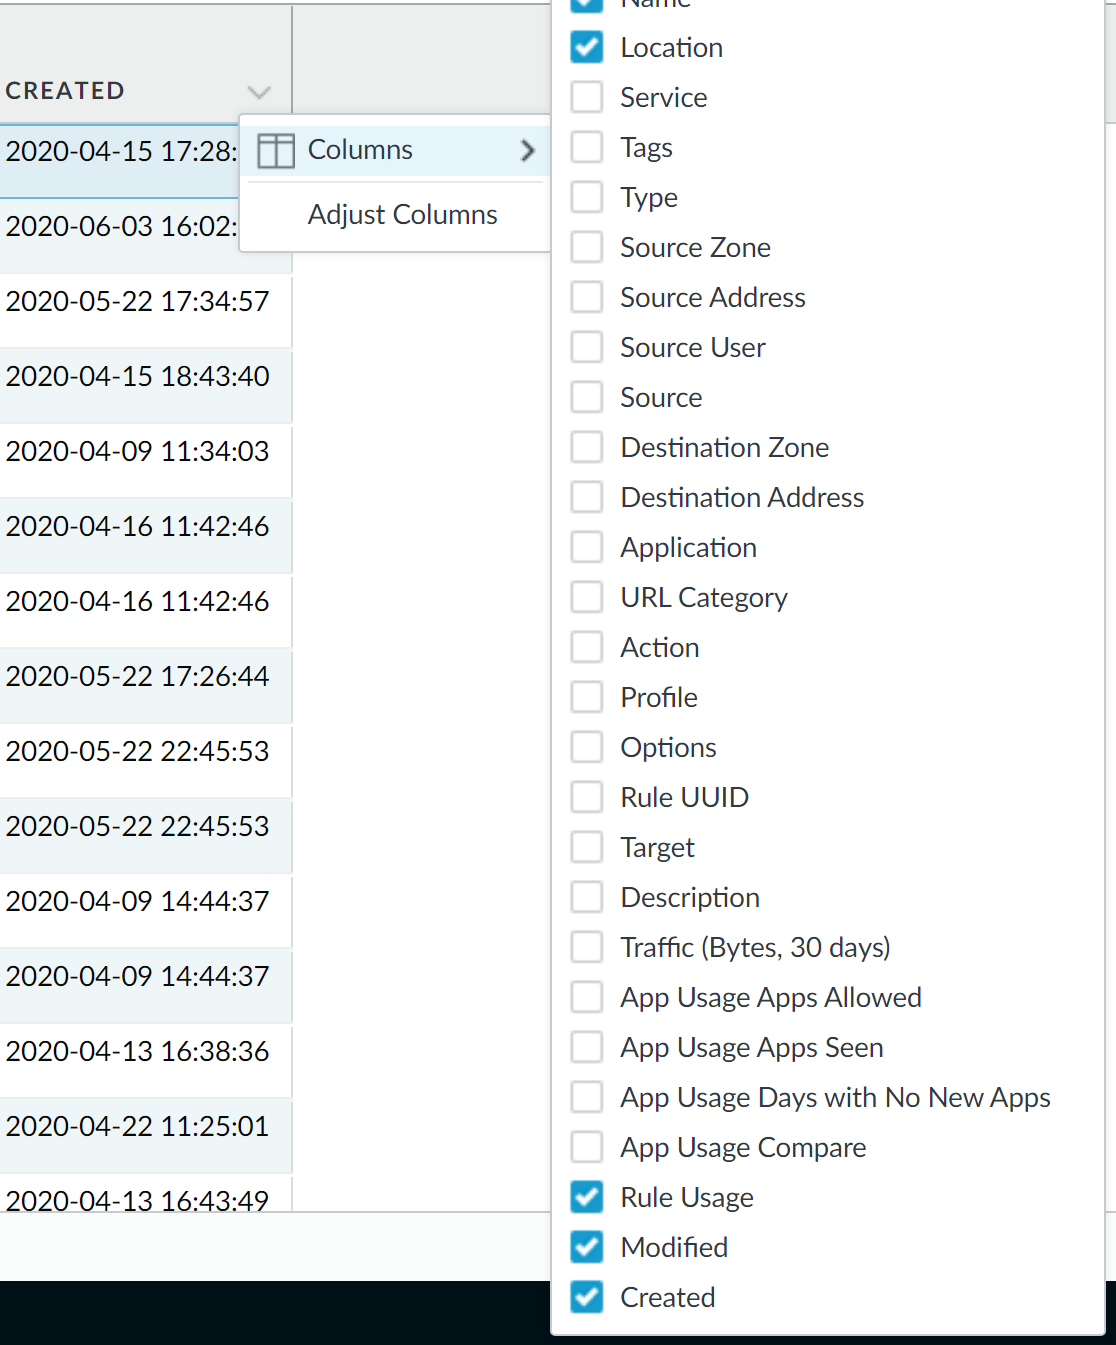
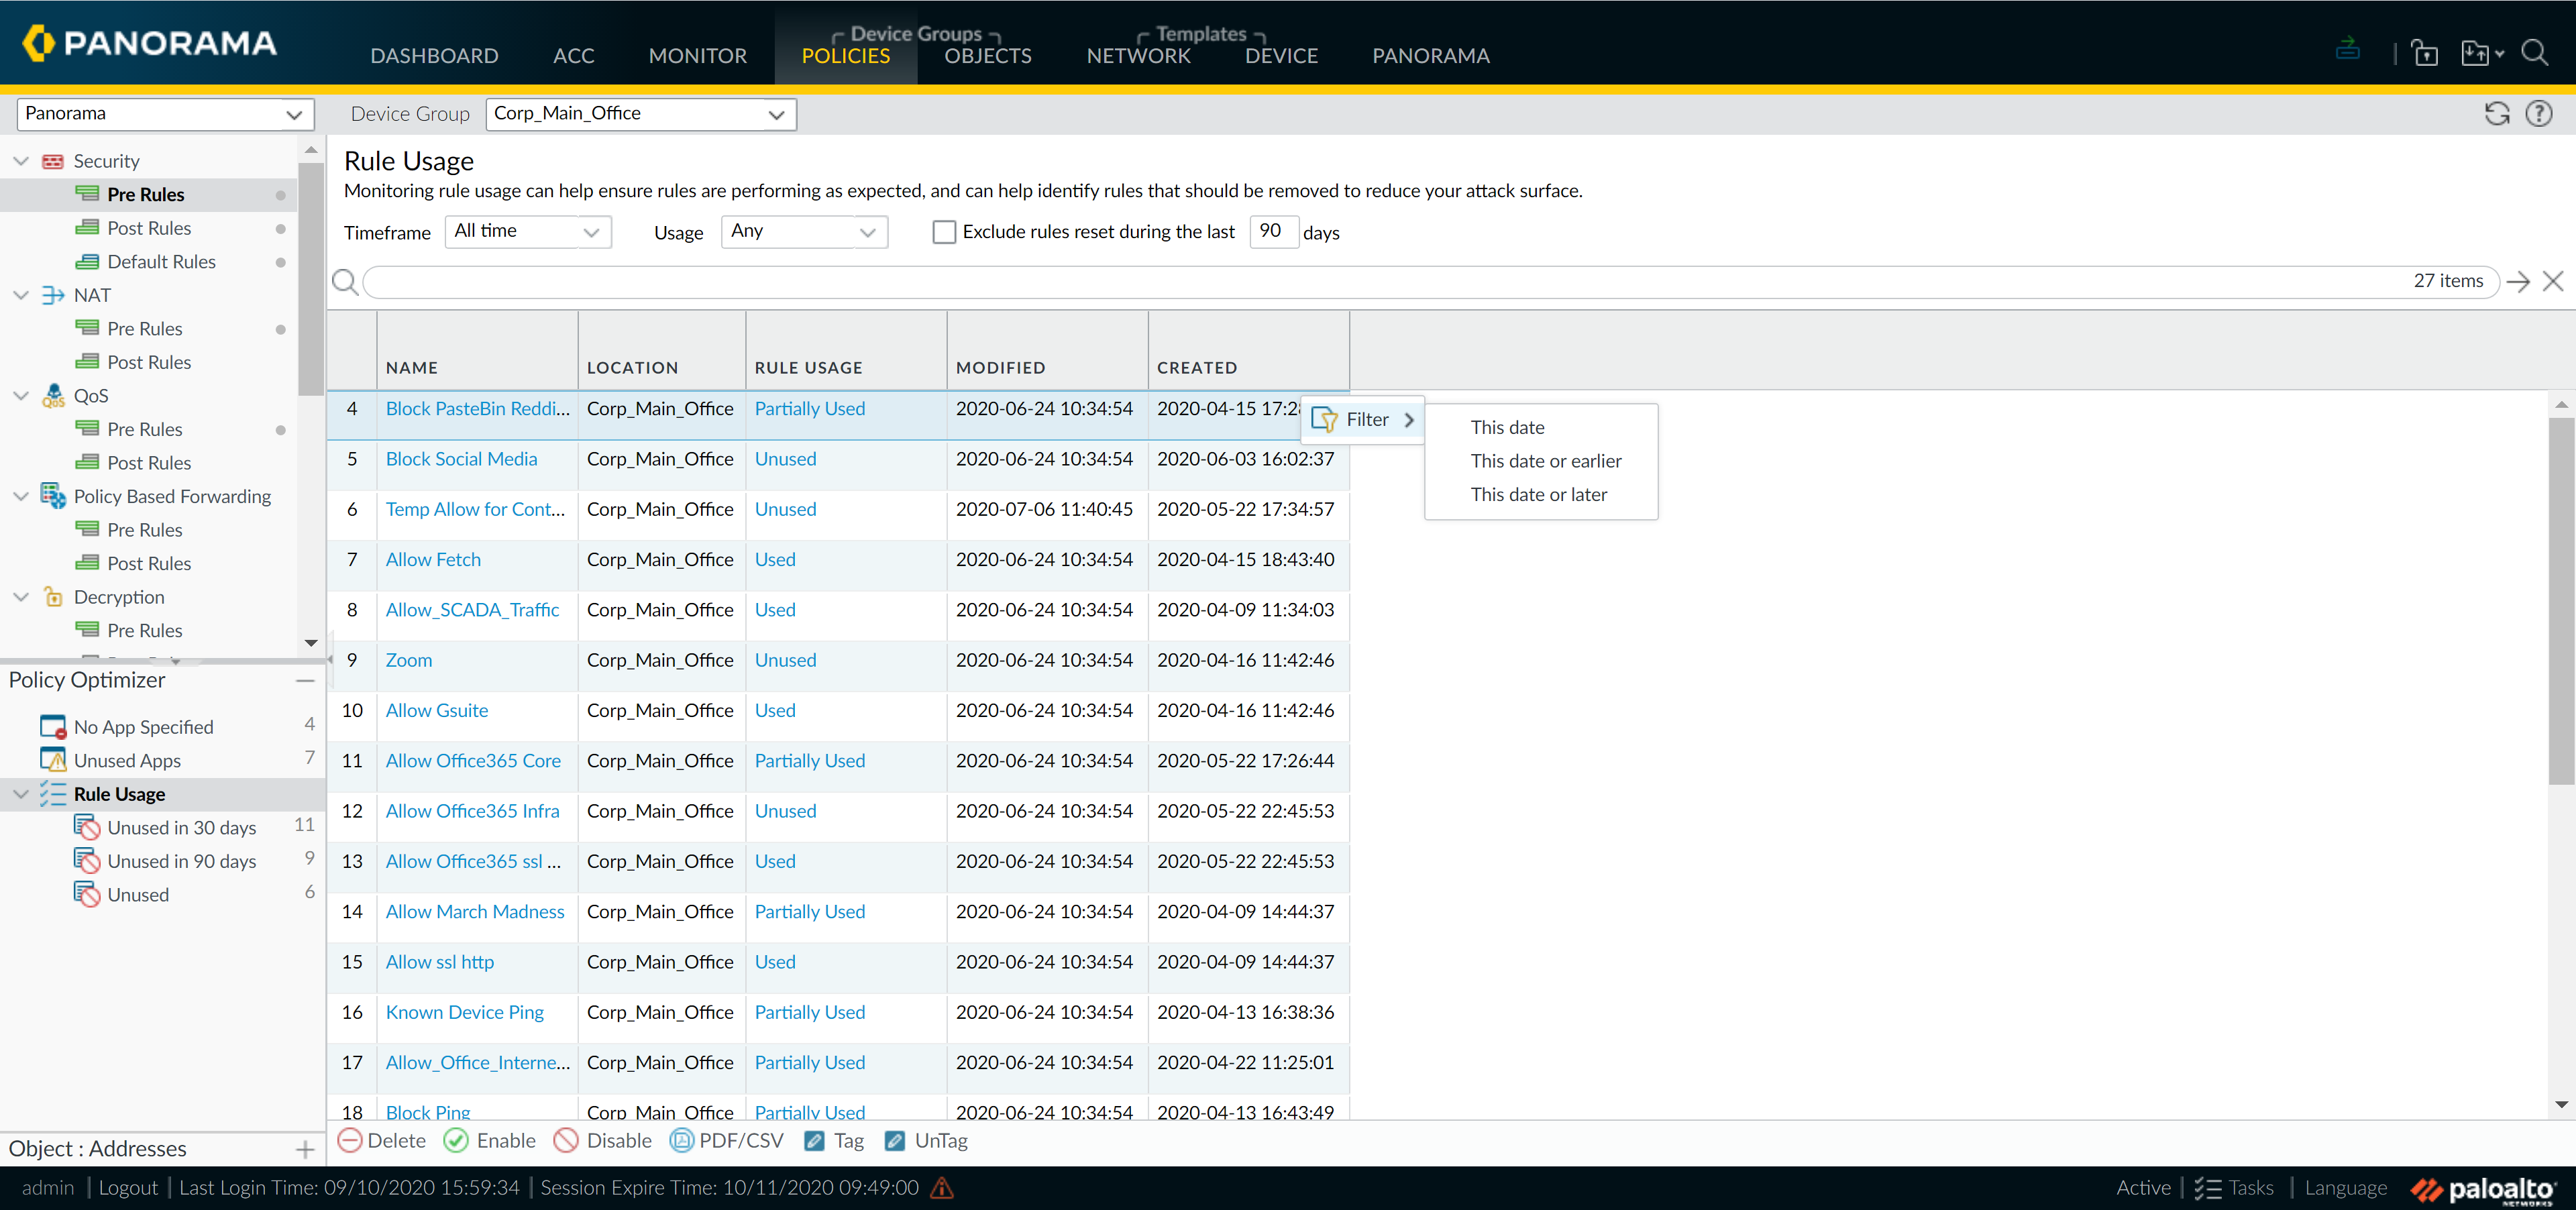
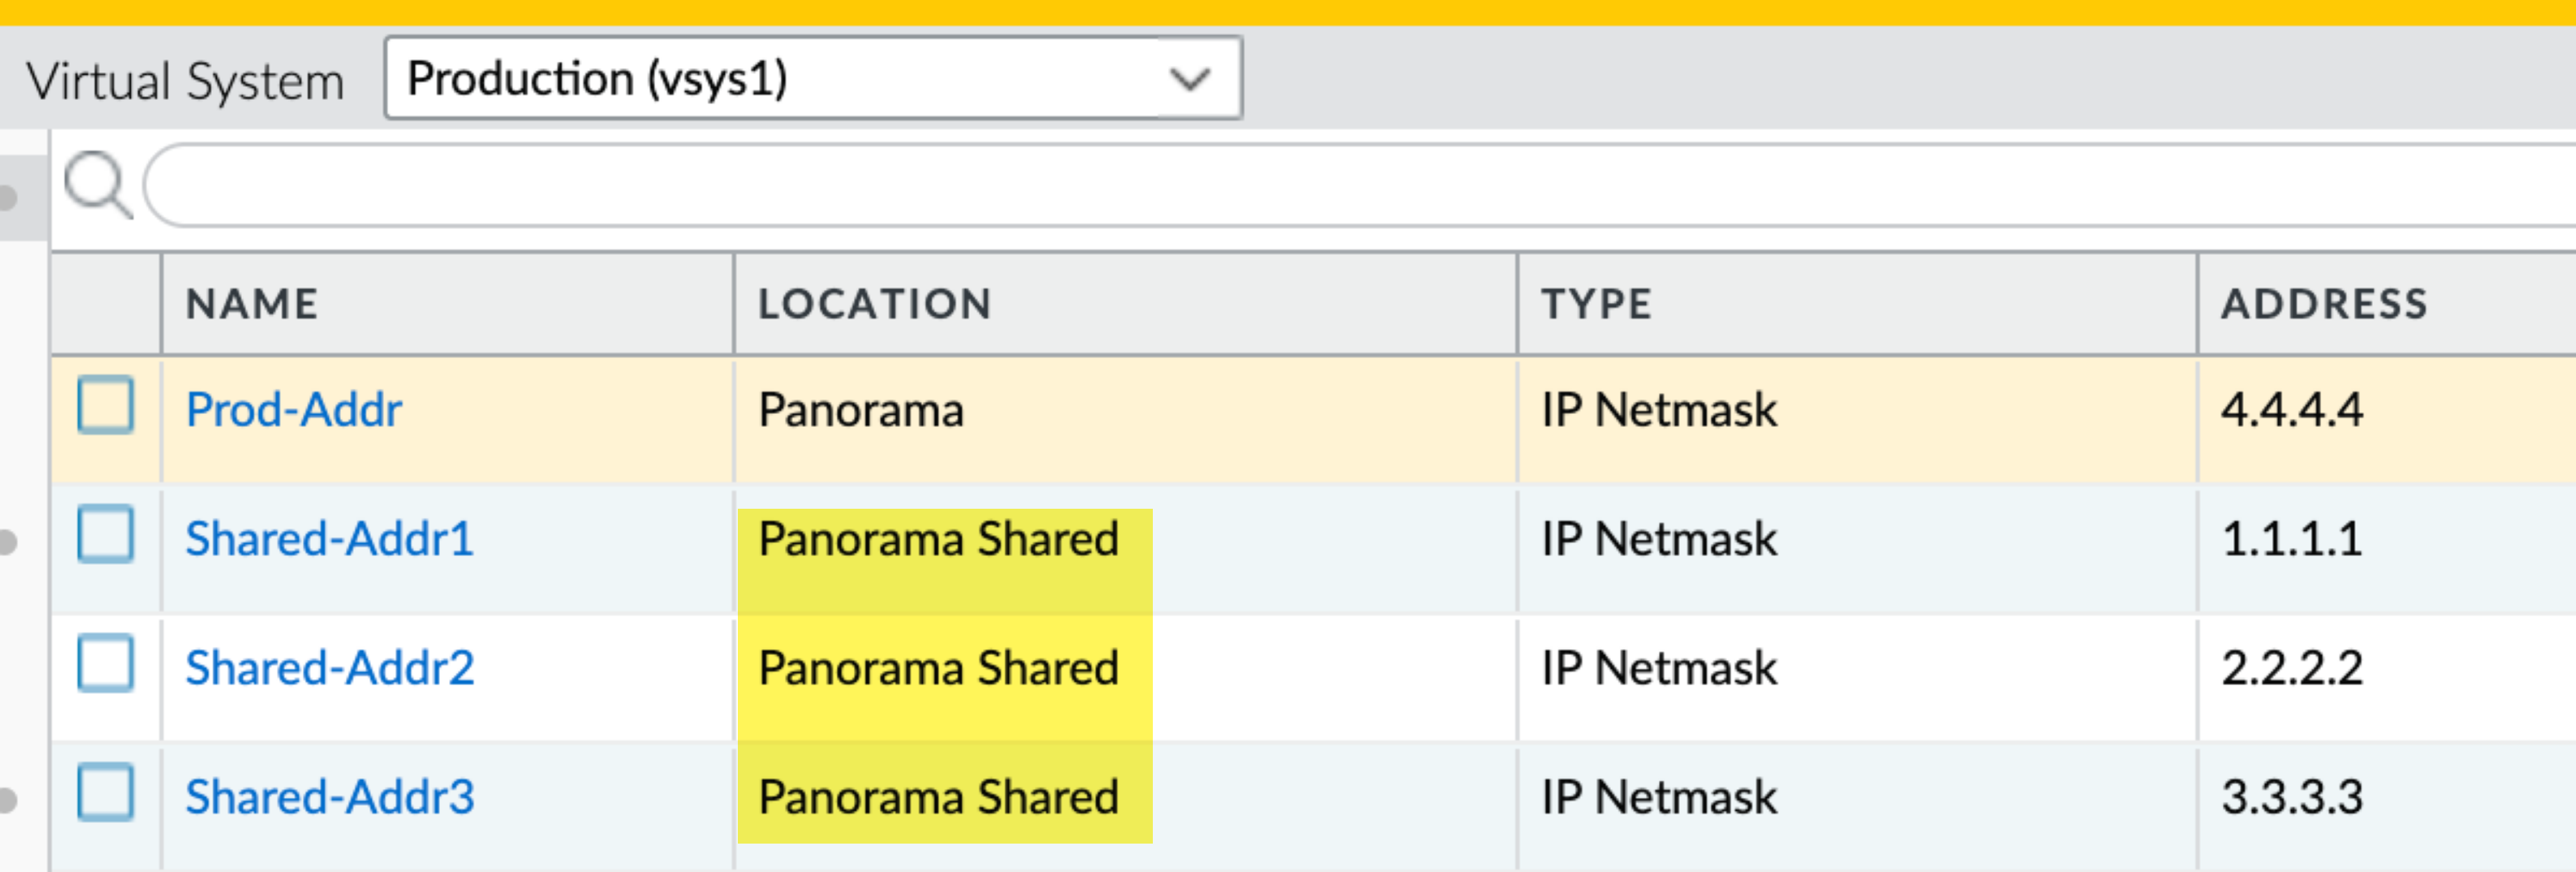
Monitoring Policy Rule Usage:
Tracks rule usage for managed firewalls (PAN-OS 8.1+ with Policy Rule Hit Count enabled).
- View in Policies > [Rulebase] . Columns: Rule Usage (Used, Partially Used, Unused, —), Modified, Created.
-
Click status for per-firewall hits.
-
Policy Optimizer (Filter):
Filter rules by usage, timeframe, etc. Take actions (Delete, Enable, Tag).
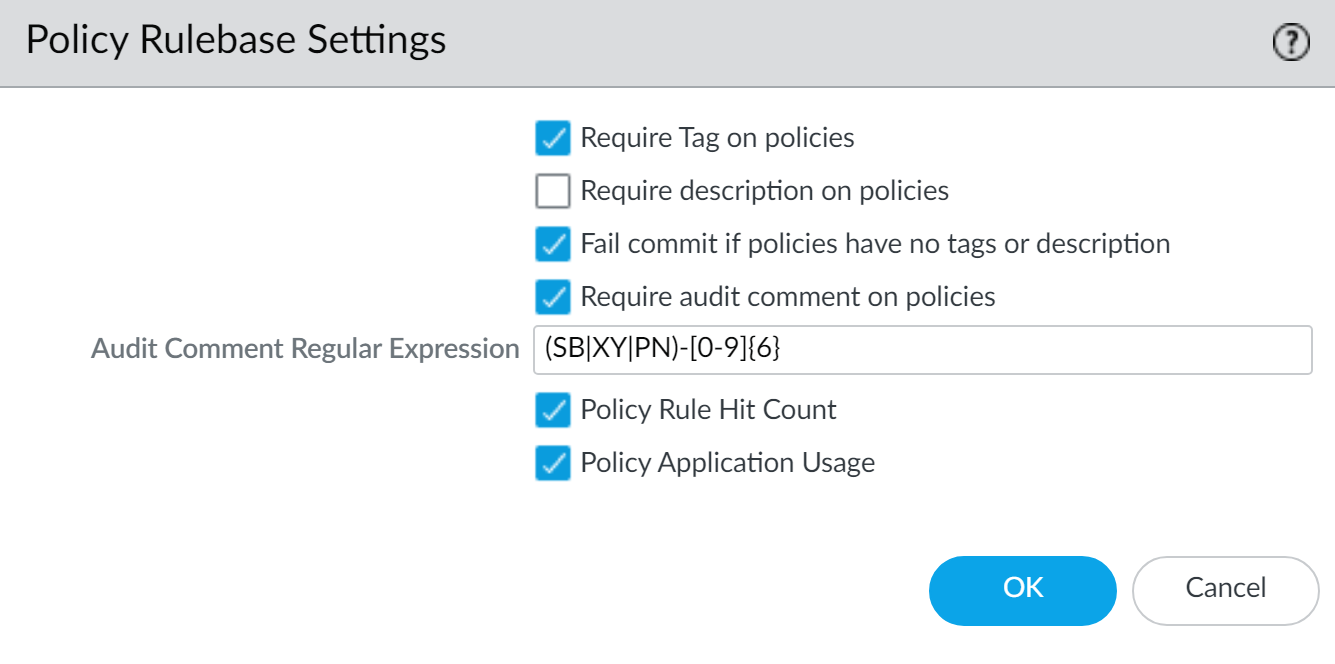
Regularly monitor rule usage. Enforce audit comments ( Panorama > Setup > Management ) for policy changes.
Managing Multi-VSYS Firewalls
Specific considerations for configuration pushes and shared objects on multi-VSYS firewalls.
Device Group Push to Multi-VSYS Firewall:
- Config changes for multiple VSYS on one physical firewall are bundled into a single job (PAN-OS 10.2+).
- If one part fails, the entire push to that multi-VSYS firewall fails.
- A full commit/push required after upgrading to PAN-OS 10.2 for optimized shared object pushes.
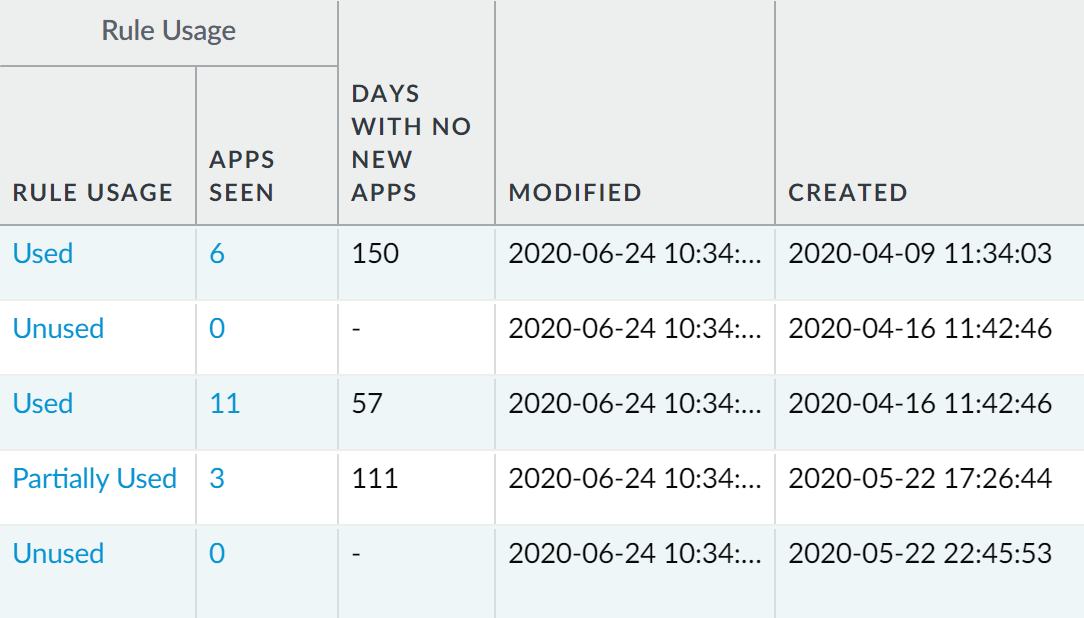
Shared Objects Pushed to Multi-VSYS Firewall:
Many shared objects go to a Panorama Shared location on the firewall, accessible by all VSYS.
- Exceptions (replicated per VSYS): Pre/Post Rules, EDLs, Security Profile Groups, HIP objects/profiles, Custom URLs, Decryption Profiles, SD-WAN Profiles.
-
Override Precedence:
VSYS-specific object in "Panorama" location overrides "Panorama Shared" object of same name.
- Best Practice: When changing shared objects for a multi-VSYS firewall, push to ALL associated DGs/VSYS.
Transitioning Firewalls: Planning
Migrating existing, locally configured firewalls to Panorama management requires careful planning.
Key Planning Steps:
- Scope & Inventory: Identify firewalls, check PAN-OS versions, verify Panorama licenses.
- Configuration Audit & Normalization: Plan DGs/Templates, normalize names (zones, objects).
- Backup & Maintenance Window: Schedule window, backup firewall states and Panorama config.
- Migration Strategy: Reuse existing config or push new? If from another Panorama, localize first.
- Post-Migration Test Plan: Define verification tasks.
Thorough planning, especially normalization of names, is crucial.
Migrating Standalone Firewalls
Importing an existing firewall's configuration into Panorama to reuse it.
Process Overview:
- Plan Migration.
- Add Firewall as Managed Device in Panorama: Create Auth Key, add serial to Panorama.
- Connect Firewall to Panorama: Configure Panorama IP and Auth Key on firewall. Verify connection.
- Import Firewall Configuration into Panorama: ( Panorama > Setup > Operations > Import device configuration... ). Auto-creates Template/DG. Choose rule import location. Commit to Panorama.
- Push Config Bundle from Panorama to Firewall (CRITICAL): ( Panorama > Setup > Operations > Export or push device config bundle... > Push & Commit ). Removes local policies/objects on firewall. Commit to Panorama again.
- Push Device Group and Template Configurations: ( Commit > Commit and Push ). Check "Include Device and Network Templates" and "Force Template Values".
- Verify & Fine-Tune.
- Perform Post-Migration Test Plan.

The "push device config bundle" step is vital to clear local firewall config. "Force Template Values" makes Panorama's settings authoritative.
Migrating HA Pairs
Similar to standalone, with extra steps for HA state and sync.
Migrating HA Pair and Reusing Existing Configuration:
- Plan. Disable Config Sync on HA Peers locally.
- Add both HA firewalls to Panorama Management. Verify connection.
-
Import Configuration for EACH Firewall Separately:
- For 1st peer: Import config. Then, Push device config bundle. Verify.
- Repeat for 2nd peer. (Creates separate DGs/Templates).
- Consolidate into Single DG and Template Stack: Move 2nd firewall into 1st's DG/Stack, delete redundant DG/Stack.
-
Push DG & Template Config to HA Pair (Phased):
- Suspend passive/active-secondary peer locally.
- From Panorama, Push to Devices (target suspended peer, Merge, Include Templates, Force Template Values if Panorama manages HA config).
- Make peer functional. Suspend active/active-primary peer.
- Repeat push from Panorama to now-suspended active peer. Make functional.
- Verify sync.
- (Local HA config only) Re-enable Config Sync .
- Post-Migration Test Plan.
Migrating HA Pair and Pushing New Configuration:
Overwrites local configs. Plan, Disable Config Sync, Add FWs, Connect FWs. Create target DG/Stack in Panorama for both peers. Push config (phased). Verify. Re-enable local sync if needed. Test.
Disabling config sync and phased pushes (passive first) are key for HA migration.
Loading Partial Configurations
Selectively load specific settings (e.g., application objects) from a firewall into Panorama. Requires superuser, full commit on Panorama, typically uses XML API/CLI.
Process Overview:
- Plan & Resolve Duplicates.
- Export Full Firewall Configuration (as XML).
- Import Snapshot into Panorama ( Panorama > Setup > Operations > Import named Panorama configuration snapshot ).
-
Load Partial Configuration (CLI/XML API):
- Identify source XPath (from firewall XML) and destination XPath (in Panorama config).
-
Panorama CLI:
load config partial mode [append|merge|replace] from-xpath <src> to-xpath <dest> from <file.xml>thencommit.
- Push Configuration from Panorama to Firewall. (Delete local conflicting objects first).
- Post-Migration Test Plan.
Partial load is advanced. XPath knowledge is essential.
Localizing Panorama Configurations
Makes Panorama-pushed config local to firewall, removing it from Panorama management or preparing for migration to a different Panorama. Requires superuser on firewall GUI.
Steps:
- Access Firewall Web Interface.
- (Best Practice) Export Device State.
- (Active/Passive HA Only) Disable Config Sync locally on each peer.
- Disable Device and Network Template: ( Device > Setup > Management > Panorama Settings ). Optionally import settings locally.
- Disable Device Group Configuration (Panorama Policy and Objects): (Same menu). Optionally import settings locally. Do NOT commit yet.
-
Save and Load Snapshot with New UUIDs (CRITICAL):
- Device > Setup > Operations > Save named configuration snapshot .
- Load named configuration snapshot (the one just saved).
- Check: Regenerate Rule UUIDs for selected named configuration .
- Click OK .
- Commit on Firewall.
- (Active/Passive HA Only) Re-enable Config Sync.
Regenerating Rule UUIDs is vital for localizing policies.
Changing Management Modes
Switching between Panorama and cloud services management.
Panorama to Cloud:
- Panorama: Remove log forwarding preferences for the firewall ( Panorama > Collector Groups > Device Log Forwarding > Delete ). Commit.
- Firewall: Set "Managed By" to Cloud Services ( Device > Setup > Management > Panorama Settings ). Commit.
Cloud to Panorama:
- Firewall: Set "Managed By" to Panorama (re-enter IP/Auth Key if needed). Commit.
-
Firewall CLI:
debug software restart process management-server. - Panorama: Verify connection ( Panorama > Managed Devices > Summary ).
Restarting management-server process on firewall is key when moving from cloud to Panorama.
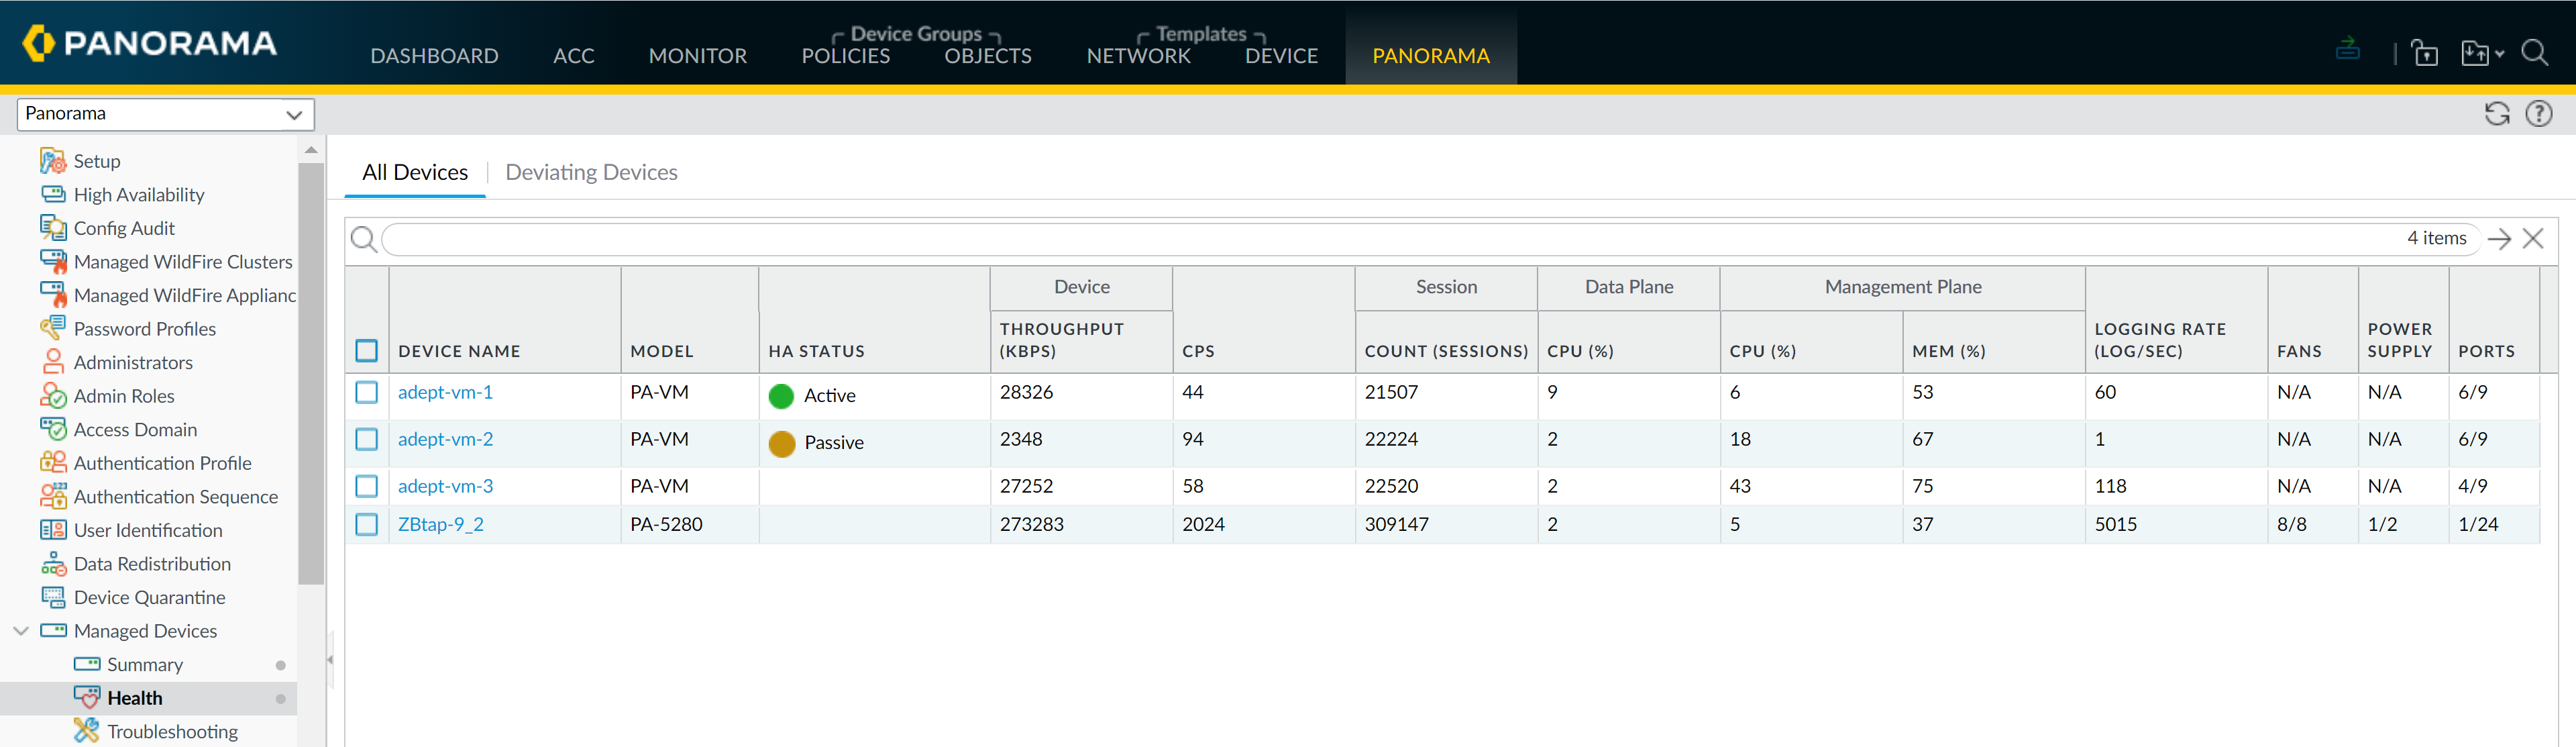
Device Health Monitoring
Panorama (PAN-OS 8.1+) monitors health of managed firewalls (PAN-OS 8.1+).
Stores last 90 days of stats.
- Baseline Performance: Calculated using 7-day averages.
- Metrics: Sessions, environmentals, interfaces, logging, resources (CPU, memory, DP), HA, throughput.
Accessing Health Data:
- Panorama > Managed Devices > Health .
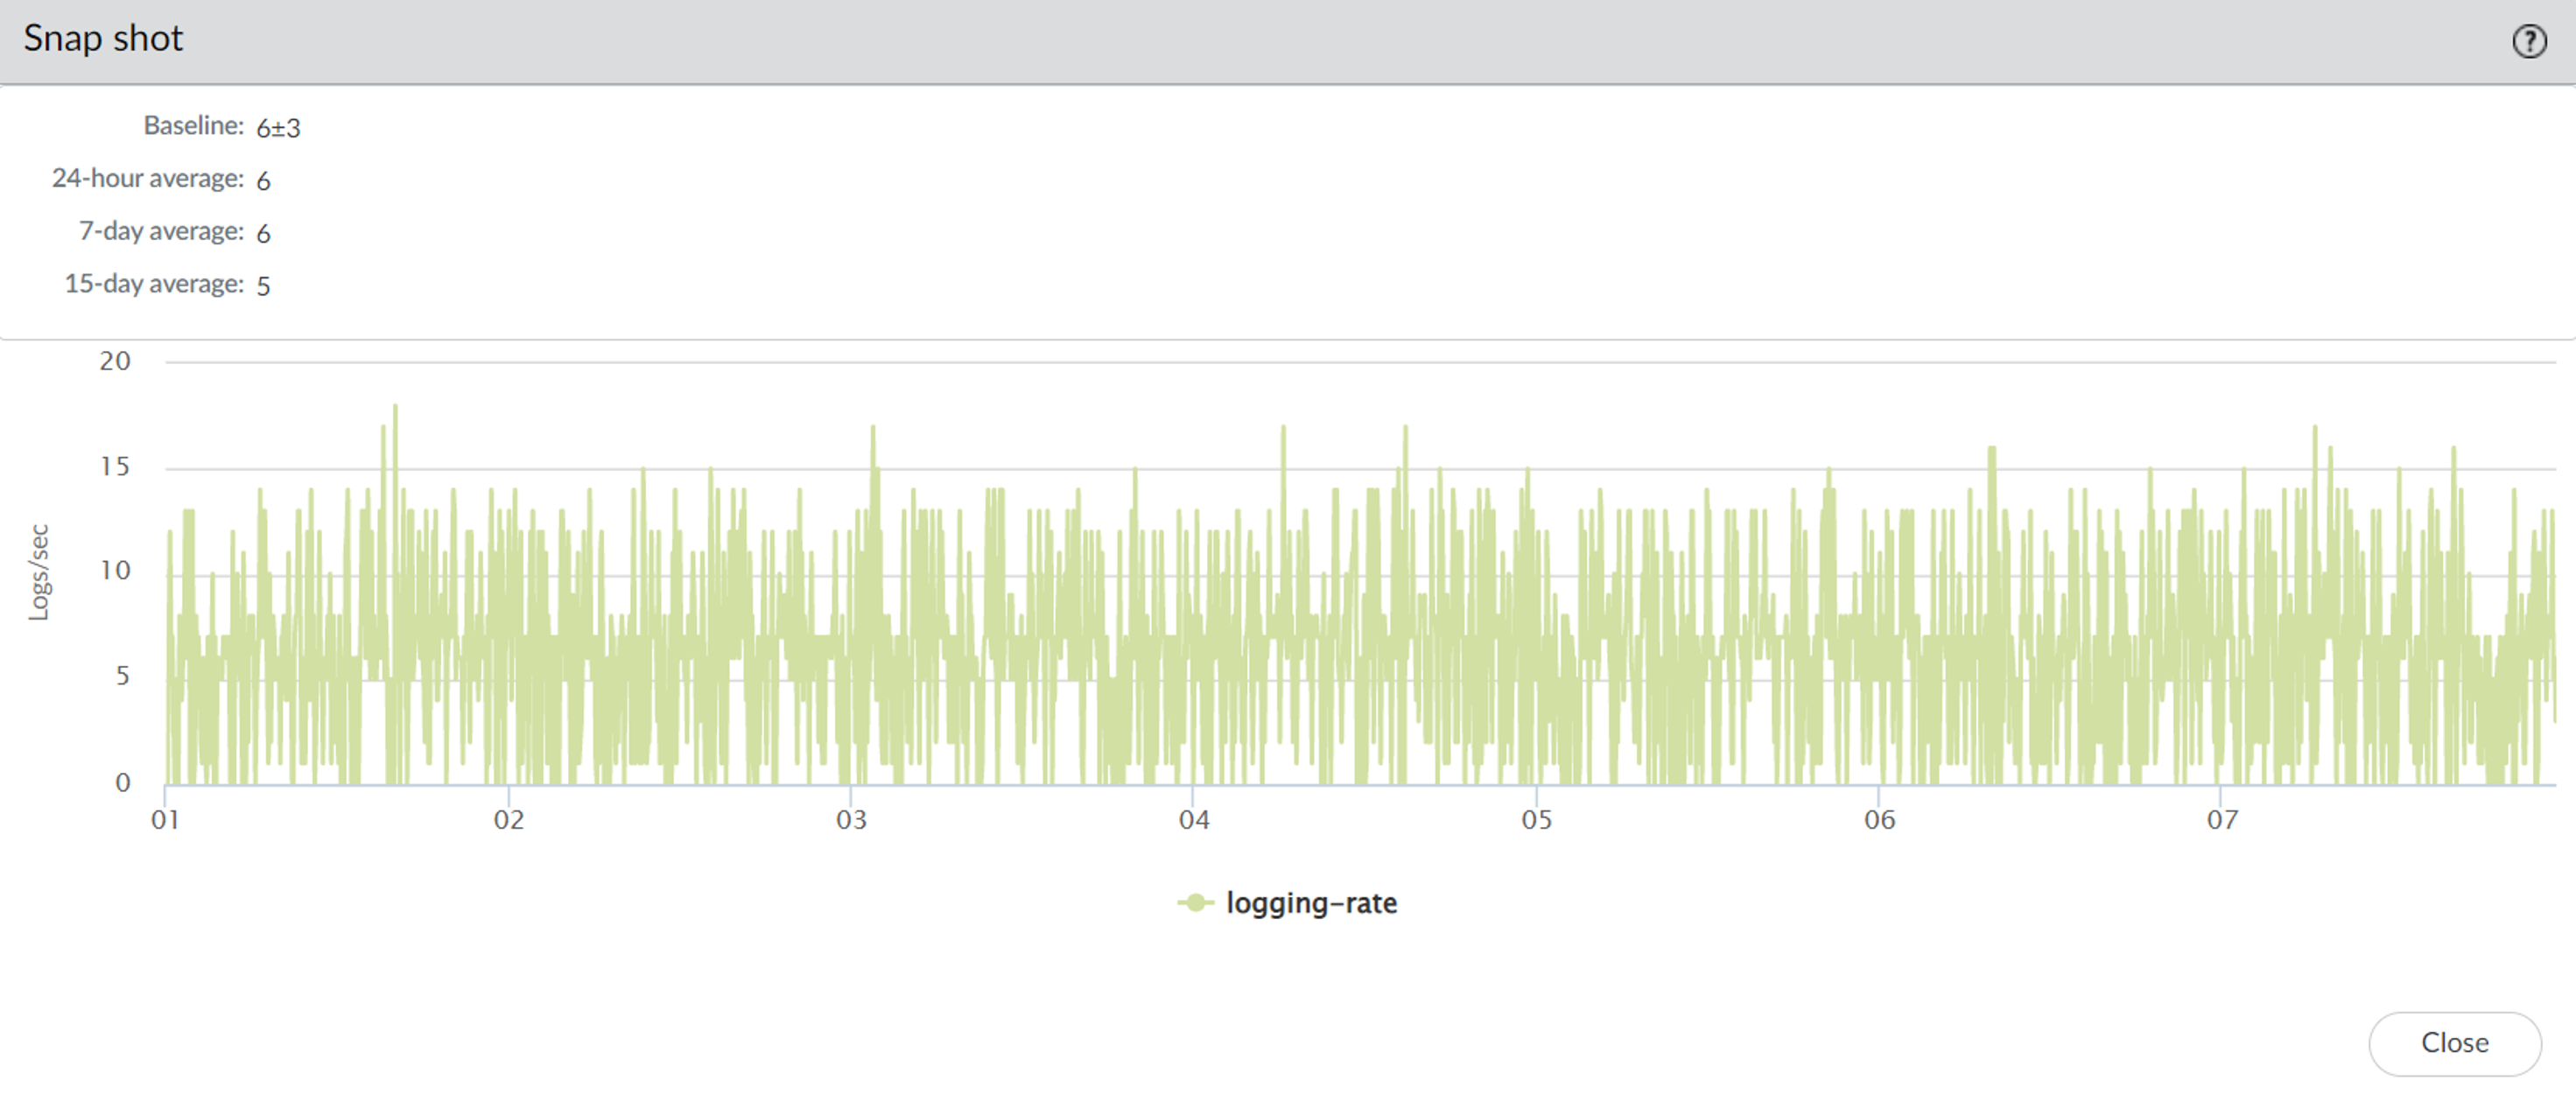
-
All Devices View:
Overview. Click metric for
View Snapshot
(Baseline, 24hr, 7-day, 15-day averages).
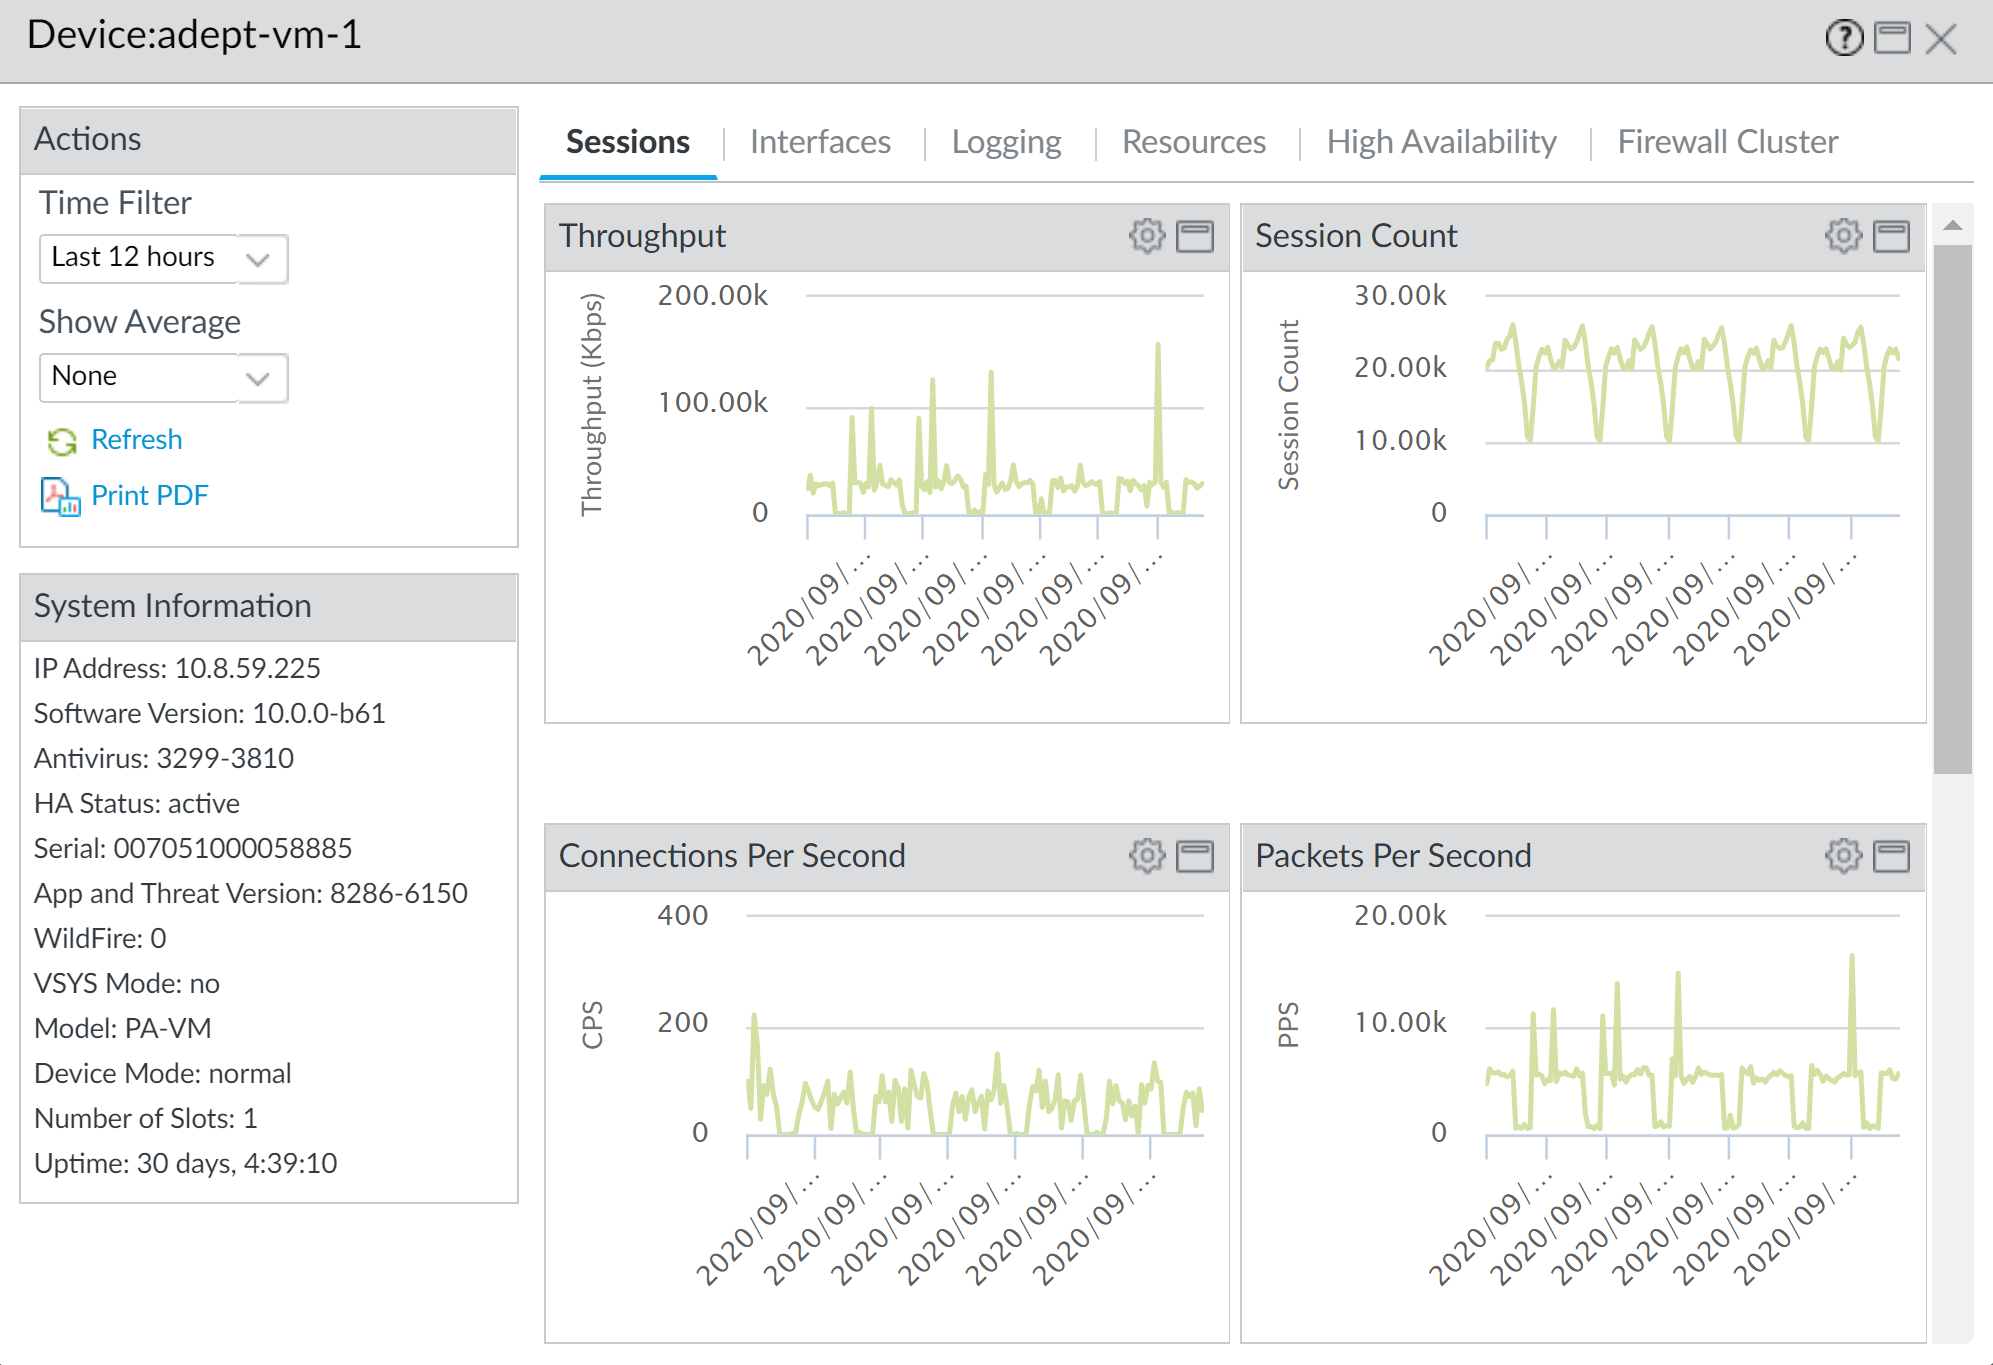
-
Detailed Device View:
Select firewall for time-trended graphs.
-
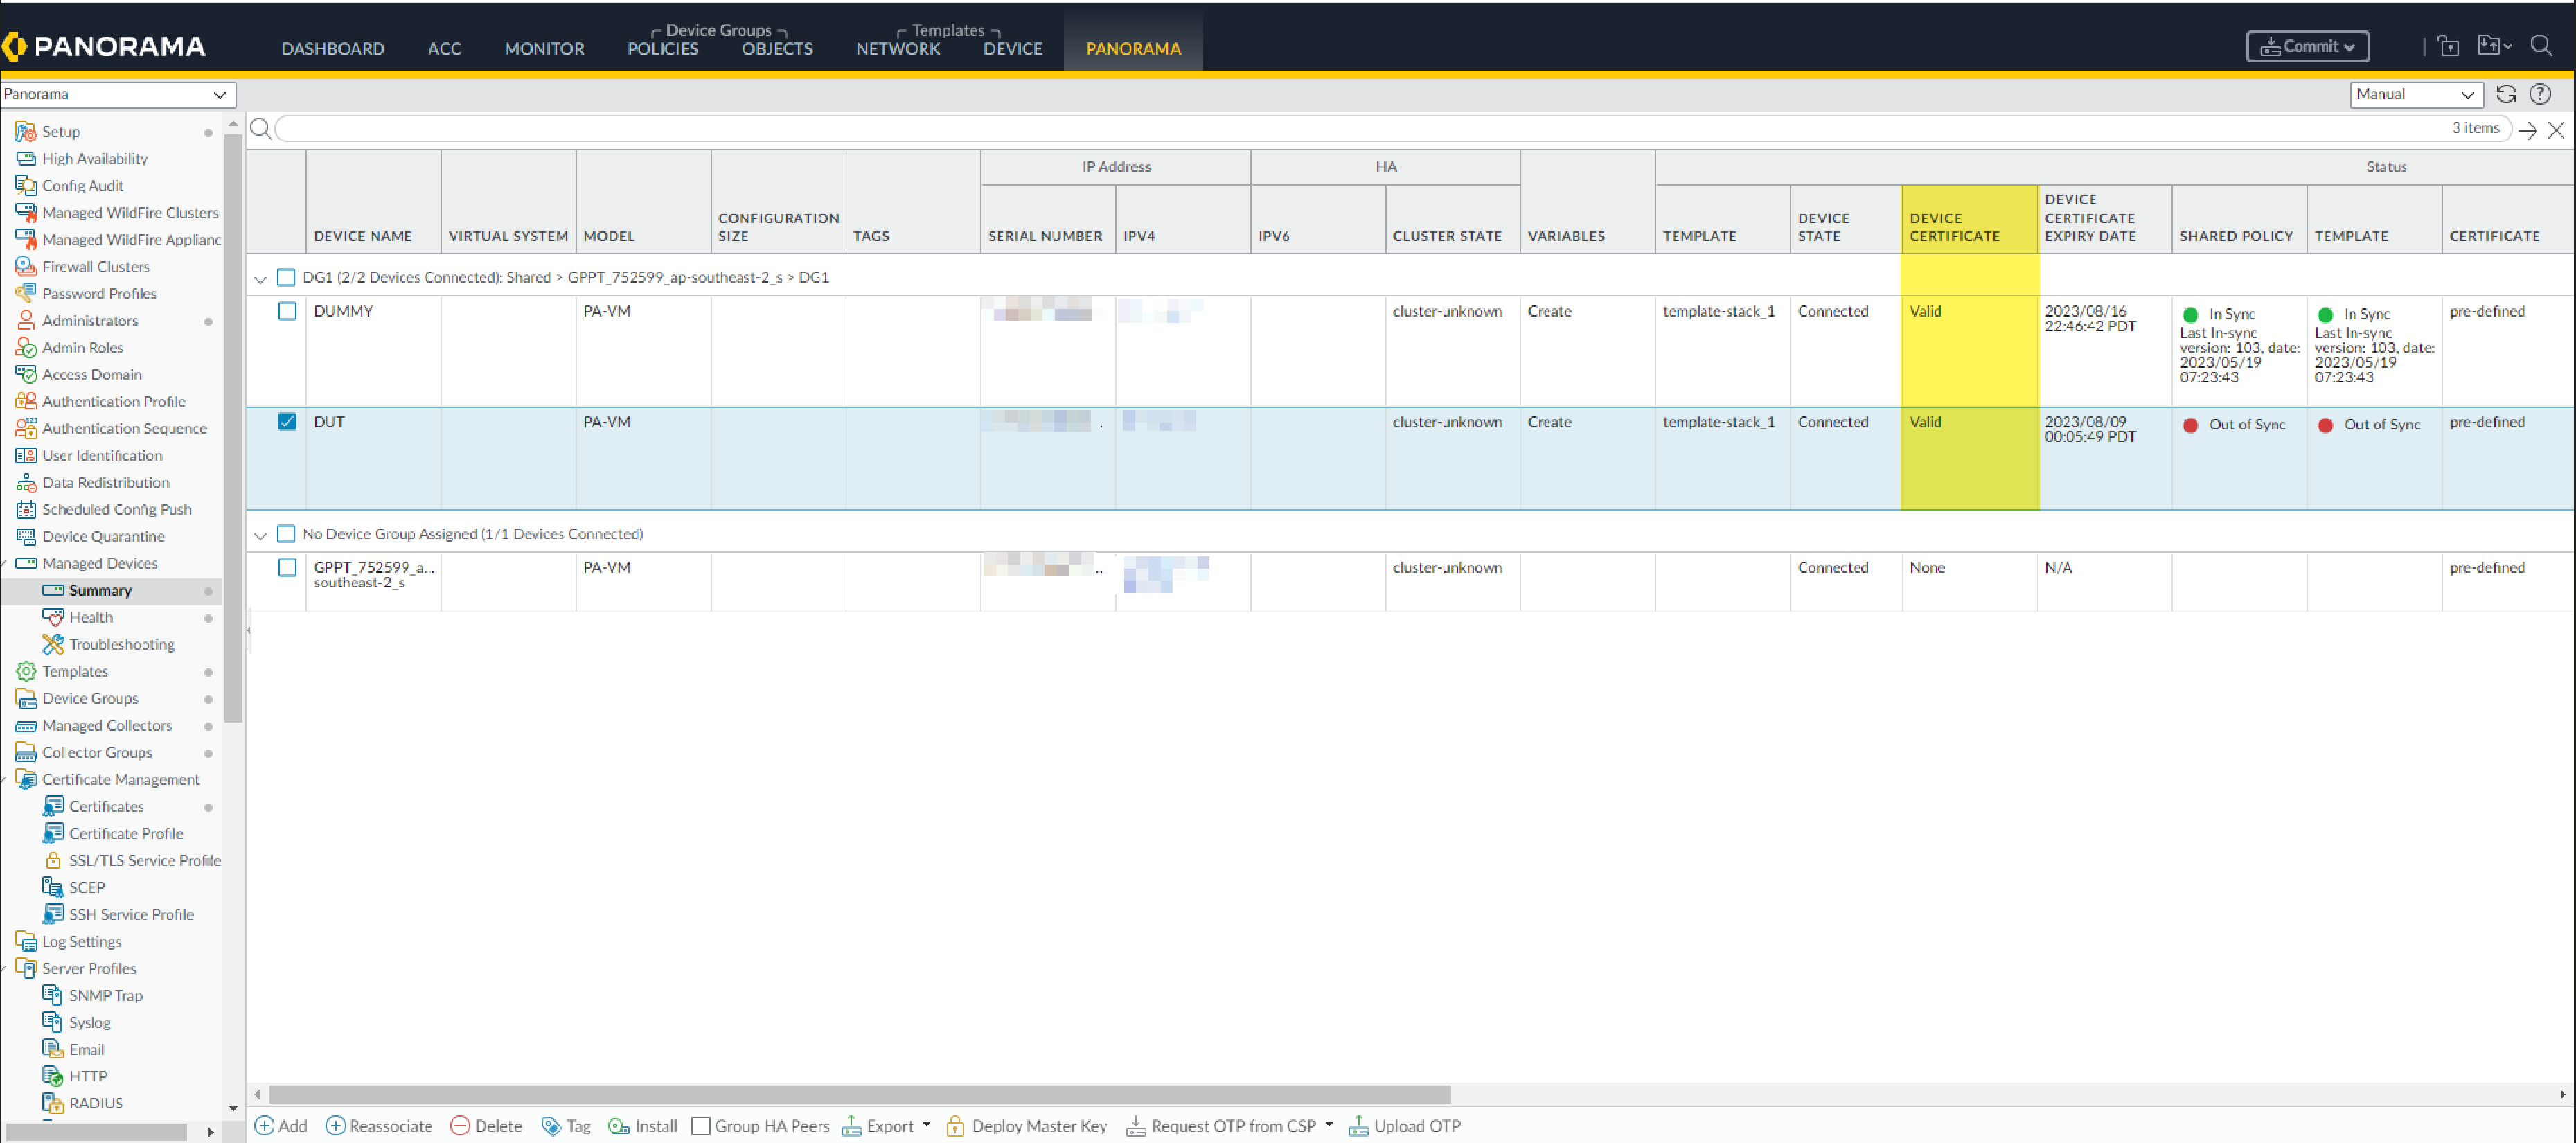
Deviating Devices Tab:
Firewalls with metrics outside baseline.
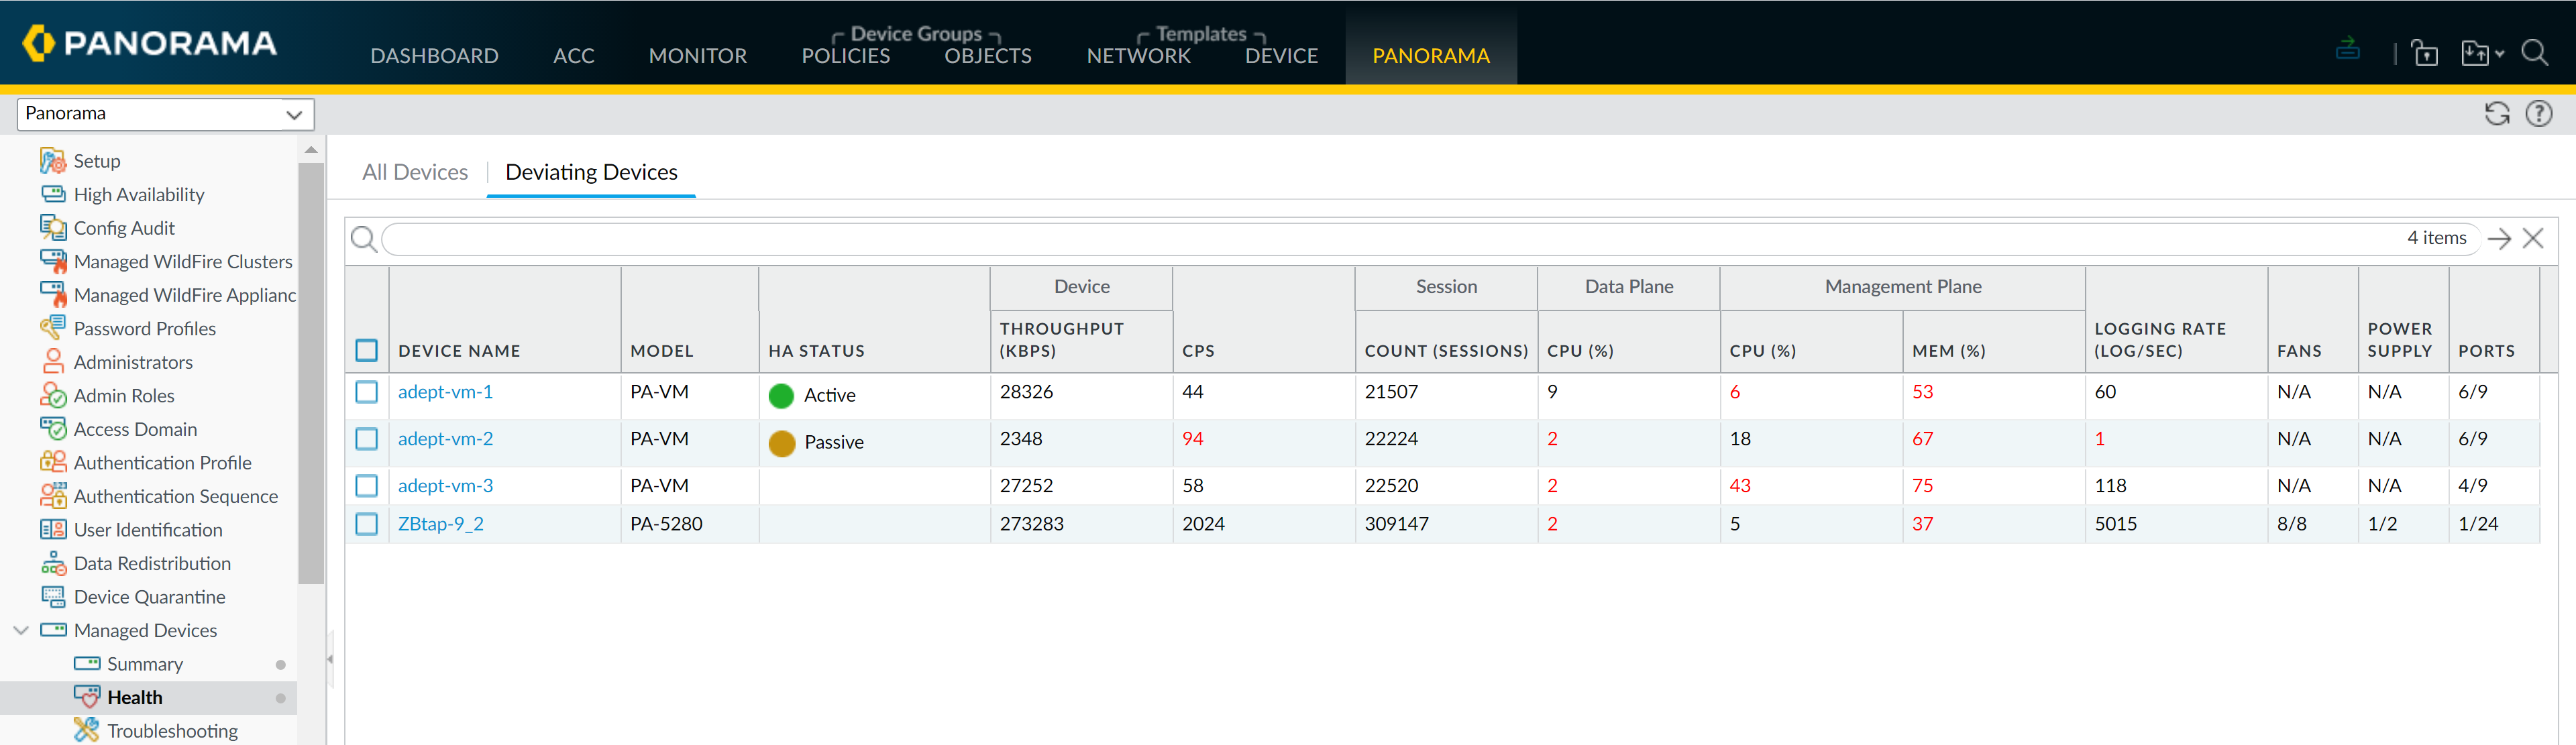
Helps identify performance or hardware issues. Data preserved for 90 days if firewall removed.
Device health status state diagram.
Device Certificate Installation (for Cloud Services)
Managed firewalls need a device certificate for Palo Alto Networks cloud services. Panorama facilitates this.
Prerequisites:
- Device management license (Panorama), Support license (firewall).
- Firewall outbound internet access (FQDNs/ports allowed).
- CSP account (Super User, etc.), Panorama superuser role.
- Firewall & Panorama in same CSP account. NTP configured (best practice).
PA-400, PA-1400, PA-3400, PA-5400, PA-5450 series install cert automatically on CSP registration.
Process:
- (Best Practice) Configure NTP on Panorama and Firewalls.
- Generate OTP Request Token on Panorama: ( Panorama > Managed Devices > Summary , select FW(s) or "Select all devices without a certificate", Copy token).
-
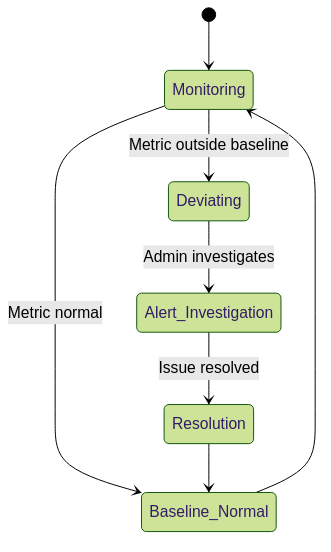
Generate OTP in CSP:
(
Products > Device Certificates > Generate OTP
, select "Generate OTP for Panorama managed firewalls", paste token, Generate OTP. View History, copy/download OTP.
OTP lifetime: 60 mins.
)
- Install Device Certificate via Panorama: ( Panorama > Managed Devices > Summary > Upload OTP , paste OTP, Upload).
-
(WildFire Only) Refresh Firewall CLI:
request wildfire registration channel public. -
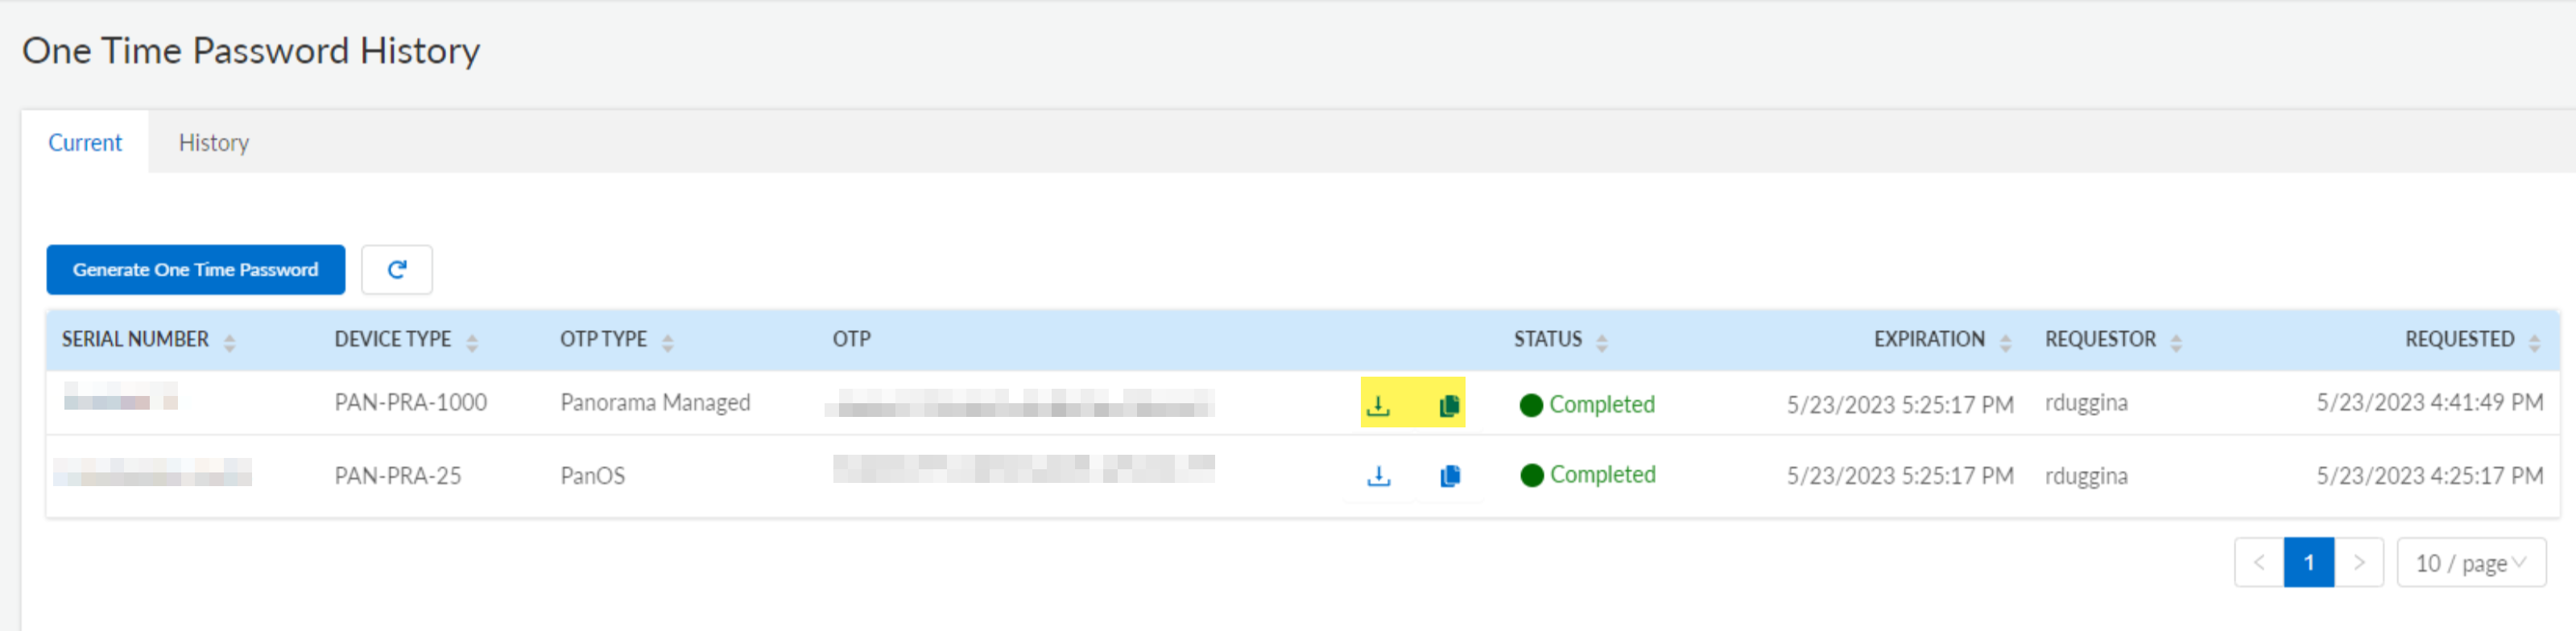
Verify:
Panorama (
Managed Devices > Summary
) shows "Valid" certificate and expiry.
Device certs: 90-day lifetime, auto-renews 15 days prior.

Device Certificate Installation Workflow.
| Where Can I Use This? | What Do I Need? |
|---|---|
|
|
Ensure the following FQDNs and ports are allowed for successful certificate installation:
| FQDN | Ports |
|---|---|
|
TCP 80 |
|
TCP 443 |
|
TCP 444 and TCP 443 |
PCNSE Panorama Management Quiz
Test your knowledge on managing firewalls with Panorama. Select the best answer for each question.