Introduction to Log Collection
Palo Alto Networks firewalls generate logs detailing various activities, crucial for auditing, monitoring, and threat analysis. Panorama™ centralizes this log data, either by storing it on its own appliances (M-Series or virtual in Panorama mode with local Log Collectors), dedicated Log Collector appliances, or by forwarding it to the cloud-based Strata Logging Service.
Effective log management is a cornerstone of network security operations and a key topic for the PCNSE exam.
Key benefits of centralized logging with Panorama:
- Global Visibility: Consolidated view of network activity across all managed firewalls.
- Scalability: Handles large volumes of logs from numerous firewalls.
- Long-term Storage: Provides options for extended log retention beyond individual firewall capacity.
- Advanced Reporting & Analysis: Enables comprehensive reporting, correlation, and threat hunting.
- Simplified Management: Central point for log forwarding configuration and monitoring.
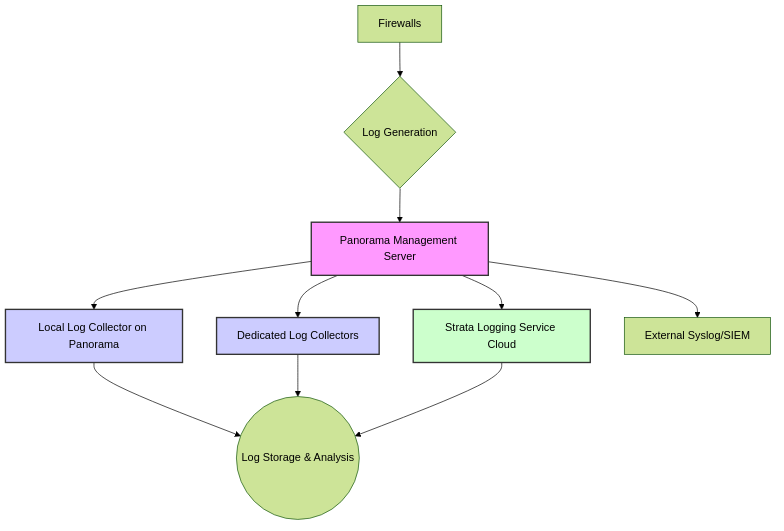
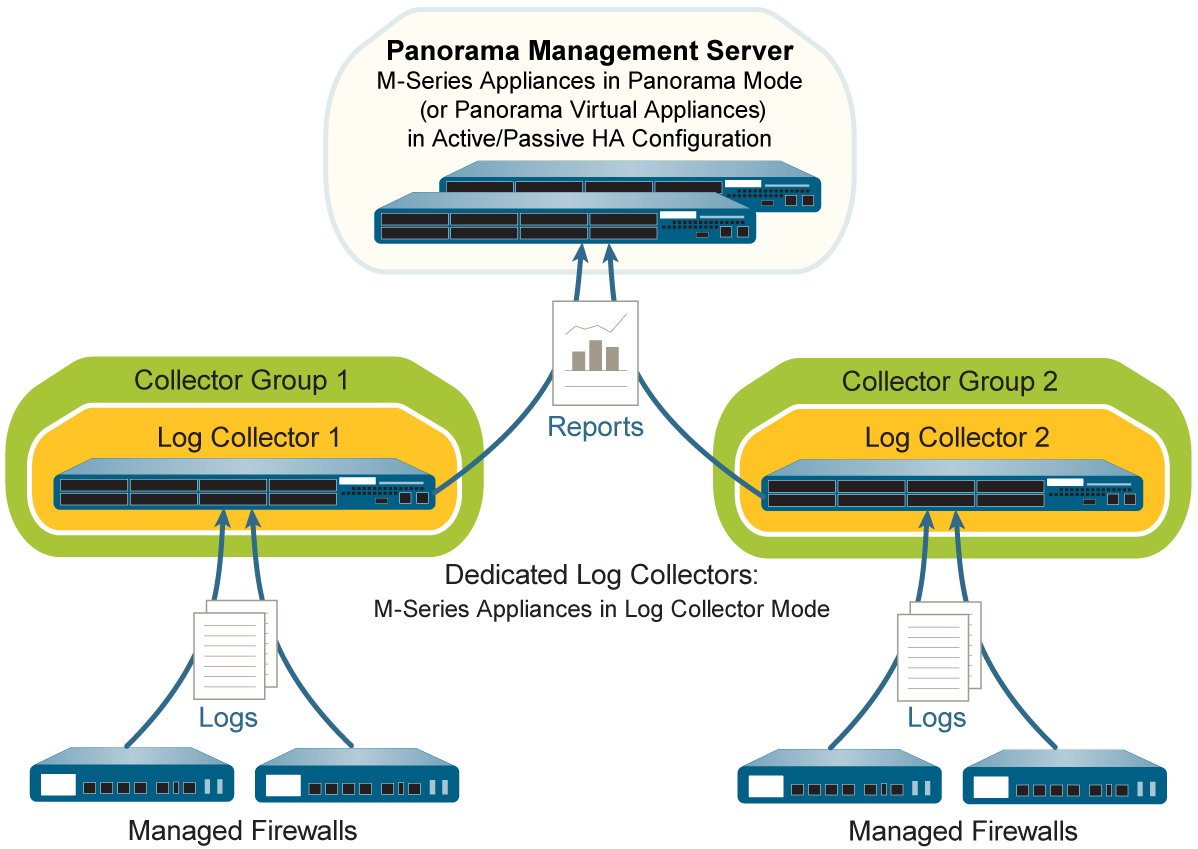
High-level overview of log collection paths with Panorama.
Centralized Logging and Reporting Overview
Centralized Logging and Reporting is a core function of Panorama. Firewalls forward their logs to Panorama's infrastructure, which can include:
- Panorama Management Server: Can have a local Log Collector (especially M-Series or Panorama virtual appliances in Panorama mode).
- Dedicated Log Collectors: M-Series or Panorama virtual appliances specifically configured in Log Collector mode for high-volume log ingestion.
- Strata Logging Service: A cloud-based logging solution provided by Palo Alto Networks.
Once logs are centralized, Panorama can optionally forward them to external logging destinations like syslog servers or SIEM solutions.
Understand the different components involved in centralized logging: Firewalls, Panorama (management server), Log Collectors (local/dedicated), and Strata Logging Service. Know where logs are sent initially and where they can be forwarded subsequently.
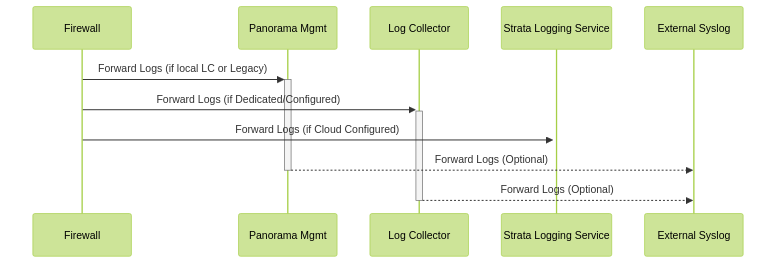
Sequence of log forwarding in a Panorama environment.
Panorama Modes & Logging
Panorama can operate in different modes, which impacts its logging capabilities:
-
Panorama Mode:
- The Panorama virtual appliance or M-Series appliance acts as a management server and can also host a local Log Collector .
- On M-Series appliances, the local Log Collector is predefined.
- On virtual appliances in Panorama mode, you must add the local Log Collector.
- This mode is suitable for managing firewalls and collecting logs, often with the addition of Dedicated Log Collectors for larger environments.
-
Log Collector Mode:
- An M-Series appliance or Panorama virtual appliance is configured to function only as a Dedicated Log Collector .
- It cannot manage firewalls. Its sole purpose is to receive and store logs.
-
Switching an appliance from Panorama Mode to Log Collector Mode removes the local Log Collector (if it was an M-Series in Panorama mode) and deletes all existing configuration and log data, except basic management access settings.
-
Legacy Mode (Panorama Virtual Appliance Only):
- Older mode for Panorama virtual appliances.
- It can manage firewalls and collect logs directly without needing to configure a separate "local Log Collector" entity in the UI in the same way as Panorama mode. Logs are stored on its virtual disk(s) or NFS.
-
To use features like Collector Groups with a Panorama virtual appliance, you must switch from Legacy mode to Panorama mode .
- Log forwarding to external destinations is configured directly on Panorama.
-
Management Only Mode:
- Panorama manages firewalls but does not collect logs itself. Log collection would be handled by Dedicated Log Collectors or Strata Logging Service.
-
If Panorama is in Management Only mode and no Log Collectors or Strata Logging Service is configured as a destination, incoming logs from firewalls will be dropped.
Be able to differentiate between Panorama modes and their implications for log collection. Particularly, understand when a "local Log Collector" needs to be explicitly added versus when it's inherent or predefined.
State diagram illustrating Panorama modes and their logging characteristics.
Panorama's "Hats": Understanding Its Different Jobs (Modes) for Logging
Imagine Panorama is like a versatile employee who can wear different "hats" (modes) depending on the job you need it to do, especially when it comes to handling information (logs) from your security firewalls.
1. The Manager & Record Keeper (Panorama Mode)
Think of this as Panorama's main role. It's the boss that manages all your firewalls. In this mode, it can also keep its own records (logs) locally.
- If Panorama is a big physical box (M-Series), it comes with a built-in filing cabinet (local Log Collector) ready to use.
- If Panorama is a software version running on a server (virtual appliance), you need to tell it, "Okay, set up your filing cabinet here" (you add the local Log Collector).
This "Manager & Record Keeper" hat is good for most situations, and if the records get too much, it can ask specialized "Archivists" (Dedicated Log Collectors) to help out.
2. The Dedicated Archivist (Log Collector Mode)
Sometimes, you have SO MANY records coming in that you need a machine whose ONLY job is to receive and store them. That's this mode.
- The Panorama appliance (physical M-Series or virtual) puts on its "Archivist ONLY" hat.
- It stops being a manager. It can't tell firewalls what to do anymore.
- Its entire focus is on collecting and filing away logs.
Important: If you take a "Manager & Record Keeper" (Panorama Mode) and tell it to become an "Archivist ONLY" (Log Collector Mode), it's a big change! It forgets all its old management tasks and clears out its old filing cabinet to make space for its new focused job. It only remembers how to let you log in to check on it.
3. The Old-School Manager (Legacy Mode - Virtual Only)
This is like an older way the software version of Panorama (virtual appliance) used to work.
- It could manage firewalls AND collect logs directly without a lot of fuss about setting up a separate "local filing cabinet" in the system menu. The logs just went into its available storage.
- However, if you want to use some of the fancier organizing tools for logs (like "Collector Groups" which are like teams of archivists), this old-school manager needs to update to the main "Manager & Record Keeper" (Panorama Mode) style.
- It could also send copies of records to other departments (external logging) directly.
4. The Manager Who Delegates ALL Record Keeping (Management Only Mode)
In this mode, Panorama is purely a manager. It tells the firewalls what to do, but it says, "I'm not keeping any records myself."
- It relies entirely on either the "Dedicated Archivists" (Dedicated Log Collectors) or a "Cloud Archiving Service" (Strata Logging Service) to handle all the logs.
Big Gotcha: If Panorama is wearing this "Manager ONLY" hat and you haven't told the firewalls where to send their records (i.e., no Dedicated Archivists or Cloud Service is set up), then all those important records (logs) from the firewalls just get thrown away!
For the Exam: It's like knowing which hat your Panorama is wearing. Sometimes the filing cabinet (local Log Collector) is already there (M-Series in Panorama Mode), and sometimes you have to point and say "put one here" (Virtual Appliance in Panorama Mode). Understanding these differences is key!
Local vs. Distributed Log Collection
The choice between local and distributed log collection depends on logging volume, retention requirements, and network architecture.
-
Local Log Collection:
- Logs are collected by a Log Collector running on the same appliance as the Panorama management server (M-Series or Panorama virtual appliance in Panorama mode).
- Simpler for smaller deployments.
- Limited by the capacity and performance of the single Panorama appliance.
-
For M-Series appliances in Panorama mode, a local Log Collector is predefined. For Panorama virtual appliances in Panorama mode, you must add the local Log Collector.
-
Distributed Log Collection:
- Logs are collected by one or more Dedicated Log Collectors (M-Series or Panorama virtual appliances in Log Collector mode) that are separate from the Panorama management server.
- Highly scalable for large environments with high logging rates.
- Provides flexibility in distributing log storage and processing load.
- Dedicated Log Collectors are managed by the Panorama management server.
The document references a link to "Local and Distributed Log Collection" for deciding which to deploy. This typically involves assessing current and future logging rates, storage needs, and redundancy requirements.
Understand when to use local log collection versus deploying Dedicated Log Collectors. The primary driver is usually the volume of logs generated by the managed firewalls.
Strata Logging Service Overview
The Strata Logging Service (formerly Cortex Data Lake or Logging Service) is Palo Alto Networks' cloud-based logging infrastructure. It offers a scalable and resilient solution for long-term log storage and analysis without requiring on-premise Log Collector hardware.
Key Features:
- Cloud-based: Eliminates the need for on-premise Log Collector hardware and maintenance.
- Scalability: Automatically scales to accommodate growing log volumes.
- Resilience: Managed by Palo Alto Networks for high availability.
- Integration: Integrates with Panorama for management and with other Palo Alto Networks cloud services (e.g., Cortex XDR).
To use Strata Logging Service:
- Purchase a license based on log volume.
- Install the cloud services plugin on Panorama.
- Configure firewalls (via Panorama templates/device groups) to forward logs to the Strata Logging Service.
For firewalls running PAN-OS 8.1 or later, you can enable Enable Duplicate Logging (Cloud and On-Premise) to send logs to both Strata Logging Service and your on-premise Panorama/Log Collector setup. You can select either this option or "Enable Strata Logging Service," but not both simultaneously for the same log forwarding configuration.
Configuring Managed Collectors
To enable Panorama to manage a Log Collector (either local or dedicated), you must add it as a "managed collector." Log Collectors use IPv4 or IPv6 for communication with Panorama.
Two types of managed collectors:
- Dedicated Log Collector: An M-Series or Panorama virtual appliance set to Log Collector mode. Requires setup as a Log Collector first.
-
Local Log Collector:
Runs on an M-Series or Panorama virtual appliance in Panorama mode.
- On M-Series, it's predefined.
- On Panorama virtual appliance (Panorama mode), it must be added.
-
In an HA Panorama setup, the Log Collector on the secondary Panorama peer is considered "remote" to the primary Panorama and must be manually added to the primary for management.
A best practice is to retain a local Log Collector and Collector Group on the Panorama management server, even if it also manages Dedicated Log Collectors.
(Panorama evaluation only) If evaluating a Panorama virtual appliance with a local Log Collector, logs stored on it cannot be preserved when converting to a production instance with a local Log Collector. Forward logs externally to preserve them during evaluation.
Dedicated Log Collectors
To set up a new M-Series (M-700, M-600, M-500, M-300, M-200) or Panorama virtual appliance as a Dedicated Log Collector, or to switch an existing one from Panorama mode to Log Collector mode:
- The appliance must be Set Up as a Log Collector . This involves changing its system mode via CLI (e.g., `request system system-mode logger`).
-
CRITICAL: Switching to Log Collector mode deletes existing configurations (except management access) and all log data. The web interface becomes inaccessible; management is via CLI or Panorama.
- If switching an M-Series appliance that was in Panorama mode, its predefined local Log Collector is removed.
Local Log Collectors
A Log Collector can run locally on an M-Series or Panorama virtual appliance that is in Panorama mode .
- M-Series Appliances (Panorama Mode): The local Log Collector is predefined and typically named "default".
-
Panorama Virtual Appliances (Panorama Mode):
You must manually add the local Log Collector after deploying the virtual appliance with logging disks.
- If the Panorama virtual appliance was in Legacy mode, you must switch it to Panorama mode to create and manage a local Log Collector effectively with Collector Groups.
-
HA Considerations:
- Each Panorama HA peer can have its own local Log Collector.
-
Relative to the primary Panorama, the local Log Collector on the secondary Panorama is treated as a remote collector. It must be manually added as a managed collector on the primary Panorama to be utilized.
- If a local Log Collector is deleted, it can be added back.
Device Registration Authentication Key
A device registration authentication key is used for secure initial authentication and connection between the Panorama management server and a new managed Log Collector (or firewall/WildFire appliance).
Configuration Steps (on Panorama):
- Navigate to Panorama > Device Registration Auth Key .
- Click Add .
-
Configure the key parameters:
- Name: Descriptive name.
-
Lifetime:
How long the key can be used to onboard
new
Log Collectors.
The auth key itself expires 90 days *after* this specified lifetime expires. A system log is generated if an attempt is made to use an expired key, and you'll be prompted to re-certify to maintain validity if within the 90-day grace period.
- Count: How many times the key can be used to onboard new Log Collectors.
- Device Type: Select Log Collector (or Any for broader use).
- (Optional) Devices: Enter specific Log Collector serial numbers for which this key is valid. This enhances security by restricting key usage.
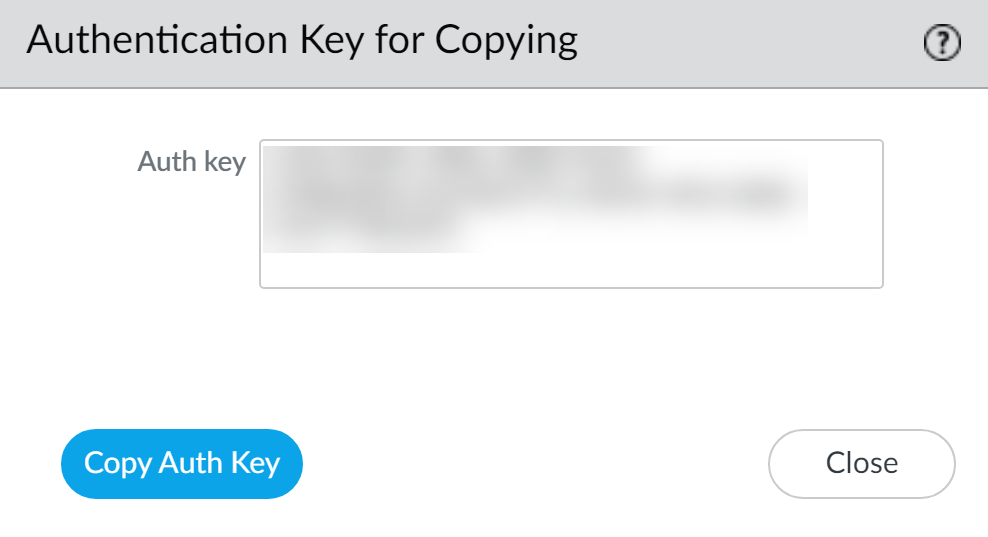
- Click OK .
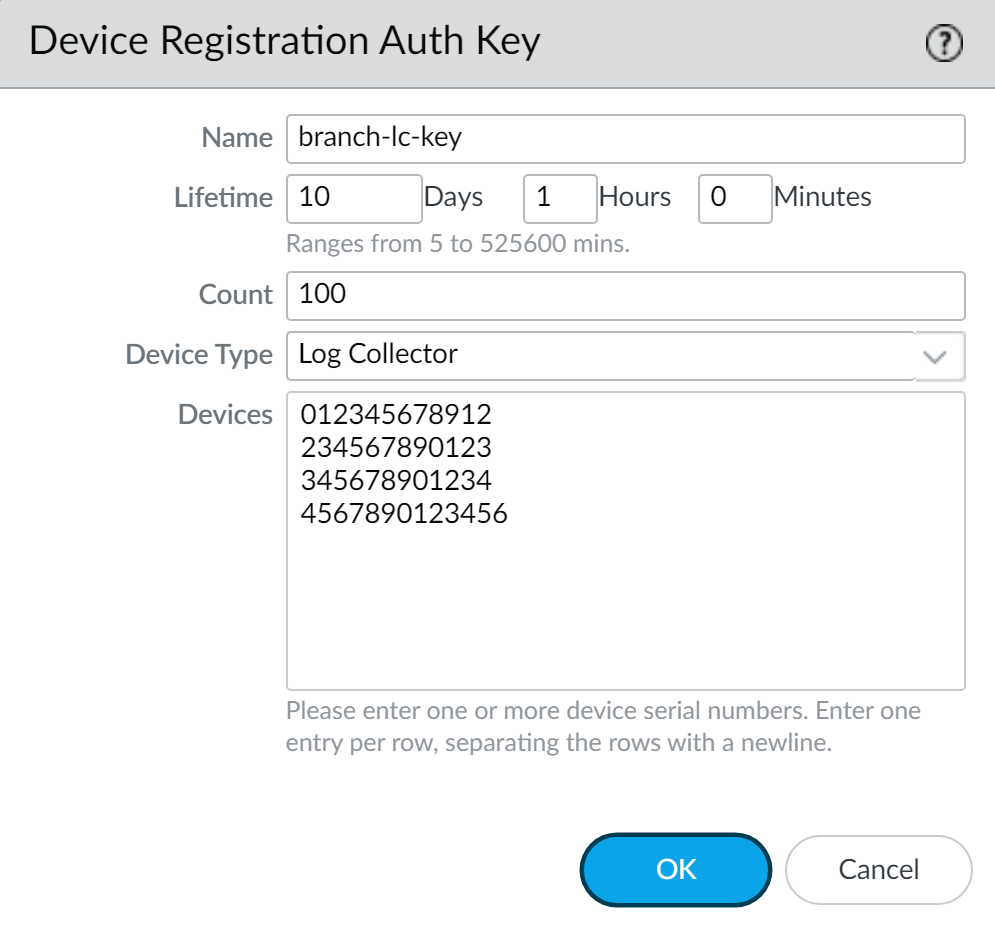
- Copy Auth Key and then Close . This key will be applied to the Log Collector.
Applying the Auth Key to a Dedicated Log Collector (via CLI):
- Log in to the Log Collector CLI.
-
Run the command:
request authkey set <auth-key>(paste the copied key).

The auth key is used by the Log Collector to authenticate Panorama upon first connection, at which point Panorama delivers a device certificate used for all subsequent communications. A Panorama in Panorama mode does not need to authenticate its own local Log Collector using this method.
Adding a Managed Collector
After preparing the Log Collector (setting mode, applying auth key if dedicated), you add it to Panorama for management.
High-level steps:
-
Record Log Collector Serial Number:
-
For a Dedicated Log Collector: Use CLI command
show system info | match serial. - For a Local Log Collector on a Panorama virtual appliance: Get the Panorama serial number from Dashboard > General Information .
-
For a Dedicated Log Collector: Use CLI command
-
(Panorama Web Interface) Add the Log Collector:
- Navigate to Panorama > Managed Collectors .
- Click Add .
- In the General tab, enter the Collector S/N (serial number).
- Click OK .
- Commit to Panorama . (This commit is often crucial before further steps like adding disks).

Flowchart for adding a Managed Log Collector.
Until you configure a Collector Group and push the configuration, the Log Collector's Configuration Status will be "Out of Sync," and Run Time Status will be "disconnected."
PAN-OS Version Compatibility for Log Collectors
Panorama's ability to onboard and manage Dedicated Log Collectors depends on PAN-OS versions.
-
Panorama running PAN-OS 11.1:
- Supports onboarding Dedicated Log Collectors running PAN-OS 10.1.3 or later.
-
Cannot add a Dedicated Log Collector running PAN-OS 10.1.2 or earlier if Panorama is on PAN-OS 11.0 or 11.1.
-
Panorama running PAN-OS 10.2 or later:
- Supports Dedicated Log Collectors running PAN-OS 10.1.3 or later.
- Supports Dedicated Log Collectors running PAN-OS 10.0 or earlier.
There is no impact to Dedicated Log Collectors already managed by Panorama when Panorama is upgraded to PAN-OS 10.2 or later.
If experiencing issues adding a Dedicated Log Collector, you might need to recover managed device connectivity to Panorama .
Enabling Logging Disks
After adding a Log Collector as managed and committing to Panorama, you must enable its logging disks.
Steps (on Panorama Web Interface):
- Navigate to Panorama > Managed Collectors .
- Click the name of the Log Collector to edit it. (The name is often the hostname/serial).
- Select the Disks tab.
- Click Add for each disk pair (for M-Series with RAID) or virtual logging disk (for Panorama virtual appliances).
- Click OK .
- Commit to Panorama .
Logging disks must be explicitly enabled. If the Log Storage value in Collector Group settings shows 0MB, verify disks are enabled and committed.
The Log Collector cannot ingest logs until its disks are enabled AND it is part of a configured Collector Group with devices assigned to it.
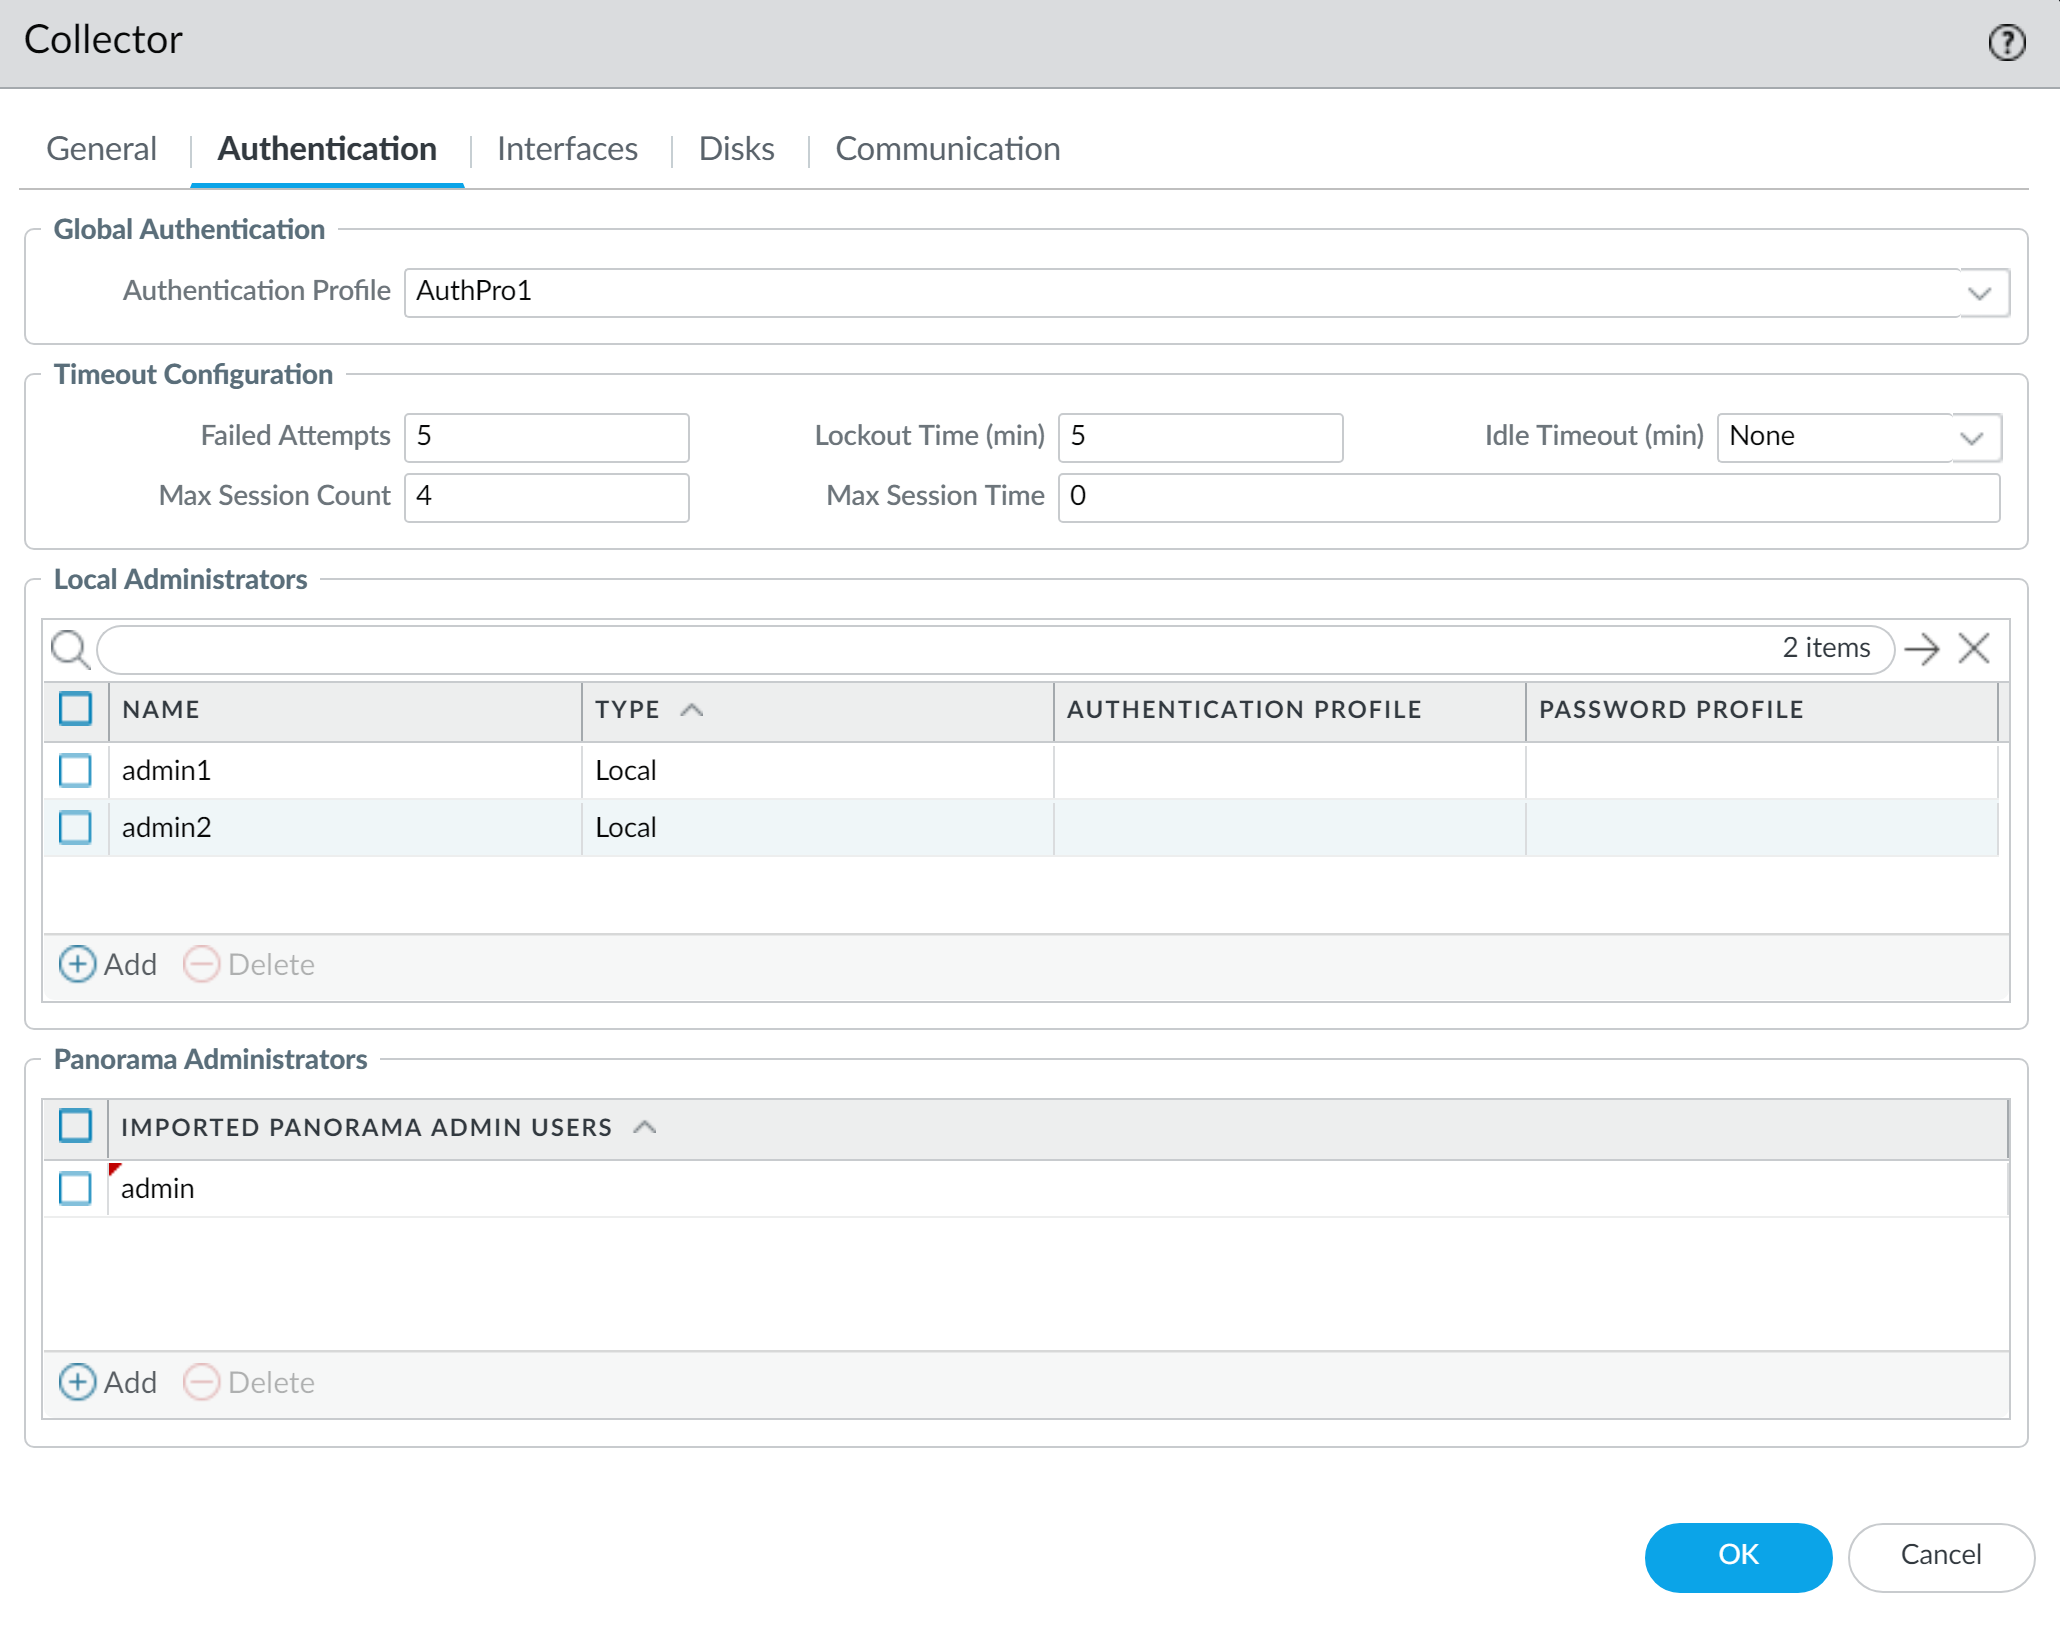
(Optional) Log Collector Admin Authentication
You can configure local administrator password settings for managed Log Collectors from Panorama.
Steps (on Panorama Web Interface, after adding the collector):
- Select Panorama > Managed Collectors and click the Log Collector's name.
-
(General Tab - for basic password)
Configure Password:
- Mode: Password or Password Hash.
- If Password mode: Enter and confirm the plaintext password.
- If Password Hash mode: Enter a hashed password string.
-
Configure Admin Login Security (Failed Attempts, Lockout Time):
- Failed Attempts: 0 (unlimited) to 10.
- Lockout Time (minutes): 0 to 60.
-
If Failed Attempts is non-zero and Lockout Time is 0, the admin user is locked out indefinitely until manually unlocked by another admin or by pushing a config change from Panorama. Default of 0 for both means no lockout.
- Click OK and Commit to Panorama .
Palo Alto Networks recommends adding at least one Local Administrator with Superuser privileges if you configure an authorization list for the managed collector. This is required if you add any Imported Panorama Admin Users.
More advanced authentication for Dedicated Log Collectors (RADIUS, TACACS+, LDAP, multiple local/imported admins) is covered in the "Advanced Configurations" section.
(Optional) Custom Certificates for Panorama-Collector Communication
For enhanced security, you can use custom certificates for mutual authentication between Panorama and its managed Log Collectors, instead of relying solely on the device registration auth key and Panorama-issued certificates.
Key steps involve:
- Obtain/Generate Certificates: CA certificate, server certificate/key for Panorama, client certificate/key for the Log Collector.
- Import Certificates: Import necessary CA certificates and device certificates/keys into Panorama ( Panorama > Certificate Management ).
- Create Certificate Profile: ( Panorama > Certificate Management > Certificate Profile ) to define trusted CAs.
-
Assign to Log Collector:
- Select Panorama > Managed Collectors , select the Log Collector.
- Go to the Communication tab.
- Select the Device Certificate Type (e.g., Local Device Certificate, SCEP).
- Assign the appropriate Certificate and Certificate Profile .
- Click OK and Commit .
-
(Optional) Configure Secure Server Communication on Log Collector (via Panorama):
- In the Log Collector's Communication tab.
-
Do
not
select "Custom Certificate Only" initially to allow migration.
Selecting "Custom Certificate Only" means the Log Collector will only accept connections from devices using custom certificates that validate against its configuration. Devices using predefined certificates will be unable to send logs.
- Select an SSL/TLS Service Profile .
- Select a Certificate Profile (for validating client certs sending logs to this Collector).
- (Optional) Authorize Client Based on Serial Number (requires client cert CN to be `$UDID`).
- (Optional) Configure Disconnect Wait Time .
- (Optional) Configure an Authorization List (checks client cert Subject/SAN).
- Click OK and Commit .
This process ensures that Panorama and the Log Collector mutually authenticate each other using a custom chain of trust. Refer to "Set Up Authentication Using Custom Certificates" in official docs for full details.
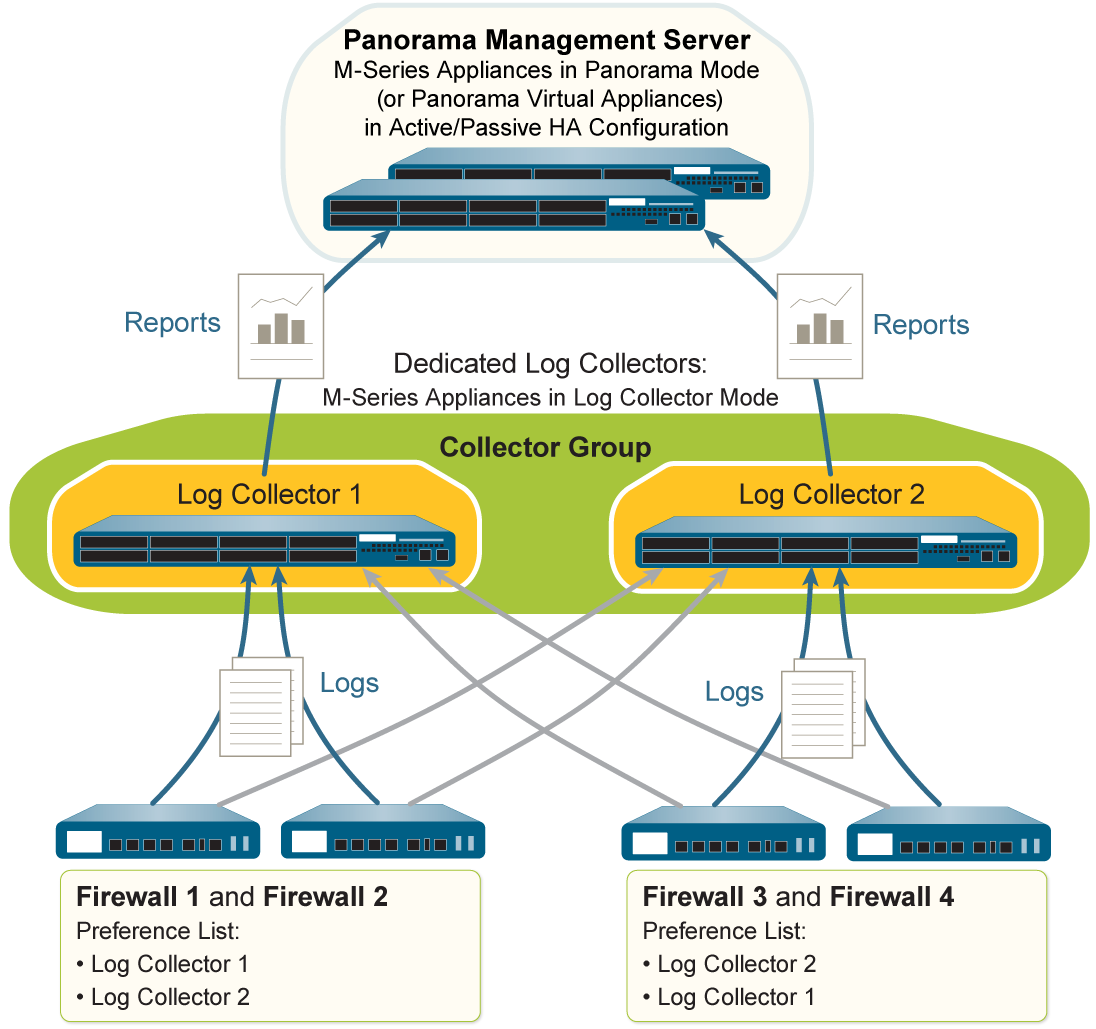
Collector Groups & Log Forwarding
Managing Collector Groups
A Collector Group is a logical unit of 1 to 16 Log Collectors that work together to collect firewall logs. Firewalls are assigned to forward logs to a Collector Group.
A Log Collector must be assigned to a Collector Group to receive and ingest firewall logs. If no Collector Group is configured, or if Log Collectors are not assigned to one, firewall logs will be dropped.
Key characteristics and considerations:
- Purpose: Enables log redundancy and scaling of log ingestion capacity.
- Membership: Can contain 1 to 16 Log Collectors.
-
Model Consistency: All Log Collectors within a single Collector Group must be of the same Panorama model (e.g., all M-600s, or all Panorama virtual appliances). You cannot mix M-Series and virtual appliances, or different M-Series models within the same Collector Group.
- Disk Consistency for Redundancy: Log redundancy is only available if each Log Collector in the group has the same number of logging disks.
- Network Proximity (Best Practice): All Log Collectors in the same group should ideally be in the same LAN for performance and reliability. Avoid WAN links between members of the same Collector Group.
- M-Series Predefined Group: M-Series appliances in Panorama mode have a predefined Collector Group named "default" which includes their local Log Collector. This group can be edited (except its name).
- Panorama Virtual Appliance: You must manually create Collector Groups and add Log Collectors (local or dedicated) to them.
-
If you switch an M-Series appliance from Panorama mode to Log Collector mode, it loses its predefined Collector Group and local Log Collector.
-
Palo Alto Networks recommends preserving the predefined/a local Log Collector and Collector Group on the Panorama management server, even when using Dedicated Log Collectors.
-
Deleting a Collector Group will result in log loss for firewalls assigned to it.
The ElasticSearch health status on a Log Collector will display as "degraded," and it cannot ingest logs until it's added to a Collector Group and the configuration is pushed.
Configuring a Collector Group
Before configuring a Collector Group:
- Ensure firewalls are added as managed devices to Panorama.
- Ensure Log Collectors are configured as managed collectors in Panorama.
Steps to configure a Collector Group (on Panorama Web Interface):
- Navigate to Panorama > Collector Groups .
- Click Add (or edit an existing one like "default").
-
General Tab:
- Name: Enter a name (cannot rename existing groups).
- Minimum Retention Period (days): 1 to 2,000. Blank means retain indefinitely.
-
Collector Group Members:
Add 1 to 16 Log Collectors.
Remember: All members must be the same model type (e.g., all M-600 or all virtual).
-
(Recommended) Enable log redundancy across collectors:
If adding multiple Log Collectors.
-
Requires each Log Collector to have the same number of logging disks .
- Ensures each log has two copies, on different Log Collectors.
- Impact: Doubles storage requirement (halves effective capacity) and doubles log processing traffic within the group (halves max logging rate).
-
- Log Storage (link): Click to define storage quotas and expiration per log type (see step 4 below).
-
Device Log Forwarding Tab:
- Click Add to create log forwarding preference lists. This determines which firewalls send logs to which collectors in this group.
-
For each preference list:
- Devices: Modify to select the firewalls.
-
Collectors:
Add Log Collectors from this Collector Group to the preference list. Order matters; the first is primary. Move Up/Down to change priority.
If redundancy is enabled, add at least two Log Collectors to the preference list for failover.
-
If a log forwarding preference list is not assigned:
- Panorama in Management Only mode: Drops incoming logs.
- Panorama in Panorama mode (local LC not managed): Drops incoming logs.
- Panorama in Panorama mode (local LC managed, but no preference list): Logs go to local LC first, potentially creating a bottleneck.
-
(Back on General Tab) Define Log Storage Quotas and Expiration:
- Click the Log Storage value (if it shows 0MB, verify disks are enabled on collectors).
-
For each log type (Traffic, Threat, etc.):
- Quota (%): Percentage of total storage allocated.
- Max Days: Expiration period (1 to 2,000). Blank means never expire.
- Click OK to save the Collector Group.
-
Commit and Push:
Select
Commit > Commit and Push
. Critically, ensure you push to the
Collector Group
you just configured.
This push is what makes the Log Collectors aware of their role in the group and allows them to start ingesting logs correctly.
Process flow for configuring a Collector Group.
Device Log Forwarding Preferences (within Collector Group)
Within a Collector Group configuration, the Device Log Forwarding tab is crucial for directing logs from specific firewalls to the Log Collectors in that group.
- Preference List: You create one or more preference lists. Each list associates a set of firewalls with an ordered list of Log Collectors from the current Collector Group.
- Primary Collector: The first Log Collector in a preference list is the primary destination for logs from the assigned firewalls.
- Failover: If the primary Log Collector becomes unavailable, firewalls will attempt to send logs to the next Log Collector in the list.
- Load Distribution (Manual): If you have multiple Log Collectors in a group and want to distribute the load, you can create multiple preference lists or one list where you strategically order the collectors for different sets of firewalls (e.g., half the firewalls prefer LC1, the other half prefer LC2).
- Redundancy: If log redundancy is enabled for the Collector Group, it's recommended to include at least two Log Collectors in each preference list to ensure redundant copies are stored.
Without a log forwarding preference list assigning firewalls to collectors within a Collector Group, logs might be dropped or bottlenecked at a default local collector. This configuration is vital for logs to reach their intended destinations within the distributed collection architecture.
Log Storage Quotas and Expiration (within Collector Group)
After configuring Collector Group members and device forwarding, you define how the collective storage of the Log Collectors in that group is utilized and managed.
Access this by clicking the Log Storage value link on the General tab of the Collector Group configuration.
-
Quota (%):
For each log type (Traffic, Threat, URL, etc.), you specify the percentage of the
total available storage capacity of the Collector Group
that should be allocated to that log type.
The sum of quotas for all log types should not exceed 100%.
- Max Days: For each log type, you set the maximum number of days logs will be retained (range 1-2,000). If left blank, logs of that type will never expire based on age (they might still be overwritten if the quota is reached).
Log Deletion Behavior:
- When a log type reaches its allocated Quota , the oldest logs of that specific type are deleted to make space for new ones.
- When logs reach their Max Days , they are deleted, regardless of whether the quota for that log type has been reached.
If the Log Storage field initially displays 0MB, it usually indicates that the logging disks on the member Log Collectors have not been enabled or the configuration hasn't been committed yet.
Enabling log redundancy in a Collector Group effectively halves the usable storage capacity because two copies of each log are stored.
Moving/Removing Log Collectors or Firewalls
Moving a Log Collector to a Different Collector Group
This might be done to rebalance logging load or consolidate resources.
All Log Collectors in the target Collector Group must still be of the same Panorama model.
If the Log Collector is local to an M-Series appliance in an HA pair, only move it if the appliance is the passive peer. Never move a Log Collector local to the active HA peer.
Steps:
-
Remove from Current Collector Group:
- Edit the current Collector Group.
- Delete the Log Collector from the "Collector Group Members" list.
- Go to "Device Log Forwarding" and remove the Log Collector from any preference lists it's part of. Reassign firewalls if necessary.
- Click OK to save changes to the Collector Group.
-
Remove from Panorama Management (as a Managed Collector):
- Go to Panorama > Managed Collectors .
- Select and Delete the Log Collector you are moving.
-
Add to New Collector Group:
- Follow the steps to Configure a Collector Group , adding the Log Collector to its new group and assigning firewalls.
-
Commit and Push:
Push changes to Panorama and the relevant Collector Groups.
Panorama will start redistributing logs. This can take hours per terabyte. The "Log Redistribution State" column in Panorama > Collector Groups shows progress.
Removing a Firewall from a Collector Group
This might be done if the firewall will send logs directly to a Panorama virtual appliance in Legacy mode, or if it's being decommissioned.
Steps:
- Select Panorama > Collector Groups and edit the Collector Group.
- Go to Device Log Forwarding .
- Click the firewall (or group of firewalls) in the "Devices" list.
- Click Modify , uncheck the firewall to remove, and click OK multiple times to save.
- Commit and Push changes to Panorama and the affected Collector Group.
If you only delete the log forwarding preference list on the firewall CLI, Panorama will re-apply the configuration on the next push unless you remove the firewall from the Collector Group configuration on Panorama itself.
Configuring Log Forwarding to Panorama/Log Collectors
For Panorama to receive logs from firewalls (either for its local Log Collector, Dedicated Log Collectors, or Strata Logging Service), you must configure the firewalls to forward logs.
This is typically done using Panorama Templates and Device Groups.
Panorama requires a Device Group to push a Log Forwarding Profile and a Template to push Log Settings to firewalls.
Steps:
- Create/Assign Device Group(s): For firewalls that will forward logs.
- Create/Assign Template(s): For firewalls that will forward logs.
-
Create a Log Forwarding Profile:
(
Objects > Log Forwarding
, select target Device Group)
- Name: Identify the profile.
-
Add Match List Profiles:
For each log type (Traffic, Threat, URL, etc.) you want to forward.
- Name: Identify this match list.
- Log Type: Select the log type.
- Filter: Use Filter Builder to specify criteria (e.g., forward only critical threats). Default is often to forward all logs of the selected type.
- Destination: Select Panorama/Strata Logging Service .
- Click OK to save the Log Forwarding Profile.
-
Assign Log Forwarding Profile to Policy Rules/Network Zones:
-
For Security, Authentication, DoS Protection rules:
- Edit the rule (e.g., Policies > Security > Pre Rules , select Device Group).
- Go to Actions tab.
- Select the created Log Forwarding profile.
- Set Profile Type (Profiles/Group) and assign necessary Security Profiles (e.g., Antivirus, WildFire Analysis) to trigger Threat/WildFire log generation.
-
For Traffic logs: Select
Log At Session Start
and/or
Log At Session End
.
Log At Session Start consumes more resources. Use primarily for troubleshooting, long-lived sessions (e.g., GRE tunnels), or OT/ICS visibility. Most common is Log At Session End .
-
For Security, Authentication, DoS Protection rules:
-
Configure Destinations for System, Config, User-ID, HIP Match Logs:
- Select Device > Log Settings (select target Template).
- For each relevant log type, add a match list profile similar to step 3, selecting Panorama/Strata Logging Service as the destination.
-
(PA-7000 Series Only) Configure Log Card Interface (Optional):
- If using a dedicated log card for forwarding, configure it under Network > Interfaces > Ethernet (select Template). Set Interface Type to Log Card .
-
If PA-7000s are managed by Panorama but not configured to forward logs, Panorama (PAN-OS 8.0.8+) can directly query them using CLI command:
debug reportd send-request-to-7k yes. Disable with `no` if you later set up forwarding.
-
Ensure Panorama/Log Collectors are Ready:
- Managed Collectors configured (if not Legacy mode).
- Collector Groups configured and firewalls assigned (if using Log Collectors).
-
Commit and Push:
- Select Commit > Commit and Push .
- Click Edit Selections .
- Ensure Merge with Device Candidate Config and Include Device and Network Templates are selected.
- Verify target Collector Groups are selected.
- Commit and Push .

Configuring Log Forwarding from Panorama/Log Collectors to External Destinations
Panorama can forward logs it has collected (from firewalls or generated by itself/Log Collectors) to external services like Syslog, Email, SNMP traps, or HTTP-based services.
Forwarded logs have a maximum record size of 4096 bytes; larger logs are truncated.
If Panorama is a virtual appliance in Legacy mode , it forwards logs directly without using Log Collectors for the conversion/forwarding step.
General Steps:
- Configure Firewalls to Forward to Panorama: (As covered previously). This is the prerequisite.
-
Configure Server Profiles:
(
Panorama > Server Profiles
)
-
Syslog:
Define server IP/FQDN, transport (UDP, TCP, SSL), port, format (BSD, IETF), facility.
If SSL is used and client auth is required, create a certificate for Panorama/Log Collector under Panorama > Certificate Management > Certificates .
(Optional) Custom Log Format can be selected for specific CEF formats.
- Email: Configure SMTP server settings.
- SNMP Trap: Configure SNMP manager details.
-
HTTP:
Configure HTTP server URL, payload format, authentication.
HTTP forwarding is not recommended for high-volume log forwarding due to potential log loss.
-
Syslog:
Define server IP/FQDN, transport (UDP, TCP, SSL), port, format (BSD, IETF), facility.
-
Configure Destinations for Panorama/Log Collector Generated Logs (and Legacy Mode Firewall Logs):
- Select Panorama > Log Settings .
-
For each log type (System, Config, Audit, Correlation, etc., and firewall logs if Legacy mode):
- Add one or more match list profiles.
- Name, Log Type, Filter (as needed).
- Add Server Profiles: Select the Syslog, Email, SNMP, or HTTP server profiles configured in step 2.
-
Configure Destinations for Firewall Logs Received by Log Collectors (Panorama/Log Collector Mode):
- Select Panorama > Collector Groups and edit the relevant Collector Group.
- Go to the Collector Log Forwarding tab.
-
Add
configured match list profiles (similar to above, these profiles will use the server profiles from step 2).
Each Collector Group can forward logs to different external destinations.
- (Optional, SNMP trap forwarding only) Configure SNMP settings on the Monitoring tab of the Collector Group.
-
(Syslog to Dedicated LCs with Client Auth) Assign Certificate:
-
If firewalls forward to Dedicated Log Collectors which then forward to a Syslog server requiring client auth:
- Select Panorama > Managed Collectors , edit the Dedicated Log Collector.
- Assign a Certificate for Secure Syslog .
-
If firewalls forward to Dedicated Log Collectors which then forward to a Syslog server requiring client auth:
- (SNMP) Load MIBs: Load Palo Alto Networks MIBs into your SNMP manager.
- Commit and Push: Commit to Panorama and push to relevant Device Groups, Templates, and Collector Groups.
- Verify: Check external services are receiving logs.
Configuring Syslog Forwarding over Ethernet
For high-rate log environments, forwarding syslogs over a dedicated Ethernet interface (instead of the MGT interface) can prevent log loss and reduce load on the management plane.
Supported only for Panorama in Panorama mode or Log Collector mode . Only a single Ethernet interface can be enabled for syslog forwarding at a time (per Panorama/Log Collector).
Steps:
- Prerequisites: Managed Collector and Collector Group configured. Syslog Server Profile created.
-
Configure Ethernet Interface for Syslog Forwarding:
-
Local Log Collector (on Panorama in Panorama Mode) - via Panorama UI:
- Select Panorama > Setup > Interfaces .
- Select an Ethernet interface. Enable it and configure IP settings.
- In "Device Management Services," enable Syslog Forwarding . Confirm.
- Click OK, then Commit and Push .
Enabling Syslog Forwarding on an Ethernet interface for a Local Log Collector (via Panorama Setup). -
Dedicated Log Collector - via Panorama UI:
- Select Panorama > Managed Collectors , select the Dedicated LC.
- Go to Interfaces tab, select an Ethernet interface. Enable it and configure IP settings.
- In "Log Collection Services," enable Syslog Forwarding . Confirm.
- Click OK, then Commit and Push .
Enabling Syslog Forwarding on an Ethernet interface for a Dedicated Log Collector. -
Local or Dedicated Log Collector - via Panorama CLI:
CRITICAL: From CLI, you must first disable syslog forwarding on the MGT interface, then enable it on the Ethernet interface. Panorama does not automatically disable MGT forwarding if you enable Ethernet forwarding via CLI.
- Login to Panorama CLI.
-
Disable MGT syslog forwarding:
admin@Panorama> configure
admin@Panorama# set log-collector <Log Collector Serial Number> deviceconfig system service disable-syslog-forwarding yes -
Enable Ethernet syslog forwarding:
admin@Panorama# set log-collector <Log Collector Serial Number> deviceconfig system eth<Interface Number> service disable-syslog-forwarding no
admin@Panorama# commit -
Push to Collector Group:
admin@Panorama> run commit-all log-collector-config log-collector-group <Collector Group name>
-
Local Log Collector (on Panorama in Panorama Mode) - via Panorama UI:
- Configure Log Forwarding to Panorama (firewalls to Panorama/LCs).
- Configure syslog forwarding from Panorama (Panorama/LCs to external syslog server via the new interface).
Forwarding Logs to Strata Logging Service
To send logs to Palo Alto Networks' cloud-based Strata Logging Service (SLS):
-
License and Plugin:
- Purchase an SLS license for your required log volume.
- Install the Cloud Services plugin on Panorama ( Panorama > Plugins ).
-
Configure Firewalls to Send Logs to SLS:
- This is typically done via Panorama Templates.
- When configuring log forwarding destinations (e.g., in Log Settings under a Template, or in a Log Forwarding Profile), you will select an option related to Strata Logging Service / Cloud Logging.
-
Enable Duplicate Logging (Cloud and On-Premise): For firewalls running PAN-OS 8.1+, this option in the Template's log settings ( Device > Log Settings > [Log Type] > Forwarding Options or similar path depending on exact UI for SLS) allows logs to be sent to both SLS and your on-premise Panorama/Log Collectors.
You can select either "Enable Duplicate Logging" OR "Enable Strata Logging Service" (which sends only to SLS), but not both for the same log type configuration.
- Commit and Push changes to Templates and Device Groups.
Advanced Configurations & Deployments
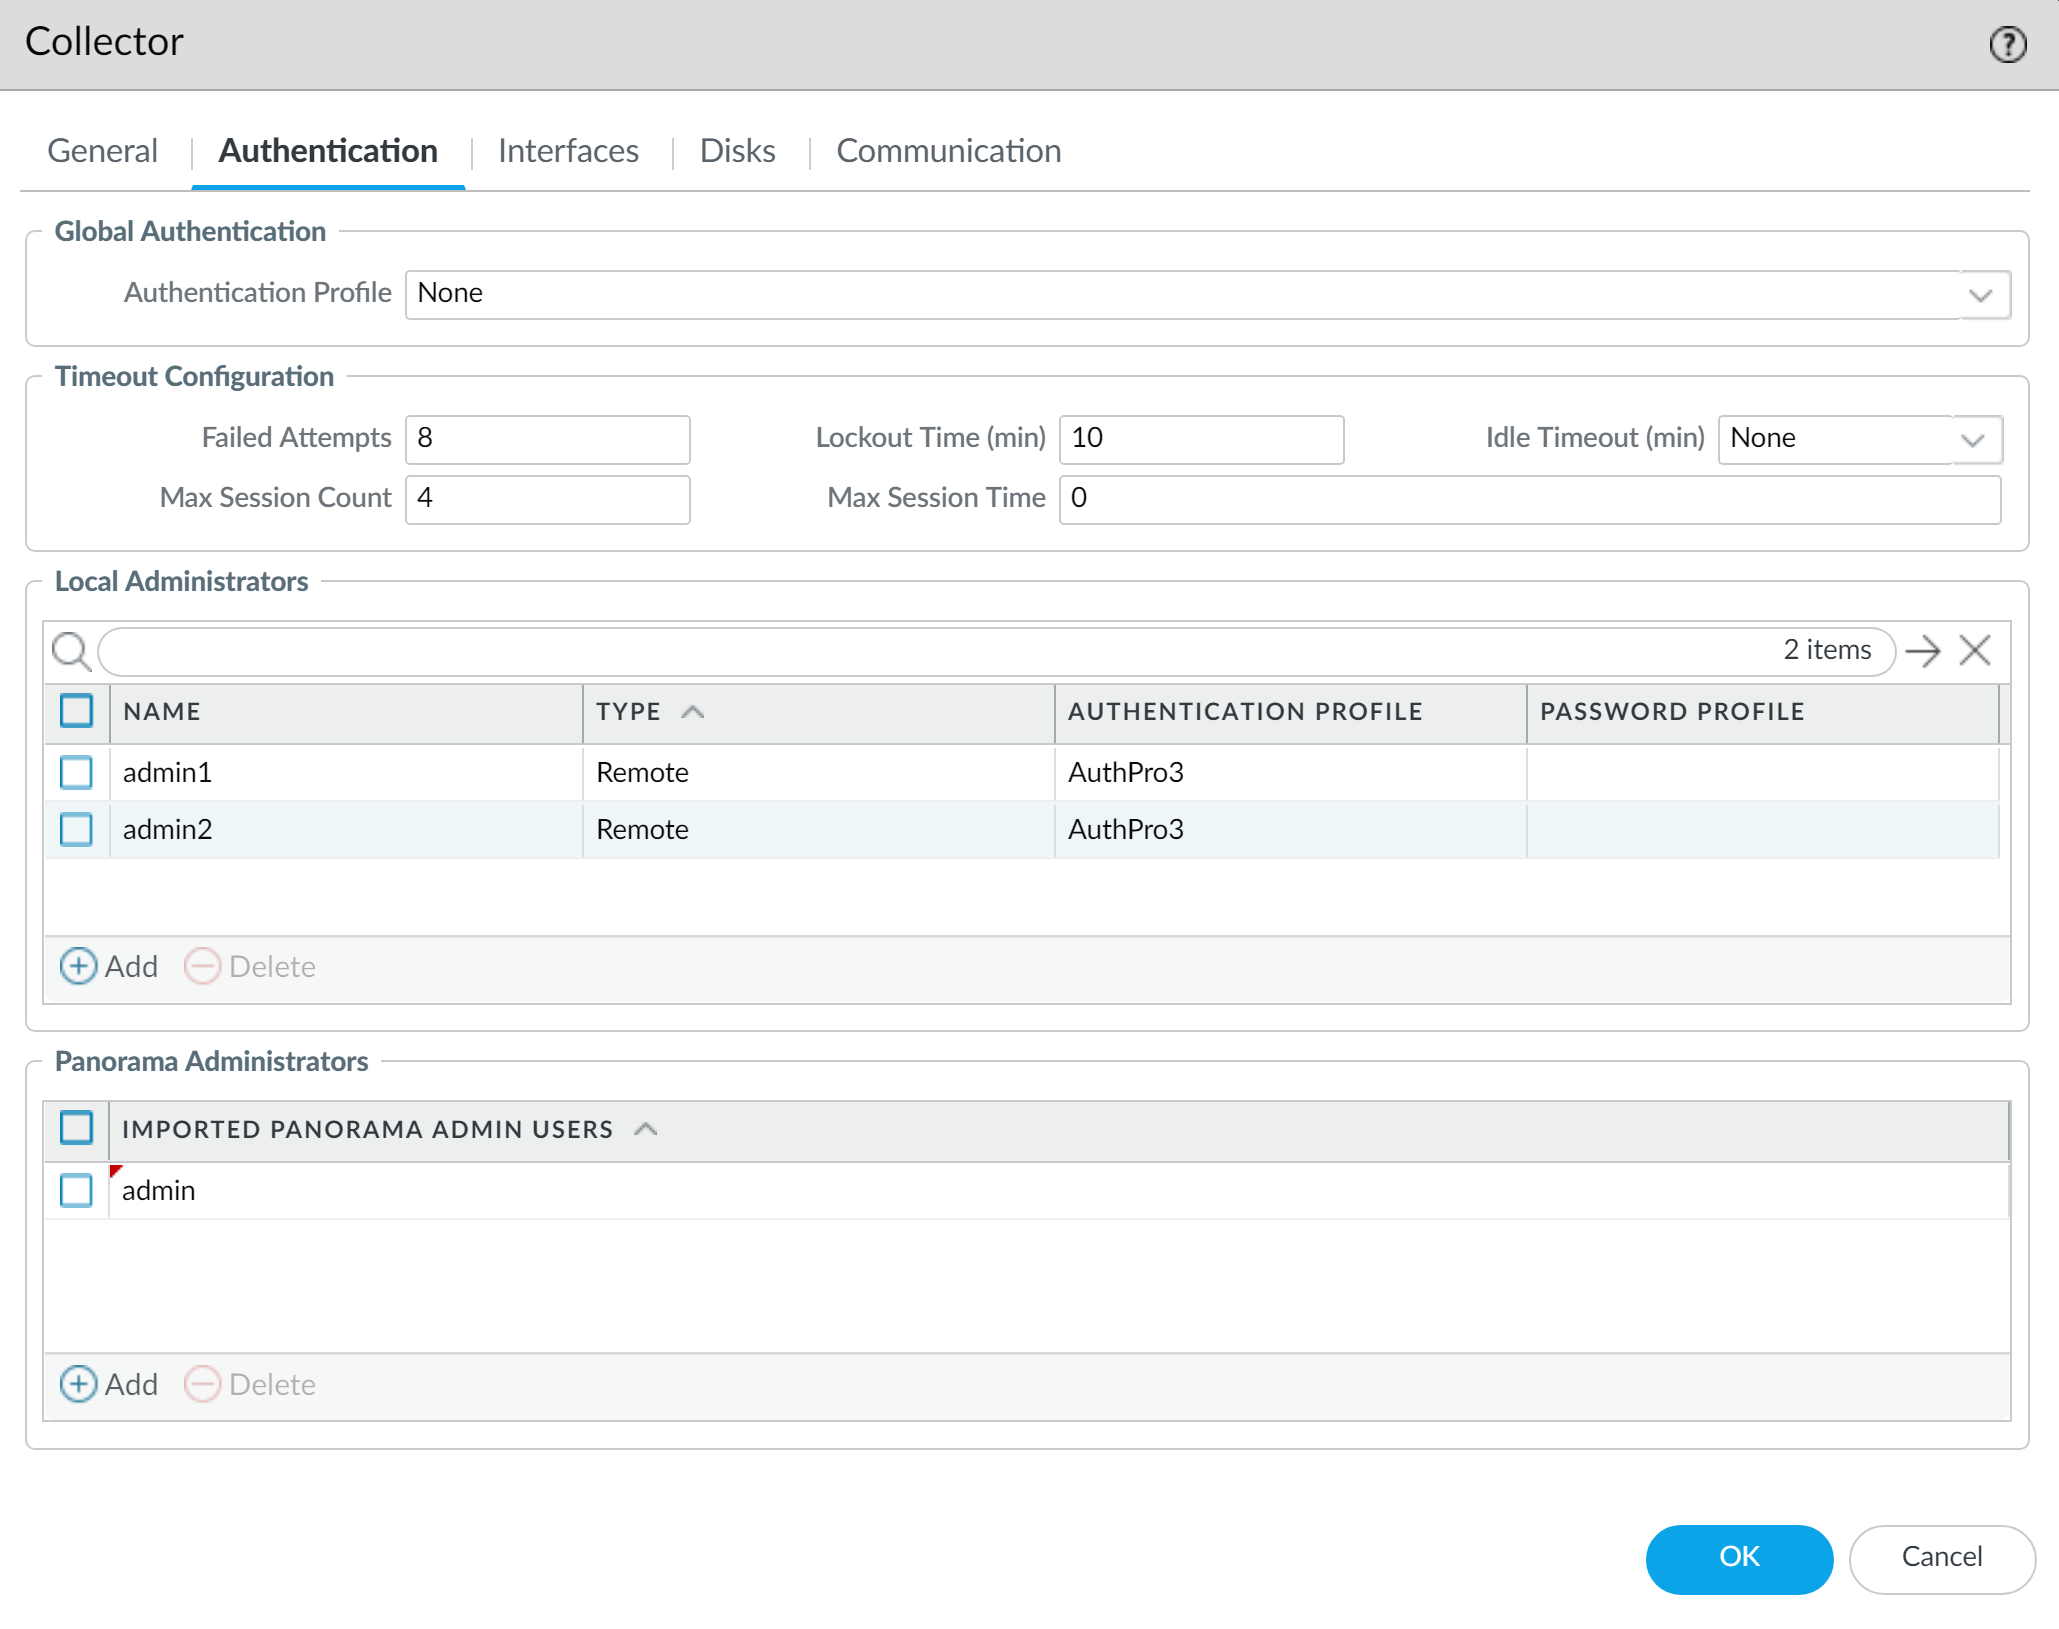
Authentication for Dedicated Log Collectors
Panorama allows enhanced authentication configuration for Dedicated Log Collectors, managing local admin accounts and integrating with external authentication services like RADIUS, TACACS+, and LDAP for CLI access to the Log Collector.
Only Superuser administrators are supported when configuring administrative accounts (local, imported, or remote via RADIUS/TACACS+/LDAP) for a Dedicated Log Collector from Panorama. Other admin role types are not supported for this specific configuration context.
When you configure and push administrators from Panorama to a Dedicated Log Collector, it overwrites existing local administrators on that Log Collector with those configured on Panorama.
Administrators may be added as either a local administrator (unique to the DLC) or as an imported Panorama administrator—but not both with the same username. This will cause the Panorama commit to fail.
General Steps for Configuring Authentication on a Dedicated Log Collector (via Panorama):
- Log in to Panorama Web Interface.
- Ensure the Dedicated Log Collector is configured as a Managed Collector .
- Select Panorama > Managed Collectors and select the target Dedicated Log Collector to edit its settings. The authentication settings are typically within the main configuration dialog for the collector, often under a tab or section for "Authentication" or "Administrators."
A. Configure an Administrative Account (Local or Imported Panorama Admins)
- (Optional) Configure an Authentication Profile on Panorama if you plan to use RADIUS, TACACS+, or LDAP for some admins.
- (Optional) Configure Panorama Administrator Accounts if you plan to import them. (Remember: Superuser role only for DLC context).
-
Configure Authentication for the Dedicated Log Collector:
-
In the Managed Collector's settings:
- (Optional) Select an Authentication Profile (if using RADIUS/TACACS+ globally for it).
- Configure Timeout Configuration : Failed Attempts, Lockout Time, Idle Timeout, Max Session Count, Max Session Time for DLC CLI access.
-
Add Administrators:
- Add Local Administrators: Create new admins unique to this DLC. Configure their password, (optionally) an Authentication Profile for this specific local admin (e.g., if this admin should use LDAP while others use local passwords).
- Add Imported Panorama Administrators: Select existing Superuser Panorama administrators to grant them access to this DLC.
-
In the Managed Collector's settings:
- Click OK .
- Commit and then Commit and Push changes to Panorama and the Dedicated Log Collector.
- Verify by logging into the DLC CLI with the configured admin user.
B. Configure RADIUS/TACACS+ Authentication
General flow for RADIUS (TACACS+ is very similar):
-
Add Server Profile:
(
Panorama > Server Profiles > RADIUS
or
TACACS+
)
- Profile Name, Timeout, Authentication Protocol (CHAP is more secure than PAP).
- Add RADIUS/TACACS+ Server details (Name, IP/FQDN, Secret, Port).
-
Create Authentication Profile:
(
Panorama > Authentication Profile
)
- Name, Type (RADIUS/TACACS+), select Server Profile created above.
- (Optional) "Retrieve user group from RADIUS/TACACS+" if using VSAs.
- Advanced Tab: Add users/groups to the Allow List.
-
Assign to Dedicated Log Collector:
- Edit the Managed Collector settings ( Panorama > Managed Collectors ).
- Select the created Authentication Profile (this applies it globally for the DLC).
- Configure Timeout Configuration (as above).
- Add Local/Imported Administrators (as above). If a global Authentication Profile is set, local admins might use it by default or can have their own. Imported admins will use it if their Panorama account is configured for remote auth.

- Click OK , then Commit and Commit and Push .
- Verify CLI login to DLC.
(RADIUS and TACAS+) Only Superuser administrators are supported when configuring remote authentication for a Dedicated Log Collector.
C. Configure LDAP Authentication
LDAP is used to authenticate users accessing the Dedicated Log Collector (though primarily for CLI, as web UI is usually not active on DLCs).
-
Add LDAP Server Profile:
(
Panorama > Server Profiles > LDAP
)
- Profile Name, Server details (IP/FQDN, Port), Type (e.g., active-directory), Base DN, Bind DN/Password, Timeouts.
-
(Optional) SSL/TLS settings (Require SSL/TLS, Verify Server Certificate).
If "Verify Server Certificate" is enabled, the server's CA cert must be trusted by Panorama (imported under Panorama > Certificate Management > Certificates ).
-
Assign LDAP Authentication Profile to Individual Local Administrators on DLC:
- Edit the Managed Collector ( Panorama > Managed Collectors ).
- Configure Timeout Configuration.
-
Add Local Administrators:
- Create a new local administrator.
-
For this administrator, assign the
Authentication Profile
(select the LDAP profile created in step 1).
LDAP authentication profiles are typically assigned to individual local administrators on the DLC, not as a global auth profile for the entire DLC in the same way RADIUS/TACACS+ might be.
- You can also add Imported Panorama Administrators (these would use their Panorama-defined auth method).
- Click OK , then Commit and Commit and Push .
- Verify CLI login to DLC using LDAP credentials for the configured local admin.
LDAP Authentication Profiles are supported for individual local administrators on the Dedicated Log Collector, rather than as a global setting for the DLC itself.
Custom Certificates Between Log Collectors (Inter-LC Communication)
For secure communication between Log Collectors within the same Collector Group , you can enforce mutual authentication using custom certificates. This is especially important in environments with high security requirements.
Each Log Collector in the group acts as both a server and a client, so both server-side and client-side custom certificate configurations are needed on each LC.
Key Steps:
-
Obtain Certificates:
For each Log Collector in the group:
- Server Key Pair (private key + certificate)
- Client Key Pair (private key + certificate)
- The CA certificate(s) that signed these LC certificates.
-
Import to Panorama:
(
Panorama > Certificate Management > Certificates > Import
)
- Import the CA certificate(s).
- Import the server key pair for each LC.
- Import the client key pair for each LC.
-
Create Certificate Profile (for Server-Side Validation):
(
Panorama > Certificate Management > Certificate Profile
)
- This profile will be used by an LC (acting as a server) to validate the client certificate of another LC connecting to it.
- Include the root CA and any intermediate CAs that signed the LC client certificates.
-
Create Certificate Profile (for Client-Side Certificate):
(
Panorama > Certificate Management > Certificate Profile
)
- This profile is associated with the client certificate an LC will present when connecting to another LC. It typically specifies usage constraints or references the CA.
- If using SCEP for client certificates, configure a SCEP profile instead.
-
Create SSL/TLS Service Profile:
(
Panorama > Certificate Management > SSL/TLS Service Profile
)
- Defines the server certificate the LC will present (when acting as a server) and the SSL/TLS protocols/ciphers to use.
-
Enable Secure Inter-LC Communication in Collector Group:
- Select Panorama > Collector Groups , edit the Collector Group.
- On the General tab, check Enable secure inter LC Communication .
-
If the Collector Group includes a Local Log Collector (on Panorama itself), a link appears to configure its secure client settings directly from Panorama's Secure Communication Settings.
- Click OK and Commit .
-
Configure Secure Server Communication on EACH Log Collector:
(via Panorama)
- For Dedicated LCs: Panorama > Managed Collectors > [Select LC] > Communications tab.
- For Local LC on Panorama: Panorama > Setup > Management > Secure Communication Settings > Edit (for Inter-LogCollector Communication section).
- Enable Customize Secure Server Communication .
- Select the SSL/TLS Service Profile (from step 5).
- Select the Certificate Profile (from step 3, for validating connecting LCs).
-
Initially, ensure Custom Certificates Only is disabled (cleared) to allow communication with predefined certs during migration. Enable it only after all LCs are configured.
- (Optional) Set Disconnect Wait Time.
- (Optional) Configure Authorization List (checks Subject/SAN of connecting LC's client cert).
- Click OK and Commit . (The disconnect wait time starts after this commit if set).
-
Configure Secure Client Communication on EACH Log Collector:
(via Panorama, same locations as server config)
- Under "Secure Client Communications" (or similar section for Inter-LC client config).
- Select Certificate Type , the specific Certificate (client cert from step 2), and Certificate Profile (from step 4).
- Click OK and Commit .
After all LCs are configured with custom certificates for both server and client roles, you can then go back to the Secure Server Communication settings on each LC and enable "Custom Certificates Only" to enforce strict custom certificate authentication for inter-LC communication.
Deployment Scenario: Panorama with Dedicated Log Collectors
This is recommended for environments generating over 10,000 logs/second. Panorama (M-Series or virtual in Panorama mode, often in HA) manages Dedicated Log Collectors (M-Series or virtual in Log Collector mode).
Single Dedicated Log Collector Per Collector Group
Multiple Dedicated Log Collectors Per Collector Group (for Redundancy/Capacity)
Key Steps (Summarized - assuming initial Panorama/LC setup like IP, licenses, PAN-OS updates are done):
-
Panorama Management Server(s):
- Set up in Panorama mode (often HA).
-
Create Device Registration Auth Key (
Panorama > Device Registration Auth Key
).
Creating Auth Key on Panorama.
Copying the Auth Key.
-
Dedicated Log Collector(s):
-
Switch mode to Log Collector:
request system system-mode logger(deletes data/config). Verify withshow system info | match system-mode. -
Reset secure connection state (SC3):
request sc3 reset, thendebug software restart process management-server. -
Apply Auth Key:
request authkey set <auth-key>.
Applying Auth Key on Dedicated Log Collector CLI. -
Set Panorama server IP(s) for management:
set deviceconfig system panorama-server <IP1> panorama-server-2 <IP2>, thencommit. -
Record serial number:
show system info | match serial.
-
Switch mode to Log Collector:
-
On Panorama Management Server (Primary UI):
- Add each Dedicated LC as a Managed Collector ( Panorama > Managed Collectors > Add ). Enter S/N. Configure MGT interface IP. (Optional) SNMP. Commit to Panorama.
- Enable Logging Disks for each Managed Collector (Edit collector > Disks tab > Add pairs/disks). Commit to Panorama.
- (Recommended) Configure dedicated Ethernet interfaces on LCs for Device Log Collection and Collector Group Communication (Edit collector > Interfaces tab). Commit to Panorama.
- Add Firewalls as Managed Devices.
-
Configure Collector Group(s) (
Panorama > Collector Groups > Add
).
- Add DLC members. Ensure same model if multiple in one group.
- Enable redundancy if applicable (requires LCs to have same disk count).
- Configure Device Log Forwarding (assign firewalls to LCs in the group, set priorities).
- Commit and Push to Panorama and the Collector Group(s).
- Verify LC status (Connected, In Sync).
- Configure Log Forwarding from Firewalls to Panorama (via Templates/Device Groups, as covered in Forwarding Logs to Panorama ).
Caveats for Collector Groups with multiple Log Collectors (model consistency, disk consistency for redundancy, network proximity) are critical for the exam.
Deployment Scenario: Panorama M-Series Appliances with Local Log Collectors
Panorama M-Series appliances in Panorama mode can use their predefined local Log Collectors. Often deployed in an HA pair.
Single Local Log Collector Per Collector Group (Primary's LC used, secondary's LC in another CG or standby)
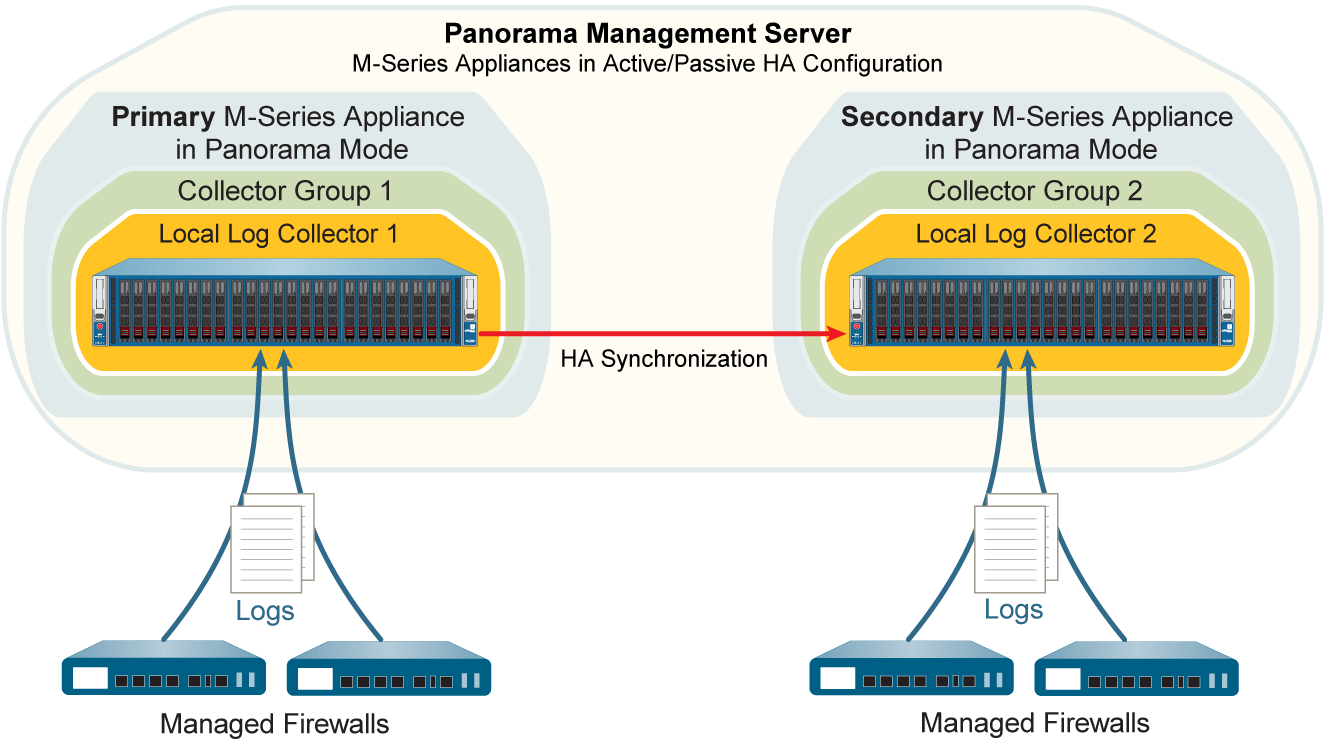
Multiple Local Log Collectors Per Collector Group (Both Primary and Secondary LCs in one CG)

Key Steps (Summarized - assuming M-Series initial setup, HA config are done):
-
Prepare Panorama M-Series HA Peers:
-
On Primary Panorama CLI:
set deviceconfig system panorama-server <Secondary_MGT_IP>, thencommit. -
On Secondary Panorama CLI:
set deviceconfig system panorama-server <Primary_MGT_IP>, thencommit. -
On Secondary Panorama CLI, record its serial number:
show system info | match serial.
-
On Primary Panorama CLI:
-
Configure Primary Panorama's Local Log Collector (via Primary UI):
- Panorama > Managed Collectors : Select the "default" (local) Log Collector.
- Disks tab: Add each logging disk pair. Click OK. (No need to Commit to Panorama yet, will do with secondary).
-
Add Secondary Panorama's Local Log Collector as Managed (via Primary UI):
- Panorama > Managed Collectors > Add .
- Enter S/N of secondary Panorama.
- Panorama Server IP (Primary MGT IP), Panorama Server IP 2 (Secondary MGT IP).
- Configure Interfaces (MGT IP for secondary Panorama).
- Click OK. Commit to Panorama .
- Edit this newly added (secondary's) Log Collector. Go to Disks tab: Add its disk pairs. Click OK. Commit to Panorama .
- Add Firewalls as Managed Devices (Primary UI).
-
Configure Collector Group(s) (Primary UI):
-
Edit the "default" Collector Group or Add new.
- "default" CG already contains primary's local LC. Add secondary's local LC if using multiple LCs in one group.
- Enable redundancy if applicable (both M-Series must have same disk count).
- Configure Device Log Forwarding (assign firewalls, set priorities between primary/secondary LCs).
-
Edit the "default" Collector Group or Add new.
- Commit and Push to Panorama and Collector Group(s) (Primary UI).
-
Configure Secondary Panorama for Primary's LC (Failover Scenario Prep):
- Manually fail over HA (Suspend primary Panorama).
- Log into now-active Secondary Panorama UI.
- Panorama > Managed Collectors : Select the Log Collector corresponding to the (now passive) primary Panorama.
- Ensure Panorama Server IP and IP 2 fields are correctly populated for primary and secondary MGT IPs.
- Configure its MGT interface IP settings (if not already synced).
- Click OK. Commit and Push .
- Fail back (Suspend secondary Panorama, make primary functional again).
- Configure Log Forwarding from Firewalls to Panorama (via Templates/Device Groups on Primary UI).
In an M-Series HA setup, the local Log Collector of the secondary peer is treated as "remote" by the primary and needs to be explicitly added and configured on the primary.
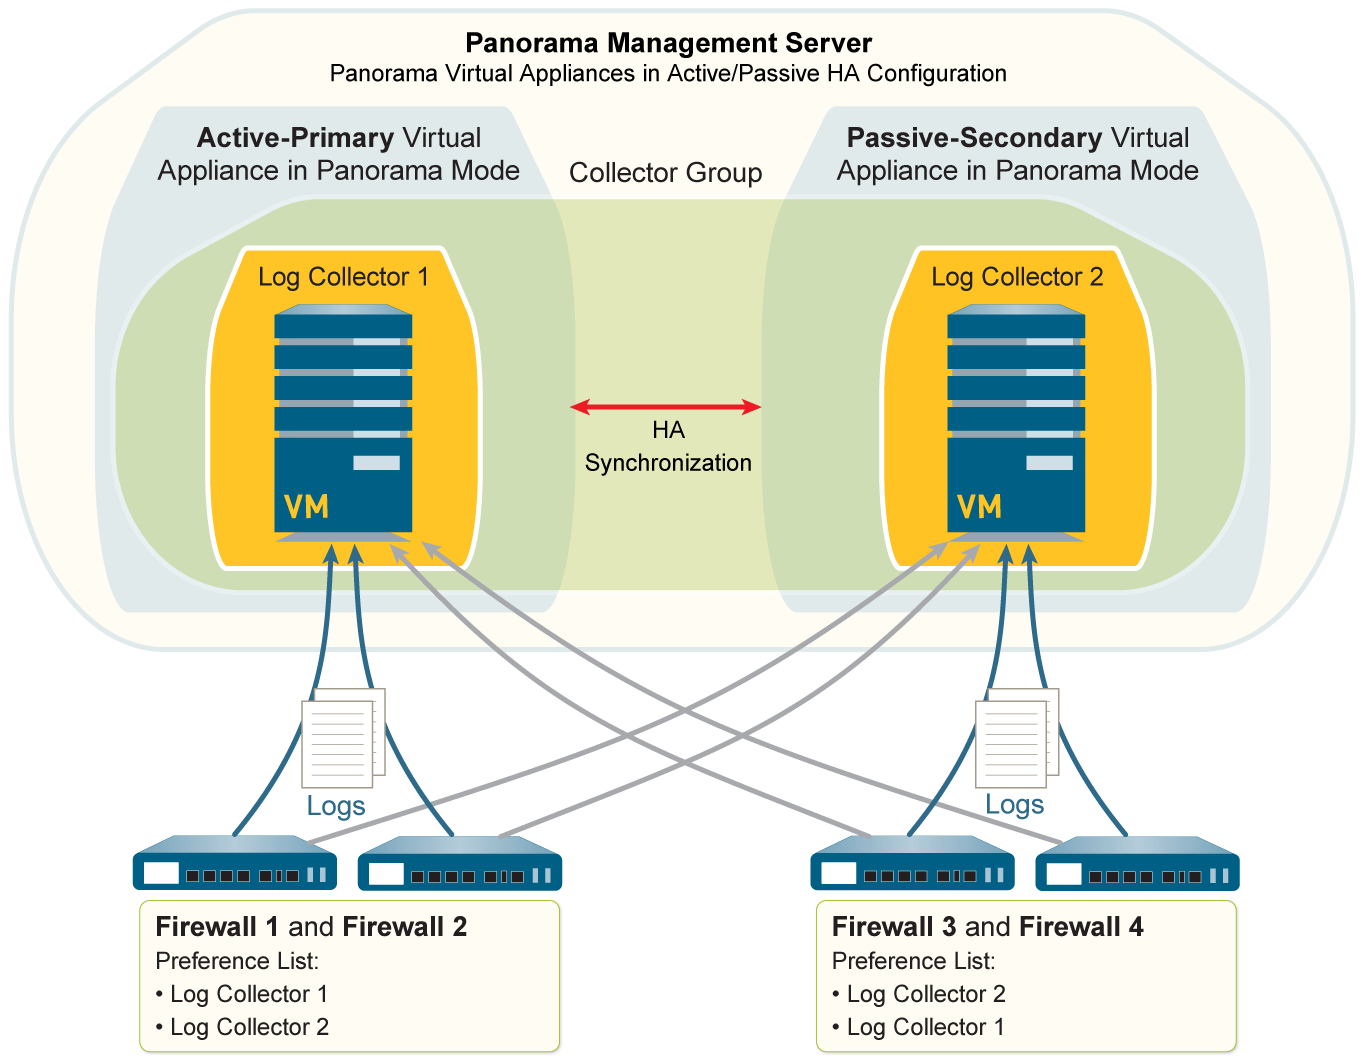
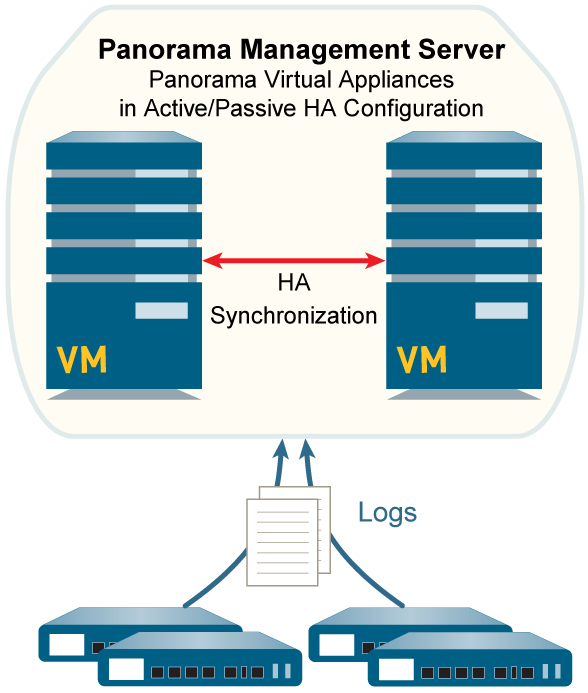
Deployment Scenario: Panorama Virtual Appliances with Local Log Collectors
Panorama virtual appliances in Panorama mode can have local Log Collectors (using added virtual logging disks). Often deployed in HA.
To start in Panorama mode, a virtual appliance needs an 81GB system disk and sufficient CPU/memory for logging. Add virtual logging disks (2-24TB).
Single Local Log Collector Per Collector Group
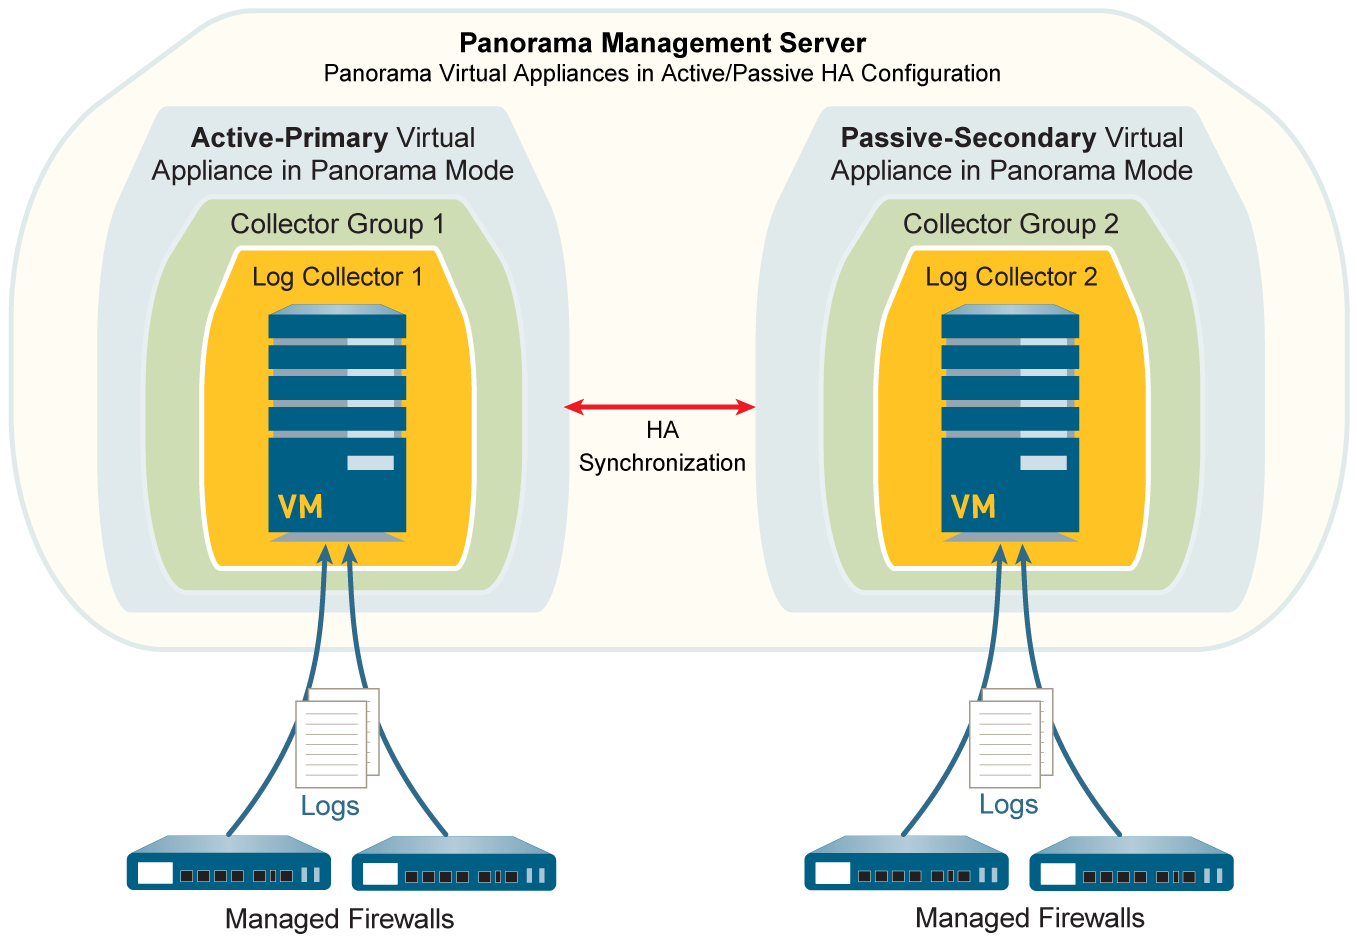
Multiple Local Log Collectors Per Collector Group
Key Steps (Summarized - assuming virtual appliance initial setup with logging disks, HA config are done):
-
Add Primary Panorama's Local Log Collector (Primary UI):
- Record Primary Panorama's S/N ( Dashboard ).
- Panorama > Managed Collectors > Add . Enter S/N. OK. Commit to Panorama .
- Edit this new LC. Disks tab: Add virtual logging disks. OK. Commit to Panorama .
-
Add Secondary Panorama's Local Log Collector (Primary UI):
- Record Secondary Panorama's S/N (from its Dashboard).
- Panorama > Managed Collectors > Add . Enter Secondary's S/N.
- Panorama Server IP (Primary MGT IP), Panorama Server IP 2 (Secondary MGT IP).
- OK. Commit to Panorama .
- Edit this new LC (secondary's). Disks tab: Add its virtual logging disks. OK. Commit to Panorama .
- Add Firewalls as Managed Devices (Primary UI).
-
Configure Collector Group(s) (Primary UI):
- Panorama > Collector Groups > Add .
-
Add local LCs of primary and/or secondary as members.
All LCs in one group must be virtual appliance type (which they are here).
- Enable redundancy if applicable (both virtual LCs should have same number/size of logging disks).
- Configure Device Log Forwarding.
- OK. Commit and Push to Panorama and Collector Group(s).
-
Configure Secondary Panorama for Primary's LC (Failover Scenario Prep - similar to M-Series):
- Trigger HA failover (Suspend primary).
- Log into now-active Secondary Panorama UI.
- Panorama > Managed Collectors : Select the Log Collector corresponding to the (now passive) primary Panorama.
- Ensure Panorama Server IP and IP 2 fields are correctly populated.
- OK. Commit and Push .
- Restore HA on primary, then fail back (Suspend secondary, make it functional, verify roles).
- Configure Log Forwarding from Firewalls to Panorama (via Templates/Device Groups on Primary UI).
Unlike M-Series, Panorama virtual appliances in Panorama mode require you to manually add both their own local Log Collector and the secondary peer's local Log Collector as managed collectors on the primary.
Deployment Scenario: Panorama Virtual Appliances in Legacy Mode with Local Log Collection
This configuration is for Panorama virtual appliances in Legacy mode, typically in an HA setup, processing up to 10,000 logs/second. Logs are sent to NFS datastore (ESXi only) or local virtual disks.
To ensure Legacy mode, do not add a virtual logging disk during initial installation (Panorama uses ~11GB on system disk by default, expandable later up to 8TB with a dedicated logging disk). If a large logging disk is added during initial setup of recent PAN-OS versions, it might default to Panorama mode.
Panorama Virtual Appliances in Legacy Mode with Local Log Collection
Key Steps (Summarized - assuming initial setup, HA config are done):
-
Initial Setup for Legacy Mode:
- During Panorama virtual appliance installation, do not add a dedicated virtual logging disk if aiming for the default small partition. If more storage is needed, it can be added post-installation.
- Complete initial configuration, registration, licensing, software updates.
- Set up HA for Panorama Virtual Appliances.
-
Prepare Panorama for Log Collection:
- Add Firewalls as Managed Devices.
-
Configure Log Forwarding to Panorama
(firewalls send logs directly to Panorama MGT IP or service route IP).
In Legacy mode, you don't configure "Managed Collectors" or "Collector Groups" in the same way as Panorama mode. Logs are sent directly to Panorama itself.
- Commit changes on Panorama.
-
Log Forwarding/Buffering Defaults (Legacy HA):
(
Panorama > Setup > Management > Logging and Reporting Settings > Log Export and Reporting
)
- Only Active Primary Logs to Local Disk (Default: Disabled): If enabled, only the primary HA peer saves logs to its local disk. Default means both peers receive/save logs. (For 5200/7000 series firewalls, only active peer receives logs anyway).
- Get Only New Logs on Convert to Primary (Default: Disabled): For NFS logging on ESXi. If enabled, after HA failover, the newly promoted primary gets only new logs, not a flood of buffered logs. With NFS, only the primary peer mounts the datastore.
If logging rates exceed 10,000 lps, consider migrating to Panorama mode and using Dedicated Log Collectors or Strata Logging Service.
Monitoring Managed Collector Health Status
Monitor the health of managed Log Collectors to identify and resolve issues impacting log collection. Health is based on vital Log Collector processes.
Steps to View Health (on Panorama Web Interface):
- Ensure Managed Collector and Collector Group are configured.
- Navigate to Panorama > Managed Collectors .
-
Observe the
Health
column:
-
Green circle
 : Healthy.
-
Red circle
 : One or more processes have degraded health.
-
Green circle
-
Click the health icon or a link/button in that row (often "Health Status" or similar, or by clicking the collector and finding a health tab) to view detailed health status of individual processes.
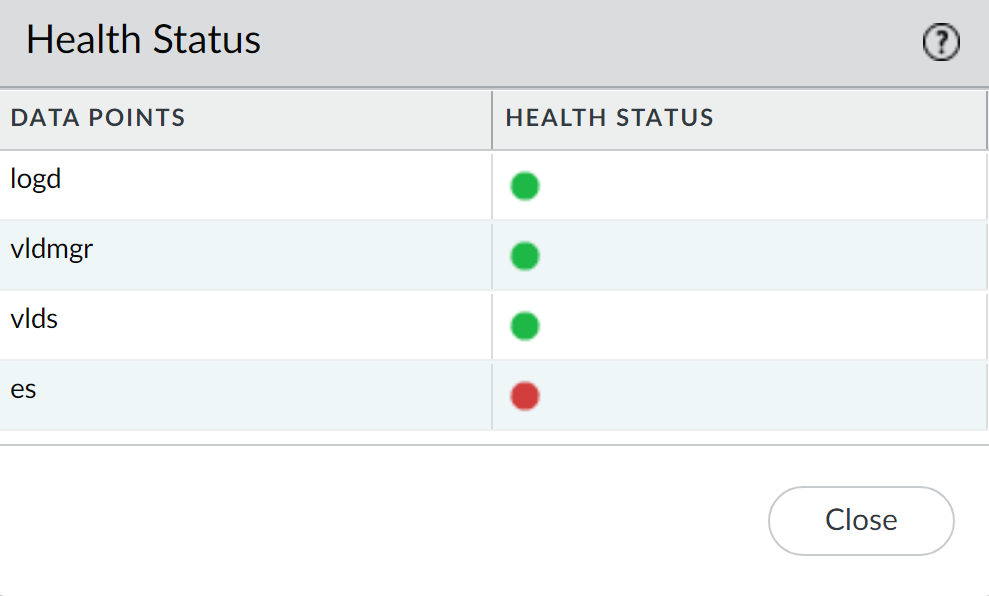
Detailed Health Status of Log Collection Processes.
Key Log Collection Processes:
- logd: Ingests logs from firewalls, transfers to vldmgr.
- vldmgr: Manages vld processes.
- vlds: Manages individual logging disks, writes logs to disks, ingests into ElasticSearch.
- es: ElasticSearch process running on the Log Collector.
Understanding these processes can help in troubleshooting log collection issues. For instance, an issue with 'es' could indicate problems with log indexing and searching, while 'logd' issues might mean logs aren't even being received properly from firewalls.
Verification, Troubleshooting & PCNSE Quiz
Verifying Log Forwarding to Panorama
After configuring log forwarding, verify its success.
Traffic logs might show "incomplete" sessions for TCP connections from firewalls to Log Collectors over Ethernet interfaces (except PA-5200/7000). This is normal and due to 60-second TCP timeouts, not a connectivity loss. Forwarding over the management port does not generate these incomplete traffic logs.
Verification Steps:
- Access Firewall CLI.
-
Verify Log Forwarding Preference List (if using Log Collectors):
> show log-collector preference-listOutput should show the serial number and IP address of the preferred Log Collector(s).
-
Verify Logging Status on Firewall:
> show logging-statusOutput should indicate the log forwarding agent is active and connected.
- Agent for Panorama virtual appliance (Legacy/Panorama mode local LC): Panorama
- Agent for M-Series appliance / Dedicated LC: LogCollector
- Agent for Strata Logging Service: Log CollectionService (and status like "Log Collection log forwarding agent is active and connected to <IP_address>")
-
View Average Logging Rate:
- If logs go to Log Collectors (via Panorama UI): Panorama > Managed Collectors , click Statistics link for the collector.
-
If logs go to Panorama virtual appliance (Legacy Mode) or M-Series (CLI):
> debug log-collector log-collection-stats show incoming-logs(This command also works on M-Series LCs/Panorama directly).
- Check Logs in Panorama: Navigate to Monitor > Logs in Panorama and verify logs from the firewalls are appearing.
Modifying Log Forwarding and Buffering Defaults
These settings are found under Panorama > Setup > Management , edit Logging and Reporting Settings > Log Export and Reporting tab.
Log Forwarding Mode on Firewall:
| Logging Option | Description |
|---|---|
|
(Best Practice) Buffered Log Forwarding from Device
Default: Enabled |
Firewall buffers logs and sends them to Panorama at 30-second intervals. Crucial for resilience if connectivity to Panorama is lost; firewall buffers locally and resumes forwarding from where it left off. If buffer fills, oldest logs are deleted. |
|
Live Mode Log Forwarding from Device
(Enabled if Buffered Log Forwarding is cleared ) |
Firewall sends each log transaction to Panorama as it's recorded locally. Higher resource consumption, less resilient to network outages. |
Buffered Log Forwarding is the default and recommended mode for its resilience.
Log Forwarding Preference (Panorama Virtual Appliance in Legacy Mode, HA Setup):
| Logging Option | Pertains to | Description |
|---|---|---|
|
Only Active Primary Logs to Local Disk
Default: Disabled |
Panorama virtual appliance in Legacy mode, logging to a virtual disk, in HA. | If enabled, only the primary Panorama peer saves logs to its local disk. Default (disabled) means both peers receive and save logs. (Note: For 5200/7000 series firewalls, only the active peer receives logs anyway). |
|
Get Only New Logs on Convert to Primary
Default: Disabled |
Panorama virtual appliance in Legacy mode, logging to NFS (ESXi server only), in HA. | If enabled, when an HA failover occurs and the secondary becomes primary, firewalls send only newly generated logs. Prevents flooding Panorama with a large volume of buffered logs after a long disconnection. With NFS, only the primary peer mounts the datastore. |
The "Abled" word at the end of the original text for this section seems to be a typo or leftover. The table name "Pertains to" from the original "Configure Log Forwarding from Panorama to External Destinations" was incorrectly placed here in the original source, it actually belongs to "Modify Log Forwarding and Buffering Defaults" as corrected.
Key PCNSE Exam Tips & Gotchas for Log Collection
General Concepts:
- Panorama Modes: Understand Panorama, Log Collector, Legacy, and Management Only modes and their impact on logging.
- Log Collector Types: Differentiate Dedicated vs. Local LCs. Know when each is appropriate.
- Collector Groups are Essential: LCs MUST be in a Collector Group to receive logs. ElasticSearch health degraded if not.
- Log Forwarding Chain: Firewall -> (Panorama/LC/SLS) -> (Optional External Syslog/SIEM).
- Switching M-Series/Virtual Appliance to Log Collector mode DELETES existing config (except MGT) and logs.
Configuration & Setup:
- Device Registration Auth Key: Know its purpose, lifetime, count, and how it expires (90 days after lifetime).
- Adding Managed LCs: Serial number is key. Commit to Panorama often required before next steps (e.g., enabling disks).
- Enabling Disks: LCs won't log without disks enabled via Panorama.
- PAN-OS Compatibility: Be aware of version restrictions for adding LCs to Panorama.
-
Collector Group Rules:
- 1-16 LCs per group.
- All LCs in a group MUST be the same model (e.g., all M-600 or all virtual).
- For log redundancy, LCs in group MUST have same number of disks.
- Log redundancy in a CG halves effective storage and max logging rate.
- Log Forwarding Profiles (on Panorama): Applied via Device Groups to rules/zones to send logs to Panorama/SLS.
- Log Settings (on Panorama): Applied via Templates for System, Config, User-ID logs.
- "Log at Session Start" consumes more resources than "Log at Session End."
HA Considerations:
- In an HA Panorama pair, the secondary peer's Local LC is "remote" to the primary and must be added manually.
- When moving a Local LC on an M-Series HA passive peer, HA sync applies new CG configs.
- Legacy Mode HA: "Only Active Primary Logs to Local Disk" and "Get Only New Logs on Convert to Primary" settings.
Authentication & Security:
- Dedicated LC admin accounts configured from Panorama: Only Superuser role supported.
- Pushing admin configs from Panorama to DLC overwrites existing local DLC admins.
- Custom Certs: Understand their use for Panorama-LC and Inter-LC communication. "Custom Certificate Only" checkbox is critical.
Forwarding to External Systems:
- Syslog forwarding over Ethernet: Only one Ethernet interface at a time. From CLI, must disable MGT syslog forwarding first.
- HTTP forwarding not for high-volume logs.
- Strata Logging Service: Requires license, plugin. "Enable Duplicate Logging" option.
Verification & Troubleshooting:
-
show log-collector preference-list(firewall CLI) -
show logging-status(firewall CLI) -
debug log-collector log-collection-stats show incoming-logs(Panorama/LC CLI) - Monitor LC health via Panorama UI (logd, vldmgr, vlds, es processes).
- "Incomplete" traffic logs for LC connections over Ethernet are normal (except PA-5200/7000).
PCNSE Log Collection Interactive Quiz
Test your knowledge on Panorama log collection. Select the best answer for each question.