Large Scale VPN (LSVPN)
The GlobalProtect Large Scale VPN (LSVPN) feature on the Palo Alto Networks Next-Generation Firewall simplifies the deployment of traditional hub and spoke VPNs, enabling you to deploy enterprise networks with several branch offices quickly with a minimum amount of configuration required on the remote satellites. This solution uses certificates for firewall authentication and IPSec to secure data.
The following topics describe the LSVPN components and how to set them up to enable site-to-site VPN services between Palo Alto Networks firewalls:
- LSVPN Overview (Current Section)
- Create Interfaces and Zones for the LSVPN
- Enable SSL Between GlobalProtect LSVPN Components
- Configure the Portal to Authenticate Satellites
- Configure GlobalProtect Gateways for LSVPN
- Configure the GlobalProtect Portal for LSVPN
- Prepare the Satellite to Join the LSVPN
- Verify the LSVPN Configuration
- LSVPN Quick Configs
LSVPN Overview
GlobalProtect provides a complete infrastructure for managing secure access to corporate resources from your remote sites. This infrastructure includes the following components:
- GlobalProtect Portal — Provides the management functions for your GlobalProtect LSVPN infrastructure. Every satellite that participates in the GlobalProtect LSVPN receives configuration information from the portal, including configuration information to enable the satellites (the spokes) to connect to the gateways (the hubs). You configure the portal on an interface on any Palo Alto Networks Next-Generation Firewall.
- GlobalProtect Gateways — A Palo Alto Networks firewall that provides the tunnel endpoint for satellite connections. The Satellites access resources that you protect using Security policy rules on the gateway. It isn’t required to have a separate portal and gateway; a single firewall can function both as portal and gateway.
- GlobalProtect Satellite — A Palo Alto Networks firewall at a remote site that establishes IPSec tunnels with one or more gateways at your corporate office(s) for secure access to centralized resources. Configuration on the satellite firewall is minimal, enabling you to scale your VPN quickly and easily as you add new sites.
The following diagram illustrates how the GlobalProtect LSVPN components work together.
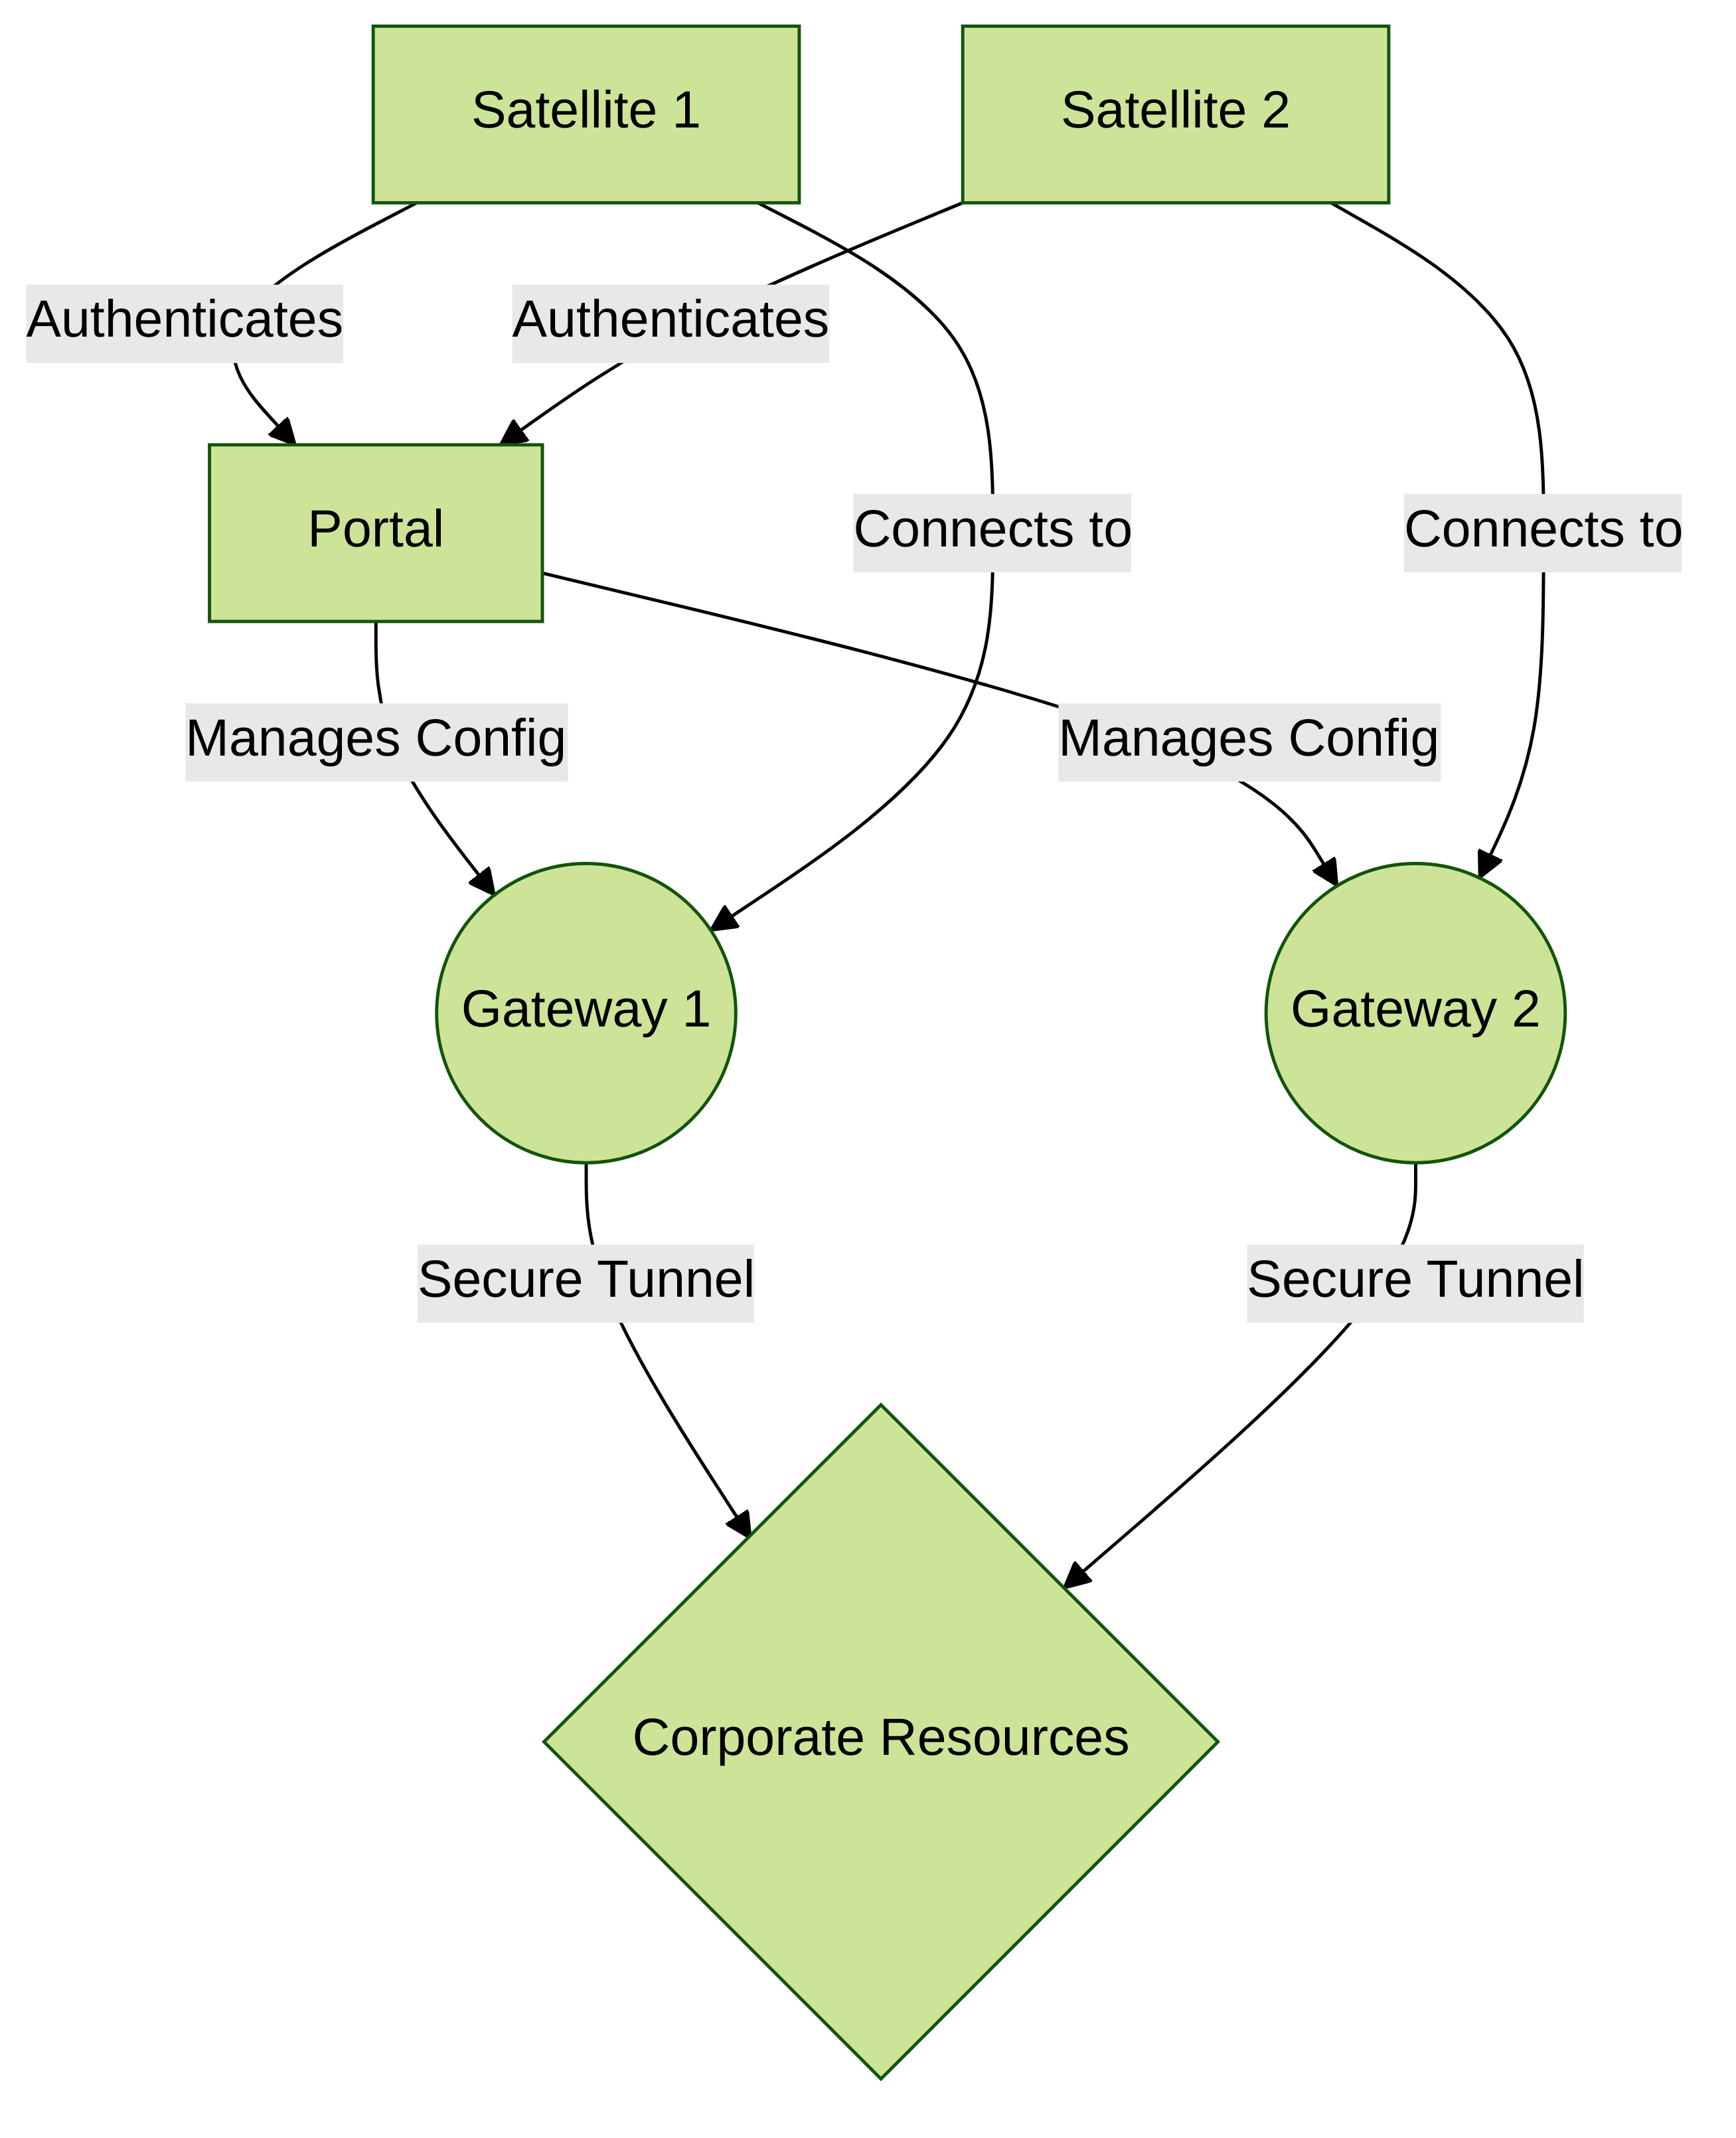
Conceptual flow of LSVPN component interaction and management.
Create Interfaces and Zones for the LSVPN
Configure the following interfaces and zones for your LSVPN infrastructure:
- GlobalProtect portal — Requires
- Layer 3 interface for GlobalProtect satellites to connect to.
- If the portal and gateway are on the same firewall, they can use the same interface.
- The portal must be in a zone that is accessible from your branch offices.
- GlobalProtect gateways — Requires
- three interfaces: a Layer 3 interface in the zone that is reachable by the remote satellites,
- an internal interface in the trust zone that connects to the protected resources,
- and a logical tunnel interface for terminating the VPN tunnels from the satellites.
- Unlike other site-to-site VPN solutions, the GlobalProtect gateway only requires a single tunnel interface, which it will use for tunnel connections with all of your remote satellites (point-to-multipoint).
- If you plan to use dynamic routing, you must assign an IP address to the tunnel interface. GlobalProtect supports both IPv6 and IPv4 addressing for the tunnel interface.
- GlobalProtect satellites — Requires
- a single tunnel interface for establishing a VPN with the remote gateways (up to a maximum of 25 gateways).
- If you plan to use dynamic routing, you must assign an IP address to the tunnel interface.
- GlobalProtect supports both IPv6 and IPv4 addressing for the tunnel interface.
For more information about portals, gateways, and satellites see LSVPN Overview.
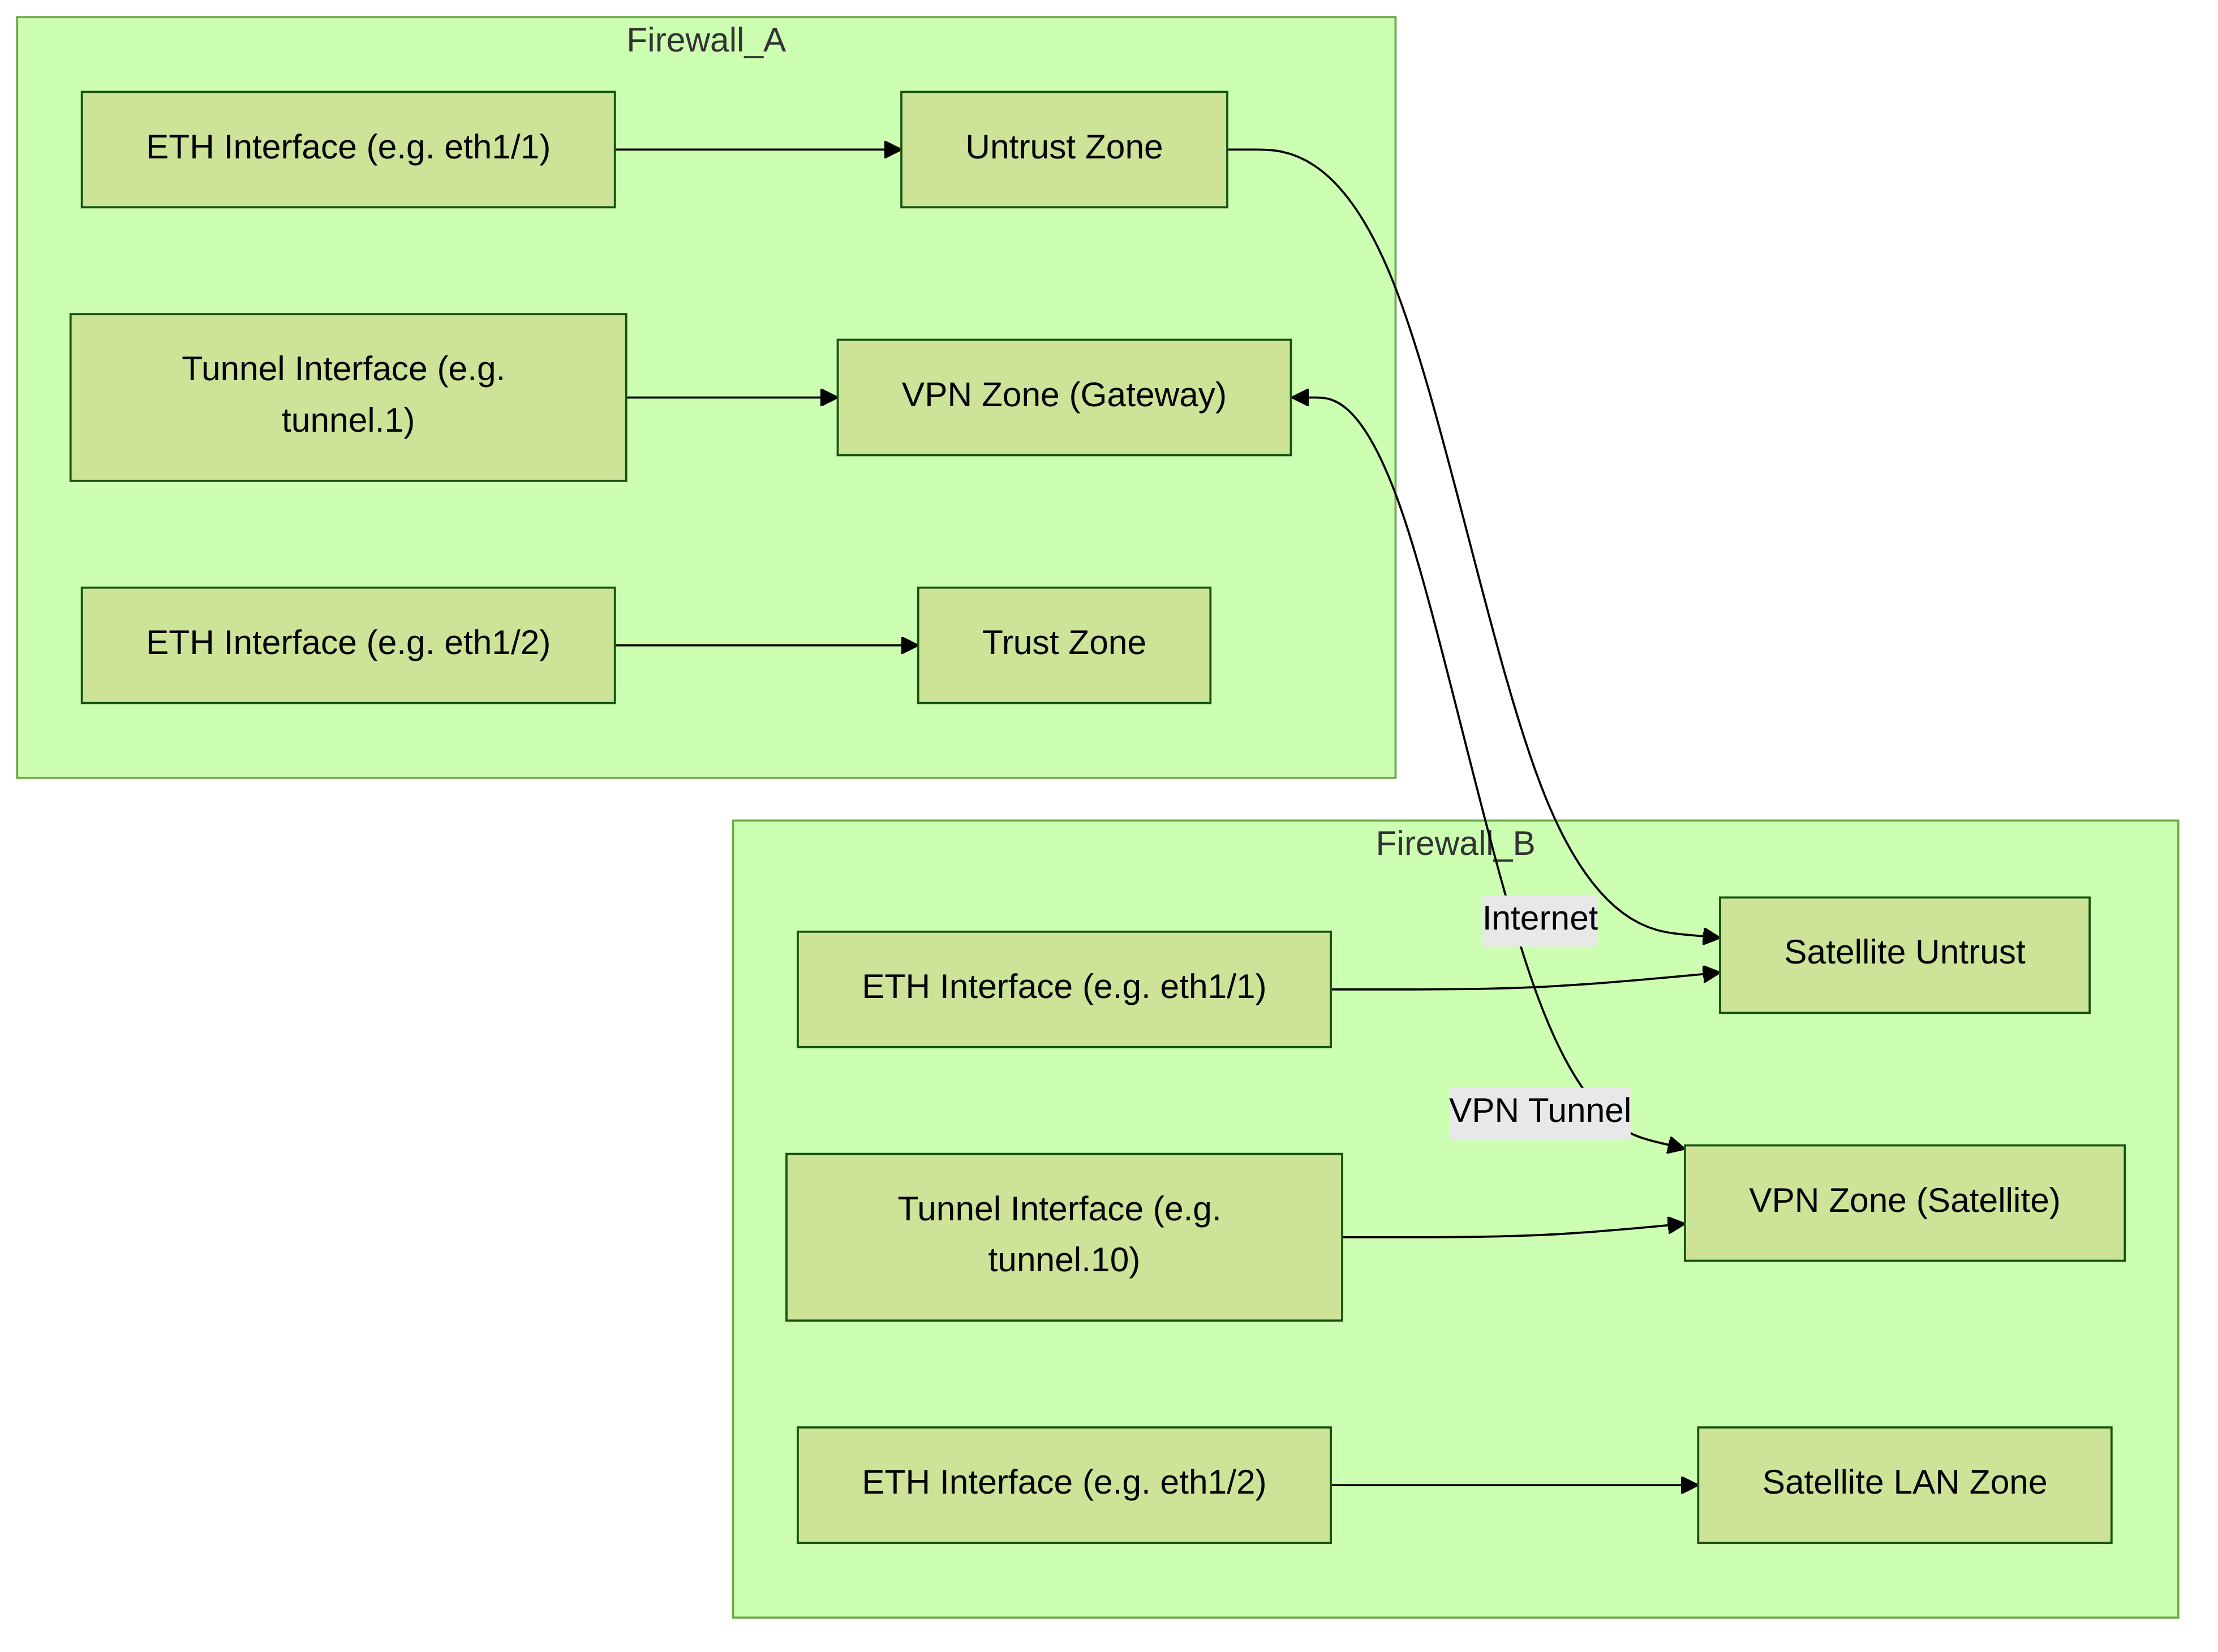
Simplified interface and zone planning for LSVPN components.
STEP 1 | Configure a Layer 3 interface.
The portal and each gateway and satellite all require a Layer 3 interface to enable traffic to be routed between sites.
If the gateway and portal are on the same firewall, you can use a single interface for both components.
- Select Network > Interfaces > Ethernet and then select the interface you want to configure for GlobalProtect LSVPN.
- Select Layer3 from the Interface Type drop-down.
- On the Config tab, select the Security Zone to which the interface belongs:
- The interface must be accessible from a zone outside of your trust network. Consider creating a dedicated VPN zone for visibility and control over your VPN traffic.
- If you haven’t yet created the zone, select New Zone from the Security Zone dropdown, define a Name for the new zone, and then click OK.
- Select the Virtual Router to use.
- Assign an IP address to the interface:
- For an IPv4 address, select IPv4 and Add the IP address and network mask to assign to the interface, for example 203.0.11.100/24.
- For an IPv6 address, select IPv6, Enable IPv6 on the interface, and Add the IP address and network mask to assign to the interface, for example 2001:1890:12f2:11::10.1.8.160/80.
- To save the interface configuration, click OK.
STEP 2 | On the firewall(s) hosting the GlobalProtect gateway(s), configure the logical tunnel interface that will terminate VPN tunnels established by the GlobalProtect satellites.
IP addresses is only required on the tunnel interface when you plan to use dynamic routing. However, assigning an IP address to the tunnel interface can be useful for troubleshooting connectivity issues.
Make sure to enable User-ID in the zone where the VPN tunnels terminate.
- Select Network > Interfaces > Tunnel and click Add.
- In the Interface Name field, specify a numeric suffix, such as .2.
- On the Config tab, expand the Security Zone drop-down to define the zone as follows:
- To use your trust zone as the termination point for the tunnel, select the zone from the drop-down.
- (Recommended) To create a separate zone for VPN tunnel termination, click New Zone. In the Zone dialog, define a Name for the new zone (for example lsvpn-tun), select the Enable User Identification check box, and then click OK.
- Select the Virtual Router.
- (Optional) To assign an IP address to the tunnel interface:
- For an IPv4 address, select IPv4 and Add the IP address and network mask, e.g., 203.0.11.100/24.
- For an IPv6 address, select IPv6, Enable IPv6 on the interface, and Add the IP address and network mask, e.g., 2001:1890:12f2:11::10.1.8.160/80.
- To save the interface configuration, click OK.
STEP 3 | If you created a separate zone for tunnel termination of VPN connections, create a security policy to enable traffic flow between the VPN zone and your trust zone.
For example, a policy rule enables traffic between the lsvpn-tun zone and the L3-Trust zone.
STEP 4 | Commit your changes.
Click Commit.
Enable SSL Between GlobalProtect LSVPN Components
All interaction between the GlobalProtect components occurs over an SSL/TLS connection. Therefore, you must generate and/or install the required certificates before configuring each component so that you can reference the appropriate certificate(s) and/or certificate profiles in the configurations for each component. The following sections describe the supported methods of certificate deployment, descriptions and best practice guidelines for the various GlobalProtect certificates, and provide instructions for generating and deploying the required certificates:
- About Certificate Deployment
- Deploy Server Certificates to the GlobalProtect LSVPN Components
- Deploy Client Certificates to the GlobalProtect Satellites Using SCEP
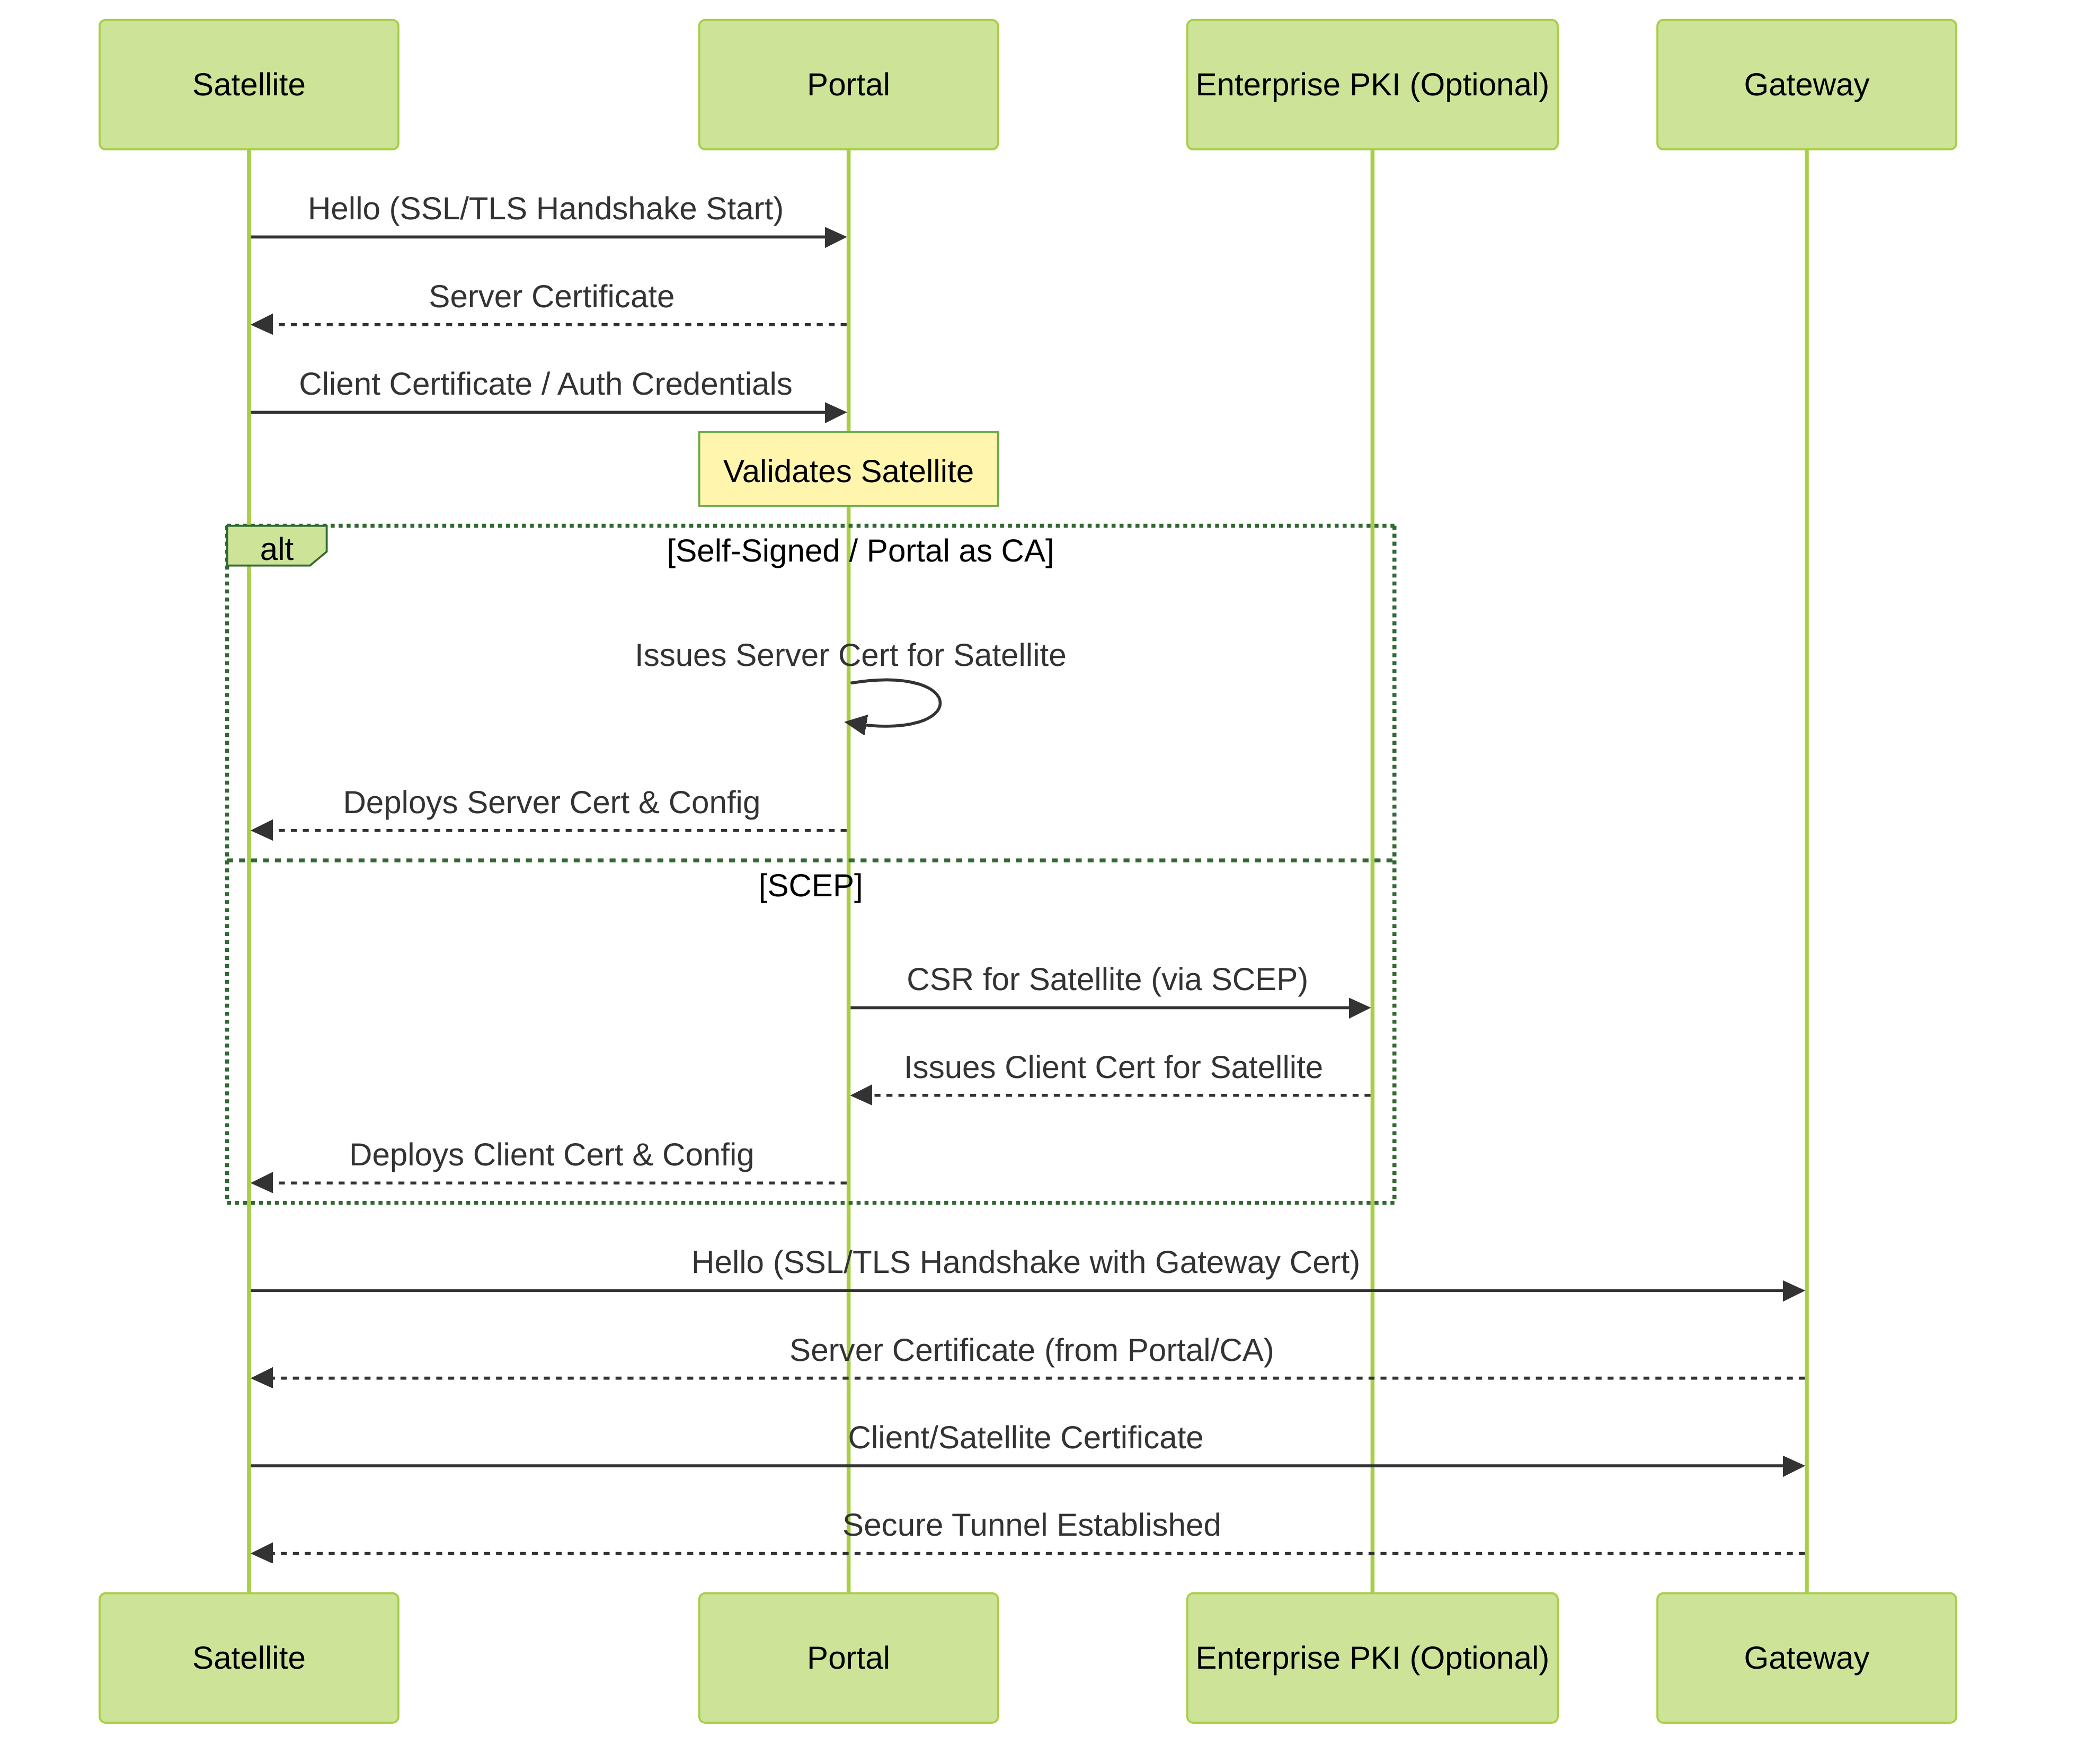
Conceptual certificate exchange and SSL/TLS handshake flow in LSVPN.
About Certificate Deployment
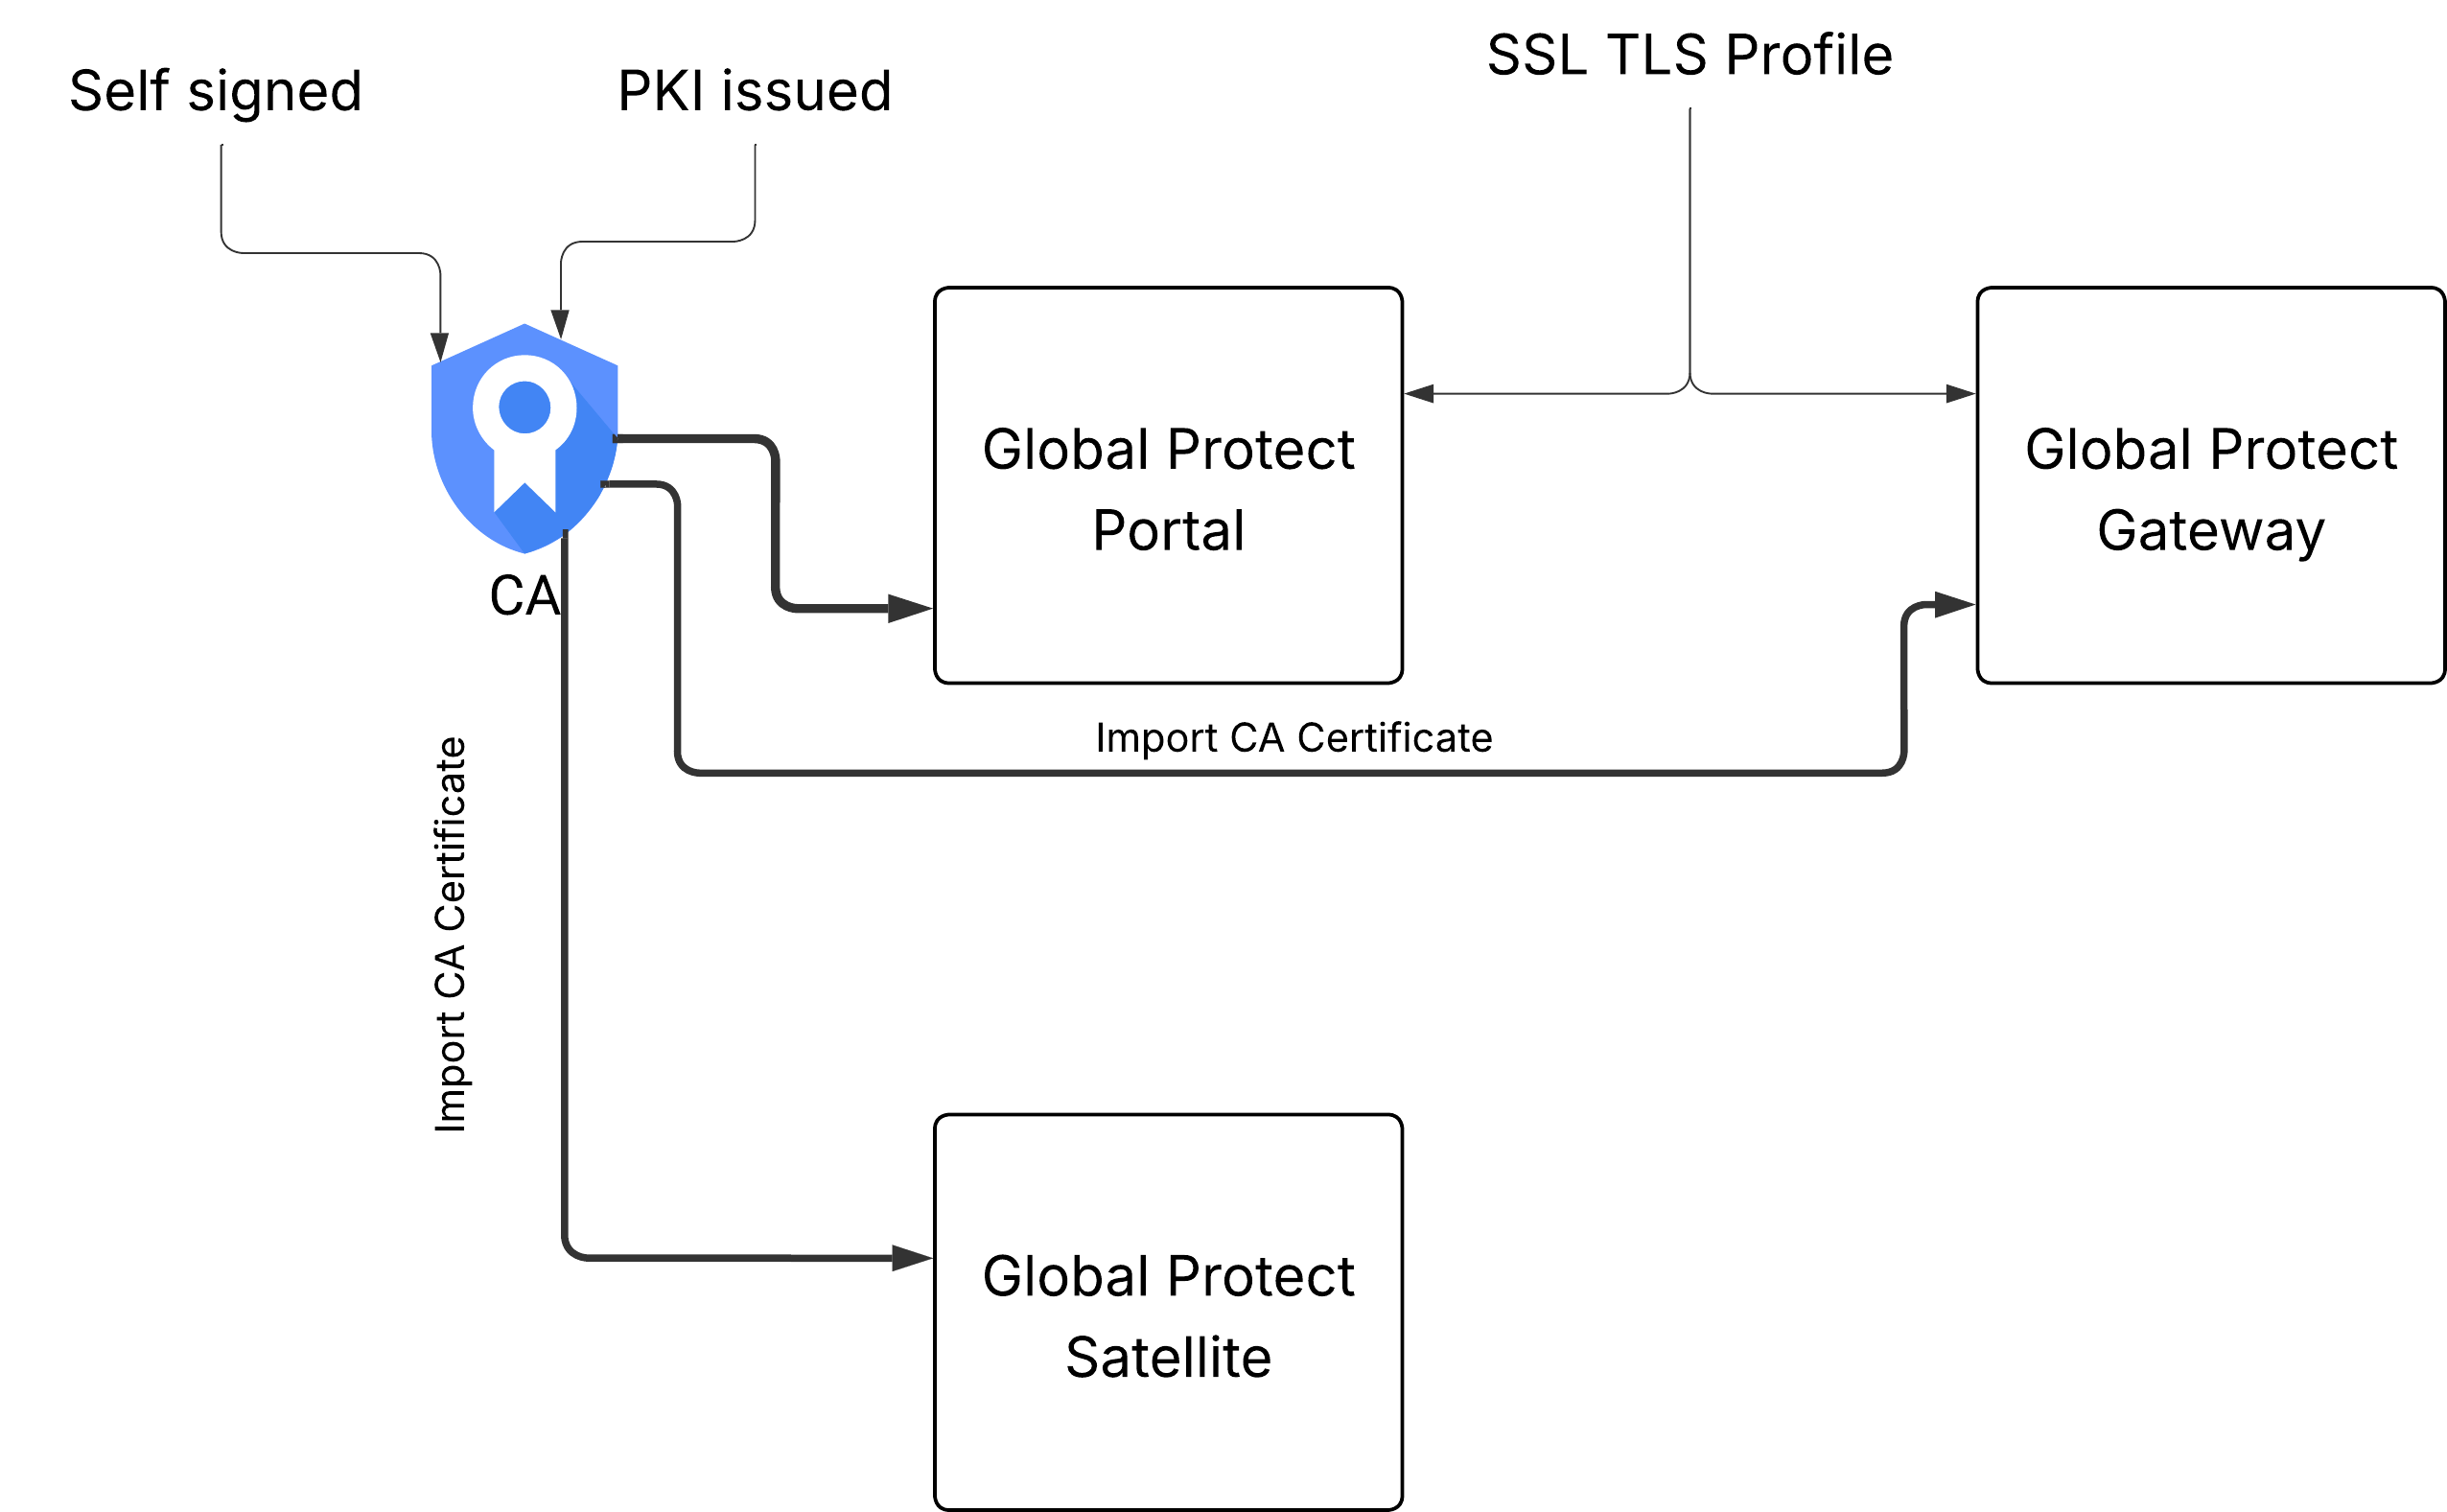
There are two basic approaches to deploying certificates for GlobalProtect LSVPN:
- Enterprise Certificate Authority —
- If you already have your own enterprise certificate authority,
- you can use this internal CA to issue an intermediate CA certificate for the GlobalProtect portal to enable it to issue certificates to the GlobalProtect gateways and satellites.
- You can also configure the GlobalProtect portal to act as a Simple Certificate Enrollment Protocol (SCEP) client to issue client certificates to GlobalProtect satellites.
- Self-Signed Certificates —
- When using self-signed root CA certificates, as a best practice, create a self-signed root CA certificate on the portal and use it to issue server certificates for the gateways and satellites.
- This way, the private key used for certificate signing stays on the portal.
Deploy Server Certificates to the GlobalProtect LSVPN Components
The GlobalProtect LSVPN components use SSL/TLS to authenticate mutually. Before deploying the LSVPN, you must assign an SSL/TLS service profile to each portal and gateway. The profile specifies the server certificate and allowed TLS versions for communication with satellites.
In addition, you must import the root certificate authority (CA) certificate used to issue the server certificates onto each firewall that you plan to host as a gateway or satellite. Finally, on each gateway and satellite participating in the LSVPN, you must configure a certificate profile that will enable them to establish an SSL/TLS connection using mutual authentication.
right click and open in it's own window to make the diagram legible
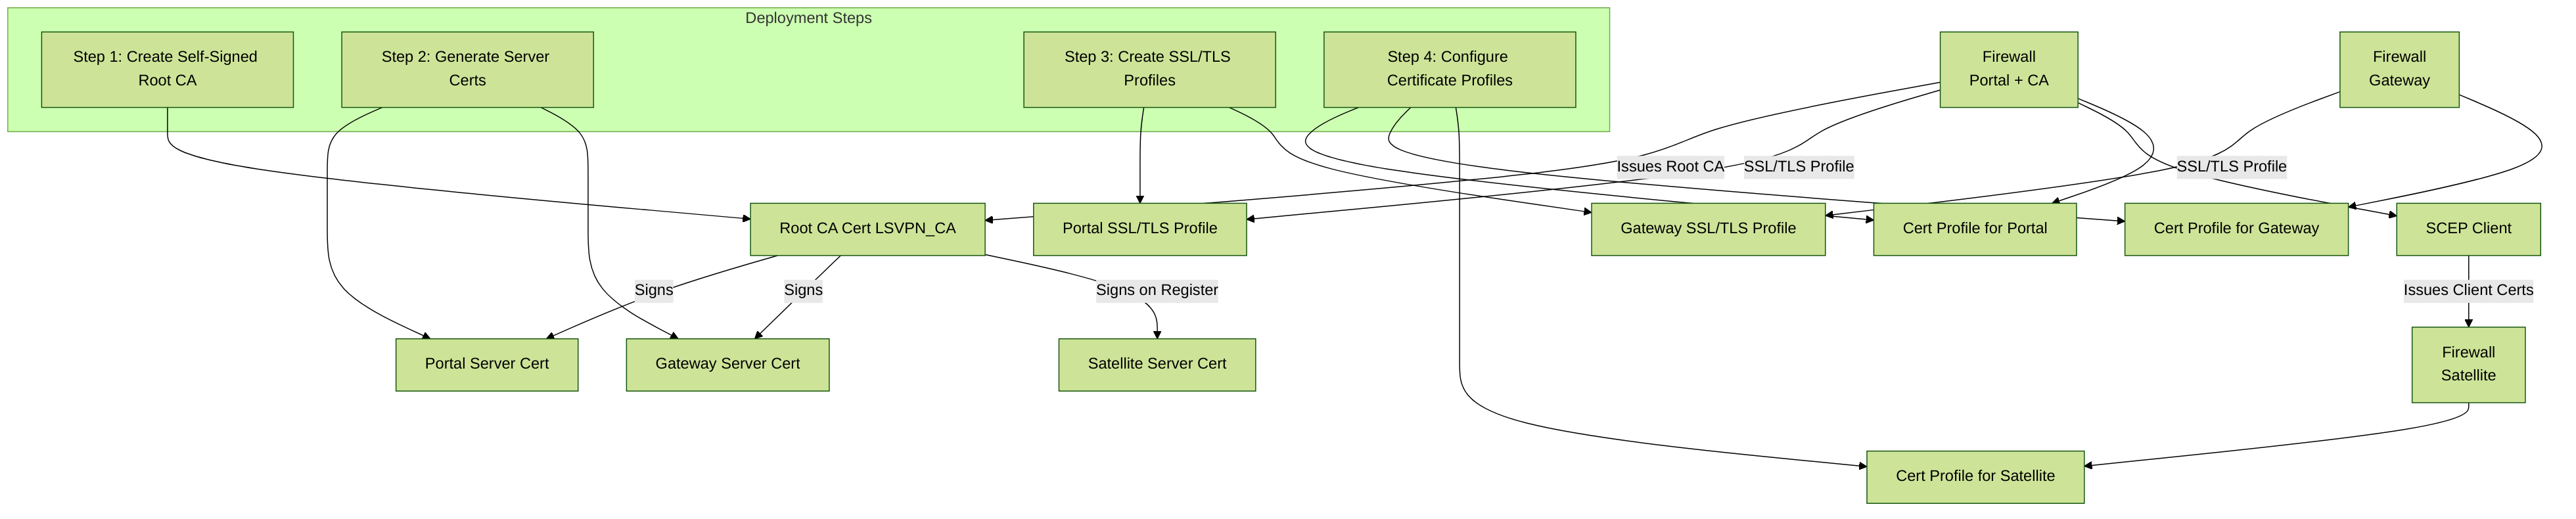
The following workflow shows the best practice steps for deploying SSL certificates to the GlobalProtect LSVPN components:
STEP 1 | On the firewall hosting the GlobalProtect portal, create the root CA certificate for signing the certificates of the GlobalProtect components.
Create a Self-Signed Root CA Certificate:
- Select Device > Certificate Management > Certificates, then Device Certificates. Select Generate.
- Enter a Certificate Name, such as LSVPN_CA.
- Don’t select a value in the Signed By field (this is what indicates that it’s self-signed).
- Select the Certificate Authority check box and then click OK to generate the certificate.
STEP 2 | Create SSL/TLS service profiles for the GlobalProtect portal and gateways.
The best practice is to issue all of the required certificates on the portal, so that the signing certificate (with the private key) doesn’t have to be exported.
If the GlobalProtect portal and gateway are on the same firewall interface, you can use the same server certificate for both components.
- Use the root CA on the portal to Generate a Certificate for each gateway that you’ll deploy:
- Select Device > Certificate Management > Certificates, then Device Certificates. Select Generate.
- Enter a Certificate Name.
- Enter the FQDN (recommended) or IP address of the interface where you plan to configure the gateway in the Common Name field.
- In the Signed By field, select the LSVPN_CA certificate you created.
- In the Certificate Attributes section, click Add and define the attributes to identify the gateway uniquely. If you add a Host Name attribute (which populates the SAN field of the certificate), it must exactly match the value you defined for the Common Name.
- Generate the certificate.
- Configure an SSL/TLS Service Profile for the portal and each gateway:
- Select Device > Certificate Management > SSL/TLS Service Profile and click Add.
- Enter a Name to identify the profile and select the server Certificate you created for the portal or gateway.
- Define the range of TLS versions (Min Version to Max Version) allowed for communicating with satellites and click OK.
Configure the Portal to Authenticate Satellites
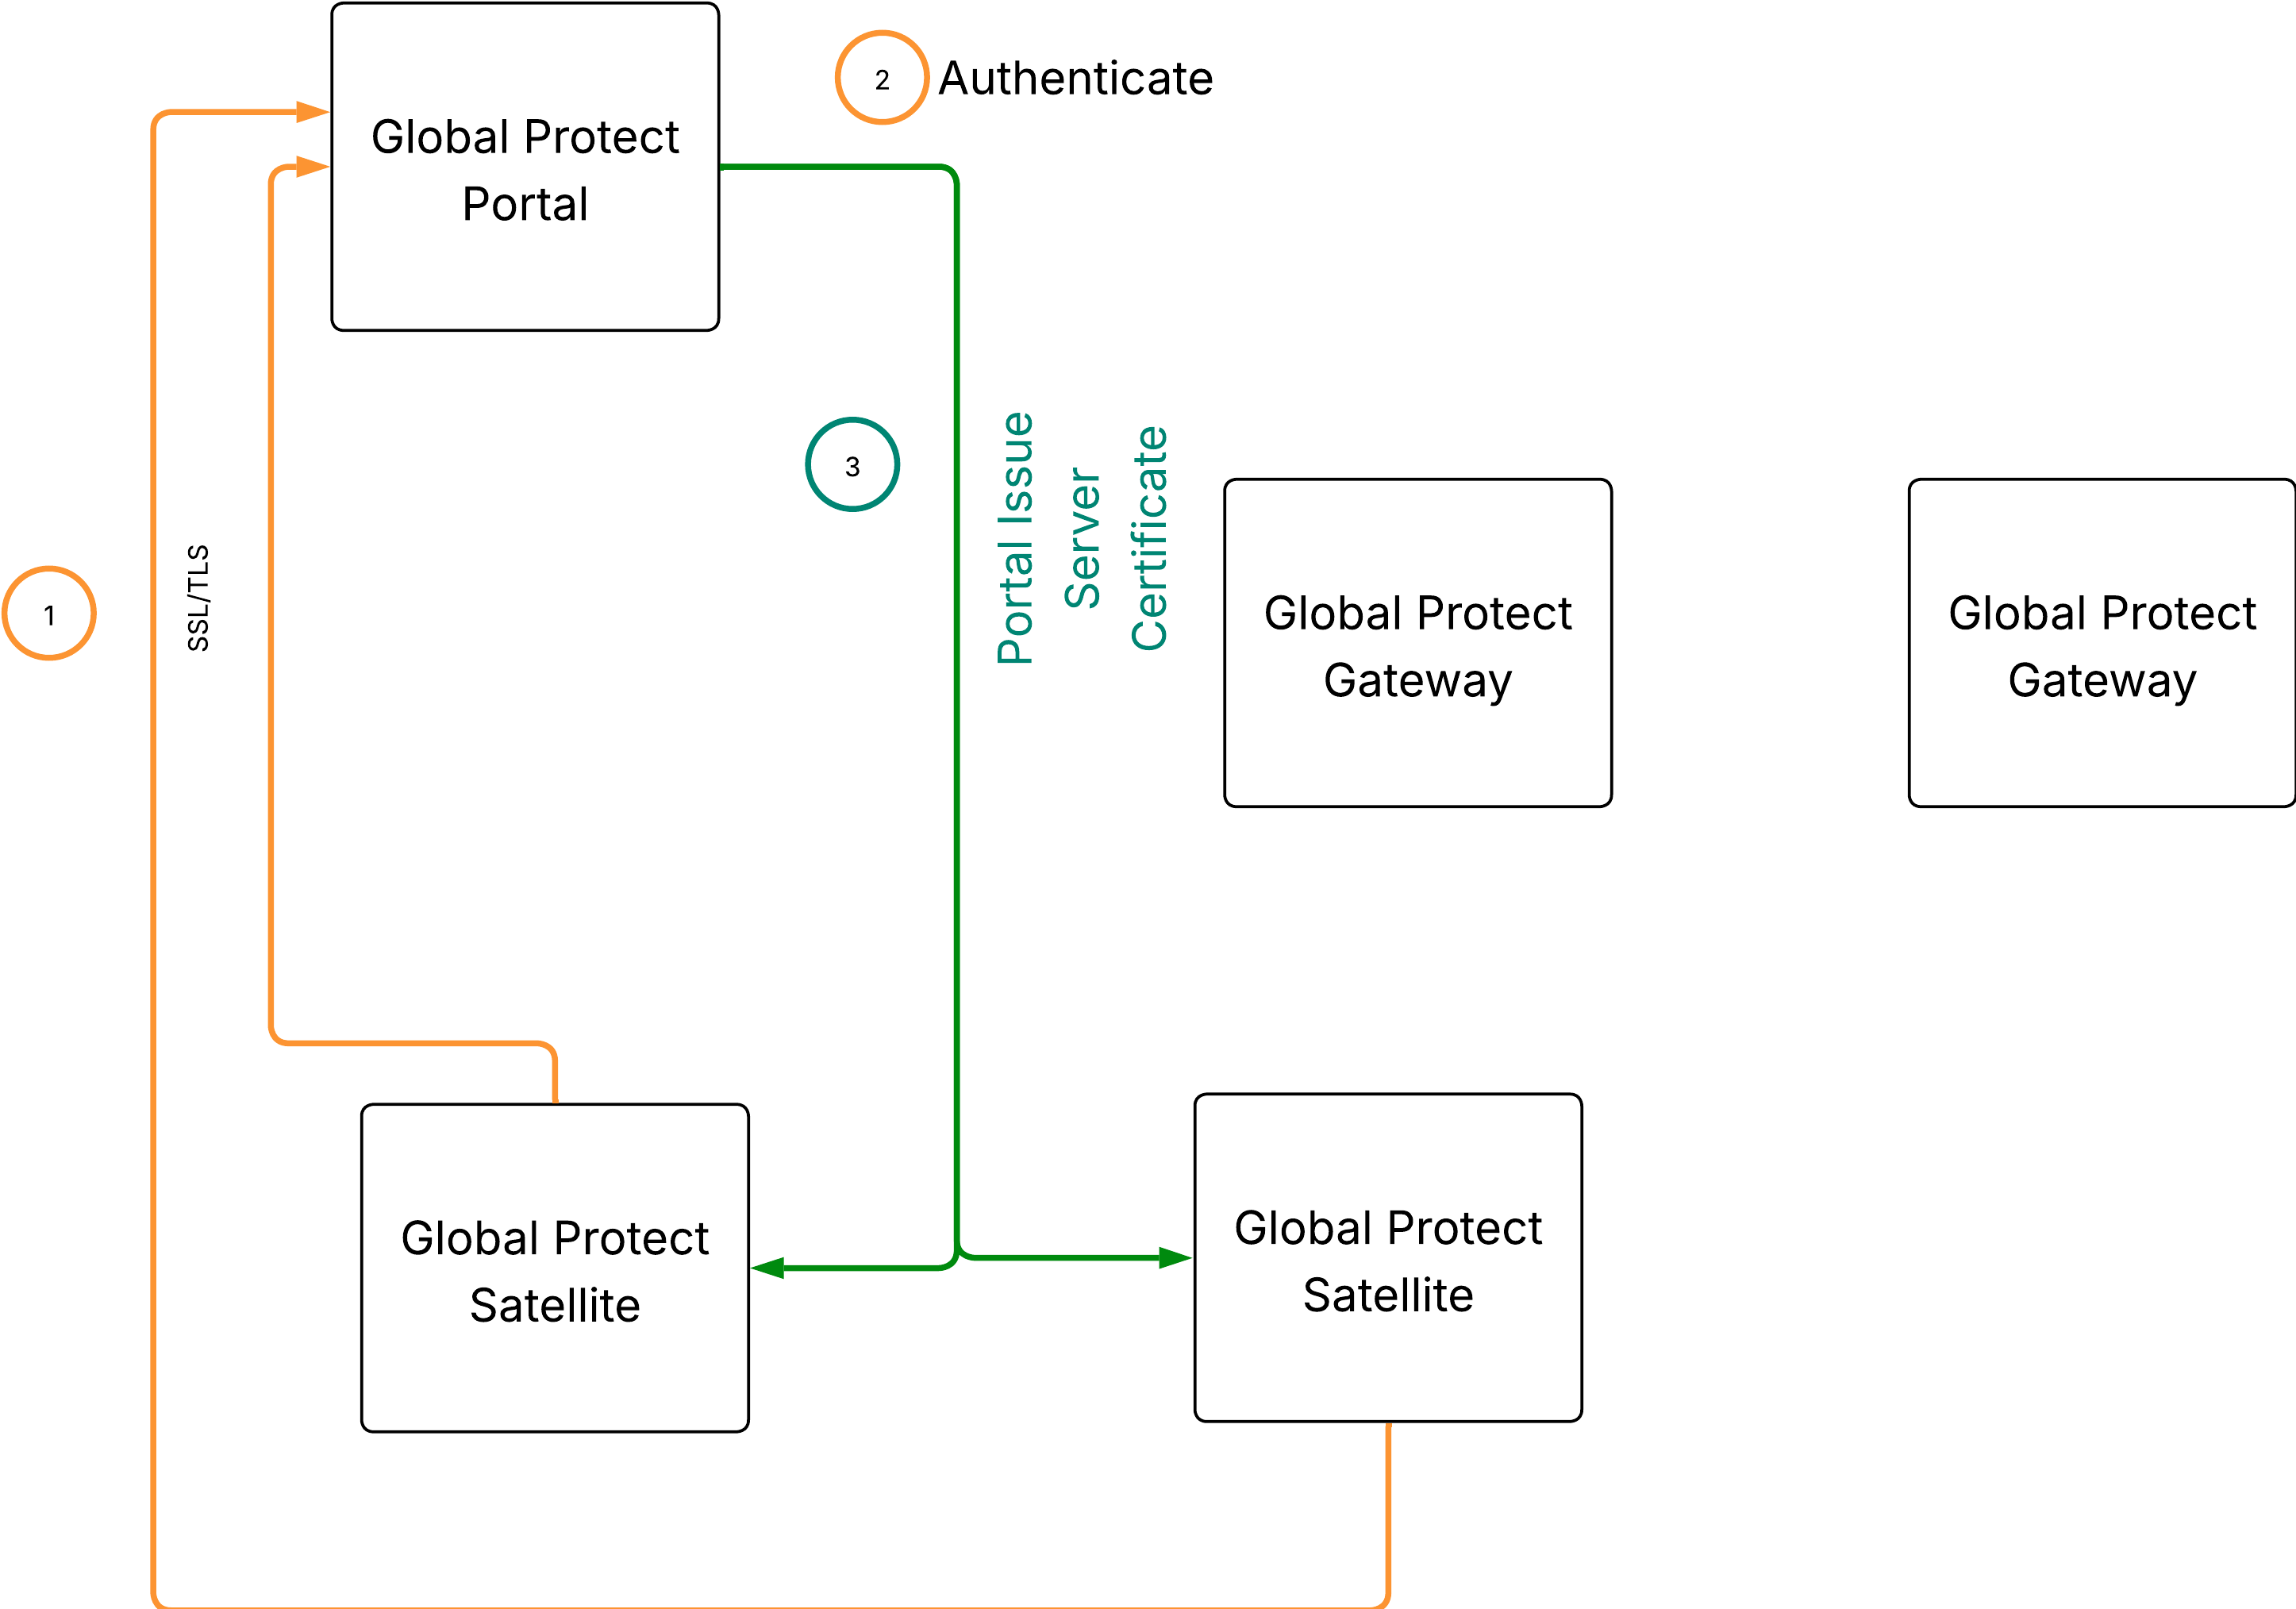
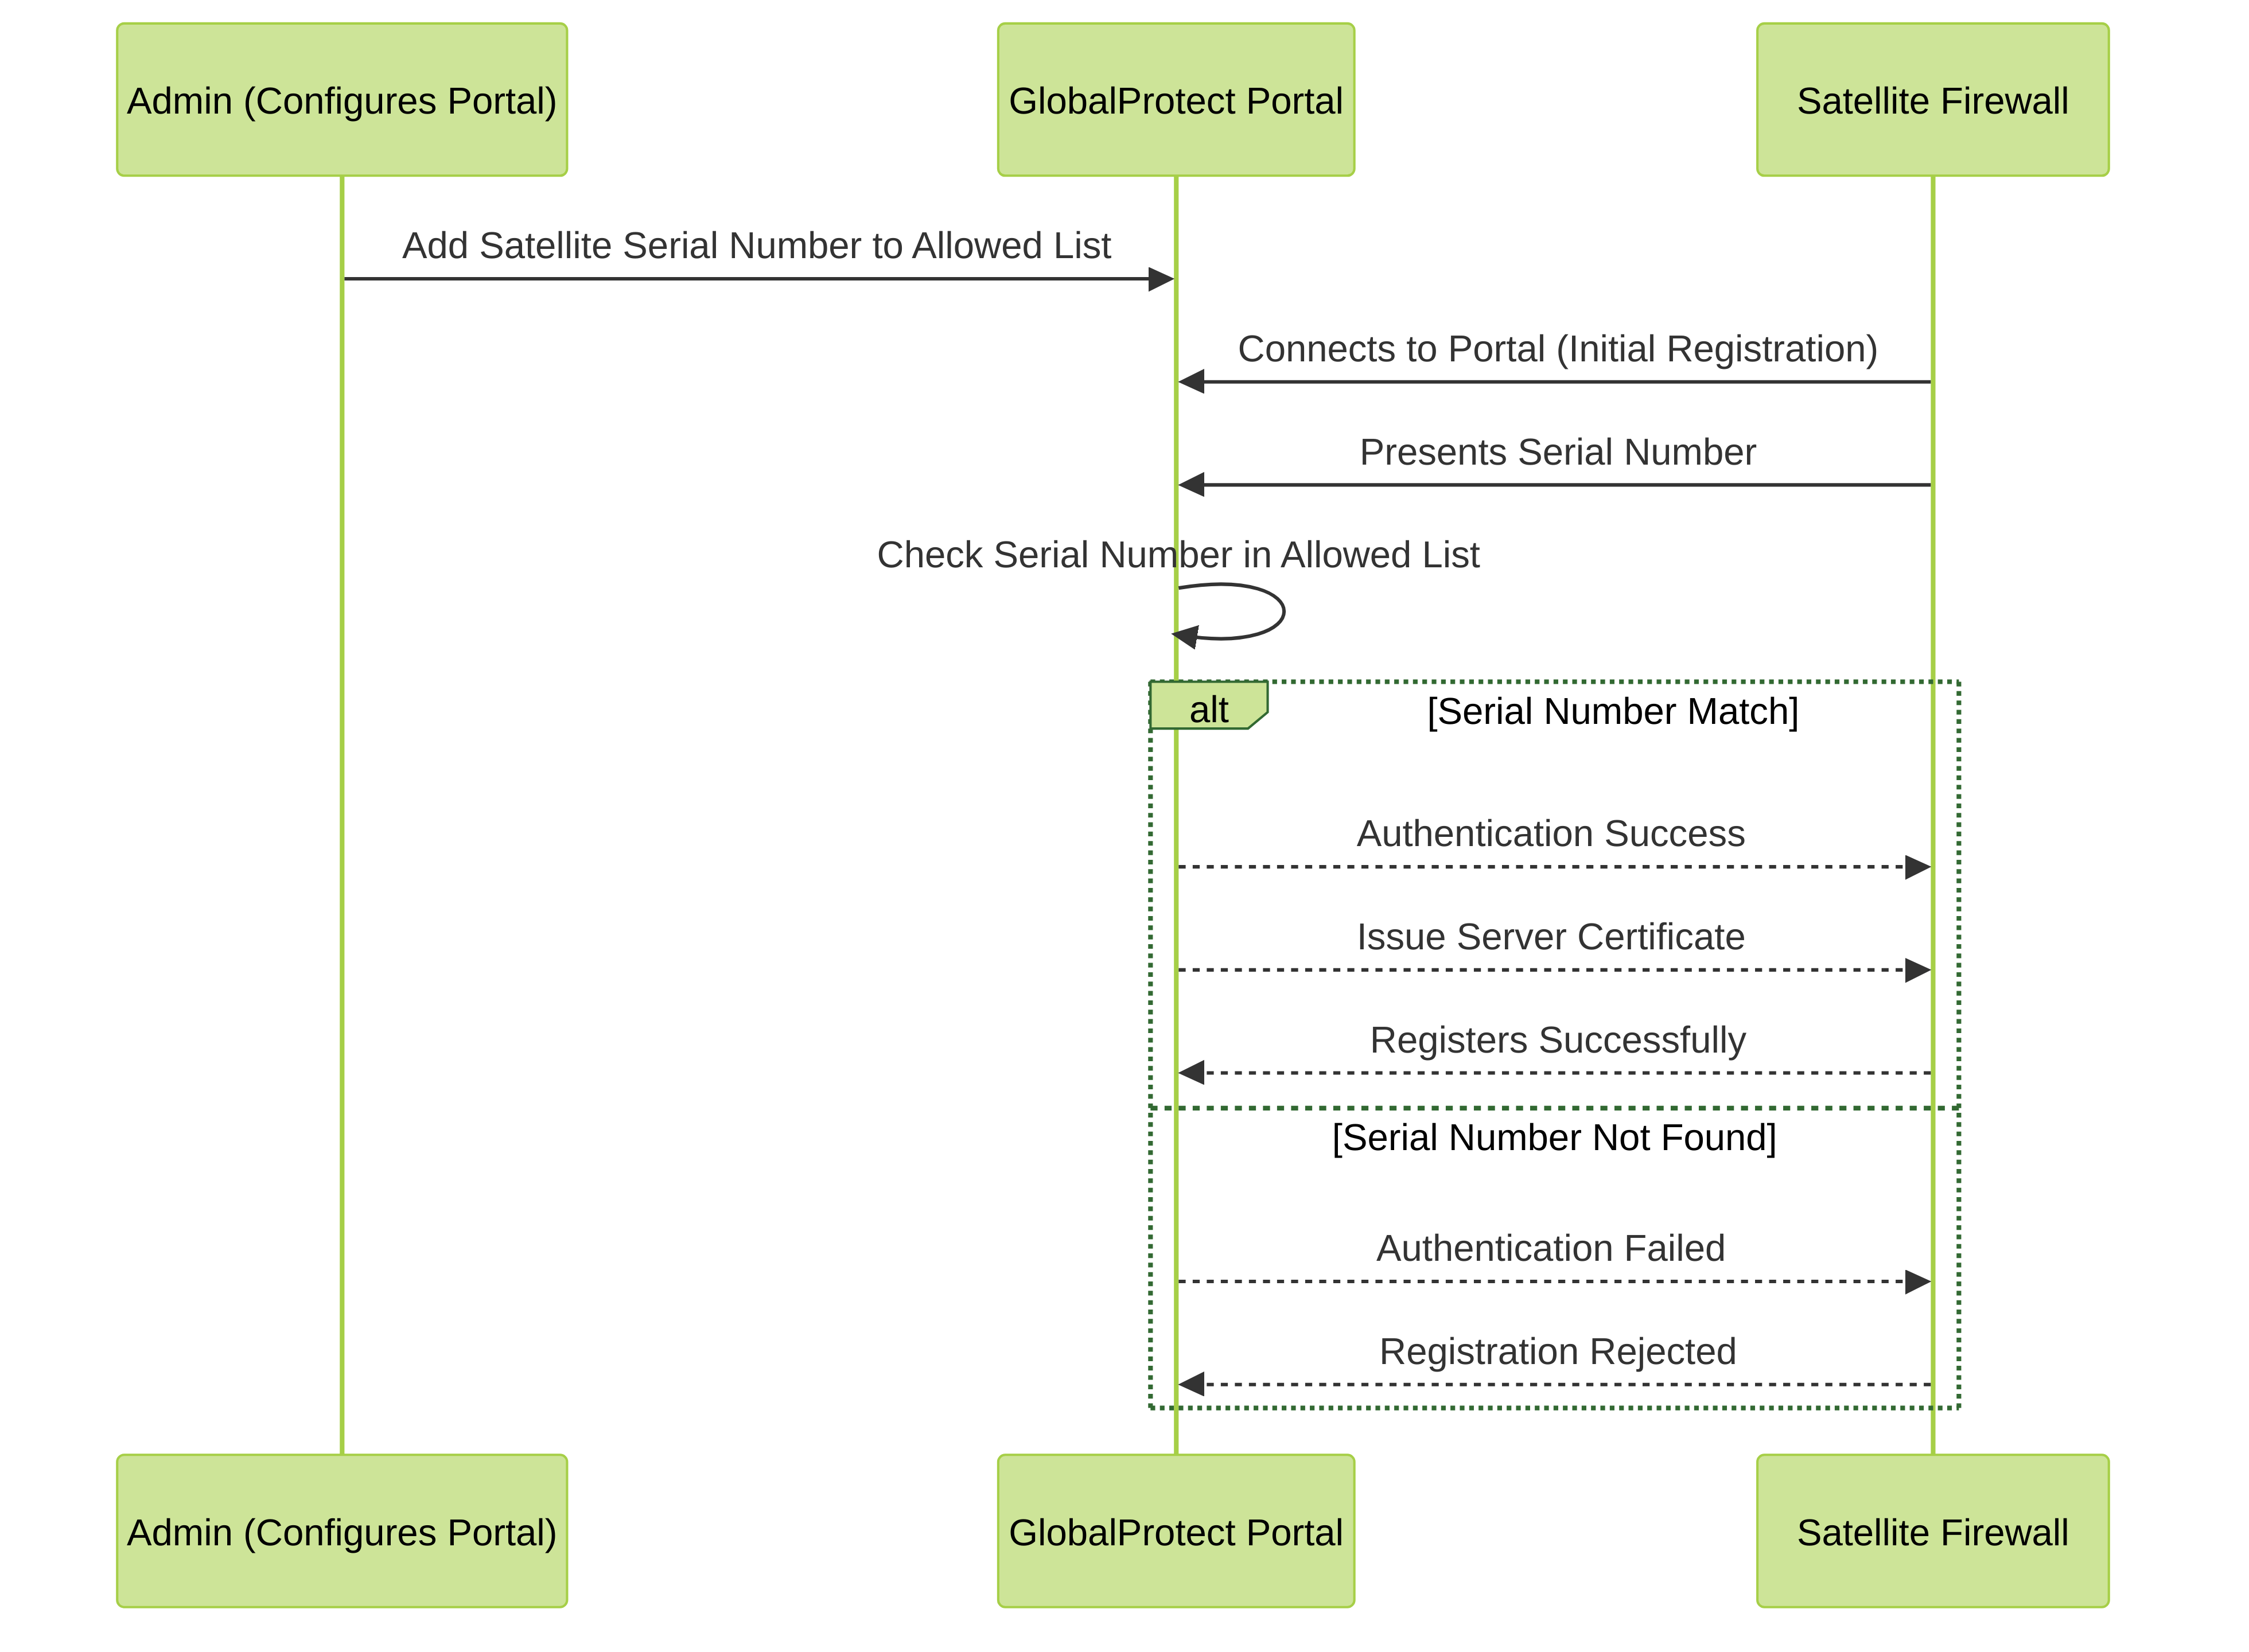
To register with the LSVPN, each satellite must establish an SSL/TLS connection with the portal. After establishing the connection, the portal authenticates the satellite to ensure that is authorized to join the LSVPN. After successfully authenticating the satellite, the portal will issue a server certificate for the satellite and push the LSVPN configuration specifying the gateways to which the satellite can connect and the root CA certificate required to establish an SSL connection with the gateways.
There are multiple ways that the satellite can authenticate to the portal during its initial connection:
- (PAN-OS 10.0 and earlier releases) Serial number Authentication —You can configure the portal with the serial number of the satellite firewalls that are authorized to join the LSVPN. During the initial satellite connection to the portal, the satellite presents its serial number to the portal and if the portal has the serial number in its configuration, the satellite will be successfully authenticated. You add the serial numbers of authorized satellites when you configure the portal. See Configure the Portal.
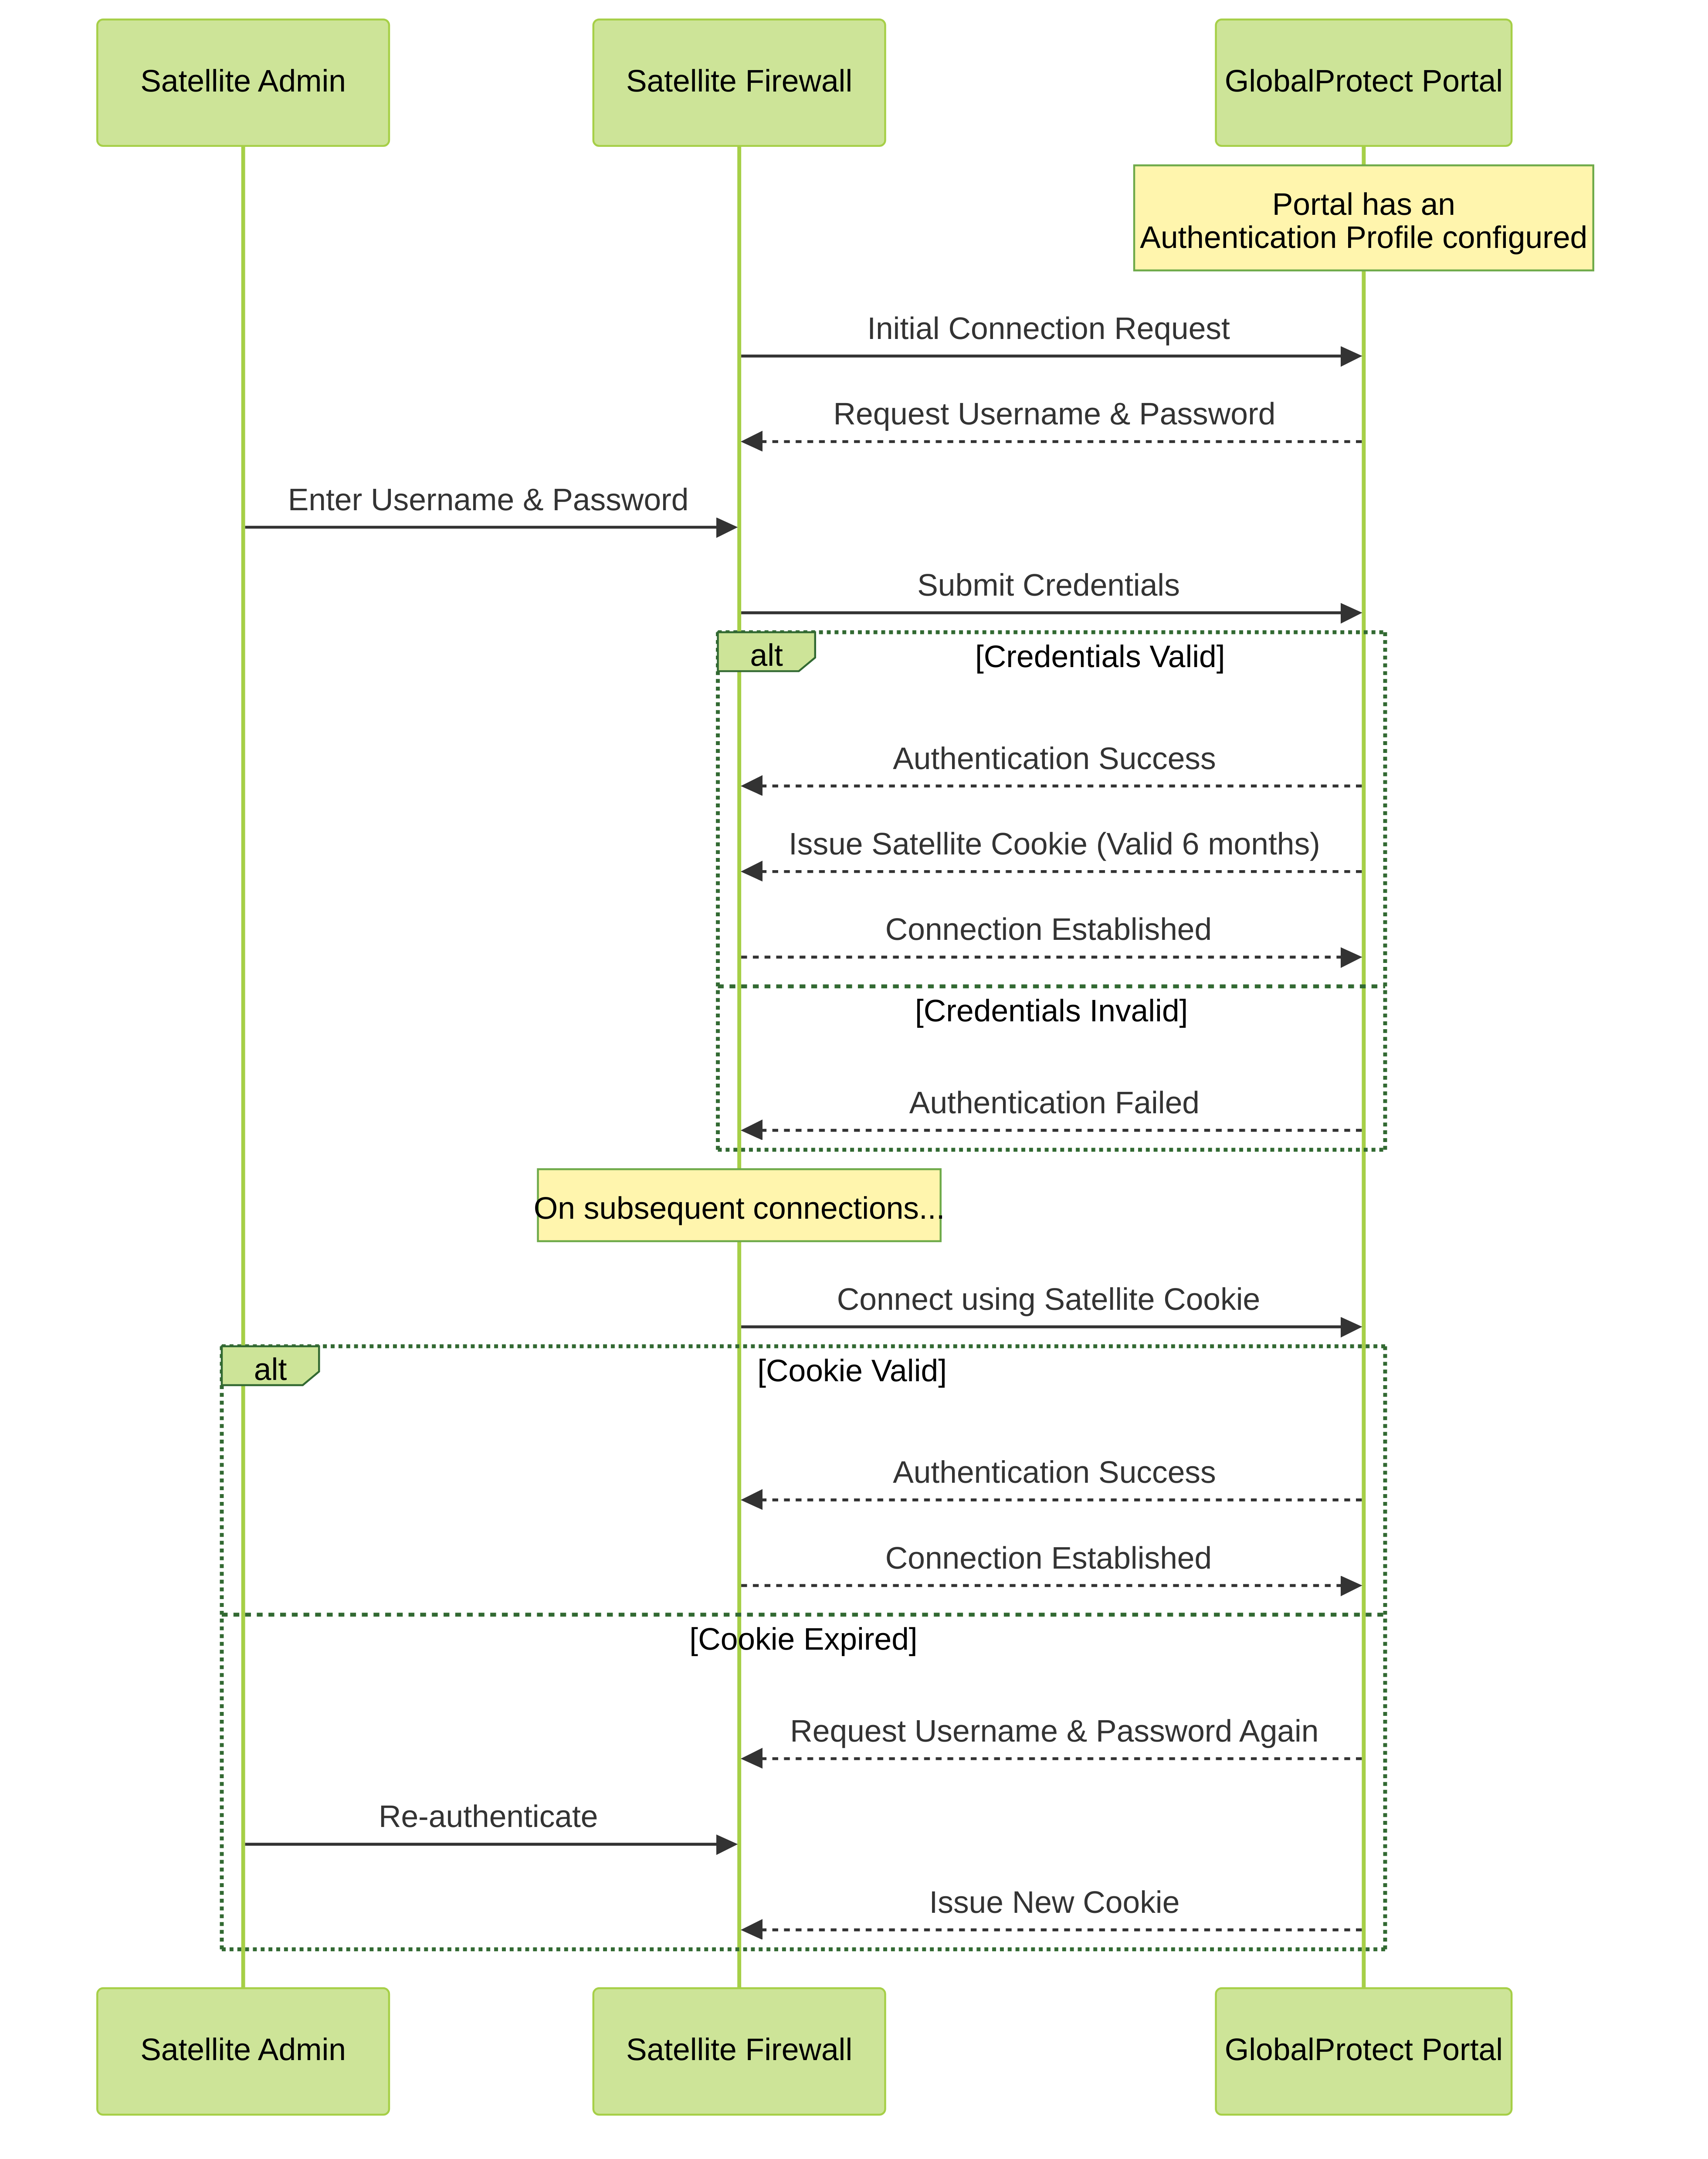
- (PAN-OS 10.1 and later releases) (Default authentication method) Username/password and Satellite Cookie Authentication — For the satellite to authenticate to the portal during its initial connection, you must create an authentication profile for the portal LSVPN configuration. The satellite administrator must manually authenticate the satellite to the portal to establish the first connection. Upon successful authentication, the portal returns a satellite cookie to authenticate the satellite on subsequent connections. The satellite cookie that the portal issues has a lifetime of 6 months, by default. When the cookie expires, the satellite administrator must manually authenticate again, at which time the portal will issue a new cookie.
- (PAN-OS 11.1.3 and later releases) Serial number and IP address Authentication — You can configure the portal with the serial number and IP address of the satellite firewalls that are authorized to join the LSVPN. During the initial satellite connection to the portal, the satellite presents its serial number and IP address to the portal and if the portal has the serial number and IP address in its configuration, the satellite will be successfully authenticated. You add the serial numbers of authorized satellites when you configure the portal.
PAN-OS releases support the following authentication methods:
| PAN-OS RELEASE | SUPPORTED AUTHENTICATION METHOD |
|---|---|
| PAN-OS 10.0 and earlier releases | Serial number Authentication method |
| PAN-OS 10.1 and later releases | Username/password and Satellite Cookie Authentication method (Default authentication method)
While configuring the Username/ password and Satellite Cookie Authentication method, configure the satellite cookie expiration to a value more than the satellite upgrade time to avoid login failures. |
| PAN-OS 11.1.3 and later releases |
|
Before upgrading or downgrading to a particular PAN-OS release, be aware of the authentication methods supported.
Refer to Upgrade and Downgrade Considerations to learn about the authentication method supported when you upgrade or downgrade the firewall from one PAN-OS release to another.
(PAN-OS 11.0.1 and later releases) You can configure the cookie expiry period from 1 to 5 years, while the default remains as 6 months.
On the portal:
- Use the
request global-protect-portal set-satellite-cookie-expiration value <1-5>CLI command to change the current satellite cookie expiration time. - Use the
show global-protect-portal satellite-cookie-expirationCLI command to view the current satellite cookie expiration time.
On the satellite:
- Use the
show global-protect-satellite satelliteCLI command to view (in “Satellite Cookie Generation Time” field) the current satellite authentication cookie's generation time.
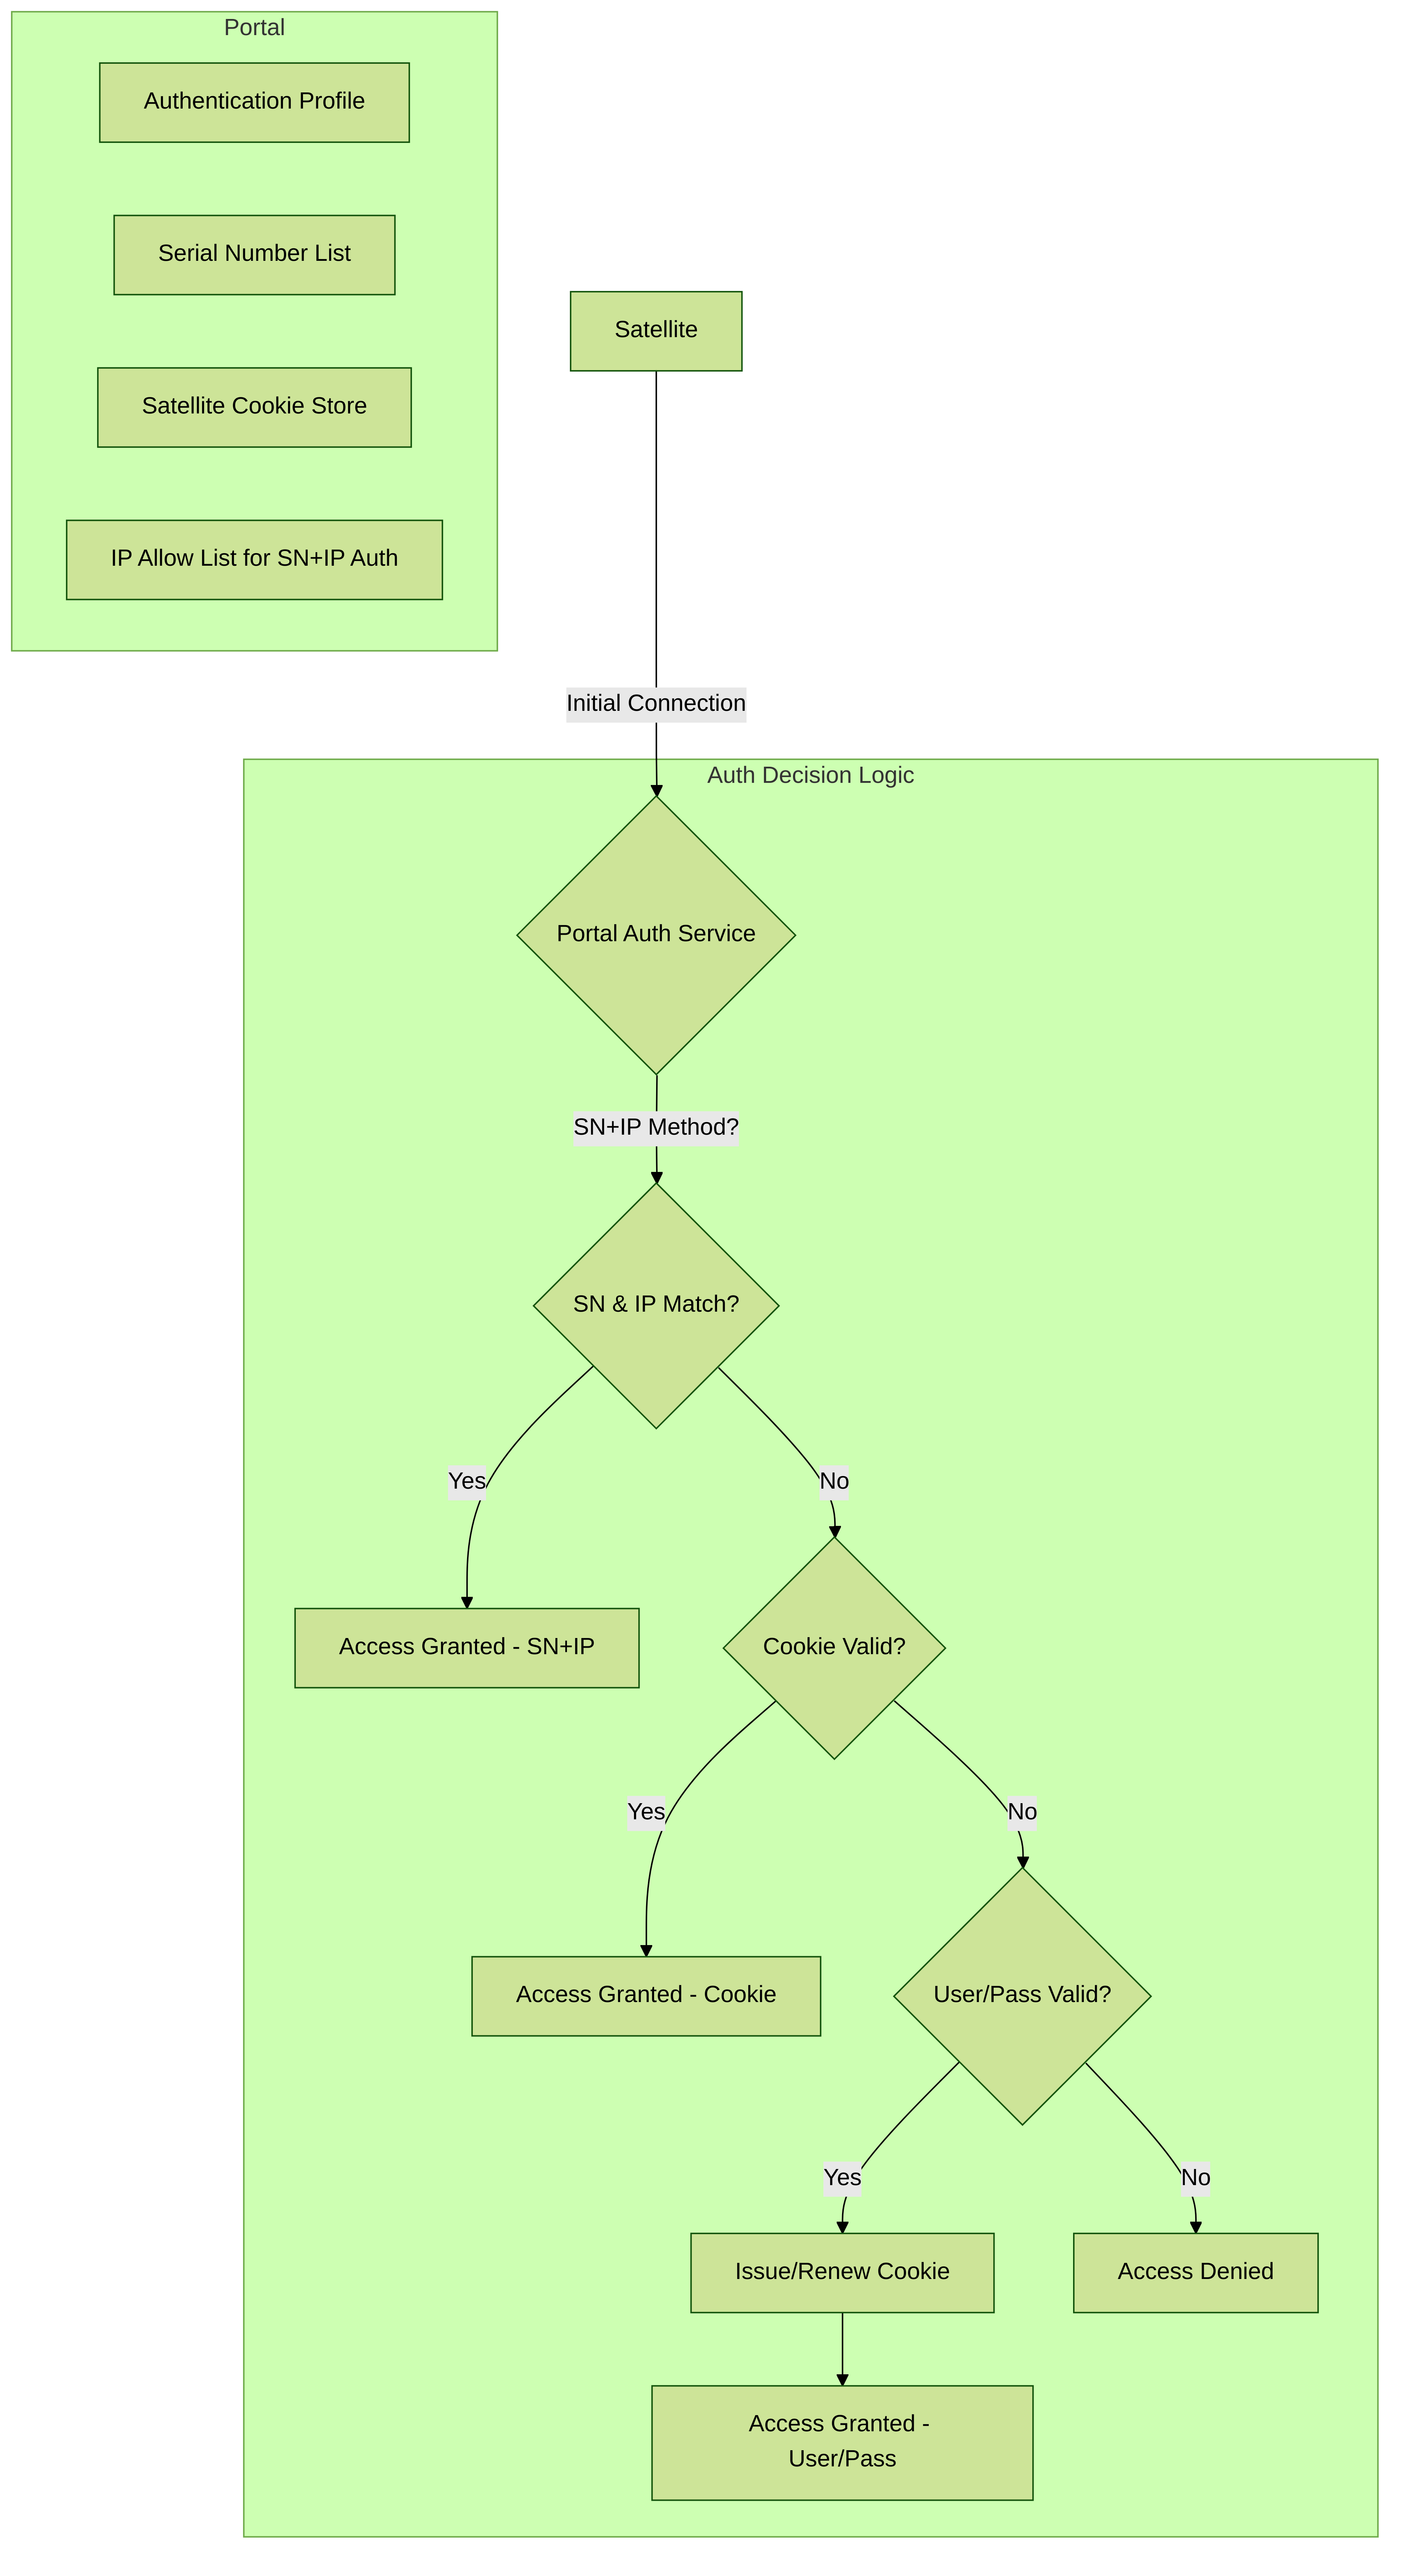
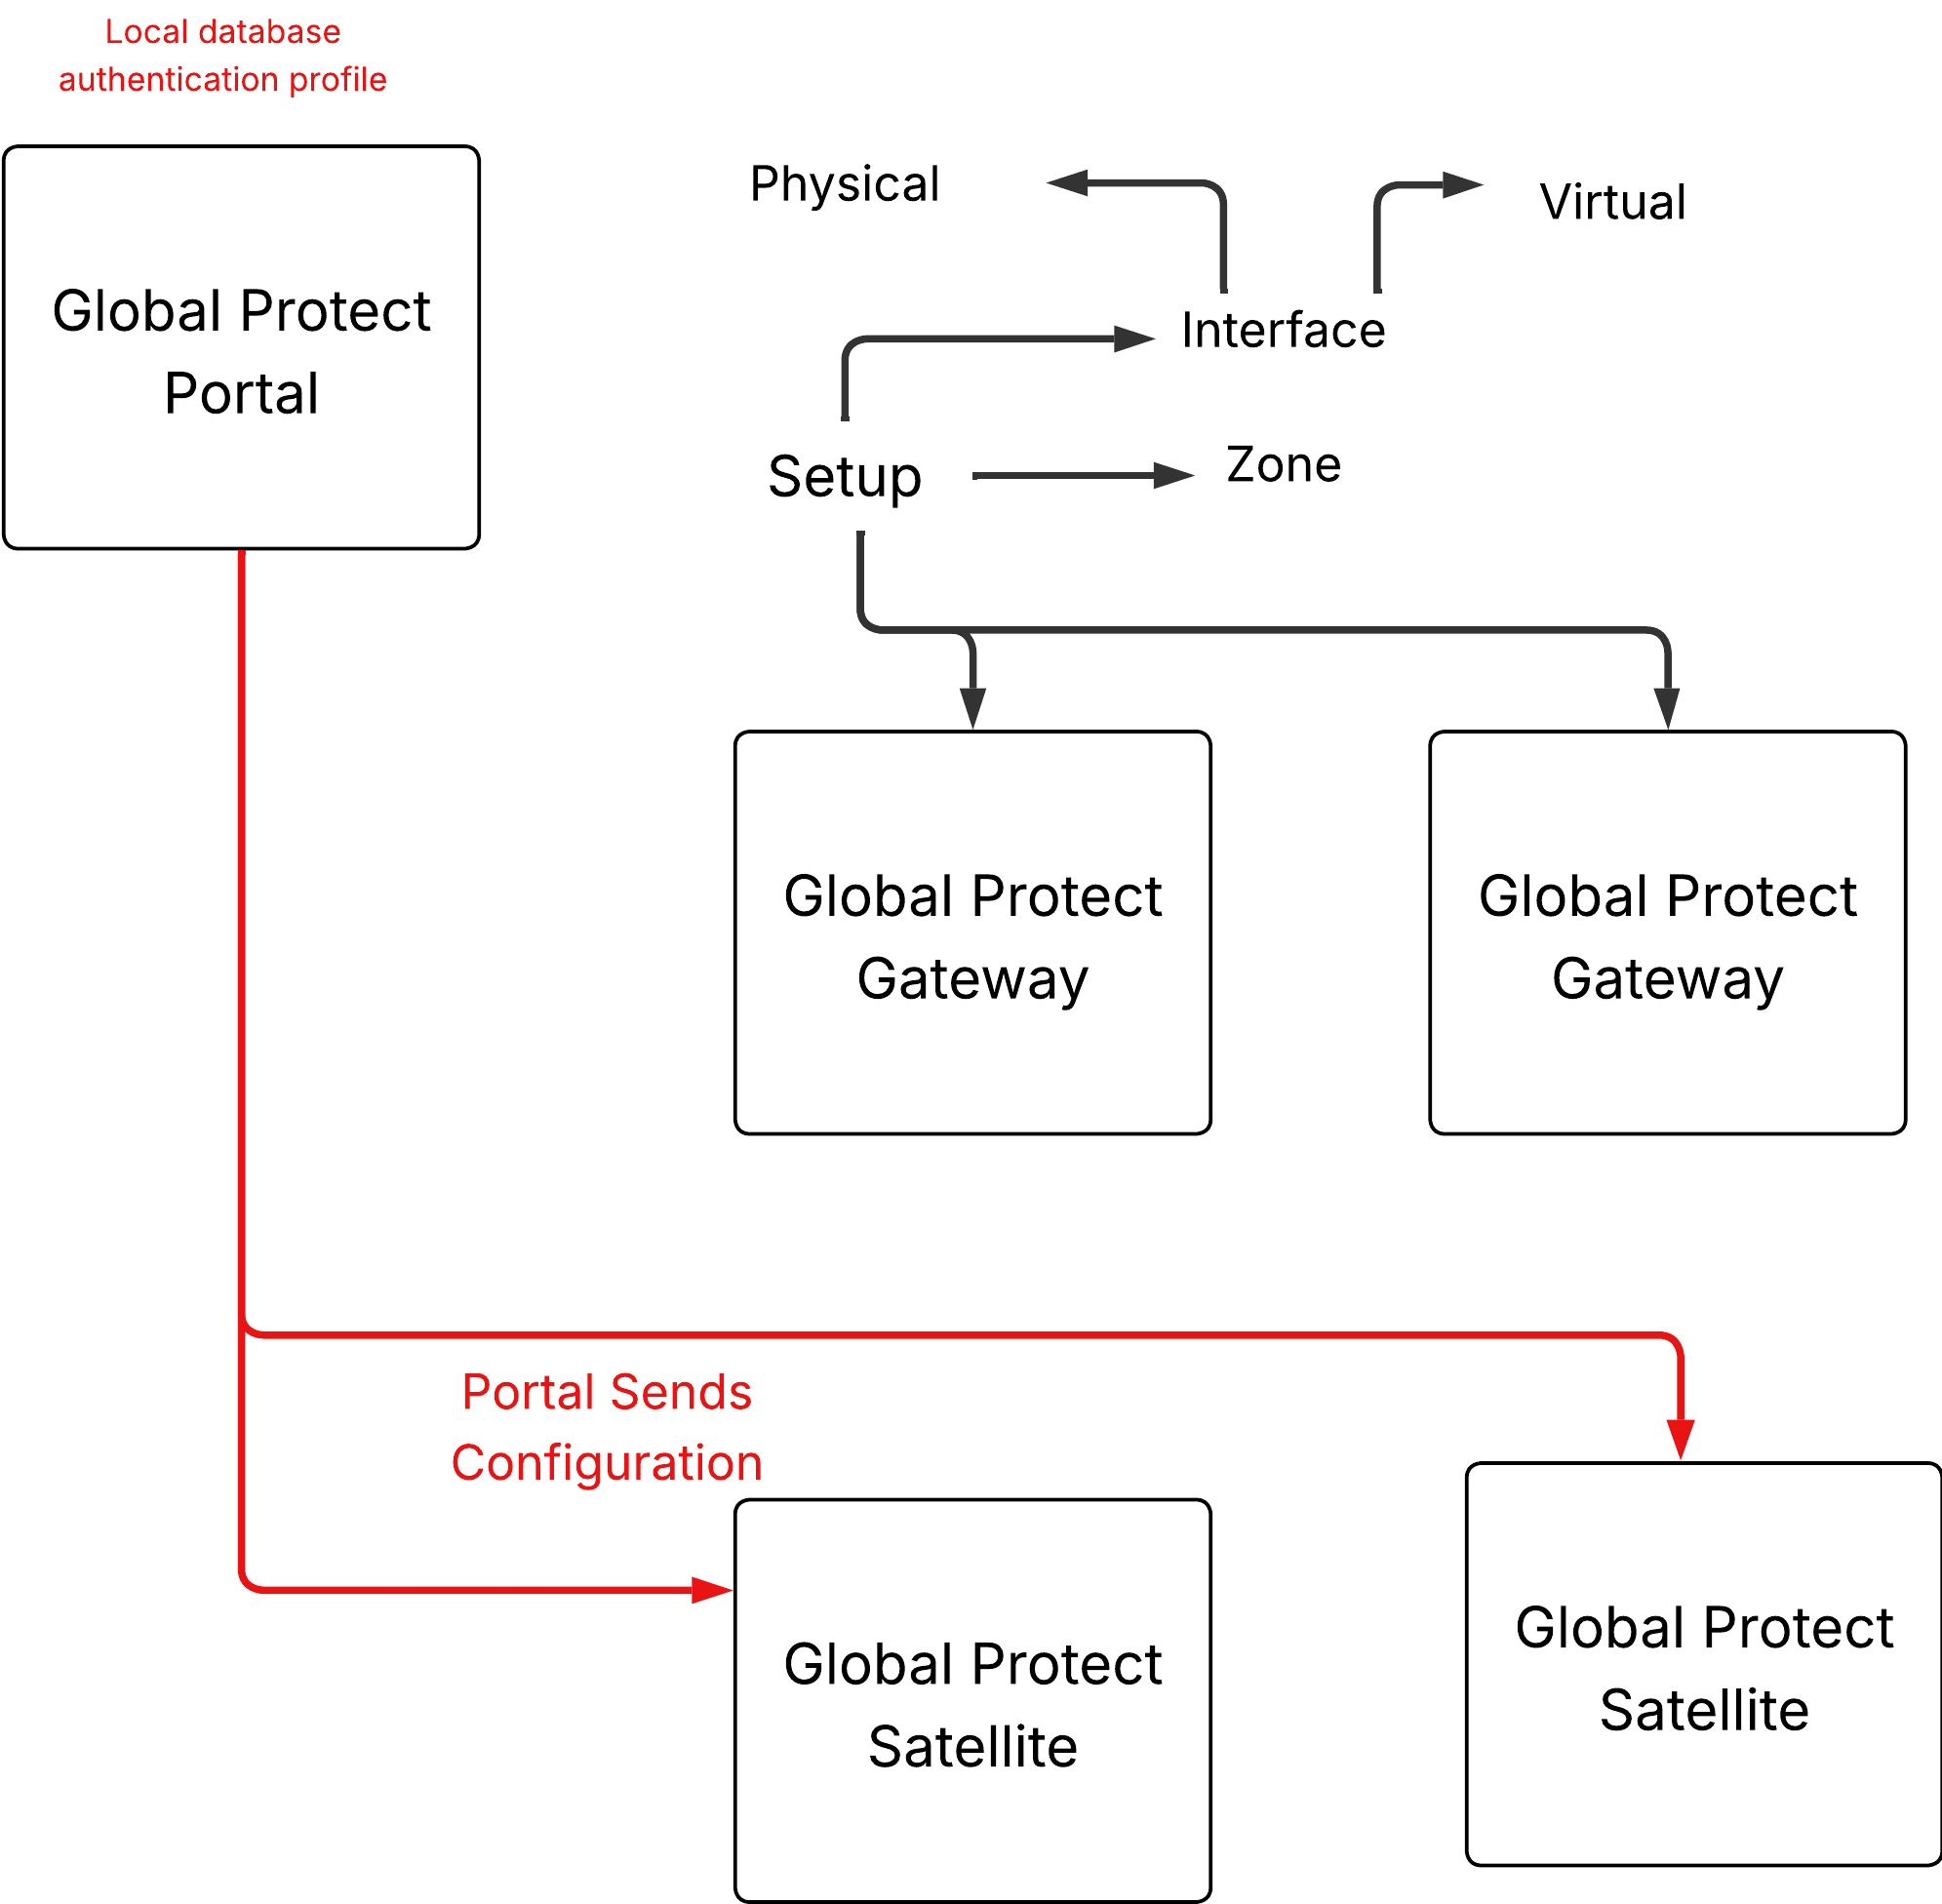
Conceptual authentication flow for satellites connecting to the portal.
Configure GlobalProtect Gateways for LSVPN
Because the GlobalProtect configuration that the portal delivers to the satellites includes the list of gateways the satellite can connect to, it’s a good idea to configure the gateways before configuring the portal.
Before you can configure the GlobalProtect gateway, you must complete the following tasks:
- Create Interfaces and Zones for the LSVPN on the interface where you’ll configure each gateway. You must configure both the physical interface and the virtual tunnel interface.
- Enable SSL Between GlobalProtect LSVPN Components by configuring the gateway server certificates, SSL/TLS service profiles, and certificate profile required to establish a mutual SSL/ TLS connection from the GlobalProtect satellites to the gateway.
Configure each GlobalProtect gateway to participate in the LSVPN as follows:
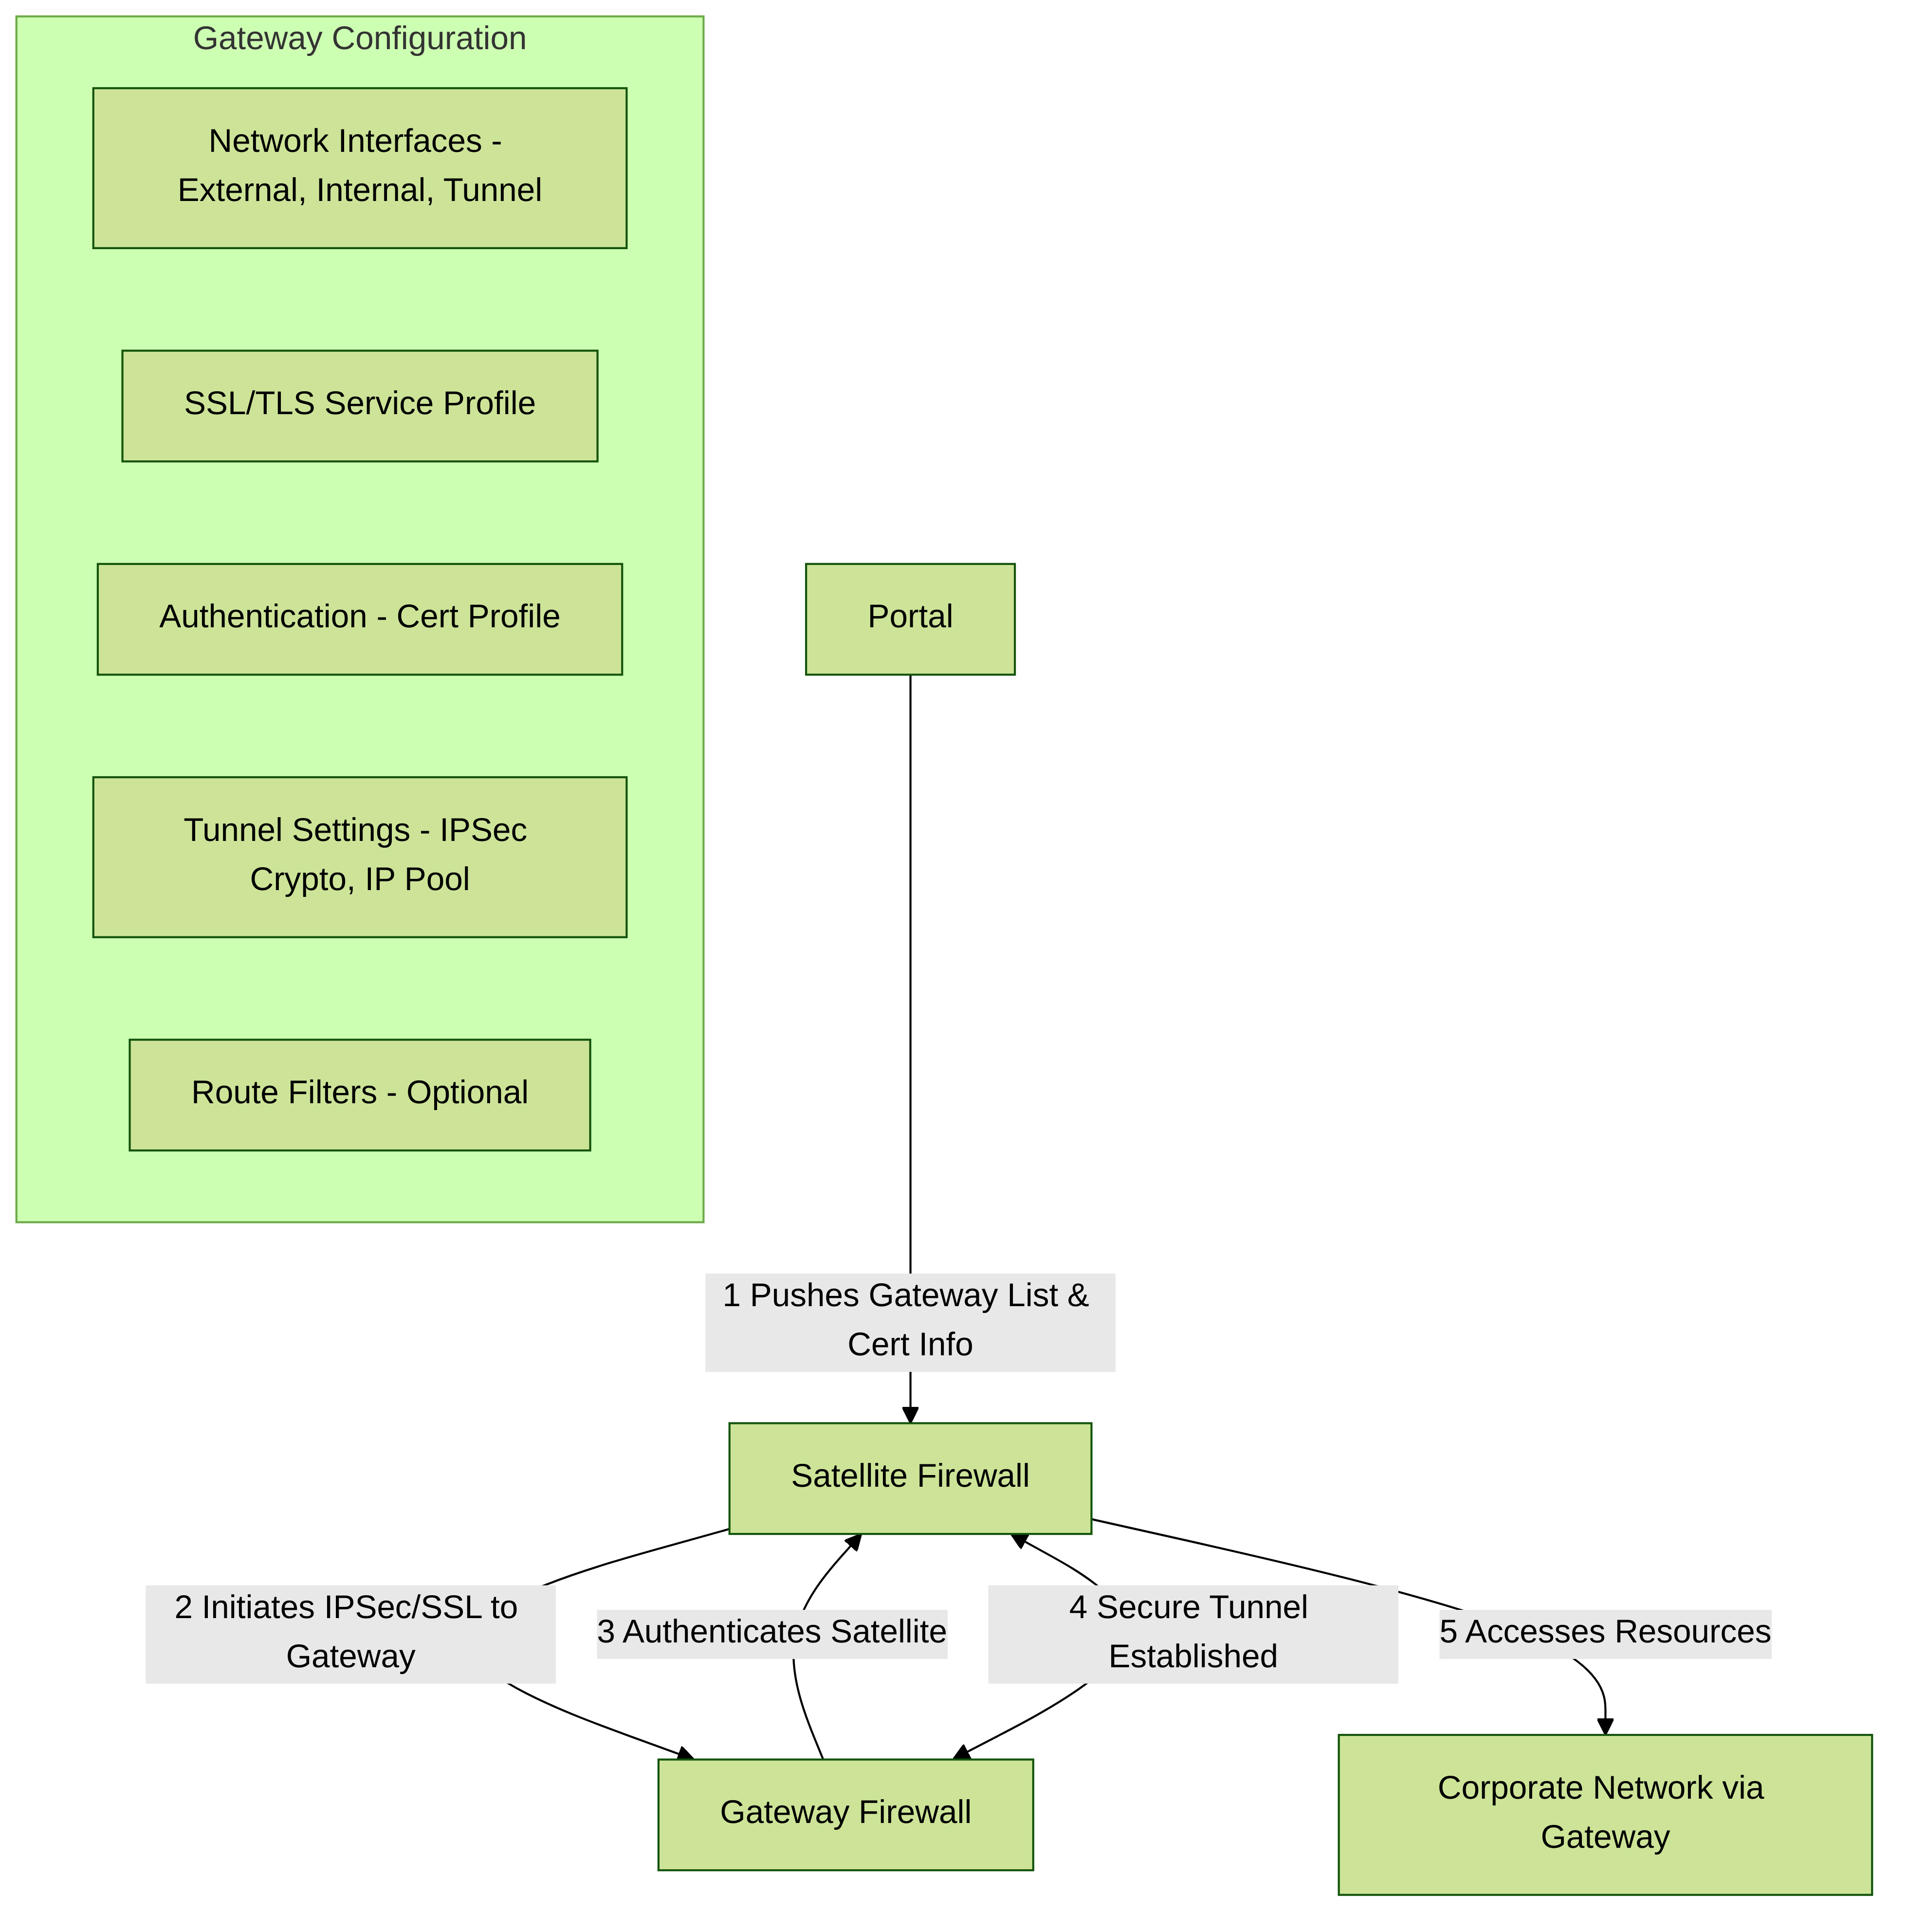
Key configuration areas for an LSVPN Gateway.
STEP 1 | Add a gateway.
- Select Network > GlobalProtect > Gateways and click Add.
- In the General screen, enter a Name for the gateway. The gateway name should have no spaces and, as a best practice, should include the location or other descriptive information to help users and administrators identify the gateway.
- (Optional) Select the virtual system to which this gateway belongs from the Location field.
Configure the GlobalProtect Portal for LSVPN
The GlobalProtect portal provides the management functions for your GlobalProtect LSVPN. Every satellite system that participates in the LSVPN receives configuration information from the portal, including information about available gateways as well as the certificate it needs in order to connect to the gateways.
The following sections provide procedures for setting up the portal:
- GlobalProtect Portal for LSVPN Prerequisite Tasks
- Configure the Portal
- Define the Satellite Configurations
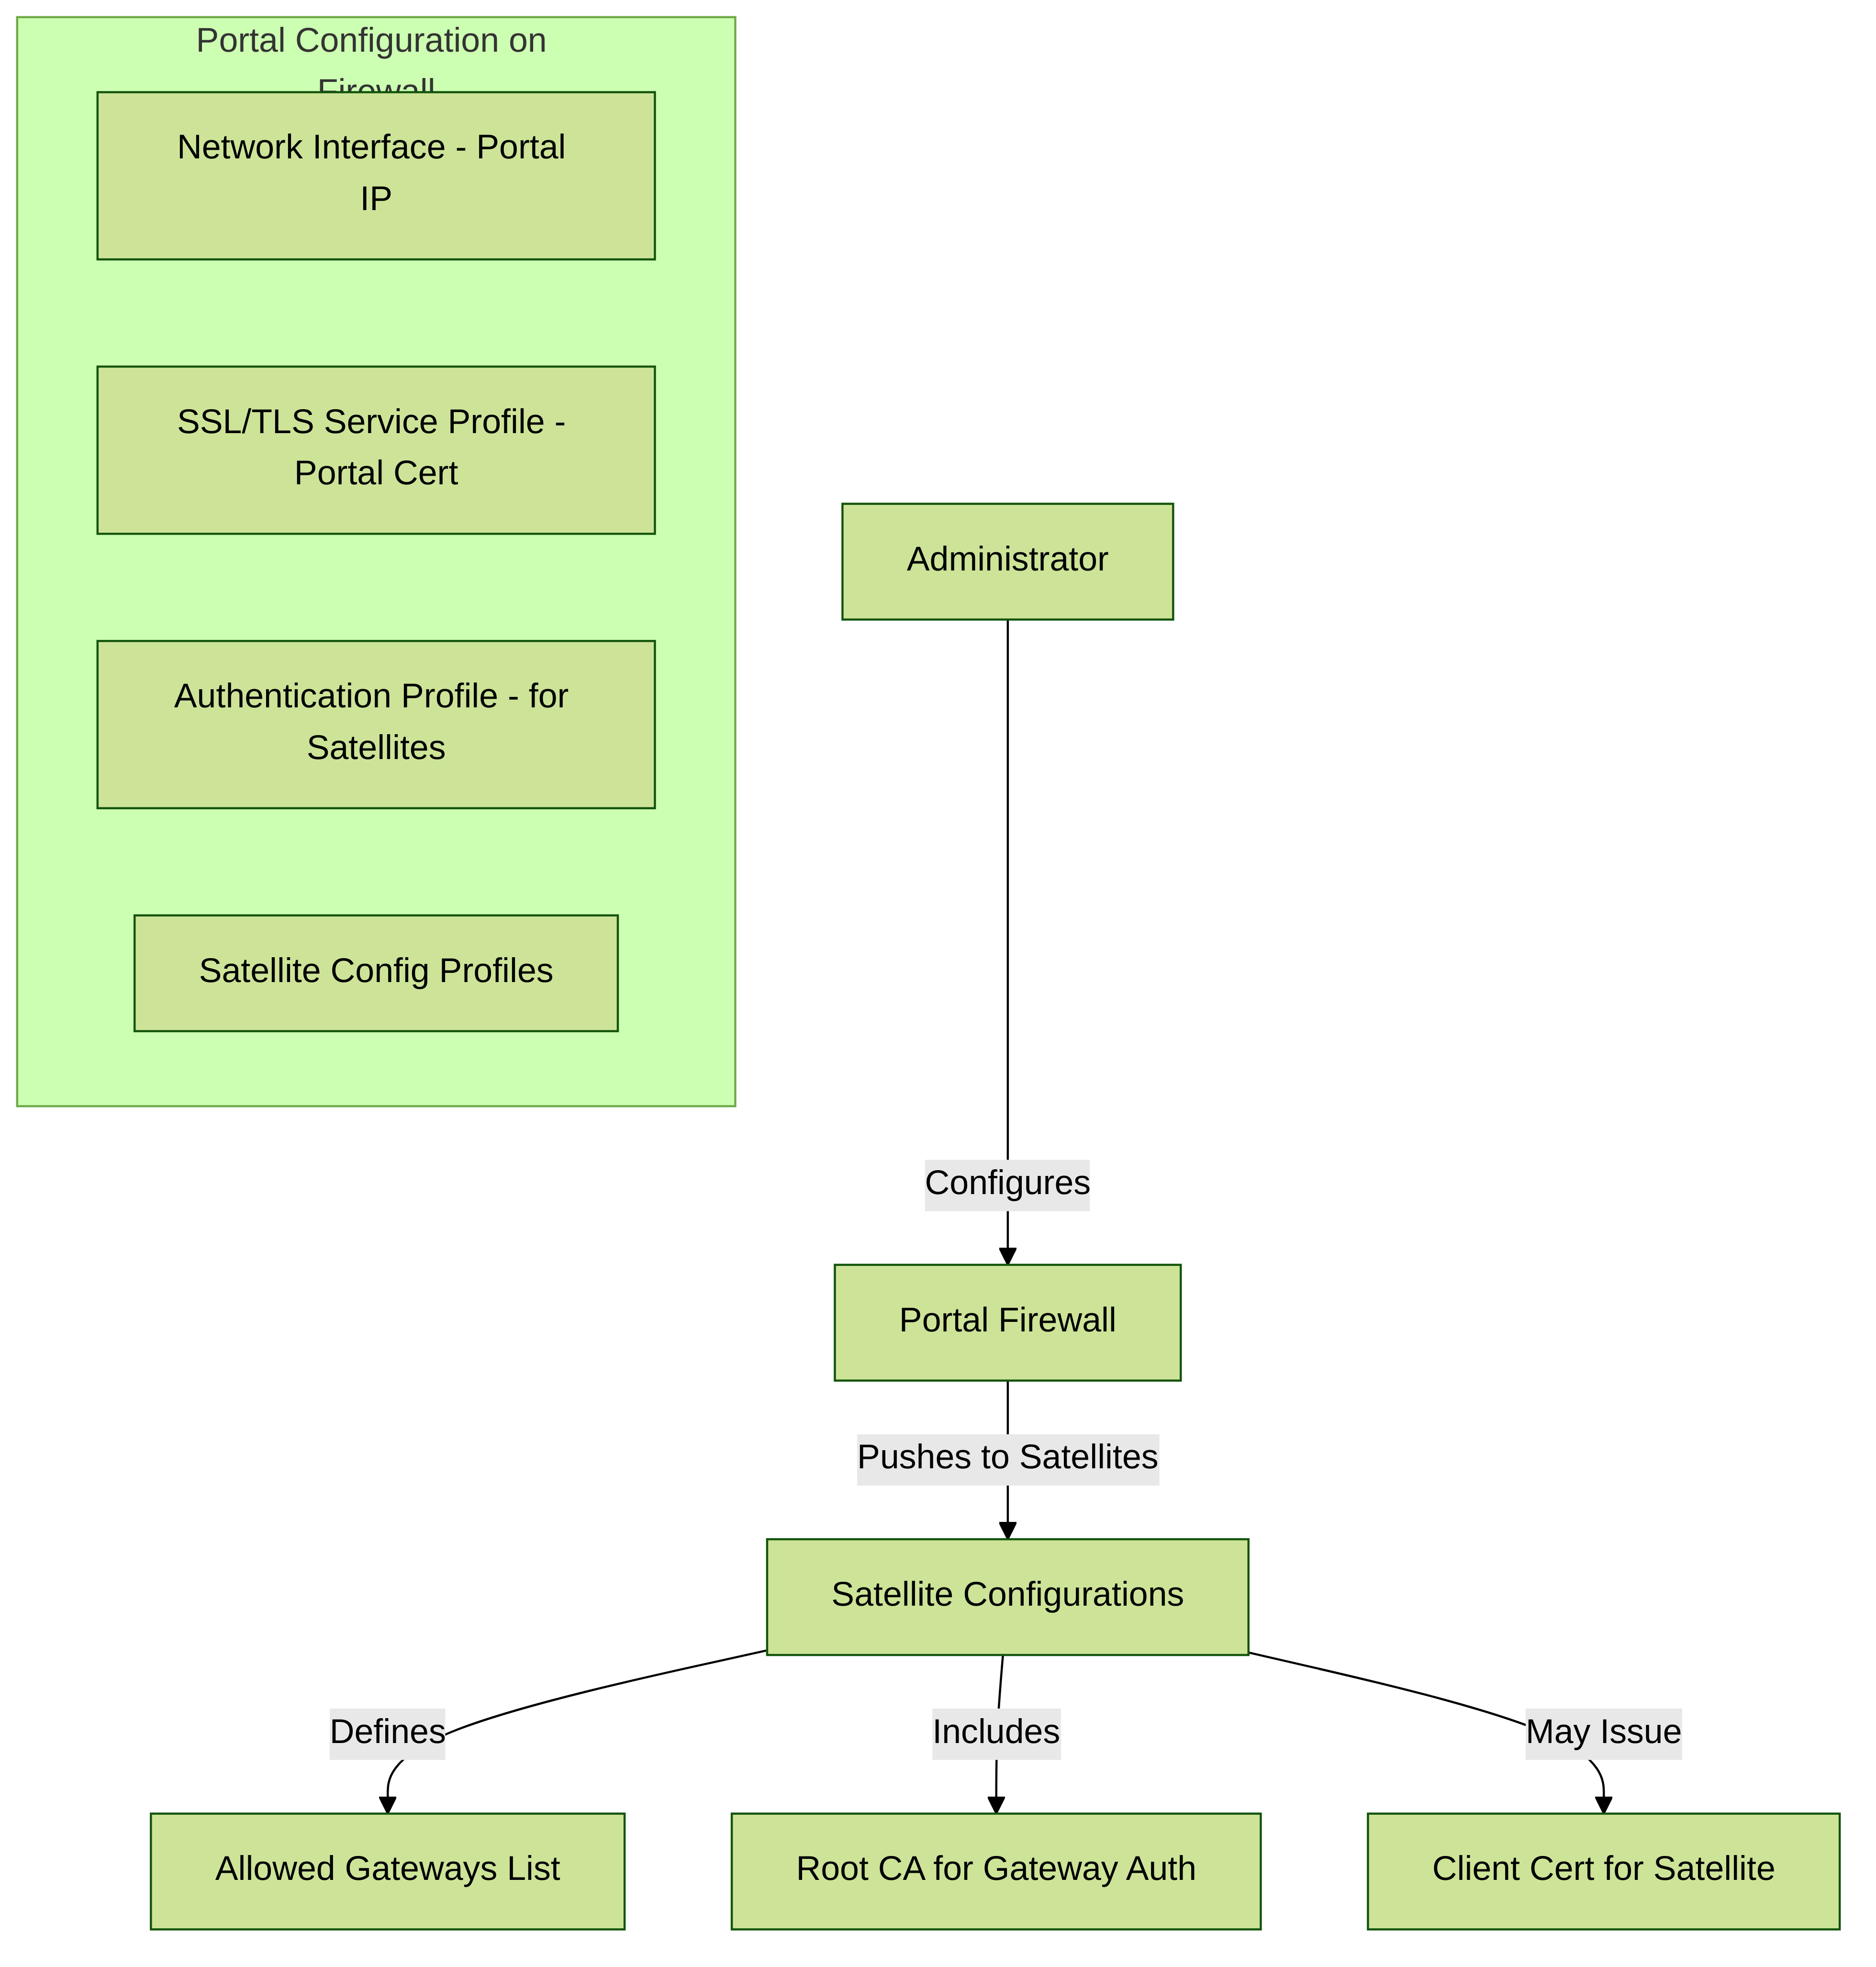
Key configuration areas for an LSVPN Portal.
GlobalProtect Portal for LSVPN Prerequisite Tasks
Before configuring the GlobalProtect portal, you must complete the following tasks:
- Create Interfaces and Zones for the LSVPN on the interface where you’ll configure the portal.
- Enable SSL Between GlobalProtect LSVPN Components by creating an SSL/TLS service profile for the portal server certificate, issuing gateway server certificates, and configuring the portal to issue server certificates for the GlobalProtect satellites.
- Configure the Portal to Authenticate Satellites by setting up local database authentication and defining the authentication profile that the portal will use to authenticate satellites.
- Configure GlobalProtect Gateways for LSVPN.
Prepare the Satellite to Join the LSVPN
To participate in the LSVPN, the satellites require a minimal amount of configuration. Because the required configuration is minimal, you can pre-configure the satellites before shipping them to your branch offices for installation.
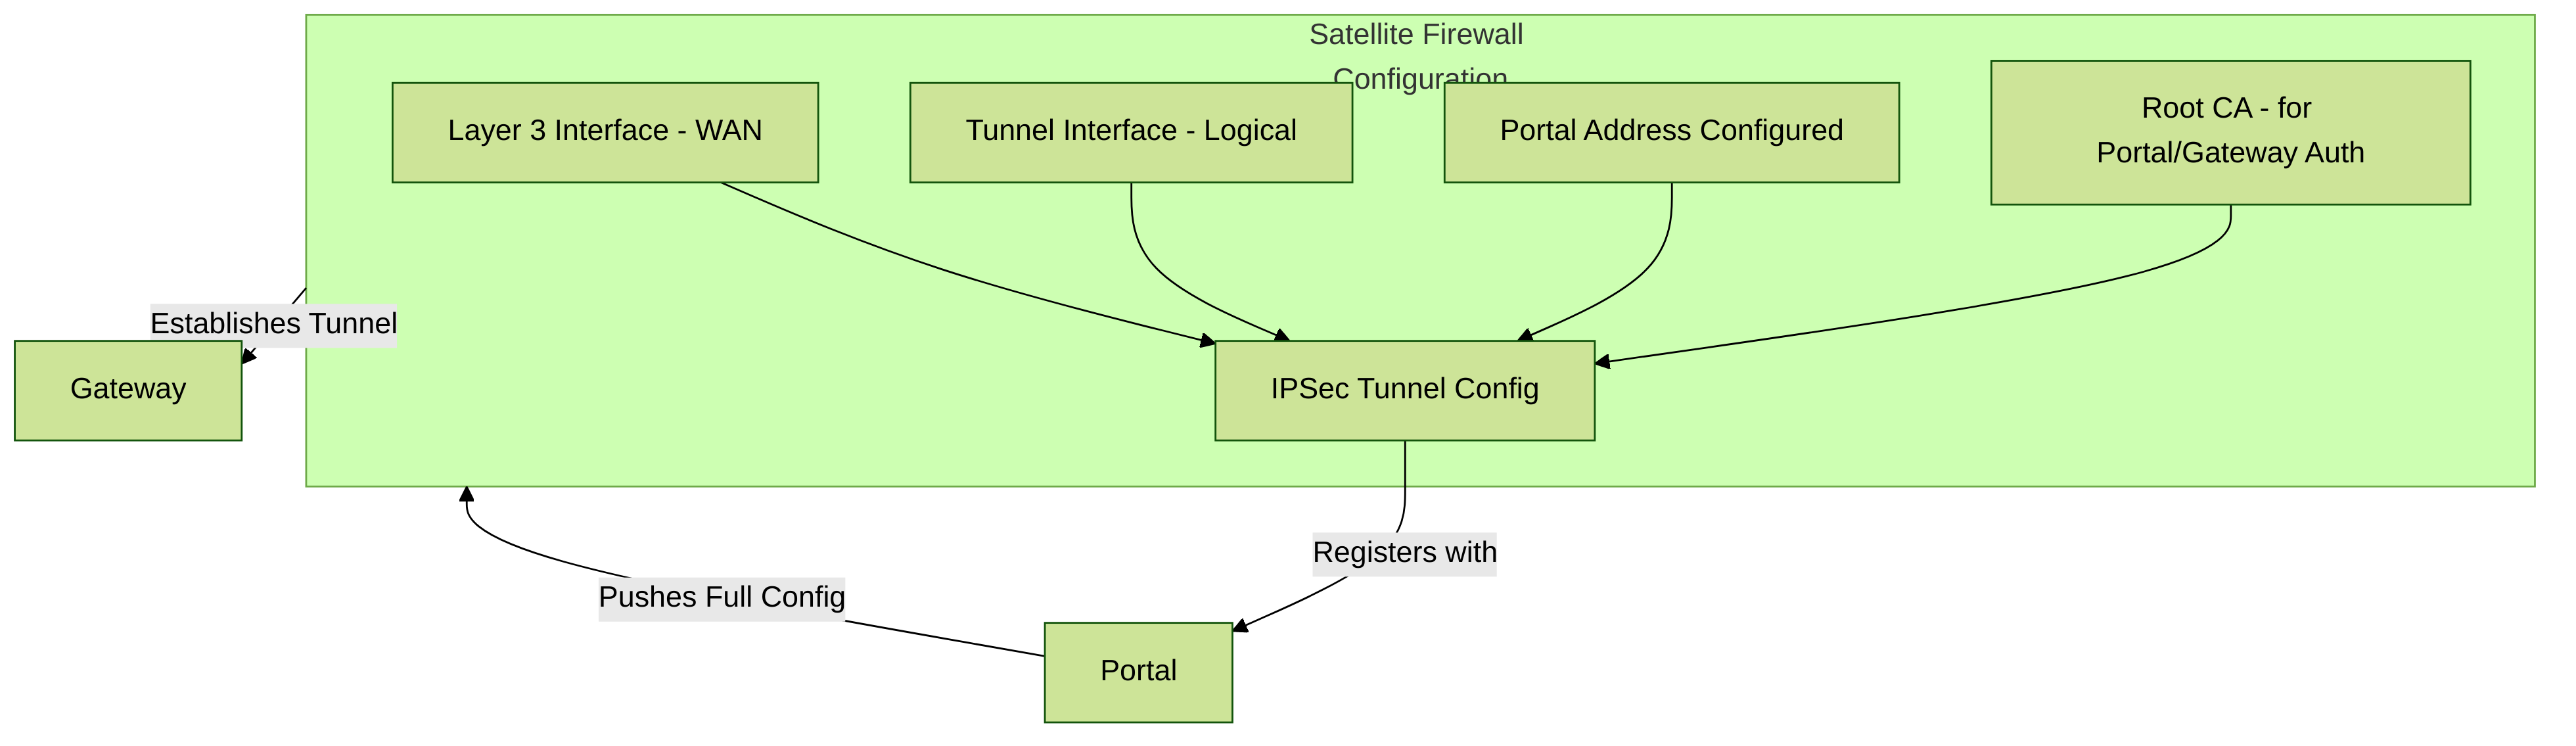
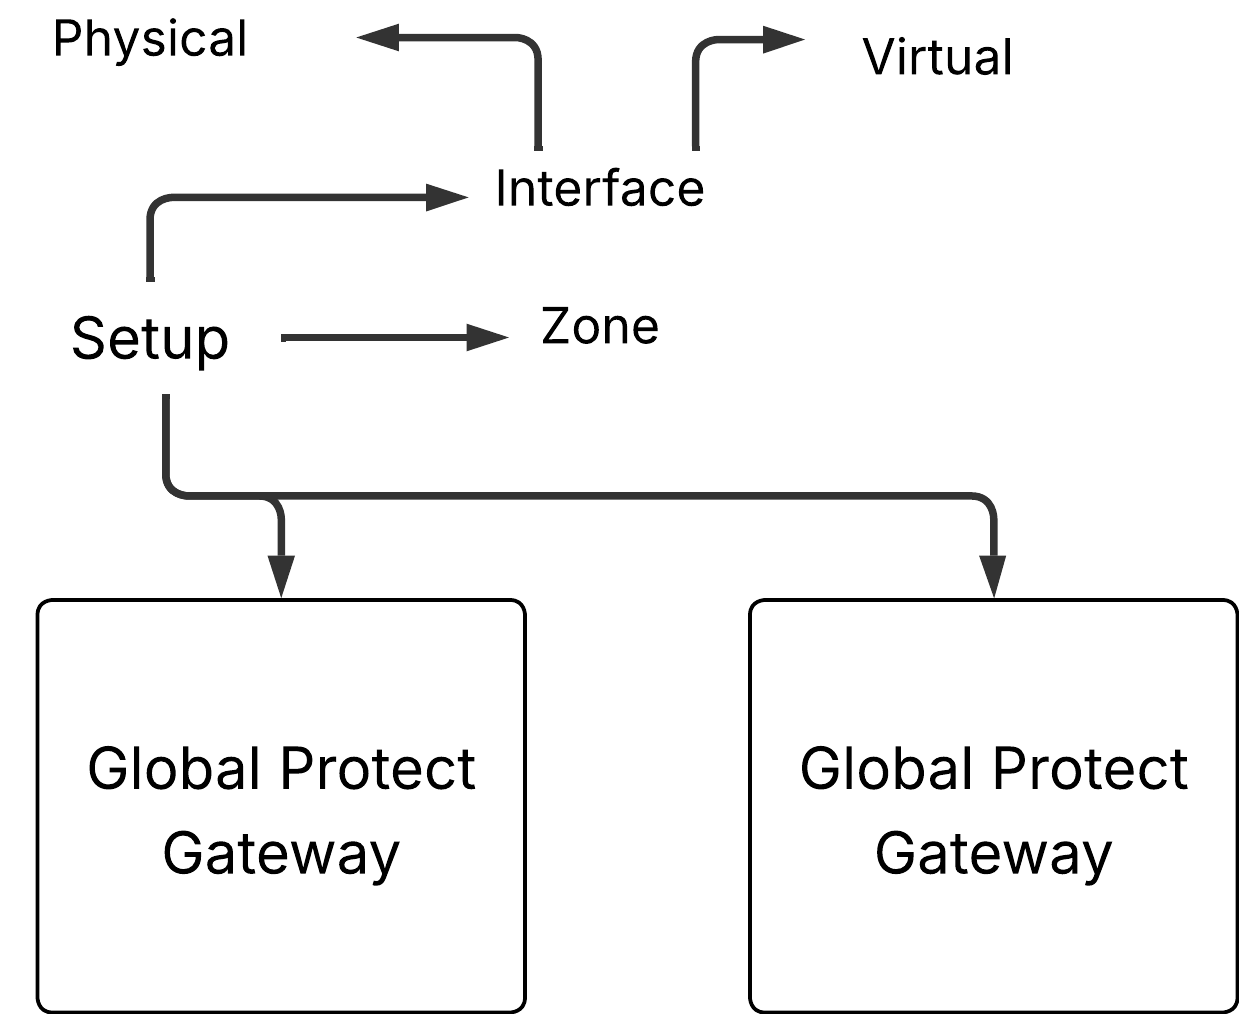
Key initial configuration elements for an LSVPN Satellite.
STEP 1 | Configure a Layer 3 Interface.
This is the physical interface that the satellite will use to connect to the portal and the gateway. This interface must be in a zone that allows access outside of the local trust network. As a best practice, create a dedicated zone for VPN connections for visibility and control over traffic destined for the corporate gateways.
STEP 2 | Configure the logical tunnel interface for the tunnel to use to establish VPN tunnels with the GlobalProtect gateways.
IP addresses aren’t required on the tunnel interface unless you plan to use dynamic routing. However, assigning an IP address to the tunnel interface can be useful for troubleshooting connectivity issues.
- Select Network > Interfaces > Tunnel and click Add.
- In the Interface Name field, specify a numeric suffix, such as .2.
- On the Config tab, expand the Security Zone drop-down and select an existing zone or create a separate zone for VPN tunnel traffic by clicking New Zone and defining a Name for the new zone (for example lsvpnsat).
- In the Virtual Router drop-down, select default.
- (Optional) To assign an IP address to the tunnel interface:
- For an IPv4 address, select IPv4 and Add the IP address and network mask.
- For an IPv6 address, select IPv6, Enable IPv6 on the interface, and Add the IP address and network mask.
- To save the interface configuration, click OK.
Verify the LSVPN Configuration
After configuring the portal, gateways, and satellites, verify that the satellites are able to connect to the portal and gateway and establish VPN tunnels with one or more gateways.
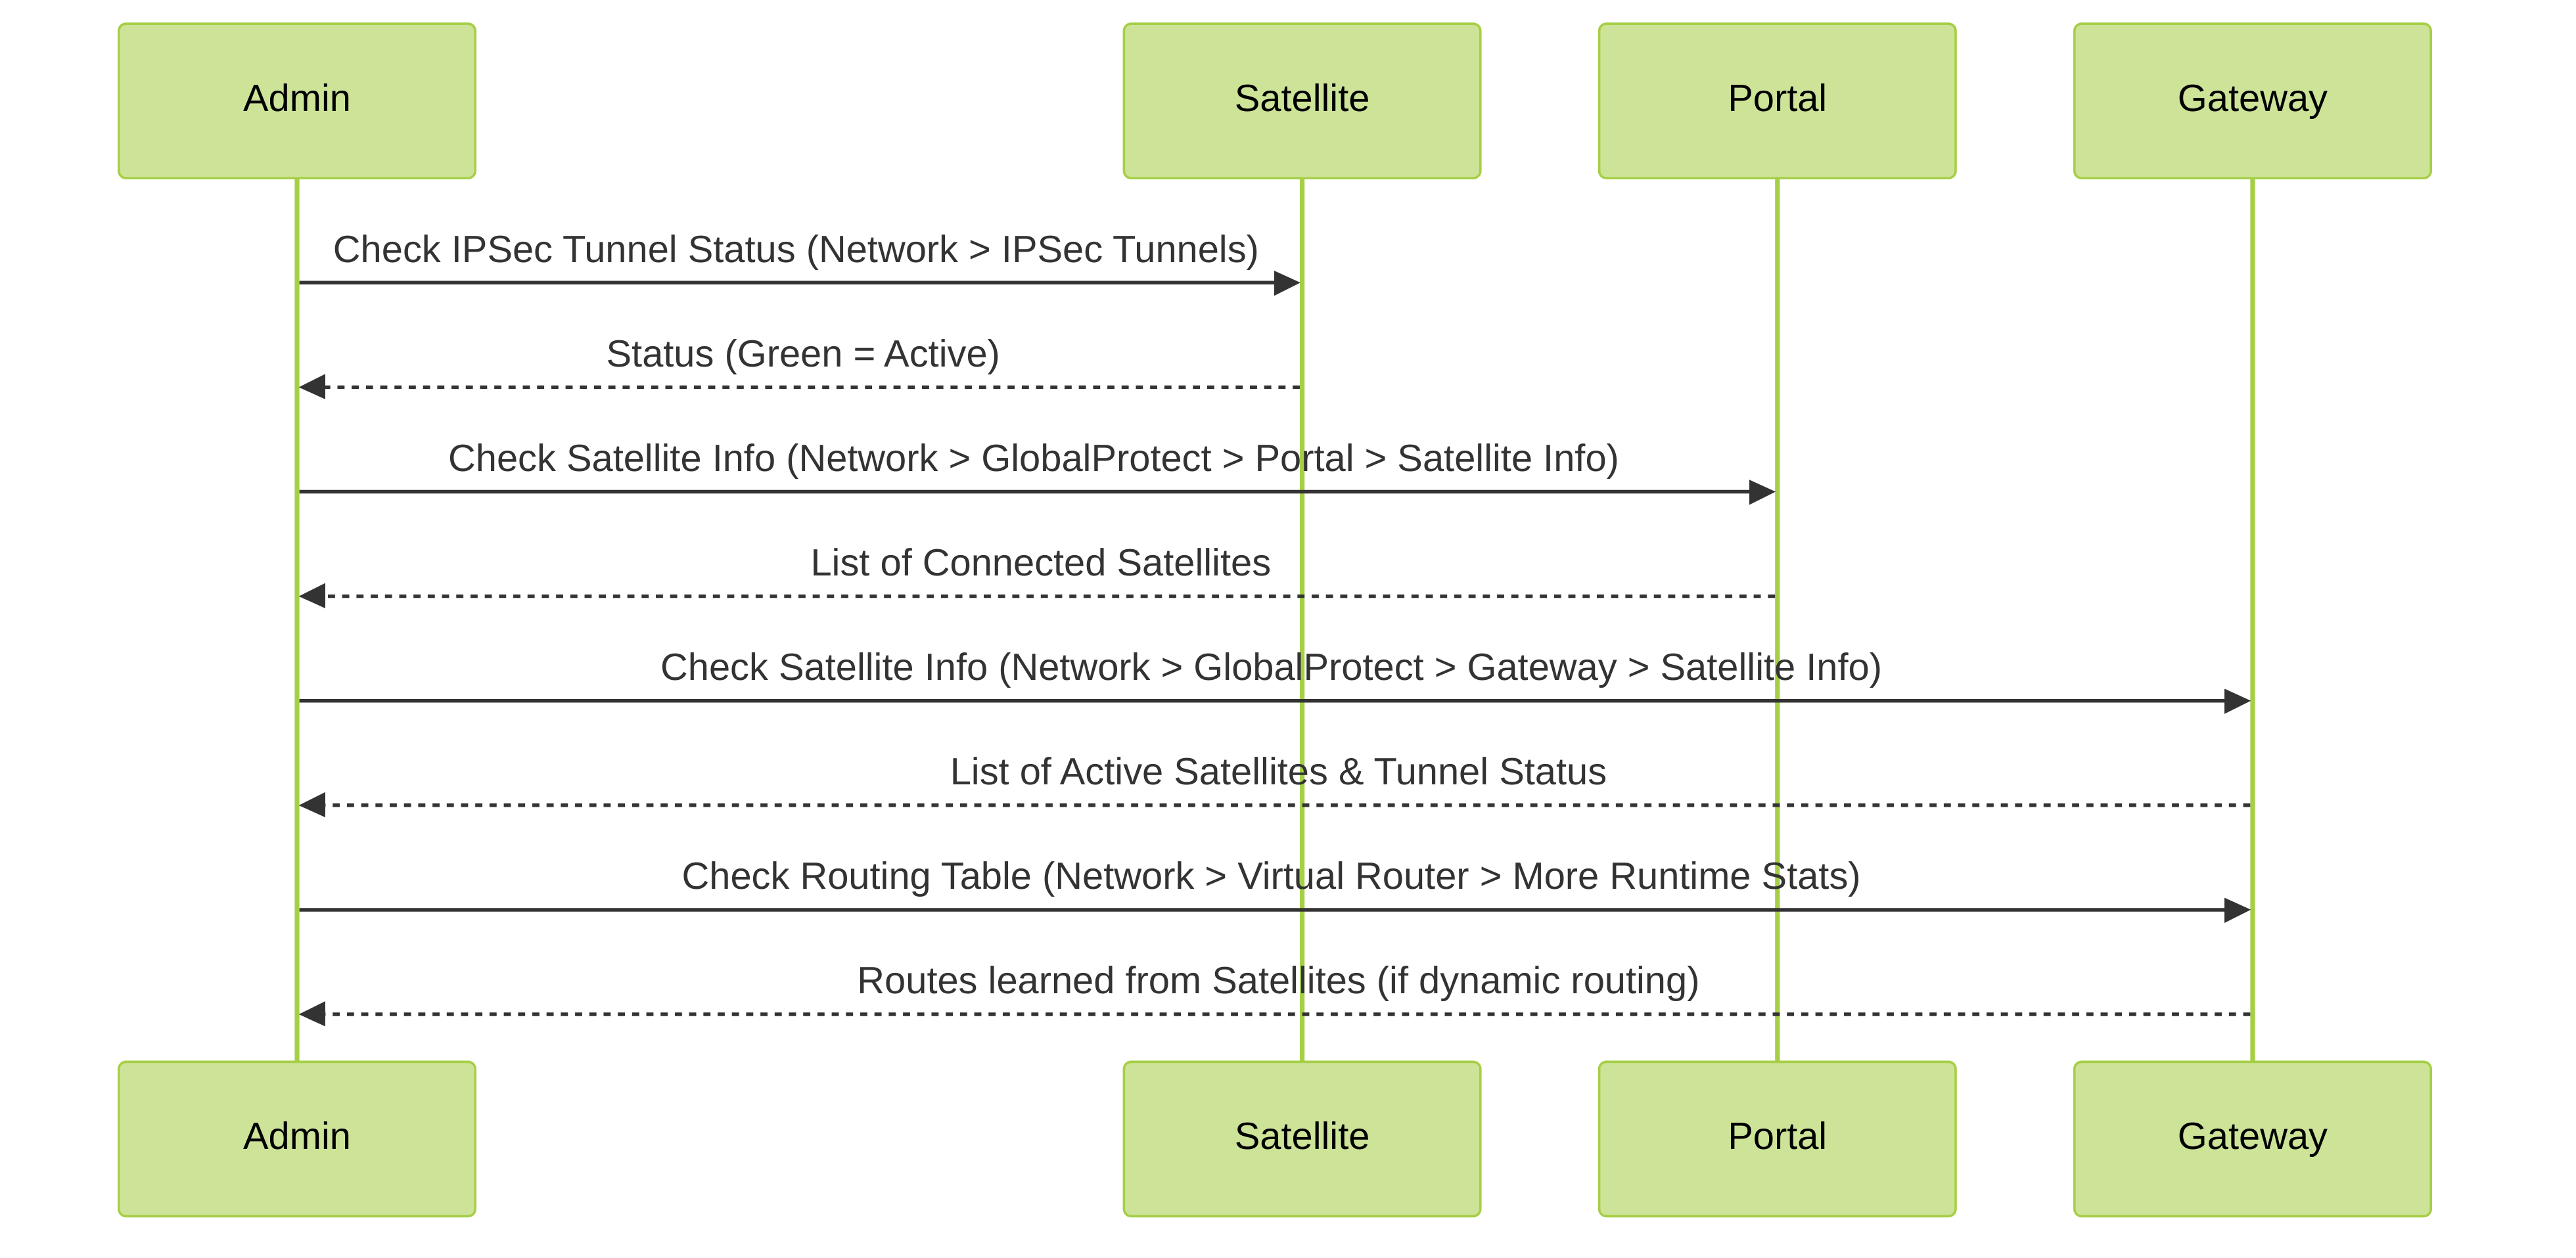
Verification steps for LSVPN connectivity.
STEP 1 | Verify satellite connectivity with portal.
From the firewall hosting the portal, verify that the satellites are successfully connecting by selecting Network > GlobalProtect > Portal and clicking Satellite Info in the Info column of the portal configuration entry.
STEP 2 | Verify satellite connectivity with the gateway(s).
On each firewall hosting a gateway, verify that satellites are able to establish VPN tunnels by selecting Network > GlobalProtect > Gateways and click Satellite Info in the Info column of the gateway configuration entry. Satellites that have successfully established tunnels with the gateway will display on the Active Satellites tab.
STEP 3 | Verify LSVPN tunnel status on the satellite.
On each firewall hosting a satellite, verify the tunnel status by selecting Network > IPSec Tunnels and verify active Status as indicated by a green icon.
LSVPN Quick Configuration
The following sections provide step-by-step instructions for configuring some common GlobalProtect LSVPN deployments:
- Basic LSVPN Configuration with Static Routing
- Advanced LSVPN Configuration with Dynamic Routing
- Advanced LSVPN Configuration with iBGP
Basic LSVPN Configuration with Static Routing
This quick configuration shows the fastest way to get up and running with LSVPN. In this example, a single firewall at the corporate headquarters site is configured as both a portal and a gateway. Satellites can be quickly and easily deployed with minimal configuration for optimized scalability.
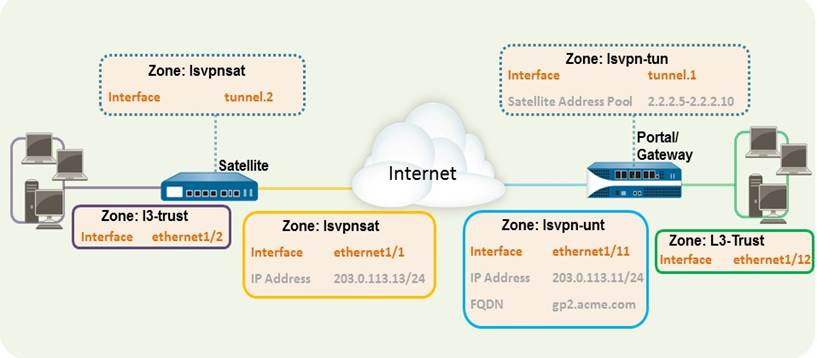
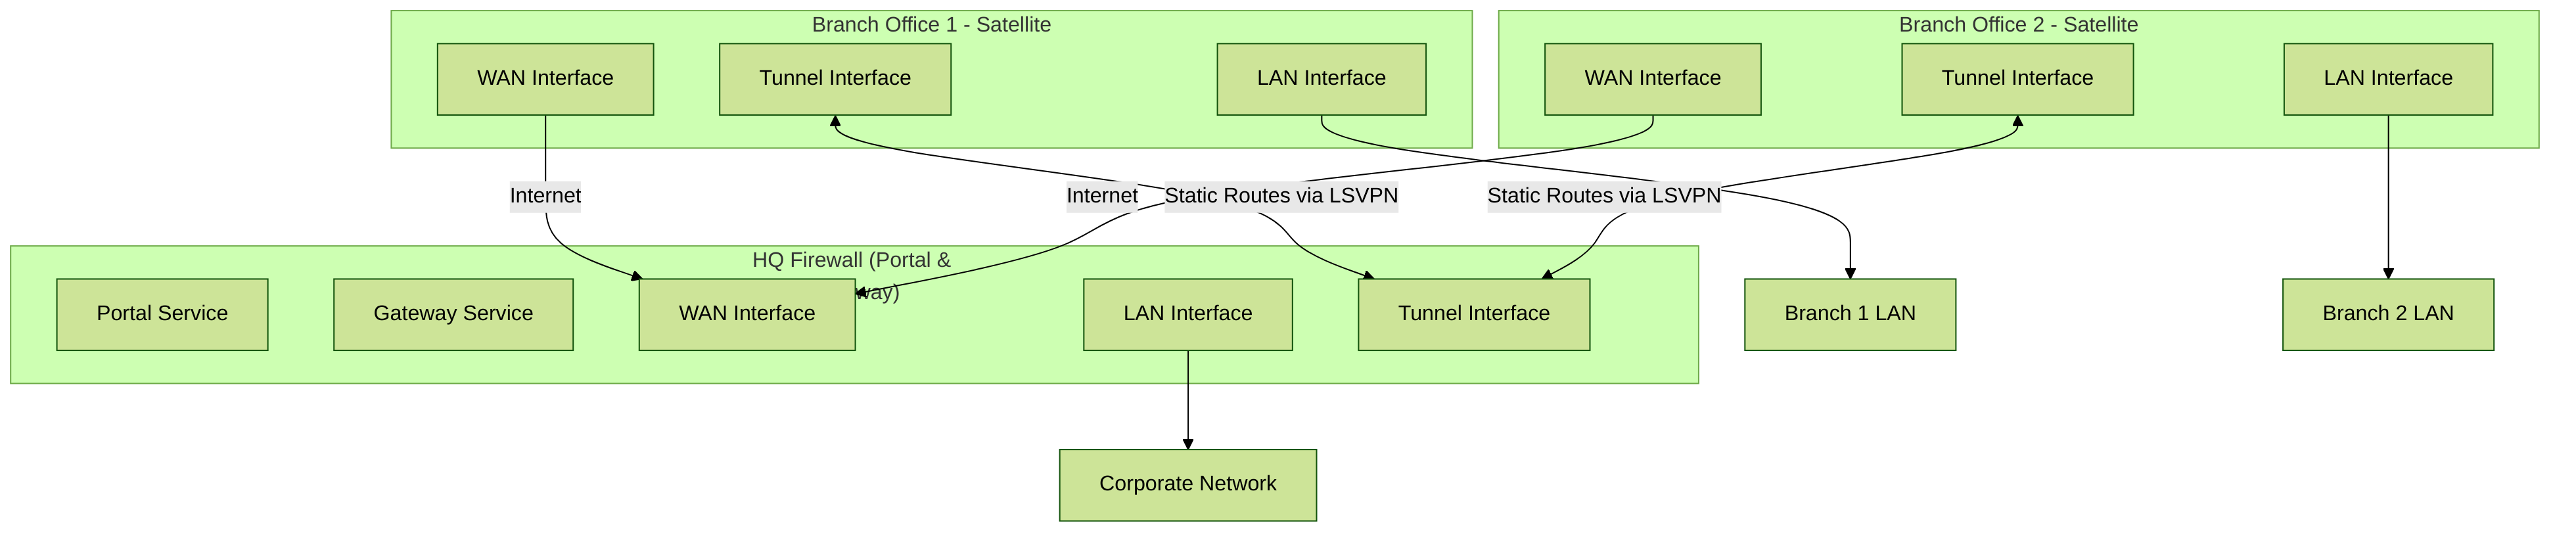
High-level diagram for Basic LSVPN with Static Routing.
The following workflow shows the steps for setting up this basic configuration:
STEP 1 | Configure a Layer 3 interface.
In this example, the Layer 3 interface on the portal/gateway requires the following configuration:
- Interface — ethernet1/11
- Security Zone — lsvpn-tun
- IPv4 — 203.0.113.11/24
Advanced LSVPN Configuration with Dynamic Routing
In larger LSVPN deployments with multiple gateways and many satellites, investing a little more time in the initial configuration to set up dynamic routing will simplify the maintenance of gateway configurations because access routes will update dynamically. The following example configuration shows how to extend the basic LSVPN configuration to configure OSPF as the dynamic routing protocol.
Setting up an LSVPN to use OSPF for dynamic routing requires the following additional steps on the gateways and the satellites:
- Manual assignment of IP addresses to tunnel interfaces on all gateways and satellites.
- Configuration of OSPF point-to-multipoint (P2MP) on the virtual router on all gateways and satellites. In addition, as part of the OSPF configuration on each gateway, you must manually define the tunnel IP address of each satellite as an OSPF neighbor. Similarly, on each satellite, you must manually define the tunnel IP address of each gateway as an OSPF neighbor.
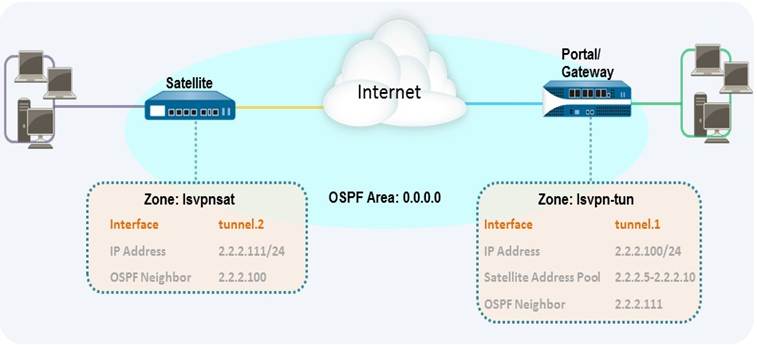
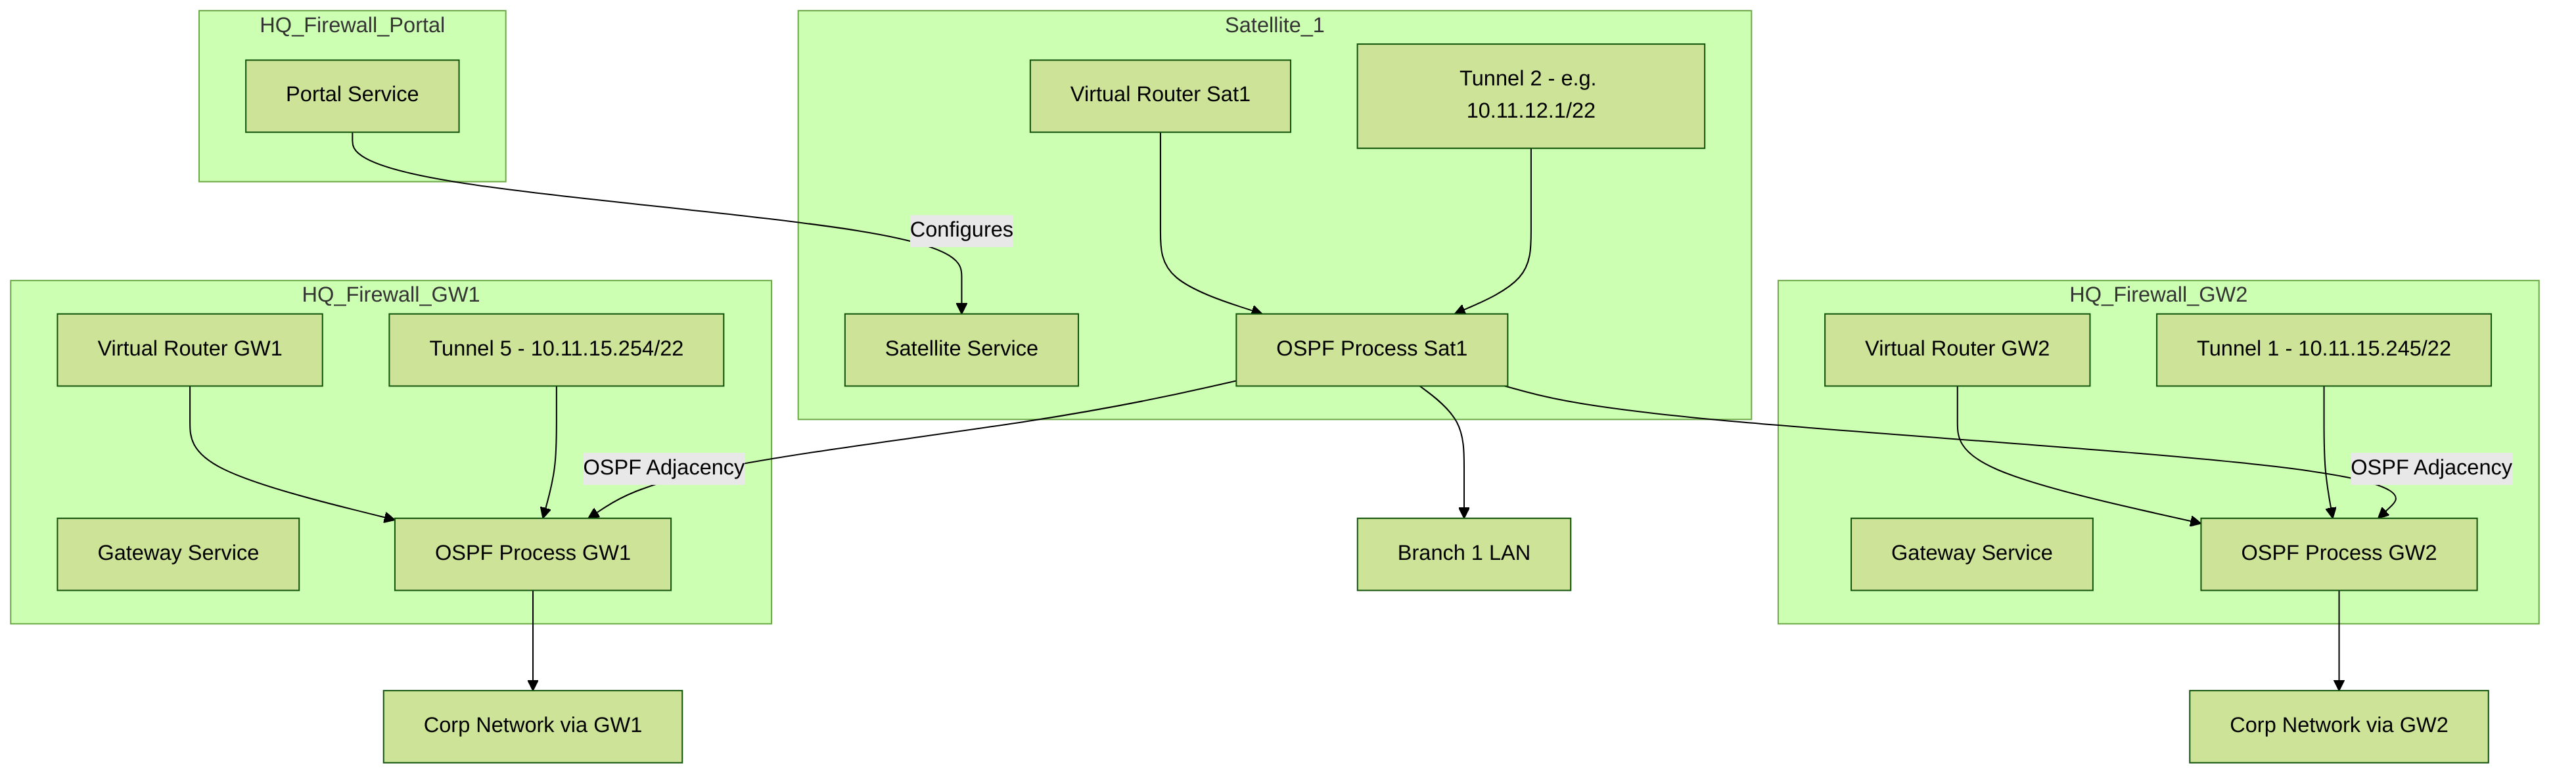
Conceptual diagram for LSVPN with OSPF dynamic routing.
For a basic setup of a LSVPN, follow the steps in Basic LSVPN Configuration with Static Routing. You can then complete the steps in the following workflow to extend the configuration to use dynamic routing rather than static routing.
STEP 1 | Add an IP address to the tunnel interface configuration on each gateway and each satellite.
Advanced LSVPN Configuration with iBGP
This use case illustrates how GlobalProtect LSVPN securely connects distributed office locations with primary and disaster recovery data centers that house critical applications for users and how an internal border gateway protocol (iBGP) eases deployment and upkeep. Using this method, you can extend up to 500 satellite offices connecting to a single gateway.
BGP is a highly scalable, dynamic routing protocol that is ideal for hub-and-spoke deployments such as LSVPN...
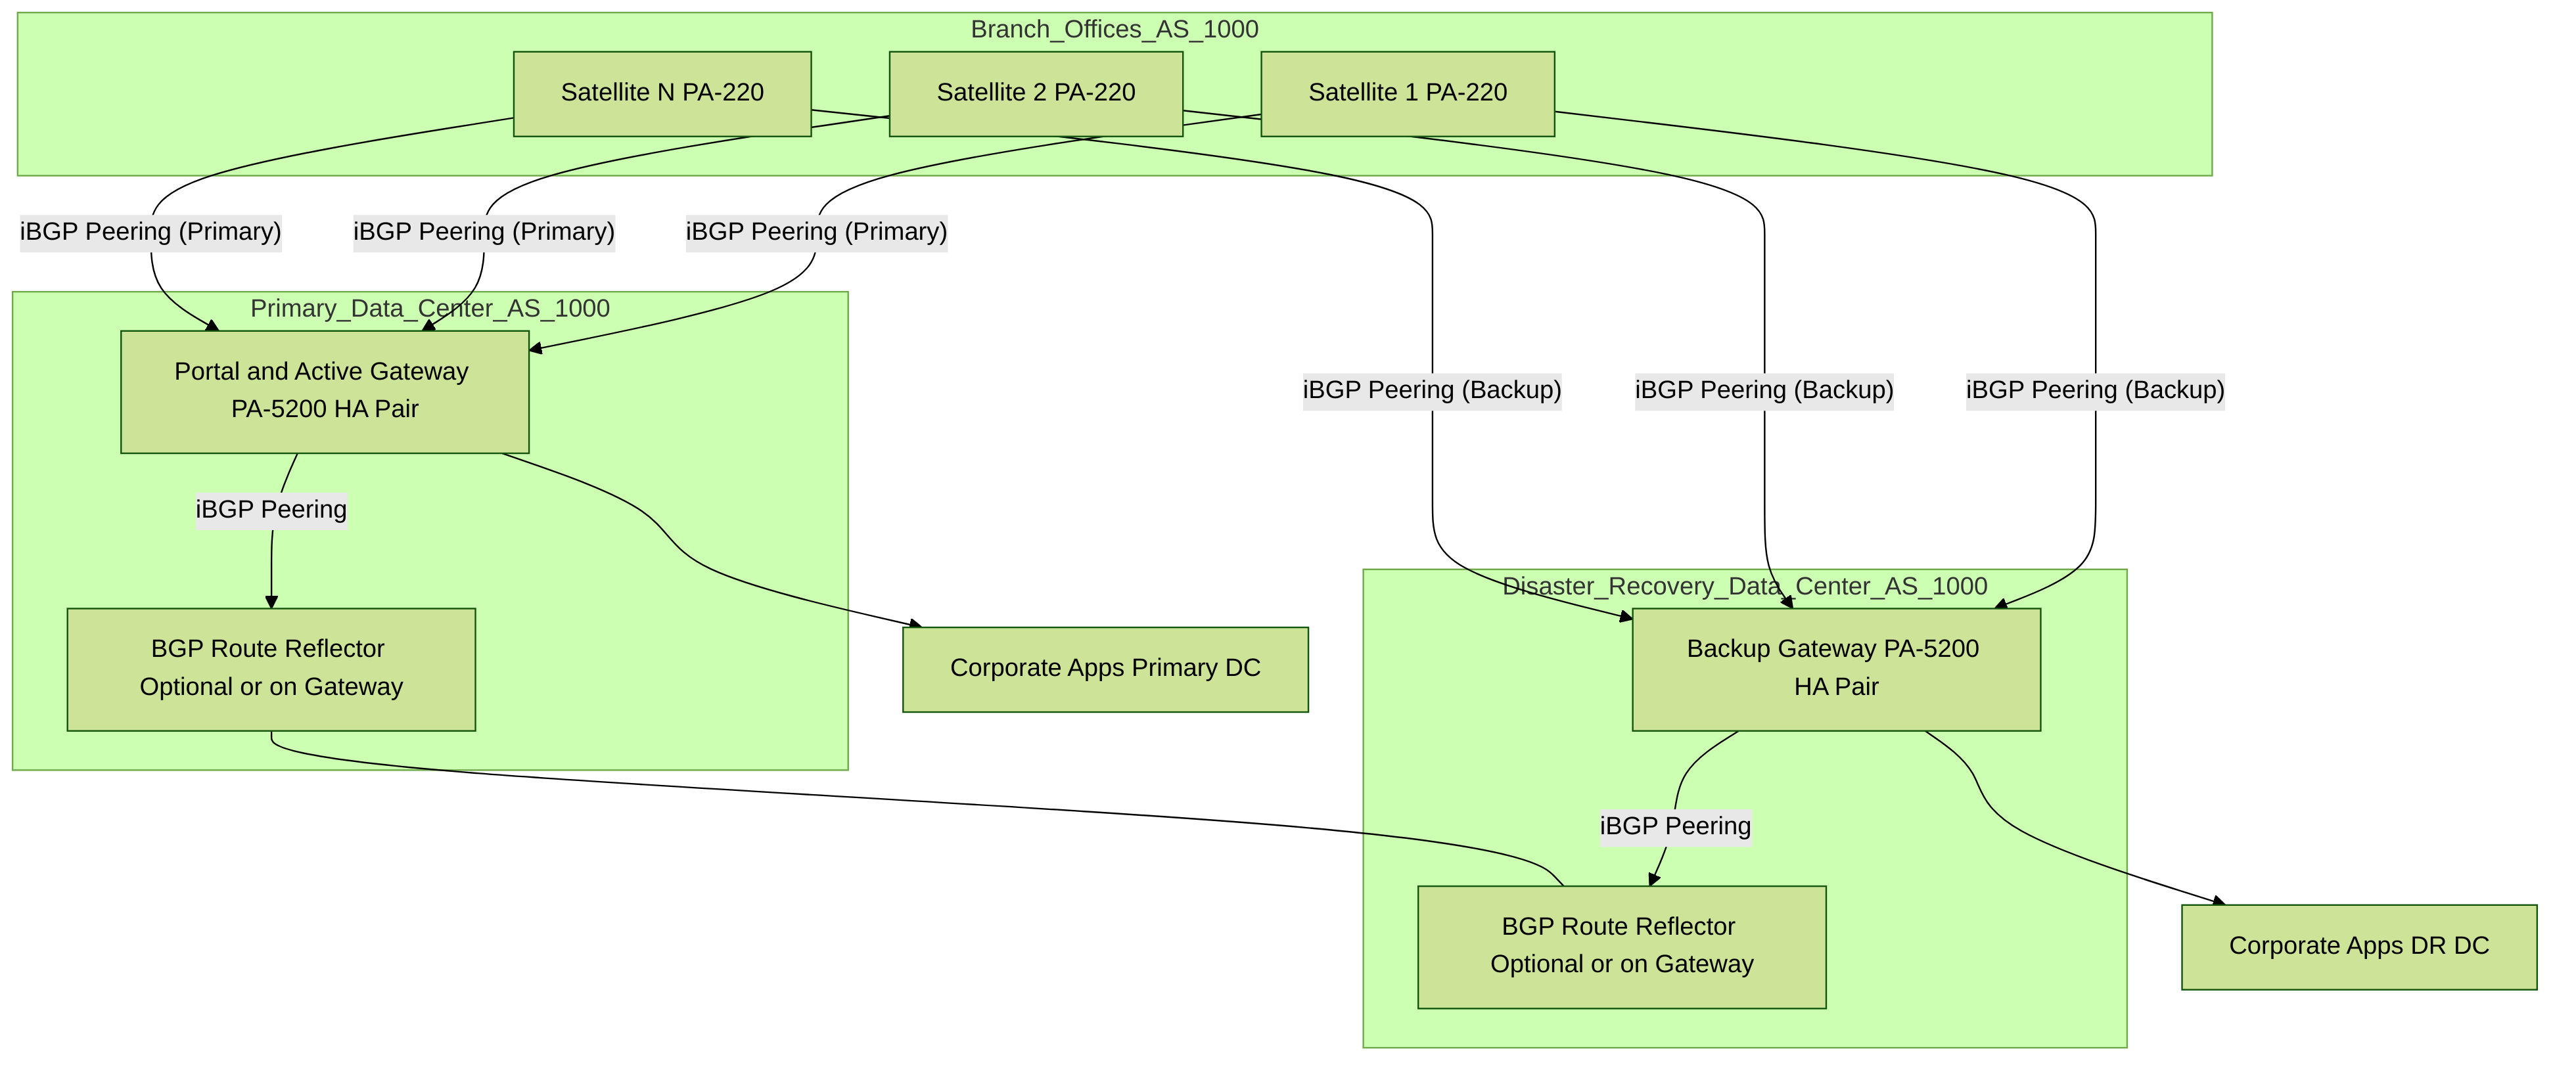
High-level overview of LSVPN with iBGP and HA data centers.
The following workflow shows the steps for configuring this deployment:
STEP 1 | Create Interfaces and Zones for the LSVPN.