Discover Risks Posed by GenAI Apps
This section covers key concepts for both PCNSA and PCNSE exams related to identifying and understanding risks associated with GenAI applications.
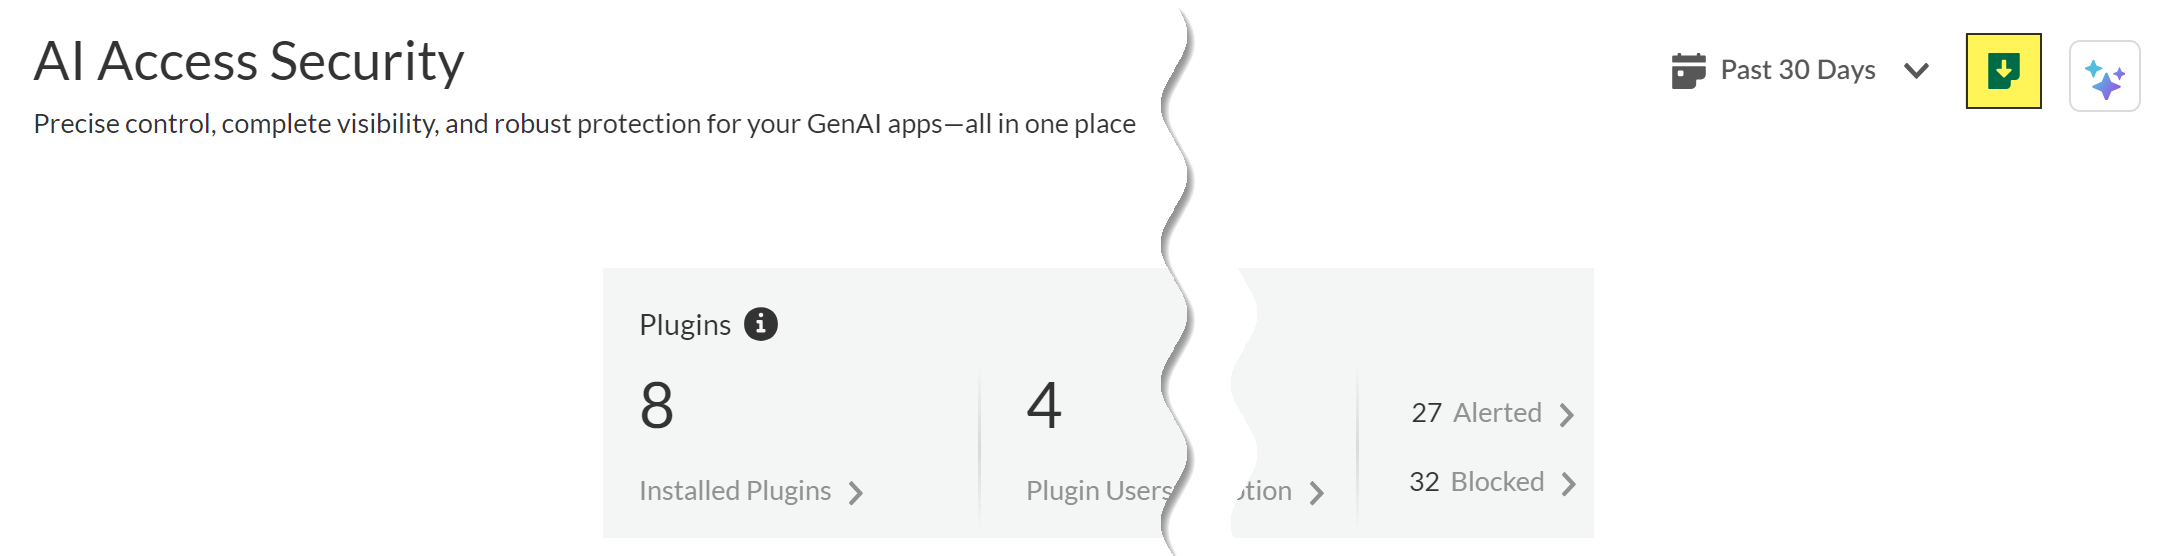
AI Access Security Insights dashboard is used to filter and understand generative AI (GenAI) app usage on your network. It provides details on which GenAI apps are used and by whom.
Applicability & Requirements
| Where Can I Use This? | What Do I Need? |
|---|---|
|
One of the following:
|
AI Access Security detects Allowed Users data , Blocked Users data , or both based on time filters:
-
1 Hour and 3 Hours
Users can count as Allowed, Blocked, or both.
For example, if UserA is blocked by Policy Rule1, then later allowed by Policy Rule2 within the same time frame (1 or 3 hours), UserA displays in both Allowed and Blocked Users counts. If UserA is blocked, and the policy is changed to allow access, UserA still displays in the Blocked Users count for the selected time period if they were blocked at least once by that rule.
-
24 Hour, 7 Day, and 30 Day
Users can count as Allowed, Blocked, or both. This logic applies similarly to shorter time frames regarding users appearing in both categories.
Filters available on the Insights dashboard:
- Use Case
- Risky Apps
- App Users
- Plugins
Review Supported Use Cases for descriptions of GenAI app categories.
Steps to Discover Risks:
- Log in to Strata Cloud Manager .
- Select Insights > AI Access to view the AI Access Security Insights dashboard.
The dashboard displays GenAI app usage by use case by default, along with high-level information:
-
Time Filter : Filter usage data (Past 1 Hour, Past 3 Hours, Past 24 Hours, Past 7 Days, Past 30 Days).
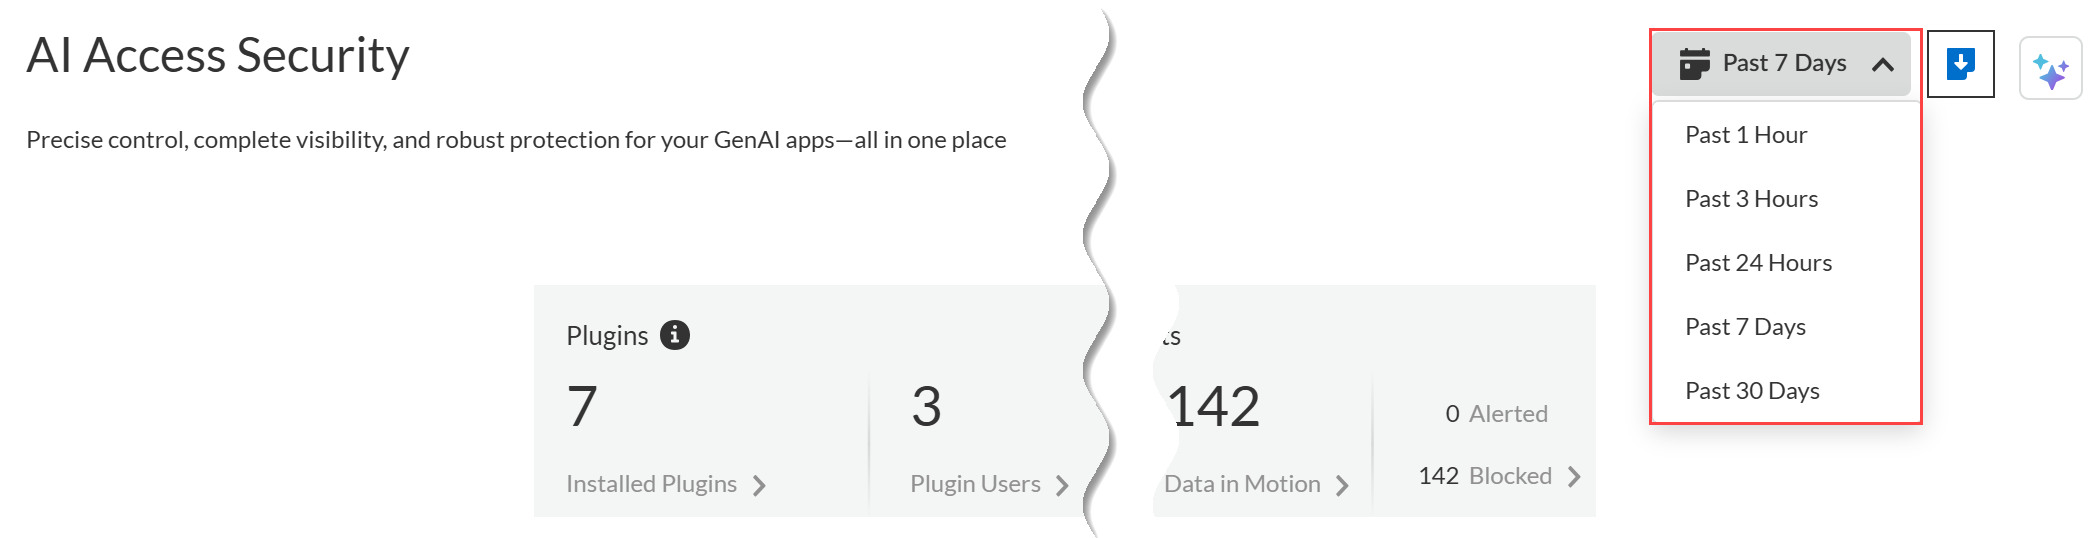
-
Threats Detected : Summarizes threats detected by the Vulnerability Protection profile attached to Web Security policy rules.
- Alerted: Total threats detected that generated an alert.
- Blocked: Total threats blocked by NGFW or Prisma Access.

-
Sensitive Data Assets : Incidents of sensitive data detected matching Enterprise Data Loss Prevention (E-DLP) data profiles .
- Data at Rest: DLP Incidents (alerted or blocked) via SaaS API (Data Security).
- Data in Motion: DLP Incidents (alerted or blocked) via SaaS Security Inline.
- Alerted: Total DLP Incidents that generated an alert (at rest and in motion).
- Blocked: Total DLP incidents blocked (at rest and in motion).

-
Top Use Cases : Dynamically displays top four use cases based on network activity.
- GenAI Apps: Total apps in the use case. Graph shows Sanctioned, Tolerated, Unsanctioned breakdown.
- Unique GenAI Users: Total users accessing apps in the use case. Clicking count shows user list, which might slightly differ from the aggregated count due to aggregation intervals.
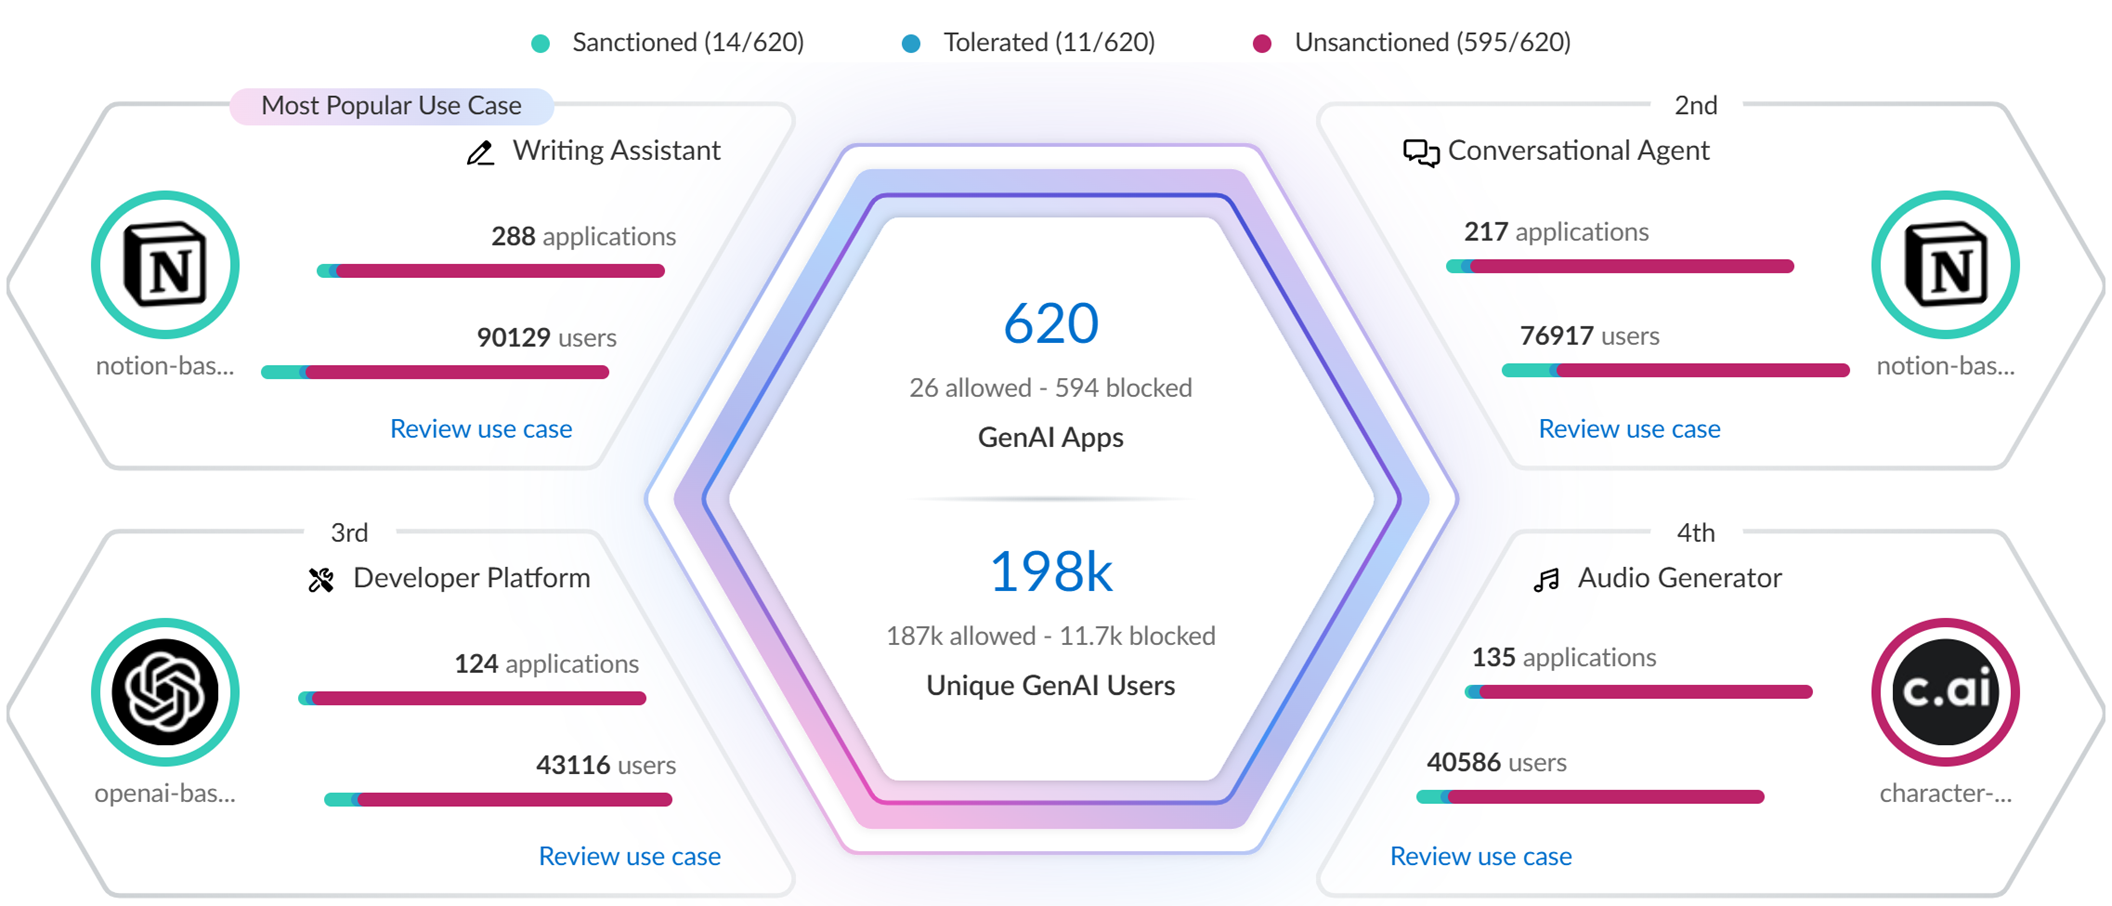
-
All Other Use Cases : Aggregated data for all other use cases.
- Applications: Total apps in other use cases. Graph shows Sanctioned, Tolerated, Unsanctioned breakdown.
- Users: Total users accessing apps in other use cases.
Hover over use cases for summary info.
- Review use case details page for granular data (Sanctioned, Tolerated, Unsanctioned apps).
-
Review use case details page to understand usage (policy rule implications, security posture).
-
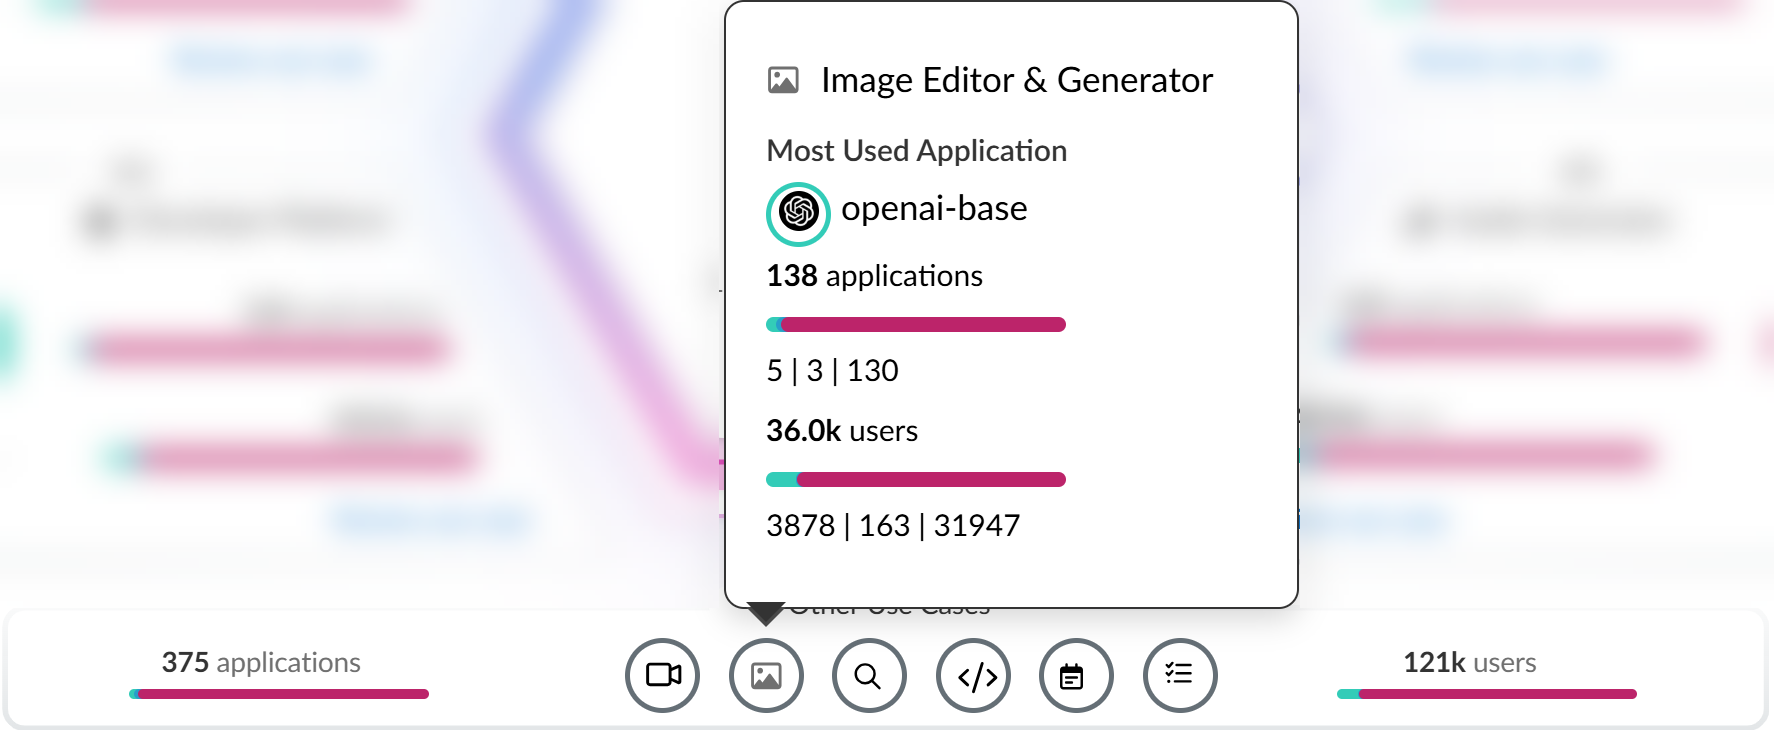
Use Case Summary
: Aggregates key info.
- Most Used Applications: Top app for the use case, including tag.
- Application Breakdown: Total apps and tag summary (Sanctioned, Tolerated, Unsanctioned).
- User Breakdown: Total users and summary by app tag.
-
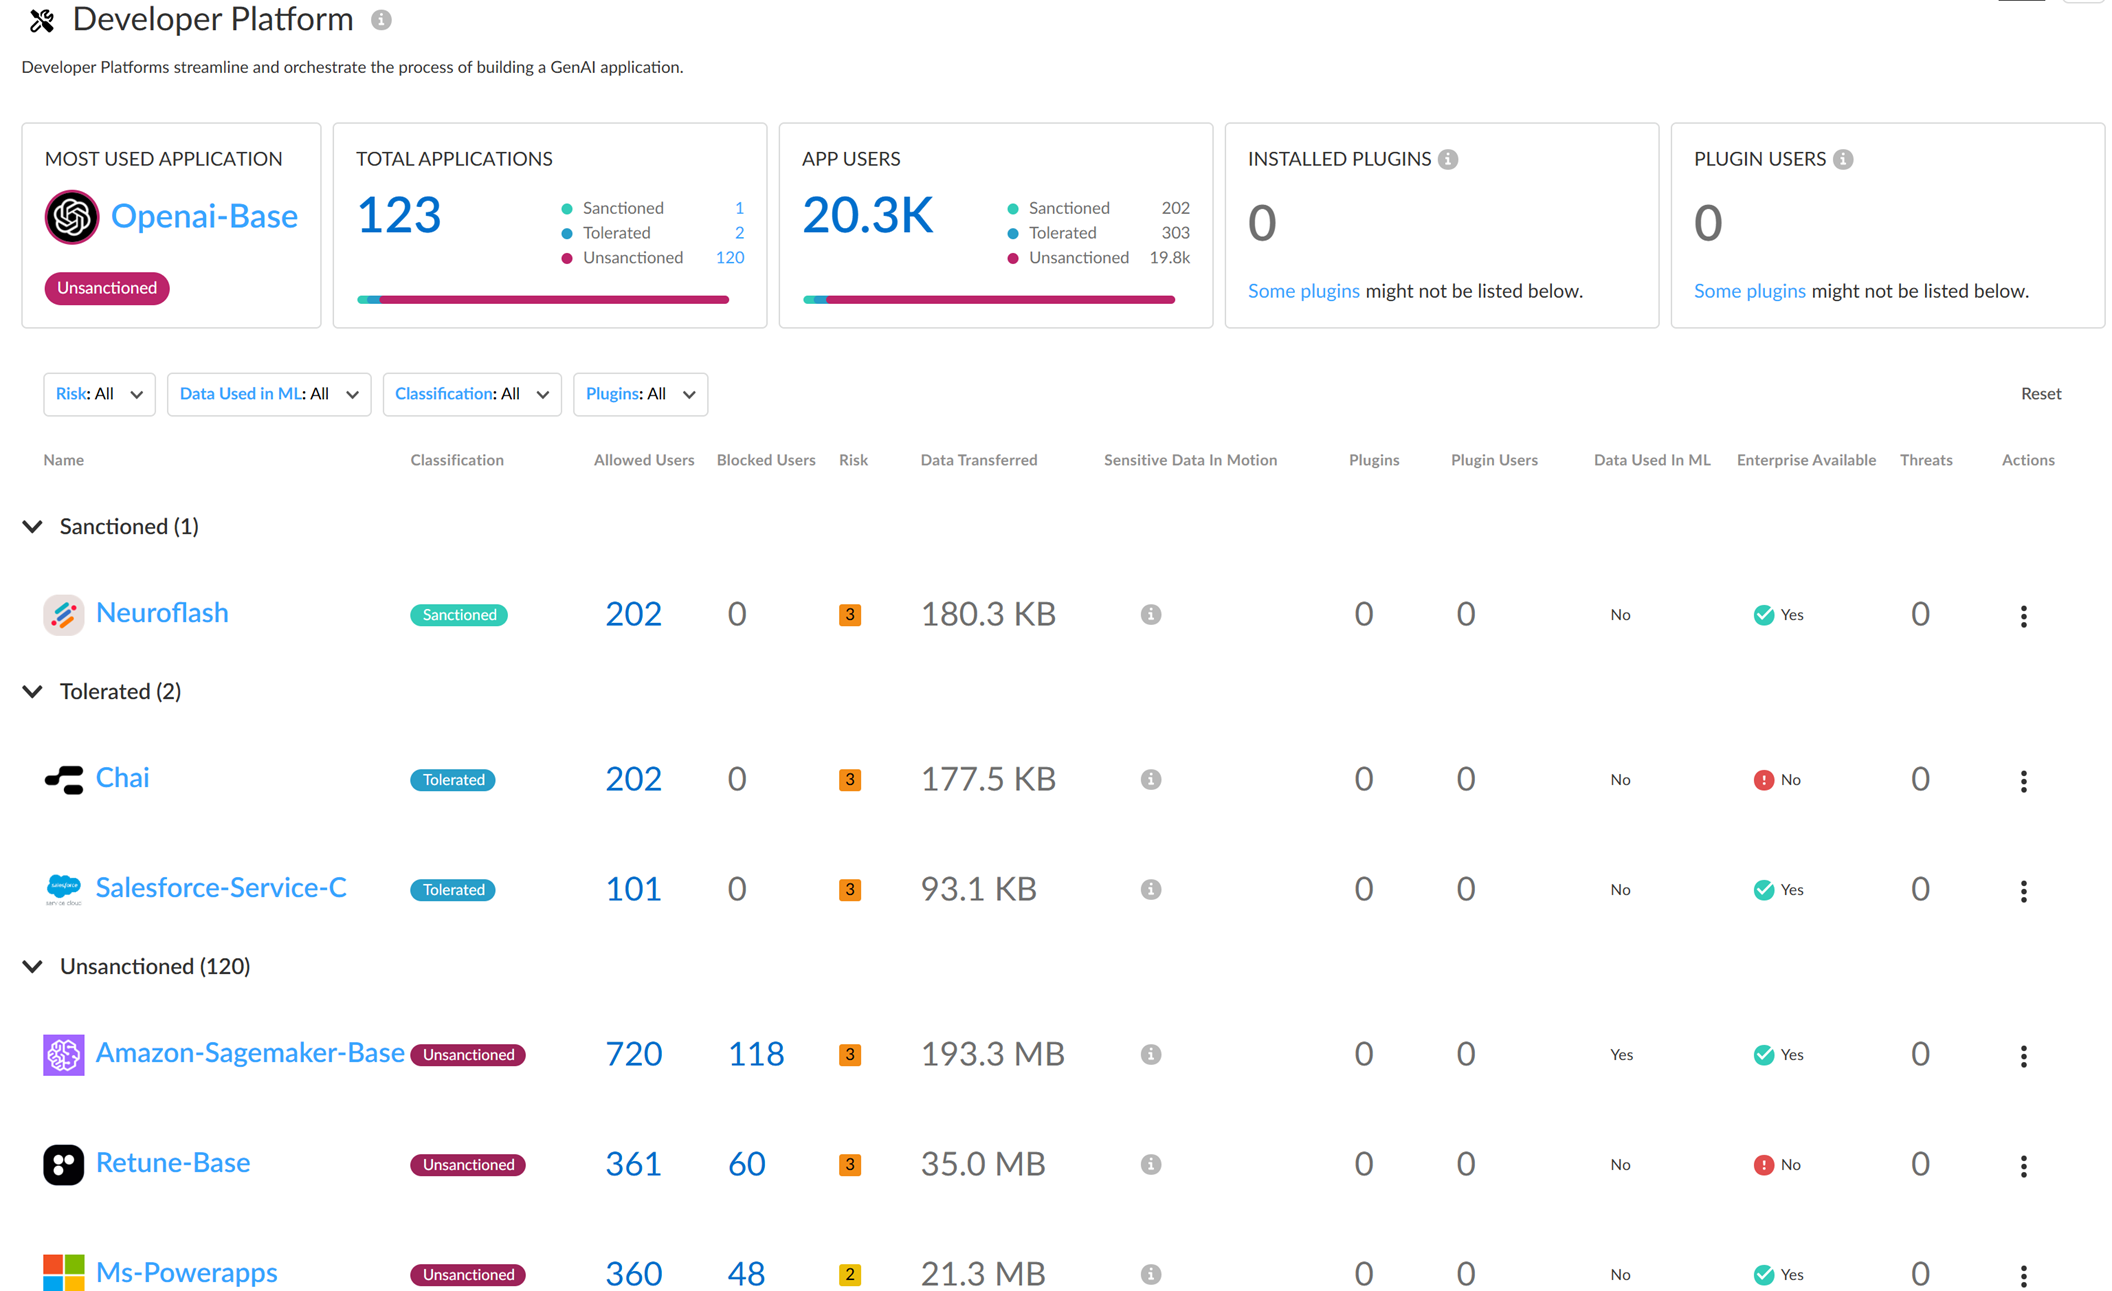
Applications (List)
: List of apps with details:
- Application Name: App-ID. Click for detailed usage (redirects to Activity Insights).
- Tag: Current tag. Can click to apply a new tag. Cannot tag container App-IDs; must tag individual child App-IDs.
- Allowed Users: Unique users who accessed the app (click count for list).
- Blocked Users: Unique users blocked (click count for list).
- Threats: Total detected threat activity.
- Transferred: Total data (GB) uploaded/downloaded. Large data usage could indicate need for strict controls.
- Sensitive Asset: DLP Incidents detected/blocked by E-DLP.
- Enterprise Available: If enterprise plan exists.
- Data Used in ML: If user data trains the model. Important privacy/security consideration.
- Risk Score: App's assigned risk score.
- Use Case Highlights : Summary of apps/users in *other* use cases. (This seems slightly misplaced in the source under use case *details*).
- Rules : List of policy rules (default and custom) targeting these apps.
-
Recommended Actions
: (This section seems to list Alerted/Blocked counts again, likely related to DLP incidents).
- Alerted: Total DLP Incidents Alerted for use case apps.
- Blocked: Total DLP incidents Blocked for use case apps.
-
Use Case Summary
: Aggregates key info.
- Create a custom Security policy rule or modify the default rule to control access.
Example: If Openai-Base (Code Assistant & Generator use case) is Unsanctioned and widely used, you might modify the default rule to block it or create a custom rule.
Tag GenAI Apps
App tagging is a fundamental concept for controlling access and reporting. Understanding the tag definitions and how to apply them (especially the child App-ID nuance) is crucial for both PCNSA and PCNSE.
Based on risk scores and other factors, you can apply tags to GenAI applications to indicate their approval status within your organization.
Applicability & Requirements
| Where Can I Use This? | What Do I Need? |
|---|---|
|
One of the following:
|
Available Tags:
| Tag | Description |
|---|---|
| Sanctioned | Approved by your organization and in use. |
| Unsanctioned | Not approved, often due to security risks. Action should be taken to block it (e.g., via policy rule). |
| Tolerated | Not fully trusted like Sanctioned, but allowed temporarily until a more secure alternative is found. May require restrictive policy rules (e.g., block upload/download). |
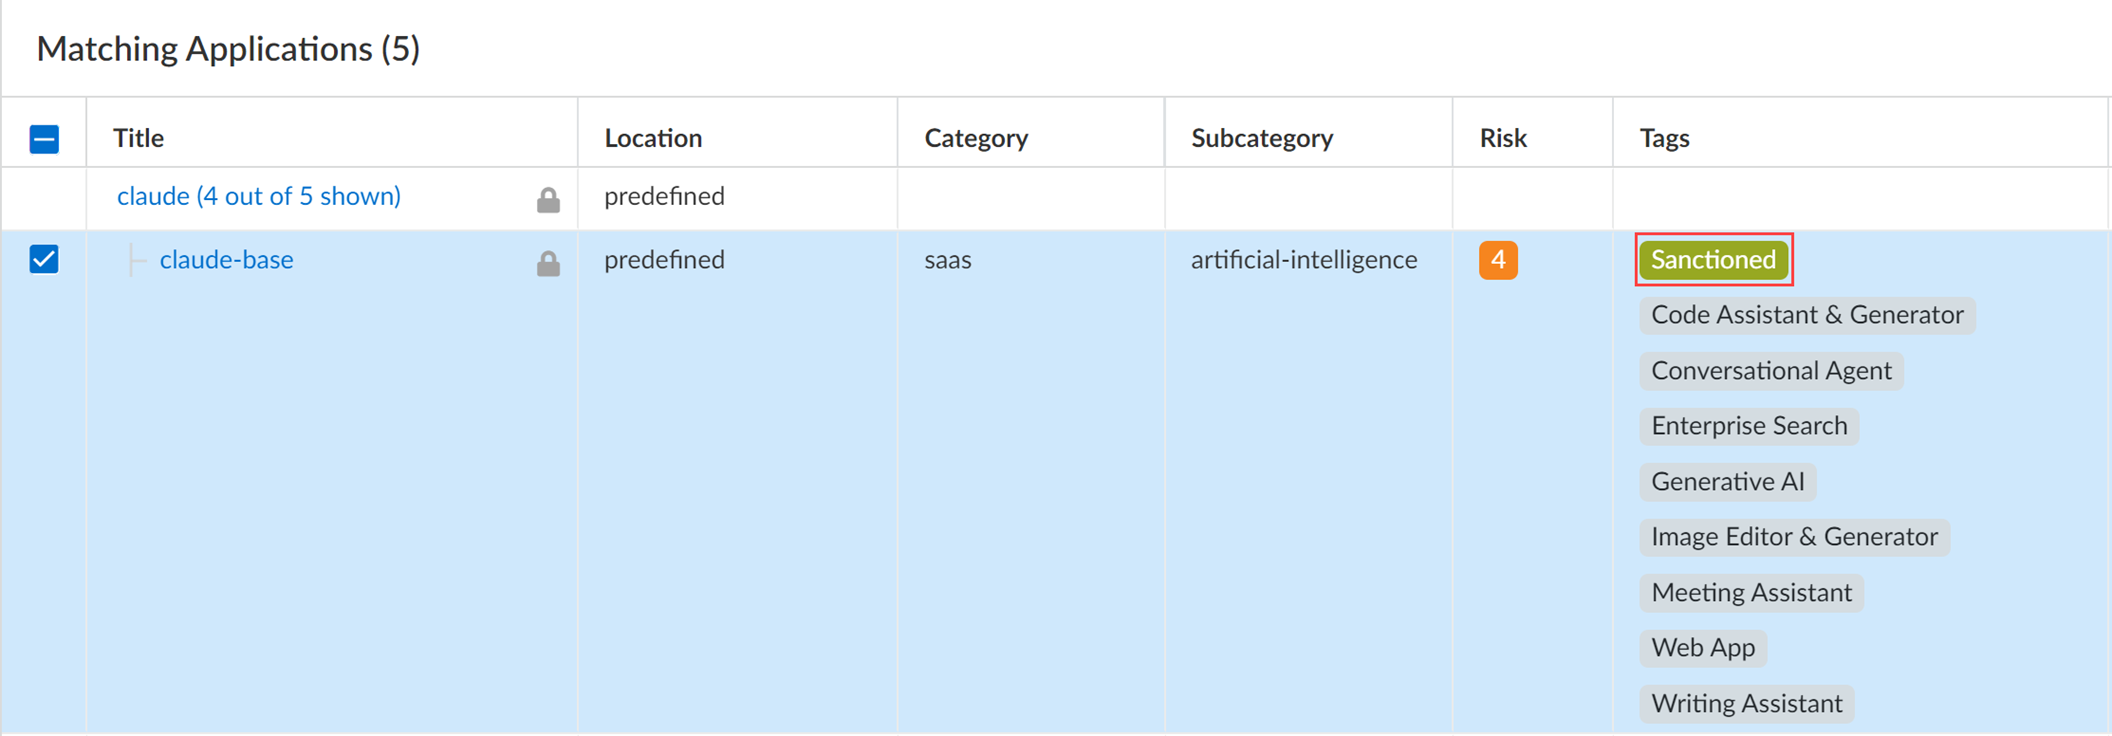
Palo Alto Networks groups child App-IDs under a container App-ID. Tagging the *container* is NOT supported. You must *individually tag* the specific child App-IDs.
Example: the 'claude' container has child IDs like claude-base, claude-upload. To apply the 'Sanctioned' tag for data exfiltration controls, you must tag *each* child App-ID individually.
In September 2024, the tagging implementation changed to use a new predefined Application-Tagging snippet . Tags applied *before* this update are no longer reflected in AI Access Security or Activity Insights Applications unless reapplied via this snippet. Only tags added *after* the update, using the snippet context, will be shown correctly. Apps not explicitly tagged Sanctioned or Tolerated in the snippet are considered Unsanctioned.
Ensure you associate the Application-Tagging snippet and apply tags within its configuration scope for tags to be effective for current visibility and tag-based policy enforcement.
Methods to Tag GenAI Apps:
- NGFW and Prisma Access Application Config (via Strata Cloud Manager)
- Activity Insights Applications (via Strata Cloud Manager)
Tagging via NGFW/Prisma Access Application Config (SCM):
- Log in to Strata Cloud Manager .
- Associate the predefined Application-Tagging snippet with the appropriate Configuration Scope.
- Obtain the child App-IDs you want to tag (Insights dashboard, Supported GenAI apps list, or Applipedia). Applipedia only shows App-IDs from dynamic content updates, not ACE.
- Select Manage > Configuration > NGFW and Prisma Access > Objects > Application > Applications .
-
In the Configuration Scope, select the Application-Tagging snippet
.
If tagging an ACE-delivered App-ID, all tenants associated with the folder must receive ACE updates. The push fails otherwise. Do not select the Global Configuration Scope for ACE App-IDs unless absolutely necessary and all devices support ACE.
- In the Category Filters search field, enter the App-ID and select it . (Can only tag one at a time here).
-
Add/Edit Tag
.
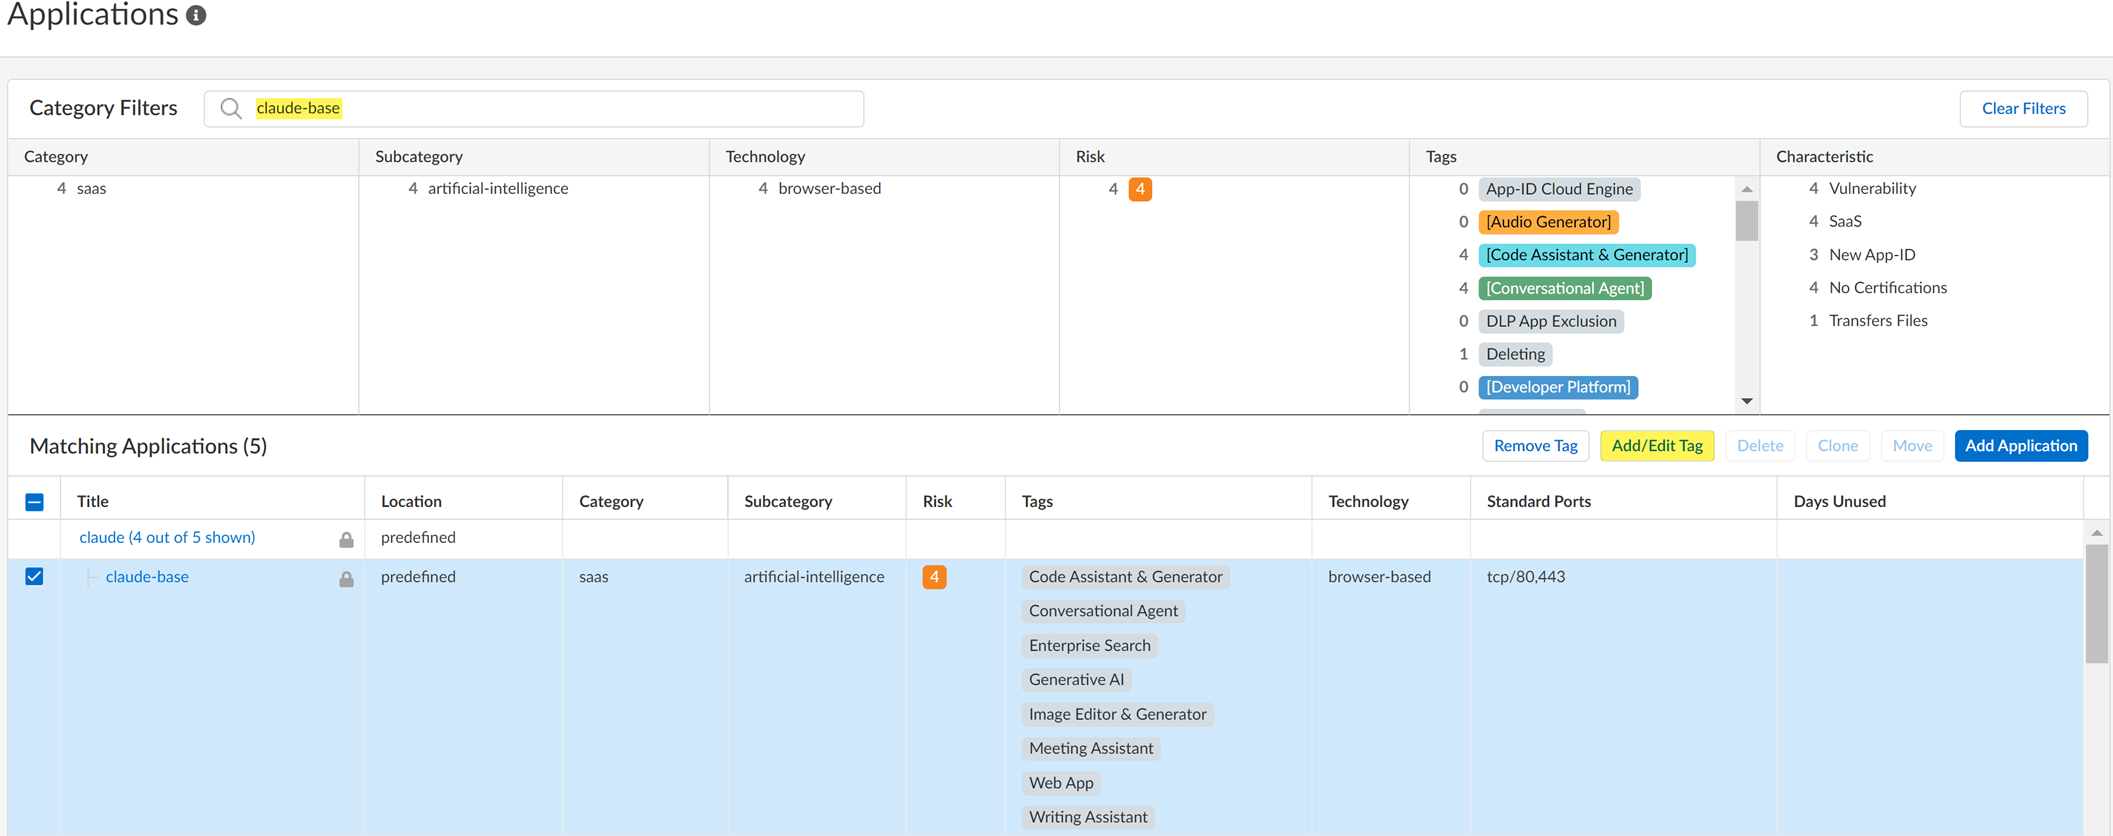
-
Click + to apply a predefined Sanctioned or Tolerated application tag
. (Unsanctioned is the default if no tag is applied).
You cannot manually tag an app as Unsanctioned from Applications. To make an app Unsanctioned, remove its Sanctioned or Tolerated tag.
-
Save
.
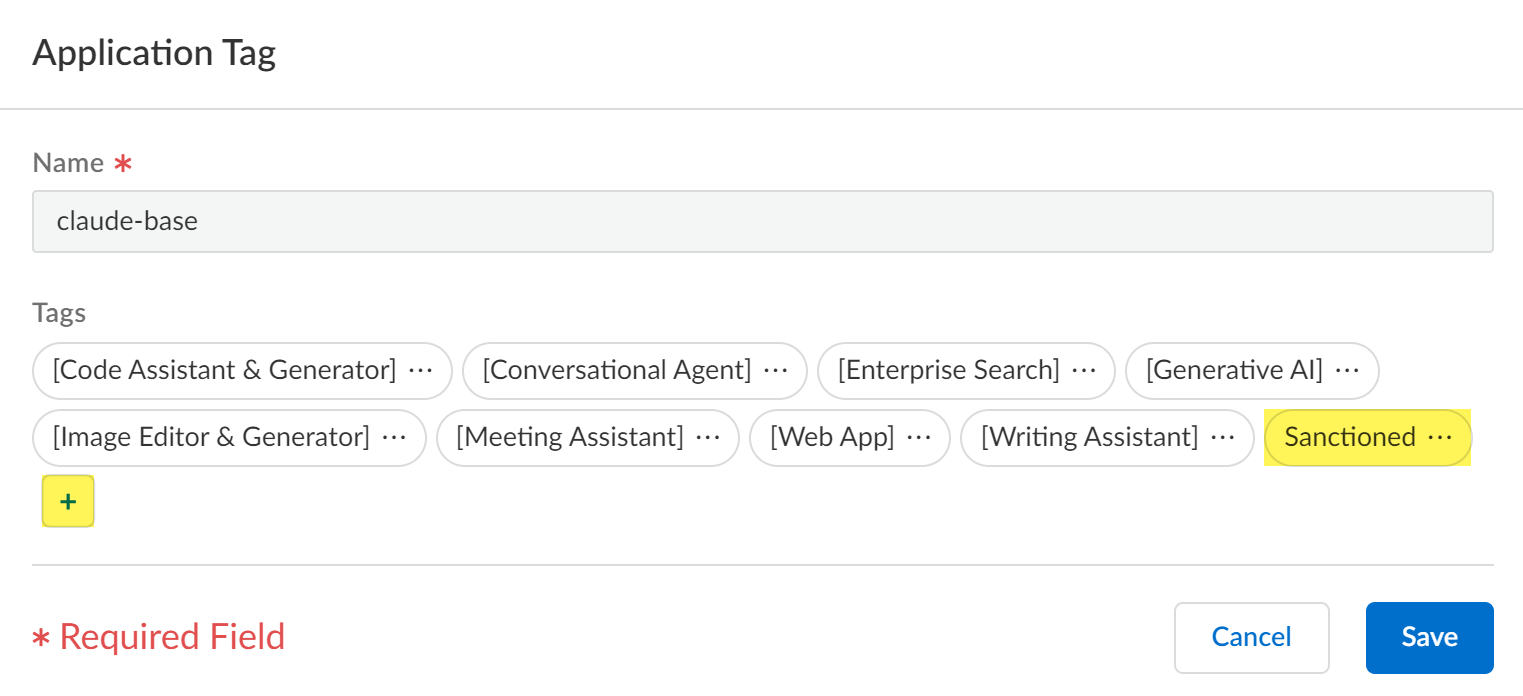
-
Review the values in the Tag column to verify
.
- Click Overview .
- Push Config and Push your changes.
Tagging via Activity Insights Applications (SCM):
- Log in to Strata Cloud Manager .
- Associate the predefined Application-Tagging snippet with the appropriate Configuration Scope.
- Obtain the child App-IDs you want to tag (Insights dashboard, Supported GenAI apps list, or Applipedia). Applipedia only shows App-IDs from dynamic content updates, not ACE.
- Select Insights > Activity Insights > Applications .
- Locate the GenAI child App-ID (use filters: Add Filter > GenAI Application = TRUE).
- Examine the values in the Tag column .
- Apply a different tag : In the Actions column, select the tag icon and choose Sanctioned, Tolerated, or Unsanctioned. Then Apply .
View the Risk Scores Assigned to GenAI Apps
Risk scores are key indicators used for policy creation and reporting. Understanding how scores are calculated and how to view them is important for PCNSA/PCNSE.
AI Access Security assigns each GenAI app a risk score (1-5) to help identify those posing the greatest threats. You can use scores to block apps or tag them Unsanctioned.
Applicability & Requirements
| Where Can I Use This? | What Do I Need? |
|---|---|
|
One of the following:
|
An app's risk score (1=low, 5=high) is based on SaaS app attributes and unique GenAI attributes .
GenAI attributes include data type for input/output, and whether user data trains ML models. These specifically influence the "GenAI risk".
General SaaS attributes include:
- Compliance attributes (regulatory adherence).
- Identity Access Management attributes (authentication/access control).
- Security and Privacy attributes (data protection features like encryption).
The final risk score combines general SaaS risk and GenAI risk, with EXTRA weight given to the GenAI risk.
Steps to View Risk Scores:
- Log in to Strata Cloud Manager .
- Select Insights > Activity Insights > Applications .
- Locate GenAI apps : Add Filter > GenAI Application = TRUE.
- Examine risk scores in the Risk column .
Risk Score Meaning:
| Risk Score | Meaning |
|---|---|
| 4-5 | High Risk — Very likely to be a risk. |
| 3 | Medium Risk — Represents a moderate risk. |
| 1-2 | Low Risk — Unlikely to be a risk. |
- Take action on the riskiest apps (e.g., block via policy, tag as Unsanctioned).
Use Application Filters for GenAI Apps
Application filters are dynamic objects used in policy rules. Understanding how to create and use filters based on GenAI attributes like tag and risk score is essential for PCNSE.
Application filters dynamically group applications based on attributes. You can use them in Security policy rules to control access to GenAI apps based on their attributes, avoiding static lists.
Applicability & Requirements
| Where Can I Use This? | What Do I Need? |
|---|---|
|
One of the following:
|
(Strata Cloud Manager only) AI Access Security includes predefined GenAI application filters based on use cases:
- Audio Generator
- Conversational Agent
- Code Assistant & Generator
- Developer Platform
- Enterprise Search
- Image Editor & Generator
- Meeting Assistant
- Productivity Assistant
- Video Editor & Generator
- Writing Assistant
Using App Filters (Strata Cloud Manager):
- Log in to Strata Cloud Manager .
- Select Manage > Configuration > Objects > Application > Application Filters and Add Application Filter .
- Enter a descriptive Name .
- For the Tag select Generative AI . Recommended to select 'Generative AI' tag to ensure the filter applies to GenAI traffic.
-
Configure additional Category Filters
to narrow scope:
- Risk : Specify risk score (e.g., 4 and 5 for risky apps). Policy action applies only to apps matching this risk score.
- Tag : Specify app tags (Sanctioned, Tolerated, Unsanctioned) or use case tags. Policy action applies only to apps matching these tags.
Example: Filter for 'Sanctioned' and 'Code Assistant & Generator' to target specific approved apps within a use case.
- Review the list of Matching Applications .
- Save .
- Push Config and Push .
- Create Custom Security Policy Rules to Control GenAI Access (using this filter).
There were no specific Panorama steps provided in the source document for *creating* GenAI application filters, although the previous sections imply Panorama can *use* them.
Modify Default GenAI App Access Policy Rule to Control GenAI Access
Understanding and configuring the default GenAI policy rule is a key starting point for controlling GenAI access, relevant for both PCNSA and PCNSE.
Modify the Default GenAI App Policy rule in Strata Cloud Manager to control GenAI App usage.
Applicability & Requirements
| Where Can I Use This? | What Do I Need? |
|---|---|
|
One of the following:
|
- Recommendation: Use Internet Access Security policy rules for GenAI in Strata Cloud Manager for efficiency.
- Avoid mixing GenAI and non-GenAI apps in the same policy rule if the Enterprise Data Loss Prevention (E-DLP) license is not active.
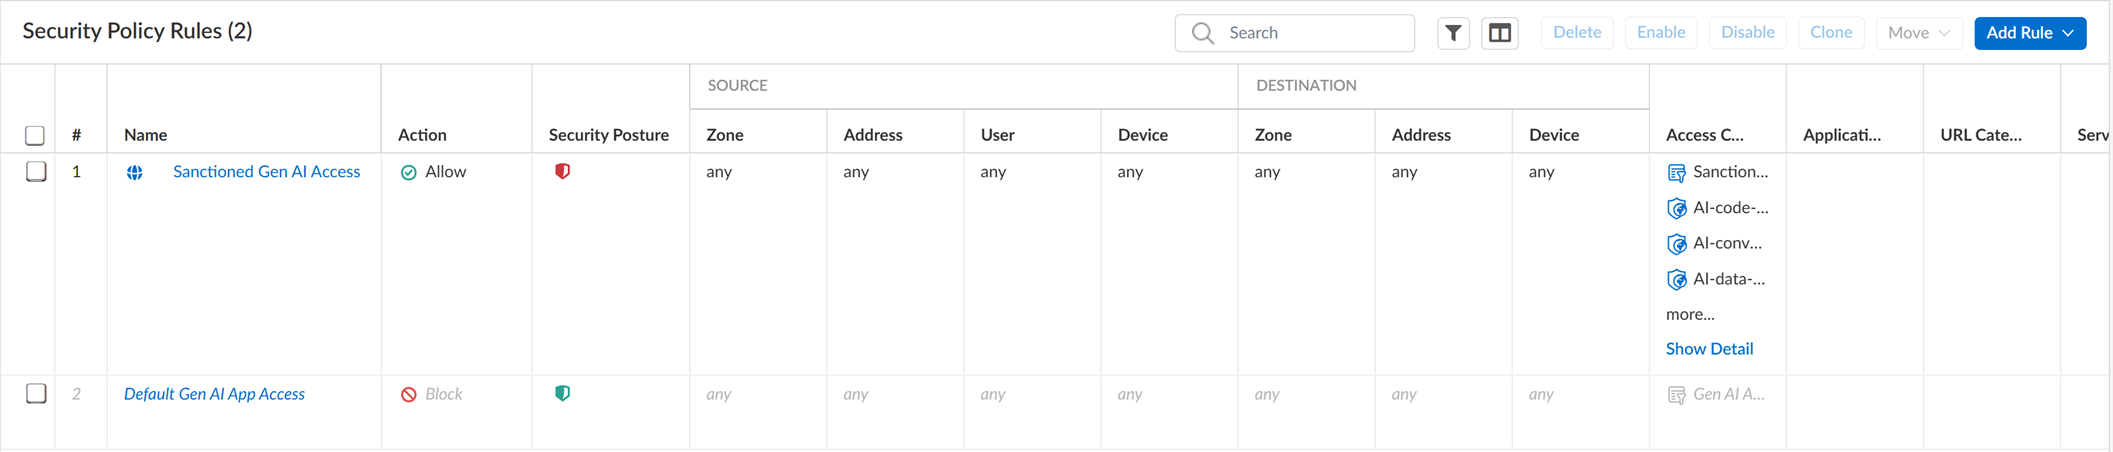
Strata Cloud Manager includes a predefined Default GenAI App Access policy rule . By default, this rule BLOCKS all GenAI apps not explicitly allowed by other rules.
Steps to Modify Default Rule (SCM):
- Log in to Strata Cloud Manager .
- Select Manage > Configuration > NGFW & Prisma Access > Security Services > Internet Security and select your target Configure Scope.
-
Click the predefined Default GenAI App Access policy rule
.
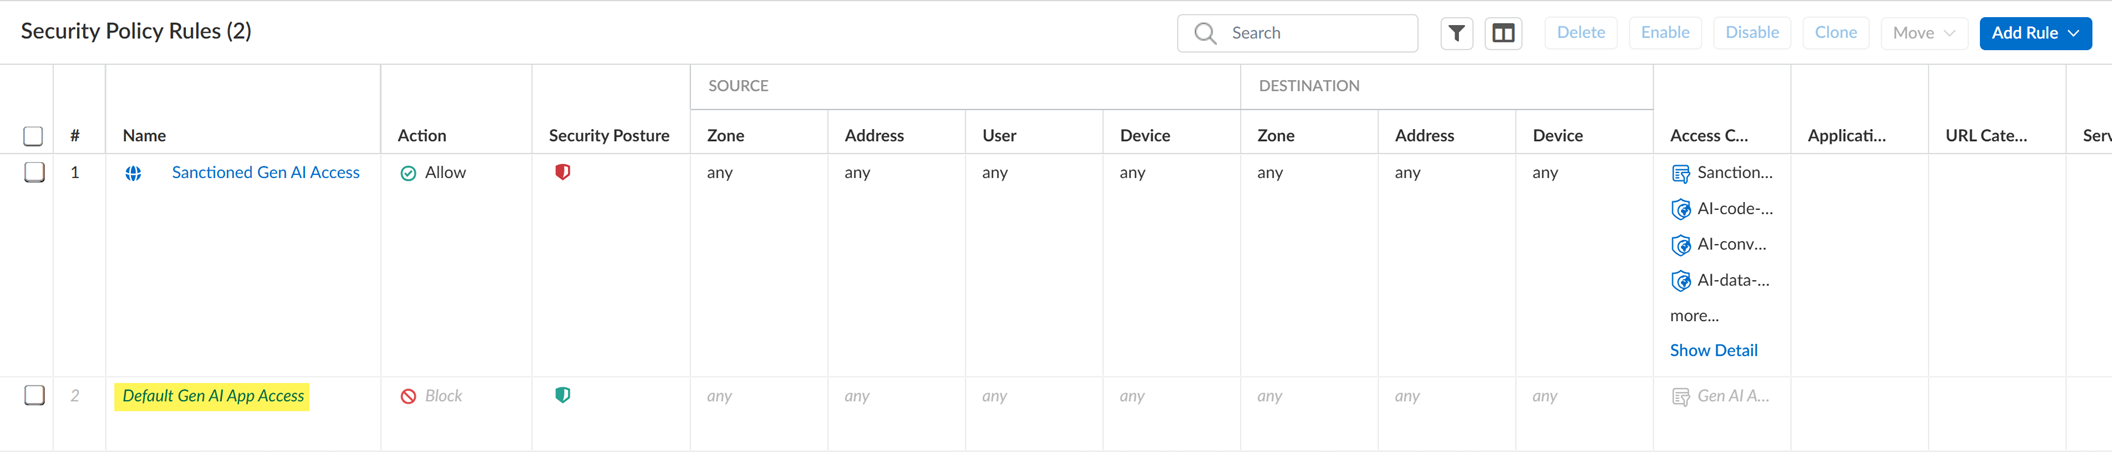
- Enable the Default GenAI App Access policy rule . (Disabled by default).
-
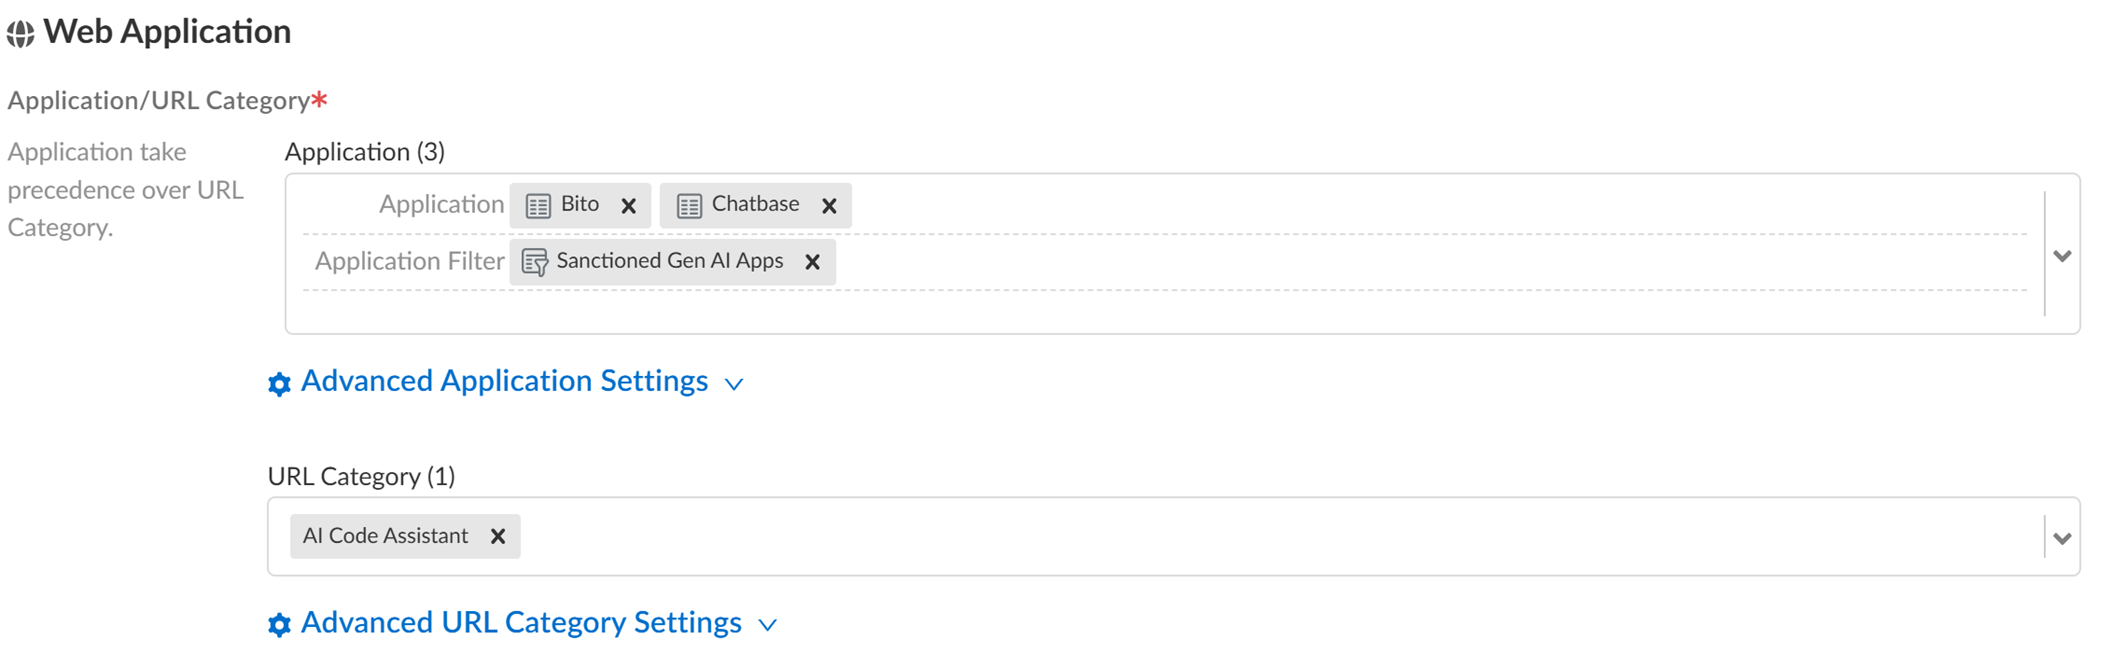
In the Web Application section, configure the Application and URL Category
. By default, it blocks *all* GenAI. You can modify it to block specific apps, groups, or filters.
- Application: Add specific GenAI apps.
- Application Group: Static group of apps.
- Application Filter: Dynamic grouping based on attributes (recommended for flexibility).
- Save .
- Push Config and Push .
Create Custom Security Policy Rules to Control GenAI Access
Custom policy rules are fundamental for granular control over GenAI apps. This section covers creating rules in both Strata Cloud Manager and Panorama, and associating security profiles (DLP, VP), which are essential for PCNSE.
Create custom Security policy rules for granular control of GenAI apps and to prevent sensitive data exfiltration to sanctioned apps. Use tags, source/user groups, and other parameters.
Applicability & Requirements
| Where Can I Use This? | What Do I Need? |
|---|---|
|
One of the following:
|
- (Strata Cloud Manager) Use or modify the predefined Sanctioned GenAI Access / Tolerated GenAI Access Internet Access policy rules, or create new Internet Access policy rules .
- (Panorama) Create Security policy rules .
Create separate rules for Sanctioned/Tolerated vs. Unsanctioned apps. E.g., an Allow rule for specific users/groups for a Tolerated app, and a Deny rule lower in the rulebase for everyone else.
- Recommendation: Use Internet Access policy rules for GenAI in Strata Cloud Manager for efficiency.
- Avoid mixing GenAI and non-GenAI apps in the same policy rule if the Enterprise Data Loss Prevention (E-DLP) license is not active.
In Strata Cloud Manager, Internet Access Security policy rules are evaluated and enforced BEFORE Security policy rules. If both apply, the Internet Access rule's Action and E-DLP inspection configuration take precedence. No further policy evaluation occurs after an Internet Access rule match.
Example: Internet Access Rule A Allows User Group A to GenAI apps with DLP Profile A. Security Policy Rule B Blocks User Group A to the same apps. Internet Access Rule A prevails, traffic is Allowed and inspected by DLP Profile A.
Creating Custom Rules (Strata Cloud Manager):
- Use the AI Access Security Insights dashboard to discover risks (identifies apps, users, use cases needing control).
- Perform initial AI Access Security configuration (E-DLP data profile, snippets, Vulnerability Protection profile, zones if applicable).
- Log in to Strata Cloud Manager .
- Select Manage > Configuration > NGFW & Prisma Access > Security Services > Internet Security and select your target Configure Scope.
-
Select Security Settings > Threat Management and Customize Vulnerability Protection
.
- Select the Vulnerability Protection Profile .
- Configure remaining Vulnerability Protection settings .
- Save .
- Select Security Services > Security Policy to create or modify rules.
-
Modify predefined Sanctioned/Tolerated GenAI Access policy rules
(optional).
- Select the predefined rule and Enable .
- Make required changes .
- Save .
-
Create a custom Internet Access policy rule
.
- Select Add Rule > Internet Access Rule .
- Enable the Internet Access policy rule .
- Enter a descriptive Name .
- (Optional) Add Description and Tag .
-
Configure the Action (Block or Allow)
.

- (Optional) Configure a Schedule .
- In Match Criteria, define Source (User Group, etc.) . E.g., block User Group A from an app sanctioned for User Group B.
-
In Web Application section, configure Application or URL Category
(GenAI apps, group, or filter).
Only add supported GenAI apps to ALLOWED lists.
- Application: Specific apps.
- Application Group: Static group.
- Application Filter : Dynamic filter based on attributes (recommended).
-
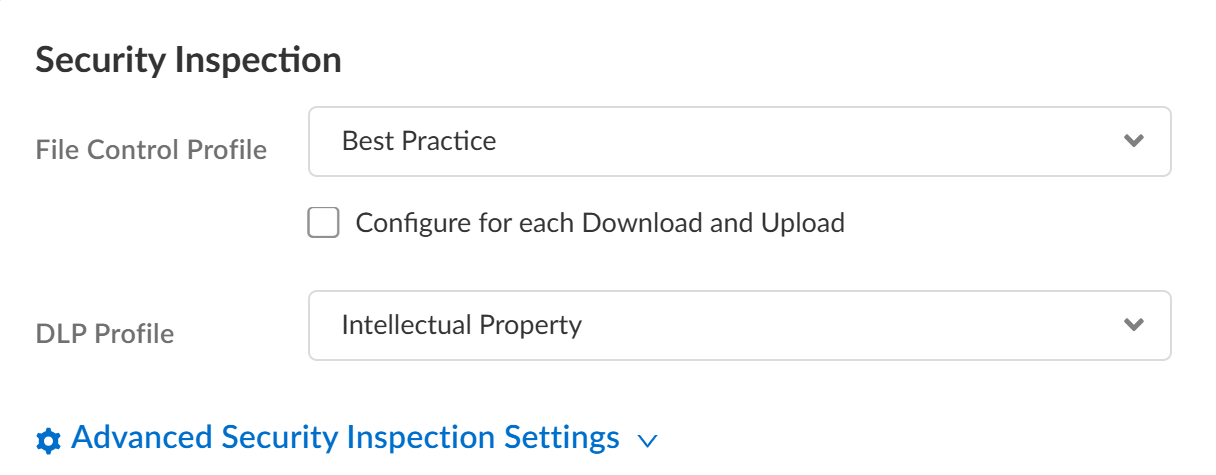
(Allowed GenAI Apps) In Security Inspection, select file blocking and Enterprise DLP profile
.
- File Control Profile: Select a File Blocking profile (custom or Best Practice).
- DLP Profile : Assign an E-DLP data profile. Required to generate Sensitive Assets data for reporting.
- Configure the rest of the rule (destination, etc.).
- Save .
-
Verify rule creation and order it within your policy rulebase
.
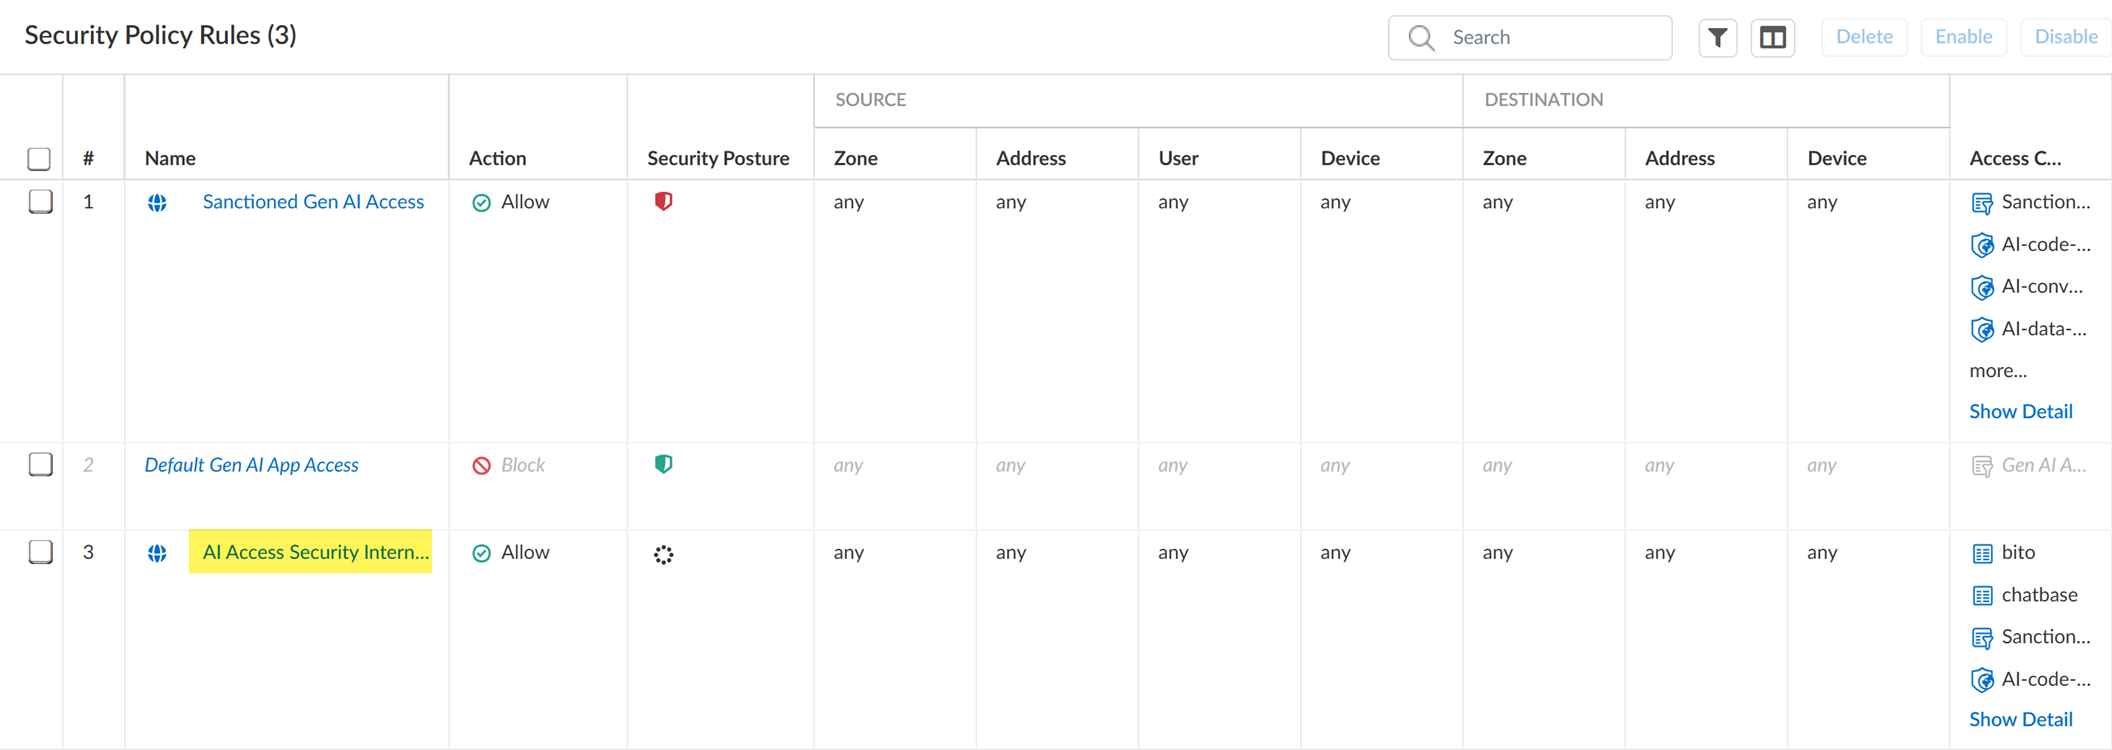
- Push Config and Push .
Creating Custom Rules (Panorama):
- Use the AI Access Security Insights dashboard to discover risks (identifies apps, users, use cases needing control).
- Perform initial AI Access Security configuration (E-DLP data profile, Vulnerability Protection profile, zones if applicable).
- Log in to the Panorama™ management server web interface .
- Select Policies > Security and specify the Device Group.
- Add a new Security policy rule .
-
Configure the Security policy rule General, Source, and Destination settings
. (Refer to Security Policy Admin Guide).
- General: Name, Description, Tags.
- Source : Define origin (Source Zone - internal trust, Source User - specific users/groups). Can select Any.
- Destination : Define target (Destination Zone - outbound untrust). Can select Any.
-
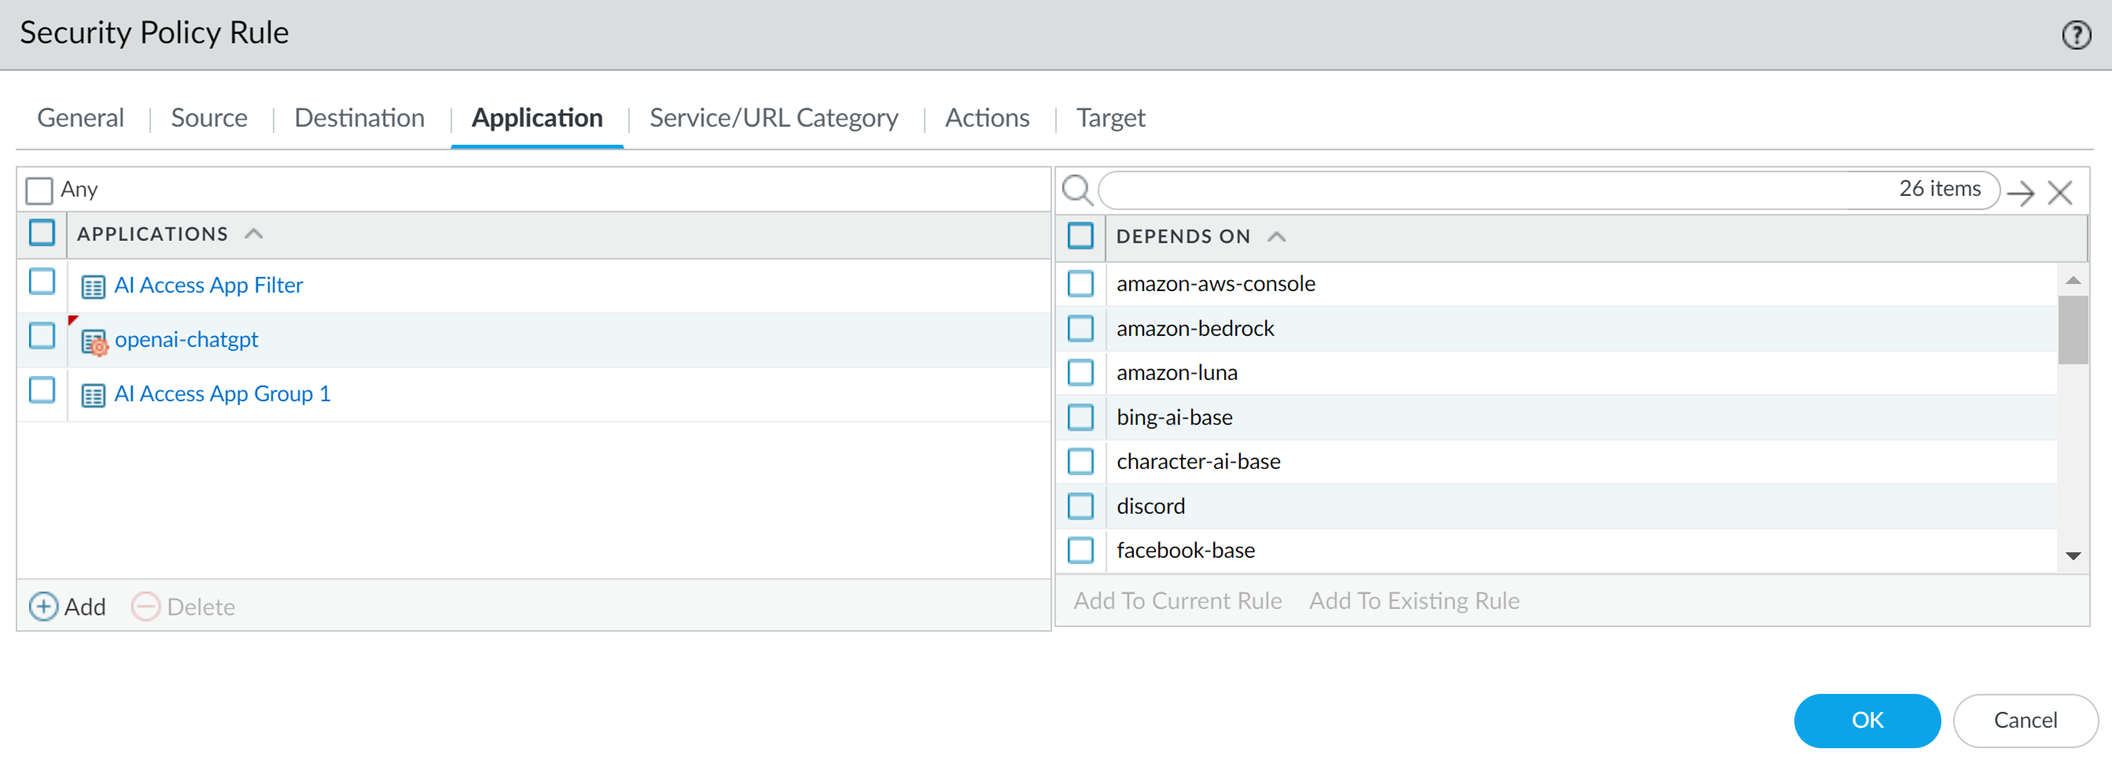
In the Application settings, specify GenAI Application Group, Application Filter, or Applications
.
Only add supported GenAI apps to ALLOWED lists.
- Application: Specific apps.
- Application Category (Application Filter) : Dynamic grouping based on attributes (recommended).
- Application Group: Static group.
-
Configure the Security policy rule Actions
. Decide what Actions to take (Allow, Deny, etc.).
- For the Action, configure Allow or Deny .
-
For the Profile Type, select Profile
.
At a minimum, add the Vulnerability Protection and Data Filtering (E-DLP) profiles . These are required to generate Threats and Sensitive Assets data for reporting.
Optional profiles: Antivirus, Anti-Spyware, URL Filtering, File Blocking, WildFire Analysis.
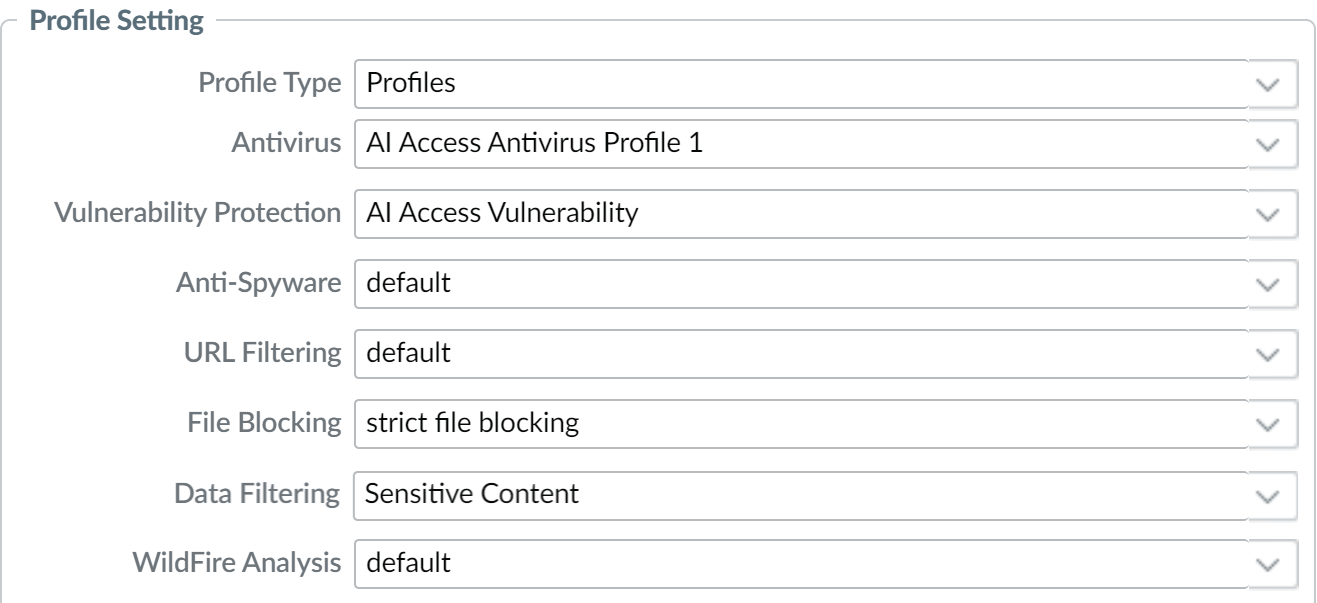
In the Actions tab, Profile Setting takes precedence over Action Setting . Ensure they align. E.g., if Action is Allow but a profile setting (like File Blocking or DLP) is Block for a specific condition, the traffic *will* be blocked. -
Commit and push the new configuration to managed firewalls
. Required for E-DLP plugin installation/profile names in logs.
Commit and Push is NOT recommended for E-DLP config changes due to manual scope selection overhead. Partial push is preferred.
-
Full configuration push from Panorama:
- Select Commit > Commit to Panorama and Commit .
- Select Commit > Push to Devices and Edit Selections .
- Select Device Groups and Include Device and Network Templates .
- Click OK .
- Push changes.
-
Partial configuration push from Panorama:
Always include the temporary __dlp administrator when performing a partial configuration push. This is required to keep Panorama and the DLP cloud service in sync.
- Select Commit > Commit to Panorama .
-
Select Commit Changes Made By
and click the current admin user to select additional admins (including
__dlp
).
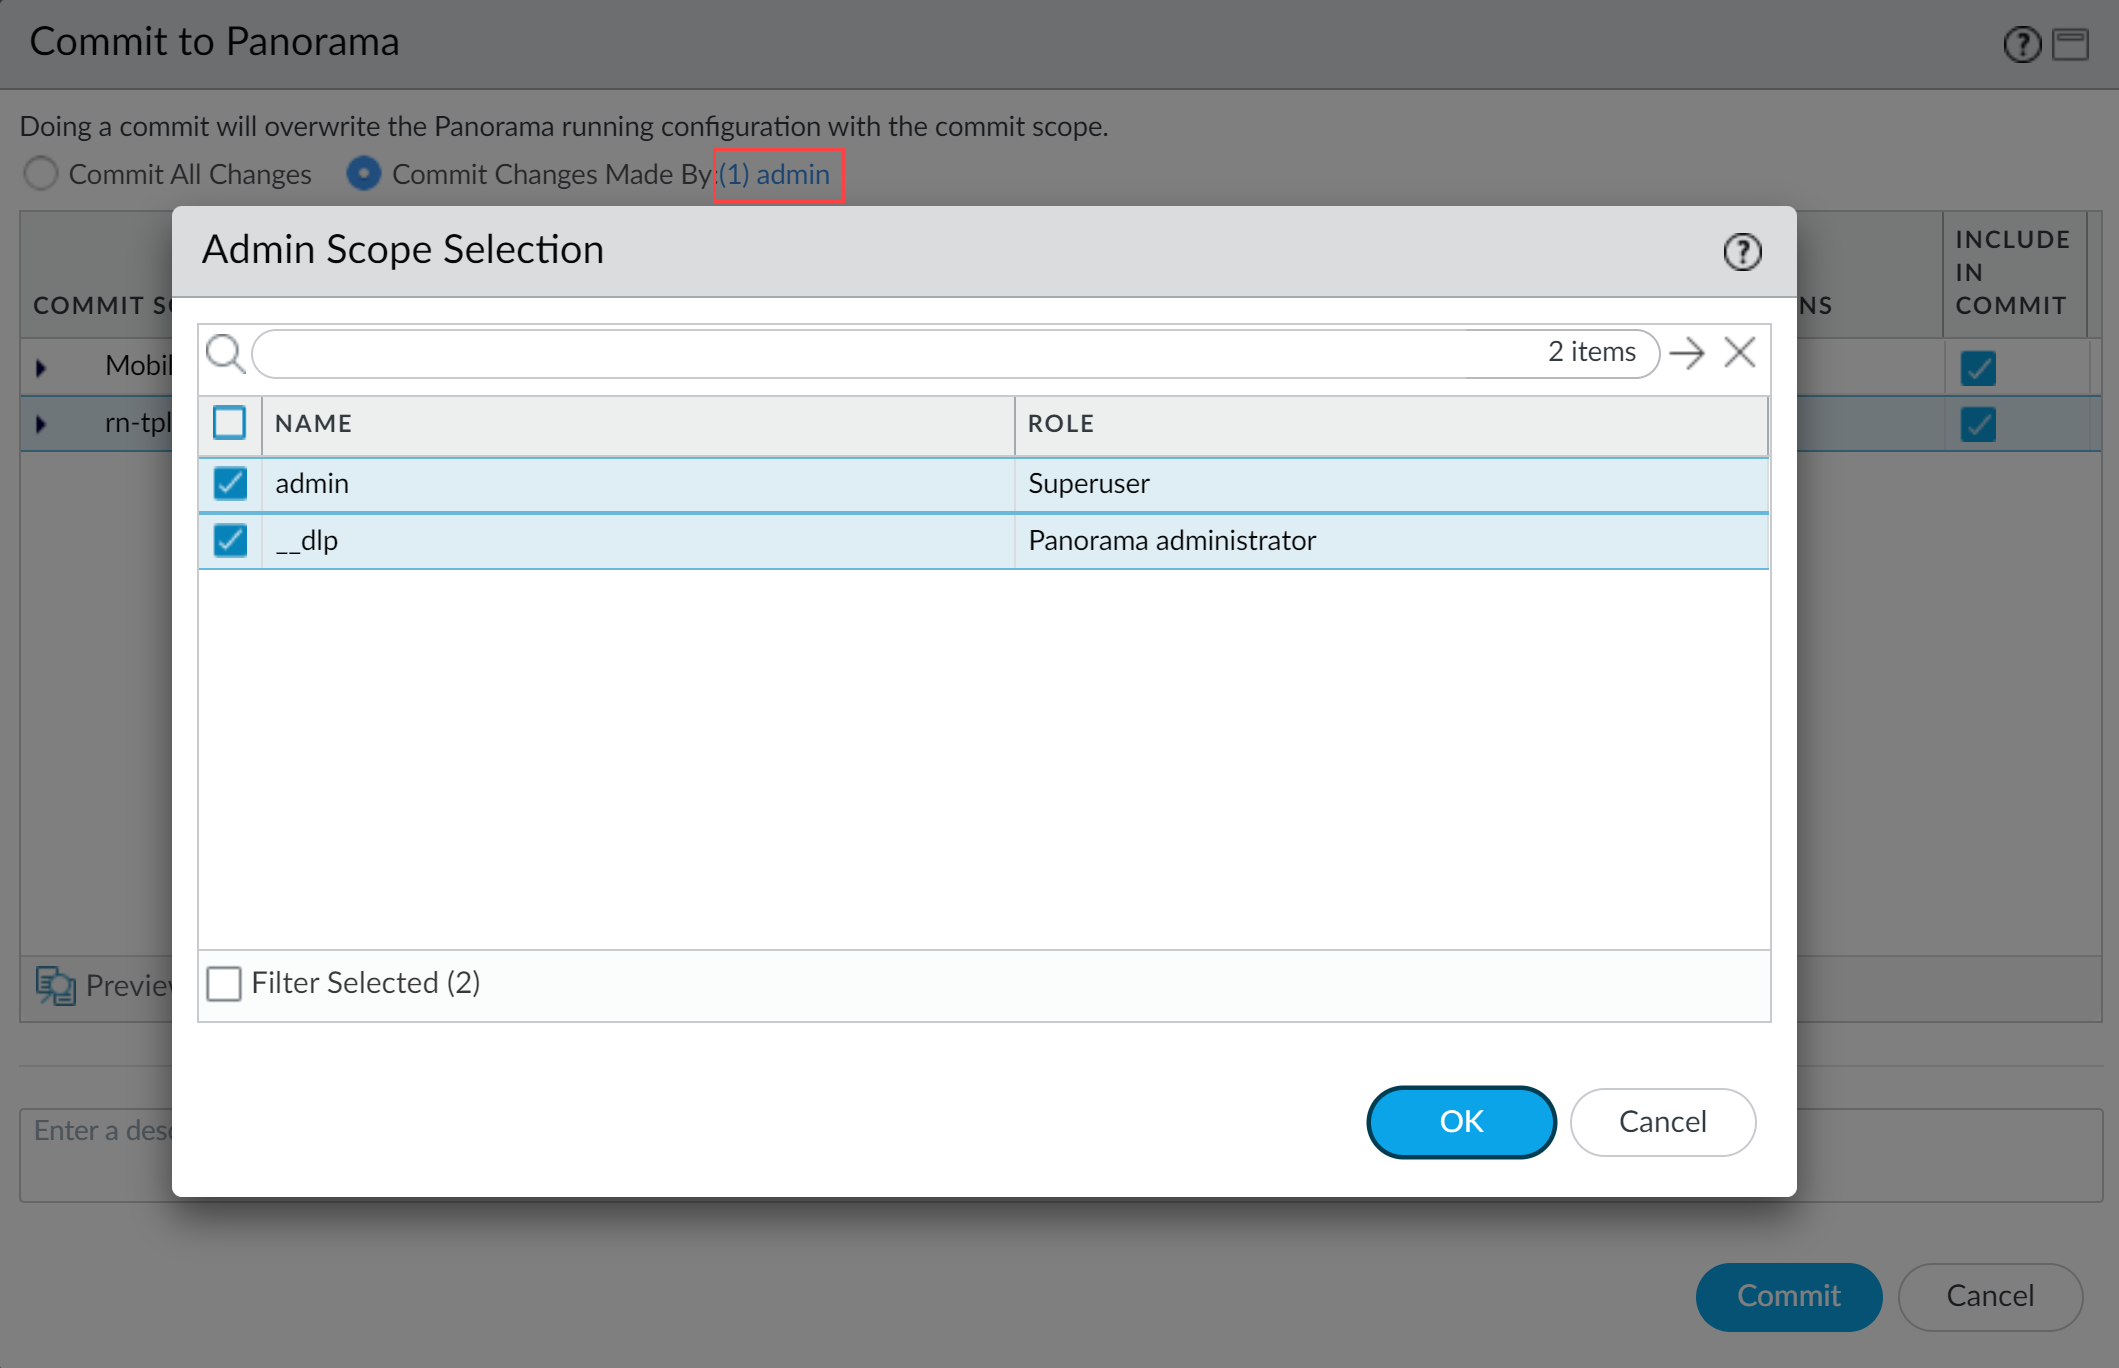
- Commit .
- Select Commit > Push to Devices .
-
Select Push Changes Made By
and click the current admin user to select additional admins (including
__dlp
).
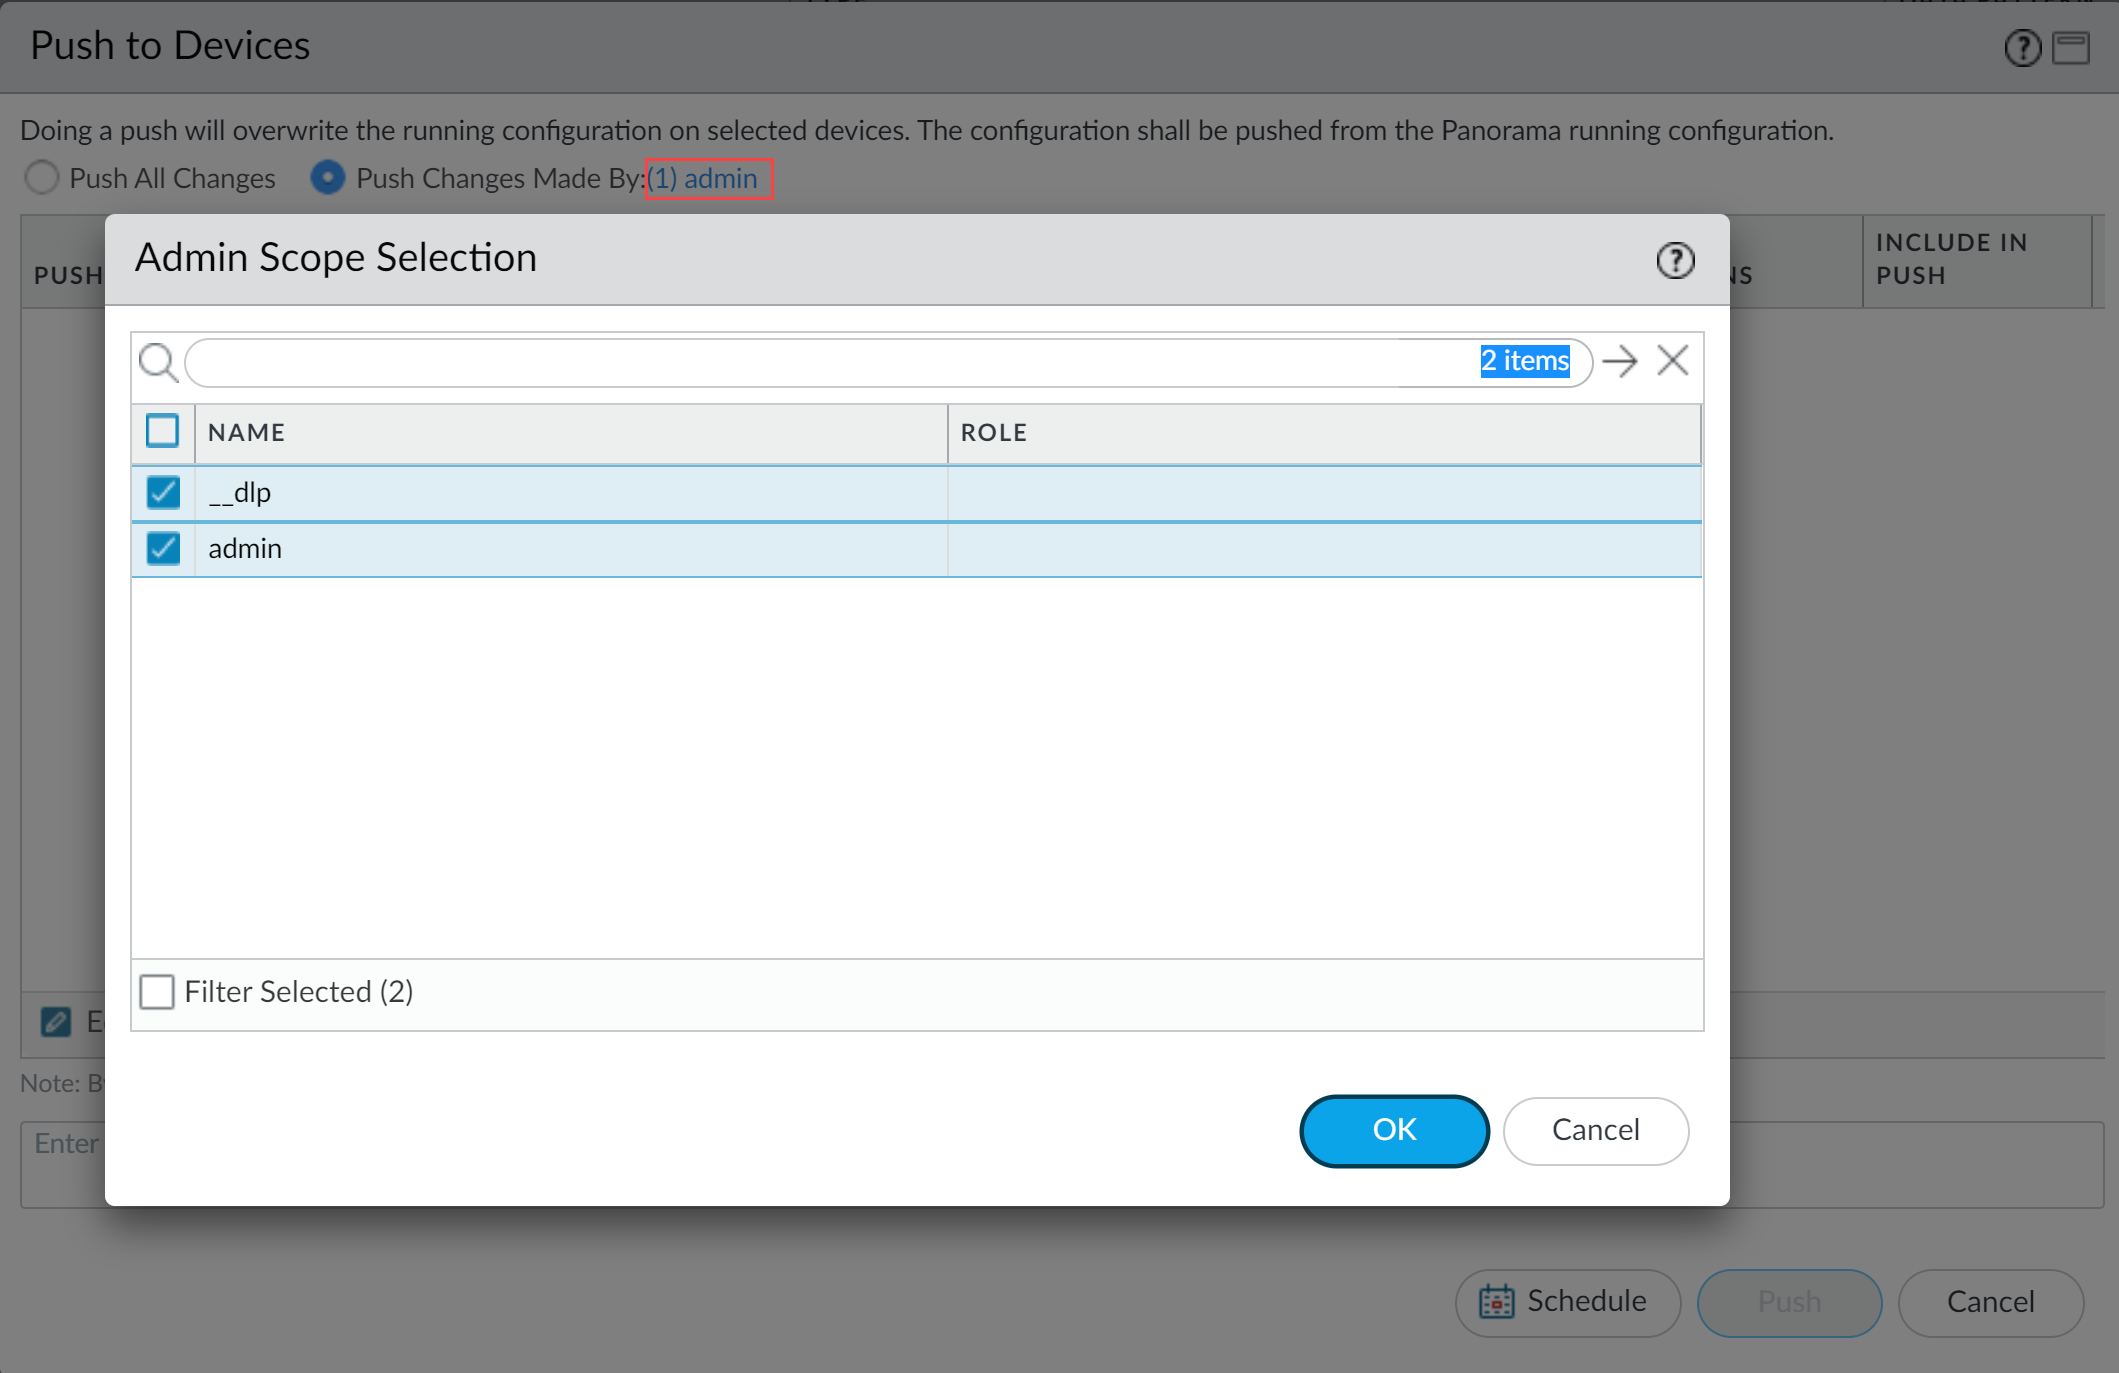
- Click OK .
- Select Device Groups and Include Device and Network Templates .
- Click OK .
- Push changes.
-
Full configuration push from Panorama:
AI Access Security Recommendations
Recommendations provide actionable steps to improve GenAI security posture, useful for both PCNSA (understanding best practices) and PCNSE (implementing suggested changes).
AI Access Security Recommendations help network security admins address gaps and strengthen security posture for GenAI apps.
Recommendations are manual or automated. Manual steps require admin action with instructions/docs. Automated steps via Palo Alto Networks Copilot require admin approval.
Applicability & Requirements
| Where Can I Use This? | What Do I Need? |
|---|---|
|
One of the following:
|
- (SCM Managed) Recommendations update in real time based on config changes and traffic analysis (7-day look back).
- (Panorama Managed) Recommendations update every 24 hours on Strata Cloud Manager.
Recommendation Categories:
- GenAI App Classification Recommendations : Based on app usage and current classification (Sanctioned, Tolerated, Unsanctioned). E.g., recommending reclassifying Unsanctioned apps if traffic is allowed.
- Best Practices Checks and Policy Recommendations : Uses Best Practice Assessment (BPA) service to analyze policy rulebase and suggest improvements. E.g., finding a rule allowing Unsanctioned GenAI apps.
- Data Loss Prevention Recommendations : Analyzes policy rules to ensure traffic to Sanctioned/Tolerated apps is forwarded to E-DLP for inline/at rest inspection. Includes config recommendations for E-DLP forwarding.
- Onboarding and Maximizing AI Access Security : Actionable recommendations to leverage platform capabilities.
Generate an AI Access Security Report
The report provides a summary of GenAI app usage and risks, which is valuable for understanding the environment (PCNSA) and validating policy effectiveness (PCNSE).
The AI Access Security Report provides a comprehensive overview of your organization's GenAI app and plugin usage and security posture. Helps understand and manage risks, packed with actionable insights and recommendations.
Applicability & Requirements
| Where Can I Use This? | What Do I Need? |
|---|---|
|
One of the following:
|
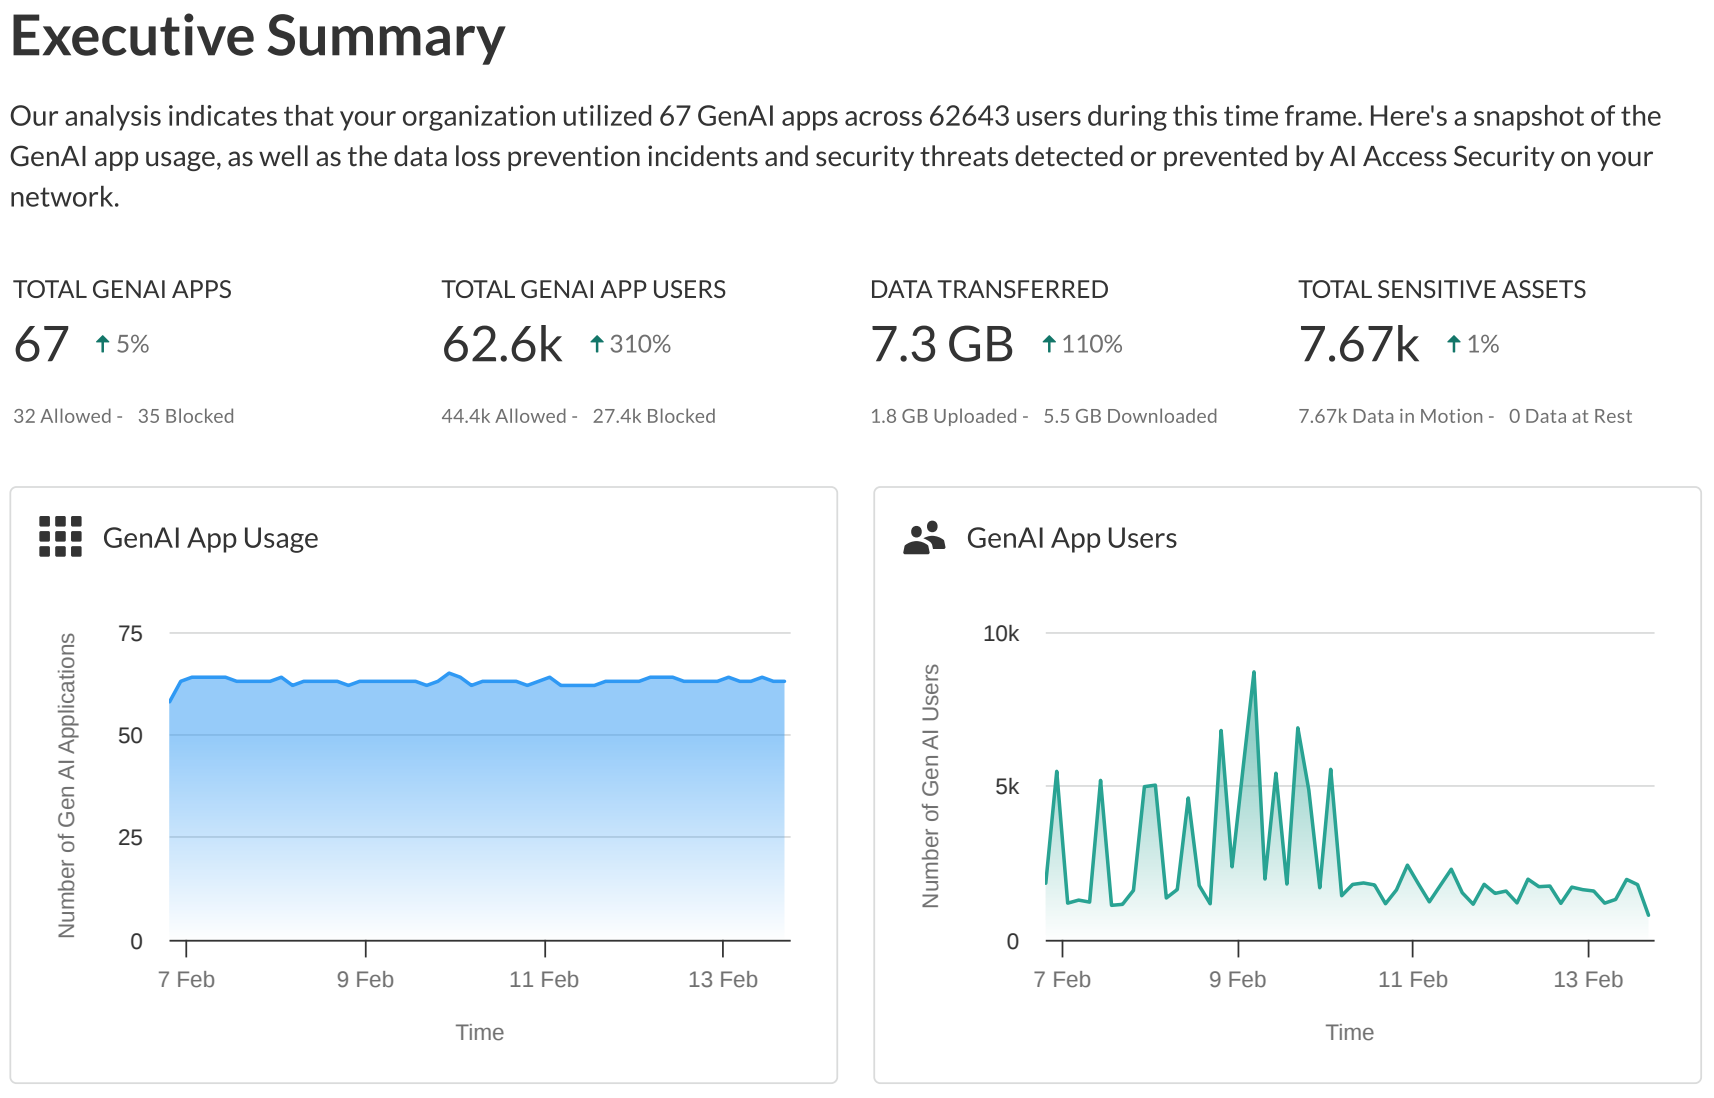
Key components of the Report:
-
Executive Summary
: High-level snapshot.
- GenAI app usage overview.
- Total data uploaded/downloaded (GB).
- Sensitive data assets detected (at rest, in motion).
-
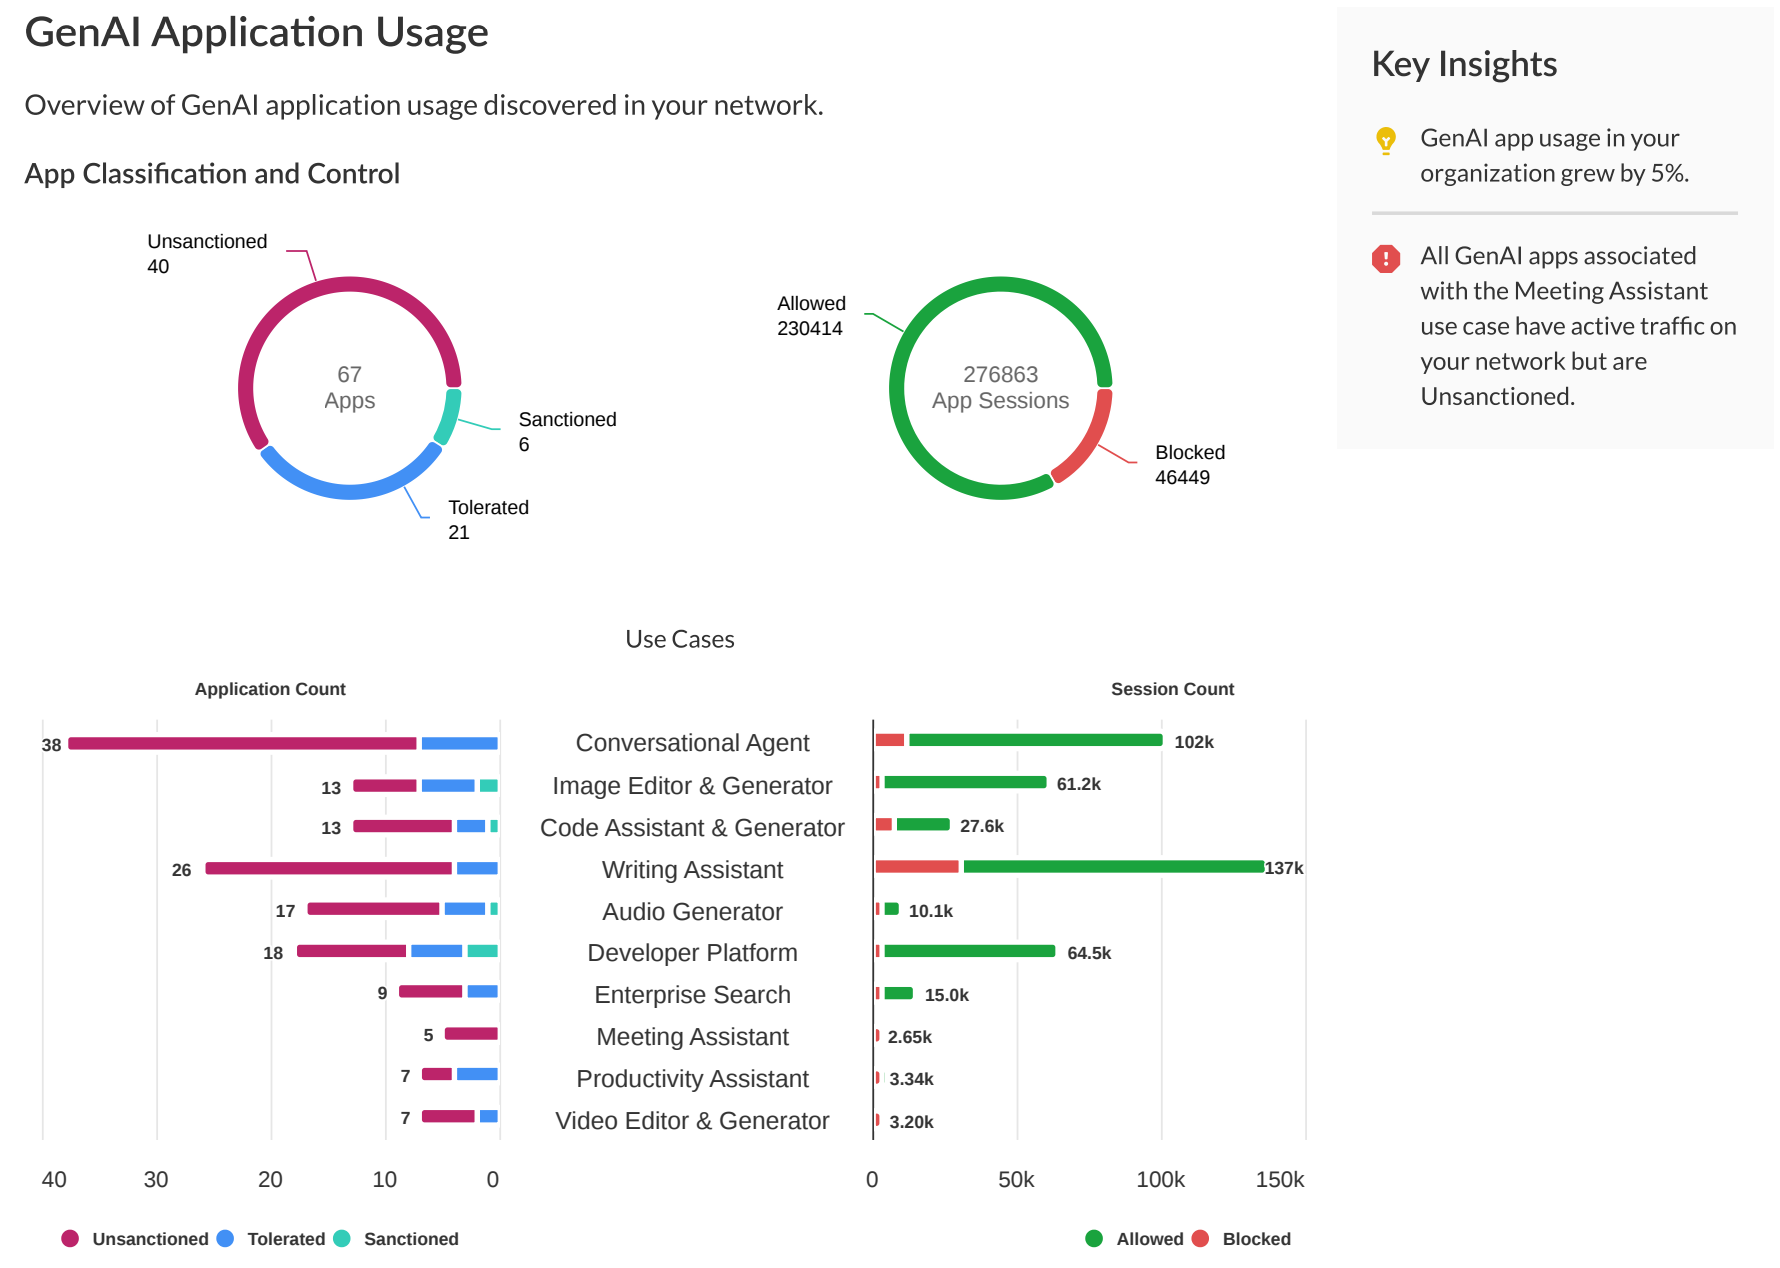
GenAI App Usage
: Comprehensive breakdown.
- Total apps (Allowed/Blocked, Sanctioned/Tolerated/Unsanctioned distribution).
- Breakdown by use case and classification/action (Allowed/Blocked).
- Number of Unsanctioned but allowed apps (including change over time).
- Aggregate usage data for unsanctioned but allowed apps (users, data transferred).
- Details on top 5 Unsanctioned but allowed apps (name, users, sessions, risk factors).
-
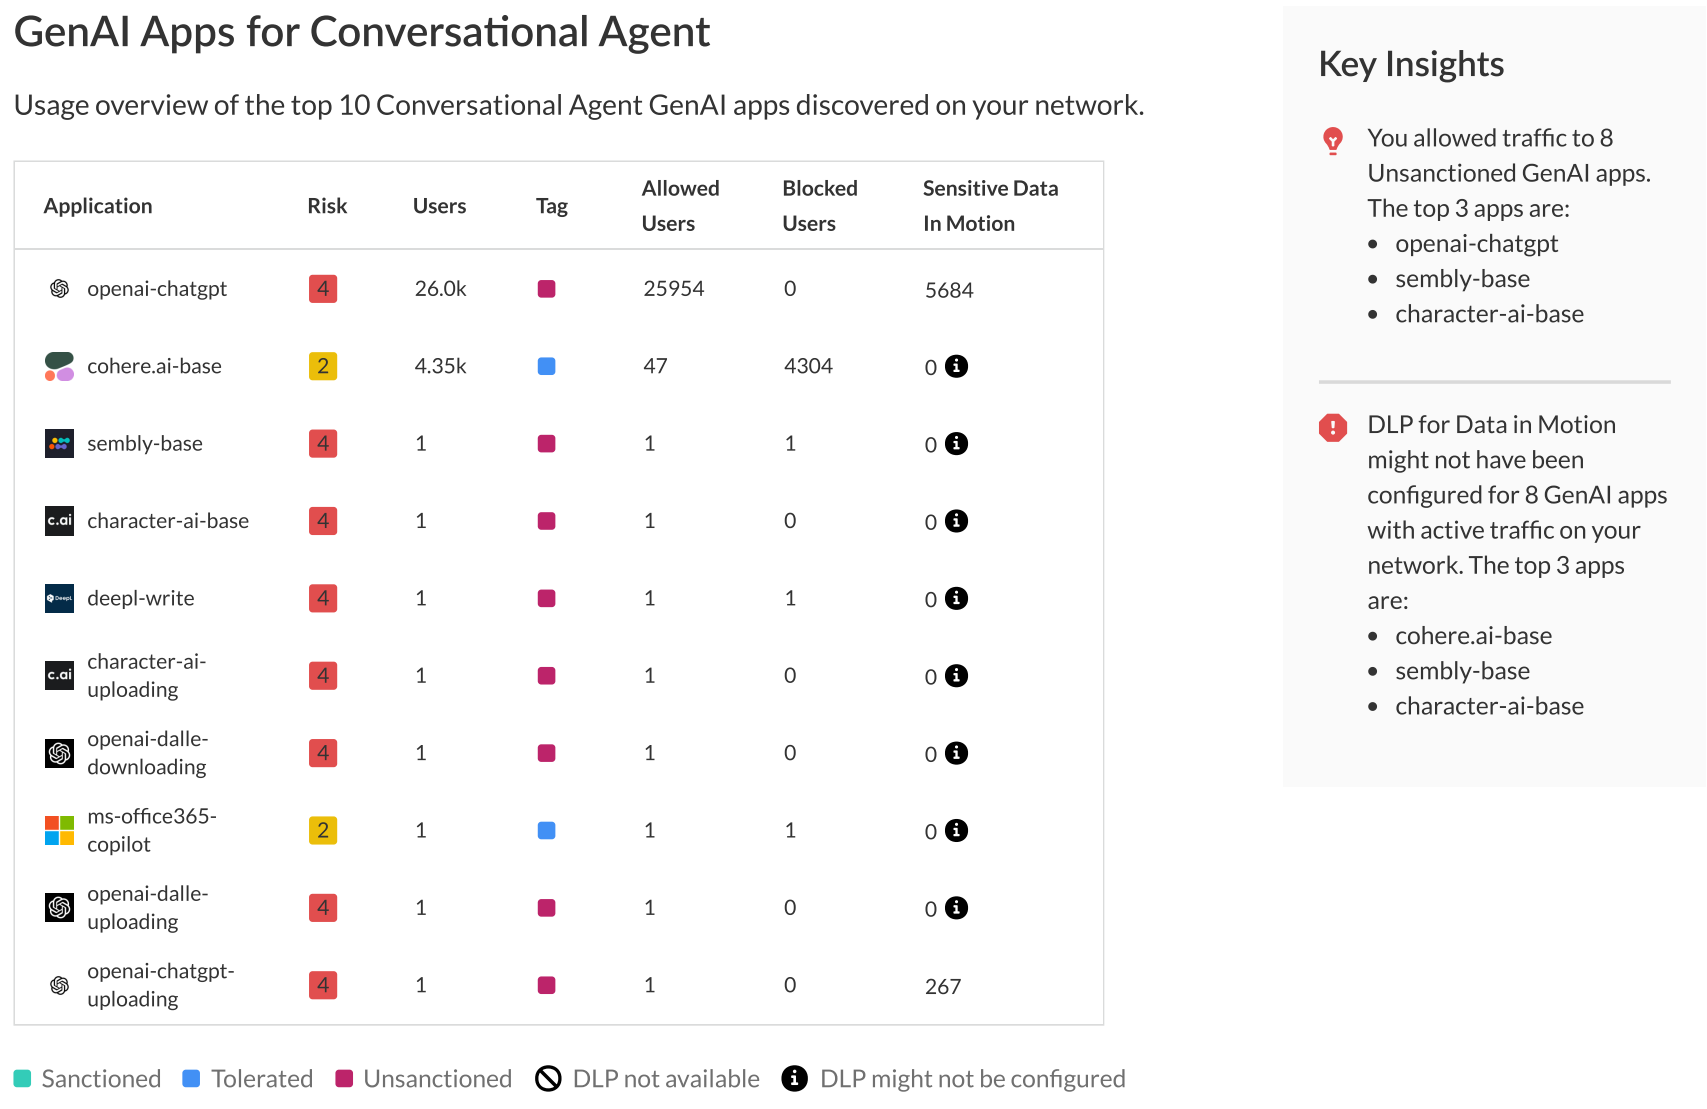
GenAI Apps for Top Use Cases
: Summary of top 10 apps by use case.
- App Name.
- Risk score.
- Unique users.
- Classification (Sanctioned, Tolerated, Unsanctioned).
- Unique sessions (allowed/blocked).
- E-DLP incidents.
-
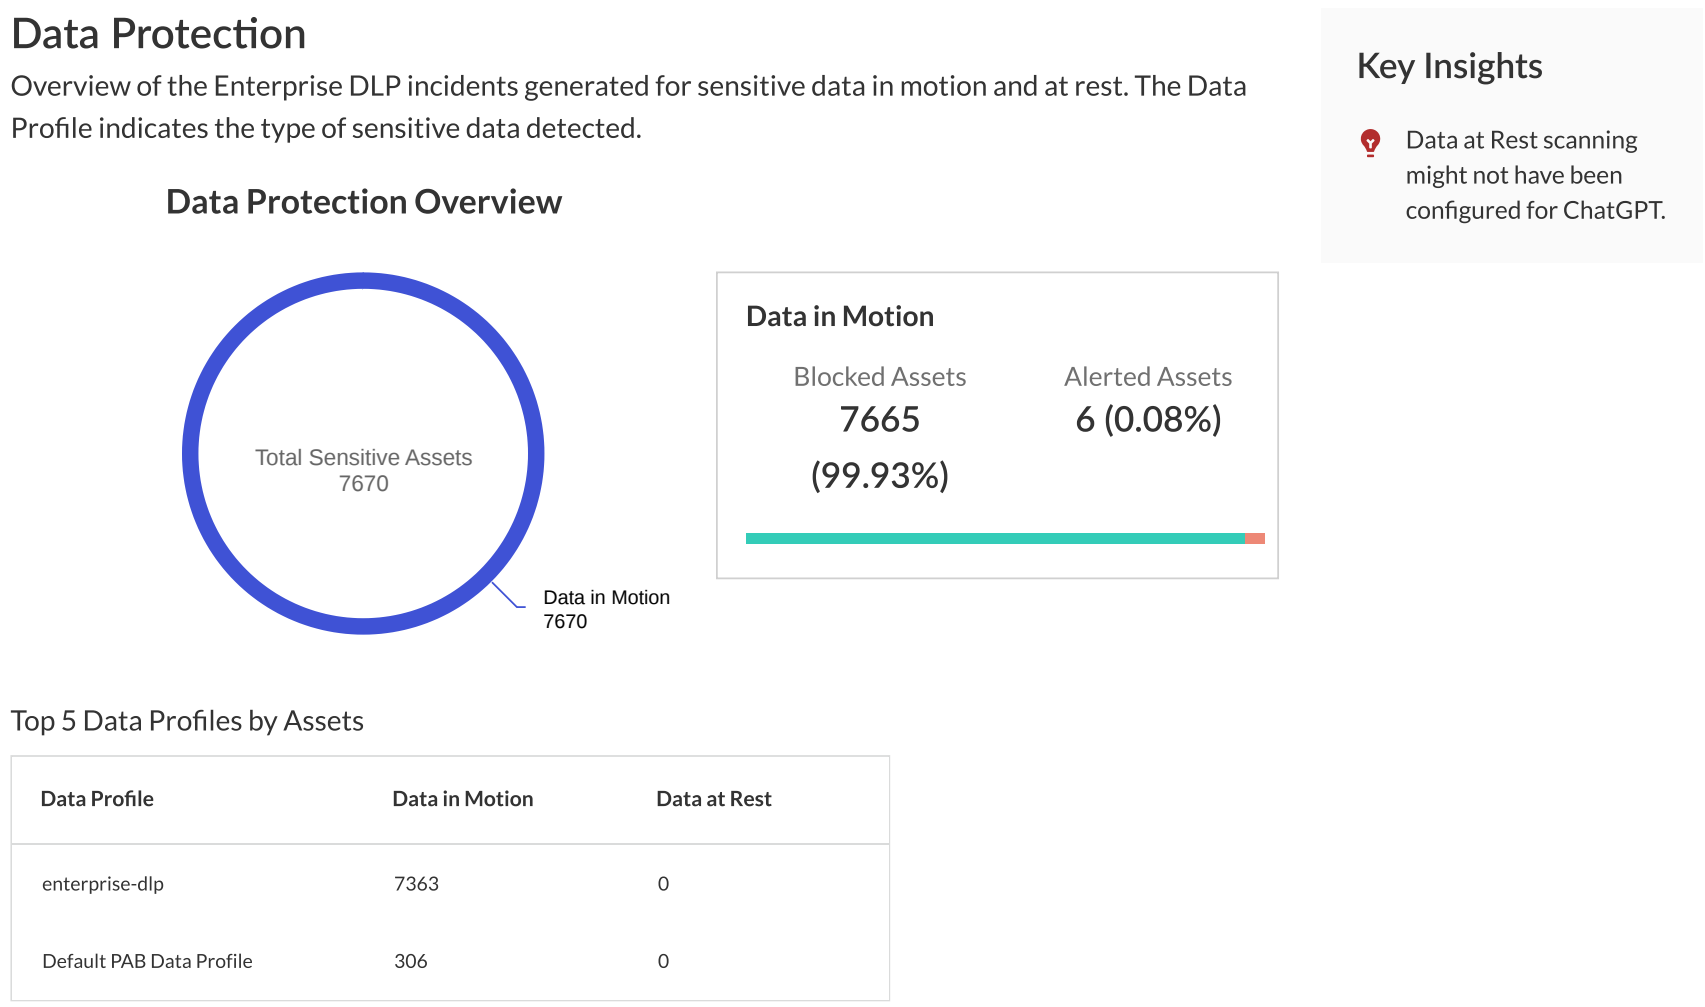
Data Protection
: Insights into sensitive data handling.
- Total sensitive assets detected (Allowed/Blocked).
- Distribution by sensitive asset type.
- Details on sensitive data in top 5 GenAI apps.
Workflow:
graph TD
    A[Observe Usage on Network] --> B[Data Collected by NGFW/Prisma Access];
    B --> C[Data Sent to Strata Cloud Manager];
    C --> D{AI Access Security Insights};
    D --> E[Analyze Usage Data];
    E --> F[Identify Risks/Trends];
    F --> G[Inform Tagging/Policy Decisions];
    G --> B;
    F --> H[Generate Report];
    H --> I[Review Report];
    I --> G;
Steps to Generate Report:
- Log in to Strata Cloud Manager .
- Select Insights > AI Access .
- Select the time frame for the report (Past 24 Hours, Past 7 Days, or Past 30 Days).
-
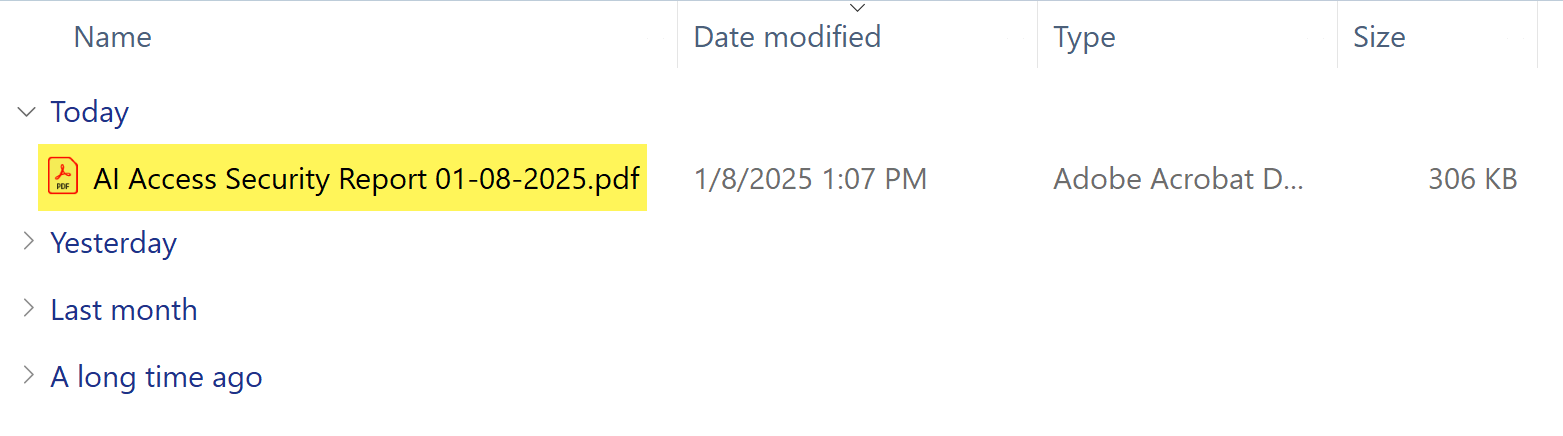
Download the AI Access Security Report
(PDF format). Default name: AI Access Security Report <generation-date>.pdf.
 Do NOT leave or refresh the page before download completes , or you must restart.
 -
Navigate to your download folder and review the Report
.
Interactive Quiz: AI Access Security Administration
Test your understanding of AI Access Security concepts, including insights, tagging, risk scores, policies, and reporting, relevant to both PCNSA and PCNSE exams.
Answer all questions below and click "Submit Answers" to check your knowledge.