Cloud Identity Engine Directory Sync
Intro
In this article you'll be able to get an actual walkthrough of how to apply it to your Panorama instance as well as to your Palo Alto Networks cloud services, such as a managed Prisma Access.
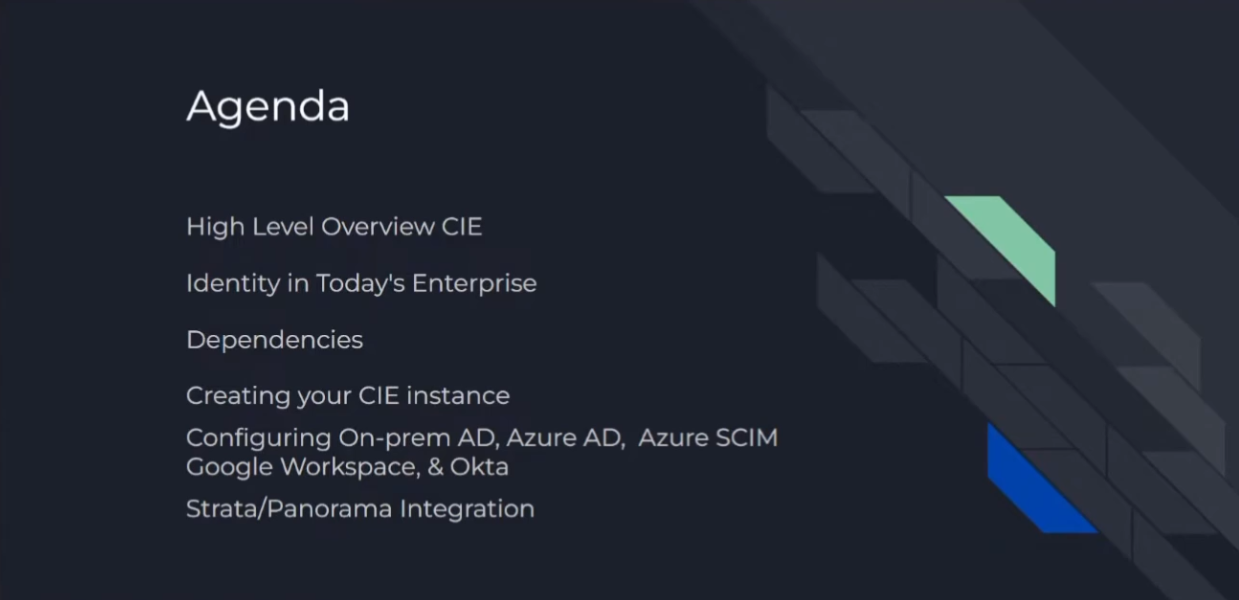
So, the agenda today: I'm going to go over what Cloud Identity Engine is, what identity looks like in the enterprise today, and any dependencies that we have. Then we're going to get down into it: I'm going to help you walk through building out your Cloud Identity Engine instance. Then, we're actually going to go through each and every one of those five IdP instances. It doesn't matter if it's on-prem AD, Azure AD, the new Azure SCIM (Secure Cross-domain Identity Management) —apparently you can just pick and choose which characters you want in your acronym because the 'D' is there but not used. Then we'll move on to Google Workspace and finally Okta.
We'll wrap that up at the end by doing the Panorama and then managed Prisma Access integration.

Cloud Identity Engine was created to help identify and verify all users across your infrastructure, irrespective of whether the users are on-prem, cloud, hybrid, or use multi-cloud identity provider sources.
Really, why this was created was to help make Zero Trust possible . One of the core tenets is to have identity, so we can identify our users and our groups on our firewalls and on our cloud services. It doesn't matter where they are; having that identity is critical and crucial for success. And what Palo Alto Networks did, as you'll see, is make it incredibly easy to accomplish.
Some of those key benefits are: we can collect user and group information not only from on-prem or the cloud. So, it doesn't matter if you're using guest accounts or if you're using more than one; we can bring them all together. I'll actually show you an example of a CIE instance that has all of them integrated. Then we're able to start looking at how those SAML claims are sending back attributes. If we don't like what we're getting from those IdPs, instead of having to troubleshoot with the different teams, getting them involved, and elongating the process, Cloud Identity Engine can actually sit in the middle of that and remap those attributes for you. So, as the firewall or the service administrator, you could just start troubleshooting, get your eyes on it, and fix the problems without having to rely on a bunch of teams getting involved.
That is the IdP portion of CIE, and I'll have another video covering that.
Figure: High-Level Overview of Cloud Identity Engine Functionality.
Identity Today
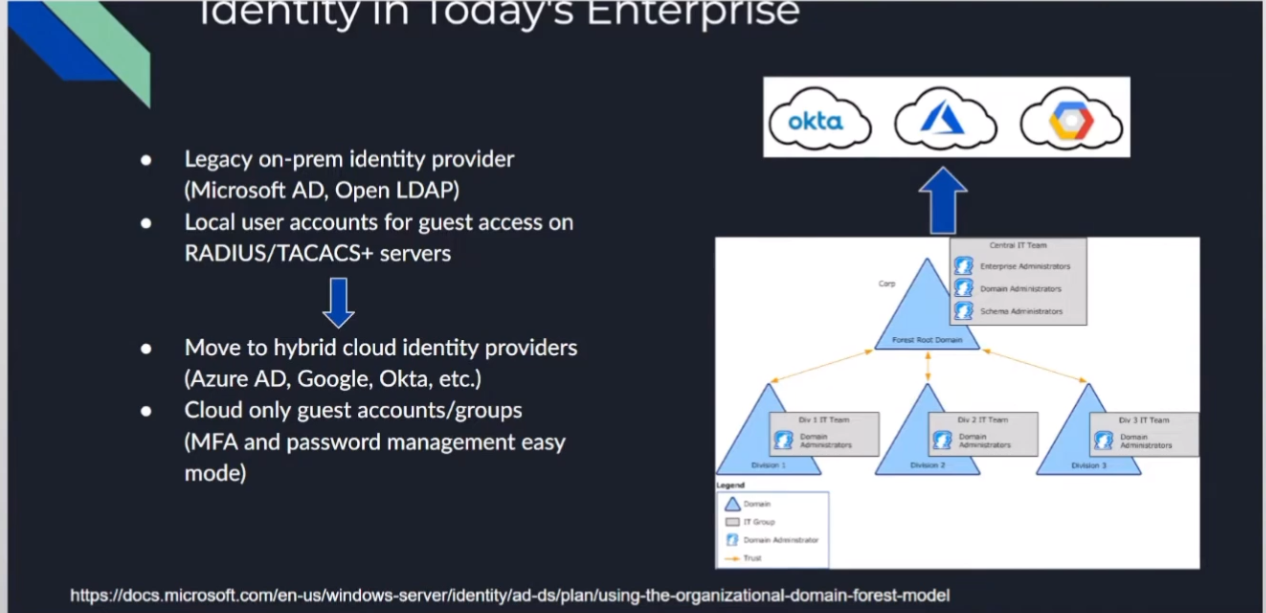
So, we have our traditional LDAP structure. This could be Microsoft AD, OpenLDAP, you name it. It really was just creating those attributes so that we could have users and groups and have some sort of mapping. This is where we were doing things like RADIUS or TACACS, or you name it, to be able to query them. We're really moving those out into the cloud where a lot of our services are going.
So, it doesn't matter if you're using Okta or Azure or Google; we're moving out there. A lot of the benefits are simplified MFA when we're going out there and using other protocols that are easier to implement, such as SAML .

Dependencies
On the Palo Alto Networks side, the dependencies are PAN-OS 10.1 or later . I'm going to be using 10.1.5-h1. Then you'll need an active support contract as well as permissions to create an app within the Palo Alto Networks hub.
Not a lot, pretty easy and straightforward.
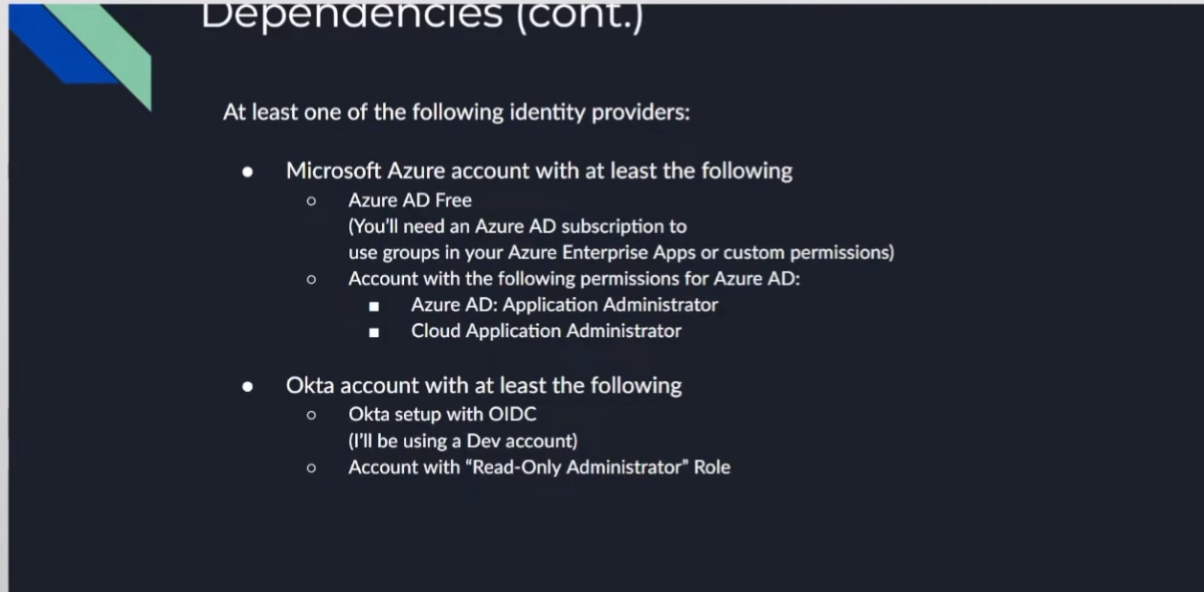
So, we're going through each of our IdPs. With Microsoft Azure, you'll need at least a free AD account .
If you're going to do anything with the permissions, you'll need a higher tier, and you'll see that where you need like a P1/P2 type thing; I have a screenshot of it. Then, if you're doing the Azure AD portion of it, you'll need Azure AD Application Administrator as well as Cloud Application Administrator roles .
With Okta, you'll need an account with at least one of the following : Okta setup with OIDC. I'm just using a dev account. There are a lot of different options with Okta; I'm definitely not an Okta specialist, so get with them, they'll be able to help you with it. It just needs a read-only administrator role .
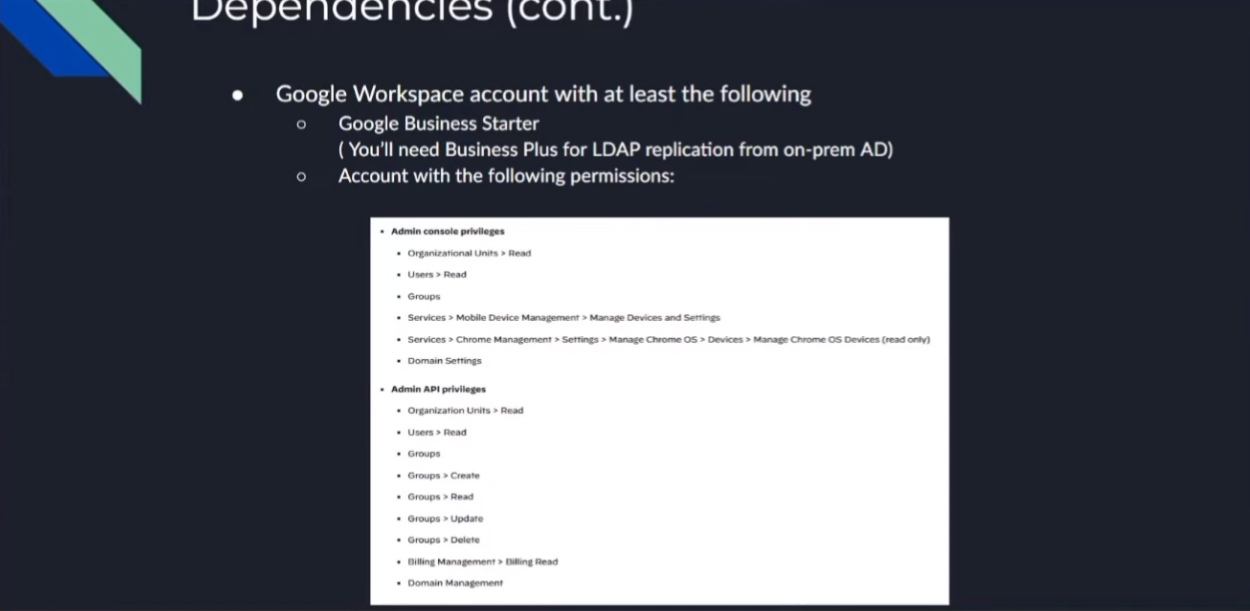
For a Google Workspace account, you'll just need the Google Business Starter edition . Then there, you'll need Business Plus if you're doing your LDAP replication for your on-prem. Then you'll need any—there are 15 total permissions that you'll need. I created a specific role for this that I'll show you that just captured all of them. The screenshot is there; it only takes a couple of minutes to set up. It's not that big of a deal, but we'll have that information.
Creating Your First Cloud Identity Engine Instance
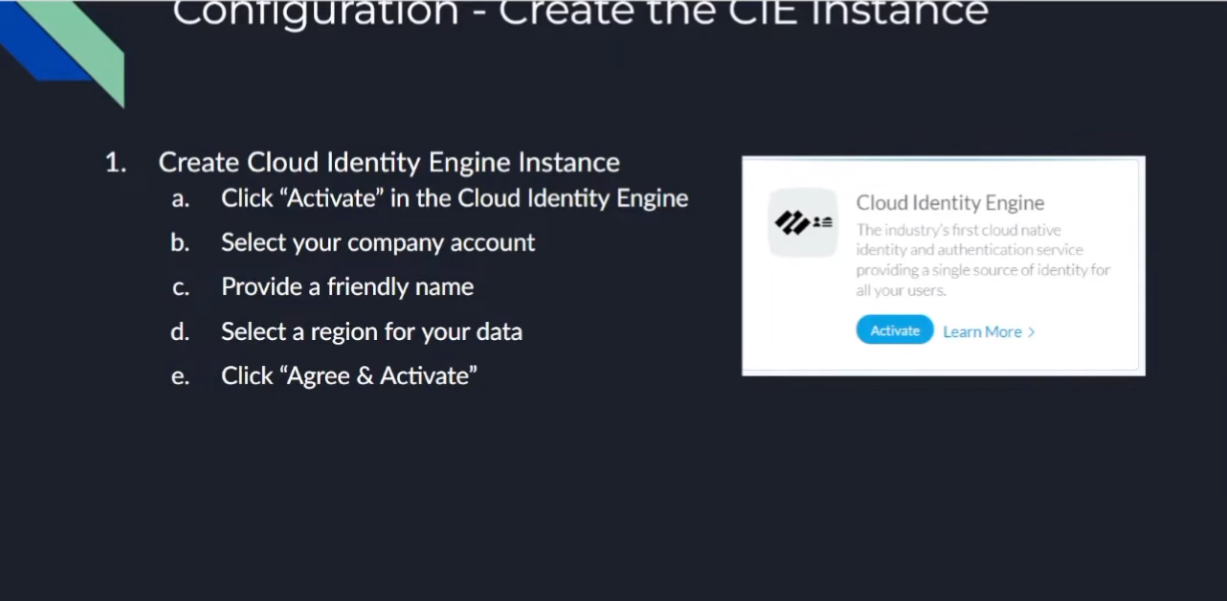
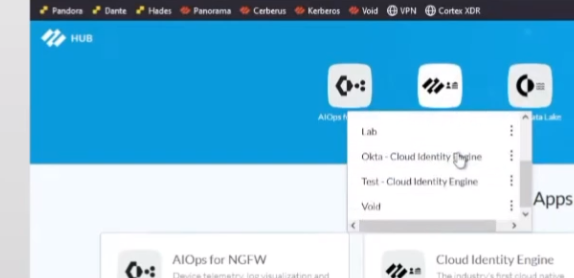
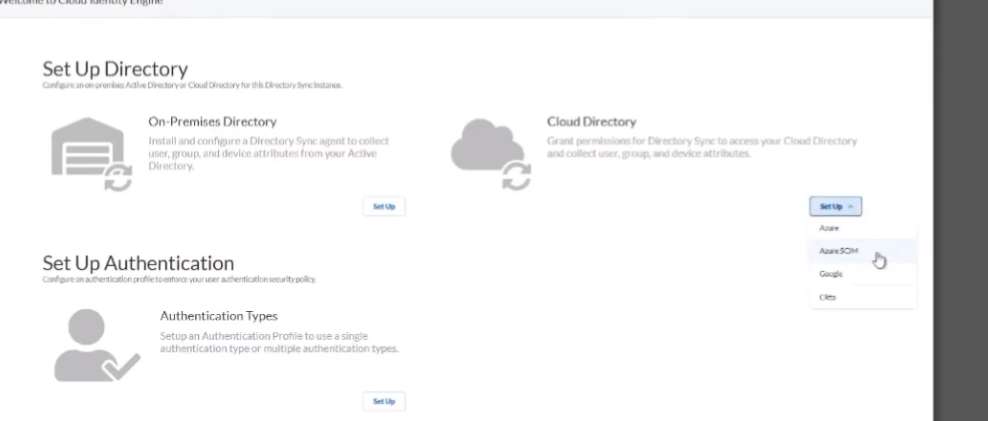
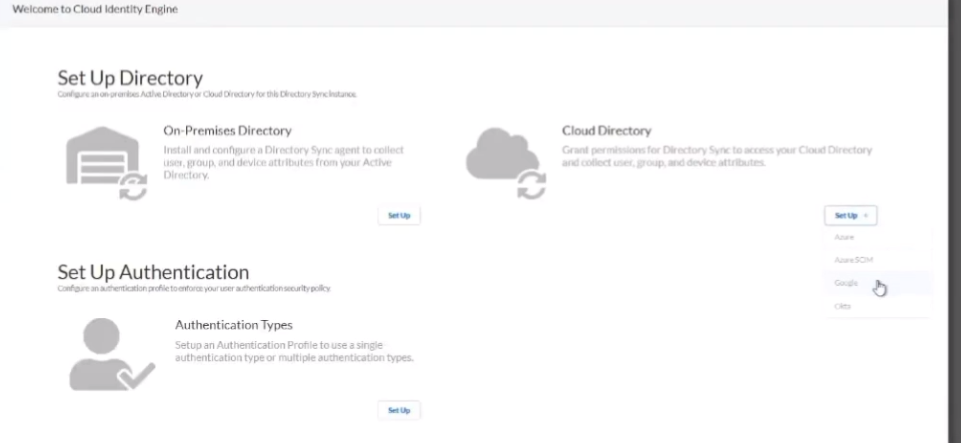
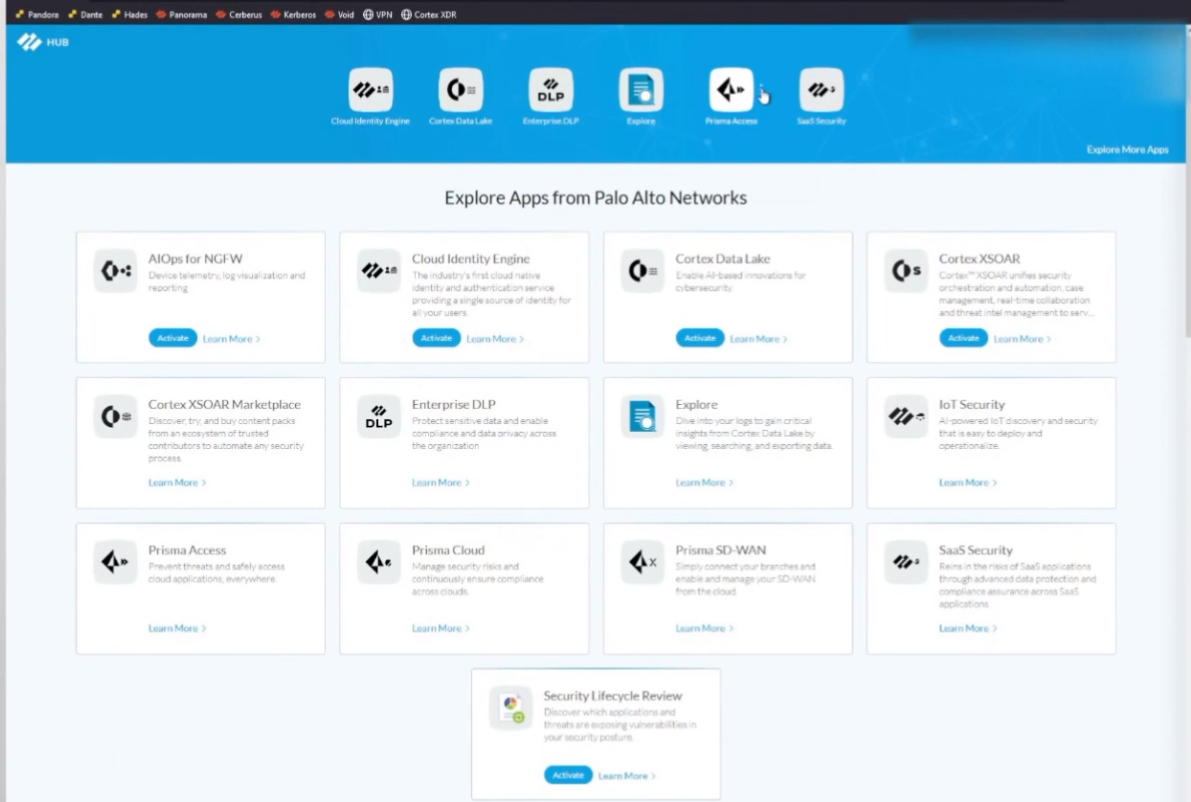
Onto the good stuff: creating your first Cloud Identity Engine instance. It's just a couple of steps. You go to your Palo Alto Networks Hub , you'll see there's a nice little button there that says, "Hey, activate your Cloud Identity Engine." Once you click that, you're going to select the account you want it under, you're going to give it a friendly name , and select the region that you want your data stored. So, if you're in the Americas, you'll pick the Americas or Europe, whatever makes sense for your data. Click to agree, and then a couple of minutes later, it's created. So, we're going to go ahead and walk through that right now.
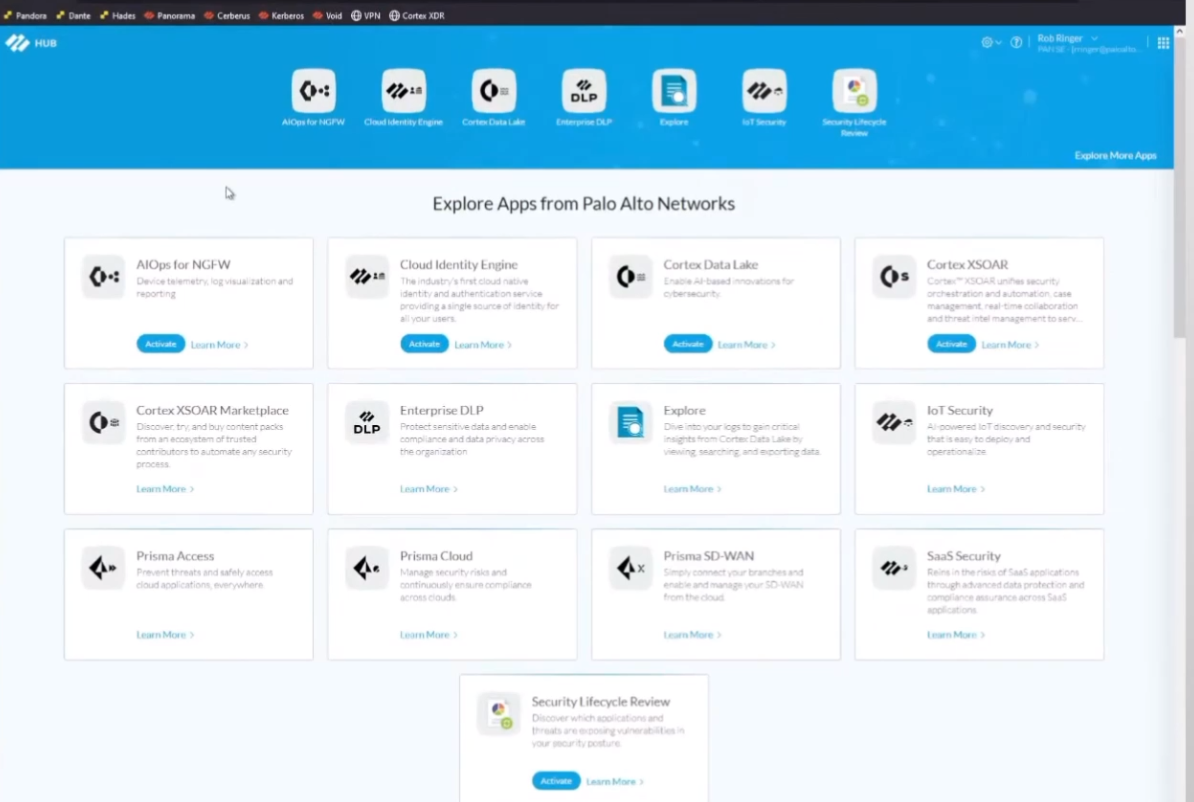
Here we are. Alright, so I'm logged into my hub, and then we can see right here I have my "Activate Cloud Identity Engine."
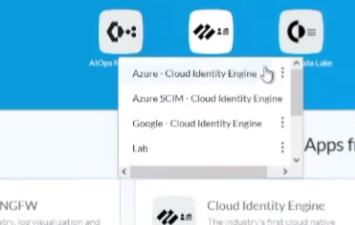
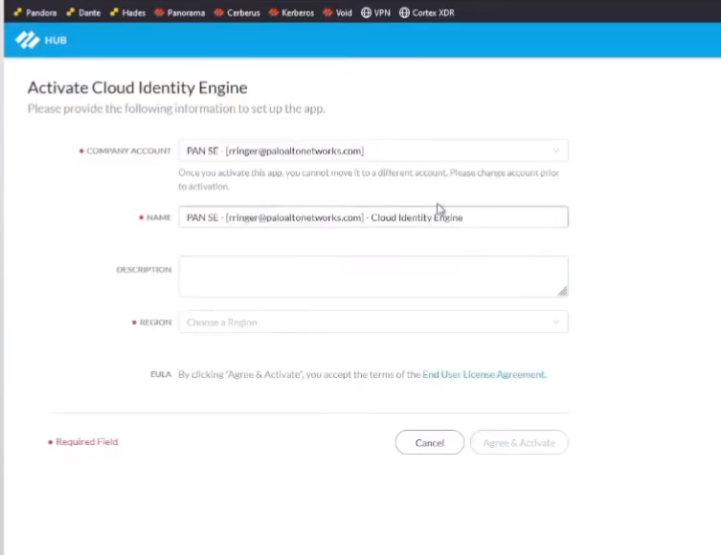
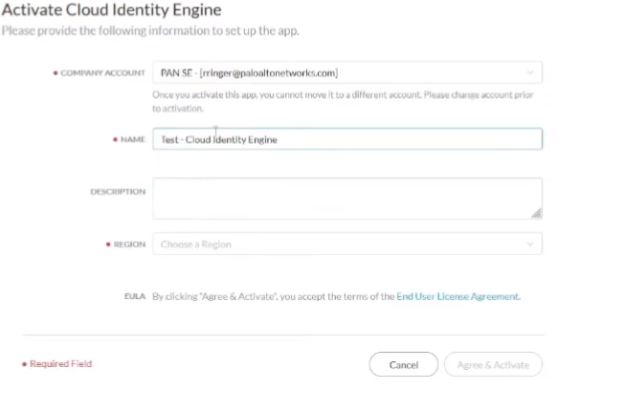
I'm going to go ahead and do that. Instead of this name here, I'm just going to call it "My Test Cloud Identity Engine." I have my account name I want it, my company name, and then under region, I'm just going to select United States, agree, and activate. Then it's going to be activated. So, I can just go ahead and click back on the hub, and then after, I don't know, a minute or two, it'll show up down here under the dropdown.
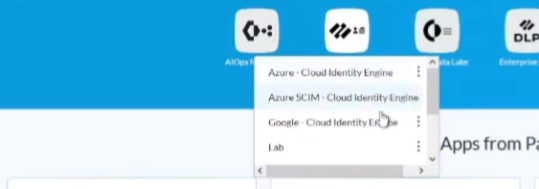
For today, I've created a different CIE instance for each one of the IdPs that we're going to be doing. As well, we can see that the test instance has already shown up there. So, we just click on it to be able to enter it. Then, under "Lab" is the one where I have everything already combined to show you guys.
So, going back to the next step.
On-Prem AD
To do our
on-premise AD integration
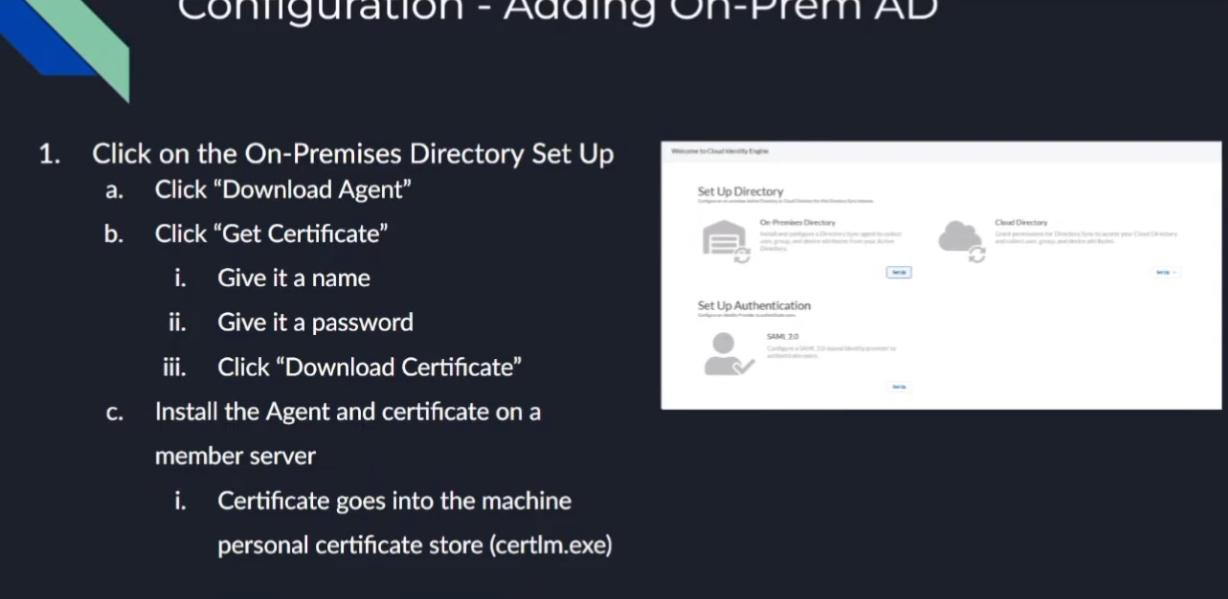
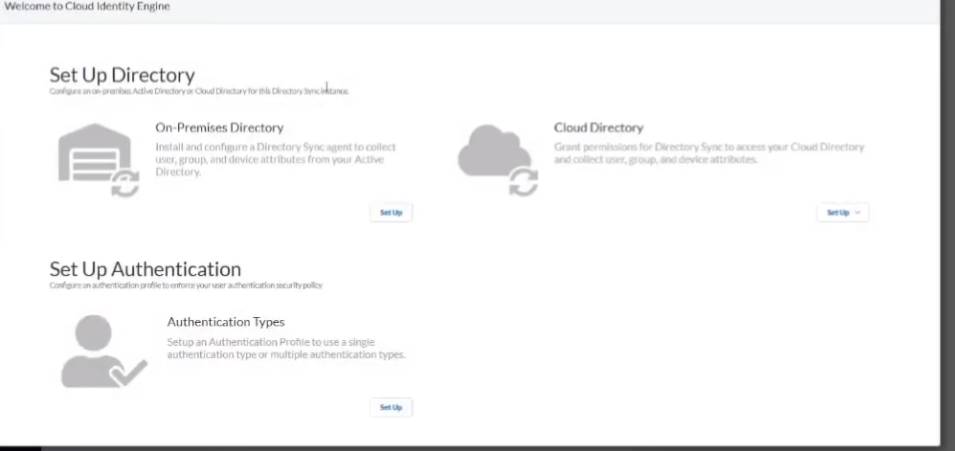
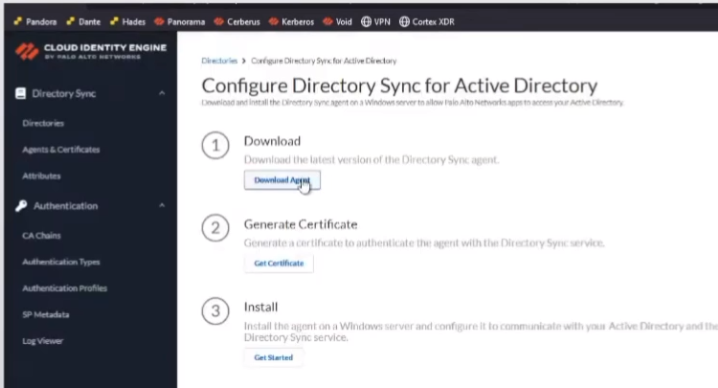
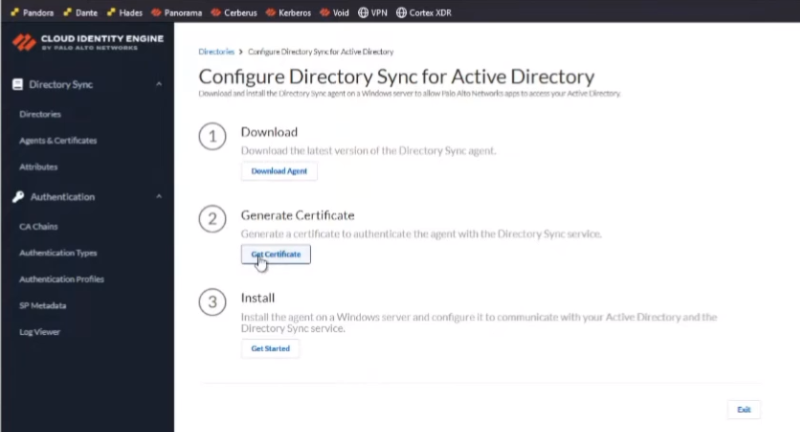
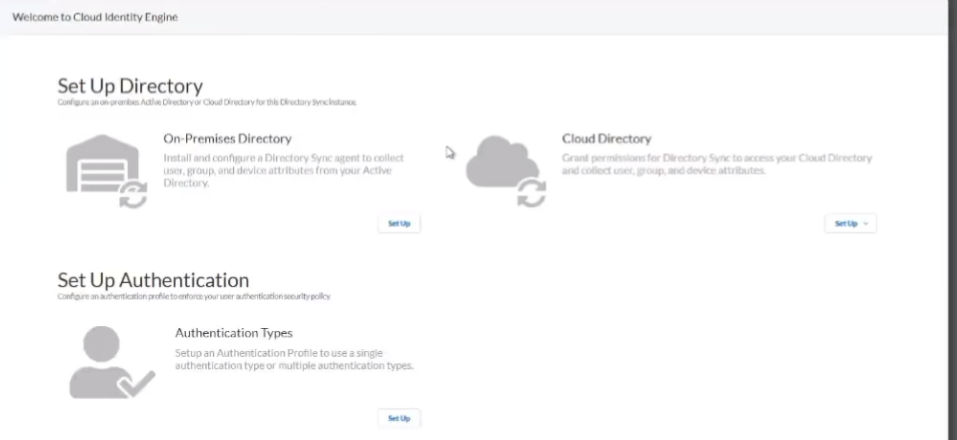
, once we click into our CIE instance, we're going to click to set up our on-premise directory. Really, it's just going to have us
download the Directory Sync agent
. We're going to get a certificate for the agent that allows the agent to securely communicate back up with your CIE instance and identify itself, so it knows where to store that data. To do that, we're just going to give it a name and a password, and we're going to download it. With those two pieces of information, we're going to go install it on a
Windows member server
(not necessarily a Domain Controller). We're going to
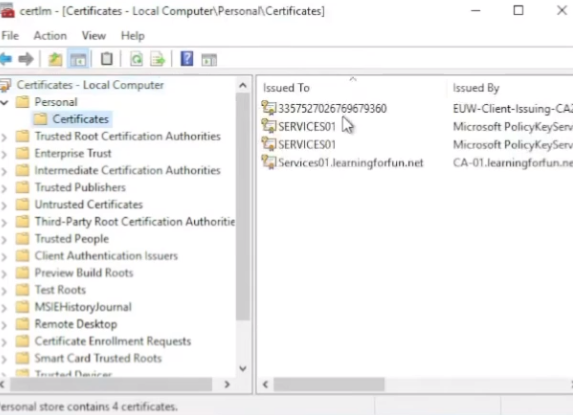
install the certificate in your local machine personal store
. To do that, you're just going to use the utility
certlm.msc
for Certificate Manager (Local Machine) that you might be used to for your personal certs. That's really all there is to it.
Once we open the agent configuration, we're going to put in our LDAP information so that we can query AD. You'll need your Bind DN , your Bind Password , the protocol ( LDAPS or LDAP with StartTLS is recommended ), and then you're going to want at least two servers—there's a little something called redundancy, right?
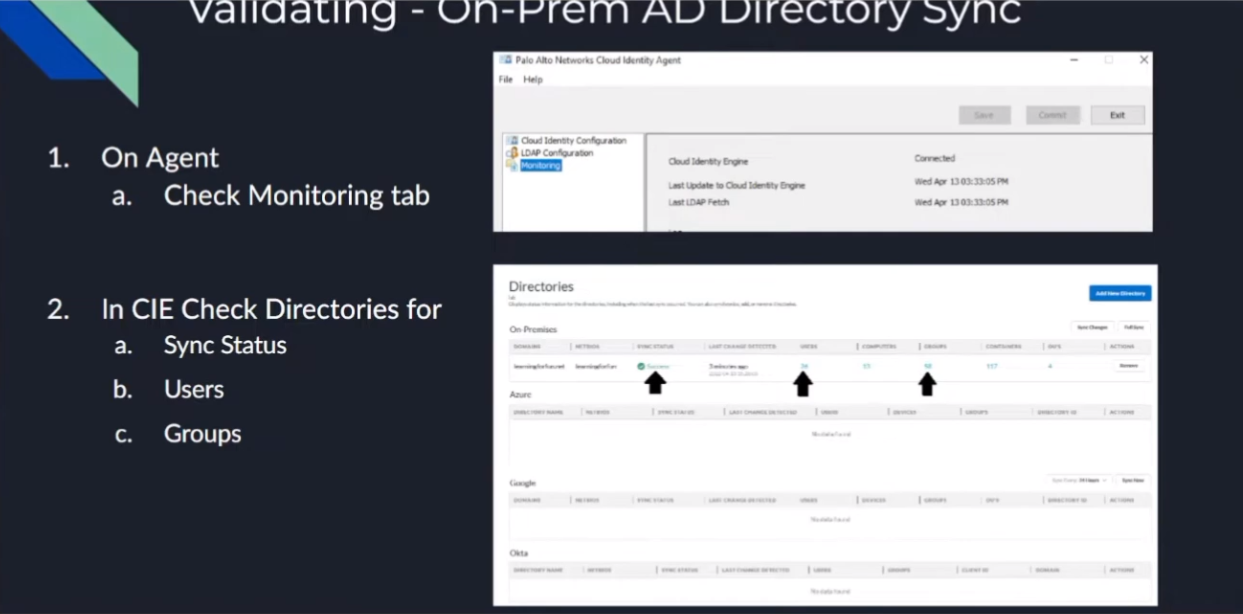
Then we're going to start the agent, and after that, it's going to go ahead and replicate up. To validate, we're going to be able to see both on the agent itself that it is connected (it's going to tell you the date), and on the Cloud Identity Engine inside your instance, you're going to be able to see some positive messages. You're going to see, "Hey, it's successful," and then you're going to see there were some users replicated and there were some groups. Those are going to change based on your environment, so don't look for the exact numbers that I have on the screen because they're probably not going to match. So now, we're going to go ahead and do a walkthrough of that.
Alright, so we're going to go ahead into the CIE instance for "best one." So, I go into it, I'm going to set up the directory, I'm going to click to download the agent.
It's downloading, and then I'm going to click to get my certificate.
So, I'm going to give it a fun name, I'll call it "services." What I found is if you give it the machine name that you're going to be installing it on and then the year, it makes it really easy to come back to. Then we're going to give it a fun little password that only we know.
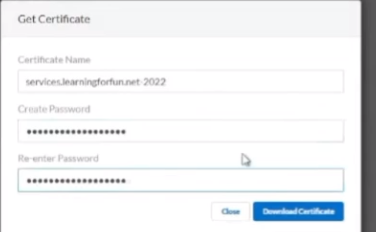
And then after that, you're going to download the certificate. Awesome. And then if you click on the "Getting Started Guide," it just walks you through everything that I've shown you. Really, at that point, we're going to hit exit. Then if we click on the "Agent Certificates," we'll see that our certificate's waiting, that there's no agent tied to it yet. But what we're going to do now is swap over, and I've logged into my VM where I'm going to install it. The first thing I need to do is copy over that certificate and that agent. So just give me one moment.
Okay, so the first thing I'm going to do is install my cert. So, I'm going to launch
certlm.msc
.
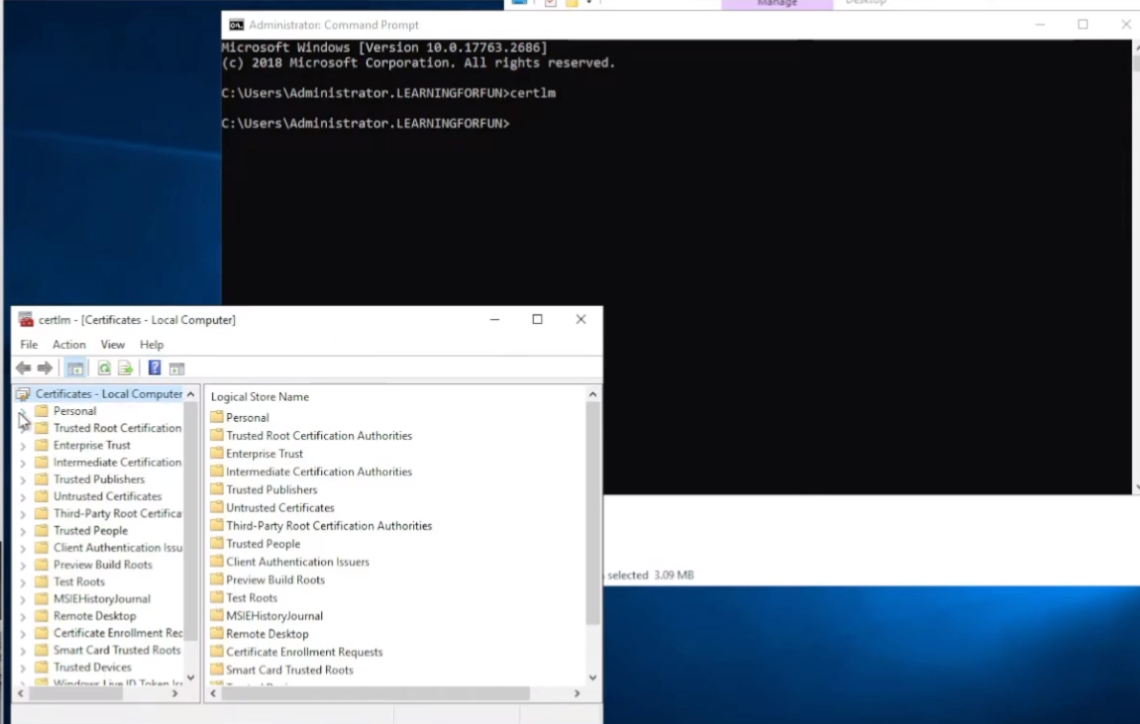
Once this comes up, I'm going to go to Personal (and we can see it's for Local Computer). I'm going to go into my Certificates here.
Then I'm going to right-click All Tasks > Import.

I'm going to browse to my certificate, which for me, I pasted on the desktop.
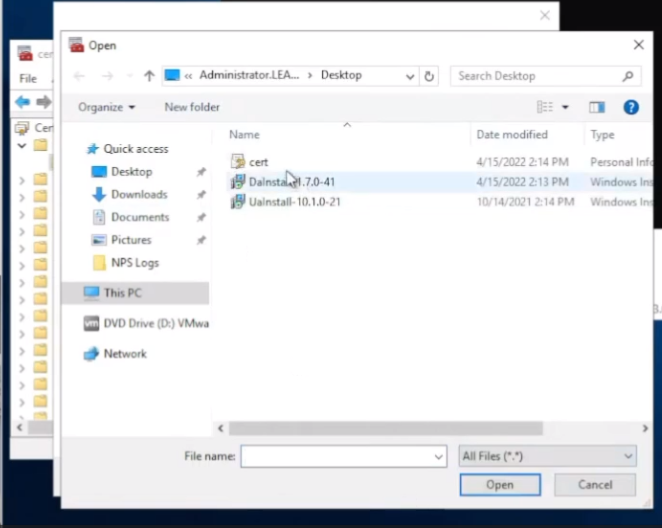
Go ahead and grab it, and then I'm going to put the password in from earlier that I did on the portal.
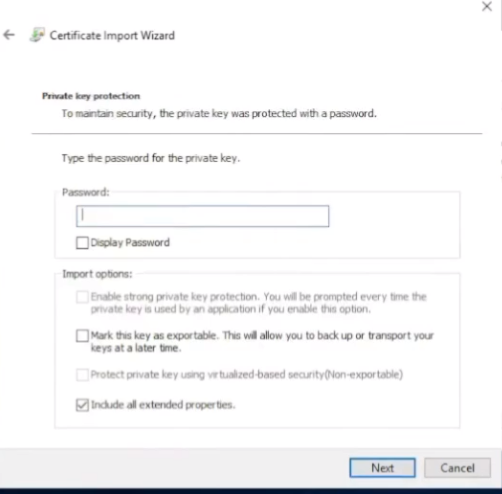
Verify where I want it, click Finish. So now we see that cert's in there, so we are good to go on that part. The next portion is installing the client.
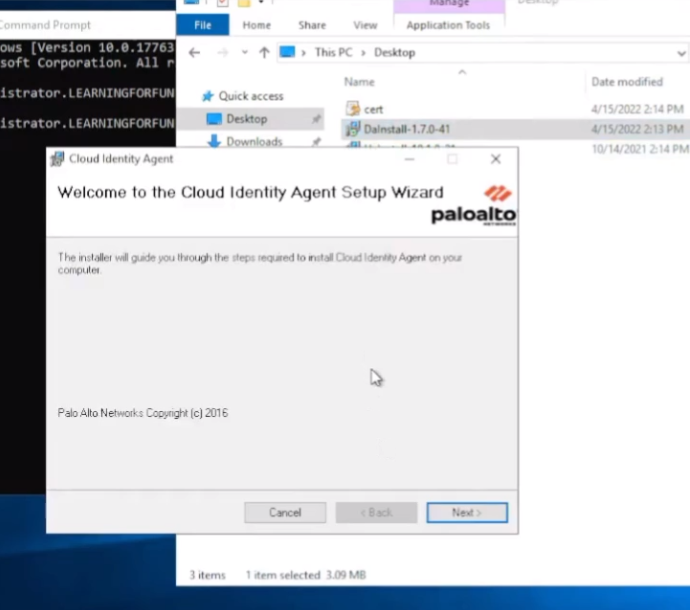
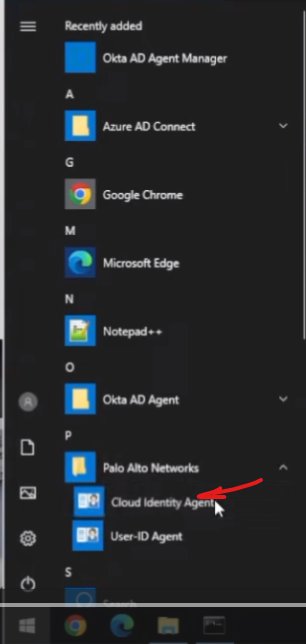
Alright, Cloud Identity Agent setup. I'm just going to step through it. So once it's done installing, go down to Palo Alto Networks Cloud Identity Agents.
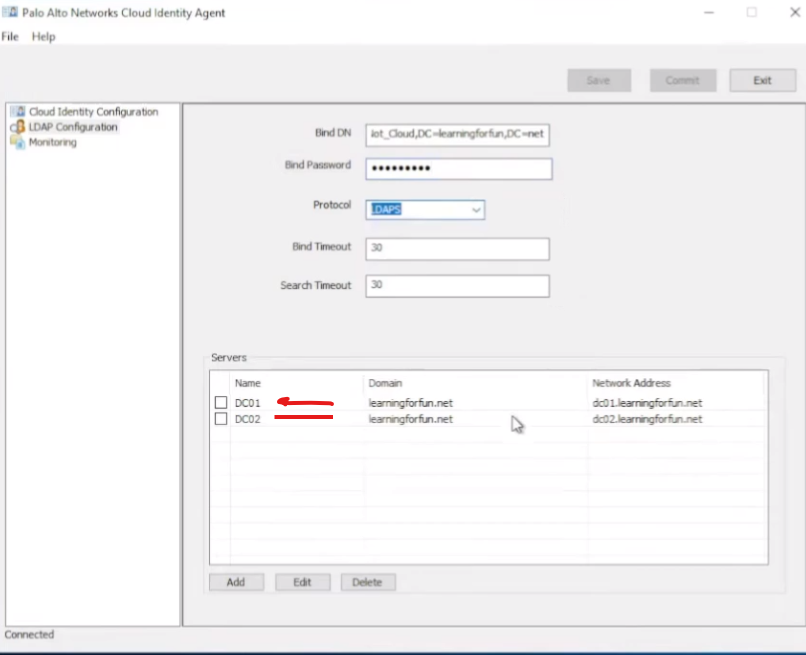
And then we're going to go to the LDAP configuration. You're going to paste your Bind DN in and then your password, and then pick your protocol. So, I'm just going to use LDAPS .
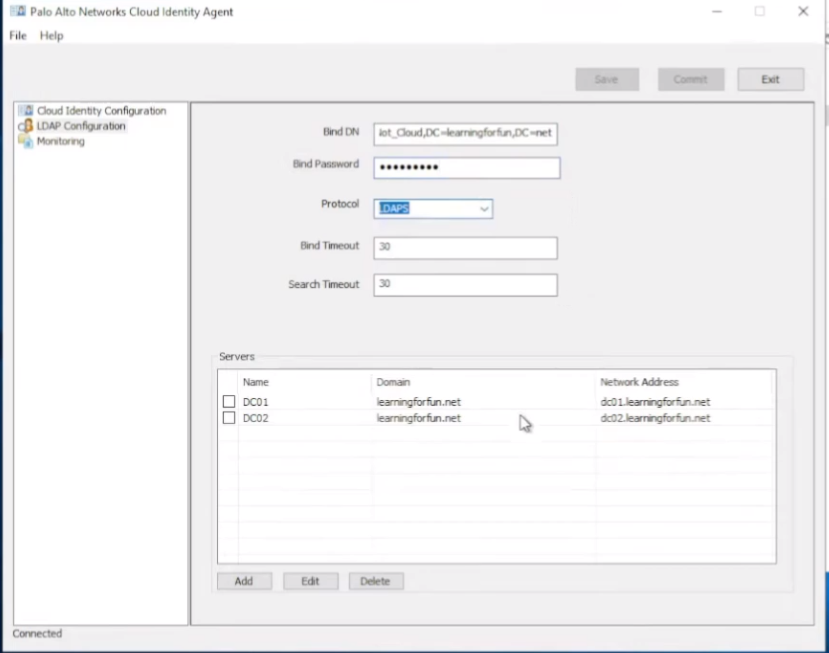
And then add your DCs that you want to query down here. So, I have two in here for redundancy purposes; you can add more if you want.
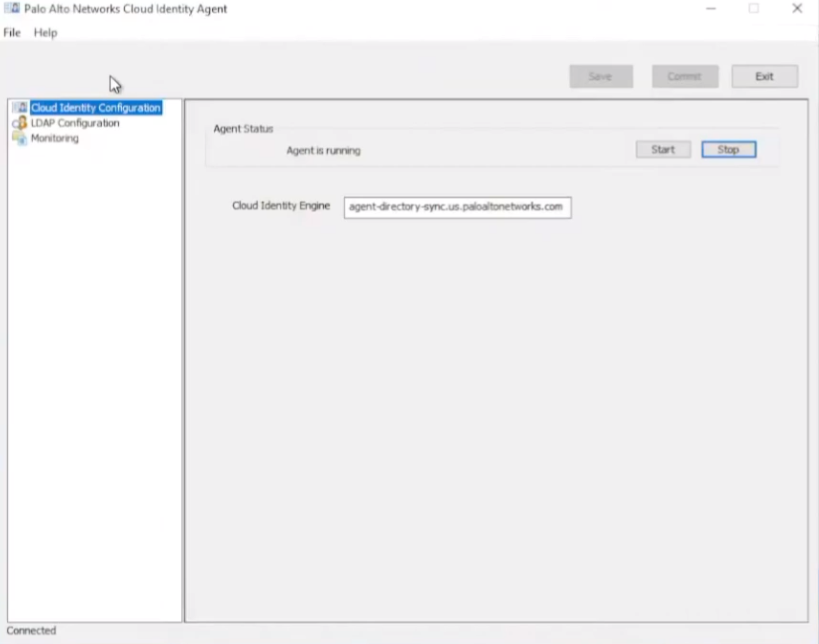
Once you're finished with that, you're going to go ahead and click Save and Commit, and then Start. Then on the Monitoring tab, you should see "Connected."
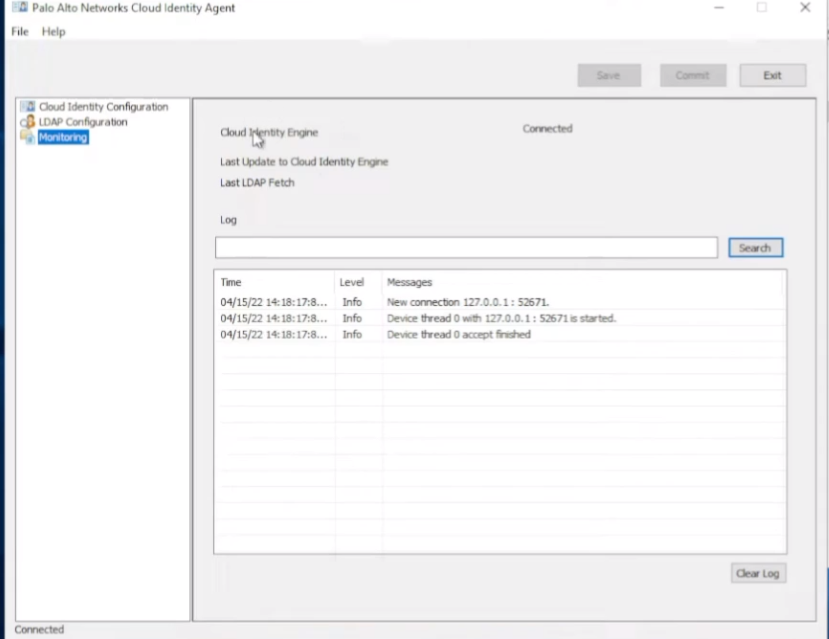
So, we're good to go.
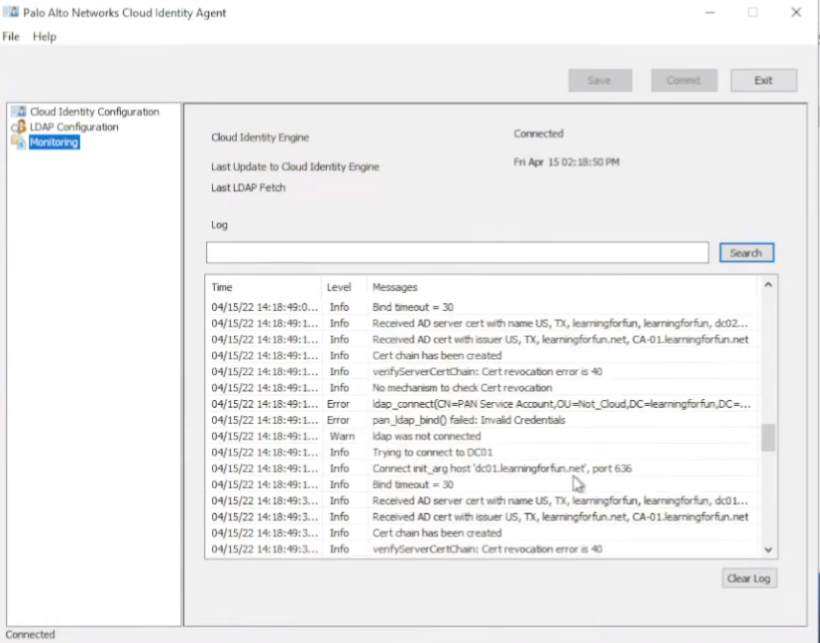
And we see with that, it's going to have a bunch of information once it goes in. Fine, failed. Okay, so my password's not correct, which is fine; we can fix that. Save it. Look, free troubleshooting, isn't it awesome?
So now we see that it's successful sending the domain list over.
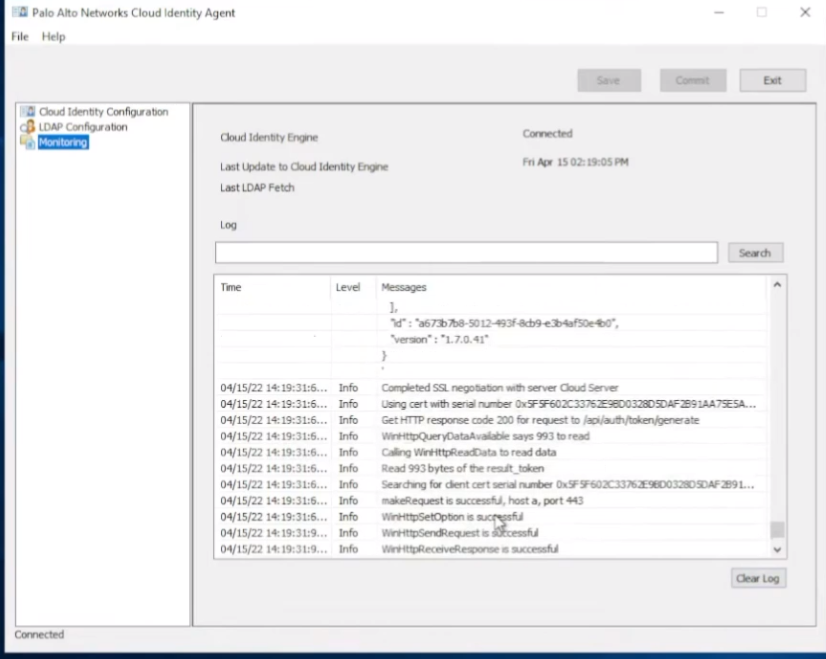
And if we jump back, we see that it's connected. That's great. If we jump back over to the CIE portal, we'll see that now we have an agent online.
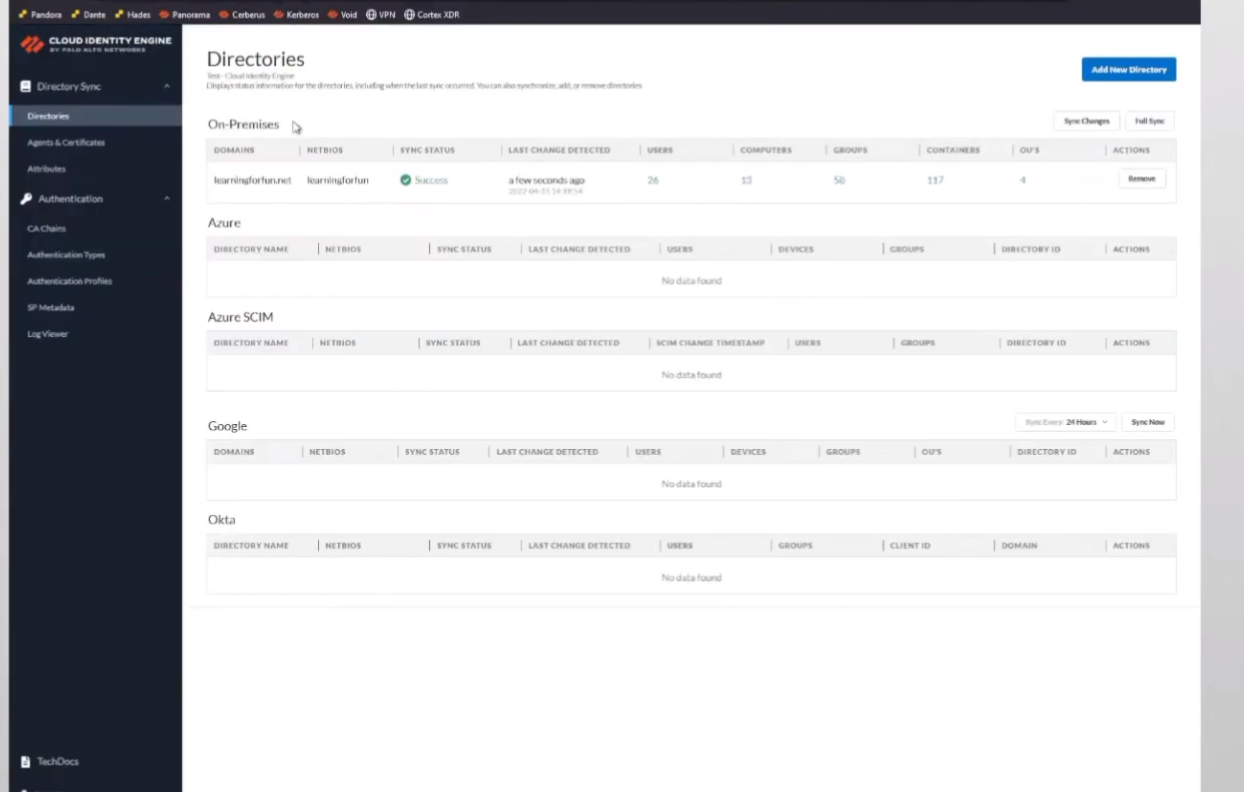
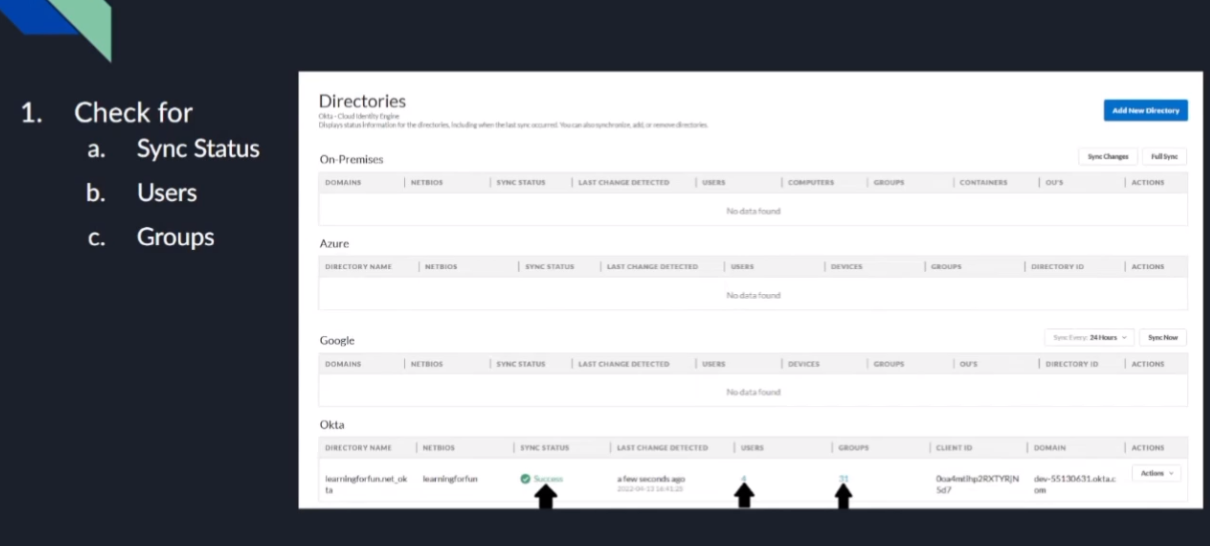
And then under "My Directories," we should see that we get some sync information here in a minute. Alright, so there we are. So, we can see the domain that got synced, the NetBIOS name, and we see it's successful. You can see the users, the groups, and OUs. But that's really all there is to do the on-premise AD. So, it only took a couple of minutes, we made it all the way through it, and we were done with it. So, I'm going to go ahead and head back to the hub and go back to our presentation.
Azure AD
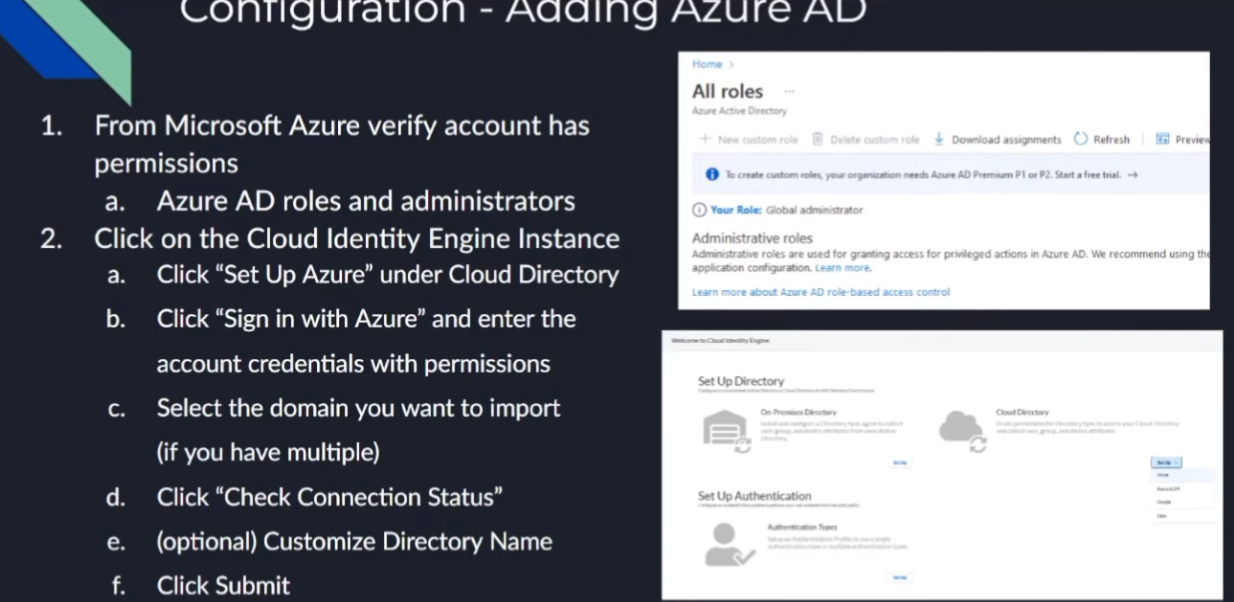
Now we're going to move on to Azure AD . So, we want to make sure that the account has those roles from earlier. The screenshot on the right, you can see the little warning; I had to create custom rules. You have to have an Azure Premium P1 or P2 license . I don't, so I am a Global Administrator. Just check with your organization, make sure they have the right permissions—those roles I listed out. So, there's not really much to this; in that case, everything's done through CIE once you have the right account.
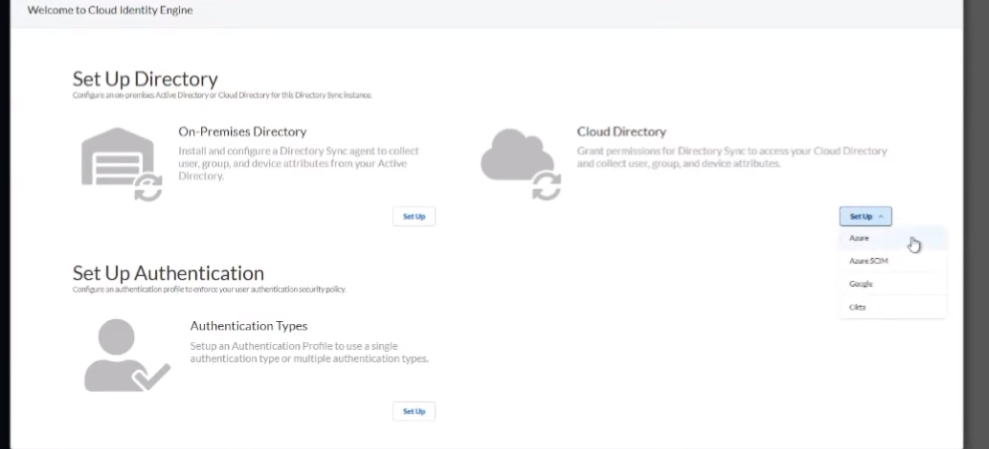
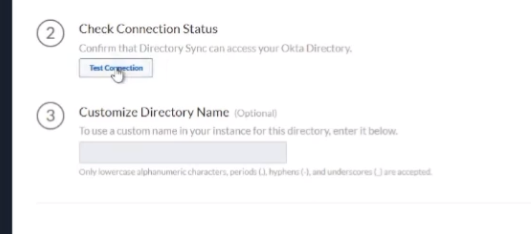
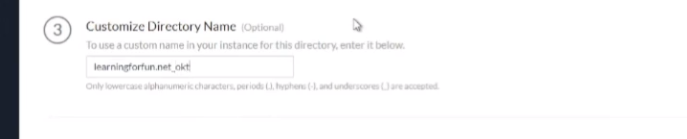
We're going to go under the CIE instance, we're going to set up an Azure AD under the Cloud Directory, sign in with those credentials, select the domain if you have multiple domains, and then check your connection status. Then, customize your domain name . The reason you're going to want to do that is if you have an on-prem directory and a cloud directory in the same domain (say that you're migrating only some things), you want to give them a distinct identifier. So, like if it's `learningforfun.net` is my on-prem, and then I have one in Azure, you'll see that I tag it with `_azure`. Same goes for Google and then Okta. That way, you can identify them when you're bringing them in. You'll see that when you're doing it on the firewall or any of your instances, that you'll want to do that. That's only for overlapping domains .
So, the way that you validate it's something correctly, you'll see that just like with our on-prem one and with the rest of them, it's: we'll have "Success," we'll have users, and we'll have groups.
With that, I'll go ahead and do the walkthrough. So, we're back at the hub. We'll go ahead and pick the Azure instance. When we log in, we're going to go ahead and do the Cloud Directory. We're going to click "Sign in with Azure."
It's going to take us to our nice little Microsoft sign-in page.
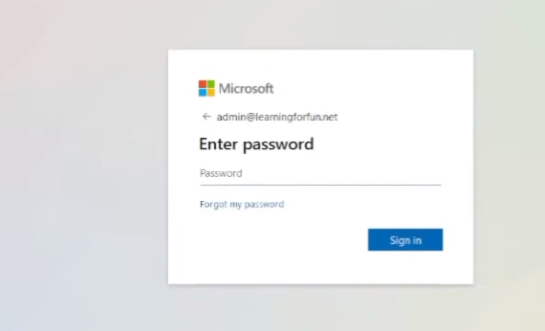
And then we are going to sign in. Maybe, maybe we're going to go sign in.
Alright, once we are logged in, you can see I have two domains. I'm just going to go ahead and click one, and then we're going to test the connection.
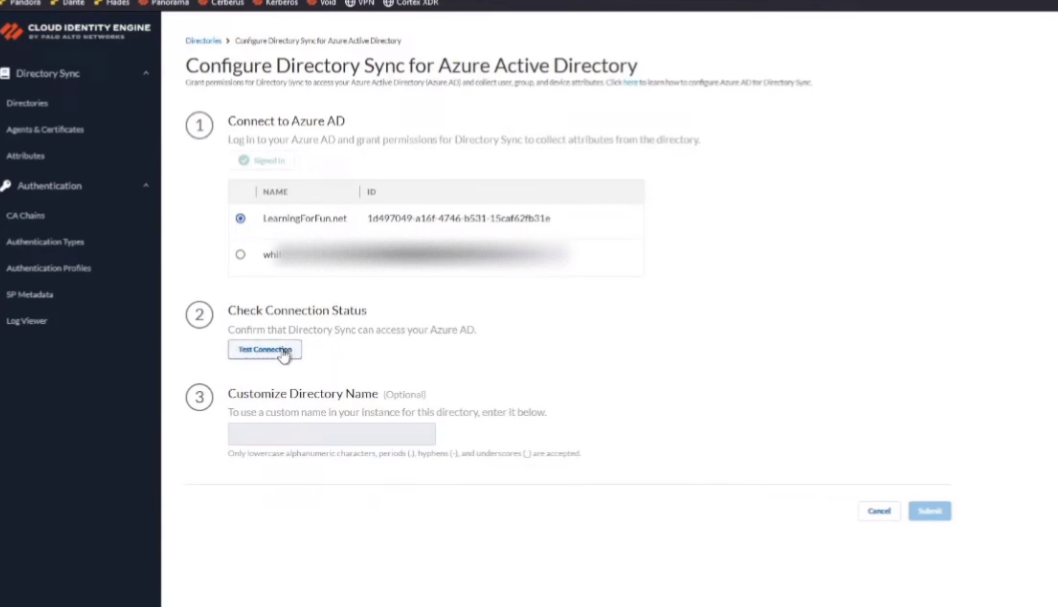
Once it's been confirmed successful, we're going to give that customized name. So, this one we'll do `_azure` so that has its own customized one, and we are going to go ahead and click Submit.
You'll get "In progress."
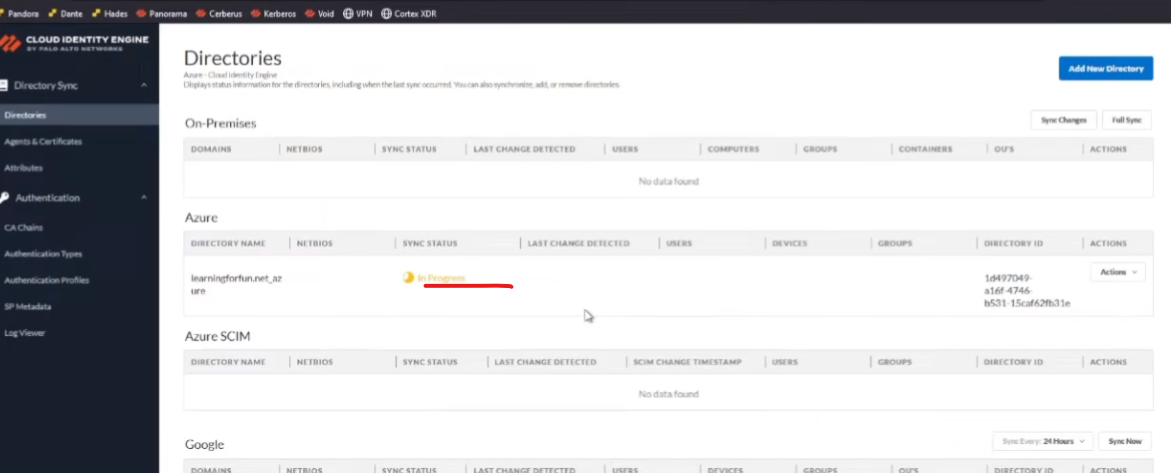
And this just will take a minute or so for it to sync up, and we'll get those positive sync status messages, and we can move on. So, there we are. We see "Success," we see that we have users, and we have groups. And that's all there is to it for that.

So, I'm going to transition back, and next, we are going to go over to our Azure using SCIM this time.
Azure AD SCIM
So, to do that, this is a little bit more complicated, as it's a couple of bouncing back and forth between Microsoft and the CIE instance.
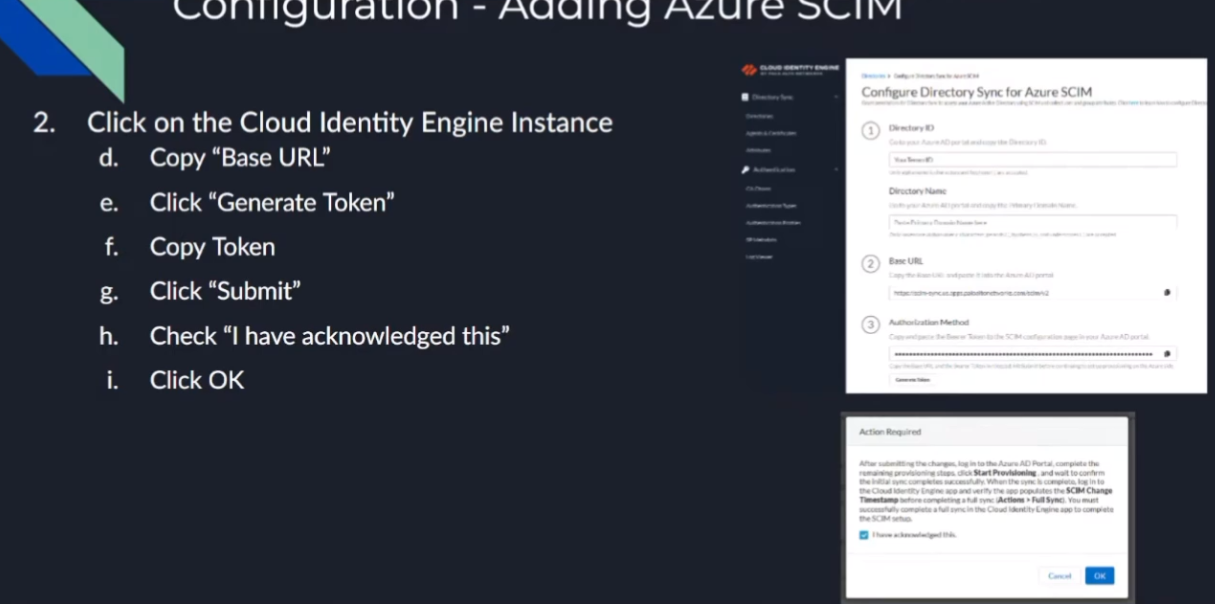
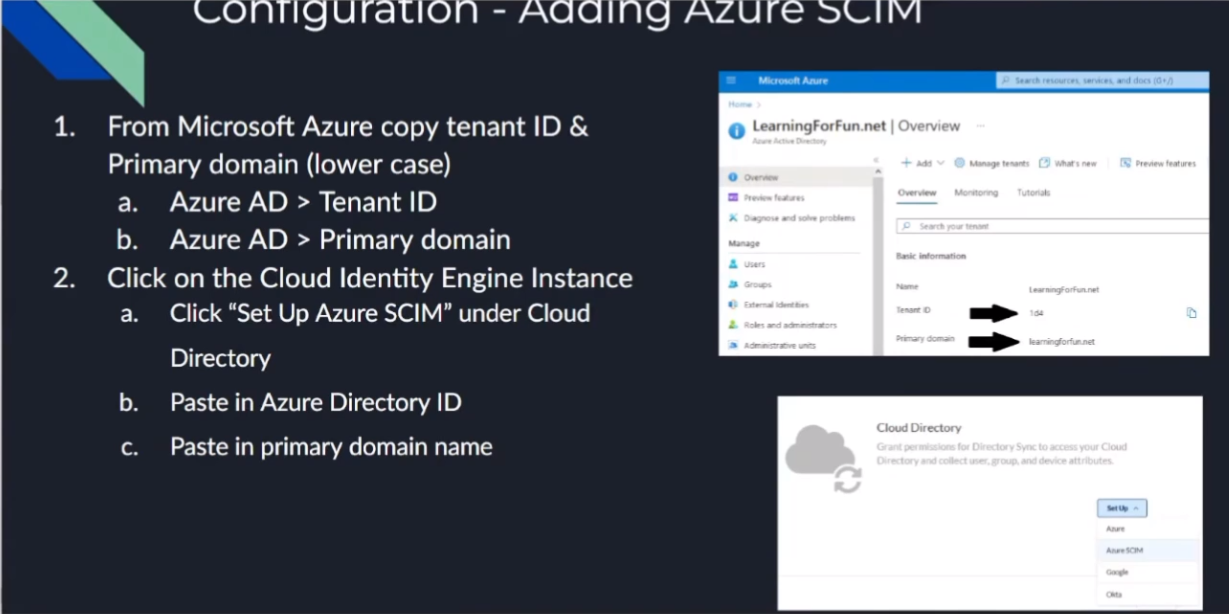
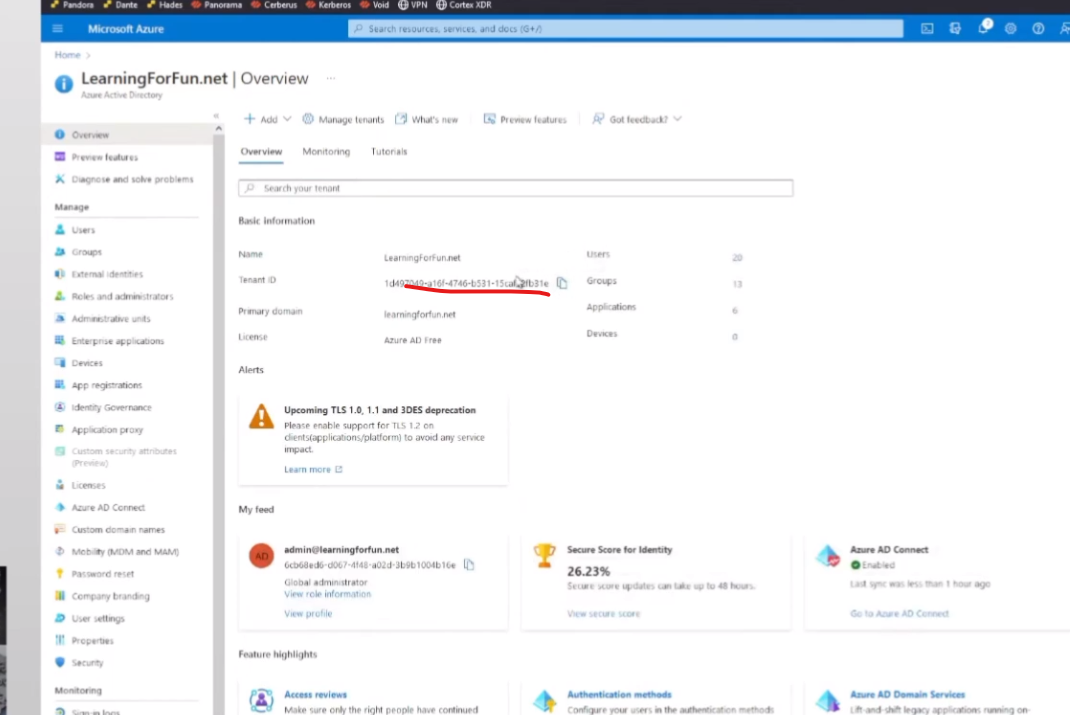
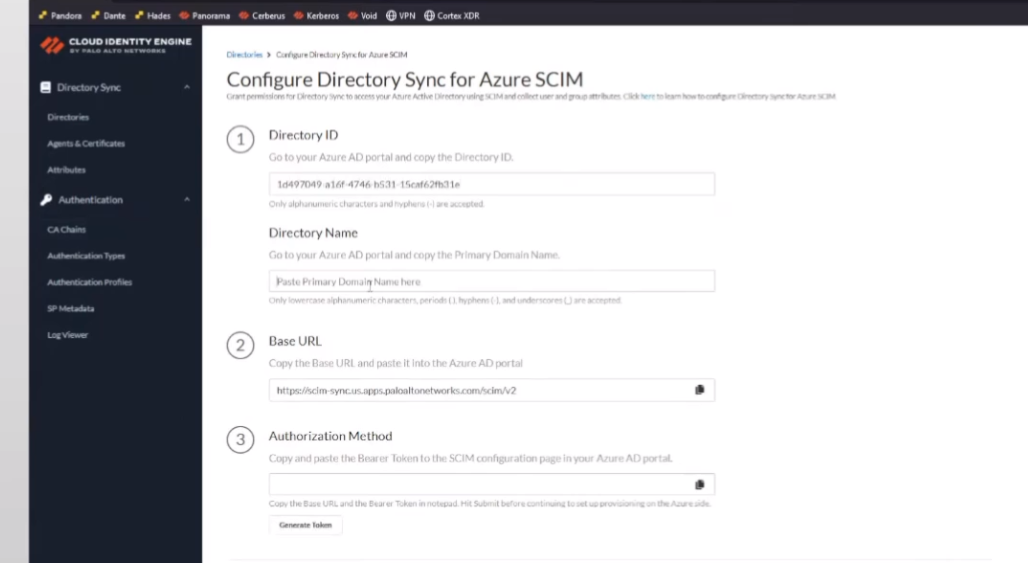
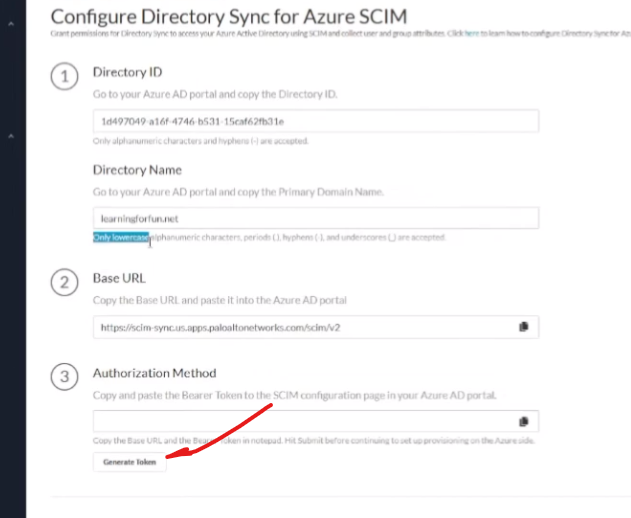
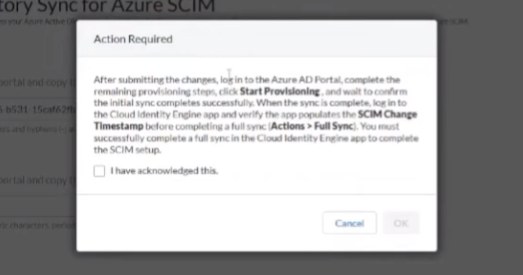
So, first off, we're going to want to make sure that we copy from Microsoft our Tenant ID and then the Primary Domain . Then we're going to use those inside of the Cloud Identity Engine to help generate our secure token. So, we're going to paste that into CIE what we copied over from Azure (the Tenant ID and the domain). Then that's going to give us a Base URL , which we need to copy, as well as we need to generate an Authorization Cookie (Secret Token) . We're going to copy those two things and then submit that. We're going to acknowledge a message that says, "Hey, once this is done and you go over there, you paste this into Azure and you sync it, you need to come back over here and do a full synchronization as a last step to get everything working."
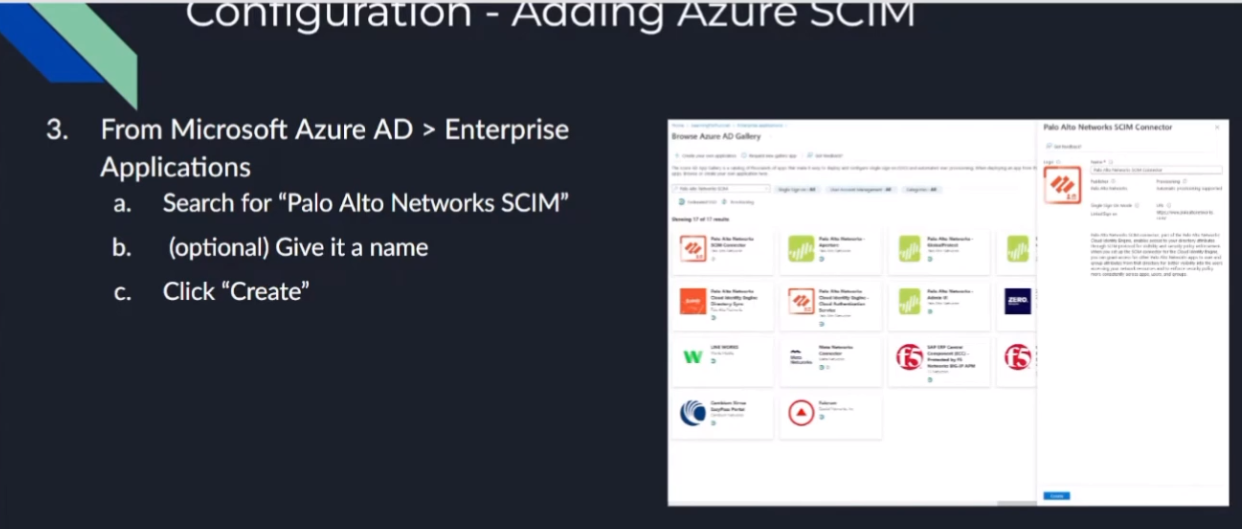
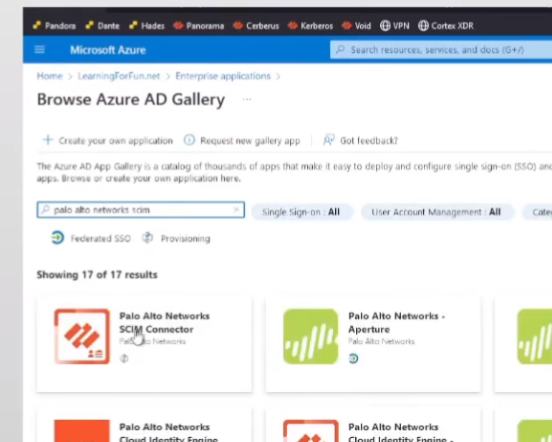
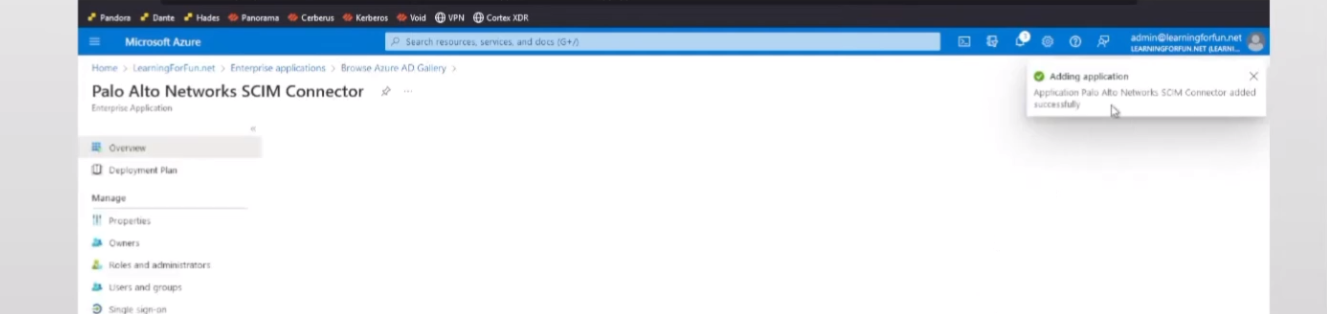
So now, where we have the pieces of information, we're going to go under our Enterprise Apps in Azure and we're going to search for "Palo Alto Networks SCIM." Once that comes up, you're going to give it a custom name if you want, or you just leave it as "Palo Alto Networks SCIM," and then we're going to click Create. Once it's created, we're going to go down to Provisioning.

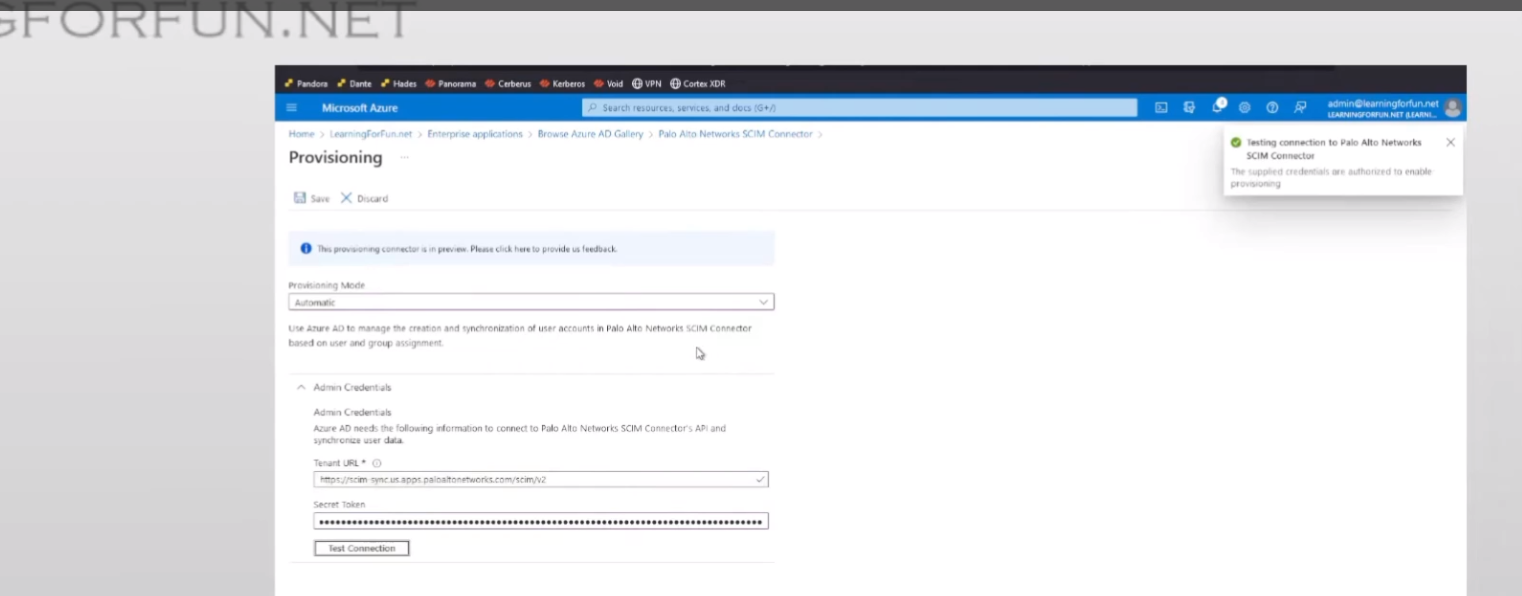
Once there, we're going to click on "Getting started." You're going to paste that Tenant URL (Base URL from CIE) and that Secret Token (Authorization Cookie from CIE) from the CIE portal. Like I said, it's a bunch of back and forth, but we're almost done. Then we're going to test that connection. You should see a positive message like the one I have down there. Once you get that, you can go ahead and click Save.
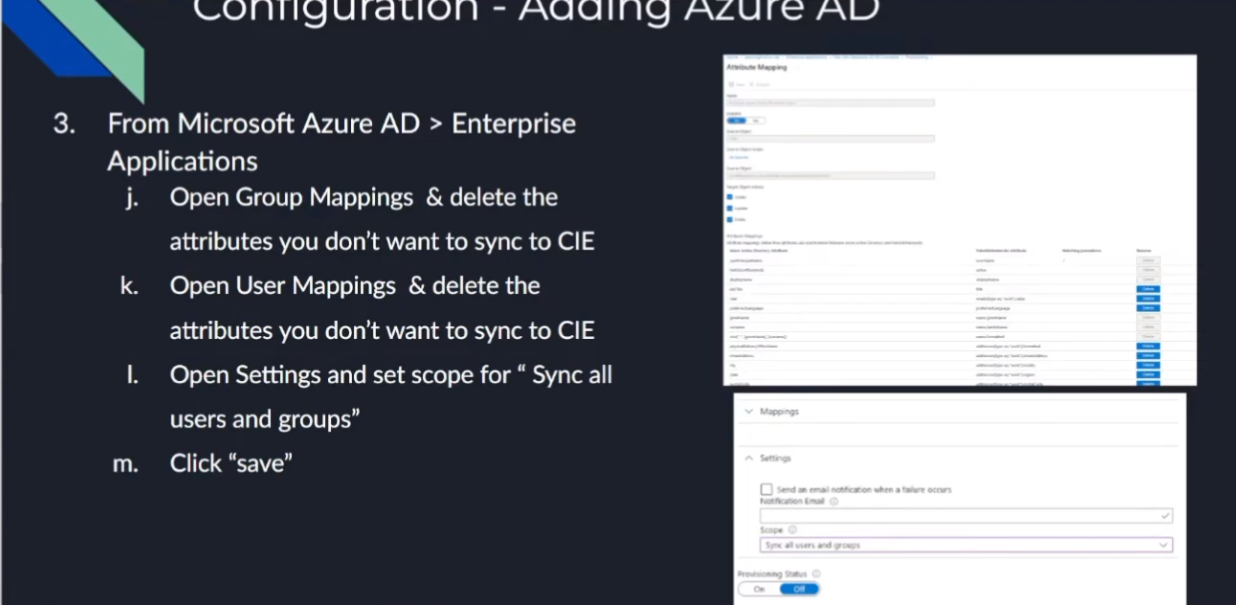
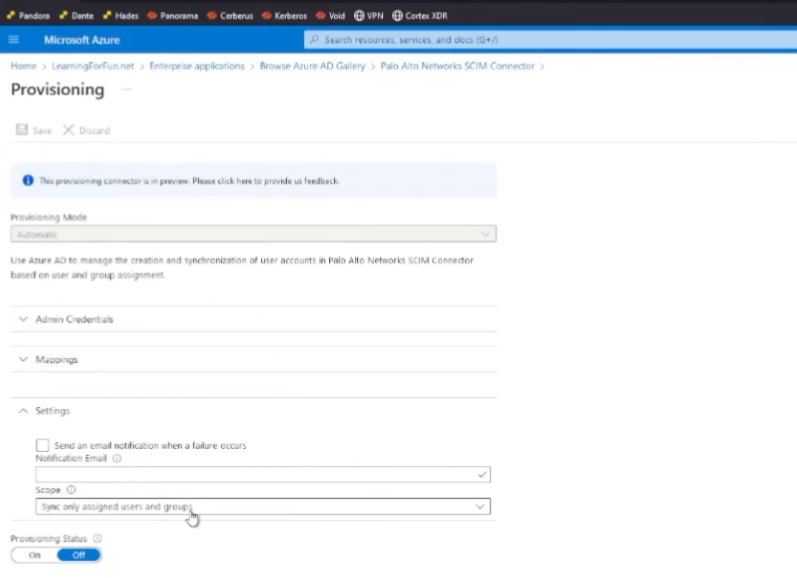
After doing that, what you're going to want to do is open up your group and your users mappings. You should see a list of all the attributes that you could delete. So, just the ones that you want to send over, right? This is the big power behind SCIM: besides having that credential, now we're setting up that secure connection between inter-domain identity mappings. It's such a cool name! But it allows you to really limit what you send over as far as attributes and things like that. So, go in there, select what you want to. Then, with that, the last step is to go under Settings and set it to "Sync for all users and groups." Click Save.
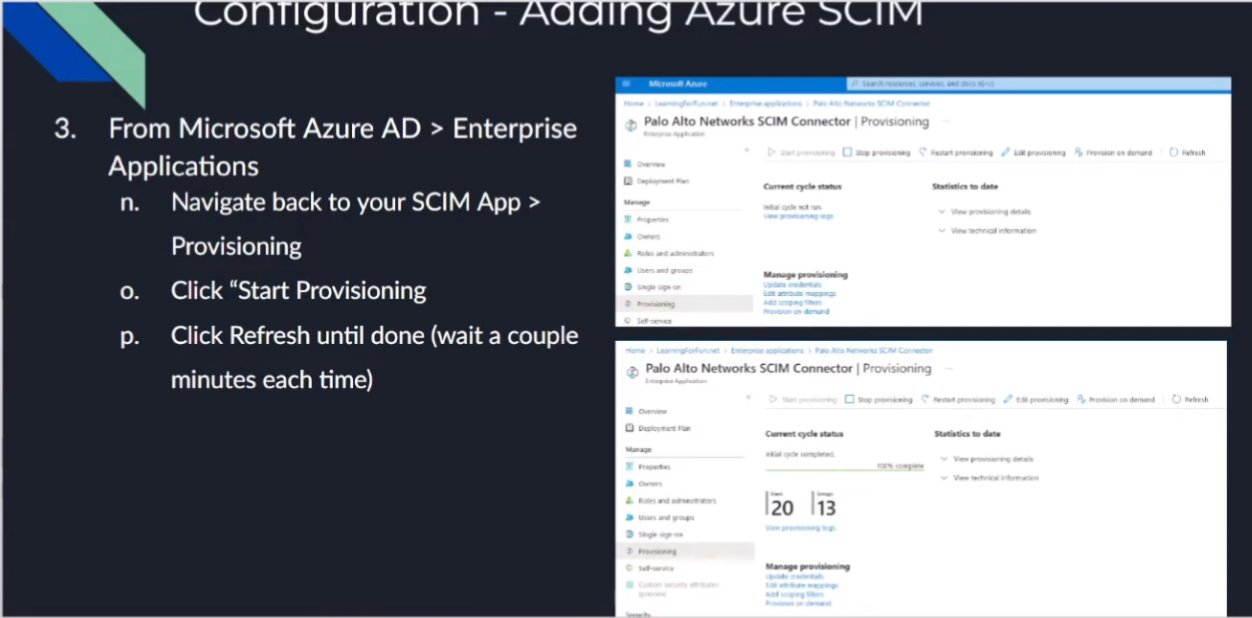
Once we're done with that, you're going to click on "Start provisioning" under the app itself. We should see that under Provisioning, and that's in that top left area over there. Once that's done, you should see it change that screen on the bottom down there, where it's going to talk about the number of users, number of groups, and say it's complete.
Once that happens,
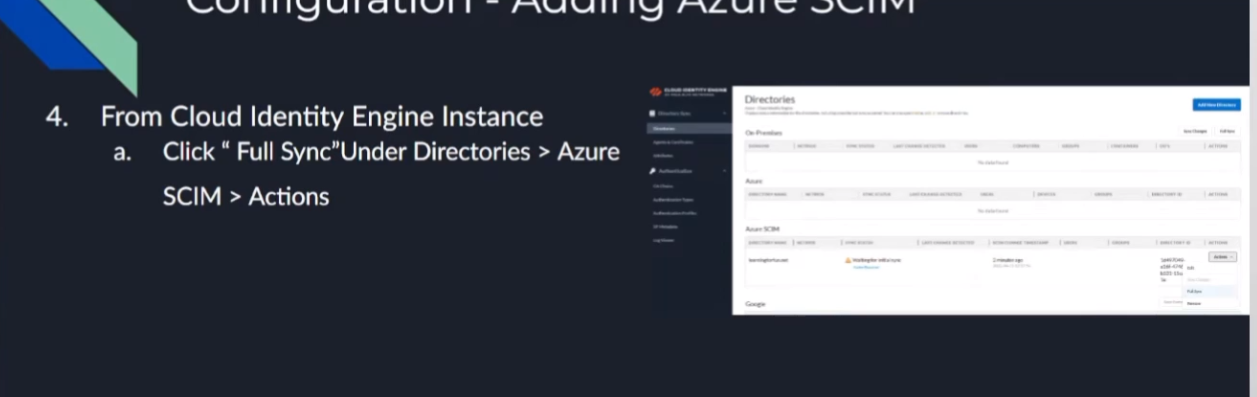
we're going to go back over to the Cloud Identity Engine. Remember that message we had to acknowledge, where we have to go back and we tell it to do a full sync afterwards? Well, this is us doing that full sync, and that's it. After that, we're done. So, it's only six times back and forth, but no one's counting. And then to validate, it looks just like the rest of them: we have "Success," we have users, and groups. Who would have thought? So now, we're going to go ahead and walk through that.
Here I am back in my hub, under SCIM. Alright, so first thing I need to do is go to my Azure instance, and under here, Active Directory.

I need to copy my Tenant ID . So, I'm going to go ahead and paste that over. And then I need to copy my Primary Domain .
So now that I've grabbed those, I can jump back over to my Cloud Identity Engine.

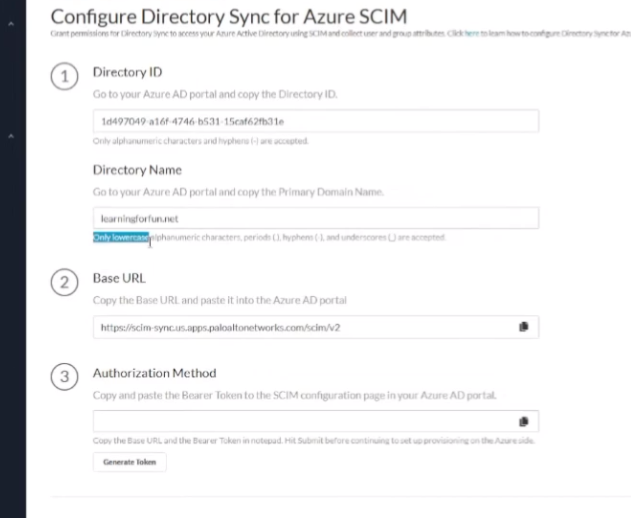
And click on "Azure SCIM," and I'm going to paste those in. So, paste in my directory ID, I click on, put in my domain, all lowercase.
Tells me right here, "only lowercase," so it's good at hinting.
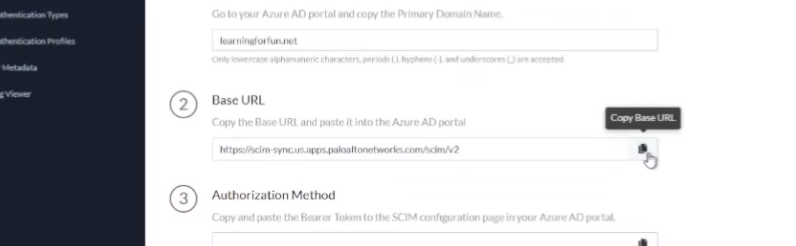
And then we're going to copy out this Base URL .
And then here's where we're going to generate the token. Going to go ahead and copy that; we're going to need that here in a minute. Alright, and then we're going to hit Submit.
And we're going to acknowledge that we know after we go over to Azure, we're going to have to come back here and click "Full Sync." Yes, so we're going to click it and hit OK.
Alright, our work here is almost done; it's waiting now. So now we're going to go back to Azure, we're going to go under our Enterprise applications , we're going to go to "New application," search "Palo Alto Networks SCIM."
There it is. I'm going to call it... so give it the default name because I'm not feeling that creative right now. Alright, so I've created it... almost, I've clicked the Create button.
It did, I clicked it.
Alright, so now that it's created, I'm going to go under my Provisioning .

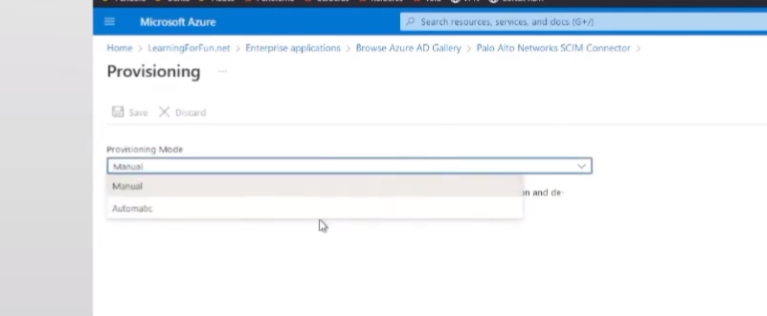
Click "Get started," select "Automatic."
And then there's my Tenant URL and my Secret Token . So, I still have the secret copied over.
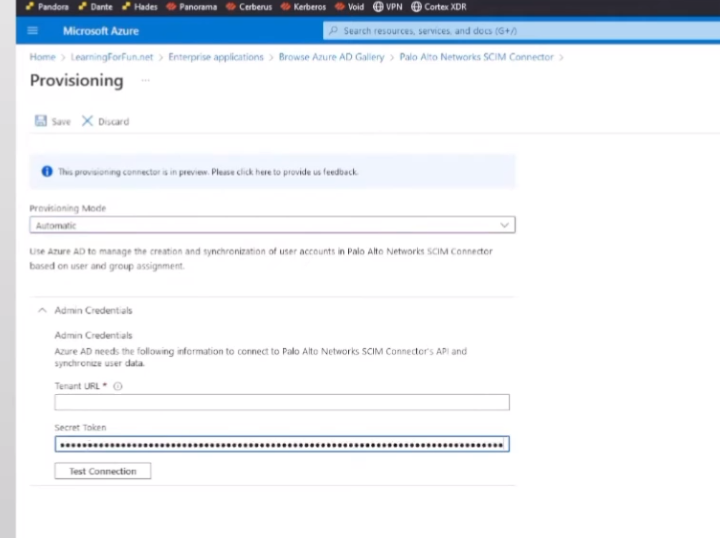
Paste it in first. Go back, grab my tenant URL.
Test the connection. You can see that positive message there, so that's awesome.
Click Save. Alright, now we're going to go to our Mappings .
And I, for one, don't want the CIE to know what city my users are in.
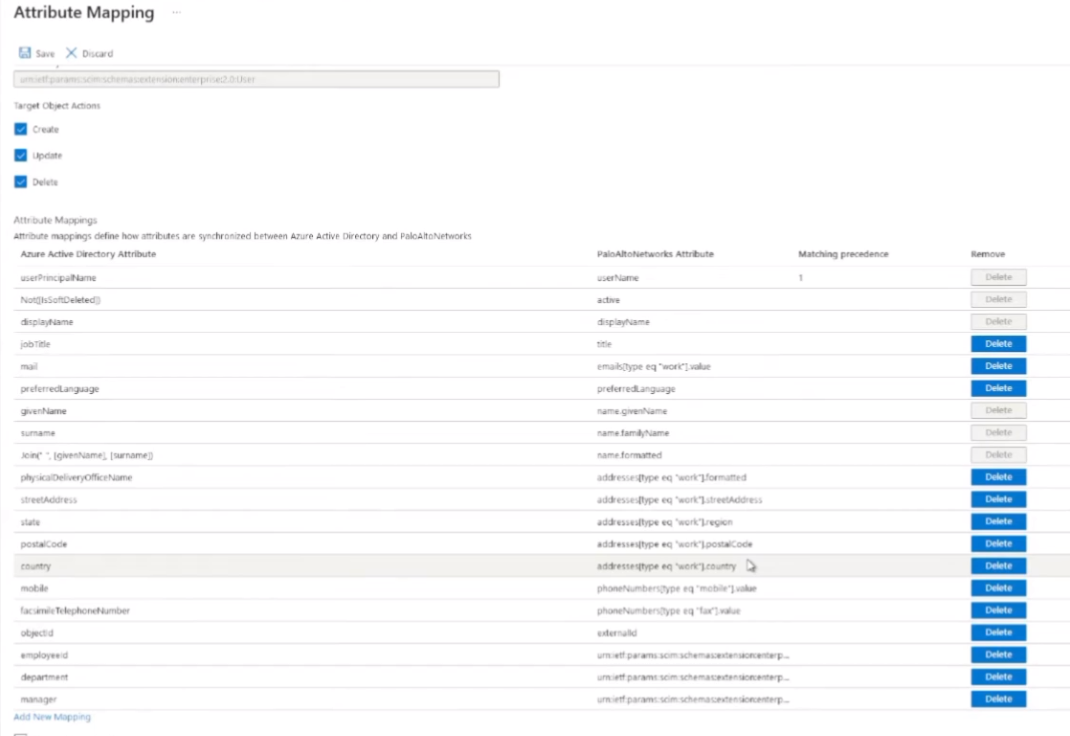
And I don't want them to have telephone numbers. So, this will just depend on your organization, right? You could be all or none. We just really need to have whatever you're using for the group mappings. So, if that's the `mail` and UPN, then so be it. It just really comes down to it. You'll see there are some of them that are greyed out, like the UPN. The `mail` you can delete, but I found a lot of the times, in most of them you'll see in my examples, the `mail` is what I use as the primary username. Now that we're moving to the cloud, that's more often than not the one that I like to use rather than UPN.
So, but do whatever makes sense. And once that's done, just click Save, save our changes.
Alright, then we're going to go back to Provisioning, and then down here under Settings.
Usually, it syncs there; I don't know why it wasn't there, but it was supposed to be. So, "Sync all users and groups," and then I'm going to go ahead and click Save. And with that, I should now be able to go back and click "Start provisioning."
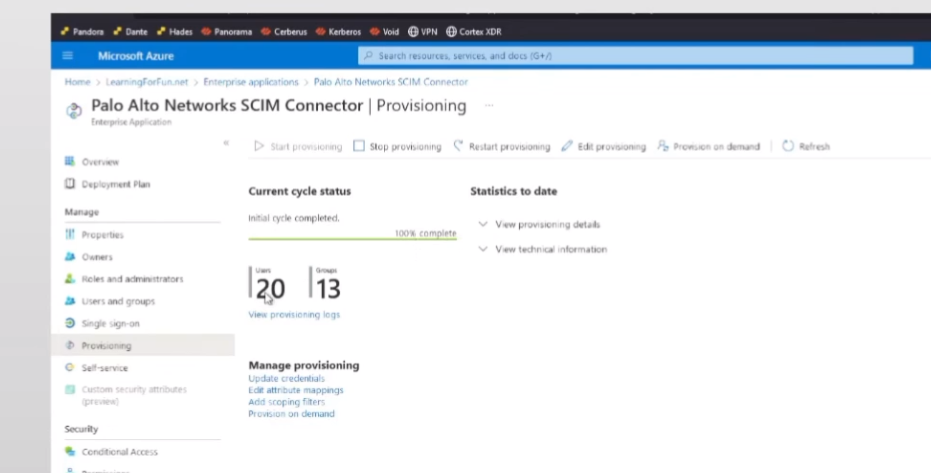
Alright, so click Refresh. We see it's done. I have complete users and groups, but I'm not done. I got to go back over to the Cloud Identity Engine because I told it I would.
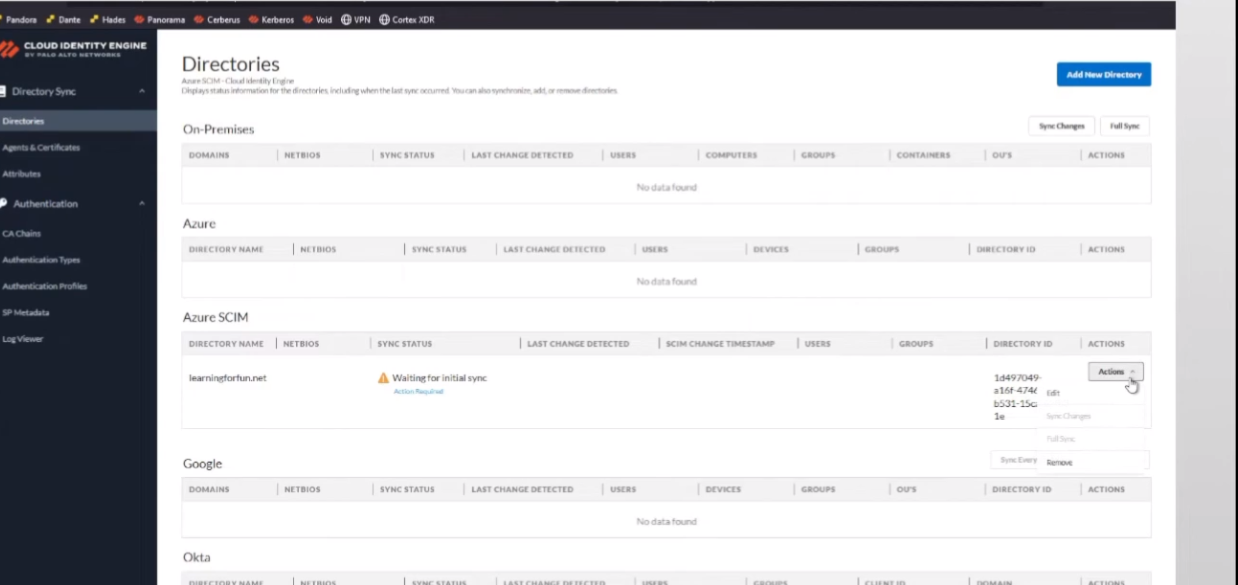
And now go to Actions and let's go... come on, be there. Let's wait, go ahead and refresh this. Alright, so we see the directory ID showed up a minute ago. So now that that's there, "Full Sync" is here. I'm going to click Yes, and this is where I win.
Google Workspace
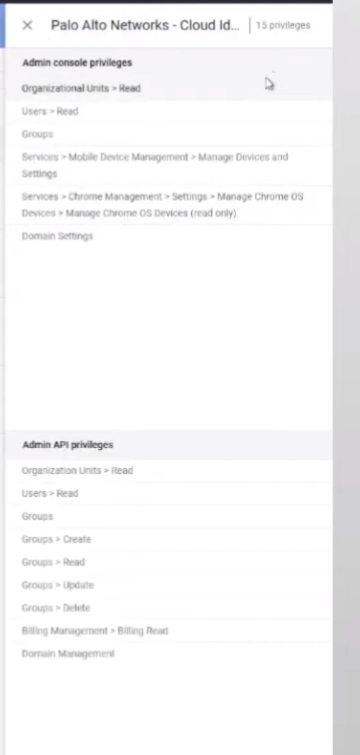
So, next, we are going to move on to Google Workspace . So, for Google, the first thing you want to do is go ahead and verify your account has the correct admin role. You could either create a specific admin role or just give an account that has the permission. It says 15 permissions upfront; the screenshot I have there on the right has all 15 in it. That's the group that I created earlier just to show it. I'll walk you through, show you how it is if you want to go ahead and manually do it. And that's really it. Besides your Google Customer ID (you'll need that), everything else is done in the CIE.
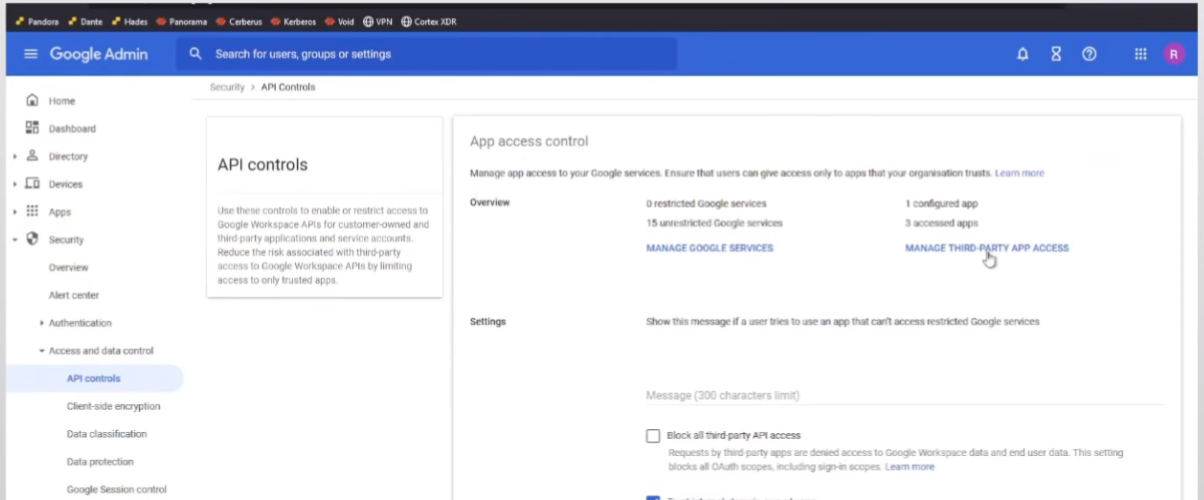
Actually, I take that back. We have to add the third-party app access API . And the way that we do that in Google is we go down through Security > Access and data control > API controls > Manage Third-Party App Access . We add the app, search for "Palo Alto Networks Cloud Identity Engine Directory Sync" using the OAuth app name or client ID.
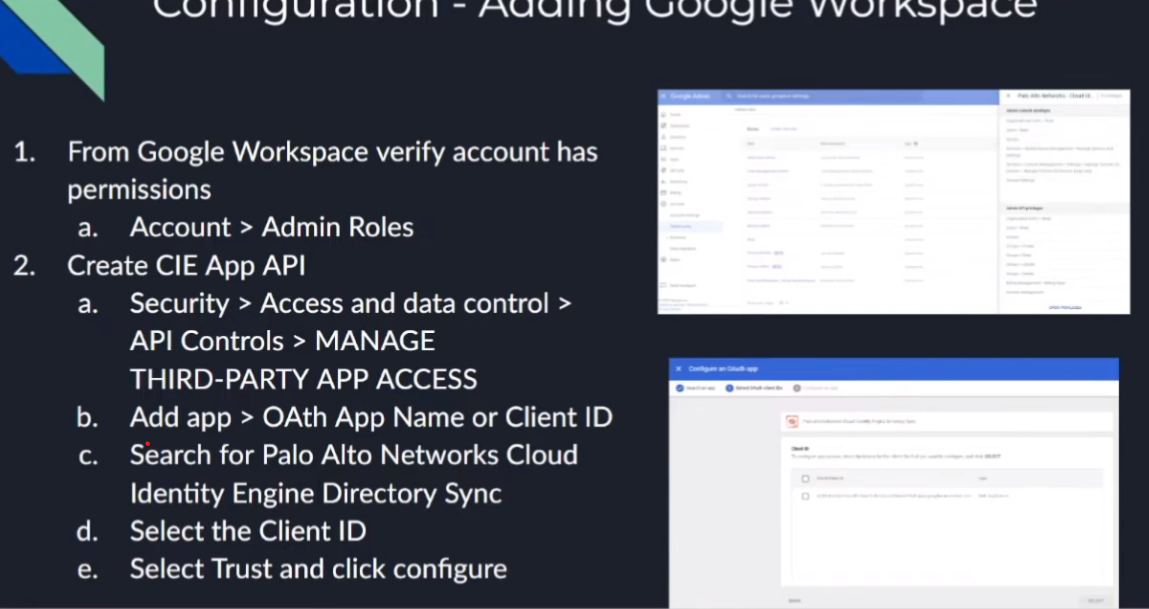
Select the client ID (there's only one client ID), and select "Trust" and "Configure."

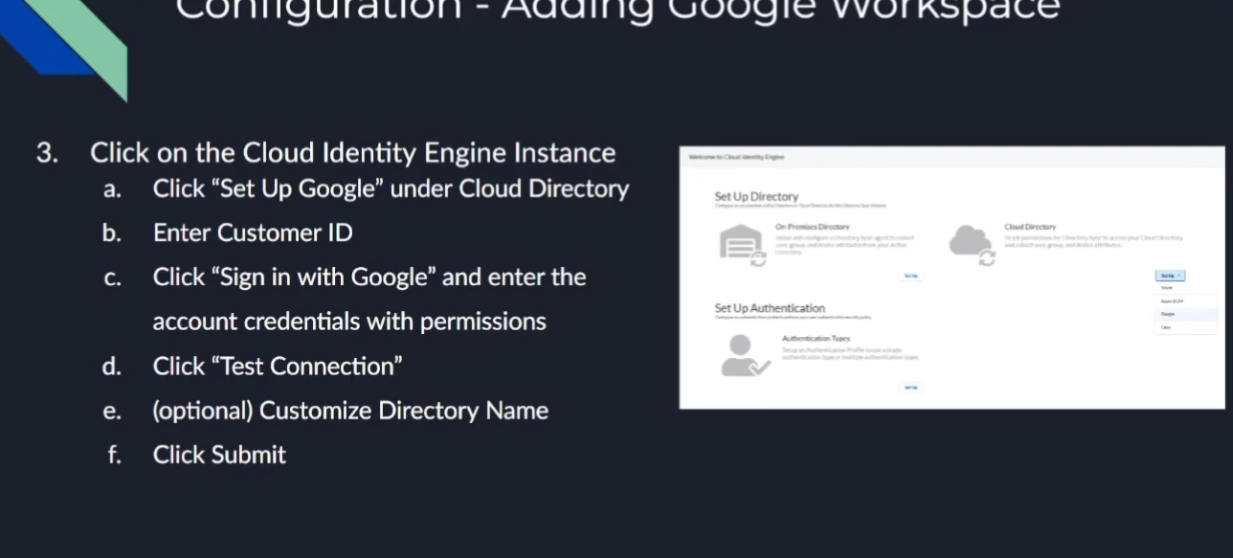
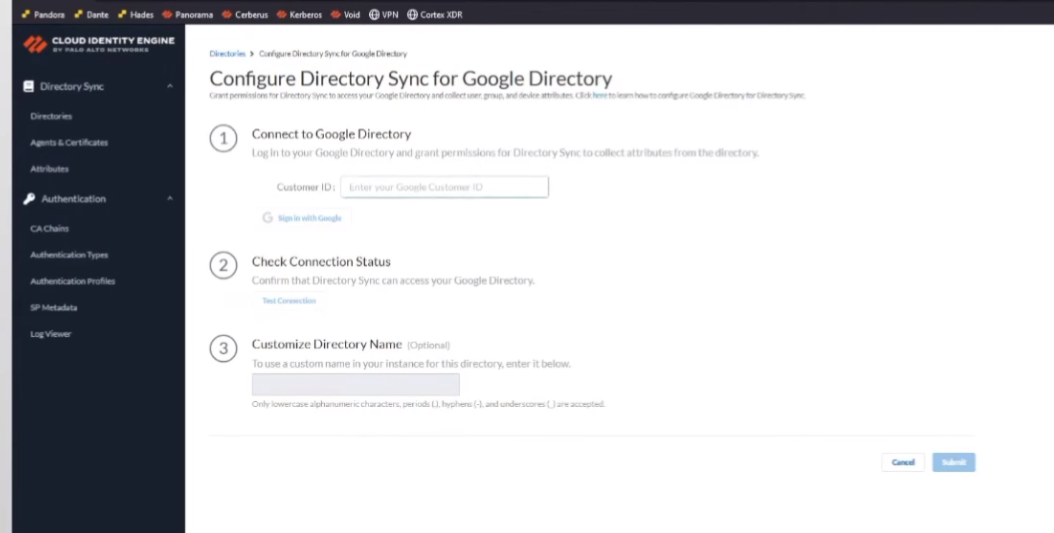
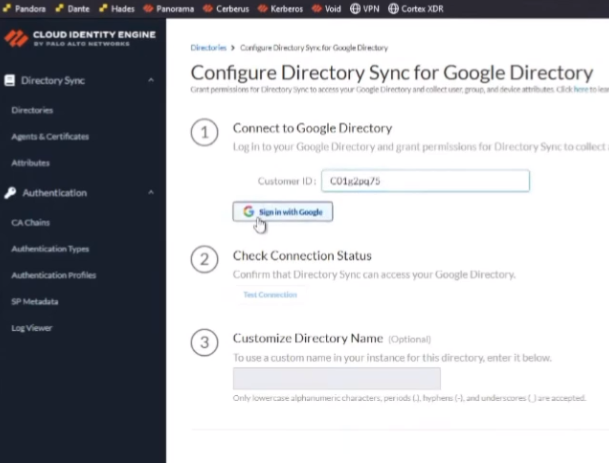
And then that's it; that's what allows it to tie in. So, after we do that, then we go back to the Cloud Identity Engine, and we go to Cloud Directory and Google. We're going to enter that Customer ID , and then you're going to sign in with that account that has the permissions for those 15 permissions in that role that I was mentioning earlier for Google. We're going to test the connection. You're going to customize the name if you need to (remember, if it's overlapping, you're going to want to, yes you are), and then you're going to want to click Submit.
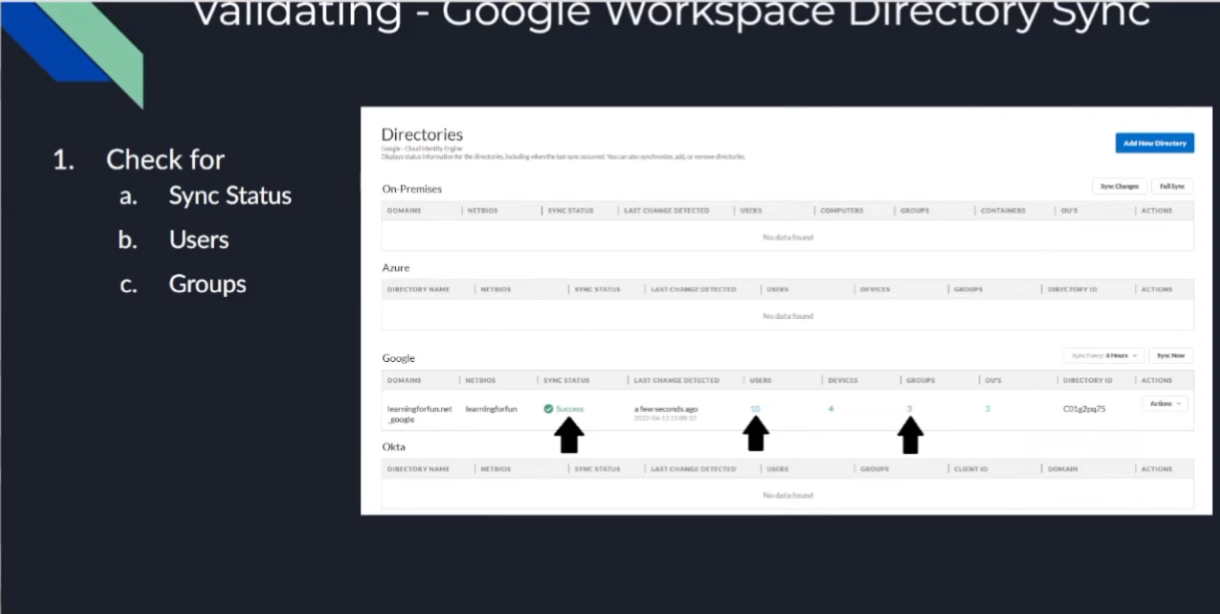
And then to verify, it's going to say "Success," it's going to have users, and it's going to have groups. And you are going to win. So now, we're going to do a walkthrough.
Here we are, we're back. Go into our Google Cloud Identity Engine.
We are going to first go to our Google Admin console.
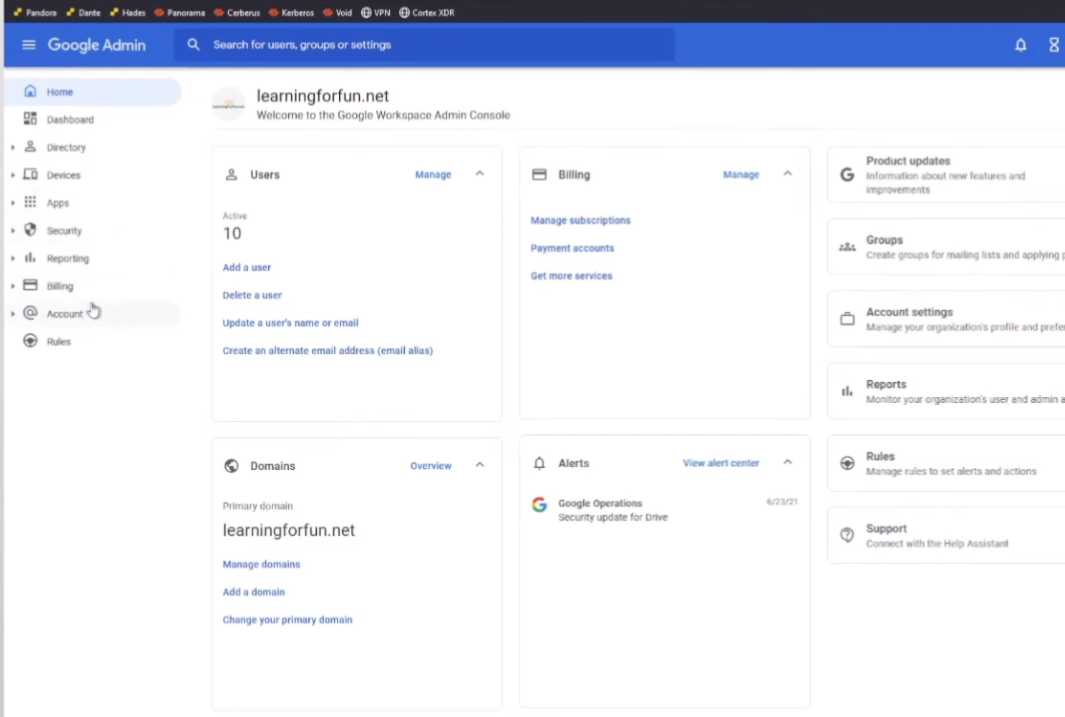
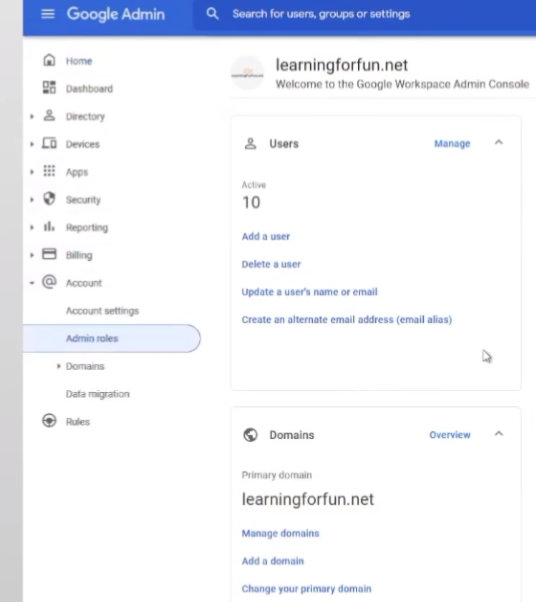
And I am going to go to Account > Admin roles .
And it's going to verify it's me, because that's cool. Alright, it's still me; we were there for a minute. Alright, so here's the one that I created earlier.

So, if we view the privileges, you can see here are all 15 privileges that are required.
If you wanted to edit it, let's see here, just go into it, and then yeah, it's just selecting them from this dropdown box.
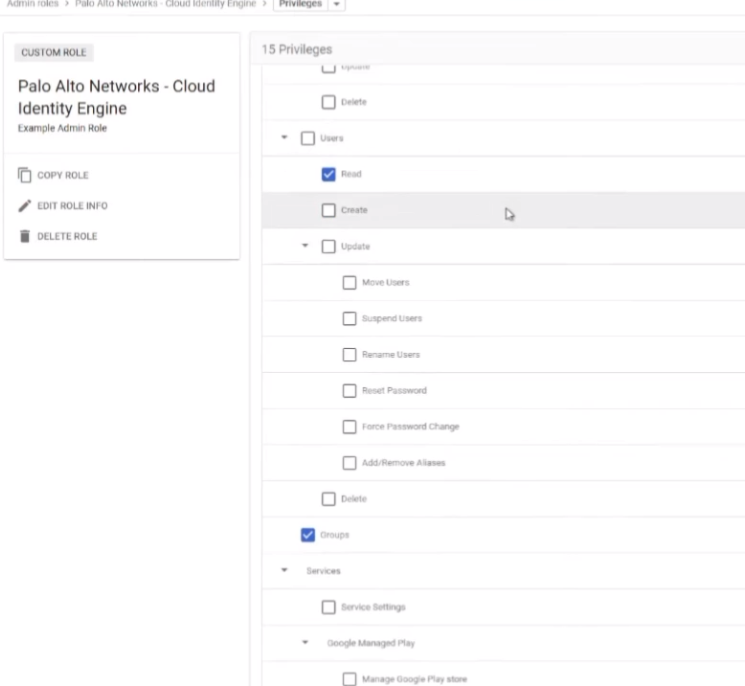
Right? So, just easy to go under each area. It tells you from that screenshot I did earlier; it's not really that exciting. So, have fun with that.
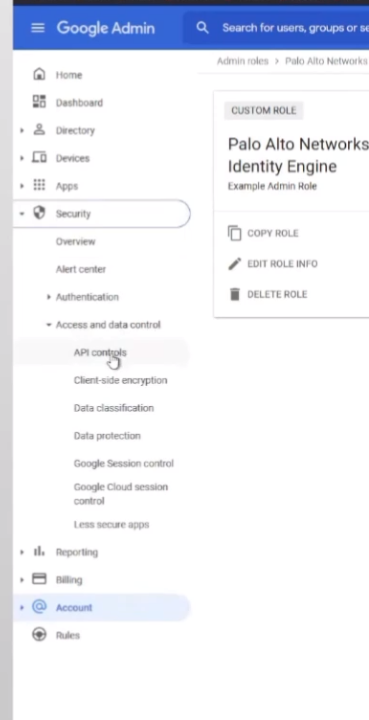
So, once you get an account set up with it or you set one with the right role, now we're going to authorize the CIE to talk. So, under Security > Access and data control > API controls , and once you're there, you're going to "Manage third-party app access."
So, I already have it down here, and it's entrusted, but it's the same process.
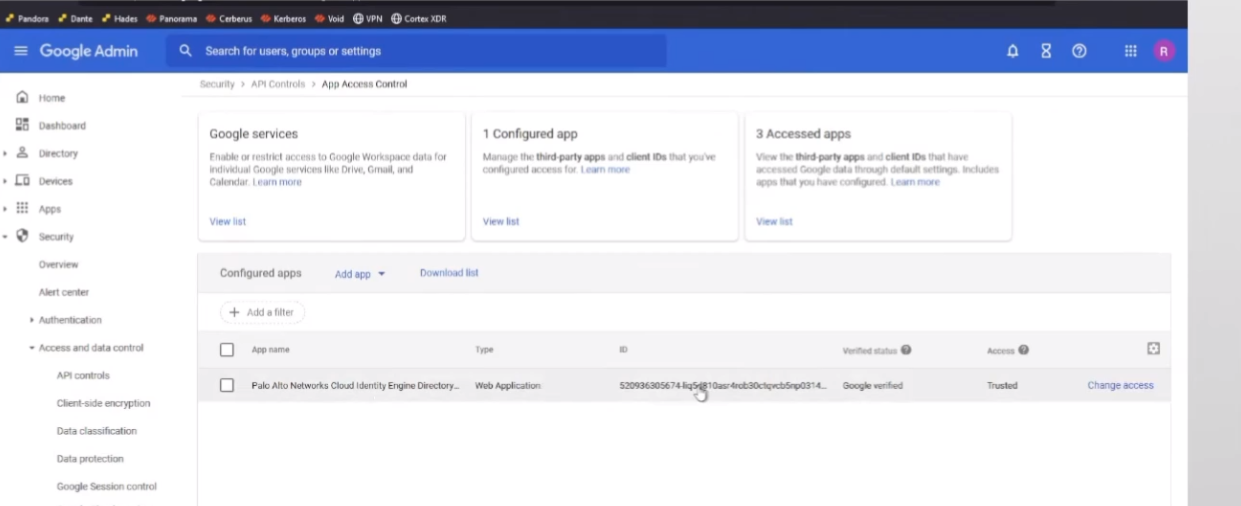
I'm just going to walk you through. We're going to add app; there's an "OAuth app name or client ID."
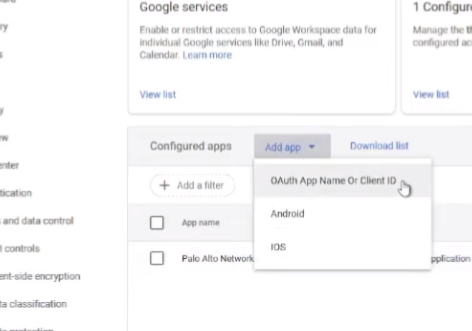
We're going to search here for "Palo Alto Networks." You can put "Cloud Identity Engine" if you want, but there are only two things that come back right now. And so, we're going to do the one that's called "Cloud Identity Engine Directory Sync."
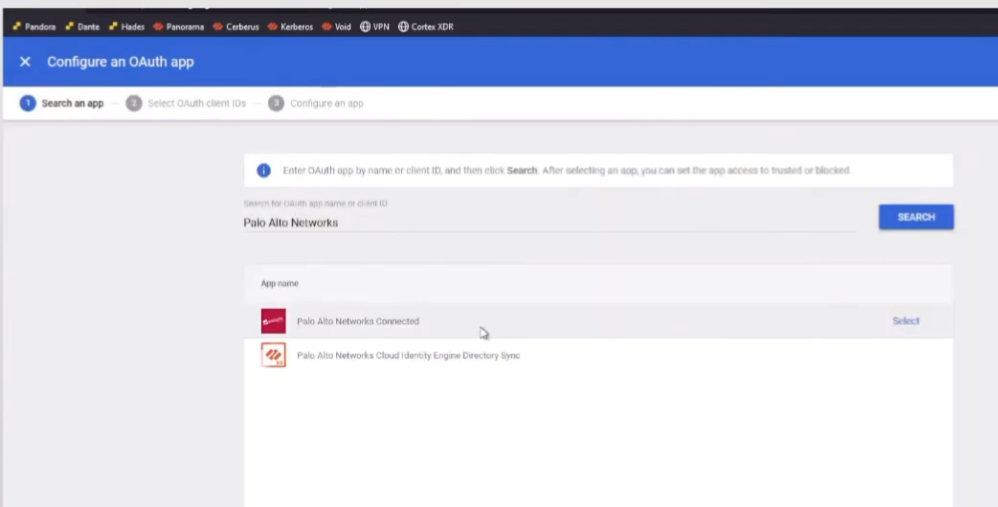
We're going to hit select. Here's that client ID. We're going to go ahead and check it.
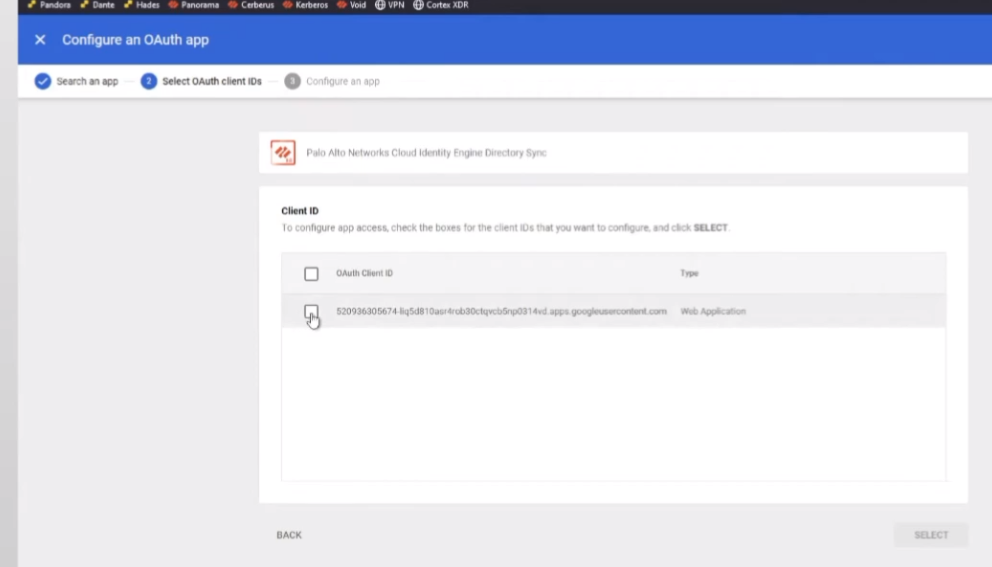
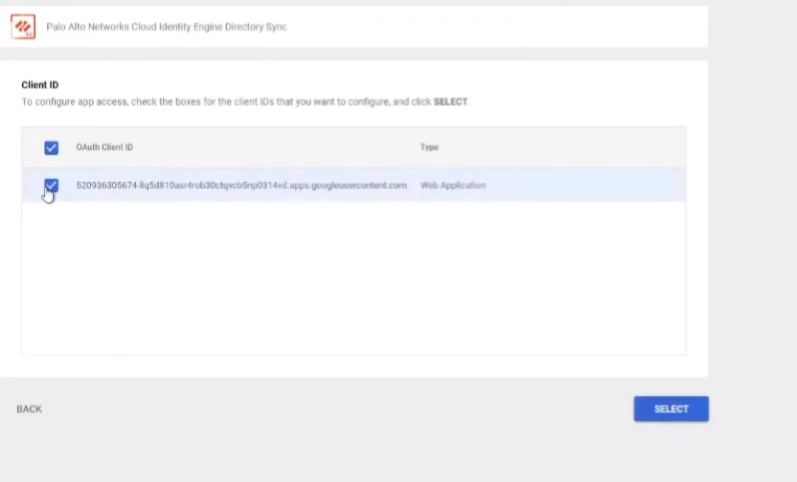
We're going to hit select. Now we're going to hit Trust .

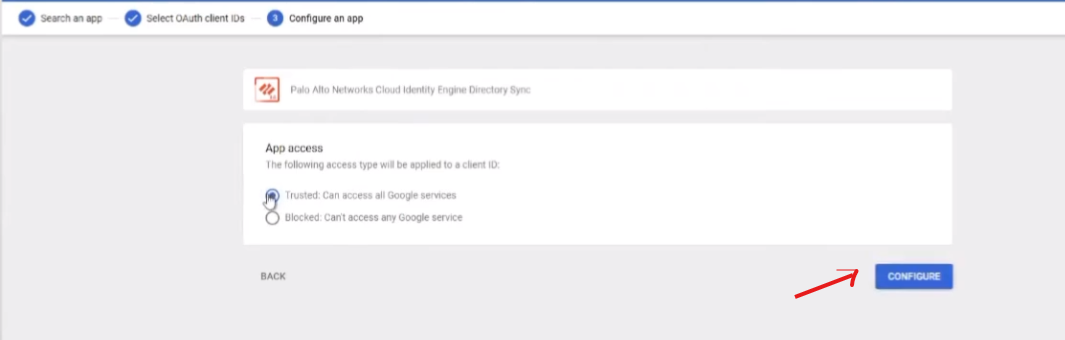
Once you do that, you're going to hit Configure. And since I already have it, it'll error out, but that's what makes it show up down here. And then you can tell it to access, and that's really all there is to it. From this point, we're going to go back to the Cloud Identity Engine. If you need to know how to get your account... your Customer ID (not Tenant ID), under Account > Account settings , you'll see it's right here. So, I have that copied down over here.
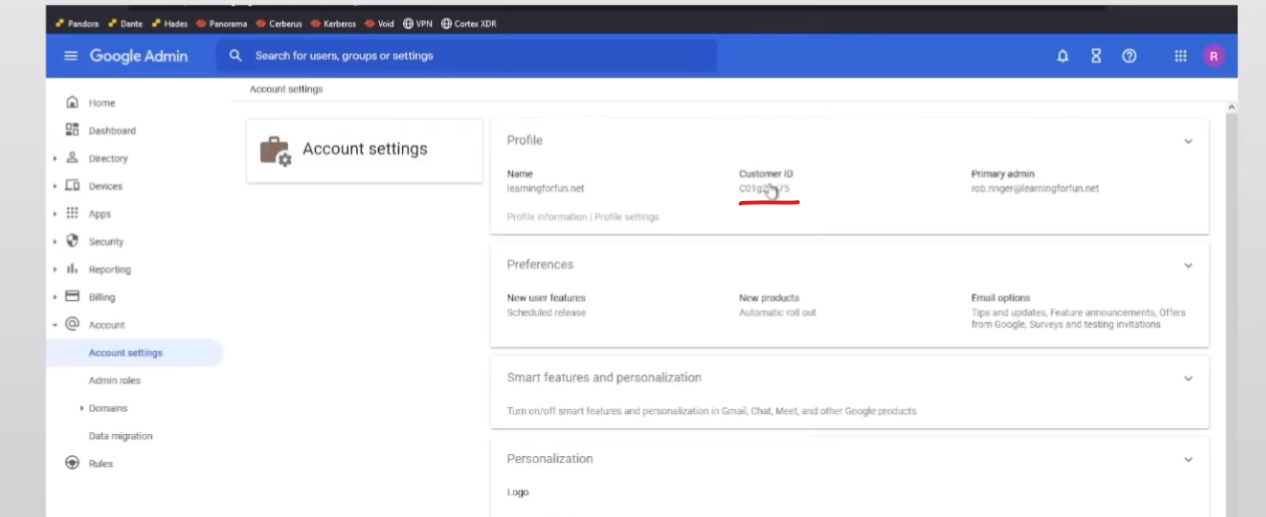
So, I'm ready to go. So, I'm going to go back to Cloud Identity Engine, go to Google, and then put my Customer ID.
And sign in to Google.
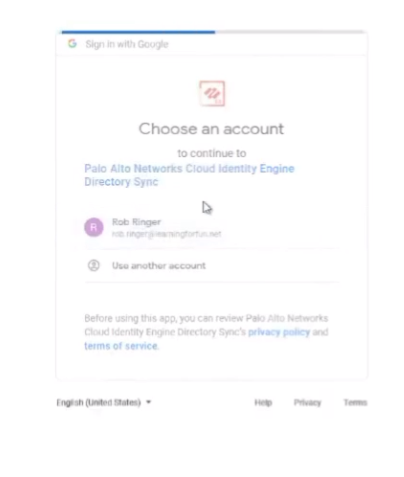
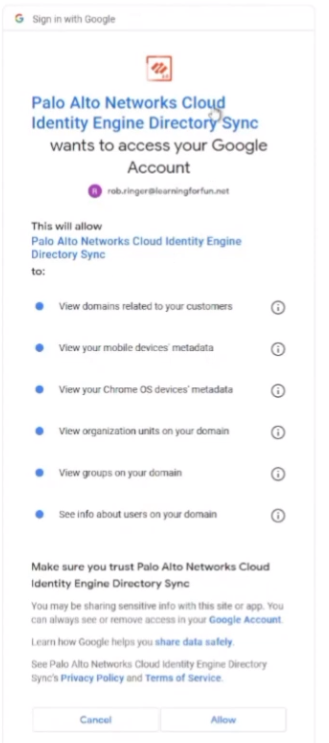
With my super secret sign-in name. Then I'm going to tell it it does have permission to access my domains, my mobile users, Chrome OS, basically everything, so I can get those attributes, right? So, I'm going to go ahead and allow it. Once I do that,
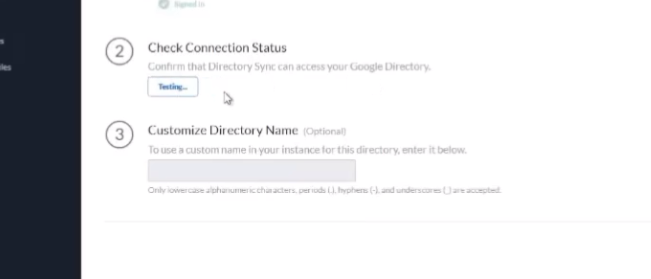
I'm going to do "Test Connection." It's going to pull it. And here's where I'm going to customize it.
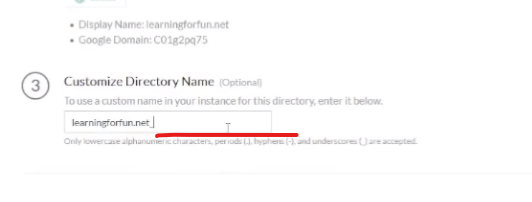
Let's put `_google` at the end. Go ahead and click Submit.

I'm going to win. Alright, so we're going to wait a minute.
And it's going to show up. That'll be awesome.

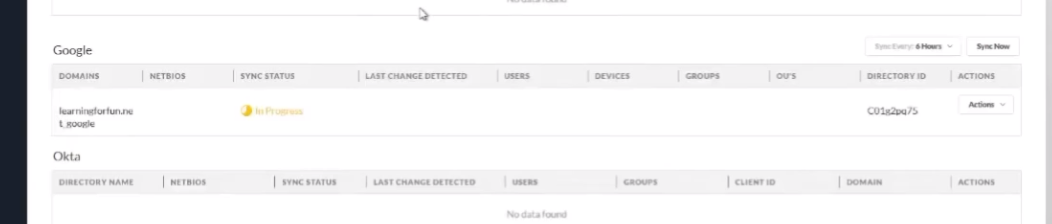
Alright, so we have our sync status "Success," our users, our groups. We are good to go.
Okta
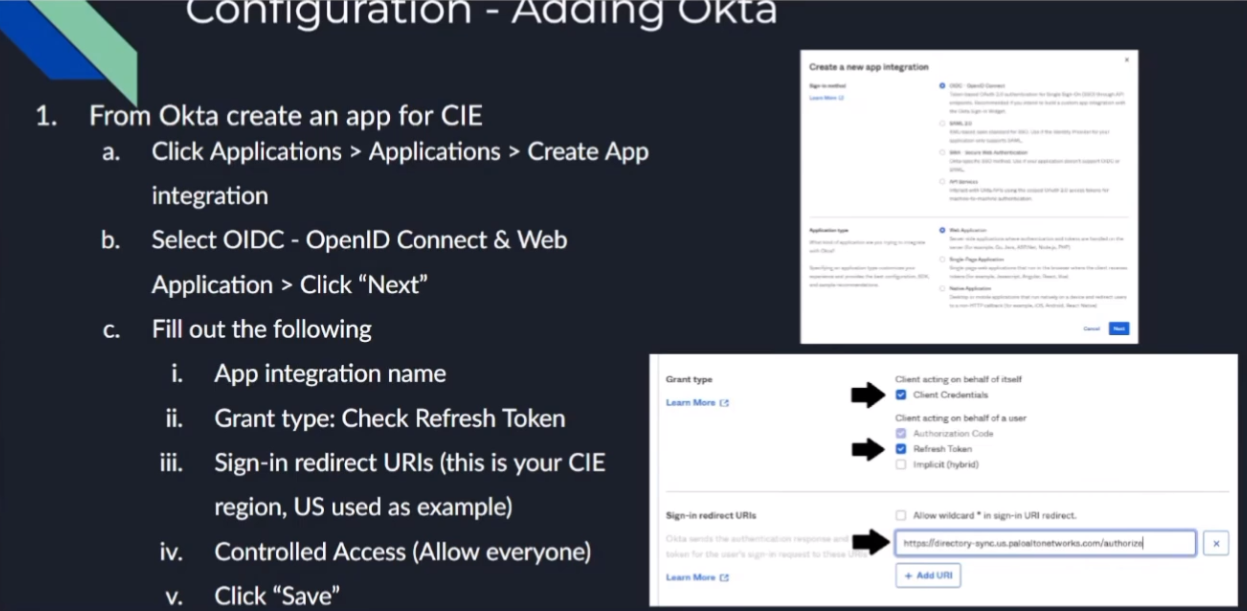
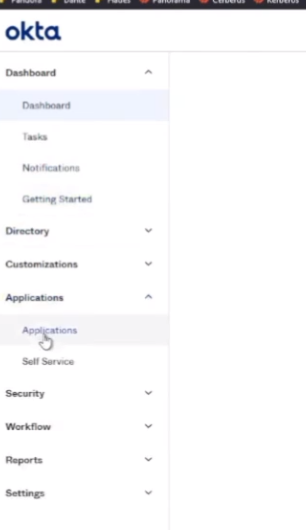
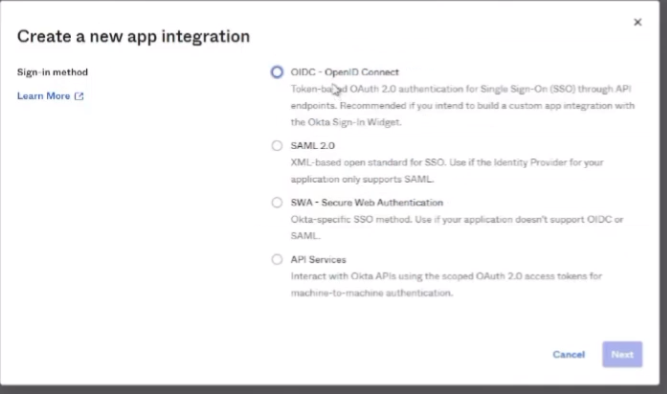
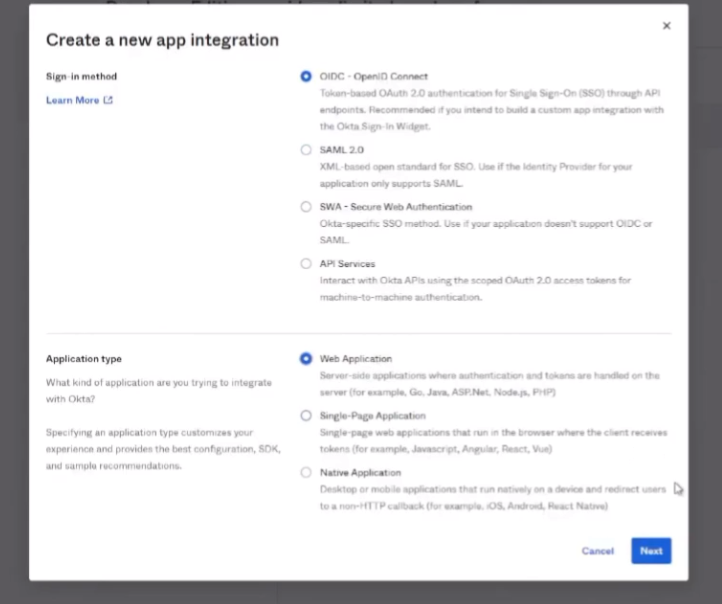
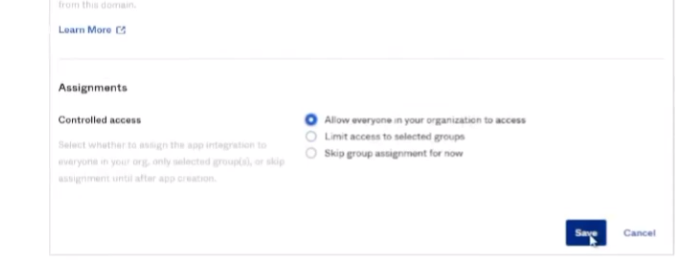
Alright, to do Okta , what we're going to do is log into the Okta portal. Then we're going to create an app for CIE . So, we need to go to Applications > Applications > Create App Integration . Select OIDC (OpenID Connect) and then Web Application . Click Next. So, we're going to give it a name. And then for Grant Type, we're going to check Client Credentials and the Refresh Token . Then the Sign-in redirect URI; this is your CIE region. "US" is what I have in the screenshot down there, but in the documentation, you can find all the rest of them. And then for Controlled Access, I'm just going to set it to "Allow everyone" if that's what you want to be able to connect into it. Use that and then go ahead and click Save.
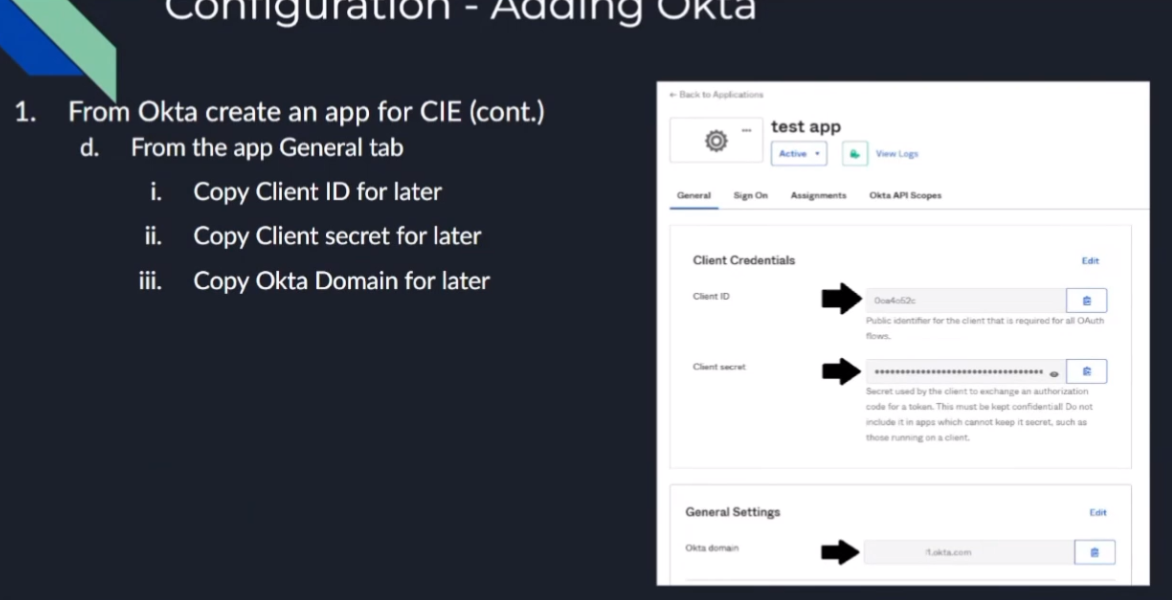
Next thing you're going to do, once you create the app, you're going to need to copy the Client ID to use in CIE, as well as the Client Secret and your Okta Domain .
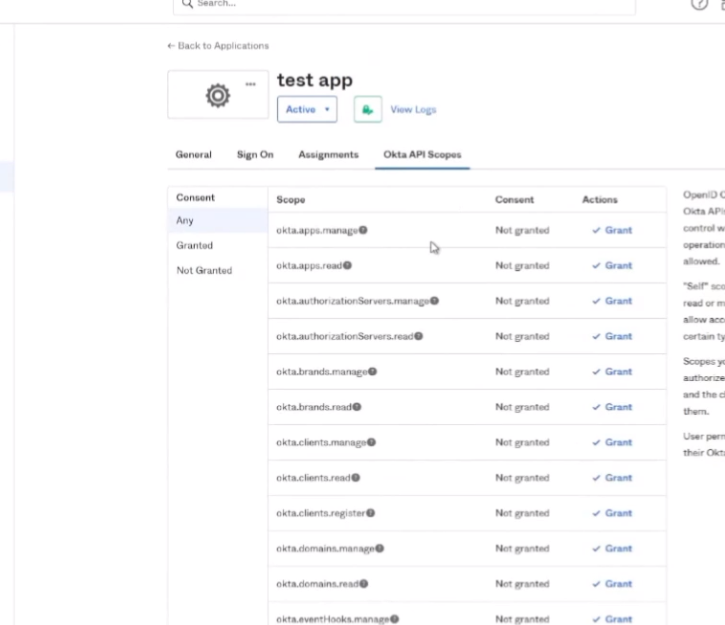
So, once you have that, the last thing we need to do is apply the API scopes . So, for the API scopes, we need these to grant the permissions for these five:
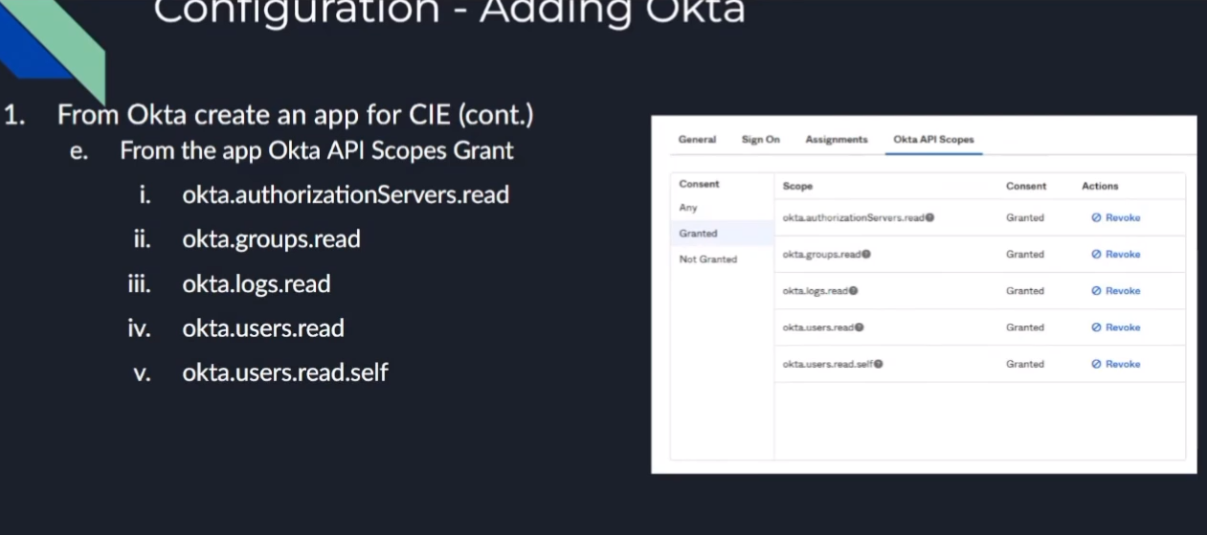
okta.authorizationServers.read
,
okta.groups.read
,
okta.logs.read
,
okta.users.read
, and
okta.users.read.self
. I believe the first one's optional, but refer to the documentation on when and where you would use it; it's a read one, so I went ahead and just granted it here in this video.
And so, once you do that, we're done with Okta.
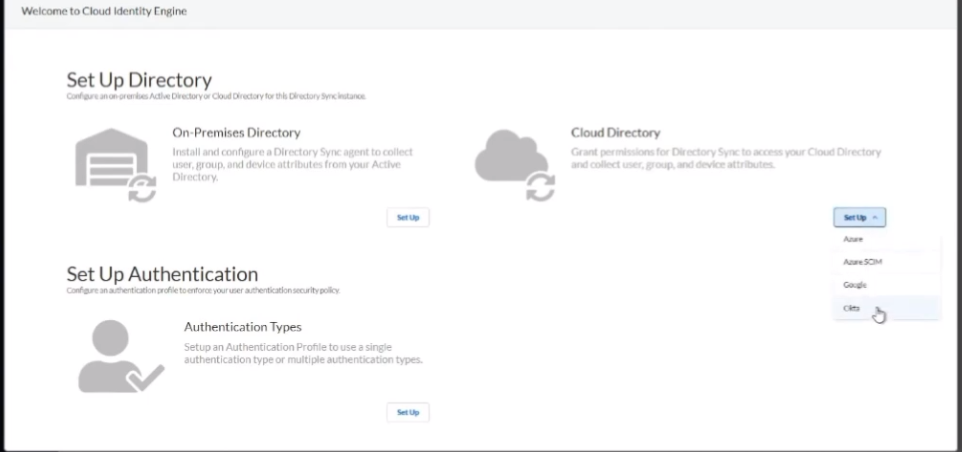
So, we can jump over to the CIE portion. And then from there, on the CIE portion,
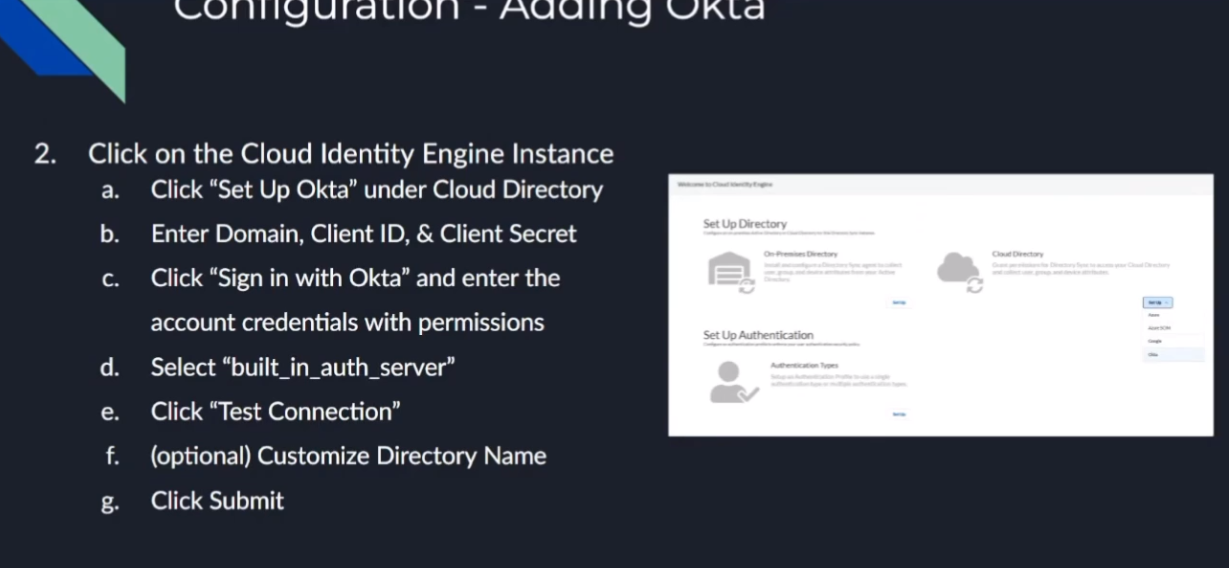
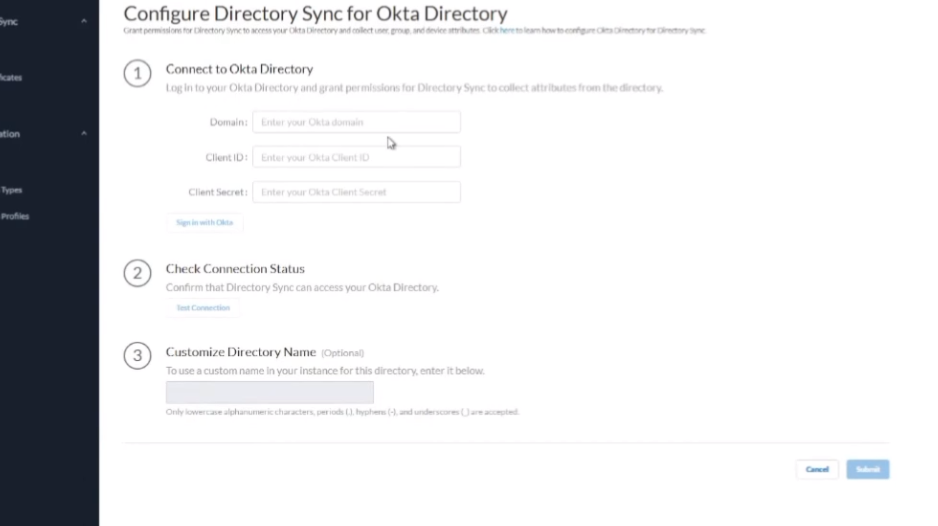
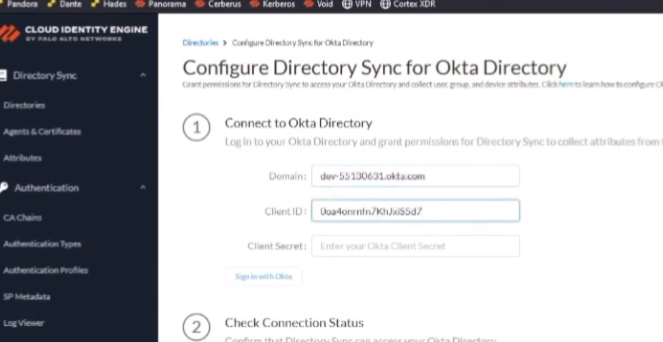
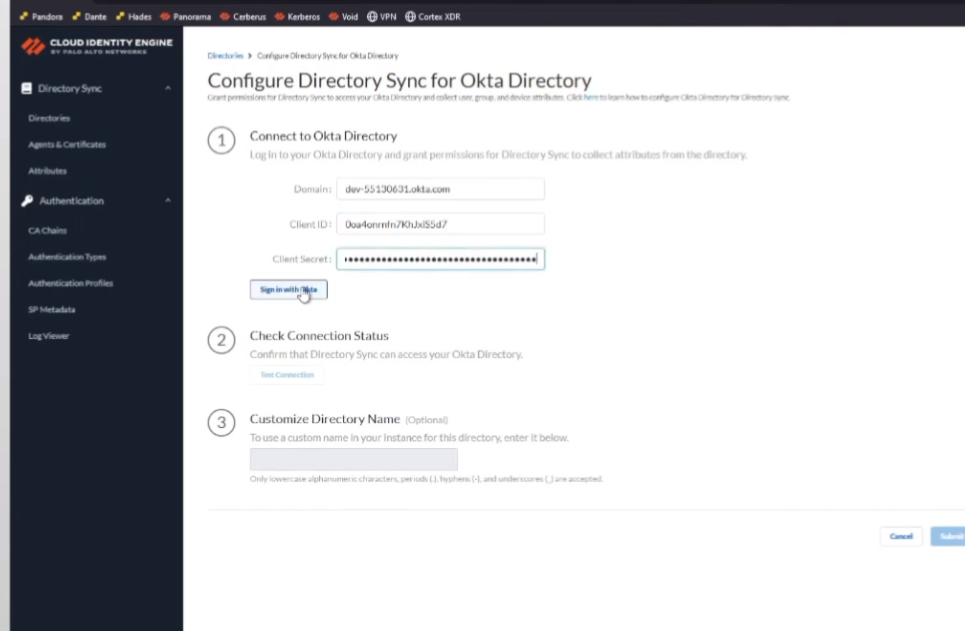
we're just going to click on the Cloud Directory and then set up Okta. We're going to enter the information you copied from earlier (the Okta Domain, the Client ID, the Client Secret), and we're going to click "Sign in with Okta" and enter the permissions for the account that can do it.
Then you're going to be given two different options. Use the built-in auth server unless you need to use the other one, which would be my recommendation. And then click "Test Connection."
After that, optionally give it a customized directory name (sorry, you'd want to do that if you have overlapping domains) and then click Submit.
Finally, you'll be able to validate it worked because you'll have "Success," users, and groups.
Almost like you can validate all of them the exact same way. Alright, so now we're going to go ahead and knock this one out as well.

So, here we are back at the hub. Go ahead and select our Okta instance.
And we're going to go to Cloud Directory, click on Okta, and there's that information we need.
So, we're going to jump over to Okta, and I'm in my Okta dashboard. So, I'm going to go to Applications.
I'm going to go ahead and create one.
Call that my OIDC Connect and then Web Application. And I'm going to call it "CIE_App." I'm going to click Client Credentials and Refresh Token .
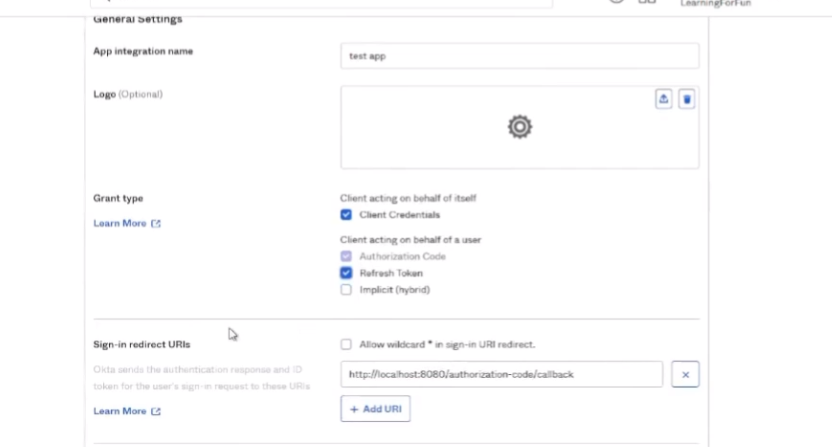
And then the Sign-in redirect URI is for my region; the US is what I'm going to paste in here.
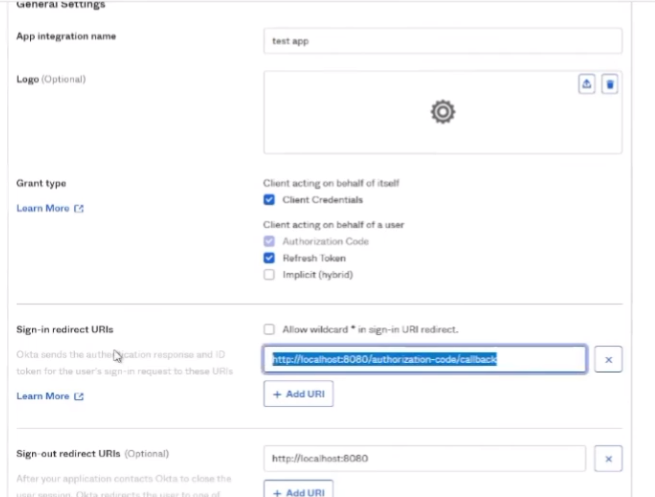
Okay, and then down below, I'm going to "Allow everyone in my organization access" for this, just for me for this video. And then once I do that, I'm going to click Save.
And under the General tab, there are just three pieces of information. So, I'm going to go ahead and copy that Client ID . Alright, and then I'm going to copy the Client Secret . And then I'm going to copy that Okta Domain . I'll call it good.

Then I'm going to go to the
API Scopes
. So, the five that I need are... let's go over to documentation here. So, it tells us, um, there's that one that's optional. So, if we have more than one authorization server, it's the
okta.authorizationServers.read
. We'll go ahead and just create that one. And then... achieve control effort... and then there's the bottom box, so I don't even need for that, just right there. Alright, so that should be all five. I can check by looking at "Granted": two, three, four, five. So, I should be good.
And it's activated already. So, there's my app, I have everything I need. So, go back to the CIE. We're going to put my domain in. I'm going to put my Client ID in, Client Secret. I'm going to sign in with Okta.
Here's where we choose the auth server. So, I'm going to use the built-in one , and I'm going to go ahead and test that connection.
And it came back good. So, I'm going to go ahead and set up my dev... I'm going to add `_okta`, which could just take a little bit and it'll show up too, just like the rest did. There we are, we see "Success," users, and groups.


Firewall and Panorama Integration
And there we have it, that's Okta. Alright, so for the final portion, I'm going to walk you through how to add it to your firewall and then how to add it to your cloud instances like a cloud-managed Panorama (it's what I'm going to use, but it's the same for anything else like Cortex XDR or your Data Lake, everything like that).
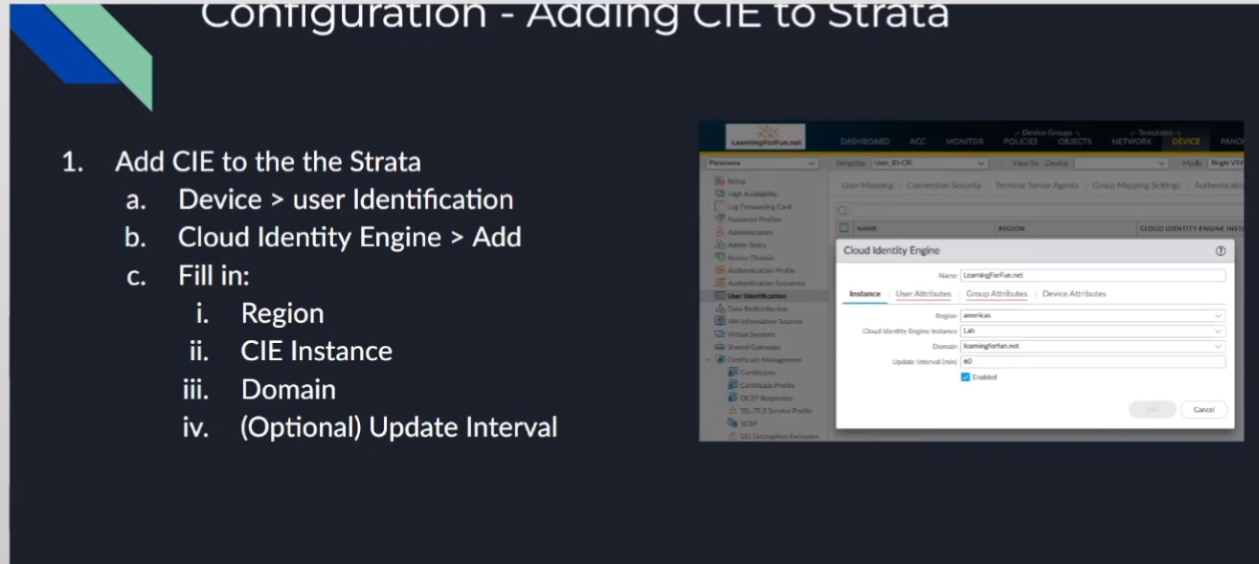
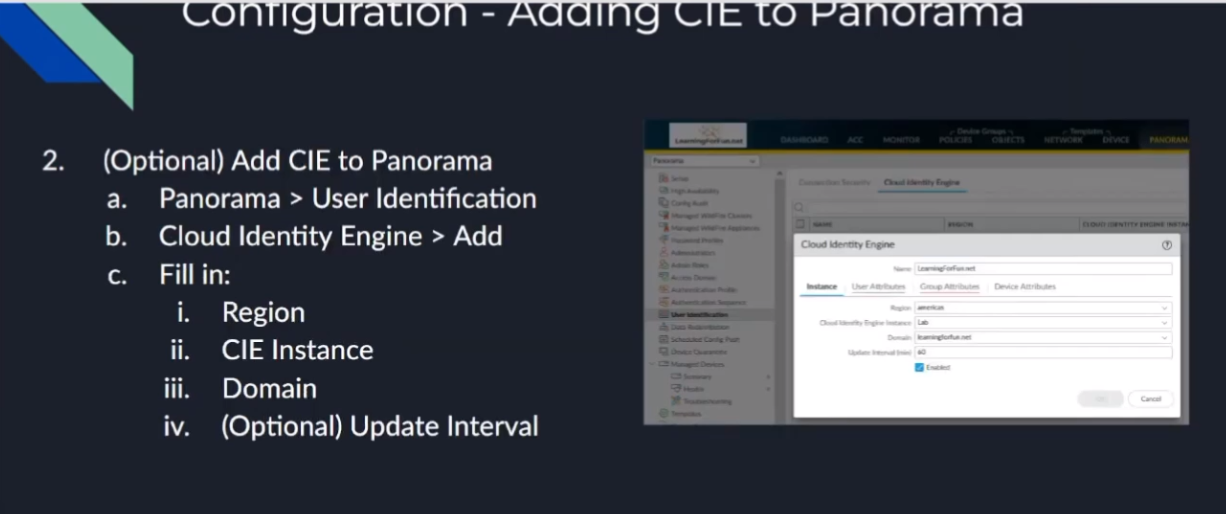
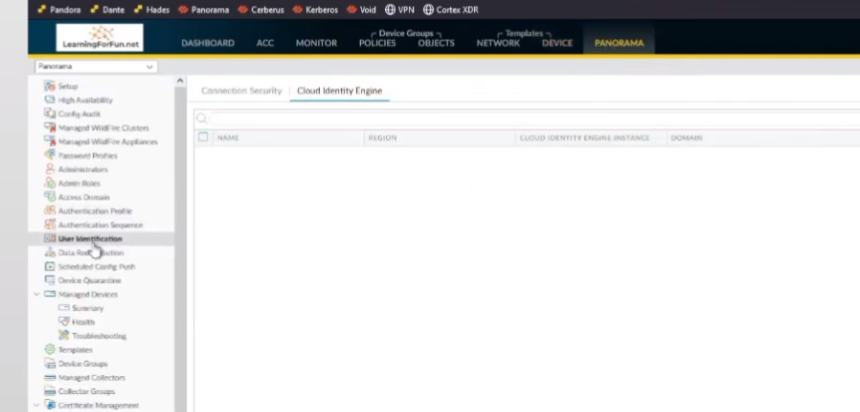
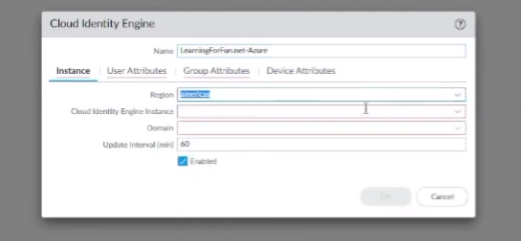
So, to add it, we're going to log into either your firewall or Panorama. Then we're going to go under the Device > User Identification > Cloud Identity Engine and Add. What you're going to do is give it a name, and then you need to fill in the region that your CIE is in, the CIE instance name that you gave it, and then the domain that you want from it. And so, this is why it was critical if you have the same domain in different locations to give them a unique name, so you know which one you're dealing with from the dropdown.
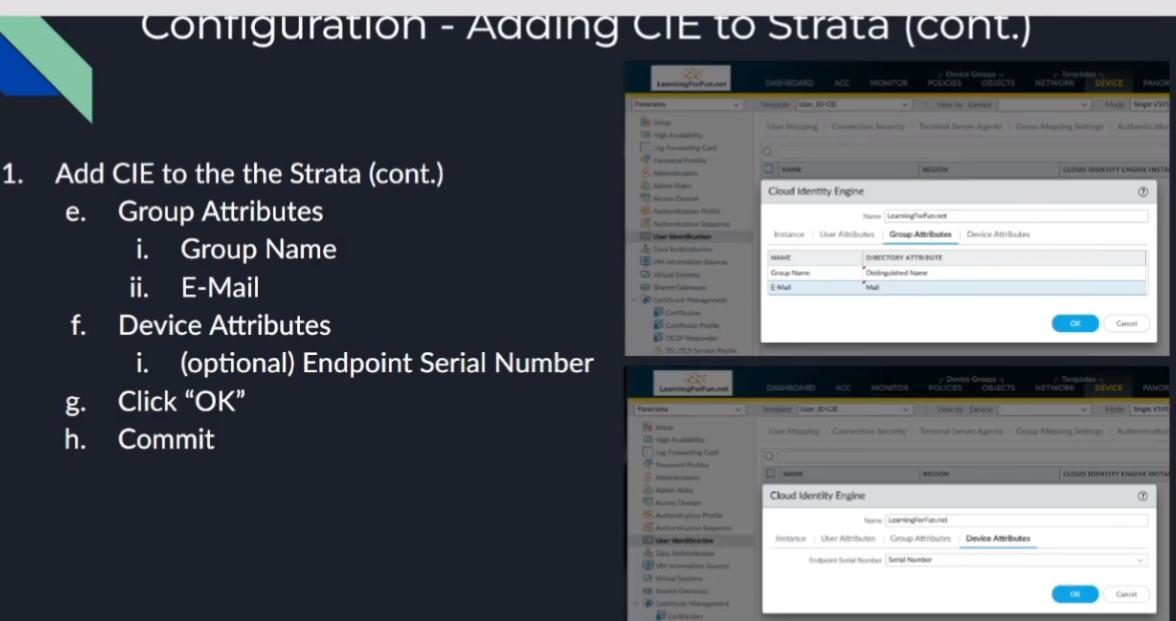
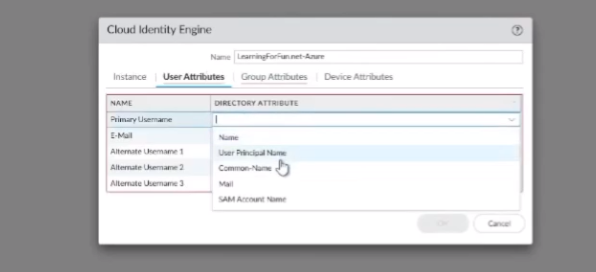
Once we do that, we need to tell it where do we want to map our user attributes from, right? So, Primary Username: my preference is to use `mail` just because I see `mail` is unique across all these different elements; that works great. Now, if you're doing something like Azure SCIM and you choose not to send the `mail` over, well, that's not going to work for you, right? So, you need to communicate a little bit with your organization if you're going to be depending on the attributes, but I found that `mail` works great, and then UPN works great for an alternate. And then for groups, Distinguished Name as a group name and `mail` as the email is pretty much never let me down. And then under Device Attributes, if you're using that functionality, Serial Number is your only option there. So, go ahead and set that, click OK, and then you would just commit it to your devices.
So, if you're using Panorama, you're going to want to add this to Panorama the same way that you're doing a master device for your User-ID information. You're going to want to set that up in Panorama as well. So, we're going to add the User-ID to Panorama under the Panorama tab > Cloud Identity Engine . The same exact thing we did under the devices for the firewalls: you're going to give it a name, you're going to set the region, your CIE instance, your domain, the update interval. You're going to give the mappings on the users (same thing, `mail`, UPN). You're going to want to make sure these match between your devices and your Panorama. And then the same with your group attributes.
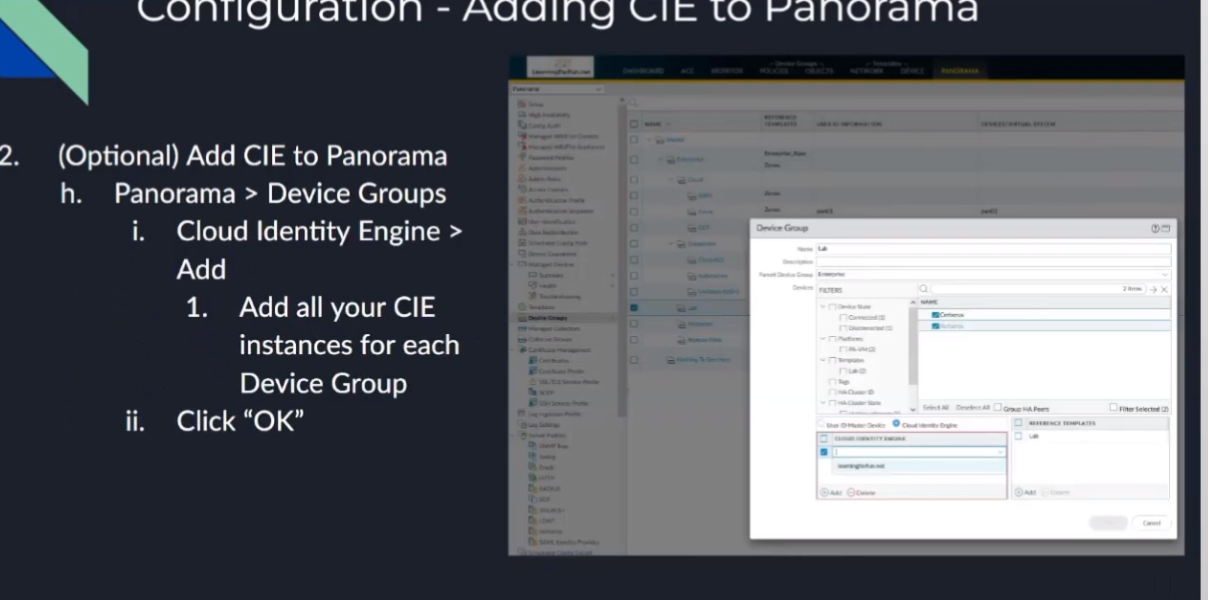
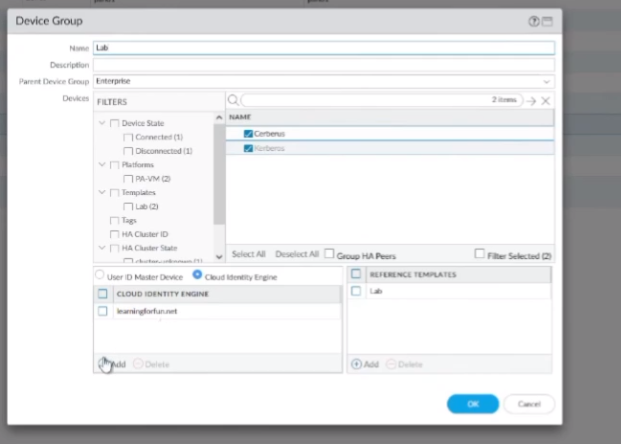
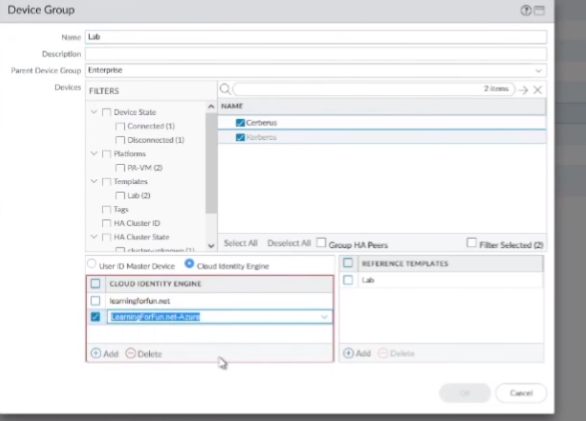
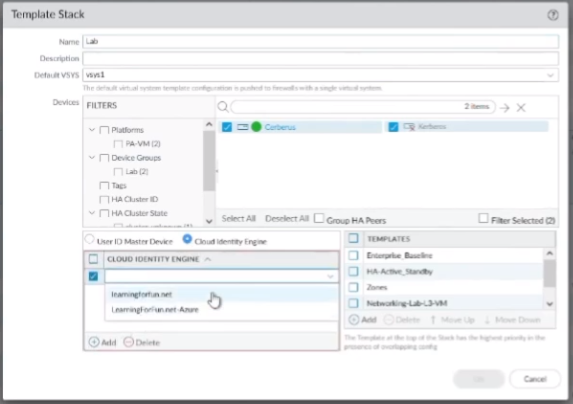
So, you're also going to want to, under your Templates and your Device Groups (this is very, very important), down below, you'll see when you open up like your Device Group, for example, under User-ID Master Device , there is now the option for "Cloud Identity Engine." Once you move those devices over to Cloud Identity Engine, you're going to want to select your Cloud Identity Engine instance that you just defined in Panorama down there because that's going to tell you where to get the users and groups that those devices are going to be using. So, you're going to select it from the dropdown list. You can have multiple ones in there. So, if we have like `learningforfun.net` for my on-prem, and then `learningforfun.net_azure`, and then Okta and Google, those would all show up down there because maybe I have different accounts in different ones synchronized or whatnot. So, I can have multiple ones show up there. It's just critical that we do that. You're going to do it under your Device Groups and your Templates , and it would be under your Template Stacks . Alright, and that's all there is to it.
I'll do a quick walkthrough of that for you. Alright, so I'm in Panorama. I'm going to go to my Device. And so, if you're in the firewall directly, you don't have Panorama; this could be right on your device. If you're under Panorama, you can use whatever template makes sense for you. I like to use a modular template system, so I have one that I call "user-id-cie." When I'm ready to move a device to CIE, I just attach the template to the template stack, and I'm good to go. So, but do whatever makes sense for you, obviously. So, I'm going to go under User Identification.
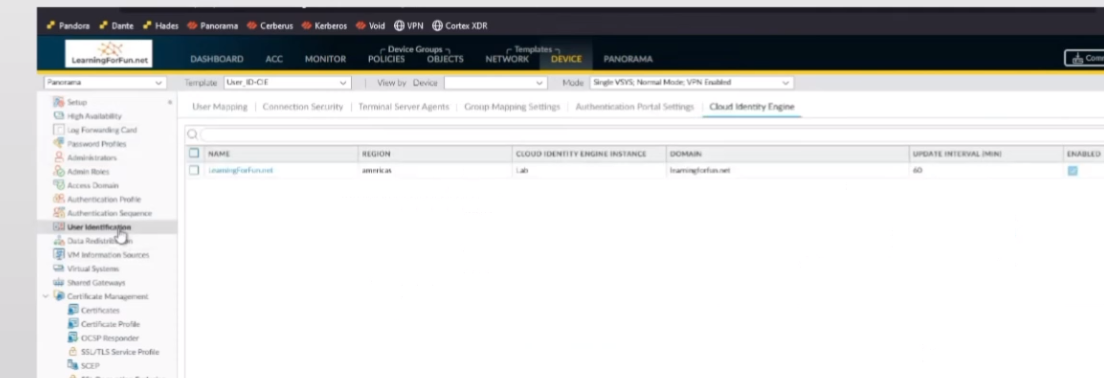
My Cloud Identity Engine. So, I already have one that's added here that's "lab," but let's say I wanted to add a different one. So, we'll say "learningfun.net" and we'll do, um, "azure." My instance here is Americas, and we'll do "lab," and then Domain. This is the one instance of CIE.
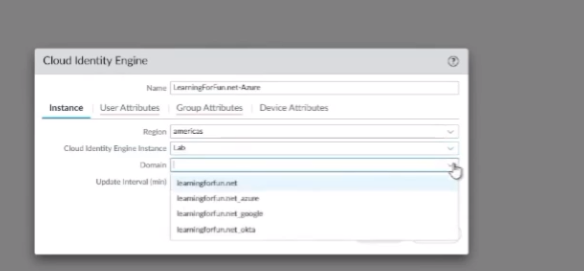
And I'll be able to show you this here in a second where I have all of them together, so that's where they show up. And so, I'll go ahead and click Azure.
I'll do my attributes right here. So, I'm going to do `mail` as my primary and alternate is my UPN. My group is going to be Distinguished Name, then email is `mail`. Go ahead and click Device Serial. And I would just do this for all the rest of them that I have unique things in for. So, and then since I'm using Panorama, I'm going to go over to Panorama > User Identification as well.

And I'm going to add this one as well.
So, I'm going to go ahead and click Add. UPN. It's the same exact thing as before; it's super exciting, I know, but once we get it done, it's done. Alright, and so that's there. So now the next thing we need to do is we're going to go under our Device Groups .
So, I'm going to pick my lab units here. And so, where I already have `learningforfun.net`, now I'll have `_azure` show up. Let me go ahead and click OK there.
And then I'll want to go to my Templates , and then under my stack, so my lab stack here, I'll go to swap over the Cloud Identity Engine. And so, I have both my `learningforfun.net` and then the Azure one I just added. I want to make sure I add those there so that I can use those groups under things, under my templates. So, it would be there, things like my portal and my gateway for my client configs. So, once I do that, I can go ahead and hit Commit and push to the device, and it'll go ahead and be sent out. And that's really all there is to it for the Panorama side.
Cloud Services Integration (e.g., Prisma Access)
So now, I'm going to swap back over and show you how to do it for your cloud services on the Palo Alto Networks hub. So, say that we already have Prisma Access identified or one of your other services.
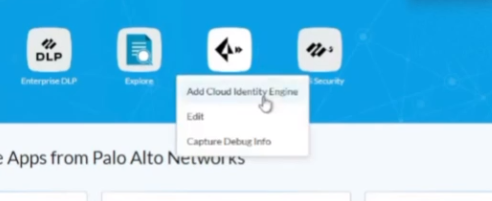
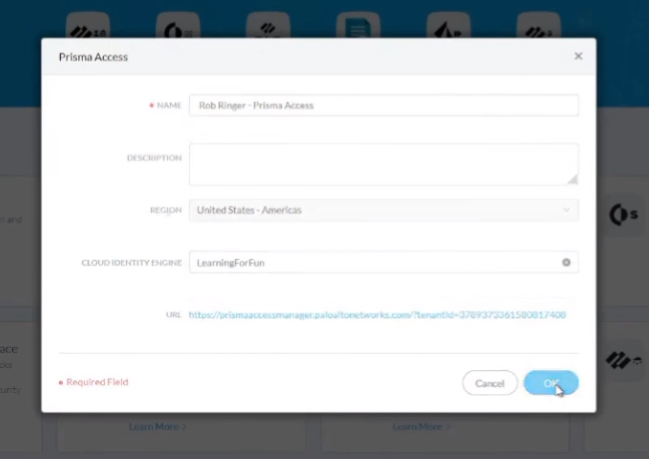
So, all you have to do is click on the ellipses and you can click Edit. Then you'll see this section down below called "Cloud Identity Engine," and then from the dropdown, you just select your instance name. So, what I'm going to do is go ahead and jump in and set that up for you. So, just one moment and walk you through it.
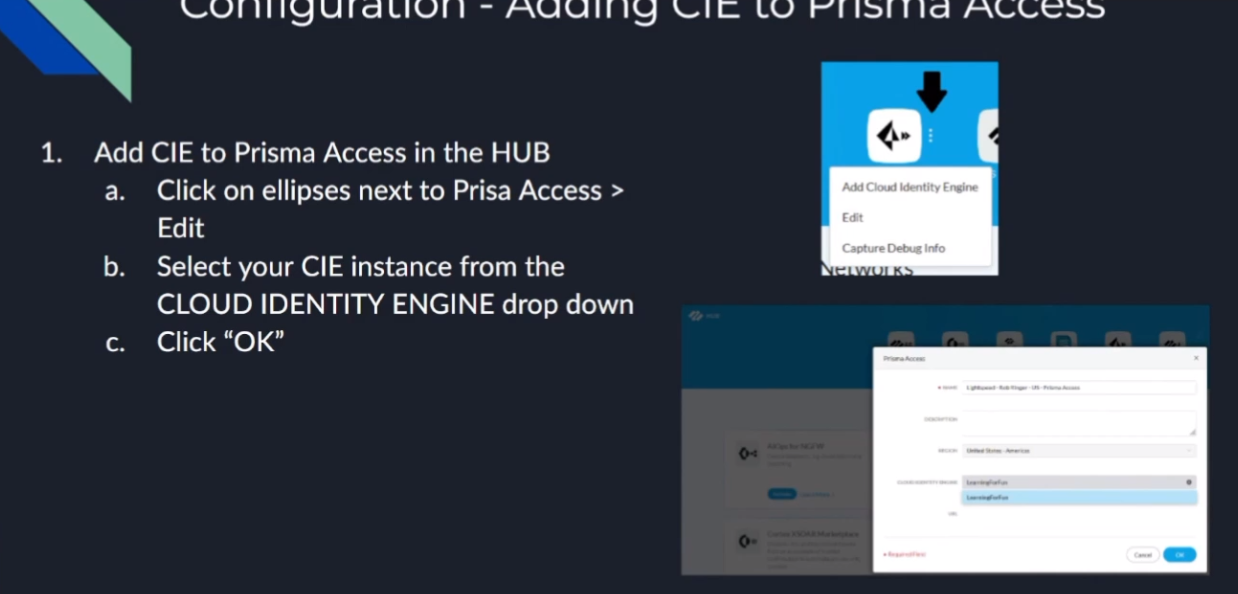
Alright, so here I am. Here's my Prisma Access instance. So, I'm going to go ahead and click... well, I clicked "Add Prisma Access Cloud Identity Engine."
So, that's one way to do it. The other way would be to click Edit, and then we can see it shows up down here. And I'm going to click on my Cloud Identity Engine and click OK.
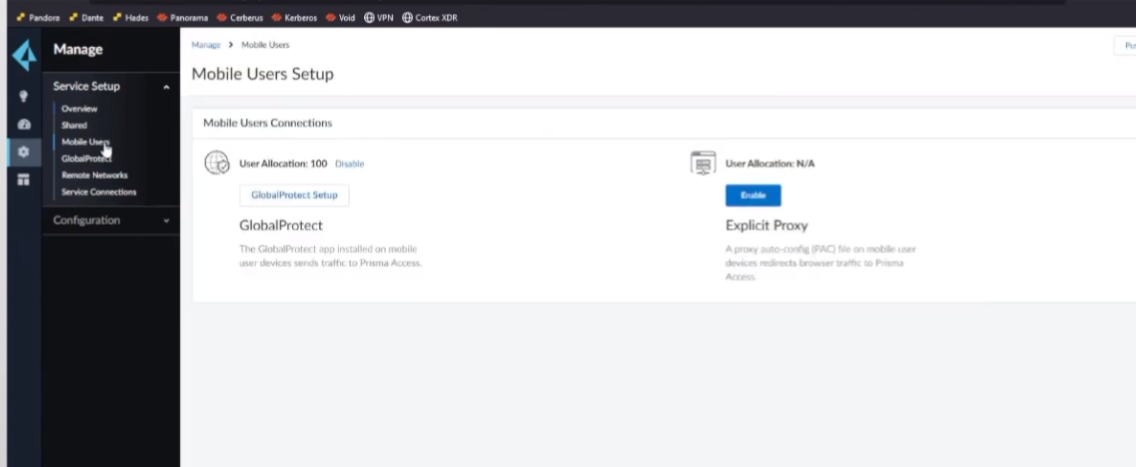
And once that's added, I'll go ahead and jump into the Prisma Access real quick and show you what it looks like.
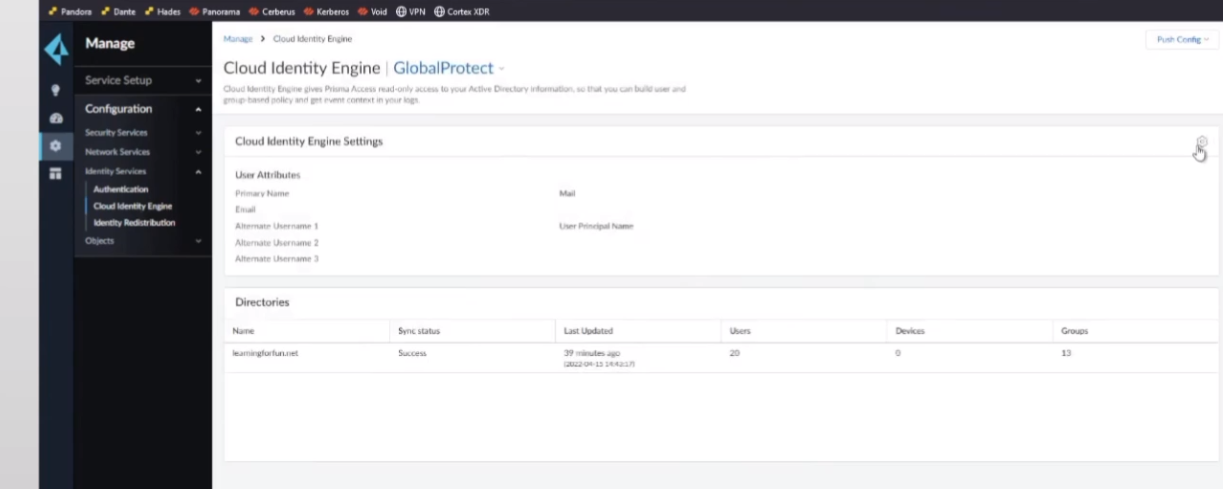
Into my cloud management access. So, it looks very similar to how it's set up on Panorama, right, with our shared objects, mobile users. So, everything that we're used to seeing before. So, GlobalProtect, our remote users, our apps are set up. But the big thing is under Manage > Configuration > Identity Services , where we click on Cloud Identity Engine , this is where we do our mappings, just like we were doing on the firewall.
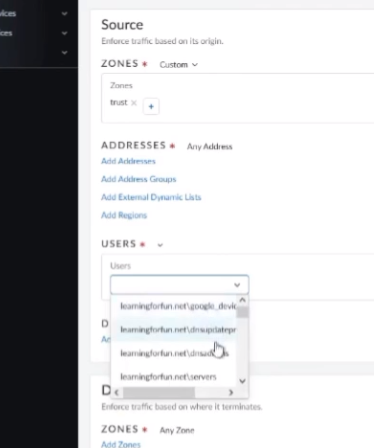
We see that we have `mail` and UPN, just like I was doing there. Then we see our directories, and this is what we had linked from the hub portal. So now, if I want to do any of my security policies, just like I do under Panorama, I'm going to go ahead and add a rule. And I'm going to go ahead and do basic based on users. We can see all my groups show up there. So, if it's Google, Google devices, or anything else that I want to do here... So, "Rob Ringer Outlook," which is one of my accounts (this is an external third-party account I just integrated through Azure). So, it's that easy to be able to tie CIE into both your on-prem or your cloud instances.