Learn About the Cloud Identity Engine
The Cloud Identity Engine provides both user identification and user authentication for a centralized cloud-based solution in on-premise, cloud-based, or hybrid network environments. The Cloud Identity Engine allows you to write security policy based on users and groups, not IP addresses, and helps secure your assets by enforcing behavior-based security actions.
It also provides the flexibility to adapt to changing security needs and users by making it simpler to configure an identity source or provider in a single unified source of user identity, allowing scalability as needs change.
By continually syncing the information from your directories, whether they are on-premise, cloud-based, or hybrid, ensures that your user information is accurate and up to date and policy enforcement continues based on the mappings even if the cloud identity provider is temporarily unavailable. To learn more about how the Cloud Identity Engine manages your data, please refer to the Cloud Identity Engine Privacy Datasheet .
To provide user, group, and computer information for policy or event context, Palo Alto Networks cloud-based applications and services need access to your directory information. The Cloud Identity Engine, a secure cloud-based infrastructure, provides Palo Alto Networks apps and services with read-only access to your directory information for user visibility and policy enforcement.
The components of the Cloud Identity Engine deployment vary based on whether the Cloud Identity Engine is accessing an on-premises directory (such as Active Directory) or a cloud-based directory (such as Azure Active Directory).
The authentication component of the Cloud Identity Engine allows you to configure a profile for a SAML 2.0-compliant identity provider (IdP) that authenticates users by redirecting their access requests through the IdP before granting access. You can also configure a client certificate for user authentication. When you configure an Authentication policy and the Authentication Portal on the Palo Alto Networks firewall, users must log in with their credentials before they can access the resource.
On-Premises Directory Configuration
To use the Cloud Identity Engine with an on-premises Active Directory or OpenLDAP-based directory, you need:
- to install the Cloud Identity agent on a Windows server (the agent host) and configure it to connect to your on-premises directory and the Cloud Identity Engine.
- access to the Cloud Identity Engine app on the hub so you can manage your Cloud Identity Engine tenants and Cloud Identity agents.
To collect attributes from your on-premises directory, install the Cloud Identity agent on an on-premises Windows server that meets the Cloud Identity Engine system requirements . The agent collects the attributes initially during tenant setup and then once every five minutes (based on the system time on the agent host) if a sync is not already in progress, syncing them with the Cloud Identity Engine so that your directory information is available to your Palo Alto Networks apps and services.
To collect attributes from your on-premises directory and synchronize them with the Cloud Identity Engine:
- The agent can use TLS 1.1, TLS 1.2, or TLS 1.3 to communicate with the Cloud Identity Engine to synchronize your attributes so that your directory information is available to your associated Cortex apps and services.
- The agent host can use TLS 1.1, TLS 1.2, or TLS 1.3 to communicate with the on-premises directory to collect the attributes.
We strongly recommend that you configure TLS 1.3 for all Cloud Identity Engine traffic. Version 1.7.0 and later versions of the agent use the latest TLS version by default.
To ensure secure transmission for the attributes, the data is encrypted end-to-end during transmission to the Cloud Identity Engine and on the agent host. The Cloud Identity Engine locally encrypts all agent data and immediately removes the encrypted local data after transmission is complete.
To set up the Cloud Identity Engine, you will need to log in the Cloud Identity Engine app on the hub to generate a certificate to Authenticate the Agent and the Cloud Identity Engine and configure other aspects of the Cloud Identity Engine.
Cloud-Based Directory Configuration
To use the Cloud Identity Engine with a cloud-based directory such as Azure Active Directory (Azure AD), you must grant permission for the Cloud Identity Engine to access your directory when you Configure a Cloud-Based Directory for the Cloud Identity Engine. You do not need to install or configure a Cloud Identity agent to collect attributes from a cloud-based directory.
User Authentication with Identity Providers
To authenticate users, configure a profile for a SAML 2.0-compliant identity provider (IdP) such as Google, Azure, Okta, PingOne, or PingFederate in the Cloud Identity Engine.
On the firewall, configure an Authentication policy that requires users to log in using Authentication Portal to access resources such as the internet. When the firewall receives this type of request, it redirects the request to the Cloud Identity Engine, which reroutes the request to the IdP you configure.
After the user logs in successfully, the firewall grants access to the resource. The Cloud Identity Engine provides flexibility as a user identity management solution by allowing you to configure multiple types of IdPs and making it easier to scale them as needs change.
User Authentication with a Client Certificate
You can configure a client certificate using a certificate authority (CA) chain in addition to SAML 2.0 authentication or as an alternate method for user authentica
Configure Your Network to Allow Cloud Identity Agent Traffic
Depending on your network configuration and Cloud Identity Engine deployment type, allow the traffic for the agent (if you have an on-premises directory), your directory, and the Cloud Identity Engine.
- Based on your region, allow traffic to the hostname for the region. To determine what region-based traffic to allow, refer to the table in Configure the Cloud Identity agent .
- Use the ssl App-ID in your Security policy (following our recommended Decryption Best Practices guidelines) to allow traffic to the Cloud Identity Engine.
- If you have deployed a Palo Alto Networks firewall between the agent and the Cloud Identity Engine:
The Cloud Identity agent version 1.7.0 and previous versions require direct reachability to the regional agent configuration endpoint and don't support proxy servers between the agent and the endpoint. If your network configuration uses a proxy server, you must update the Cloud Identity agent to version 1.7.1 or later.
- Use the paloalto-cloud-identity App-ID to allow traffic from the Cloud Identity agent to the Cloud Identity Engine. This App-ID requires the ssl and web-browsing application signatures.
- Allow Cloud Identity agent traffic from the specified ports to the following URLs.
- http://crl.godaddy.com on port 80.
- http://ocsp.godaddy.com on port 80.
- https://certs.godaddy.com on port 443.
- If you’re using Secure Socket Layer (SSL) decryption on the firewall, exclude the traffic between the agent and the Cloud Identity Engine from SSL decryption to allow the mutual authentication between the agent and the service.
- If you have deployed a Palo Alto Networks firewall between the agent and the Active Directory:
Depending on which protocol you select when you configure the Cloud Identity agent , use one of the following App-IDs to allow traffic from the Cloud Identity agent to your domain controllers.
- If the agent uses the LDAP protocol, use the ldap App-ID.
- If the agent uses the LDAPS or LDAP with STARTTLS protocol, use the ssl App-ID.
- If you're using a non-Palo Alto Networks firewall:
- Allow LDAP or LDAPS traffic to the LDAP or LDAPS port from the Cloud Identity agent to your Active Directory or Domain Controller.
- Allow HTTPS traffic from the Cloud Identity agent on port 443 to your Cloud Identity Engine destination URL. You need to allow traffic only for the region that you specify for your tenant and you need to allow traffic for multiple regions only if you have tenants in multiple regions. For the region-specific agent configurations, refer to Configure the Cloud Identity agent .
- Allow traffic from the Cloud Identity agent from the specified ports to the following URLs.
- http://crl.godaddy.com on port 80.
- http://ocsp.godaddy.com on port 80.
- https://certs.godaddy.com on port 443.
Configure Domains for the Cloud Identity Engine
On-Premises Active Directory Domains
A single Cloud Identity agent can communicate with multiple domains. The service account you use to query the Active Directory must have permission to query all domains you configure on the agent. We recommend configuring multiple domain controllers for each domain so that if a domain controller is unavailable, the agent can try the next available domain controller.
To ensure agent redundancy for a domain, configure multiple agents for that domain. The server hosting the agent should be physically located near the domain controllers from which the agent will collect attributes. If the domain controllers are in different locations, we recommend that you configure multiple agents and install each agent on a host server that is physically located near the domain controllers from which the agent will collect attributes.
To obtain cross-domain memberships for groups with members from other domains in the forest, configure those domains on the Cloud Identity agent(s). In this scenario, you must configure the agent to connect to the domain controllers using the LDAP or LDAPS port (by default, 389 and 636 respectively).
When you configure the Active Directory in the Cloud Identity agent, do not configure the agent to use the Global Catalog port (3268 for LDAP or 3269 for LDAPS).
Azure Active Directory Domains
Ensure that your Azure Active Directory (Azure AD) does not contain any circular references, where a group is a direct or indirect member of itself (for example, Group 2 is a member of Group 1 and Group 1 is a member of Group 2). If your Azure AD contains circular references, the Cloud Identity Engine cannot accurately populate the membership of the groups and you must change the membership of the groups to remove the circular references. After removing the circular references, sync the attributes to verify that the Cloud Identity Engine can successfully collect the attributes.
To successfully sync the attributes from Azure AD, the Cloud Identity Engine automatically removes circular references. If you do not make any changes, the Cloud Identity Engine is still operational and other applications, such as Prisma Access, can successfully retrieve data from the Cloud Identity Engine, but the membership of the circular groups may not be correctly computed in Cloud Identity Engine. Therefore, we strongly recommend that you manually remove any circular references from the Azure AD to ensure the Cloud Identity Engine operates as expected.
Manage Cloud Identity Engine App Roles
App roles determine the privileges that users have and how they can use the Cloud Identity Engine app. For more information on roles, refer to the Common Services documentation. To configure a role:
- Select Common ServicesIdentity & Access .
- Select the tenant containing the user whose role you want to assign (if it's not already selected).
- Select a user and click Assign Roles .
- To Add Access , select Cloud Identity Engine from the list of Apps & Services .
- Select the appropriate Role for the user based on the following table based on the user’s access needs.
|
Role |
Description |
|
View Only Administrator |
This role allows users to view all available data for the tenant in the Cloud Identity Engine, including detailed Active Directory (AD) data. |
|
Deployment Administrator |
This role provides access to deployment functionality and view-only access to other functions. This role allows users to view AD summary data but they can't view or query detailed AD data. |
|
MSP Superuser |
This role provides full viewing and editing privileges for all functions for all tenants in a multitenant hierarchy. Assign this role only to users or service accounts who need unrestricted access to the Managed Service Provider (MSP) portal. |
|
Superuser |
This role provides full viewing and editing privileges for all available functions system-wide. It includes all privileges for all other roles. Assign this role only to users or service accounts who need unrestricted privileges. |
If a user has multiple roles in the Managed Service Provider (MSP) portal, the user is granted the same privileges for the role that allows all granted privileges for all of the user's roles.
For example, if a user has the View Only Administrator role and the Deployment Administrator role for the Cloud Identity Engine, the Deployment Administrator role grants management privileges without the ability to view or query detailed data, while the View Only Administrator role grants privileges to view all Cloud Identity Engine data, including detailed data. To allow the privileges granted by both of these roles, a user who has both of these roles is granted the same privileges as a user with the Superuser role, which allows full viewing and editing privileges.
Configure the Cloud Identity Engine Visibility Scope
An individual firewall that you associate with the Cloud Identity Engine can belong to a Customer Support Portal ( CSP ) account as well as a Tenant Service Group ( TSG ). There is a one-to-many relationship between CSP accounts and TSGs. This means that a single CSP account can have many associated TSGs.
When you use the Cloud Identity Engine's Directory Sync or Cloud Authentication Service, your firewall can view and connect to all tenants associated with your CSP account. To isolate firewalls and ensure a particular firewall is only associated with and can only view specific tenants, you can configure the Visibility Scope.
When you configure the Visibility Scope, you can configure each tenant for CSP visibility or TSG visibility. When you configure a tenant for CSP visibility, that tenant is visible and available to firewalls that are a member of any TSG within that CSP account. If you configure a tenant for TSG visibility, the tenant is only visible and available to firewalls associated with that TSG.
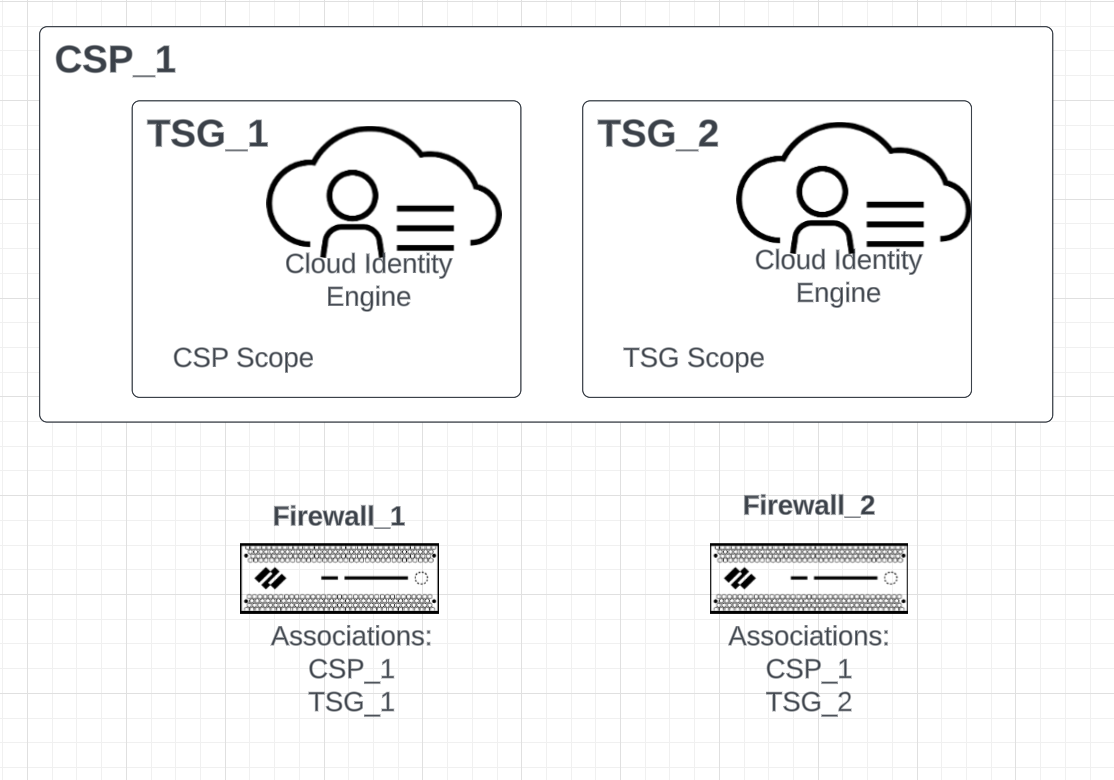
In the diagram above, there are two firewalls (Firewall_1 and Firewall_2), each with a different configuration. Visibility and availability depends on the Visibility Scope for the tenant. In this example, there are two TSGs (TSG_1 and TSG_2) within a single CSP account (CSP_1). Each tenant has its own Cloud Identity Engine instance. Both firewalls are associated with CSP_1.
One of the firewalls is associated with TSG_1 and the other firewall is associated with TSG_2. In this example, the Cloud Identity Engine instance for TSG_1 uses the CSP Visibility Scope and the instance for TSG_2 uses the TSG Visibility Scope. As a result, on Firewall_1, only the instance for TSG_1 is visible. This is because Firewall_1 is associated with TSG_1 and TSG_2's Visibility Scope is configured so that only firewalls associated with TSG_2 can view and select Firewall_2.
Firewall_2 has visibility for both the Cloud Identity Engine instance for TSG_1 and the instance for TSG_2. This is because although Firewall_2 is associated with TSG_2, TSG_1's Visibility Scope is configured for CSP visibility, so any firewall associated with the CSP account can view and select Firewall_1.
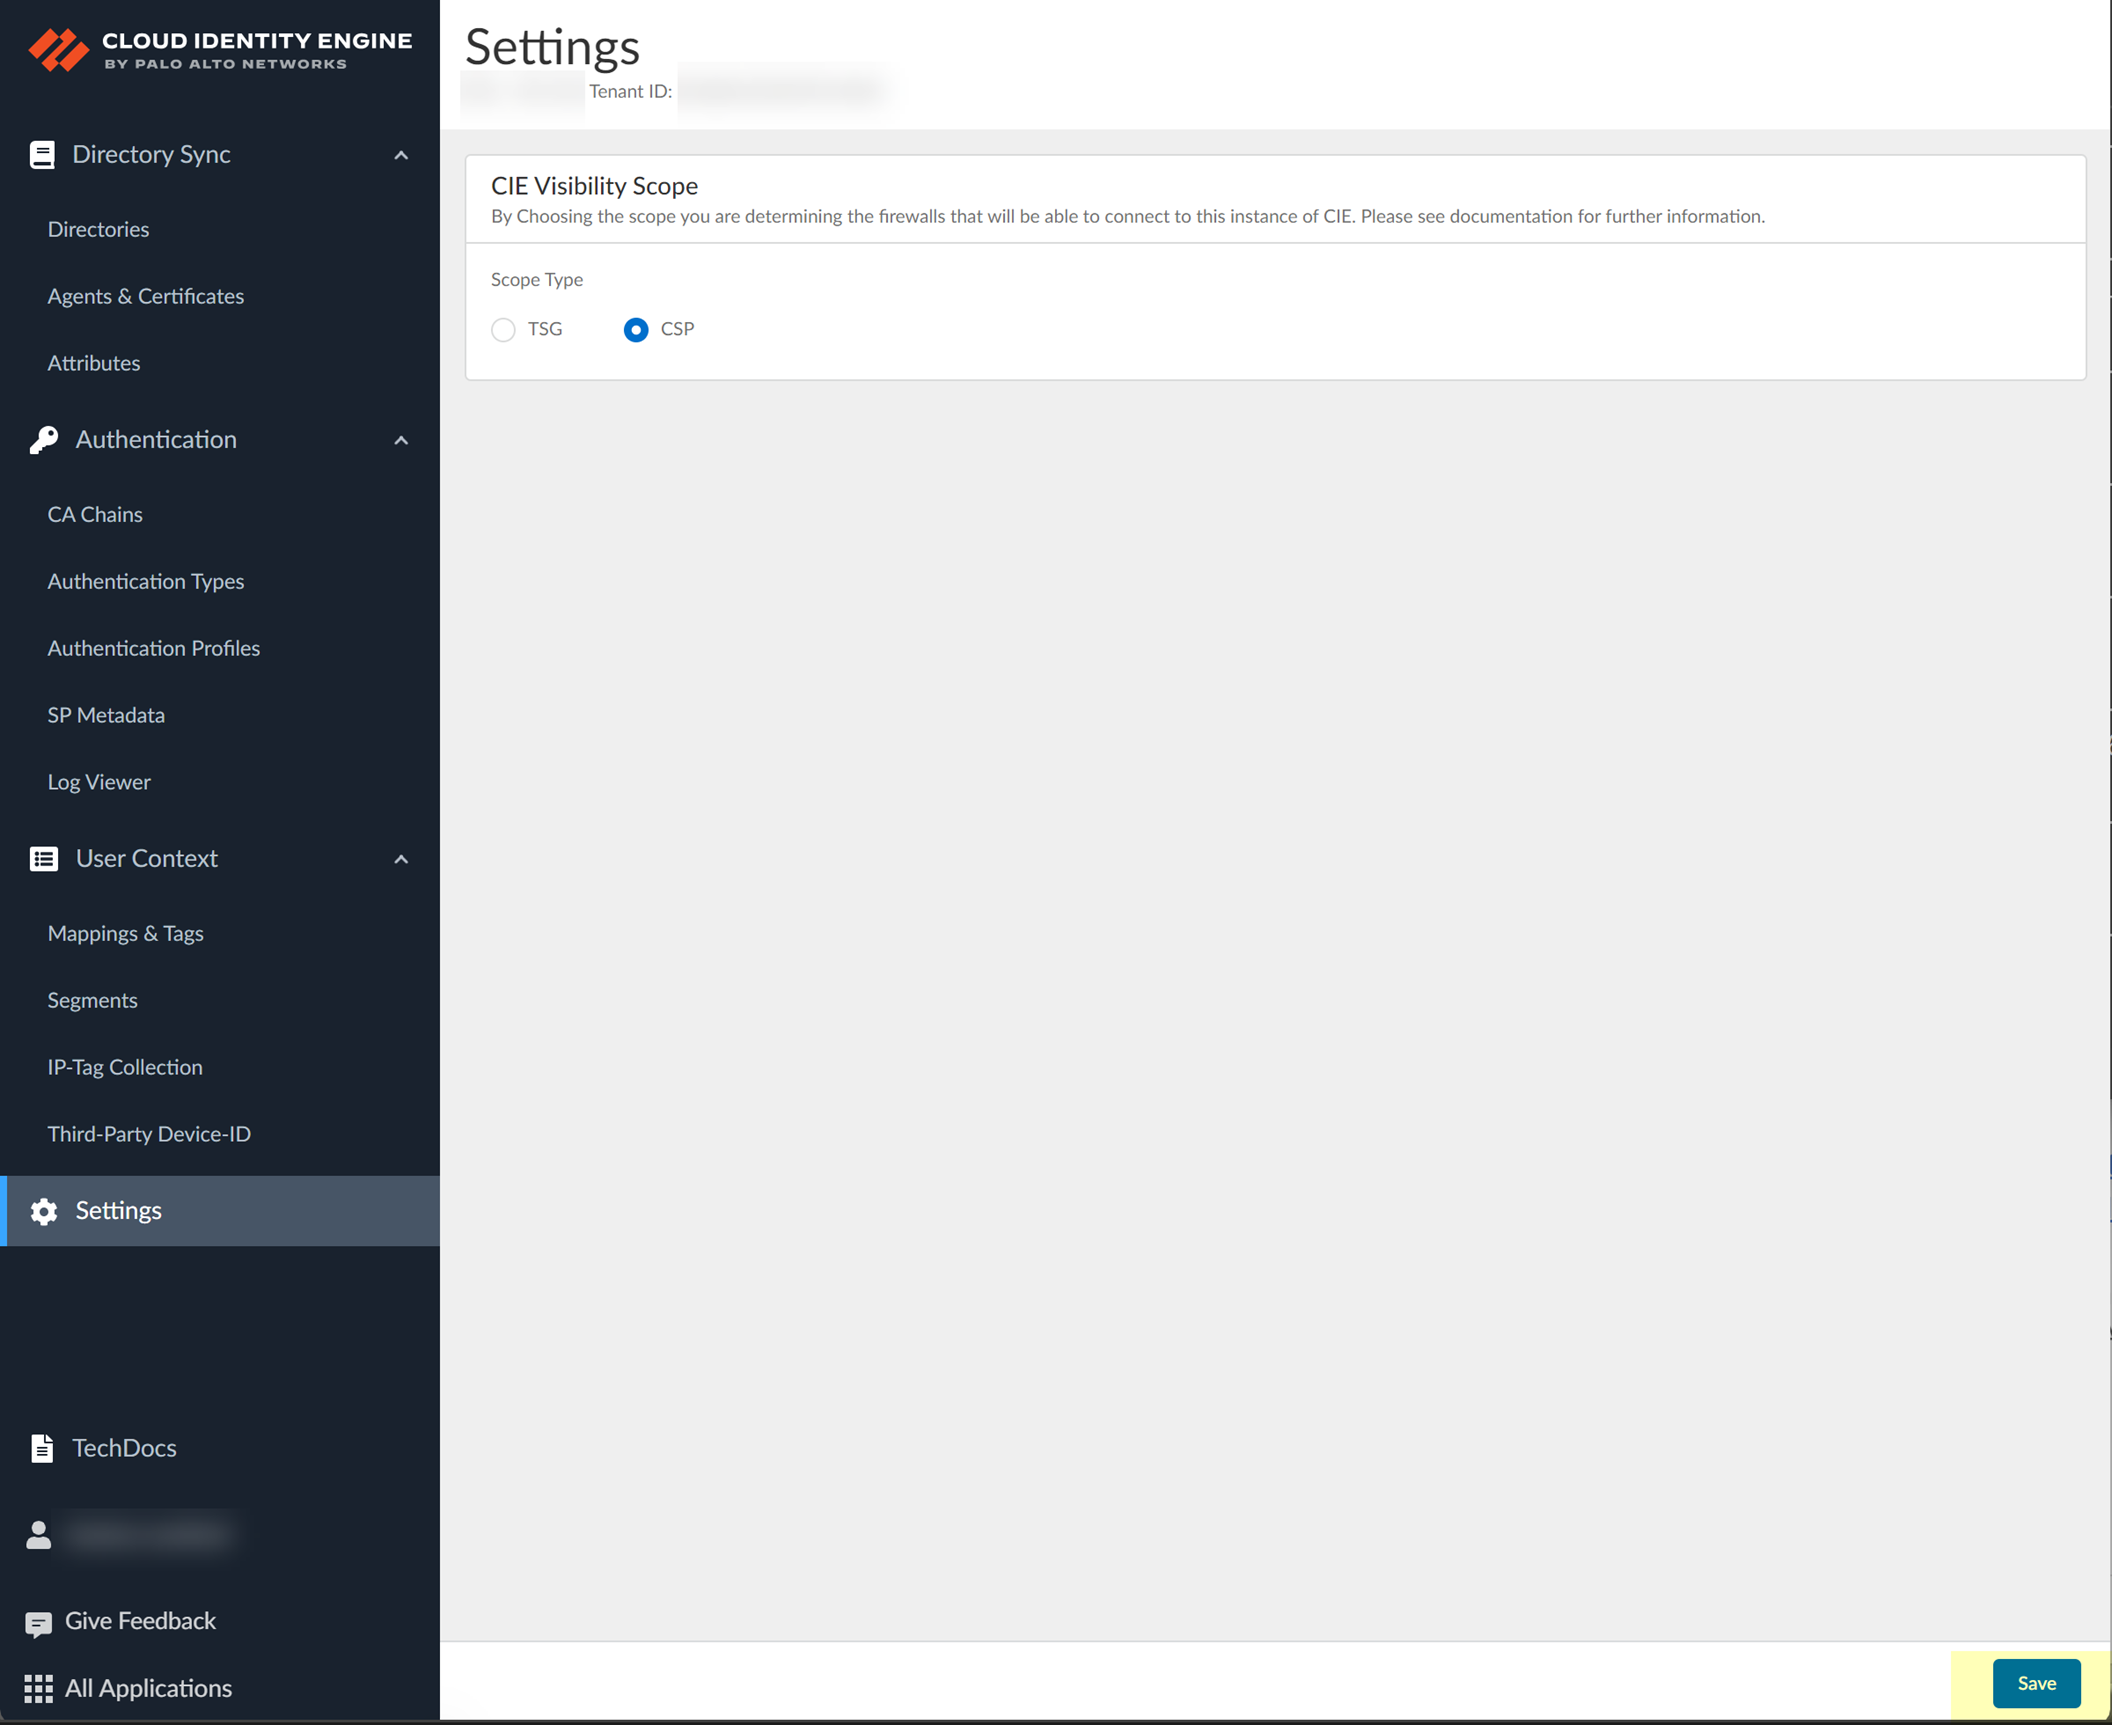
- Log in to the Cloud Identity Engine and select Settings.

- Select the scope type you want to use for the Cloud Identity Engine.
- TSG — The Cloud Identity Engine tenant is only visible and available to firewalls associated with the current tenant.
- CSP —The tenant is visible and available to firewalls that are a member of any tenant within the current CSP account.
If you use Panorama to manage Prisma Access in the same tenant service group (TSG) as the Cloud Identity Engine, associate Panorama with the Cloud Identity Engine to ensure that Panorama and Prisma Access can access the Cloud Identity Engine (for more information, refer to User Context, step 1.n ). This a requirement if you select TSG as the Scope Type .
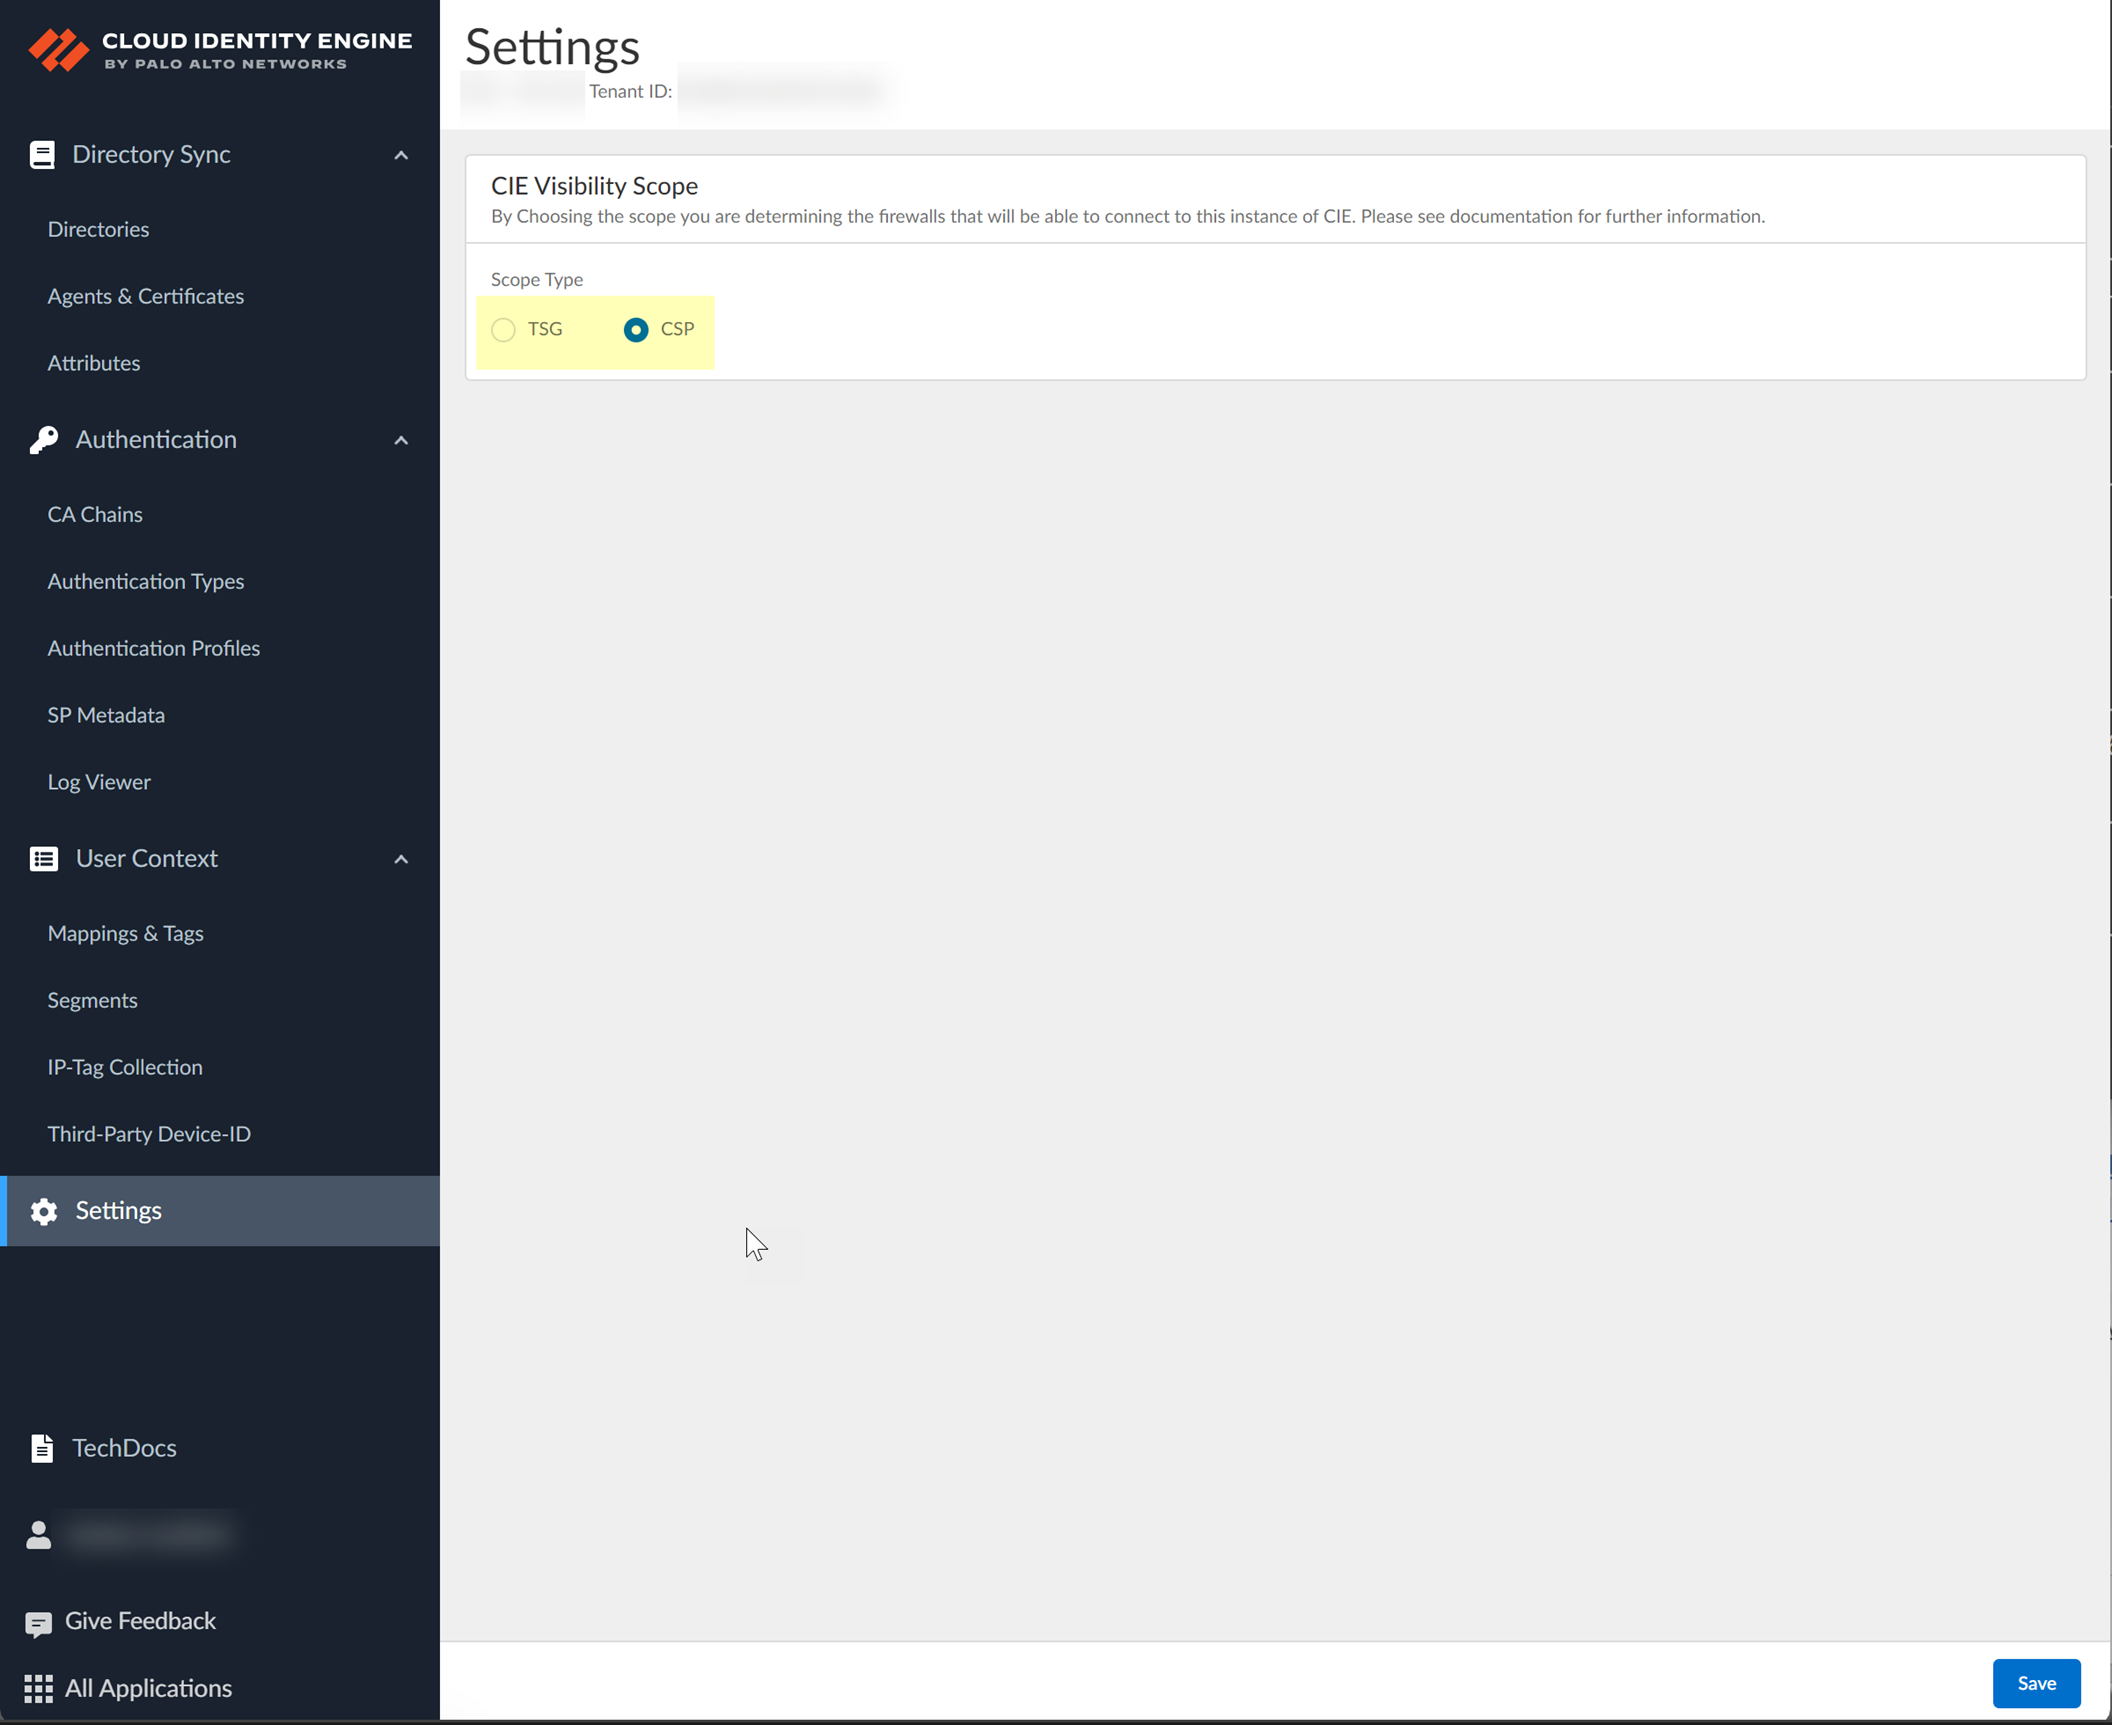
- Save your changes.
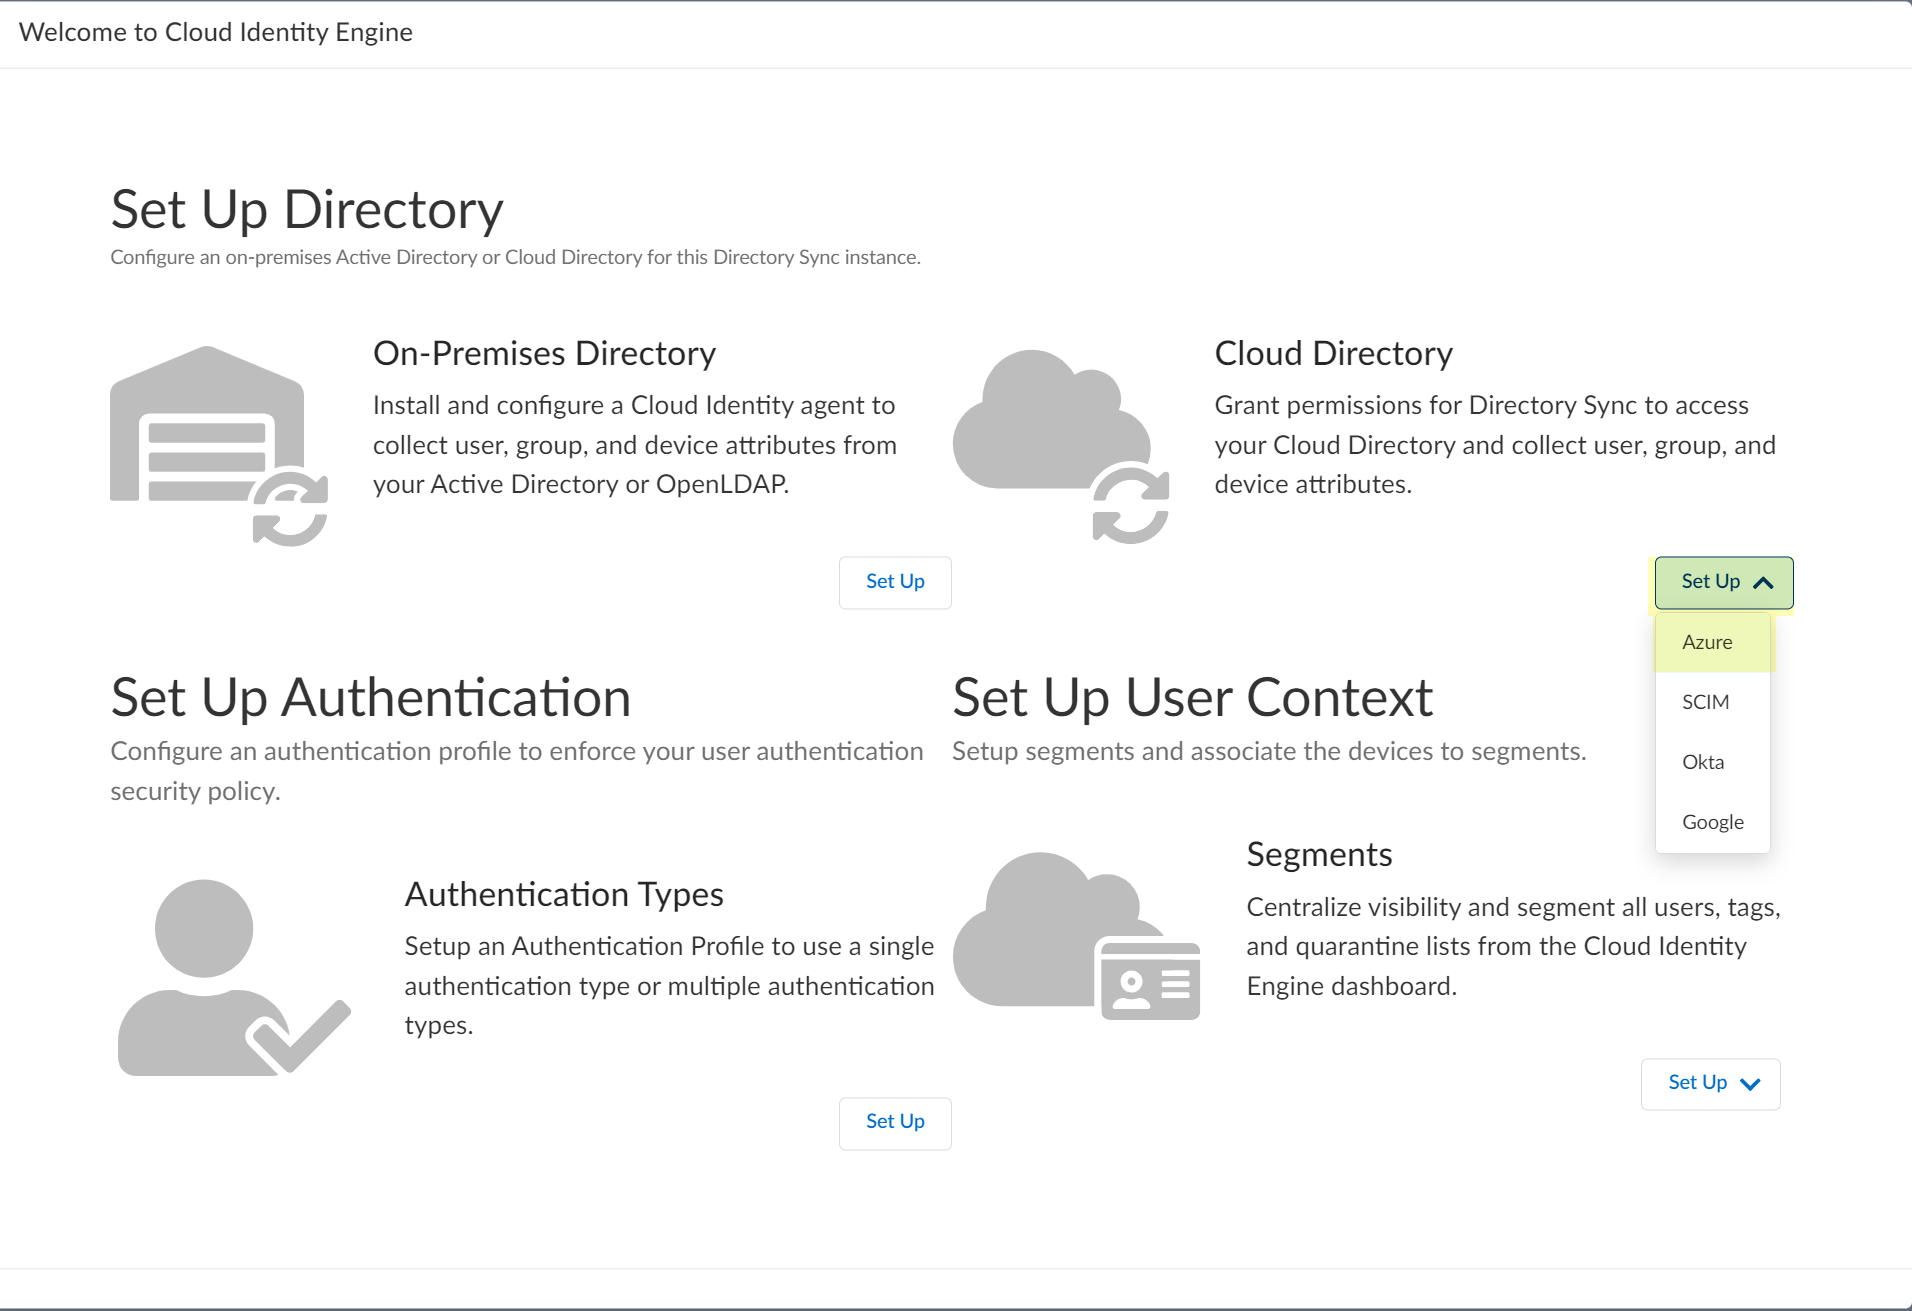
Set Up the Cloud Identity Engine
After you activate the Cloud Identity Engine , complete the following steps to set up and configure the Cloud Identity Engine:
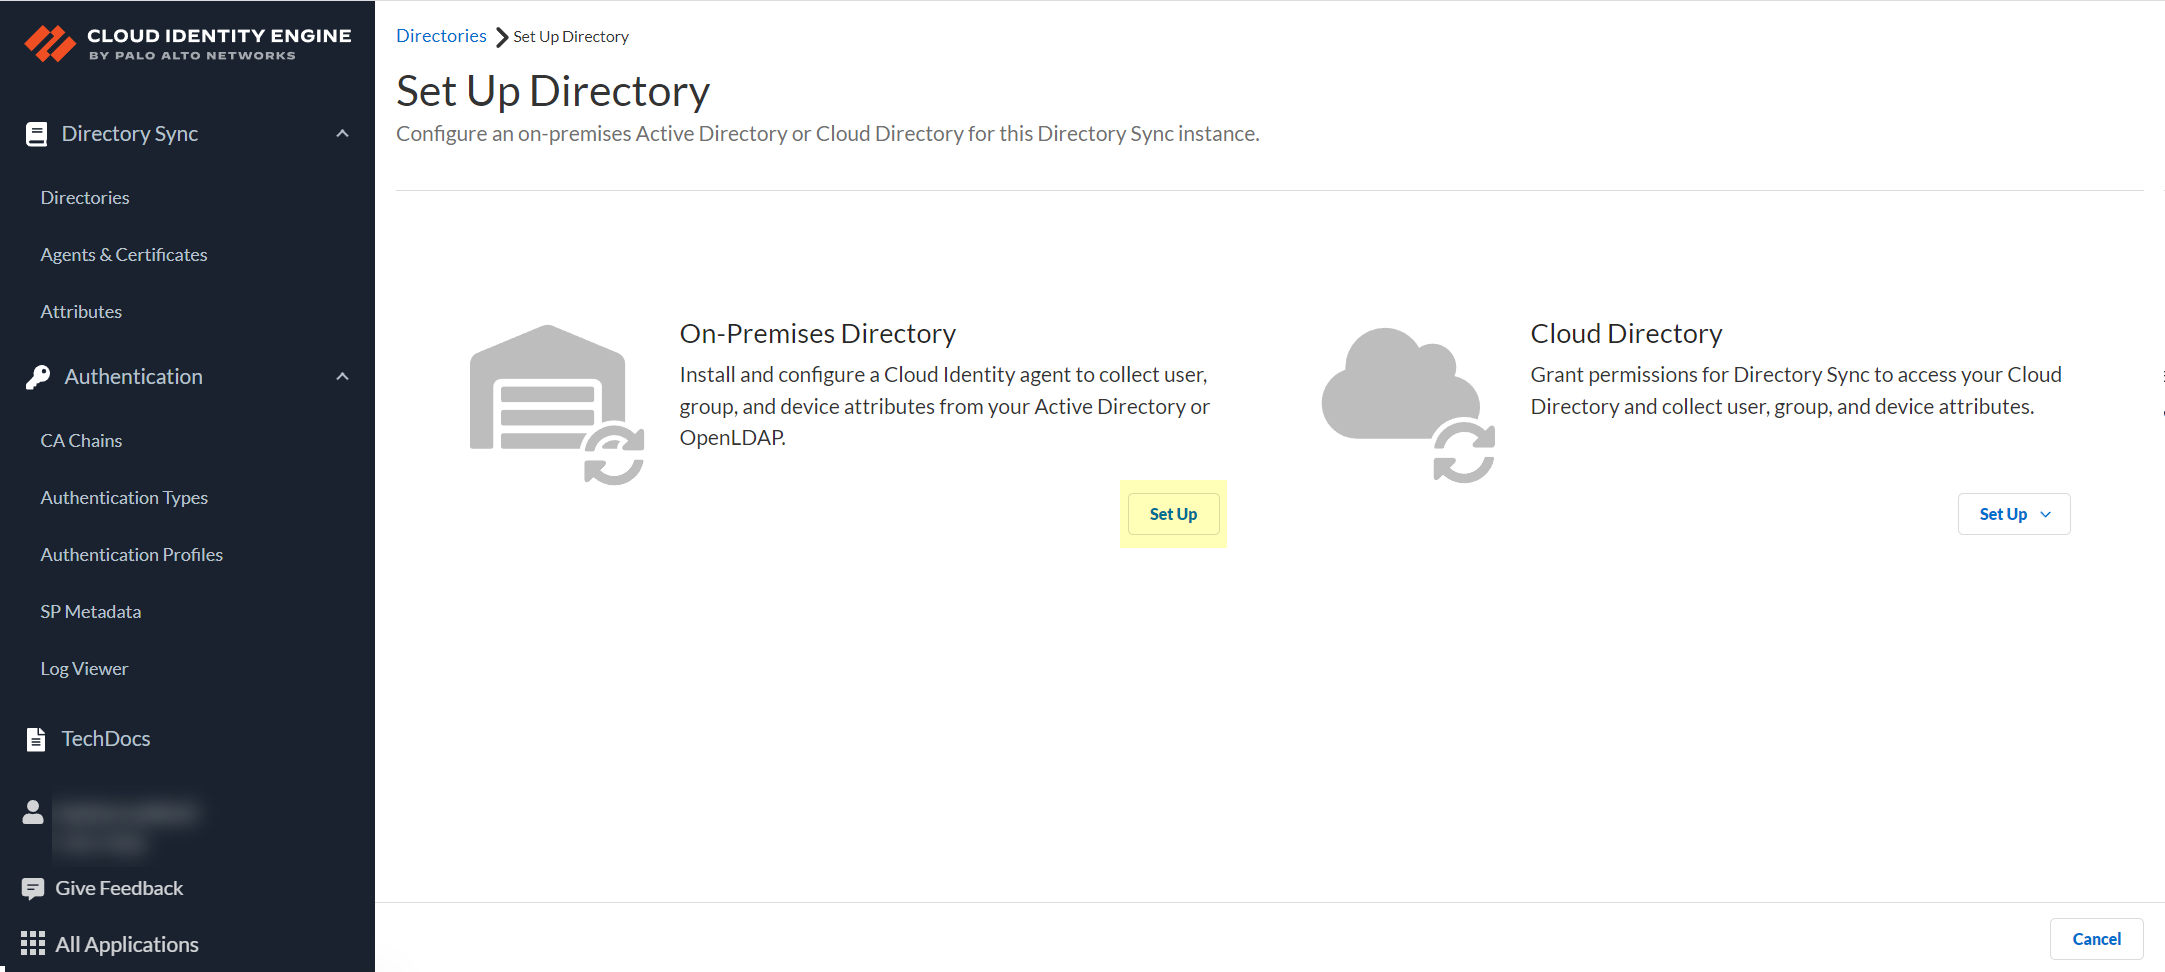
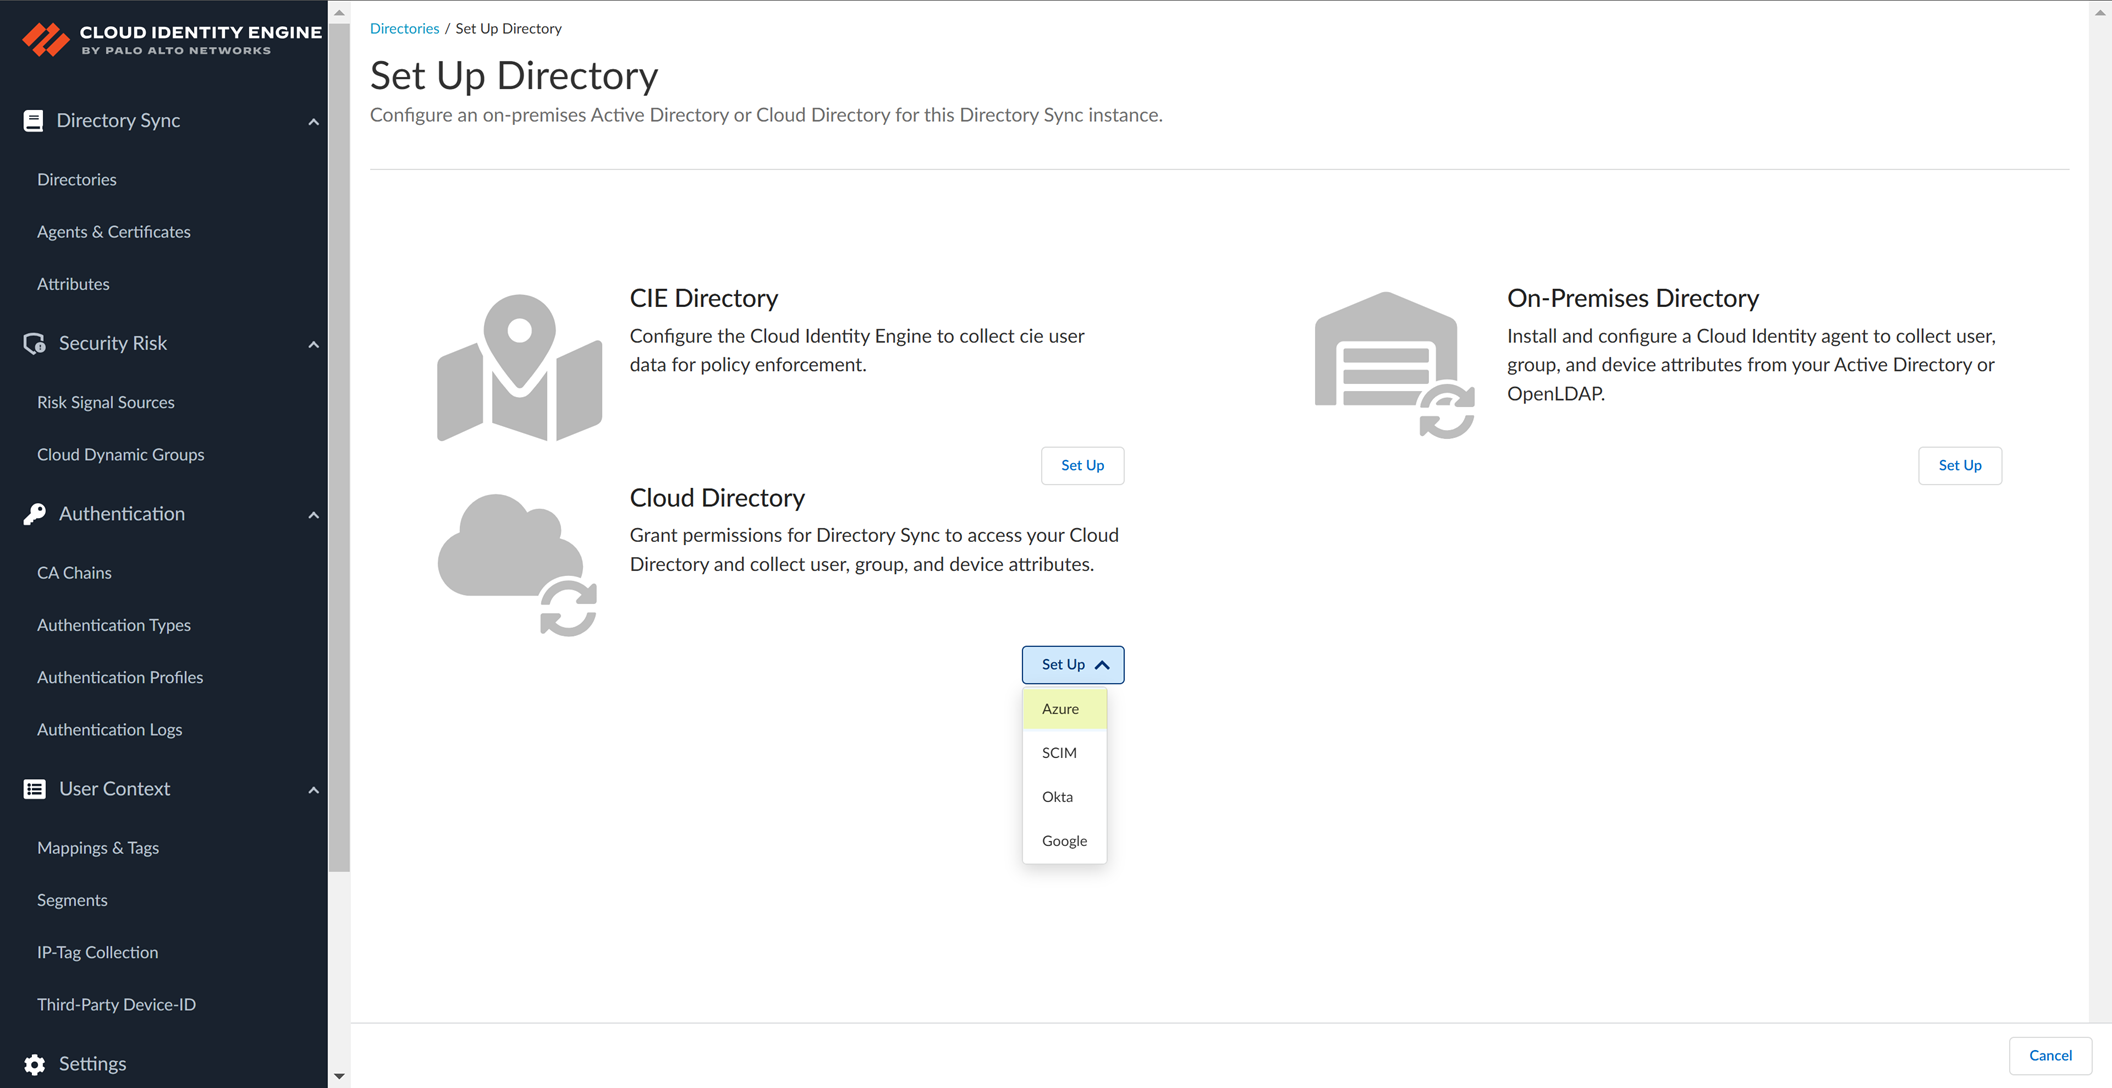
- Choose Your Directory Type —Select the type of directory that you want the Cloud Identity Engine to access.
- Configure an On-Premises Directory —Learn how to configure the Cloud Identity agent to communicate with your on-premises Active Directory or OpenLDAP-based directory and the Cloud Identity Engine.
- Configure a Cloud-Based Directory —Learn how to configure a cloud-based directory (such Azure Active Directory or Okta Directory) for the Cloud Identity Engine.
- Authenticate Users with the Cloud Identity Engine —Find out the necessary steps to configuring user authentication in the Cloud Identity Engine for a single-source identity solution.
- Configure a SAML 2.0 Authentication Type —Learn how to configure SAML 2.0-compliant identity providers (IdPs) in the Cloud Identity Engine to enable user authentication.
- Configure a Client Certificate —Configure a client certificate using a certificate authority (CA) chain in addition to SAML 2.0 authentication or as an alternate method for user authentication.
- Set Up an Authentication Profile —After you configure how you want to authenticate users (SAML 2.0 authentication, client certificate, or both), create an authentication profile to configure details such as specifying particular authentication methods for certain groups or directories.
- Configure Cloud Identity Engine Authentication on the Firewall or Panorama —Find out how to configure an Authentication profile on the Palo Alto Networks firewall or Panorama to enforce authentication using the Cloud Identity Engine.
- Associate the Cloud Identity Engine with Palo Alto Networks Apps —Share the directory information in your Cloud Identity Engine tenant with other Palo Alto Networks applications.
If you are using the tenant account view in the hub, association is not necessary for a tenant service group ( TSG ). For more information, refer to the Hub Getting Started guide.
- Manage the Cloud Identity Engine App —Create, view, rename, delete, and synchronize your Cloud Identity Engine tenants and view the list of attributes that the Cloud Identity Engine collects.
Choose Your Directory Type
After you activate the Cloud Identity Engine, select the directory type you want to configure:
onfigure an On-Premises Directory
After your activate your Cloud Identity Engine tenant, install and configure a Cloud Identity agent to communicate with your on-premises Active Directory or OpenLDAP-based directory, then generate a certificate to authenticate communication between the agent and the Cloud Identity Engi
Install the Cloud Identity Agent
Before installing the Cloud Identity agent, verify that the time on the agent host is correct and synced to a valid NTP server. If the time on the server host is incorrect, the Cloud Identity Engine may not be able to sync your directory attributes successfully.
After you activate your Cloud Identity Engine tenant, download the Cloud Identity agent from the Cloud Identity Engine app on the hub and install it on a supported directory server. Palo Alto Networks strongly recommends using TLS 1.3. If TLS 1.2 is not already enabled on the Windows server that will host the agent, install the update to enable TLS 1.2 before you install the agent.
Because the User-ID agent and the Cloud Identity agent require the same port, you must use a dedicated host for each agent type. Do not install both agent types on the same host.
- Log in to the hub and select the Cloud Identity Engine app.
- Select Directories then click Add New Directory .
- Set Up an On-Premises Directory .
- Click Download Agent .
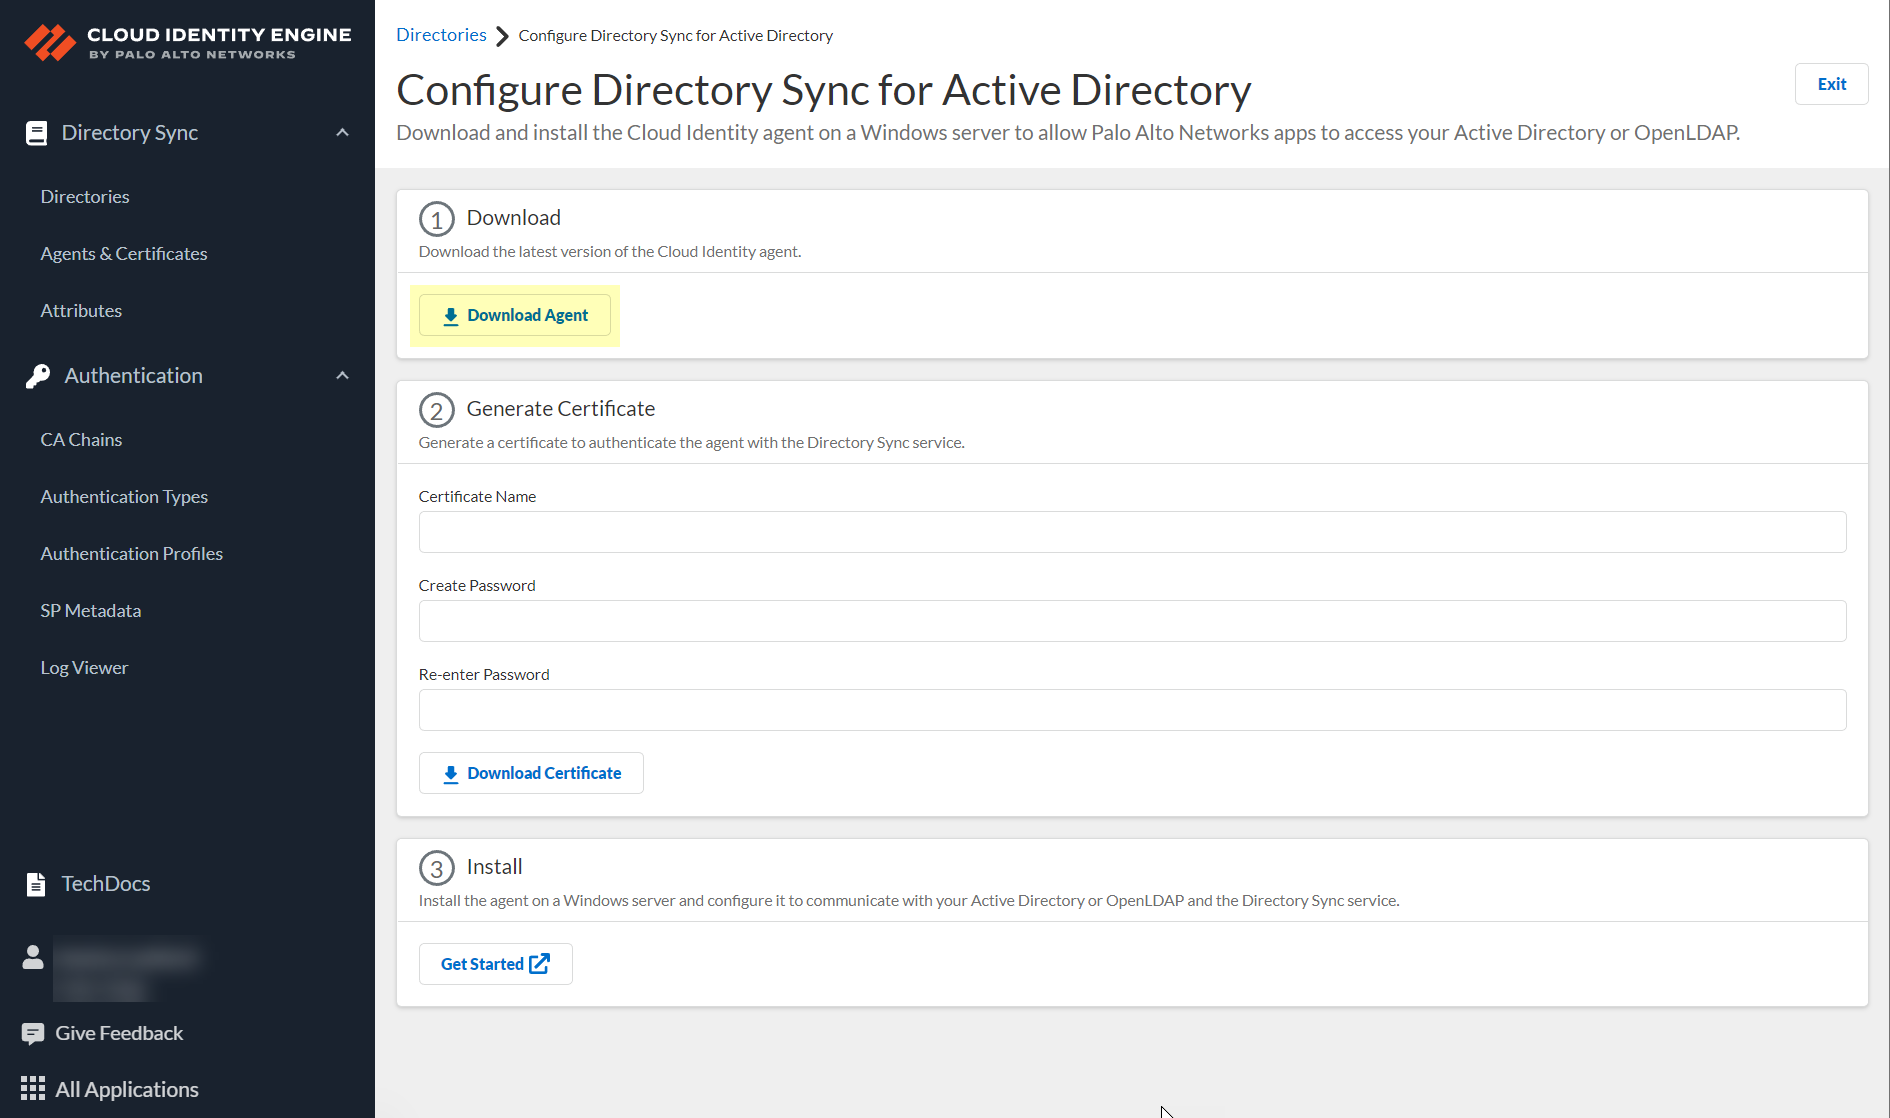
- When the download is complete, open the DaInstall.msi installation file for the agent on the Windows server where you plan to install the agent.
For a list of supported servers, see the Cloud Identity Engine system requirements .
If you are also using the Terminal Server (TS) agent, we recommend that you do not install the Cloud Identity agent on the same host as the TS agent. If you must install both agents on the same host, you must change the default listening port on the TS agent.
- Follow the prompts in the installation wizard to install the agent.
- Navigate to the location of the Cloud Identity agent.
The default location is C:\Program Files (x86)\Palo Alto Networks\Cloud Identity Agent\.
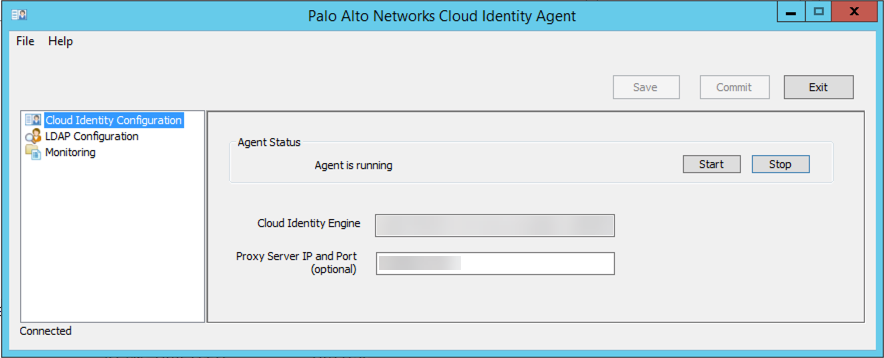
- Double-click the CloudIdAgentController.exe file to launch the Cloud Identity agent.
Starting the agent also starts the Cloud Identity Engine, which runs in the background on the server hosting the Cloud Identity agent until you stop the connection to the Cloud Identity Engine .
Next Steps
- After you have installed the Cloud Identity agent on the host, Configure the Cloud Identity Agent to communicate with both your directory and the Cloud Identity Engine.
- After configuring the agent, make sure to Authenticate the Agent and the Cloud Identity Engine to enable communication between the agent and the Cloud Identity Engine.
- For a comprehensive user identity and authentication solution, learn how to Authenticate Users with the Cloud Identity Engine .
Configure the Cloud Identity Agent
Avoid configuring the agent for the first time during the daily certificate revocation list (CRL) reload time (9:00-10:00 PM/21:00-22:00 CDT for US or CEST for EU). If you configure the agent and the initial attribute sync occurs at this time but isn’t successful, wait a few minutes, then Synchronize All Attributes to ensure the attributes are synchronized with your tenant.
After you download the agent from the Cloud Identity Engine app and Install the Cloud Identity Agent on a supported Windows server, configure the agent to establish a connection with your Active Directory or OpenLDAP-based directory and the Cloud Identity Engine so that it can collect all of the attributes from the Active Directory during the initial setup.
OpenLDAP requires specific attributes. For more information, refer to the On-Premises OpenLDAP attributes.
In the Cloud Identity Engine app, you can optionally Synchronize Cloud Identity Engine Tenants instantly to ensure attribute and other directory changes are available in the Cloud Identity Engine.
The minimum required permissions for the service account are the ability to create LDAP bind requests (LDAP protocol version, the DN for the account, and the account credentials) and the IP address or domain for the directory.
- If you haven’t already done so, Configure Your Network to Allow Cloud Identity Agent Traffic .
- Install the certificate authority (CA) certificate used to sign the certificate used by the directory in the Local Computer Trusted root CA certificate store of the agent host.
You must complete this step if the server that hosts the agent doesn’t already have the CA certificate of the domain controller or the CA certificate from the issue of the domain controller’s certificate.
- On the agent host, launch the Cloud Identity agent ( StartPalo Alto NetworksCloud Identity Agent ).
Don’t manually edit configuration files for the agent. Manually editing the agent configuration files might cause unexpected behavior.
- Select Cloud Identity Configuration and enter the regional agent configuration endpoint for the Cloud Identity Engine that matches the region that the corresponding Cloud Identity Engine tenant uses.
|
Region |
Agent Configuration |
|
United States (US) |
agent-directory-sync.us.paloaltonetworks.com |
|
European Union (EU) |
agent-directory-sync.eu.paloaltonetworks.com |
|
United Kingdom (UK) |
agent-directory-sync.uk.paloaltonetworks.com |
|
Singapore (SG) |
agent-directory-sync.sg.paloaltonetworks.com |
|
Canada (CA) |
agent-directory-sync.ca.apps.paloaltonetworks.com |
|
Japan (JP) |
agent-directory-sync.jp.apps.paloaltonetworks.com |
|
Australia (AU) |
agent-directory-sync.au.apps.paloaltonetworks.com |
|
Germany (DE) |
agent-directory-sync.de.apps.paloaltonetworks.com |
|
United States - Government |
agent-directory-sync.gov.apps.paloaltonetworks.com |
|
India (IN) |
agent-directory-sync.in.apps.paloaltonetworks.com |
|
Switzerland (CH) |
agent-directory-sync.ch.apps.paloaltonetworks.com |
|
Spain (ES) |
agent-directory-sync.es.apps.paloaltonetworks.com |
|
Italy (IT) |
agent-directory-sync.it.apps.paloaltonetworks.com |
|
France (FR) |
agent-directory-sync.fr.apps.paloaltonetworks.com |
|
China (CN) |
agent-directory-sync.cn.apps.prismaaccess.cn This region is only accessible in the Cloud Identity Engine within the specified region. |
|
Poland (PL) |
agent-directory-sync.pl.apps.paloaltonetworks.com |
|
Qatar (QA) |
agent-directory-sync.qa.apps.paloaltonetworks.com |
|
Taiwan (TW) |
agent-directory-sync.tw.apps.paloaltonetworks.com |
|
Israel (IL) |
agent-directory-sync.il.apps.paloaltonetworks.com |
|
Indonesia (ID) |
agent-directory-sync.id.apps.paloaltonetworks.com |
|
South Korea (KR) |
agent-directory-sync.kr.apps.paloaltonetworks.com |
|
Saudi Arabia (SA) |
agent-directory-sync.sa.apps.paloaltonetworks.com |
- (Optional) If your network configuration uses a proxy server, enter the Proxy IP Server and Port (optional) to allow the Cloud Identity agent to use a secure mTLS connection to tunnel the agent traffic through the proxy server.
Enter the proxy server’s IP address in <IP_Address>:<Port> format, where <IP_Address> represents the IP address of the proxy server and <Port> represents the port number.
- Configure the LDAP Configuration to allow the agent to communicate with your on-premises directory.
To learn how to collect attributes from multiple domains, see Configure Domains for the Cloud Identity Engine .

- Enter the Bind DN for the service account you want to bind to your directory (for example, CN=admin,OU=IT,DC=domain1,DC=example,DC=com ).
If you don’t know the DN of the service account, enter the following command in the command prompt on the Active Directory server: dsquery user -name username (where username is the service account login name). Be sure to delete the quotation marks if you copy the DN from the command output.
- Enter the Bind Password to authenticate the session.
The Bind Password is saved in encrypted format in the Windows credential store, not the configuration file. If you delete the LDAP configuration for the server and commit the changes, you must re-enter the password.
- Select a Protocol :
- LDAP —Connect to the directory using the default unencrypted LDAP protocol on port 389.
- LDAPS —(Default) Connect to the directory server using LDAP over SSL (LDAPS) on port 636. This option requires a CA certificate in the Local Computer certificate store on the agent host or in the Trusted Root CA store for your directory.
- LDAP with STARTTLS —Connect to the directory server using LDAPv3 Transport Layer Security (TLS) on port 389. This option requires a CA certificate in the Local Computer certificate store on the agent host or in the Trusted Root CA store for your directory.
- Verify that the Bind Timeout value will allow enough time for the agent to connect to your on-premises directory.
The default is 30 seconds and the range is from 1-60 seconds. When the timeout limit is reached, the agent attempts to connect to the next domain controller in the sequence for that domain.
- Verify that the Search Timeout value will allow enough time for the LDAP query to complete.
The default is 15 seconds and the range is 1-120 seconds. If the timeout occurs, the search stops and the timeout error is included in the debug logs. If you Configure Cloud Identity Agent Logs to Information, any partial results retrieved by the Cloud Identity Engine are deleted. If the log level is set to Debug or higher, the results might not be deleted, but they aren’t used by the agent.
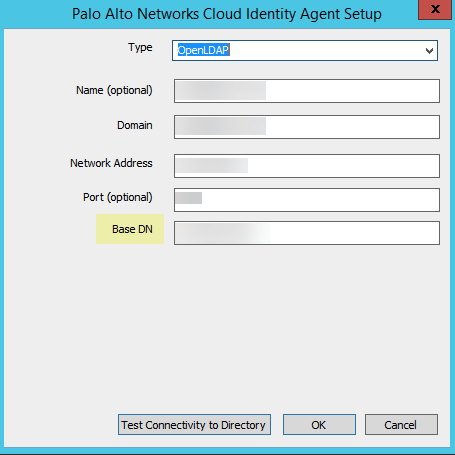
- Add your on-premises directory.
To ensure that the Cloud Identity Engine can calculate group membership correctly, use a value that doesn’t end in 65 if you must use a custom value for the MaxValRange attribute in your LDAP query policy rule.
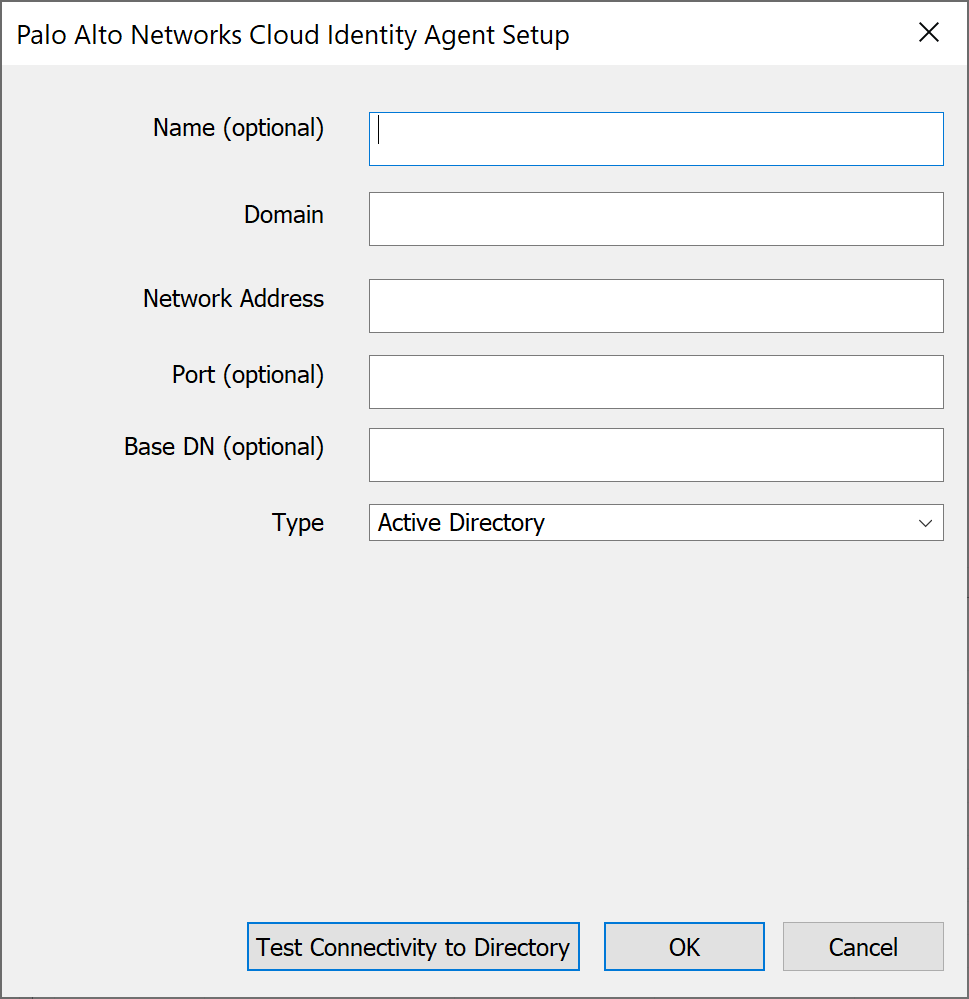
- (Optional) Enter the Name (optional) for your directory.
- Enter the fully qualified Domain name for your directory.
You can configure up to 20 domains for each agent.
- Enter the IP address or fully qualified domain name (FQDN) as the Network Address for your directory.
If you enter an FQDN, it must be the complete original FQDN for that IP address (for example, if the FQDN is example.hr.com , you must enter example.hr.com , not just example.com ).
- (Optional) Enter the Port (optional) number for your directory.
Don’t configure the agent to use the Global Catalog port (3268 for LDAP or 3269 for LDAPS).
If you don’t enter a port number, the agent uses the following default ports:
- 636 for LDAPS
- 389 for LDAP or LDAP with STARTTLS
- ( Required for OpenLDAP ) Enter the Base DN (base Distinguished Name) for your directory.
OpenLDAP requires the Base DN; without the Base DN, directory searches can’t complete successfully.
When you enter the Base DN, use the domainComponent format (for example, DC=example, DC=com ).
- Select your directory Type .
- OpenLDAP —Configure the agent to use an OpenLDAP-based directory server.
The Cloud Identity Engine supports OpenLDAP groups with the following ObjectClass: groupsOfUniqueNames . When configuring another application (for example, GlobalProtect) with the Cloud Identity Engine for an OpenLDAP-based directory, specify the Common-Name as the Primary Name. By default, the Cloud Identity Engine uses the sAMAccountName.
- Active Directory —Configure the agent to use an Active Directory directory server.
- (Optional but recommended) To confirm the agent can successfully connect to your Active Directory, you can Test Connectivity to Directory . The agent verifies that it can successfully connect to the domain and validates the NetBIOS name based on the domain.
- Click OK .
When you add an on-premises directory, the Cloud Identity agent automatically attempts to complete a full synchronization of all domains, including existing domains, so confirm the agents are active and all configured domains are active before adding a new domain to the agent. If an inactive domain is no longer necessary, delete the domain from your configuration.
- Commit the changes to restart the agent and apply the configuration.
The agent will connect to your directory to collect the attributes and to the Cloud Identity Engine to share the attributes with the Palo Alto Networks cloud-based apps.
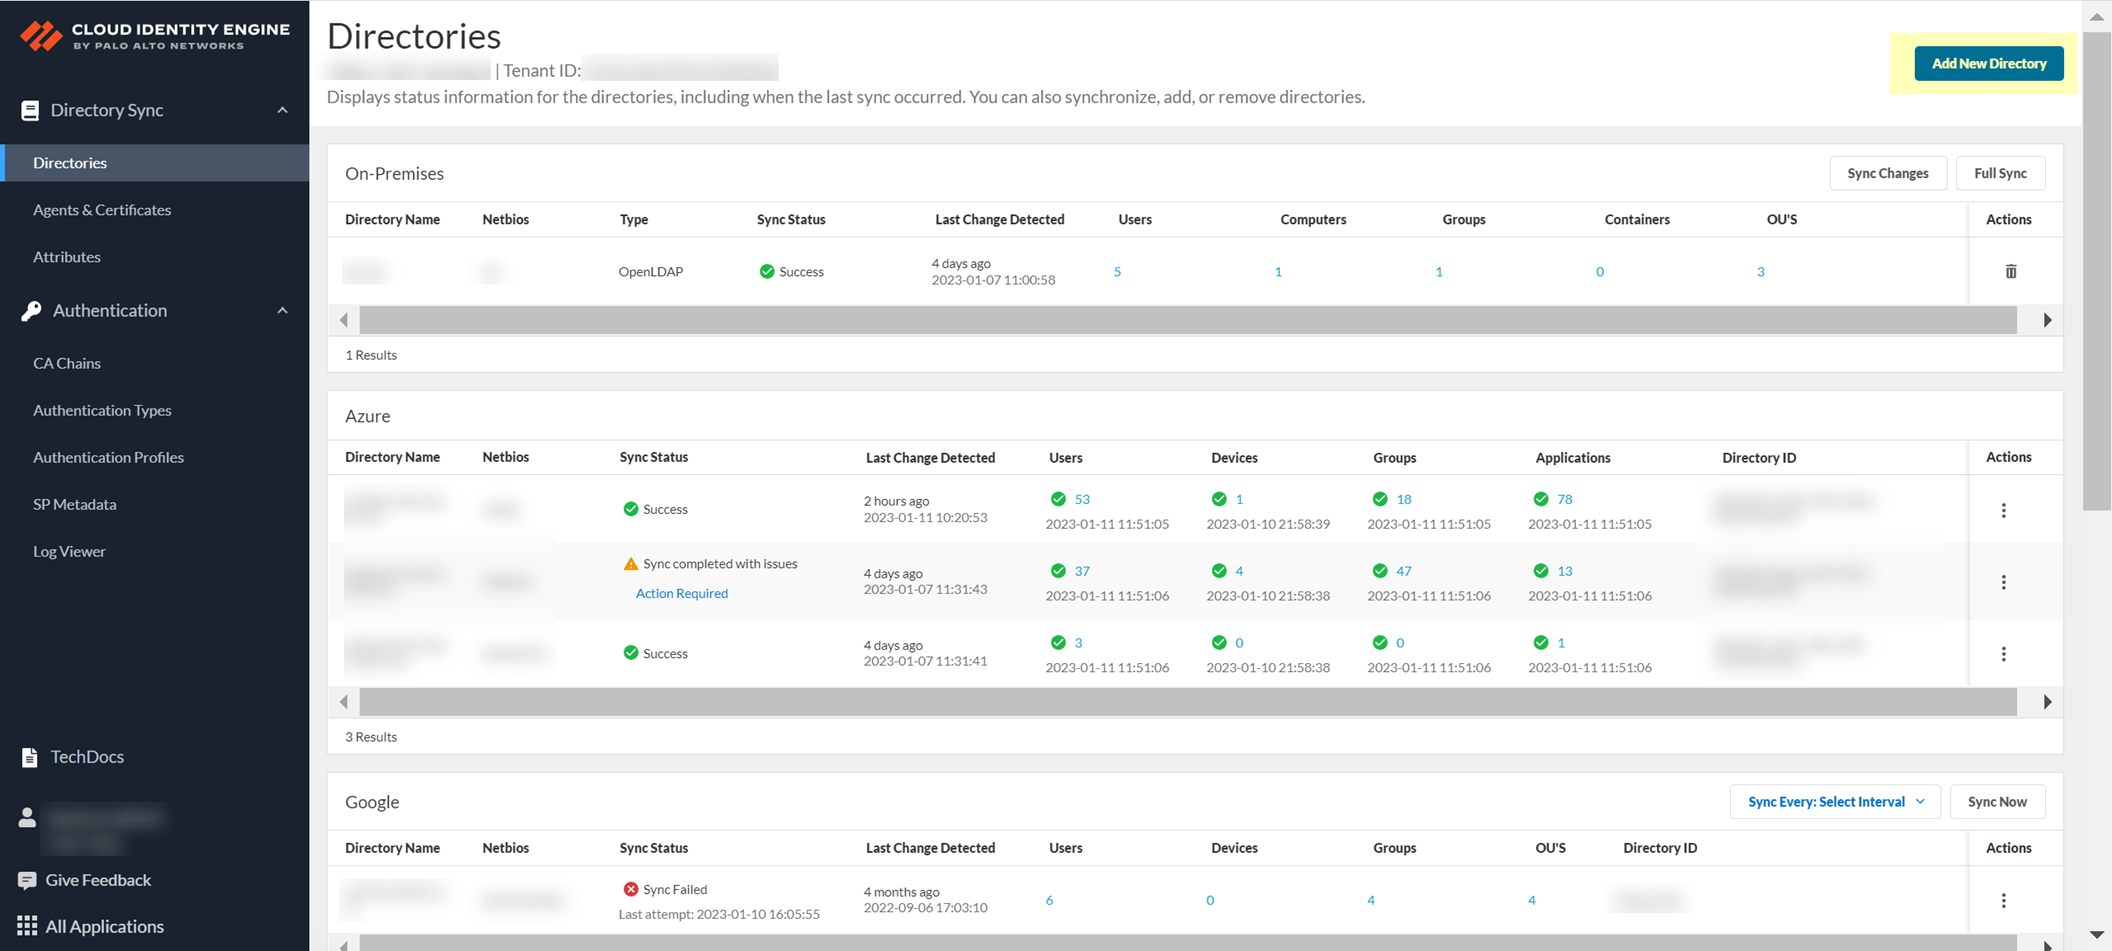
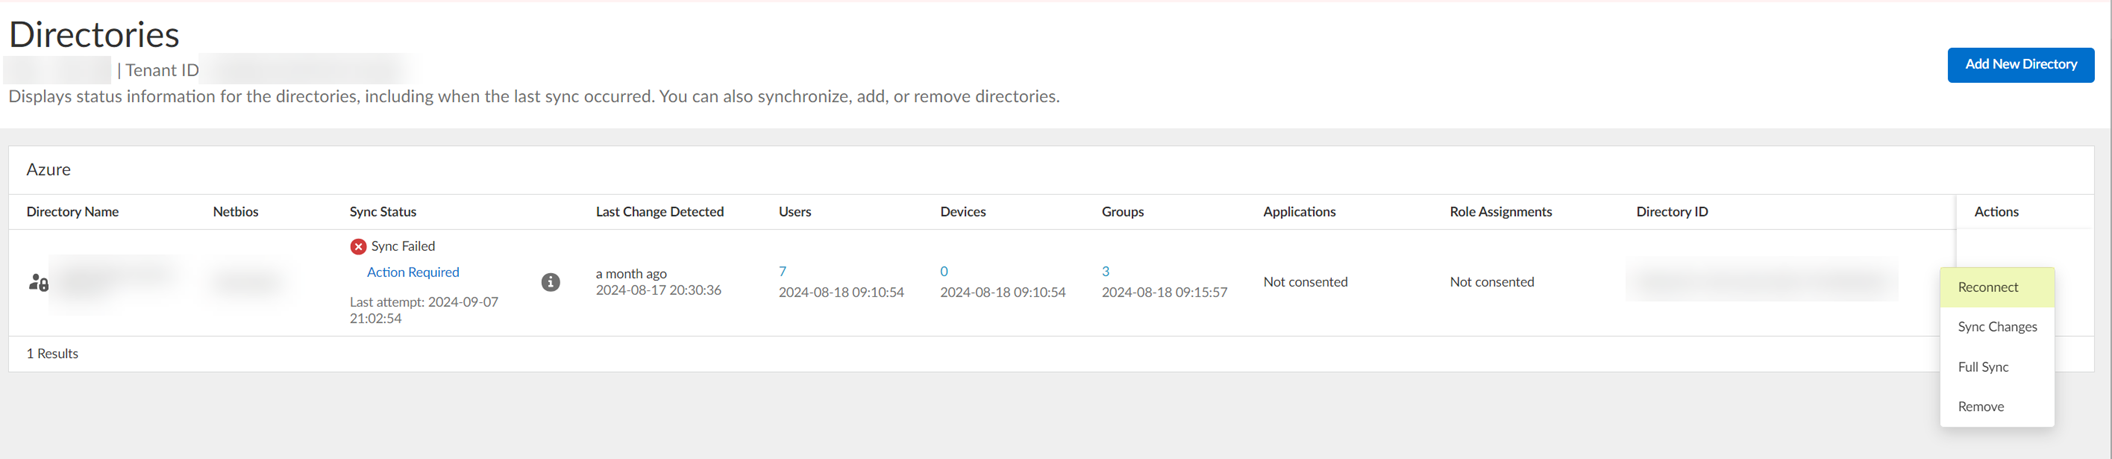
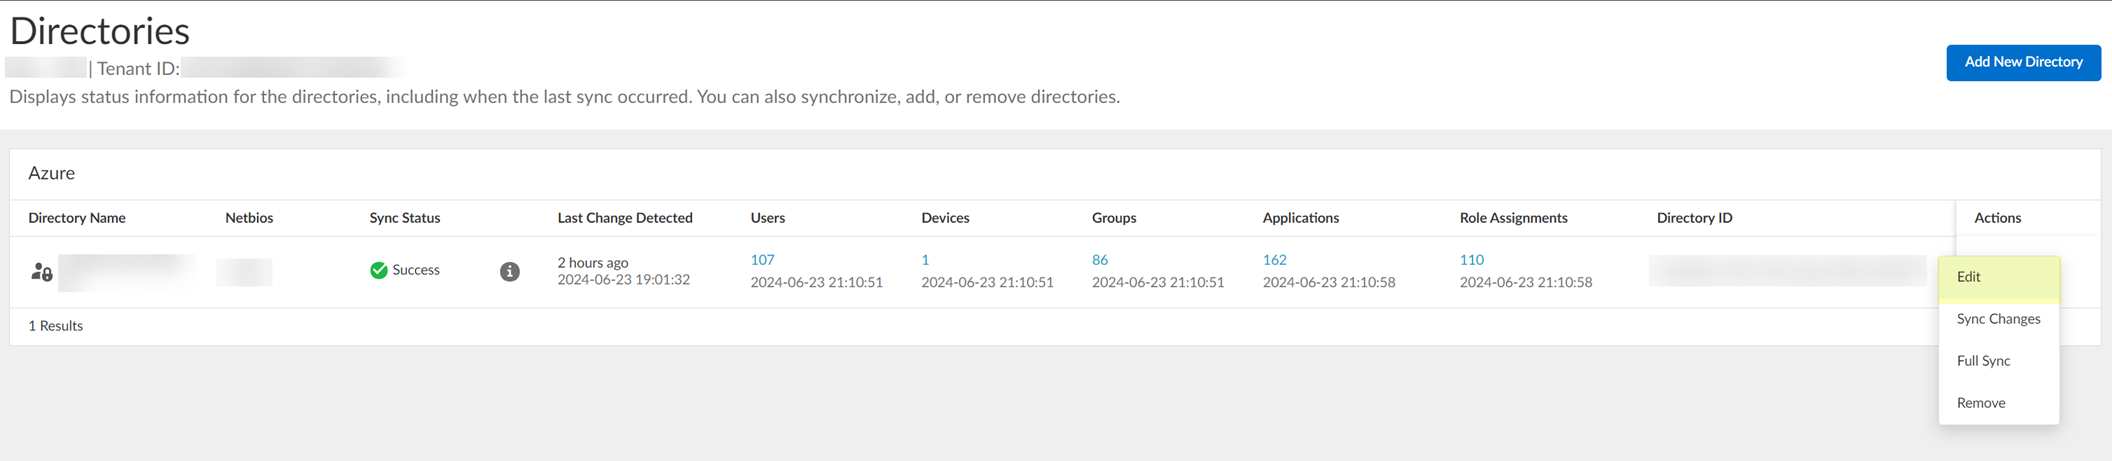
- To confirm the agent is able to connect to your on-premises directory and the Cloud Identity Engine, log in to the Cloud Identity Engine app, select the tenant, then select Directories to verify the following information:
- The domains currently monitored by the Cloud Identity Engine and each domain’s NetBIOS name.
- The sync status of the most recent attribute collection update from the directory (for example, In Progress or Successful).
- When the last successful attribute collection update from the directory occurred.
- The number of users, computers, groups, containers, and organizational units (OUs) in the domains monitored by the Cloud Identity Engine.
- (Optional but recommended) Configure an additional agent for high availability (HA).
You can configure HA for the Cloud Identity Engine by configuring two or more agents to collect attributes from the same domain in the same tenant. The configuration for each agent must be identical. We recommend this configuration to ensure that if an agent is temporarily unavailable, any in-progress syncs complete successfully and service isn’t interrupted. If the Cloud Identity Engine fails to connect to an agent, it searches for the next available agent. The Cloud Identity Engine communicates with only one agent at a time and the agents don’t communicate with each other.
- (Optional but recommended) To enhance security, you can optionally update the bind password at regular intervals (also known as password rotation). To automate this process, you can create a script to enter the command instead of manually updating the agent configuration.
- To update the bind password, update the password on the LDAP server then enter the following command on the agent host: CloudIdAgentCLI.exe ldap_bind_password:<password> (where <password> represents the new password).
If the password contains any of the following non-alphanumeric characters, use an escape character to interpret it as a literal character:`*\~;(%?.:@/$%^*()!''"
The escape character depends on the shell or programming language you use to enter the command.
For example, if you are using Powershell version 7.4.2:
- If the password contains the specified non-alphanumeric characters, use quotation marks ( " ) before and after the password.
- If the password contains quotation marks or escape characters, use the escape character ( ` ) before the character. You must also use quotation marks before and after the password.
For example, if the new password is `*\~;(%?.:@/$%^*()!''" and you are using Powershell version 7.4.2, enter the following command: .\CloudIdAgentCLI.exe ldap_bind_password:"``*\~;(%?.:@/$%^*()!''`""

For more information on using non-alphanumeric characters in passwords, refer to the Microsoft documentation .
- To troubleshoot any issues, check the log file ( CloudIdAgentCLIDebug.log ).
The log file location is the same as the installation location for the agent ( C:\Program Files (x86)\Palo Alto Networks\Cloud Identity Agent .
Next Steps
- After you’ve configured the agent, you can optionally Configure Cloud Identity Agent Logs to track the agent events you want to monitor.
- For a comprehensive user identity and authentication solution, learn how to Authenticate Users with the Cloud Identity Engine .
Authenticate the Agent and the Cloud Identity Engine
The Cloud Identity Engine and the Cloud Identity agent use a certificate for mutual authentication (i.e., the agent authenticates the service and the service authenticates the agent) over Transport Layer Security (TLS). If the certificate is valid, the agent connects to the Cloud Identity Engine. If the certificate is not valid, the Cloud Identity Engine rejects the connection.
To authenticate the Cloud Identity Engine and the Cloud Identity agent, generate a Cloud Identity Engine certificate using the Cloud Identity Engine app and import it to the Local Computer certificate store on the Windows server that hosts the agent. Each certificate expires three months from the issuance date. The Cloud Identity agent version 1.5.0 and later versions automatically renews the certificate before it expires.
Each agent must use a unique certificate to authenticate with the service. Only use the certificate for the agent in the selected tenant. Generate certificates on an as-needed basis and do not use the certificate for other services or share them between agents. You can generate up to 5 unused certificates and up to 100 total certificates per tenant. You can only use the certificate for the specified tenant and you can only associate the certificate with one agent.
- Enter a unique Certificate Name .
The name must be between 5 and 128 alphanumeric characters.
- Enter a secure password in the Create Password and Re-enter Password fields.
The password must be between 12 to 25 characters. You will need to enter this password when you install the certificate on the agent host.
- Click Download Certificate .
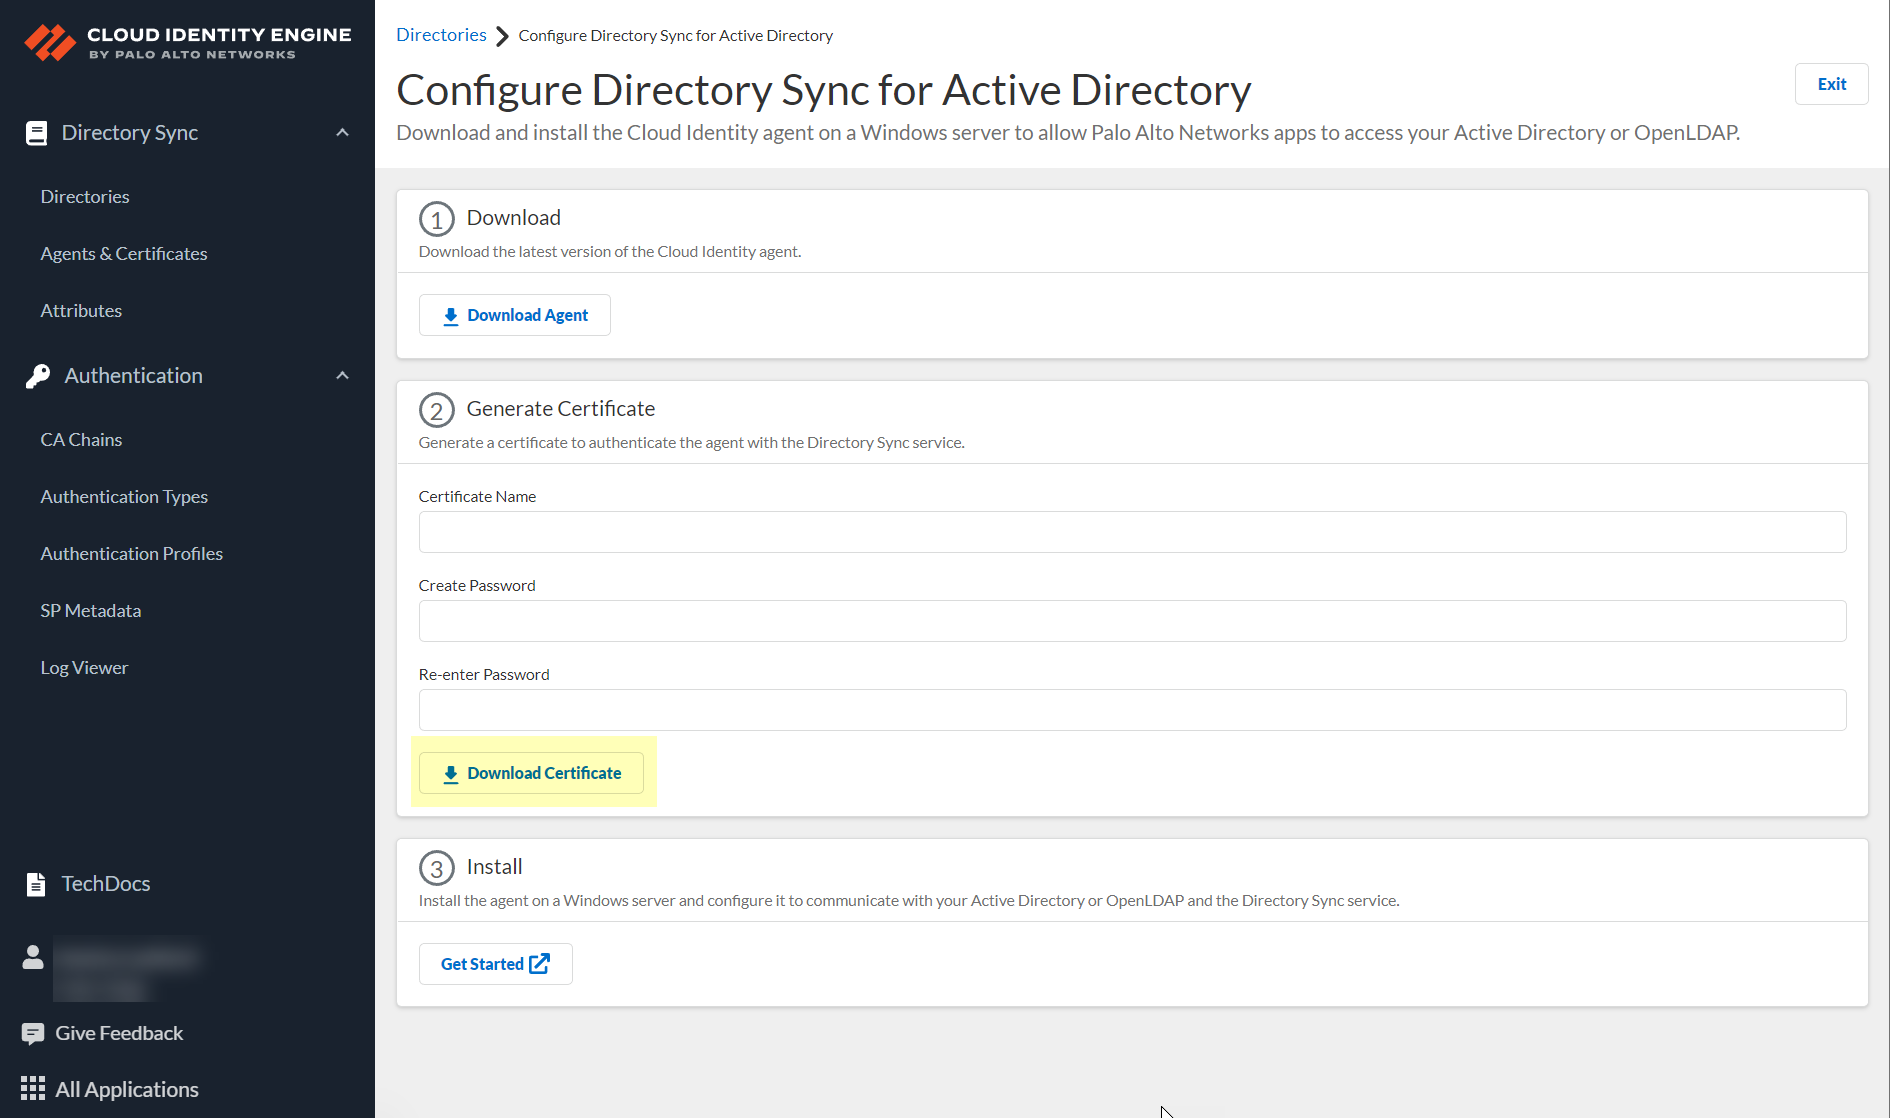
- Store the certificate in the Local Computer Personal certificate store on the agent host.
For more information on how to store certificates, see the following link .
After the agent authenticates with the Cloud Identity Engine, it provides the directory attributes to the service. The service then shares the attributes with the apps that you with the Cloud Identity Engine for visibility and policy enforcement. For more information, refer to Manage Cloud Identity Engine Certificates .
Next Steps
- Use the Cloud Identity Engine app to create, view, delete, rename, or synchronize tenants and to view or customize the attributes that the Cloud Identity Engine collects.
- Learn how to manage the Cloud Identity agent by logging agent events, managing the certificates that the agent uses, starting or stopping the agent’s connection to the Cloud Identity Engine, and updating or removing the agent.
Configure a Cloud-Based Directory
After you activate your Cloud Identity Engine tenant, configure a cloud-based directory, such as Azure Active Directory (Azure AD), Okta Directory, or Google Directory, to communicate with the Cloud Identity Engine.
To use the System for Cross-domain Identity Management (SCIM) provisioning to customize which attributes your Azure AD shares with the Cloud Identity Engine, you can configure the SCIM Connector.
If the connection between your directory and the Cloud Identity Engine is not active, you can reconnect your directory. If you no longer want to associate a directory with the Cloud Identity Engine, learn how to revoke the permissions for that directory.
Configure Azure Active Directory
When you configure an Azure Active Directory (AD) in the Cloud Identity Engine, it allows the Cloud Identity Engine to collect attributes for user identification, enabling consistent enforcement of your Security policy across your network.
After you configure your Azure AD, you can reconnect or edit the configuration or revoke permissions for directory removal. You can also use the client credential flow as an alternative to the CIE Enterprise app connection flow type or Configure SCIM Connector for the Cloud Identity Engine to specify which attributes the Cloud Identity Engine collects from your Azure AD. You can also Configure Azure as an IdP in the Cloud Identity Engine for user authentication.
Set Up Azure Directory
Configure an Azure Active Directory (Azure AD) in the Cloud Identity Engine to allow the Cloud Identity Engine to collect data from your Azure AD for policy rule enforcement and user visibility.
To configure an Azure AD in the Cloud Identity Engine, you must have at least the following role privileges in Azure AD:
- Application Administrator
- Cloud Application Administrator
For more information about roles in Azure AD, refer to the following link .
If you Configure Azure Using the CIE Enterprise App , the account you use must have the Global Administrator Role to set up Azure. However, the app itself uses the Cloud Application Administrator Role, not the Global Administrator Role.
As an alternative, you can also Configure SCIM Connector for the Cloud Identity Engine to select the attribute data you want to collect with the Cloud Identity Engine.
To further reduce sync time and minimize the amount of data collected by the Cloud Identity Engine, you can configure the Cloud Identity Engine to sync only specific groups from your directory by filtering the groups. Because SCIM is most suitable for small and frequent data requests, directory update intervals are restricted by Microsoft to once every 40 minutes. If you choose to filter the groups instead, directory updates can be as often as every 5 minutes. Choose the best option for your deployment based on your organizational and regulatory requirements.
For an Azure Active Directory (AD), the Cloud Identity Engine retrieves updates from the directory using the following schedule:
- Users, Groups, and Devices—When the Cloud Identity Engine syncs changes.
- Apps—Every x hours (where x is either a maximum of 3 hours or the duration necessary to complete the previous apps sync).
- Role Assignments—Every x hours (where x is either a maximum of 24 hours or the duration necessary to complete the previous role assignment sync).
When you configure an Azure AD for the Cloud Identity Engine, log in, and grant the necessary permissions, Microsoft automatically onboards the Cloud Identity Engine Enterprise App into your Azure AD.
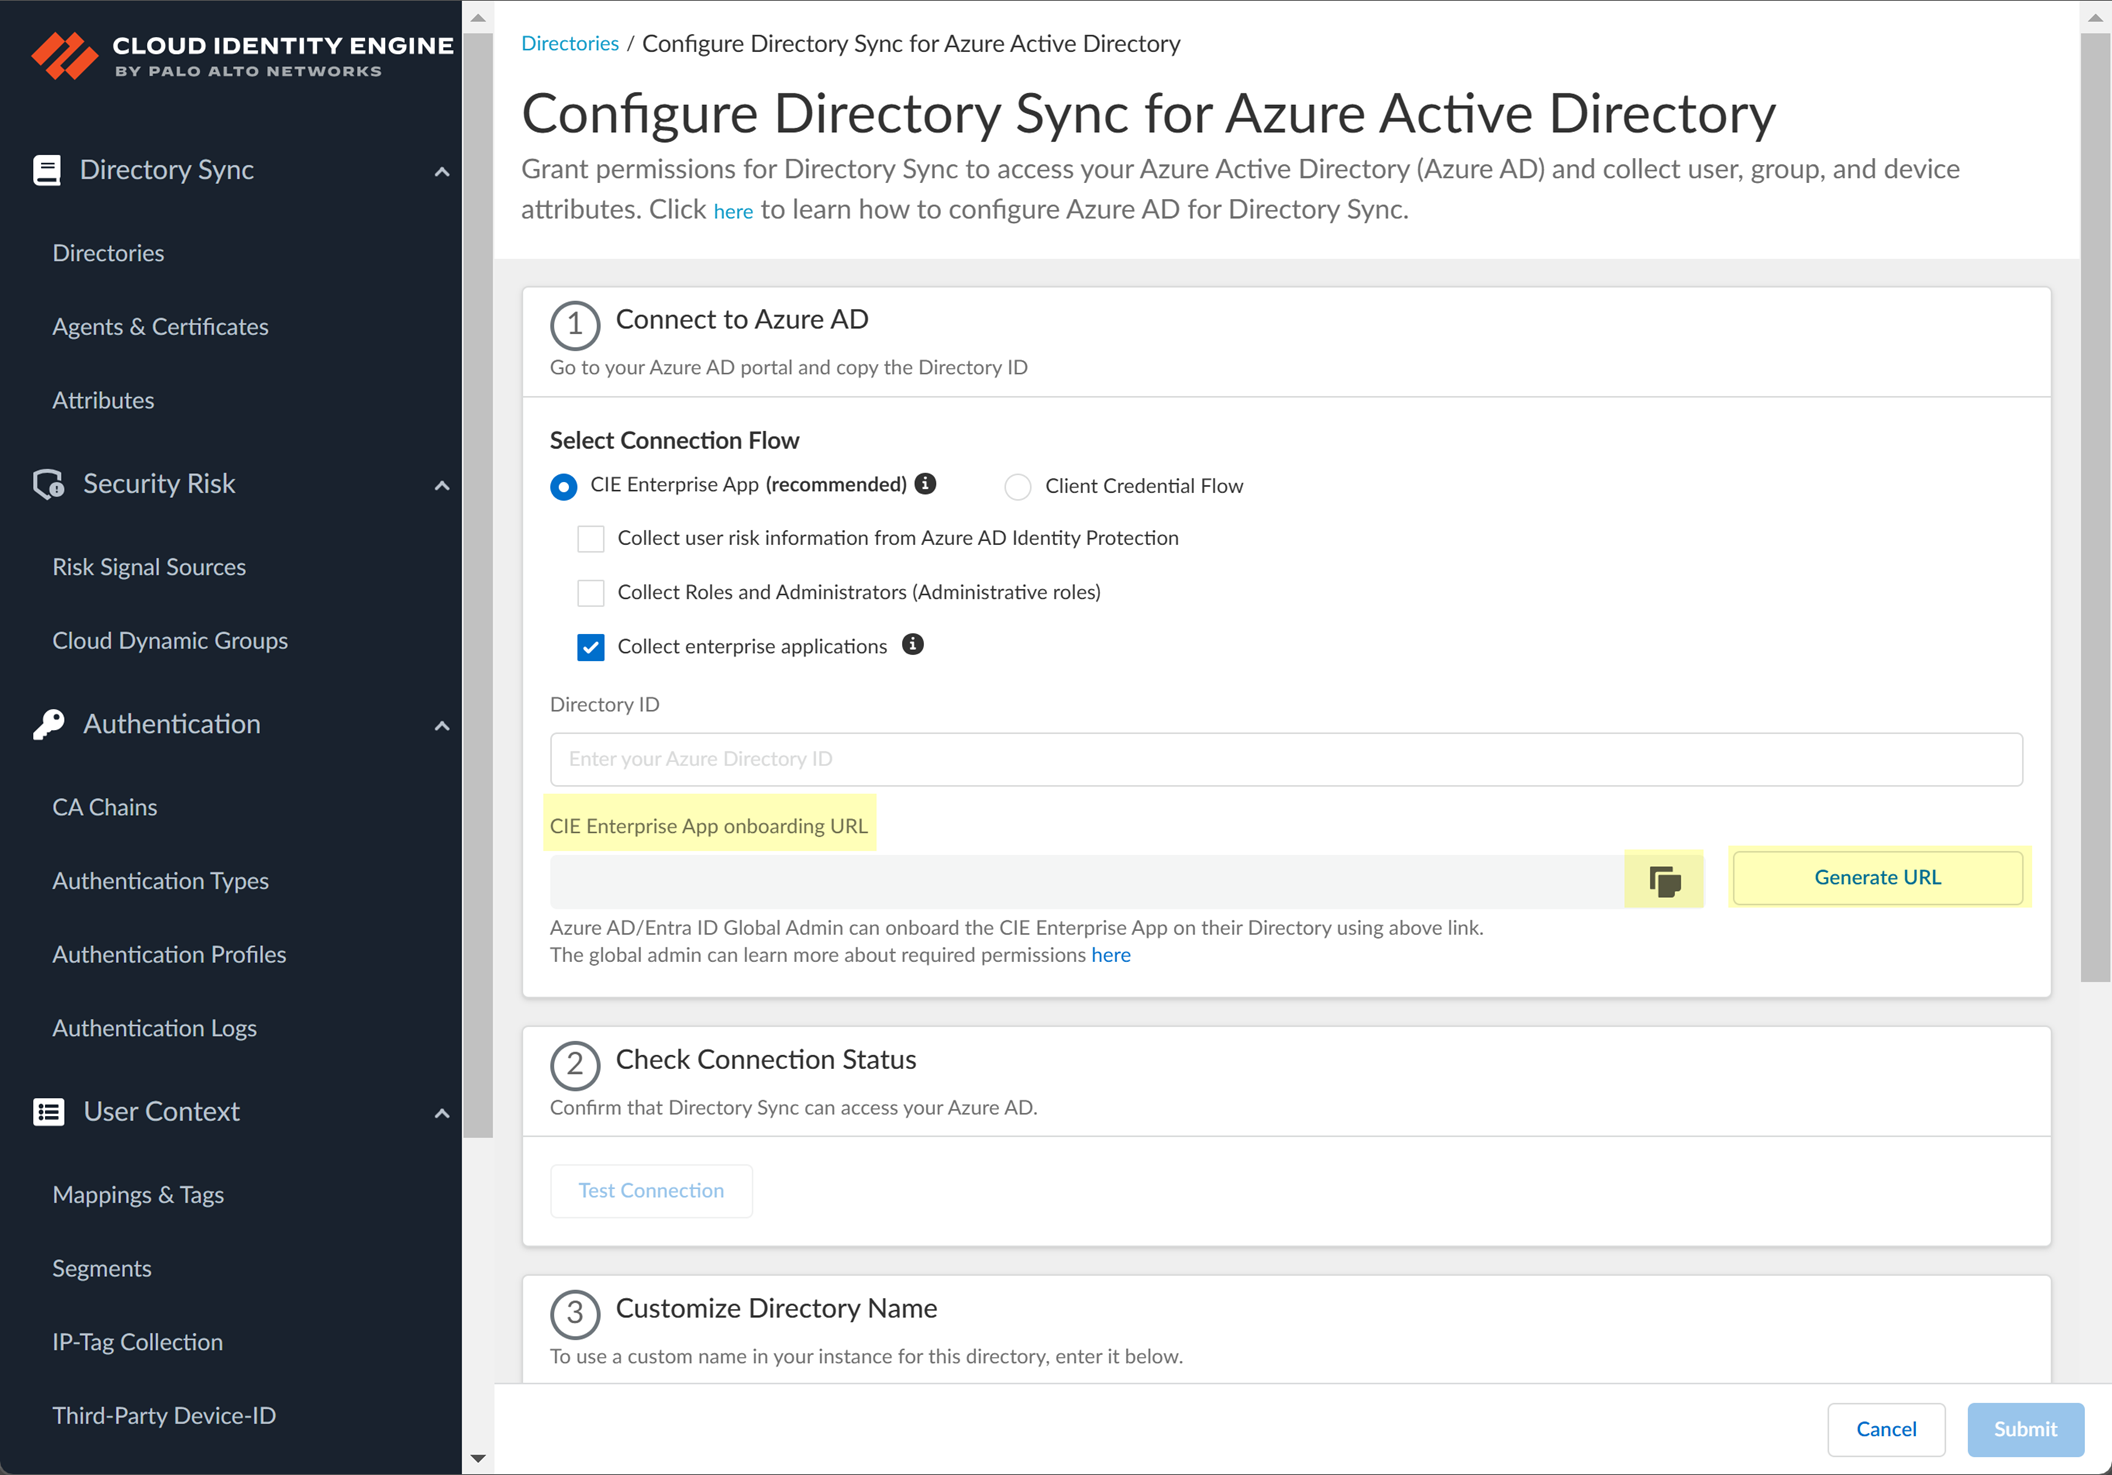
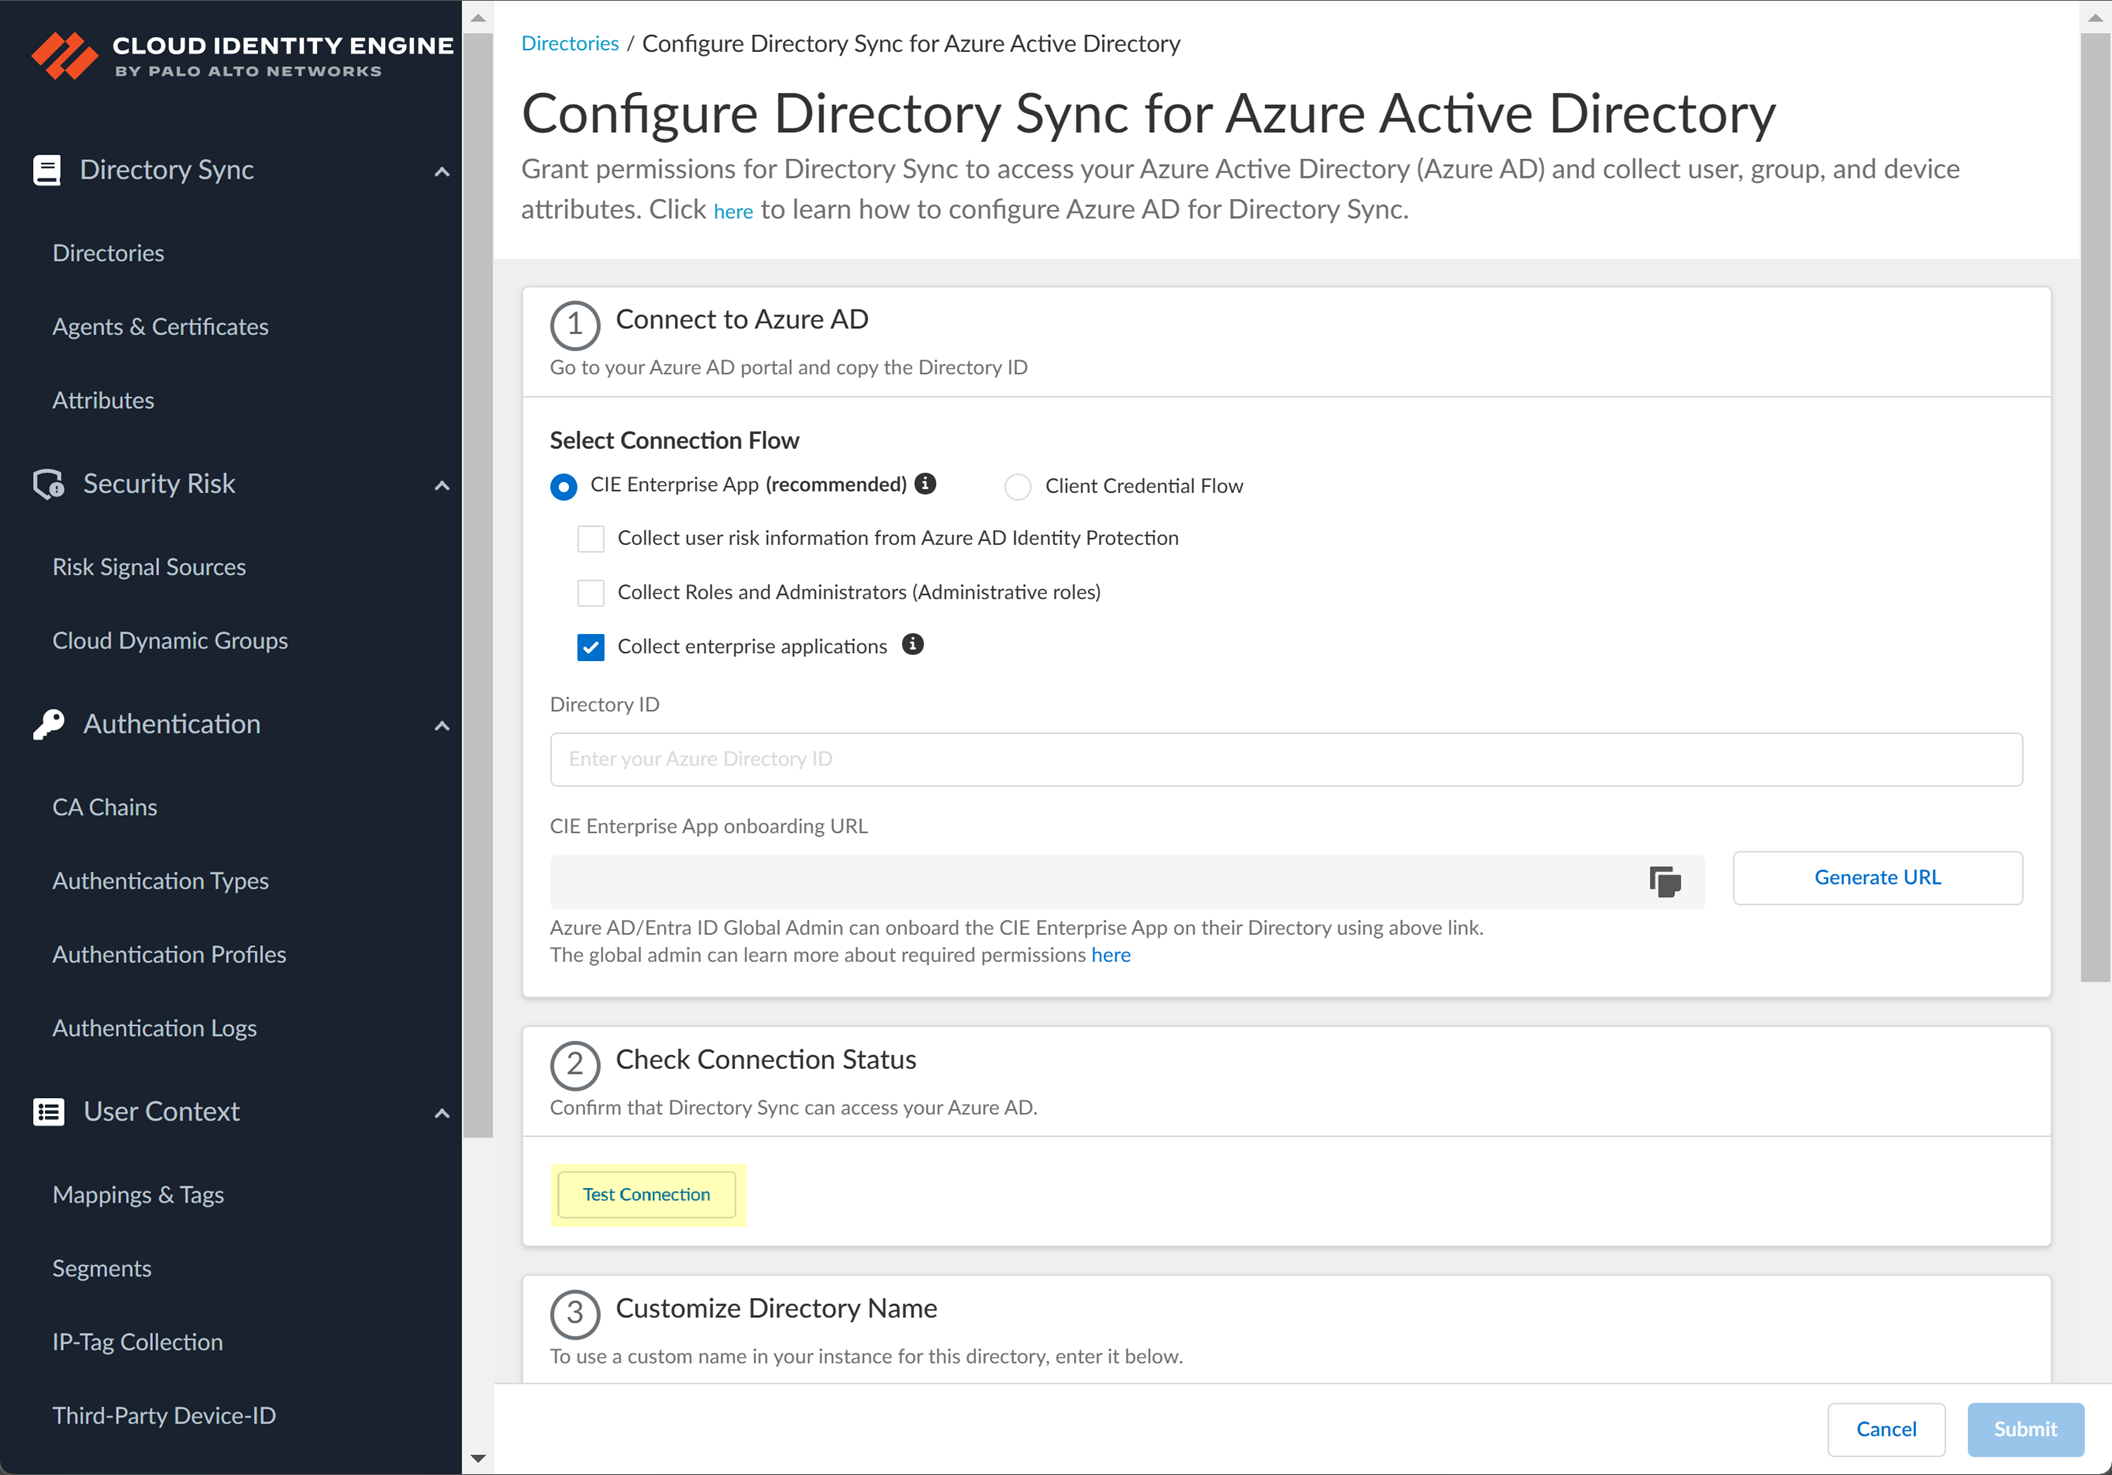
Configure Azure Using the CIE Enterprise App
To configure an Azure directory, use the CIE Enterprise app by completing the following steps.
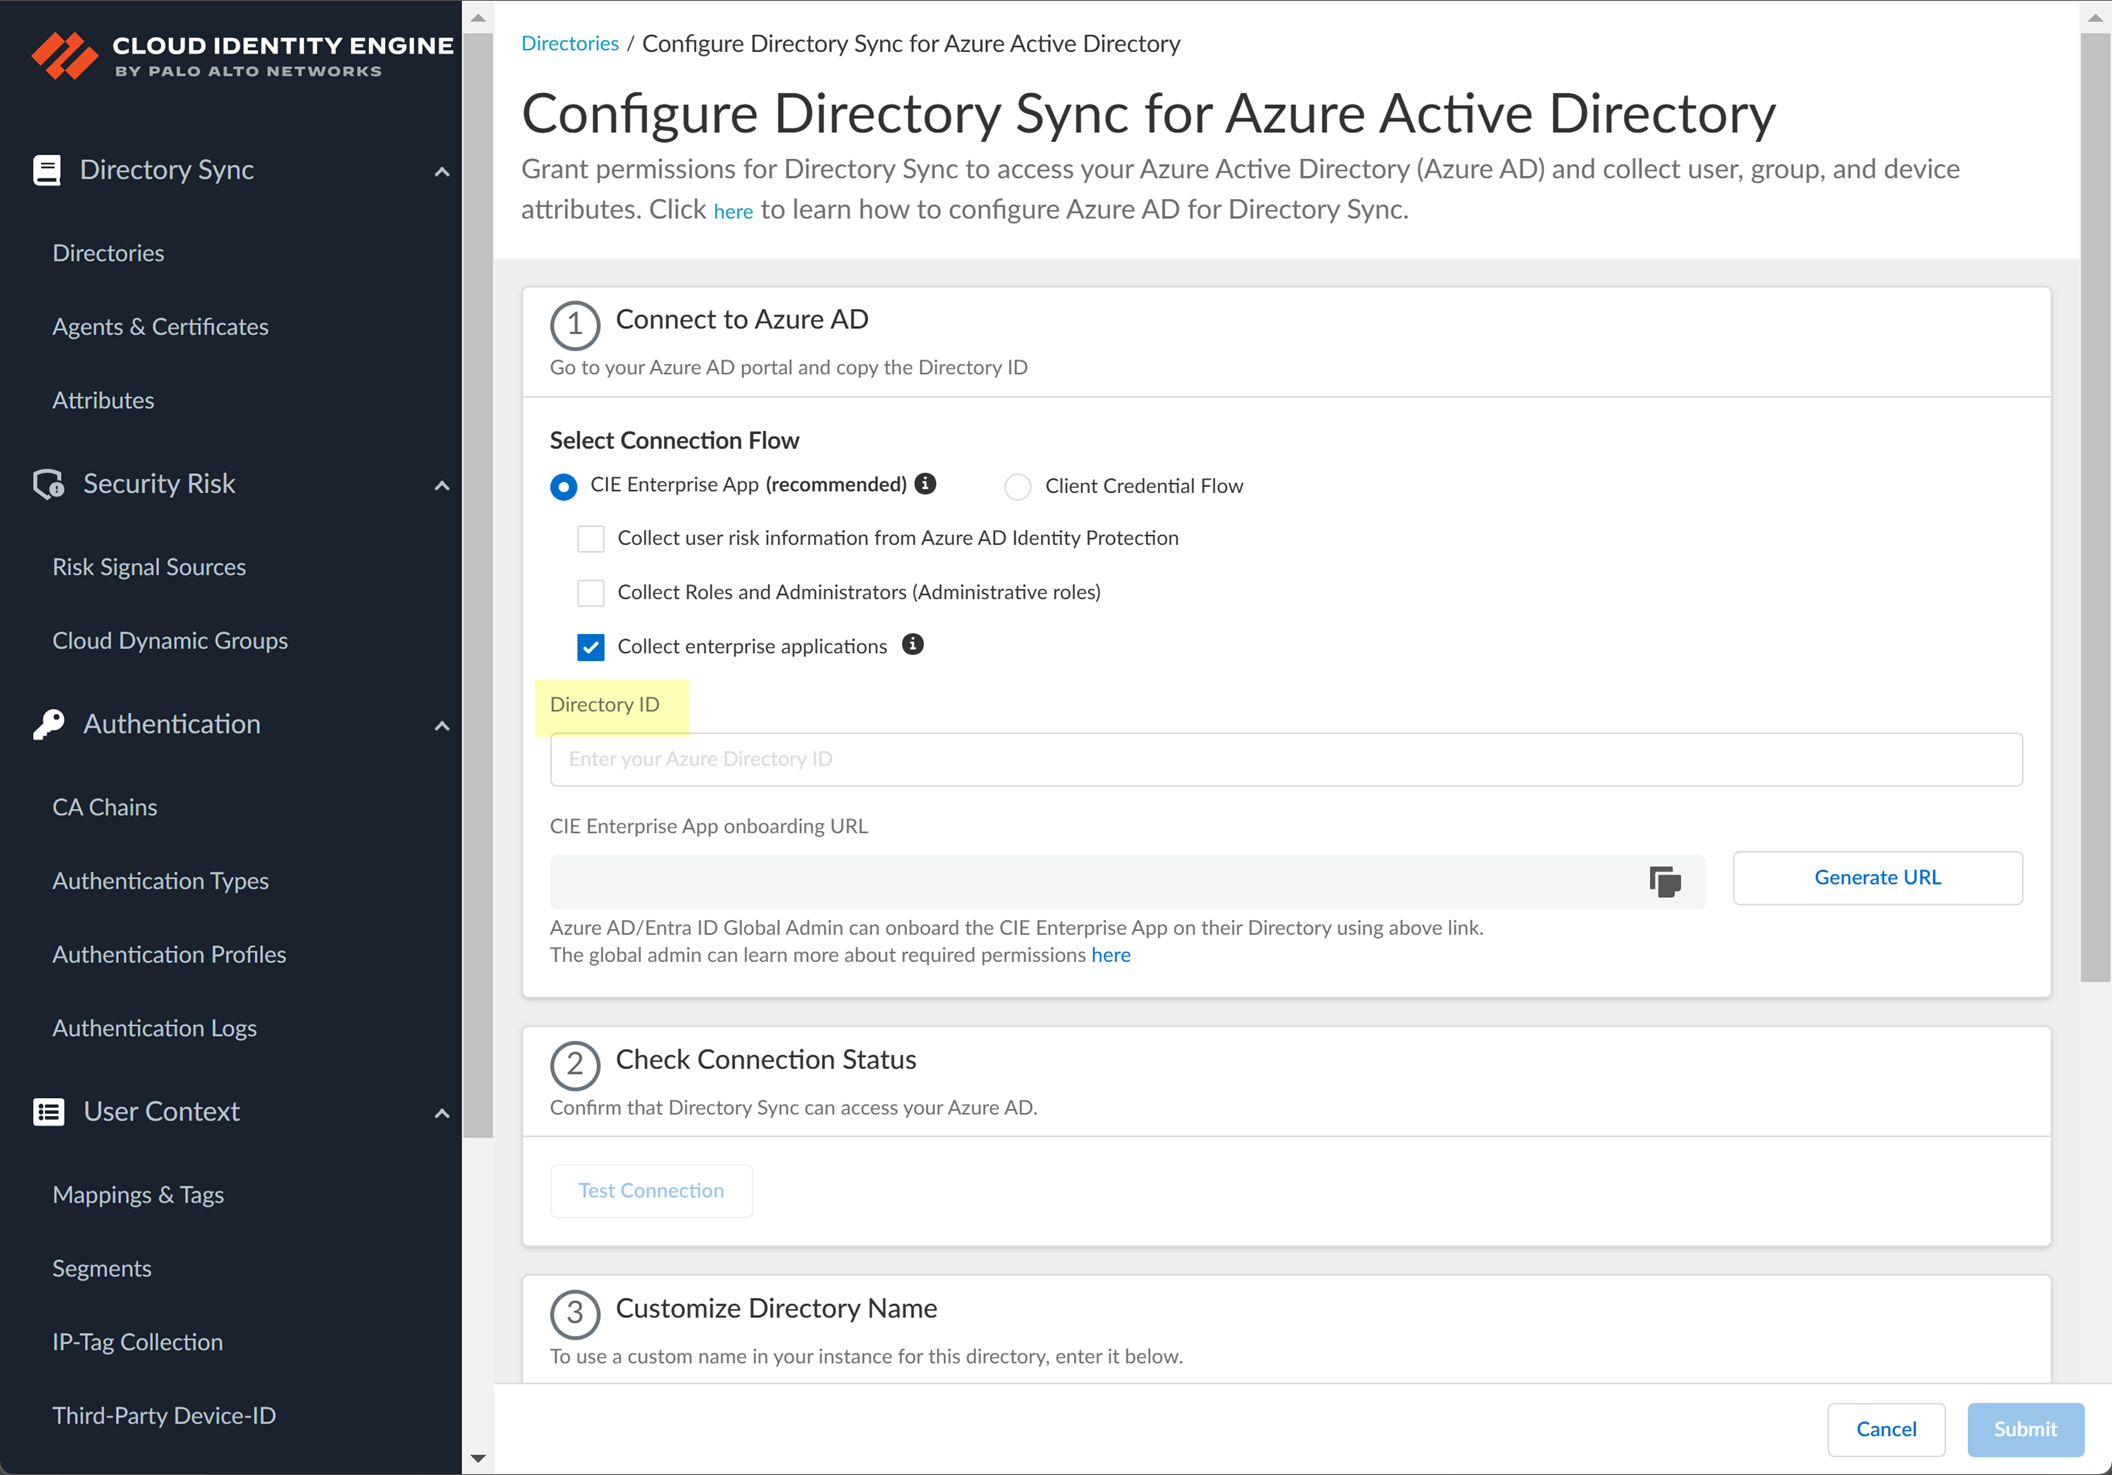
- Copy the directory ID for your Azure directory.
- Log in to the Azure administrator portal using the credentials of the account you want to use to connect to the Cloud Identity Engine (for example, a service account) and select Overview .
- Copy the Directory (tenant) ID and store it in a secure location.

- Set up your Azure directory in the Cloud Identity Engine.
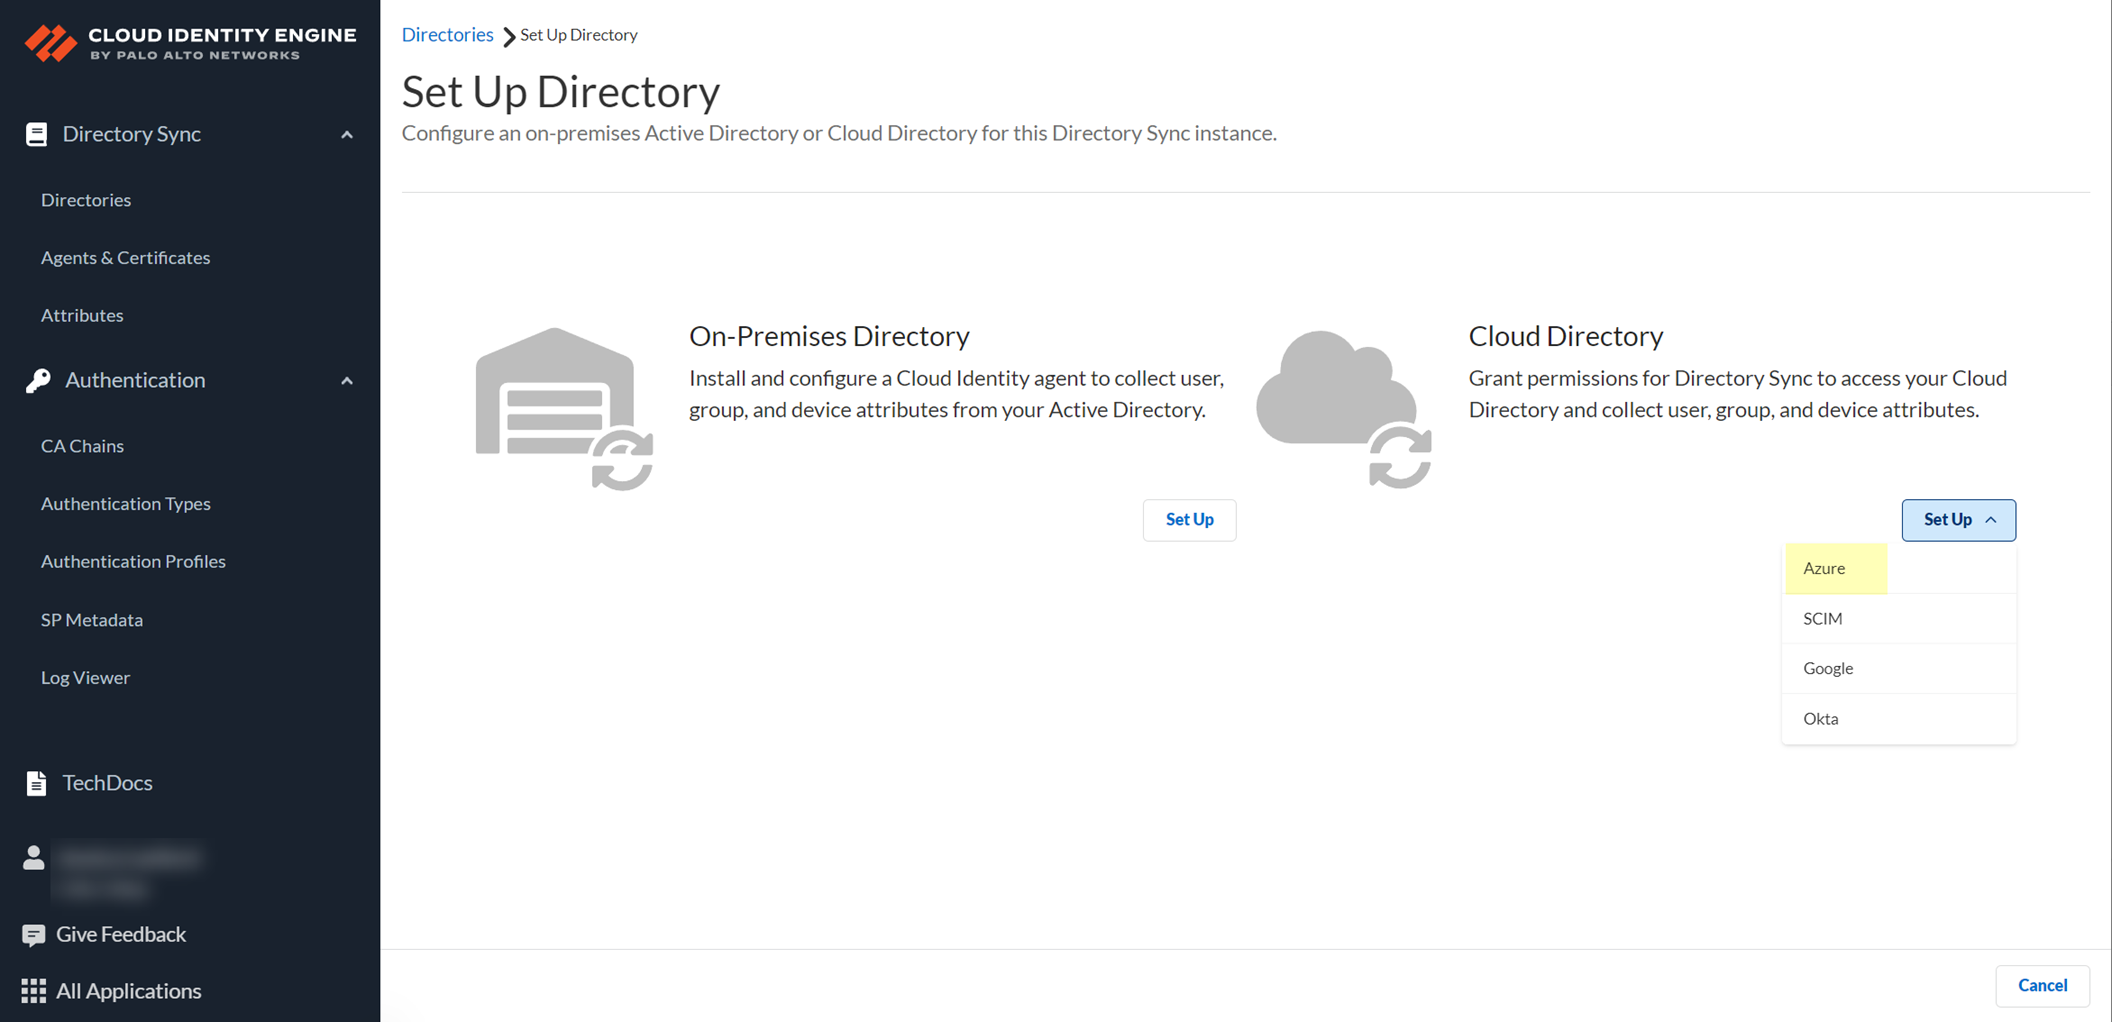
- In the Cloud Identity Engine app, select Directories then click Add New Directory .
- Set Up an Azure directory.
- (Optional) Select additional information types to collect from your Azure directory.
The CIE Enterprise app automatically requests the privileges necessary to retrieve the directory information, including for any options you have selected. If you enable an option that requires additional privileges, you must reconnect the directory. For configurations that use the
CIE Enterprise app
, use the CIE Enterprise App onboarding URL in step
4.2
to ensure you grant the necessary privileges.
After onboarding the app into the directory, you can revoke privileges if they are not necessary for your configuration. Do not revoke privileges for options that you have selected for your configuration. If you revoke a privilege that is necessary for an option you have select or that is required for the Cloud Identity Engine by default, the sync cannot complete successfully.
To enable permissions that have been revoked, edit the directory configuration and complete steps
4.1
through
4.5
.
The following list provides the permissions for each additional information type.
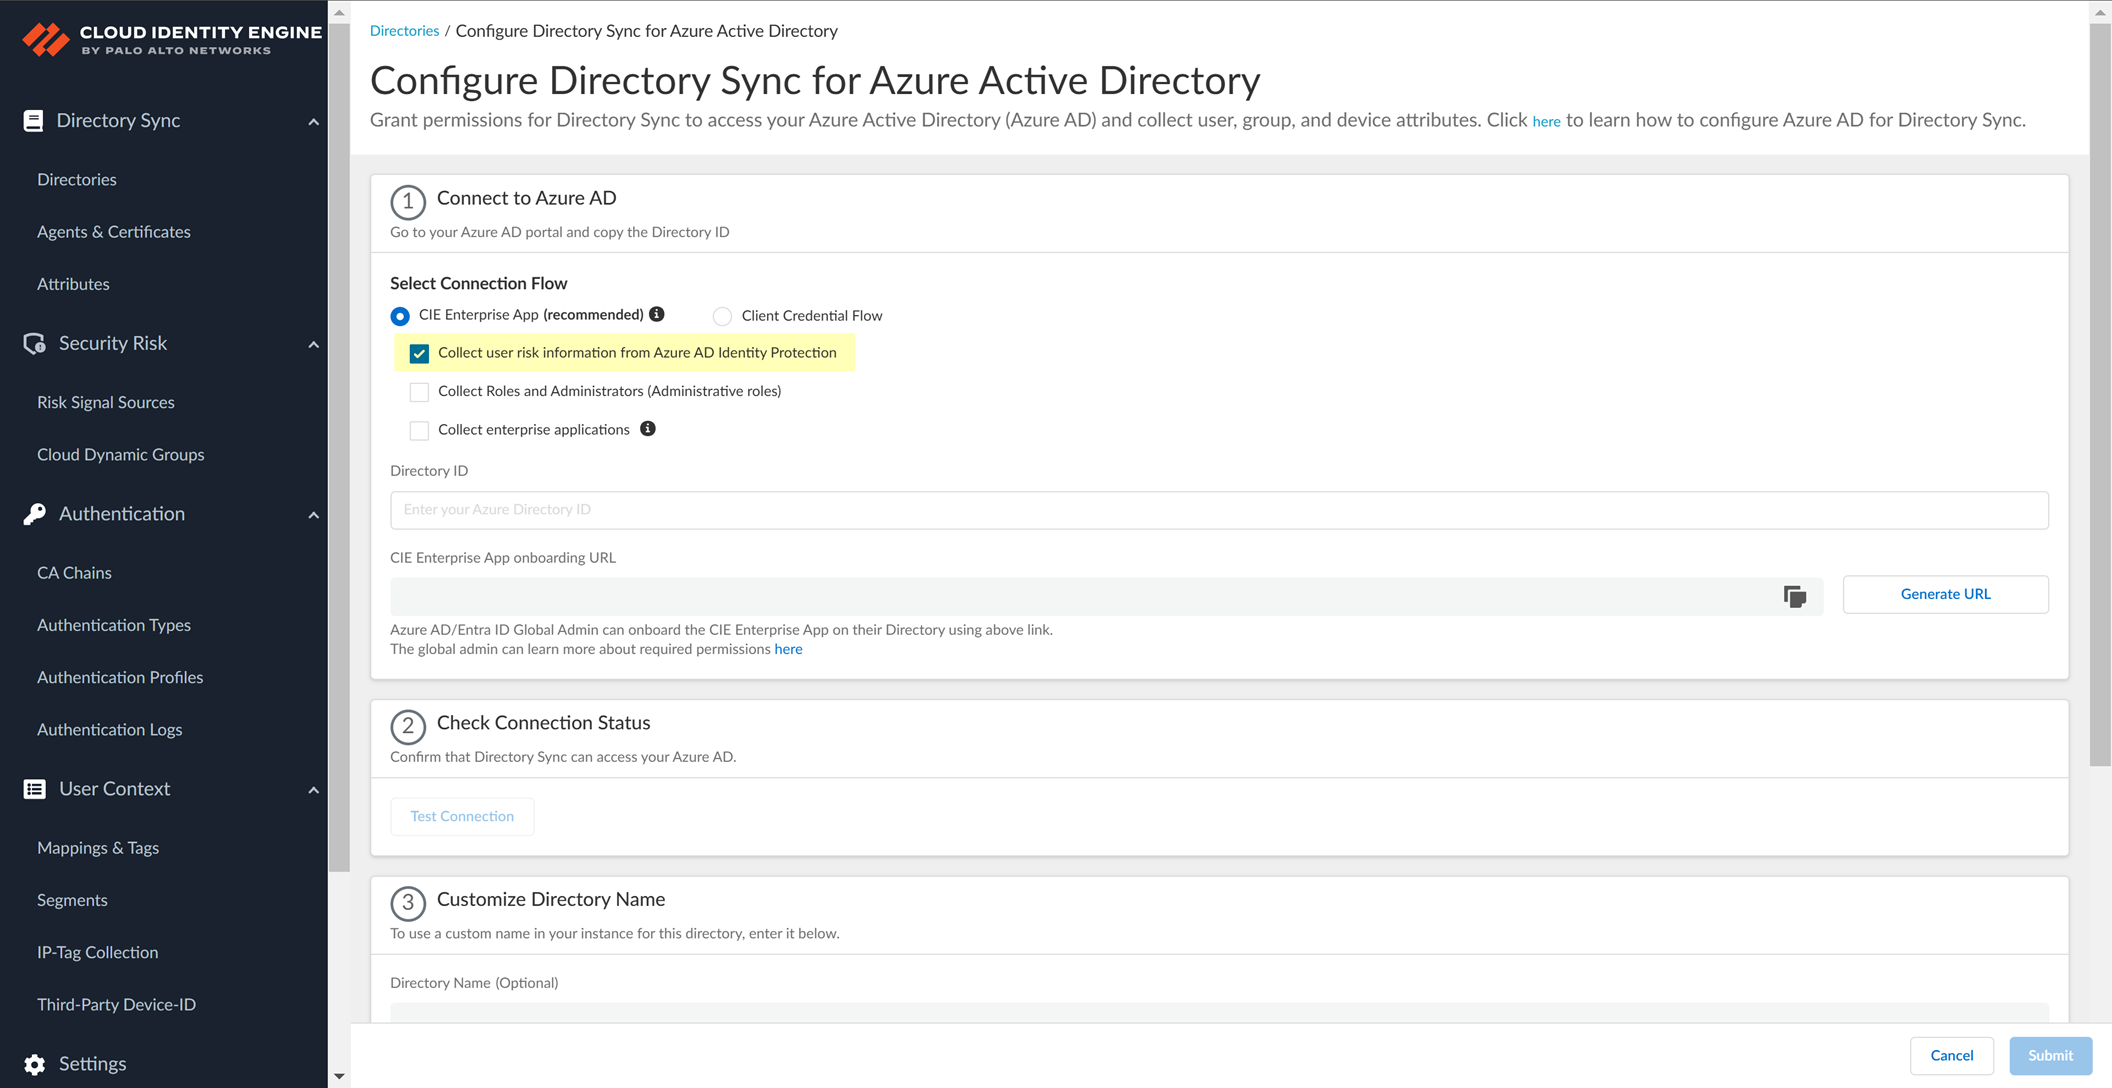
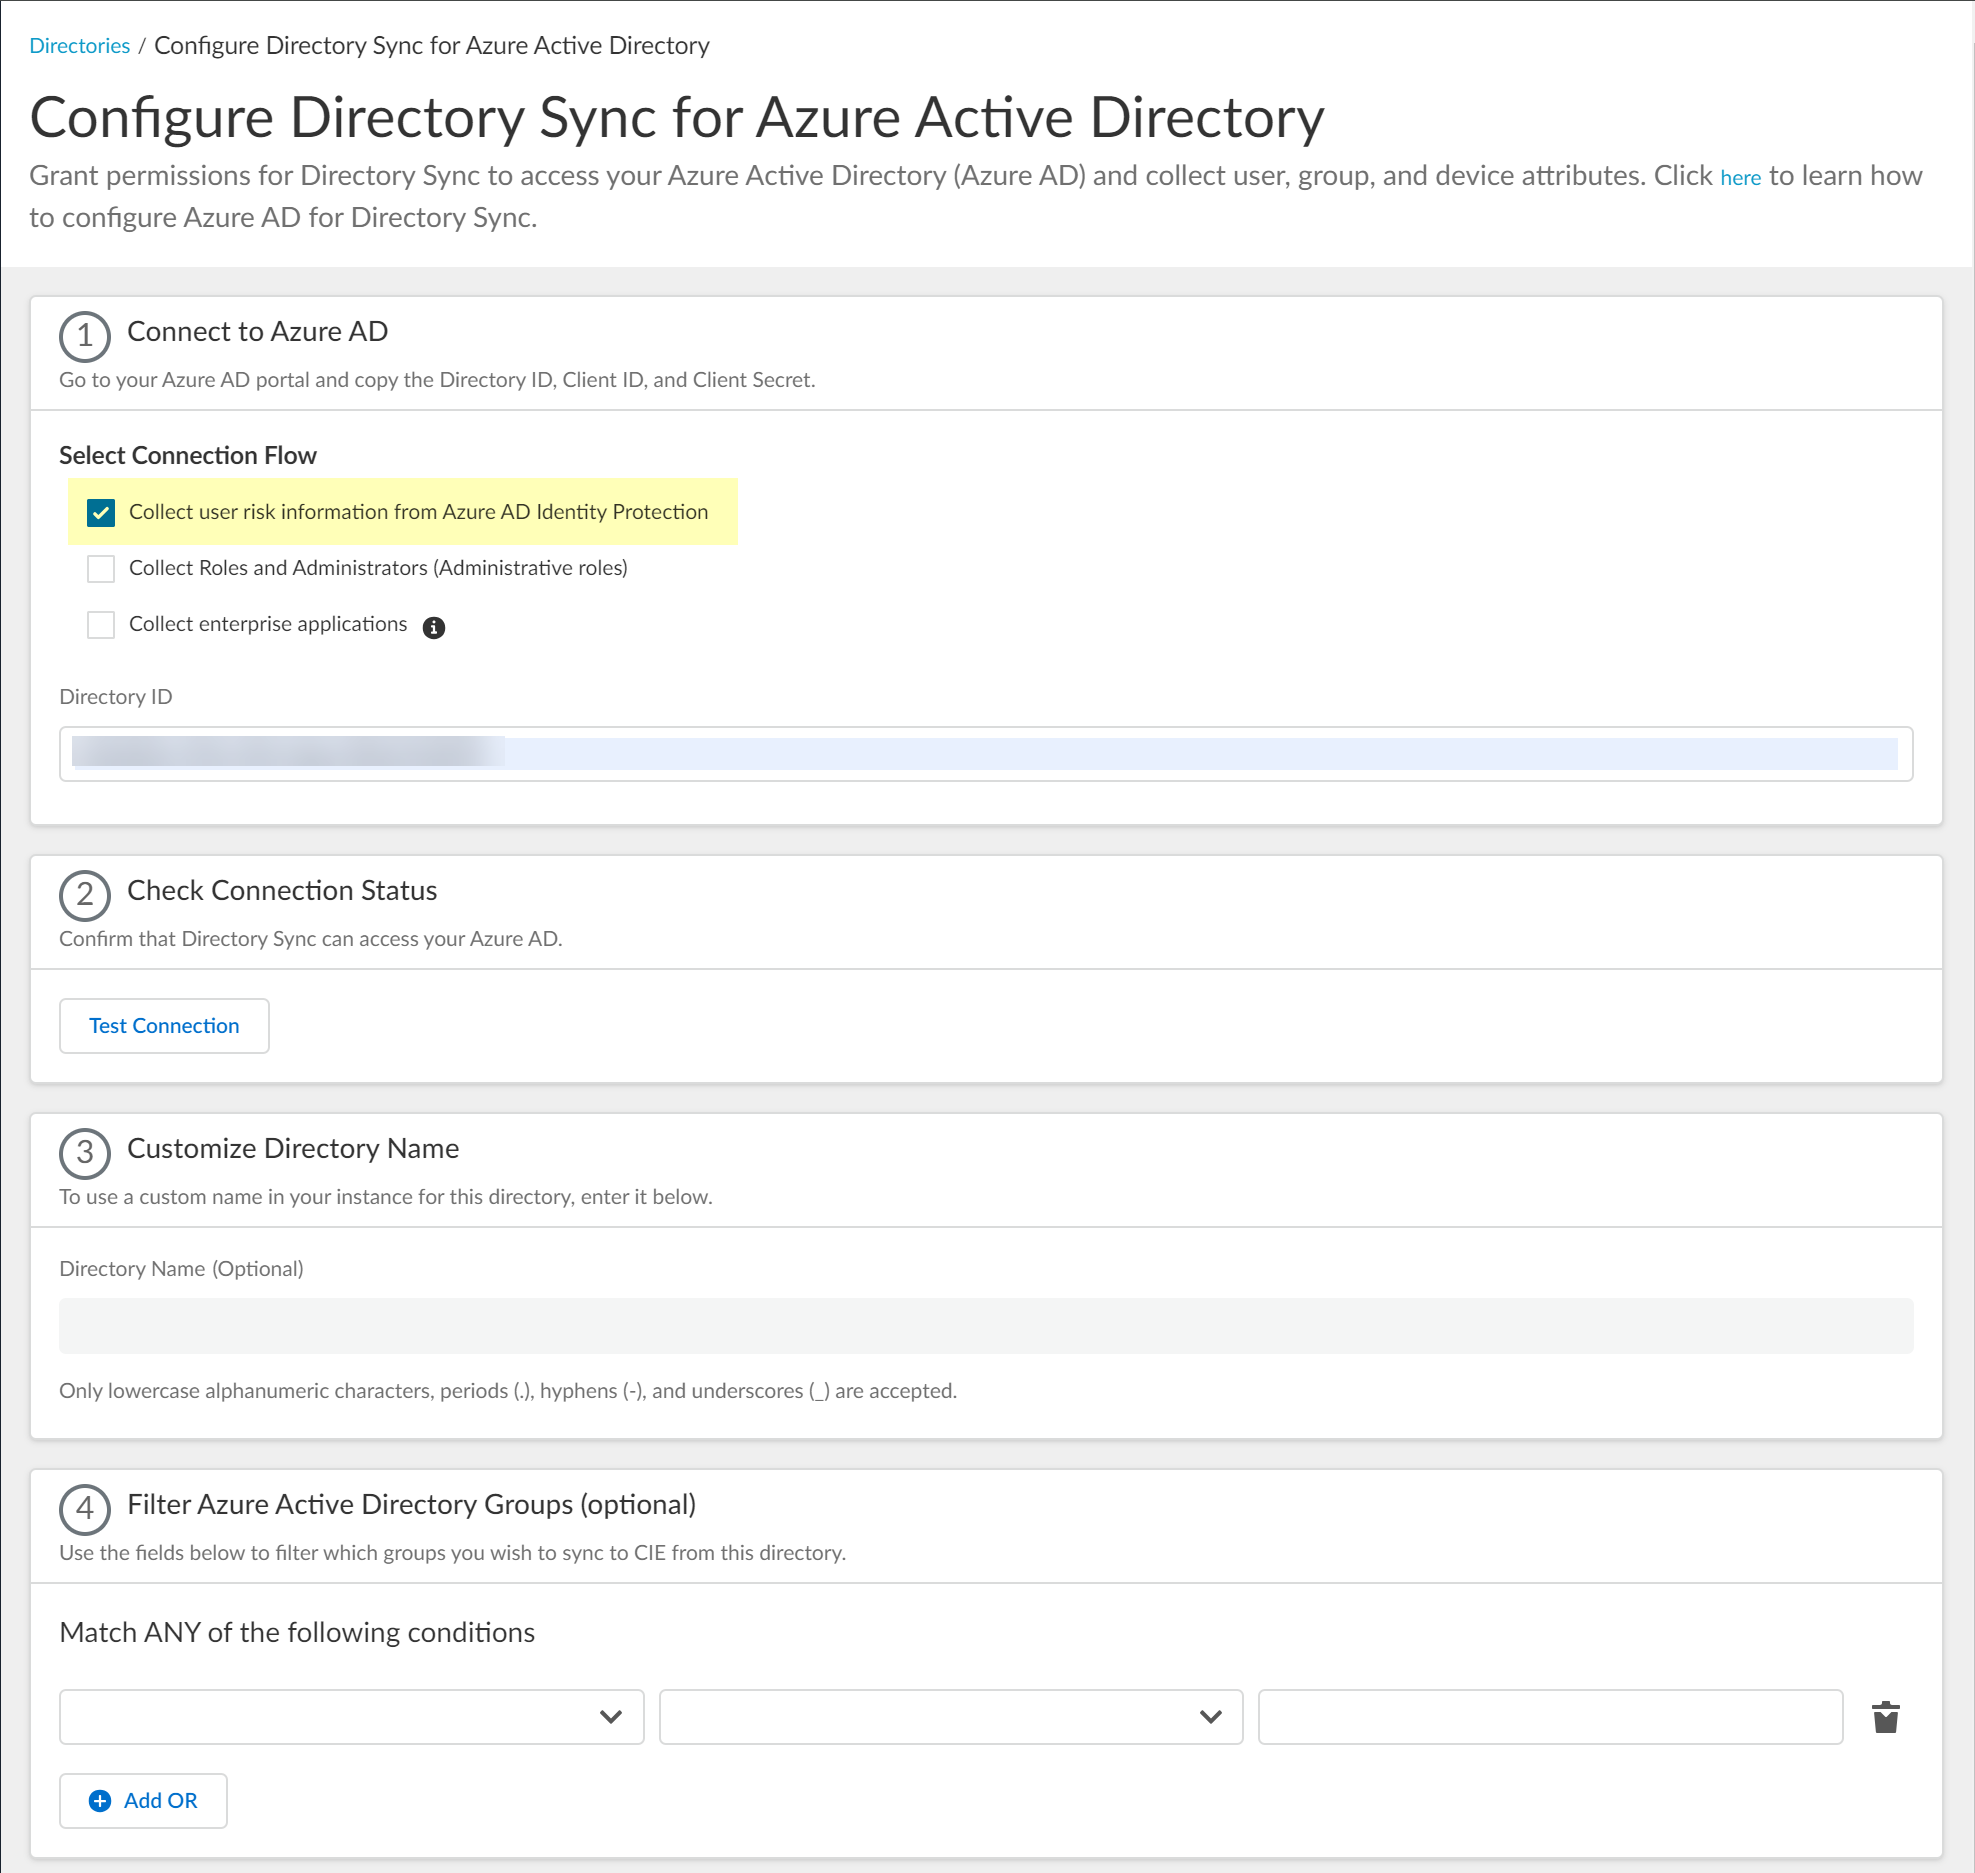
- Collect user risk information from Azure AD Identity Protection :
- IdentityRiskyUser.Read.All
- IdentityRiskEvent.Read.All
For more information, refer to Create a Cloud Dynamic User Group .
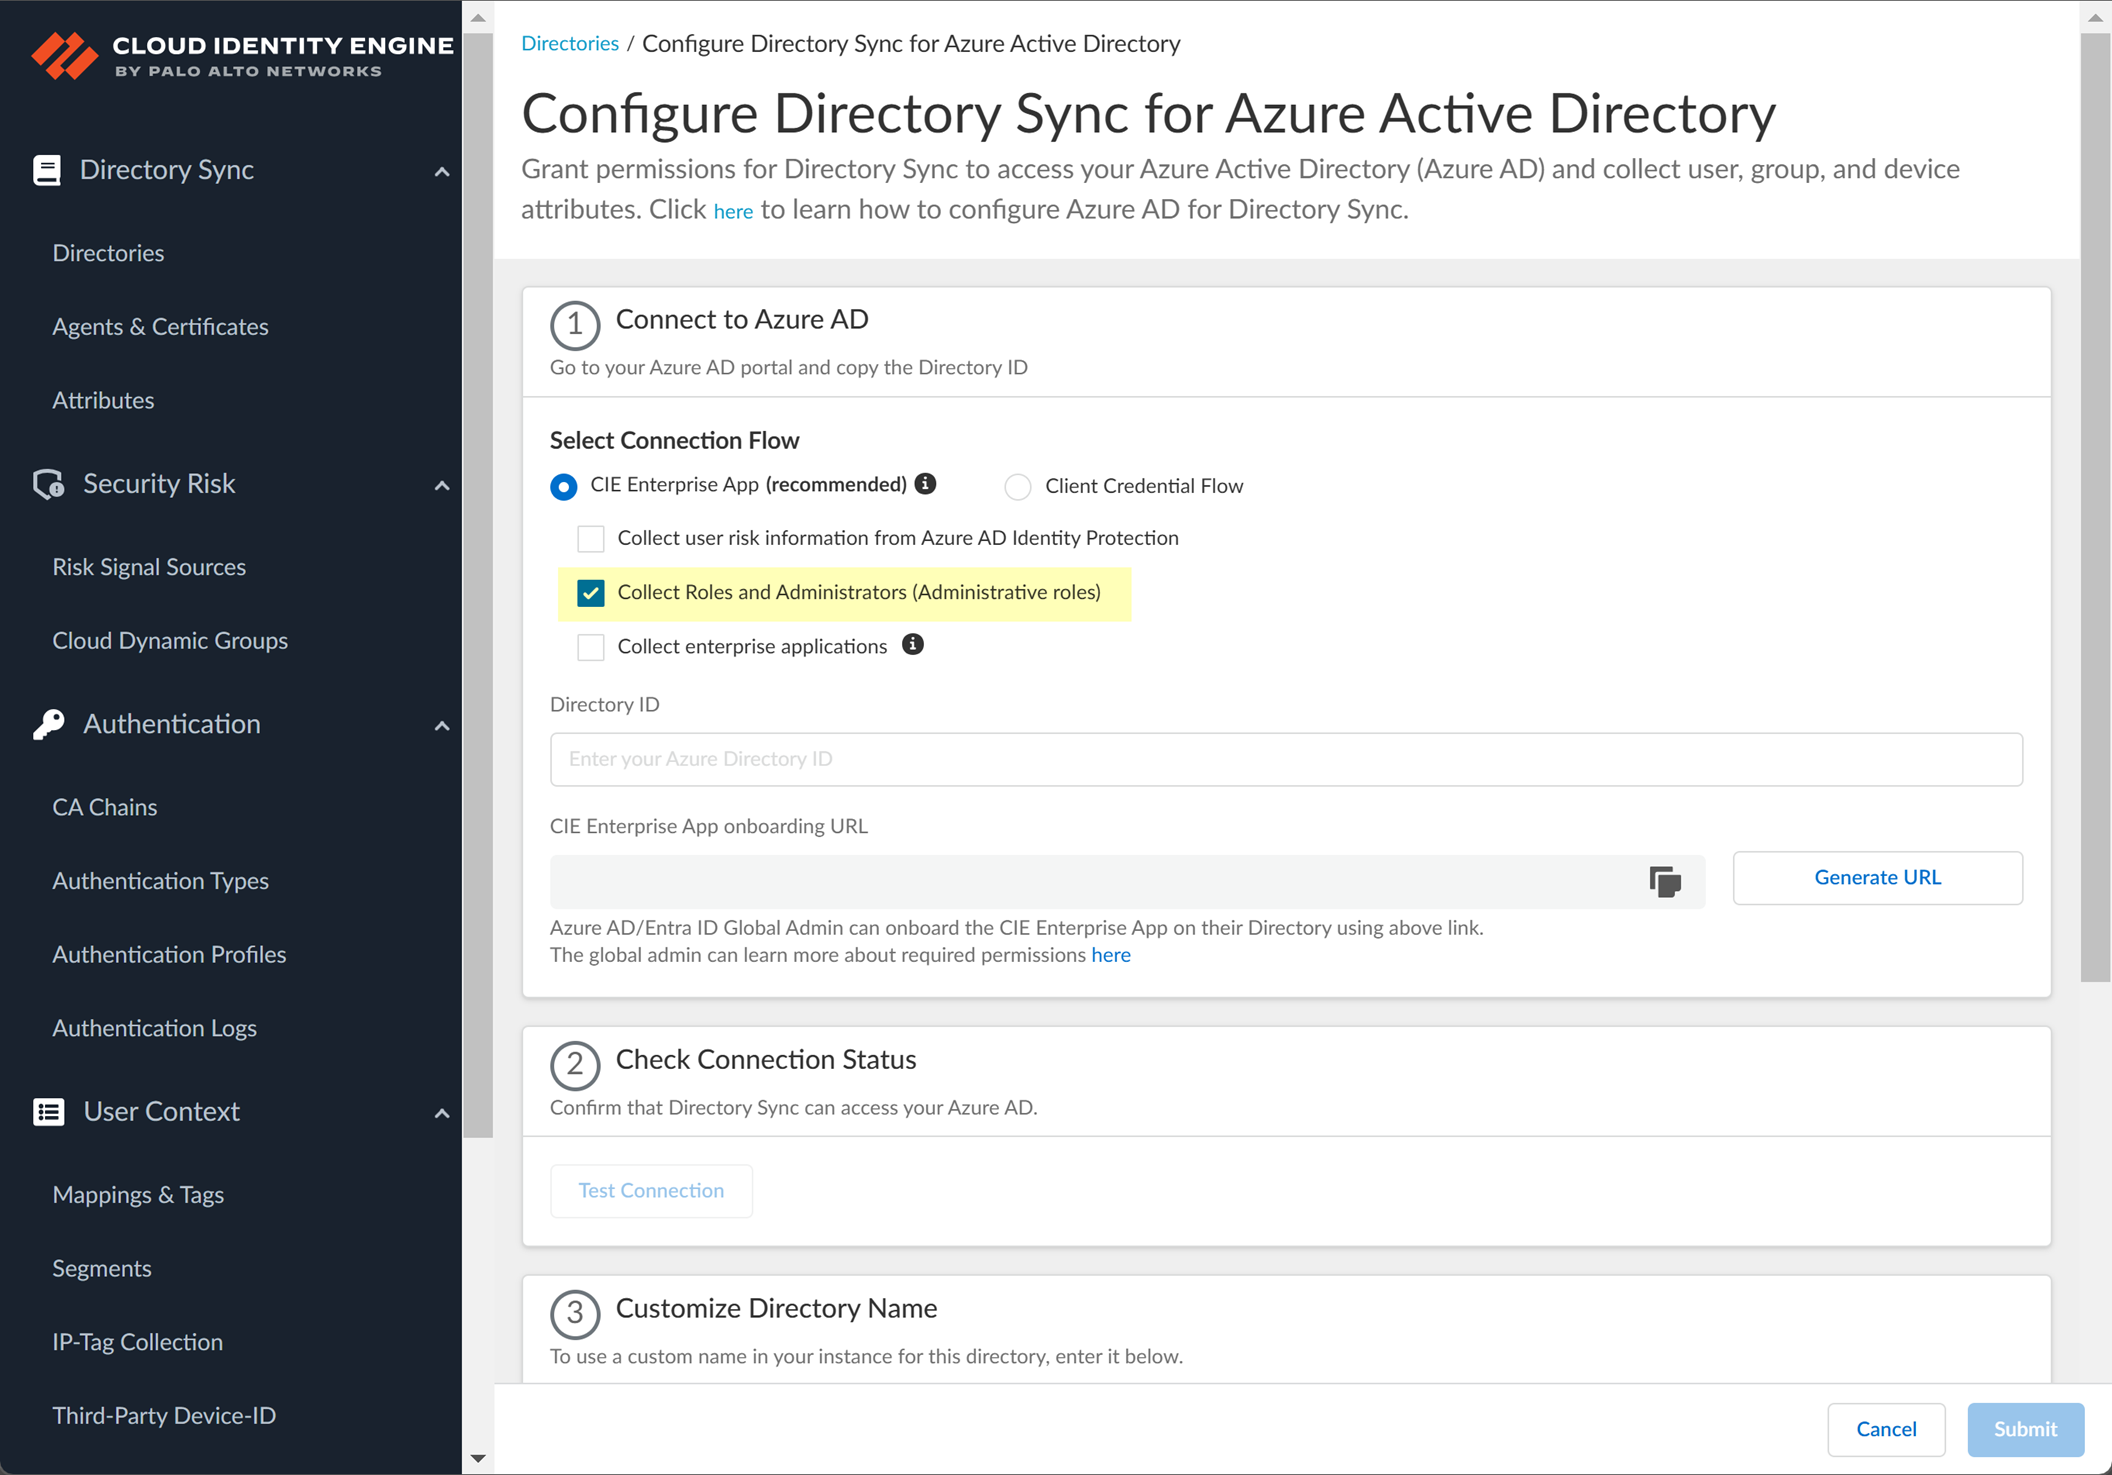
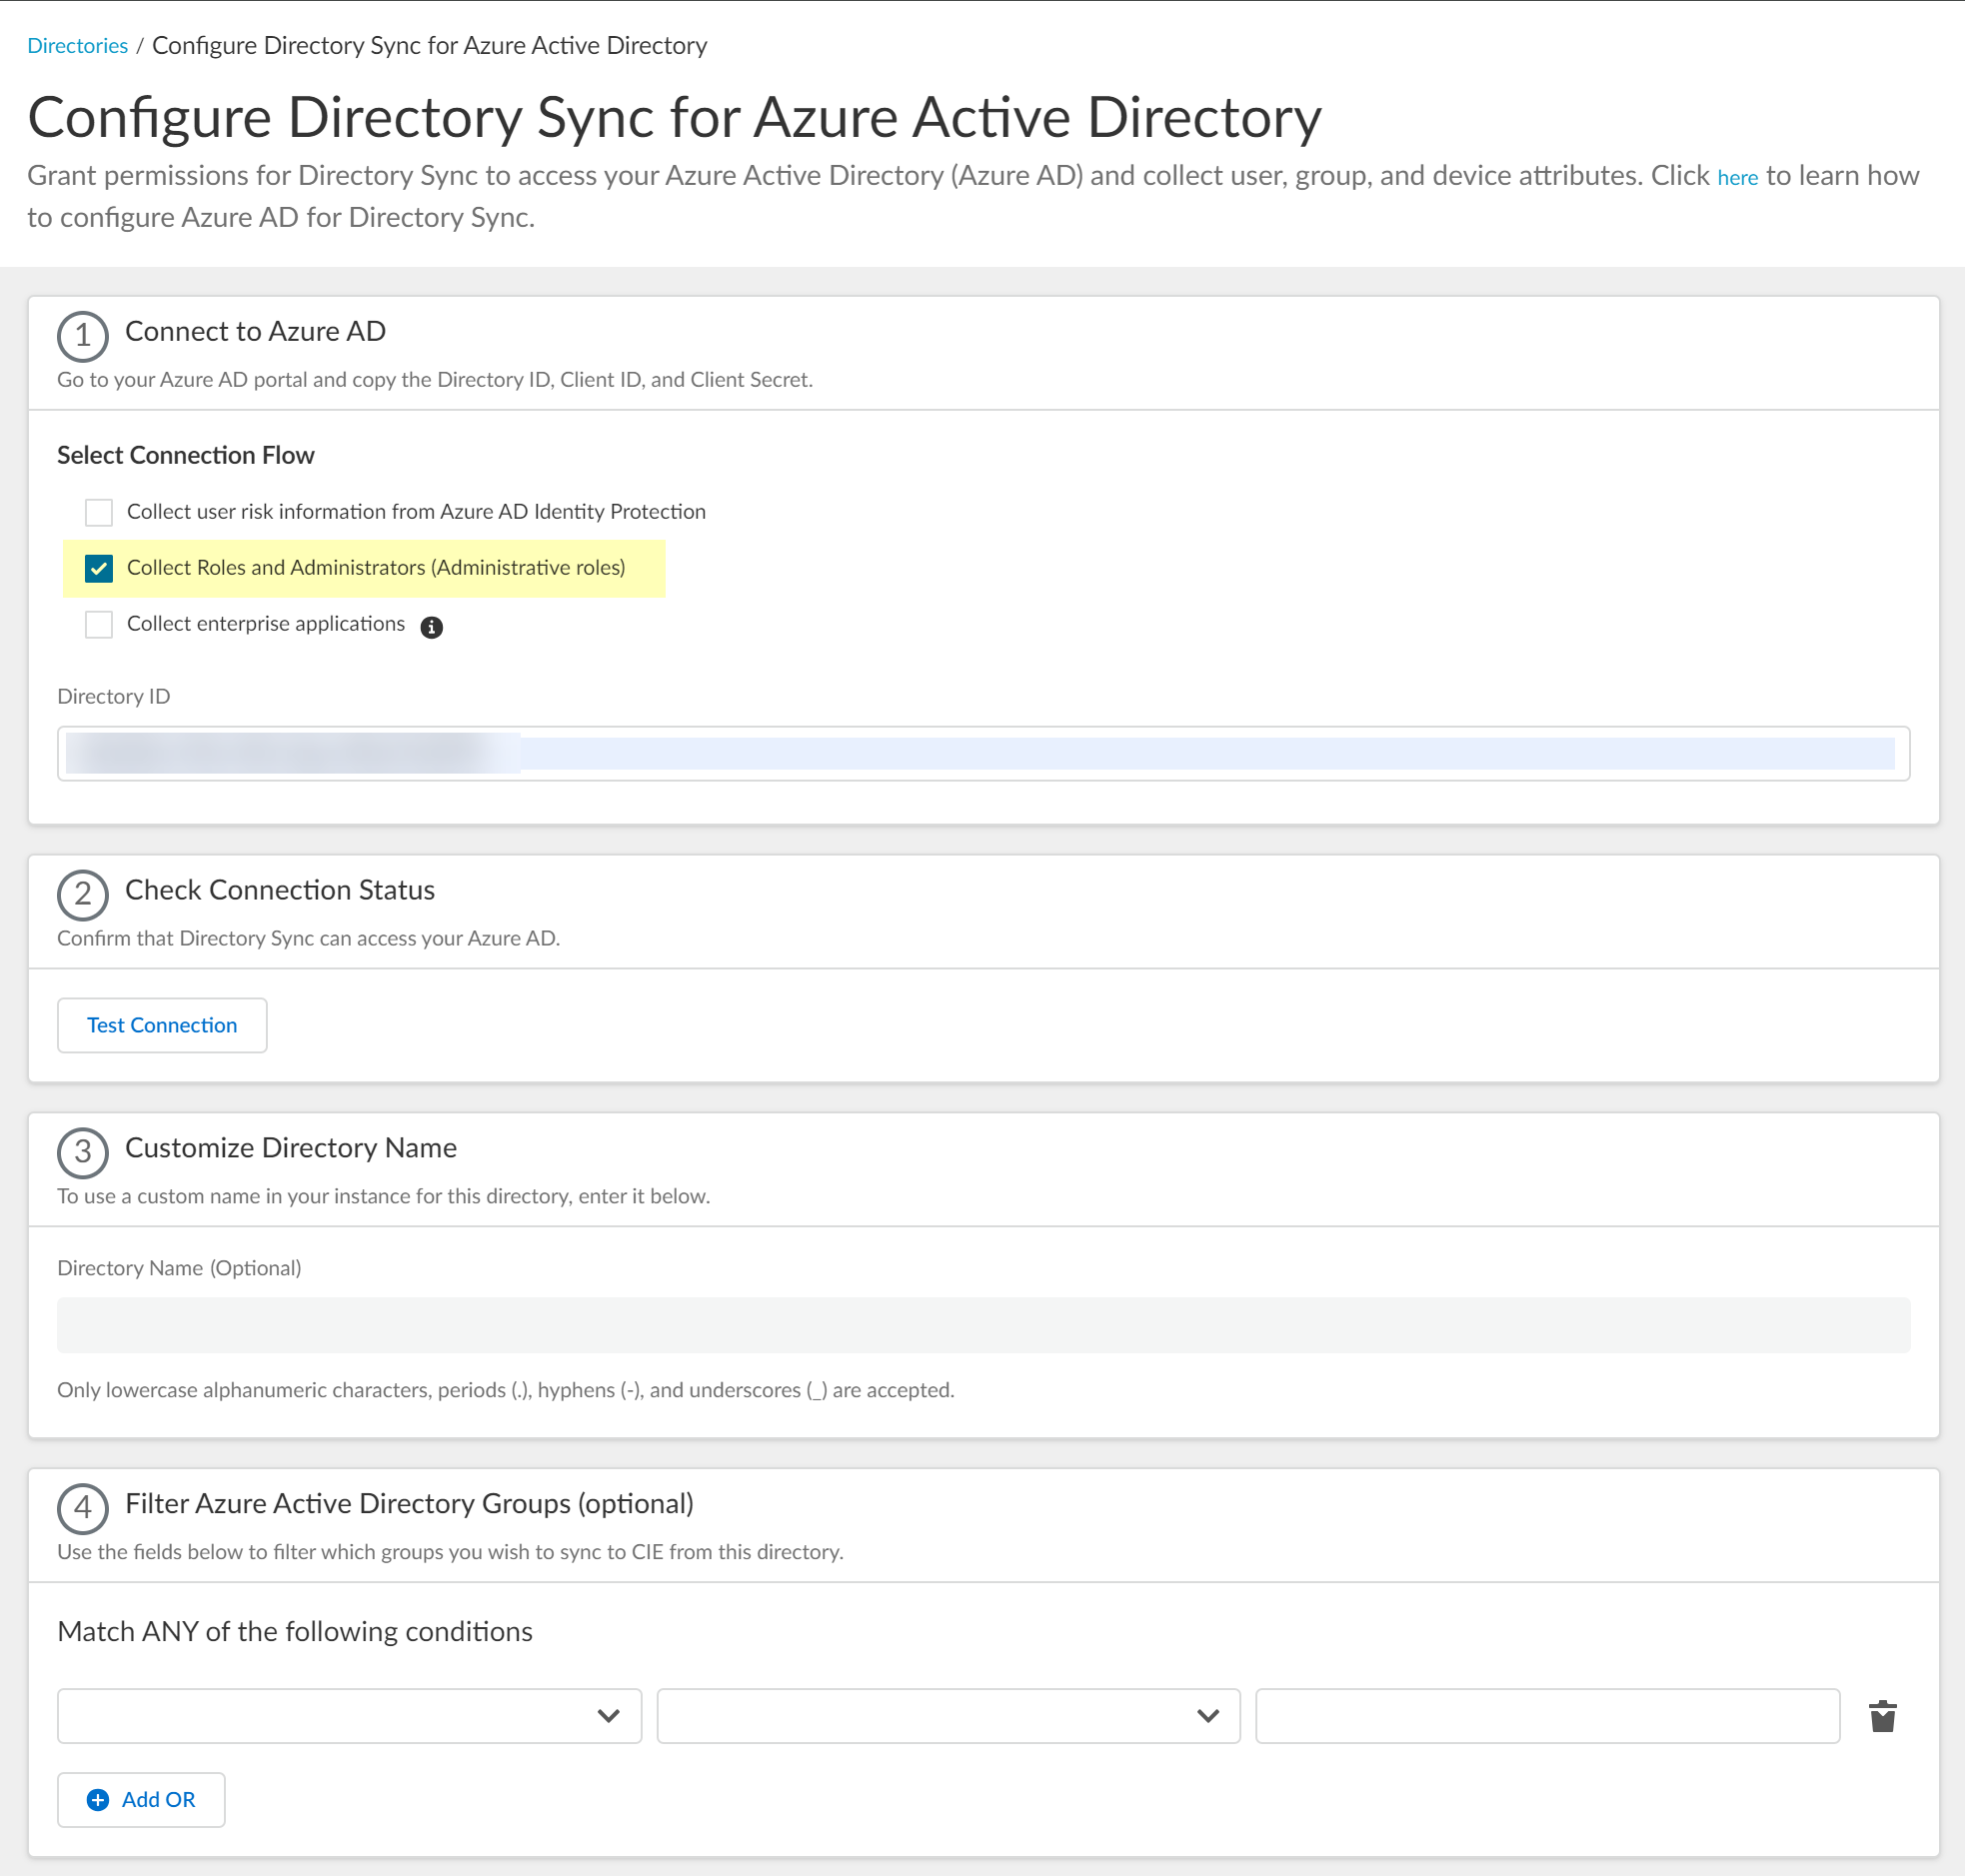
- Collect Roles and Administrators (Administrative roles) : Directory.Read.All or RoleManagement.Read.Directory .
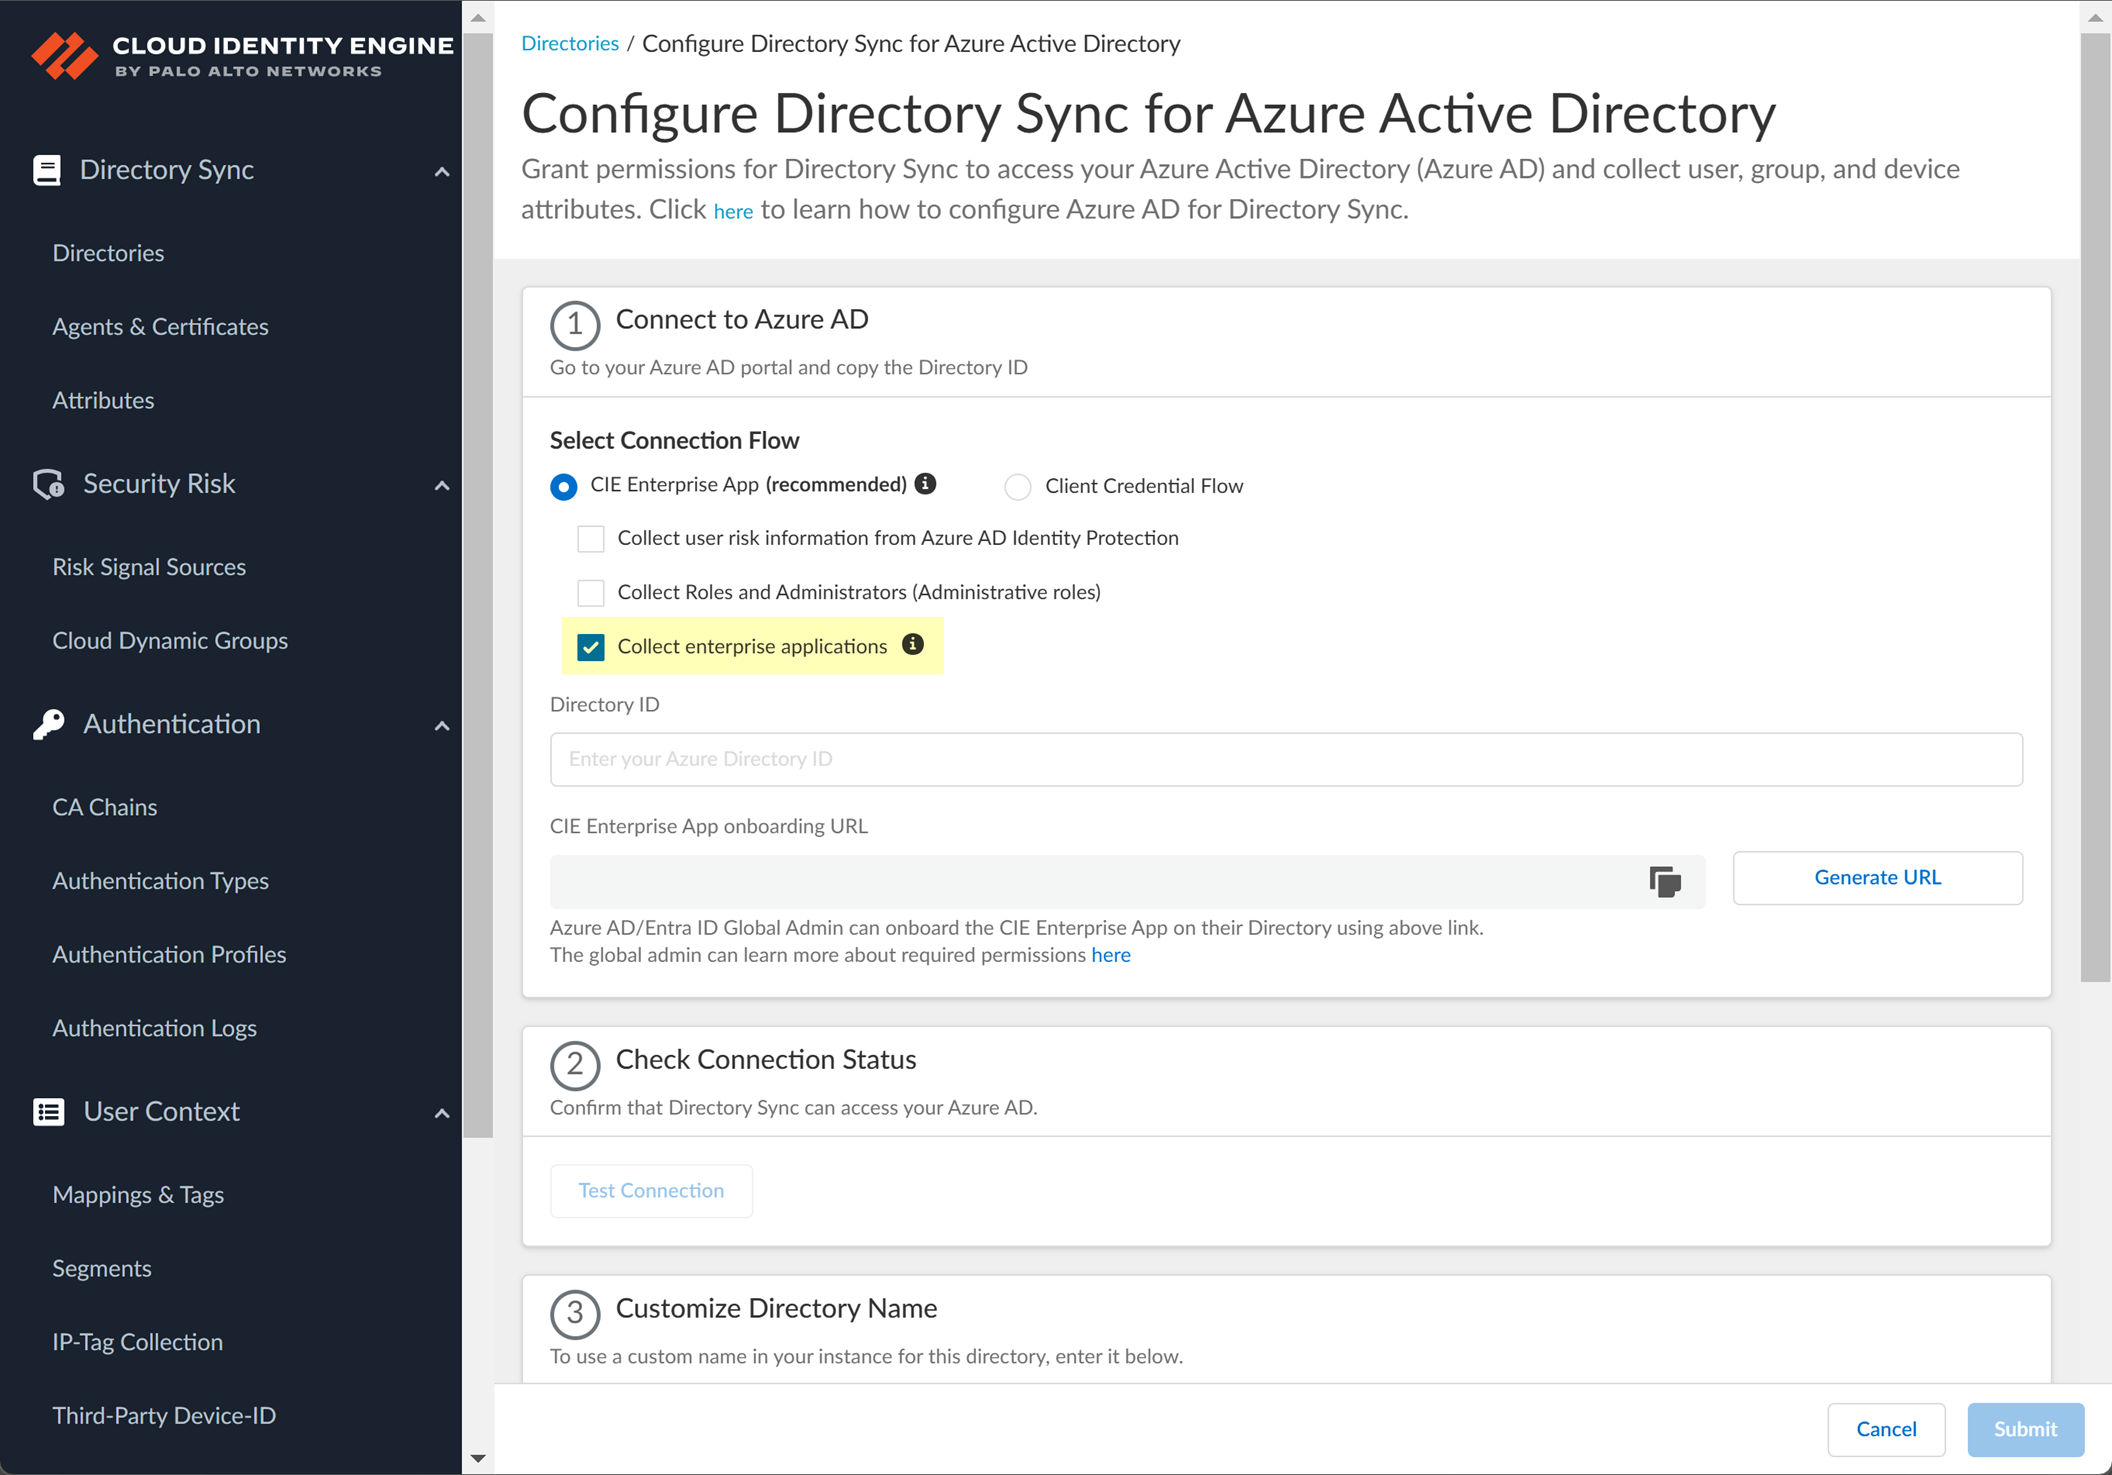
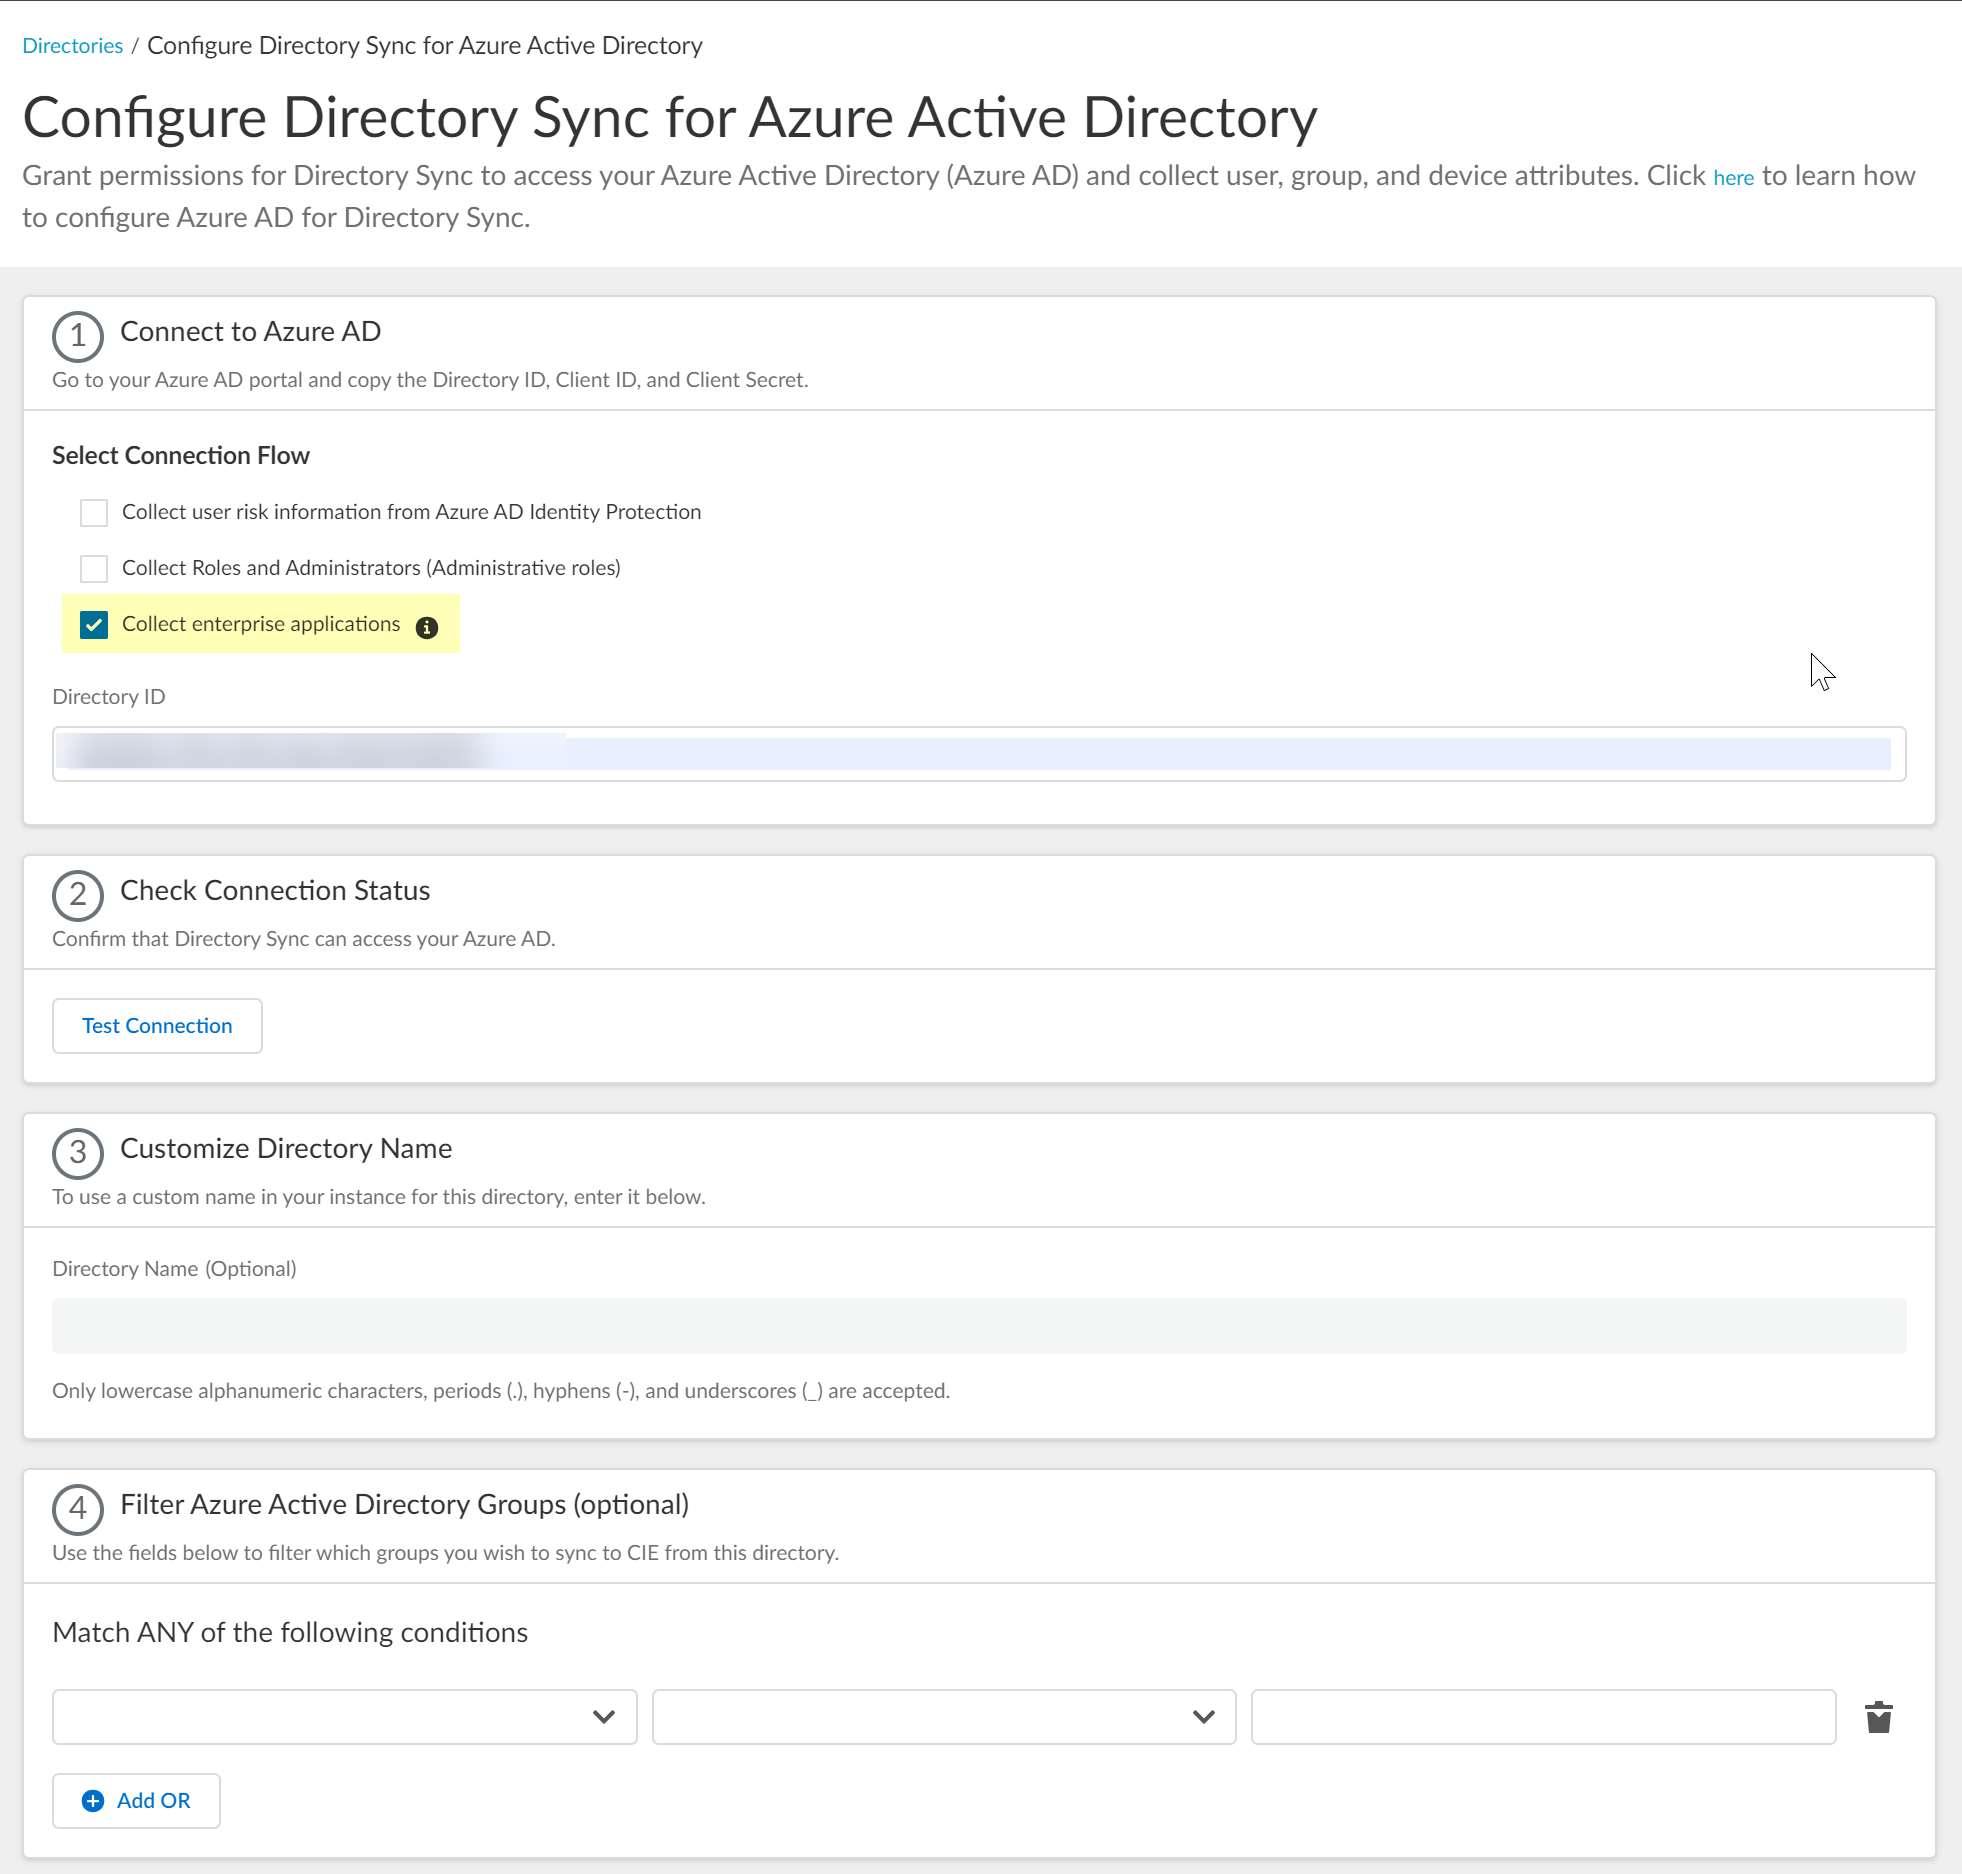
- Collect enterprise applications : Application.Read.All
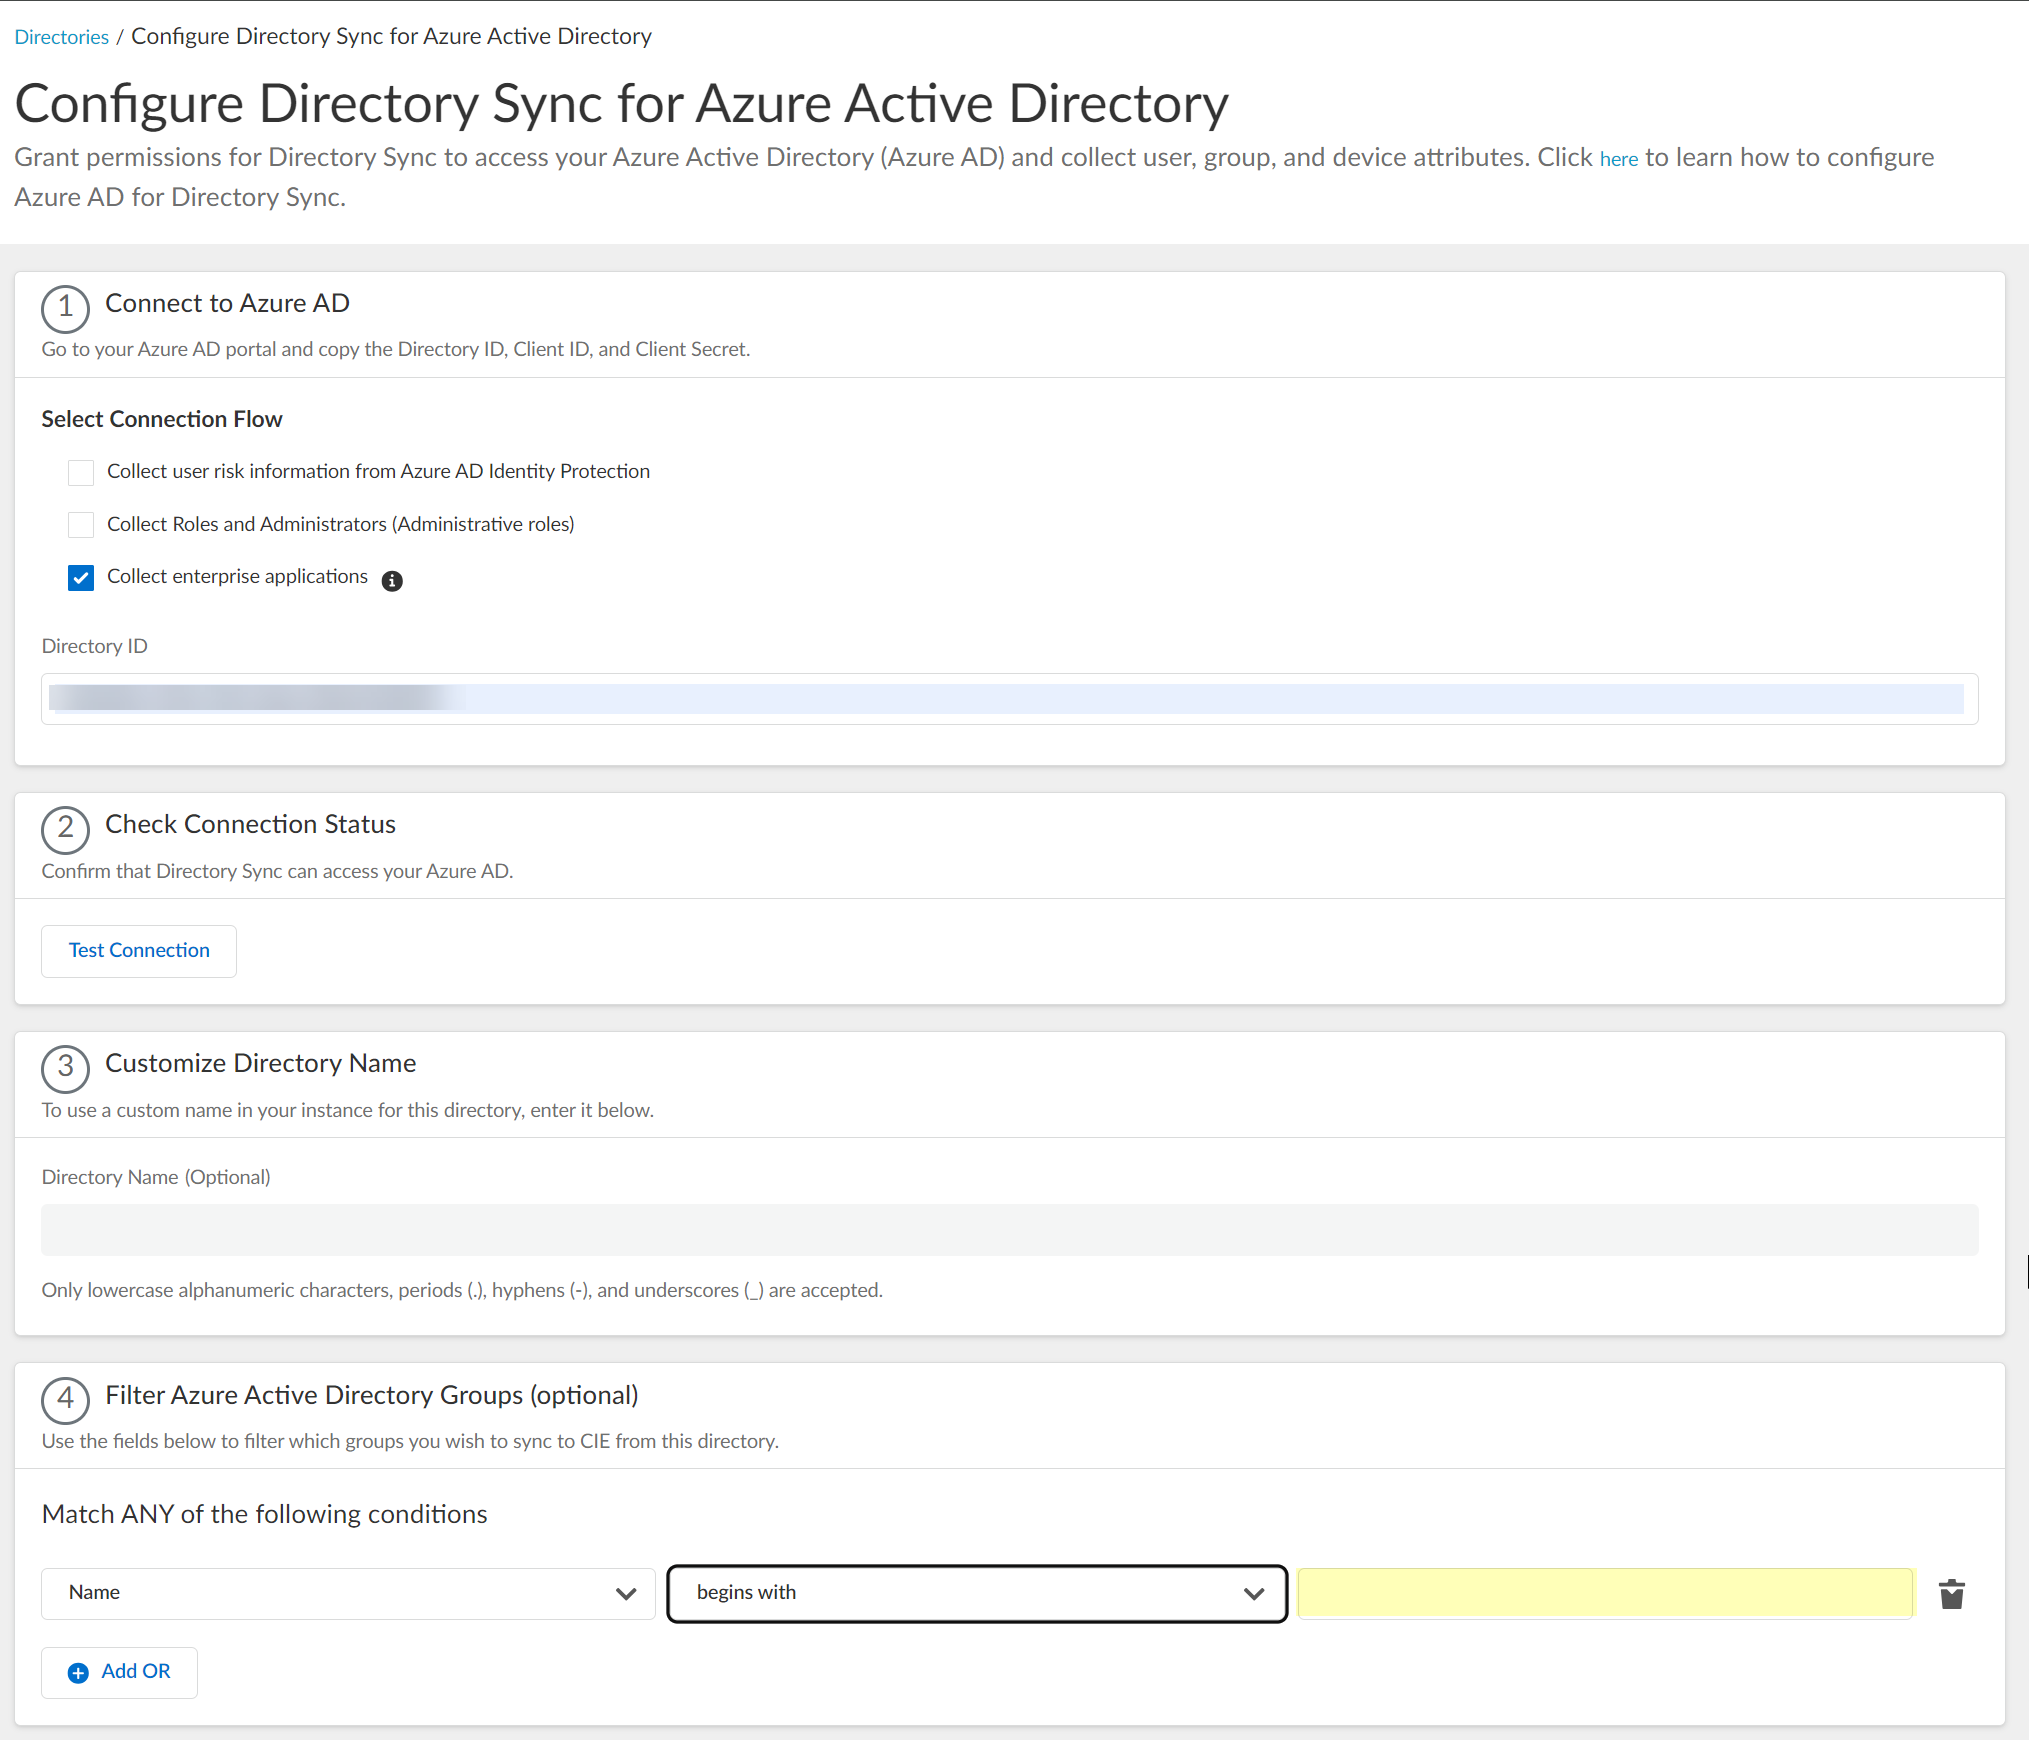
- Select whether you want to Collect user risk information from Azure AD Identity Protection to use in attribute-based Cloud Dynamic User Groups .
- Select whether you want to Collect Roles and Administrators (Administrative roles) to retrieve roleAssignments attribute information for users and groups. Allowing the Cloud Identity Engine to include this information for analysis helps to prevent role-based malicious attacks.
By default, the Cloud Identity Engine enables this option for tenants who are associated with Cortex XDR.
- Select whether you want to Collect enterprise applications data so that it displays when you View Directory Data . If you don't want to collect the application data or you don't use application data in your Security policy, deselect the check box to decrease the sync time.
- Configure your Azure directory information in the Cloud Identity Engine.
- Enter the directory ID you copied in step
1.2
as the Directory ID .
- To obtain the CIE Enterprise App onboarding URL , click Generate URL then Copy the URL and open it in a new tab or window.
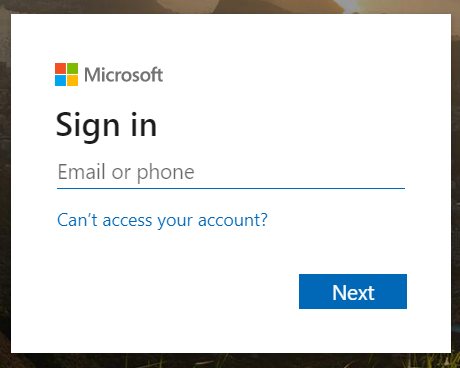
- Enter the email address or phone number for the Global Administrator Role account you use to connect to the Cloud Identity Engine then click Next .
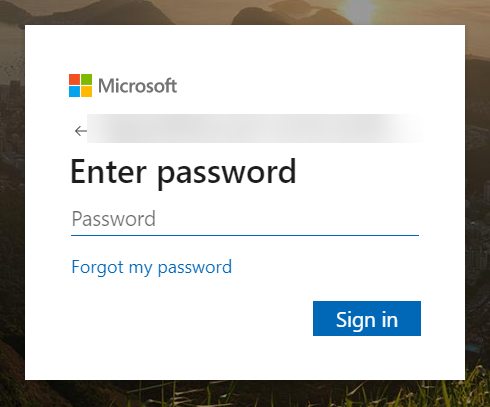
- Enter your password and Sign in .
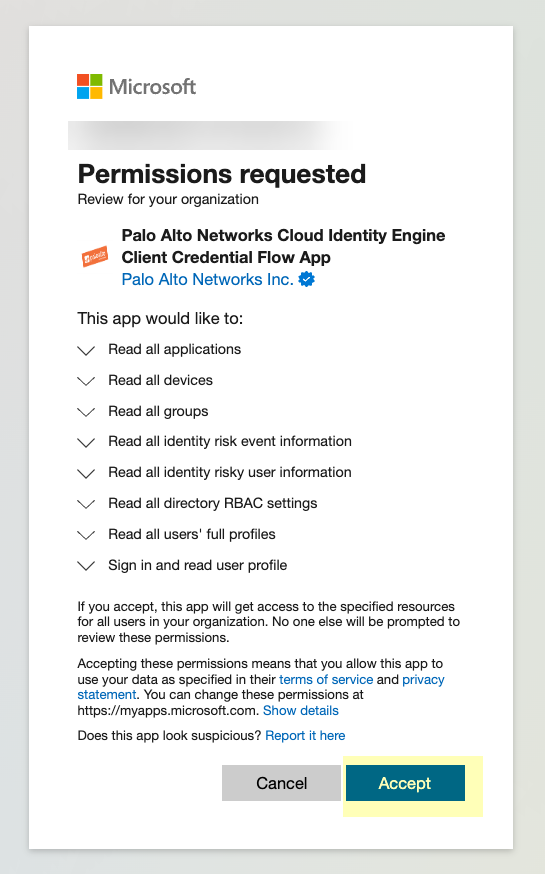
- Click Accept to grant the necessary permissions for your Azure directory.
When you accept, Azure automatically enables the following required permissions, as well as the additional information type permissions listed in step
3
:
- Device.Read.All —Application, Read all devices
- Group.Read.All —Application, Read all groups
- User.Read.All —Application, Read all users' full profiles
- User.Read —Delegated, Sign in and read user profile
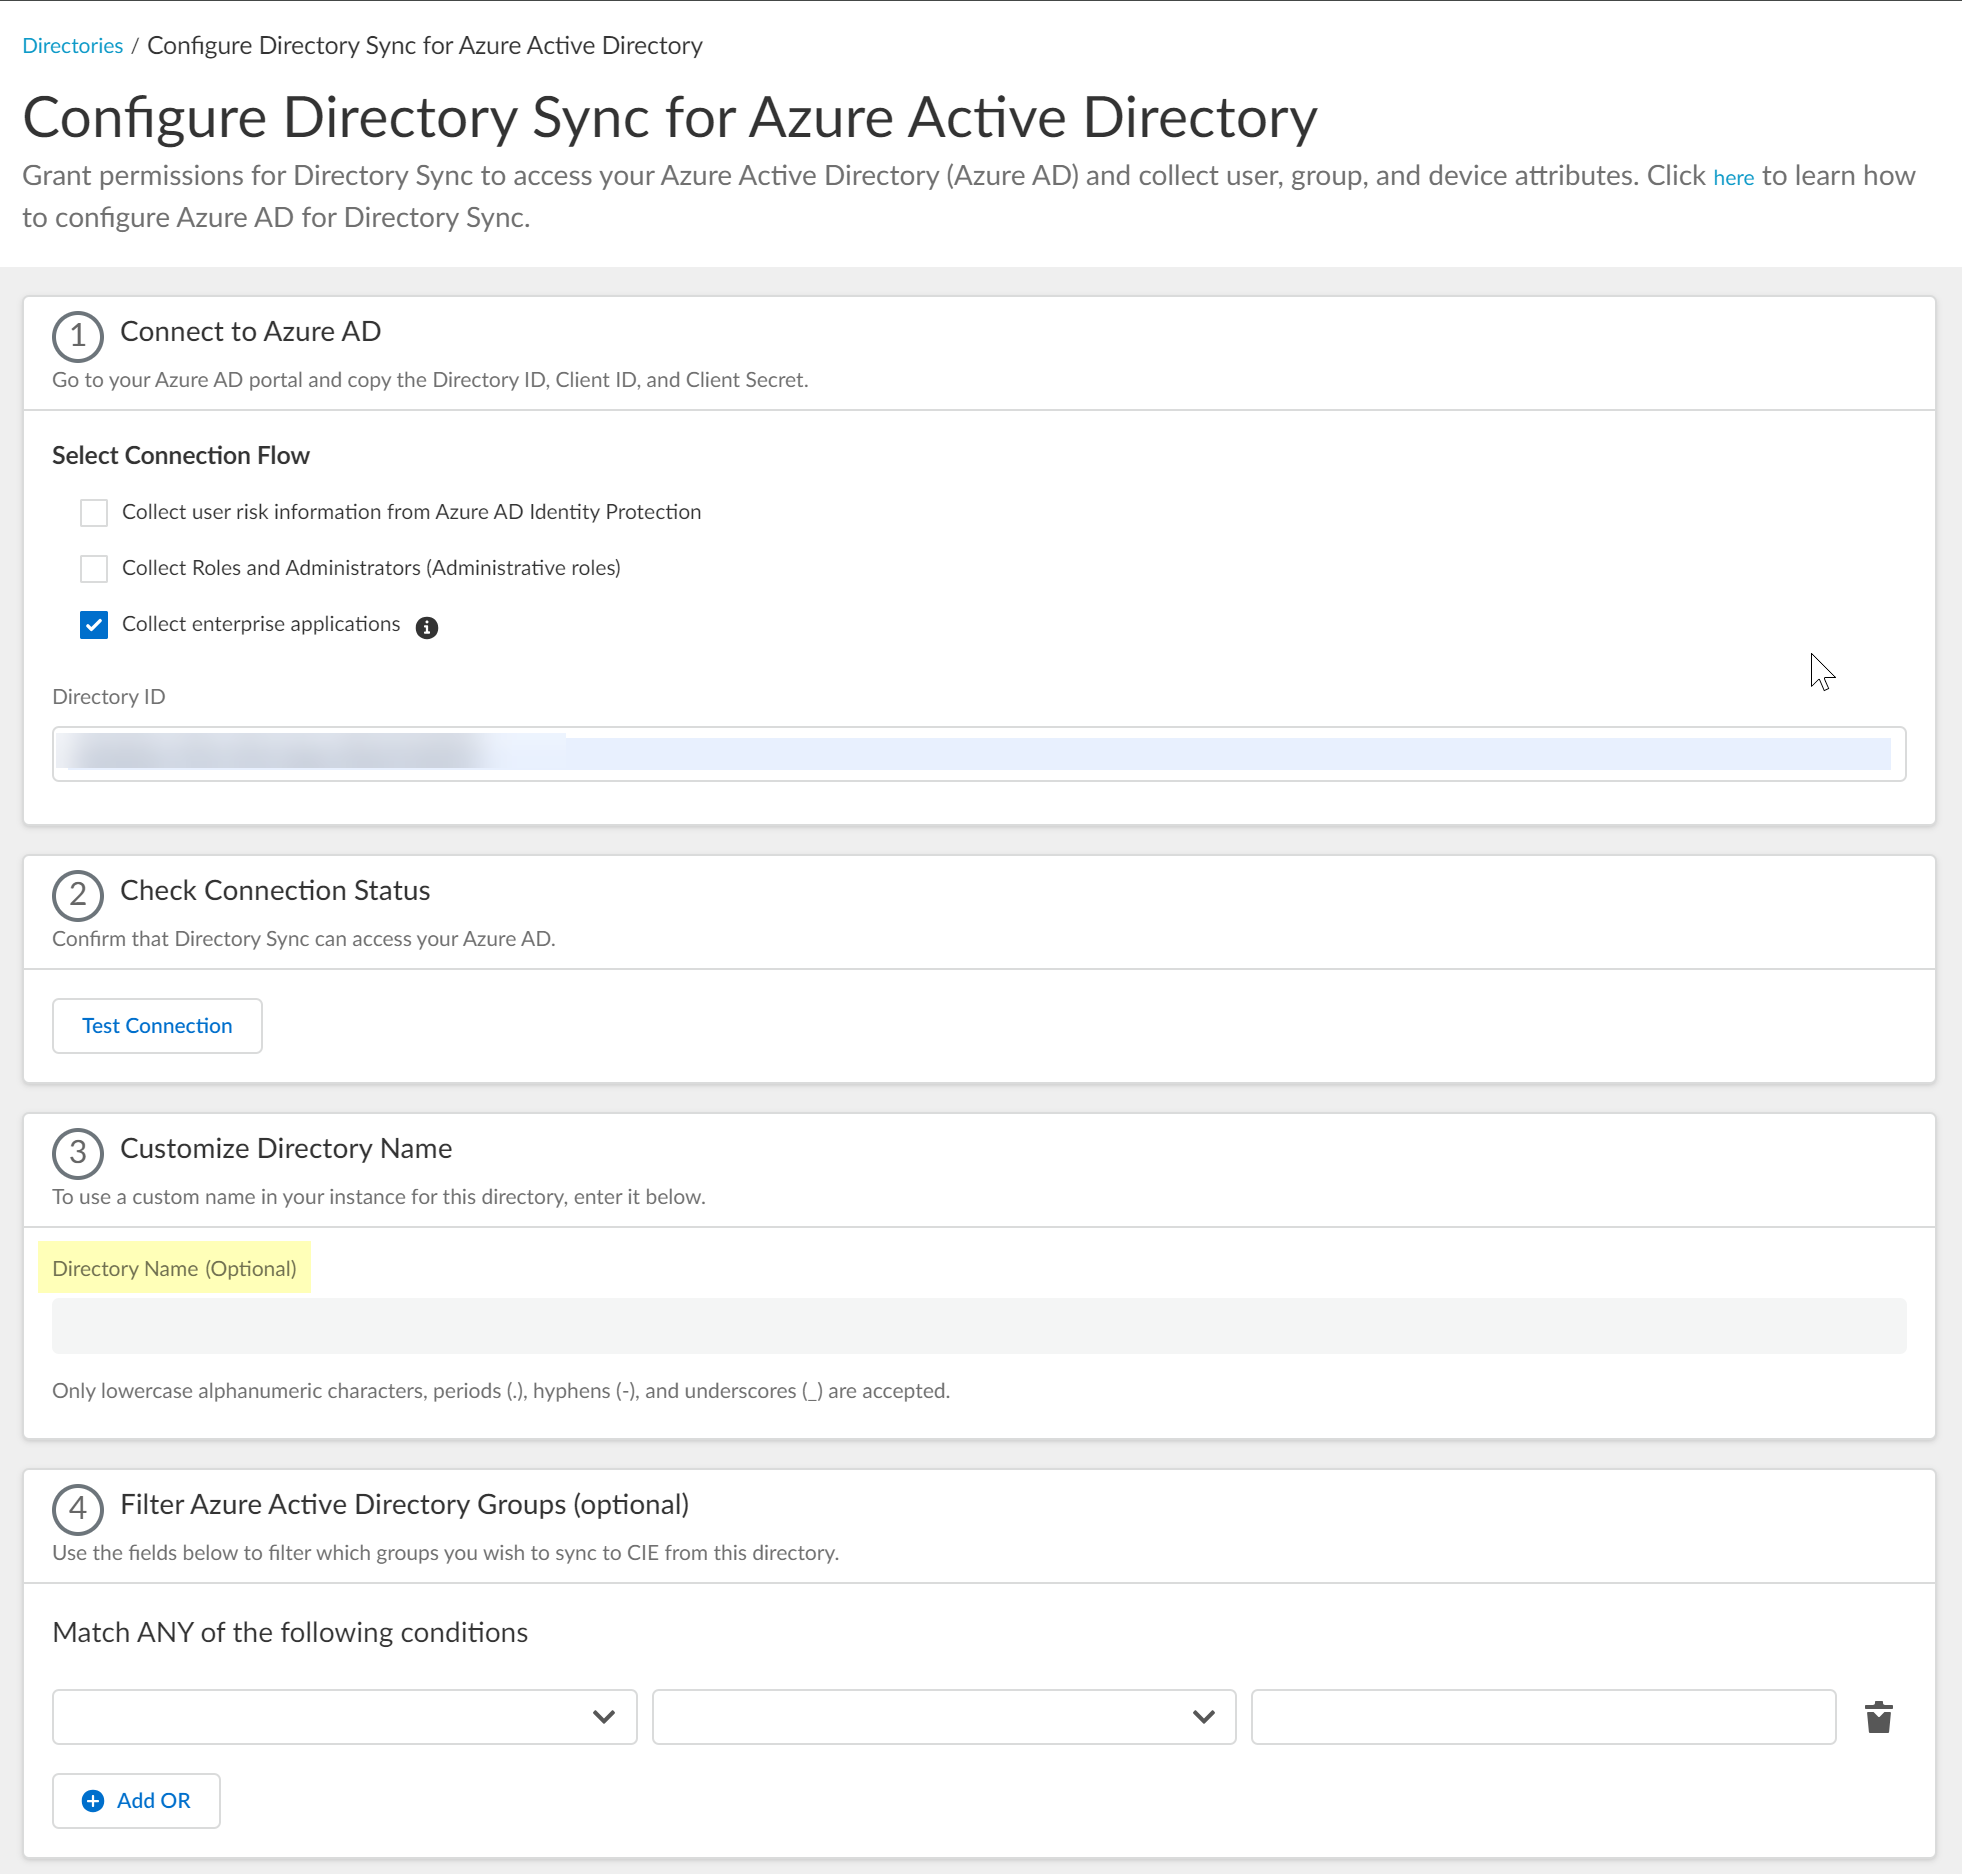
- Click Test Connection to confirm that the Cloud Identity Engine can successfully connect to your Azure AD tenant.

- (Optional) Enter a custom Directory Name (Optional) to use in the Cloud Identity Engine.
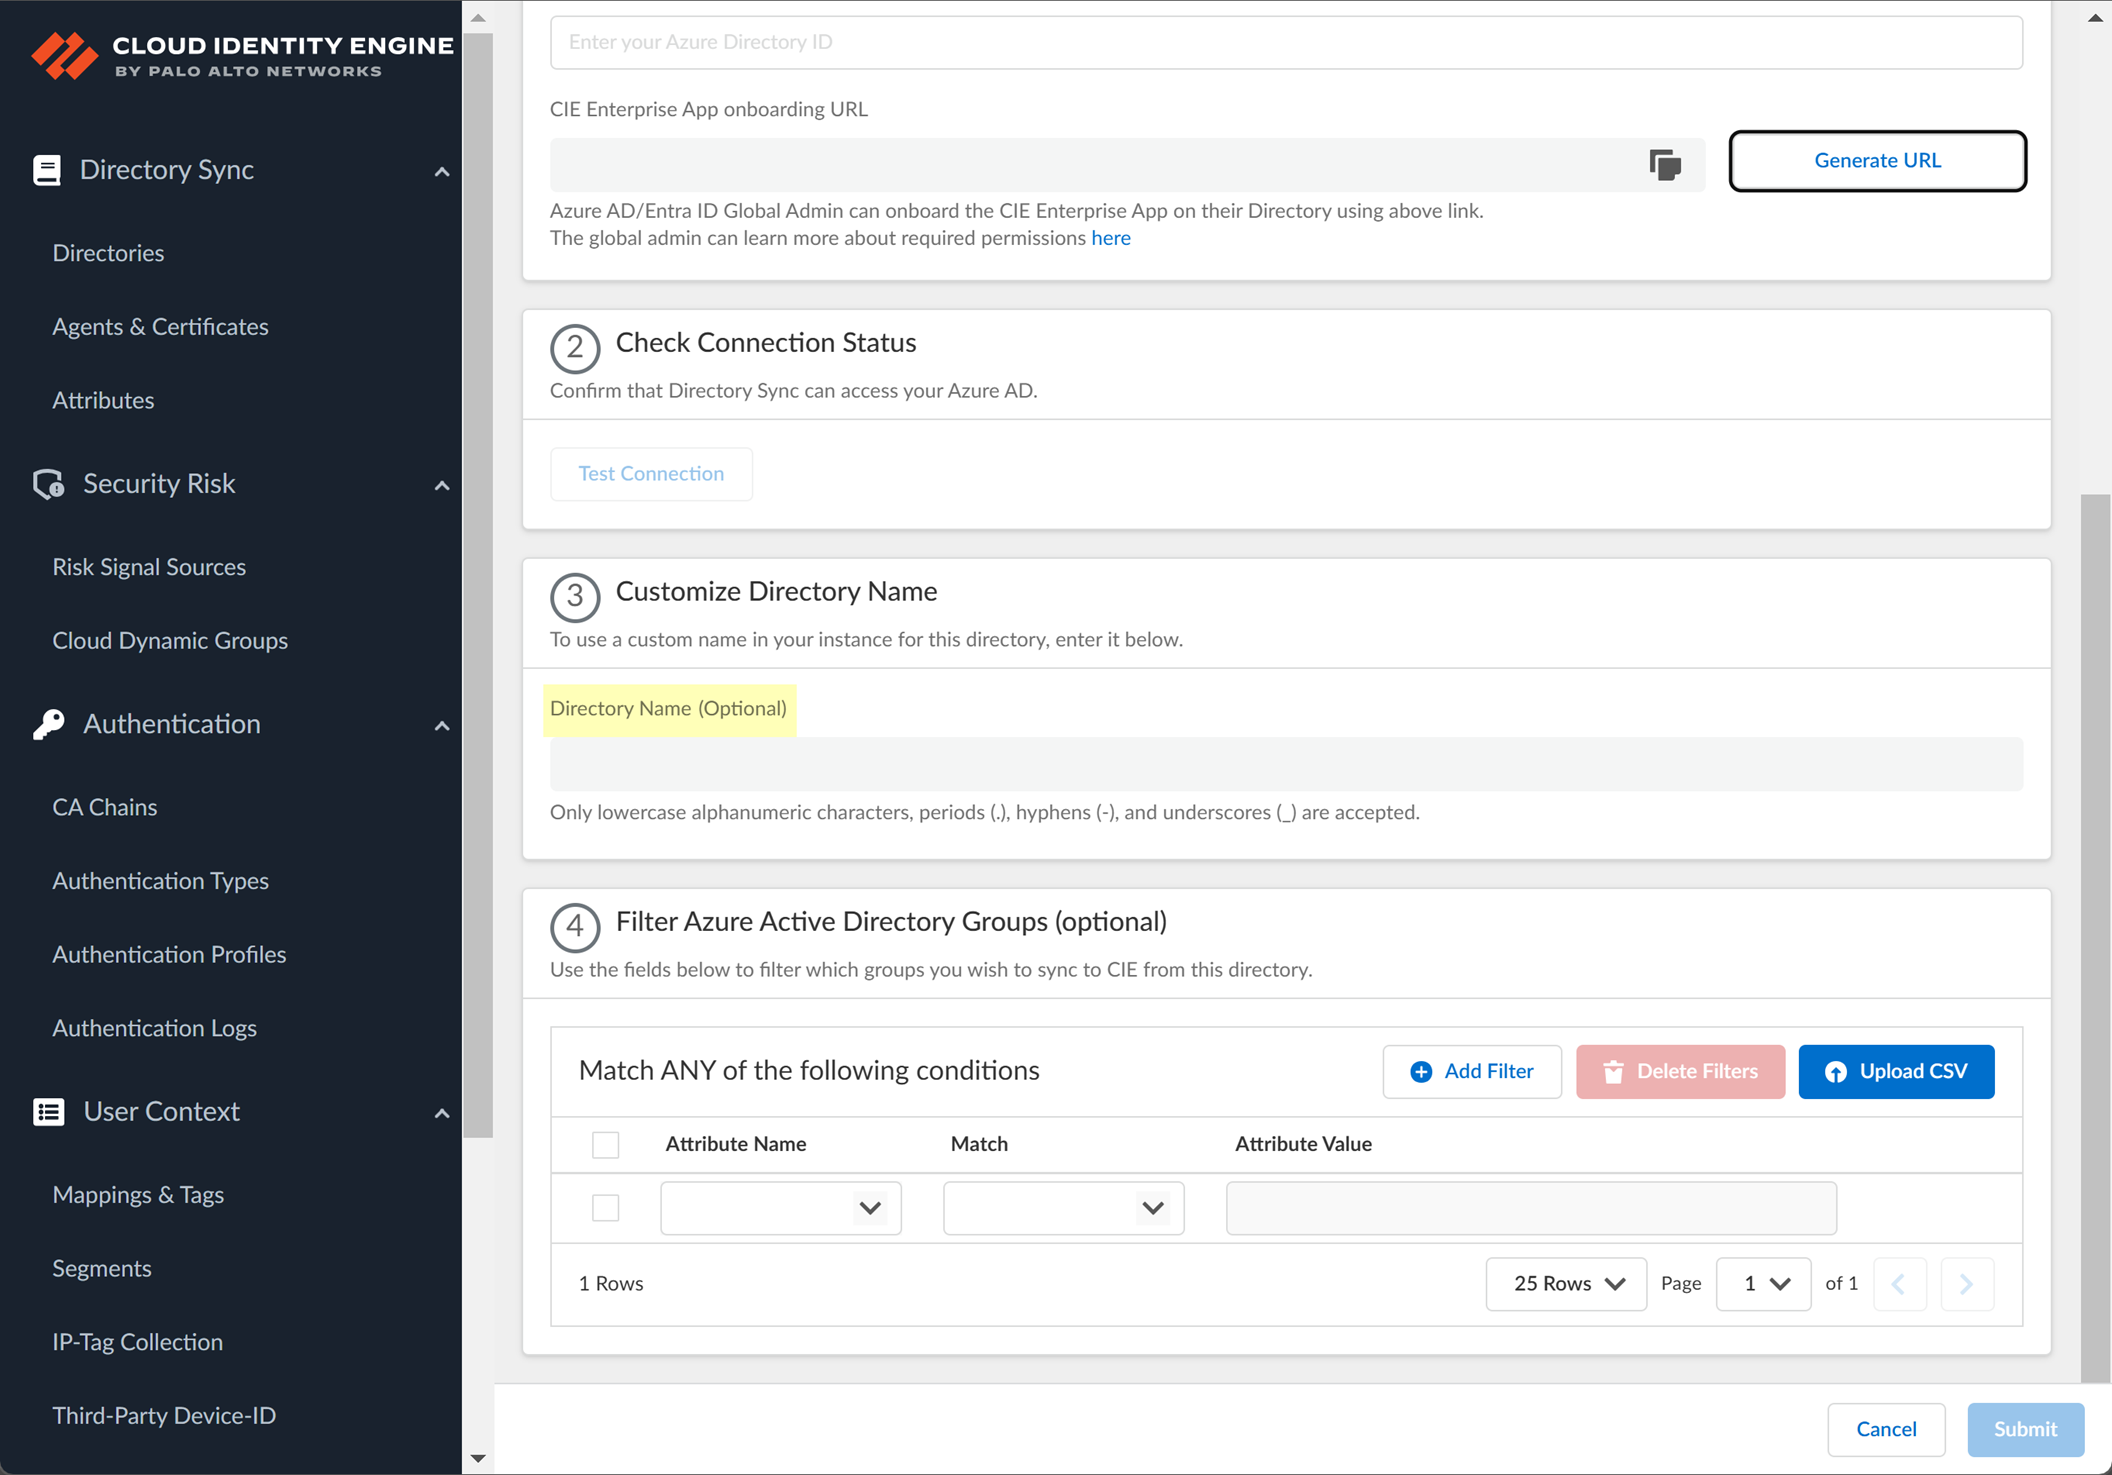
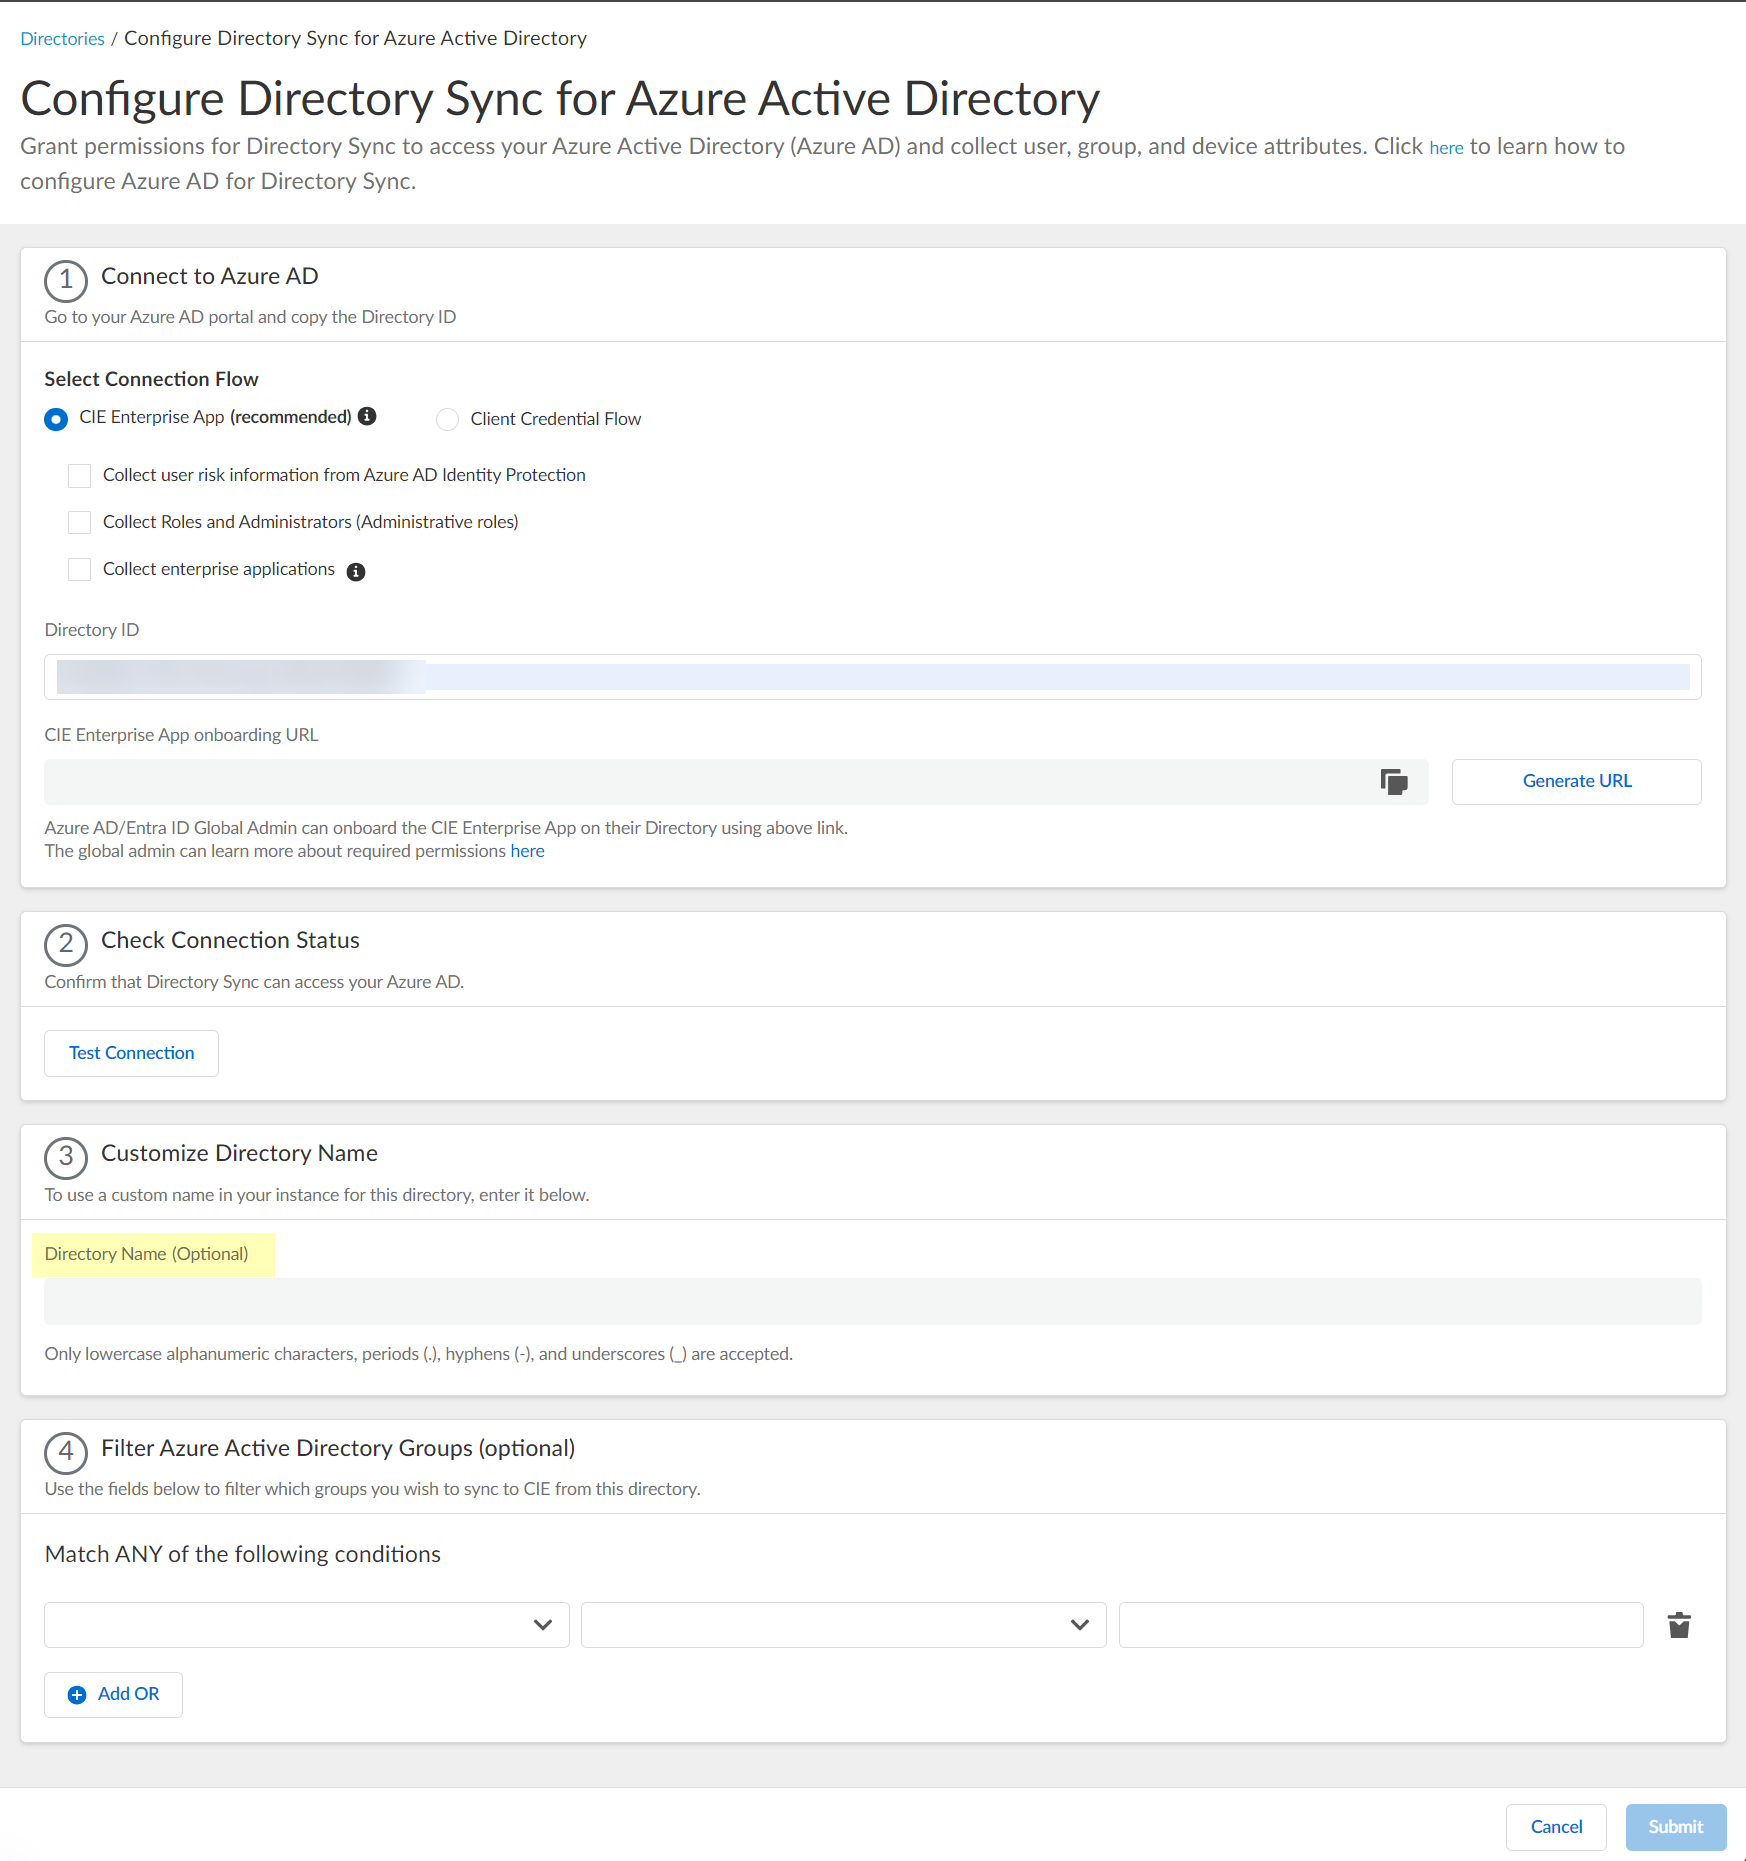
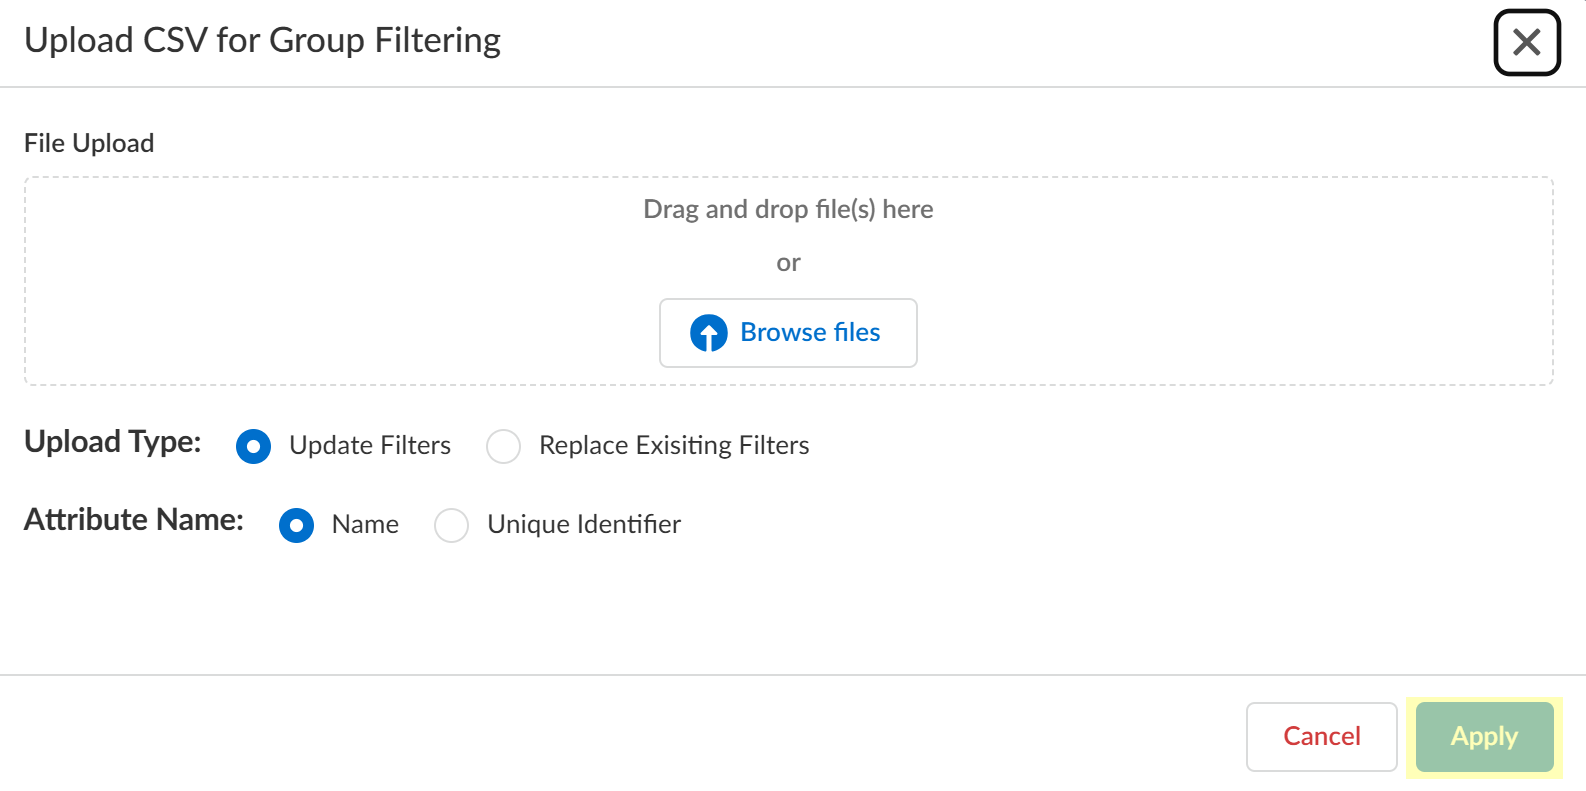
- (Optional) Upload a .CSV file to use as a
filter for groups
.
- Click Upload CSV to upload a comma-separated value (CSV) file to use as a filter.

- Drag and drop the .CSV file or click Browse files to select the .CSV file you want to use as a filter.
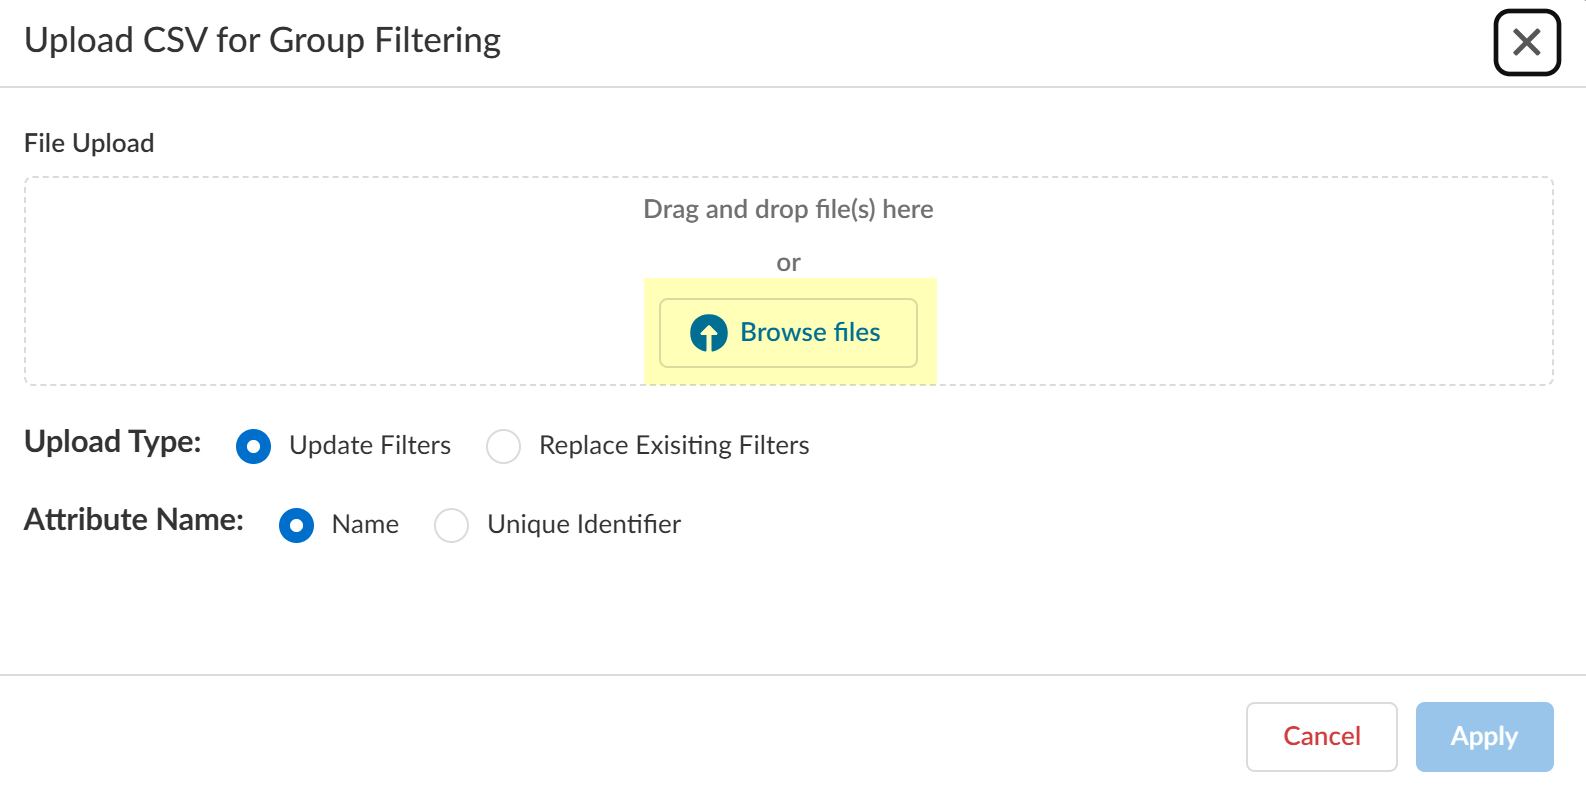
- Select the Upload Type for the filter.
- Update Filters —Update the existing filters with the .CSV data.
- Replace Existing Filters —Replace the existing filters with the .CSV data.
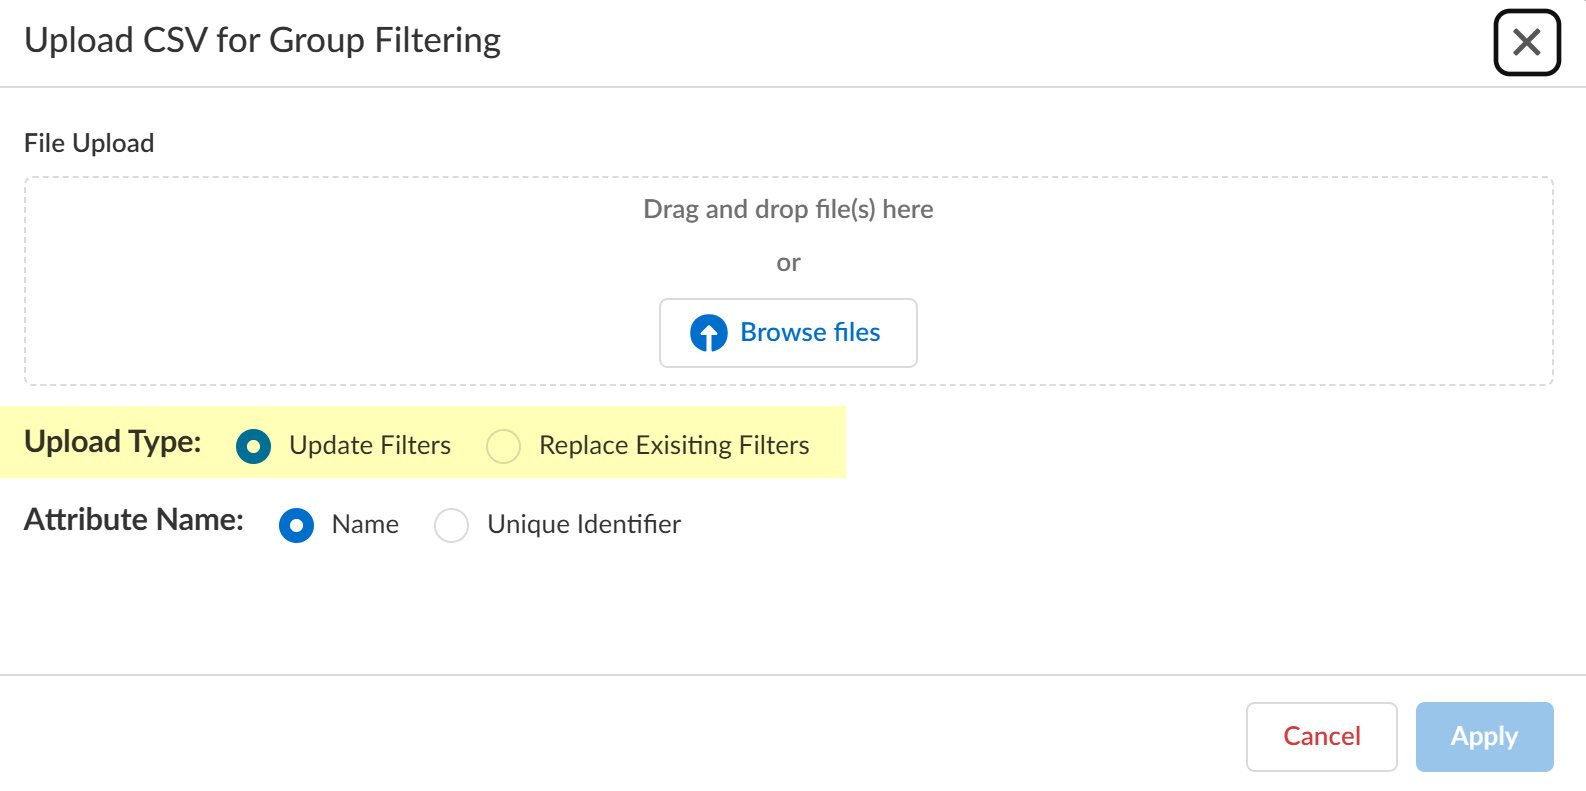
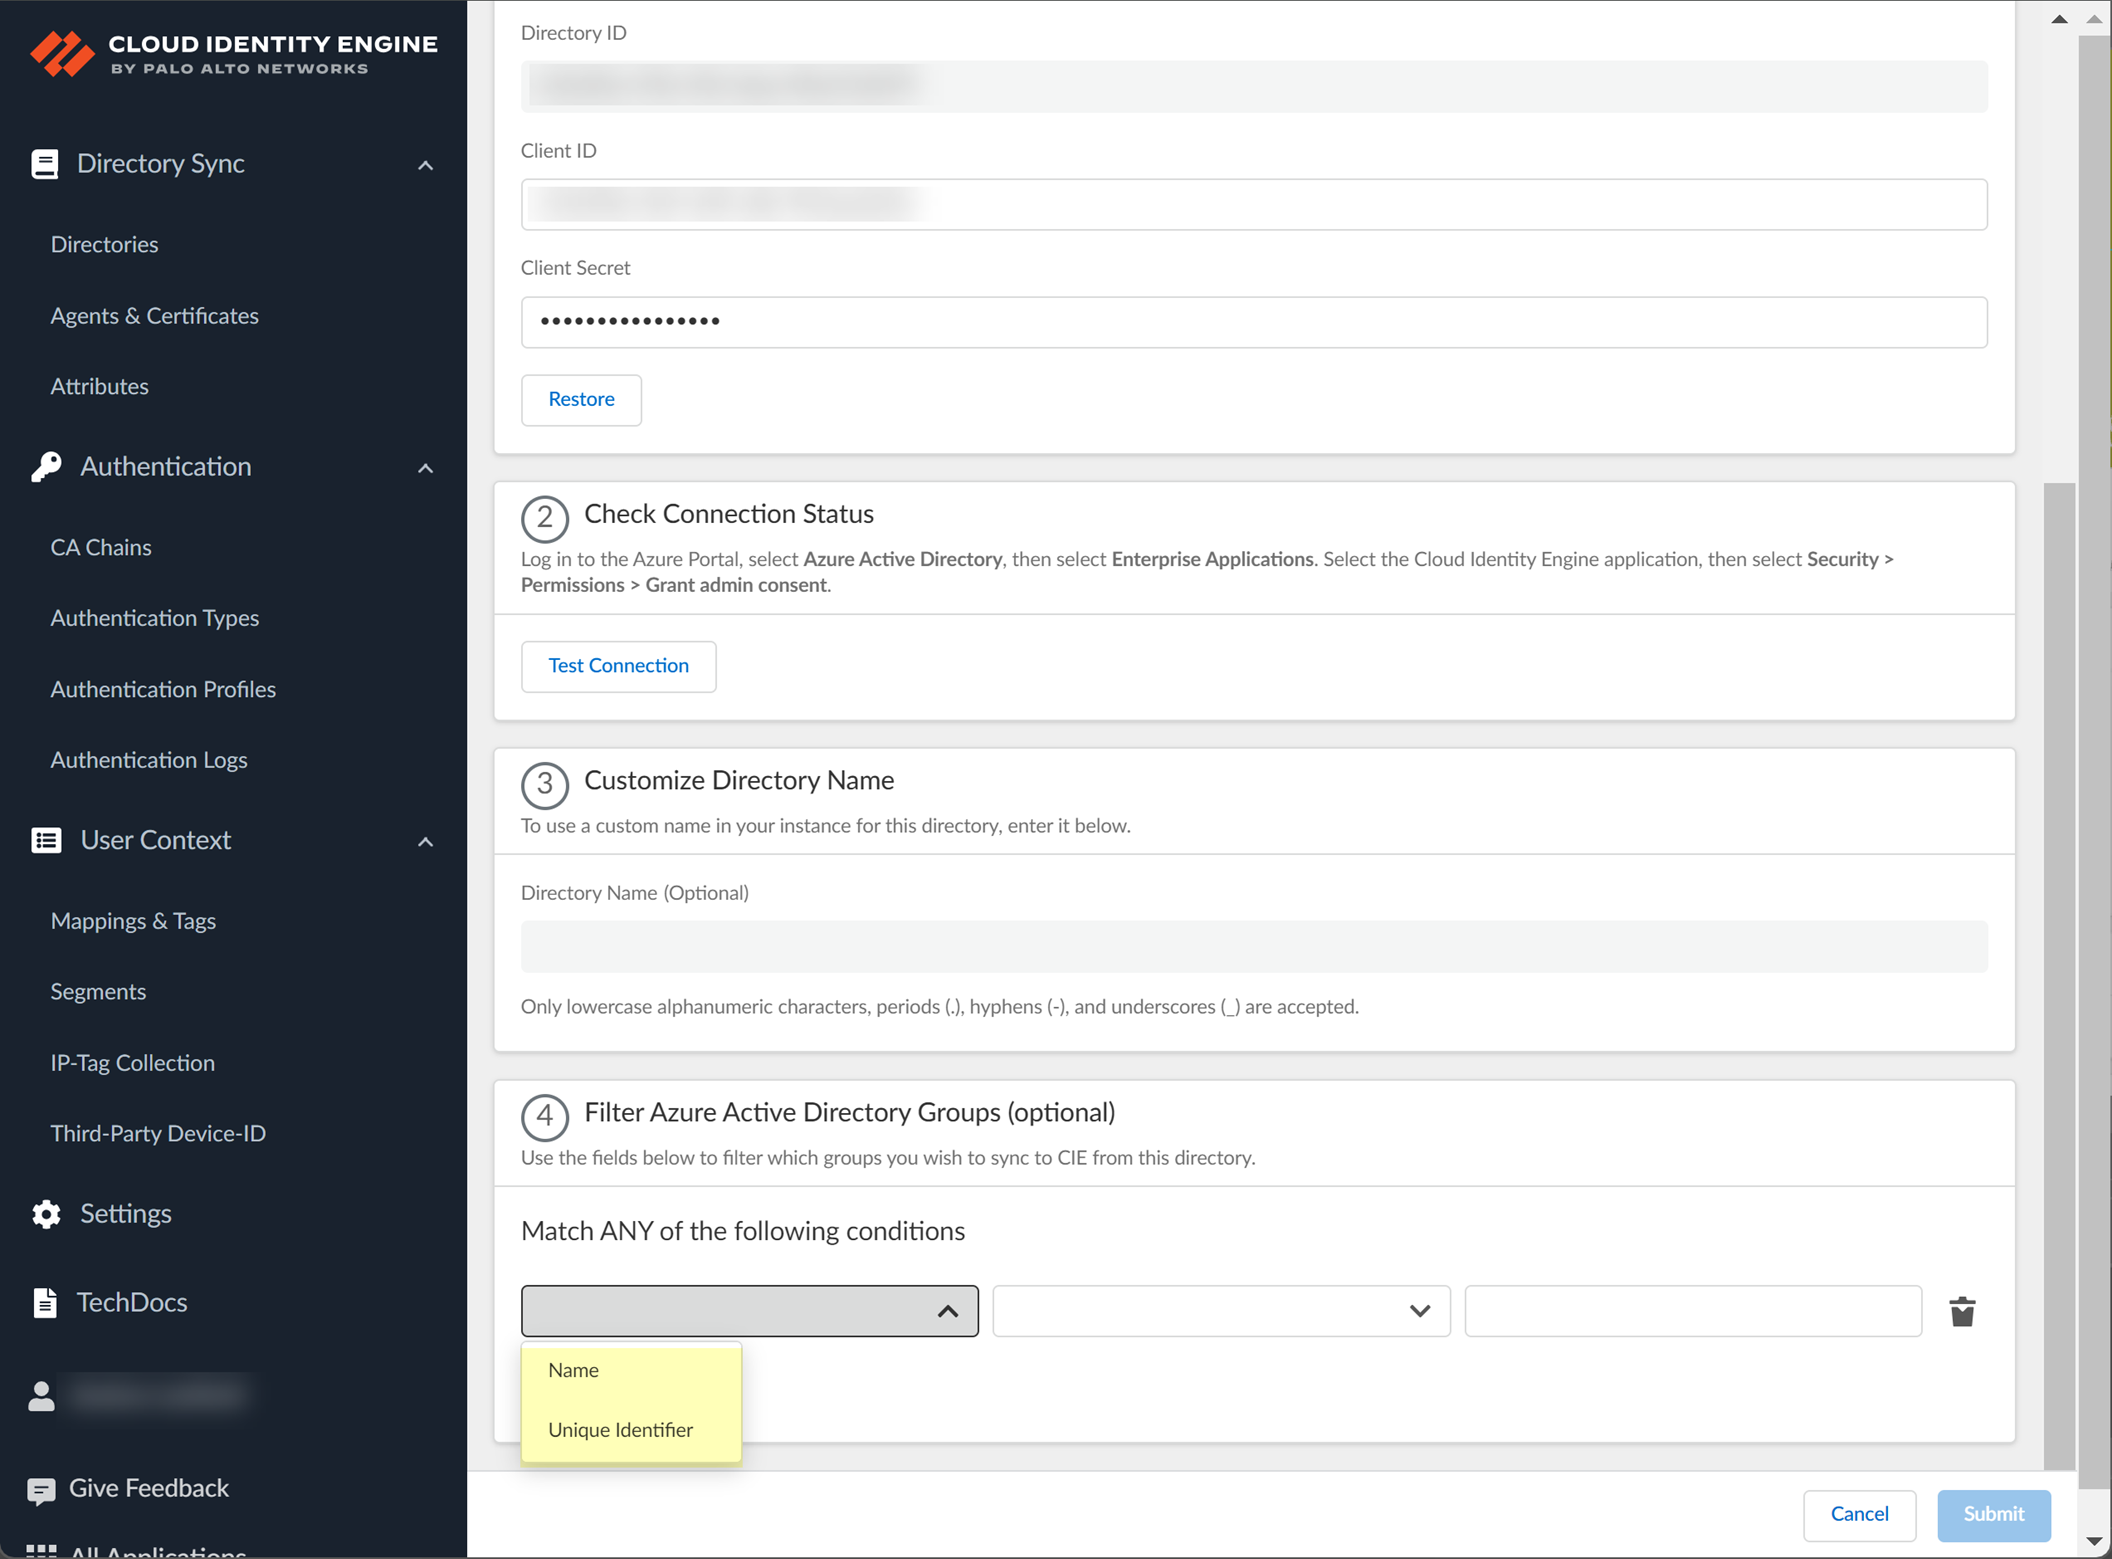
- Select the Attribute Name you want to use for the filter ( Name or Unique Identifier ).
- Click Apply to confirm the changes.
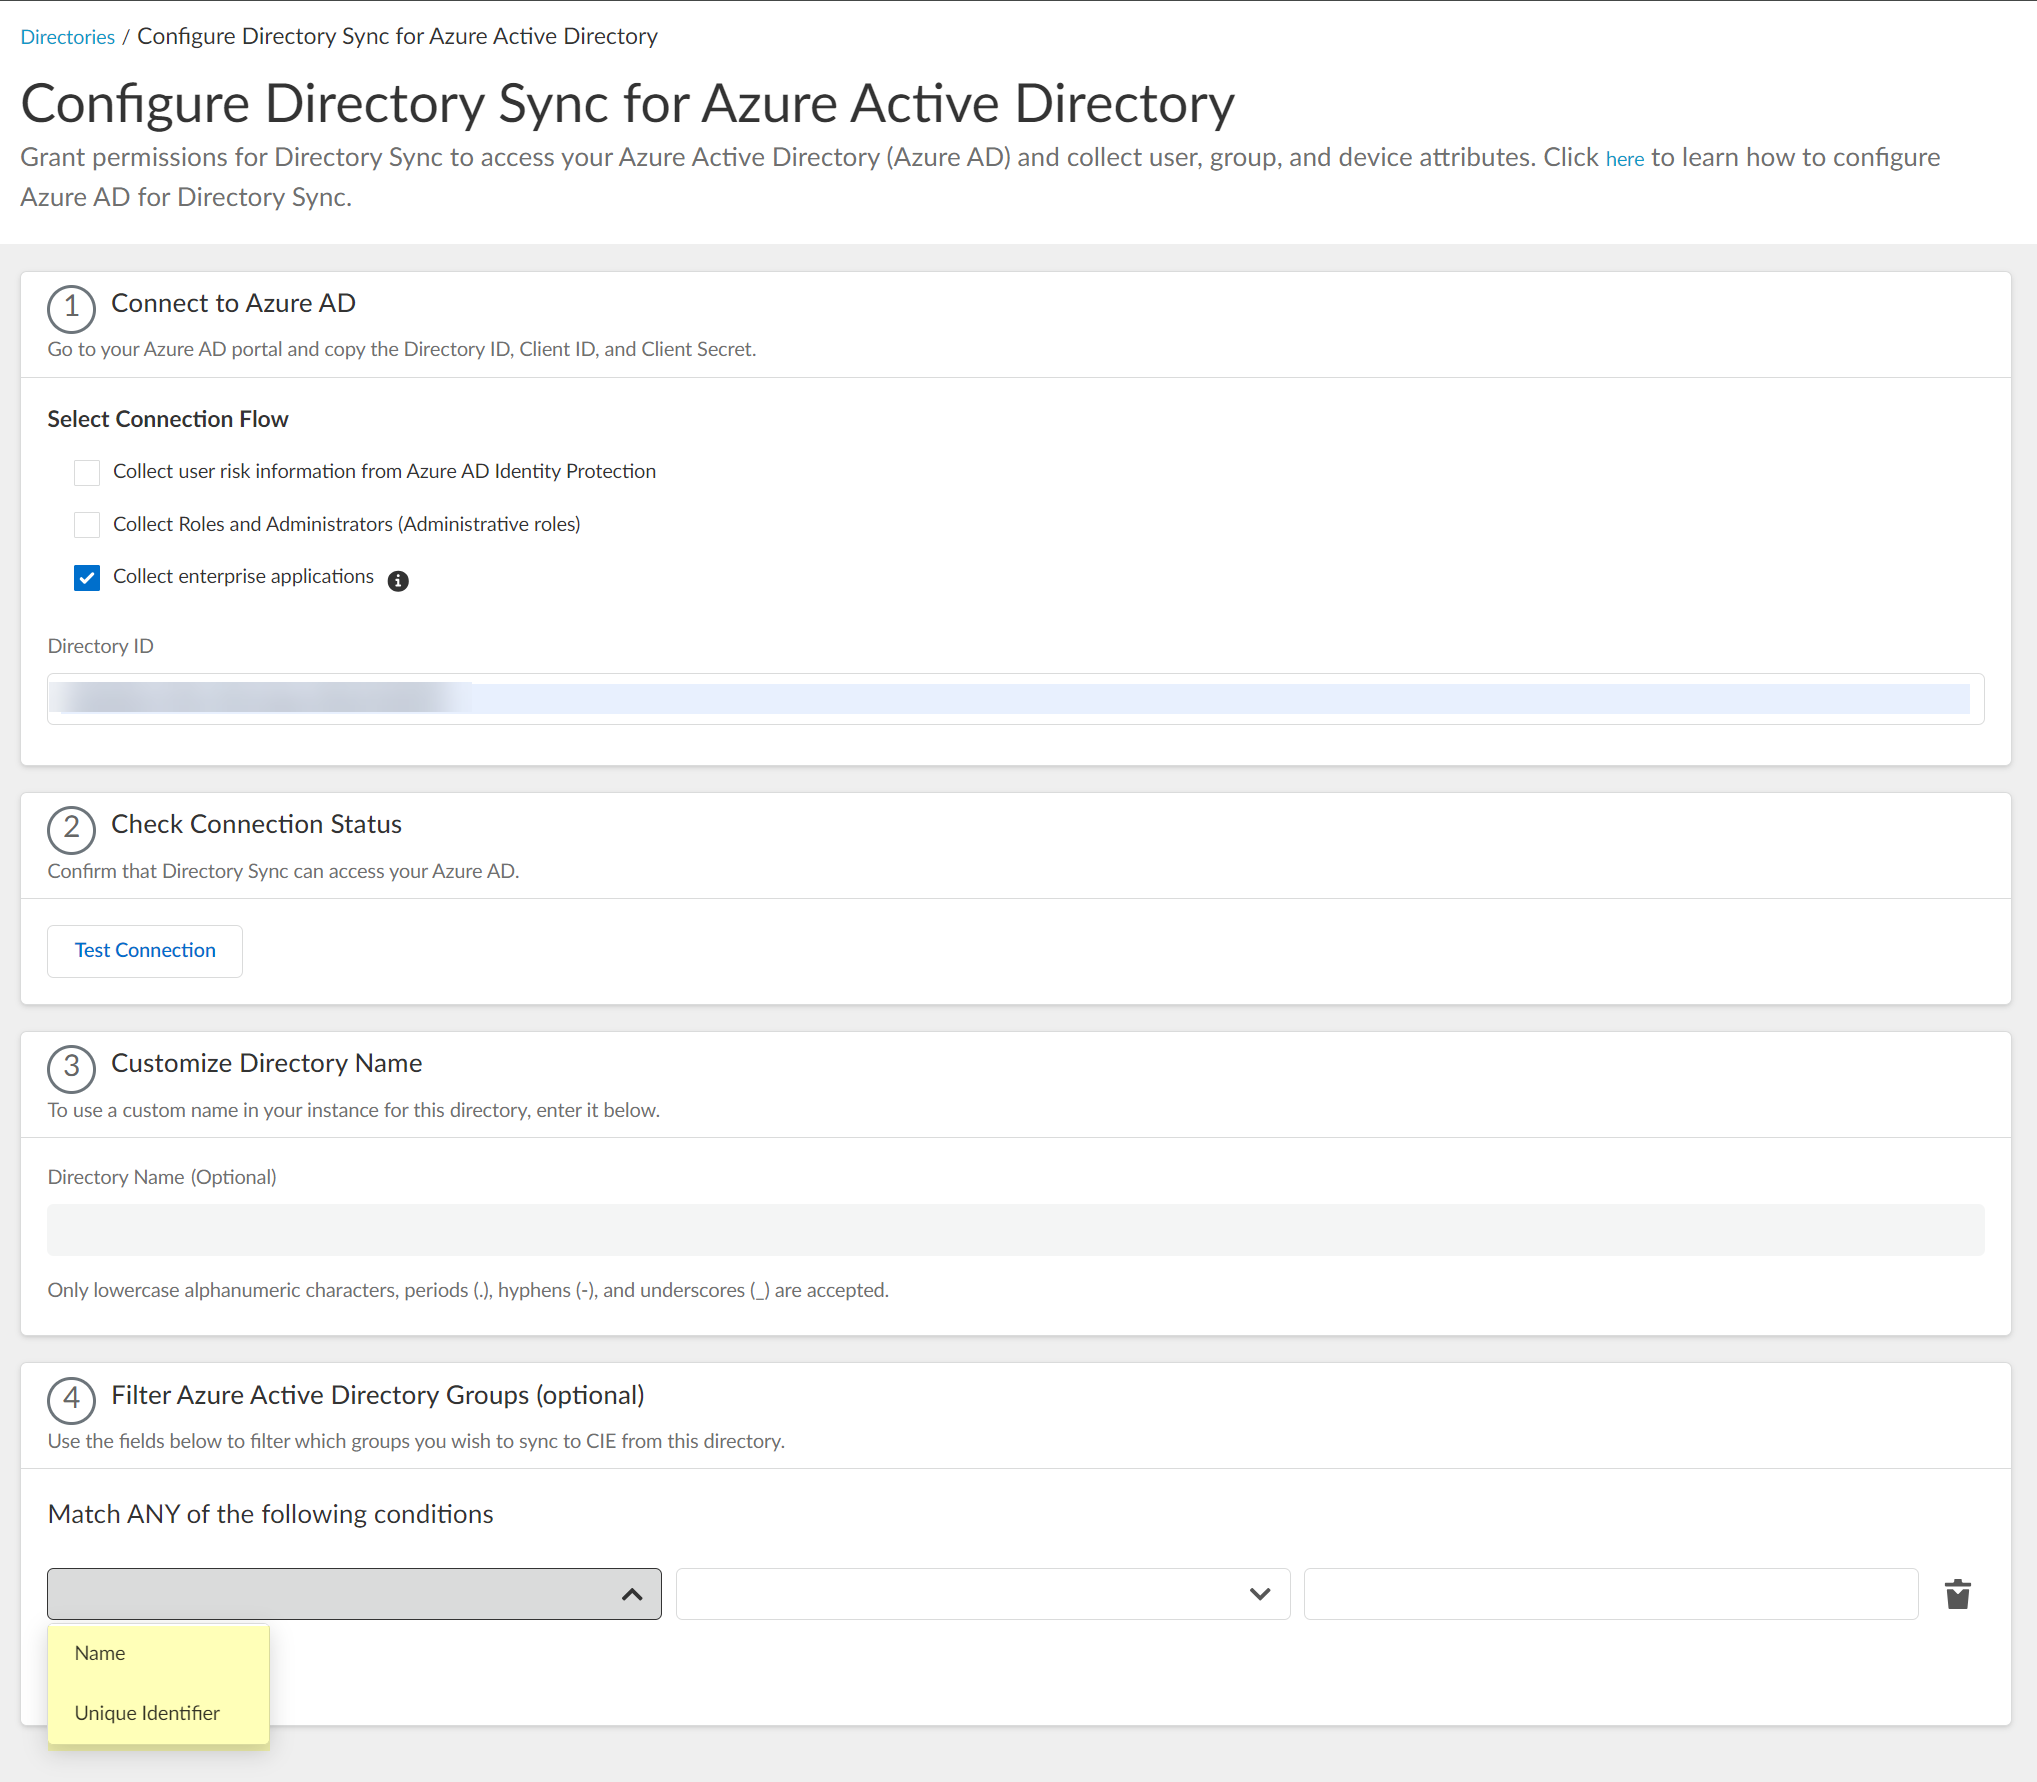
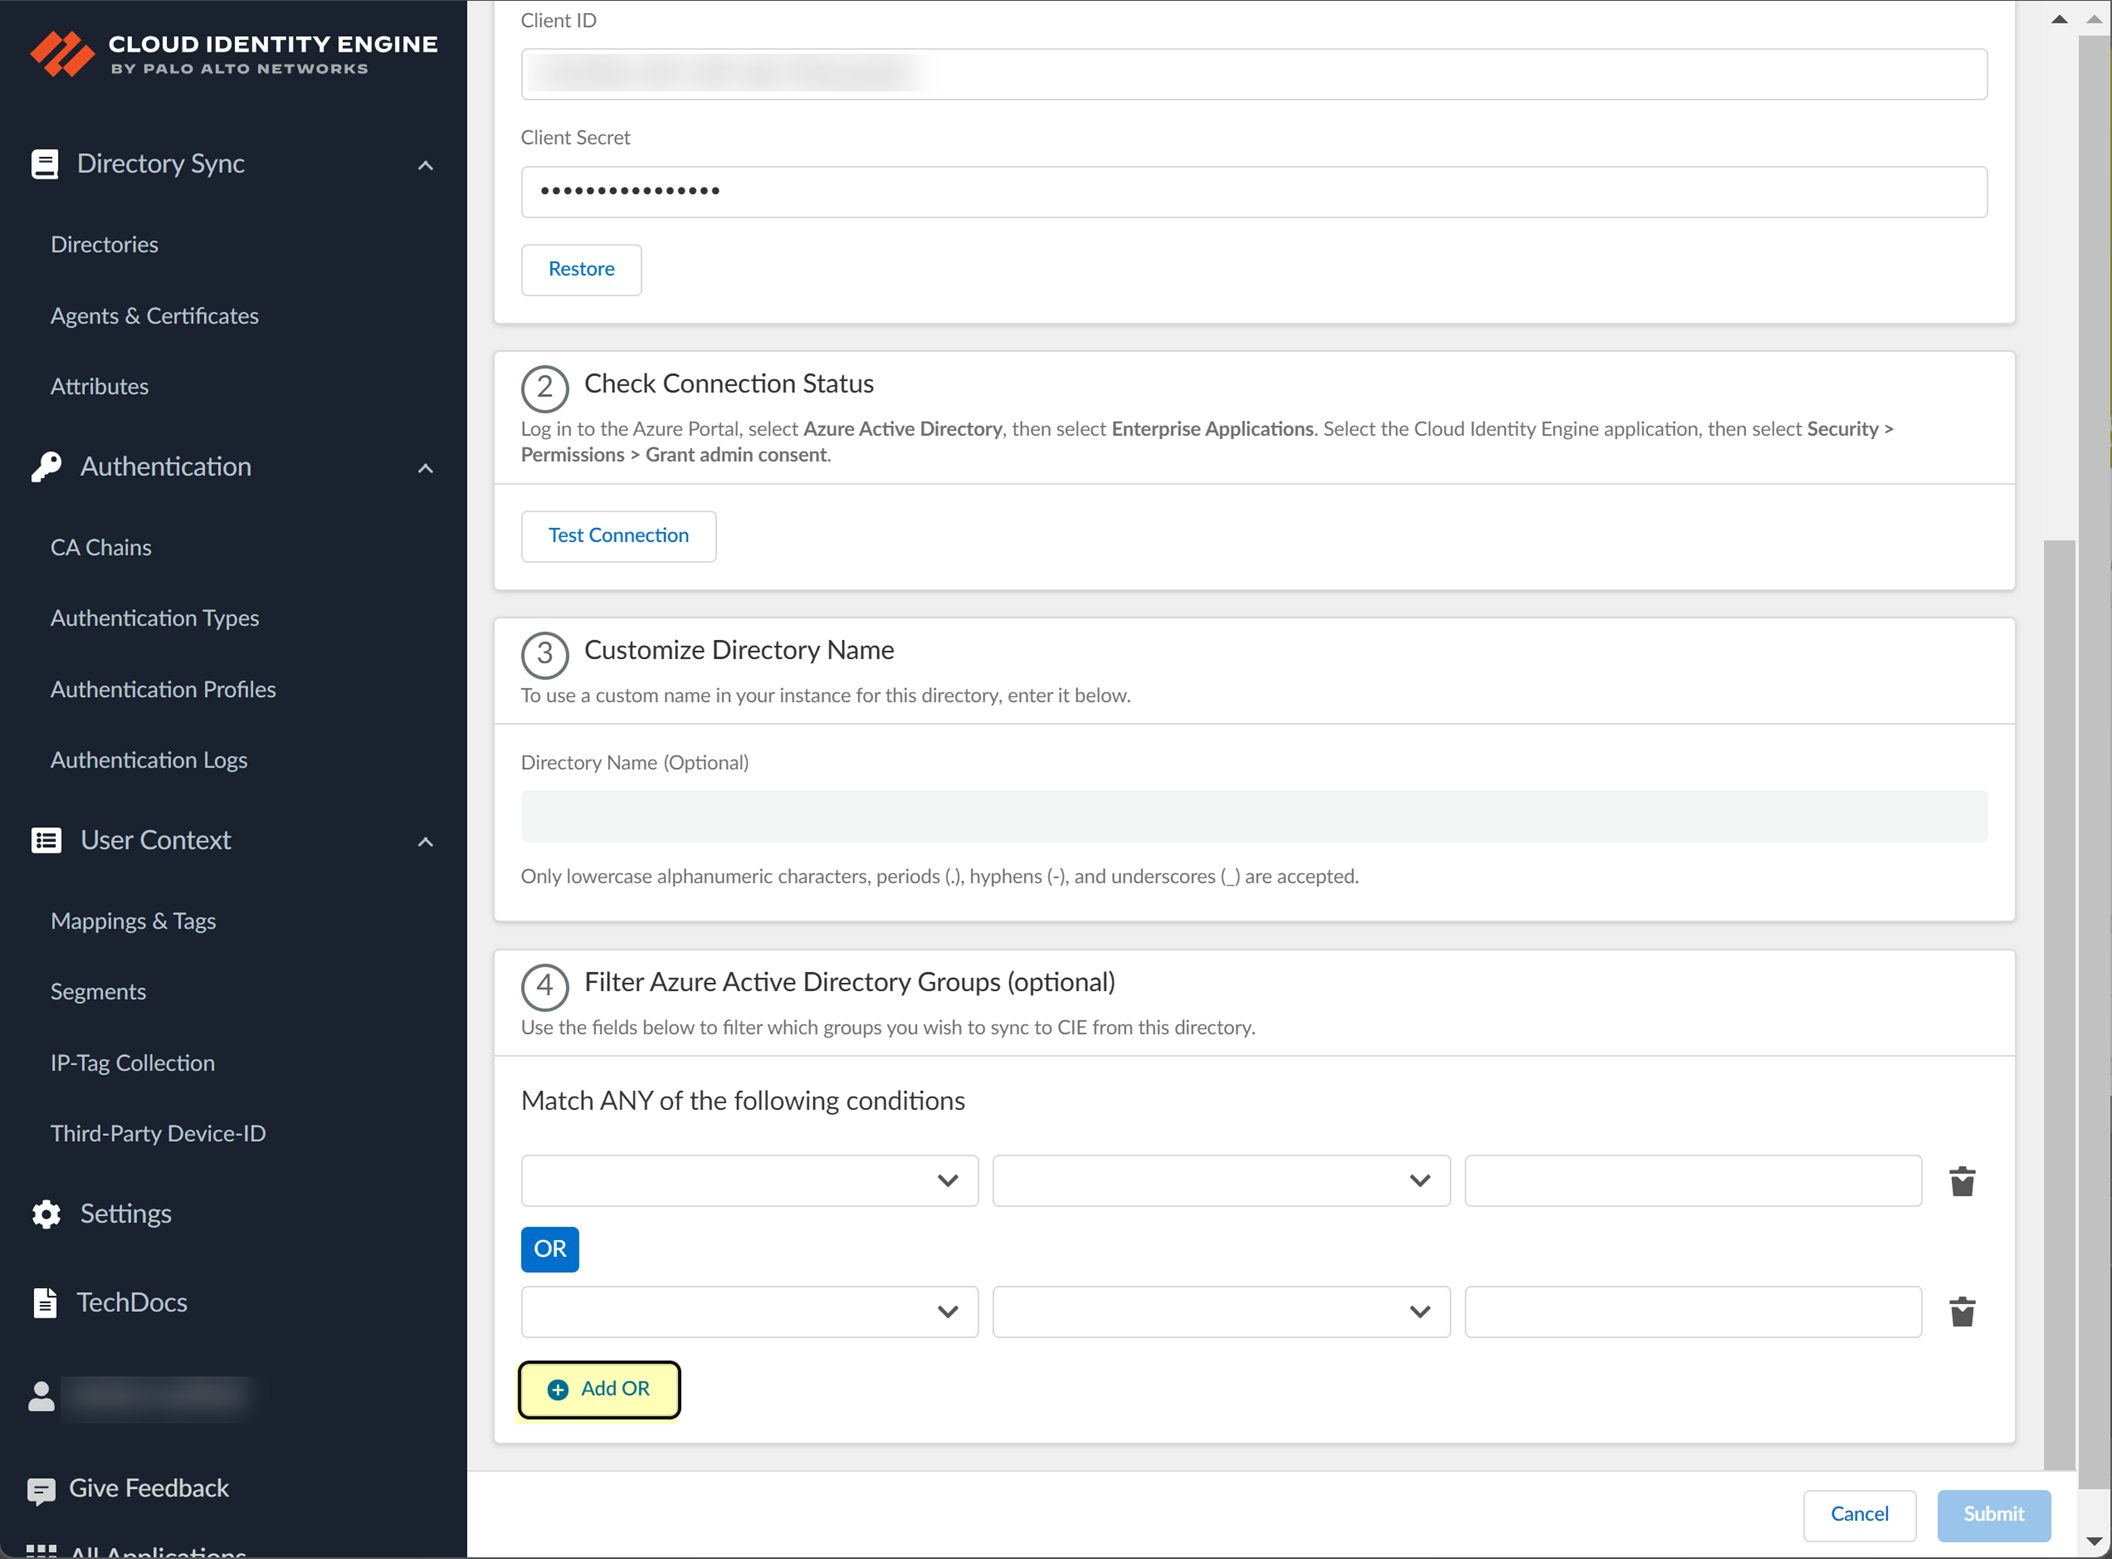
- (Optional) Select whether you want to Filter Azure Active Directory Groups.
- Select the group attribute you want to use as a filter.
- Name —Filter the groups based on the group name.
- Unique Identifier —Filter the groups based on the unique identifier for the group.
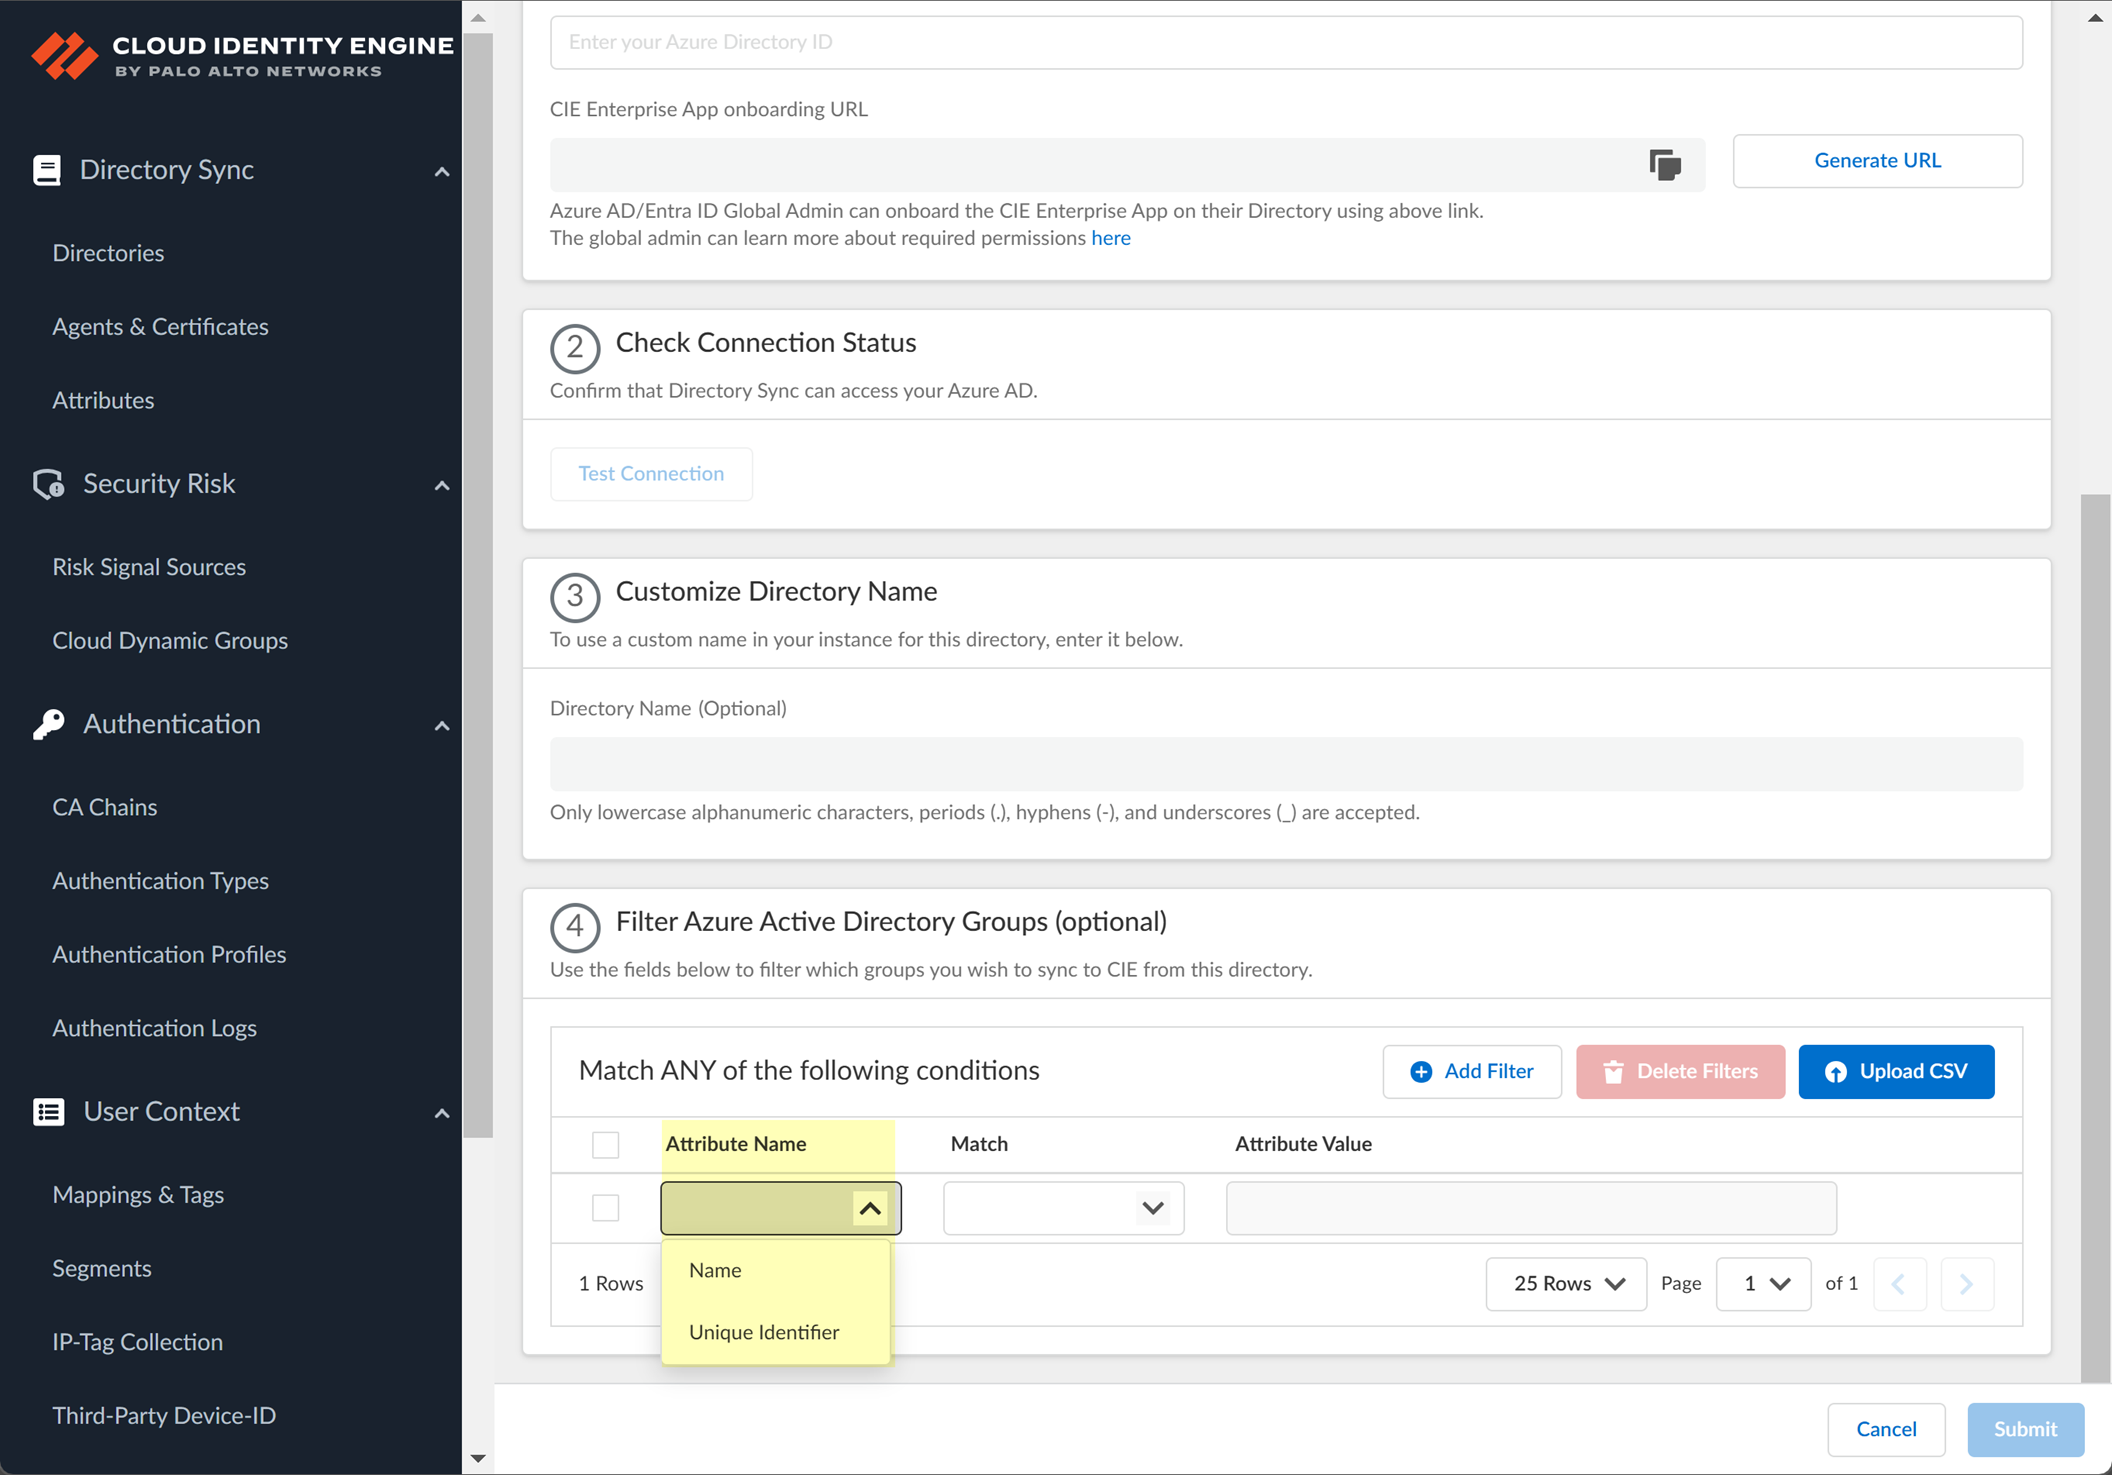
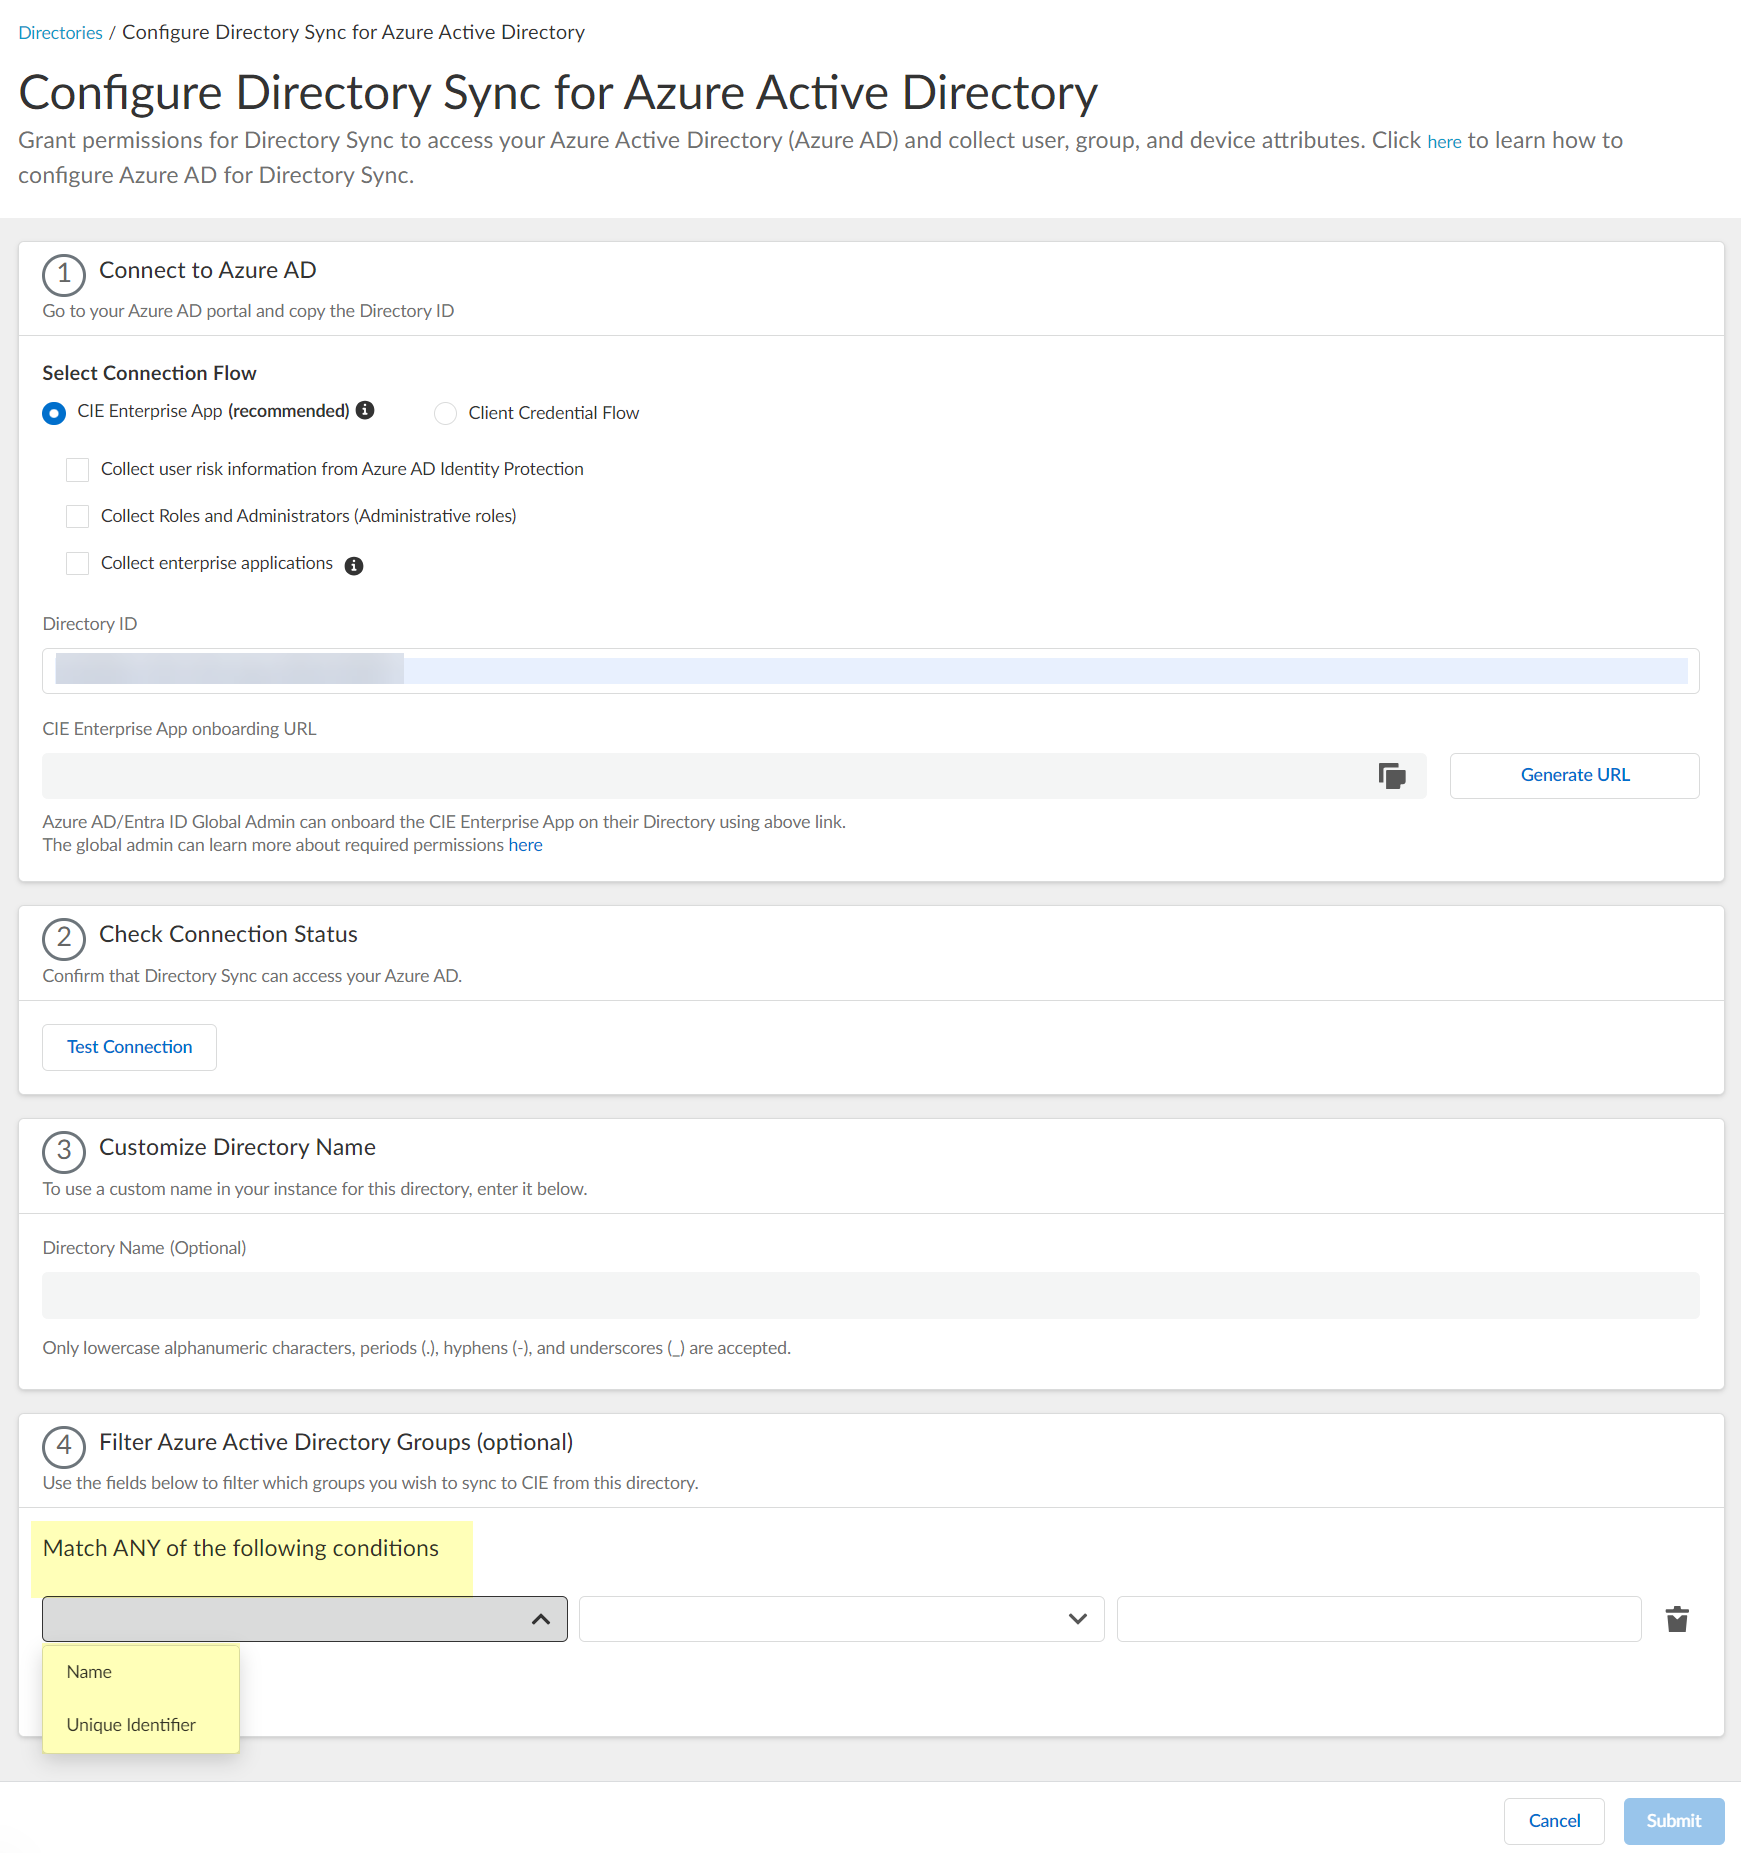
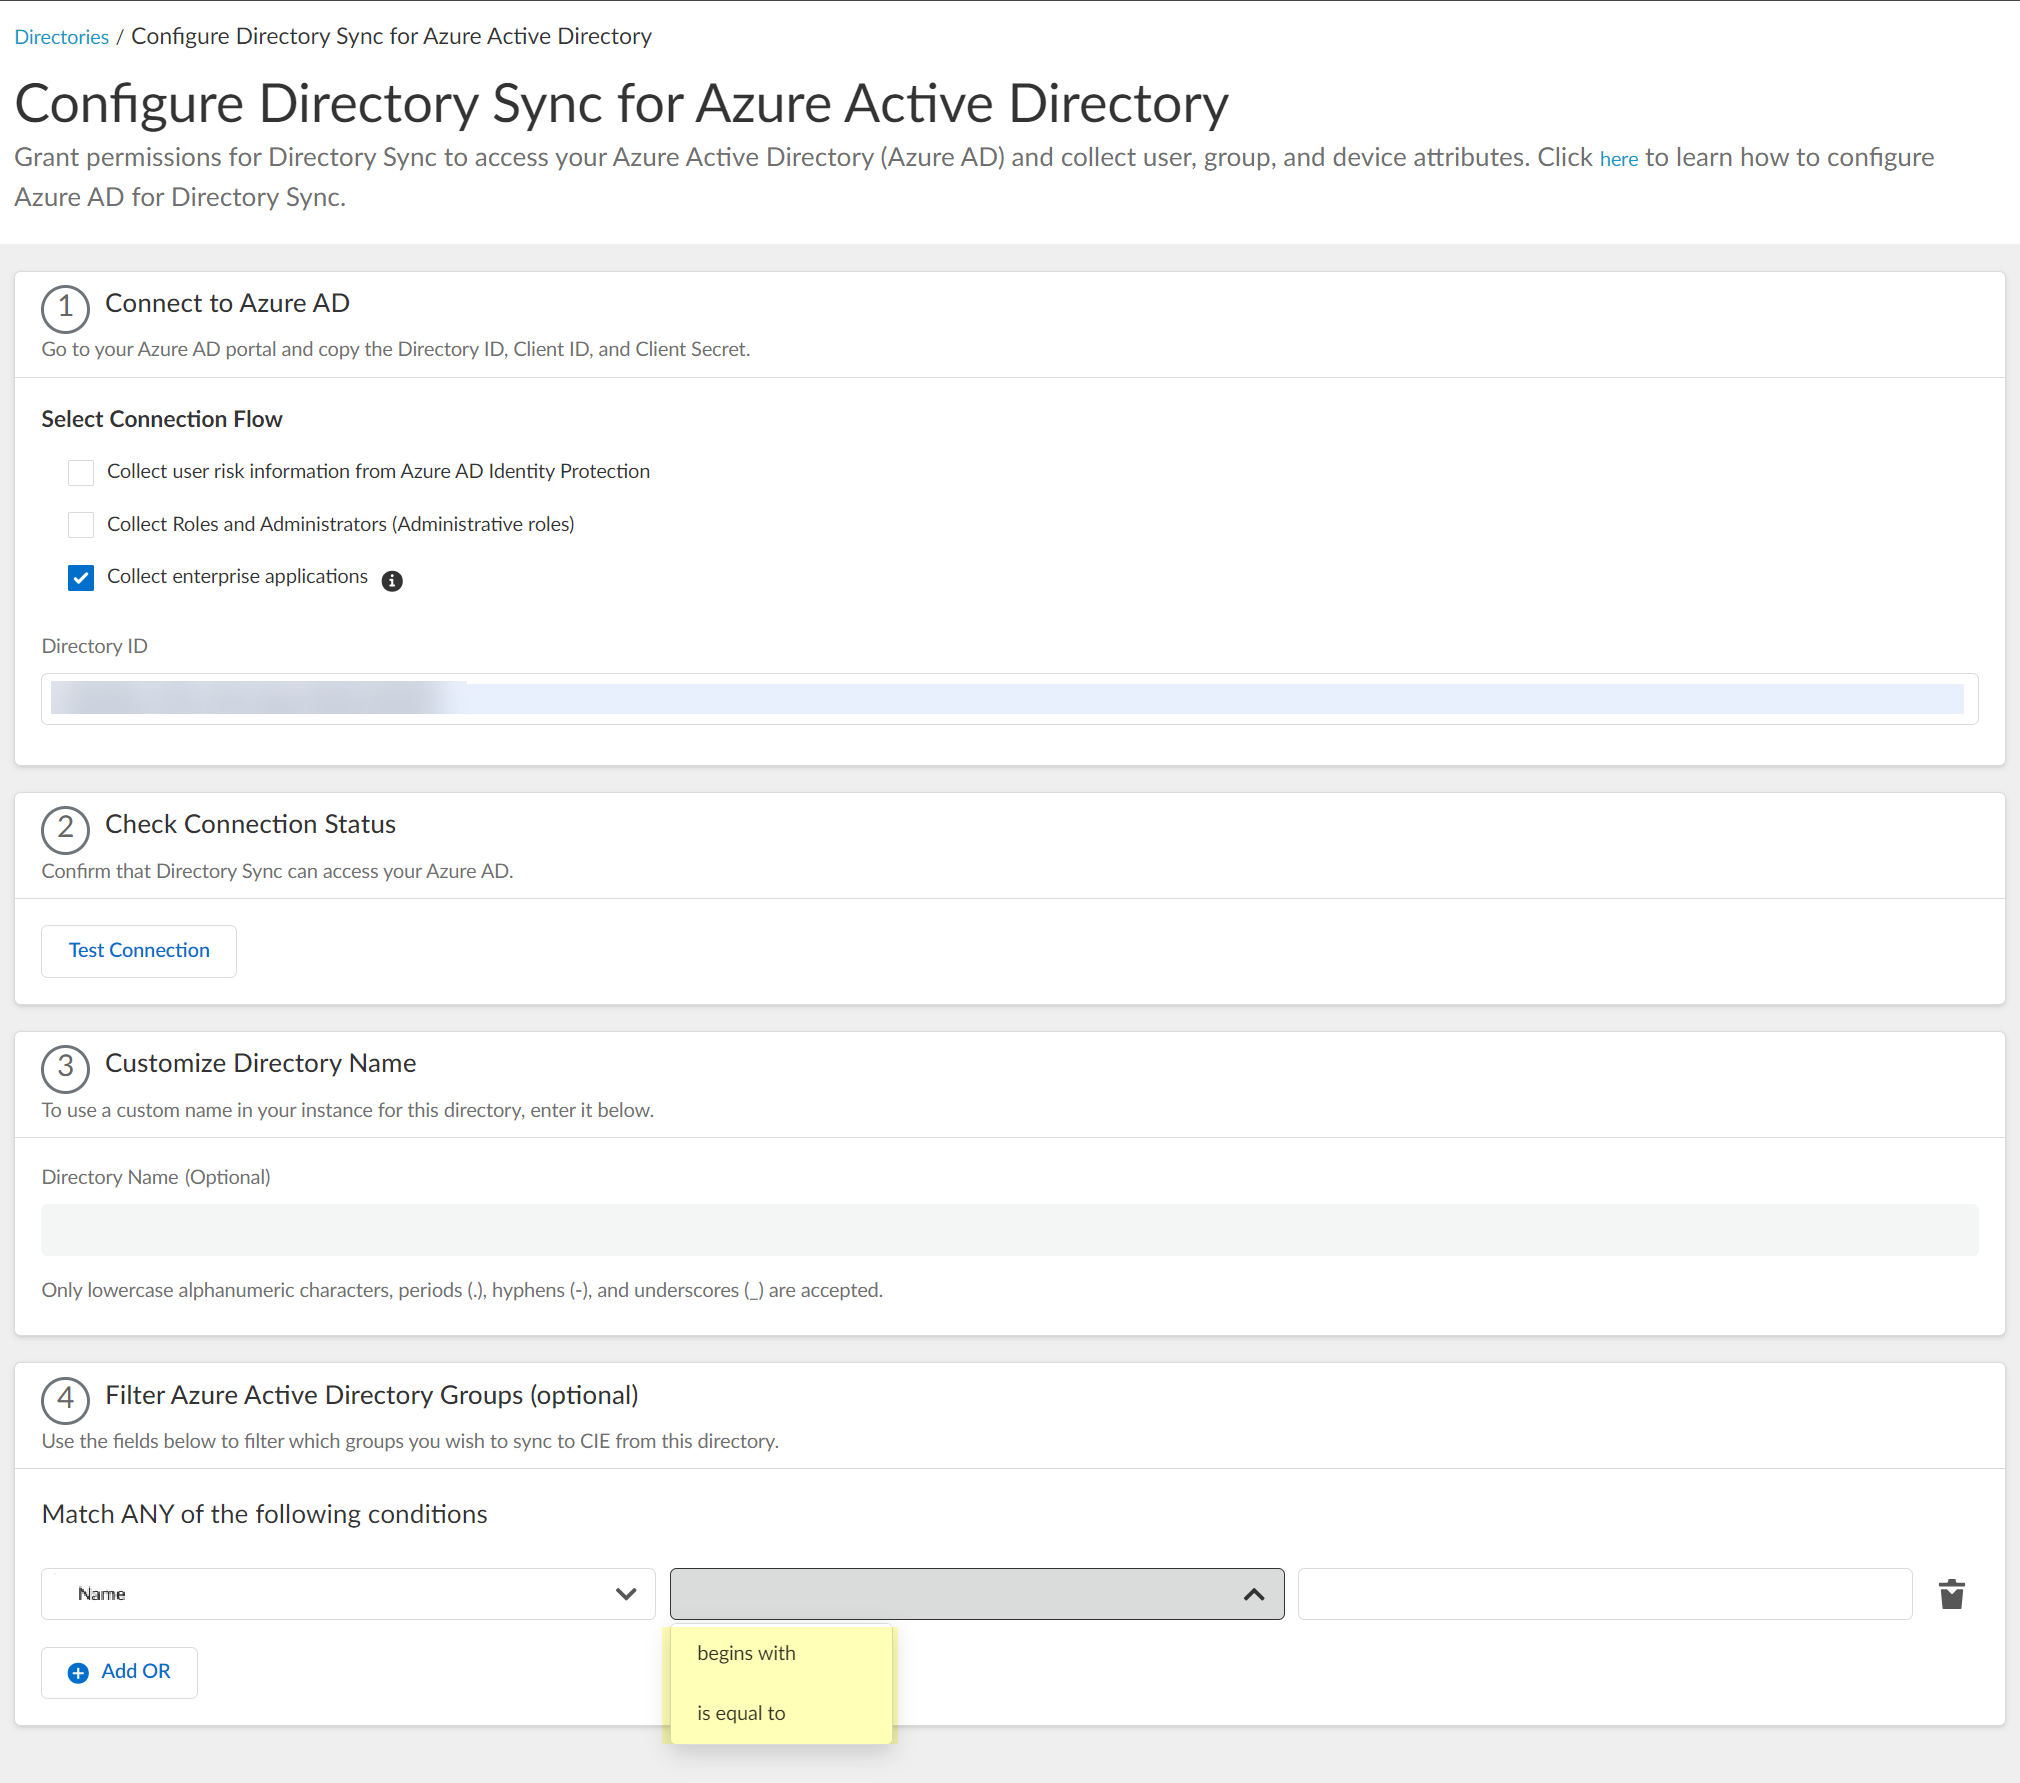
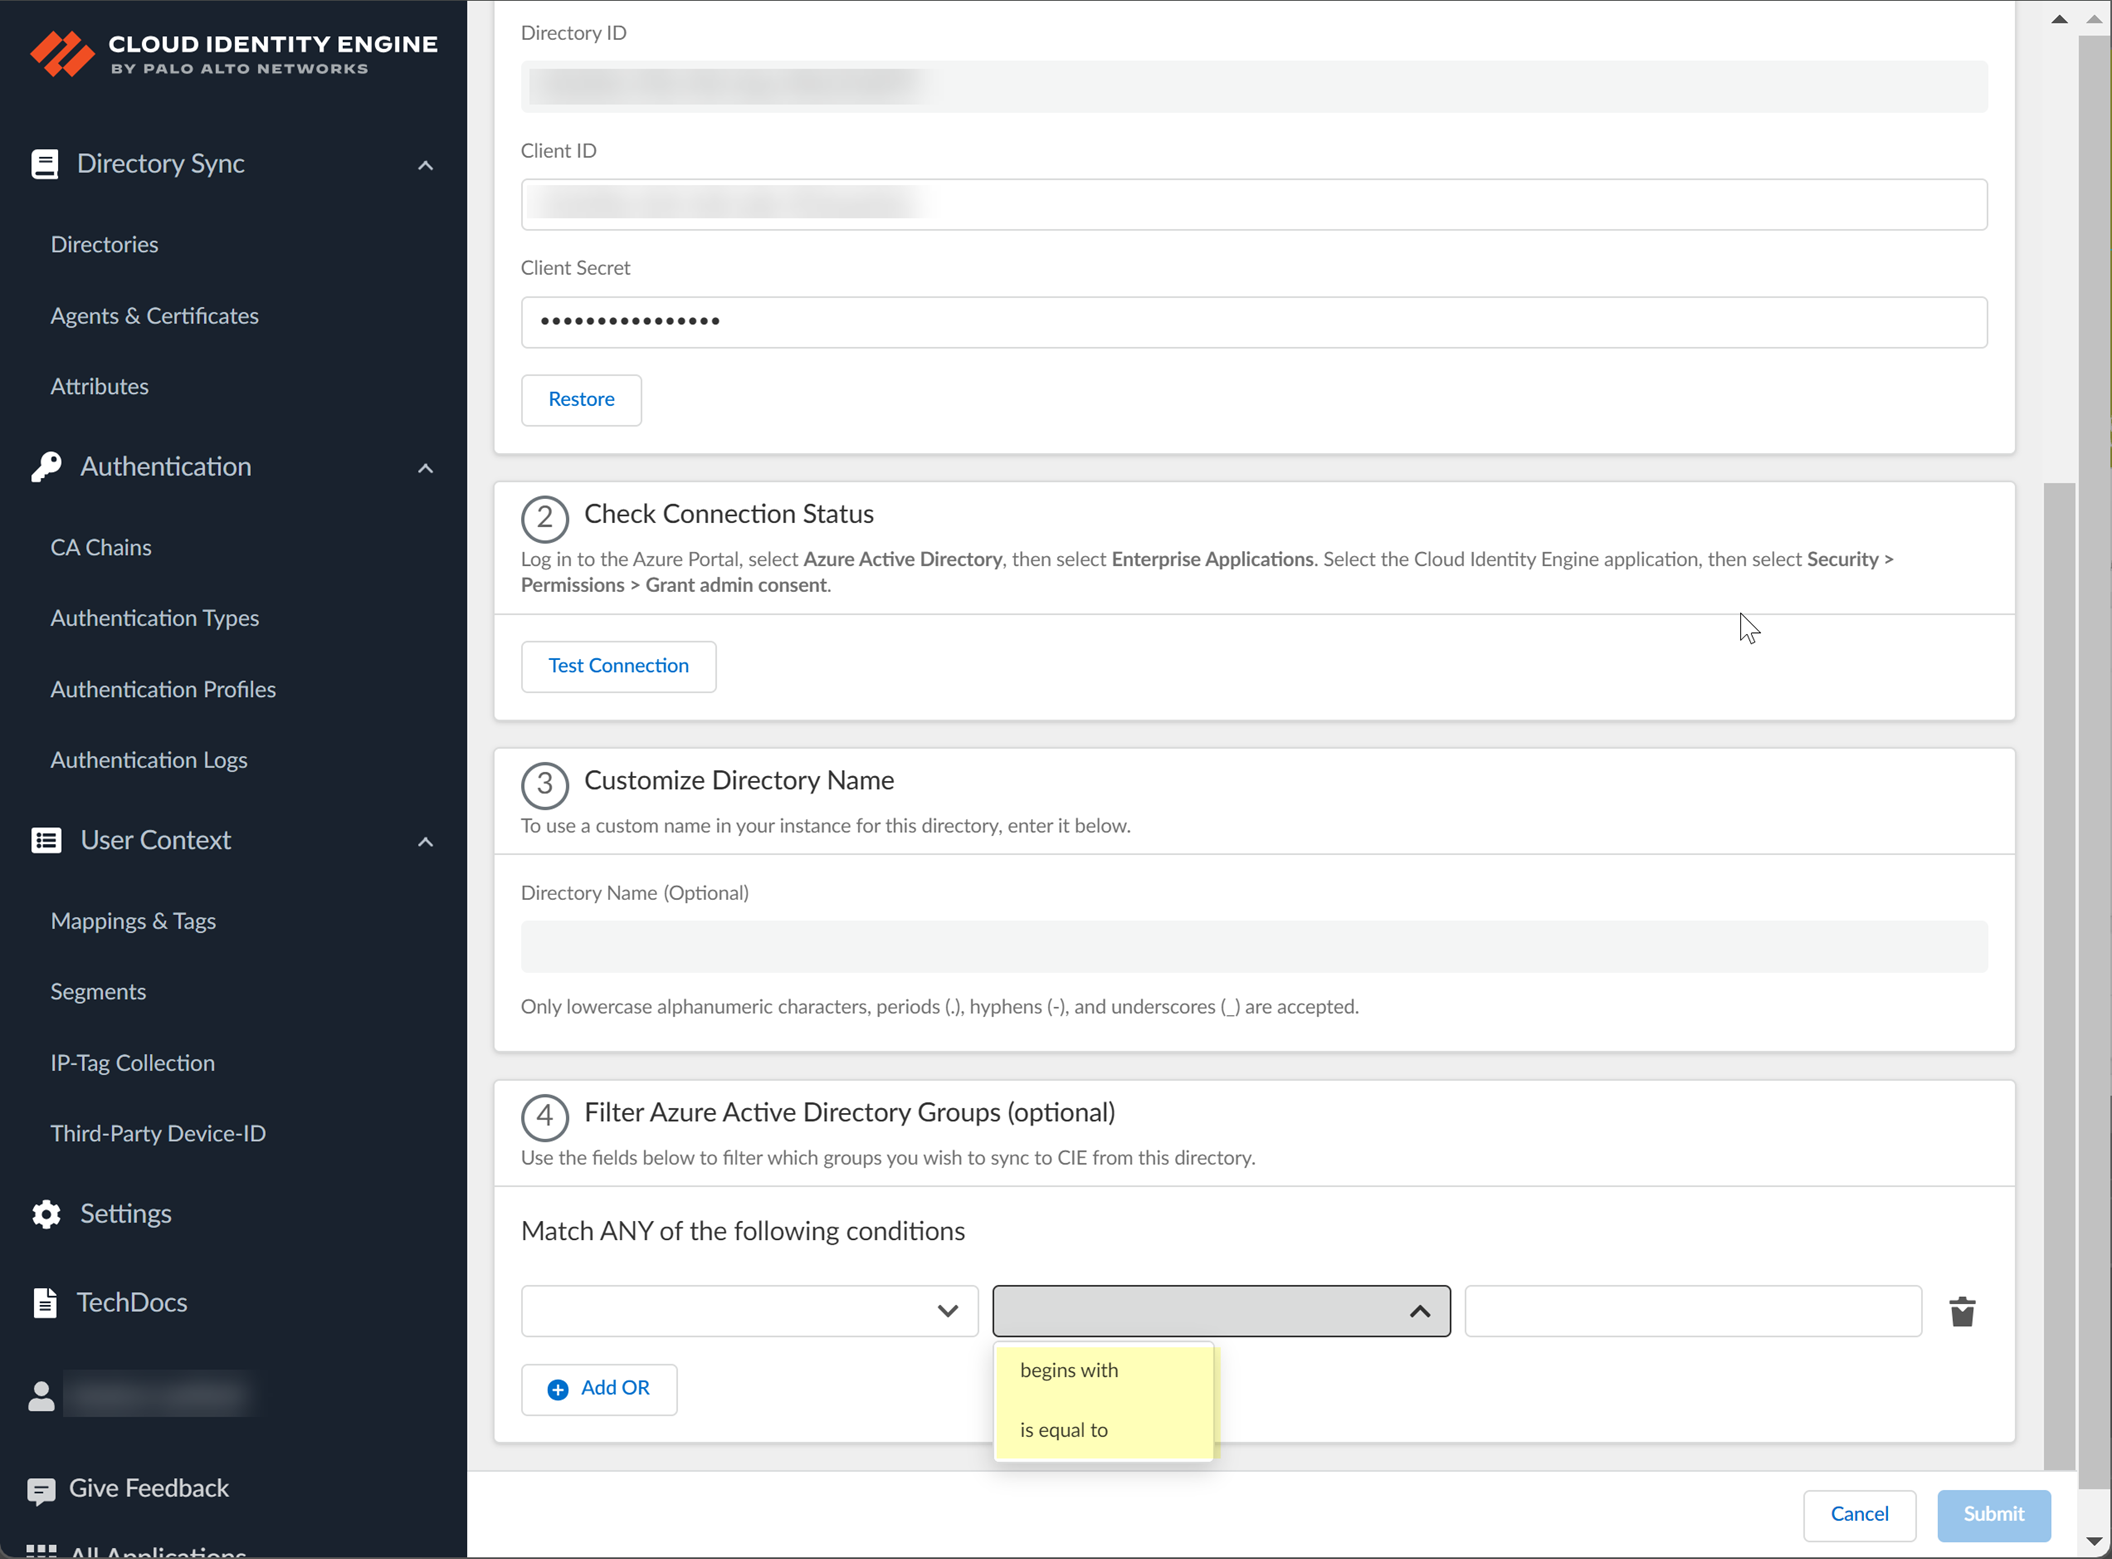
- Select how you want to filter the groups.
- for Name attribute only begins with —Filter the groups based on a partial match for the text you enter.
The filter supports spaces in the search query.
- is equal to —Filter the groups based on an exact match for the text you enter.
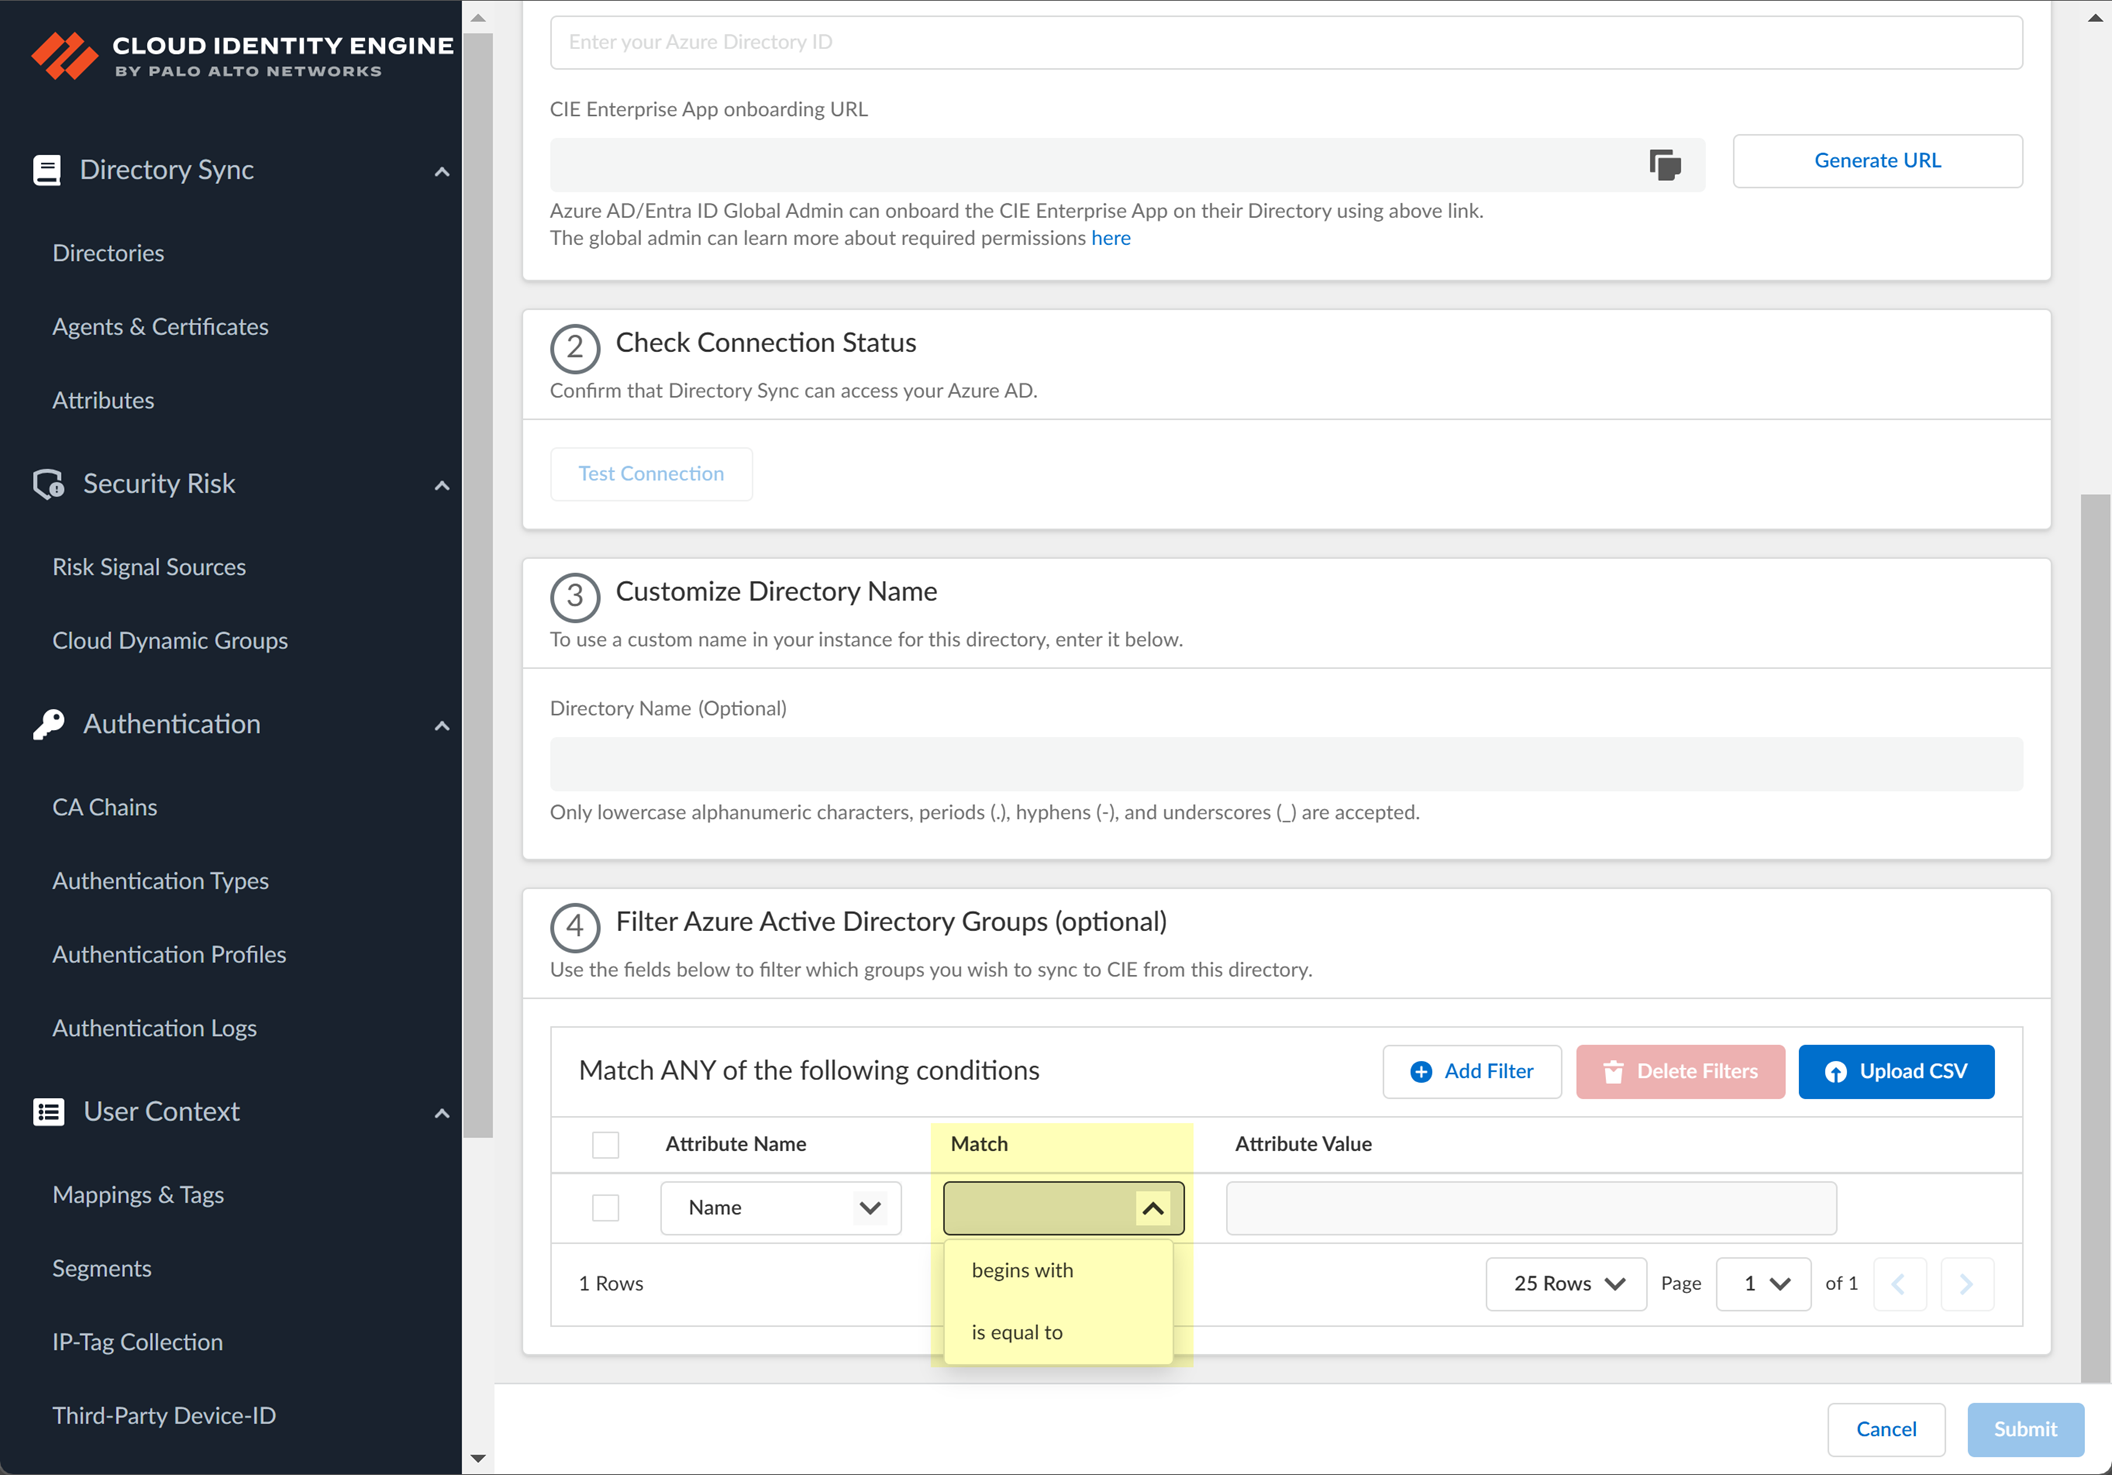
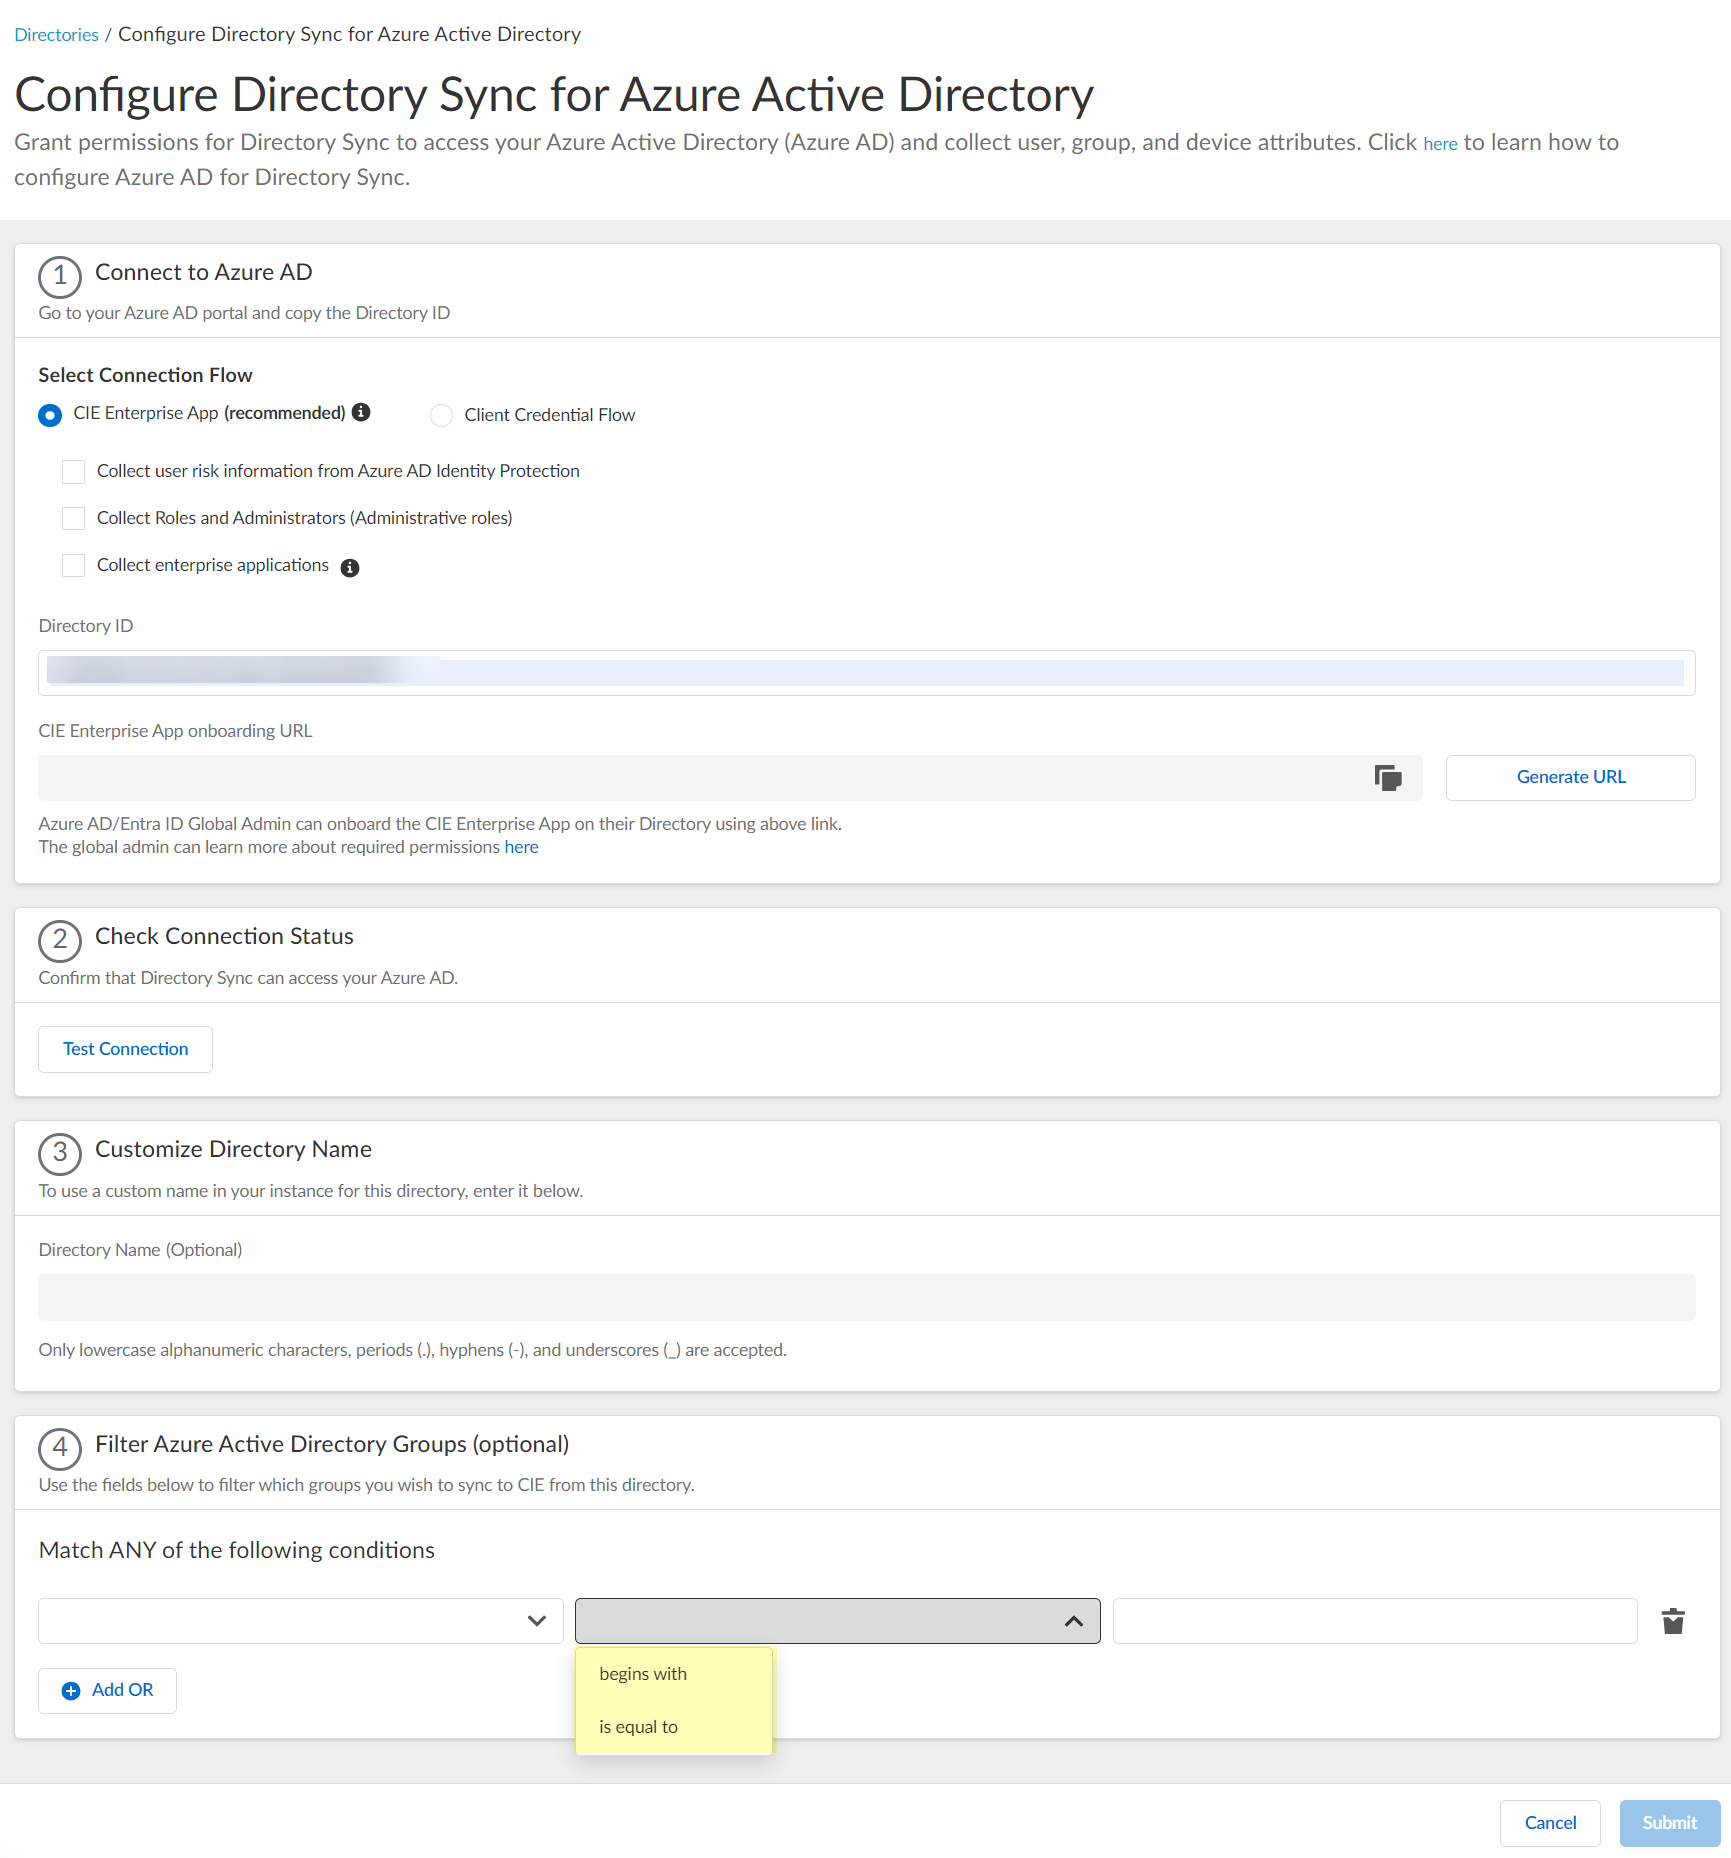
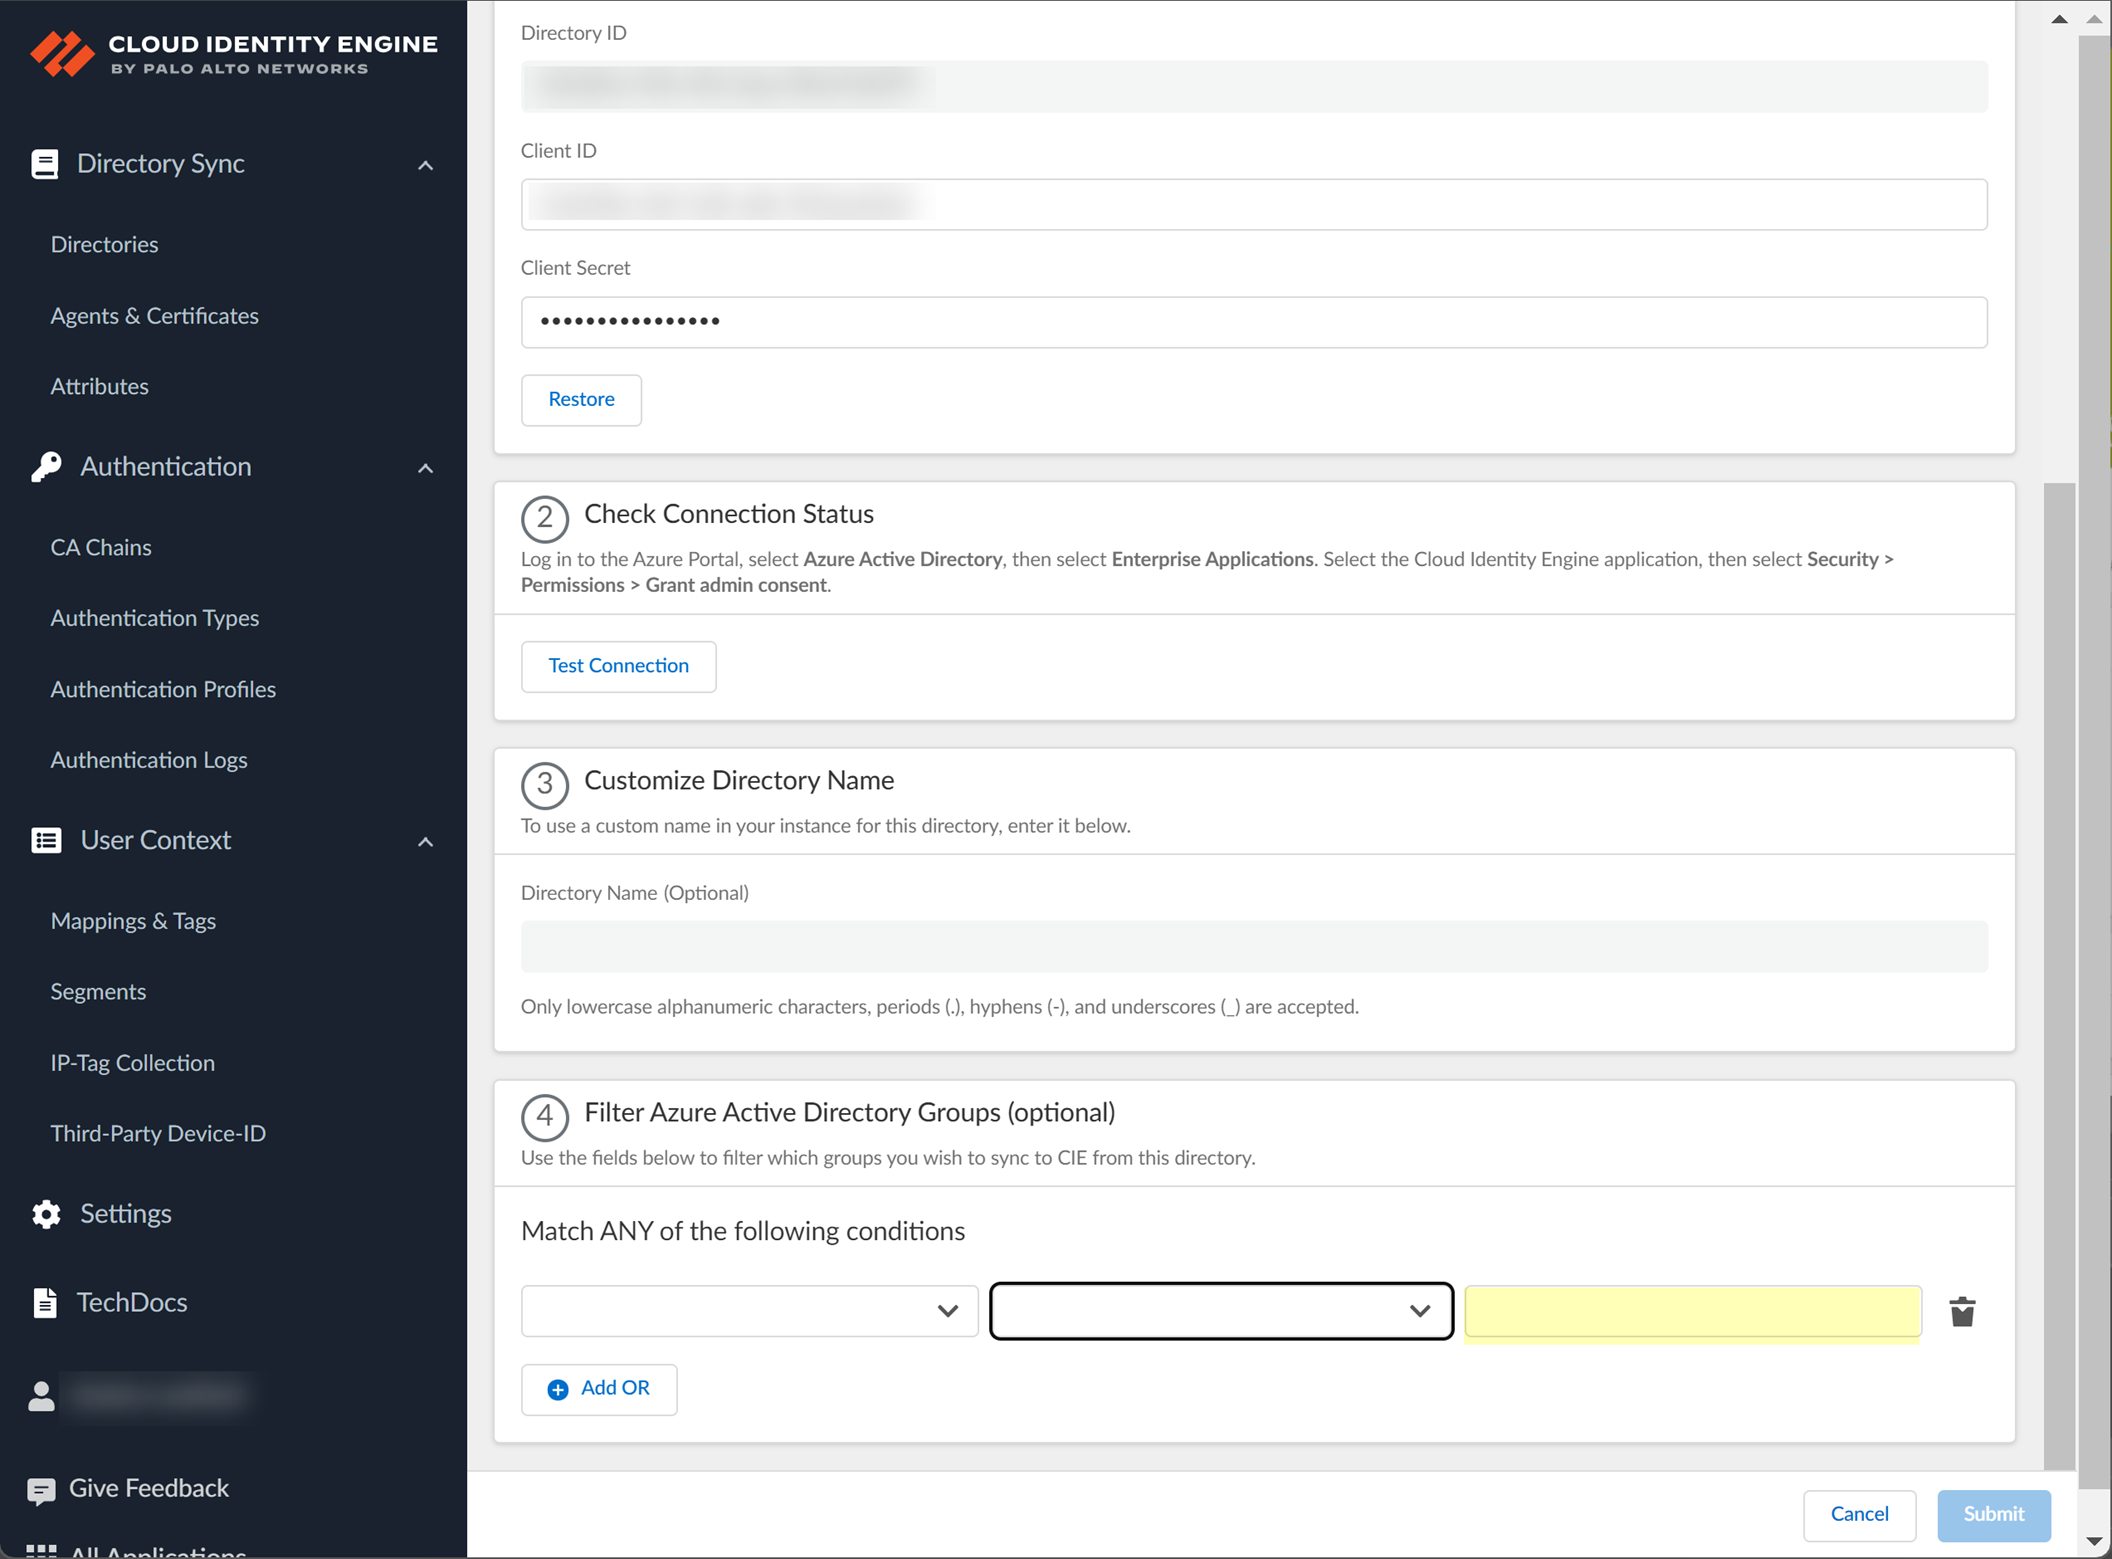
- Enter the search query you want to use to filter the groups (either alphanumeric characters for a name or numeric characters for a unique identifier).
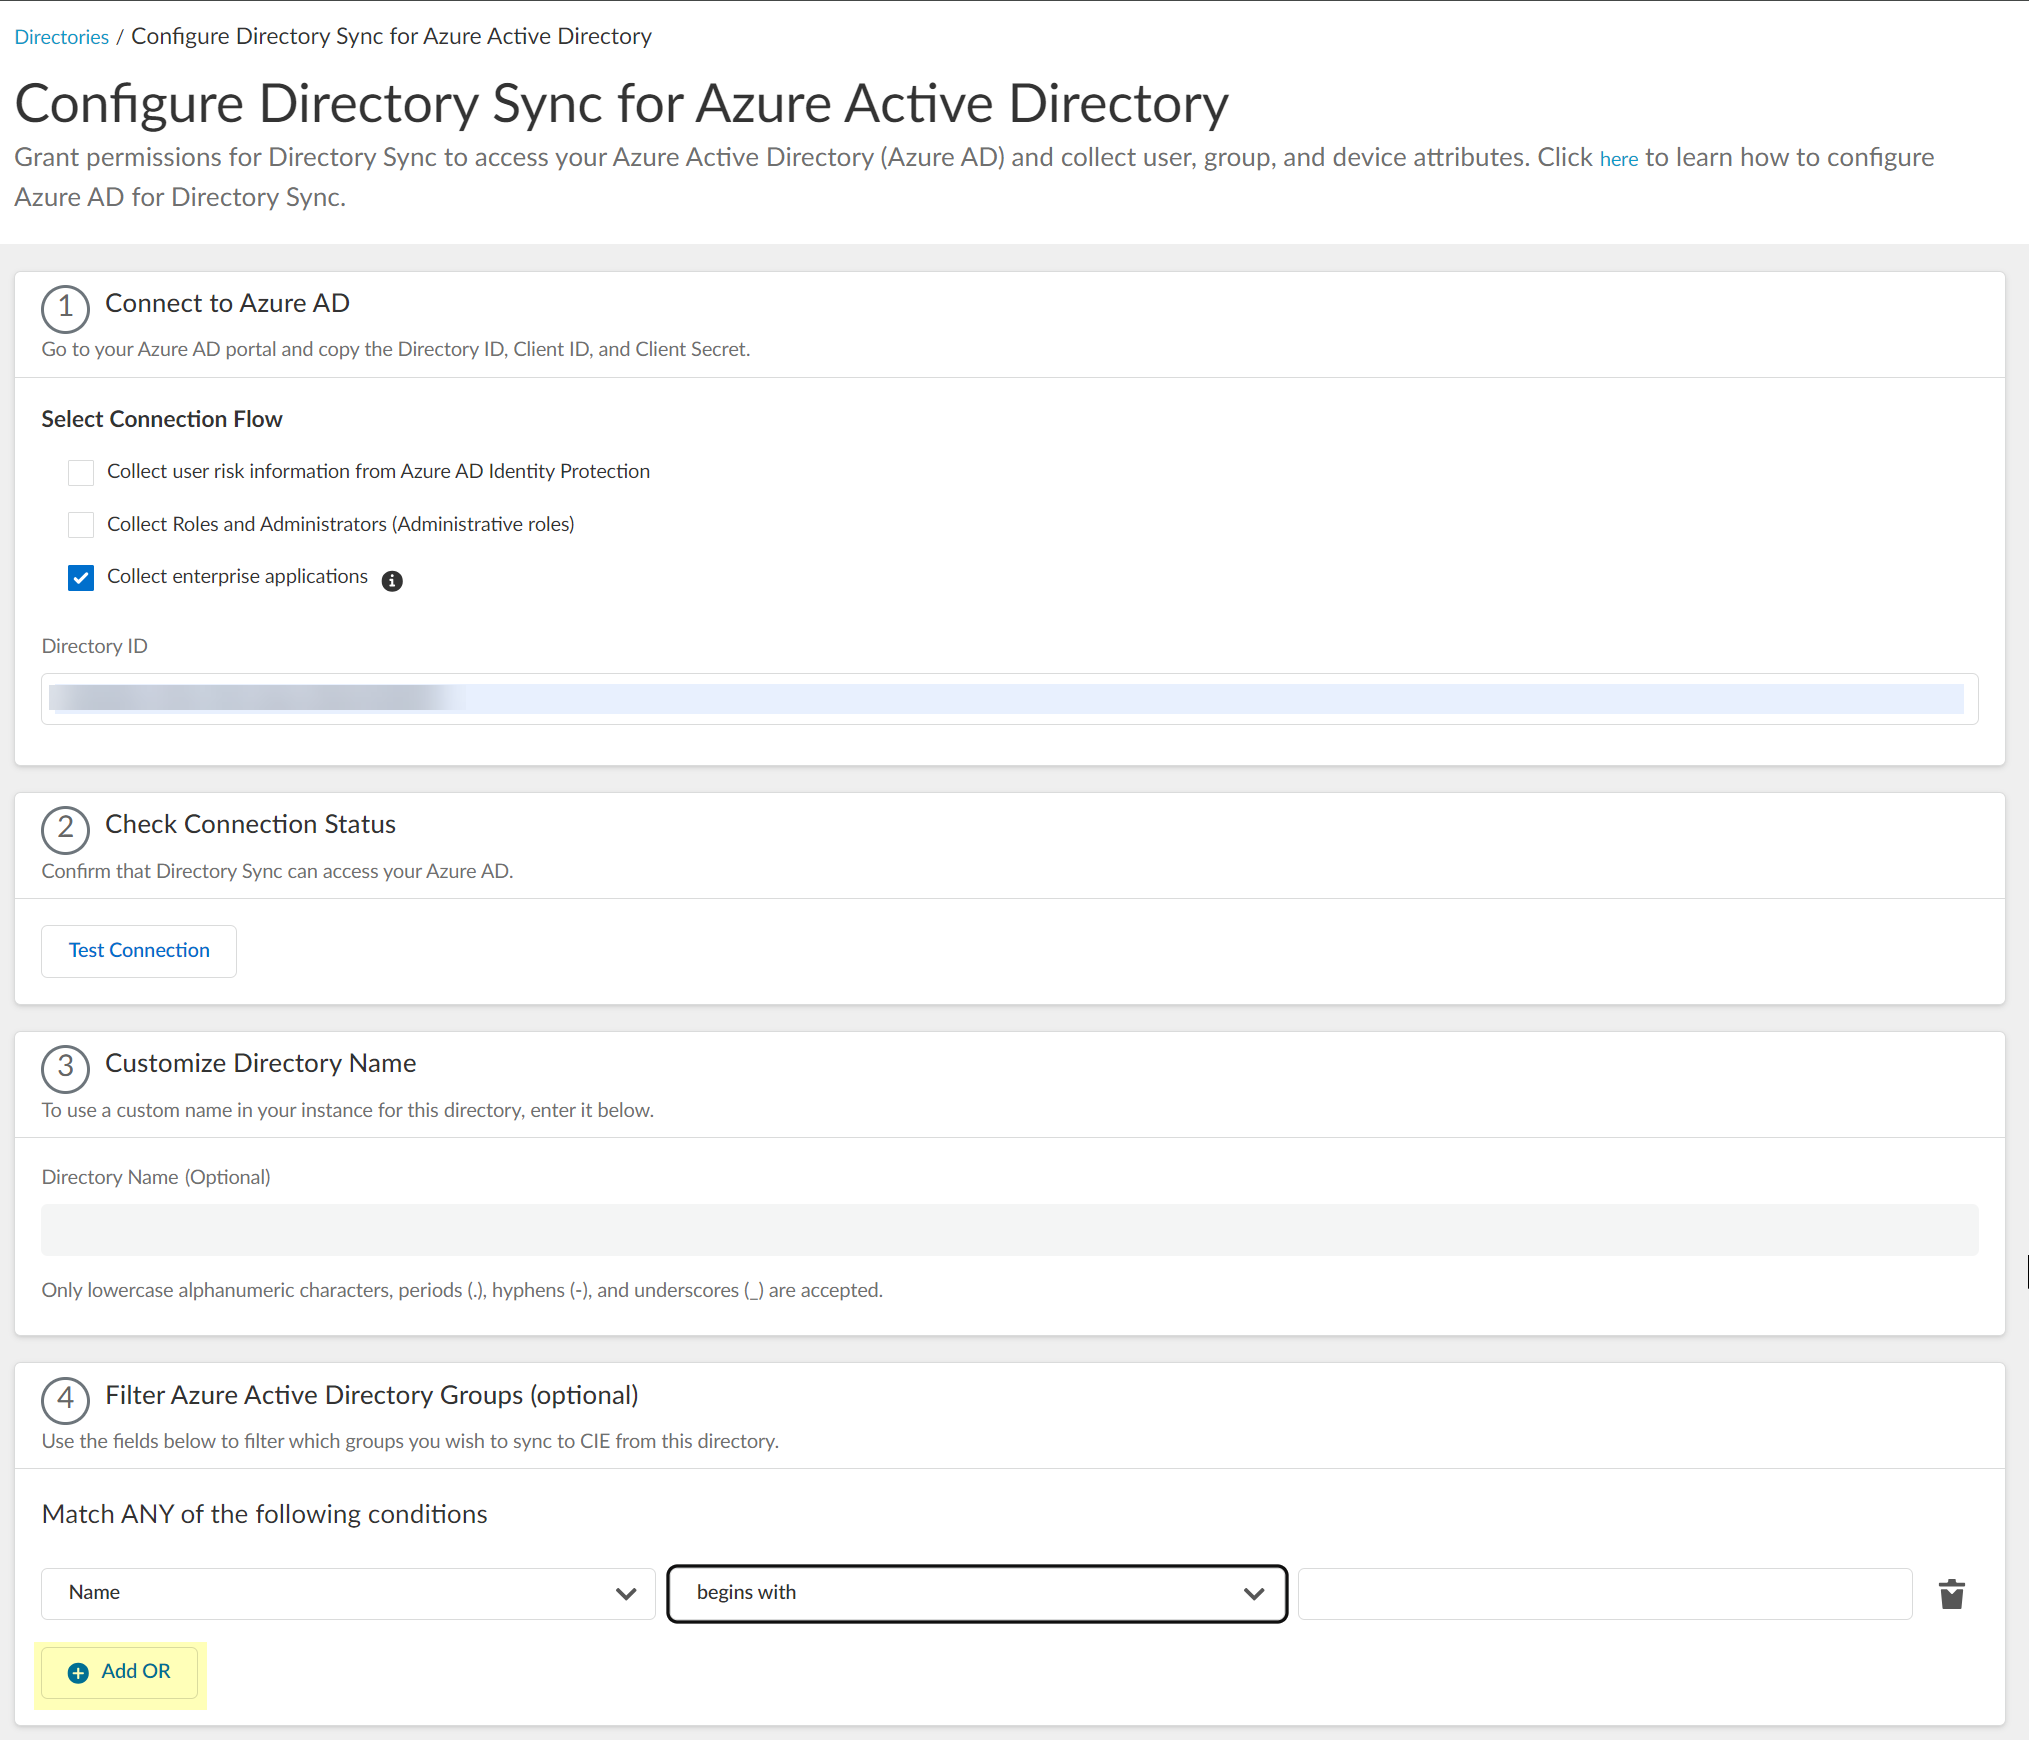
- (Optional) Configure an additional filter by clicking Add ORAdd Filter and repeating the previous three steps for each filter you want to include.
If you select additional attributes as match conditions, the Cloud Identity Engine initially attempts to find a match for the first condition, then continues to match based on the additional conditions you specify.
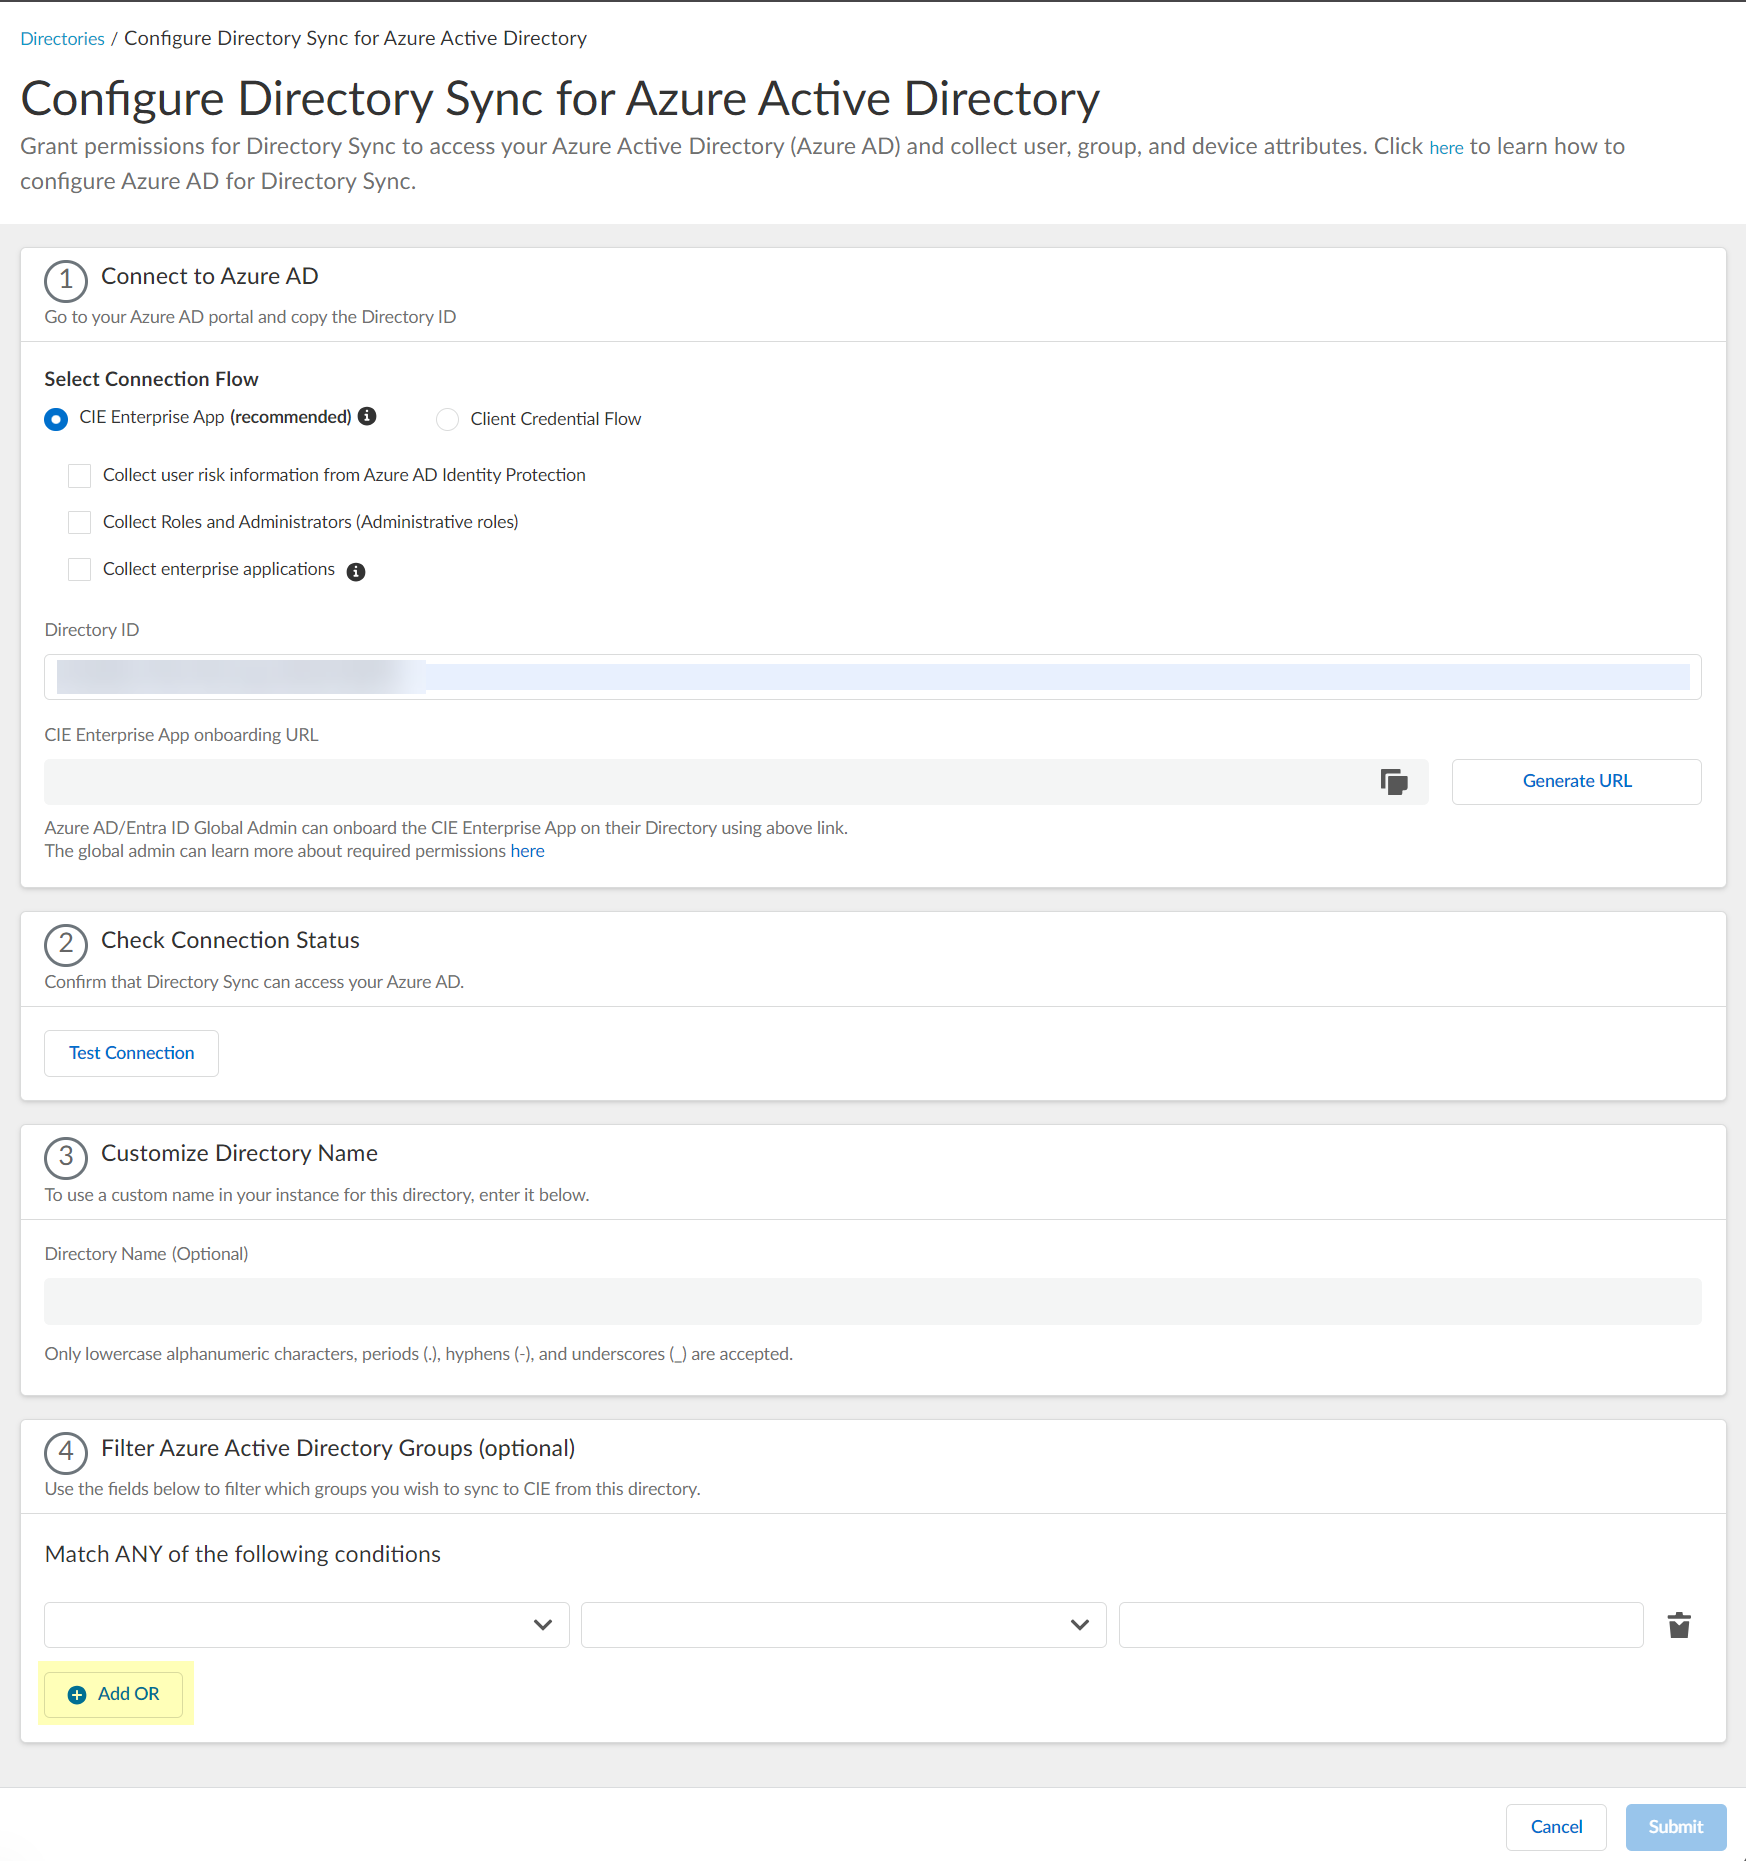
- Submit your changes and verify your directory information when the Directories page displays.
Configure Azure Using the Client Credential Flow
The Client Credential Flow option for Azure Active Directory (AD) in the Cloud Identity Engine allows you to use a service account to log in to your Azure AD in the Cloud Identity Engine. Using a service account is strongly recommended, as this is a more secure method for directory access and does not require the account to be associated with a specific user.
If this is the first time you have created a Cloud Identity Engine tenant, the Cloud Identity Engine app is not available in the Azure app gallery, so you must create a custom app.
If you already have an existing Azure AD configuration in the Cloud Identity Engine, you can easily migrate the existing configuration to use the client credential flow option by reconnecting your Azure AD to the Cloud Identity Engine, selecting the Client Credential Flow option, and testing the connection to verify the configuration.
- If you have not already done so, activate your Cloud Identity Engine tenant.
- Grant the required read-only permissions in the Azure Portal.
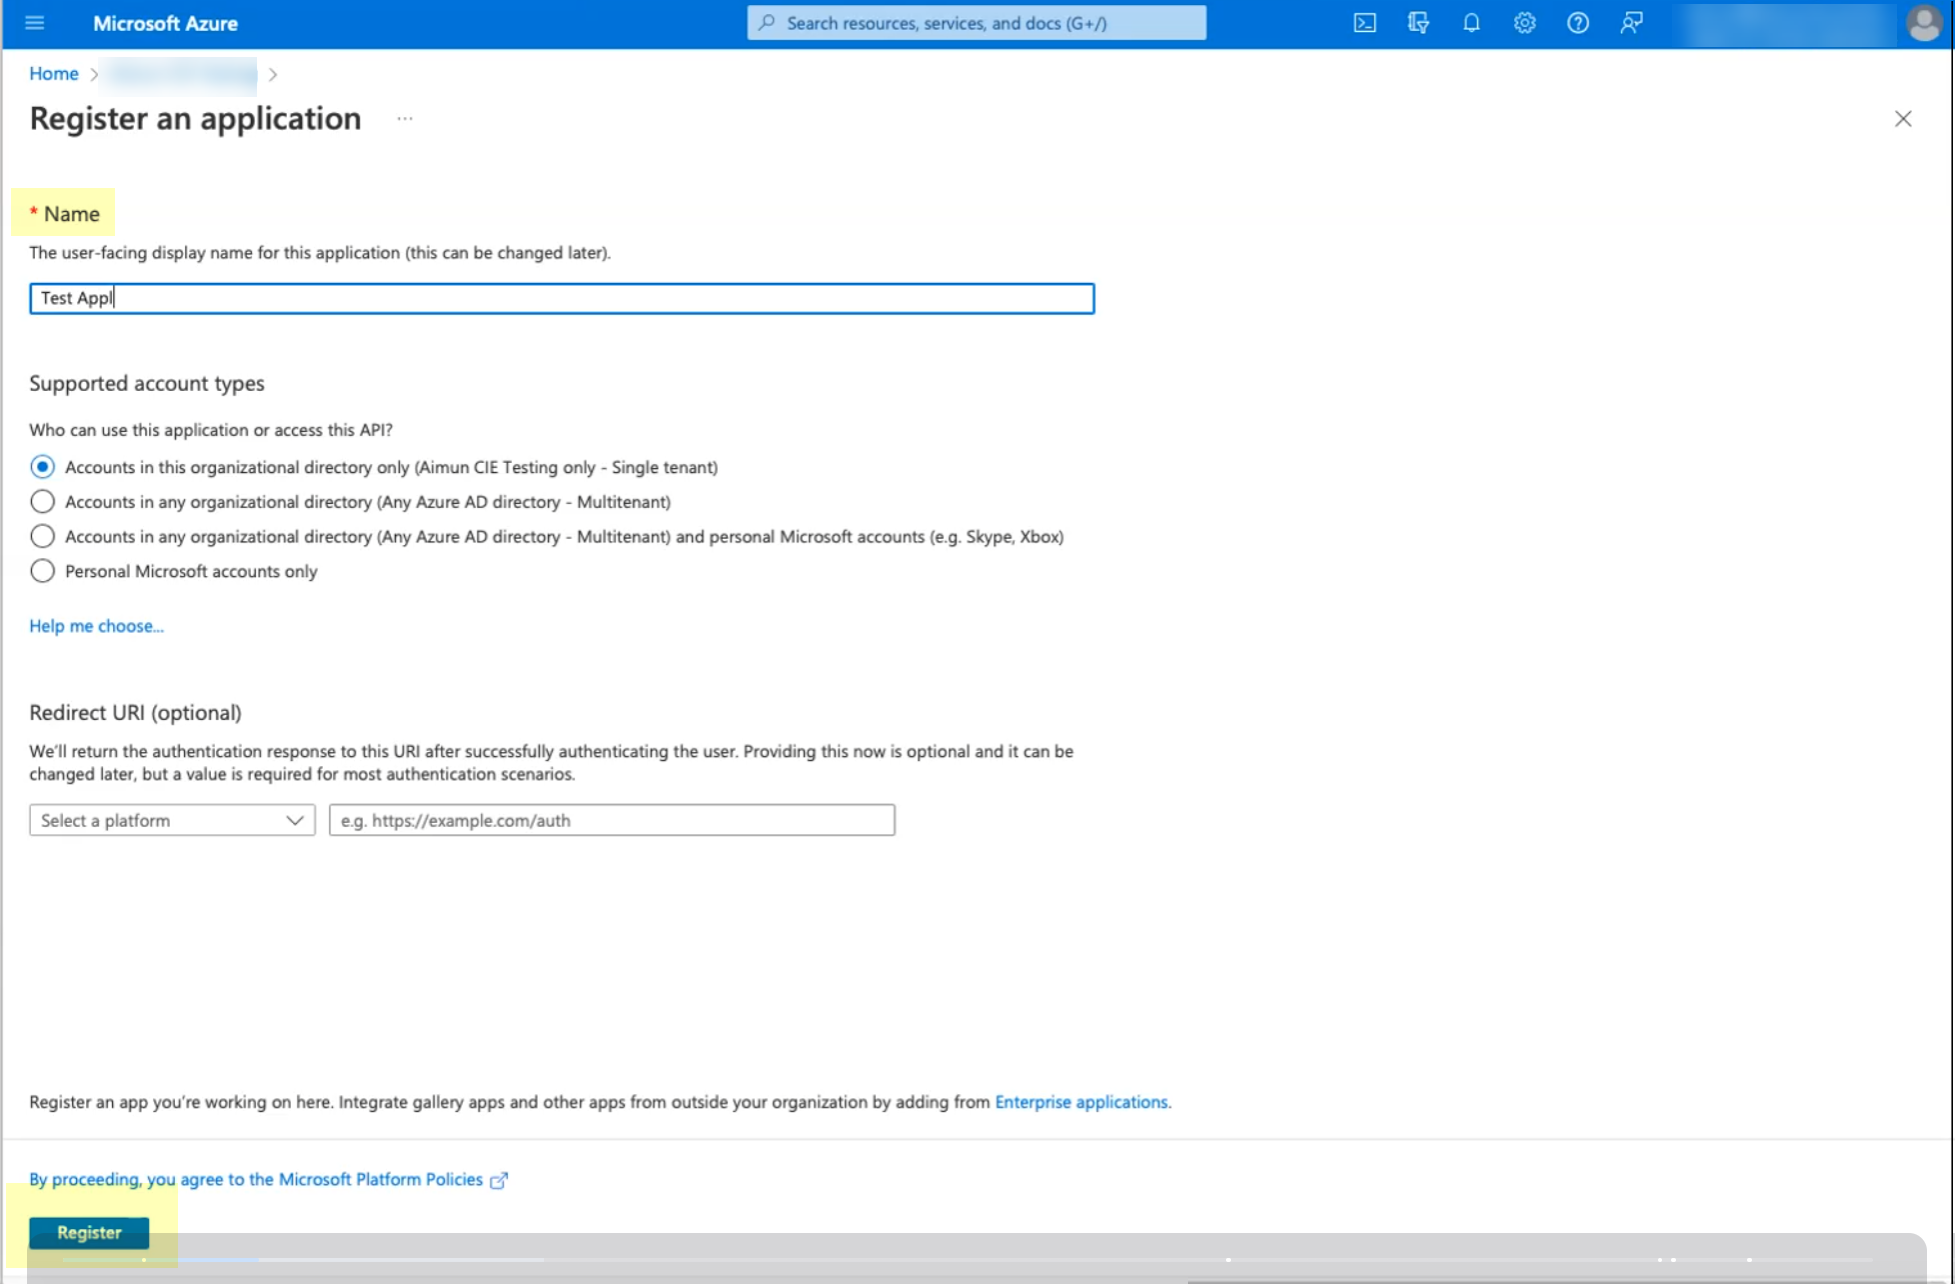
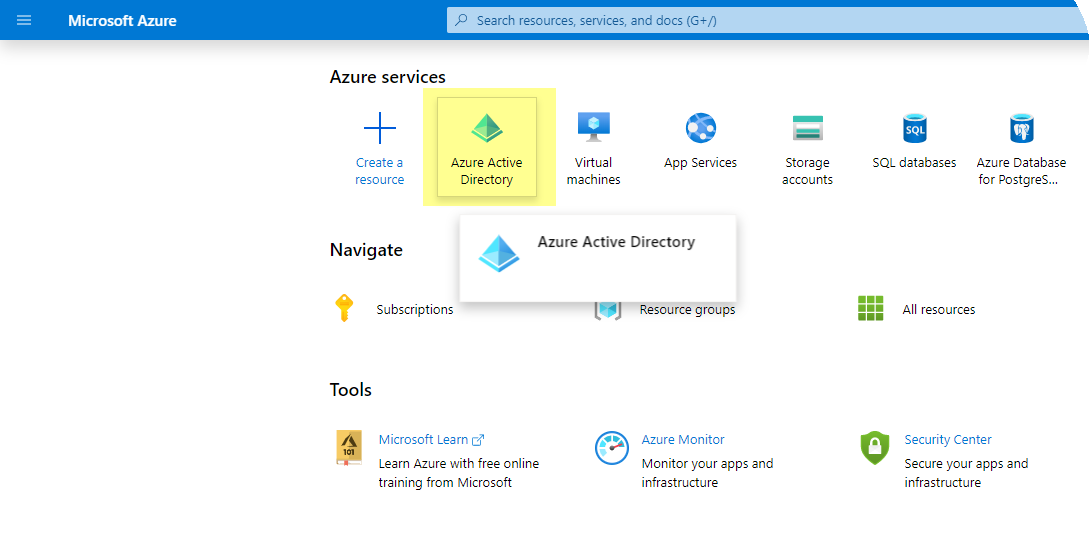
- In the Azure Portal, select HomeAzure Active DirectoryApp Registrations .
- Click New registration .
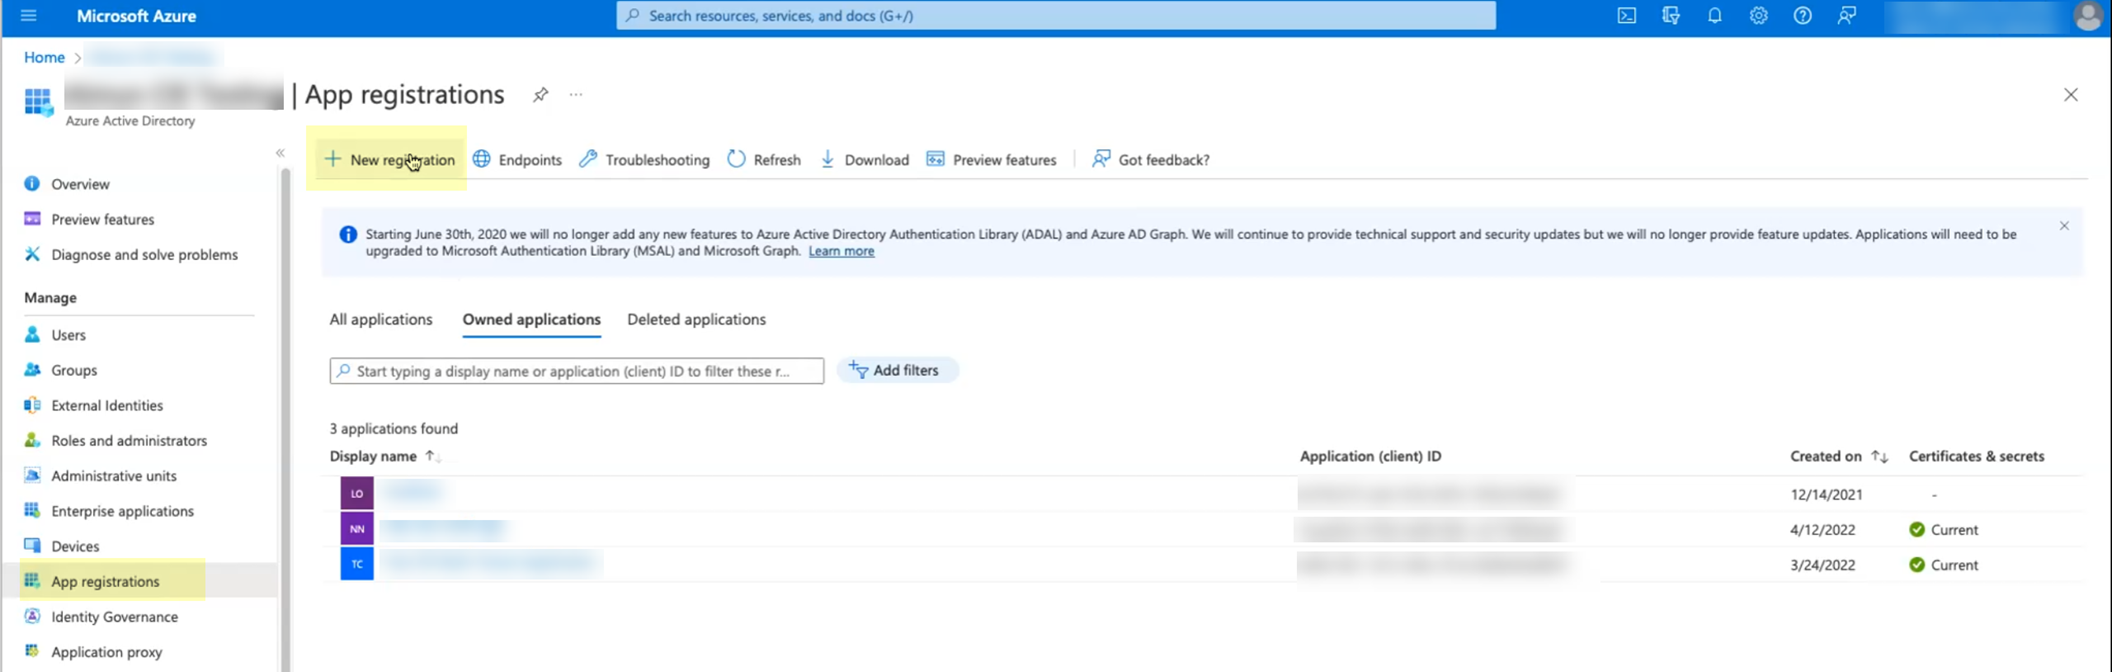
- Enter a Name then click Register .
- Select API permissions then click Add a permission .
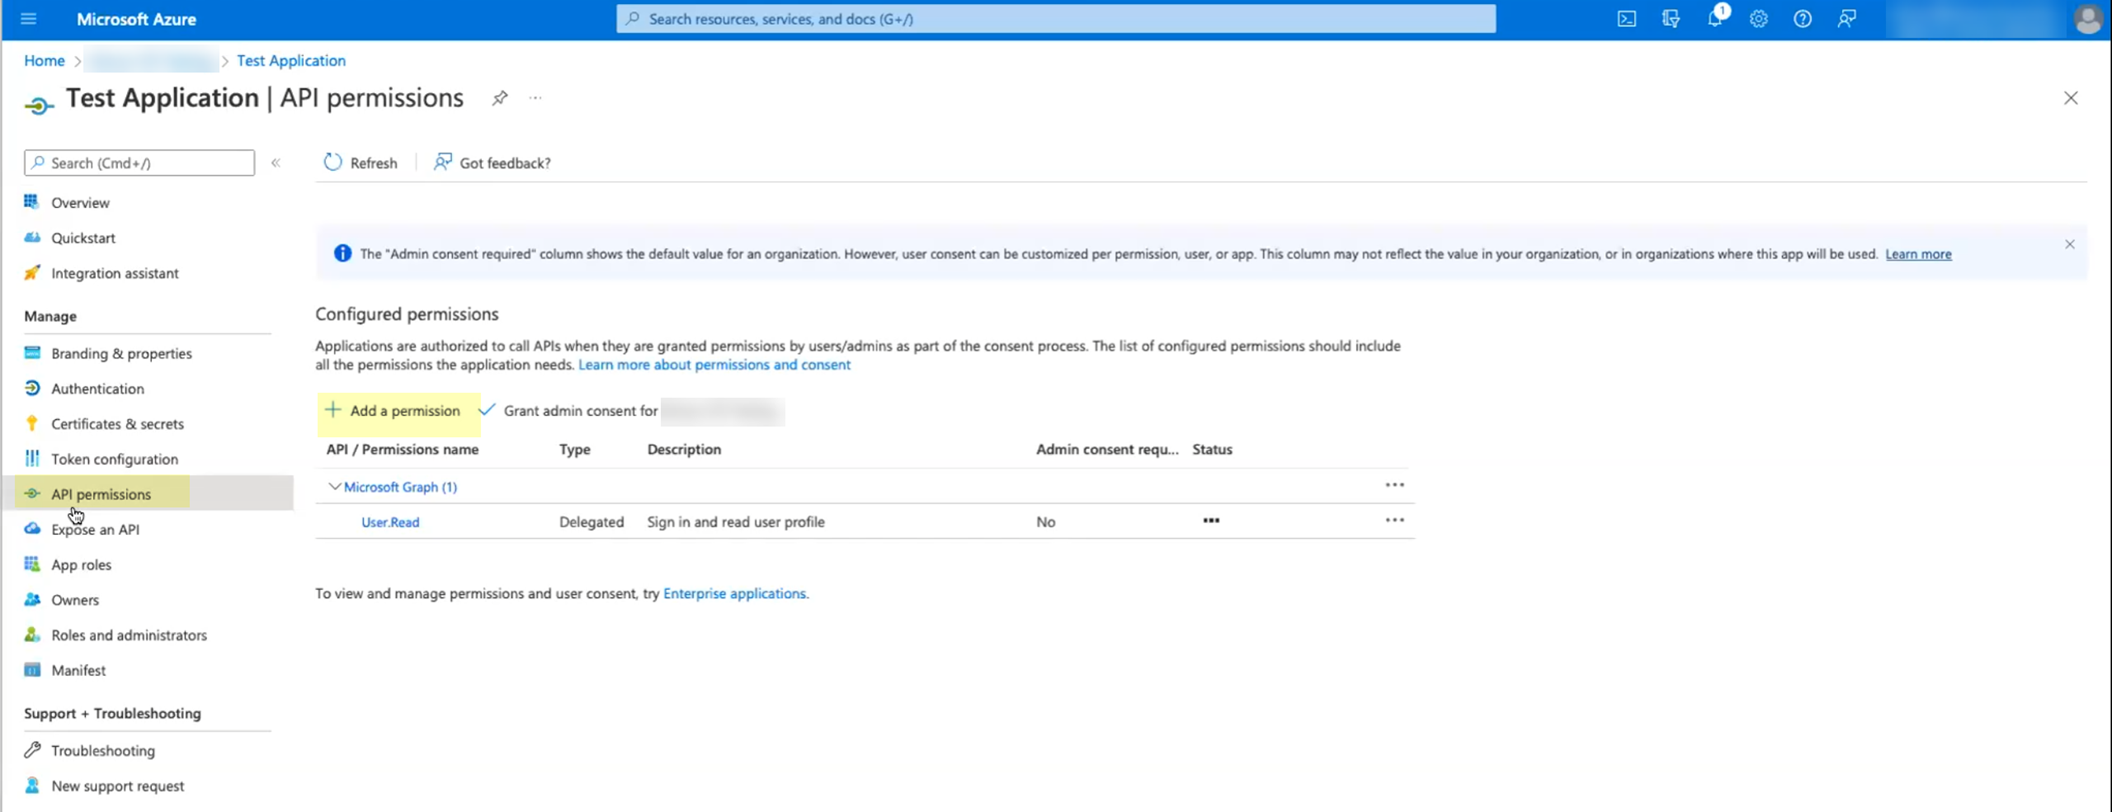
- Click Microsoft Graph then select Application permissions .
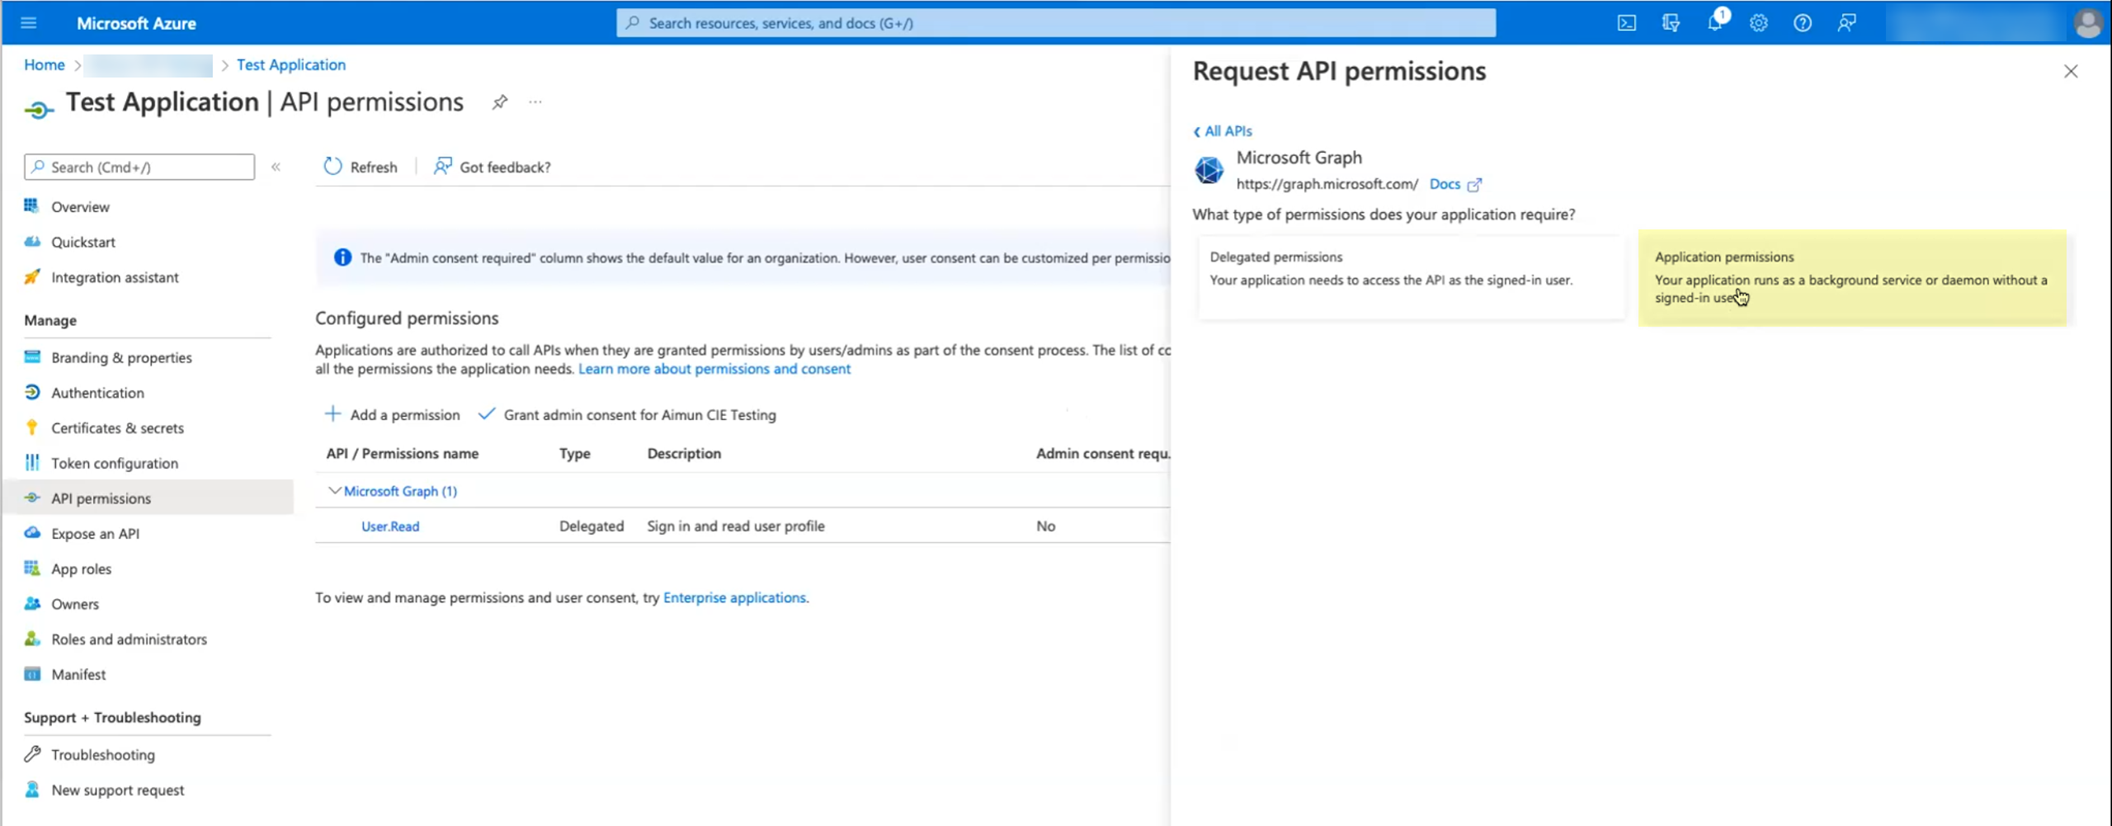
- Select the following permissions then click Add permissions :
- Device.Read.All —Application, Read all devices
- GroupMember.Read.All —Application, Read all groups
- User.Read.All —Application, Read all users' full profiles
- User.Read —Delegated, Sign in and read user profile
The permissions listed above represent the minimum required permissions that use least privilege access. If you prefer a less granular scope that is simpler to implement, you can use these permissions instead:
- Directory.Read.All
- Organization.Read.All
- If you want to use user risk information in attribute-based Cloud Dynamic User Groups , you must grant additional permissions. For more information, refer to the documentation on how to Create a Cloud Dynamic User Group .
- If you want to collect information on roles and administrators, if you have already granted the Directory.Read.All scope, no further permissions are required. If you are using the scopes listed above, you must also grant the RoleManagement.Read.Directory scope to collect role and administrator information. For more information, refer to step
6
.
- If you want to collect enterprise application data, you must also grant the Application.Read.All scope. For more information, refer to step
7
.
- Click Grant admin consent for DirectoryName (where DirectoryName represents the name of your Azure AD).
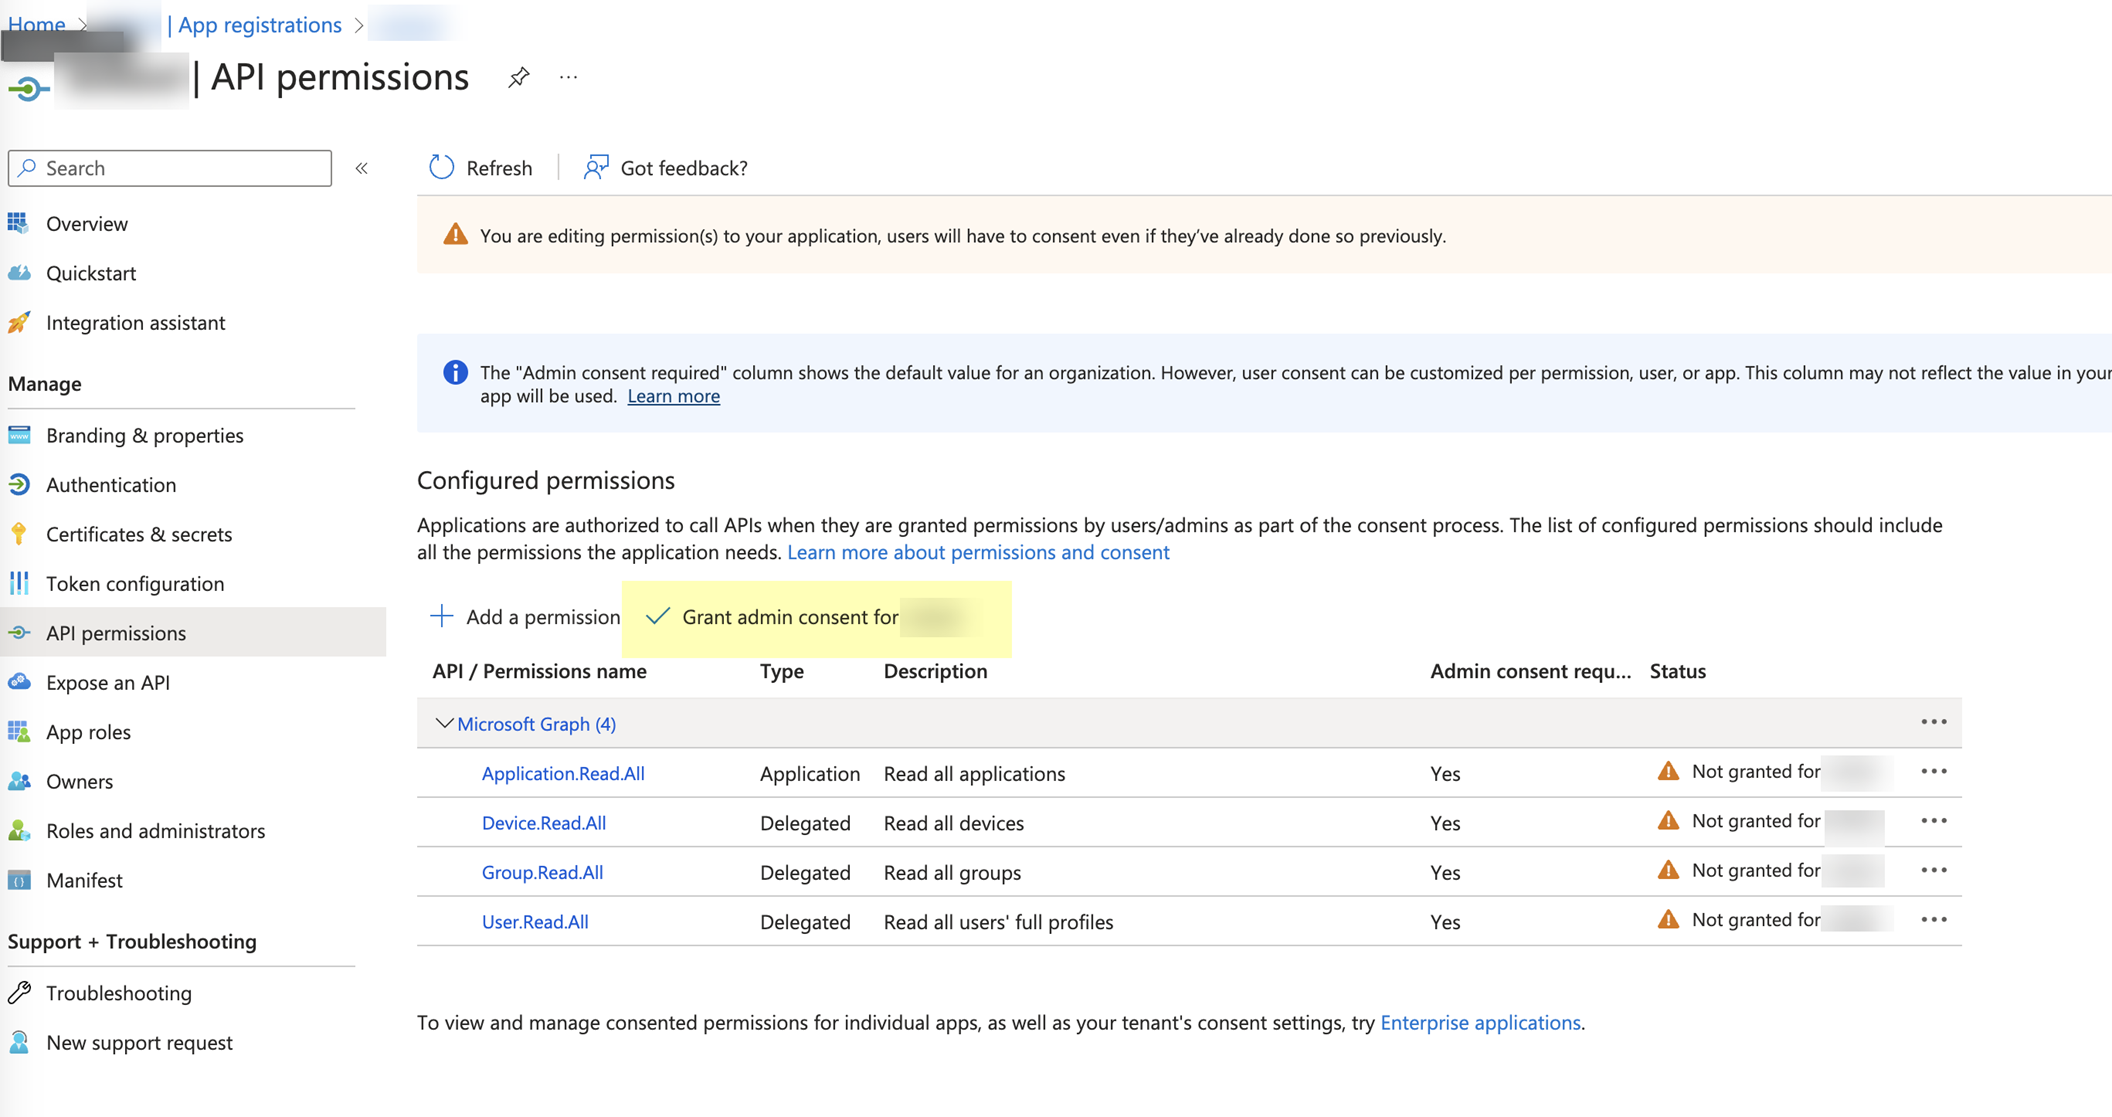
- Click Yes to confirm.

- Collect the necessary configuration information from the Azure Portal.
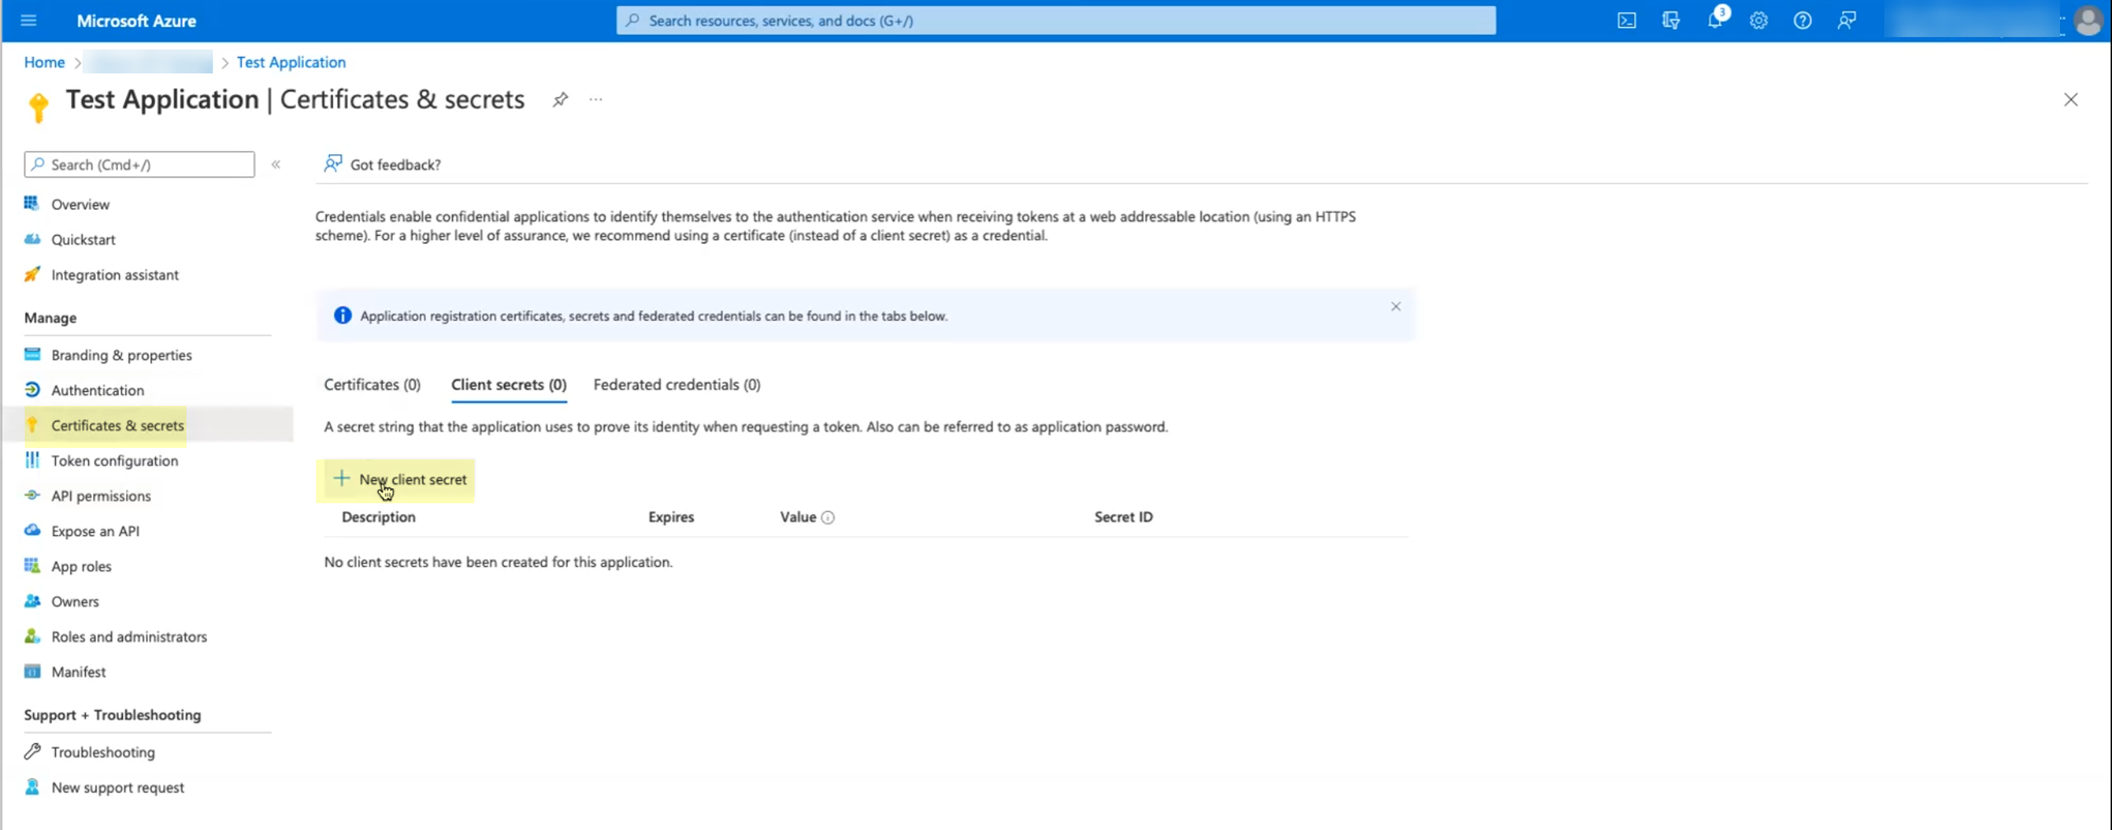
- In the Azure dashboard, select your Azure AD, then select App Registrations and select the app you created.
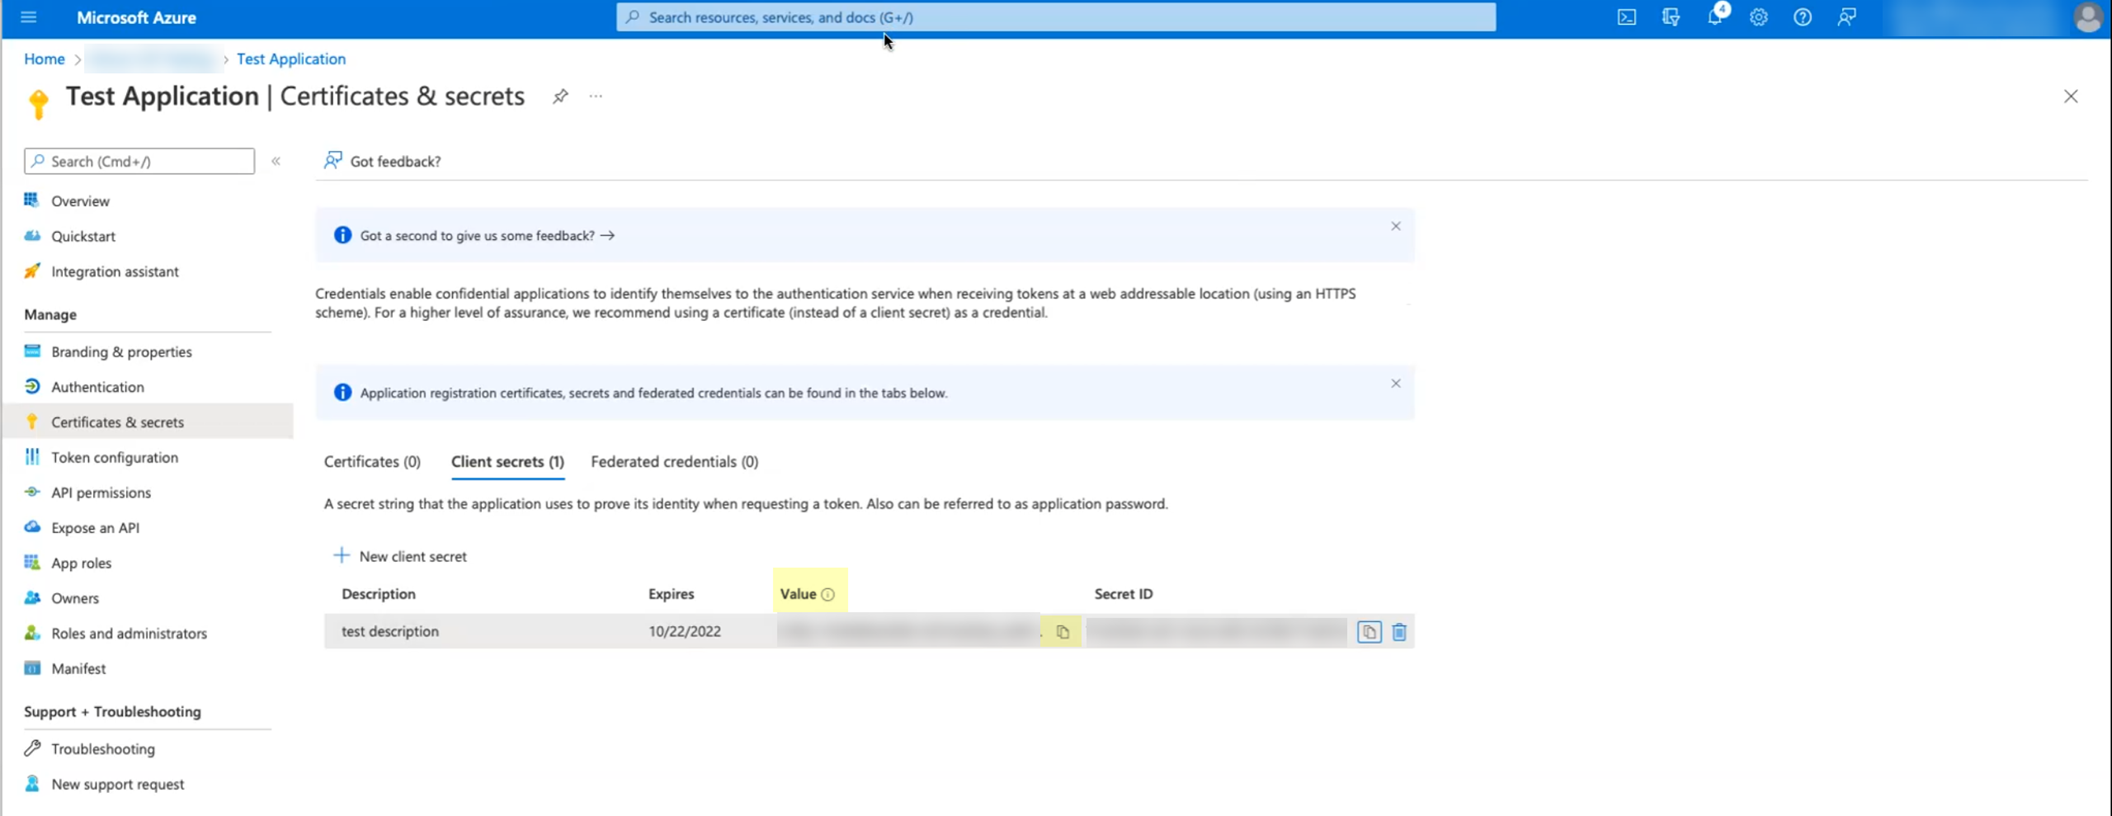
- Select Certificates & secrets then click New client secret .
- Enter a Description and Add the secret.
When you add the secret, make sure to keep track of when the secret Expires . When the secret expires, you must configure the new secret in the Azure Portal and update the configuration in the Cloud Identity Engine app to replace the expired secret. Keep this in mind when selecting the expiry value for the secret. If you prioritize ease of configuration, select a longer expiration for the secret (the maximum value is 2 years). If security is of greater concern, select a shorter value for the secret’s expiration (the default is 6 months).
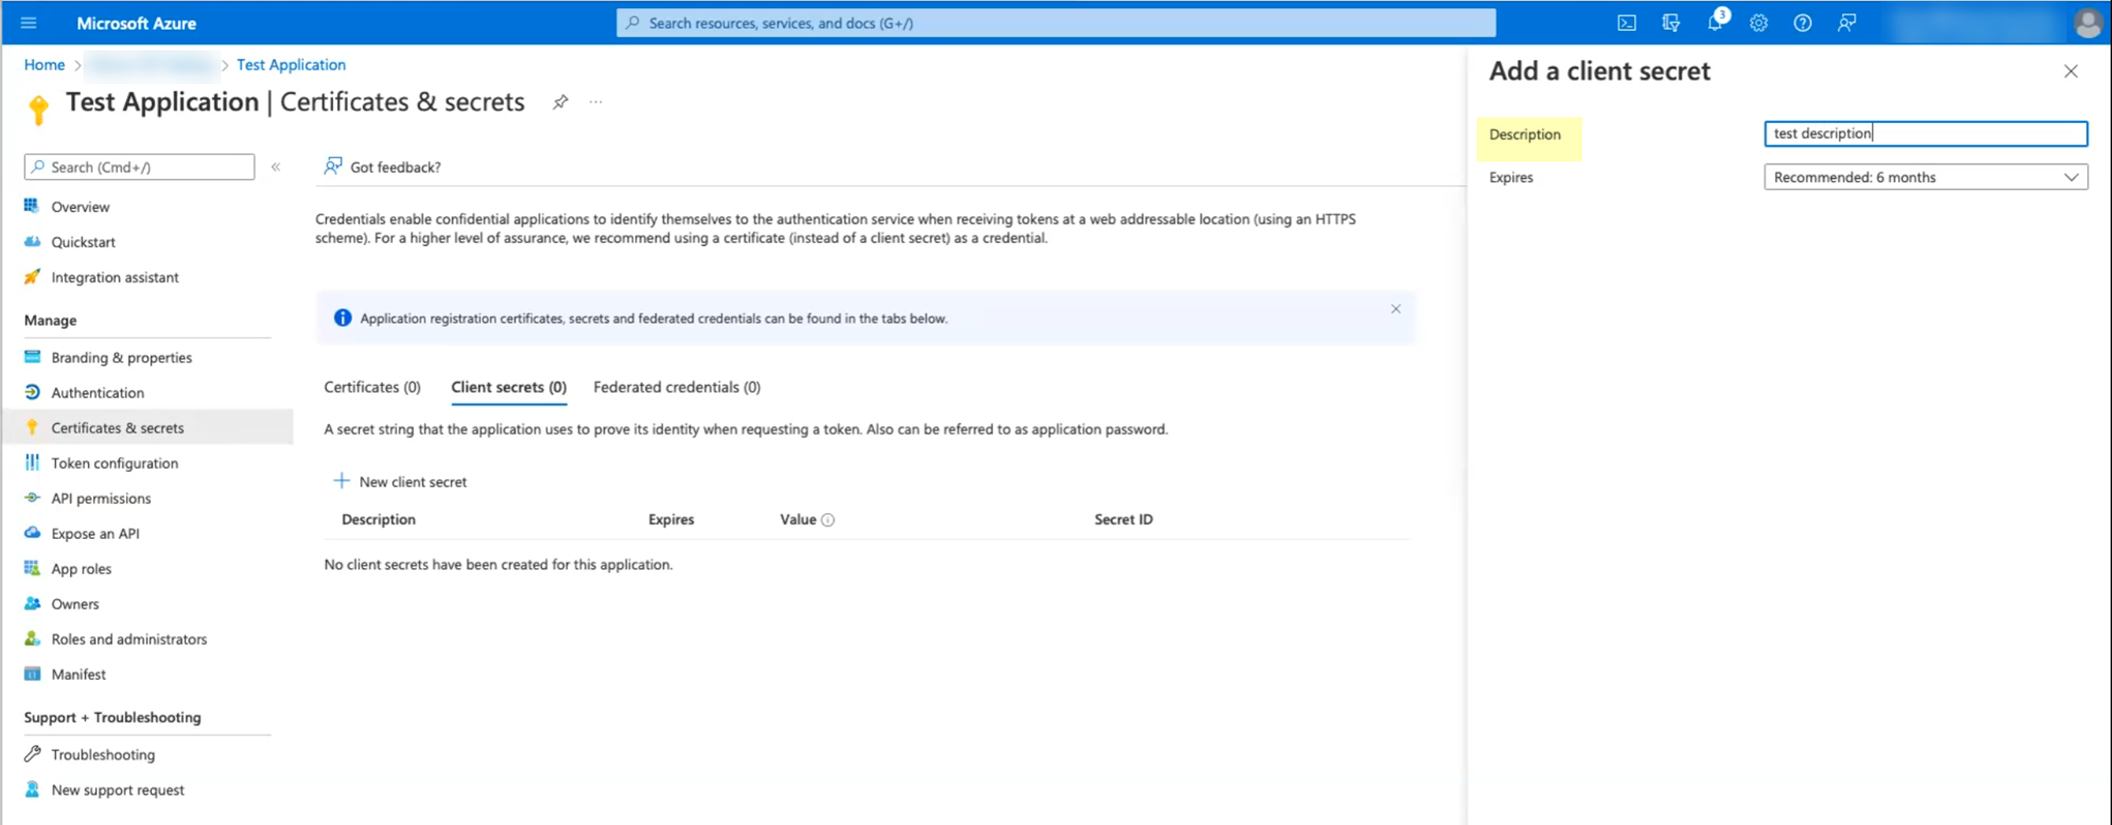
- Copy the Value of the secret and store it in a secure location.
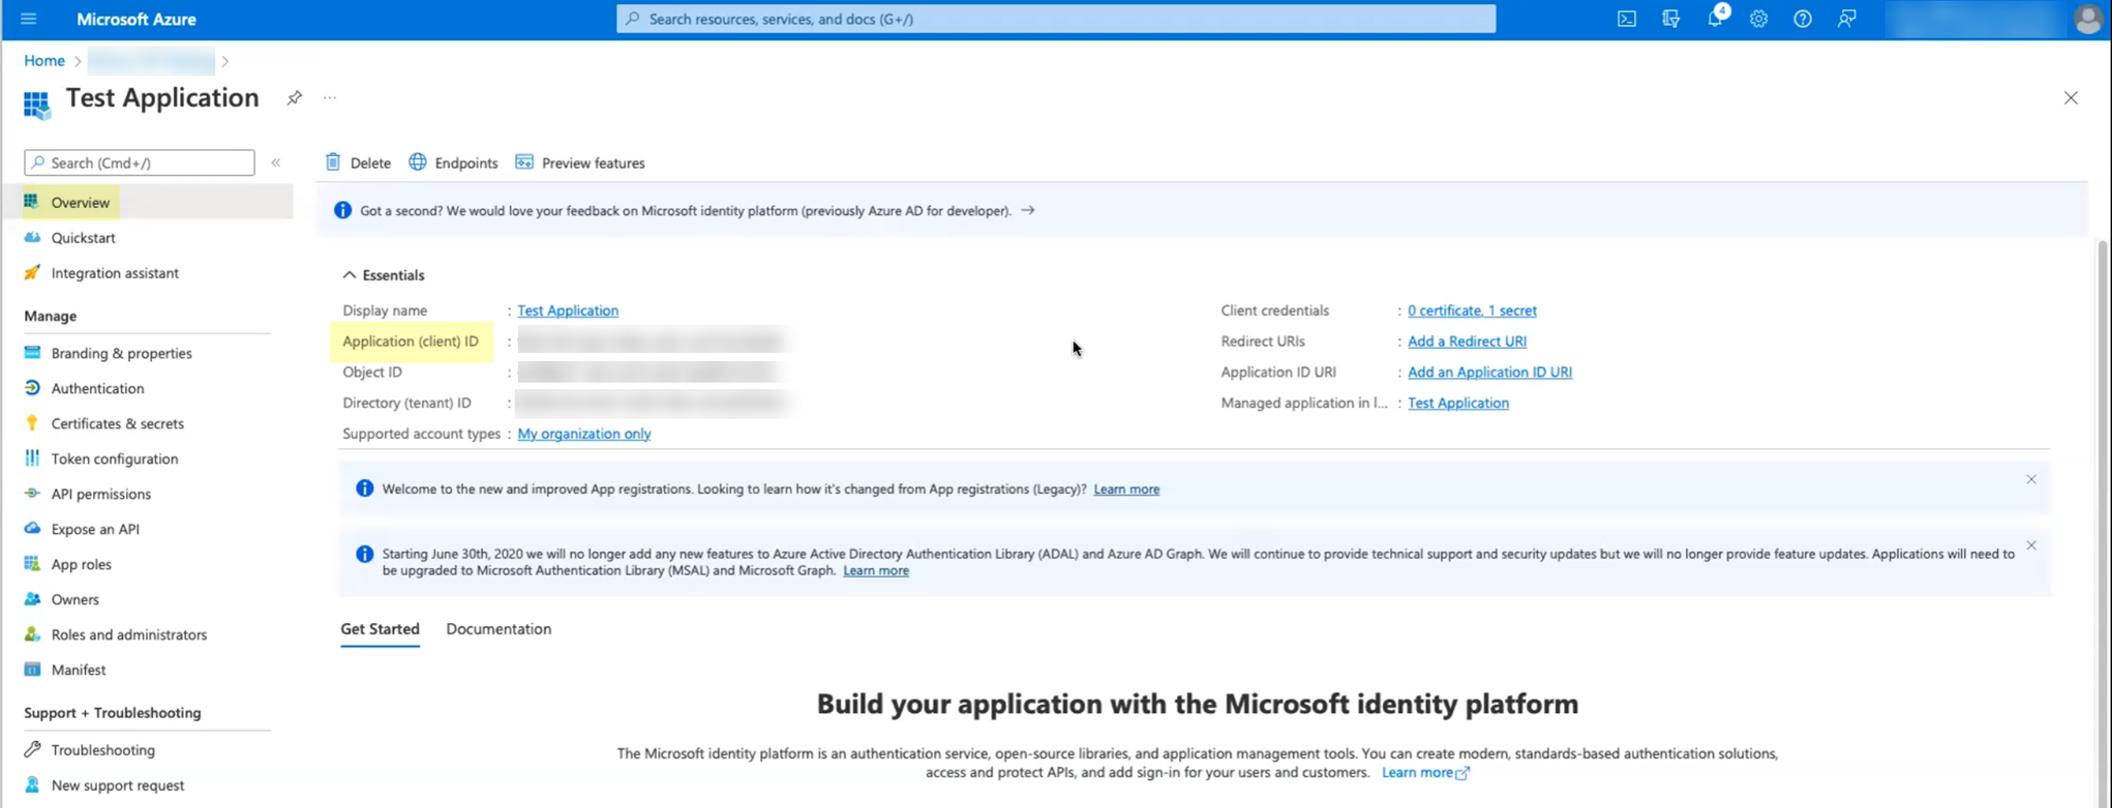
- Click Overview then copy the Application (client) ID and store it in a secure location.
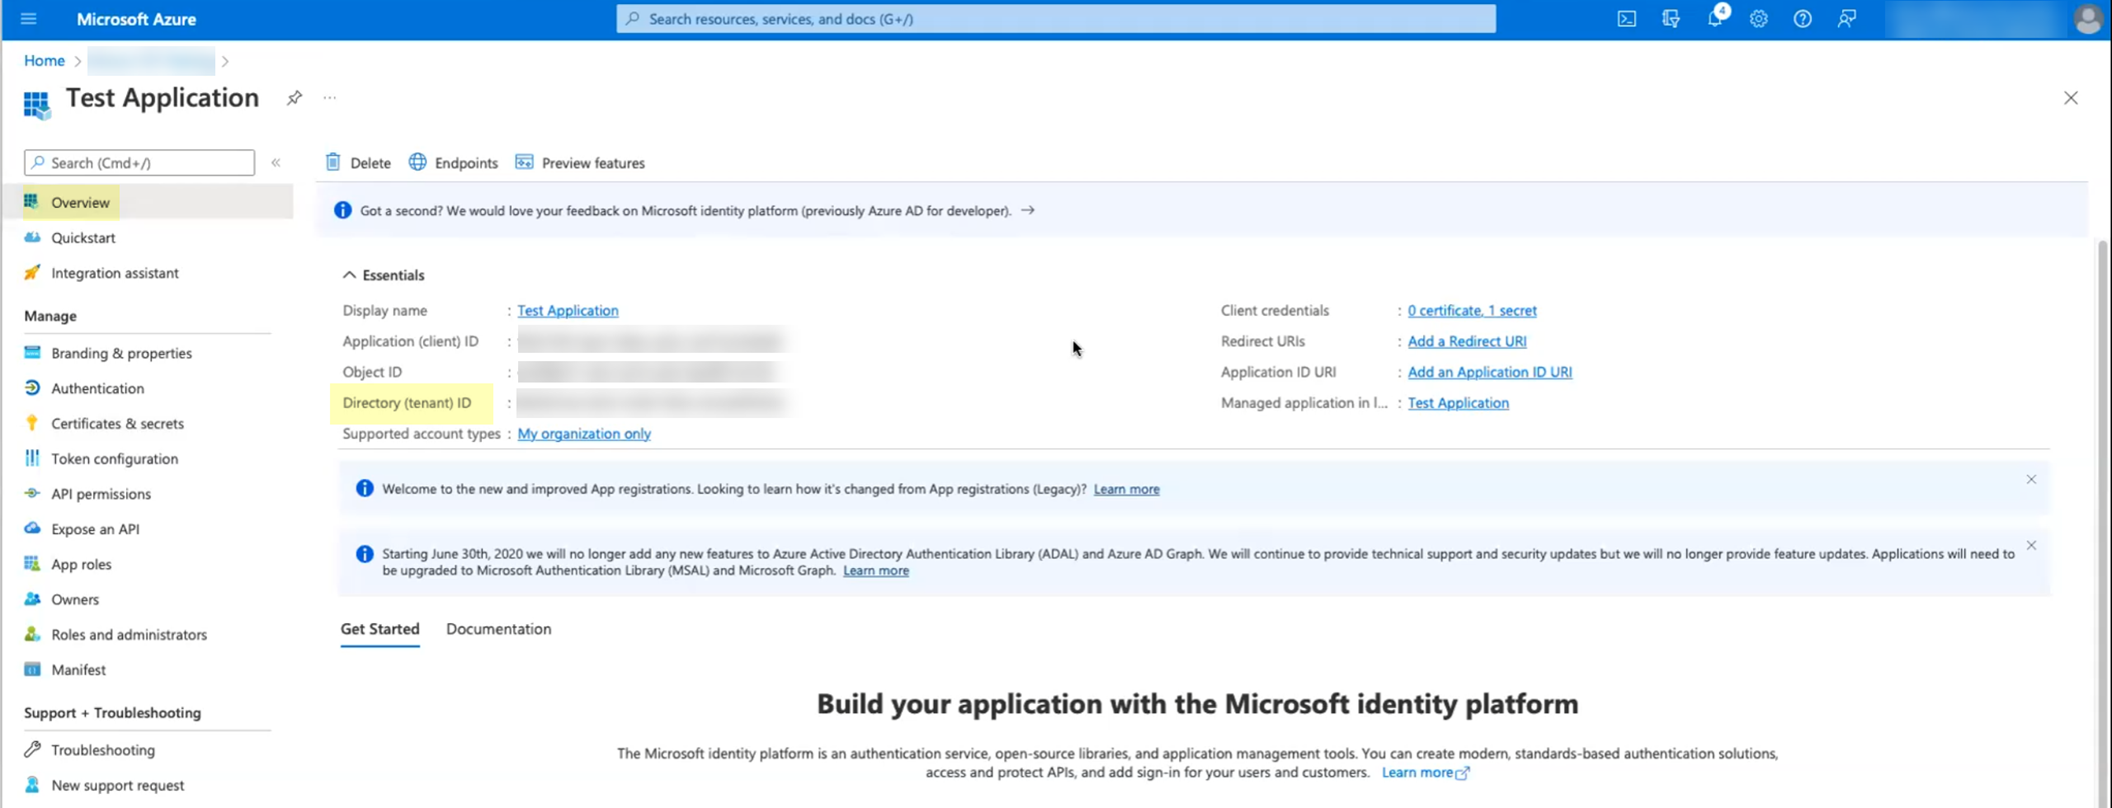
- Copy the Directory (tenant) ID and store it in a secure location.
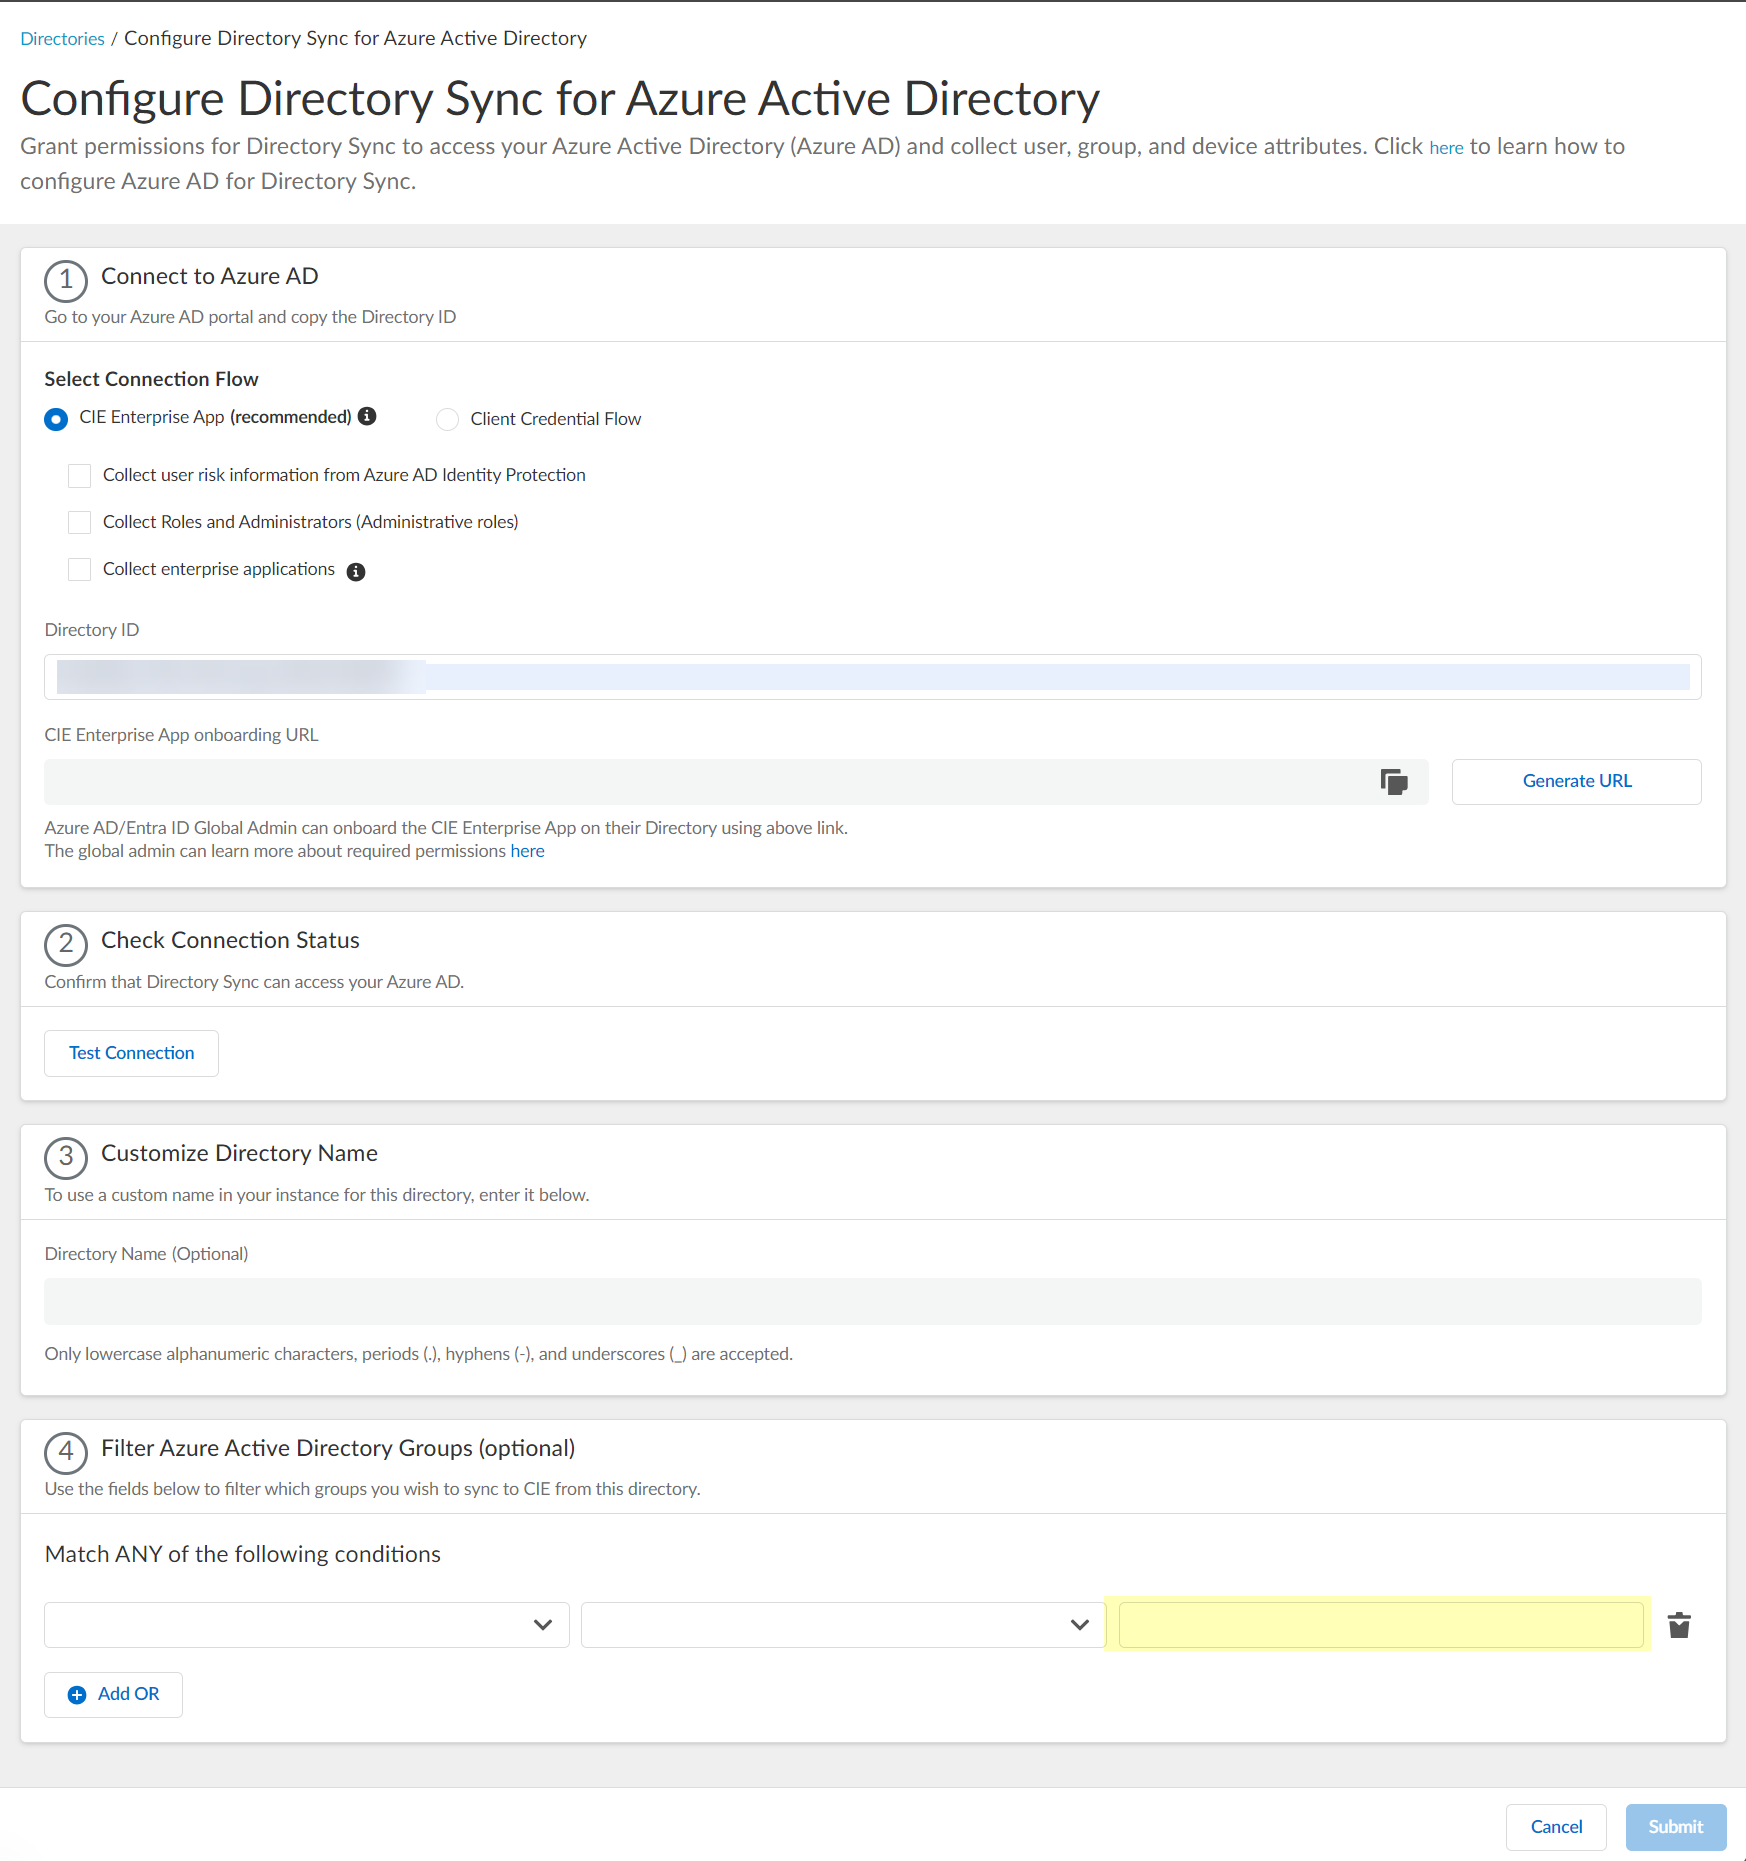
- Add your Azure AD directory in the Cloud Identity Engine.
Required for migration If you are migrating an existing Azure AD configuration, select ActionsReconnect on the Directories page for the Azure AD you want to migrate. The Cloud Identity Engine automatically populates the necessary information so you can continue to step
9
(testing the connection).
- In the Cloud Identity Engine app, select Directories then click Add New Directory .
- Set Up an Azure directory.
- Select whether you want to Collect user risk information from Azure AD Identity Protection to use in attribute-based Cloud Dynamic User Groups .
If you select this option, you must grant additional permissions for the Cloud Identity Engine in the Azure AD Portal. For more information, refer to the documentation for Cloud Dynamic User Groups .
- Select whether you want to Collect Roles and Administrators (Administrative roles) to retrieve roleAssignments attribute information for users and groups. Allowing the Cloud Identity Engine to include this information for analysis helps to prevent role-based malicious attacks.
By default, the Cloud Identity Engine enables this option for tenants that are associated with Cortex XDR.
If you do not see the Collect Roles and Administrators (Administrative roles) option, reconnect your directory to select the option.
- Select whether you want to Collect enterprise applications data so that it displays when you View Directory Data . If you don't want to collect the application data or you don't use application data in your security policy, deselect the checkbox to decrease the sync time. If you select this option, you must enable additional permissions for the Cloud Identity Engine (see step
2.6
).
For beta users of this feature, the Cloud Identity Engine continues collecting enterprise application data for any directories configured in your tenant during the beta and no further configuration is required. If you configure a new directory, you must select whether you want to collect enterprise application data from the new directory.
- Enter your directory information as indicated, using the information you copied from the Azure Portal in steps
3.4
:
During migration of an existing Azure AD configuration to the client credential flow, the Cloud Identity Engine automatically populates the Directory ID.
|
Copy from Azure Portal |
Enter in Cloud Identity Engine |
|
Directory (tenant) ID |
Directory ID |
|
Application (client) ID |
Client ID |
- Required Confirm the Cloud Identity Engine app can successfully communicate with your directory.
- In the Cloud Identity Engine, click Test Connection to confirm that the Cloud Identity Engine can successfully connect to your Azure AD.
- (Optional) Enter a new name to Customize Directory Name in the Cloud Identity Engine.
- (Optional) Select whether you want to Filter Azure Active Directory Groups.
To reduce sync time and minimize the amount of data collected by the Cloud Identity Engine, you can configure the Cloud Identity Engine to sync only specific groups from your directory. To do this, you can Configure SCIM Connector for the Cloud Identity Engine or you can filter the groups. Because SCIM is most suitable for small and frequent data requests, directory update intervals are restricted to once every 40 minutes. If you choose to filter the groups instead, directory updates can be as often as every 5 minutes. Choose the best option for your deployment based on your organizational and regulatory requirements.
- Select the group attribute you want to use as a filter.
- Name —Filter the groups based on the group name.
- Unique Identifier —Filter the groups based on the unique identifier for the group.
- Select how you want to filter the groups.
- for Name attribute onlybegins with —Filter the groups based on a partial match for the text you enter.
- is equal to —Filter the groups based on an exact match for text you enter.
- Enter the text you want to use to filter the groups.
- (Optional) Configure an additional filter by clicking Add OR and repeating the previous three steps for each filter you want to include.
When you configure additional attributes, the Cloud Identity Engine initially attempts to find a match for the first criteria in the configuration, then continues to attempt to match based on the additional criteria you specify.
- Submit your changes and verify your directory information when the Directories page displays.
You can now use your Azure AD to enforce group-based policy with the Cloud Identity Engine.
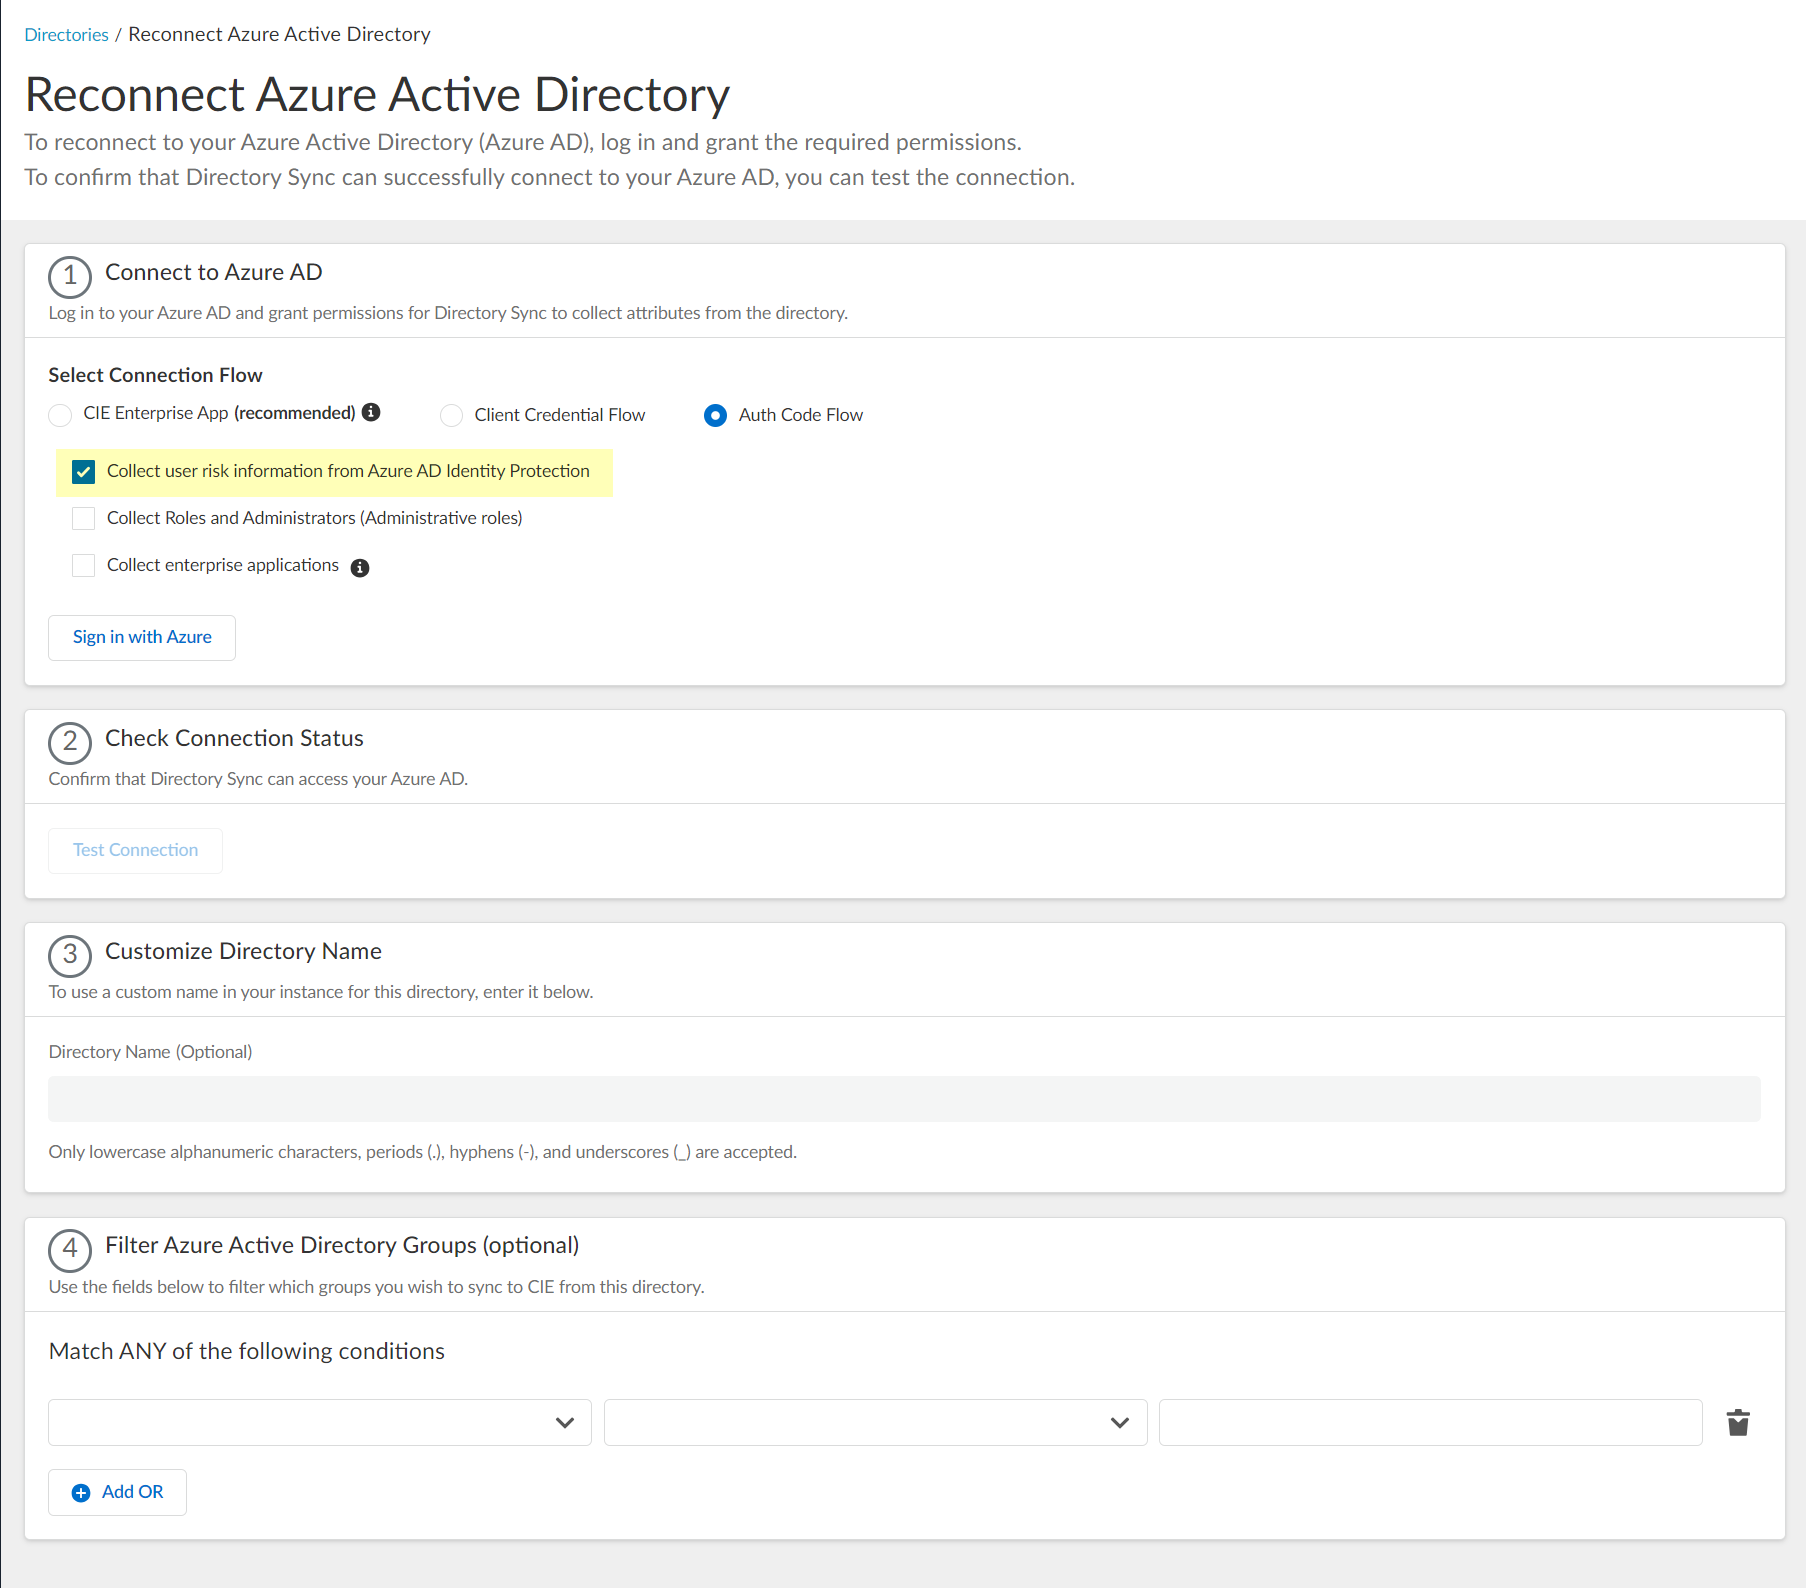
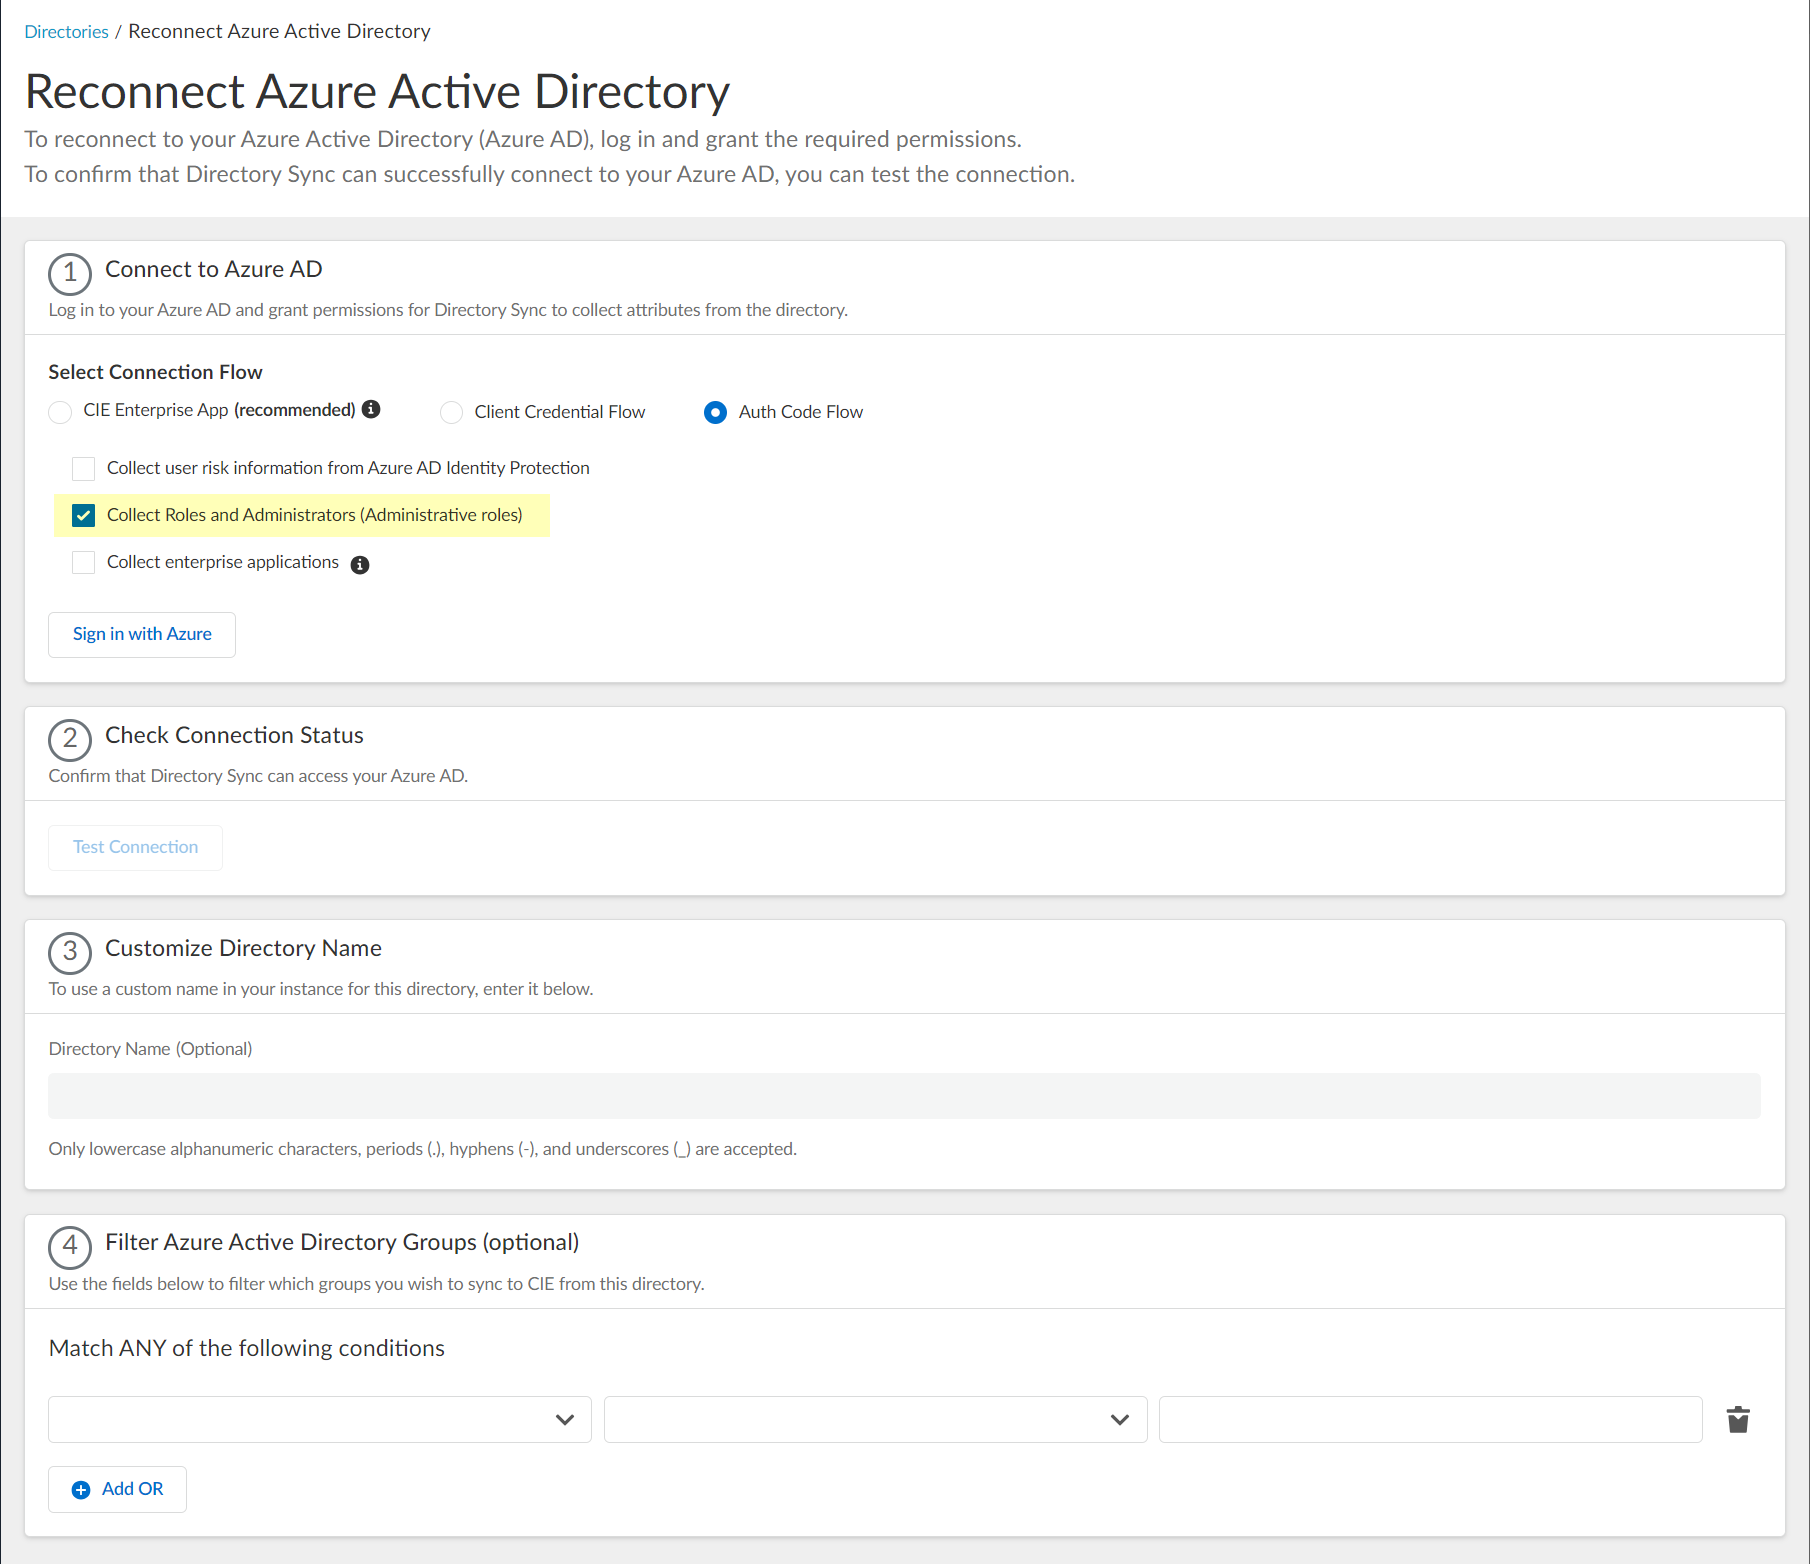
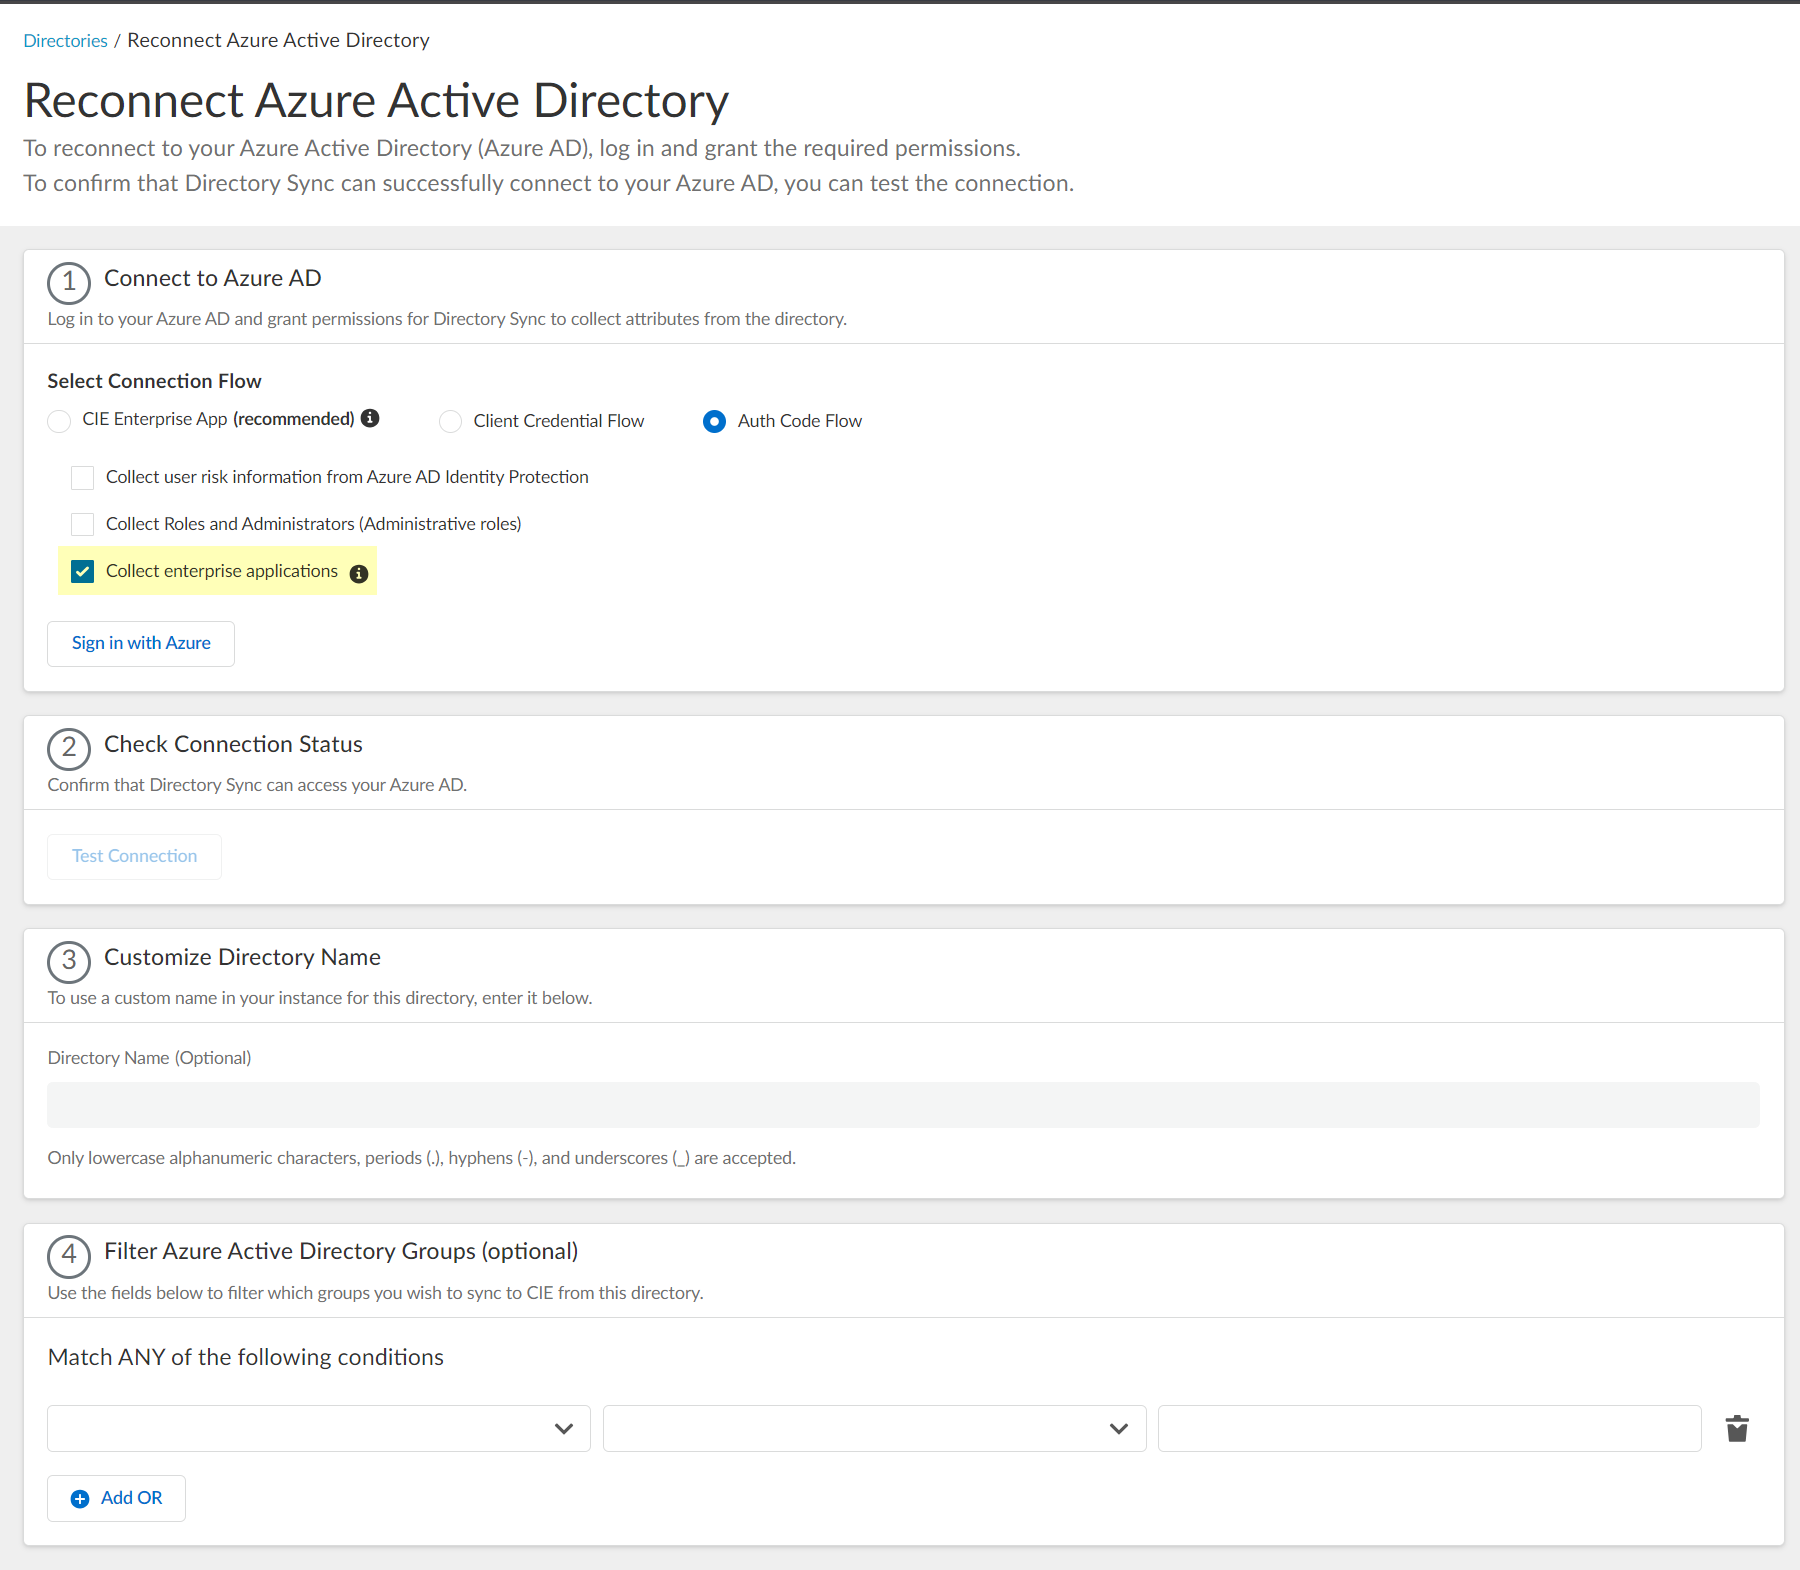
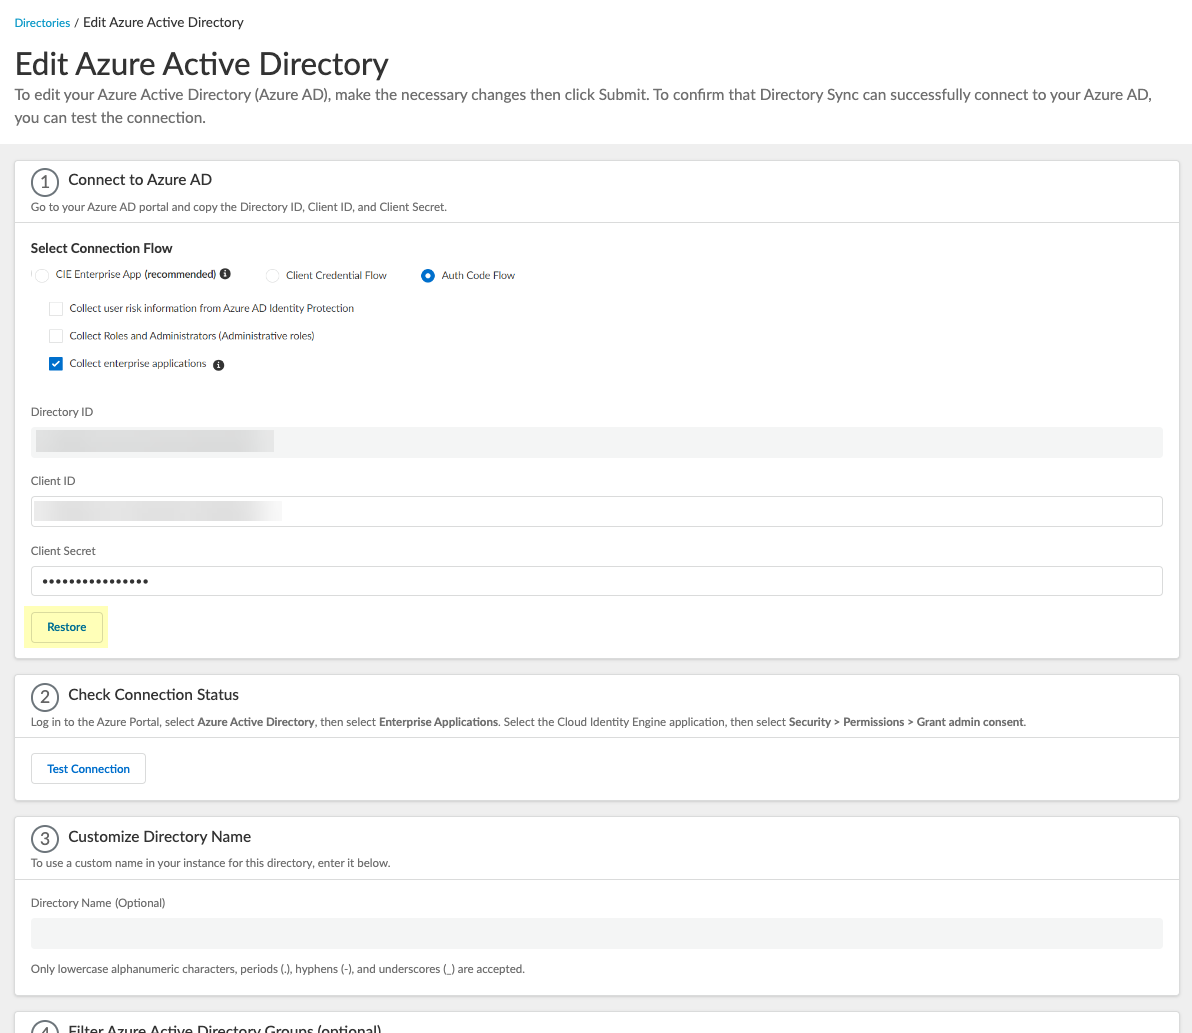
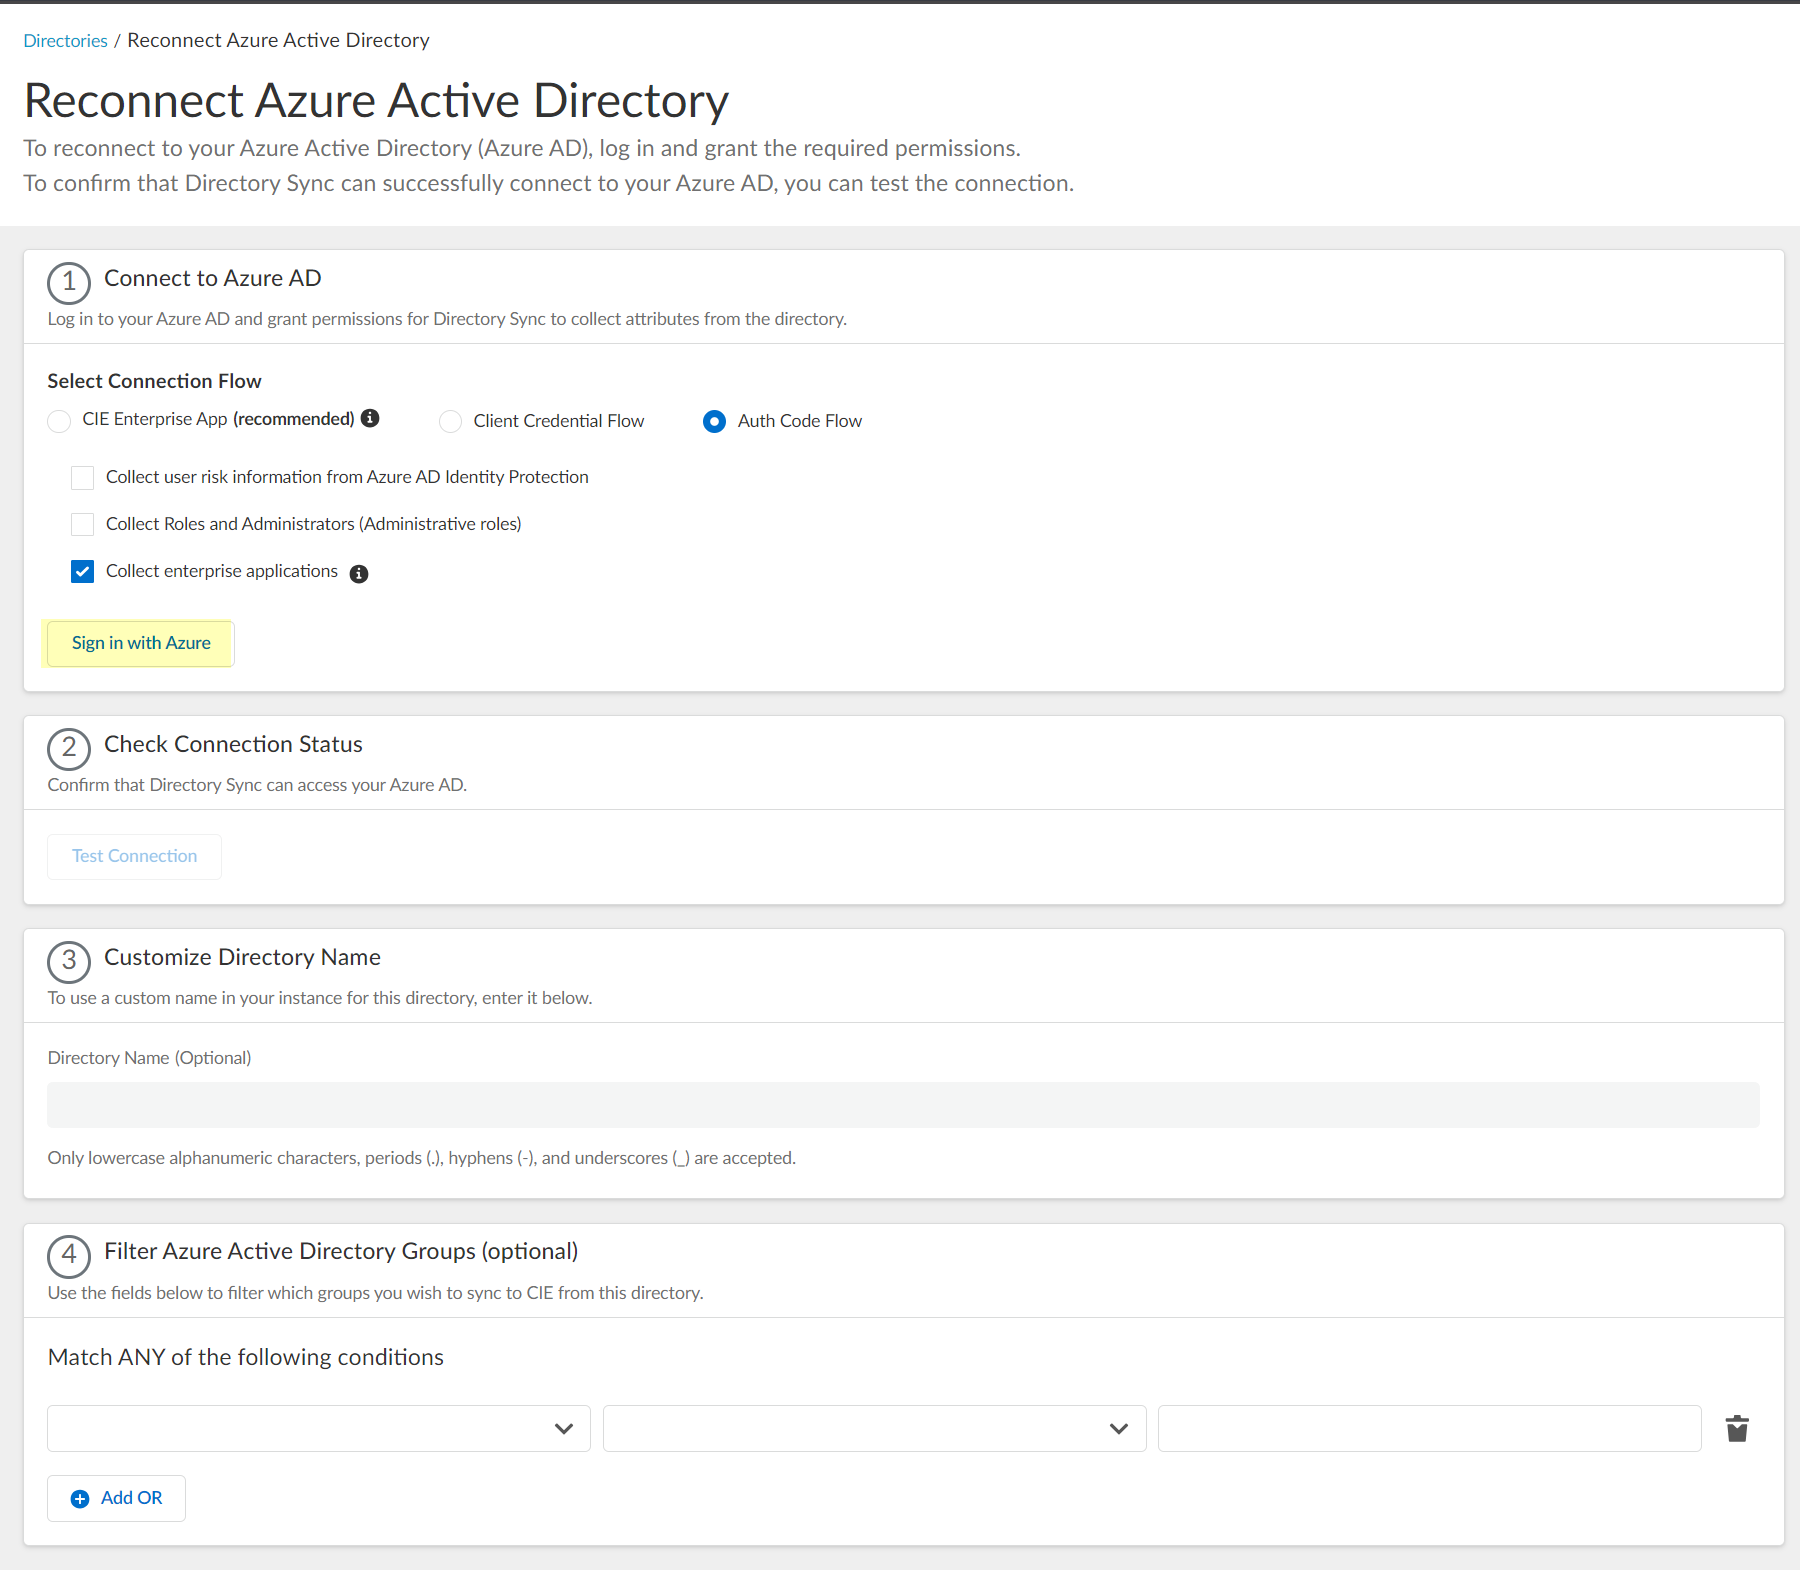
Reconnect or Edit Azure Active Directory
The auth code flow method has been deprecated and is not available for new configurations, only existing configurations. For new configurations, refer to Configure Azure Using the CIE Enterprise App .
- Log in to the hub and select the Cloud Identity Engine app.
- In the Cloud Identity Engine app, select DirectoriesReconnect .
If this Azure AD configuration has never successfully connected to the Cloud Identity Engine, select ActionsEdit .
- Select the method you want to use to log in to your Azure AD.
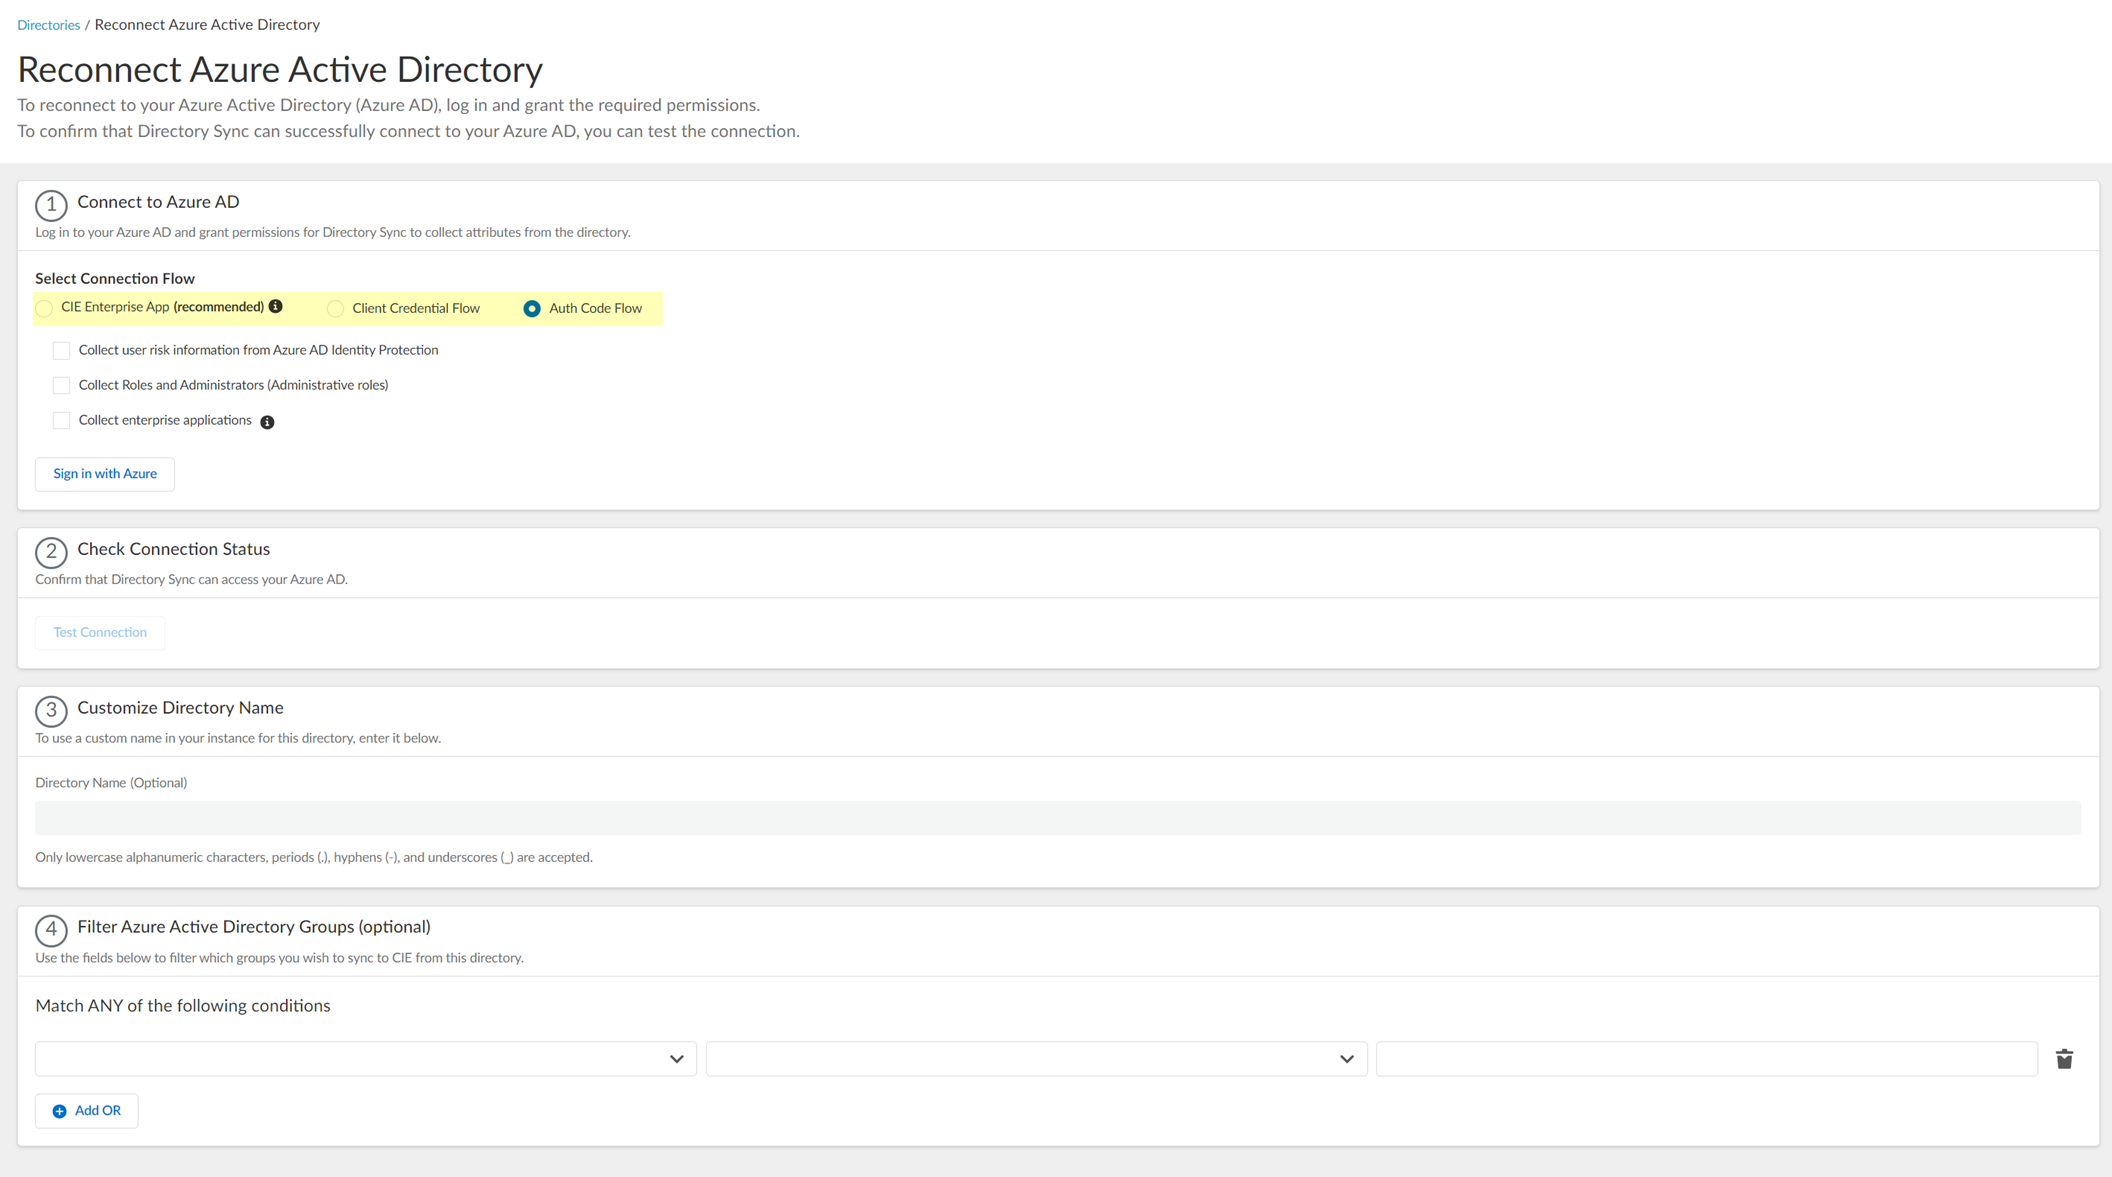
Palo Alto Networks strongly recommends the CIE Enterprise App connection flow type. Using the client credential connection flow type requires you to configure your Azure AD with the necessary permissions, so ensure you’ve completed all of the predeployment steps necessary to Configure Azure Using the Client Credential Flow before you configure this option.
- CIE Enterprise App (Recommended) (Default) — Configure Azure Using the CIE Enterprise App with the Cloud Identity Engine. This option requires Global Administrator privileges but you only need to enter the directory ID.
- Client Credential Flow —By granting the required permissions in advance, you do not need to log in to the Azure AD to make changes to that directory in the Cloud Identity Engine. For more information, refer to Configure Azure Using the Client Credential Flow .
- Select whether you want to Collect user risk information from Azure AD Identity Protection to use in attribute-based Cloud Dynamic User Groups .
If you select this option, you must grant additional permissions for the Cloud Identity Engine in the Azure AD Portal. For more information, refer to the documentation for Cloud Dynamic User Groups .
- Select whether you want to Collect Roles and Administrators (Administrative roles) to retrieve roleAssignments attribute information for users and groups. Allowing the Cloud Identity Engine to include this information for analysis helps to prevent role-based malicious attacks. By default, the Cloud Identity Engine enables this option for tenants that are associated with Cortex XDR.
If you select this option, you must grant additional permissions for the Cloud Identity Engine in the Azure AD Portal. For more information, refer to step
9
.
- Select whether you want to Collect enterprise applications data so that it displays when you View Directory Data . If you don't want to collect the application data or you don't use application data in your security policy, deselect the checkbox to decrease the sync time.
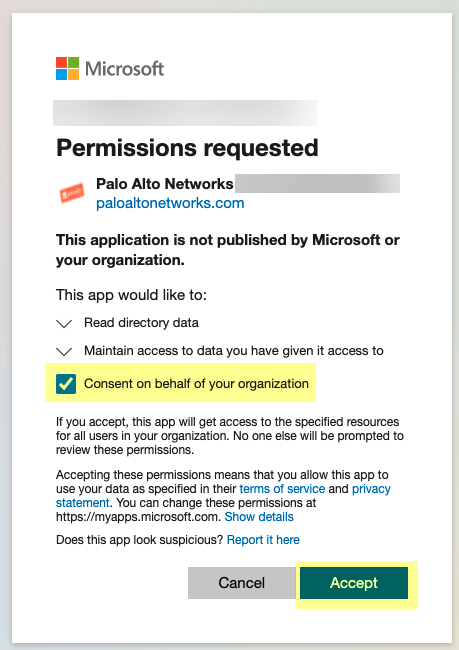
- Sign in with Azure or Restore the connection using your Azure administrator credentials and grant permissions for the Cloud Identity Engine to access the directory information.
You must have an administrative account for the directory to grant the following required permissions.
- Access Azure Service Management
- View your basic profile
- Maintain access to data you have given it access to
- Read directory data
- View your email address
If this Azure AD configuration has never successfully connected to the Cloud Identity Engine, select Sign in with Azure .
6. Enter your email address or phone number then click Next .
7. Enter your password and Sign in .
8. Consent on behalf your organization to grant the permissions that the Cloud Identity Engine requires to get the metadata with the list of directories and Accept to confirm.
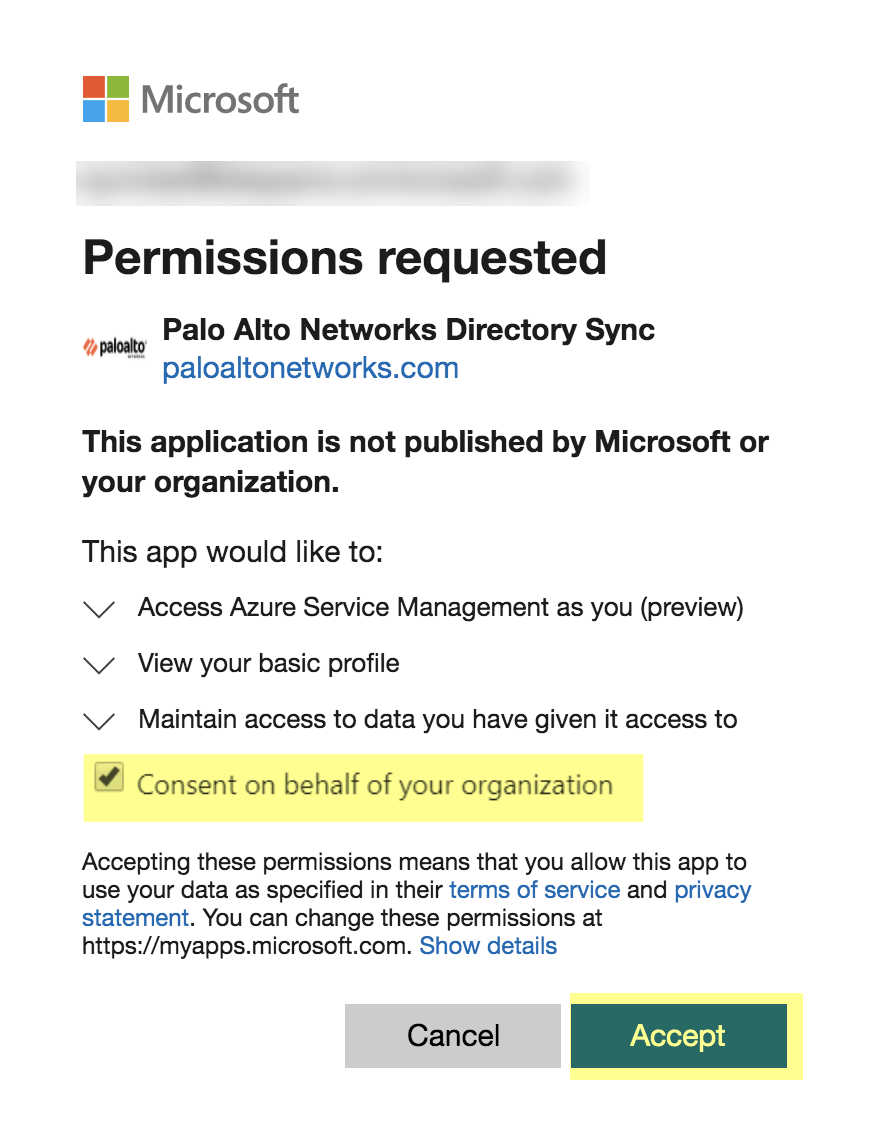
The button displays Logged In when the authentication is successful.
- Click Test Connection to confirm that the Cloud Identity Engine tenant can successfully communicate with the Azure directory.
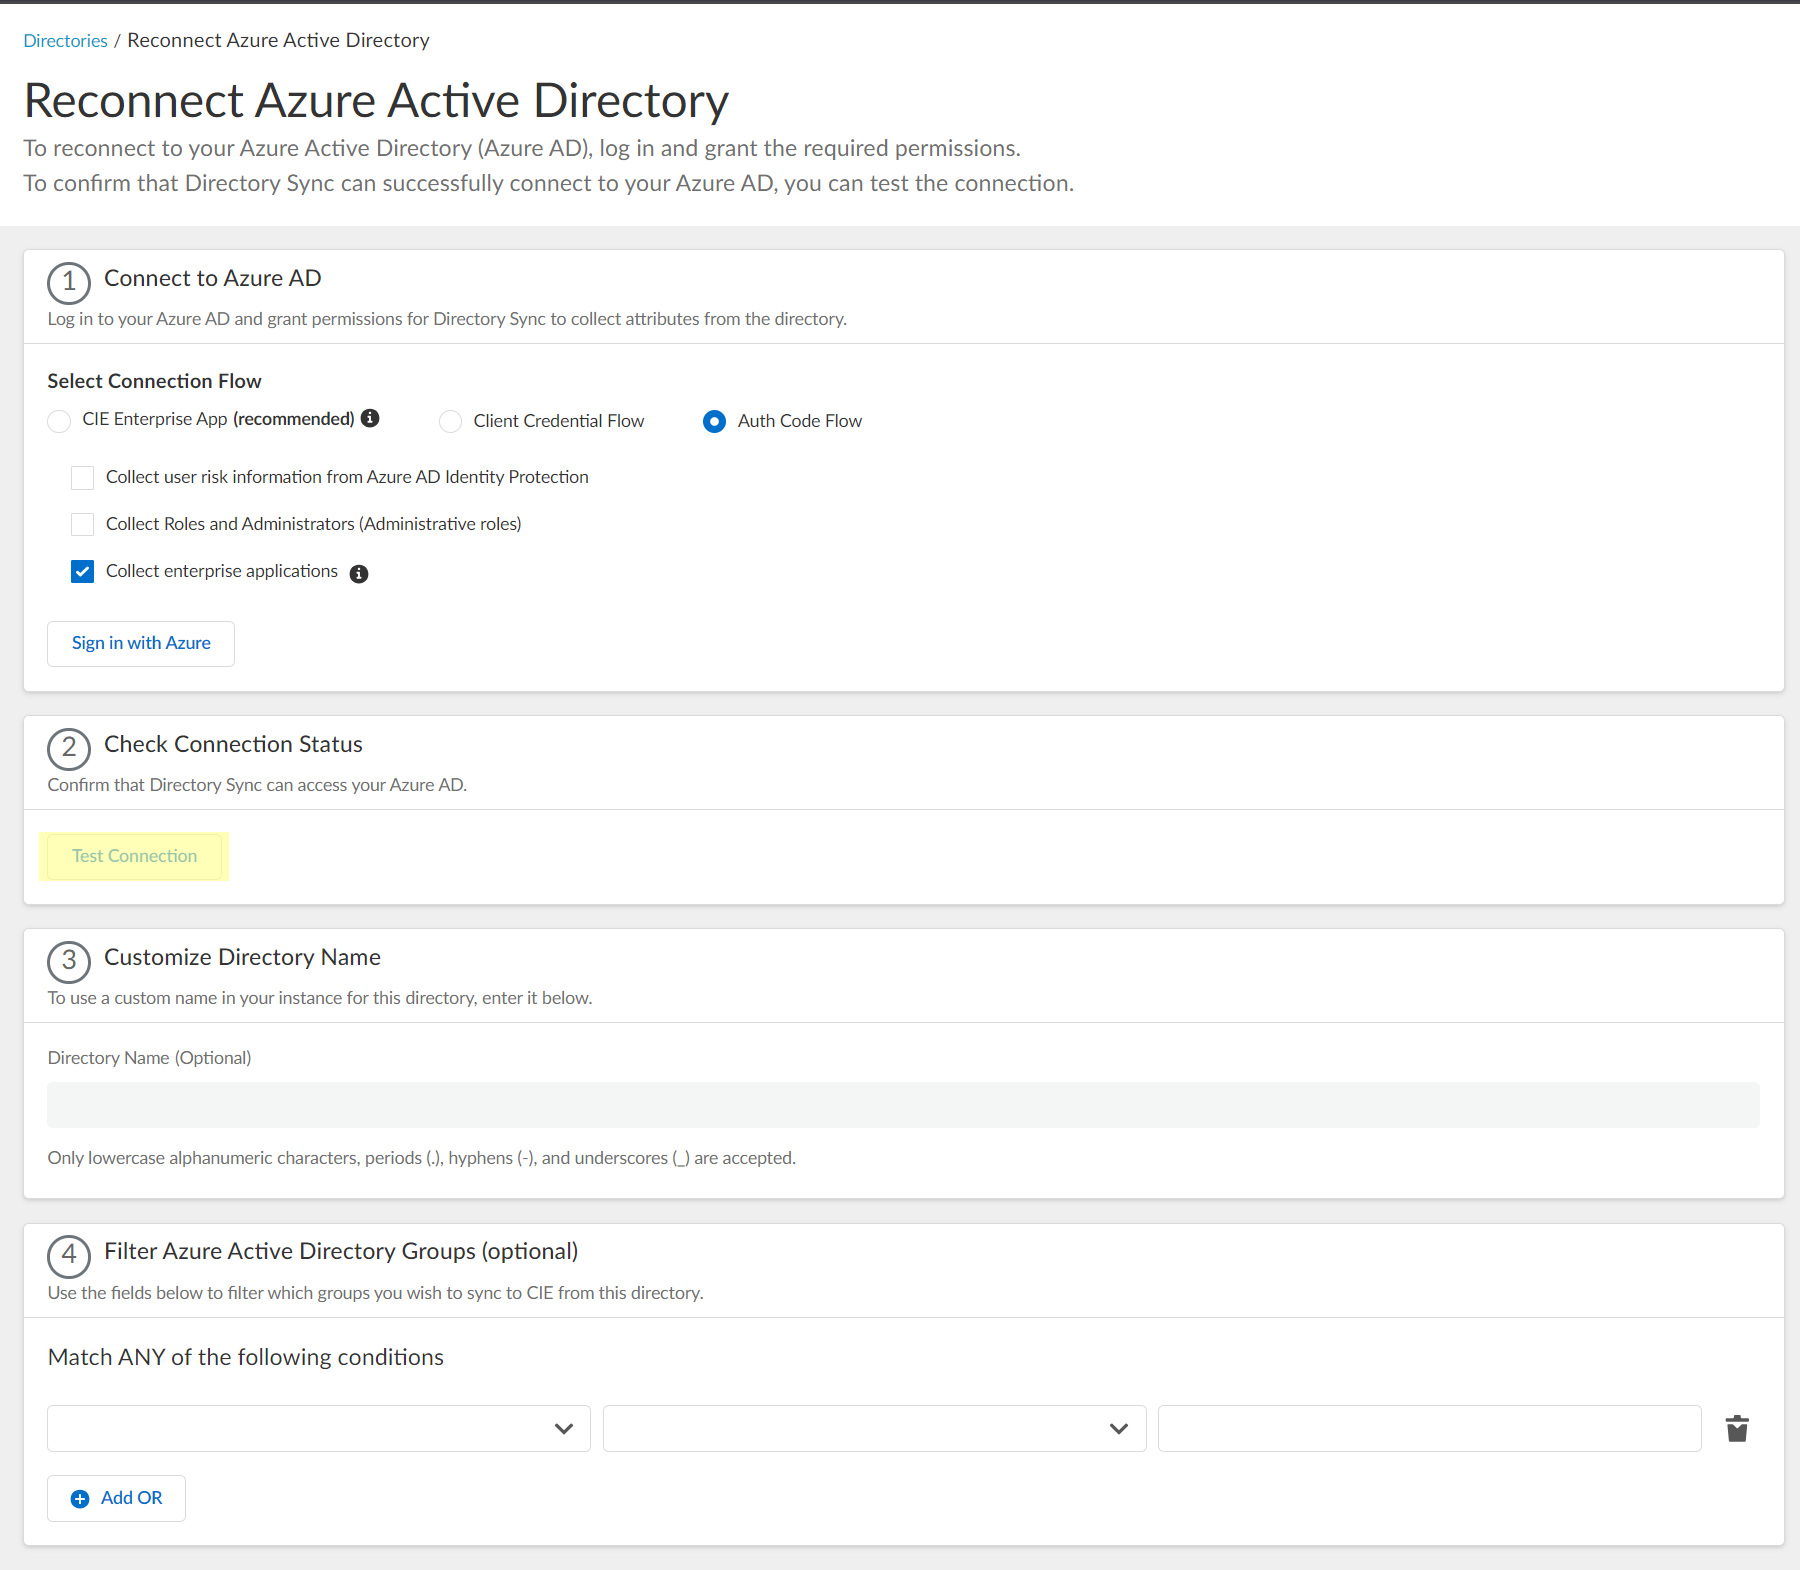
- The Cloud Identity Engine checks for the primary directory, which may not be the same as initial directory.
- While the test is in progress, the button displays Testing .
- When the Cloud Identity Engine verifies the connection, the button displays Success and lists the domain name and ID for the directory.
- If the connection is not successful, the button displays Failed and a red exclamation point. If this occurs, confirm you have entered your Azure credentials correctly.
- If you have more than one directory in your Azure AD, select the radio button for each directory and Test Connection . Submit each directory individually.
- Consent on behalf your organization to grant the permissions the Cloud Identity Engine requires to access the directory data and Accept to confirm.
- If you want to use user risk information in attribute-based Cloud Dynamic User Groups , you must grant additional permissions. For more information, refer to the documentation on how to Create a Cloud Dynamic User Group .
- If you select the Collect Roles and Administrators (Administrative roles) option in step
5
and you have already granted the Directory.Read.All scope, no further permissions are required. Otherwise, you must also grant the RoleManagement.Read.Directory scope to collect role and administrator information.
- If you select the Collect enterprise applications option in step
6
, you must grant the Application.Read.All scope.
-
- (Optional) Enter a unique name as the Directory Name (optional) field to use a customized name for the directory in the Cloud Identity Engine app.
You can use up to 15 lowercase alphanumeric characters (including hyphens, periods, and underscores) for the directory name in the Cloud Identity Engine. You don't need to change the name of the directory itself, only the name of the directory in the Cloud Identity Engine app.

If you are collecting data for the same domain from both an on-premises Active Directory (AD) and an Azure AD, Palo Alto Networks recommends that you create a separate Cloud Identity Engine tenant for each directory type. If you must use the same Cloud Identity Engine tenant and want to collect data from both an on-premises AD and an Azure AD, you must customize the directory name for the Azure AD (for example, by adding .aad to Customize Directory Name ) then Reconnect or Edit Azure Active Directory . Any applications that you associate with the Cloud Identity Engine use the custom directory name.
- The custom directory name is the alias for your Azure AD in your Cloud Identity Engine tenant; it does not change the name of your directory. If you do not enter a custom directory name, the Cloud Identity Engine uses the default domain name.
- The Cloud Identity Engine supports lowercase alphanumeric characters, periods (.), hyphens (-), and underscores (_).
- If you associate the Cloud Identity Engine with Cortex XDR, the customized directory name must be identical to the Domain you select in Cortex XDR .
The custom directory name must match the corresponding directory name in any app that you associate with the Cloud Identity Engine. For example, if you are using the Cloud Identity Engine with Cortex XDR, the custom directory name in the Cloud Identity Engine must be the same as the directory name in Cortex XDR.
- (Optional) Select whether you want to Filter Azure Active Directory Groups.
To reduce sync time and minimize the amount of data collected by the Cloud Identity Engine, you can configure the Cloud Identity Engine to sync only specific groups from your directory. To do this, you can Configure SCIM Connector for the Cloud Identity Engine or you can filter the groups. Because SCIM is most suitable for small and frequent data requests, directory update intervals are restricted to once every 40 minutes. If you choose to filter the groups instead, directory updates can be as often as every 5 minutes. Choose the best option for your deployment based on your organizational and regulatory requirements.
1. Select the group attribute you want to use as a filter.
- Name —Filter the groups based on the group name.
- Unique Identifier —Filter the groups based on the unique identifier for the group.
2. Select how you want to filter the groups.
- for Name attribute onlybegins with —Filter the groups based on a partial match for the text you enter.
- is equal to —Filter the groups based on an exact match for text you enter.
3. Enter the text you want to use to filter the groups.
4. (Optional) Configure an additional filter by clicking Add OR and repeating the previous three steps for each filter you want to include.
When you configure additional attributes, the Cloud Identity Engine initially attempts to find a match for the first criteria in the configuration, then continues to attempt to match based on the additional criteria you specify.
- When the configuration is complete, Submit the configuration.
When you submit the configuration, the Cloud Identity Engine connects to your Azure AD and begins synchronizing attributes. The Sync Status column displays In Progress while the Cloud Identity Engine collects the attributes.
Revoke Cloud Identity Engine Permissions for Azure Active Directory
If you want to revoke the permissions for the Cloud Identity Engine to access your Azure Active Directory (AD), delete the directory in your Cloud Identity Engine tenant and delete the application from the Azure Portal.
To revoke permissions for an Azure AD from the Cloud Identity Engine, you must have at least the following role privileges in Azure AD: Application Administrator and Cloud Application Administrator. For more information about roles in Azure AD, refer to the following link .
- Delete the directory from your Cloud Identity Engine tenant.
- Log in to the Azure Portal with your administrator credentials.
- Select Azure Active Directory .
- In the Manage section, select Enterprise applications .
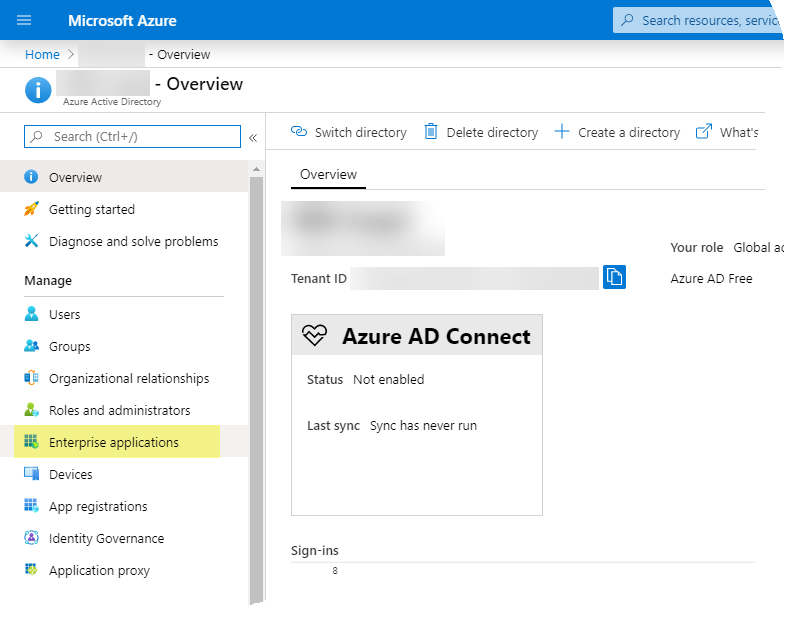
- In the Manage section, select All applications then select Palo Alto Networks Cloud Identity Engine .
- In the Manage section, select Properties .
- Delete the application and click Yes to confirm.
When you confirm, the Cloud Identity Engine can no longer access this Azure AD.
Configure Okta Directory
The Cloud Identity Engine can integrate Okta Directory information. When you configure your Okta Directory as part of the Cloud Identity Engine, the Cloud Identity Engine uses Okta Directory to collect user and group attribute information for Security policy enforcement and for visibility into the users who access your network.
You must create an OpenID Connect (OIDC) app to configure an Okta directory for the Cloud Identity Engine, even if you’ve configured Okta for SAML. If you try to use the SAML app to configure an Okta directory instead of creating a new OIDC app, the initial sync might be successful, but any subsequent syncs fail because the refresh token from gallery applications does not support this configuration.
You can select one of two methods for the Cloud Identity Engine to use to connect to your Okta Directory:
- The
Auth Code Flow
, which requires you to log in to make changes to the directory configuration in the Cloud Identity Engine
- The Client Credential Flow , which initially requires additional permissions but does not require you to log in to change the directory configuration in the Cloud Identity Engine
For an Okta directory, the Cloud Identity Engine retrieves updates from the directory using the following schedule:
- Users, Groups, and Devices—When the Cloud Identity Engine syncs changes.
- Apps—Every x hours (where x is either a maximum of three hours or the duration necessary to complete the previous apps sync).
Deploy Auth Code Flow for Okta Directory
- If you have not already done so, activate the Cloud Identity Engine and obtain the Sign-in redirect URI for Okta.
- After activating the Cloud Identity Engine, log in to the hub and select the Cloud Identity Engine app.
- Copy the URL for your Cloud Identity Engine tenant and edit it to obtain the Sign-in redirect URI that Okta requires. To edit the URL, replace the text after the domain with /authorize . For example, if your Cloud Identity Engine tenant URL is https://directory-sync.us.paloaltonetworks.com/directory?instance=<InstanceId> , your Redirect URL is https://directory-sync.us.paloaltonetworks.com/authorize .
- Using the Okta Administrator Dashboard, prepare to add your Okta Directory in the Cloud Identity Engine.
To set up an Okta Directory in the Cloud Identity Engine, you must create a user then assign Admin Roles to that user to grant privileges for the Okta Directory in the Okta Administrator Dashboard ( SecurityAdministratorsAdminsAdd Administrator ). This is the account you’ll assign to the app in step
2.6
. This is also the same account you'll use to log in for step
8
when using the
Auth Code Flow
for your Okta Directory.
- Create an app integration for the Cloud Identity Engine app in Okta.
- Select OIDC - OpenID Connect as the Sign-in method .
- Select Web Application as the Application type then click Next .
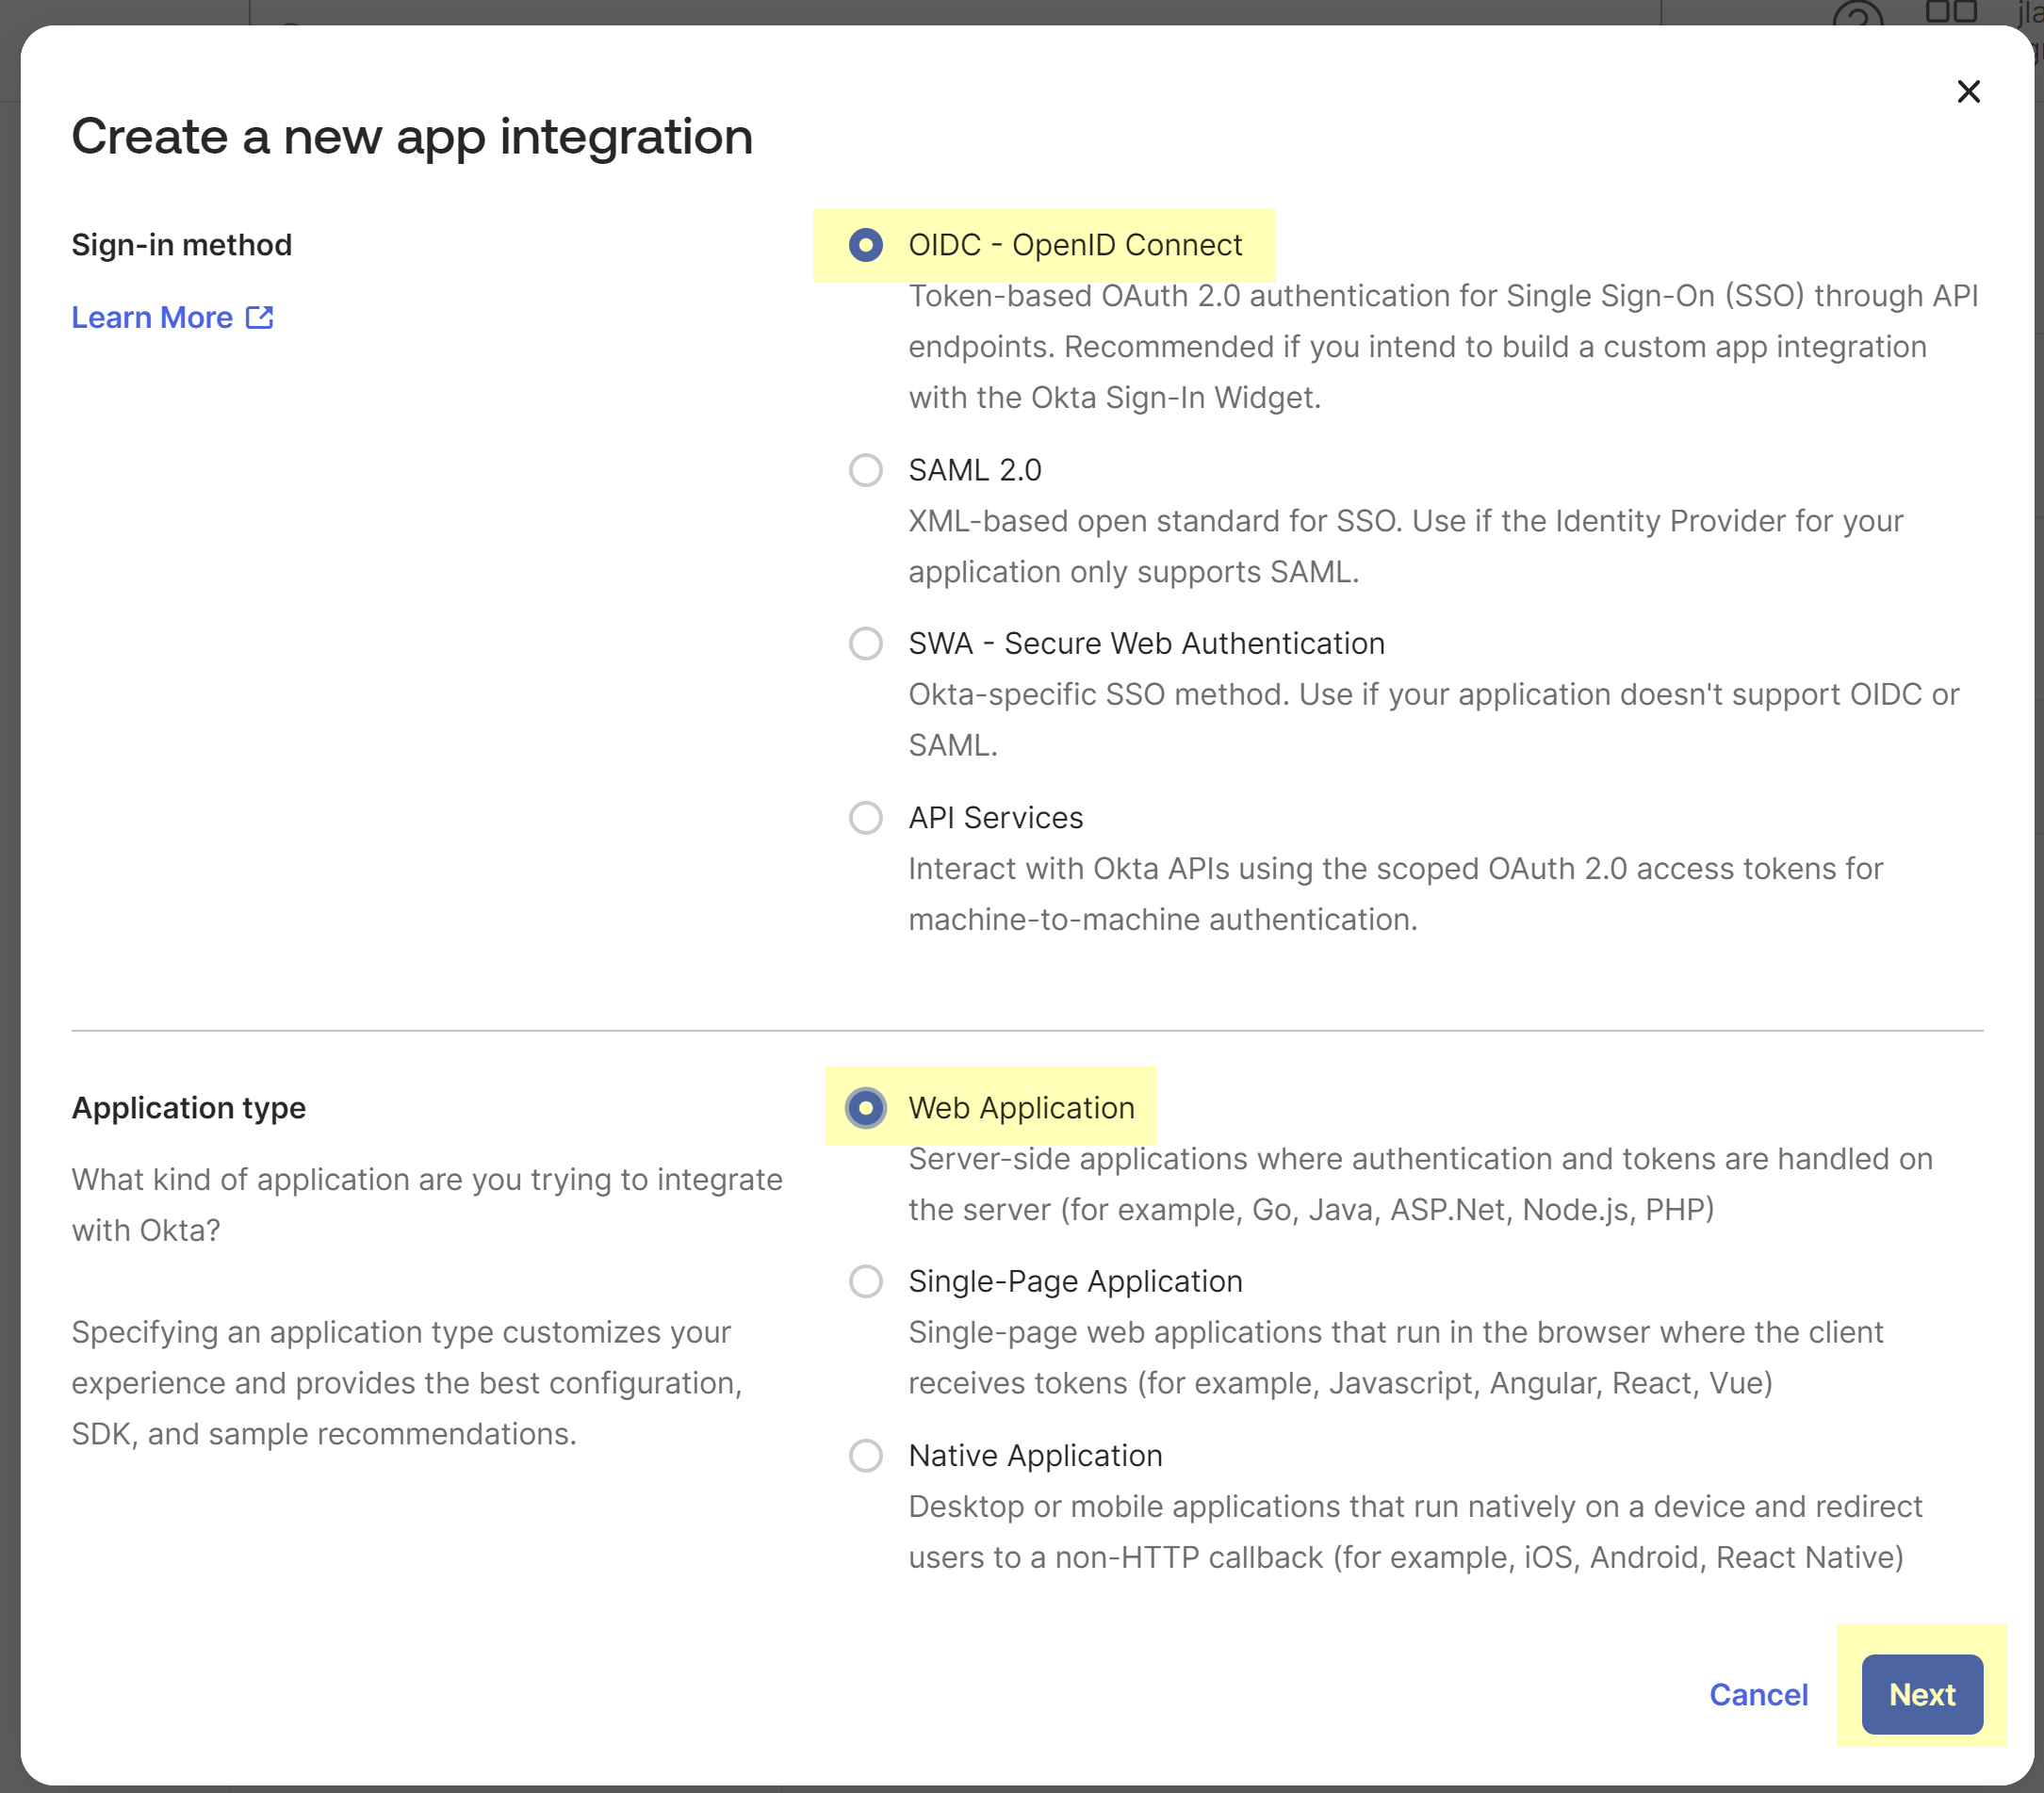
- Replace any existing Sign-in redirect URIs with the edited URL from step
1.2
.
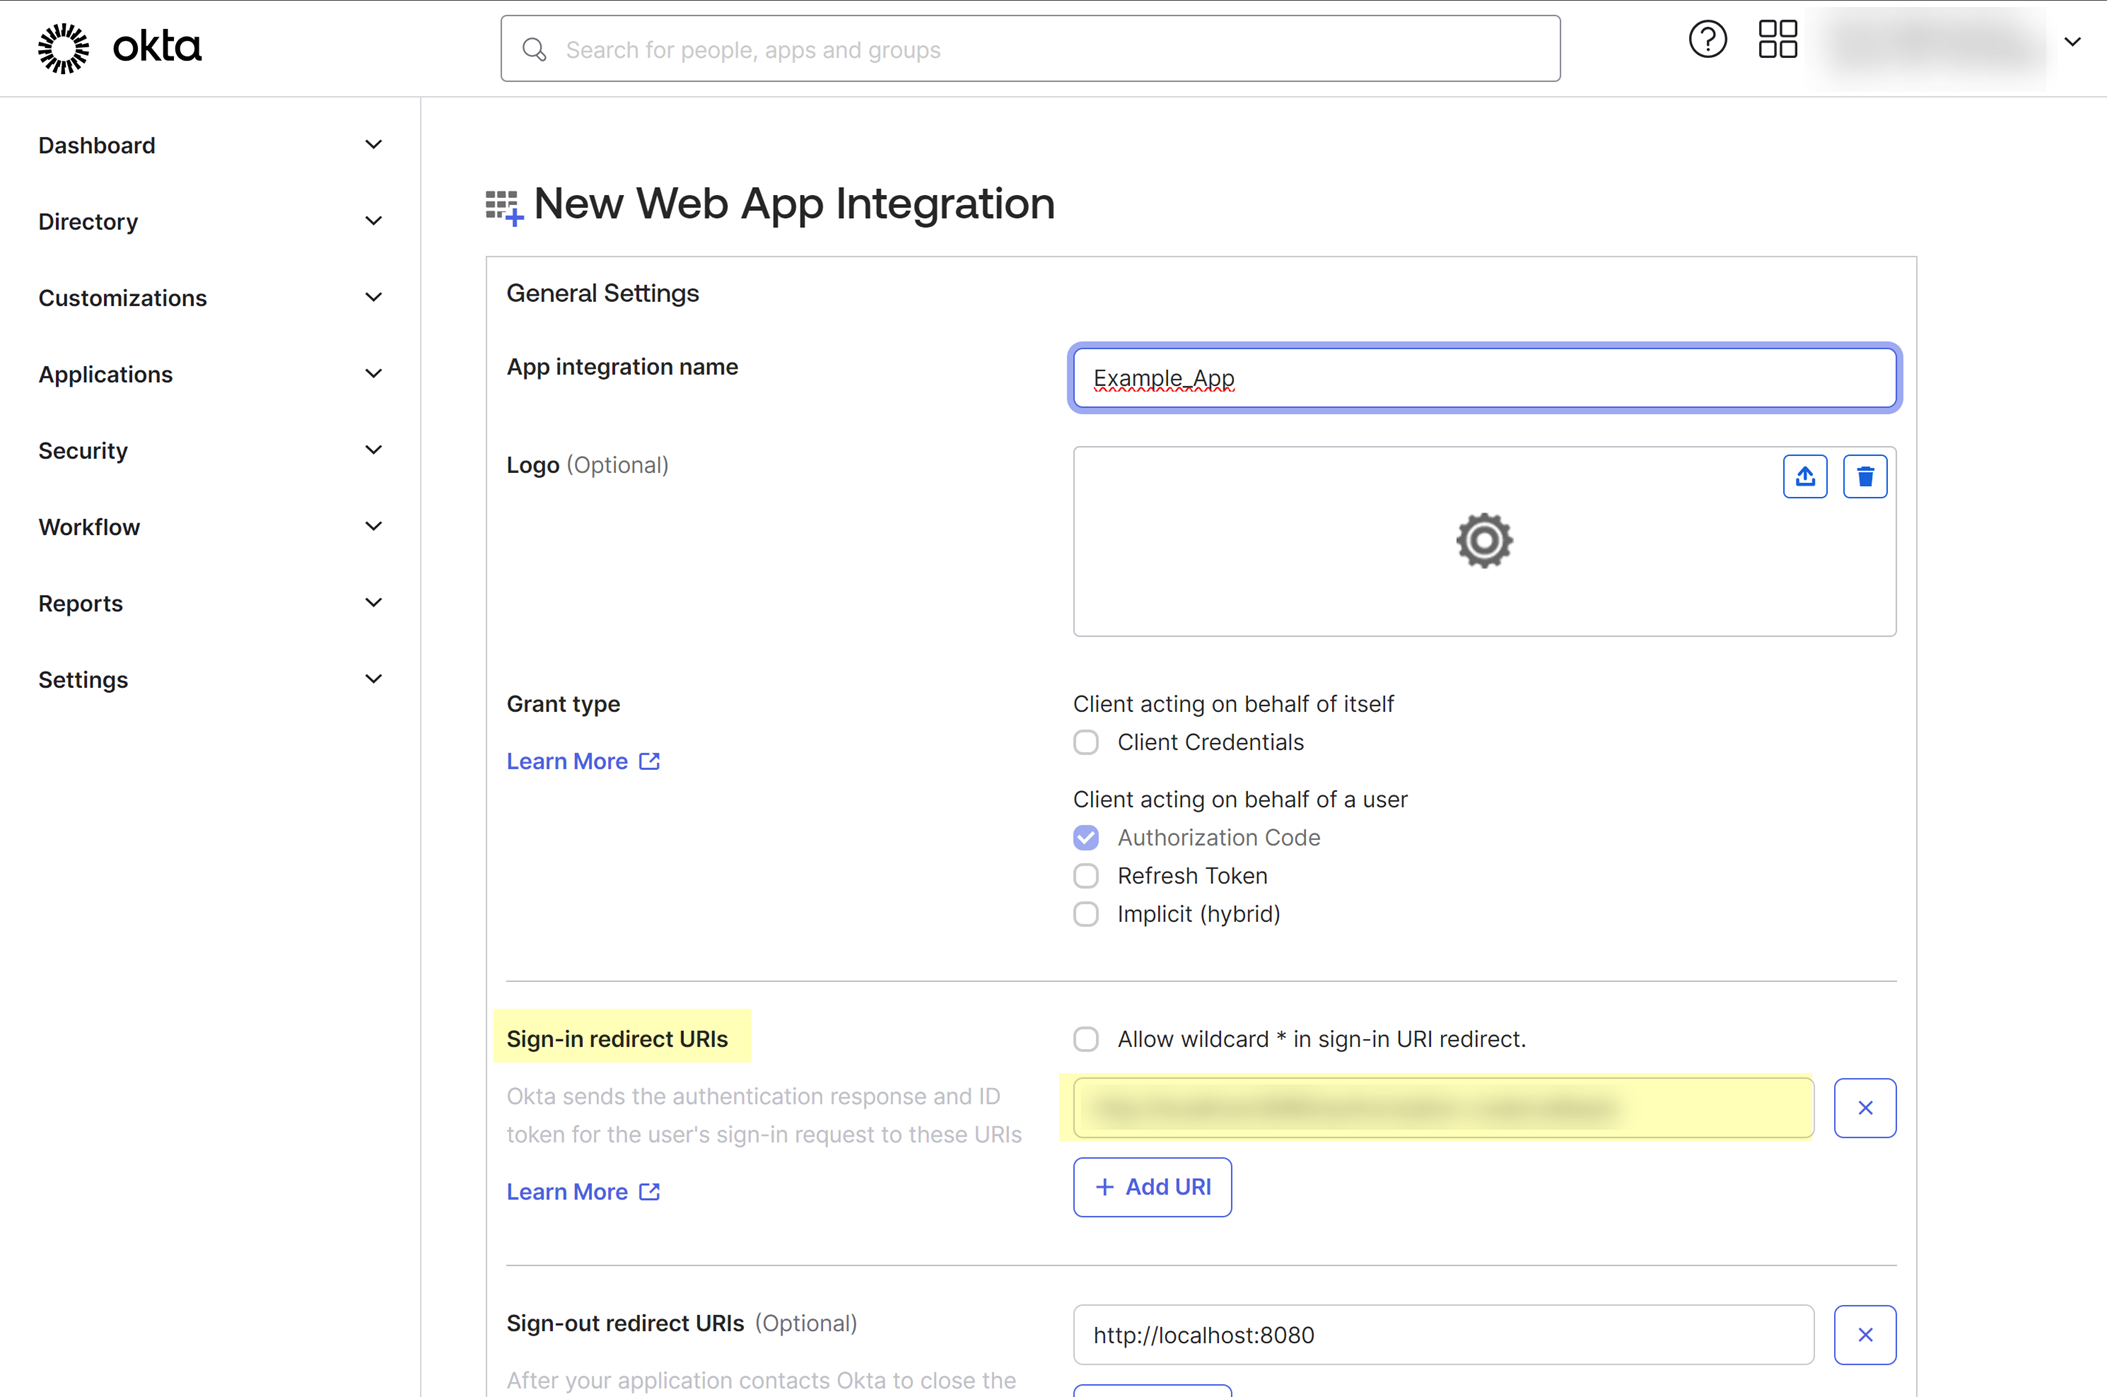
Palo Alto Networks recommends separating regions by aligning region-specific tenants with region-specific Okta accounts. However, for testing, if you have Cloud Identity Engine tenants in more than one region, add Sign-in redirect URIs for each region where you have a tenant.
- Skip the steps for Sign-out redirect URIs and Base URIs as these aren't required.
- Assign the app to a user or group and Save the configuration.
Be sure to assign the app only to the administrator you created in the
first step
.
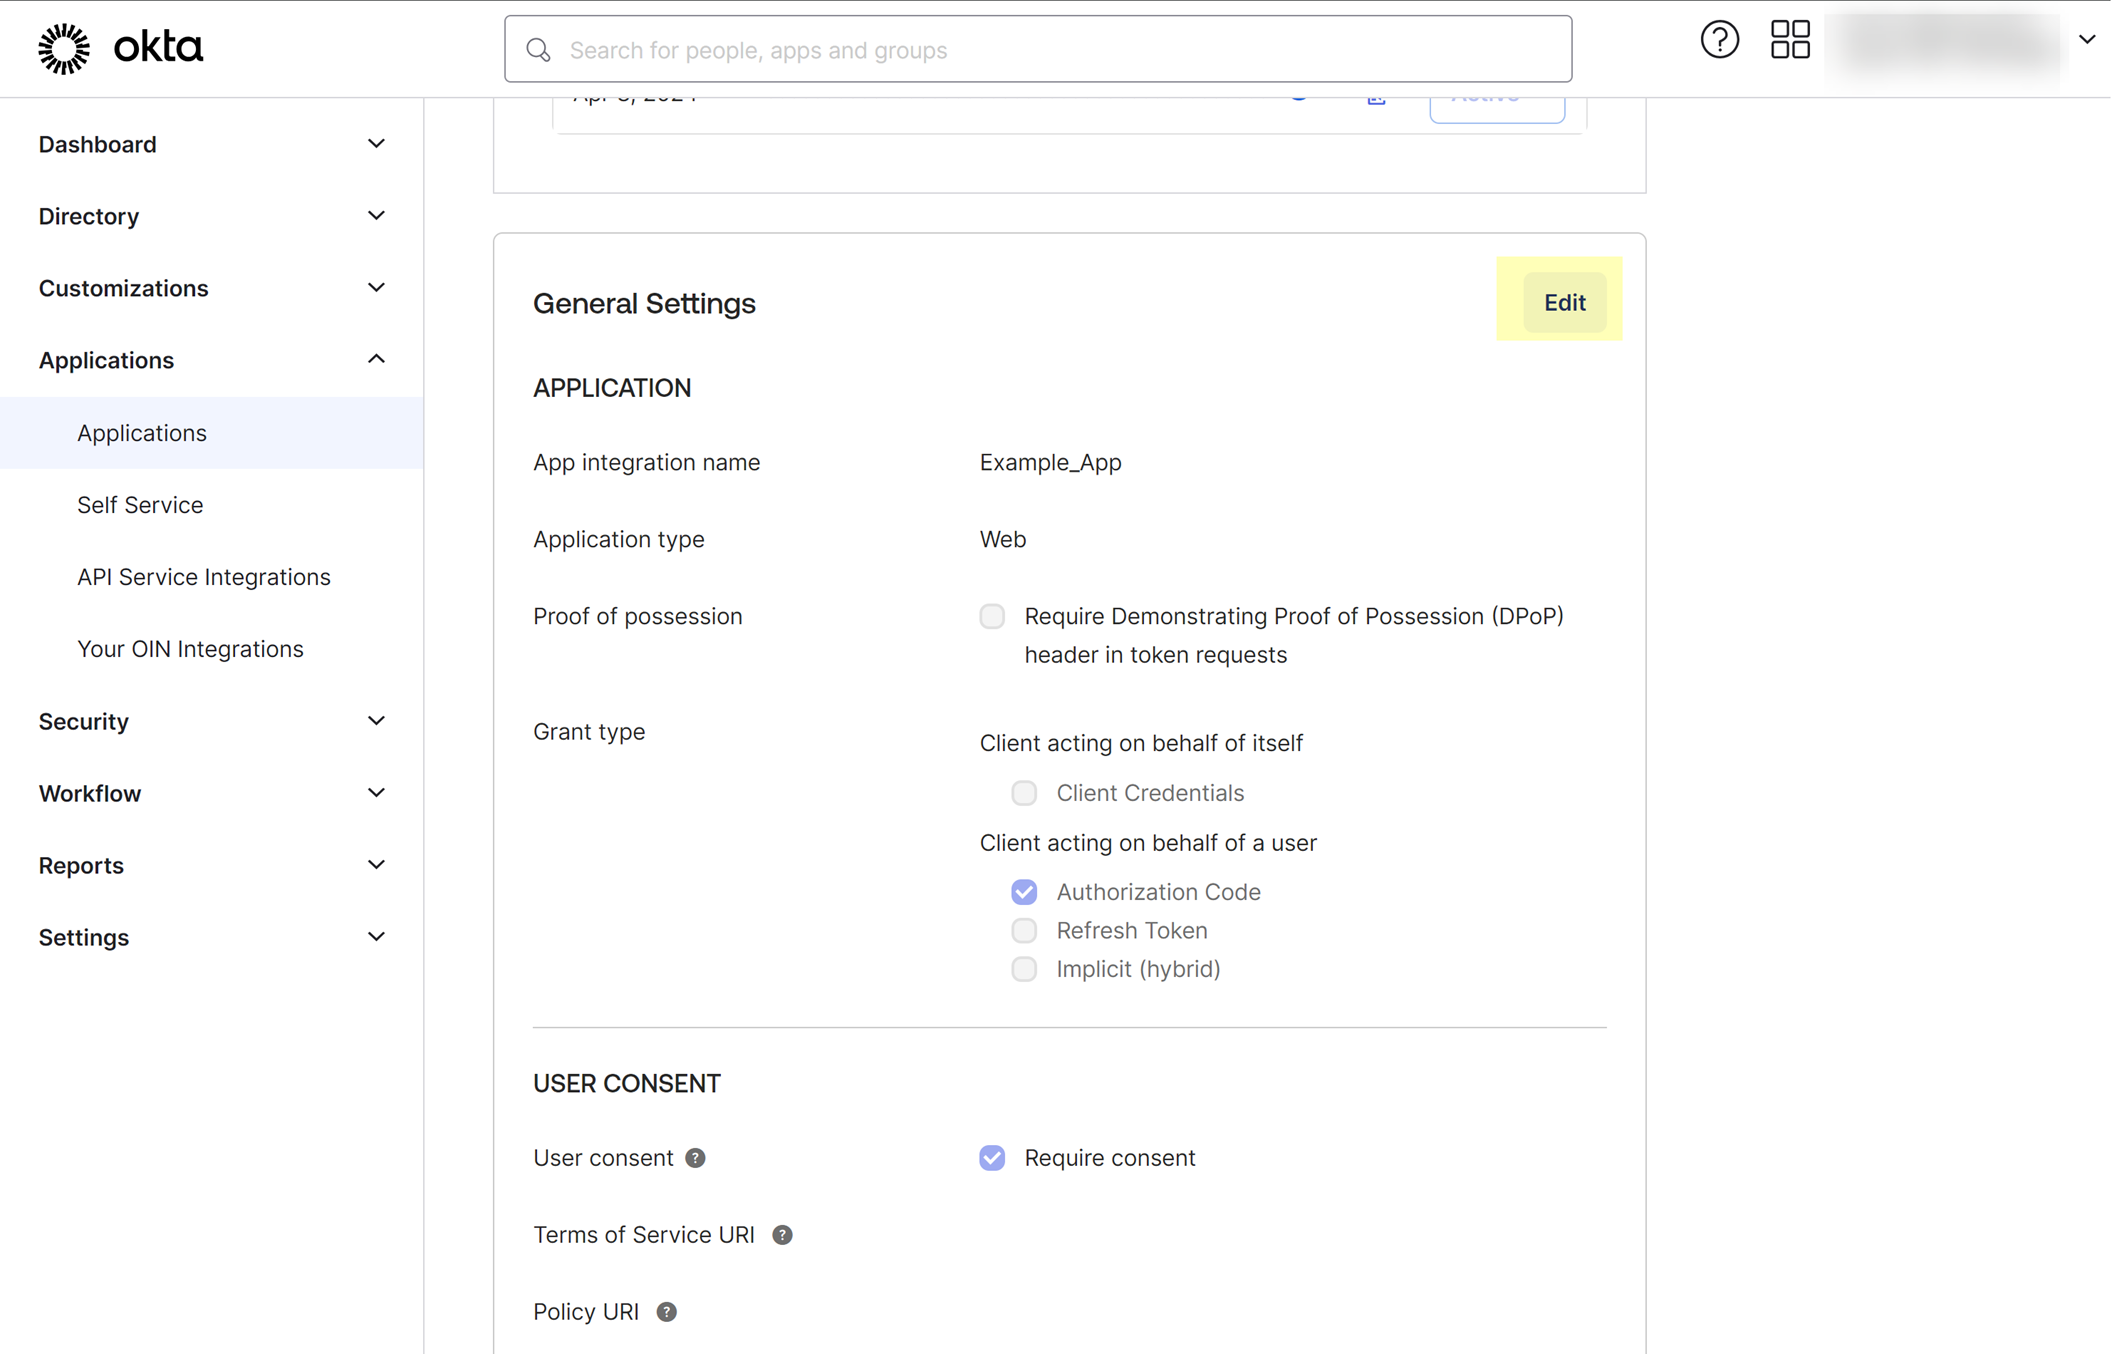
- Configure the Okta app integration.
- Edit the app you just created then select Refresh Token .
Using the refresh token is mandatory.
- Select Rotate token after every use and increase the Grace period for token rotation to 60 seconds.
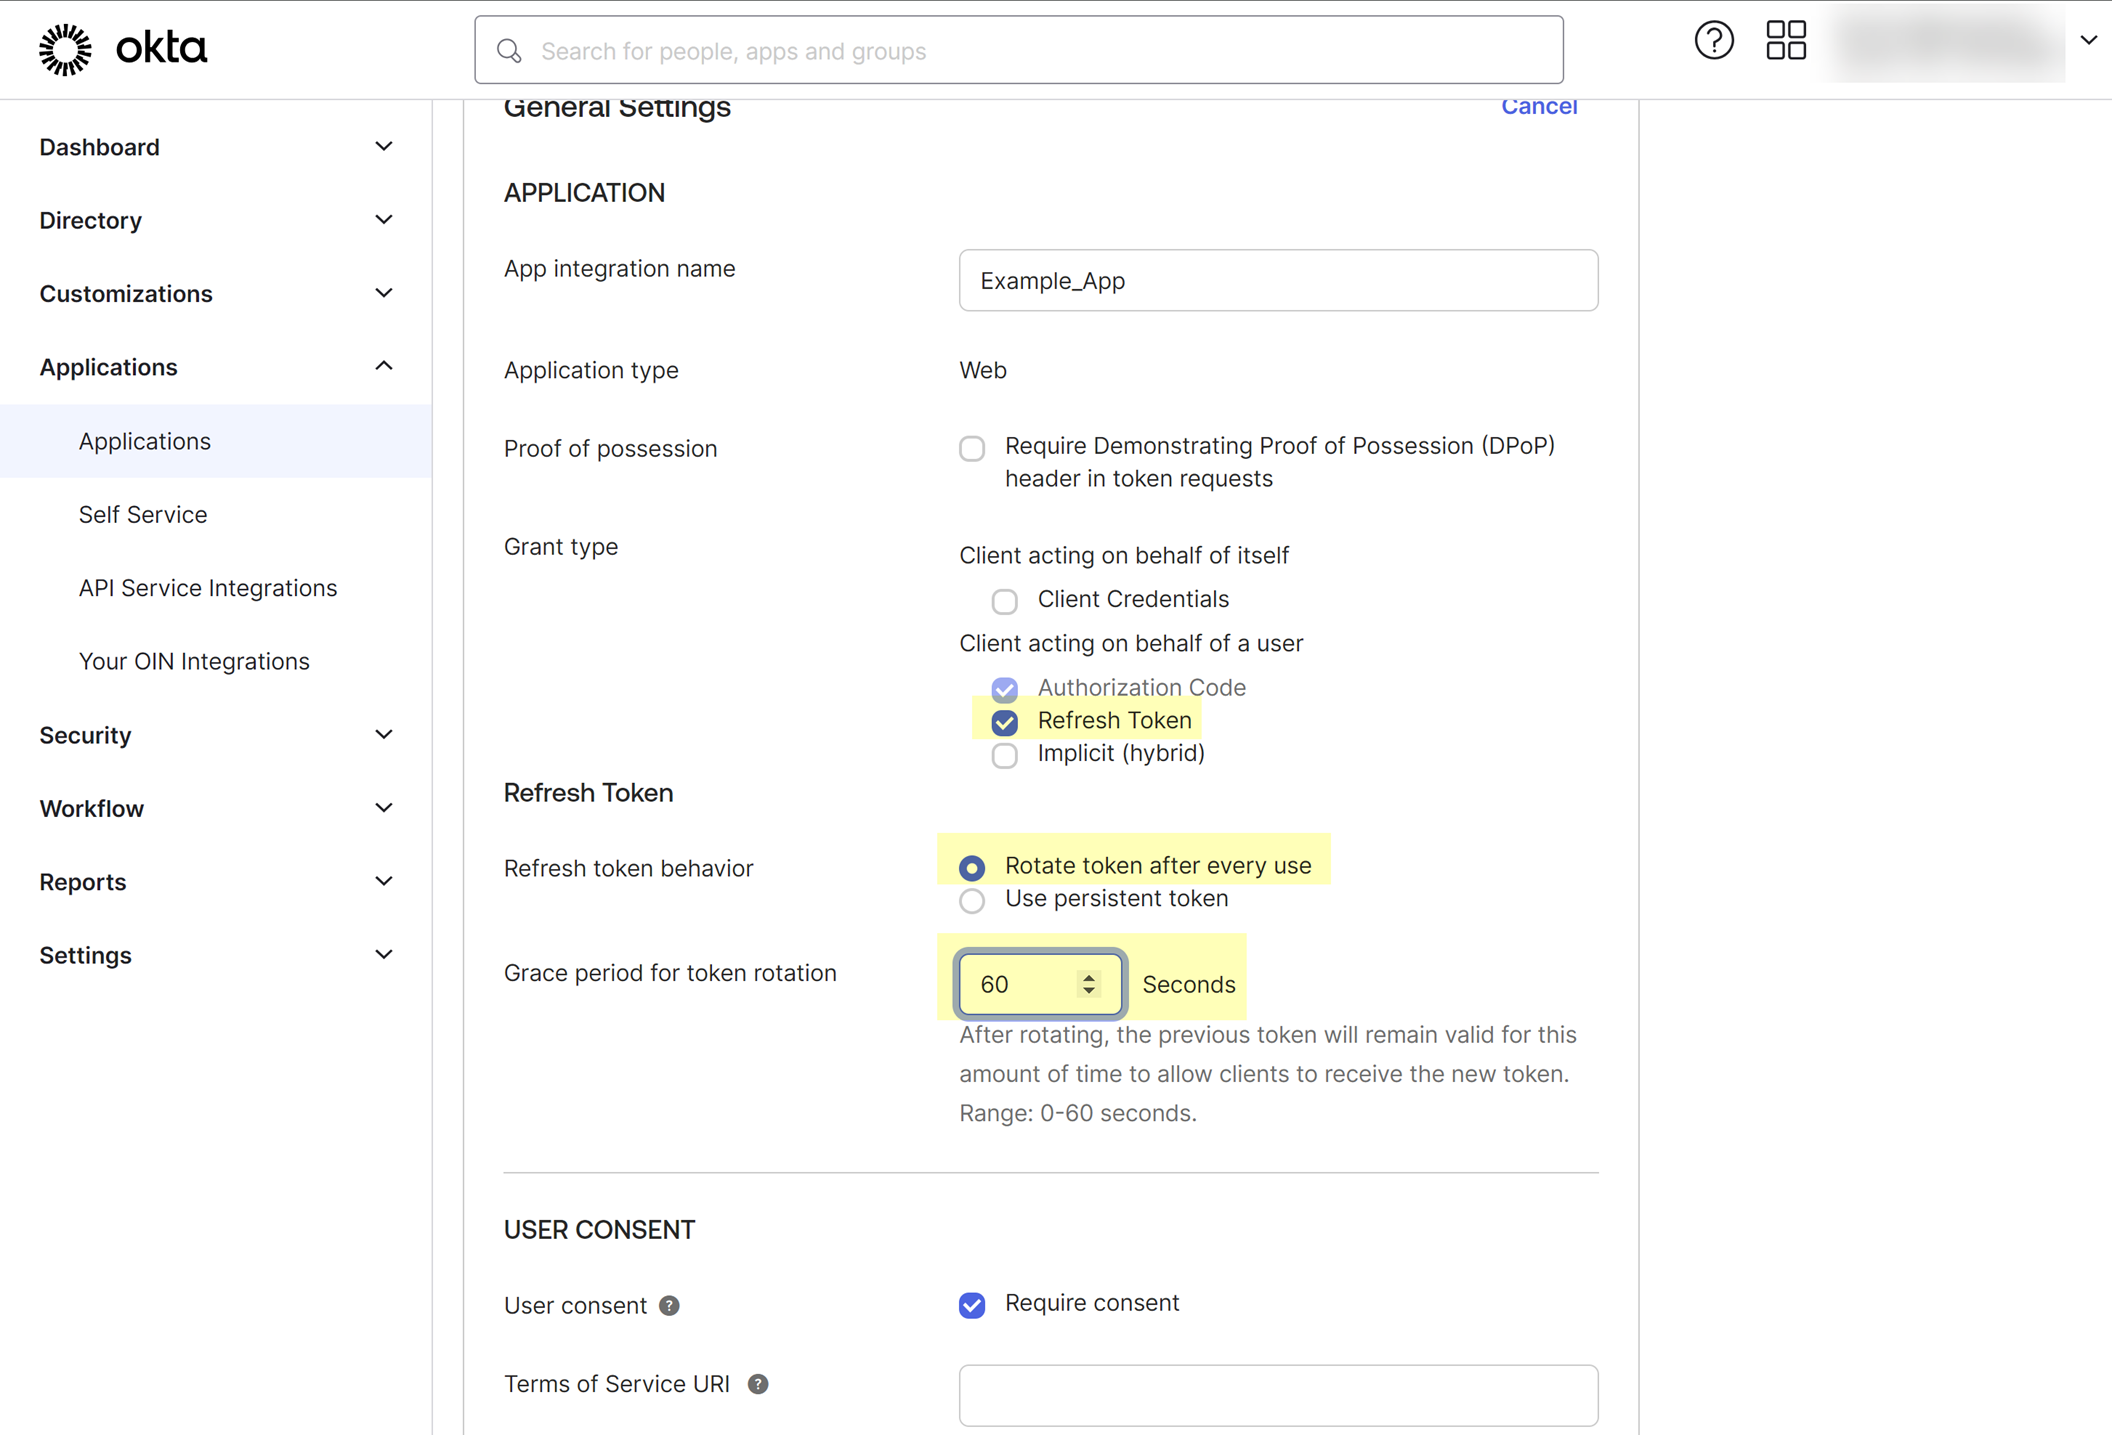
- Save your changes.
- Obtain the information about your Okta app integration that you need to configure in the Cloud Identity Engine.
- Select General , then copy your Client ID and Secret .
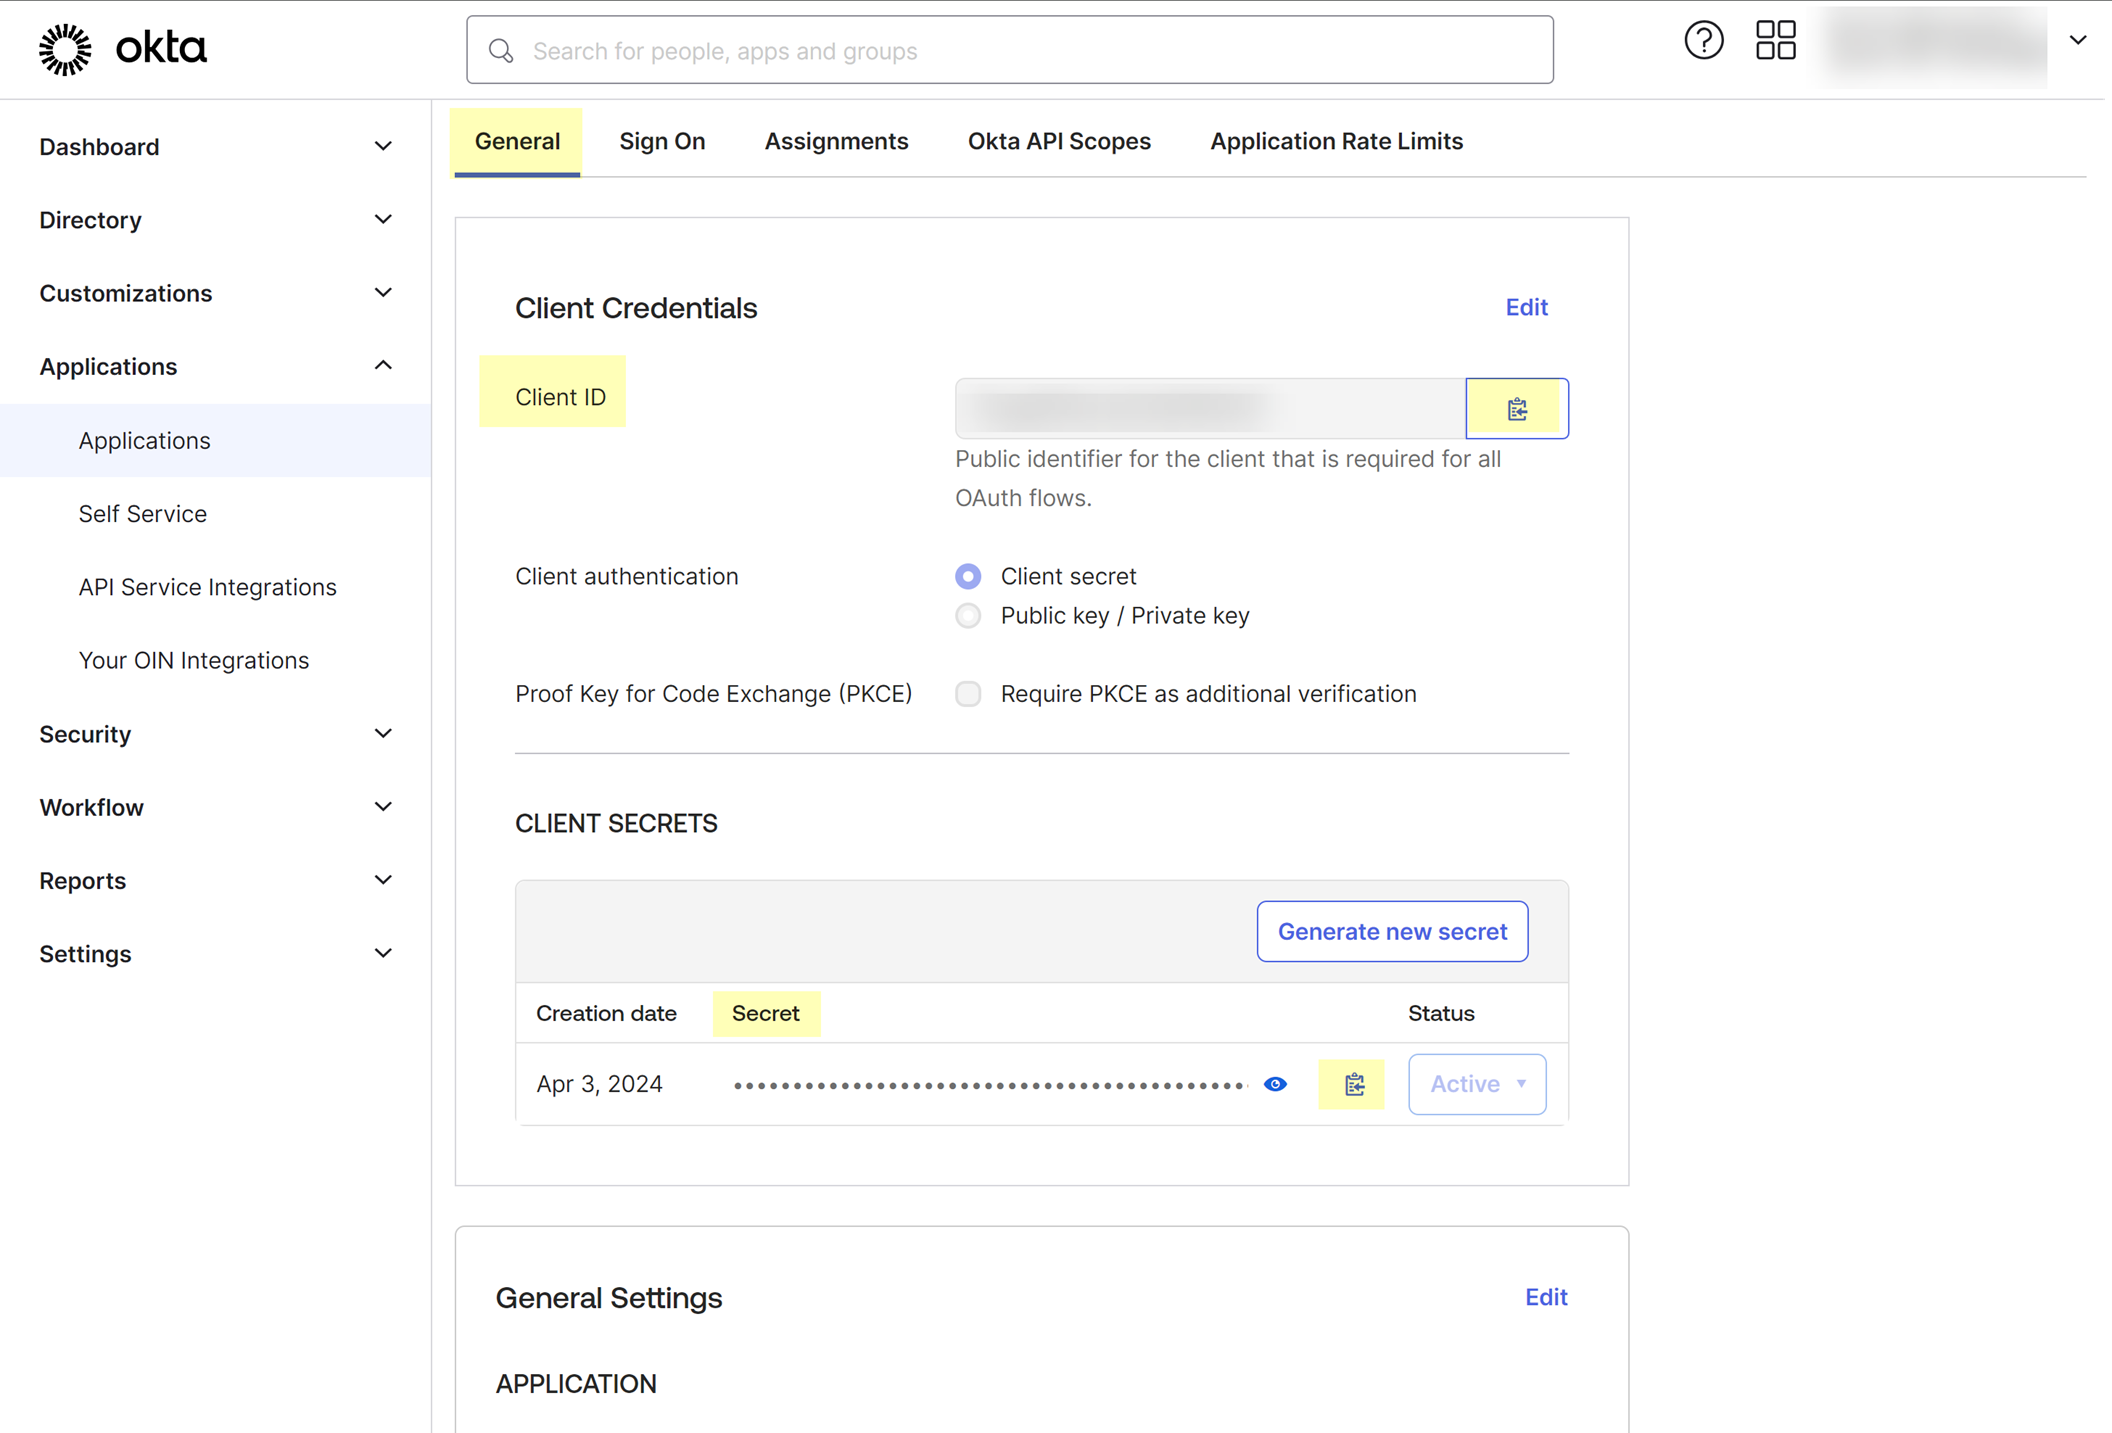
- Select your username in the upper right to copy your Okta domain.
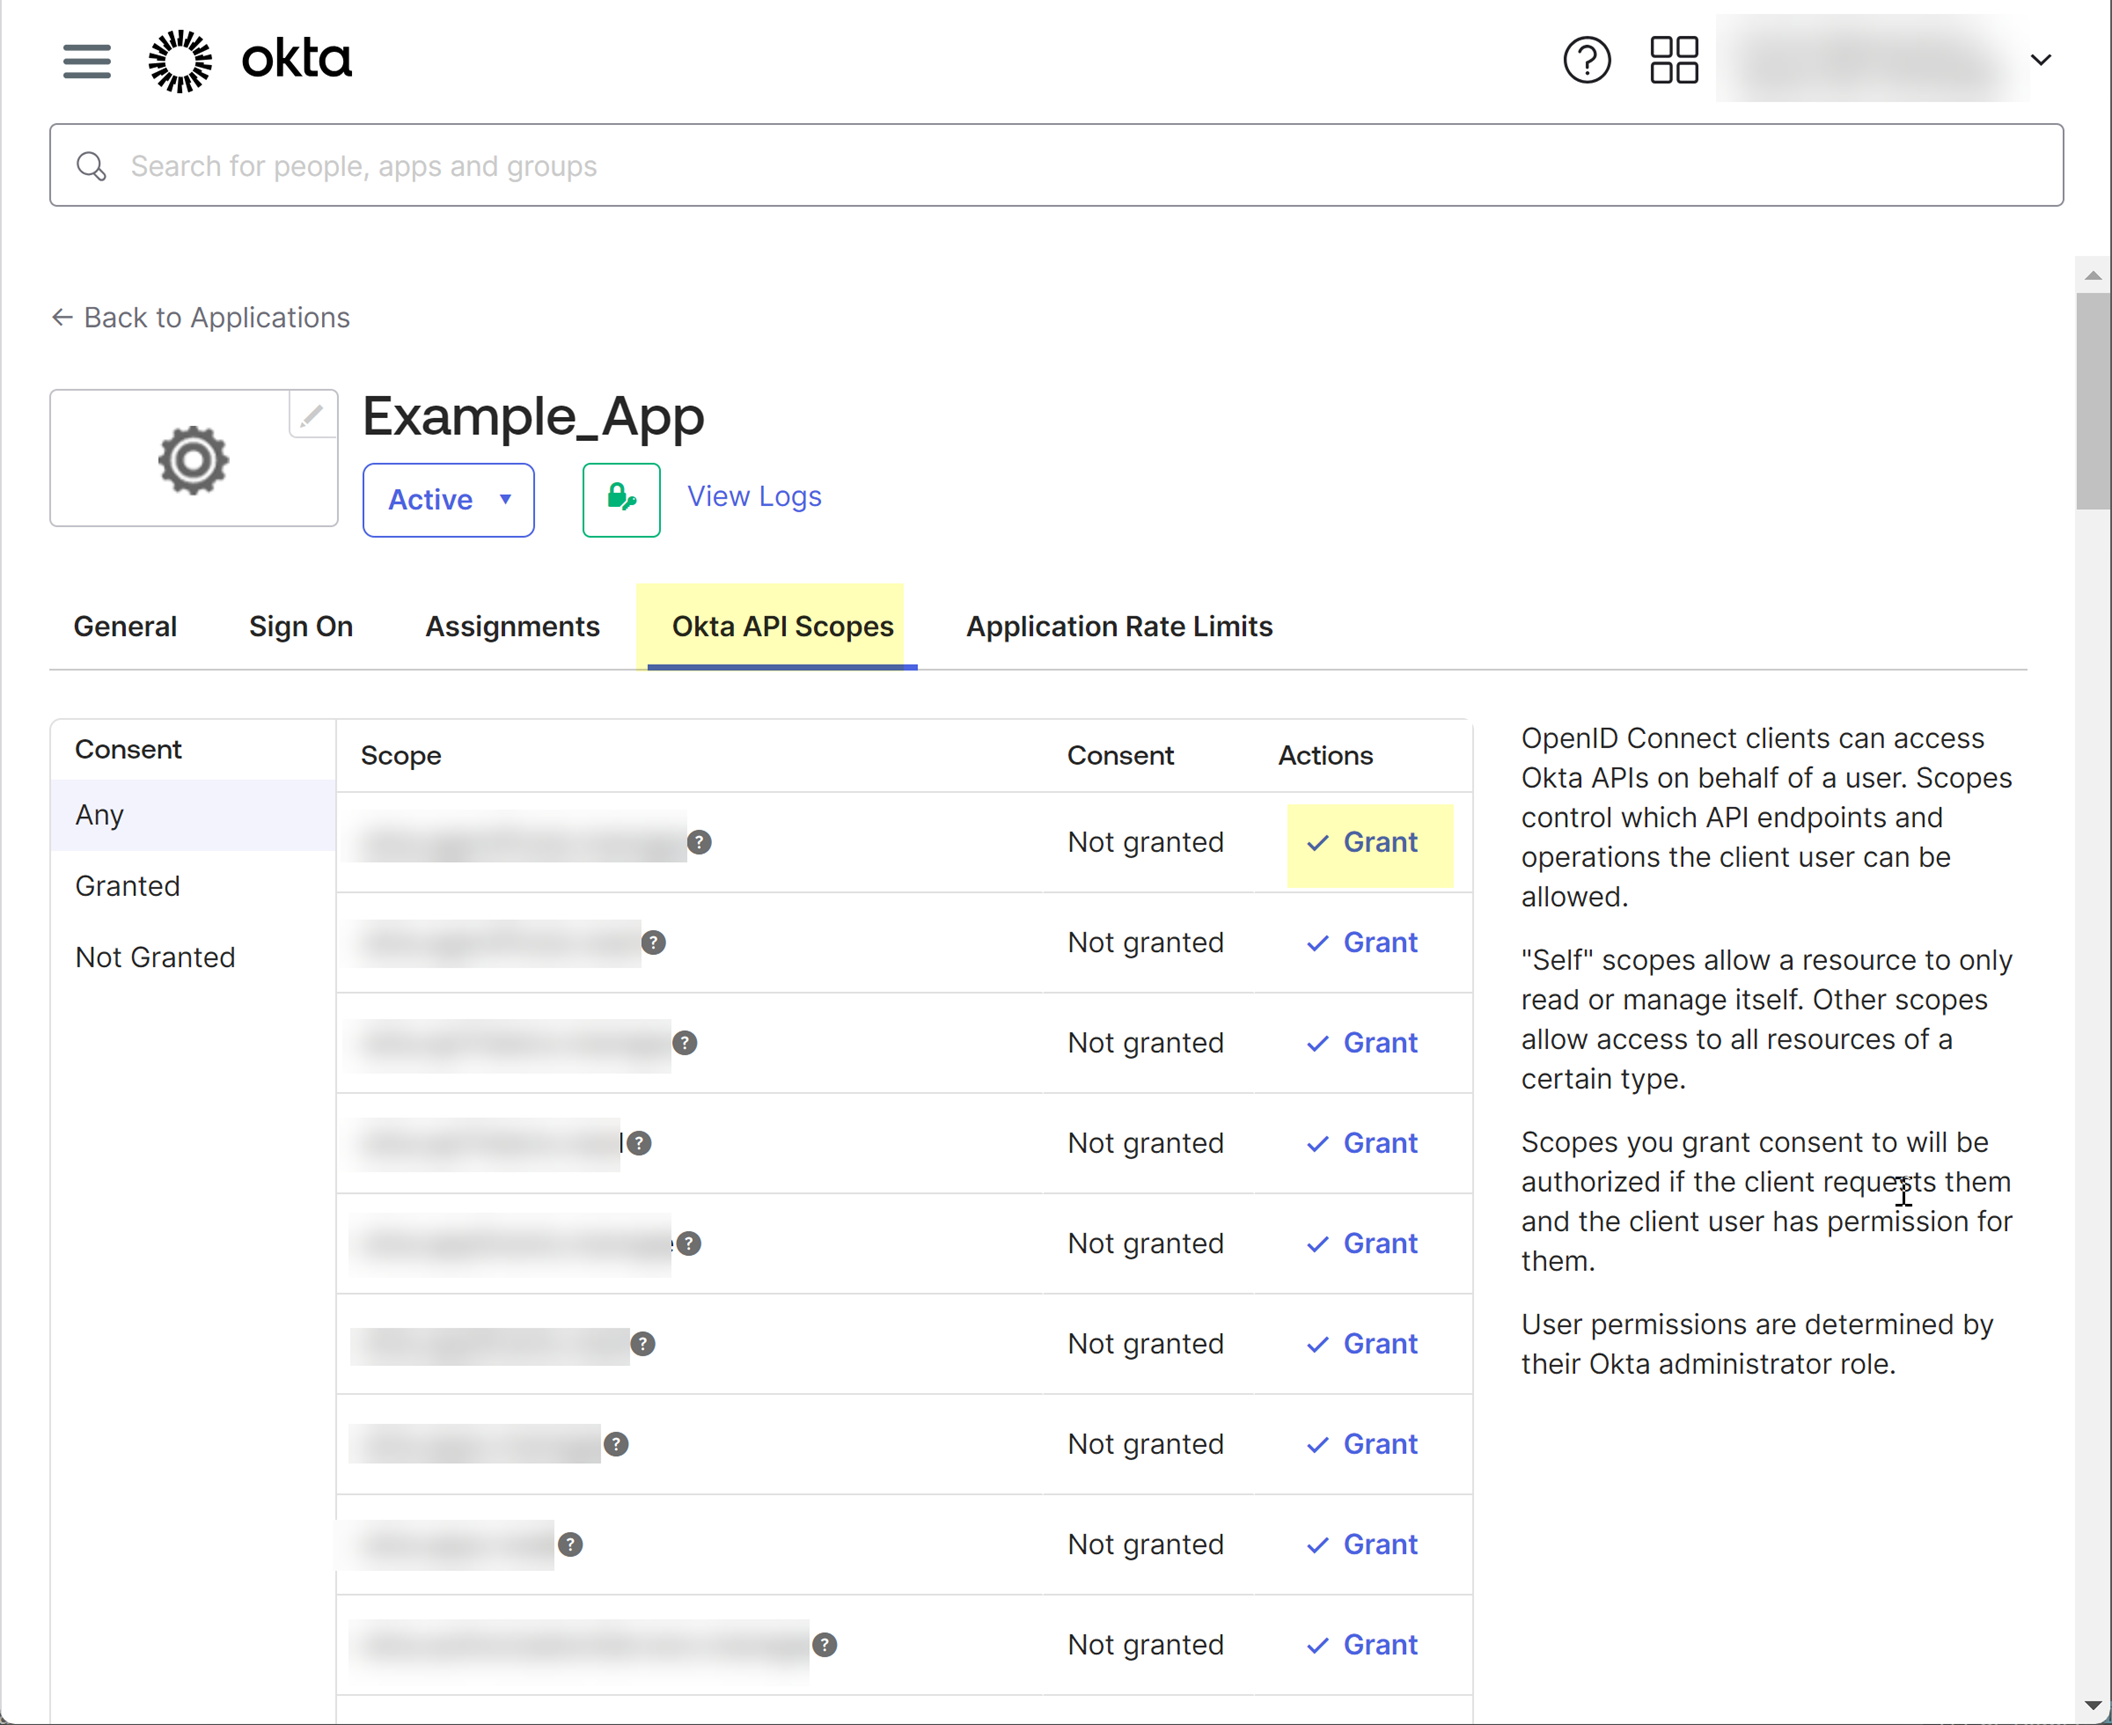
- Assign the app and grant the required permissions for the Cloud Identity Engine to access your Okta directory information.
- Select Assignments , then assign the Cloud Identity Engine app to the administrator who configures the Okta integration in the Cloud Identity Engine.
- Select Okta API Scopes and grant consent to the following scopes:
- okta.authorizationServers.read Required only if you have more than one Okta authorization server
- okta.groups.read
- okta.logs.read
The Cloud Identity Engine requires this scope to read the following log events only:
- user.lifecycle.delete.initiated
- group.lifecycle.delete
- user.lifecycle.activate
- user.lifecycle.deactivate
The Cloud Identity Engine uses a filter to retrieve only these events, it does not receive any other events for this scope.
- okta.users.read
- okta.users.read.self
If you want the Cloud Identity Engine to collect enterprise application data so that it is included when you View Directory Data , you must grant consent to the okta.apps.read scope before you select the option in step
9
.
- In the Cloud Identity Engine app, select DirectoriesAdd Directory .
- Set Up a Cloud Directory and select Okta .
- Select the method you want to use to log in to the Okta directory.
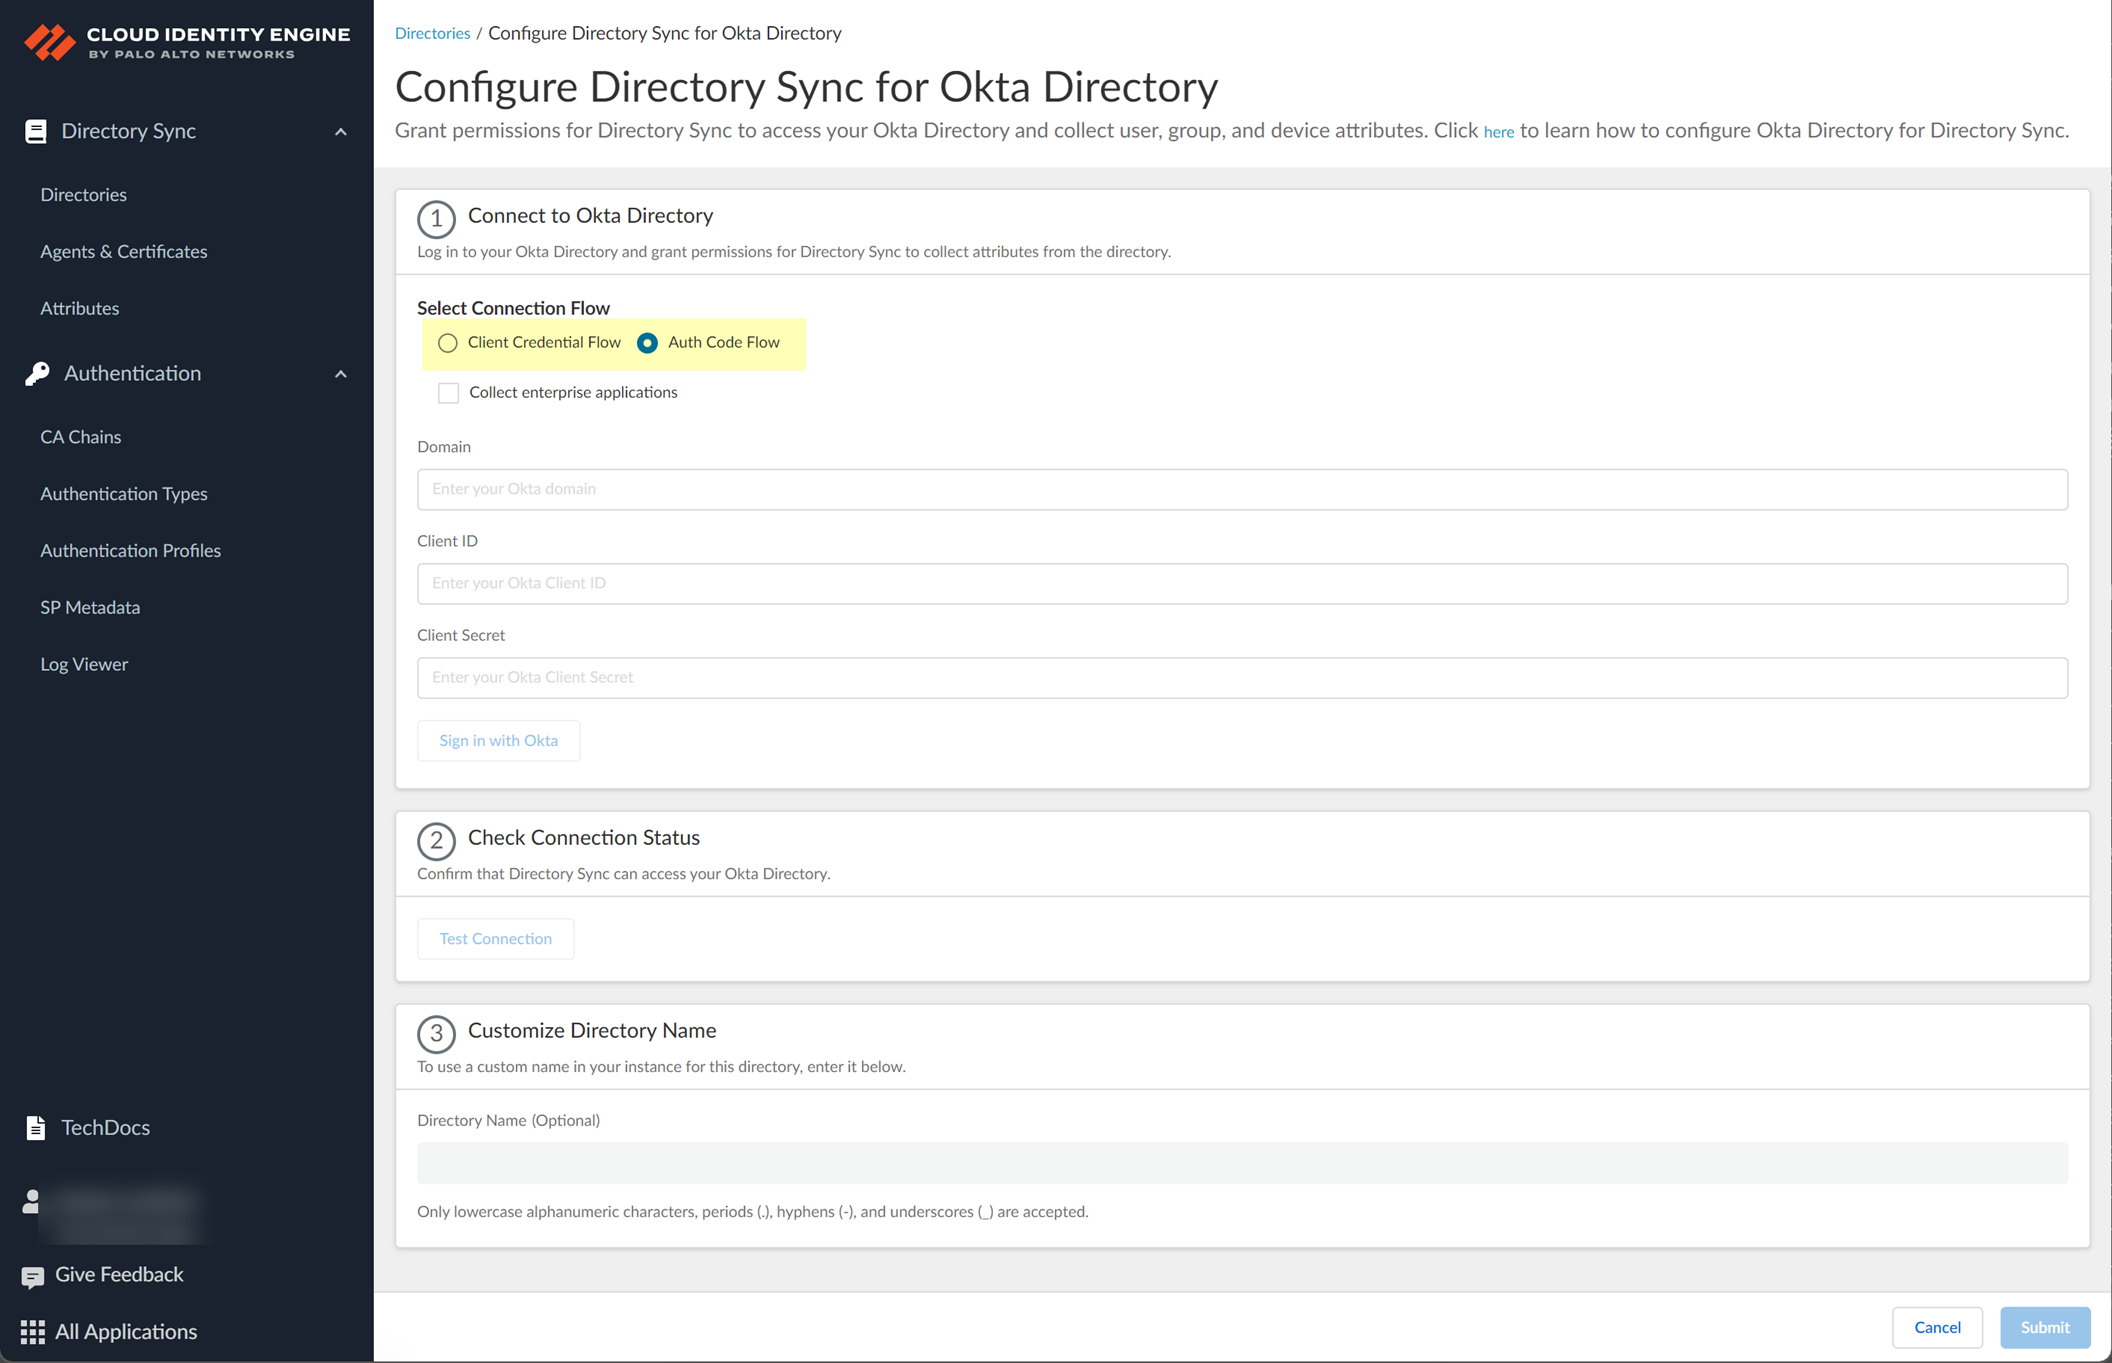
- Auth Code Flow —(Default) To make changes to your Okta directory in the Cloud Identity Engine, you must log in to the Okta directory.
- Client Credential Flow —By granting the required permissions in advance, you do not need to log in to the Okta directory to make changes to that directory in the Cloud Identity Engine. This option requires additional configuration; for more information, refer to Deploy Client Credential Flow for Okta .
- Select whether you want to Collect enterprise applications data so that it displays when you View Directory Data .
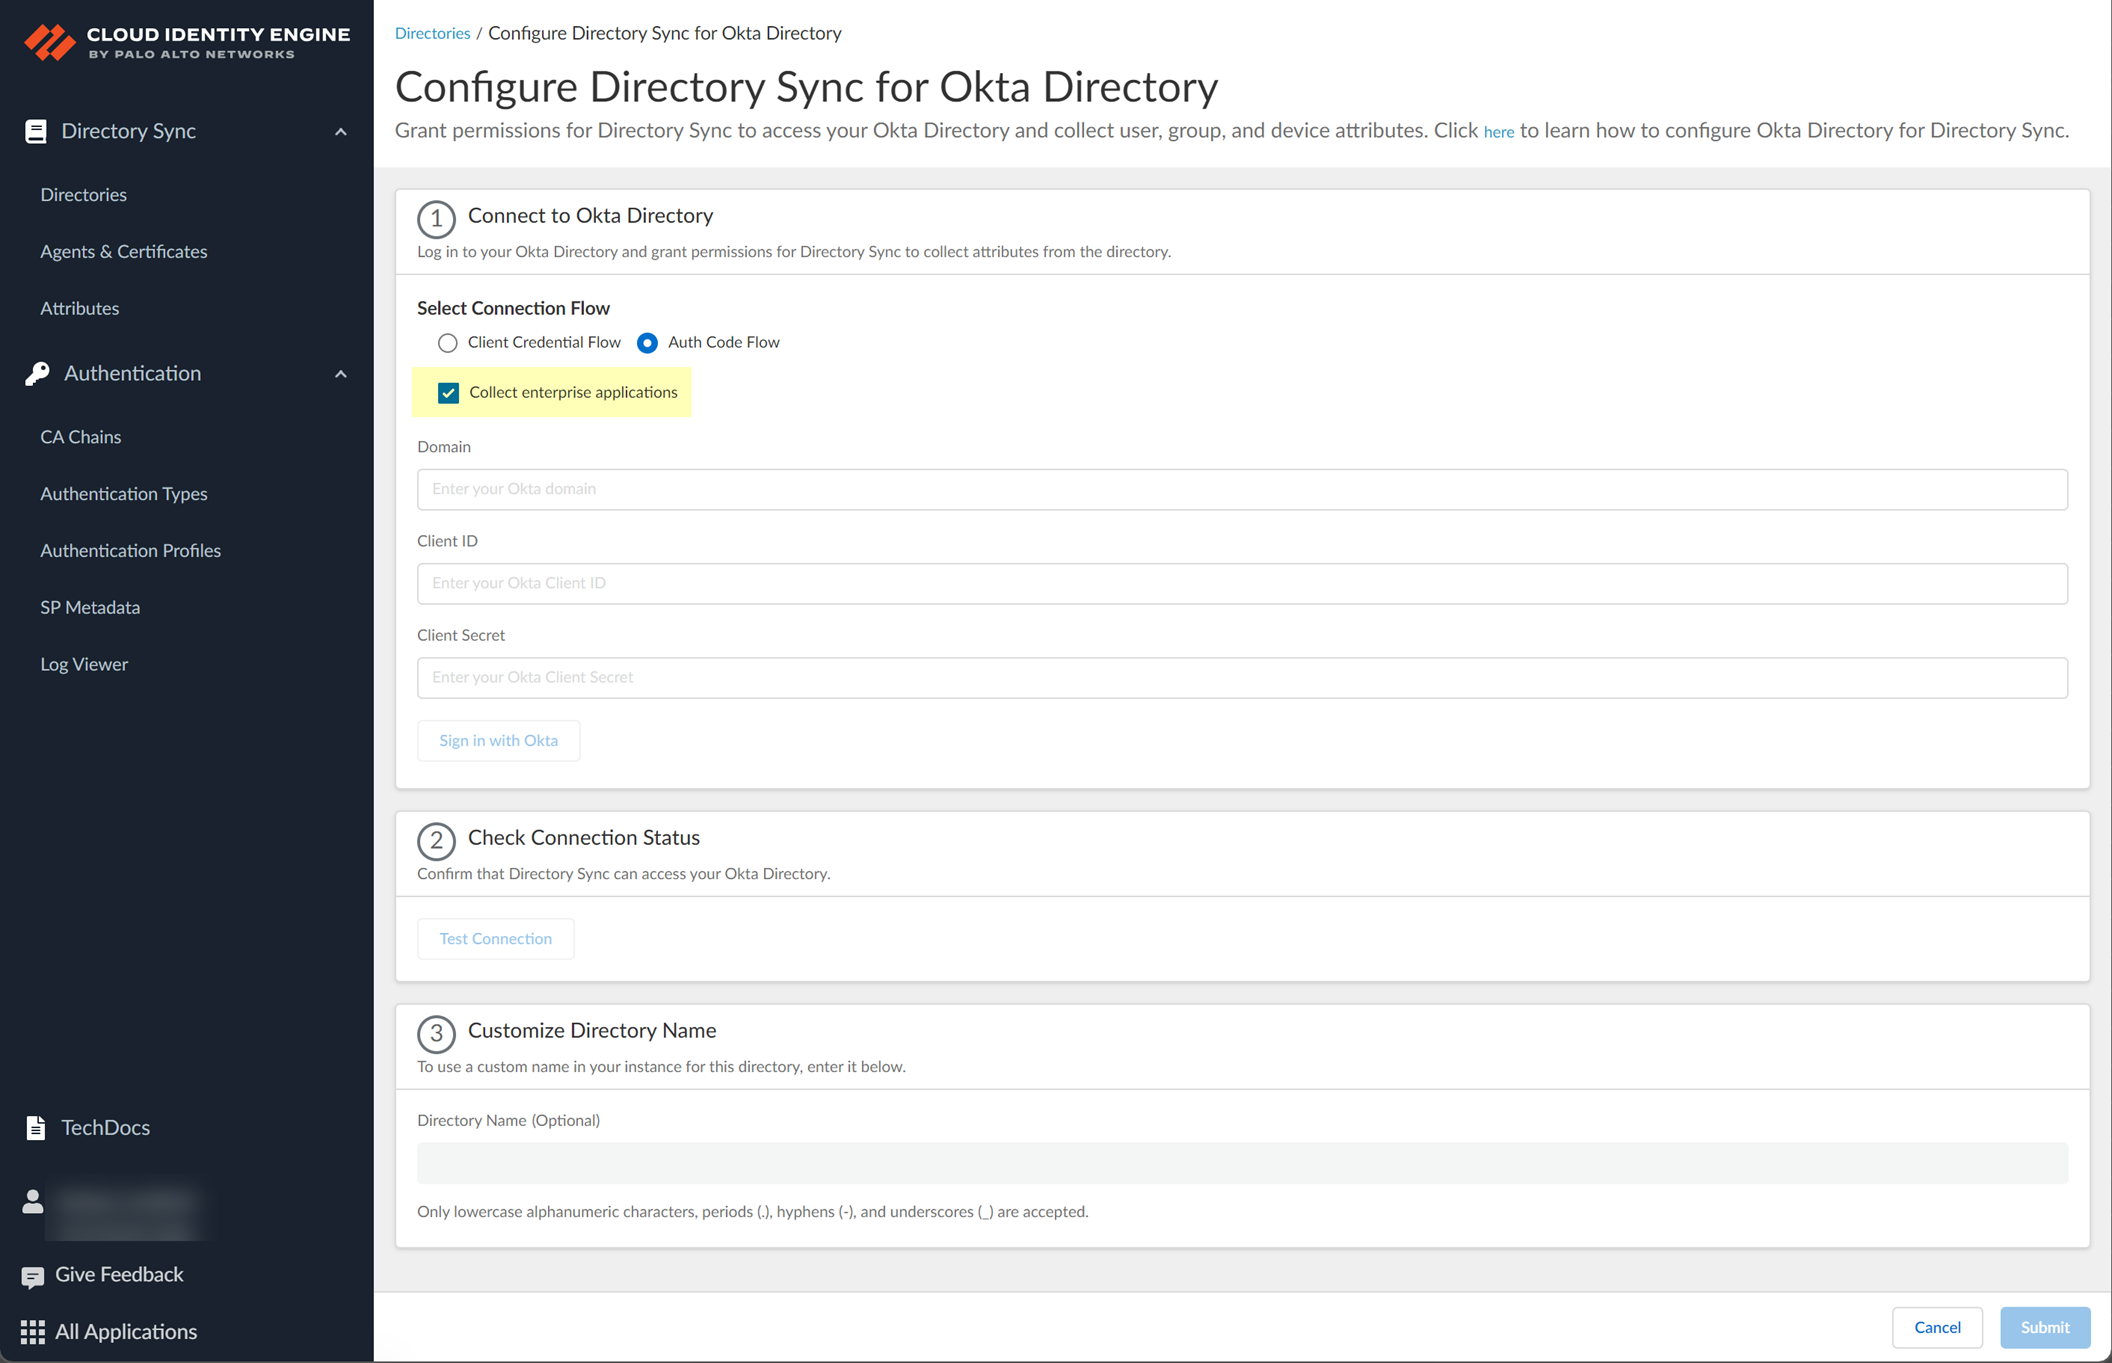
For beta users of this feature, the Cloud Identity Engine continues collecting enterprise application data for any directories configured in your tenant during the beta and no further configuration is required. If you configure a new directory, you must select whether you want to collect enterprise application data from the new directory and grant consent for the scope in step
5.2
.
- Specify your Okta Directory information to allow the Cloud Identity Engine to connect to your Okta Directory.
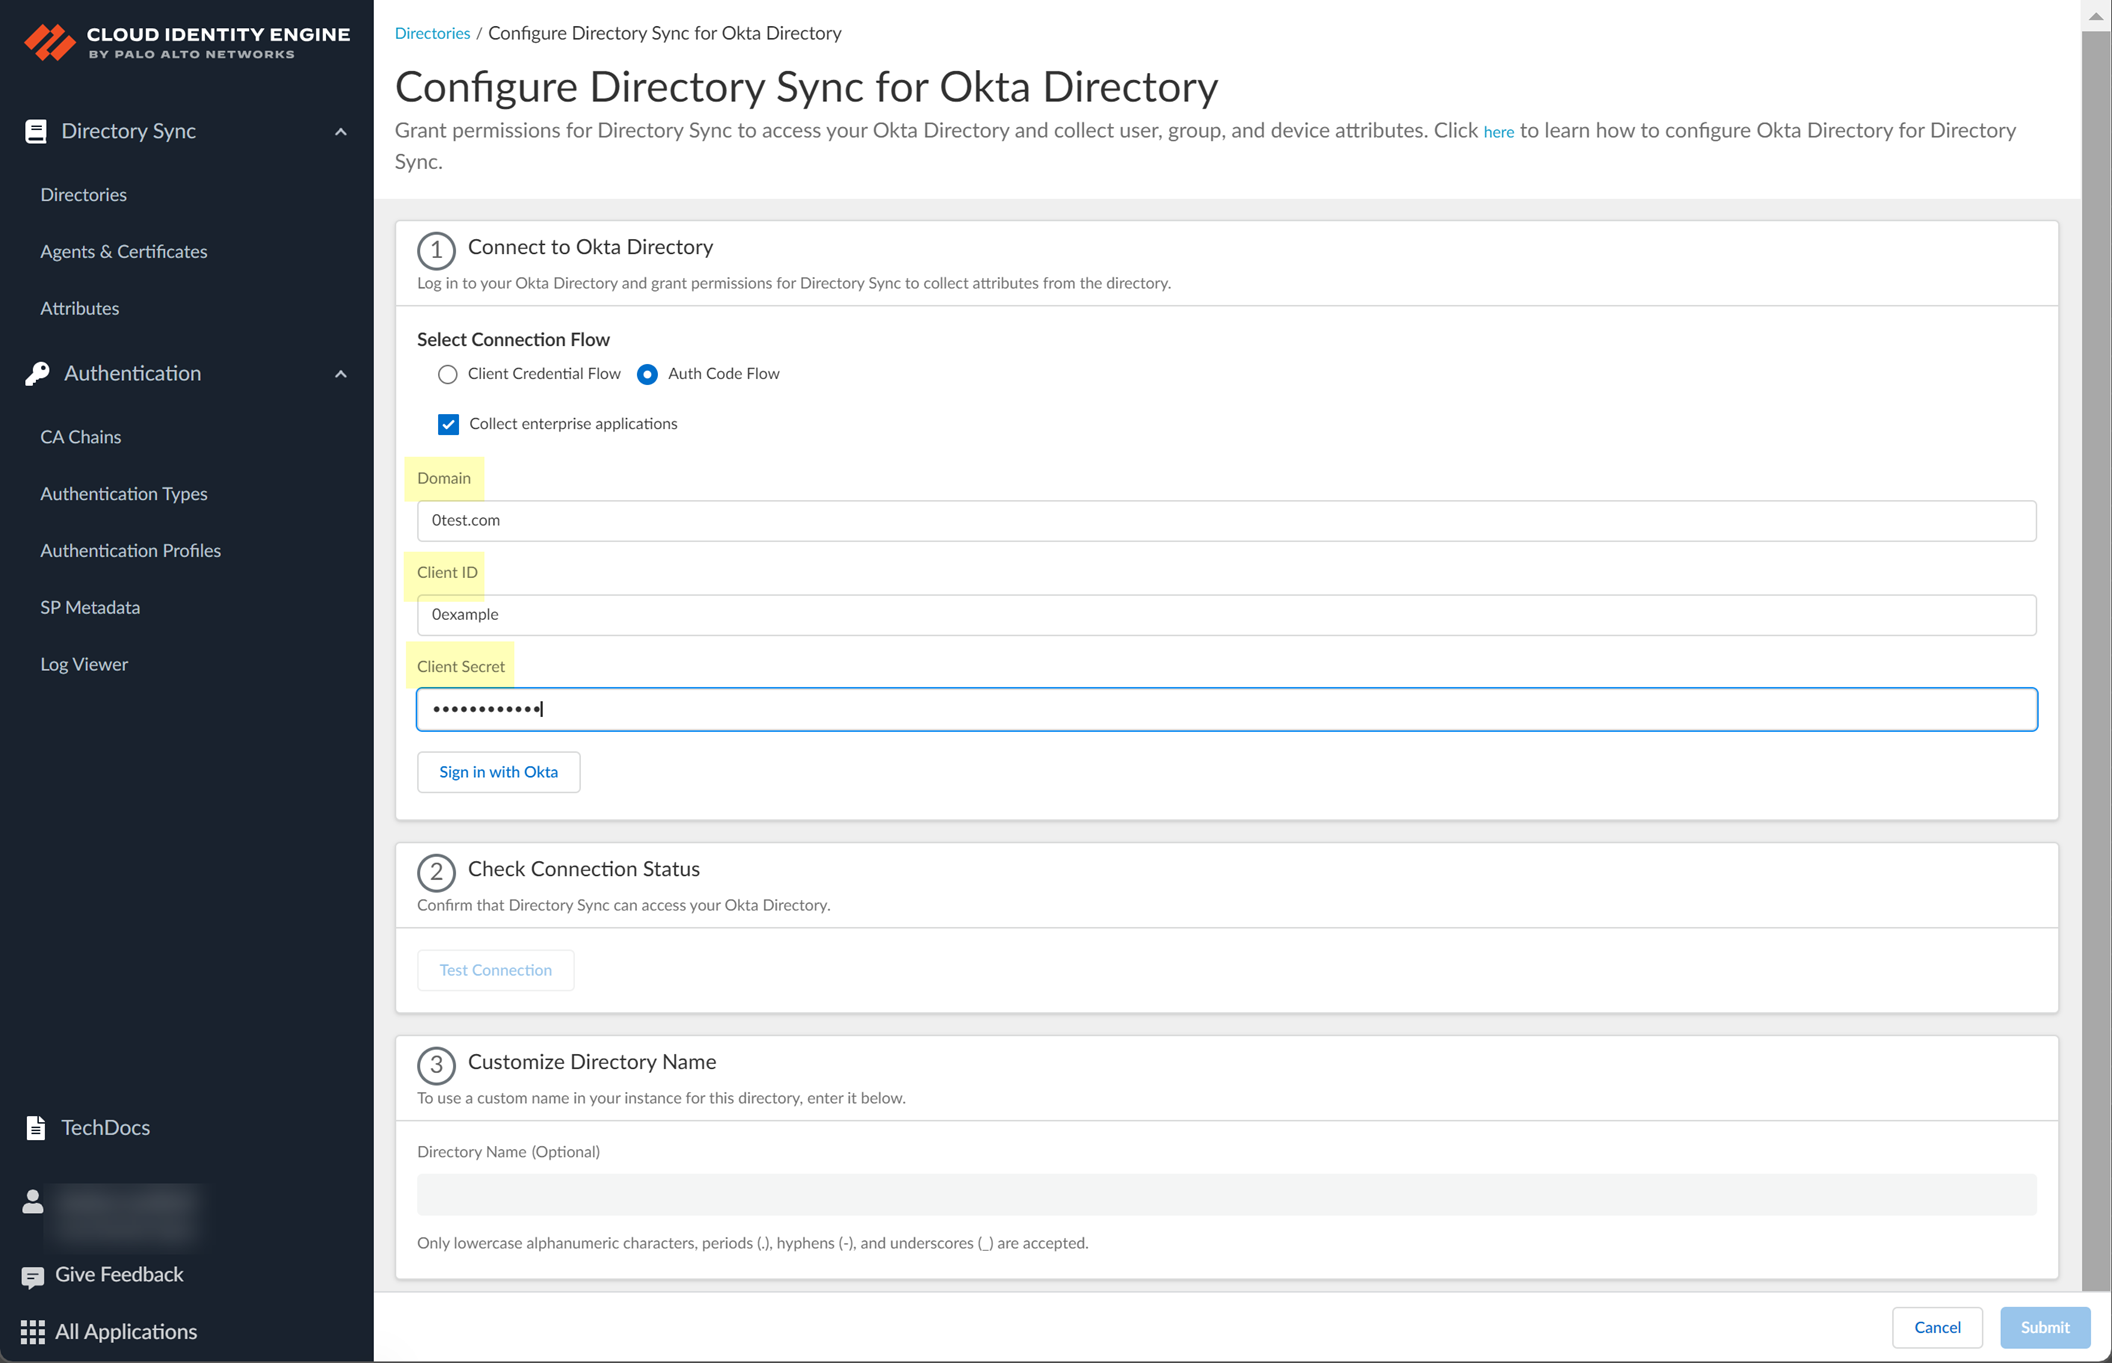
- Paste your Okta Directory Domain that you copied in step
4.2
.
- Paste your Okta Directory Client ID and Client Secret that you copied in step
4.1
.
The Client ID must begin with 0.
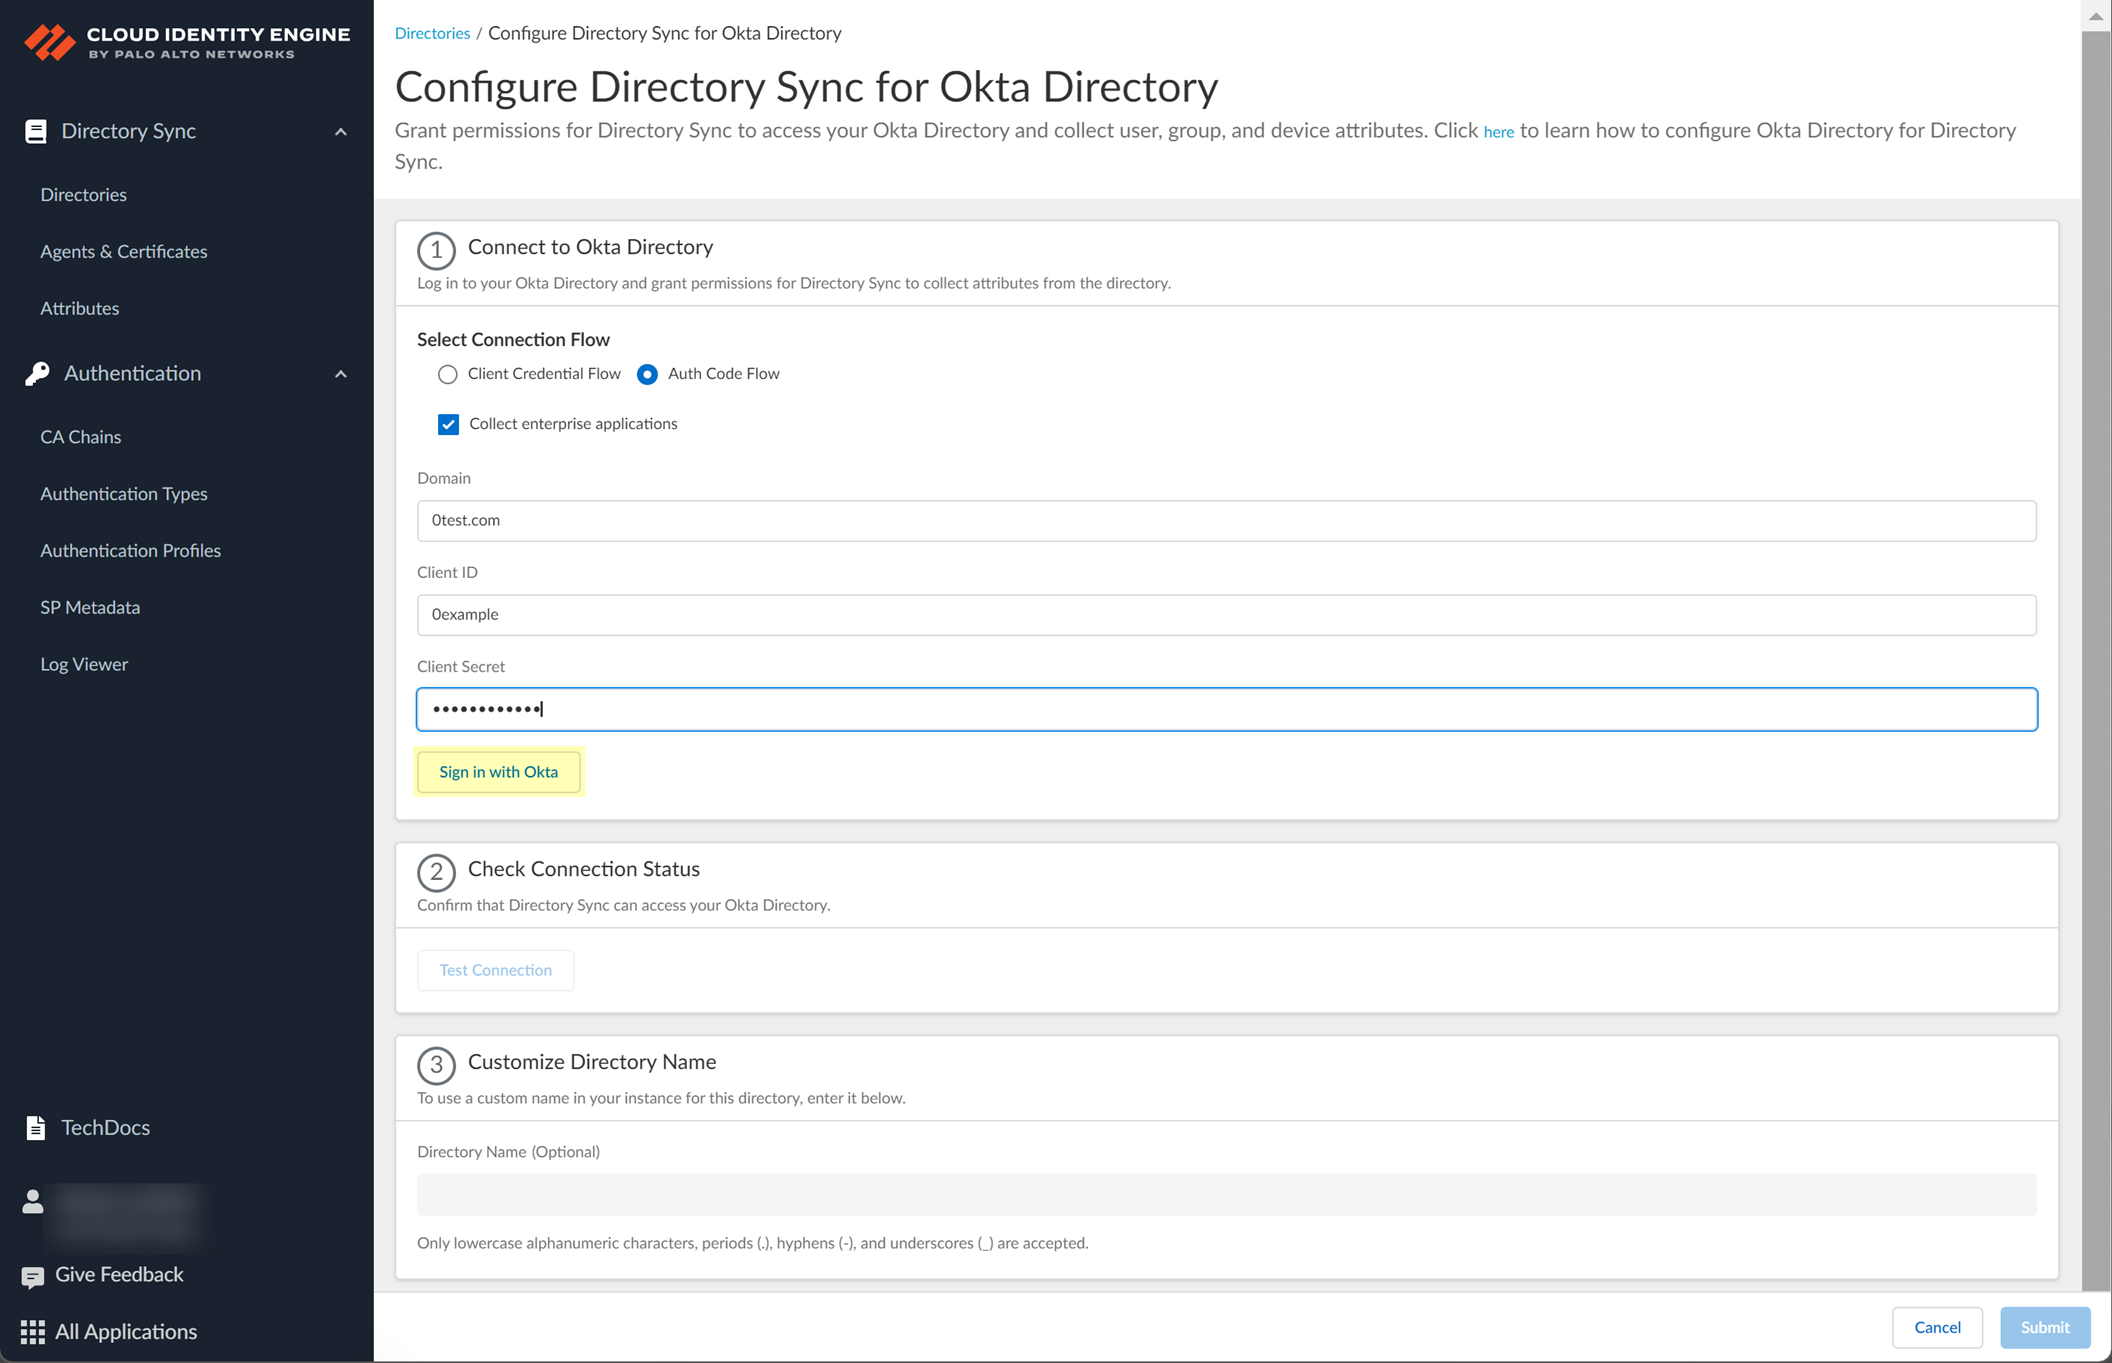
- Click to Sign in with Okta and enter your Okta Directory credentials.
When the login is successful, Logged In displays. Palo Alto Networks recommends using the built-in authorization server. If you have more than one Okta authorization server, repeat the previous steps for each additional Okta Directory you want to add.
- Click Test Connection to verify your configuration.
When the test is successful, Success displays.
- (Optional) Customize the name the Cloud Identity Engine displays for your Okta Directory.
By default, the Cloud Identity Engine uses the default domain name.
You can use up to 15 lowercase alphanumeric characters (including hyphens, periods, and underscores) for the directory name in the Cloud Identity Engine. You don't need to change the name of the directory itself, only the name of the directory in the Cloud Identity Engine app.
- Submit the configuration.
You can now use information from your Okta Directory in the Cloud Identity Engine when you configure a user- or group-based Security policy rule or with other Palo Alto Networks applications.
For optimal performance, the Cloud Identity Engine does not support the default Okta group " Everyone " because Okta does not recommend using this group to define policy rules.
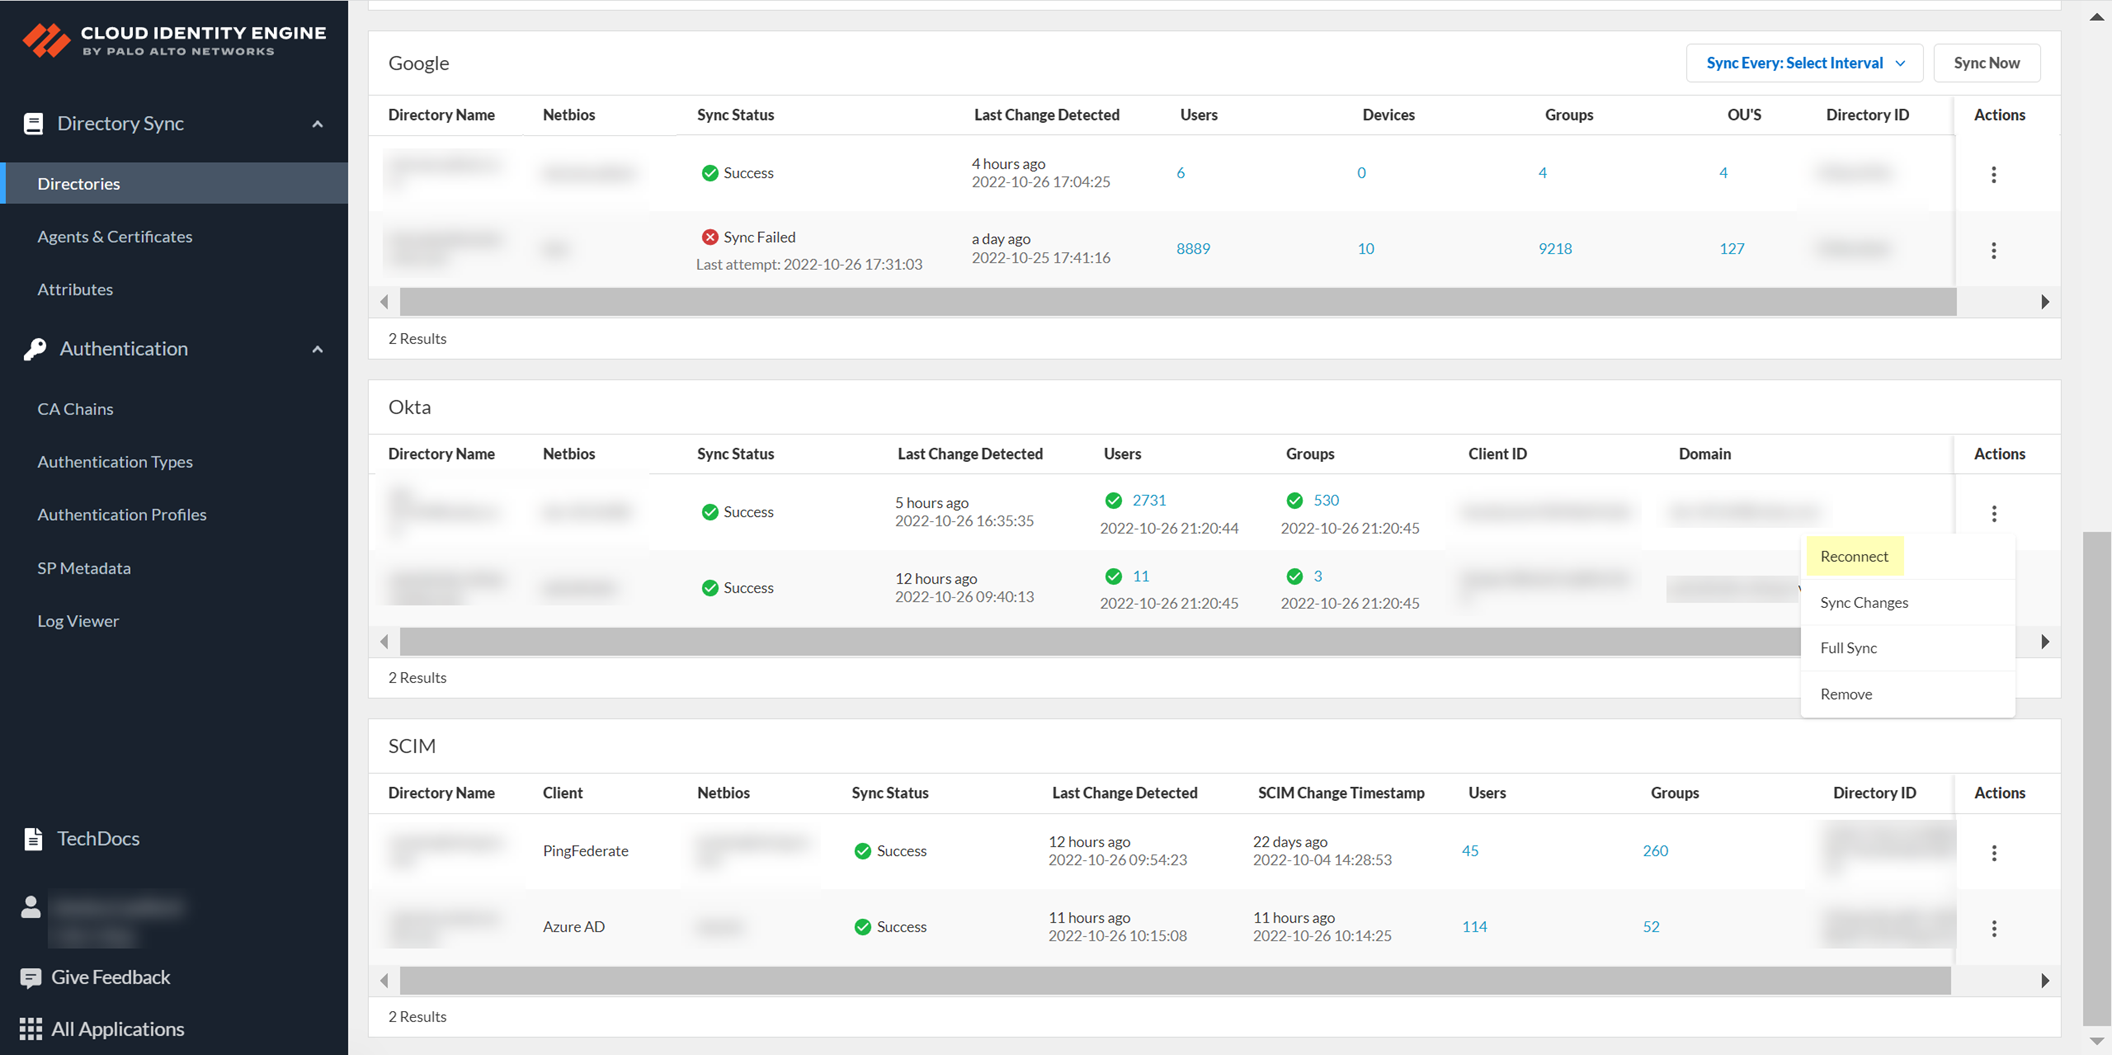
Reconnect Okta Directory
If the connection between your Okta directory and the Cloud Identity Engine isn’t active or you want to make changes to your Okta directory configuration, you can reconnect your Okta directory to the Cloud Identity Engine.
- Log in to the hub and select the Cloud Identity Engine tenant that contains the Okta directory you want to reconnect.
- Select Directories .
- Select ActionsReconnect for the directory you want to reconnect.
- Select whether you want to make any changes to your configuration.
- If you want to use a service account to log in to the Okta directory, select the Client Credential Flow . For more information, refer to step 8 in the documentation on how to Configure Okta Directory for the Cloud Identity Engine.
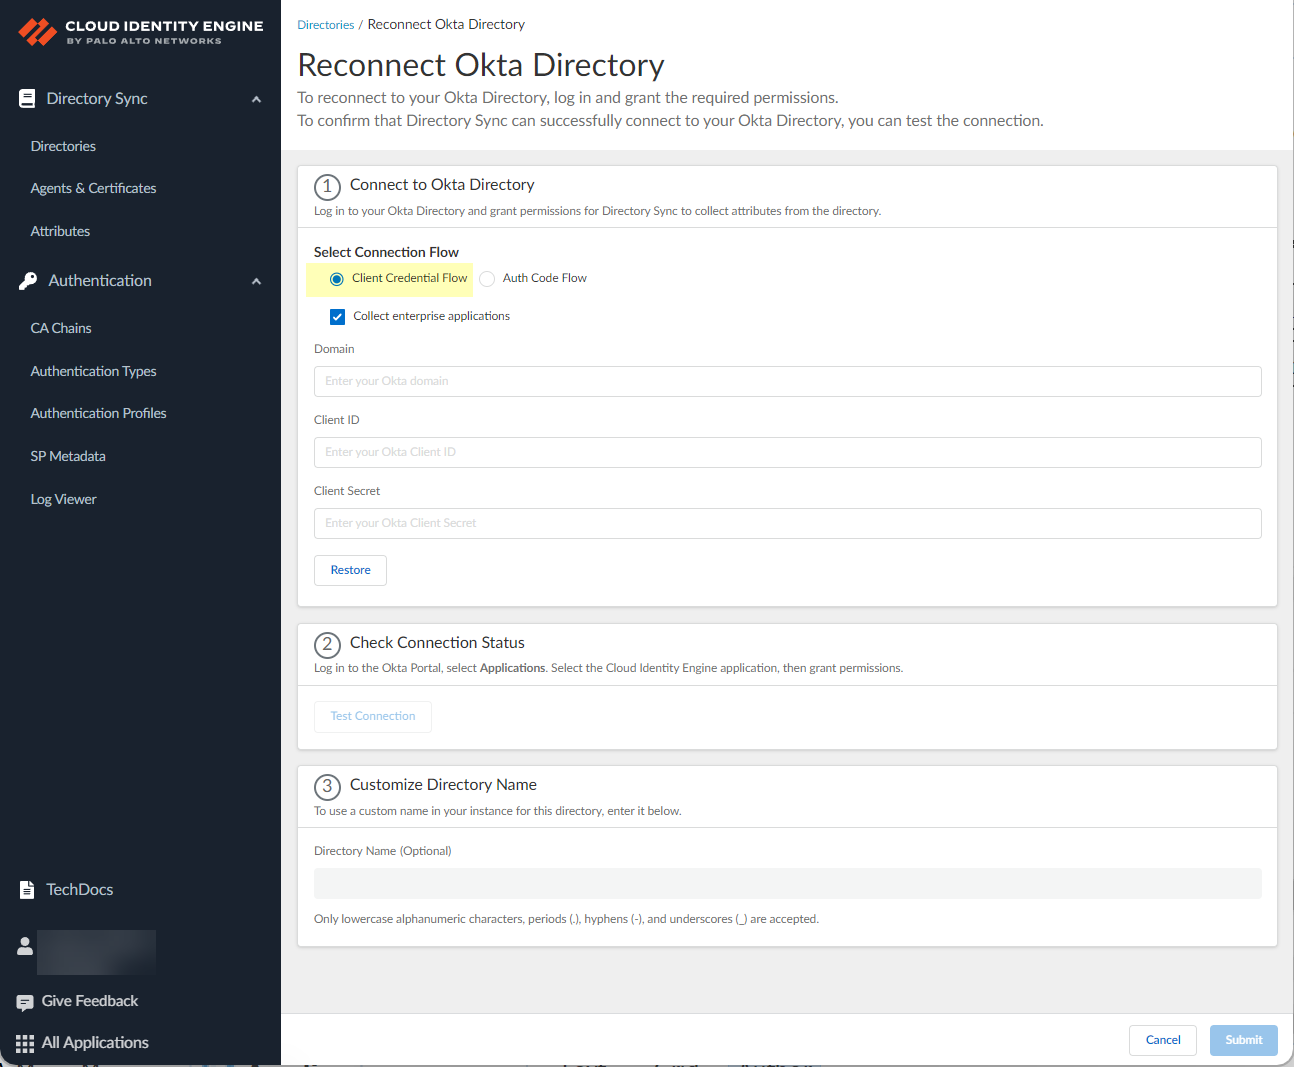
- If you want the Cloud Identity Engine to Collect enterprise applications data so that it is included when you View Directory Data , select the checkbox. If you don't use enterprise application data in your security policy or you don't want to collect the data, deselect the checkbox.
- ( Auth Code Flow only ) Sign in with Okta using your Okta administrator credentials and grant permissions for the Cloud Identity Engine to access the directory information.
- Client credential flow only Enter the Client ID and Client Secret (or click Restore to restore the current client secret).
You cannot change the Domain . If you need to change the domain, you must create a new Okta directory configuration in the Cloud Identity Engine.
- Click Test Connection to confirm the Cloud Identity Engine can access your Okta directory.
- ( Optional ) Customize Directory Name if you want to change the name that the Cloud Identity Engine displays for this directory in your tenant.
You can use up to 15 lowercase alphanumeric characters (including hyphens, periods, and underscores) for the directory name in the Cloud Identity Engine. You don't need to change the name of the directory itself, only the name of the directory in the Cloud Identity Engine app. If your directory name contains more than 15 characters, you must change the directory name to contain a maximum of 15 characters.
- Submit your configuration.
Remove Okta Directory
If you no longer need to sync your Okta Directory with the Cloud Identity Engine, you can remove it from the Cloud Identity Engine.
- Remove the Cloud Identity Engine integration from Okta.
- Log in to the Okta Admin Dashboard.
- Select ApplicationsApplications .
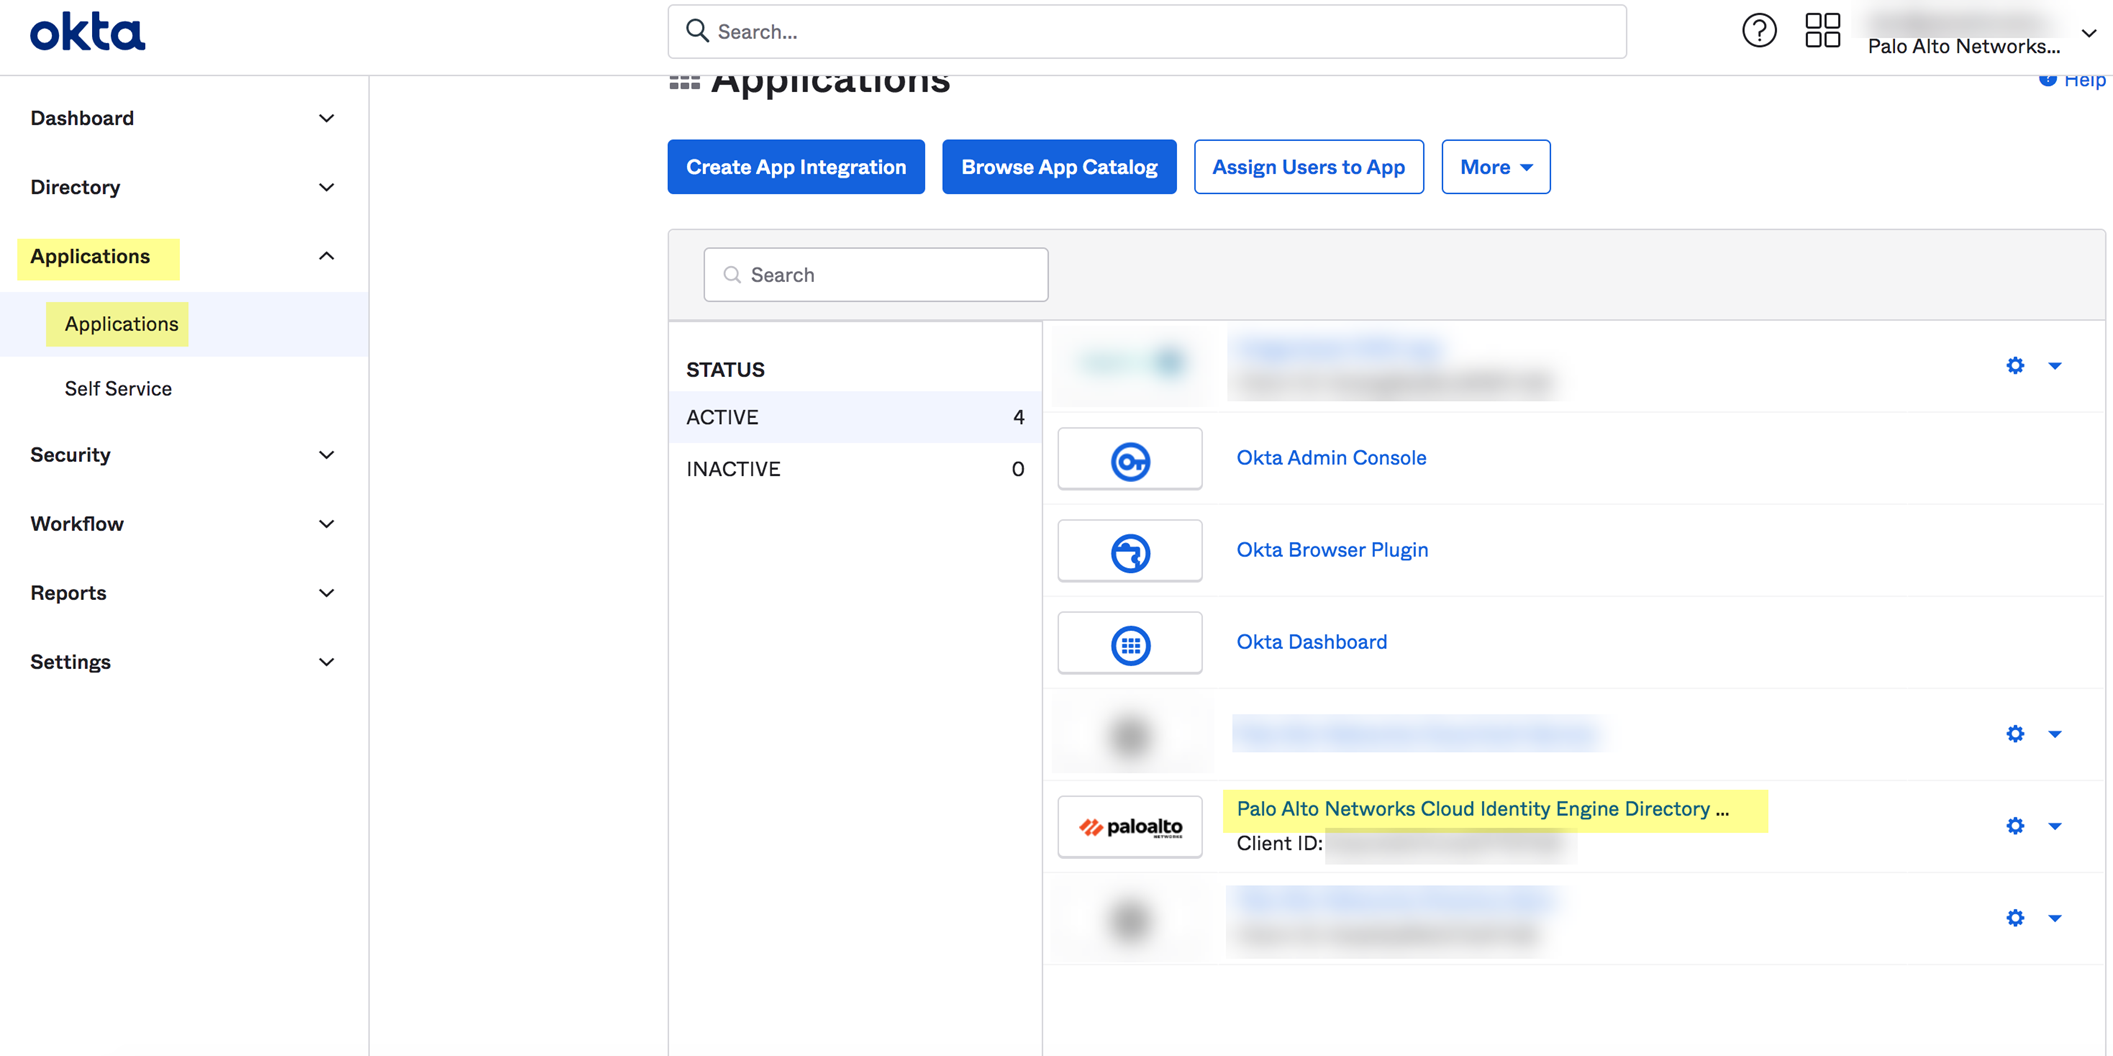
- Select the Cloud Identity Engine integration you want to remove.
- Select InactiveDelete .
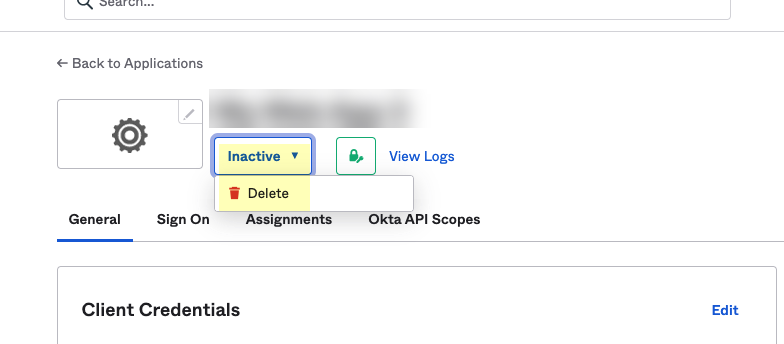
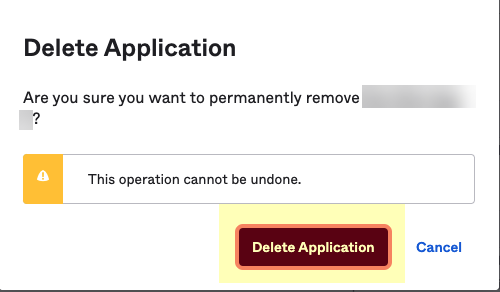
- Click Delete Application to confirm that you want to remove the Cloud Identity Engine integration from Okta.
- Remove the Okta Directory from the Cloud Identity Engine app.
- In the Cloud Identity Engine app, select Directories .
- Select ActionsRemove .

- Click Yes to confirm removal of the directory.
Deploy Client Credential Flow for Okta
By granting a few read-only permissions for your Okta directory in advance, the Client Credential Flow option for Okta in the Cloud Identity Engine allows you to use a service account to log in to your Okta directory in the Cloud Identity Engine. Using a service account is strongly recommended, as this is a more secure method for directory access and does not require the account to be associated with a specific user.
You must obtain a new client ID and secret if you have an existing Okta directory configuration. The client ID and secret for the Okta directory auth code flow (the existing method) are not compatible with the API service integration that the client credential flow method uses.
- Download the Okta integration app from the Okta Integration Network .
- In the Okta Administrator Portal, select ApplicationsAPI Service Integrations .
- Click Add Integration .

- Select the app integration you want to use based on whether you want to enable app data and click Next .
- If you use application data in your security policy, select the Palo Alto Networks Cloud Identity Engine (Application-enabled) app. For more information on collecting application data, see Step 9 in Configure Okta Directory .

- If you do not use application data in your security policy, select the Palo Alto Networks Cloud Identity Engine app.
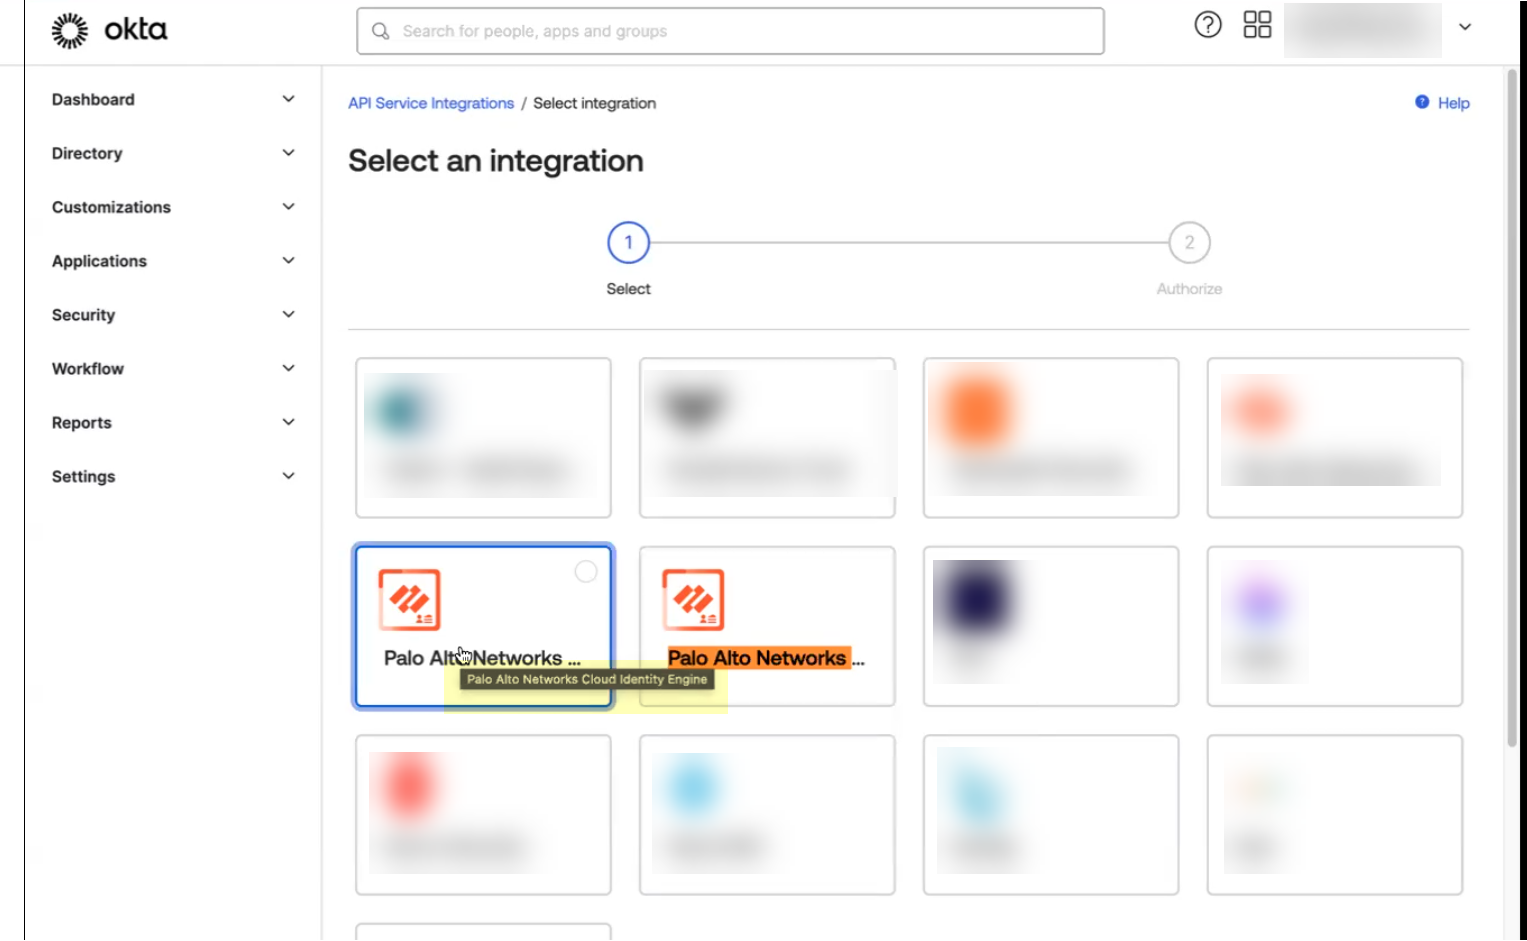
- To ensure that you select the correct app, either use Find in your browser ( Ctrl + F ) to search for the app you want to use or hover over the app to display the full app name.
- Install and configure the API service integration.
- Install & Authorize the API service integration.
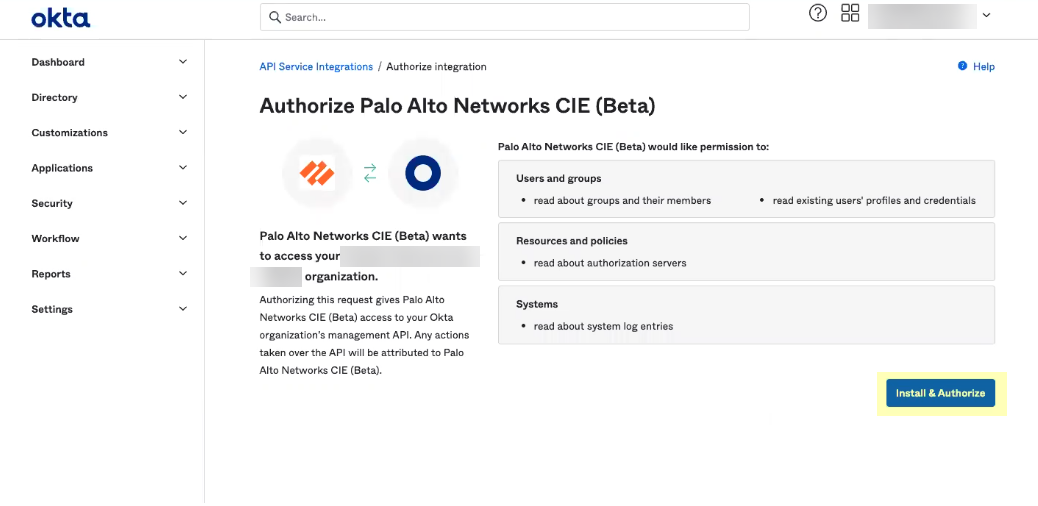
The Okta API service integration automatically configures the following required API scopes:
- Users and groups —Read existing users’ profiles and credentials. Read about groups and their members. Read the signed-in user's profile and credentials.
- Authorization servers —Read about authorization servers.
- ( Application-enabled app only ) Apps —Read about apps.
- Logs —Read about system log entries.
- Click Copy to clipboard to copy the client secret and store it in a secure location, then click Done .
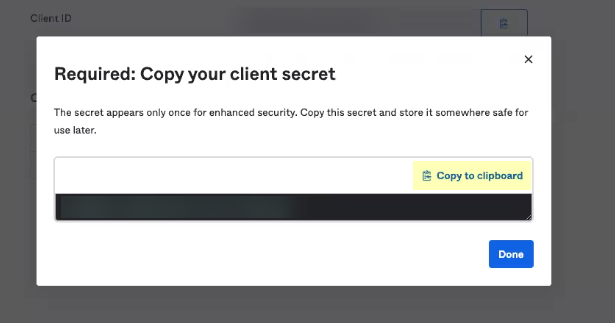
The client secret displays only once, so make sure to copy it and store it securely before clicking Done .
- Copy the Okta Domain and the Client ID and store them in a secure location.
You must edit the domain by removing the https:// before pasting it.
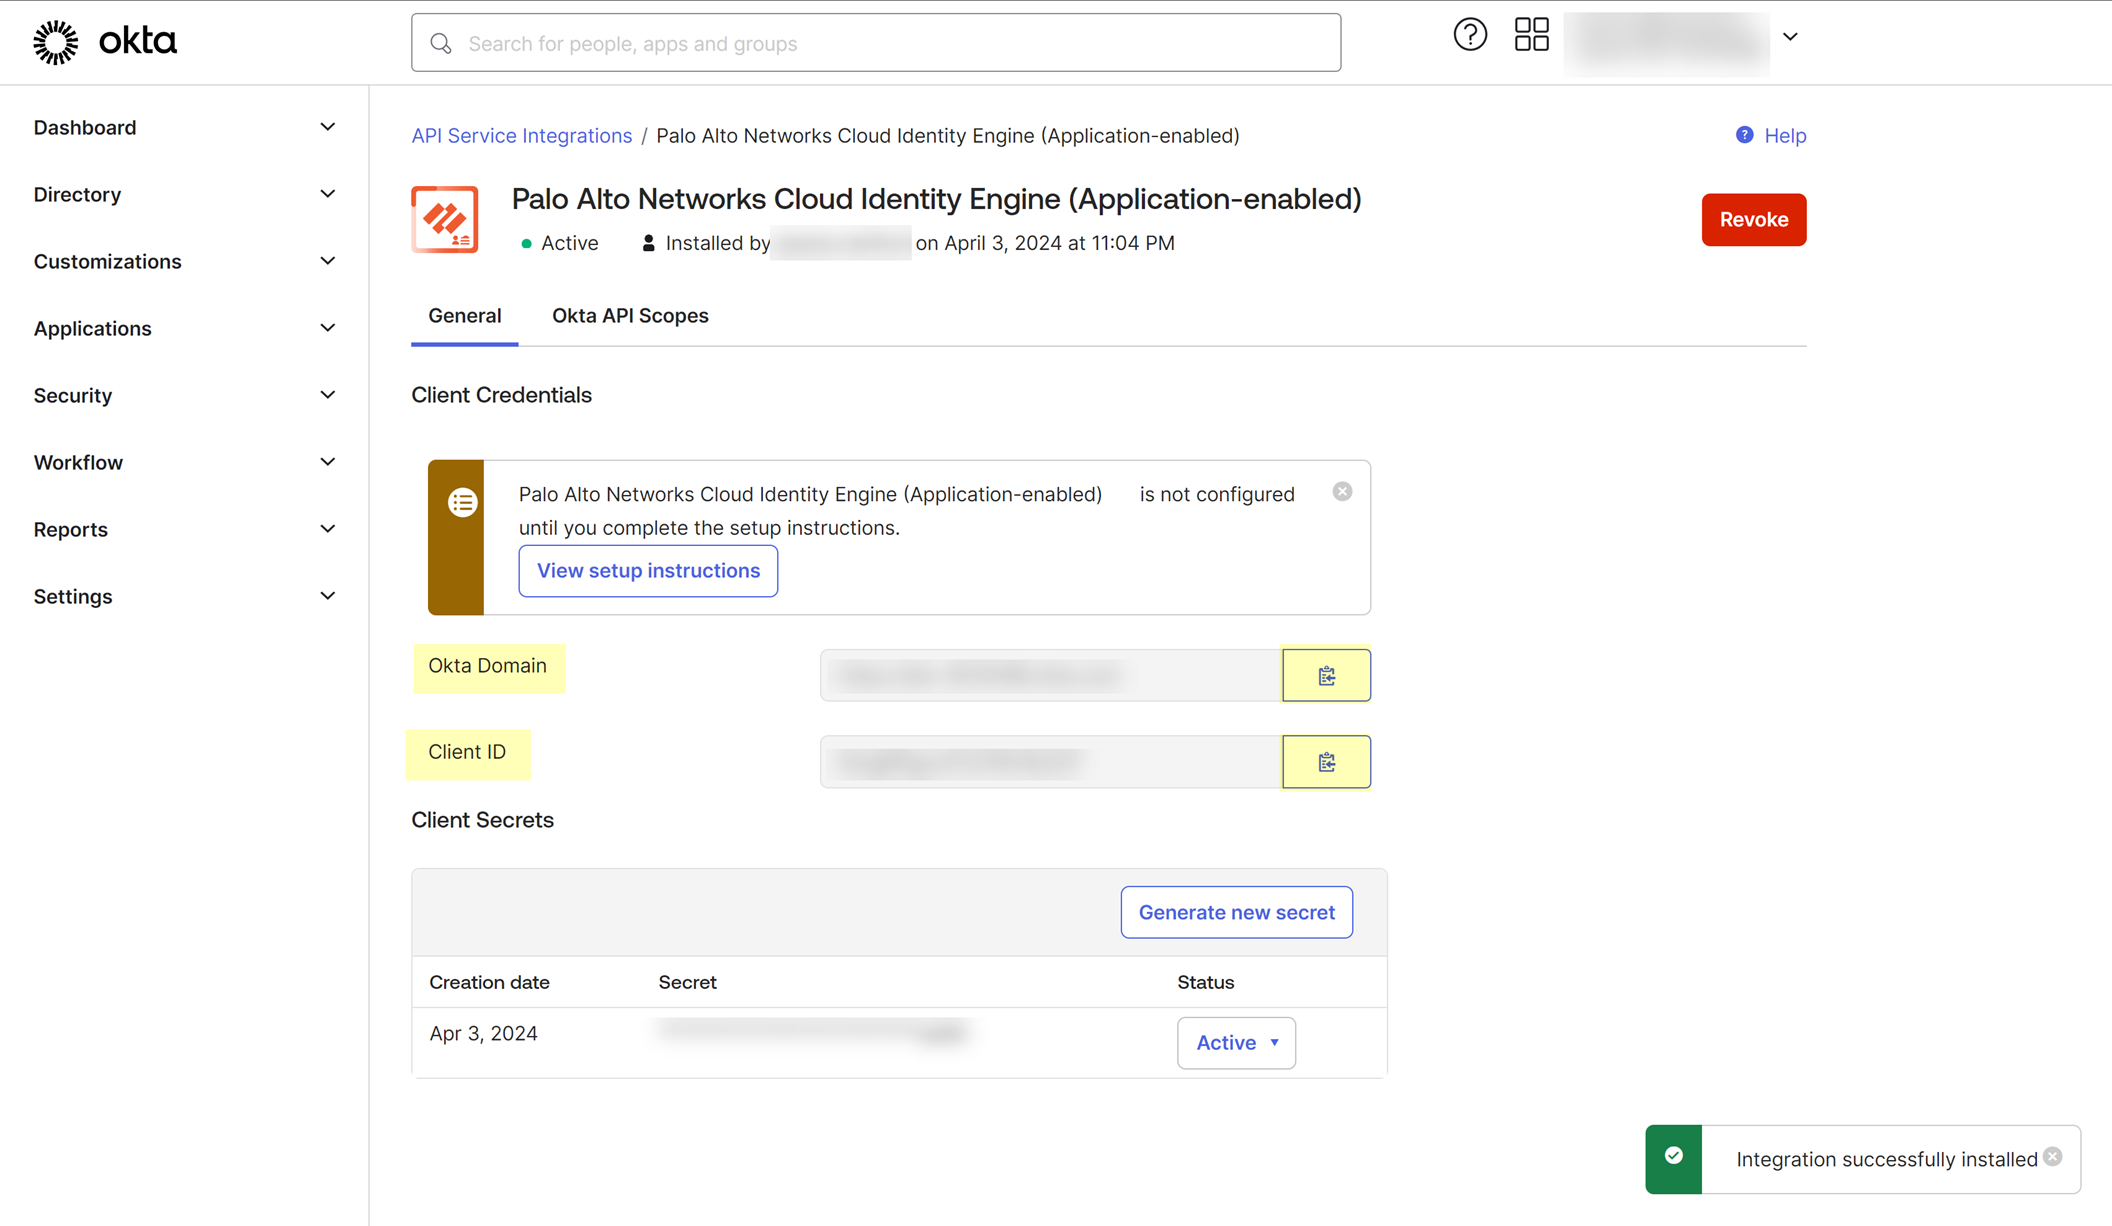
- If you have not already done so, activate your Cloud Identity Engine tenant.
- Set up a Cloud Directory and select Okta .
- Under Select Connection Flow , select Client Credential Flow .
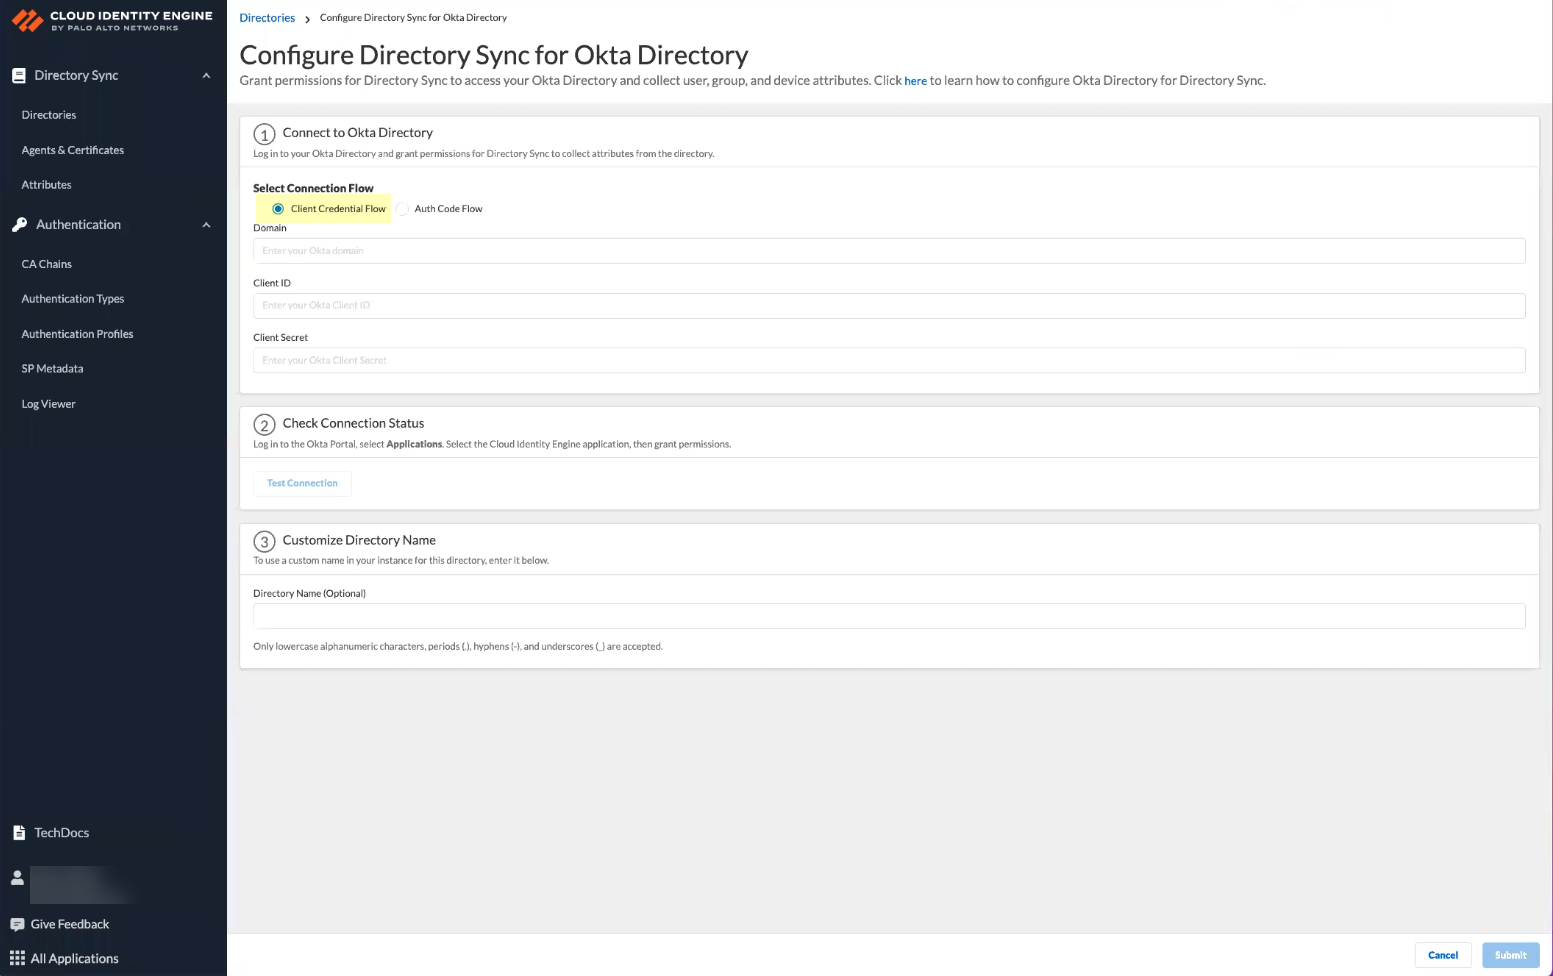
- Select Collect enterprise applications to display application data when you view directory data.
If you select this option, you must use the Palo Alto Networks Cloud Identity Engine (Application-enabled) to ensure the correct permissions.
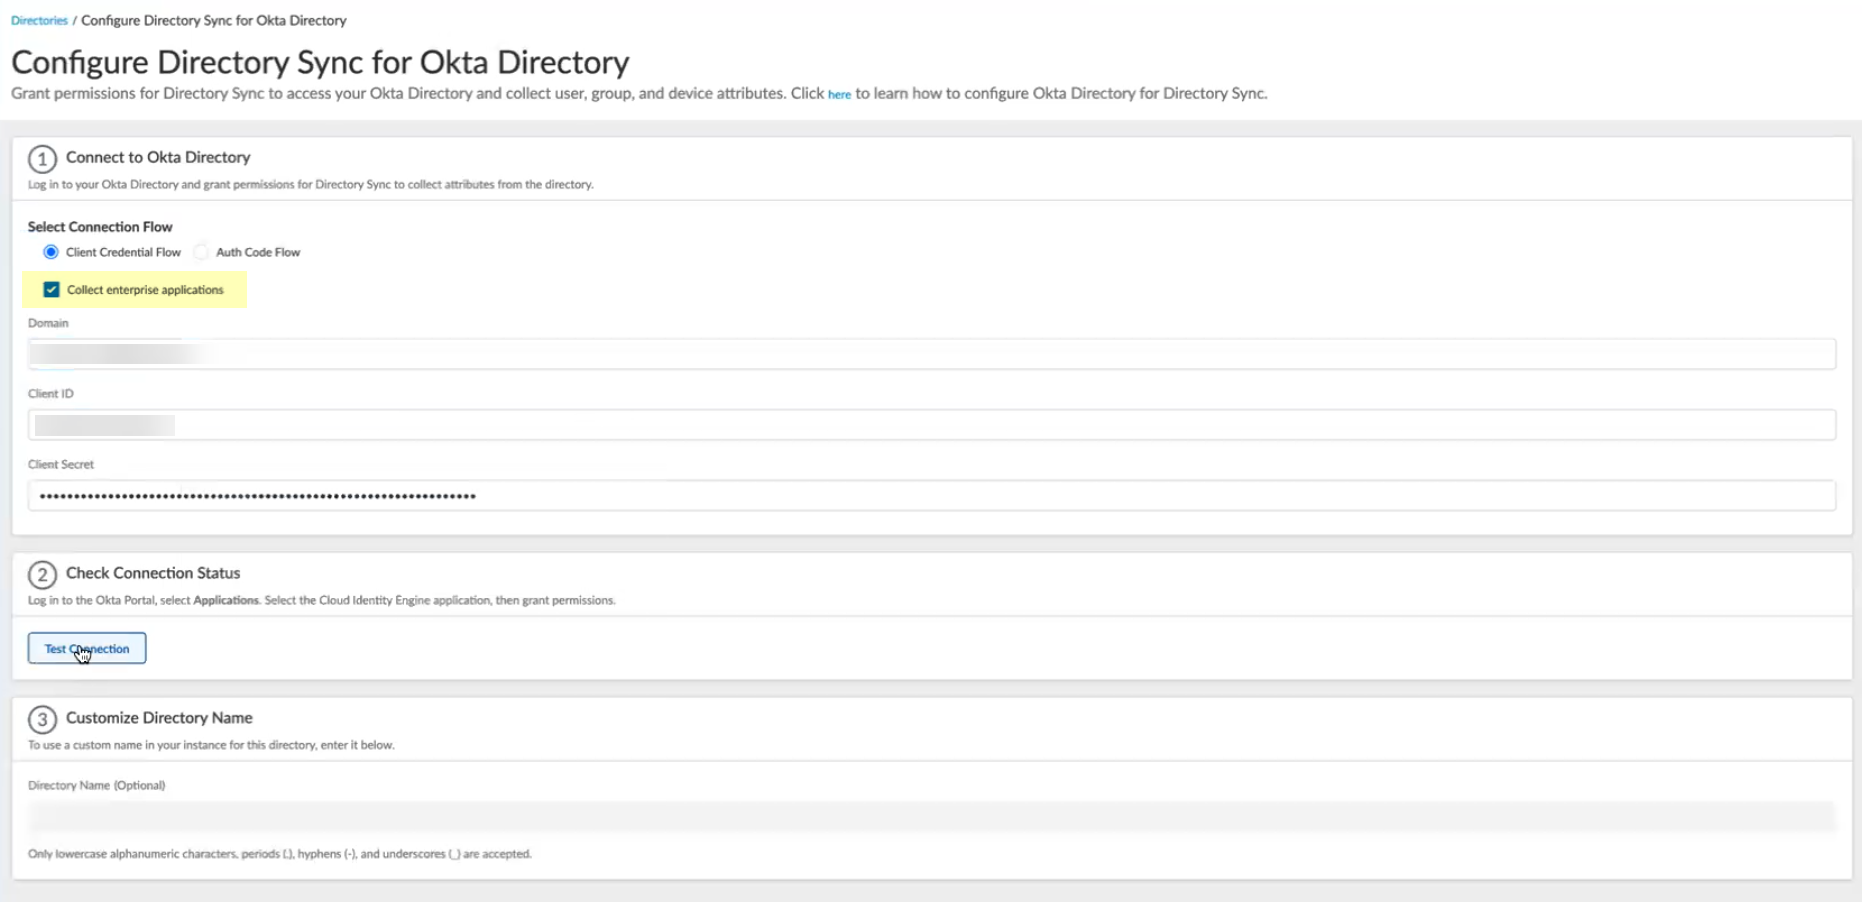
- Paste the information you copied from the Okta management console into the fields as indicated in the following table.
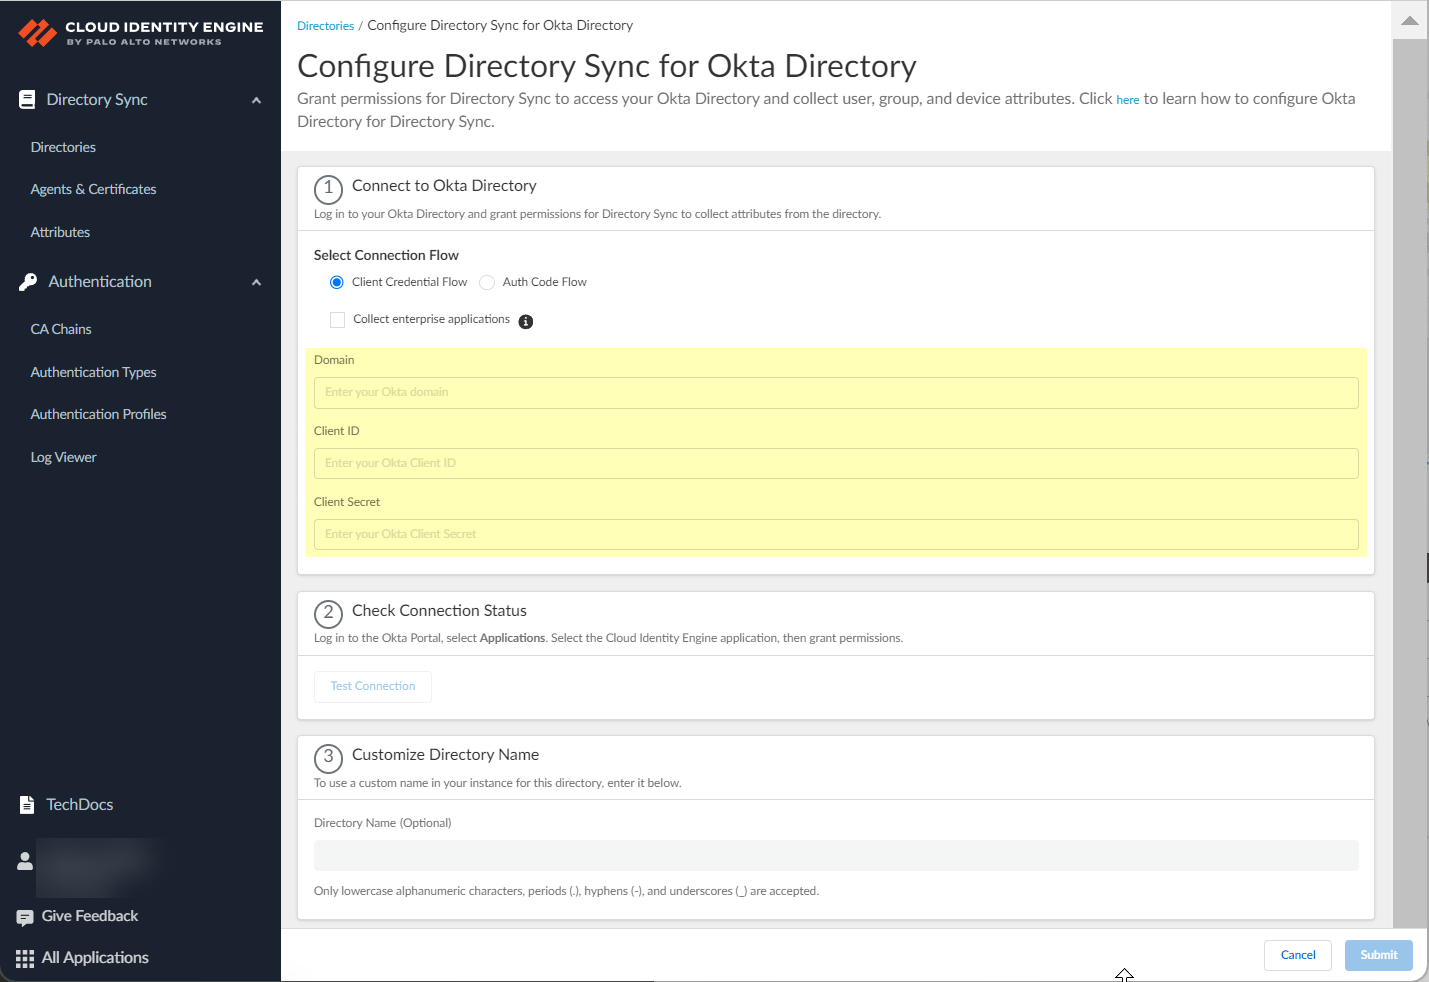
|
Okta Managment Console Field |
Cloud Identity Engine App Field |
|
Okta Domain |
Domain |
|
Client ID |
Client ID |
|
Client Secret |
Client Secret |
- Click Test Connection to verify the Cloud Identity Engine can successfully communicate with your Okta directory.
You must test the connection to submit the configuration.
- (Optional) Customize the name of the directory that displays in the Cloud Identity Engine.
If you want to use a custom name for this directory in the Cloud Identity Engine, enter the custom name as the Directory Name (Optional) .
- Submit your changes and verify your directory information when the Directories page displays.
Configure Google Directory
When you configure your Google Directory in the Cloud Identity Engine, the Cloud Identity Engine can access your Google Directory information to identify users and enforce Security policy.
- If you haven’t already done so, activate the Cloud Identity Engine.
- Grant the necessary administrator rights in the Google Admin console for the Cloud Identity Engine.
- In the Google Admin console, select Admin roles .
- Select a role then click Privileges .
- Select the following privileges then Save your changes:
- Admin console privileges
- Organizational Units > Read
- Users > Read
- Groups
- Services > Mobile Device Management > Manage Devices and Settings
- Services > Chrome Management > Settings > Manage Chrome OS > Devices > Manage Chrome OS Devices (read-only)
- Domain Settings
- Admin API privileges
- Organization Units > Read
- Users > Read
- Groups
- Groups > Create
- Groups > Read
- Groups > Update
- Groups > Delete
- Billing Management > Billing Read
- Domain Management
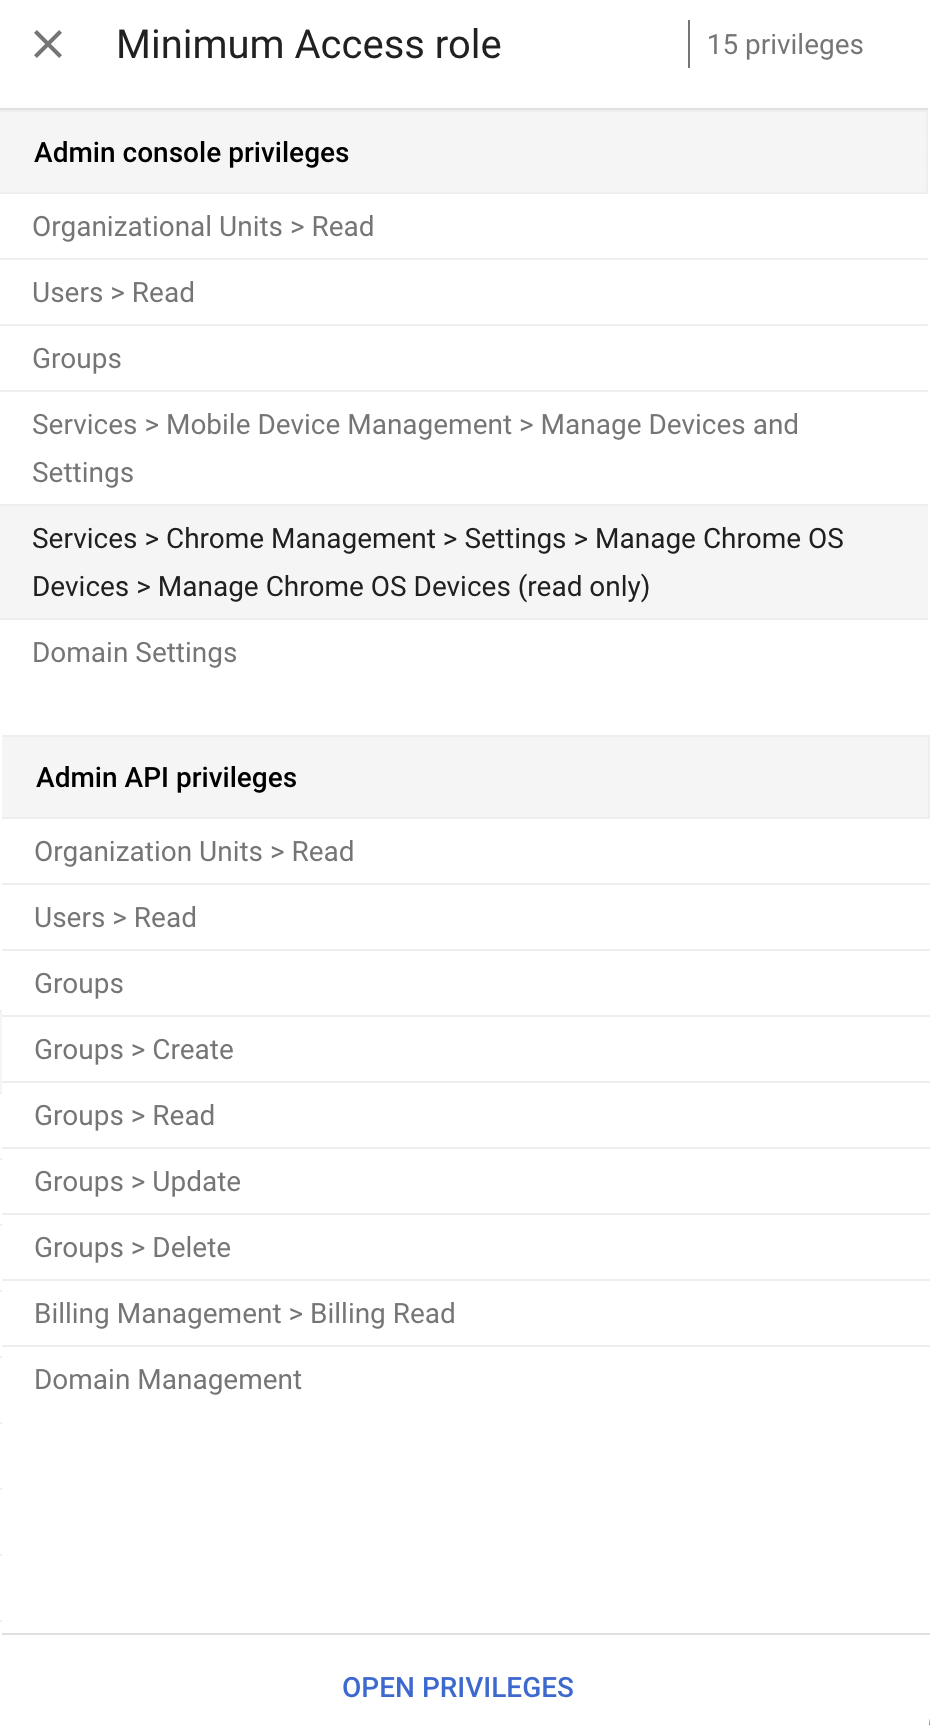
- Log in to the Google Admin console and configure the Cloud Identity Engine app in the Google Admin console.
- Select SecurityAPI controls and click Manage Third-Party App Access .

- Select Configure new appOAuth App Name Or Client ID .
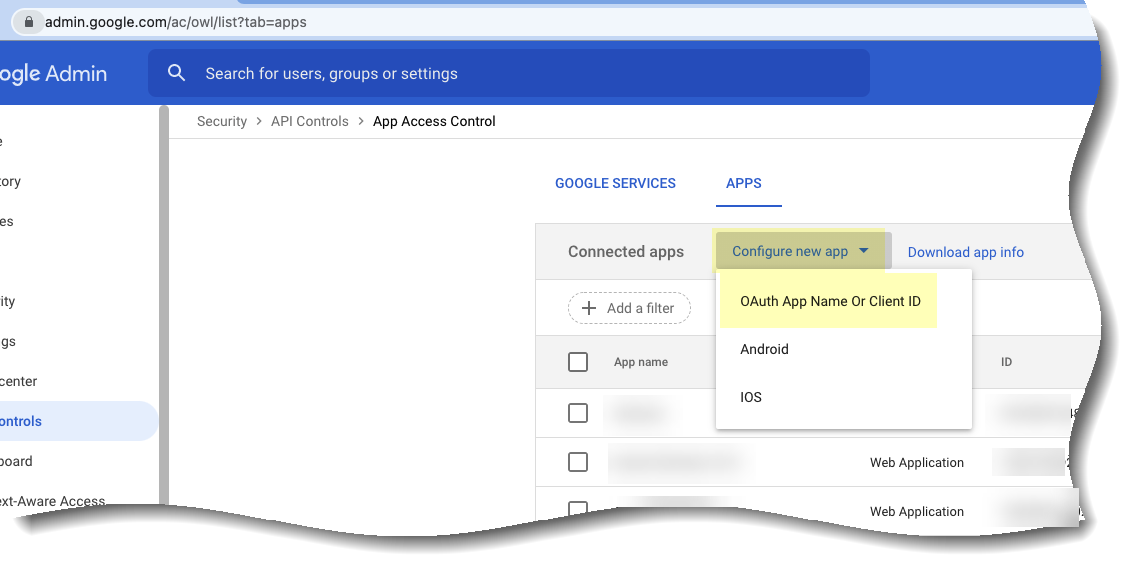
- Enter Palo Alto Networks Cloud Identity Engine Directory Sync and click Search .
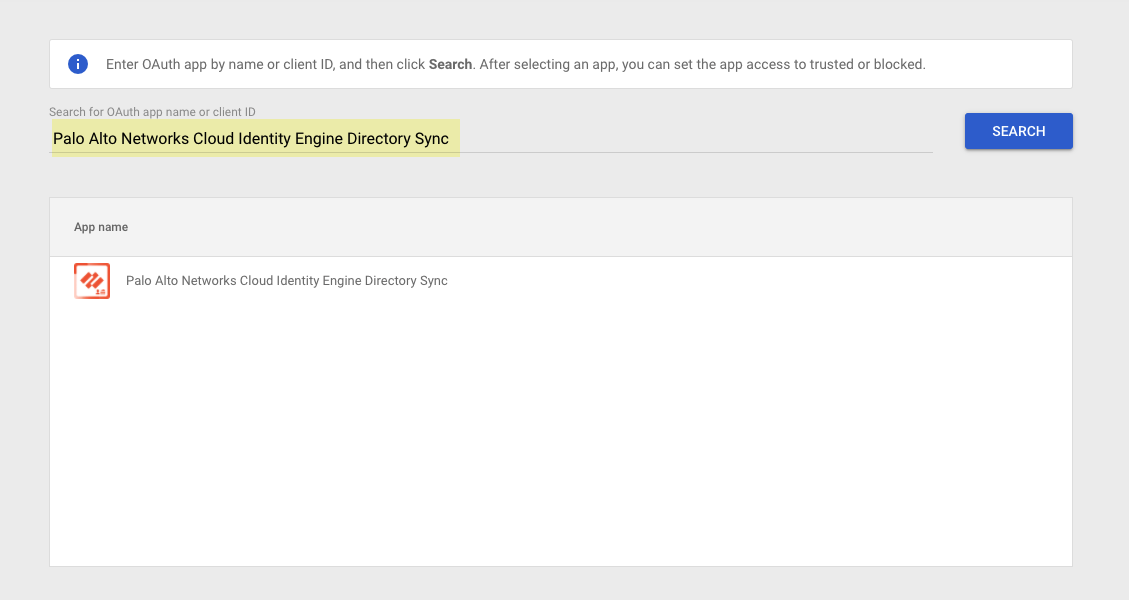
- Select the Palo Alto Networks Cloud Identity Engine Directory Sync app.
- Select the OAuth Client ID option if it isn’t already selected then click Select .
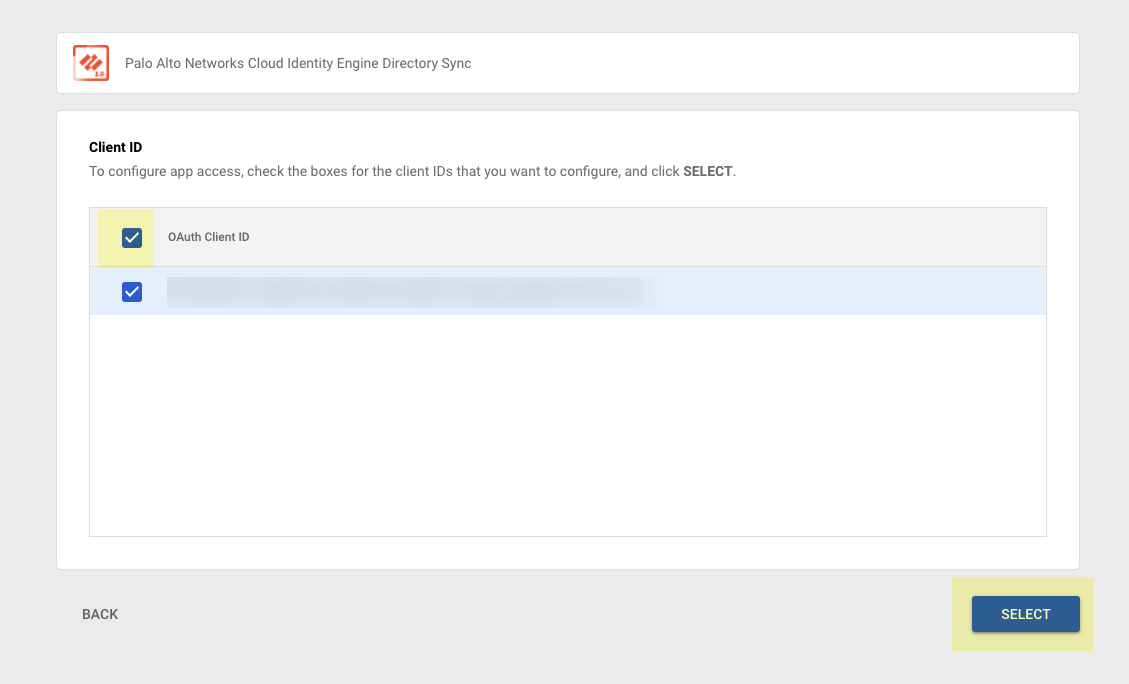
- Select Trusted: Can access all Google services as the App access option then Configure the app.
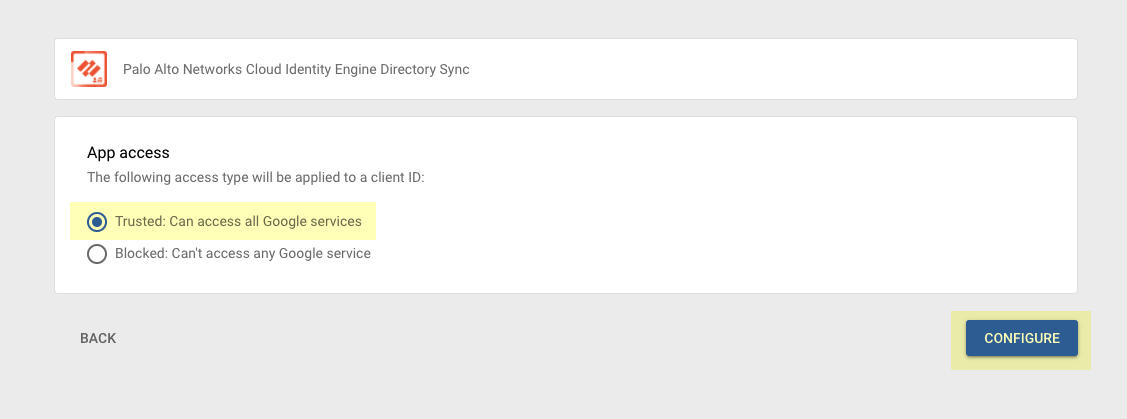
- Collect the necessary information from the Google Admin console to configure the Google Directory in the Cloud Identity Engine.
- Select AccountAccount Settings .
- Copy the Customer ID and store it in a secure location.
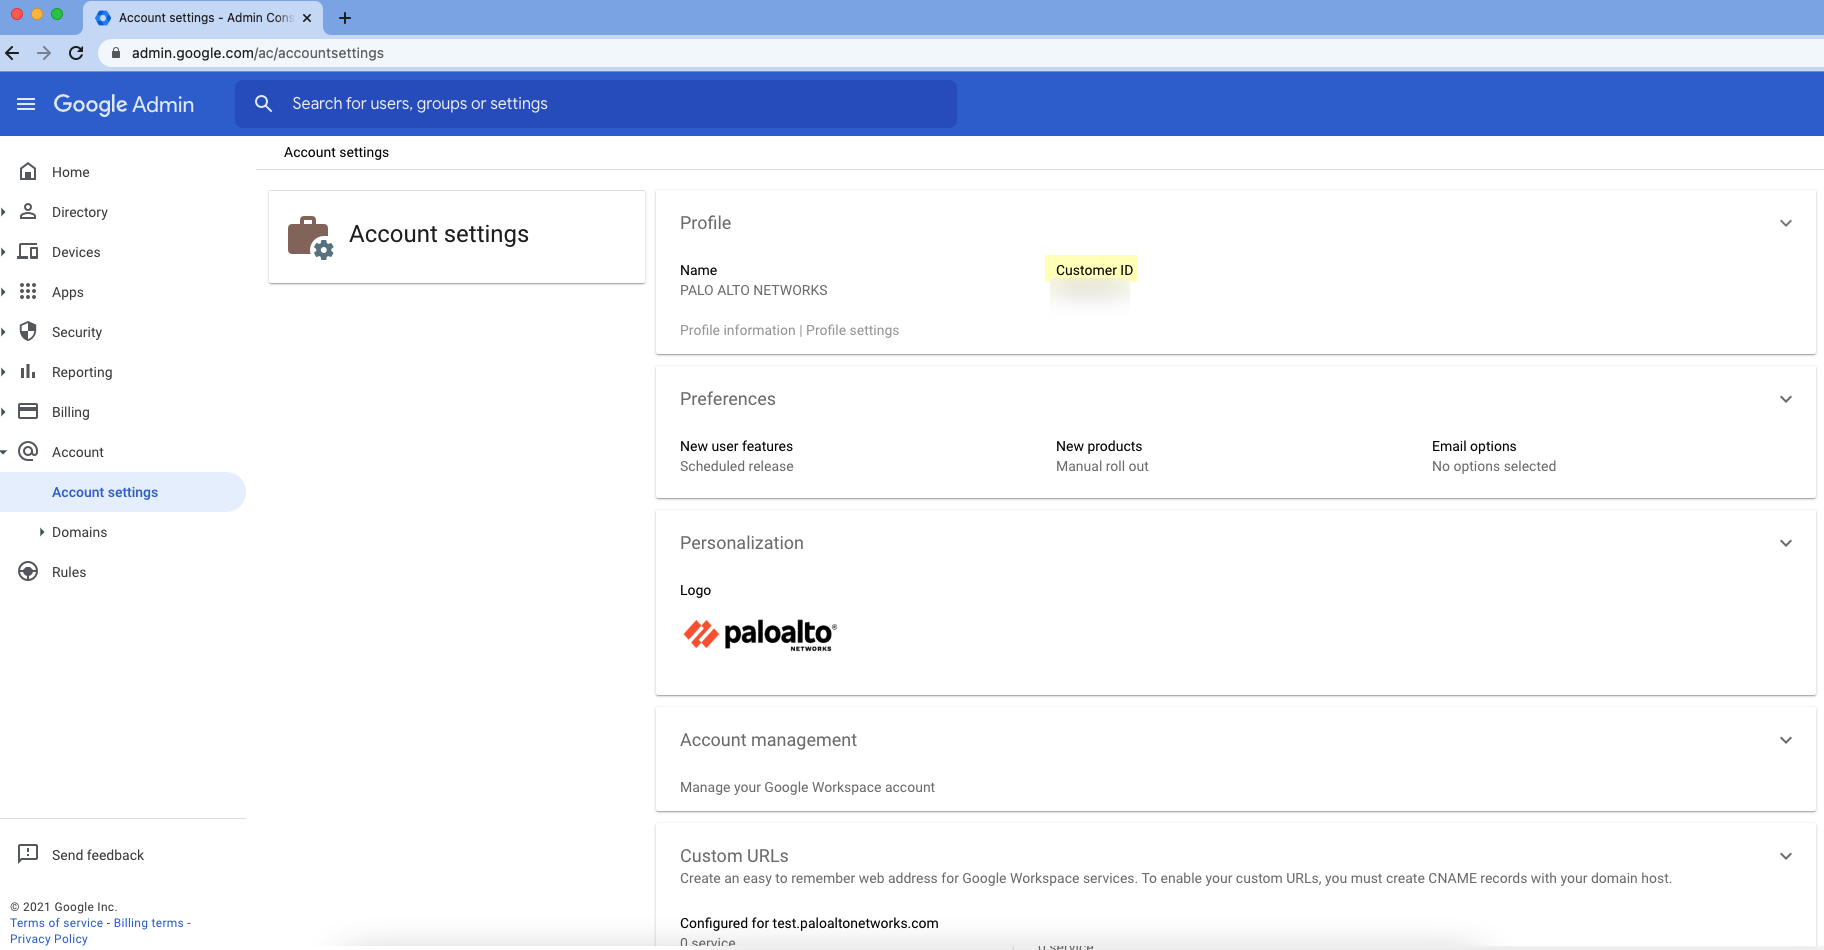
- In the Cloud Identity Engine app, select DirectoriesAdd Directory .
- Set Up a Cloud Directory and select Google .
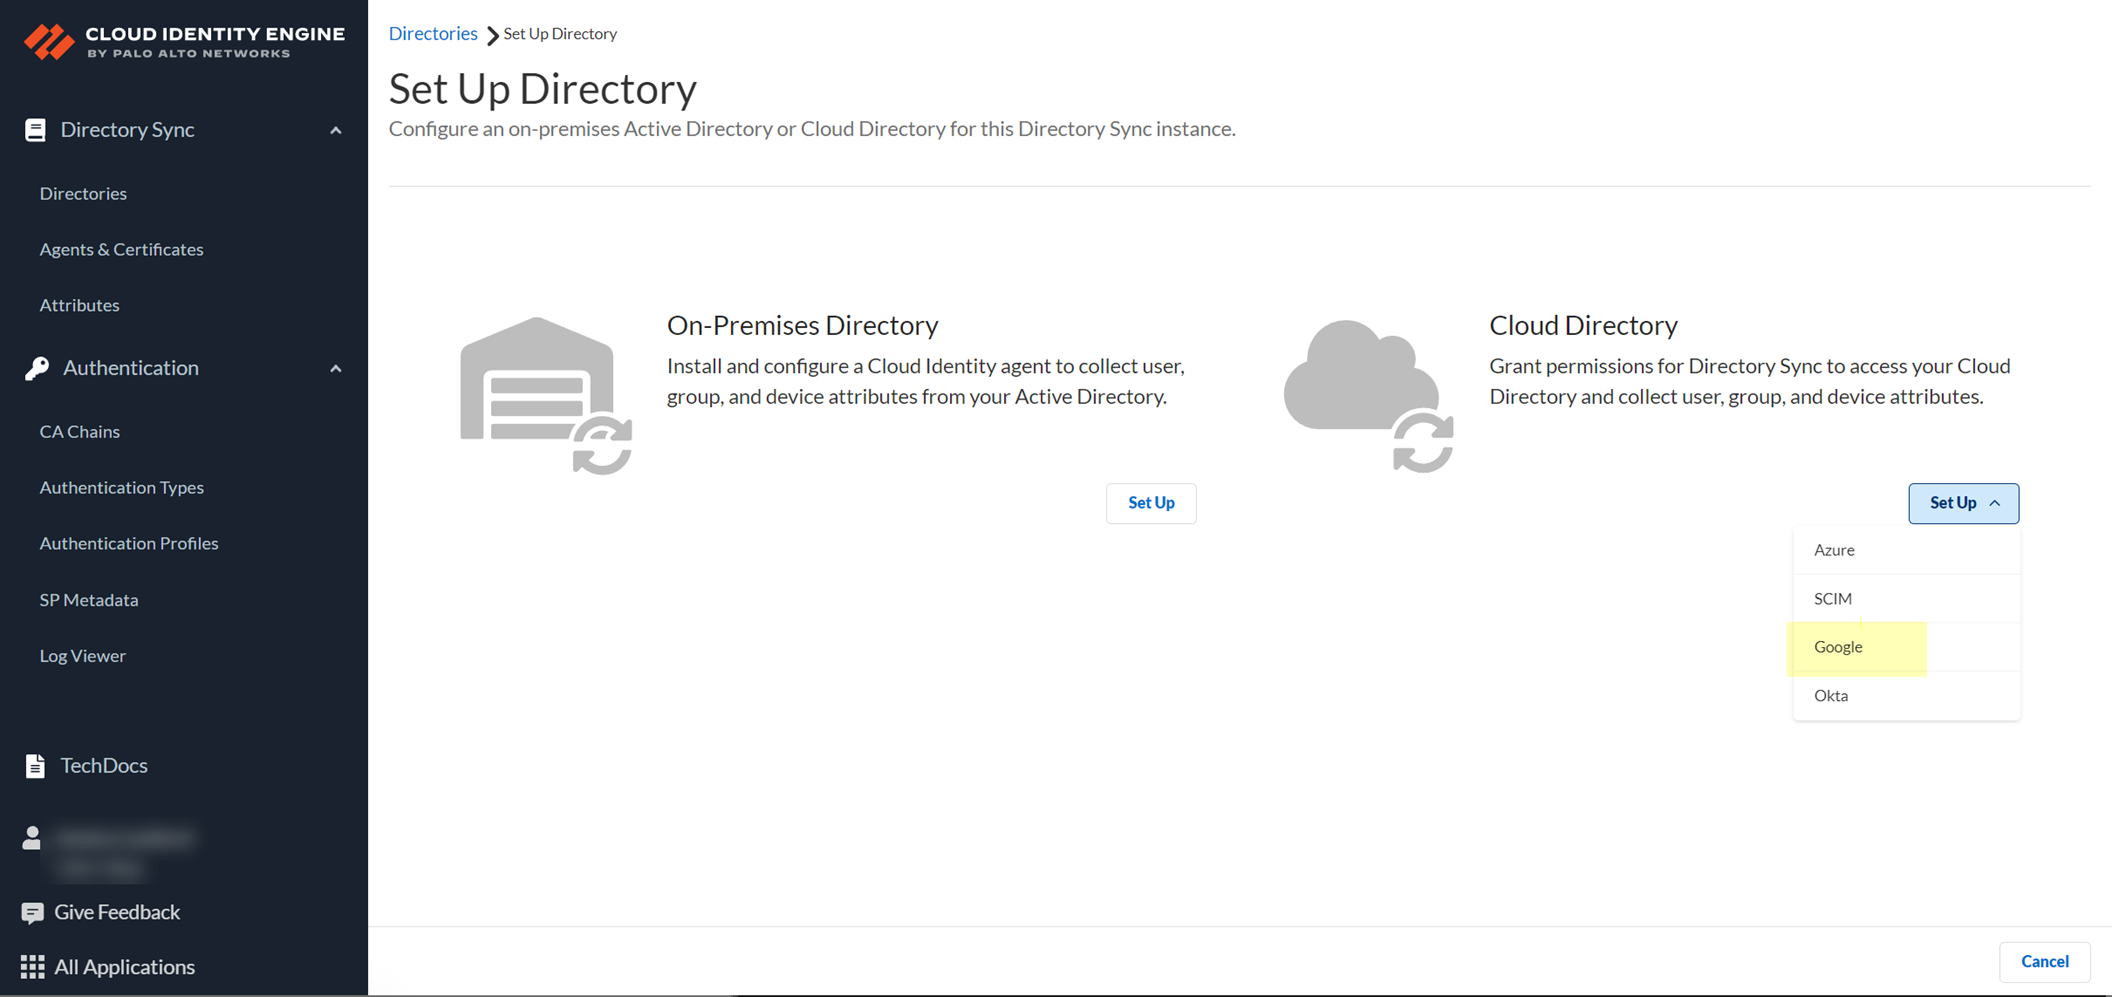
- Enter your Customer ID that you copied in step 4.
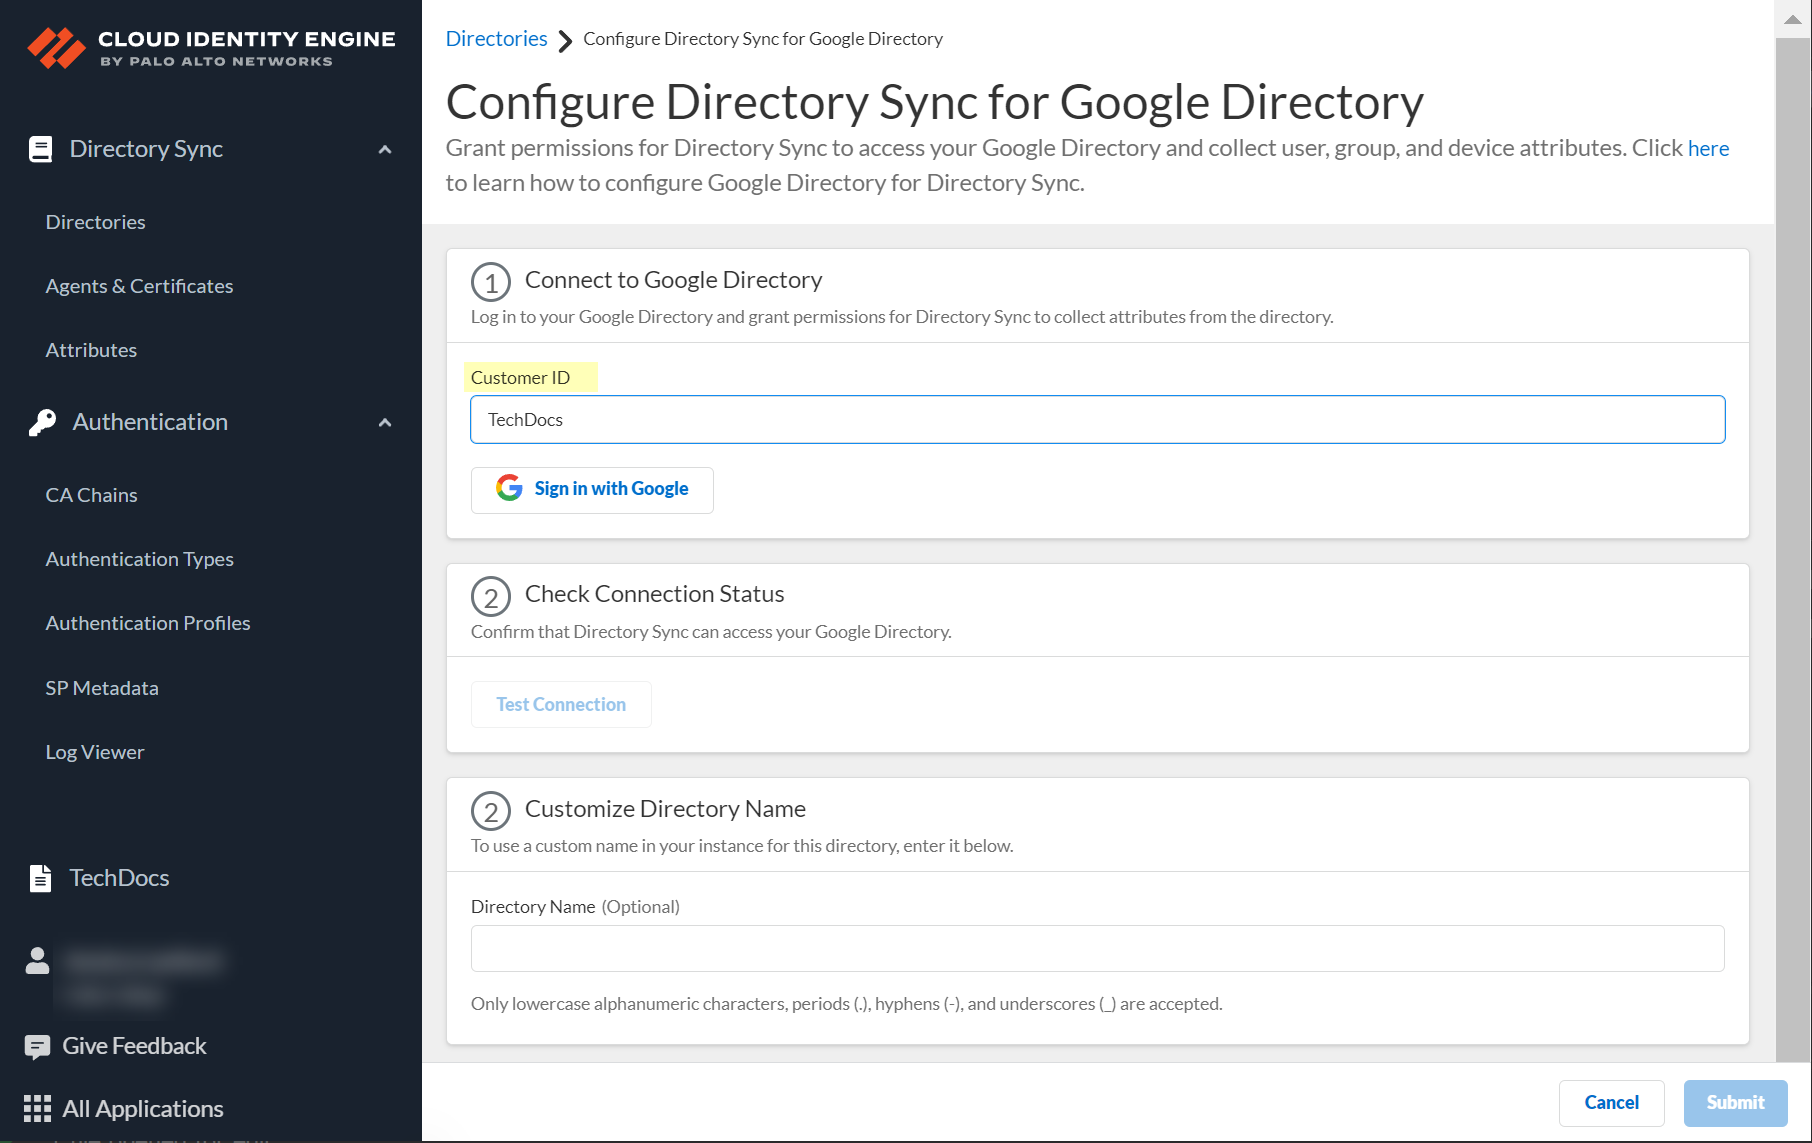
- Sign in with Google by entering the Google Admin credentials for the account associated with the Customer ID.
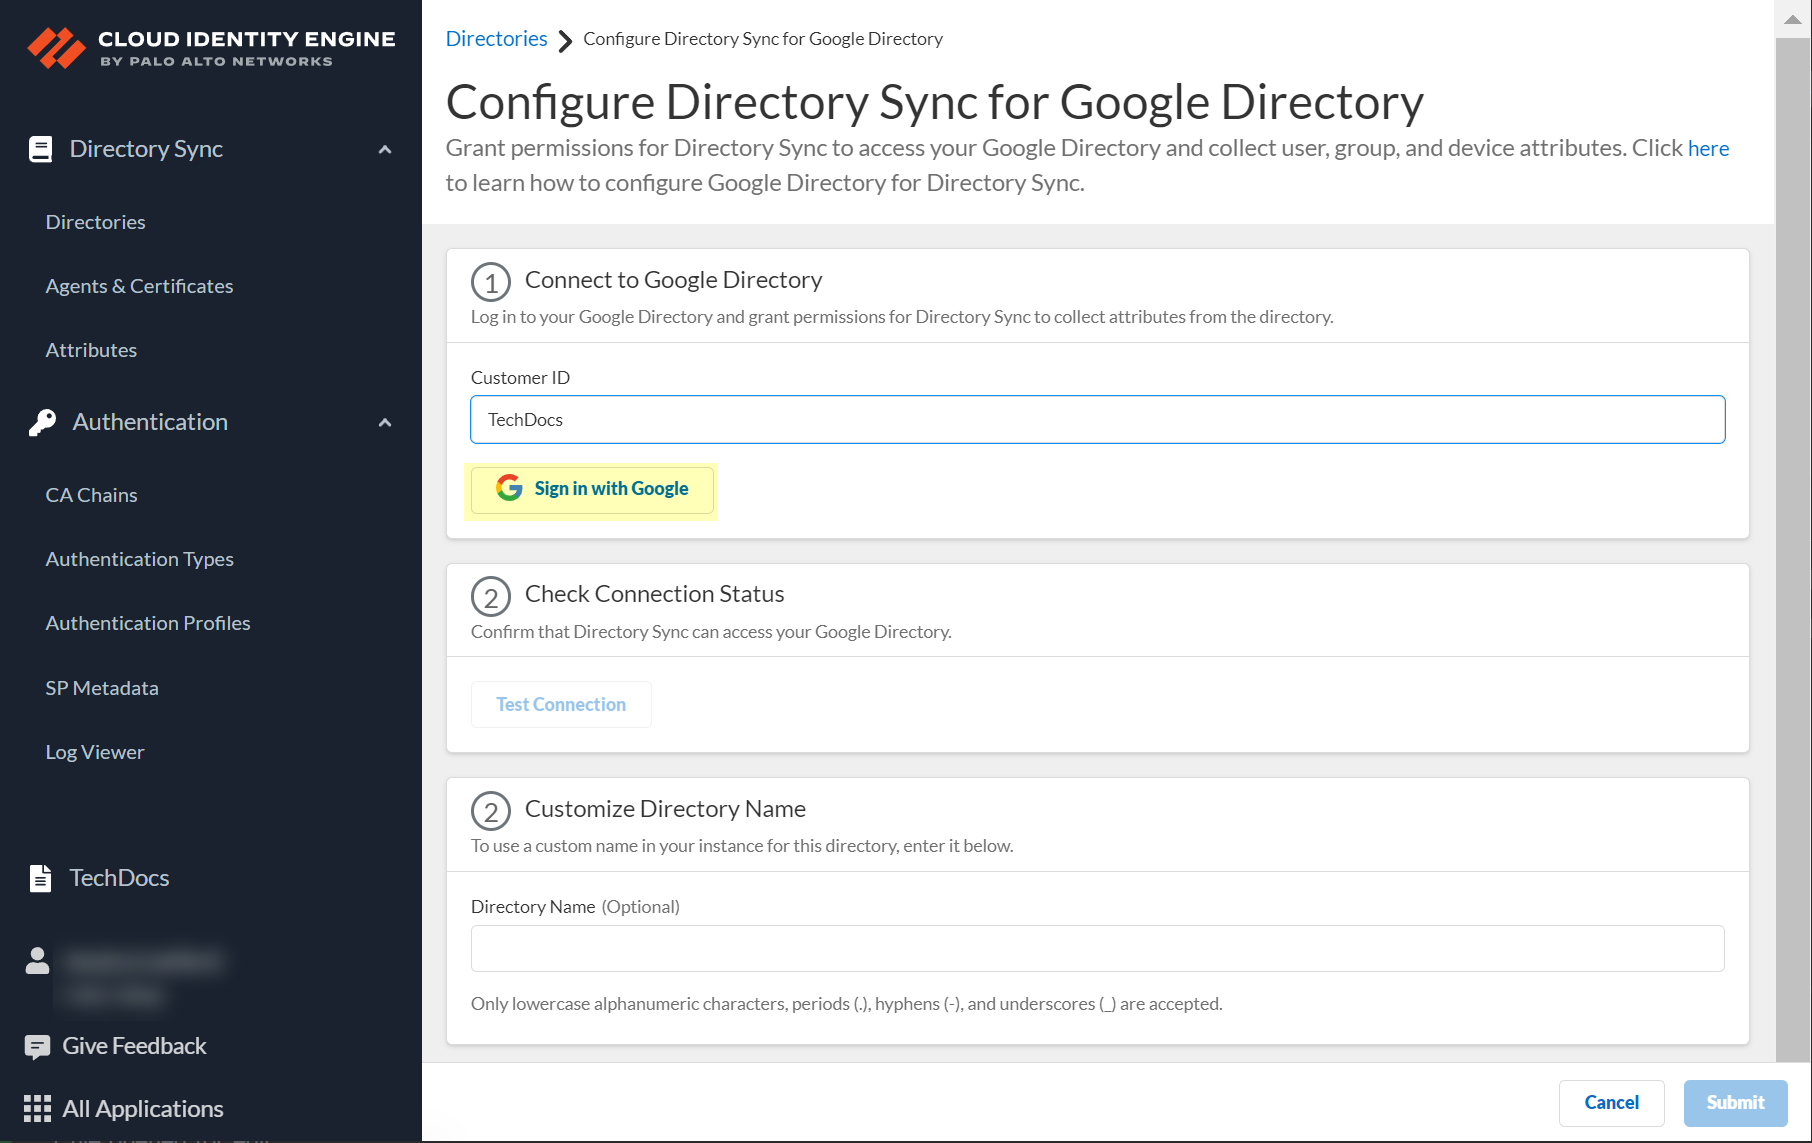
When the login is successful, Signed In displays.
- Click Test Connection to verify your configuration.
When the test is successful, Success displays.
- (Optional) Customize the name the Cloud Identity Engine displays for your Google Directory.
By default, the Cloud Identity Engine uses the default domain name.
You can use up to 15 lowercase alphanumeric characters (including hyphens, periods, and underscores) for the directory name in the Cloud Identity Engine.
- Submit the configuration.
When you submit the configuration successfully, the Cloud Identity Engine displays the Directories page.
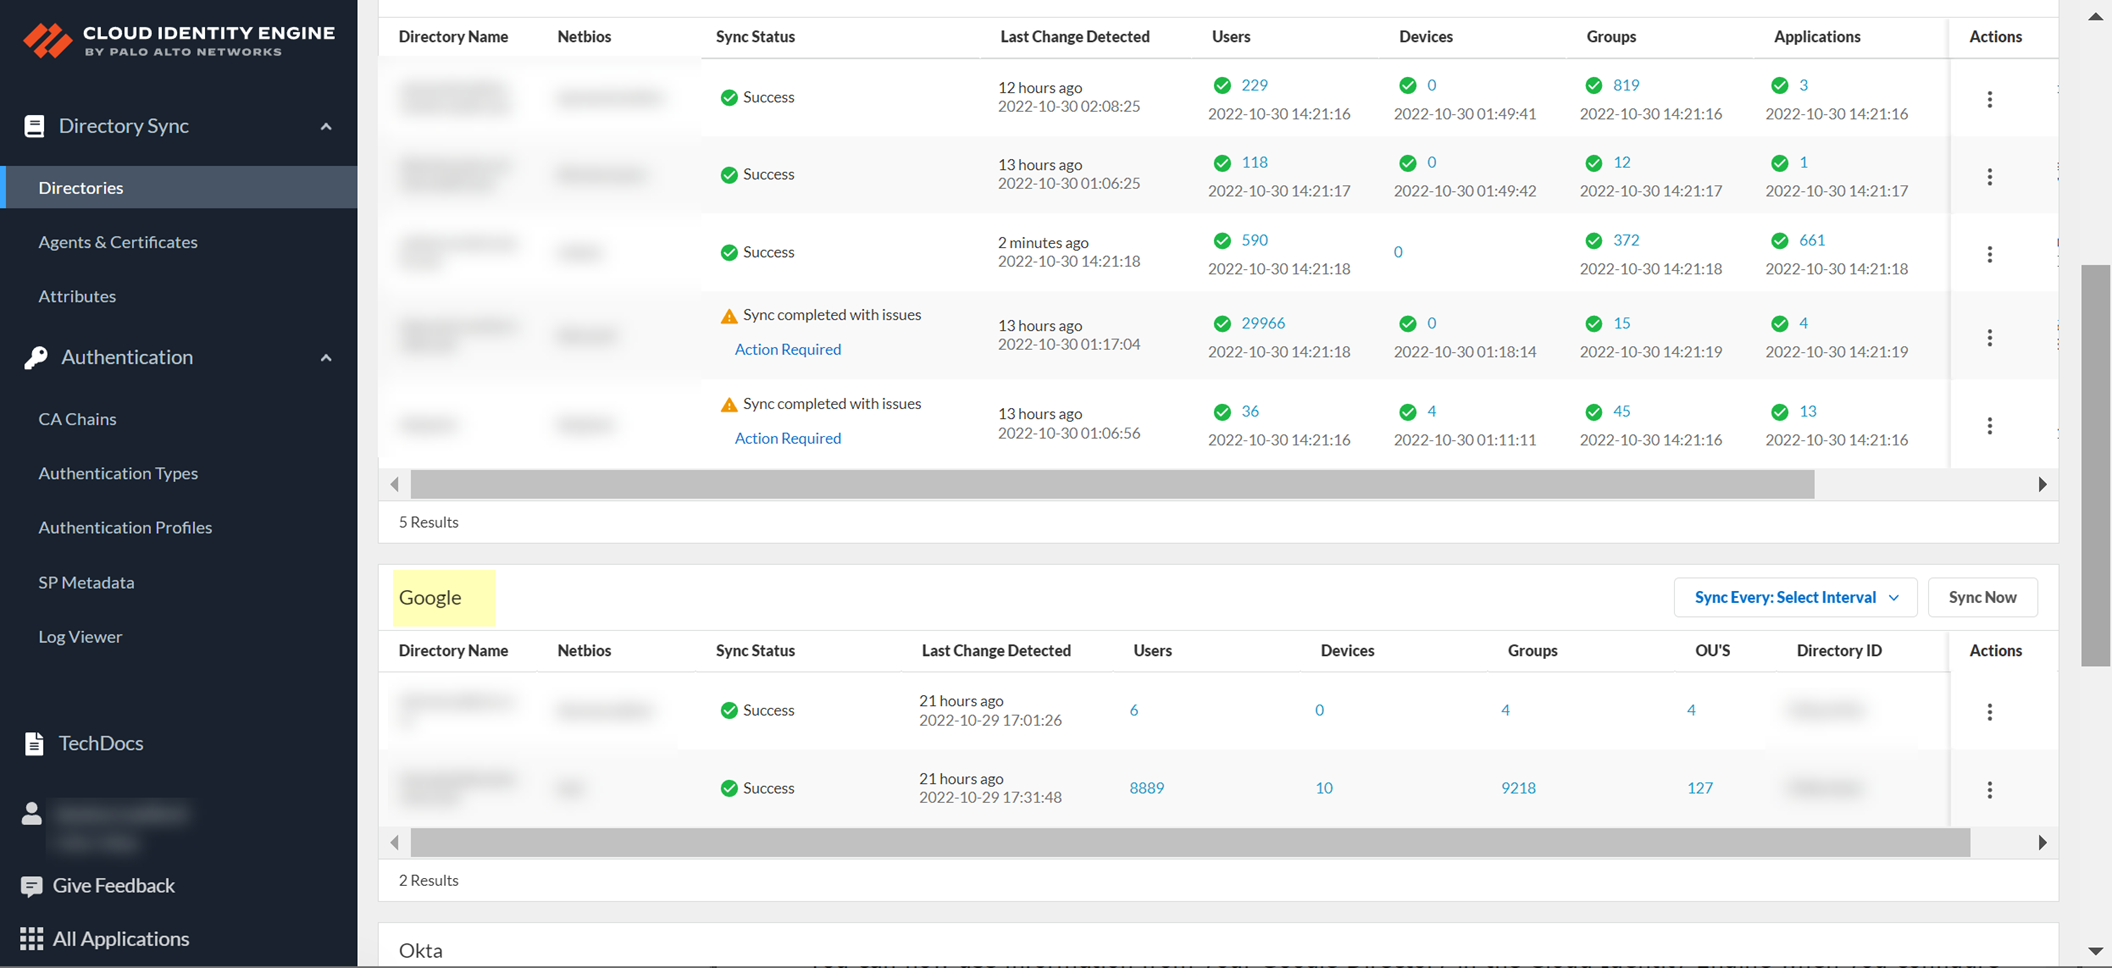
You can now use information from your Google Directory in the Cloud Identity Engine when you configure a user- or group-based security policy rule or with other Palo Alto Networks applications.
Reconnect Google Directory
If the connection between the Cloud Identity Engine and your Google Directory is inactive, reconnect the Google Directory to the Cloud Identity Engine.
- Log in to the hub and select the Cloud Identity Engine tenant that contains the Google Directory you want to reconnect.
- Select Directories .
- Select ActionsReconnect .
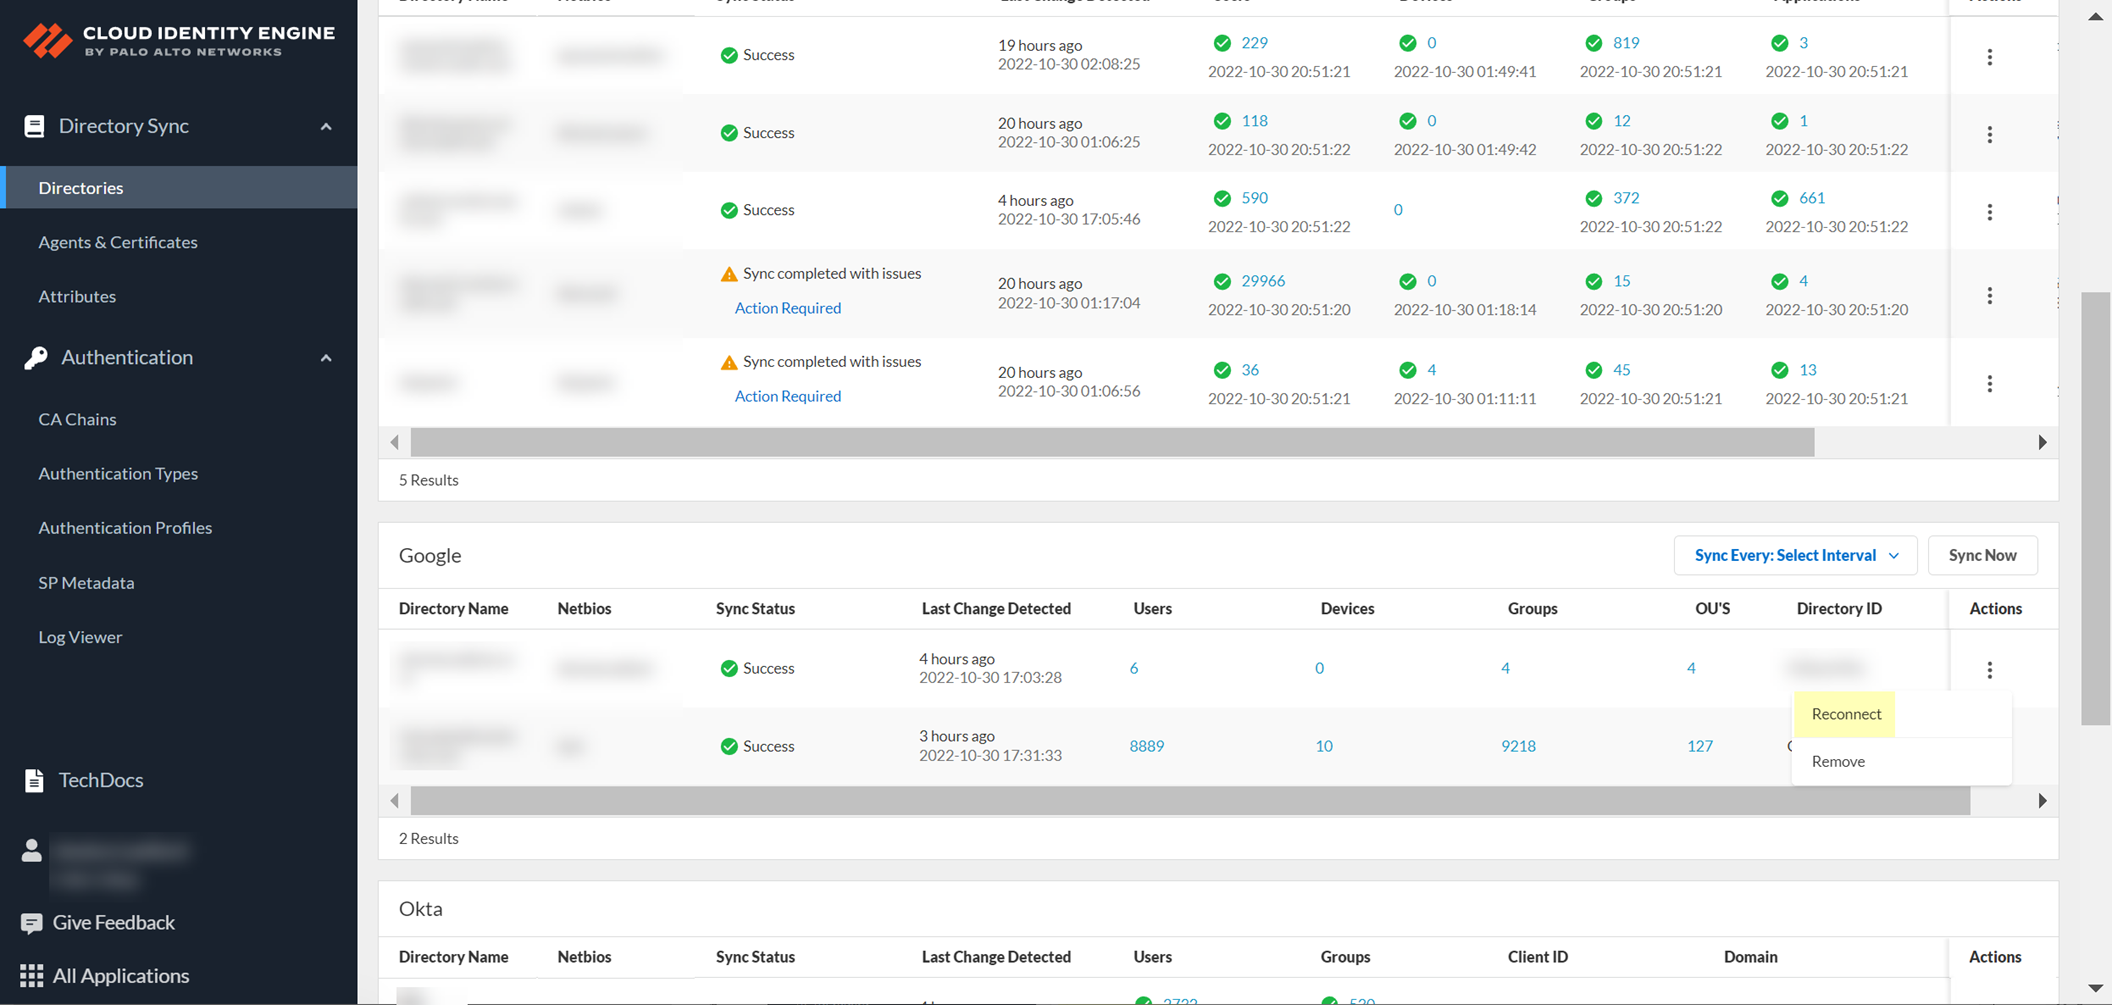
- Log in to Google and Test Connection to confirm the Cloud Identity Engine can access your Google Directory.
- ( Optional ) Customize Directory Name if you want to change the name that the Cloud Identity Engine displays for this directory in your tenant.
You can use up to 15 lowercase alphanumeric characters (including hyphens, periods, and underscores) for the directory name in the Cloud Identity Engine. You don't need to change the name of the directory itself, only the name of the directory in the Cloud Identity Engine app. If your directory name contains more than 15 characters, you must change the directory name to contain a maximum of 15 characters.
- Submit your configuration.
Remove Google Directory
If you no longer need to use Google Directory with the Cloud Identity Engine app, revoke permissions for the Cloud Identity Engine app and remove the Google Directory from the Cloud Identity Engine app.
- Revoke permissions for the Cloud Identity Engine app in the Google Admin Dashboard.
- Log in to the Google Admin Dashboard.
- Select SecurityAPI ControlsApp Access Control .
- Select the Cloud Identity Engine app and Change access to Blocked: Can’t access any Google service .
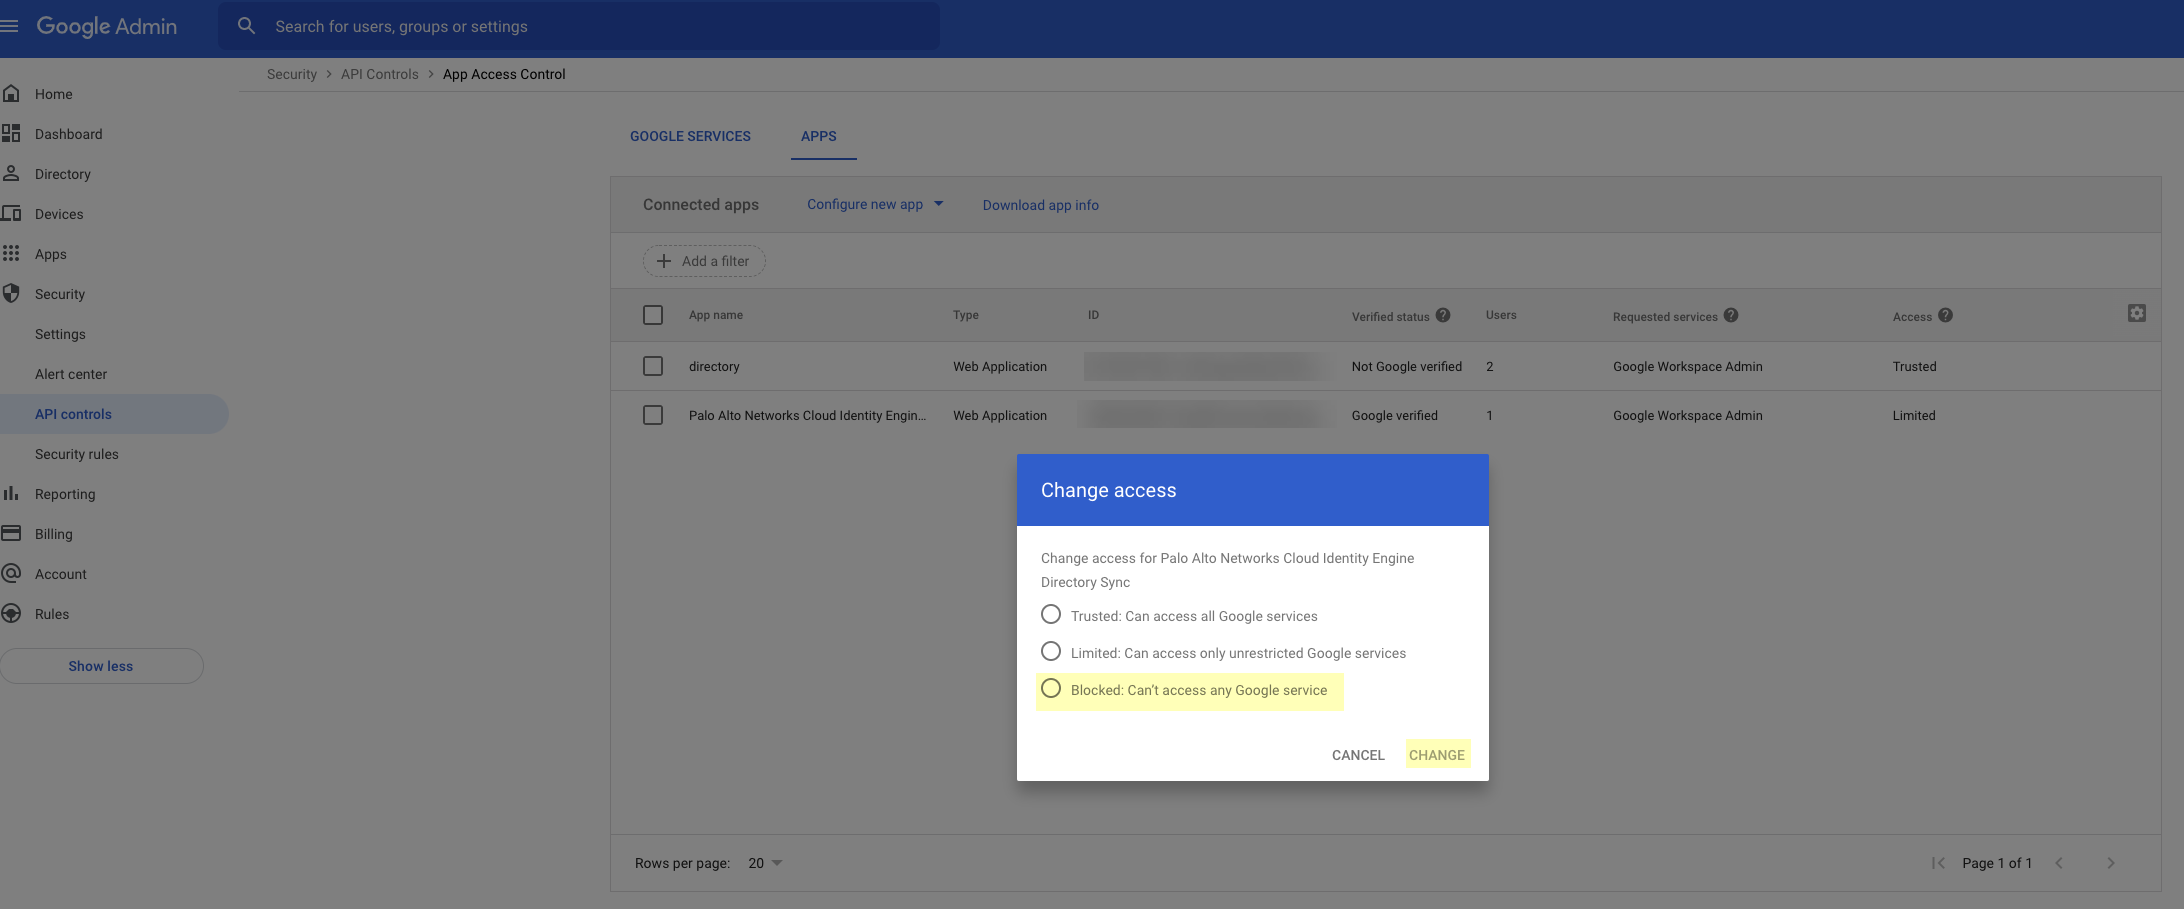
- Click Change to confirm your changes.
- Remove the Google Directory from the Cloud Identity Engine app.
- Log in to the hub and select the Cloud Identity Engine app.
- Select Directories then select ActionsRemove .
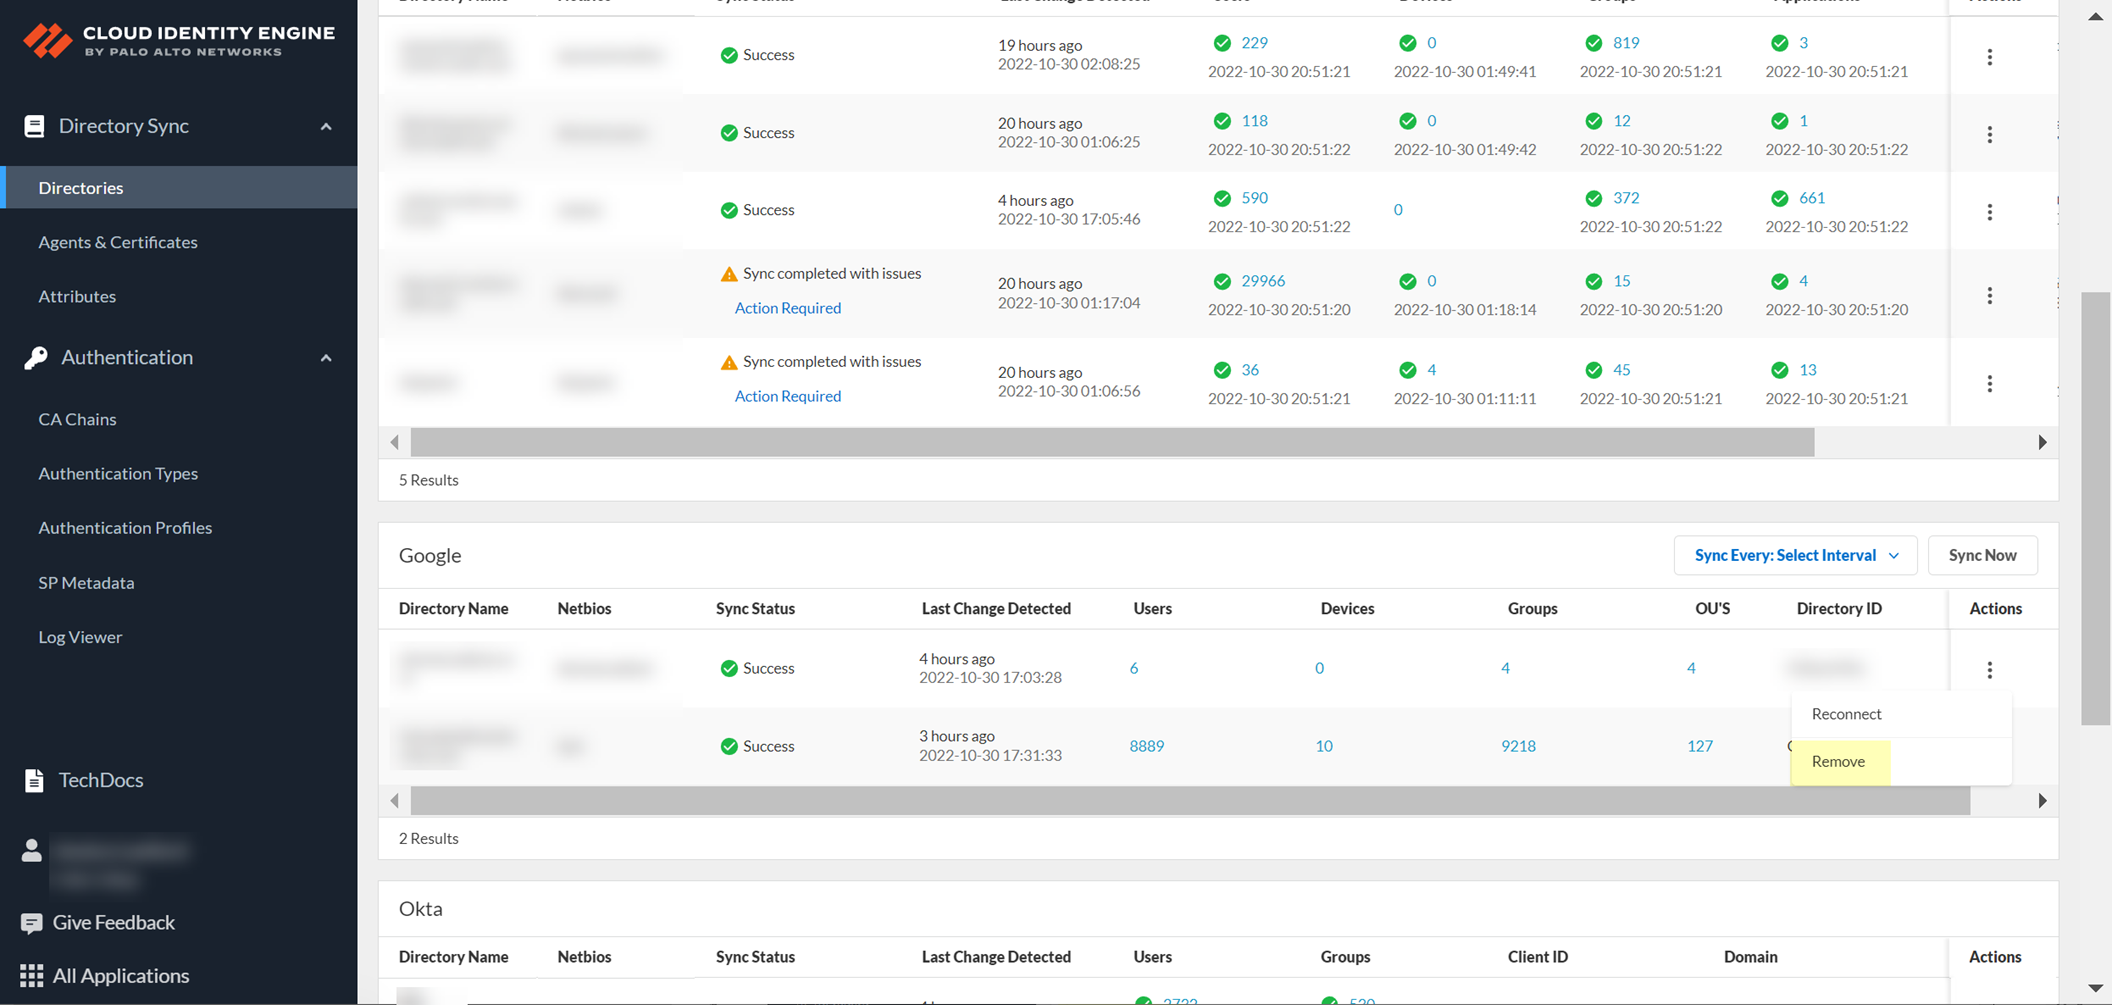
- Click Yes to confirm removal of the directory.
Configure SCIM Connector for the Cloud Identity Engine
As part of the Cloud Identity Engine, Directory Sync connects to your directory to obtain user and group information for user identification and enforcement for group-based and user-based Security policy.
Configuring the System for Cross-Domain Identity Management ( SCIM ) protocol for Directory Sync in the Cloud Identity Engine allows you to customize what attributes Directory Sync collects from your directory. You can add or remove attributes in your directory portal to customize which attributes you want to share with the Cloud Identity Engine for user and group identification.
The SCIM gallery app does not support the userType attribute.
Configuring your directory to use the SCIM Connector with the Cloud Identity Engine requires completing all necessary steps in both the Cloud Identity Engine and in the portal for your specific SCIM client. If you encounter any issues with the SCIM Connector setup, learn how to Troubleshoot Cloud Identity Engine Issues .
- Set up SCIM Connector in the Cloud Identity Engine app and complete the predeployment steps for your SCIM client.
- Complete the predeployment steps for your SCIM client.
- Configure Azure Active Directory for SCIM Connector
- Configure PingFederate for SCIM Connector
- Configure Okta Directory for SCIM Connector
- In the Cloud Identity Engine app, select Directory SyncDirectoriesCloud DirectorySet UpSCIM .
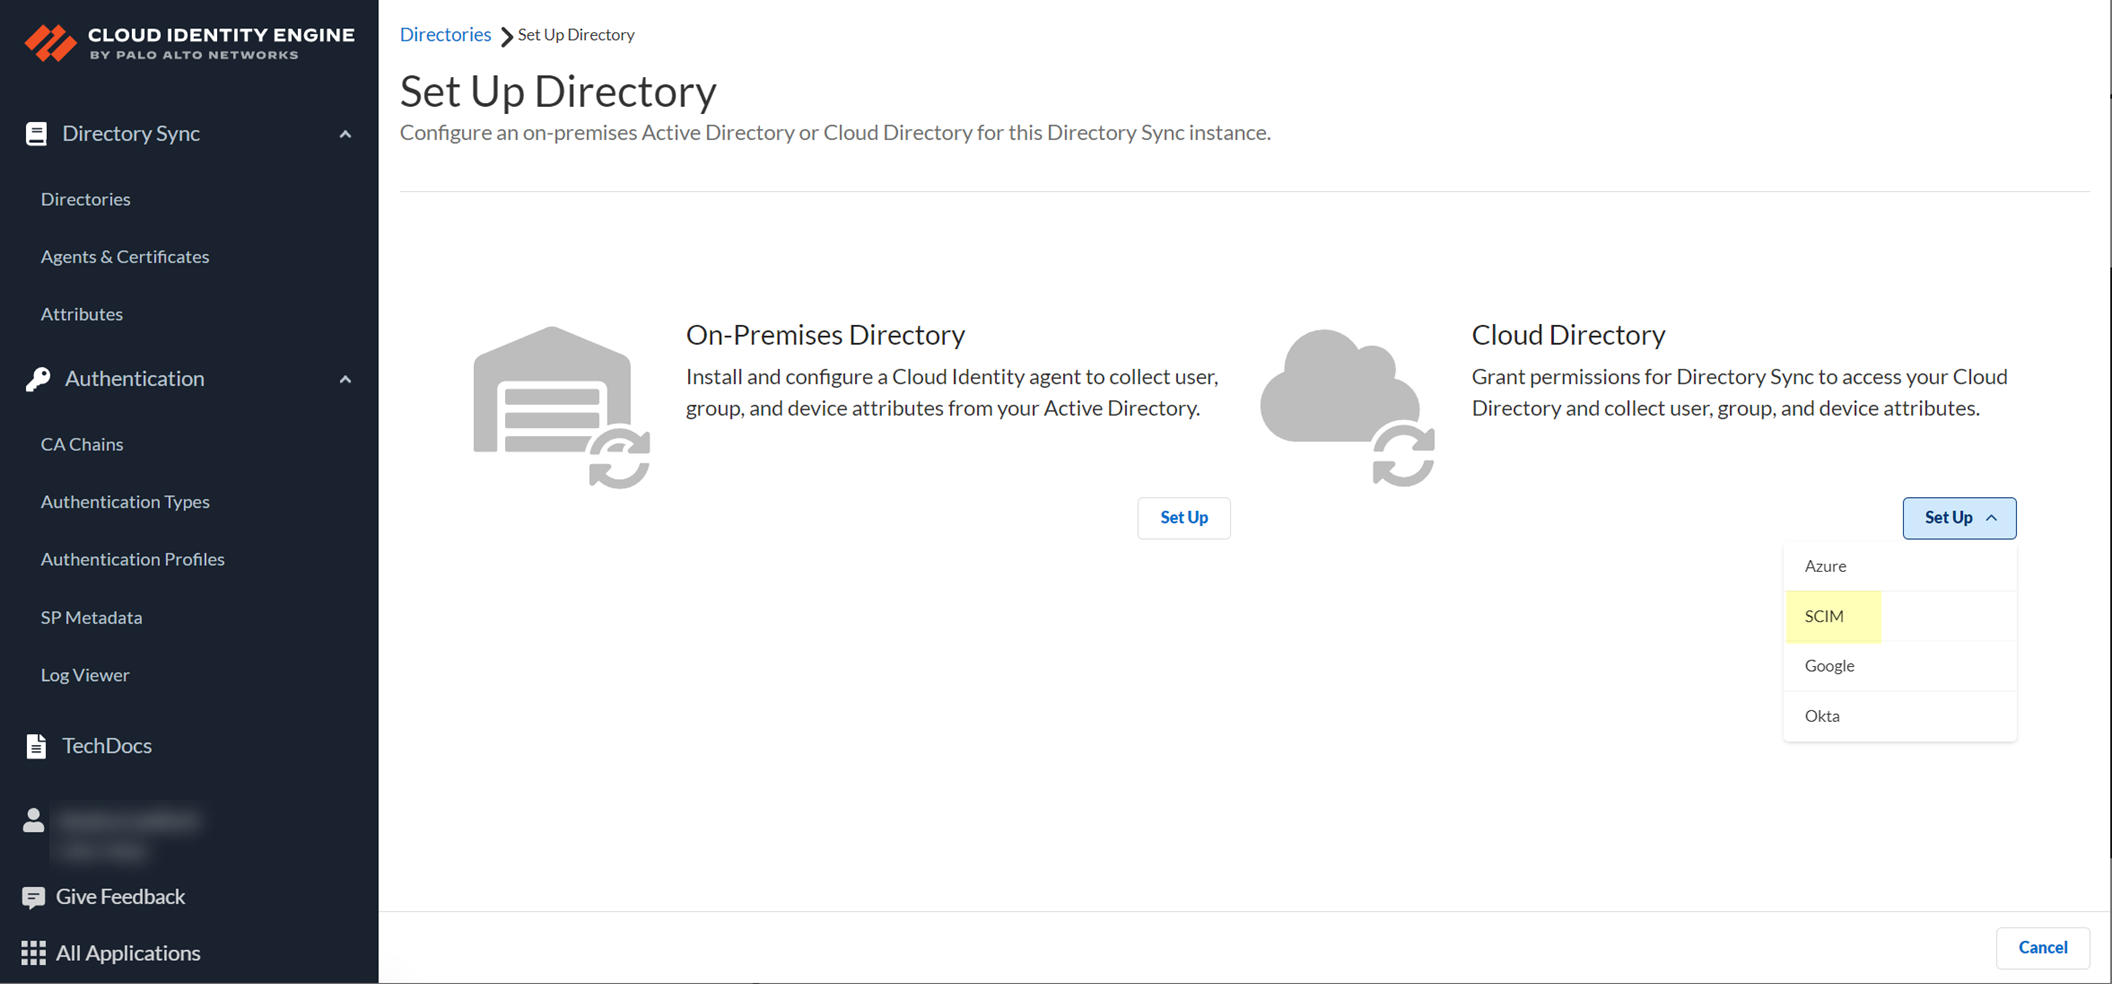
- Select the SCIM Client you want to use:
- Azure AD —Configure an Azure Active Directory to use the SCIM Connector. Be sure to complete the predeployment steps in the Azure Portal to
Configure Azure Active Directory for SCIM Connector
.
- PingFederate —Configure a PingFederate server to use the SCIM Connector. Be sure to complete the predeployment steps in the PingFederate portal to
Configure PingFederate for SCIM Connector
.
- Okta —Configure an Okta Directory to use the SCIM Connector. Be sure to complete the predeployment steps in the Okta Administrator Dashboard to
Configure Okta Directory for SCIM Connector
.
-
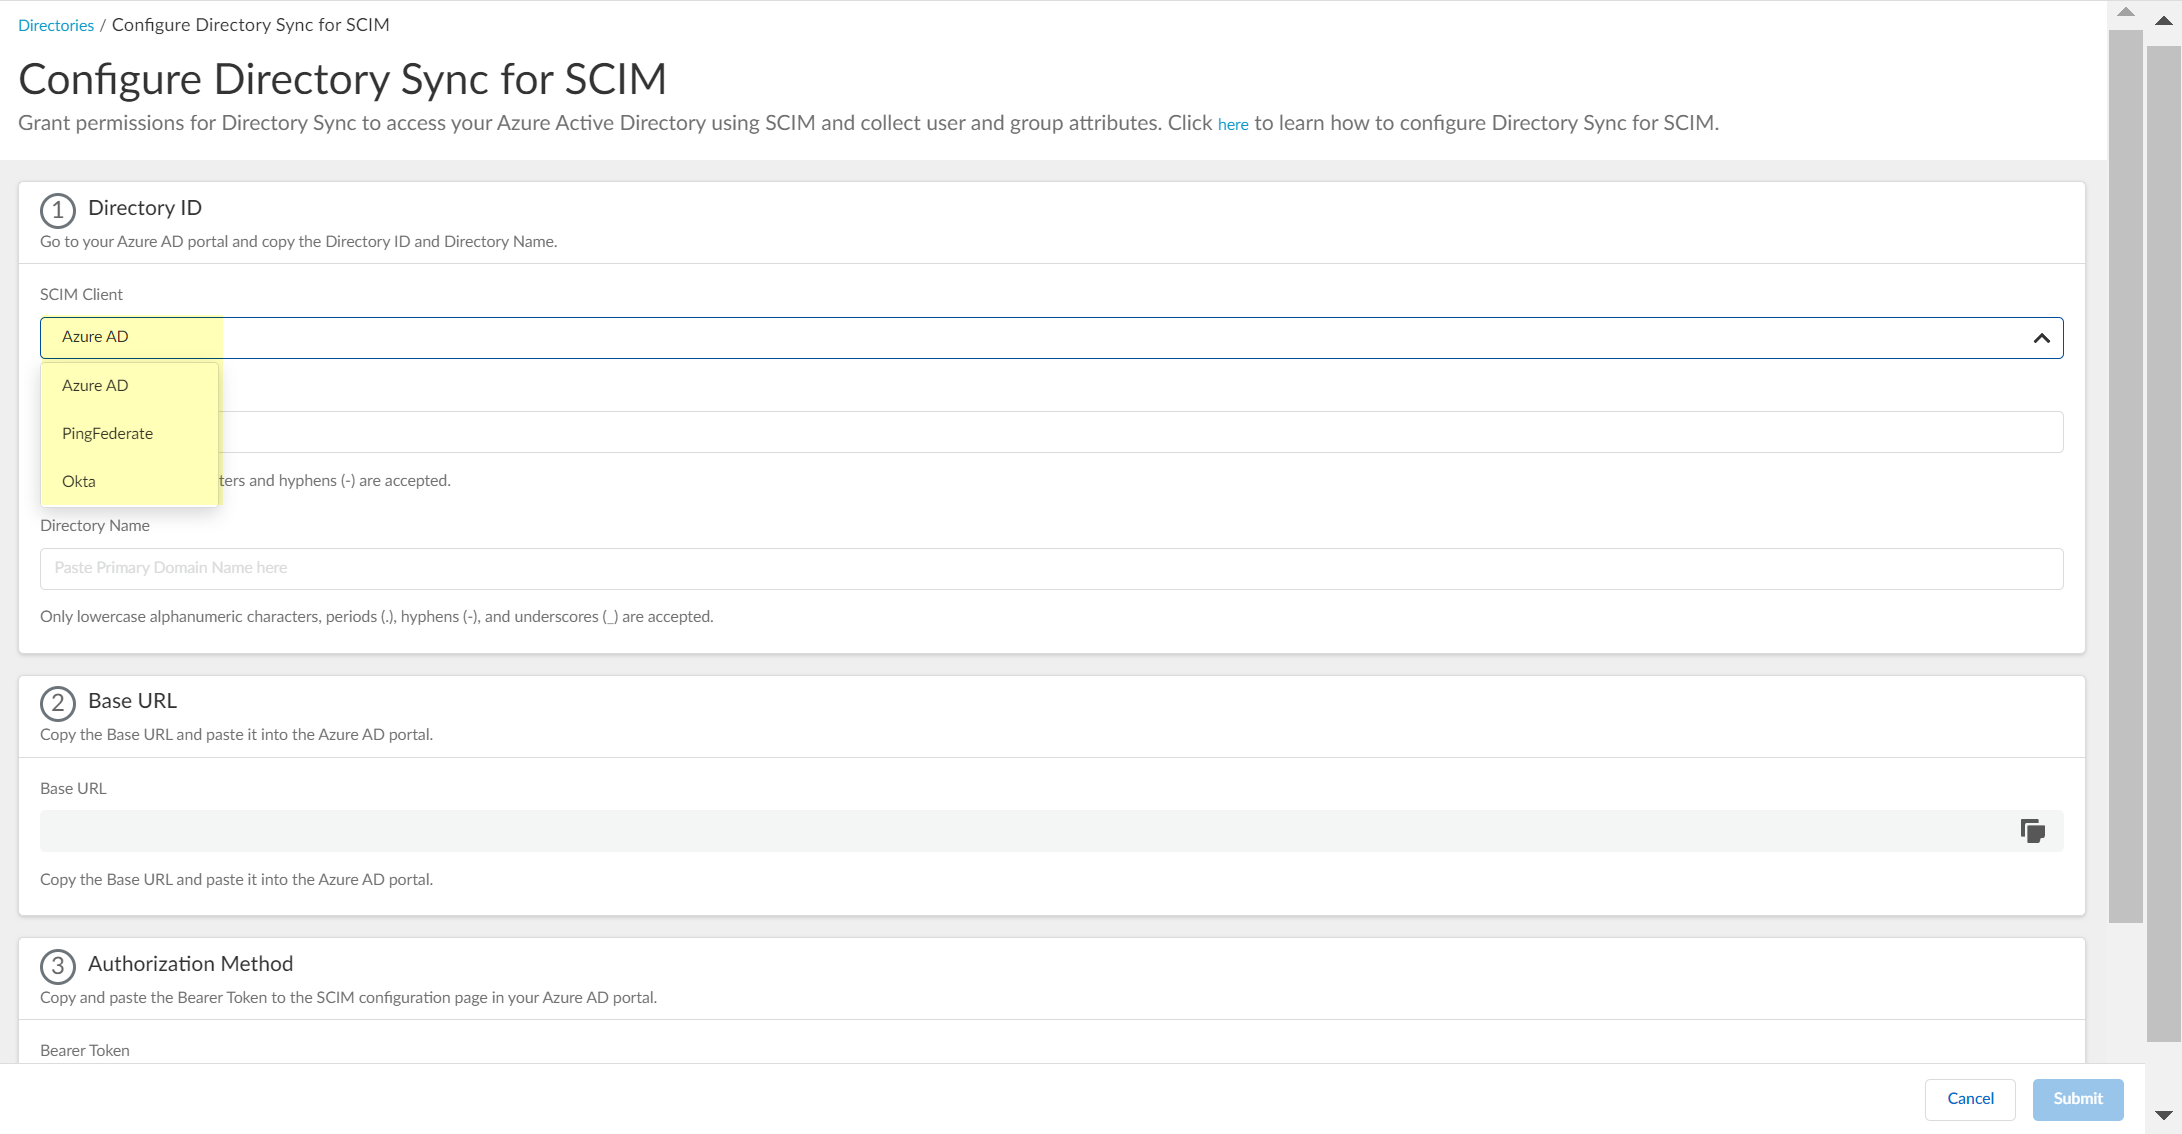
- In the portal for your SCIM client, obtain the necessary information you must enter to configure the SCIM Connector in the Cloud Identity Engine.
- Configure Azure Active Directory for SCIM Connector
- Configure PingFederate for SCIM Connector
- Configure Okta Directory for SCIM Connector
- Enter the necessary information in the Cloud Identity Engine to configure your directory to use SCIM with Directory Sync.
- Enter the Directory ID (up to 40 alphanumeric characters, including hyphens) and Directory Name (up to 50 lowercase alphanumeric characters including periods, hyphens, and underscores) that you copied from your directory portal.
- For the Directory ID in the Cloud Identity Engine:
- For Azure, use the Tenant ID .
- For Ping, use the System ID .
- For Okta, use the Directory Name .
For Okta, Palo Alto Networks recommends using the Directory Name, but you can enter any name (up to 40 alphanumeric characters, including hyphens).
- For the Directory Name in the Cloud Identity Engine:
- For Azure, use the Primary Domain .
- For Ping, use the User .
- For Okta, use the Okta Domain .
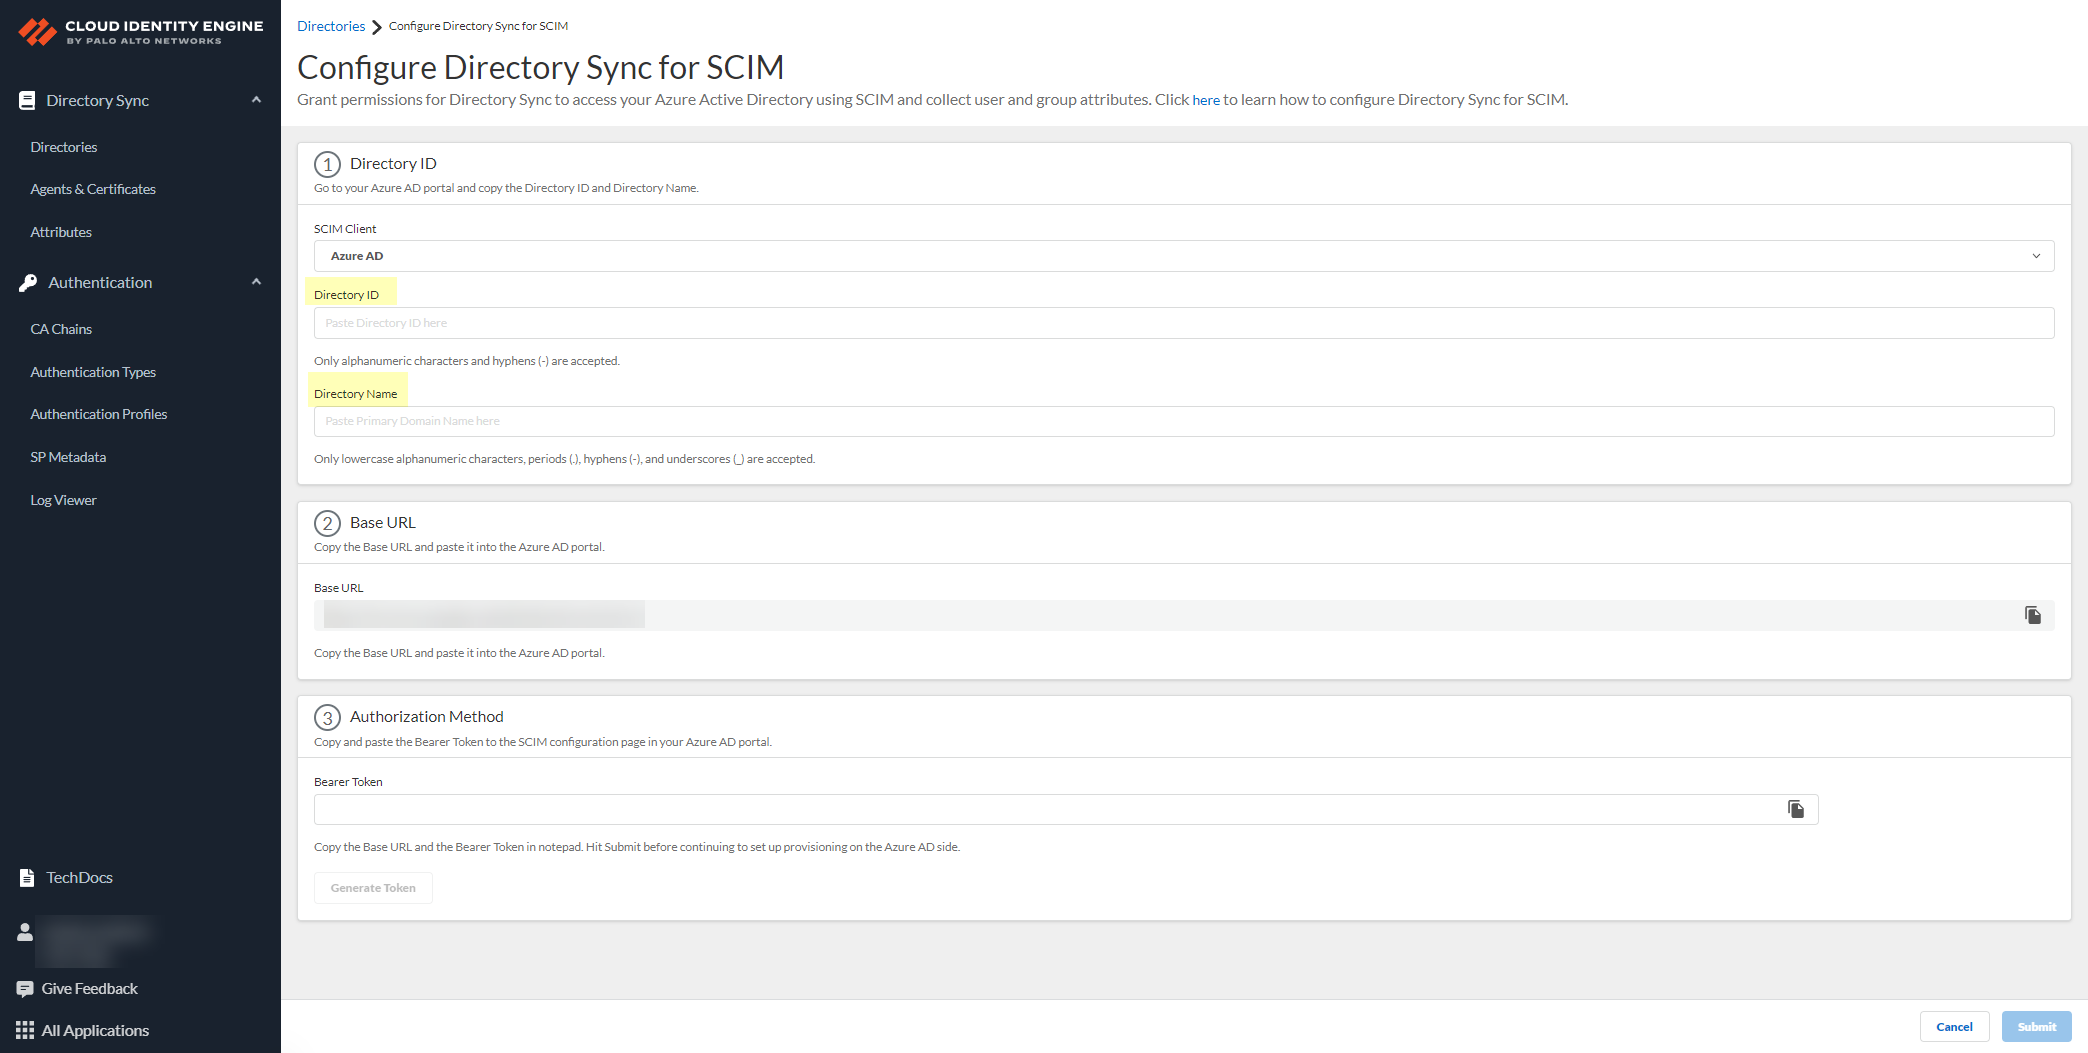
- Copy the Base URL and save it in a secure location.
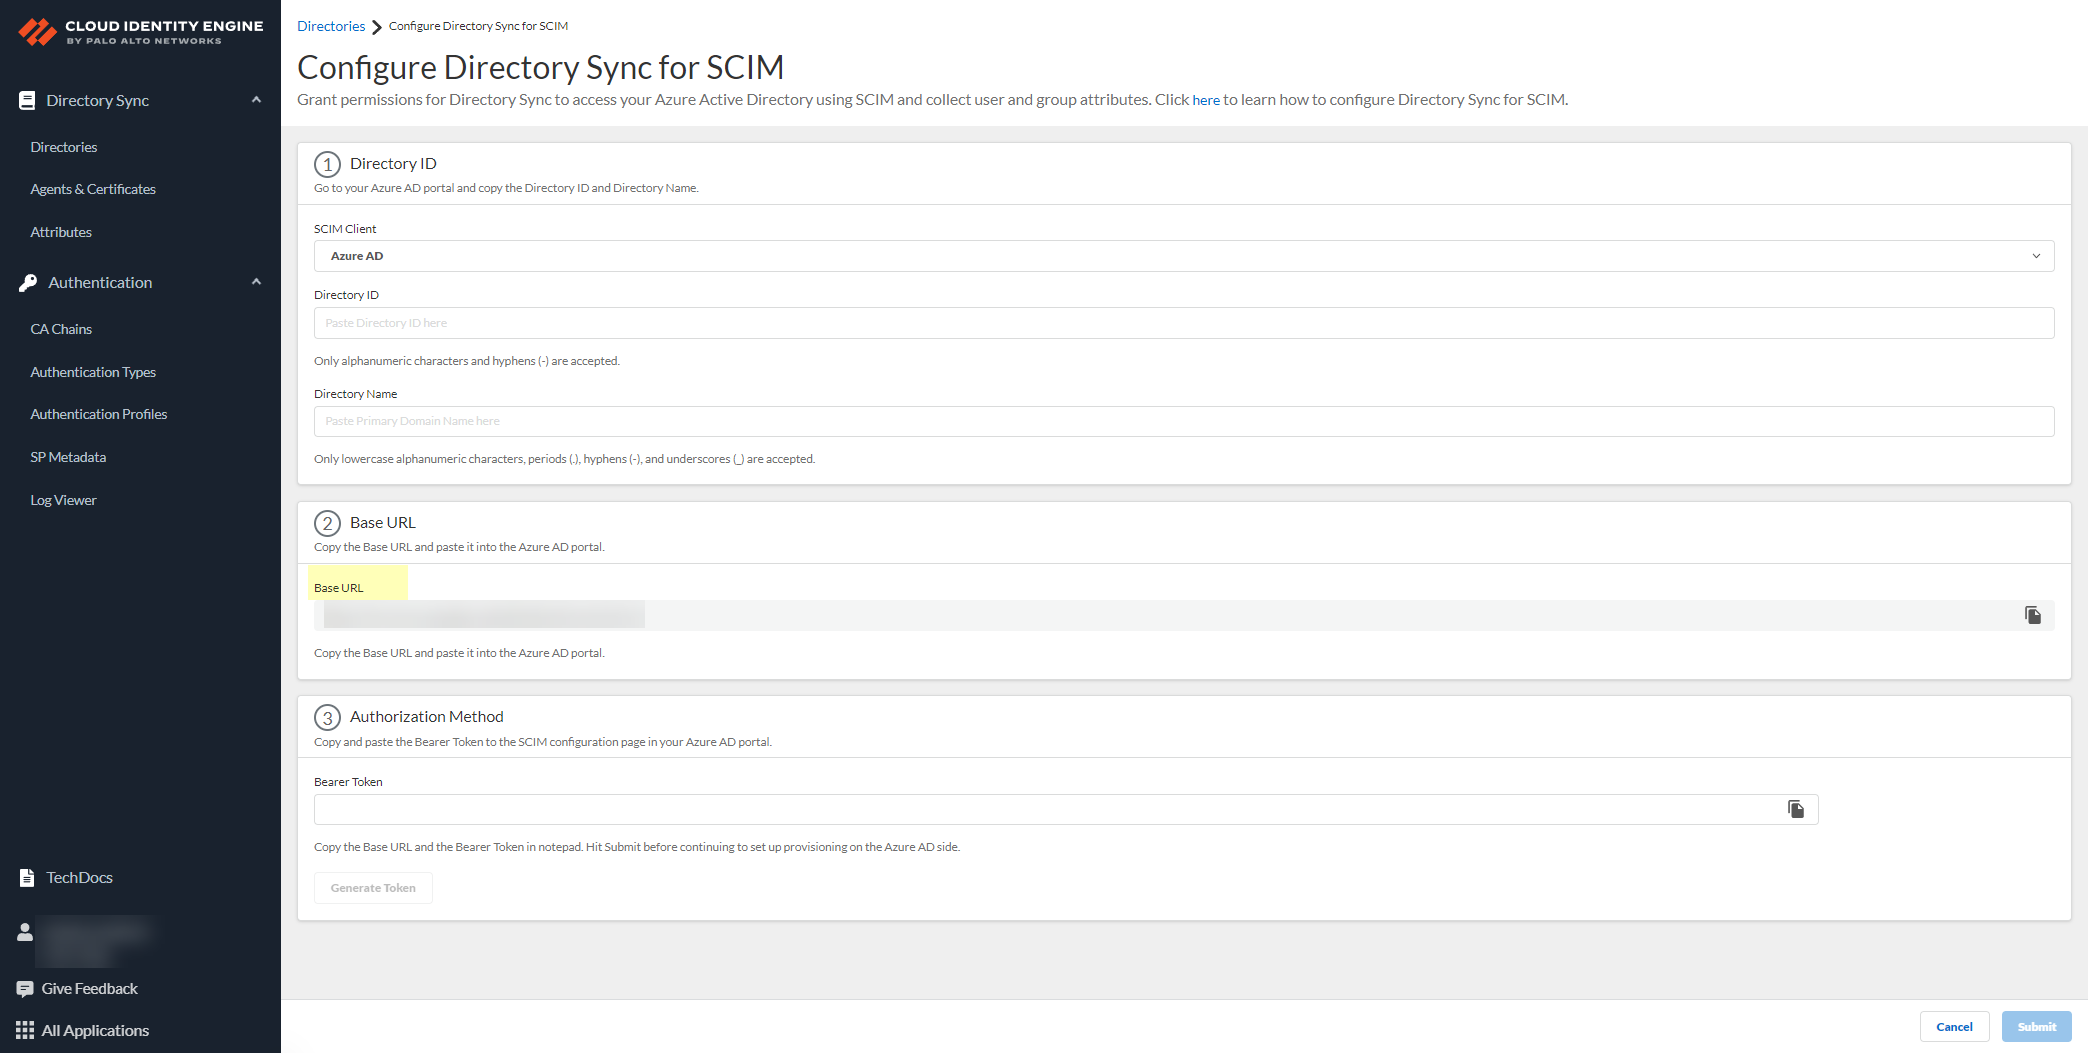
- Click Generate Bearer Token then copy the token that the Cloud Identity Engine generates for your Authorization Method and save it in a secure location.
Before continuing to the next step and submitting the changes, make sure to save the token in a location where you can easily retrieve it to enter it in your SCIM client directory portal. If you submit the changes in the Cloud Identity Engine app before you generate and save the token, you must generate a new token in the Cloud Identity Engine app and enter the new token in the directory portal.
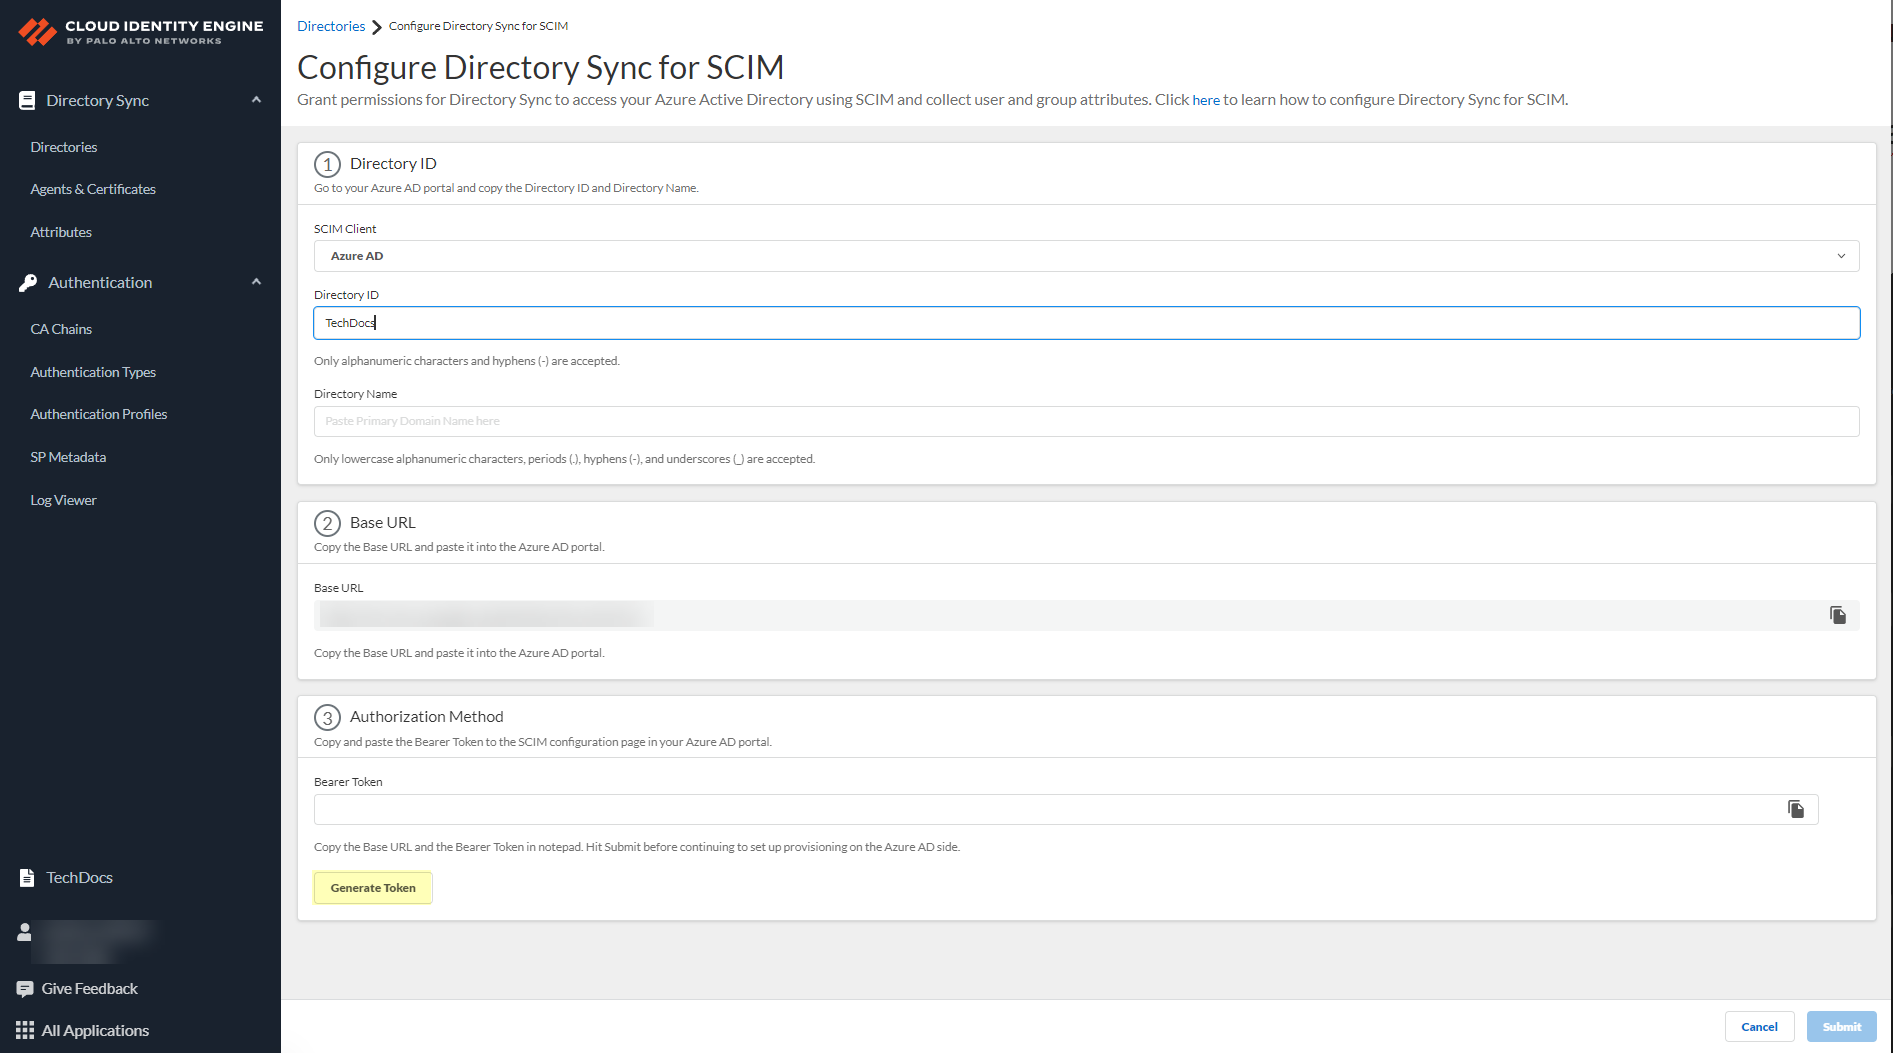
- Click Submit to commit your changes.
You must click Submit to create the configuration in the Cloud Identity Engine app before continuing the configuration in the IdP, then return to the Cloud Identity Engine app and complete a full sync of the entire directory before the configuration is complete.
- Select the check box and click OK to confirm your acknowledgment of the postconfiguration requirements then return to the portal for your SCIM client to complete the postconfiguration steps.
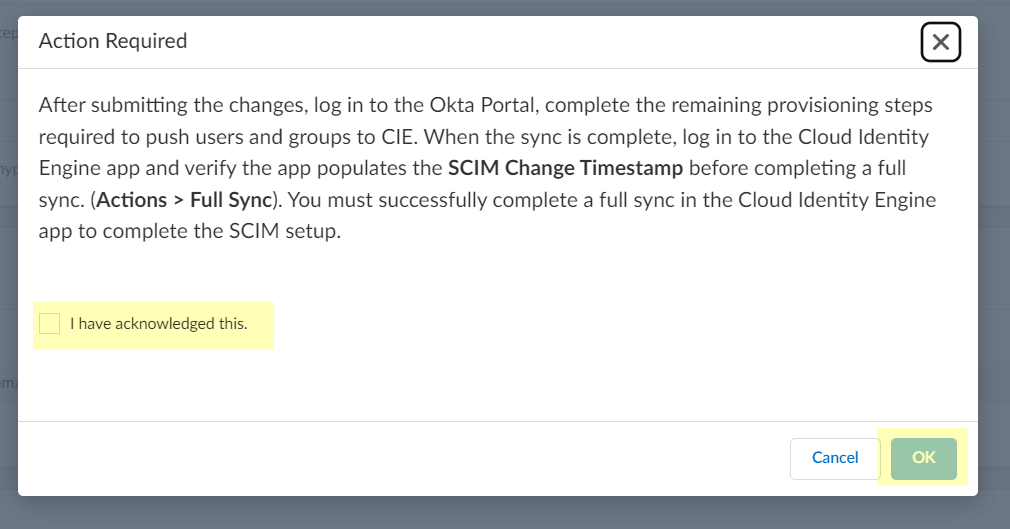
- Configure Azure Active Directory for SCIM Connector
- Configure PingFederate for SCIM Connector
- Configure Okta Directory for SCIM Connector
After completing the steps in both the Cloud Identity Engine app and your directory portal, you can now use the SCIM Connector to collect attributes from your directory. To learn which attributes the SCIM Collector collects, see the Cloud Identity Engine Attributes .
Configure Azure Active Directory for SCIM Connector
You must also complete the required steps in the Azure Active Directory (AD) Portal to complete the SCIM Connector configuration. For more information, refer to the documentation for the Azure AD SCIM Connector .
- Complete the predeployment steps to add a new application in the Azure Portal then obtain the necessary information to configure SCIM for Directory Sync.
Azure Active Directory (AD) SCIM provisioning requires that the group attribute displayName is unique. If more than one group uses the displayName attribute, the initial sync isn't successful and the data for the duplicate group names might only be partially retrievable. If you don't use the duplicate groups in Security policy, then you can proceed. If you use the duplicate group names in Security policy, you must resolve the issue by modifying the displayName attribute in your Azure Active Directory (AD) to ensure that it’s unique.
- Log in to the Azure Portal.
- Select Overview (if it'sn’t already selected), copy the Tenant ID , and save it in a secure location.

- Copy the Primary domain and save it in a secure location.
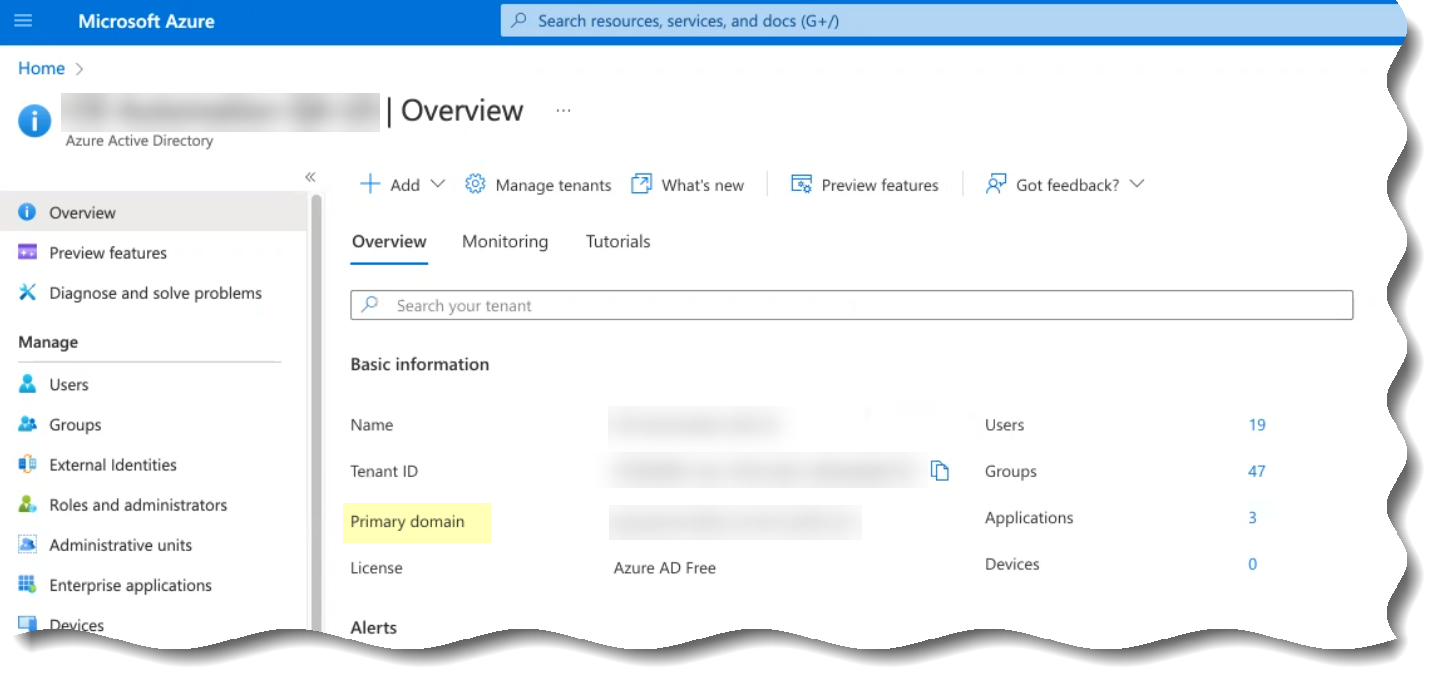
- Select Enterprise applicationsAll applicationsNew application .
- To Search application (s), enter Palo Alto Networks SCIM Connector .
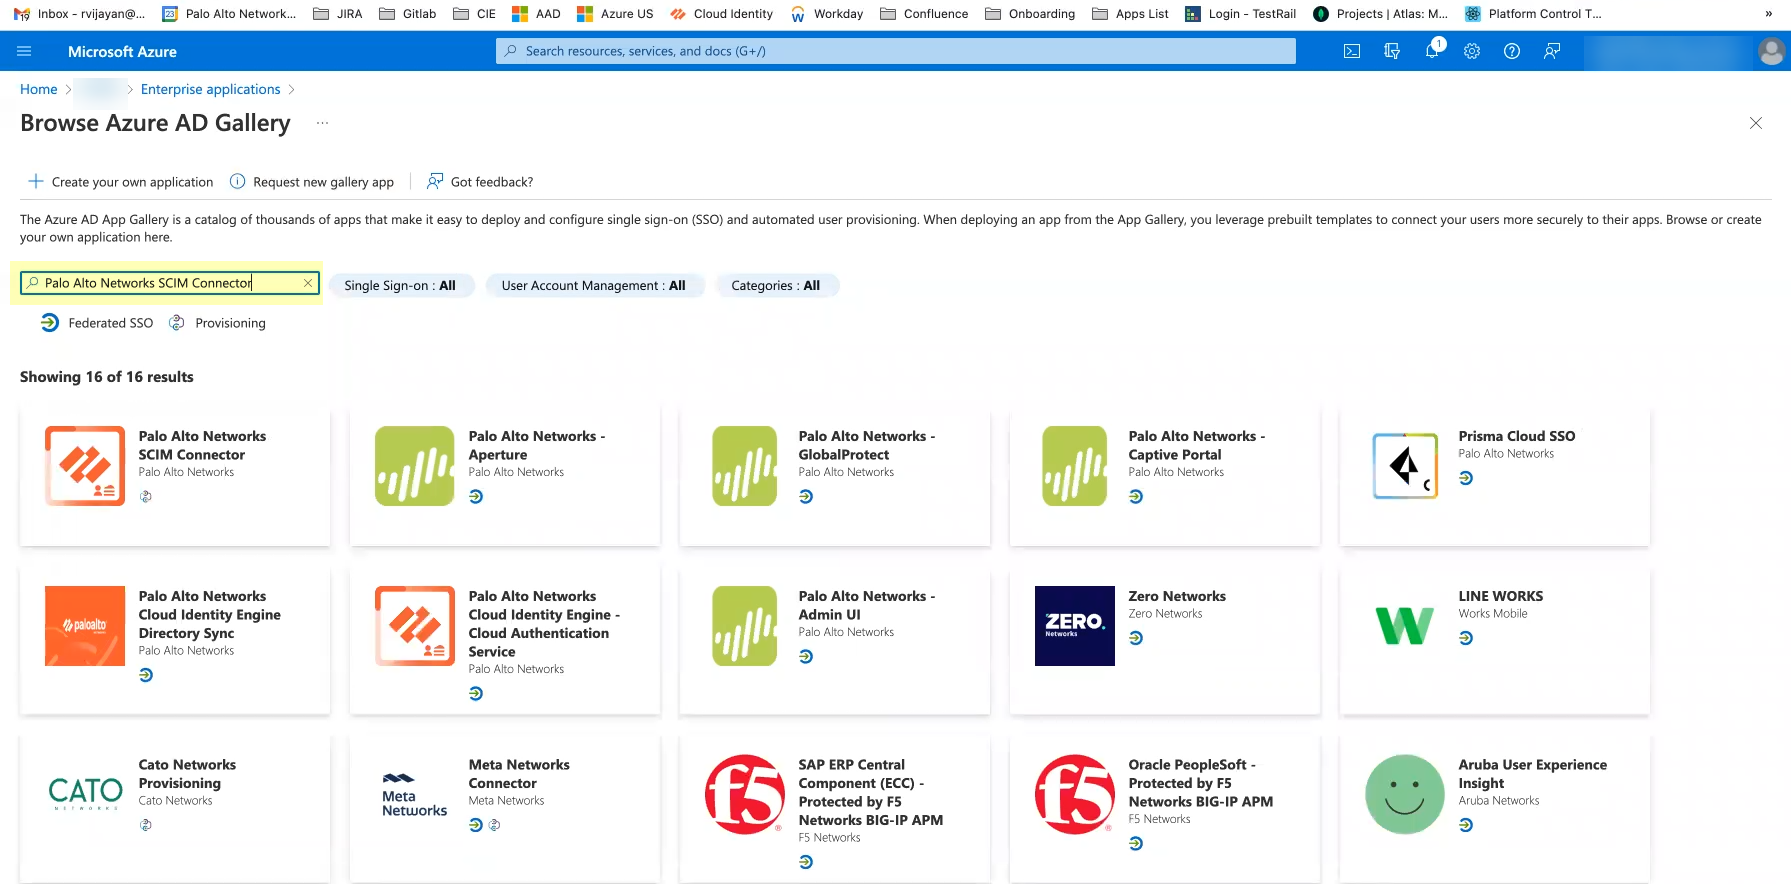
- Select Palo Alto Networks SCIM Connector and Create the application.
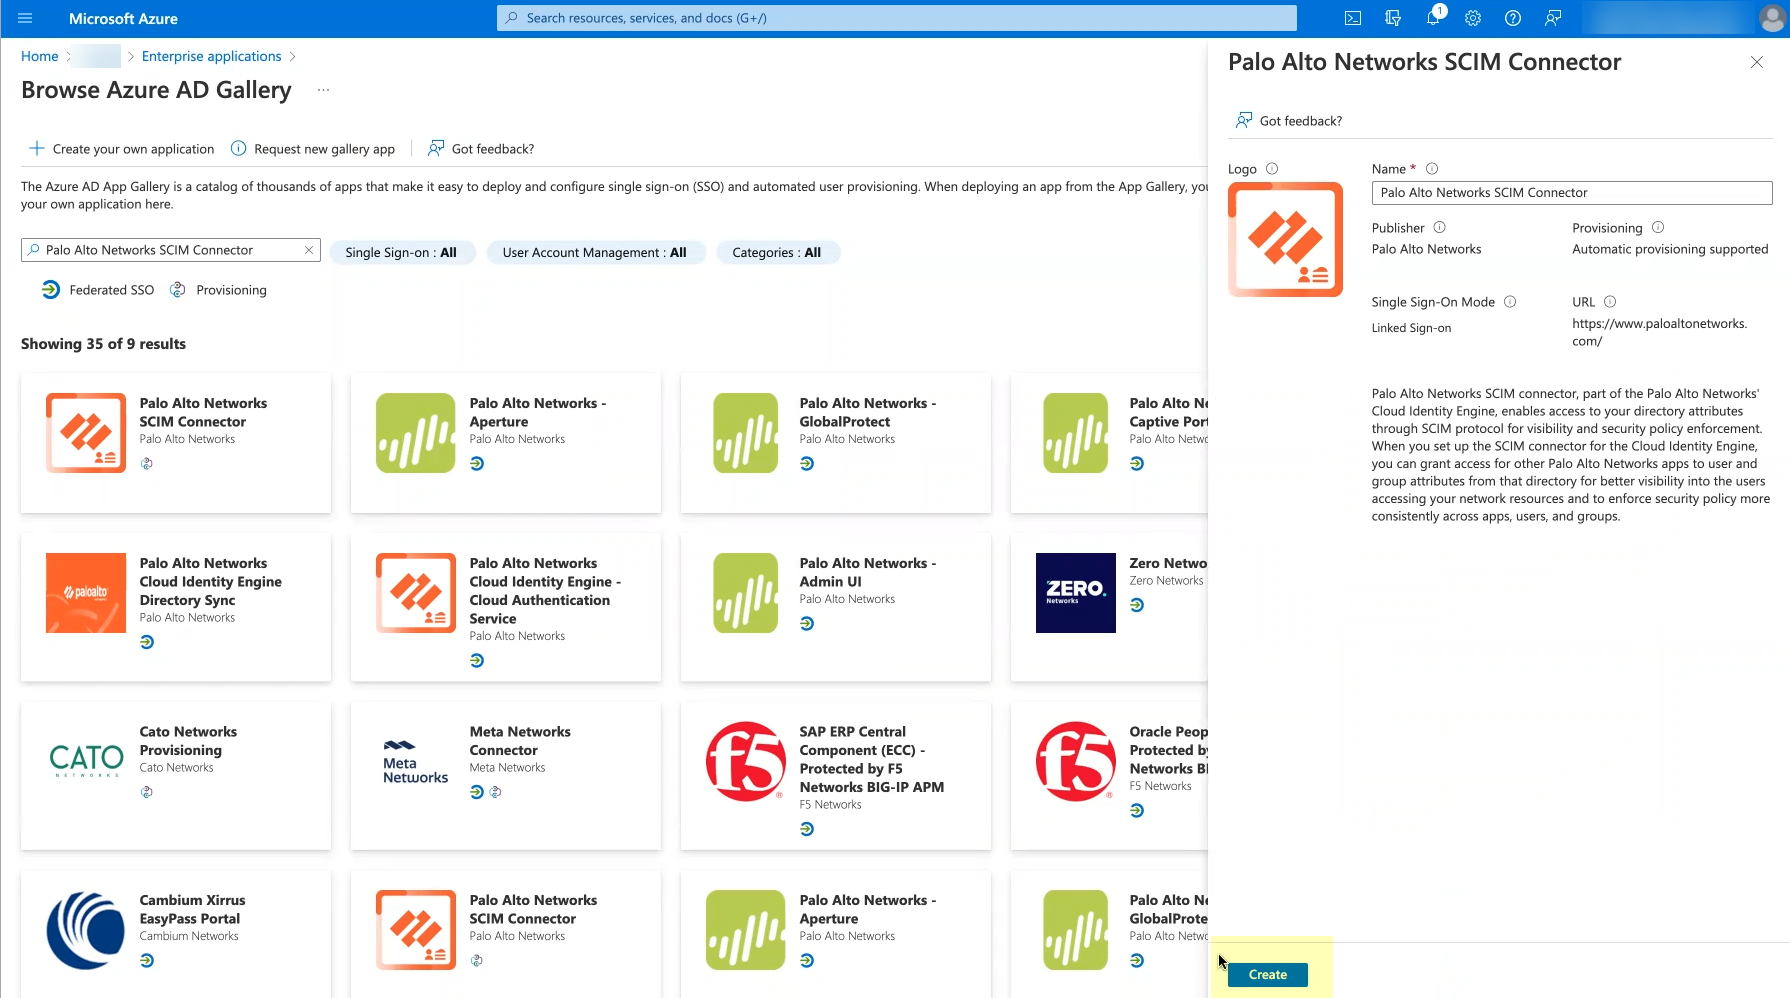
If you encounter an error when creating the application, refer to Troubleshoot Cloud Identity Engine Issues .
- Return to the Cloud Identity Engine app to continue the SCIM Connector setup.
You must complete the setup in the Cloud Identity Engine before you can successfully Test Connection in the Azure Portal.
- After you submit the SCIM Connector configuration in the Cloud Identity Engine app, continue to the next step.
- Configure your Azure Active Directory (AD) to use SCIM Connector to connect to the Cloud Identity Engine.
- Log in to the Azure Active Directory (AD) Portal.
- Select Enterprise Applications then select the Palo Alto Networks SCIM Connector application.
- Select Provisioning and click Get Started .

- Select Automatic as the Provisioning Mode .
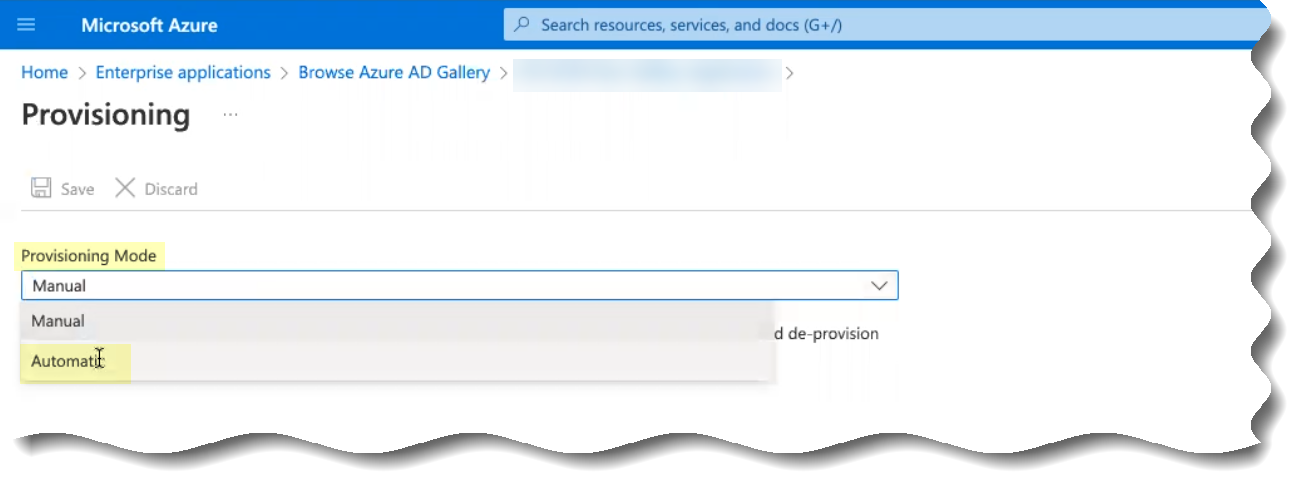
- Enter the following information from steps
3.b
and
3.c
in the fields as indicated in the following table:
|
Copy from Cloud Identity Engine |
Enter in Azure Portal |
|
Base URL |
Tenant URL |
|
Authorization Method Bearer token |
Secret Token |
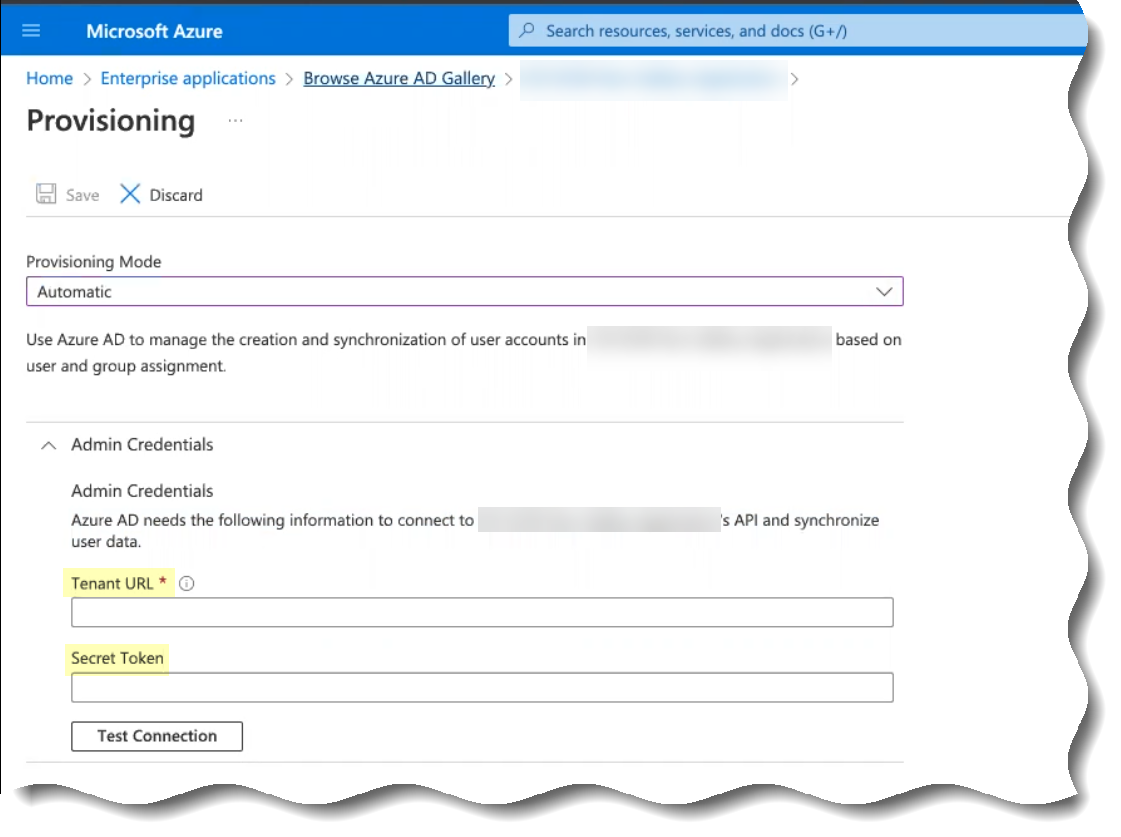
- Save your changes.

- (Optional but recommended) Click Test Connection to confirm that the Azure Active Directory (AD) can successfully communicate with the Cloud Identity Engine app.
You must complete the setup in the Cloud Identity Engine before you can successfully Test Connection in the Azure Portal.
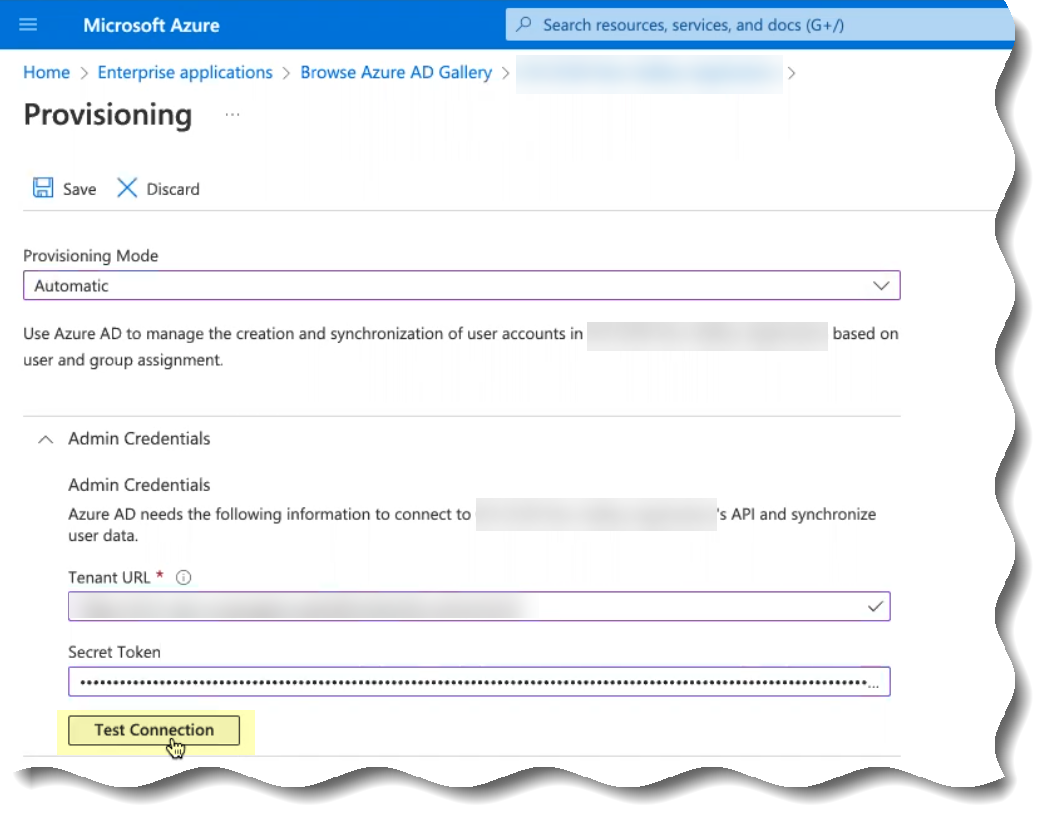
- Manage the users, groups, and attributes that the Azure Active Directory (AD) provisions to the Cloud Identity Engine app.
If you choose to
sync only specific groups
and those groups contain subgroups, add the parent group first, then add any child groups. If you do not manually add the child groups of any parent groups, the Cloud Identity Engine syncs only the parent group. You do not need to manually add users as the Cloud Identity Engine sync users in groups, just any child groups of parent groups where you want to sync both groups.
- In the Azure Portal, select ProvisioningEdit Provisioning .
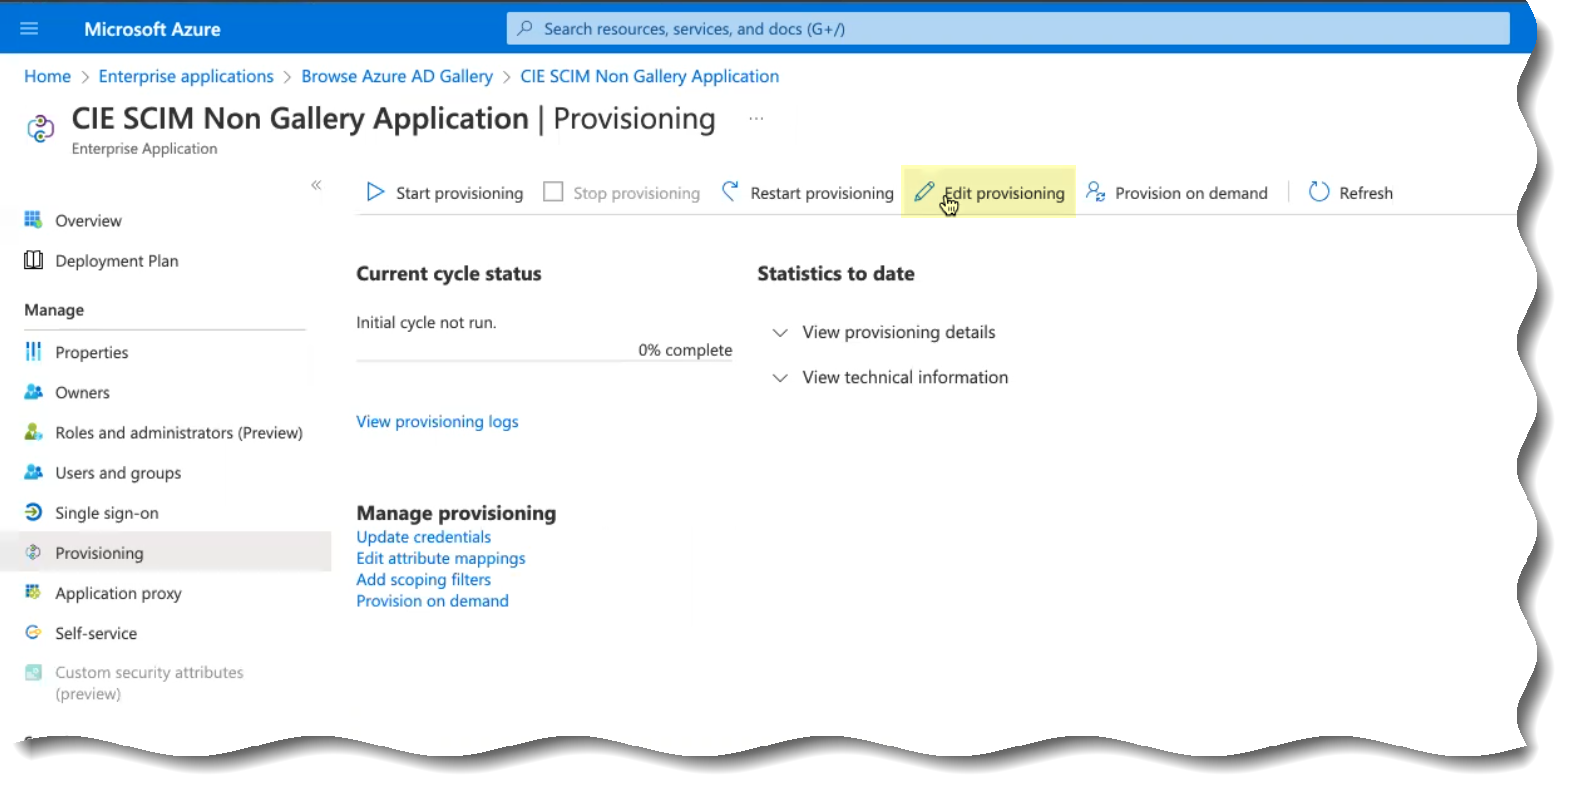
- Select Mappings then select whether you want to edit the attributes when you Provision Active Directory Groups or Provision Active Directory Users .
For optimal performance, Palo Alto Networks strongly recommends provisioning only the groups that you want to use the SCIM Connector. If you're using Prisma® Access with the Cloud Identity Engine, make sure that you provision any groups that you use in your Security policy to ensure it applies your Security policy correctly.
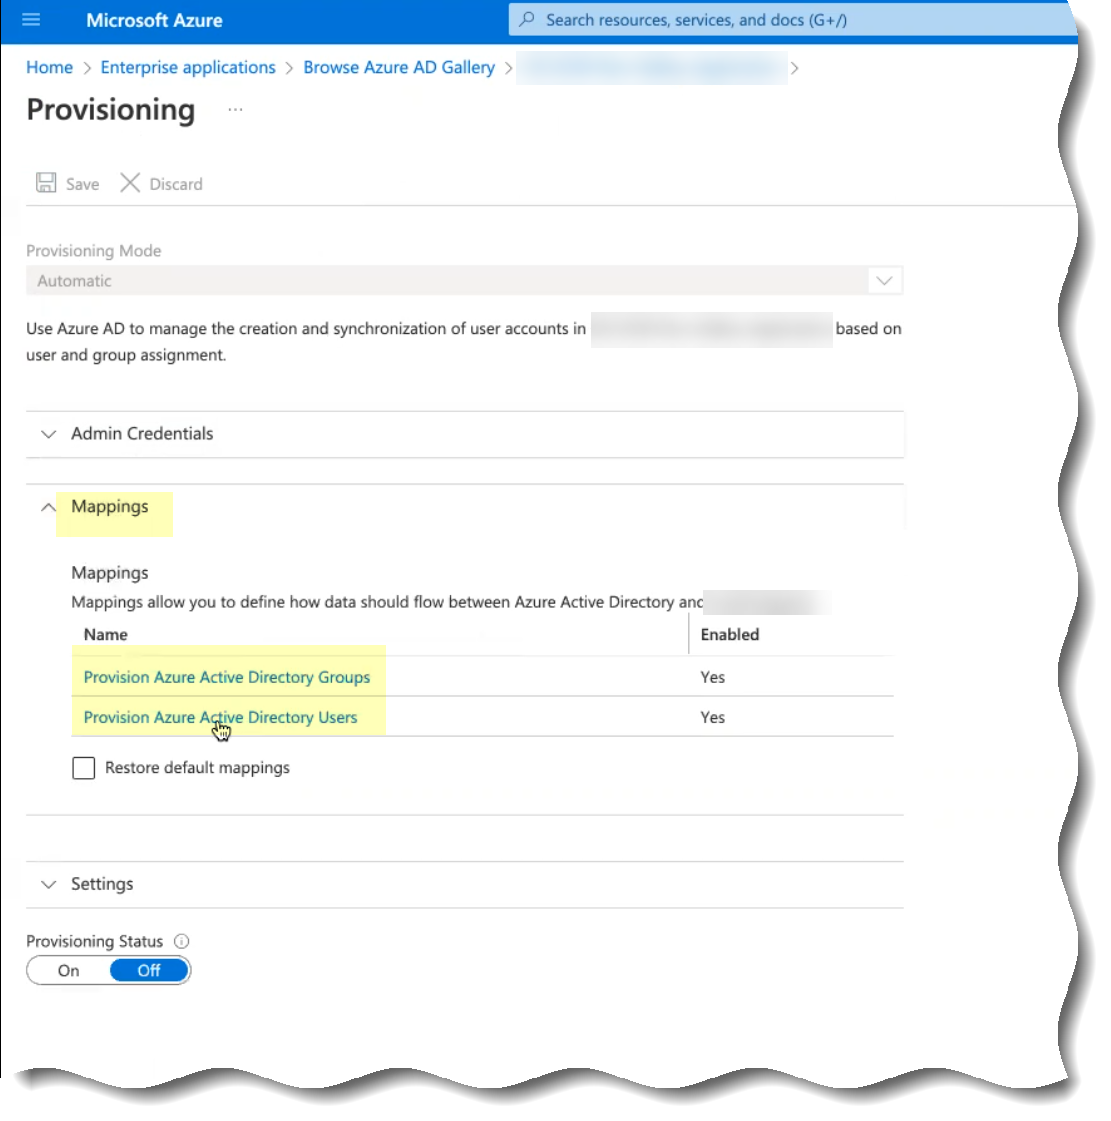
- Delete any attributes that you don’t want to provide to the Cloud Identity Engine app.
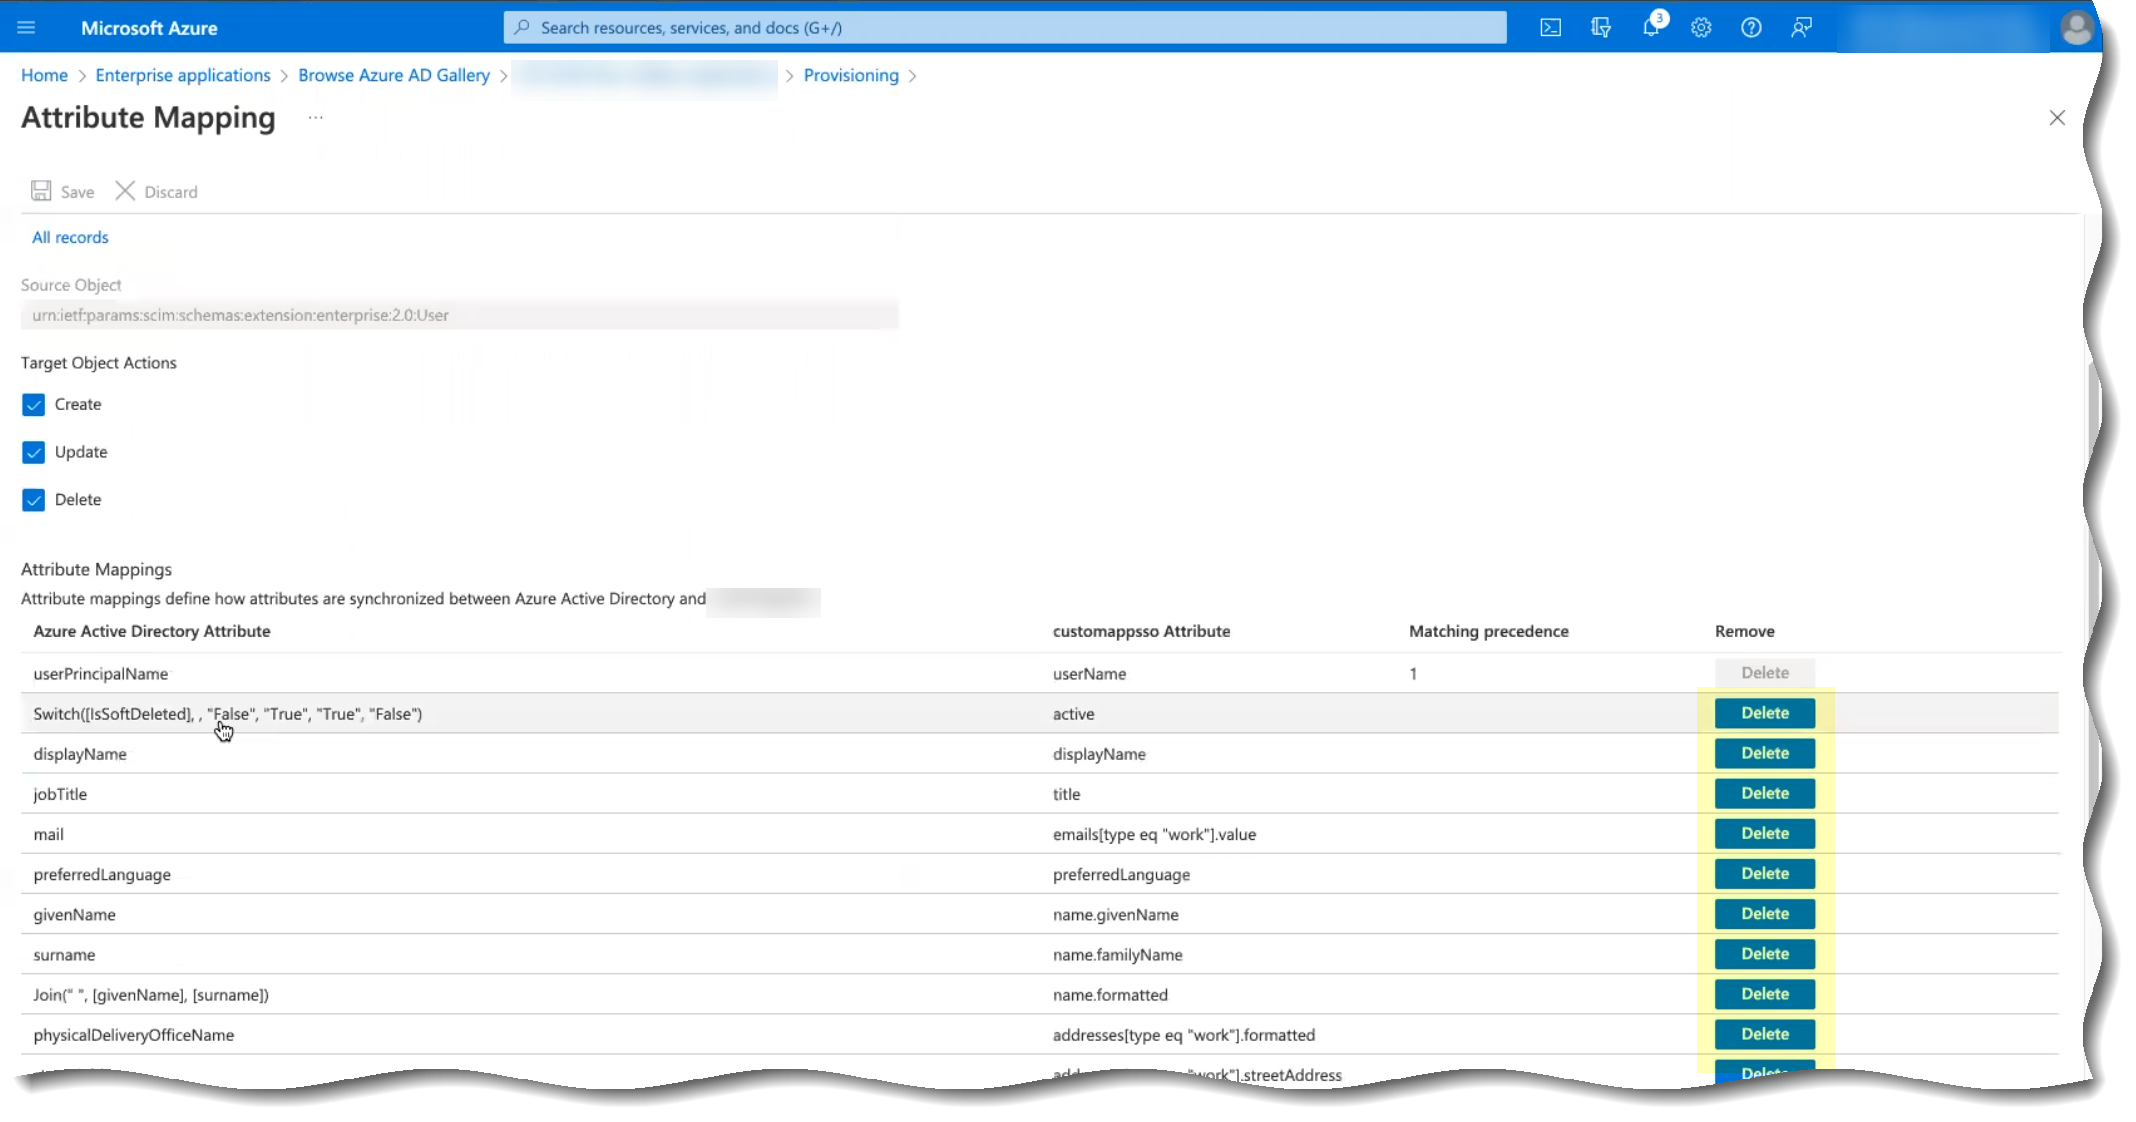
- (Optional) Click Add new mapping to add a new mapping that you want Azure Active Directory (AD) to use to identify users for the Cloud Identity Engine.
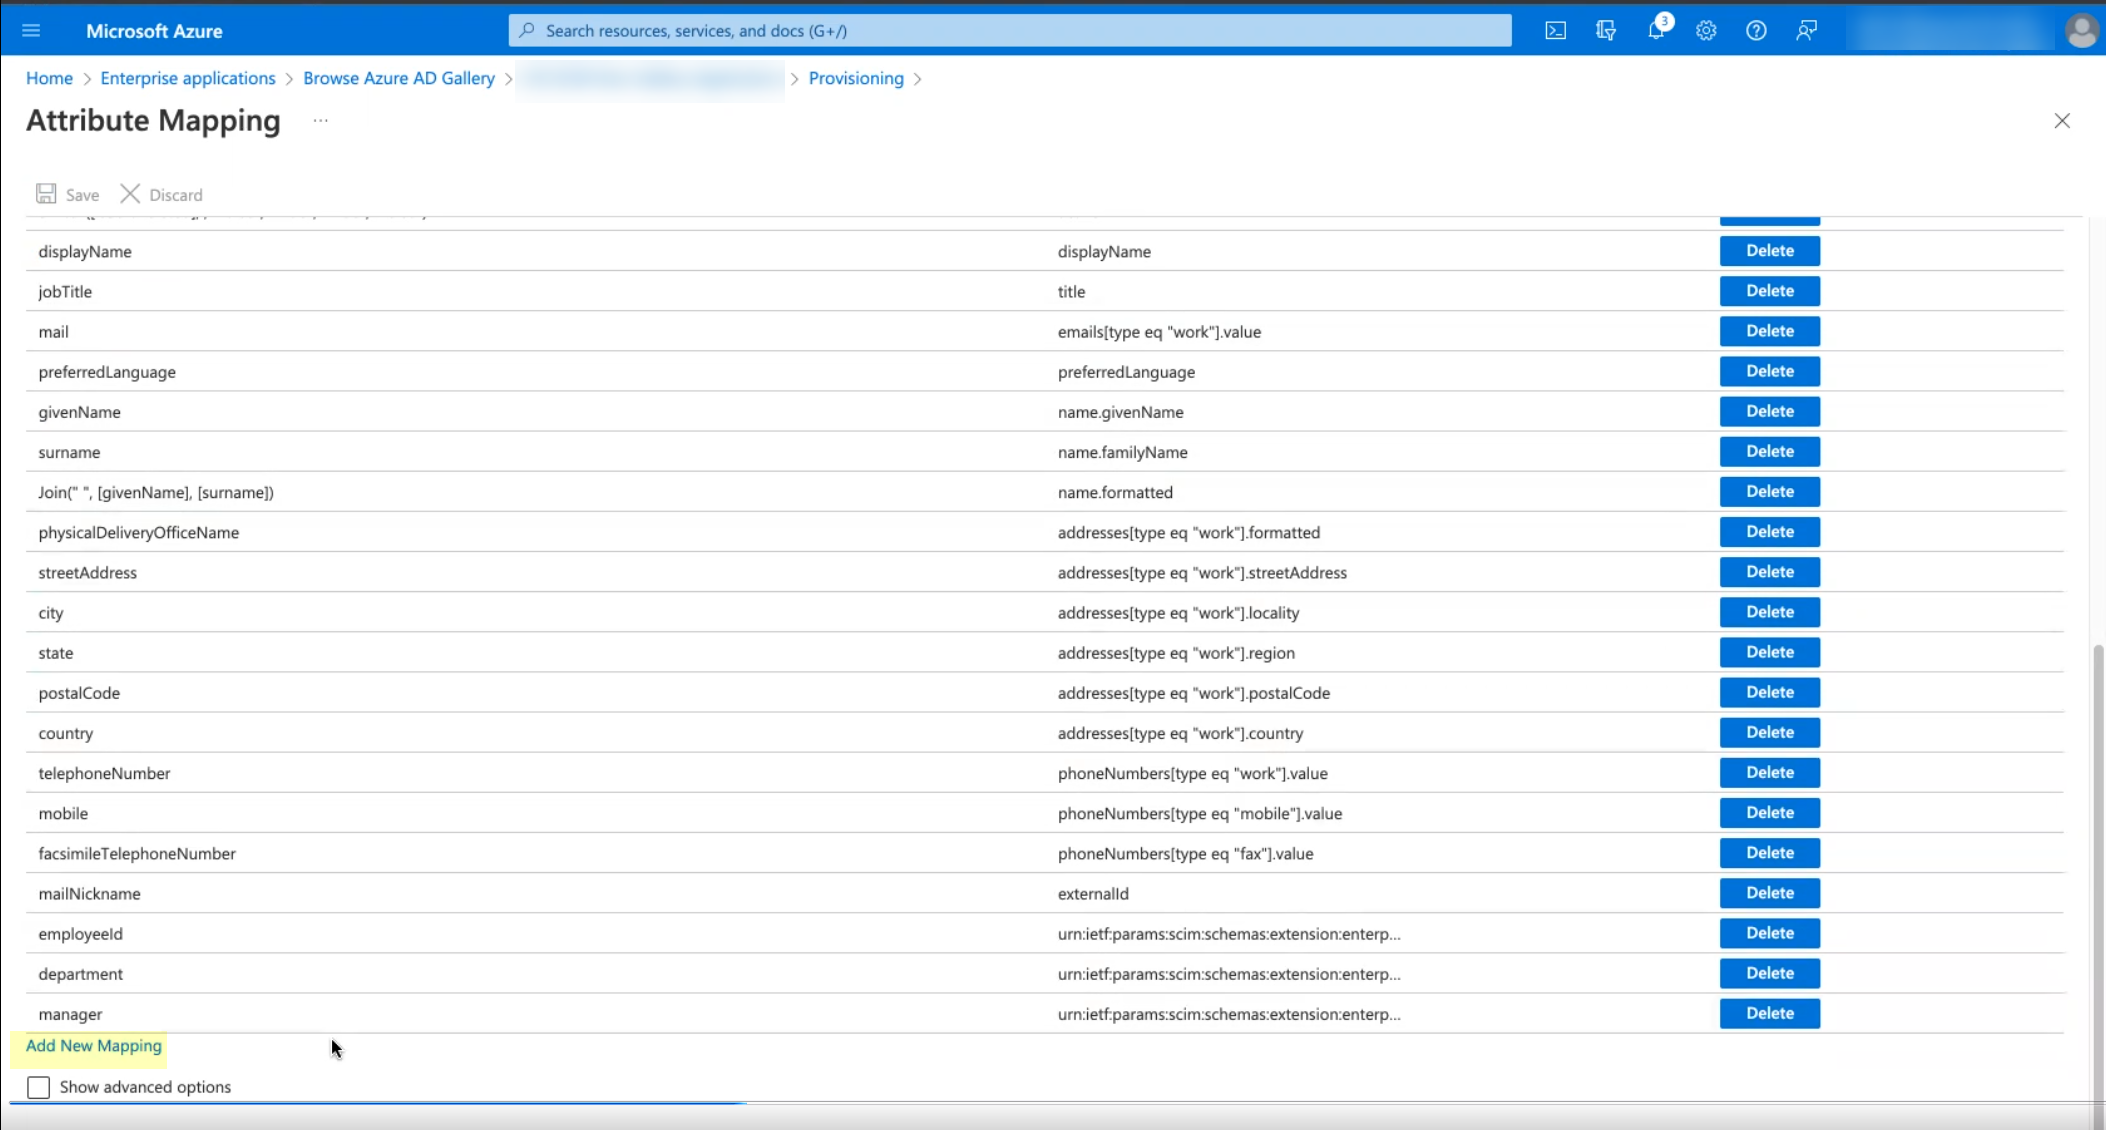
- (Optional) By default, the Cloud Identity Engine only synchronizes the users and groups you assign to this app in the Azure Portal. You can optionally synchronize all users and groups ( SettingsSync all users and groups ).
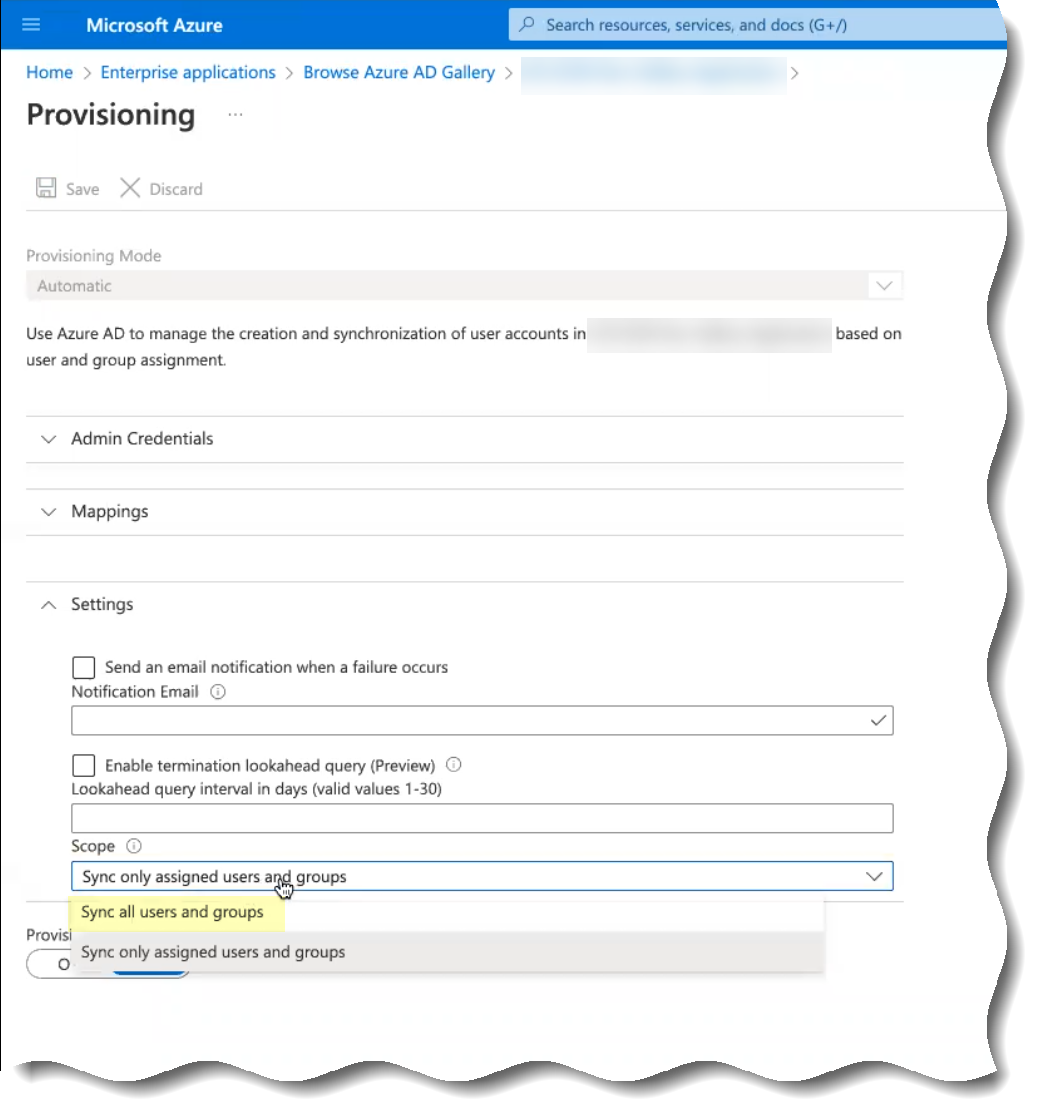
- Save your changes when they are complete.
- Allow Azure Active Directory (AD) to provide the information to the Cloud Identity Engine and verify that the Cloud Identity Engine uses SCIM to obtain the Azure Active Directory (AD) information.
- In the Azure Portal, verify you’ve completed all the provisioning steps in the documentation for the Azure AD SCIM Connector .
- Select the name of the app that you configured in the first step then select ManageProvisioningStart Provisioning to begin providing attributes to the Cloud Identity Engine.
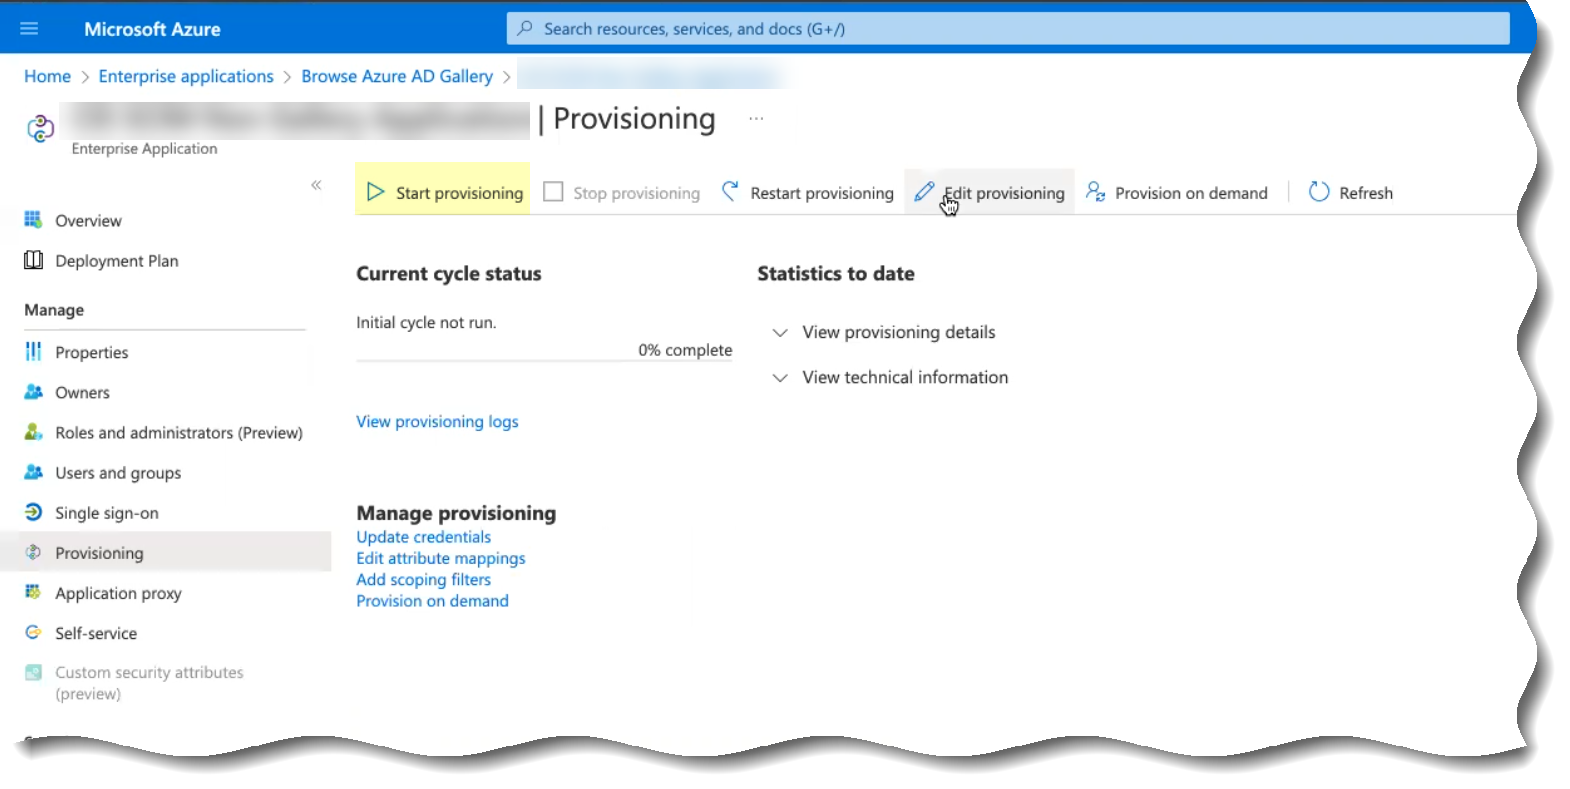
- Wait until the sync is complete ( Initial cycle completed ) then View provisioning details .

- Verify that the synchronization was successful by confirming the timestamps ( Completed and Steady state achieved ) and verifying that the number of Users and Groups displays.
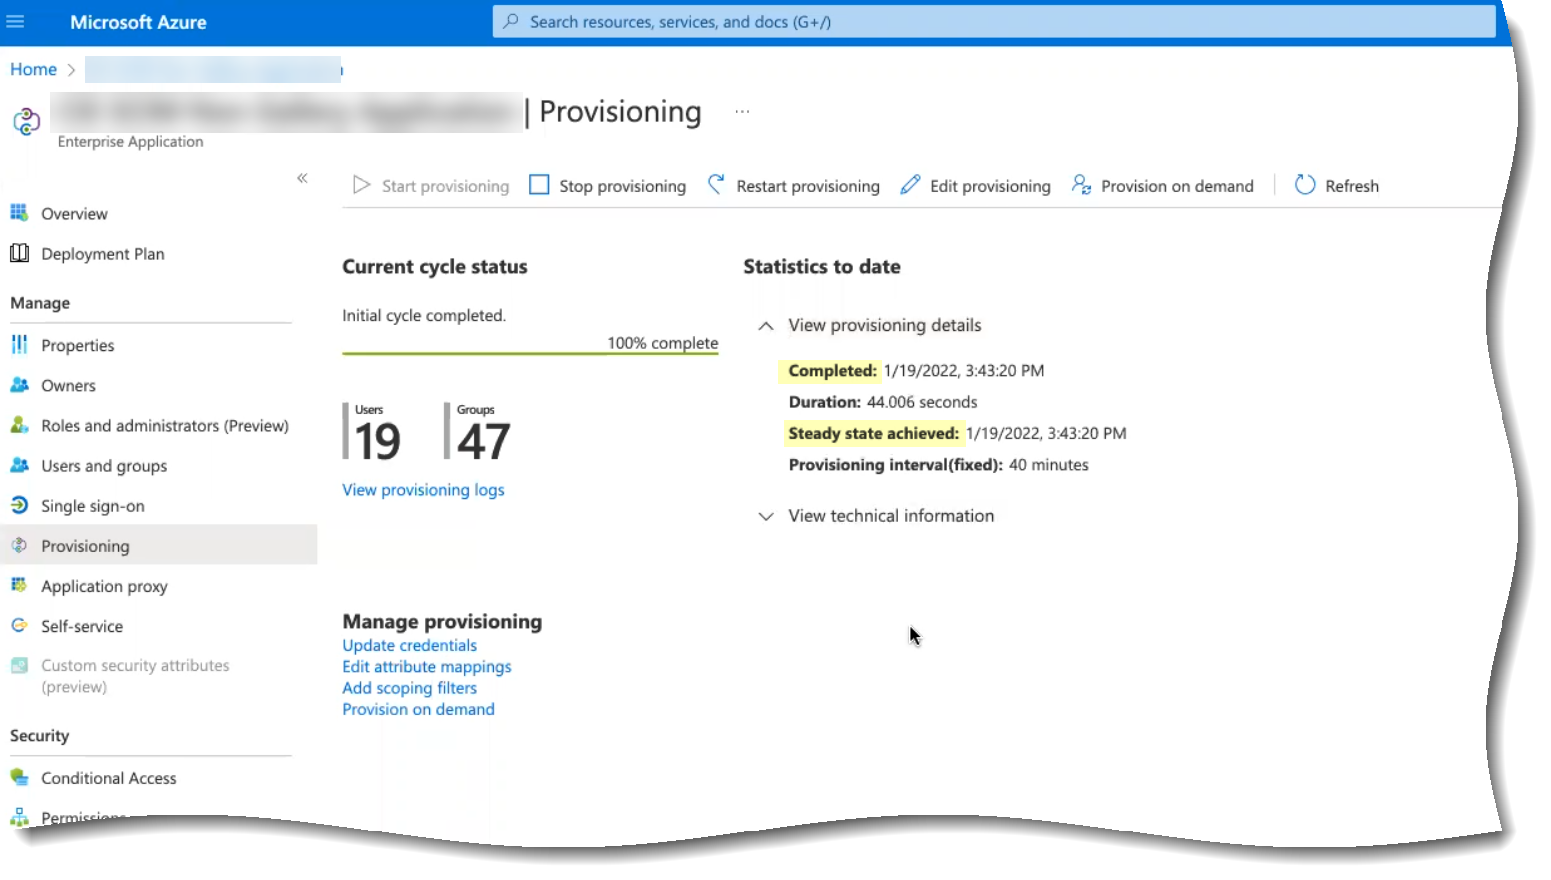
If the number of users and groups does not display, refer to Troubleshoot Cloud Identity Engine Issues .
- In the Cloud Identity Engine app, verify that the SCIM Change Timestamp for your Azure SCIM directory populates on the Directories page.
- Select ActionsFull Sync to complete a full synchronization of your Azure Active Directory with Directory Sync for the Cloud Identity Engine.
You must successfully complete a full sync in the Cloud Identity Engine app to complete the SCIM Connector setup.
Configure PingFederate for SCIM Connector
Complete the following steps to configure the Cloud Identity Engine to use the SCIM Connector to connect to your PingFederate server. Be sure to complete all the steps in the PingFederate SCIM Connector documentation as well.
- Set up the directory for SCIM Connector.
- Log in to the PingFederate portal and select Data Stores then click Add New Data Store .
- Enter a Data Store Name and select Directory (LDAP) as the Type .
- Enter the Hostname(s) (including the port number).
- Enter a valid email address as the User DN .
- Click Test Connection to verify the connection is successful.
If the connection test isn't successful, verify that the hostname and email address are valid. Some directories, such as PingDirectory, format the User DN as cn=administrator . In this case, select Use LDAPS and use a different port number, such as 1636, instead of the default port number of 389.
- Copy and edit the System ID then paste the edited value in the Cloud Identity Engine app as the Directory ID .
You must edit the System ID to remove the LDAP- that precedes the Directory ID value before entering the value as the Directory ID in the Cloud Identity Engine app.

- Copy and edit the User value and edit the edited value in the Cloud Identity Engine app as the Directory Name .
For the Directory Name , use the domain name that follows the username in the User column (for the example below, the Directory Name is the value after Administrator@ ).

- Provision the SCIM connection.
- Select SP ConnectionsCreate Connection .
- Select Do not use a template for this connection .
- Select Outbound provisioning .
- Select SCIM Connector .
If the SCIM Connector option isn’t available, confirm that you completed all substeps in the previous step correctly.
- Select General Info and enter a Partner’s Entity ID (Connection ID) and a Connection Name .
- (Optional but recommended) To decrease the amount of time necessary for the initial sync, select Outbound ProvisioningConfigure ProvisioningManage ChannelsChannel ConfigurationChannel Info and increase the value for Max Threads .
The range is recommended range is 1–5; for optimal sync time, Palo Alto Networks recommends 5 as the value for Max Threads .
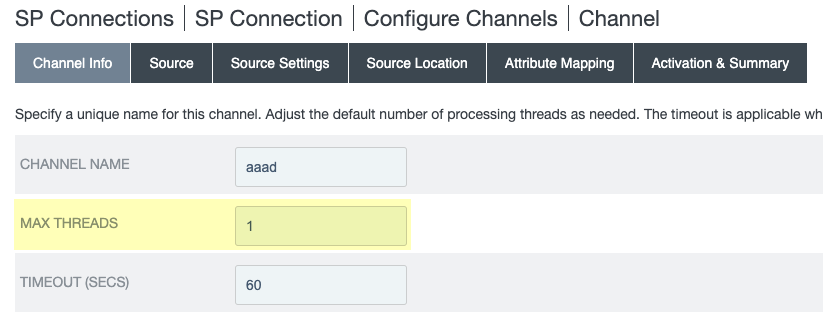
- Specify the information from the Cloud Identity Engine for the SCIM connection provisioning.
- Select Outbound ProvisioningConfigure Provisioning .
- Select the SP Connections Target tab and enter the Base URL that you copied from the Cloud Identity Engine.
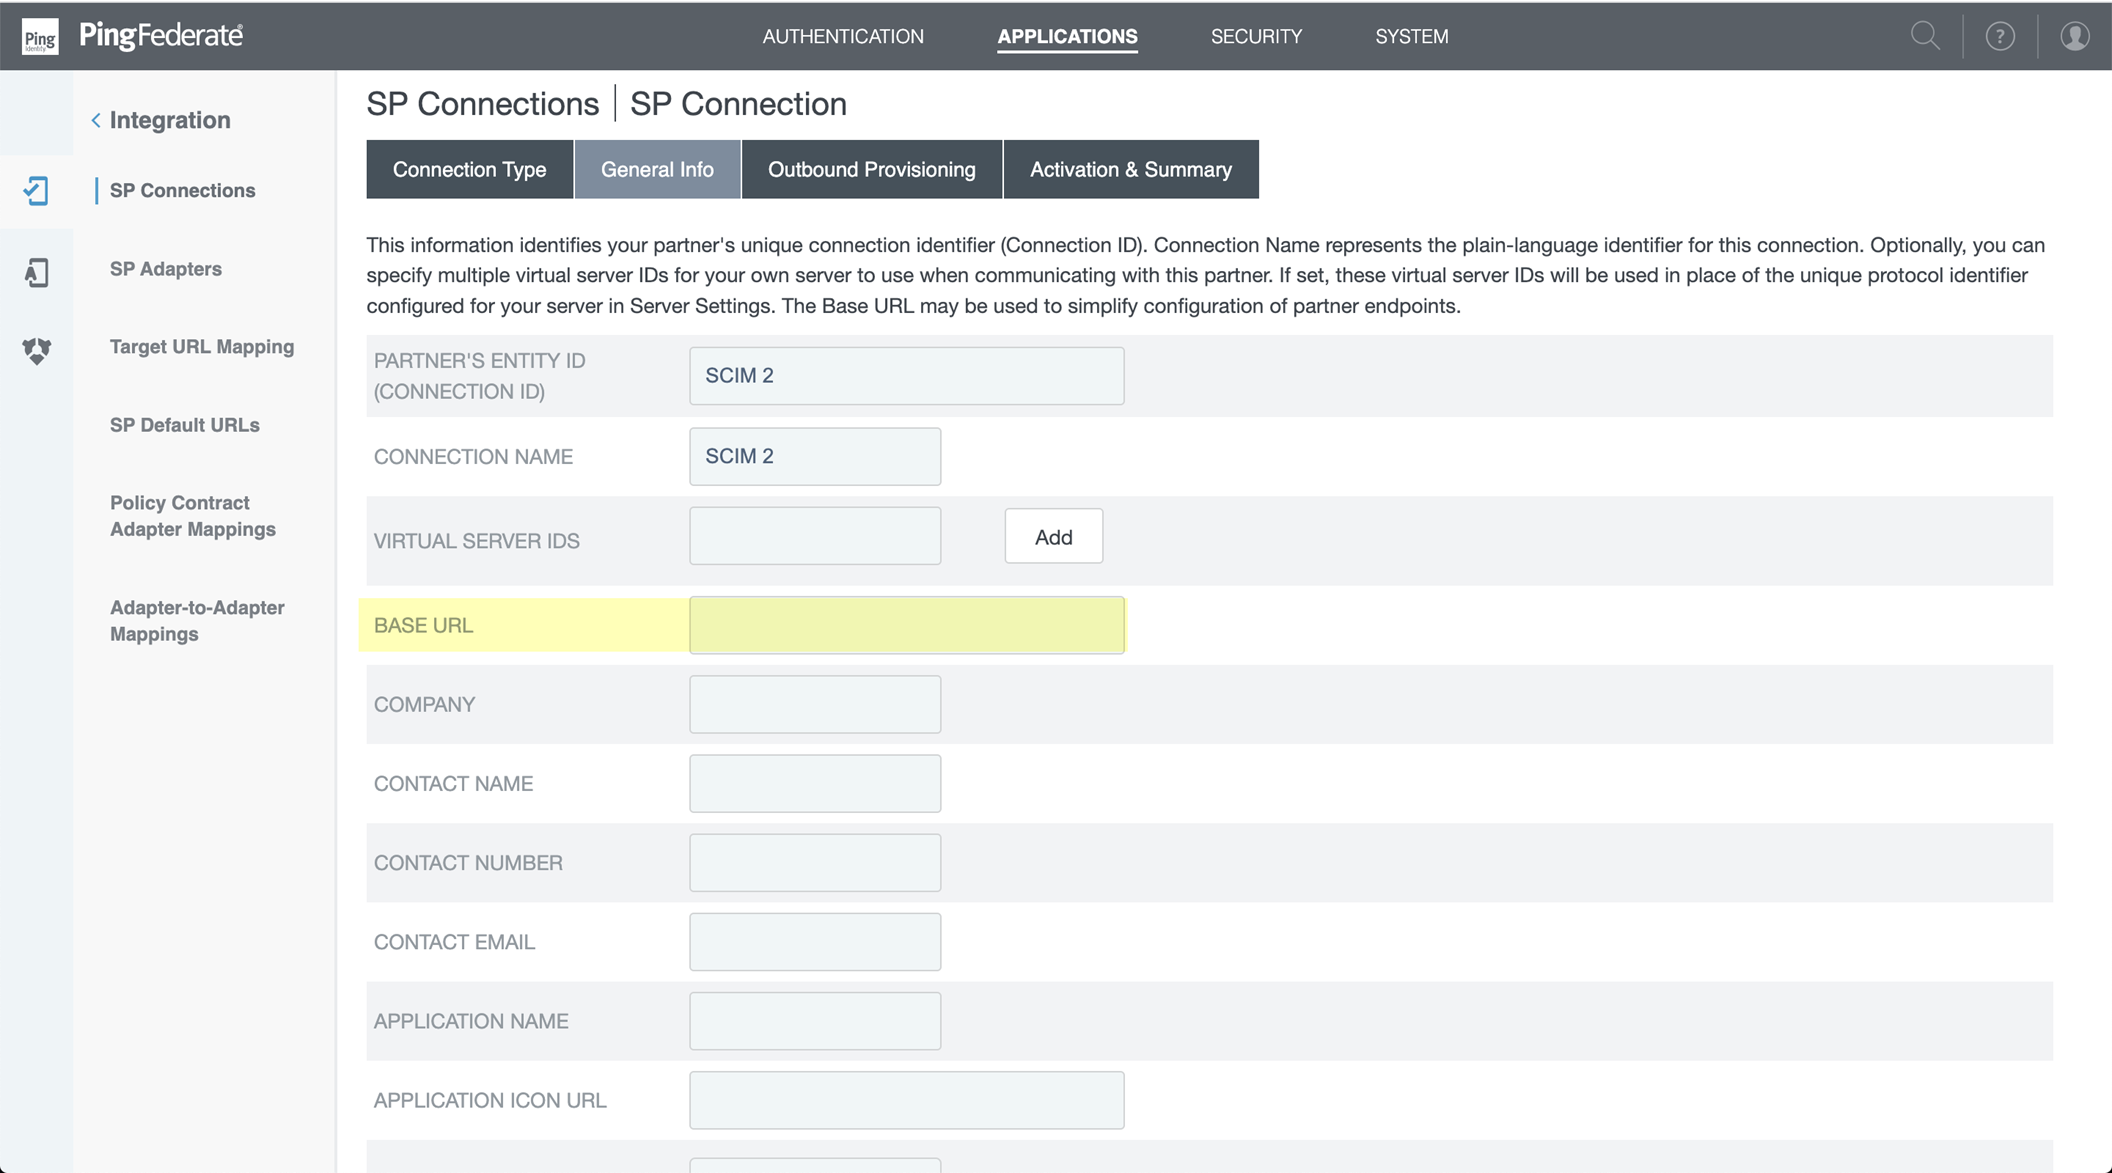
- Select ApplicationsSP ConnectionsSP ConnectionConfigure ChannelsManage Channels .
- Select OAuth 2 Bearer Token as the Authentication Method and enter the Bearer Token that you copied from the Cloud Identity Engine as the Access Token .
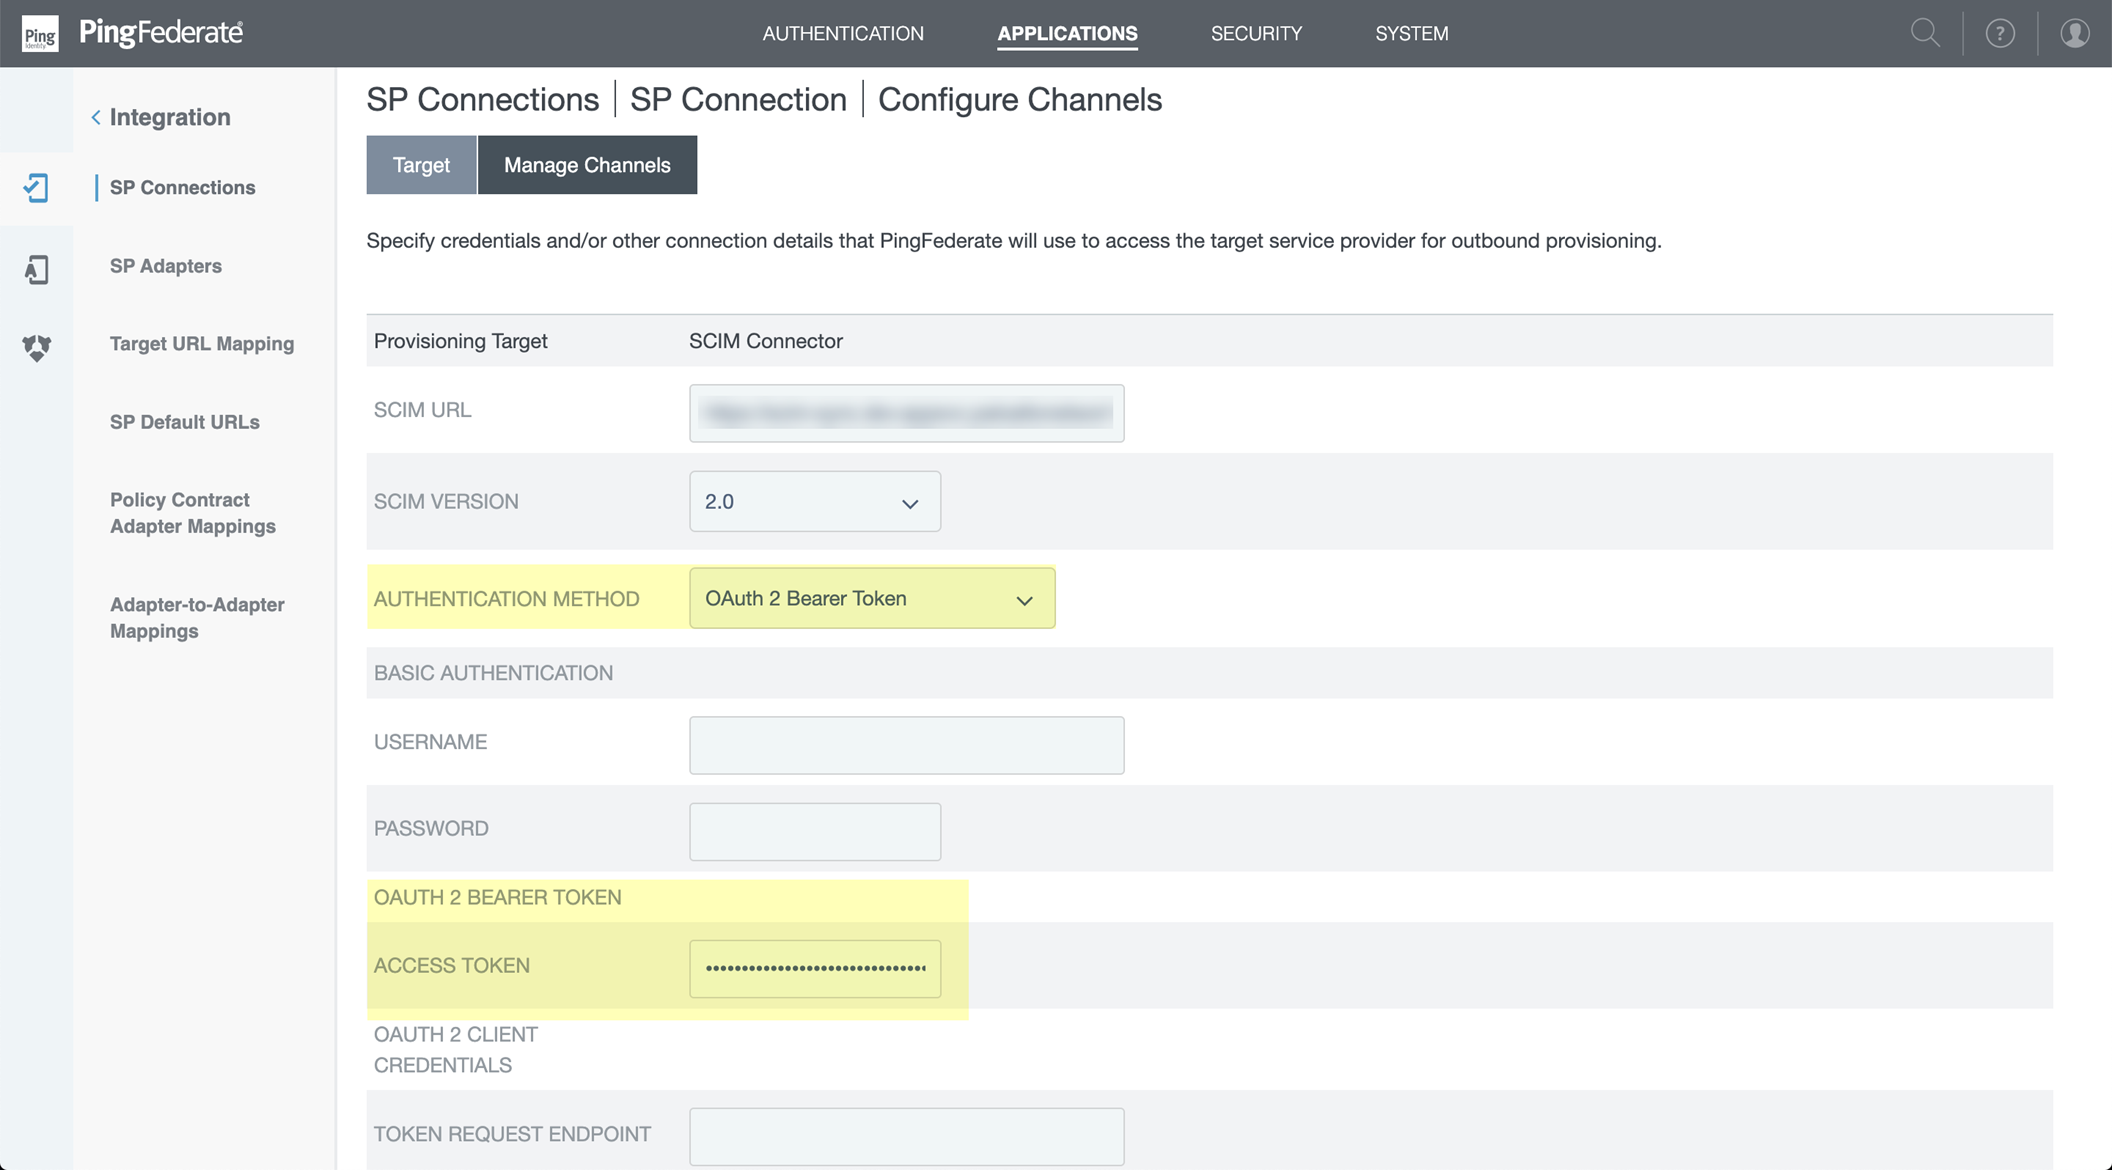
- Select Common Name as the Group Name Source .
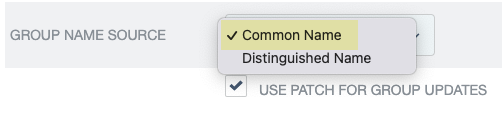
- Select Use patch for group updates .
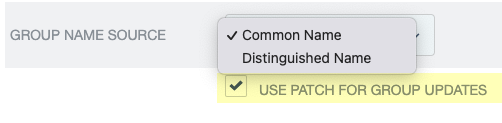
- Configure the channels for the SCIM connection.
- Select Configure Channels and Create a channel.
- Enter a Name for the channel and select the directory you want to configure in the Cloud Identity Engine as the Active Data Store .
- Select Source Location and enter the Base DN for your directory.
- Enter the Group DN for the source of the user and group mappings or create a filter that specifies which entries to use. For example, Group DN:CN=Chicago,OU=Illinois,DC=example,DC=com syncs all users and groups in the Chicago group.
- If you use a Group DN and your directory contains nested groups, select Nested Search .
Retention of nested group hierarchies from PingFederate servers through the SCIM Connector isn’t available. If your directory contains nested groups and you want to sync all of the child users and groups, you must select the method you want to use to ensure the Cloud Identity Engine correctly collects all users and groups in the parent group.
- Add the parent group as a member of a different group and use that container group as the Group DN. For example, configure the parent group in a directory with the name root in an OU with the name location and use the value CN=root,OU=location,DC=paloaltonetworks,DC=com for the Group DN.
- Add a filter that includes all members of the parent group (for example, (objectClass=user),(objectClass=group) includes all users and groups in the Base DN DC=paloaltonetworks,DC=com ).
- Select Attribute Mapping and Edit the userName* to userPrincipalName .

- Save the connection and continue the configuration in the Cloud Identity Engine.
- Complete the postdeployment steps to configure the PingFederate server for the SCIM Connector.
- Verify that you’ve completed all of the provisioning steps .
- In the PingFederate Portal, either commit a directory change or enter the following command: pingfederate/bin/provmgr.sh --reset-all -c [channel number] command.
To determine the channel number, use the ./provmgr.sh --show-channels command.
- In the Cloud Identity Engine, verify the app populates the SCIM Change Timestamp then complete a full sync ( ActionsFull Sync ).
Configure Okta Directory for SCIM Connector
You must also complete the required steps in the Okta Administrator Dashboard to complete the SCIM Connector configuration. For more information, refer to the documentation for the Okta Directory .
The SCIM Connector for Okta directory supports the following capabilities:
- Create users
- Update user attributes
- Deactivate users
- Import users
- Import groups
- Sync password
- Group push
- Log in to your Okta Administrator Dashboard and add the integration using the Okta Integration Network .
- Log in to the Okta Administrator Dashboard, select Applications , and click Browse App Catalog .
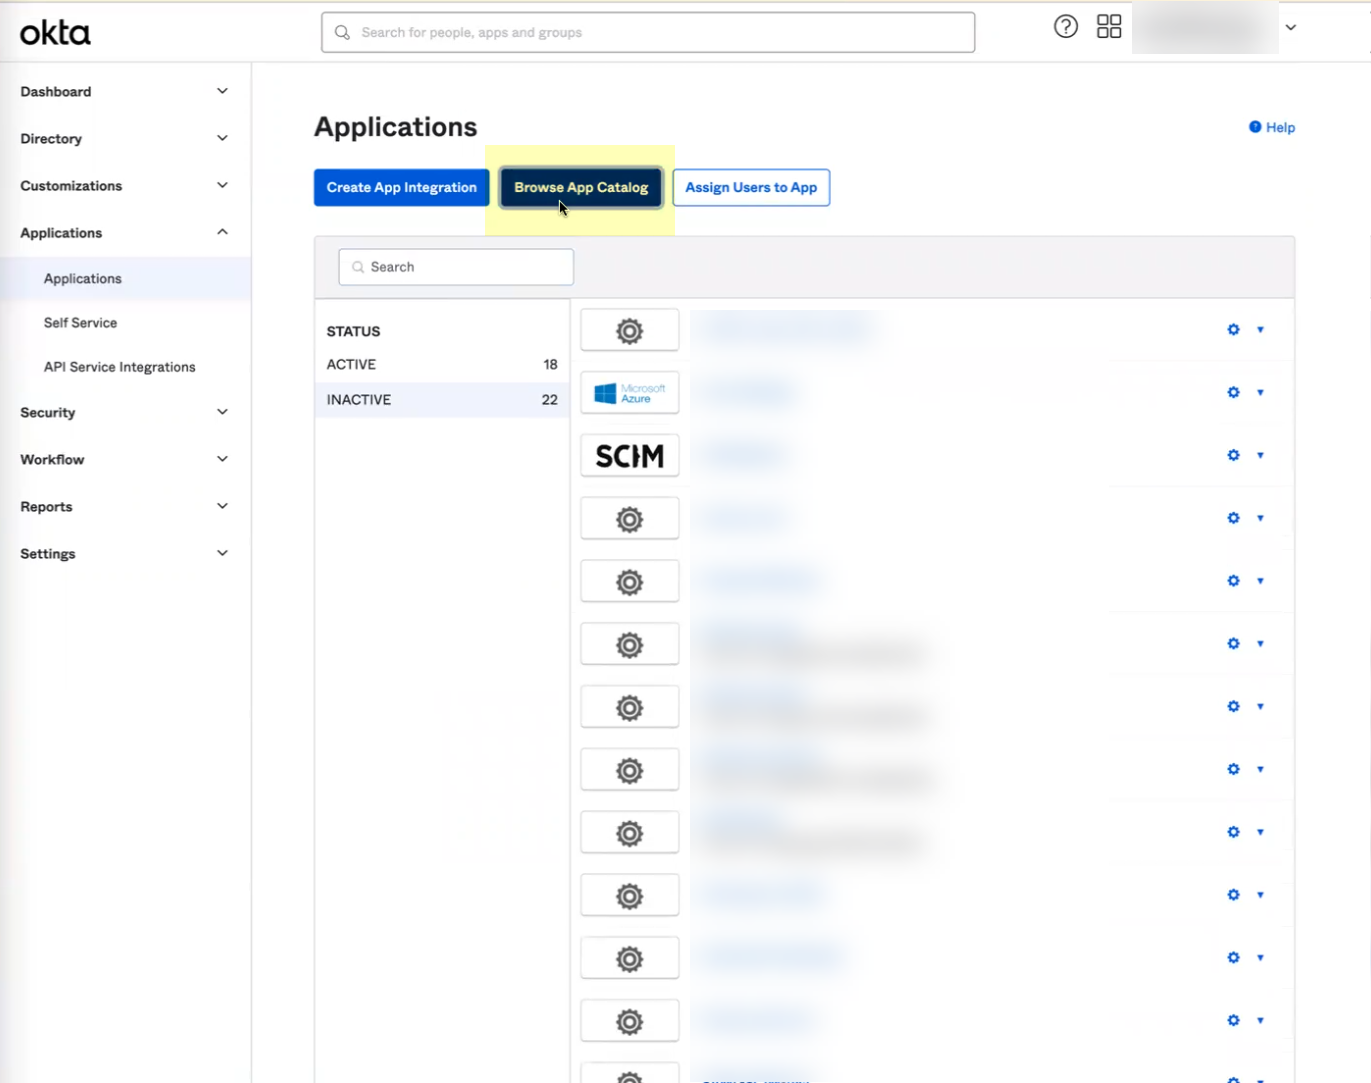
- Enter Palo Alto Networks SCIM as the search query.
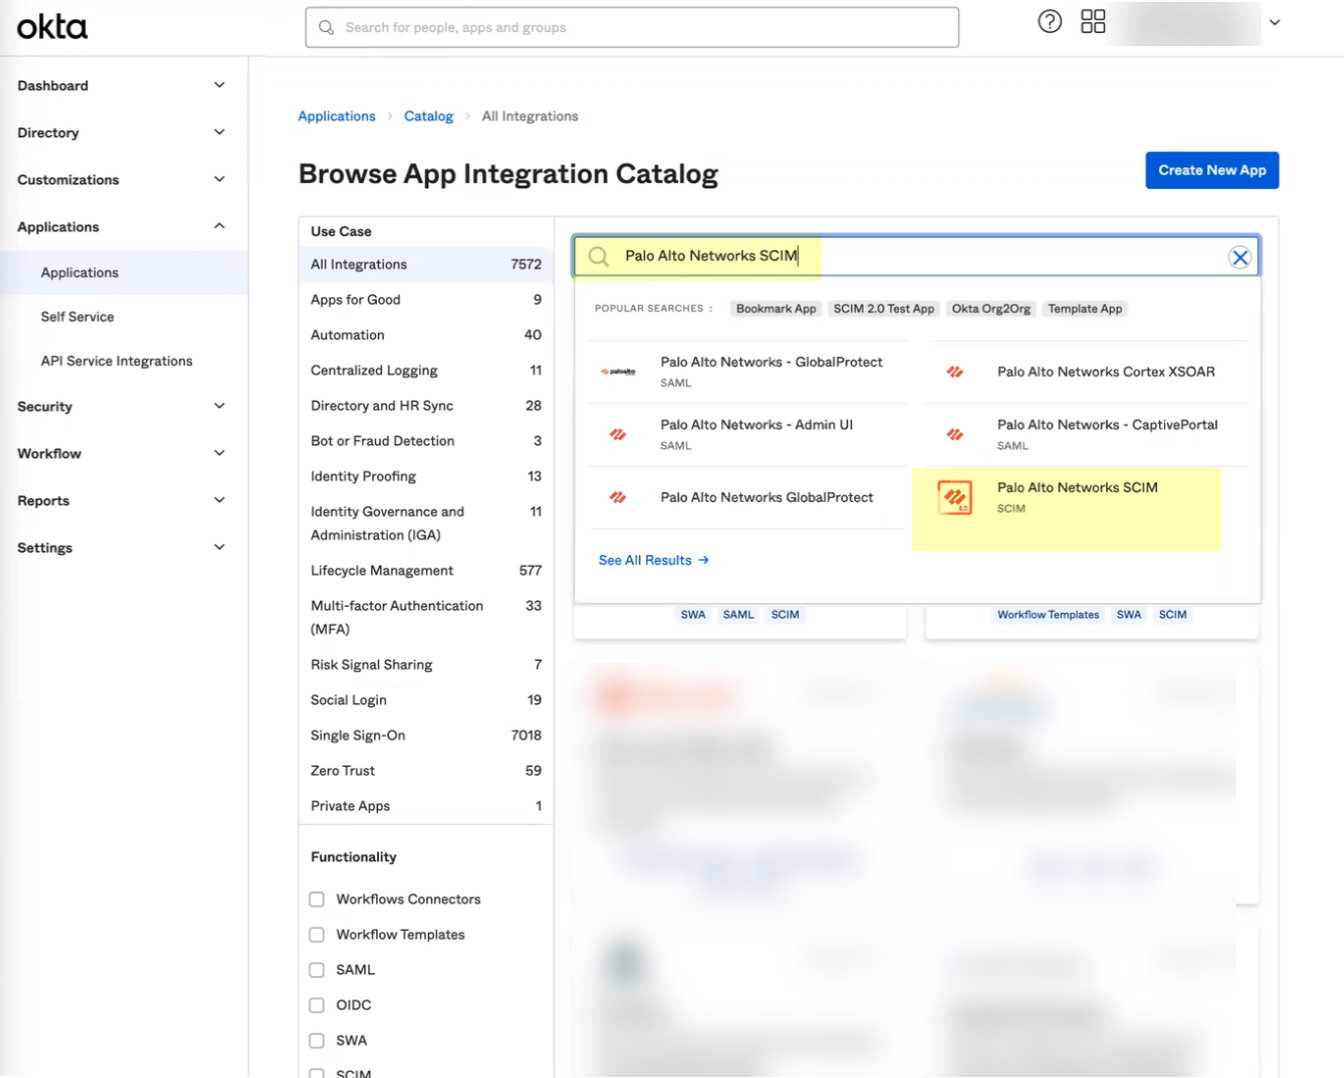
- Select the app and click Add Integration .
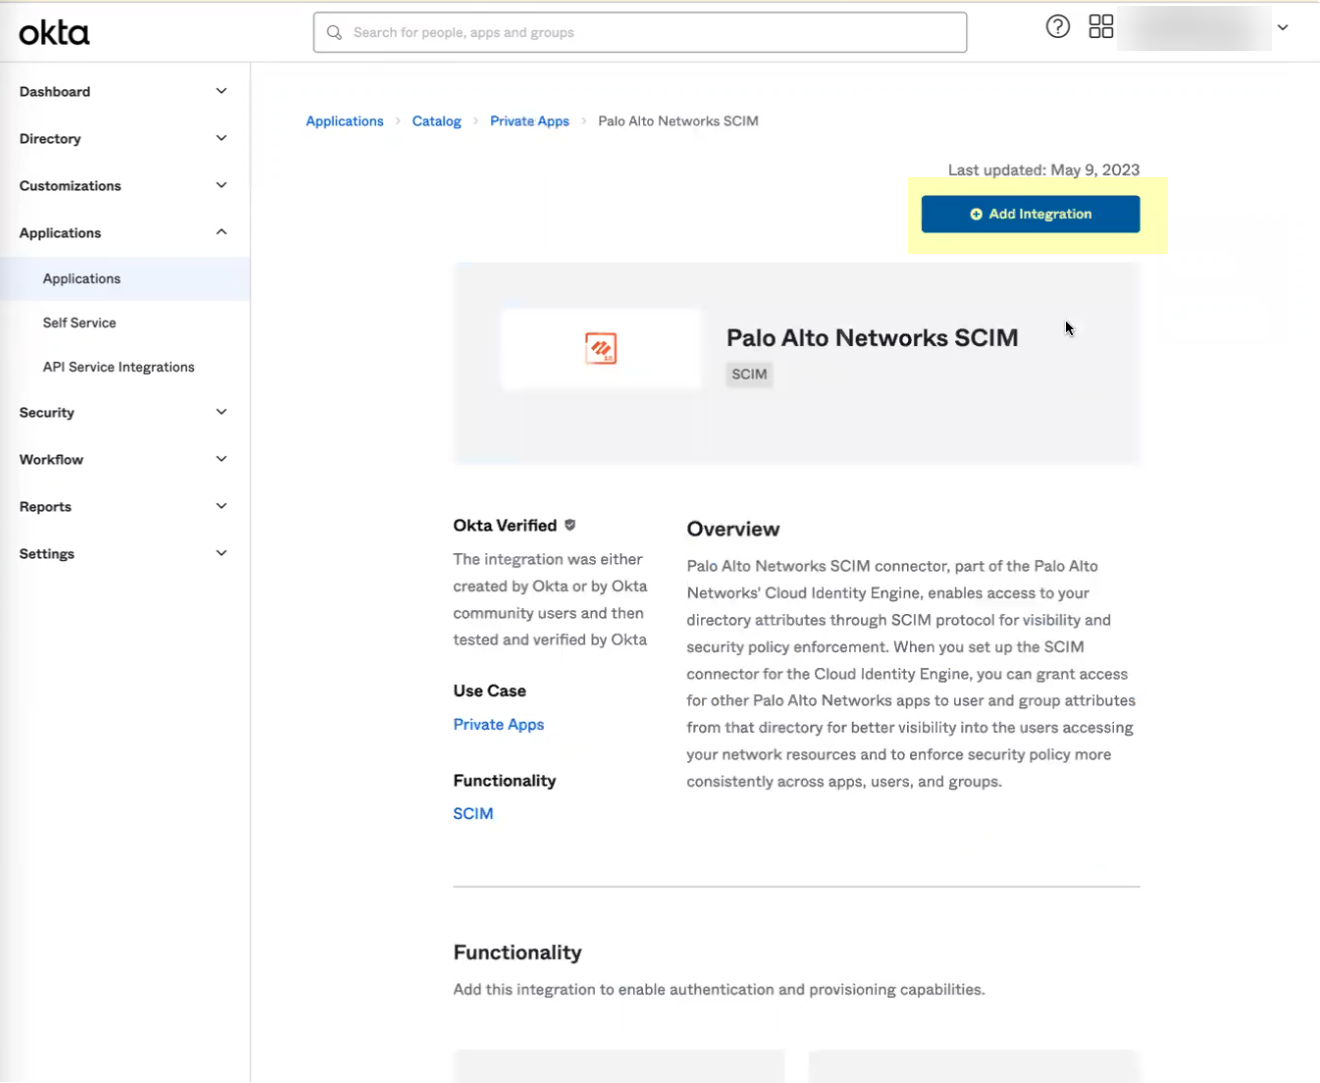
- Optionally change any settings, such as the Application Label , then click Done .
- Copy your Okta domain name.
- Configure the Okta integration to communicate with the Cloud Identity Engine.
- Select Provisioning .
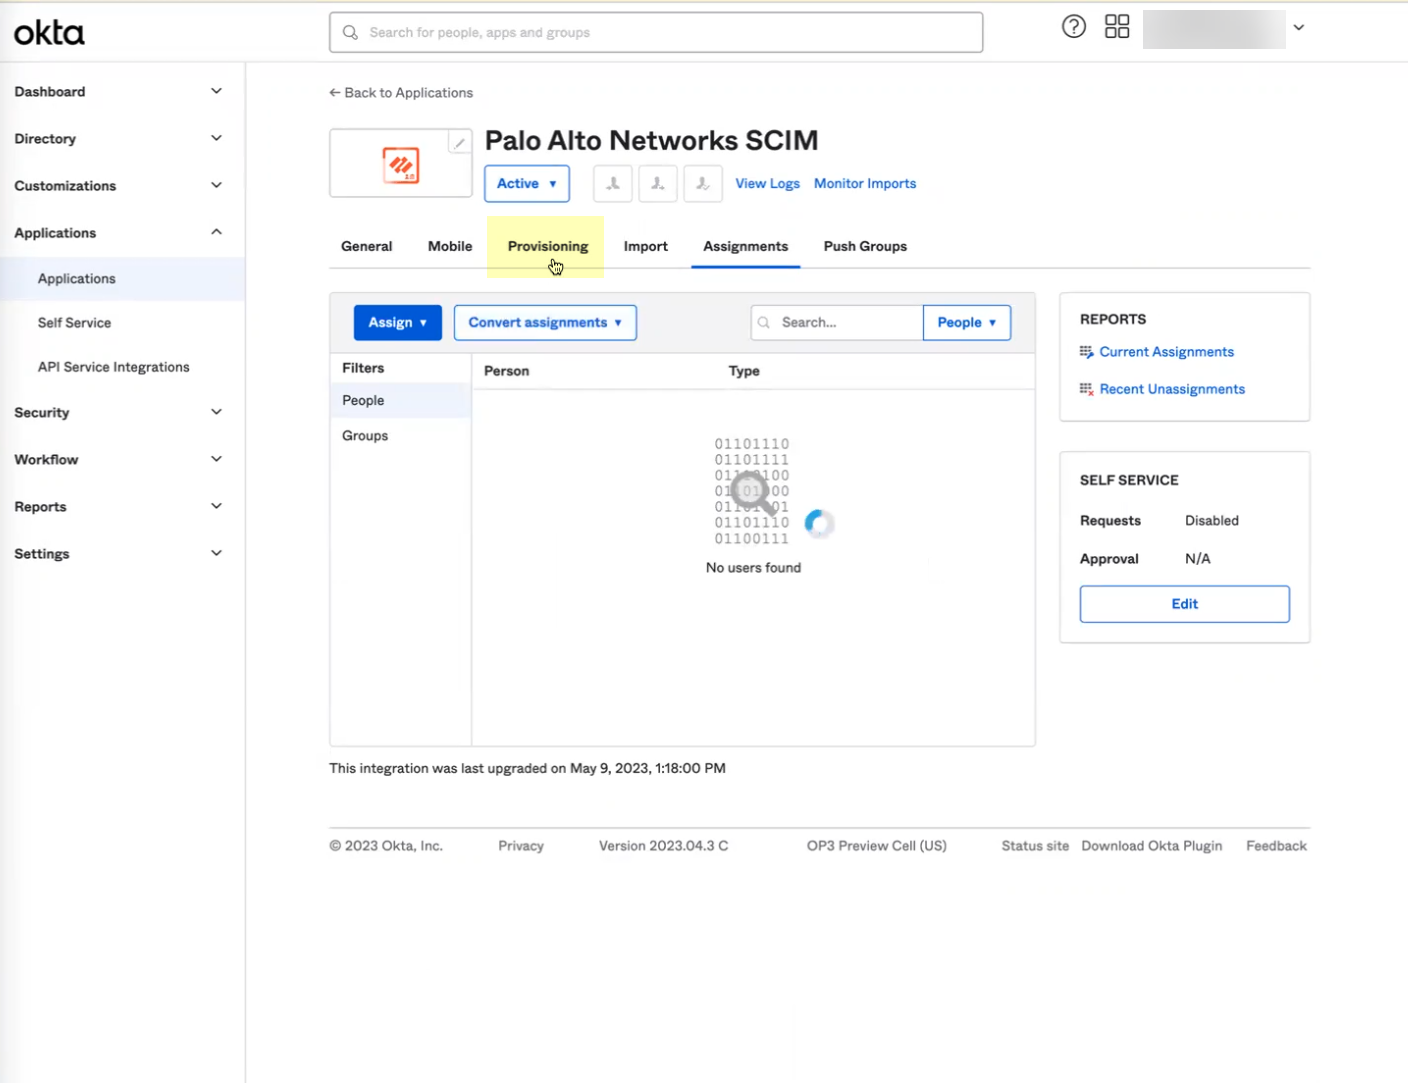
- Click Configure API Integration .
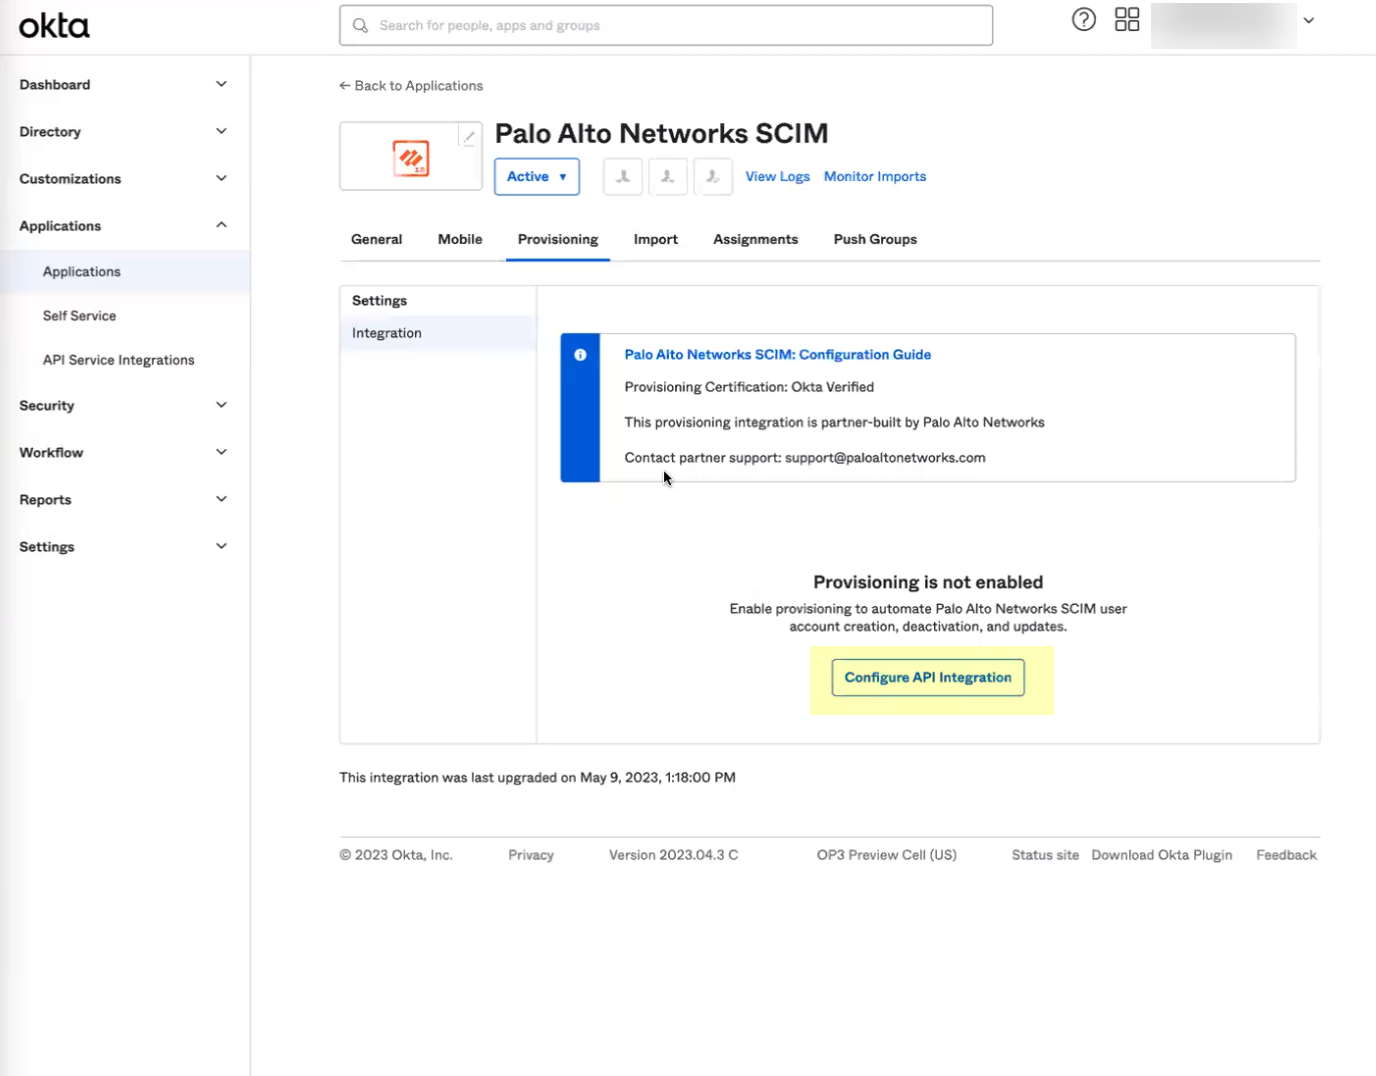
- Select Enable API integration .
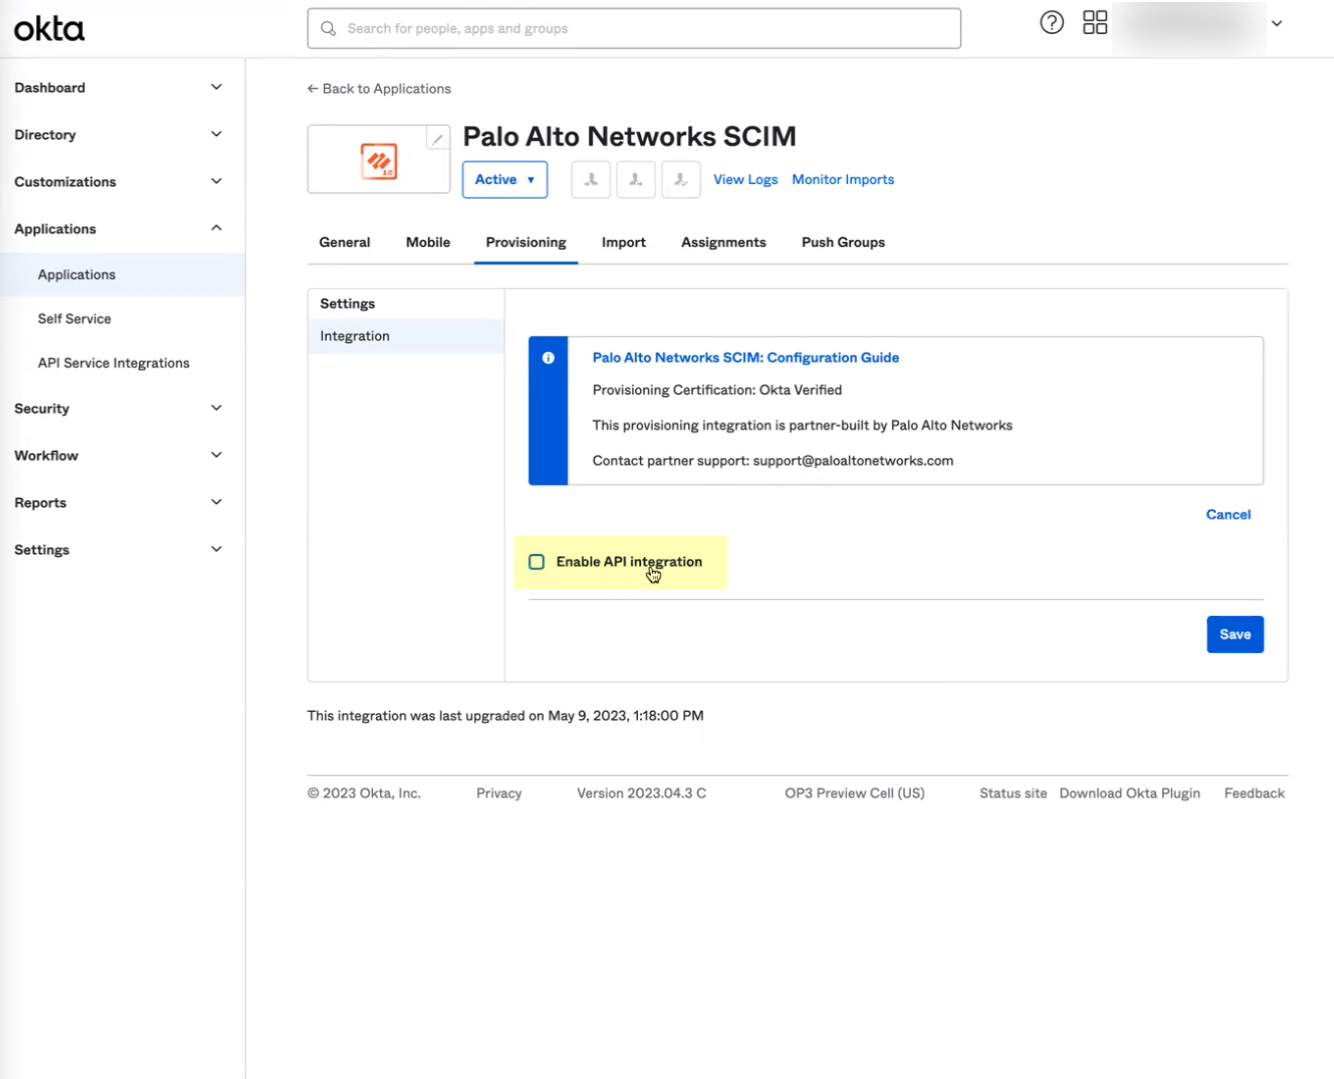
- Enter the URL you copied in step
3.b
as the Base URL .
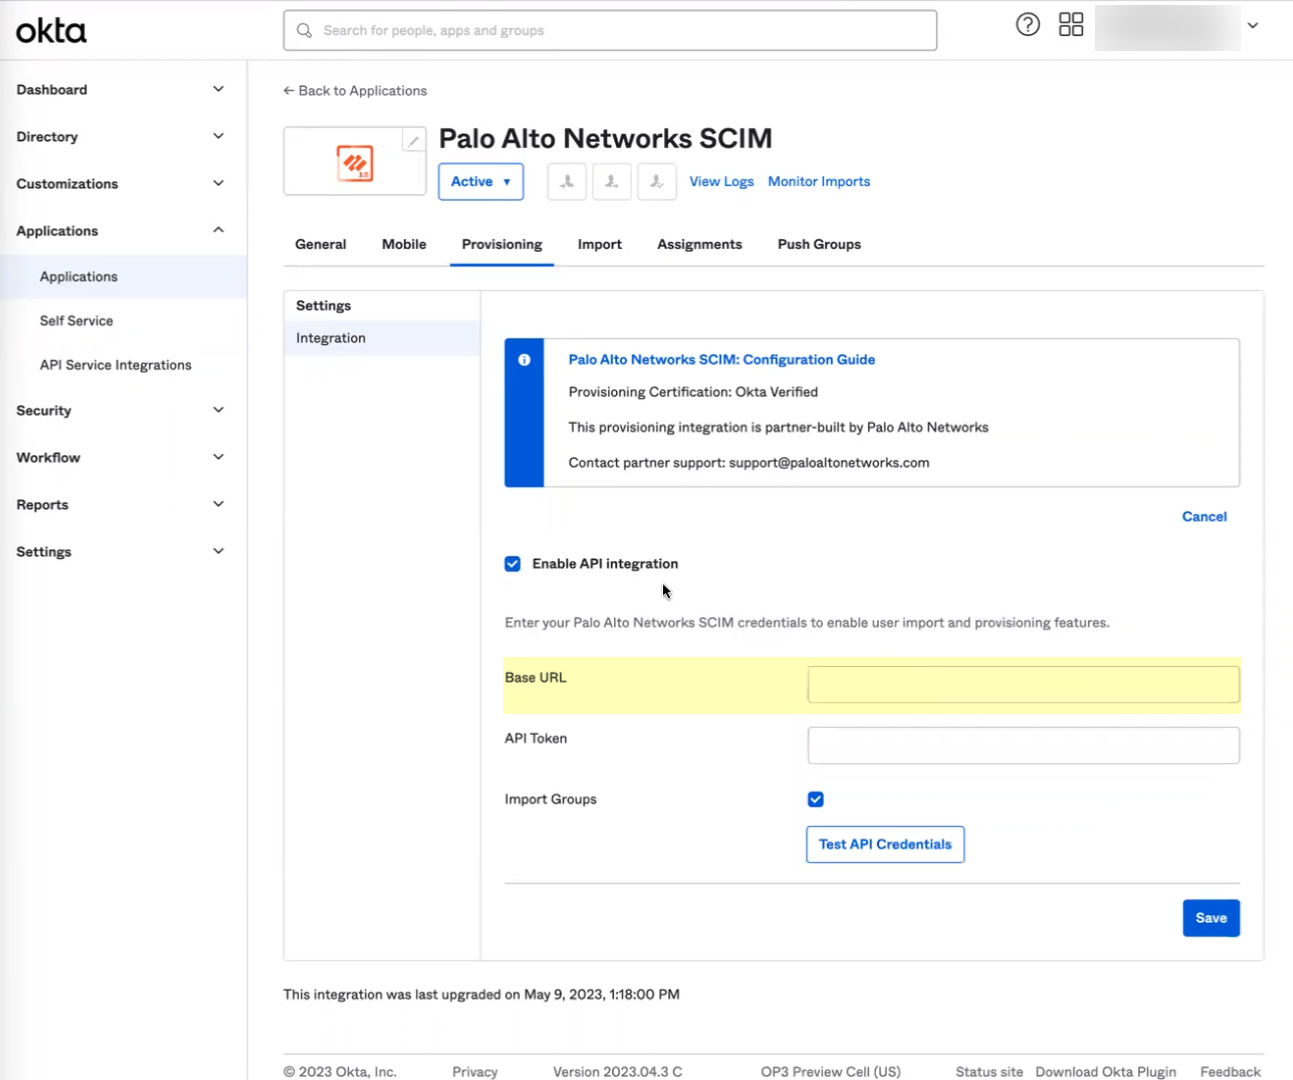
- Enter the token you copied in step
3.c
as the API Token .
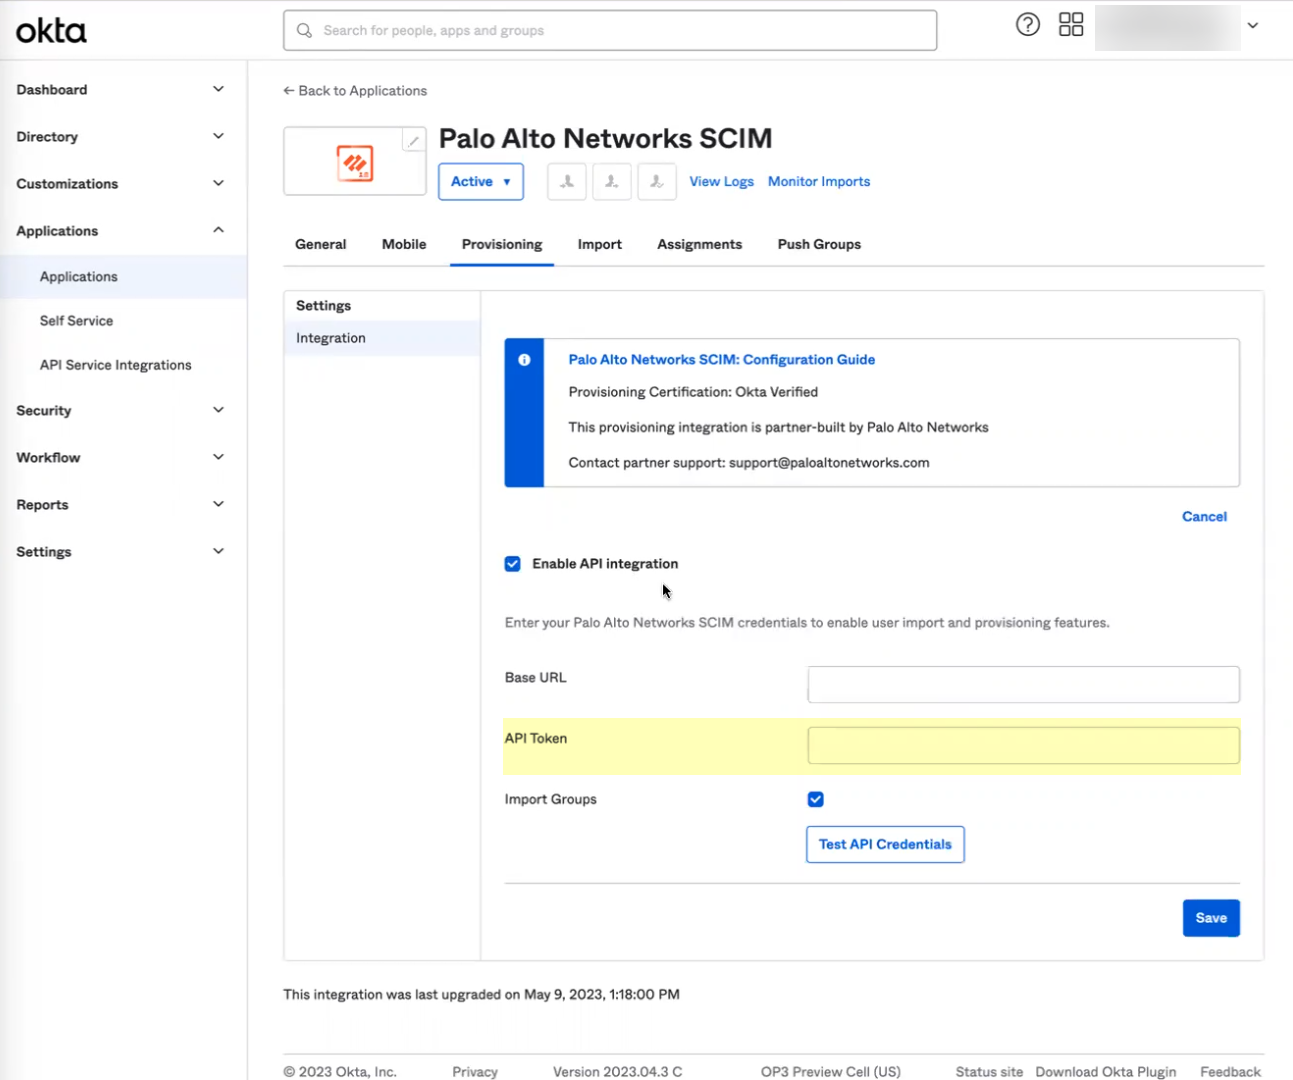
- Click Test API Credentials to verify the Okta Directory can successfully communicate with the Palo Alto Networks SCIM integration then click Save .
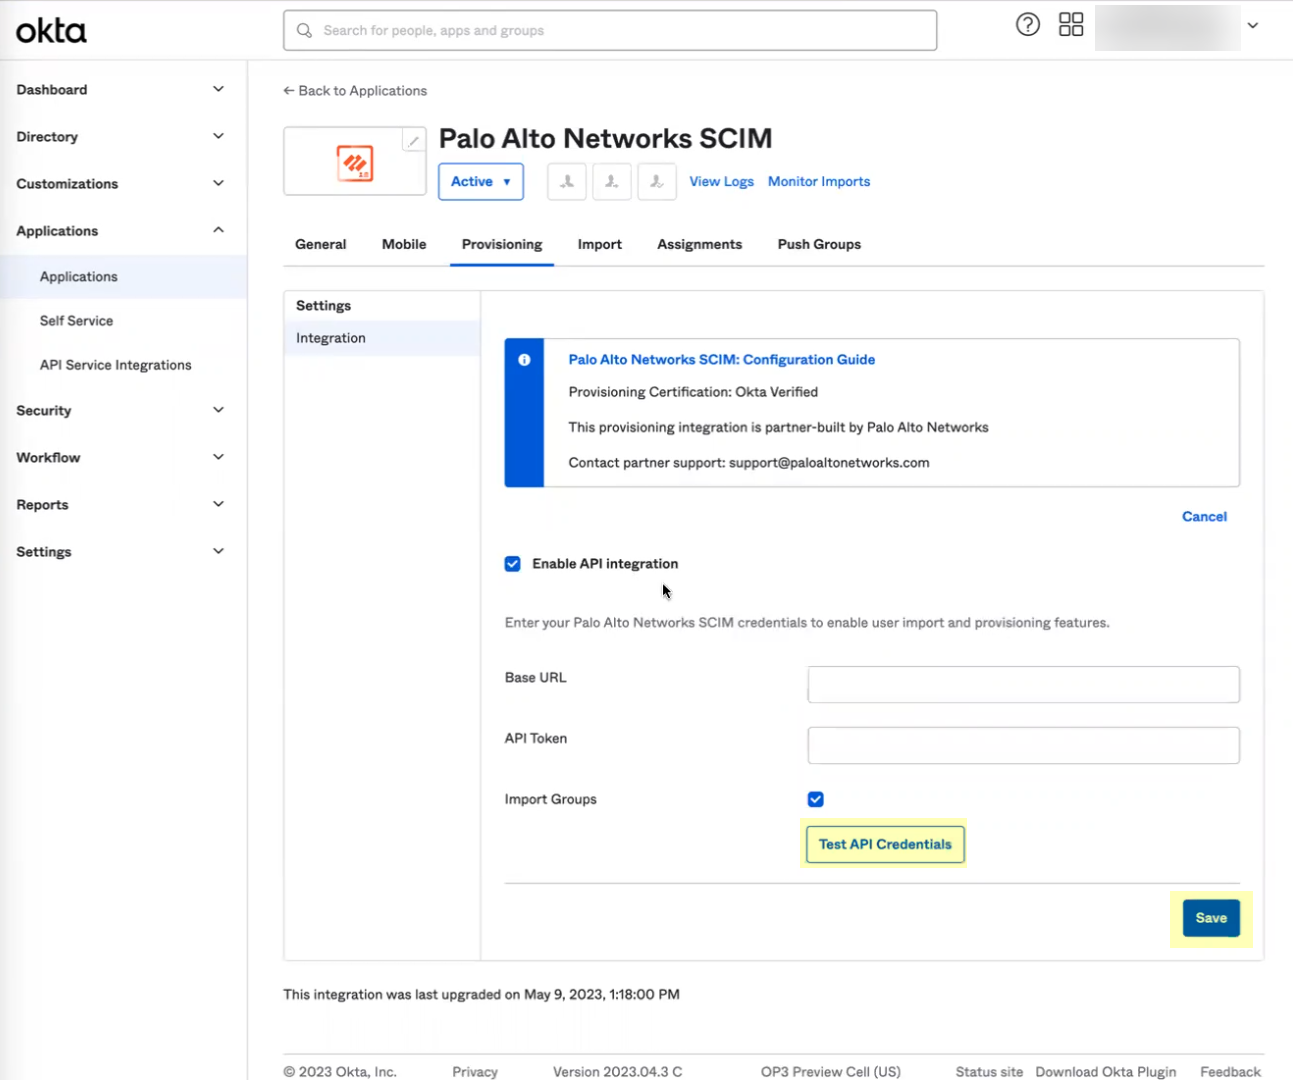
If the test is not successful, verify that you successfully submitted your configuration in the Cloud Identity Engine app in step
3.d
.
- Assign the Okta integration to the users you want to include in your Security policy.
- Edit the settings to assign Provisioning to App .
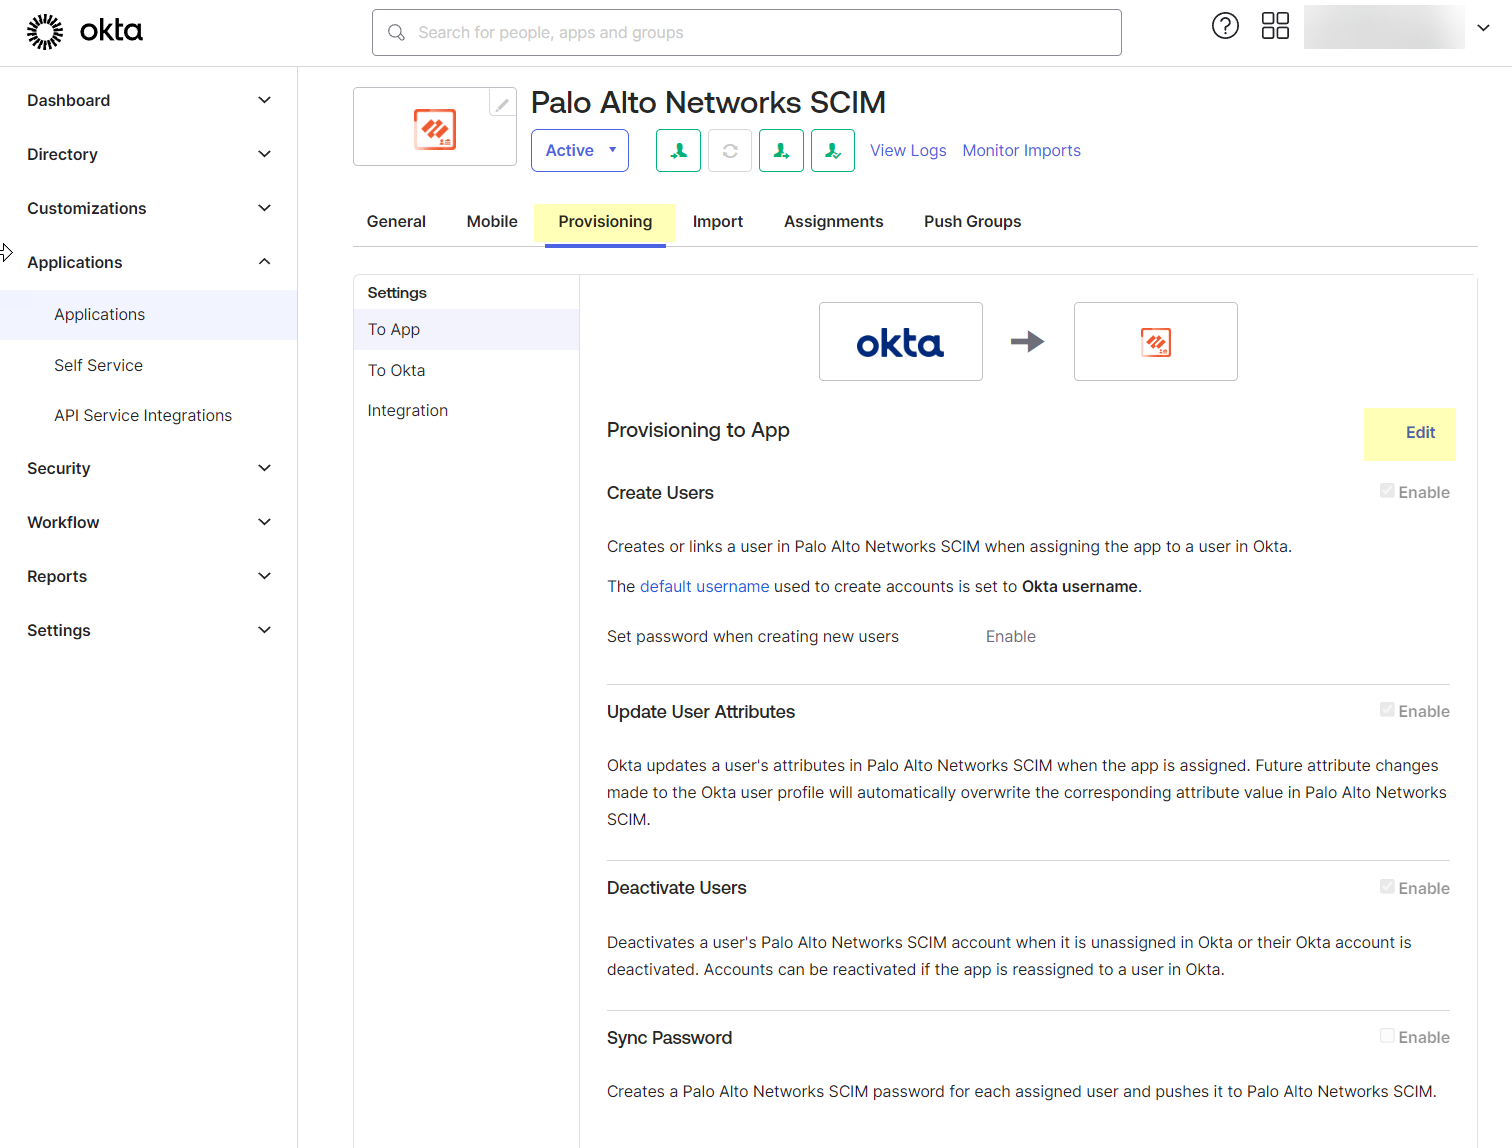
- Enable all the options and Save your changes.
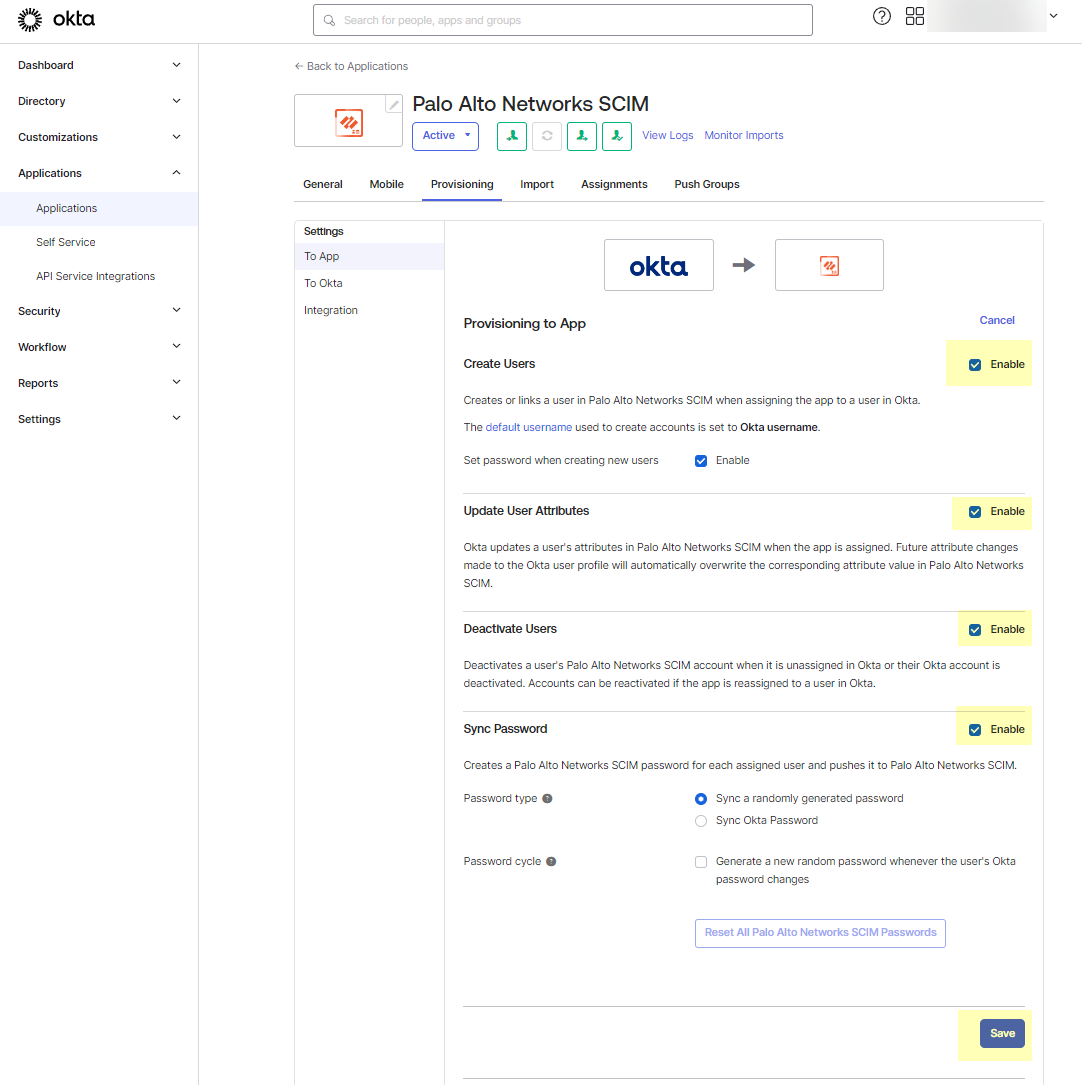
- Select the Push Groups tab then click the Find Groups button to Find groups by name .
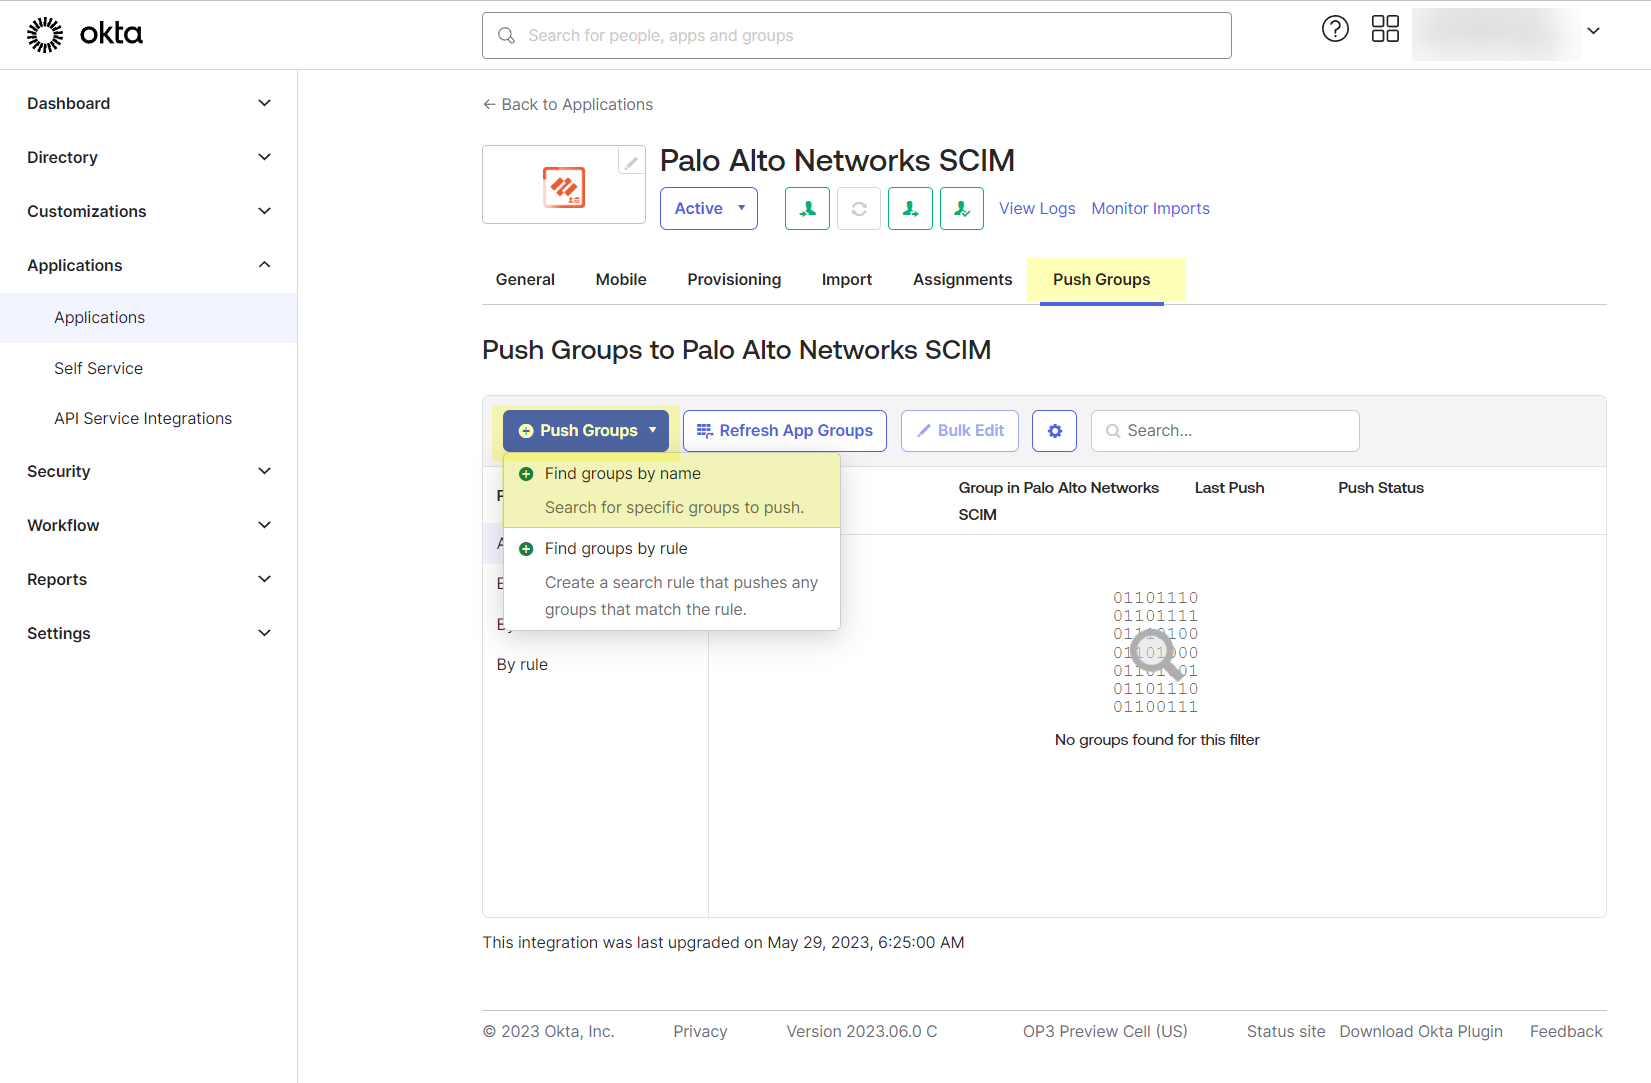
- Type the name of a group to Push groups by name .
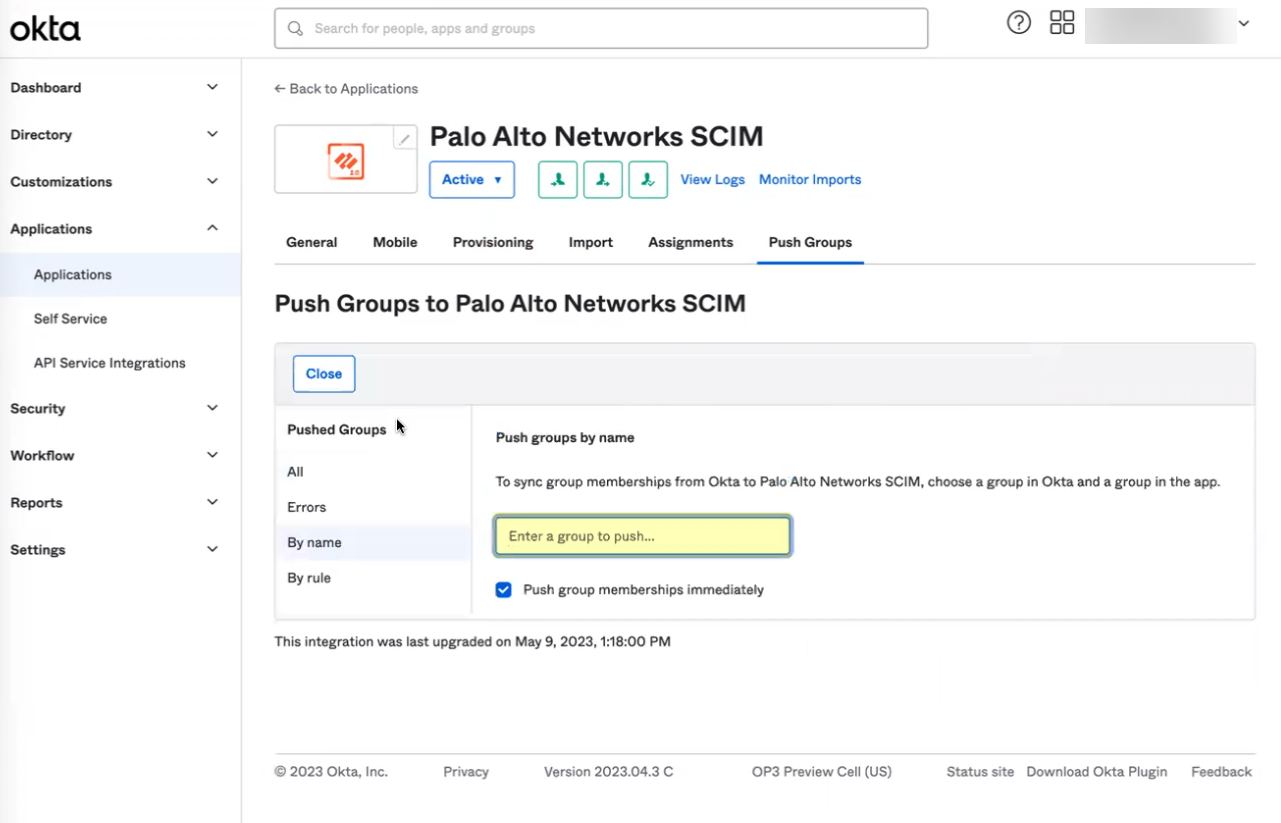
- Select the group and Save your changes.
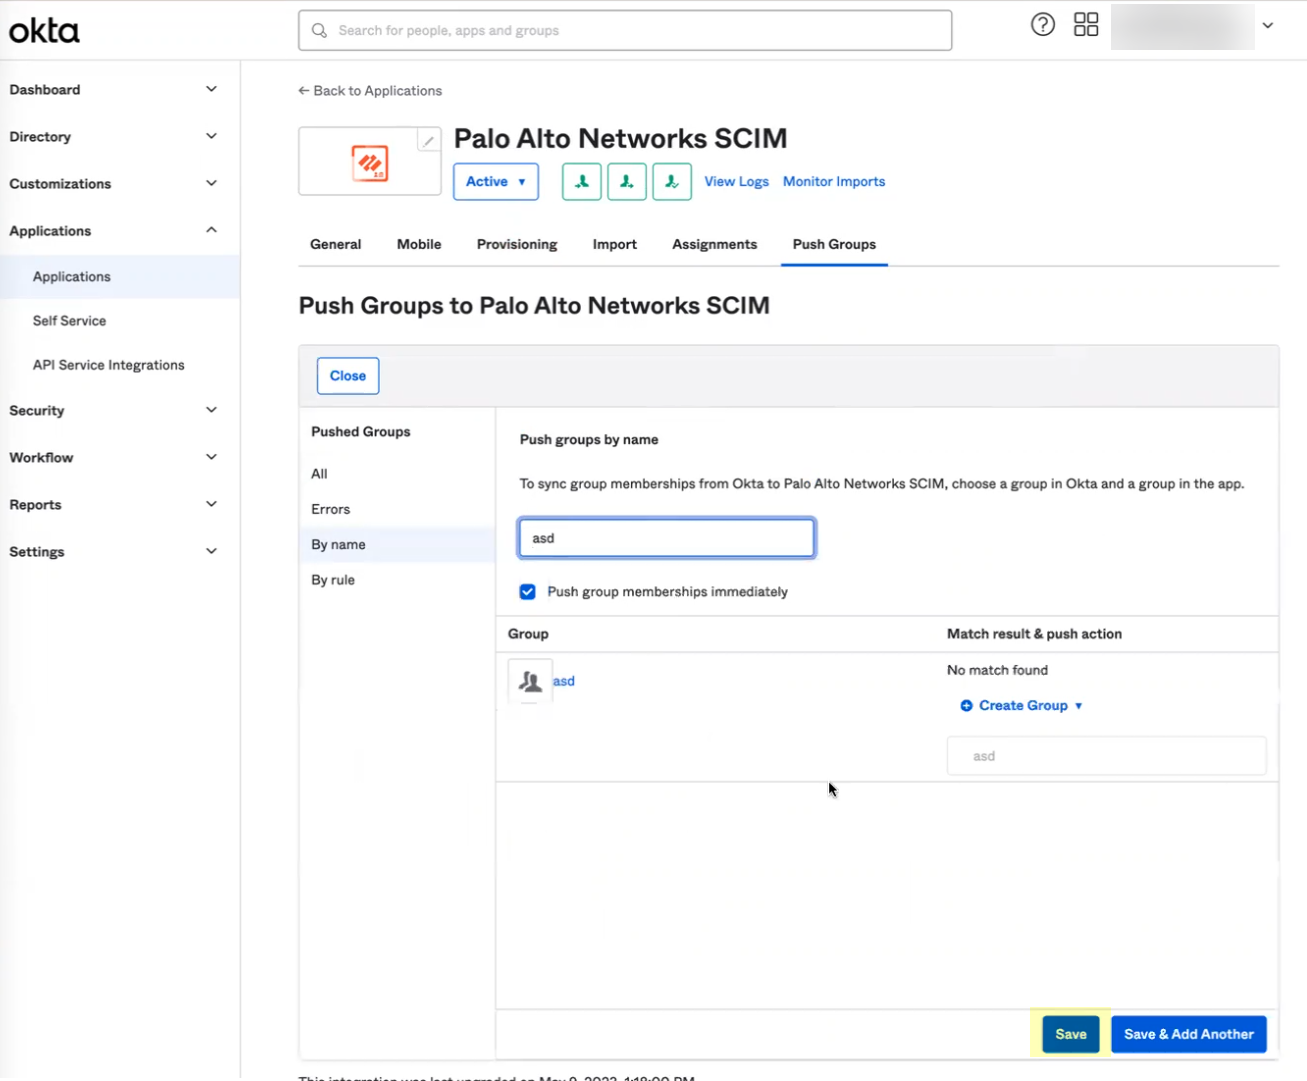
- Verify the configuration.
- In the Cloud Identity Engine app, select Directories and verify that the timestamp displays in the SCIM Change Timestamp column for the Okta SCIM directory.
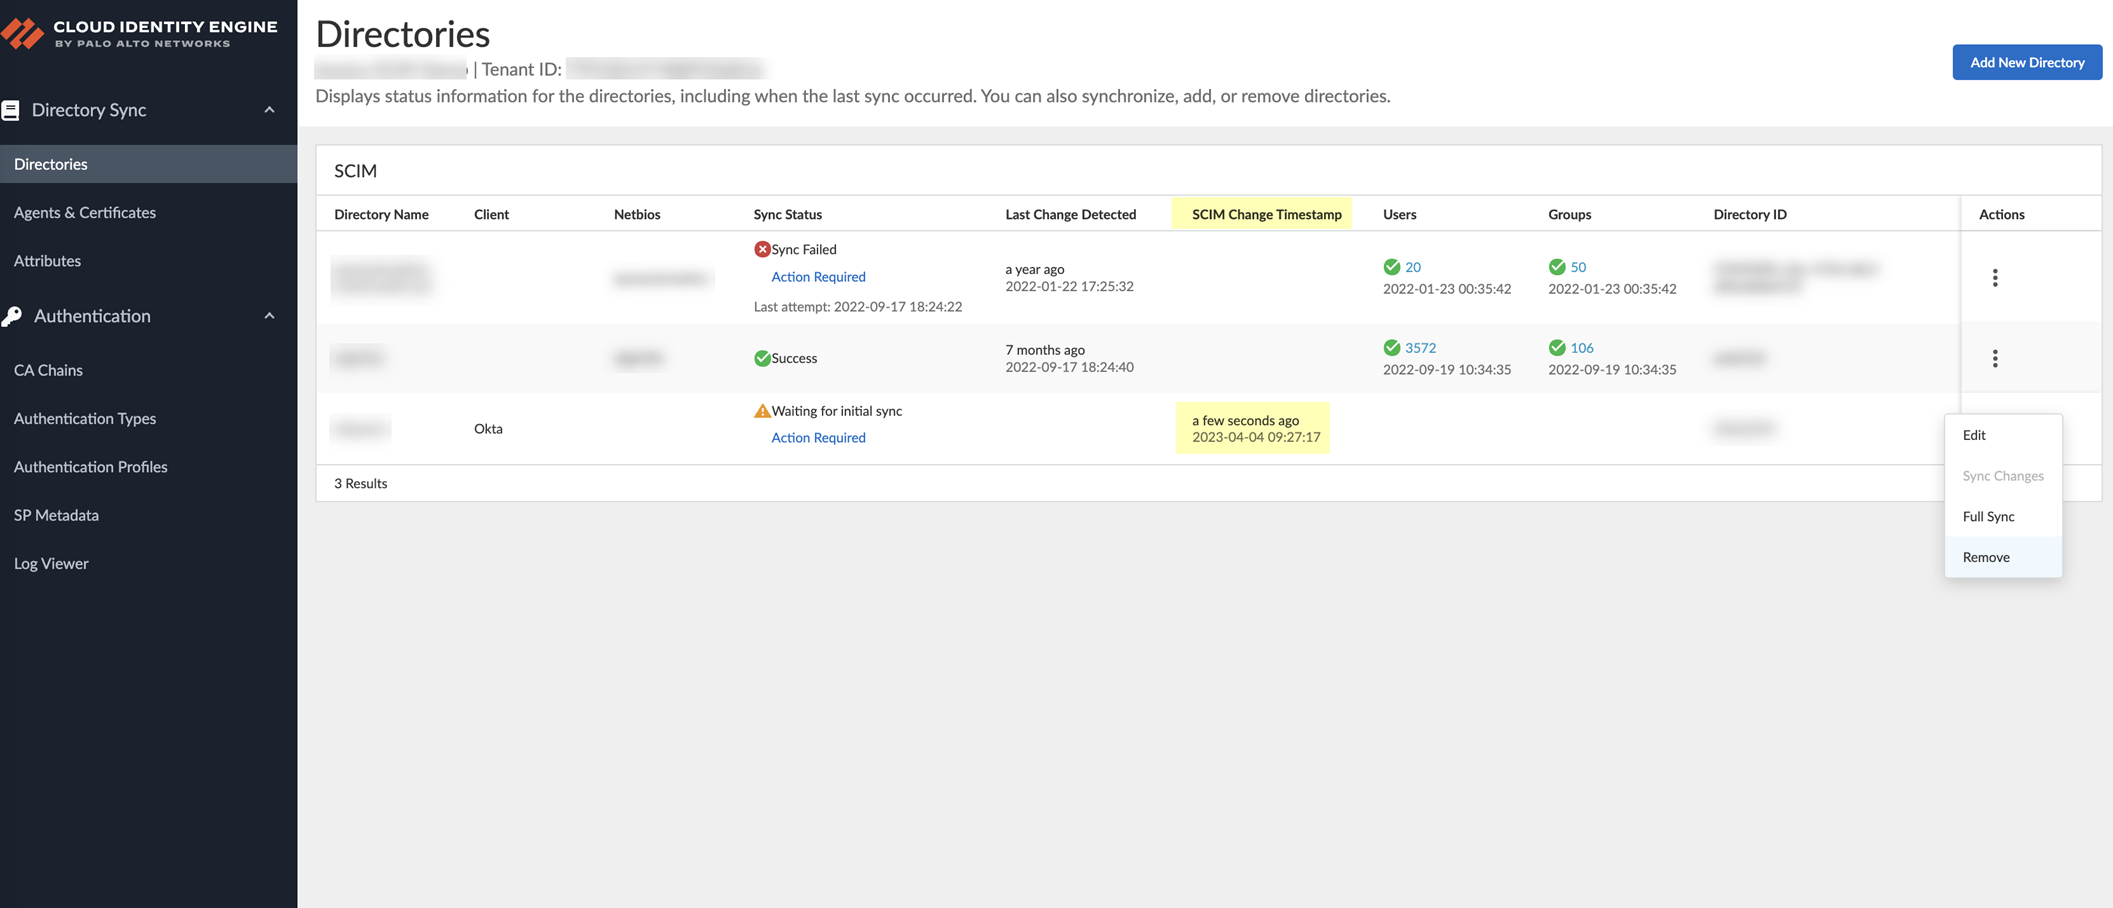
- Select ActionsFull Sync for the directory.
The configuration isn’t complete until you’ve successfully completed a full sync for the entire directory.
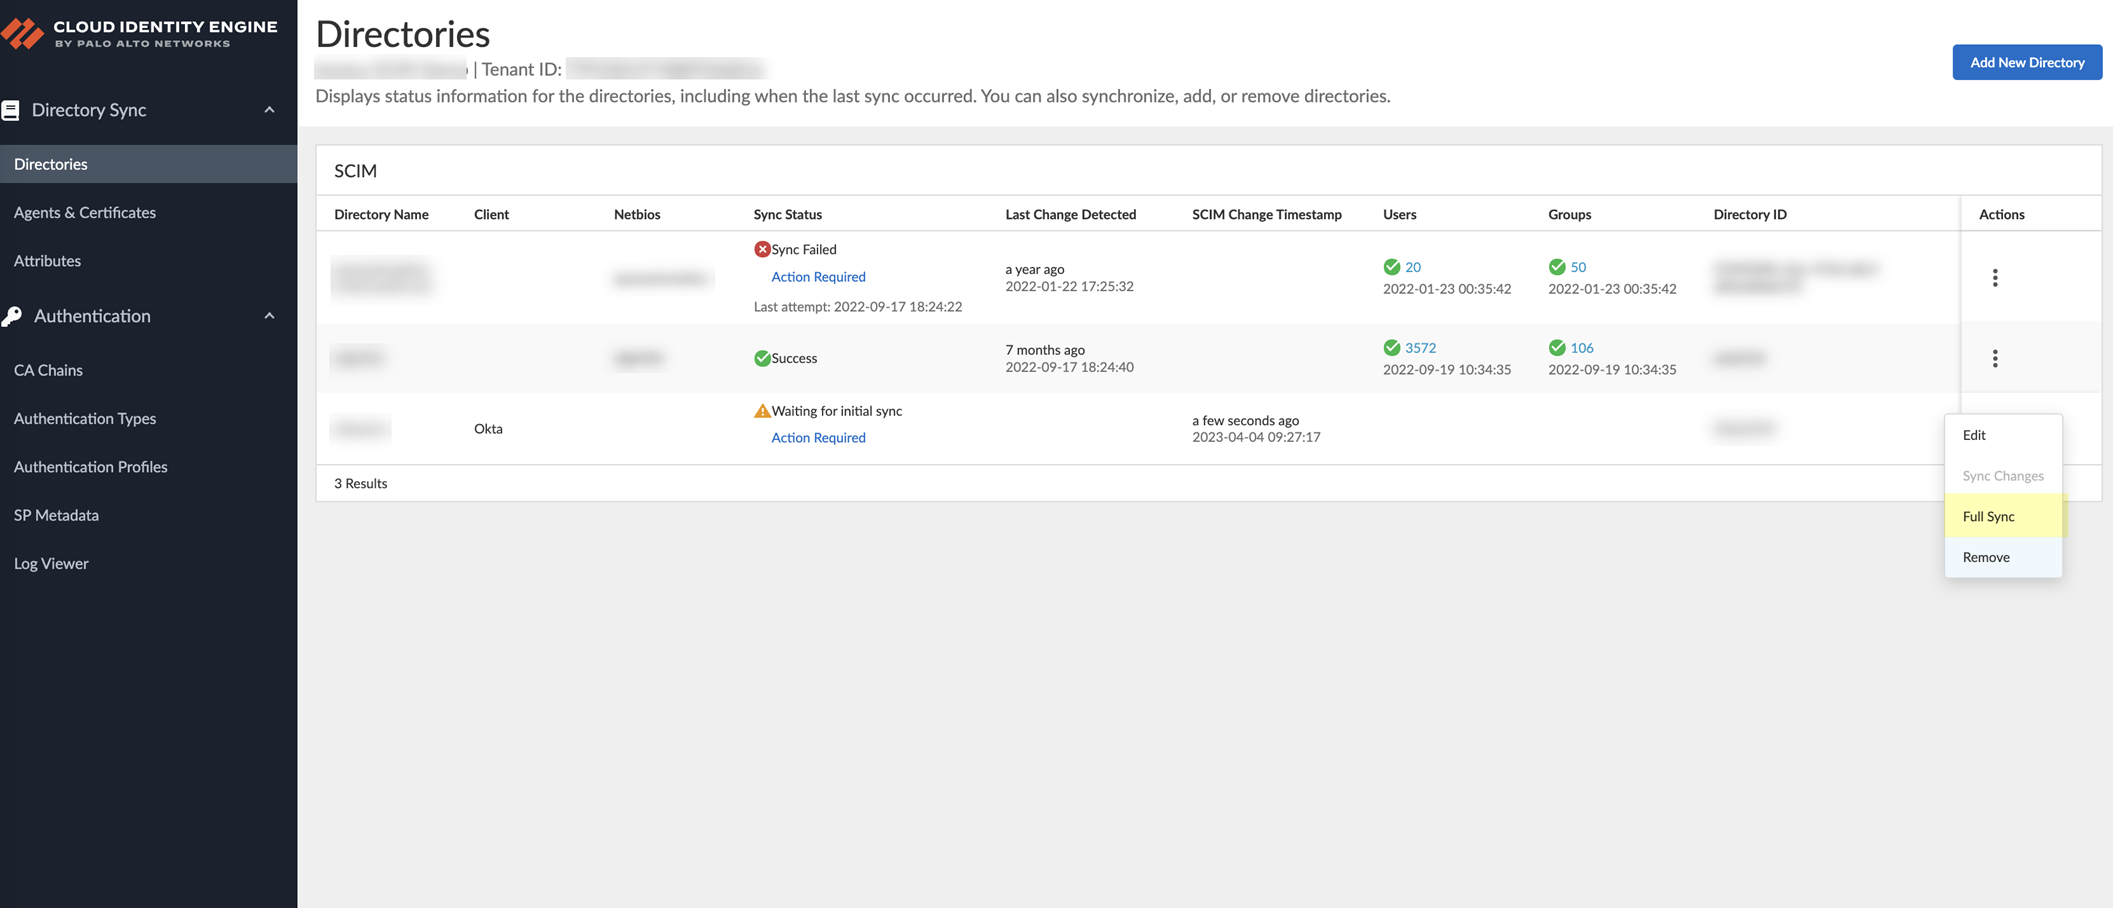
Configure a Custom Okta App Integration for SCIM Connector
Palo Alto Networks strongly recommends using the Okta gallery app to