Configure SCIM Connector for the Cloud Identity Engine
As part of the Cloud Identity Engine, Directory Sync connects to your directory to obtain user and group information for user identification and enforcement for group-based and user-based Security policy.
Configuring the System for Cross-Domain Identity Management ( SCIM ) protocol for Directory Sync in the Cloud Identity Engine allows you to customize what attributes Directory Sync collects from your directory. You can add or remove attributes in your directory portal to customize which attributes you want to share with the Cloud Identity Engine for user and group identification.
The SCIM gallery app does not support the userType attribute.
Configuring your directory to use the SCIM Connector with the Cloud Identity Engine requires completing all necessary steps in both the Cloud Identity Engine and in the portal for your specific SCIM client. If you encounter any issues with the SCIM Connector setup, learn how to Troubleshoot Cloud Identity Engine Issues .
- Set up SCIM Connector in the Cloud Identity Engine app and complete the predeployment steps for your SCIM client.
- Complete the predeployment steps for your SCIM client.
- Configure Azure Active Directory for SCIM Connector
- Configure PingFederate for SCIM Connector
- Configure Okta Directory for SCIM Connector
- In the Cloud Identity Engine app, select Directory SyncDirectoriesCloud DirectorySet UpSCIM .
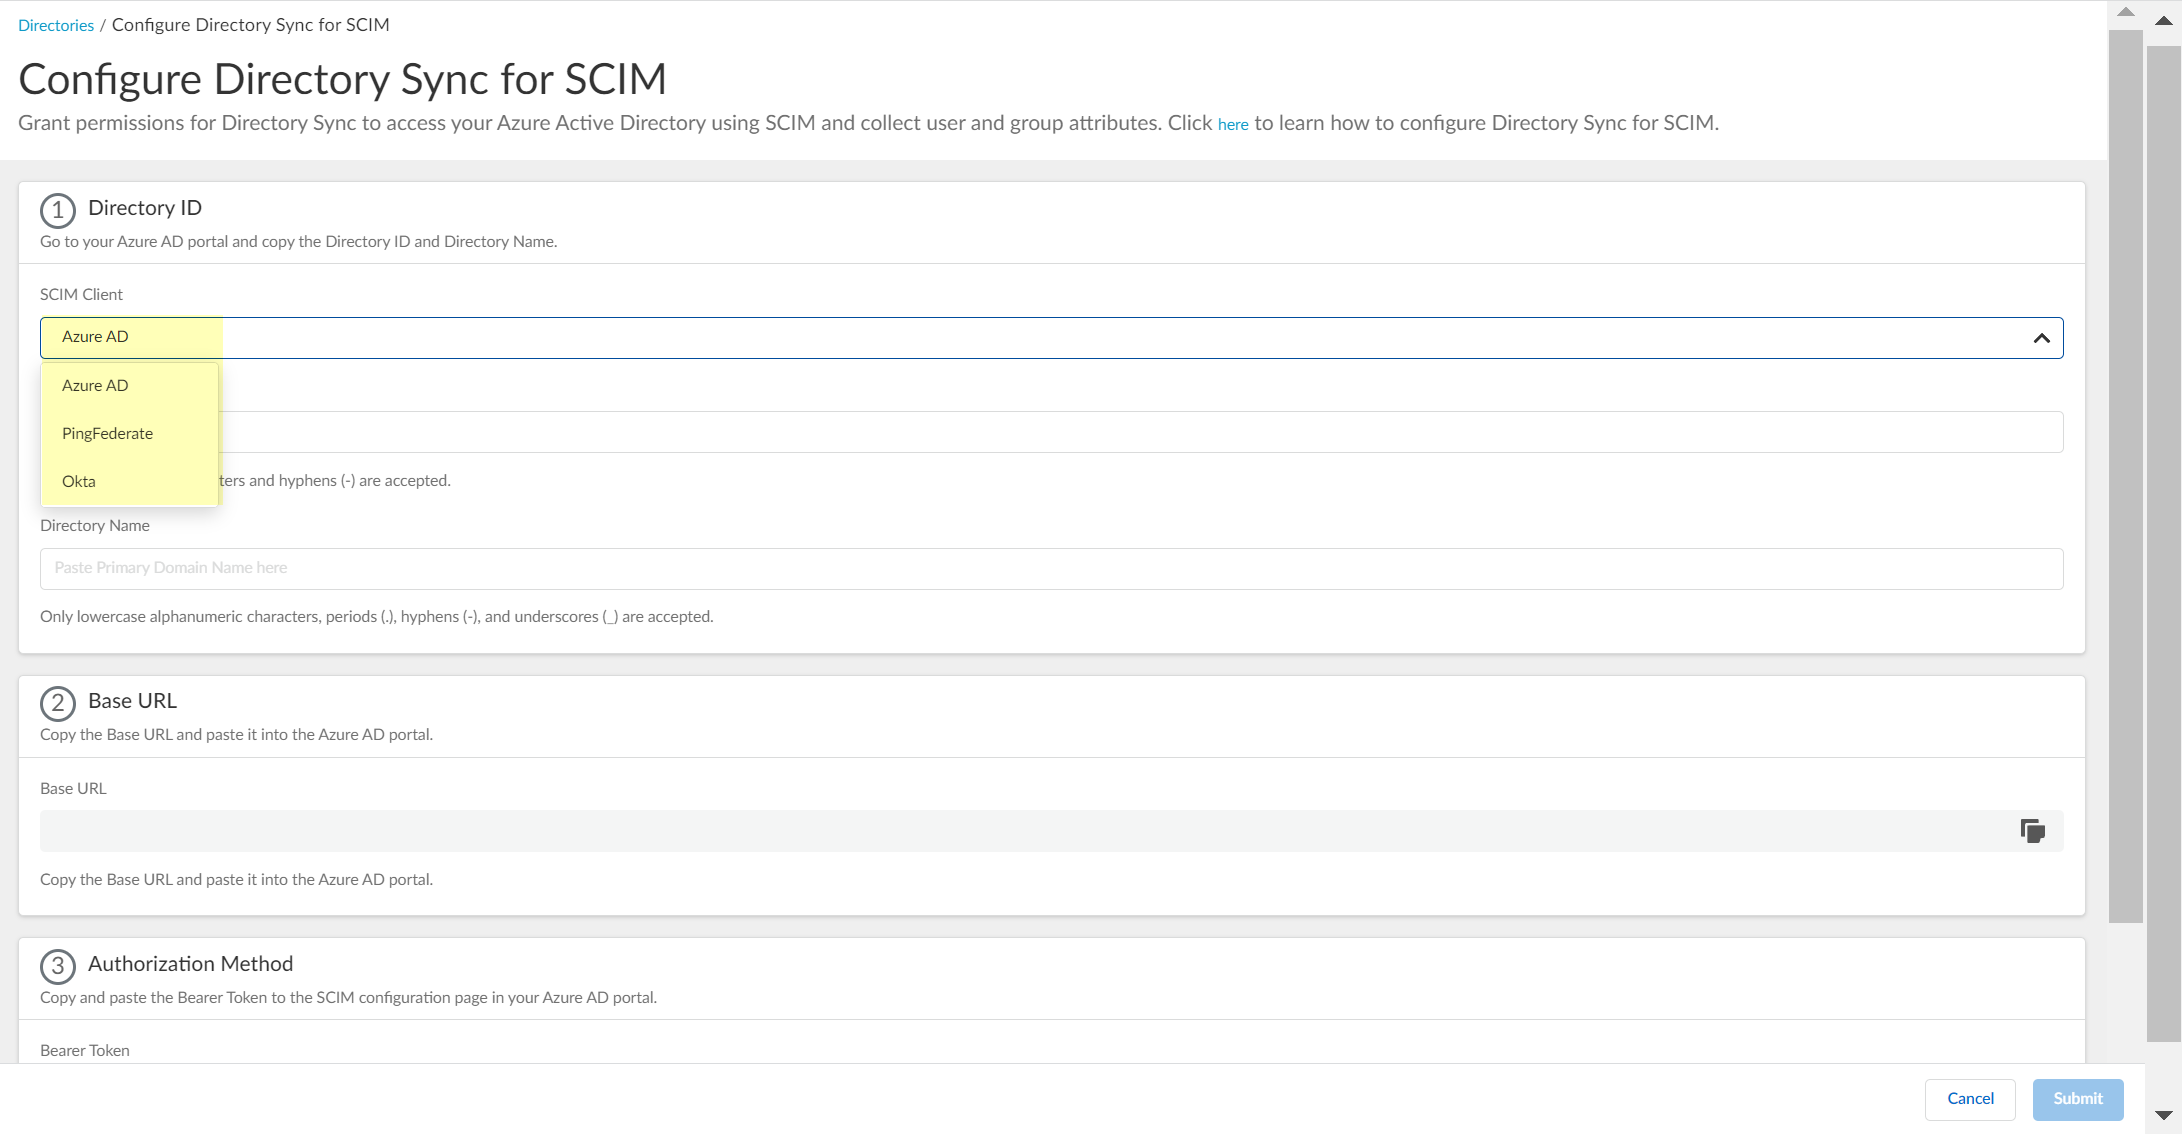
- Select the SCIM Client you want to use:
- Azure AD —Configure an Azure Active Directory to use the SCIM Connector. Be sure to complete the predeployment steps in the Azure Portal to
Configure Azure Active Directory for SCIM Connector
.
- PingFederate —Configure a PingFederate server to use the SCIM Connector. Be sure to complete the predeployment steps in the PingFederate portal to
Configure PingFederate for SCIM Connector
.
- Okta —Configure an Okta Directory to use the SCIM Connector. Be sure to complete the predeployment steps in the Okta Administrator Dashboard to
Configure Okta Directory for SCIM Connector
.
-
- In the portal for your SCIM client, obtain the necessary information you must enter to configure the SCIM Connector in the Cloud Identity Engine.
- Configure Azure Active Directory for SCIM Connector
- Configure PingFederate for SCIM Connector
- Configure Okta Directory for SCIM Connector
- Enter the necessary information in the Cloud Identity Engine to configure your directory to use SCIM with Directory Sync.
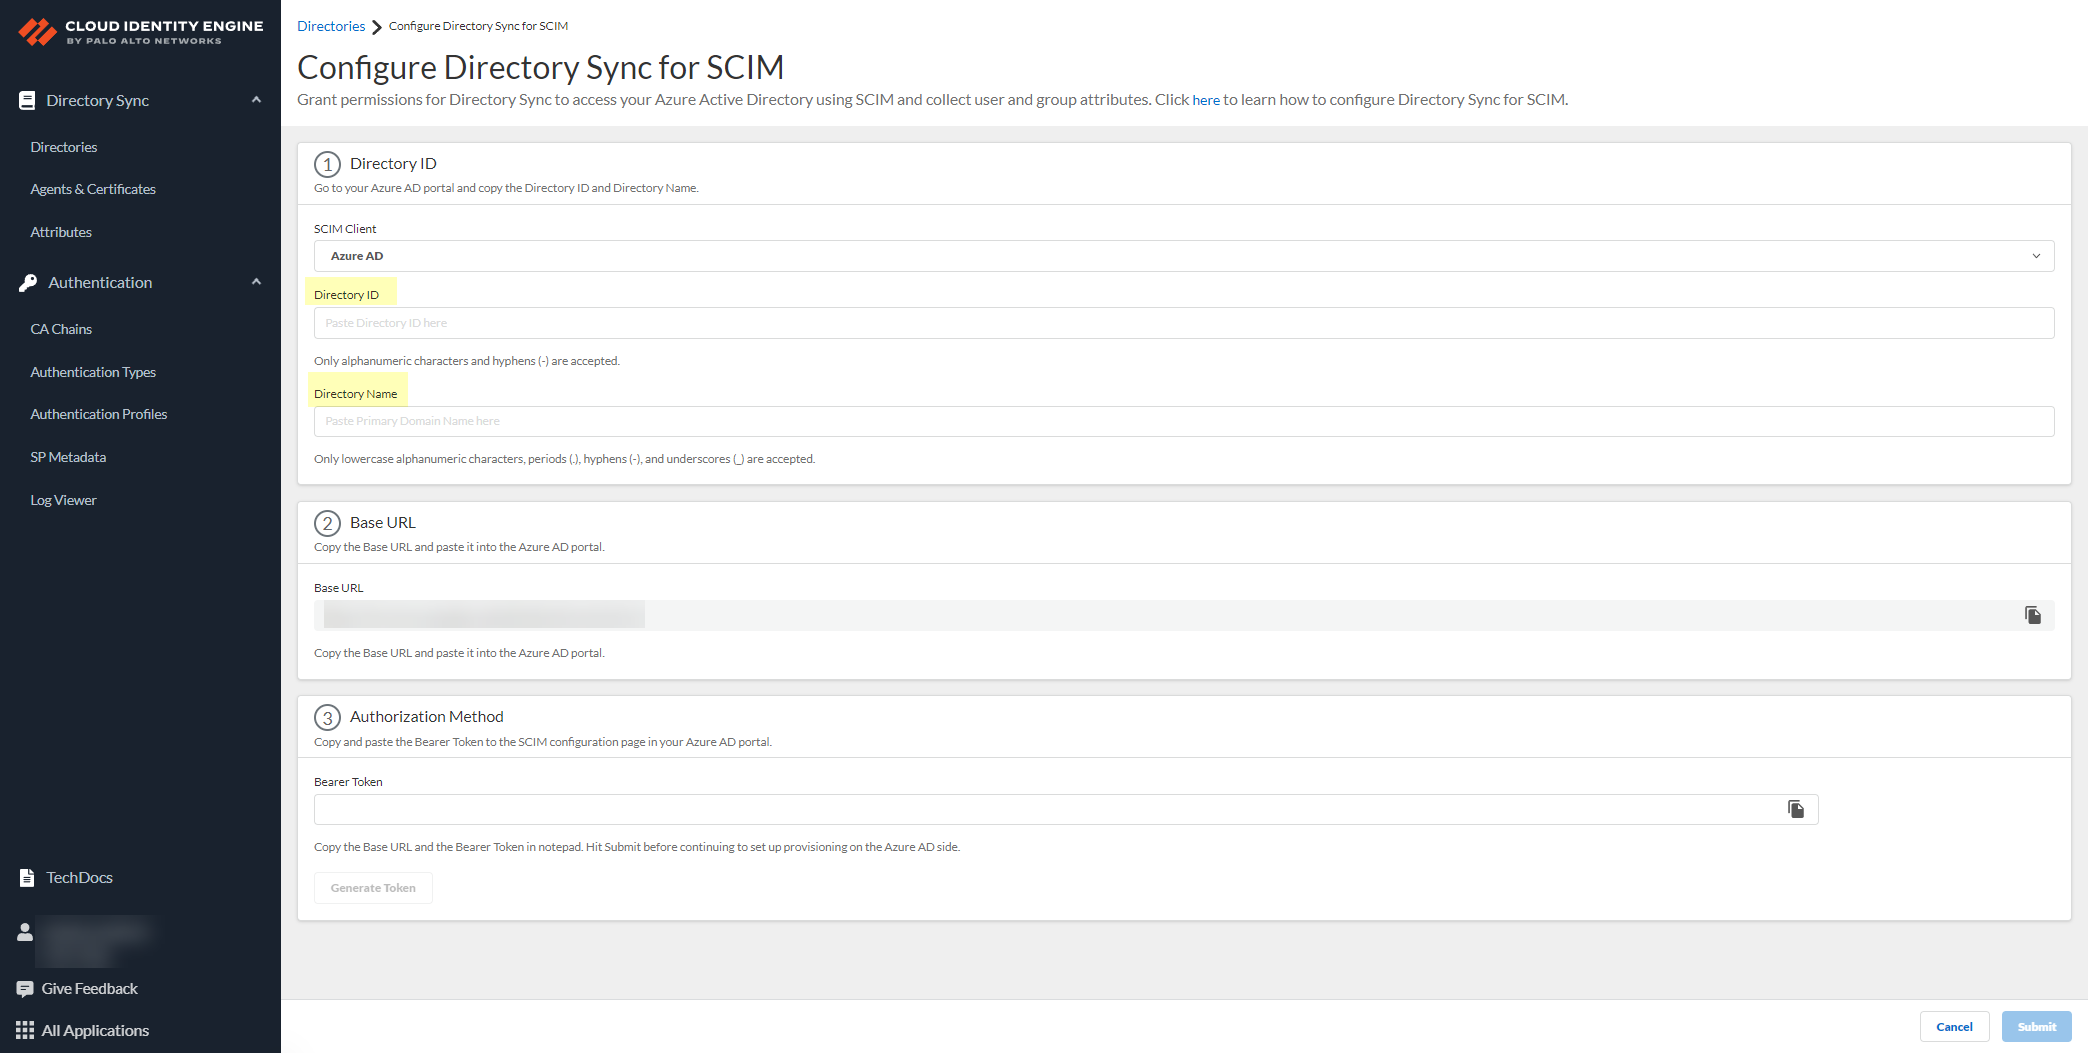
- Enter the Directory ID (up to 40 alphanumeric characters, including hyphens) and Directory Name (up to 50 lowercase alphanumeric characters including periods, hyphens, and underscores) that you copied from your directory portal.
- For the Directory ID in the Cloud Identity Engine:
- For Azure, use the Tenant ID .
- For Ping, use the System ID .
- For Okta, use the Directory Name .
For Okta, Palo Alto Networks recommends using the Directory Name, but you can enter any name (up to 40 alphanumeric characters, including hyphens).
- For the Directory Name in the Cloud Identity Engine:
- For Azure, use the Primary Domain .
- For Ping, use the User .
- For Okta, use the Okta Domain .
- Copy the Base URL and save it in a secure location.
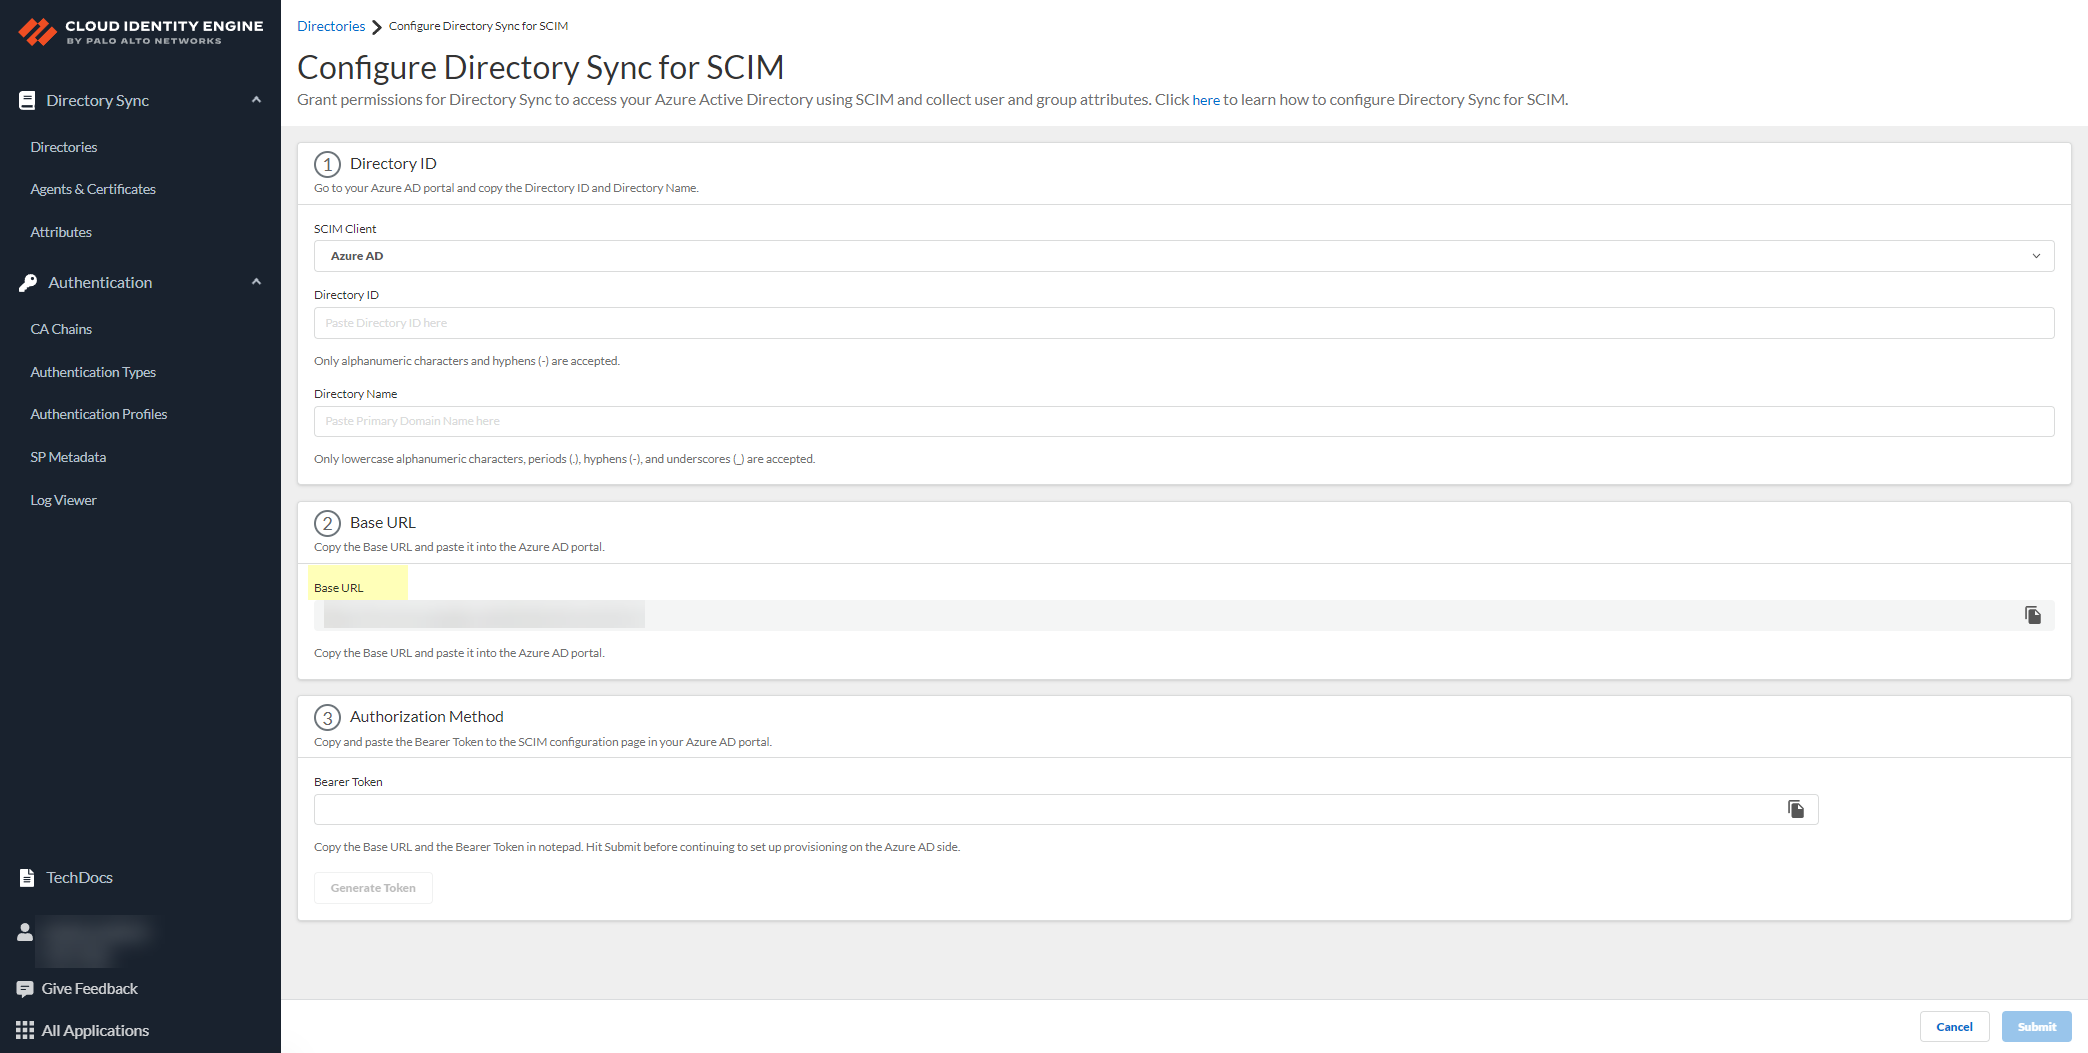
- Click Generate Bearer Token then copy the token that the Cloud Identity Engine generates for your Authorization Method and save it in a secure location.
Before continuing to the next step and submitting the changes, make sure to save the token in a location where you can easily retrieve it to enter it in your SCIM client directory portal. If you submit the changes in the Cloud Identity Engine app before you generate and save the token, you must generate a new token in the Cloud Identity Engine app and enter the new token in the directory portal.
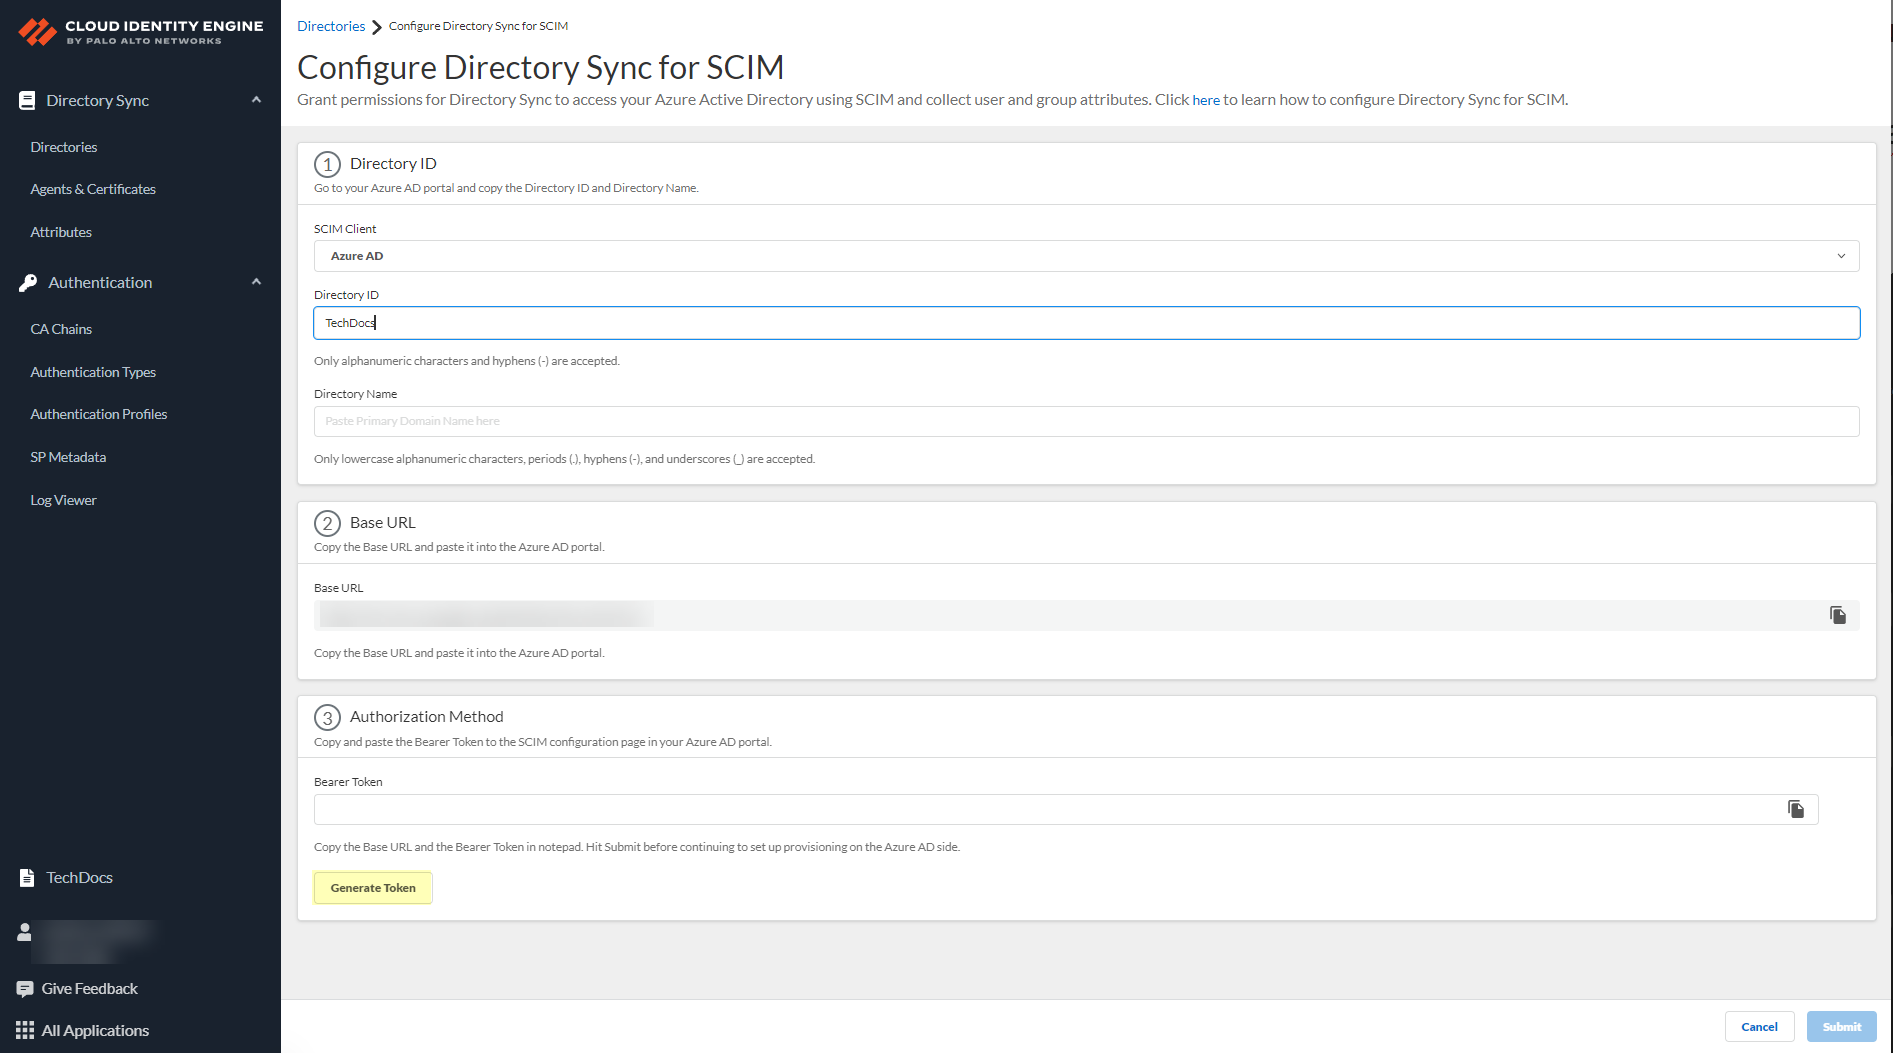
- Click Submit to commit your changes.
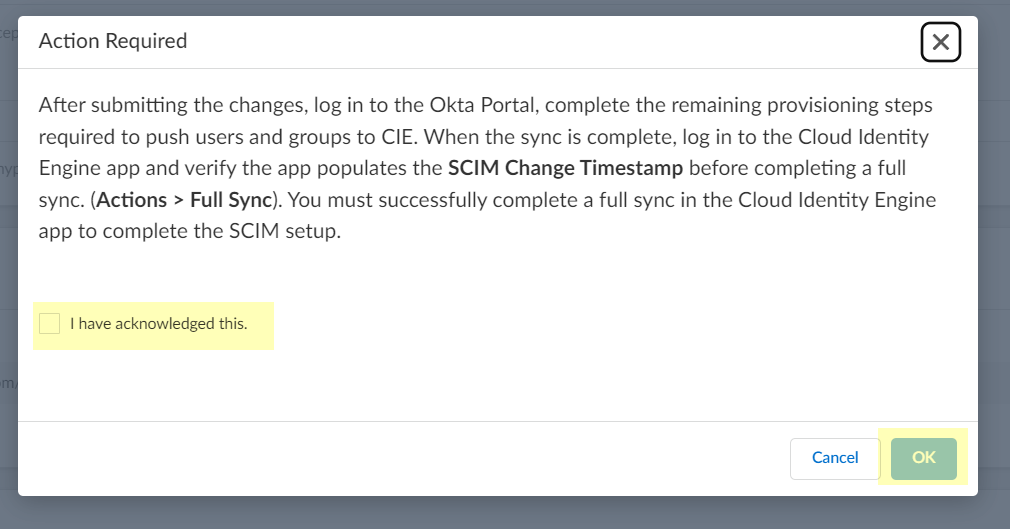
You must click Submit to create the configuration in the Cloud Identity Engine app before continuing the configuration in the IdP, then return to the Cloud Identity Engine app and complete a full sync of the entire directory before the configuration is complete.
- Select the check box and click OK to confirm your acknowledgment of the postconfiguration requirements then return to the portal for your SCIM client to complete the postconfiguration steps.
- Configure Azure Active Directory for SCIM Connector
- Configure PingFederate for SCIM Connector
- Configure Okta Directory for SCIM Connector
After completing the steps in both the Cloud Identity Engine app and your directory portal, you can now use the SCIM Connector to collect attributes from your directory. To learn which attributes the SCIM Collector collects, see the Cloud Identity Engine Attributes .
Configure Azure Active Directory for SCIM Connector
You must also complete the required steps in the Azure Active Directory (AD) Portal to complete the SCIM Connector configuration. For more information, refer to the documentation for the Azure AD SCIM Connector .
- Complete the predeployment steps to add a new application in the Azure Portal then obtain the necessary information to configure SCIM for Directory Sync.
Azure Active Directory (AD) SCIM provisioning requires that the group attribute displayName is unique. If more than one group uses the displayName attribute, the initial sync isn't successful and the data for the duplicate group names might only be partially retrievable. If you don't use the duplicate groups in Security policy, then you can proceed. If you use the duplicate group names in Security policy, you must resolve the issue by modifying the displayName attribute in your Azure Active Directory (AD) to ensure that it’s unique.
- Log in to the Azure Portal.
- Select Overview (if it'sn’t already selected), copy the Tenant ID , and save it in a secure location.
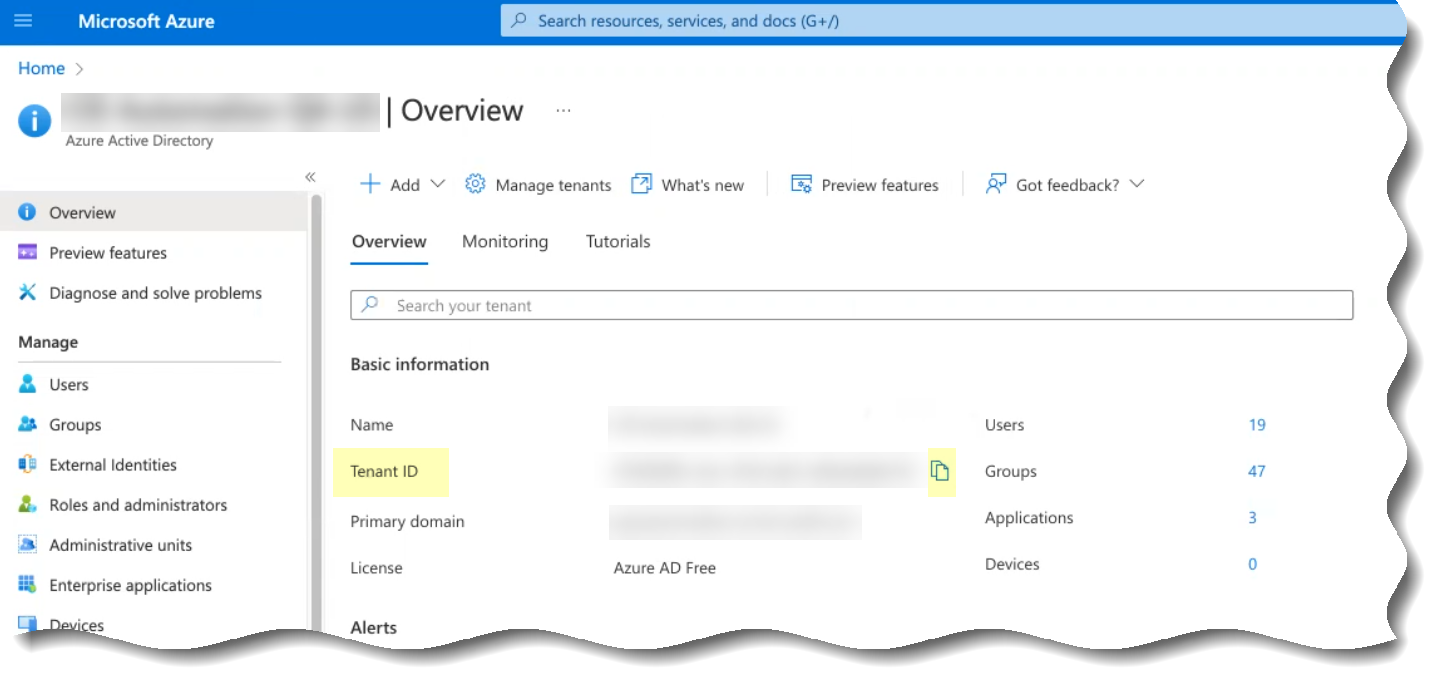
- Copy the Primary domain and save it in a secure location.

- Select Enterprise applicationsAll applicationsNew application .
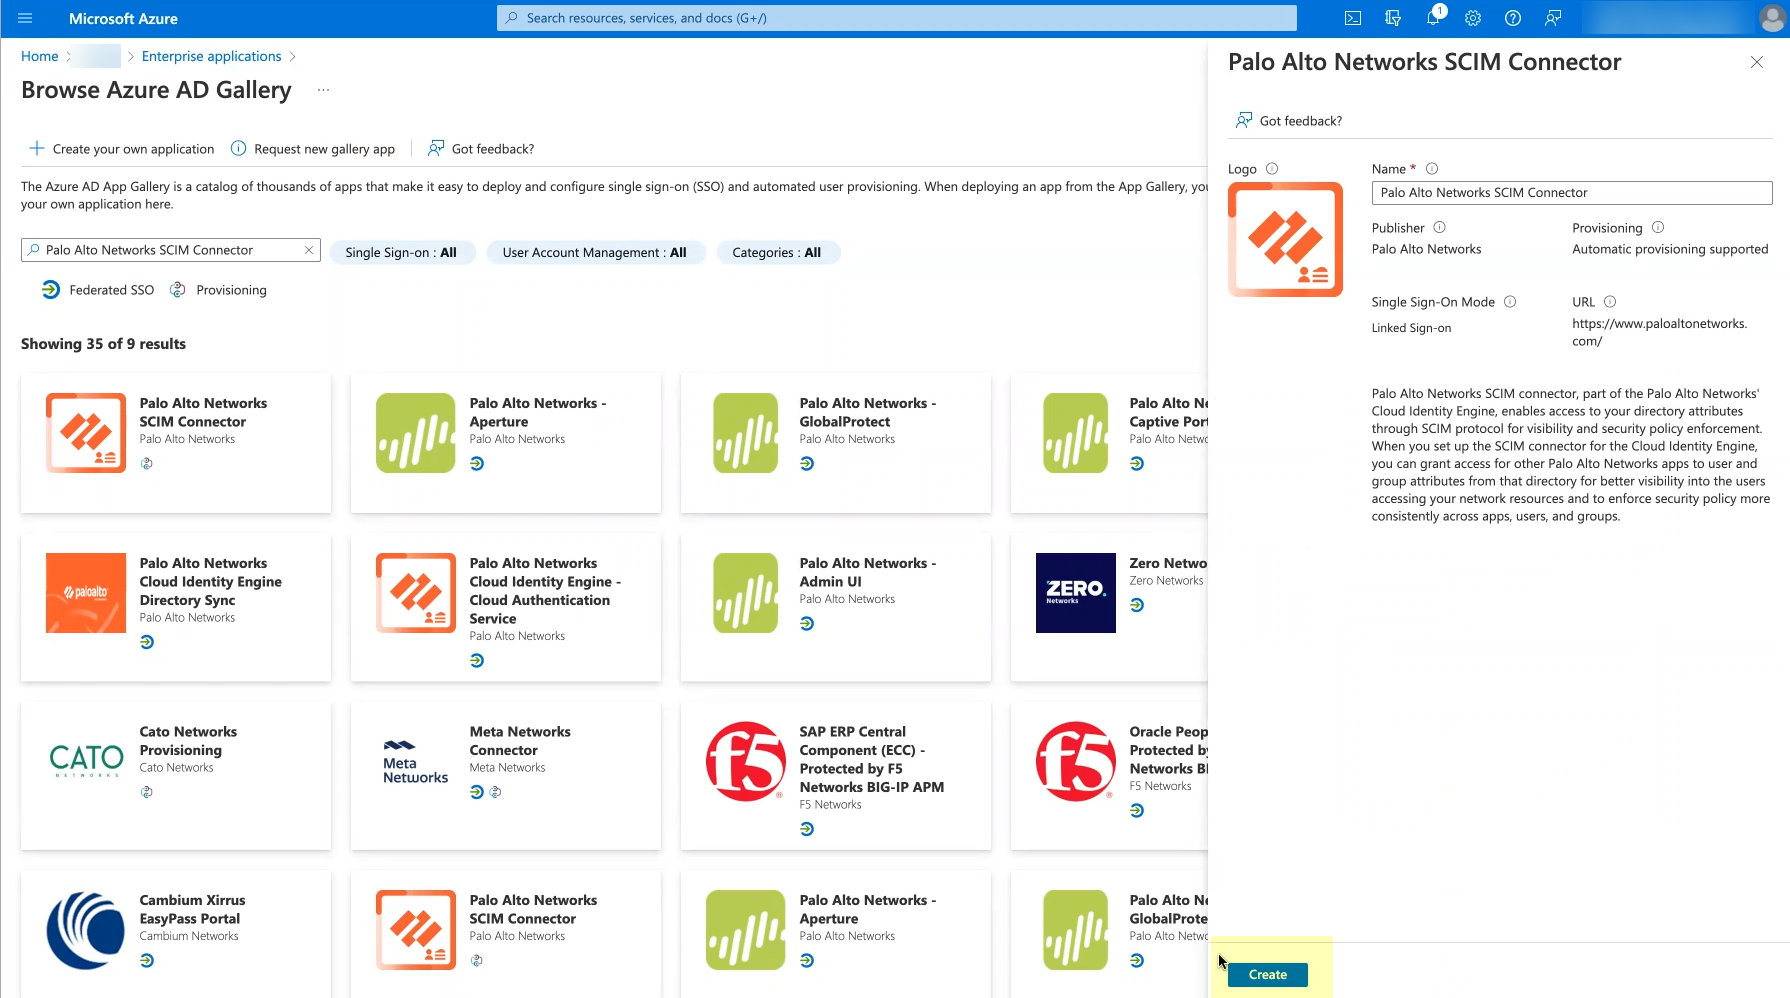
- To Search application (s), enter Palo Alto Networks SCIM Connector .
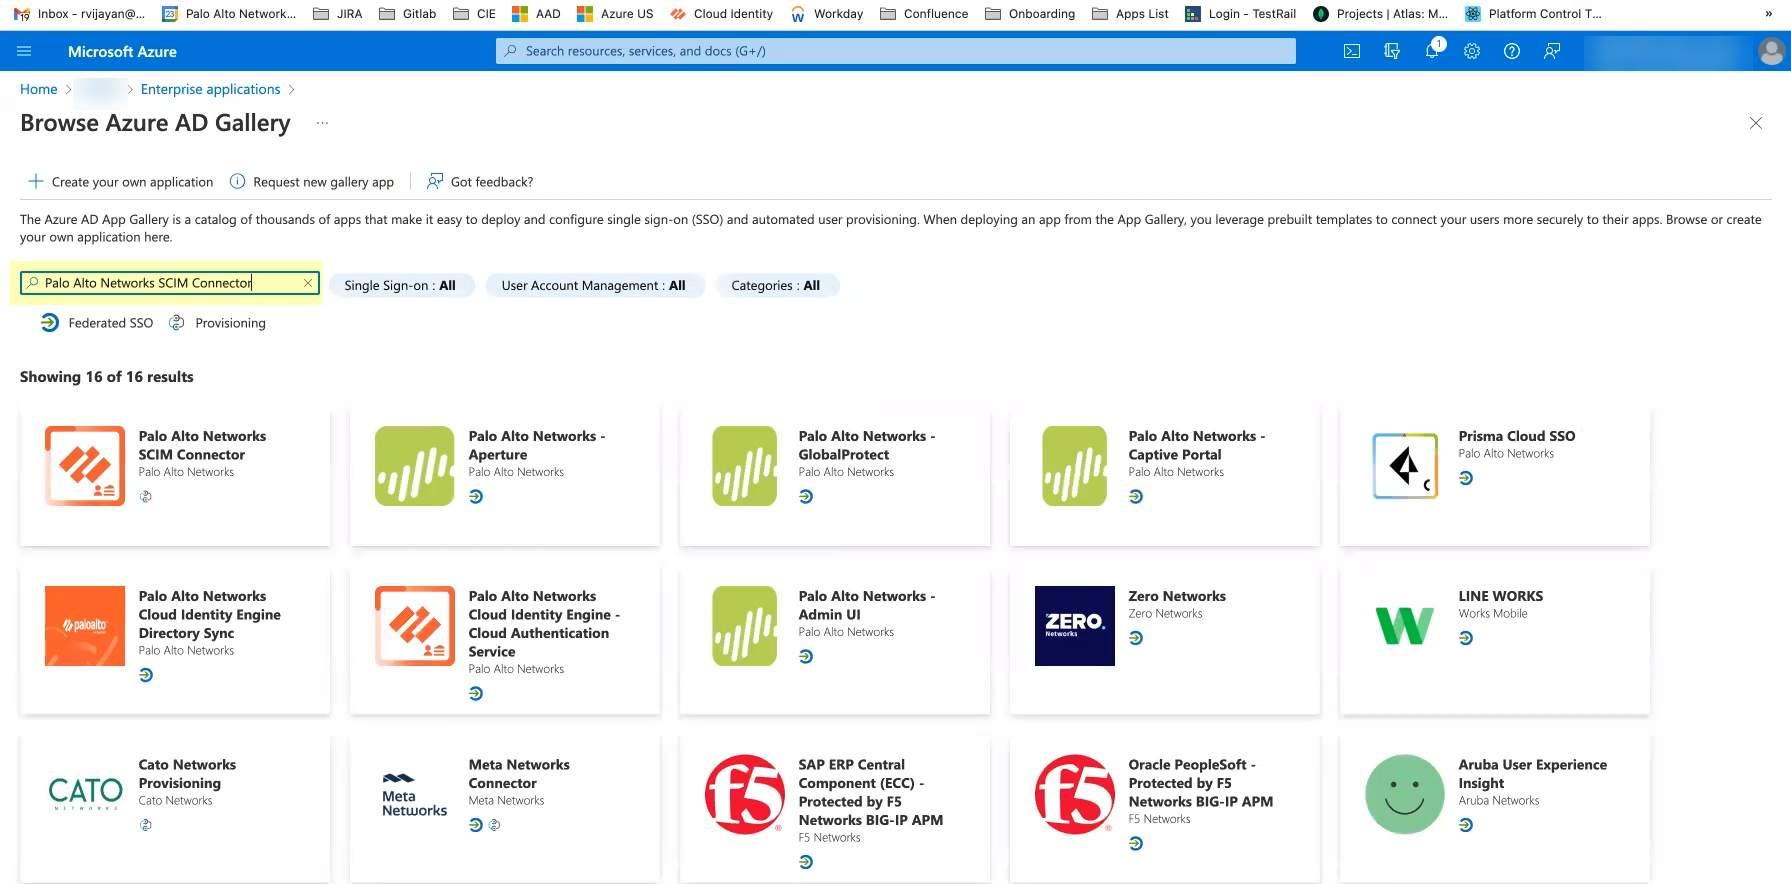
- Select Palo Alto Networks SCIM Connector and Create the application.
If you encounter an error when creating the application, refer to Troubleshoot Cloud Identity Engine Issues .
- Return to the Cloud Identity Engine app to continue the SCIM Connector setup.
You must complete the setup in the Cloud Identity Engine before you can successfully Test Connection in the Azure Portal.
- After you submit the SCIM Connector configuration in the Cloud Identity Engine app, continue to the next step.
- Configure your Azure Active Directory (AD) to use SCIM Connector to connect to the Cloud Identity Engine.
- Log in to the Azure Active Directory (AD) Portal.
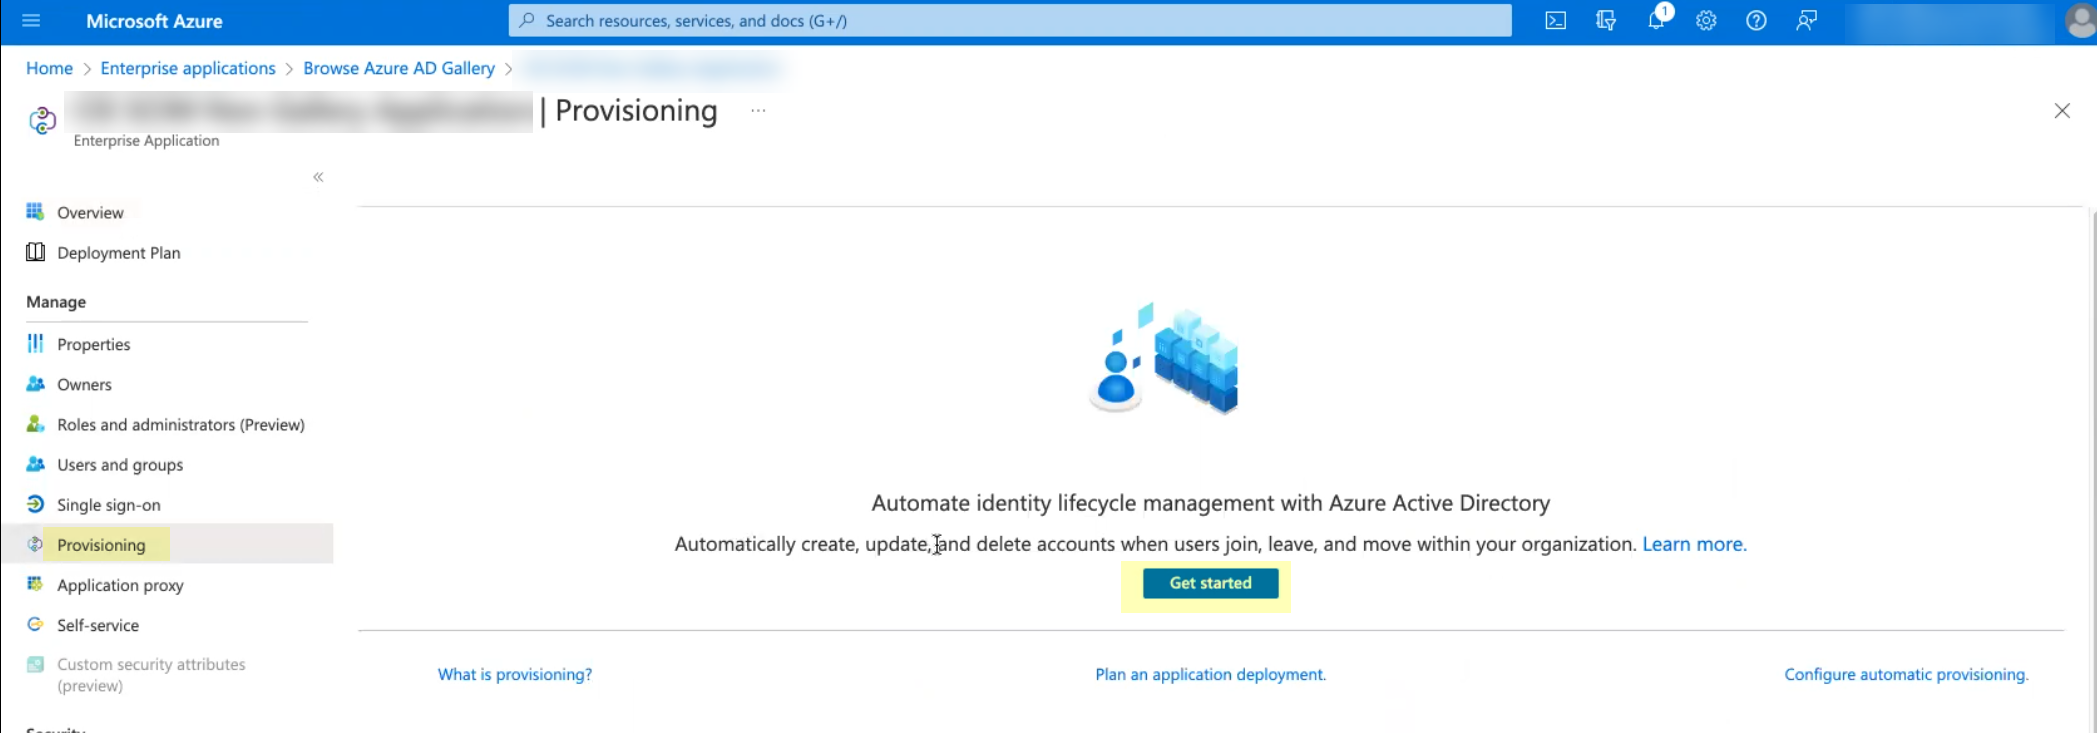
- Select Enterprise Applications then select the Palo Alto Networks SCIM Connector application.
- Select Provisioning and click Get Started .
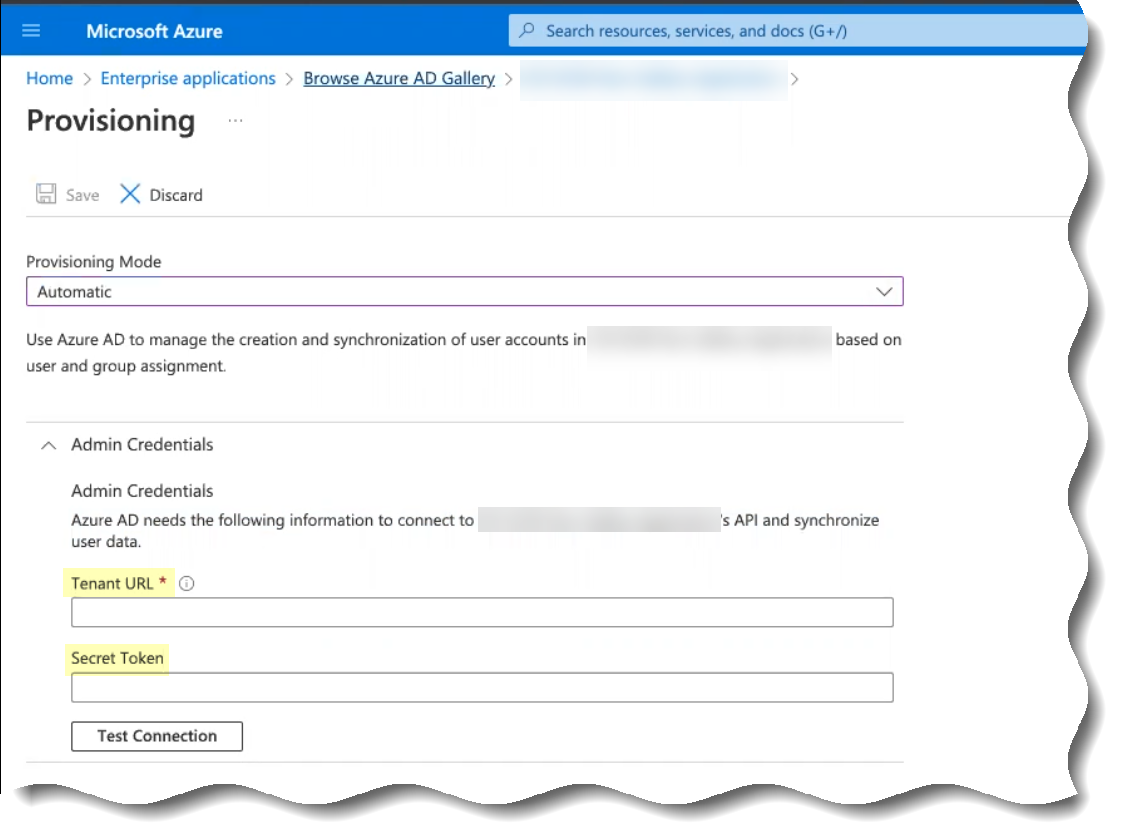
- Select Automatic as the Provisioning Mode .

- Enter the following information from steps
3.b
and
3.c
in the fields as indicated in the following table:
|
Copy from Cloud Identity Engine |
Enter in Azure Portal |
|
Base URL |
Tenant URL |
|
Authorization Method Bearer token |
Secret Token |
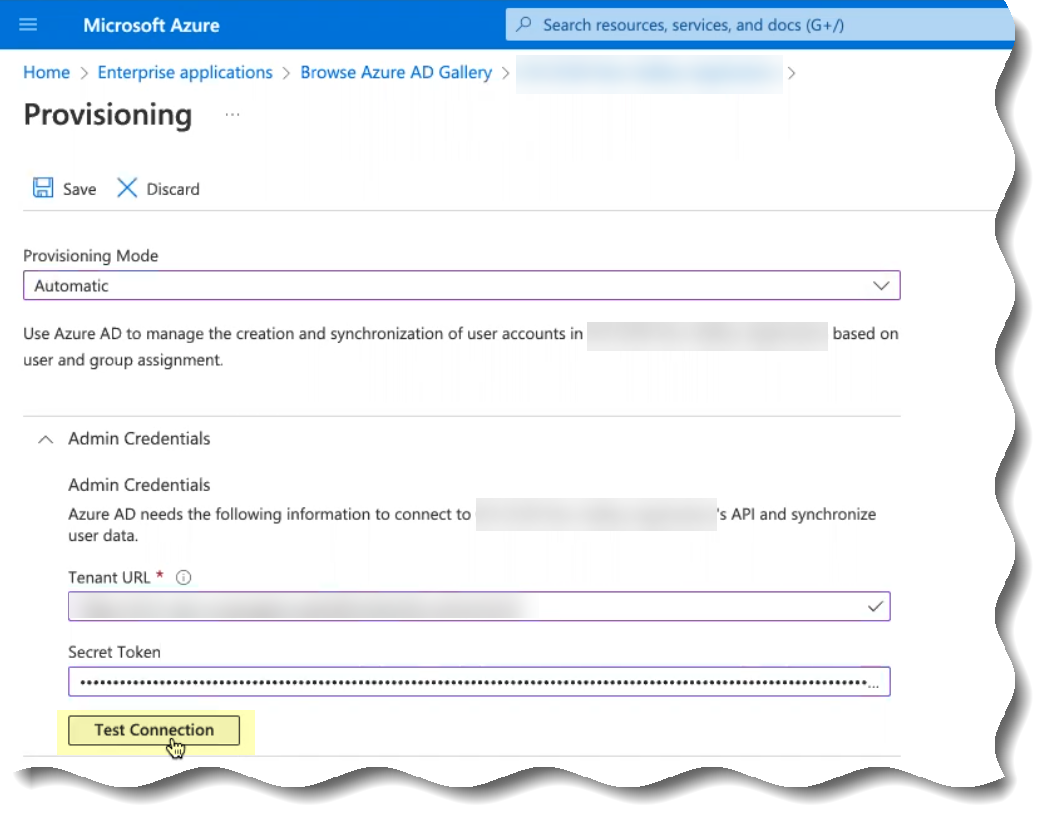
- Save your changes.

- (Optional but recommended) Click Test Connection to confirm that the Azure Active Directory (AD) can successfully communicate with the Cloud Identity Engine app.
You must complete the setup in the Cloud Identity Engine before you can successfully Test Connection in the Azure Portal.
- Manage the users, groups, and attributes that the Azure Active Directory (AD) provisions to the Cloud Identity Engine app.
If you choose to
sync only specific groups
and those groups contain subgroups, add the parent group first, then add any child groups. If you do not manually add the child groups of any parent groups, the Cloud Identity Engine syncs only the parent group. You do not need to manually add users as the Cloud Identity Engine sync users in groups, just any child groups of parent groups where you want to sync both groups.
- In the Azure Portal, select ProvisioningEdit Provisioning .

- Select Mappings then select whether you want to edit the attributes when you Provision Active Directory Groups or Provision Active Directory Users .
For optimal performance, Palo Alto Networks strongly recommends provisioning only the groups that you want to use the SCIM Connector. If you're using Prisma® Access with the Cloud Identity Engine, make sure that you provision any groups that you use in your Security policy to ensure it applies your Security policy correctly.
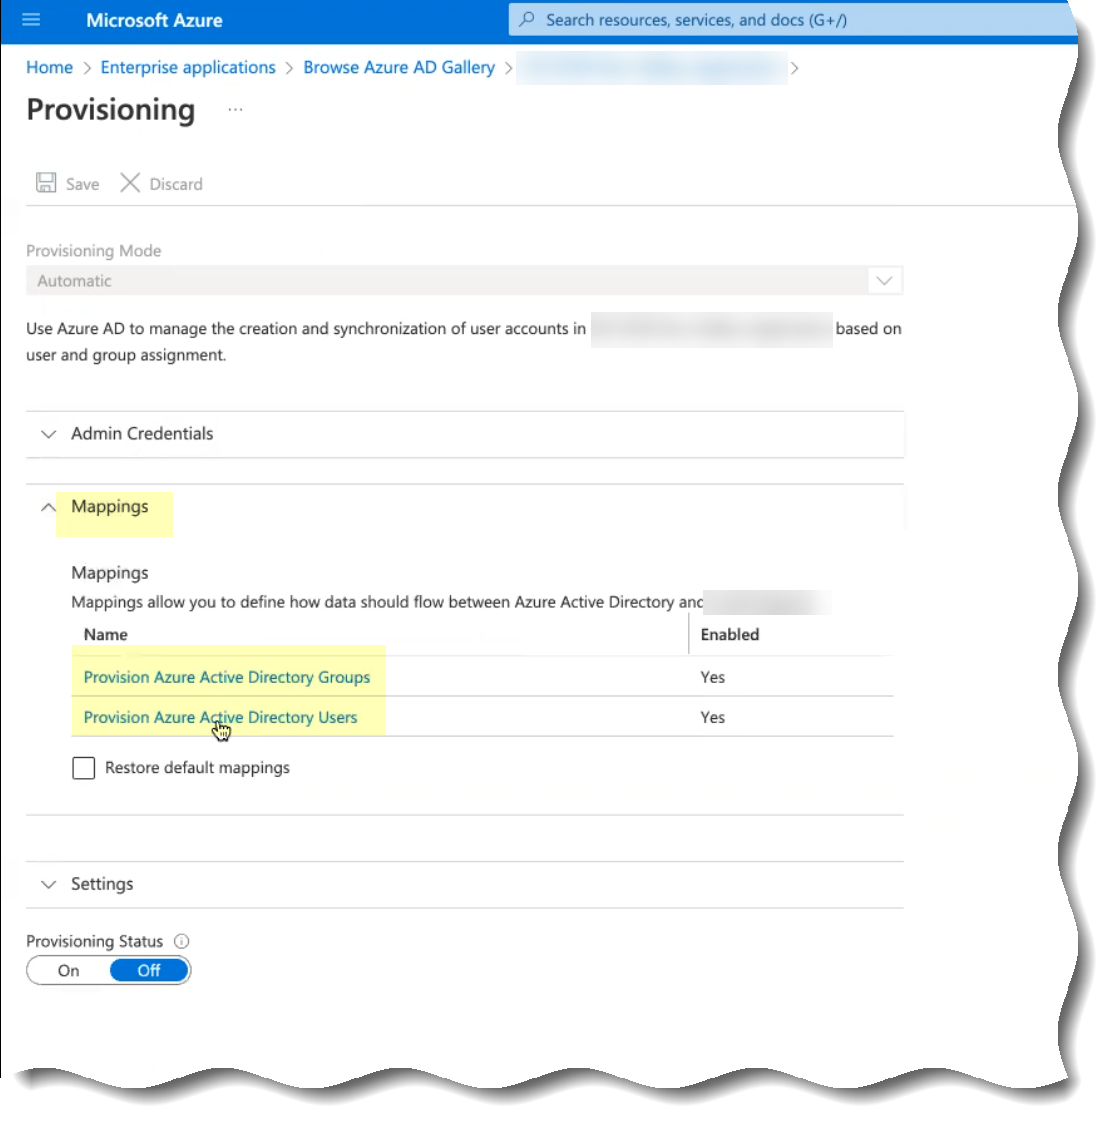
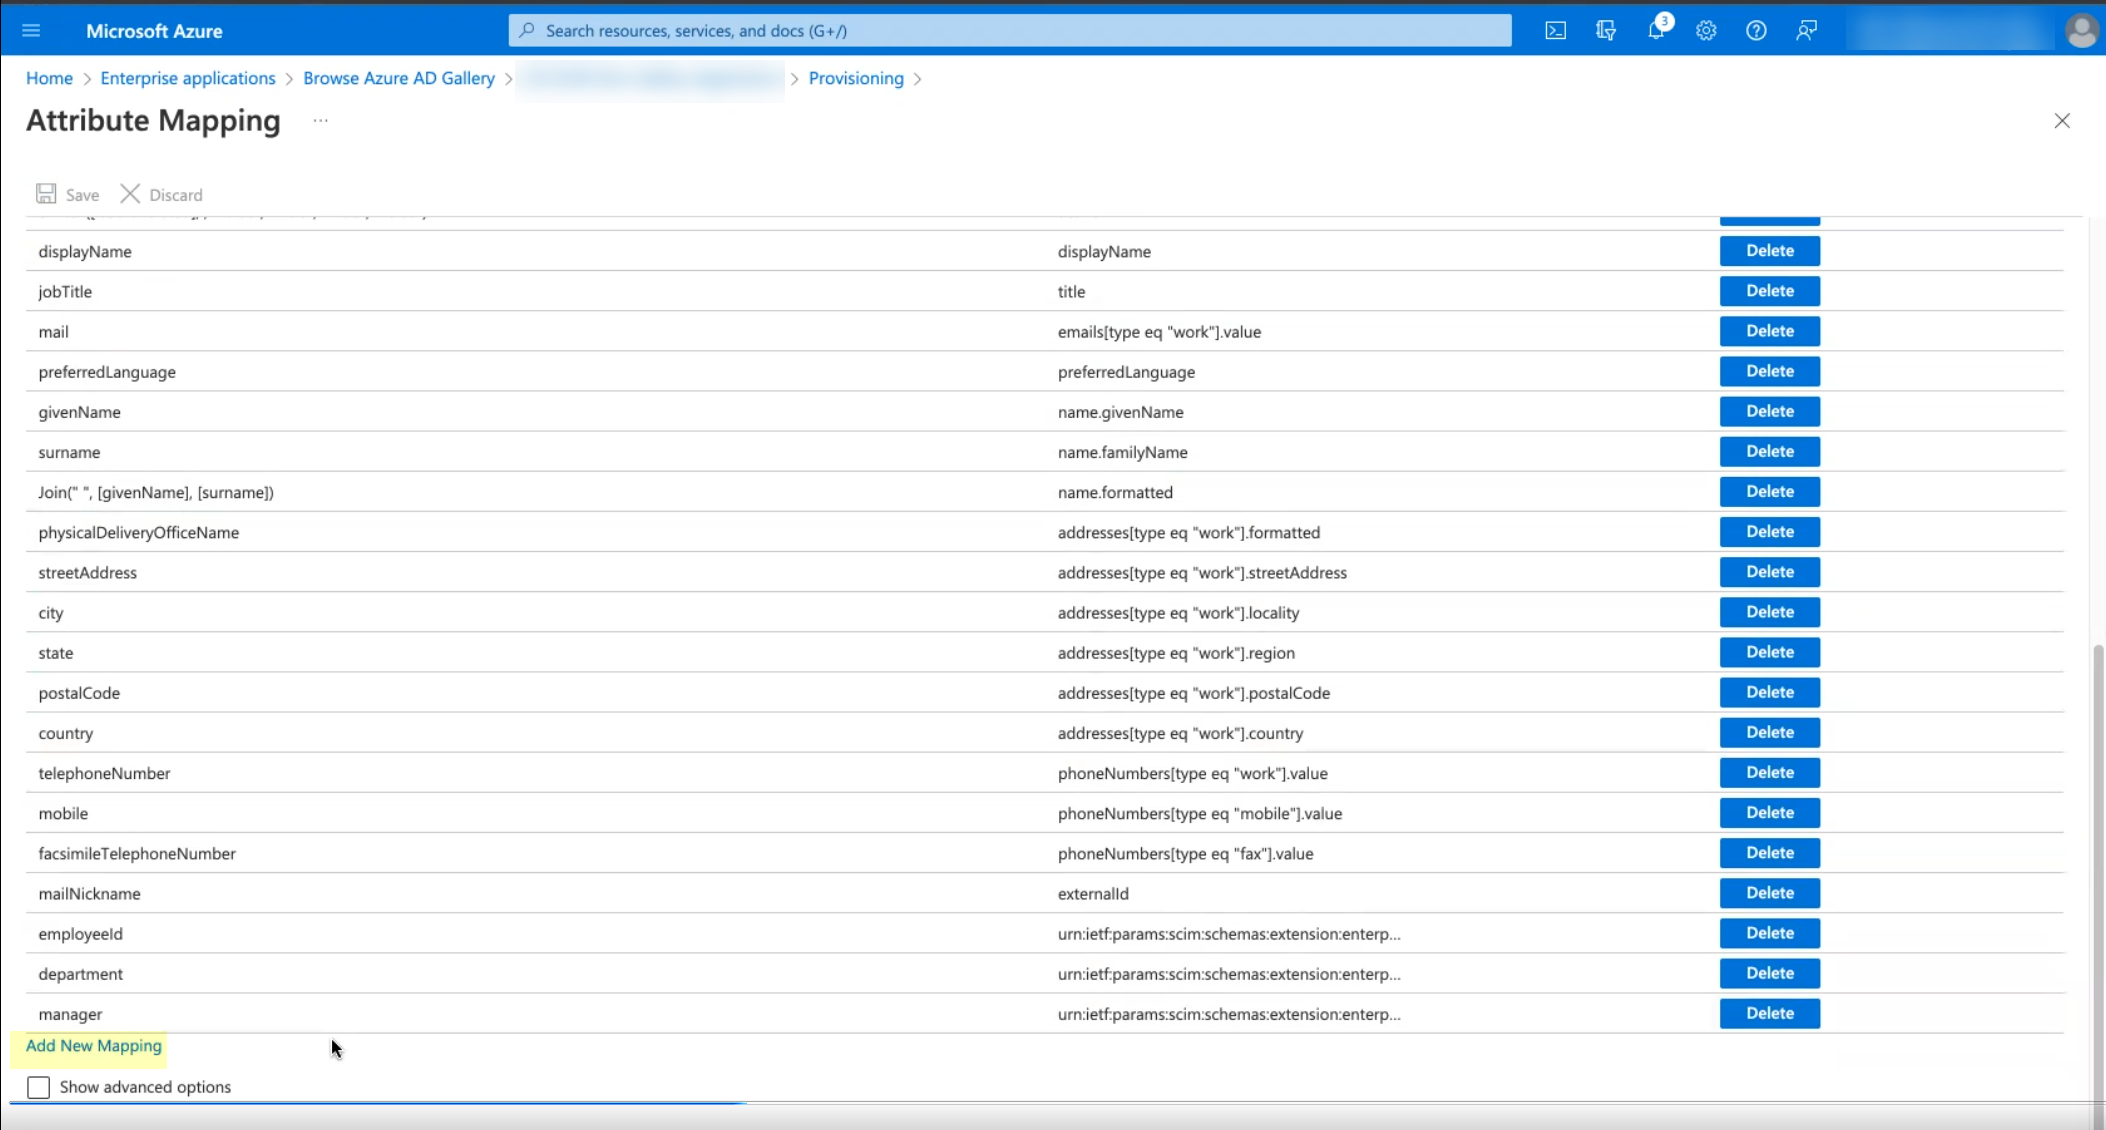
- Delete any attributes that you don’t want to provide to the Cloud Identity Engine app.
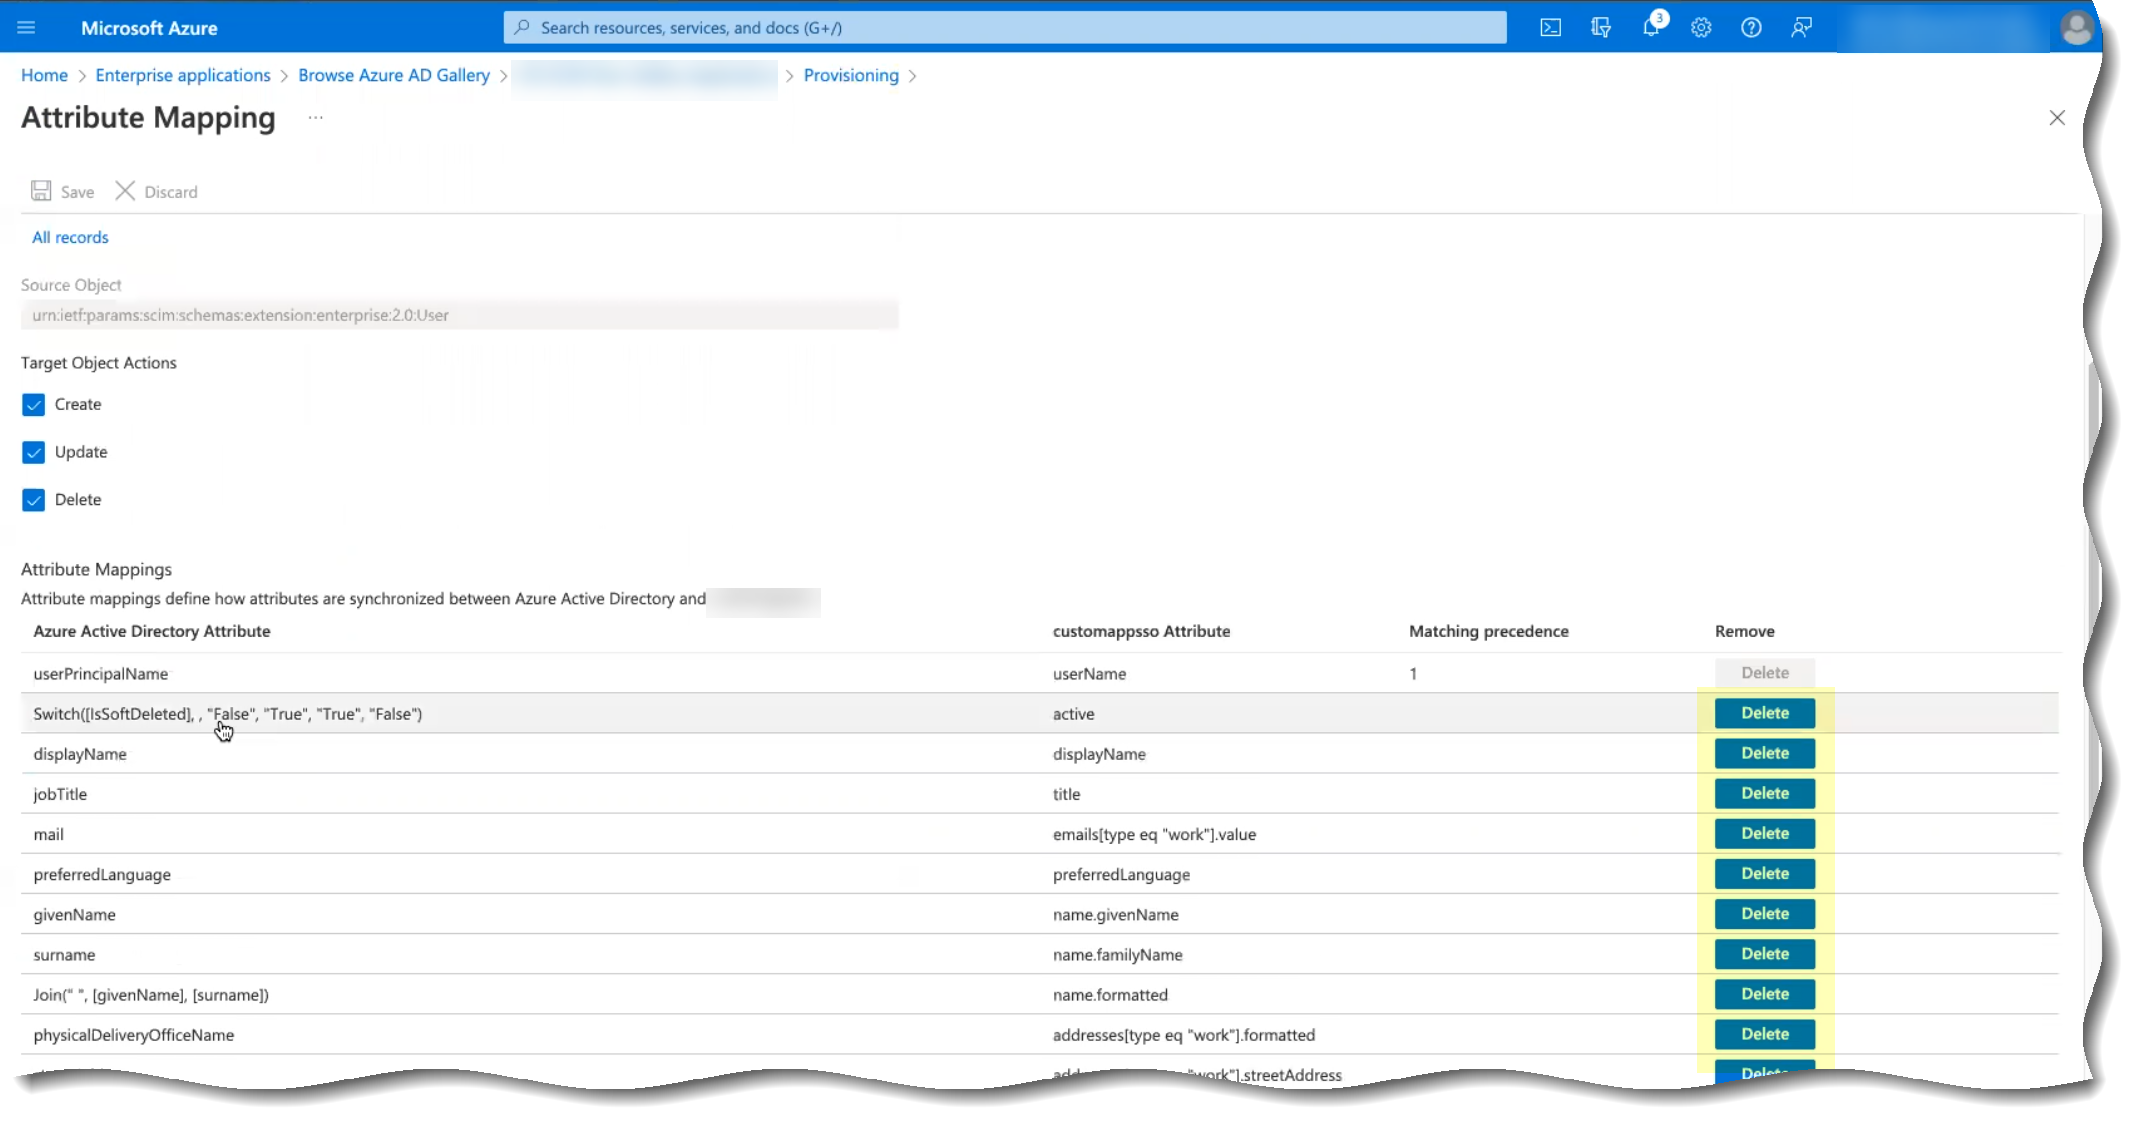
- (Optional) Click Add new mapping to add a new mapping that you want Azure Active Directory (AD) to use to identify users for the Cloud Identity Engine.
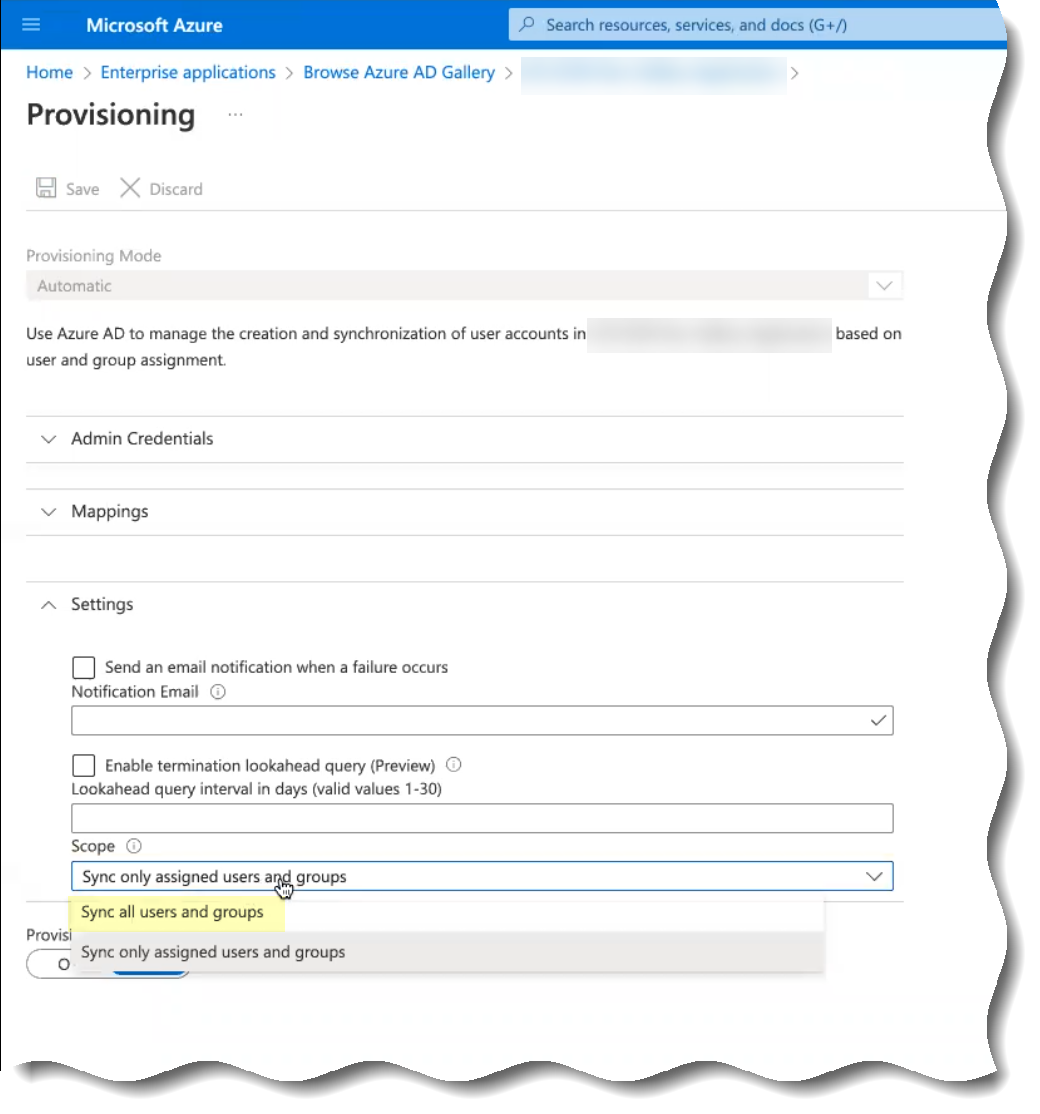
- (Optional) By default, the Cloud Identity Engine only synchronizes the users and groups you assign to this app in the Azure Portal. You can optionally synchronize all users and groups ( SettingsSync all users and groups ).
- Save your changes when they are complete.
- Allow Azure Active Directory (AD) to provide the information to the Cloud Identity Engine and verify that the Cloud Identity Engine uses SCIM to obtain the Azure Active Directory (AD) information.
- In the Azure Portal, verify you’ve completed all the provisioning steps in the documentation for the Azure AD SCIM Connector .
- Select the name of the app that you configured in the first step then select ManageProvisioningStart Provisioning to begin providing attributes to the Cloud Identity Engine.
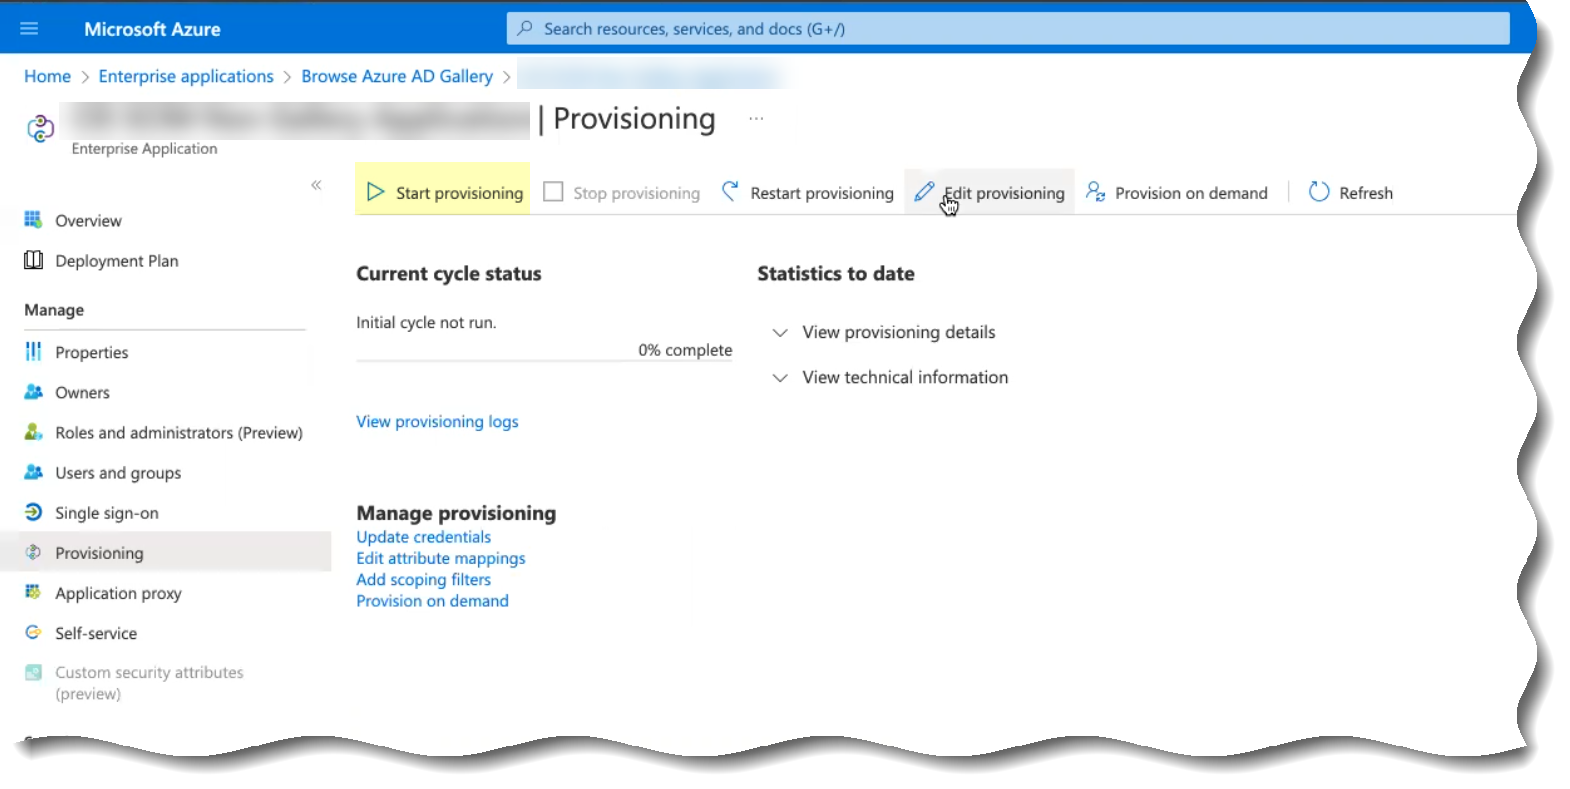
- Wait until the sync is complete ( Initial cycle completed ) then View provisioning details .
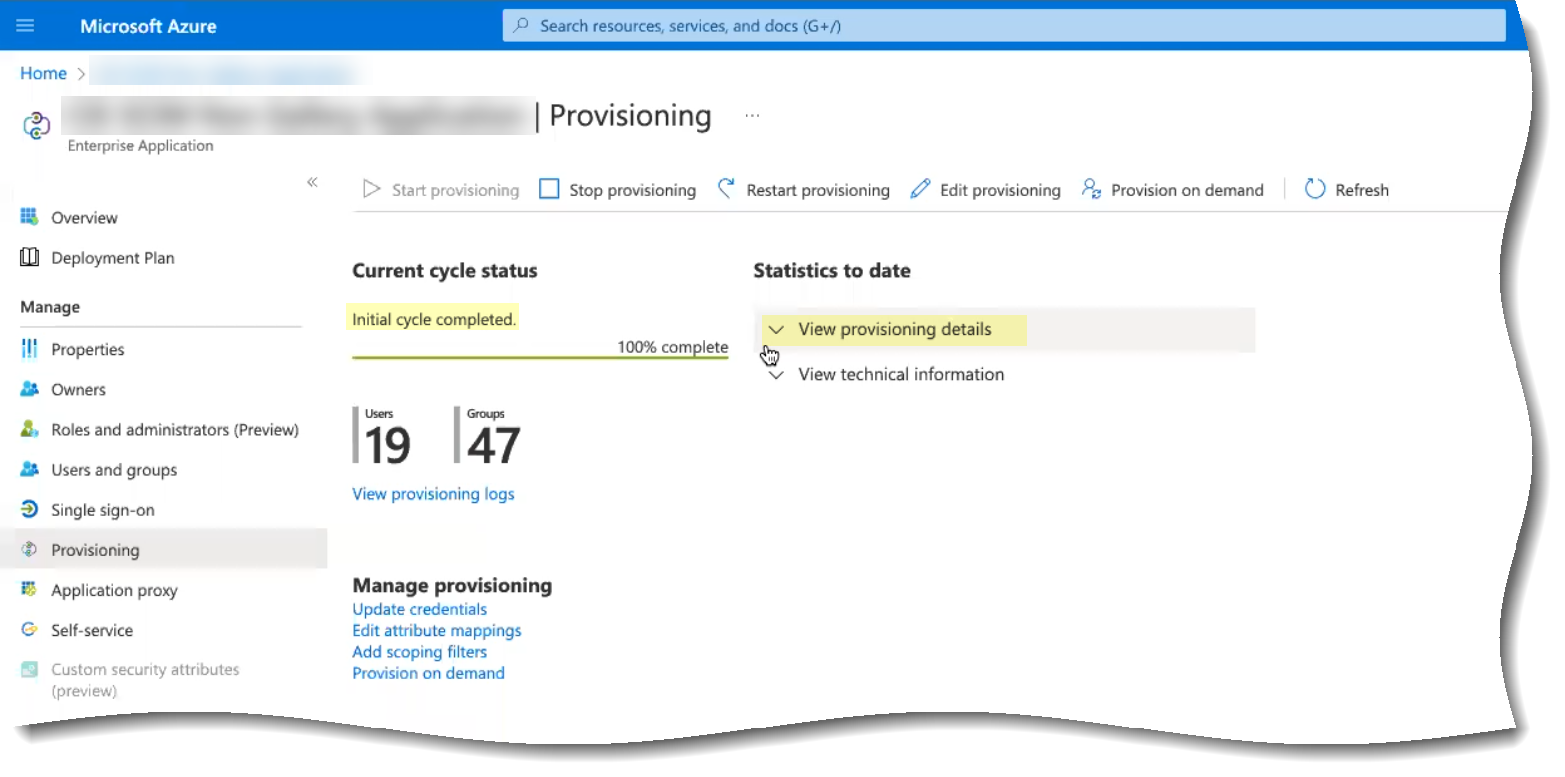
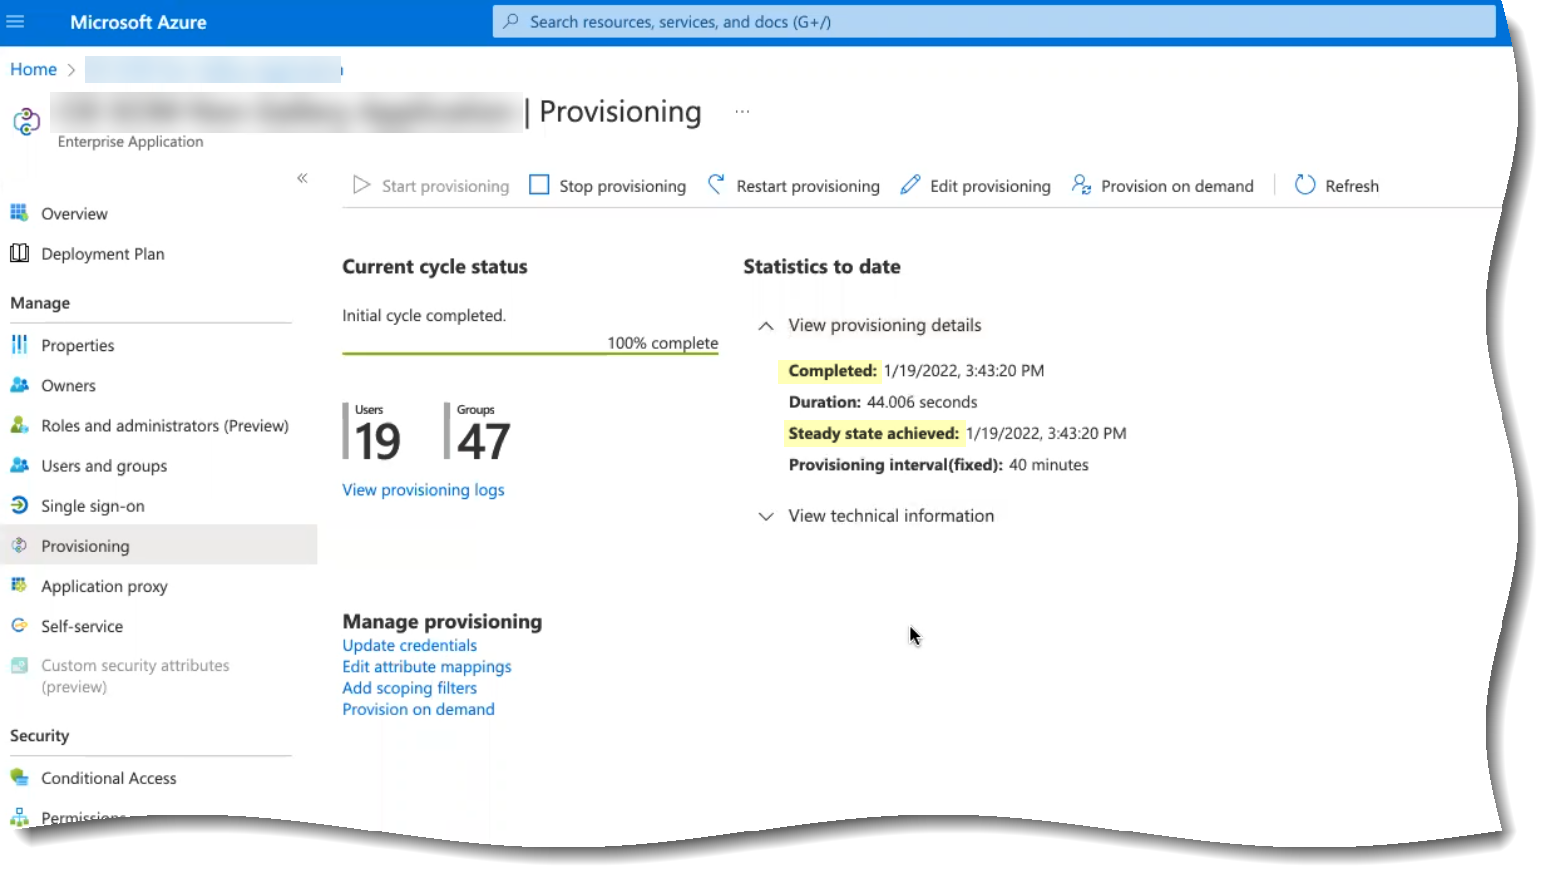
- Verify that the synchronization was successful by confirming the timestamps ( Completed and Steady state achieved ) and verifying that the number of Users and Groups displays.
If the number of users and groups does not display, refer to Troubleshoot Cloud Identity Engine Issues .
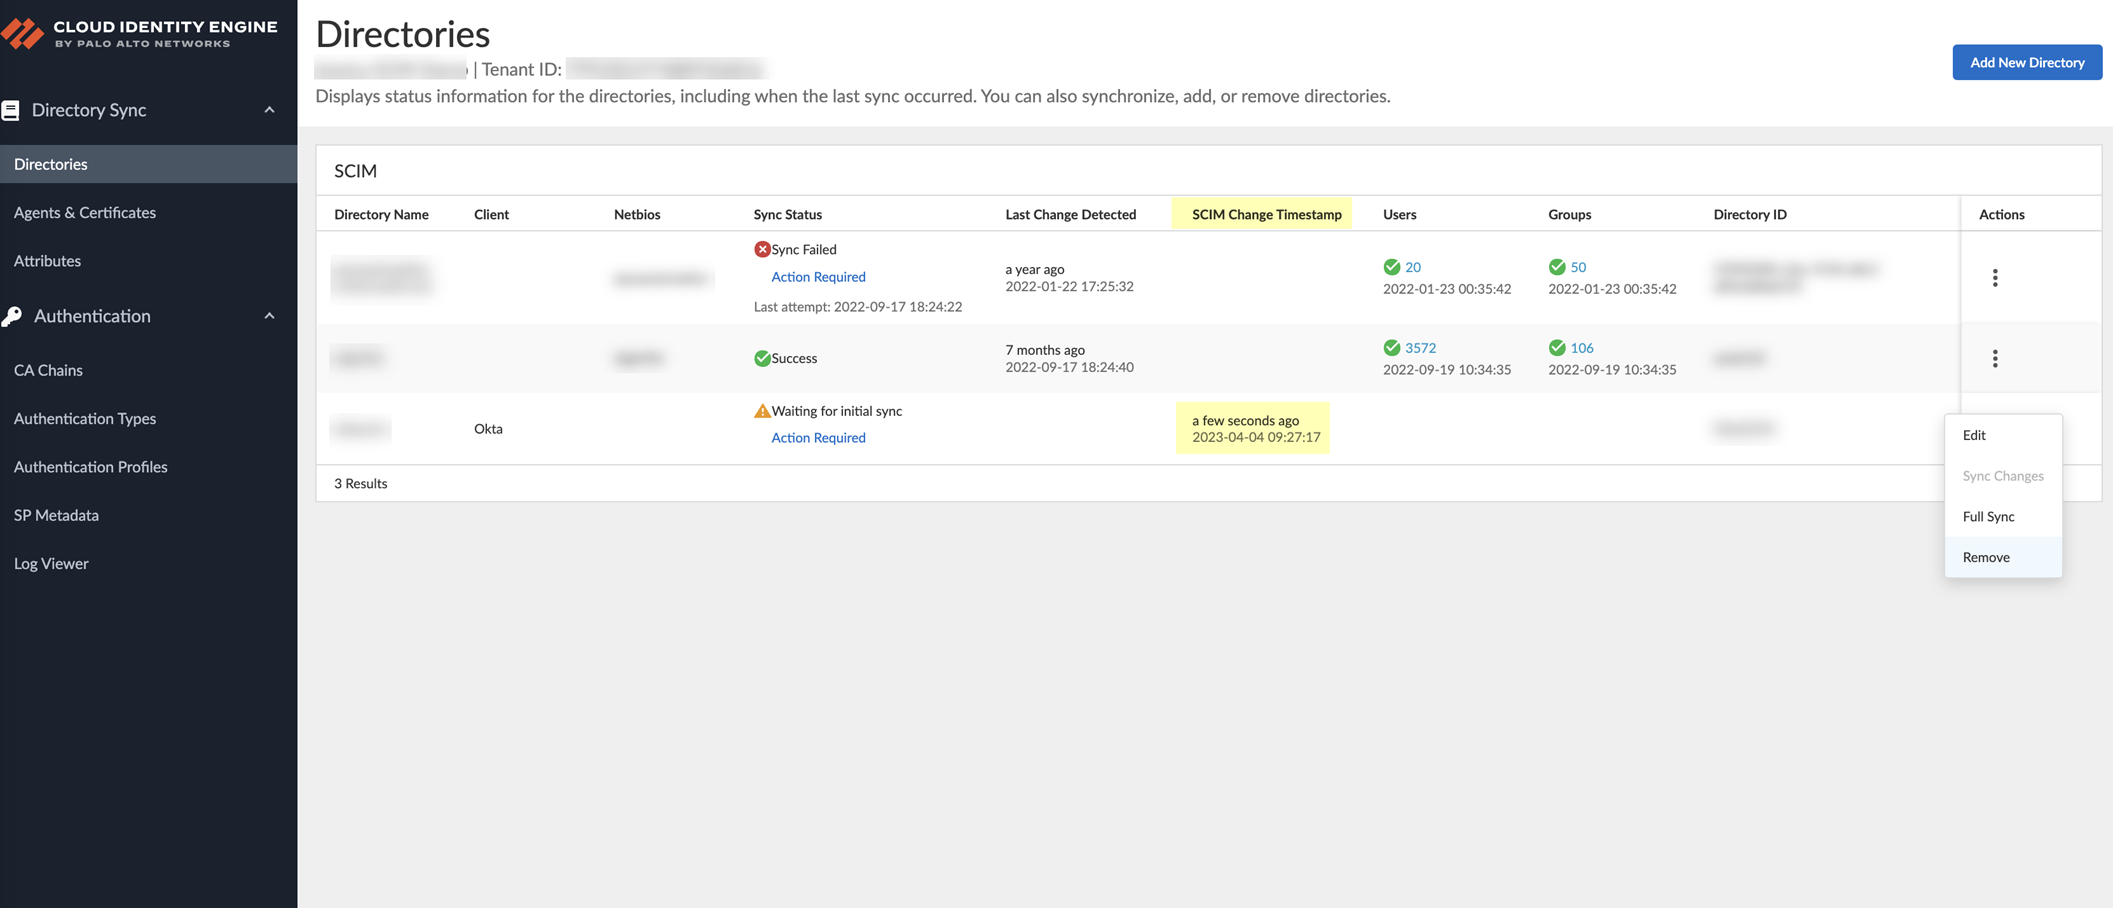
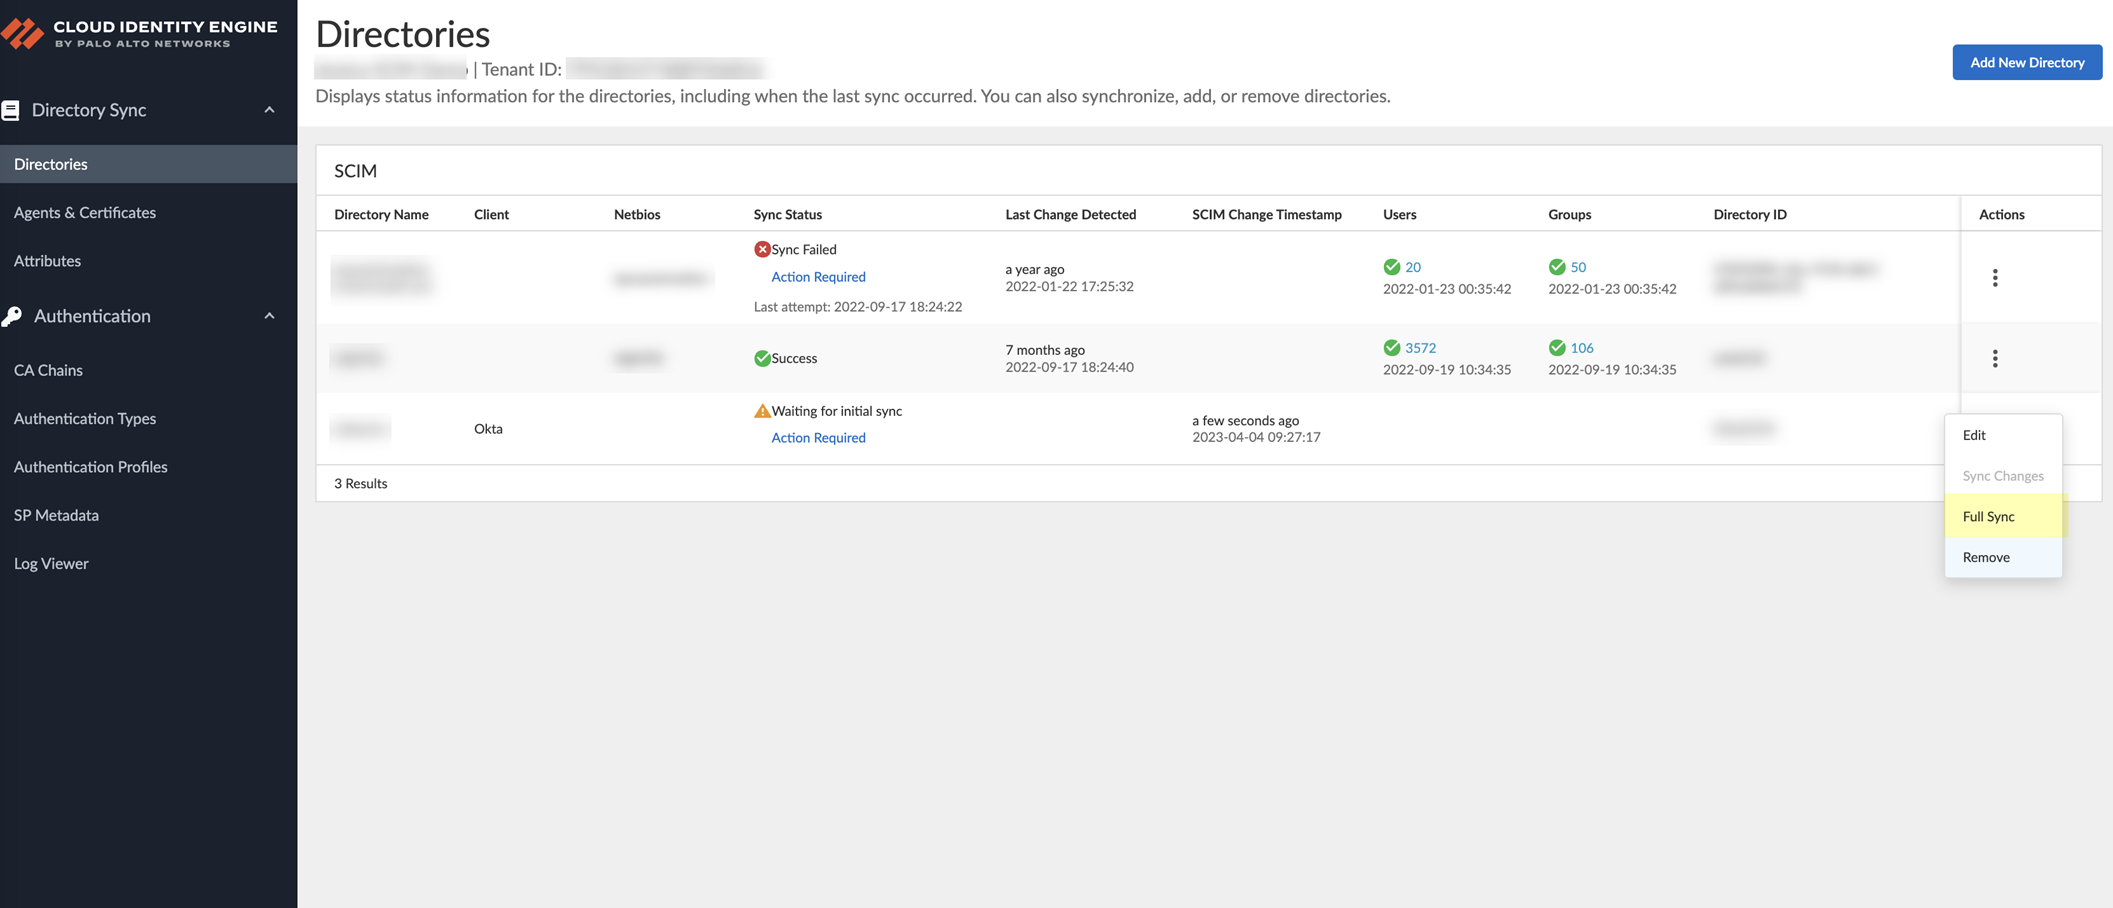
- In the Cloud Identity Engine app, verify that the SCIM Change Timestamp for your Azure SCIM directory populates on the Directories page.
- Select ActionsFull Sync to complete a full synchronization of your Azure Active Directory with Directory Sync for the Cloud Identity Engine.
You must successfully complete a full sync in the Cloud Identity Engine app to complete the SCIM Connector setup.
Configure PingFederate for SCIM Connector
Complete the following steps to configure the Cloud Identity Engine to use the SCIM Connector to connect to your PingFederate server. Be sure to complete all the steps in the PingFederate SCIM Connector documentation as well.
- Set up the directory for SCIM Connector.
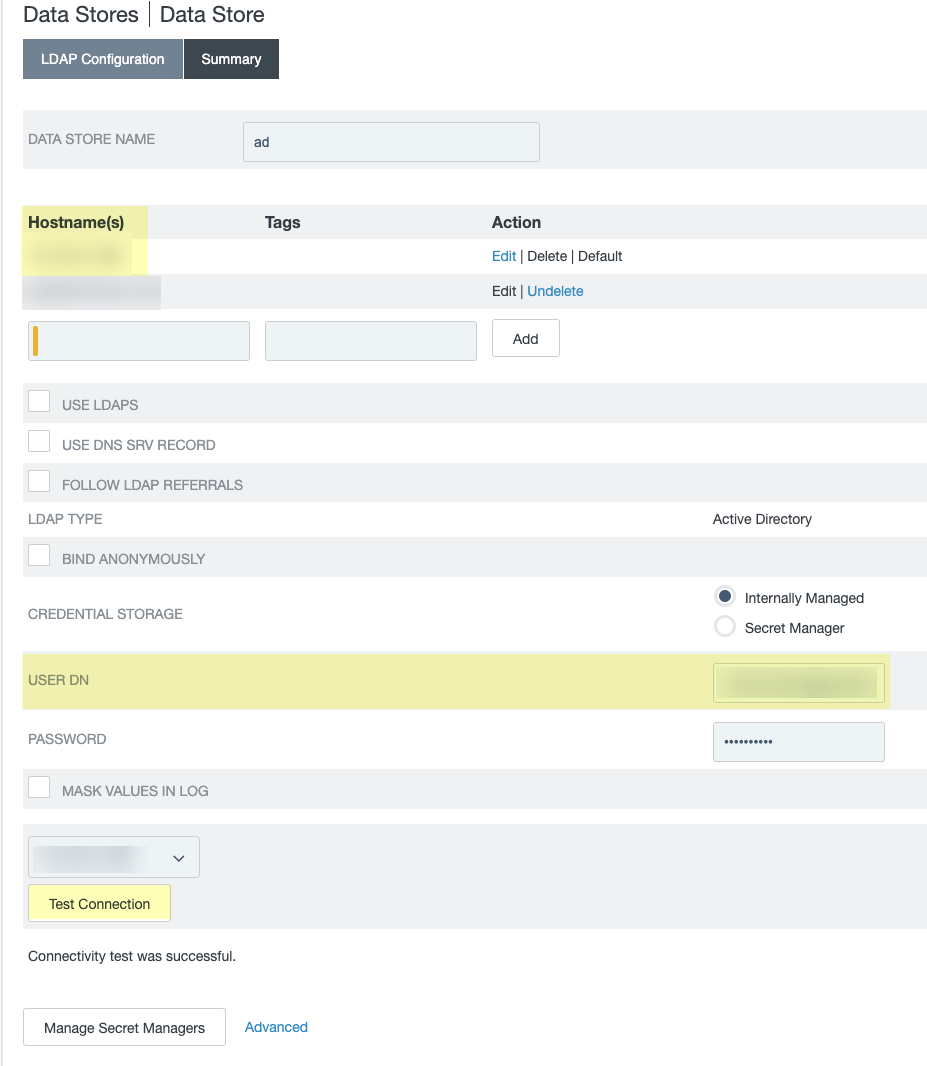
- Log in to the PingFederate portal and select Data Stores then click Add New Data Store .
- Enter a Data Store Name and select Directory (LDAP) as the Type .
- Enter the Hostname(s) (including the port number).
- Enter a valid email address as the User DN .
- Click Test Connection to verify the connection is successful.
If the connection test isn't successful, verify that the hostname and email address are valid. Some directories, such as PingDirectory, format the User DN as cn=administrator . In this case, select Use LDAPS and use a different port number, such as 1636, instead of the default port number of 389.
- Copy and edit the System ID then paste the edited value in the Cloud Identity Engine app as the Directory ID .
You must edit the System ID to remove the LDAP- that precedes the Directory ID value before entering the value as the Directory ID in the Cloud Identity Engine app.

- Copy and edit the User value and edit the edited value in the Cloud Identity Engine app as the Directory Name .
For the Directory Name , use the domain name that follows the username in the User column (for the example below, the Directory Name is the value after Administrator@ ).

- Provision the SCIM connection.
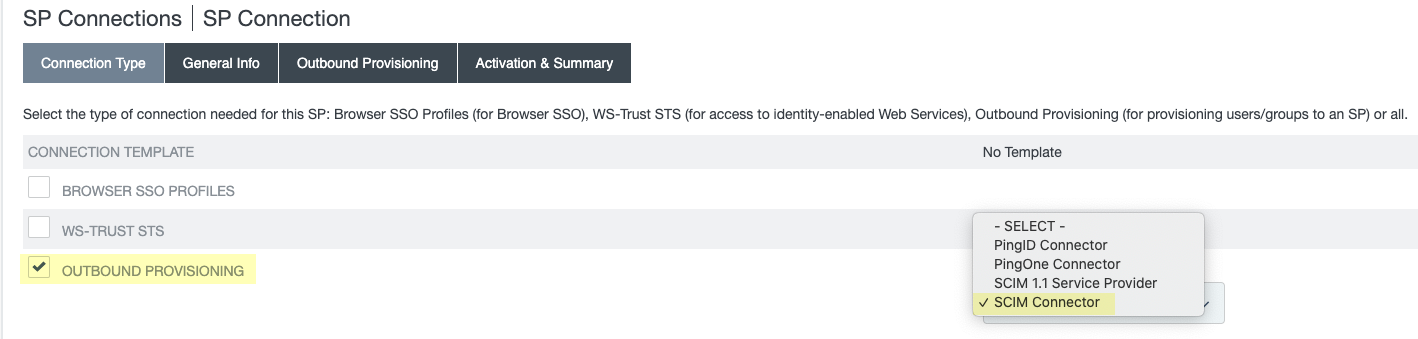
- Select SP ConnectionsCreate Connection .
- Select Do not use a template for this connection .
- Select Outbound provisioning .
- Select SCIM Connector .
If the SCIM Connector option isn’t available, confirm that you completed all substeps in the previous step correctly.
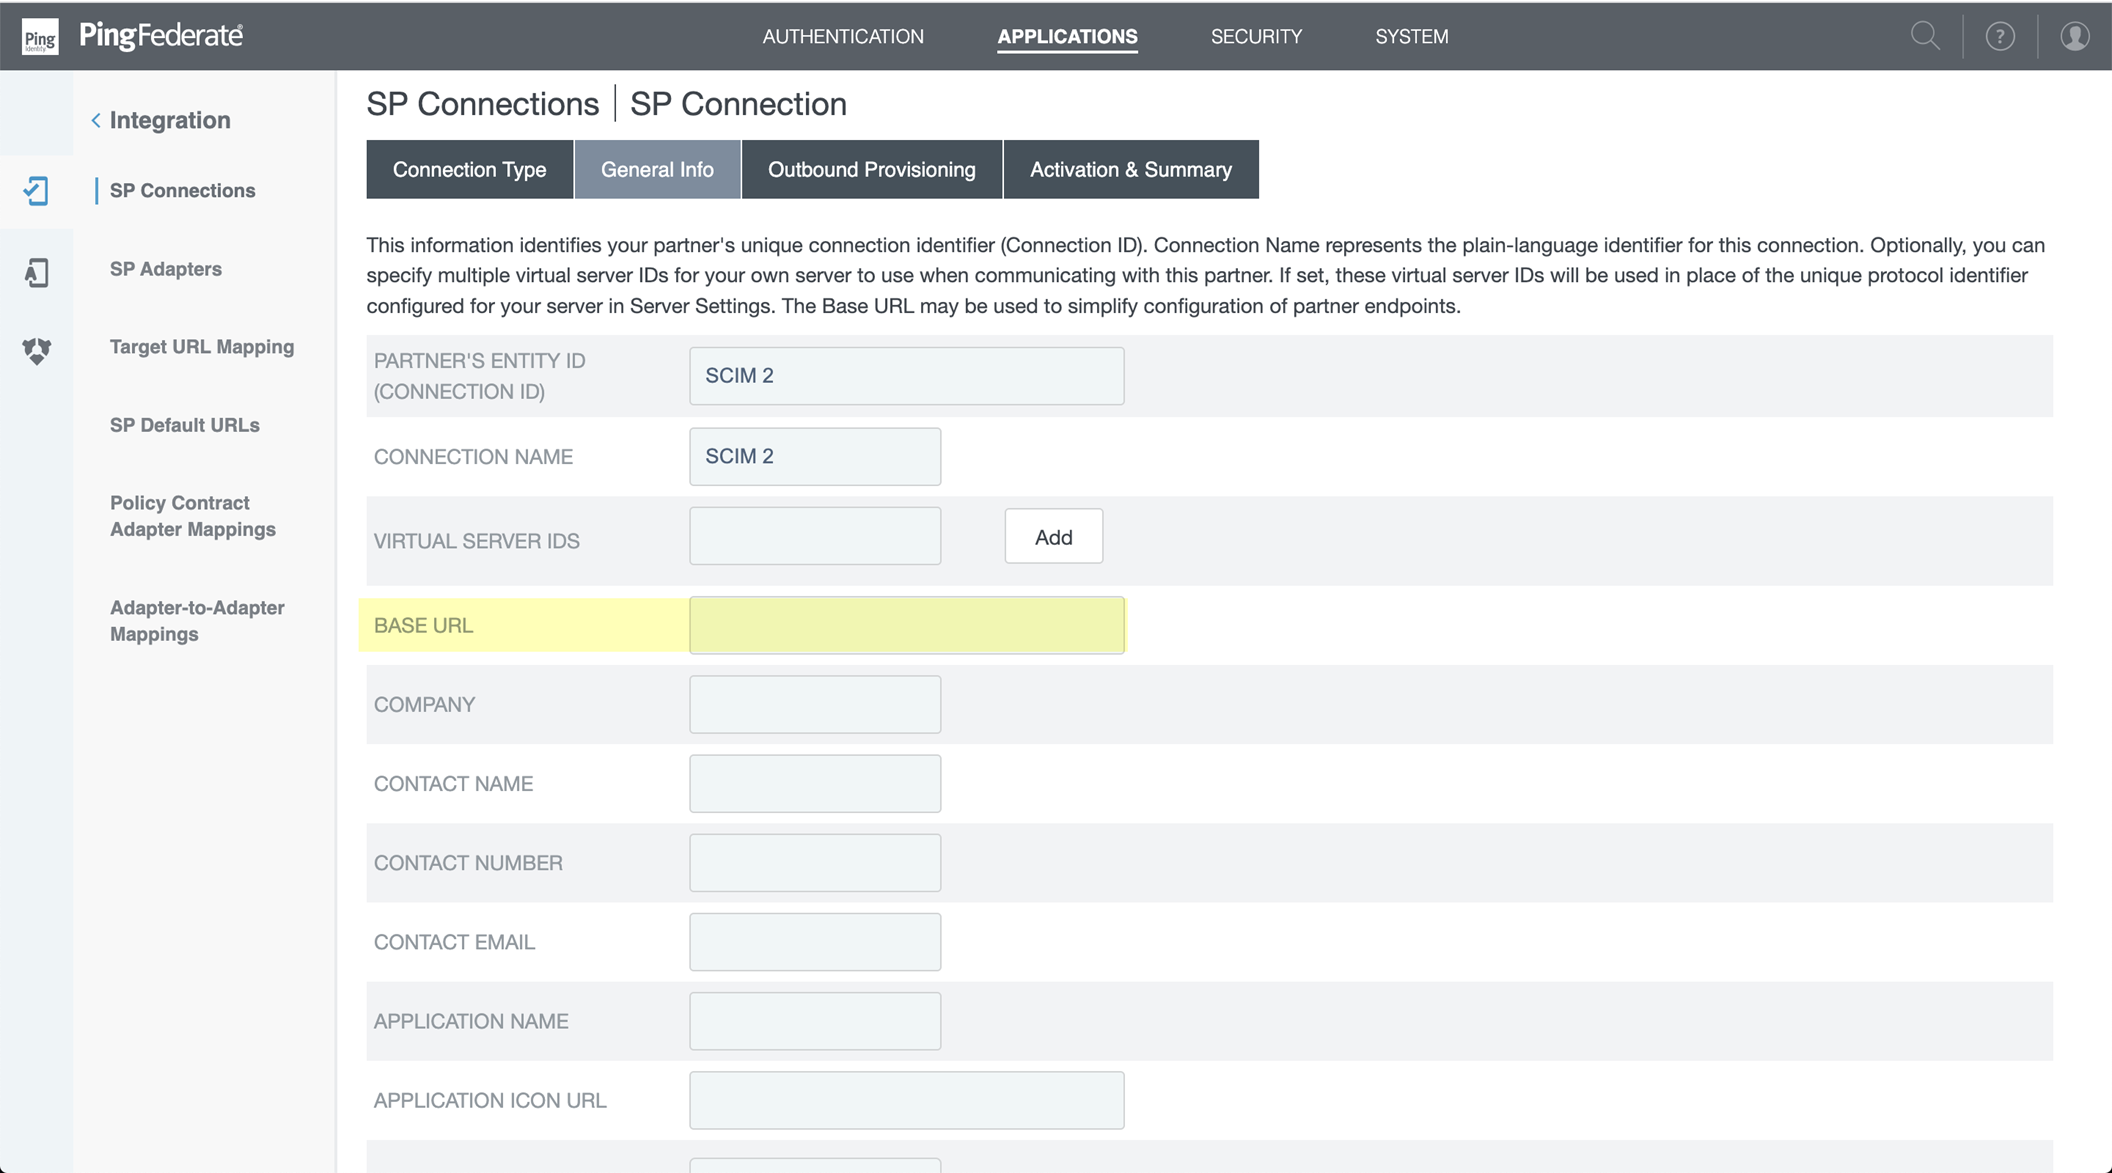
- Select General Info and enter a Partner’s Entity ID (Connection ID) and a Connection Name .
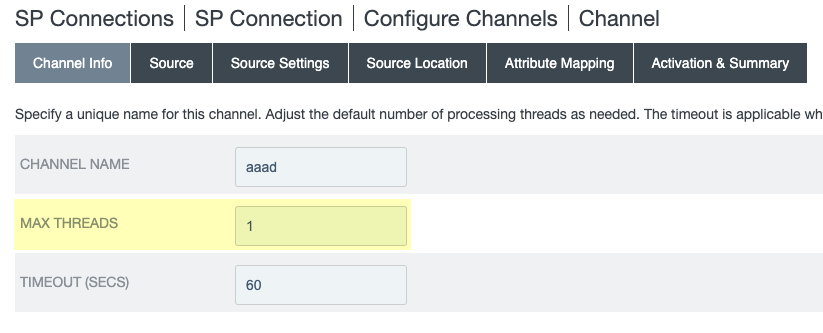
- (Optional but recommended) To decrease the amount of time necessary for the initial sync, select Outbound ProvisioningConfigure ProvisioningManage ChannelsChannel ConfigurationChannel Info and increase the value for Max Threads .
The range is recommended range is 1–5; for optimal sync time, Palo Alto Networks recommends 5 as the value for Max Threads .
- Specify the information from the Cloud Identity Engine for the SCIM connection provisioning.
- Select Outbound ProvisioningConfigure Provisioning .
- Select the SP Connections Target tab and enter the Base URL that you copied from the Cloud Identity Engine.
- Select ApplicationsSP ConnectionsSP ConnectionConfigure ChannelsManage Channels .
- Select OAuth 2 Bearer Token as the Authentication Method and enter the Bearer Token that you copied from the Cloud Identity Engine as the Access Token .
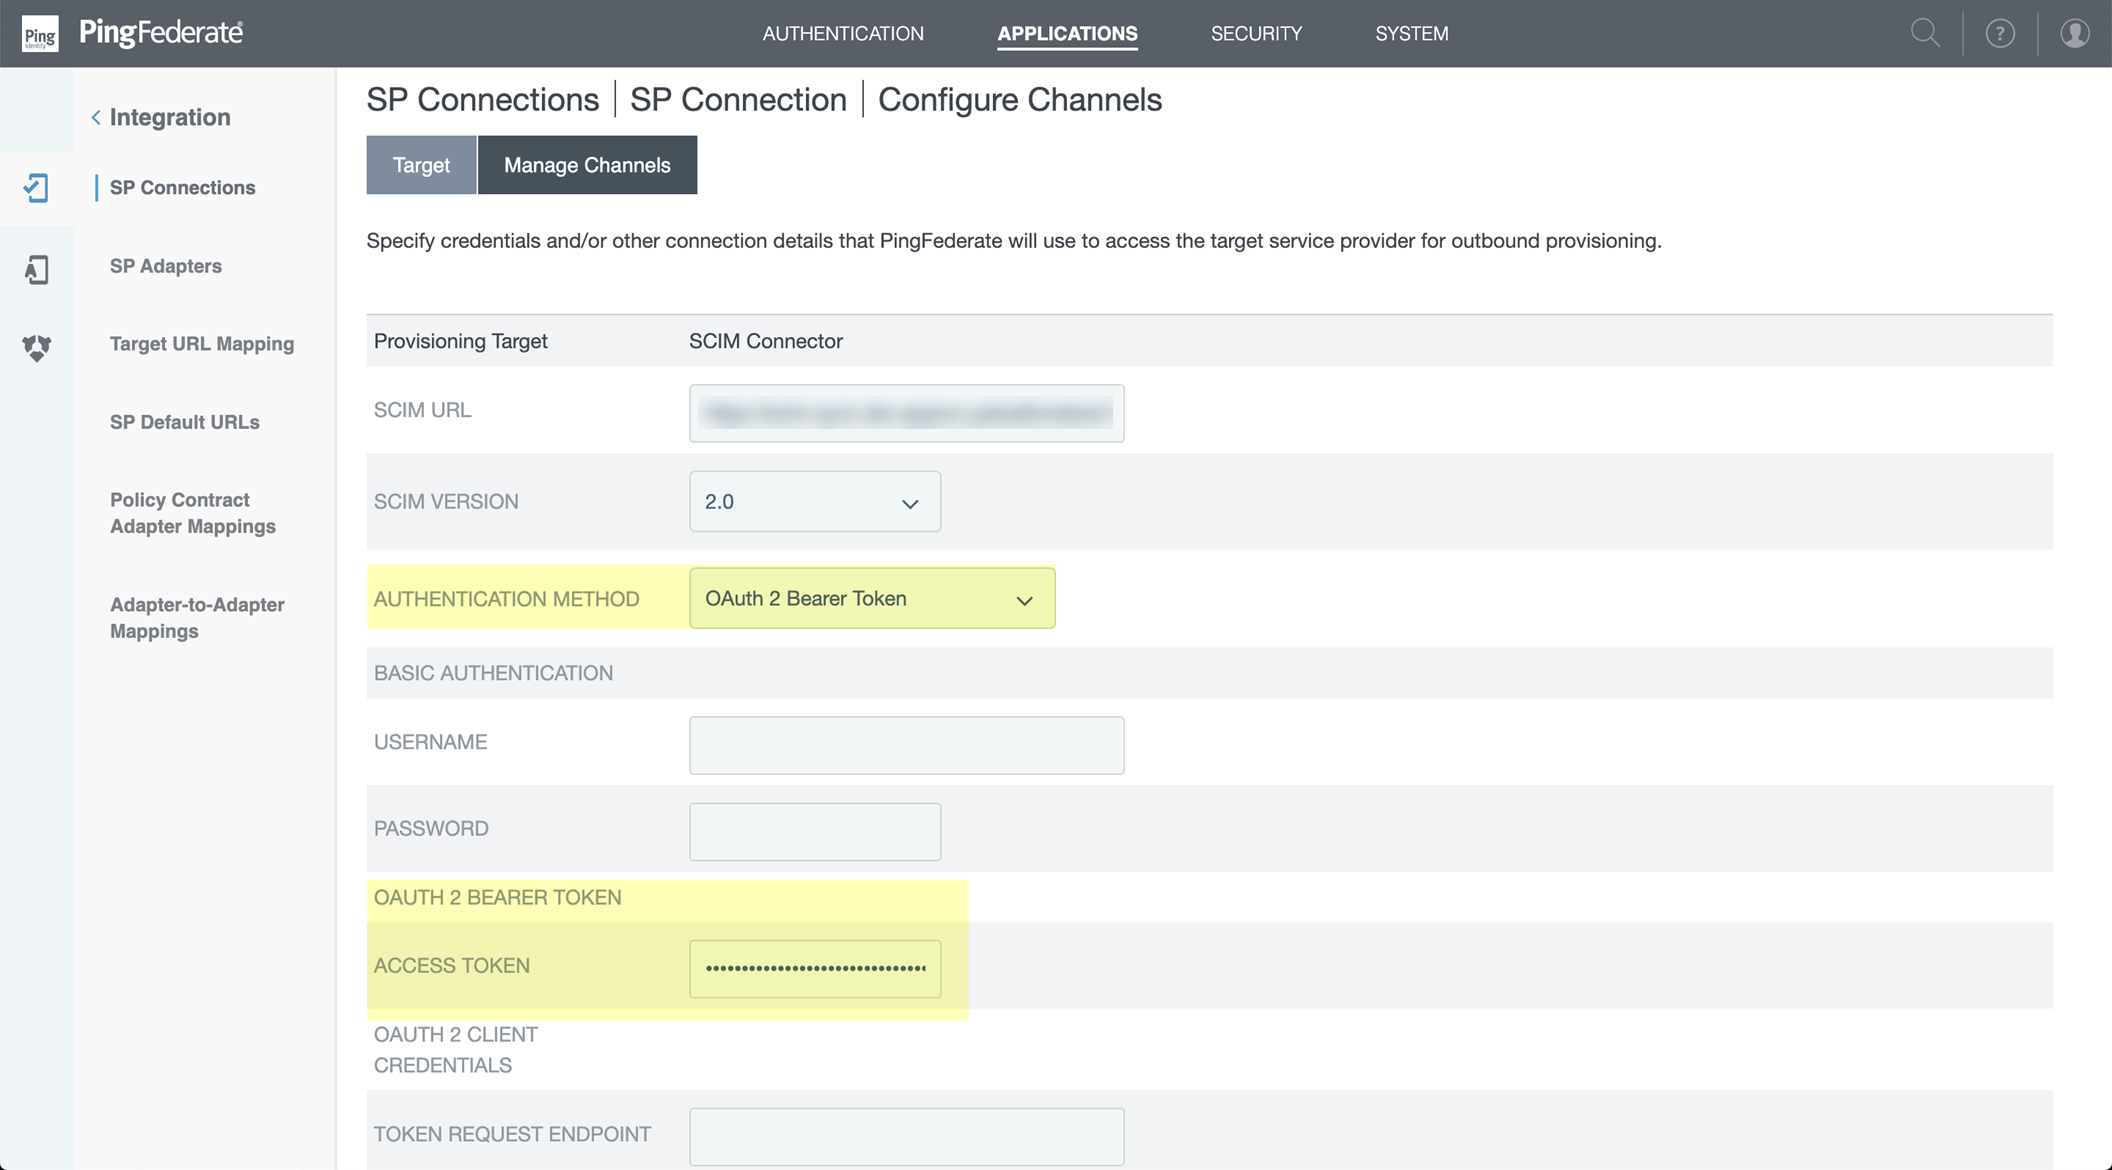
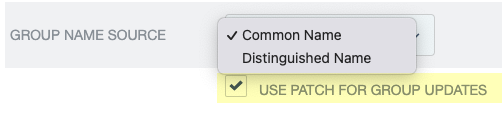
- Select Common Name as the Group Name Source .
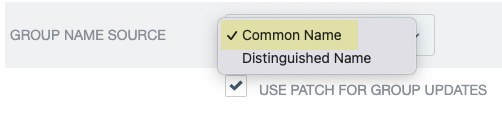
- Select Use patch for group updates .
- Configure the channels for the SCIM connection.
- Select Configure Channels and Create a channel.
- Enter a Name for the channel and select the directory you want to configure in the Cloud Identity Engine as the Active Data Store .
- Select Source Location and enter the Base DN for your directory.
- Enter the Group DN for the source of the user and group mappings or create a filter that specifies which entries to use. For example, Group DN:CN=Chicago,OU=Illinois,DC=example,DC=com syncs all users and groups in the Chicago group.
- If you use a Group DN and your directory contains nested groups, select Nested Search .
Retention of nested group hierarchies from PingFederate servers through the SCIM Connector isn’t available. If your directory contains nested groups and you want to sync all of the child users and groups, you must select the method you want to use to ensure the Cloud Identity Engine correctly collects all users and groups in the parent group.
- Add the parent group as a member of a different group and use that container group as the Group DN. For example, configure the parent group in a directory with the name root in an OU with the name location and use the value CN=root,OU=location,DC=paloaltonetworks,DC=com for the Group DN.
- Add a filter that includes all members of the parent group (for example, (objectClass=user),(objectClass=group) includes all users and groups in the Base DN DC=paloaltonetworks,DC=com ).
- Select Attribute Mapping and Edit the userName* to userPrincipalName .

- Save the connection and continue the configuration in the Cloud Identity Engine.
- Complete the postdeployment steps to configure the PingFederate server for the SCIM Connector.
- Verify that you’ve completed all of the provisioning steps .
- In the PingFederate Portal, either commit a directory change or enter the following command: pingfederate/bin/provmgr.sh --reset-all -c [channel number] command.
To determine the channel number, use the ./provmgr.sh --show-channels command.
- In the Cloud Identity Engine, verify the app populates the SCIM Change Timestamp then complete a full sync ( ActionsFull Sync ).
Configure Okta Directory for SCIM Connector
You must also complete the required steps in the Okta Administrator Dashboard to complete the SCIM Connector configuration. For more information, refer to the documentation for the Okta Directory .
The SCIM Connector for Okta directory supports the following capabilities:
- Create users
- Update user attributes
- Deactivate users
- Import users
- Import groups
- Sync password
- Group push
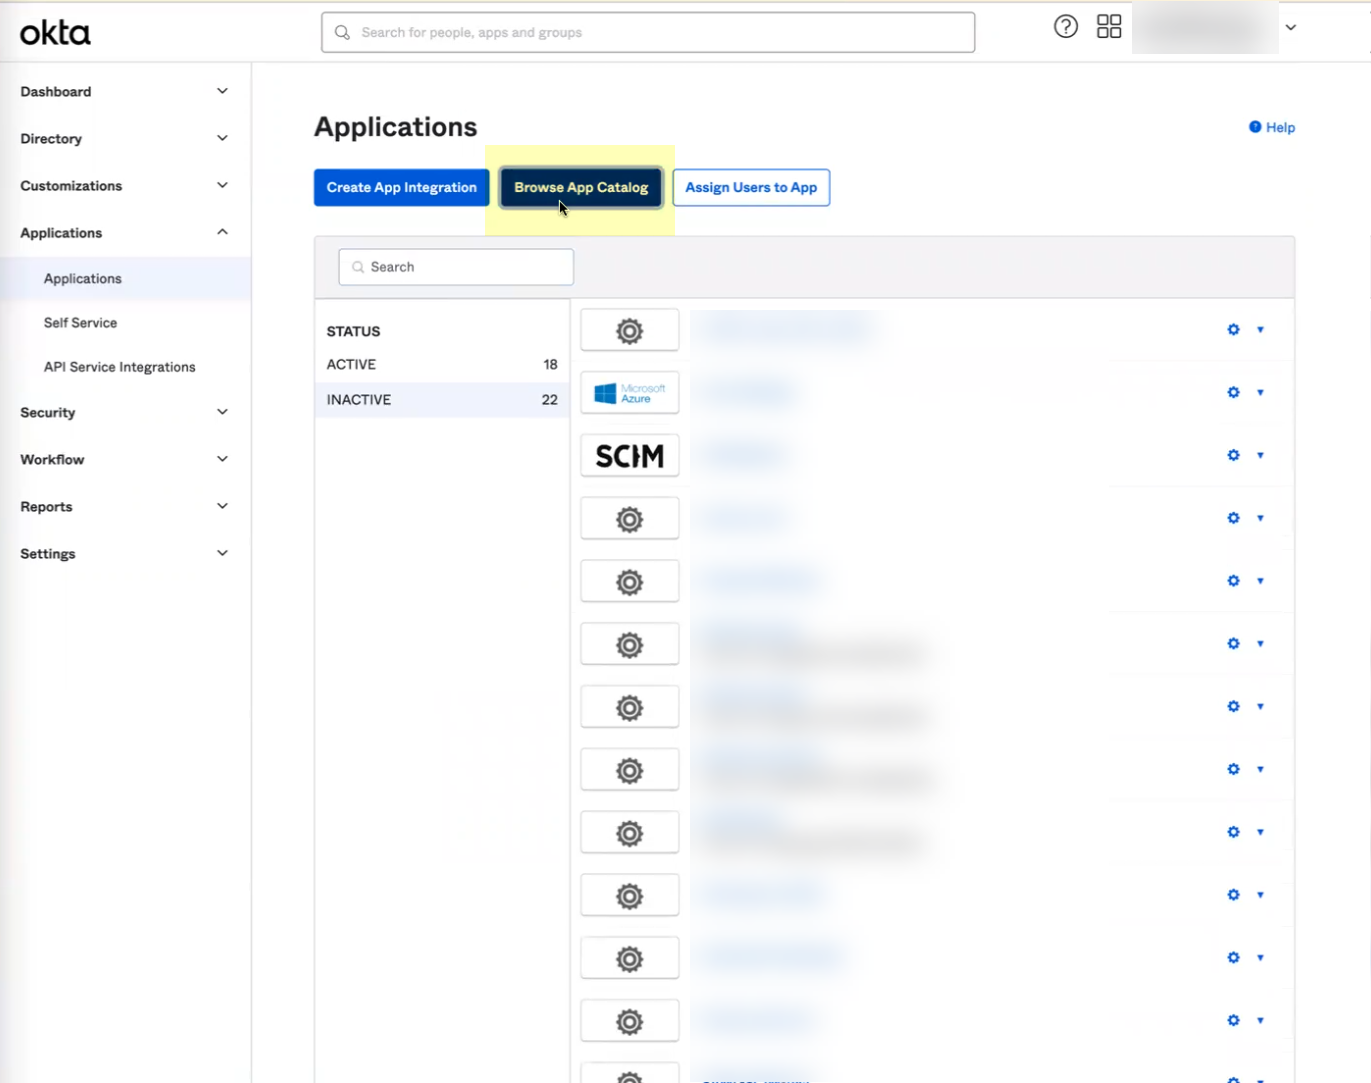
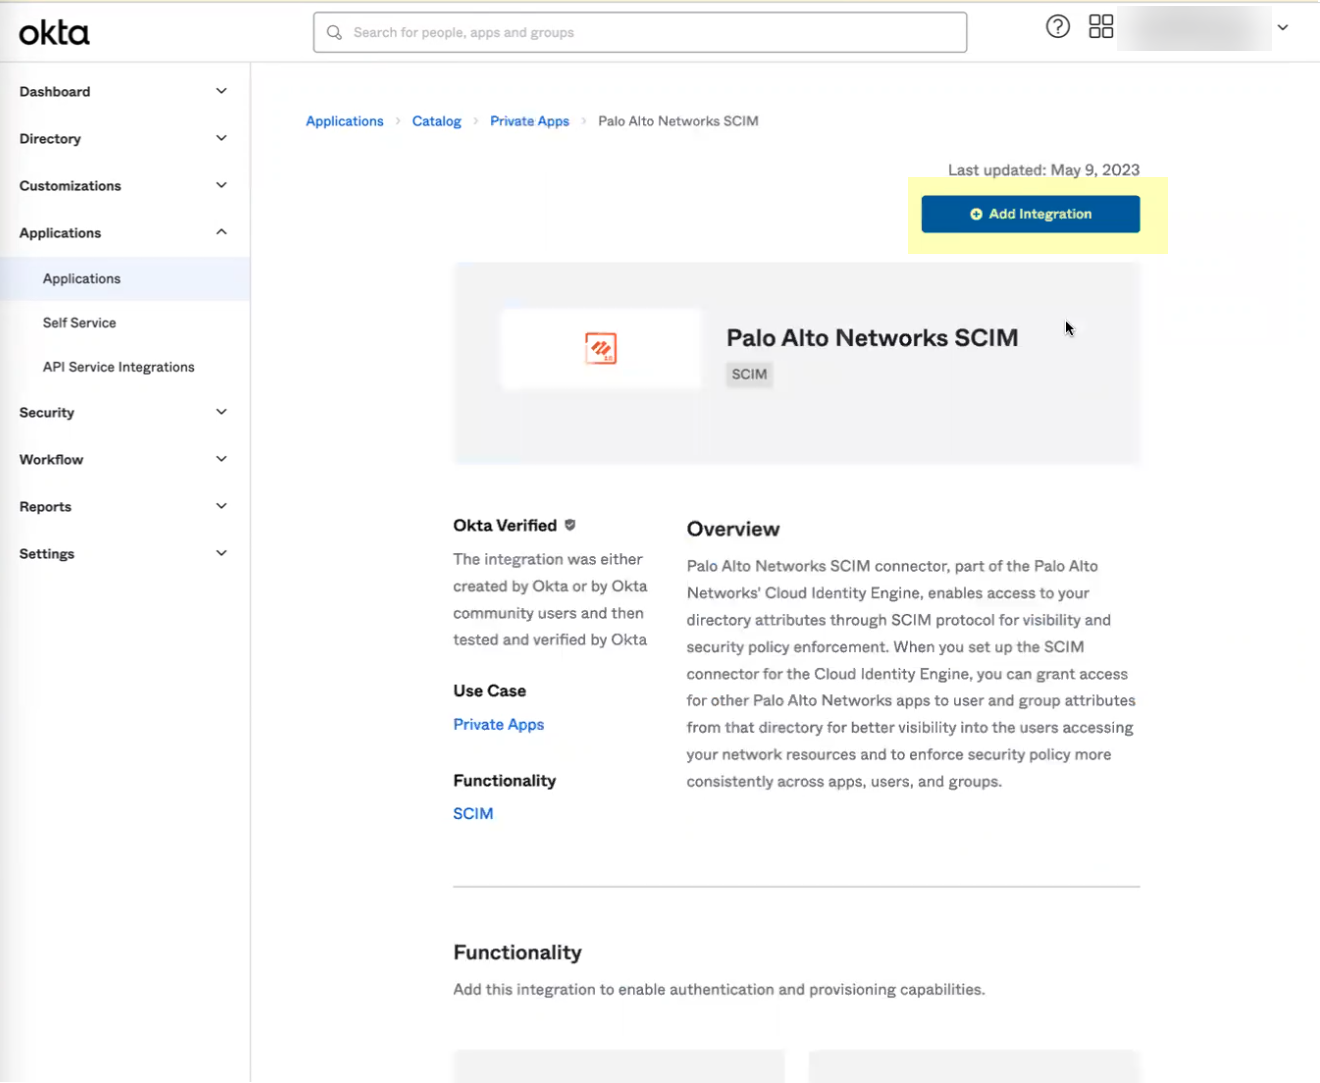
- Log in to your Okta Administrator Dashboard and add the integration using the Okta Integration Network .
- Log in to the Okta Administrator Dashboard, select Applications , and click Browse App Catalog .
- Enter Palo Alto Networks SCIM as the search query.
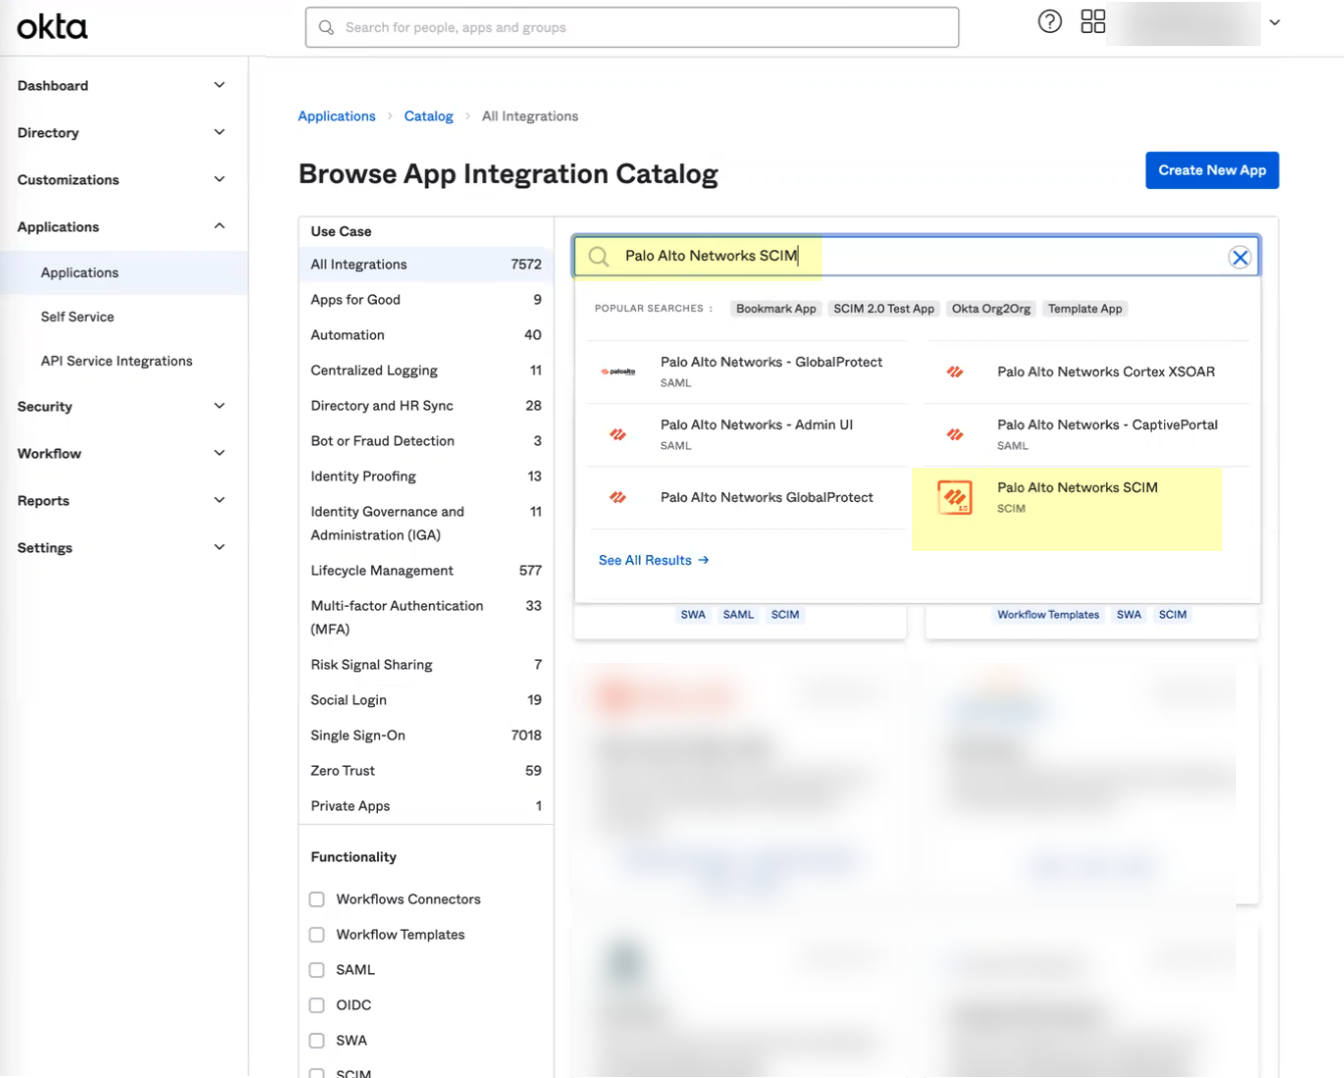
- Select the app and click Add Integration .
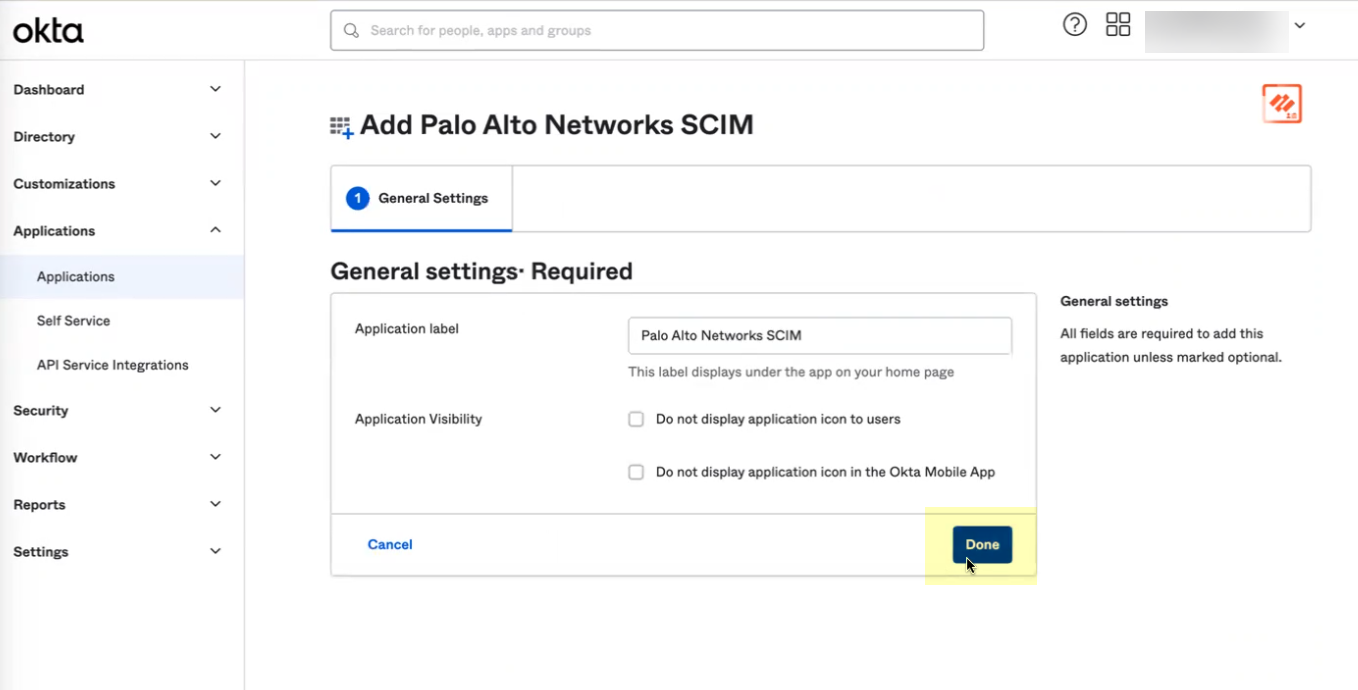
- Optionally change any settings, such as the Application Label , then click Done .
- Copy your Okta domain name.
- Configure the Okta integration to communicate with the Cloud Identity Engine.
- Select Provisioning .
- Click Configure API Integration .
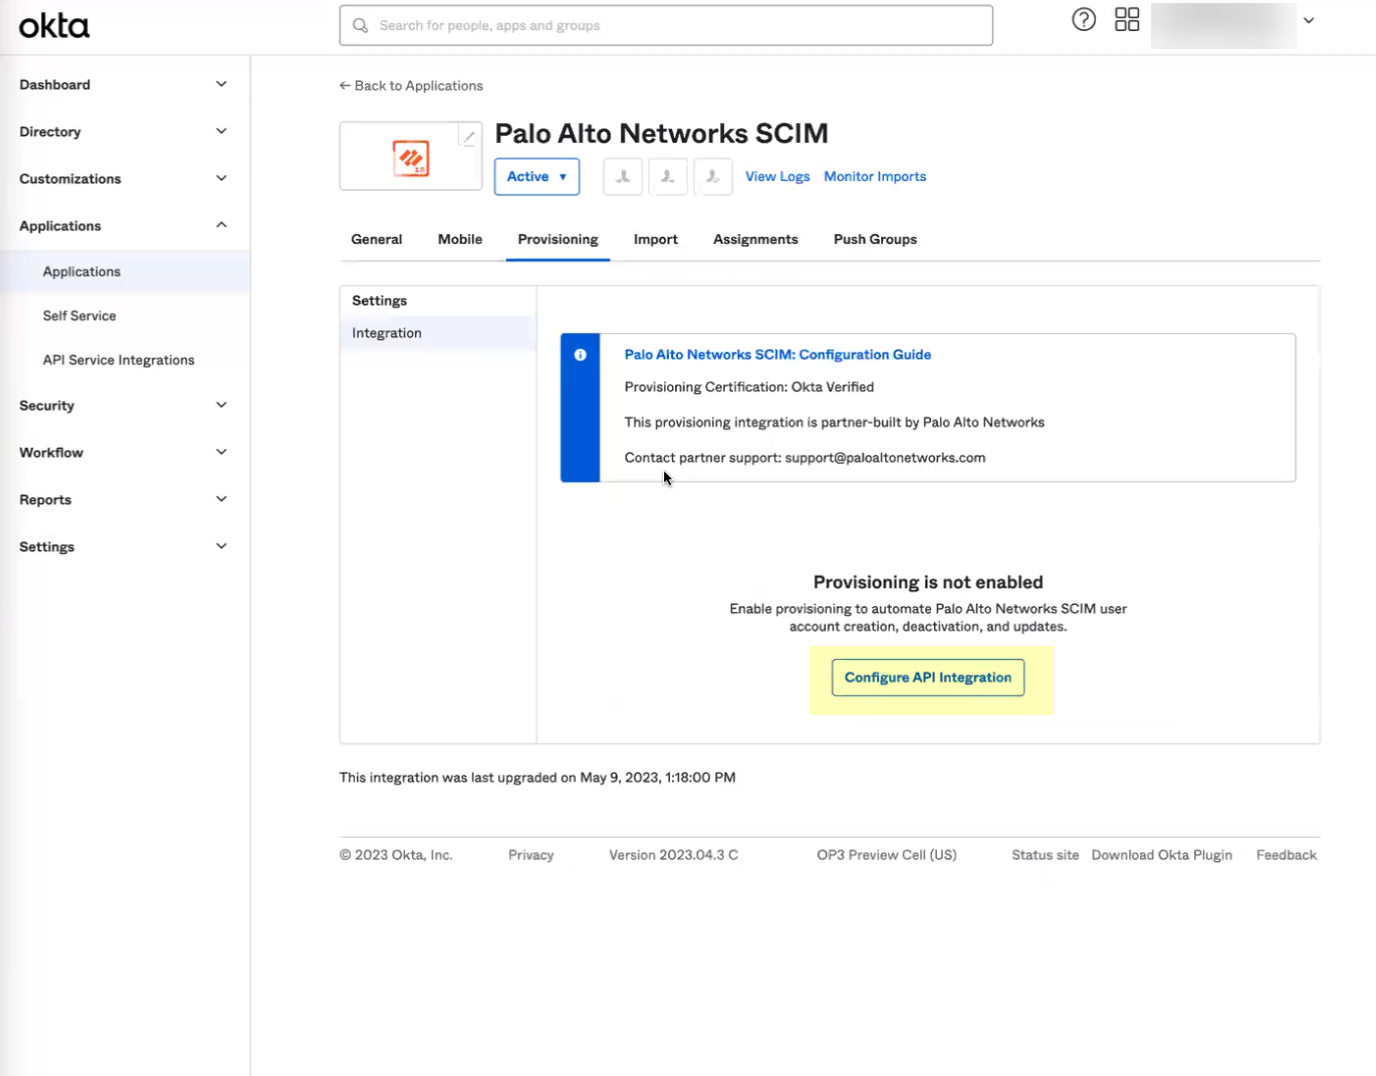
- Select Enable API integration .
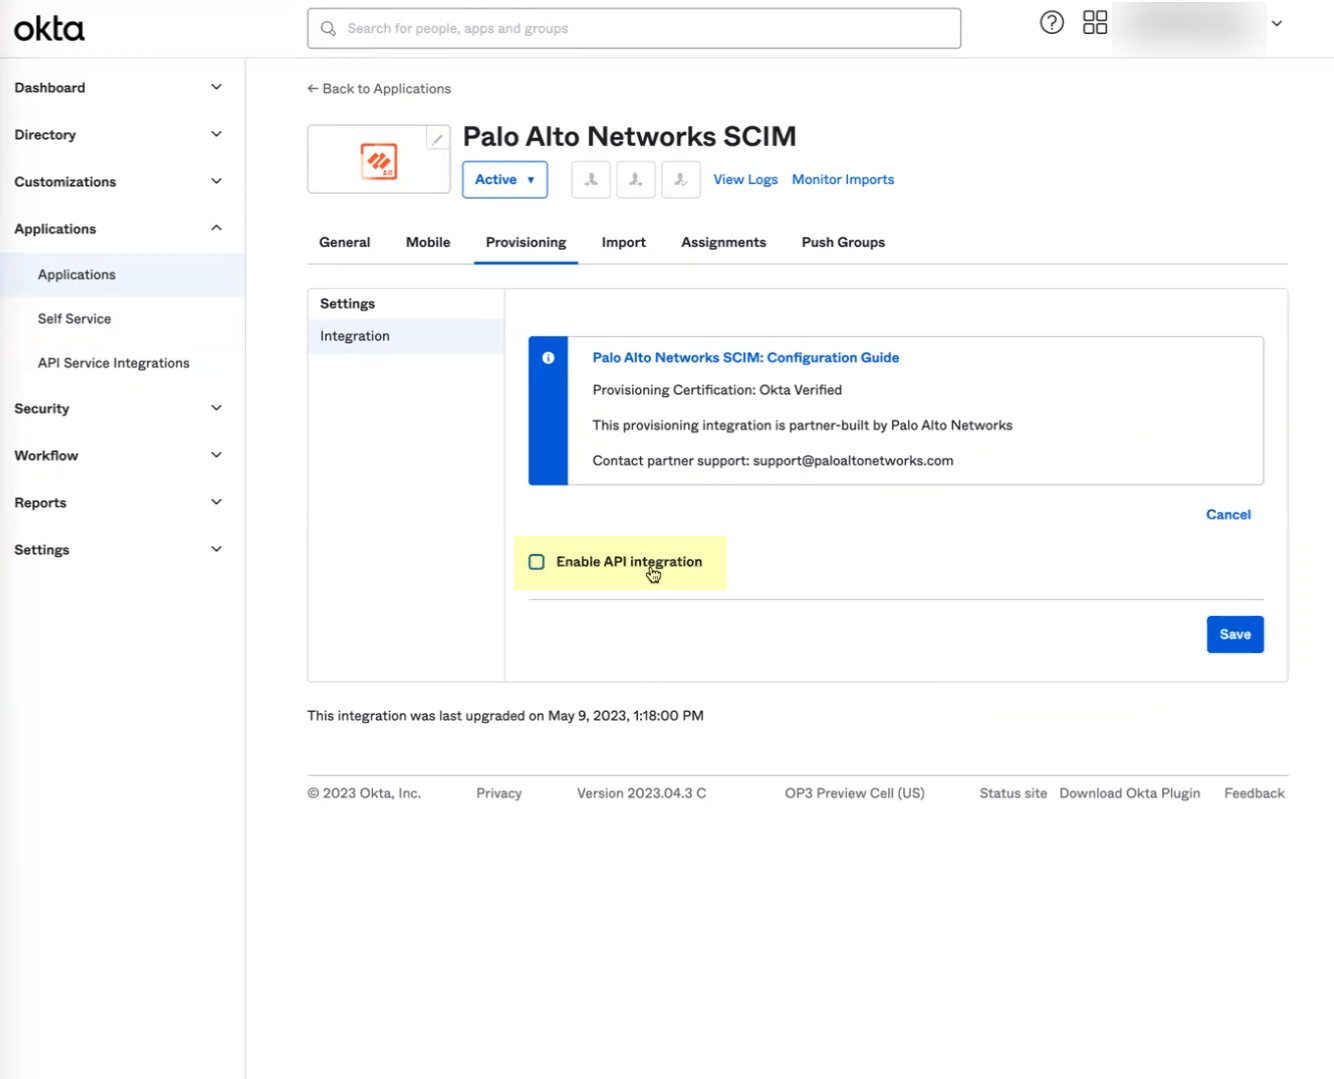
- Enter the URL you copied in step
3.b
as the Base URL .
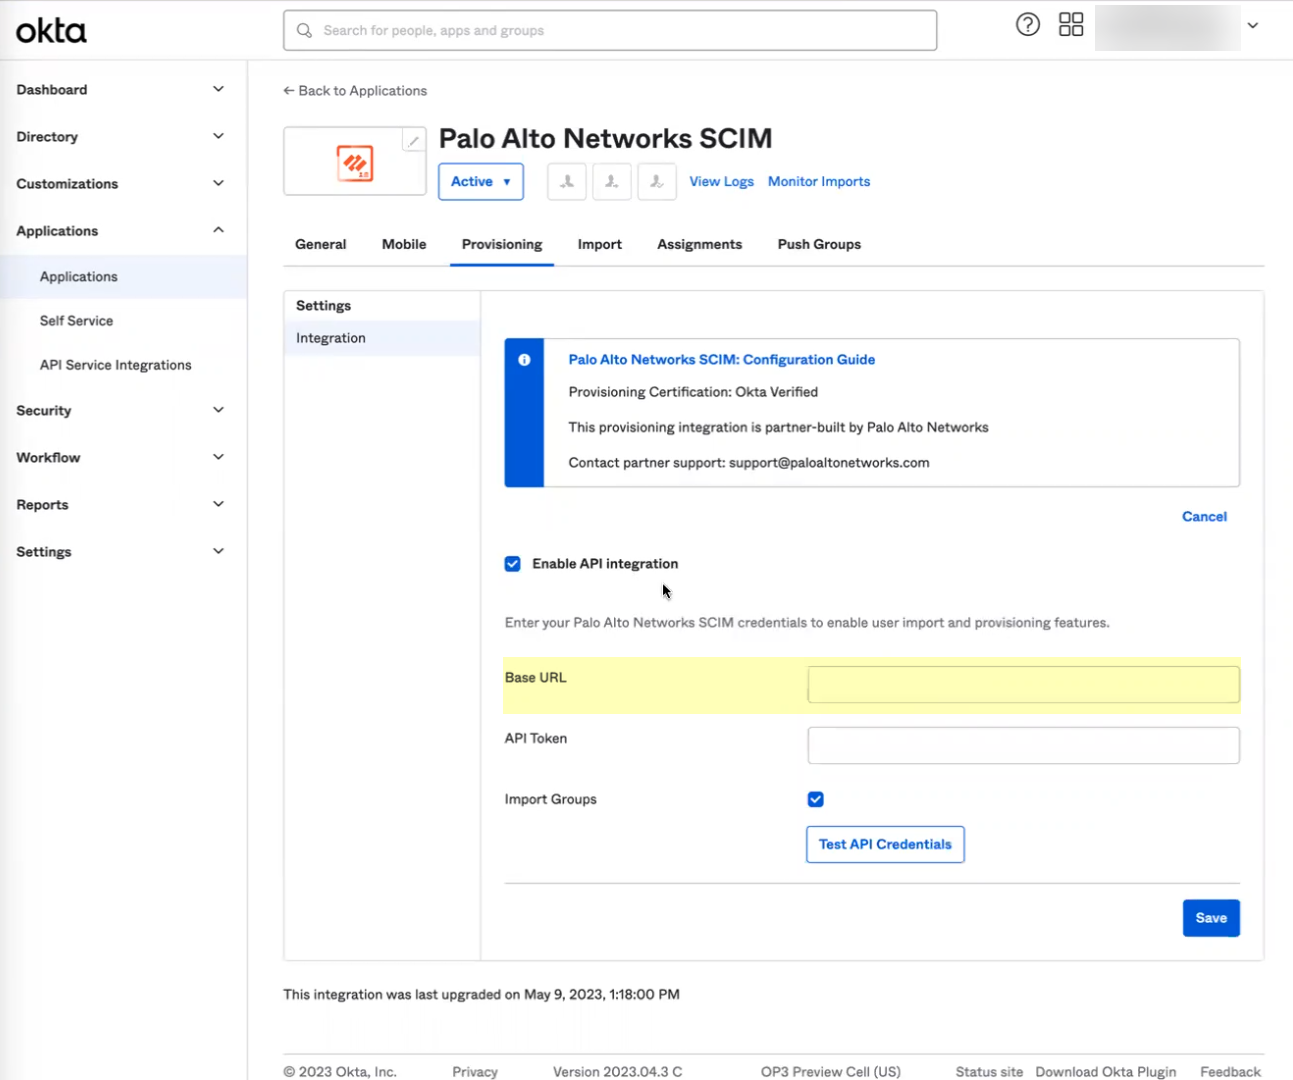
- Enter the token you copied in step
3.c
as the API Token .
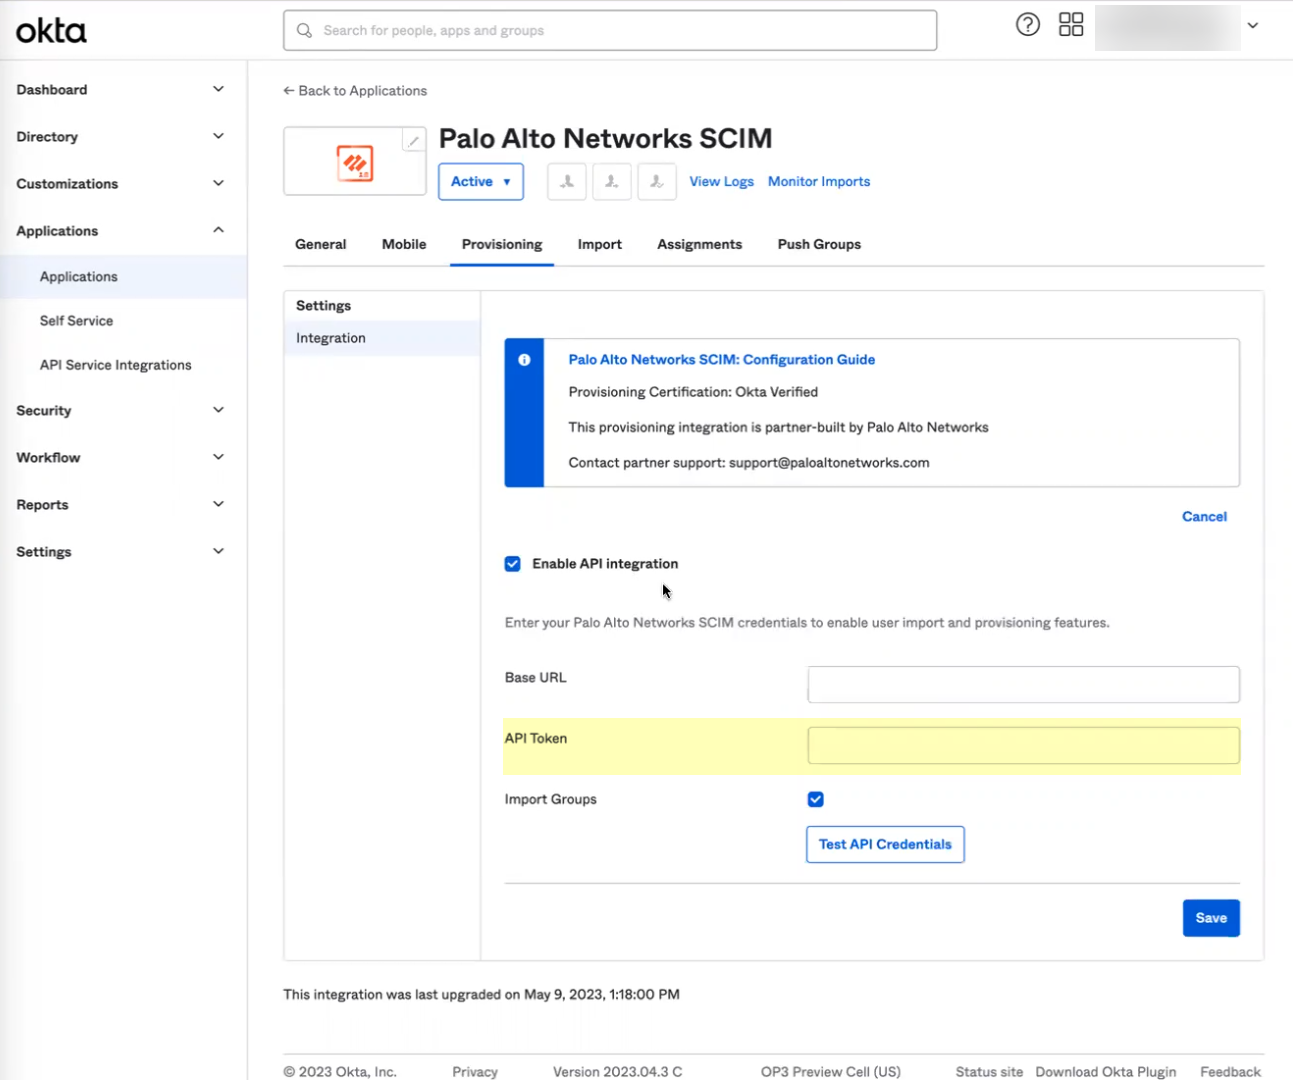
- Click Test API Credentials to verify the Okta Directory can successfully communicate with the Palo Alto Networks SCIM integration then click Save .
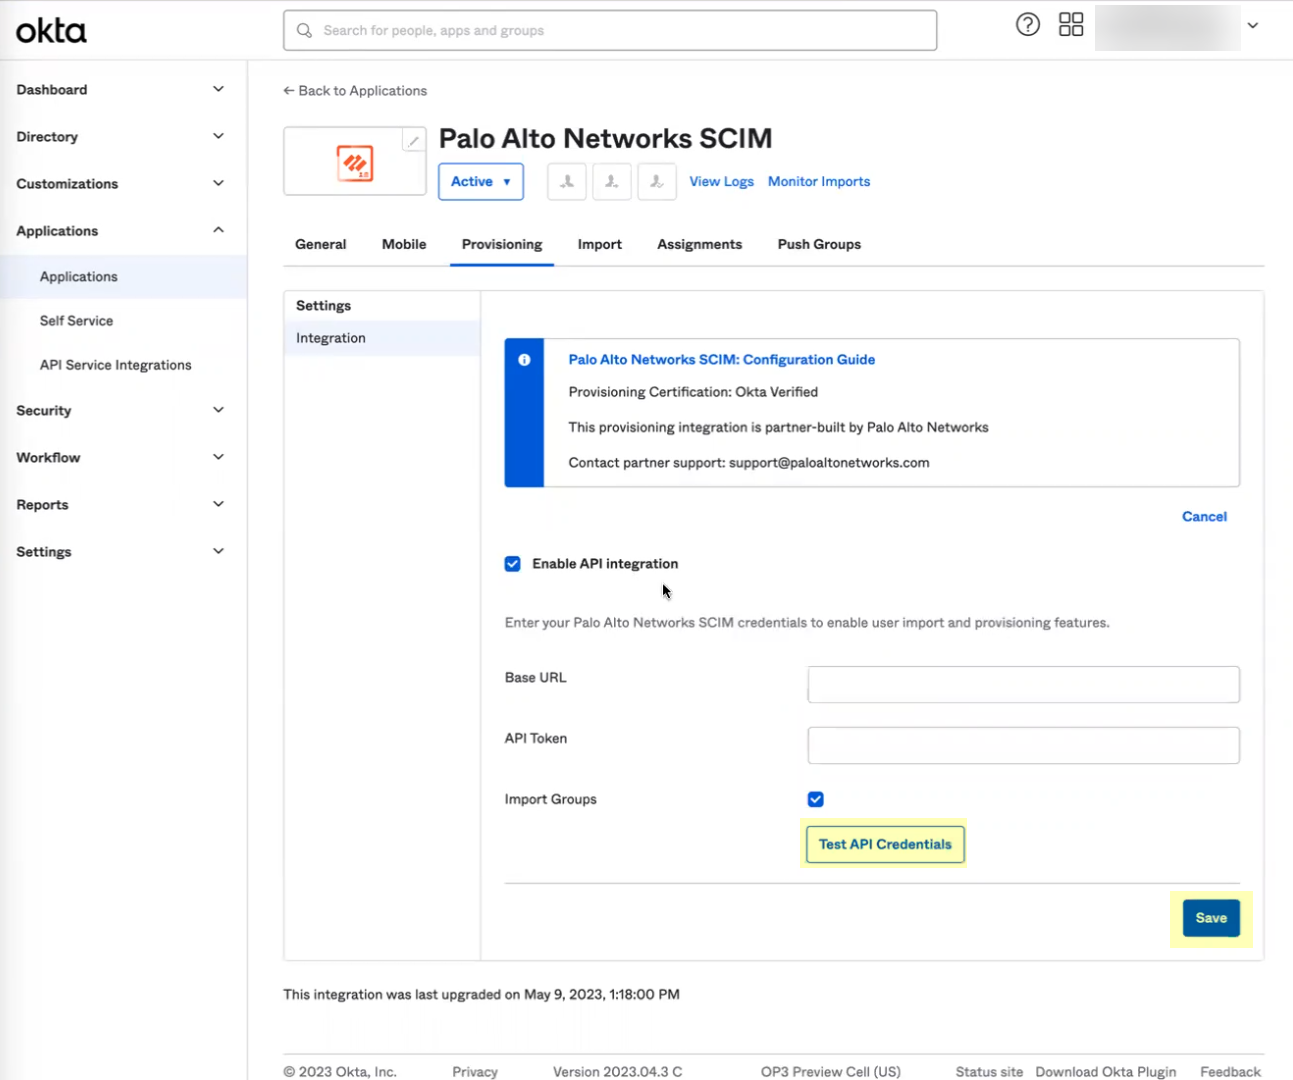
If the test is not successful, verify that you successfully submitted your configuration in the Cloud Identity Engine app in step
3.d
.
- Assign the Okta integration to the users you want to include in your Security policy.
- Edit the settings to assign Provisioning to App .
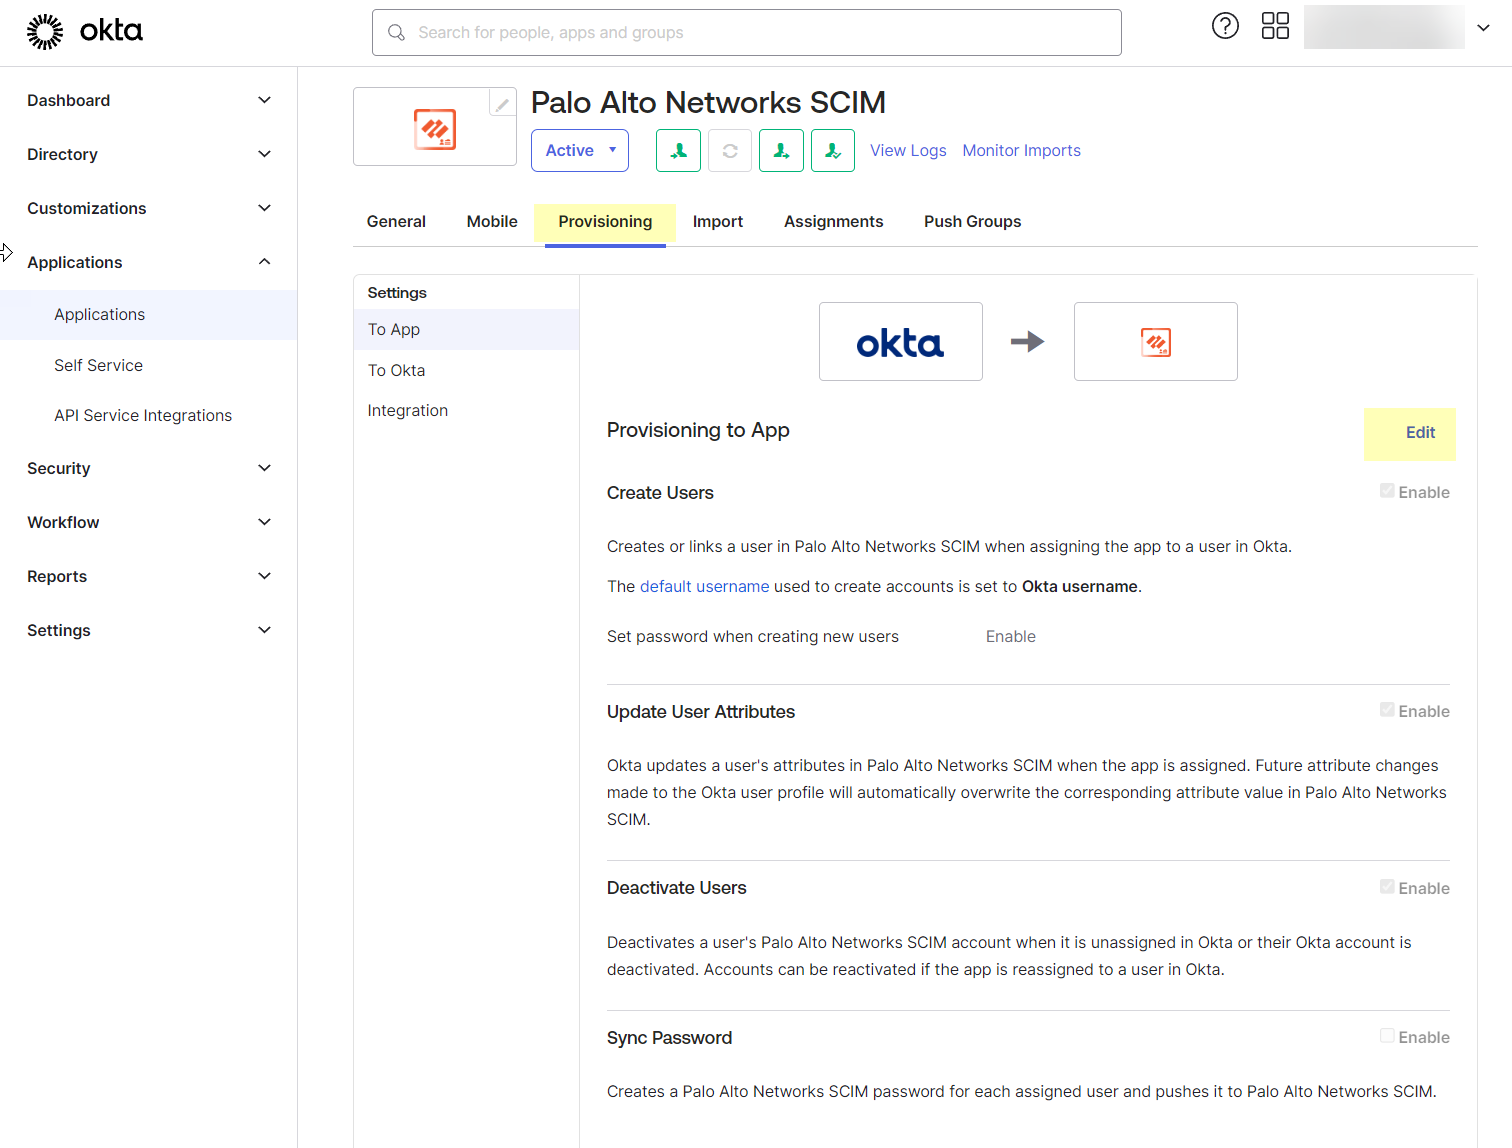
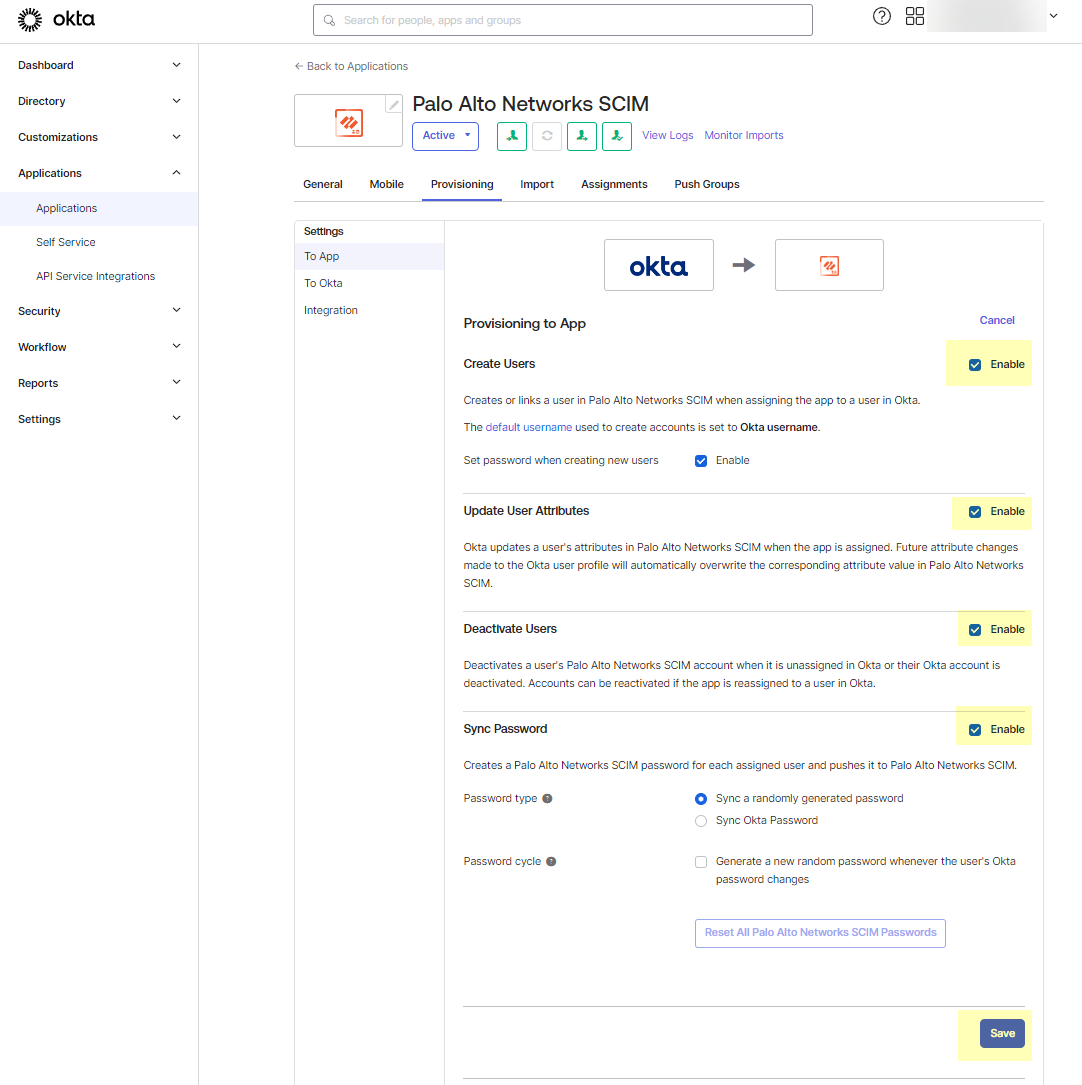
- Enable all the options and Save your changes.
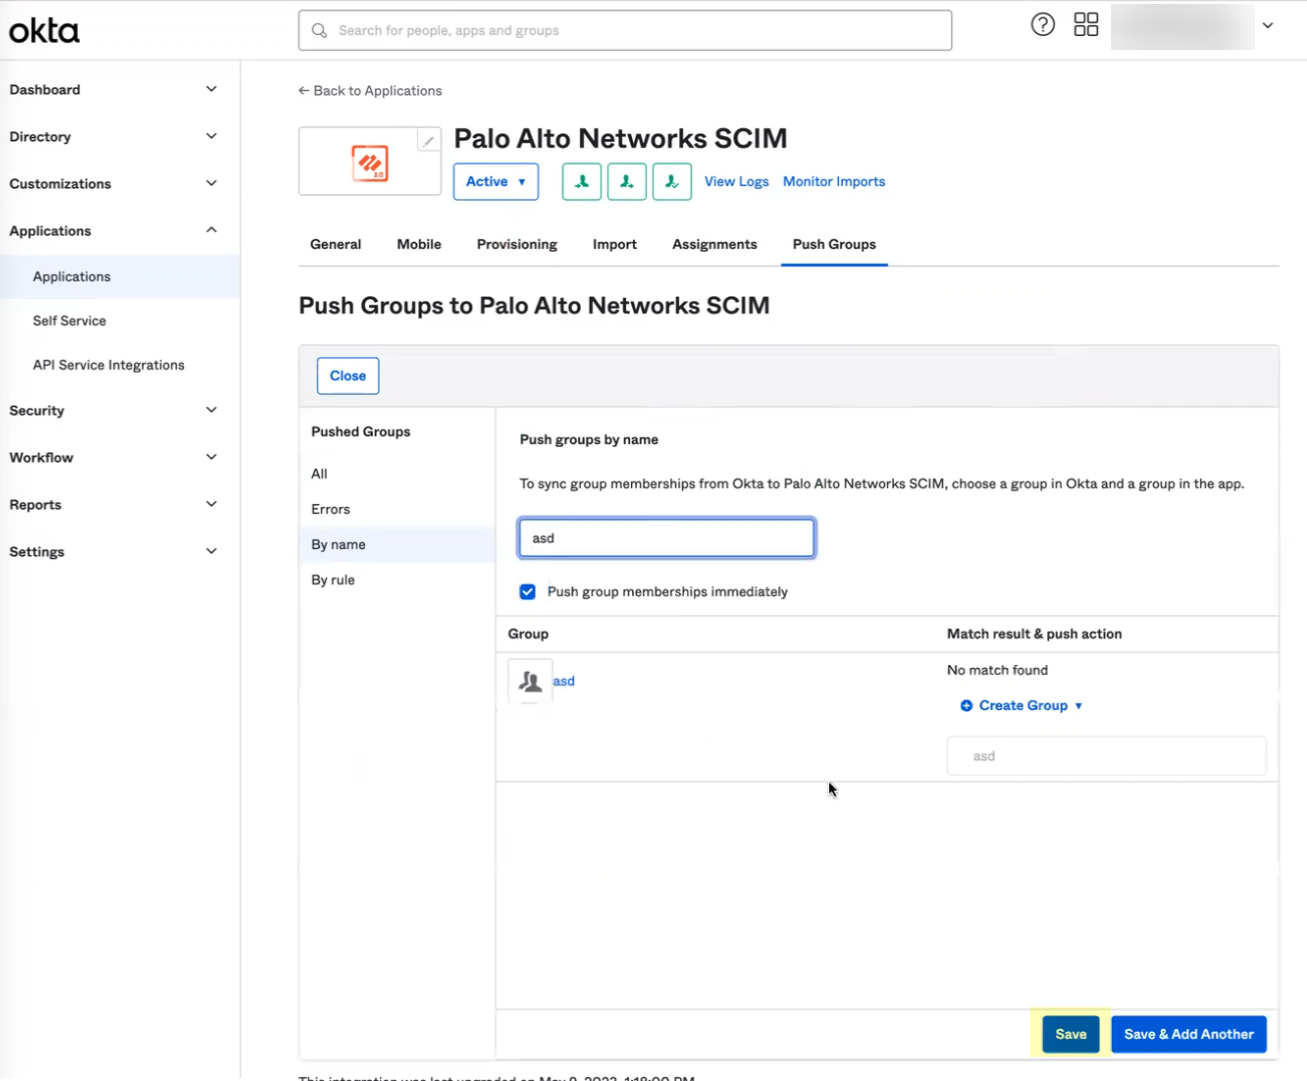
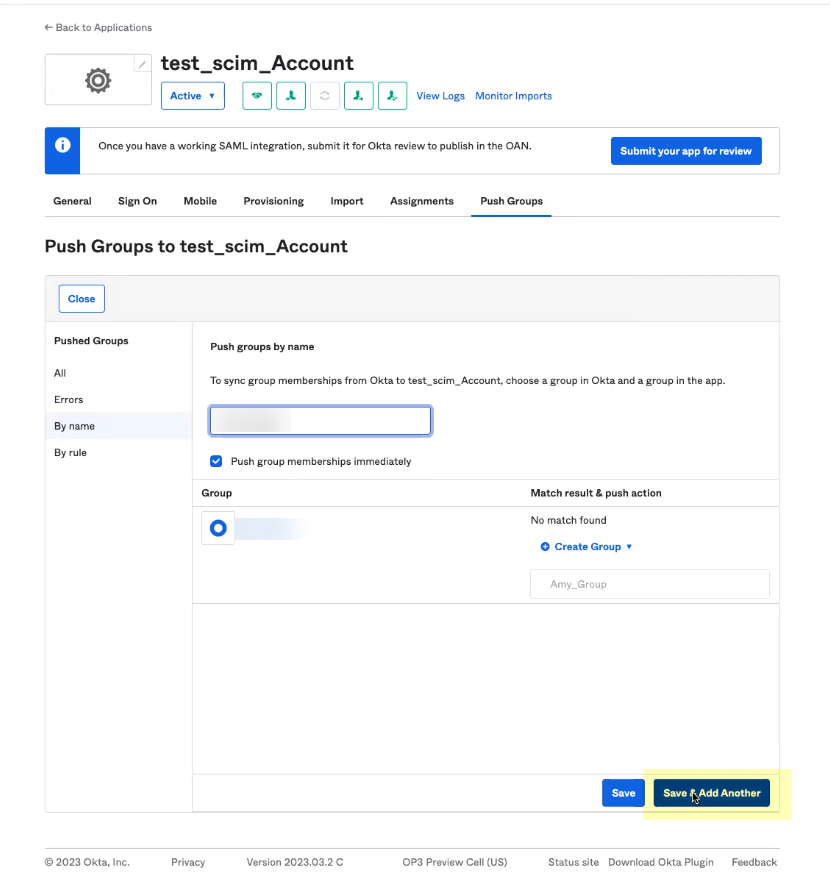
- Select the Push Groups tab then click the Find Groups button to Find groups by name .
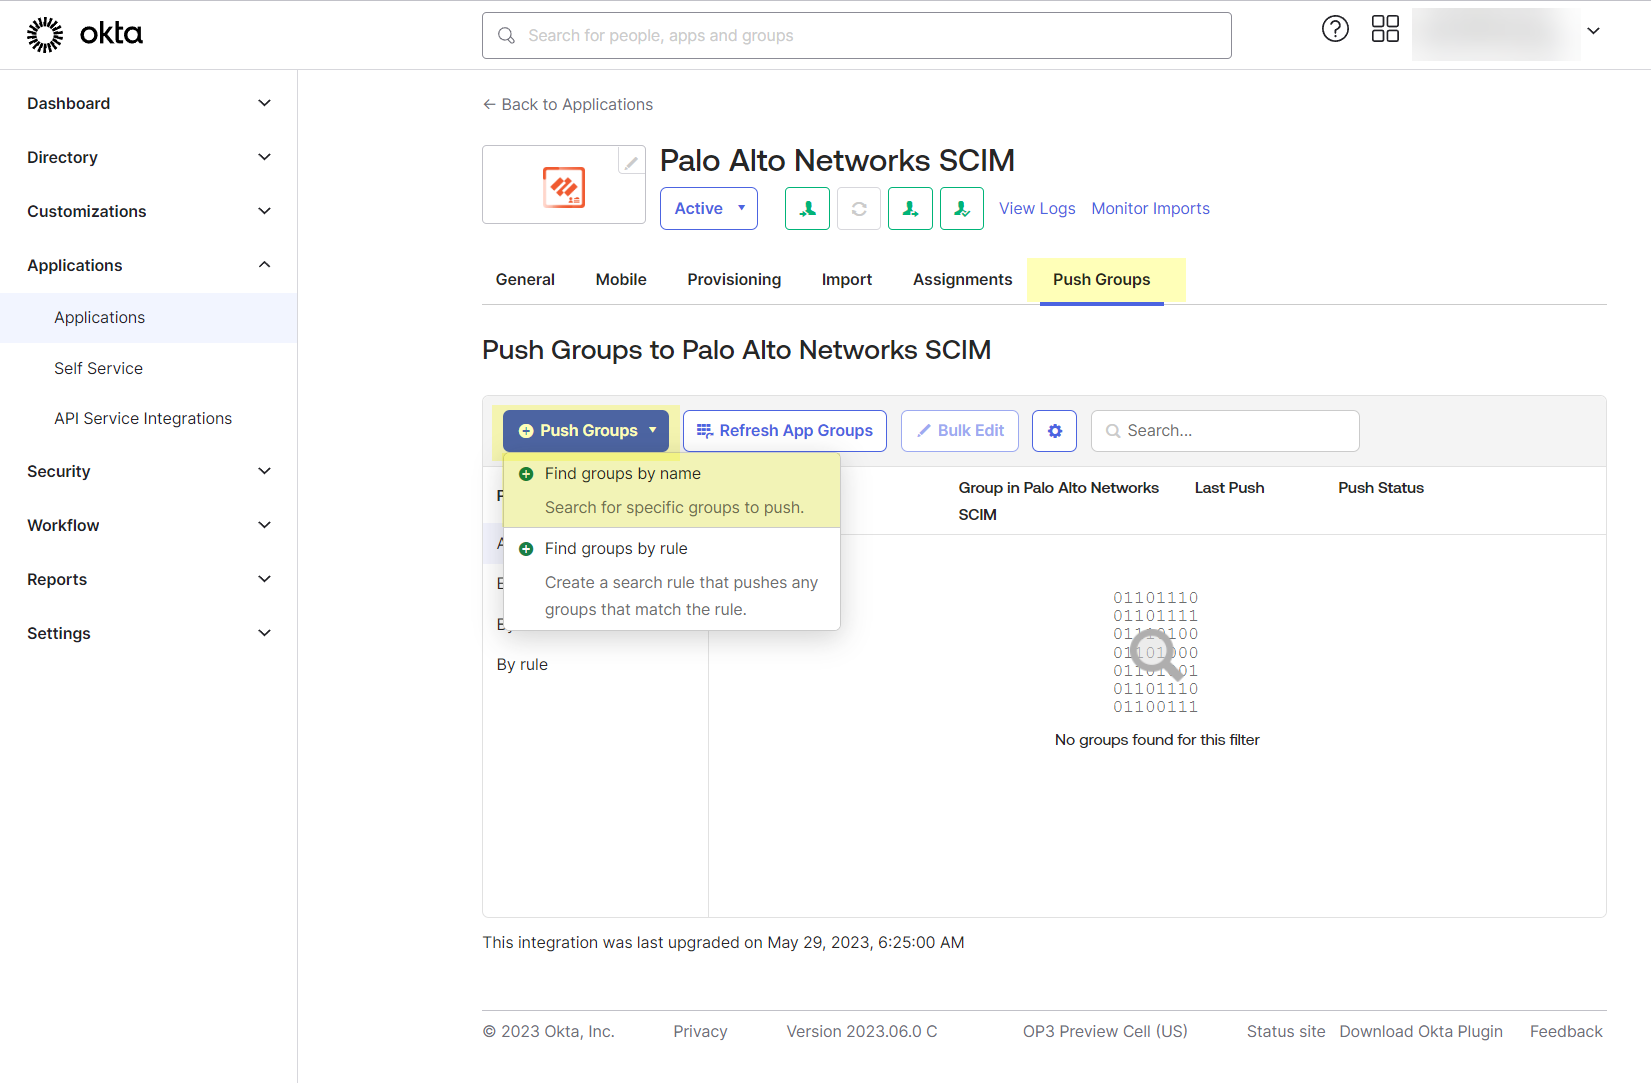
- Type the name of a group to Push groups by name .
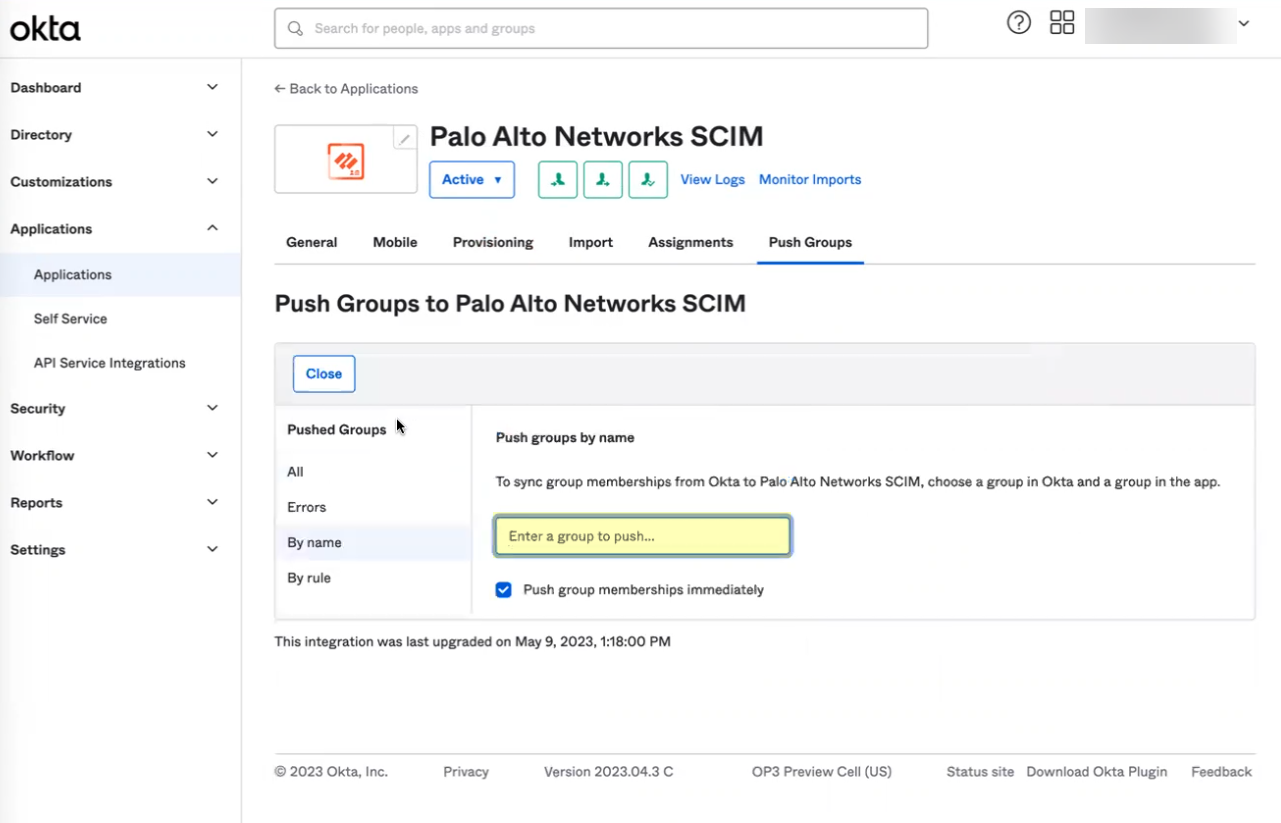
- Select the group and Save your changes.
- Verify the configuration.
- In the Cloud Identity Engine app, select Directories and verify that the timestamp displays in the SCIM Change Timestamp column for the Okta SCIM directory.
- Select ActionsFull Sync for the directory.
The configuration isn’t complete until you’ve successfully completed a full sync for the entire directory.

Configure a Custom Okta App Integration for SCIM Connector
Palo Alto Networks strongly recommends using the Okta gallery app to
Configure Okta Directory for SCIM Connector
. If you want to use a custom Okta app integration, complete the following steps.
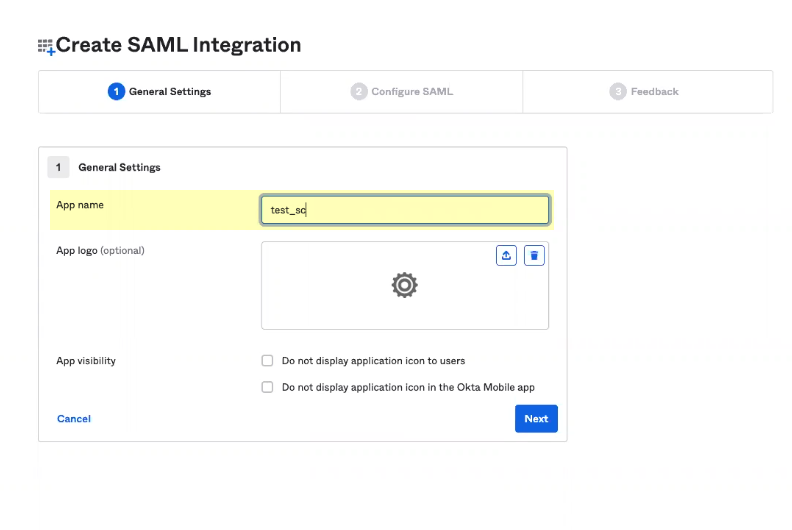
- Log in to your Okta Administrator Dashboard and Create an app integration .
- Select SAML 2.0 as the Sign-in method and click Next .

- Enter a unique App Name and optionally enter any other information (such as an App Logo or App Visibility ) then click Next .
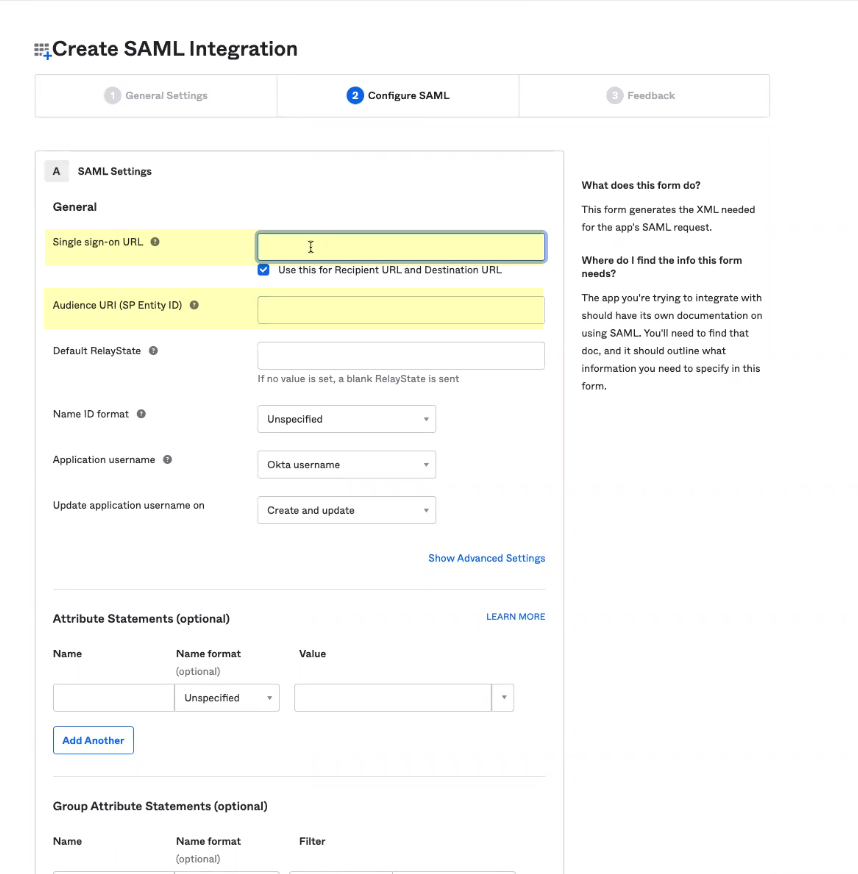
- Enter the Single-sign on URL where you want to redirect users to sign in and the Audience URI (SP Entity ID) then click Next .
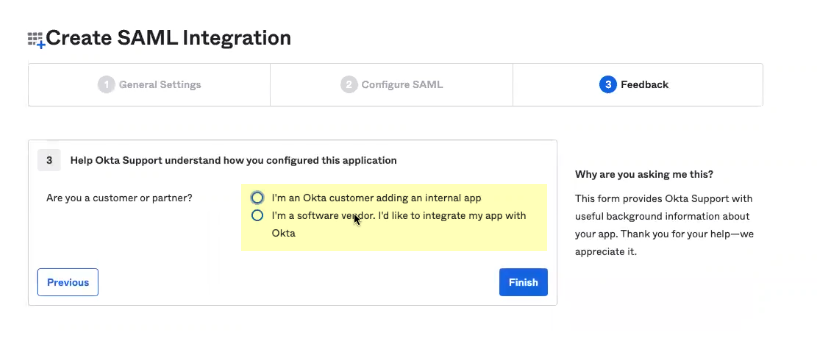
- Select the option that best reflects your use of the SCIM Connector app integration and click Finish .
- Configure the Okta SCIM Connector app integration.
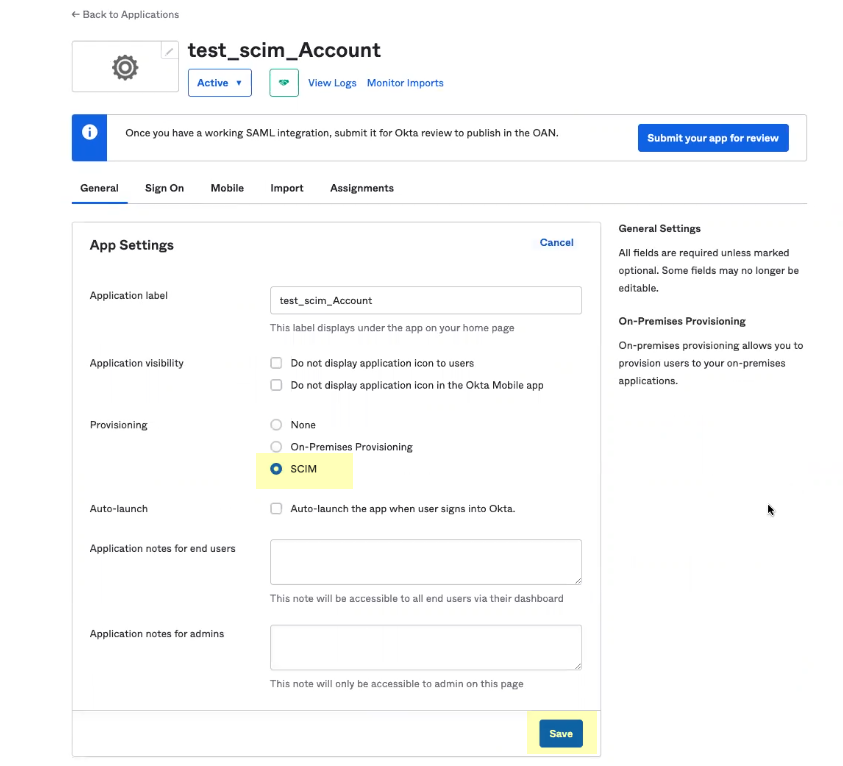
- Select General (if it is not already selected) and Edit the App Settings .
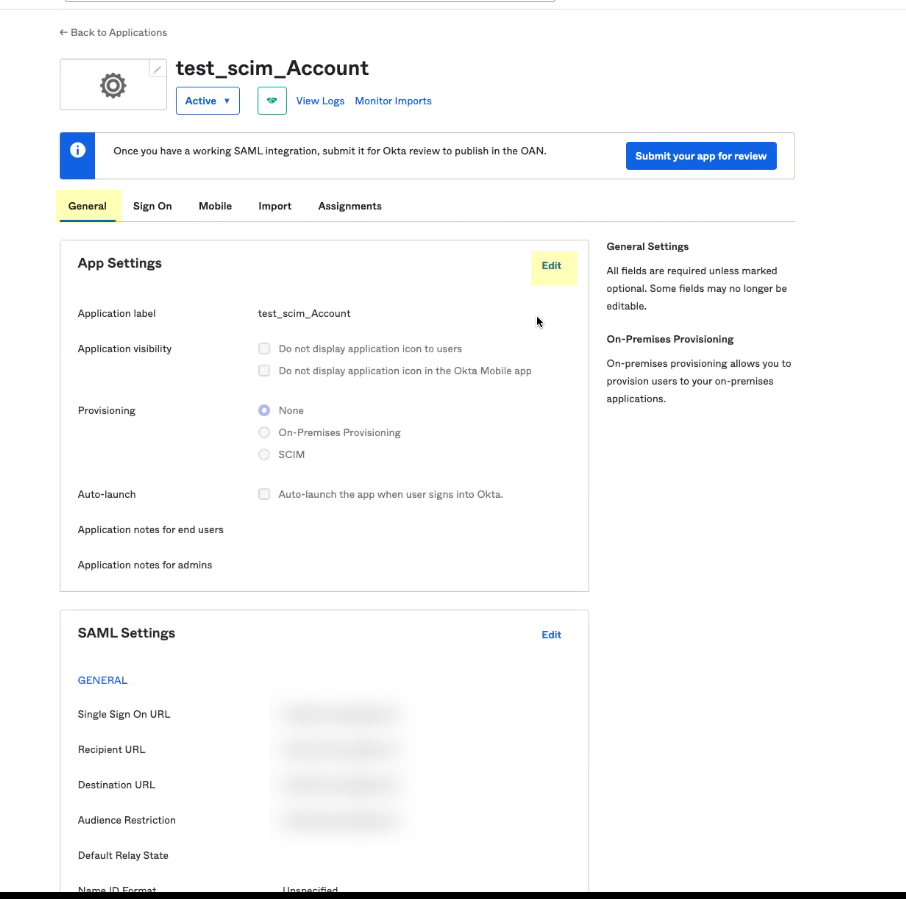
- Select SCIM as the Provisioning method and Save your changes.
- Configure provisioning for the Okta SCIM Connector app integration.
- Select Provisioning and Edit the SCIM Connection settings.
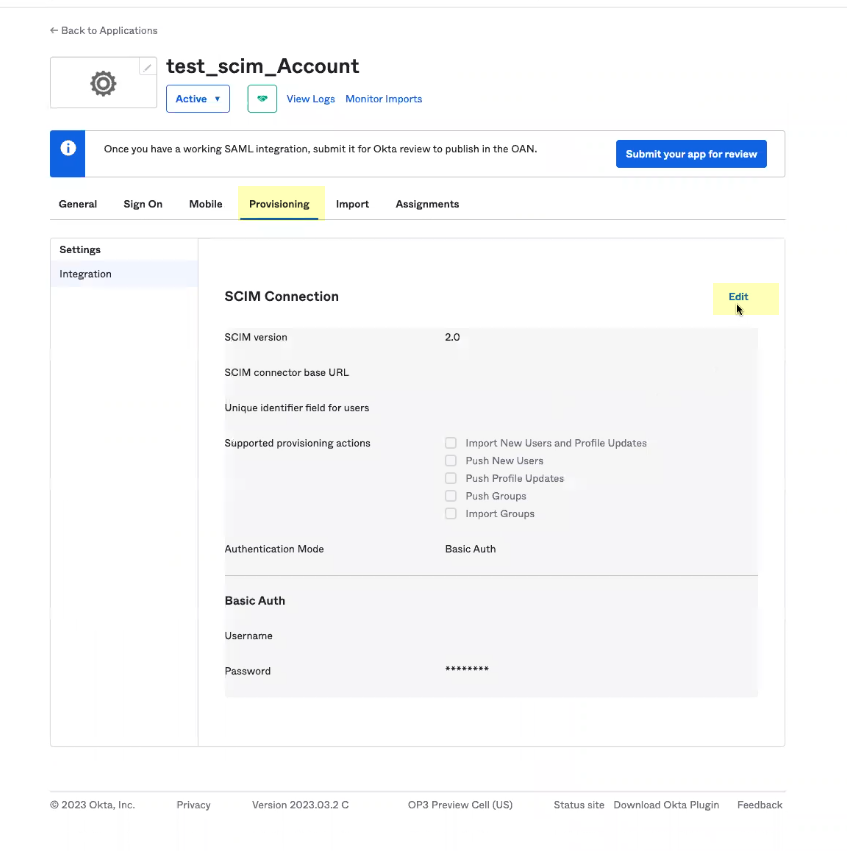
- Enter the Base URL you copied from the Cloud Identity Engine app in Step
3.b
as the SCIM connector base URL .
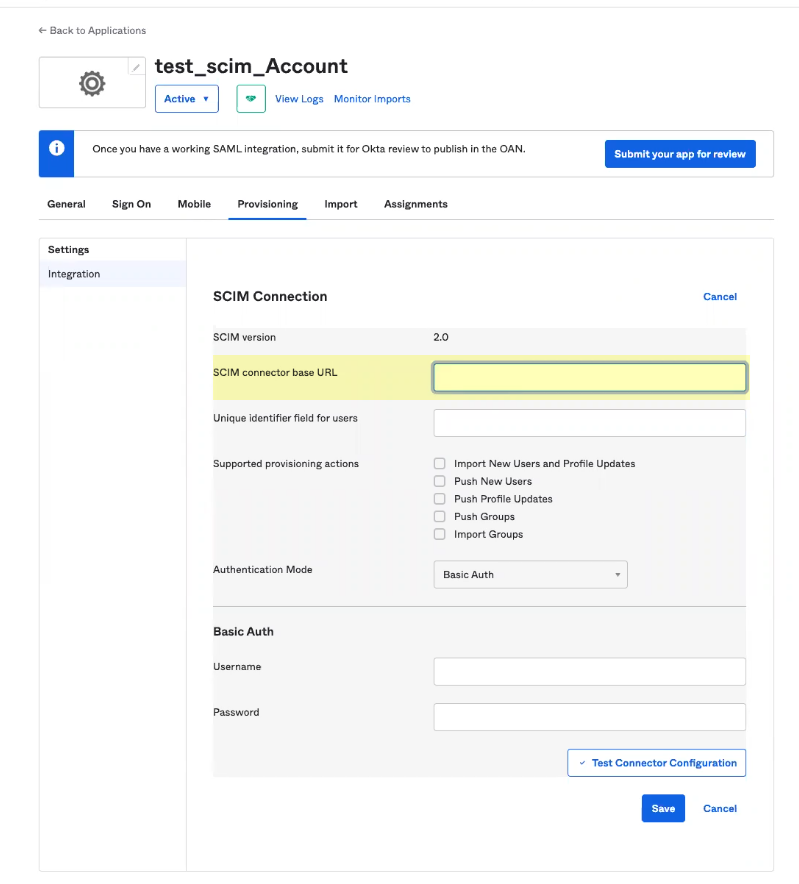
- Enter userName as the Unique identifier field for users .
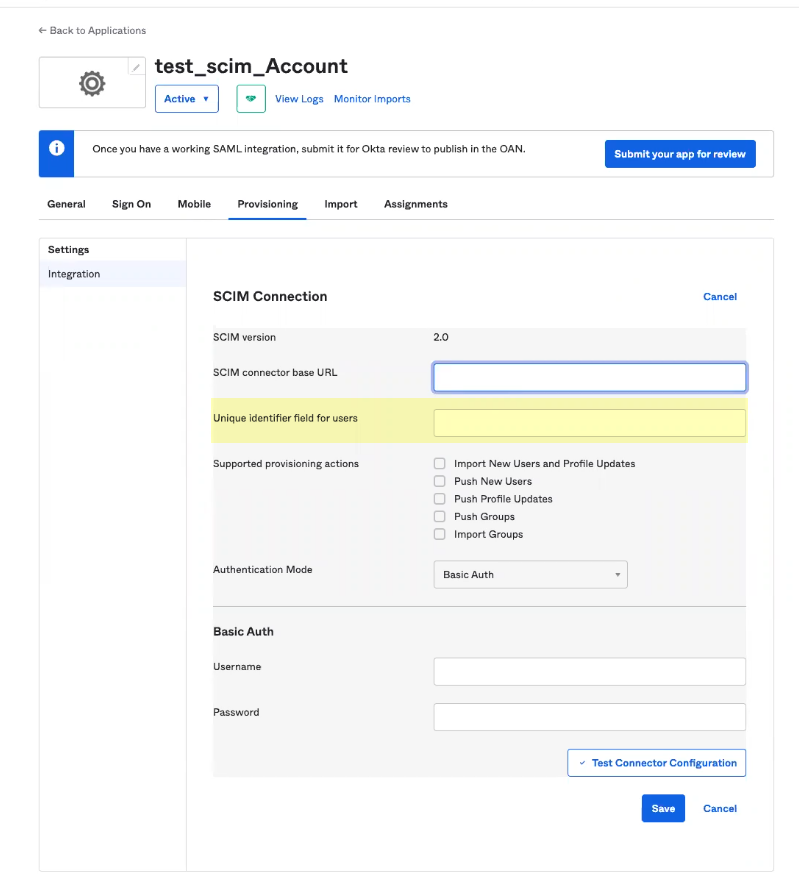
- Select the Supported provisioning actions you want to use to allow users to authenticate.

- Select HTTP Header as the Authentication Mode .
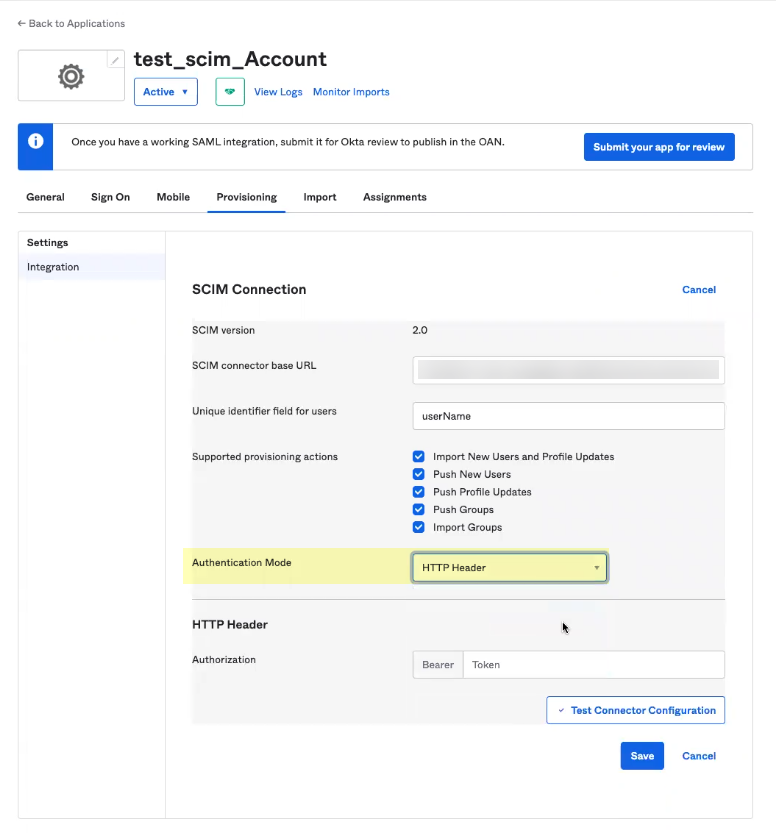
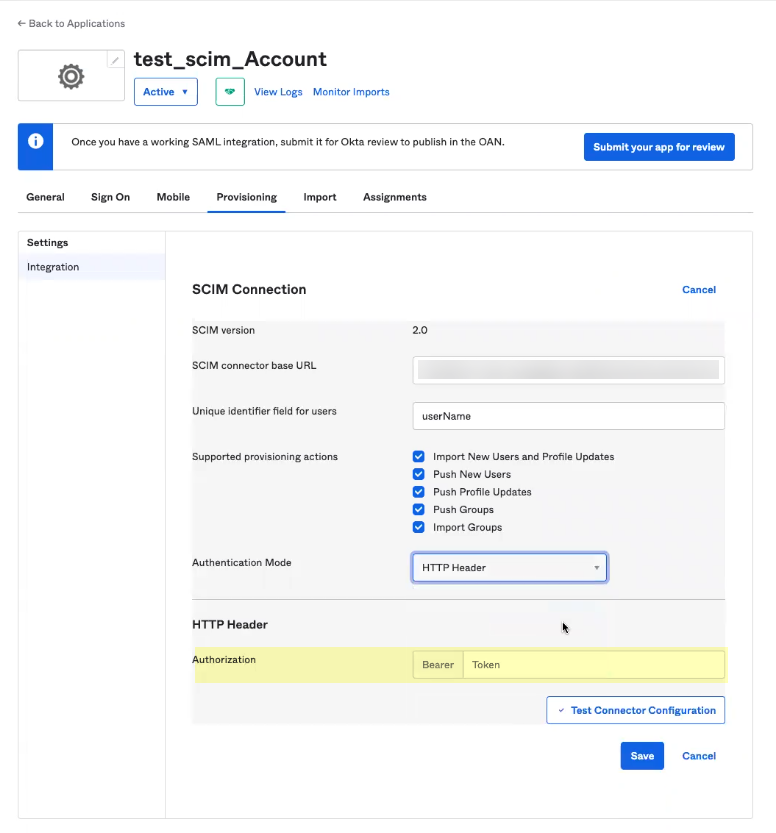
- Enter the Bearer Token you copied from the Cloud Identity Engine app in Step
3.c
and Save your changes.
- Select Provisioning and Edit the settings.

- Select at least one of the options for Provisioning to App and Save your changes.

- Assign the users and groups that you want to use the Okta SCIM Connector app integration.
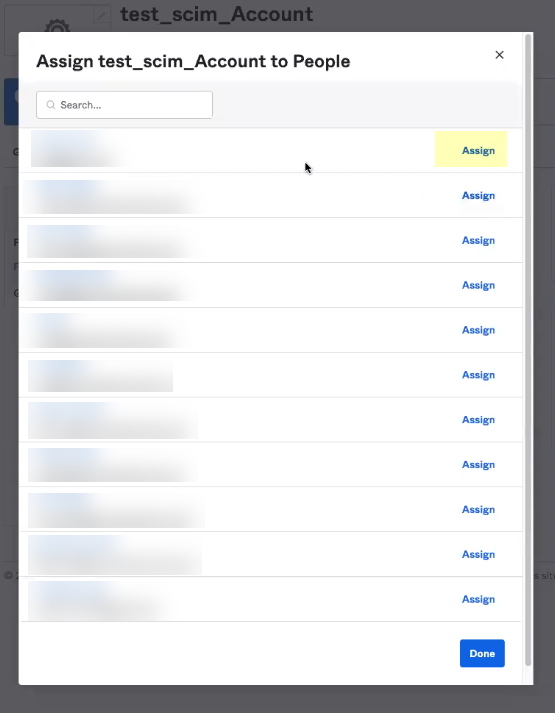
- Select AssignmentsAssignAssign to People to assign the users you want to use Okta SCIM.
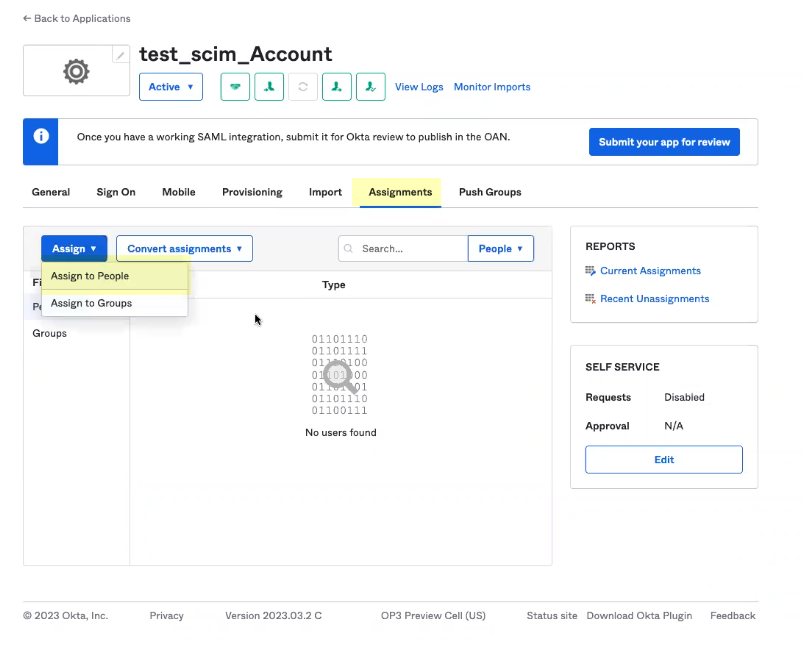
- Select the users for whom you want to Assign this app.
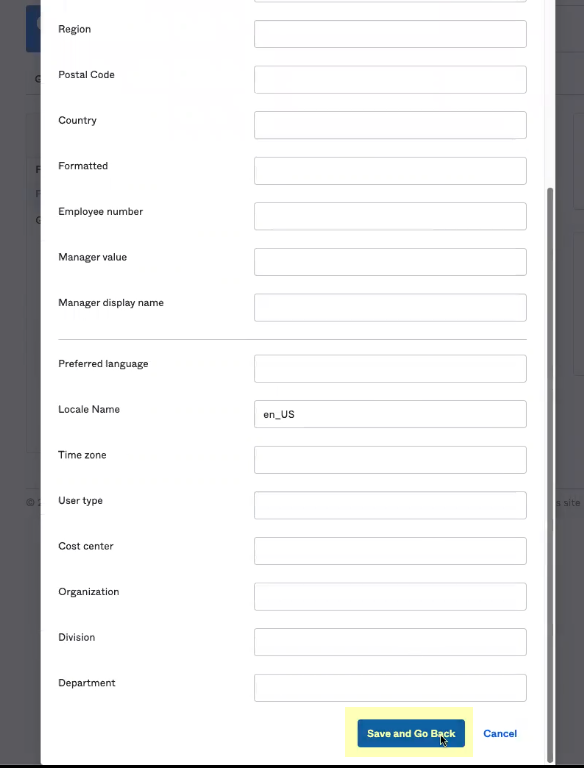
- Review and edit the information as needed then click Save and Go Back .
- Verify the users you added display on the Assignments tab.

- Select Push Groups then Find groups by name to assign groups to this app.
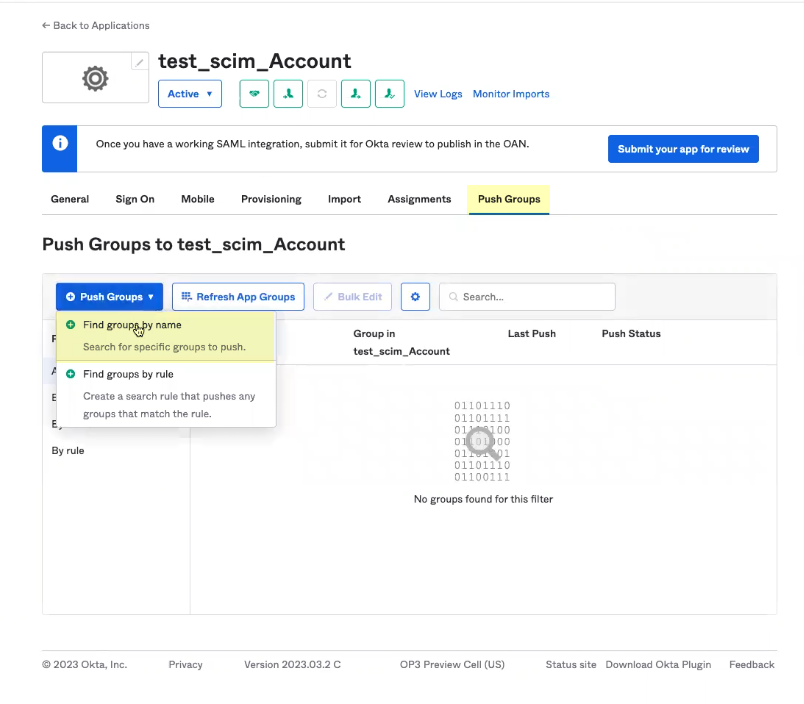
- Select the group you want to assign to this app then click Save and add another . Repeat as needed until all the groups you want to assign to this app have been selected then click Save .
- Verify the configuration.
- Select ReportsSystem Log .
- Verify that log results display to confirm that the SCIM Connector can successfully communicate with your directory. If no results populate, the SCIM Connector cannot communicate with your directory; verify the configuration and make any needed changes, then check the log results again.
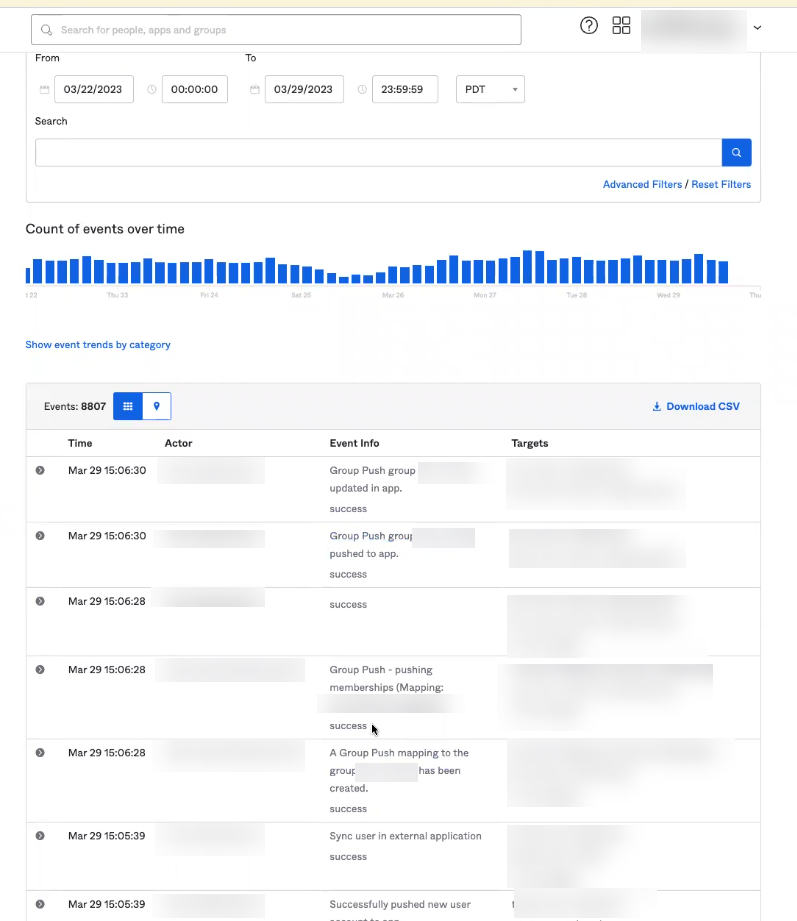
Verify that this step is complete before continuing to the next step. Until the log results display in the Okta Administrator Dashboard, a full sync cannot successfully complete for the directory in the Cloud Identity Engine app.
- In the Cloud Identity Engine app, select Directories and verify that the timestamp displays in the SCIM Change Timestamp column for the Okta SCIM directory.

- Select ActionsFull Sync for the directory.
The configuration is not complete until you have successfully completed a full sync for the entire directory.
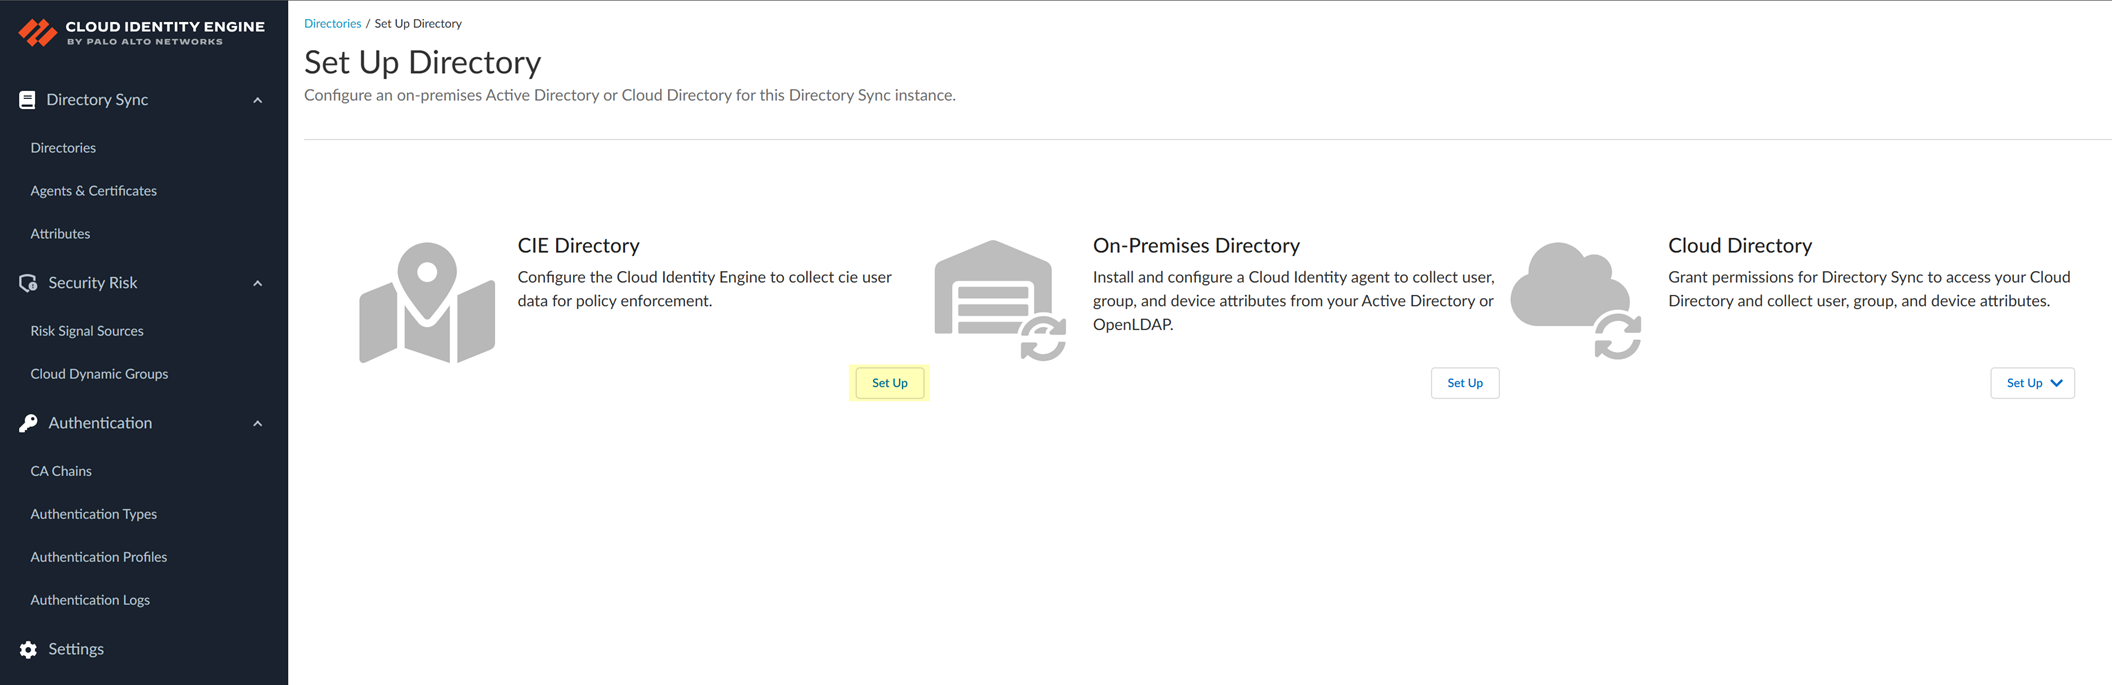
Configure a CIE Directory
To configure a local directory for the Cloud Identity Engine, use the CIE Directory by completing the following steps.
- Add the CIE Directory in the Cloud Identity Engine.
- Select DirectoryAdd a new directory .
- Set Up a CIE Directory .
- Enter a unique Directory Name .
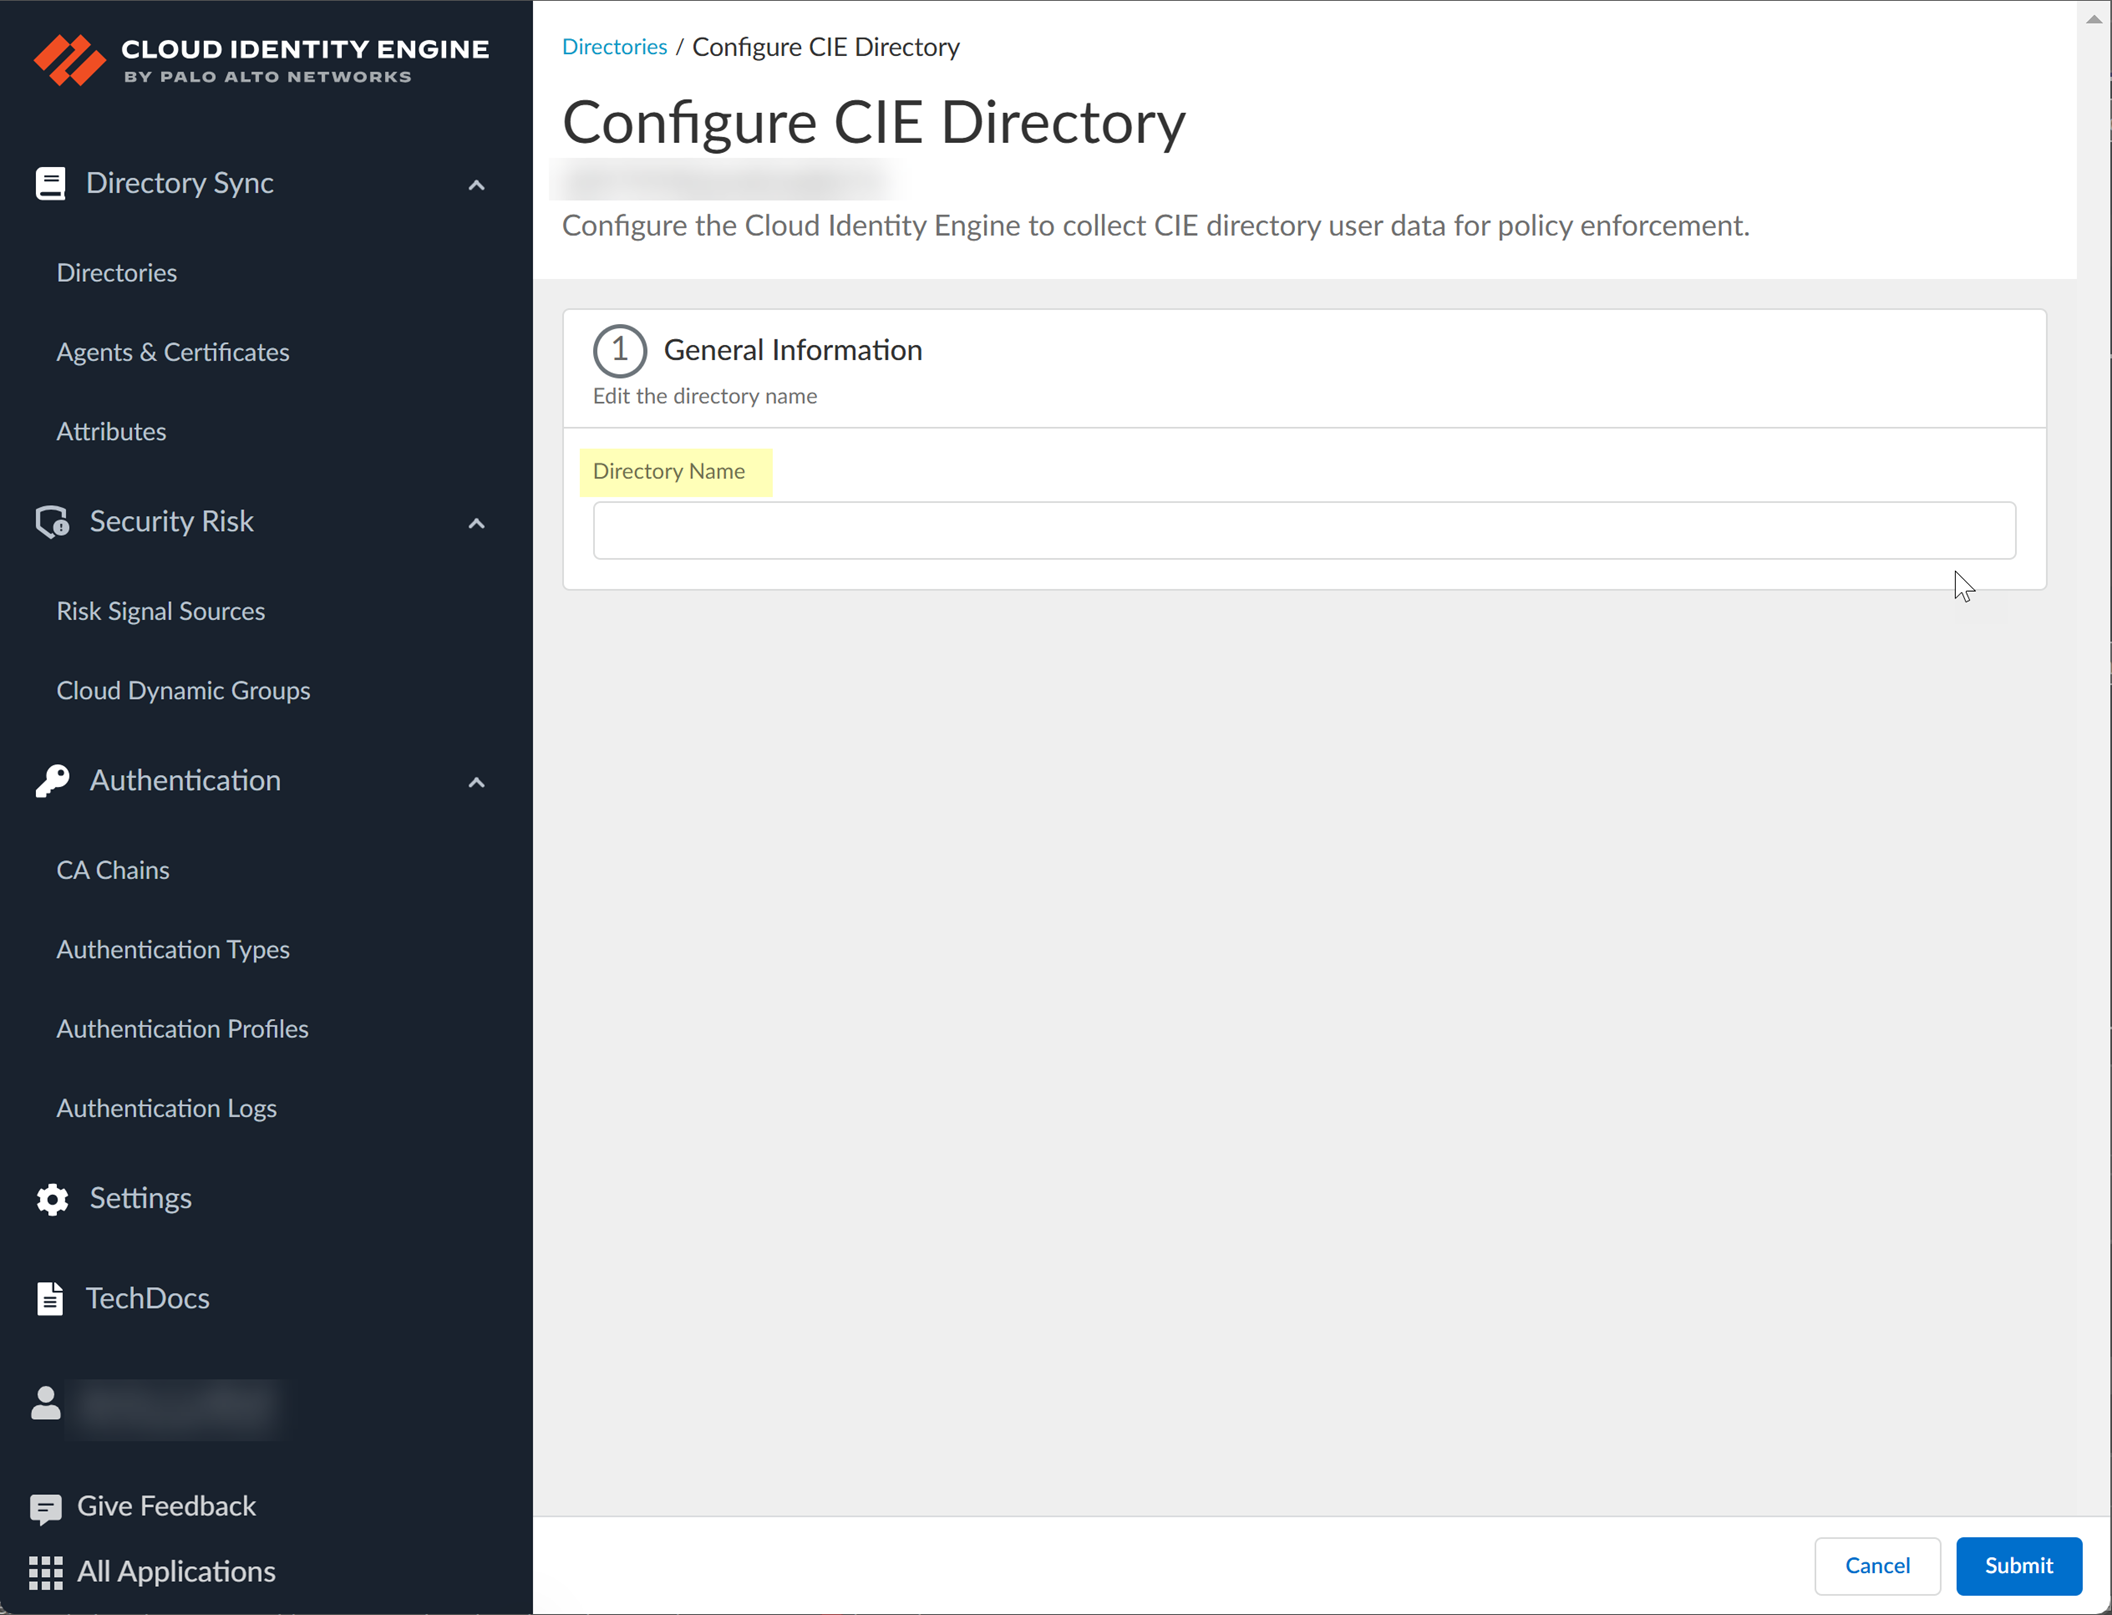
- Click Submit to create the CIE Directory.
Creating the directory takes some time, so wait until the Directories page displays before proceeding.
- Manually add the users to the CIE Directory.
- On the Directories page, select ActionsAdd/Remove Users .
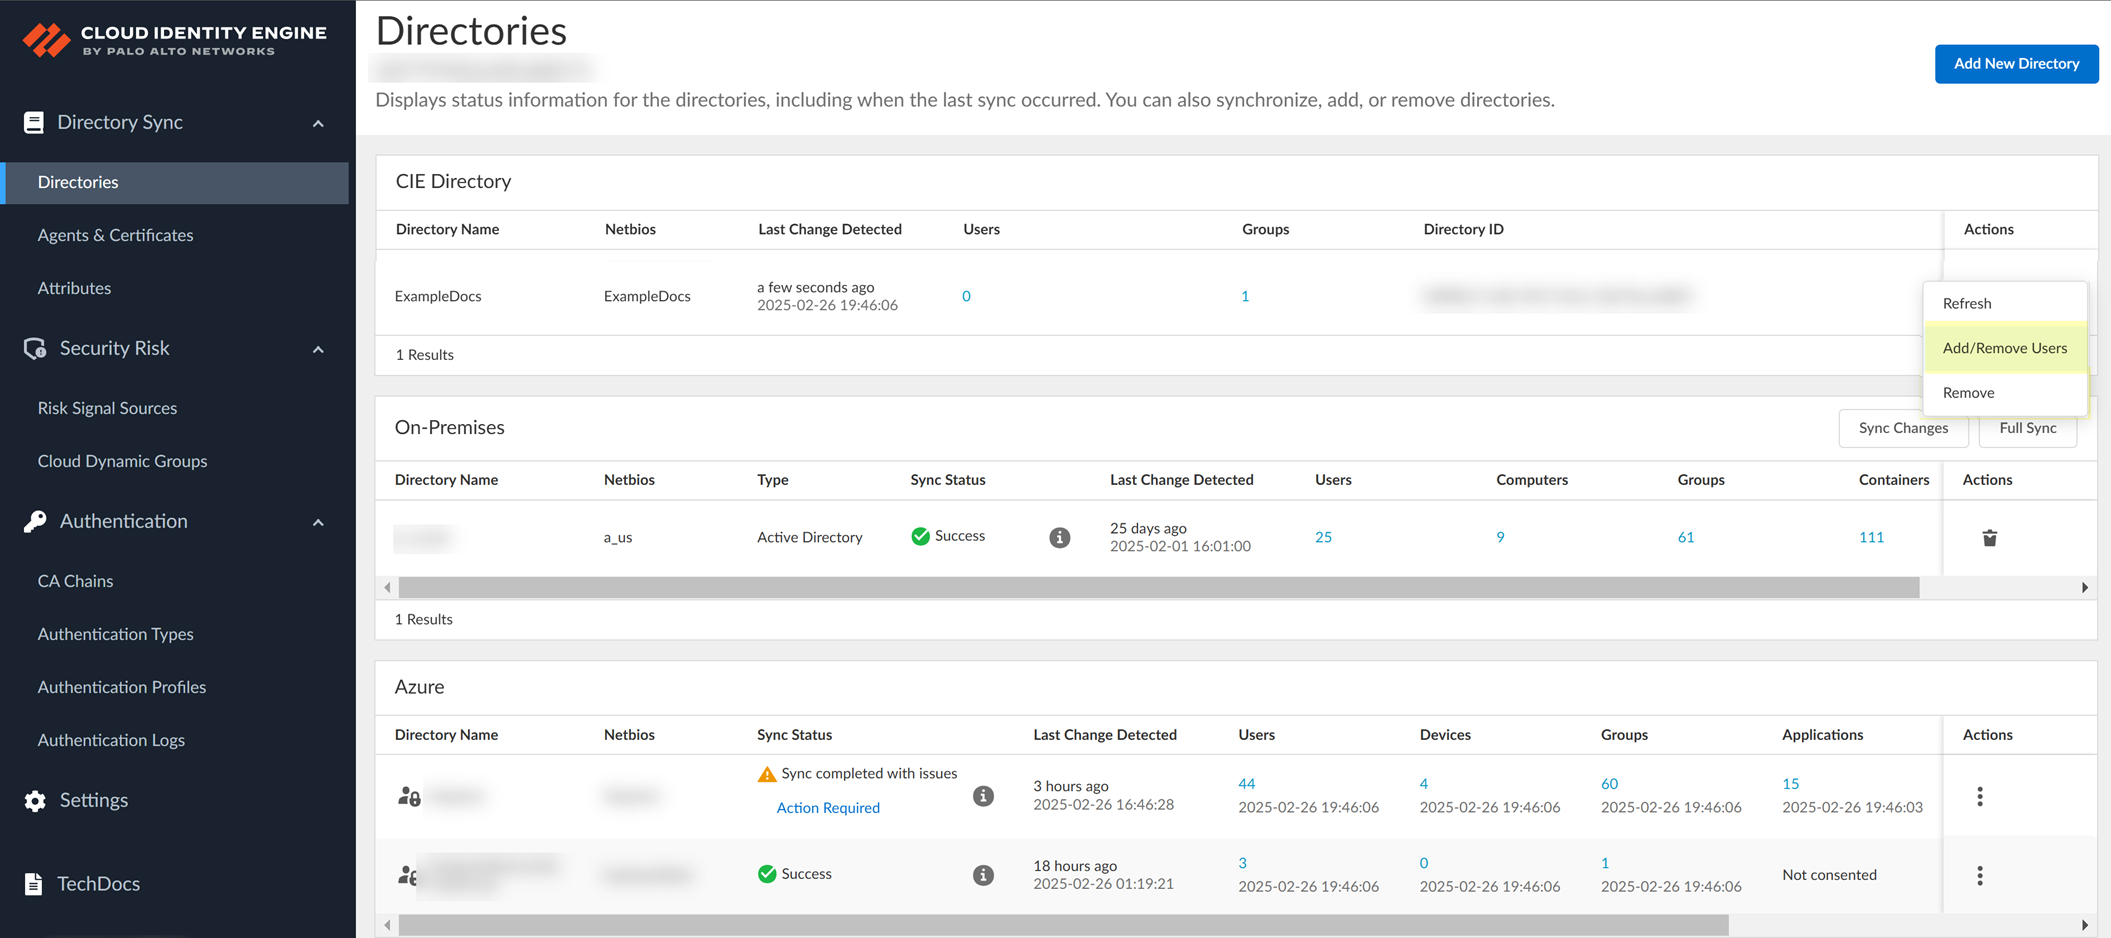
- Click Add User .
The Cloud Identity Engine supports up to 200 users for the CIE Directory.
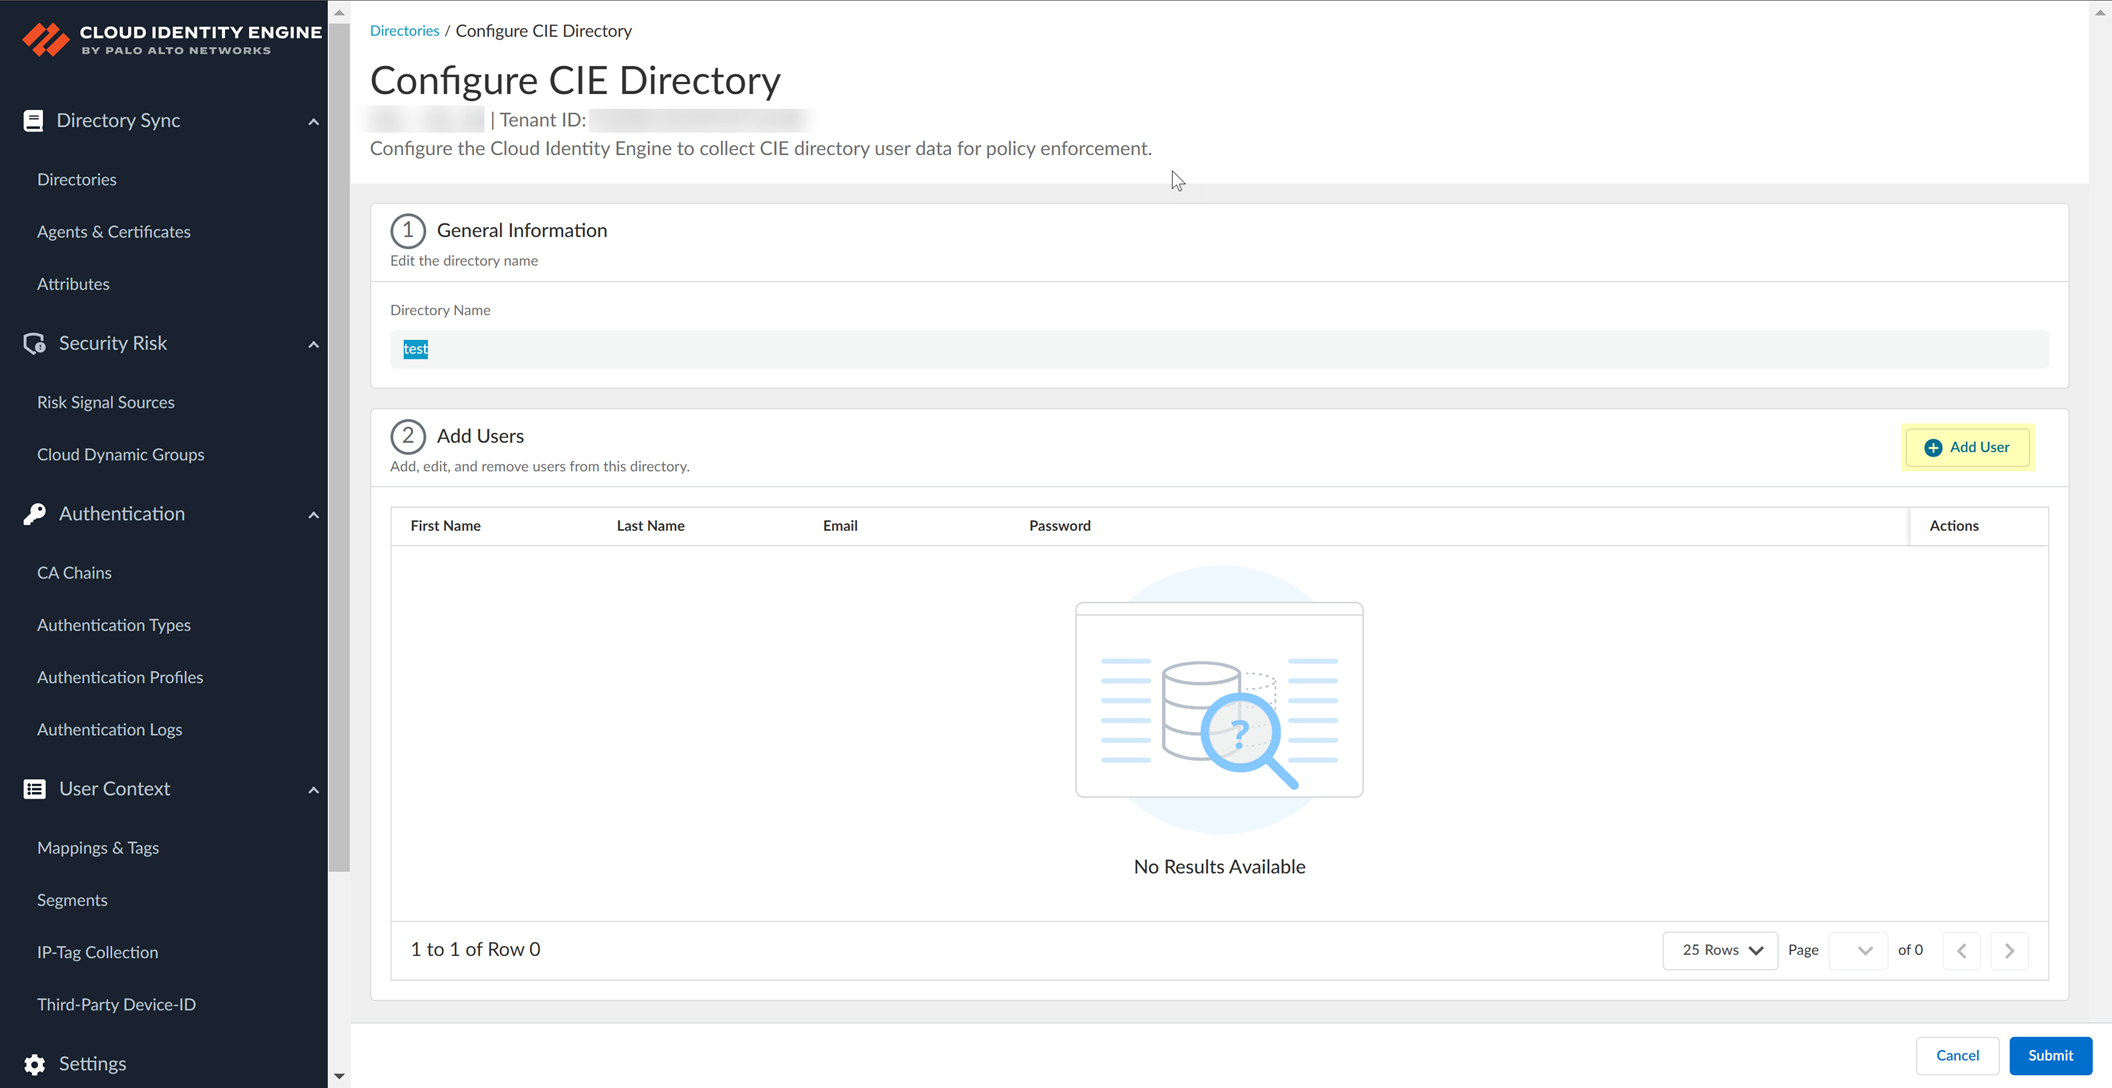
To add multiple users simultaneously, you can click Add User multiple times.
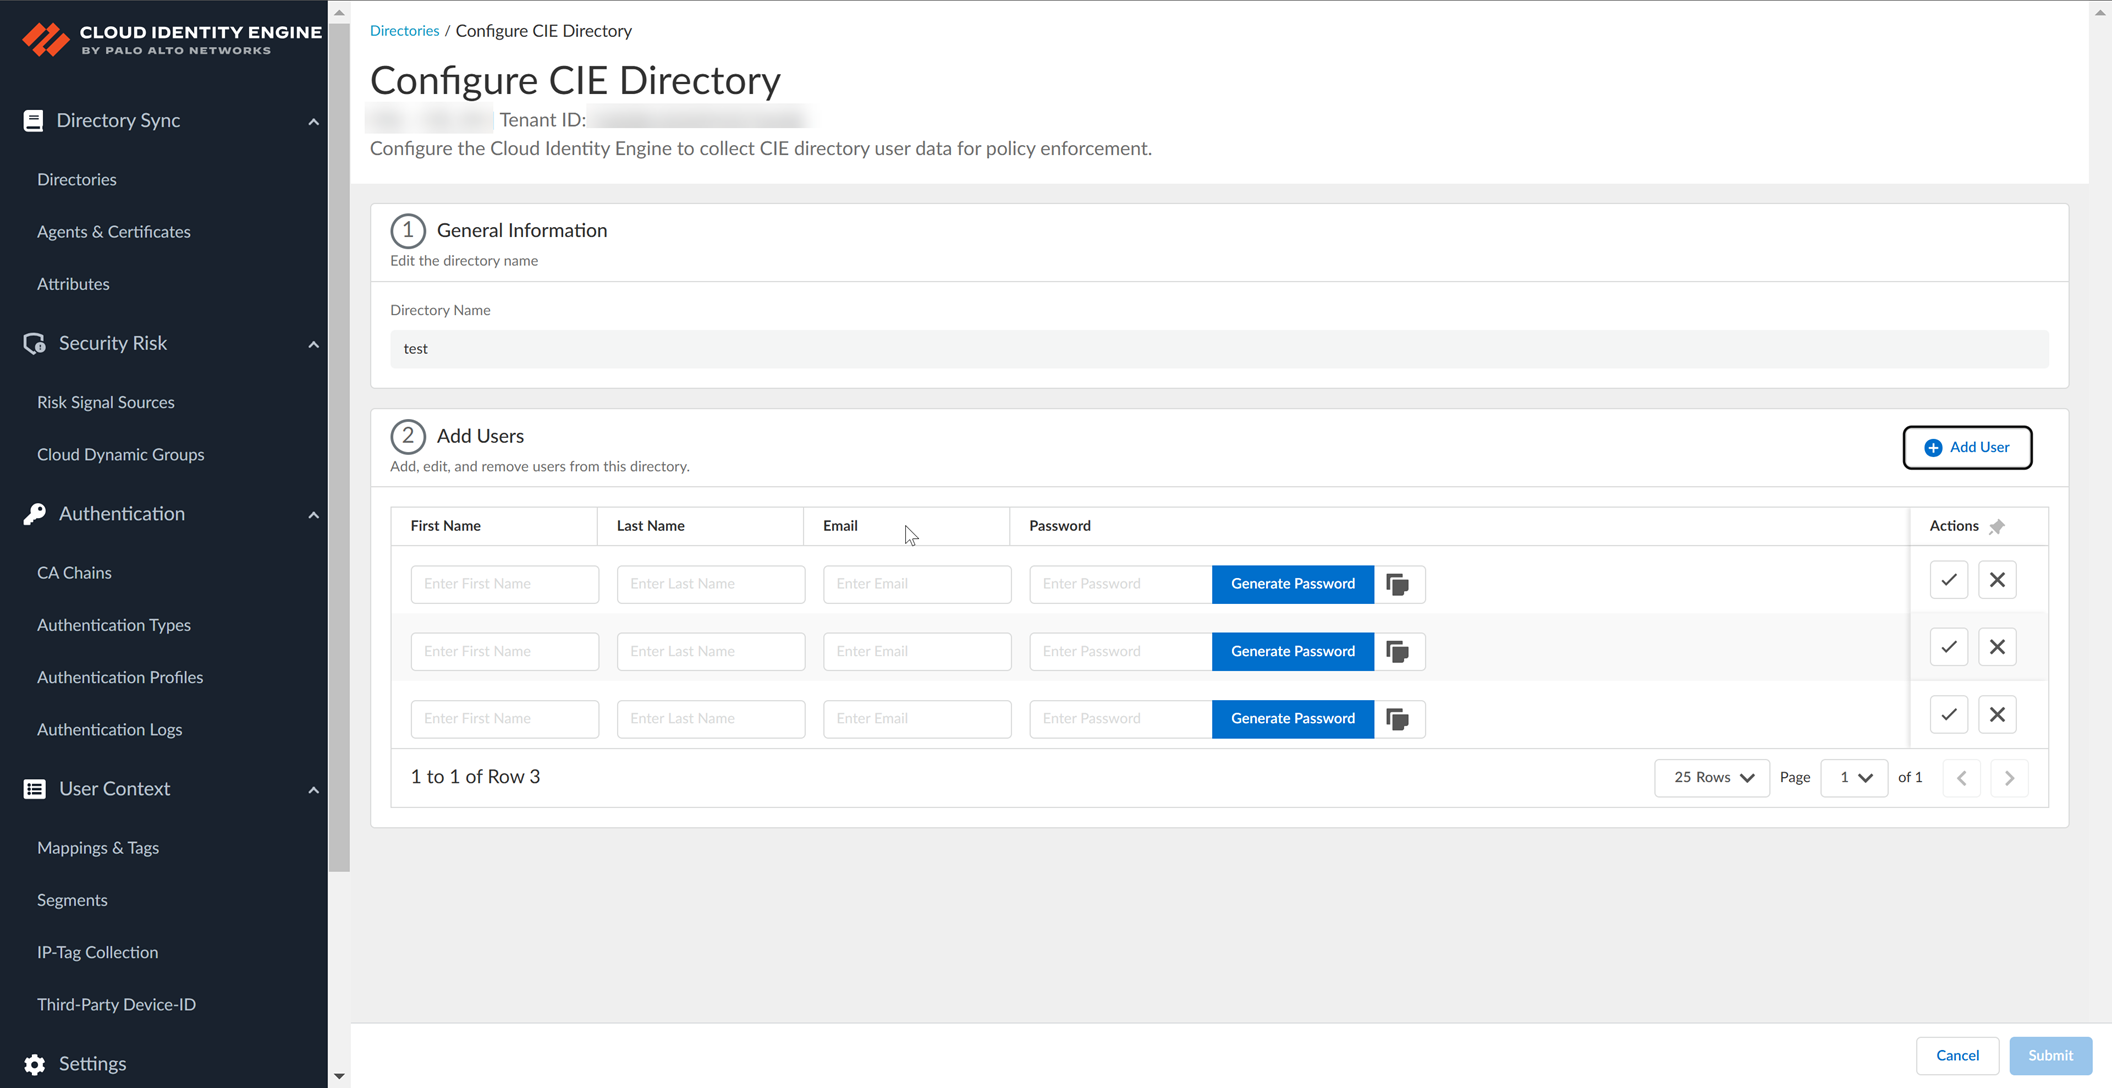
- Enter the user's First Name , Last Name , and Email .
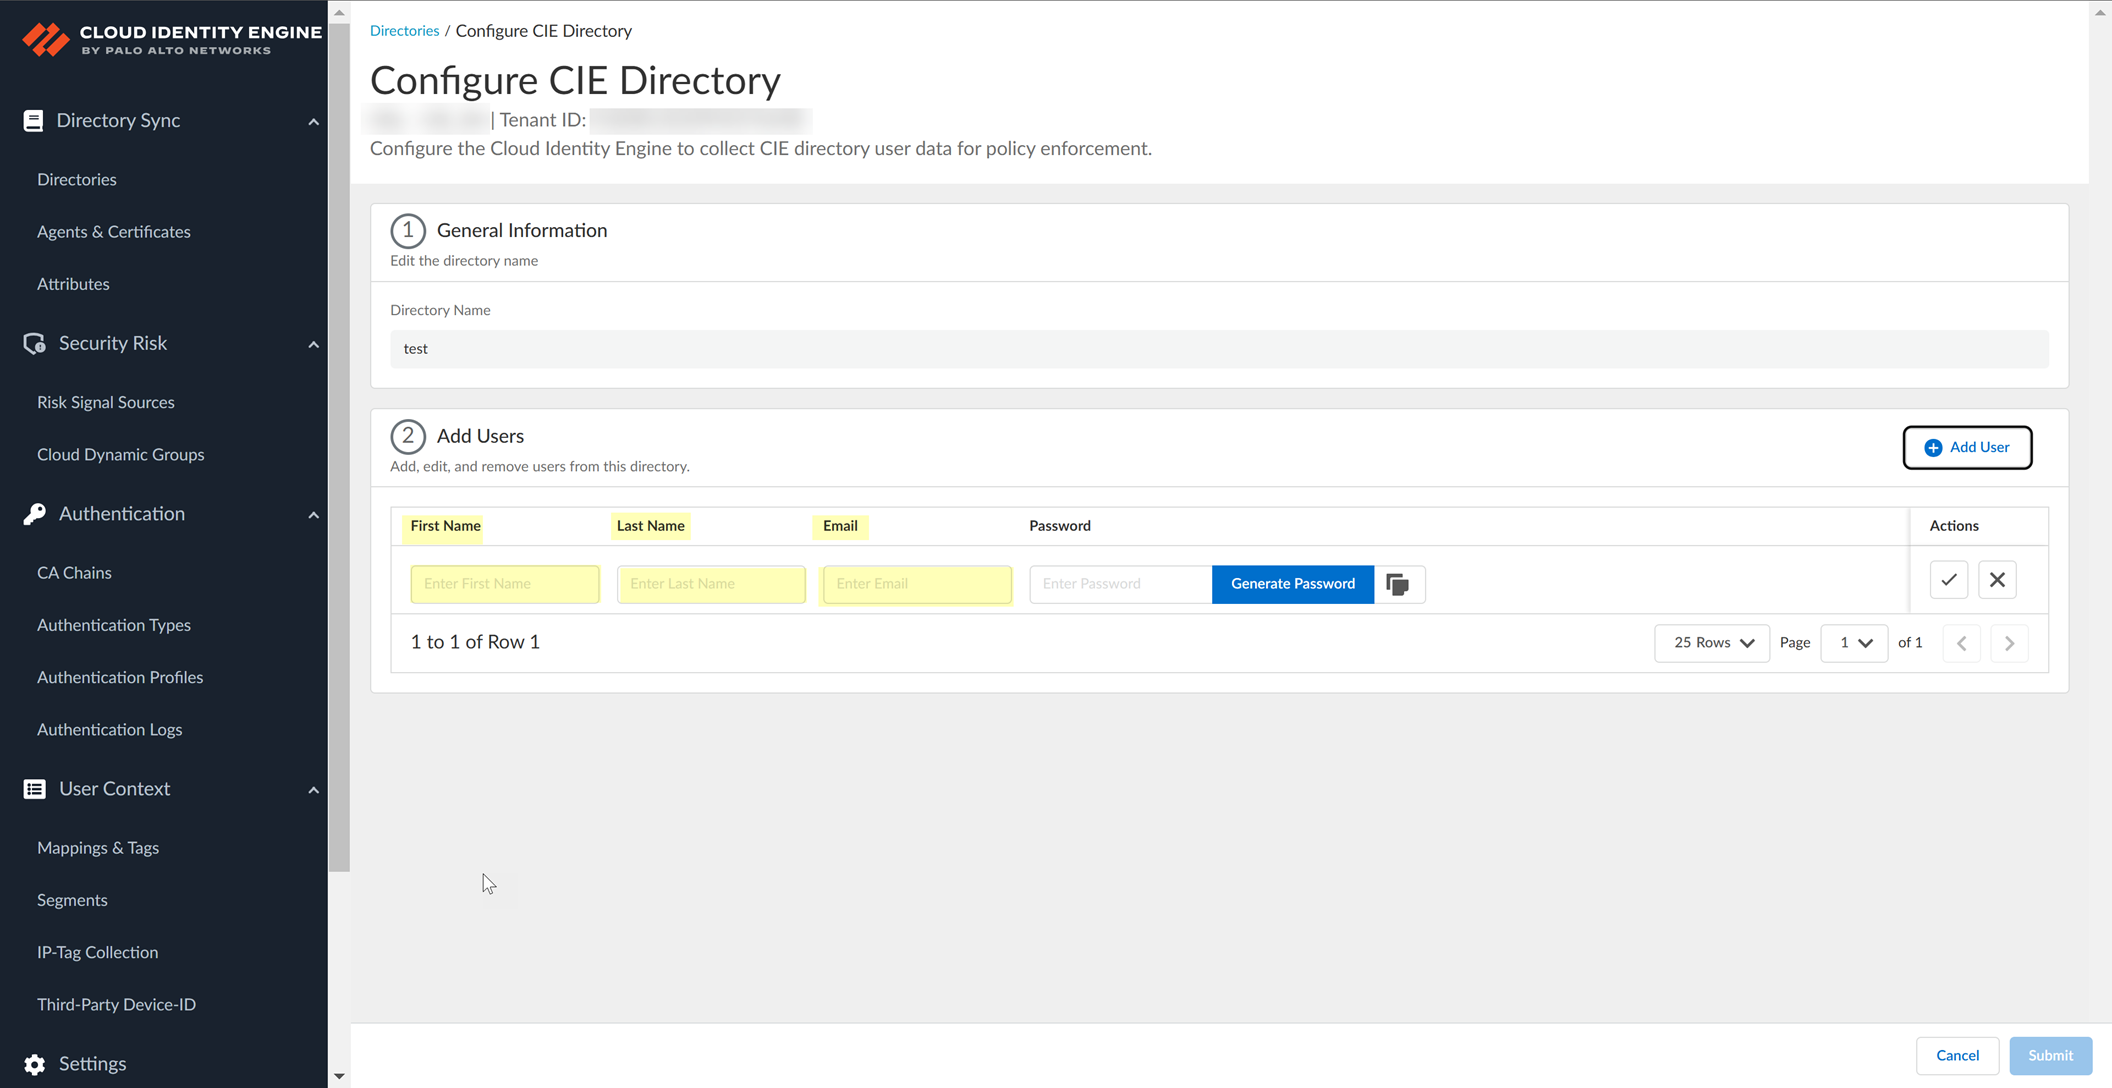
- Enter a Password for the user or click Generate Password to generate a password.
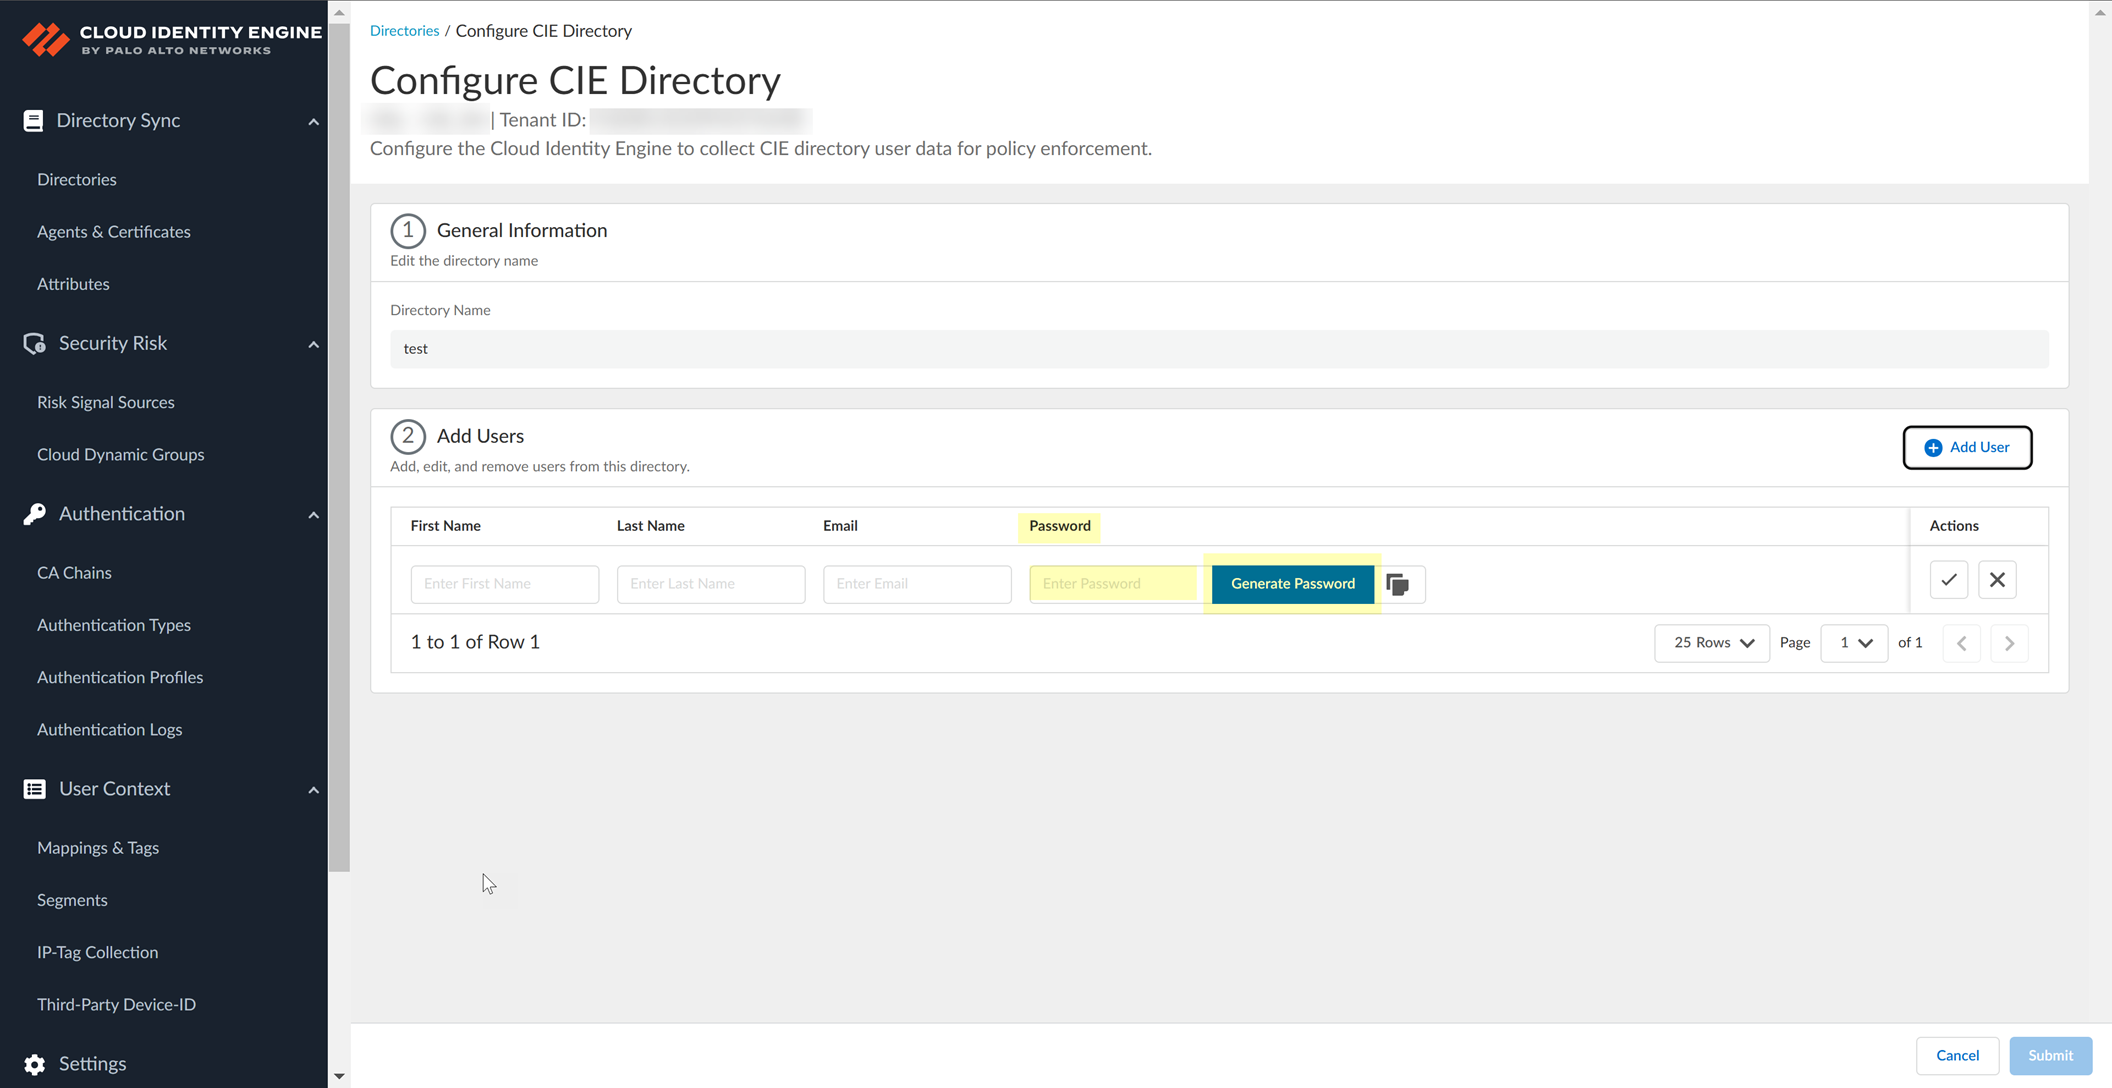
You can also optionally copy (

) the password.
You must enter a password for the user before you can add the user to the directory.
- Confirm (

) that you want to add the user or users.
- When you're finished adding users, Submit the changes for the directory.
- Manage the directory as necessary.
As your directory needs change, manage and update the directory information.
- To update user information, Edit (

) information for a user then Confirm the updates and Submit the changes.
- If you no longer need to keep a user's information, Remove the user.
There is no confirmation for the deletion.
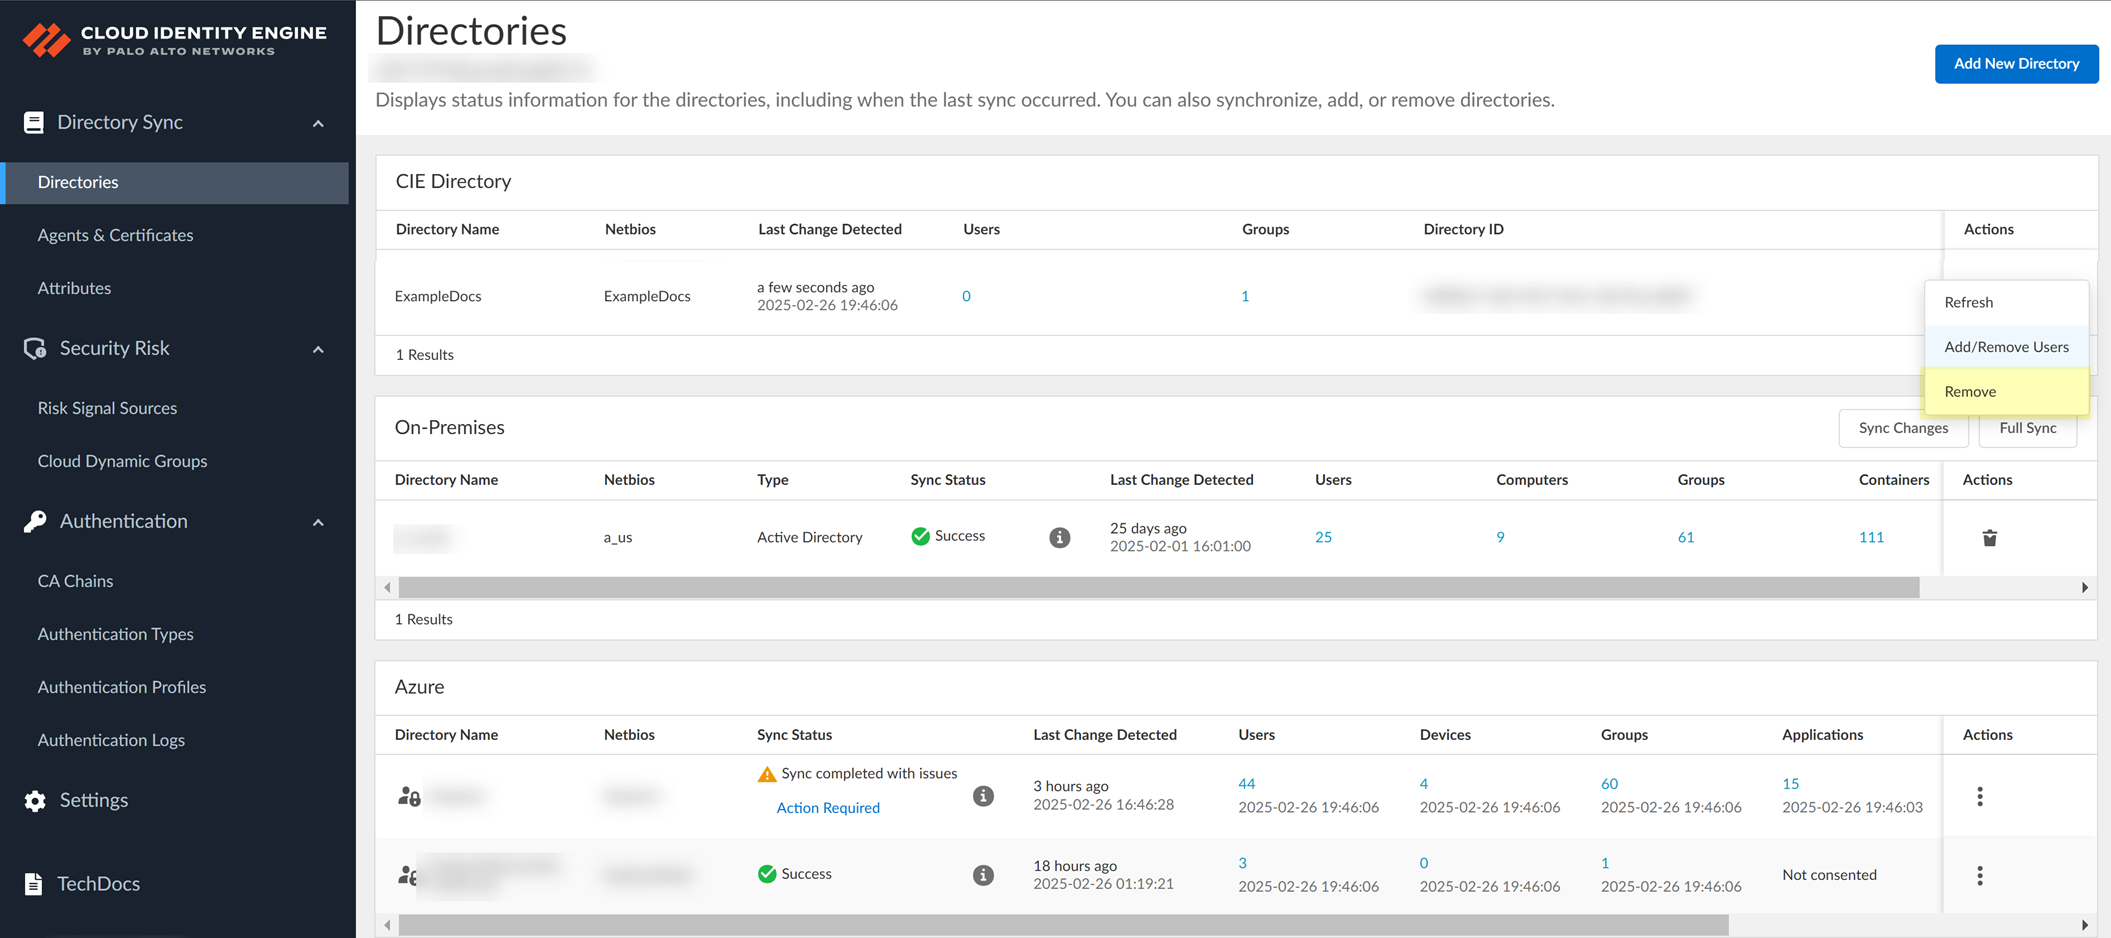
- To ensure you have the latest directory information, select the Directories page and Refresh the specified directory.

- If you no longer need a CIE Directory, select the Directories page, Remove the directory, and click Yes to confirm the deletion.
Manage the Cloud Identity Engine App
After you have configured the Cloud Identity Engine, you can add, rename, or delete tenants and collect any custom attributes in your directory, as well as view a list of the default attribute formats. You can also view the comprehensive information that the Cloud Identity Engine collects.
To ensure consistent security policy enforcement, you can configure segments for granular data sharing across your network You can also configure context-based groups that update membership automatically based on criteria that you select.
If you use Device-ID and third-party devices to identify IoT devices on your network, you can use the Cloud Identity Engine to share device mappings with your Prisma Access Nodes.
If you use dynamic address groups for your tag-based security policy , you can use the Cloud Identity Engine to collect and redistribute mappings across your network to help ensure consistent policy enforcement.
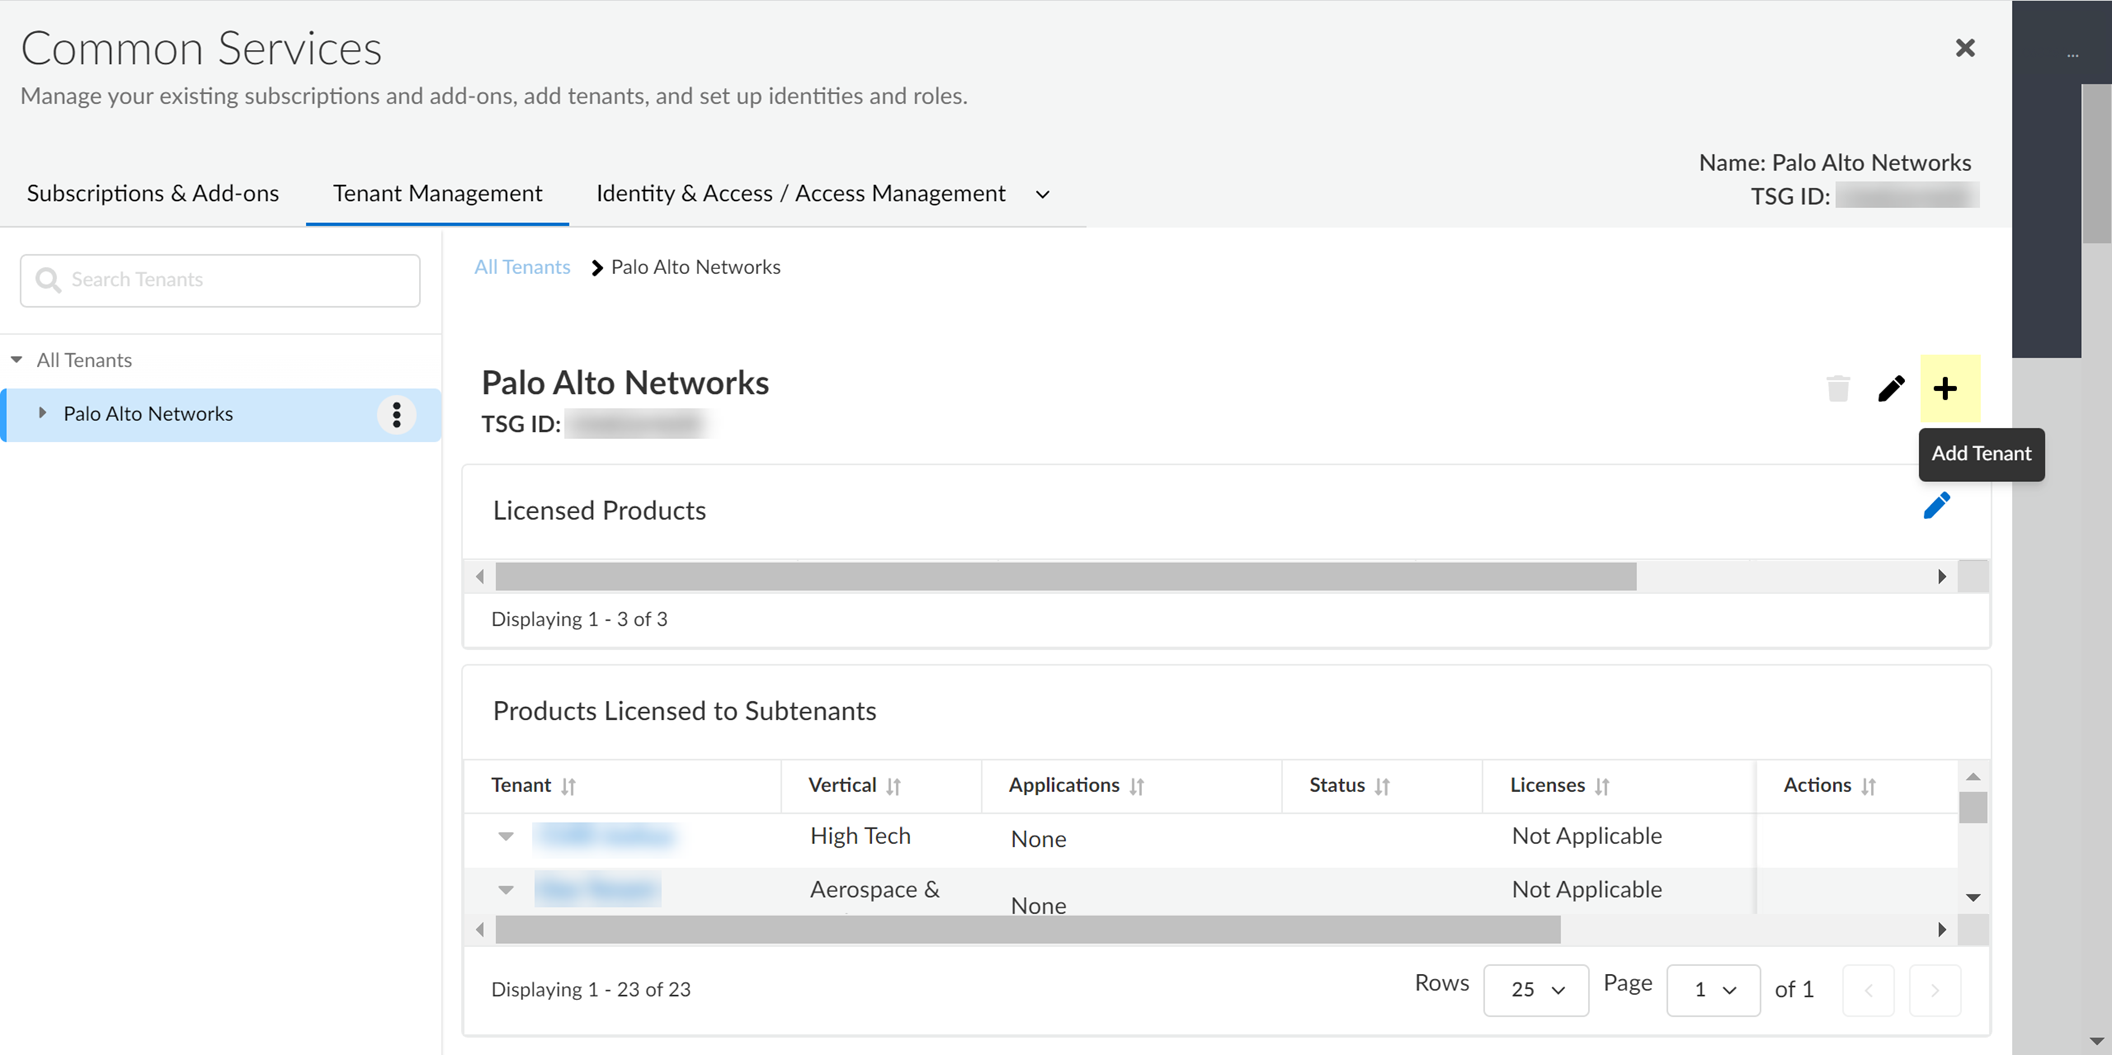
Cloud Identity Engine Tenants
When you activate the Cloud Identity Engine, it automatically creates a tenant . Each tenant can collect attributes from multiple directory types for multiple domains in a single region. If you want to collect attributes for multiple regions, create multiple tenants in the Cloud Identity Engine app. You can also create multiple tenants to segment or isolate specific attributes.
Create Cloud Identity Engine Tenants
If you want to isolate your directory data, or allow different Palo Alto Networks cloud applications and services to access different sets of directory data, you can create multiple Cloud Identity Engine tenants in the hub.
- Log in to the hub.
- Select Tenant Management .

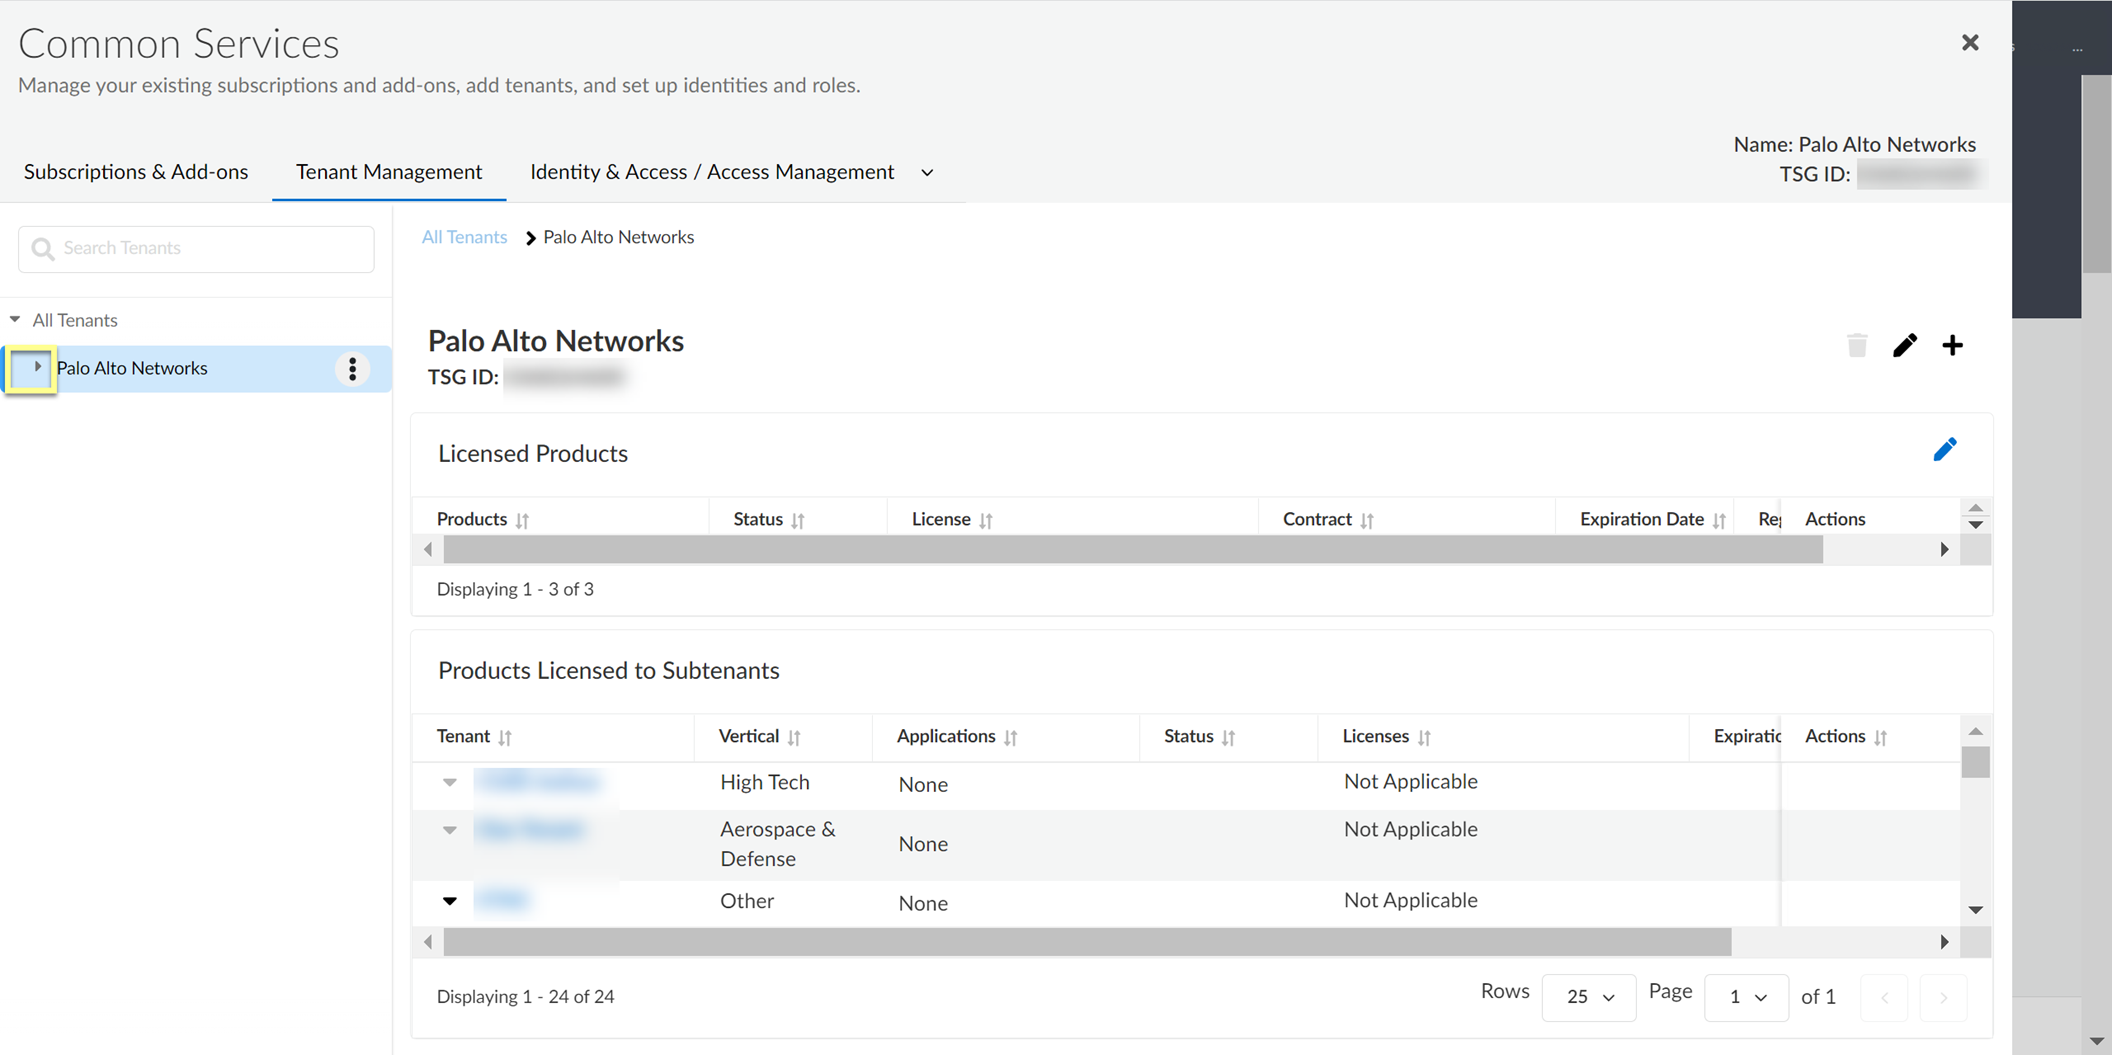
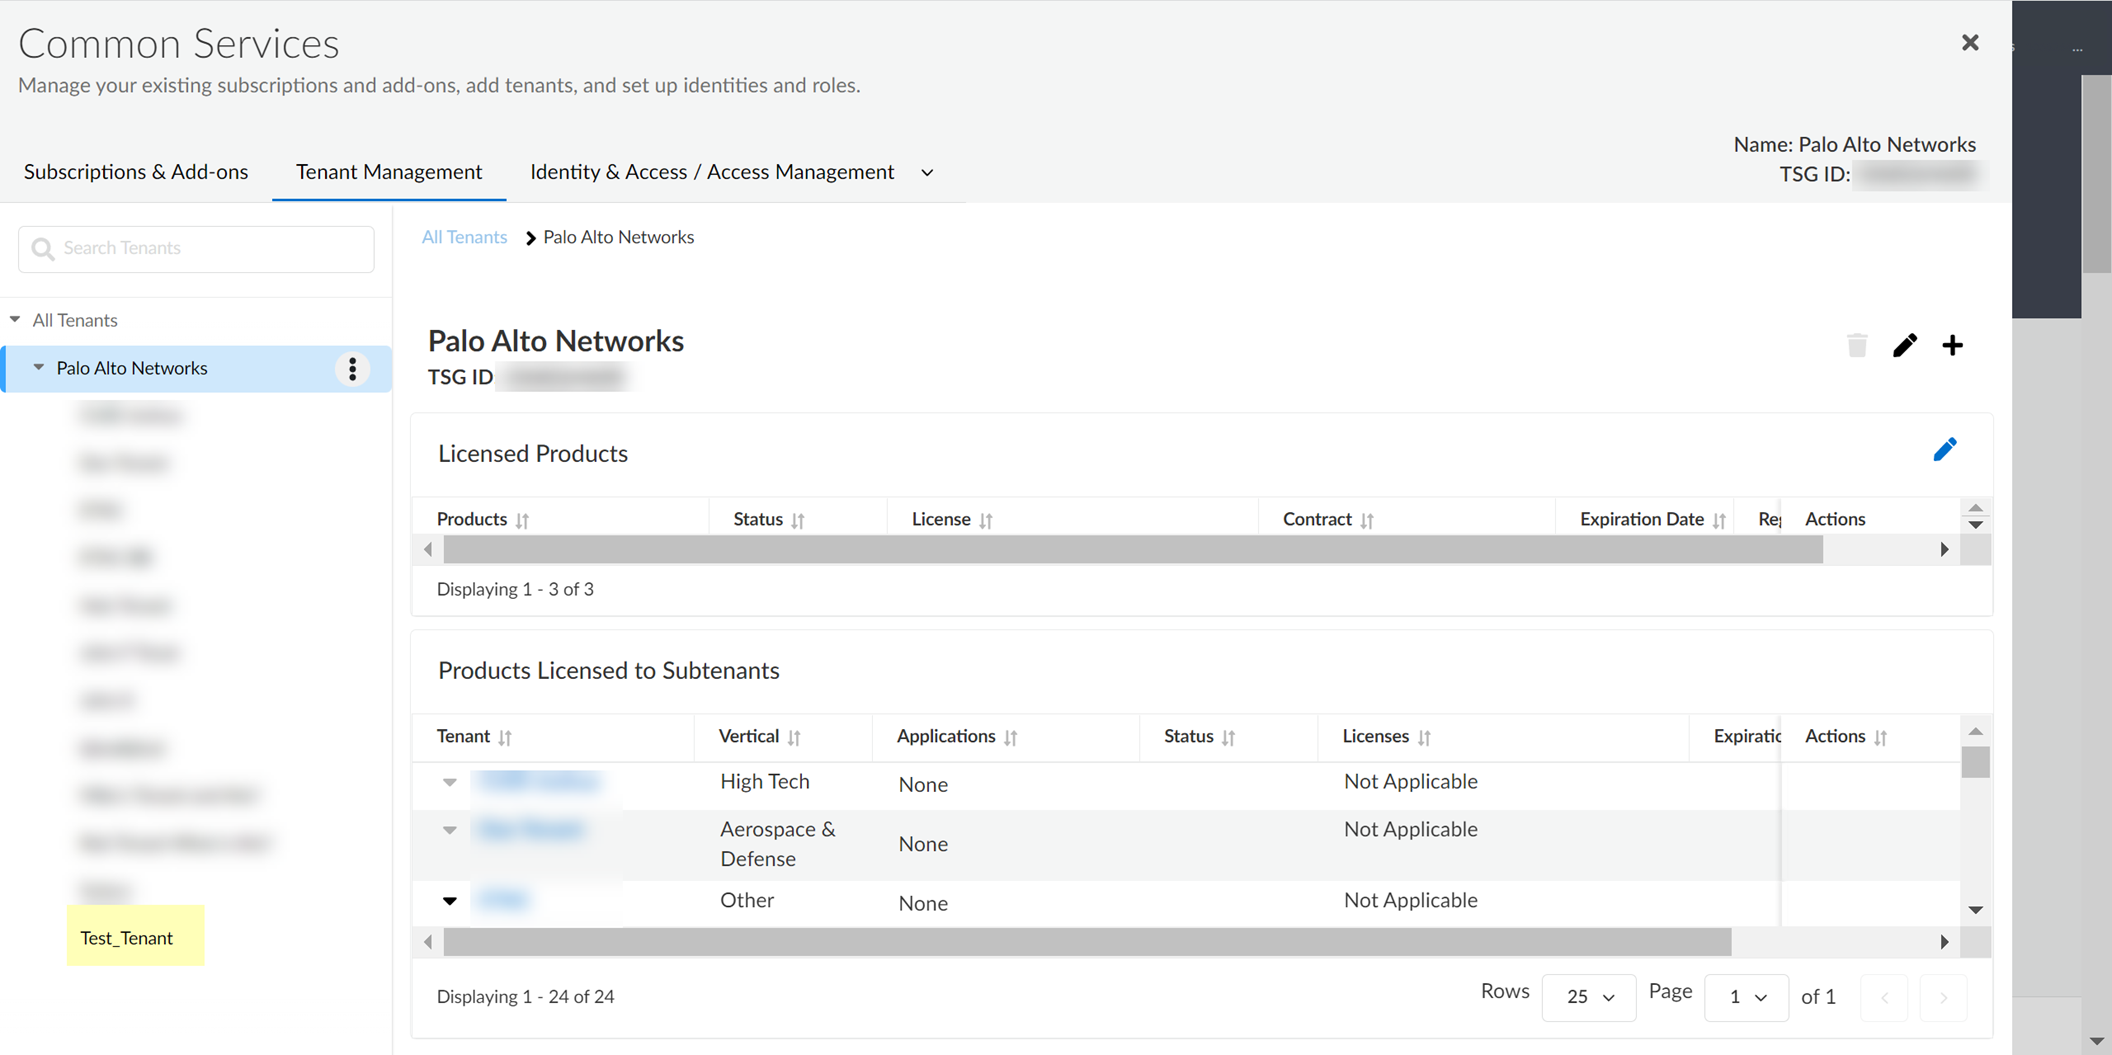
- Select Add Tenant .
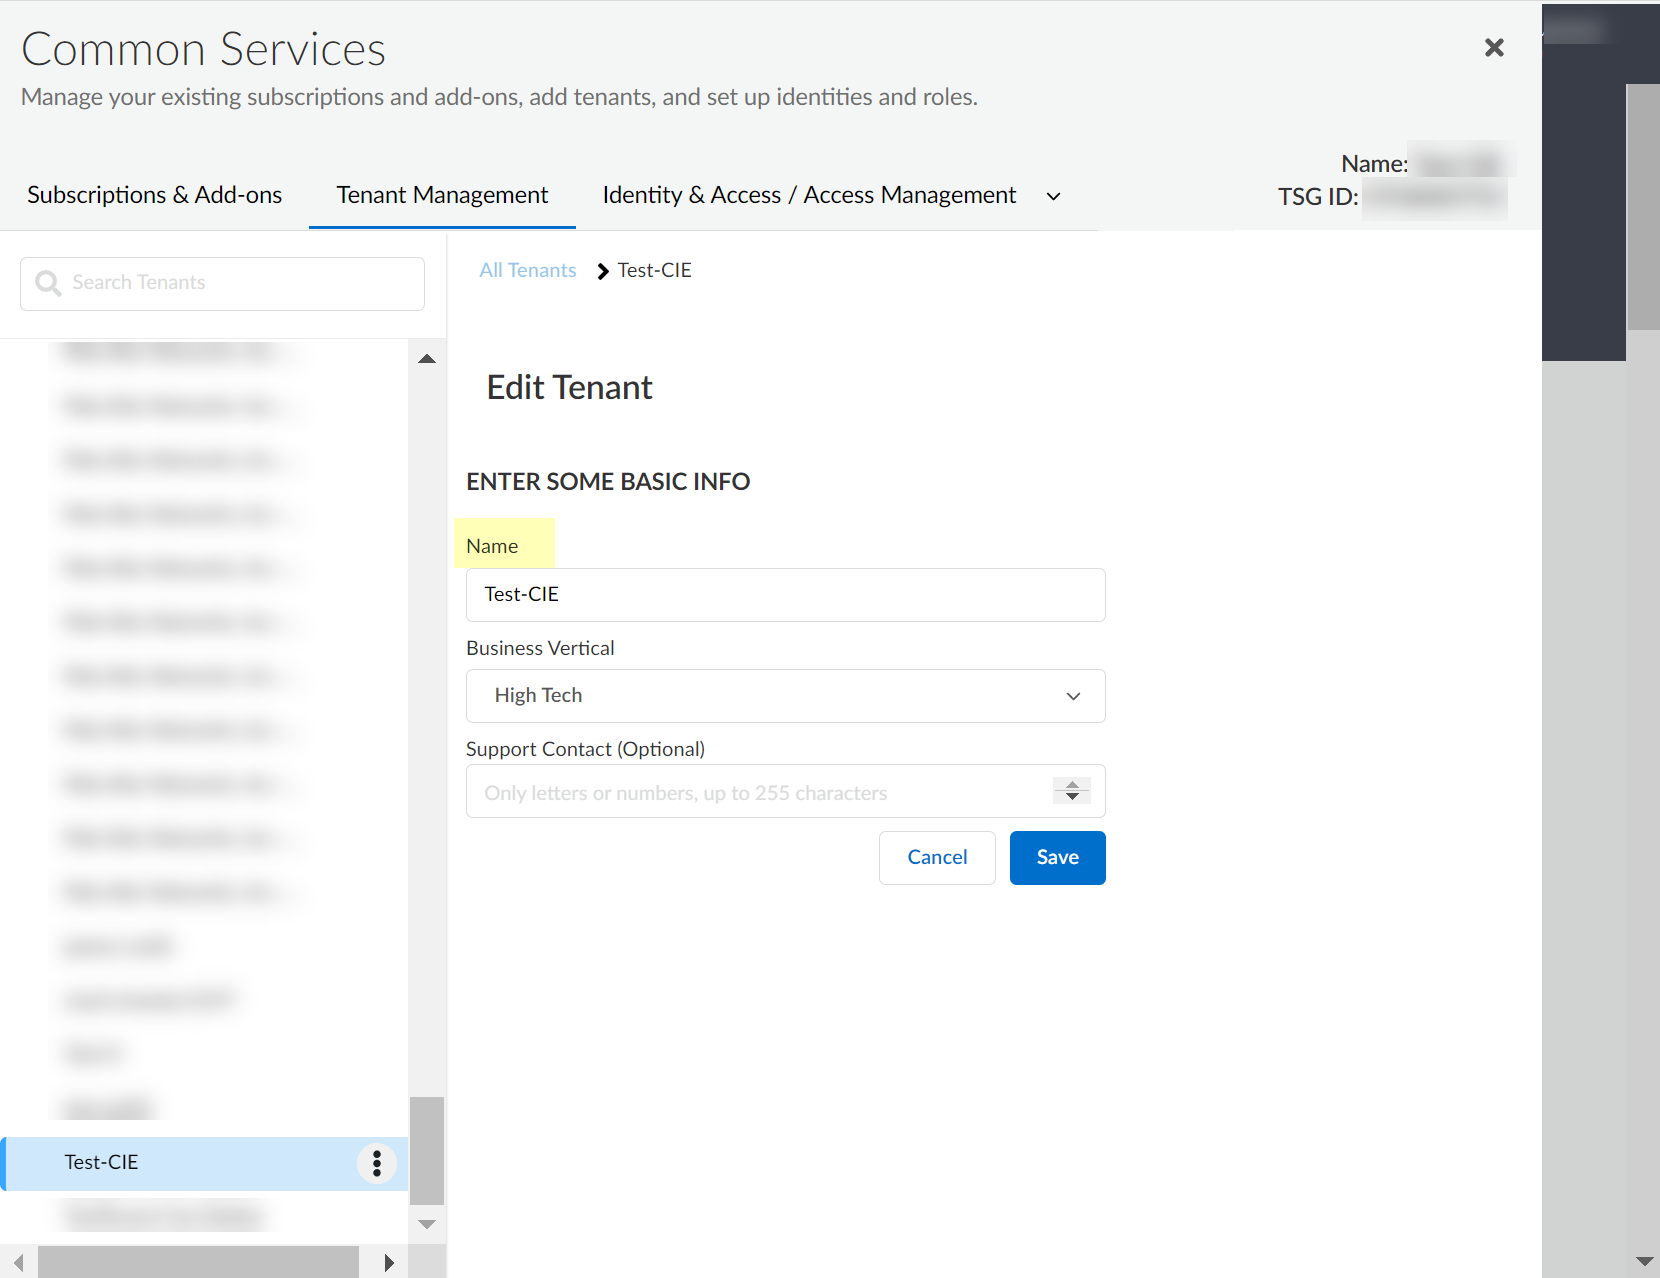
- Enter a Name for the tenant and select a Business Vertical .

- (Optional) To enter custom support contact information, select Use custom and enter the contact information.
You can enter up to 255 alphanumeric characters.
- Click Add Tenant .
The Hub lists new tenants at the bottom of the list of tenants.

View Cloud Identity Engine Tenants
Tenants display in the order in which they were created, with the most recently created tenant at the bottom of the list.
- Log in to the hub.
- Select Tenant Management .

- By default, the list of tenants displays as collapsed; click the arrow to display the full tenant list.
- Select the tenant you want to view.
Synchronize Cloud Identity Engine Tenants
There are two ways that the Cloud Identity Engine synchronizes changes to your directory attributes:
- A full sync, which is a complete sync of the entire directory.
- A sync of just the changes to the directory since the last successful sync, which takes much less time to complete ( Not supported with Google Directory ).
By default, the Cloud Identity Engine app synchronizes the directory attributes:
- Every five minutes with the changes since the last successful sync ( Not supported with Google Directory ) unless a sync is already in progress.
- Weekly with a complete sync of all configured directories ( Not supported with Google Directory ).
- Based on the schedule you select ( Google Directory only ).
The time to synchronize data depends significantly on the number of changes, the size of the directory, and the amount of group nesting.
To refresh your Cloud Identity Engine tenant with any recent changes in your directory before that time, you can select how you want to synchronize changes to the attributes for your configured domains.
Synchronize All Attributes
Synchronizing all attributes (a full sync) is recommended if you are experiencing issues or lose connectivity.
For on-premises directories, all agents and domains for the tenant must be active for the sync to complete successfully.
- Log in to the hub and select the Cloud Identity Engine app.
- Select the directory you want to synchronize, then select Directories .
- Select ActionsFull Sync to initialize the synchronization for the directory type you want to synchronize instantly.
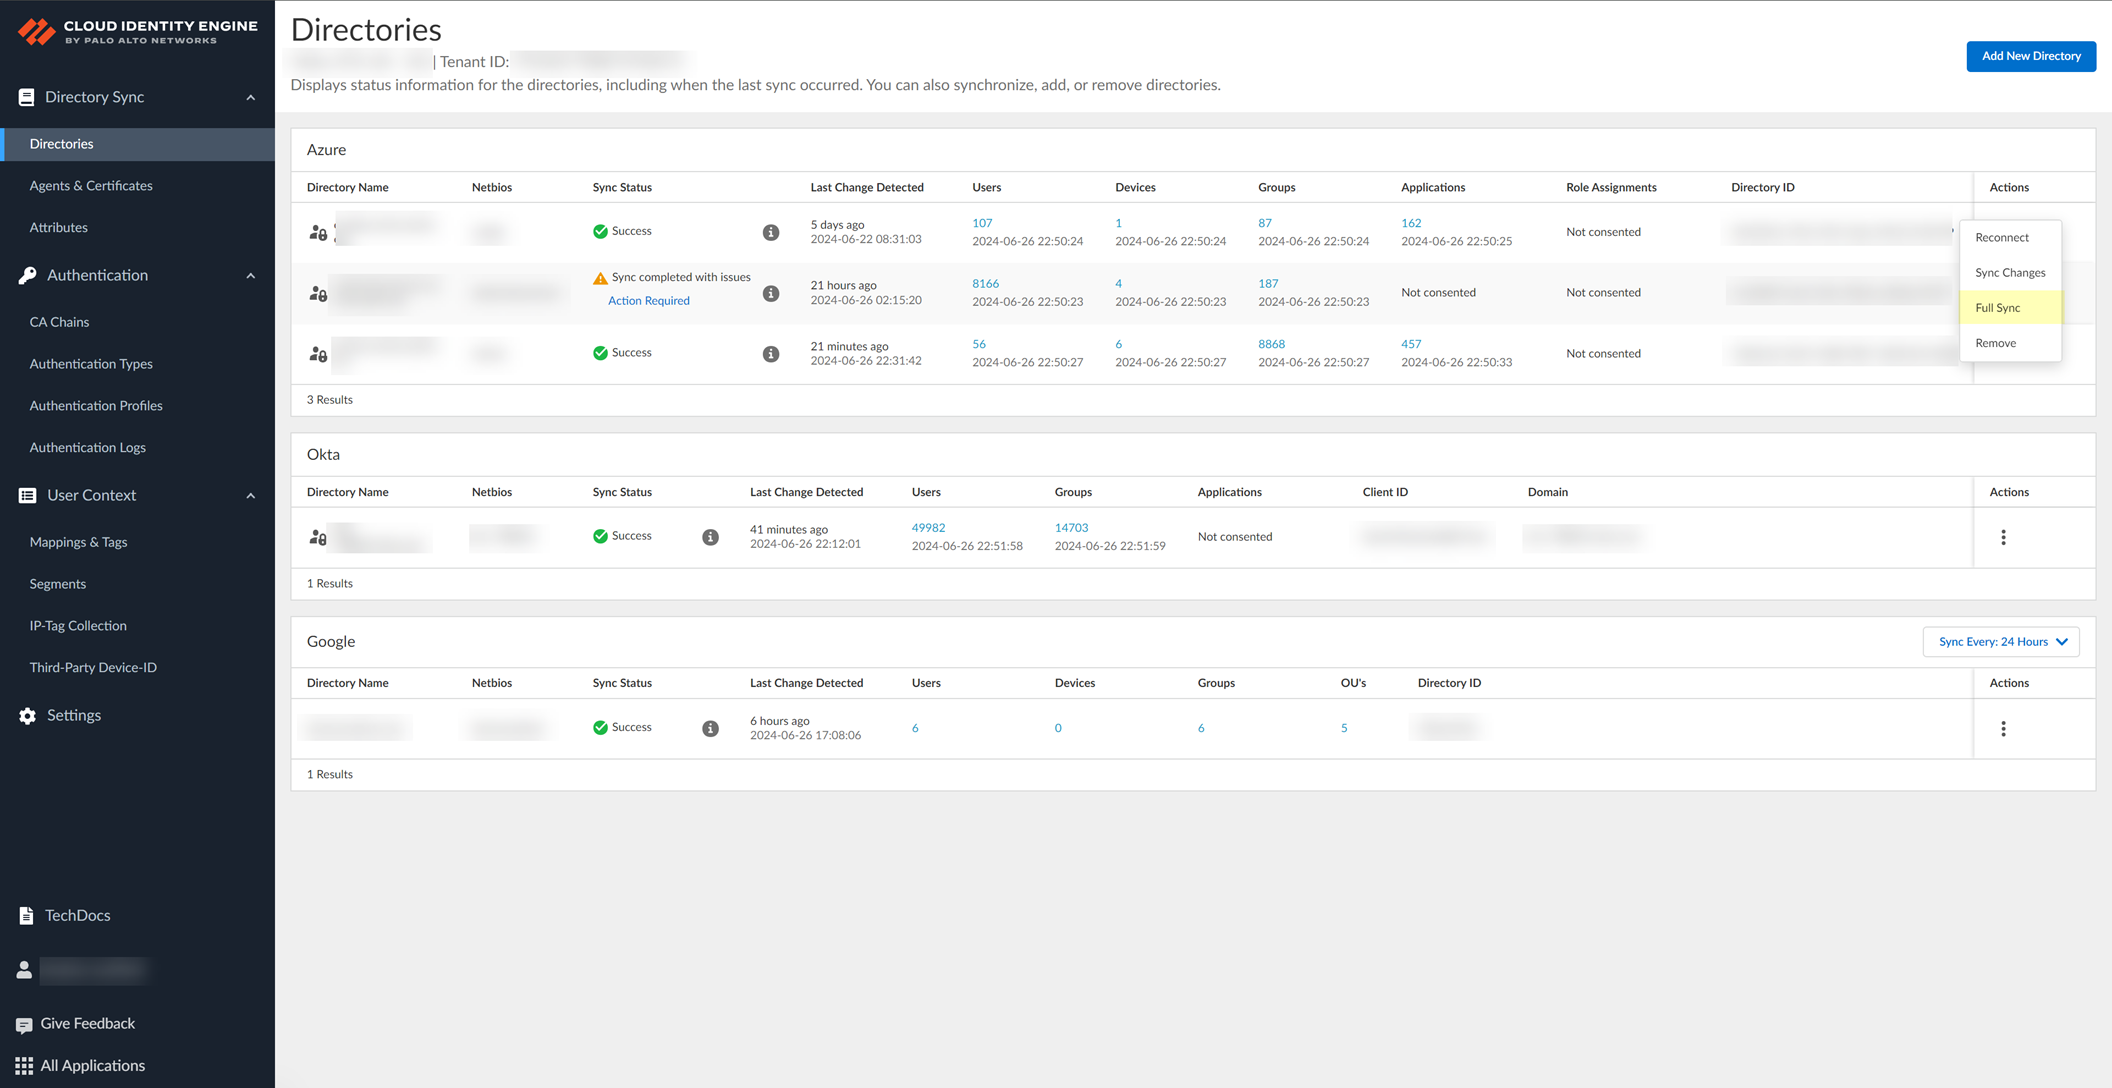
For an on-premises Active Directory, click Full Sync .
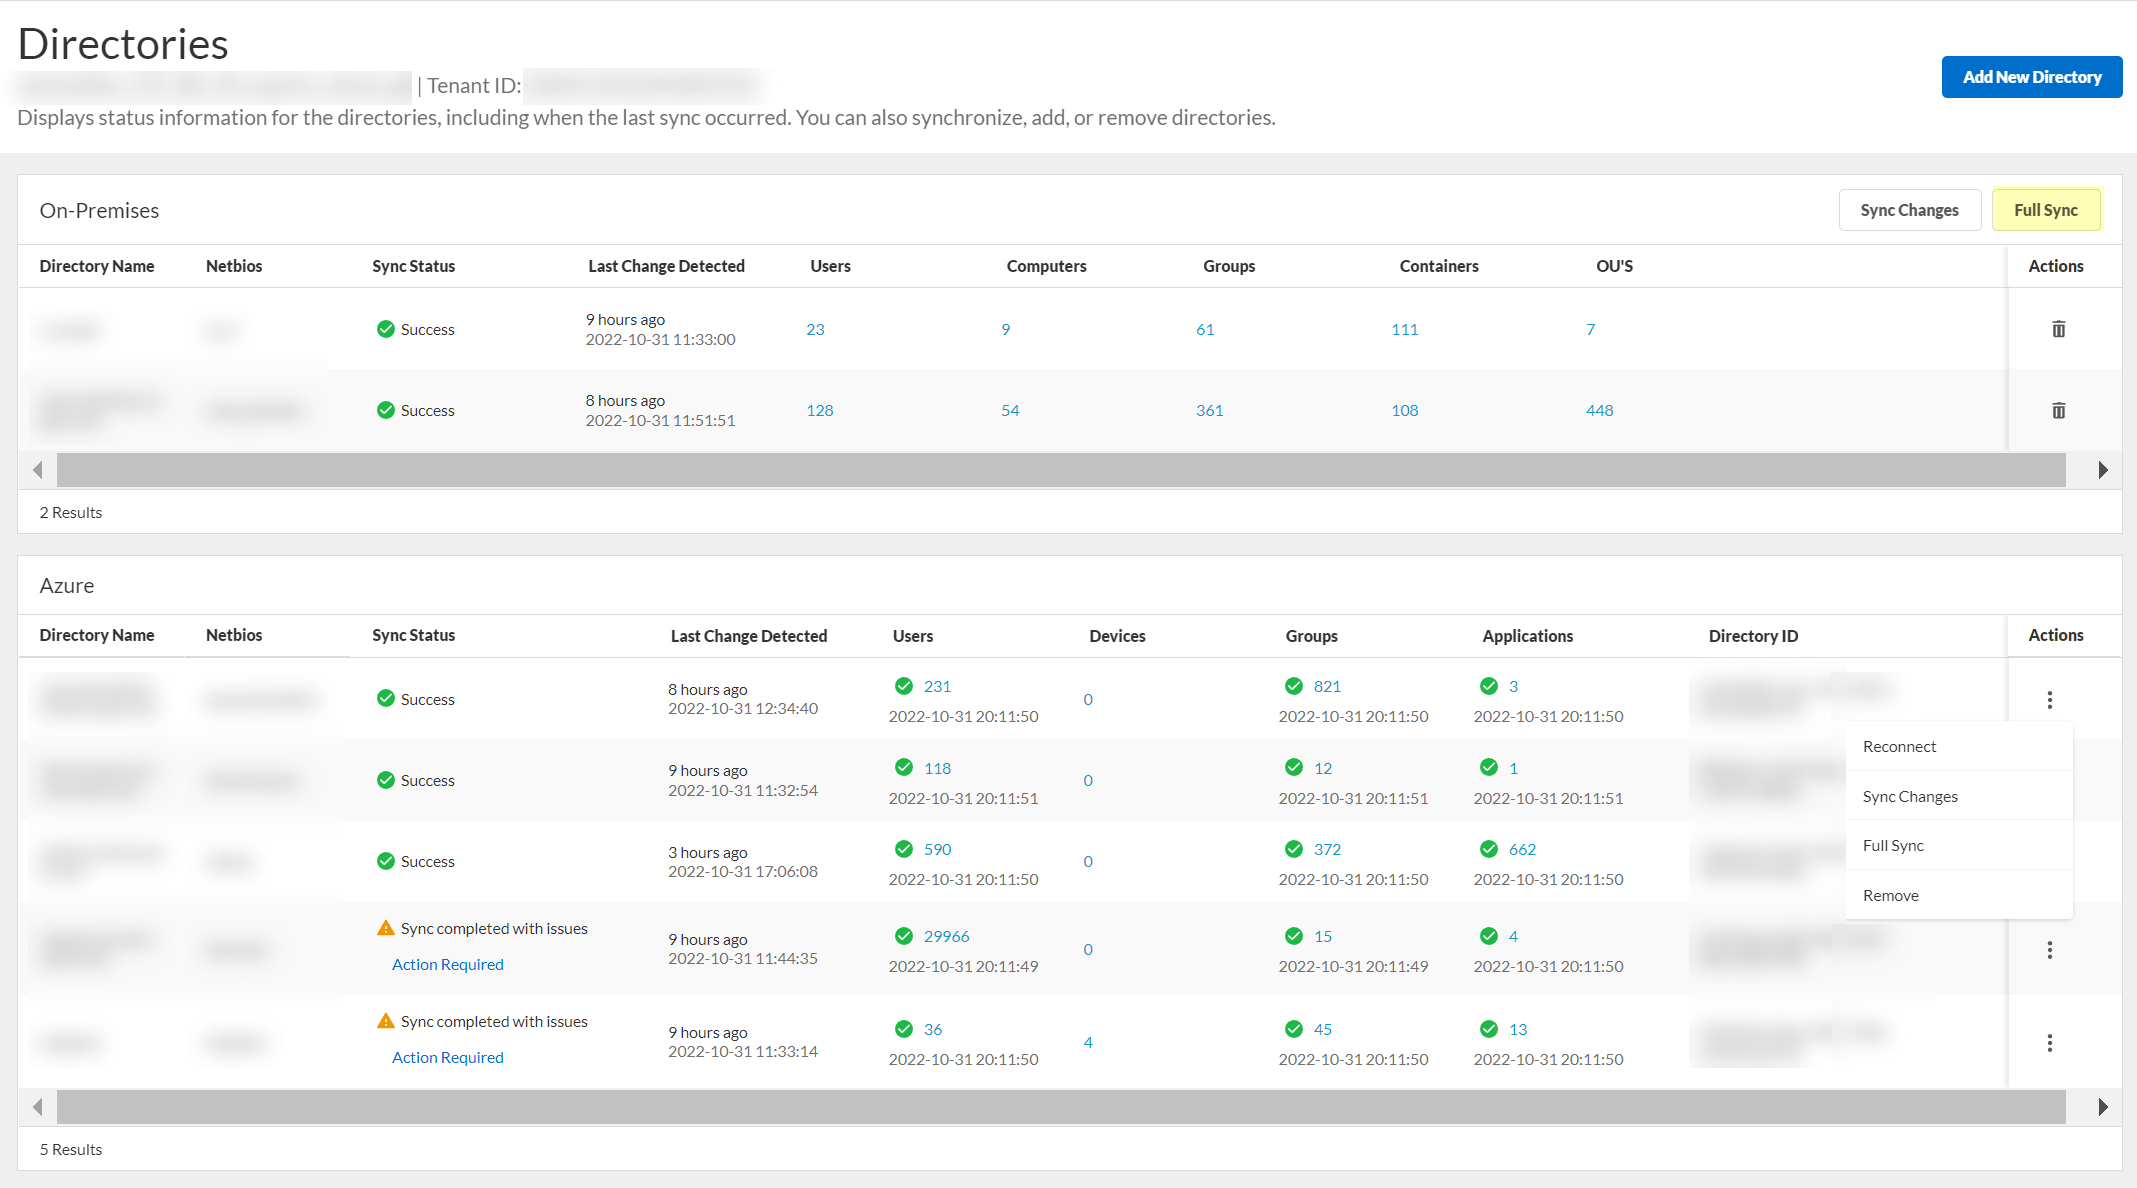
The synchronization starts immediately and a confirmation message ( Sync started ) displays. The sync may take some time to complete, so make sure you click Full Sync only once. If a synchronization is currently in progress when you try to synchronize, a warning message ( Sync in progress ) displays at the top of the screen.
After completing a full sync, you must wait at least 90 seconds before initiating another full sync.
- To confirm the synchronization is complete, verify the Sync Status is Success .
Synchronize Directory Changes
You can sync just the changes to your directory, which is much faster than a full sync of your directory. By default, the Cloud Identity Engine syncs changes for most attributes every five minutes unless a sync is already in progress.
The Sync Status on the Directories page may incorrectly indicate Success while an incremental sync is still in progress. The synchronization automatically captures any changes made in the directory but it is not possible to initiate another sync while a sync is currently in progress.
For Azure Active Directory (Azure AD) and Okta, the Cloud Identity Engine syncs attributes for users and groups every five minutes; for Azure AD, a sync for devices occurs daily if the previous device sync required less than 24 hours to complete. If completing the device sync required more than 24 hours, the next sync occurs at the interval of the duration for the previous device sync (for example, if the previous device sync required 26 hours, then the next sync would occur 26 hours from the previous successful sync).
The Sync Changes option is not available for Google Directory.
- If you have not already done so, configure a directory .
- After making changes to your directory, select ActionsSync Changes to sync the changes for your directory.

For an on-premises Active Directory, click Sync Changes .
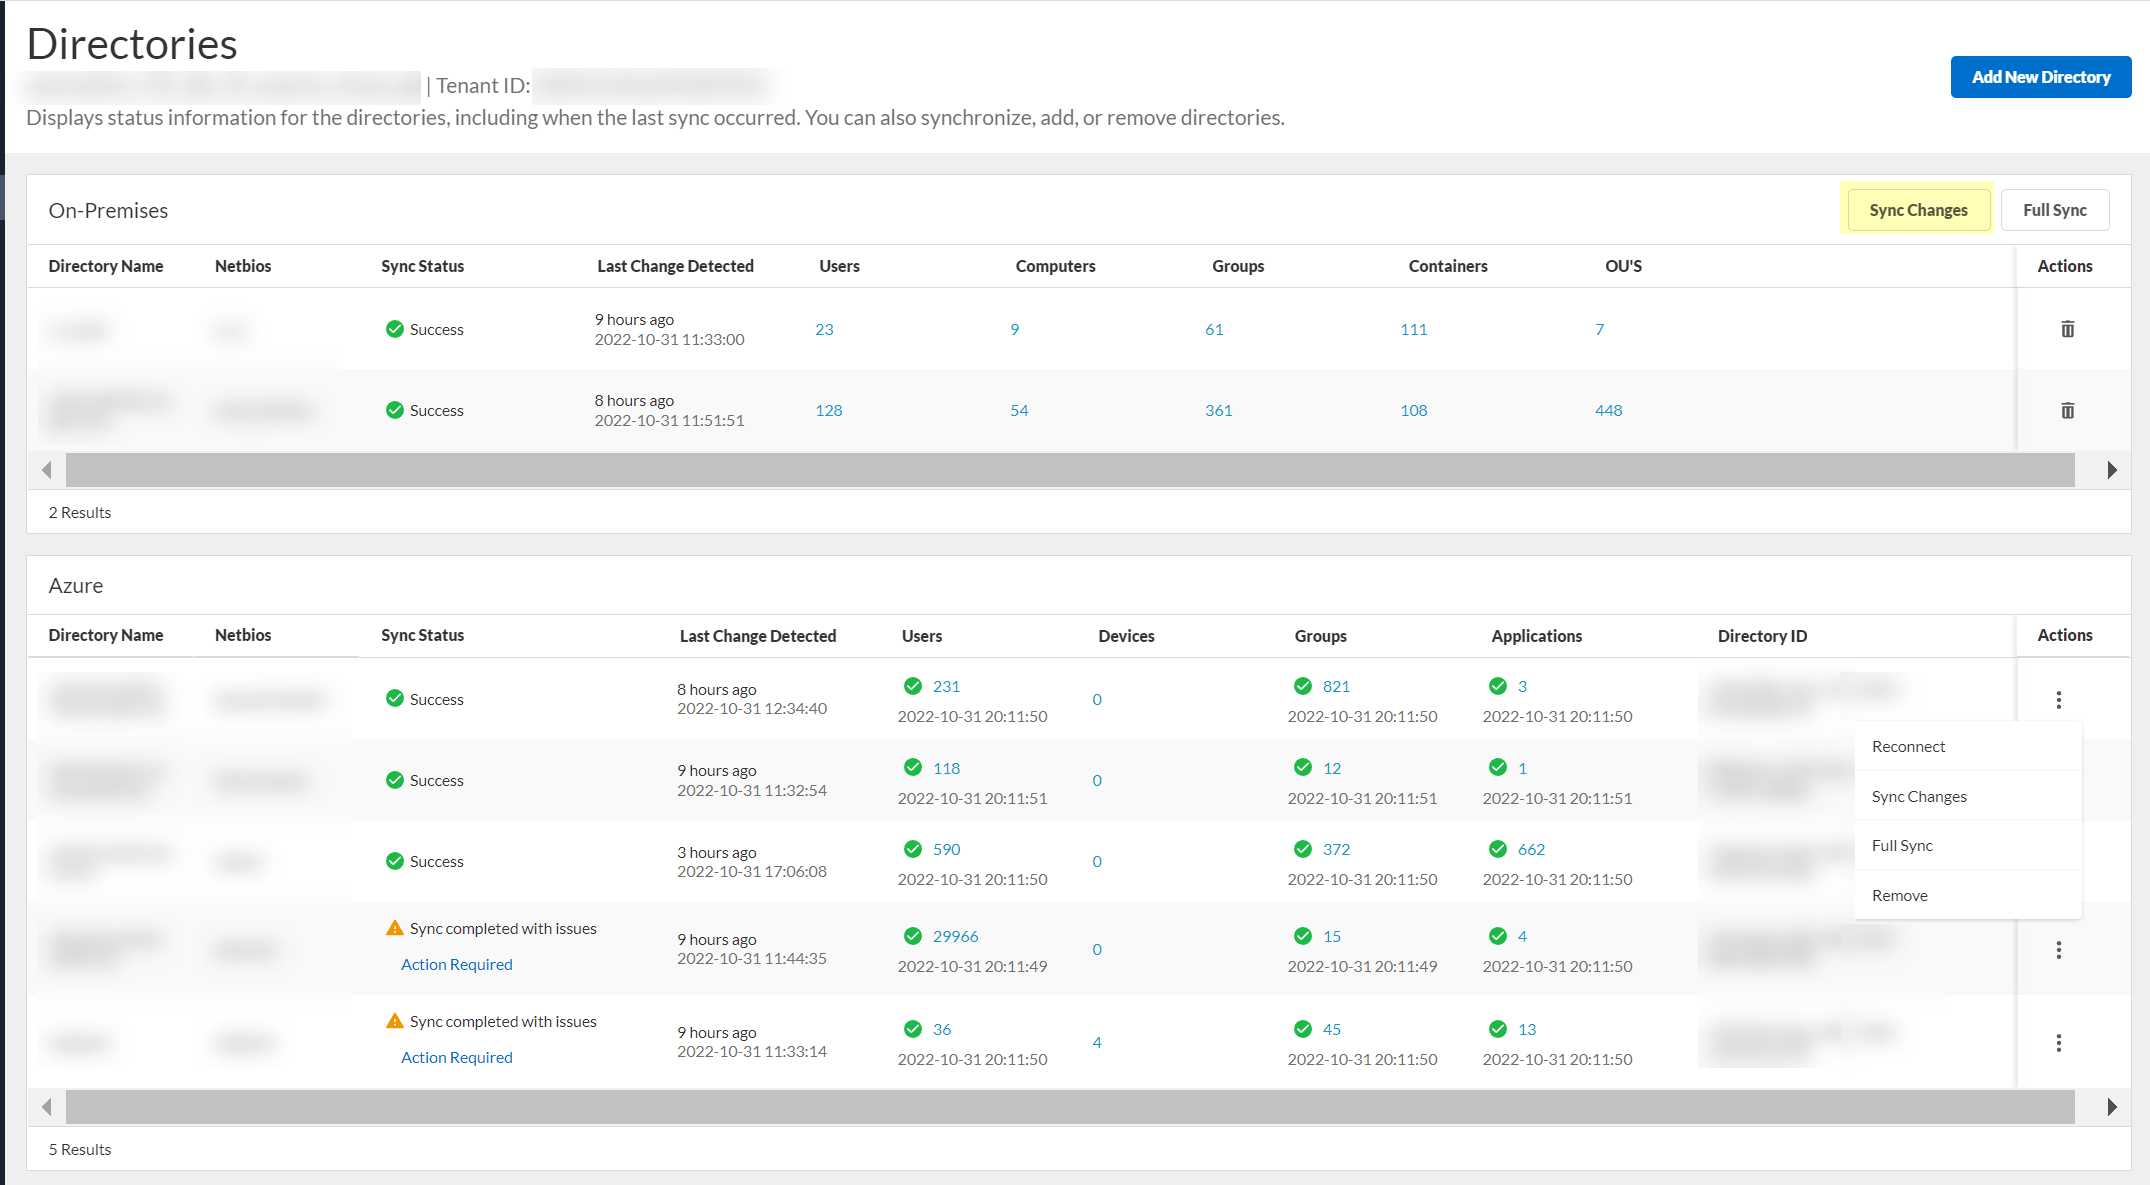
The sync may take some time to complete, so make sure you click Sync Changes only once. We recommend a full sync of your directory if you lose connectivity or are experiencing issues. To sync the entire directory,
Synchronize All Attributes
in a full sync. If a full sync is in progress, you cannot sync changes. After a full sync completes in the Cloud Identity Engine app, the firewall must also complete a full sync.
Set Synchronization Interval
This sync option is available for Google Directory only.
- Log in to the hub and select the Cloud Identity Engine app.
- Select the tenant you want to synchronize, then select Directories .
- Click Sync Every: for the directory type interval that you want to change and select the interval.
- 6 Hours
- 12 Hours
- 24 Hours (Default)

After you select an interval, a confirmation message displays at the top of the screen.
Synchronize CDUG Changes
This sync option is available for Google Directory only.
- Log in to the hub and select the Cloud Identity Engine app.
- Select the tenant you want to synchronize, then select Directories .
- Sync CDUG Changes to initialize the synchronization of the cloud dynamic user group information.
The synchronization starts immediately and a confirmation message ( Sync started ) displays. If a synchronization is currently in progress when you try to synchronize, a warning message ( Sync in progress ) displays at the top of the screen.

- To confirm the synchronization is complete, verify the Sync Status is Success .
Rename Cloud Identity Engine Tenants
If you want to change the name of a Cloud Identity Engine tenant after you create it, you can rename it in the Cloud Identity Engine app.
- Log in to the hub .
- Select Common ServicesTenant Management .
- Select the tenant you want to rename then click Edit Tenant .
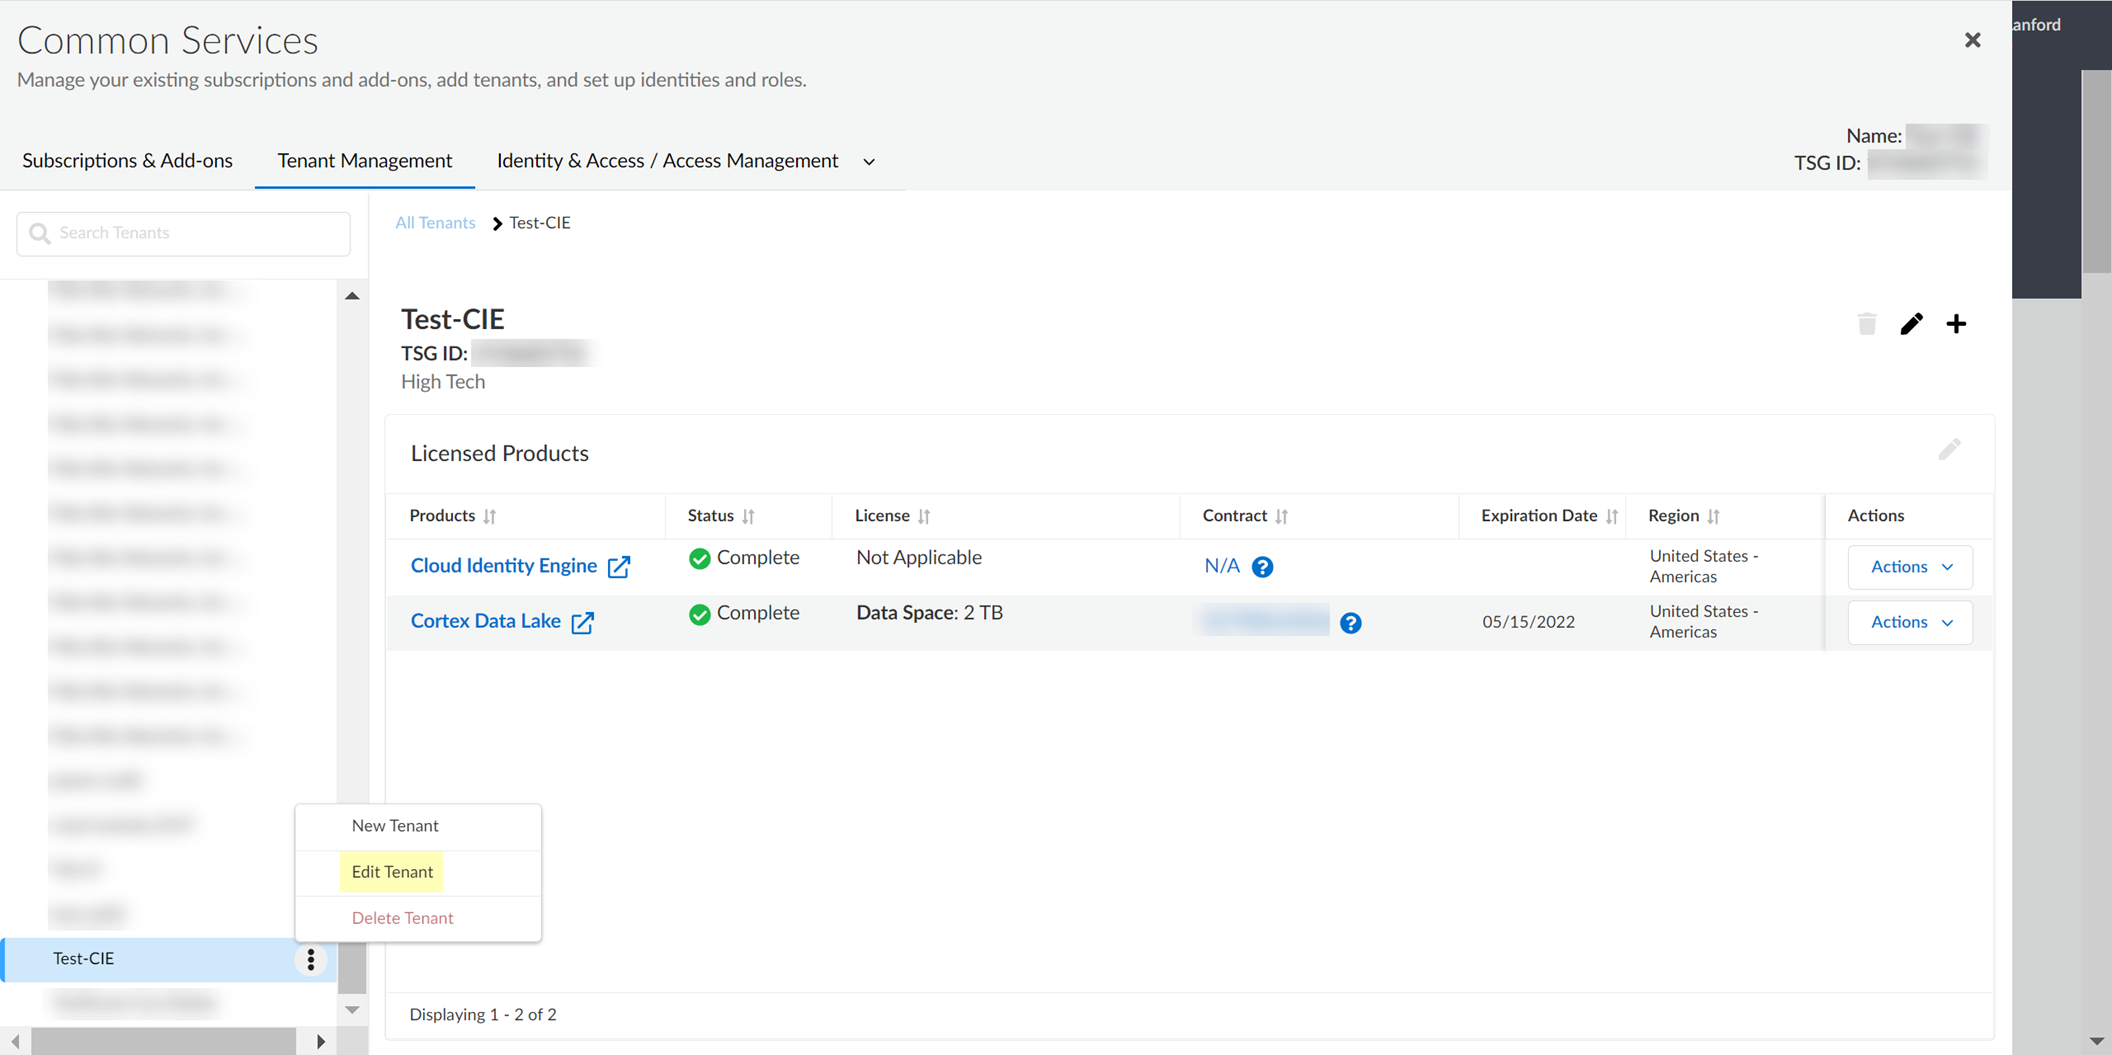
A pop-up displays to allow you to edit the name of the tenant.
You cannot change the region. If you need to change the region for an tenant, create a new tenant .
- Enter the new Name and confirm the change by clicking Save .
A confirmation message displays to indicate that the tenant was successfully renamed.
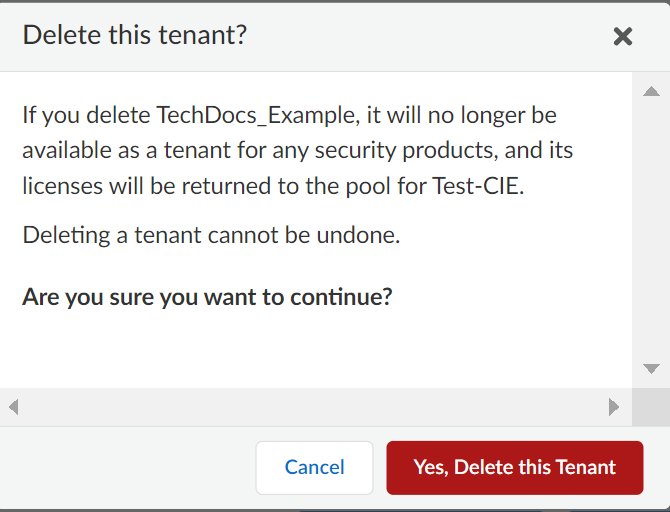
Delete Cloud Identity Engine Tenants
If you no longer need to use an tenant, you can delete it as long as no other application is using it. If the tenant is currently used by another app, an error message displays when you try to delete the tenant.
- ( On-premises Active Directory only ) Stop the agent’s connection with the Cloud Identity Engine and Remove the Cloud Identity Agent .
- Log in to the hub .
- Select Common ServicesTenant Management .
- Select the tenant and click Delete Tenant .
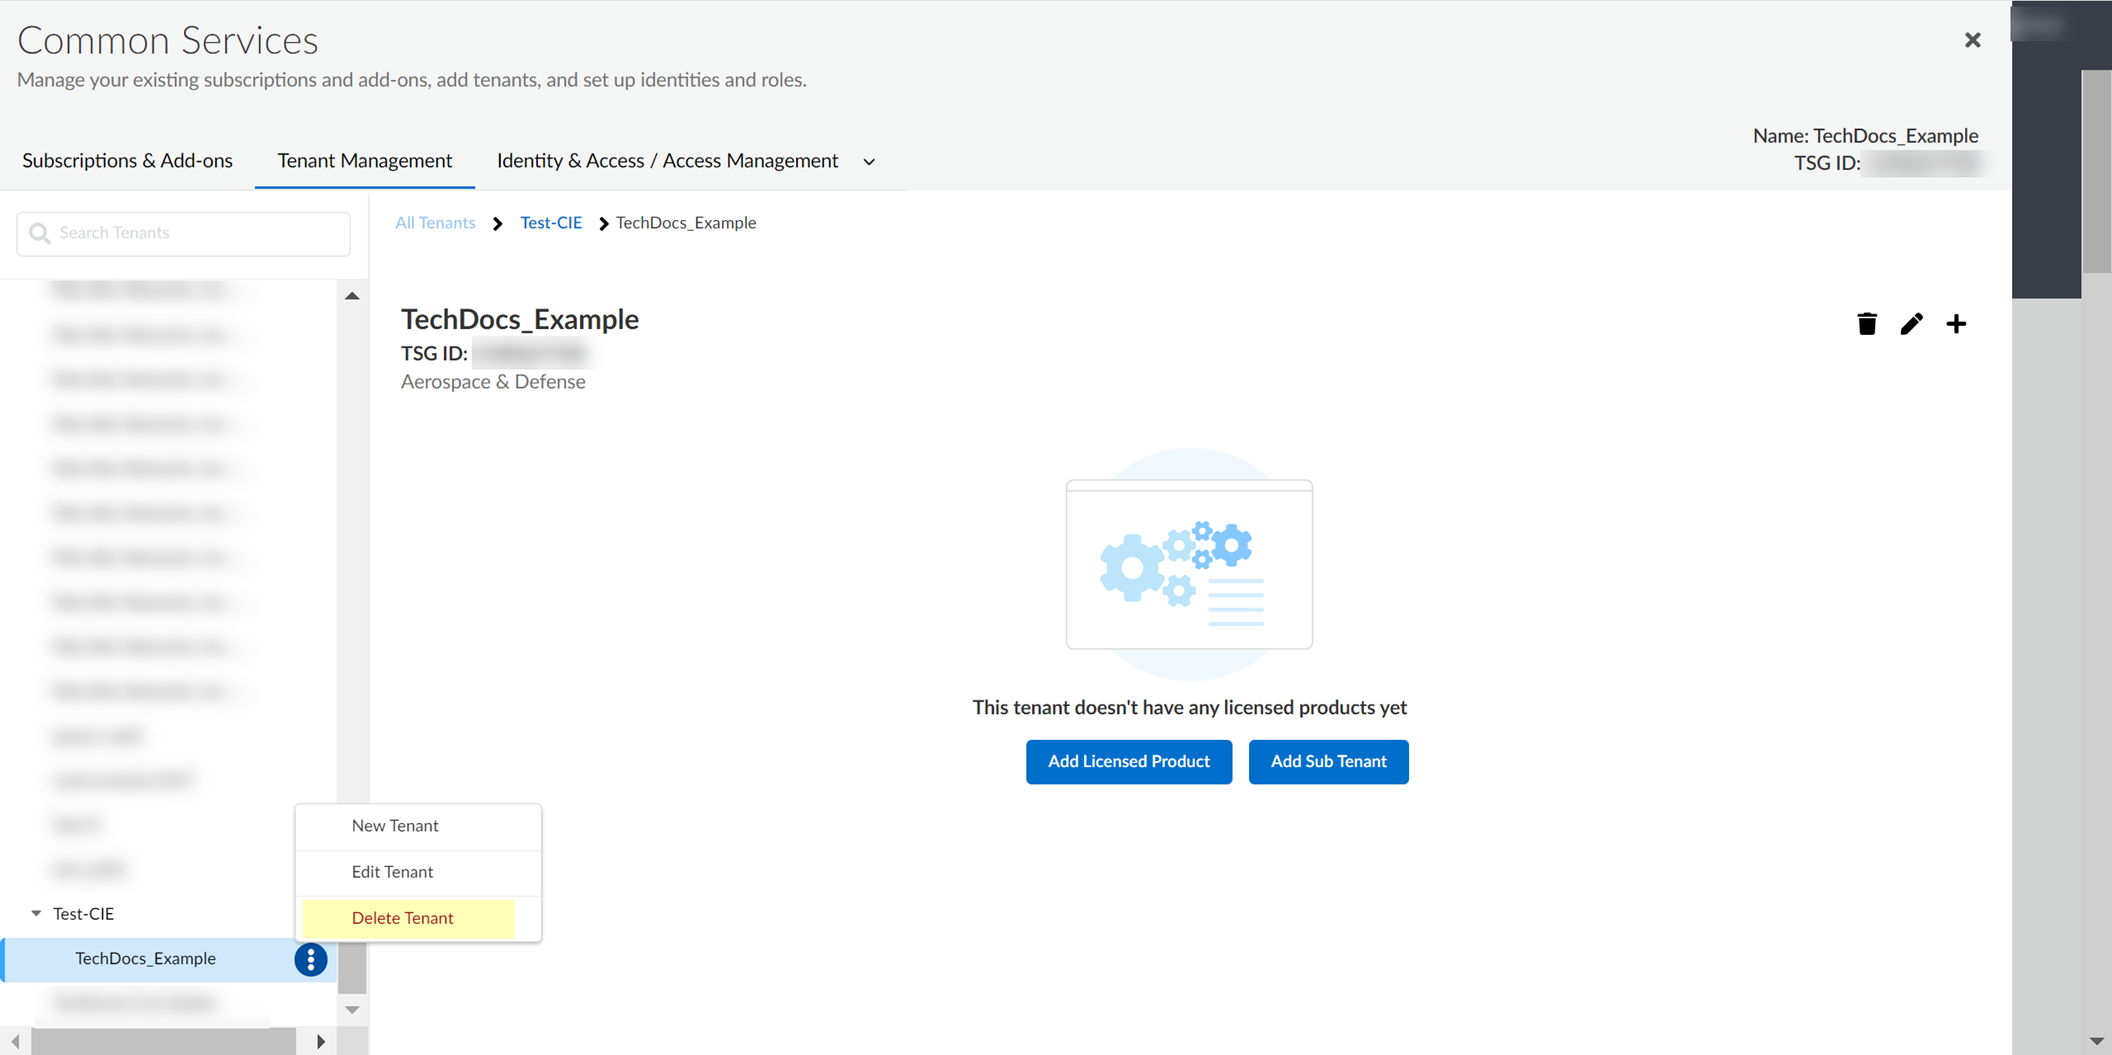
- Confirm that you want to delete the tenant.
Delete Domains or Directories from Cloud Identity Engine Tenants
The procedure for deleting a domain from the Cloud Identity Engine varies depending on whether you are deleting a domain for an Active Directory (AD) configuration or for a cloud-based directory.
- Delete Active Directory Domains
- Delete Cloud-Based Directories
Delete Active Directory Domains
To delete a domain from your Cloud Identity Engine tenant, first delete it from the agent configuration then delete it from the Cloud Identity Engine app on the hub.
- Launch the agent and select LDAP Configuration .
- From the list of Servers , select the domain you want to delete and Delete it.
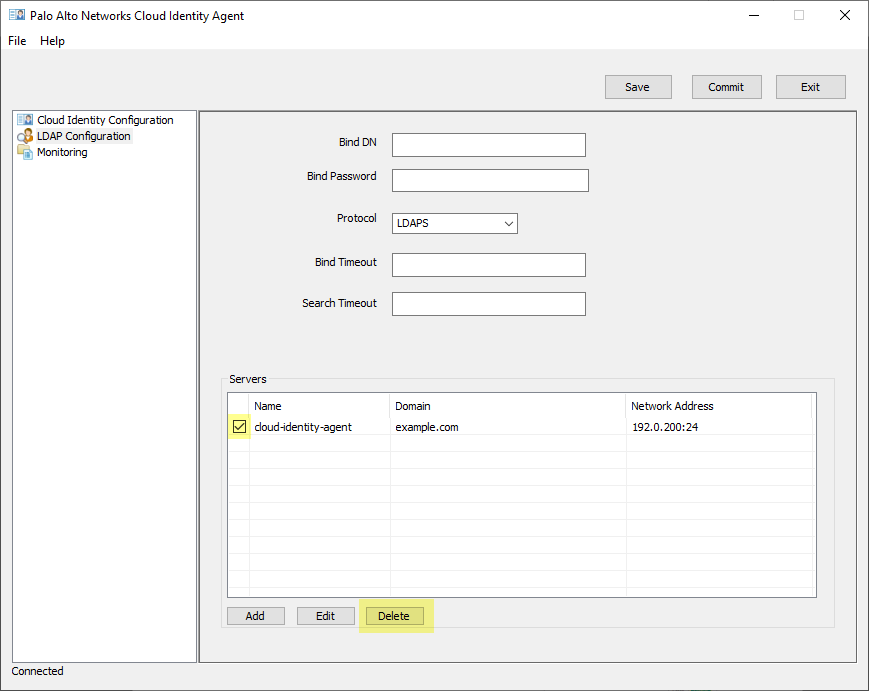
- Commit the changes.
You must delete the domain from the Cloud Identity agent configuration before you delete it from the Cloud Identity Engine app. Otherwise, it will be re-added on the next synchronization.
- Log in to the hub and select the Cloud Identity Engine app.
- Select the tenant with the domain you want to delete, then select Directory .
- Remove the domain then Confirm the deletion of the domain.
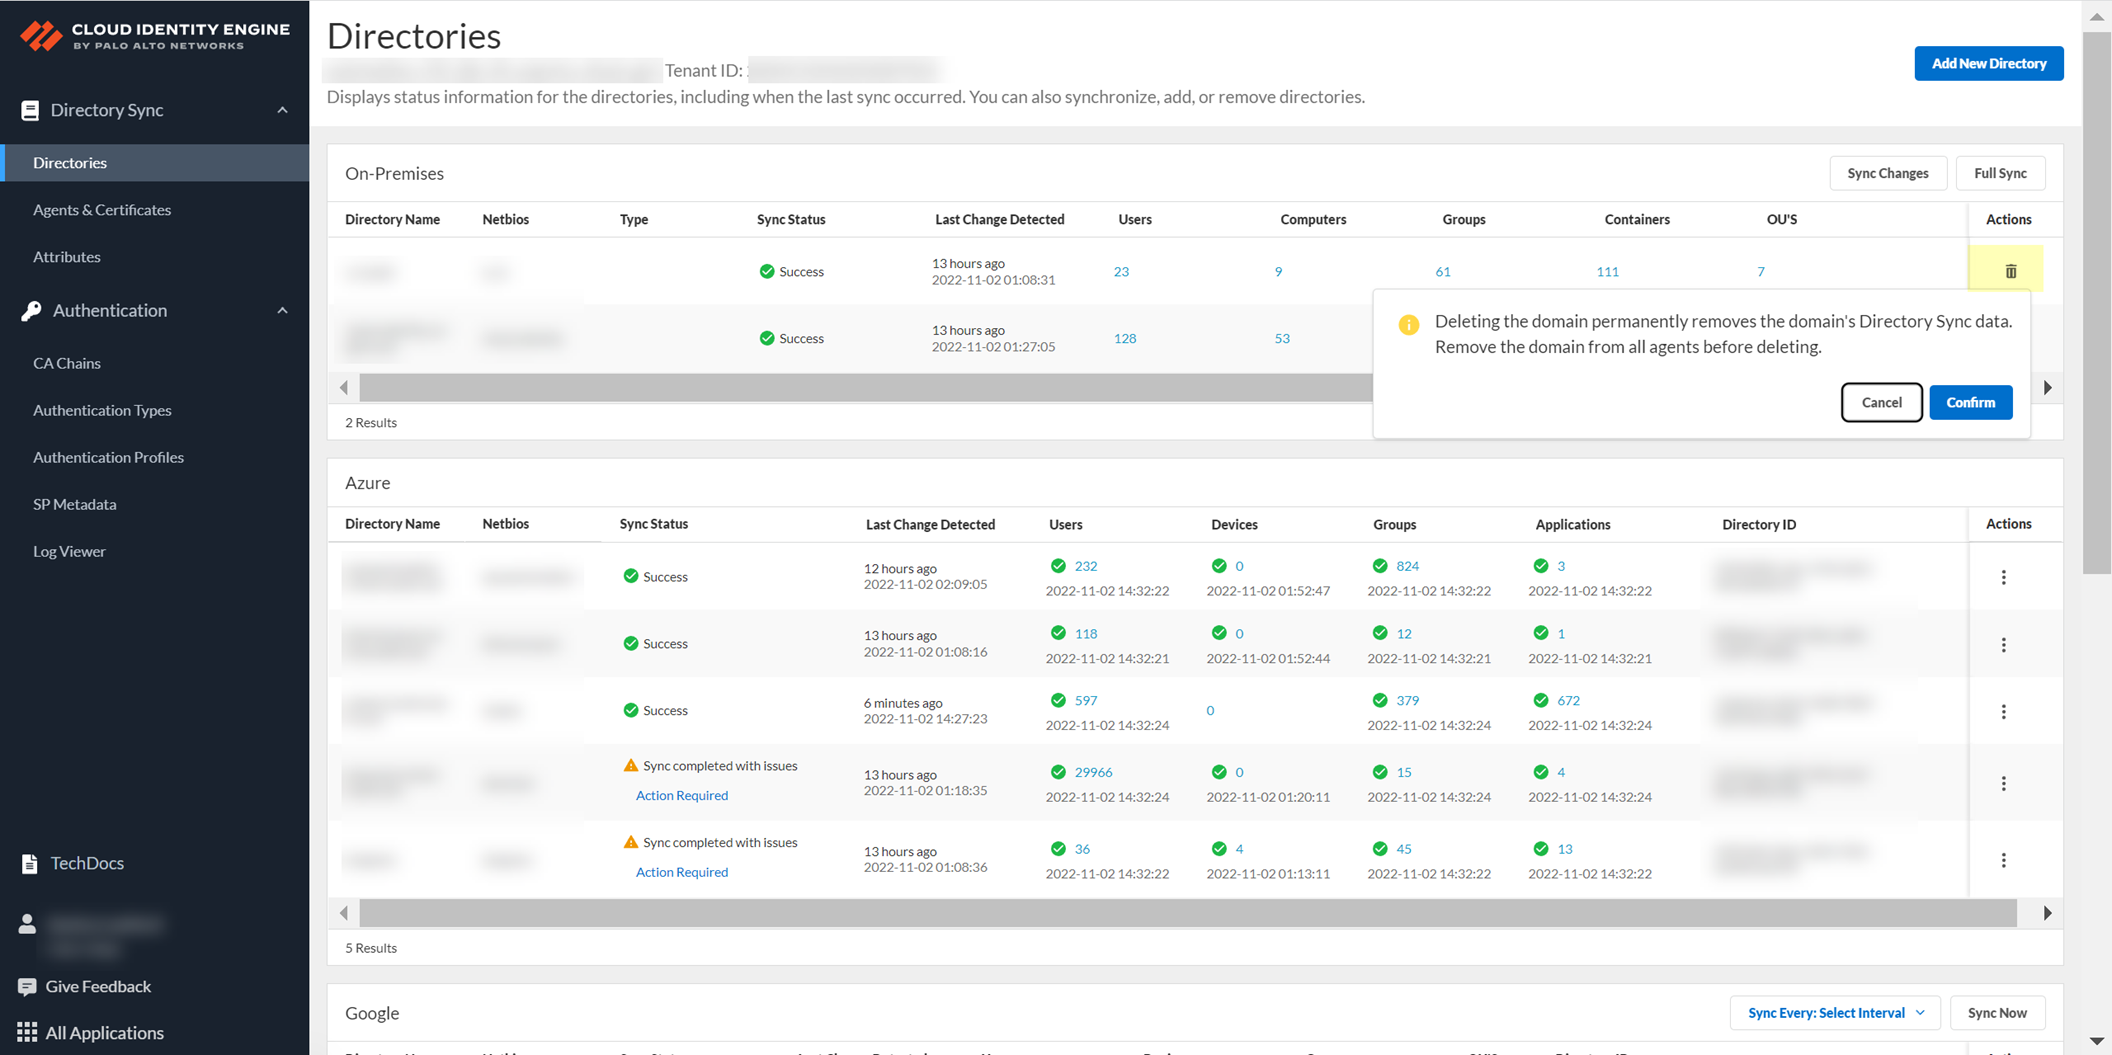
Delete Cloud-Based Directories
- Log in to the hub and select the Cloud Identity Engine app.
- Select the tenant with the domain you want to delete, then select Directory .
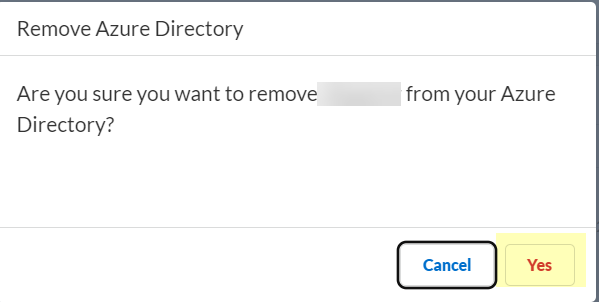
- Select Actions then Remove the directory.
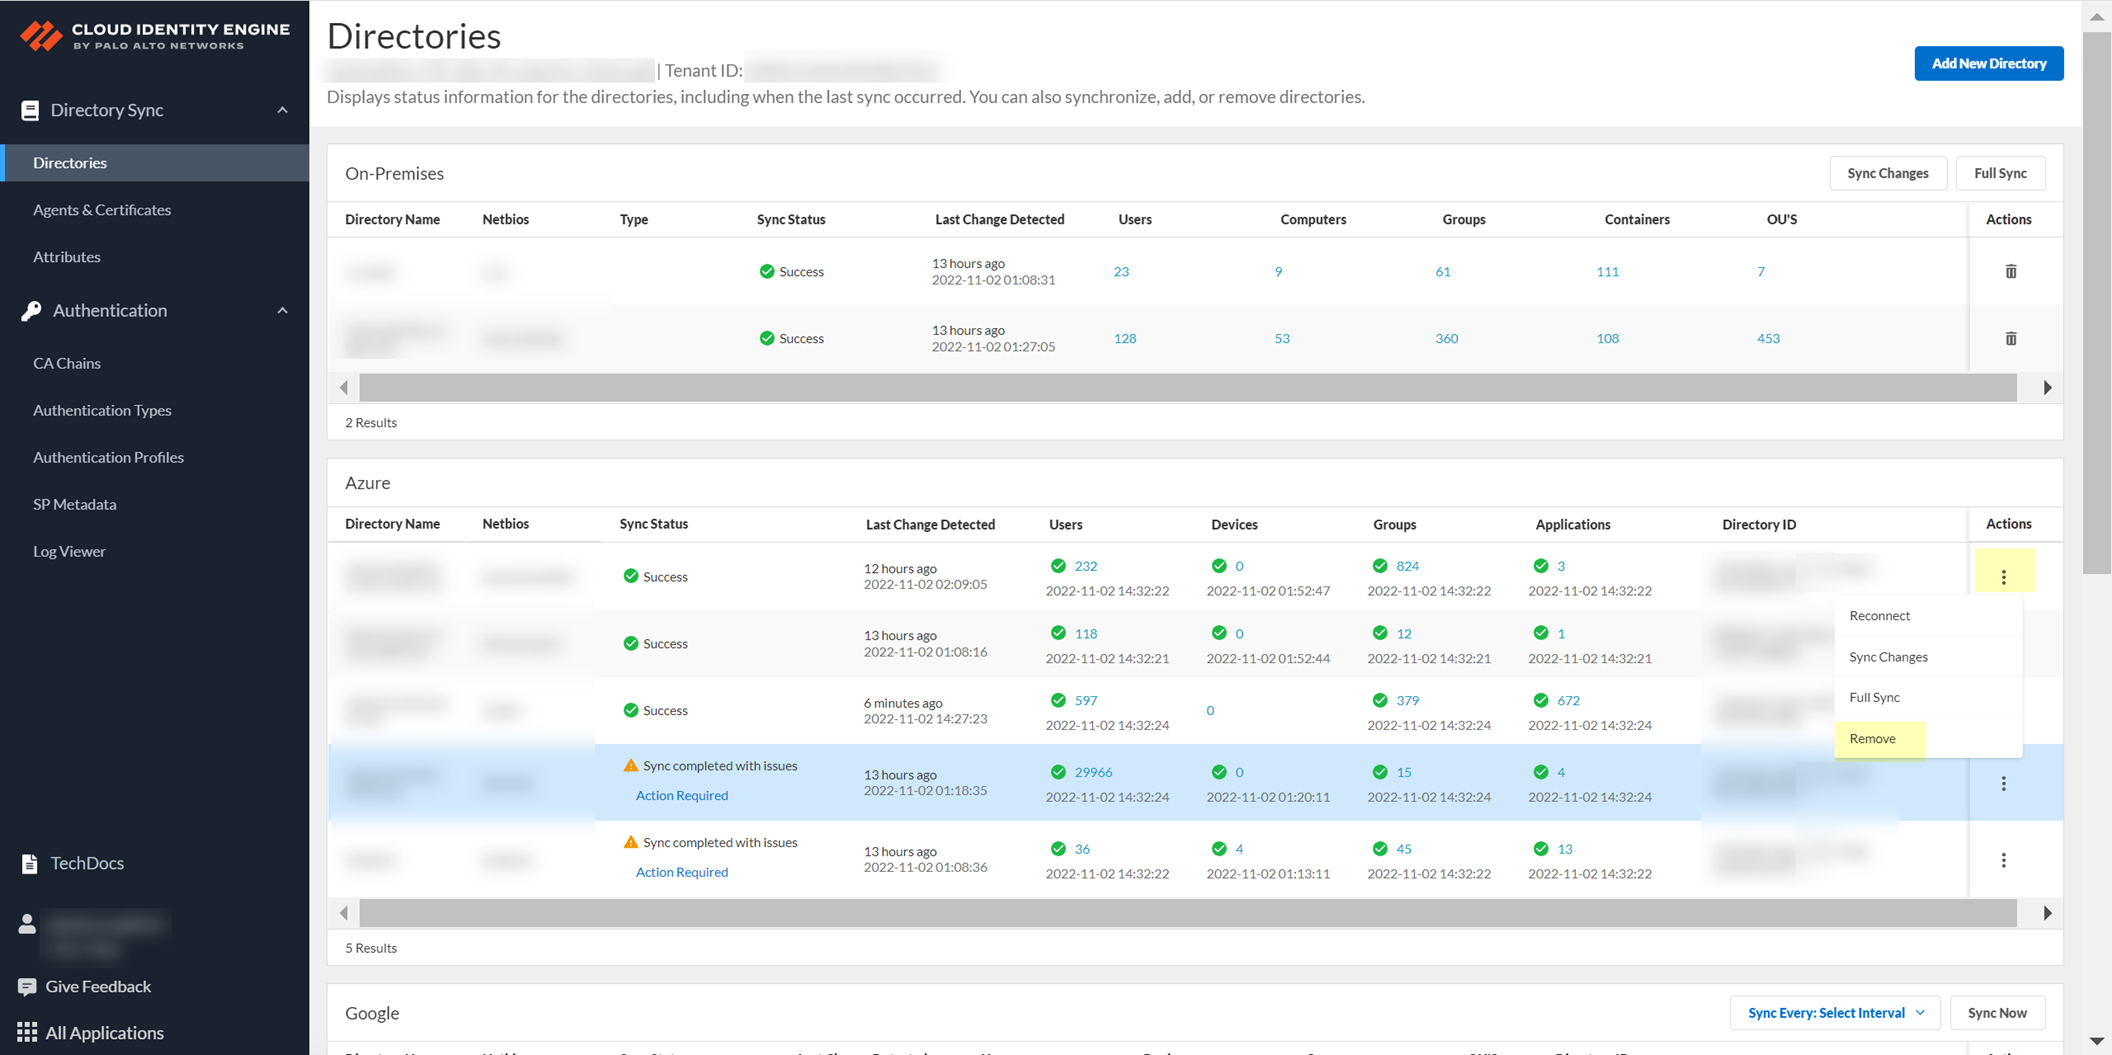
- Click Yes to confirm the deletion of the directory.
Cloud Identity Engine Attributes
An attribute is a unique identifier, such as a Distinguished Name, that correlates to a specific object in the directory, which can be a user, a computer, or another network entity. If your directory uses custom attributes that do not use the following formats, specify the custom formats in the Cloud Identity Engine app (see Collect Custom Attributes with the Cloud Identity Engine ).
- On-Premises Active Directory
- Azure Active Directory
- SCIM Directory
- Okta Directory
- Google Directory
- On-Premises OpenLDAP
Verify that your attributes are valid before attempting to sync the attributes. If one or more attributes are not valid, the initial sync is not successful.
On-Premises Active Directory
You can collect the following types of default attributes and their associated Active Directory fields:
- User Attributes
- Organizational Unit (OU) Attributes
- Group Attributes
- Container Attributes
- Computer Attributes
User Attributes
|
Directory Sync Attribute |
Directory Field |
|
Admin Count |
adminCount |
|
Common-Name |
cn |
|
CompanyName |
companyName |
|
Country |
co |
|
Department |
department |
|
Distinguished Name |
dn |
|
Groups |
memberOf |
|
Last Login |
lastLogon |
|
LastLogonTime |
lastLogonTimestamp |
|
Location |
l |
|
MSDSAllowedDelegatedTo |
msDS-AllowedToDelegateTo |
|
MSDSAllowedToActOnBehalfOfOtherIdentity |
msDS-AllowedToActOnBehalfOfOtherIdentity |
|
MSDSSupportedEncryptionTypes |
msDS-SupportedEncryptionTypes |
|
If you do not configure a value for the Mail attribute, the Cloud Identity Engine uses the value of the User Principal Name . |
|
|
Manager |
manager |
|
NETBIOS Name |
nETBIOSName |
|
Name |
displayName |
|
Object Class |
objectClass |
|
Primary Group ID |
primaryGroupID |
|
SAM Account Name |
sAMAccountName |
|
SID |
objectSid |
|
SID History |
sIDHistory |
|
Service Principal Name |
servicePrincipalName |
|
Title |
title |
|
Unique Identifier |
objectGUID |
|
User Principal Name |
userPrincipalName |
|
UserAccountControl |
userAccountControl |
|
WhenChanged |
whenChanged |
|
WhenCreated |
whenCreated |
Organizational Unit (OU) Attributes
|
Directory Sync Attribute |
Directory Field |
|
Canonical Name |
canonicalName |
|
Common-Name |
cn |
|
Distinguished Name |
dn |
|
Name |
displayName |
|
Object Class |
objectClass |
|
Unique Identifier |
objectGUID |
|
When Changed |
whenChanged |
|
WhenCreated |
whenCreated |
Group Attributes
|
Directory Sync Attribute |
Directory Field |
|
Admin Count |
adminCount |
|
Common-Name |
cn |
|
Distinguished Name |
dn |
|
Group Type |
groupType |
|
Groups |
memberOf |
|
|
|
|
Member |
member |
|
Name |
name |
|
Object Class |
objectClass |
|
SAM Account Name |
sAMAccountName |
|
SID |
objectSid |
|
Unique Identifier |
objectGUID |
|
WhenChanged |
whenChanged |
|
WhenCreated |
whenCreated |
Container Attributes
|
Directory Sync Attribute |
Directory Field |
|
Canonical Name |
canonicalName |
|
Common-Name |
cn |
|
Distinguished Name |
dn |
|
Domain |
domain |
|
Name |
displayName |
|
Object Class |
objectClass |
|
Unique Identifier |
objectGUID |
|
WhenChanged |
whenChanged |
|
WhenCreated |
whenCreated |
Computer Attributes
|
Directory Sync Attribute |
Directory Field |
|
Admin Count |
adminCount |
|
Common-Name |
cn |
|
Distinguished Name |
dn |
|
Groups |
memberOf |
|
HostID |
_hostId |
|
Host Name |
dNSHostName |
|
Last Login |
lastLogon |
|
LastLogonTime |
lastLogonTimestamp |
|
MSDSAllowedDelegatedTo |
msDS-AllowedToDelegateTo |
|
MSDSAllowedToActOnBehalfOfOtherIdentity |
msDS-AllowedToActOnBehalfOfOtherIdentity |
|
MSDSSupportedEncryptionTypes |
msDS-SupportedEncryptionTypes |
|
NETBIOS Name |
nETBIOSName |
|
Name |
displayName |
|
OS |
operatingSystem |
|
OSServicePack |
operatingSystemServicePack |
|
OSVersion |
operatingSystemVersion |
|
Object Class |
objectClass |
|
Primary Group ID |
primaryGroupID |
|
SAM Account Name |
sAMAccountName |
|
SID |
objectSid |
|
SID History |
sIDHistory |
|
Serial Number |
serialNumber |
|
Service Principal Name |
servicePrincipalName |
|
Unique Identifier |
objectGUID |
|
User Principal Name |
userPrincipalName |
|
UserAccountControl |
userAccountControl |
|
WhenChanged |
whenChanged |
|
WhenCreated |
whenCreated |
Azure Active Directory
You can collect the following types of default attributes and their associated Active Directory fields:
- User Attributes
- Role Assignments Attributes
- Group Attributes
- Computer Attributes
- Application Attributes
User Attributes
|
Directory Sync Attribute |
Directory Field |
|
BusinessPhones |
businessPhones |
|
CompanyName |
companyName |
|
Country |
country |
|
Department |
department |
|
EmployeeId |
employeeId |
|
FaxNumber |
faxNumber |
|
Given Name |
givenName |
|
Groups |
memberOf |
|
IsResourceAccount |
isResourceAccount |
|
LastPasswordChangeDateTime |
lastPasswordChangeDateTime |
|
Location |
officeLocation |
|
If you do not configure a value for the Mail attribute, the Cloud Identity Engine uses the value of the User Principal Name . |
|
|
Manager |
manager |
|
MobilePhone |
mobilePhone |
|
Name |
displayName |
|
OnPremisesDistinguishedName |
onPremisesDistinguishedName |
|
OnPremisesDomainName |
onPremisesDomainName |
|
OnPremisesExtensionAttributes |
onPremisesExtensionAttributes |
|
OnPremisesImmutableId |
onPremisesImmutableId |
|
OnPremisesLastSyncDataTime |
onPremisesLastSyncDateTime |
|
OnPremisesProvisioningErrors |
onPremisesProvisioningErrors |
|
OnPremisesSamAccountName |
onPremisesSamAccountName |
|
OnPremisesSyncEnabled |
onPremisesSyncEnabled |
|
OtherMails |
otherMails |
|
PasswordPolicies |
passwordPolicies |
|
PasswordProfile |
passwordProfile |
|
PostalCode |
postalCode |
|
PreferredLanguage |
preferredLanguage |
|
SignInSessionsValidFromDateTime |
signInSessionsValidFromDateTime |
|
State |
state |
|
StreetAddress |
streetAddress |
|
Sur Name |
surname |
|
Title |
jobTitle |
|
Unique Identifier |
objectGUID |
|
UsageLocation |
usageLocation |
|
User Principal Name |
userPrincipalName |
|
UserAccountControl |
accountEnabled |
|
UserType |
userType |
|
createdDateTime |
createdDateTime |
|
onPremisesSecurityIdentifier |
onPremisesSecurityIdentifier |
|
onPremisesUserPrincipalName |
onPremisesUserPrincipalName |
Role Assignments Attributes
The Cloud Identity Engine only collects these attributes if you select the Collect Roles and Administrators (Administrative roles) option when you set up your Azure directory.
|
Directory Sync Attribute |
Directory Field |
|
Description |
description |
|
Is Builtin |
isBuiltIn |
|
Is Enabled |
isEnabled |
|
Name |
displayName |
|
Role Permissions |
rolePermissions |
|
Template Id |
templateId |
|
Unique Identifier |
objectGUID |
Group Attributes
|
Directory Sync Attribute |
Directory Field |
|
Classification |
classification |
|
DeletedDateTime |
deletedDateTime |
|
Description |
description |
|
Group Type |
groupTypes |
|
Groups |
memberOf |
|
|
|
|
Mail Nick Name |
mailNickname |
|
MailEnabled |
mailEnabled |
|
Member |
member |
|
Name |
displayName |
|
OnPremisesDomainName |
onPremisesDomainName |
|
OnPremisesLastSyncDateTime |
onPremisesLastSyncDateTime |
|
OnPremisesProvisioningErrors |
onPremisesProvisioningErrors |
|
OnPremisesSecurityIdentifier |
onPremisesSecurityIdentifier |
|
OnPremisesSyncEnabled |
onPremisesSyncEnabled |
|
RenewedDateTime |
renewedDateTime |
|
SAM Account Name |
onPremisesSamAccountName |
|
SID |
securityIdentifier |
|
SecurityEnabled |
securityEnabled |
|
Unique Identifier |
objectGUID |
|
Visibility |
visibility |
|
createdDateTime |
createdDateTime |
Computer Attributes
|
Directory Sync Attribute |
Directory Field |
|
ComplianceExpirationDateTime |
complianceExpirationDateTime |
|
Device ID |
deviceId |
|
Groups |
memberOf |
|
IsCompliant |
isCompliant |
|
IsManaged |
isManaged |
|
LastLogonTime |
approximateLastSignInDateTime |
|
Manufacturer |
manufacturer |
|
MdmAppId |
mdmAppId |
|
Model |
model |
|
Name |
displayName |
|
OS |
operatingSystem |
|
OSVersion |
operatingSystemVersion |
|
ProfileType |
profileType |
|
Serial Number |
deviceId |
|
SystemLabels |
systemLabels |
|
TrustType |
trustType |
|
Unique Identifier |
objectGUID |
|
UserAccountControl |
accountEnabled |
|
createdDateTime |
createdDateTime |
Application Attributes
|
Directory Sync Attribute |
Directory Field |
|
App Id |
appId |
|
App Roles |
appRoles |
|
Application TemplateId |
applicationTemplateId |
|
Description |
description |
|
DisabledByMicrosoftStatus |
disabledByMicrosoftStatus |
|
Identifier Uris |
identifierUris |
|
Name |
displayName |
|
Unique Identifier |
objectGUID |
|
createdDateTime |
createdDateTime |
|
web |
web |
SCIM Directory
You can collect the following types of default attributes and their associated SCIM Connector fields:
- User Attributes
- Group Attributes
User Attributes
The following section lists the default attributes for users that the directory provisions to Directory Sync using SCIM.
|
Directory Sync Attribute |
SCIM Field |
|
Common-Name |
name_formatted |
|
CompanyName |
addresses_work_formatted |
|
Country |
addresses_work_country |
|
Department |
enterprise_department |
|
EmployeeId |
enterprise_employeeNumber |
|
FaxNumber |
phoneNumbers_fax_value |
|
Given Name |
name_firstName |
|
Groups |
groups |
|
Location |
addresses_work_locality |
|
If you do not configure a value for the Mail attribute, the Cloud Identity Engine uses the value of the User Principal Name . |
emails_work_value |
|
MobilePhone |
phoneNumbers_mobile_value |
|
Name |
displayName |
|
PostalCode |
addresses_work_postalCode |
|
PreferredLanguage |
preferredLanguage |
|
PreferredName |
nickName |
|
StreetAddress |
addresses_work_streetAddress |
|
Sur Name |
name_familyName |
|
Title |
title |
|
Unique Identifier |
objectGUID |
|
User Principal Name |
userName |
|
UserType |
userType The SCIM gallery app does not support the userType attribute. |
|
createdDateTime |
meta_created |
Group Attributes
The following section lists the default attributes for groups that the directory provisions to Directory Sync using SCIM.
Group names for the displayName attribute must be unique. For more information, refer to Troubleshoot Cloud Identity Engine Issues .
|
Directory Sync Attribute |
SCIM Field |
|
Description |
displayName |
|
Group Type |
groupTypes |
|
Member |
members |
|
Name |
displayName |
|
Unique Identifier |
objectGUID |
|
createdDateTime |
meta_created |
Okta Directory
You can collect the following types of default attributes and their associated Okta Directory fields:
- User Attributes
- Group Attributes
User Attributes
|
Directory Sync Attribute |
Okta Directory Fields |
|
City |
city |
|
CompanyName |
companyName |
|
Country |
countryCode |
|
Department |
department |
|
Distinguished Name |
dn |
|
EmployeeId |
employeeNumber |
|
Given Name |
firstName |
|
Groups |
memberOf |
|
Last Login |
lastLogin |
|
LastPasswordChangeDateTime |
passwordChanged |
|
If you do not configure a value for the Mail attribute, the Cloud Identity Engine uses the value of the User Principal Name . |
|
|
Manager |
managerDN |
|
MobilePhone |
mobilePhone |
|
Name |
displayName |
|
PostalCode |
zipCode |
|
PreferredLanguage |
preferredlanguage |
|
PreferredName |
nickName |
|
Primary Group ID |
primaryGroupID |
|
SID |
objectSid |
|
State |
state |
|
StreetAddress |
streetAddress |
|
Sur Name |
lastName |
|
Title |
title |
|
Unique Identifier |
objectGUID |
|
User Principal Name |
userName |
|
UserAccountControl |
status |
|
UserType |
userType |
|
createdDateTime |
created |
Group Attributes
|
Directory Sync Attribute |
Okta Directory Fields |
|
Description |
description |
|
Group Type |
groupTypes |
|
Groups |
memberOf |
|
Member |
member |
|
Name |
name |
|
SAM Account Name |
samAccountName |
|
SID |
objectSid |
|
Unique Identifier |
objectGUID |
|
createdDateTime |
created |
Application Attributes
|
Directory Sync Attribute |
Okta Directory Field |
|
App Id |
appId |
|
Client Uri |
client_uri |
|
Description |
description |
|
Name |
displayName |
|
Unique Identifier |
objectGUID |
Google Directory
To identify users and apply security policy, the Cloud Identity Engine collects the following attributes from Google Directory:
- User Attributes
- Organizational Unit (OU) Attributes
- Group Attributes
- Computer Attributes
User Attributes
|
Directory Sync Attribute |
Google Directory Field |
|
BusinessPhones |
phones |
|
Country |
country |
|
Given Name |
givenName |
|
Groups |
memberOf |
|
LastLogonTime |
lastLoginTime |
|
Location |
locations.area |
|
If you do not configure a value for the Mail attribute, the Cloud Identity Engine uses the value of the User Principal Name . |
primaryEmail |
|
Name |
fullName |
|
OtherMails |
emails |
|
PreferredLanguage |
languages |
|
SID |
id |
|
State |
state |
|
StreetAddress |
streetAddress |
|
Sur Name |
familyName |
|
Title |
title |
|
Unique Identifier |
objectGUID |
|
User Principal Name |
userName |
|
UserAccountControl |
suspended |
|
UserType |
isAdmin |
|
createdDateTime |
creationTime |
Organizational Unit (OU) Attributes
|
Directory Sync Attribute |
Google Directory Field |
|
Description |
description |
|
Name |
name |
|
Unique Identifier |
objectGUID |
Group Attributes
|
Directory Sync Attribute |
Google Directory Field |
|
Group Type |
kind |
|
Groups |
memberOf |
|
|
|
|
Member |
member |
|
Name |
name |
|
SID |
id |
|
Unique Identifier |
objectGUID |
Computer Attributes
|
Directory Sync Attribute |
Google Directory Field |
|
Groups |
memberOf |
|
HostName |
dNSHostName |
|
Last Login |
lastLogon |
|
LastLogonTime |
lastLogonTimestamp |
|
NETBIOS Name |
nETBIOSName |
|
OS |
operatingSystem |
|
OSServicePack |
operatingSystemServicePack |
|
OSVersion |
operatingSystemVersion |
|
Primary Group ID |
primaryGroupID |
|
SID |
deviceId |
|
SID History |
sIDHistory |
|
Serial Number |
serialNumber |
|
Service Principal Name |
servicePrincipalName |
|
Unique Identifier |
objectGUID |
|
User Principal Name |
userPrincipalName |
|
UserAccountControl |
status |
On-Premises OpenLDAP
You can collect the following types of default attributes and their associated Active Directory fields:
- User Attributes
- Organizational Unit (OU) Attributes
- Group Attributes
- Container Attributes
- Computer Attributes
User Attributes
|
Directory Sync Attribute |
OpenLDAP Directory Field |
|
Common-Name |
cn |
|
Country |
co |
|
Department |
department |
|
Distinguished Name |
dn |
|
Groups |
memberOf |
|
Last Login |
lastLogon |
|
LastLogonTime |
lastLogonTimestamp |
|
Location |
l |
|
If you do not configure a value for the Mail attribute, the Cloud Identity Engine uses the value of the User Principal Name . |
|
|
Manager |
manager |
|
Name |
displayName |
|
Object Class |
objectClass |
|
SAM Account Name |
sAMAccountName |
|
SID |
objectSid |
|
Title |
title |
|
Unique Identifier |
entryUUID OpenLDAP requires this attribute. |
|
User Principal Name |
userPrincipalName |
|
WhenChanged |
modifyTimestamp |
|
WhenCreated |
createTimestamp |
Organizational Unit (OU) Attributes
|
Directory Sync Attribute |
OpenLDAP Directory Field |
|
Canonical Name |
canonicalName |
|
Common-Name |
cn |
|
Distinguished Name |
dn |
|
Name |
displayName |
|
Object Class |
objectClass |
|
Unique Identifier |
entryUUID |
|
WhenChanged |
modifyTimestamp |
|
WhenCreated |
createTimestamp |
Group Attributes
|
Directory Sync Attribute |
OpenLDAP Directory Field |
|
Common-Name |
cn |
|
Distinguished Name |
dn |
|
Group Type |
groupType |
|
Groups |
memberOf |
|
|
|
|
Member |
uniqueMember |
|
Name |
name |
|
Object Class |
objectClass For OpenLDAP, the groups' objectClass must be groupOfUniqueNames . |
|
Unique Identifier |
entryUUID |
|
WhenChanged |
modifyTimestamp |
|
WhenCreated |
createTimestamp |
Container Attributes
|
Directory Sync Attribute |
OpenLDAP Directory Field |
|
Canonical Name |
canonicalName |
|
Common-Name |
cn |
|
Distinguished Name |
dn |
|
Domain |
domain |
|
Name |
displayName |
|
Object Class |
objectClass |
|
Unique Identifier |
entryUUID |
|
WhenChanged |
modifyTimestamp |
|
WhenCreated |
createTimestamp |
Computer Attributes
|
Directory Sync Attribute |
OpenLDAP Field |
|
Common-Name |
cn |
|
Distinguished Name |
dn |
|
Groups |
memberOf |
|
HostName |
dNSHostName |
|
Last Login |
lastLogon |
|
LastLogonTime |
lastLogonTimestamp |
|
NETBIOS Name |
nETBIOSName |
|
Name |
displayName |
|
OS |
operatingSystem |
|
OSServicePack |
operatingSystemServicePack |
|
OSVersion |
operatingSystemVersion |
|
Object Class |
objectClass |
|
Primary Group ID |
primaryGroupID |
|
SAM Account Name |
sAMAccountName |
|
SID |
objectSid |
|
Serial Number |
serialNumber |
|
Unique Identifier |
entryUUID |
|
User Principal Name |
userPrincipalName |
|
User Account Control |
userAccountControl |
|
WhenChanged |
modifyTimestamp |
|
WhenCreated |
createTimestamp |
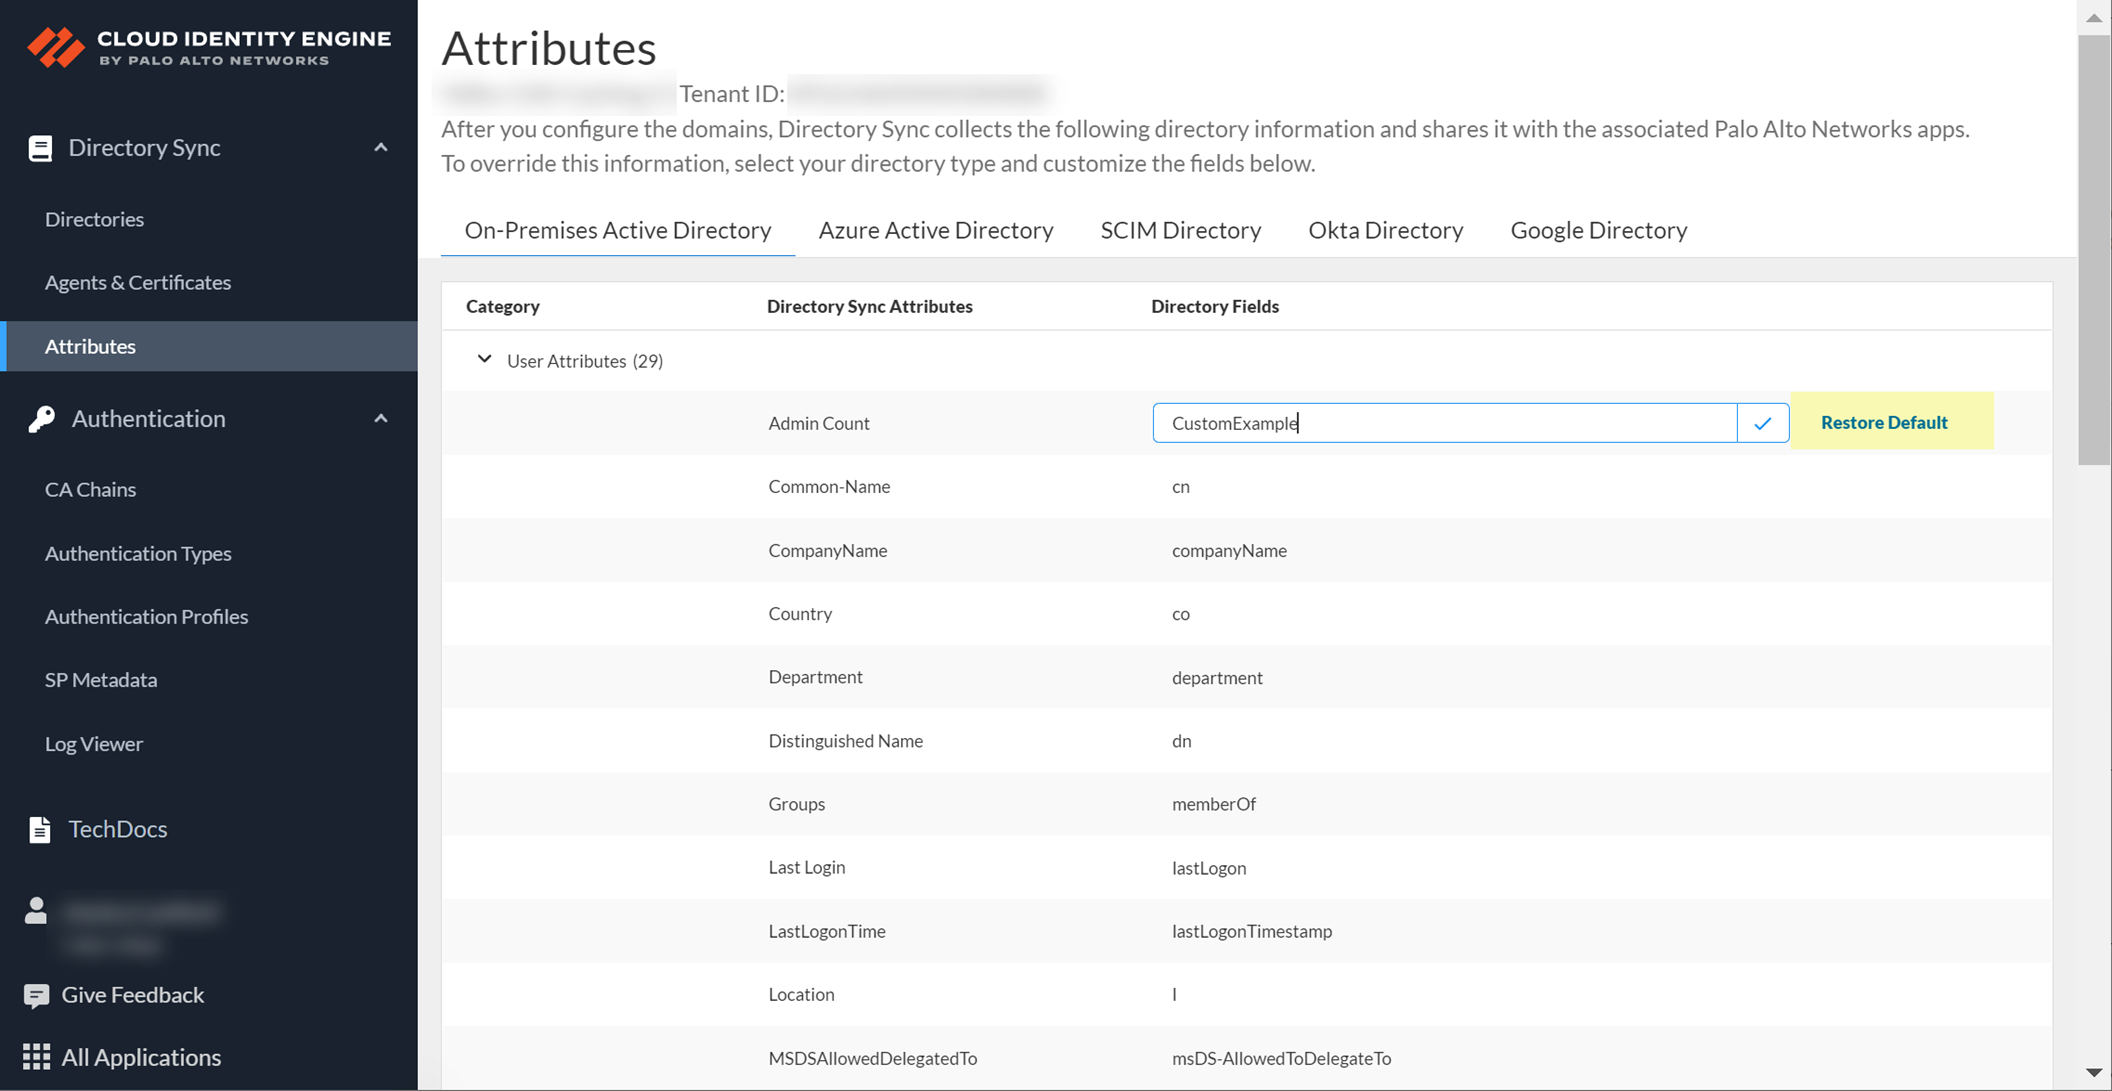
Collect Custom Attributes with the Cloud Identity Engine
If your directory uses custom attributes, you must specify the custom attribute so that the Cloud Identity Engine can collect it. To view the default attribute formats, see Cloud Identity Engine Attributes .
- Log in to the hub and select the Cloud Identity Engine tenant that uses custom attributes.
- Select Attributes then select the directory type that uses the custom attribute.
- Select a custom attribute in your directory.
The field is now editable.
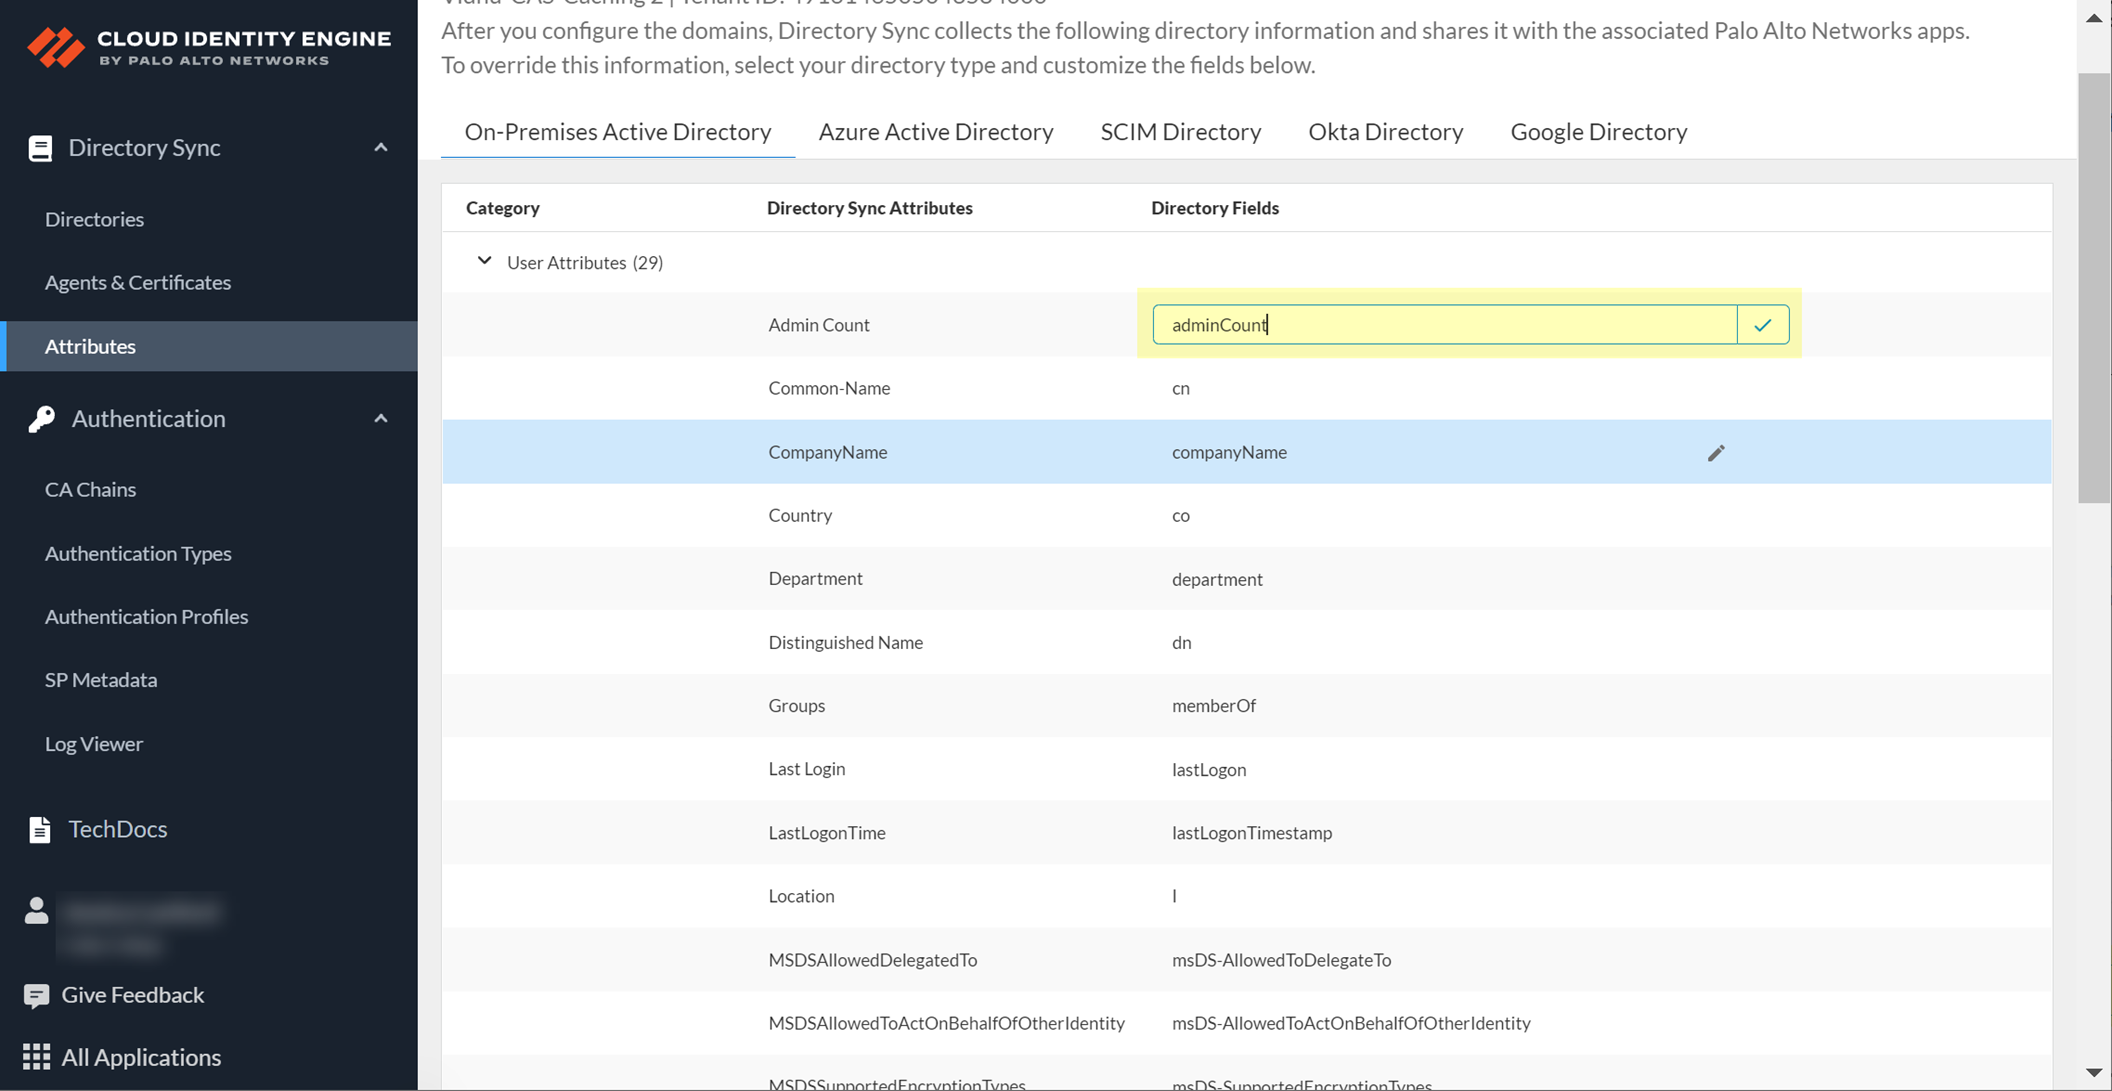
- Enter the new value in the field and confirm the change by clicking the checkmark.
Custom attributes cannot begin with an underscore ( _ ).
A green triangle displays in the upper left corner of the row to indicate the changes.
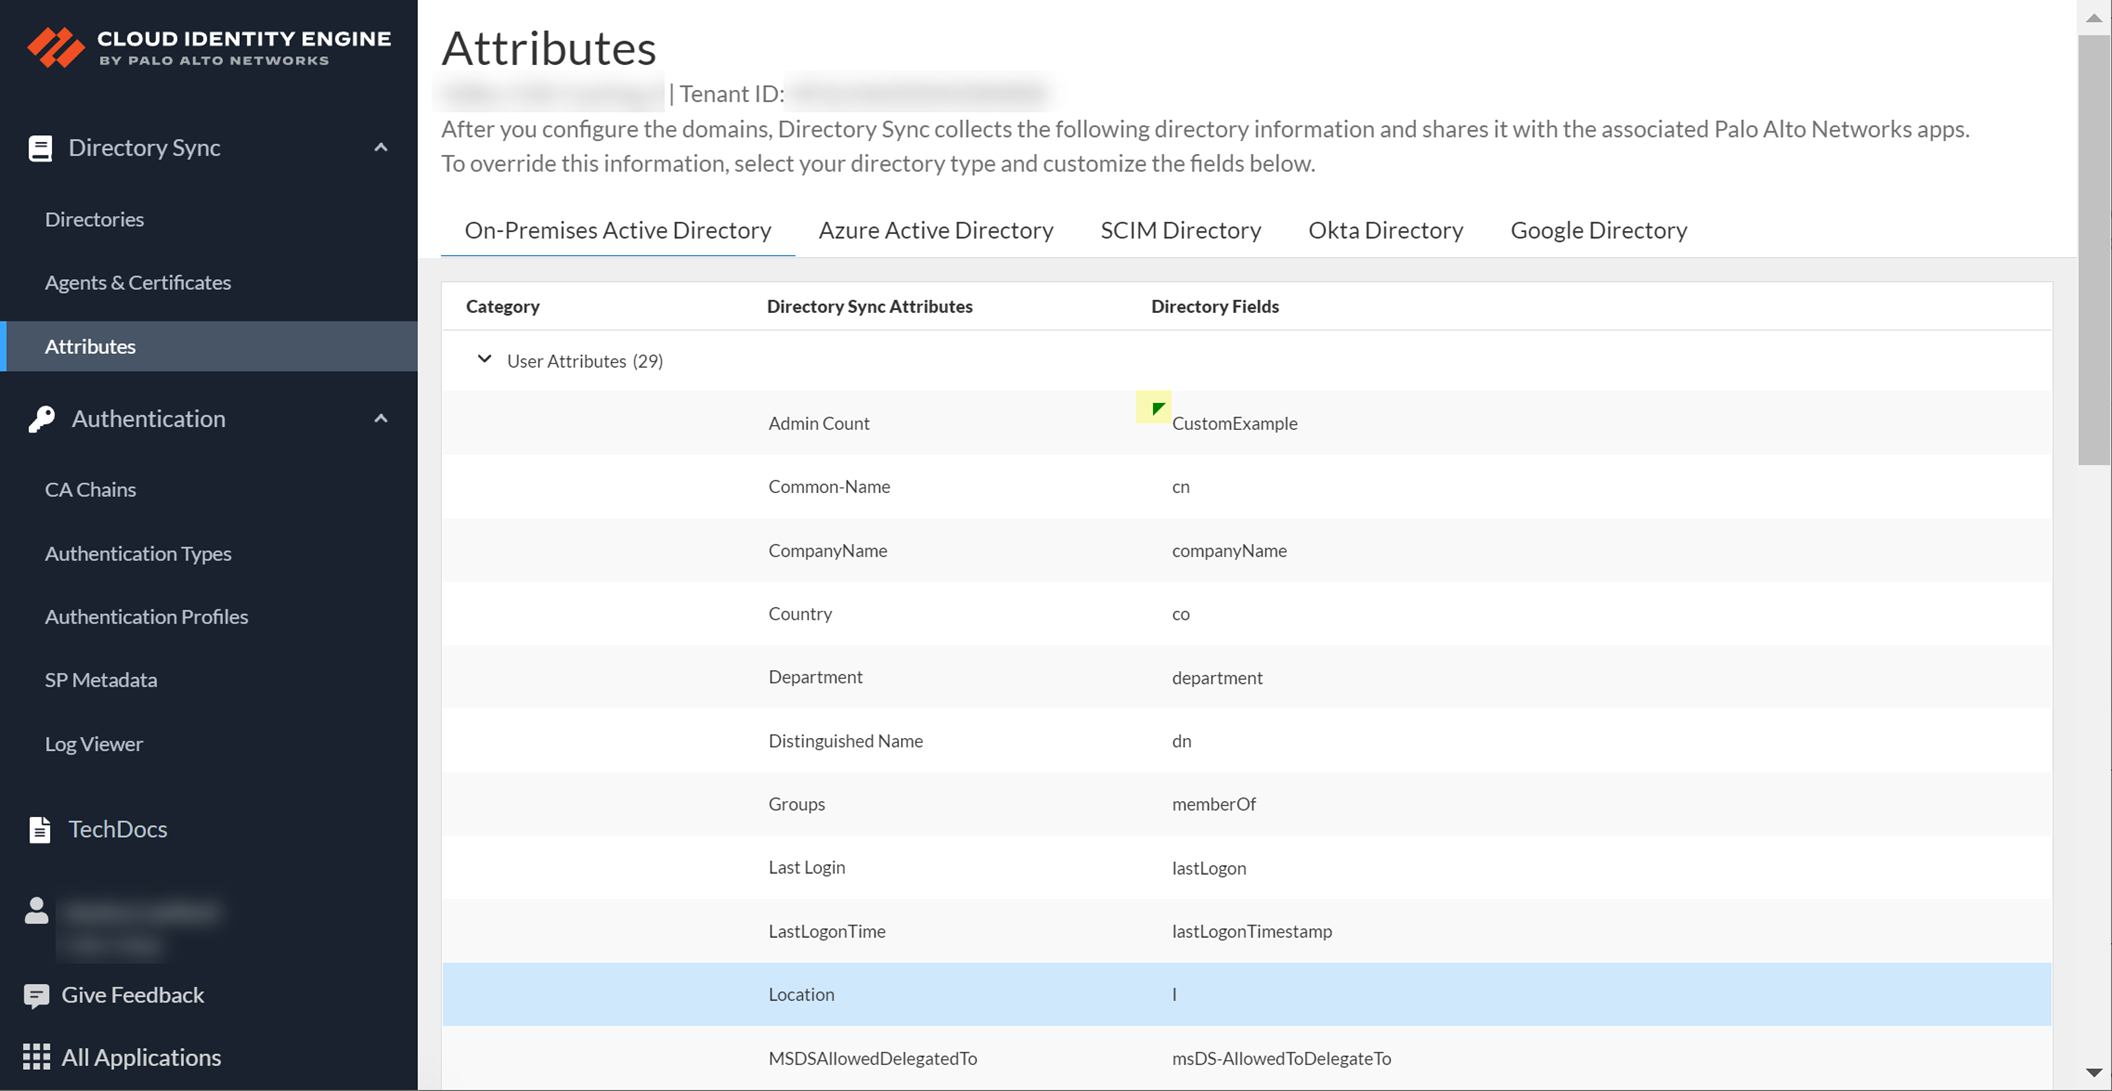
To use the original attribute value, select the custom attribute and Restore Default .
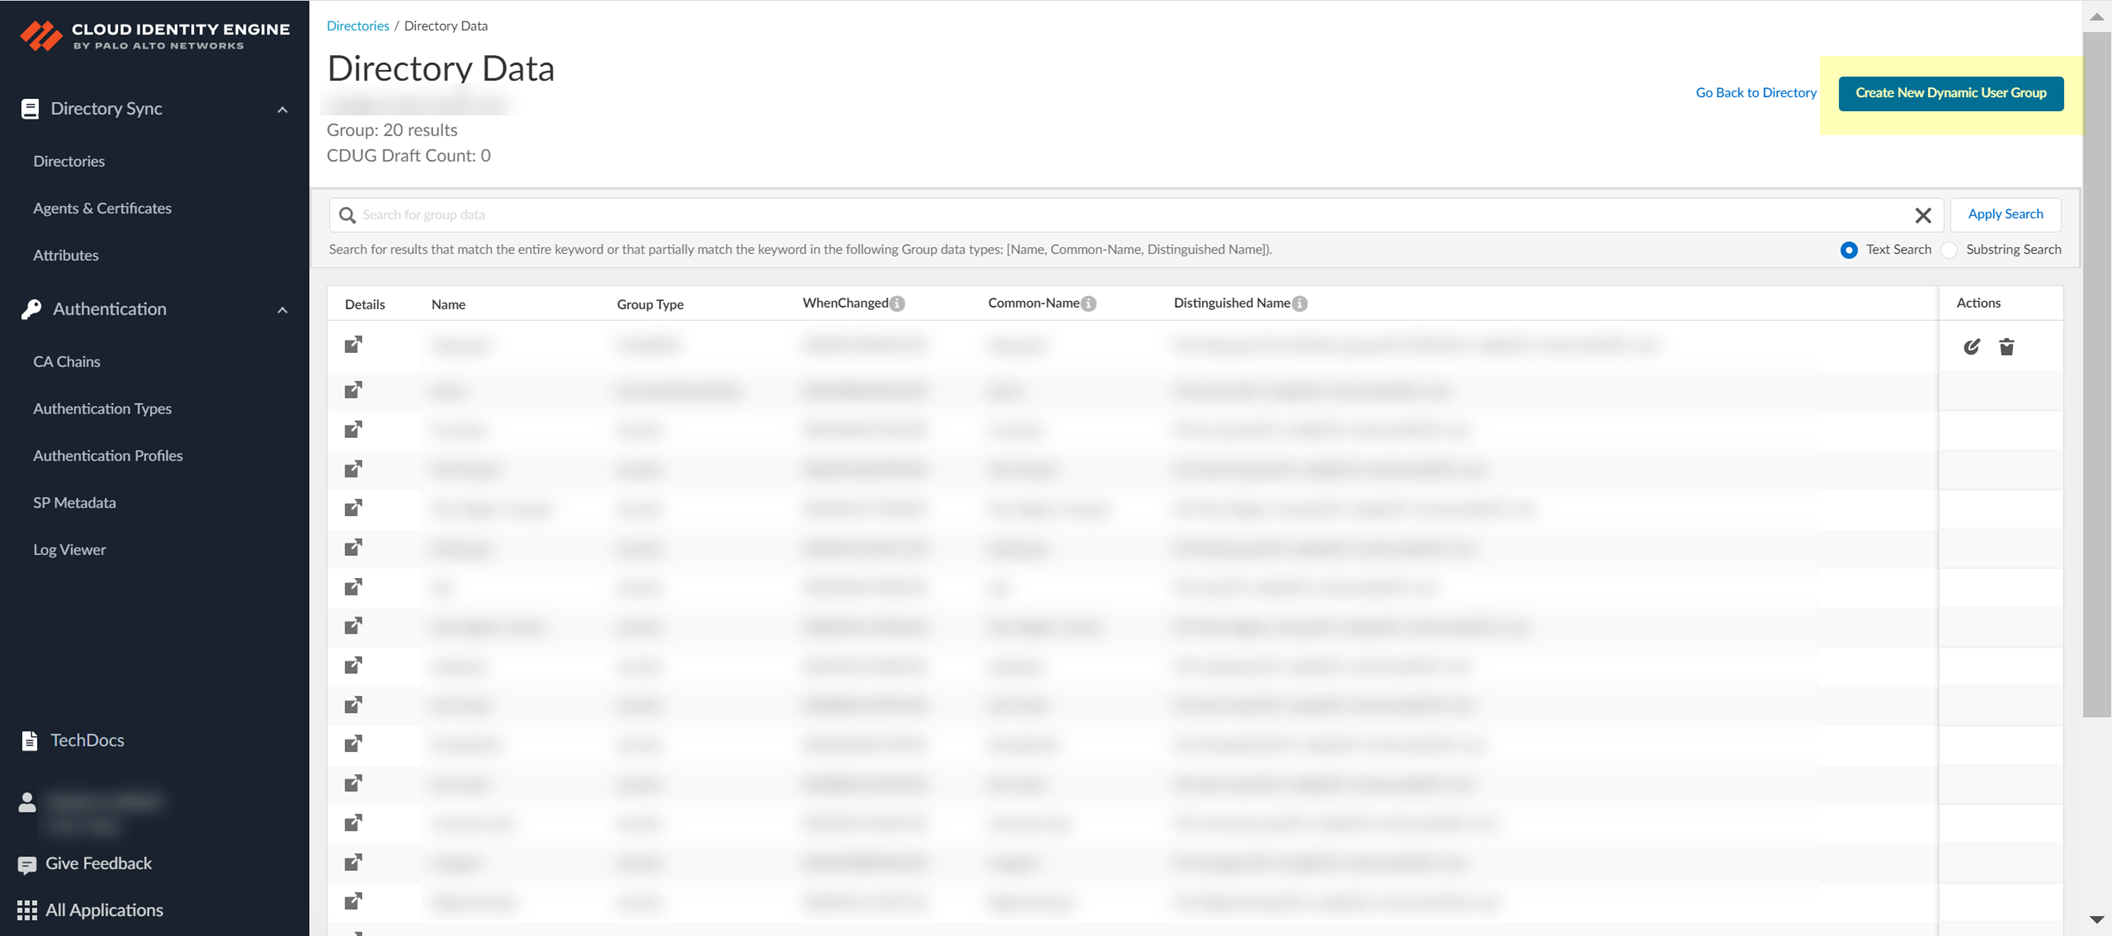
View Directory Data
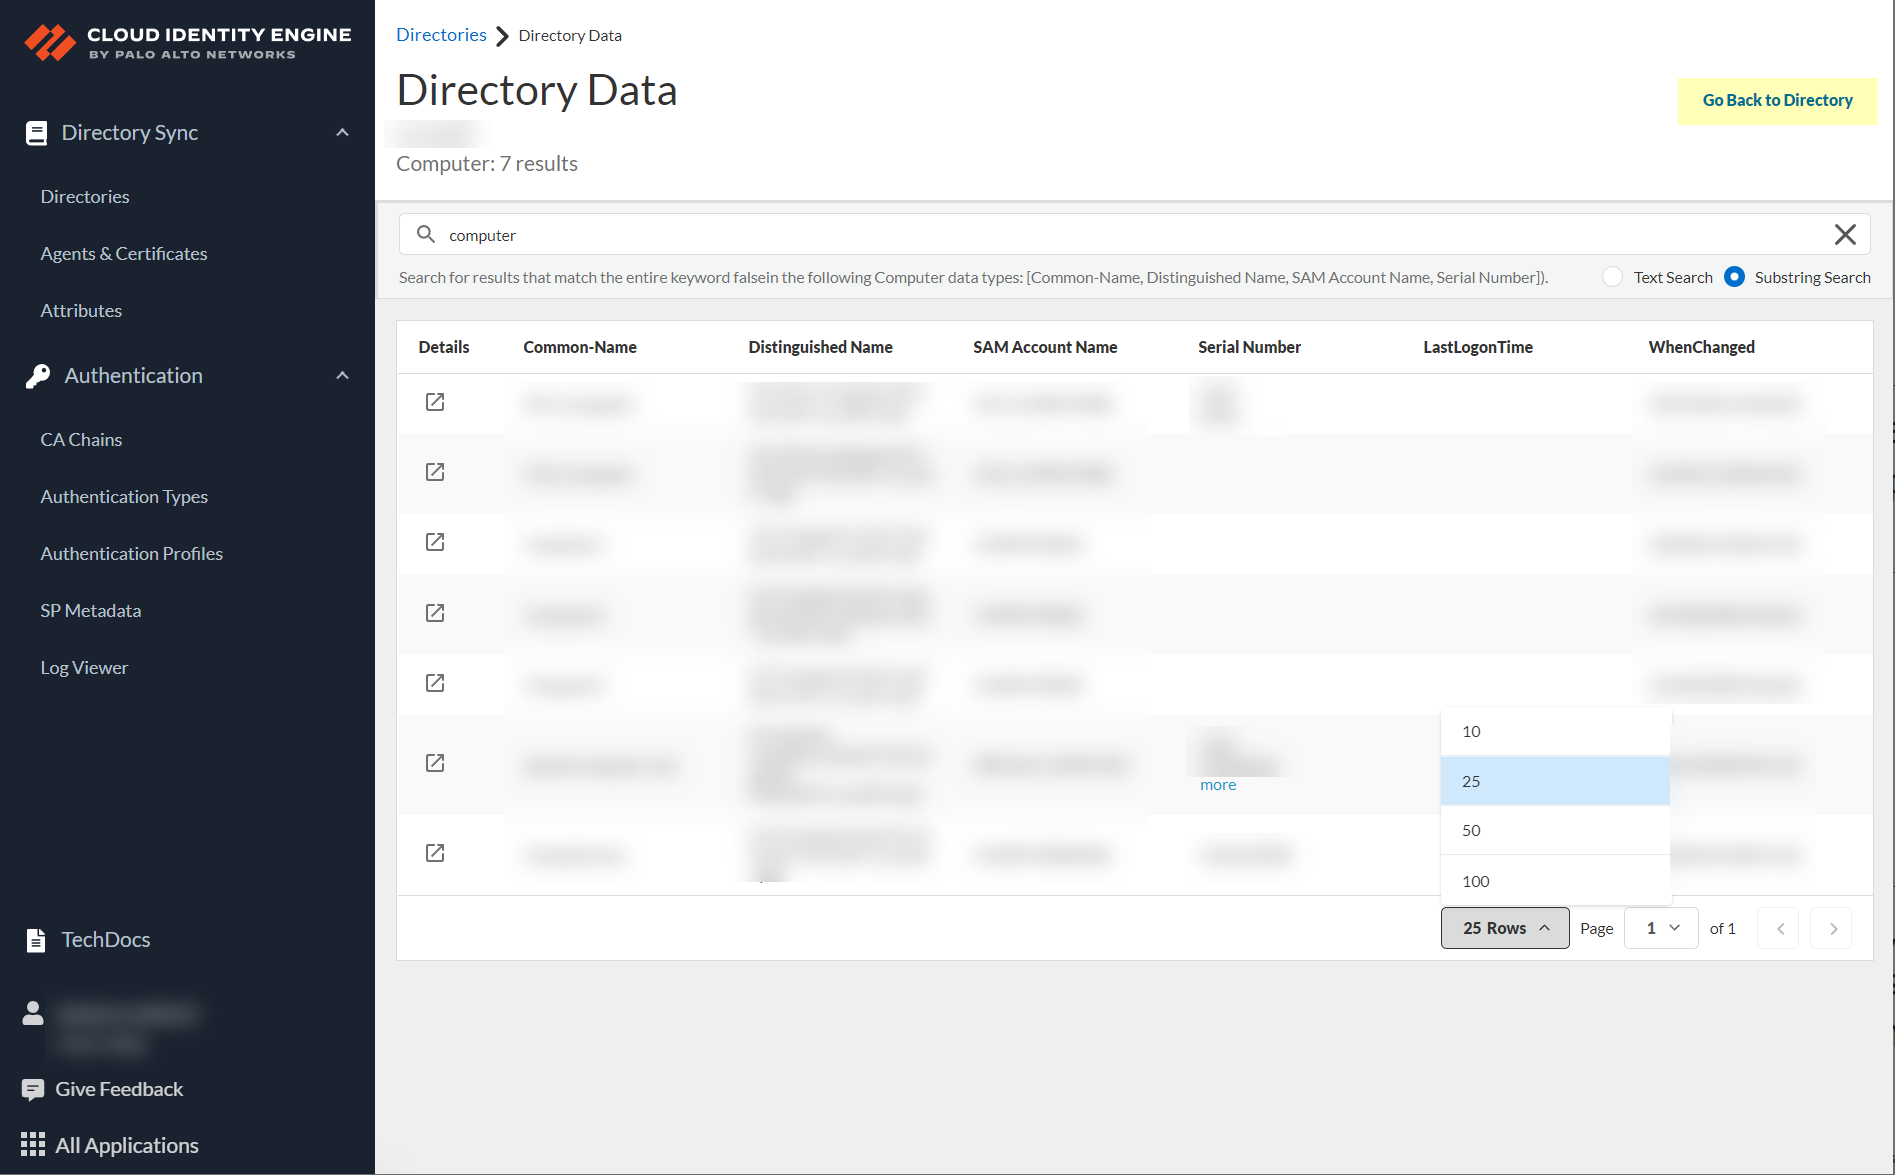
In the Cloud Identity Engine app, you can use the Directory Data page to view data (depending on your directory type) about users, computers, groups, devices, containers, and organizational units that are collected from your directory. You can also use keywords to search the data for specific objects (such as users or groups) and view all the attributes of those objects to validate the data.
The Directories page provides a total count for the objects that the Cloud Identity Engine has collected from your directory. To review details for an object, click the total count in the column for the object to view the Directory Data page.
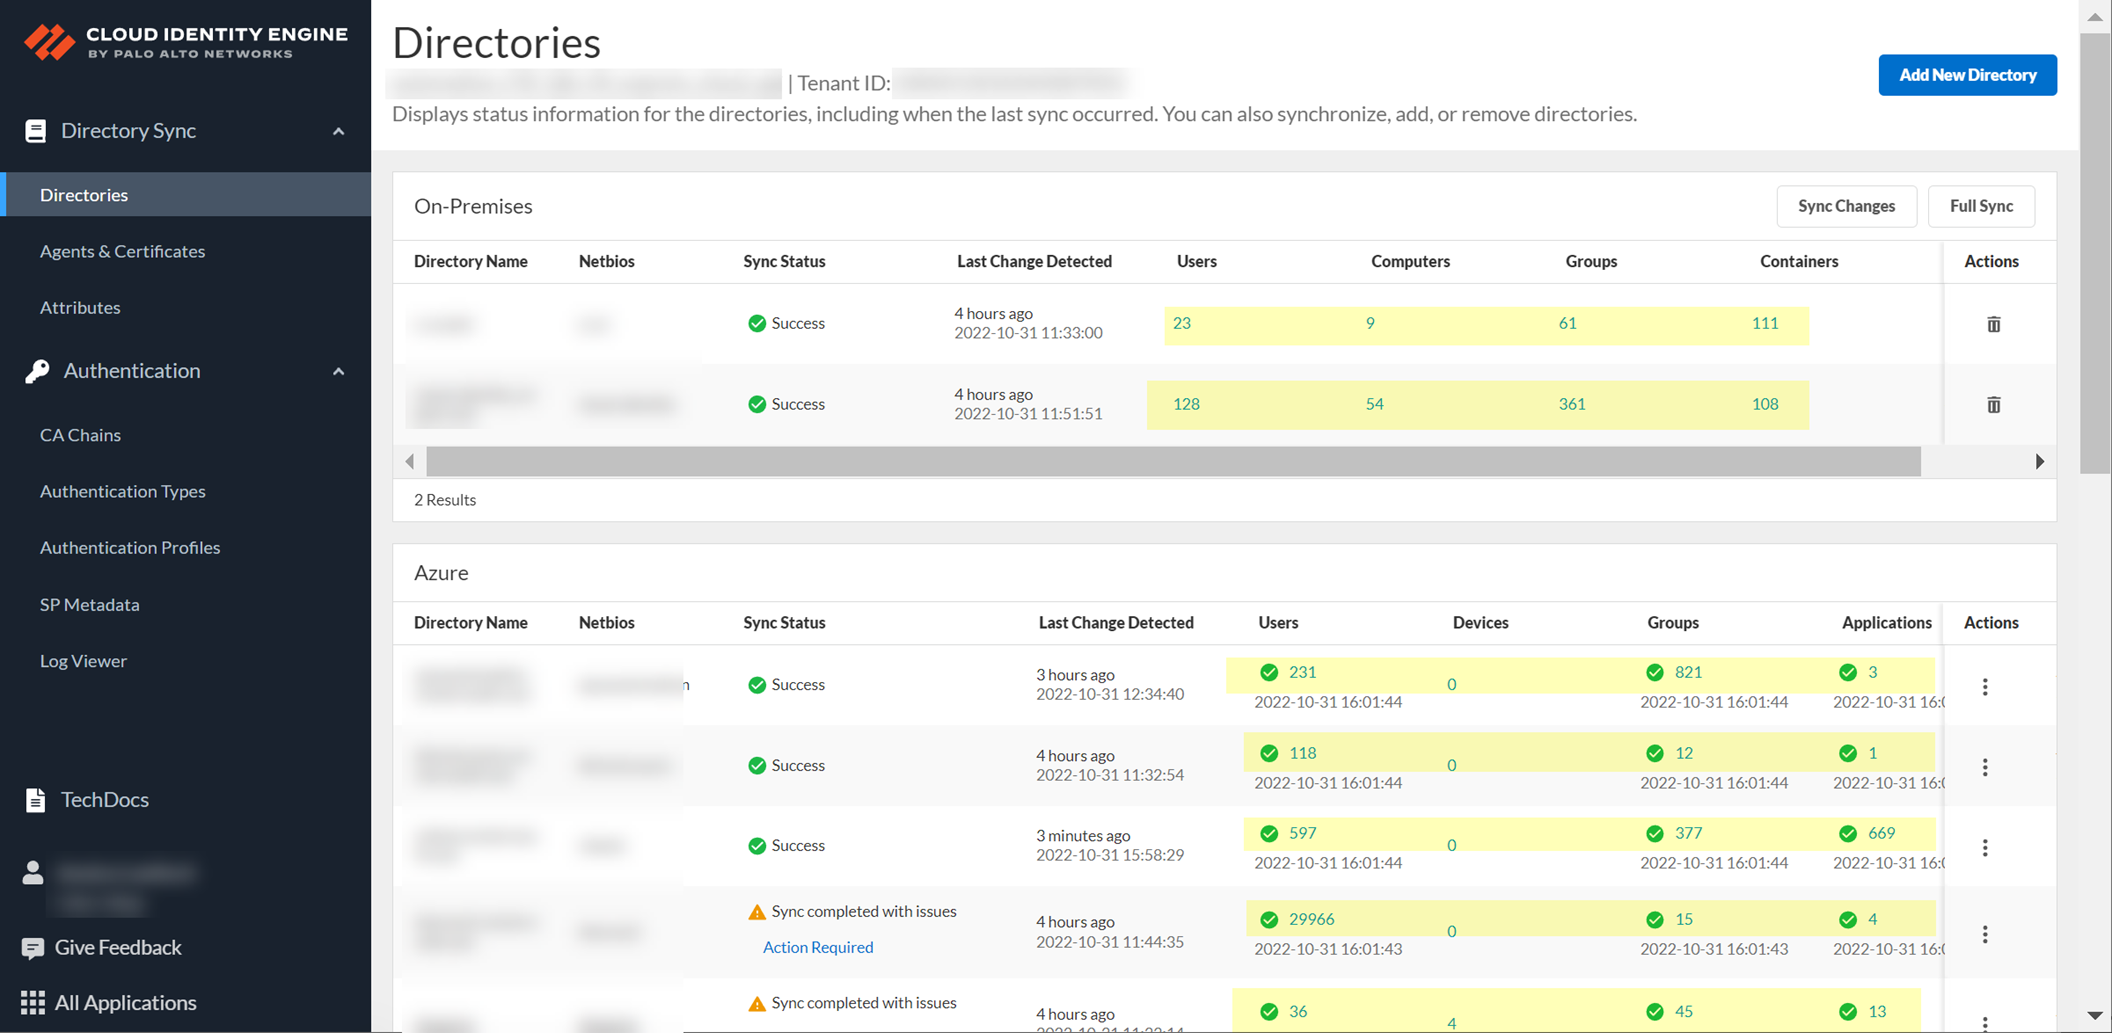
When you select an object, the number of results for that object displays below the domain name at the top of the page.
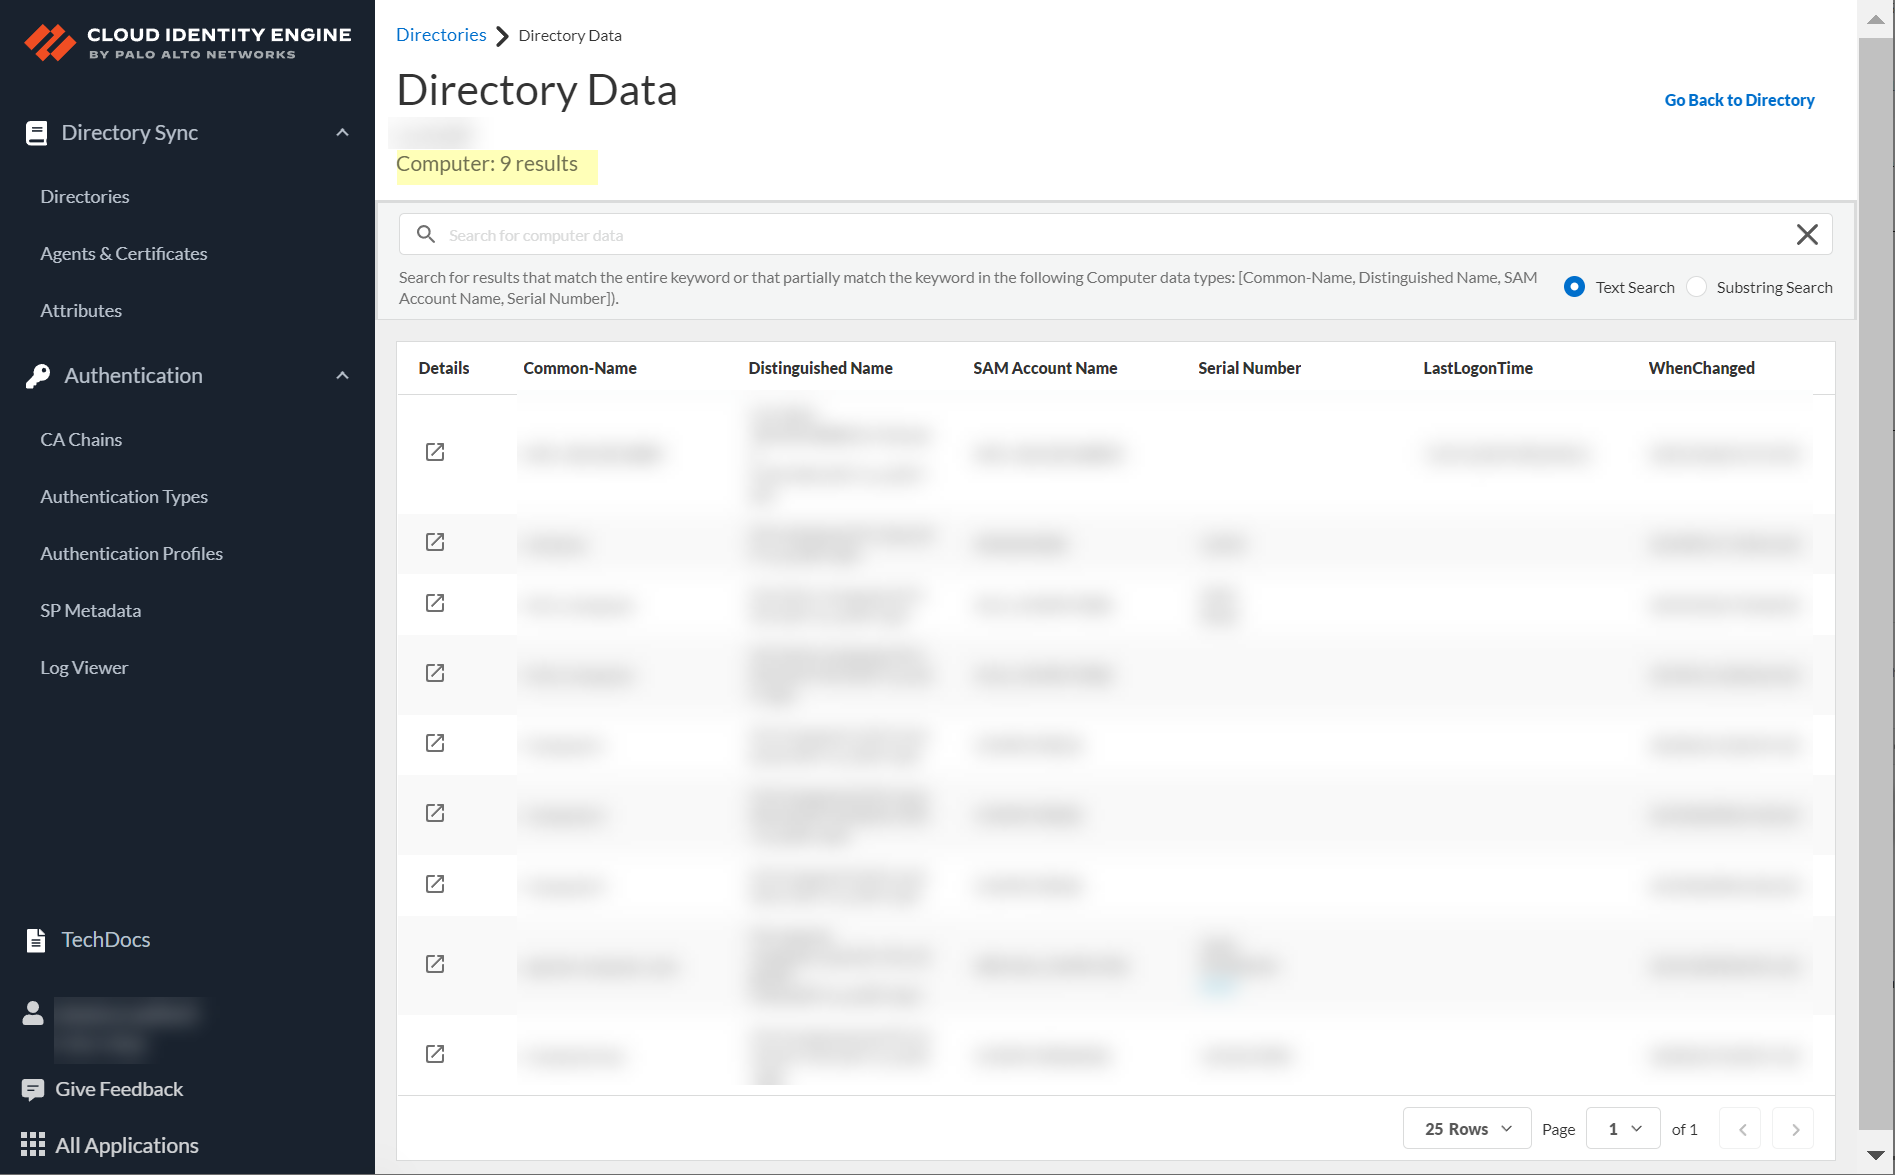
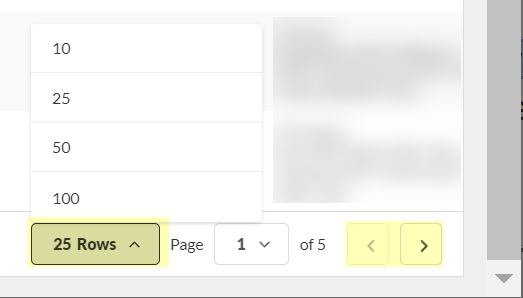
By default, up to 25 results display for the object. To view the rest of the data or a specific result, use the following methods.
- Search for data in the search bar by entering a partial or complete keyword, then press Enter or click Search to see the results.
Search terms are not case-sensitive.
- To refine the search results, select a search type:
Search results include delimiter characters for MongoDB and Unicode . For example, entering test-user as a search term includes results for test-user and test user but not testuser because the hyphen is a delimiter character.
- Text search —Displays results that match the entire search term.

- Substring match —Displays results that match the entire search term or that partially match the search term.
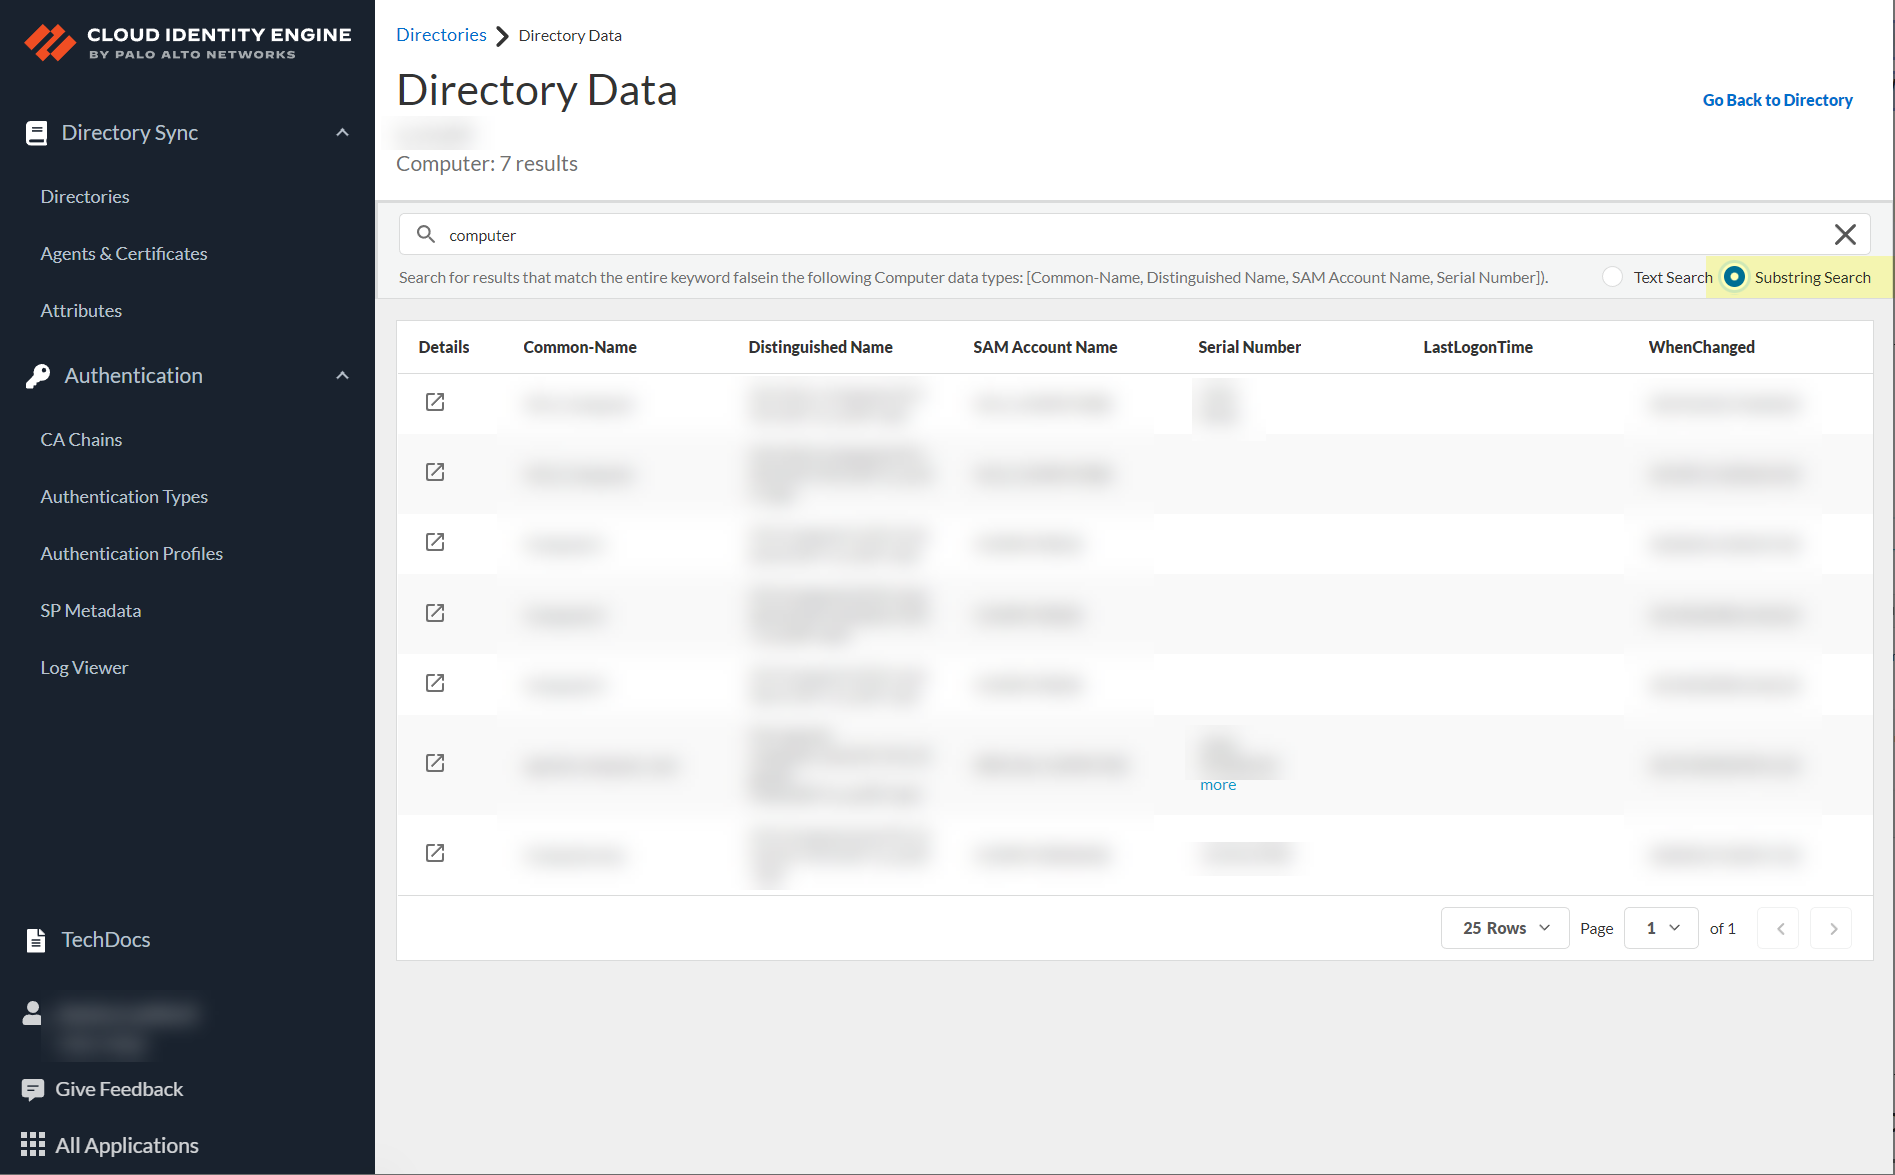
- Browse the data using the page navigation buttons or use the drop-down list to select the number of rows to display.
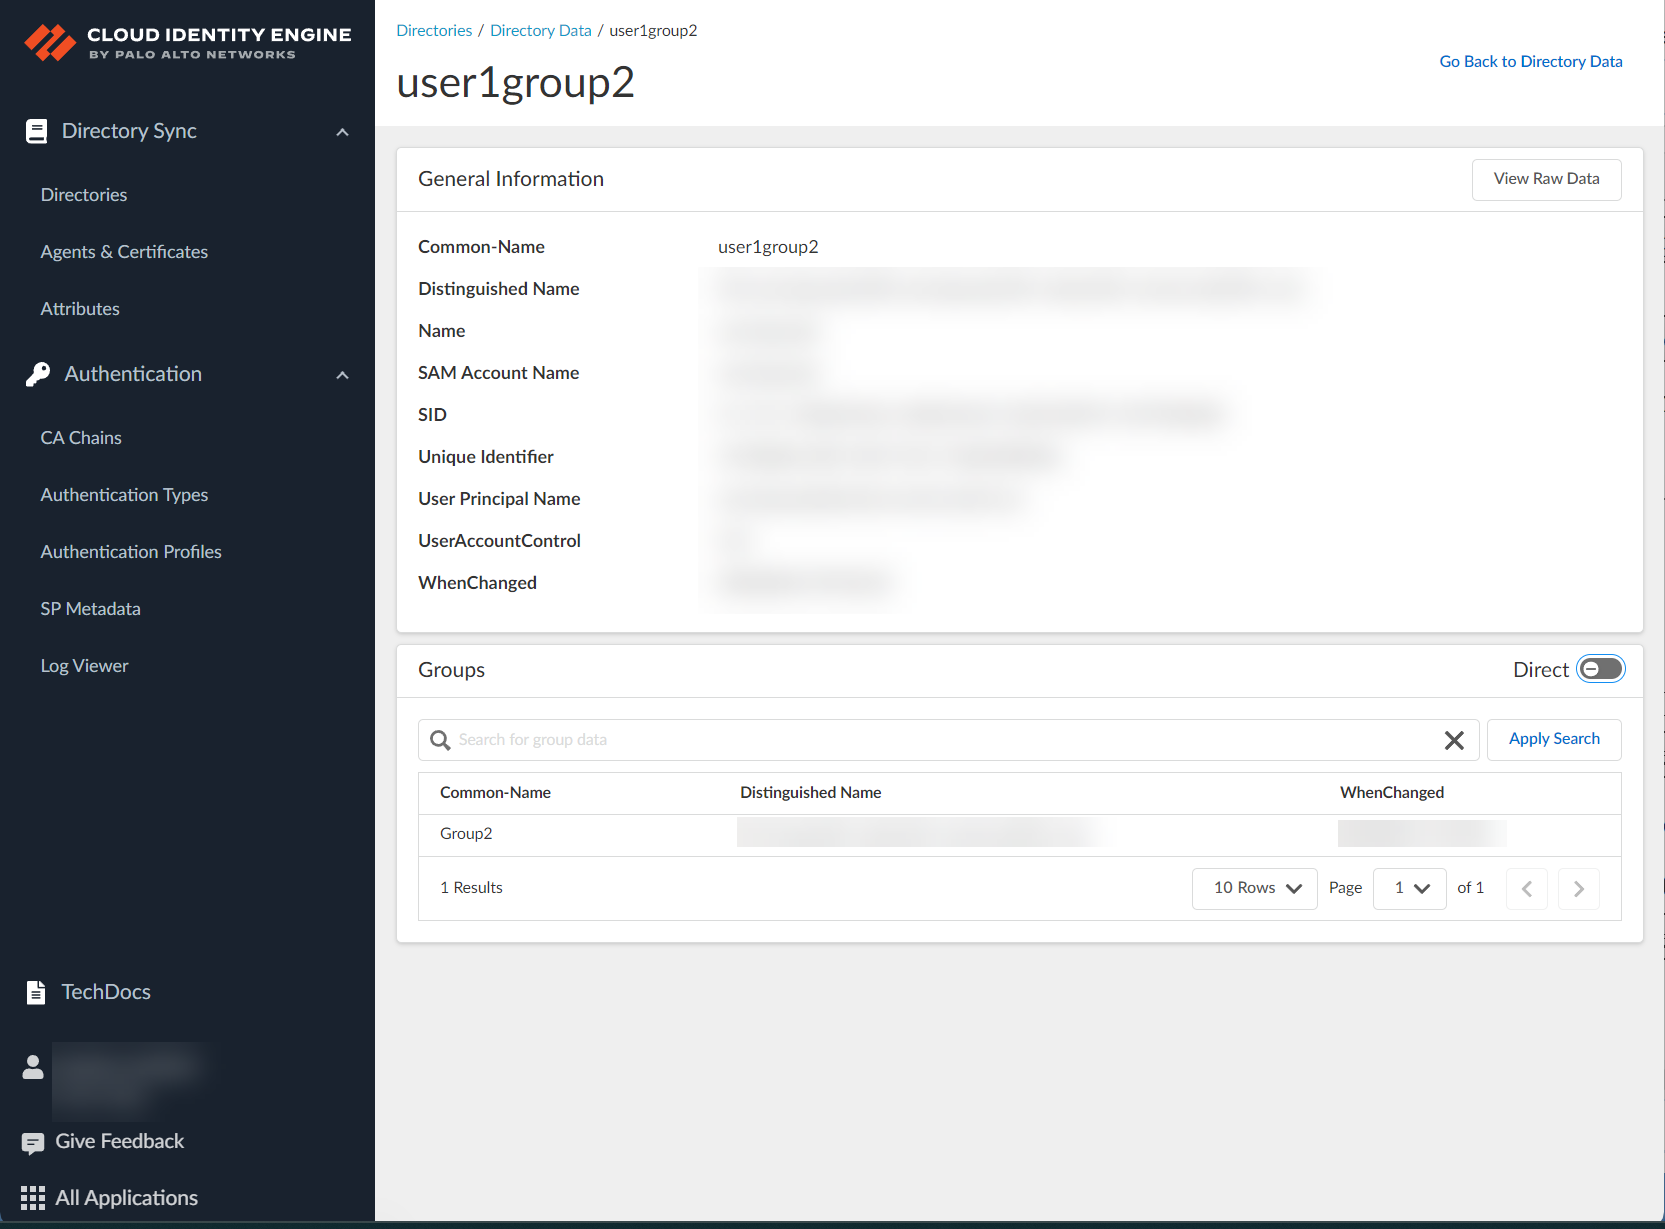
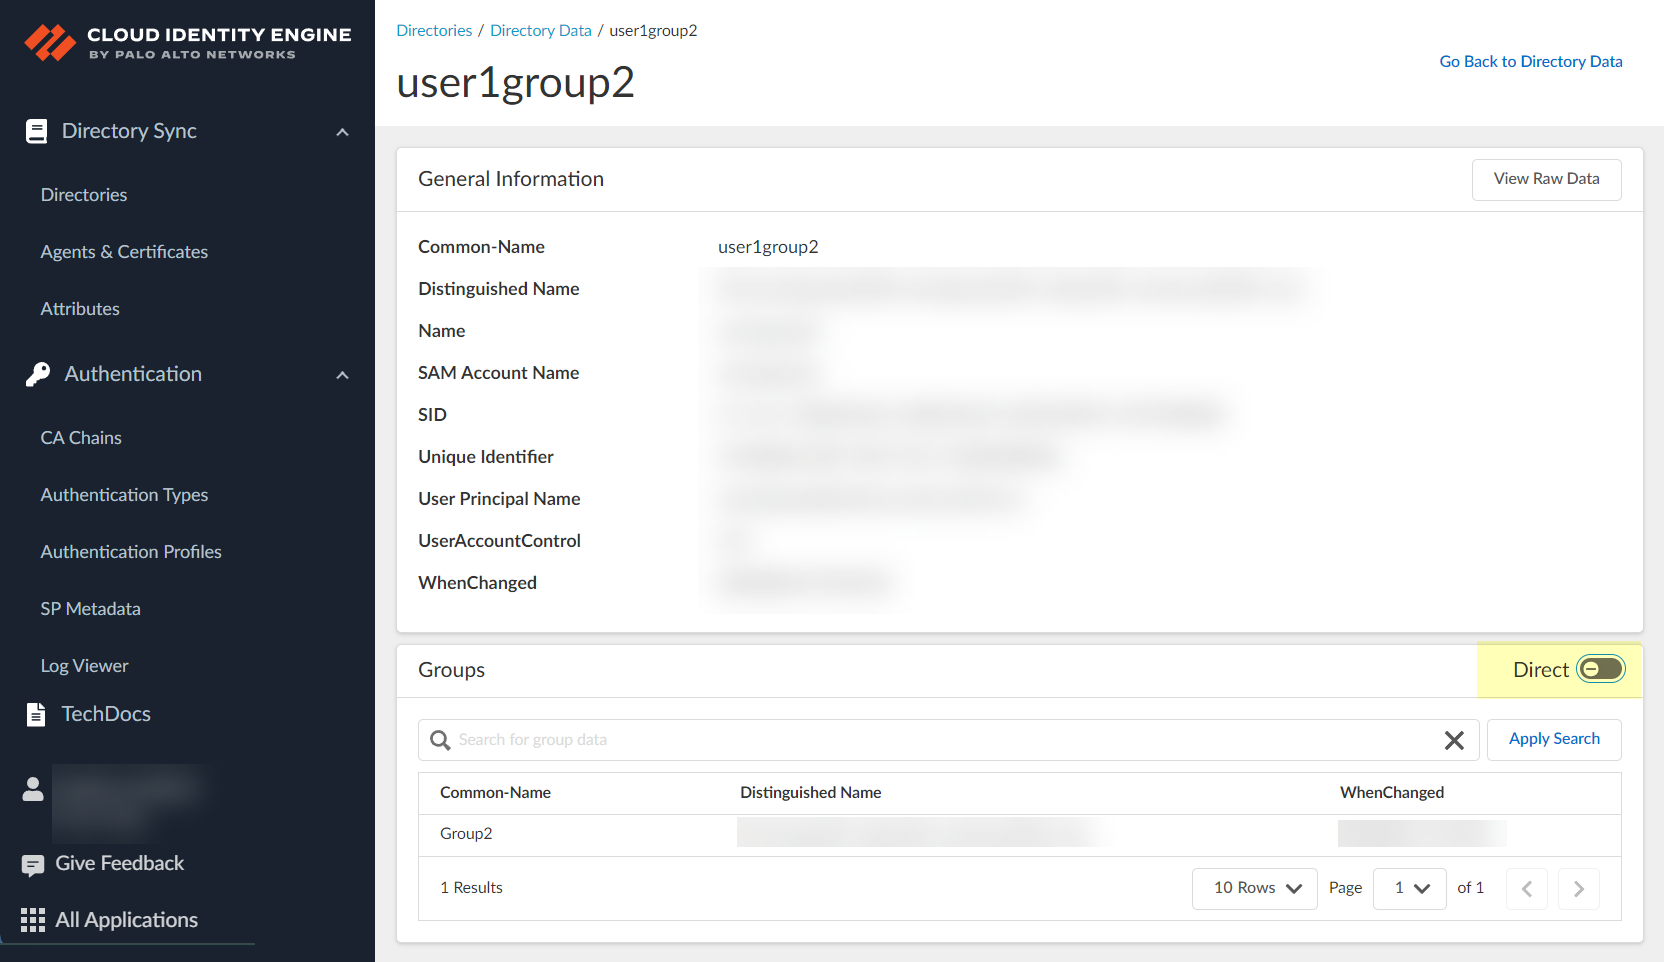
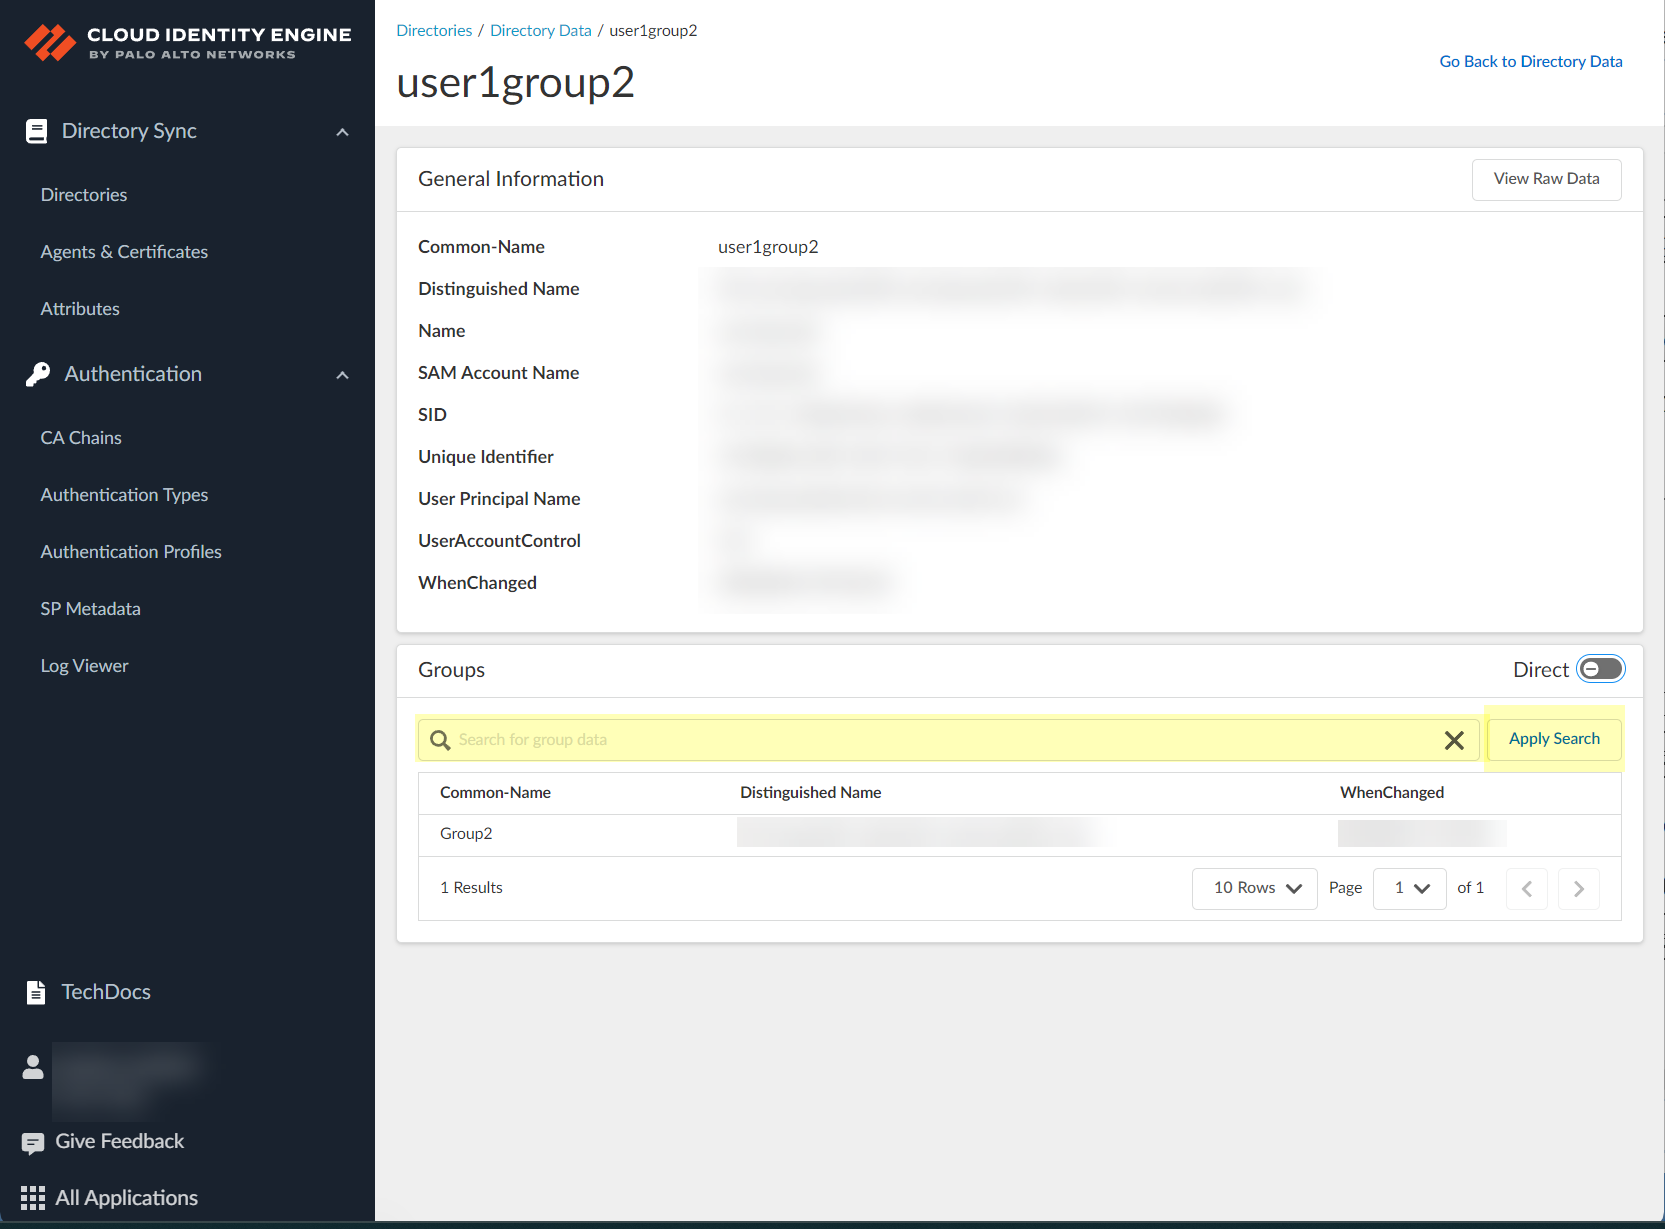
- To view selected details for an object, select Details (

) in the first column.
- When you select a group, the app displays the first 2000 flattened users in the group below the Member attribute. If the group doesn’t contain any members, this attribute does not display any information.
- When you select a user, the app displays the first 2000 groups to which the user belongs below the Groups attribute. If the user doesn’t belong to any groups, this attribute does not display any information.
The Cloud Identity Engine currently supports retrieval of inventory information for enterprise applications, such as Name, Redirect URIs, and IDs. Viewing the membership assignment relationships between the retrieved apps and their corresponding users and groups is currently a beta feature.
- To view the all data for this object, click View Raw Data in the upper right corner.
- To copy the details for the data, click Copy (
![]()
) to copy the details to the clipboard.
- To switch the view between Direct and Direct and Nested , select the toggle.
If the directory contains nested groups, they display after you select the toggle. To restore the original Direct view, select the toggle again.
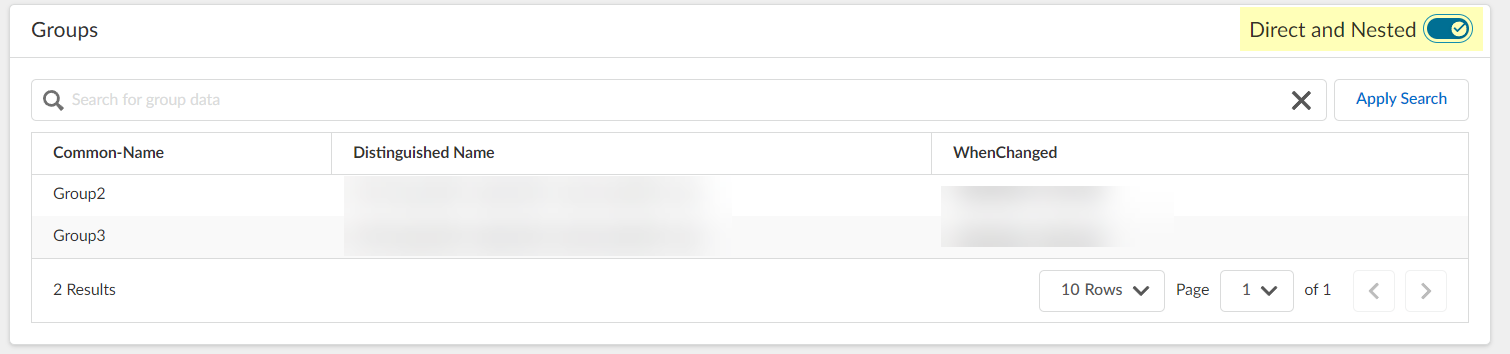
Nested group information is not available for attribute-based Cloud Dynamic User Groups.
- To query the data, enter a search term and click Apply Search to display the results.
- To return to the Directory page, select Go Back to Directory in the upper right.
Cloud Identity Engine User Context
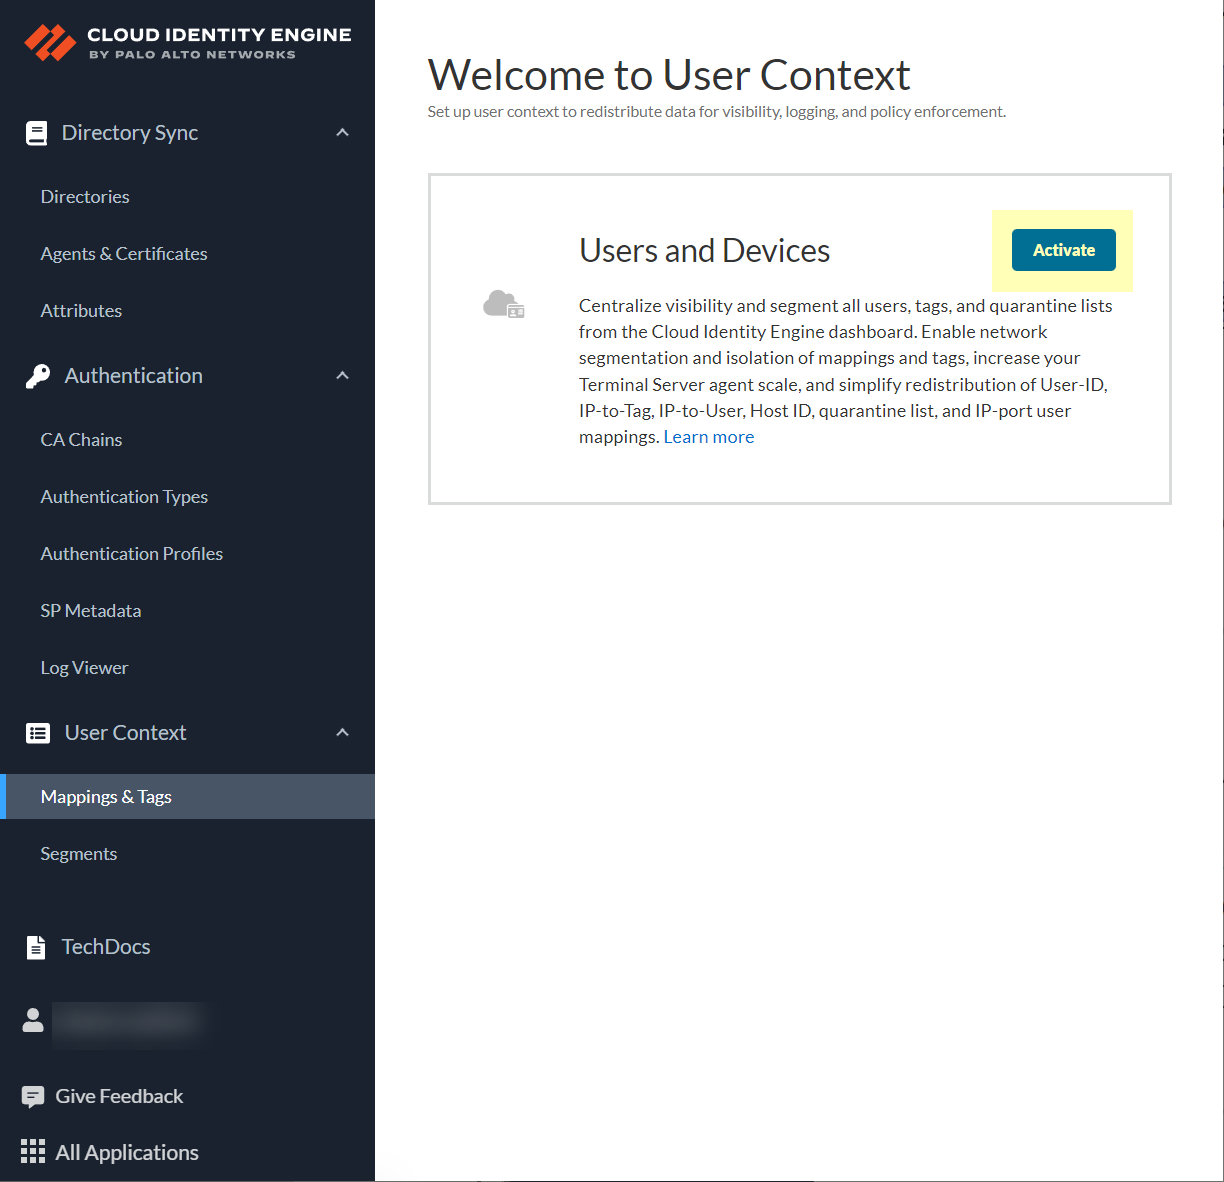
As large enterprise networks continue to become increasingly distributed across cities, regions, and countries, enforcing least-privilege user access becomes increasingly challenging, especially as scale increases. User Context for the Cloud Identity Engine provides simplified granular control over the data that is shared across your security devices. It provides administrators with the flexibility to specify the data types (such as mappings and quarantine lists) each device sends and receives.
User Context for the Cloud Identity Engine requires PAN-OS 11.0.
The simplified deployment of User Context for information such as user mappings and tags minimizes time to enforcement. Centralizing visibility for users, tags, and mappings makes it easier to segment the data types based on user access needs. This method also increases scalability for Virtual Desktop users (VDI) using the Terminal Server agent.
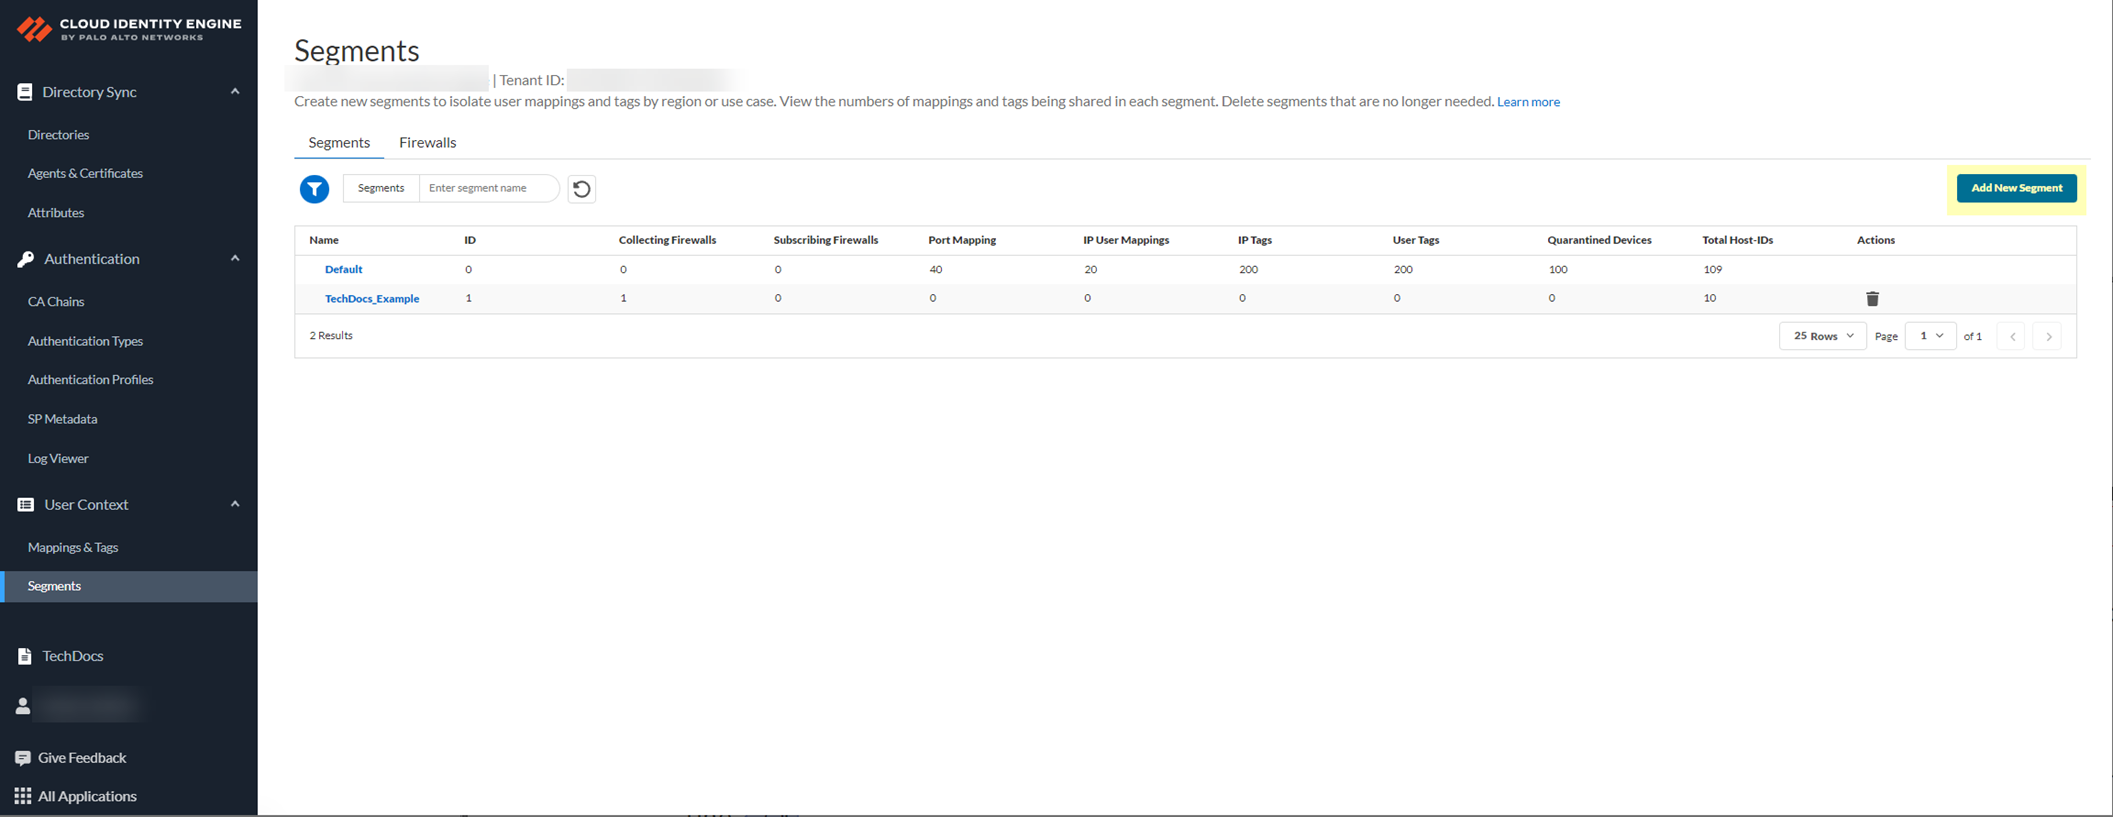
To enforce policy, User Context provides IP address-to-username mappings , IP port to username mappings, user tags IP address tags, Host IDs, and quarantine list information to other firewalls and devices in your network through segments, which consist of firewalls that you specify. A segment can collect information as well as share information. A publishing segment sends the data from the firewalls and devices in that segment to the firewalls in the subscribed segment , which contains the firewalls that receive the data from the publishing segments.
Firewalls and Panorama can share multiple data types to one segment. On a firewall or Panorama, each data type can only be shared in one segment. Each Firewall or Panorama can receive data from up to 100 segments.
By selecting the data that is collected by a segment and where that data is shared, you have full control in ensuring that the information required to enforce least-privilege access is available on each enforcement device.
If you associate a firewall that you configure as a User-ID hub with a segment, the Cloud Identity Engine provides the data types based on the firewall that is subscribed or publishing the segment, not based on the virtual system. To ensure that both locally learned data and data that the User Context Cloud Service provides are available to all virtual systems, configure the User-ID hub firewall as a subscriber in the segment.
- Onboard your Cloud Identity Engine instance.
- Obtain the serial number for the firewall you want to onboard, and Register the firewall with the Palo Alto Networks Customer Support Portal (CSP).
- Click the magic link provided by Palo Alto Networks to begin onboarding your Cloud Identity Engine tenant.
The magic link is provided by Palo Alto Networks by email.
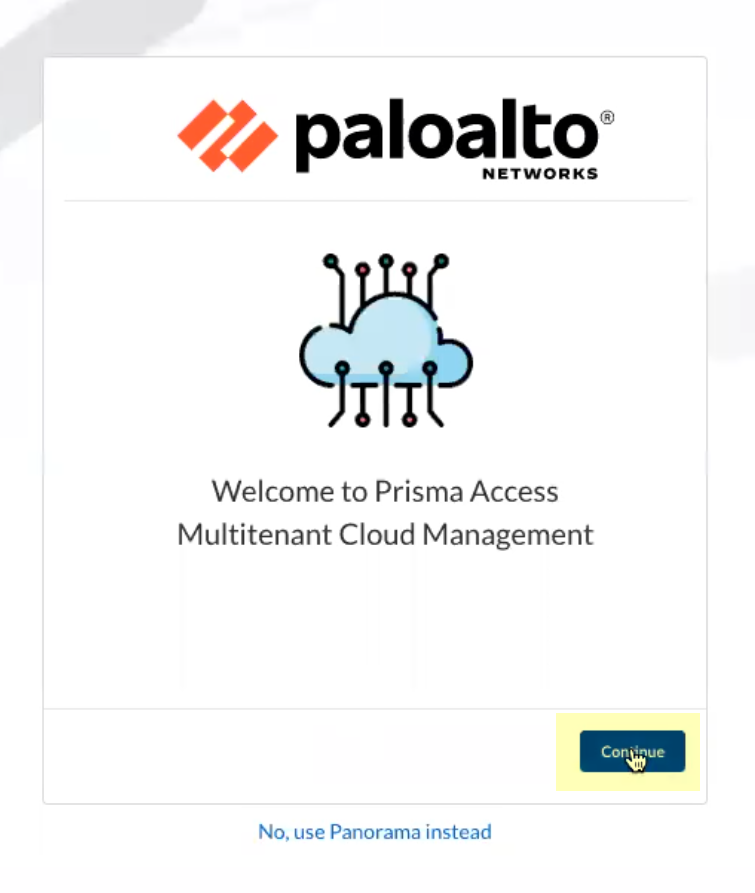
- Click MSP Cloud Management .
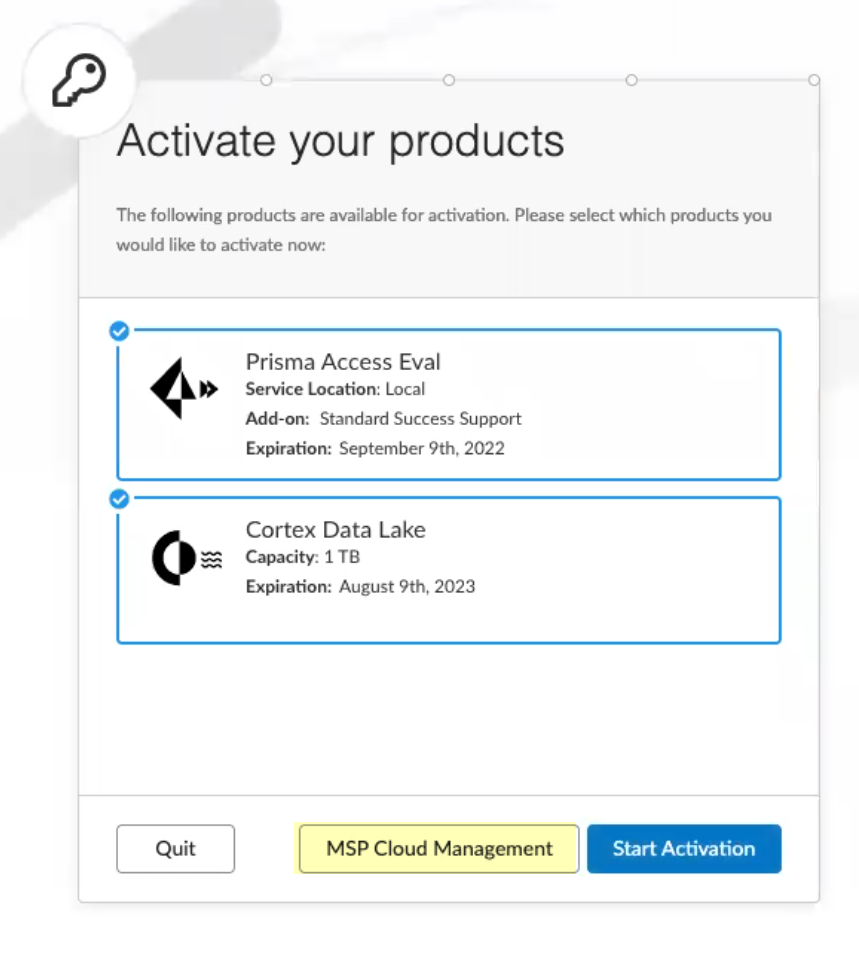
- Continue the onboarding process.
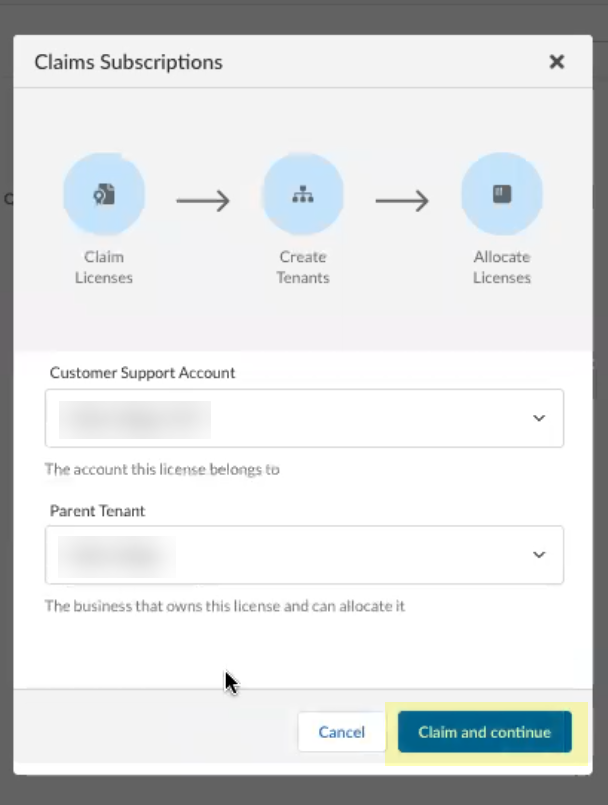
- Claim the license for the tenant you want to onboard.
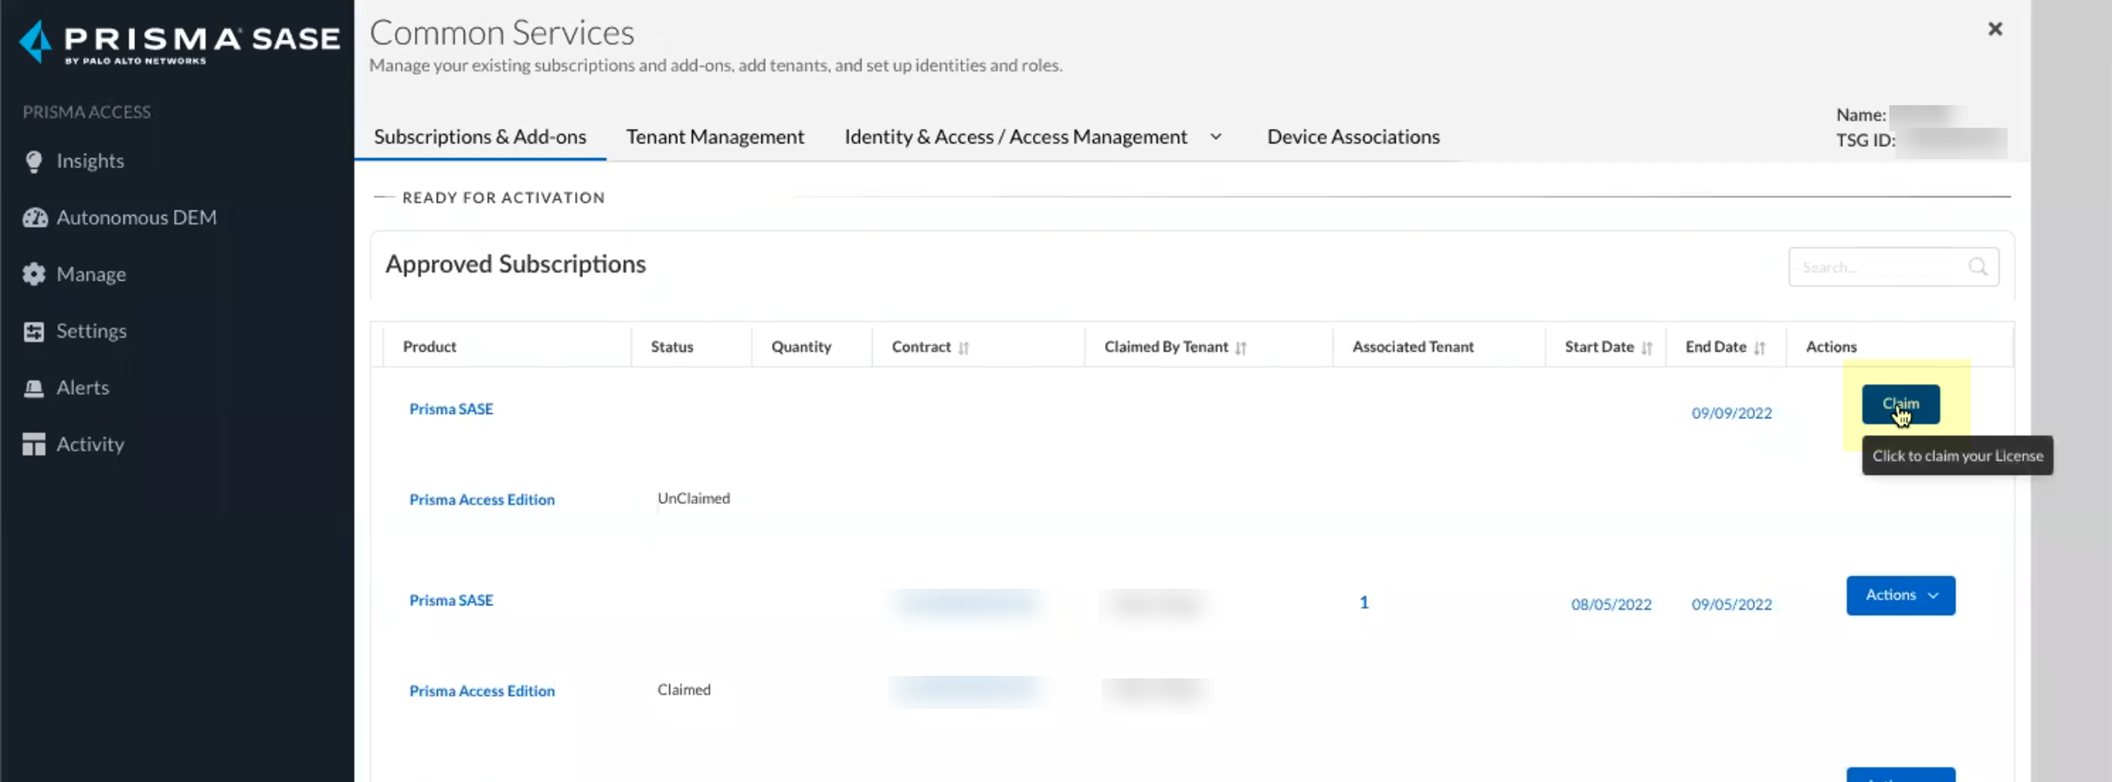
- Select the Customer Support Account you want to use.
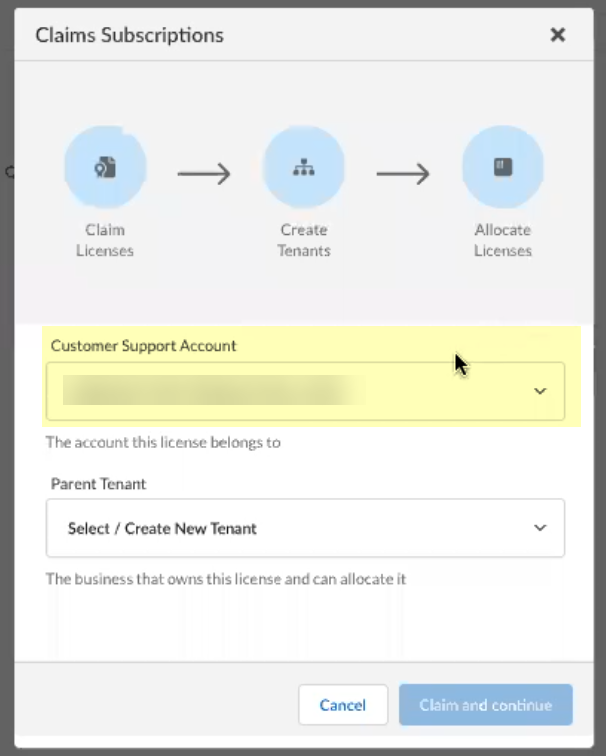
- Select the Parent Tenant you want to use or click Create New to create a new tenant.
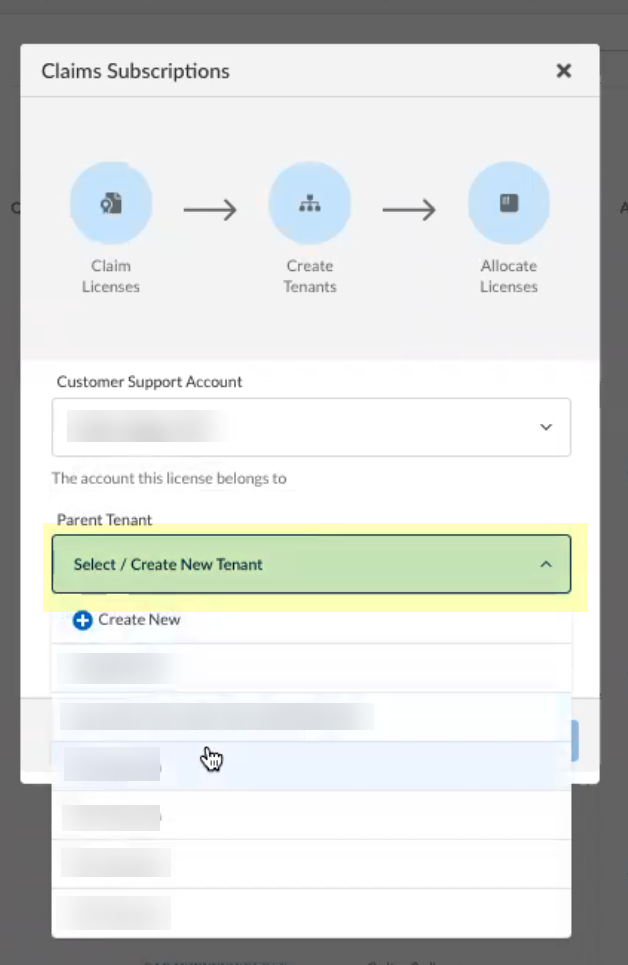
- Click Claim and continue to continue the onboarding process.
- Click Add Licensed Product to continue the onboarding process.

- Select the contract you want to use.

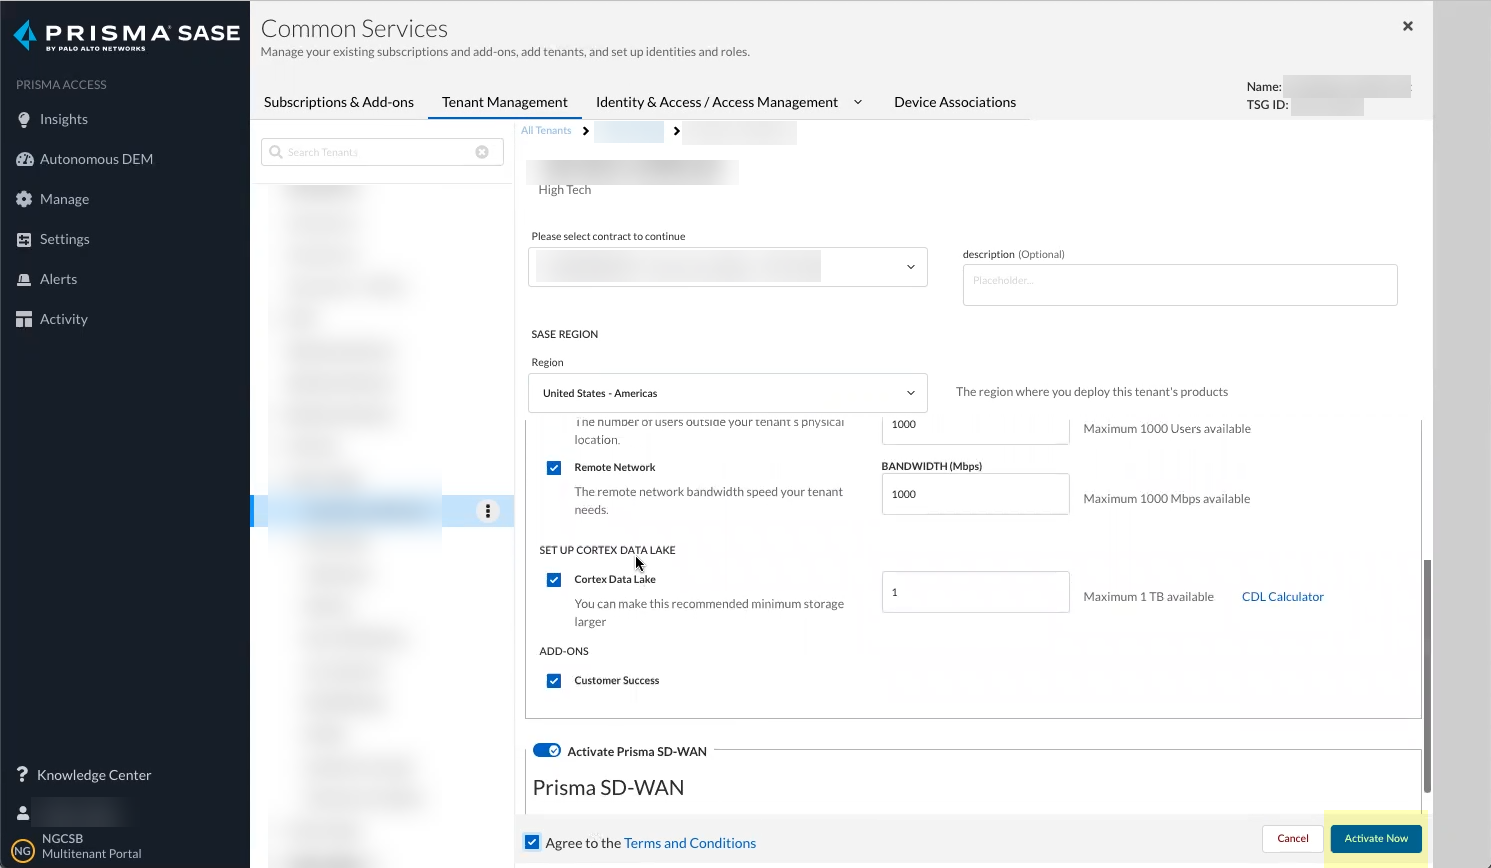
- Select the Region for your Cloud Identity Engine instance.
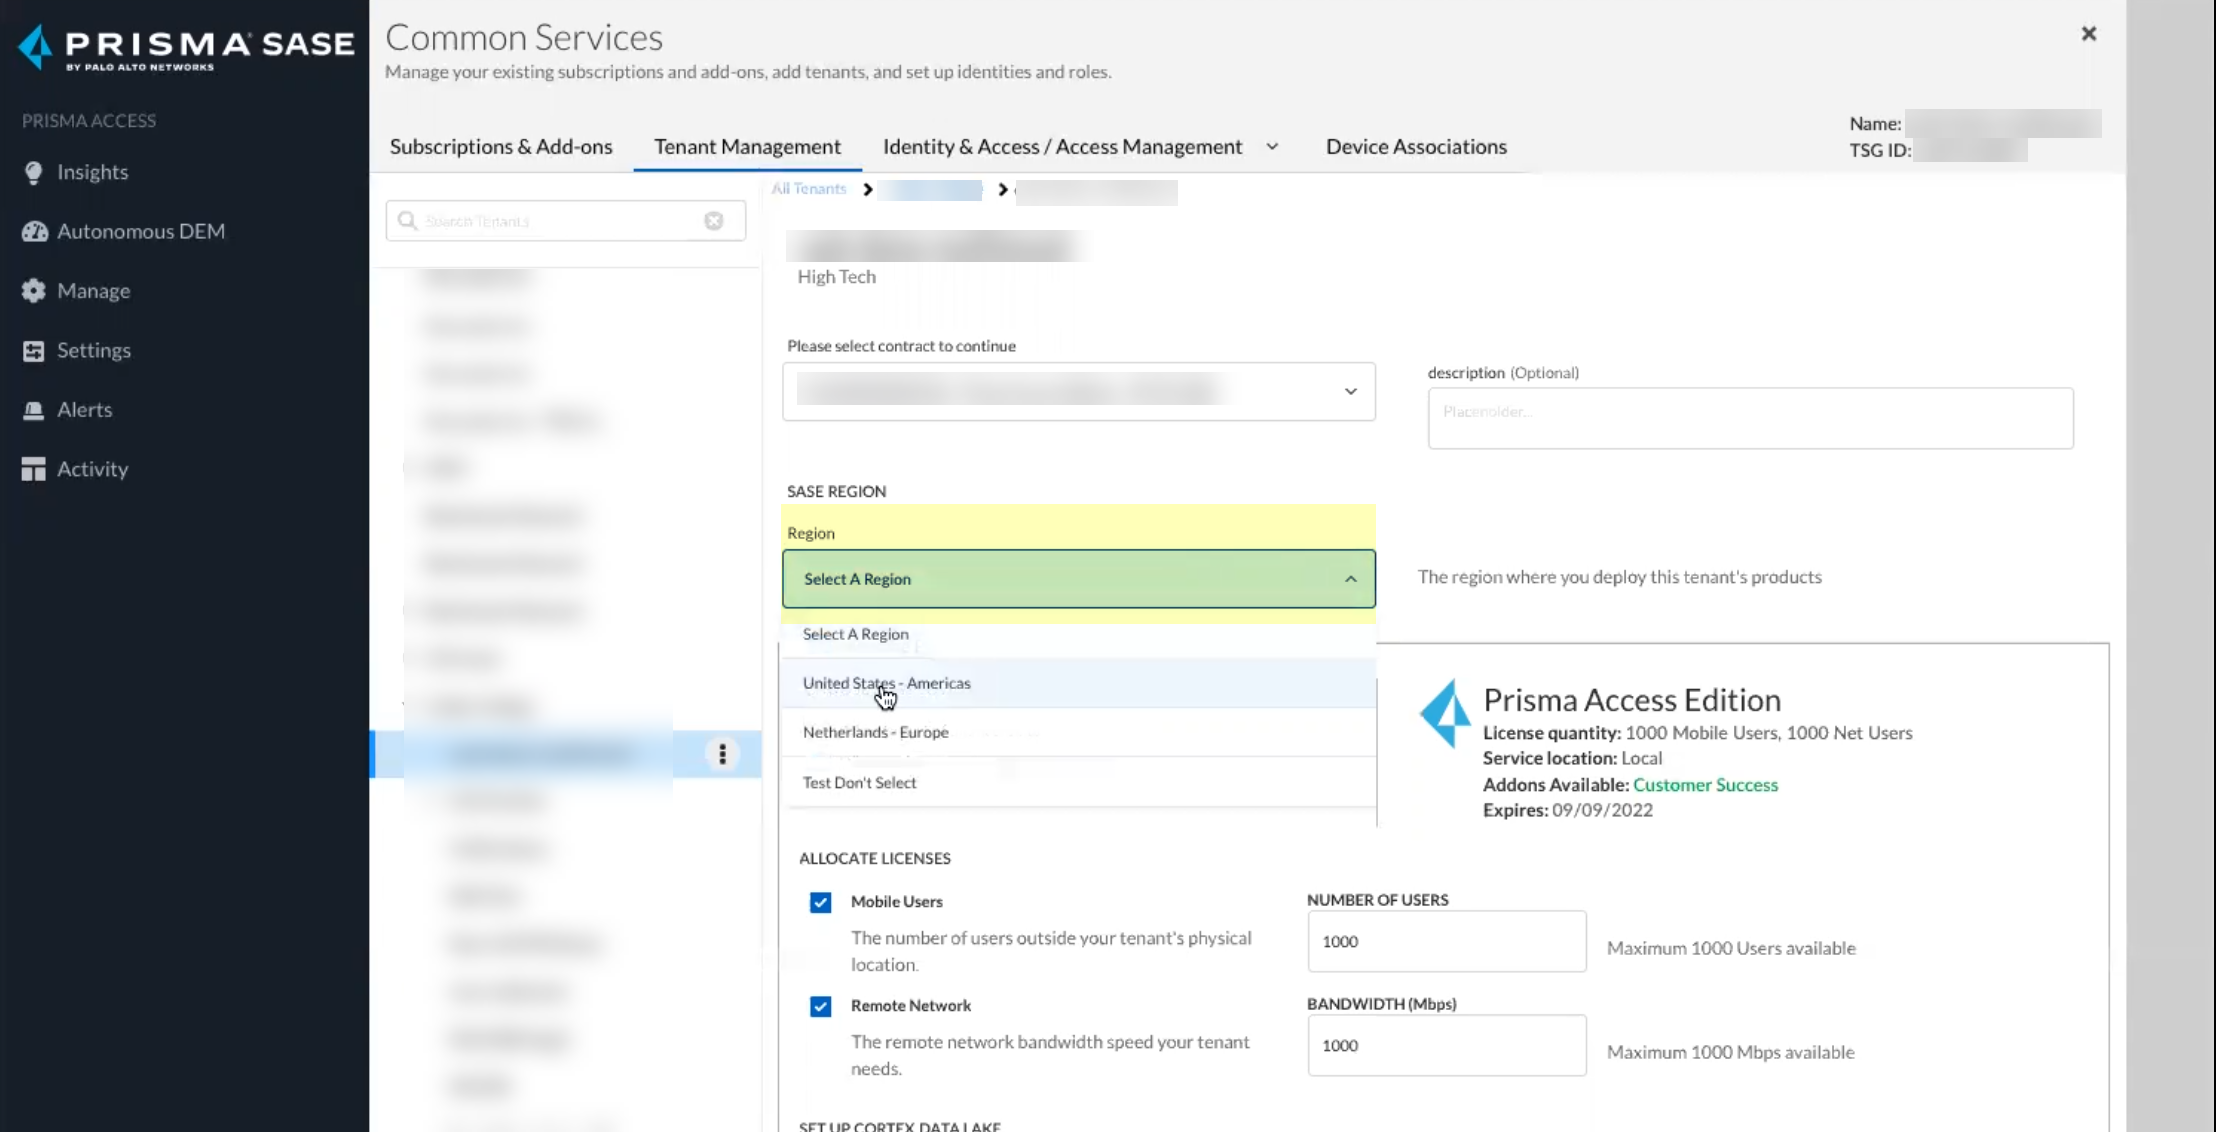
- Click Activate Now to complete the onboarding process.
- Confirm that the Status for the Cloud Identity Engine is Complete .
You can access your Cloud Identity Engine instance by selecting Cloud Identity Engine .
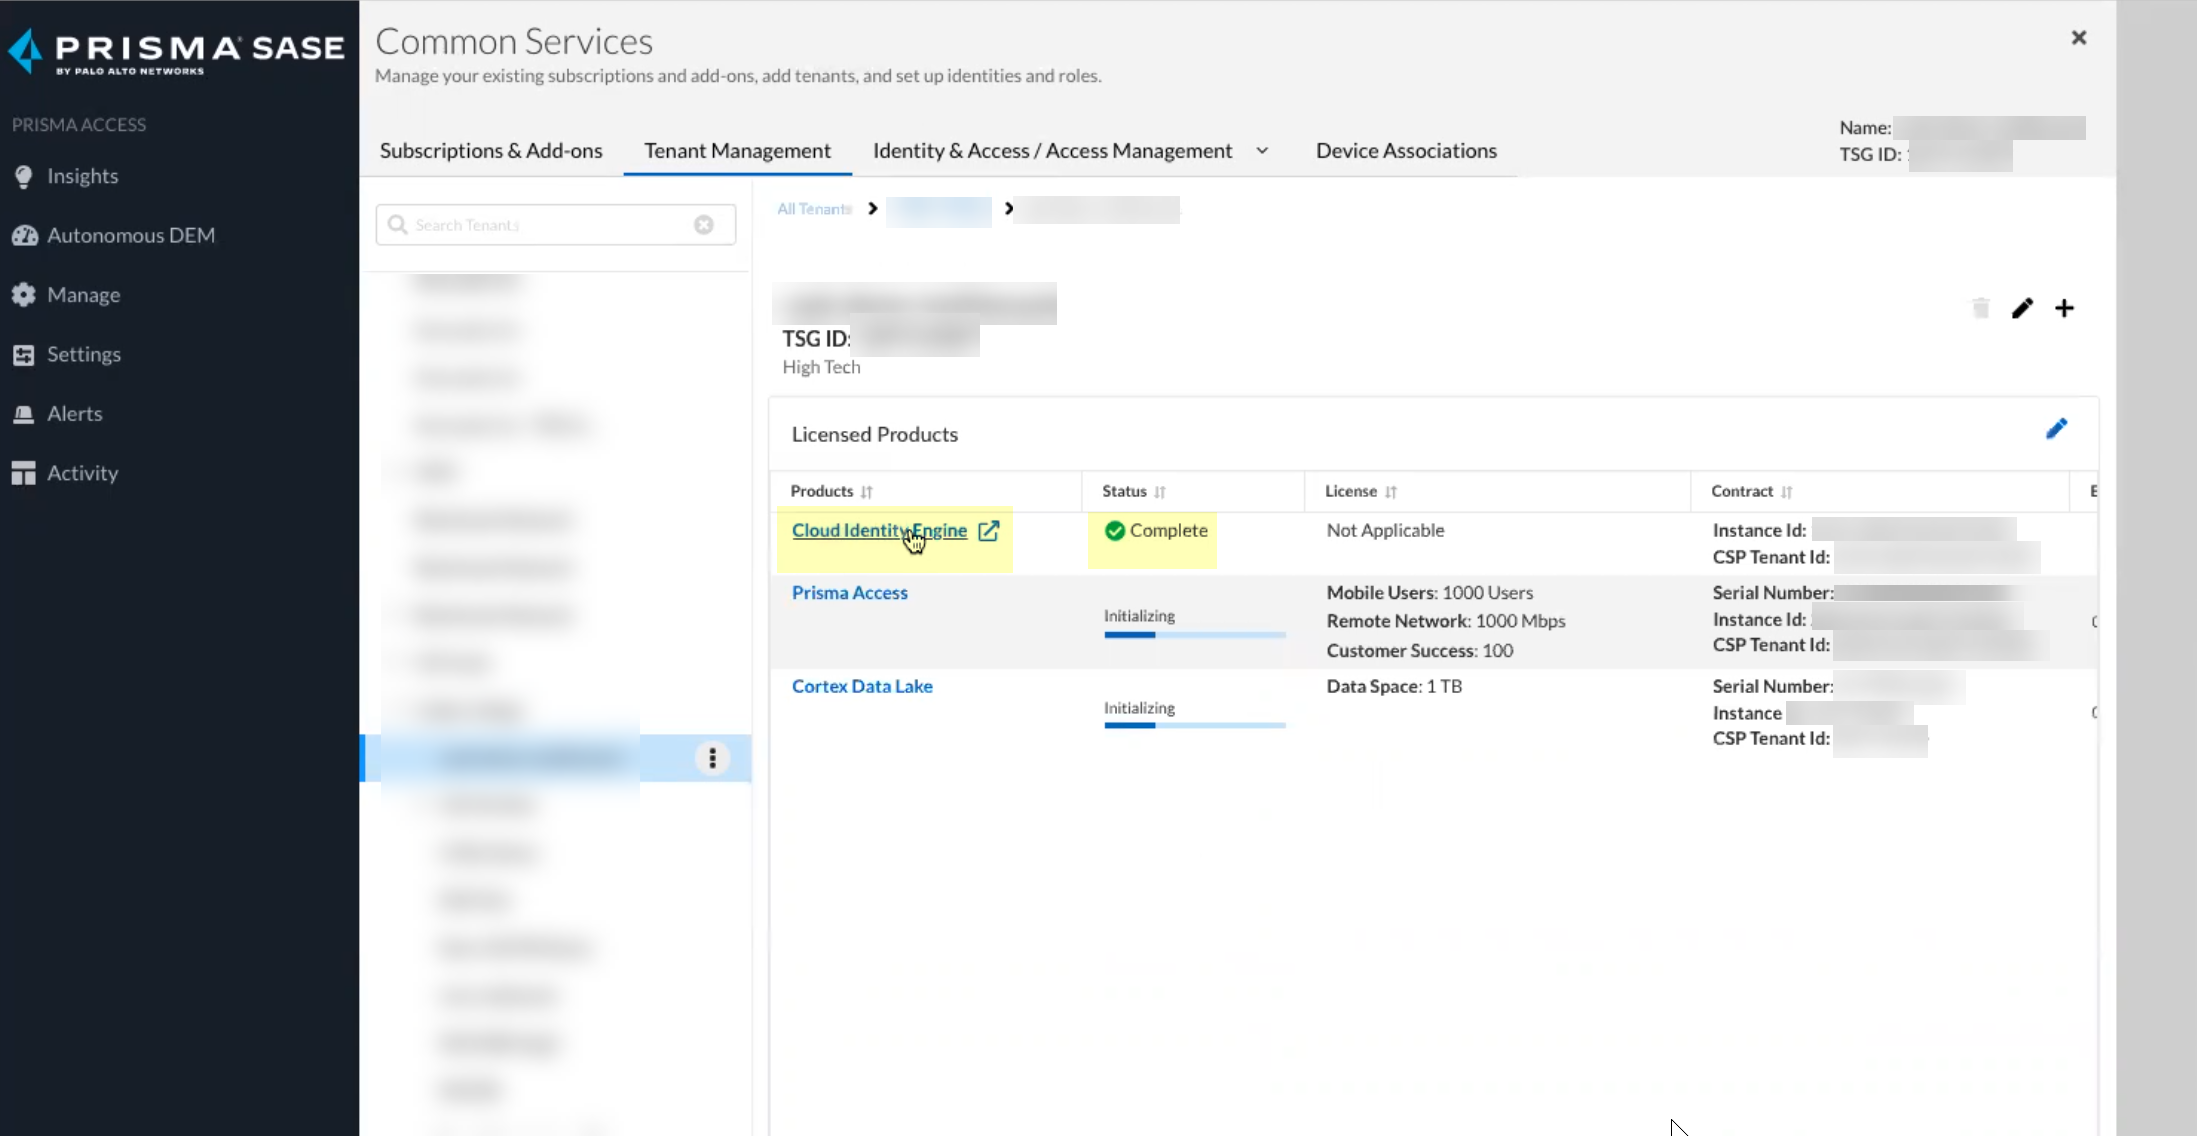
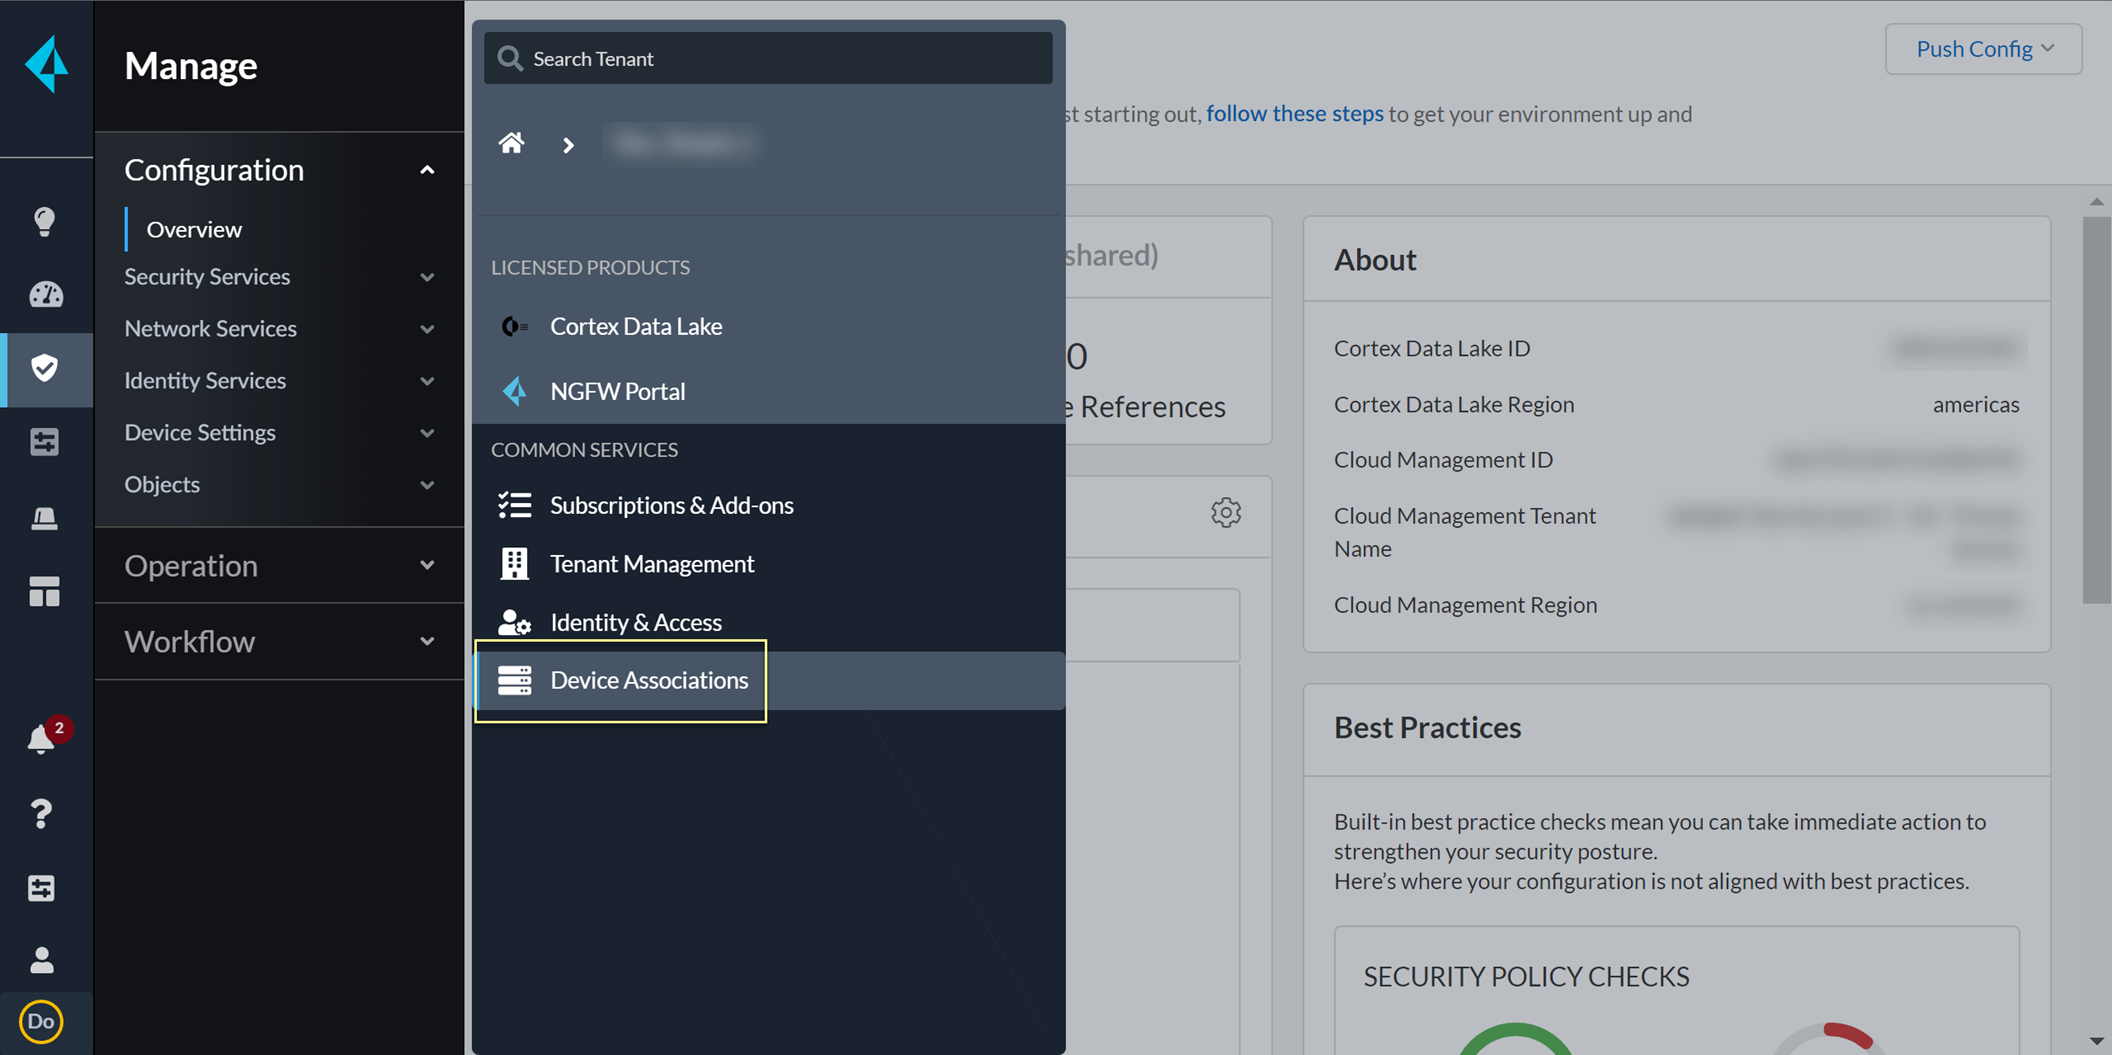
- In the bottom left of the window, select the icon for your tenant and select Device Associations .
If you use Panorama to manage Prisma Access in the same tenant service group (TSG) as the Cloud Identity Engine, associate Panorama with the Cloud Identity Engine to ensure that Panorama and Prisma Access can access the Cloud Identity Engine. This a requirement if you select TSG as the Scope Type when you Configure the Cloud Identity Engine Visibility Scope .
- Select Add Device .
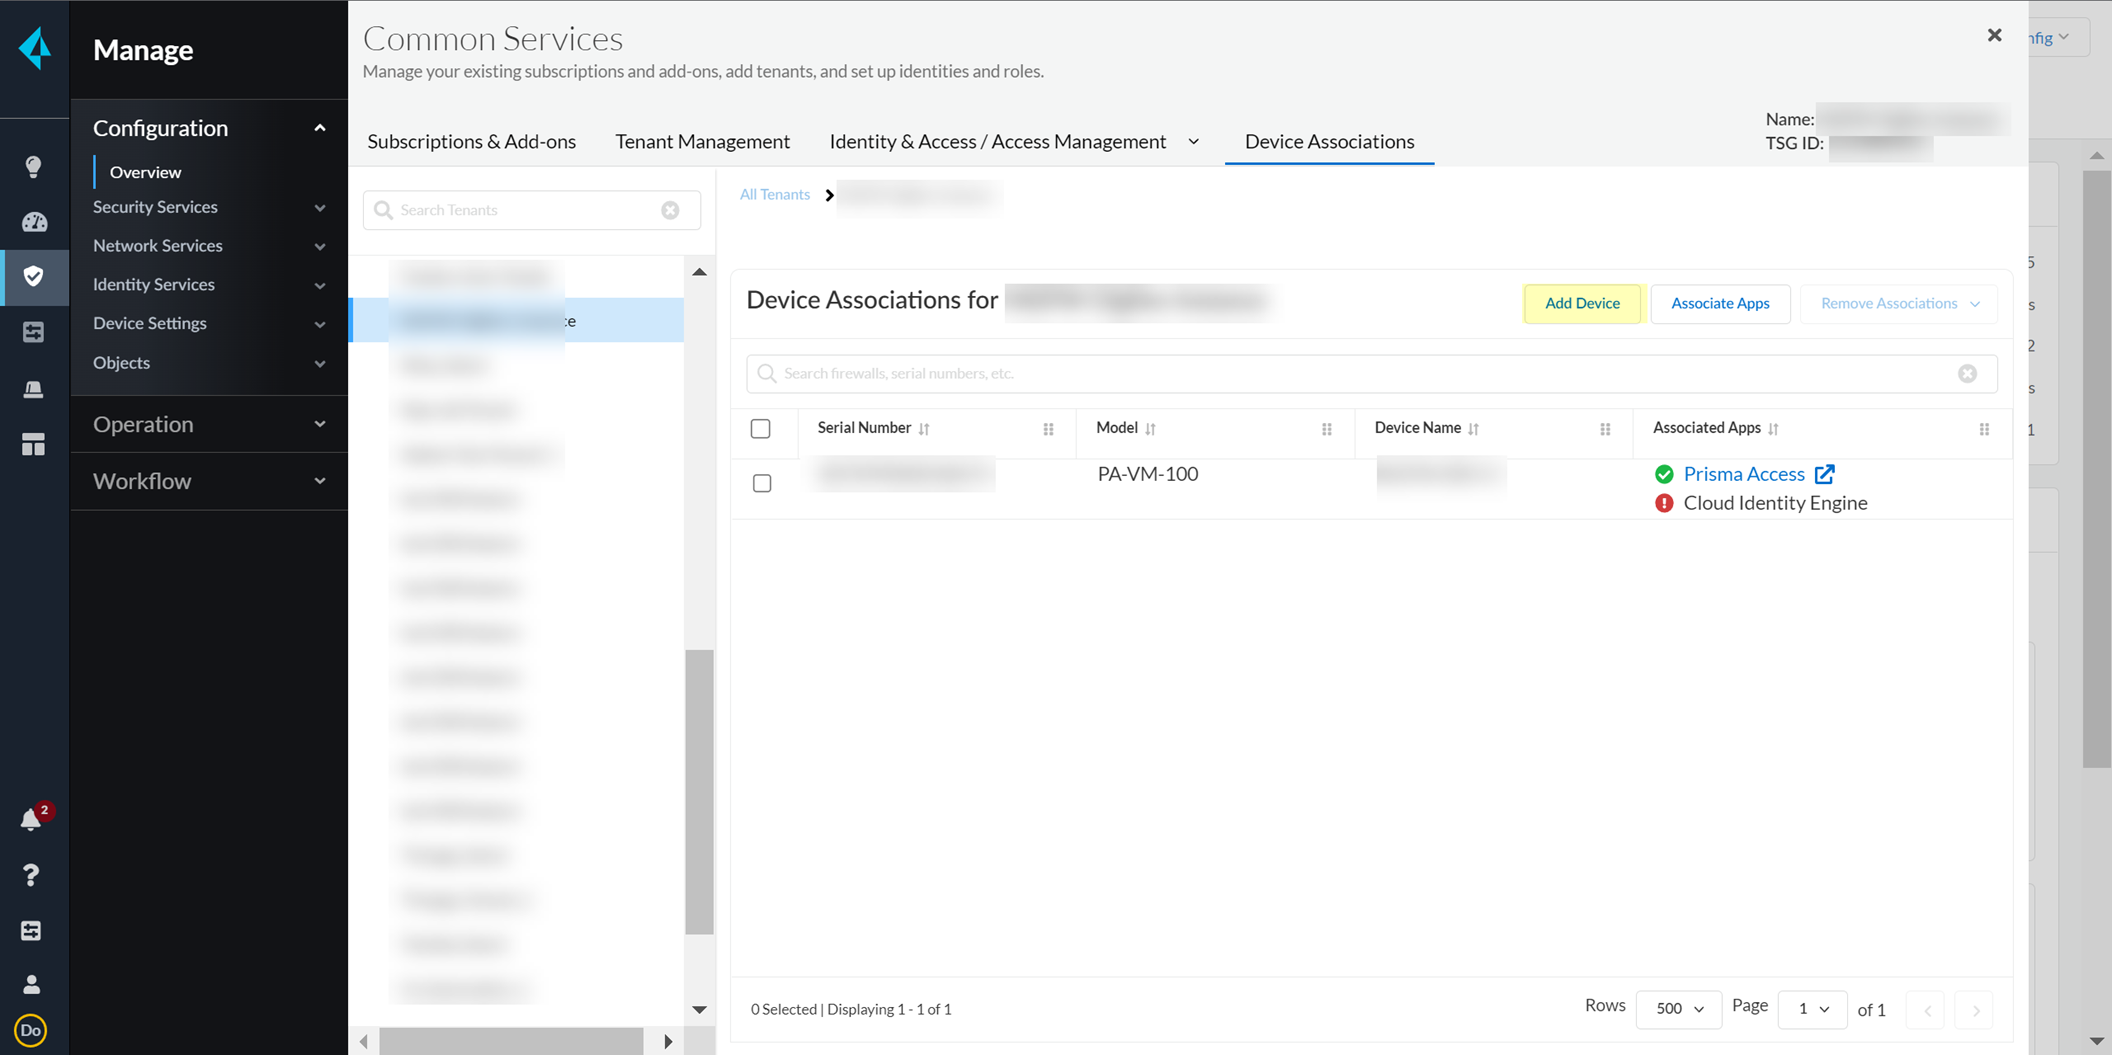
- Select your Customer Support Account and enter your firewall serial number.
- Select the firewall Save your changes.
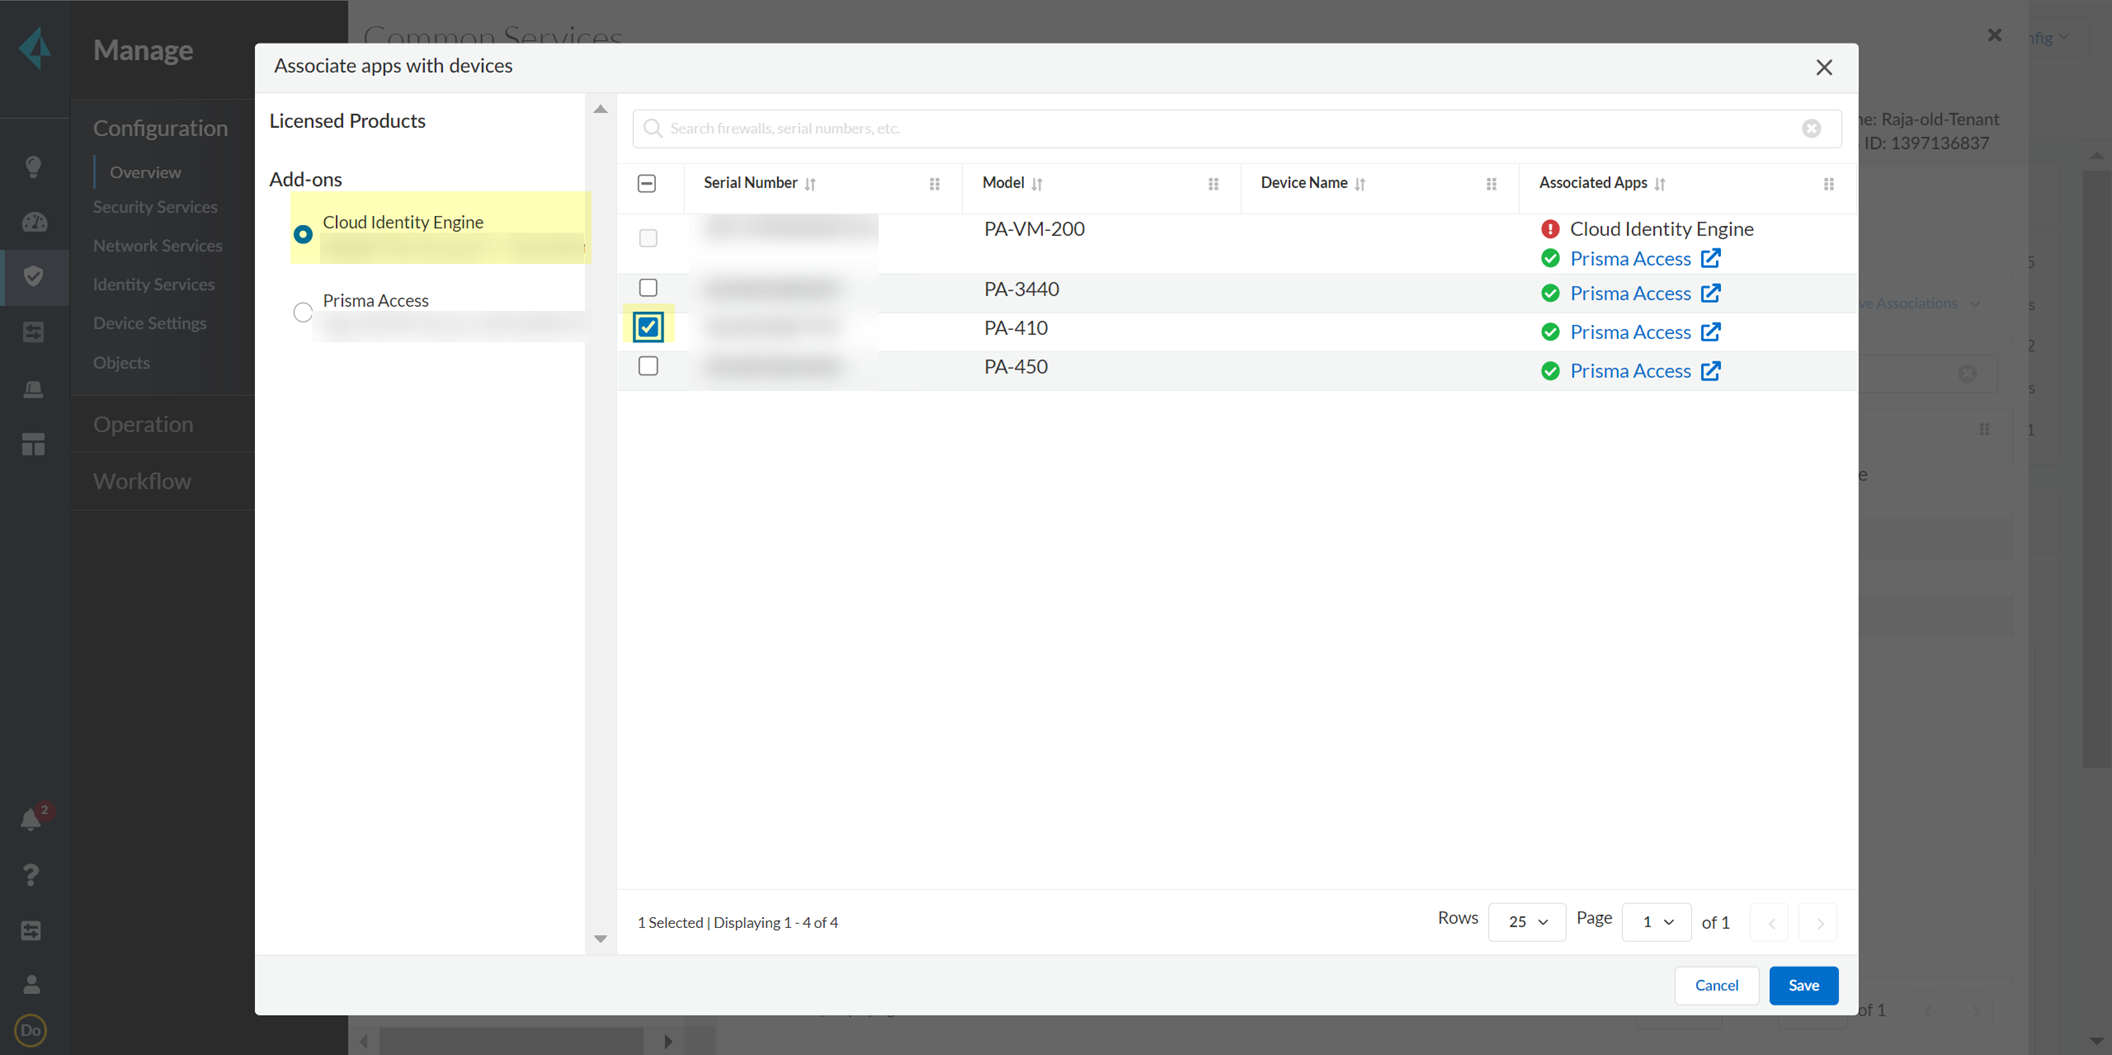
- Select Associate Apps .
- Select the firewall, select the Cloud Identity Engine , and Save your selections.
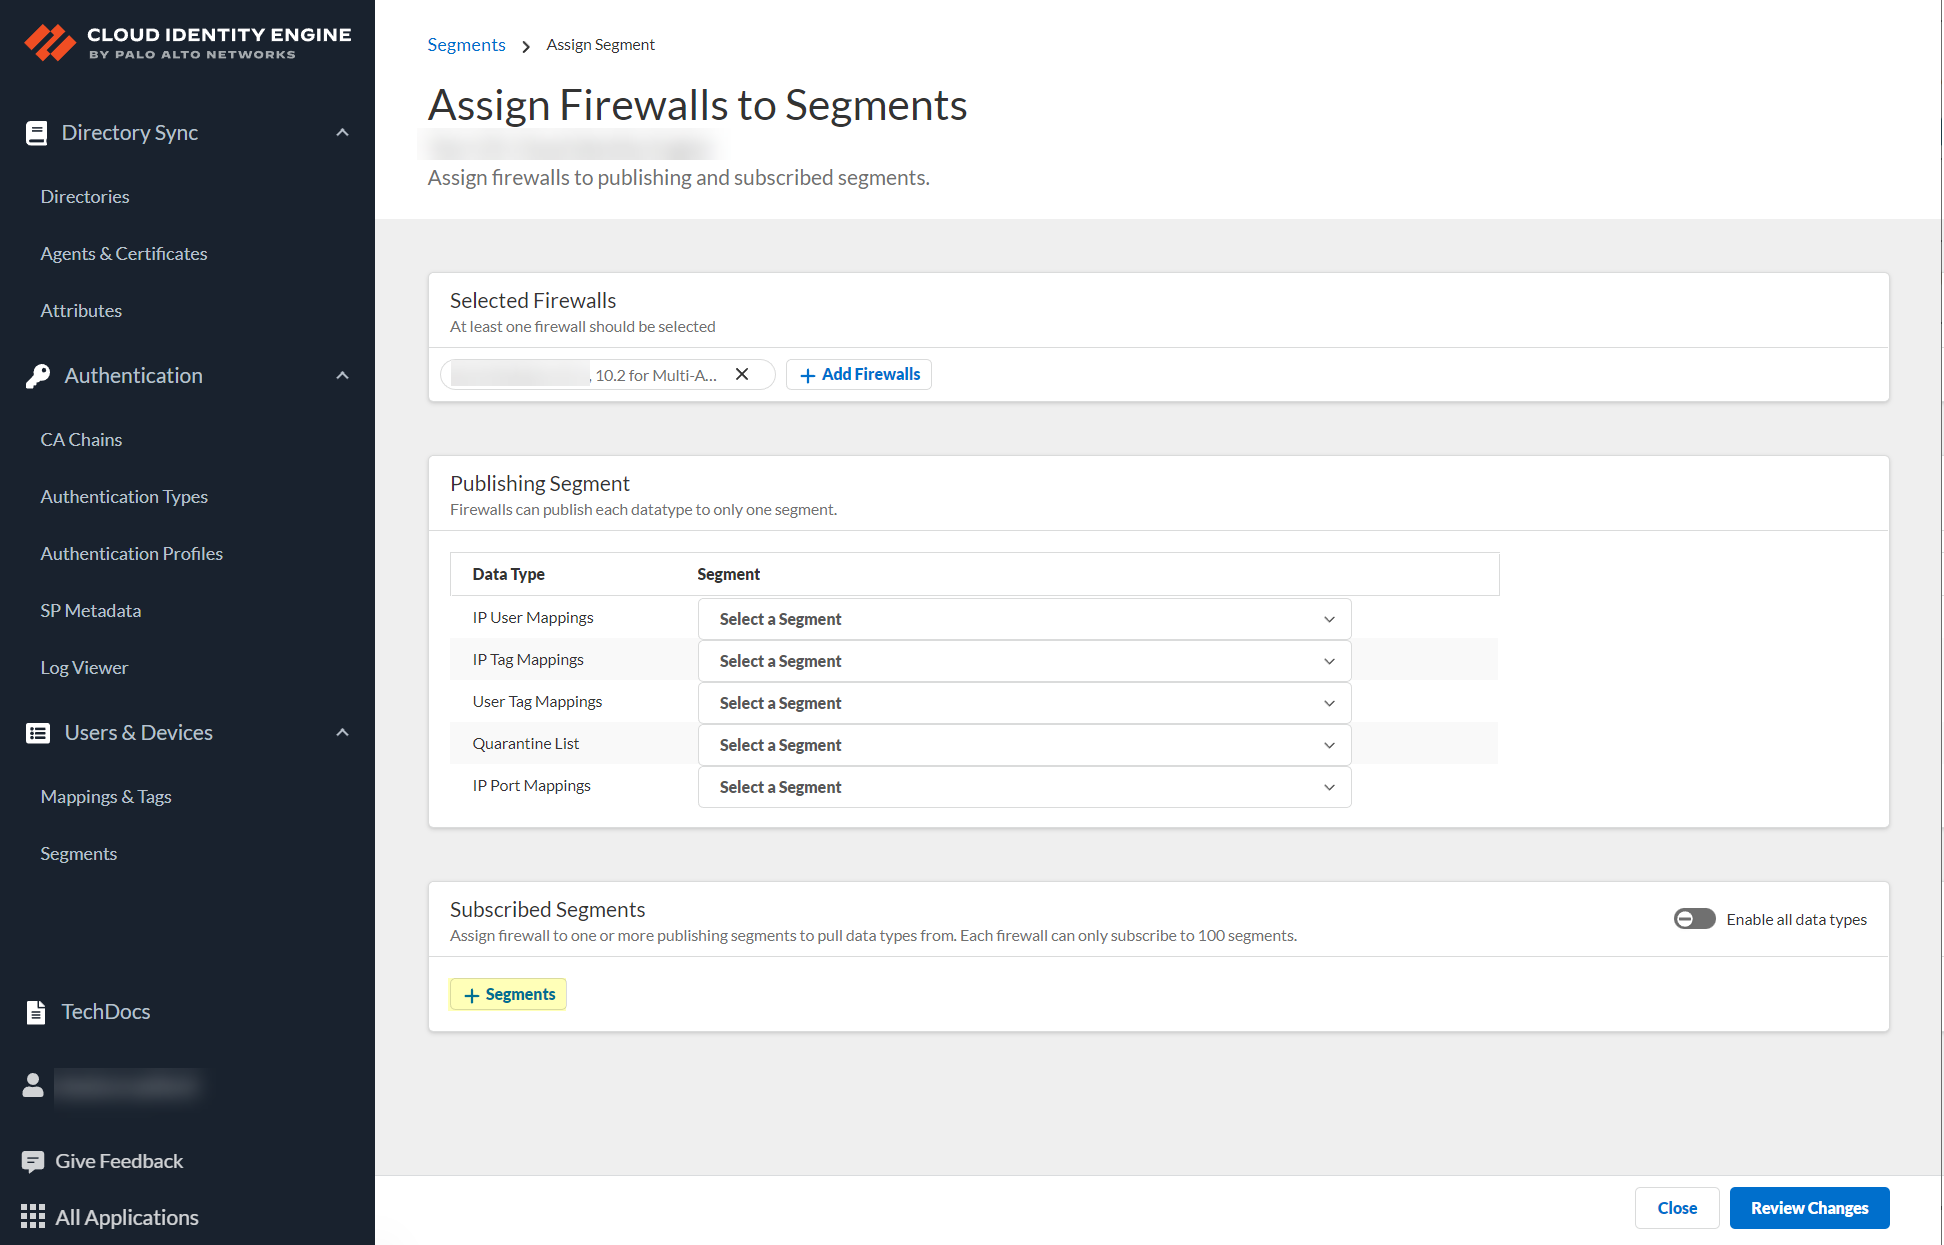
- In the Cloud Identity Engine, activate sharing for mappings.
- Log in to the Cloud Identity Engine app and select User ContextSegments
- Activate sharing for mappings.
- Configure the default segment as a publishing segment.
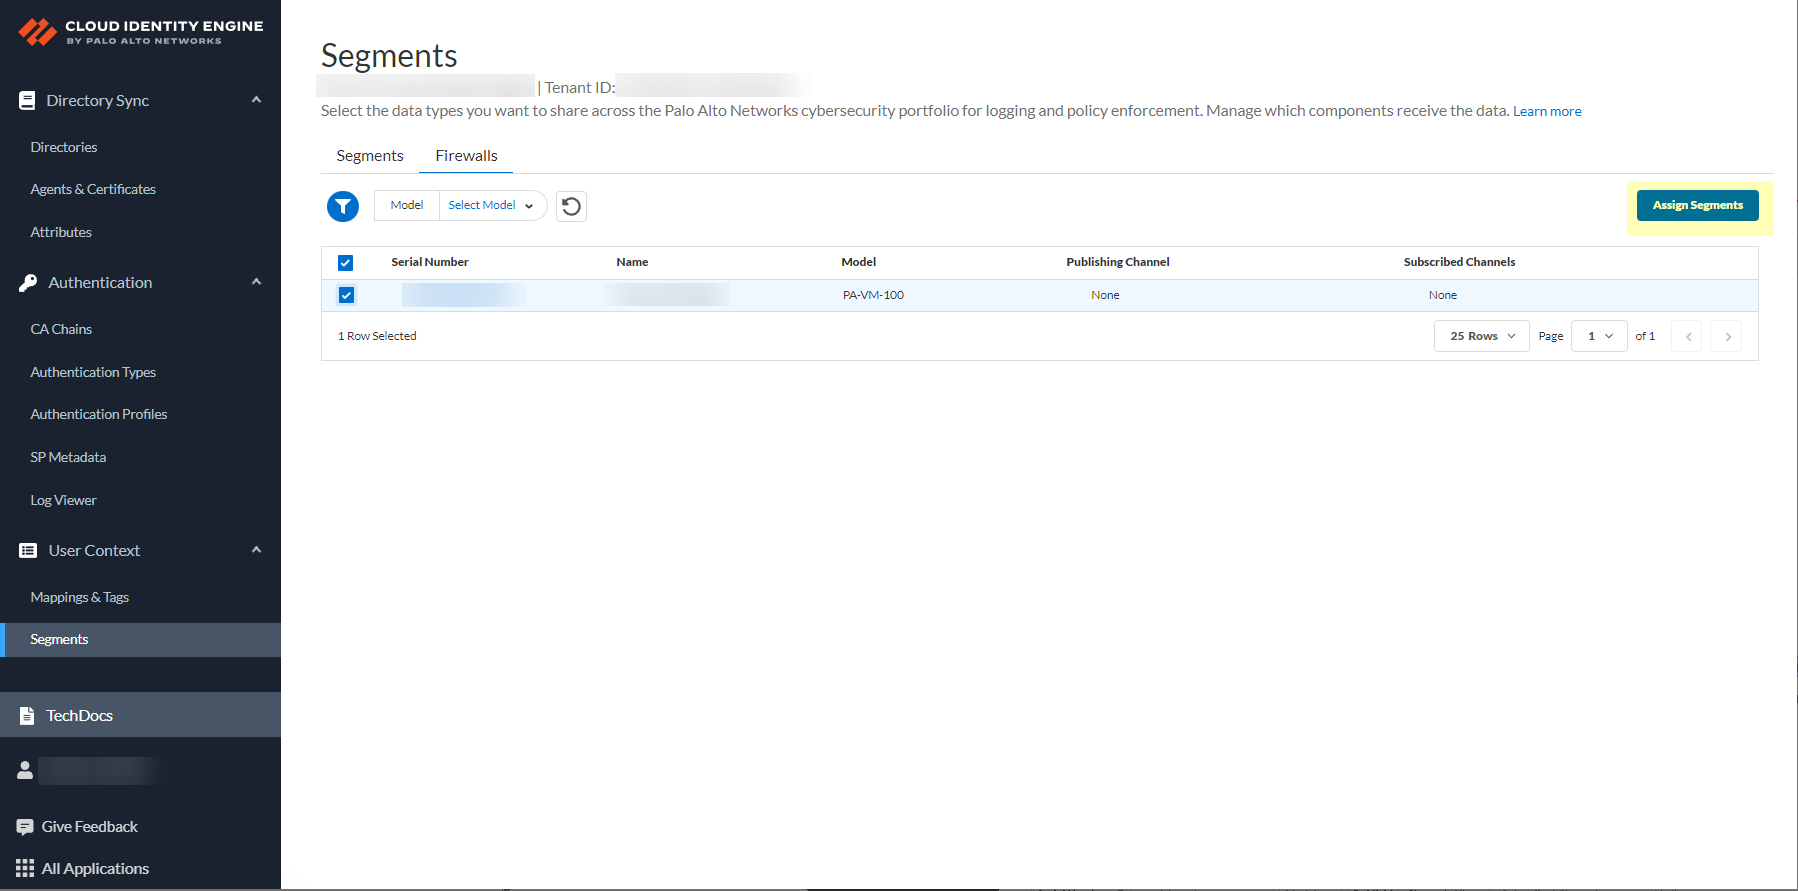
- Select the Firewalls tab and select one or more firewalls.
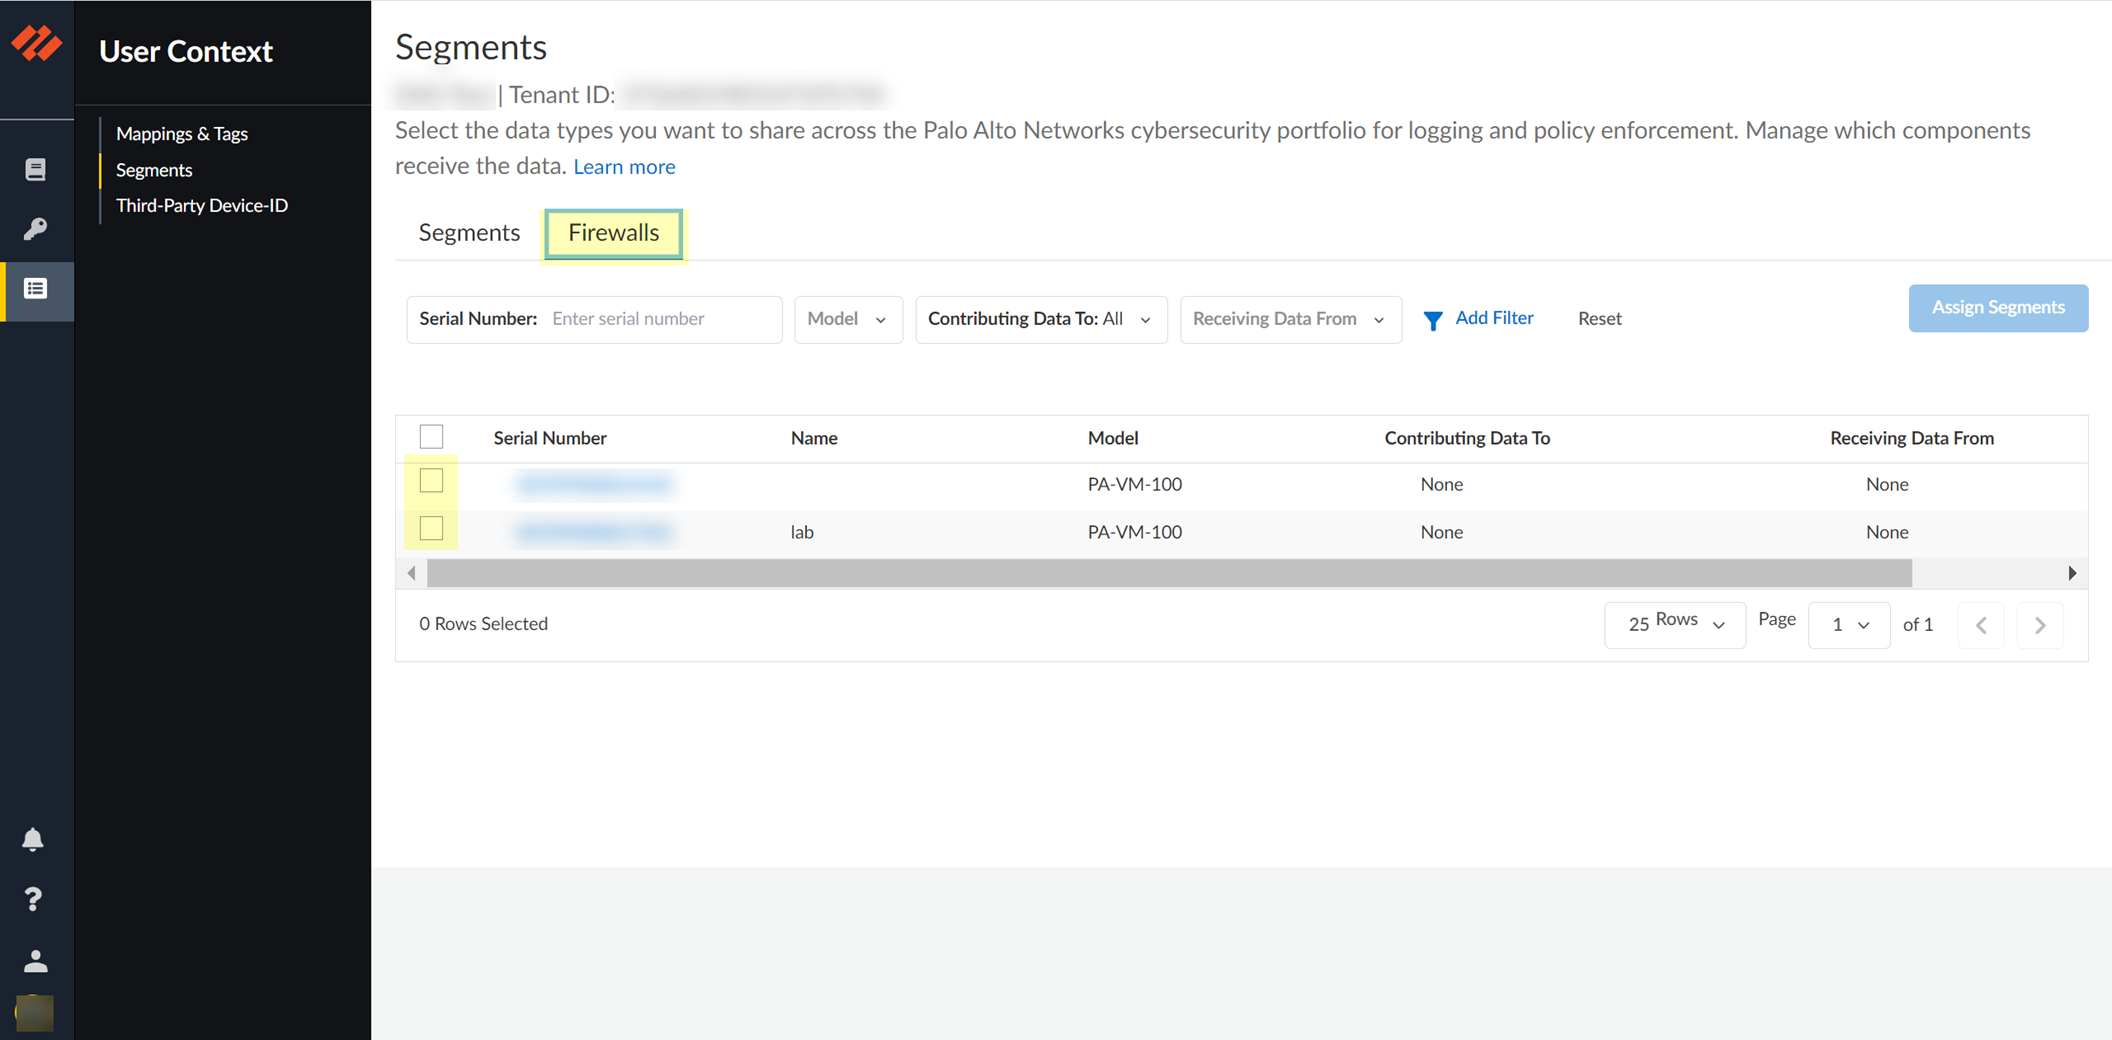
- After selecting the firewalls that you want to include in this segment, Assign Segments to the selected firewalls.
Assigning a segment to a firewall allows you to define which data the Cloud Identity Engine receives from or provides to that firewall. You can only assign segments to a firewall that uses PAN-OS 11.0; User Context does not support other source types.
- (Optional) If you want to include additional firewalls in the segment, Add Firewalls to the segment to specify the firewalls you want to include.
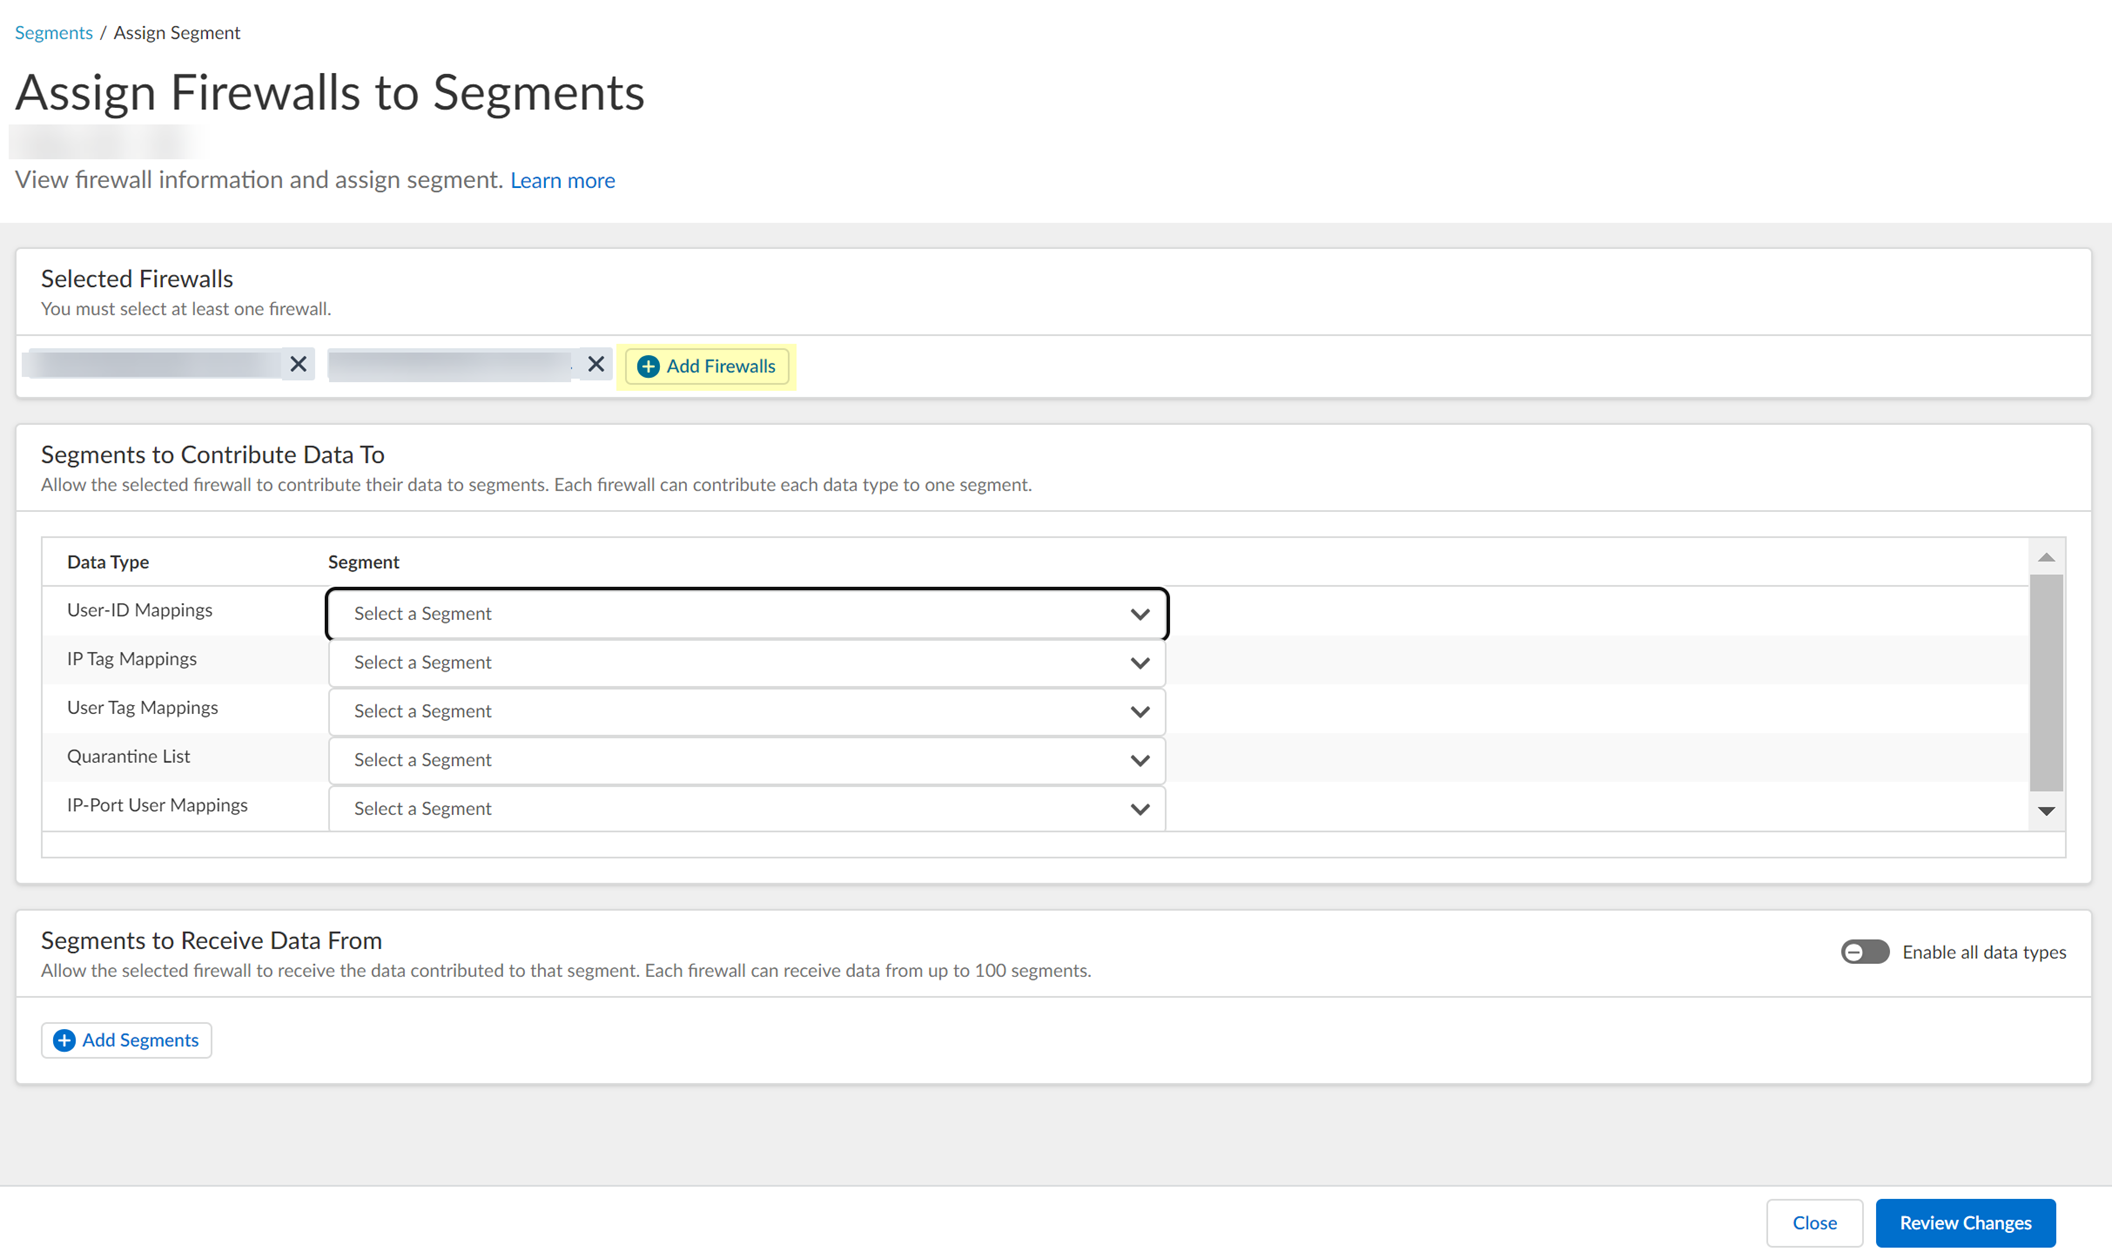
- For each Data Type that you want to share, select the Segment where you want to publish the data type.
Firewalls publish each data type to one segment. To share data between firewalls, you will need to configure a segment for each data type you want share.
You can select the following data types:
- IP User Mappings —(GlobalProtect, Authentication Portal, XFF Headers, Username Header Insertion, XML APIs, Syslog, Server Monitoring, Panorama TrustSec plugin) Maps the IP address to a username.
- IP Tag Mappings —( Dynamic Address Group only) Maps the IP address to a tag.
- User Tag Mappings —( Dynamic User Group only) Maps the tag to a user.
- Quarantine List —(GlobalProtect only) Lists the firewalls that GlobalProtect has in quarantine.
- IP Port Mappings —(Terminal Server agent only) Maps the IP address to the port range allocated to a Windows-based terminal server user.
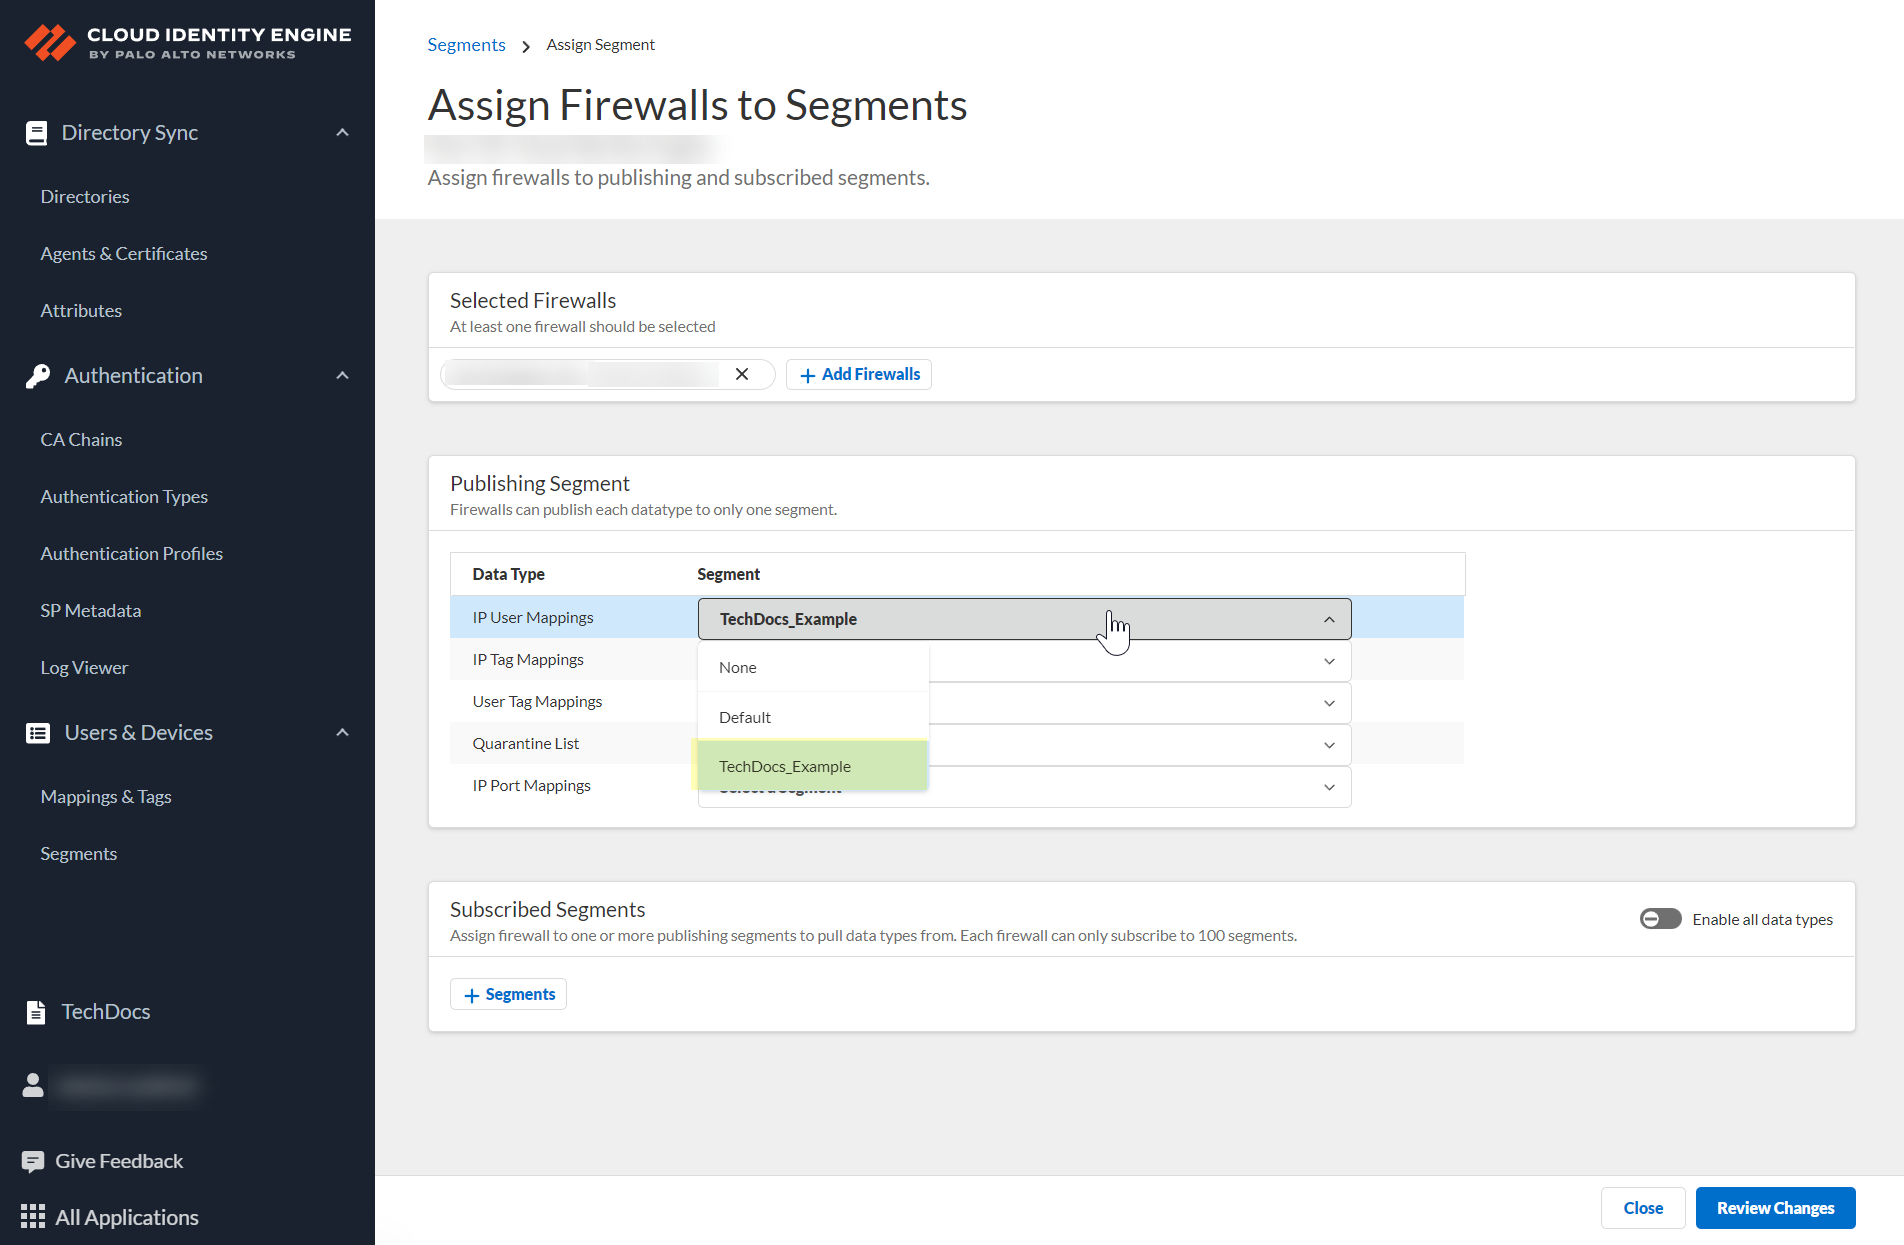
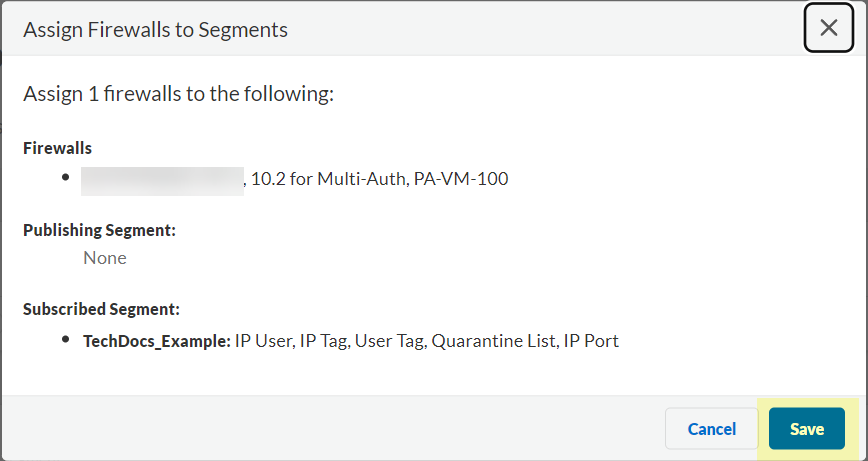
- Click Review Changes to review your configuration before submitting the changes.
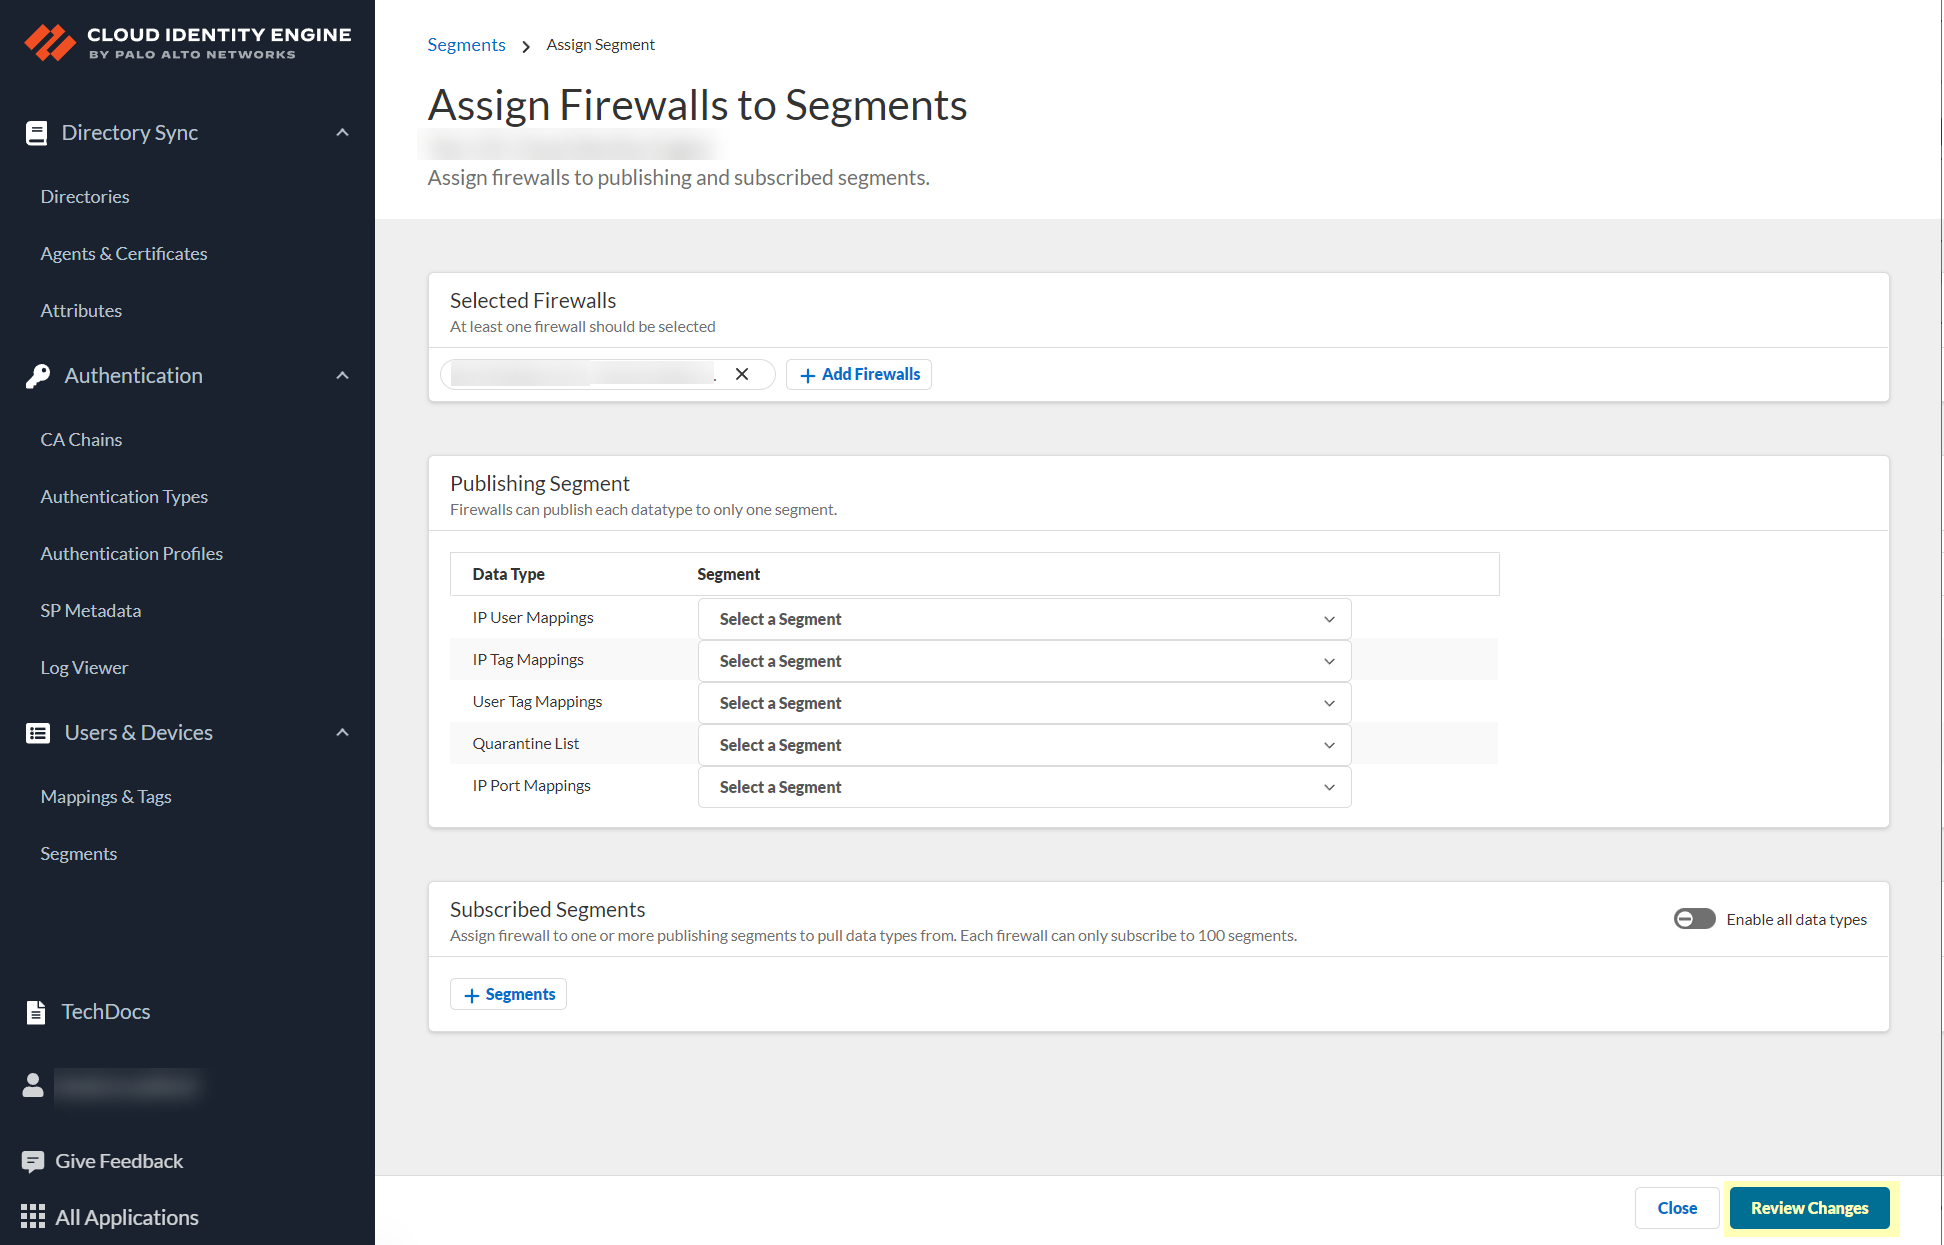
- Save the changes to confirm the configuration.
- Create a segment to subscribe to the publishing segment you created in the previous step.
Publishing segments provide the specified data type that the Cloud Identity Engine collects from other firewalls to the segment containing the firewalls that you select.
You can subscribe up to 100 segments per firewall.
- Select User ContextSegments and click Add New Segment .
- Enter a unique Segment Name and optionally a Description for the segment.
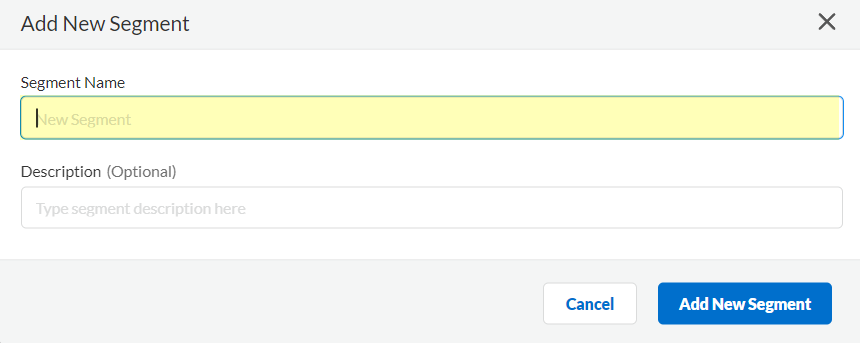
- Click Add New Segment to save the changes.
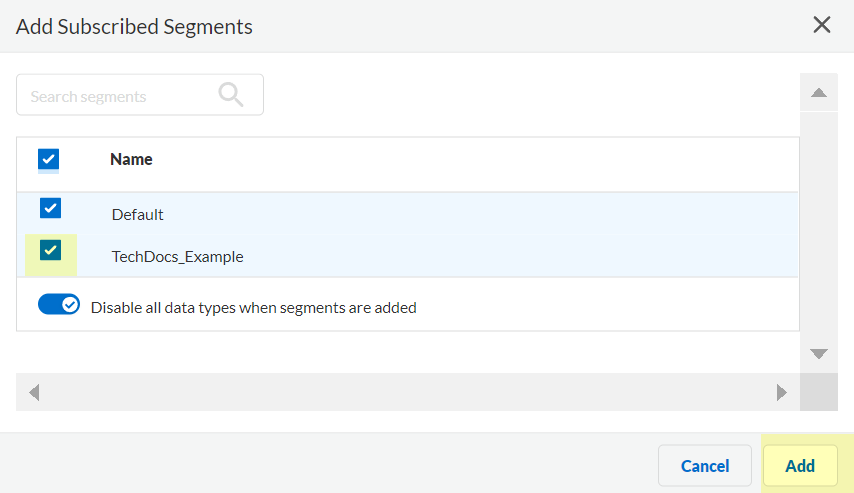
- Click Segments to add the segments you want to receive data.
- Select the segments that you want to include and Add the segments.
- (Optional) Edit segments as needed to customize how the Cloud Identity Engine provides mappings to the firewalls.
- If sharing for data type is Enabled and you do not want to share this data type in this segment, select it to change the setting to Disabled .

- If you no longer need a segment, delete it from the configuration.
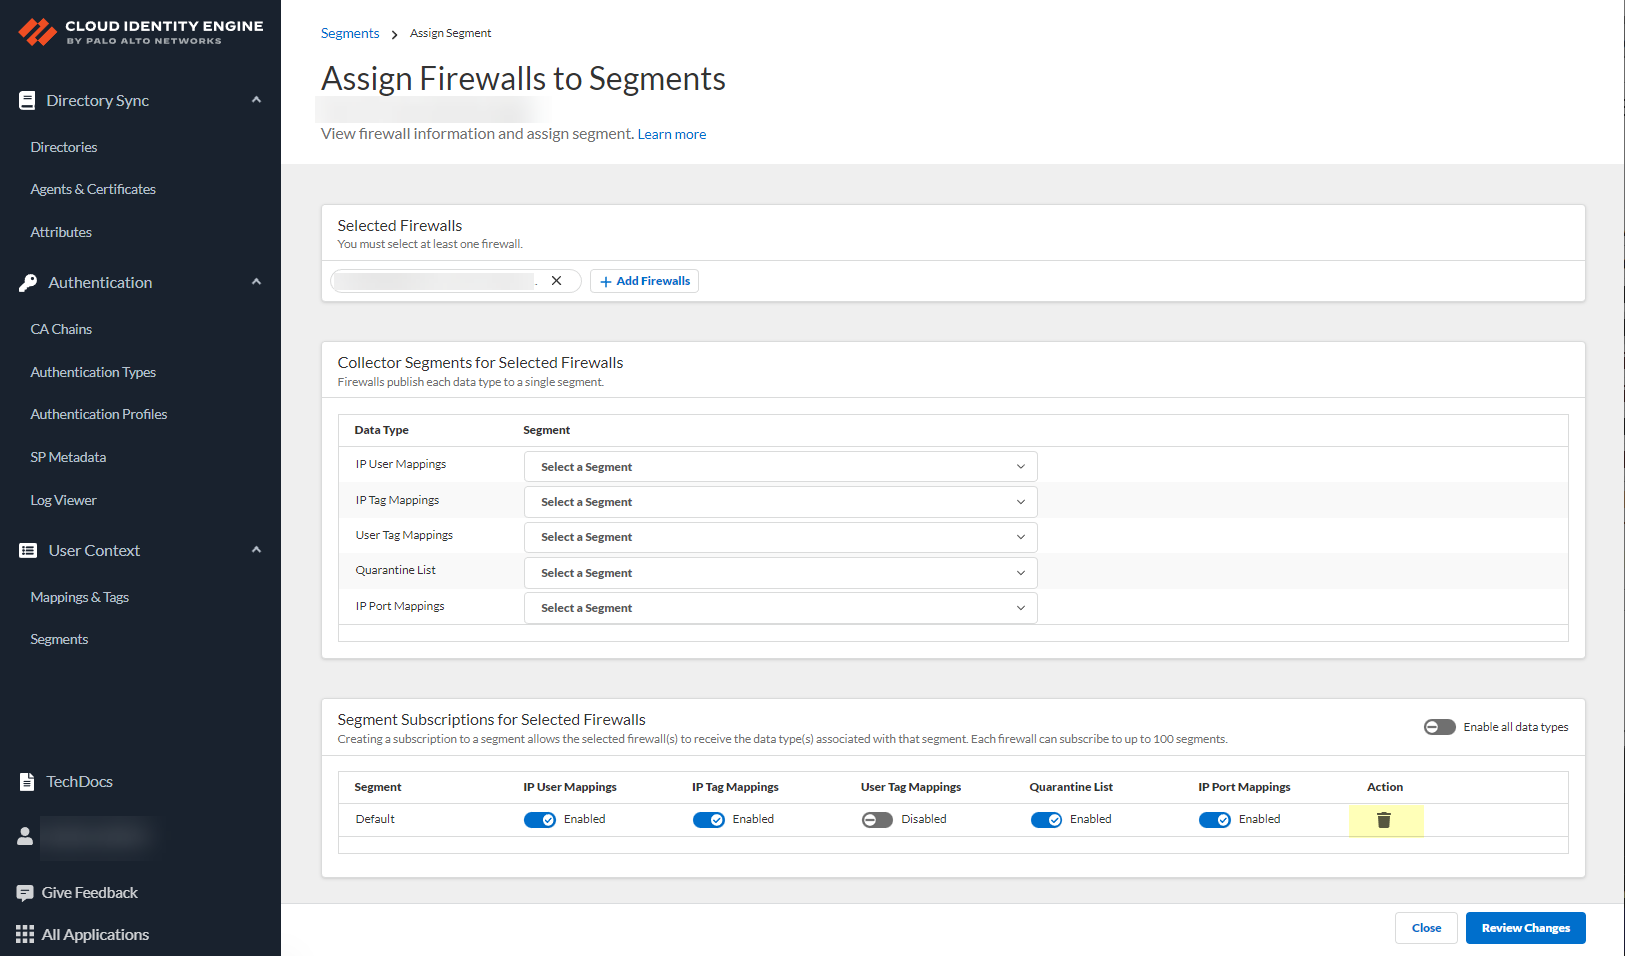
- When your configuration is complete, Review Changes and Save the configuration.
- On your firewall, enable the service that the Cloud Identity Engine uses to communicate with your firewall.
- Ensure that you have configured a device certificate.
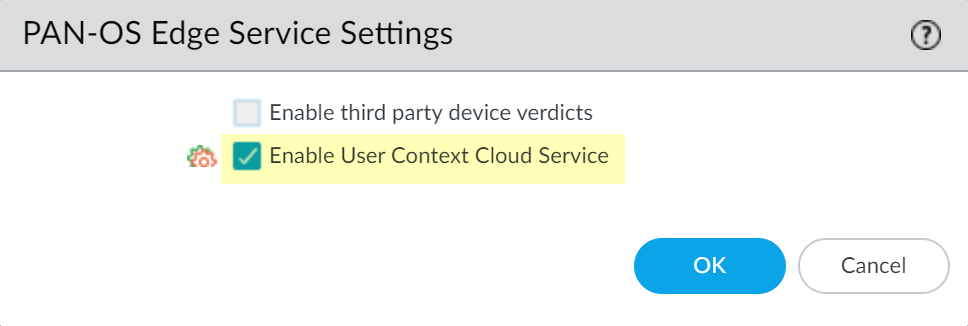
- Log in to the firewall and Edit the PAN-OS Edge Service Settings ( DeviceManagementSetupPAN-OS Edge Service Settings ).
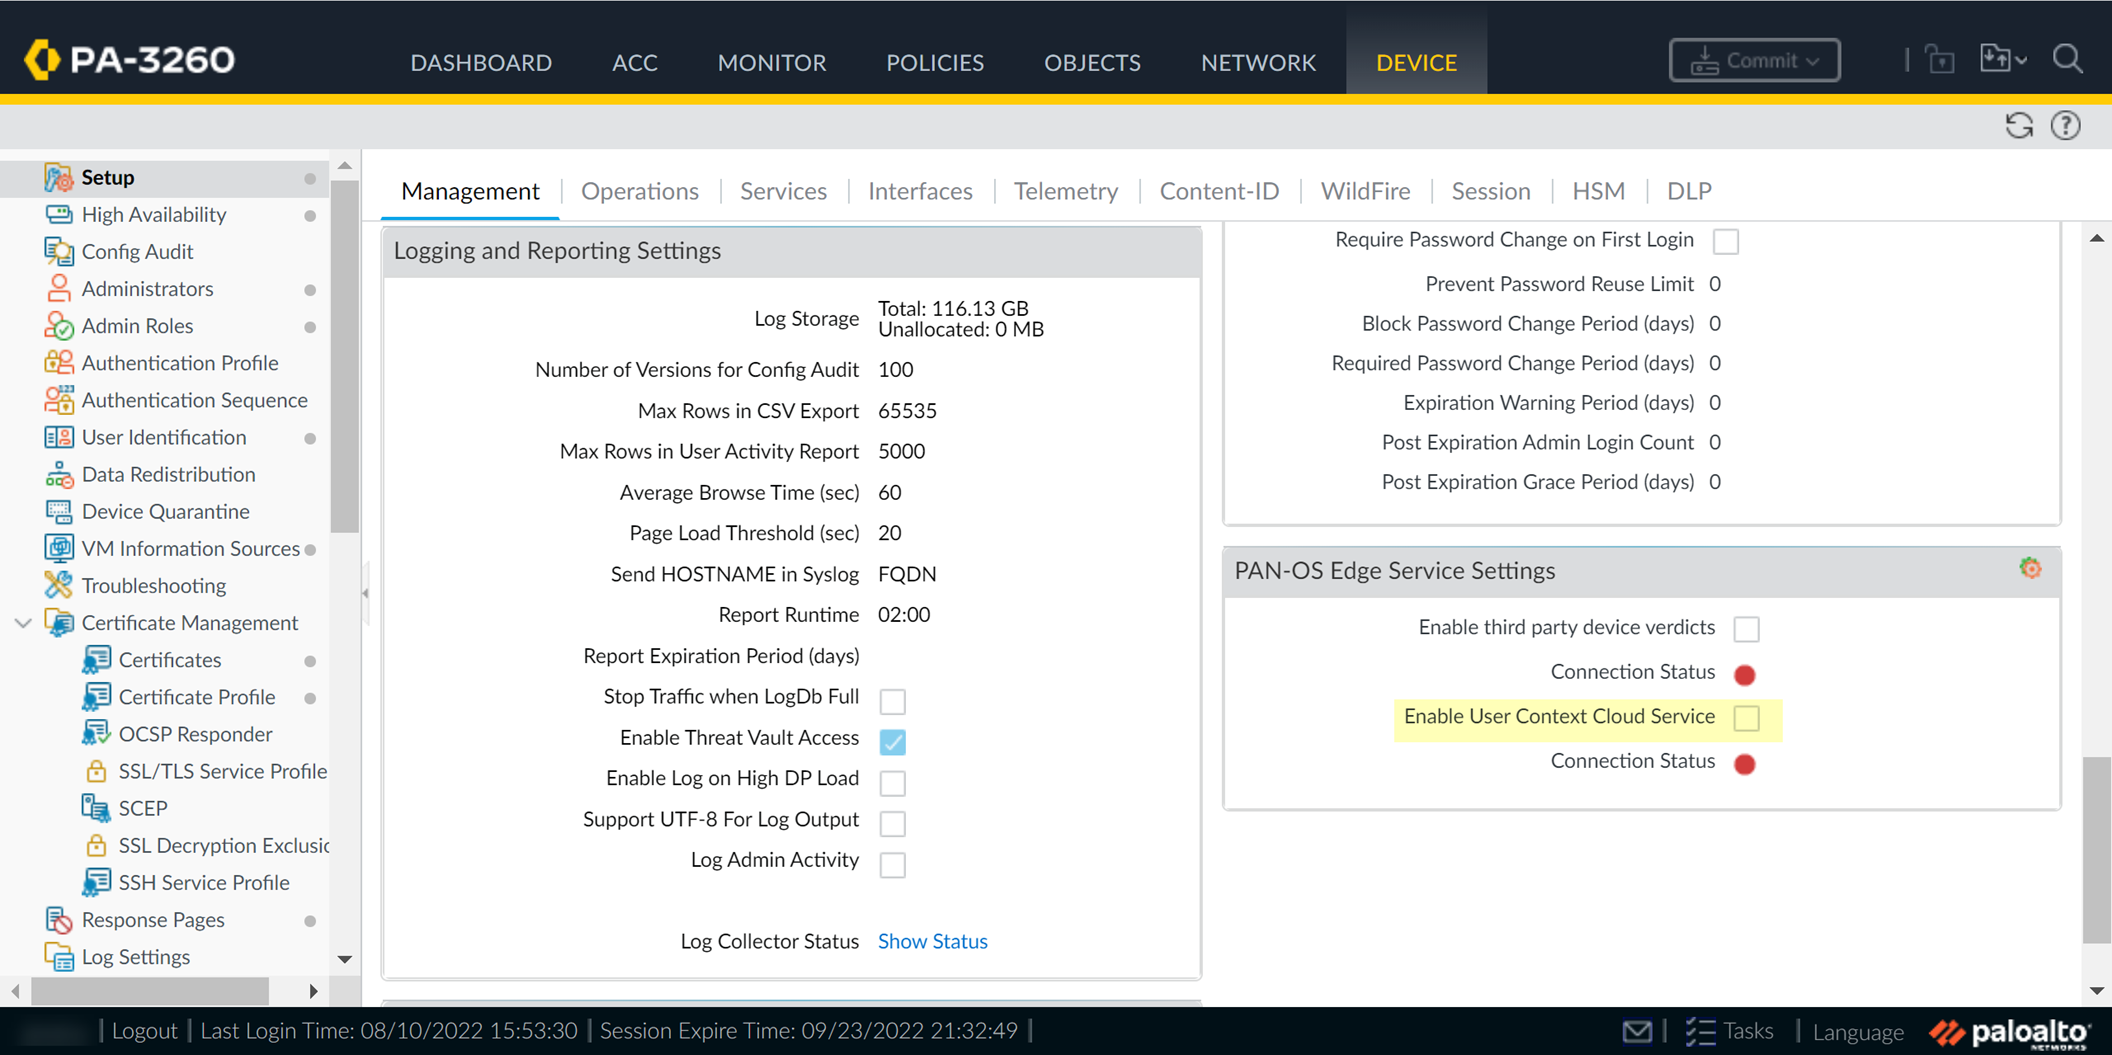
- Enable User Context Cloud Service and click OK to confirm the changes.
If the firewall traffic uses a management interface, create security policy rules to allow connectivity between the firewall and the User Context Cloud Service.
- Commit your changes on the firewall.
- Verify the User Context configuration is successful and view the mappings and tags that the Cloud Identity Engine collects from the firewall.
- On the firewall, verify the User Context Cloud Service Connection Status is active.

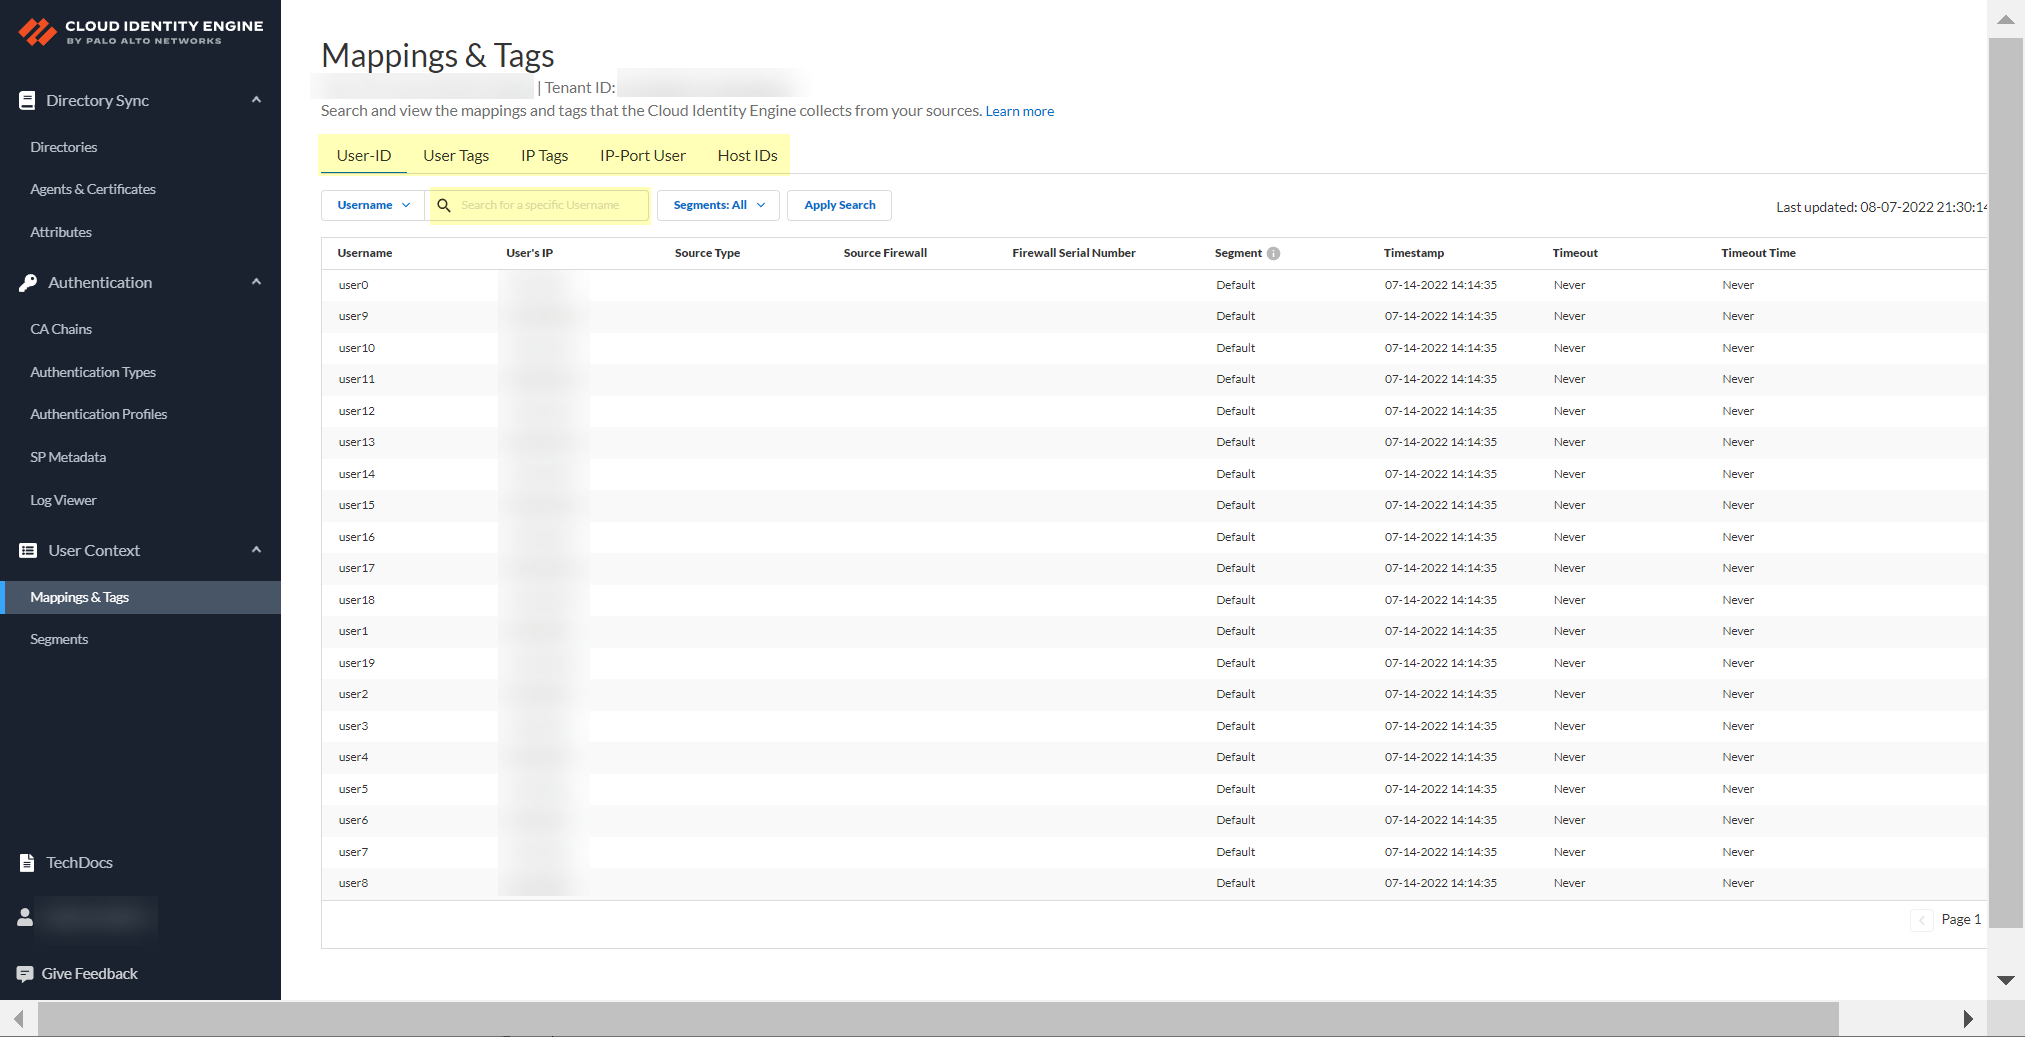
- In the Cloud Identity Engine app, select User ContextMappings & Tags to review the information for the data types.
You can review the following data types:
- User-ID —Search User-ID mappings by Username or IP address.
- User Tags —Search Dynamic User Group tags by Username or by Tag .
- IP Tags —Search Dynamic Address Group tags by IP address or by Tag .
- IP-Port User —(Terminal Server agent only) Search Terminal Server agent mappings by IP address.
- Host IDs —(GlobalProtect only) Search devices (both quarantined and not quarantined) by Host ID .
Now that you’ve configured segments, you can use them to enable user- and group-based policy , authentication profiles and sequences, and other firewall-based tasks.
Create a Cloud Dynamic User Group
Cloud Dynamic User Groups simplify the creation of group-based Security policy by providing adaptable and granular group membership that updates automatically based on the criteria (also known as context or attributes) you specify. This allows you to create a policy that adapts to changes in user behavior, location, and other conditions where context plays a key role in determining access.
As work locations change and users take on different roles in an organization, determining user privileges based on attributes such as department or location is no longer sufficient. Cloud Dynamic User Groups provide a simplified and automated solution by allowing you to specify the context for group membership based on attributes that can change (such as location, department, or title), allowing you to create more responsive group-based policy.
If you're using a Cloud Dynamic User Group to Set Up an Authentication Profile , you must add the users in the Cloud Dynamic User Group to the SAML app integration in the Azure Portal. For more information, refer to step 3 in Configure Azure as an IdP in the Cloud Identity Engine .
You can also create static groups where membership remains constant until you manually add or remove members. For example, you can use static groups to quickly assign privileges or to isolate an account that’s exhibiting unusual or risky behavior based on specific events.
If you're using Microsoft Active Directory Identity Protection , you can use the risk assessment information to create Cloud Dynamic User Groups based on a user's risk level or anomalous user behavior, such as an unusual login location.
Using risk assessment information to create Cloud Dynamic User Groups requires the client credential flow for Azure AD . You must allow the following permissions in the Azure Portal to enable support for risk-based attributes:
- IdentityRiskyUser.Read.All
- IdentityRiskEvent.Read.All
- If you have not already done so, configure your directory for the type of Cloud Dynamic User Group you want to create.
- Configure an on-premises directory or a cloud-based directory .
- ( User Risk Information with Azure AD only ) To allow the Cloud Identity Engine to collect user risk information from your Microsoft Active Directory Identity Protection , select Collect user risk information from Azure AD Identity Protection .
For an existing Azure Active Directory (AD) configuration in the Cloud Identity, reconnect your directory to enable user risk information collection.

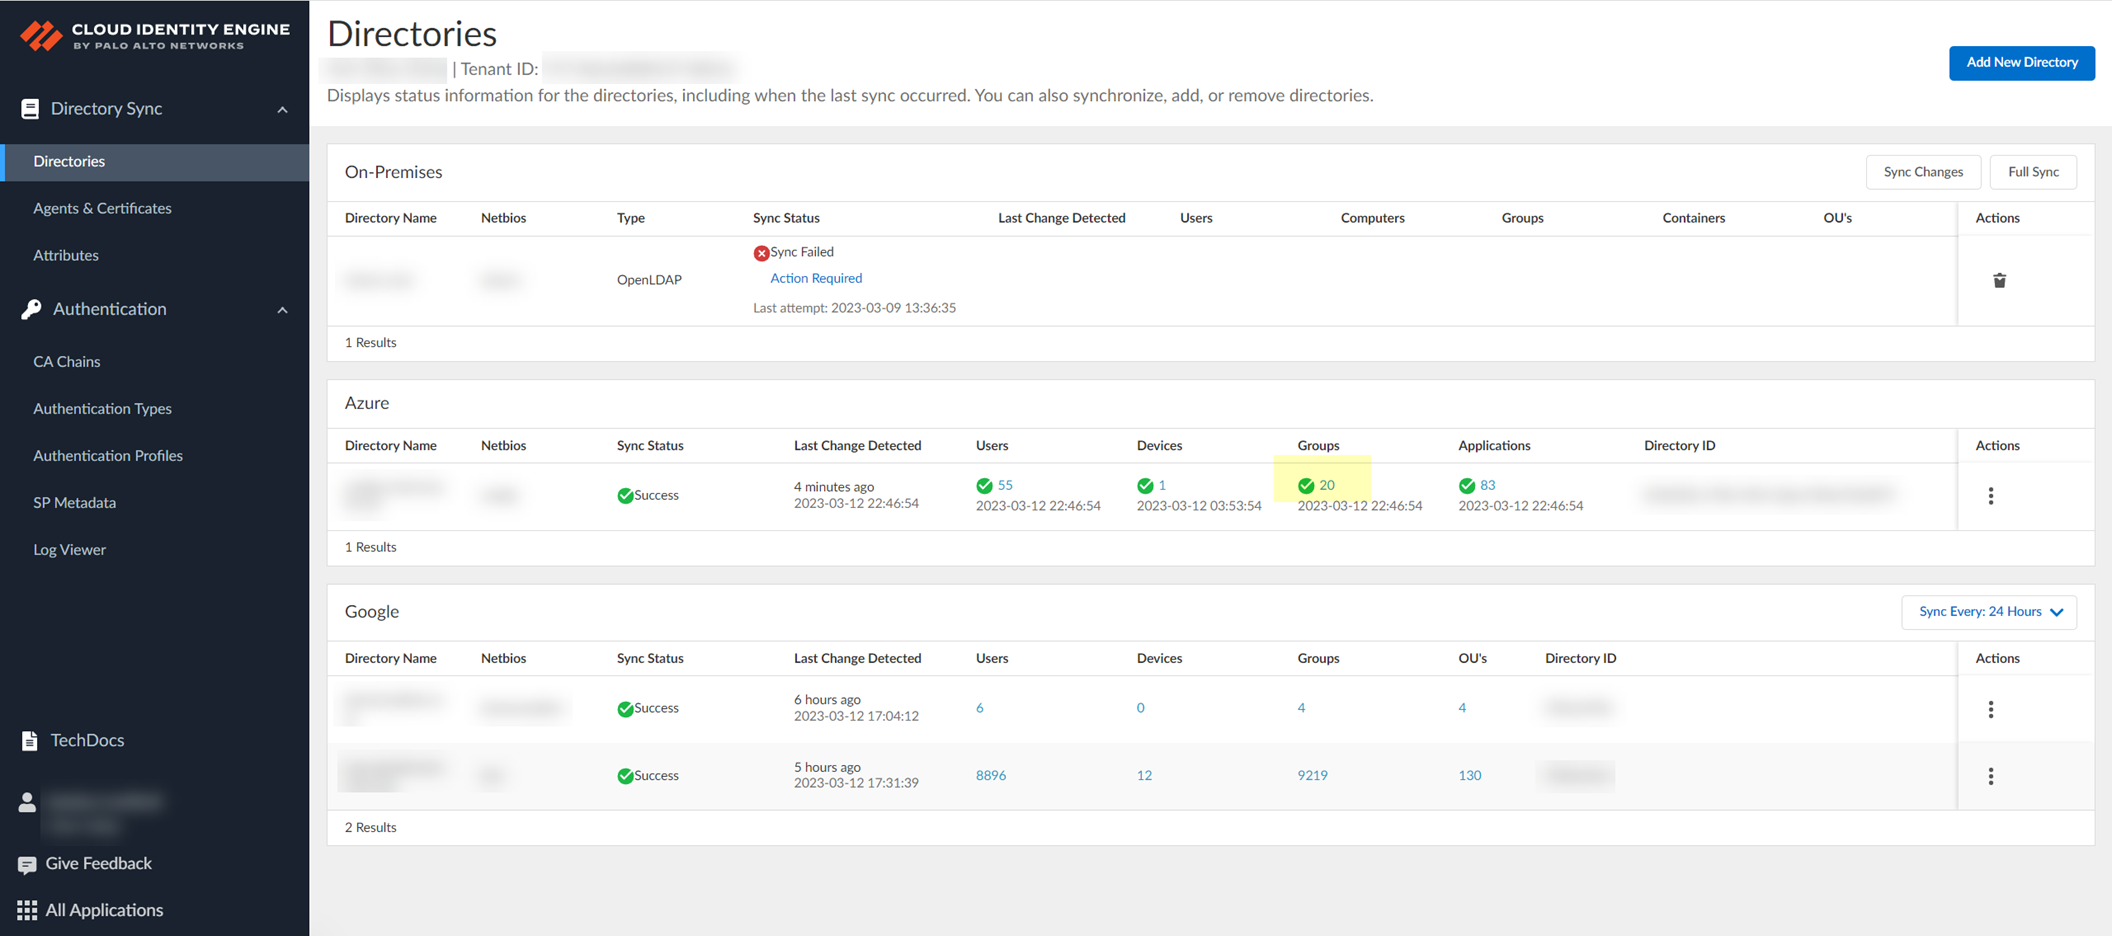
- Sync the groups for the directory.
- In the Cloud Identity Engine app, select Directories and click on the number in the Groups column.
- On the Directory Data page, click Create New Dynamic User Group .
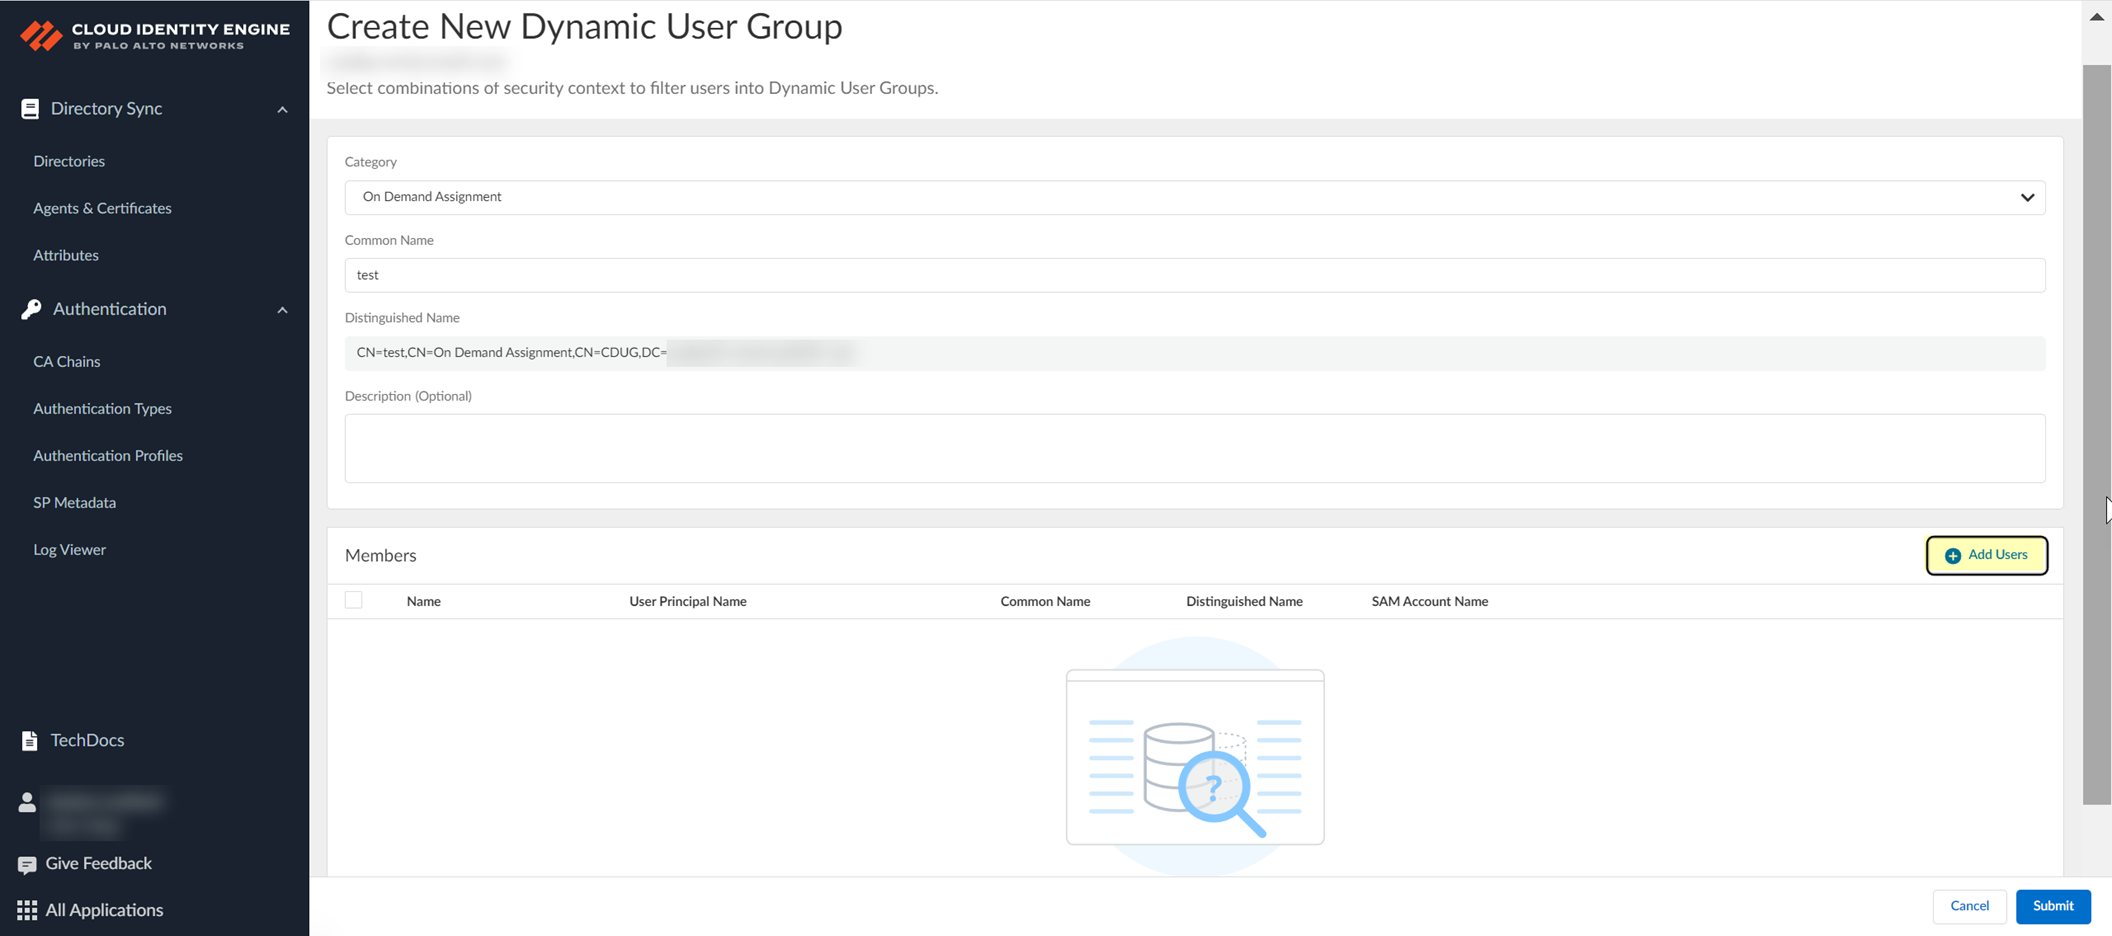
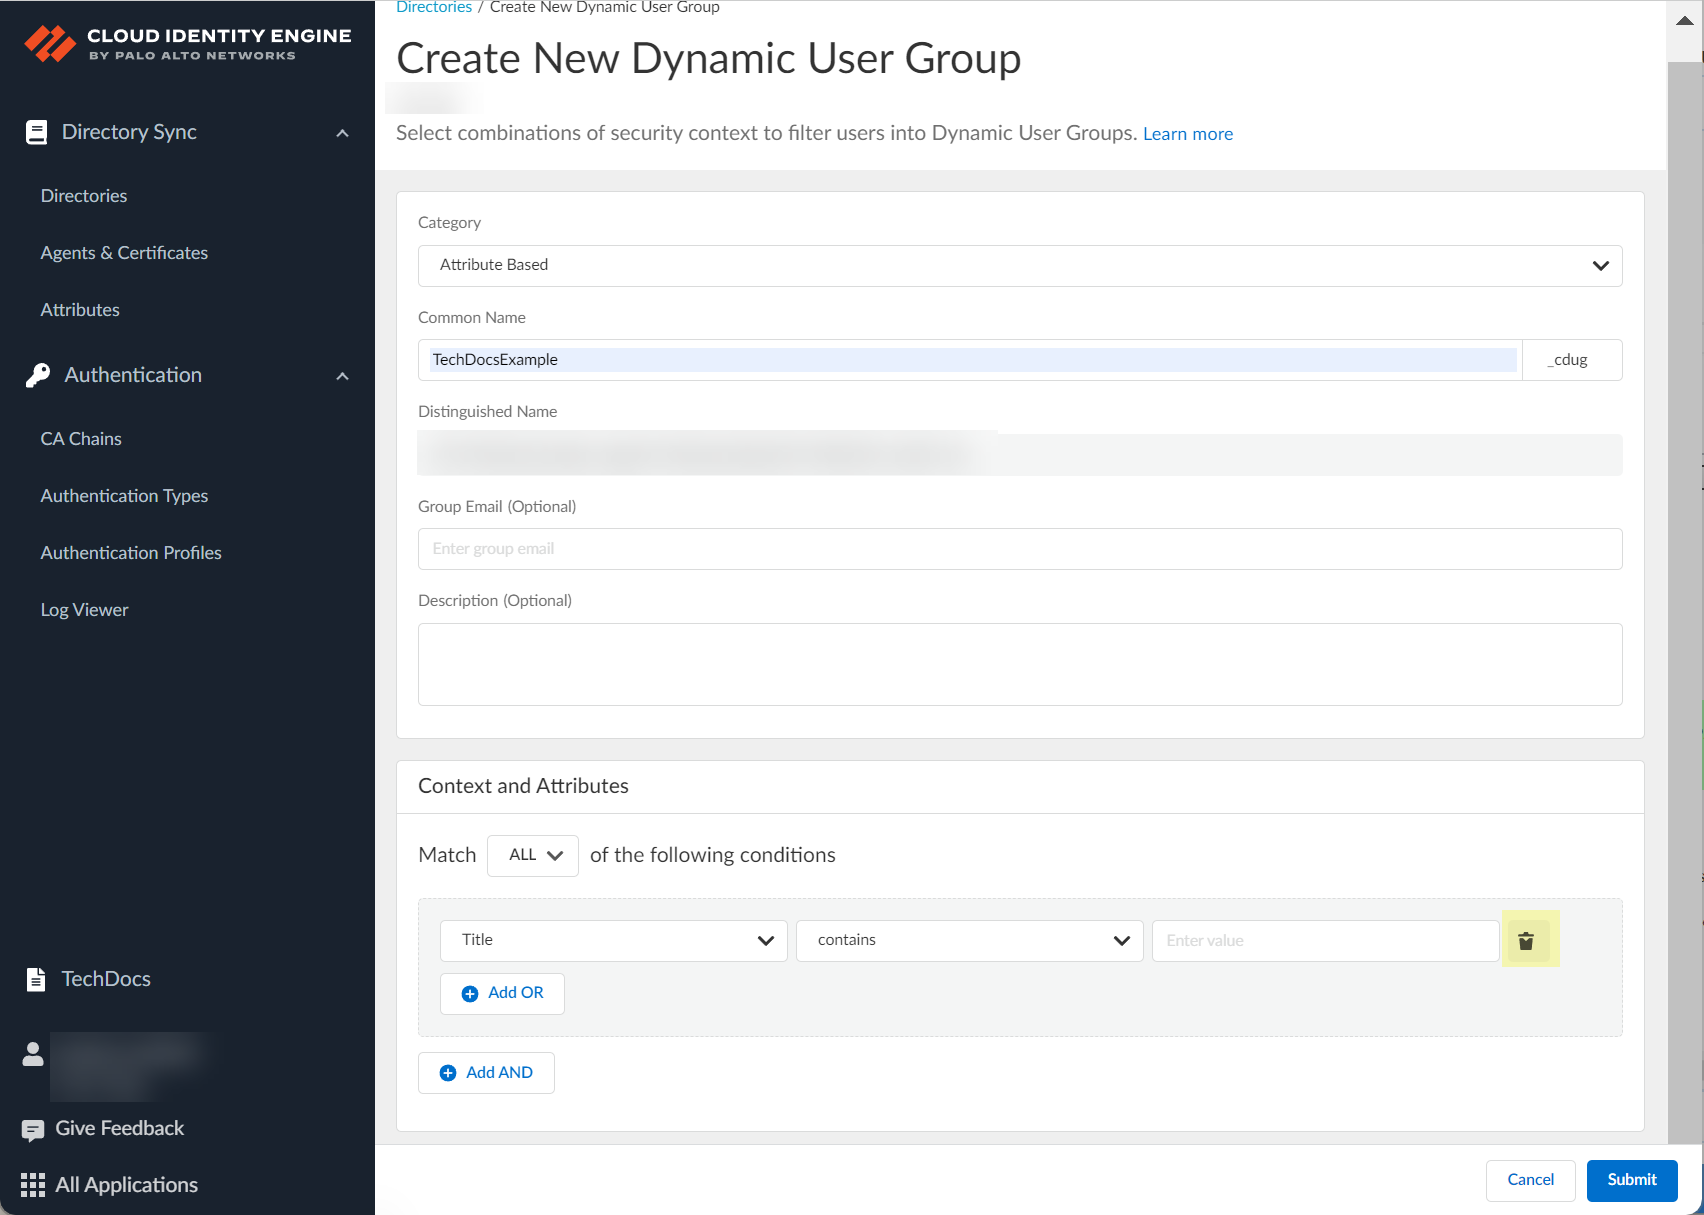
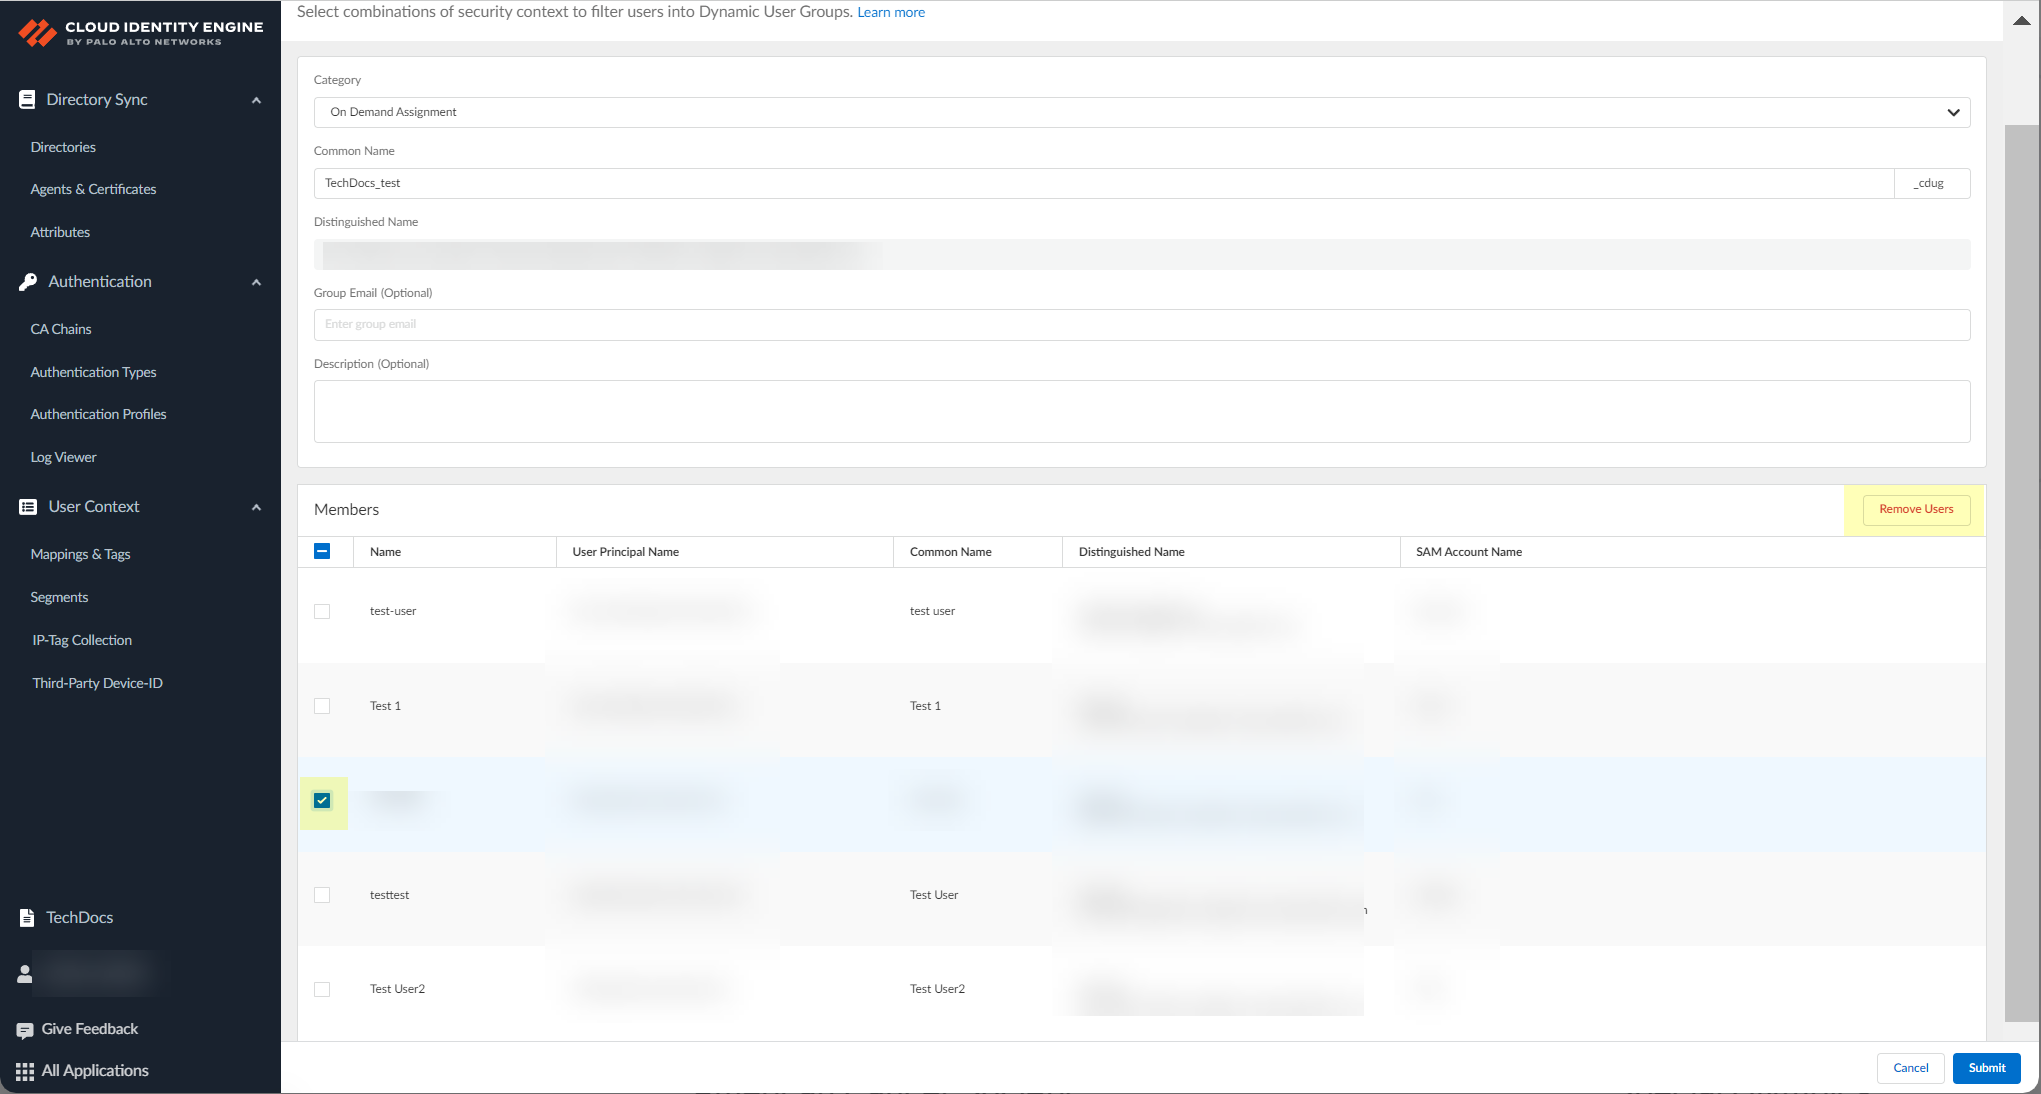
- Select the Category for the group.
- Attribute Based —Specify the criteria for the Dynamic User Group using attributes.
- On Demand Assignment —Assign specific users to a static group.
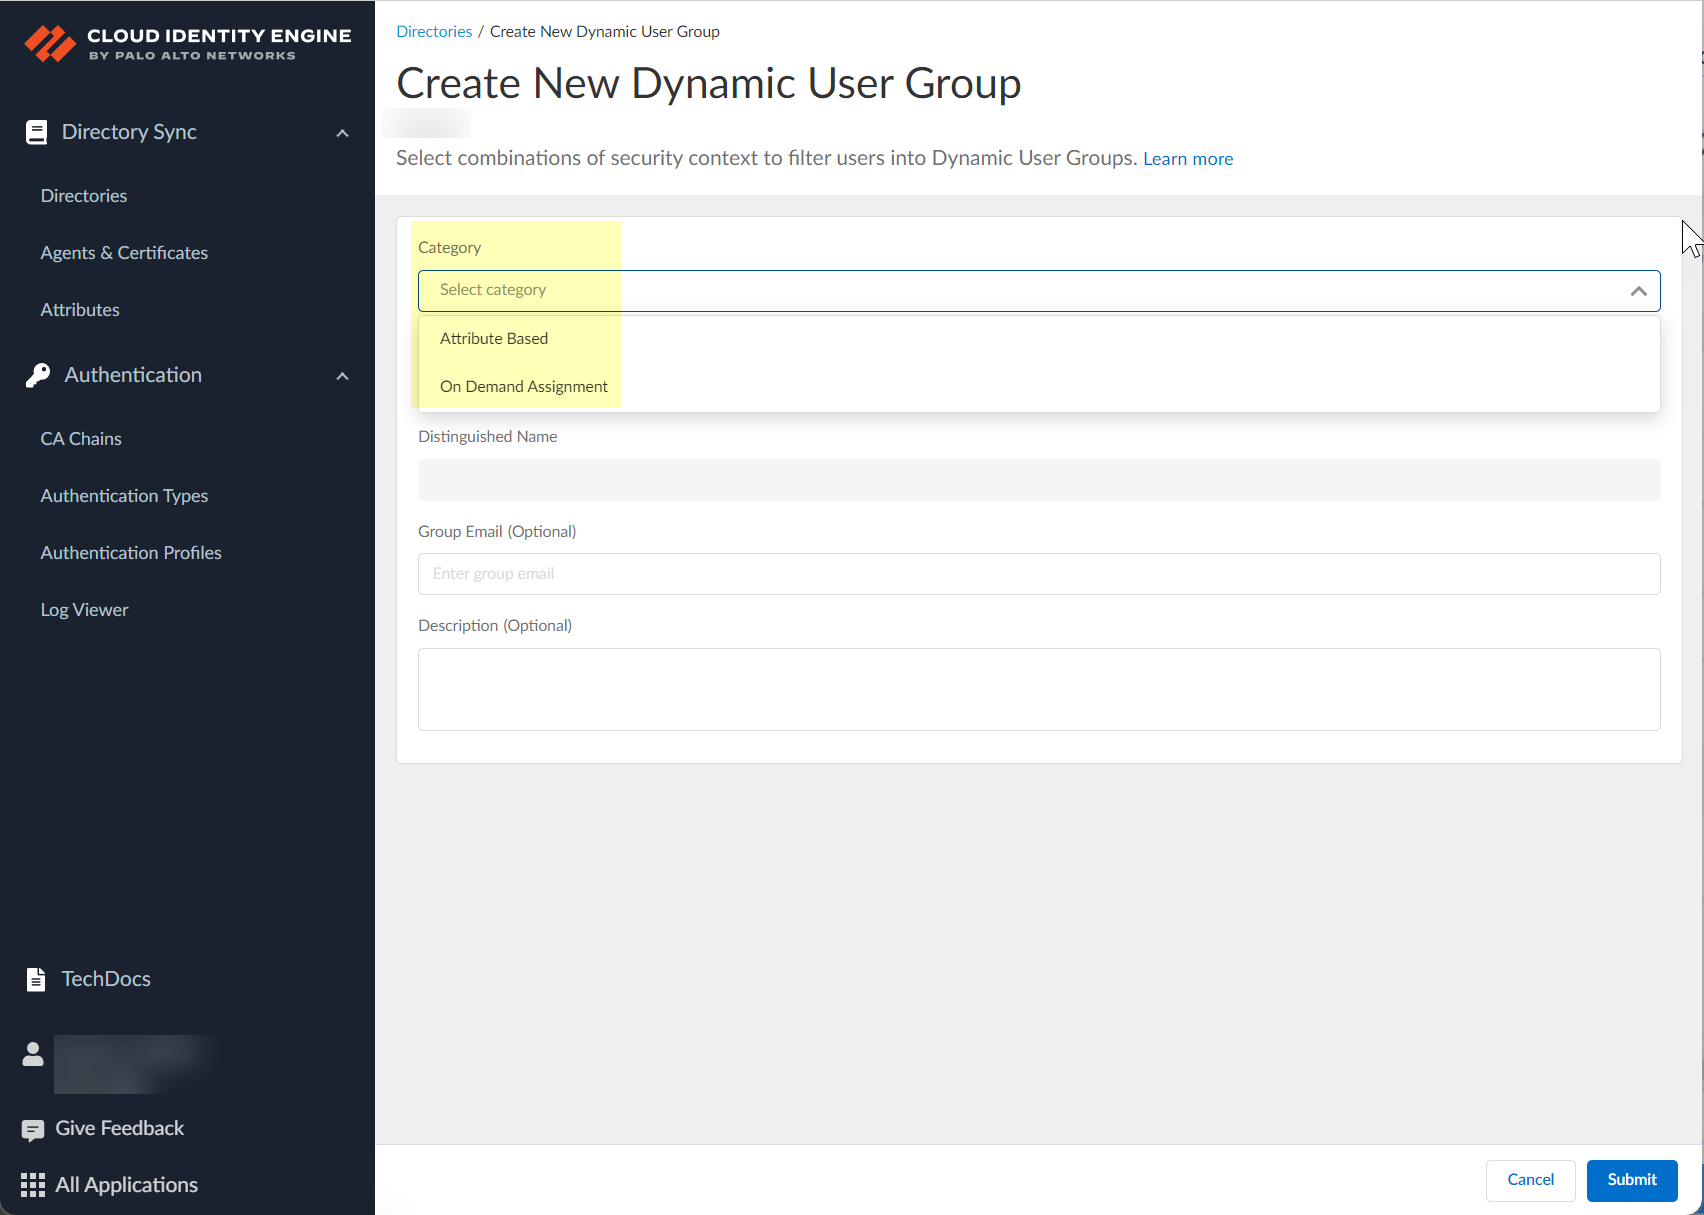
- Enter the Common Name for the group.
This automatically generates a Distinguished Name for the group that the Cloud Identity Engine, Prisma Access, and your firewalls use to identify the group. The Cloud Identity Engine appends _cdug to the name you enter to indicate that the group is a Cloud Dynamic User Group.
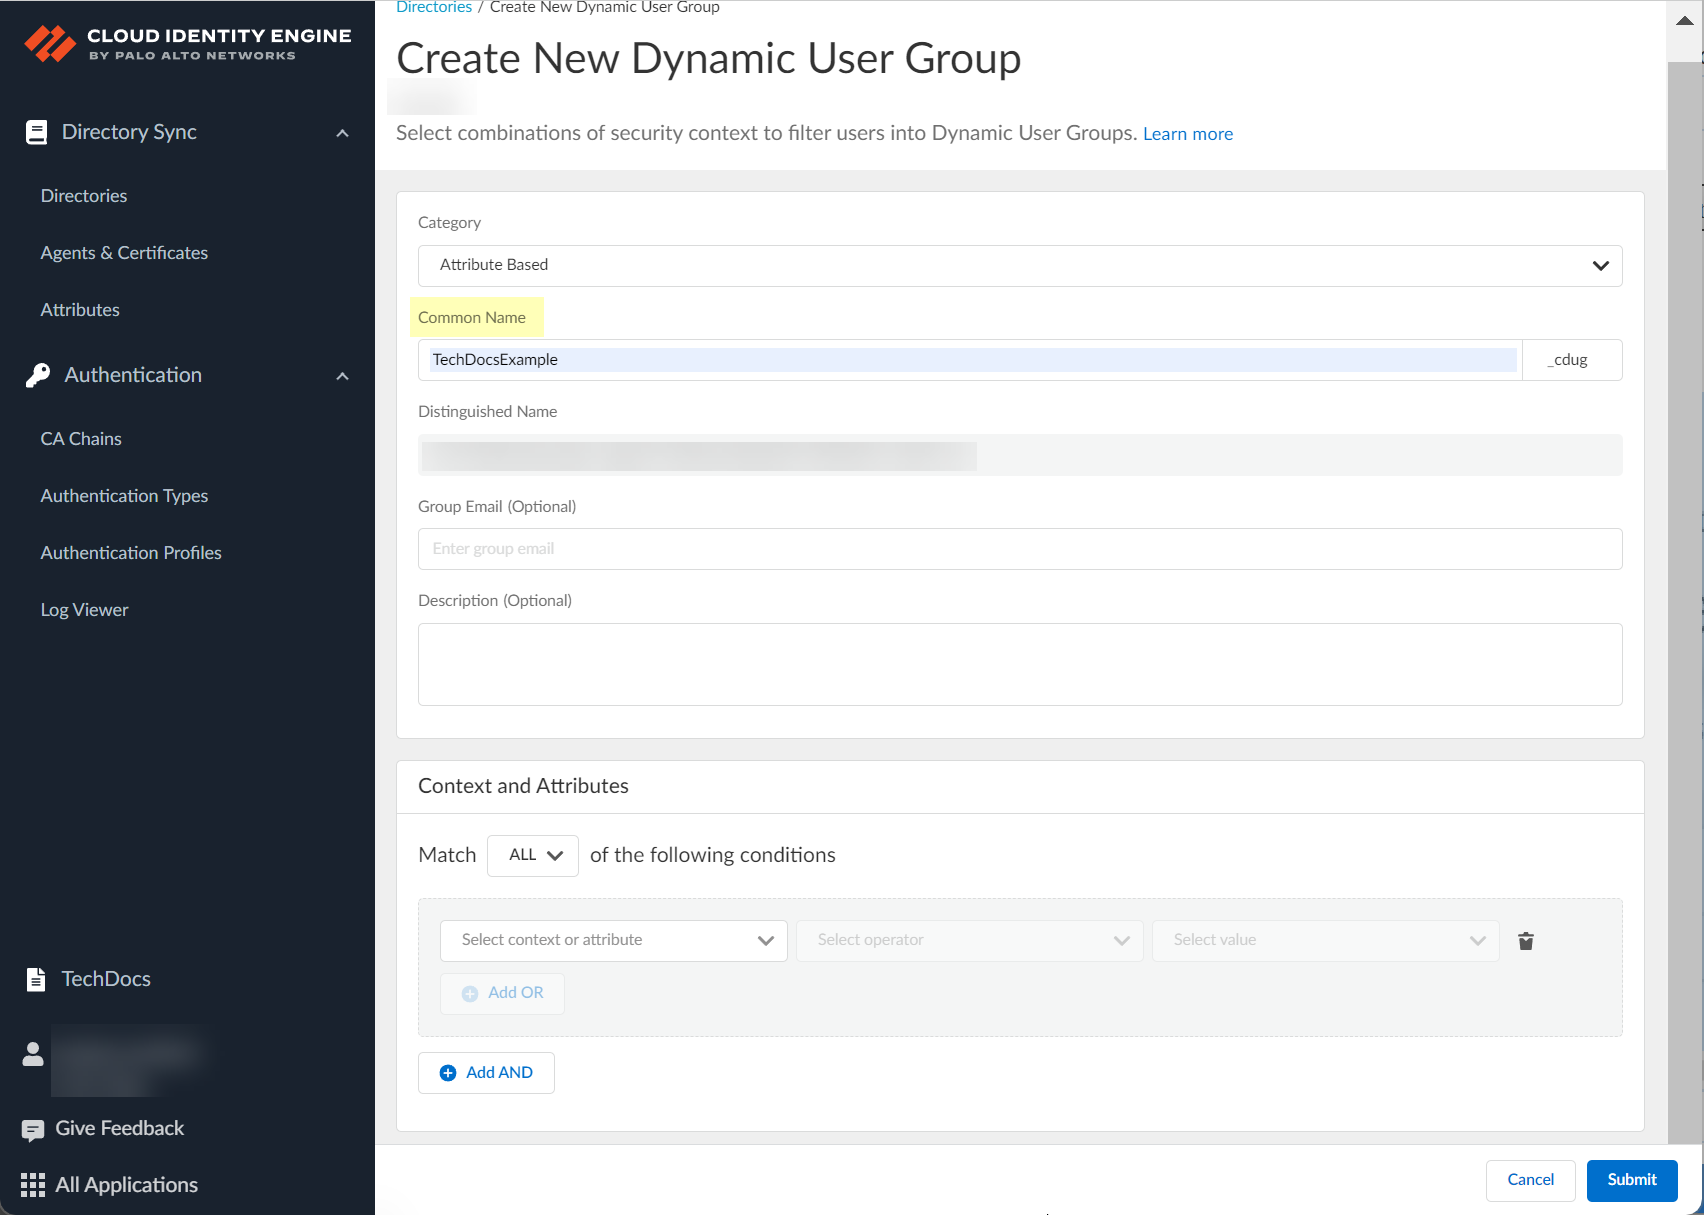
- (Optional) Enter a Group Email for the group.

- (Optional) Enter a Description for the group.

- Depending on the group Category you selected in step
4
, select either the attributes you want to use to define the group or the users you want to add to the group.
- (Attribute Based only) Select whether you want the group members to match Any of the criteria or if you want them to match All of the criteria you select.
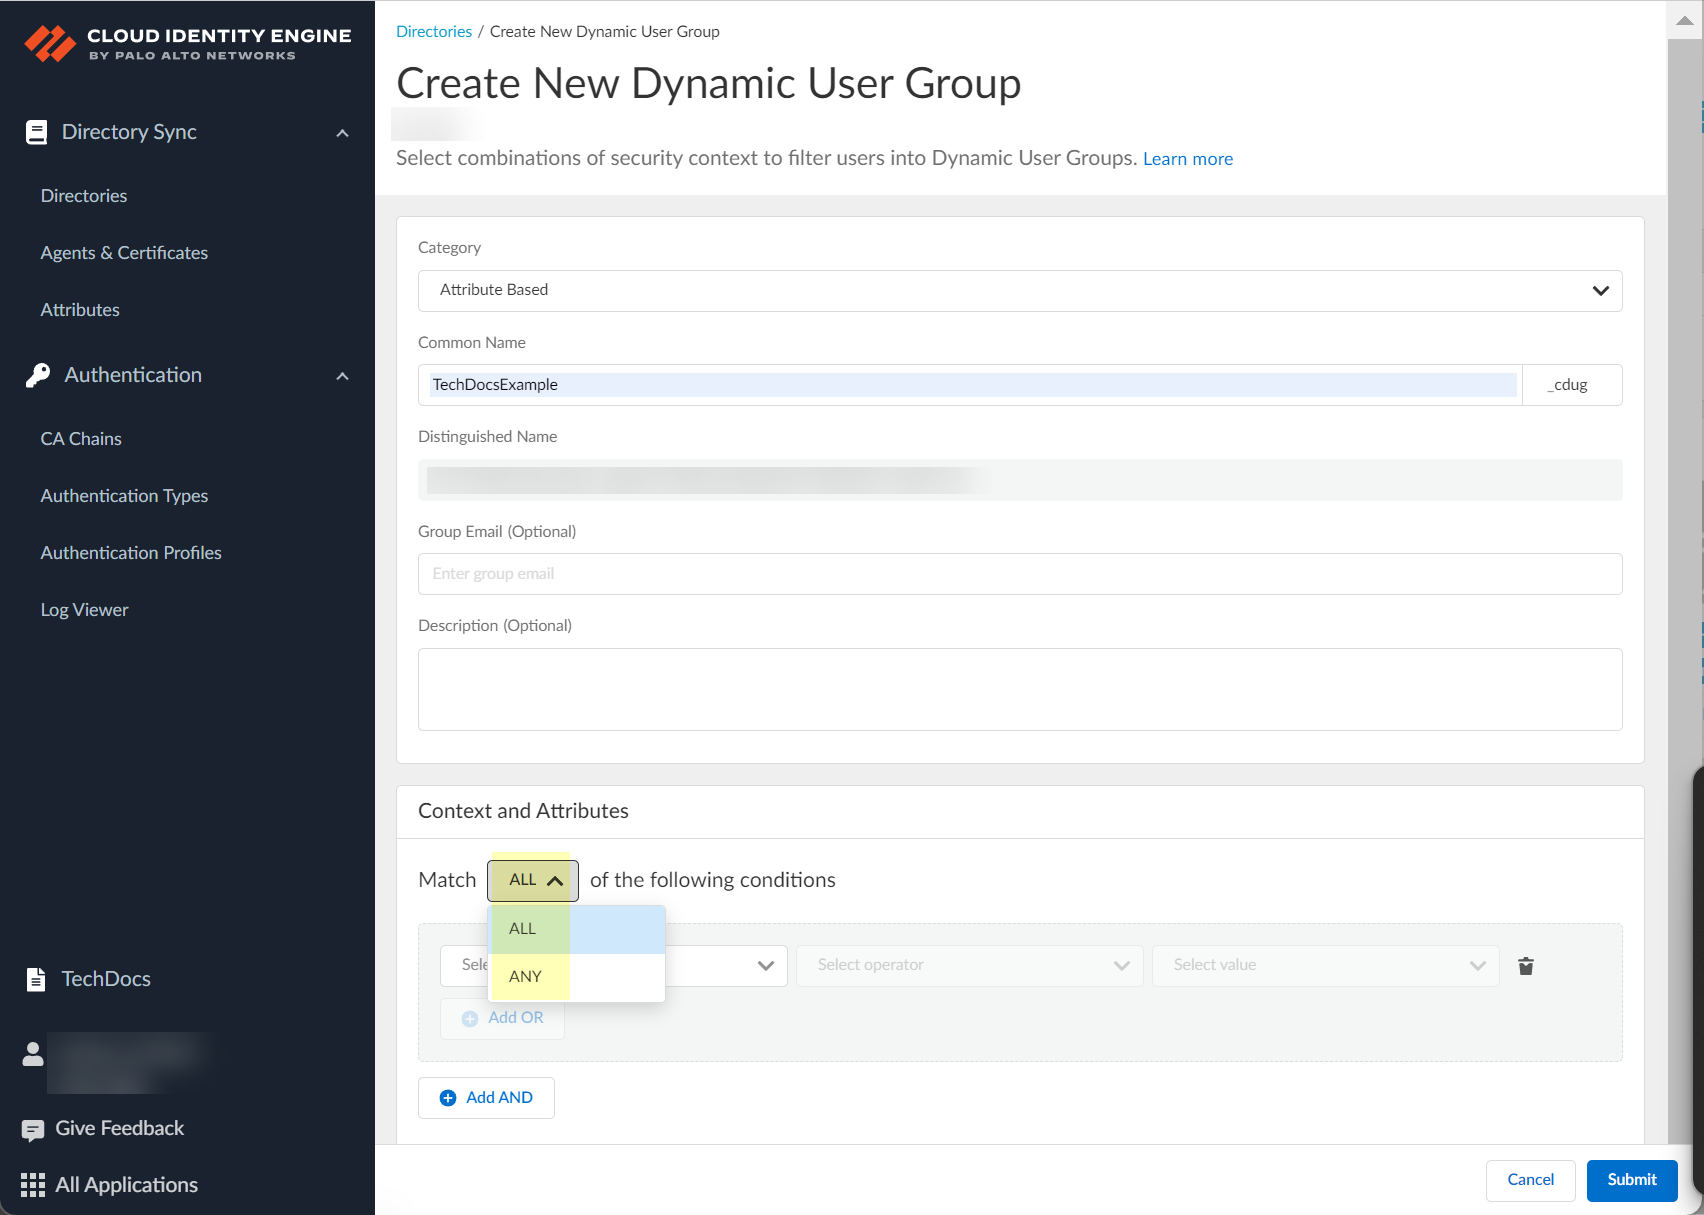
- (Attribute Based only) Click Select context or attribute to select the criteria (also known as context or attribute) that you want to use to define the group.
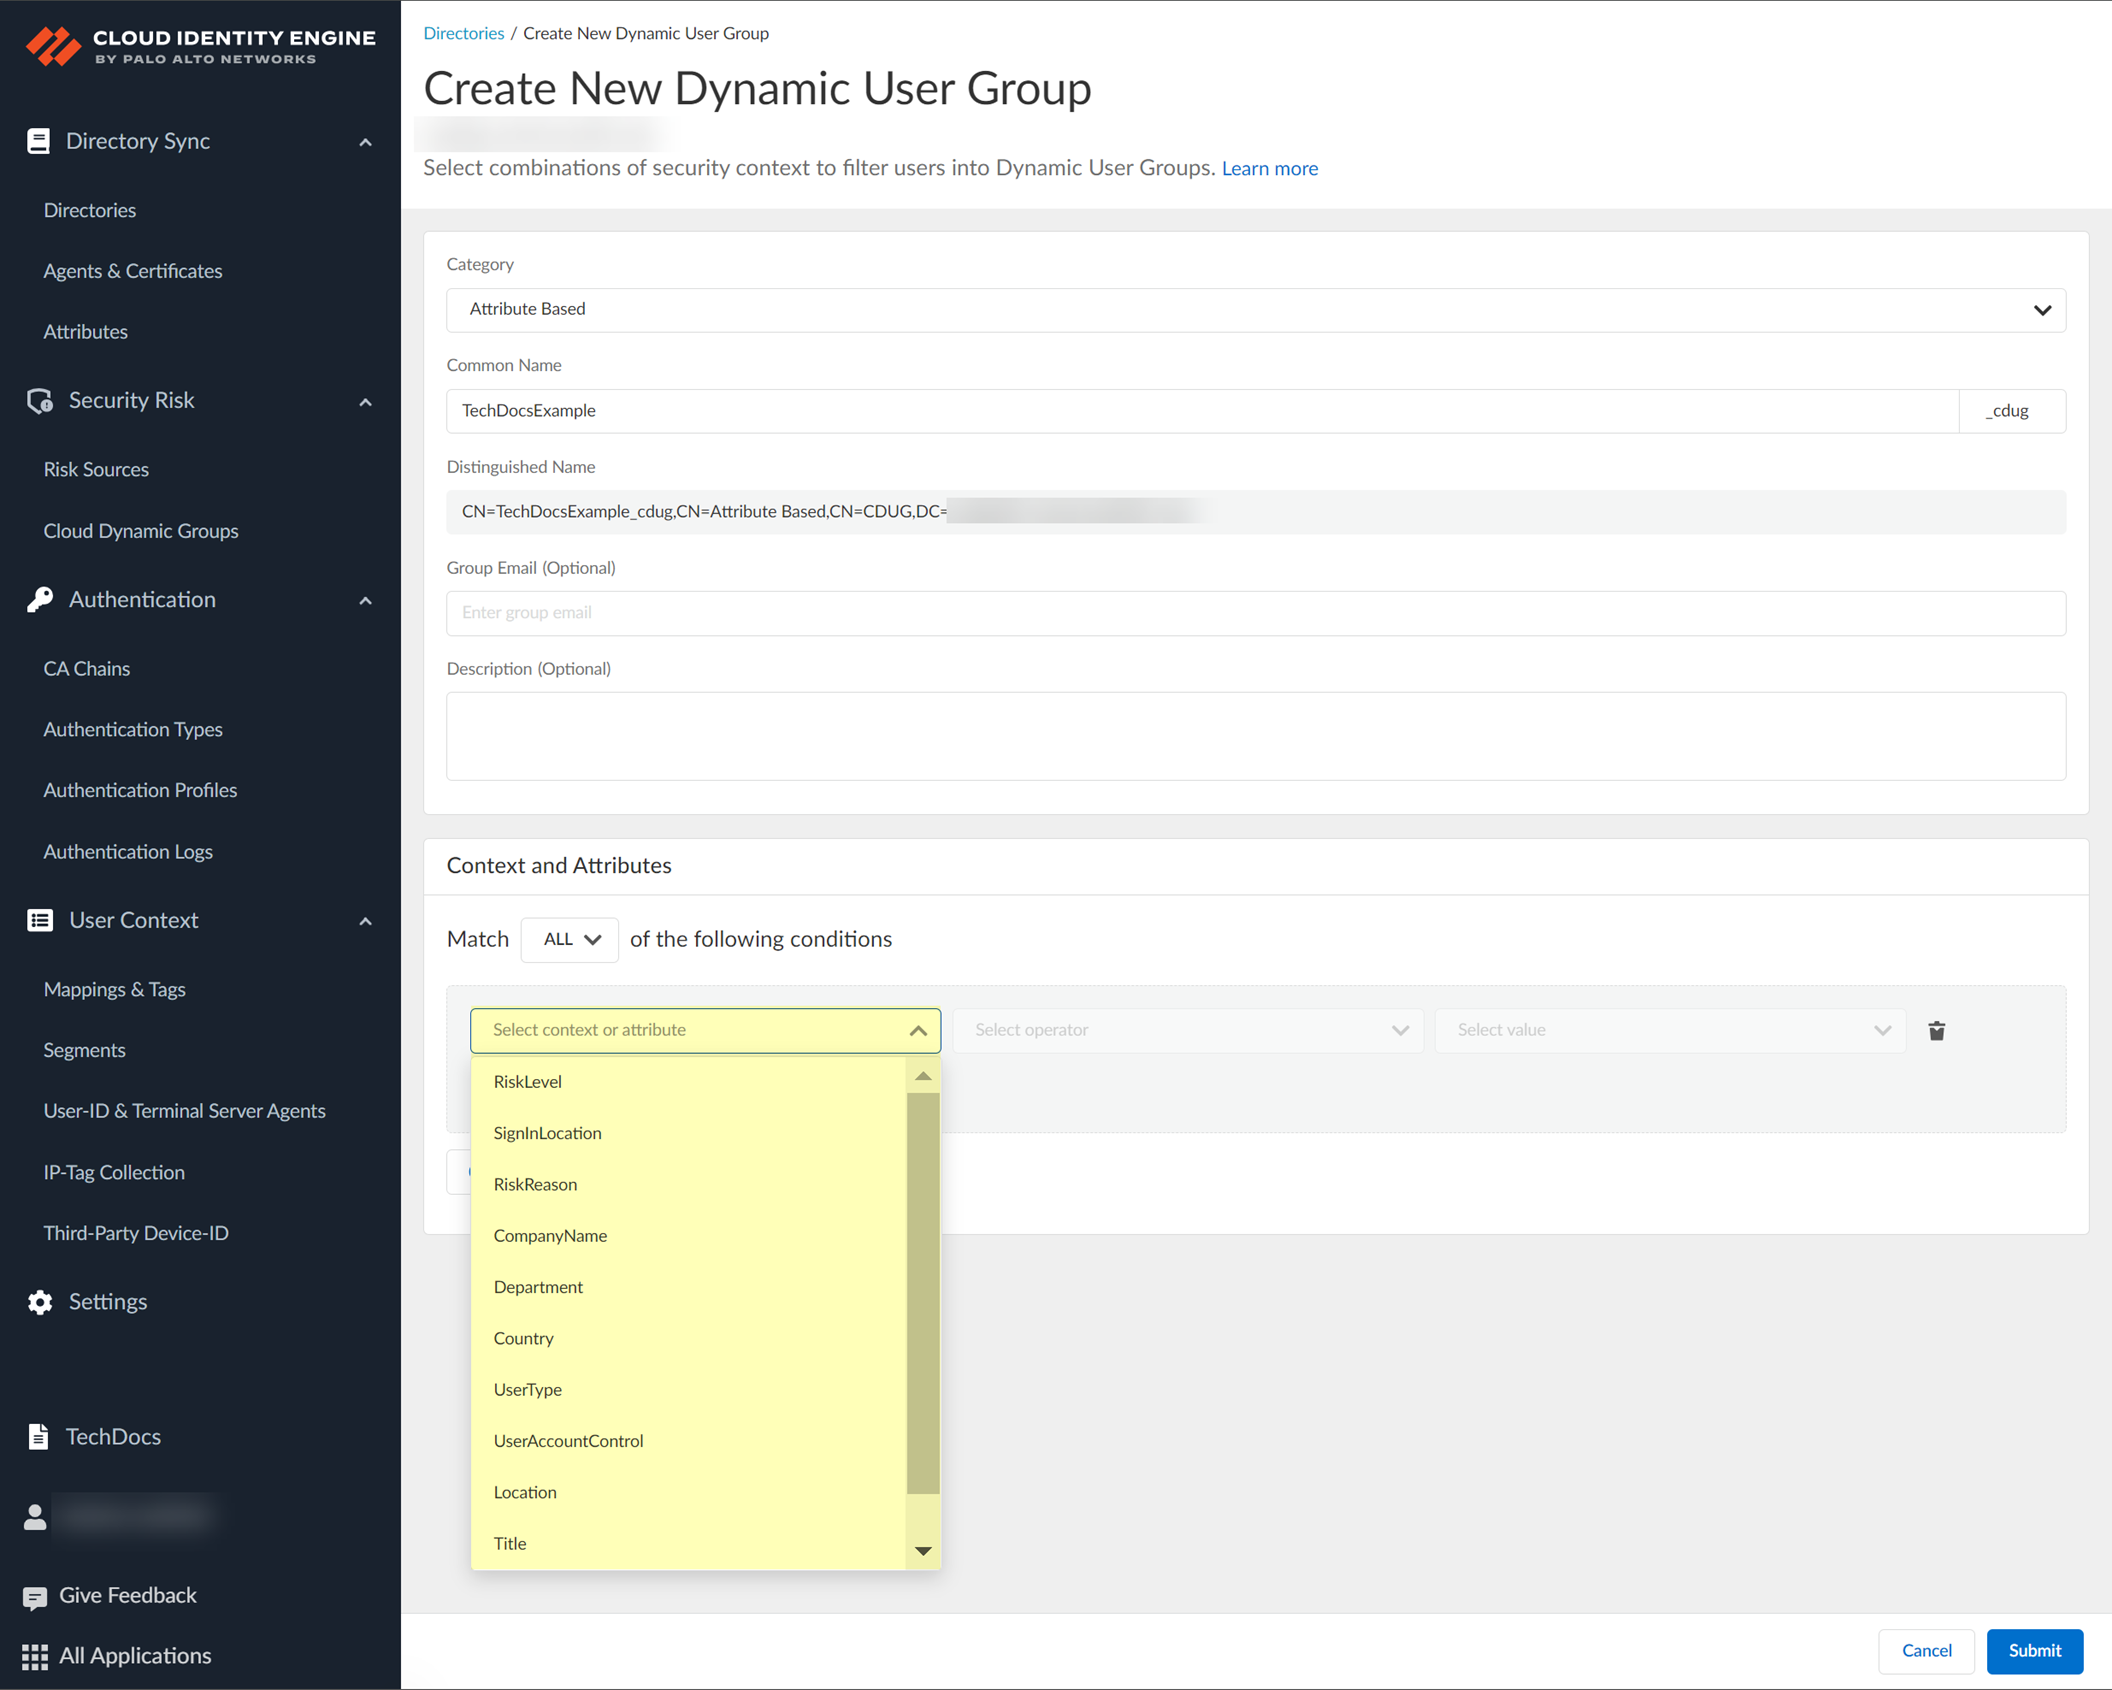

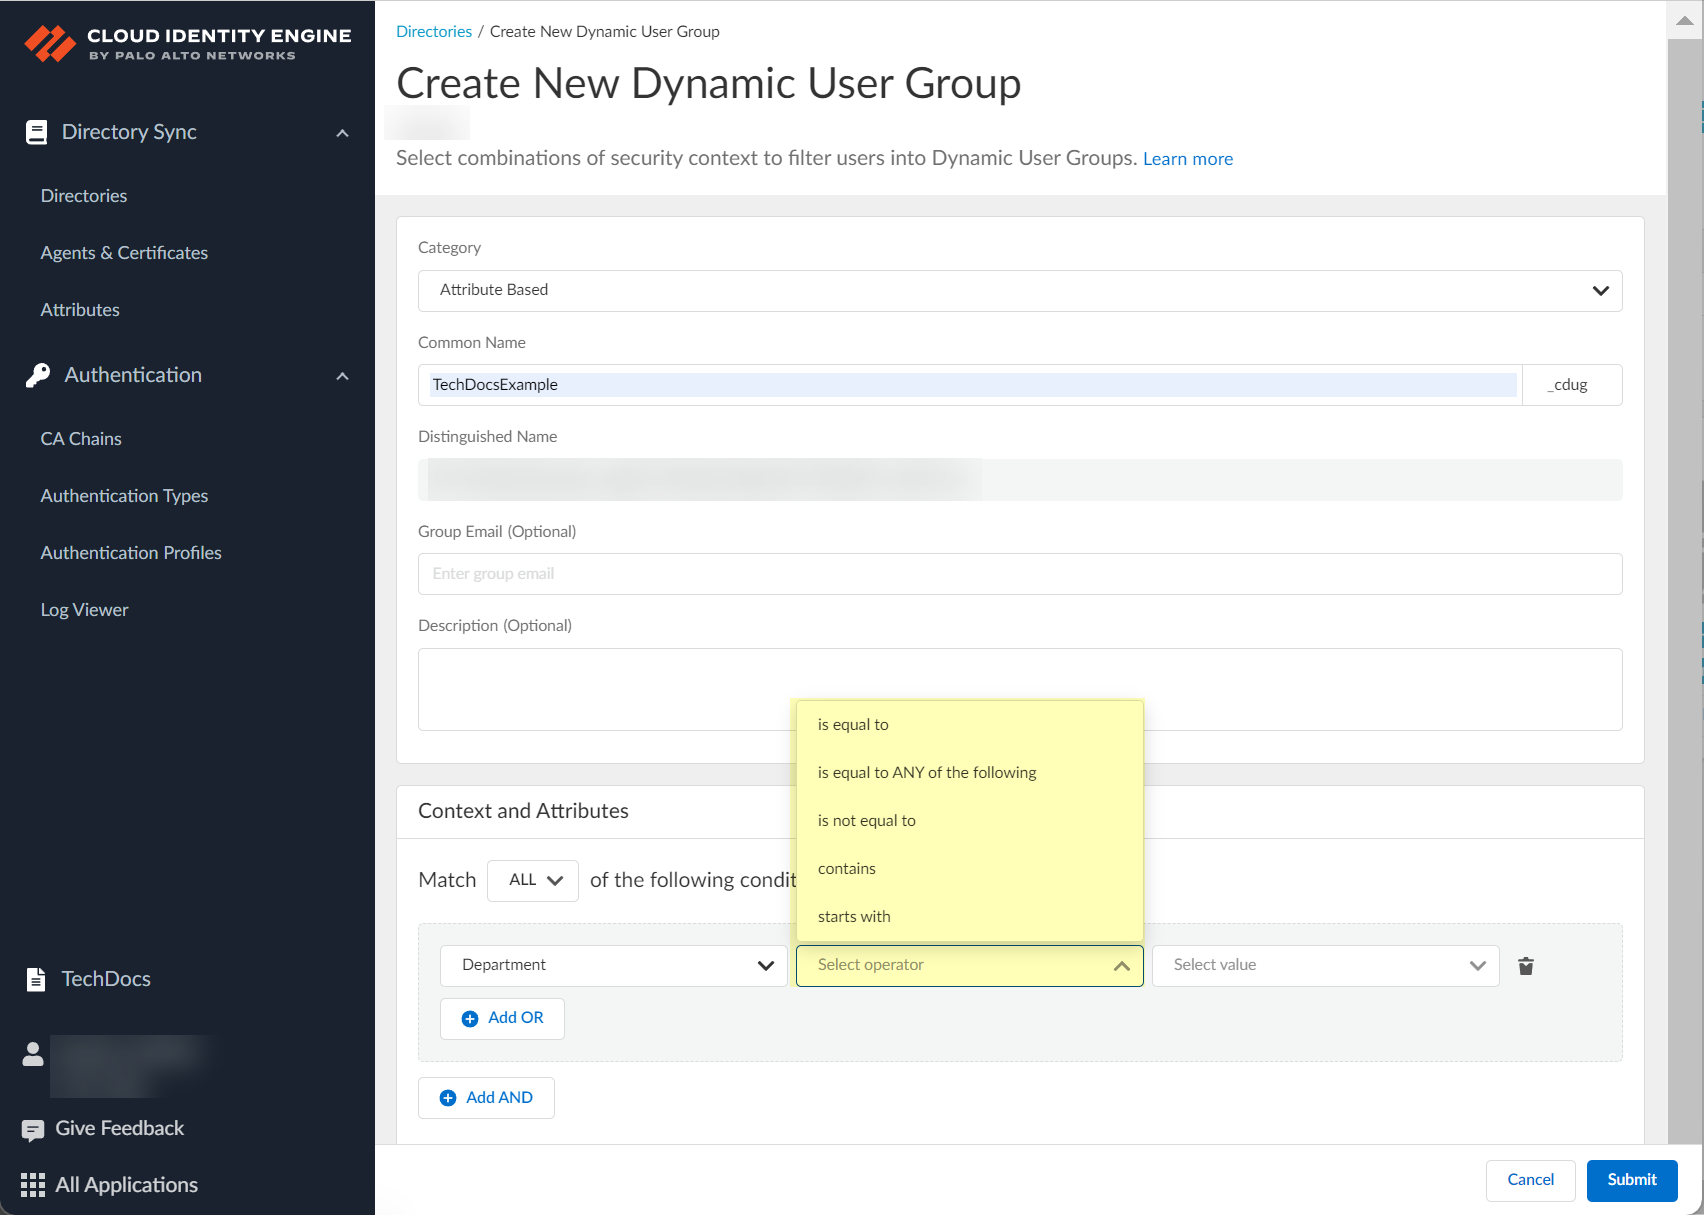
- (Attribute Based only) Click Select operator to select the type of operand.
The operators that are available depend on your context or attribute selection in the previous step.
- is equal to —Adds members to the group who are an exact match for a single attribute or context.
- is equal to ANY of the following —Adds members to the group who are an exact match for one or more attributes or contexts.
- is not equal to —Adds members to the group results who don't match the attribute or context.
- contains —Adds members to the group when they contain the term you enter.
- starts with —Adds members to the group when they begin with the characters you enter.
- (Attribute Based only) Click Select value to select the value (if the operand is is equal to ) or values (if the operand is is equal to ANY of the following ) for the group members. If the operand is contains or starts with , enter the value.
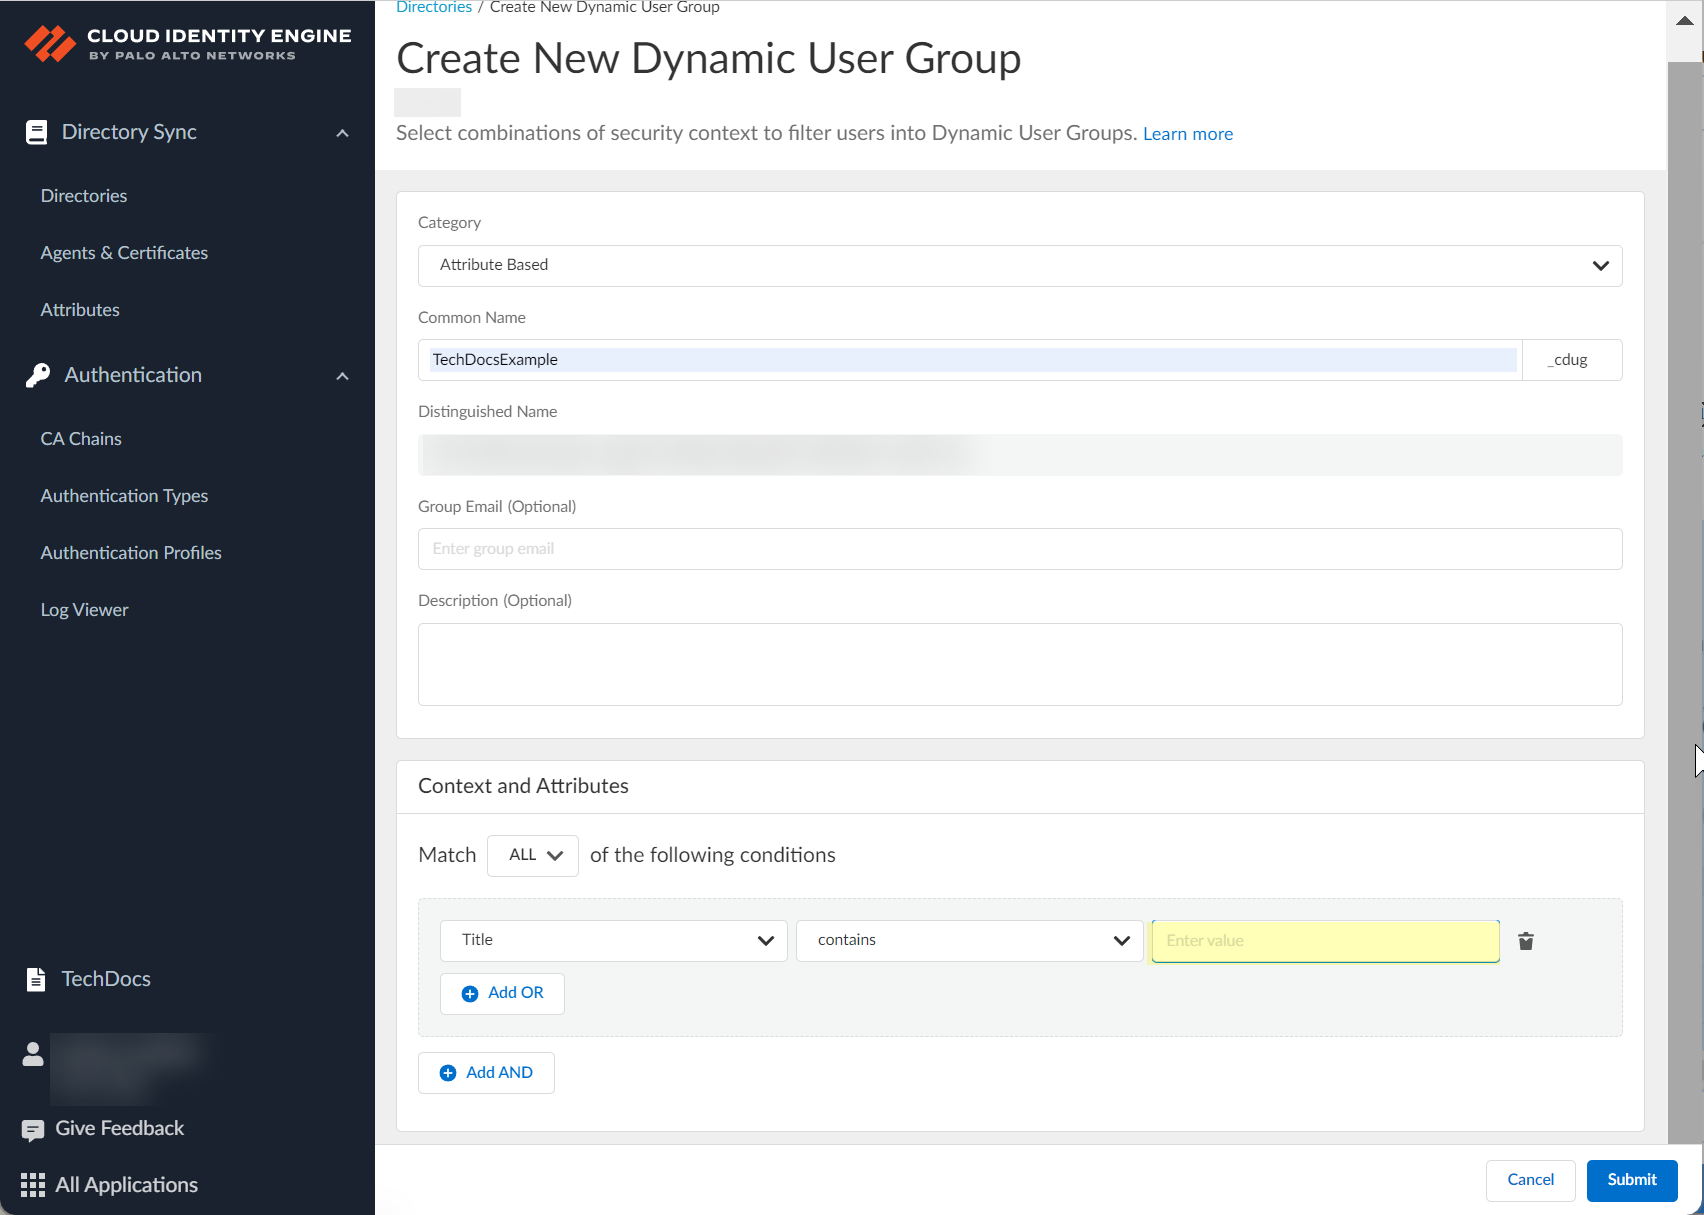
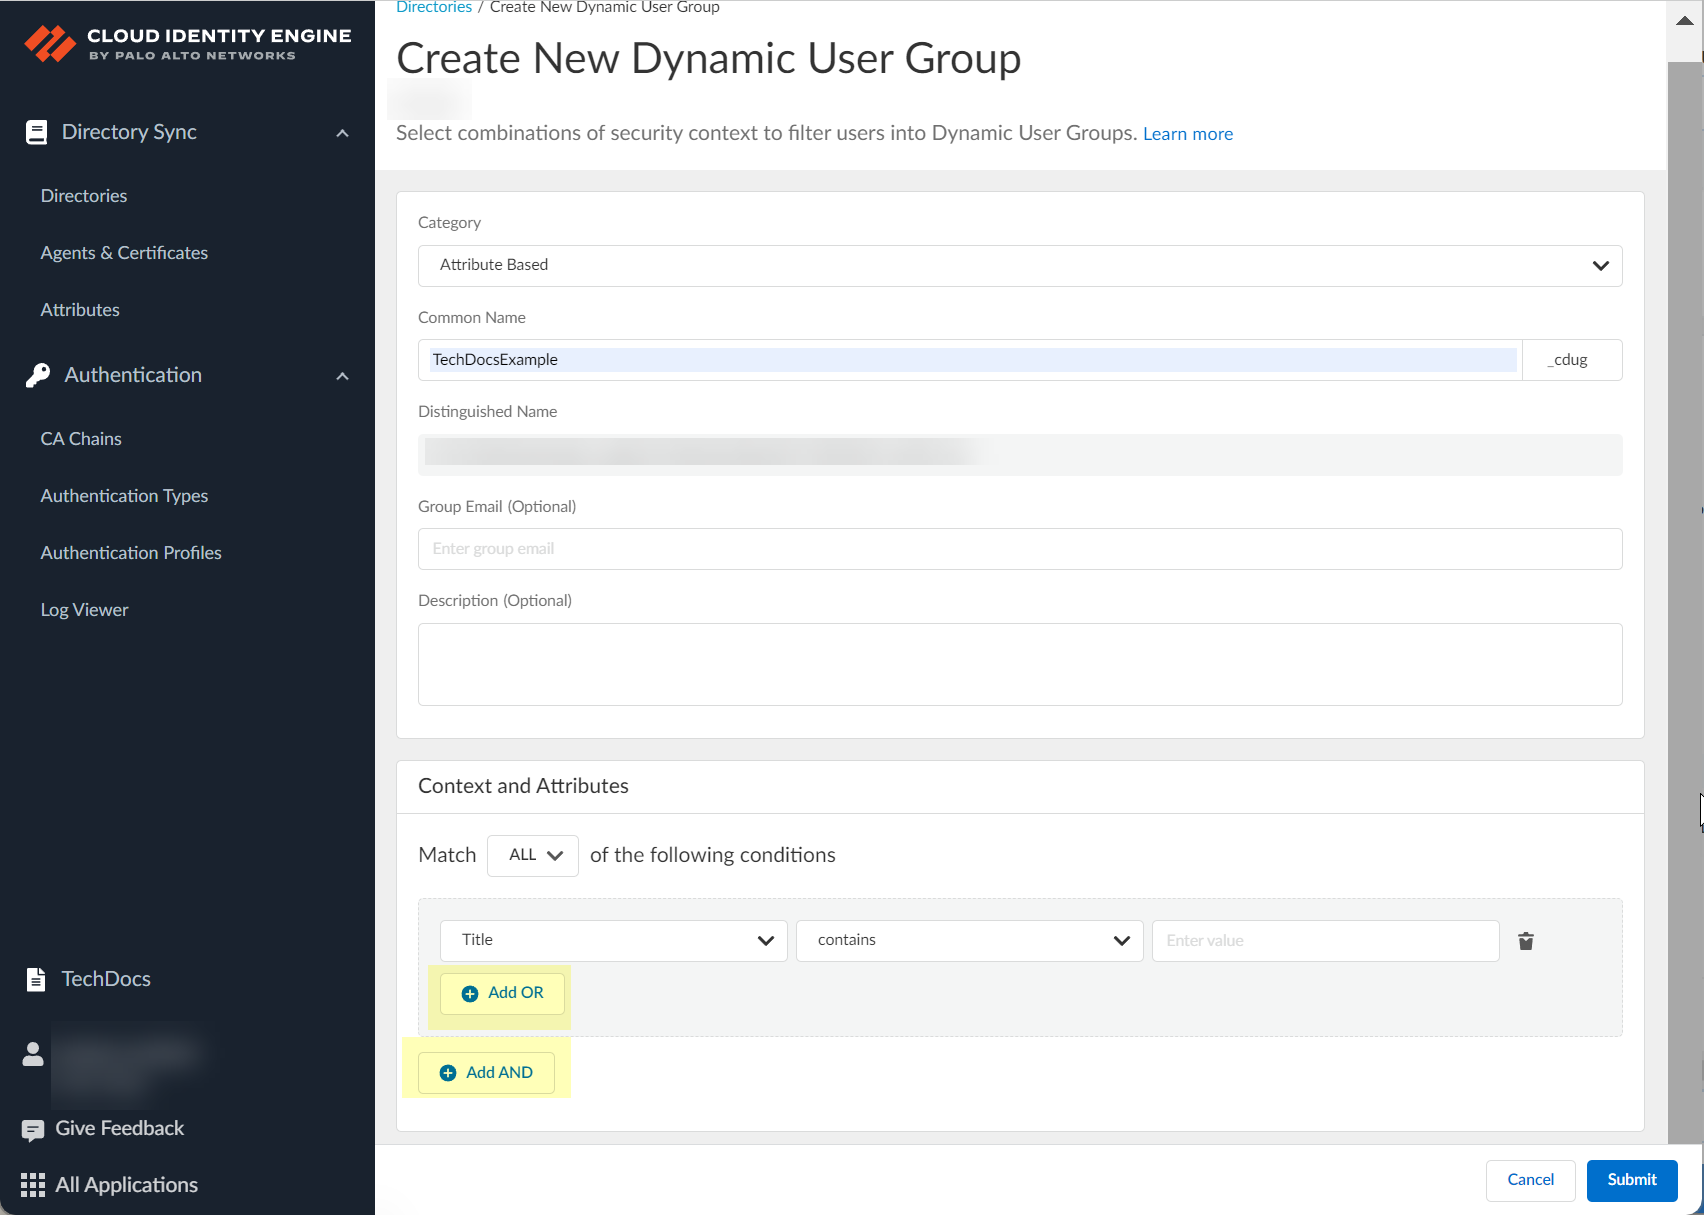
- (Optional) If you want to include additional criteria for the Cloud Dynamic User Group, select the type of operand and repeat the previous steps as needed to add the necessary criteria for the group.
- Add OR —Adds members to the group when at least one of the criteria applies.
- Add AND —Adds members to the group only when all criteria apply.
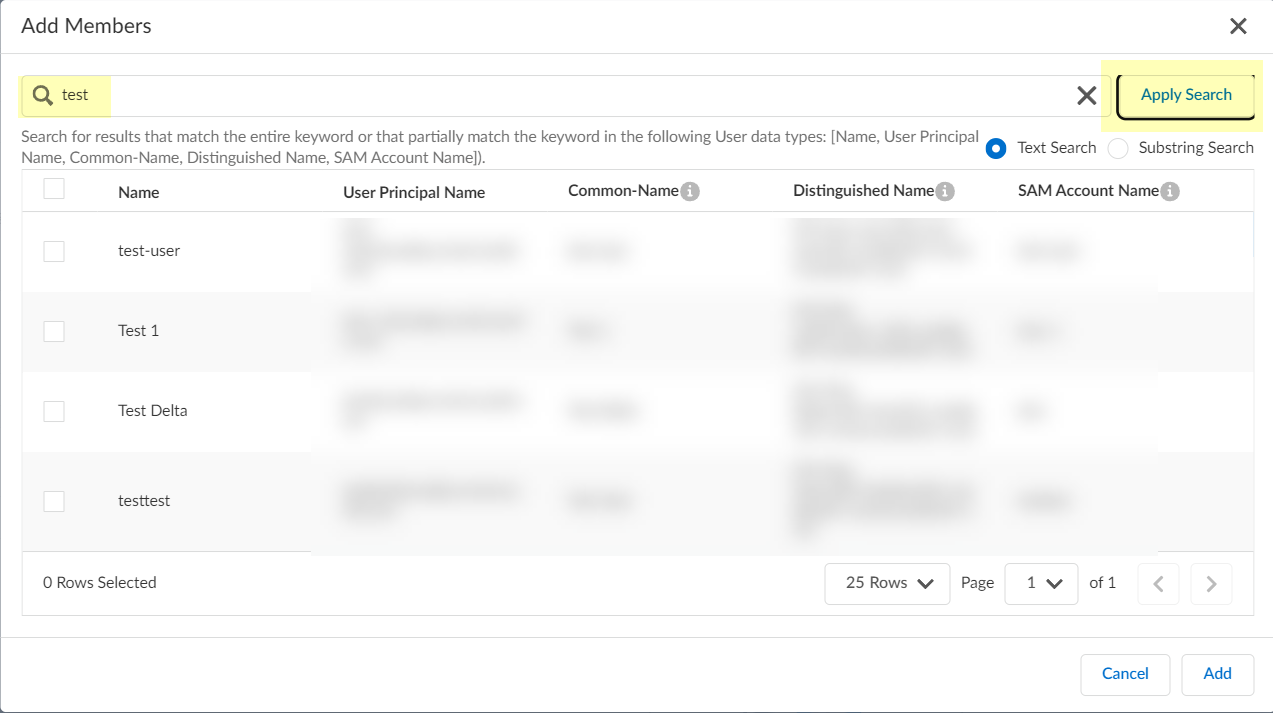
- (On Demand Assignment only) Click Add Users to view the list of possible group members.
- (On Demand Assignment only) Select the users you want and Add them to the group.
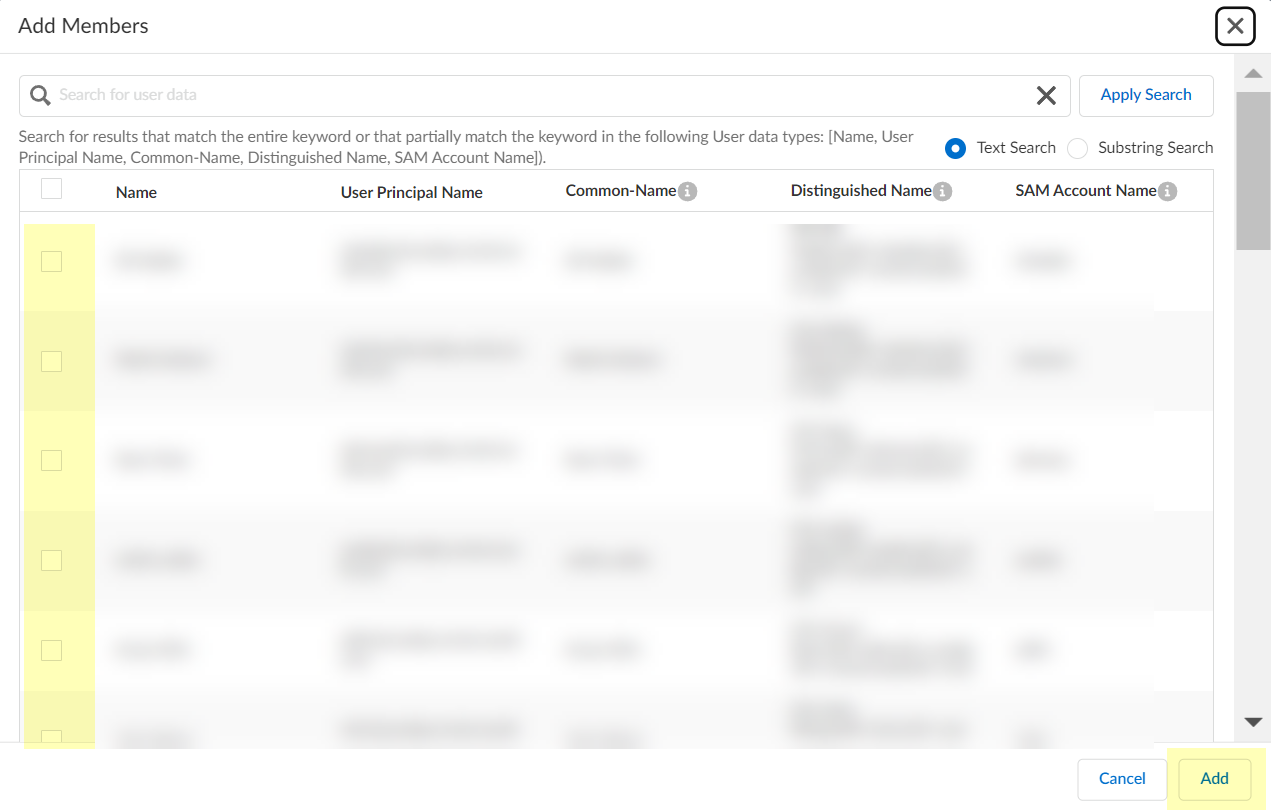
To filter the list of possible group members, enter a search term and Apply Search and optionally select either Text Search or Substring Search .
- (Optional) If you want to delete one of the contexts or attributes, click Delete in the row that contains the context or attribute you want to remove.
- (Optional) To remove a user from a cloud Dynamic User Group, select the check box in the row for the user and click Remove User then click Continue to confirm.
The Add User button changes to Remove User when you select a user.
- Click Submit to create the Cloud Dynamic User Group.
You can now use the Cloud Dynamic User Group to create group-based Security policy .
- ( User Risk Information with Azure AD only ) If you enabled user risk information collection in step
1.b
, verify that the Cloud Identity Engine can successfully collect the information by clicking the locked user icon and verifying that Collect User Risk displays with a green check mark.

- To remove a Cloud Dynamic User Group, select the ellipses button then select Remove .
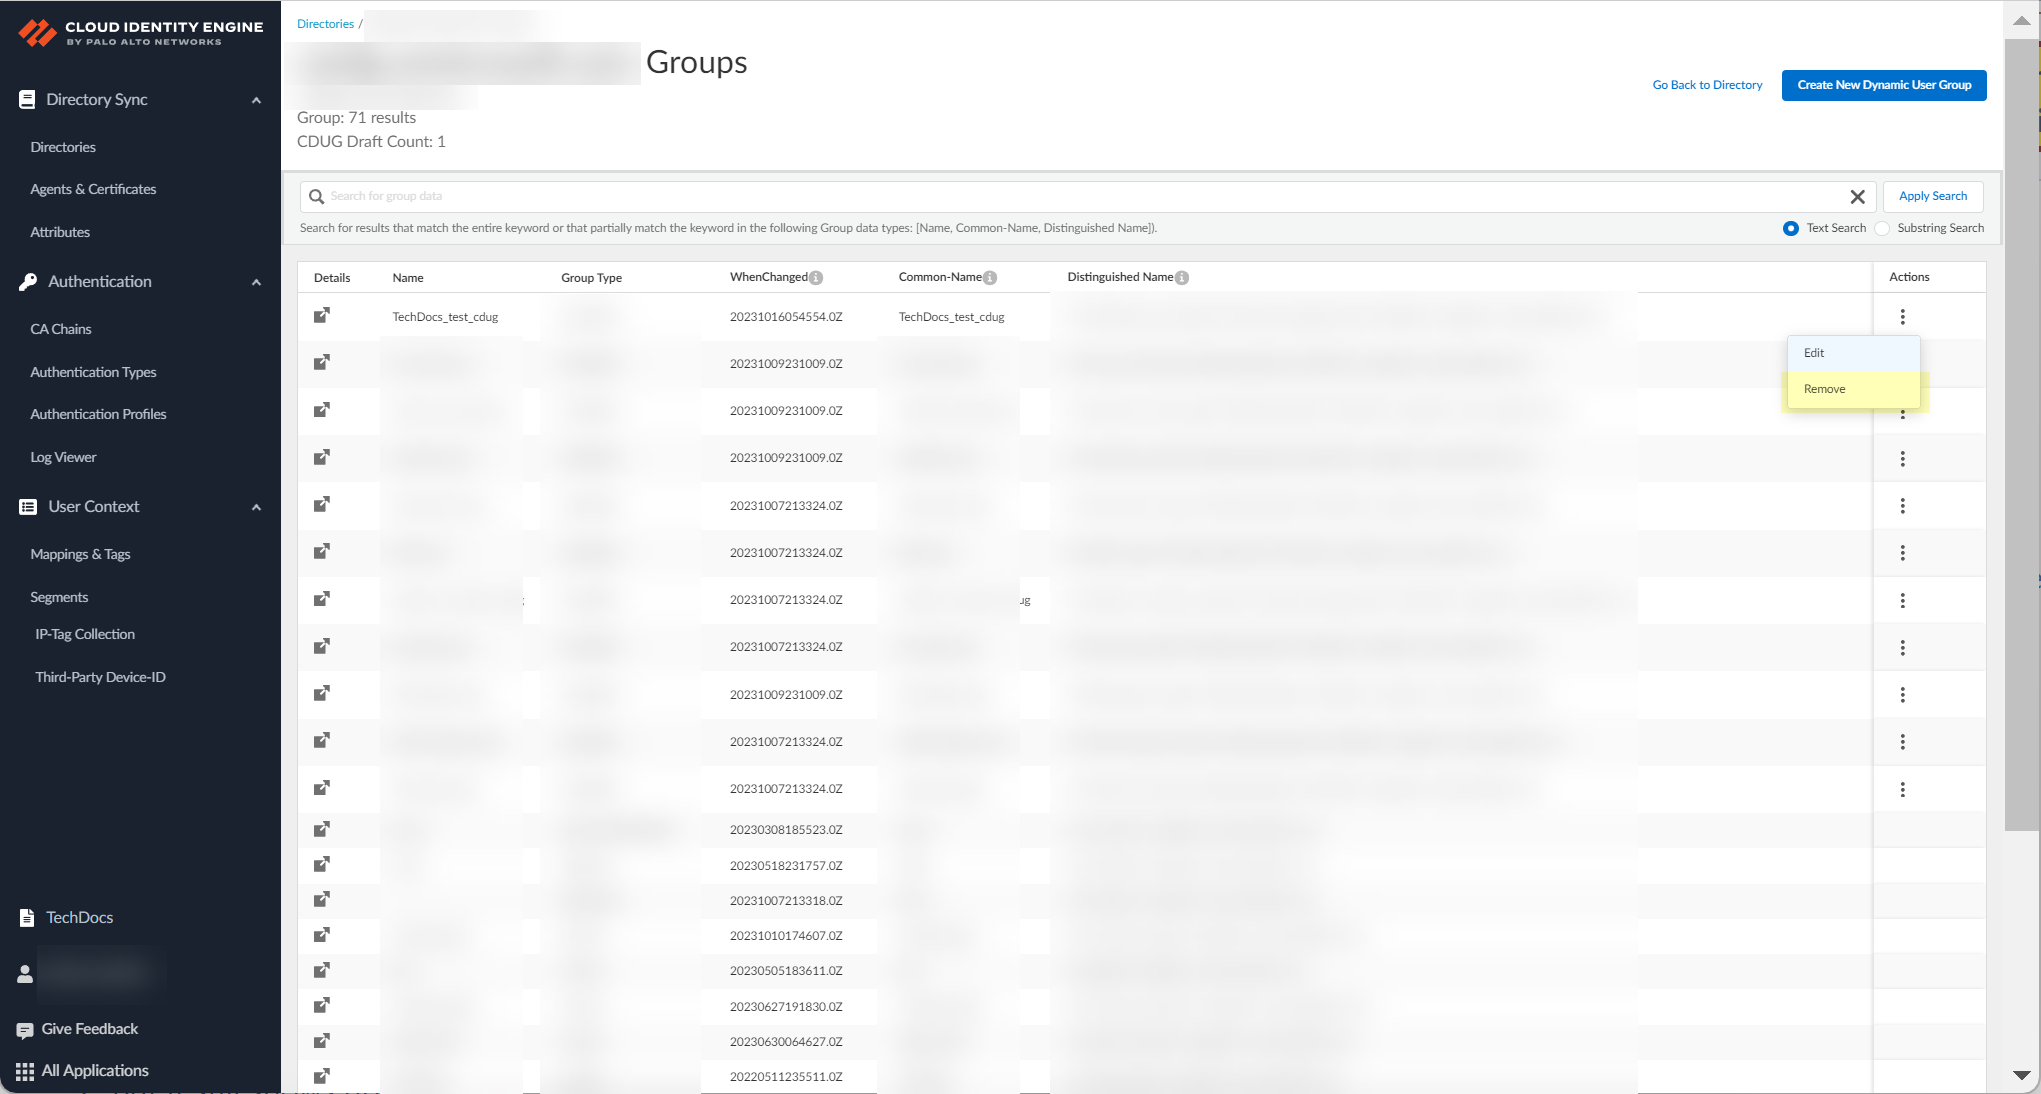
If a sync for the removed group is currently in progress, the removed group could still display on the page. If this occurs, refresh the page and confirm the removed group no longer displays.
Configure Third-Party Device-ID
Third-Party Device-ID allows you to leverage information from third-party IoT detection sources to simplify the task of identifying and closing security gaps for devices in your network. Third-Party Device-ID enables Prisma Access to obtain and use information from third-party IoT visibility solutions through the Cloud Identity Engine for device visibility and control.
When you configure Third-Party Device-ID, the third-party IoT solutions can use an API to provide the Device-ID verdicts to a secure cloud-based infrastructure, the Third-Party Device-ID service, that provides the information to the Prisma Access Security Processing Nodes (SPNs).
The same verdicts display as IP address-to-device mappings in the Cloud Identity Engine, allowing you to confirm that the Device-ID verdicts are available to your Palo Alto Networks applications. After the Prisma Access SPNs receive the IP address-to-device mappings and the third-party IoT solution information is available in the Cloud Identity Engine, any matching device-based policy rules defined in Prisma Access are enforced.
The following diagram depicts how the Third-Party Device-ID service receives the device information from the third-party IoT solutions, which it then transmits as IP address-to-device mappings to the Cloud Identity Engine and the Prisma Access SPNs.
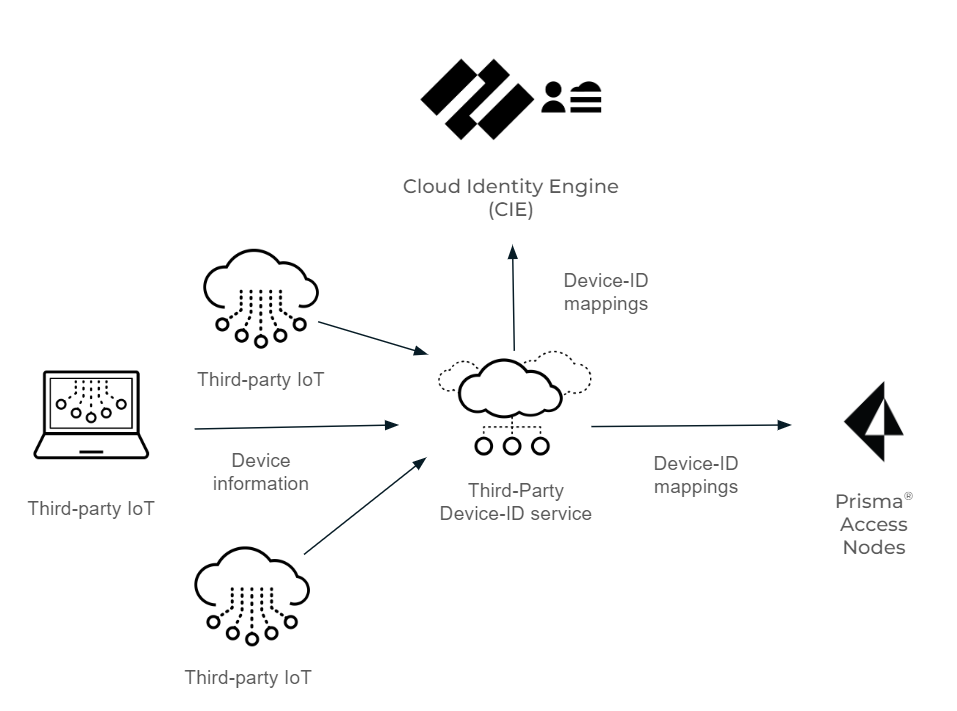
Before you begin the procedure, obtain a certificate signing request and its key for the vendor of each third-party IoT solution you want to use with Third-Party Device-ID from your network administrator.
- Activate Third-Party Device-ID in the Cloud Identity Engine.
If you have not already done so, configure the Cloud Identity Engine .
- Log in to the hub and select the Cloud Identity Engine tenant you want to use, then select User ContextThird-Party Device-ID .
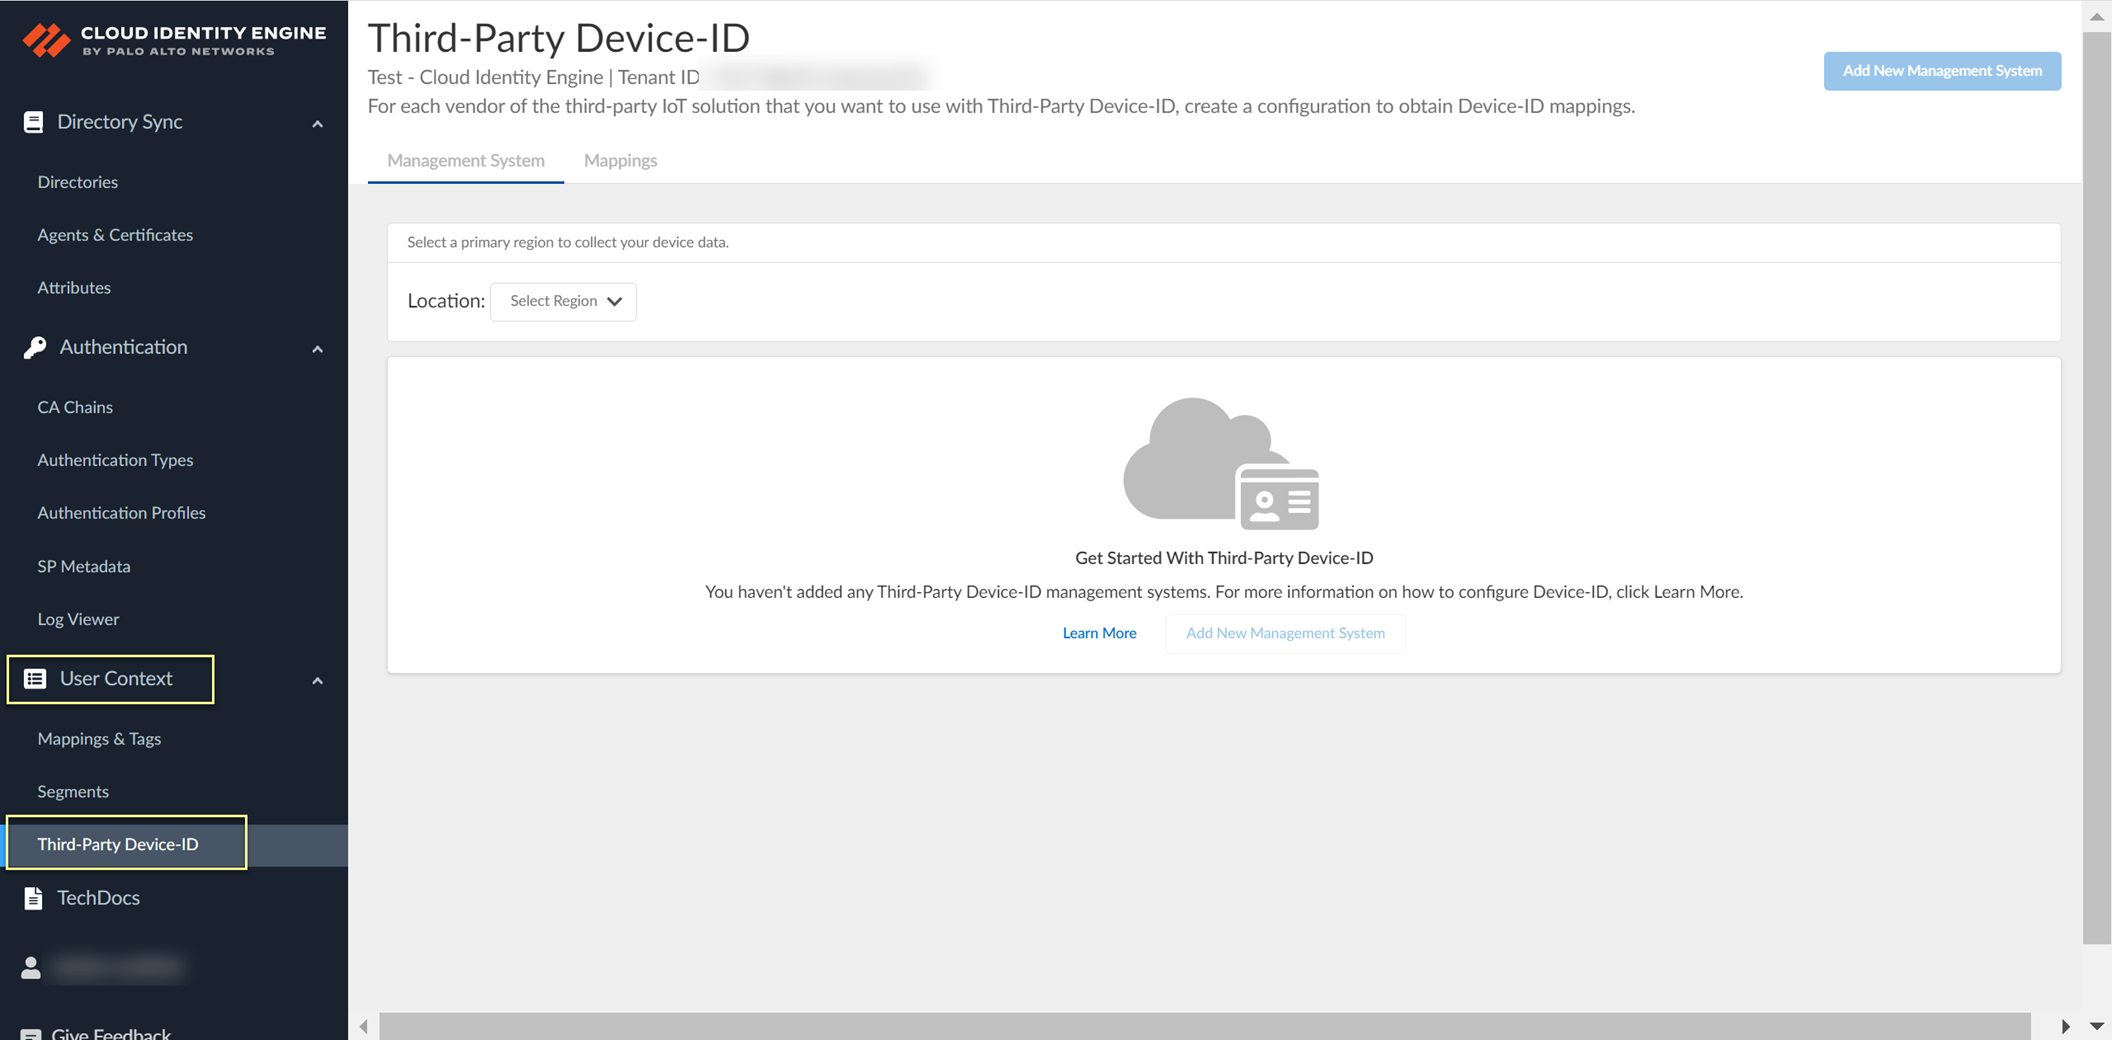
- Select the Location of your tenant.
Because you can only select the region once and you can't change it after making a selection, verify your region before selecting it during Third-Party Device-ID activation.
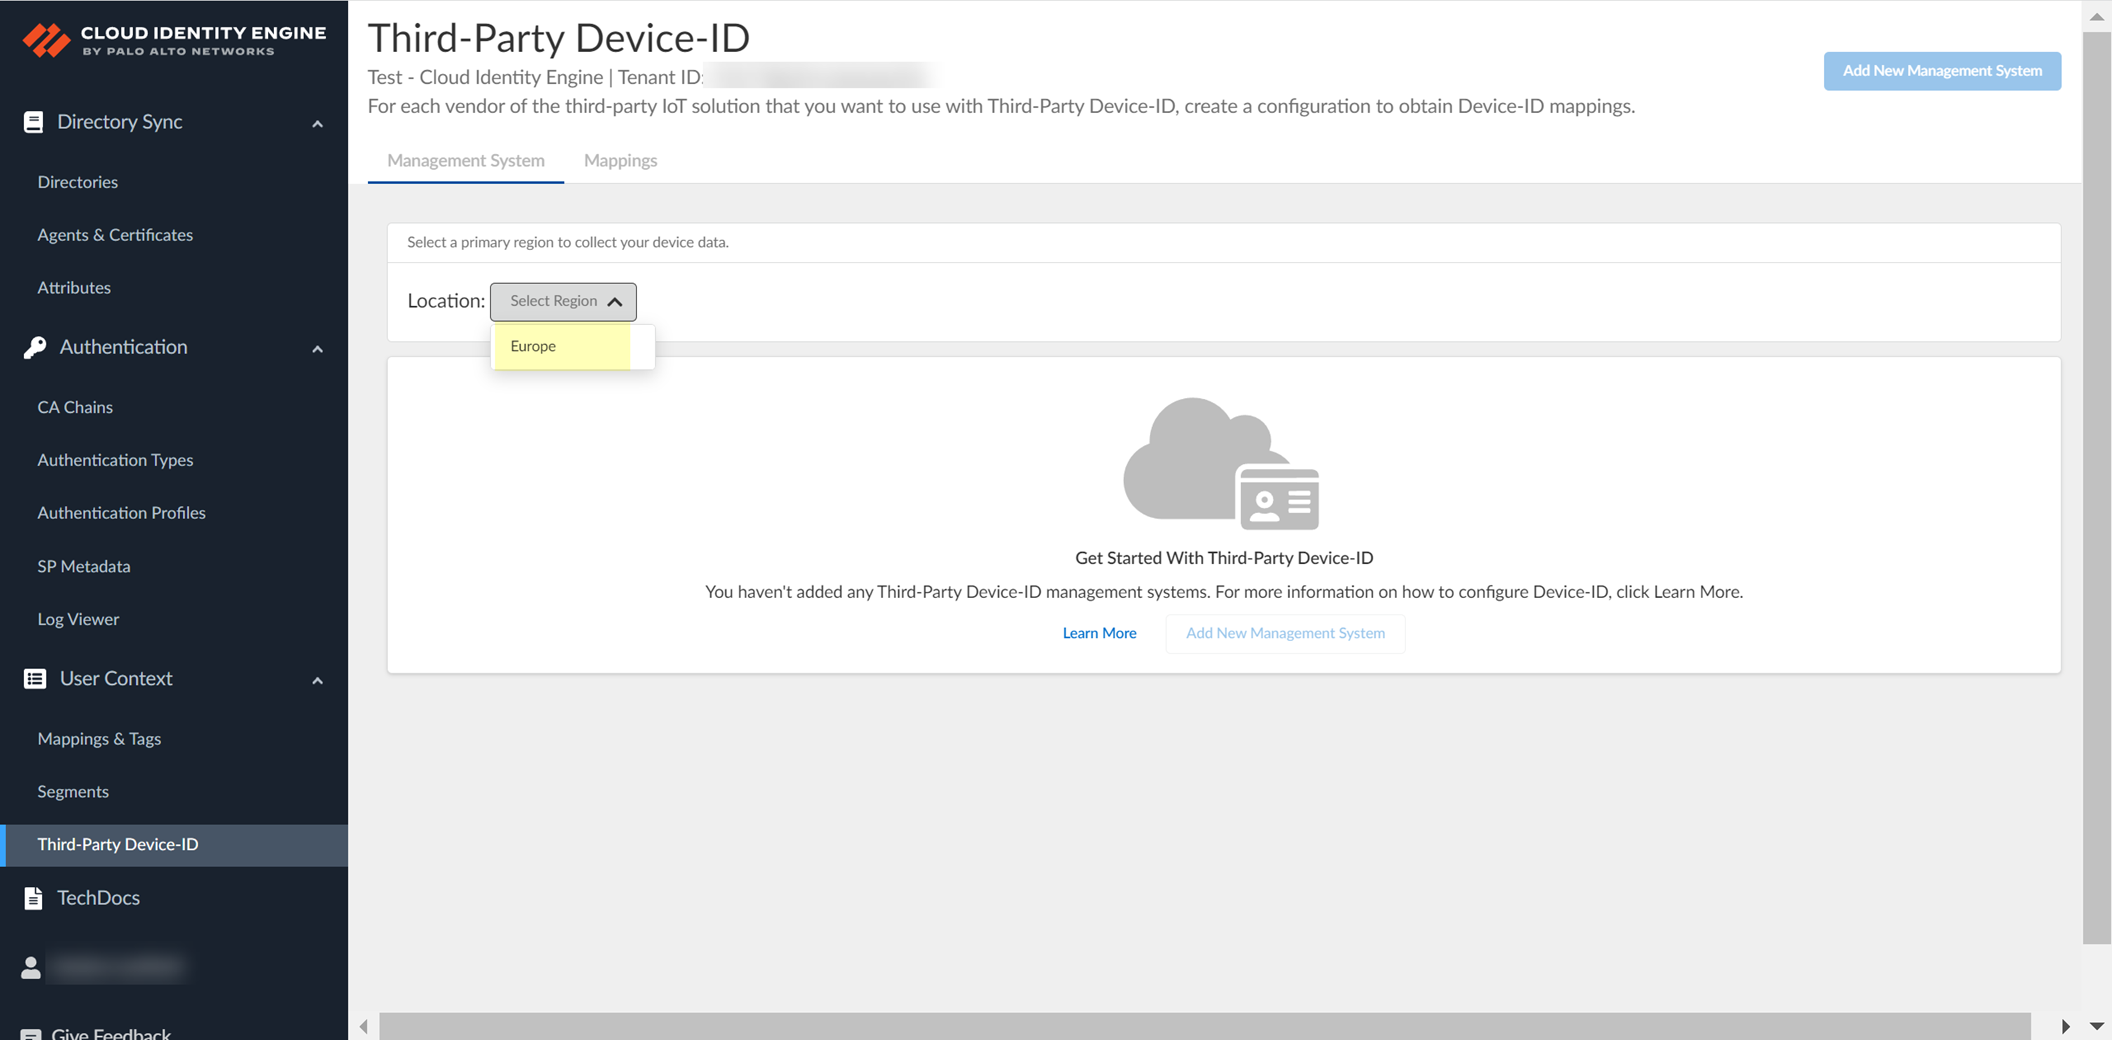
- Click Add New Management System .
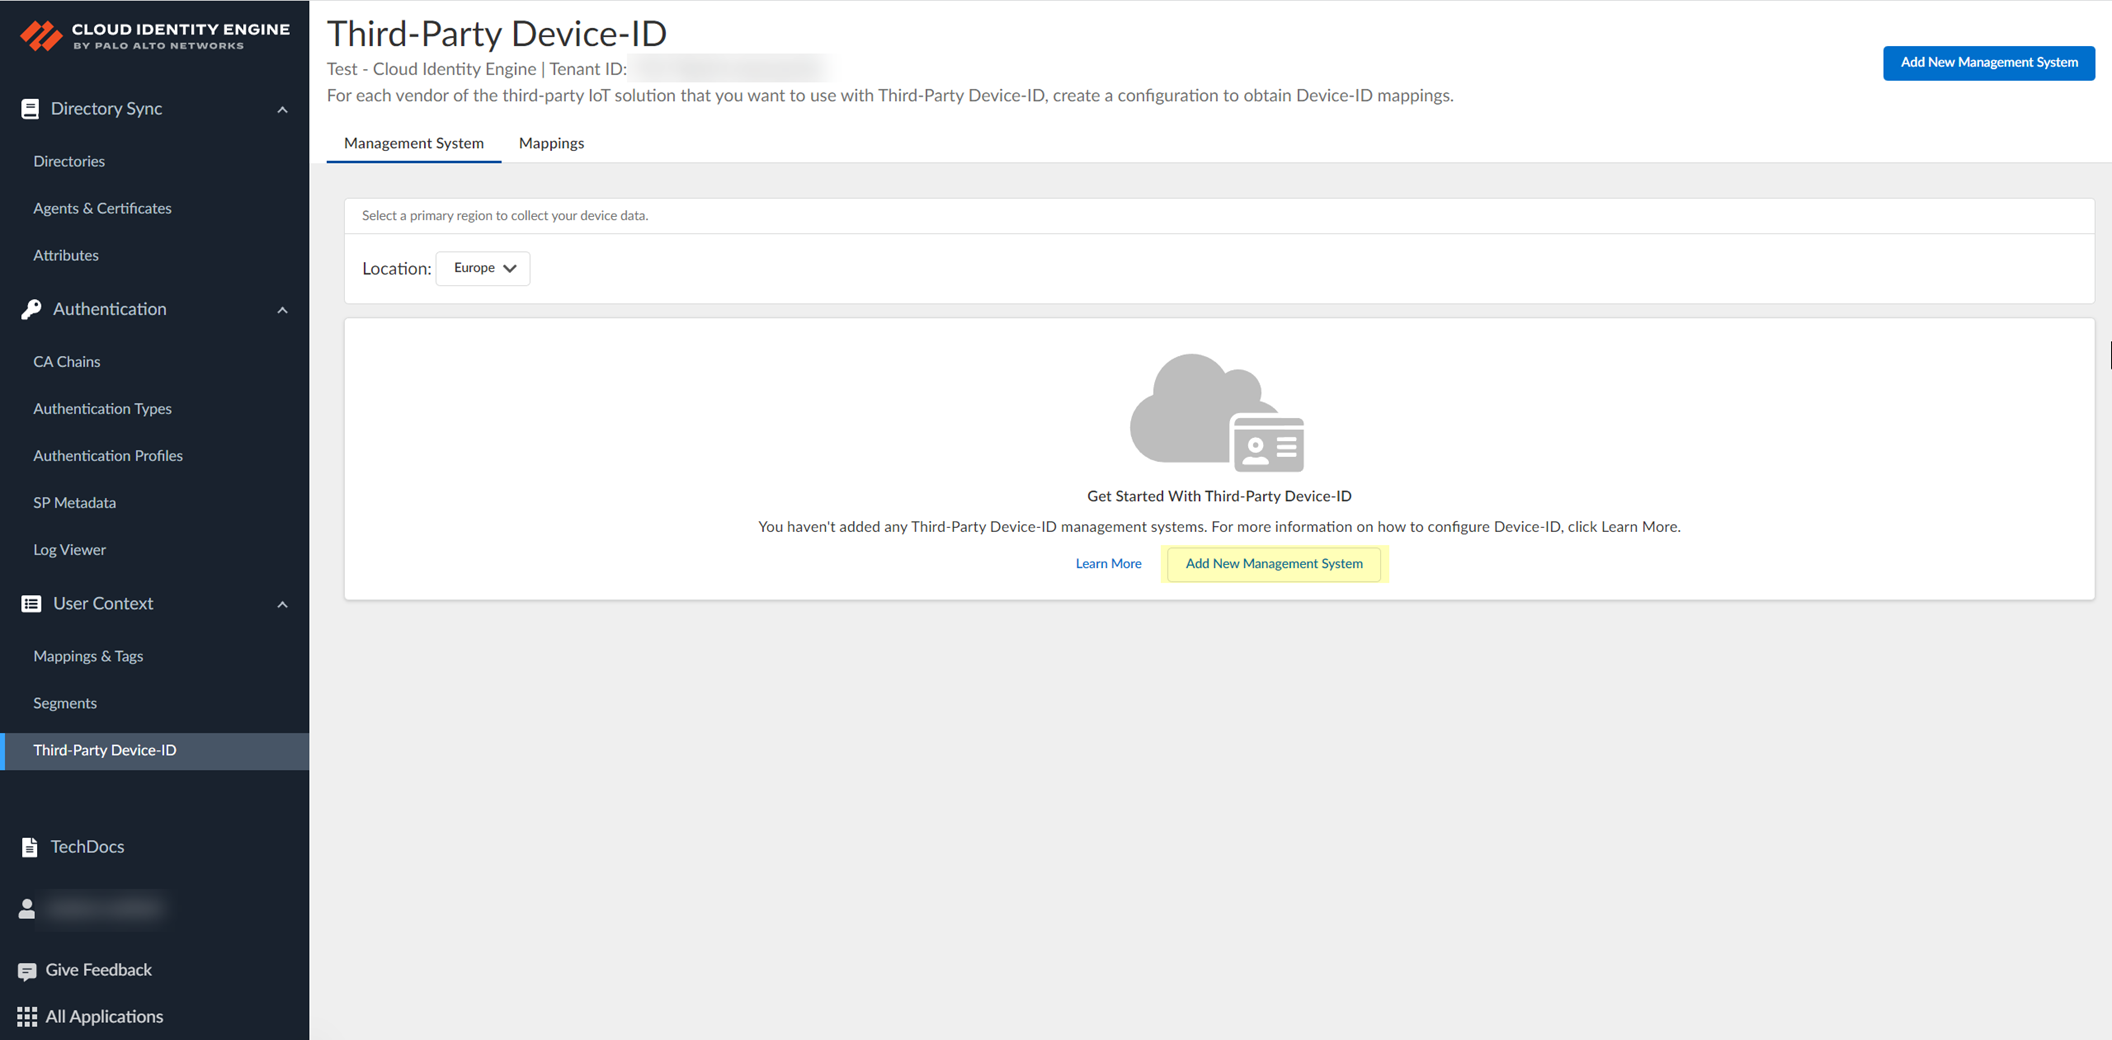
- Upload the certificate signing request (CSR) from the third-party IoT solution.
- Enter a unique Configuration Name (for example, the vendor of the third-party IoT solution).
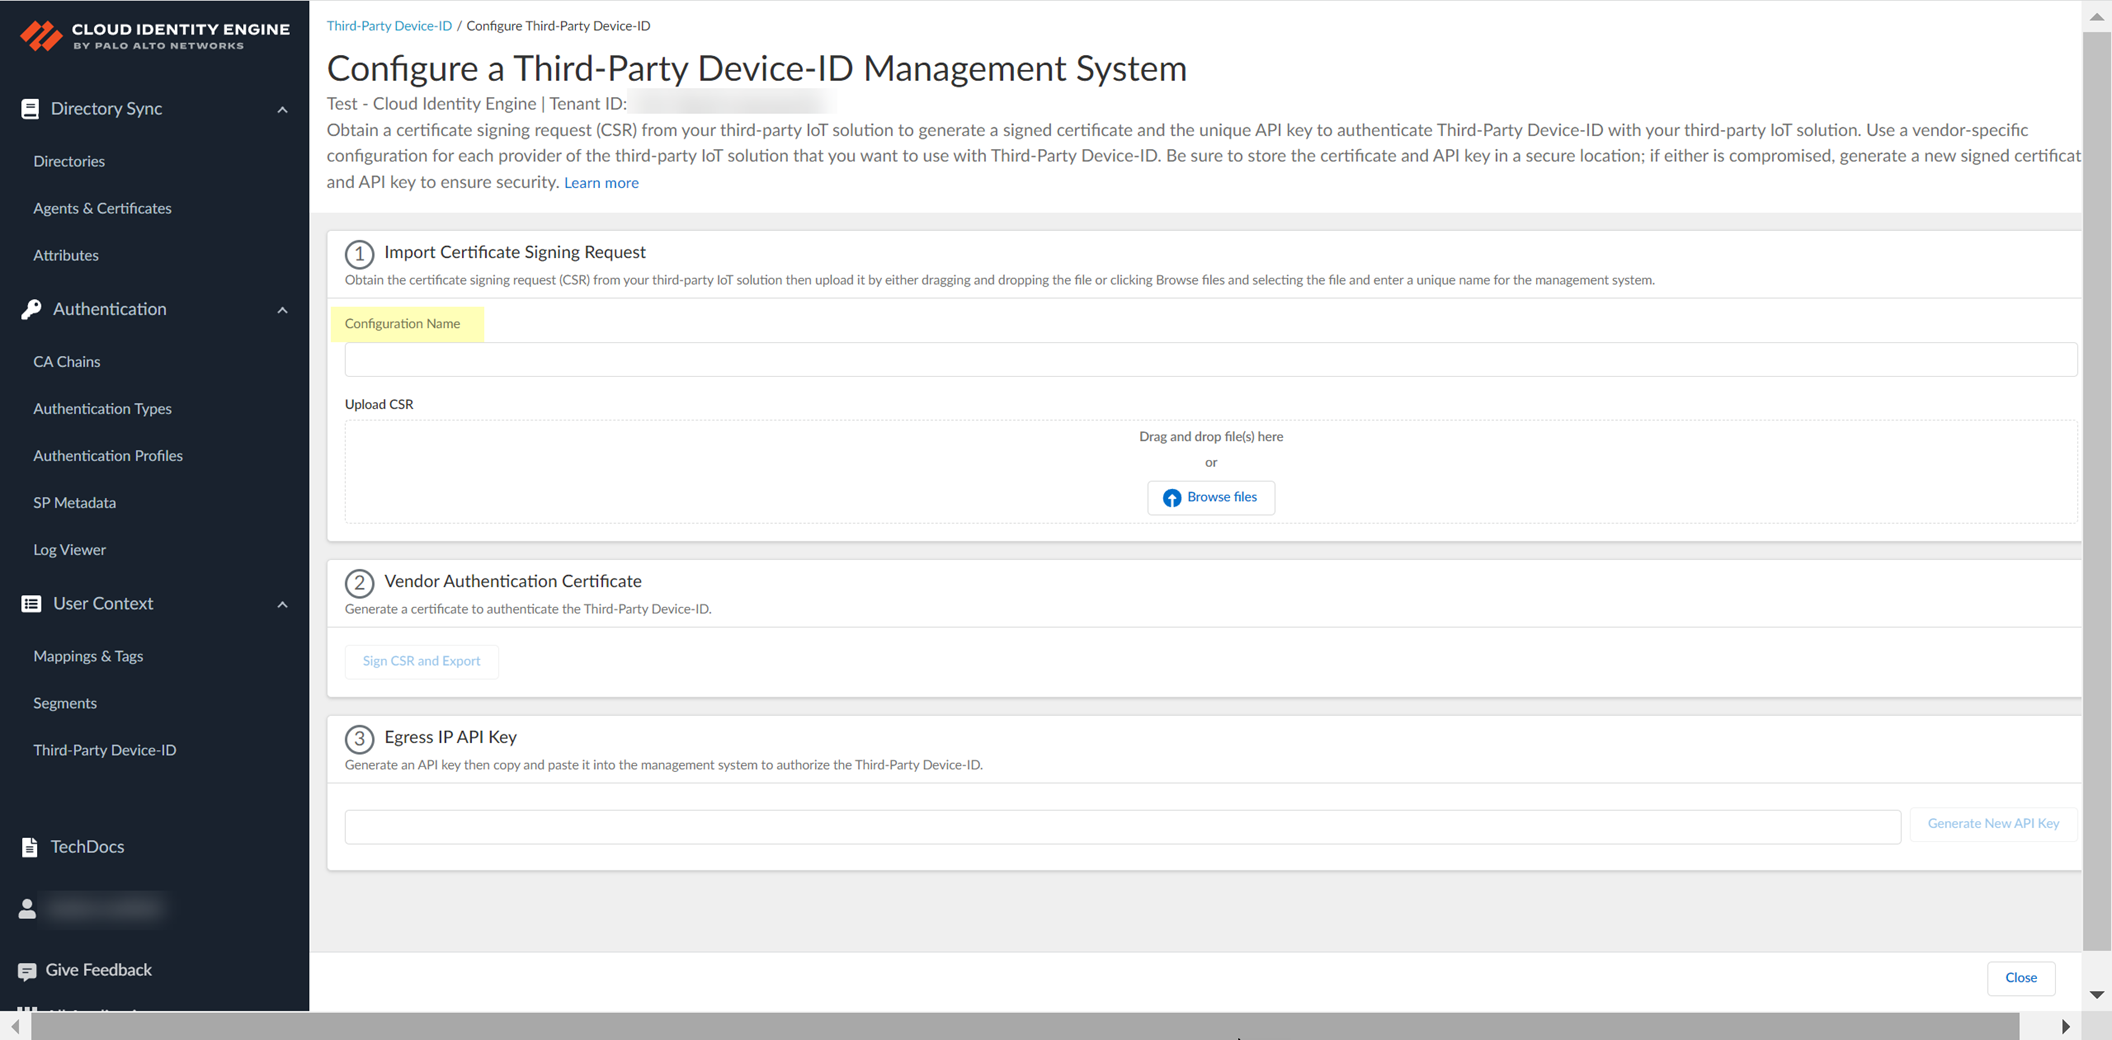
- Click Browse Files or drag and drop to upload the certificate signing request (CSR) file from the third-party IoT solution.
Contact the administrator of the third-party IoT solution to obtain the CSR file.
You can only upload a CSR once for each configuration. If you need to update or change the configuration, you must create a new CSR.
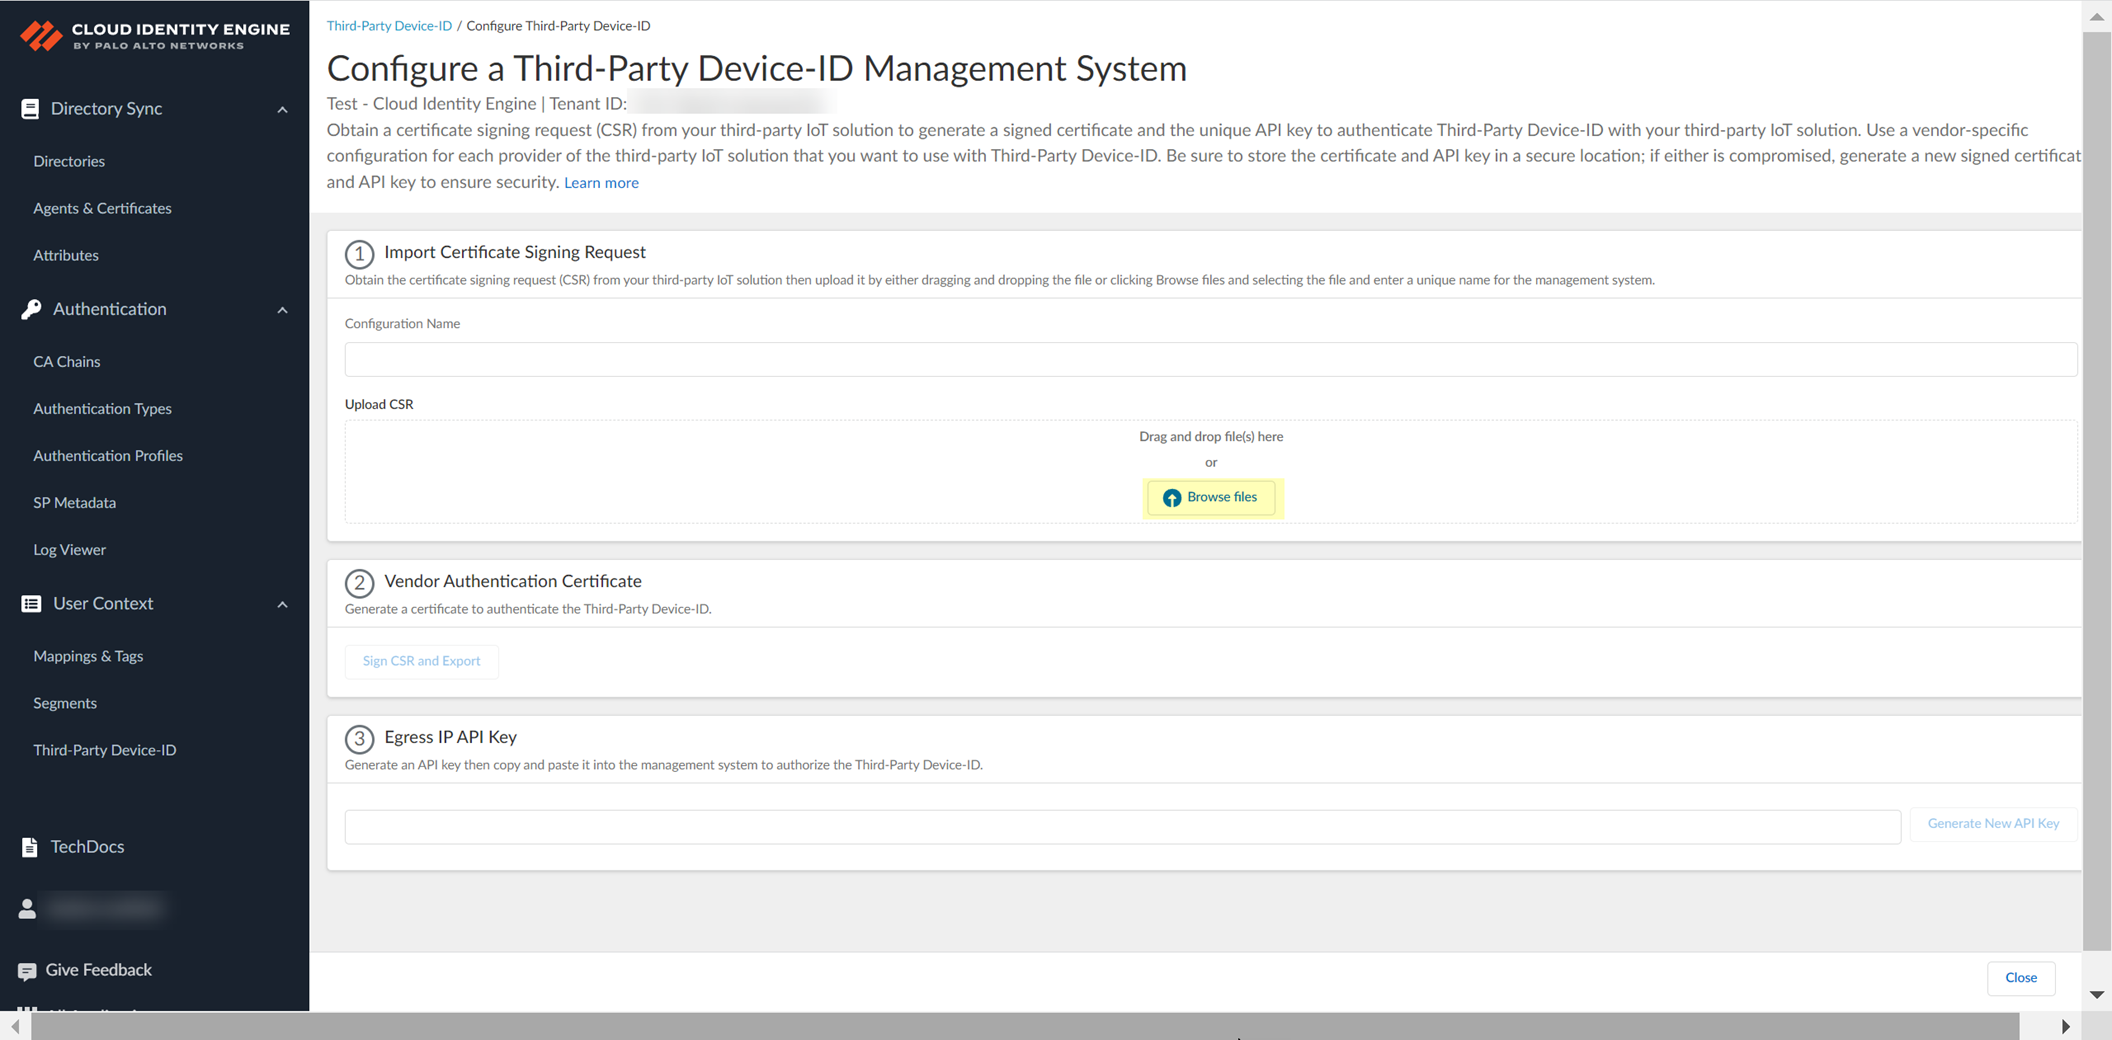
- Obtain the signed certificate and the API key to import to the management system for your third-party IoT solution.
- Click Sign CSR and Export to download the certificate that you must import to the third-party IoT solution management system.
To help prevent any security risk for the certificate or the API key, be sure to store both the signed certificate and the API key in a secure location.
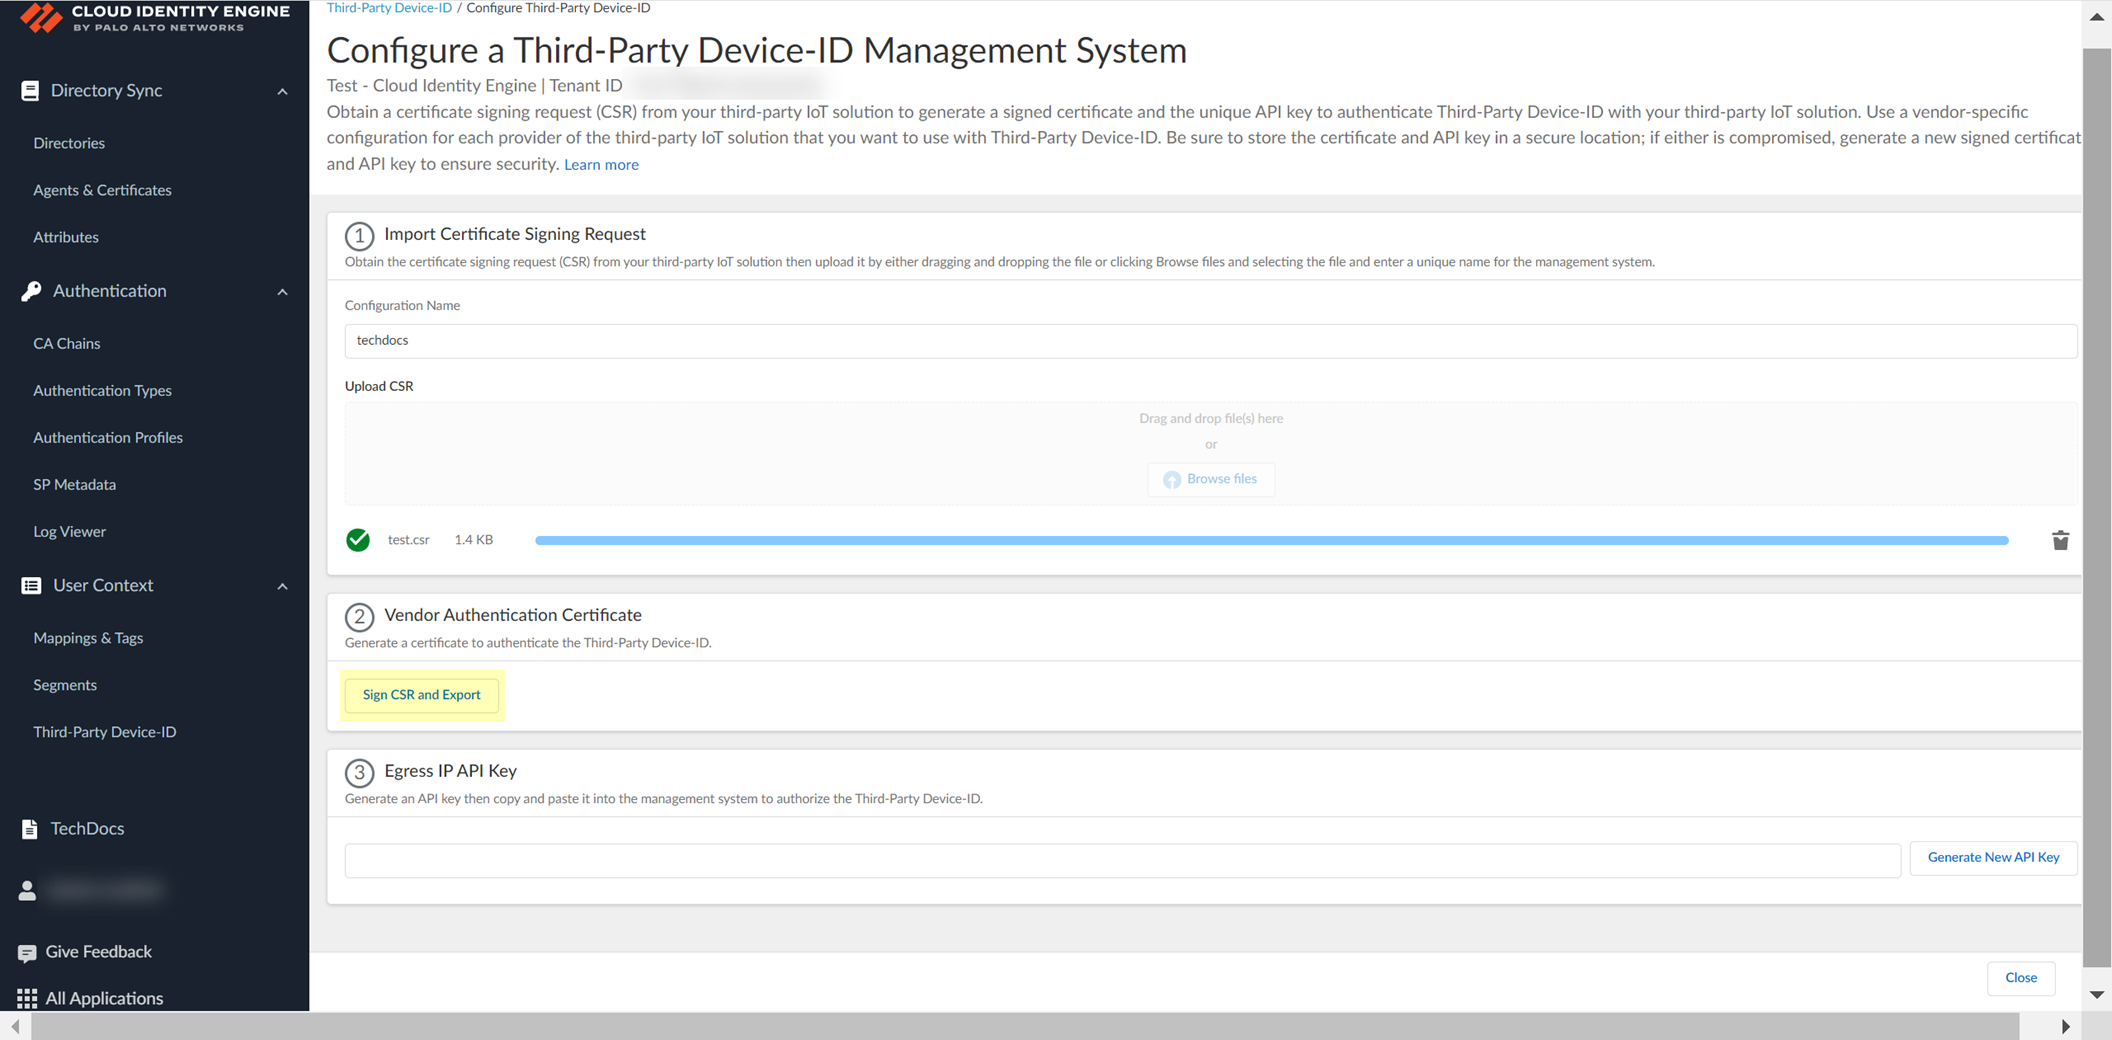
- Click Generate New API Key to generate an API token to authenticate the third-party IoT solution.
The API key is a token that contains information about the third-party IoT solution and other required information, such as the identifier for the tenant and the token’s expiration.
If the API key becomes compromised, you must generate a new API key and import the new key to the third-party IoT solution management system.
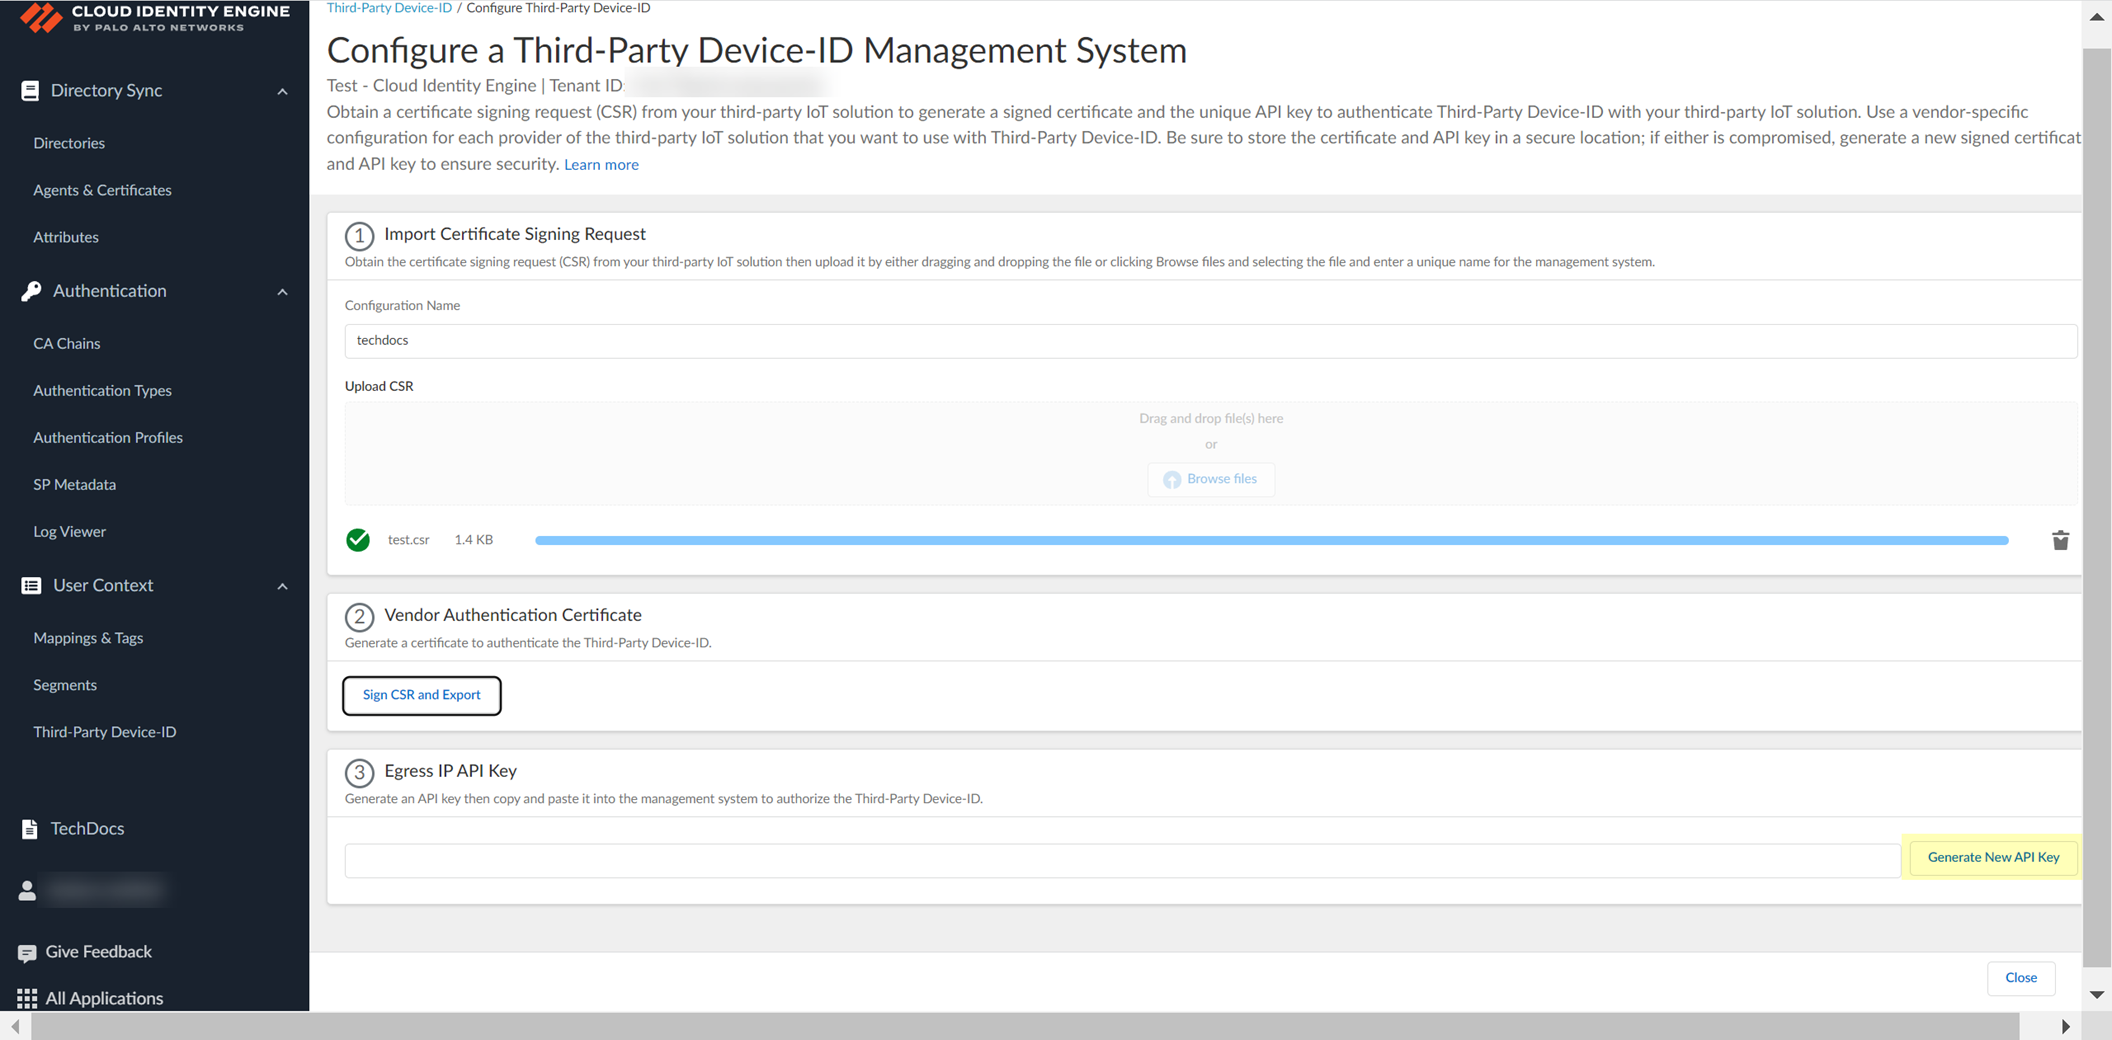
- Copy the API key then import both the signed certificate that you downloaded and the API key that you generated to the management system for your third-party IoT solution and configure the IoT solution to use these files to communicate with the Third-Party Device-ID.
To ensure that the third-party IoT solution can successfully communicate with the Third-Party Device-ID, you must upload both the signed certificate from the previous step and the API key. Create a configuration for each third-party vendor in your network that you want to use with Third-Party Device-ID. The configuration for each vendor must have a unique signed certificate and API key; don't use the same certificate or API key in more than one configuration.
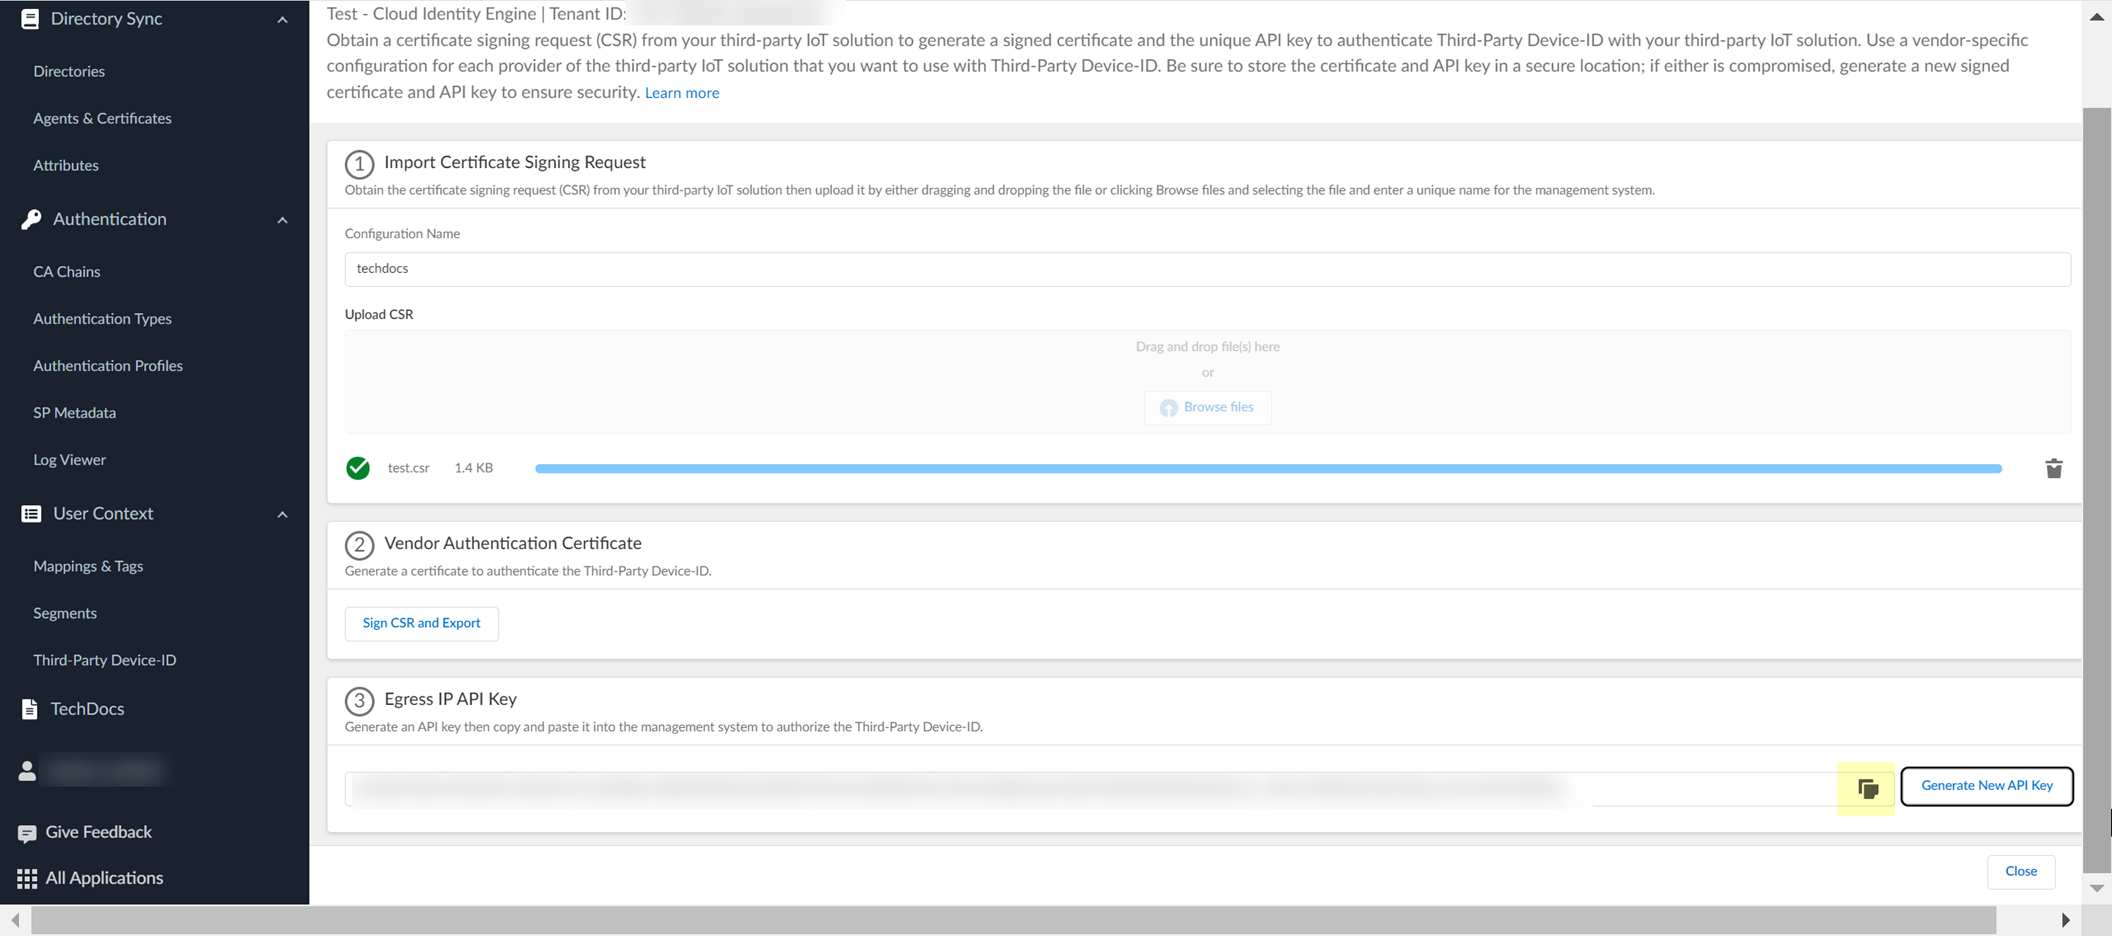
- Review the information to verify the configuration is correct.
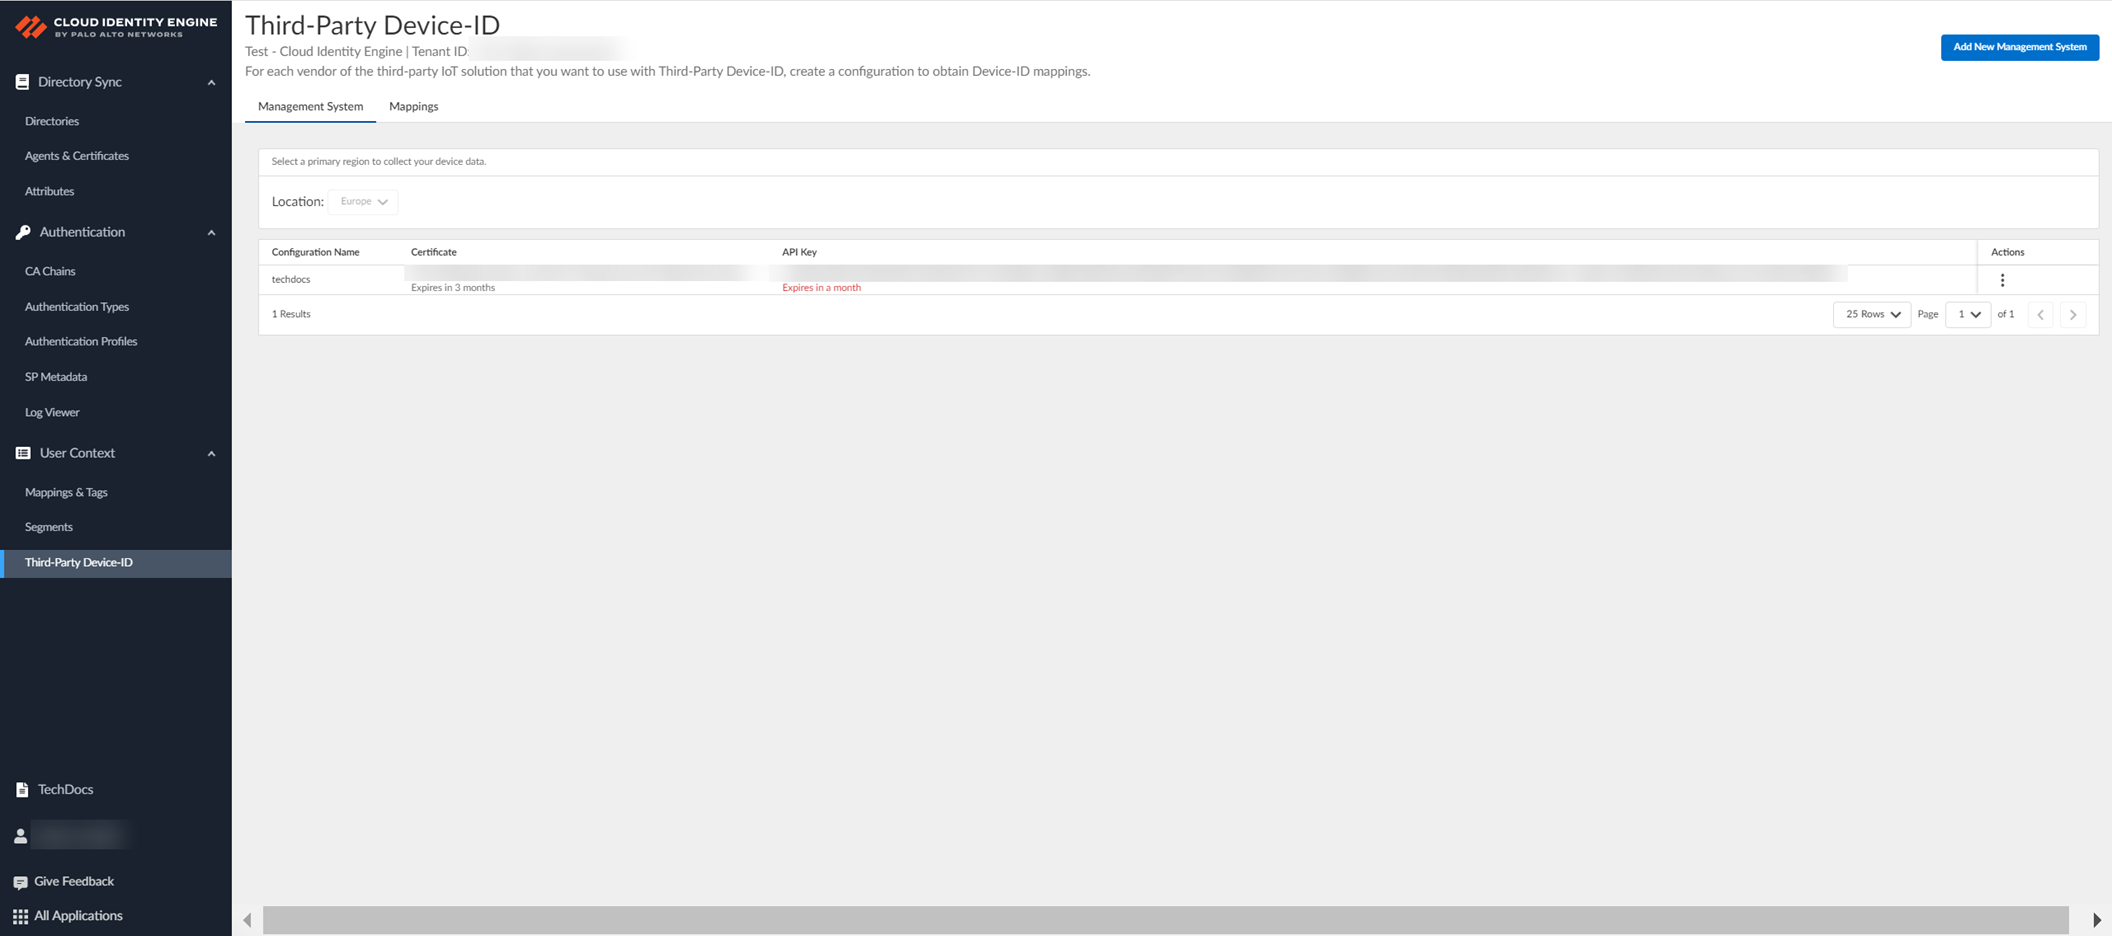
- After you use the API commands to obtain the information from the third-party IoT solutions, select Mappings to view information about the devices that the Third-Party Device-ID has detected and their IP address-to-device mappings.
You can search the IP address-to-device mappings by IP address by entering the IP address and clicking Apply Search .

- Select Management Systems to view information about your management systems, such as certificate expiration date and API key.
- (Optional) Edit the management system configuration.
- In the row for the management system you want to edit, select ActionsEdit .
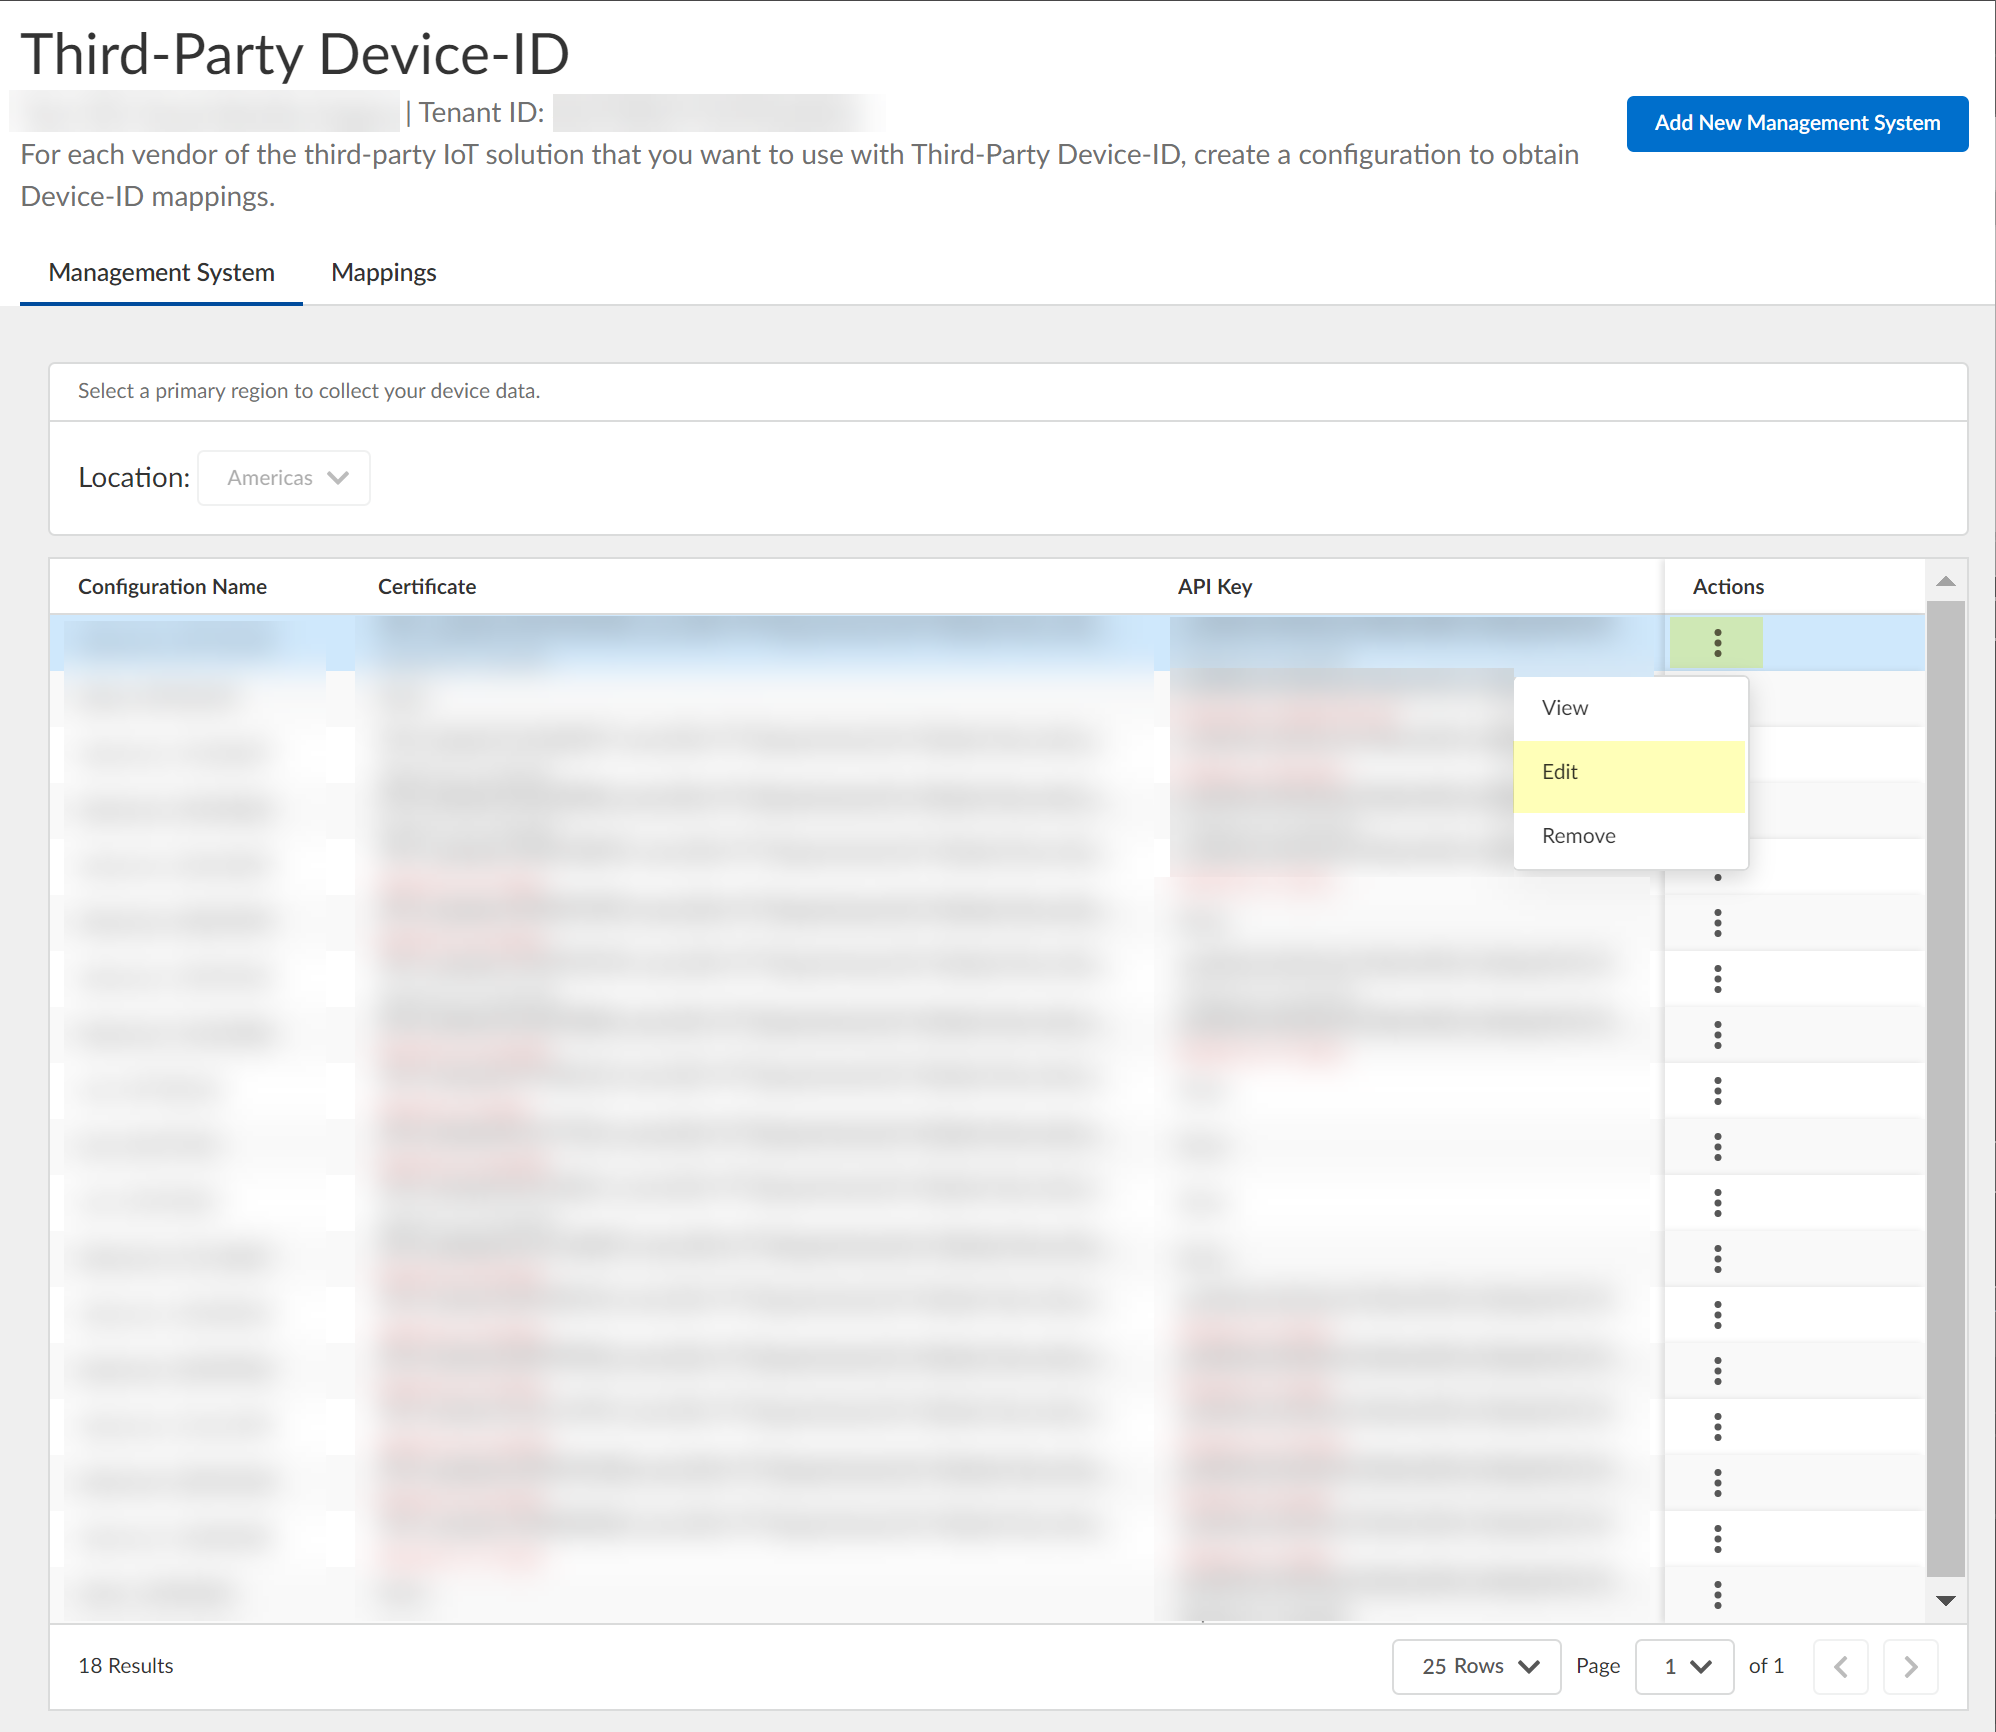
- Make the necessary changes to the configuration, such as uploading a new CSR or vendor authentication certificate or generating a new API key.
You can't change the name of the configuration.
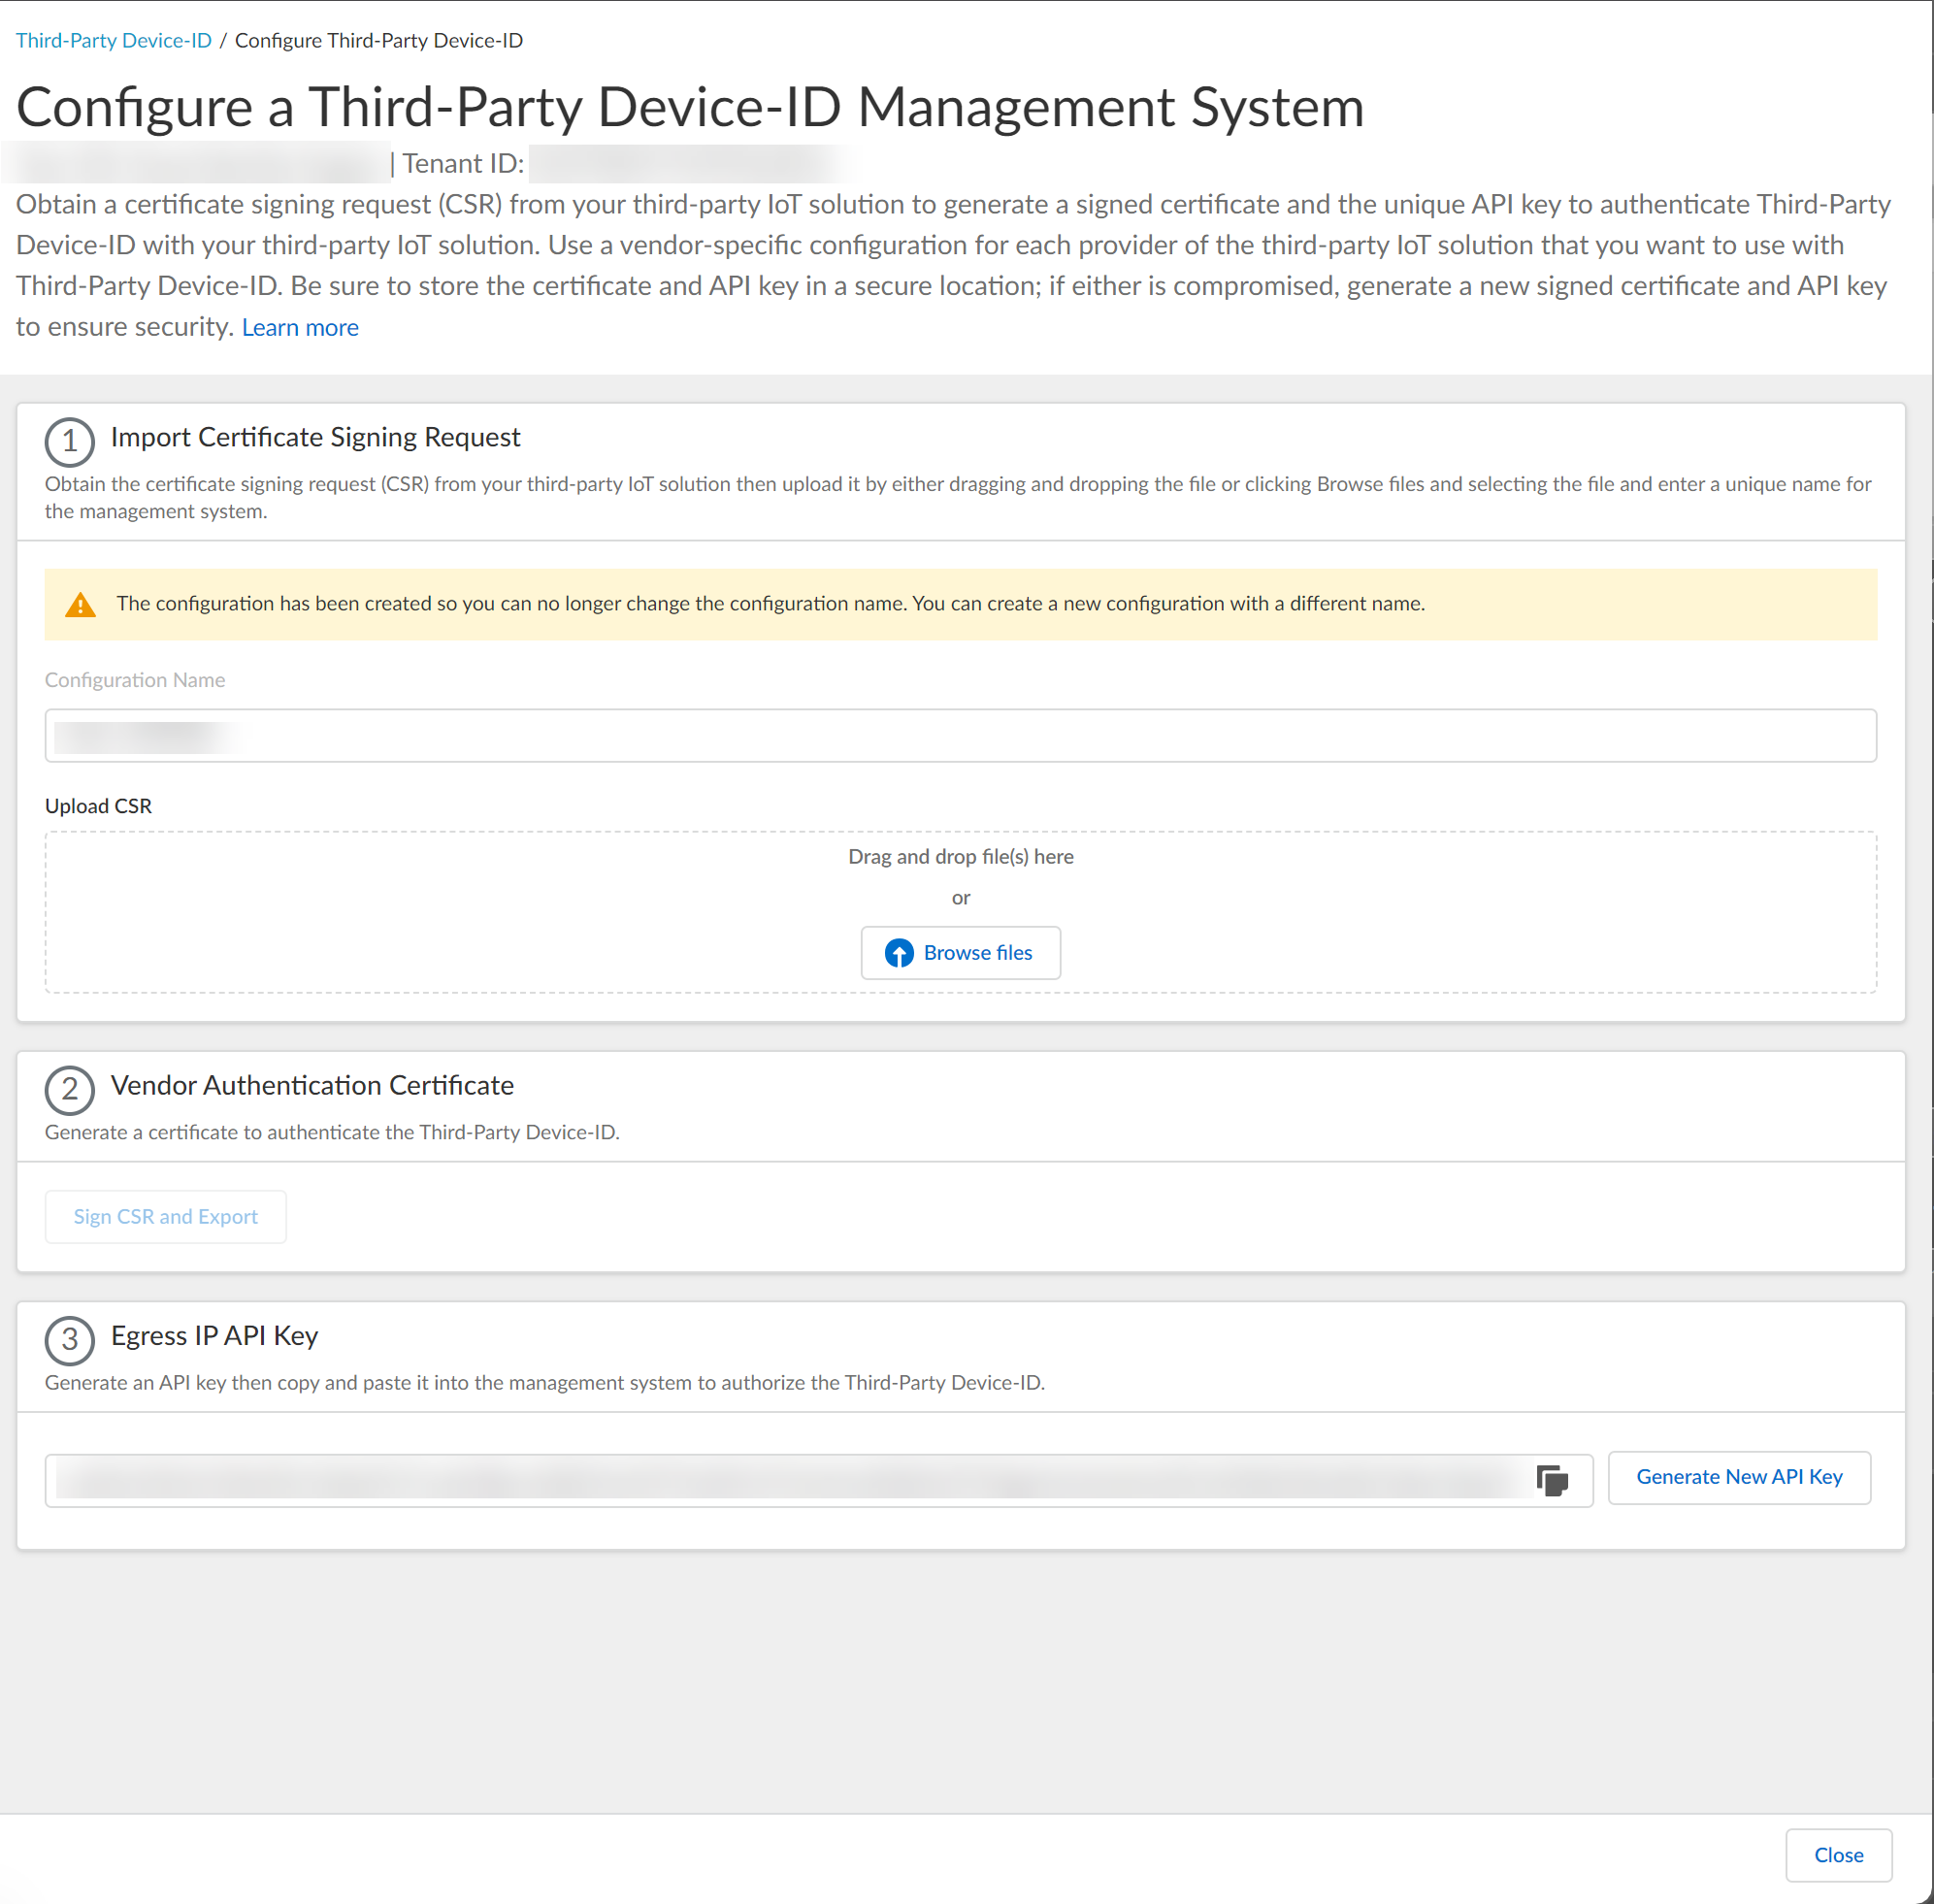
- (Optional) Remove the management system configuration.
- In the row for the management system you want to remove, select ActionsRemove .

- Click Yes to confirm that you want to remove the configuration.
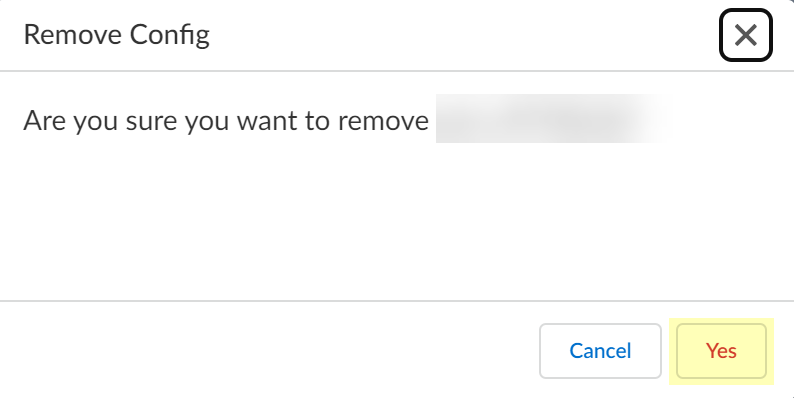
Now that your Third-Party Device-ID configuration is complete, you can:
- Use the APIs to manage how your third-party IoT solutions share information with Third-Party Device-ID.
- Use Device-ID features such as the Device Dictionary to manage and edit device information.
For more information, refer to the Prisma Access documentation.