Configure Azure as an IdP in the Cloud Identity Engine
- Download the Cloud Identity Engine integration in the Azure Portal.
- If you have not already done so, activate the Cloud Identity Engine app.
- Log in to the Azure Portal and select Azure Active Directory .
Make sure you complete all the necessary steps in the Azure portal.
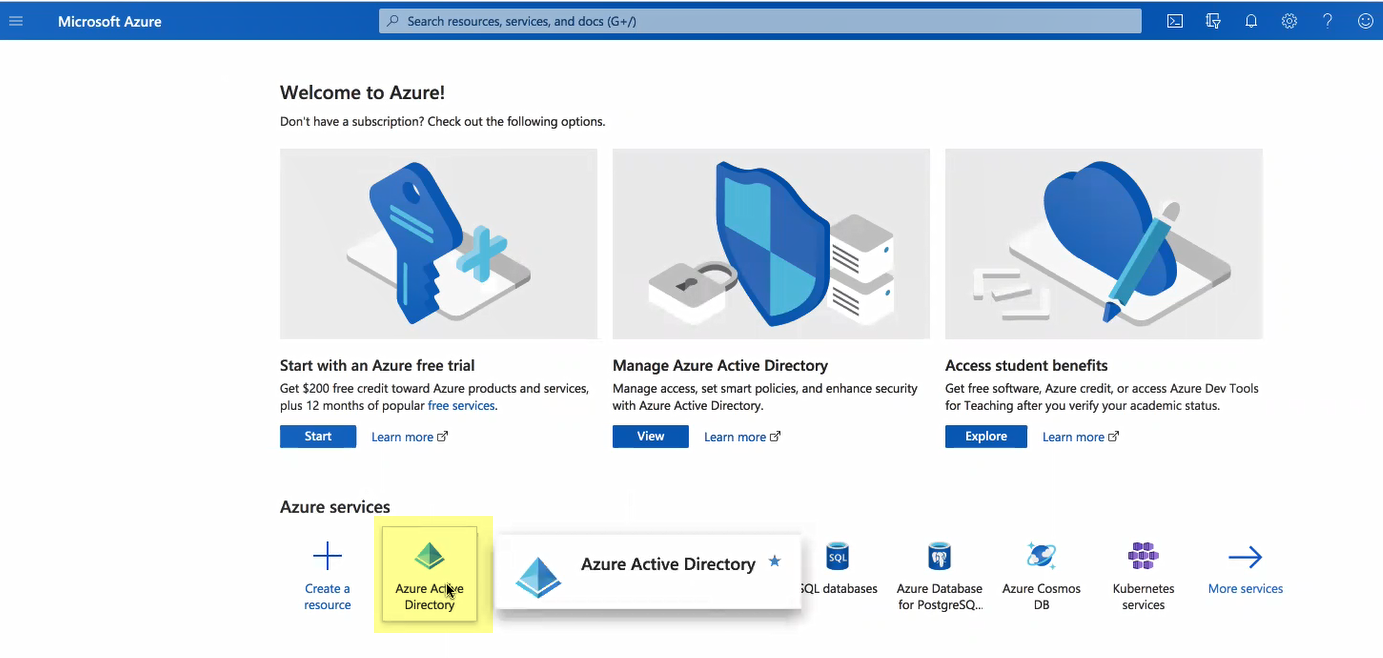
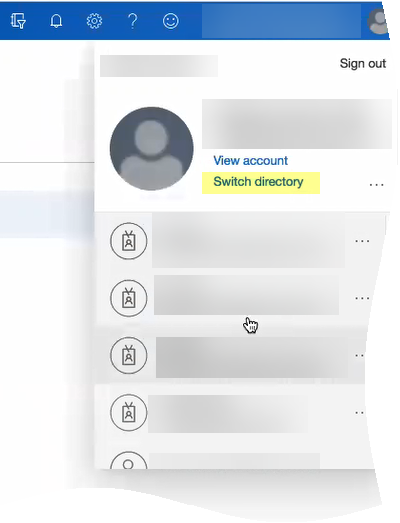
If you have more than one directory, Switch directory to select the directory you want to use with the Cloud Identity Engine.
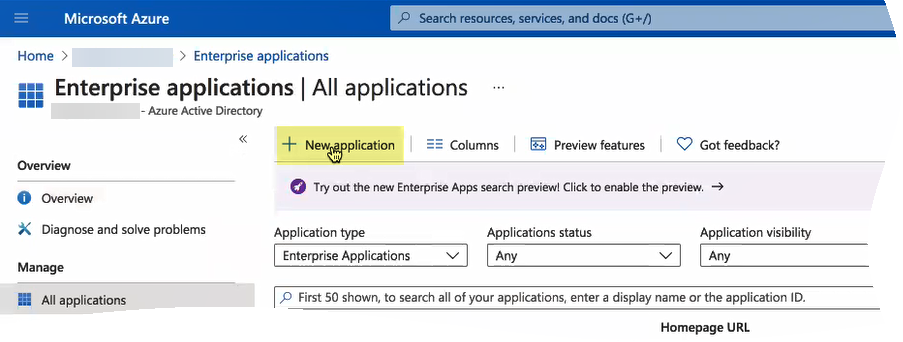
- Select Enterprise applications and click New application .
- Add from the gallery then enter Palo Alto Networks Cloud Identity Engine - Cloud Authentication Service and download the Azure AD single-sign on integration.
- After the application loads, select Users and groups , then Add user/group to Assign them to this application.
Select the users and groups you want to use the Azure IdP in the Cloud Identity Engine for authentication.
Be sure to assign the account you're using so you can test the configuration when it's complete. You may need to refresh the page after adding accounts to successfully complete the test.
- Select Single sign-on then select SAML .
- Upload Metadata File by browsing to the metadata file that you downloaded from the Cloud Identity Engine app and click Add .
- After the metadata uploads, Save your configuration.
- (Optional) Edit your User Attributes & Claims to Add a new claim or Edit an existing claim.
If you attempt to test the configuration on the Azure Admin Console, a 404 error displays because the test is triggered by the IdP and the Cloud Identity Engine supports authentication requests initiated by the service provider.
- Configure Azure AD for the Cloud Identity Engine.
- Select Single sign-on then select SAML .
- Edit the Basic SAML Configuration settings.
- Upload metadata file and select the metadata file you downloaded from the Cloud Identity Engine in the first step.
- Enter your regional endpoint as the Sign-on URL using the following format: https://<RegionUrl>.paloaltonetworks.com/sp/acs (where <RegionUrl> is your regional endpoint). For more information on regional endpoints, see Configure Cloud Identity Engine Authentication on the Firewall or Panorama .
- Copy the App Federation Metadata Url and save it to a secure location.
At this point in the process, you may see the option to Test sign-in . If you try to test the single sign-on configuration now, the test won't be successful. You can test your configuration to verify it's correct in step
9
.
- Add and assign users who you want to require to use Azure AD for authentication.
- Select Azure Active Directory then select UsersAll users .
- Create a New user and enter a Name , User name .
- Select Show password , copy the password to a secure location, and Create the user.
- In the Palo Alto Networks Cloud Identity Engine - Cloud Authentication Service integration in the Azure Portal, select Users and groups .
- Add user then select Users and groups .
- Add Azure as an authentication type in the Cloud Identity Engine app.
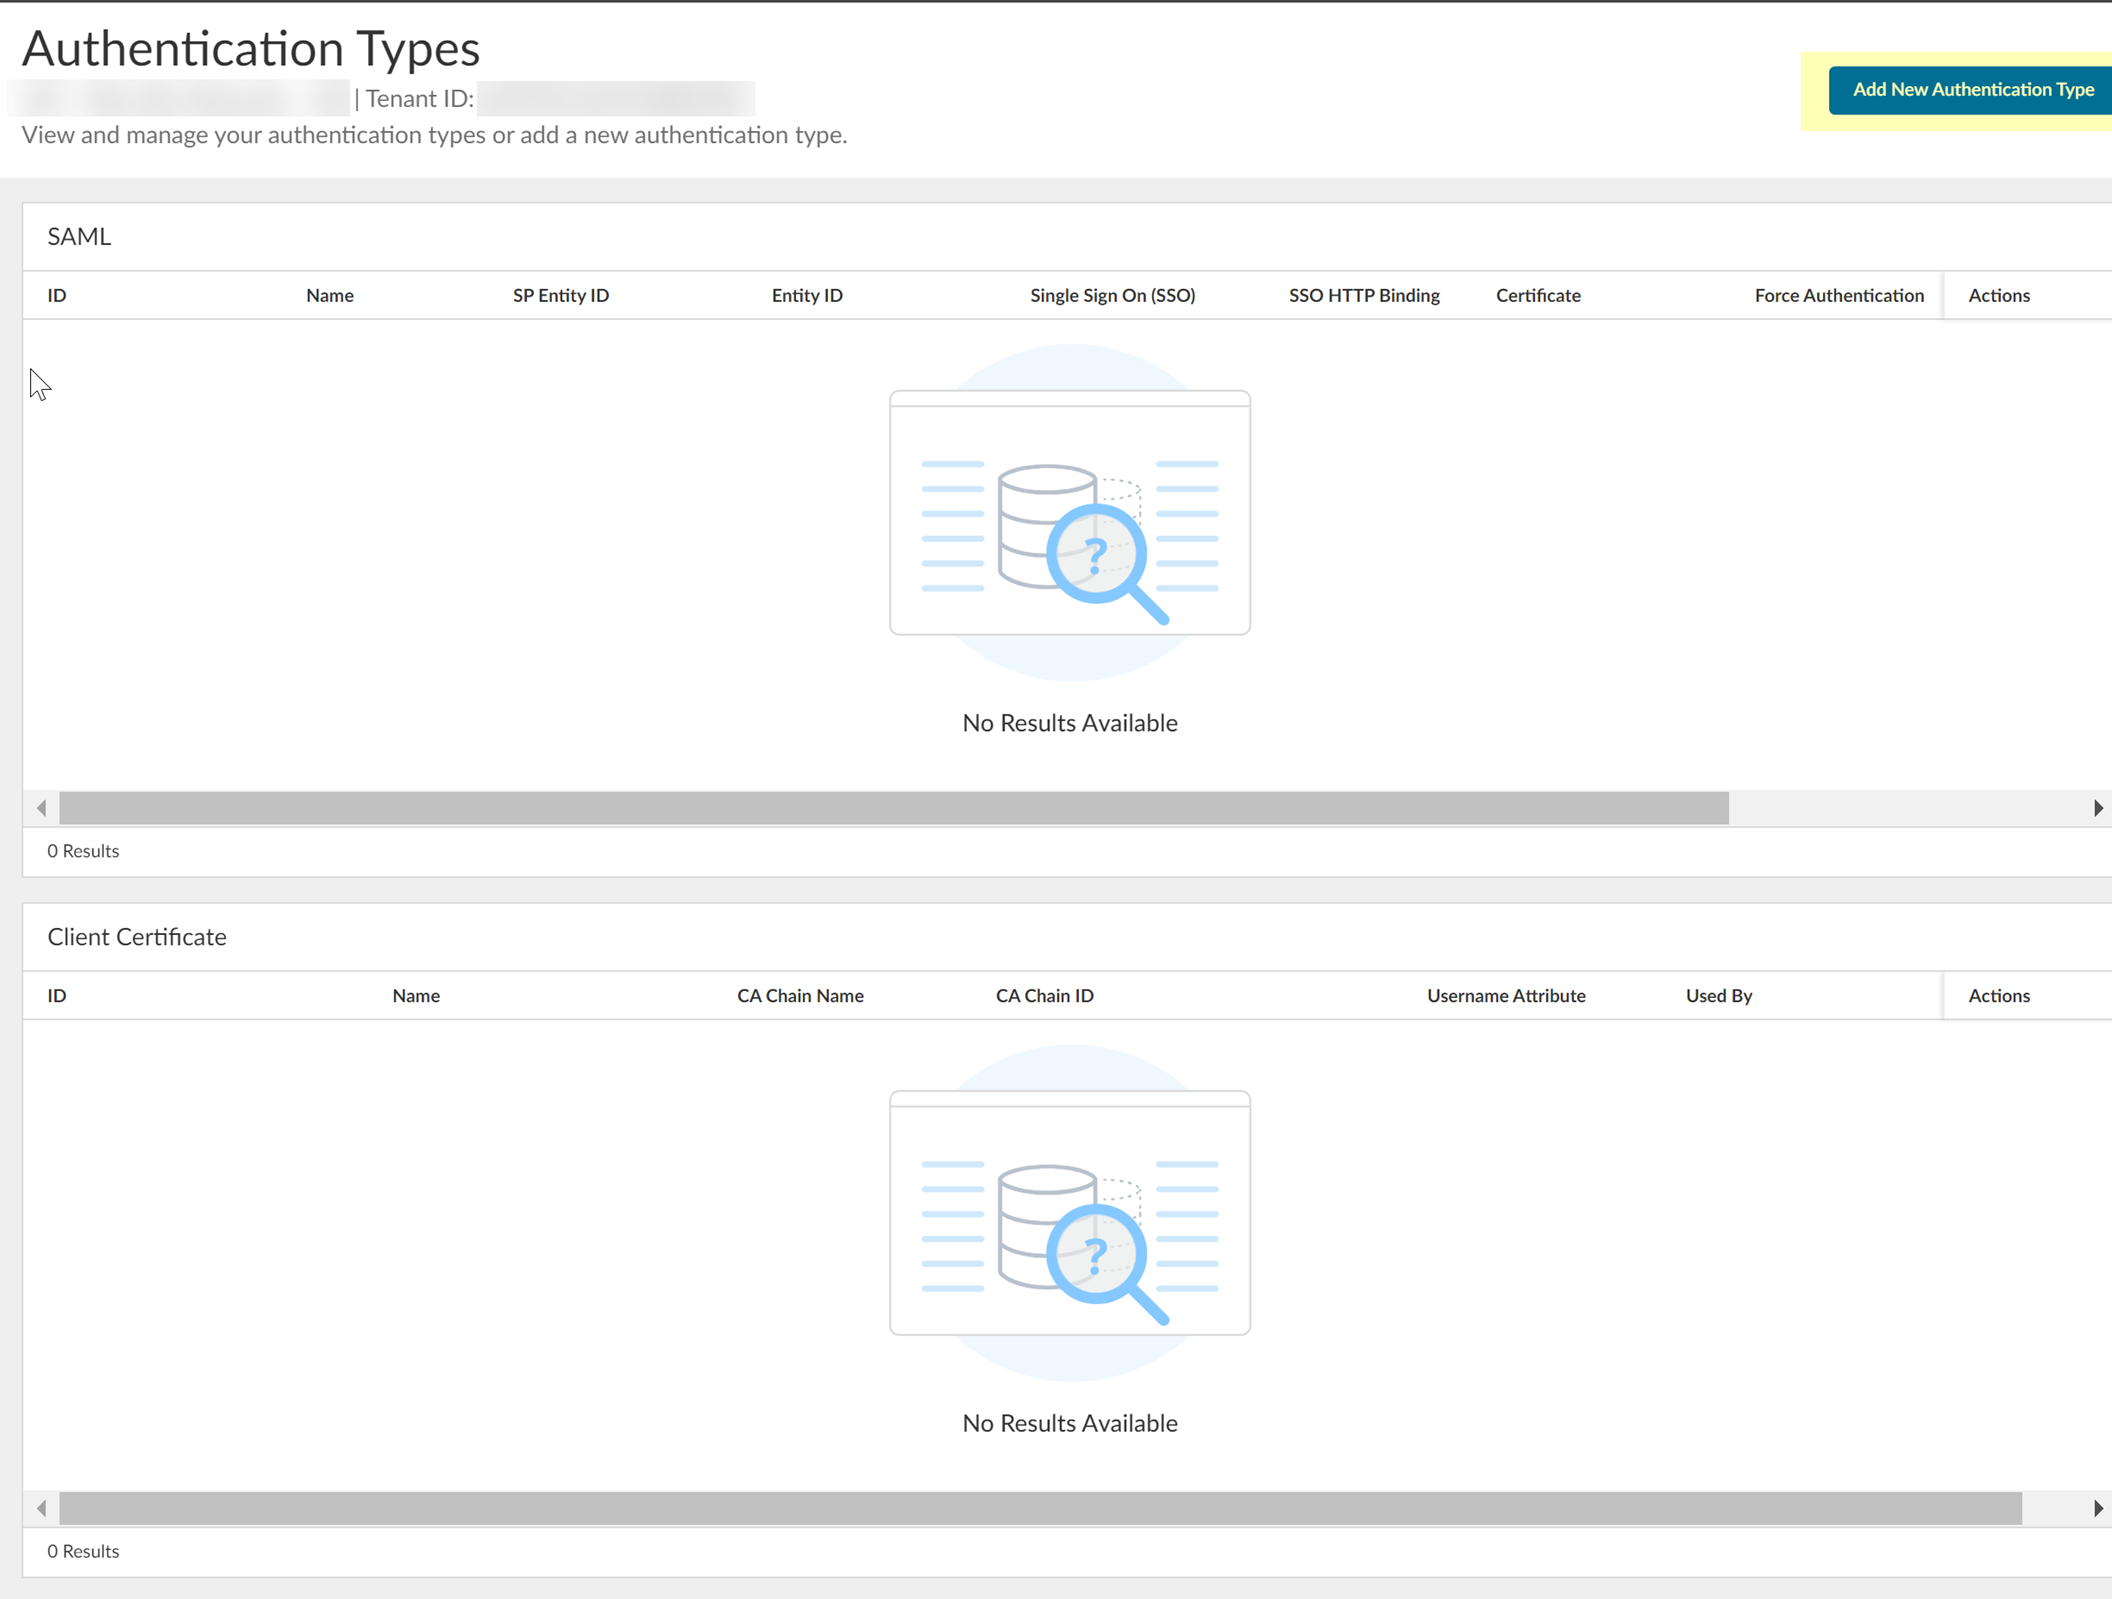
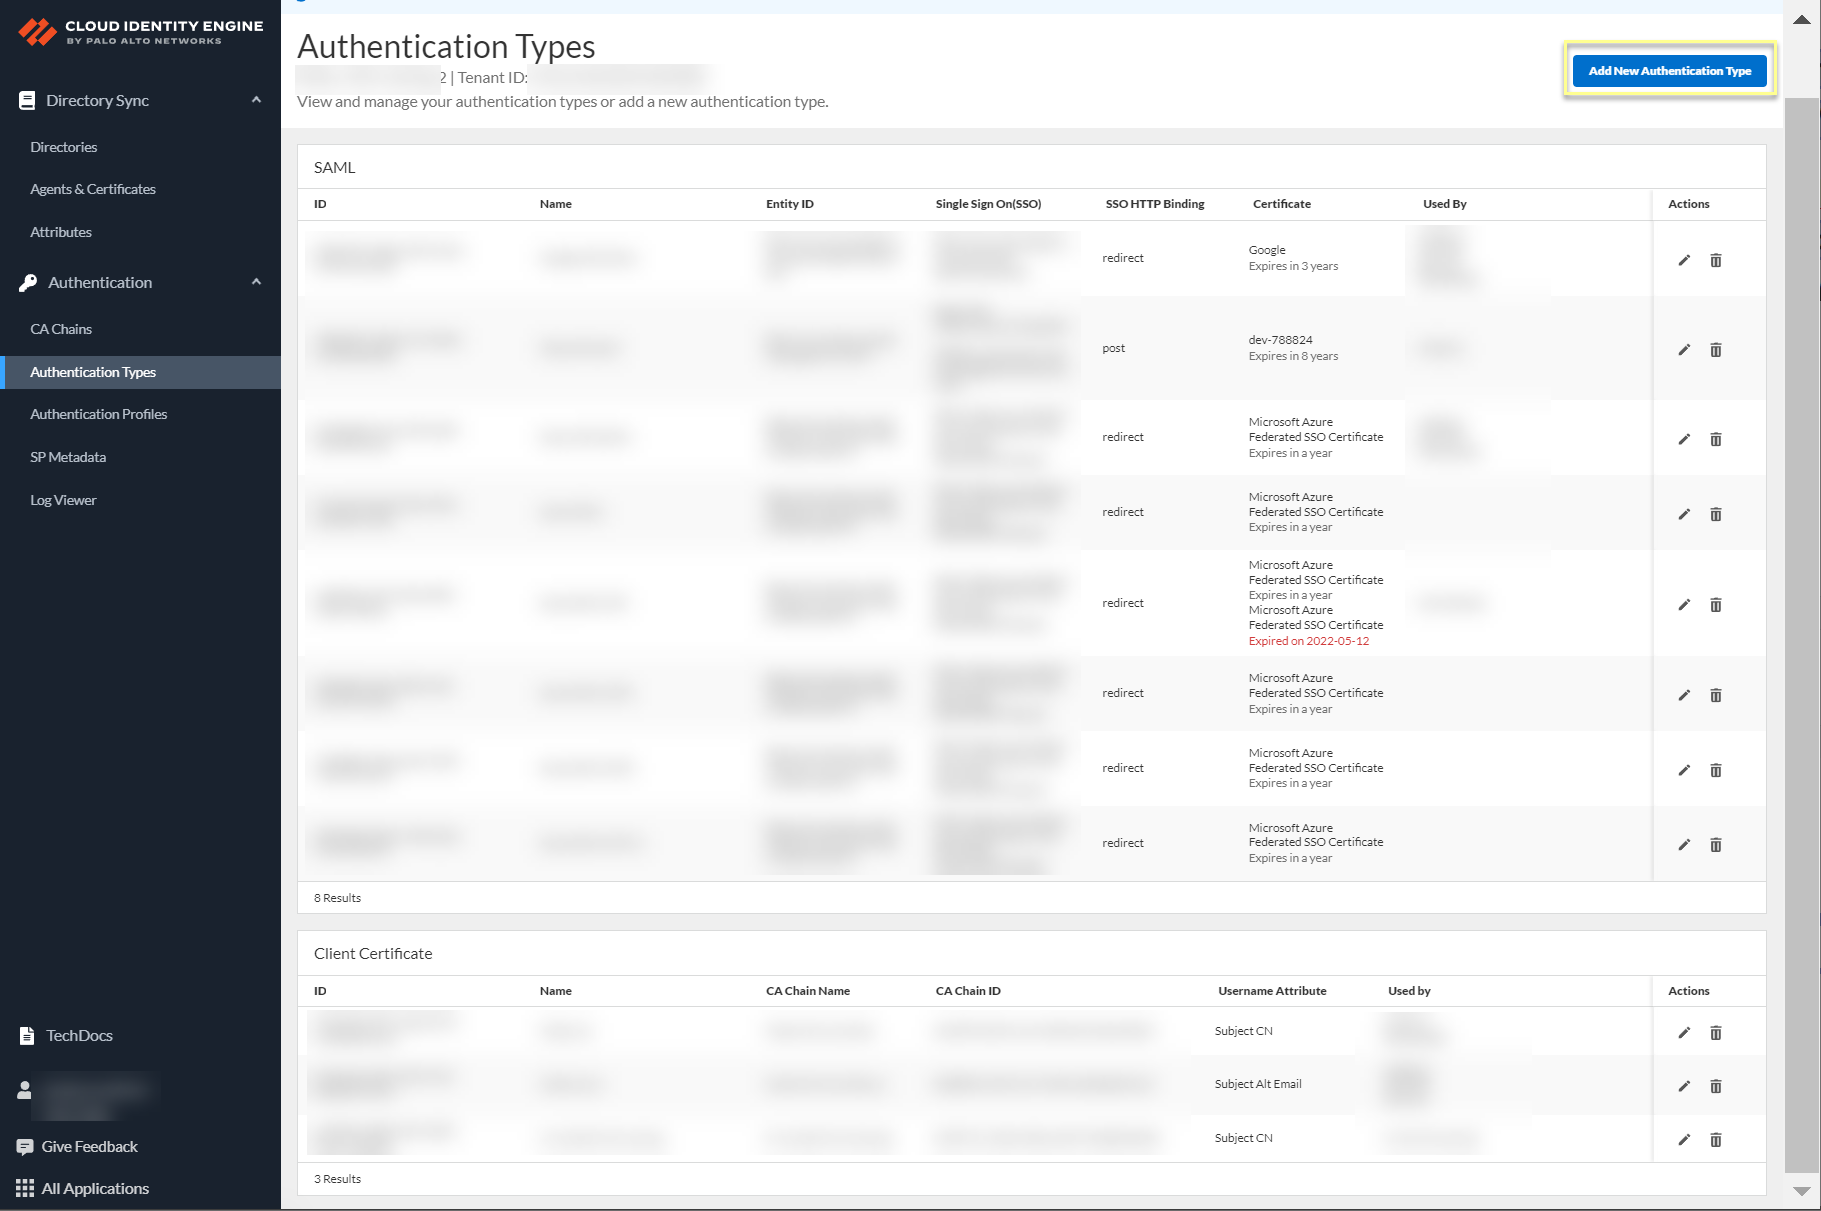
- In the Cloud Identity Engine app, select AuthenticationAuthentication Types then click Add New Authentication Type .
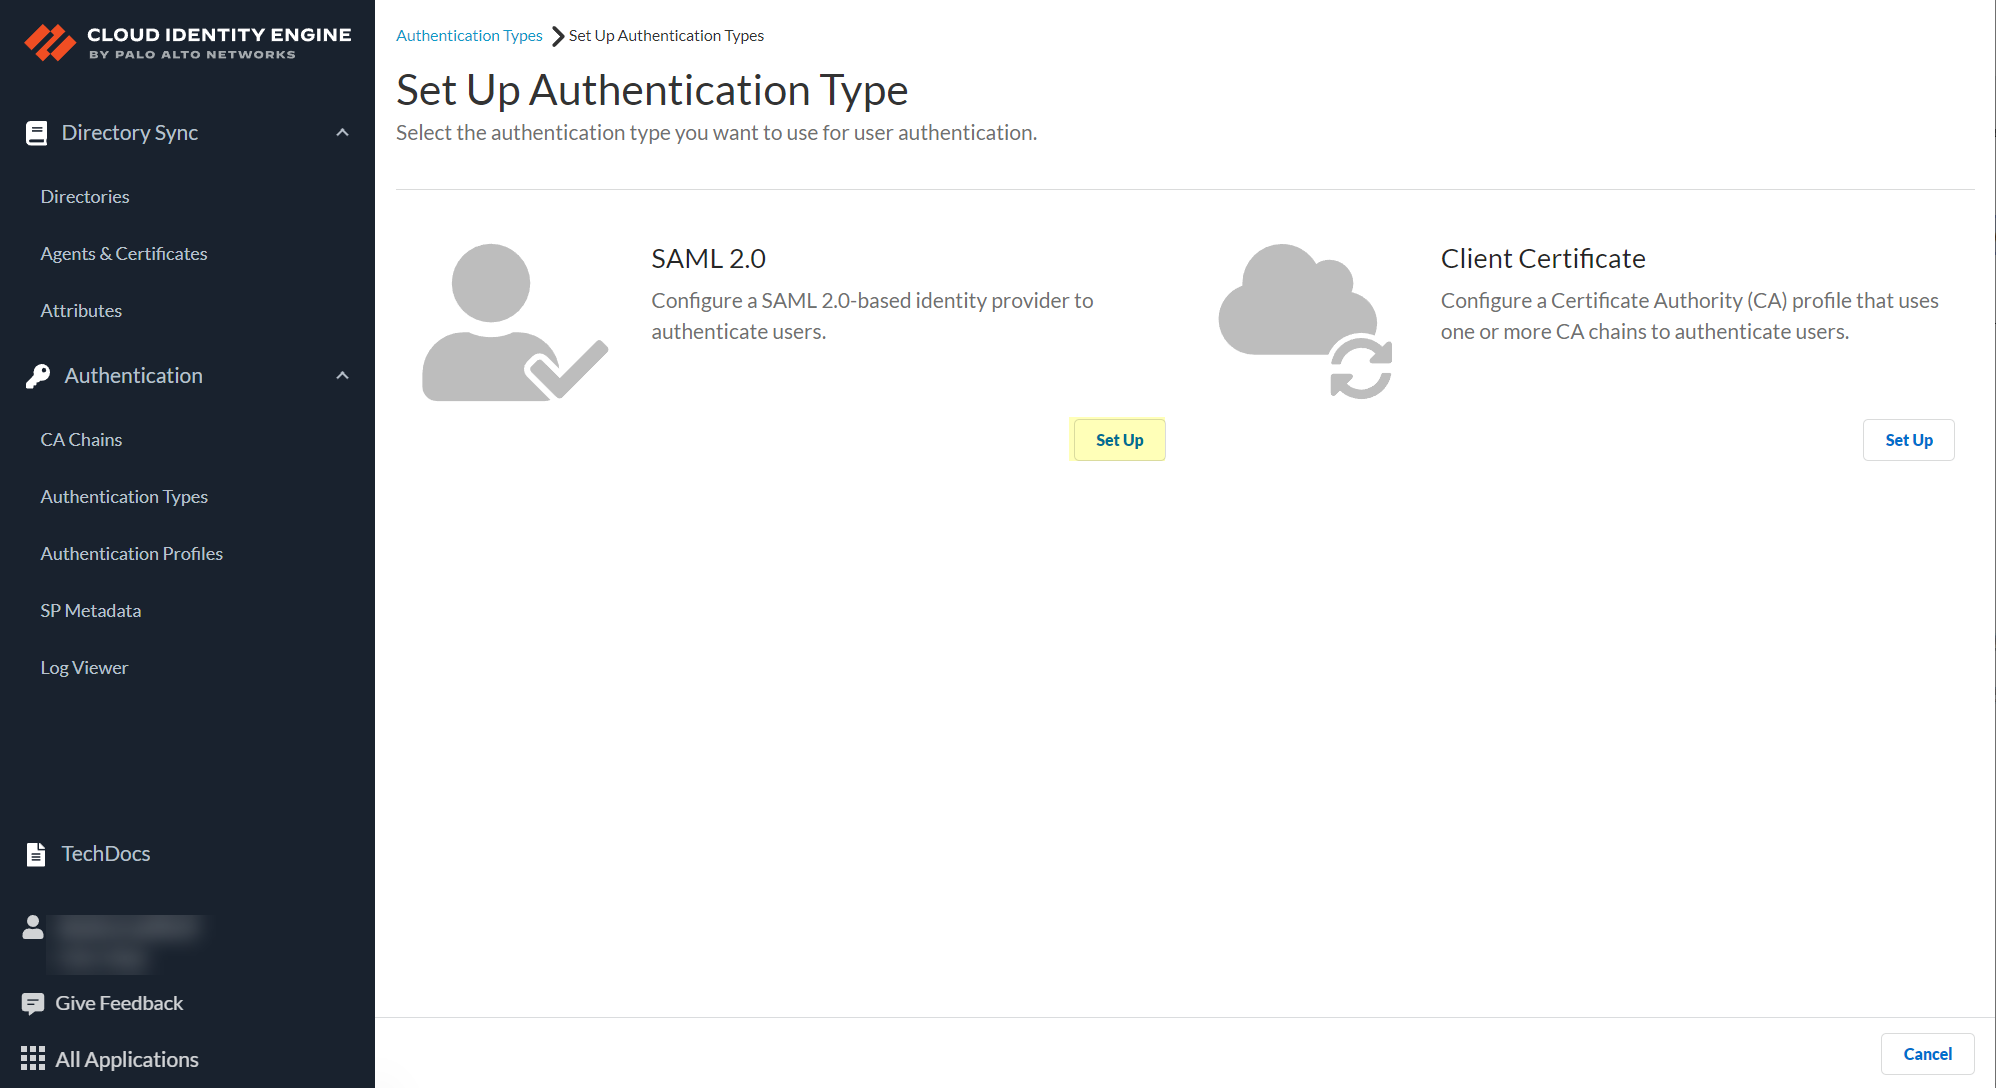
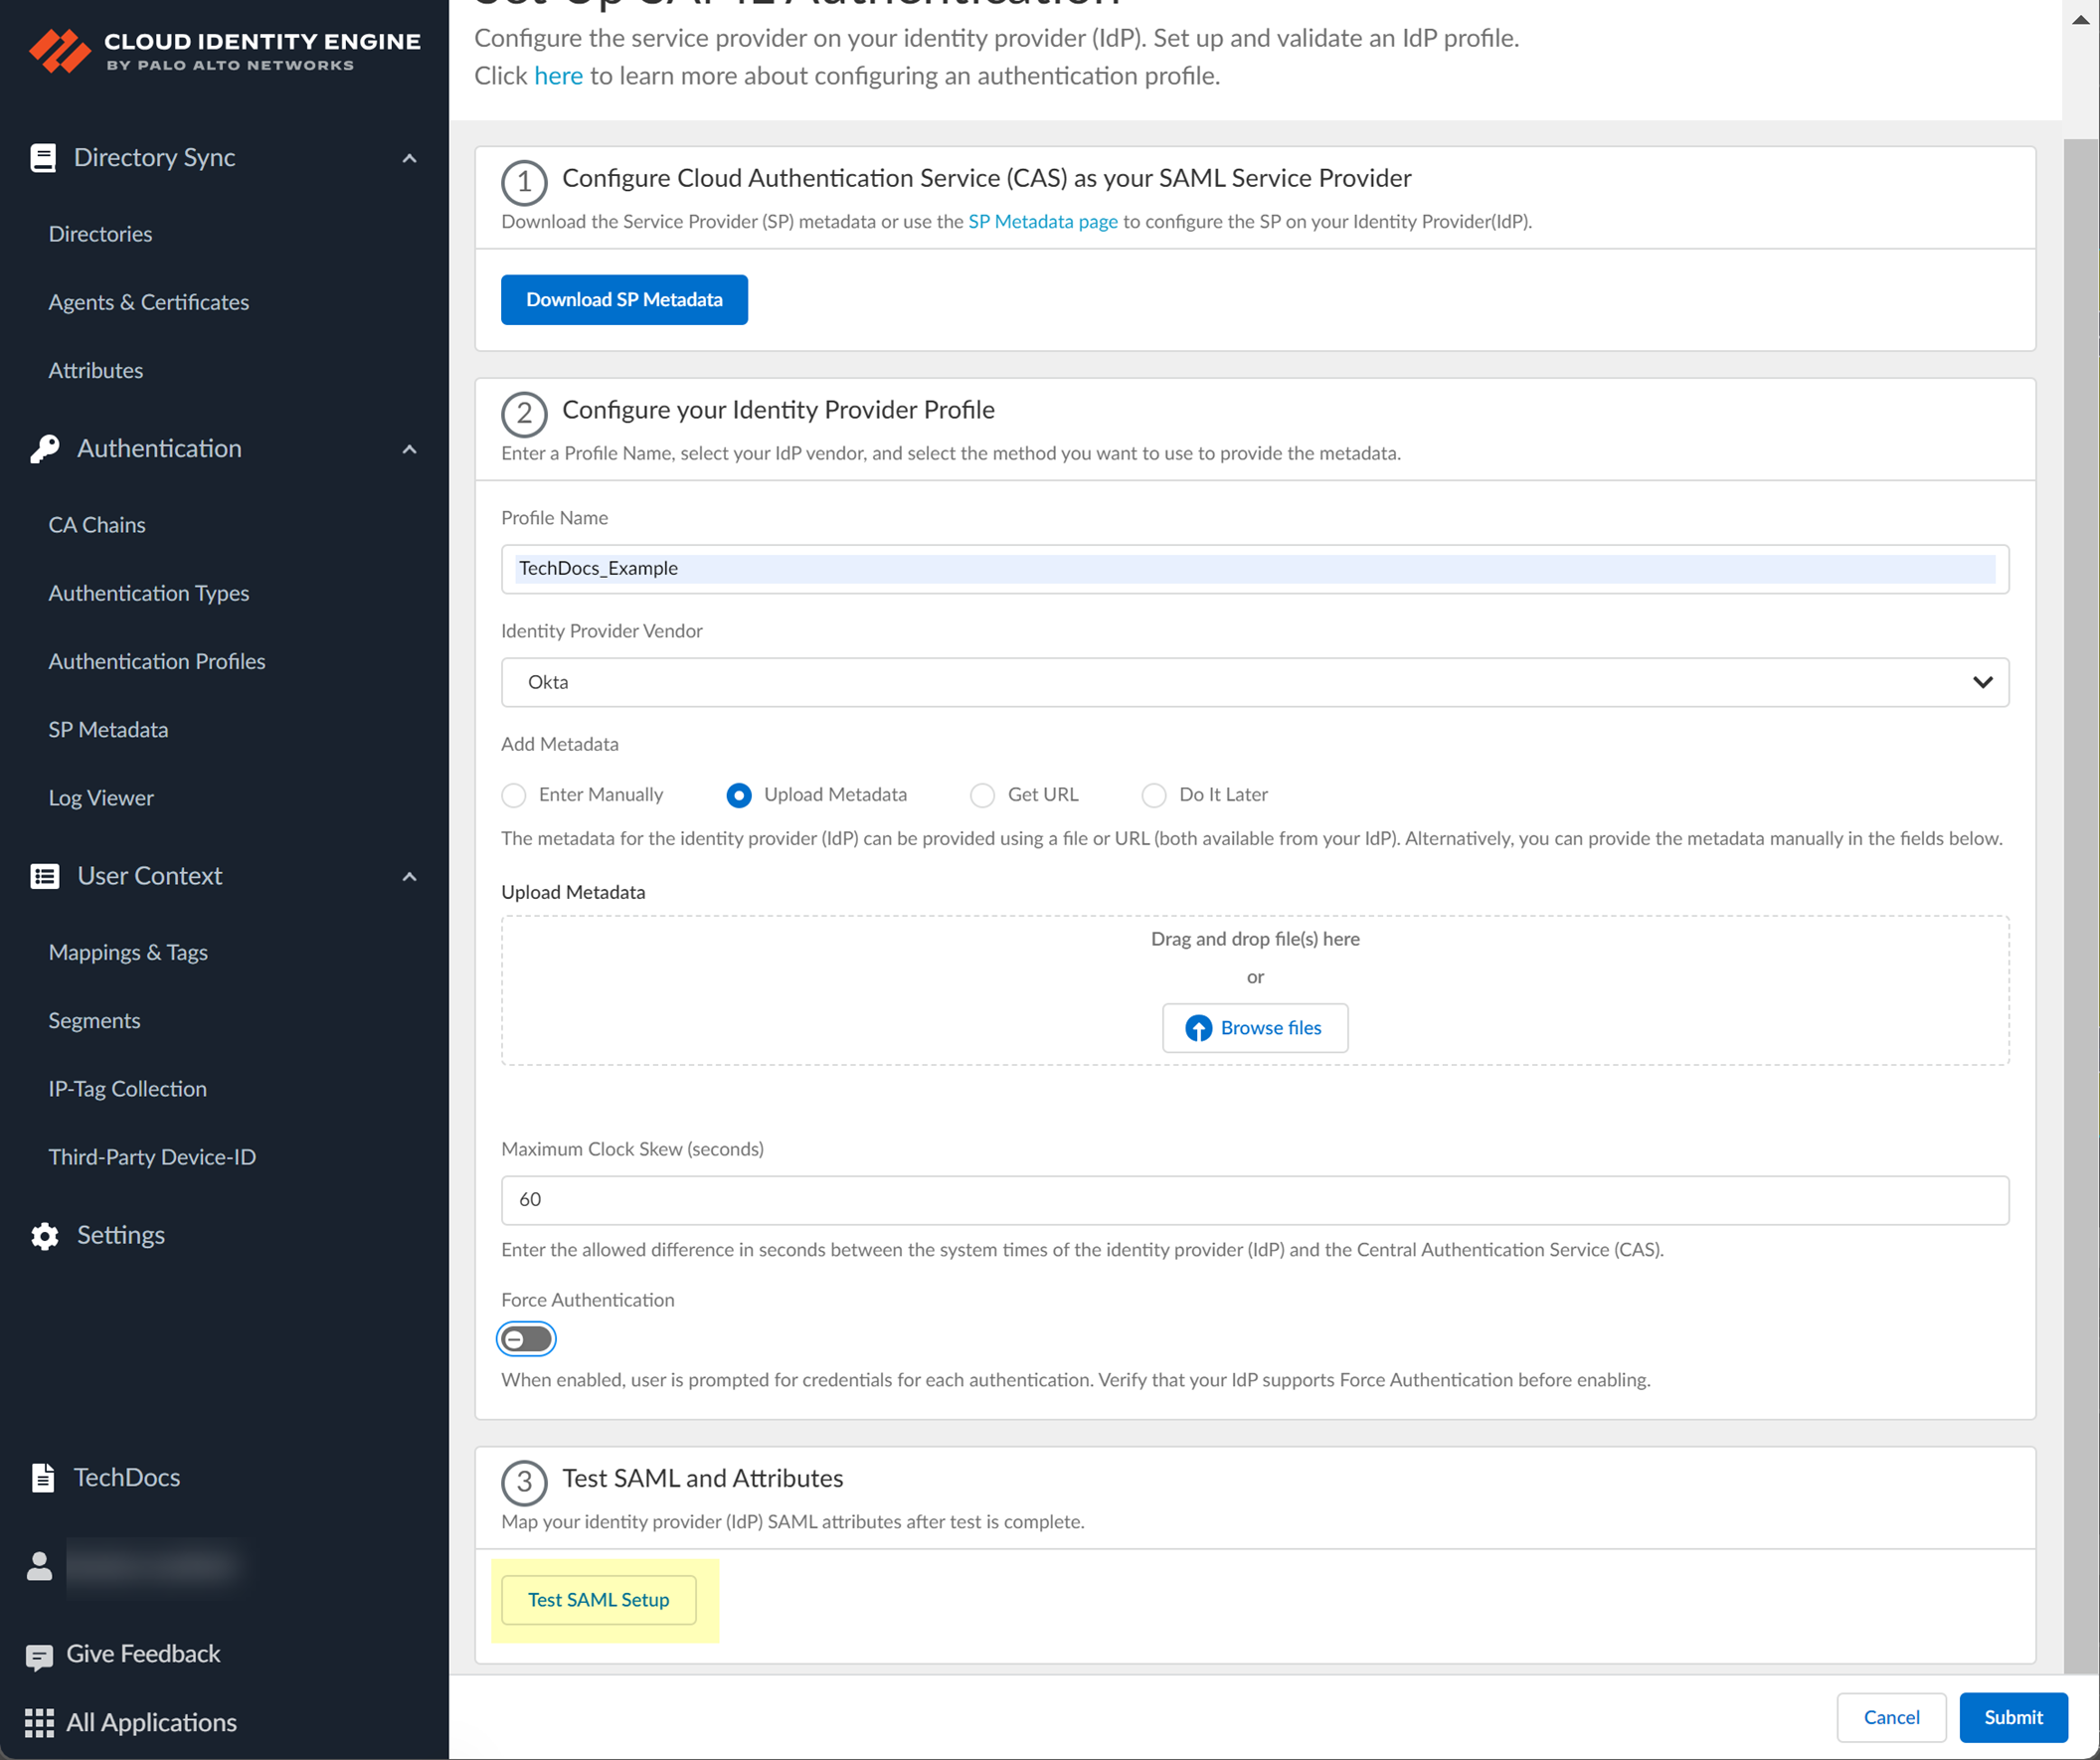
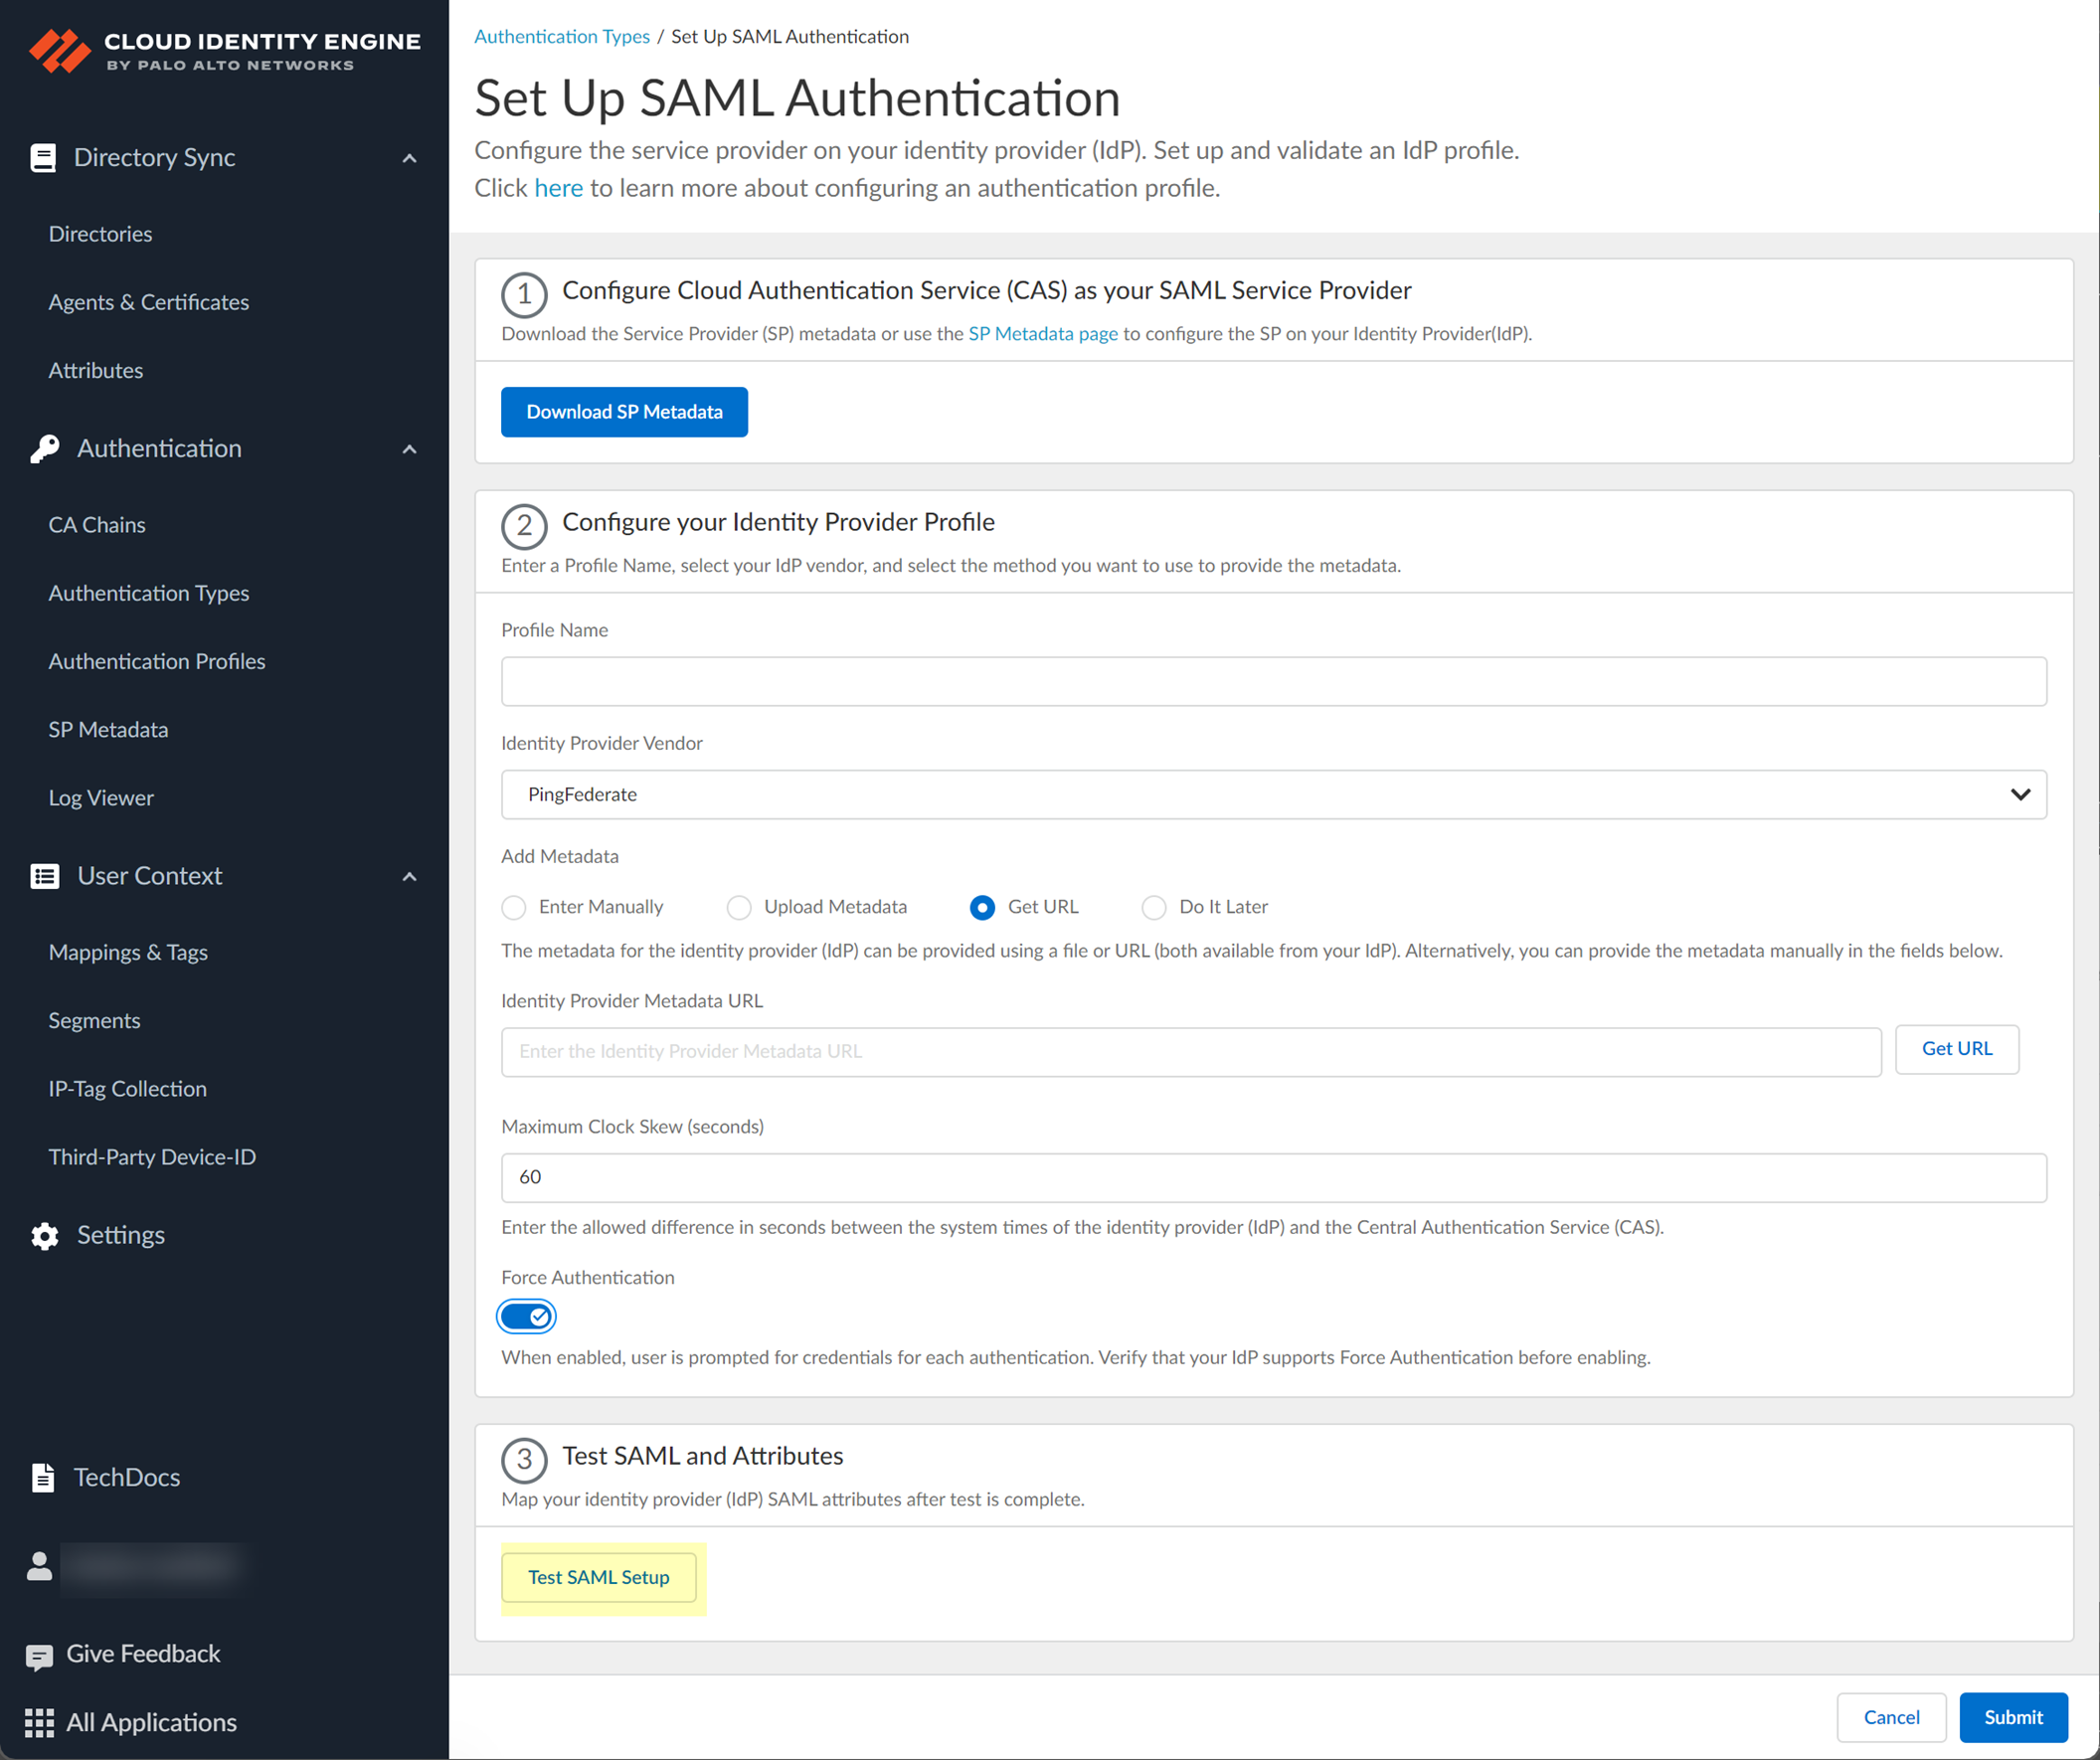
- Set Up a SAML 2.0 authentication type.
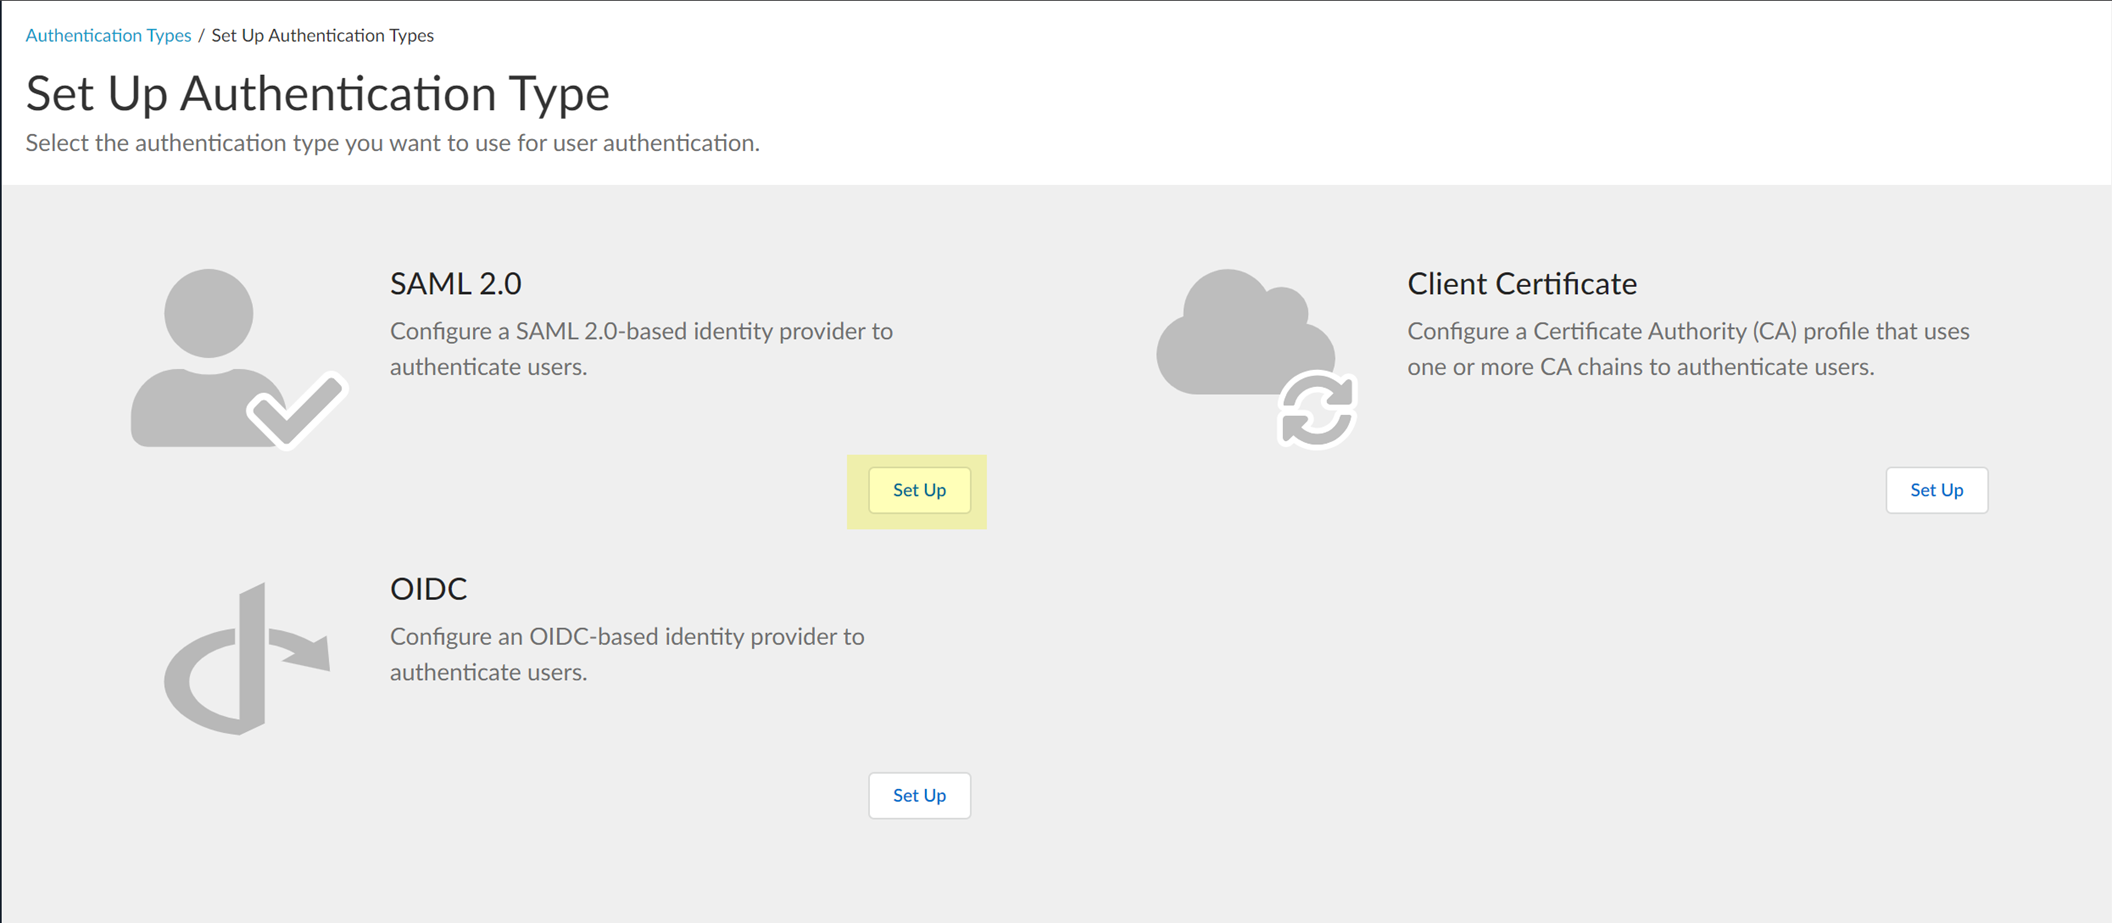
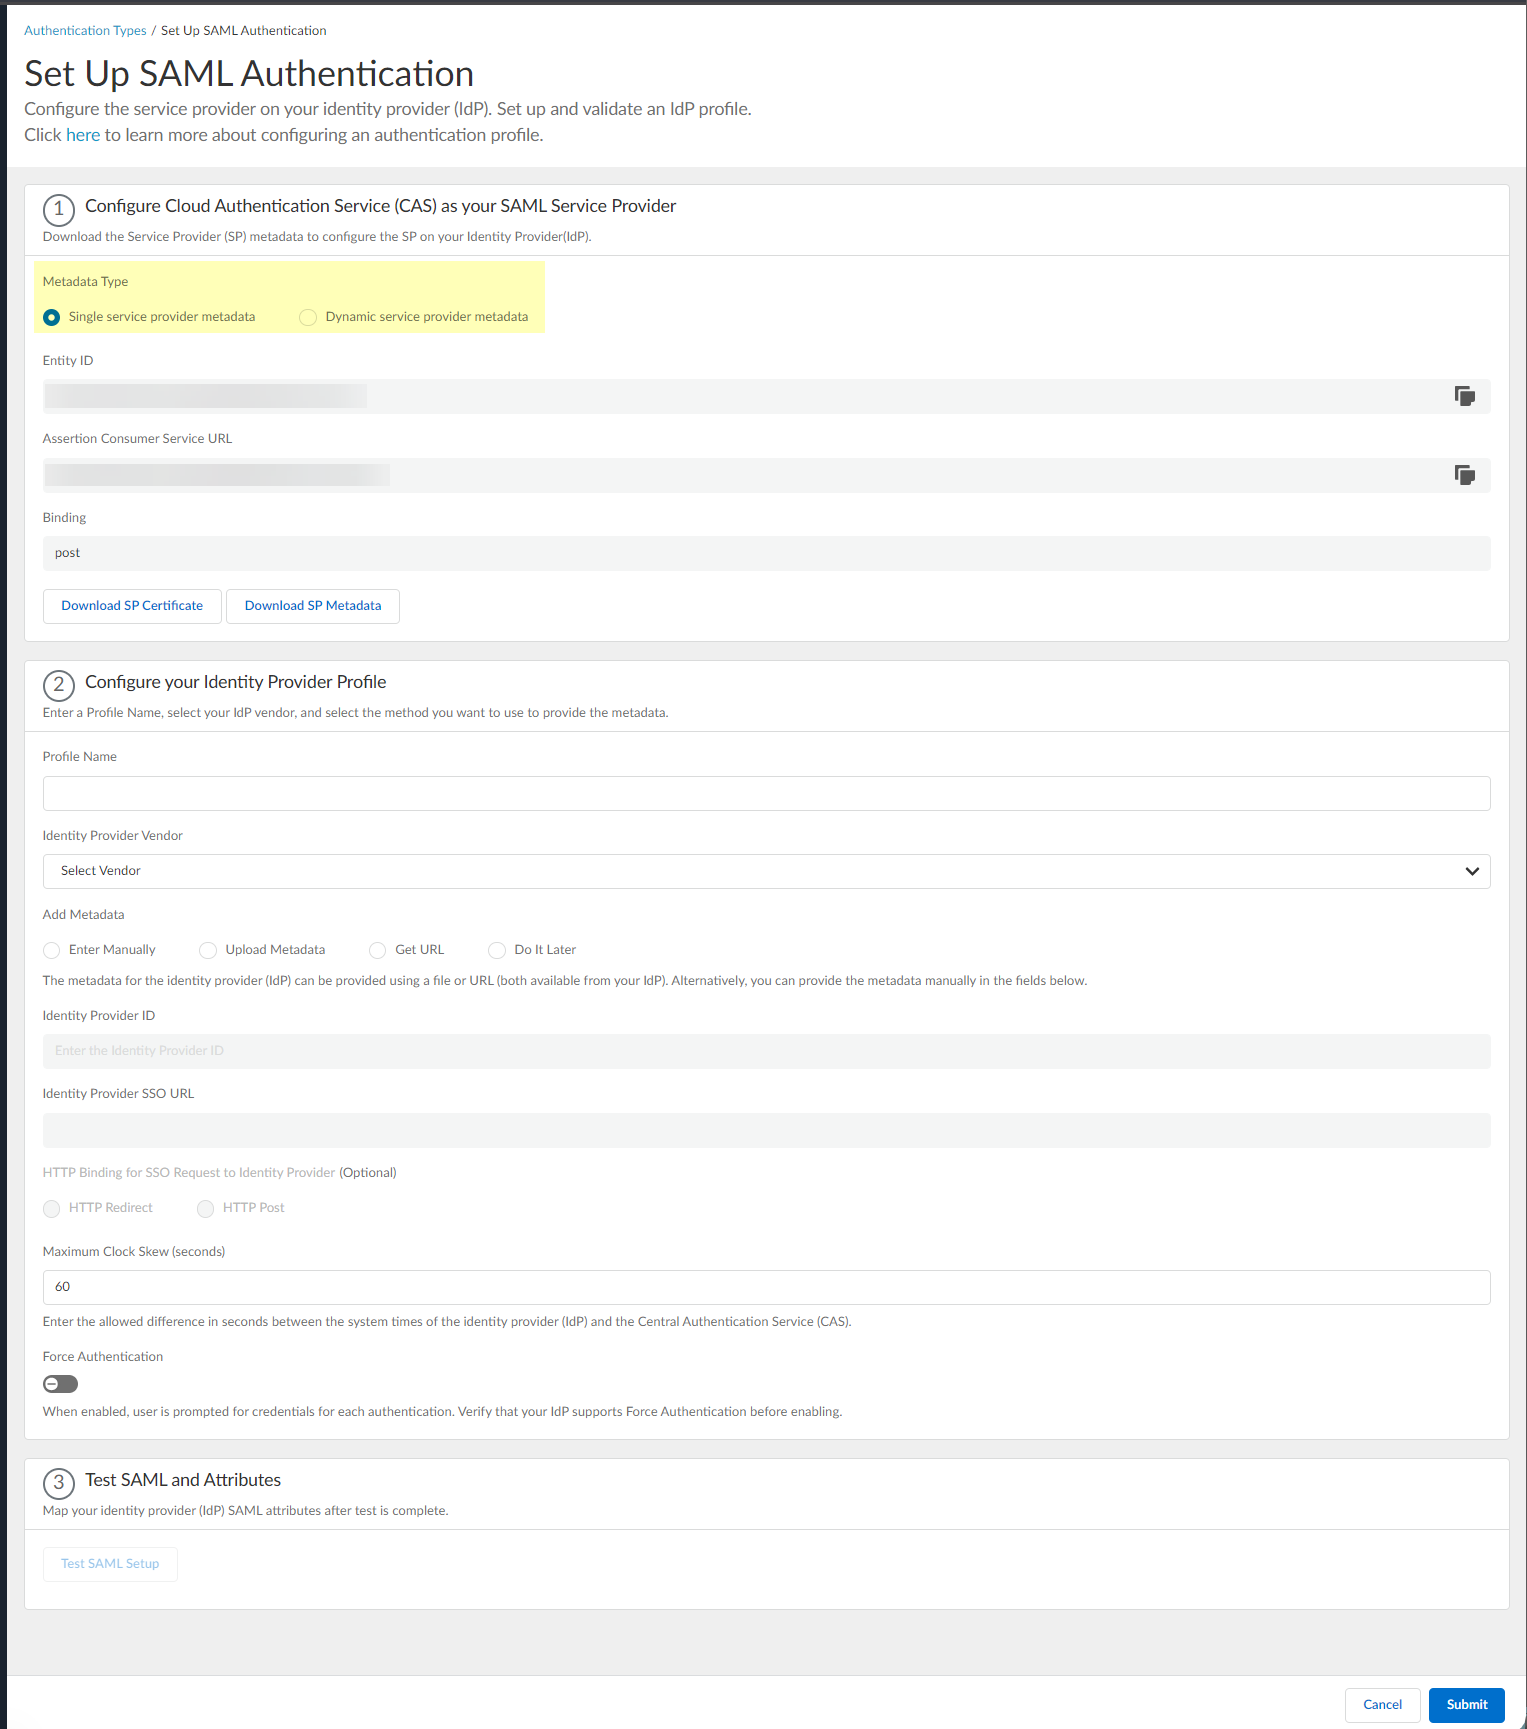
- Select the Metadata Type you want to use.
- To use the client credential flow, the auth code flow, or SCIM, select Single service provider metadata .
- To Configure Dynamic Privilege Access in the Cloud Identity Engine , select Dynamic service provider metadata .
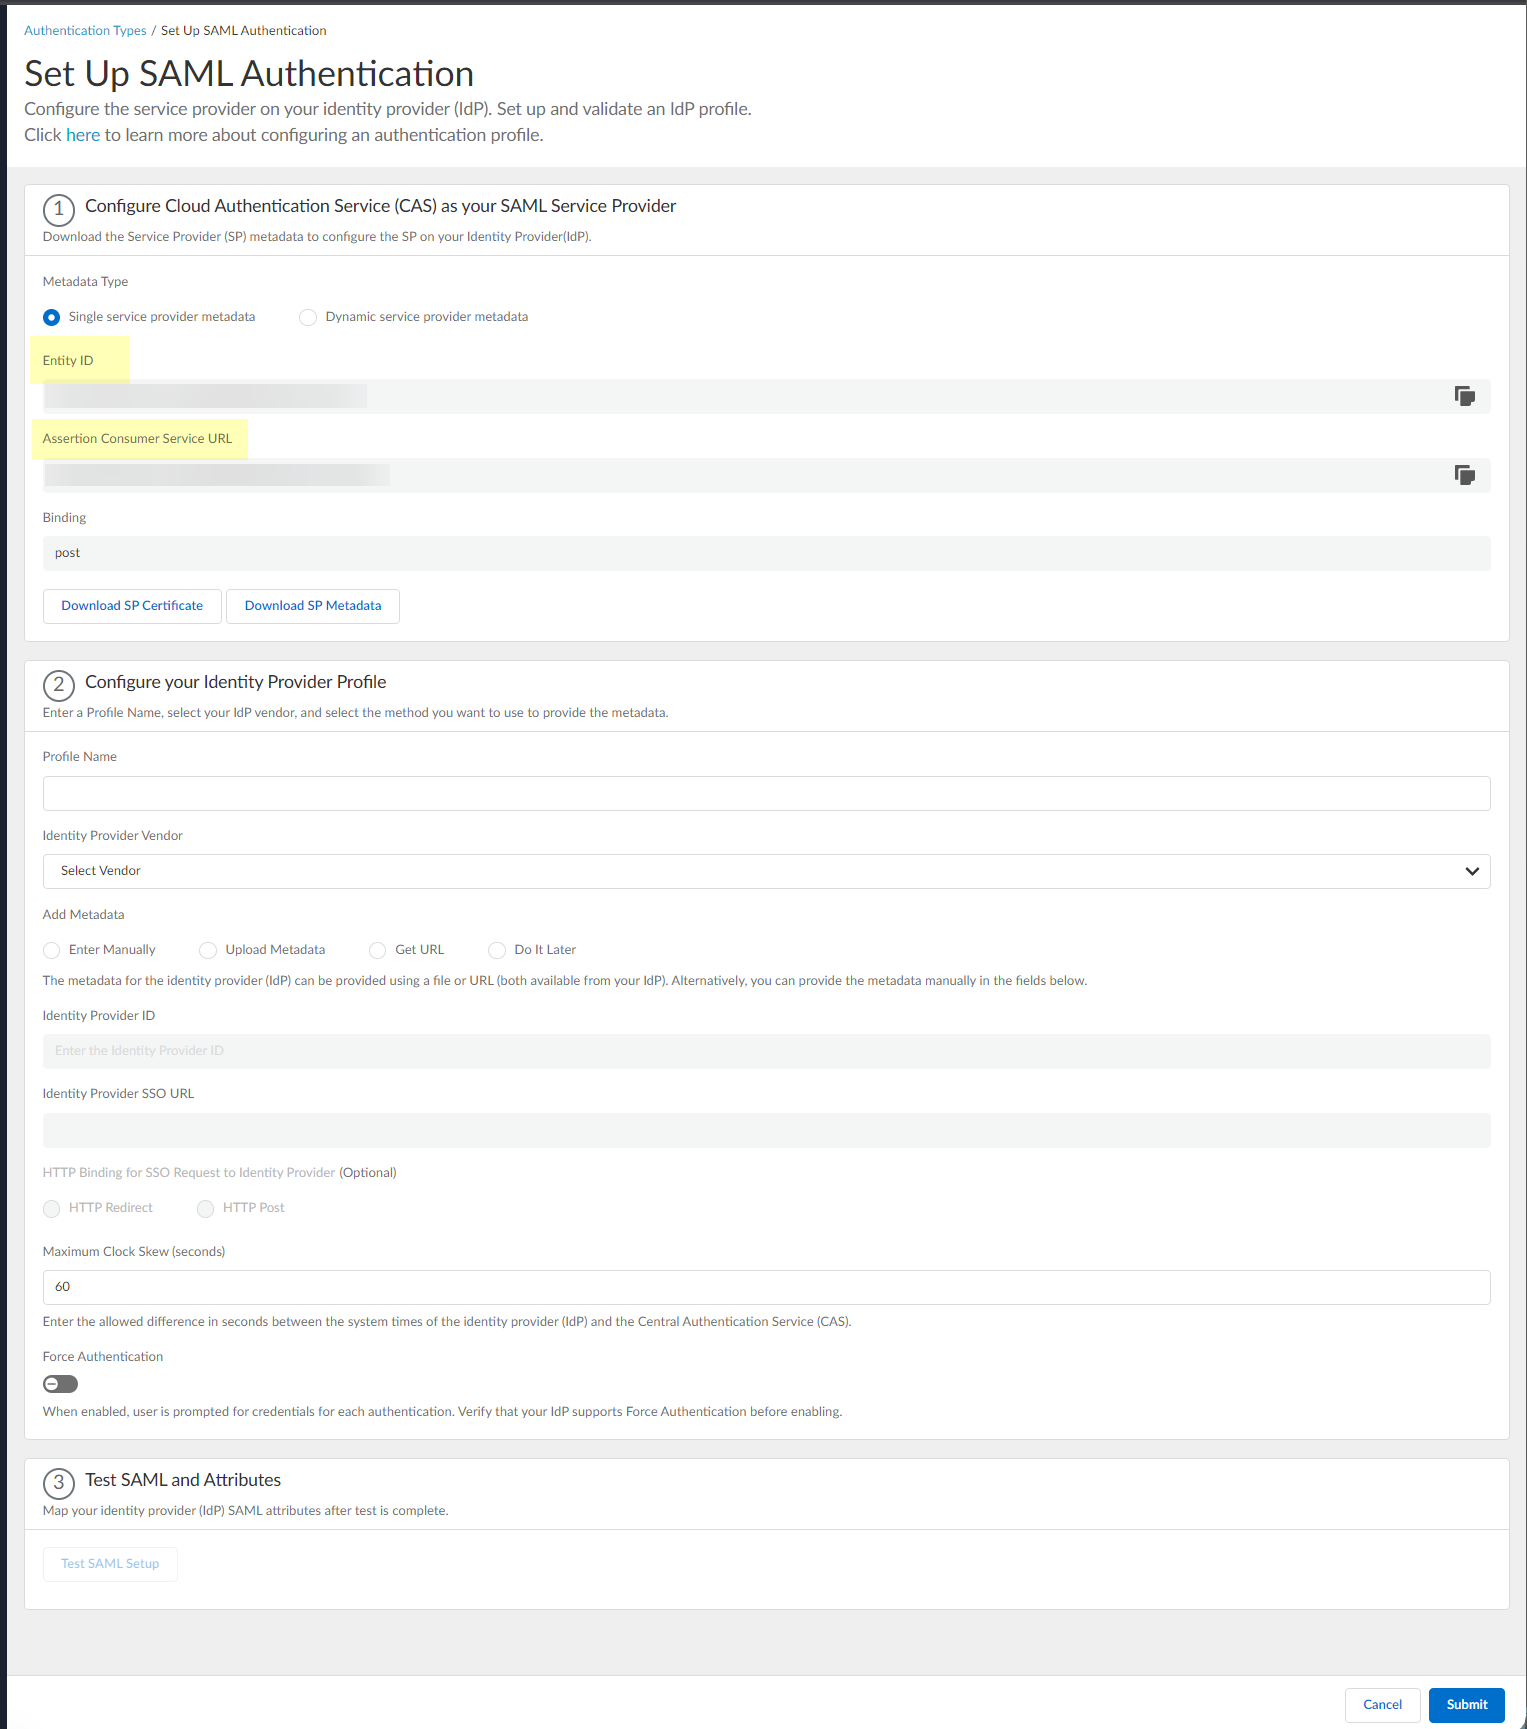
- Copy the Entity ID and Assertion Consumer Service URL and save them in a secure location.
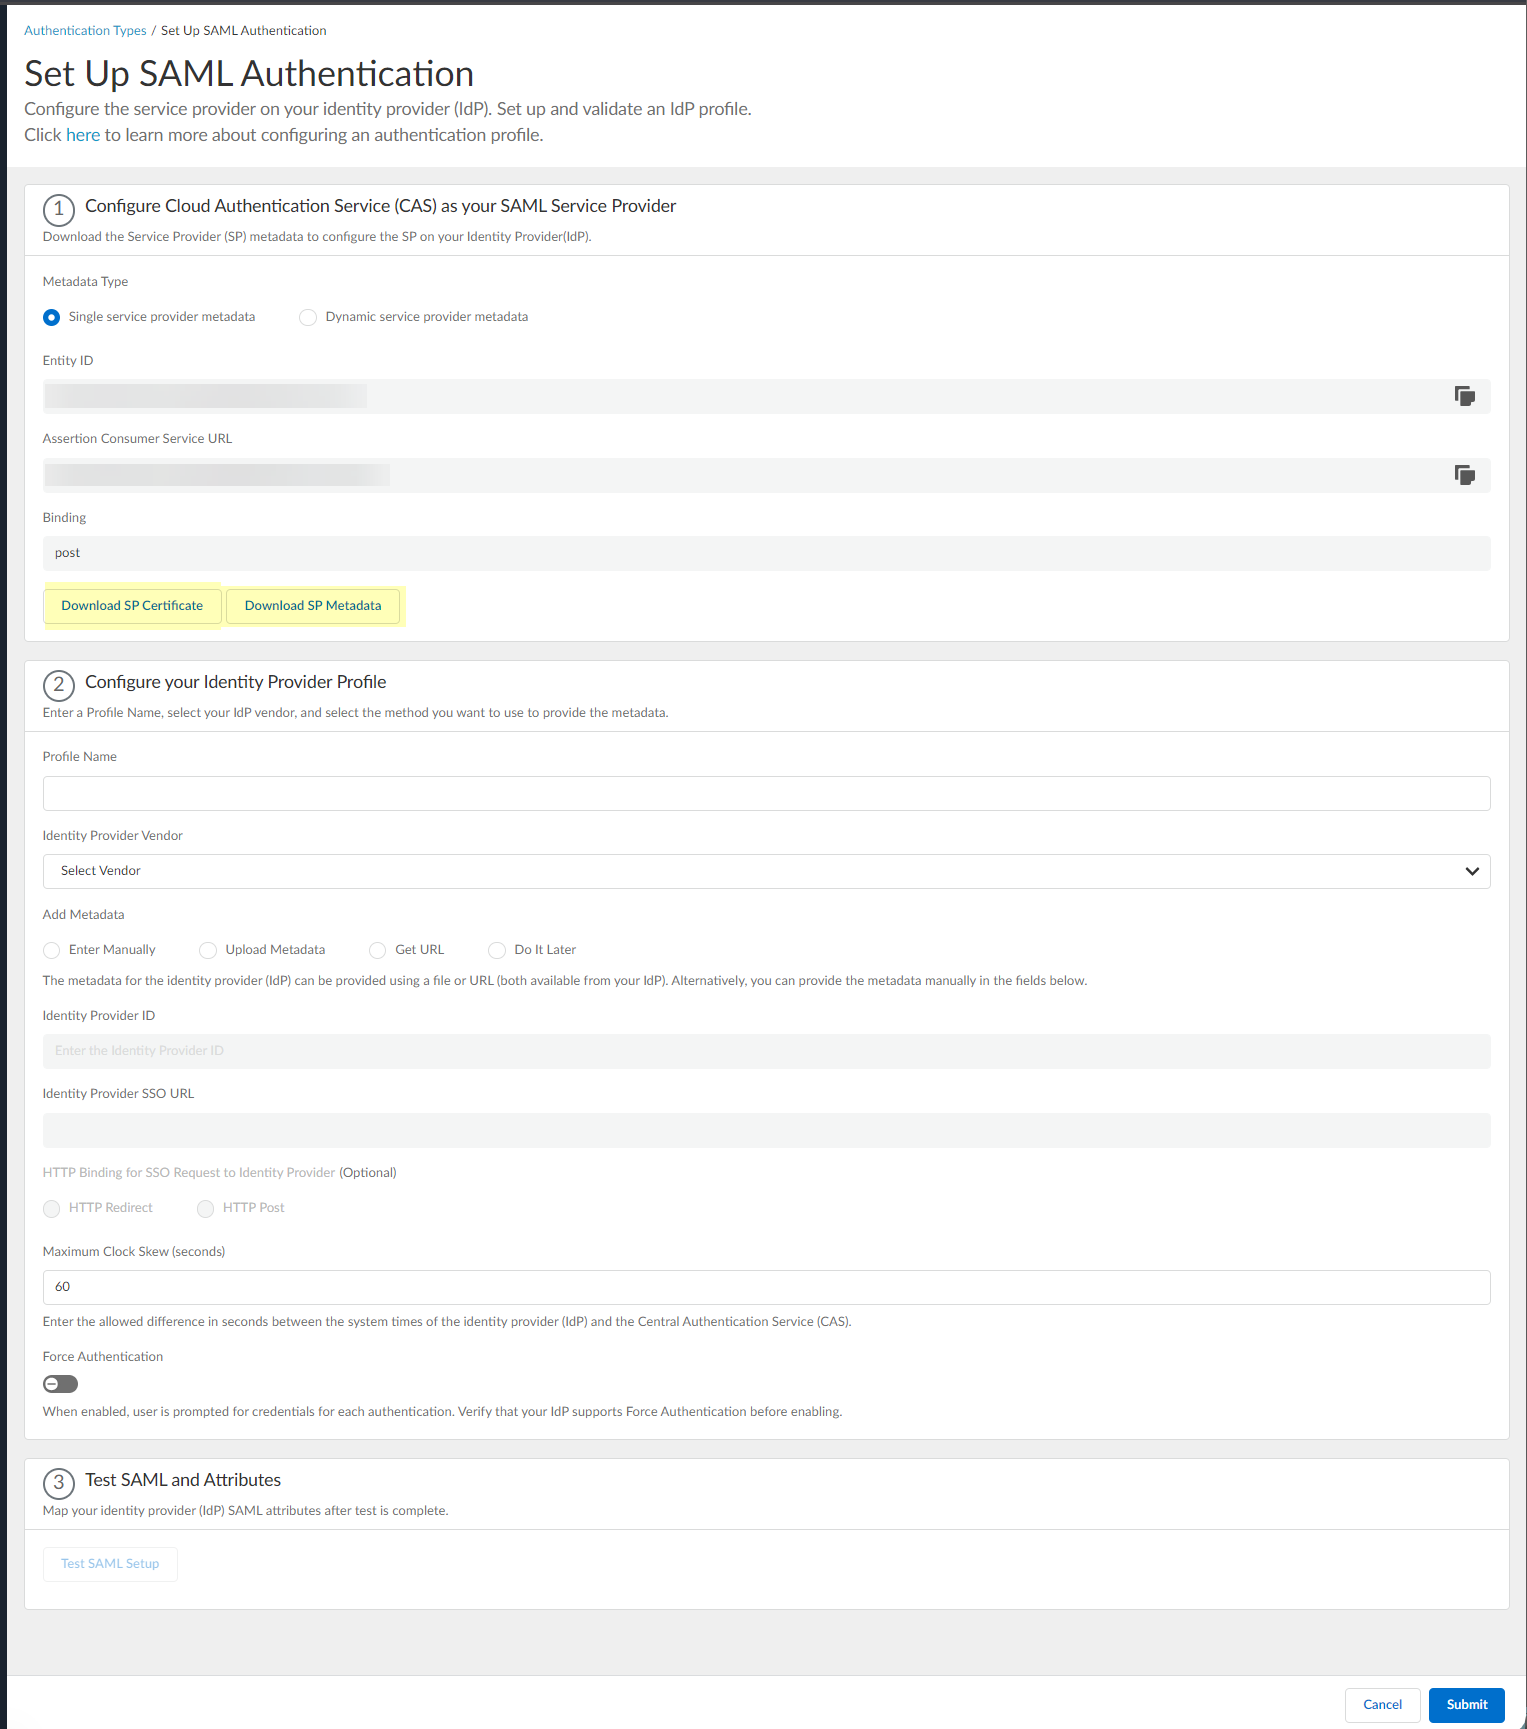
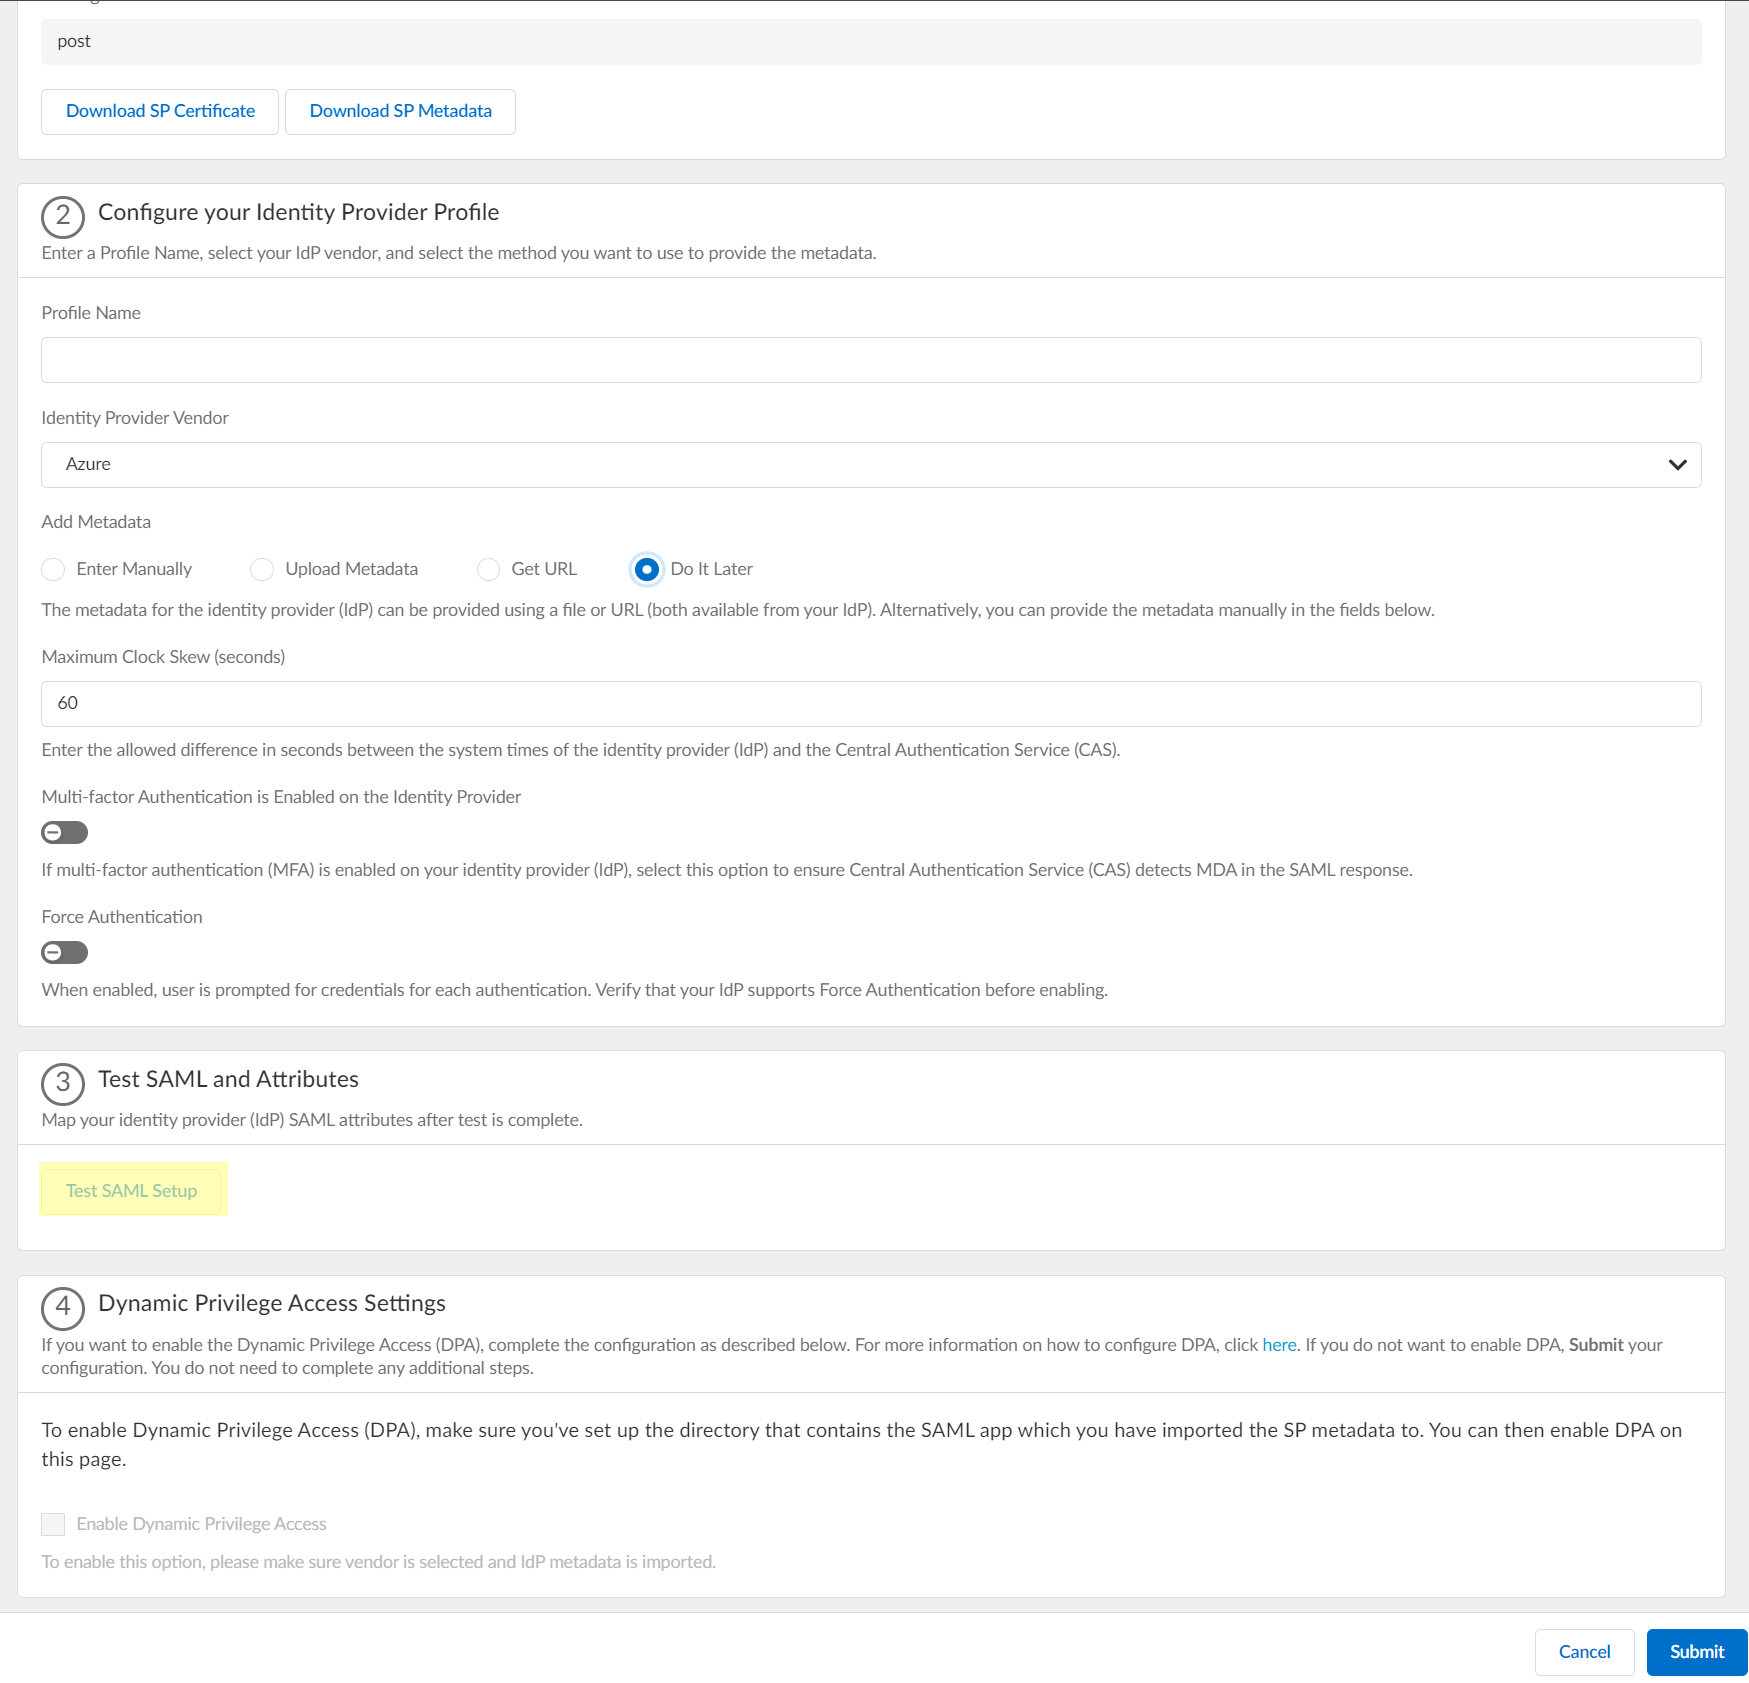
- Download SP Certificate and Download SP Metadata and save them in a secure location.
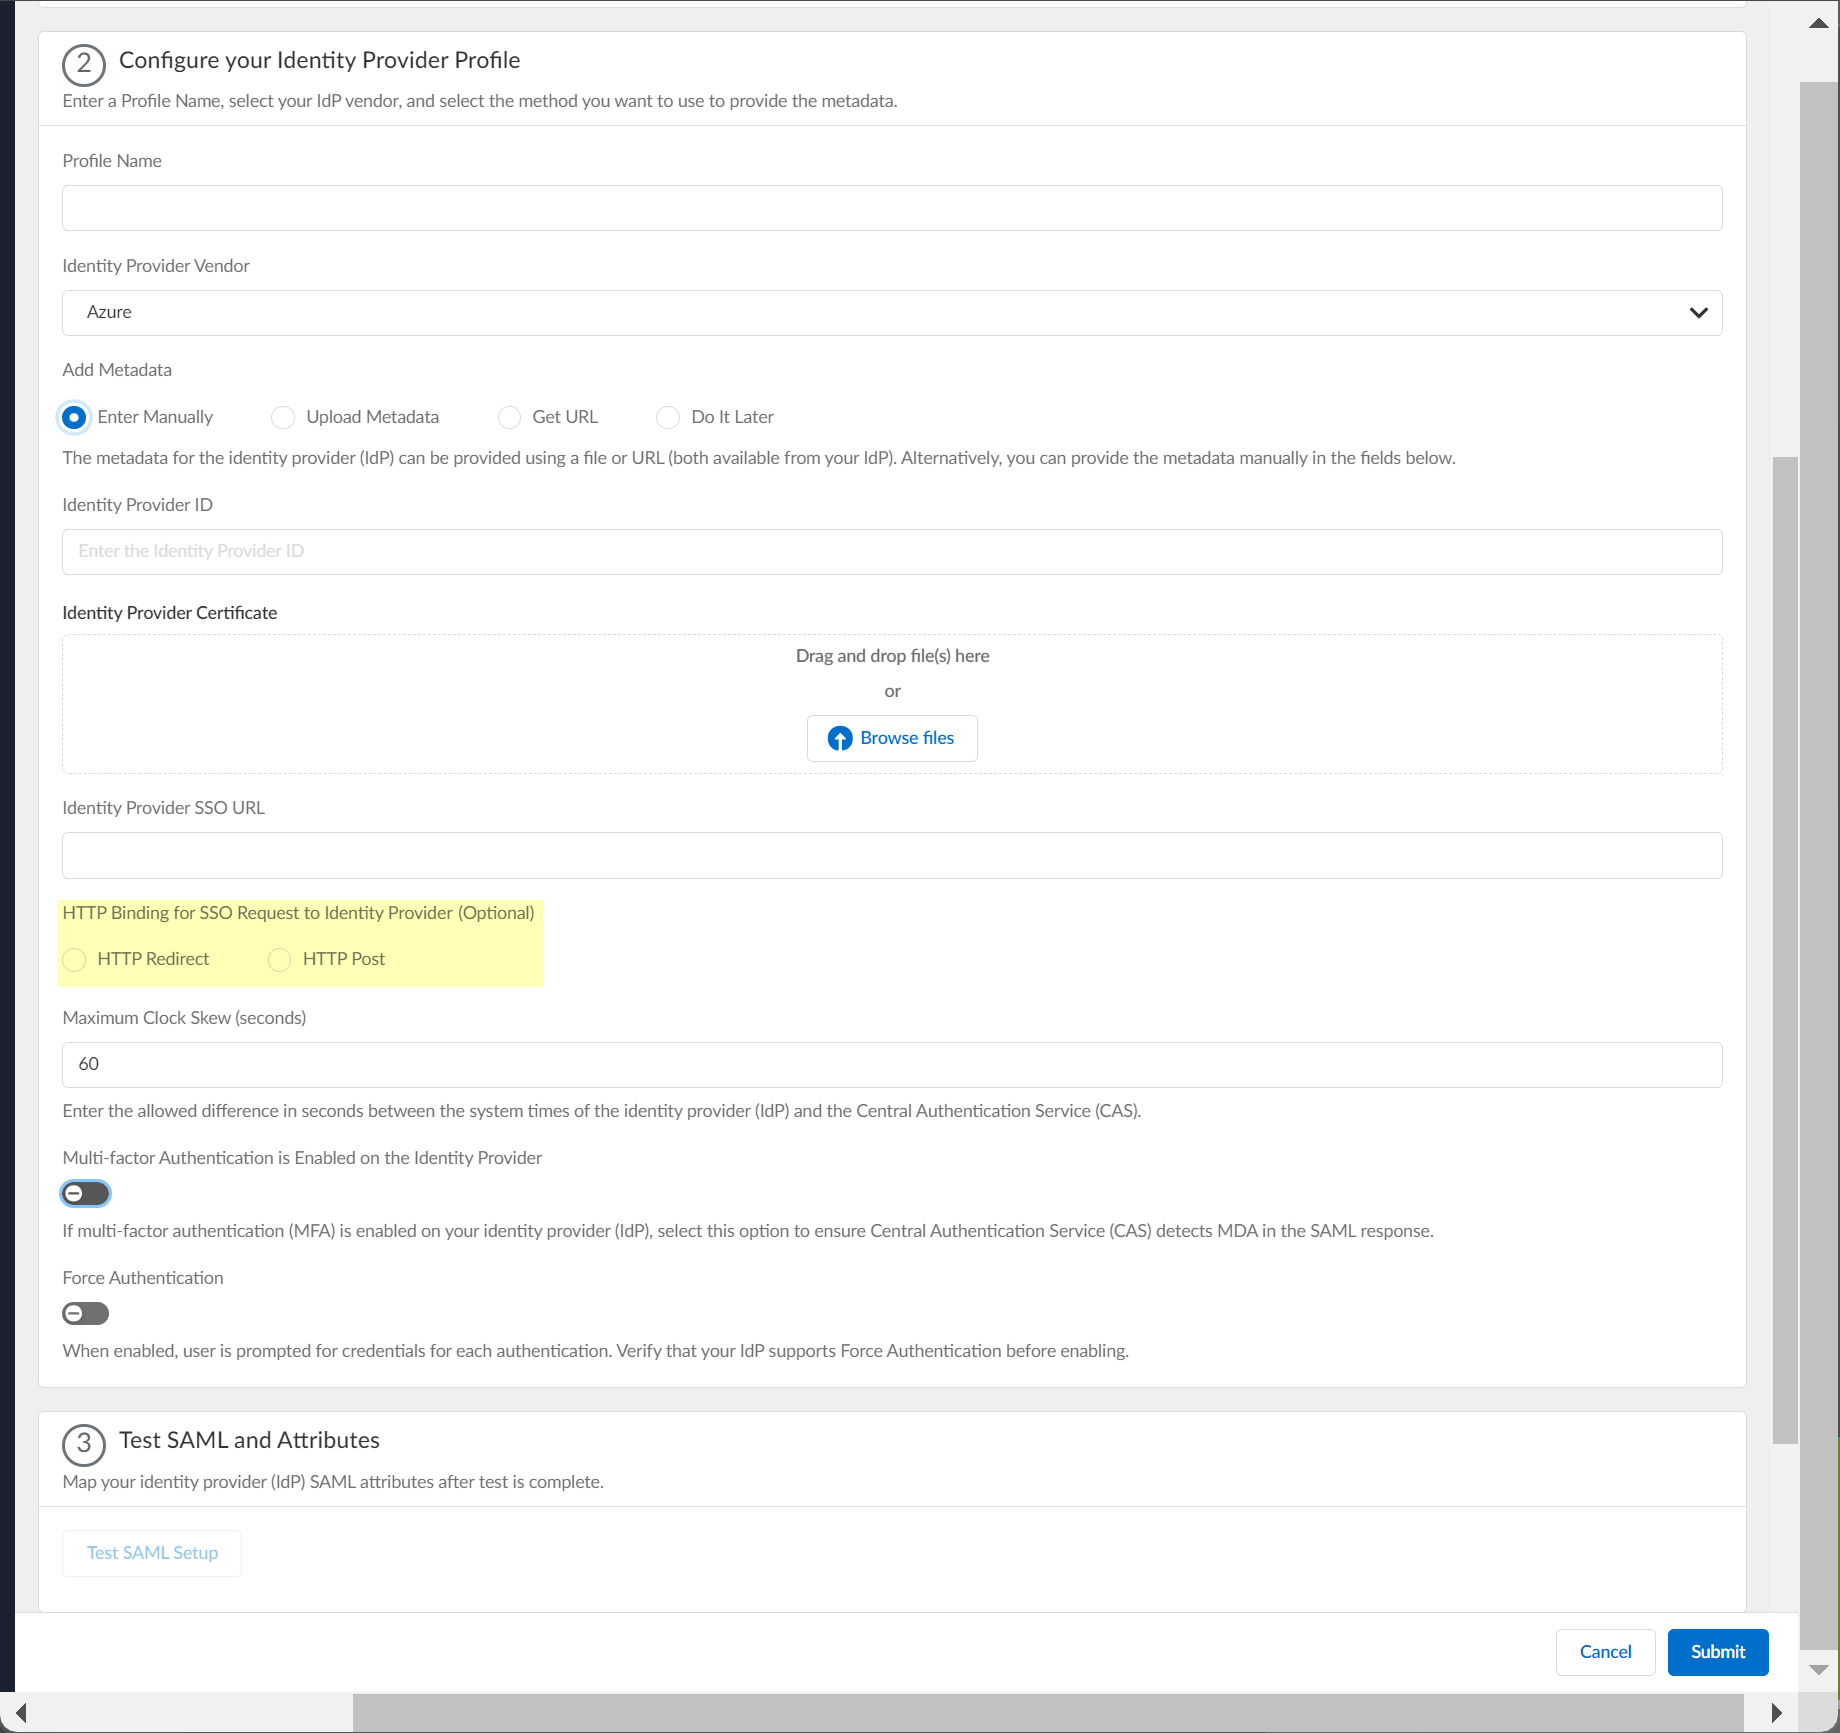
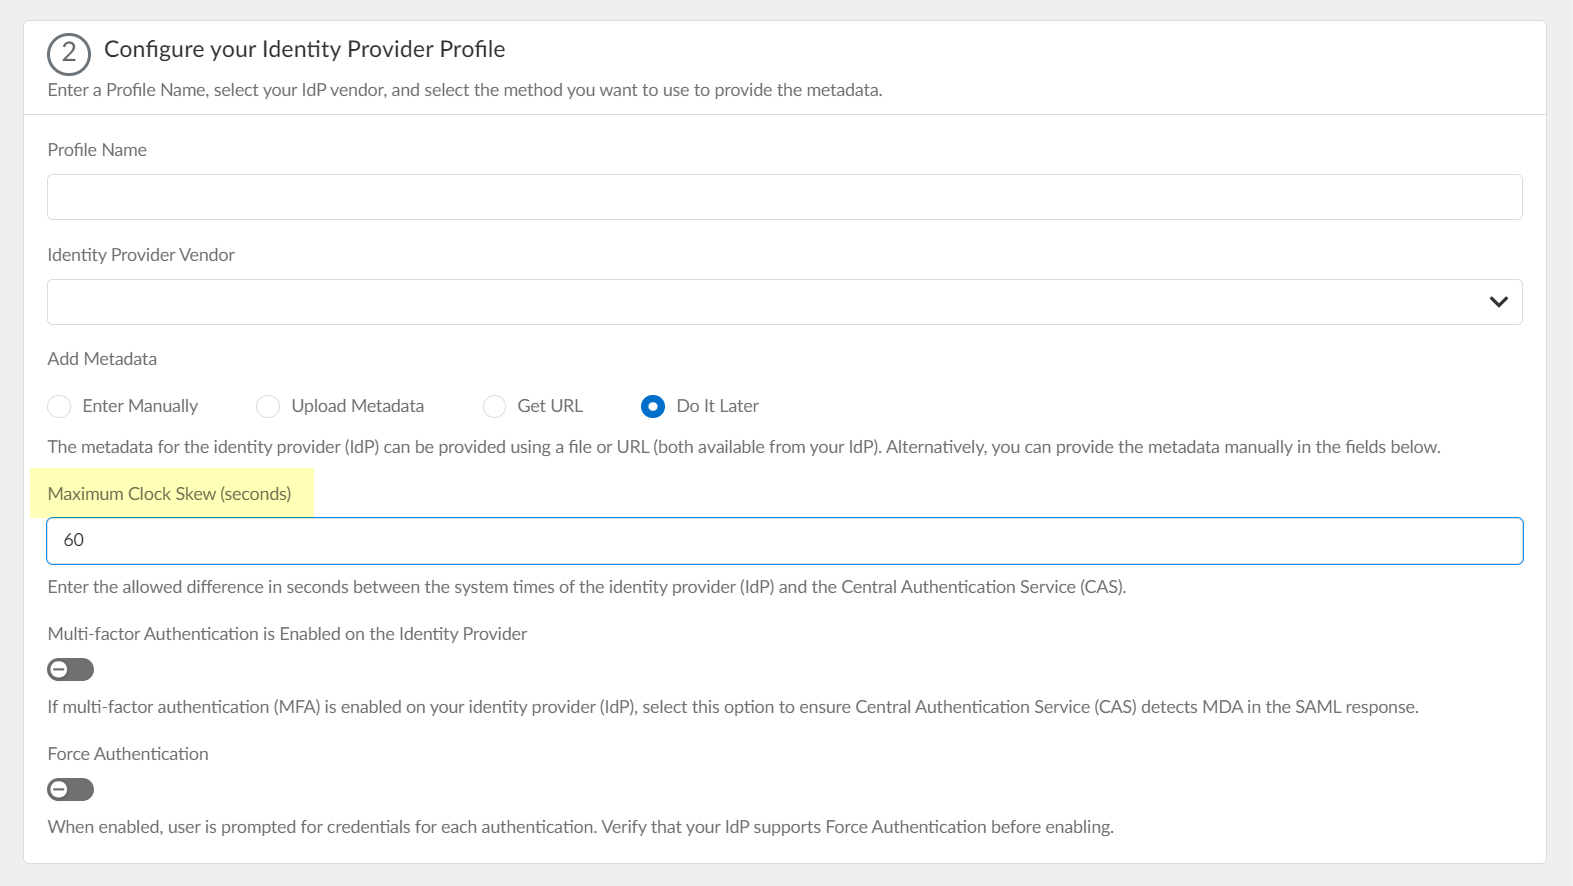
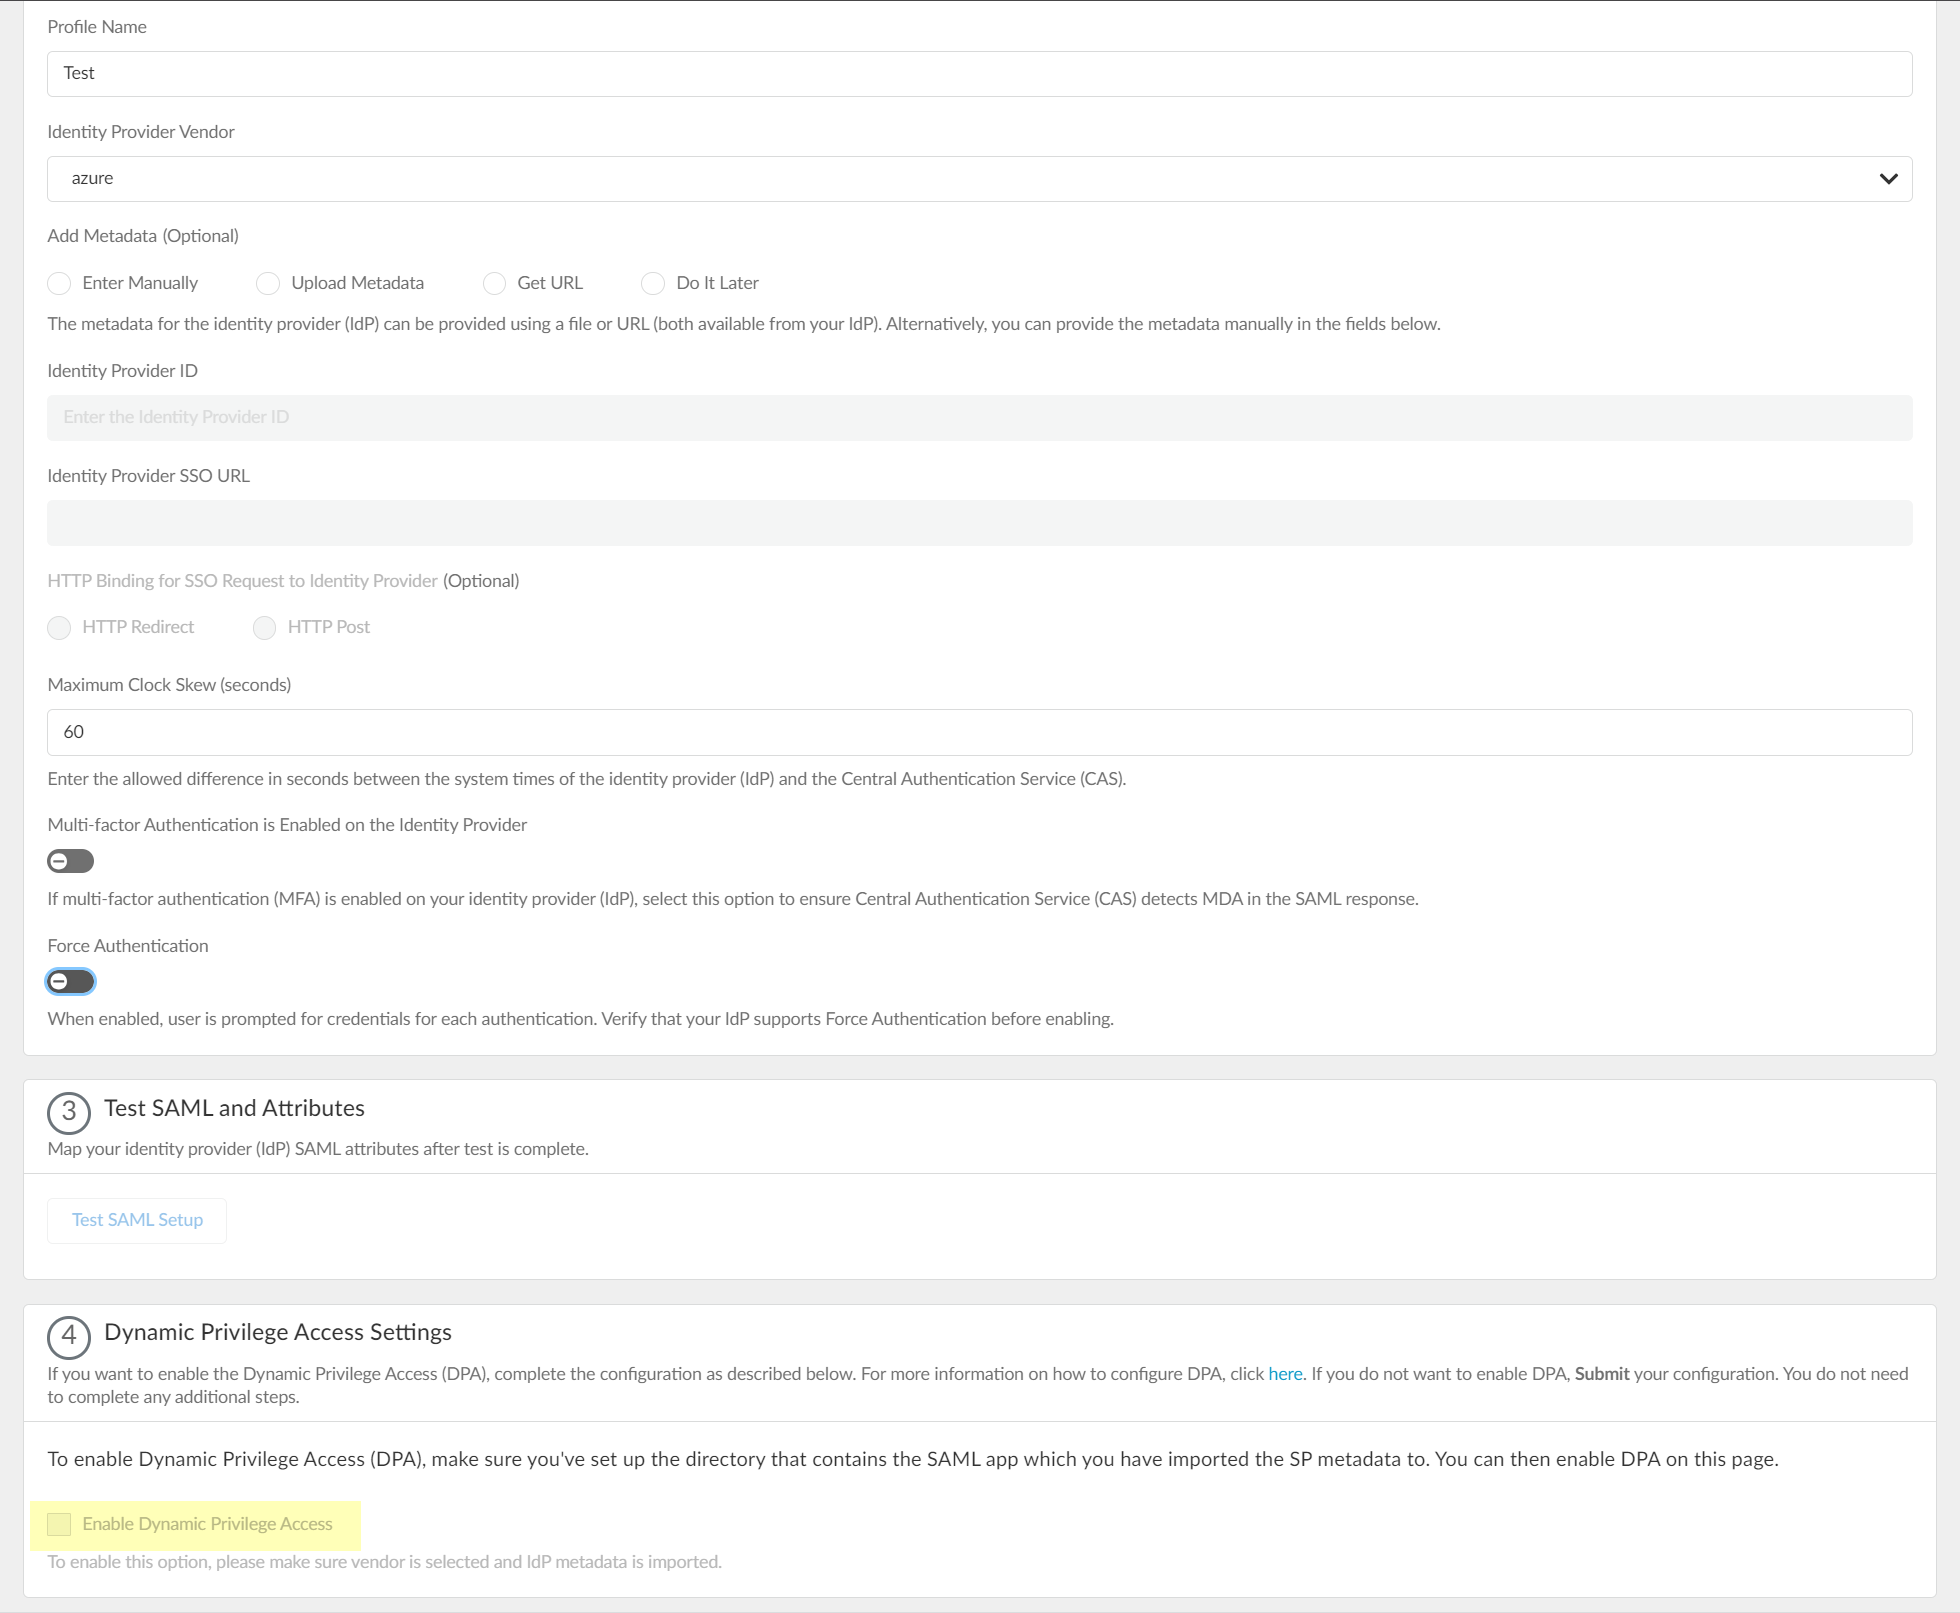
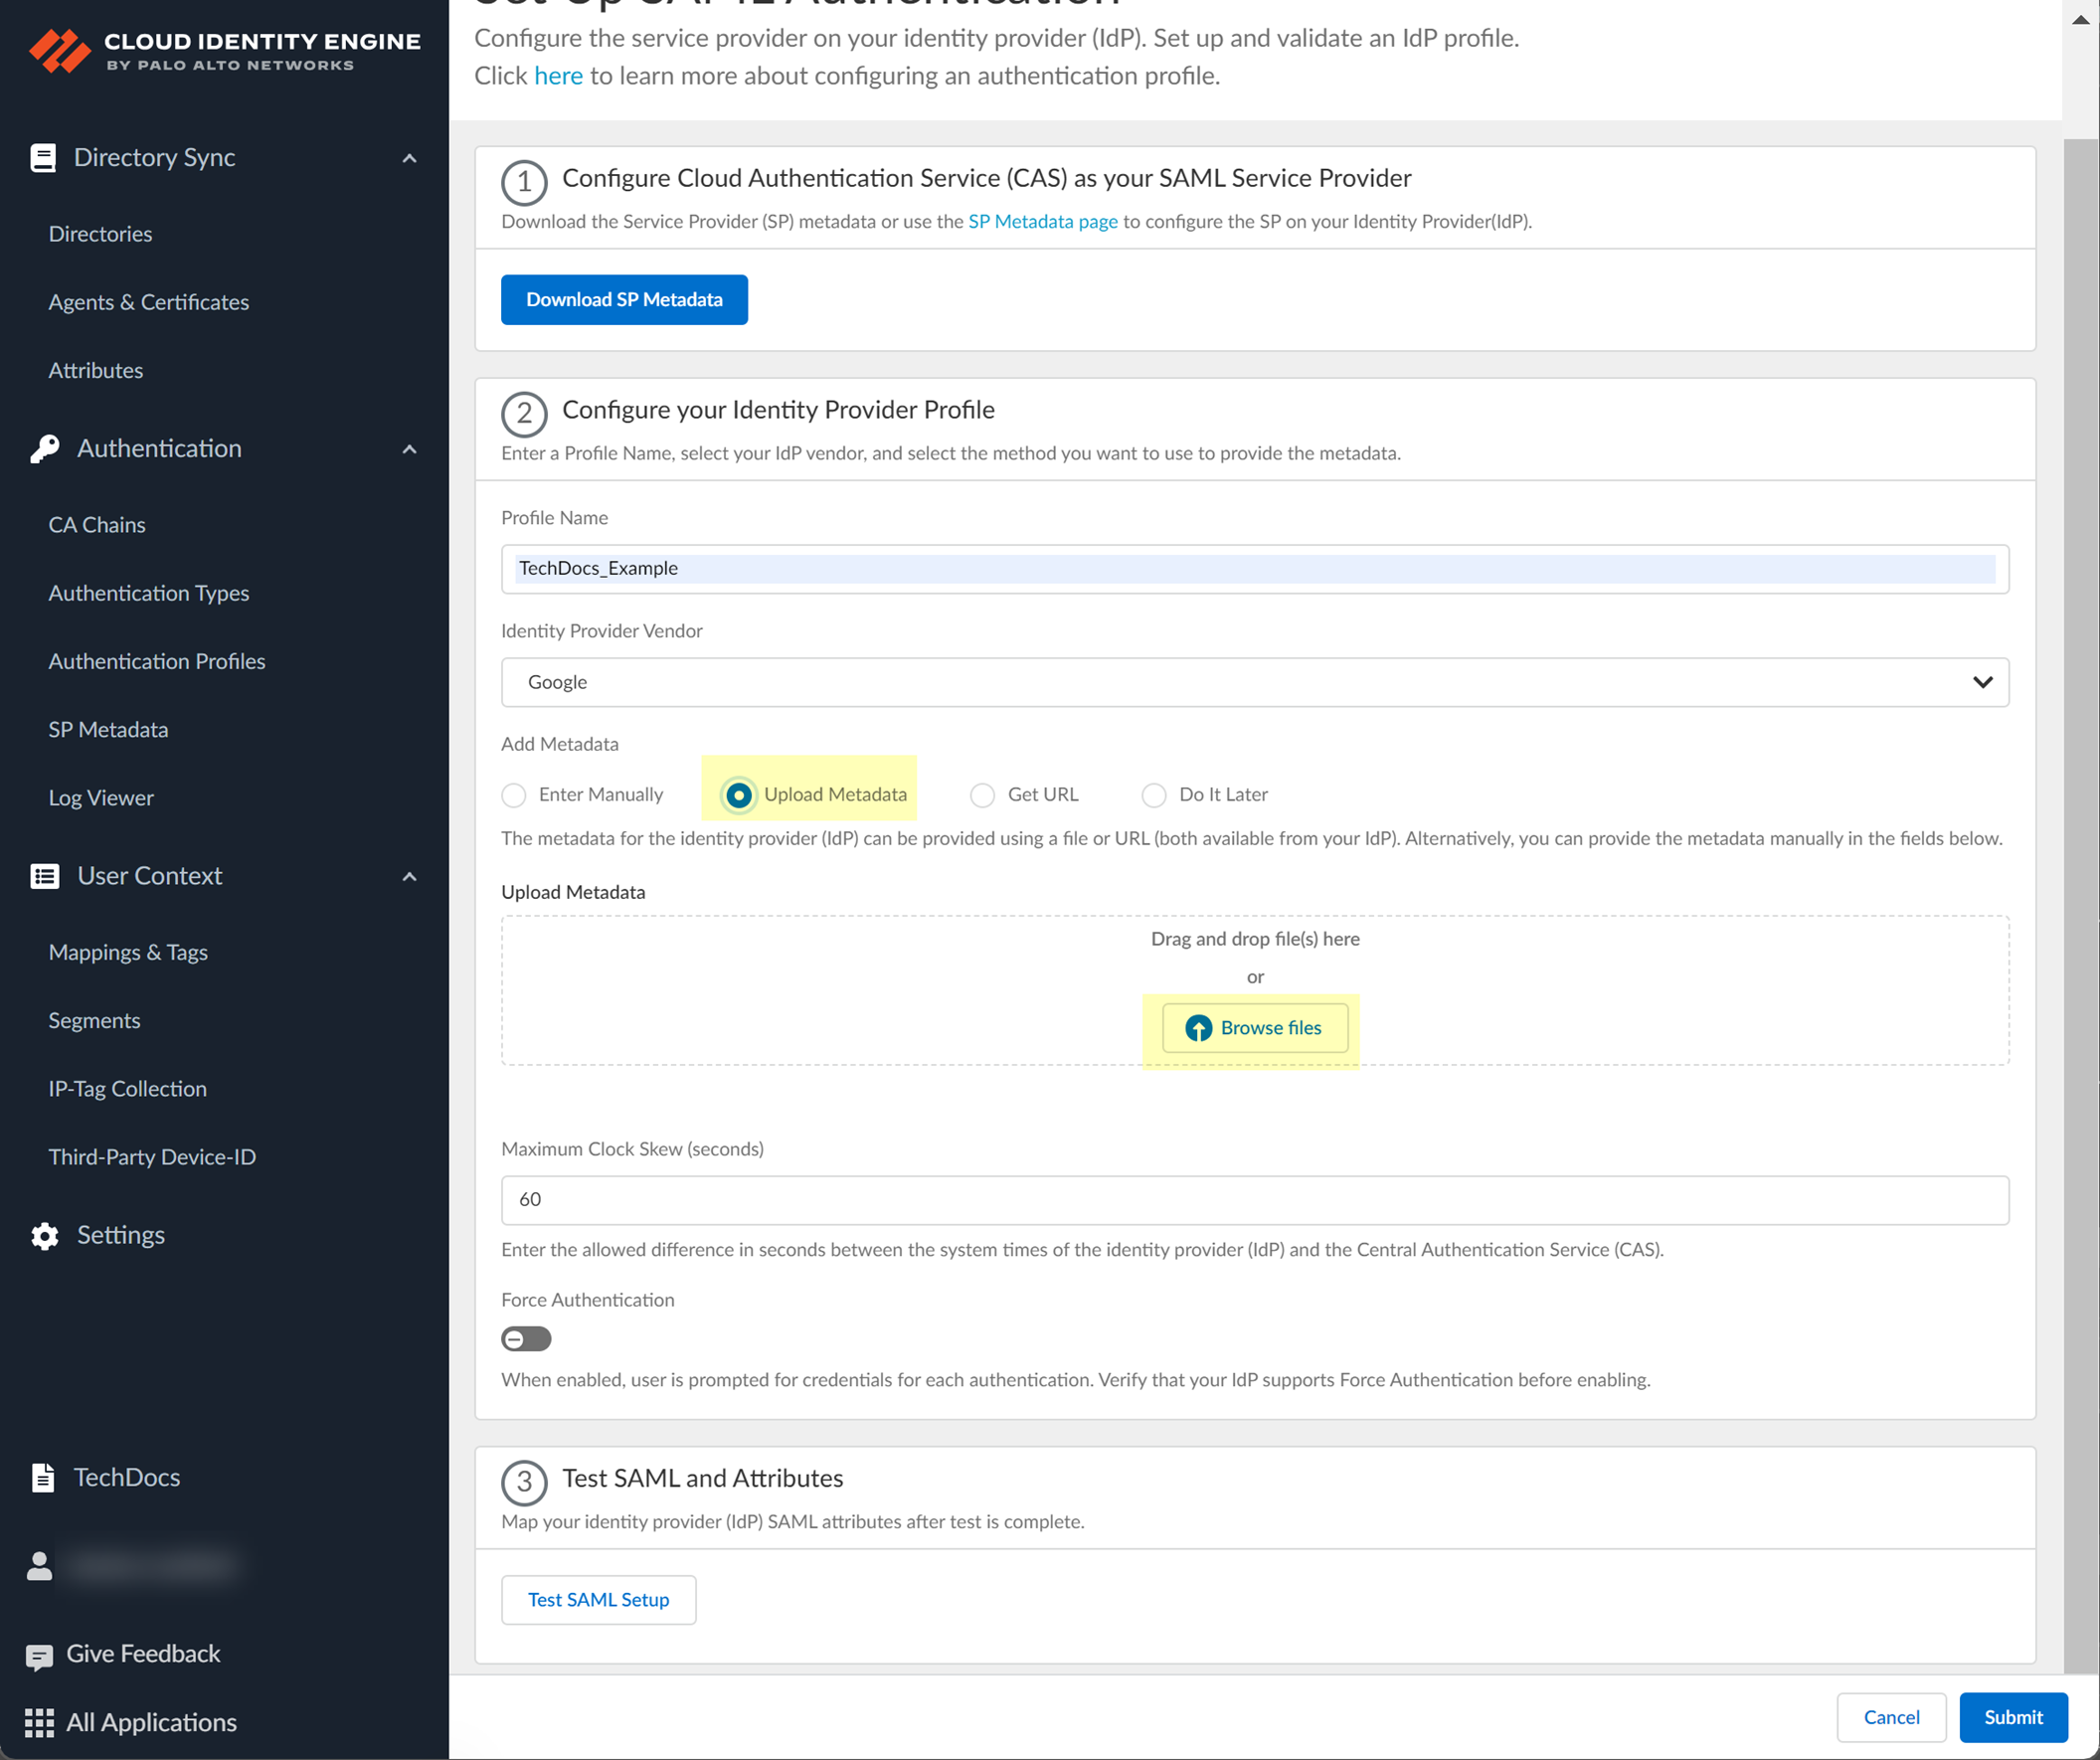
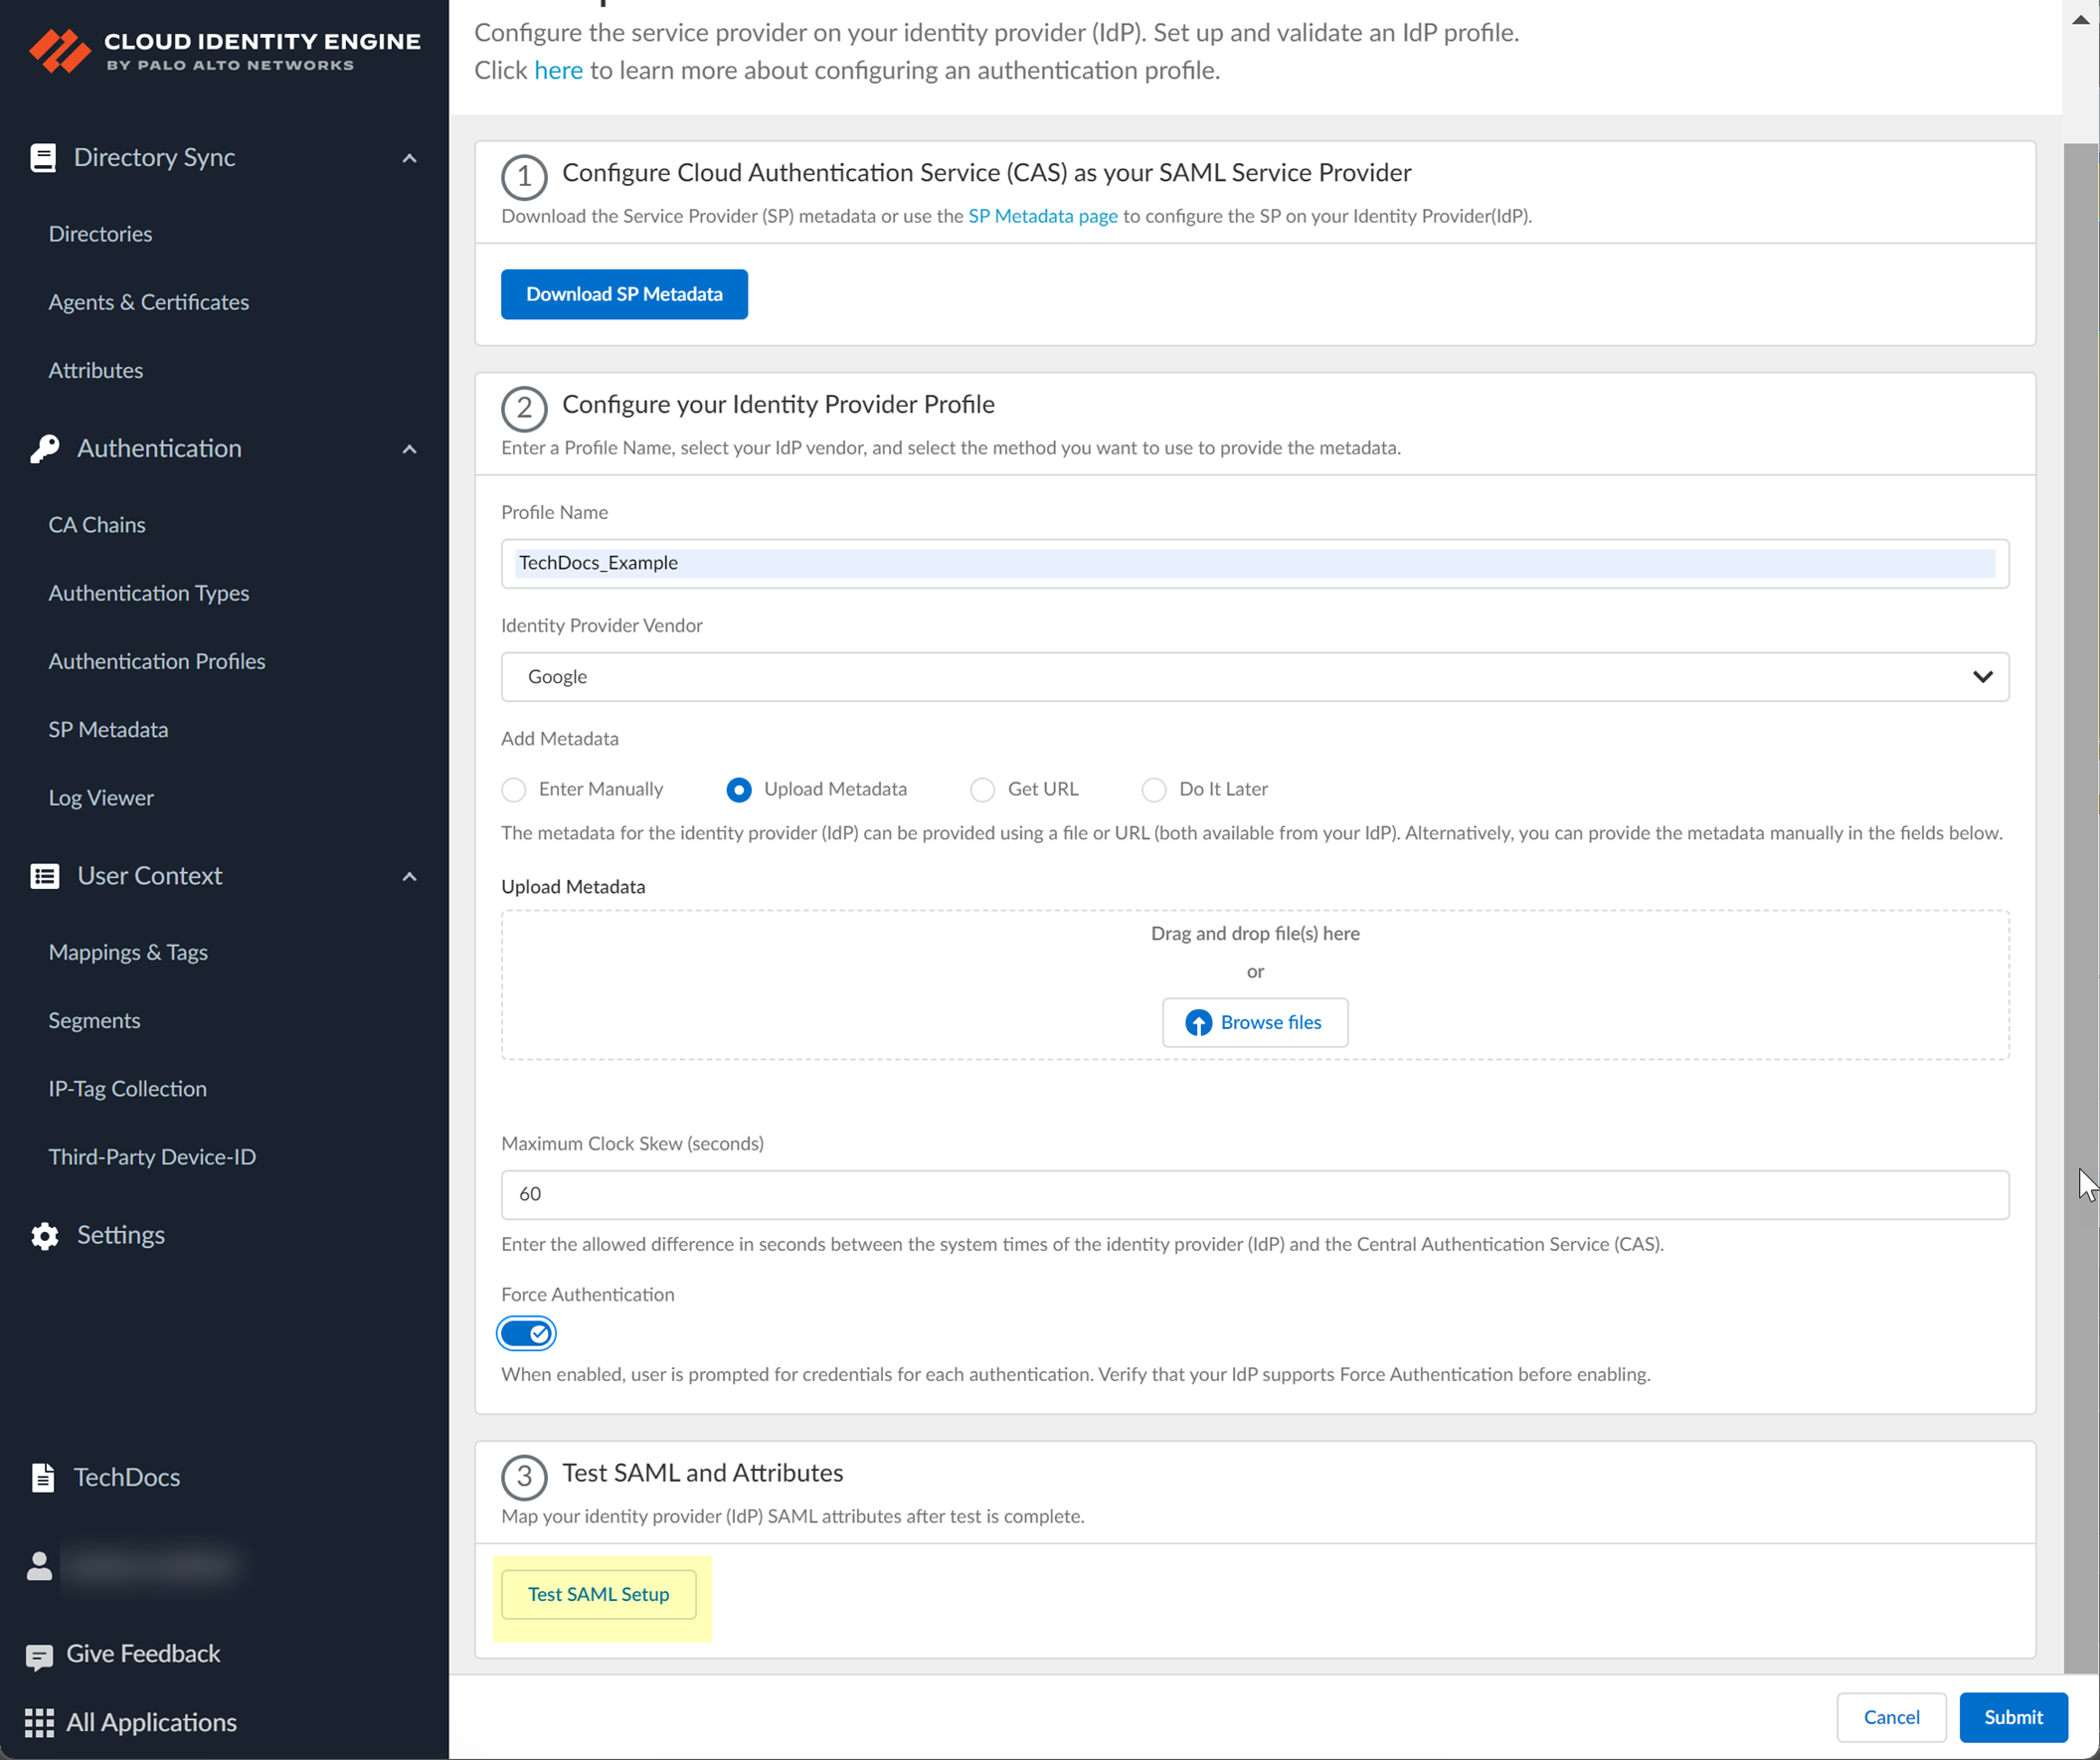
- Enter a unique and descriptive Profile Name .
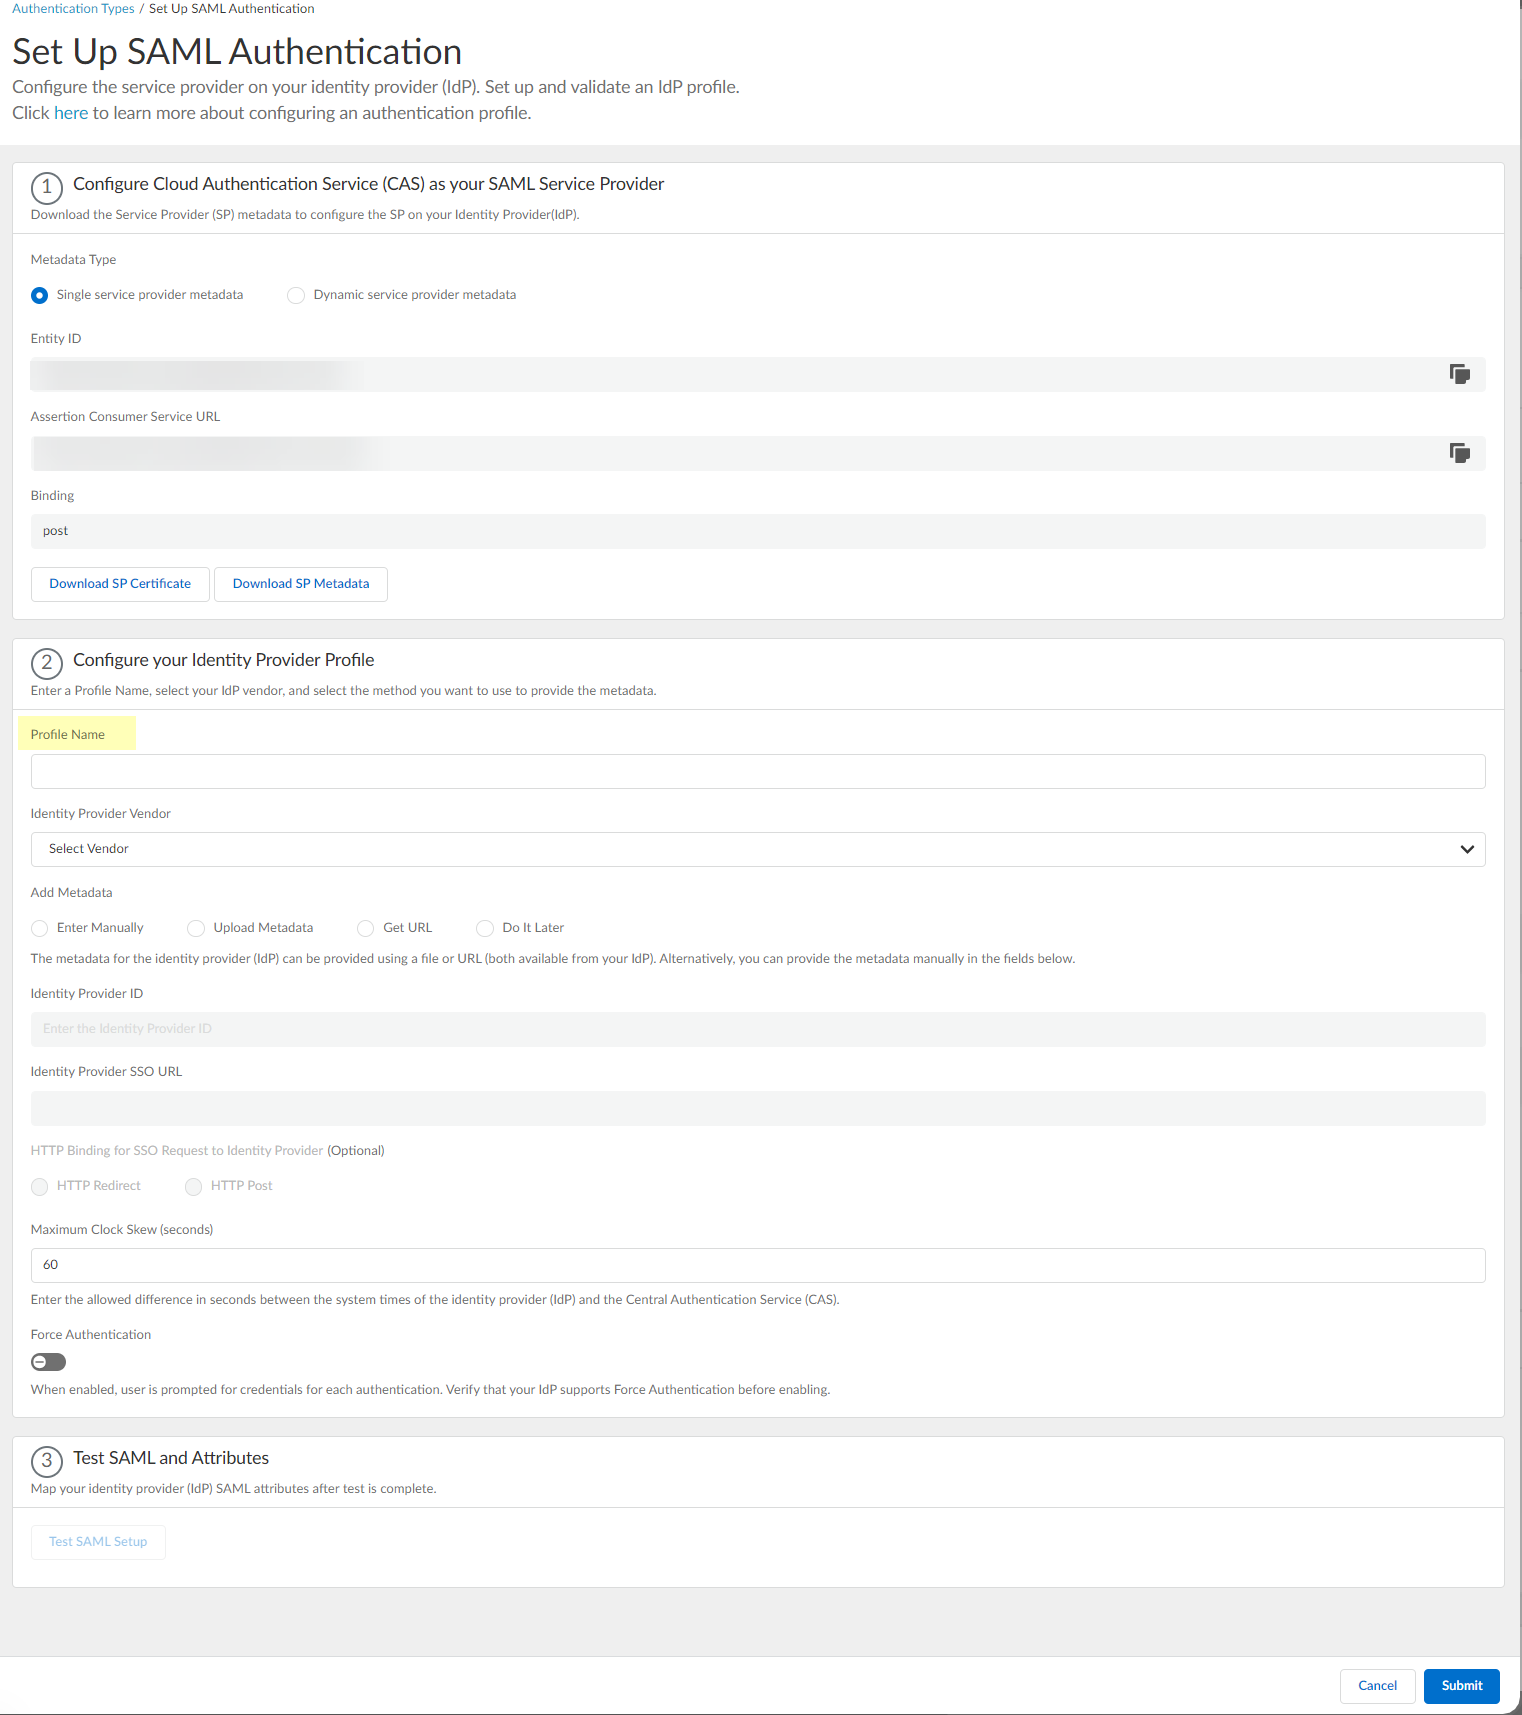
- Select Azure as your Identity Provider Vendor .
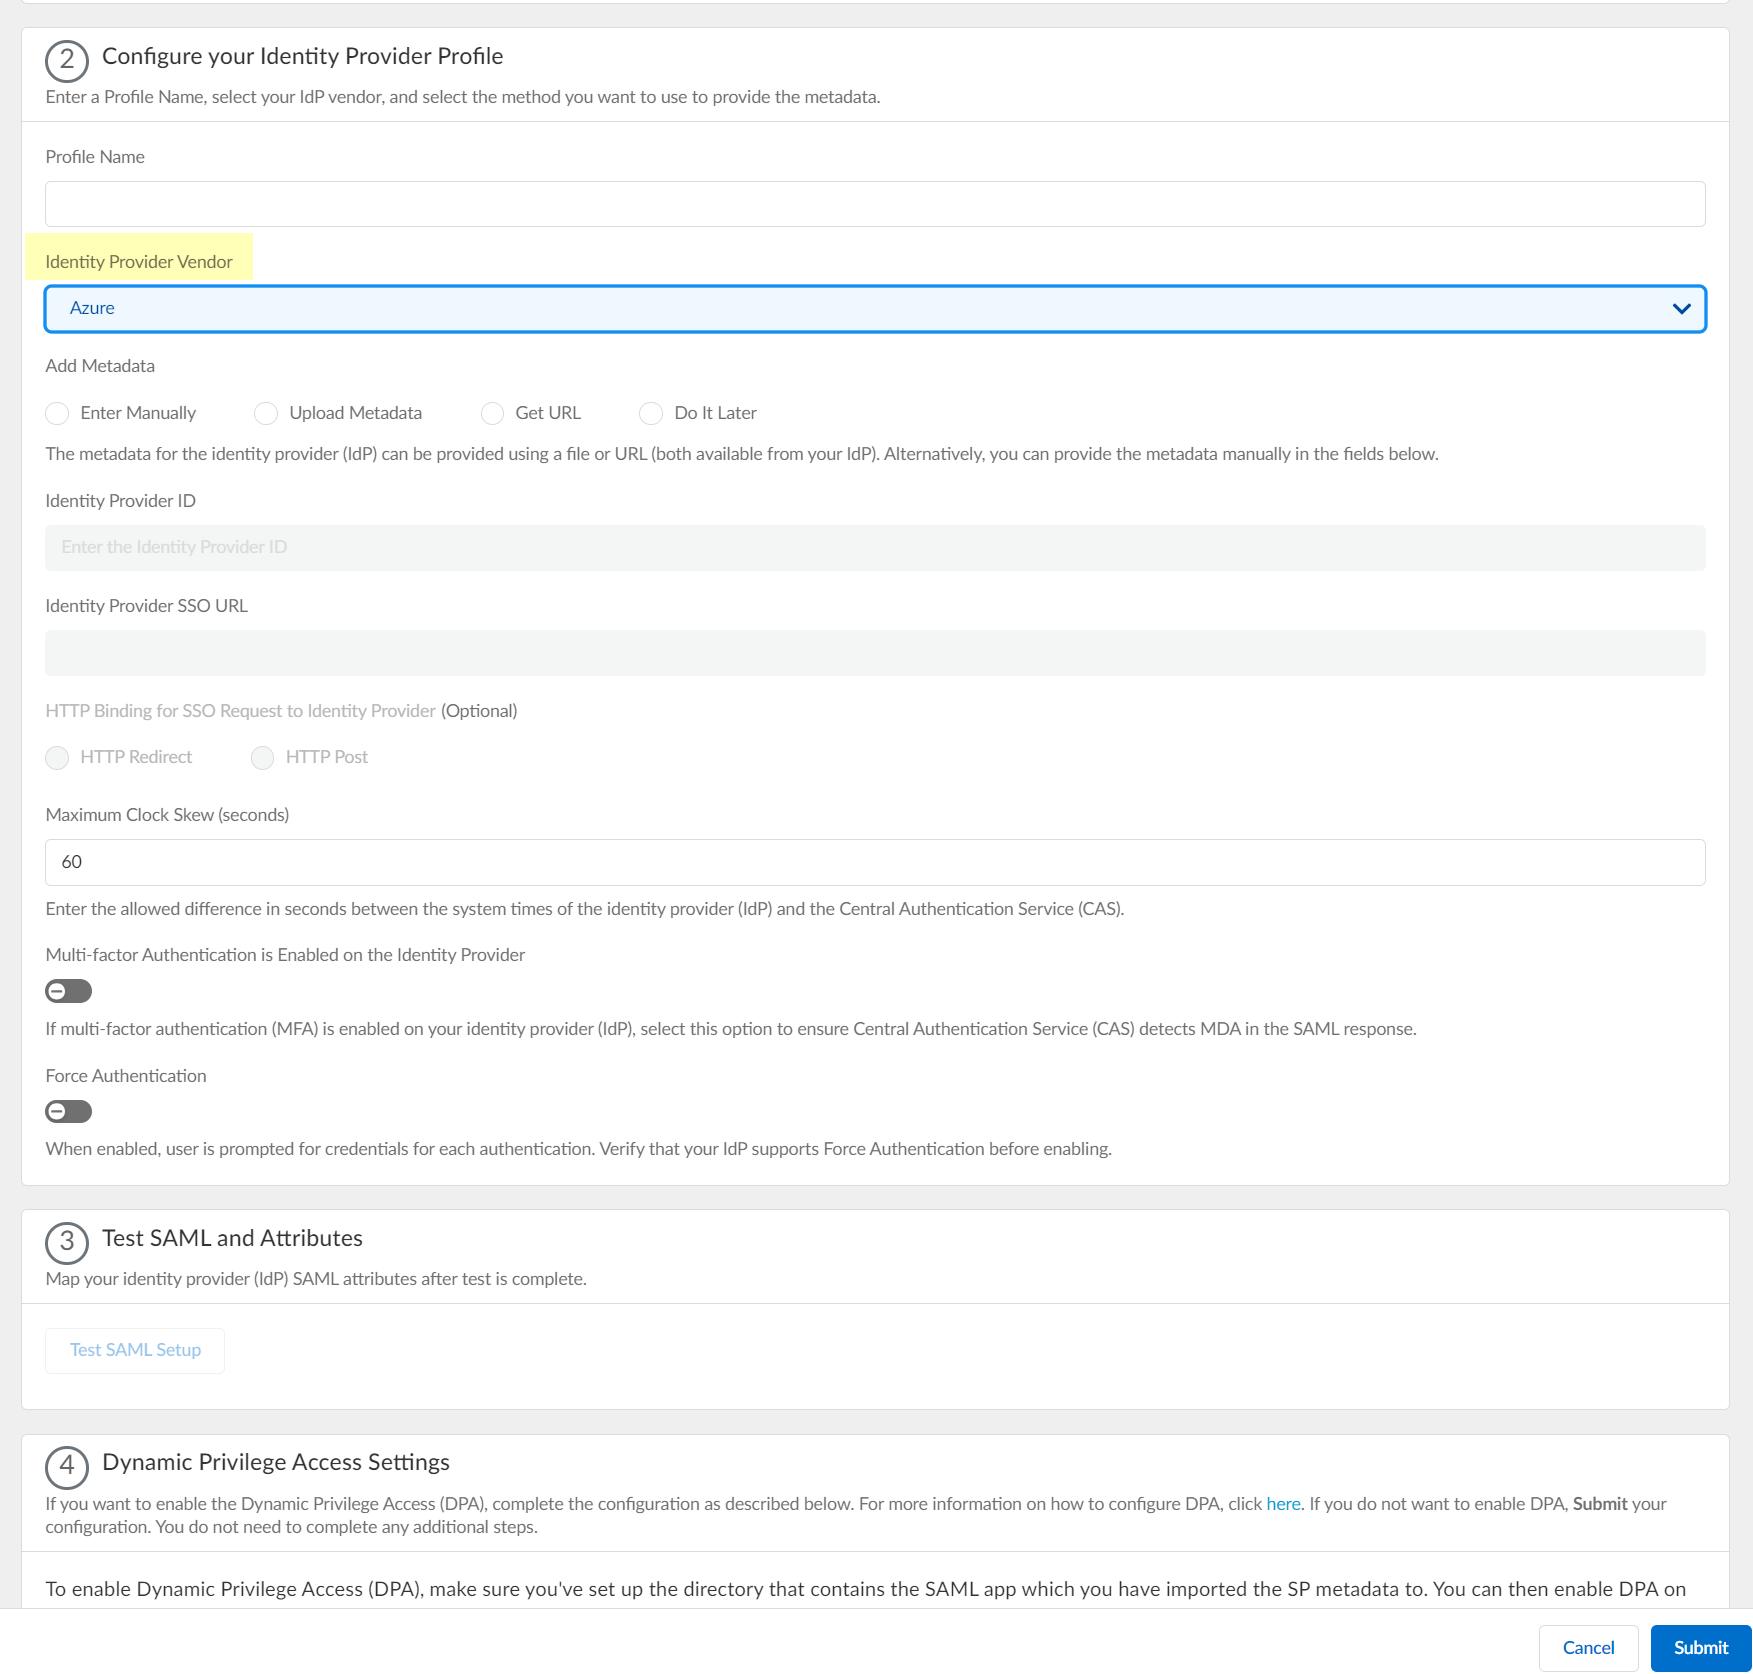
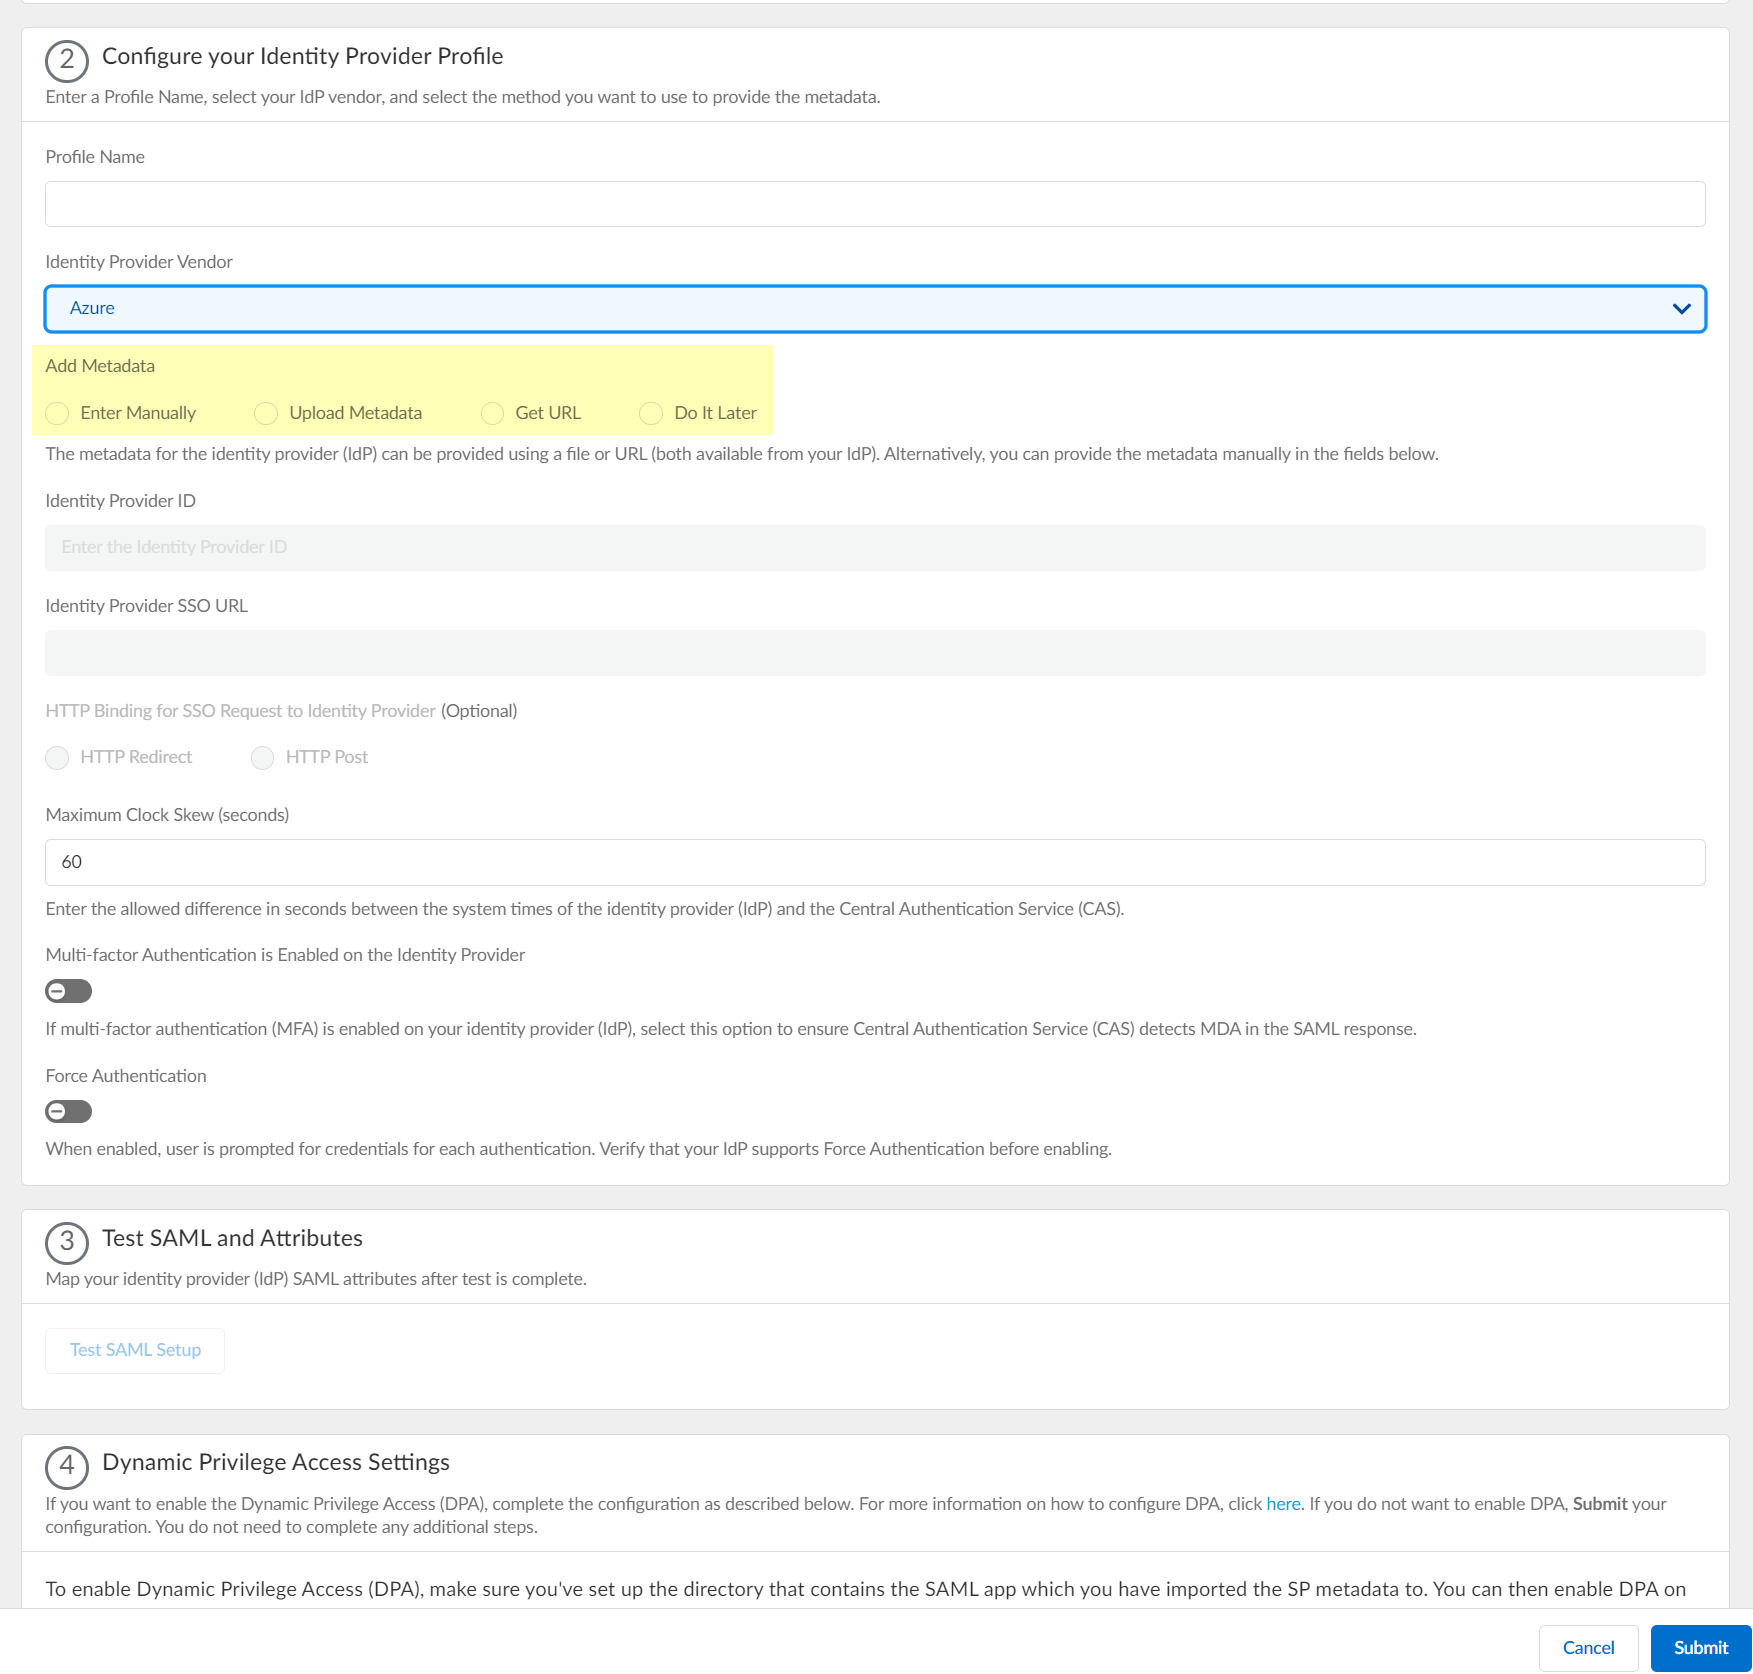
- Select the method you want to use to Add Metadata .
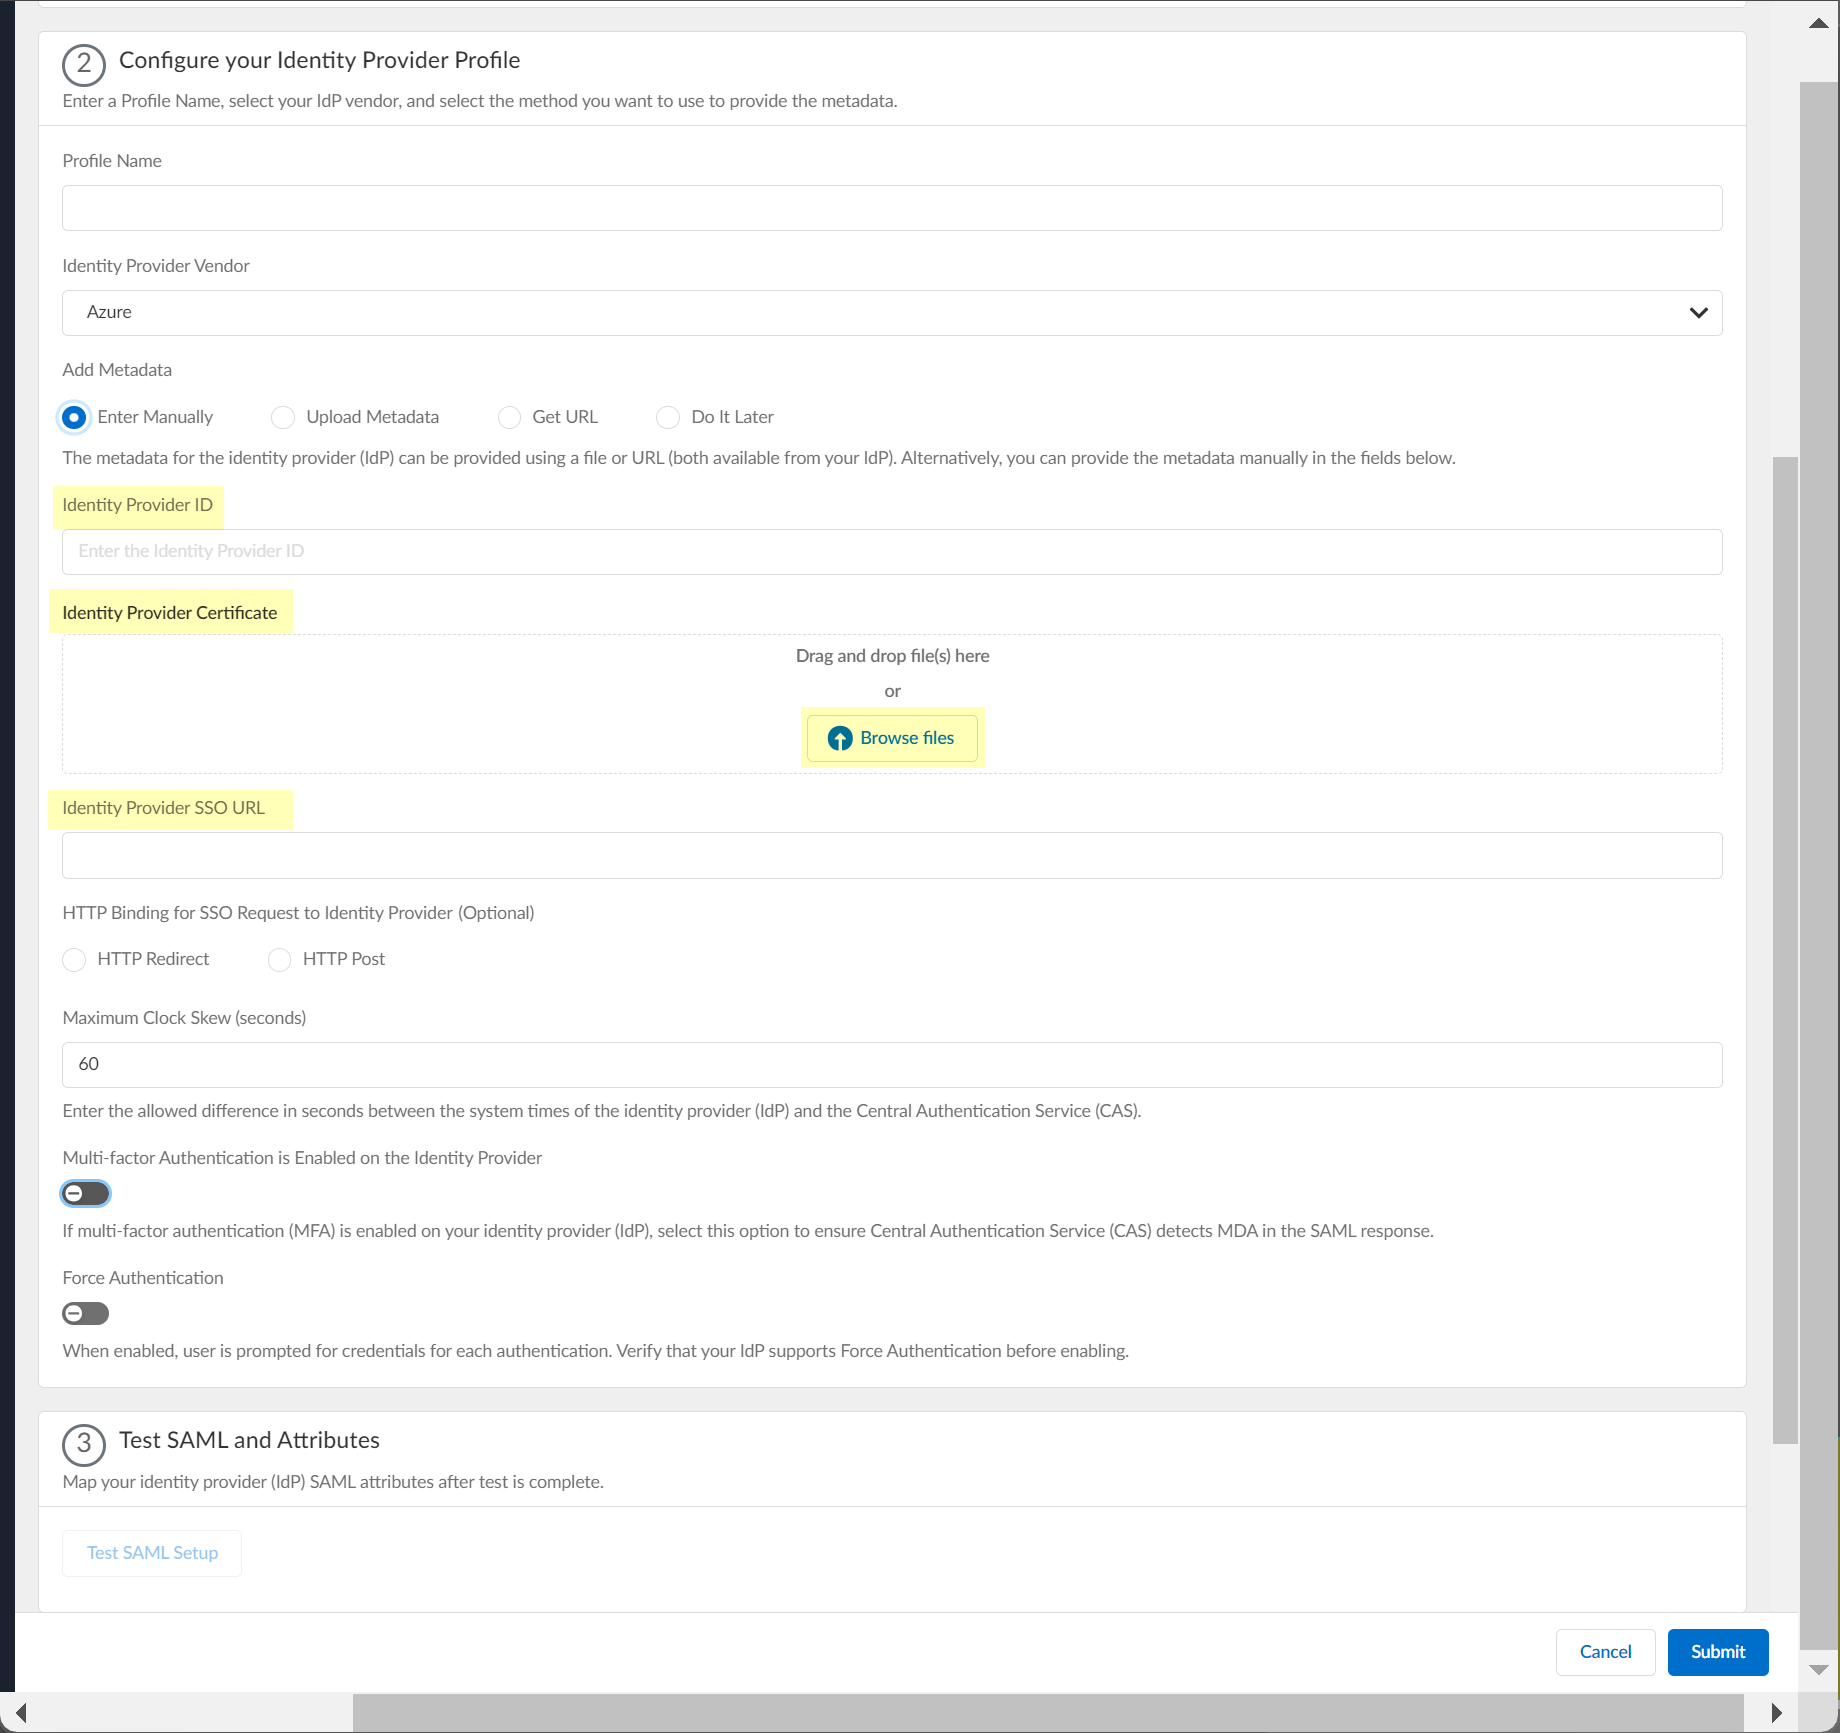
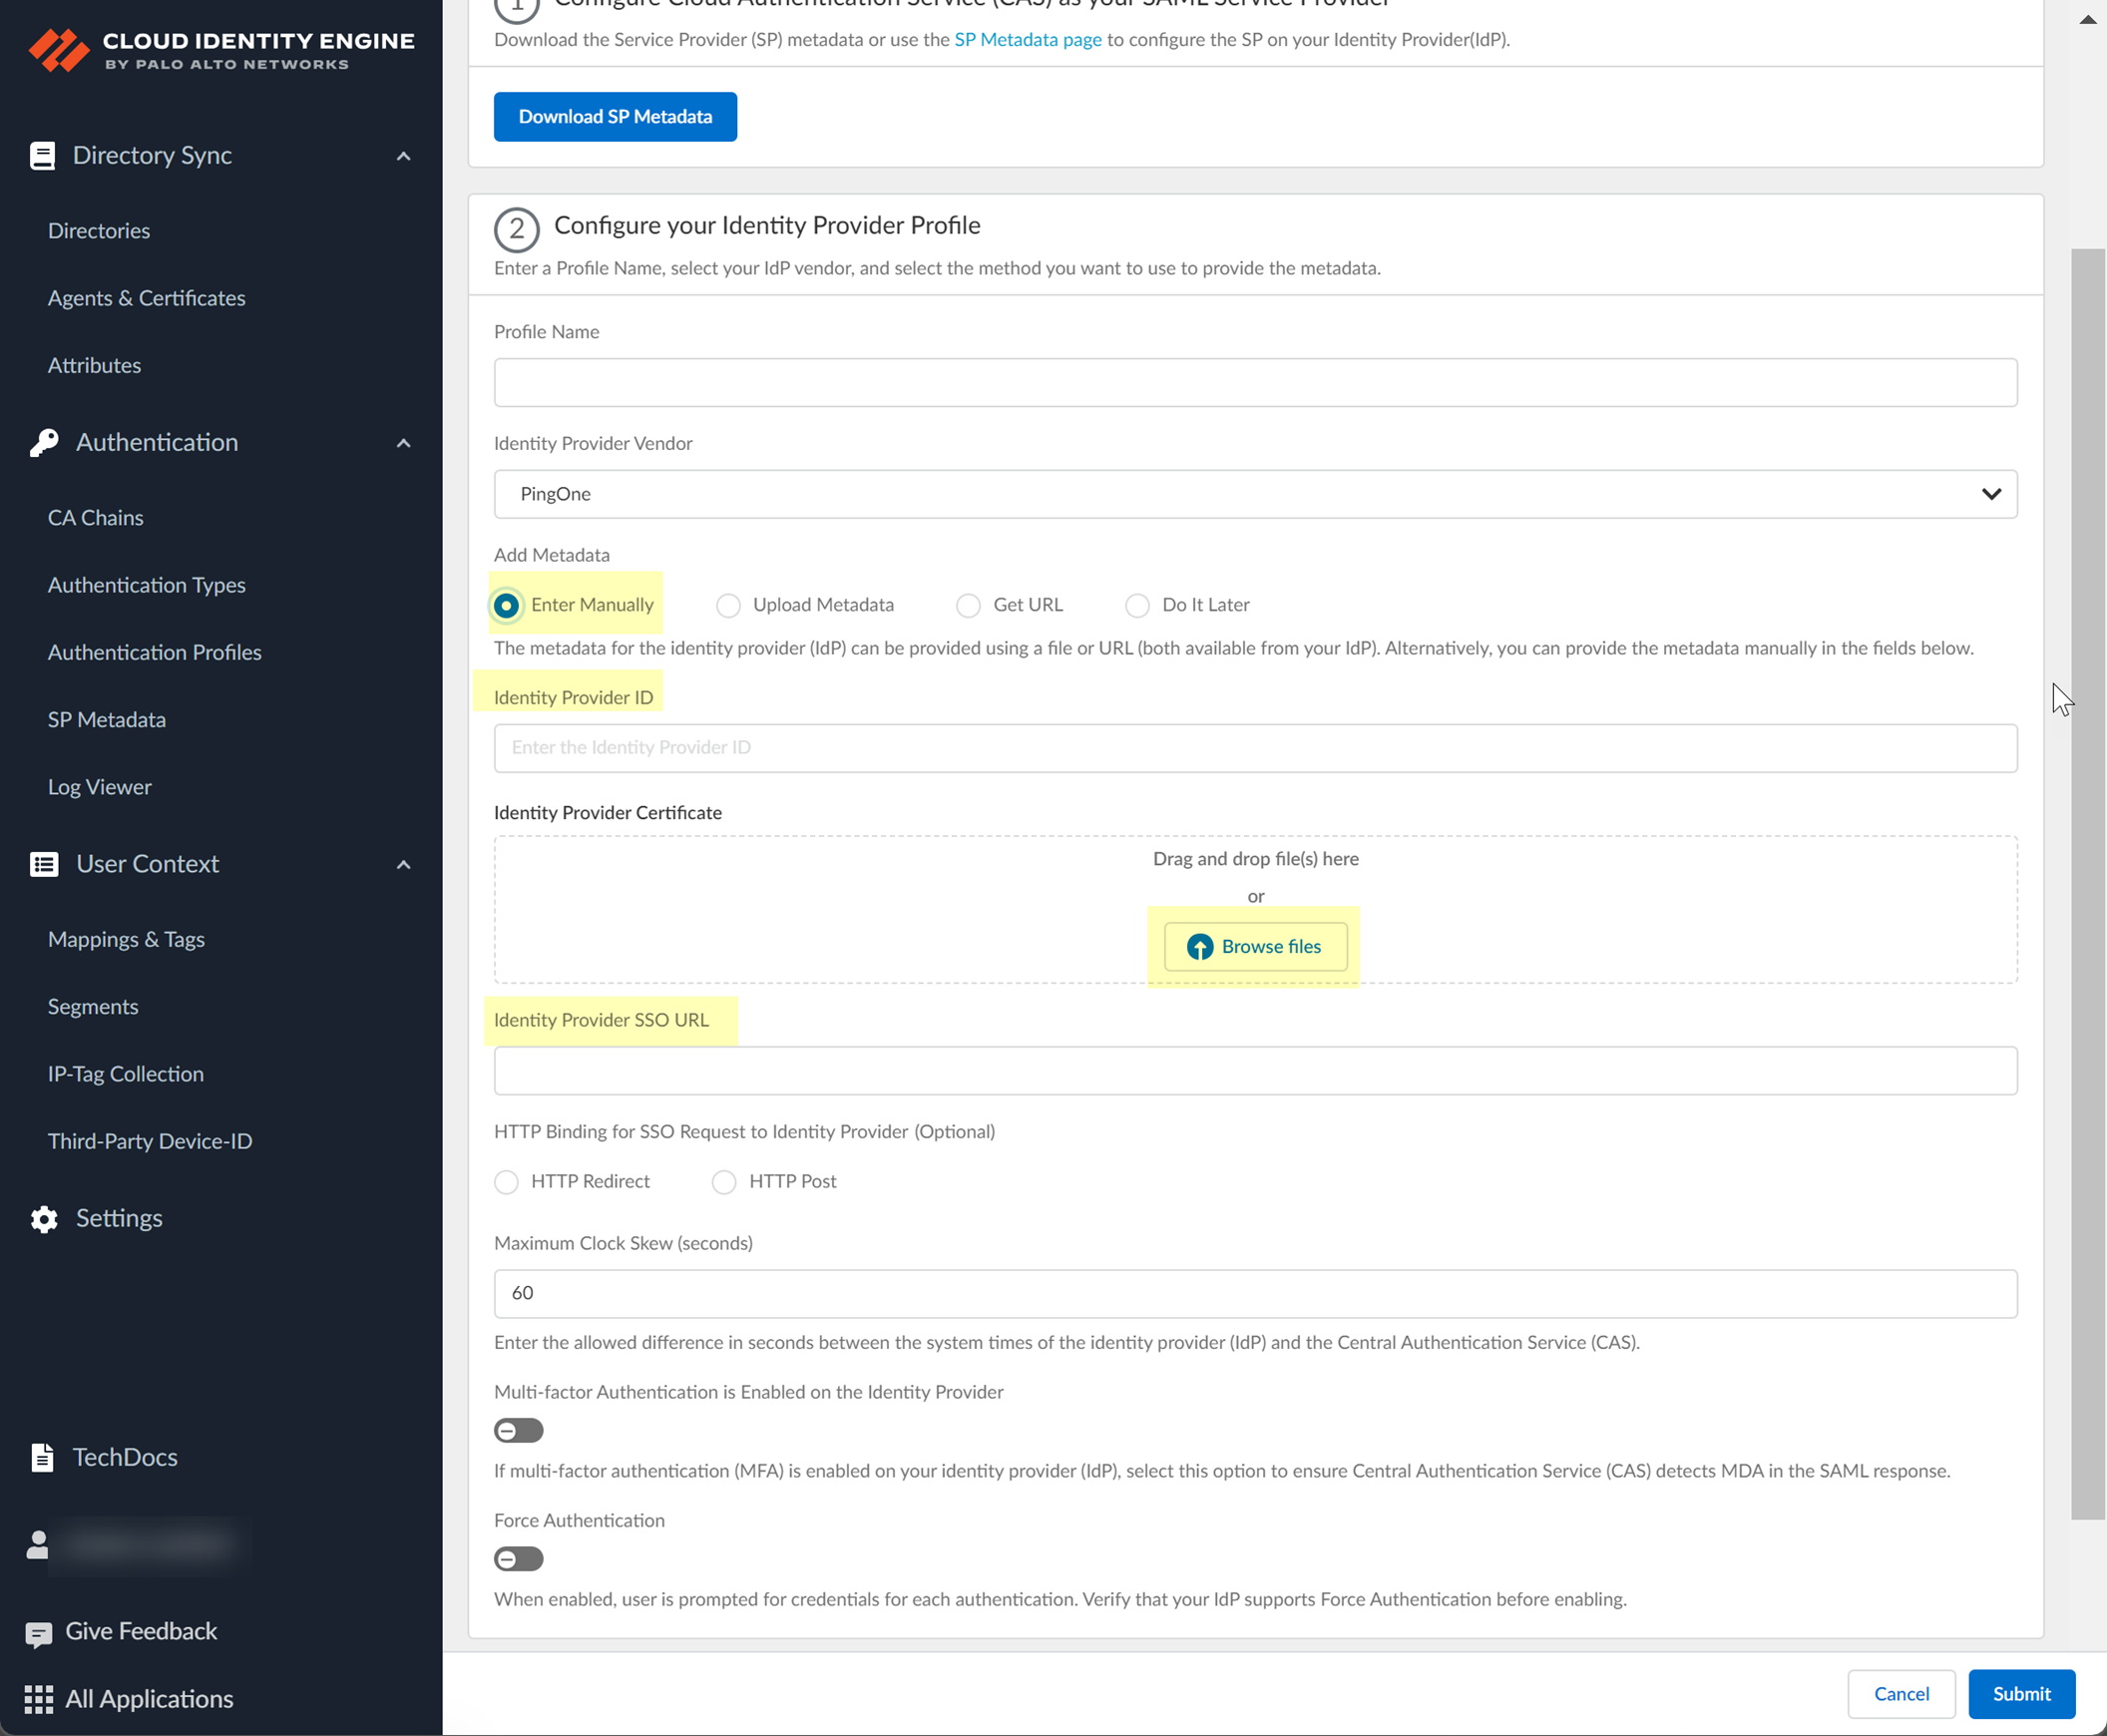
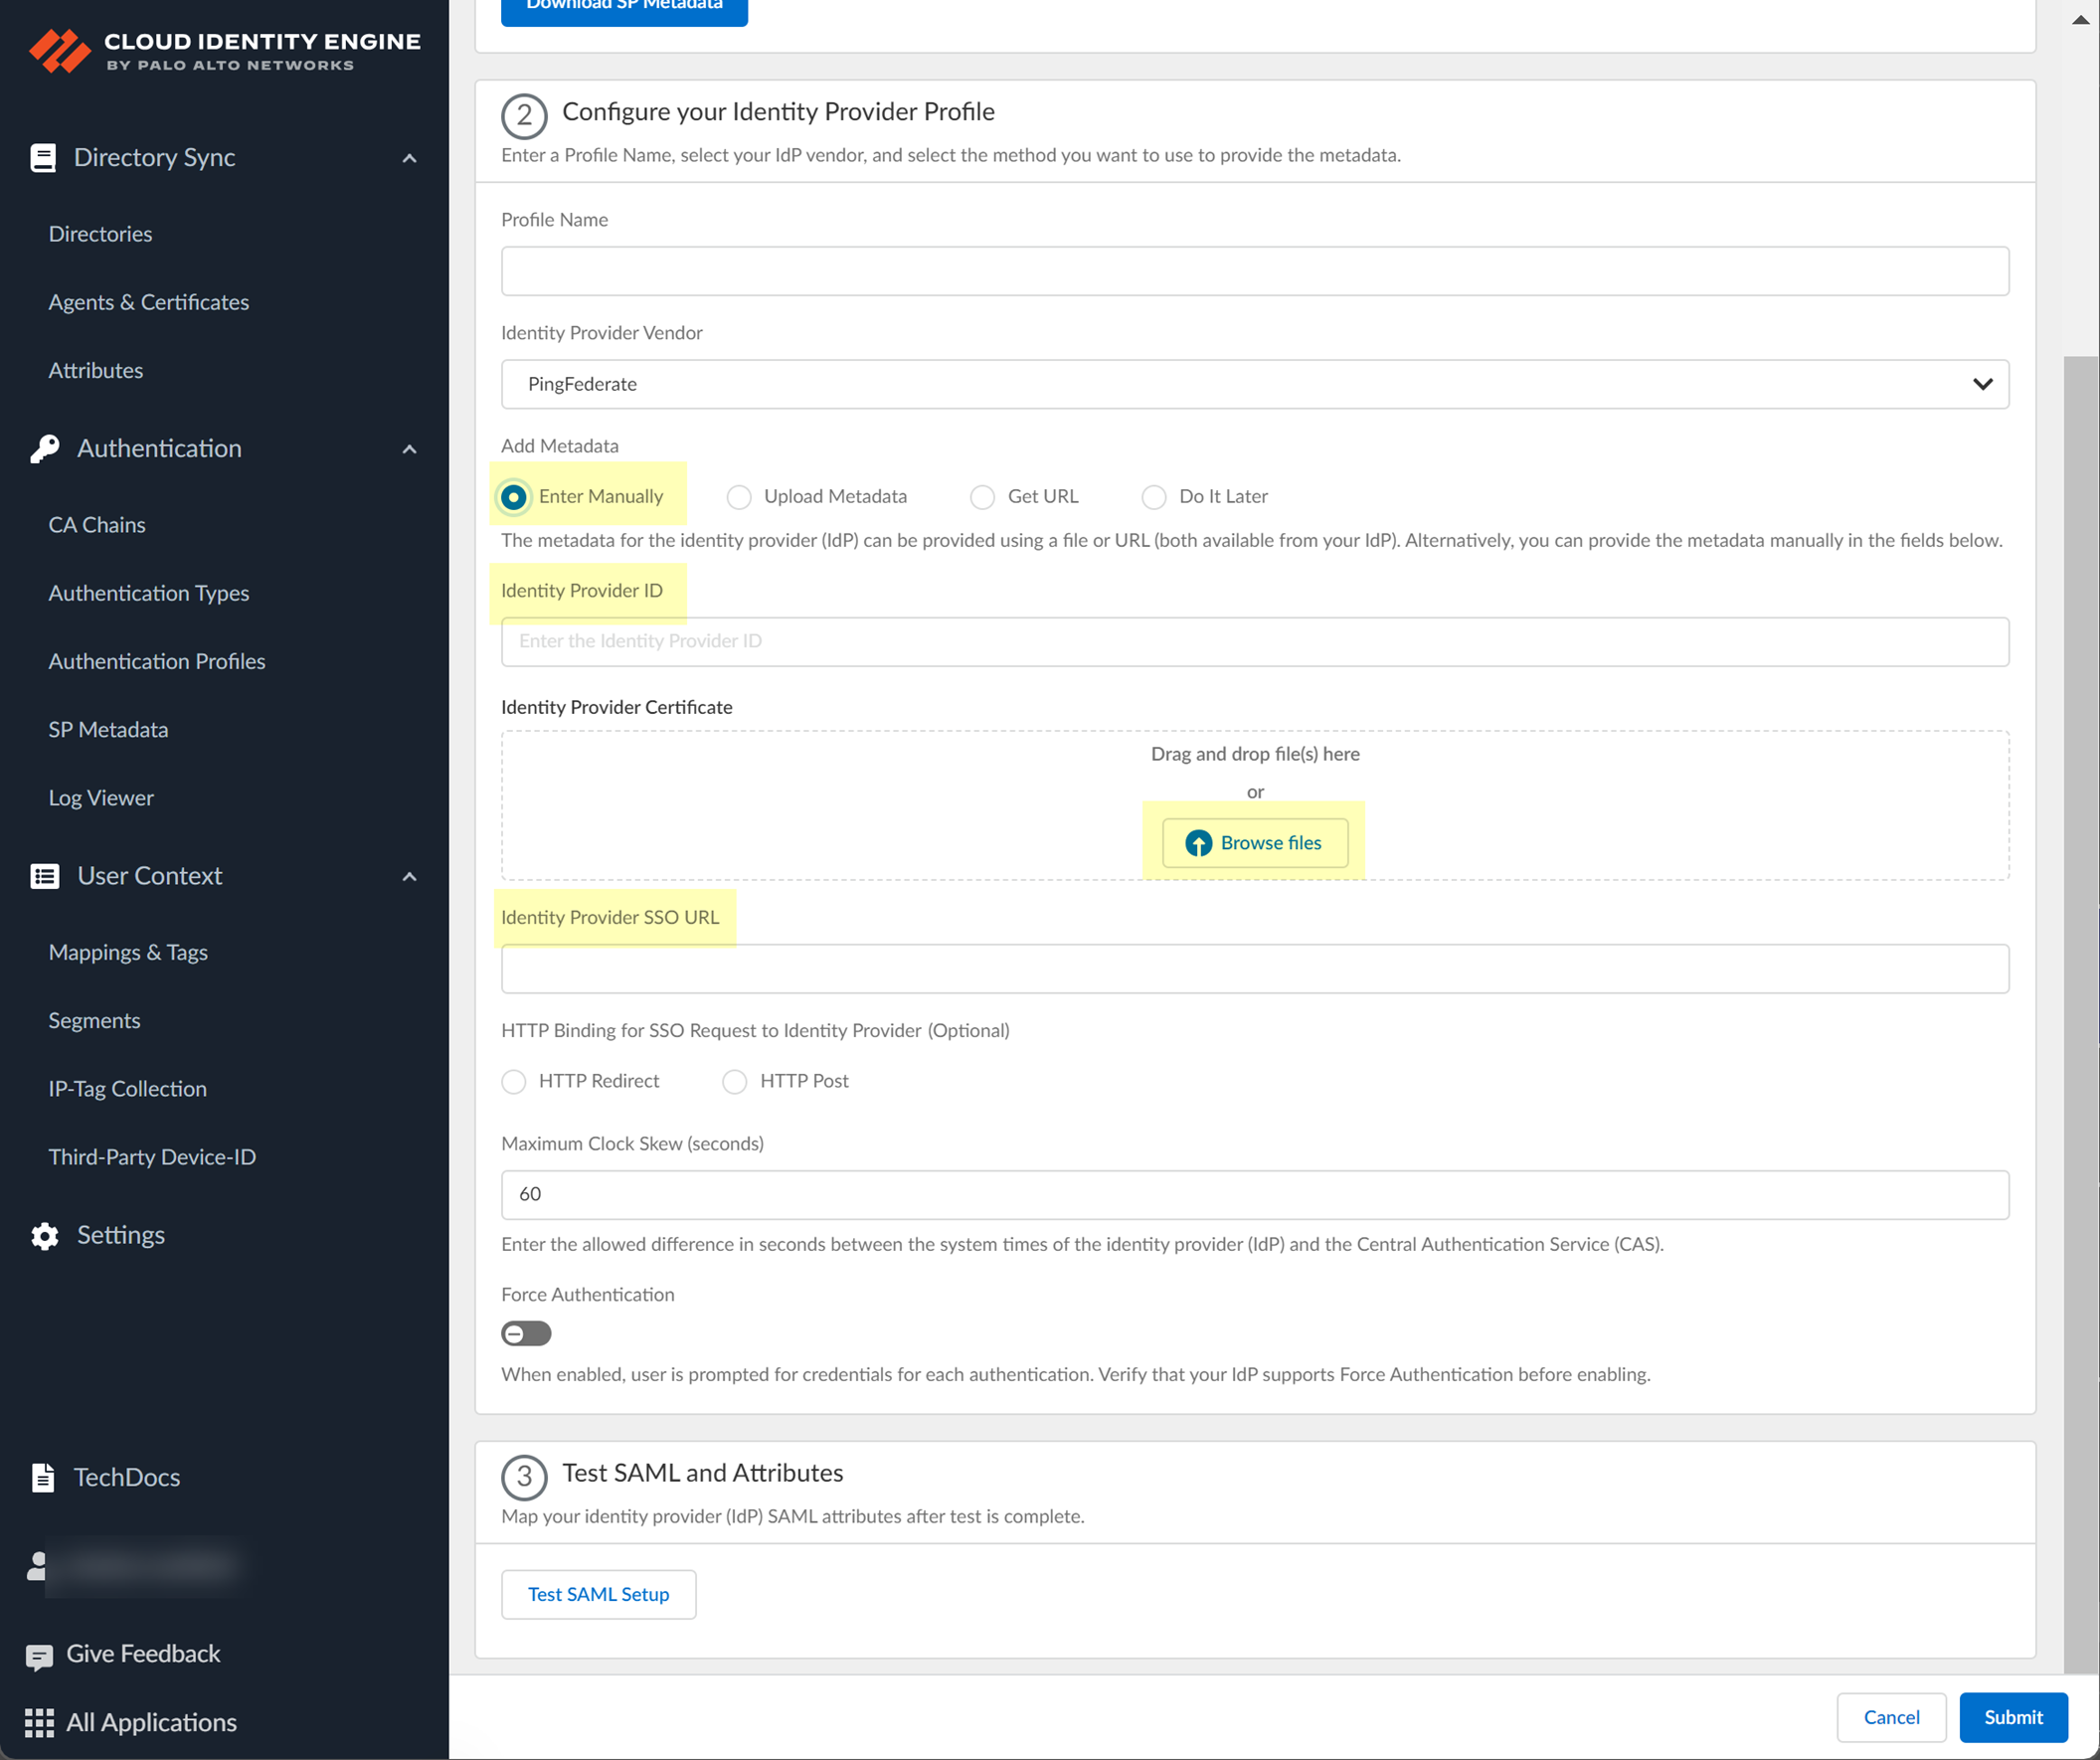
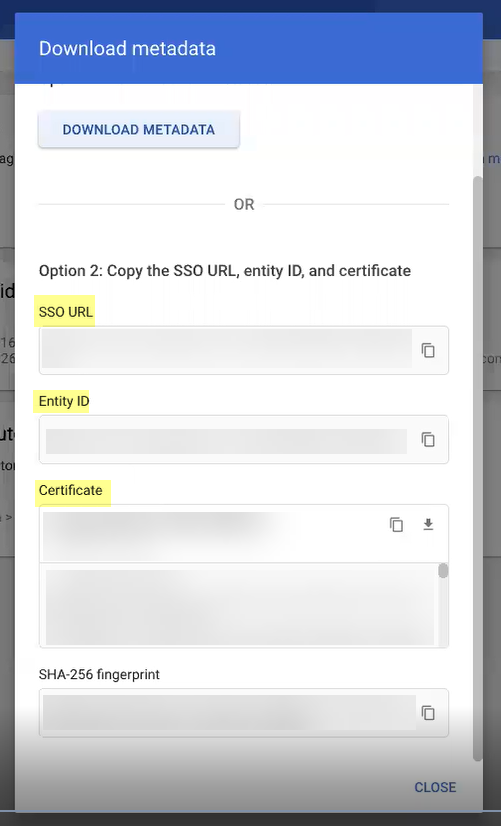
- If you want to enter the information manually, copy the identity provider ID and SSO URL, download the certificate, then enter the information in the Cloud Identity Engine IdP profile.
1. Copy the necessary information from the Azure Portal and enter it in the IdP profile on the Cloud Identity Engine app as indicated in the following table:
|
Copy or Download from Azure Portal |
Enter in Cloud Identity Engine IdP Profile |
|
Copy the Azure AD Identifier . |
Enter it as the Identity Provider ID . |
|
Download the Certificate (Base64) . |
Click Browse files to select the Identity Provider Certificate you downloaded from the Azure Portal. |
|
Copy the Login URL . |
Enter the URL as the Identity Provider SSO URL . |
2.
3. (Optional) Select the HTTP Binding for SSO Request to Identity Provider (Optional) method you want to use for the SAML binding that allows the firewall and IdP to exchange request and response messages:
- HTTP Redirect —Transmit SAML messages through URL parameters.
- HTTP Post —Transmit SAML messages using base64-encoded HTML.
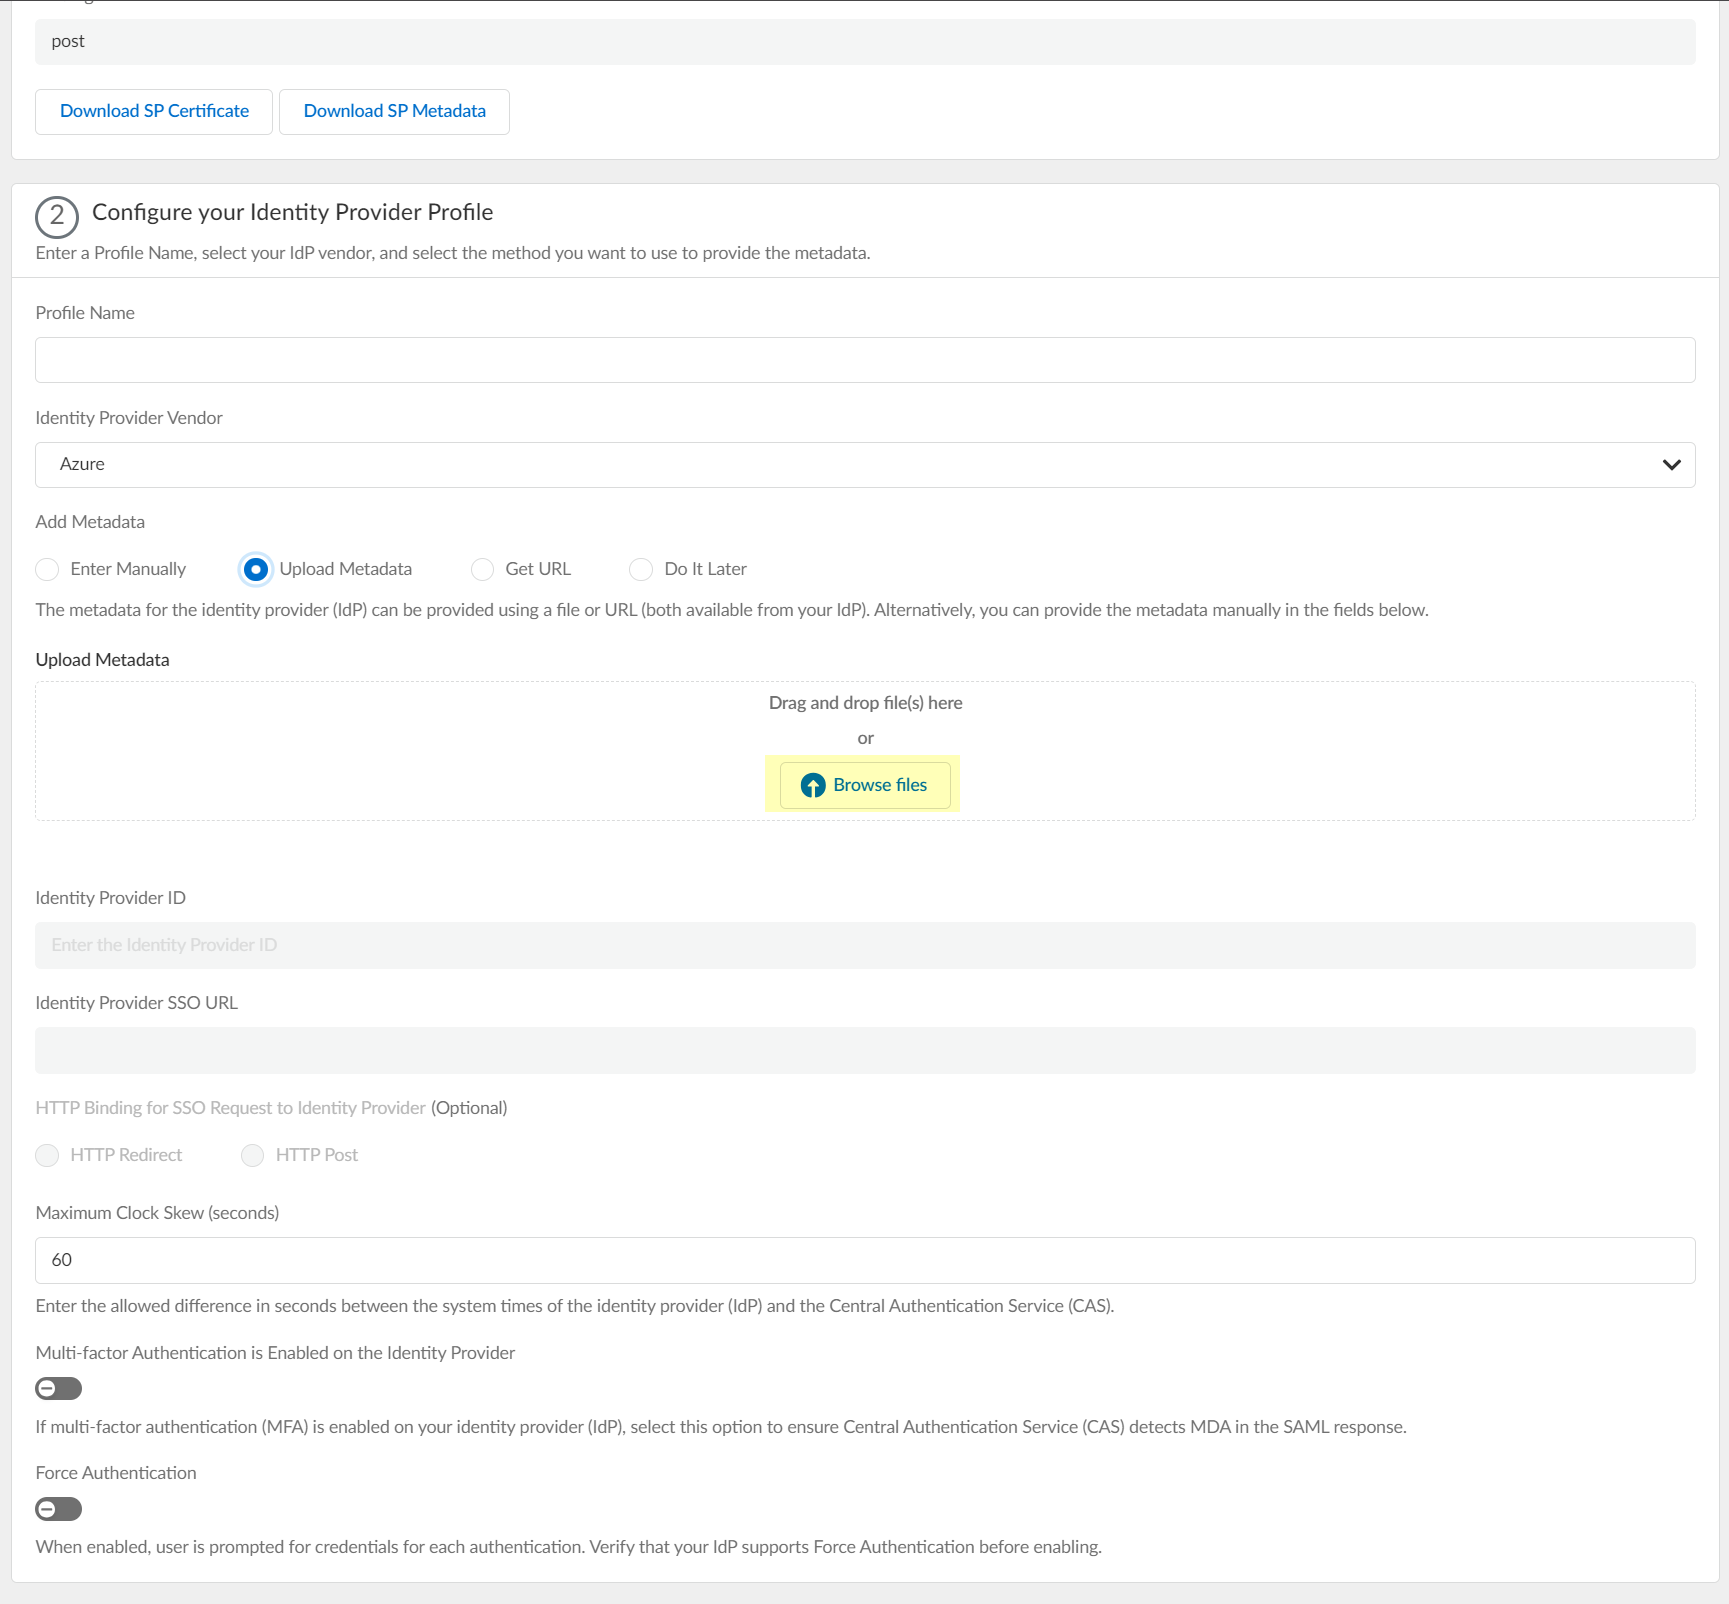
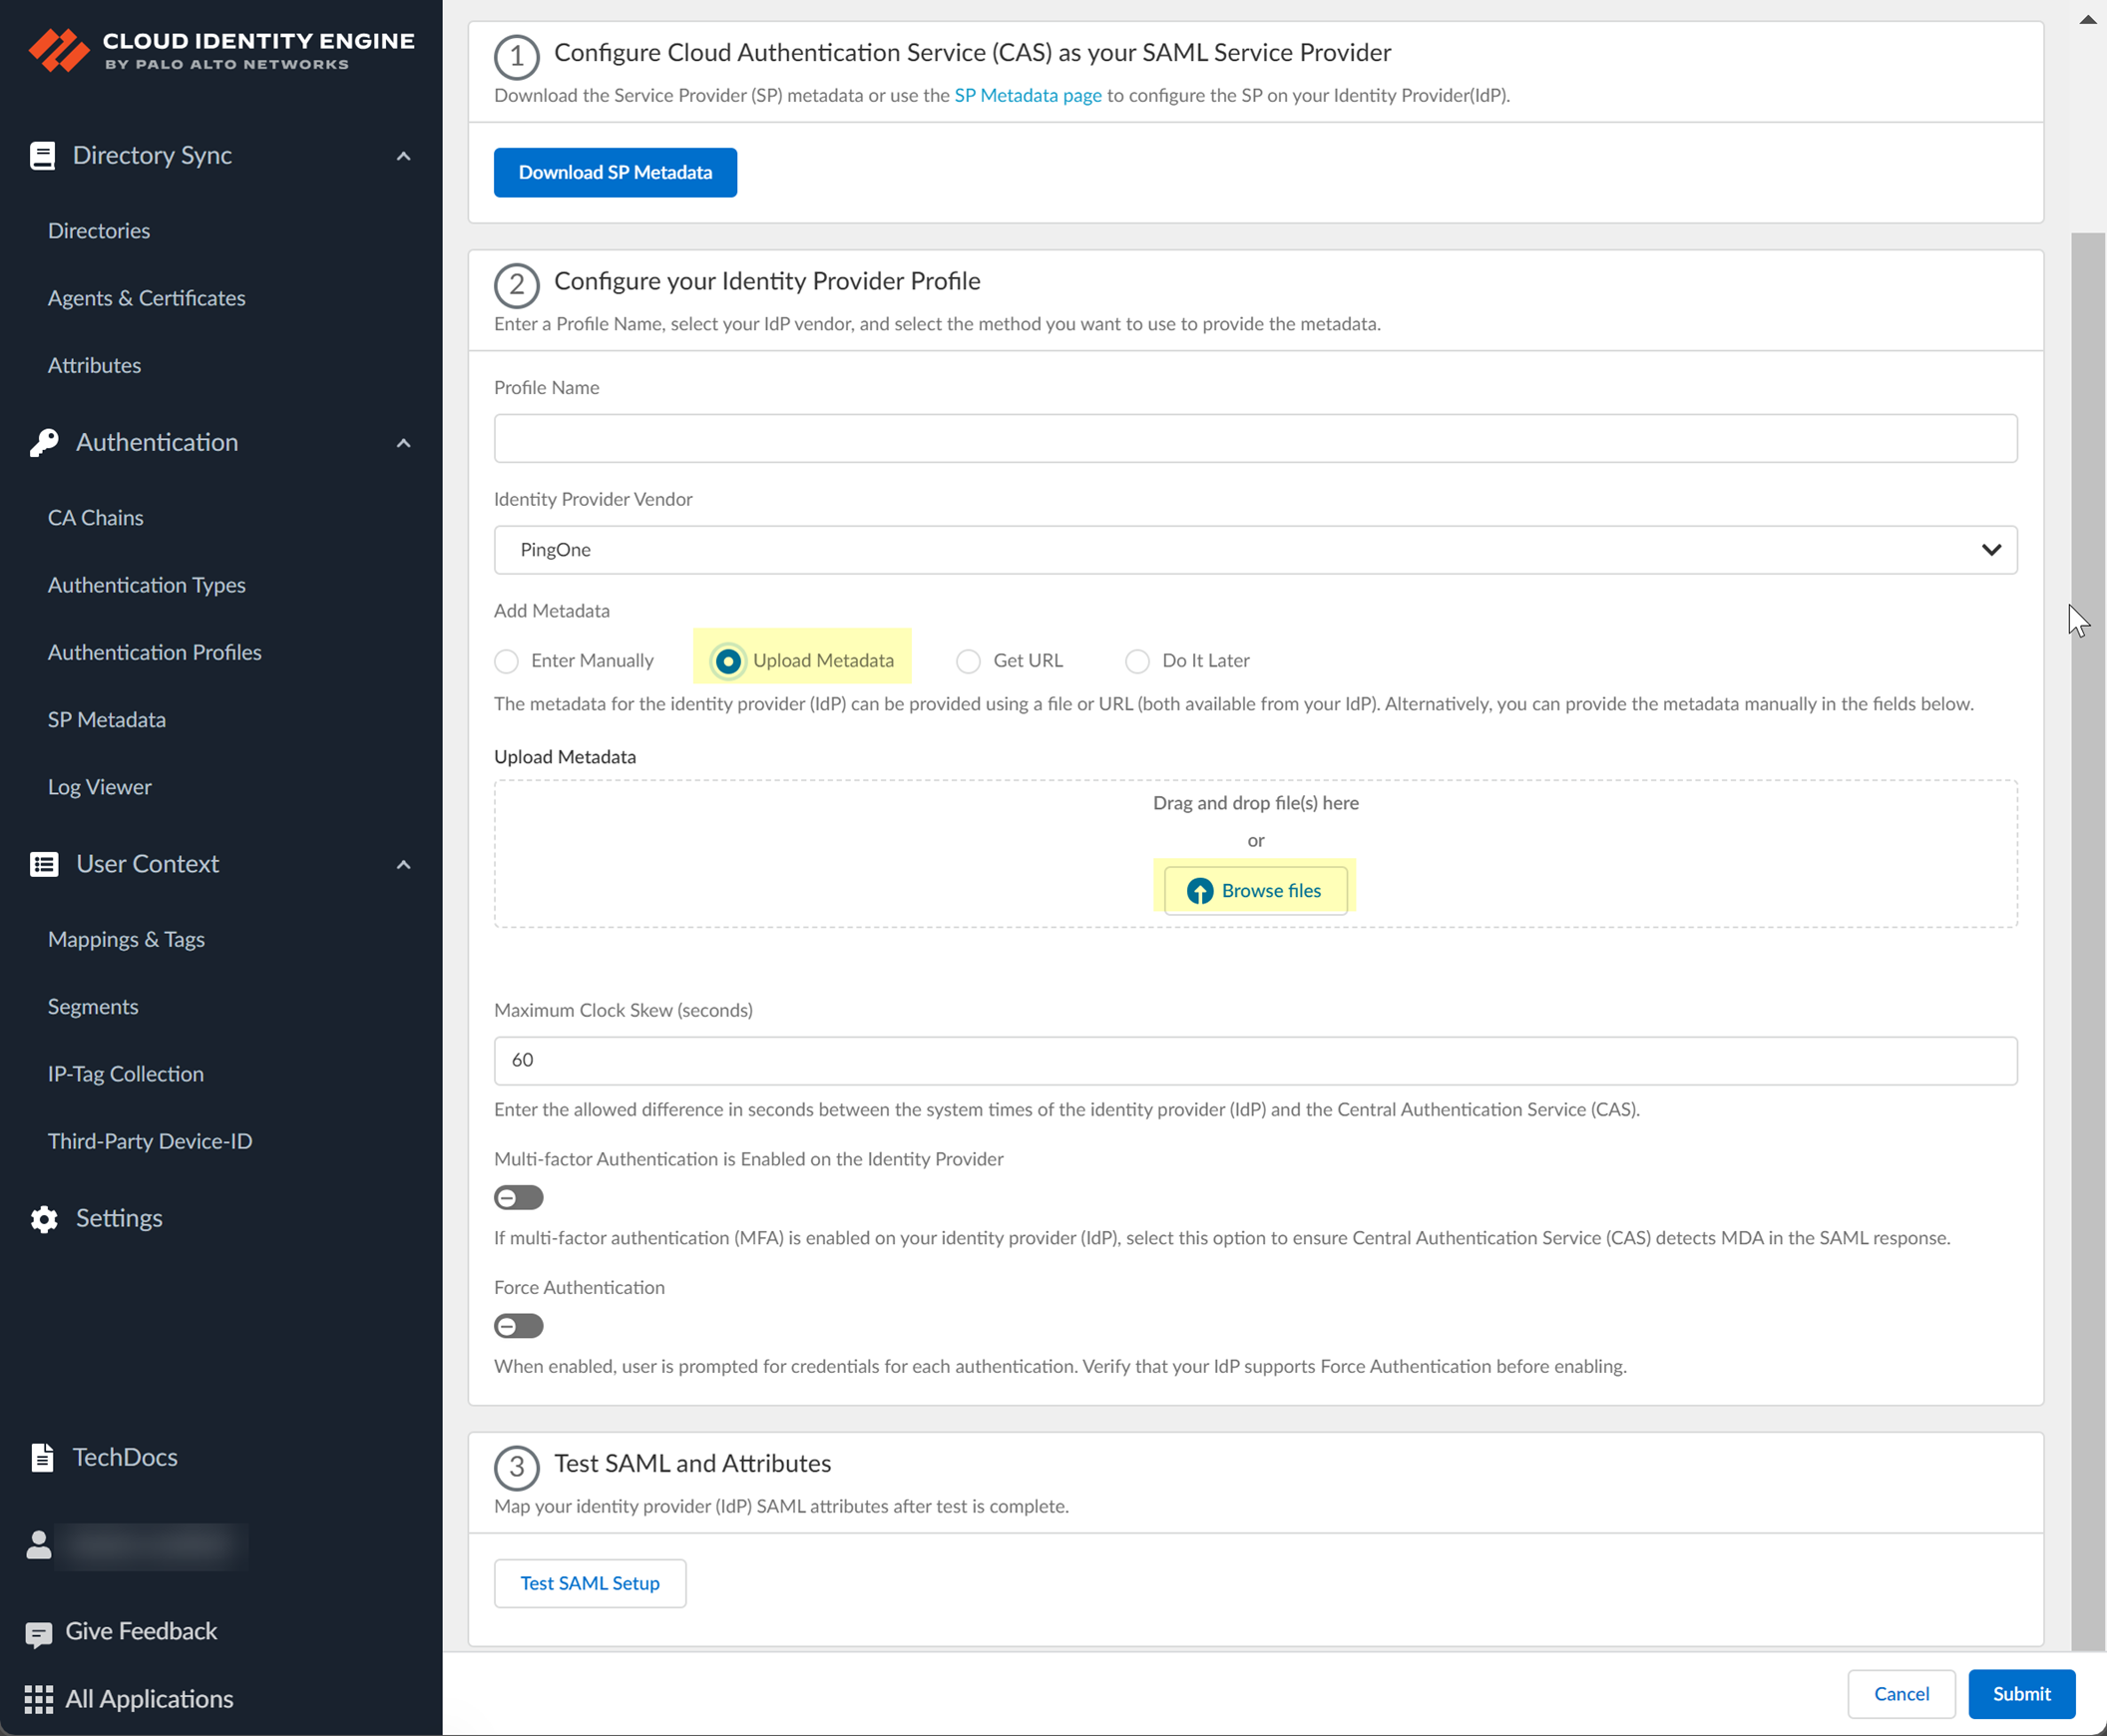
- If you want to upload a metadata file, download the metadata file from your IdP management system.
1. In the Azure Portal, Download the Federation Metadata XML and Save it to a secure location.
2. In the Cloud Identity Engine app, click Browse files to select the metadata file, then Open the metadata file.
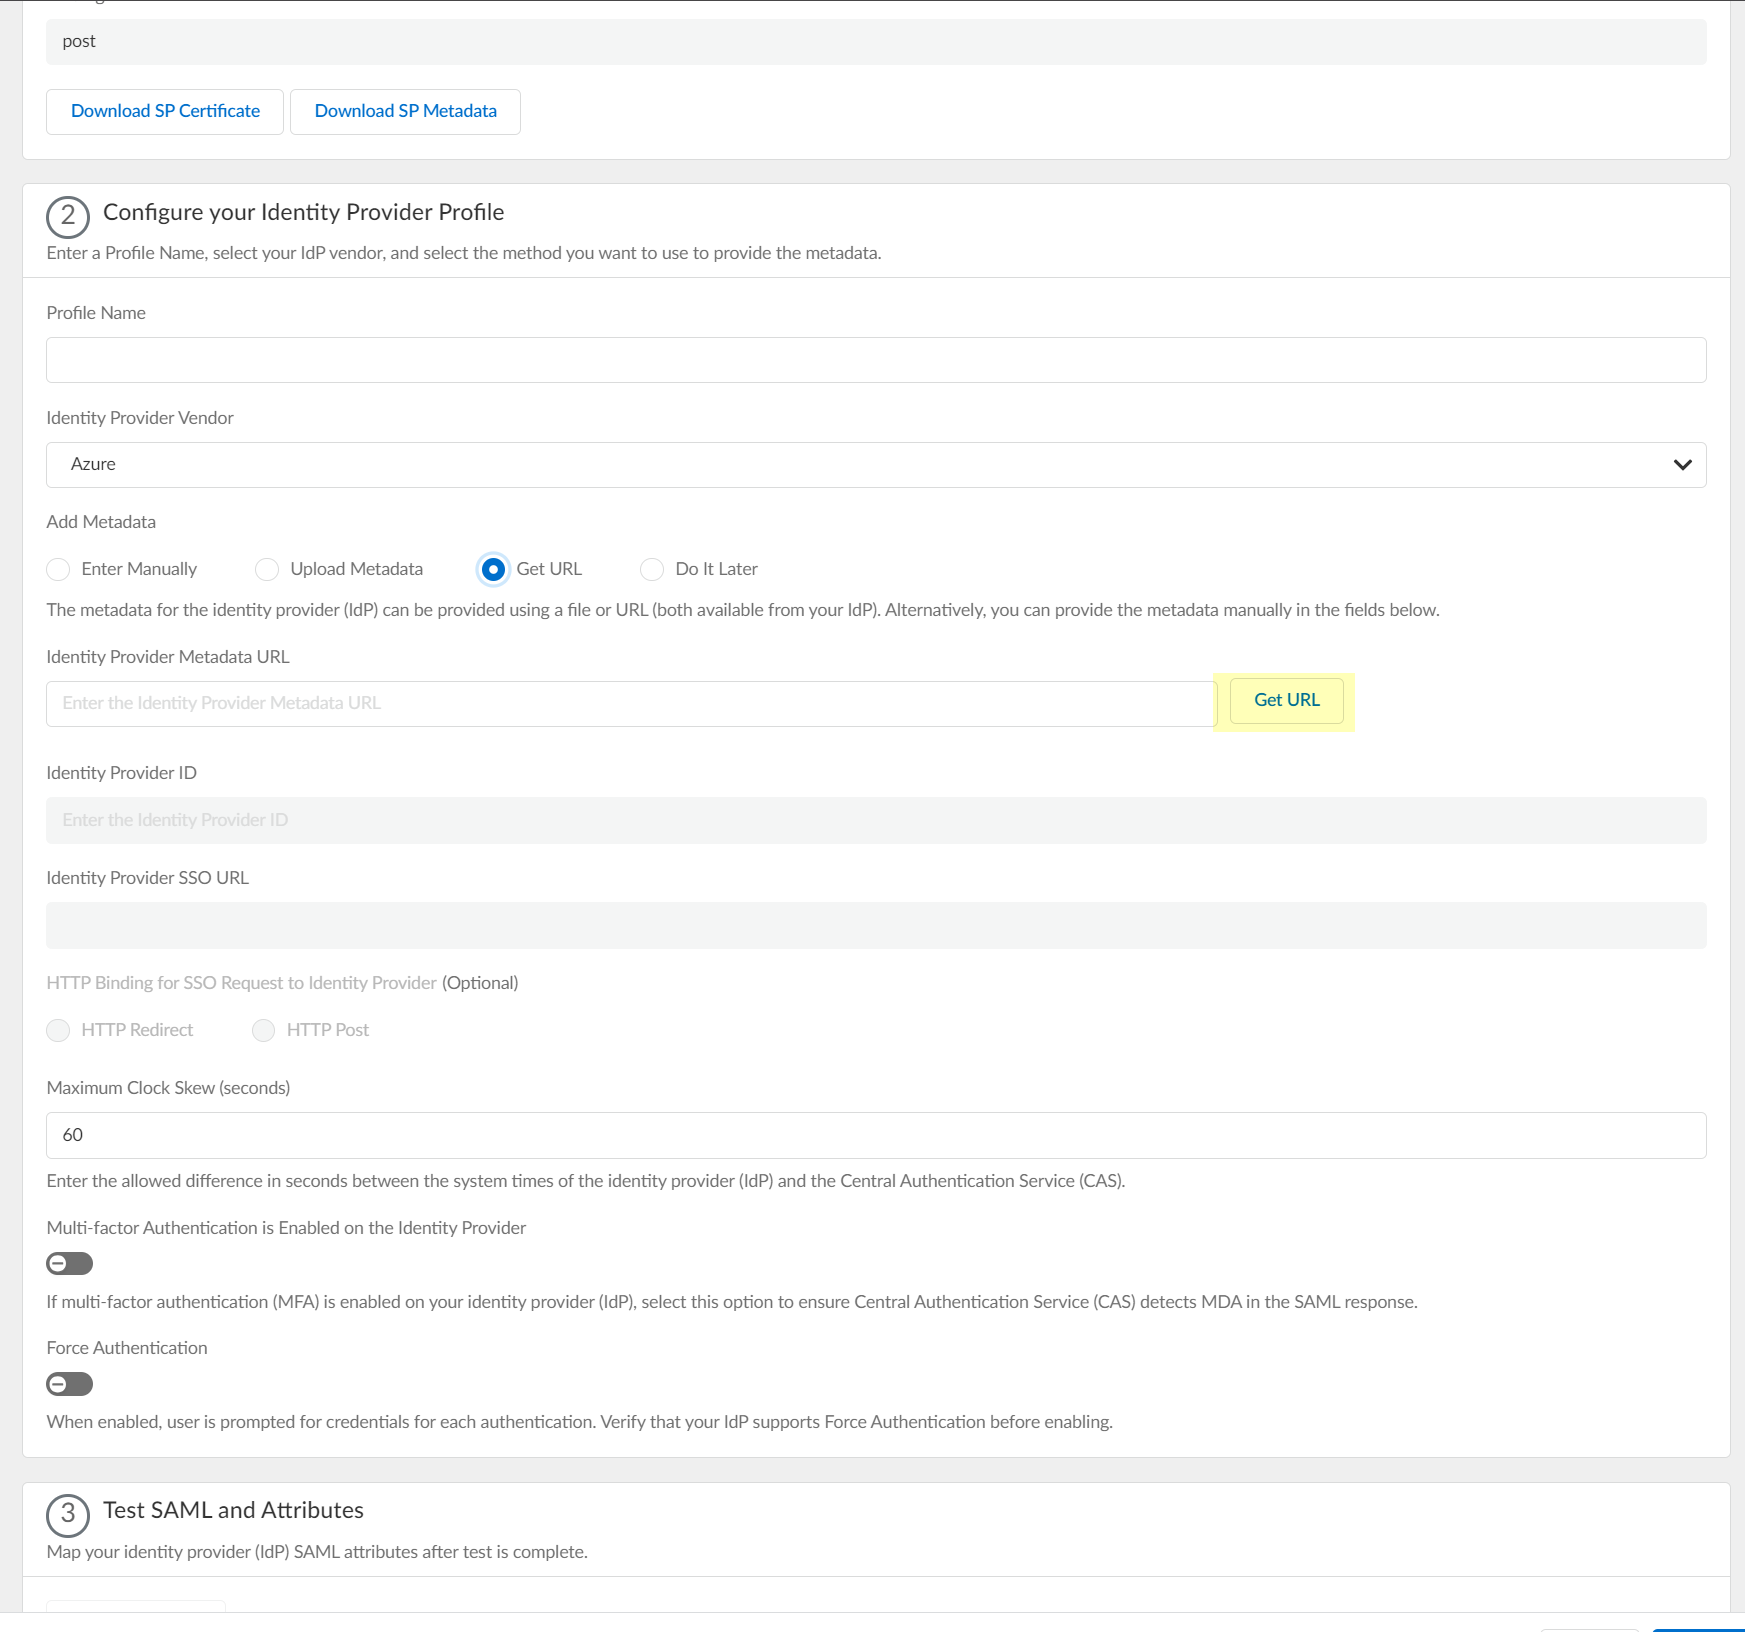
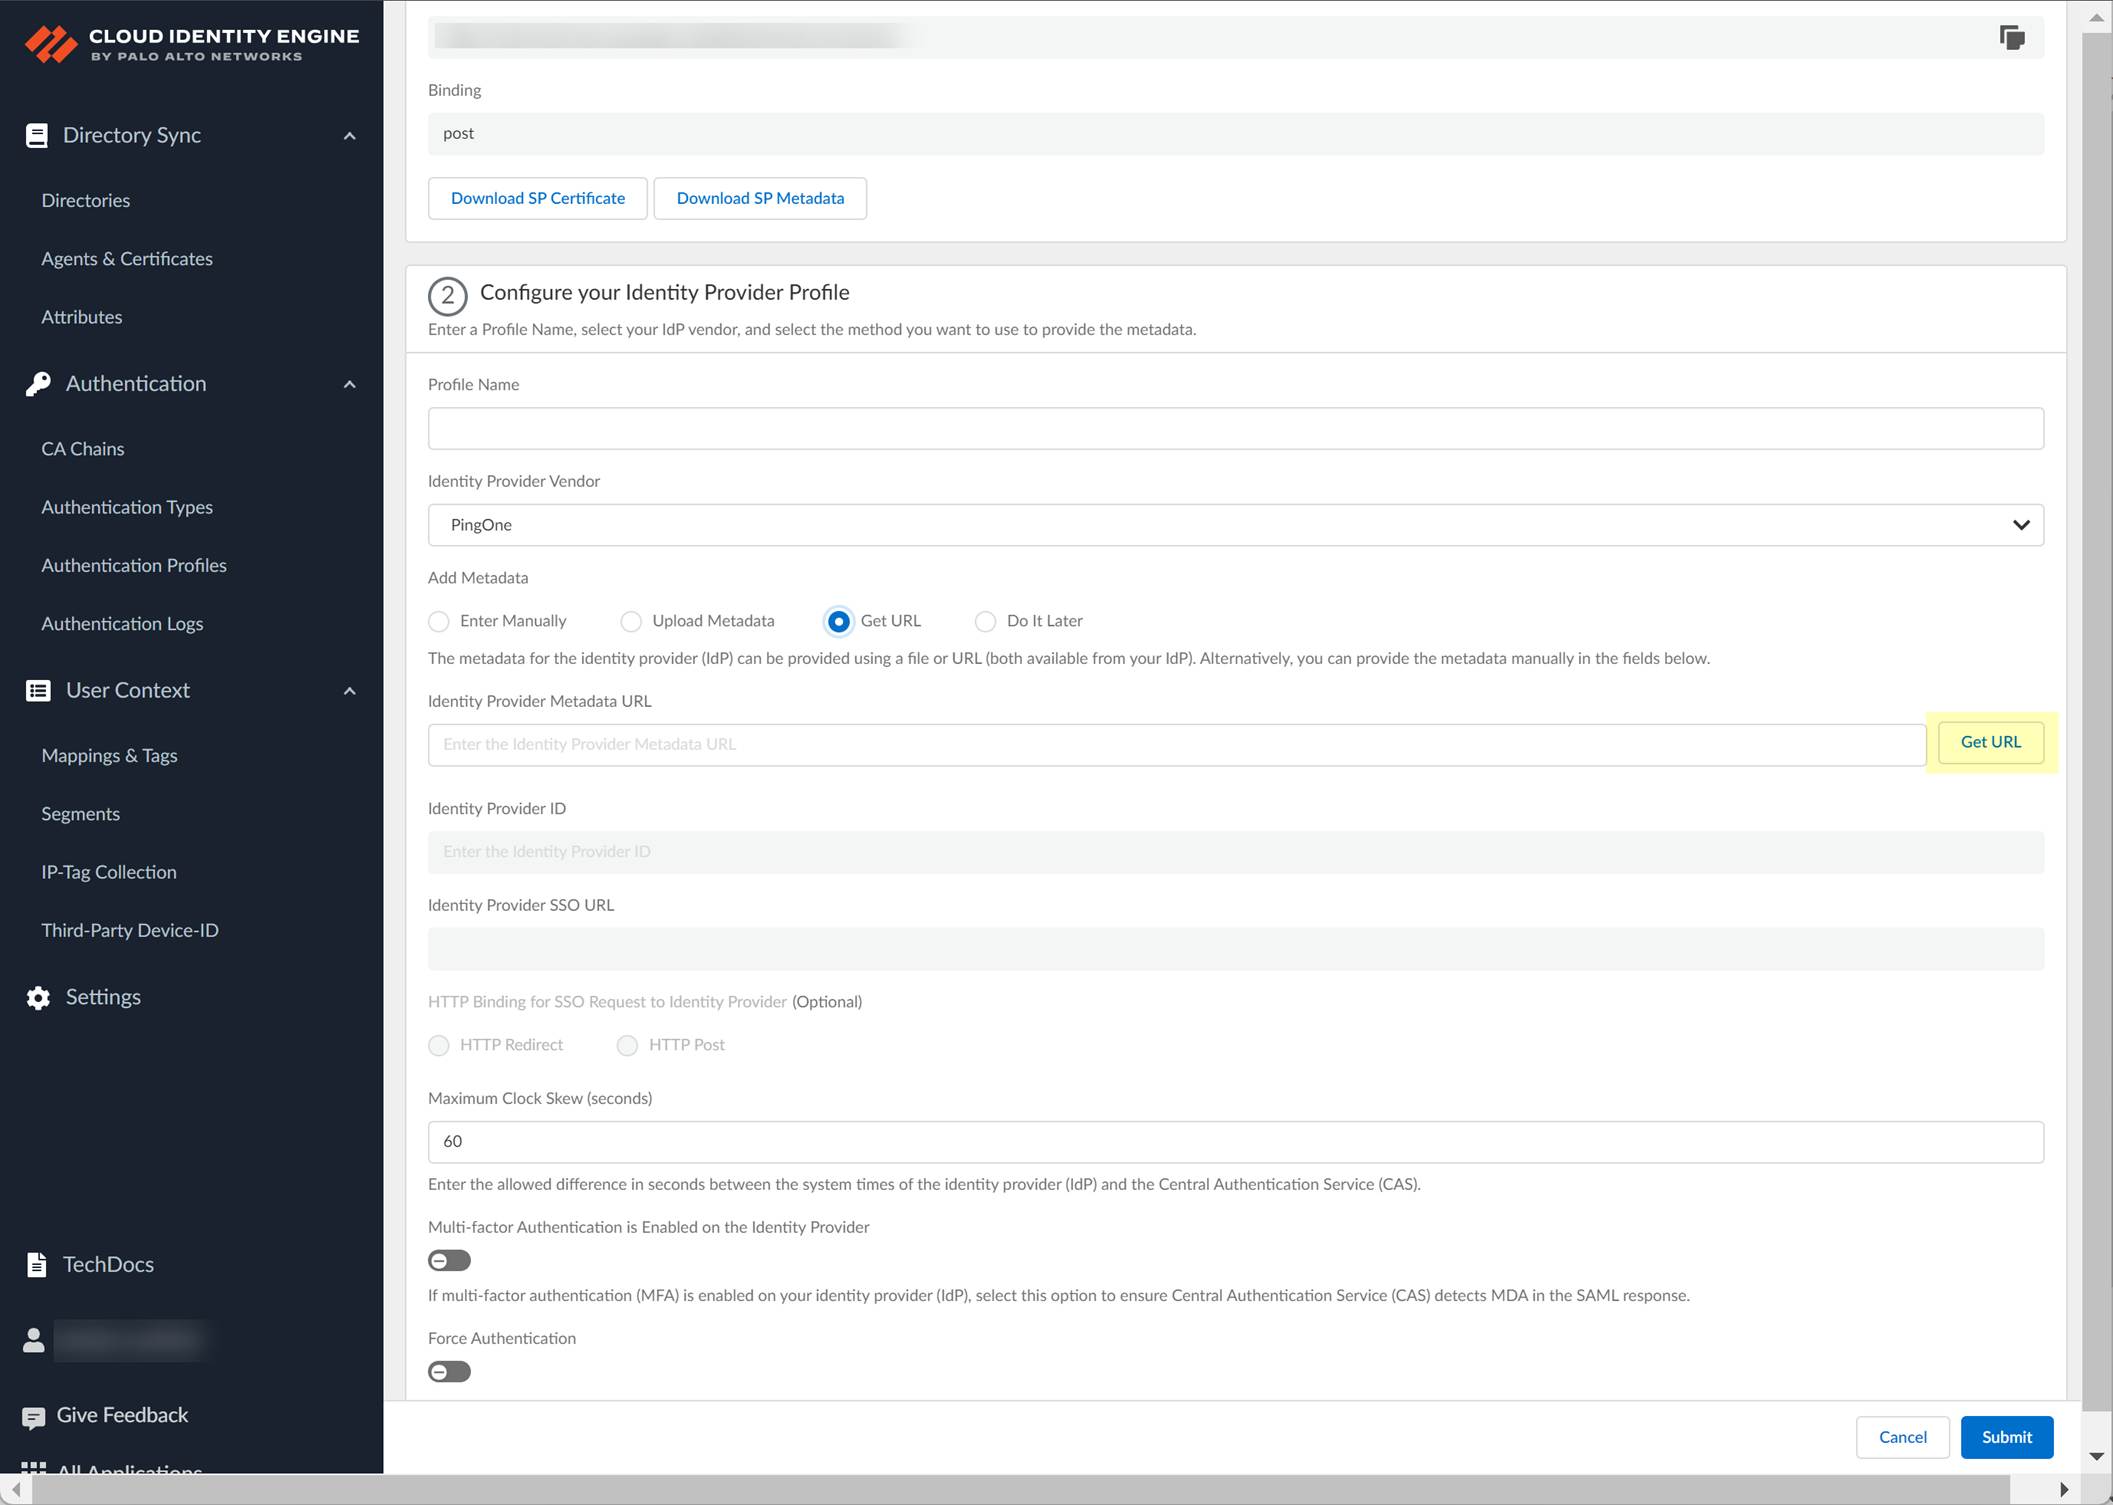
- If you want to use a URL to retrieve the metadata, copy the App Federation Metadata Url , then paste it in the profile as the Identity Provider Metadata URL and click Get URL to obtain the metadata.
Palo Alto Networks recommends using this method to configure Azure as an IdP.
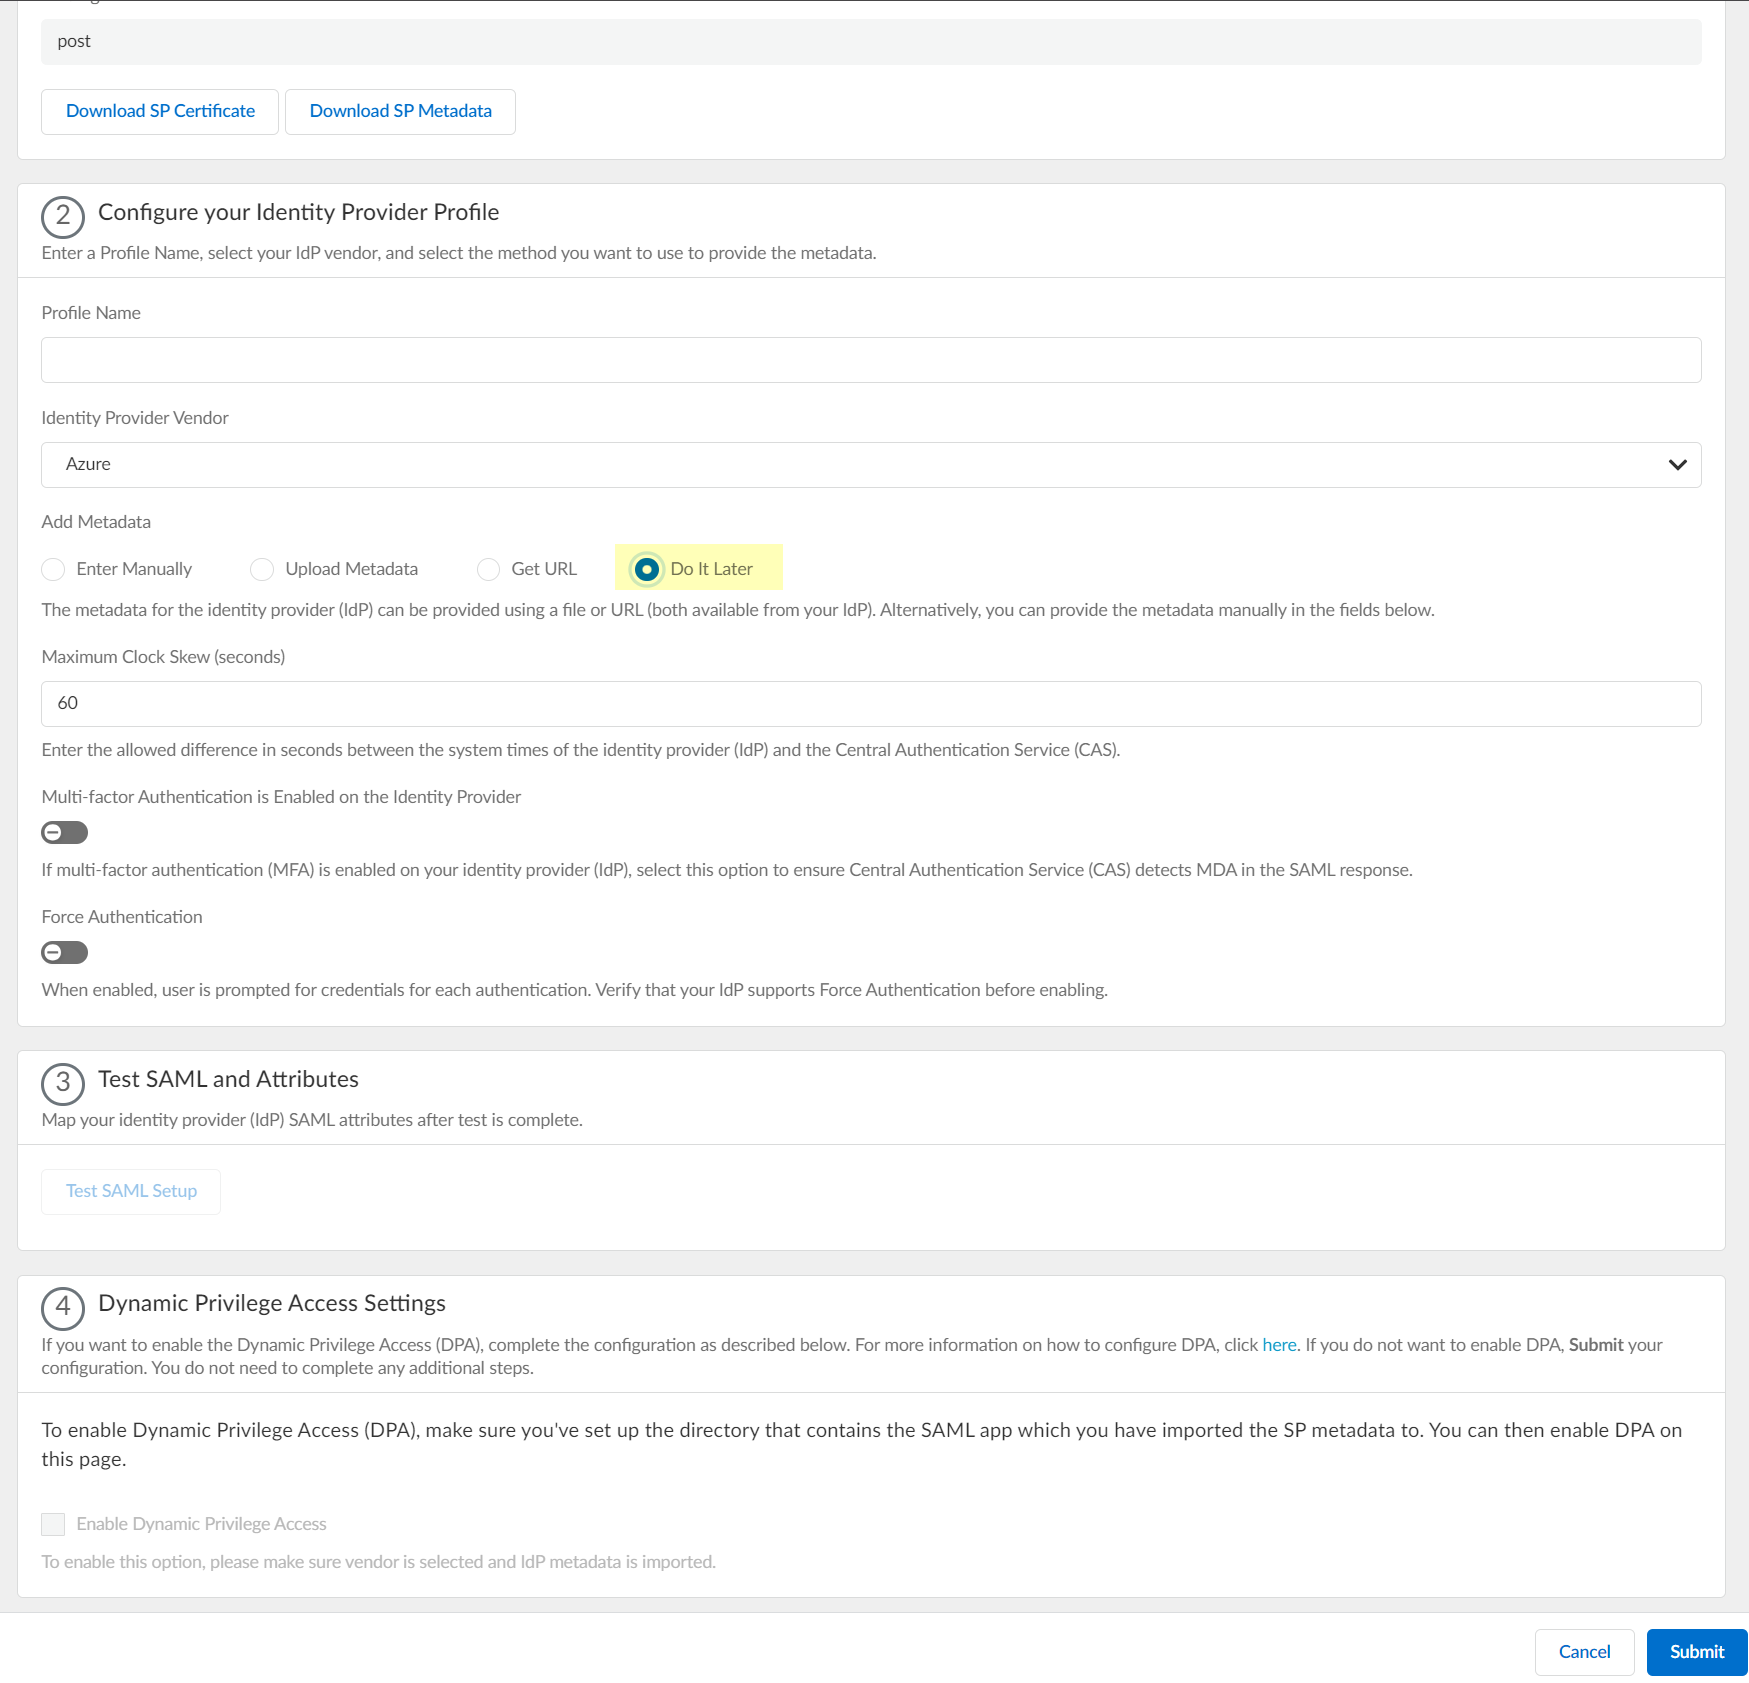
- If you don't want to enter the configuration information now, you can Do it later . This option allows you to submit the profile without including configuration information. However, you must edit the profile to include the configuration information to use the authentication type in an authentication profile.
- Specify the Maximum Clock Skew (seconds) , which is the allowed difference in seconds between the system times of the IdP and the firewall at the moment when the firewall validates IdP messages (default is 60; range is 1–900). If the difference exceeds this value, authentication fails.
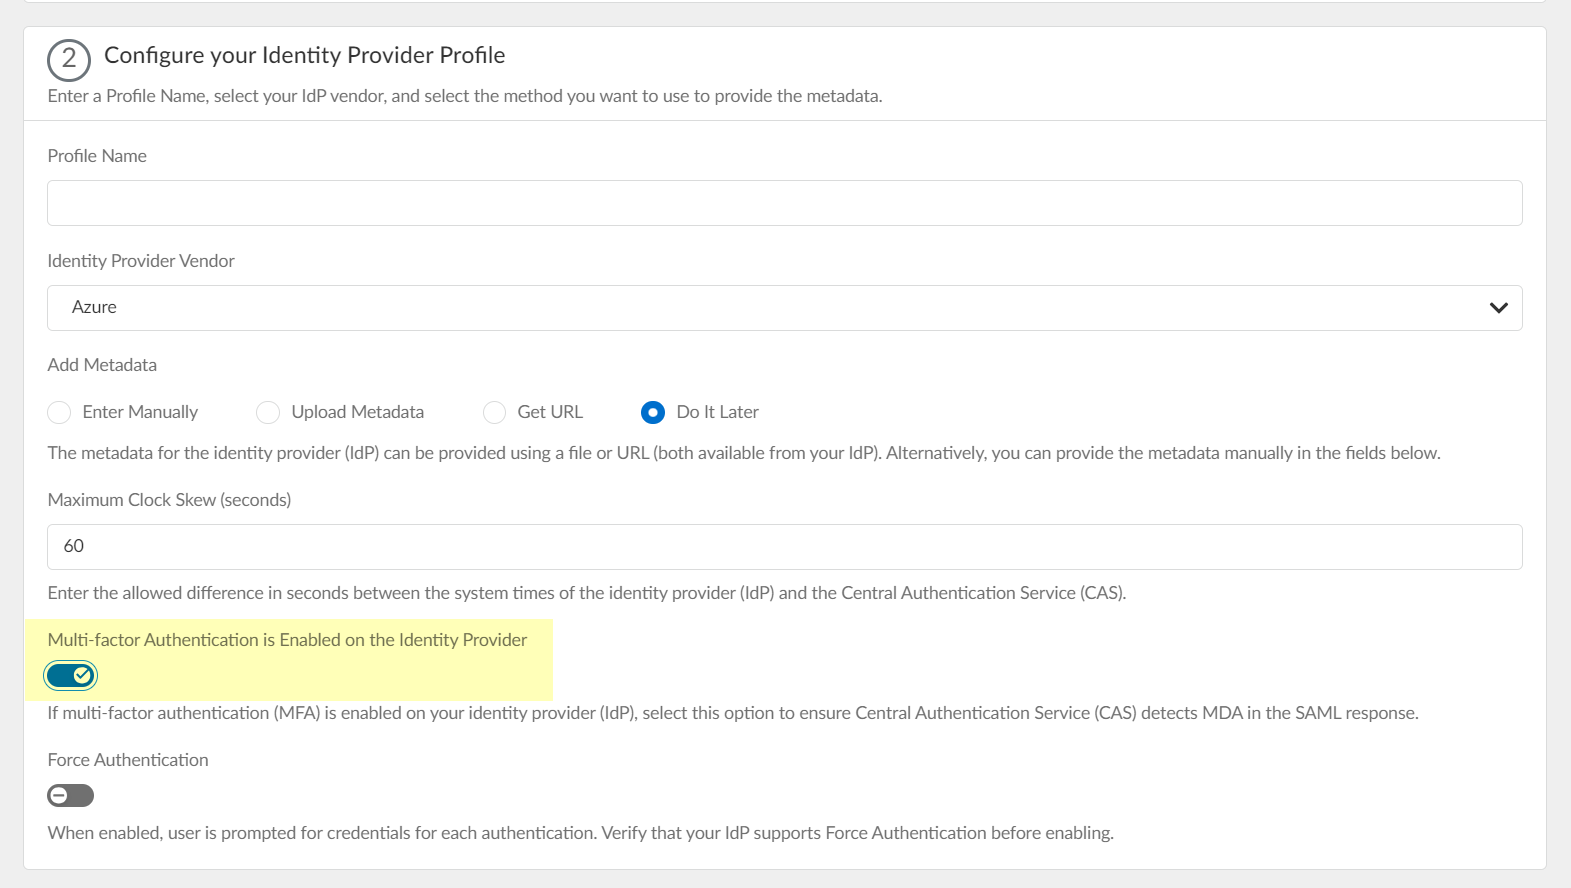
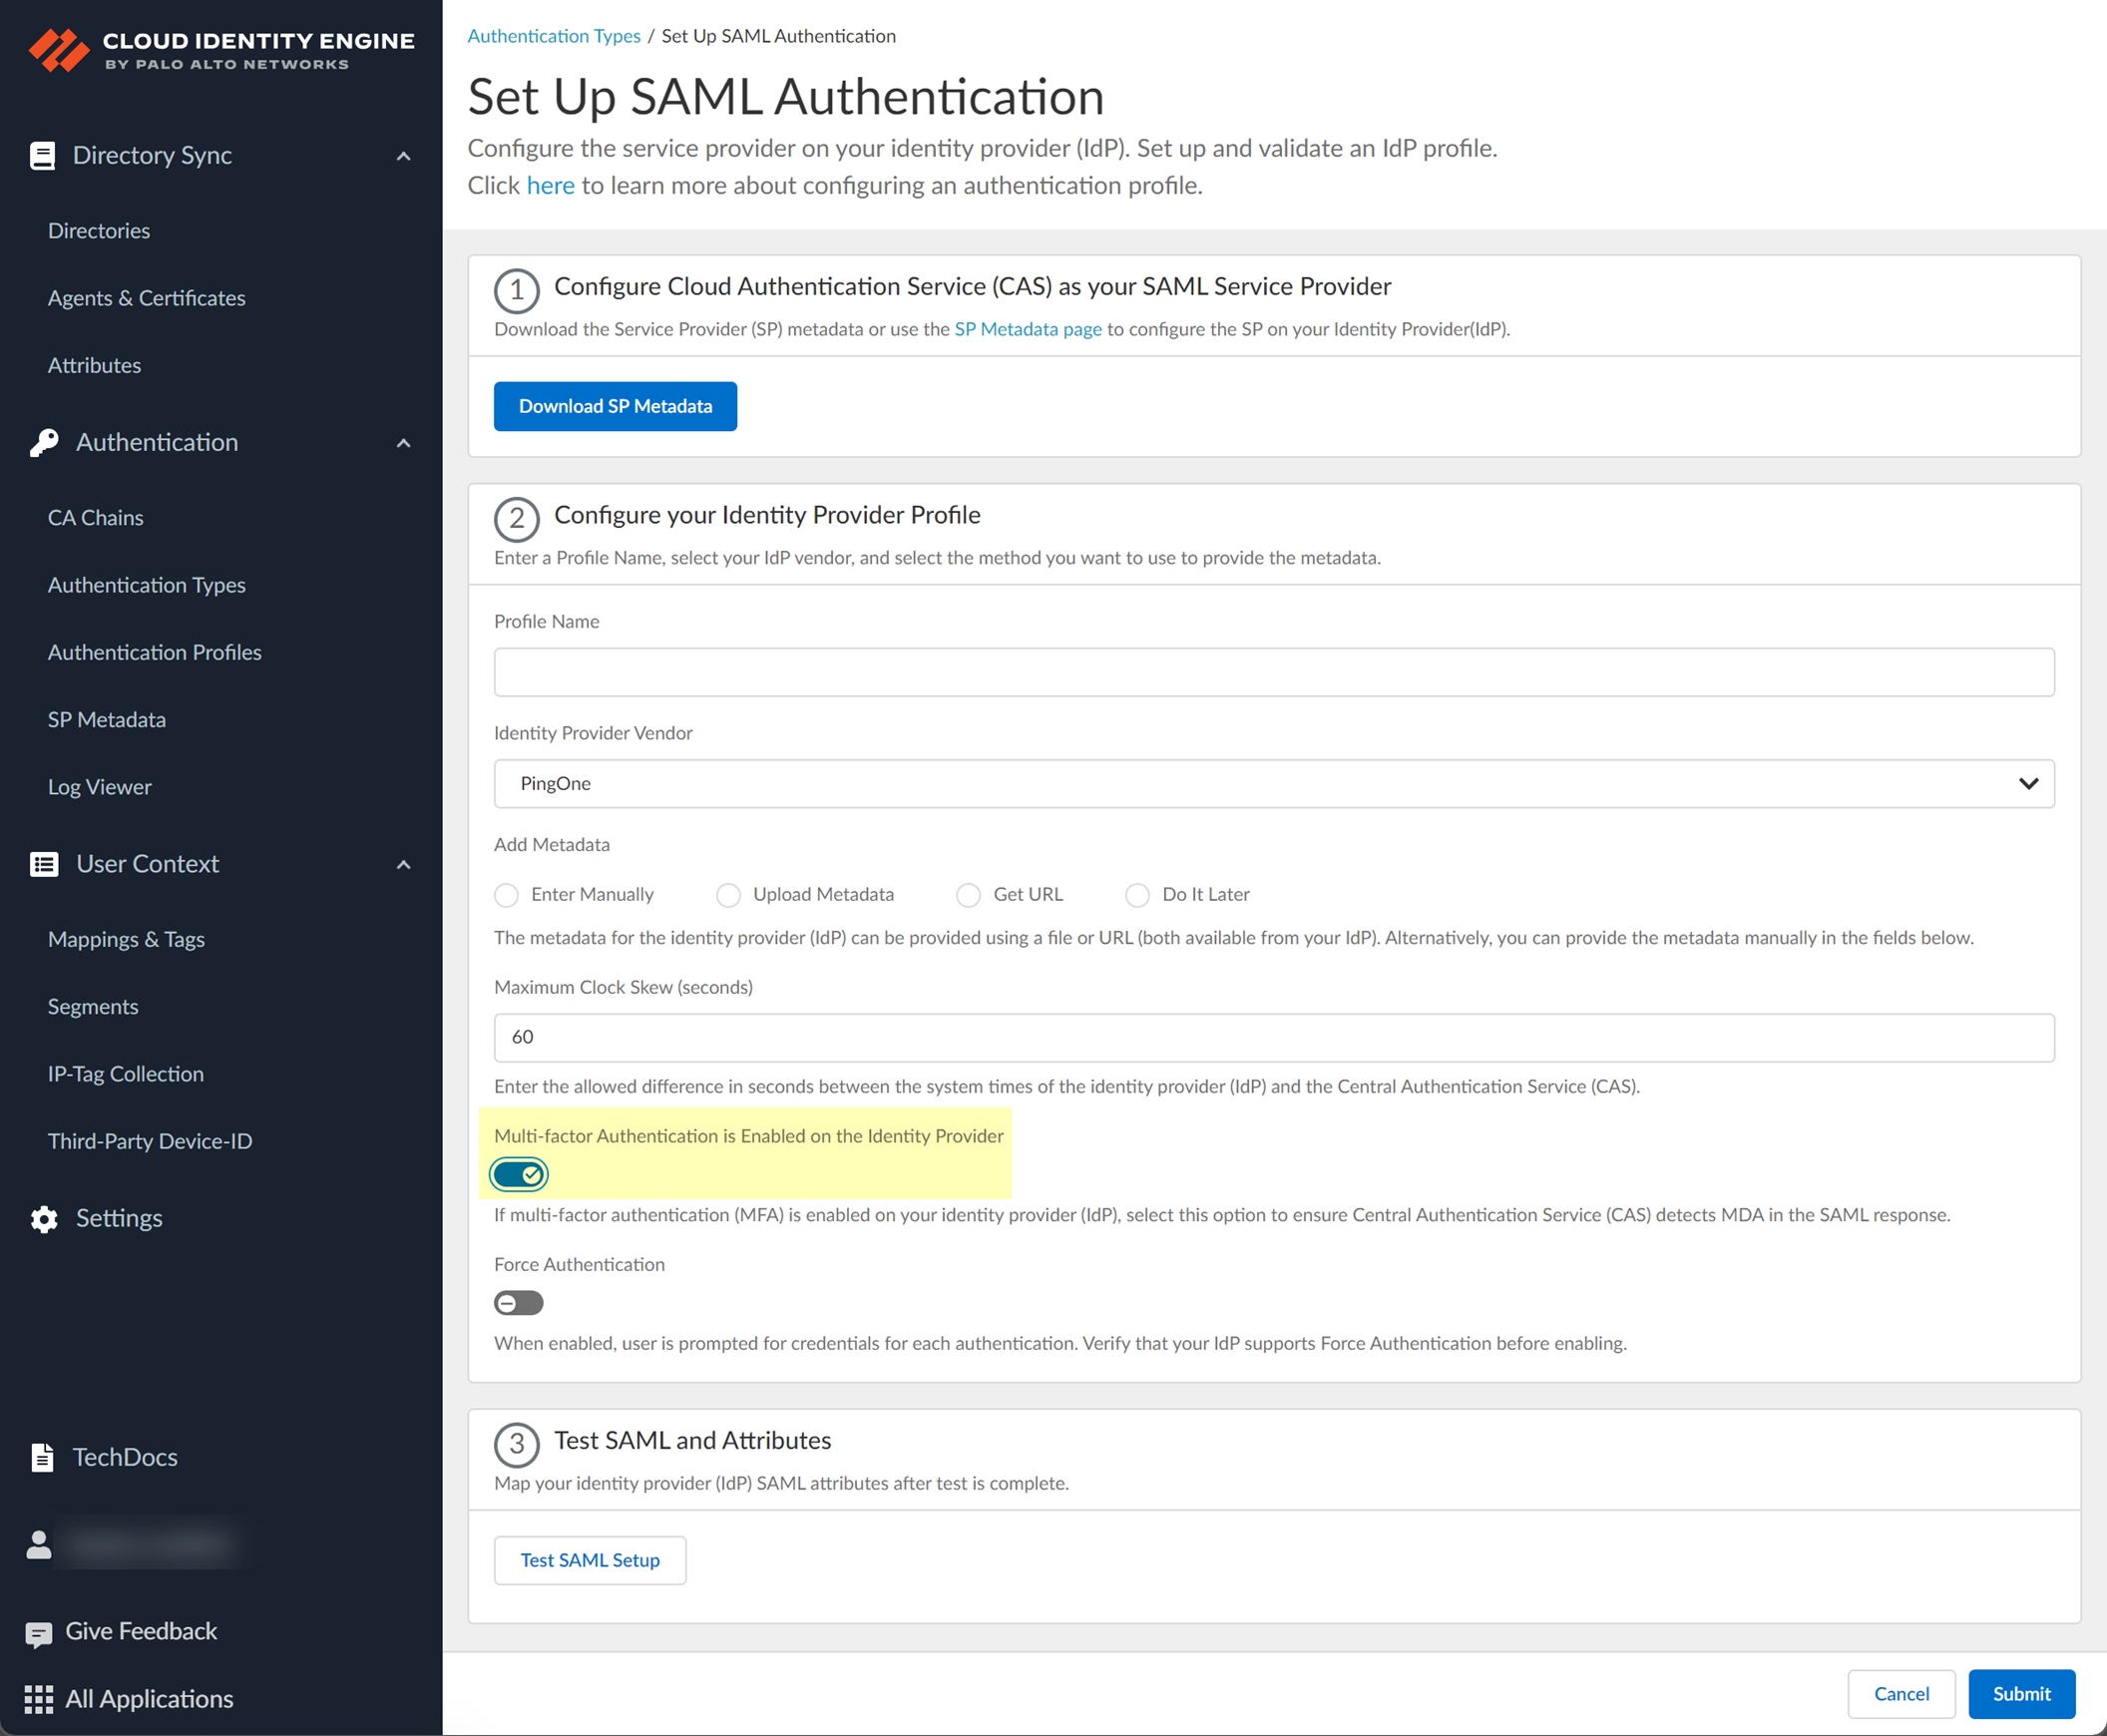
- Select Multi-factor Authentication is Enabled on the Identity Provider if your Azure configuration uses multi-factor authentication (MFA).
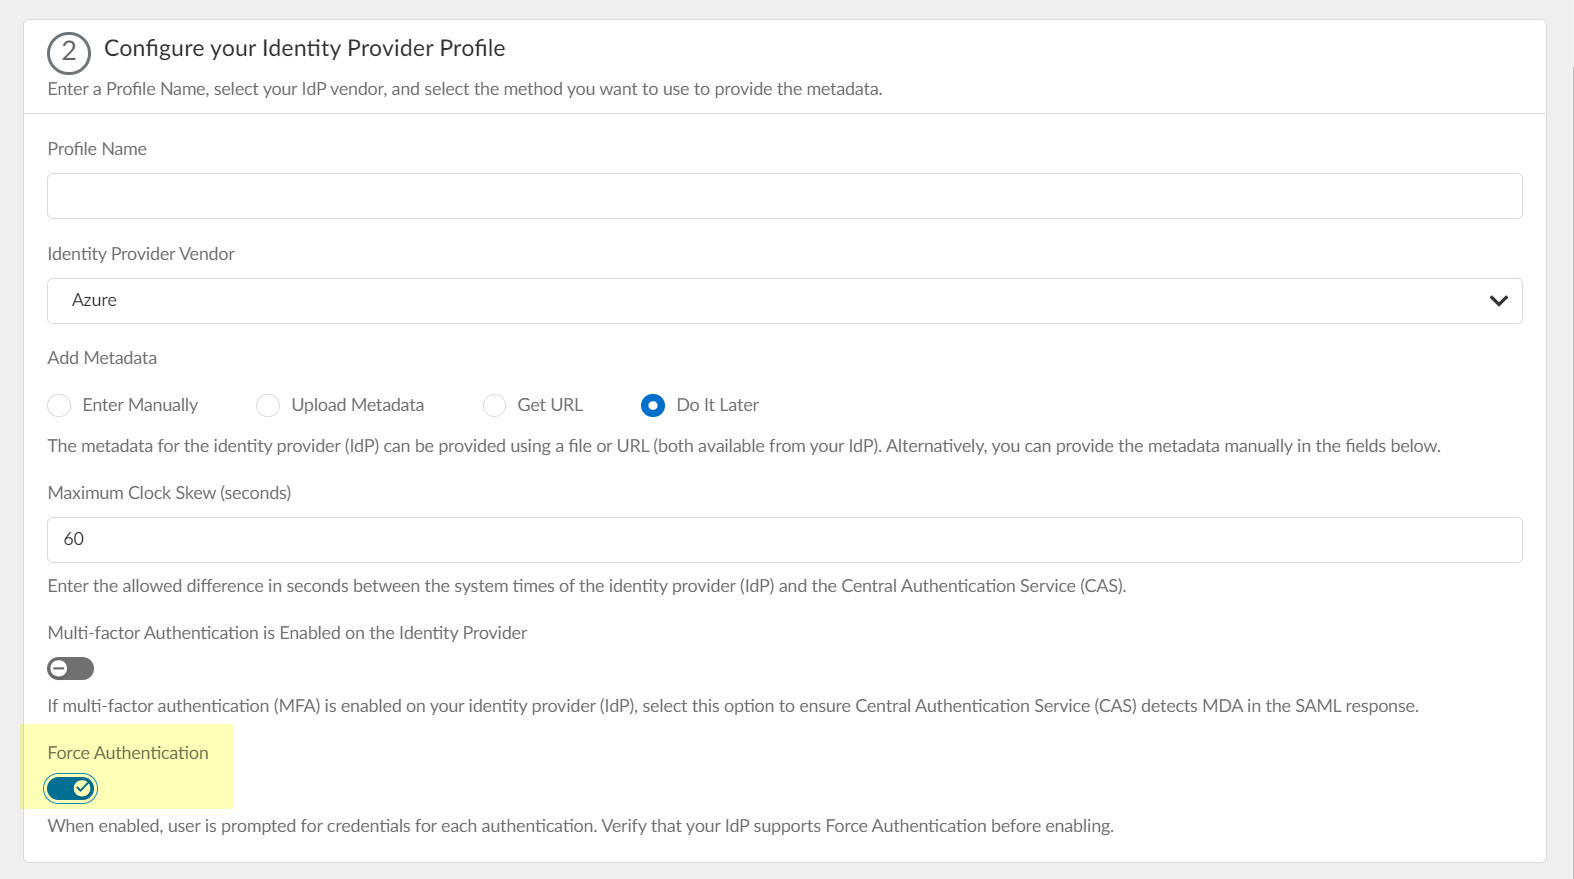
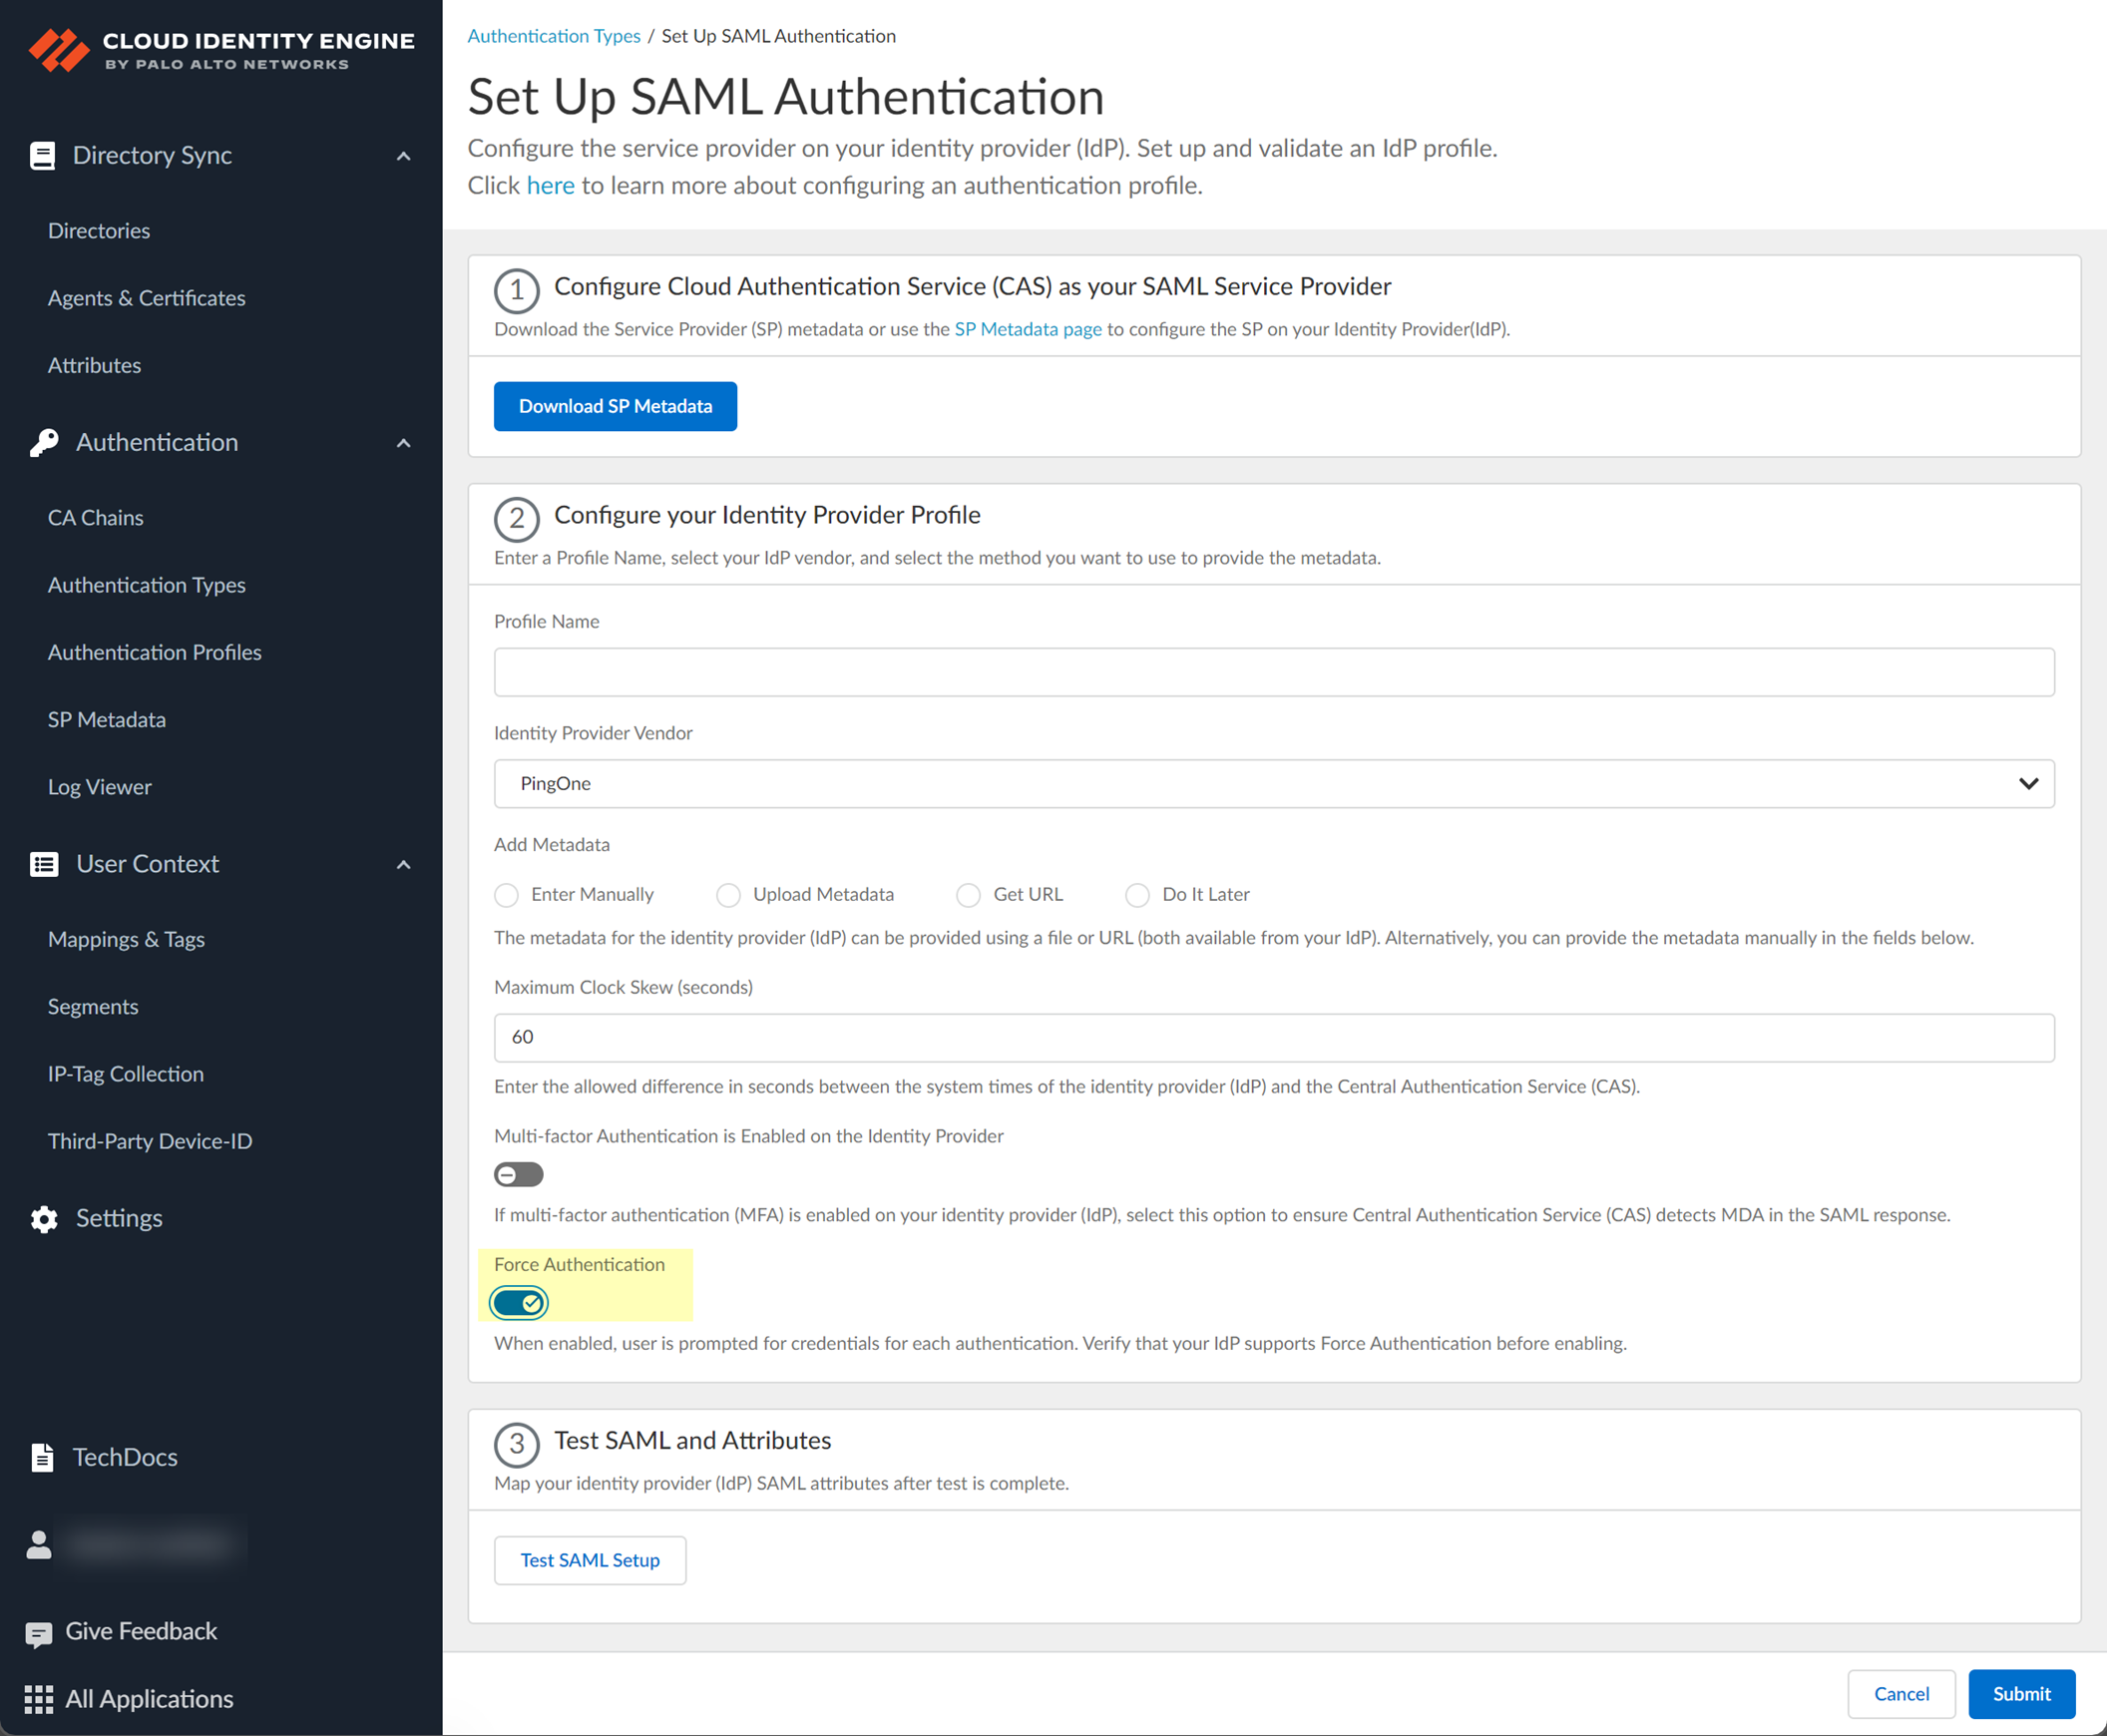
- To require users to log in using their credentials to reconnect to GlobalProtect, enable Force Authentication .
- Click Test SAML setup to verify the profile configuration.
This step is necessary to confirm that your firewall and IdP can communicate.
If you do not provide the vendor information, the SAML test passes so that you can still submit the configuration.
- Select the SAML attributes you want the firewall to use for authentication and Submit the IdP profile.
- In the Azure Portal, Edit the User Attributes & Claims .
- (Optional) In the Cloud Identity Engine app, enter the Username Attribute , Usergroup Attribute , Access Domain , User Domain , and Admin Role .
- Submit the profile.
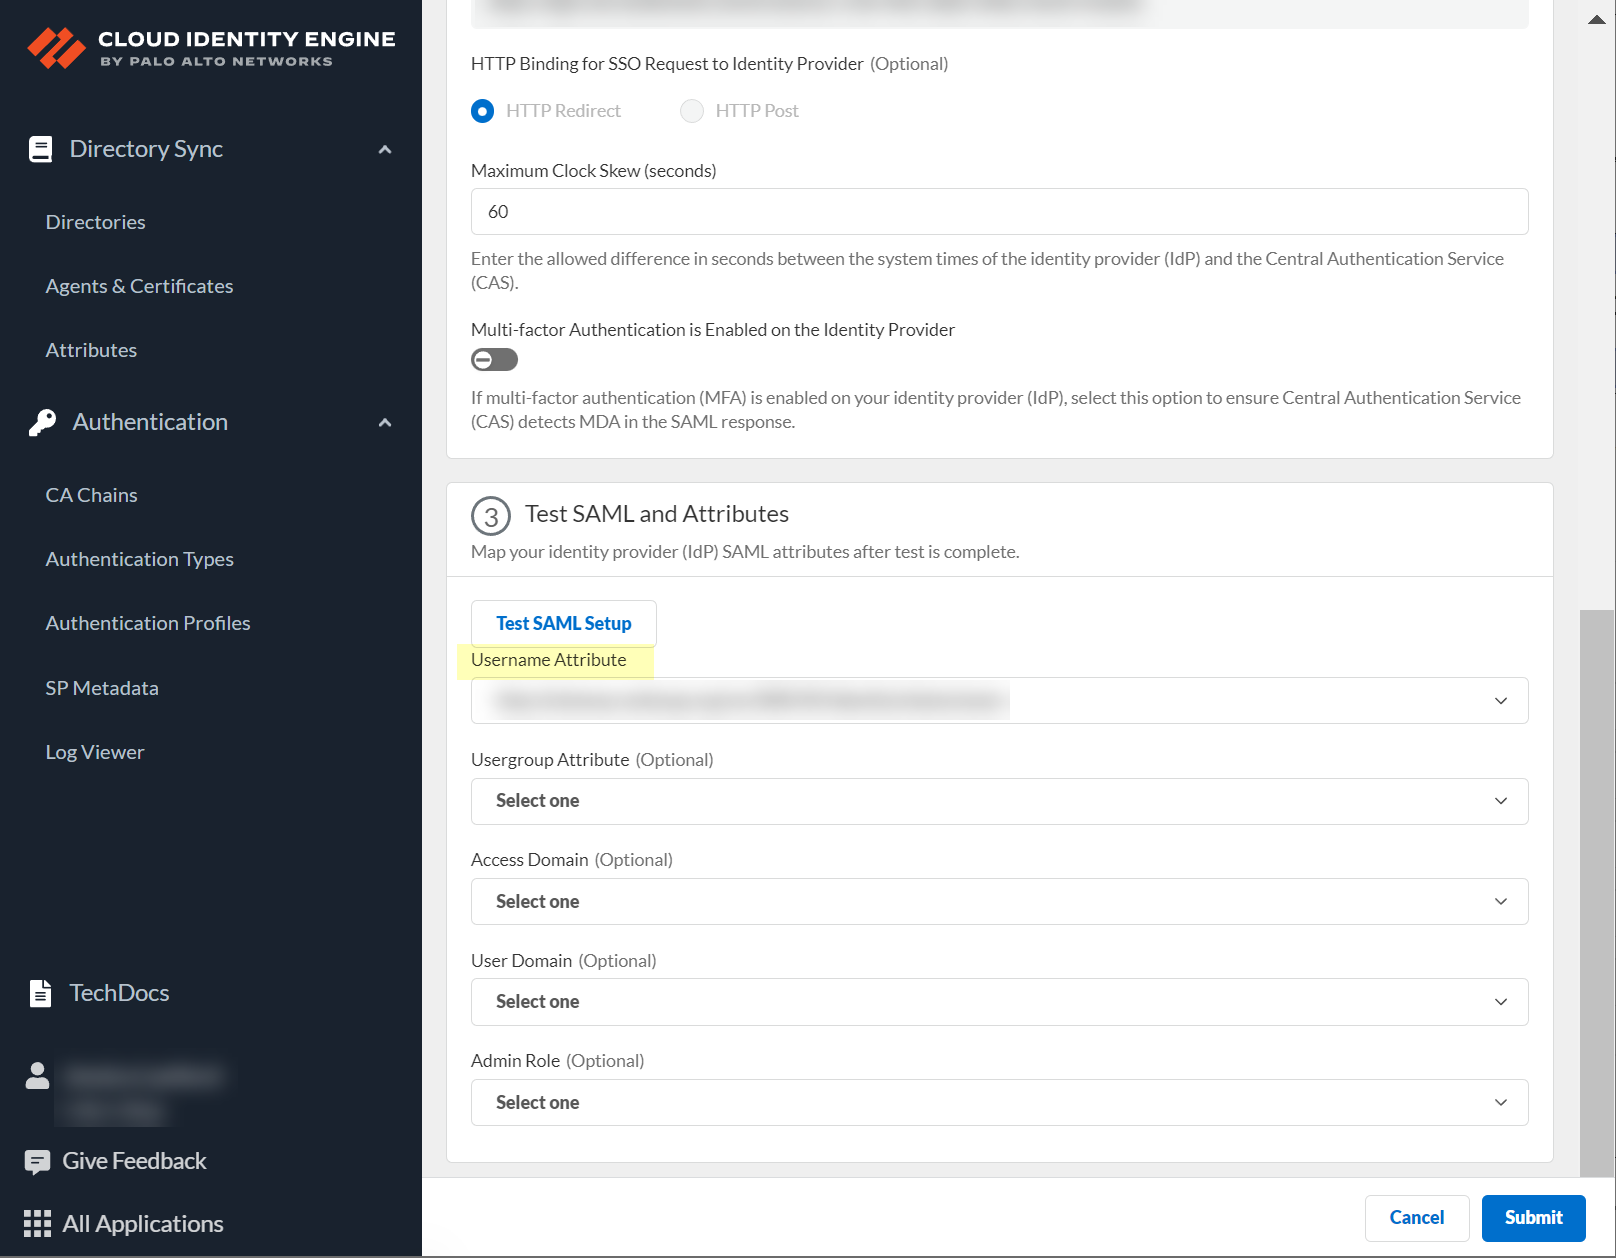
- If you want to Enable Dynamic Privilege Access , ensure completion of the prerequisites before enabling this option, then Submit your changes to confirm the configuration.
For more information, refer to Configure Dynamic Privilege Access in the Cloud Identity Engine .
Configure Okta as an IdP in the Cloud Identity Engine
If you want to use Okta to authenticate users with the Cloud Identity Engine, there are two ways to configure Okta authentication with the Cloud Identity Engine:
- Integrate Okta as a Gallery Application
Recommended
- Integrate Okta as a Custom Application
- Select the method you want to use to integrate the Okta authentication in the Cloud Identity Engine and complete the steps in the Okta management console.
- Integrate Okta as a Gallery Application
Recommended
- Integrate Okta as a Custom Application
- Set up the Okta authentication in the Cloud Identity Engine.
1. If you have not already done so, activate the Cloud Identity Engine app.
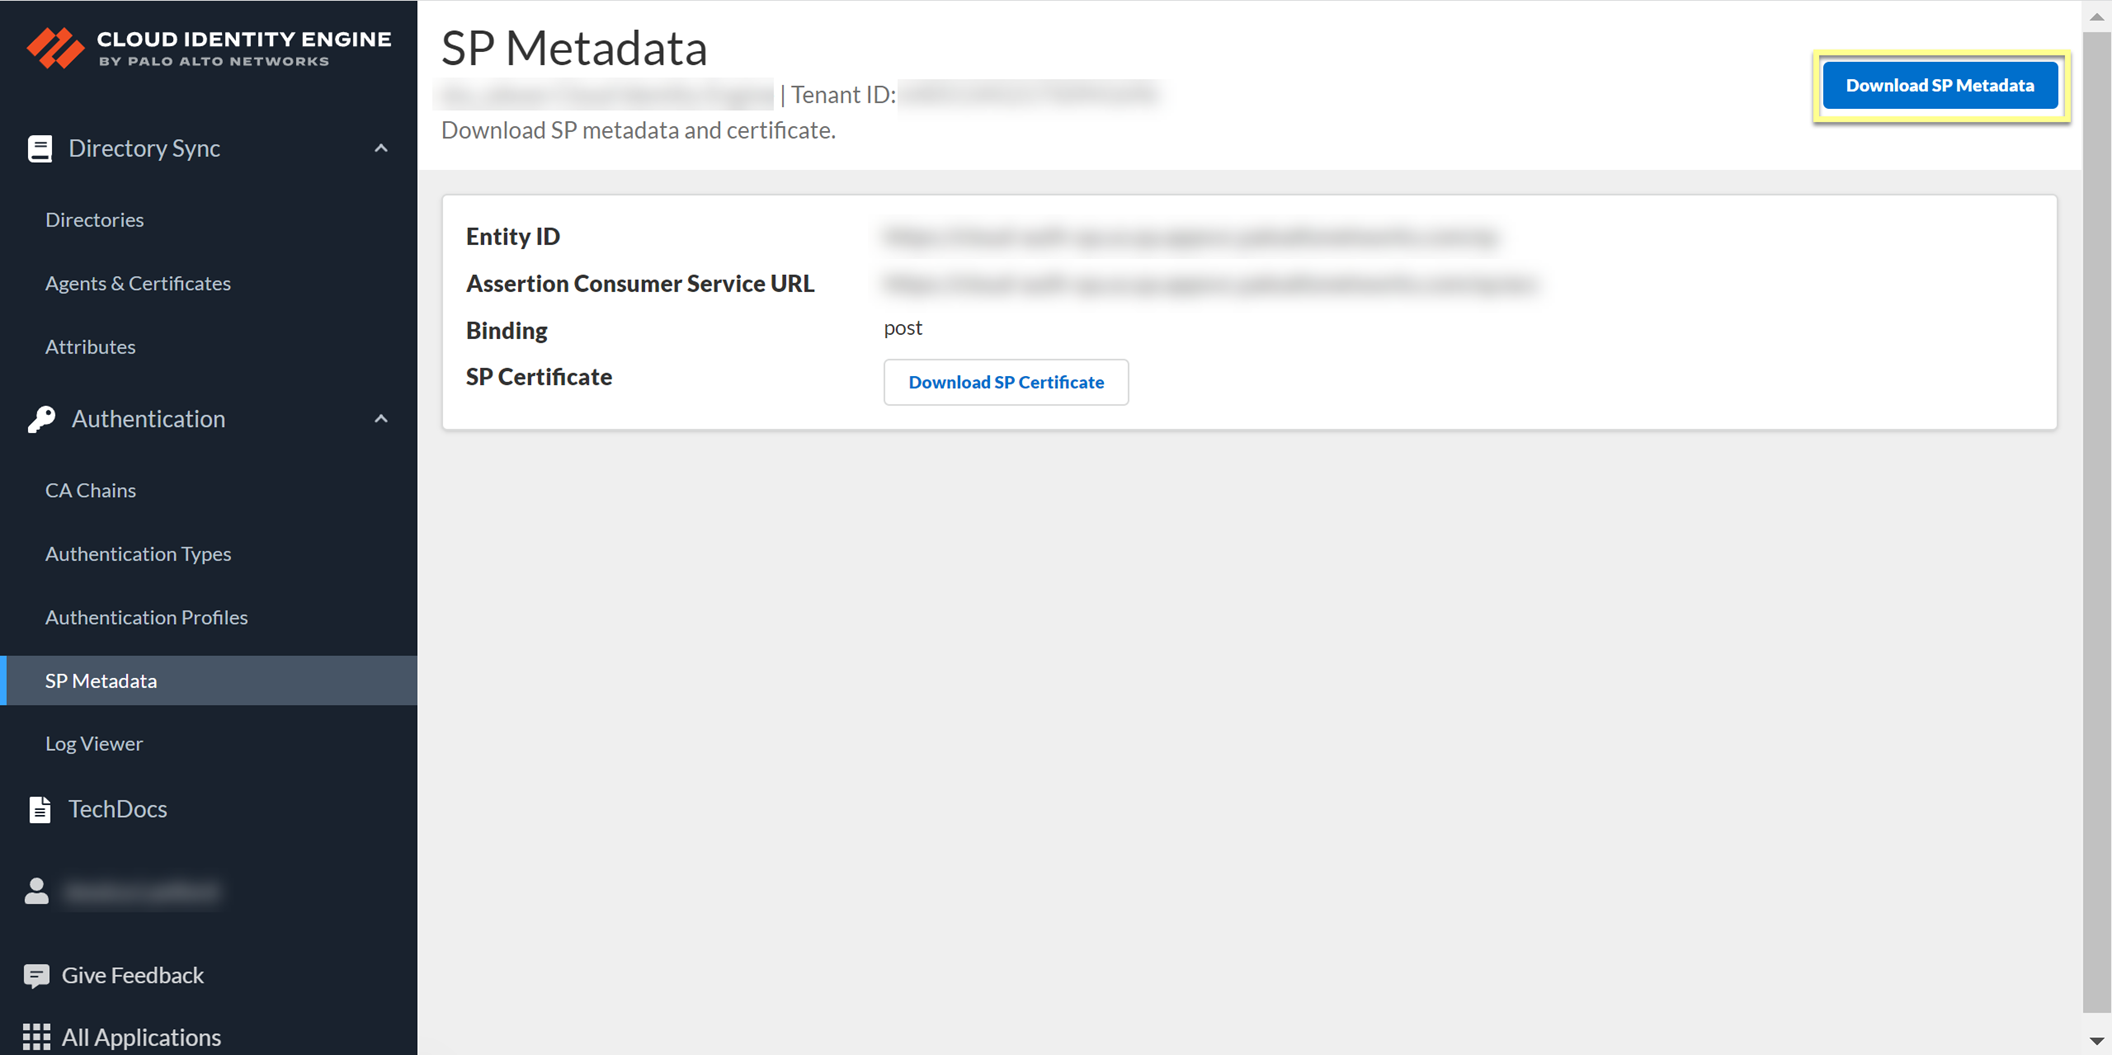
2. In the Cloud Identity Engine app, select AuthenticationSP MetadataDownload SP Metadata and Save the metadata in a secure location.

- Add Okta as an authentication type in the Cloud Identity Engine app.
1. Select Authentication Types and click Add New Authentication Type .
2. Set Up a SAML 2.0 authentication type.
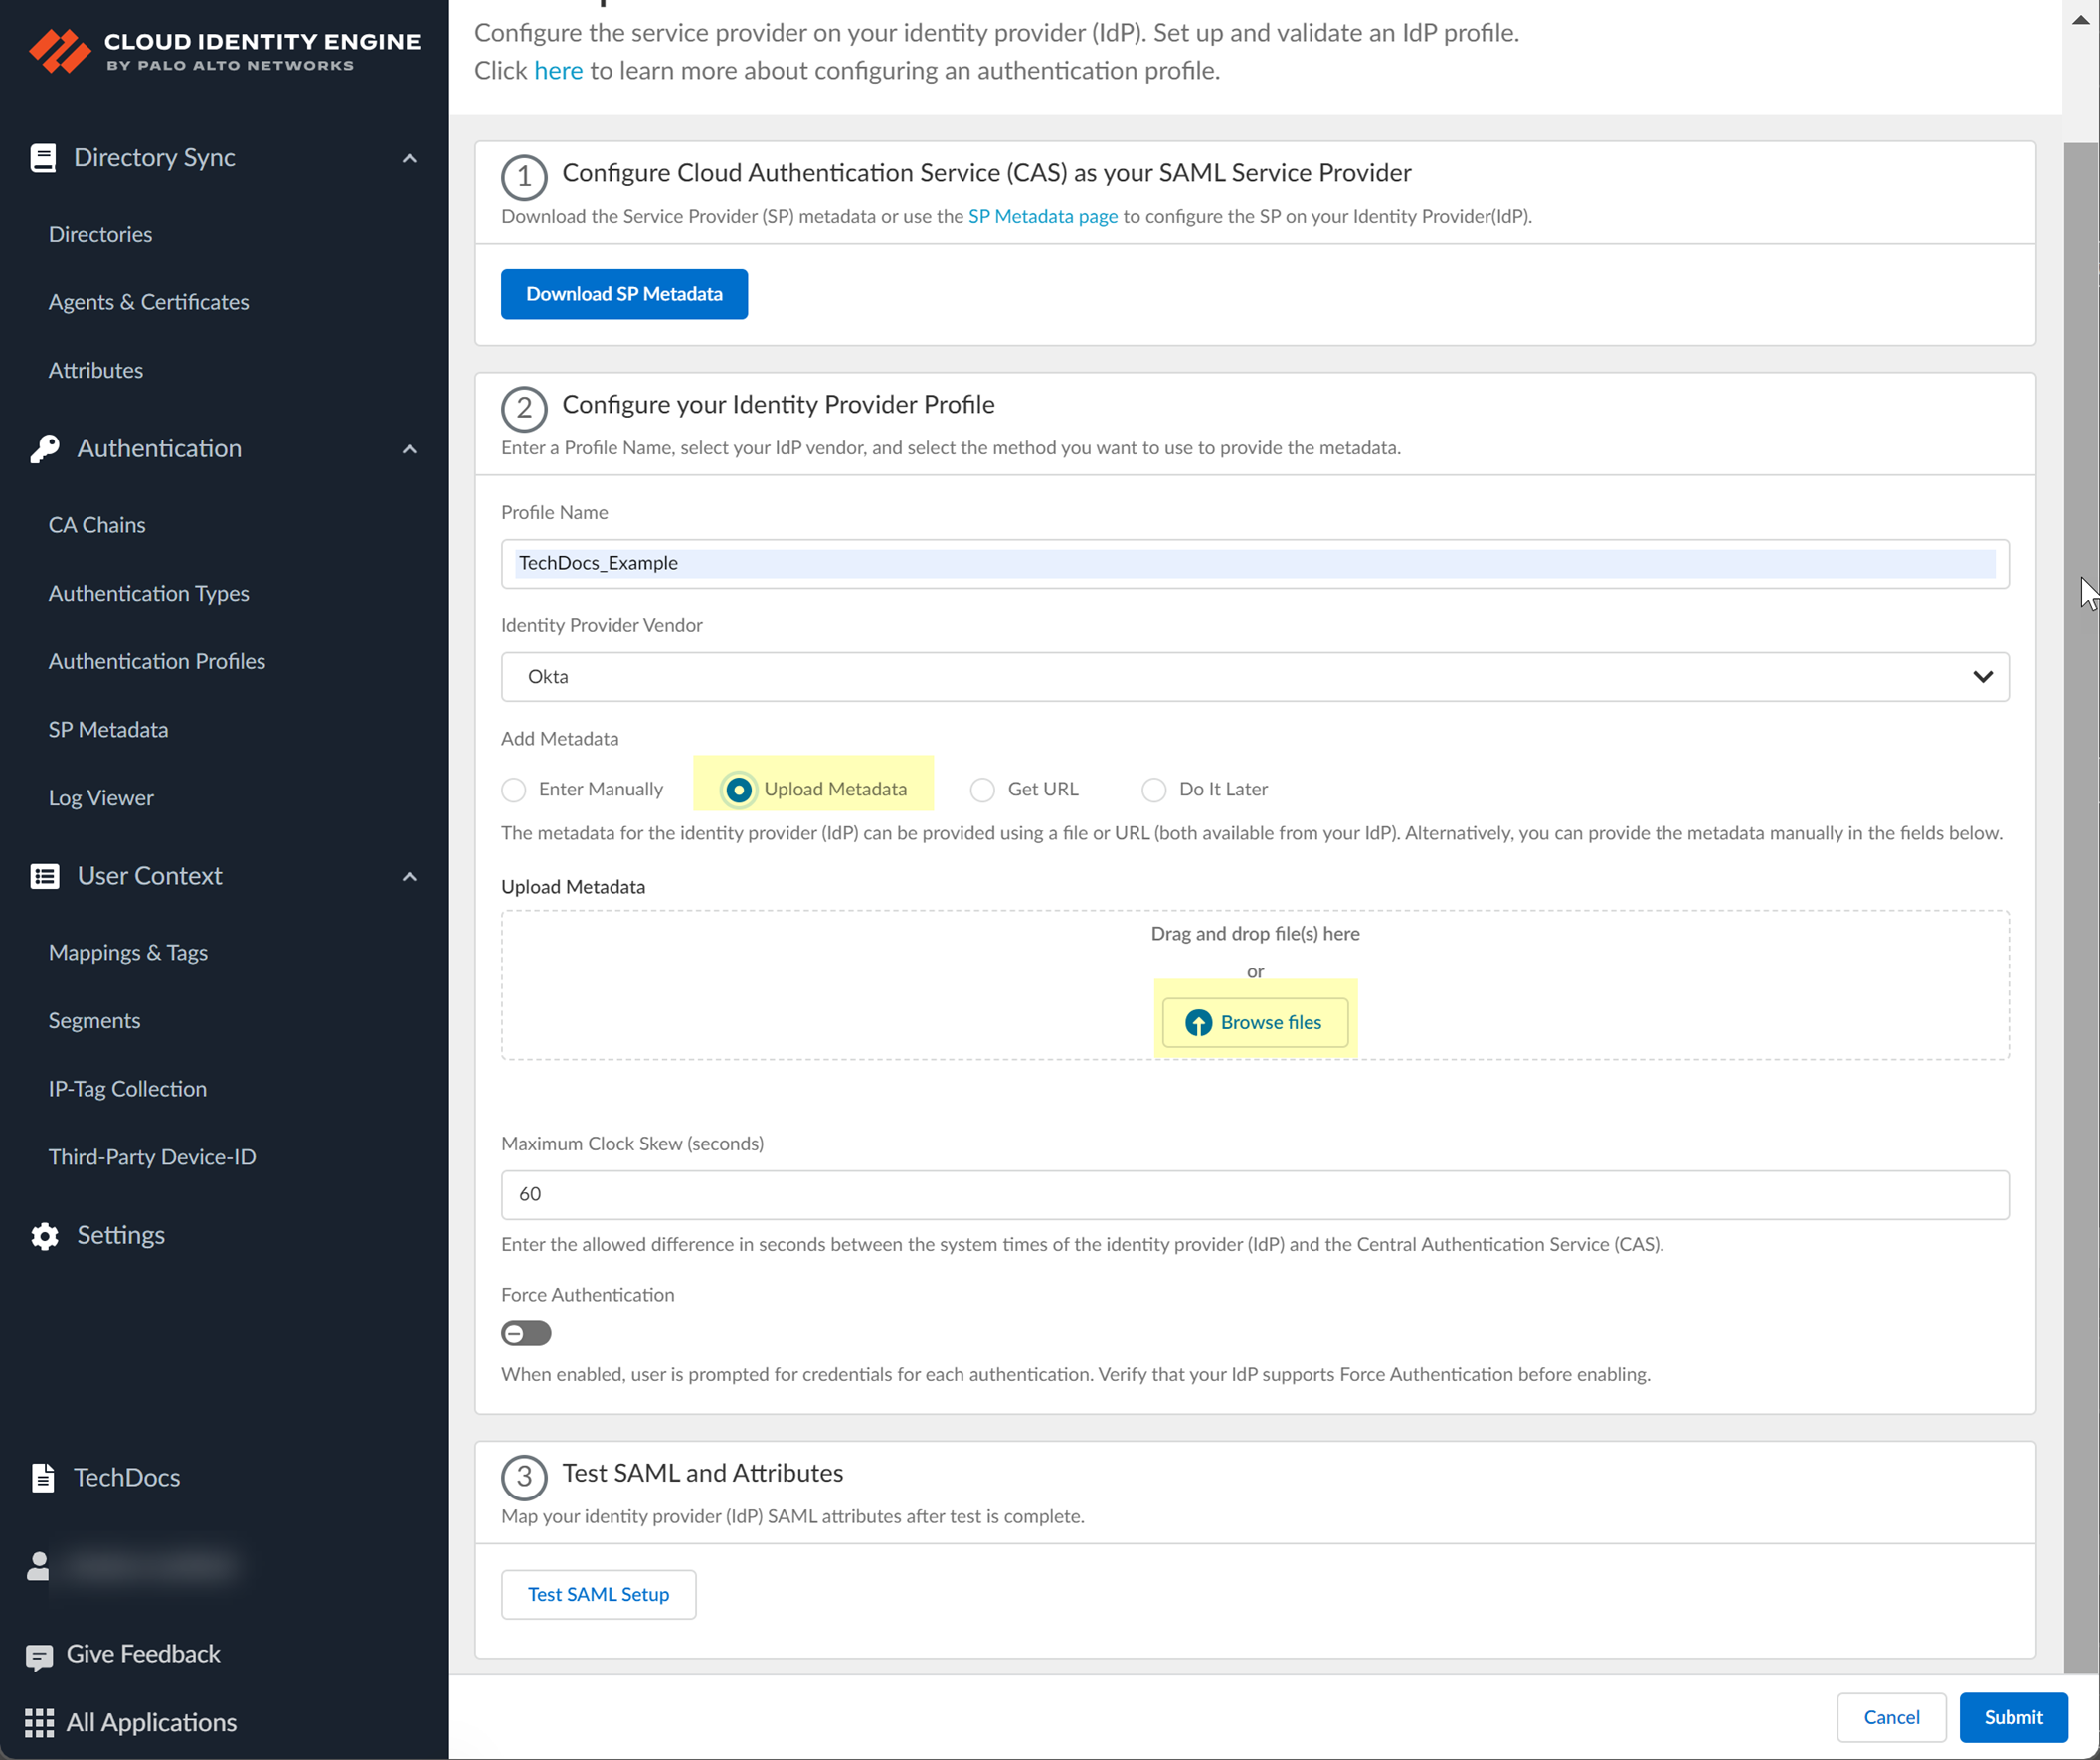
3. Enter a Profile Name .

4. Select Okta as your Identity Provider Vendor .
- Select the method you want to use to Add Metadata and Submit the IdP profile.
- If you want to enter the information manually, copy the identity provider ID and SSO URL, download the certificate, then enter the information in the Cloud Identity Engine IdP profile.
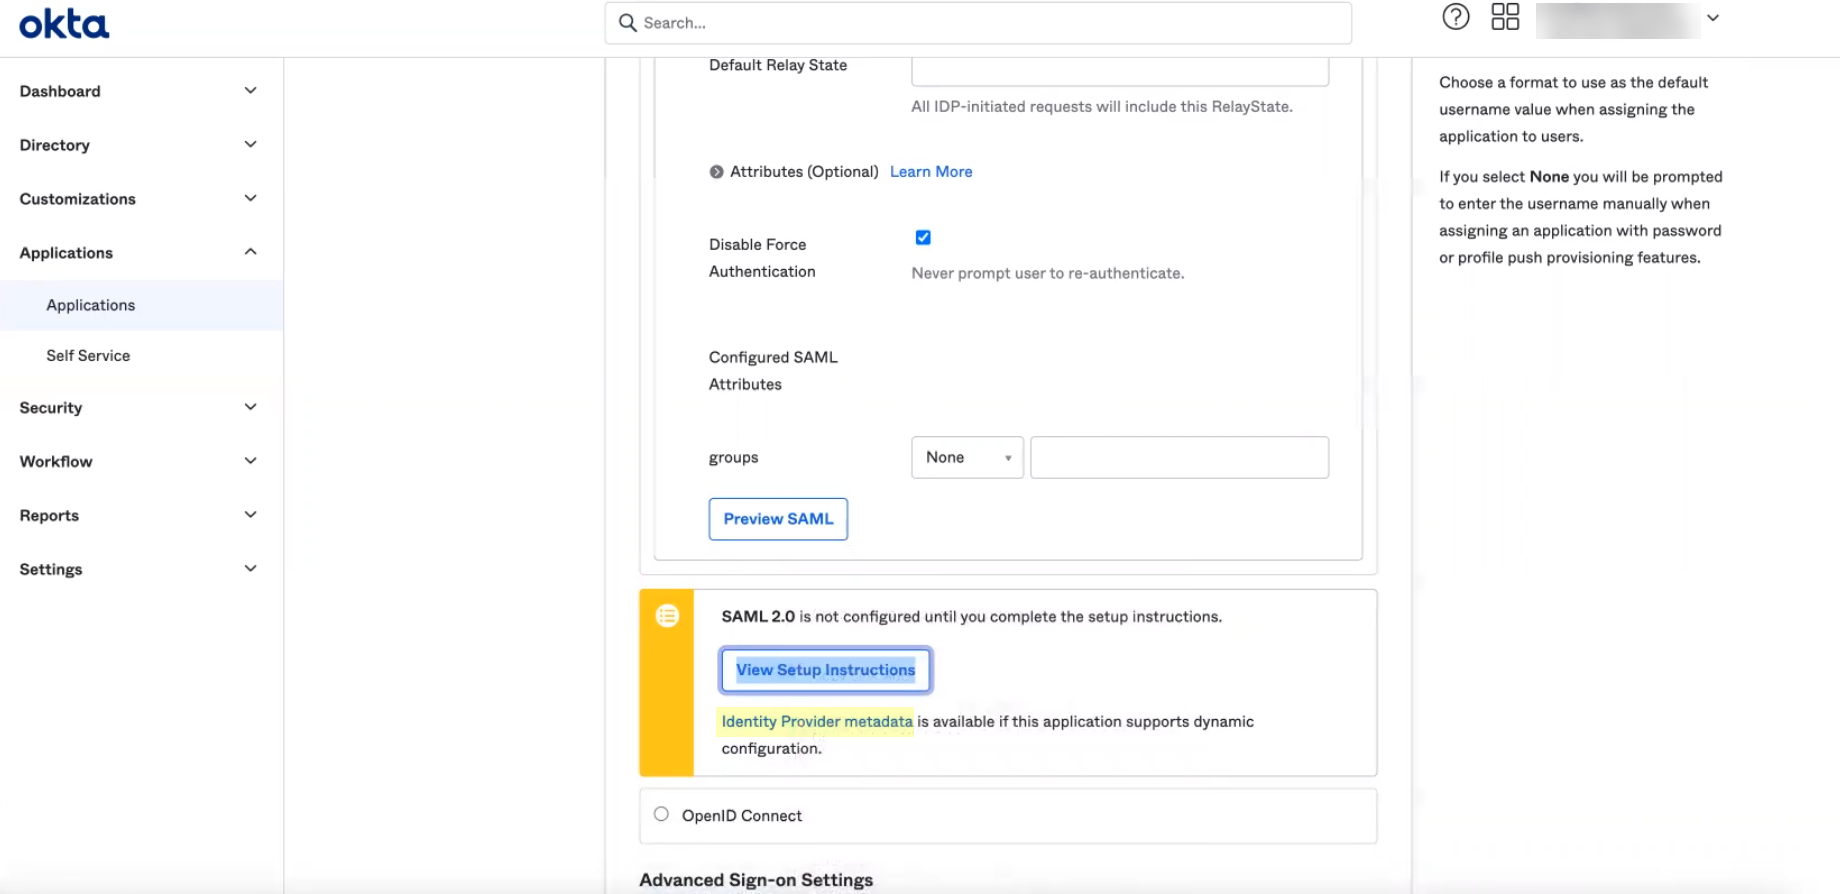
- In the Okta Admin Console, click Identity Provider metadata .
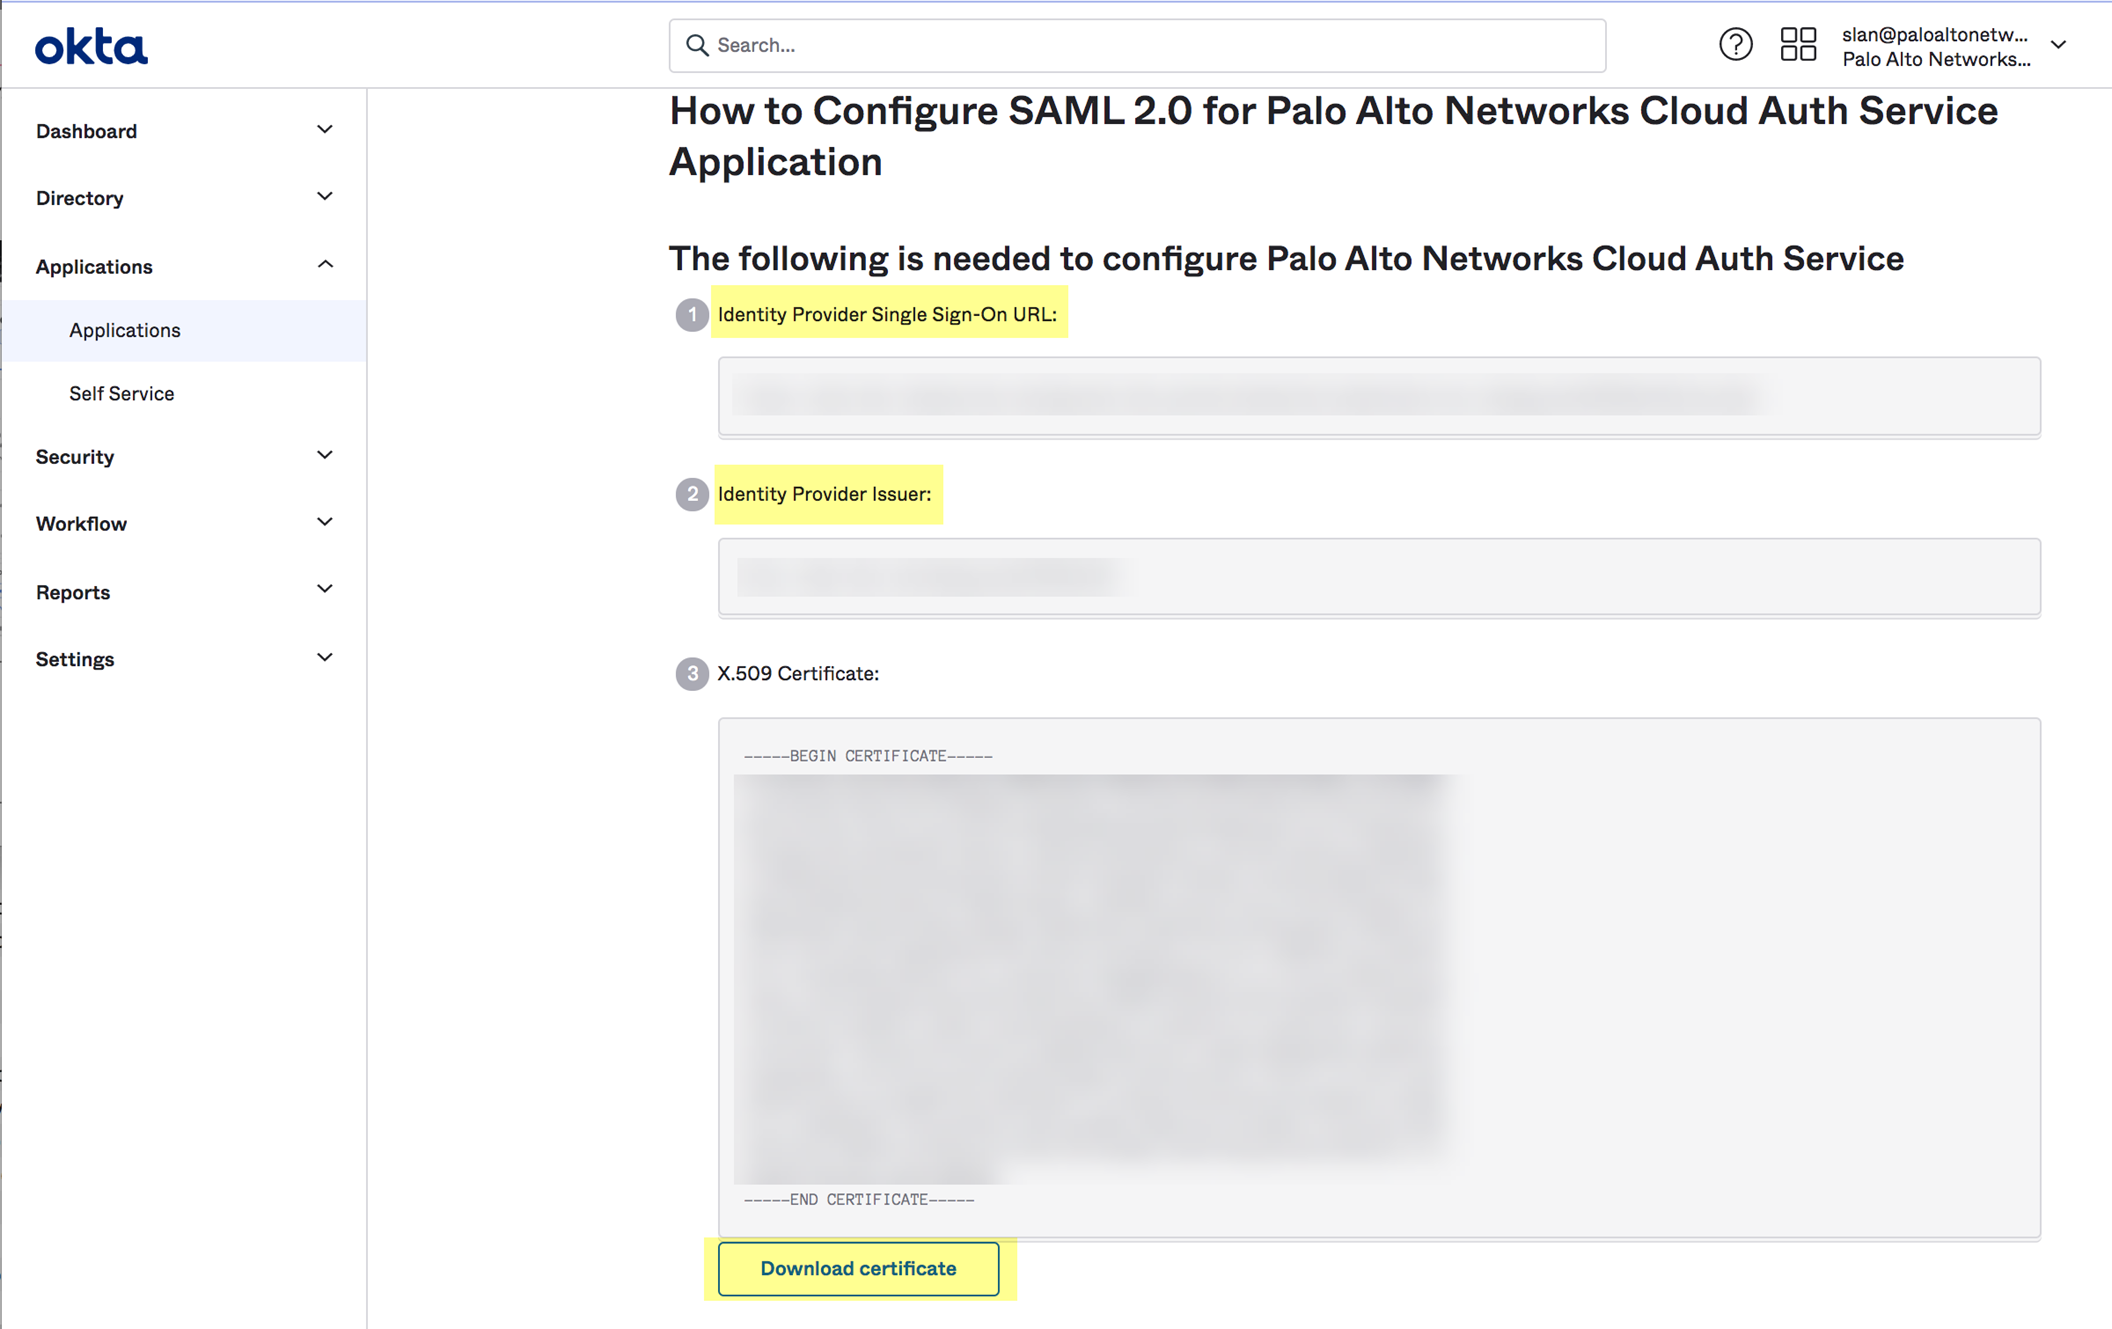
- Copy the necessary information from the Okta Admin Console and enter it in the IdP profile on the Cloud Identity Engine app as indicated in the following table:
|
Copy or Download from Okta Admin Console |
Enter in Cloud Identity Engine |
|
Copy the Identity Provider Issuer . |
Enter it as the Identity Provider ID . |
|
Download the X.509 Certificate . |
Click to Upload the certificate from the Okta Admin Console. |
|
Copy the Identity Provider Single Sign-On URL . |
Enter the URL as the Identity Provider SSO URL . |
-
- Select the HTTP Binding for SSO Request to IdP method you want to use for the SAML binding that allows the firewall and IdP to exchange request and response messages:
- HTTP Redirect —Transmit SAML messages through URL parameters.
- HTTP Post —Transmit SAML messages using base64-encoded HTML.
- If you want to upload a metadata file, download the metadata file from your IdP management system.
- In the Okta Admin Console, click View Setup Info and copy the IDP metadata and save it to a secure location.
- In the Cloud Identity Engine app, click Browse Files to select the metadata file then Open the metadata file.
- If you want to use a URL to retrieve the metadata, copy the IDP metadata from step
4.2
. Paste it in the profile and click Get URL to obtain the metadata.
#id4126bb2e-0974-45b8-81da-c13f5db29908_li_l5n_bz5_3xb
- If you don't want to enter the configuration information now, you can Do it later . This option allows you to submit the profile without including configuration information. However, you must edit the profile to include the configuration information to use the authentication type in an authentication profile.

- Specify the Maximum Clock Skew (seconds) , which is the allowed difference in seconds between the system times of the IdP and the firewall at the moment when the firewall validates IdP messages (default is 60; range is 1–900). If the difference exceeds this value, authentication fails.
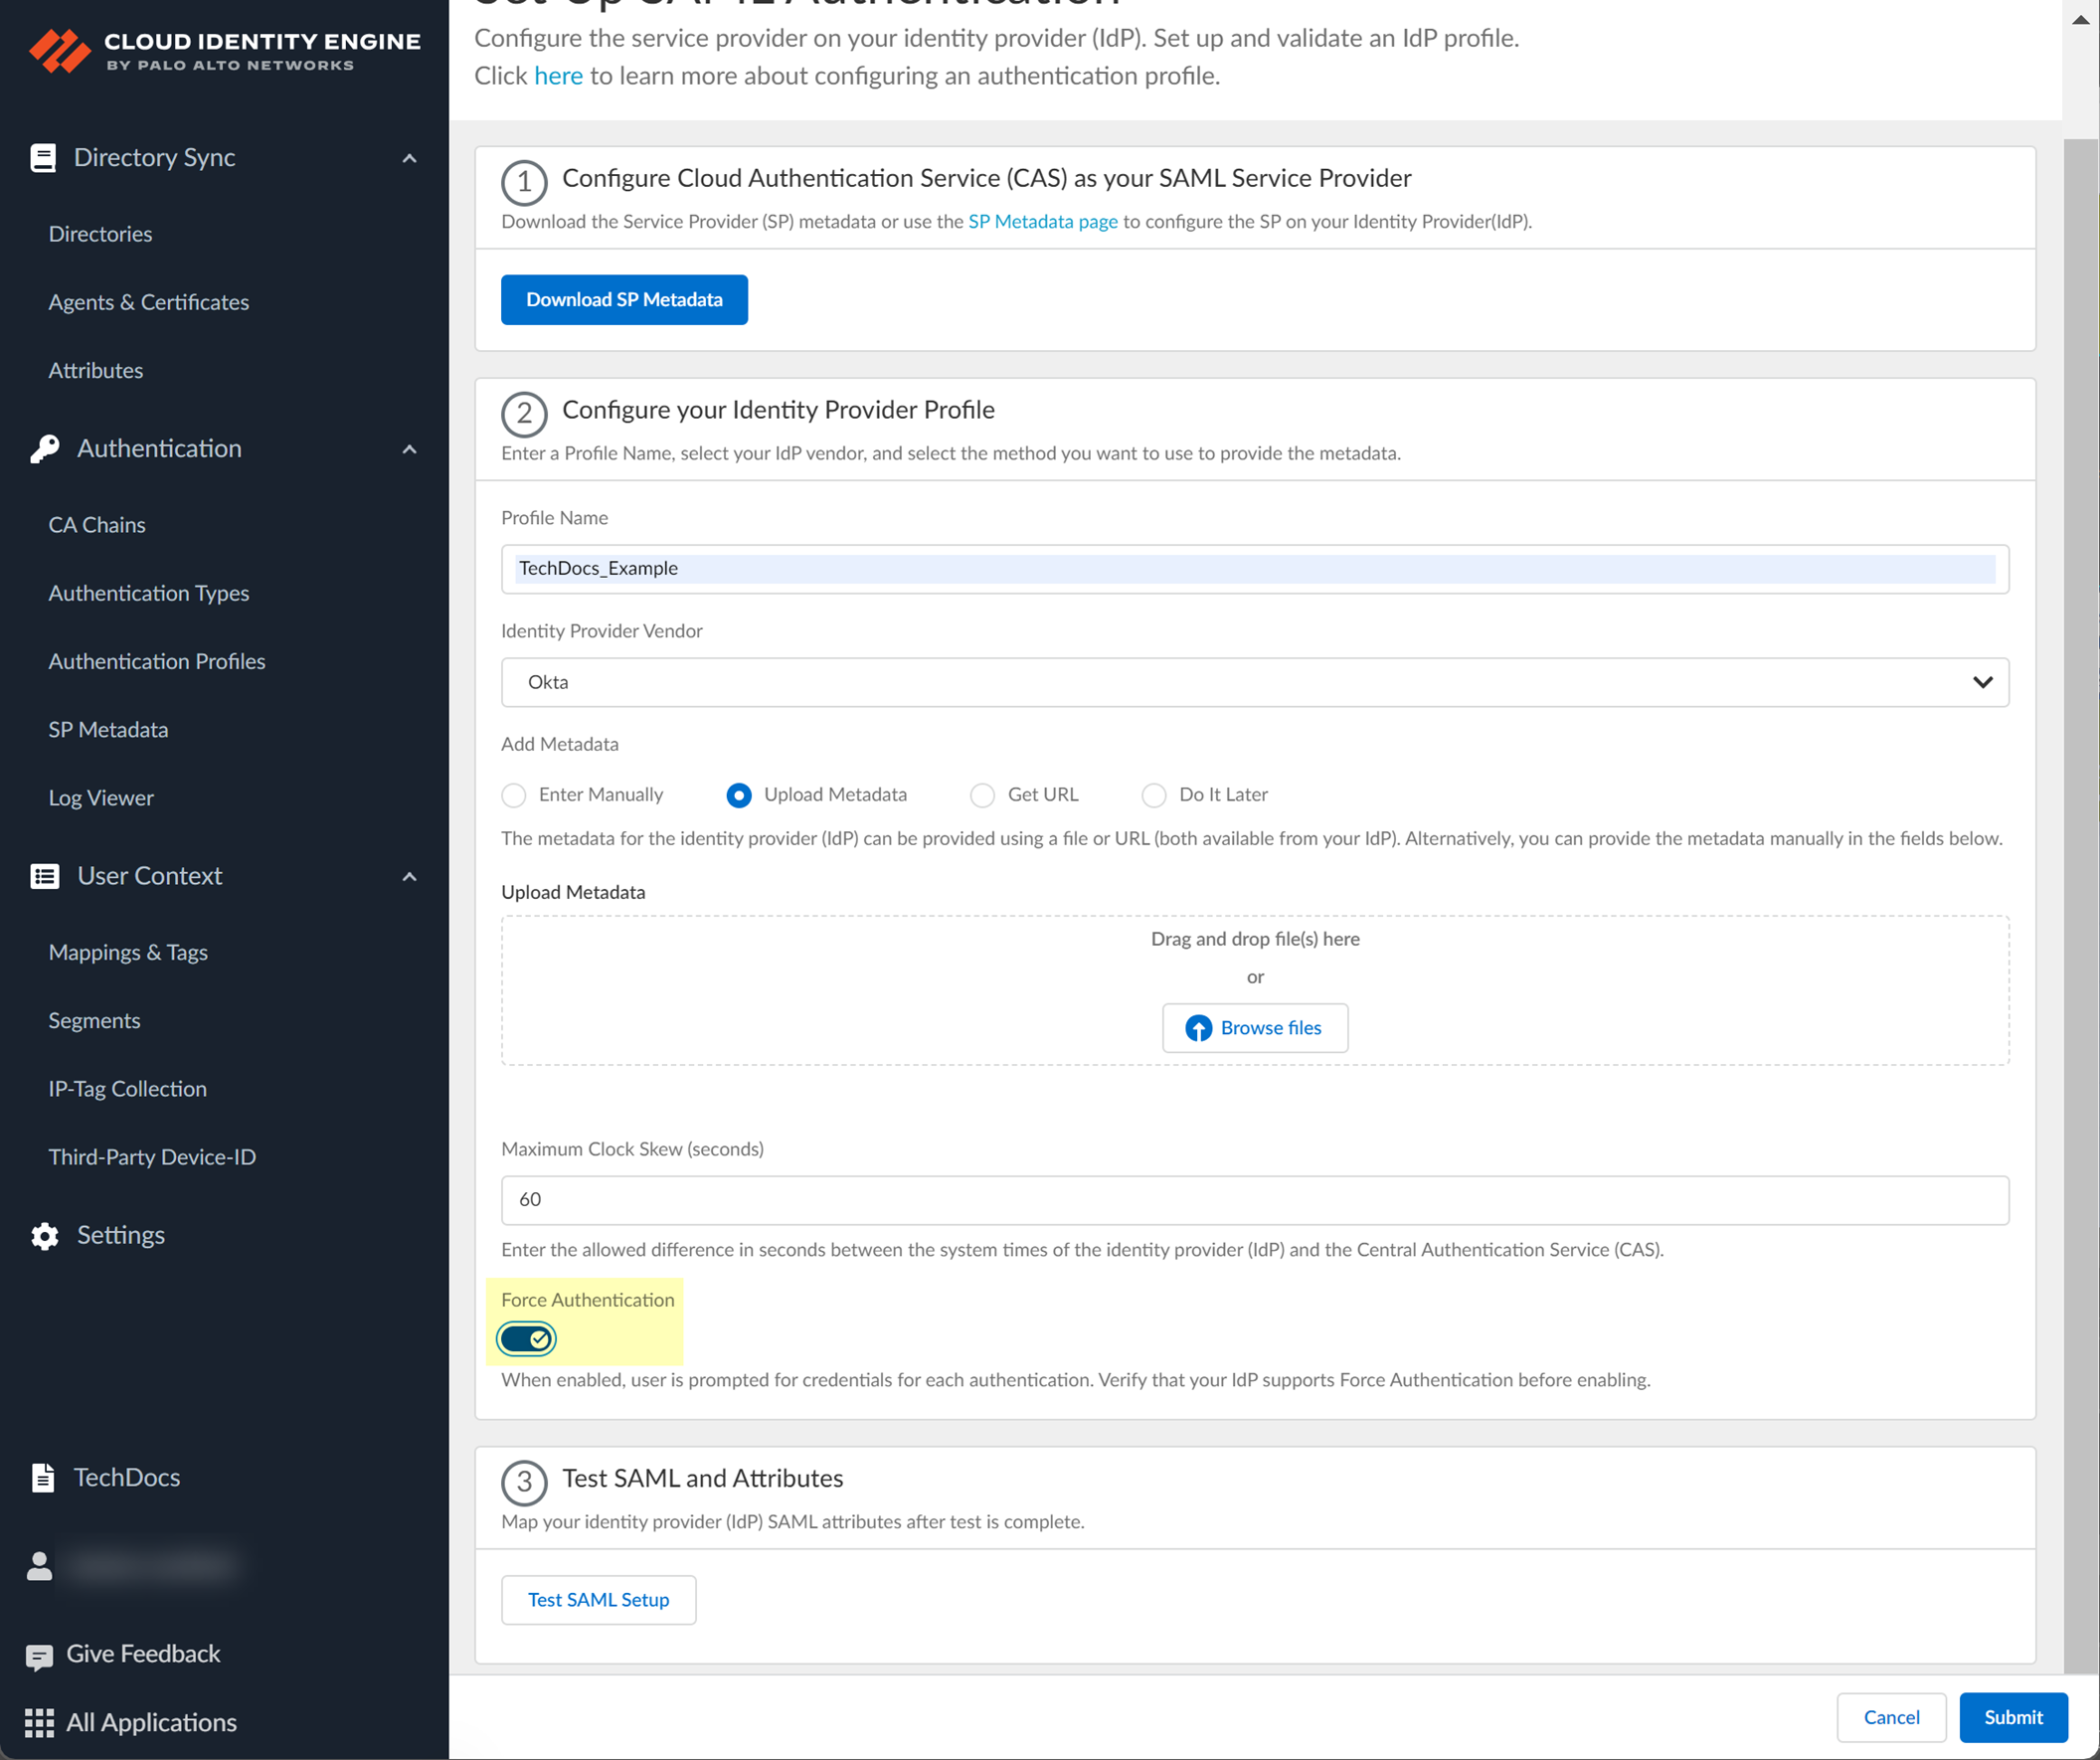
- To require users to log in using their credentials to reconnect to GlobalProtect, enable Force Authentication .
- Test SAML setup to verify the profile configuration.
This step is necessary to confirm that your firewall and IdP can communicate.
- Select the SAML attributes you want the firewall to use for authentication and Submit the IdP profile.
You must select the username attribute in the Okta Admin Console for the attribute to display in the Cloud Identity Engine.
1. In the Okta Admin Console, Edit the User Attributes & Claims .
2. In the Cloud Identity Engine app, select the Username Attribute and optionally, the Usergroup Attribute , Access Domain , User Domain , and Admin Role .
If you're using the Cloud Identity Engine for SAML authentication with GlobalProtect Clientless VPN, you must configure the User Domain attribute to the same value as the userdomain field in the Okta Admin Console ( ApplicationsApplicationsSAML 2.0General ).
Integrate Okta as a Gallery Application
Palo Alto Networks strongly recommends that you integrate Okta in the Cloud Identity Engine as a gallery application. Complete the following steps to add and configure the Okta gallery application in the Cloud Identity Engine. Be sure to complete all the steps here and in the Okta documentation .
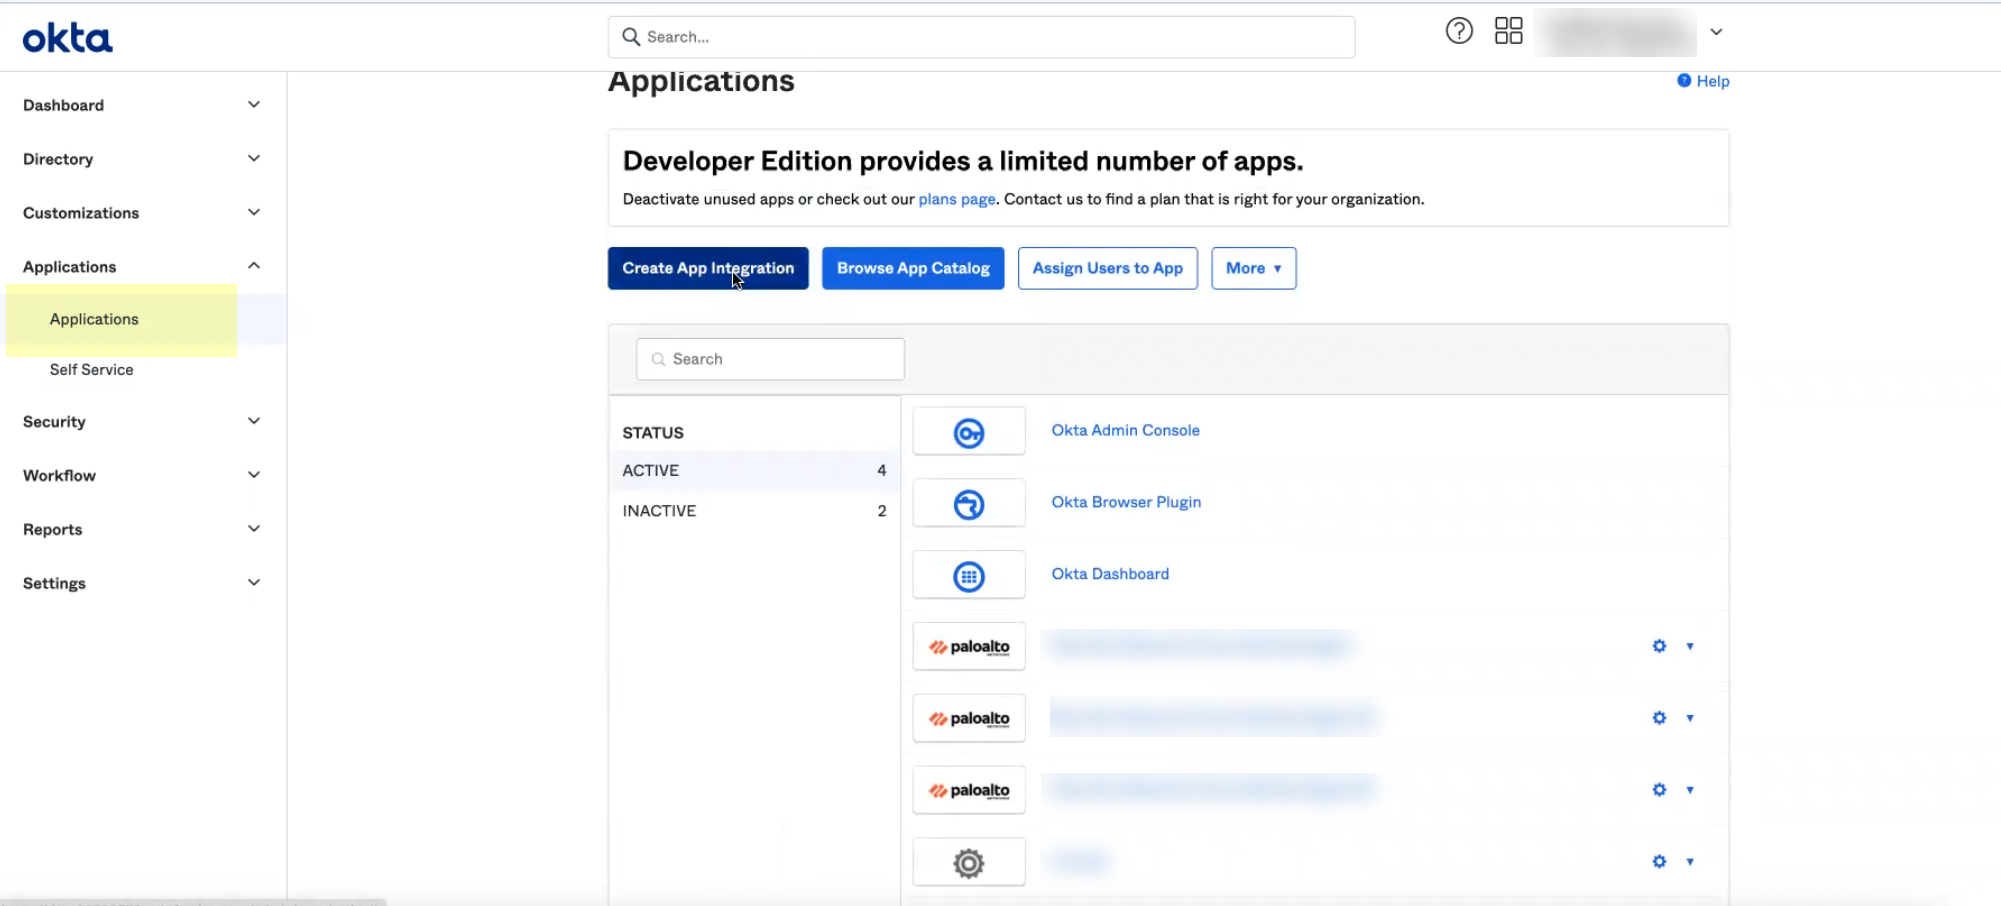
- Log in to the Okta Admin Console and select ApplicationsApplications .
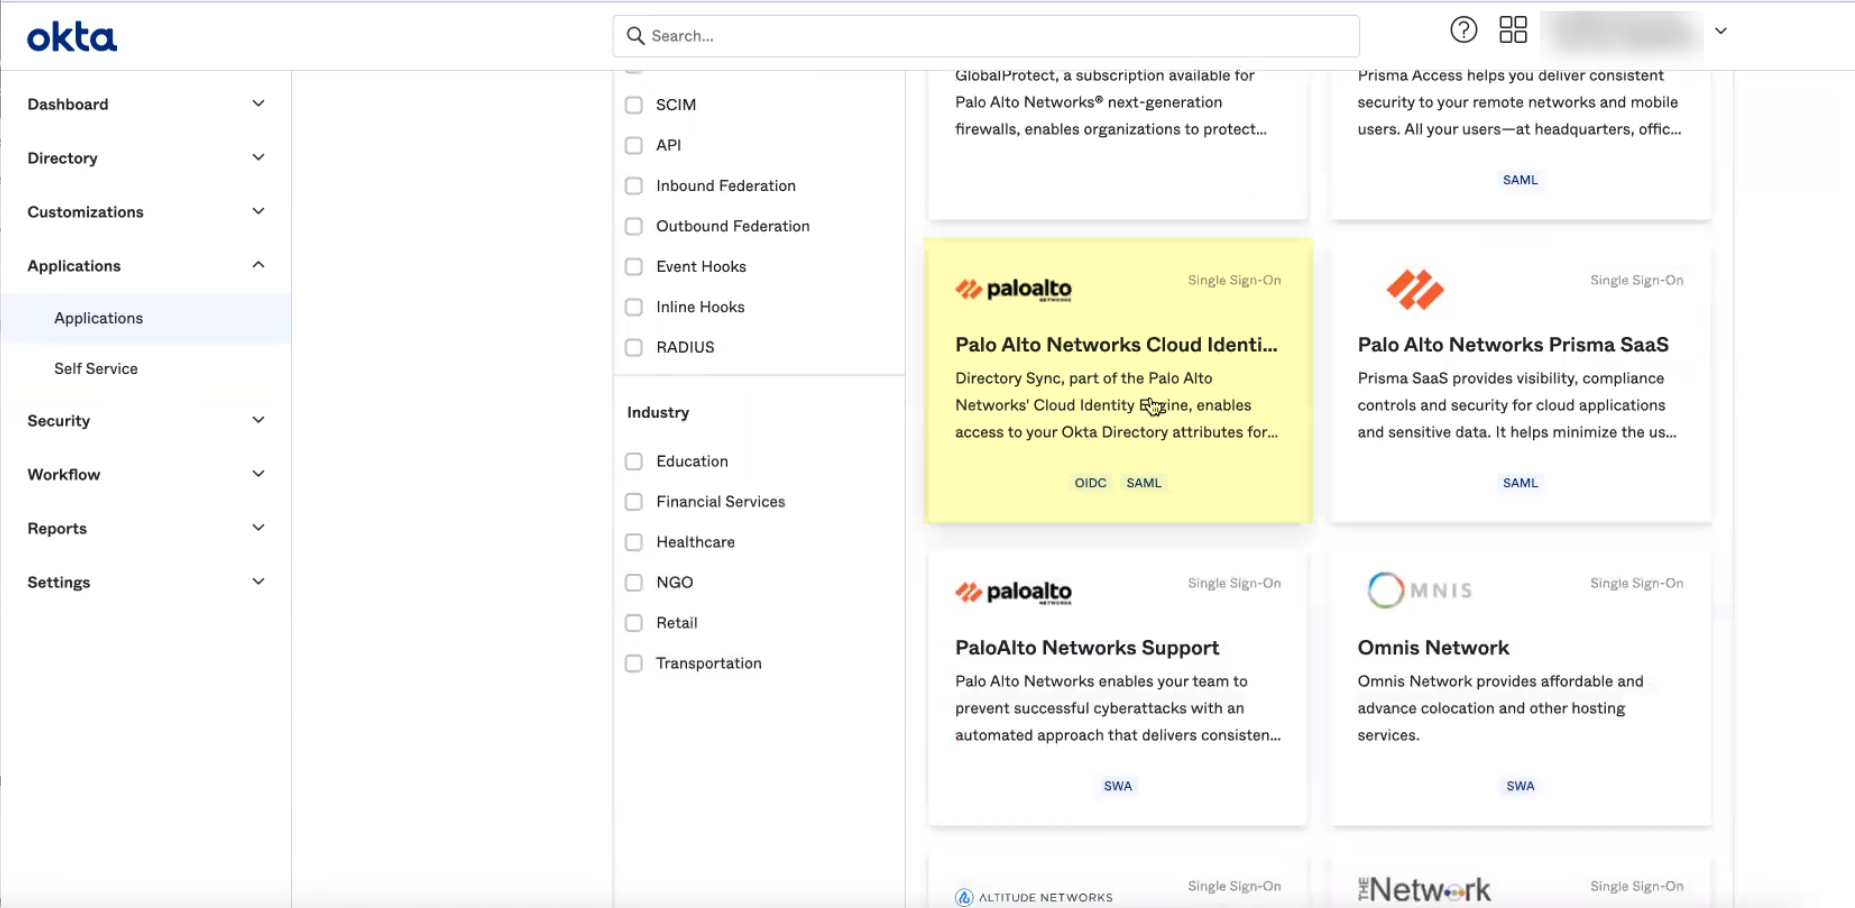
- Click Browse App Catalog .

- Search for and select Palo Alto Networks Cloud Identity Engine .
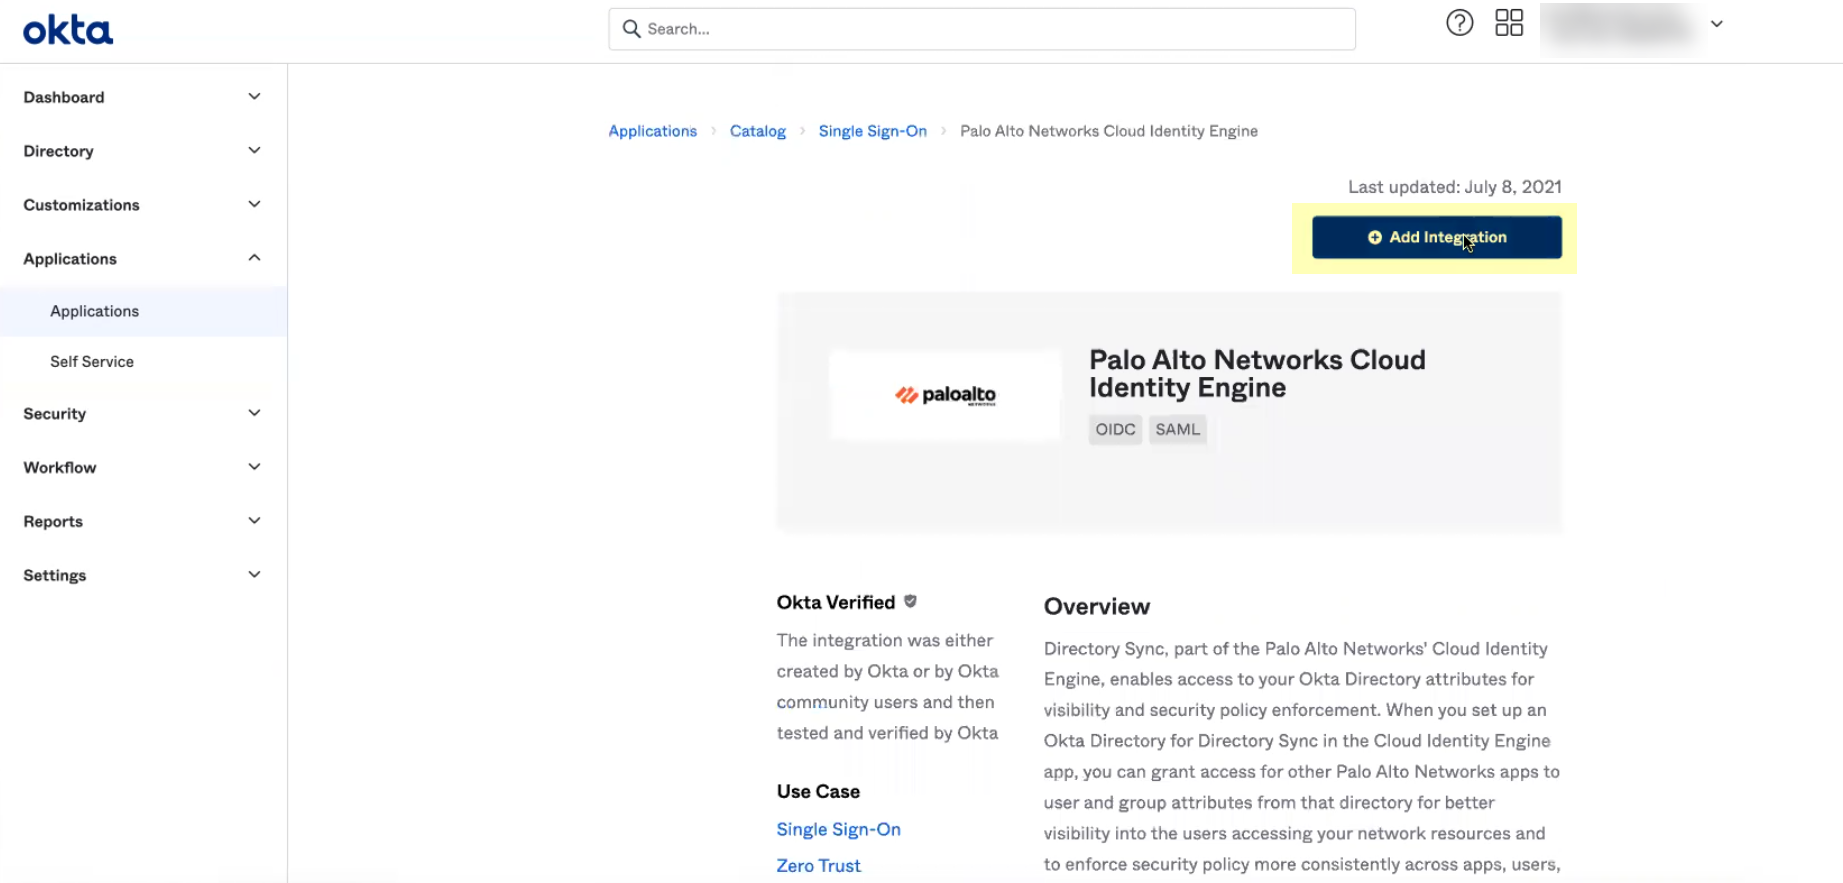
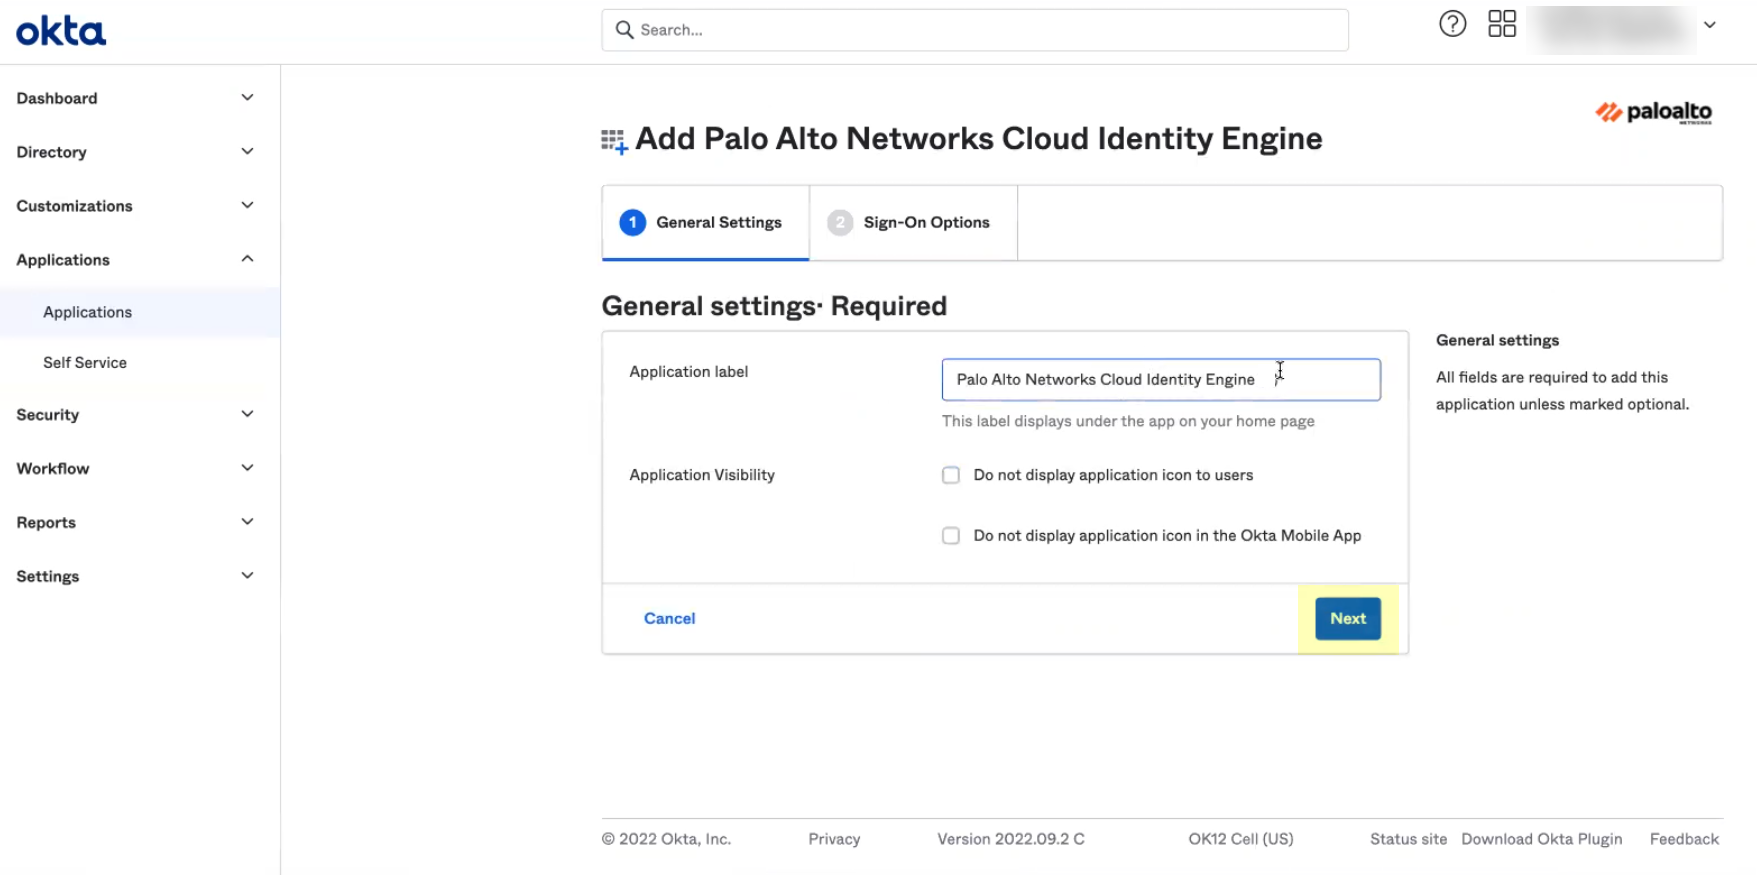
- Click Add Integration .
- Optionally edit the application name then click Next .
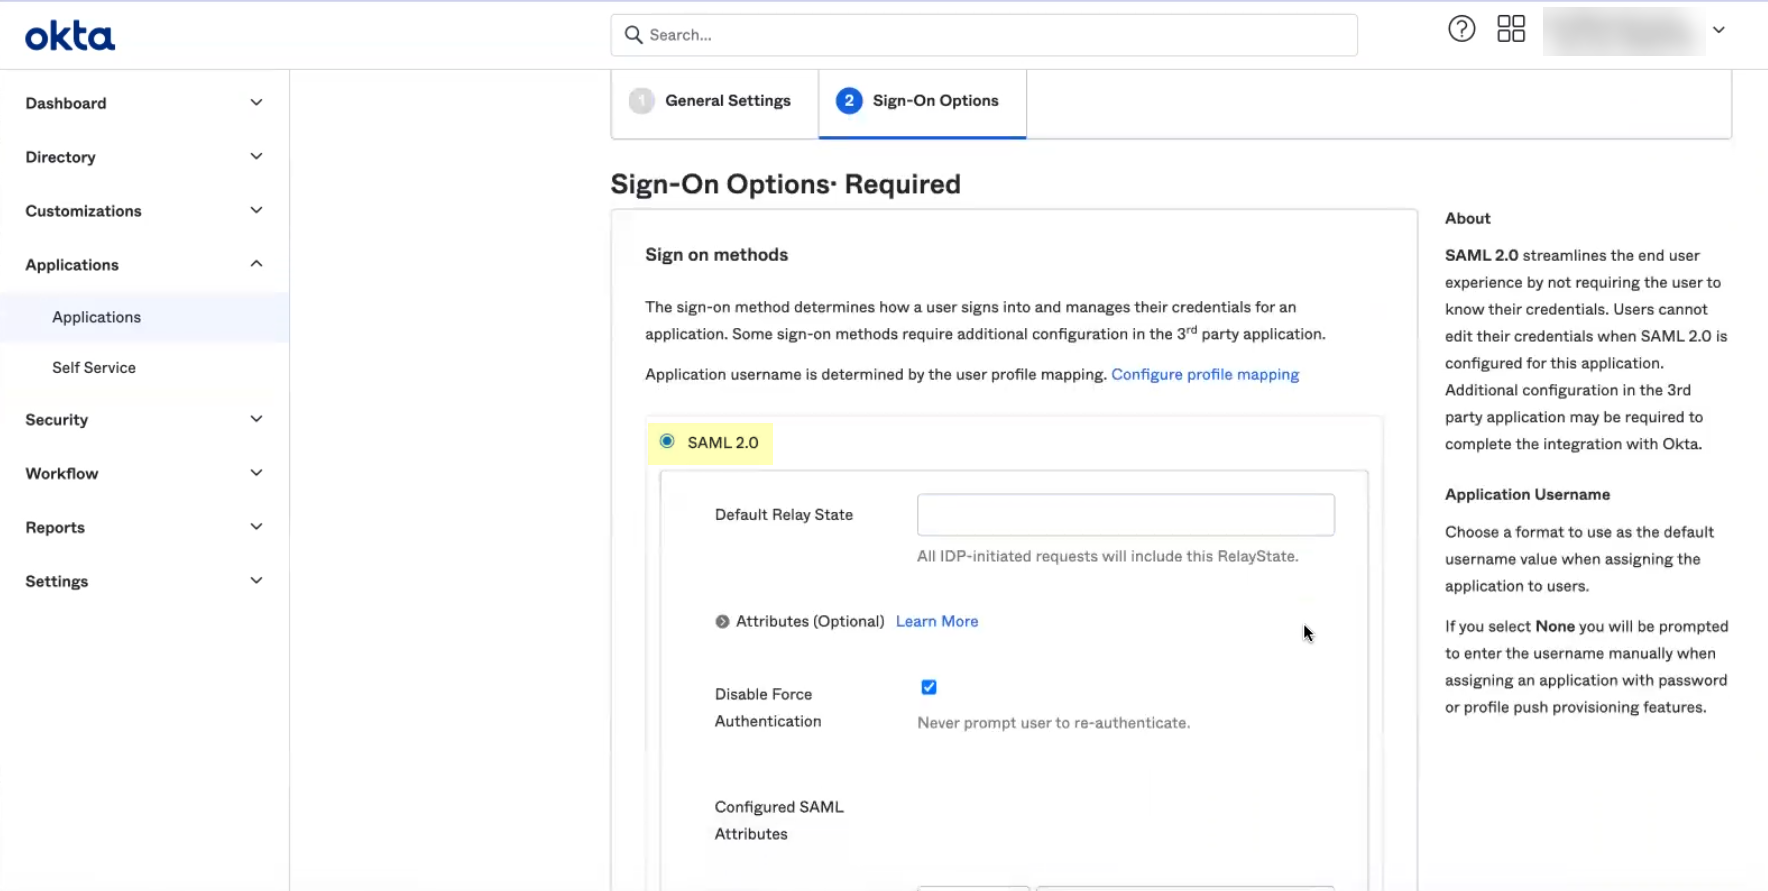
- Verify that SAML 2.0 is the sign-on option type.
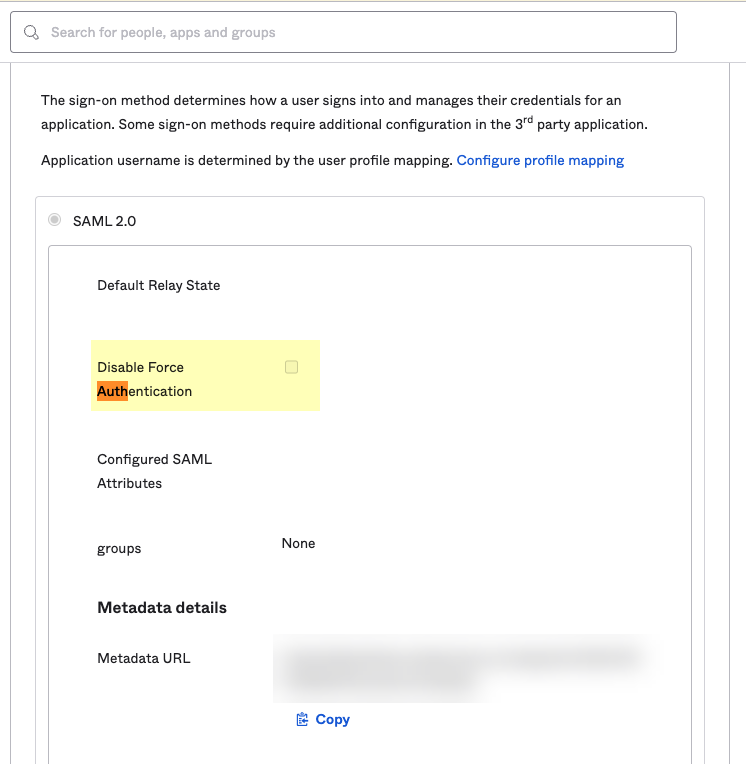
- If you enabled Force Authentication in step
6
, select Applications , select the app you created, select Sign-On , Edit the Settings , and uncheck Disable Force Authentication .
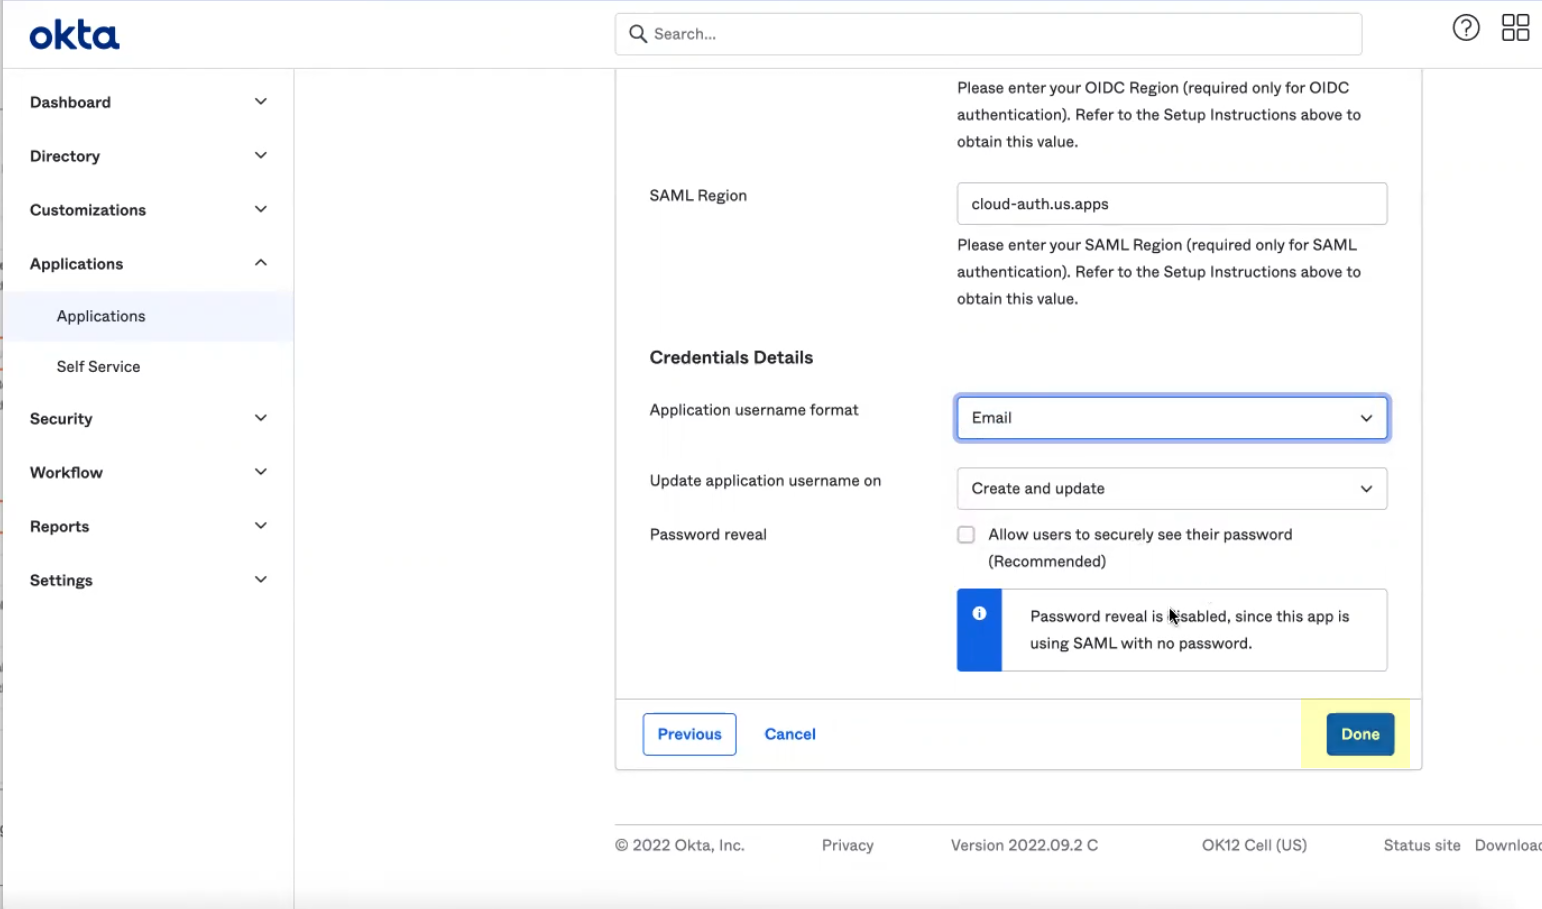
- Edit and paste the SAML Region .
The SAML Region is based on the Entity ID in the SP Metadata. To obtain the SAML Region, enter only the text between the backslash in the Entity ID and the paloaltonetworks.com domain. For example, if the Entity ID is https://cloud-auth.us.apps.paloaltonetworks.com/sp , the SAML Region is cloud- auth.us.apps .
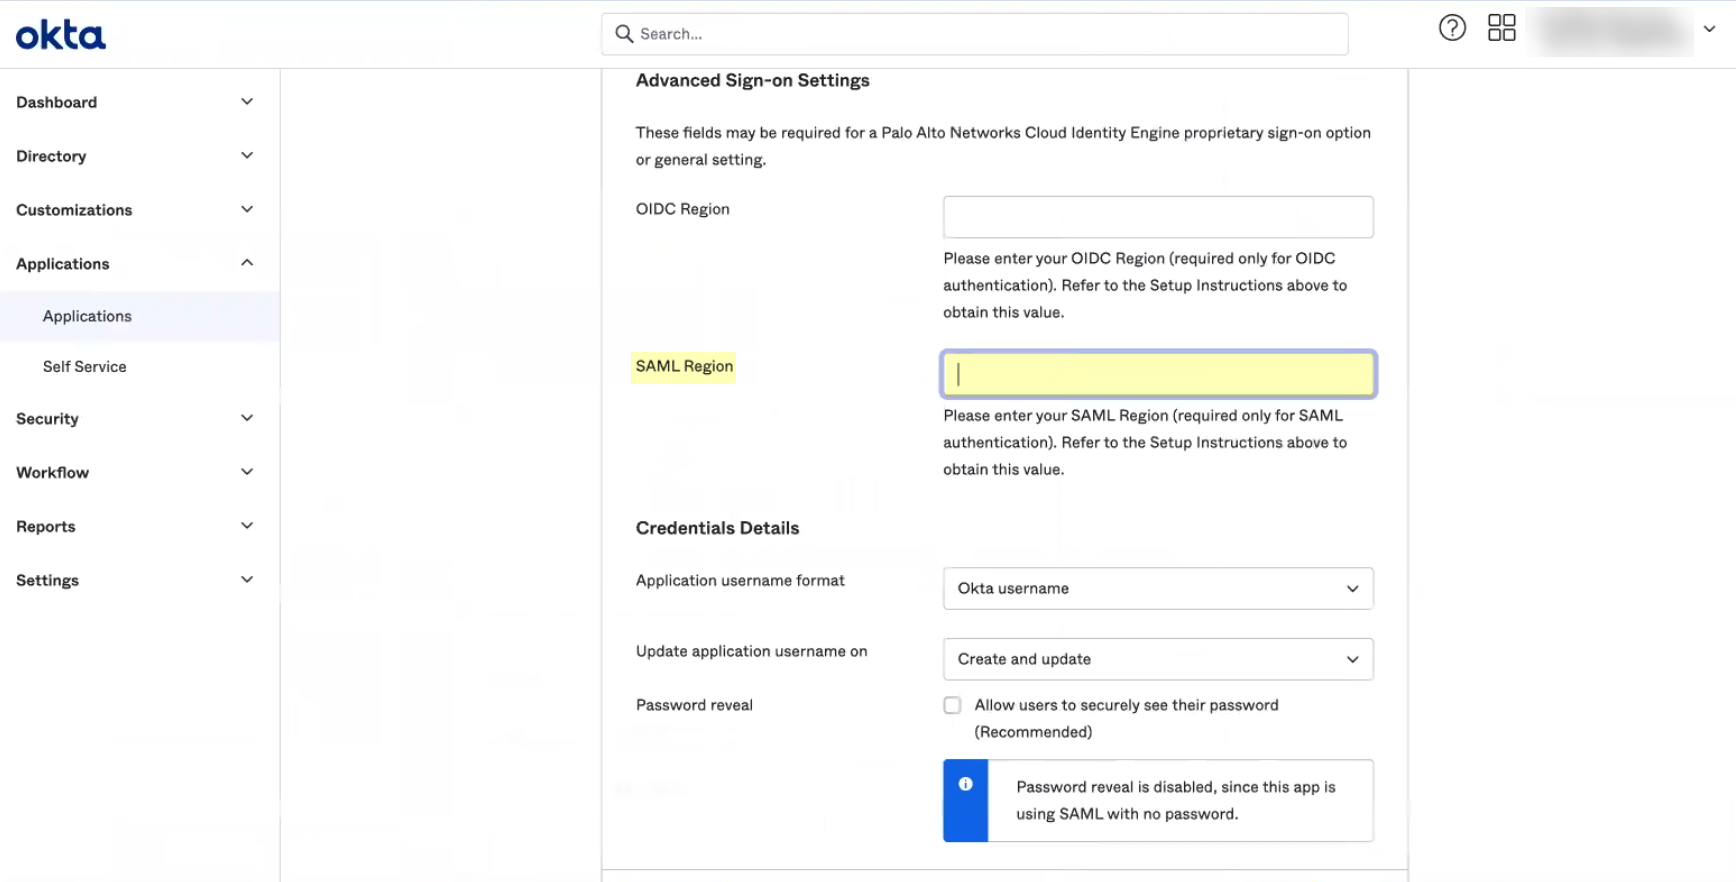
- Select the Application username format that you want to use to authenticate the user. For example, Email represents the UserPrincipalName (UPN) format.
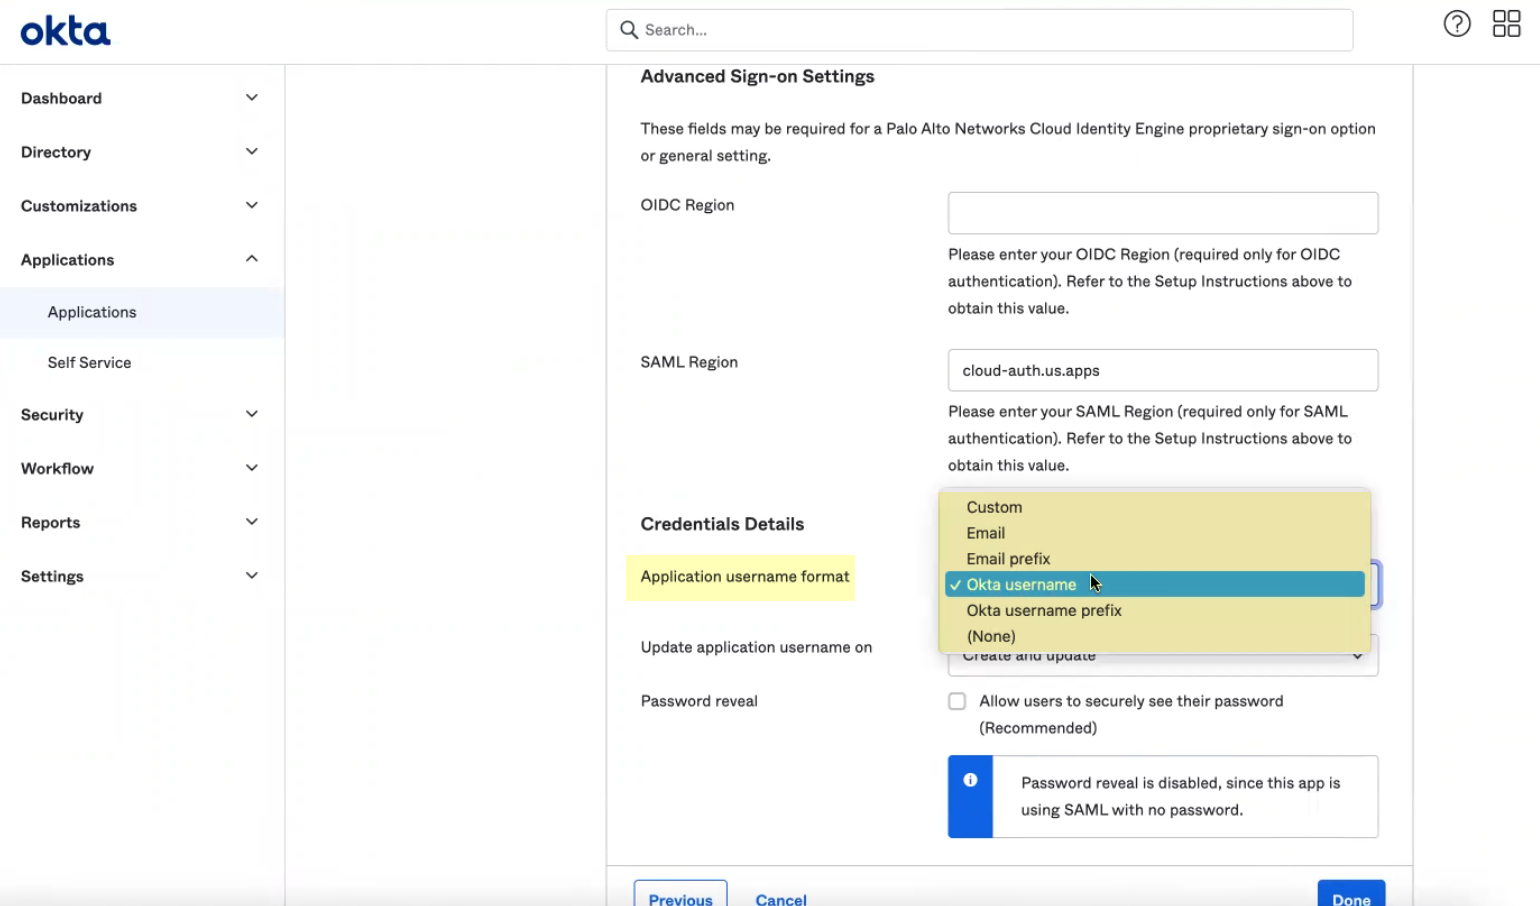
- Click Done .
- (Optional) If you want to configure other attributes in addition to the username, refer to the Okta documentation .
Integrate Okta as a Custom Application
Palo Alto Networks strongly recommends that you
Integrate Okta as a Gallery Application
. However, if you want to configure the Okta integration as a custom application, complete the following steps.
- Log in to the Okta Admin Console and select ApplicationsApplications .
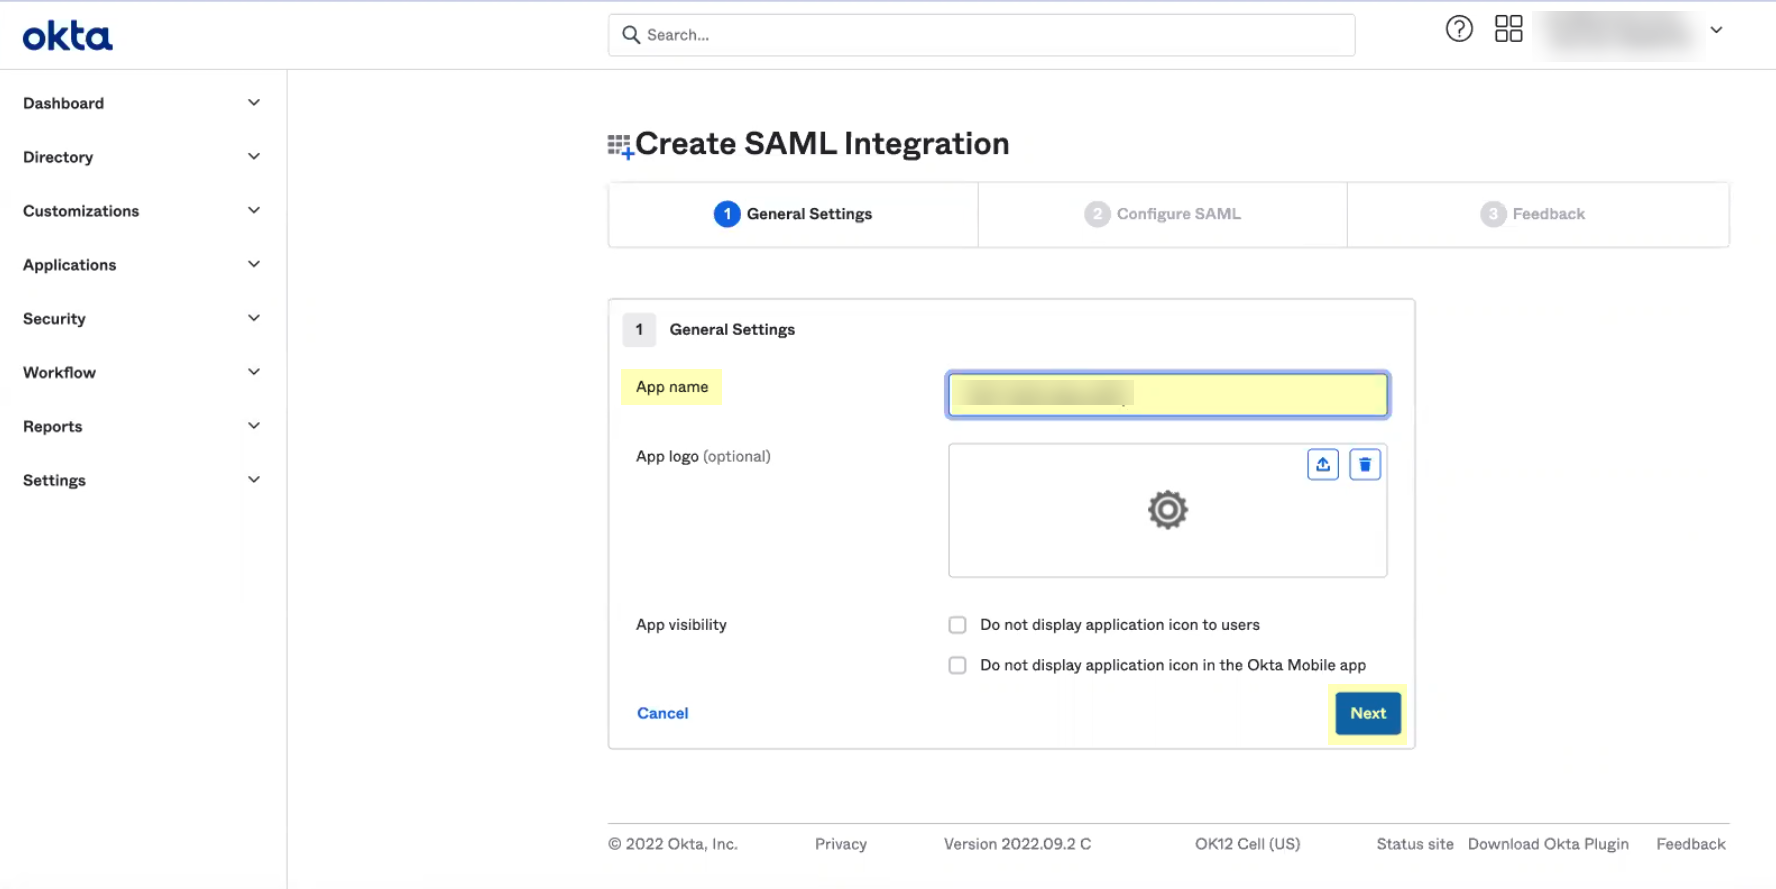
- Click Create App Integration .
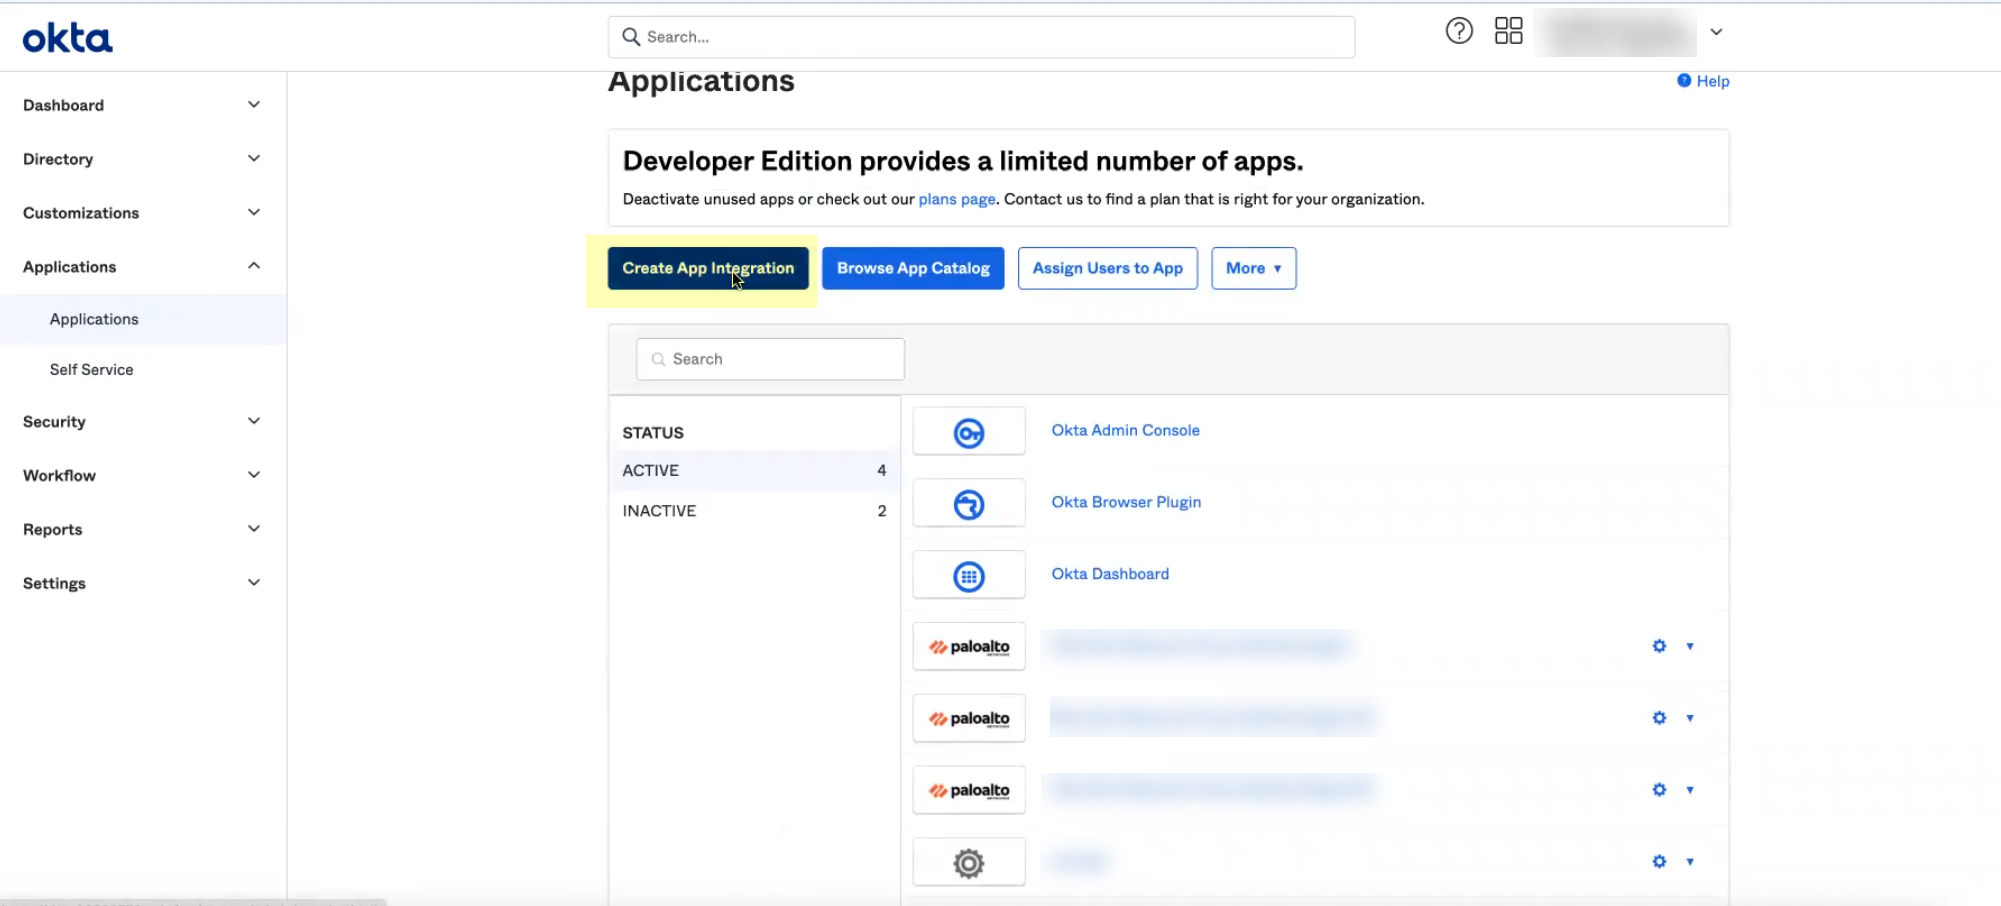
- Verify that SAML 2.0 is the sign-on method then click Next .
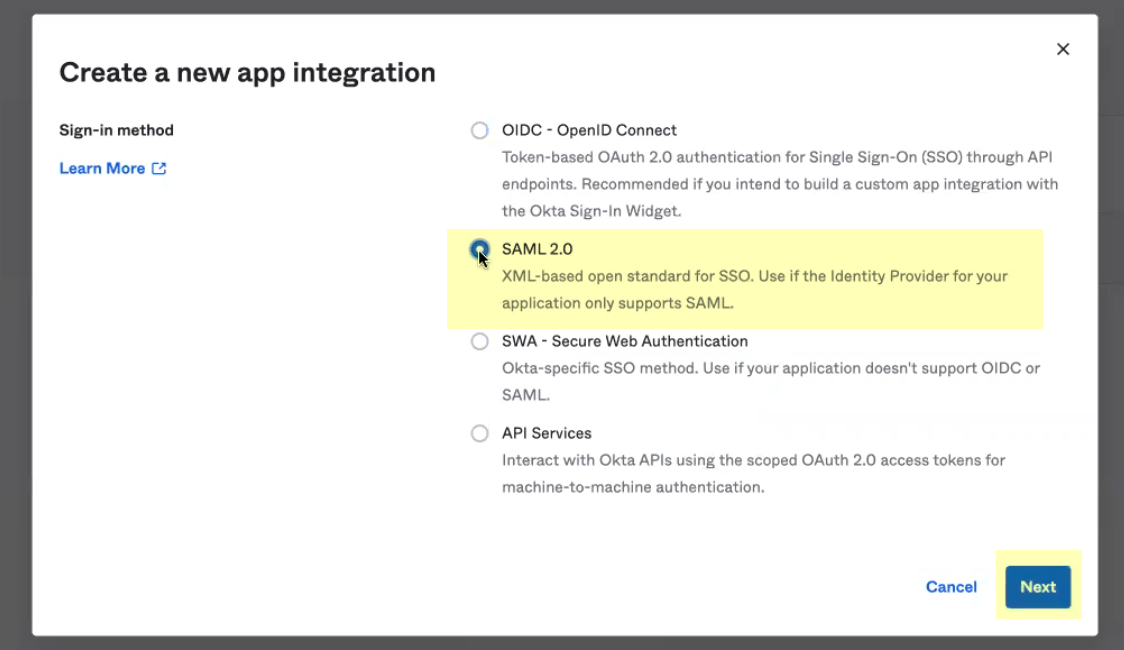
- Enter an App name then click Next .
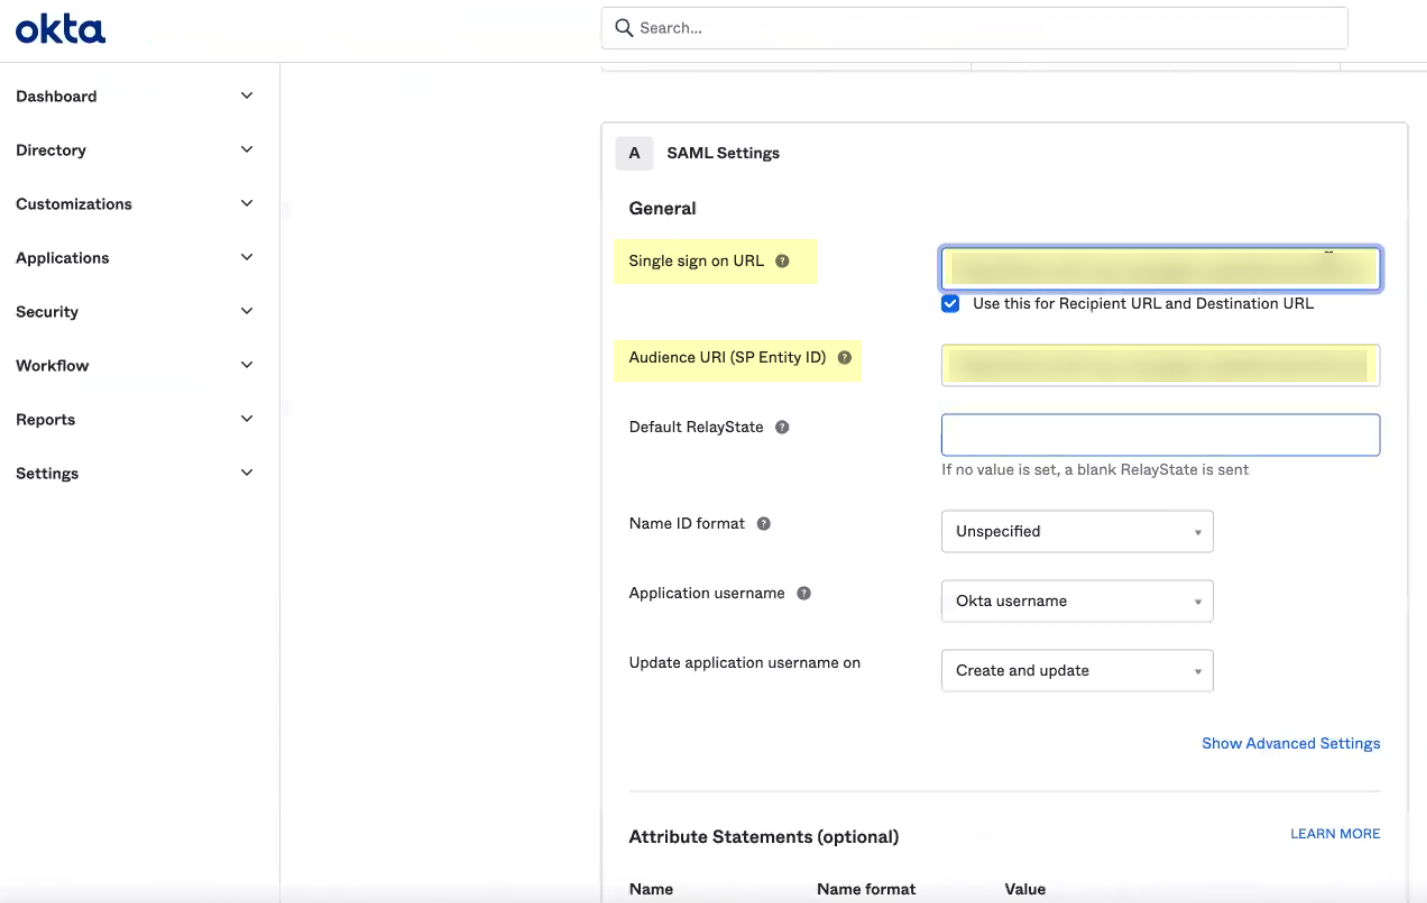
- Copy the SP Metadata information from the Cloud Identity Engine and enter it in the Okta Admin Console as described in the following table:
|
Copy from Cloud Identity Engine |
Enter in Okta Admin Console |
|
Copy the Entity ID from the SP Metadata page. |
Enter it as the Audience URI (SP Entity ID) . |
|
Copy the Assertion Consumer Service URL . |
Enter the URL as the Single sign on URL . |
-
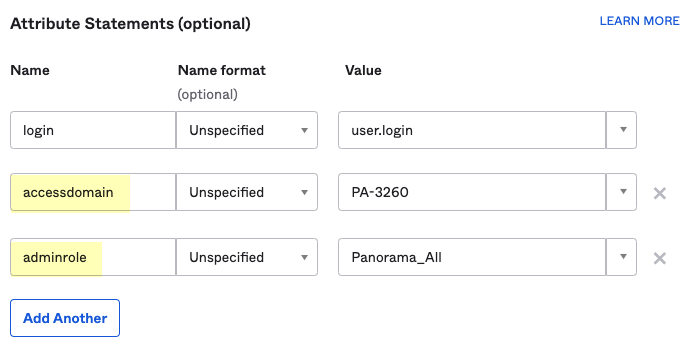
- ( Required for custom app ) Select a Value for the user attributes ( Attribute Statements ( optional) ) and optionally enter a Filter for the group attributes ( Group Attribute Statements (optional) ) to specify the attribute formats.
You must configure at least one SAML attribute that contains identification information for the user (usually the username attribute) for the attributes to display in the Cloud Identity Engine. To configure administrator access, you must also enter values for the accessdomain attribute and for the adminrole attribute that match the values on the firewall.
- Click Next , specify whether you're a customer or partner, then click Finish .
- Click Add Rule to define a Sign On Policy that specifies which users and groups must authenticate with the Okta IdP using the Cloud Identity Engine.
- Select Assignments and Assign the users and groups that you require to authenticate using the Cloud Identity Engine. Save and Go Back to assign more users or groups.
Be sure to assign the account you're using so you can test the configuration when it's complete. You may need to refresh the page after adding accounts to successfully complete the test.
- Select Sign On and View Setup Instructions .
- Select the SAML attributes you want the firewall to use for authentication.
Configure PingOne as an IdP in the Cloud Identity Engine
Configure a profile to configure PingOne as an identity provider (IdP) in the Cloud Identity Engine. After you configure the IdP profile, Configure Cloud Identity Engine Authentication on the Firewall or Panorama .
- Enable the Cloud Identity Engine app in PingOne .
- If you have not already done so, activate the Cloud Identity Engine app.
- In the Cloud Identity Engine app, select AuthenticationSP MetadataDownload SP Metadata and Save the metadata in a secure location.
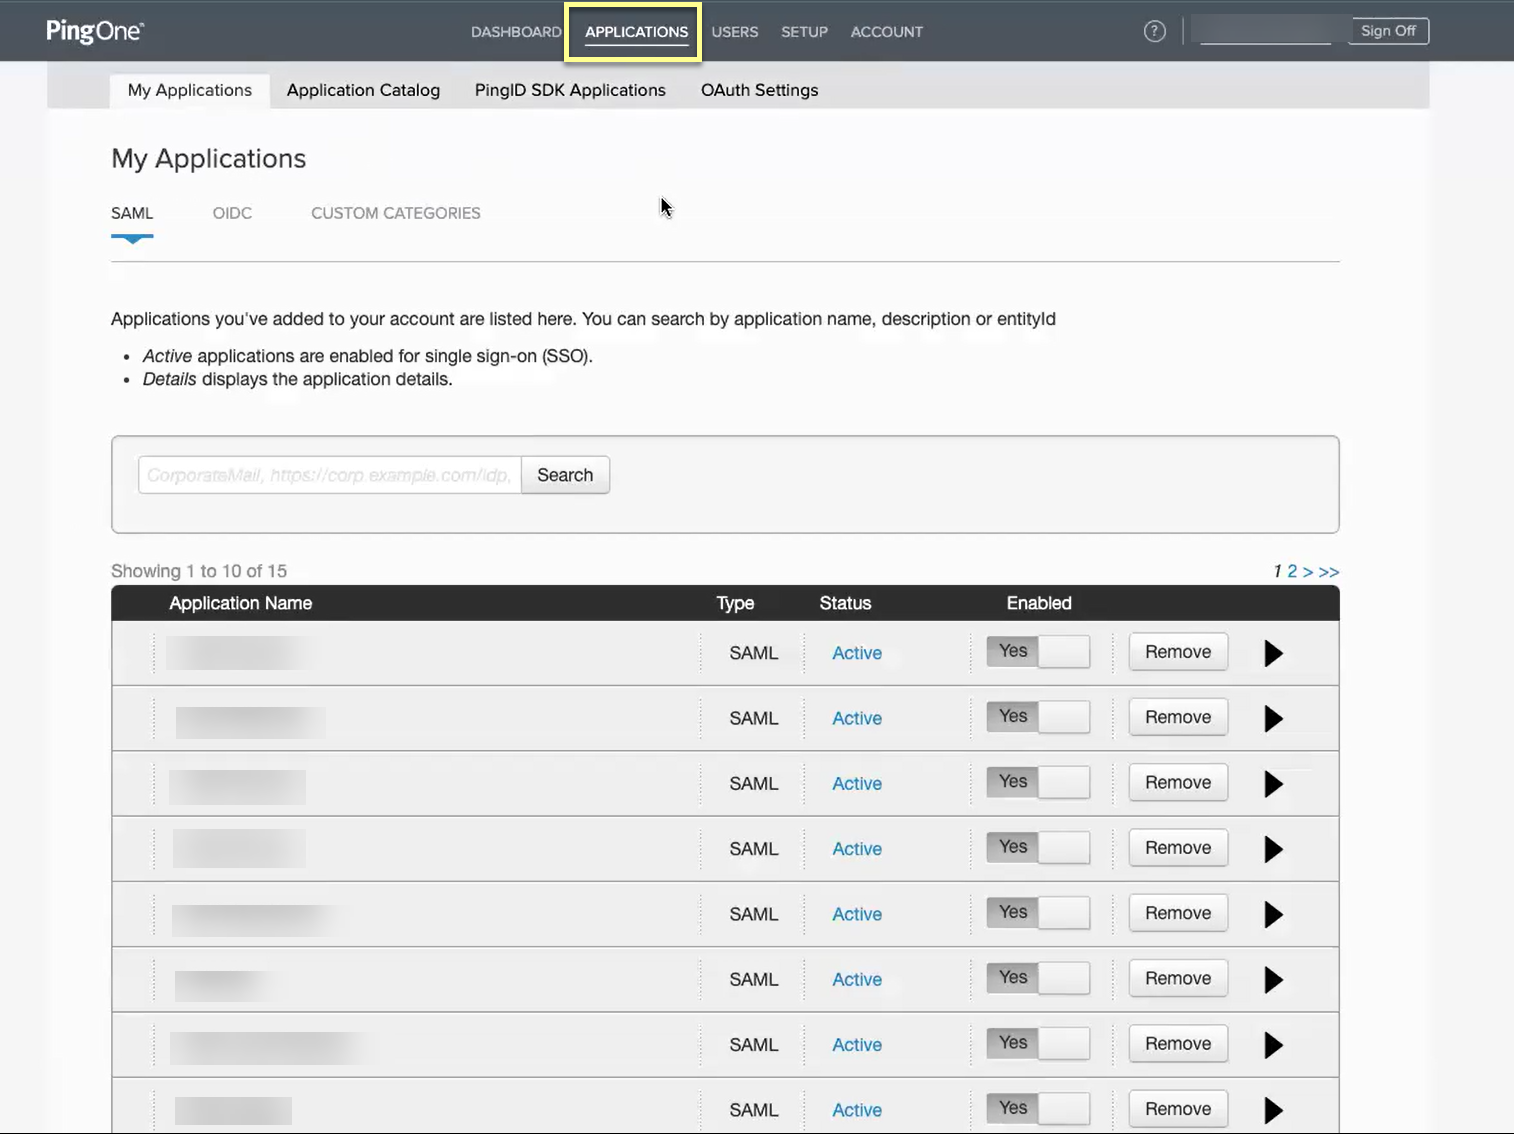
- Log in to PingOne and select ApplicationsMy ApplicationsAdd ApplicationNew SAML Application .
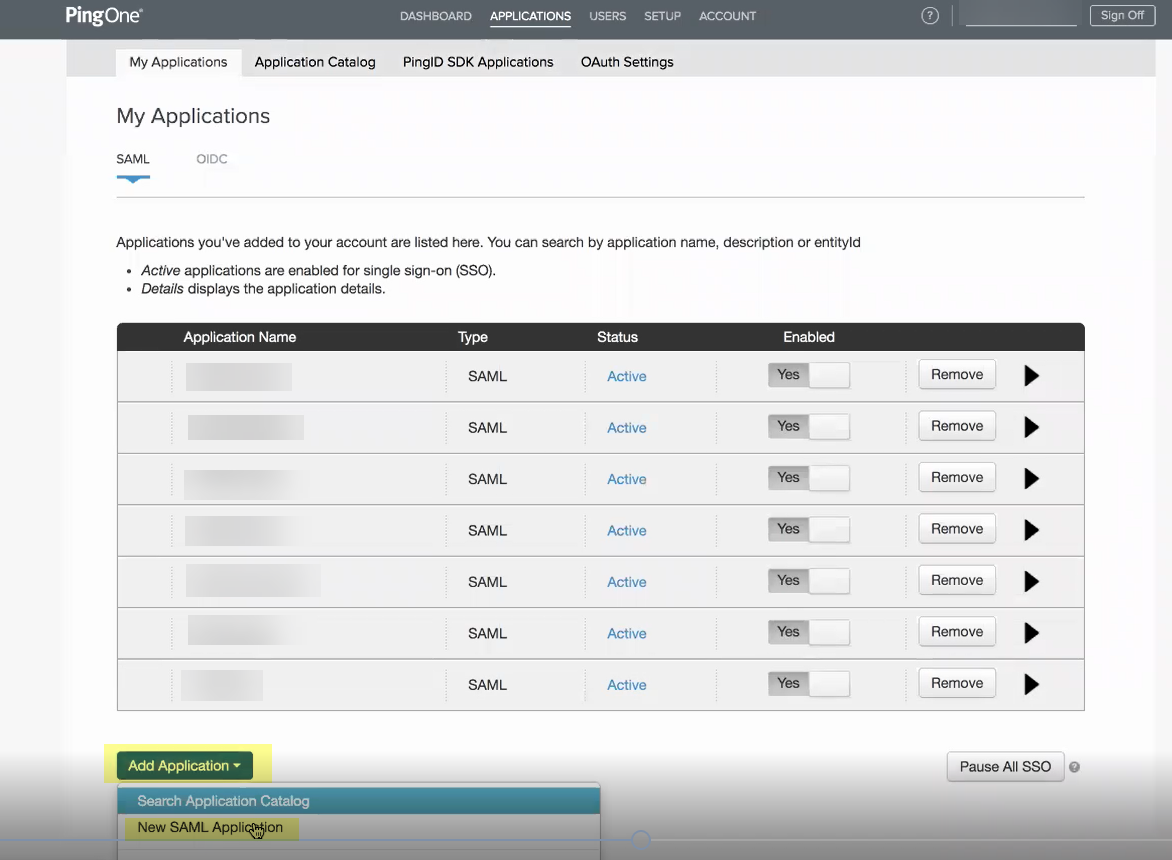
- Enter an Application Name , an Application Description , and select the Category then Continue to Next Step .
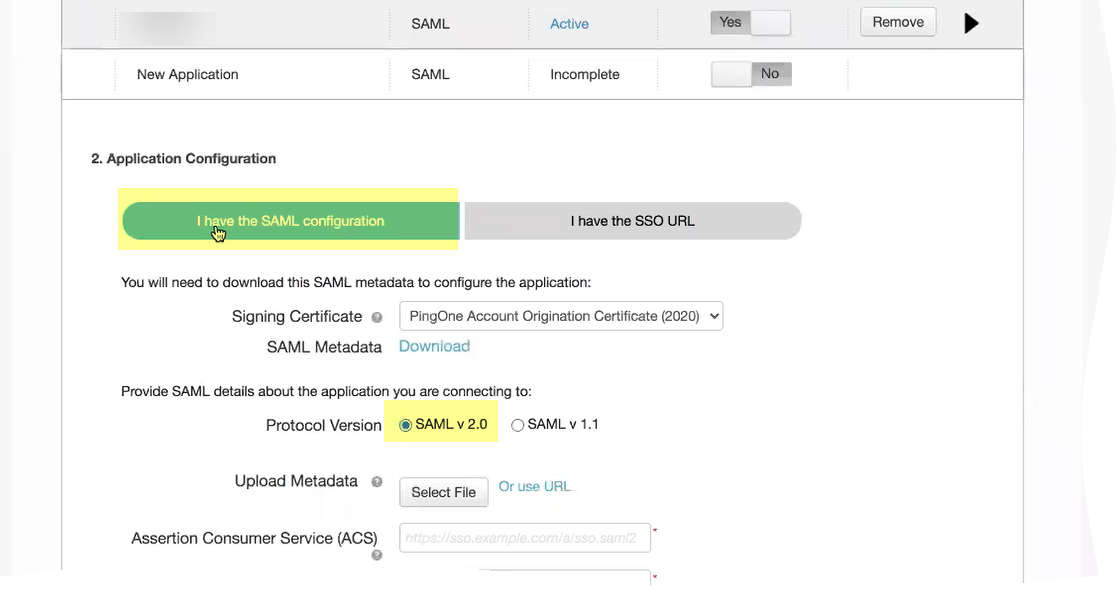
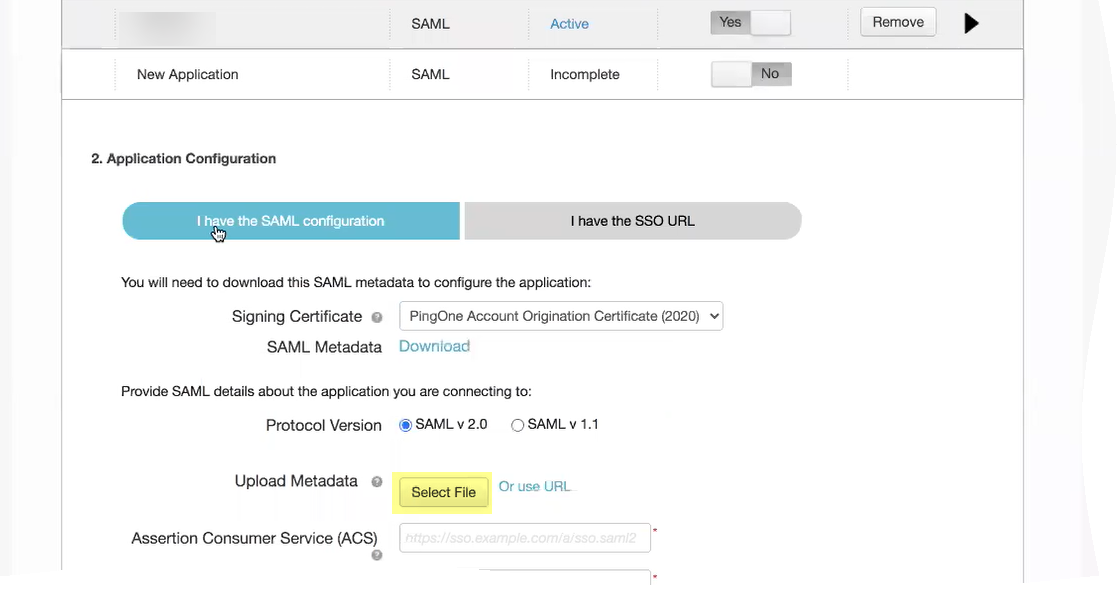
- Select I have the SAML configuration and ensure the Protocol Version is SAML v 2.0 .
- Click Select File to Upload Metadata
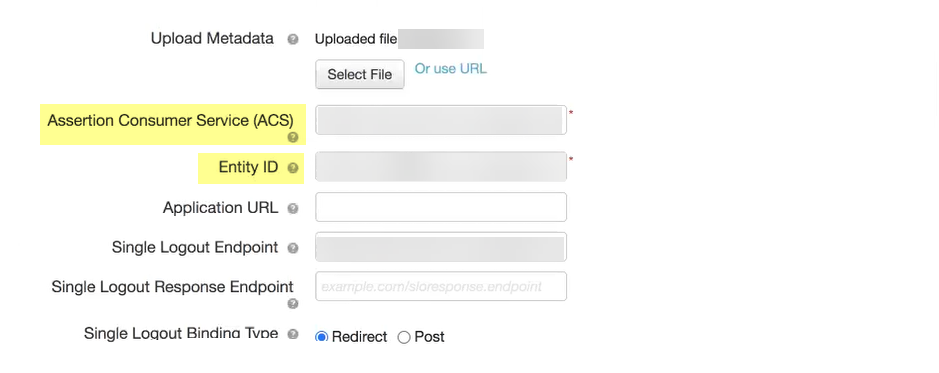
- Copy the metadata information from the Cloud Identity Engine and enter it in PingOne as described in the following table:
|
Copy from Cloud Identity Engine |
Enter in PingOne |
|
Copy the Entity ID from the SP Metadata page. |
Enter it as the Entity ID . |
|
Copy the Assertion Consumer Service URL . |
Enter the URL as the Assertion Consumer Service (ACS) . |
-
- Select either RSA_SHA384 or RSA_SHA256 as the Signing Algorithm .
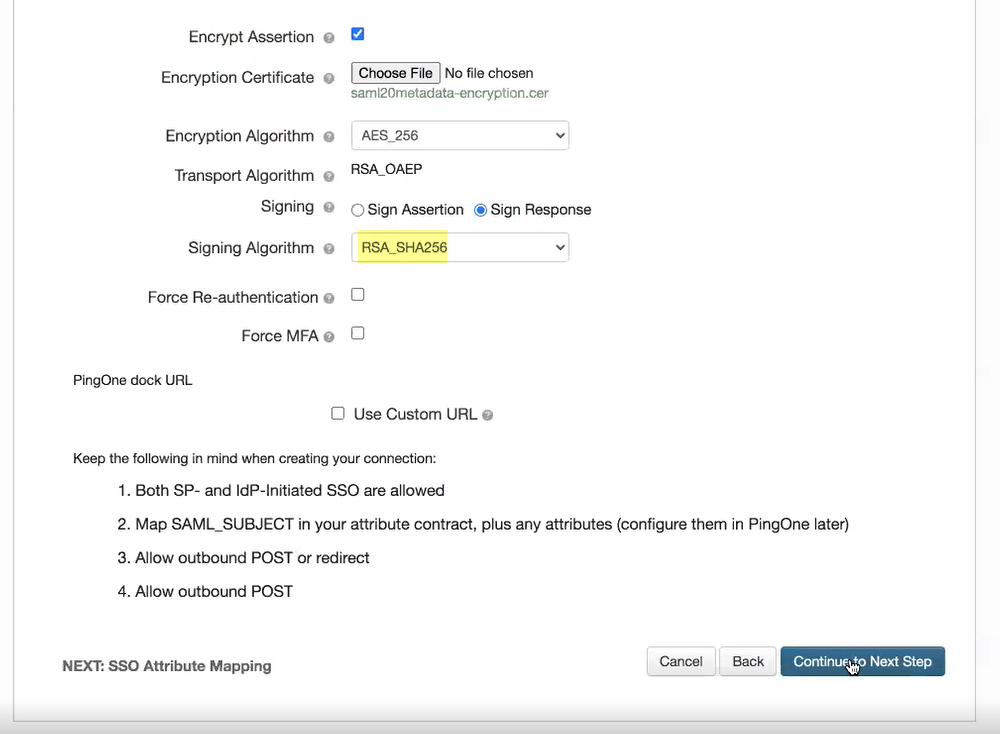
- If you want to require users to log in with their credentials to reconnect to GlobalProtect, select Force Re-authentication .
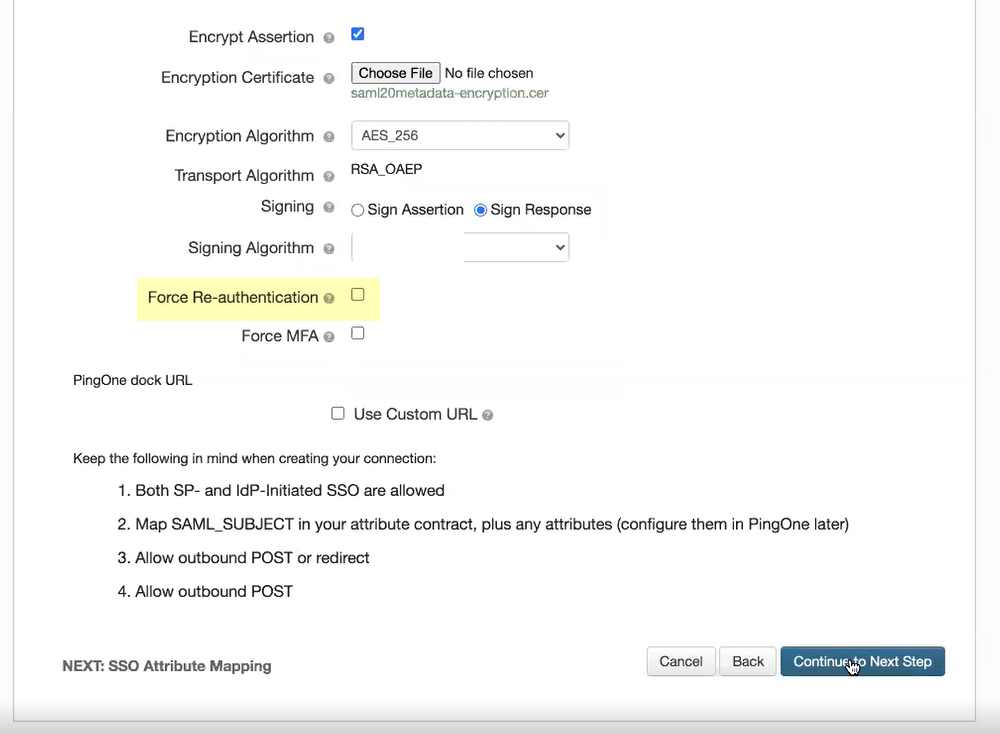
- (Required for MFA) If you want to require multi-factor authentication for your users, select Force MFA .
- Click Continue to Next Step to specify the attributes for the users you want to authenticate using PingOne .
- Specify the Application Attribute and the associated Identity Bridge Attribute or Literal Value for your user then select Required .
Be sure to assign the account you're using so you can test the configuration when it's complete. You may need to refresh the page after adding accounts to successfully complete the test.

- Click Add new attribute as needed to include additional attributes then Continue to next step to specify the group attributes.
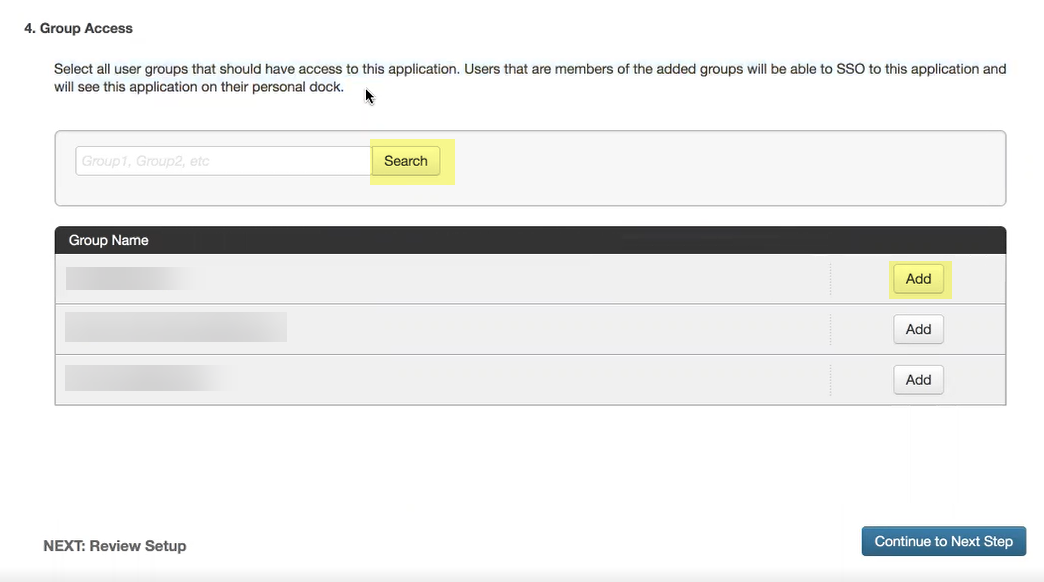
- Add the groups you want to authenticate using PingOne or Search for the groups you want to add then Continue to next step to review your configuration.
- Add PingOne as an authentication type in the Cloud Identity Engine app.
- Select Authentication Types and click Add New Authentication Type .
- Set Up a SAML 2.0 authentication type.
- Enter a Profile Name .
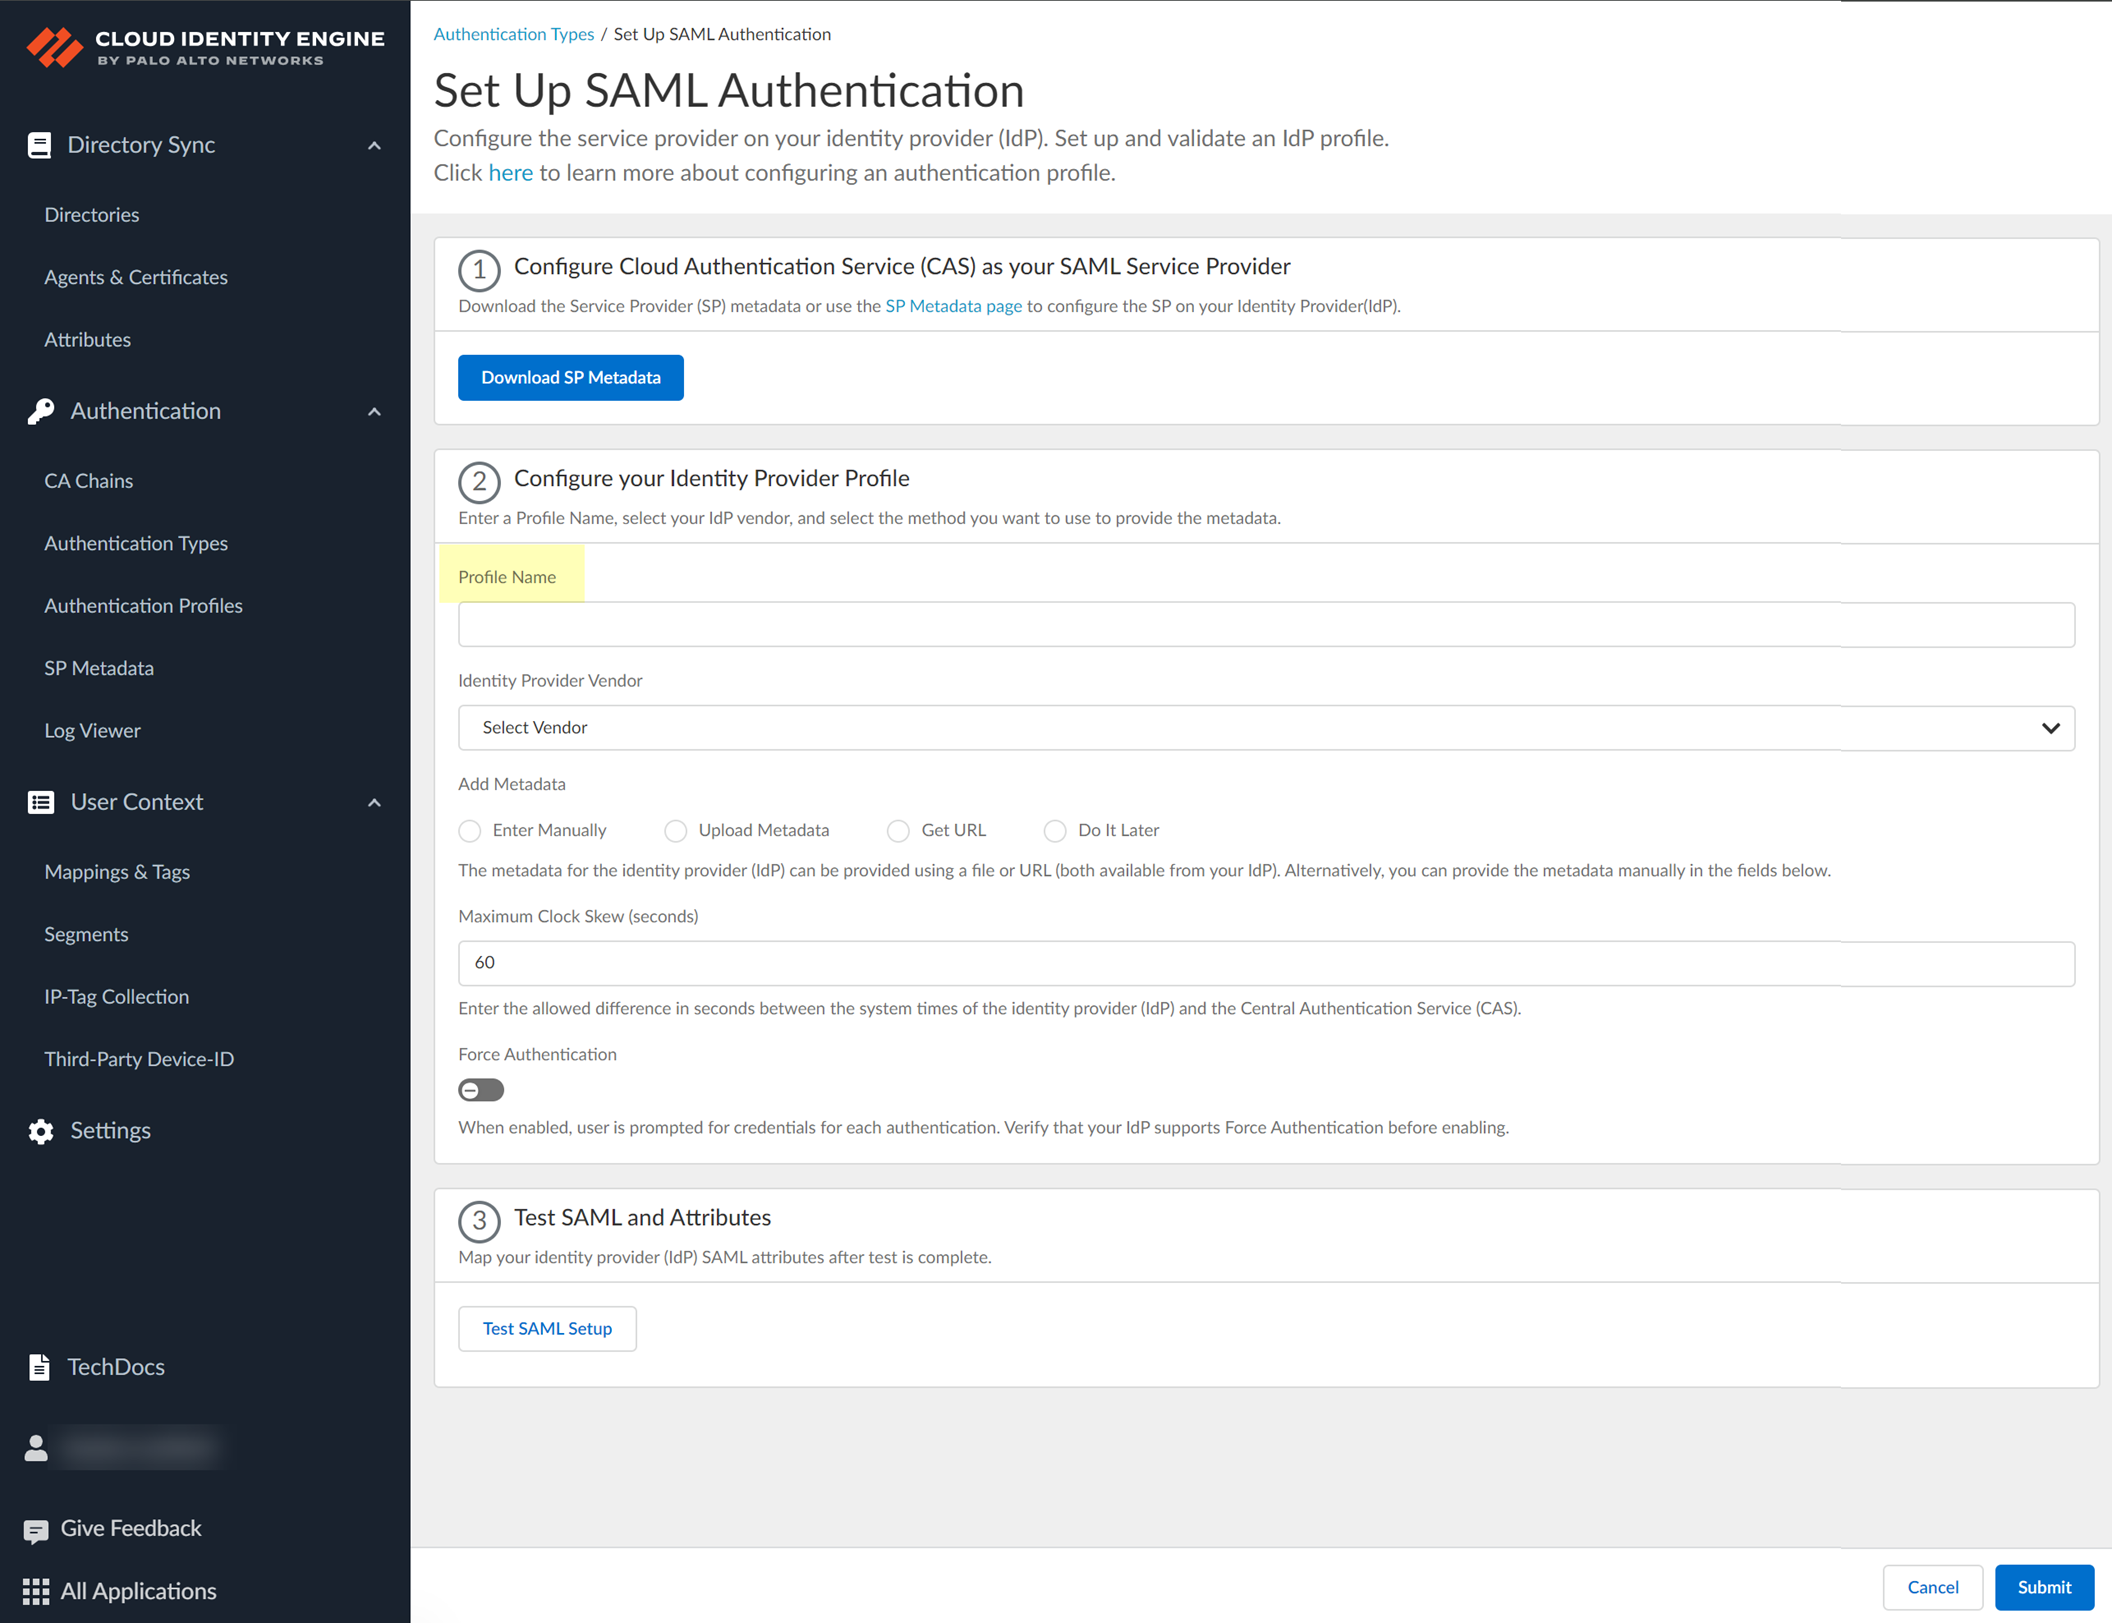
- Select PingOne as your Identity Provider Vendor .
- Select the method you want to use to Add Metadata and Submit the IdP profile.
- If you want to enter the information manually, copy the identity provider ID and SSO URL, download the certificate, then enter the information in the Cloud Identity Engine IdP profile.
- In PingOne , select ApplicationsMy Applications then select the Cloud Identity Engine app.
- Copy the necessary information from PingOne and enter it in the IdP profile on the Cloud Identity Engine app as indicated in the following table:
|
Copy or Download from Okta Admin Console |
Enter in Cloud Identity Engine IdP Profile |
|
Copy the Issuer ID. |
Enter it as the Identity Provider ID . |
|
Download the Signing Certificate . |
Click to Upload the certificate from the Okta Admin Console. |
|
Copy the Initiate Single Sign-On (SSO) URL . |
Enter the URL as the Identity Provider SSO URL . |
-
- If you want to upload a metadata file, download the metadata file from your IdP management system.
- In PingOne , select ApplicationsMy Applications then select the Cloud Identity Engine app.
- Download the SAML Metadata .
- In the Cloud Identity Engine app, click Browse files to select the metadata file, then Open the metadata file.
- To use the Get URL method, copy the URL from your IdP and enter it in Cloud Identity Engine.
- Log in to Ping One using your administrator credentials.
- Select Applications then select the application you created in step
1.c
.
- Copy the SAML Metadata URL and save it in a secure location.
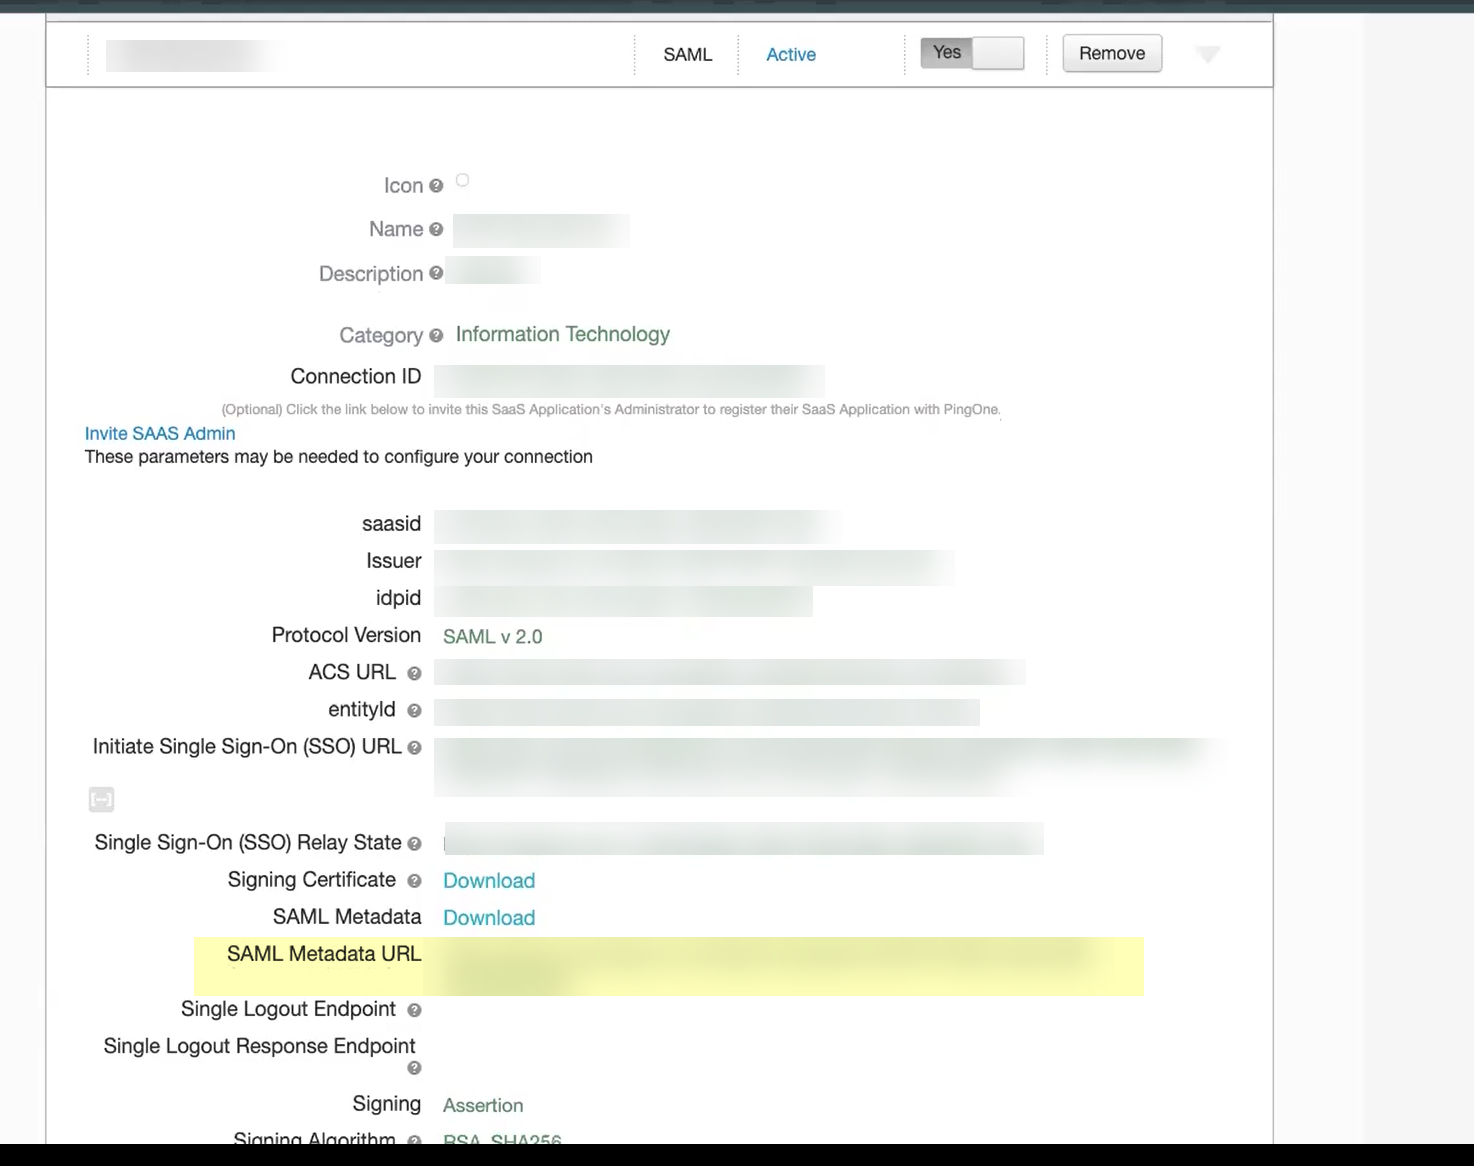
- In the Cloud Identity Engine, select Get URL and the Add Metadata method and paste the URL you copied in the previous step as the Identity Provider Metadata URL .
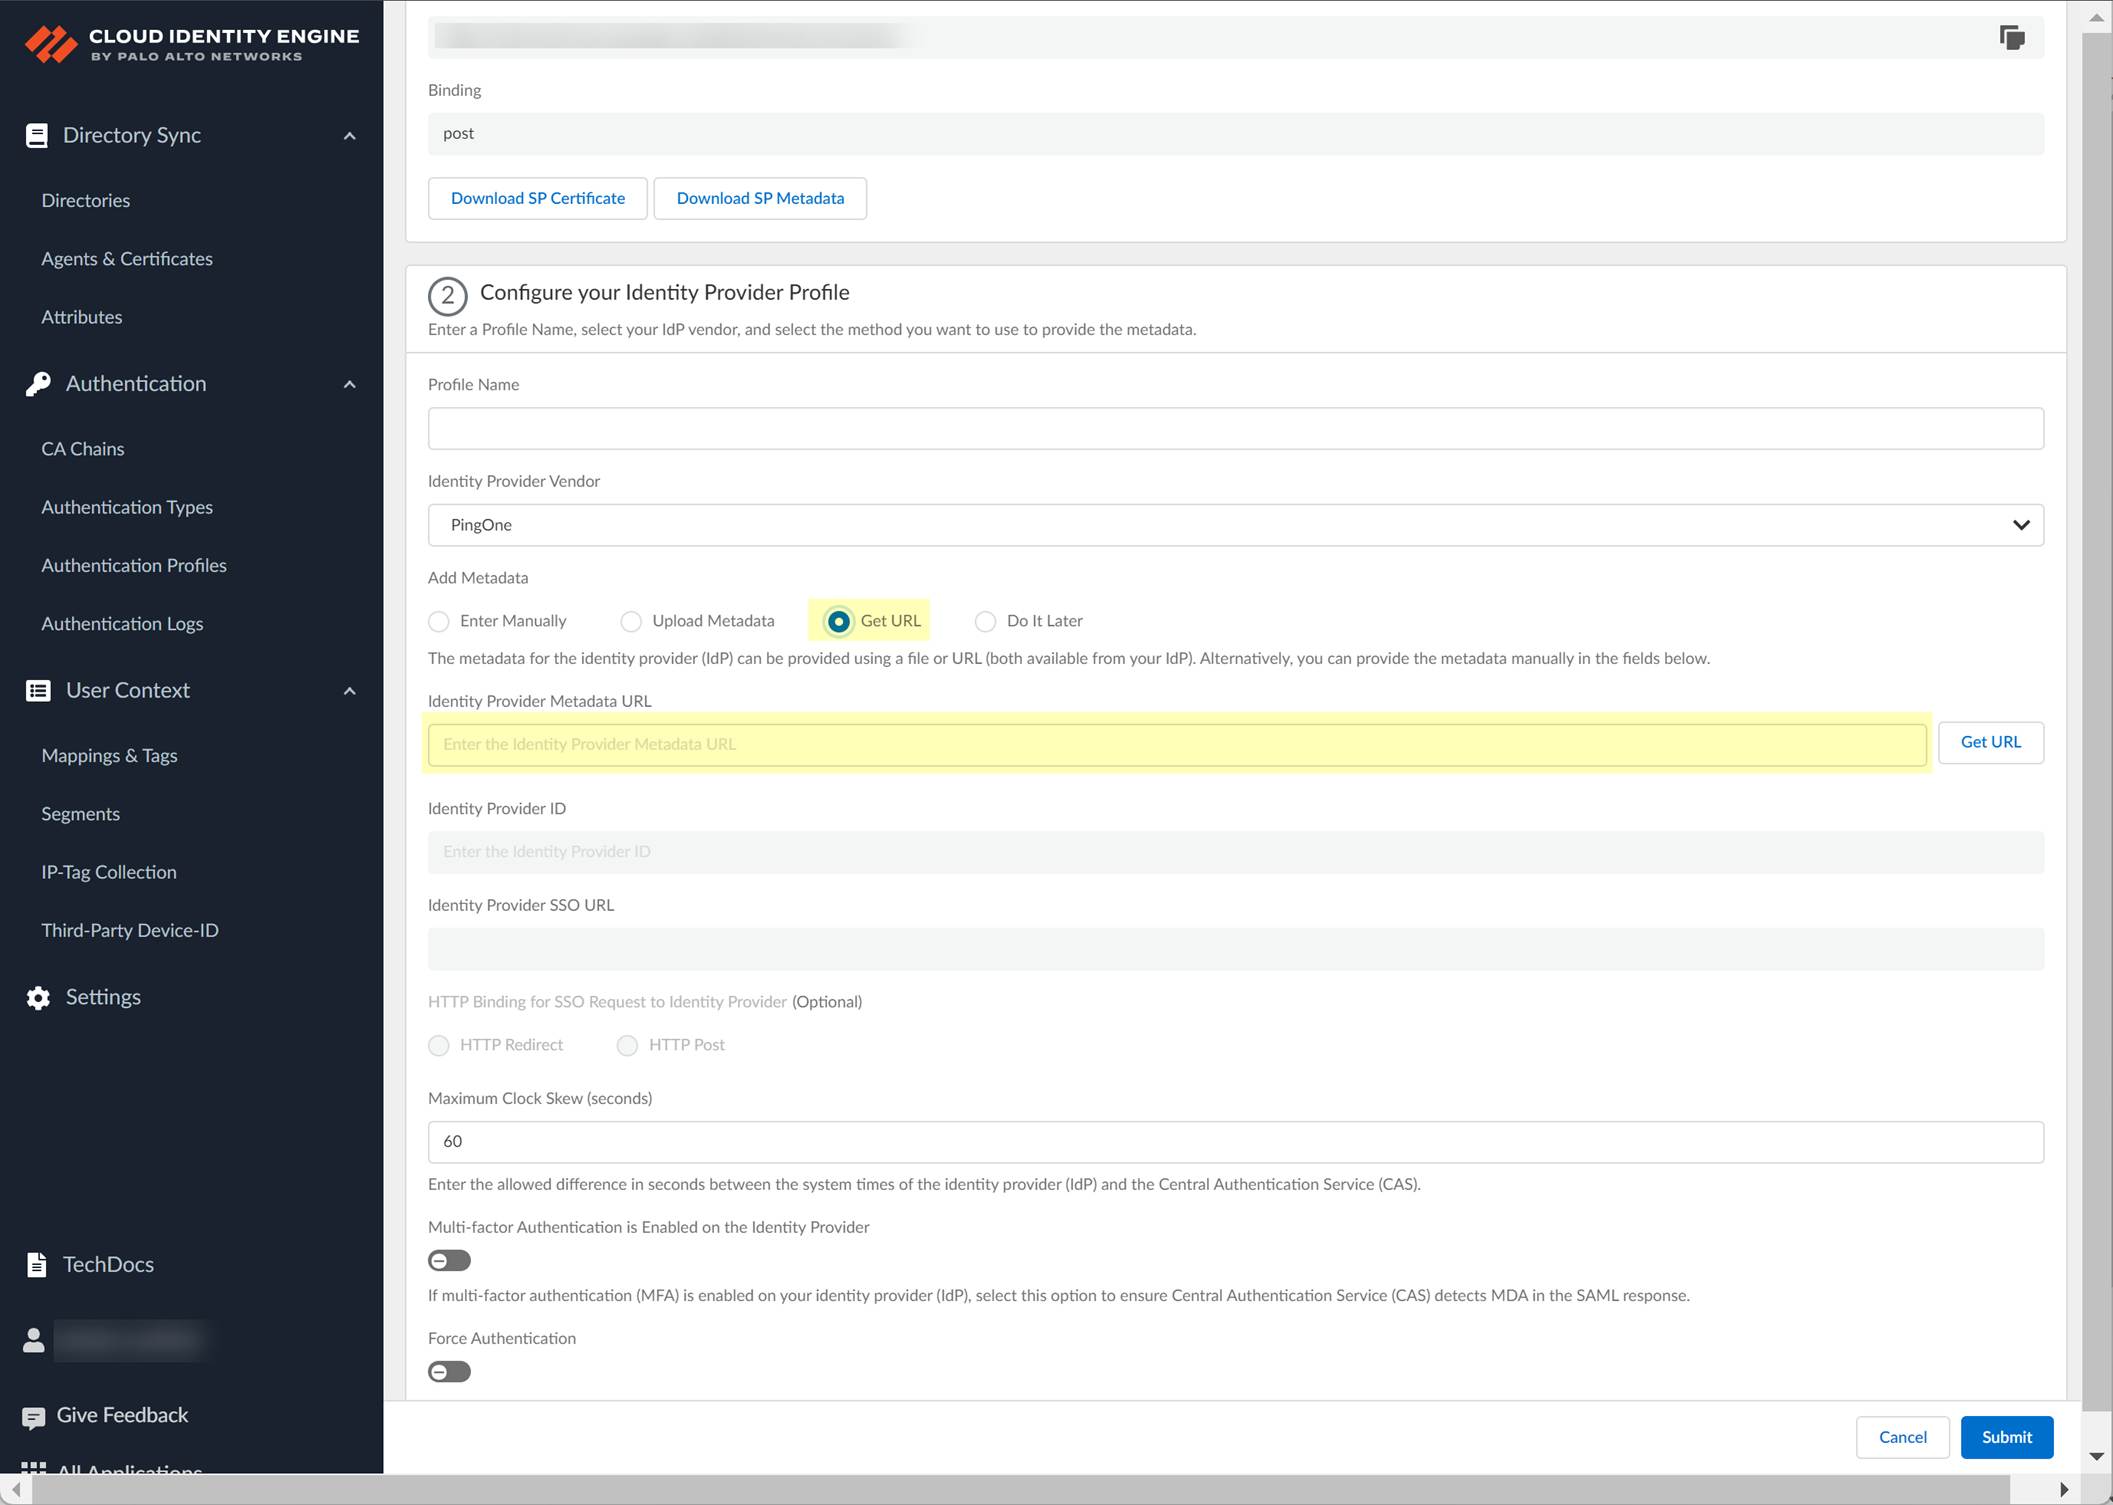
- Click Get URL to confirm the URL and populate the Identity Provider ID and Identity Provider SSO URL .
- If you don't want to enter the configuration information now, you can Do it later . This option allows you to submit the profile without including configuration information. However, you must edit the profile to include the configuration information to use the authentication type in an authentication profile.
- Select the HTTP Binding for SSO Request to IdP method you want to use for the SAML binding that allows the firewall and IdP to exchange request and response messages:
- HTTP Redirect —Transmit SAML messages through URL parameters.
- HTTP Post —Transmit SAML messages using base64-encoded HTML.
- Specify the Maximum Clock Skew (seconds) , which is the allowed difference in seconds between the system times of the IdP and the firewall at the moment when the firewall validates IdP messages (default is 60; range is 1–900). If the difference exceeds this value, authentication fails.
- If your IdP requires users to log in using multi-factor authentication (MFA), select Multi-factor Authentication is Enabled on the Identity Provider .
- If you enabled the Force Re-authentication option in step
1.9
, enable the Force Authentication option to require users to log in with their credentials to reconnect to GlobalProtect.
- Test SAML setup to verify the profile configuration.
This step is necessary to confirm that your firewall and IdP can communicate.
- Select the SAML attributes you want the firewall to use for authentication and Submit the IdP profile.
- In the Okta Admin Console, Edit the User Attributes & Claims .
- In the Cloud Identity Engine, select the Username Attribute and optionally, the Usergroup Attribute , Access Domain , User Domain , and Admin Role , then Submit your changes.
You must select the username attribute in the Okta Admin Console for the attribute to display in the Cloud Identity Engine.
Configure PingFederate as an IdP in the Cloud Identity Engine
- Prepare the metadata for the Cloud Identity Engine app in PingFederate.
- If you have not already done so, activate the Cloud Identity Engine app.
- In the Cloud Identity Engine app, select AuthenticationSP MetadataDownload SP Metadata and Save the metadata in a secure location.

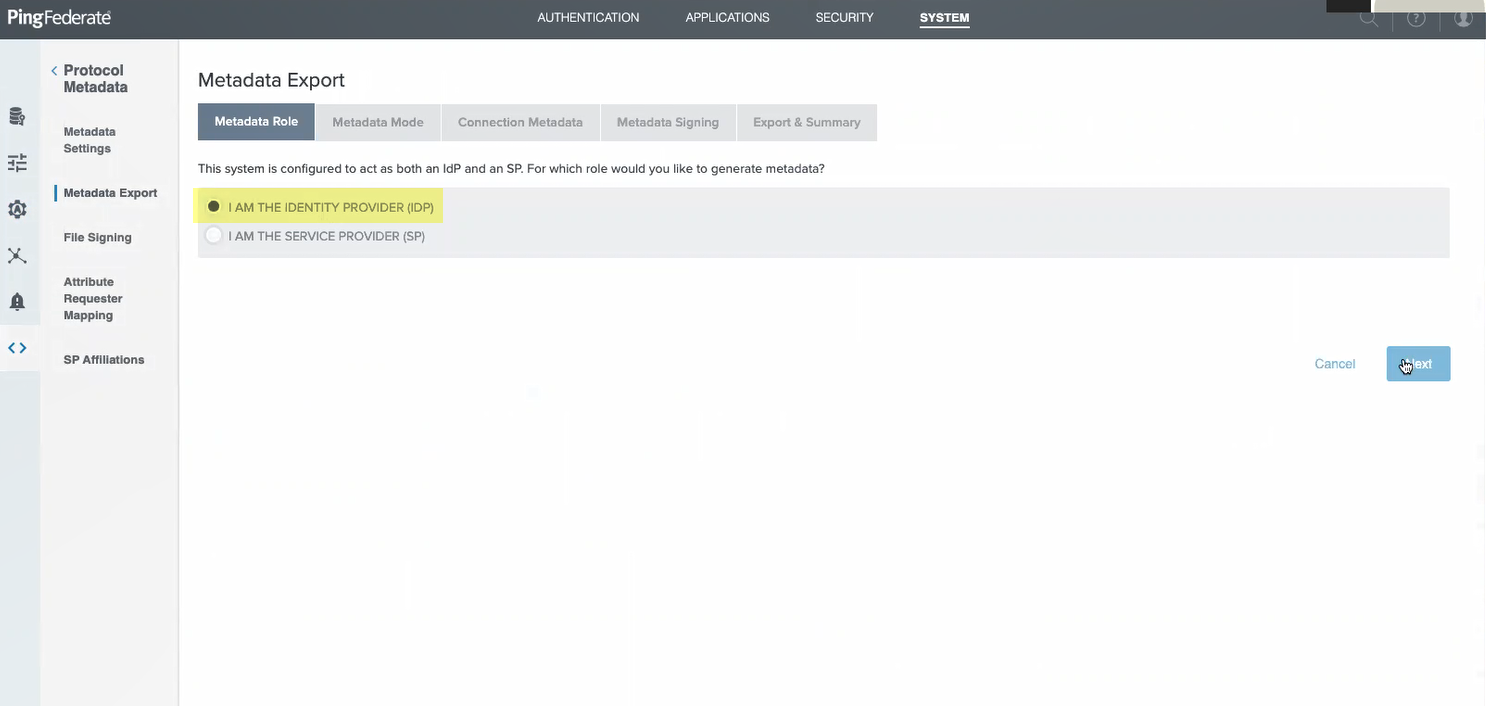
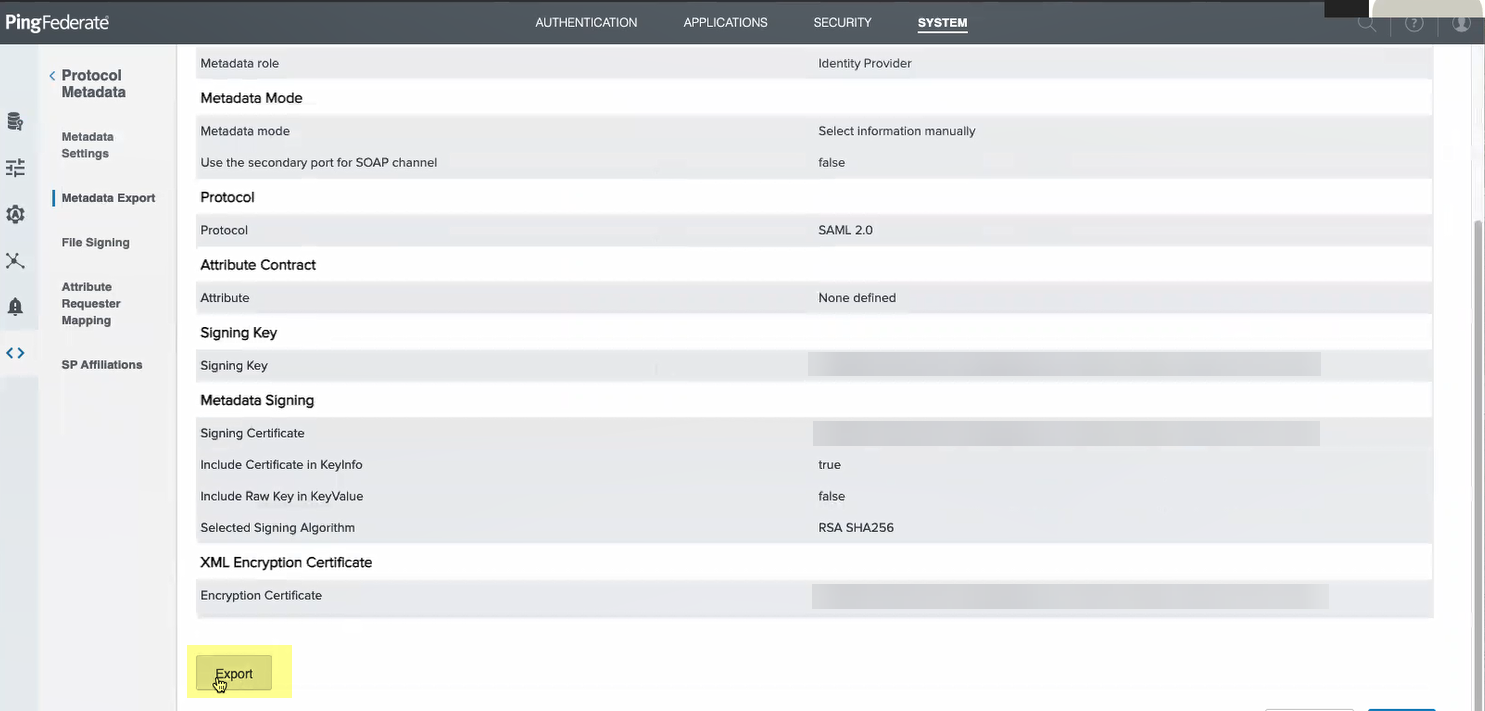
- Log in to PingFederate and select SystemSP AffiliationsProtocol MetadataMetadata Export .
- Select I am the Identity Provider (IdP) then click Next .
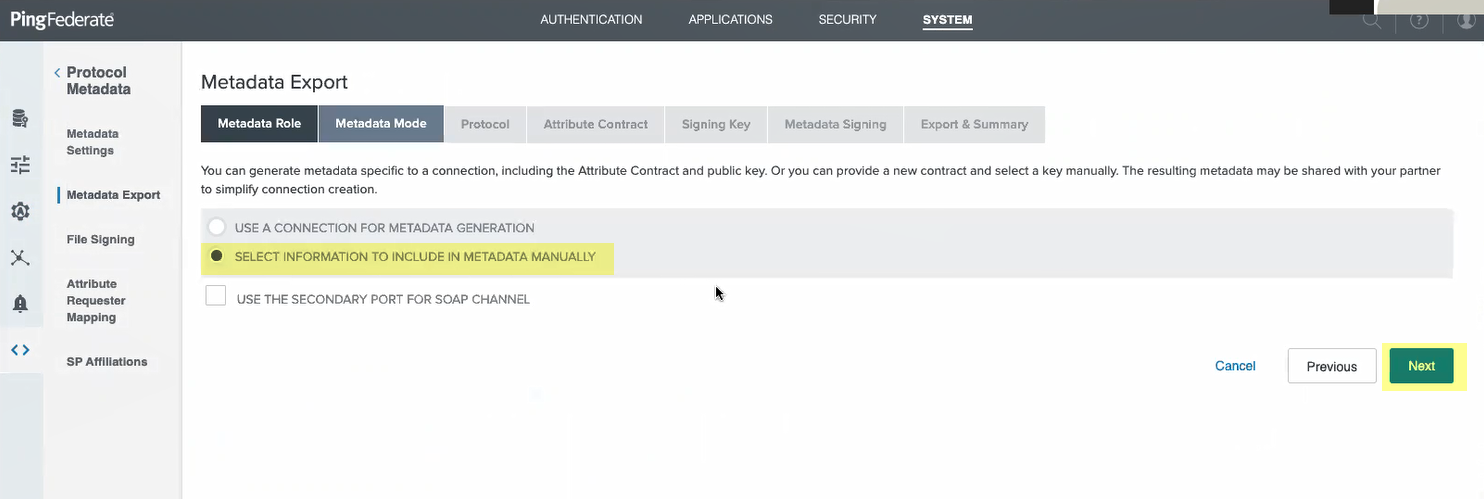
- Select information to include in metadata manually then click Next .
- Select the Signing key you want to use then click Next .
- Ensure that SAML 2.0 is the protocol then click Next .
- Click Next as you don't need to define an attribute contract.
- Select the Signing Certificate and that you want to Include this certificate’s public key certificate in the <key info> element .
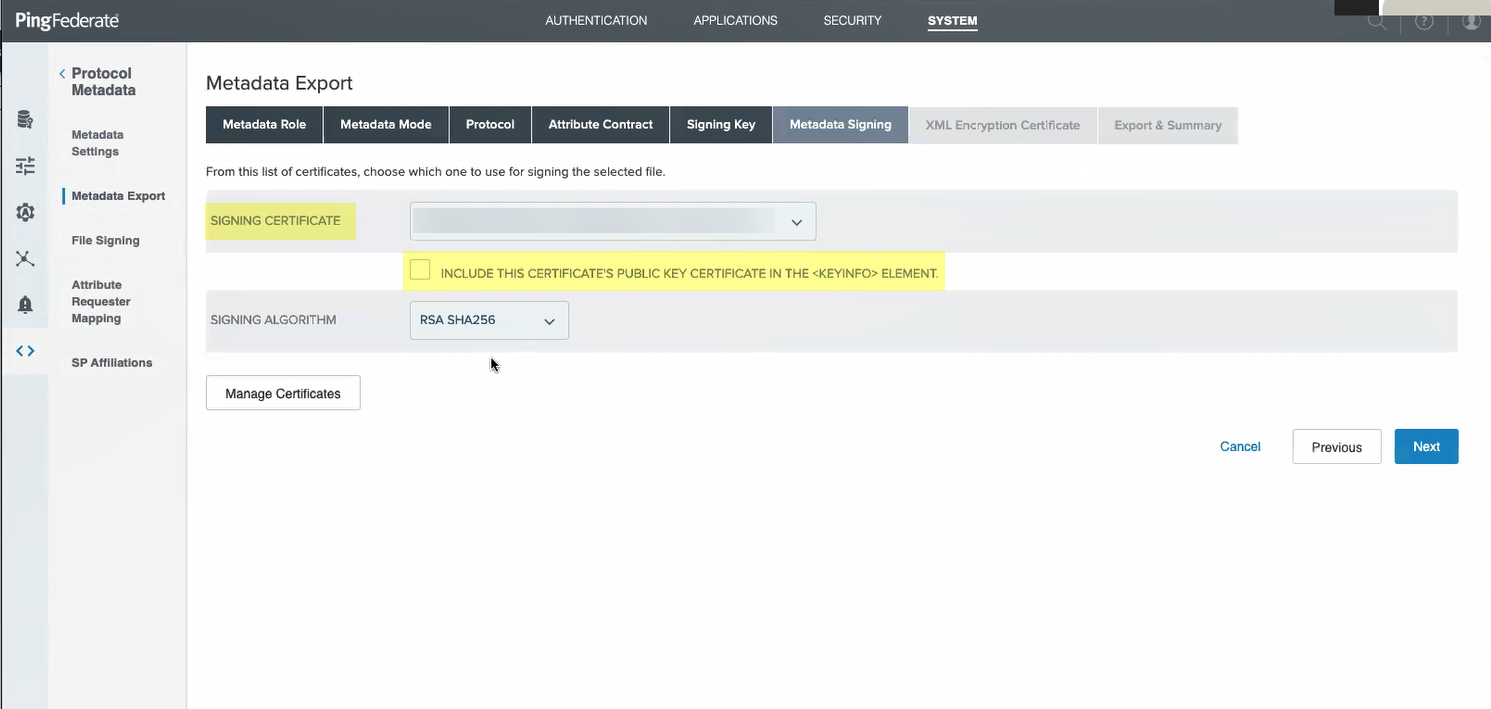
- Select the Signing Algorithm you want to use then click Next .
- Select the same certificate as the Encryption certificate then click Next .
- Review the metadata to verify the settings are correct then Export the metadata.
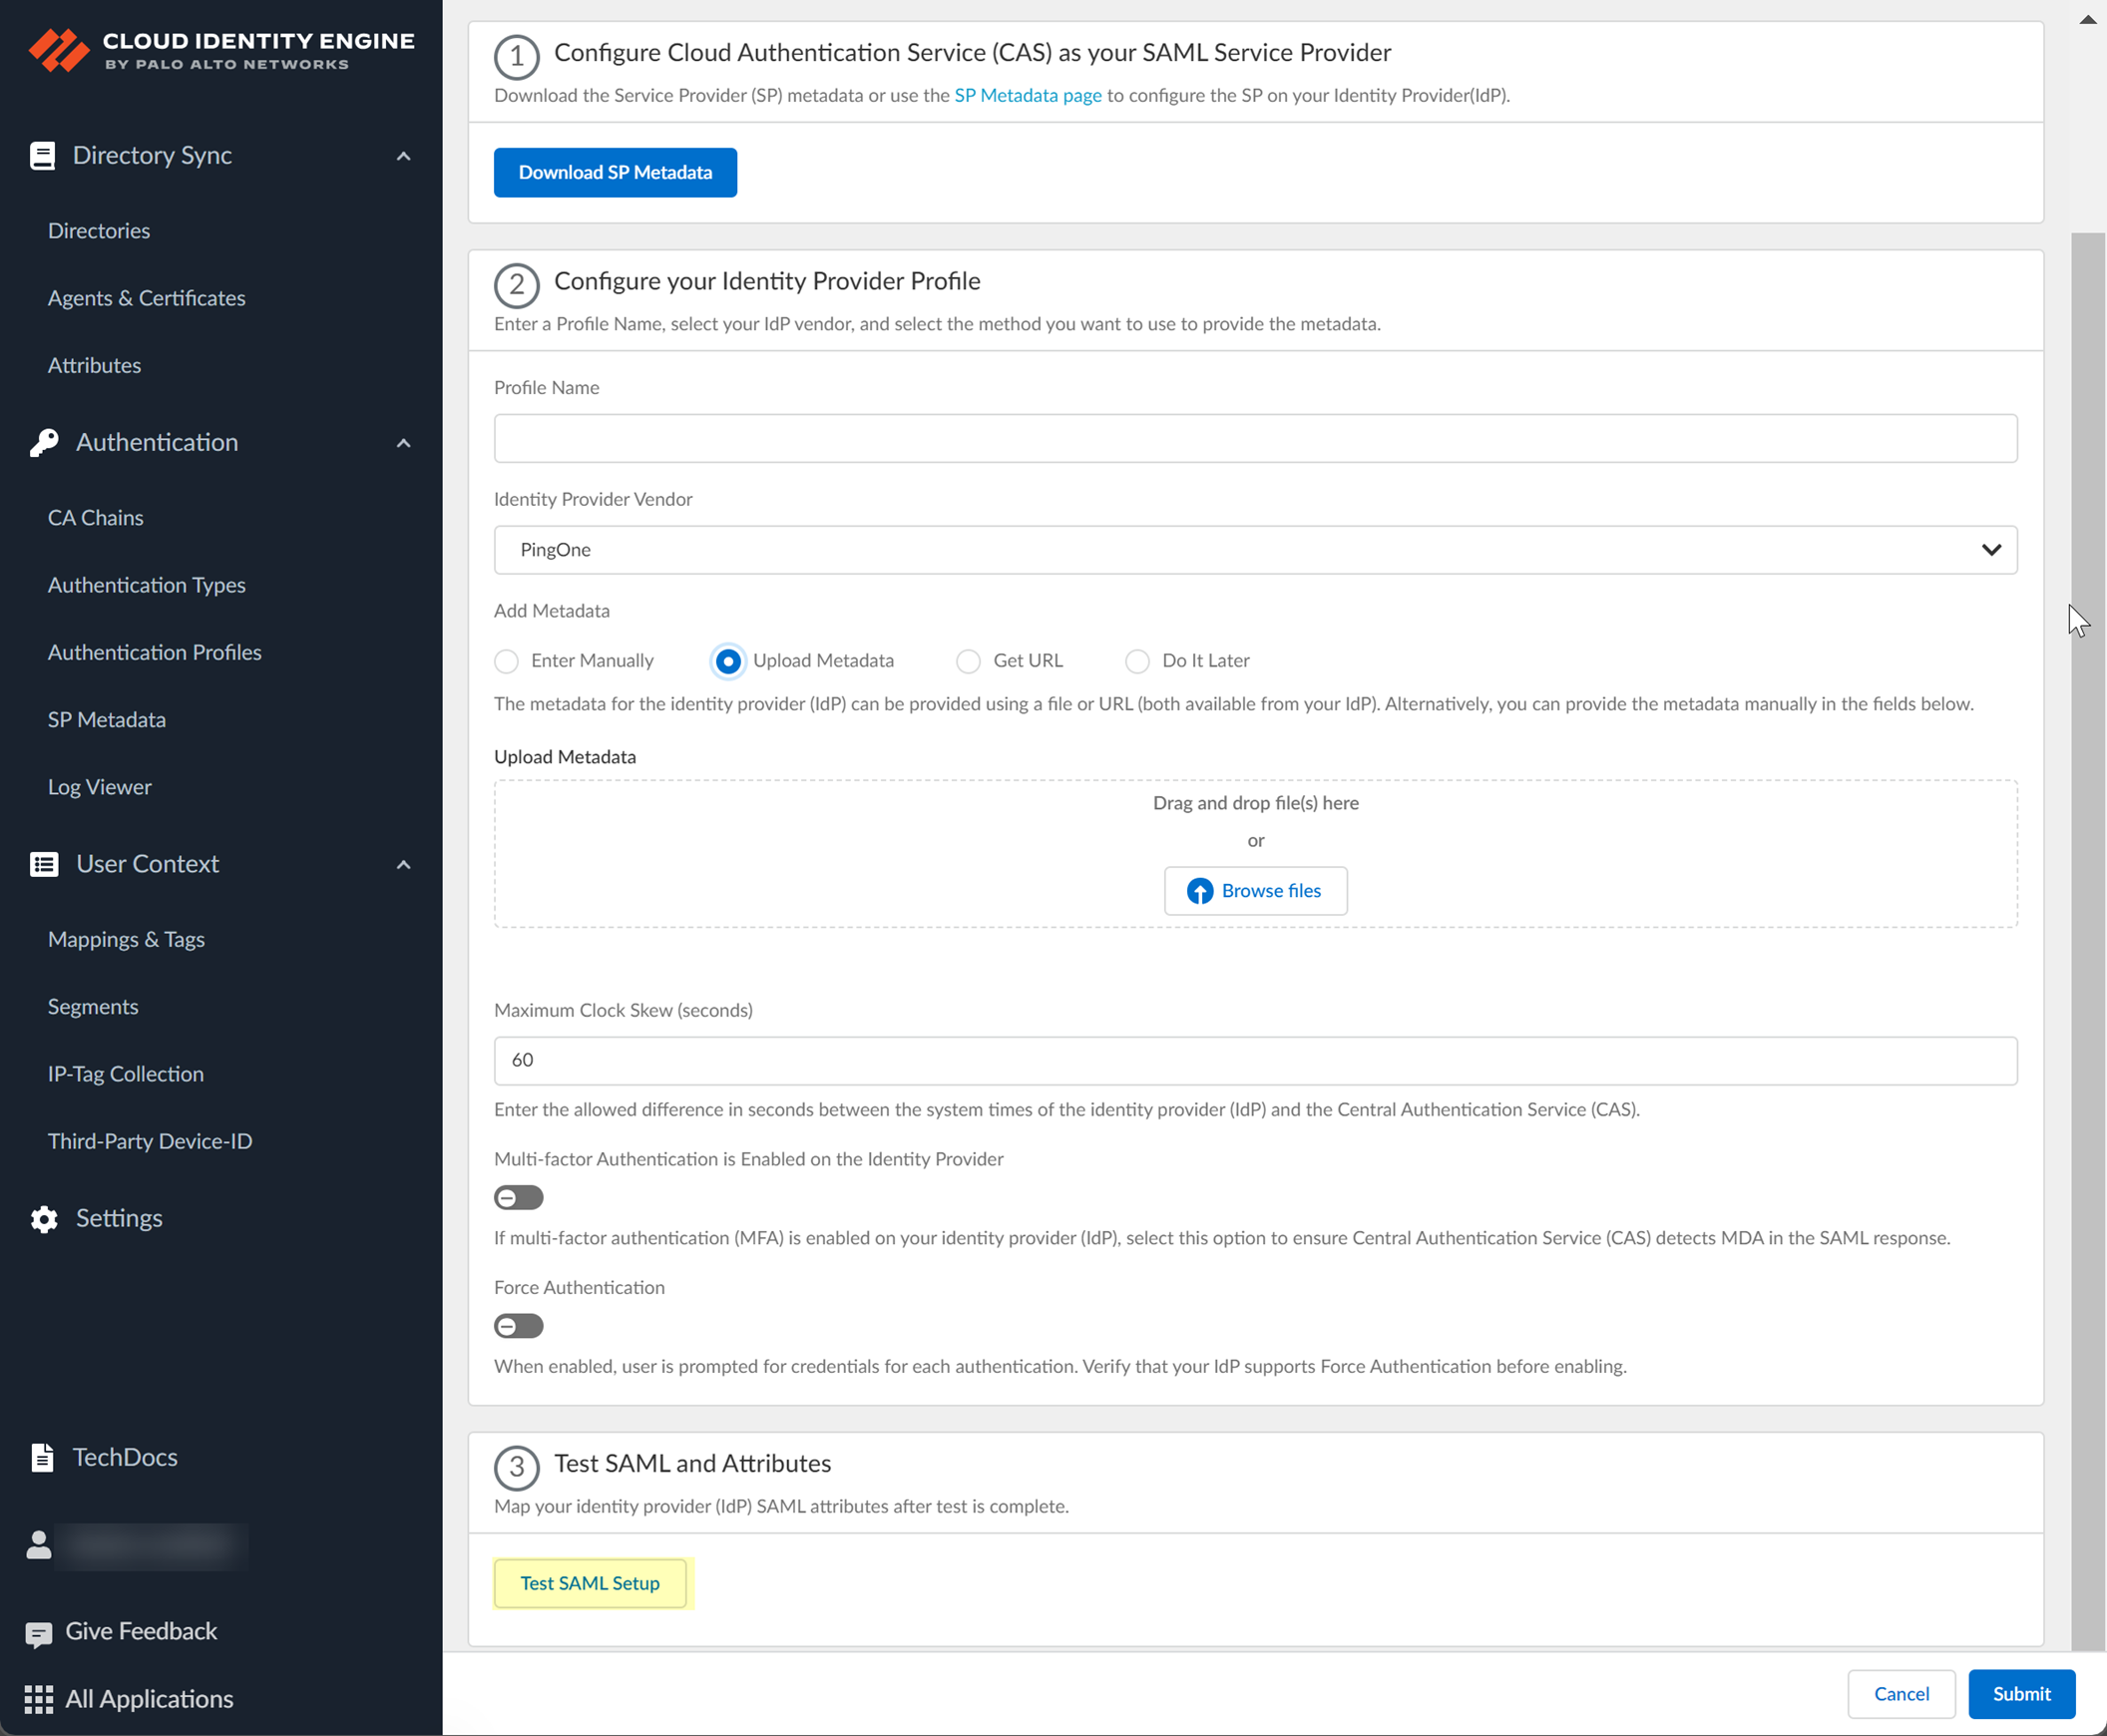
- Add PingFederate as an authentication type in the Cloud Identity Engine app.
- Select Authentication Types and click Add New Authentication Type .
- Set Up a SAML 2.0 authentication type.
- Enter a Profile Name .

- Select PingFederate as your Identity Provider Vendor .
- Select the method you want to use to Add Metadata and Submit the IdP profile.
- If you want to enter the information manually, copy the identity provider ID and SSO URL, download the certificate, then enter the information in the Cloud Identity Engine IdP profile.
- In PingFederate, select SystemOAuth SettingsProtocol Settings to copy the Base URL and SAML 2.0 Entity .
- Copy the necessary information from PingFederate and enter it in the IdP profile on the Cloud Identity Engine app as indicated in the following table:
|
Copy or Download from PingFederate |
Enter in Cloud Identity Engine IdP Profile |
|
Copy the SAML 2.0 Entity ID. |
Enter it as the Identity Provider ID . |
|
Copy the Base URL . |
Enter the URL as the Identity Provider SSO URL . |
-
- In PingFederate, select SecuritySigning & Decryption Keys & Certificates to Export the certificate you want to use.
- In the Cloud Identity Engine app, click Browse files to select the PingFederate certificate.
- Select the HTTP Binding for SSO Request to IdP method you want to use for the SAML binding that allows the firewall and IdP to exchange request and response messages:
- HTTP Redirect —Transmit SAML messages through URL parameters.
- HTTP Post —Transmit SAML messages using base64-encoded HTML.
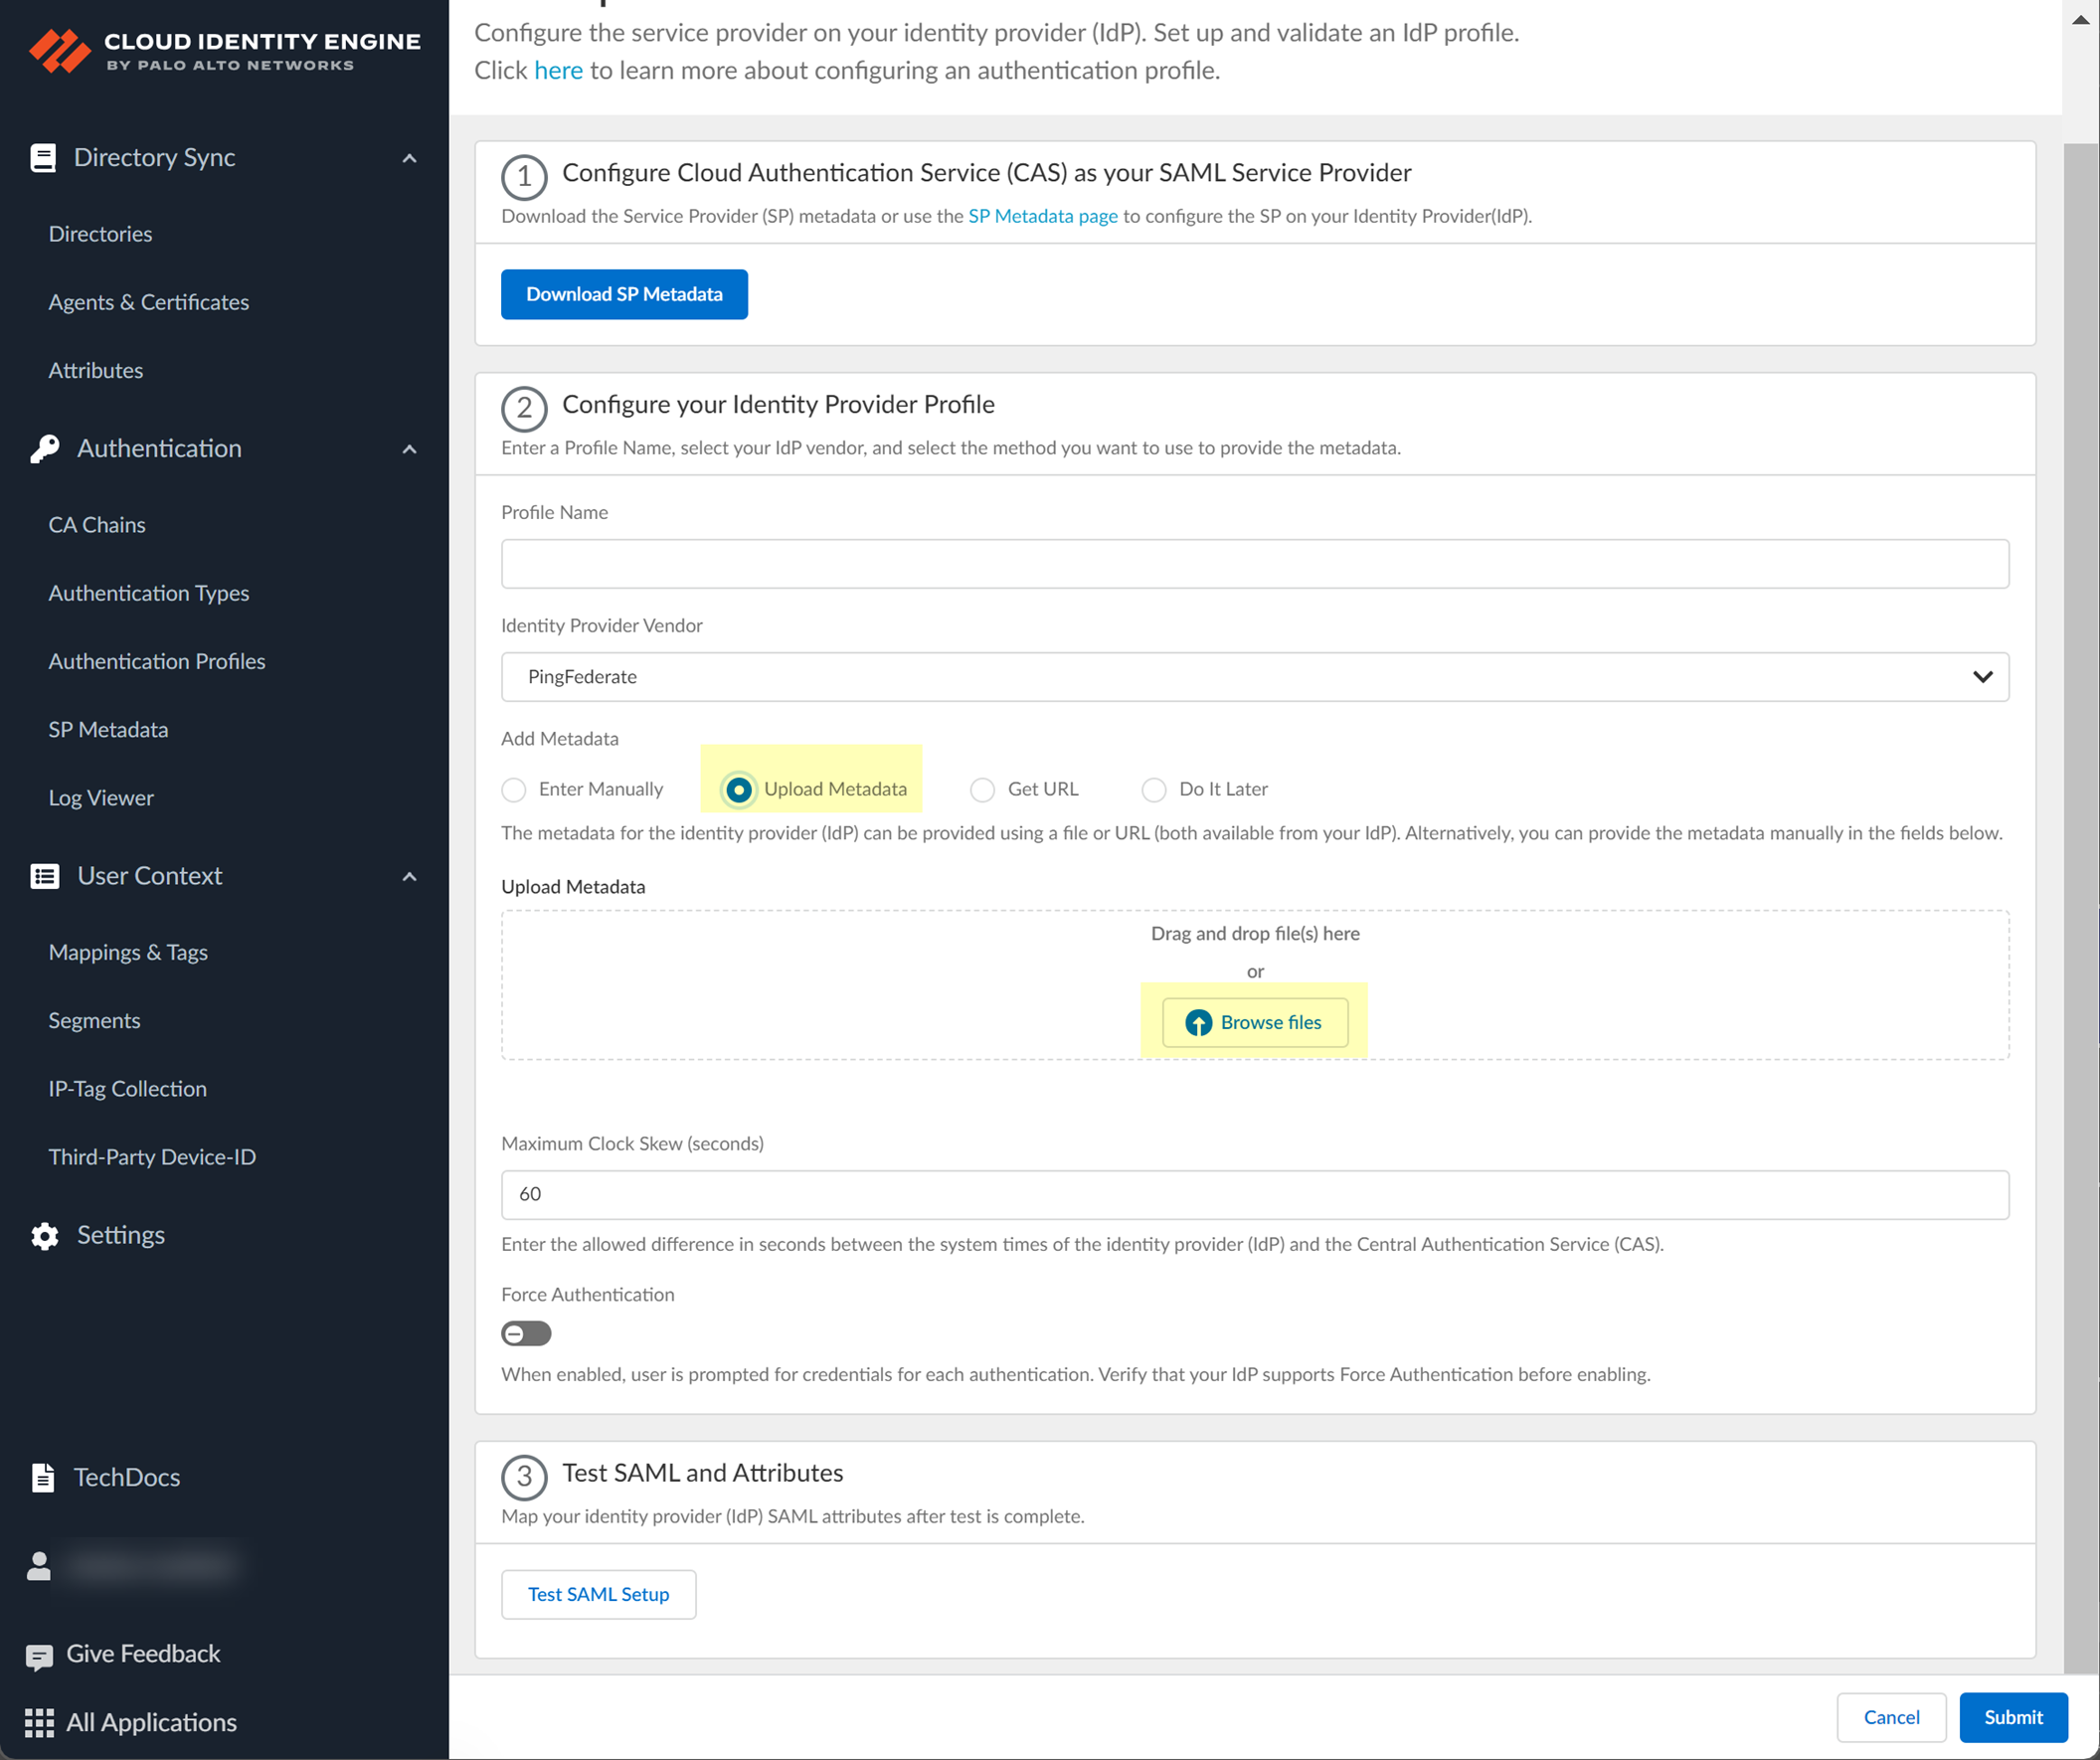
- If you want to upload a metadata file, download the metadata file from your IdP management system.
- Locate the metadata file from the first step.
- In the Cloud Identity Engine app, click Browse files to select the metadata file, then Open the metadata file.
- If you don't want to enter the configuration information now, you can Do it later . This option allows you to submit the profile without including configuration information. However, you must edit the profile to include the configuration information to use the authentication type in an authentication profile.
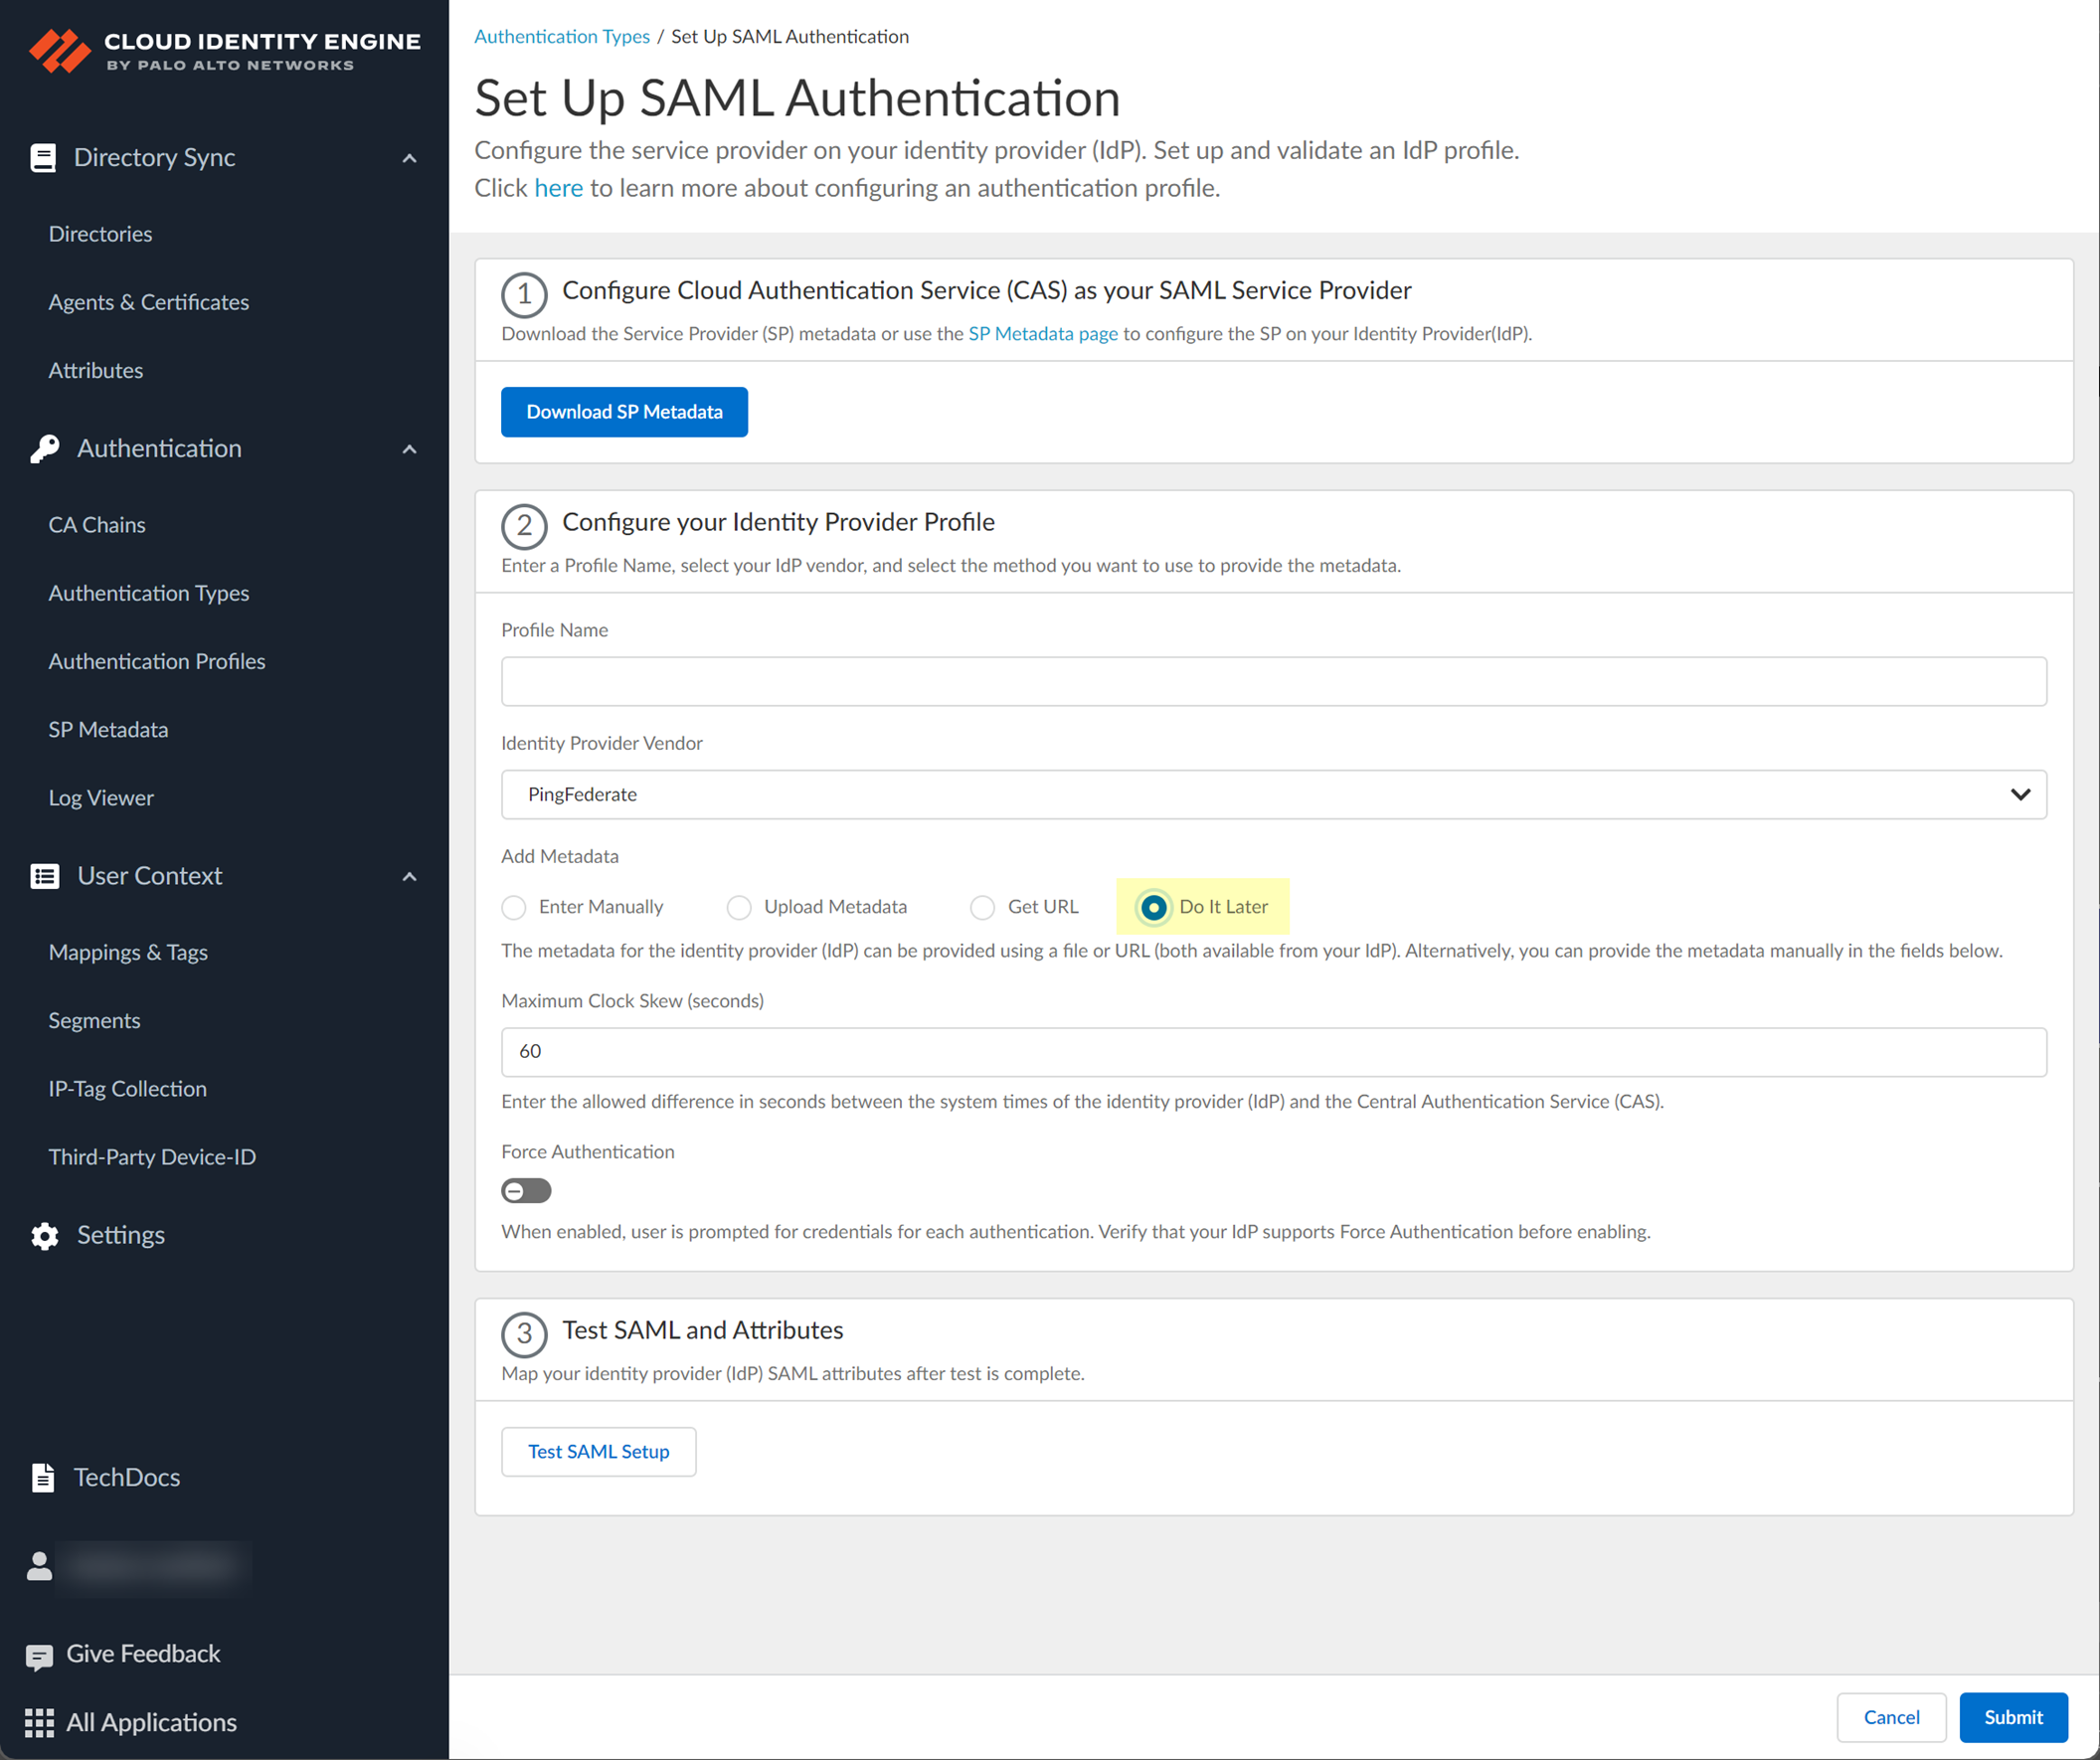
- The Cloud Identity Engine does not currently support the Get URL method for PingFederate.
- Specify the Maximum Clock Skew (seconds) , which is the allowed difference in seconds between the system times of the IdP and the firewall at the moment when the firewall validates IdP messages (default is 60; range is 1–900). If the difference exceeds this value, authentication fails.
- To require users to log in using their credentials to reconnect to GlobalProtect, enable Force Authentication .

- Test SAML setup to verify the profile configuration.
This step is necessary to confirm that your firewall and IdP can communicate.
- Select the SAML attributes you want the firewall to use for authentication and Submit the IdP profile.
- In the Cloud Identity Engine, select the Username Attribute .
- (Optional) Select the Usergroup Attribute , Access Domain , User Domain , and Admin Role .
Configure Google as an IdP in the Cloud Identity Engine
If you use Google to authenticate users, you can configure your Google IdP as an authentication type in the Cloud Identity Engine.
The Cloud Identity Engine does not support the ForceAuthn attribute for Google as an IdP.
- Prepare to configure Google as an IdP in the Cloud Identity Engine.
- If you have not already done so, activate the Cloud Identity Engine app.
- In the Cloud Identity Engine app, select AuthenticationSP MetadataDownload SP Metadata and Save the metadata in a secure location.

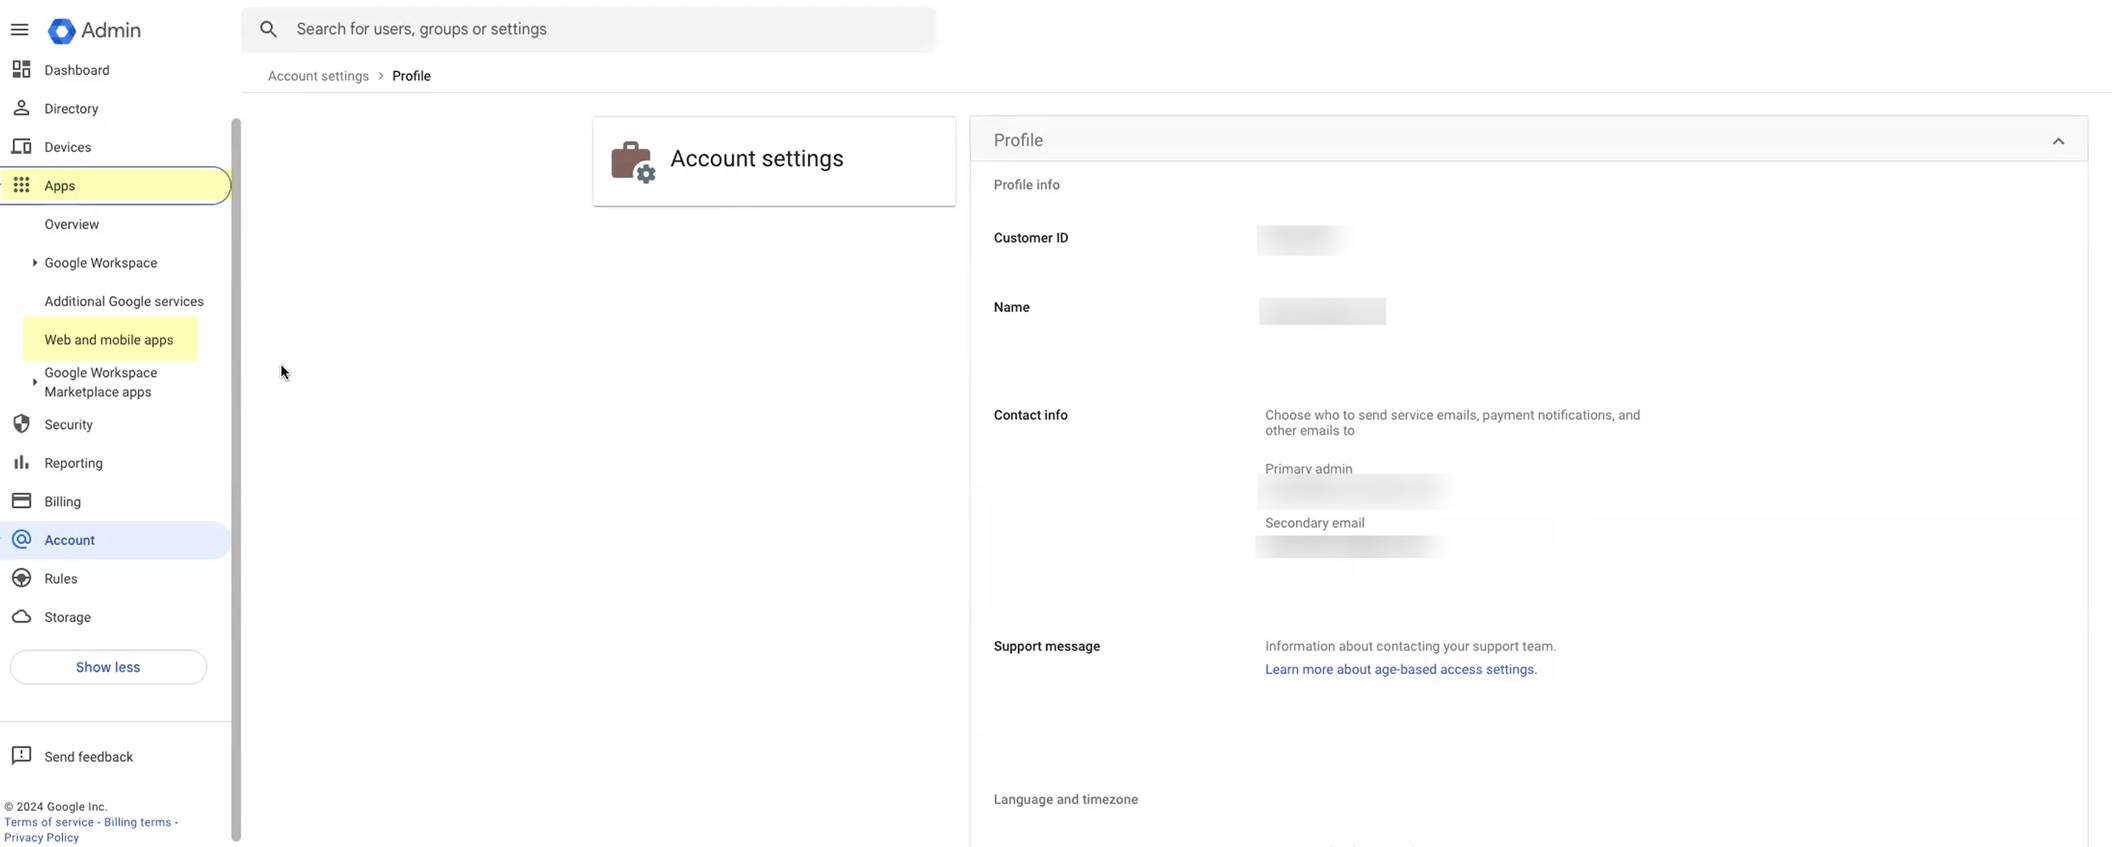
- Log in to the Google Admin Console and select AppsSAML Apps .
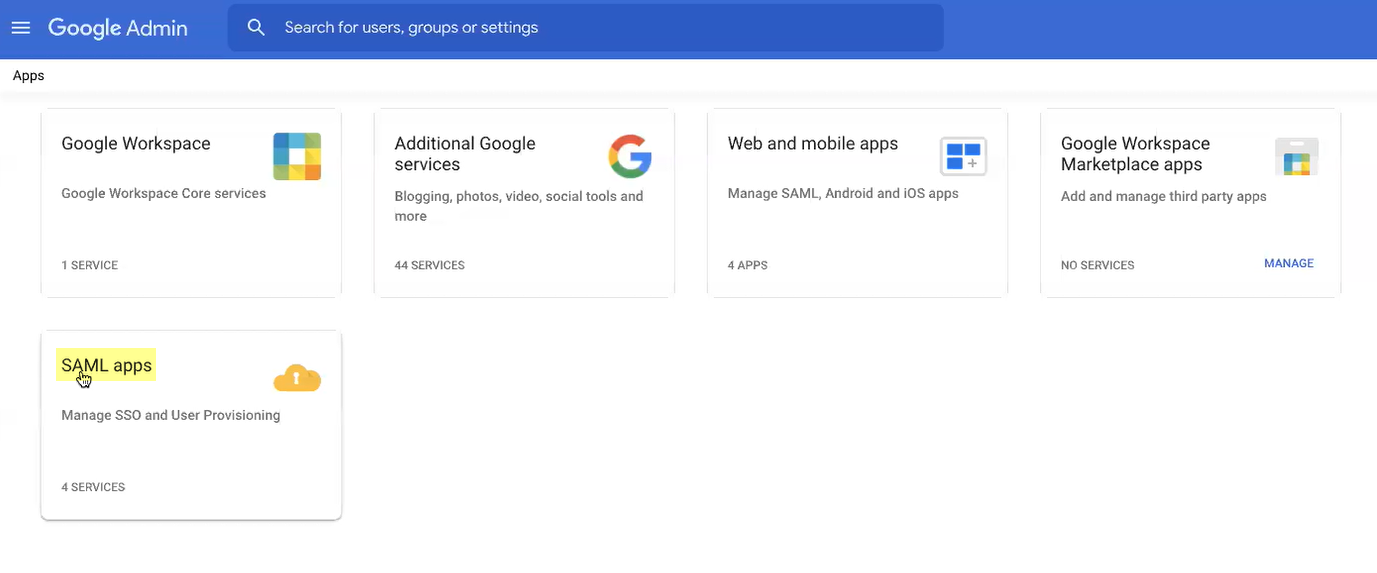
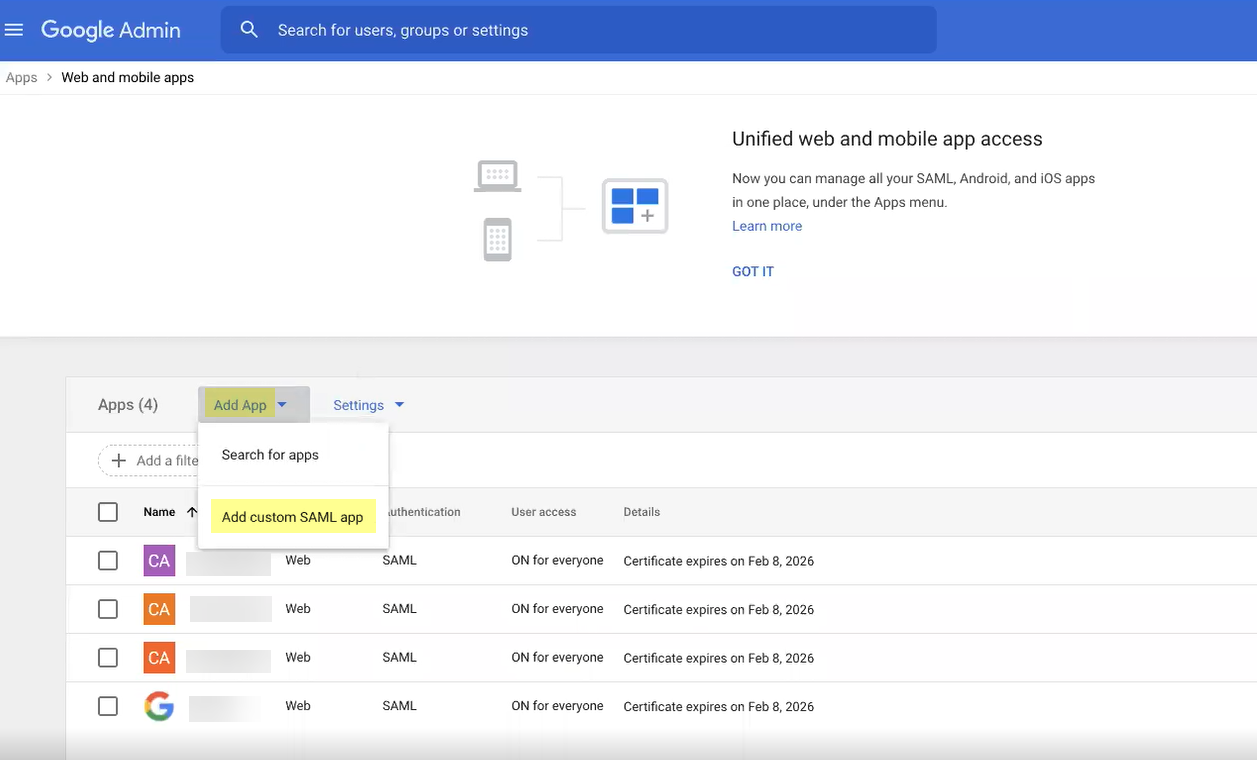
- Select Add AppAdd custom SAML app .
- Enter an App name then Continue to the next step.
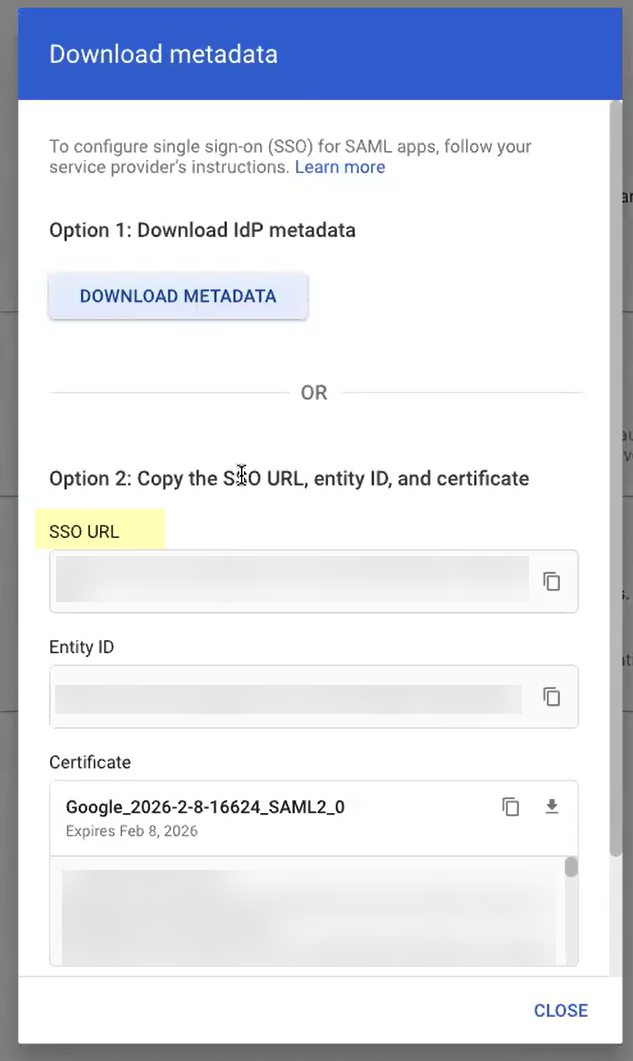
- Click Download Metadata to Download IdP metadata then Continue to the next step.
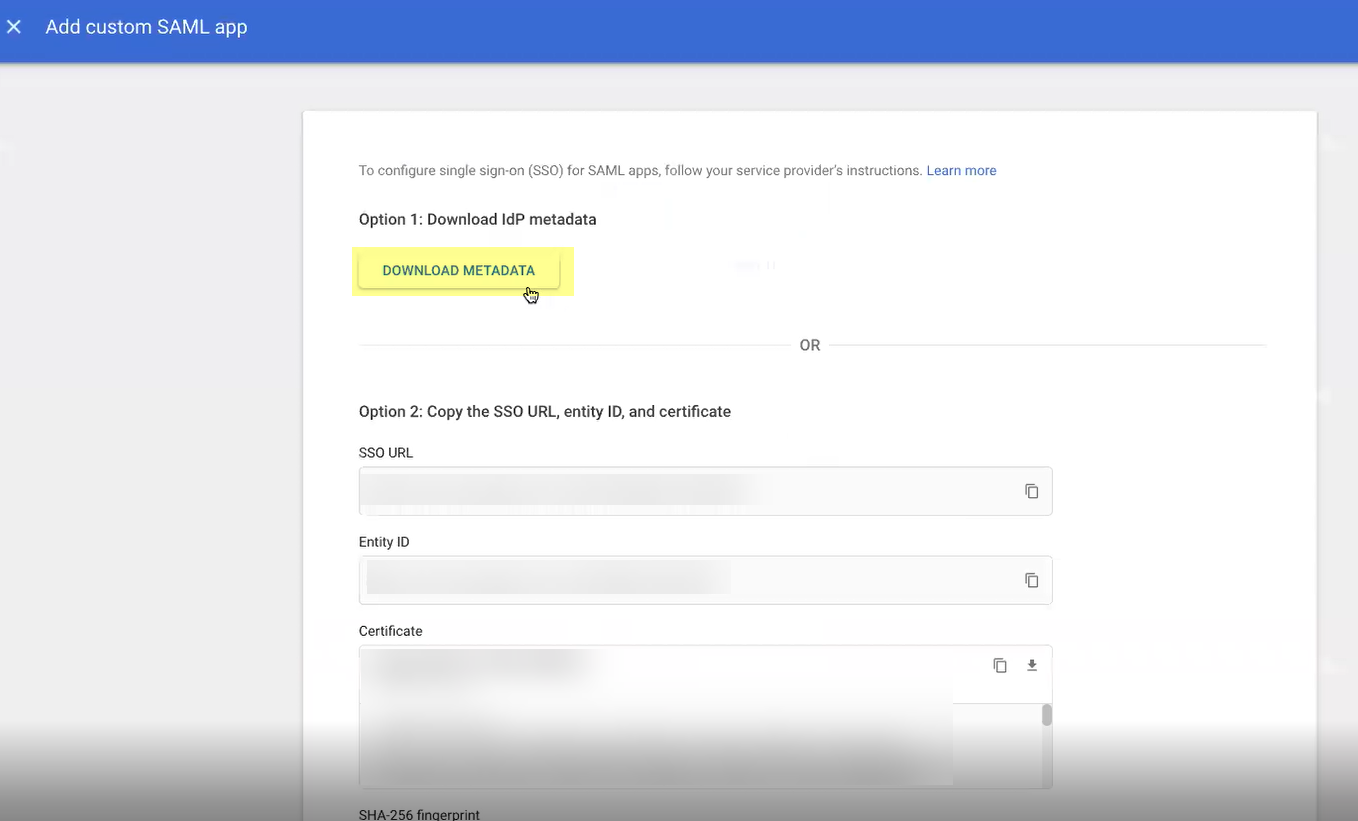
- Copy the metadata information from the Cloud Identity Engine and enter it in the Google Admin Console as described in the following table then Continue to the next step:
|
Copy from Cloud Identity Engine |
Enter in Google Admin Console |
|
Copy the Entity ID from the SP Metadata page. |
Enter it as the Entity ID . |
|
Copy the Assertion Consumer Service URL . |
Enter the URL as the ACS URL . |
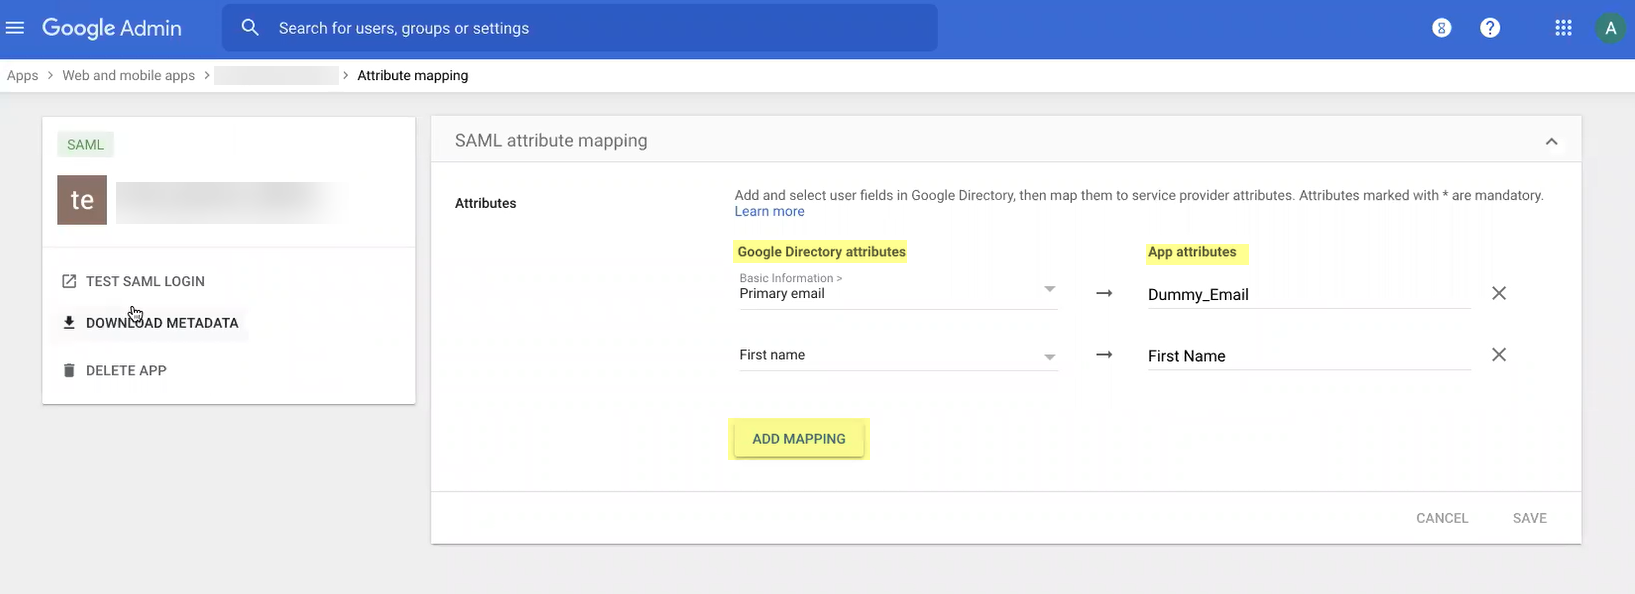
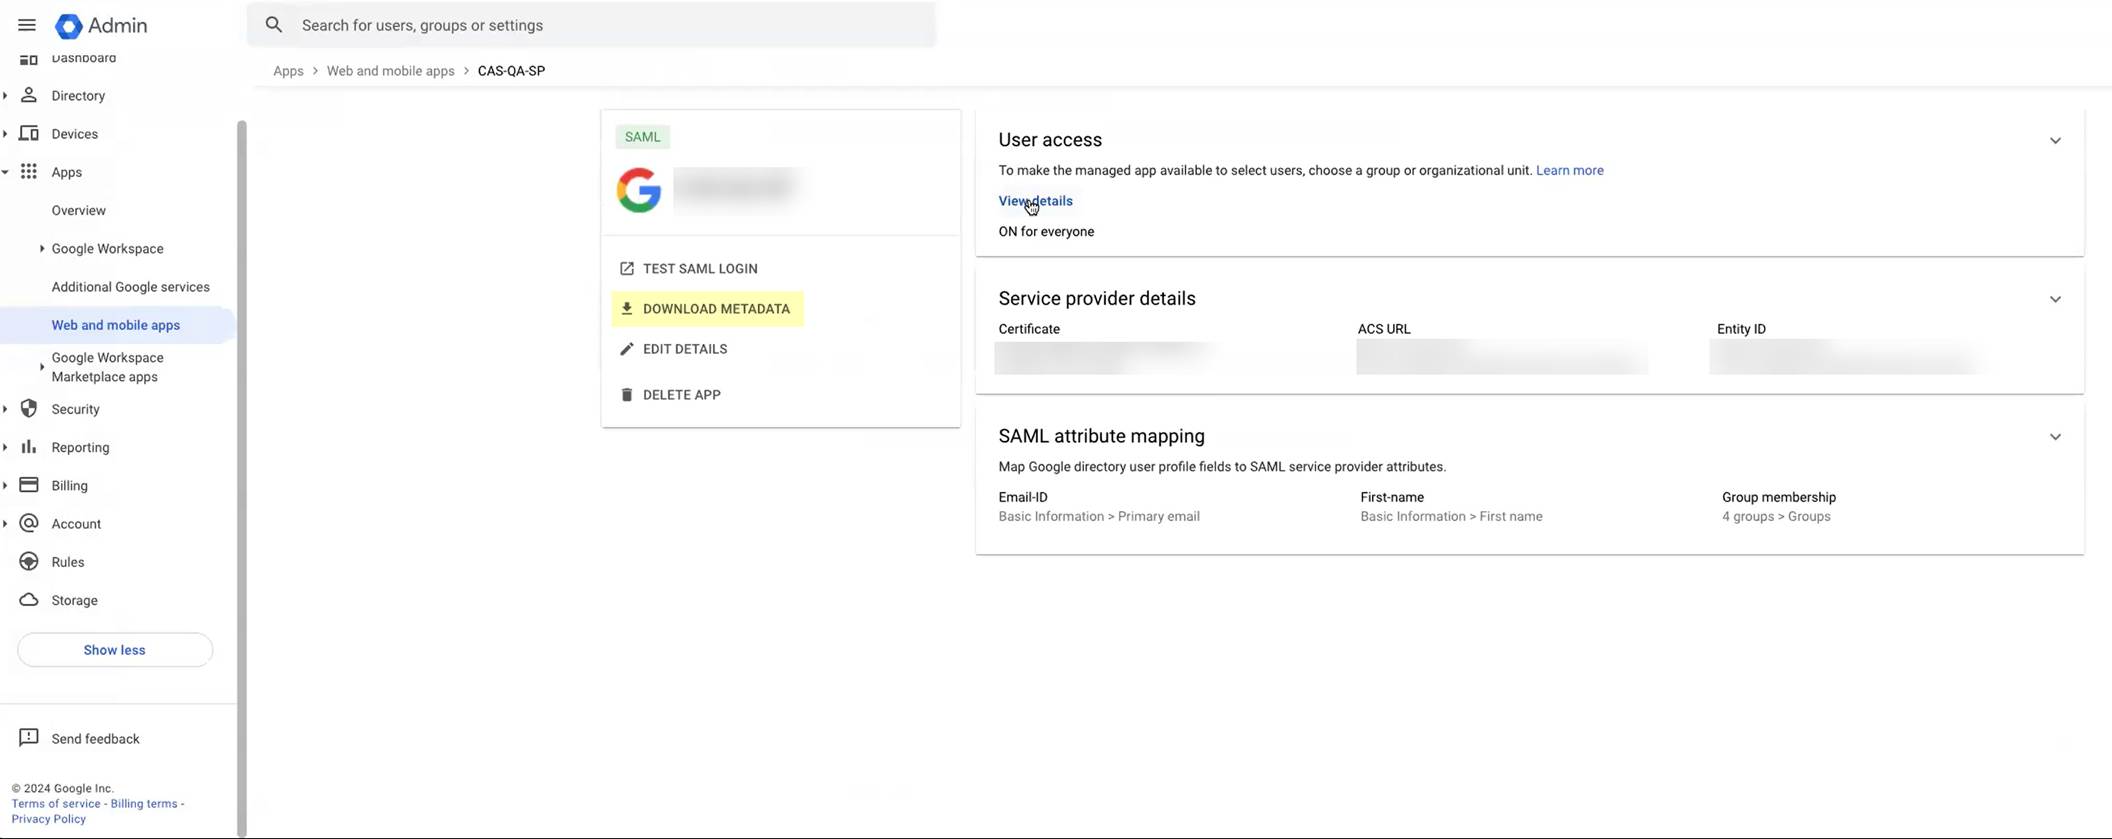
- Add mapping to select the Google Directory attributes then specify the corresponding App attributes . Repeat for each attribute you want to use then click Finish when the changes are complete.
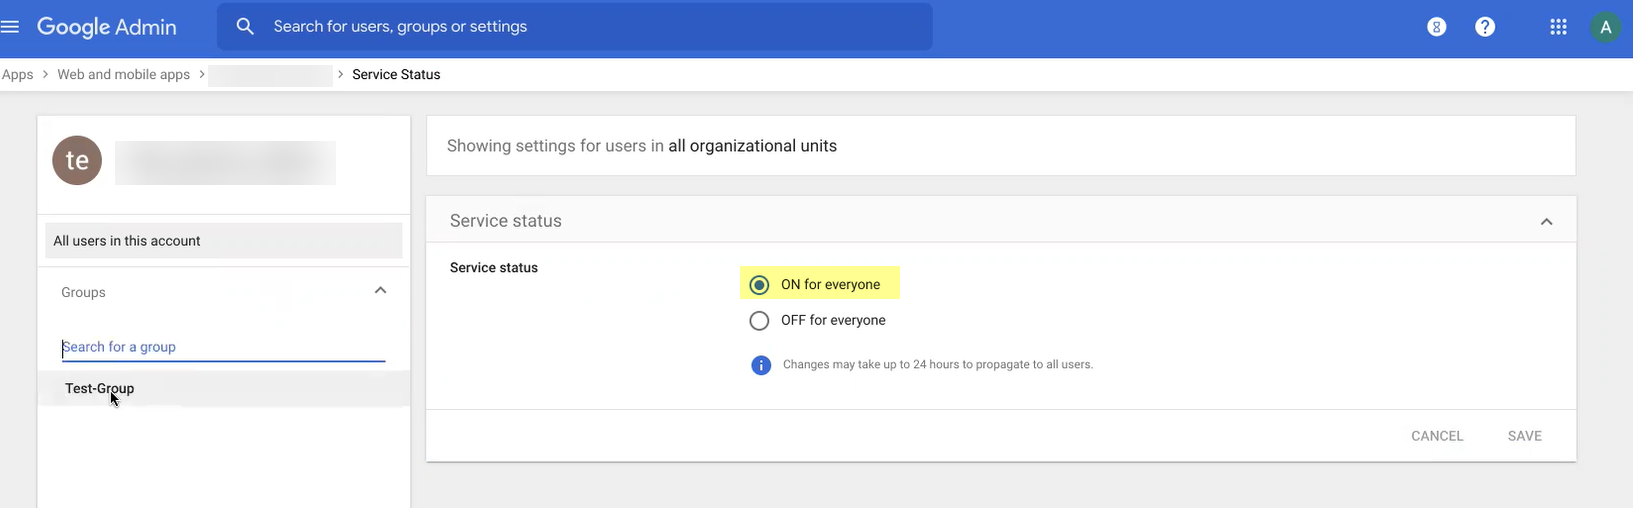
- View details to specify the users and groups you want to authenticate with Google and enable the app to turn it ON for everyone then Save your changes.
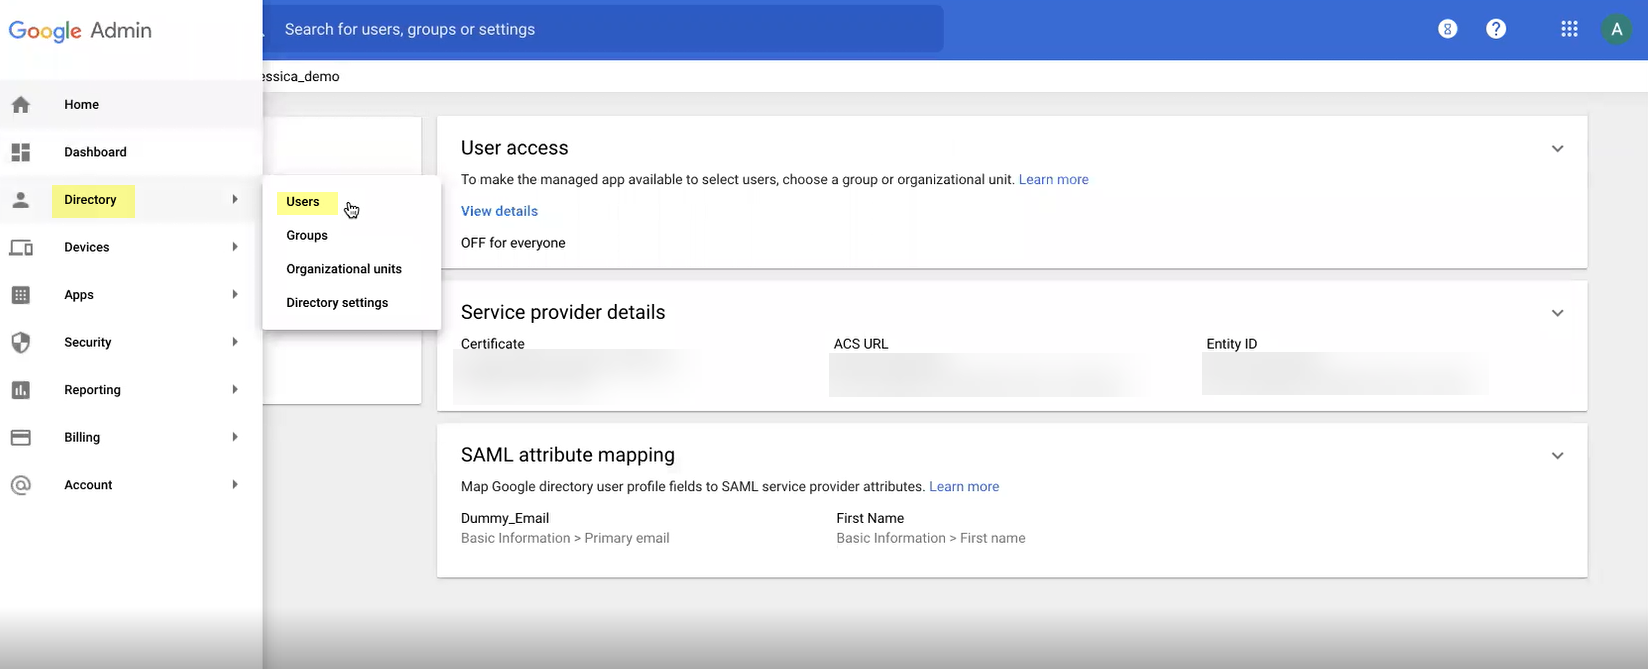
- Select DirectoryUsers to specify the users you want to authenticate using Google.
- Add Google as an authentication type in the Cloud Identity Engine app.
- Select Authentication Types and click Add New Authentication Type .
- Set Up a SAML 2.0 authentication type.
- Enter a Profile Name .

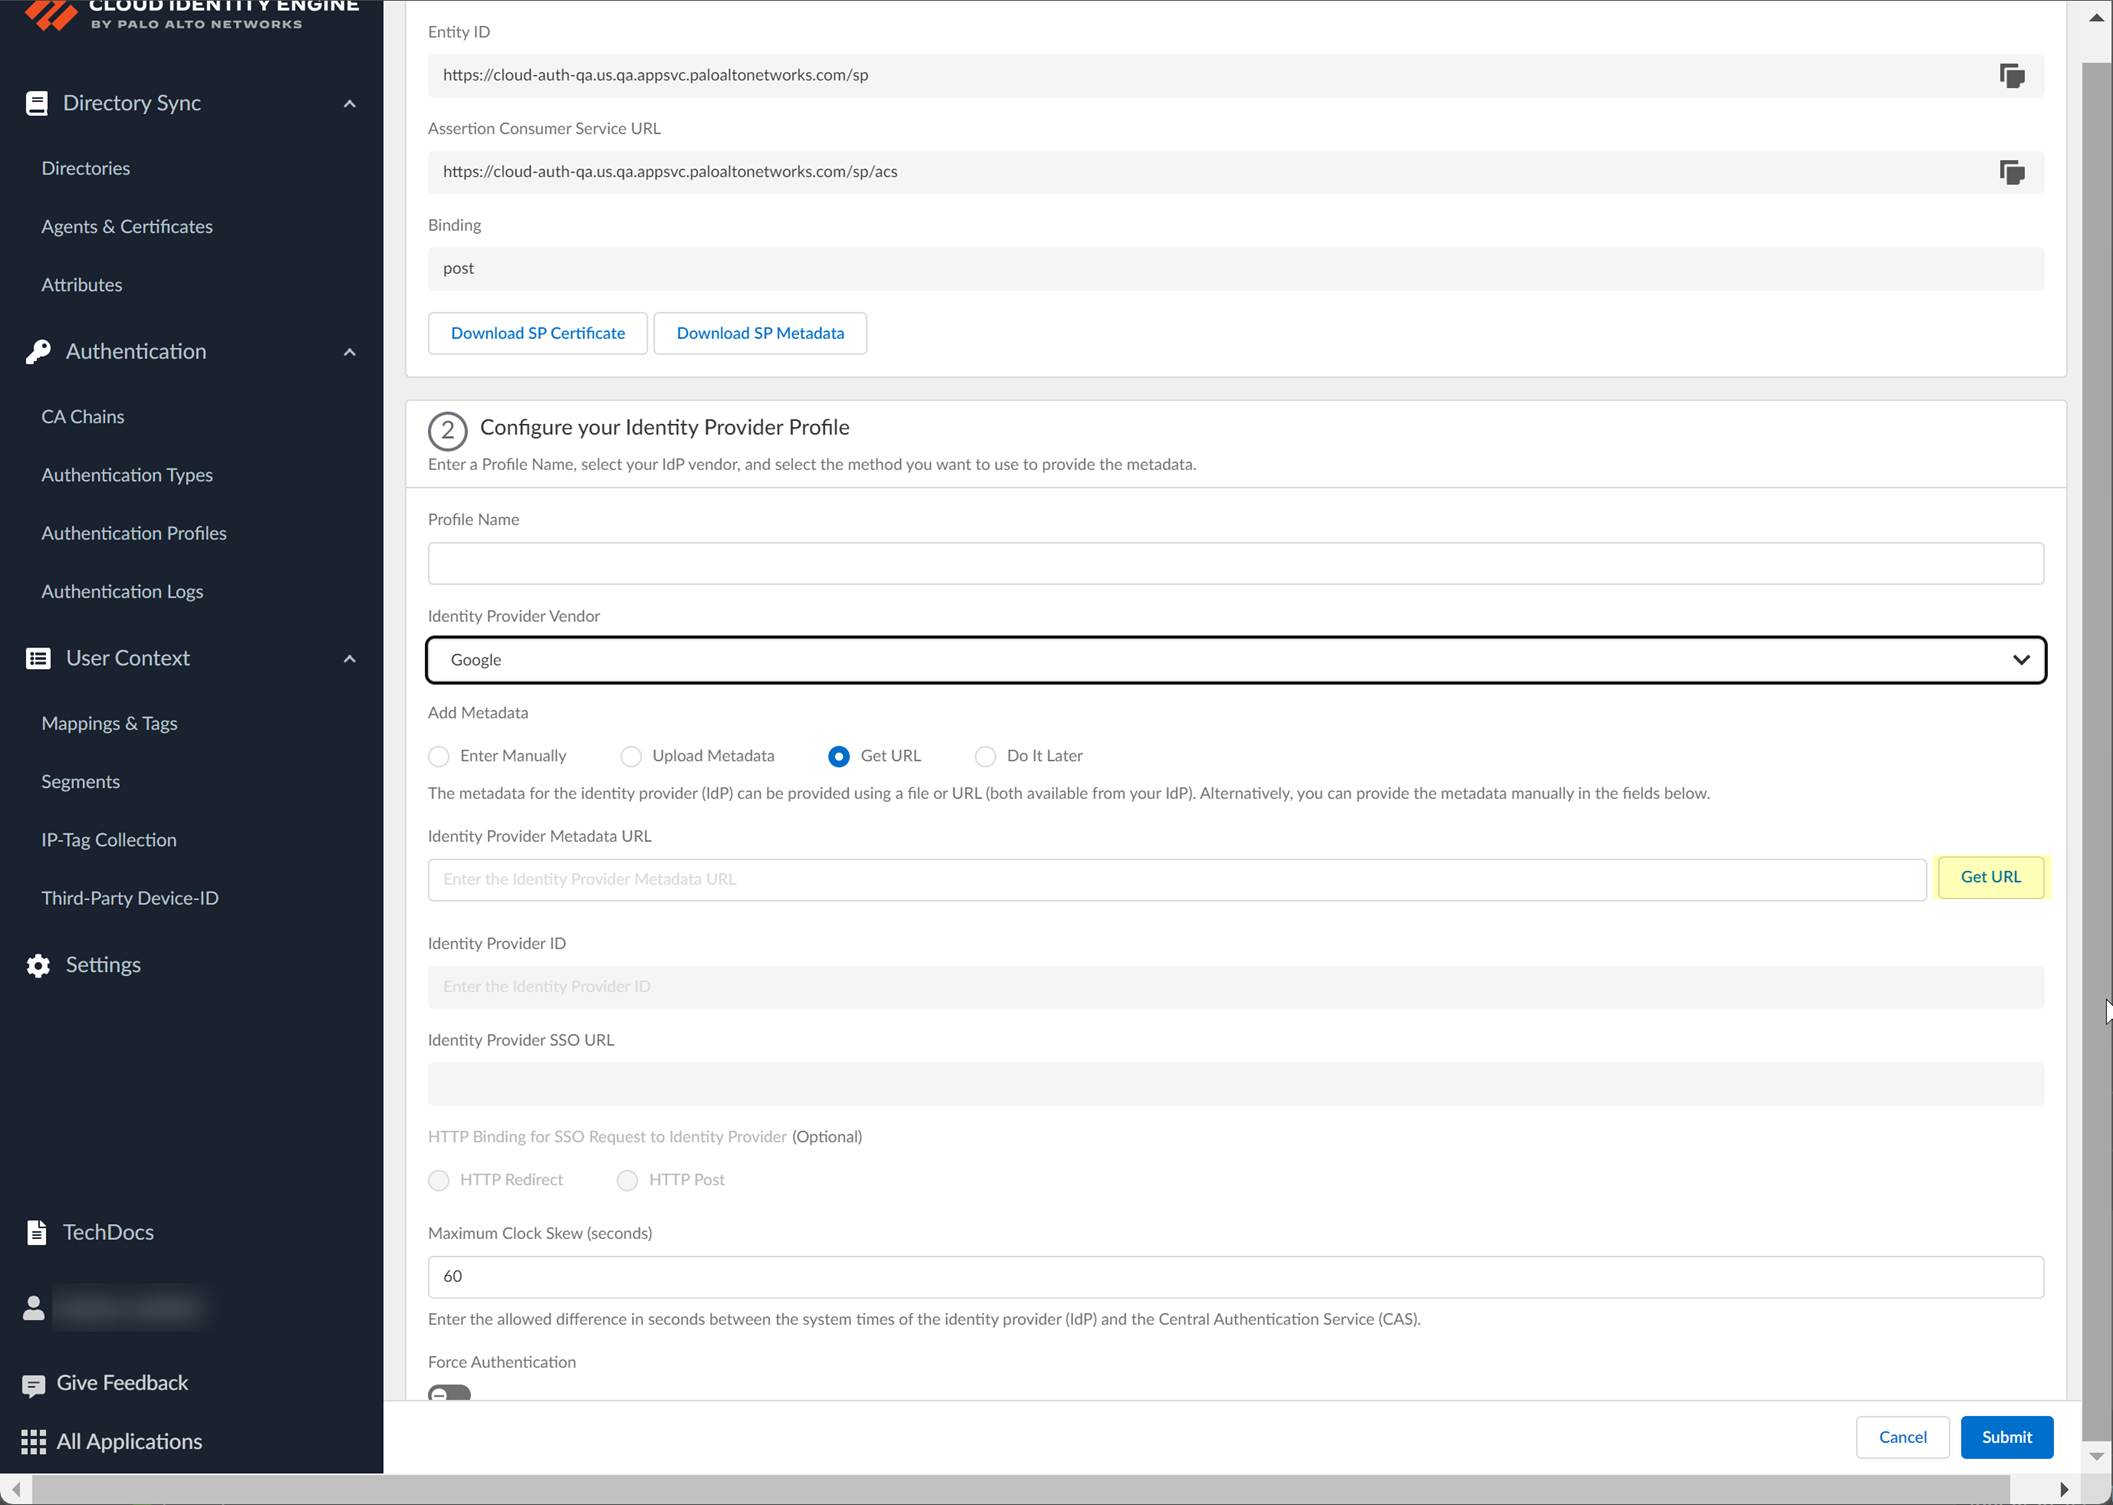
- Select Google as your Identity Provider Vendor .
- Select the method you want to use to Add Metadata and Submit the profile.
- If you want to enter the information manually, copy the identity provider ID and SSO URL, download the certificate, then enter the information in the Cloud Identity Engine.
- In the Google Admin Console, select the Cloud Identity Engine app and Download Metadata .
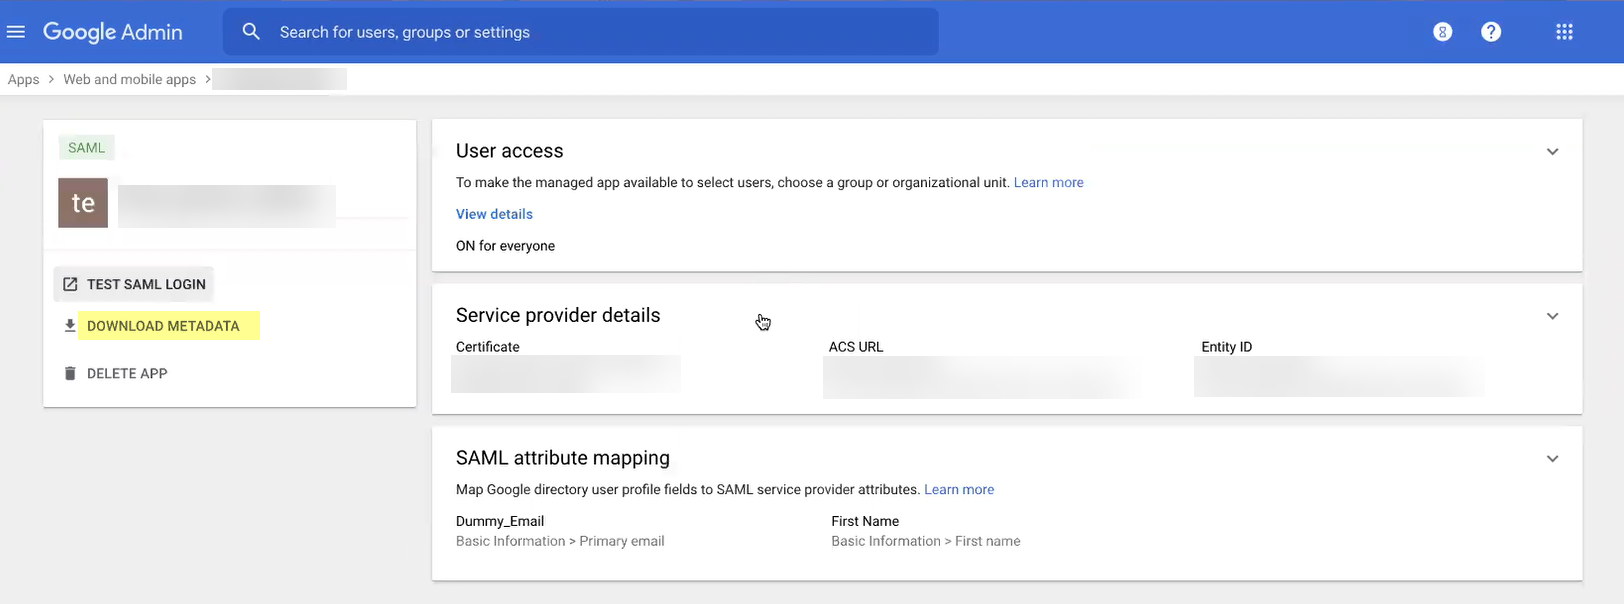
- Click Download Metadata then copy the necessary information from Google and enter it in the Cloud Identity Engine app as indicated in the following table:
|
Copy or Download from Google Admin Console |
Enter in Cloud Identity Engine IdP Profile |
|
Copy the Entity ID . |
Enter it as the Identity Provider ID . |
|
Download the Certificate . |
Click to Upload the certificate from Google. |
|
Copy the SSO URL . |
Enter the URL as the Identity Provider SSO URL . |
-
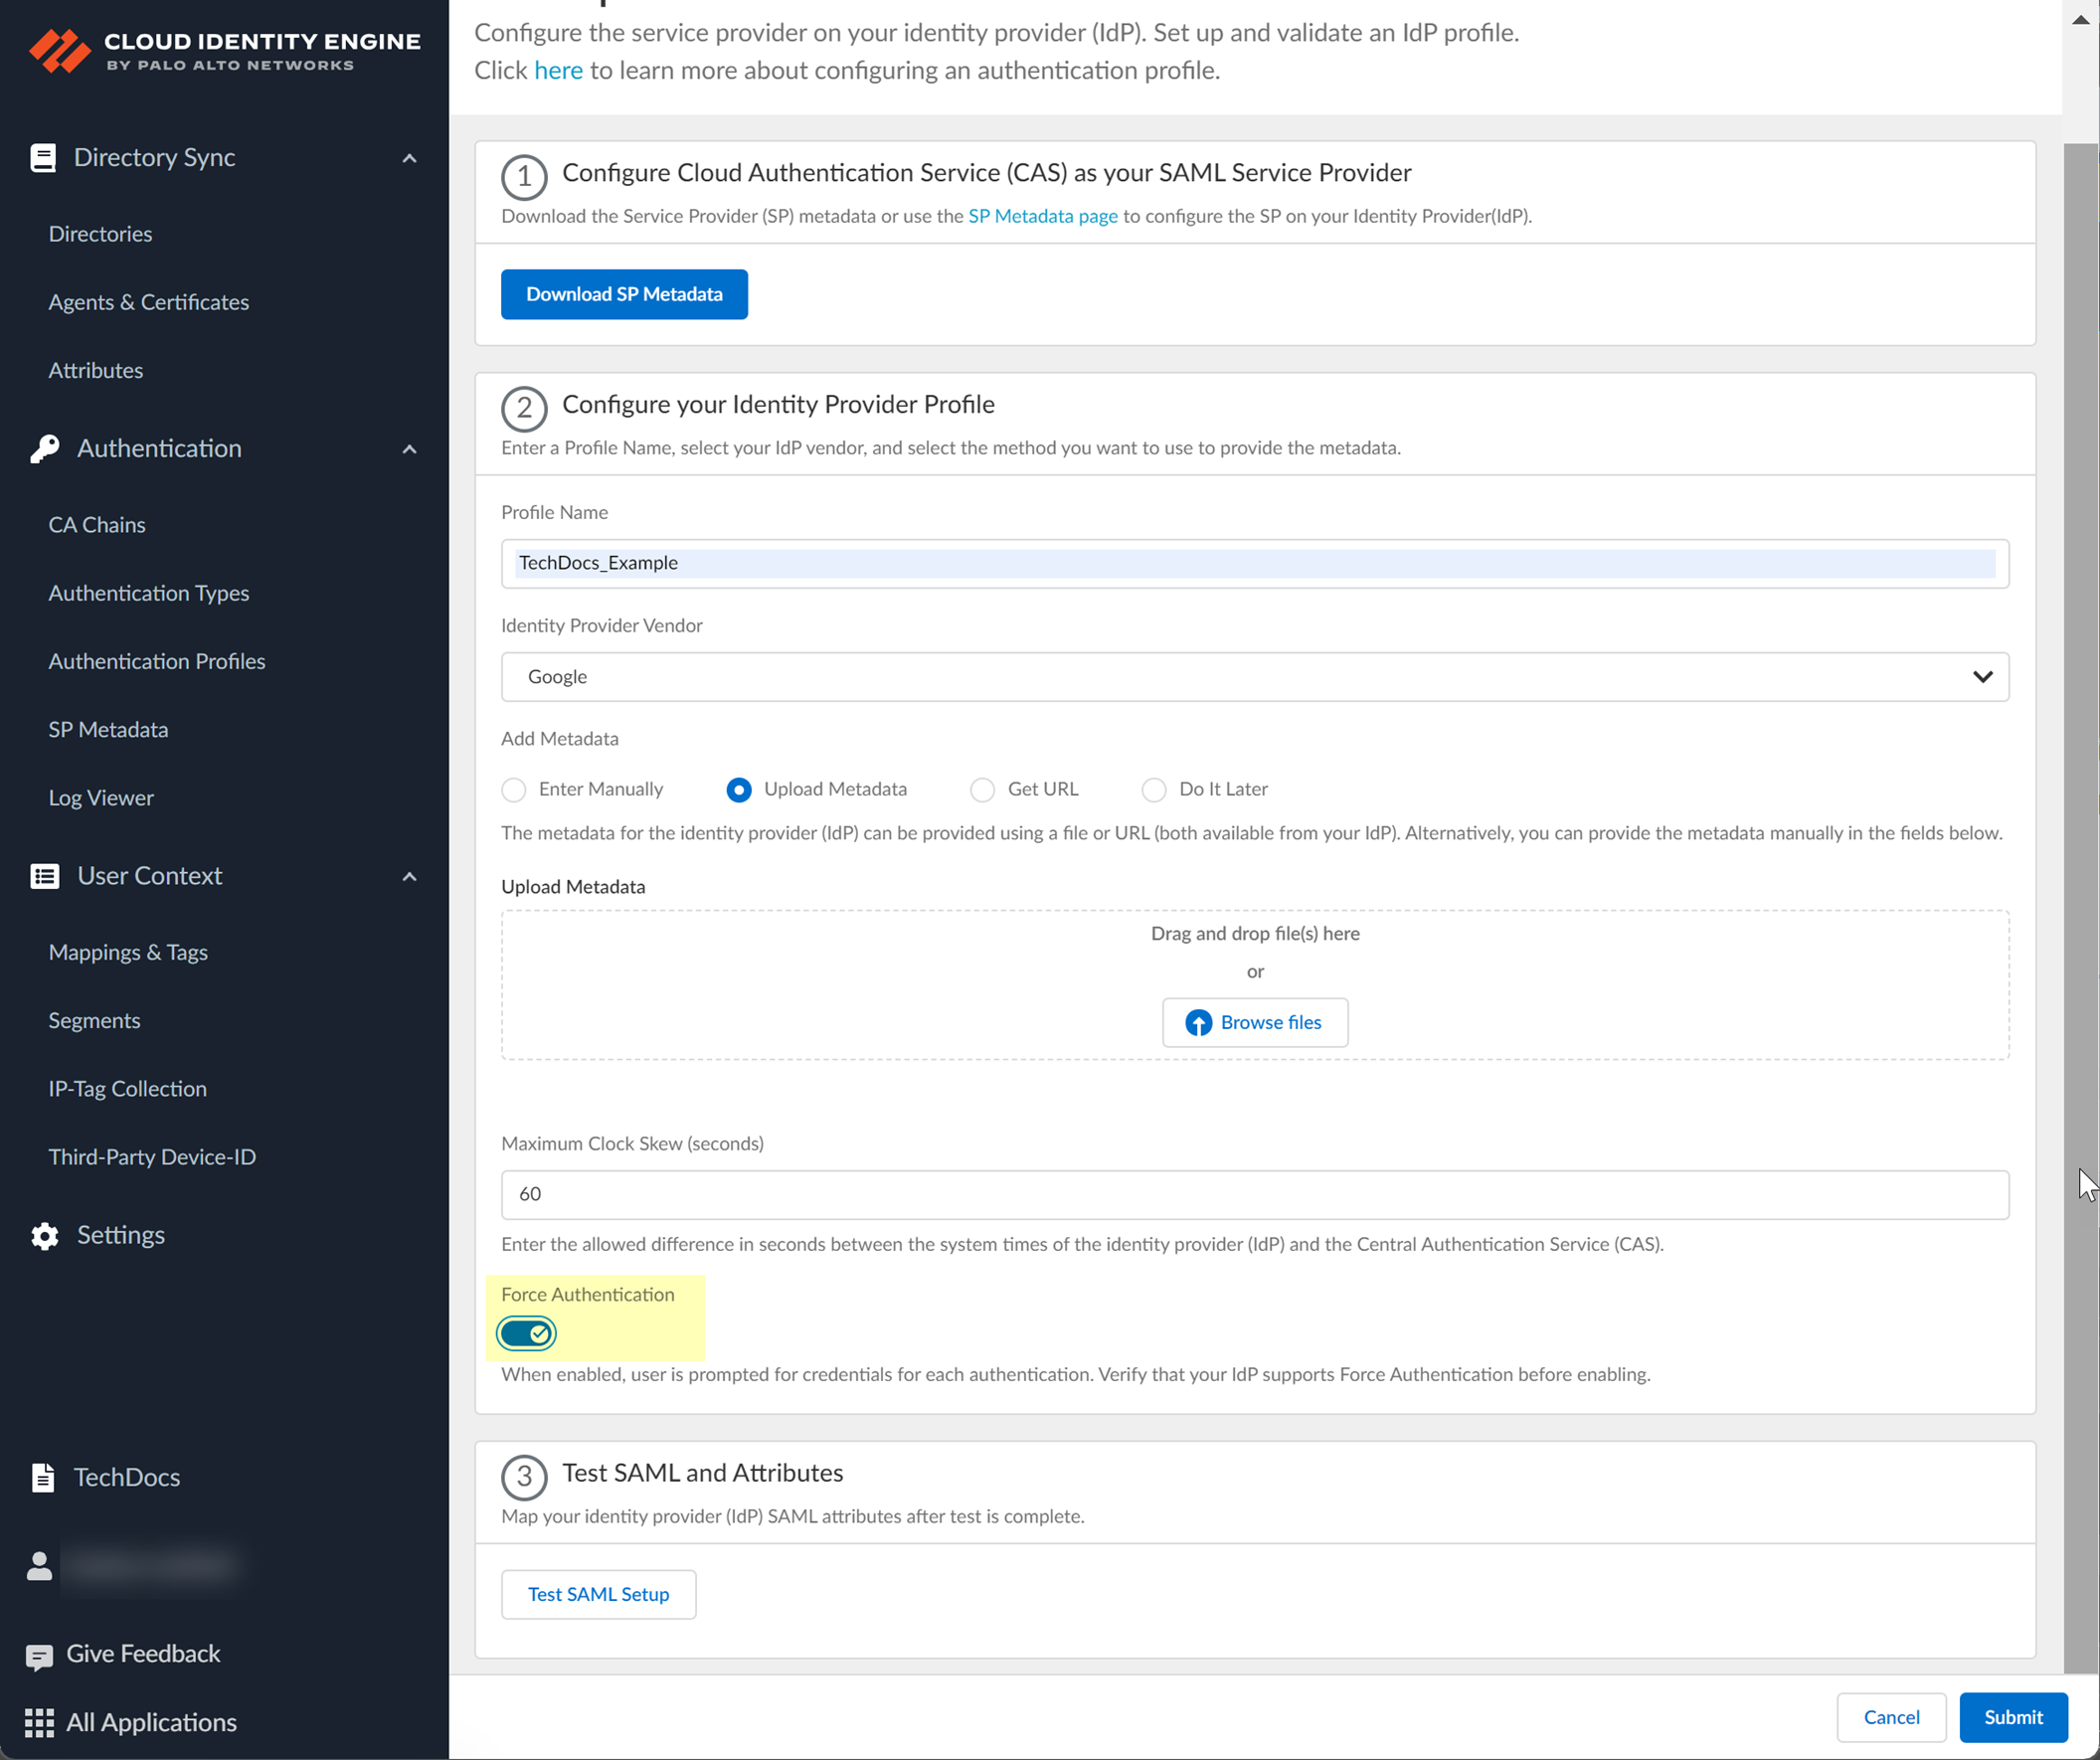
- If you want to upload a metadata file, download the metadata file from your IdP management system.
- In the Google Admin Console, select the Cloud Identity Engine app and Download Metadata .
- Click Download Metadata and Save the file to a secure location.
- In the Cloud Identity Engine app, select Upload Metadata then click Browse files to select the metadata file then Open the metadata file.
- To use the Get URL method, copy the URL from your IdP and enter it in Cloud Identity Engine.
- Log in to the Google portal using your administrator credentials.
- Select AppsWeb and mobile apps .
- Select the Google app you created in step
1.d
.
- Click Download Metadata .
- Copy the SSO URL and store it in a secure location.
- In the Cloud Identity Engine, select Get URL and paste the URL as the Identity Provider Metadata URL .
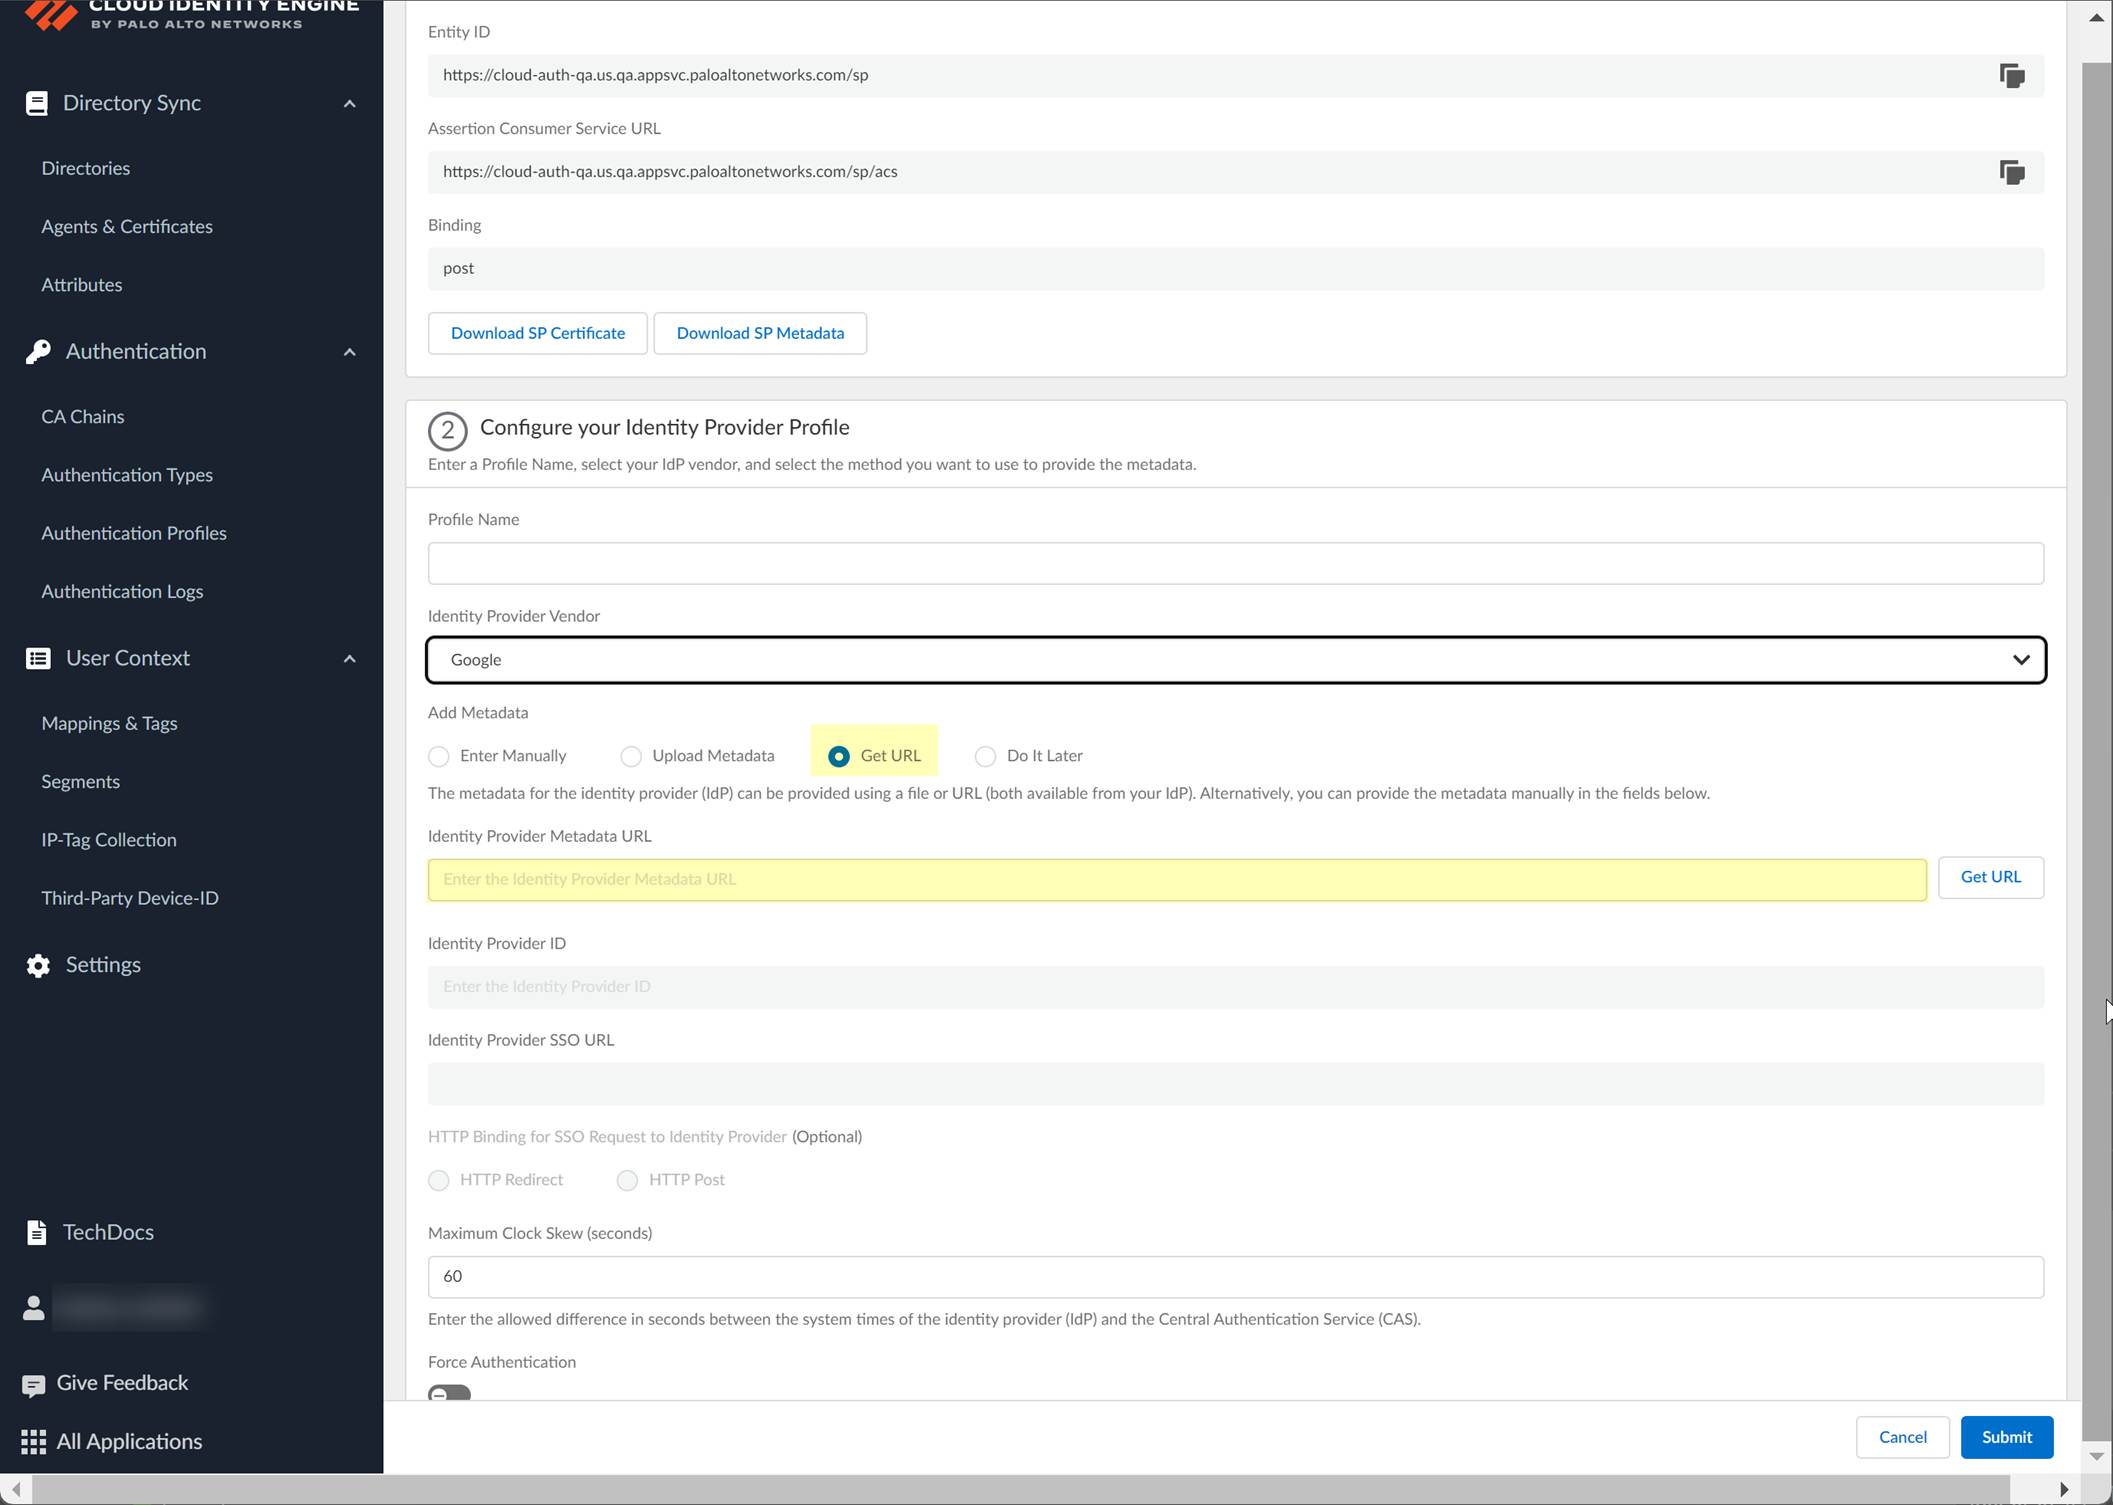
- Click Get URL to confirm the URL and populate the Identity Provider ID and Identity Provider SSO URL .
- If you don't want to enter the configuration information now, you can Do it later . This option allows you to submit the profile without including configuration information. However, you must edit the profile to include the configuration information to use the authentication type in an authentication profile.

- Select the HTTP Binding for SSO Request to IdP method you want to use for the SAML binding that allows the firewall and IdP to exchange request and response messages:
- HTTP Redirect —Transmit SAML messages through URL parameters.
- HTTP Post —Transmit SAML messages using base64-encoded HTML.
- Specify the Maximum Clock Skew (seconds) , which is the allowed difference in seconds between the system times of the IdP and the firewall at the moment when the firewall validates IdP messages (default is 60; range is 1–900). If the difference exceeds this value, authentication fails.
- To require users to log in using their credentials to reconnect to GlobalProtect, enable Force Authentication .
- Test SAML setup to verify the profile configuration.
This step is necessary to confirm that your firewall and IdP can communicate.
- Select the SAML attributes you want the firewall to use for authentication and Submit the IdP profile.
Select the Username Attribute and optionally, the Usergroup Attribute , Access Domain , User Domain , and Admin Role .
Configure a SAML 2.0-Compliant IdP in the Cloud Identity Engine
To use a SAML 2.0-compliant identity provider (IdP) that is not listed as an Identity Provider Vendor , you can configure the IdP using the Others
- Obtain the information from your SAML 2.0- compliant IdP that you need to configure in the Cloud Identity Engine.
- Copy the following information from your IdP:
- Identity Provider ID
- Identity Provider Certificate
- Identity Provider SSO URL
- In the Cloud Identity Engine app, select AuthenticationSP MetadataDownload SP Metadata and Save the metadata in a secure location.
- Configure the IdP in the Cloud Identity Engine.
- Select Authentication Types and click Add New Authentication Type .
- Set Up a SAML 2.0 authentication type.
- Enter a Profile Name .

- Select Others as your Identity Provider Vendor .
- Select the method you want to use to Add Metadata .
- If you want to enter the information manually, obtain the necessary information from your IdP then enter the information in the Cloud Identity Engine.
1. Copy or download the following information from your IdP and enter it in the Cloud Identity Engine app:
- Identity Provider ID
- Identity Provider Certificate
- Identity Provider SSO URL
2. Select the HTTP Binding for SSO Request to IdP method you want to use for the SAML binding that allows the firewall and IdP to exchange request and response messages:
- HTTP Redirect —Transmit SAML messages through URL parameters.
- HTTP Post —Transmit SAML messages using base64-encoded HTML.
- If you want to upload a metadata file, download the metadata file from your IdP management system.
1. Download the metadata from your IdP.
2. In the Cloud Identity Engine app, click Browse files to select the metadata file then Open the metadata file.
- If you want to use a URL to retrieve the metadata, copy the URL from your IdP. Enter it as the Identity Provider Metadata URL in the Cloud Identity Engine and click Get URL to obtain the metadata.
- If you don't want to enter the configuration information now, you can Do it later . This option allows you to submit the profile without including configuration information. However, you must edit the profile to include the configuration information to use the authentication type in an authentication profile.
- Specify the Maximum Clock Skew (seconds) , which is the allowed difference in seconds between the system times of the IdP and the firewall at the moment when the firewall validates IdP messages (default is 60; range is 1–900). If the difference exceeds this value, authentication fails.
- To require users to log in using their credentials to reconnect to GlobalProtect, enable Force Authentication .
- Test SAML setup to verify the profile configuration.
This step is necessary to confirm that your firewall and IdP can communicate.
- Select the SAML attributes you want the firewall to use for authentication and Submit the IdP profile.
- In the IdP, edit as necessary the attributes you want to use to authenticate users.
- In the Cloud Identity Engine app, select the Username Attribute and optionally, the Usergroup Attribute , Access Domain , User Domain , and Admin Role .
Configure a Client Certificate
To use a client certificate to authenticate users, configure a certificate authority (CA) and client certificate.
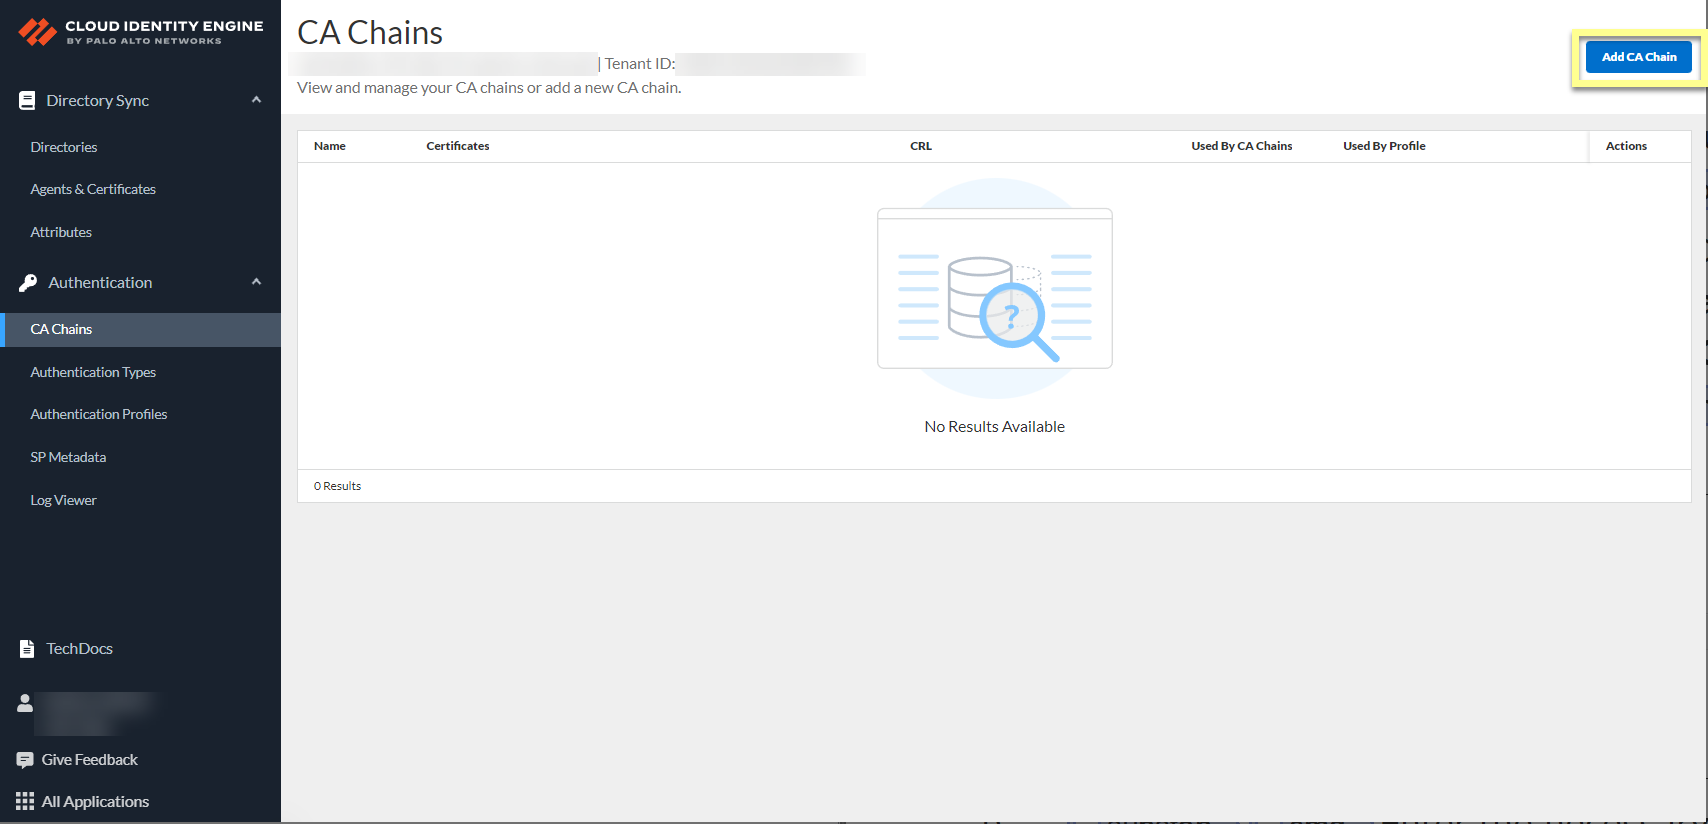
- Configure a Certificate Authority (CA) chain to authenticate users.
Upload the CA chain, including the root certificate and any intermediate certificates, that issues the client certificate. The Cloud Identity Engine supports multiple intermediate certificates but does not support sibling intermediate certificates in a single CA chain.
- In the Cloud Identity Engine app, select AuthenticationCA ChainsAdd CA Chain .
- Enter the necessary information for the CA chain profile.
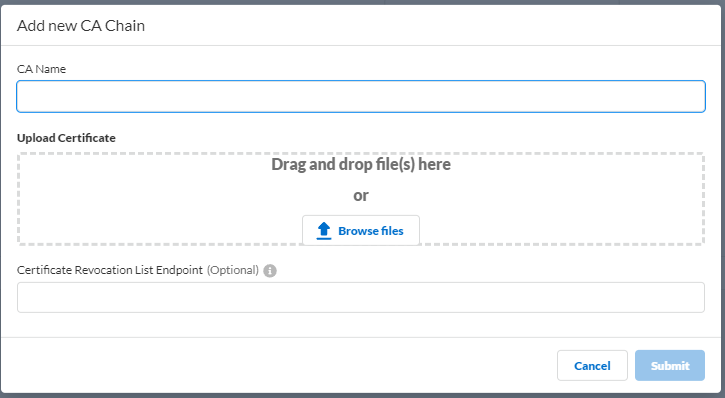
- CA Name —Enter a unique name to identify the CA chain in the Cloud Identity Engine tenant.
- Upload Certificate — Drag and drop file(s) here or Browse files to your CA certificate then Open the certificate to select it.
The file must end in the . crt or . pem file extension.
- Certificate Revocation List Endpoint (Optional) —( Optional but recommended) Specify the URL for the certificate revocation list (CRL) list that you want the Cloud Identity Engine to use to validate the client certificate.
- Submit the changes to complete the configuration.
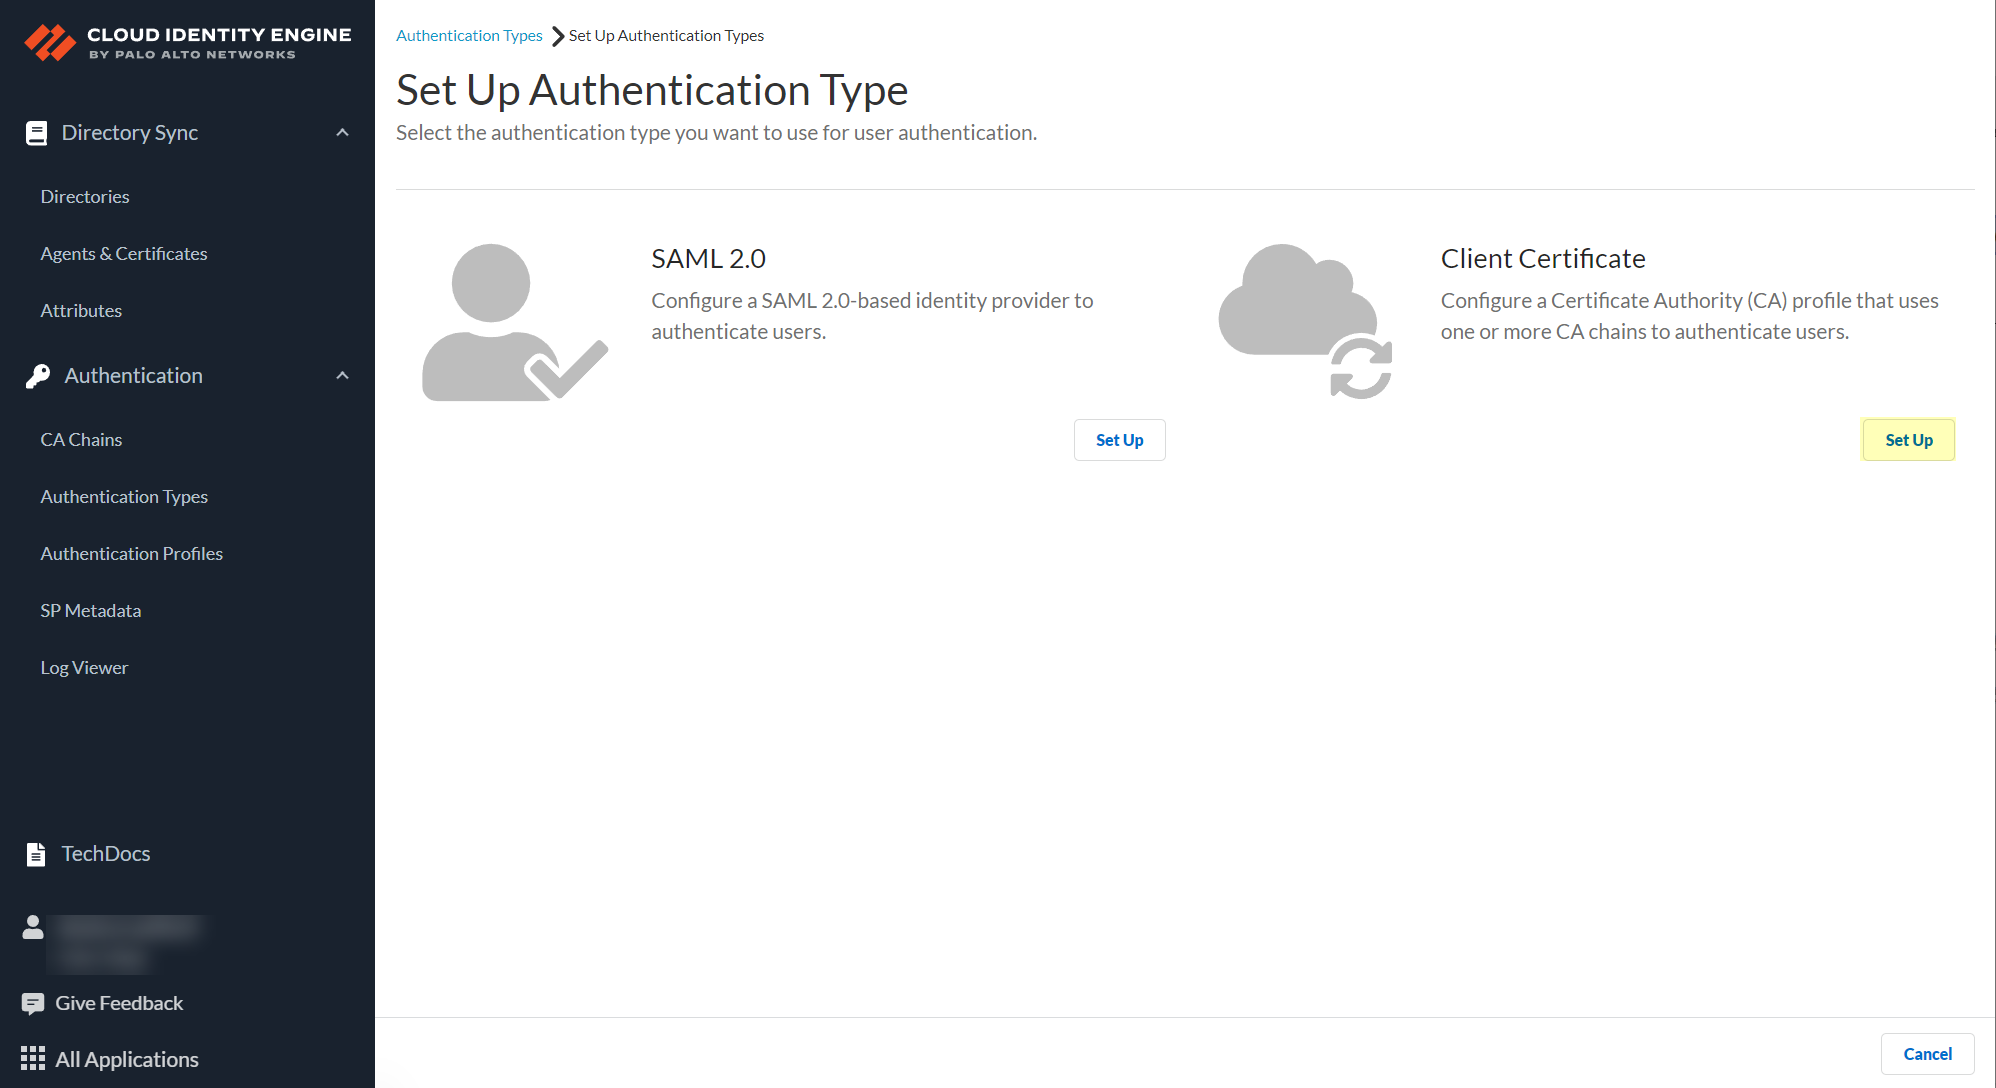
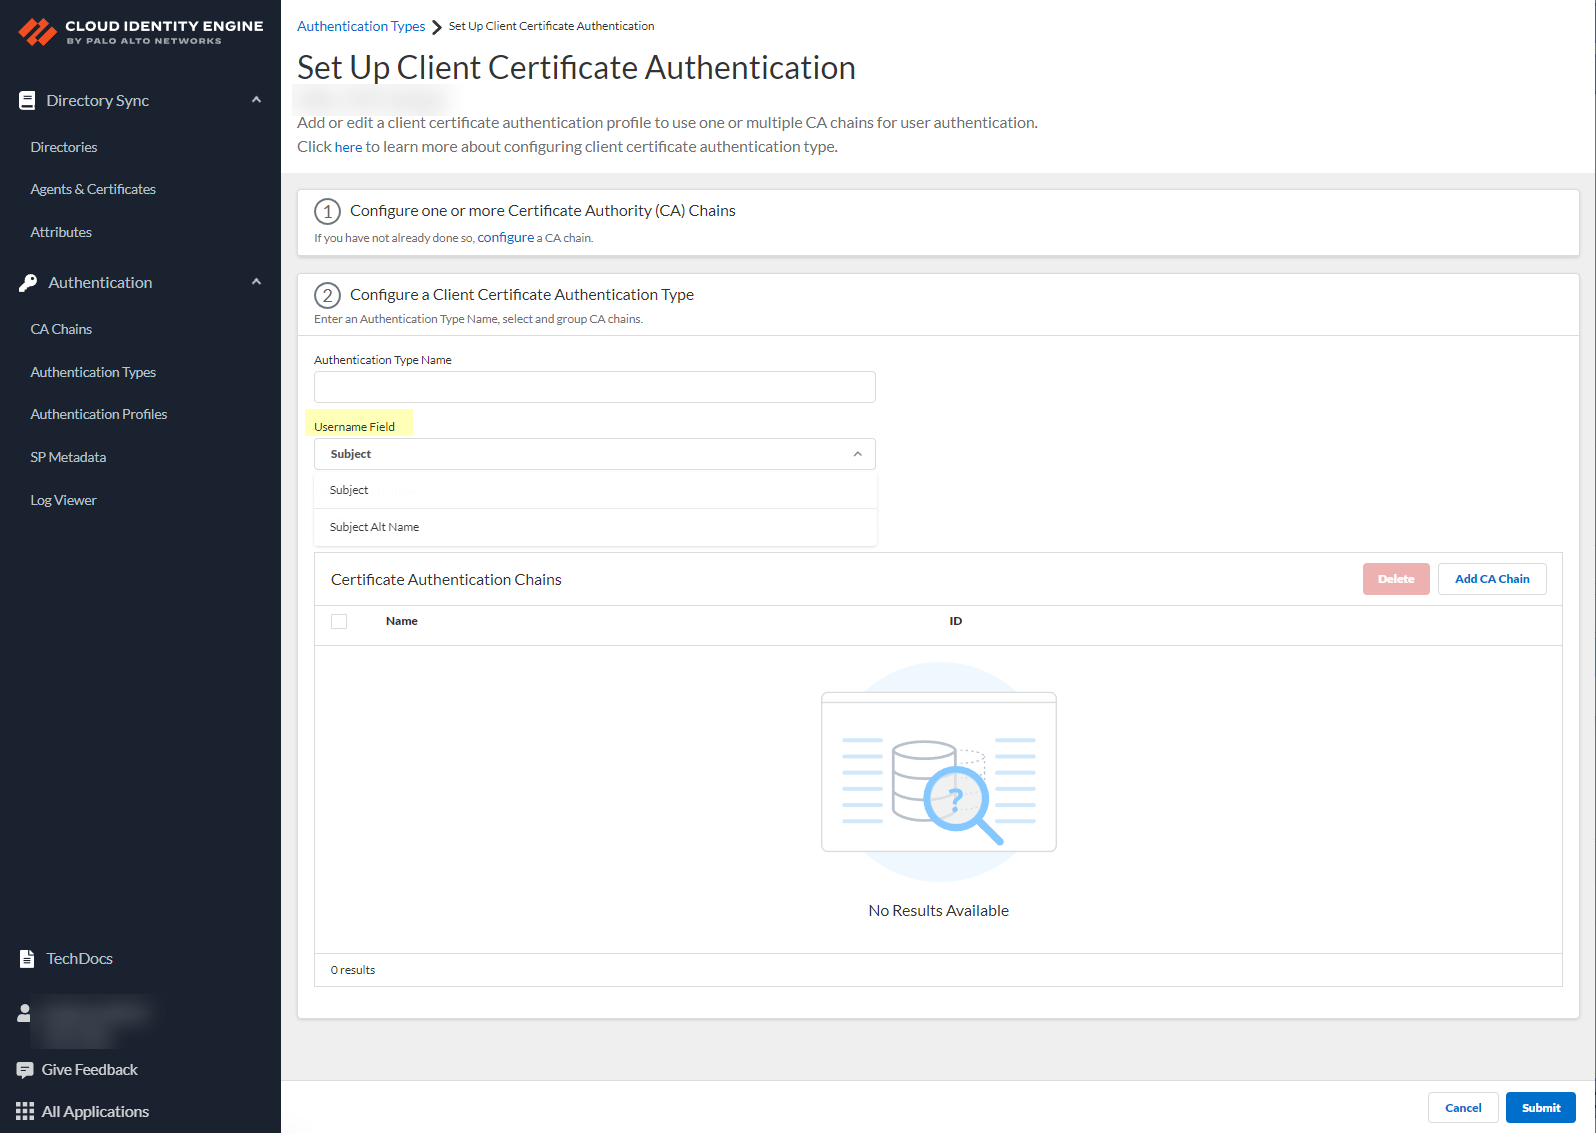
- In the Cloud Identity Engine app, select AuthenticationAuthentication TypesAdd New Authentication Type .
- Select Client CertificateSet Up .
- Enter a unique Authentication Type Name for the client certificate.
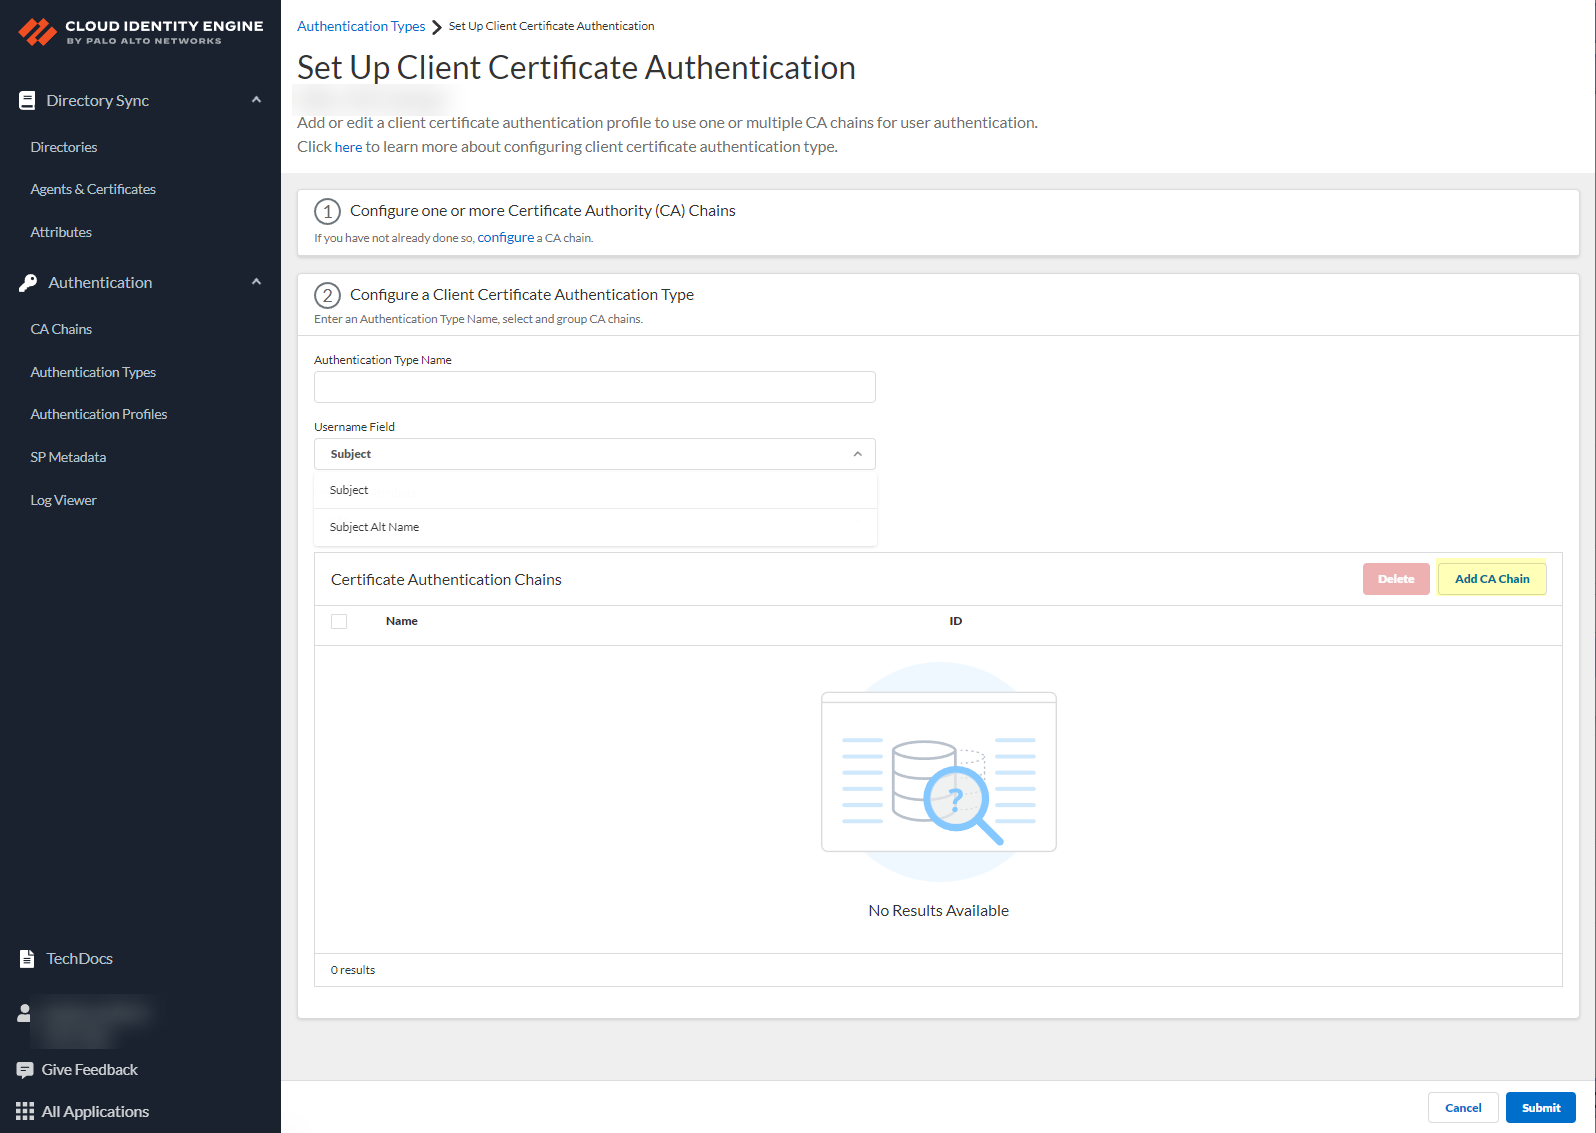
- Select the Username Field that you want the Cloud Identity Engine to use to authenticate users.
Select the Username Field based on the attribute type of the client certificate that you want to use to authenticate the user; for example, if the username is defined in the client certificate using Subject , select Subject .
- Configure the Username Attribute based on the previous step and the attribute that your client certificate uses to authenticate users.
- If the Username Field is Subject , the Username Attribute is CN .
- If the Username Field is Subject Alt Name , select Email or User Principal Name based on the attribute that your client certificate specifies.
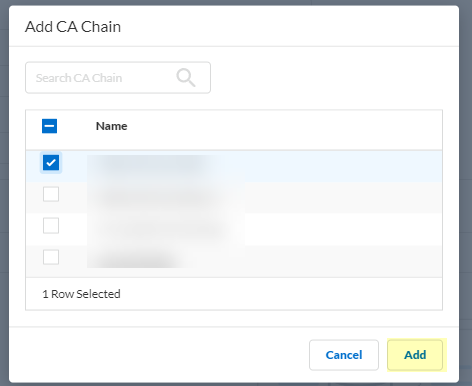
- Click Add CA Chain to add one or more CA chains to authenticate users.
- Enter a search term in the Search CA Chain field or select a CA chain you previously configured and Add it to the configuration.
The Cloud Identity Engine supports grouping multiple CA chains in a certificate type to authenticate client certificates issued by multiple CA chains.
- Submit your changes to configure the authentication type.