Set Up an Authentication Profile
Configure an authentication profile to use to authenticate users with the Cloud Identity Engine. You can specify one or more authentication types by group or by directory or for all directories.
To use more than one authentication type in your authentication profile, you must configure a directory in the Cloud Identity Engine. For a single client certificate authentication type, configuring a directory in the Cloud Identity Engine is optional. There is no directory requirement for a single SAML 2.0-compliant authentication type.
- Select AuthenticationAuthentication Profiles then Add Authentication Profile .
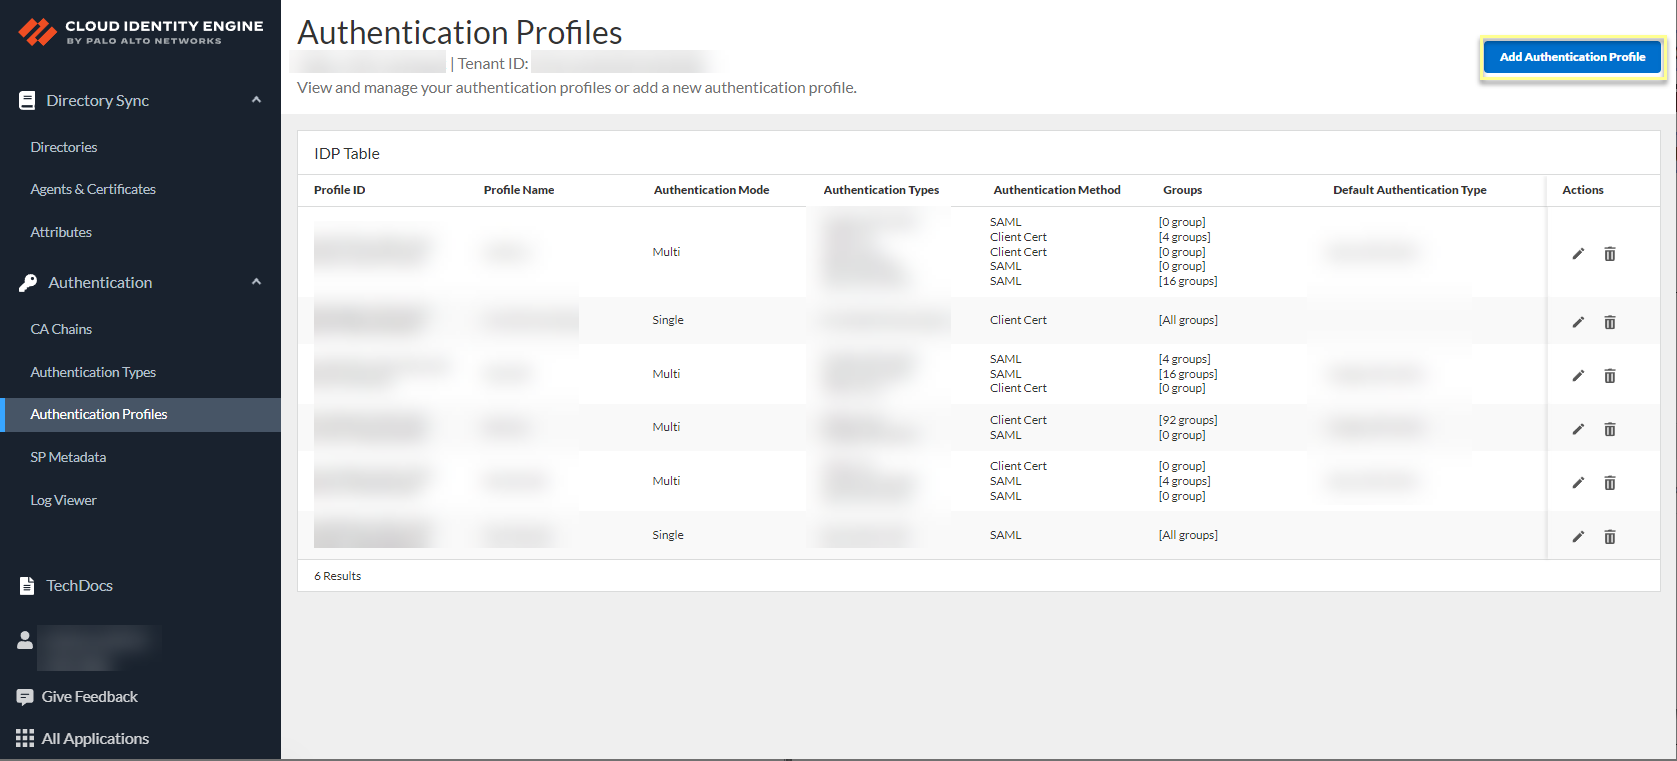
- If you have not already done so, Configure a SAML 2.0 Authentication Type or Configure a Client Certificate to use as an authentication type.
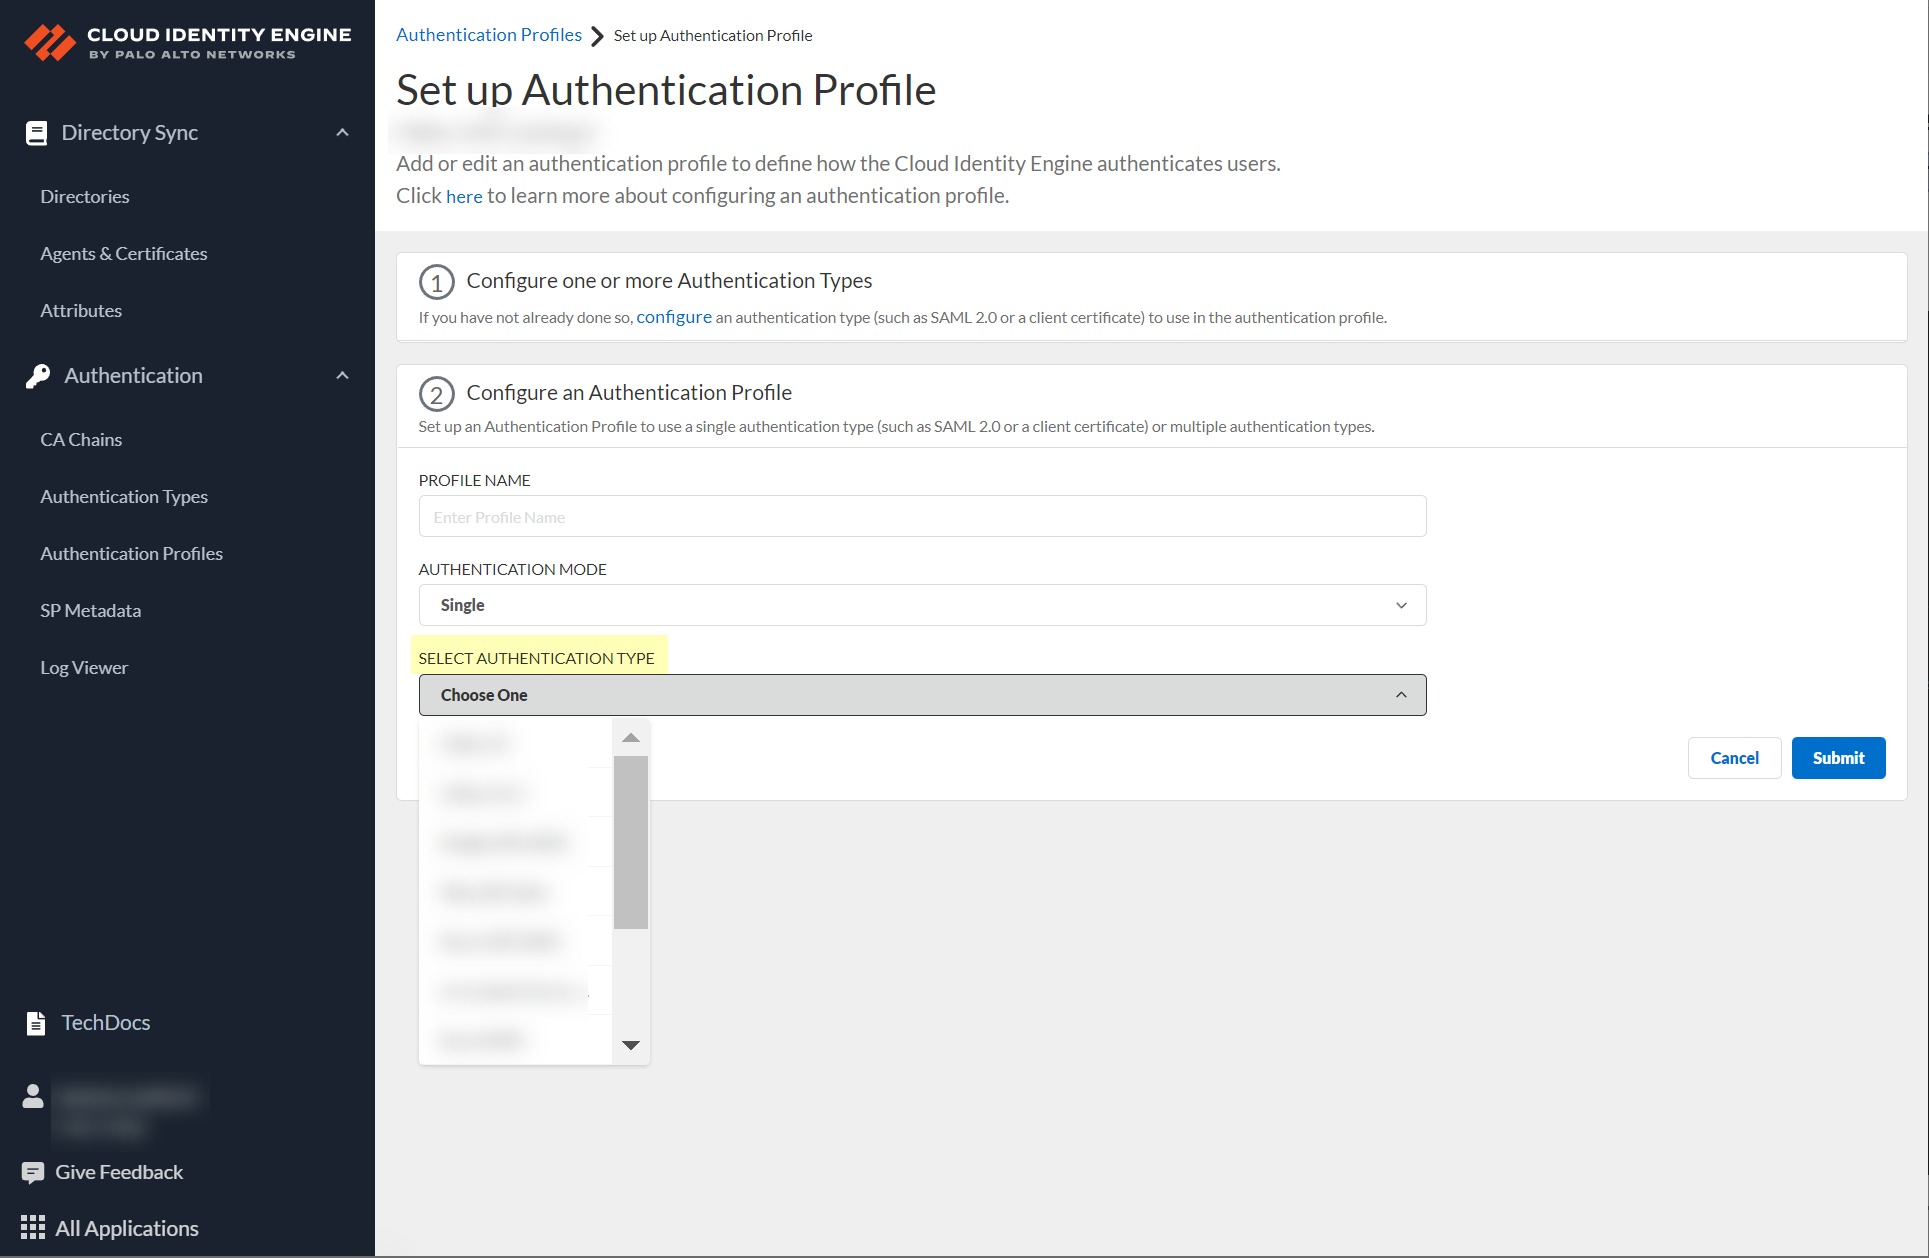
- Enter a unique Profile Name .
- Select the Authentication Mode .

- If you select Single as the authentication mode, click Select authentication type and select the authentication type you want to use.
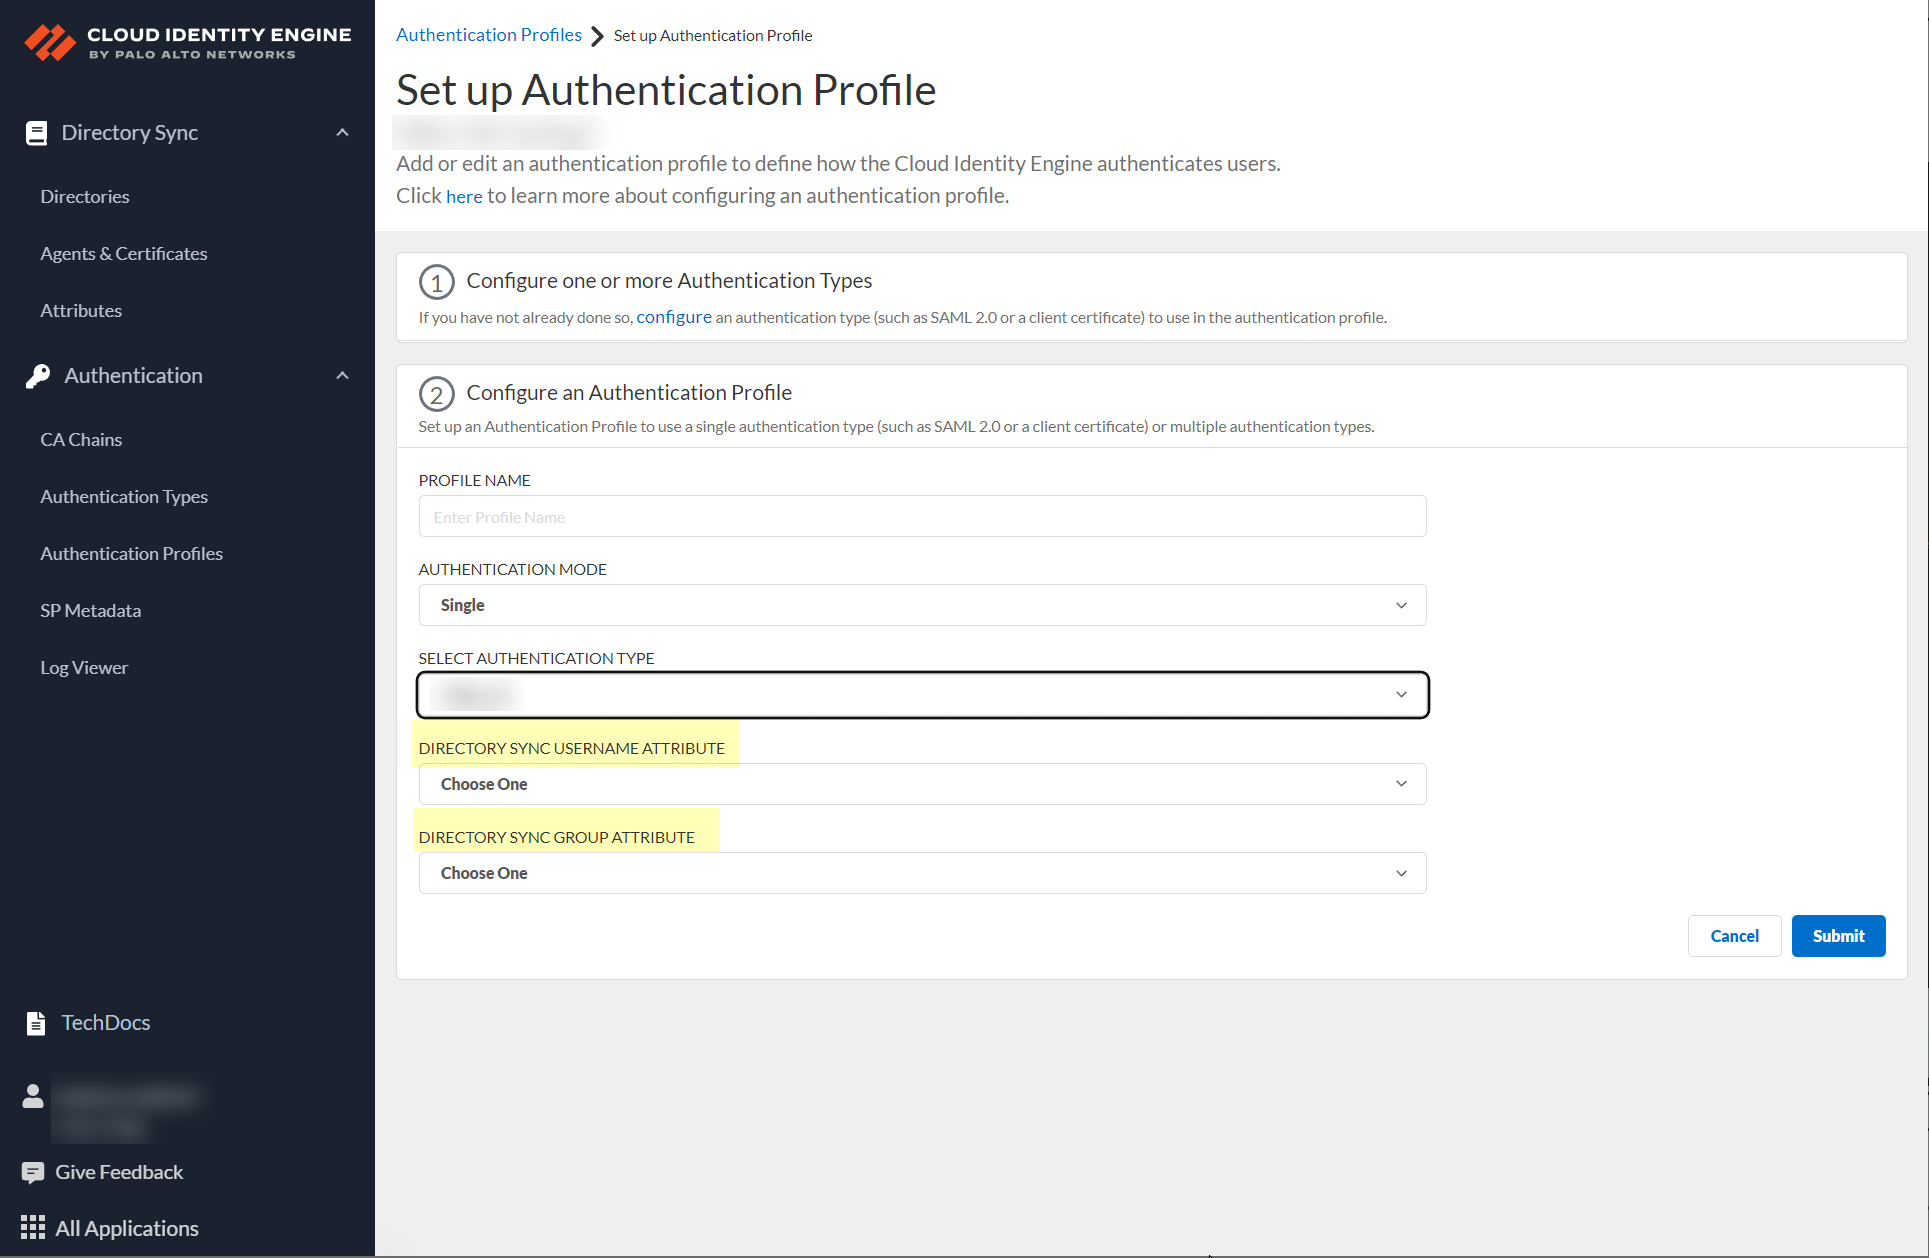
- If either of the following apply to your configuration, select the Directory Sync Username Attribute and Directory Sync Group Attribute .
- You selected Multiple as the Authentication Mode and you have configured a client certificate.
- You selected Single and the Authentication Type is Client Certificate.
To successfully authenticate users using a client certificate, the value of the Directory Sync Username Attribute must match the value of the Username Attribute you select when you configure the Client Certificate Authentication Type.
- (Multiple Authentication Mode only) Define the Authentication mapping order by selecting the configured authentication types that you want to use to authenticate users.
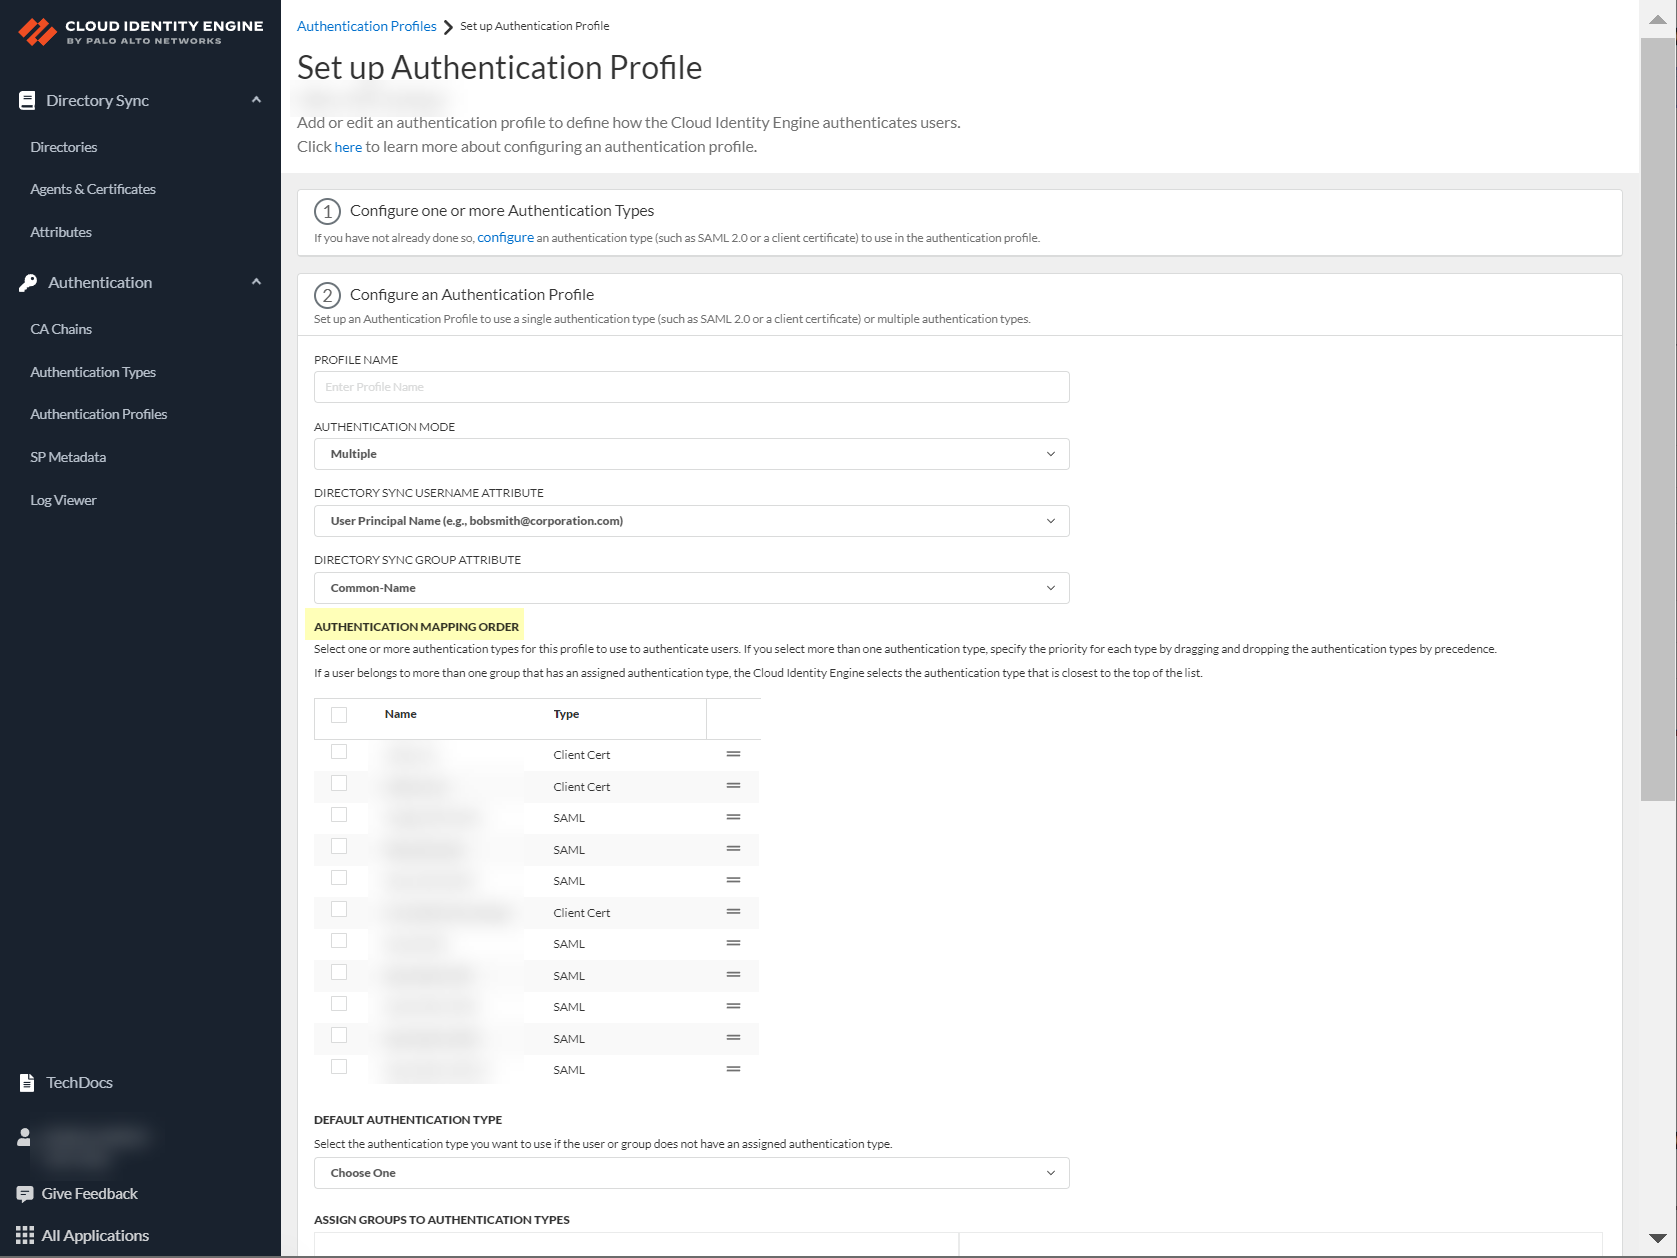
- (Multiple Authentication Mode only) During authentication, the Cloud Identity Engine uses the given user identity information to obtain the directory group information for the user to determine if the user’s group has an assigned authentication type. If the user belongs to multiple groups, the Cloud Identity Engine uses the first authentication type you assign to the group for user authentication.
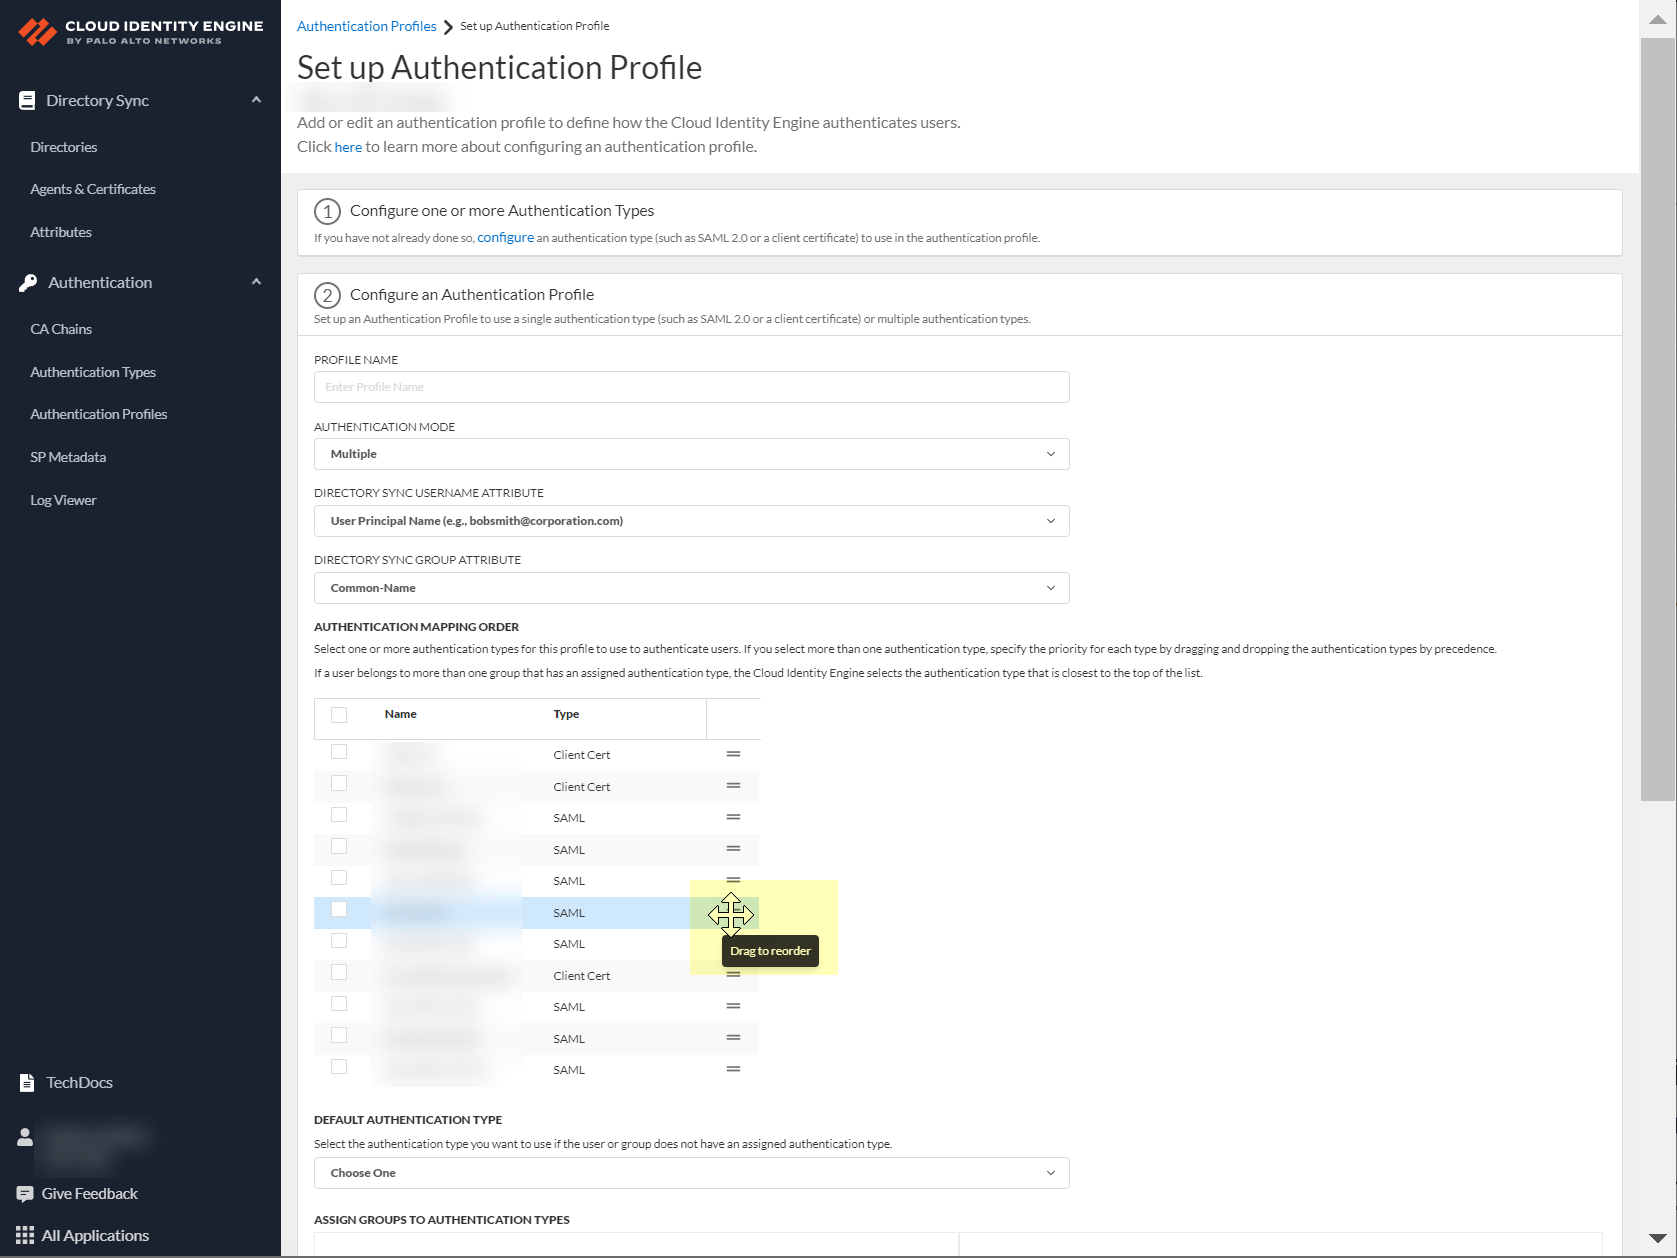
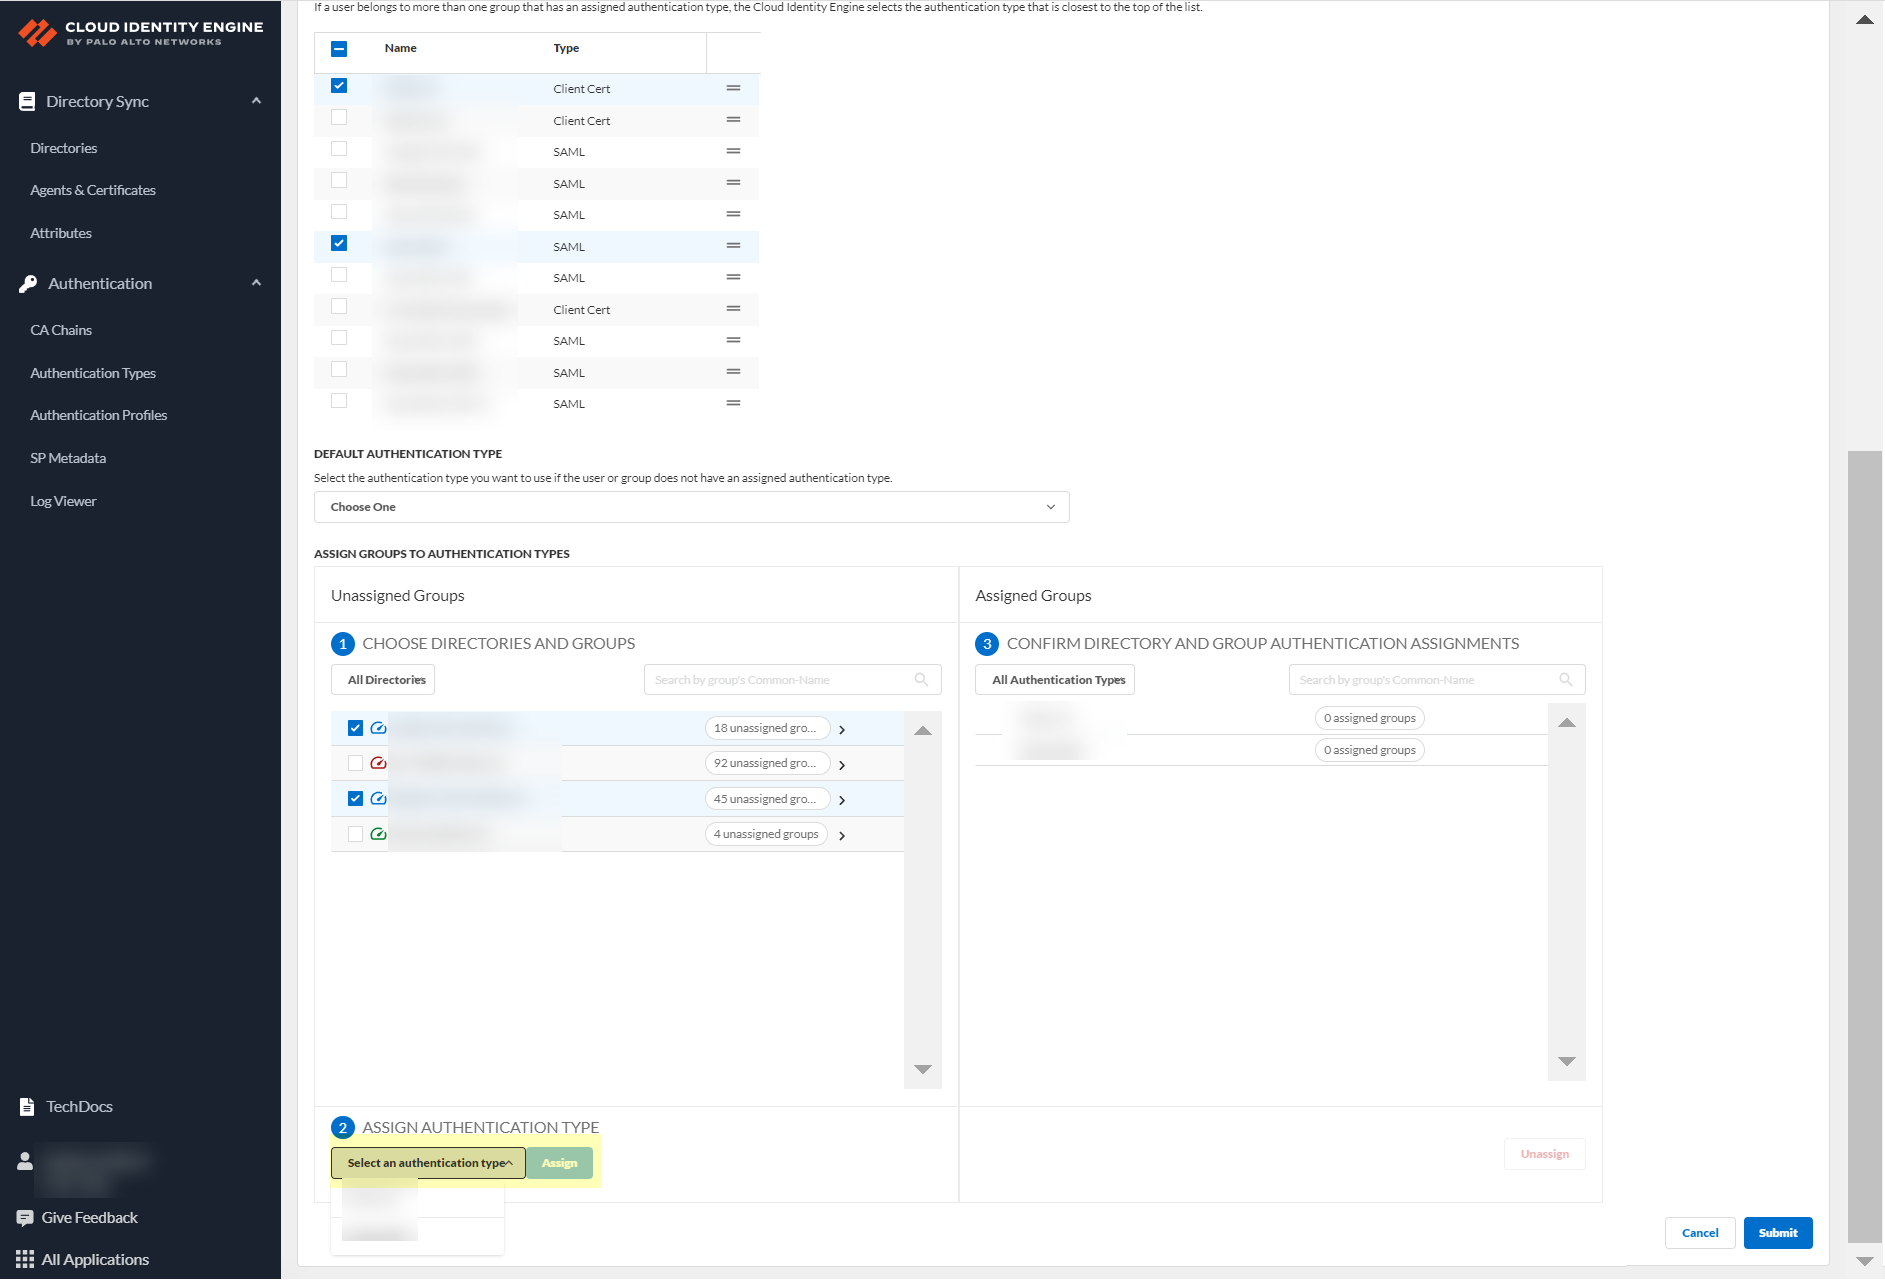
- Select the Default authentication type that you want the Cloud Identity Engine to use to authenticate users if the user is not in an assigned group.
As a best practice, assign an authentication type for each group you want to authenticate using the Cloud Identity Engine.

- Choose directories and groups by selecting a directory or selecting All Directories .
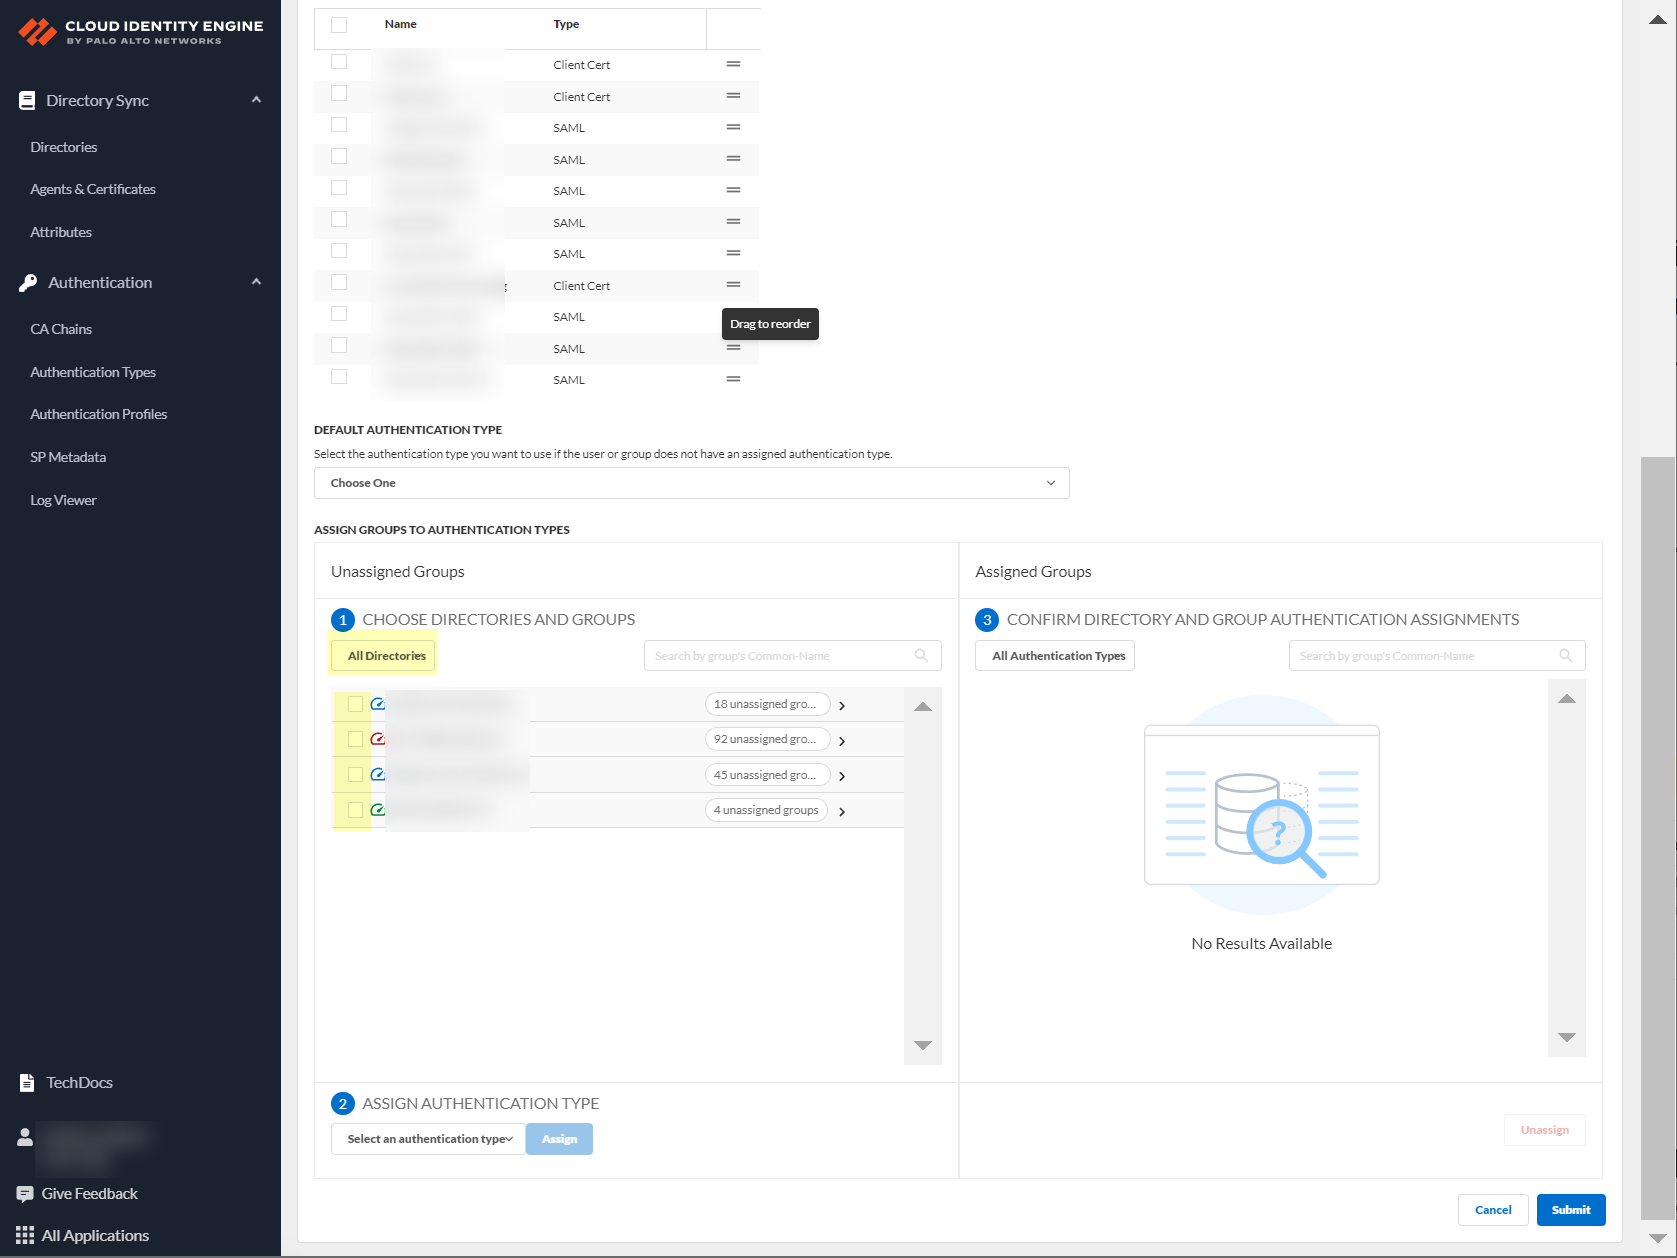
You can also search by Directory Sync Group Attribute (such as Common-Name ).
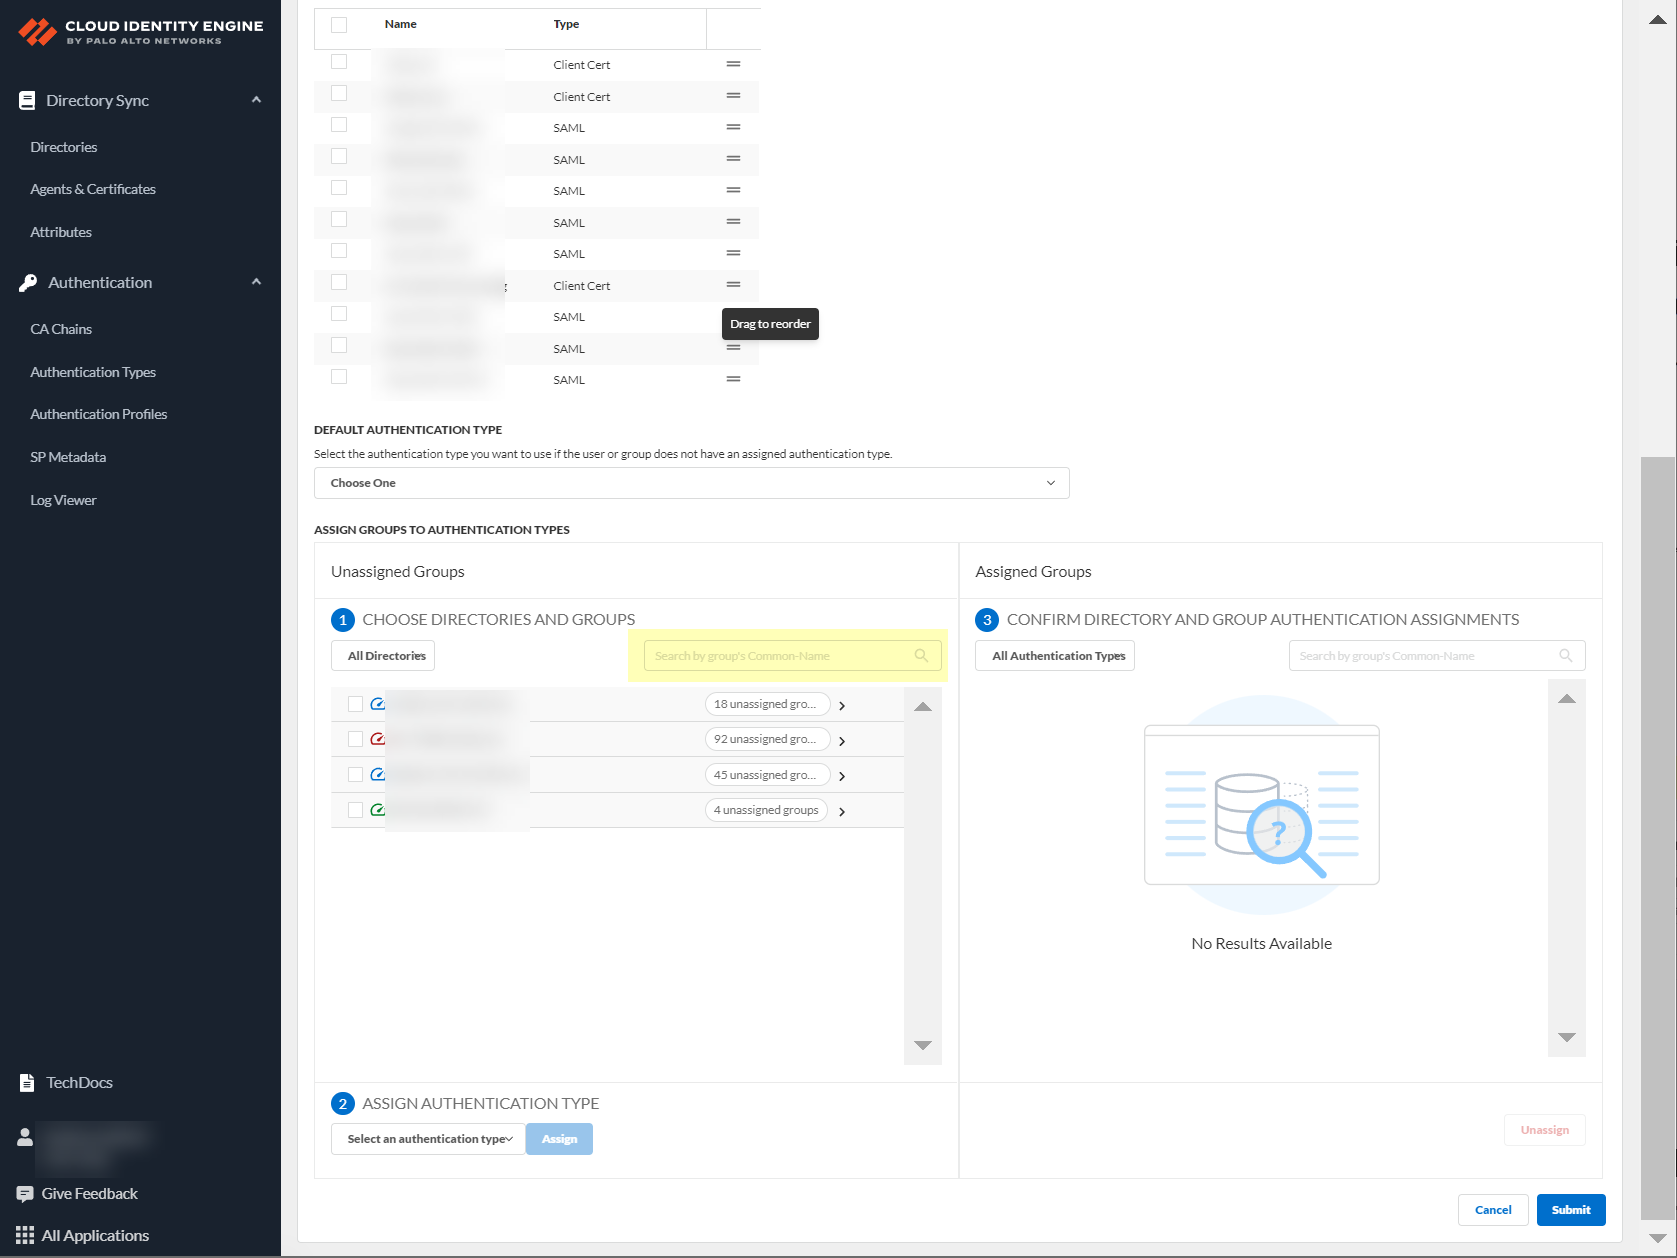
- Select the group or groups from each directory that you want to authenticate using the authentication type you select in the next step.
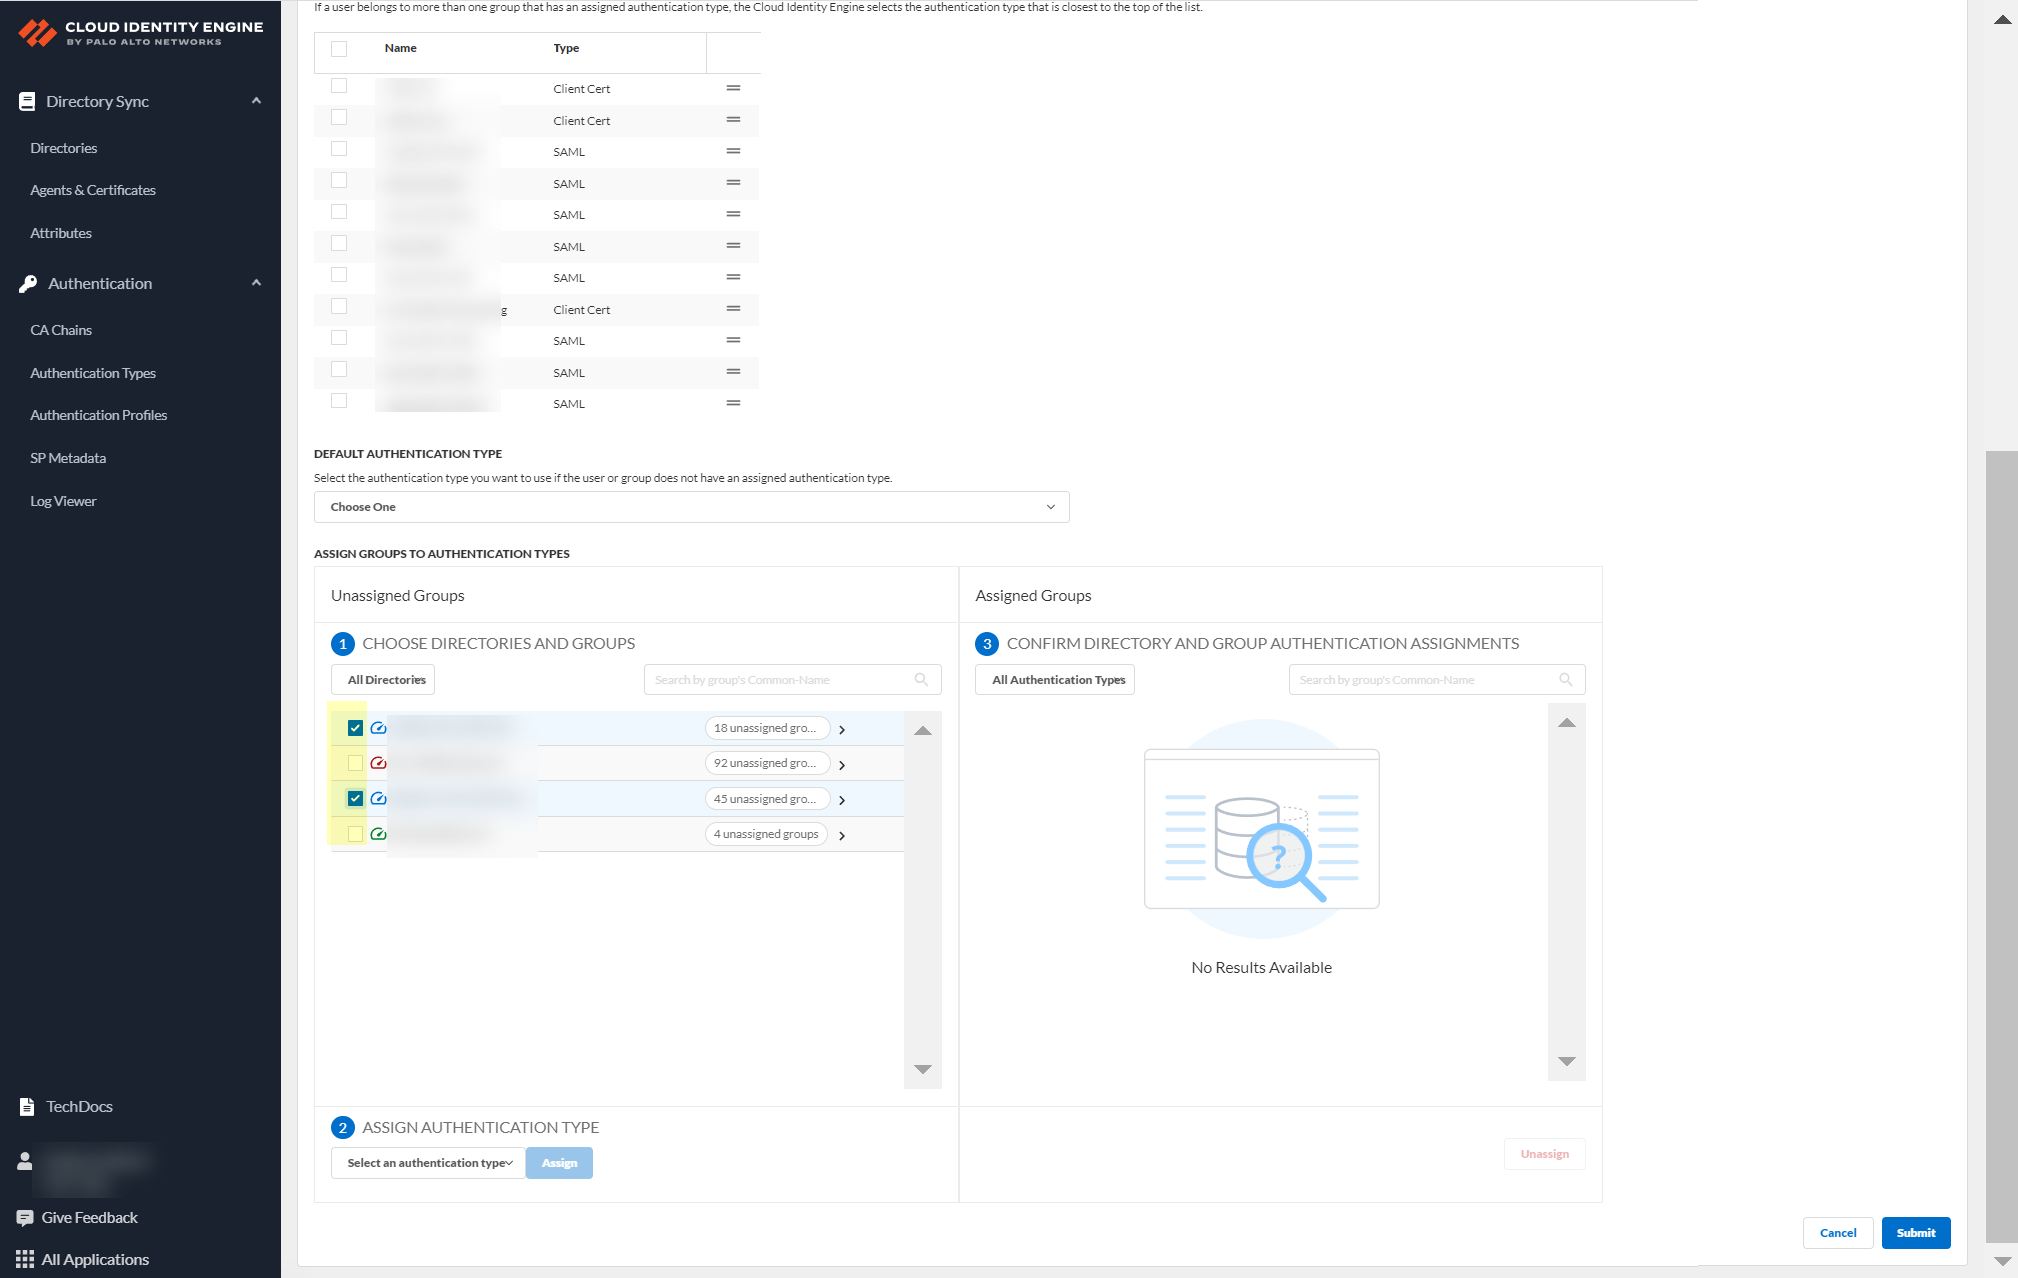
- Select an authentication type and Assign it to assign this authentication type to the group or groups you selected.
- Review your selections by authentication type or select All Authentication Types to see all assigned groups.
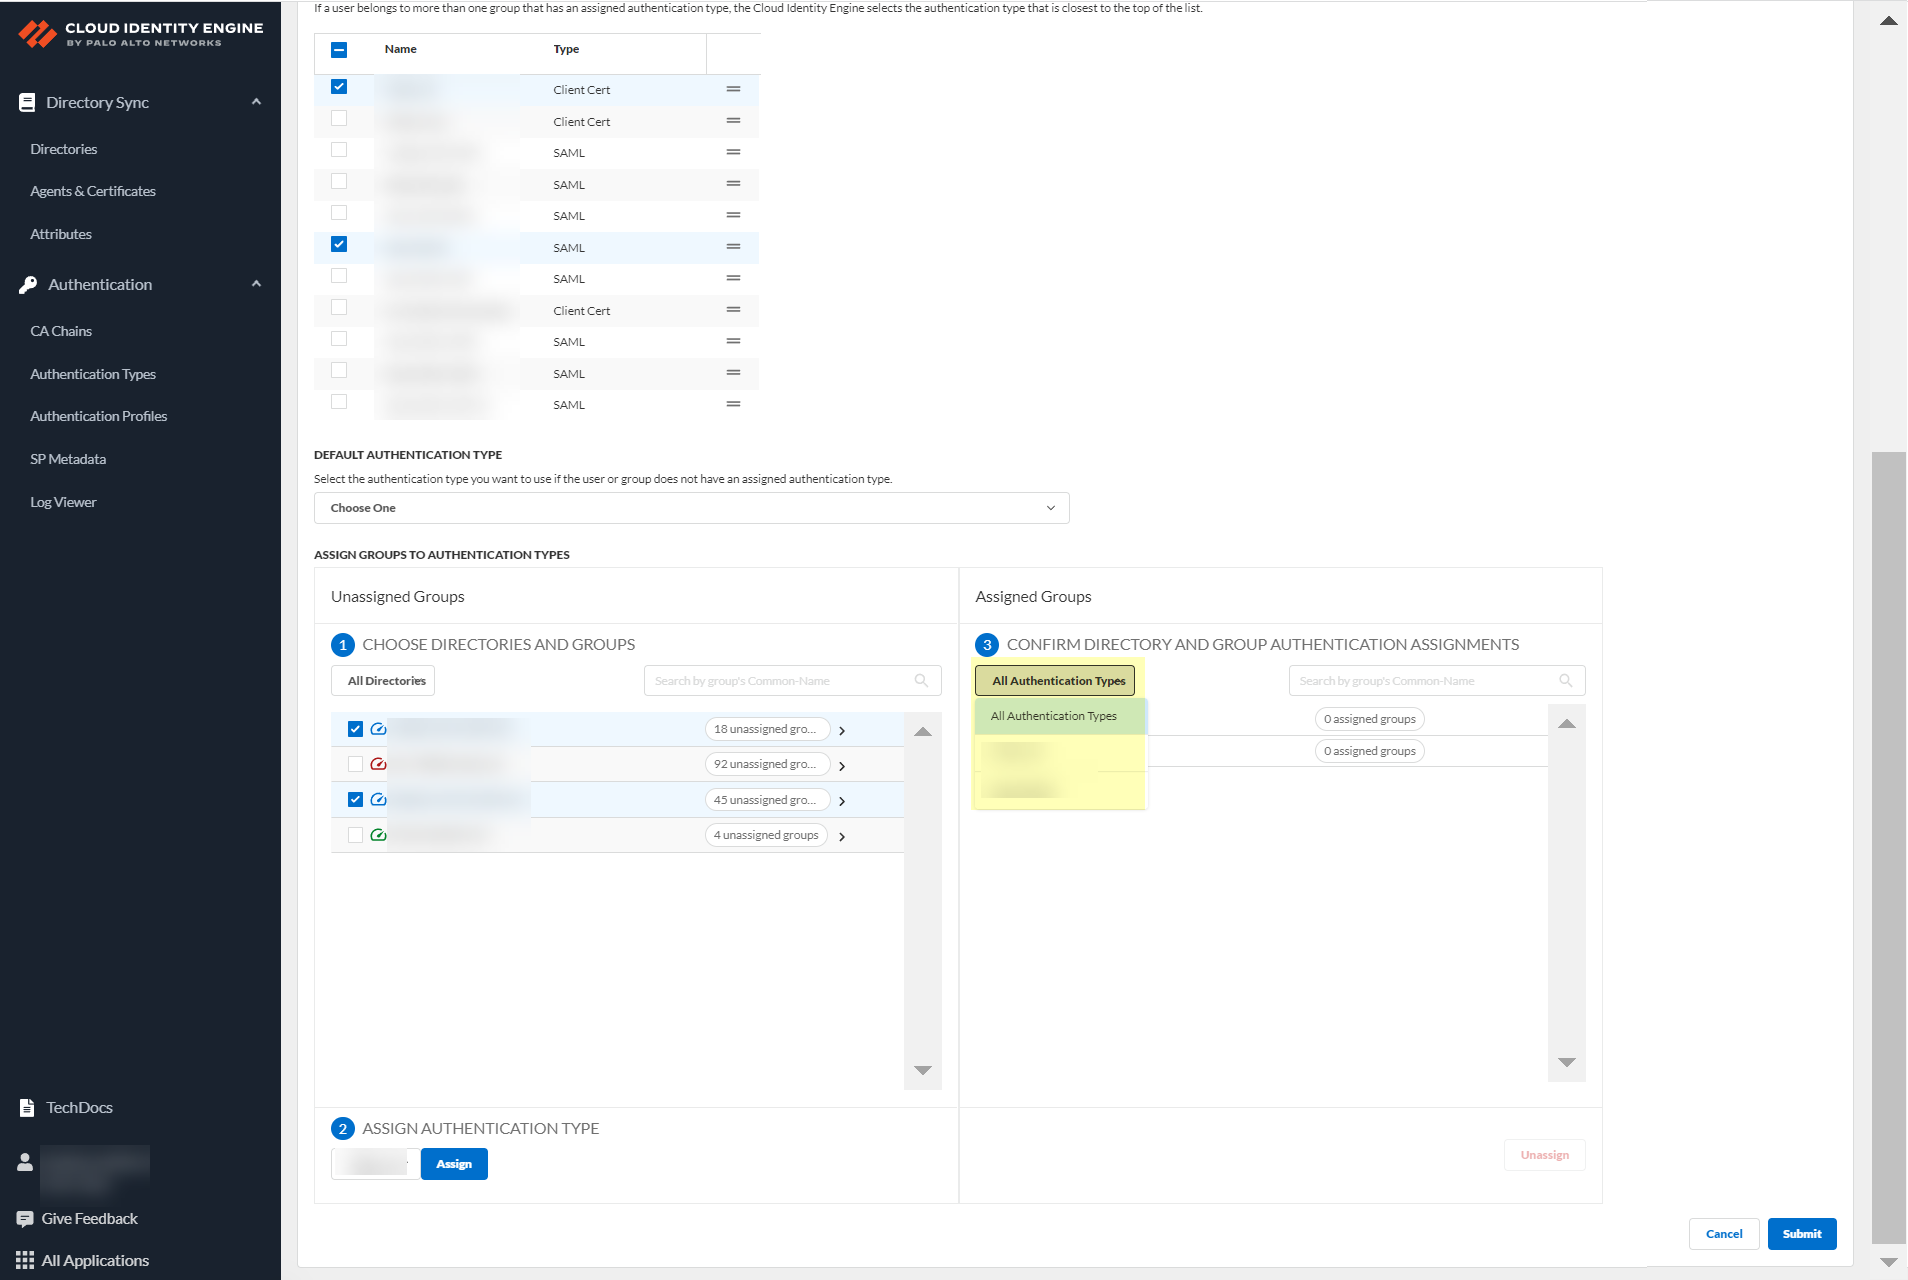
- Submit your changes to configure the authentication profile.
Configure Cloud Identity Engine Authentication on the Firewall or Panorama
After you Configure the Cloud Identity Engine as a Mapping Source on the Firewall or Panorama and Configure a SAML 2.0 Authentication Type , Configure a Client Certificate , or both, you can create an authentication profile that redirects users to the authentication type (either a client certificate or a SAML 2.0-compliant identity provider) you configure for authentication.
If you use Panorama to manage your firewalls, configure an authentication profile in Panorama then push the authentication profile to the managed firewalls.
Some steps in the following procedure are required only if you want to configure an authentication policy rule on the firewall using the Cloud Identity Engine and aren’t required if you want to authenticate administrators or to authenticate users with Prisma Access or GlobalProtect. These steps are indicated below.
- Configure an authentication profile to use the Cloud Authentication Service.
- On the firewall, select DeviceAuthentication Profile .
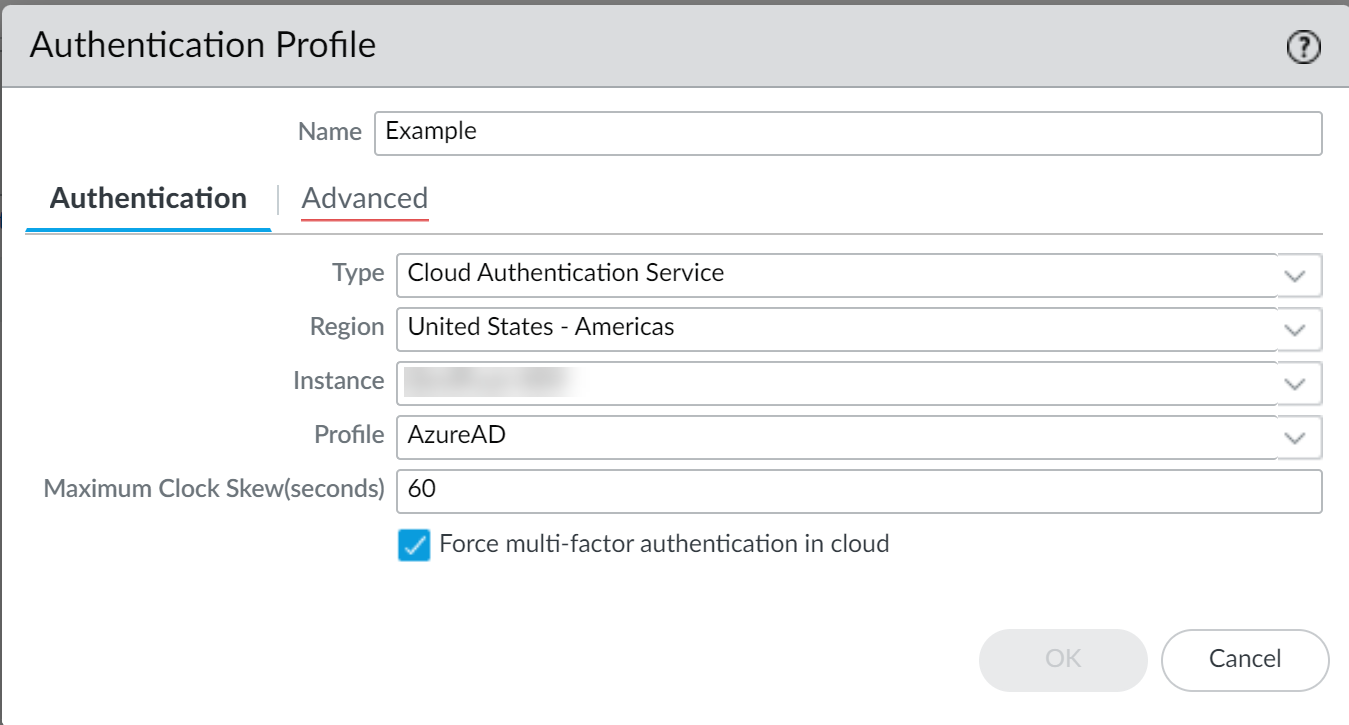
- Enter a Name for the authentication profile.
- Select Cloud Authentication Service as the Type .
- Select the Region of your Cloud Identity Engine tenant.
For more information on regions, refer to Activate the Cloud Identity Engine .
- Select the Cloud Identity Engine Instance you want to use for this authentication profile.
For more information on Cloud Identity Engine tenants, refer to Cloud Identity Engine Tenants .
- Select an authentication Profile that specifies the authentication type you want to use to authenticate users.
- Specify the Maximum Clock Skew (seconds) , which is the allowed difference in seconds between the system times of the IdP and the firewall at the moment when the firewall validates IdP messages (default is 60; range is 1–900). If the difference exceeds this value, authentication fails.
- Select Force multi-factor authentication in cloud if your IdP is configured to require users to log in using multi-factor authentication (MFA).
- (Required for authentication policy rule only) Configure the Authentication Portal settings to use the authentication profile.
- Select DeviceUser IdentificationAuthentication Portal Settings .
- Edit the settings and select the Authentication Profile from the first step.
- Select Redirect as the Mode .
For more information on how to configure redirect mode, refer to Configure Authentication Portal .
- Click OK .
- (Required for authentication policy rule only) Create an Authentication Enforcement object that uses the authentication profile to redirect users to log in using their authentication type.
- Select ObjectsAuthentication .
- Add an Authentication Enforcement object and enter a Name for the object.
- Select web-form as the Authentication Method .
- Select the Authentication Profile from the first step.
- (Optional) Enter a Message to display to users.
- Click OK .
- Create a URL list as a custom URL category to allow the necessary traffic for the Cloud Identity Engine.
- If you don’t need to strictly limit traffic to your region, you can enter *.apps.paloaltonetworks.com . Otherwise, determine your region-based URL using the show cloud-auth-service-regions command to display the URLs for the region associated with your Cloud Identity Engine tenant and enter each region-based URL. The following table includes the URLs for each region:
|
Region |
Cloud Identity Engine Region-Based URL |
|
United States |
cloud-auth.us.apps.paloaltonetworks.com cloud-auth-service.us.apps.paloaltonetworks.com |
|
Europe |
cloud-auth.nl.apps.paloaltonetworks.com cloud-auth-service.nl.apps.paloaltonetworks.com |
|
United Kingdom |
cloud-auth.uk.apps.paloaltonetworks.com cloud-auth-service.uk.apps.paloaltonetworks.com |
|
Singapore |
cloud-auth.sg.apps.paloaltonetworks.com cloud-auth-service.sg.apps.paloaltonetworks.com |
|
Canada |
cloud-auth.ca.apps.paloaltonetworks.com cloud-auth-service.ca.apps.paloaltonetworks.com |
|
Japan |
cloud-auth.jp.apps.paloaltonetworks.com cloud-auth-service.jp.apps.paloaltonetworks.com |
|
Australia |
cloud-auth.au.apps.paloaltonetworks.com cloud-auth-service.au.apps.paloaltonetworks.com |
|
Germany |
cloud-auth.de.apps.paloaltonetworks.com cloud-auth-service.de.apps.paloaltonetworks.com |
|
United States - Government |
cloud-auth-service.gov.apps.paloaltonetworks.com cloud-auth.gov.apps.paloaltonetworks.com |
|
India |
cloud-auth-service.in.apps.paloaltonetworks.com cloud-auth.in.apps.paloaltonetworks.com |
|
Switzerland |
cloud-auth-service.ch.apps.paloaltonetworks.com cloud-auth.ch.apps.paloaltonetworks.com |
|
Spain |
cloud-auth-service.es.apps.paloaltonetworks.com cloud-auth.es.apps.paloaltonetworks.com |
|
Italy |
cloud-auth-service.it.apps.paloaltonetworks.com cloud-auth.it.apps.paloaltonetworks.com |
|
France |
cloud-auth-service.fr.apps.paloaltonetworks.com cloud-auth.fr.apps.paloaltonetworks.com |
|
China |
cloud-auth-service.cn.apps.prismaaccess.cn cloud-auth.cn.apps.prismaaccess.cn This region is only accessible in the Cloud Identity Engine within the specified region. |
|
Poland |
cloud-auth-service.pl.apps.paloaltonetworks.com cloud-auth.pl.apps.paloaltonetworks.com |
|
Qatar |
cloud-auth-service.qa.apps.paloaltonetworks.com cloud-auth.qa.apps.paloaltonetworks.com |
|
Taiwan |
cloud-auth-service.tw.apps.paloaltonetworks.com cloud-auth.tw.apps.paloaltonetworks.com |
|
Israel |
cloud-auth-service.il.apps.paloaltonetworks.com cloud-auth.il.apps.paloaltonetworks.com |
|
Indonesia |
cloud-auth-service.id.apps.paloaltonetworks.com cloud-auth.id.apps.paloaltonetworks.com |
|
South Korea |
cloud-auth-service.kr.apps.paloaltonetworks.com cloud-auth.kr.apps.paloaltonetworks.com |
|
Saudi Arabia |
cloud-auth-service.sa.apps.paloaltonetworks.com cloud-auth.sa.apps.paloaltonetworks.com |
- Enter the URLs that your IdP requires for user authentication (for example, *.okta.com ).
- Create a security policy rule to allow traffic to the authentication type and Cloud Identity Engine and select the custom URL category as the match criteria.
- Create a internet management profile in the trusted zone and enable response pages.
- (Required for authentication policy rule only) Configure an Authentication policy rule to use the Authentication Enforcement object and allow traffic to the custom URL category.
- ( Panorama only ) If you use Panorama to manage multiple firewalls, configure the Cloud Identity Engine for Panorama.
- Select the Cloud Identity Engine authentication method you want to use with Panorama.
- To configure the Cloud Identity Engine in an authentication profile for managed devices, select DeviceAuthentication Profile .
- To use the Cloud Identity Engine in an authentication profile for Panorama administrators, select PanoramaAuthentication Profile .
- Select PanoramaSetupManagement and Edit the Authentication Settings , then select the Authentication Profile for the Cloud Identity Engine tenant you want to associate with Panorama.
- Select PanoramaDevice Groups and Add or Edit a device group.
- Select the Cloud Identity Engine and Add the Cloud Identity Engine tenant you want to associate with Panorama then click OK .
- Commit your changes and verify that the firewall redirects authentication requests to the Cloud Authentication Service.
- On the client device, use the browser to access a webpage that requires authentication.
- Confirm that the access request redirects to the Cloud Authentication Service.
- Enter your credentials to log in.
Configure the Cloud Identity Engine as a Mapping Source on the Firewall or Panorama
When you configure the Cloud Identity Engine as a User-ID source, the firewall or Panorama retrieves the group mapping information from the Cloud Identity Engine. You can then use the group information from the Cloud Identity Engine to create and enforce group-based security policy rules.
If your tenant contains an Okta directory that uses subdomains, enter the following CLI command on the firewall before configuring the Cloud Identity Engine profile: debug user-id dscd subdomains on. This command is disabled by default. To disable the subdomain capability, use the debug user-id dscd subdomains off CLI command. These commands are supported for PAN-OS version 10.2.9.
The Cloud Identity Engine retrieves the information for your tenant based on your device certificate. It also uses the Palo Alto Networks Services service route , so make sure to allow traffic for this service route or configure a custom service route .
To ensure that the Cloud Identity Engine can successfully retrieve users and groups, all user or group names must meet the following requirements: the name is case-sensitive and can have up to 63 characters on the firewall or up to 31 characters on Panorama. It must be unique and use only letters, numbers, hyphens, and underscores.
- On the firewall, select DeviceUser IdentificationCloud Identity Engine and Add a profile.
On Panorama, to configure the Cloud Identity Engine as a User-ID source for managed devices, select DeviceUser IdentificationCloud Identity Engine . To configure the Cloud Identity Engine as a User-ID source for Panorama administrators, select PanoramaUser IdentificationCloud Identity Engine .
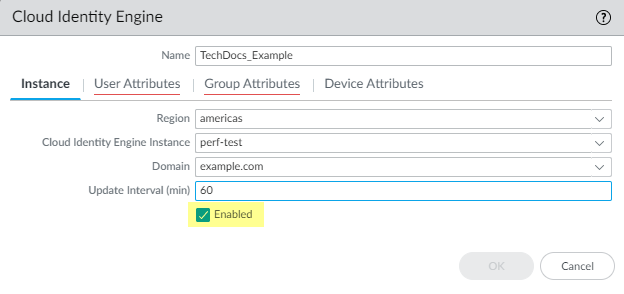
- For the Instance , specify each of the following:
- Region —Select the regional endpoint for your tenant.
The region you select must match the region you select when you activate your Cloud Identity Engine tenant.
- Cloud Identity Engine Instance —If you have more than one tenant, select the tenant you want to use.
- Domain —Select the domain that contains the directories you want to use.
If you have enabled subdomain retrieval for Okta, select the subdomain you want to use for this profile.
- Update Interval (min) —Enter the number of minutes that you want the firewall to wait between updates from the Cloud Identity Engine app to the firewall (also known as a refresh interval). The default is 60 minutes and the range is 5—1440.
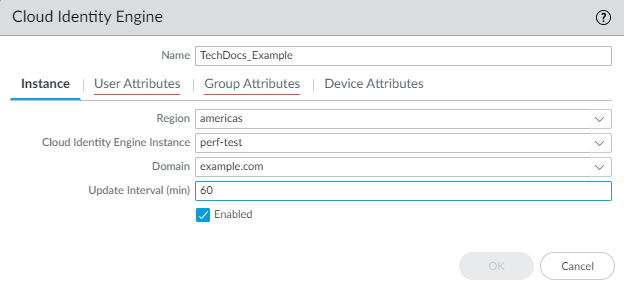
- Verify that the profile is Enabled .
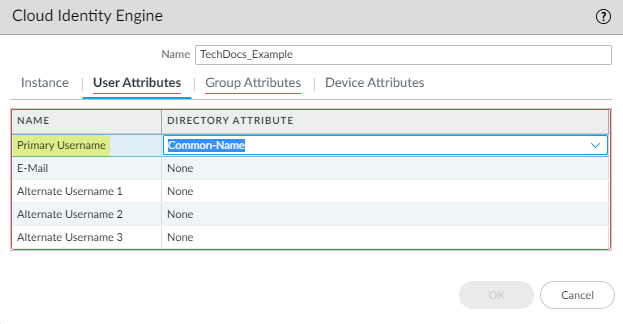
- For the User Attributes , select the format for the Primary Username . You can optionally select the formats for the E-Mail and an Alternate Username . You can configure up to three alternate username formats if your users log in using multiple username formats.
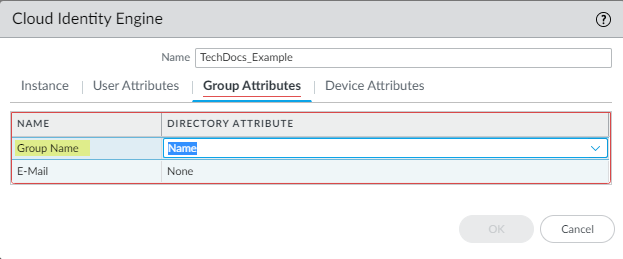
- For the Group Attributes , select the format for the Group Name .
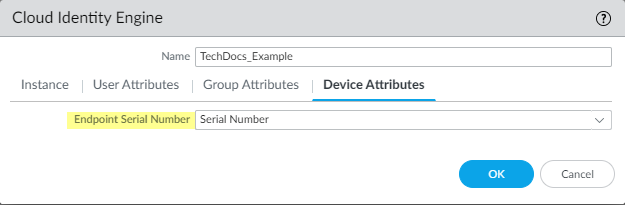
- For the Device Attributes , select the Endpoint Serial Number .
If you are using GlobalProtect and you have enabled Serial Number Check, select the Endpoint Serial Number option to allow the Cloud Identity Engine to collect serial numbers from managed endpoints. This information is used by the GlobalProtect portal to check if the serial number exists in the directory for verification that the endpoint is managed by GlobalProtect.
- Click OK then Commit your changes.
- Configure security policy rules for your users (for example, by specifying one or more users or groups that the firewall retrieves from the Cloud Identity Engine as the Source User ).
The firewall collects attributes only for the users and groups that you use in security policy rules, not all users and groups in the directory.
- Verify that the firewall has the mapping information from the Cloud Identity Engine.
1. On the client device, use the browser to access a web page that requires authentication.
2. Enter your credentials to log in.
3. On the firewall, use the show user ip-user-mapping all command to verify that the mapping information is available to the firewall.
Configure Dynamic Privilege Access in the Cloud Identity Engine
Enabling Dynamic Privilege Access (DPA) allows you to isolate network resources so they are only accessible to users on a per-project basis.
Contact your Palo Alto Networks account representative to activate this functionality.
Complete the following steps to enable and configure DPA in the Cloud Identity Engine. For more information, refer to the Prisma Access documentation . The Prisma Access release notes have information on known issues for DPA.
Syncing new user groups for SAML applications in Azure may require up to 3 hours for the Cloud Identity Engine to complete the sync. Wait until the sync is complete before assigning projects to the new group.
- Configure an authentication type in the Cloud Identity Engine.
The authentication type you configure in the Cloud Identity Engine is only for use with DPA authentication; don't use the same authentication type you use for DPA for another authentication type.
- In the Cloud Identity Engine, select Authentication TypesAdd New Authentication Type .
The Cloud Identity Engine supports Azure Active Directory (Azure AD) in this release. To use an existing Azure IdP configuration, select Authentication TypesActionsEdit .
- If you Set Up a new SAML 2.0 authentication type, configure Azure as the identity provider (IdP) in a new configuration.
If you edit the configuration for an existing Azure IdP authentication type, synchronize all attributes for the directory (also known as a full sync) after editing and submitting the configuration.
- Select Dynamic service provider metadata as the Metadata Type .
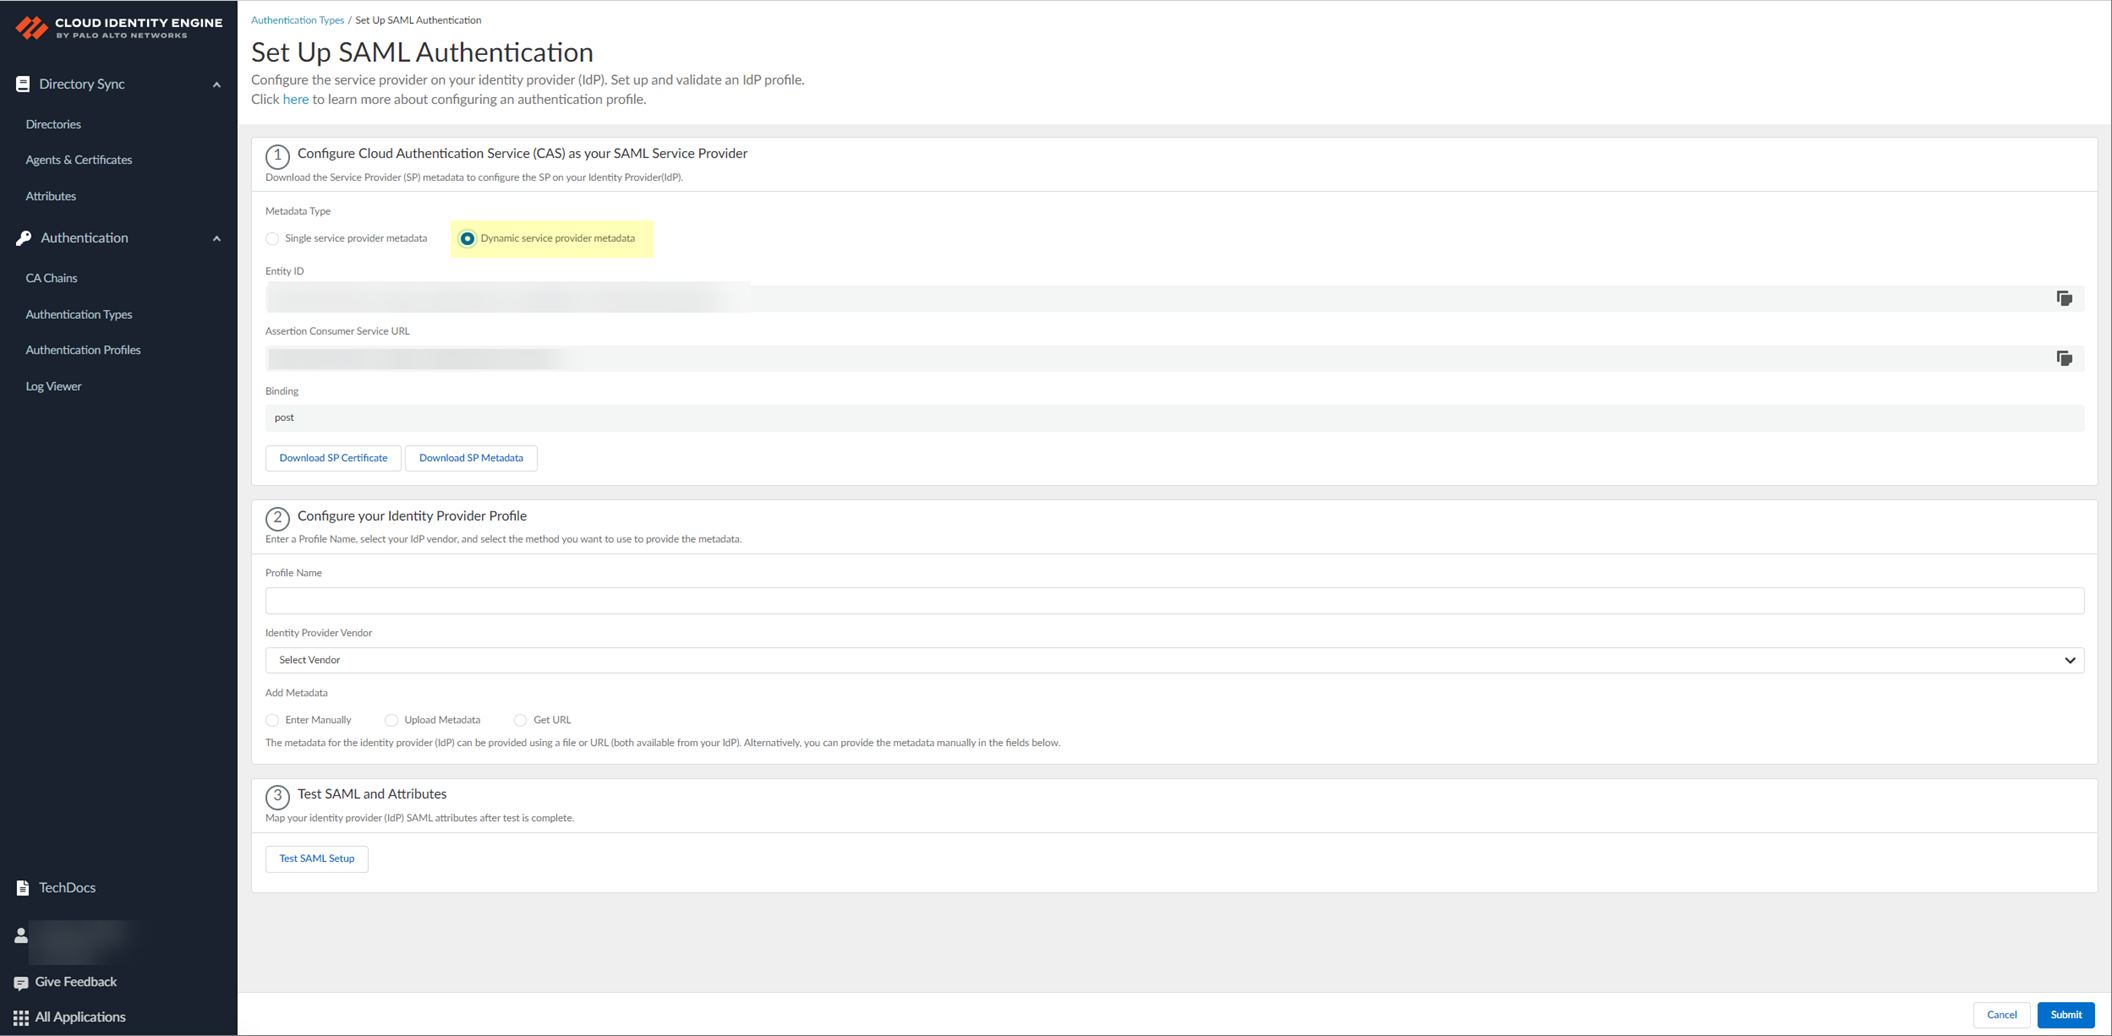
- Copy and save the information from the Cloud Identity Engine that you must configure in your identity provider.
Select one of the following methods to obtain the information you need to configure for the Cloud Identity Engine to communicate with your identity provider:
- Copy the Entity ID and the Assertion Consumer Service URL , then save them in a secure location.
Don't edit the Entity ID or use the Entity ID for other applications. You don't need to download the SP metadata if you use the Entity ID.
- Click Download SP Metadata and save the metadata in a secure location. For more information, refer to the first step in the procedure for configuring Azure as an IdP in the Cloud Identity Engine.
This step is mandatory for successful DPA configuration using SP metadata, even if you edit an existing Azure IdP configuration. The SP metadata provides the Entity ID, the Reply URL (Assertion Customer Service URL) and the Logout URL; you must manually enter the Sign on URL.
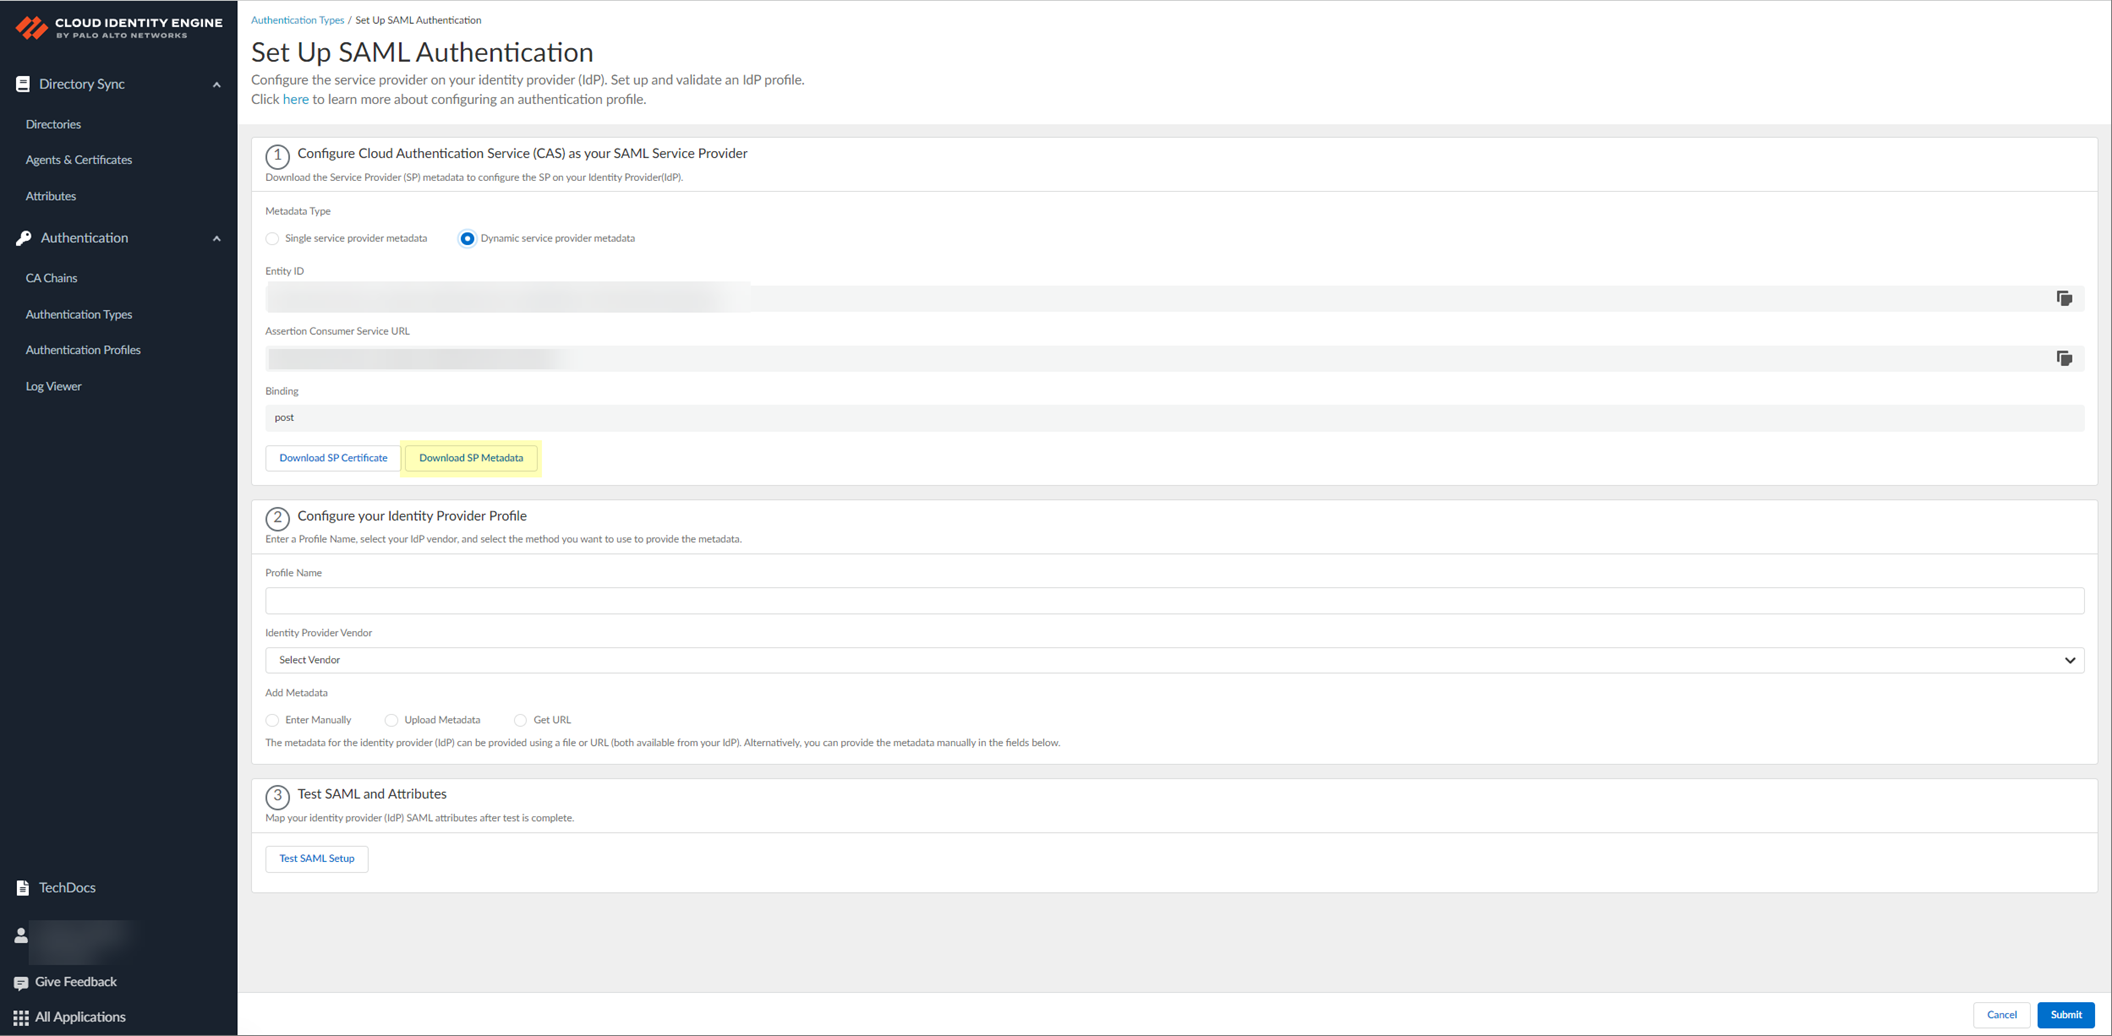
If you want to configure the authentication type so you can obtain the necessary information and you don't want to enter the metadata now, you can choose to Do It Later . This option allows you to generate the data you need to enter in the IdP for the next steps; however, you must enter the metadata before submitting the configuration to successfully use the authentication type with the Cloud Identity Engine.
- In the IdP administrator portal, download the SAML application for the Cloud Identity Engine from the gallery.
- Log in to the Azure Portal and select Enterprise Applications .
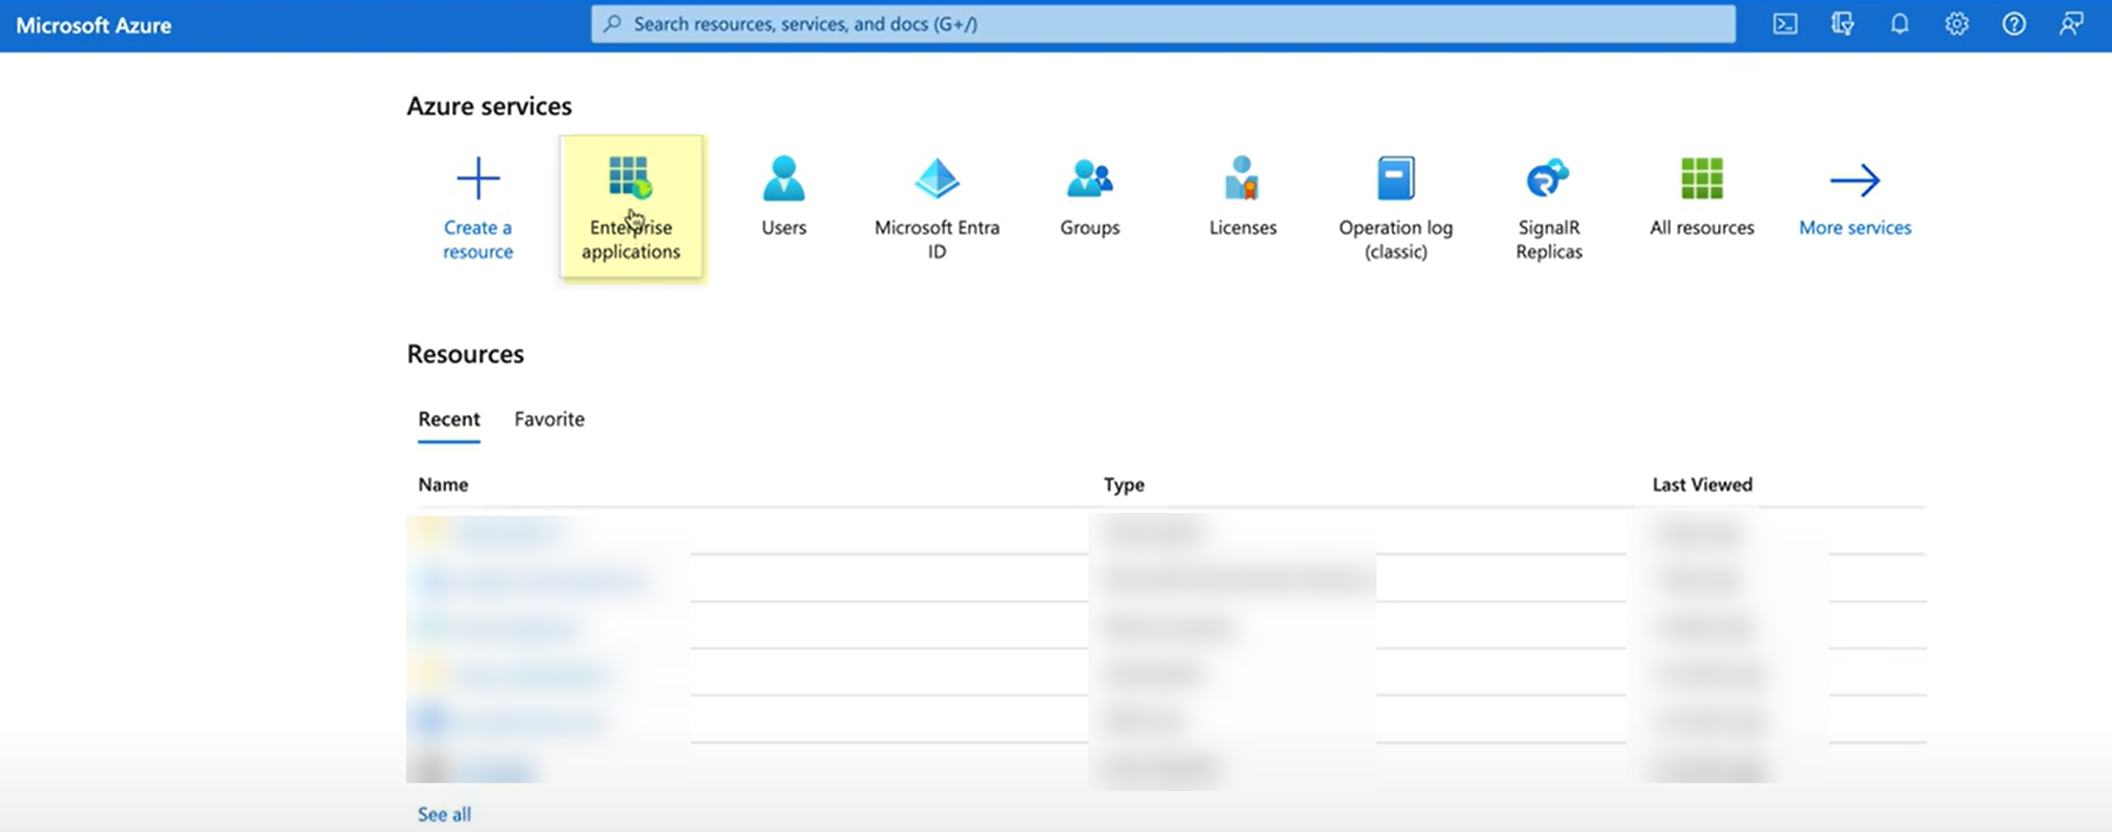
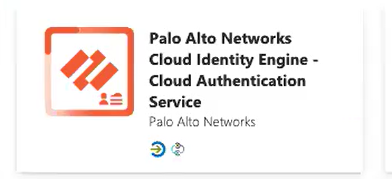
- Search for the Palo Alto Networks Cloud Identity Engine - Cloud Authentication Service gallery application and select it.
- (Optional) Edit the application Name .
- Create the configuration.
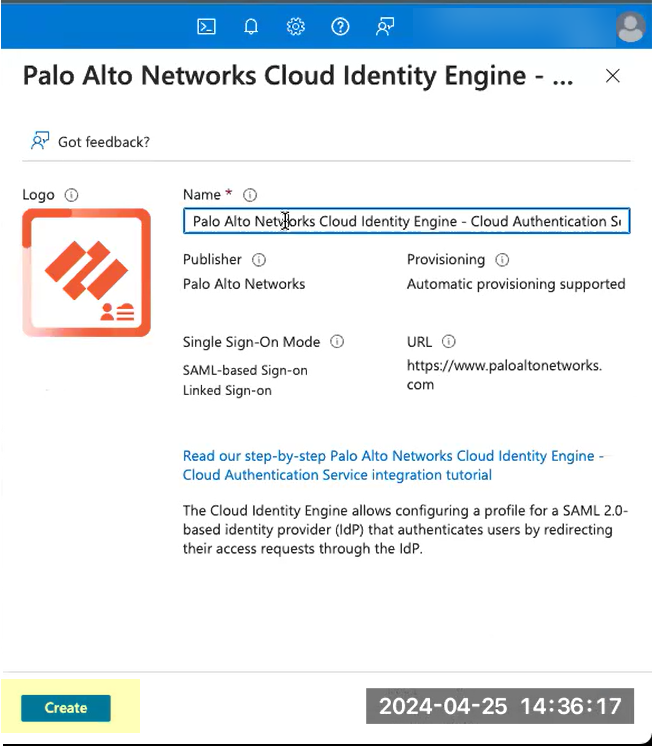
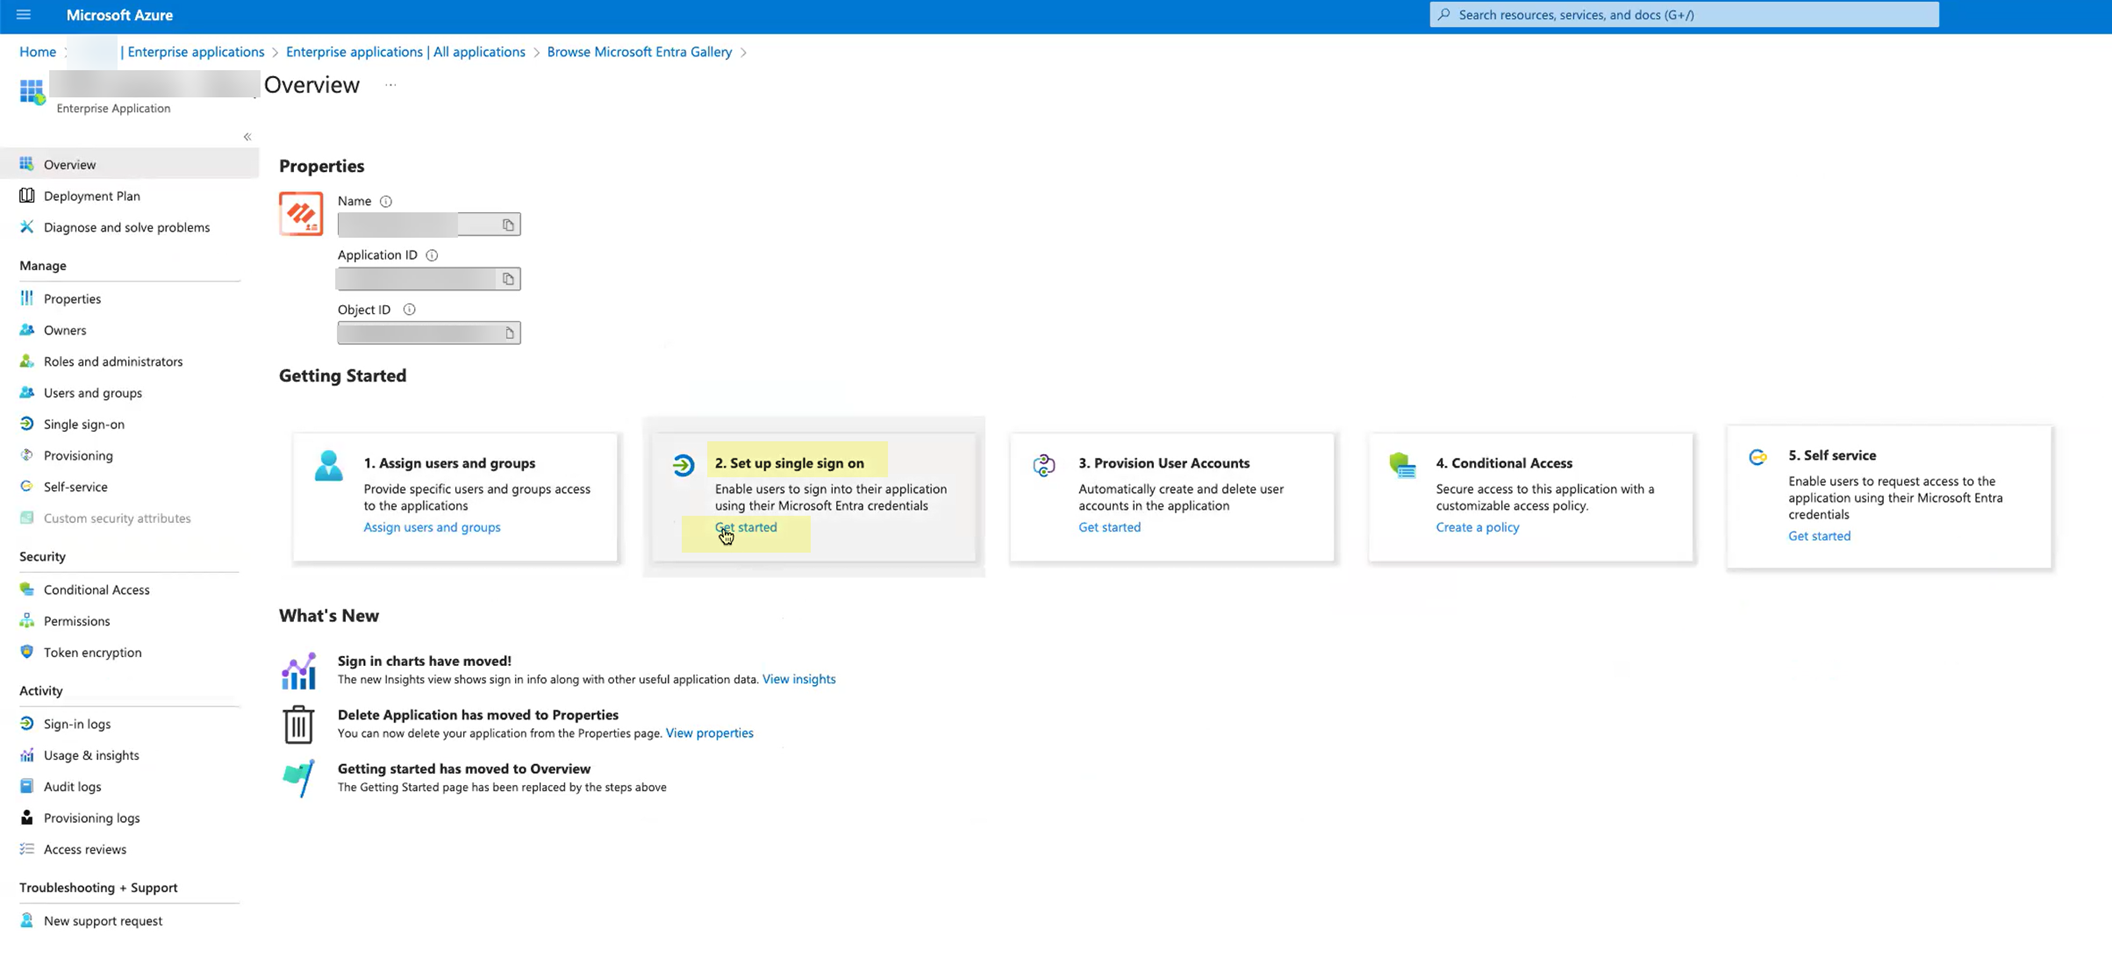
- For Set up single sign-on , click Get started .
- Depending on the method you used in step
2
, complete the necessary steps to configure the SAML application.
- If you copied the Entity ID and Assertion Consumer Service URL:
- Edit the Basic SAML Configuration you created.
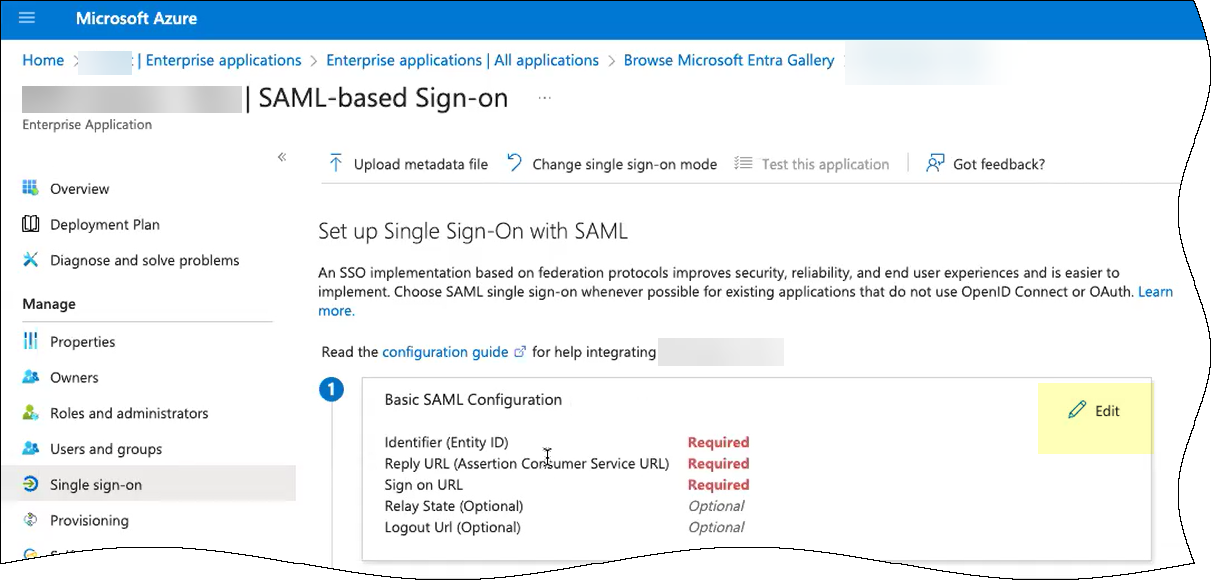
- Click Add identifier and paste the Entity ID you copied from the Cloud Identity Engine.
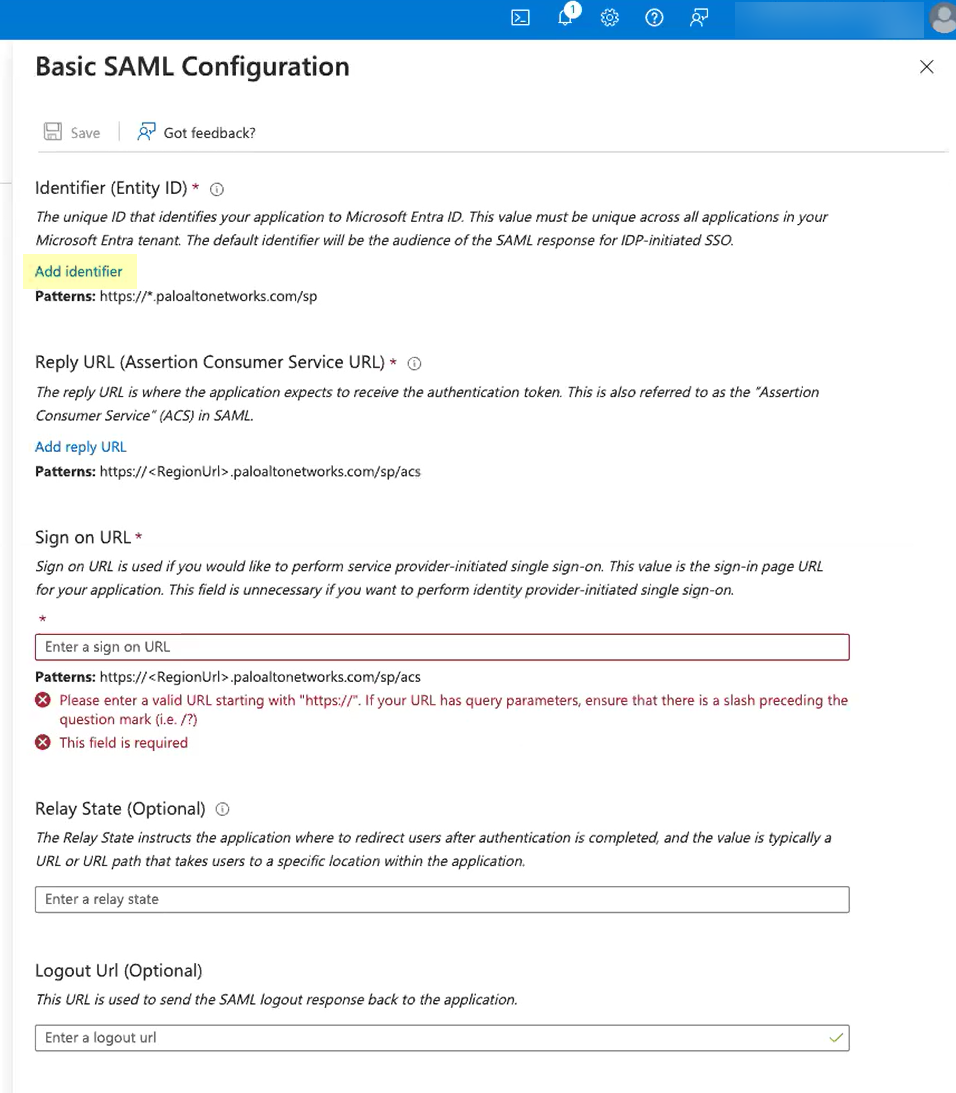
- Click Add reply URL and paste the Assertion Consumer Service URL you copied from the Cloud Identity Engine.
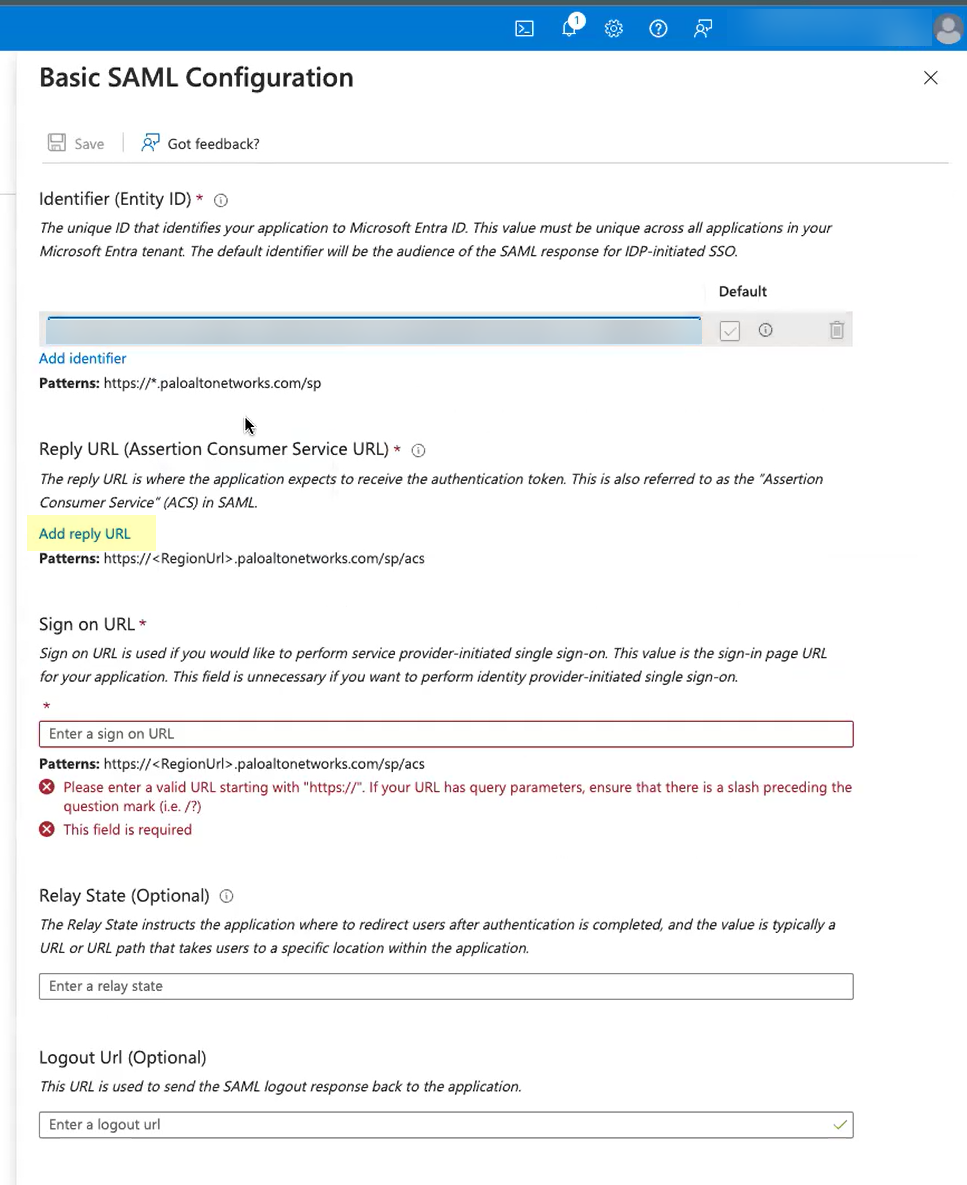
- Enter your regional endpoint as the Sign on URL using the following format: https://<RegionUrl>.paloaltonetworks.com/sp/acs (where <RegionUrl> is your regional endpoint). For more information on regional endpoints, see Configure Cloud Identity Engine Authentication on the Firewall or Panorama .
- Save your configuration.
- Close the window and Copy the App Federation Metadata URL .
- If you downloaded the SP metadata:
- Click Upload metadata file to upload the SP metadata file from the Cloud Identity Engine.
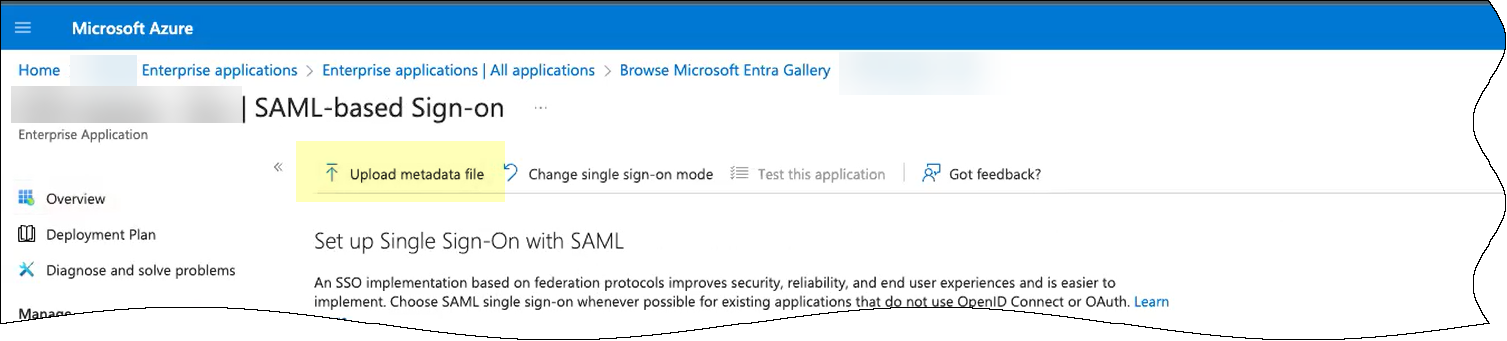
- Browse to the SP metadata file you downloaded from the Cloud Identity Engine.
- Add the file.
- Edit the Basic SAML Configuration you created.
- Enter your regional endpoint as the Sign on URL using the following format: https://<RegionUrl>.paloaltonetworks.com/sp/acs (where <RegionUrl> is your regional endpoint). For more information on regional endpoints, see Configure Cloud Identity Engine Authentication on the Firewall or Panorama .
- Save your configuration.
- Close the window and Copy the App Federation Metadata URL .
- Assign your account to the application and save the configuration.
- Assign your account to ensure your access to the application and to any other users you want to authenticate using the SAML application. For more information, refer to step 3 in configuring Azure as an IdP .
- Save the configuration.
- Continue the IdP configuration in the Cloud Identity Engine.
- Enter the remaining information to configure your identity provider (refer to step 5).
- In the Cloud Identity Engine, enter the App Federation Metadata URL you copied as the Identity Provider Metadata URL .
- Click Get URL to confirm the Cloud Identity Engine can connect to the URL.
This step is mandatory to confirm the configuration. If you don't click Get URL before clicking Test SAML Setup , the test isn't successful.
- Select whether Multi-factor Authentication is Enabled on the Identity Provider and whether you want to Force Authentication .
Refer to steps 6-7 in Configure Azure as an IdP in the Cloud Identity Engine for more information.
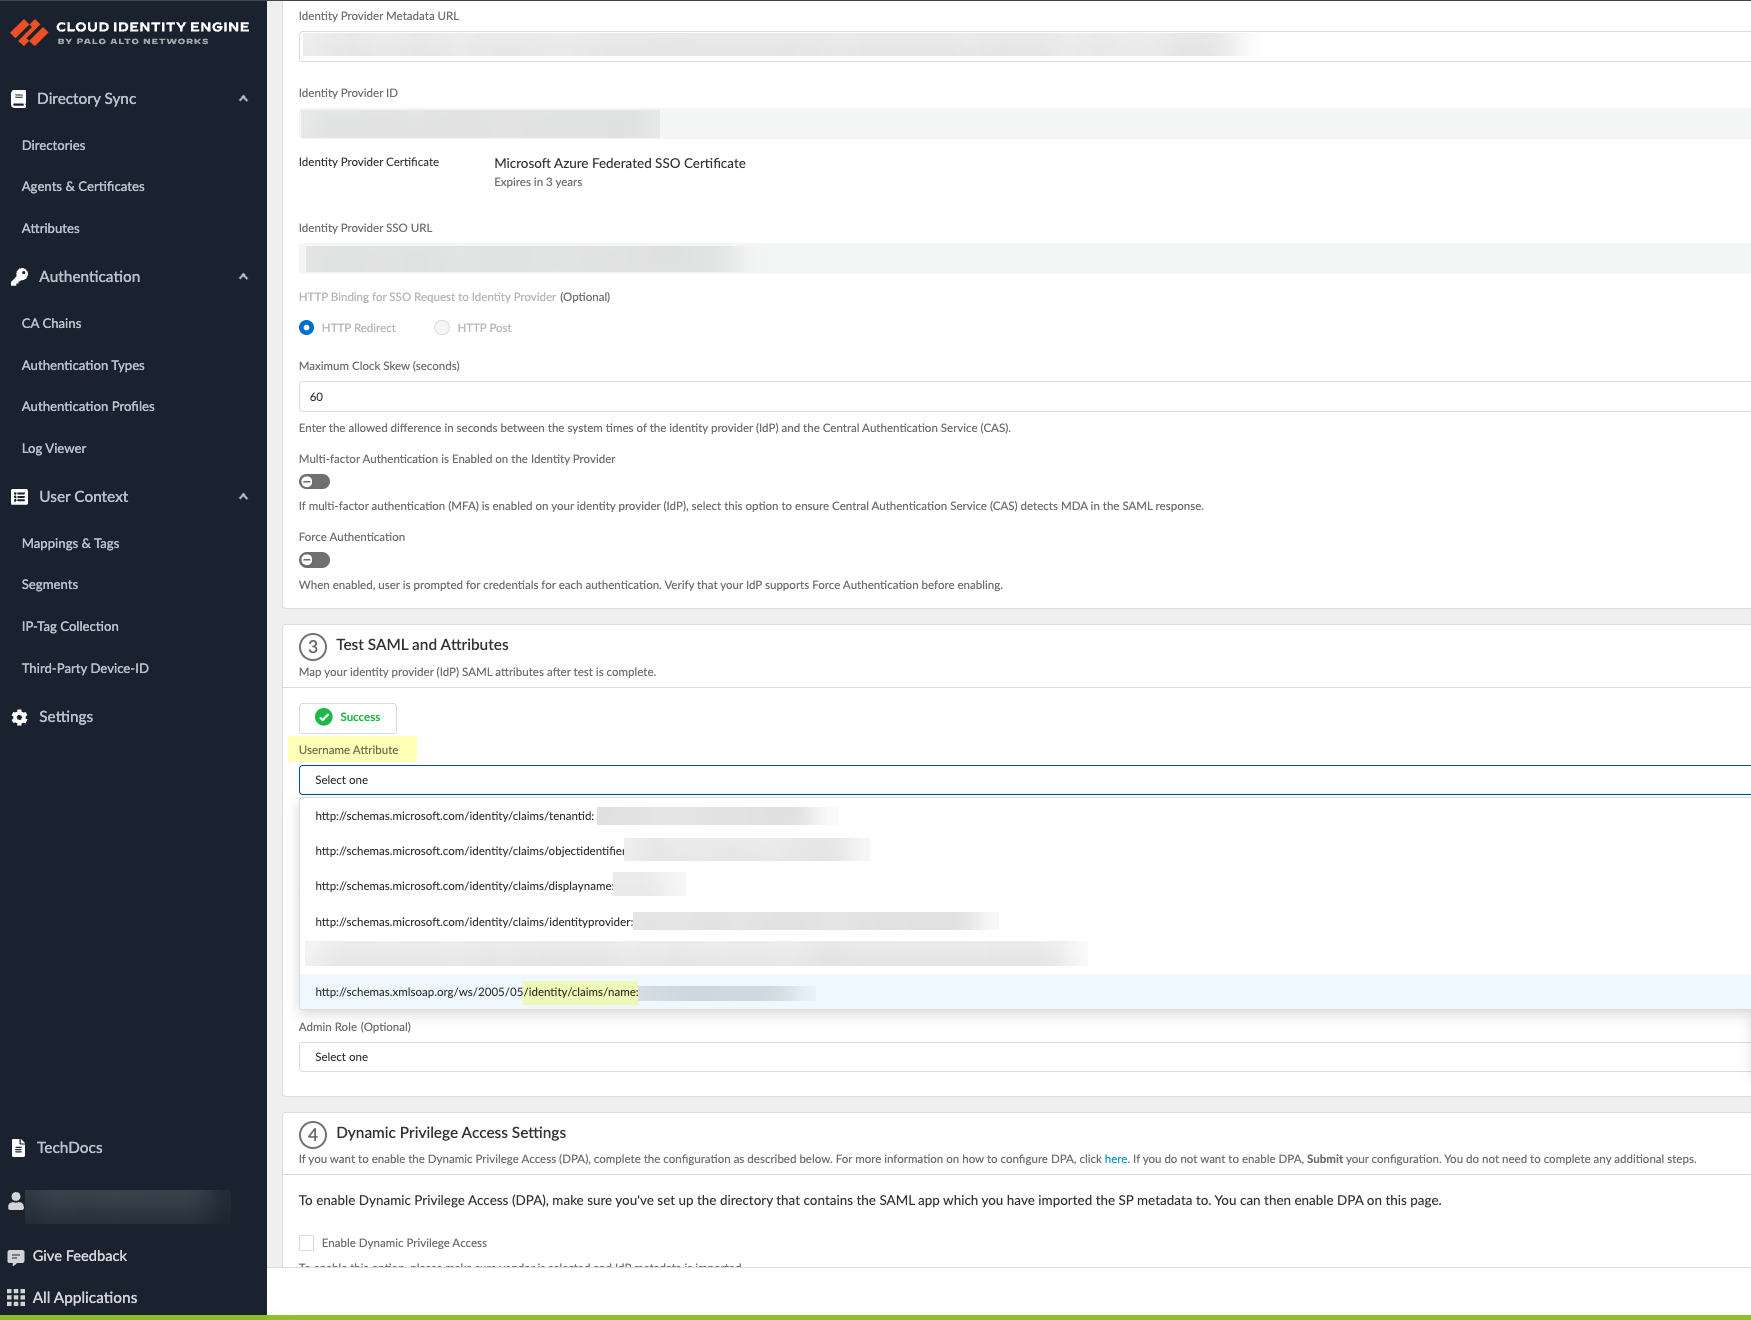
- Configure the SAML attributes for the Cloud Identity Engine to use for authentication.
- Click Test SAML Setup to verify the configuration.
- Select the Username Attribute for the Cloud Identity Engine to use for authentication.
Select the username attribute that uses the Name ( /identity/claims/name: ) format. If you do not select the correct username attribute, user authentication for projects is not successful. For more information, refer to the Microsoft documentation .
- (Optional) Select other attributes to use for authentication, such as Usergroup Attribute , Access Domain , User Domain , and Admin Role .
- If you have not already done so, Collect enterprise applications data from your Azure directory . Sign in to confirm the changes and Submit the update to the configuration.
The Cloud Identity Engine begins a complete synchronization of the attributes (also known as a full sync ) when you submit the configuration. Wait until the sync is complete before continuing.
This step is mandatory to complete the configuration regardless of whether you're creating a new configuration or editing an existing configuration. You must complete this step before enabling Dynamic Privilege Access in the Cloud Identity Engine.
- Enable Dynamic Privilege Access in the Cloud Identity Engine authentication profile.
- Select Enable Dynamic Privilege Access .
- Click Detect Directory and SAML to allow the Cloud Identity Engine to detect available directories and SAML attributes.
When the Cloud Identity Engine completes the collection of the attributes, the Directory and SAML 2.0 Application information displays.
If the Cloud Identity Engine can't detect the SAML application, complete a full sync then reattempt this step.
- After confirming the information is correct, Submit the configuration.
- Configure an authentication profile in the Cloud Identity Engine to use the authentication type you configured.
Configure Security Risk for the Cloud Identity Engine
Security Risk for the Cloud Identity Engine obtains specific information to evaluate risk (such as an outdated OS, failed password attempts, or suspicious device activity) for users and devices. By using telemetry and receiving risk scores for these sources, the Cloud Identity Engine allows you to define the risk criteria for a group, then the Cloud Identity Engine automatically assigns users and devices to that group using the information it receives from your risk assessment sources. This enables closed-loop automation, since after you address the source of the risk for a user or device, the Cloud Identity Engine removes it from the group.
Microsoft Azure analyzes user behavior and sign-in events to determine a user risk score and create a list of risky users. By identifying suspicious or anomalous user activity and assigning a risk score, you can quickly assess user risk level, evaluate priority, and take actions to reduce risk.
SentinelOne reviews all device activity (such as processes) on the endpoint to assign specific attributes that determine the risk level of the endpoint.
The SentinelOne Endpoint Detection and Response (EDR) agent monitors device activity and behavior. By specifying the attributes you want the agent to collect, you can identify at-risk device endpoints.
The bidirectional integration between Prisma Access and SentinelOne helps ensure your Zero Trust Security policy by continuously receiving device information and risk signals from SentinelOne and automatically enforcing access restrictions, such as quarantining the device.
You can also use the Strata Cloud Manager to view the list of devices currently in quarantine.
- If you want to obtain risk information about users,
Configure Azure for Security Risk in the Cloud Identity Engine
.
- If you want to obtain security posture and risk information about devices,
Configure SentinelOne for Security Risk in the Cloud Identity Engine
.
By continuously monitoring the device security posture and risk information from SentinelOne, updating and enforcing quarantine lists across all devices, and removing devices after remediation, Security Risk for the Cloud Identity Engine helps you enforce adaptive Security policy and just-in-time access.
- In the Cloud Identity Engine, select Security RiskRisk Sources .
- Click Add Risk Source .
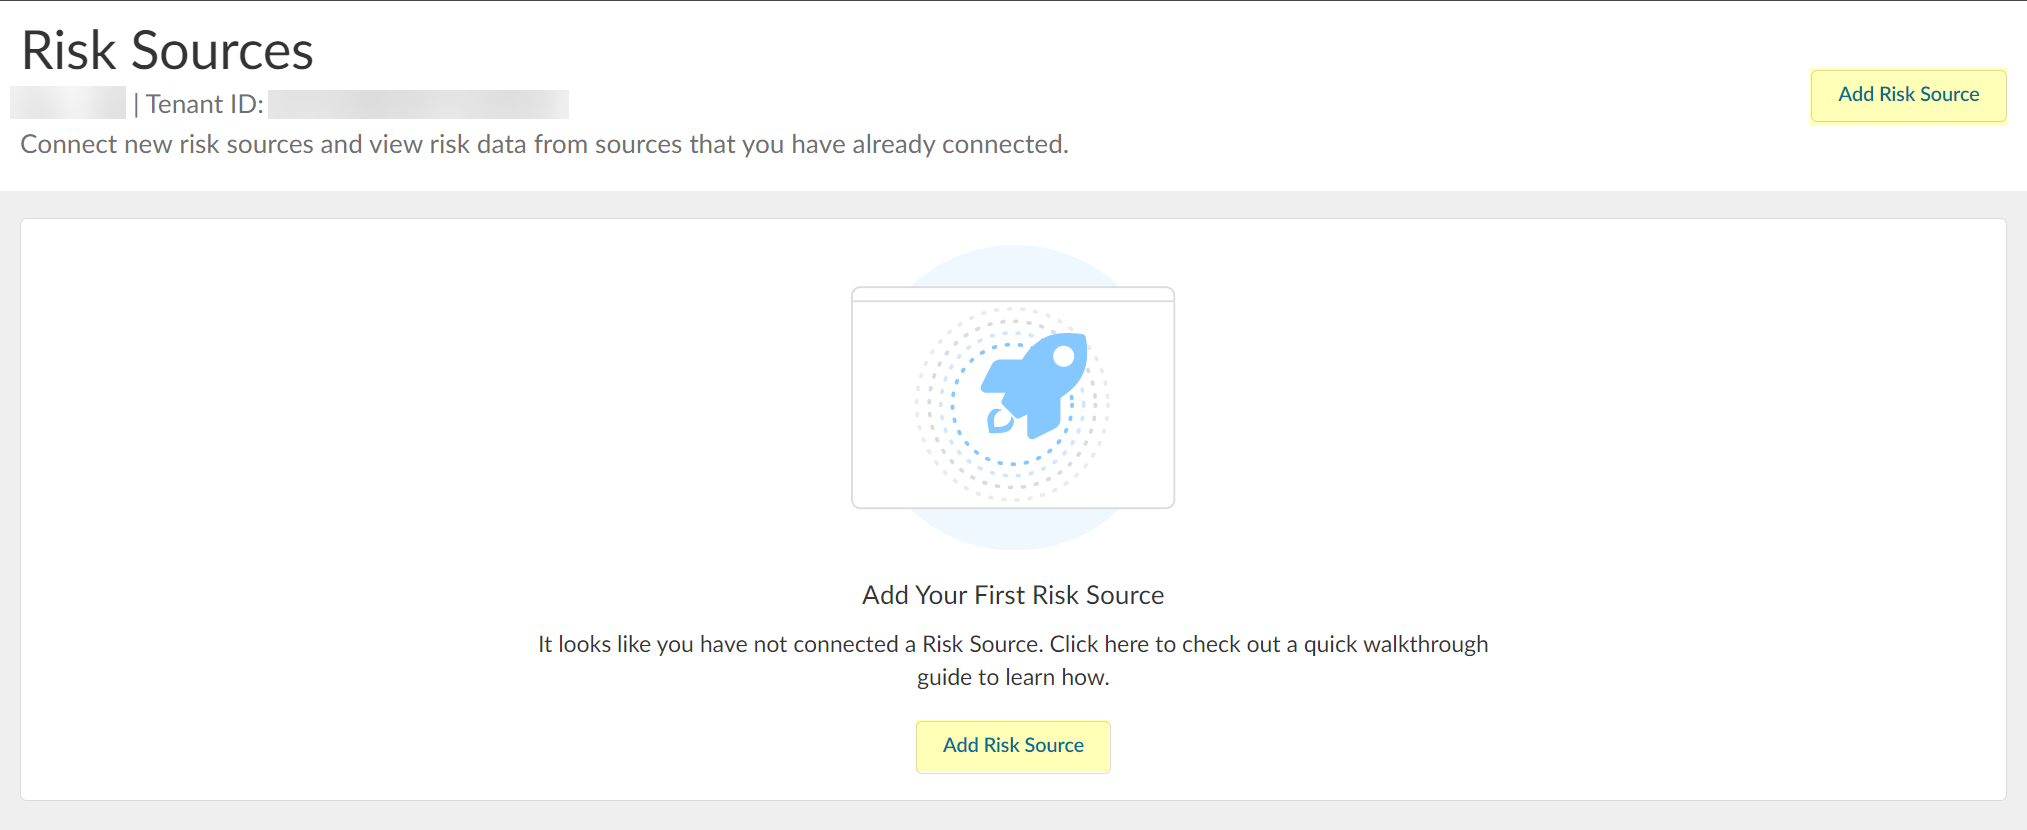
- Select the type of risk source you want to configure.
You can configure up to one Azure Active Directory source and up to one SentinelOne source.
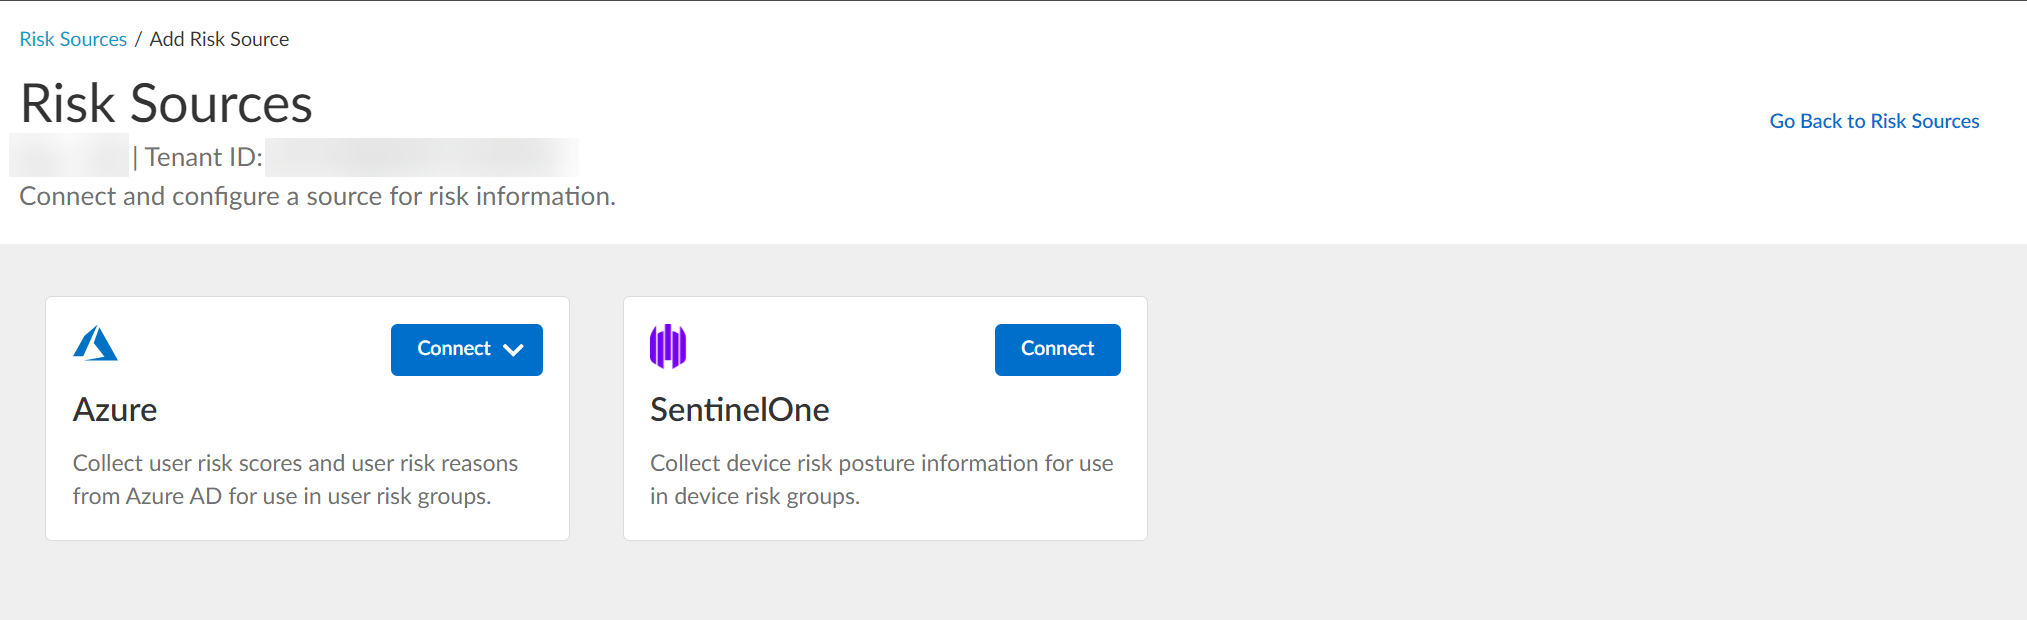
The Cloud Identity Engine uses the risk source you configure to obtain risk information.
- Azure — Click Connect and Configure a new Azure directory or select an Existing Directory to obtain risk information about users.
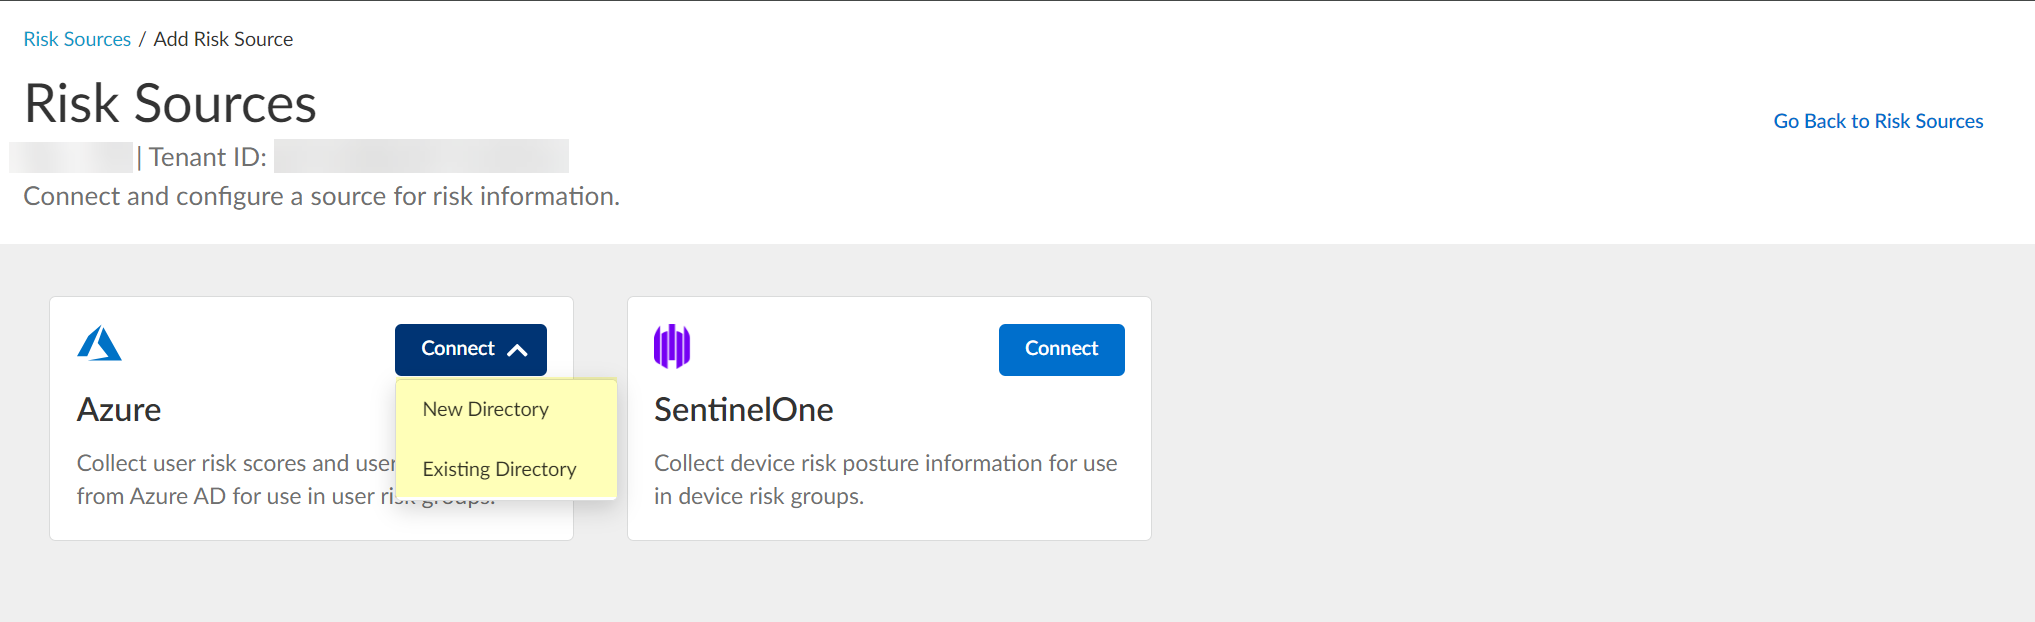
If you configure Security Risk to use a directory and you want to remove the directory from the Cloud Identity Engine, you must first remove the directory from the Security Risk configuration.
- SentinelOne —Click Connect and continue to
Configure SentinelOne for Security Risk in the Cloud Identity Engine
as a risk source to obtain risk information about devices.
Configure Azure for Security Risk in the Cloud Identity Engine
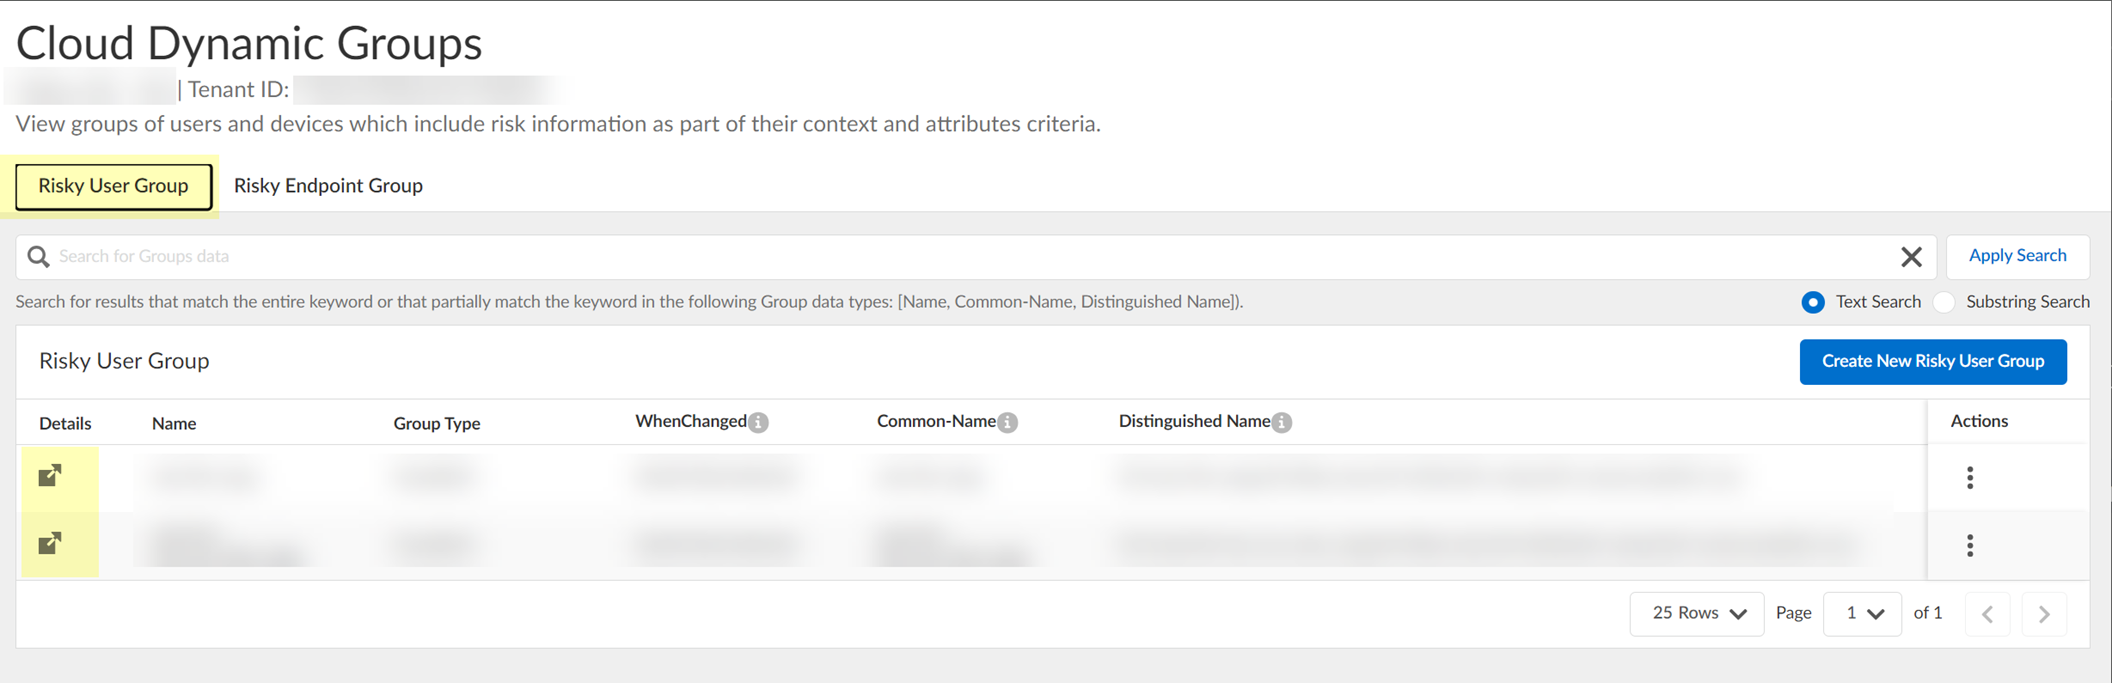
- View and optionally edit the dynamic risky user groups.
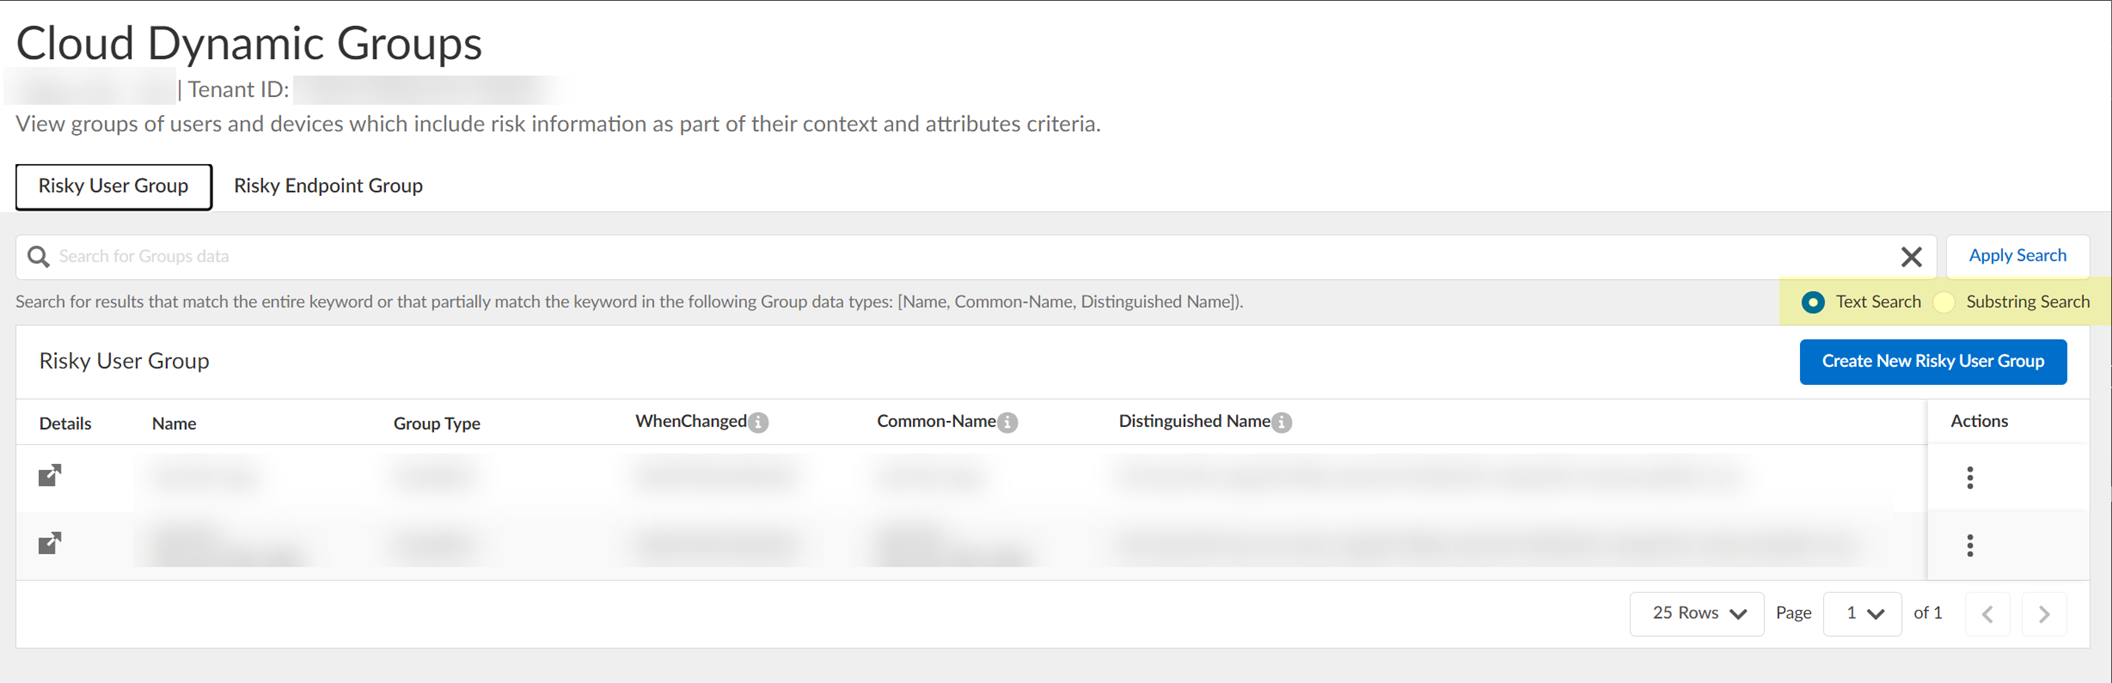
- In the Cloud Identity Engine, select Security RiskCloud Dynamic Groups .
- Select the Risky User Group tab to view the groups that the Cloud Identity Engine creates to isolate users who it identifies as risky. You can optionally click the Details icon to view more information about the specific group.
- (Optional) Search the groups by entering a search query then click Apply Search .
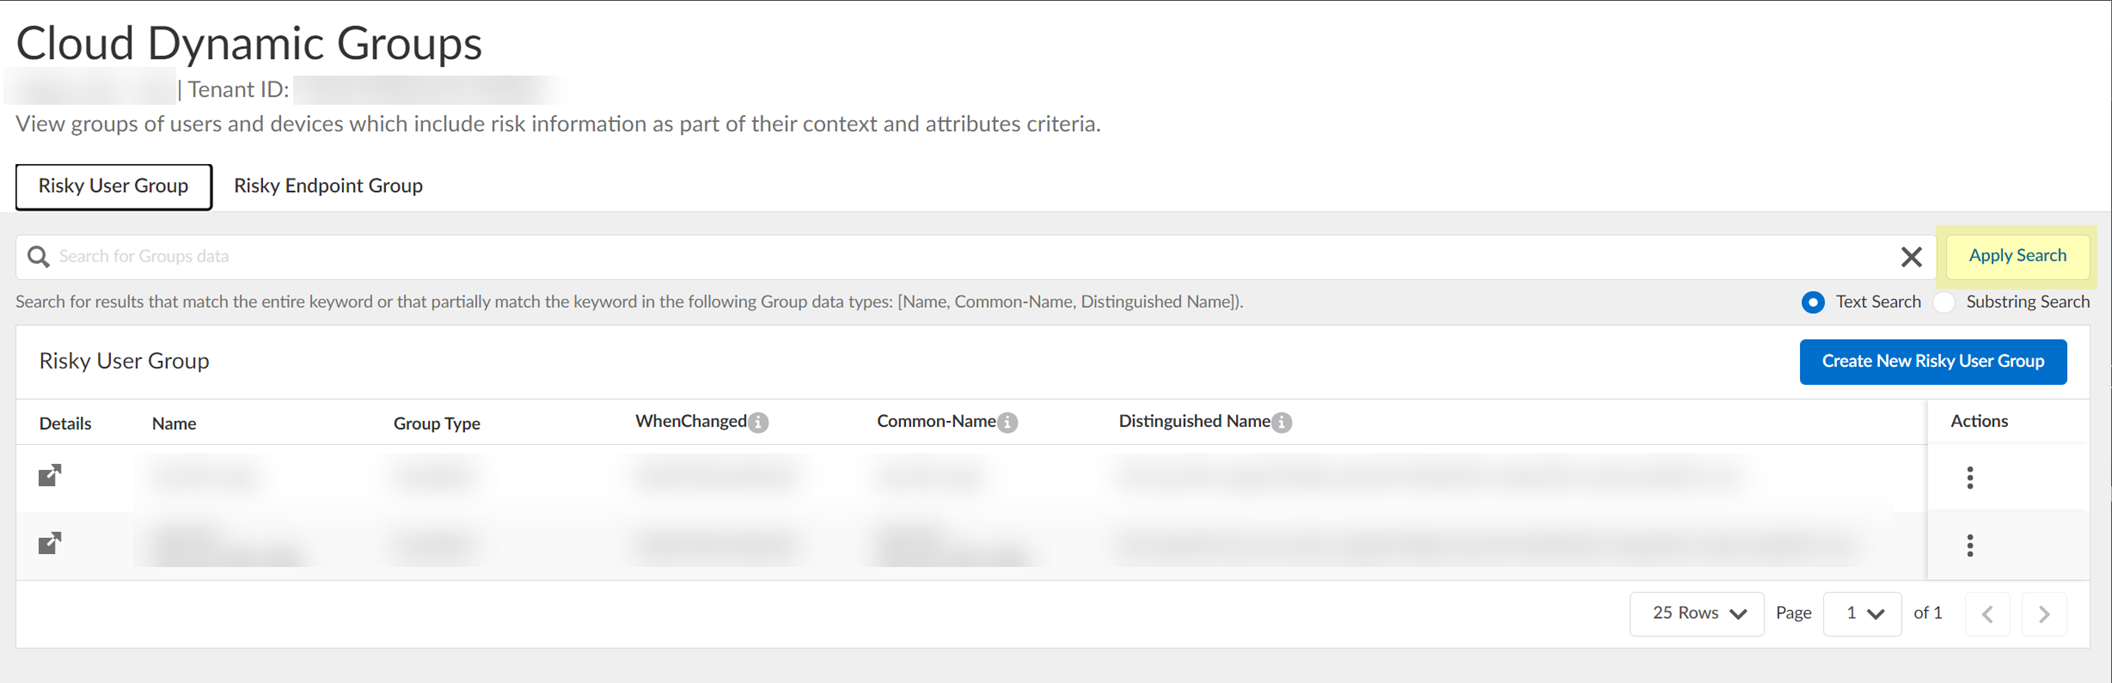
You can specify a Text Search or a Substring Search .
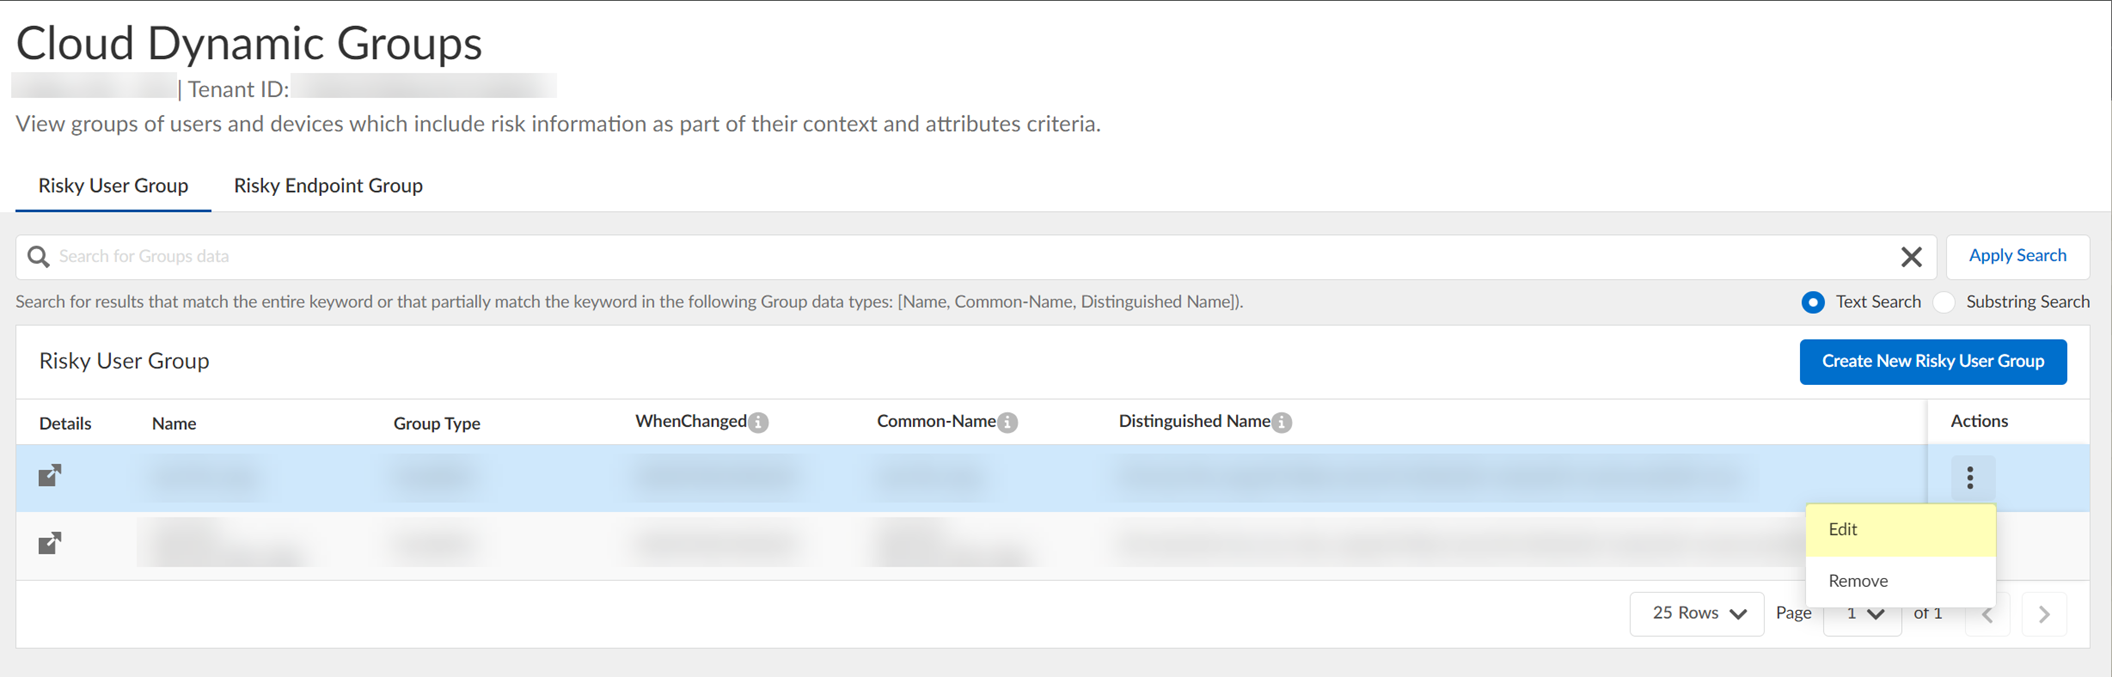
- (Optional) To include additional context and attributes for the cloud dynamic risky user group, select ActionsEdit , add the additional context and attributes, and Submit the changes.
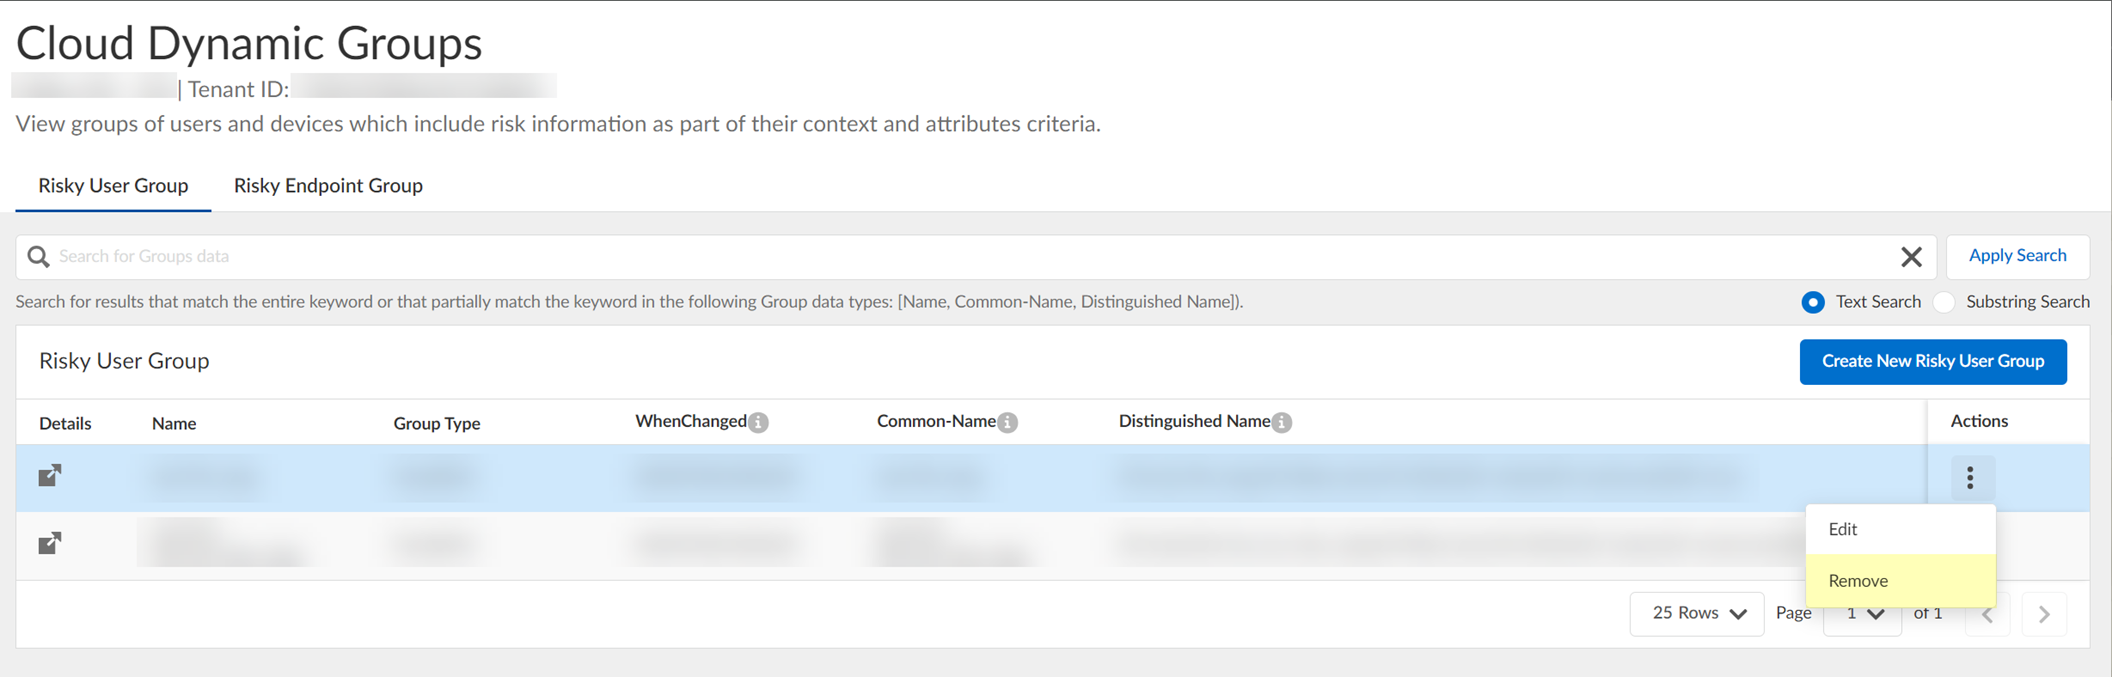
- (Optional) To delete a group, select ActionsRemove and click Yes to confirm removal of the group.
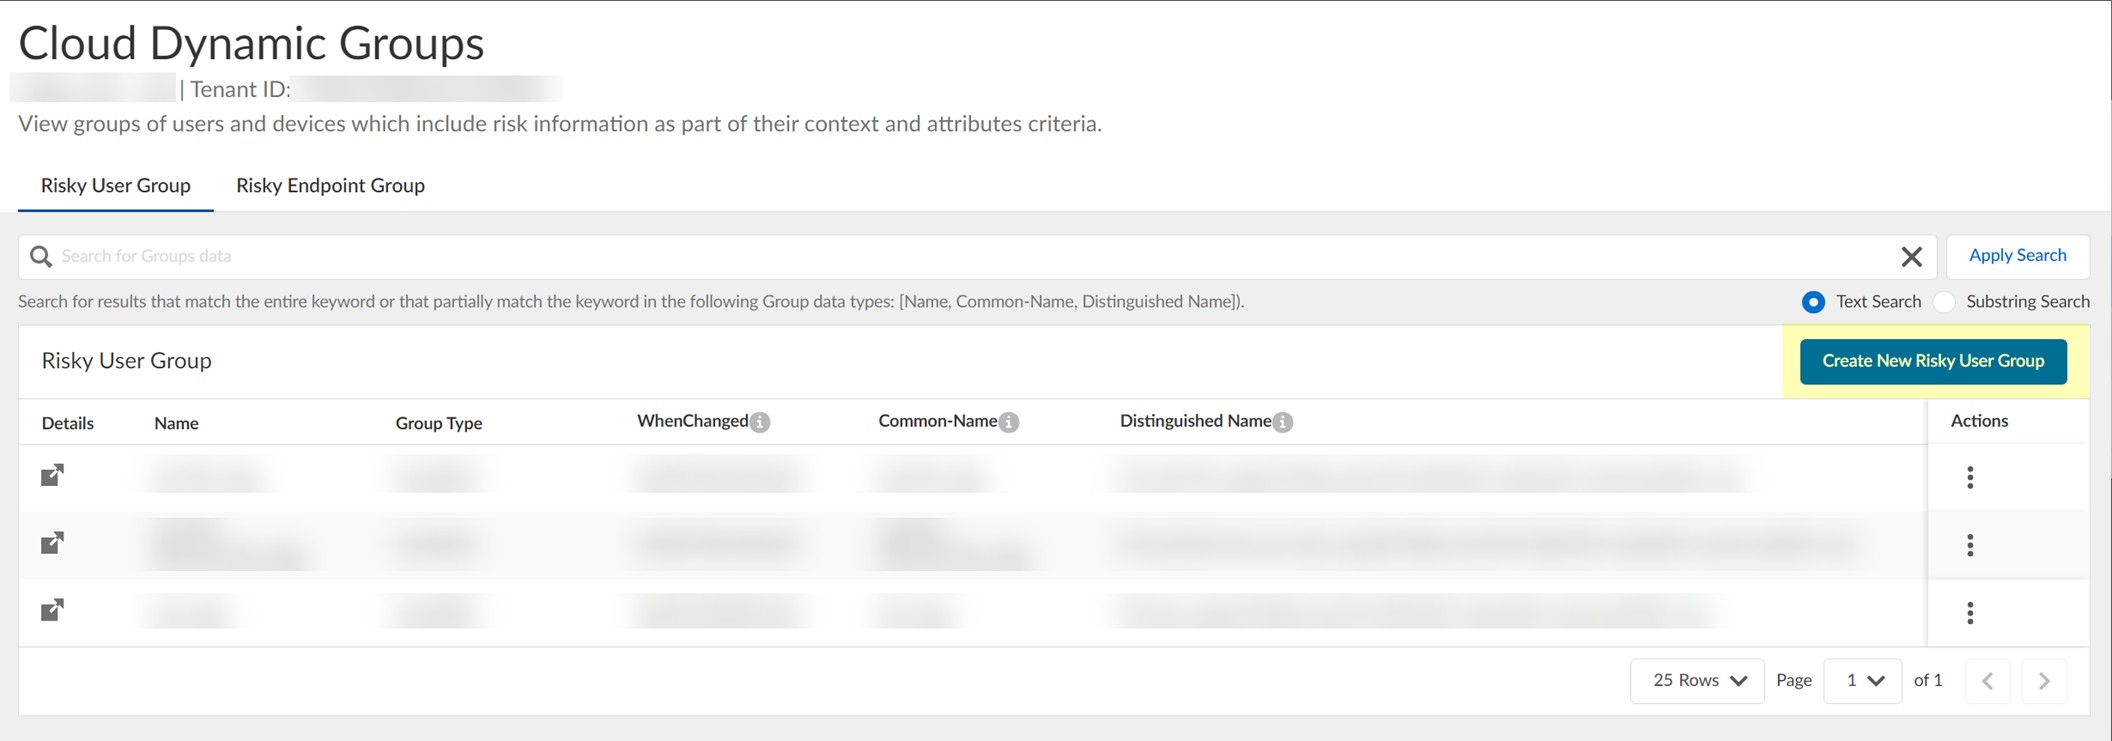
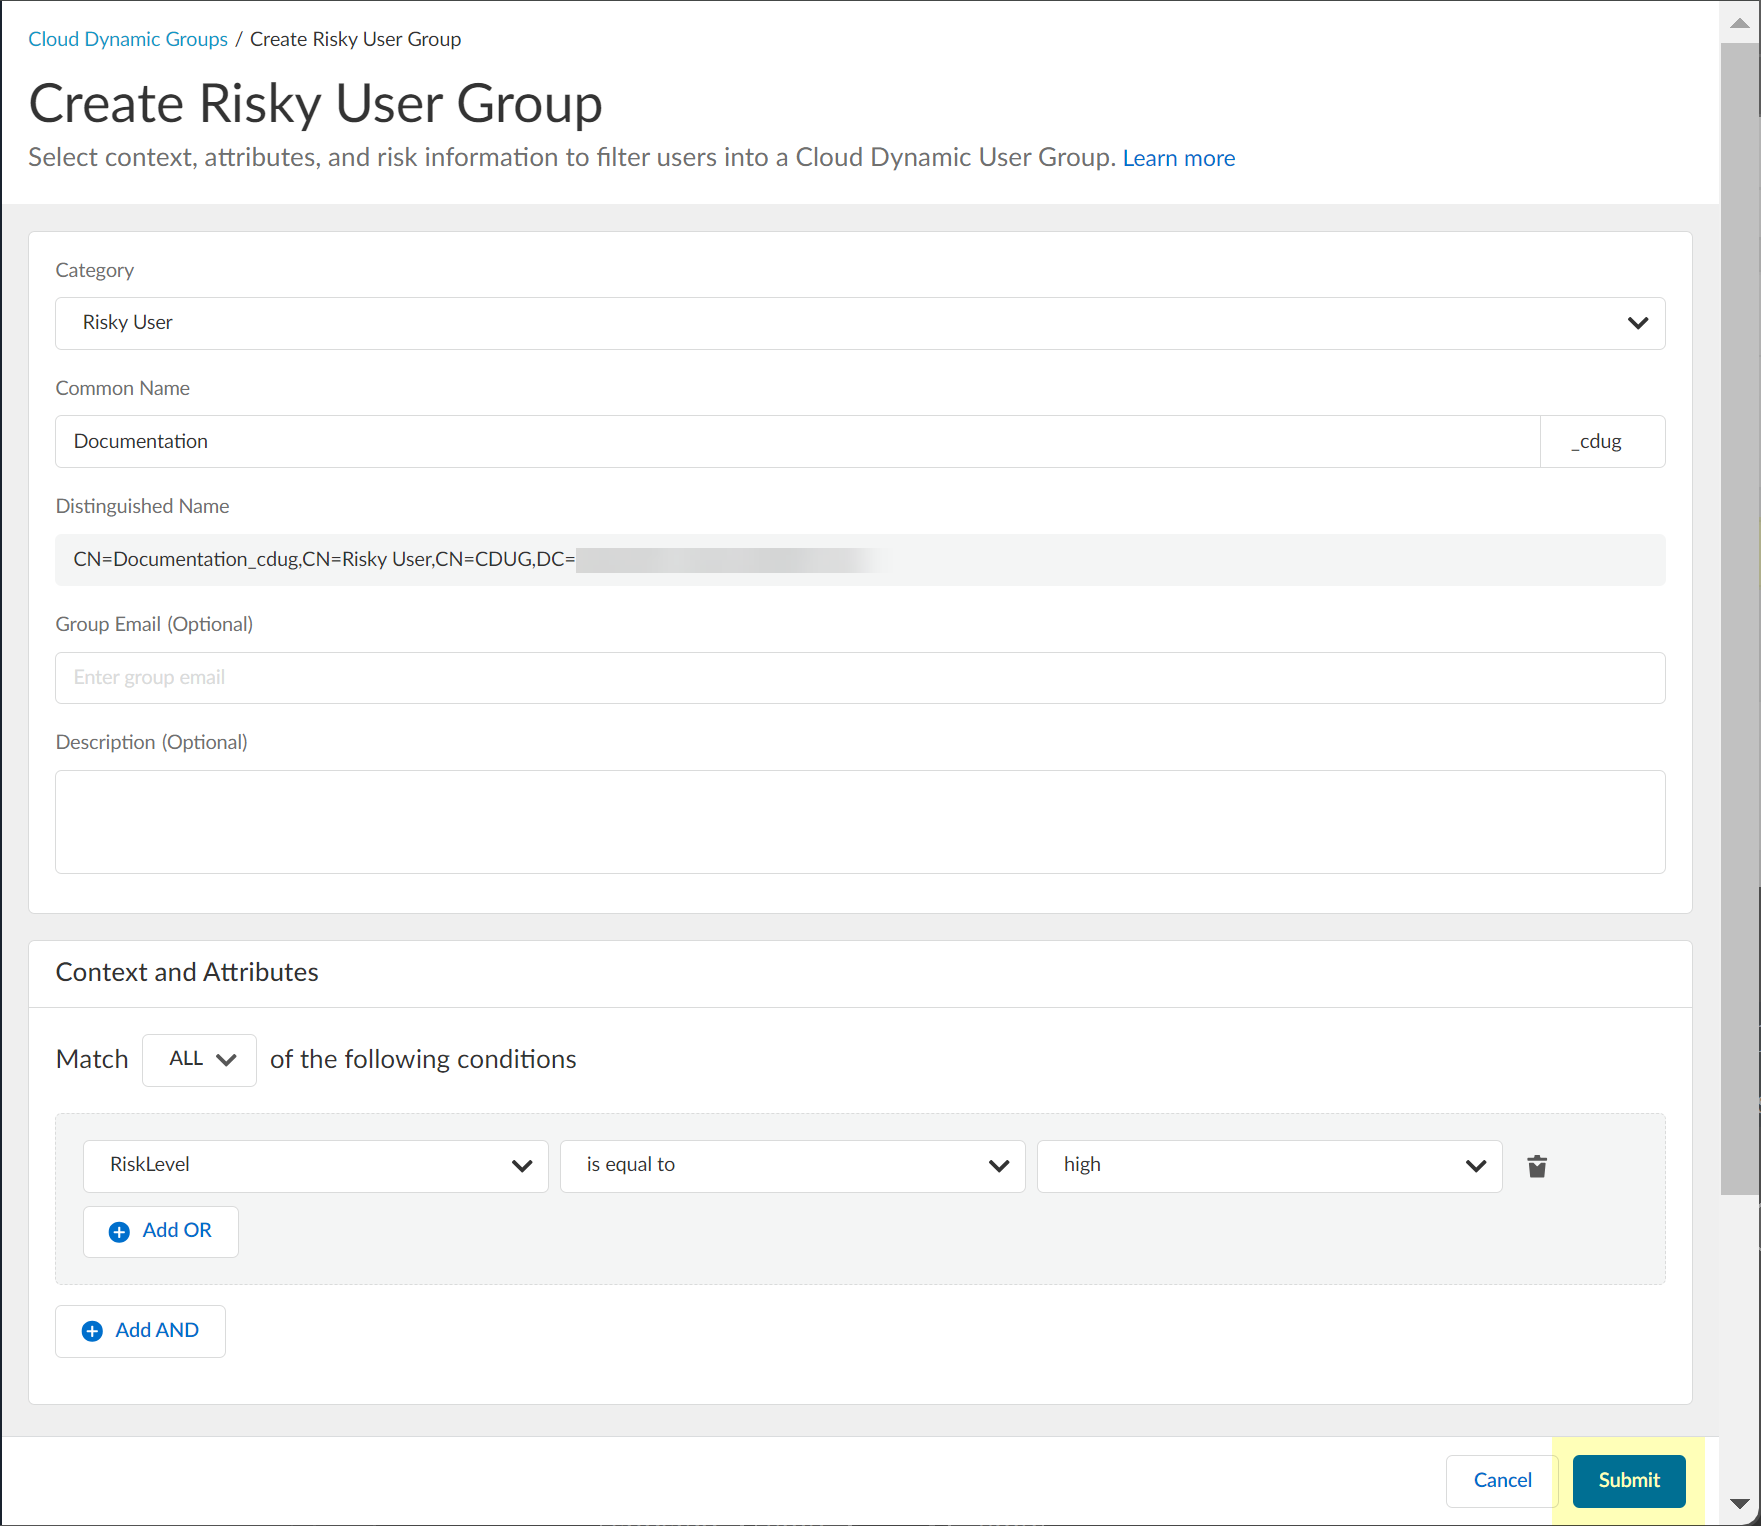
- (Optional) Create a new cloud dynamic risky user group.
- Click Create New Risky User Group .
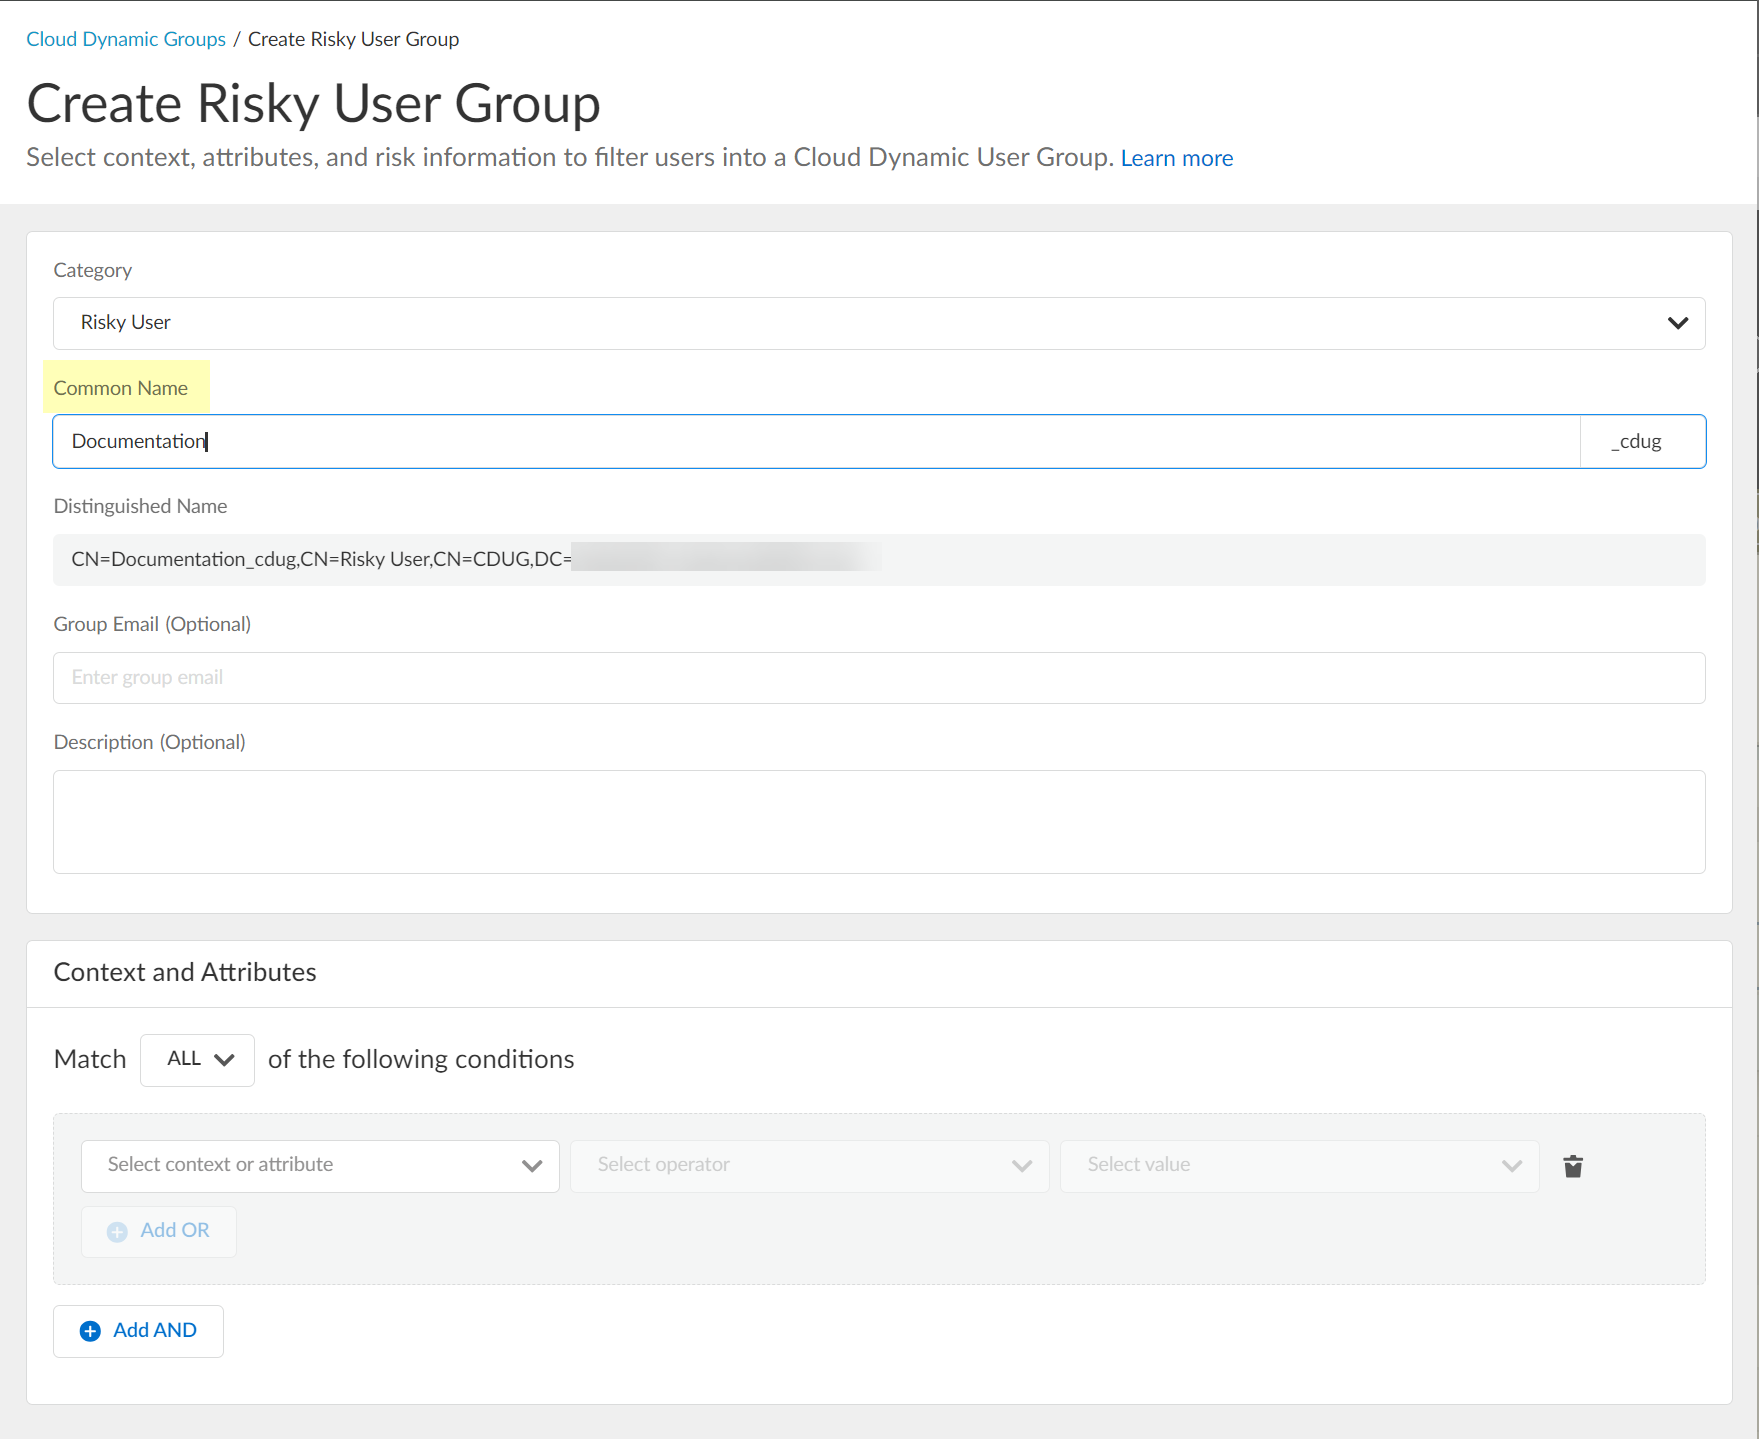
- Select Risky User as the Category .
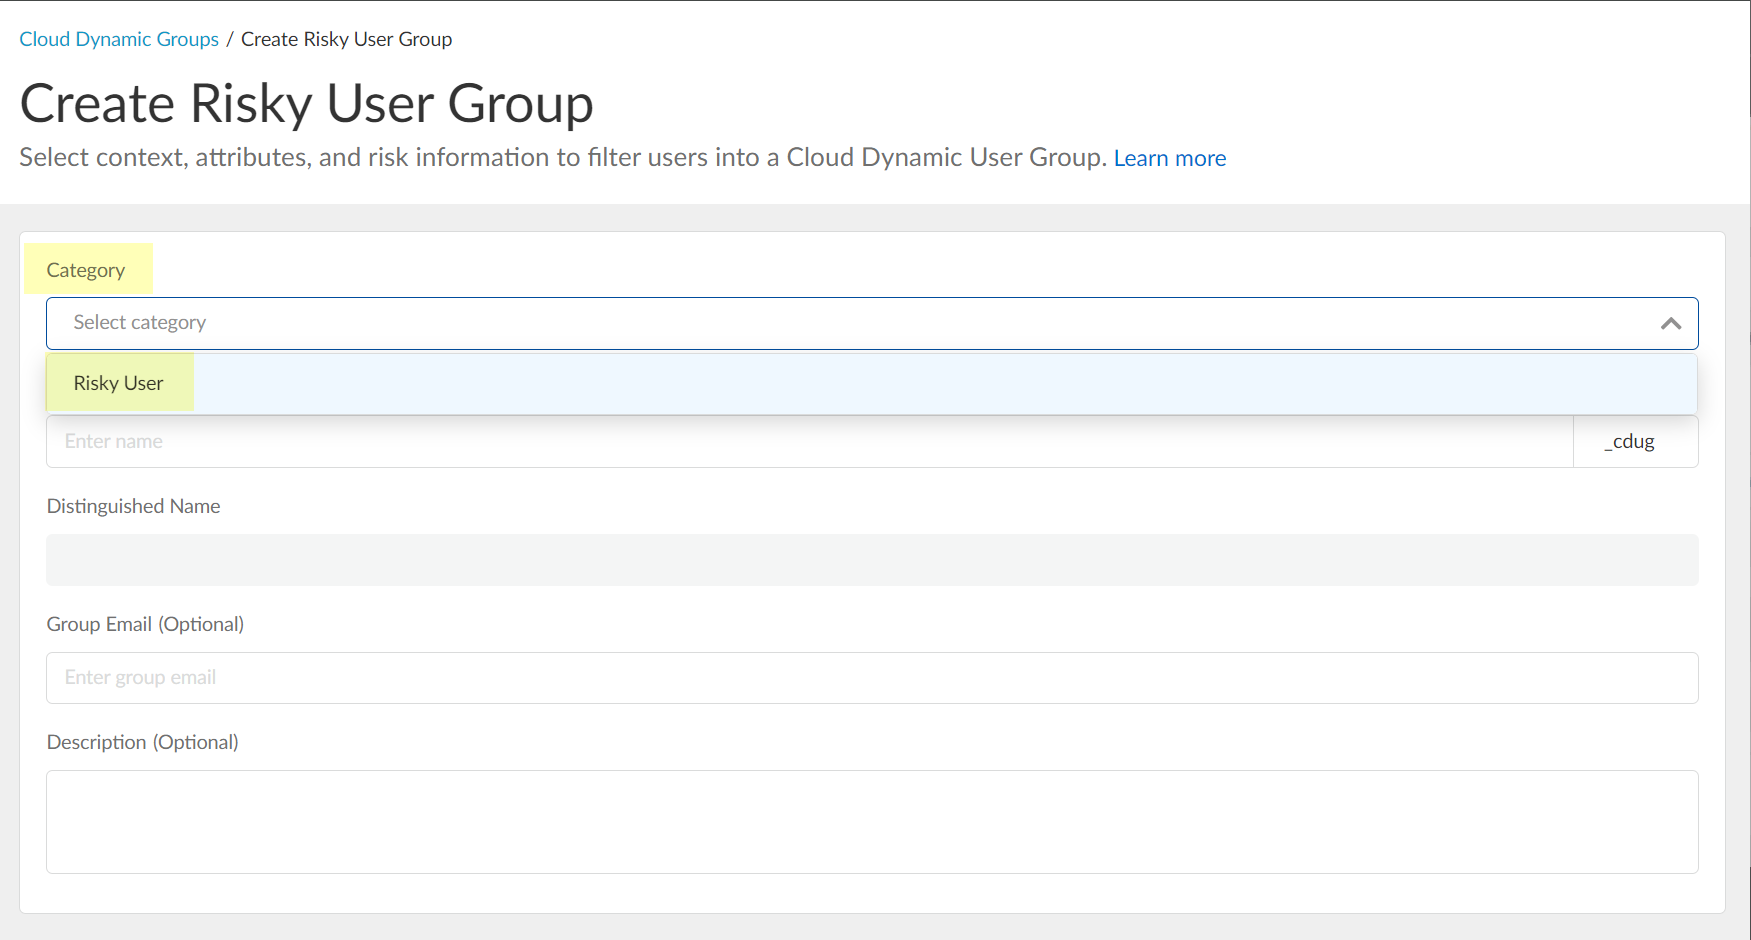
- Enter the Common Name you want to use for the dynamic risky user group.
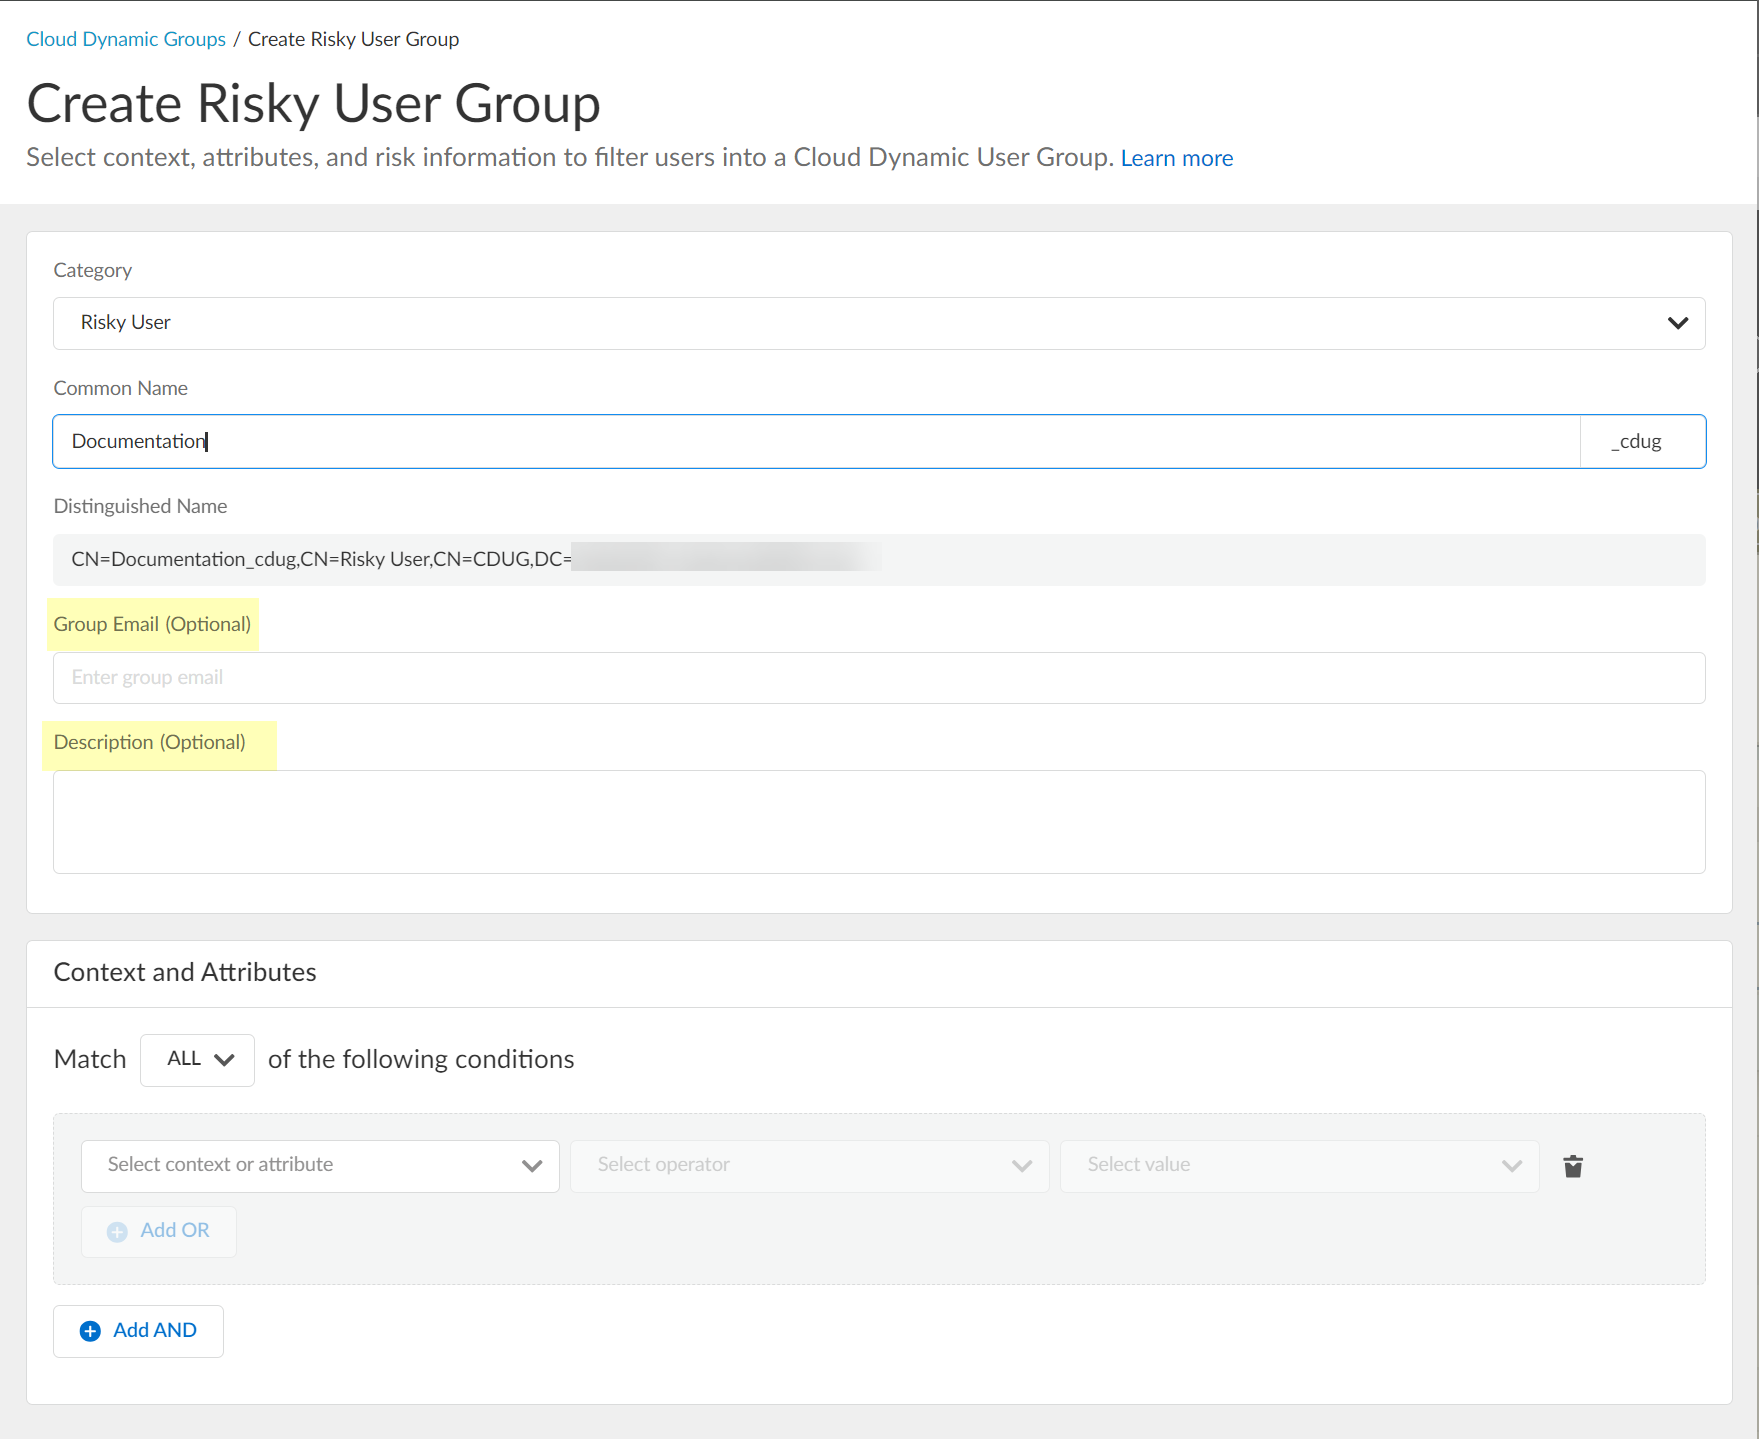
- (Optional) Enter a Group Email a Description for the group.
- Select the context and attributes to use for the dynamic risky user group.
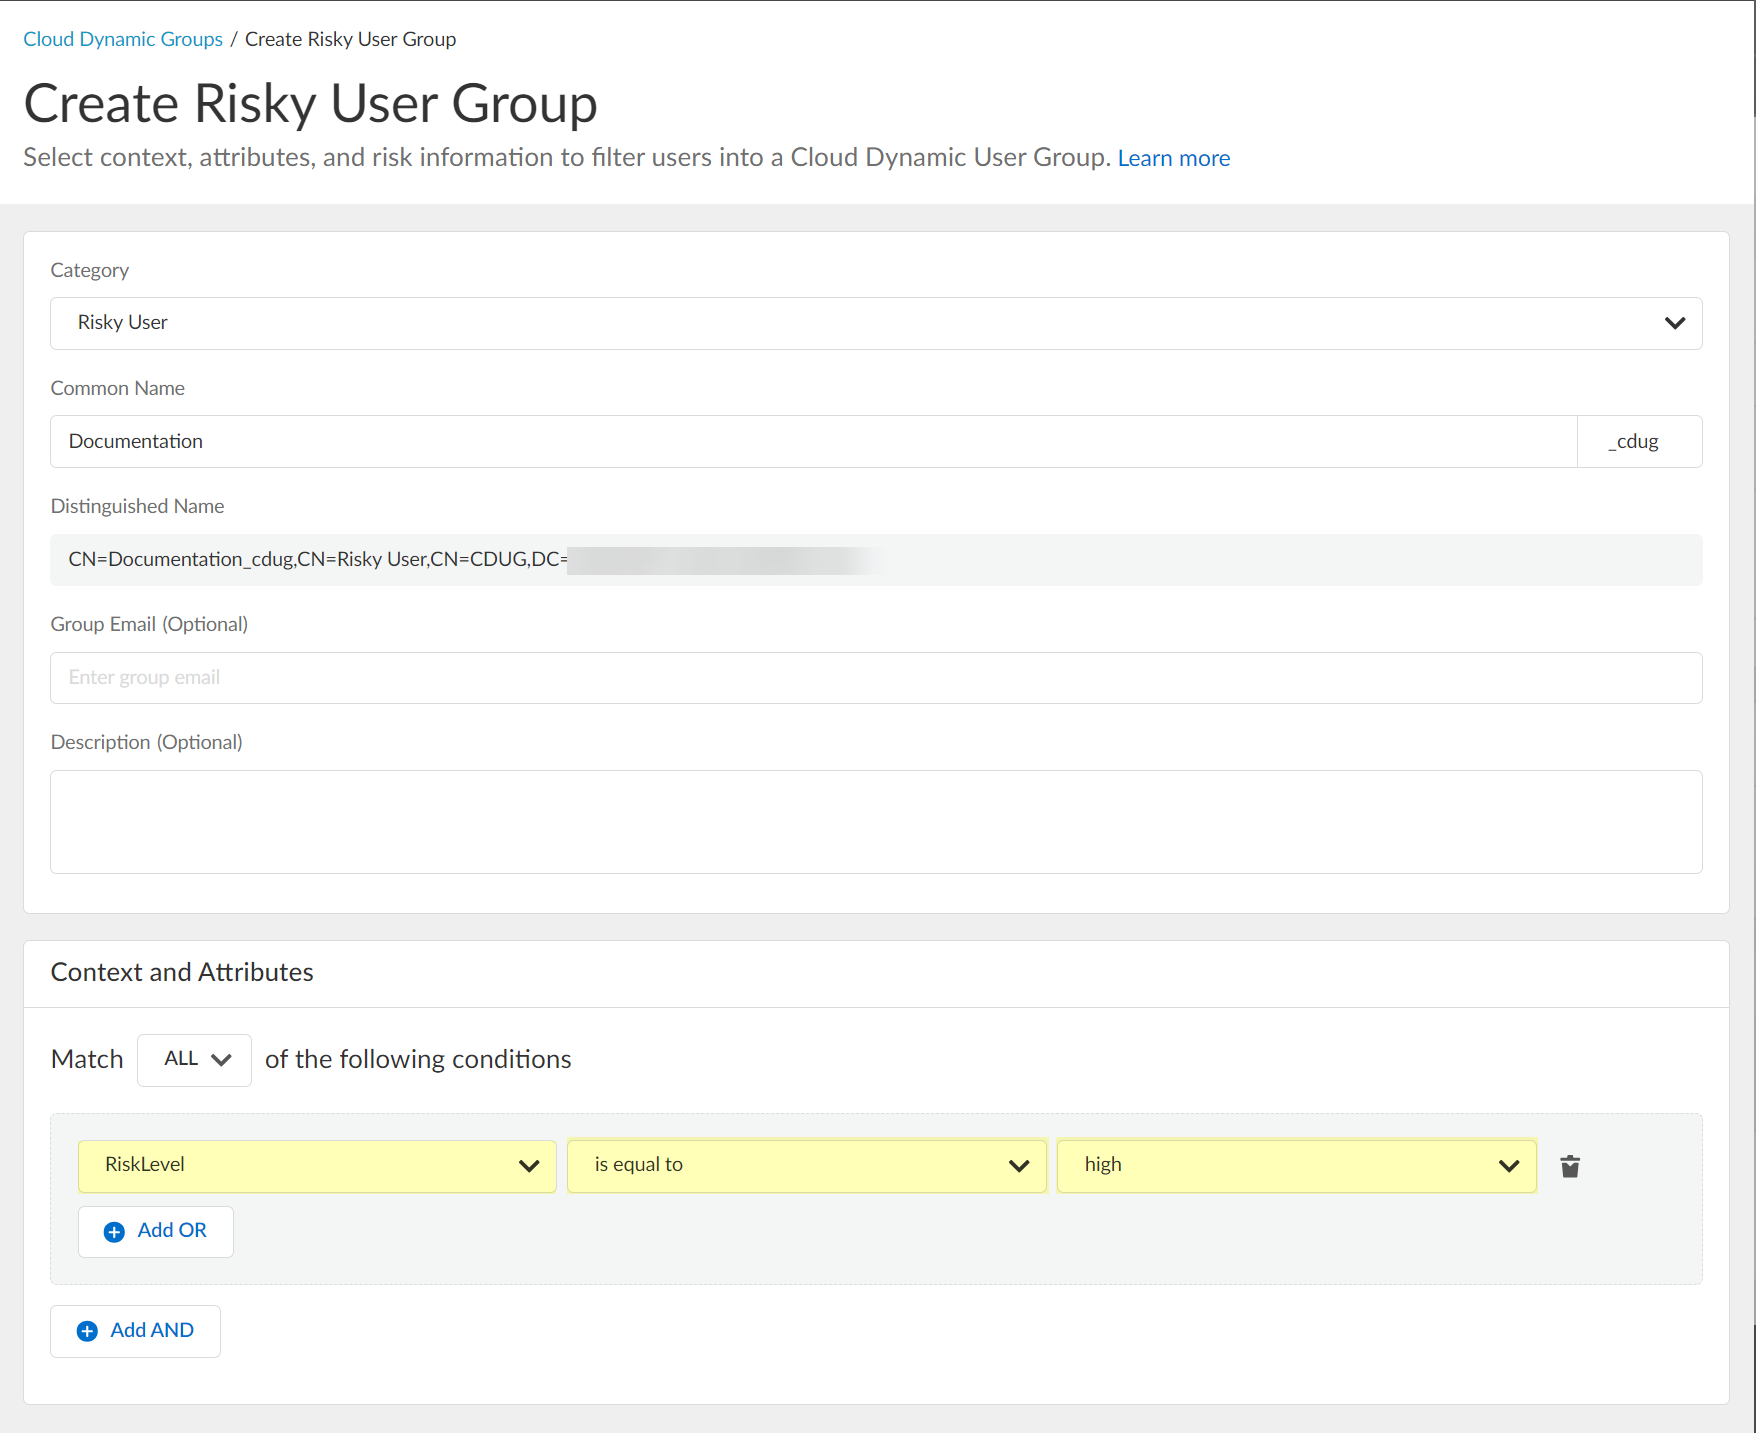
- (Optional) To include additional context and attributes, click Add OR and optionally Add AND and select the context and attributes to use for the dynamic risky user group.
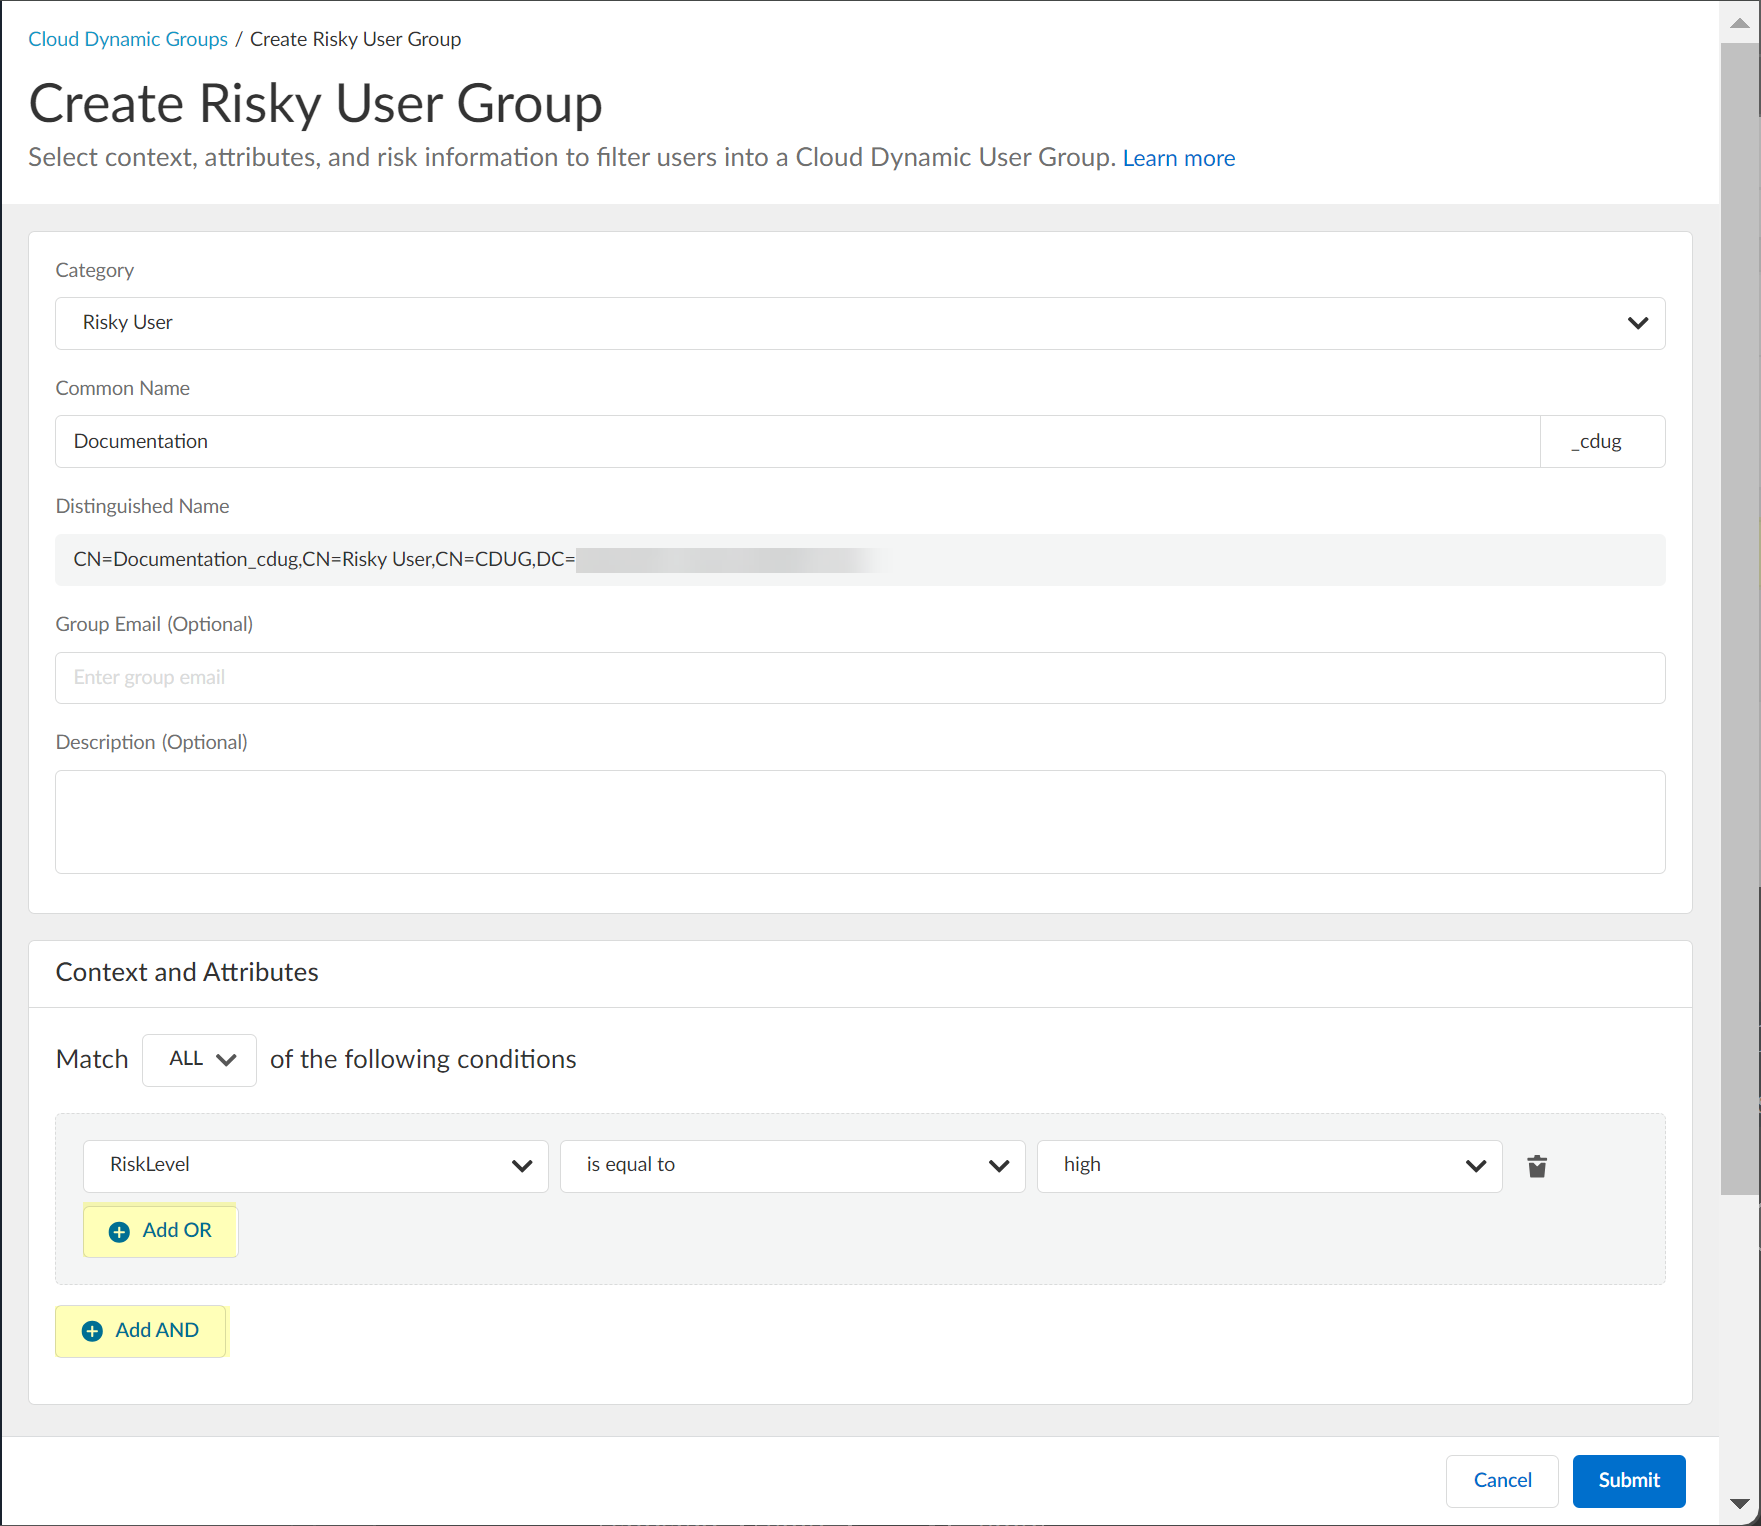
- Submit the configuration.
Configure SentinelOne for Security Risk in the Cloud Identity Engine
- To configure SentinelOne as a risk source for Security Risk, collect the necessary information from your SentinelOne configuration.
- Before logging in to SentinelOne, copy the URL without the /login part of the address and save it in a secure location.

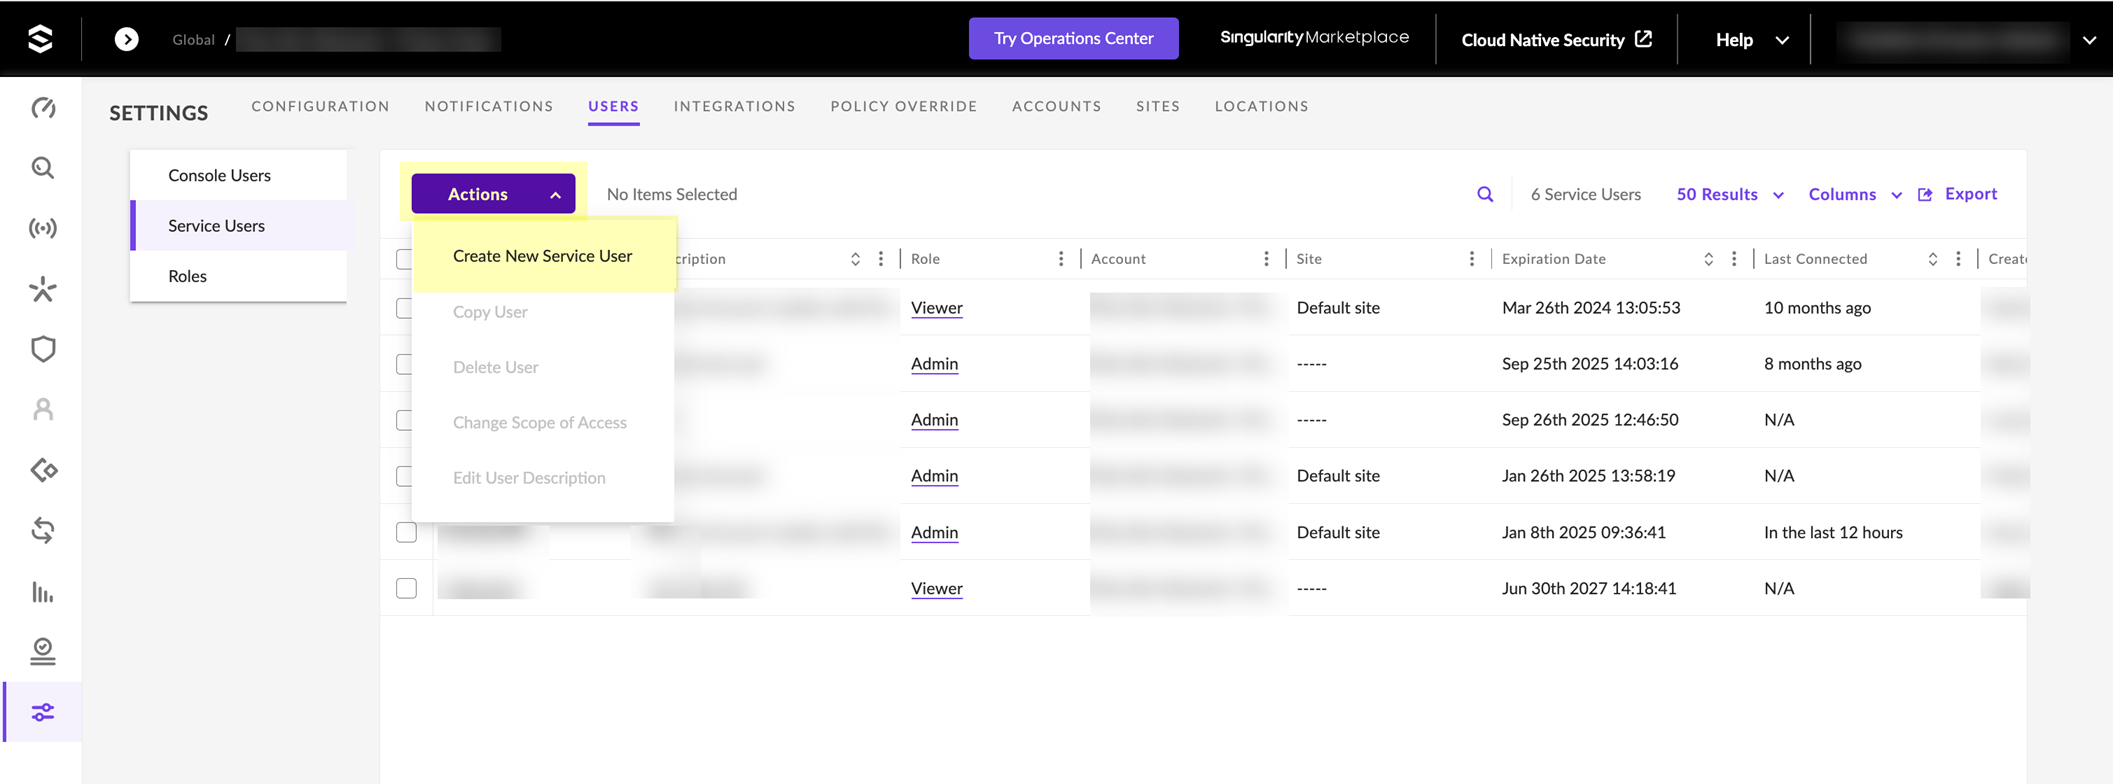
- Log in to SentinelOne and select SettingsUsersService Users .
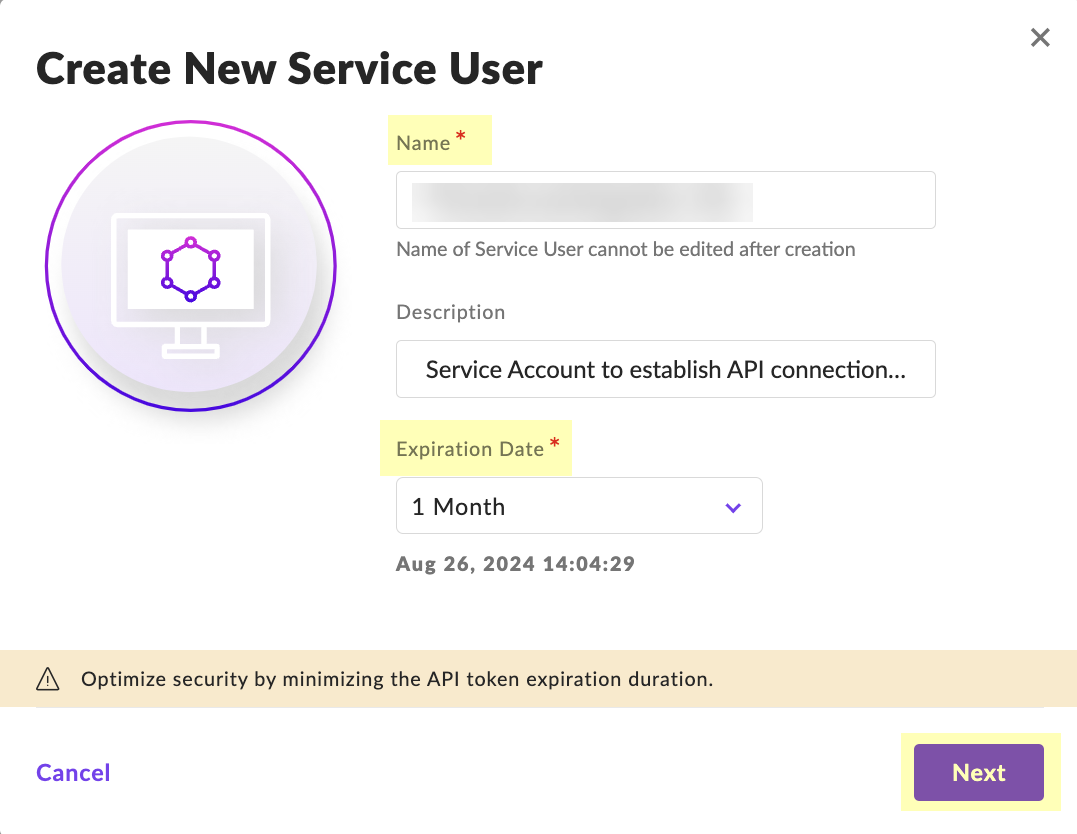
- Click ActionsCreate New Service User .
- Enter a Name for the service user account and select the Expiration Date then click Next .
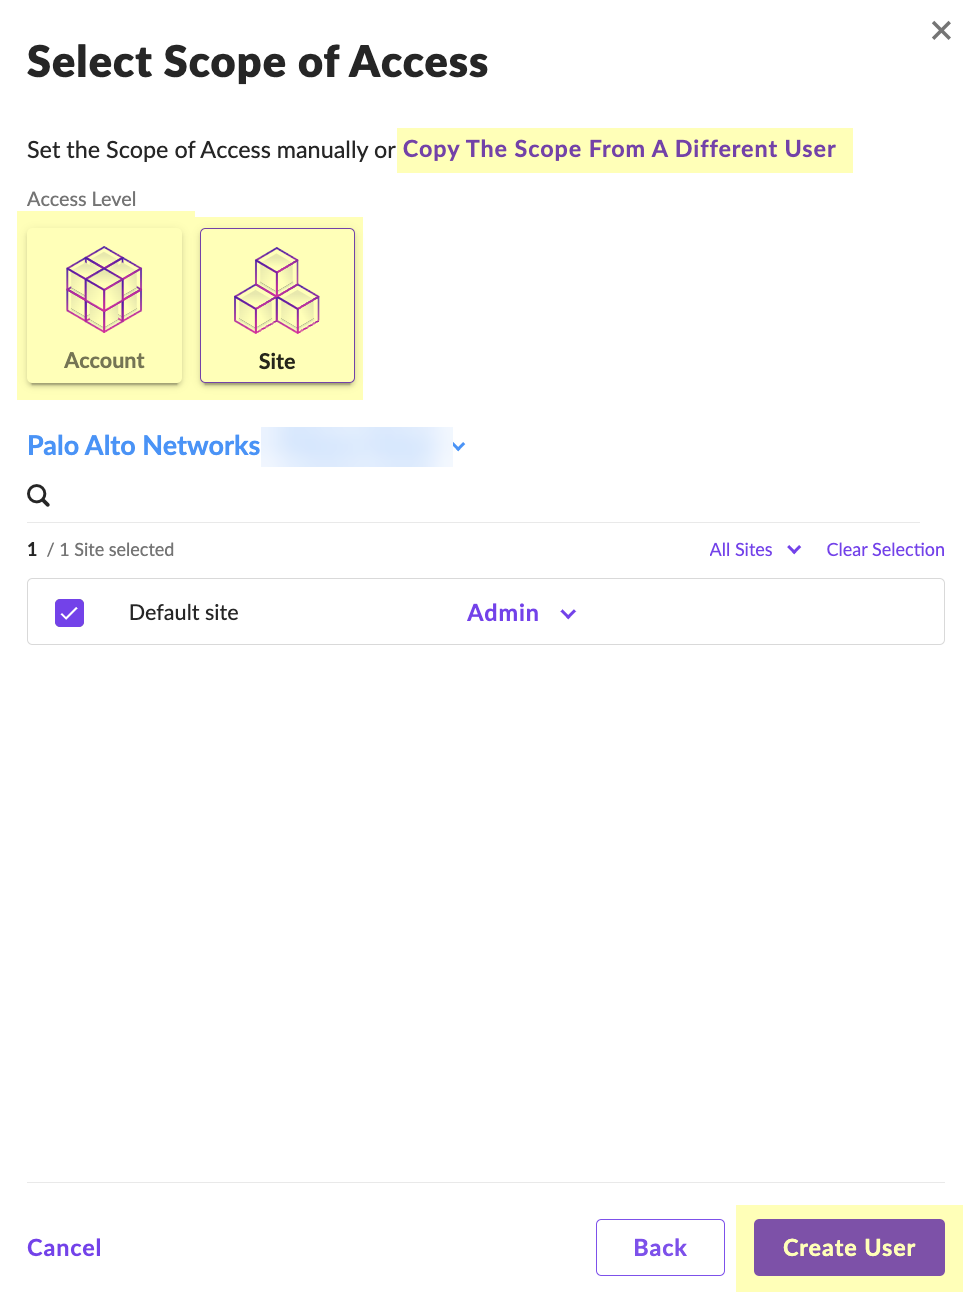
- Select Scope of Access and click Create User .
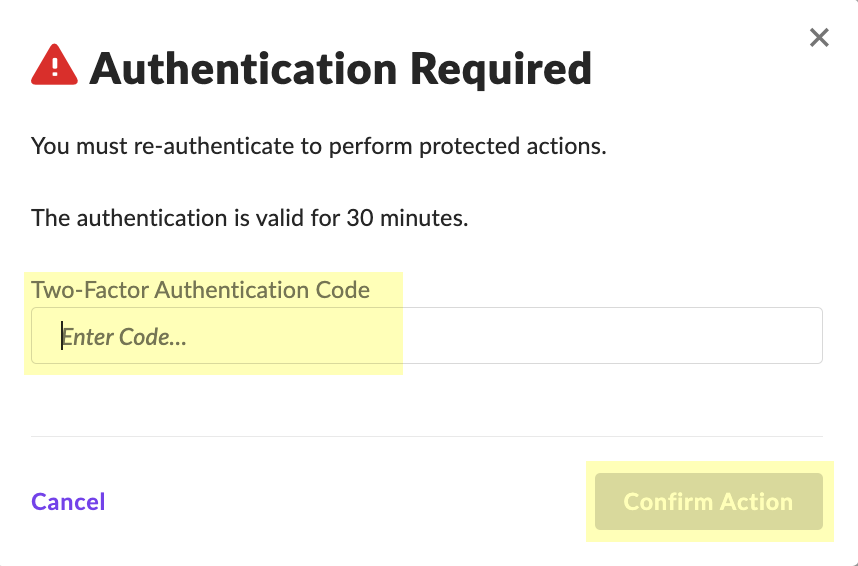
- Enter the Two-Factor Authentication Code within the 30-minute duration and click Confirm Action .
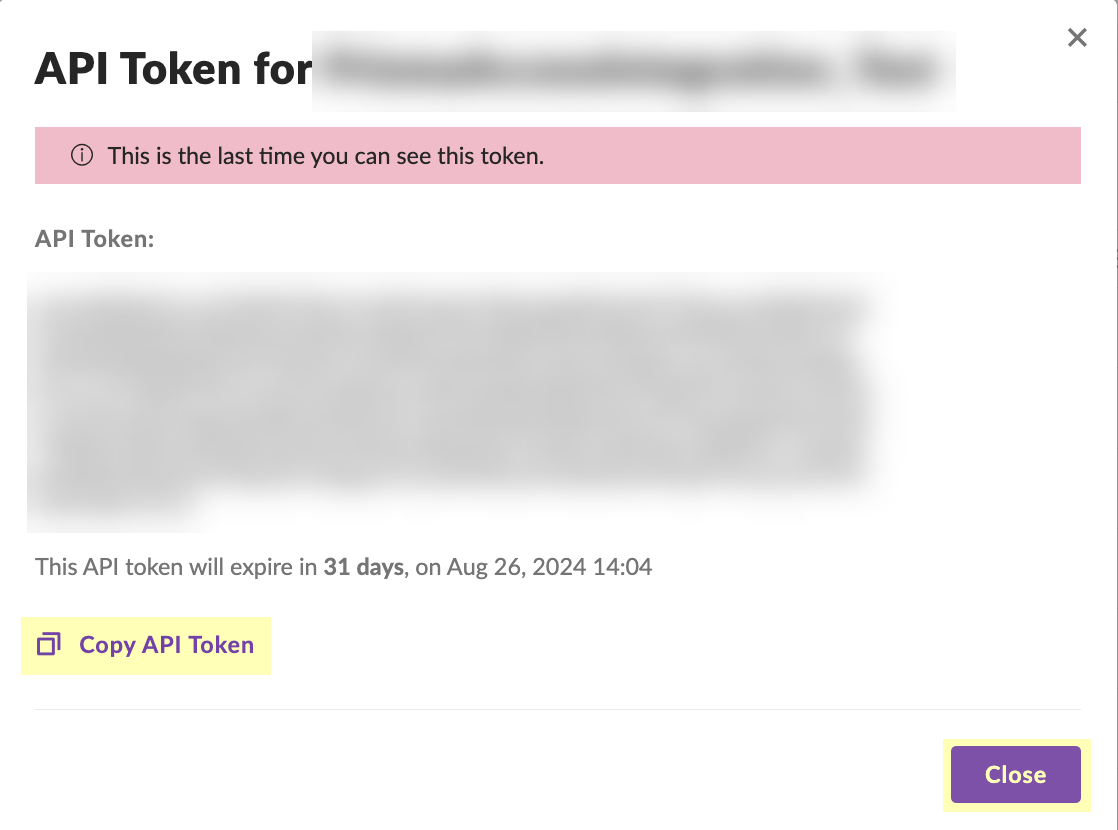
- Click Copy API Token to copy the API token and save it in a secure location. Because the API token only displays once, ensure you copy the token before clicking the Close button.
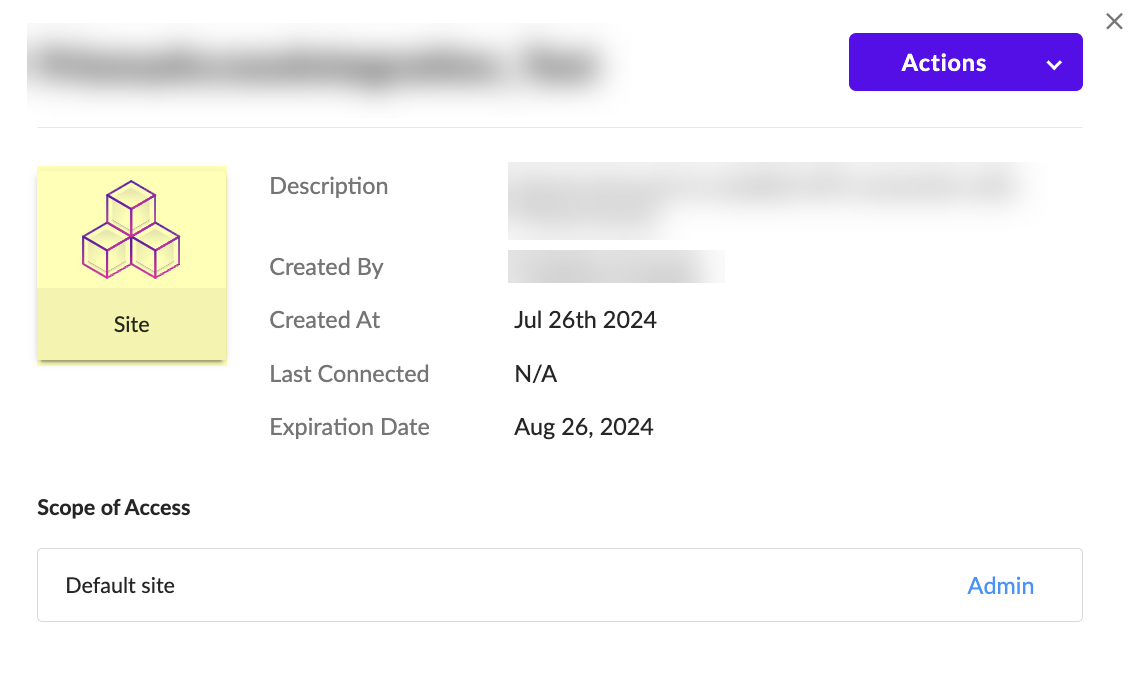
- (Optional but recommended) Click the Site button to confirm the creation of the site.
- Configure SentinelOne as a risk source in the Cloud Identity Engine.
- Enter the SentinelOne Source Name .
The source name must use lowercase.
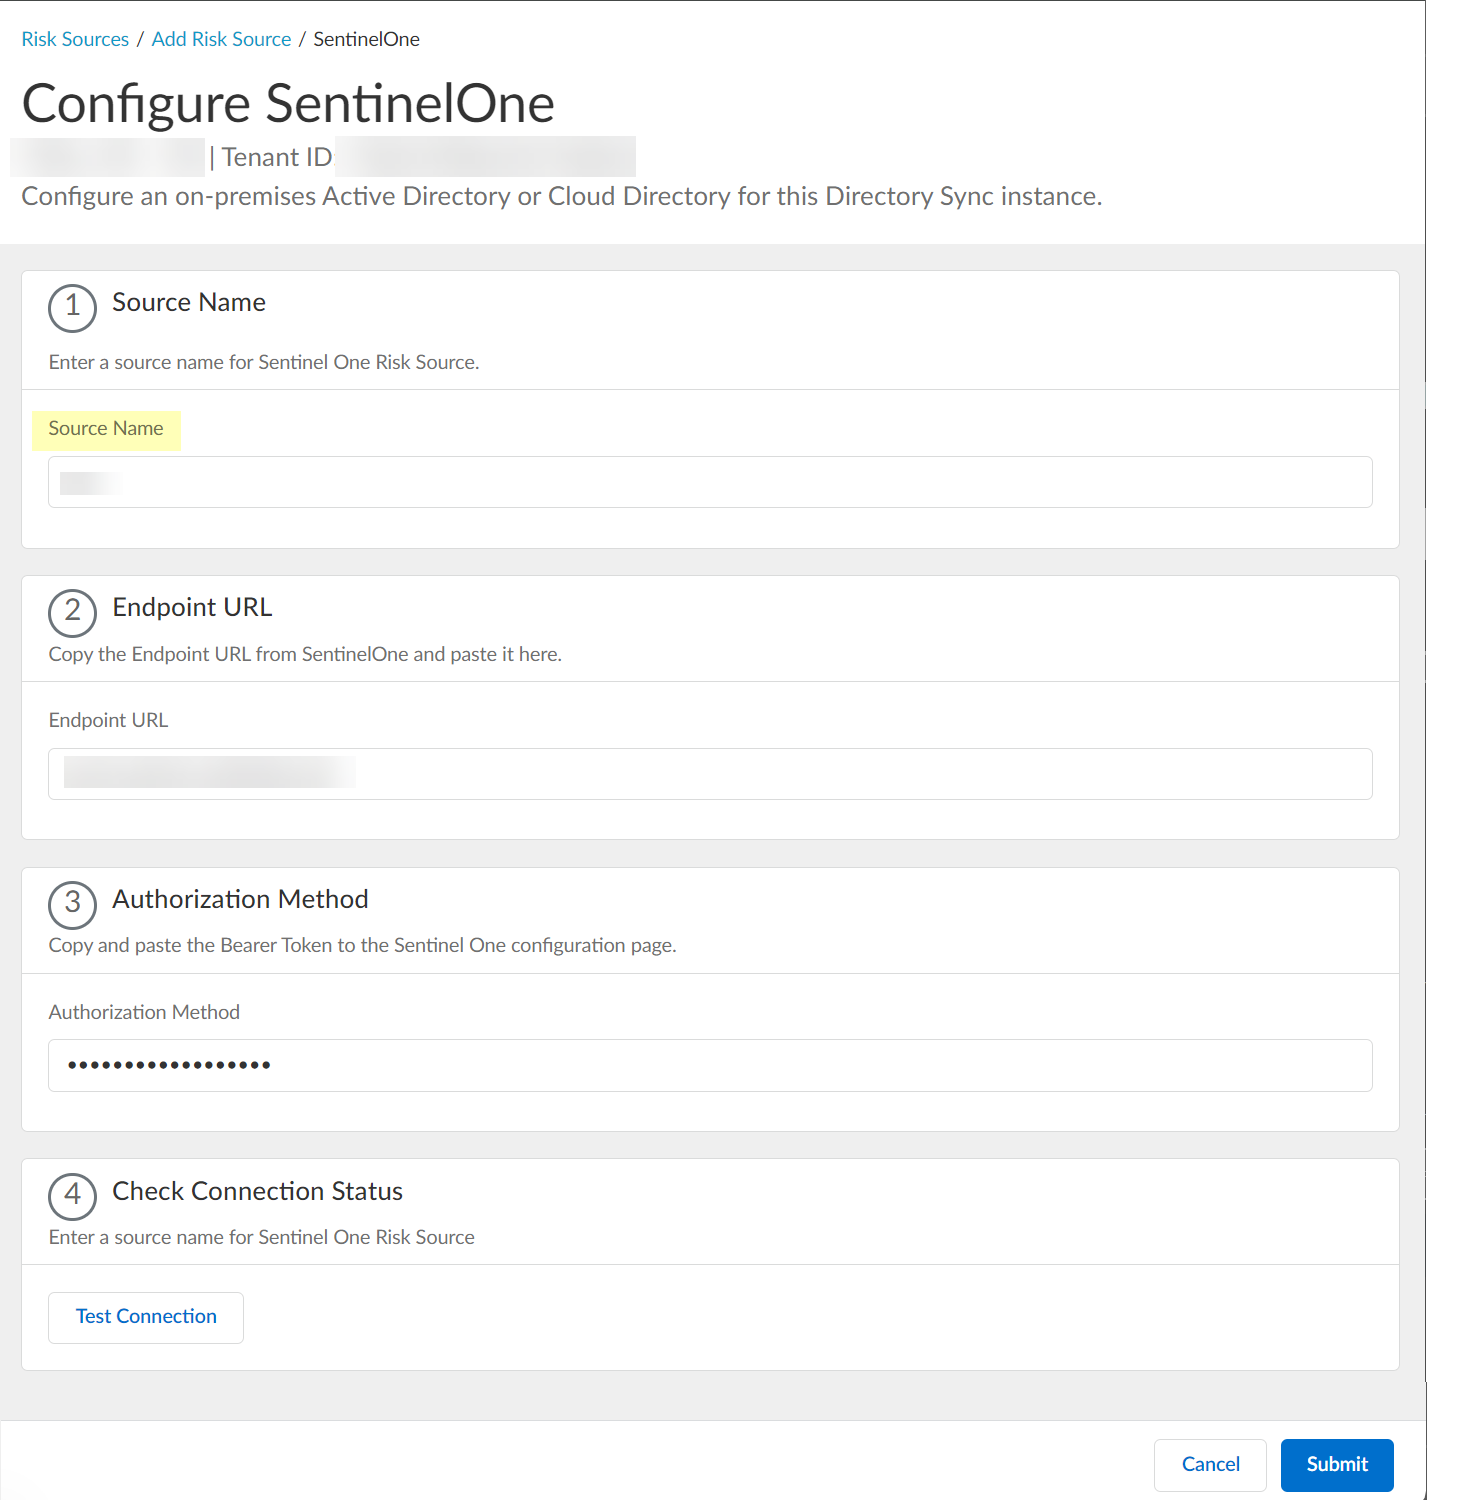
- Paste the Endpoint URL you copied from SentinelOne in step
1.a
.

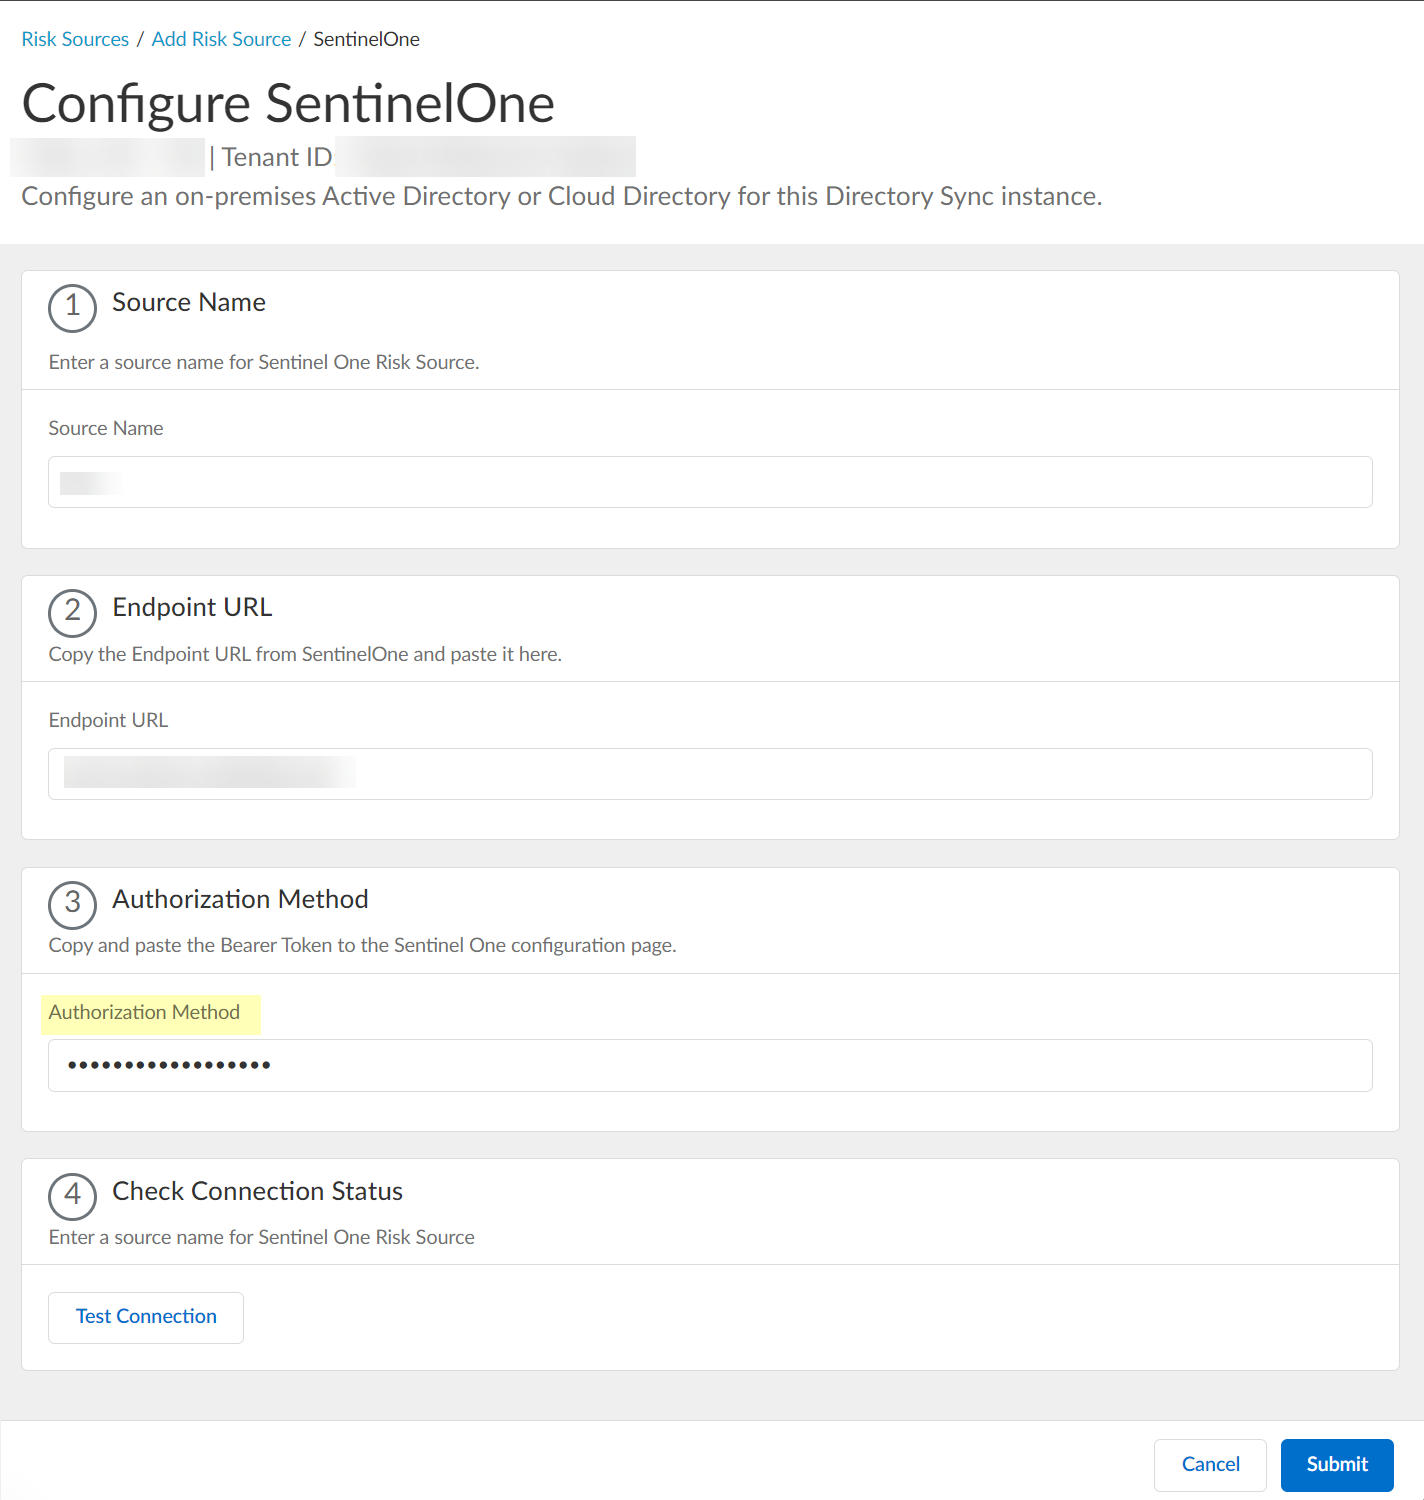
- Paste the Authorization Method API token you copied in step
1.7
and paste it in your SentinelOne configuration.
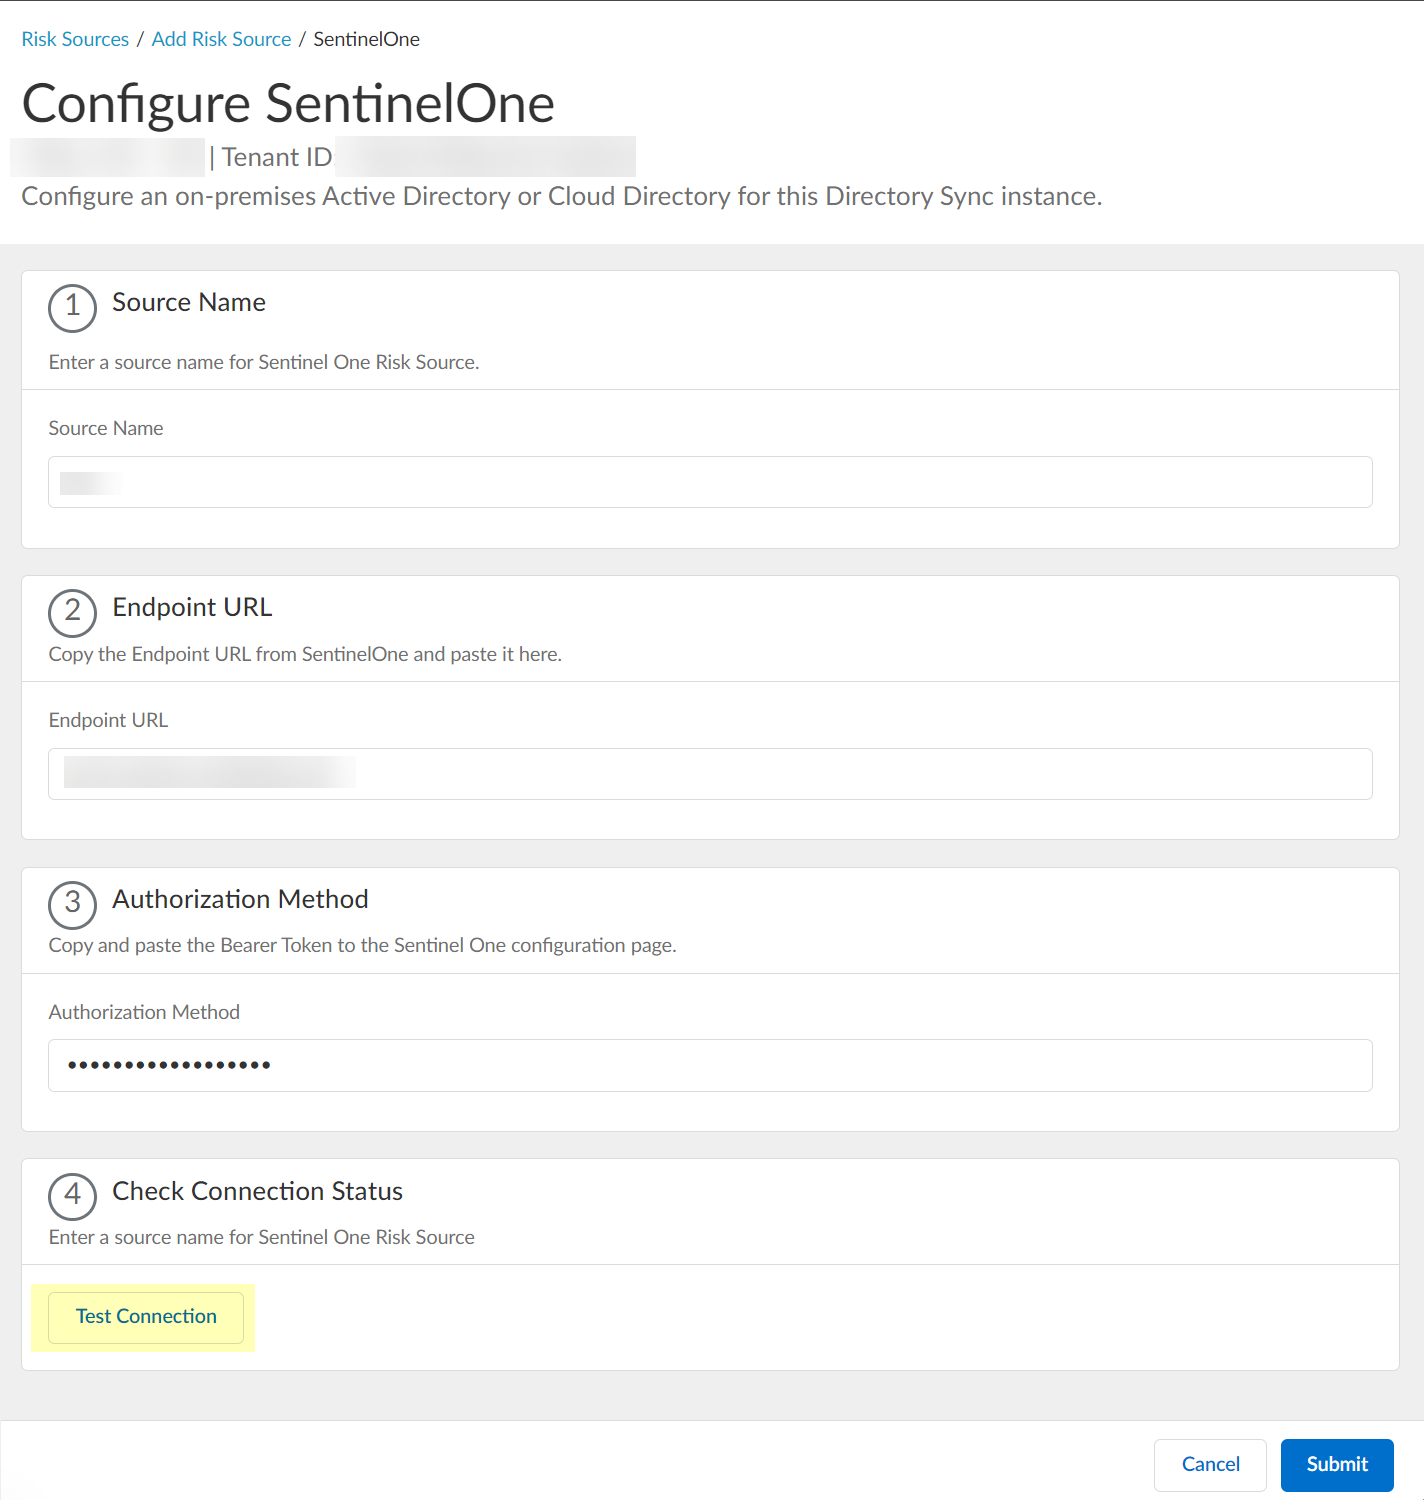
- Click Test Connection to verify that the Cloud Identity Engine can communicate with your SentinelOne configuration.
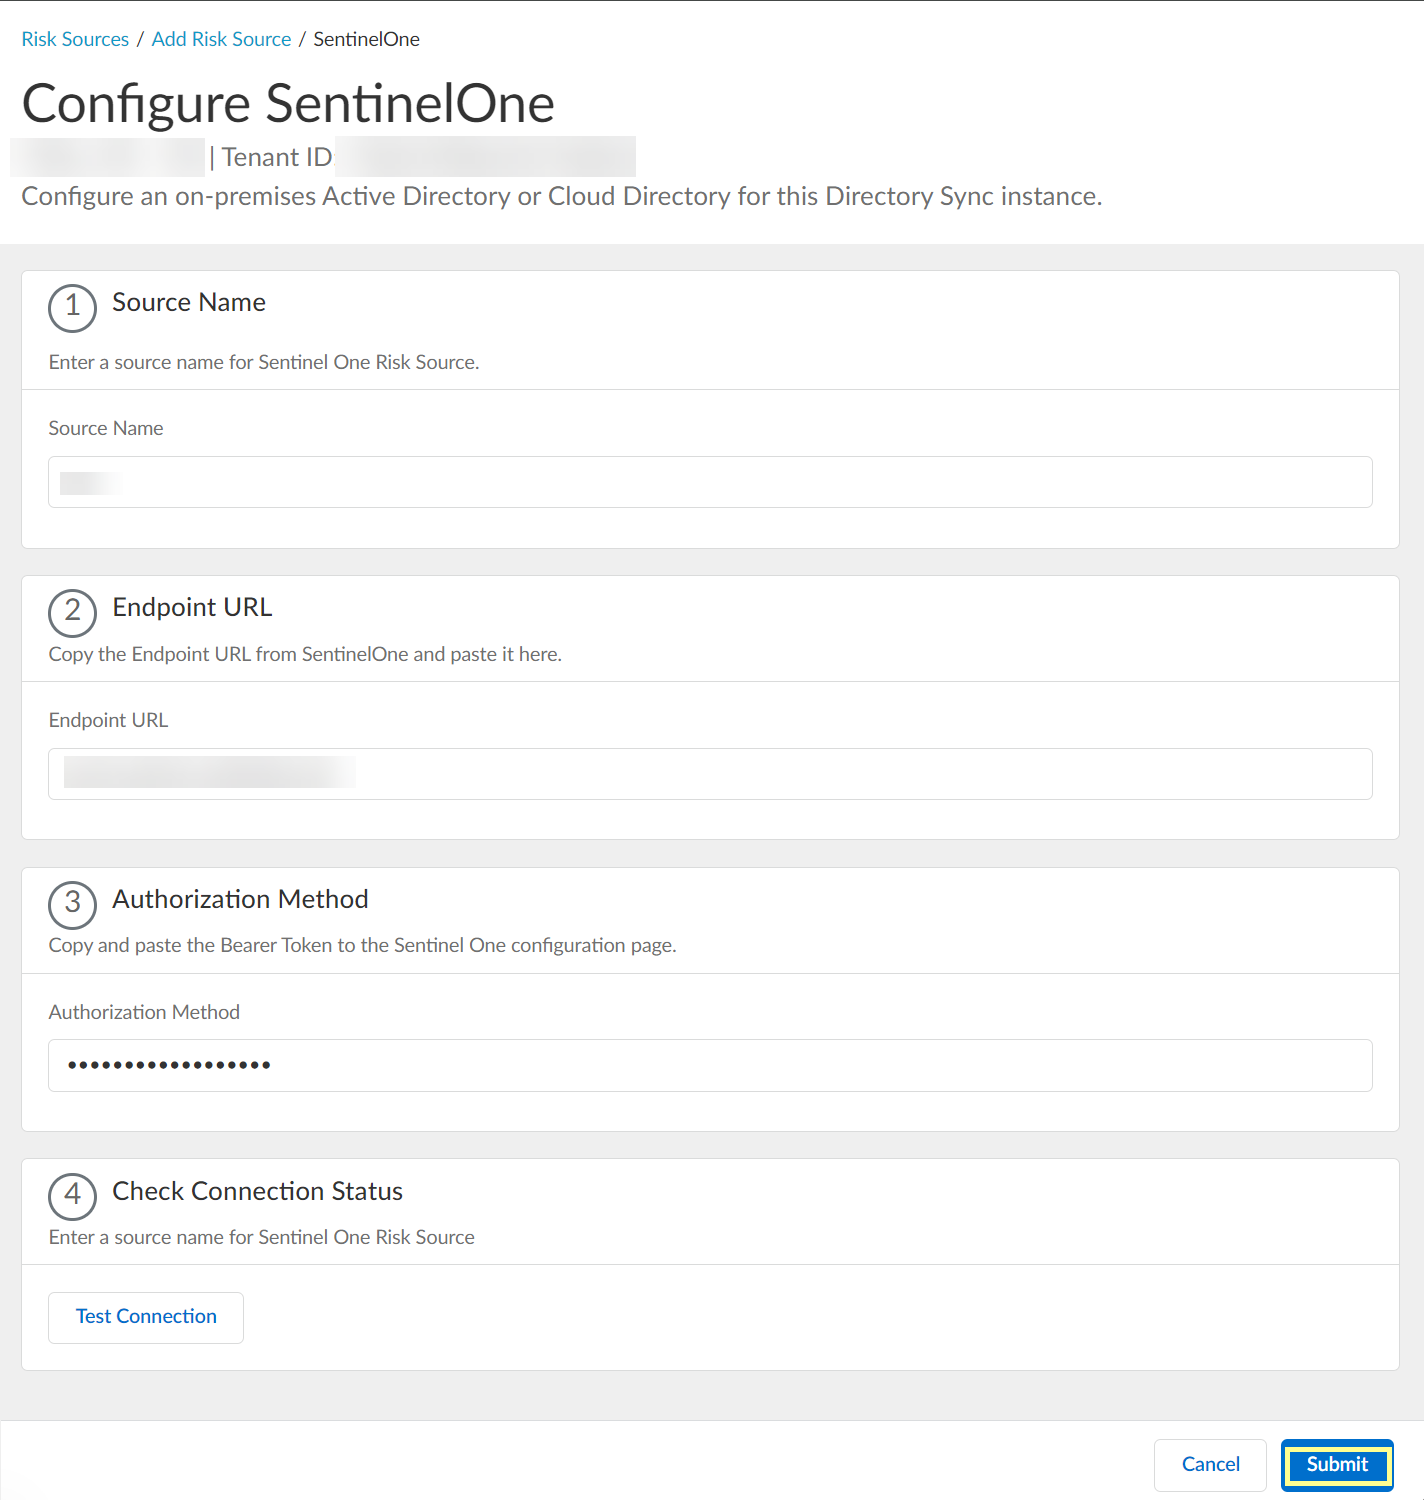
- After confirming that the Cloud Identity Engine can successfully communicate with your provider using your SentinelOne configuration, Submit the SentinelOne configuration.
- View or edit the dynamic risky endpoint groups.
- In the Cloud Identity Engine, select Security RiskCloud Dynamic Groups .
- Select the Risky Endpoint Group tab to view the groups that the Cloud Identity Engine creates to isolate endpoints that it identifies as risky. You can optionally click the Details icon to view more information about the specific endpoint group.
The Cloud Identity Engine creates a default group without any attributes; you must specify the attributes you want to use for the group (see step
3.4
).
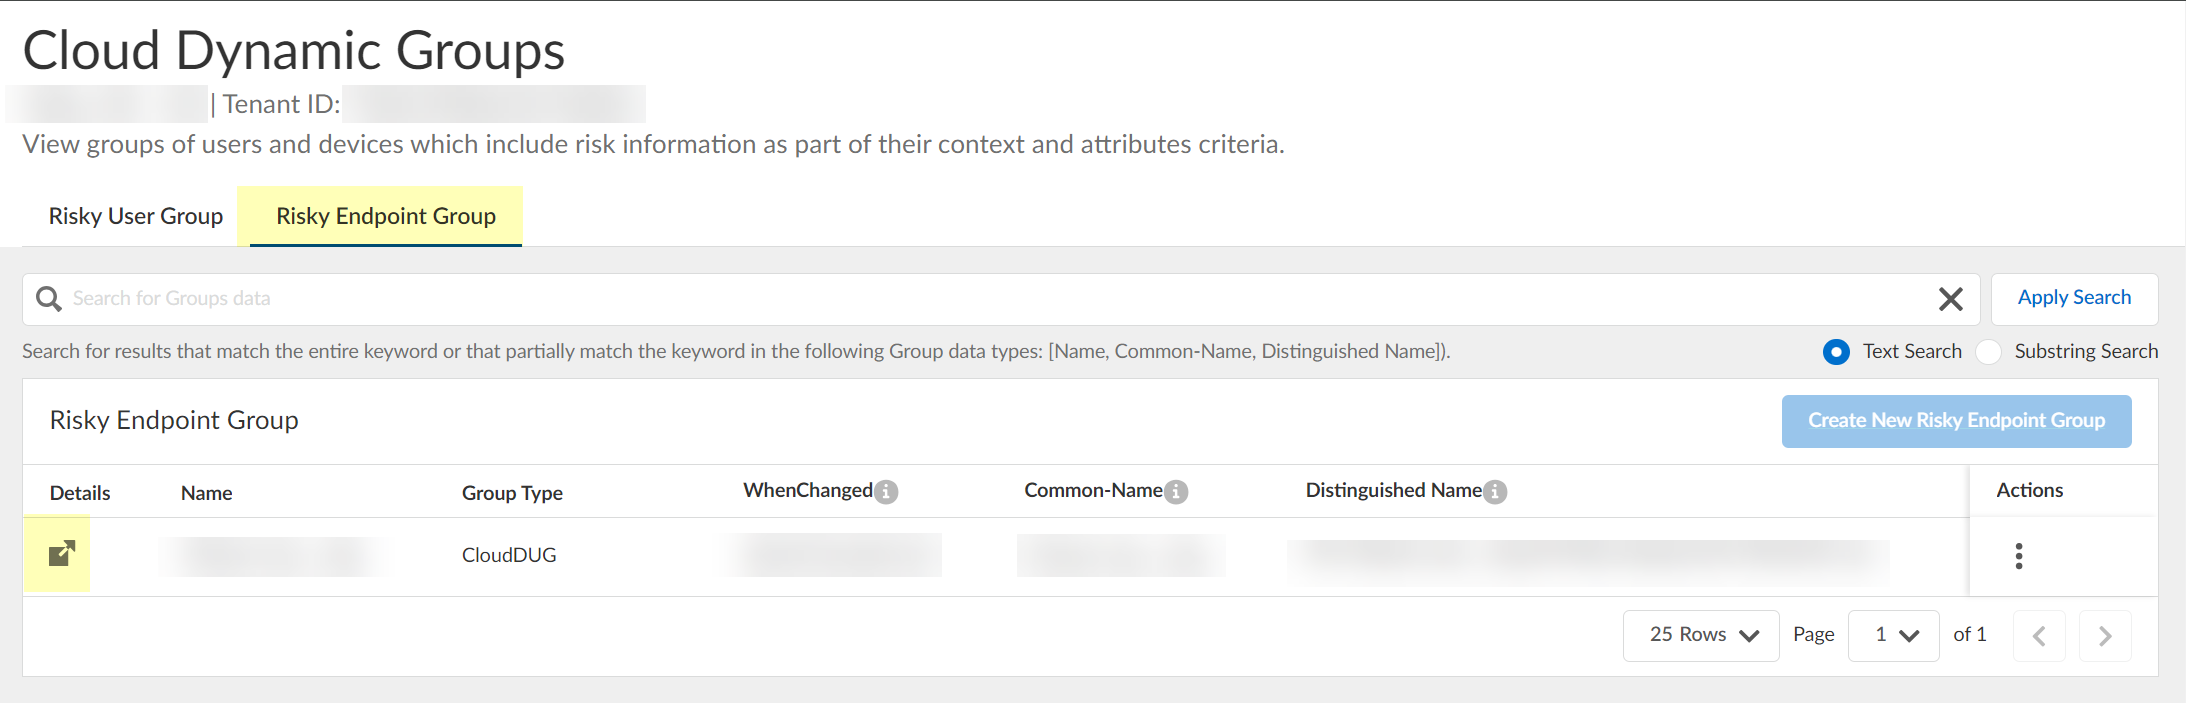
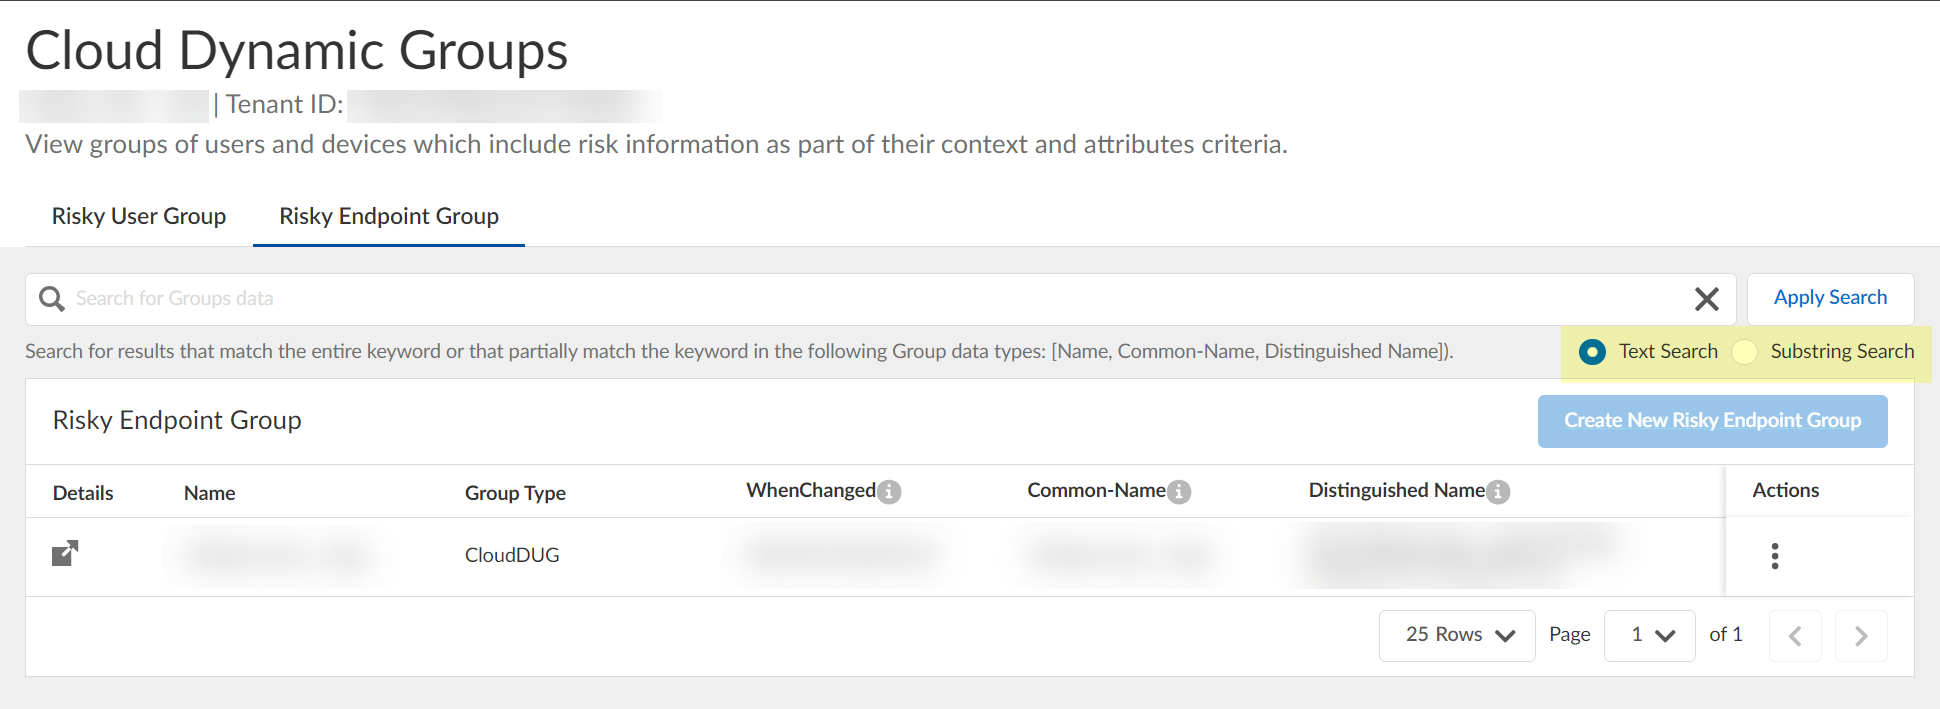
- (Optional) Search the groups by entering a search query then click Apply Search .
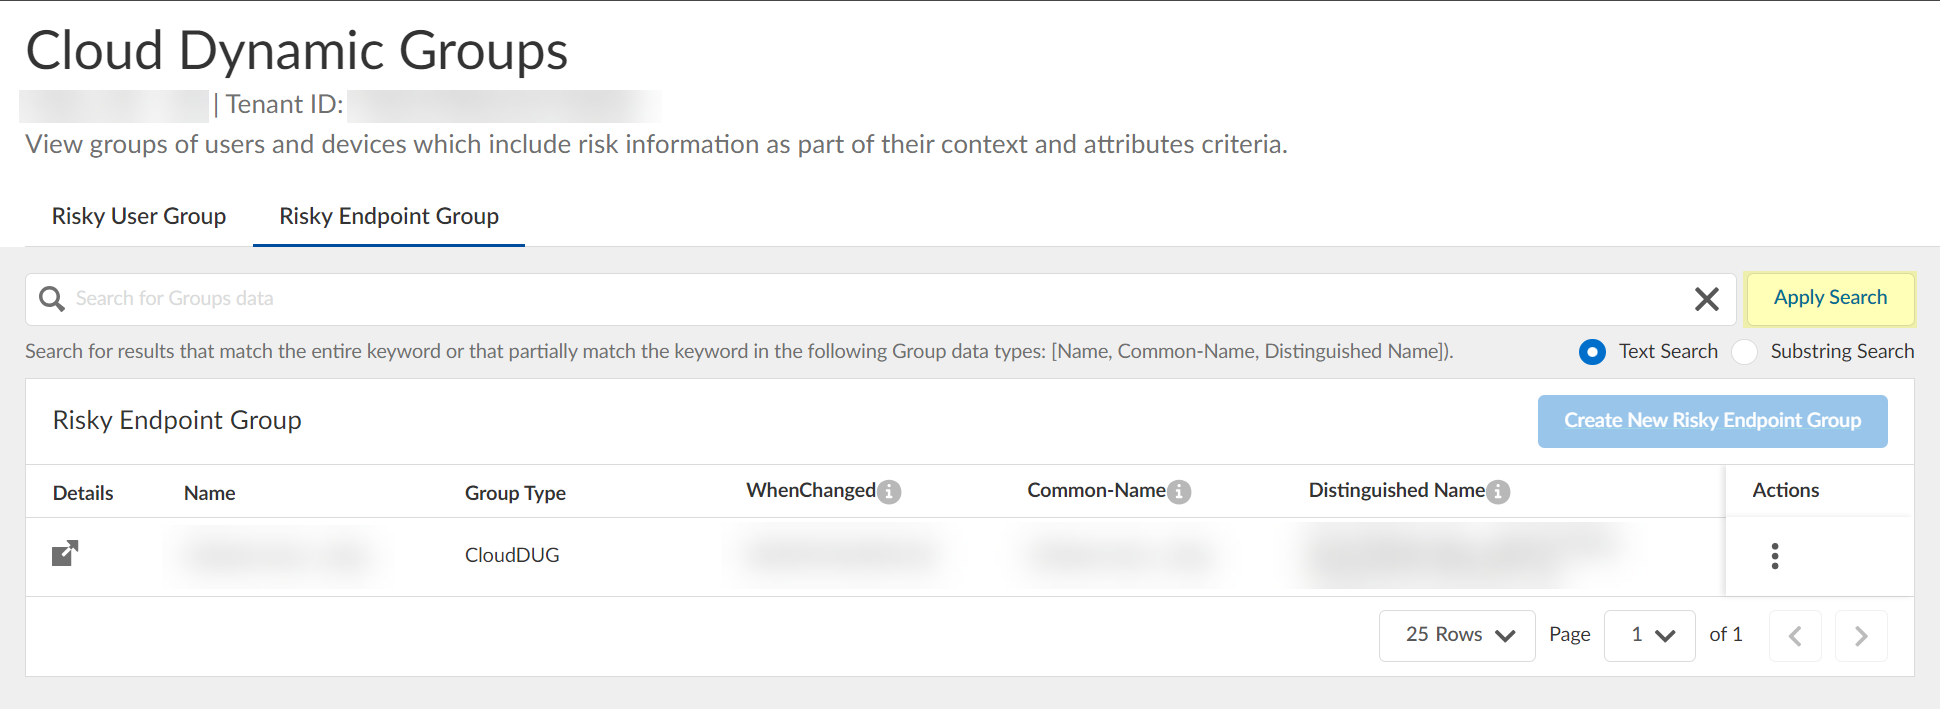
You can specify a Text Search or a Substring Search .
- Specify the context and attributes for the cloud dynamic risky endpoint group by selecting ActionsEdit , adding the context and attributes, and clicking Submit to confirm the changes.

- (Optional) To delete a group, select ActionsRemove and click Yes to confirm removal of the group.

The Cloud Identity Engine does not currently support creation of a dynamic risky endpoint group if there is an existing group.
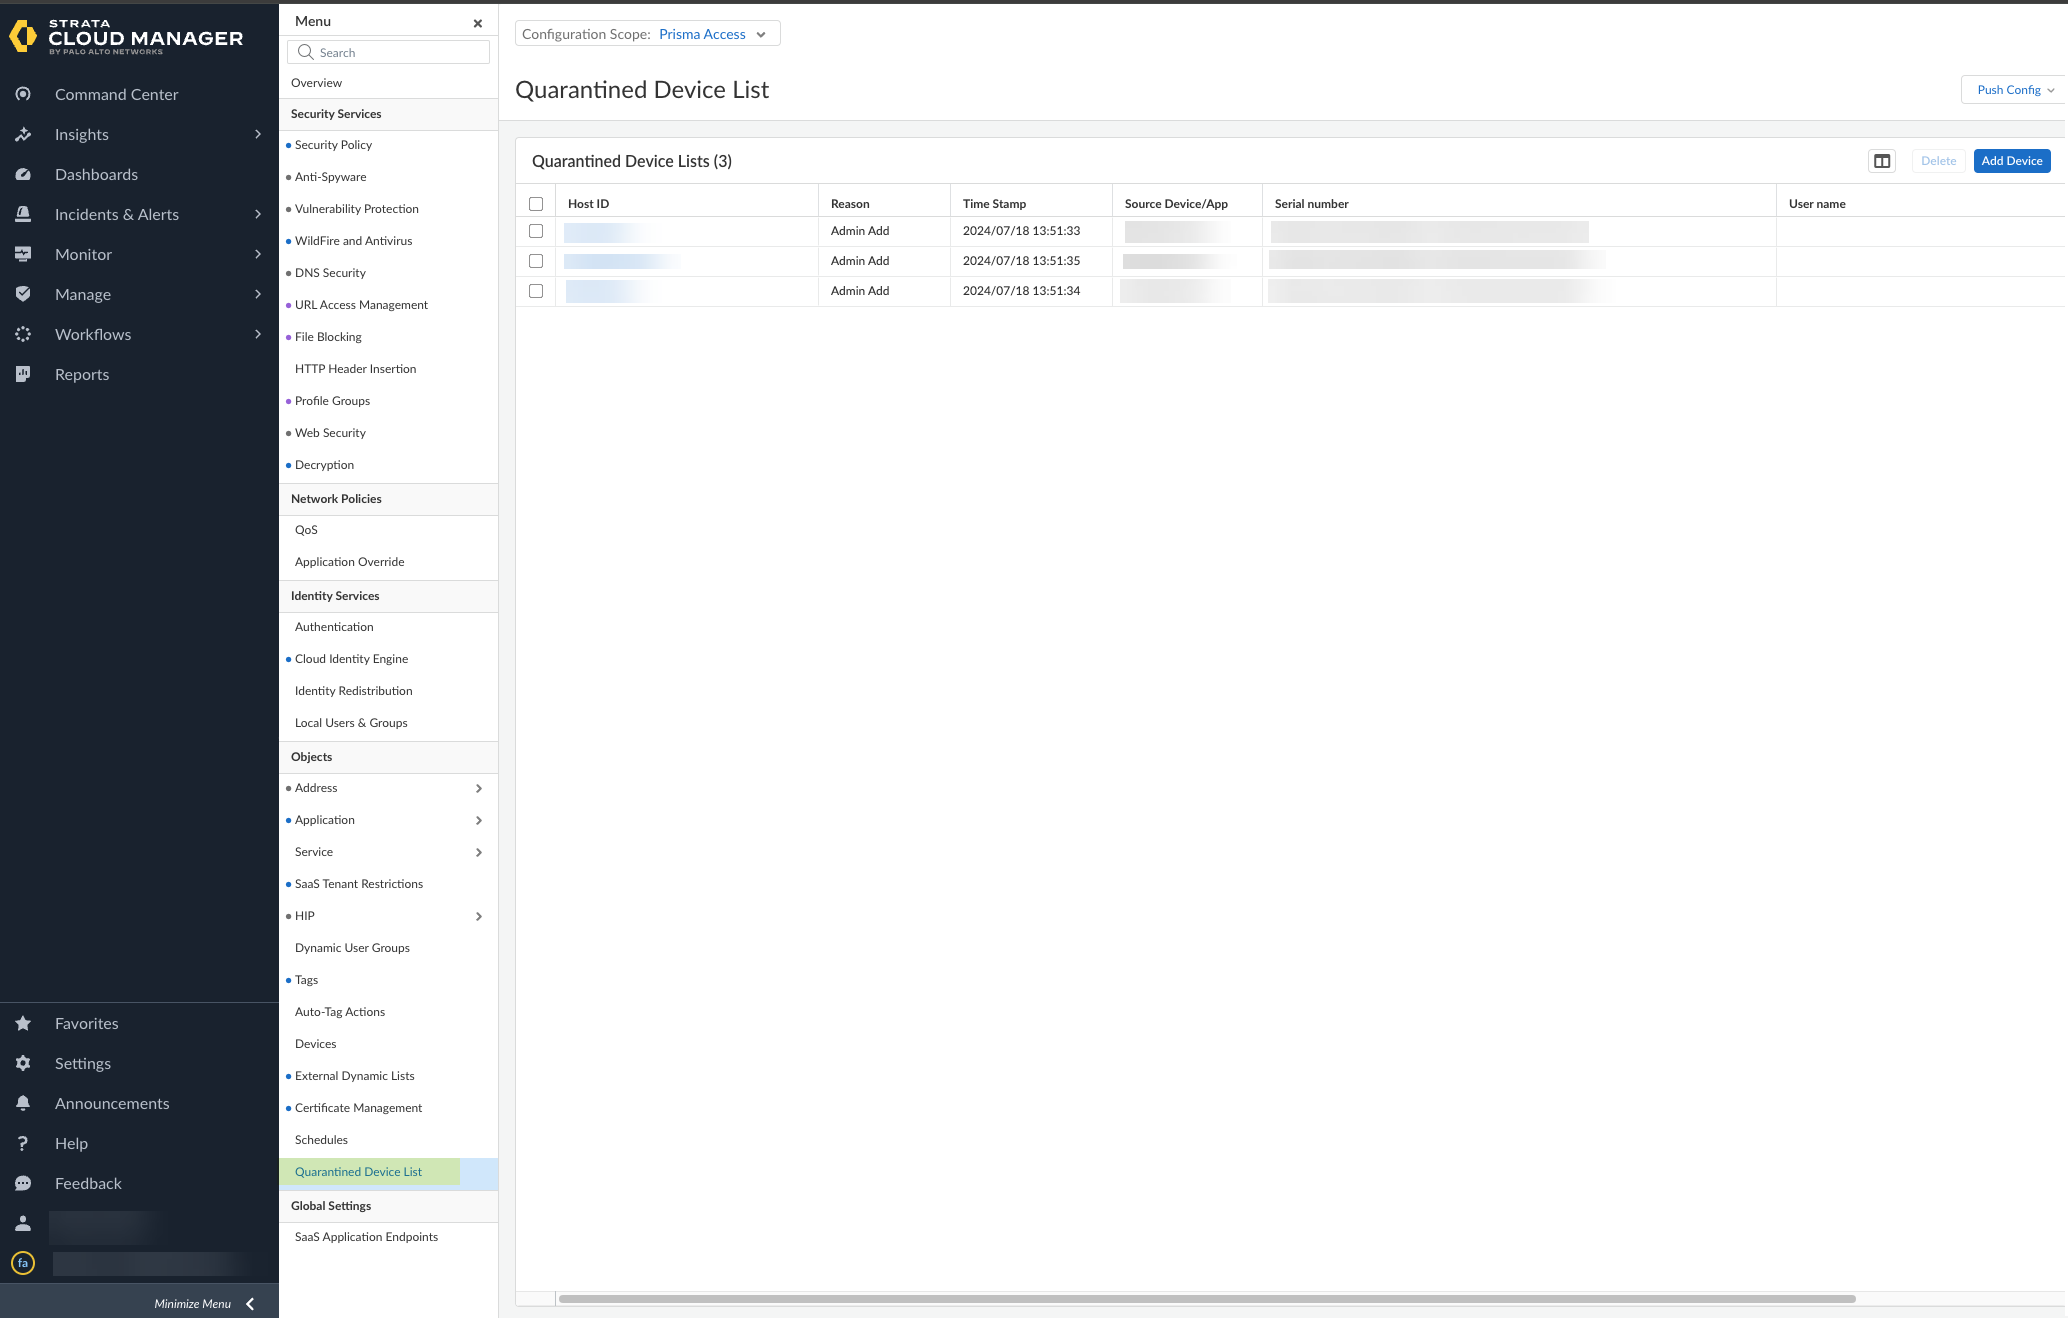
- Use Strata Cloud Manager to view the devices that have been quarantined .
The Cloud Identity Engine places devices in quarantine using device security posture information and risk signals from SentinelOne. It removes devices from the quarantine list only when the device no longer meets any of the match criteria in the Cloud Identity Engine configuration. If a device is in quarantine due to SentinelOne information, Palo Alto Networks does not recommend manually removing the device from the quarantine list using Strata Cloud Manager or Panorama.
- Log in to Strata Cloud Manager.
- Select ManageConfigurationNGFW and Prisma Access .
- Select Prisma Access as the Configuration Scope .
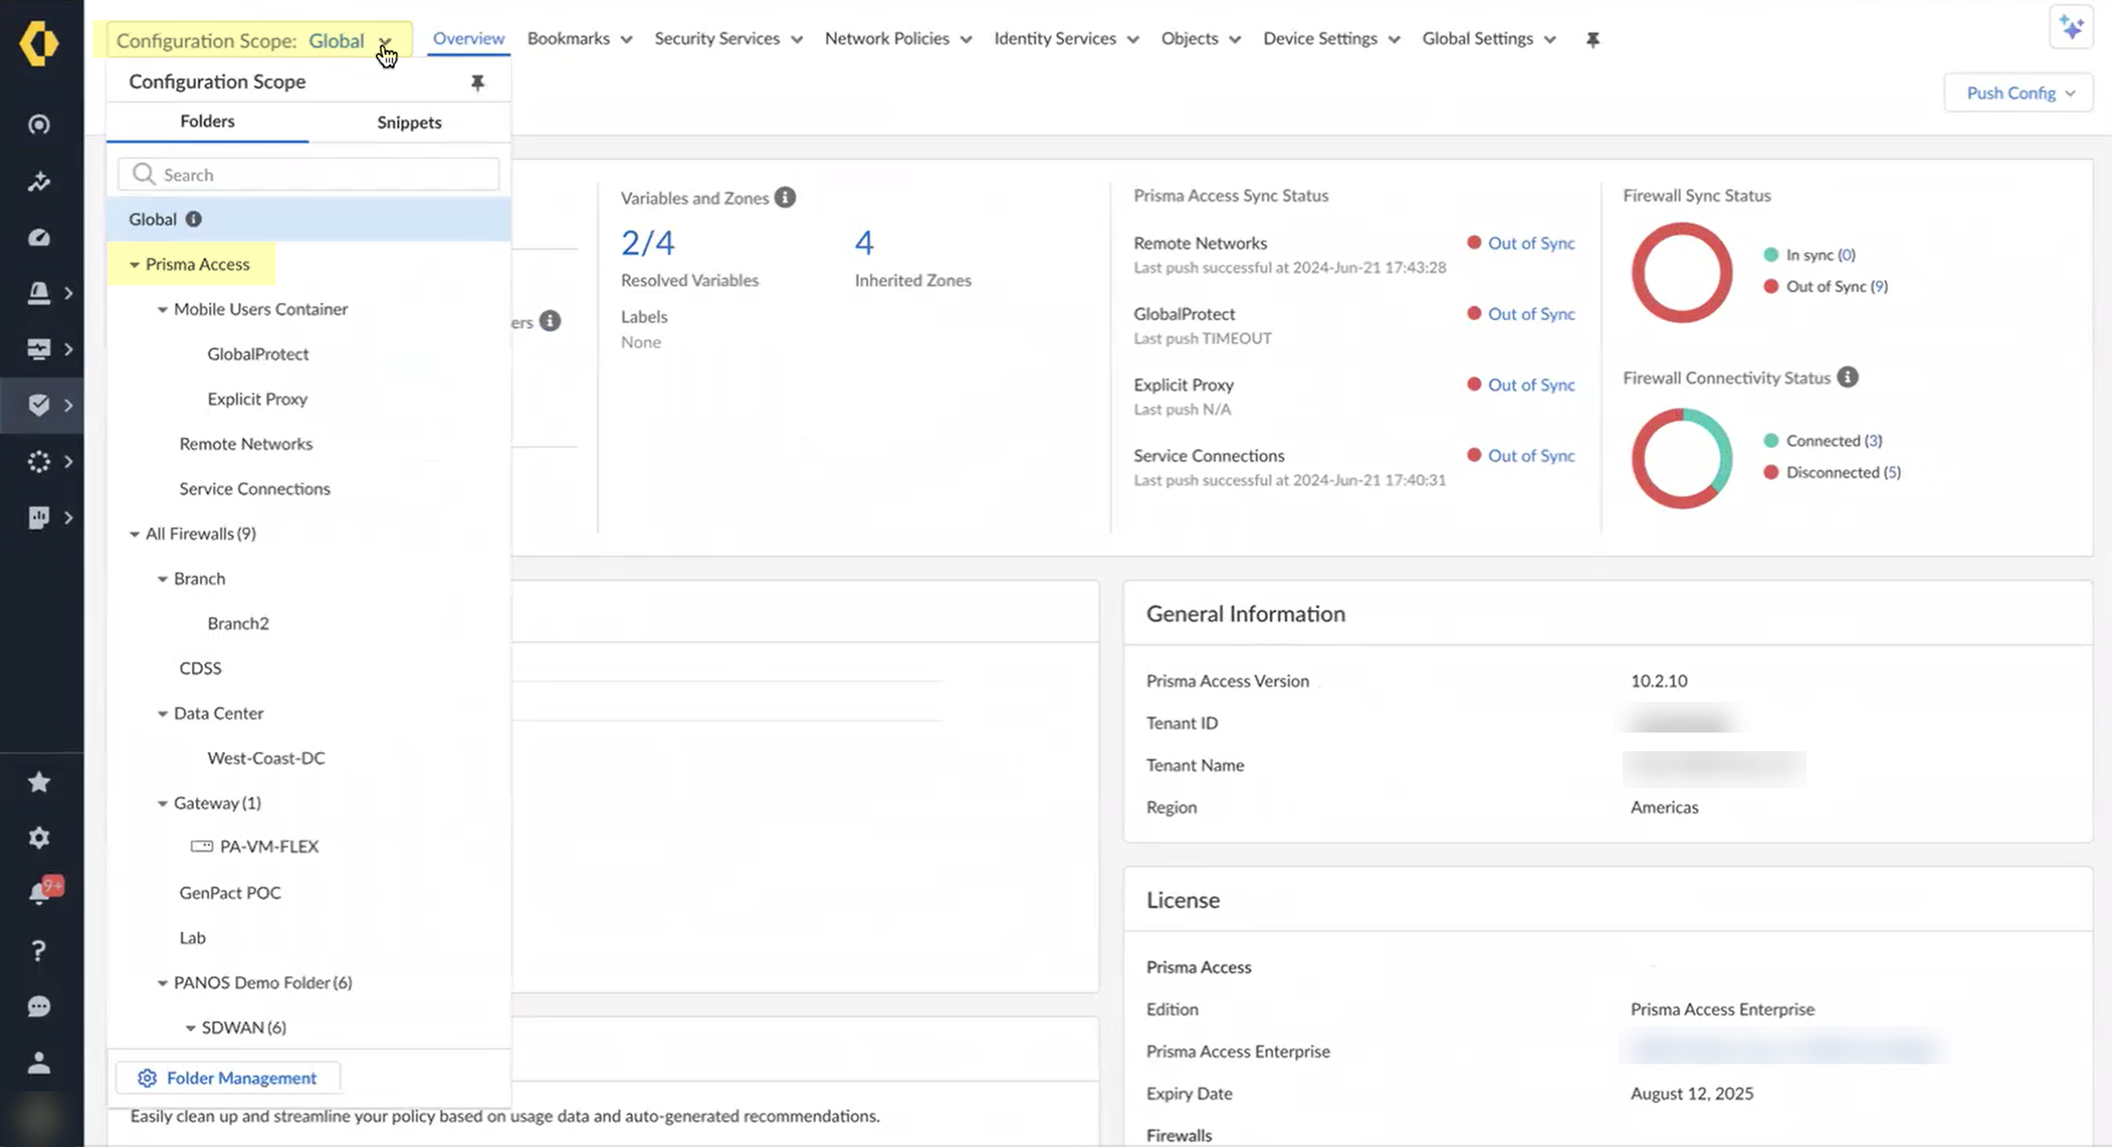
- Select ObjectsQuarantined Device List .
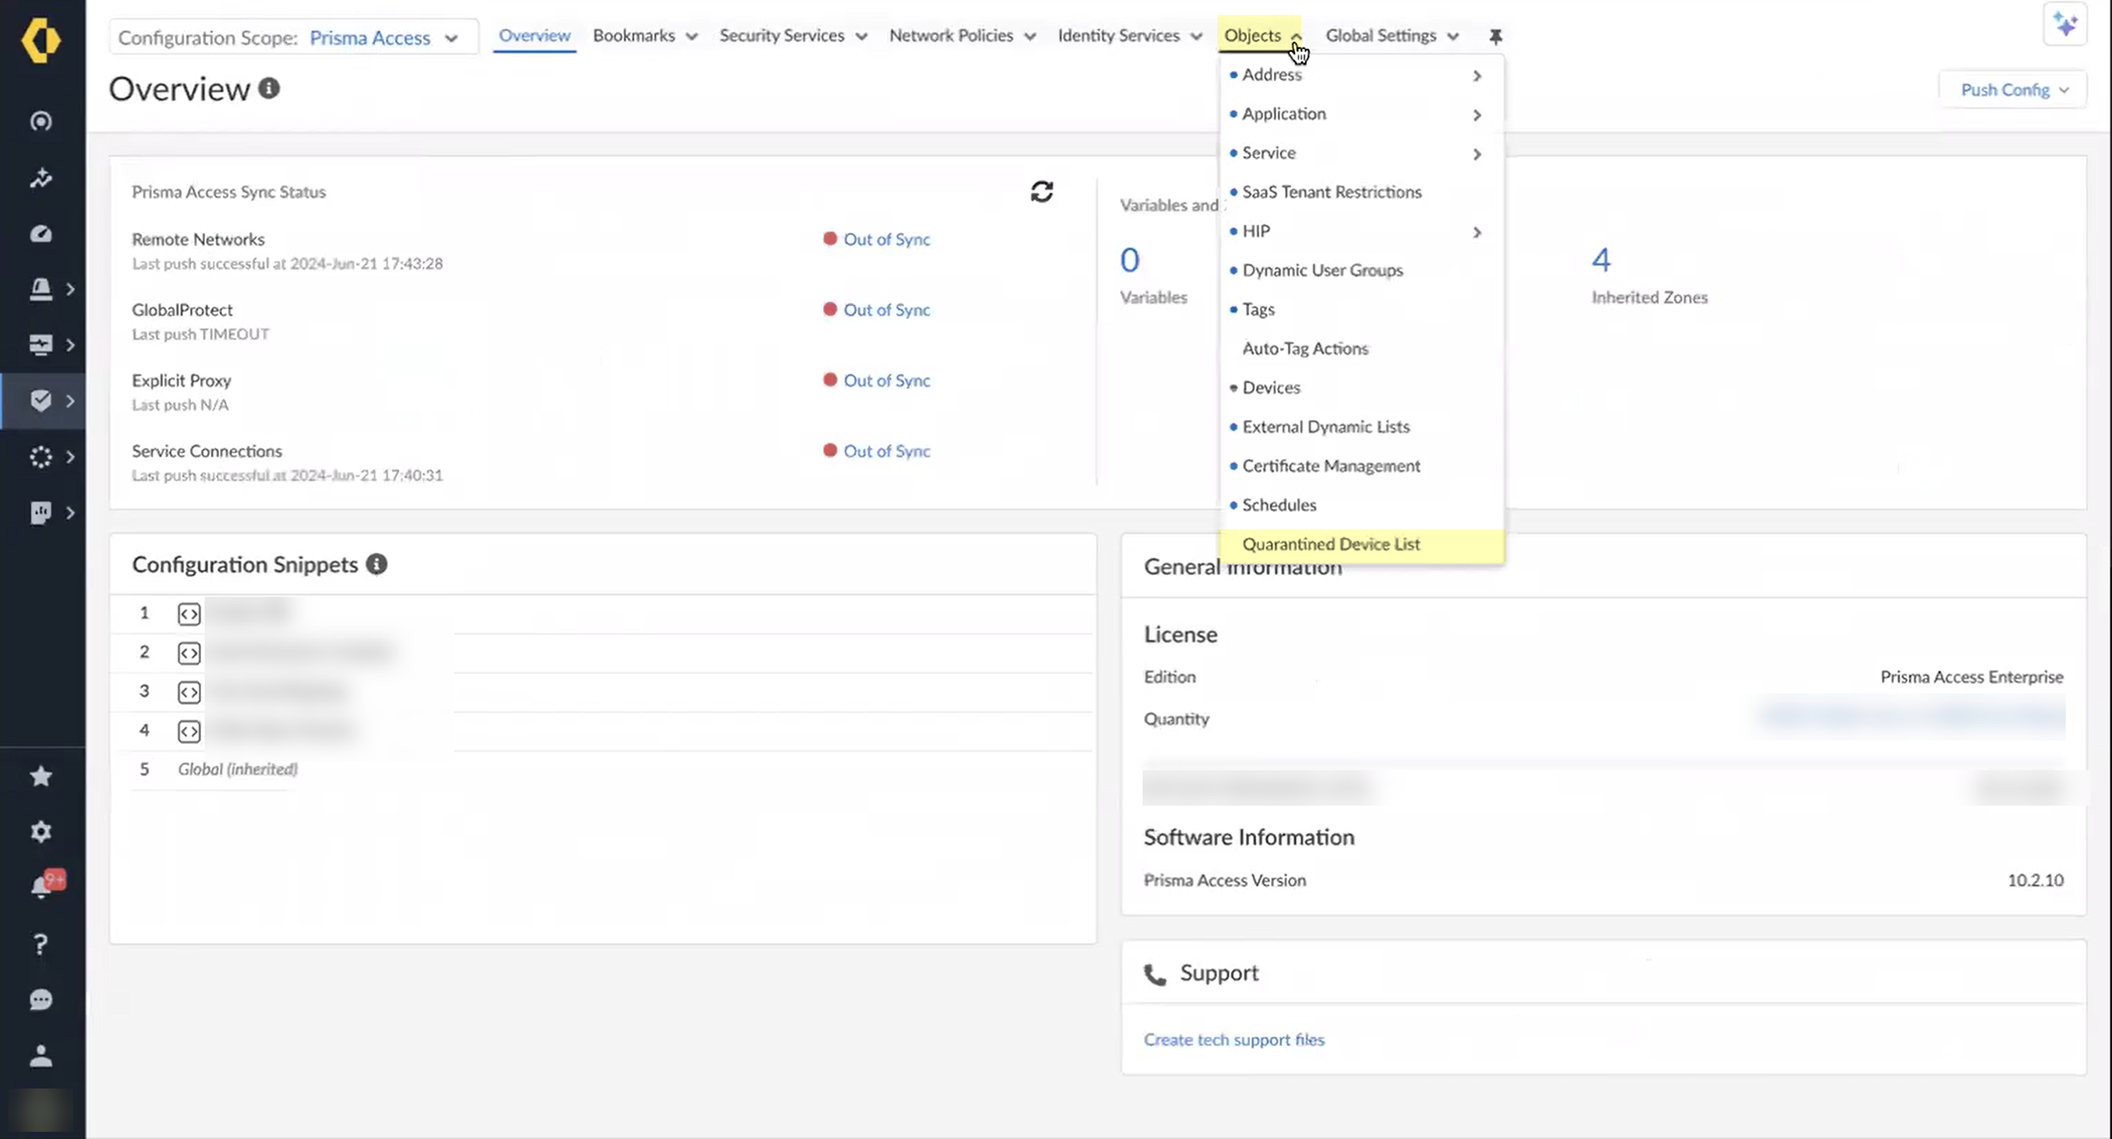
- Review the devices in the quarantine list to determine what remediation actions to take.
Manage the Cloud Identity Agent
After you have installed and configured the agent, learn how to ensure you are using the latest agent version. If you need to perform maintenance, you can stop and restart the agent’s connection to your tenant. To help troubleshoot any issues, learn more about the events logged by the agent and how to use the logs.
Configure Cloud Identity Agent Logs
The Cloud Identity agent logs Cloud Identity Engine events that occur on the agent host. You can use these logs to monitor informational events such as new connections ( Information—New connection 192.0.2.0: 49161 ), or for troubleshooting ( Error—Verification of Server Cert failed, stopping Cloud Identity Agent ). For example, the agent automatically generates logs if you test connectivity when you Configure the Cloud Identity Agent . You can also use the Event Viewer on the agent host to review logs created if the agent is unable to connect to the Cloud Identity Engine due to an incorrect bind DN or password, server unavailability, or other issue.
The agent displays logs in the order in which they were generated. To provide a consistent timestamp across timezones, logs include the timezone information in Coordinated Universal Time (UTC), where the time offset is indicated by + or -. For the complete log history, check the CloudIdAgentDebug log file on the agent host, which permanently retains all logs.
- Launch the agent.
- Select FileDebug .
- Select the type of event you want to log.
The agent logs the events of the selected type and all subsequent types. For example, if you select Debug , the logs include error, warning, information, and debug events.
- If you select None , the Cloud Identity agent does not log events at any level.
- If you select Information , Warning , or Error , the agent deletes the data from the log after sending it to the debug log on the agent host.
- If you select Debug or Verbose , the received data is stored permanently on the disk until you delete the files.
To remove log files from the agent’s user interface, you can optionally Clear Cloud Identity Agent Logs .
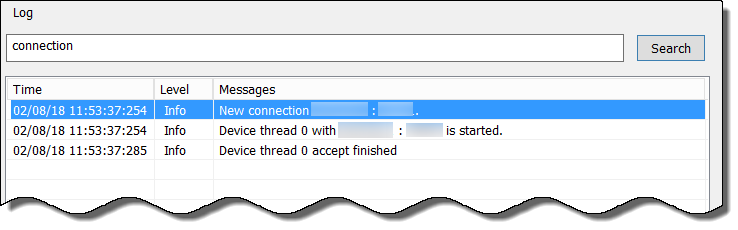
Search Cloud Identity Agent Logs
To troubleshoot issues with the Cloud Identity Engine, use keywords to search the Cloud Identity agent logs. For example, you could search for the IP address of a directory where the agent wasn’t able to connect to learn more about why the error occurred.
Search terms are case-sensitive.
- From the Cloud Identity agent, select Monitoring .
- Enter the search terms in the entry field to the left of Search .
- Click Search . The results are highlighted in blue below the entry field.
Clear Cloud Identity Agent Logs
You can clear outdated logs on the agent’s user interface. This does not delete the entries from the CloudIdAgentDebug log file on the agent host.
- From the Cloud Identity agent, select Monitoring .
- Click Clear Log .
Update the Cloud Identity Agent
Using the latest version of the agent is strongly recommended. If your Cloud Identity agent is not the latest version available, the Cloud Identity Engine app displays a notification.
Use the following procedure to update your Cloud Identity agent to the latest version.
When you upgrade the agent to version 1.7.0, it creates a backup of the existing agent configuration before removing the deprecated version of the agent. During installation of the new version of the agent, the existing configuration is automatically restored.
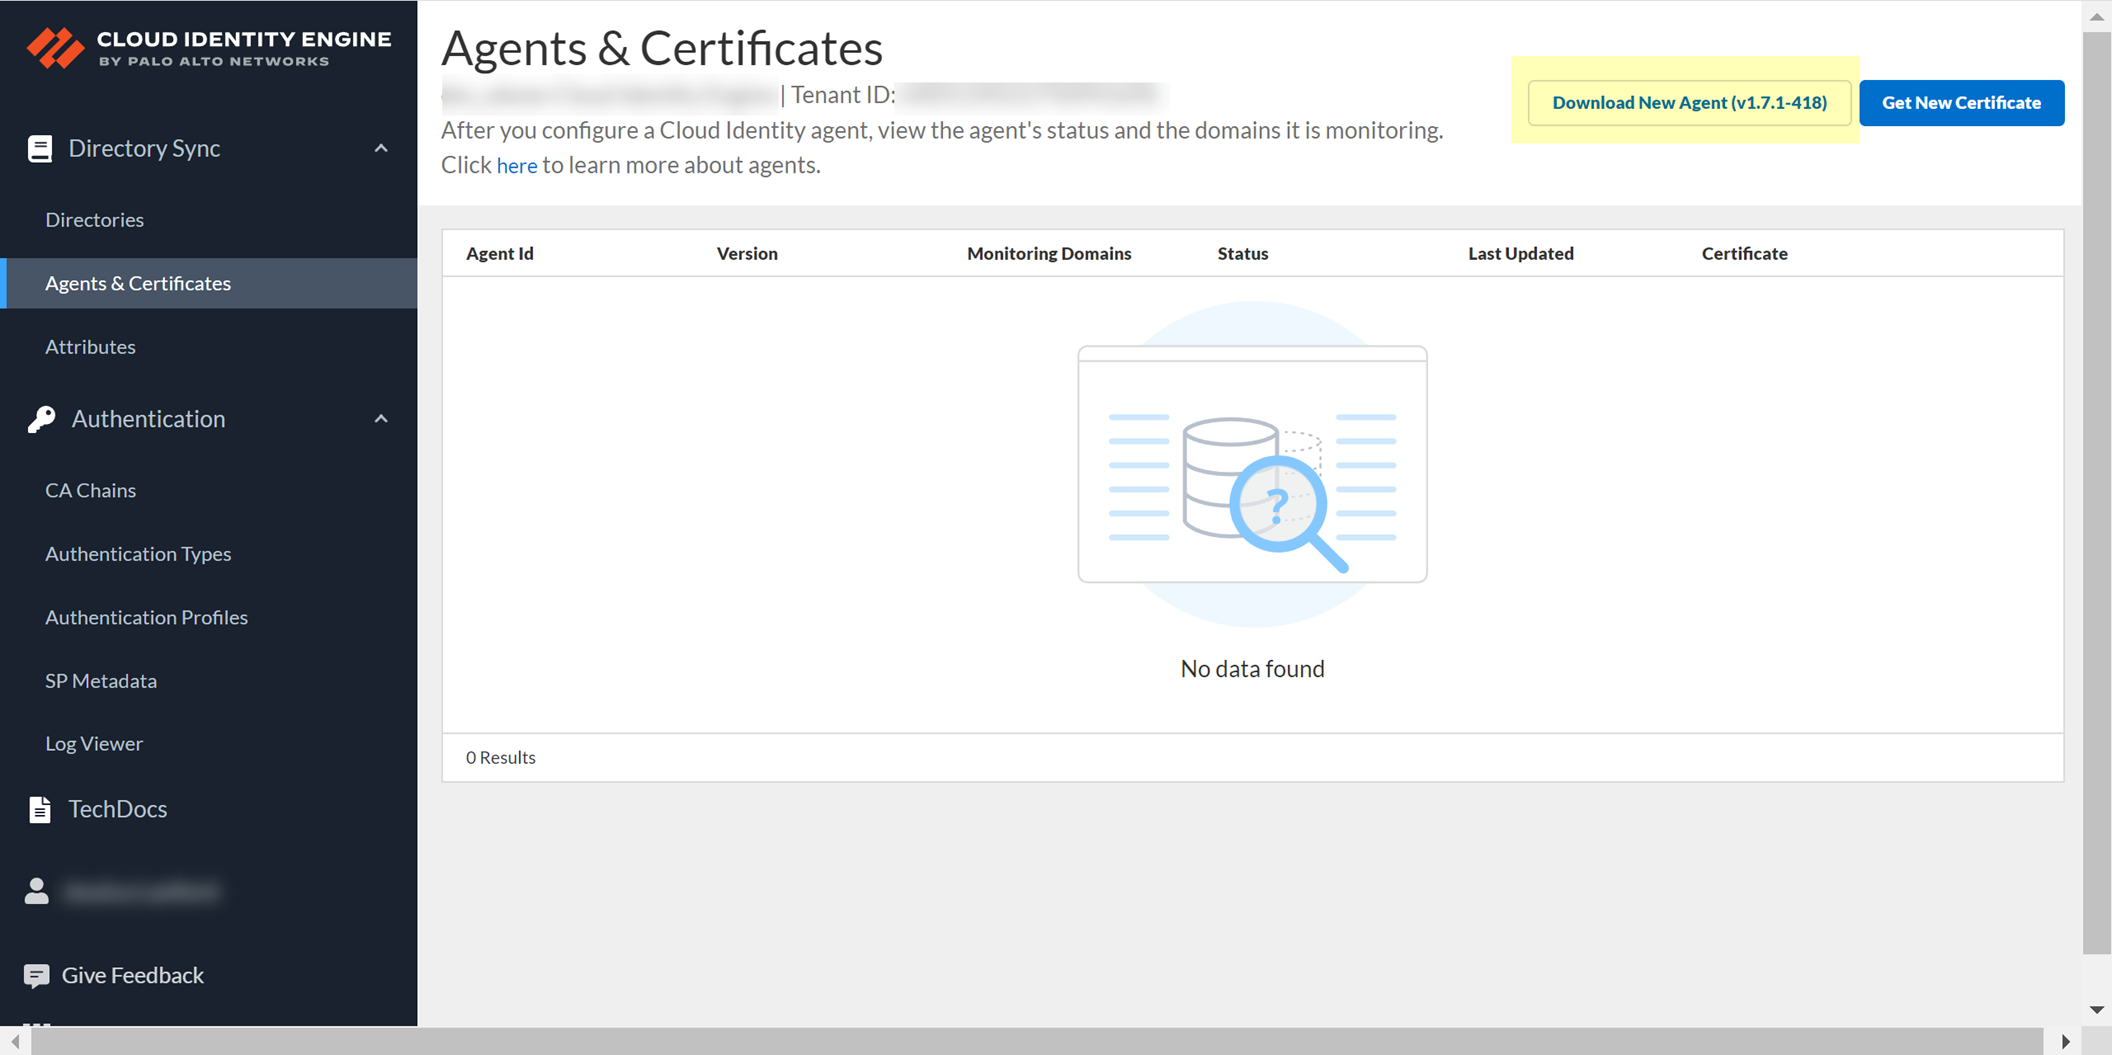
- Stop the connection to the Cloud Identity Engine service.
You must stop the connection between the agent and the service before you can update the agent. Check Agents & Certificates in the Cloud Identity Engine app to confirm the agent’s status.
- Uninstall the outdated agent from the host ( StartControl PanelPrograms and FeaturesCloud Identity AgentUninstall ).
You must uninstall the outdated agent from the host before installing the latest version of the agent.
- Log in to the hub and select the Cloud Identity Engine app.
- Select your Cloud Identity Engine tenant (if you have more than one) then select Agents & Certificate .
- Click Download New Agent , then Install the Cloud Identity Agent .
Start or Stop the Connection to the Cloud Identity Engine
When you start the Cloud Identity agent, it automatically starts communicating with the Cloud Identity Engine to synchronize the attributes. To prevent this communication (for example, if a directory server is unavailable or if you want to Remove the Cloud Identity Agent ), you can stop communication between the Cloud Identity agent and the Cloud Identity Engine. You can then restart the connection later to allow communication.
- On the agent host, start the Cloud Identity agent if it is not already running, then select Cloud Identity Configuration .
The current connection status of the agent displays at the lower-left corner of the window.
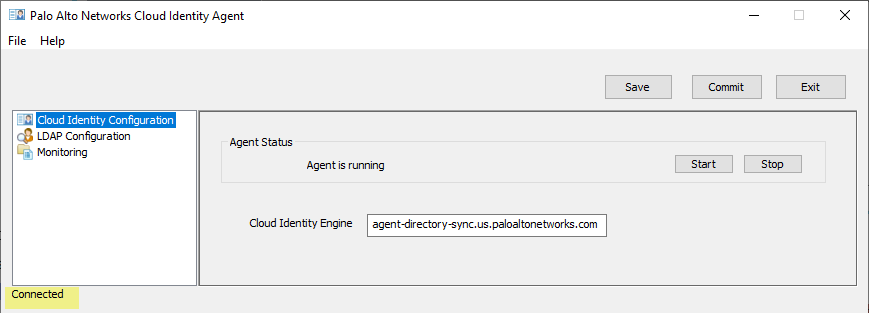
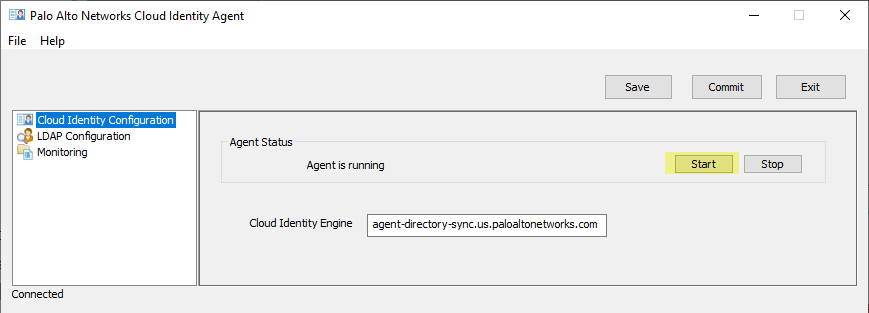
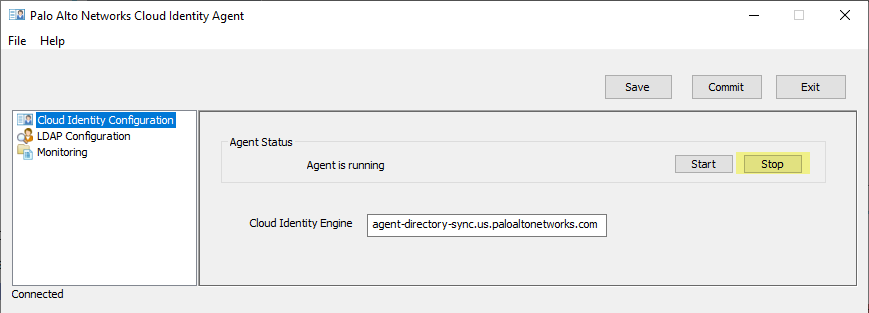
- Stop or re-establish the connection between the agent and the service.
- To connect the agent to the Cloud Identity Engine, click Start .
- To prevent the agent from communicating with the Cloud Identity Engine, click Stop .
Remove the Cloud Identity Agent
If you no longer need a Cloud Identity agent, you can remove it from your Cloud Identity Engine tenant.
- Stop the connection to the Cloud Identity Engine.
You must stop the connection between the agent and the Cloud Identity Engine before you can remove the agent.
- Uninstall the agent from the host server ( StartControl PanelPrograms and FeaturesCloud Identity AgentUninstall ).
- Log in to the hub and select the Cloud Identity Engine tenant that contains the agent you want to remove.
- Select Agents & Certificates .
- Confirm that the agent’s Status is Offline and Remove Agent .
You can only remove an agent that is offline (the connection between the agent and the Cloud Identity Engine is not active). If the agent is not offline, the Remove Agent button is not available.
Manage Cloud Identity Engine Certificates
After you generate the certificate to Authenticate the Agent and the Cloud Identity Engine , you can view the certificate and its associated agent in the Cloud Identity Engine app.
The Cloud Identity agent version 1.5.0 and later versions automatically renews the certificate before it expires.
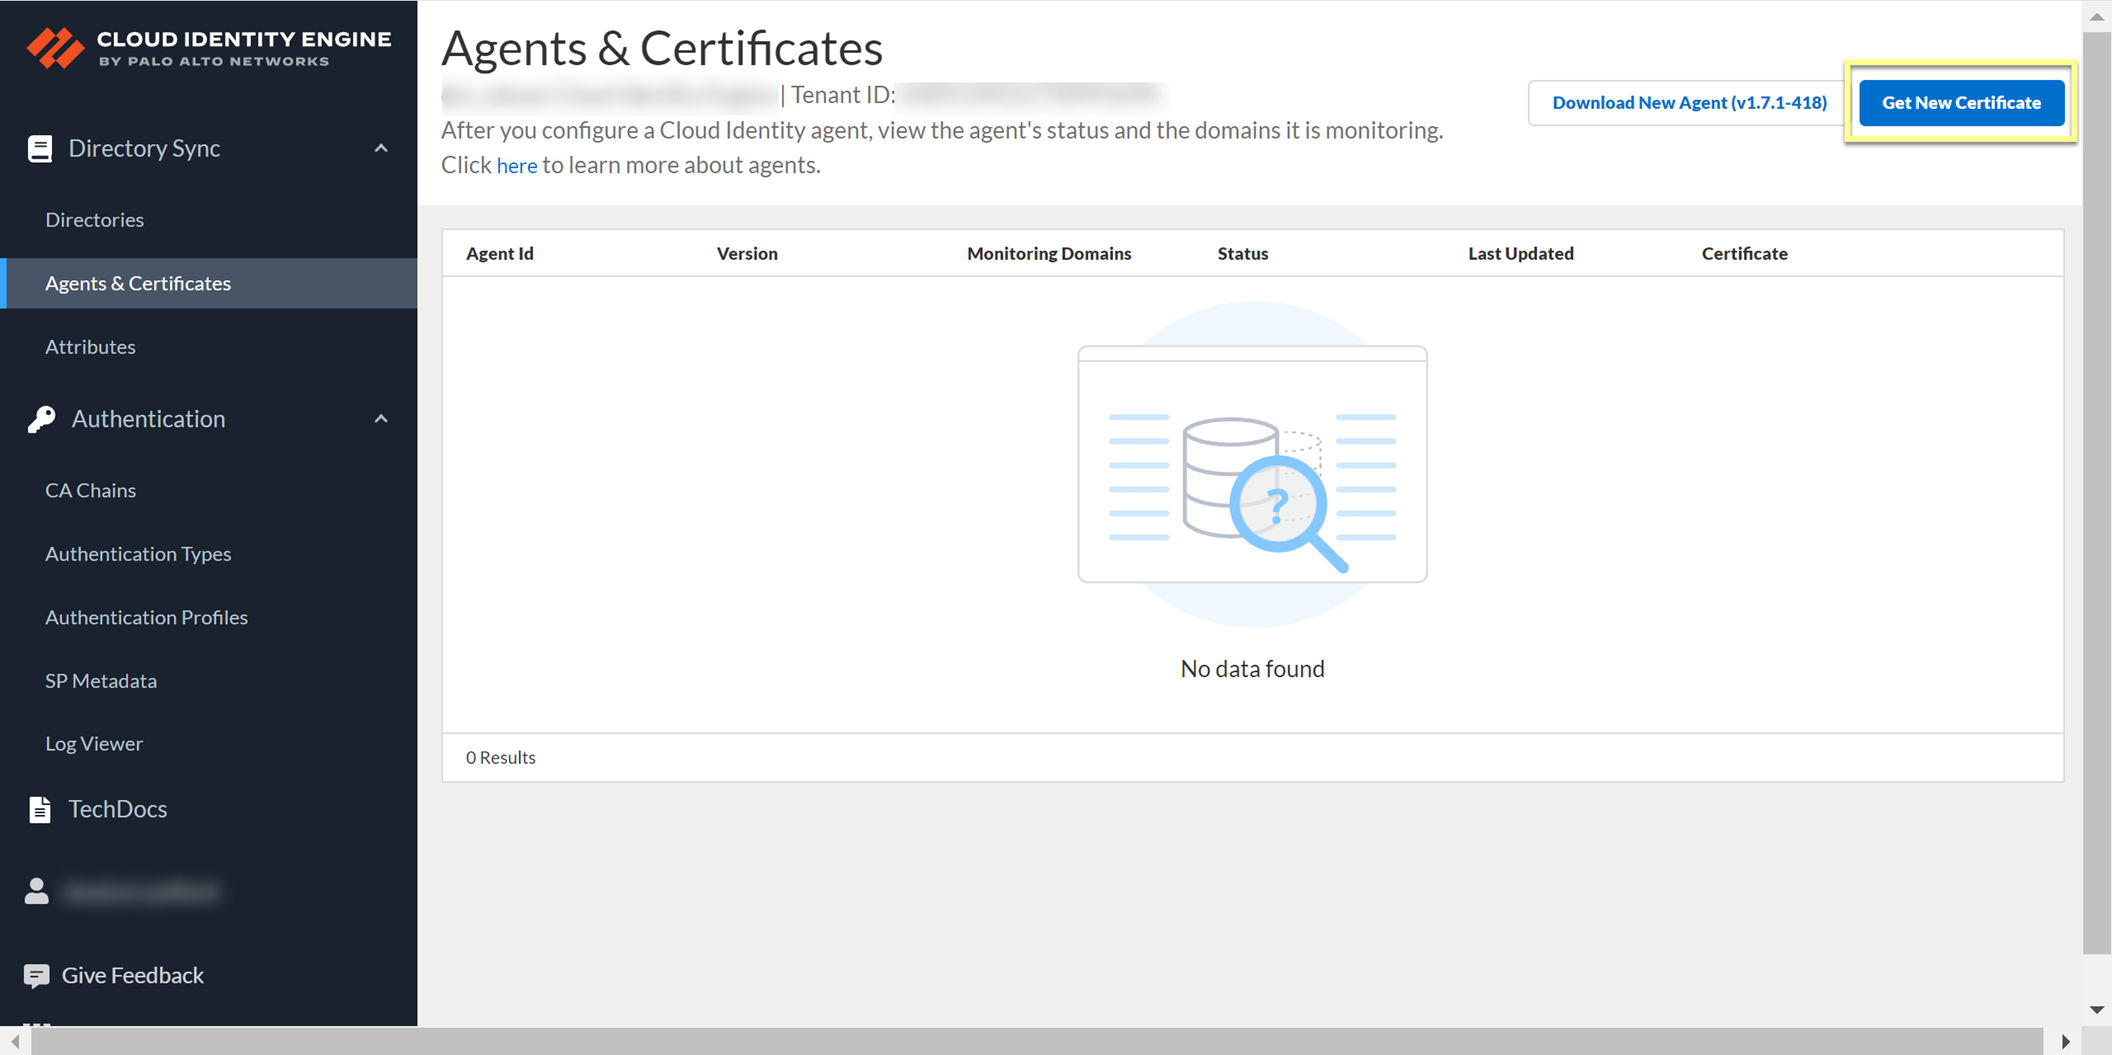
You can view the identification number and lifetime of the certificate on the Agents & Certificates page in the Cloud Identity Engine app.
If you need to Revoke Cloud Identity Agent Certificates , you must Delete Obsolete Cloud Identity Agent Certificates before you generate and install the new certificate.
To generate a new certificate for an agent, click Get New Certificate , then follow the steps to Authenticate the Agent and the Cloud Identity Engine .
Revoke Cloud Identity Agent Certificates
If a Cloud Identity agent’s certificate is compromised, revoke the certificate.
- Log in to the hub and select Cloud Identity Engine .
- Select the tenant associated with the agent with the compromised certificate.
- From the Cloud Identity Engine app, select Agents & Certificates .
- Revoke the certificate.
- Delete Obsolete Cloud Identity Agent Certificates to remove the previous certificate.
- Generate a new certificate to Authenticate the Agent and the Cloud Identity Engine and install it on the agent host.
Delete Obsolete Cloud Identity Agent Certificates
You must delete the previous certificate for the agent before installing the new certificate. If you do not delete the previous certificate, the Cloud Identity Engine may reference the previous certificate instead of the new certificate.
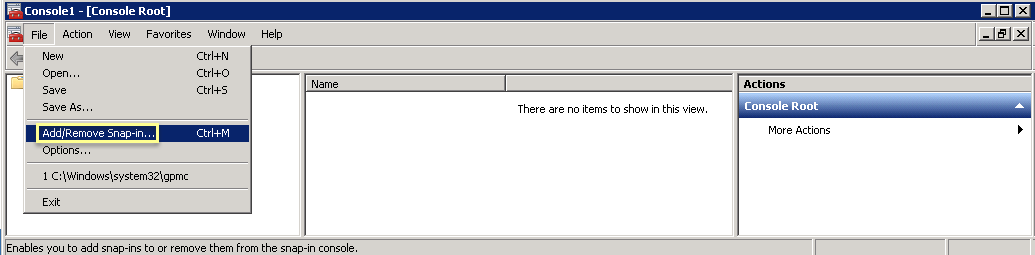
- On the agent host, open Microsoft Management Control (MMC) by selecting StartRun , then entering MMC .
- Select FileAdd/Remove Snap-In .
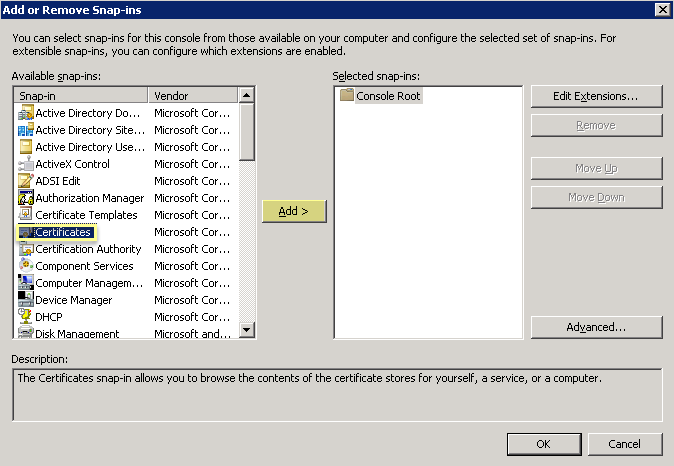
- Select CertificatesAdd .
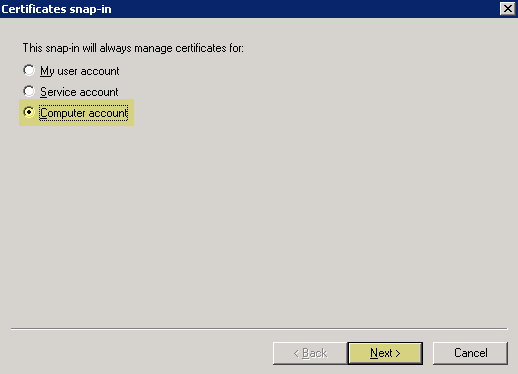
- Select Computer AccountNext .
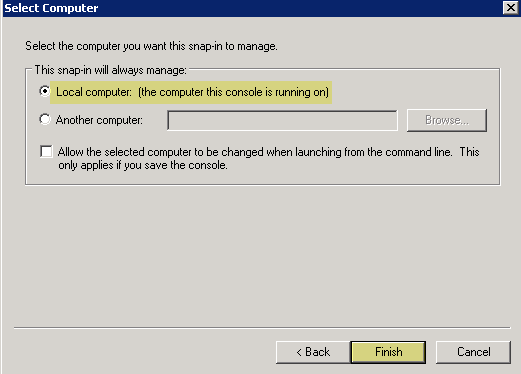
- Select Local ComputerFinish .
- Click OK , then navigate to Console RootCertificates (Local Computer)PersonalCertificates .
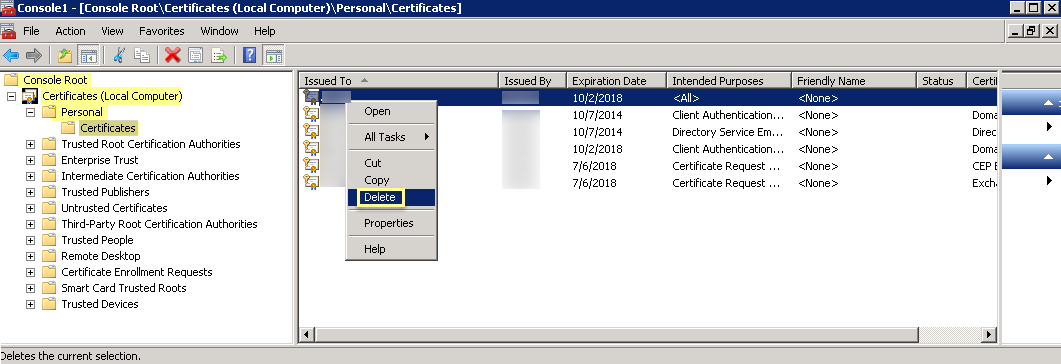
- Select the previous certificate from the list.
- Right-click the certificate, then Delete and click Yes to confirm the deletion.
- Generate a new certificate to Authenticate the Agent and the Cloud Identity Engine and install it on the agent host.