The Cloud Identity Engine (CIE) provides user identification and user authentication for centralized cloud-based identity management in on-premise, cloud, or hybrid network environments.
[PCNSA/PCNSE] CIE allows security policy creation based on users and groups instead of IP addresses, enhancing security through behavior-based actions.
CIE simplifies configuring identity sources into a single, unified source, allowing scalability. By continually syncing information from directories (on-premise, cloud-based, or hybrid), it ensures user information is accurate and up-to-date.
[PCNSA/PCNSE] Policy enforcement continues based on mappings even if the cloud identity provider is temporarily unavailable.
Data management details are in the Cloud Identity Engine Privacy Datasheet.
Palo Alto Networks cloud-based applications and services need directory information for policy or event context. CIE provides read-only access to this information.
[GOTCHA] CIE deployment components vary based on directory location (on-premises vs. cloud-based).
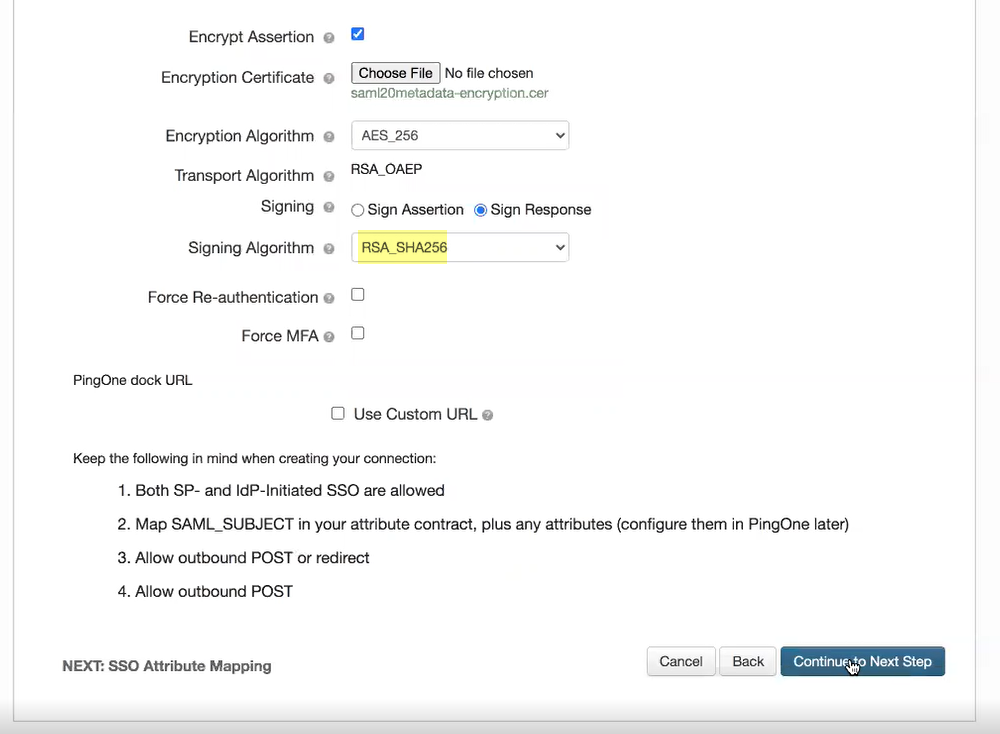
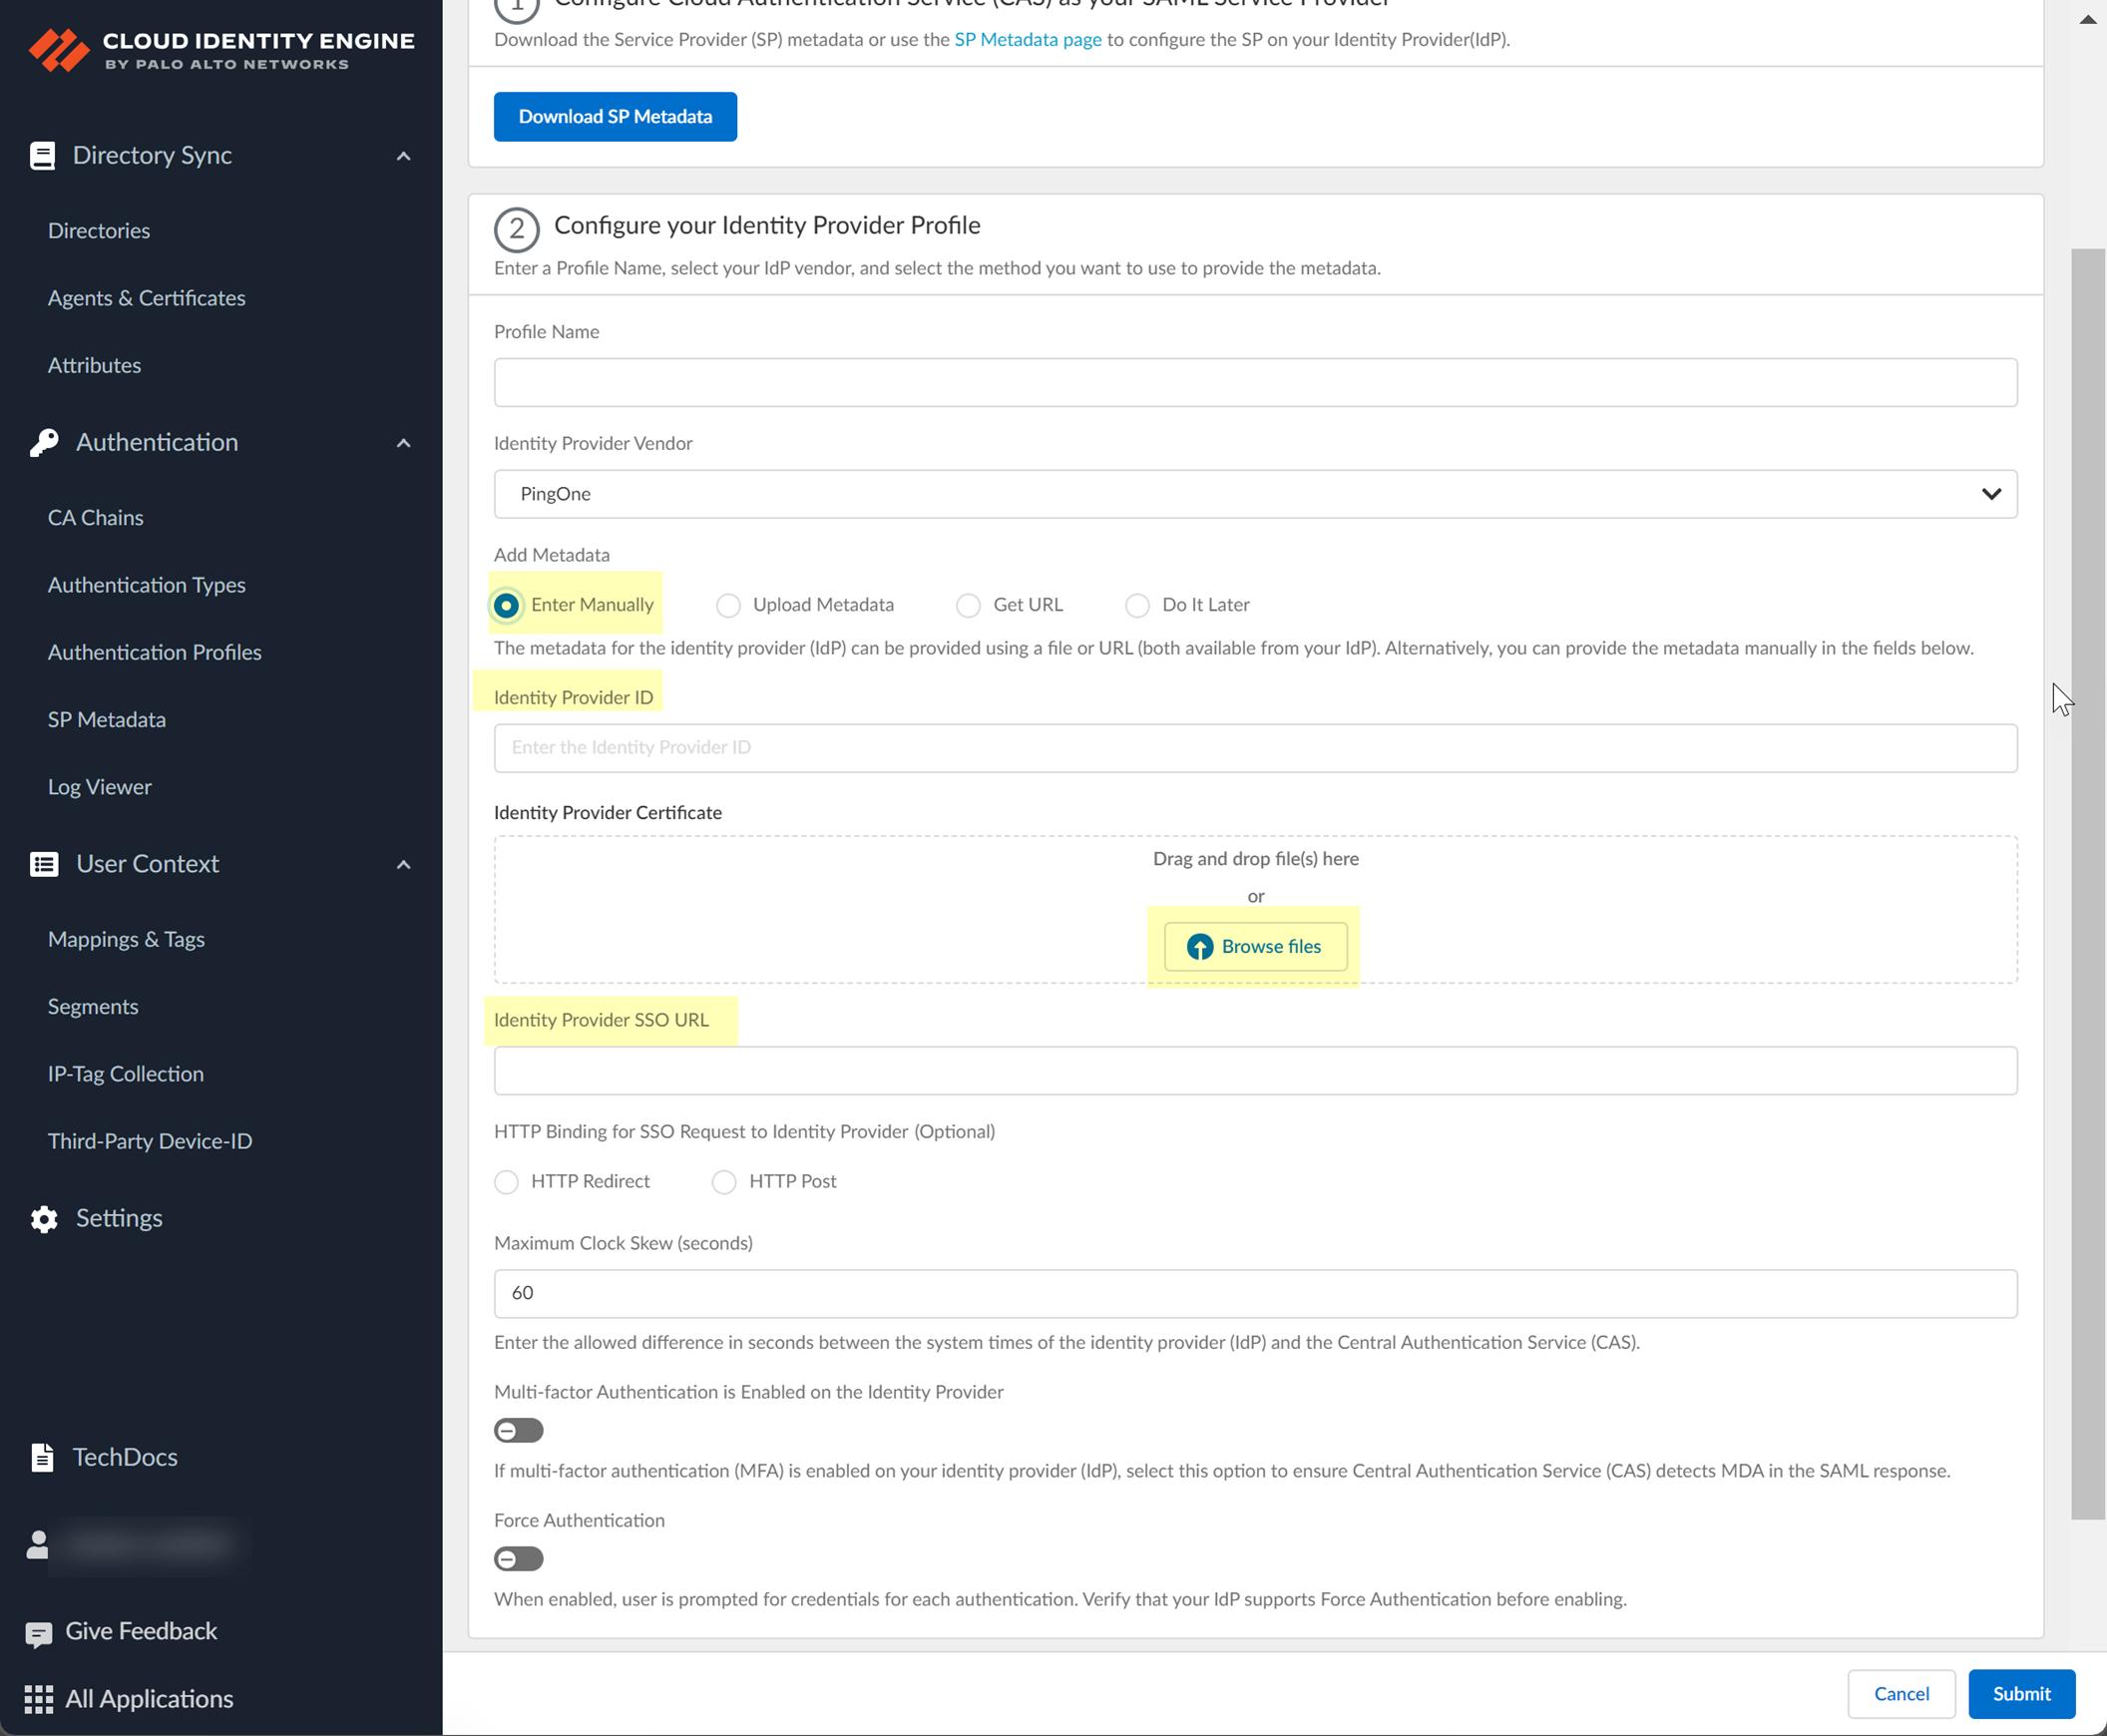
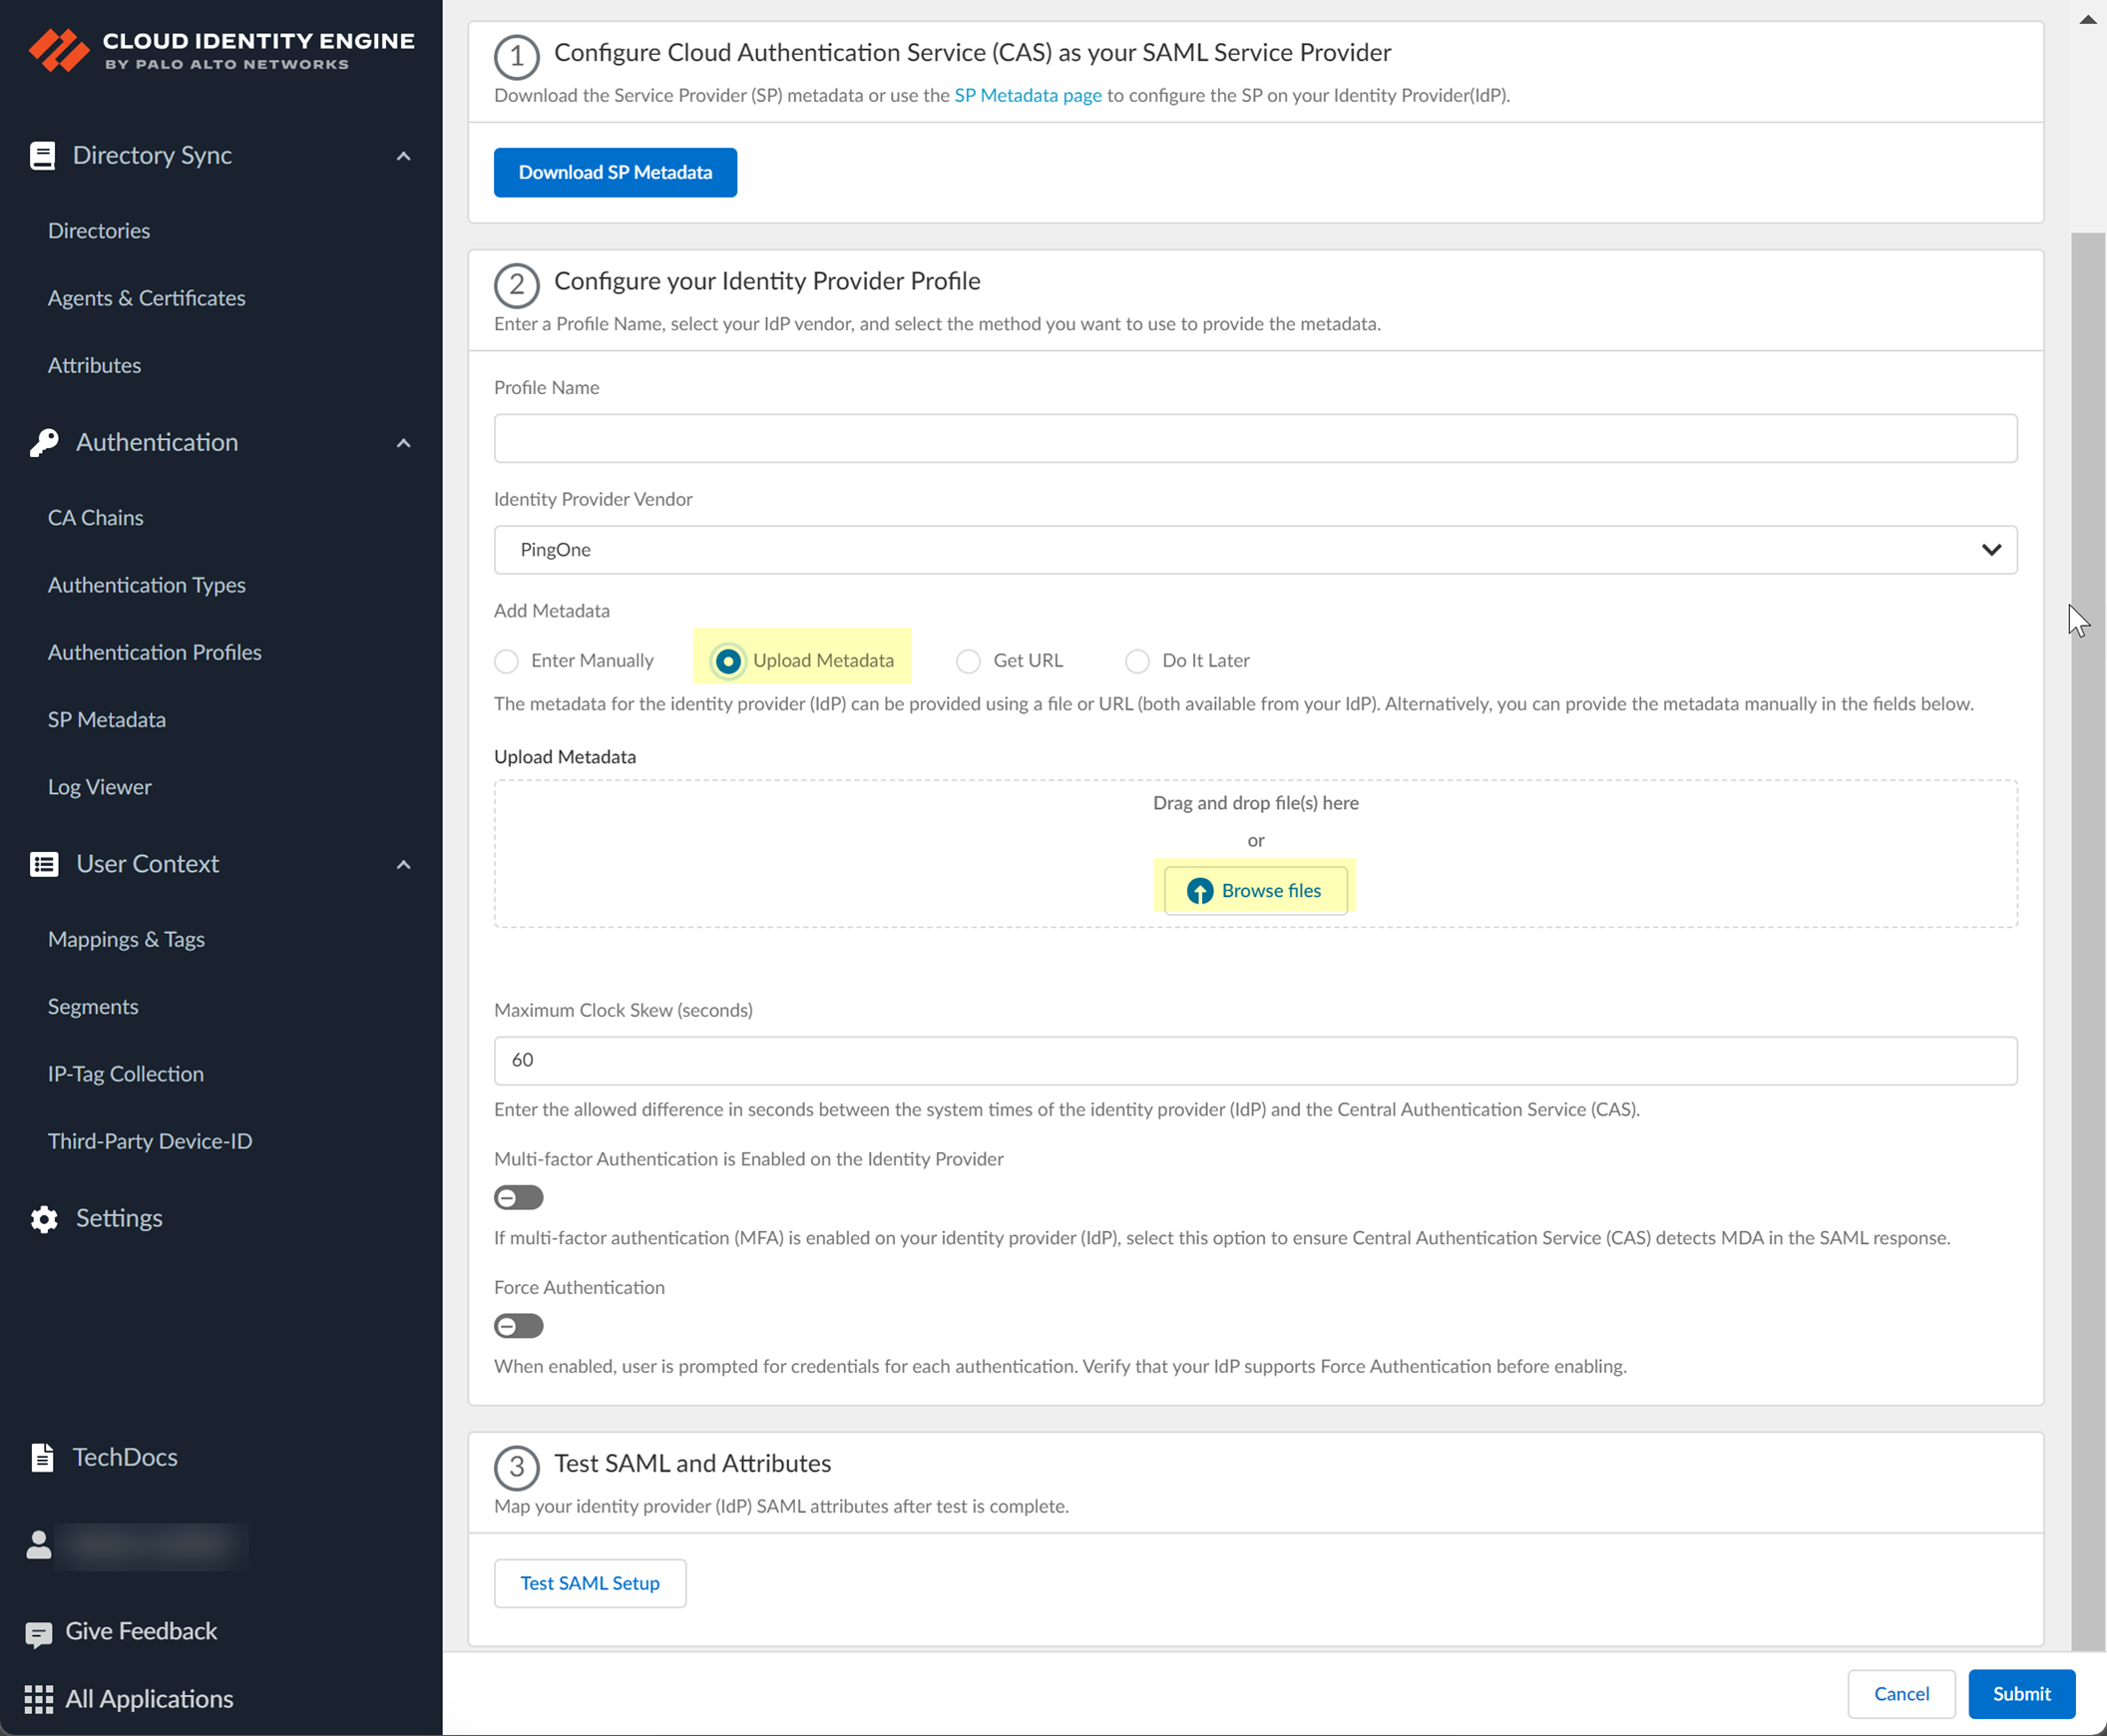
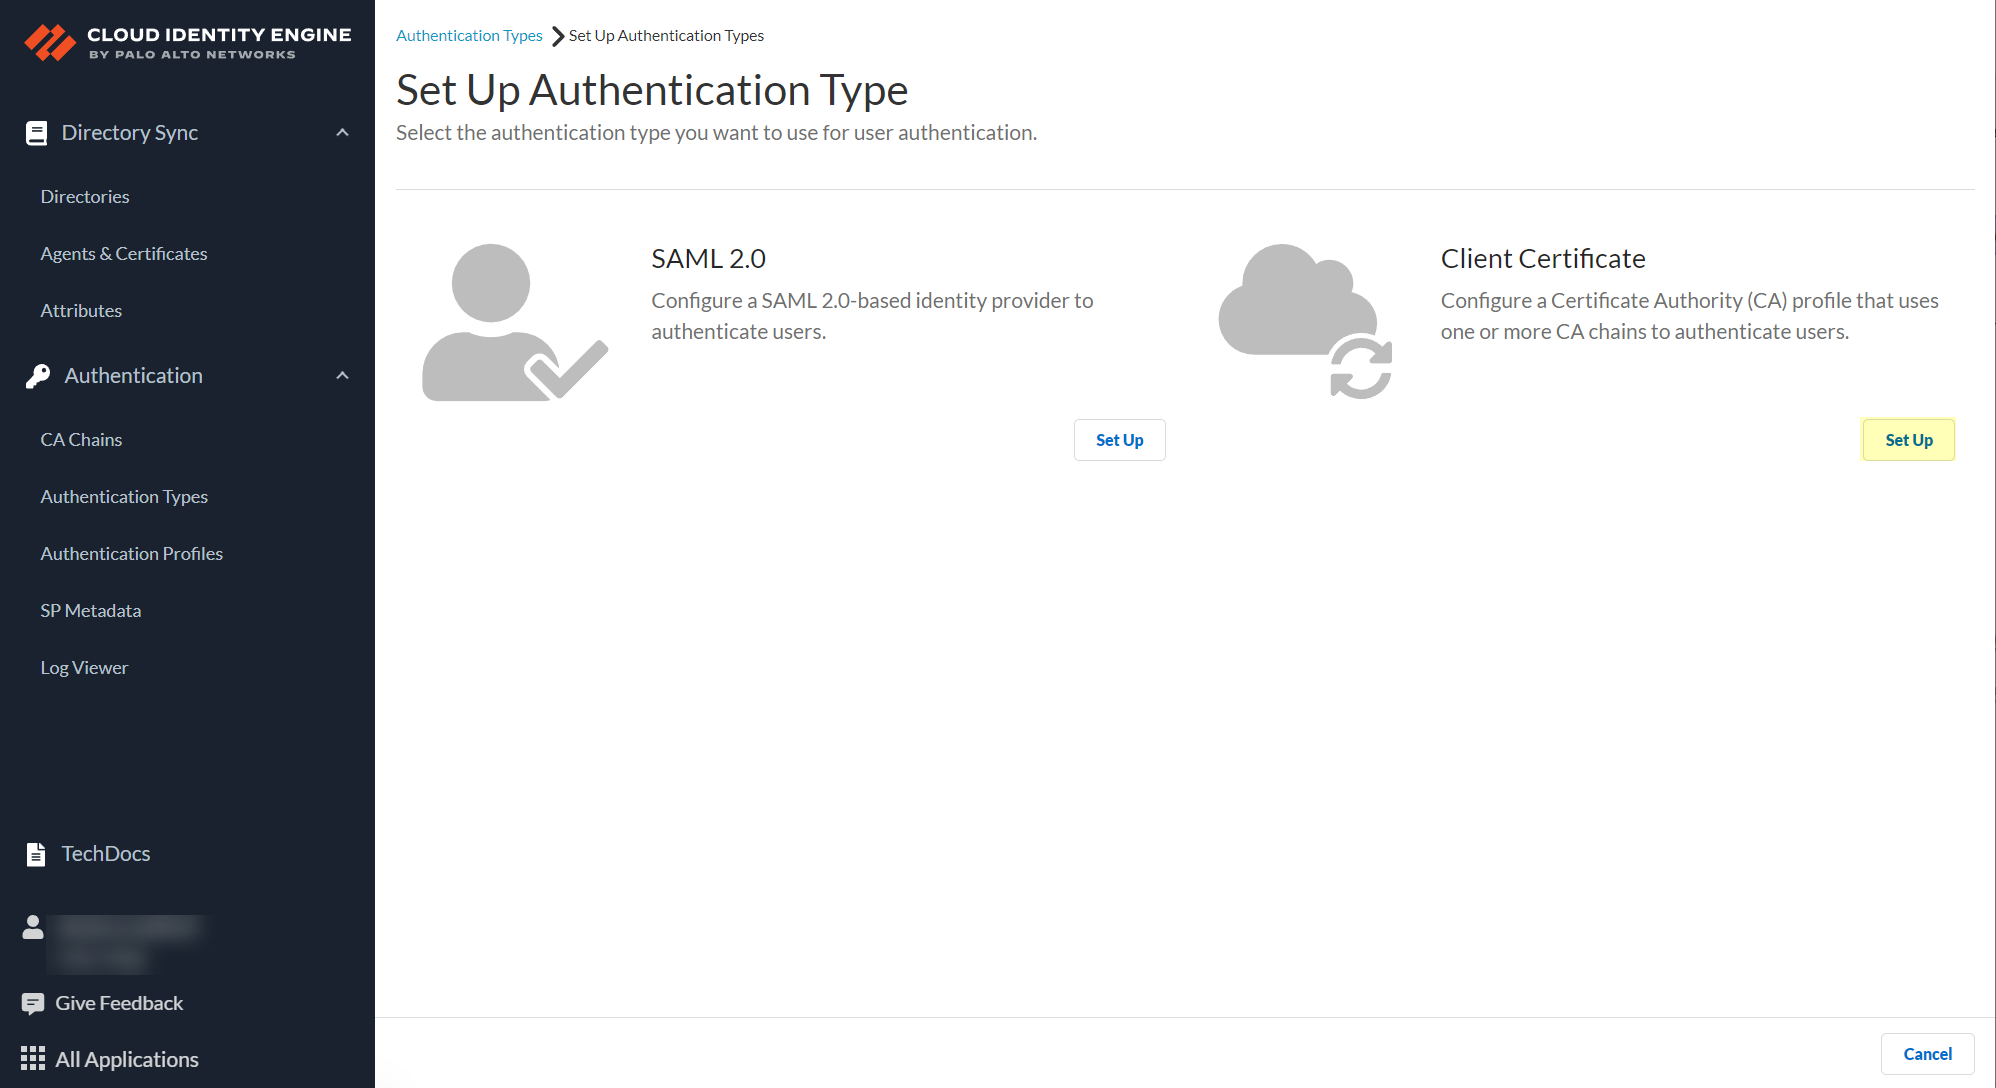
The authentication component allows configuring SAML 2.0-compliant identity providers (IdPs) or client certificates. When configured with an Authentication policy and Authentication Portal on a Palo Alto Networks firewall, users must log in before accessing resources.
Configure Your Network to Allow Cloud Identity Agent Traffic
Allow traffic based on your region and deployment type.
Allow traffic to the regional hostname (refer to Agent Configuration table).
Use the
ssl
App-ID in Security policy (follow Decryption Best Practices).
[GOTCHA] Agent versions 1.7.0 and earlier don't support proxies between the agent and the regional configuration endpoint. Update to 1.7.1+ if using a proxy.
If a Palo Alto Networks firewall is between the agent and CIE:
Use the
paloalto-cloud-identity
App-ID (requires
ssl
and
web-browsing
signatures).
Allow traffic to specific GoDaddy URLs for certificate validation:
http://crl.godaddy.com
on port 80.
http://ocsp.godaddy.com
on port 80.
https://certs.godaddy.com
on port 443.
[CRITICAL] If using SSL decryption, exclude traffic between the agent and CIE to allow mutual authentication.
If a Palo Alto Networks firewall is between the agent and Active Directory:
Use
ldap
App-ID for LDAP protocol.
Use
ssl
App-ID for LDAPS or LDAP with STARTTLS.
If using a non-Palo Alto Networks firewall:
Allow LDAP/LDAPS traffic from the agent to Domain Controllers on relevant ports.
Allow HTTPS traffic from the agent (port 443) to your regional CIE destination URL.
Allow traffic to the GoDaddy URLs listed above.
We strongly recommend configuring TLS 1.3 for all Cloud Identity Engine traffic. Agent v1.7.0+ use the latest TLS version by default.
Configure Domains for the Cloud Identity Engine
On-Premises Active Directory Domains
[PCNSA/PCNSE] A single Cloud Identity agent can communicate with multiple domains.
The service account needs query permissions for all configured domains. Configure multiple domain controllers per domain for redundancy.
For agent redundancy, configure multiple agents per domain.
Install agents physically near their target domain controllers.
[GOTCHA] To obtain cross-domain group memberships, configure all relevant domains on the agent(s). Use LDAP (port 389) or LDAPS (port 636). Do not configure the agent to use Global Catalog ports (3268/3269).
Azure Active Directory Domains
[GOTCHA] Ensure Azure AD has no circular group references (a group being a direct/indirect member of itself). CIE automatically removes these during sync, but memberships might be computed incorrectly. Manually remove circular references for best results.
Manage Cloud Identity Engine App Roles
[PCNSA] App roles define user privileges within the CIE app.
Configure roles via
Common Services > Identity & Access
.
Role
Description
View Only Administrator
View all tenant data, including detailed AD data.
Deployment Administrator
Deployment functions + view-only access to others. Cannot view detailed AD data.
MSP Superuser
Full view/edit for all tenants in a multitenant hierarchy. For MSP portal unrestricted access.
Superuser
Full view/edit privileges system-wide. Includes all other role privileges. Use cautiously.
[GOTCHA] If a user has multiple roles, they get the combined highest privileges. (e.g., View Only + Deployment Admin = Superuser privileges).
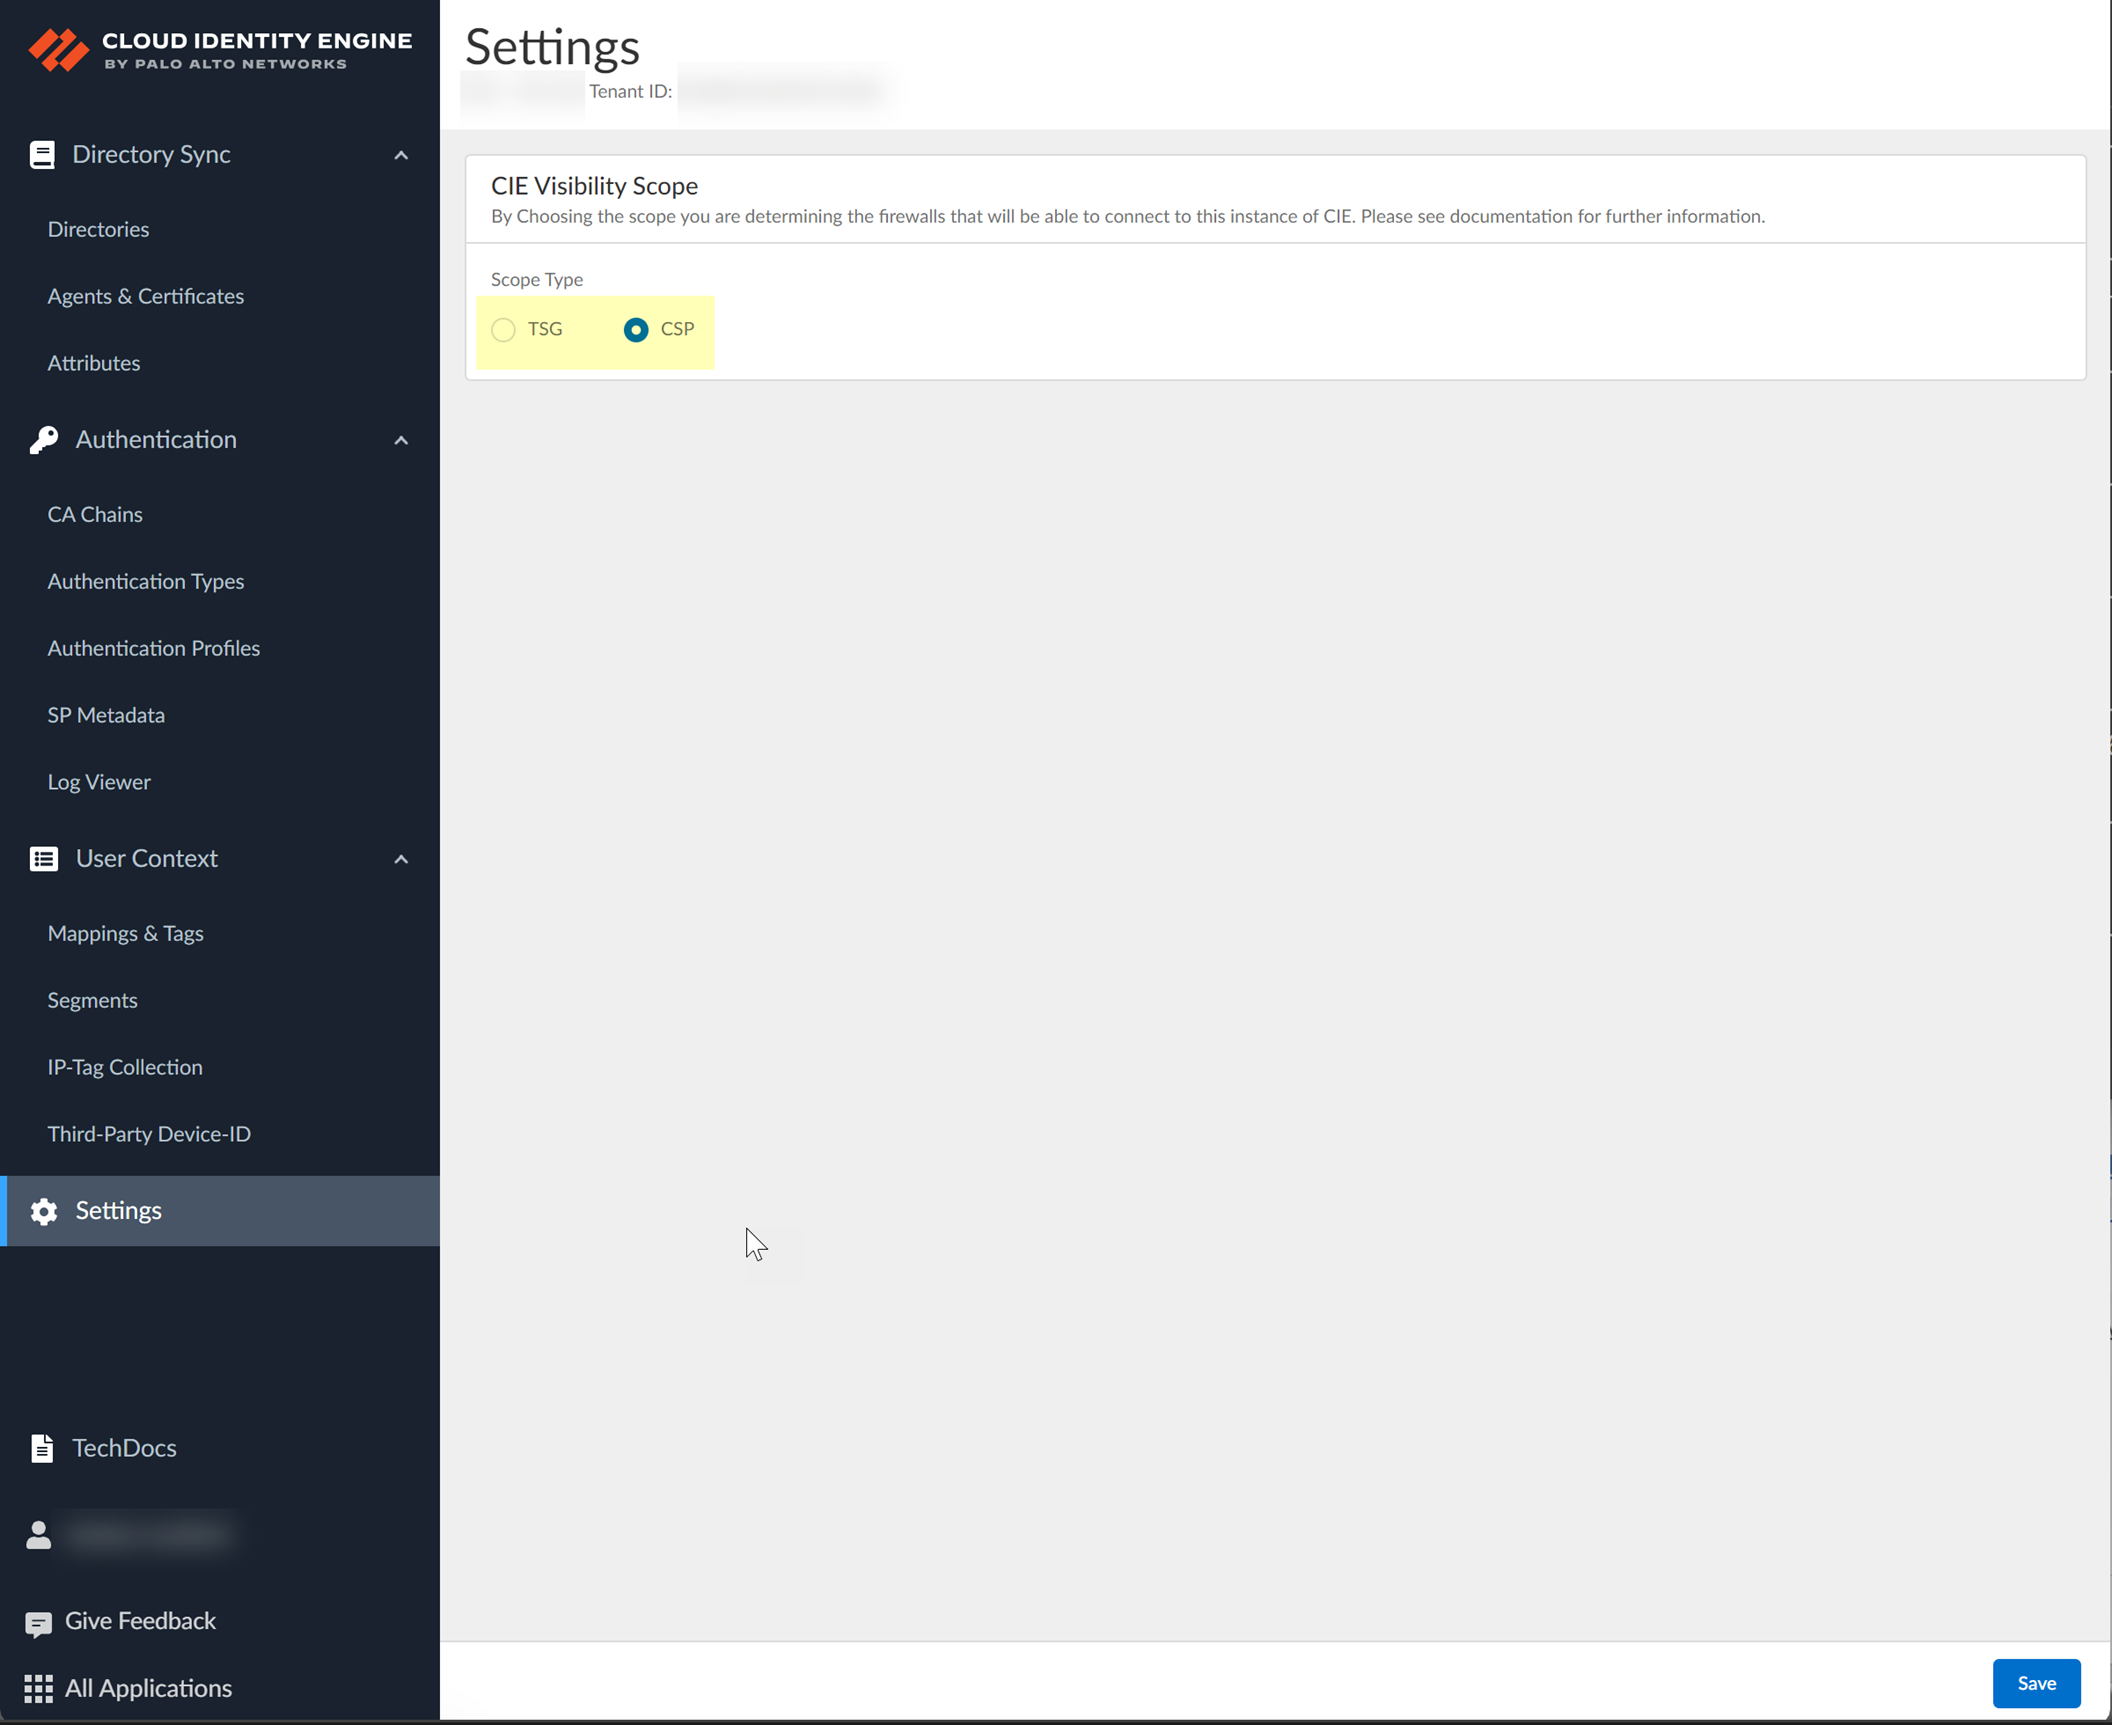
Configure the Cloud Identity Engine Visibility Scope
Visibility Scope controls which firewalls can see and connect to specific CIE tenants, useful for isolating devices within Tenant Service Groups (TSGs) under a single Customer Support Portal (CSP) account.
TSG Scope:
Tenant visible only to firewalls within the *same* TSG.
CSP Scope:
Tenant visible to *any* firewall associated with *any* TSG under the *same* CSP account.
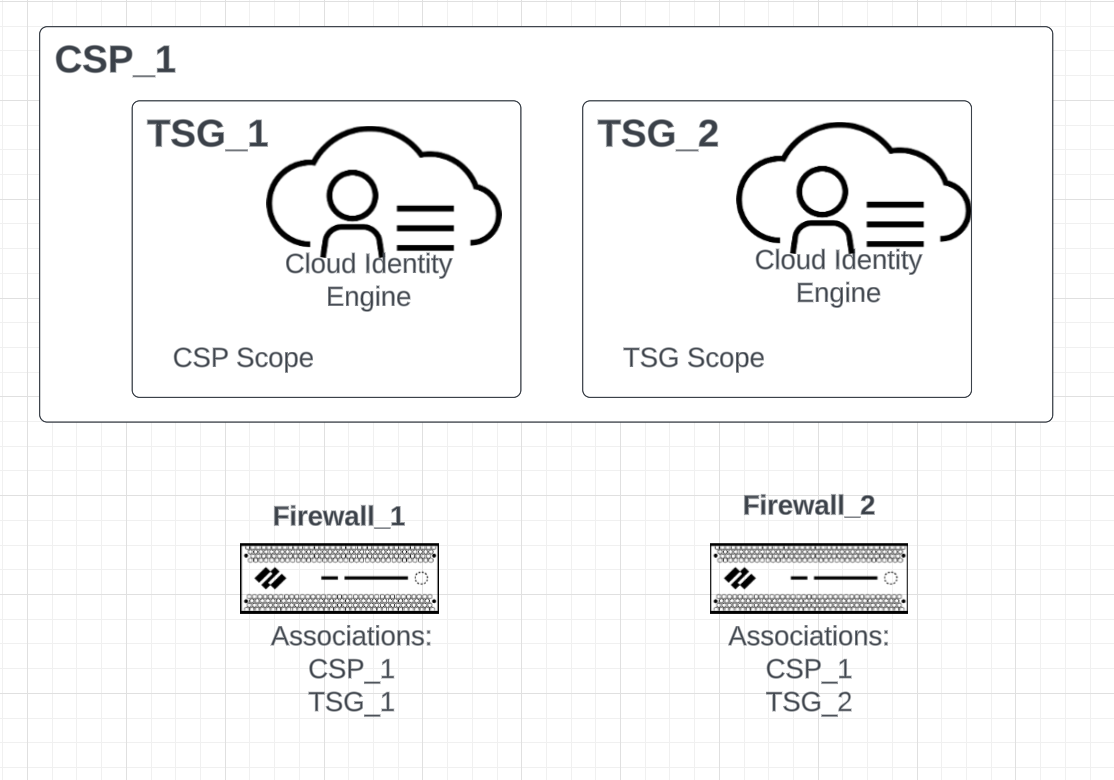
Example Diagram Explanation:
In the diagram: CSP_1 contains TSG_1 and TSG_2. Firewall_1 is in TSG_1, Firewall_2 is in TSG_2.
Tenant for TSG_1 uses CSP Scope. Tenant for TSG_2 uses TSG Scope.
Result: Firewall_1 (in TSG_1) can only see the Tenant for TSG_1 because TSG_2's tenant is restricted to TSG_2 firewalls. Firewall_2 (in TSG_2) can see *both* tenants because TSG_1's tenant uses CSP scope (visible to all under CSP_1) and TSG_2's tenant is visible because Firewall_2 is in TSG_2.
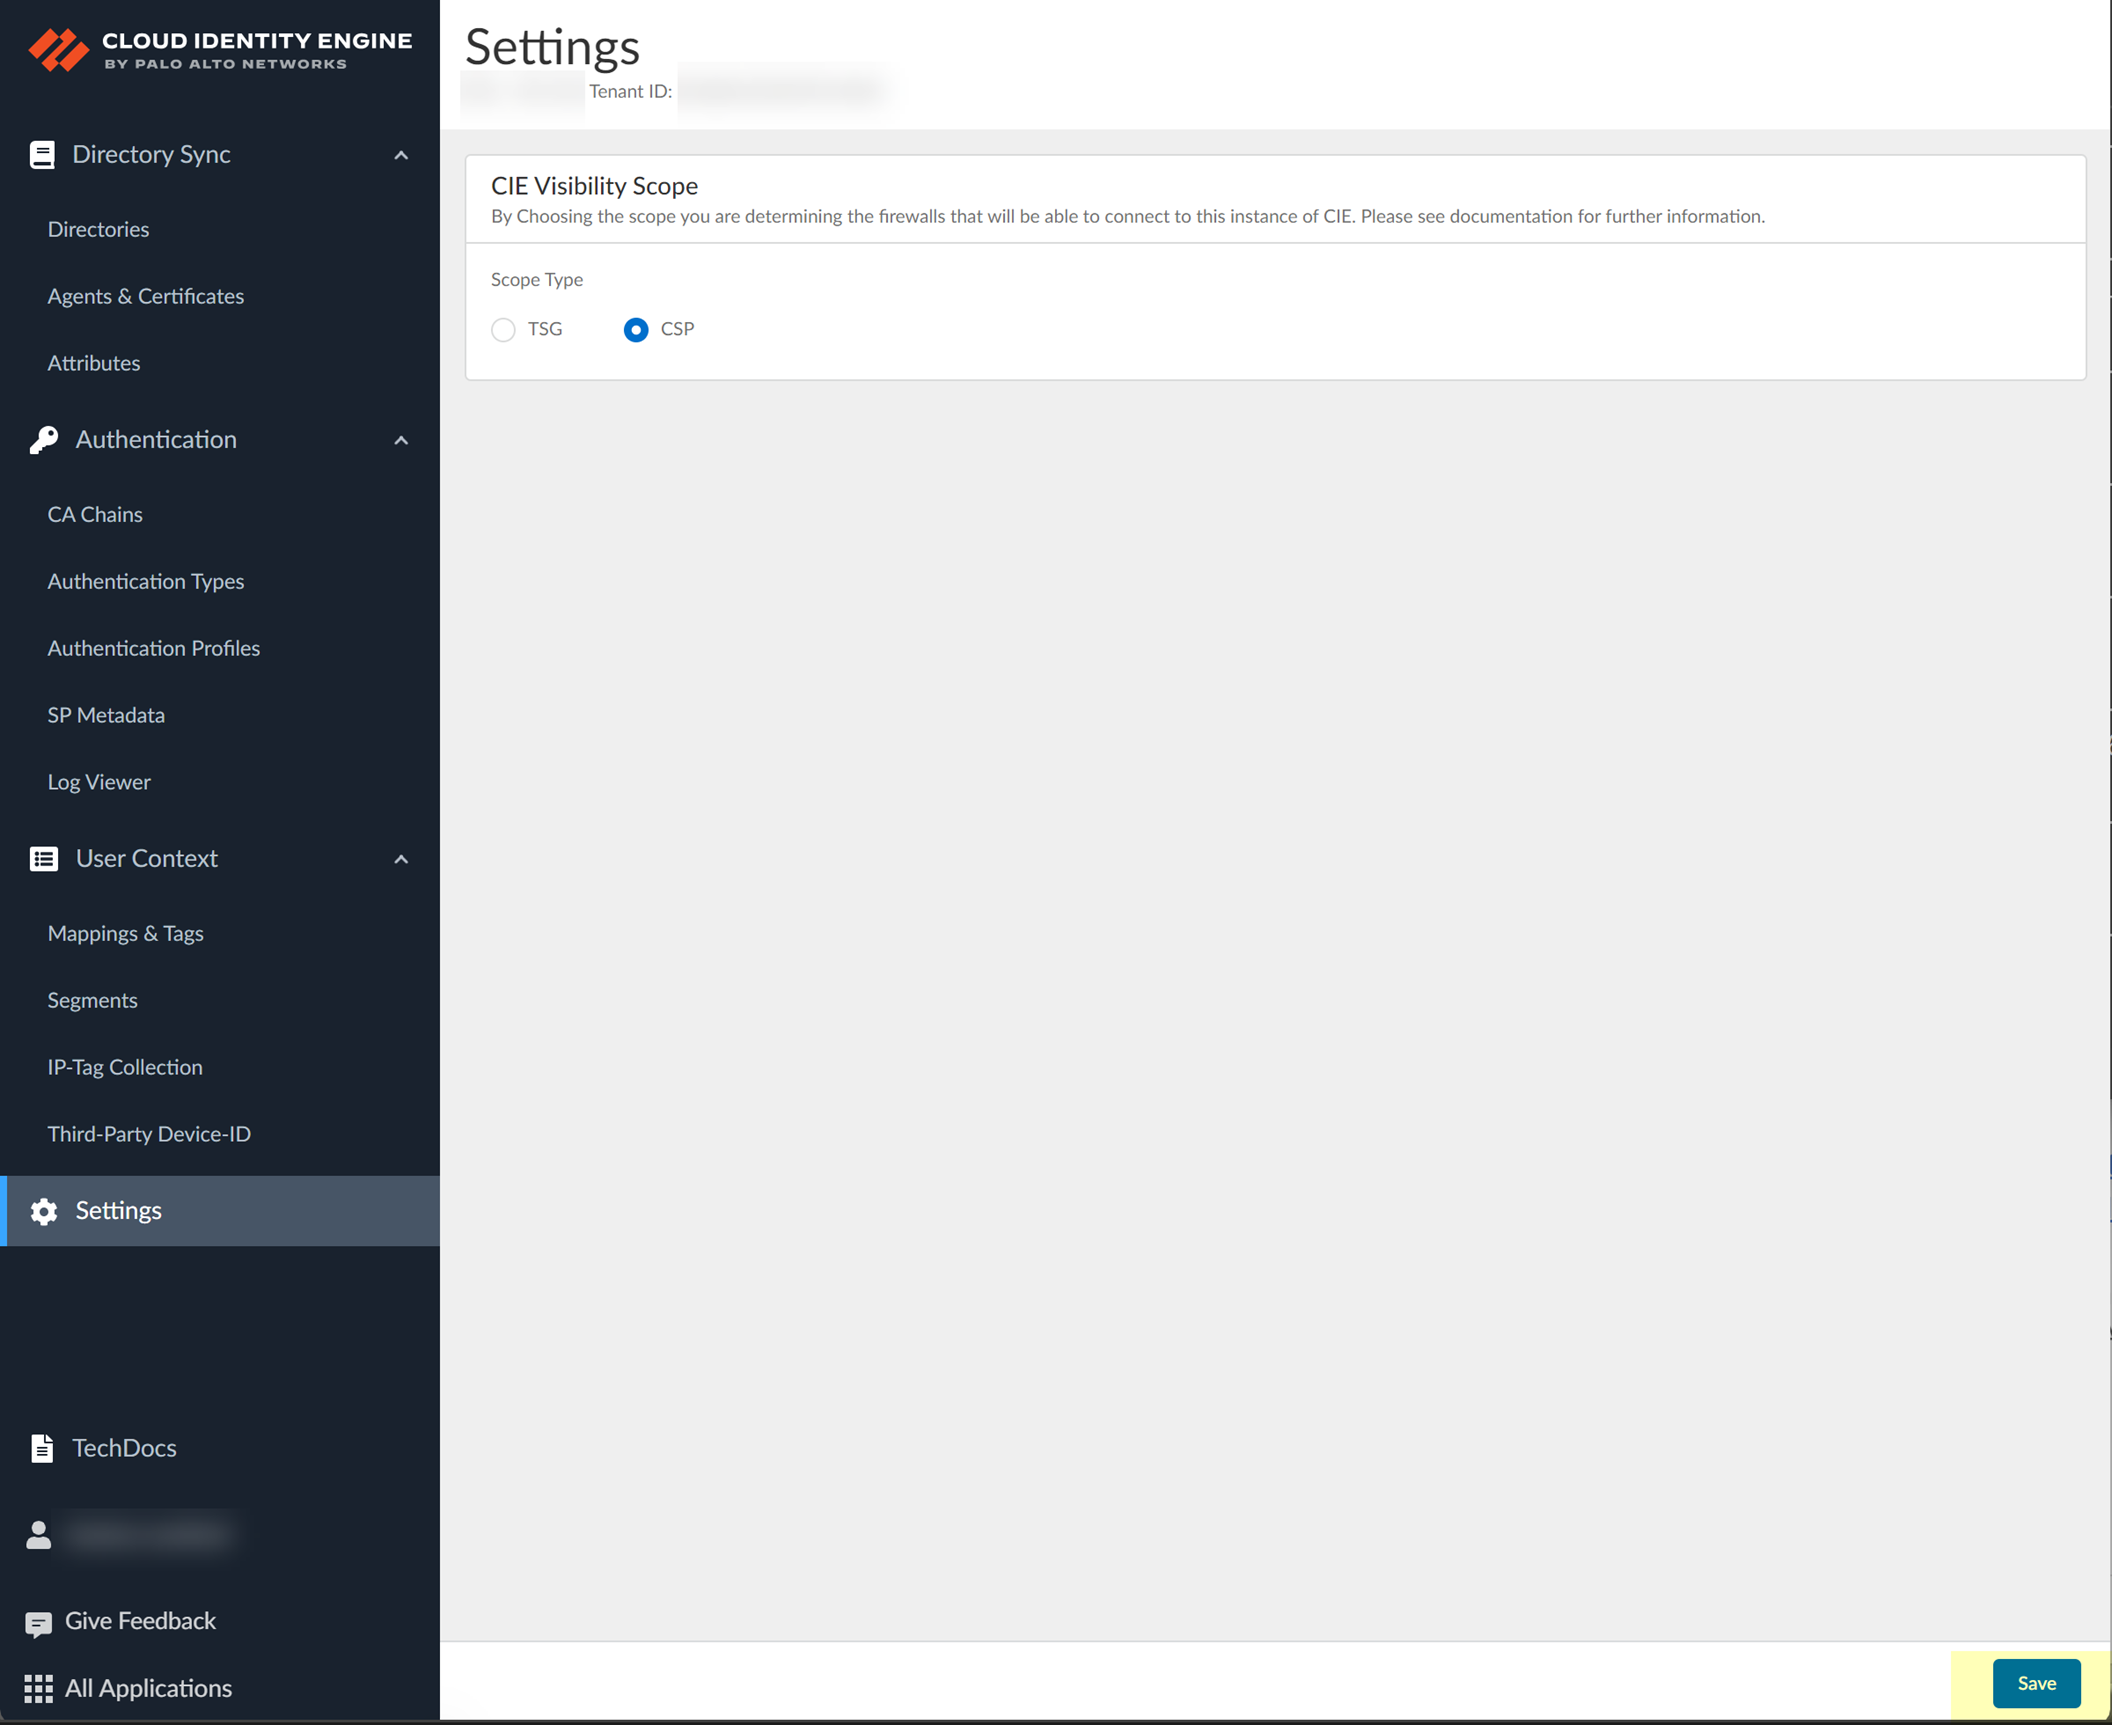
Configuration Steps:
Log in to CIE, select
Settings
.
Select Scope Type:
TSG
or
CSP
.
[GOTCHA] If using Panorama to manage Prisma Access in the same TSG as CIE, and you select TSG Scope, you *must* associate Panorama with CIE.
Configure Directory:
Install agent (if on-prem) or grant permissions (if cloud).
Authenticate Users (Optional):
Configure SAML IdPs or Client Certificates. Set up Authentication Profiles. Configure on Firewall/Panorama.
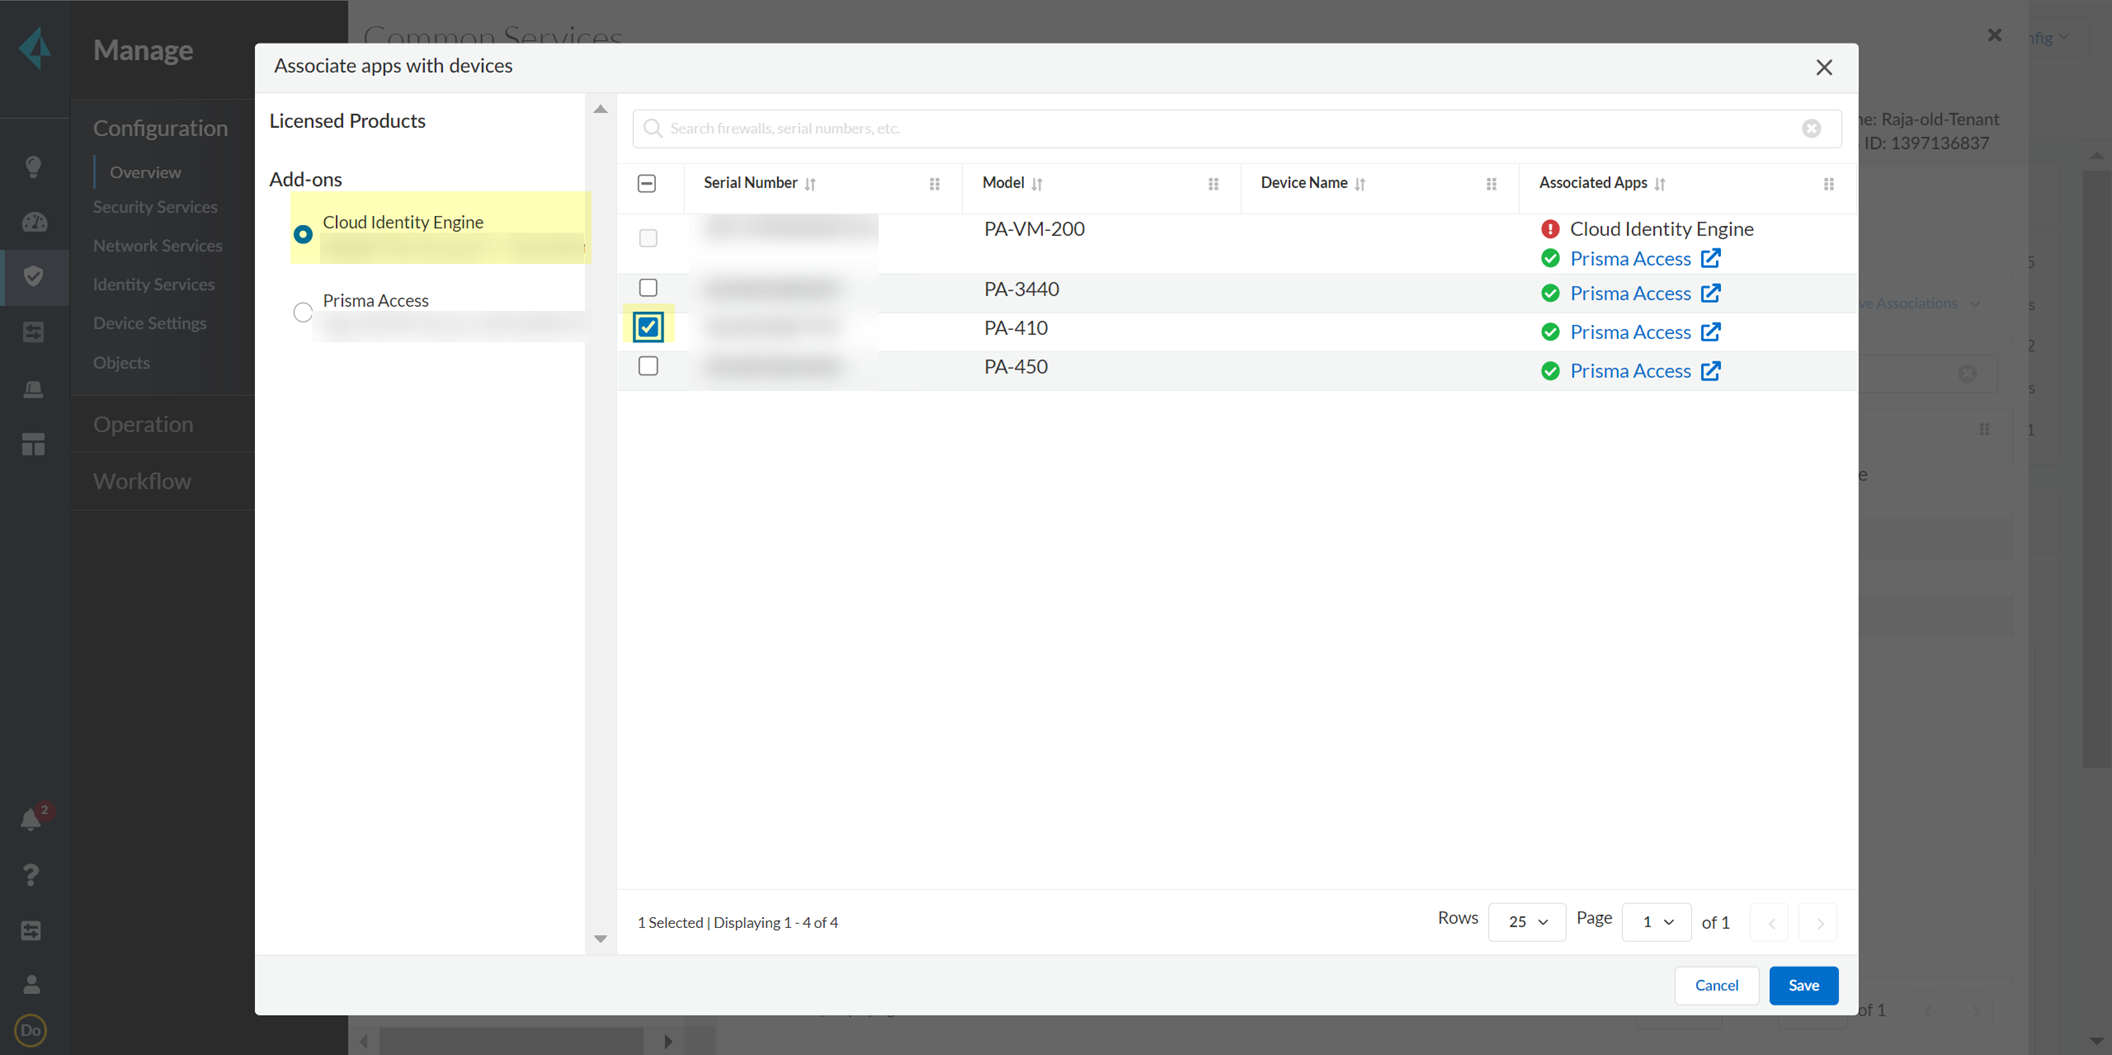
Associate with Apps:
Share CIE data with other Palo Alto Networks apps (if using support account view).
Manage CIE App:
Create/manage tenants, attributes, etc.
Association (Step 4) is generally not needed if using the Tenant Account View in the hub.
Configure an On-Premises Directory
Requires installing the Cloud Identity agent on a Windows server.
The agent communicates with the on-prem directory (AD or OpenLDAP) and the Cloud Identity Engine.
Install the Cloud Identity Agent
[CRITICAL] Verify the agent host server time is correct and synced via NTP before installation.
Incorrect time can cause sync failures.
Ensure the Windows host meets
system requirements
and has TLS 1.2/1.3 enabled (install OS update if needed).
[GOTCHA] Do not install the Cloud Identity agent on the same host as the User-ID agent (port conflict).
Use dedicated hosts.
[GOTCHA] If installing on the same host as the Terminal Server (TS) agent, change the default listening port on the TS agent.
Installation Steps:
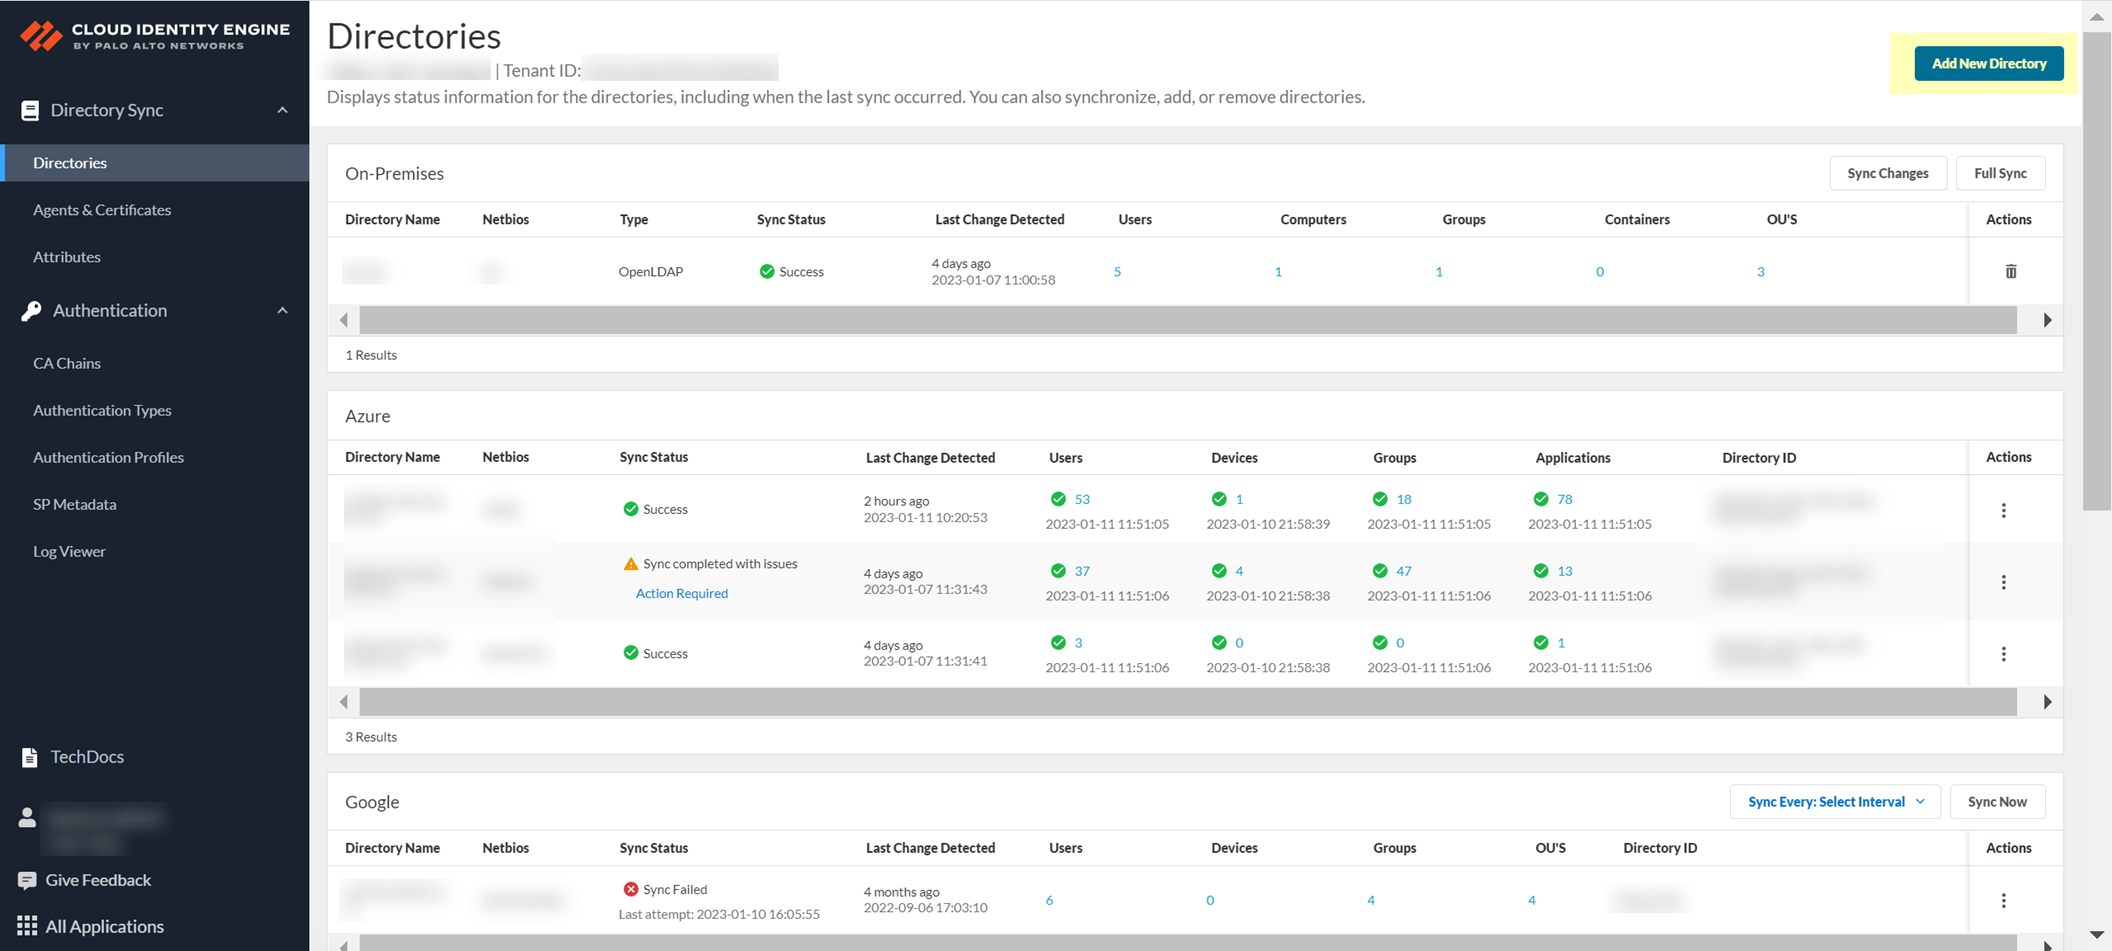
Log in to the hub, select Cloud Identity Engine app.
Navigate to
Directories
>
Add New Directory
.
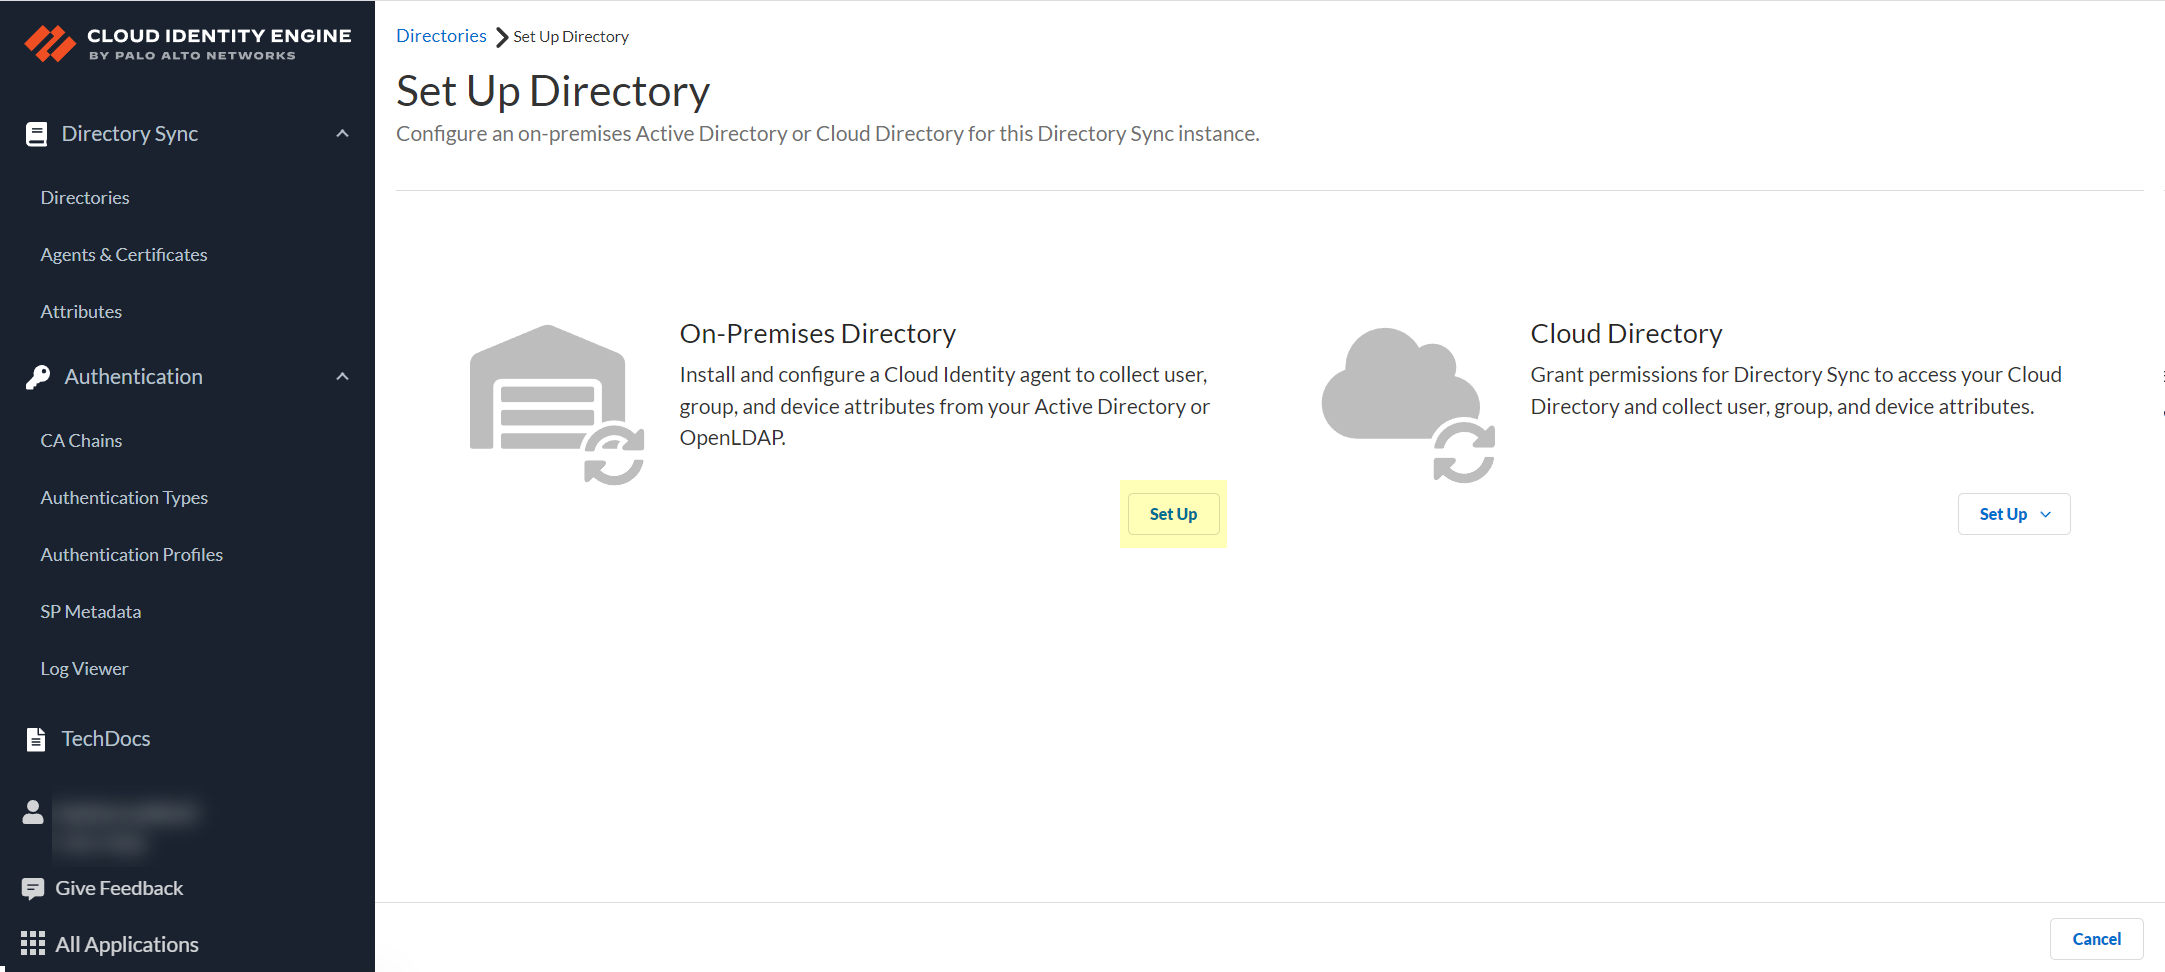
Click
Set Up
under
On-Premises Directory
.
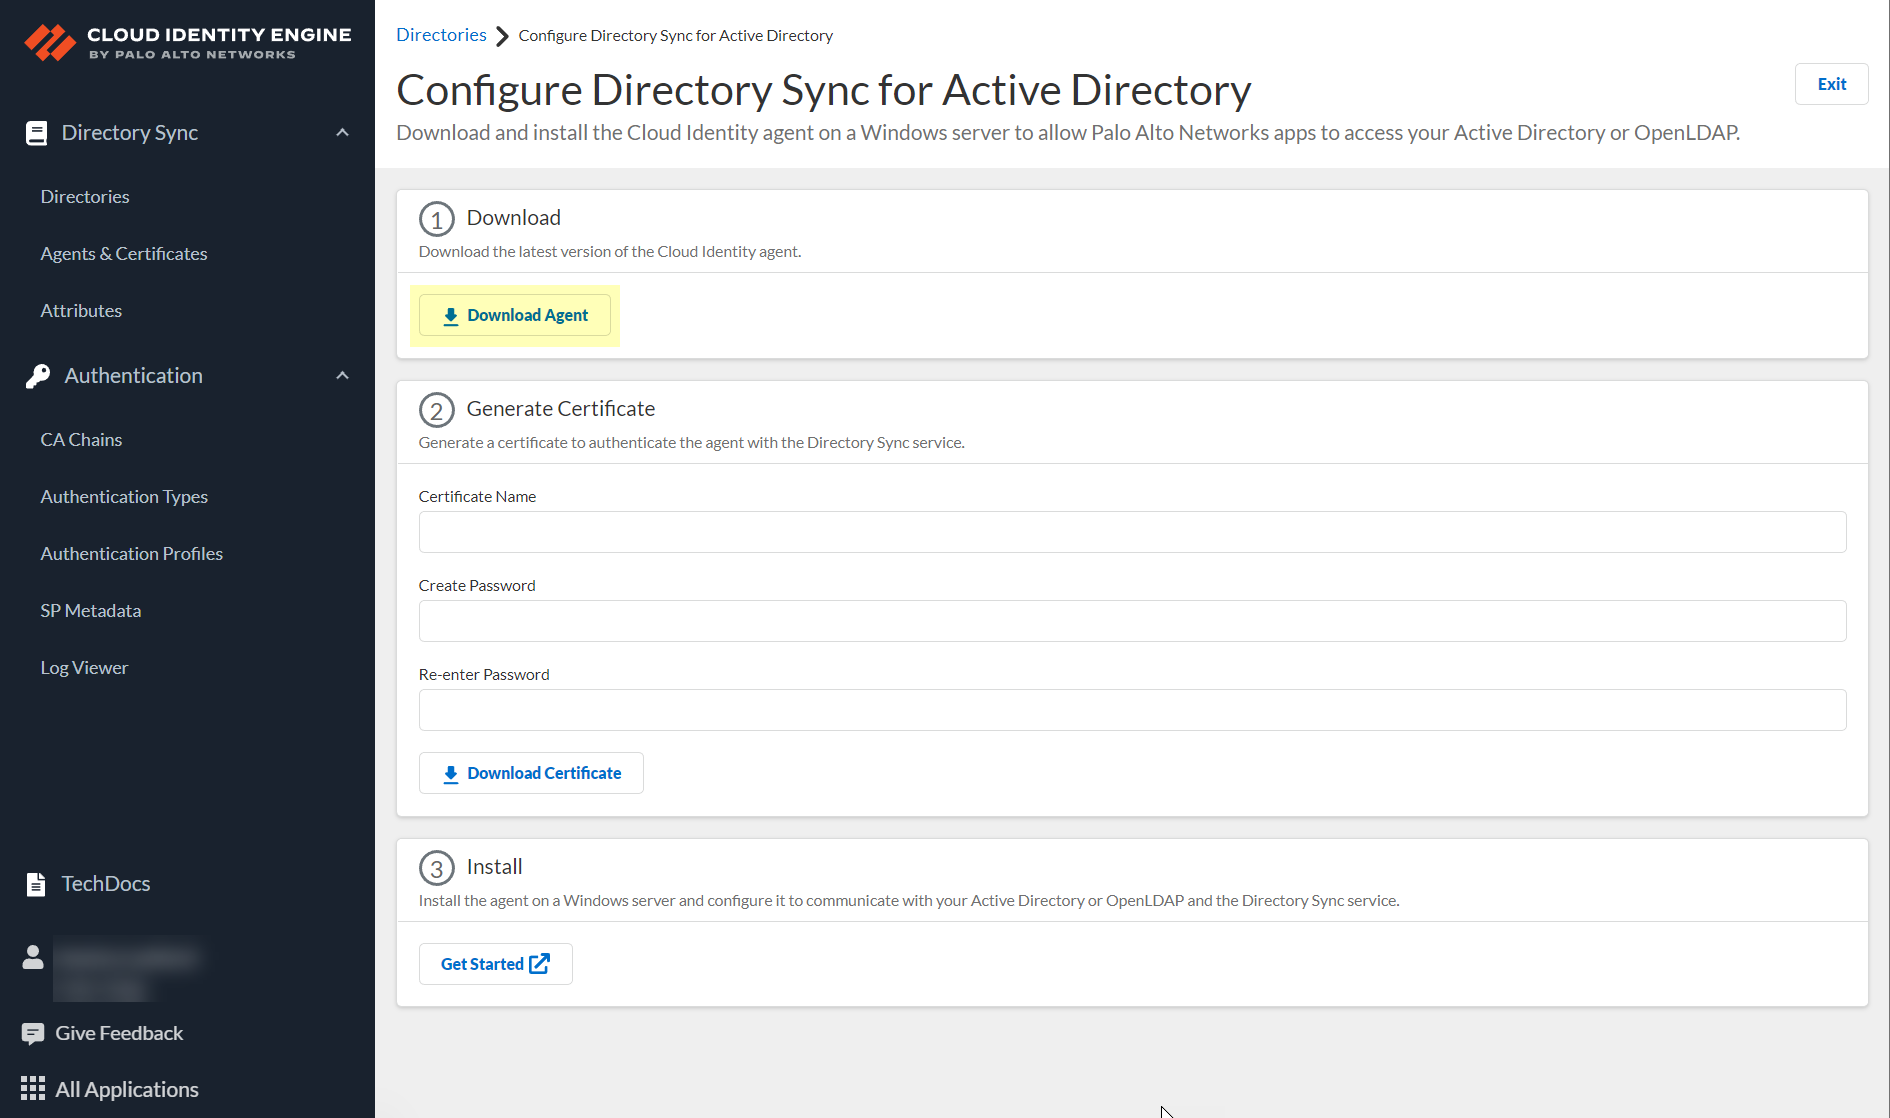
Click
Download Agent
.
Run the downloaded
DaInstall.msi
on the chosen Windows server.
Follow the installation wizard prompts.
Navigate to the installation directory (Default:
C:\Program Files (x86)\Palo Alto Networks\Cloud Identity Agent\
).
Double-click
CloudIdAgentController.exe
to launch the agent configuration tool.
Starting the agent controller also starts the background CIE service on the host.
Next Steps:
Configure the agent and authenticate it with CIE.
Configure the Cloud Identity Agent
[GOTCHA] Avoid first-time agent configuration during the daily CRL reload time (9:00-10:00 PM CDT/CEST).
If initial sync fails during this window, wait and re-sync.
[PCNSA/PCNSE] The agent needs configuration for both the directory connection and the CIE connection.
OpenLDAP requires specific attributes.
The service account needs minimum permissions for LDAP bind requests.
Configuration Steps:
Ensure network traffic is allowed (see "Configure Network Traffic" section).
[CRITICAL] Install the CA certificate (used to sign the directory server's certificate) in the Local Computer Trusted Root CA store on the agent host if not already present.
Required for LDAPS/STARTTLS.
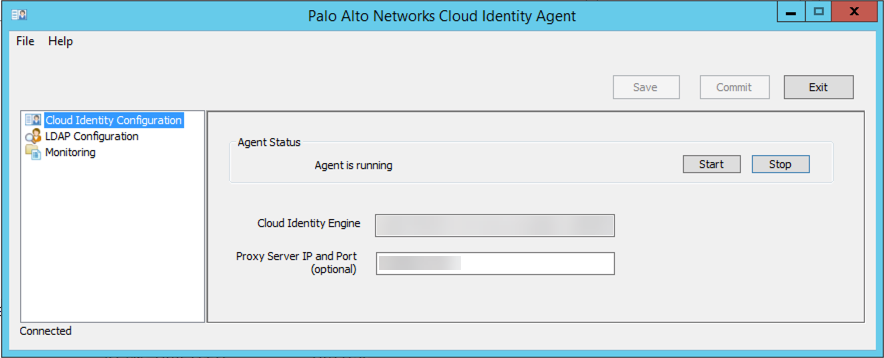
Launch the Cloud Identity agent controller (
Start > Palo Alto Networks > Cloud Identity Agent
).
[GOTCHA] Do not manually edit agent config files.
Under
Cloud Identity Configuration
, enter the regional agent configuration endpoint URL for your CIE tenant region.
agent-directory-sync.cn.apps.prismaaccess.cn
(Region specific access)
Poland (PL)
agent-directory-sync.pl.apps.paloaltonetworks.com
Qatar (QA)
agent-directory-sync.qa.apps.paloaltonetworks.com
Taiwan (TW)
agent-directory-sync.tw.apps.paloaltonetworks.com
Israel (IL)
agent-directory-sync.il.apps.paloaltonetworks.com
Indonesia (ID)
agent-directory-sync.id.apps.paloaltonetworks.com
South Korea (KR)
agent-directory-sync.kr.apps.paloaltonetworks.com
Saudi Arabia (SA)
agent-directory-sync.sa.apps.paloaltonetworks.com
(Optional) If using a proxy (requires agent v1.7.1+), enter the
Proxy IP Server and Port
(e.g.,
192.168.1.100:8080
).
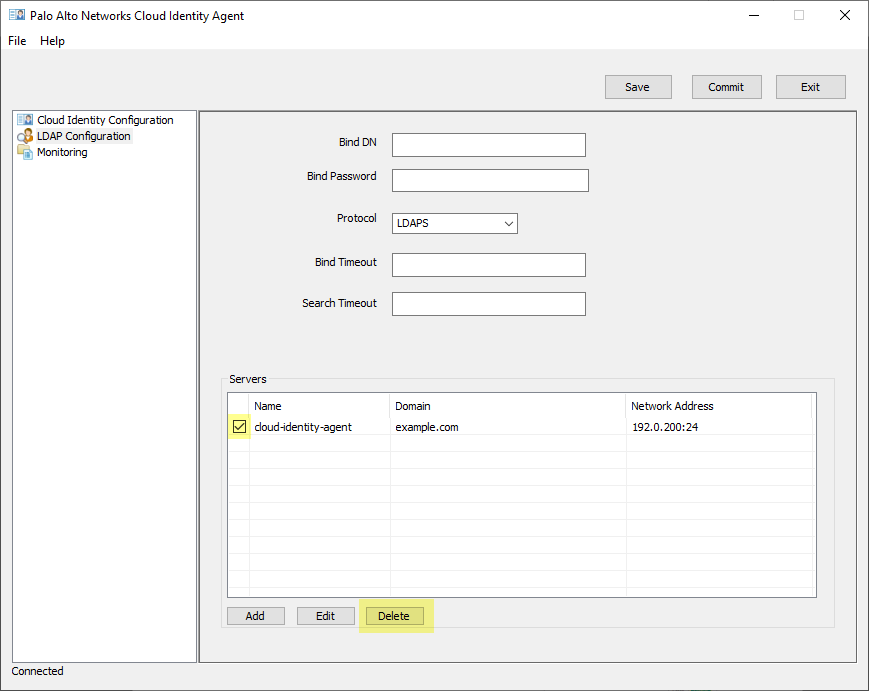
Under
LDAP Configuration
:
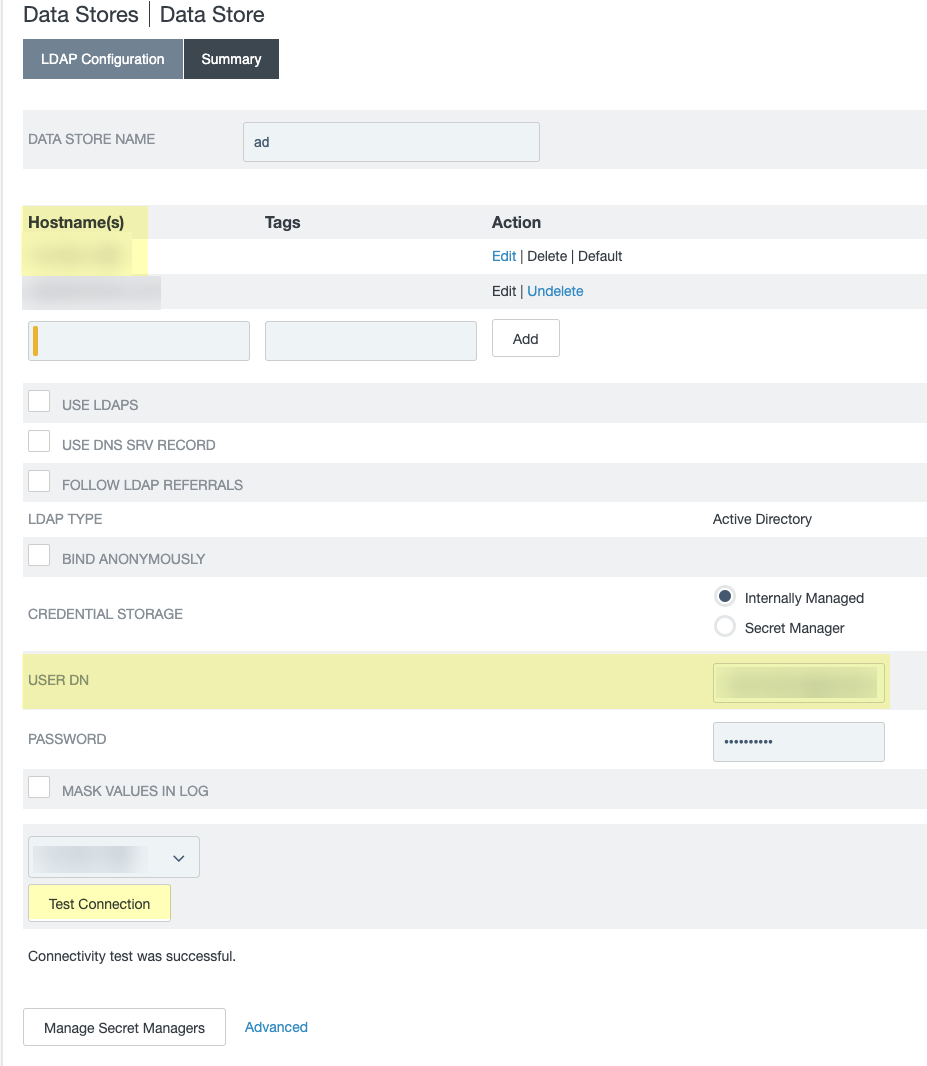
Enter the service account
Bind DN
(e.g.,
CN=admin,OU=IT,DC=domain1,DC=example,DC=com
). (Use
dsquery user -name <username>
on AD server if needed).
Enter the
Bind Password
(stored encrypted in Windows credential store).
Select
Protocol
: LDAP (port 389, unencrypted), LDAPS (port 636, SSL, default, requires CA cert), or LDAP with STARTTLS (port 389, TLS, requires CA cert).
Verify
Bind Timeout
(default 30s).
Verify
Search Timeout
(default 15s).
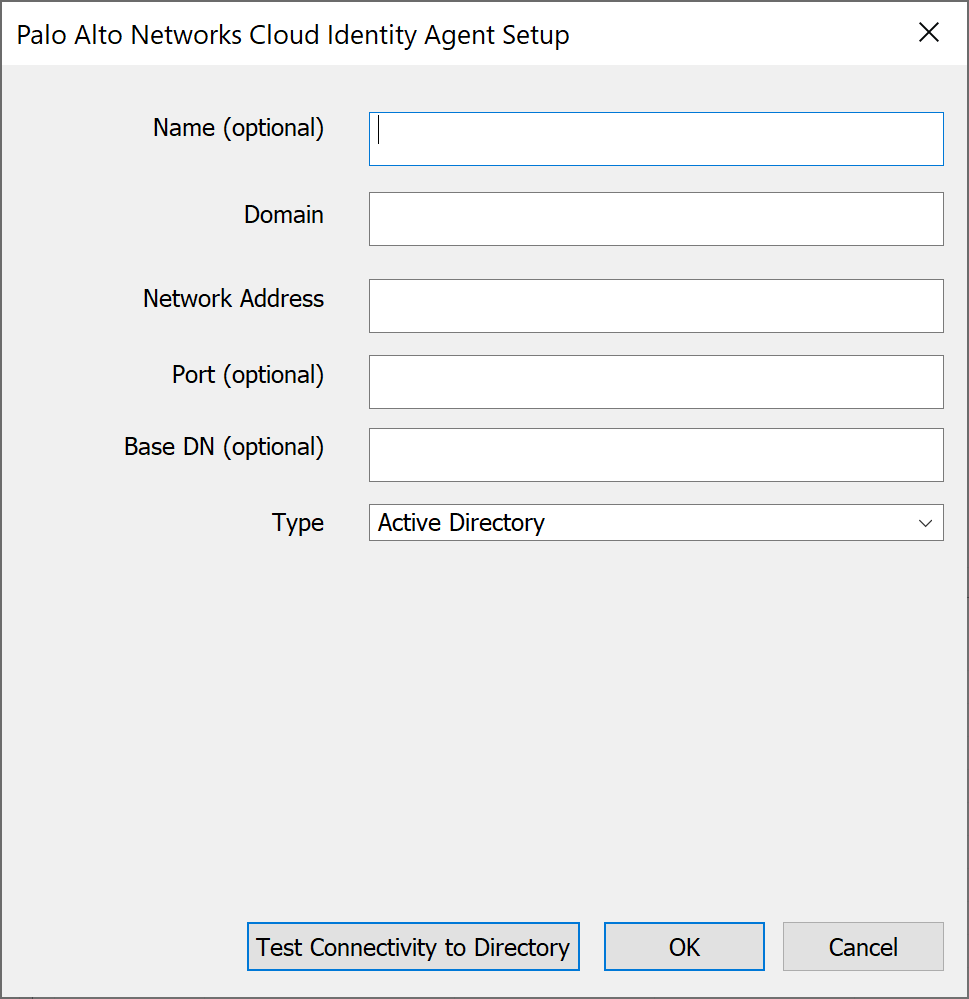
Click
Add
to configure your directory server(s).
(Optional) Enter a directory
Name
.
Enter the FQDN for the
Domain
(up to 20 per agent).
Enter the IP or FQDN for the
Network Address
.
(Optional) Enter the
Port
.
[GOTCHA] Do not use Global Catalog ports (3268/3269).
Defaults: 636 (LDAPS), 389 (LDAP/STARTTLS).
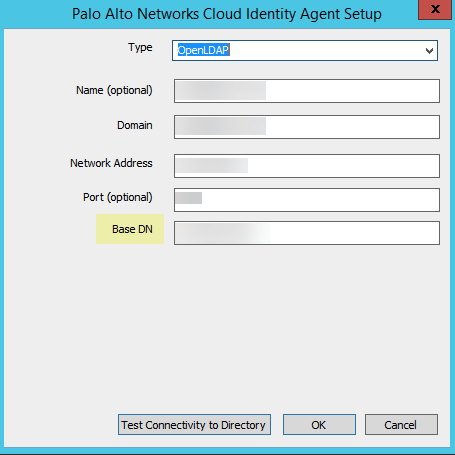
(
Required for OpenLDAP
) Enter the
Base DN
(e.g.,
DC=example, DC=com
).
Select directory
Type
: Active Directory or OpenLDAP.
(OpenLDAP requires group objectClass: groupOfUniqueNames)
(Optional but recommended) Click
Test Connectivity to Directory
.
Click
OK
.
[GOTCHA] Adding a directory triggers a full sync attempt for *all* domains on the agent. Ensure all are active.
Click
Commit
to apply changes and restart the agent.
Verify connection in the CIE app (
Directories
tab) by checking domain status, sync status, last sync time, and object counts.
(Recommended) Configure additional agents for the same domain for High Availability (HA).
[PCNSA/PCNSE] HA requires identical configuration on multiple agents pointing to the same domain/tenant. CIE communicates with only one agent at a time.
(Optional) Automate bind password rotation using the CLI:
CloudIdAgentCLI.exe ldap_bind_password:<password>
. Escape special characters as needed per shell.
Next Steps:
Authenticate the agent, configure logging, or set up user authentication.
Authenticate the Agent and the Cloud Identity Engine
[PCNSA/PCNSE] Agent and CIE use mutual certificate authentication over TLS.
A valid certificate is required for the agent to connect.
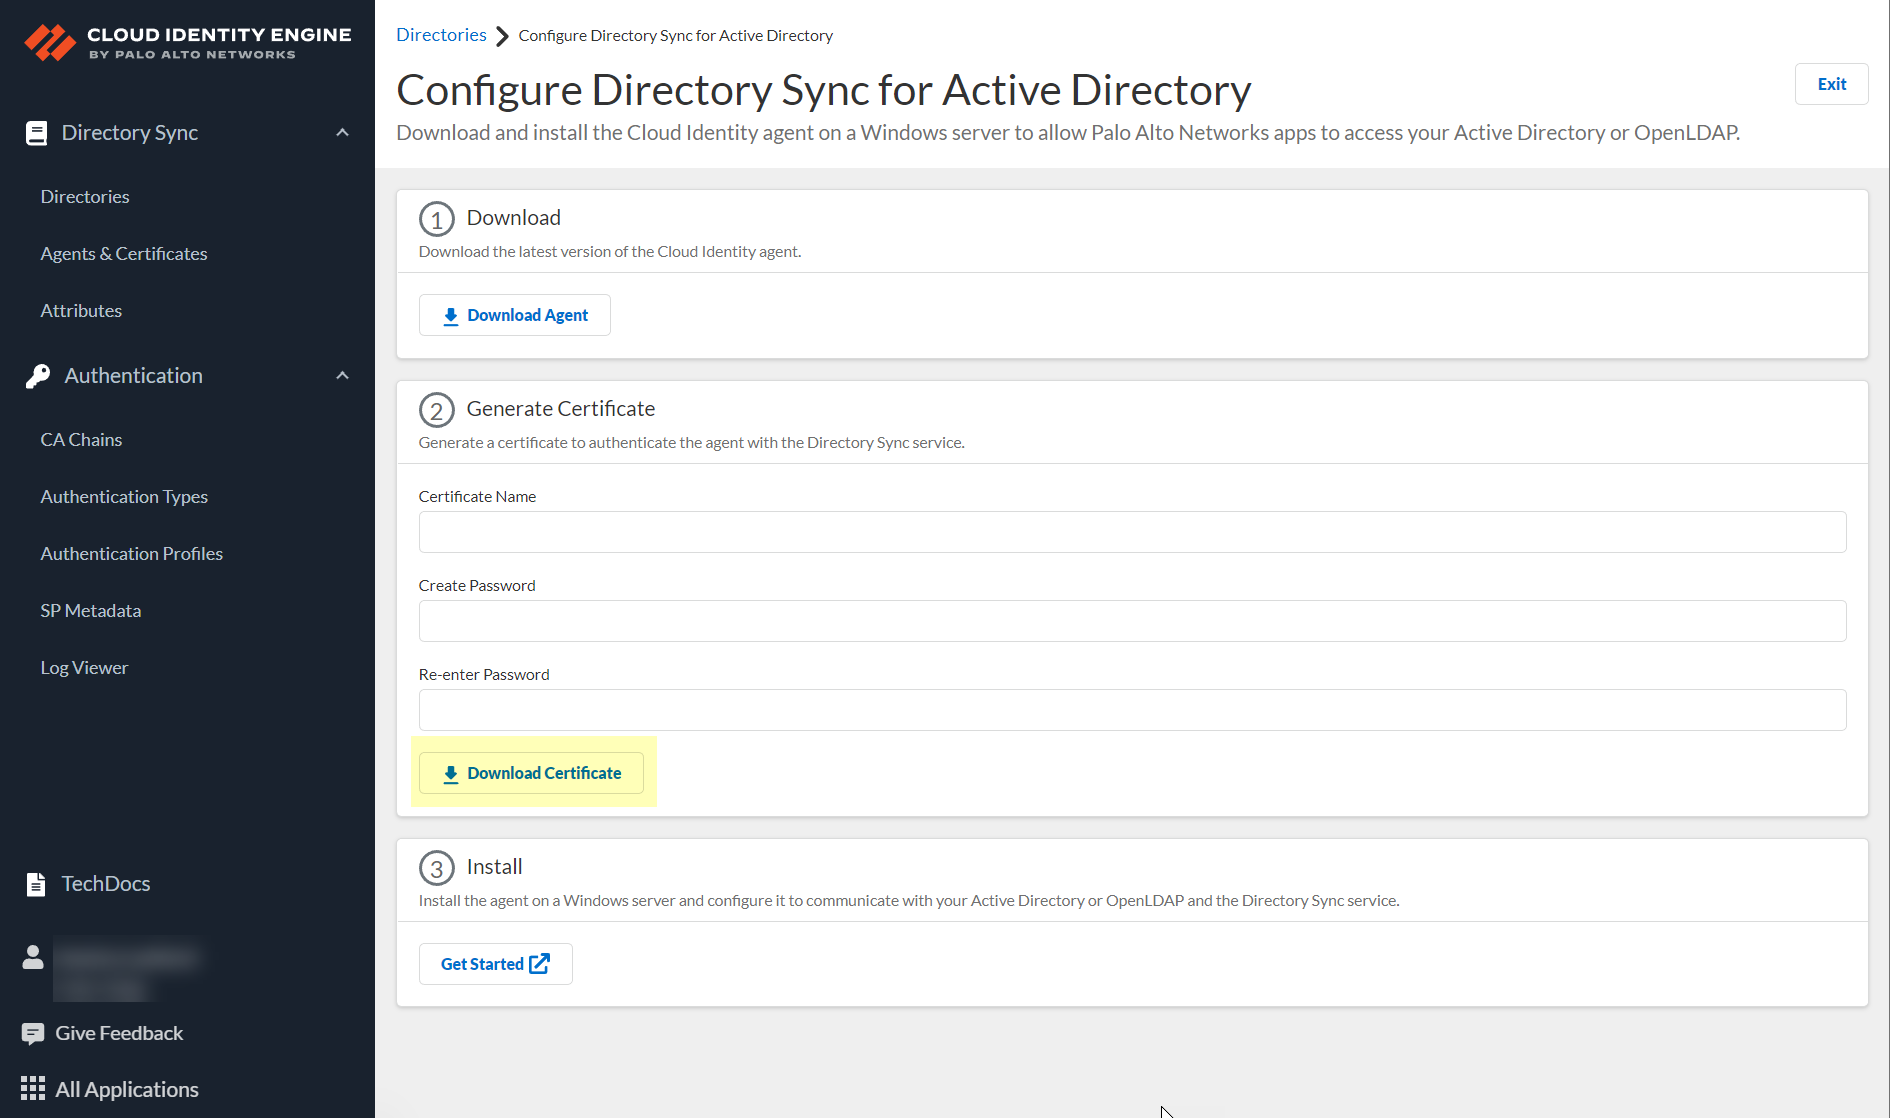
Generate a certificate in the CIE app and import it to the agent host's Local Computer Personal certificate store.
Certificates expire every three months. Agent v1.5.0+ auto-renews before expiry.
[GOTCHA] Each agent requires a unique certificate for a specific tenant. Do not share certificates between agents.
Limit of 5 unused and 100 total certificates per tenant.
Enter a unique
Certificate Name
(5-128 alphanumeric chars).
Create and re-enter a secure
Password
(12-25 chars). This password is needed when importing the cert onto the agent host.
Click
Download Certificate
.
Import the downloaded certificate into the
Local Computer > Personal > Certificates
store on the agent host server.
After successful authentication, the agent sends directory attributes to CIE, which shares them with associated Palo Alto Networks apps.
Next Steps:
Manage the CIE app or the agent.
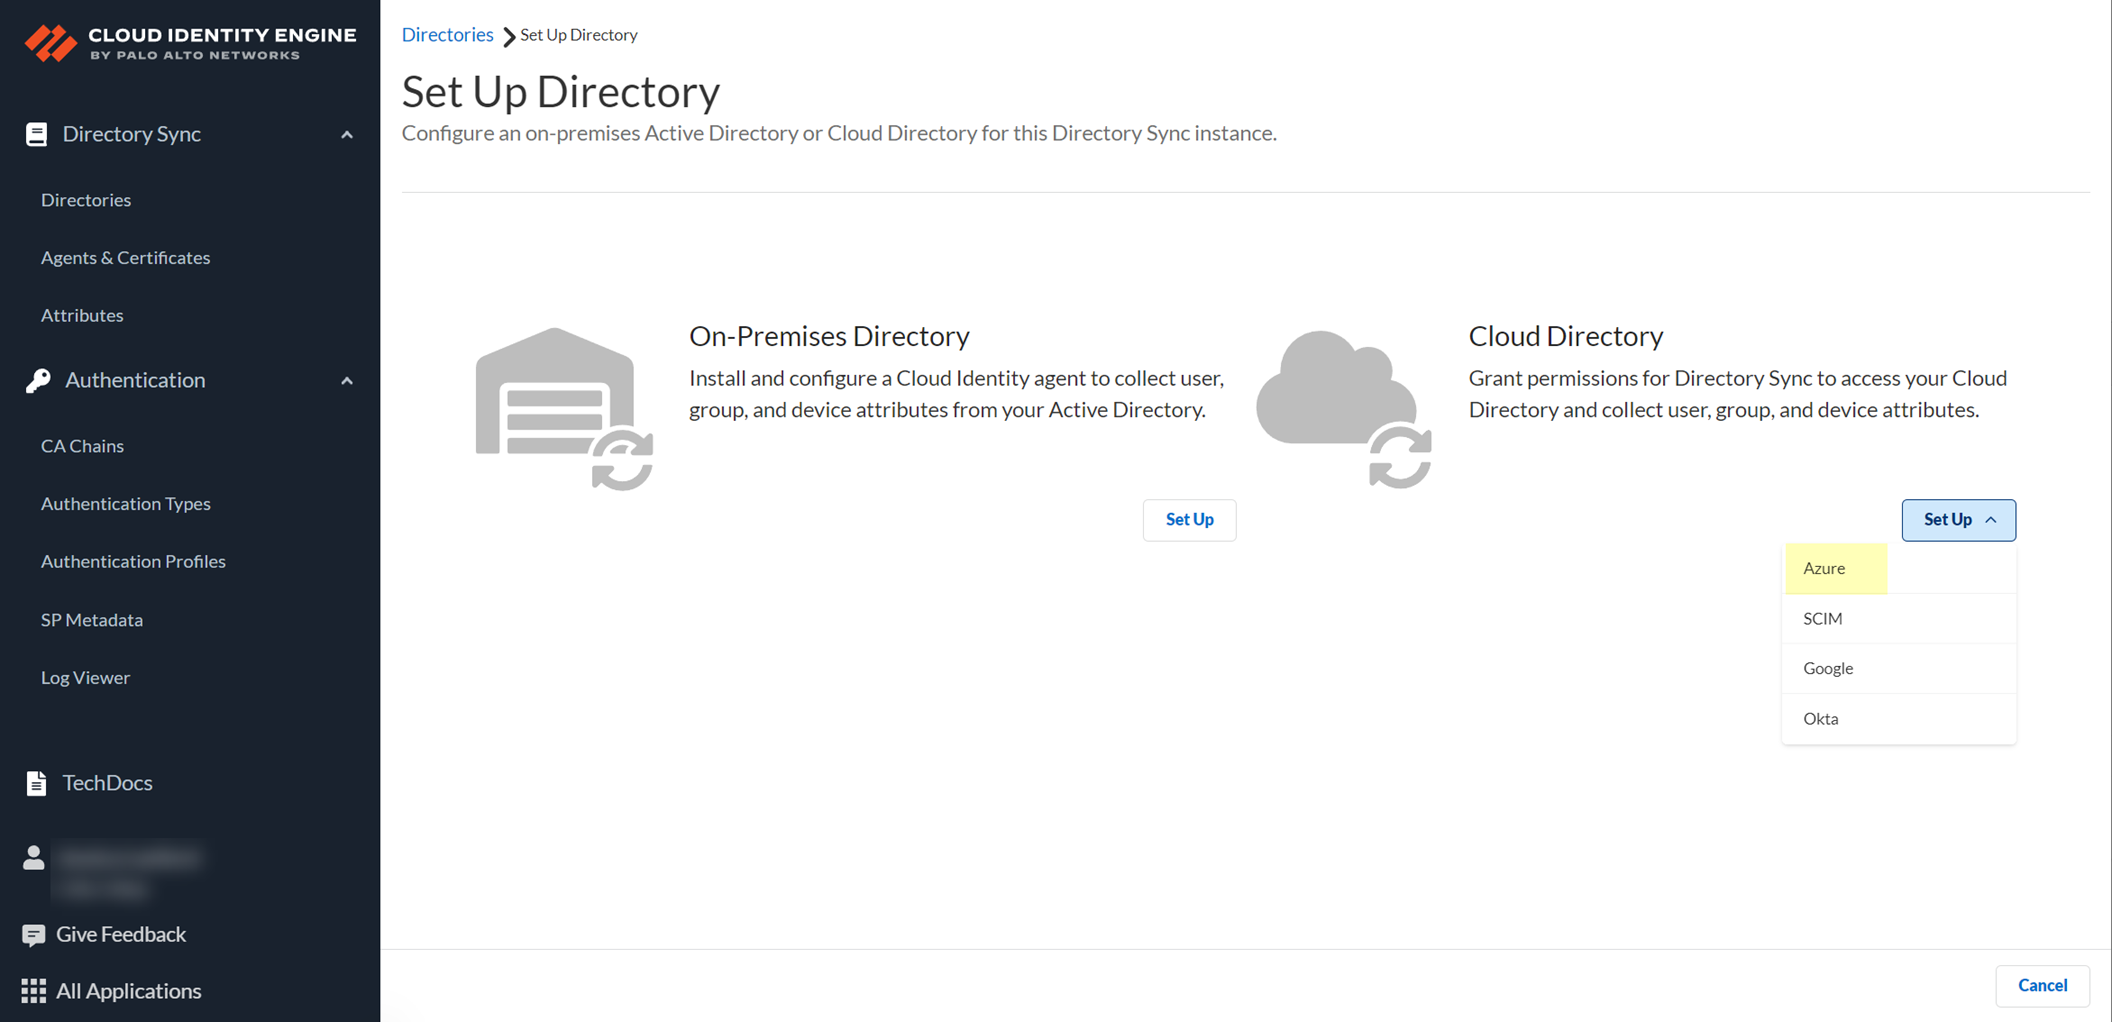
Configure a Cloud-Based Directory
Configure cloud directories like Azure AD, Okta, or Google Directory to communicate with CIE. No agent installation is required for cloud directories.
SCIM provisioning can be used with Azure AD to customize attribute collection, but standard integration methods (Auth Code Flow, Client Credential Flow) are also available.
Configure Azure Active Directory
Allows CIE to collect Azure AD attributes for user identification and policy enforcement.
[PCNSA/PCNSE] Requires specific Azure AD roles: Application Administrator or Cloud Application Administrator. Global Administrator role is needed *only* for the initial setup using the CIE Enterprise App method.
Alternatives: Client Credential Flow (uses service account, recommended for security), SCIM Connector (custom attribute selection, syncs every ~40 min), or Group Filtering (syncs every ~5 min).
Default Azure AD Sync Schedule: Users/Groups/Devices sync on changes. Apps sync up to every 3 hours. Role Assignments sync up to every 24 hours.
Configure Azure Using the CIE Enterprise App (Recommended)
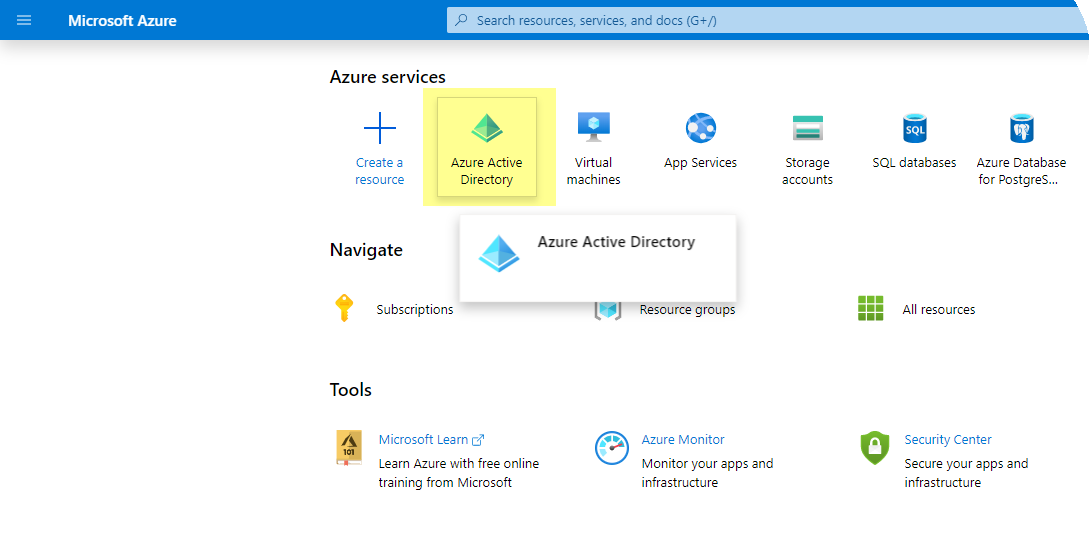
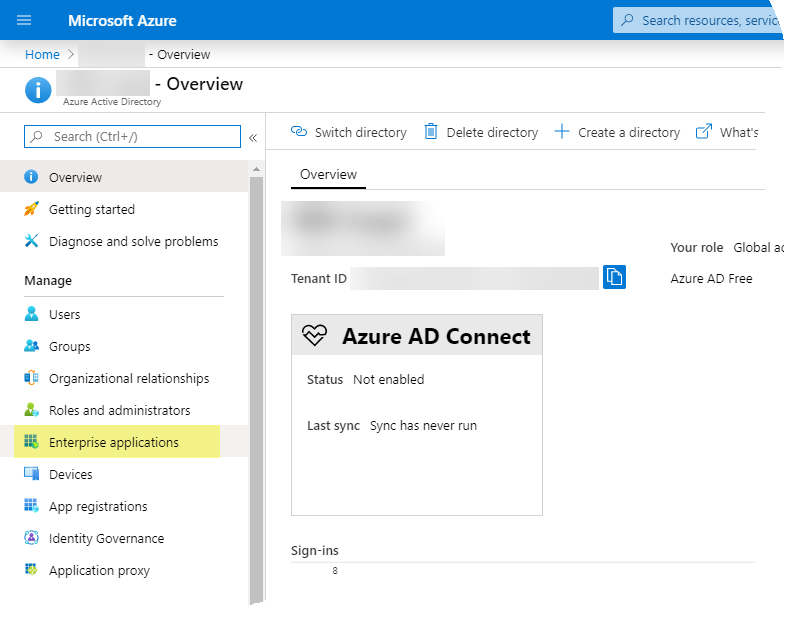
In Azure Portal: Go to Azure AD > Overview. Copy the
Directory (tenant) ID
.
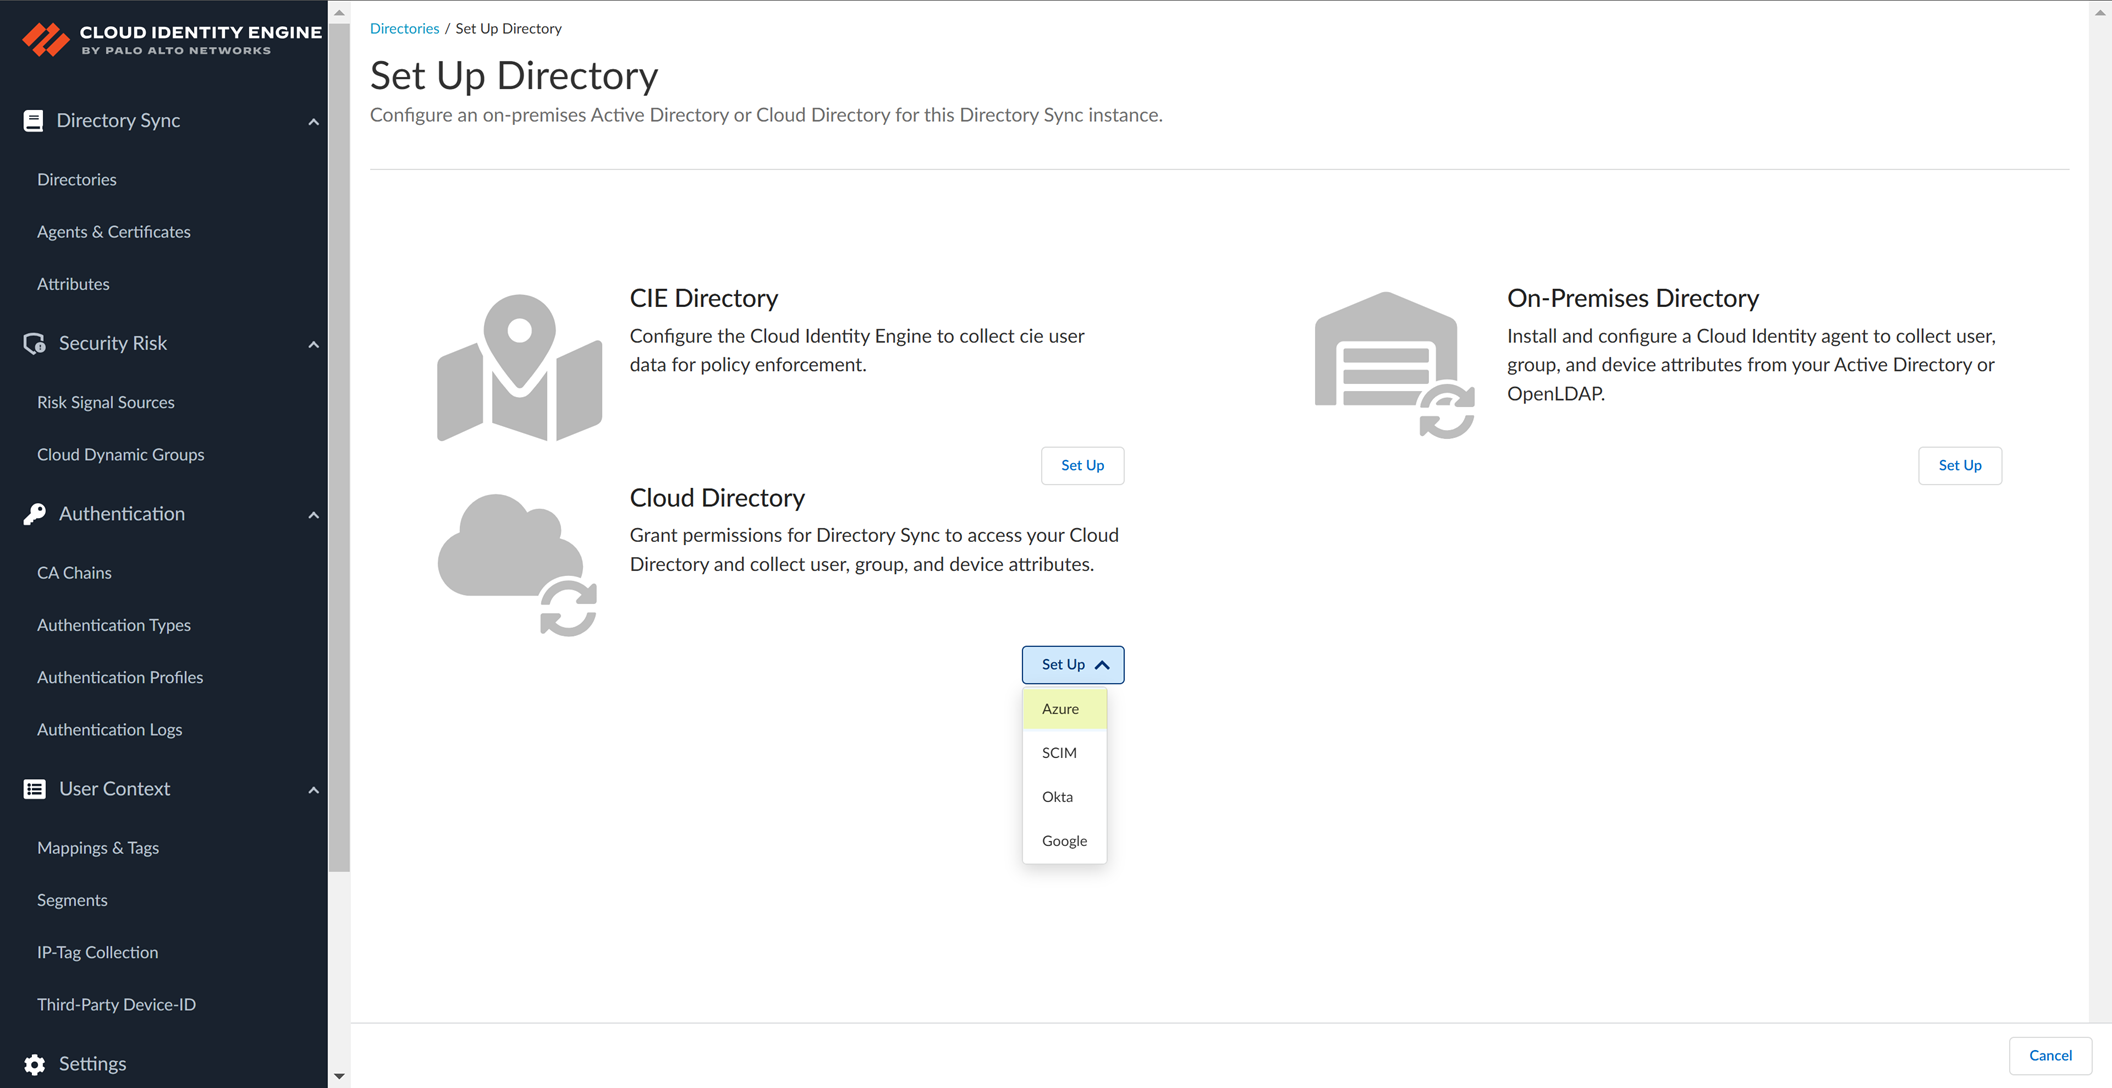
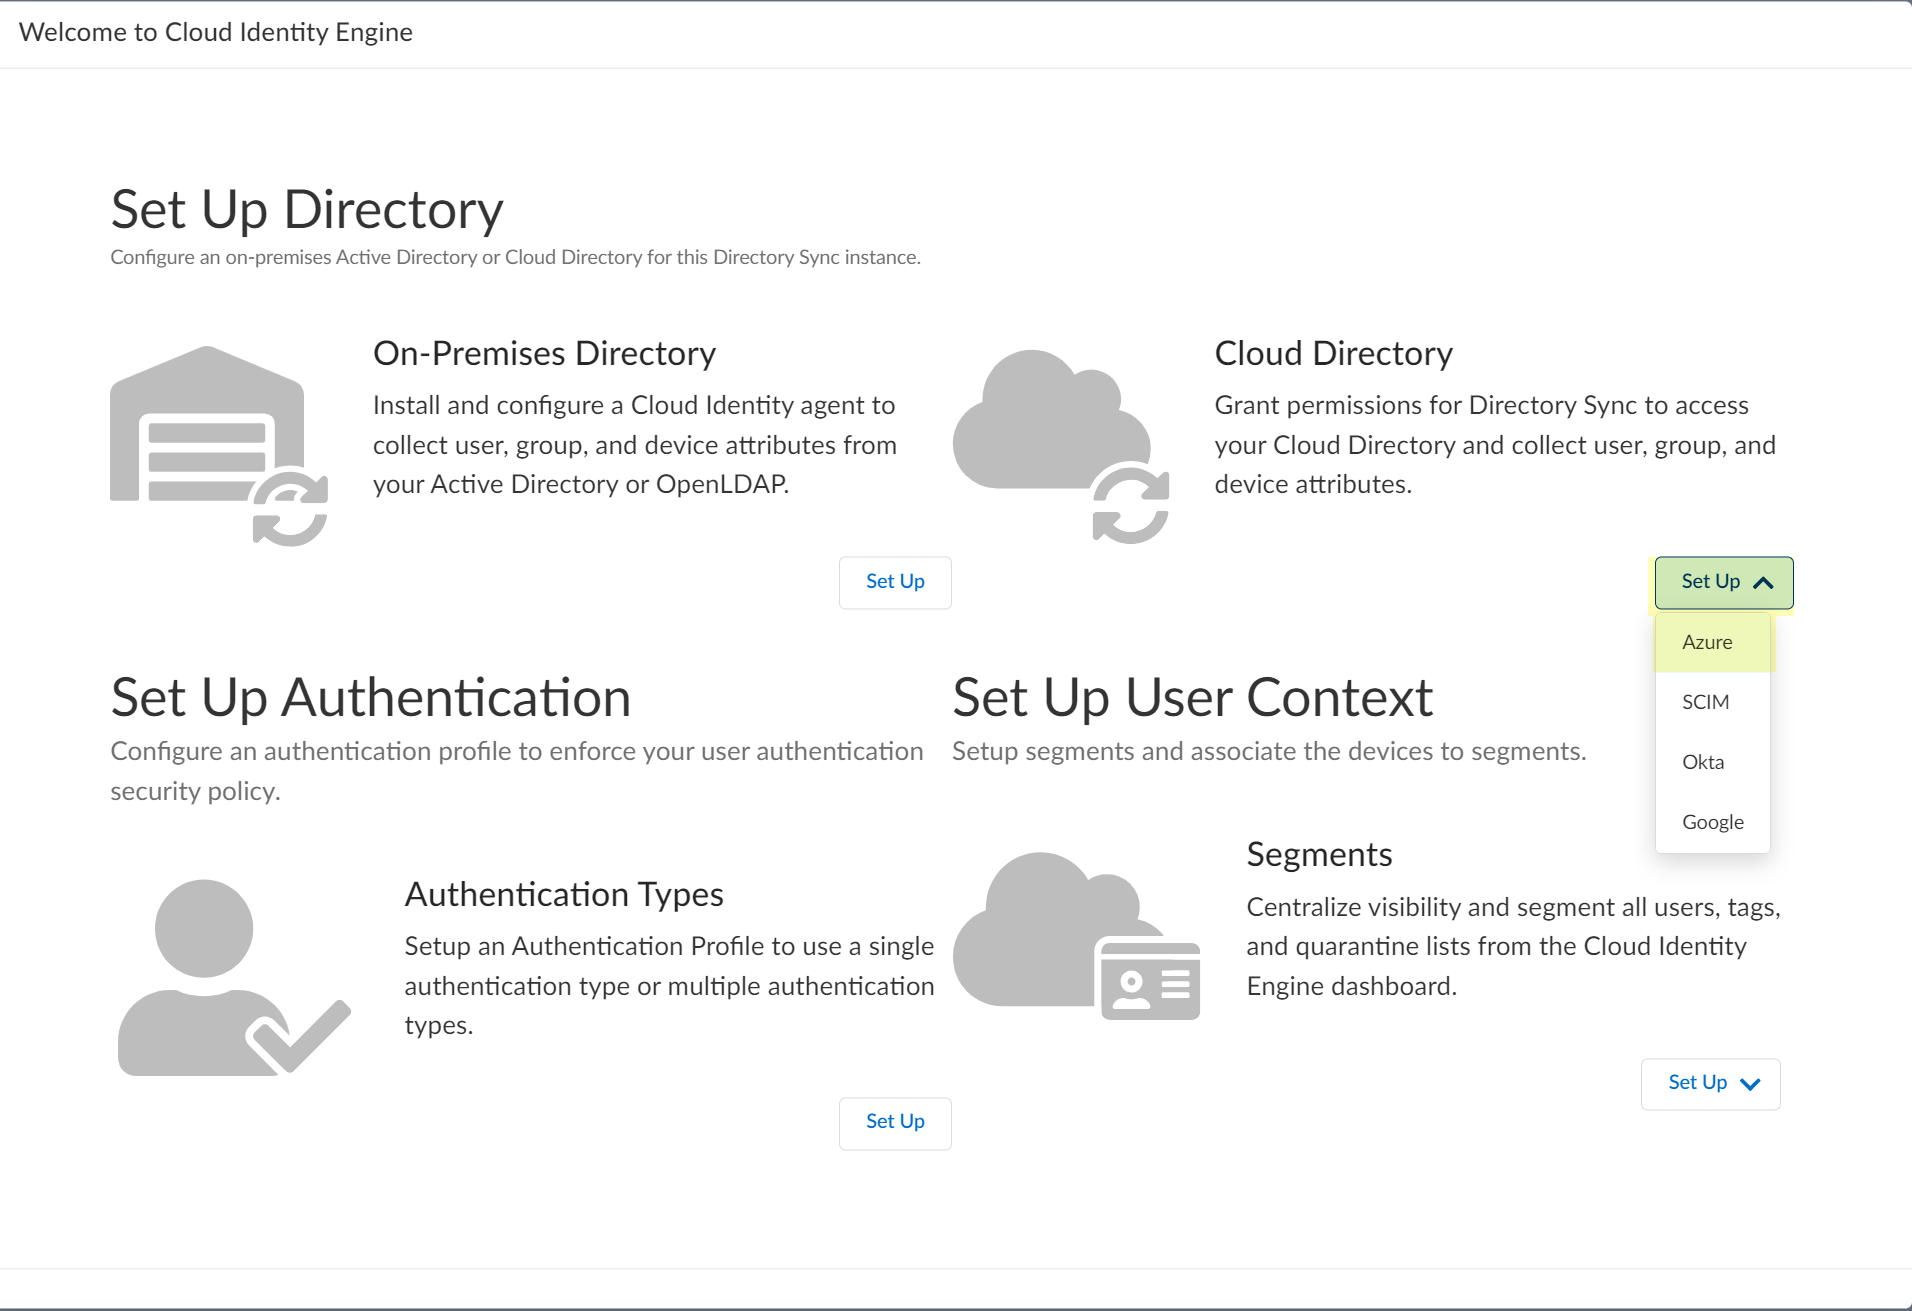
In CIE App: Go to
Directories
>
Add New Directory
> Select
Azure
> Click
Set Up
.
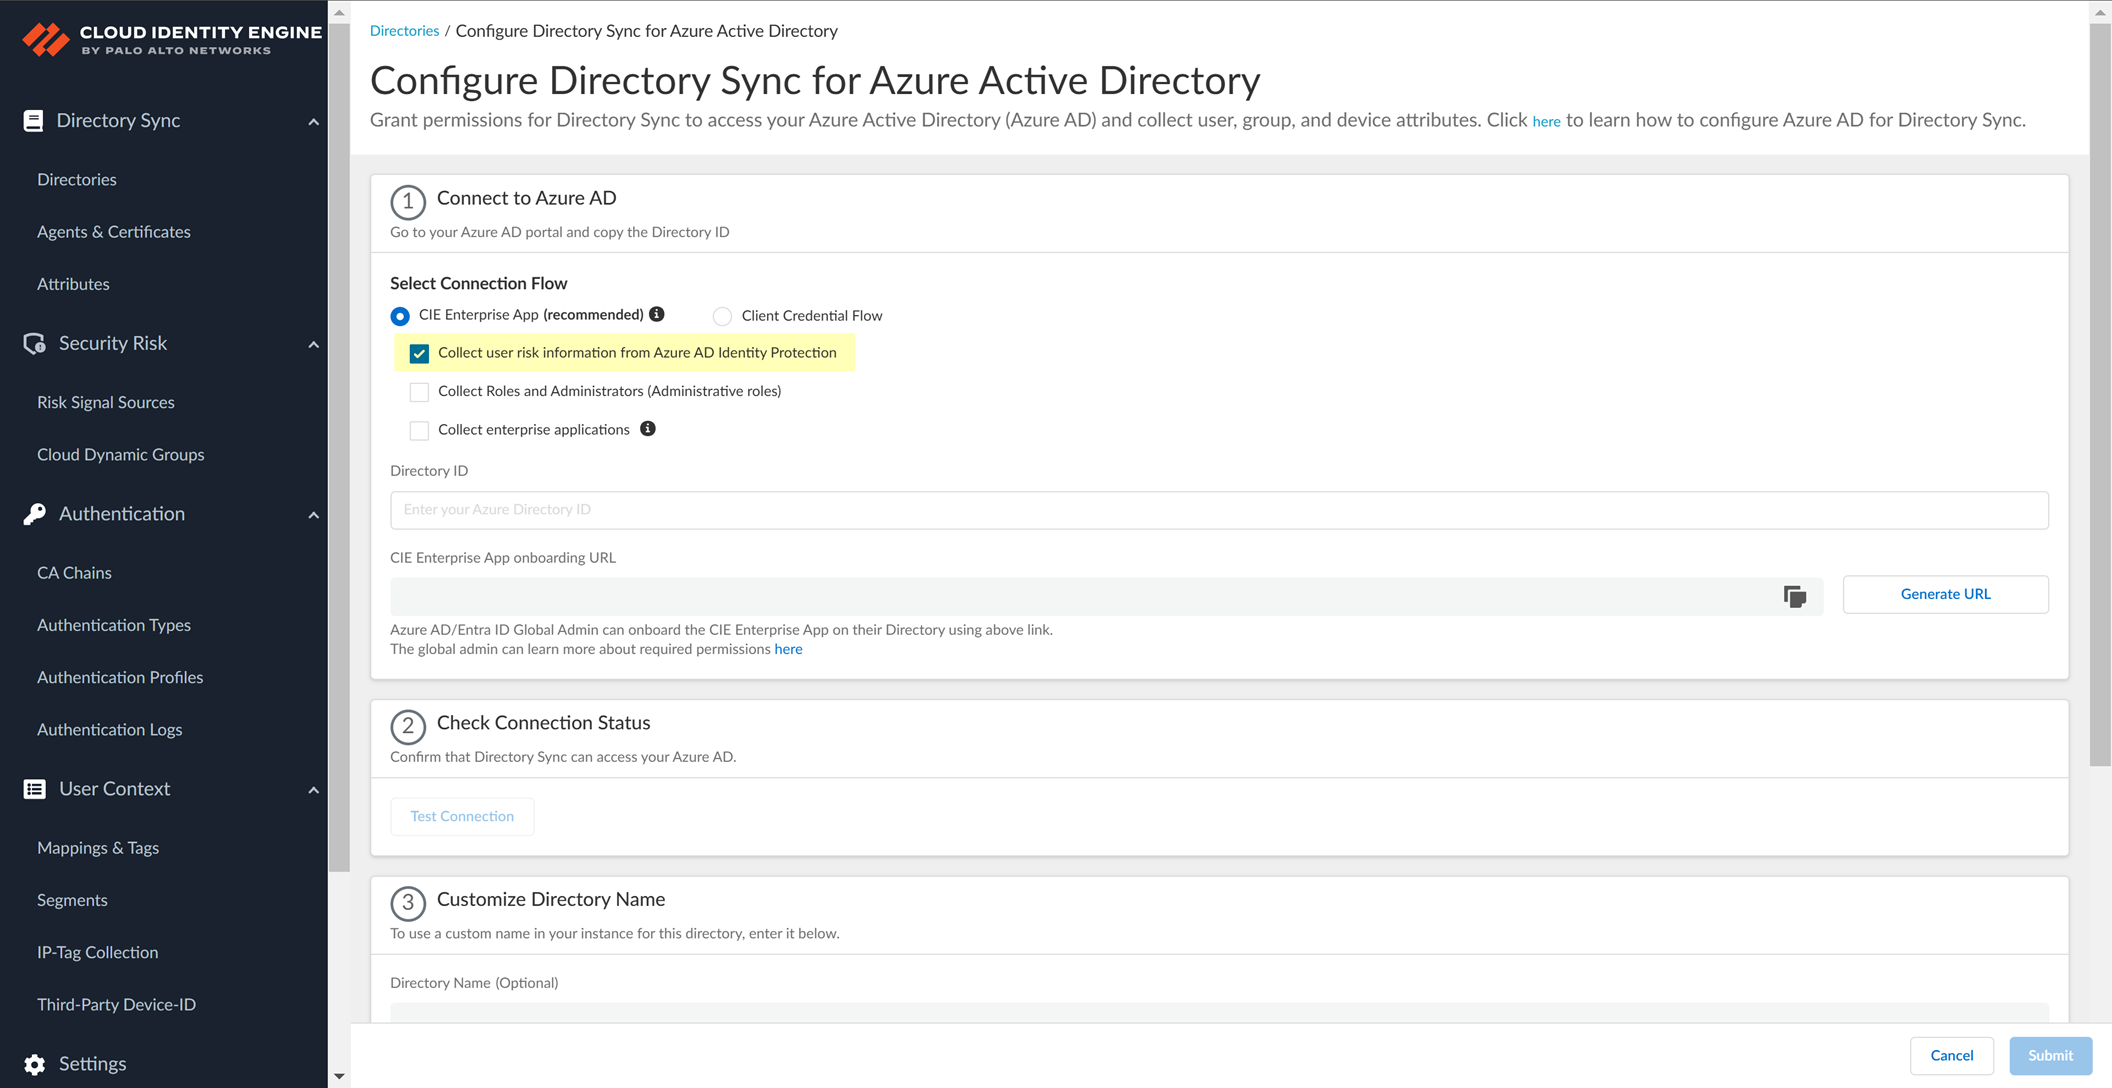
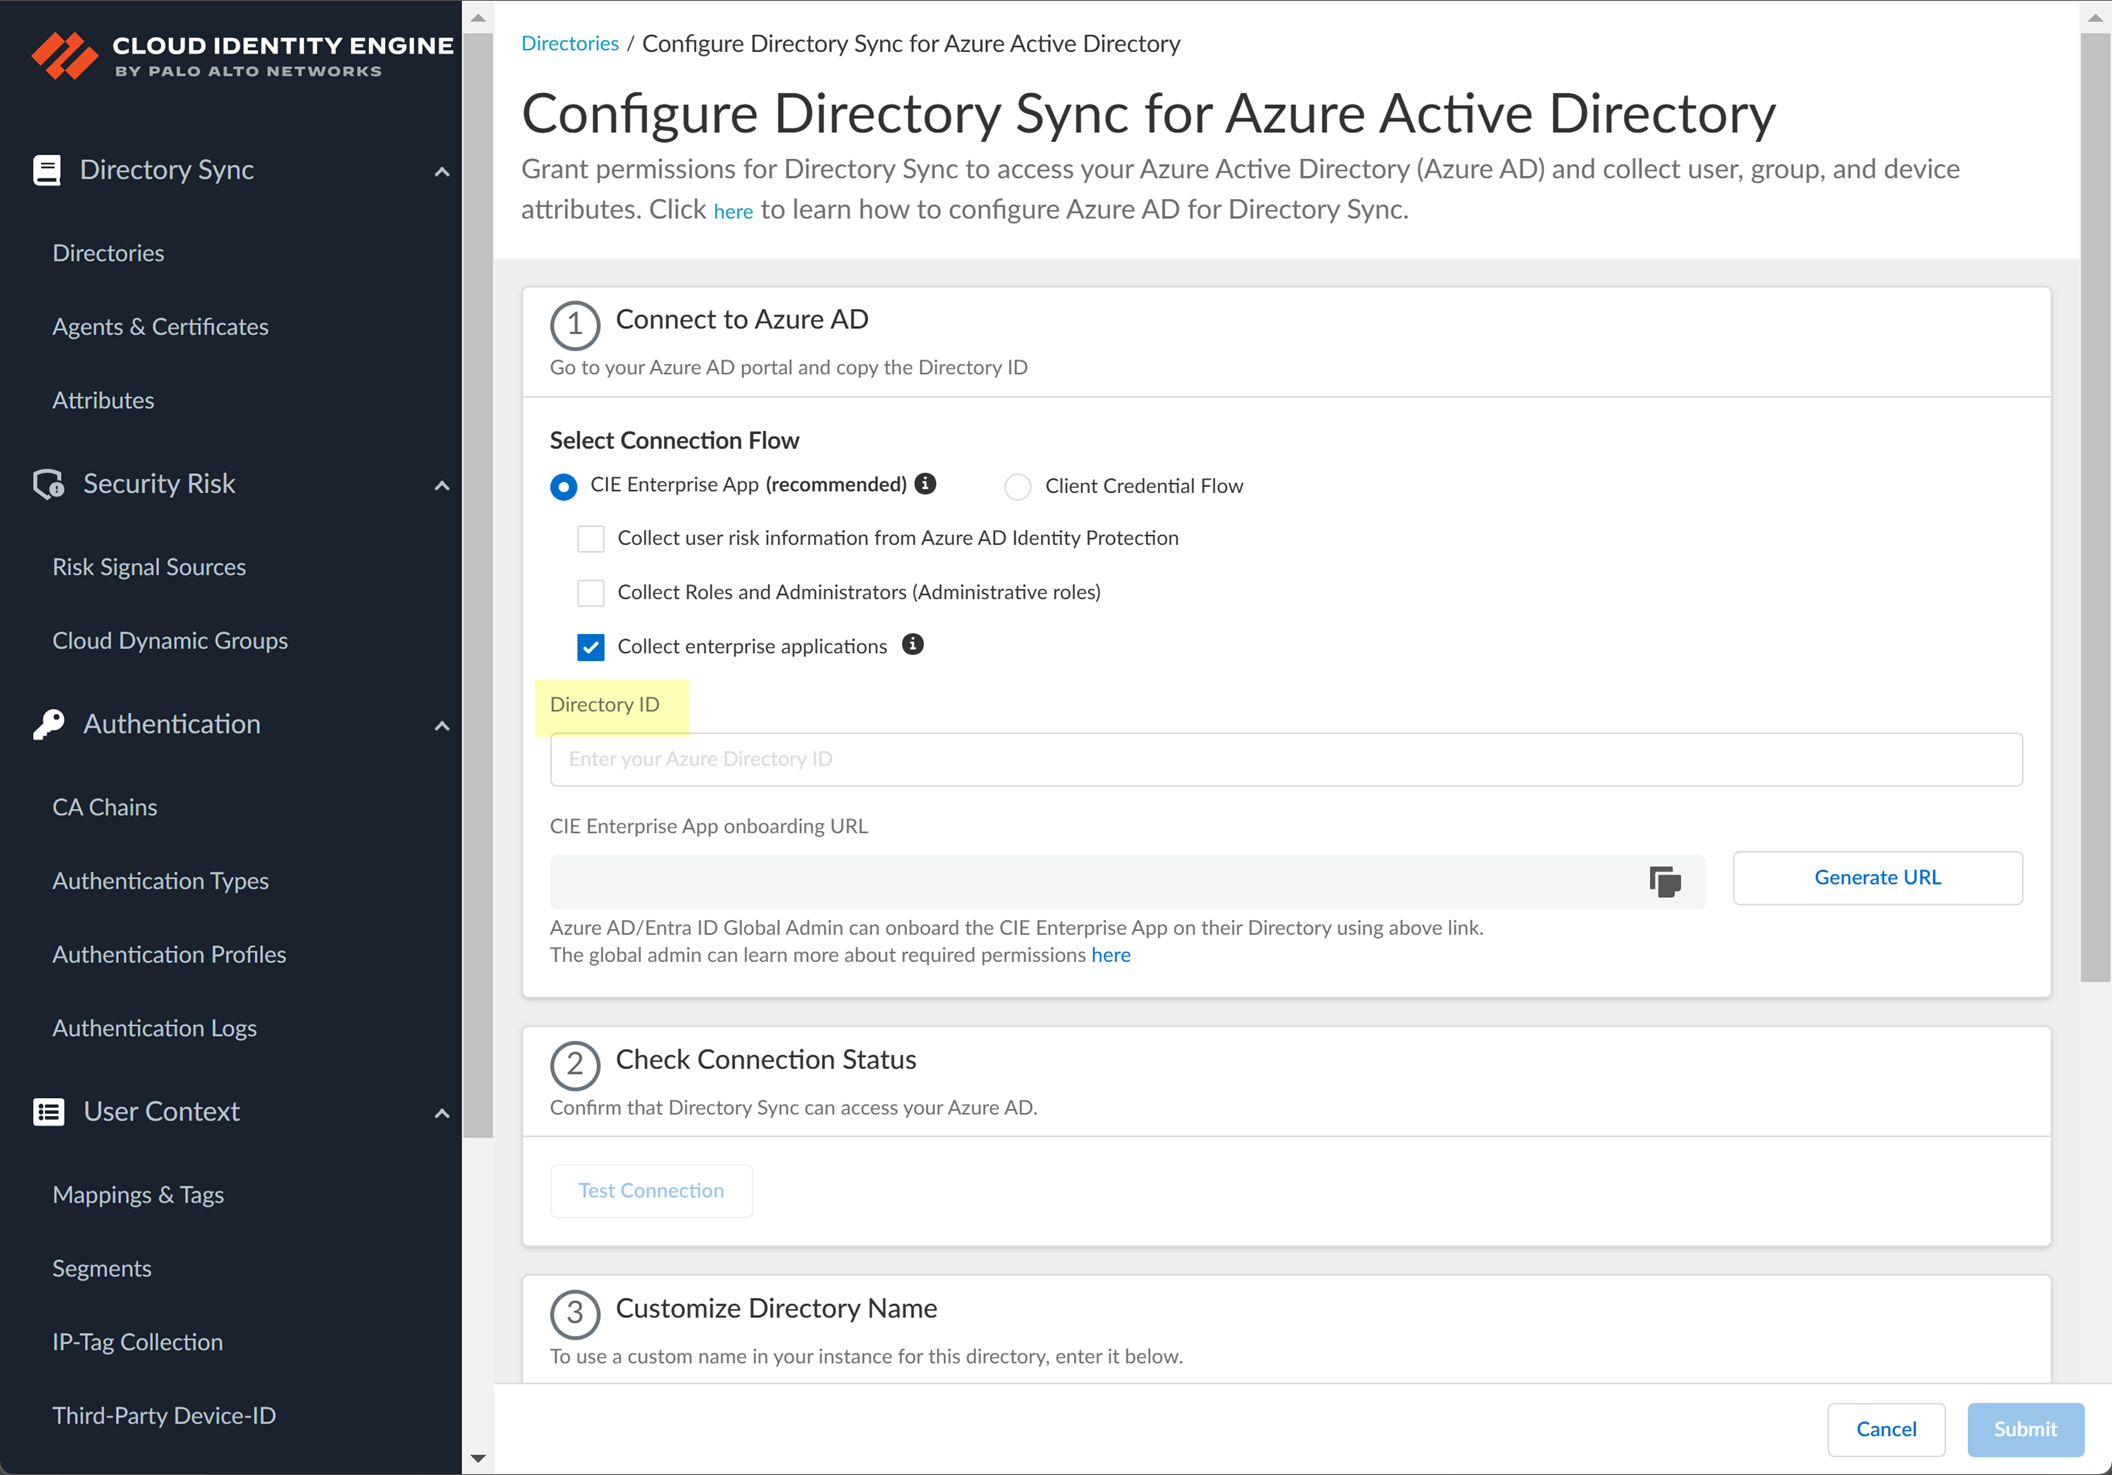
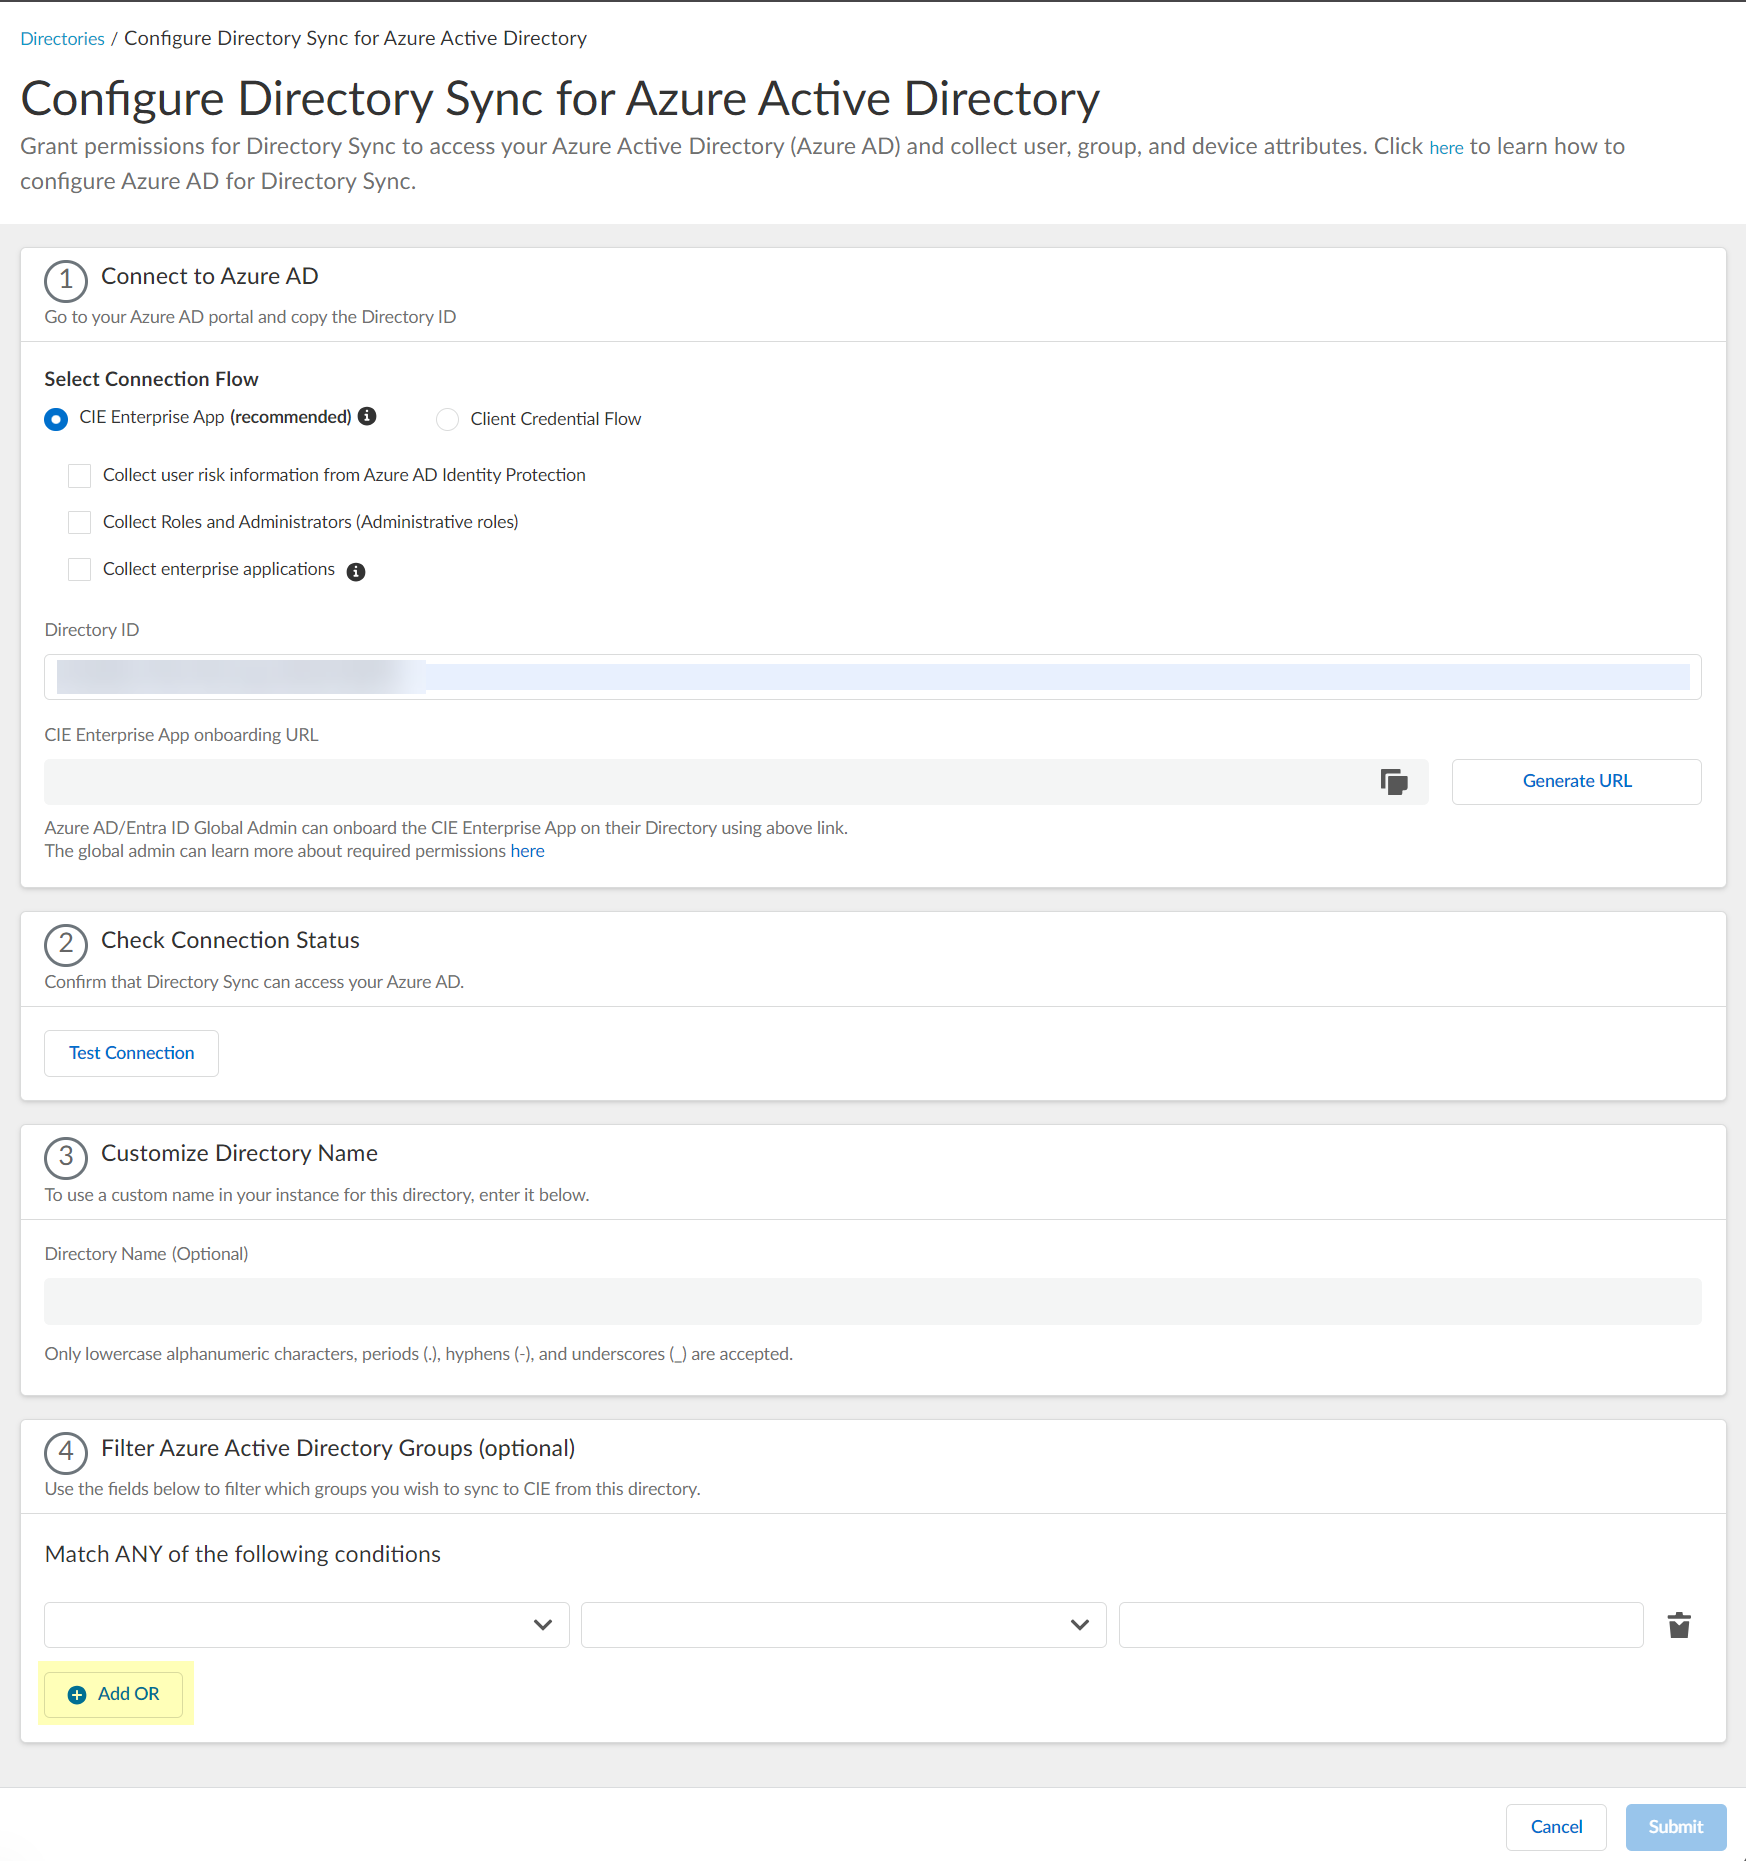
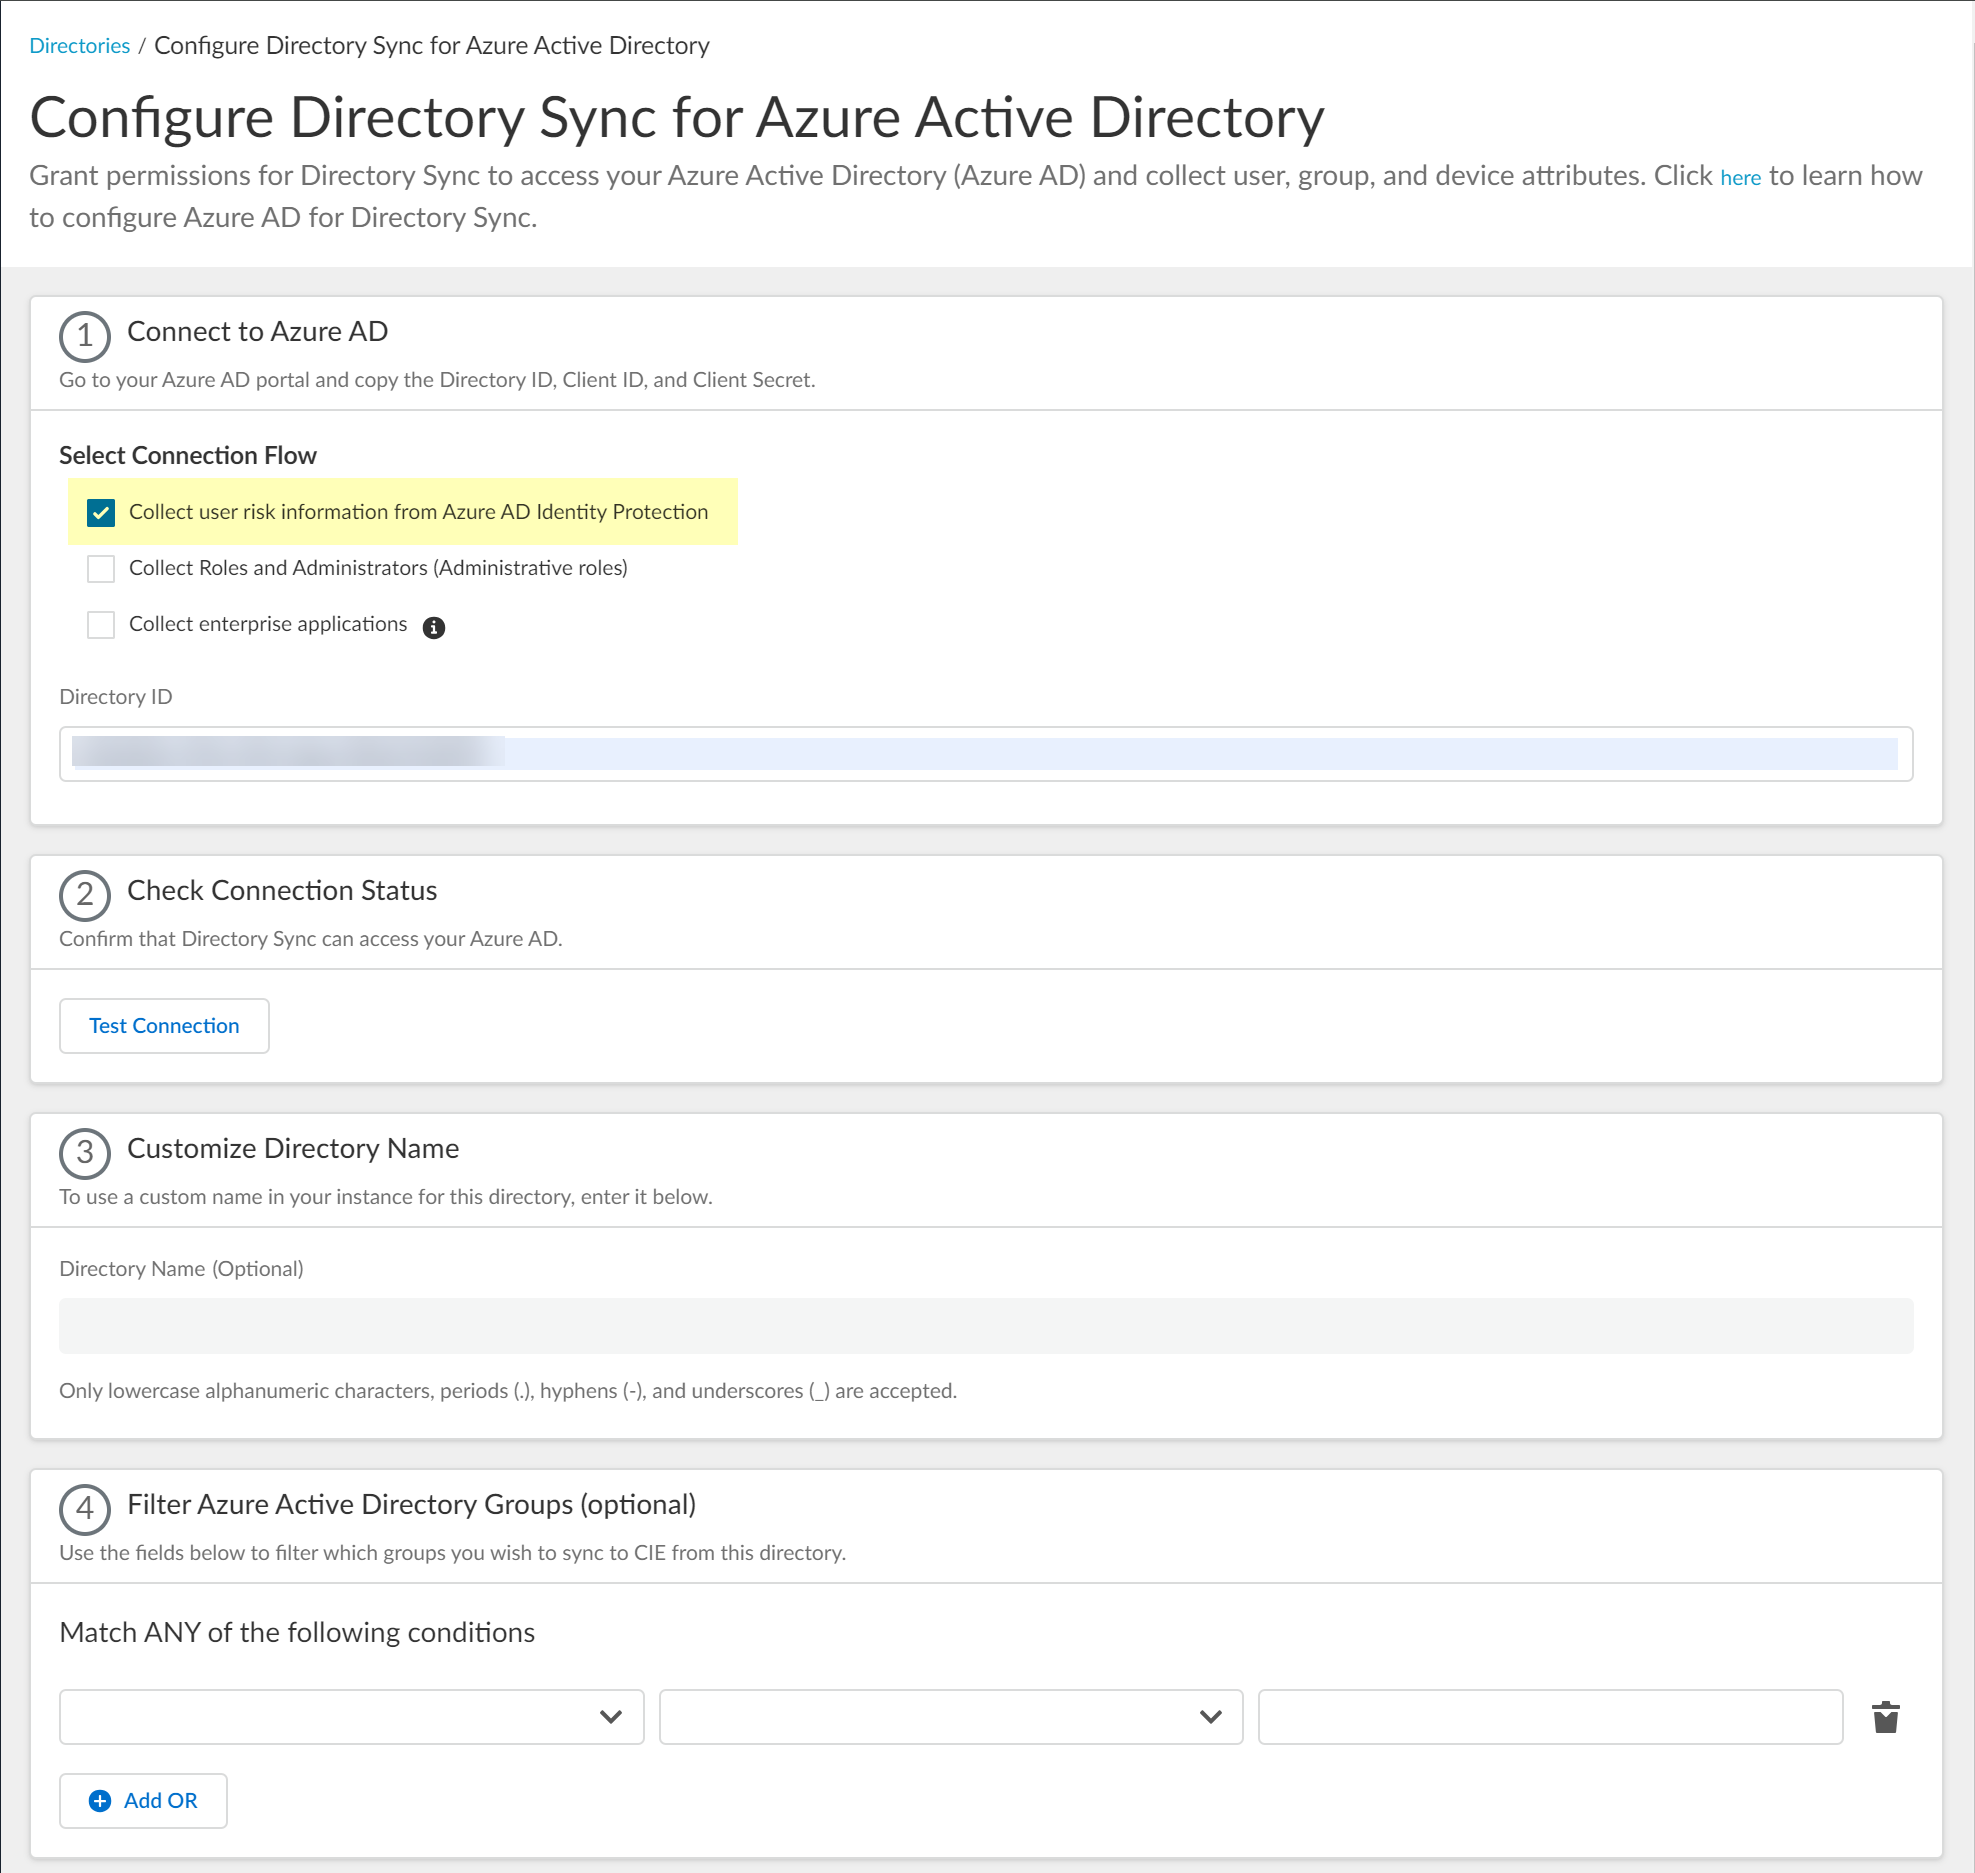
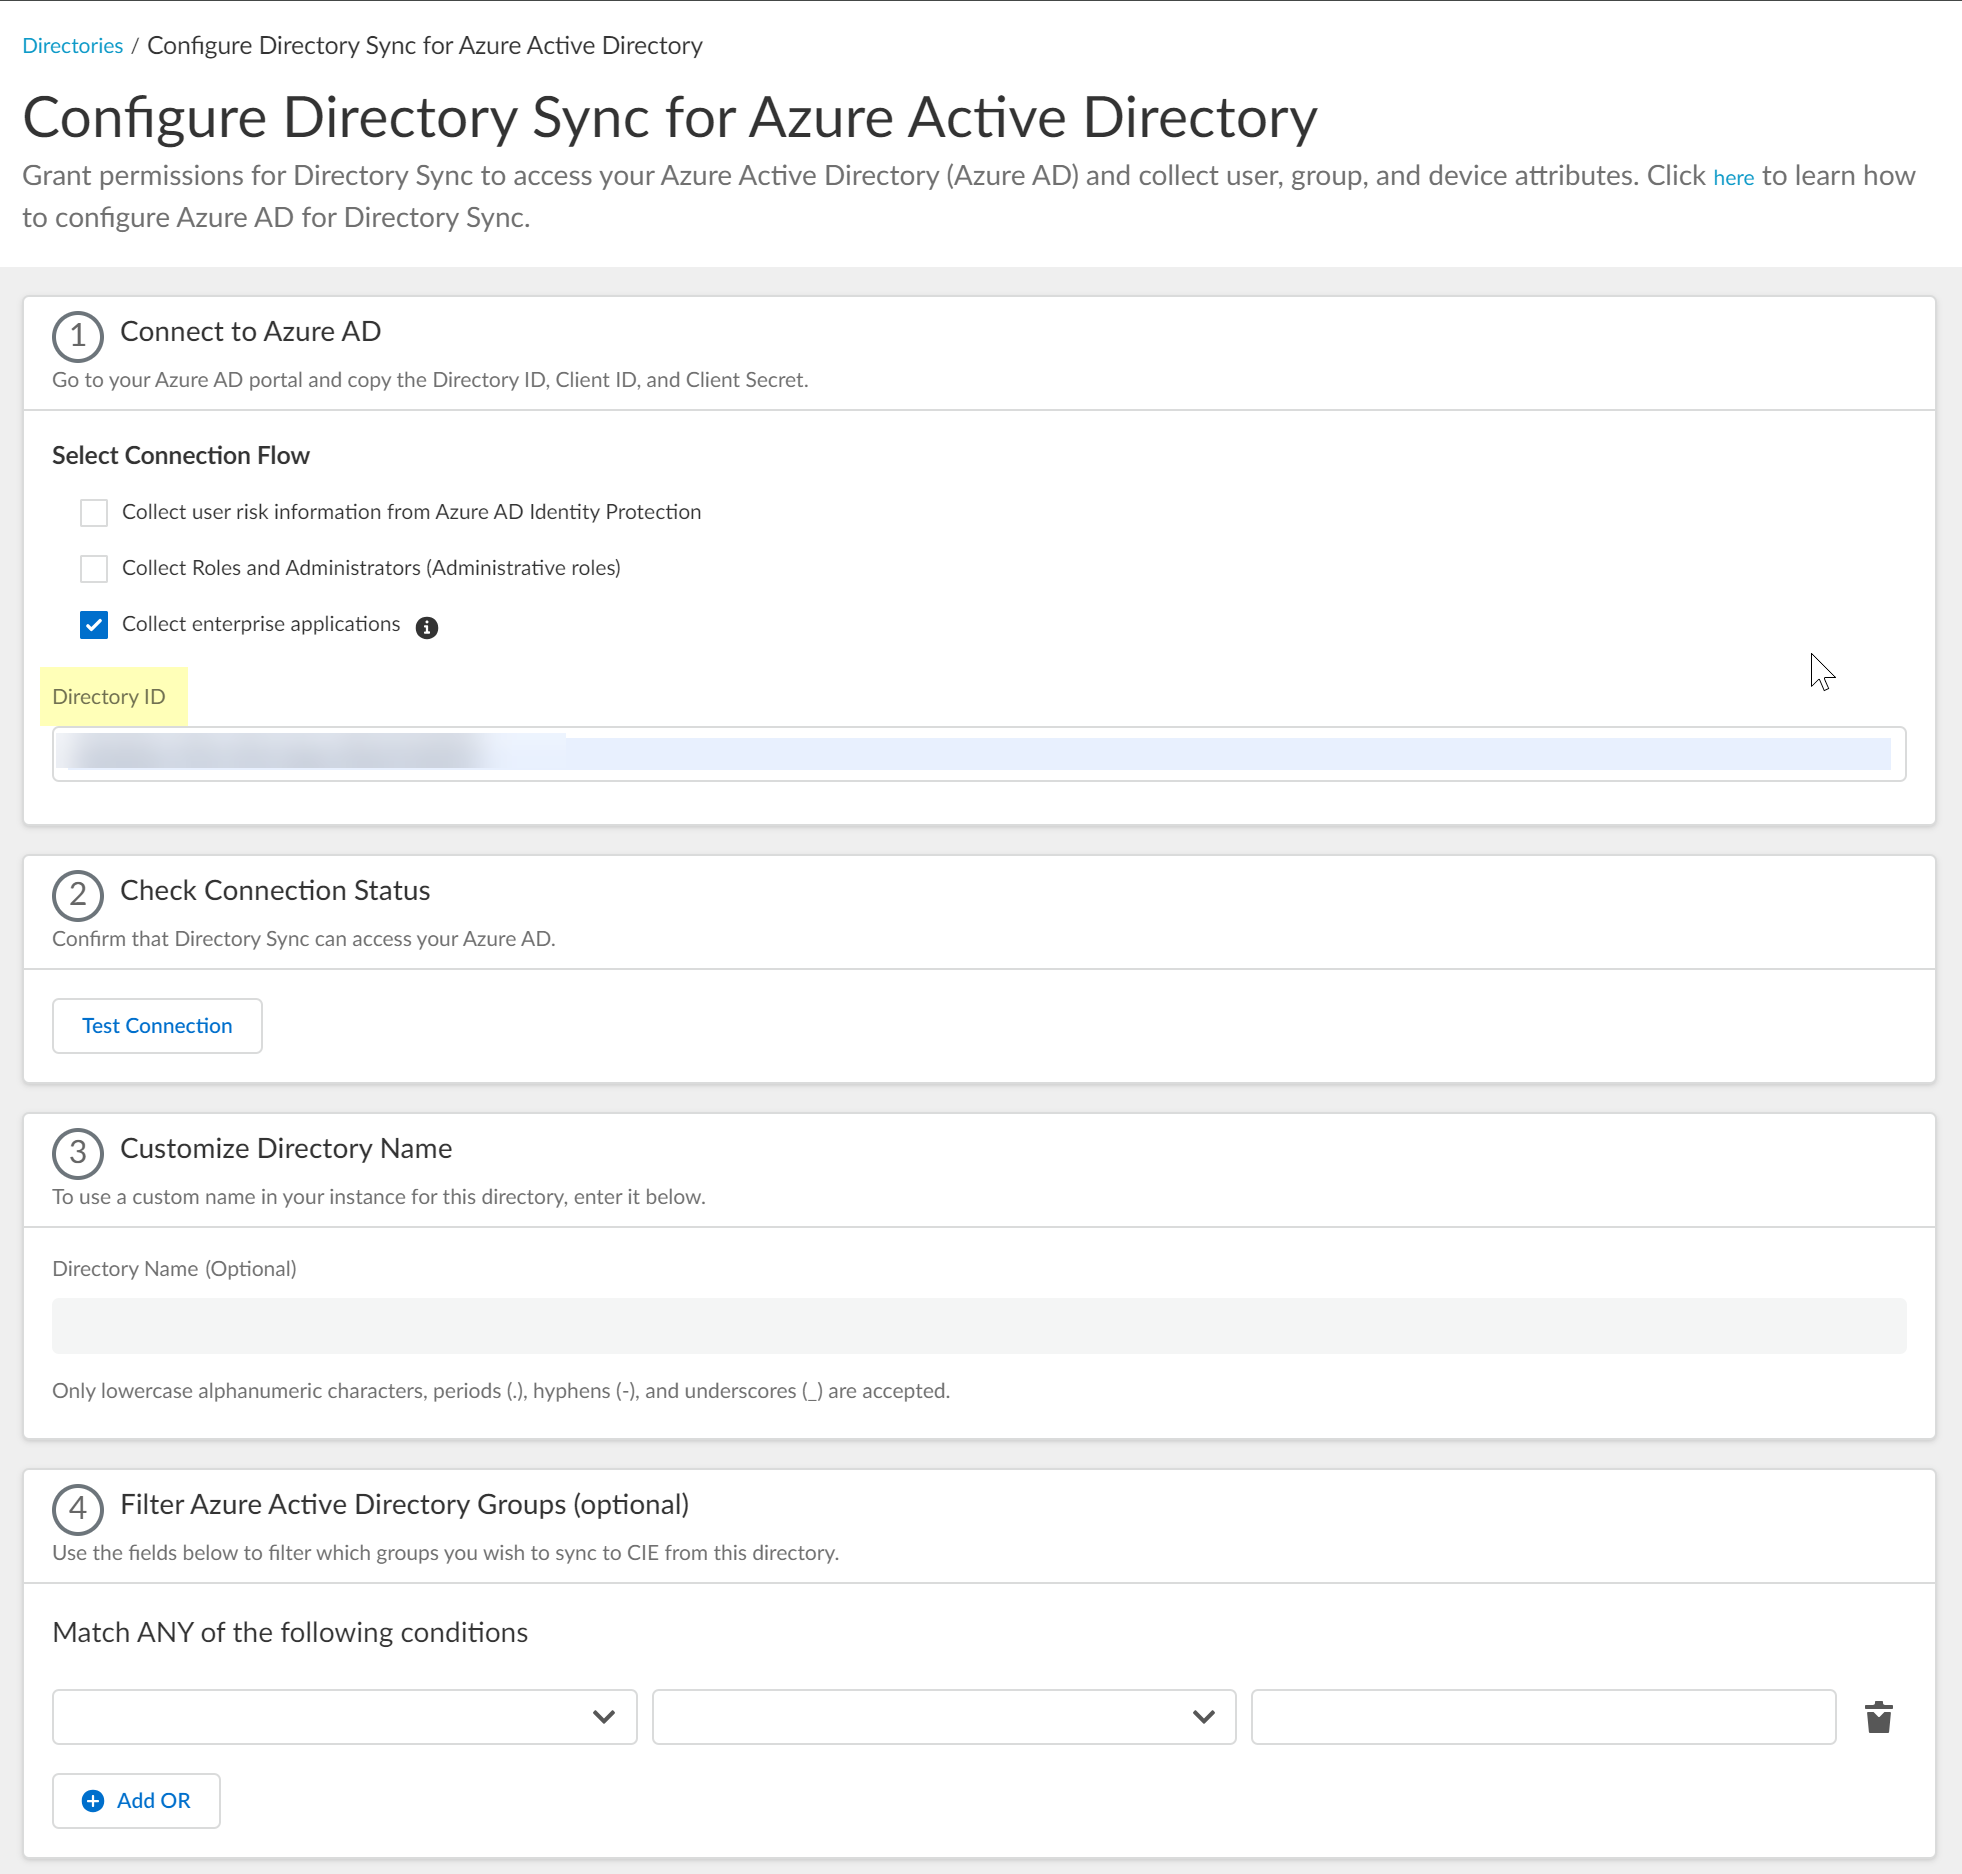
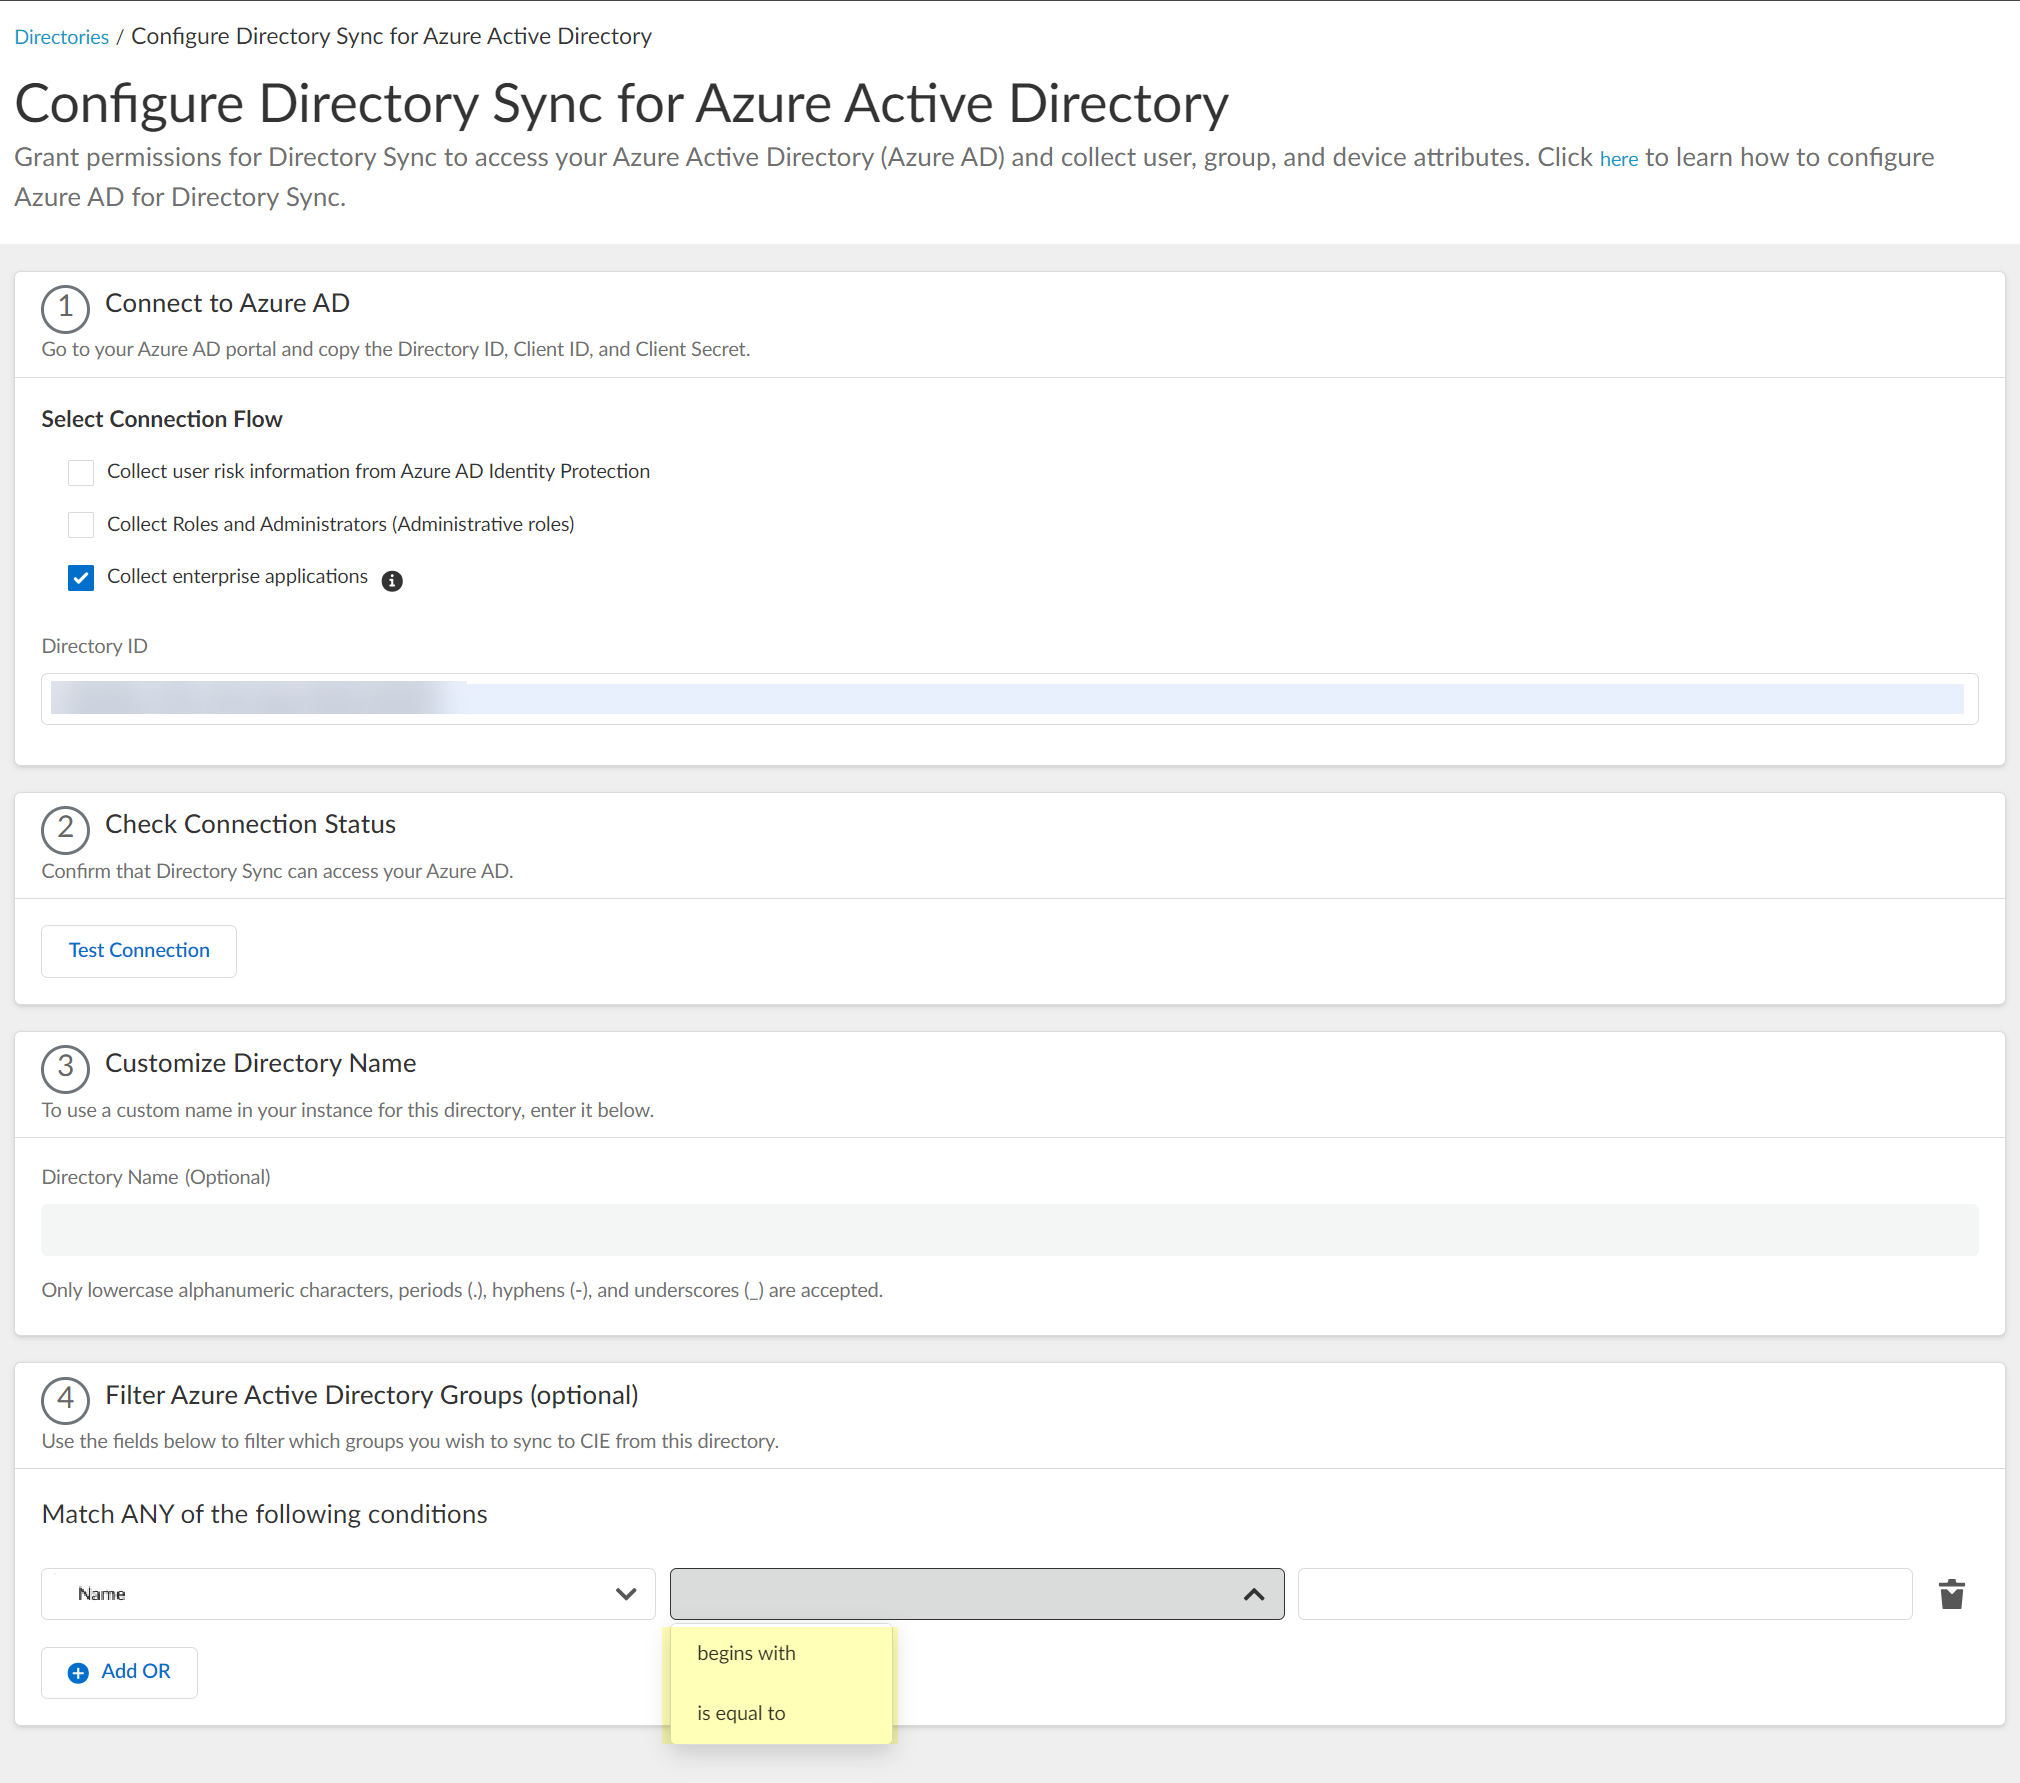
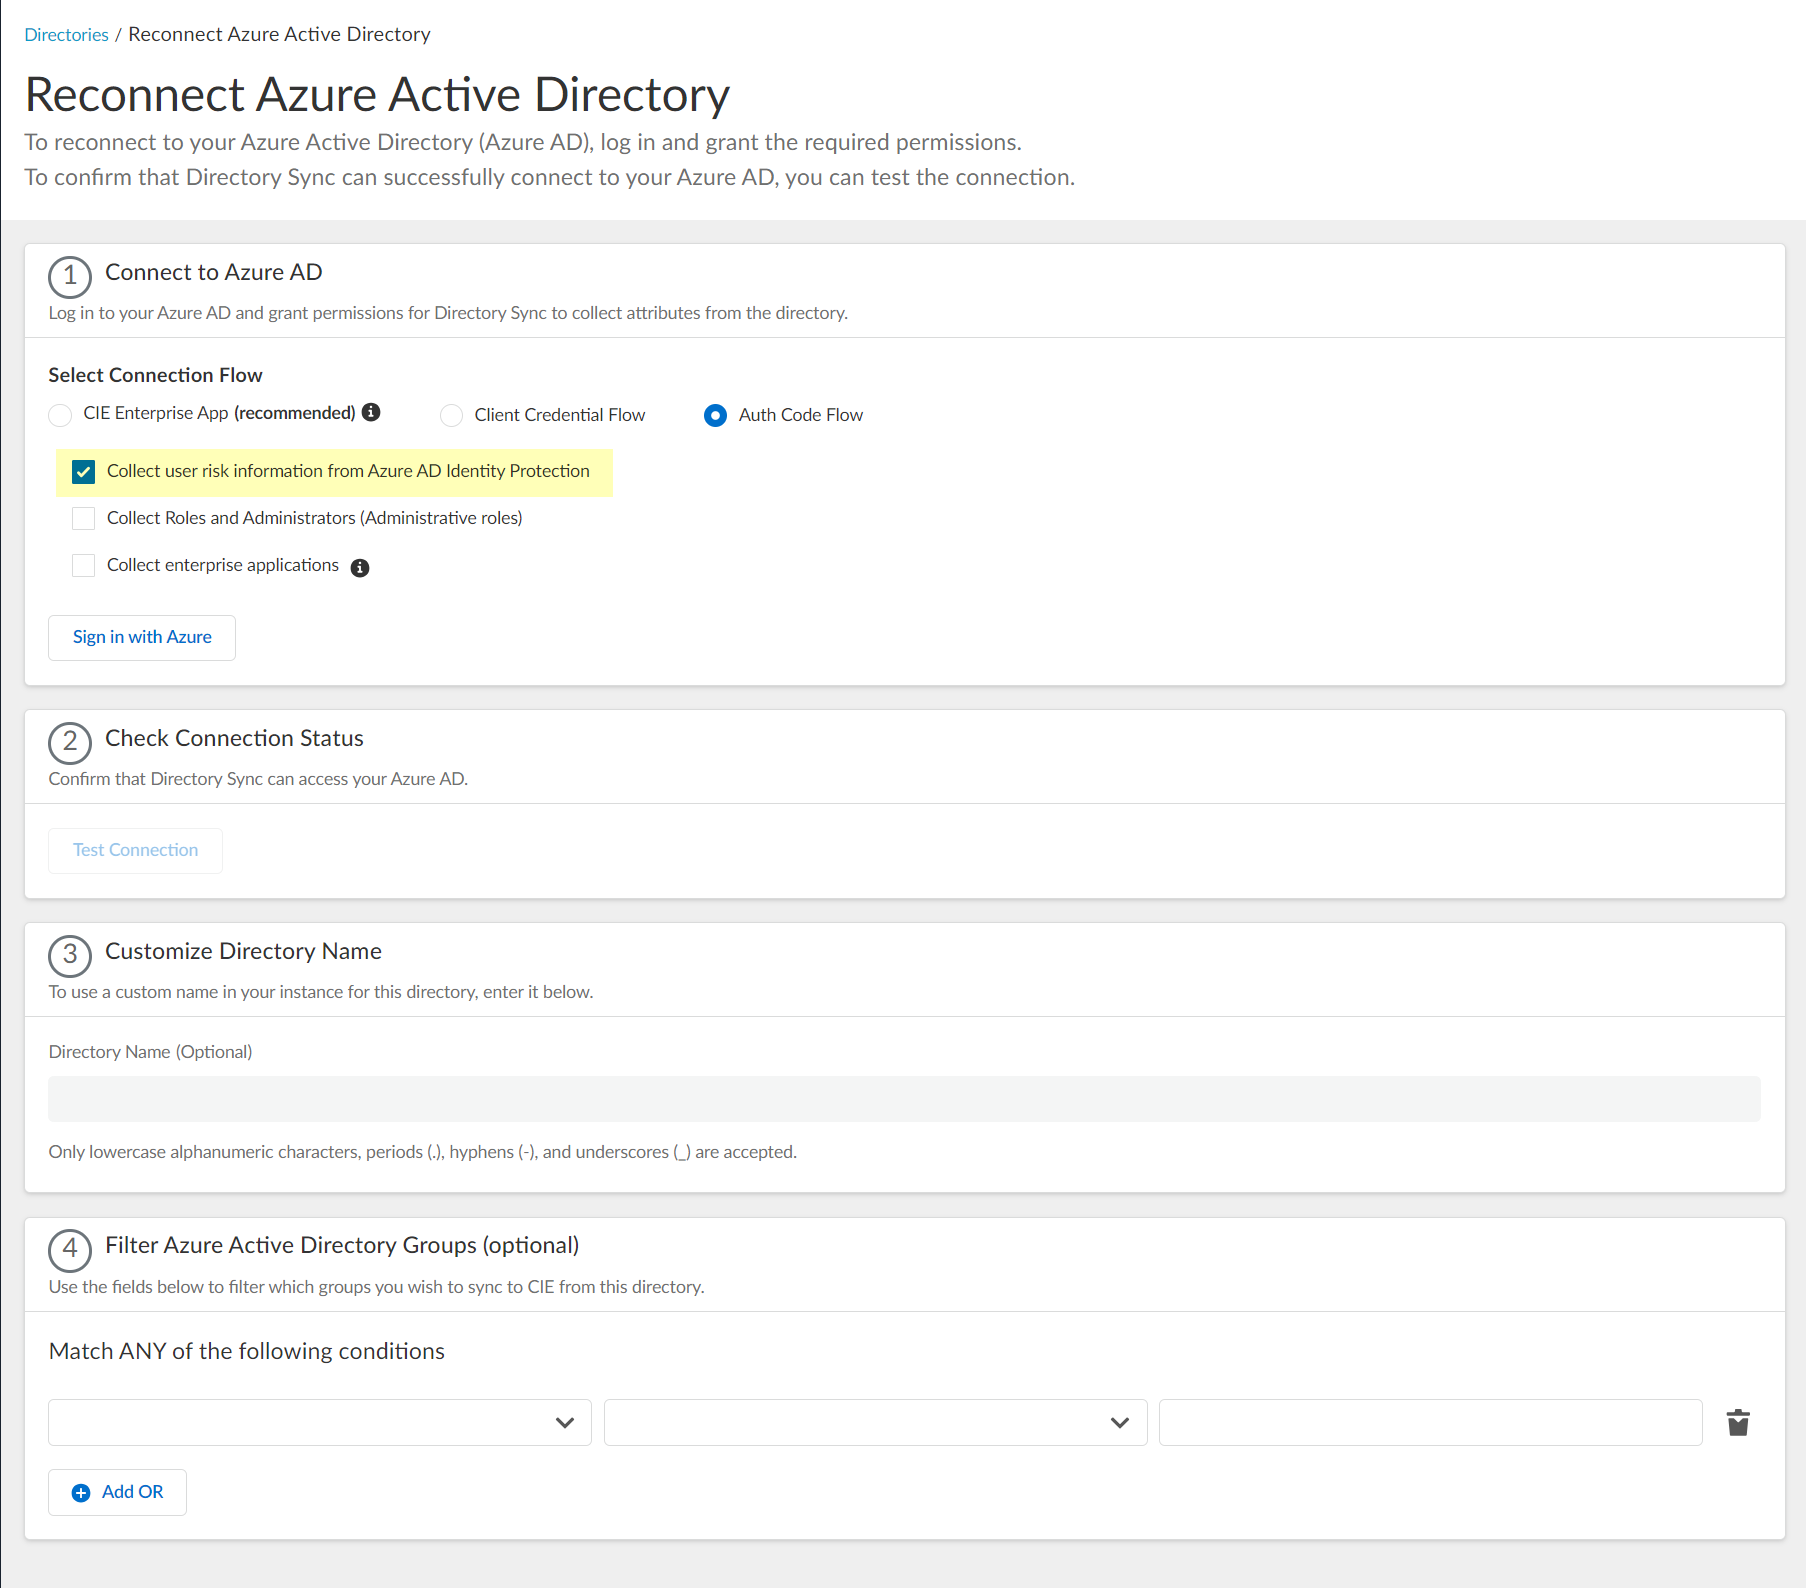
(Optional) Select additional info to collect:
Collect user risk information from Azure AD Identity Protection:
For dynamic user groups based on risk. Requires
IdentityRiskyUser.Read.All
,
IdentityRiskEvent.Read.All
permissions.
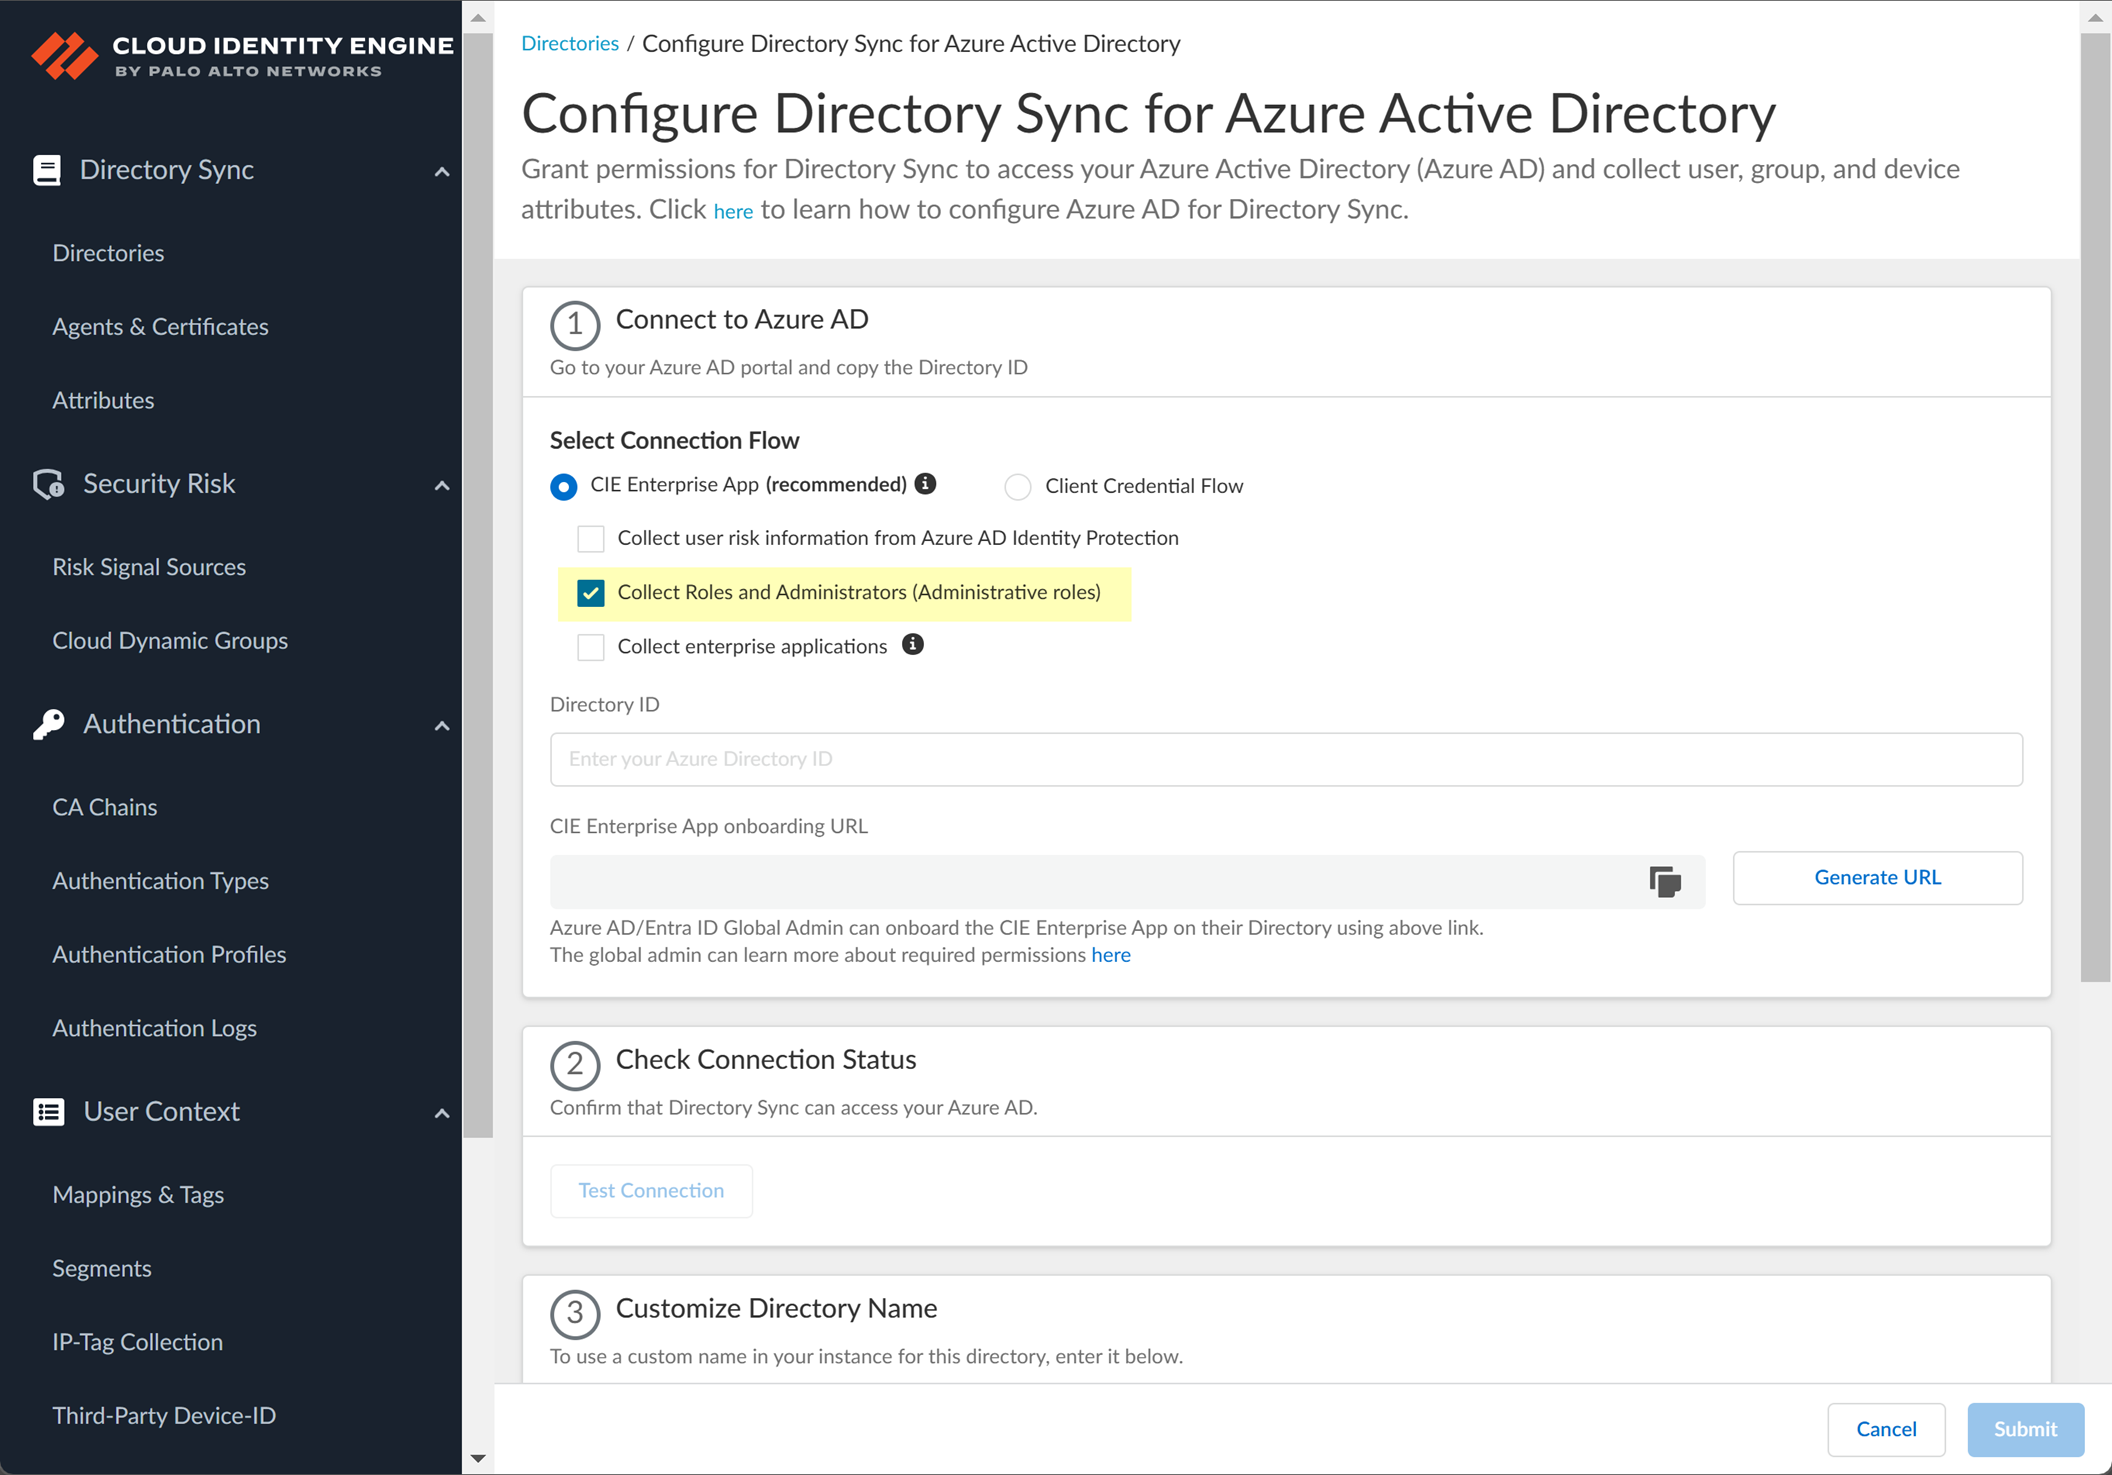
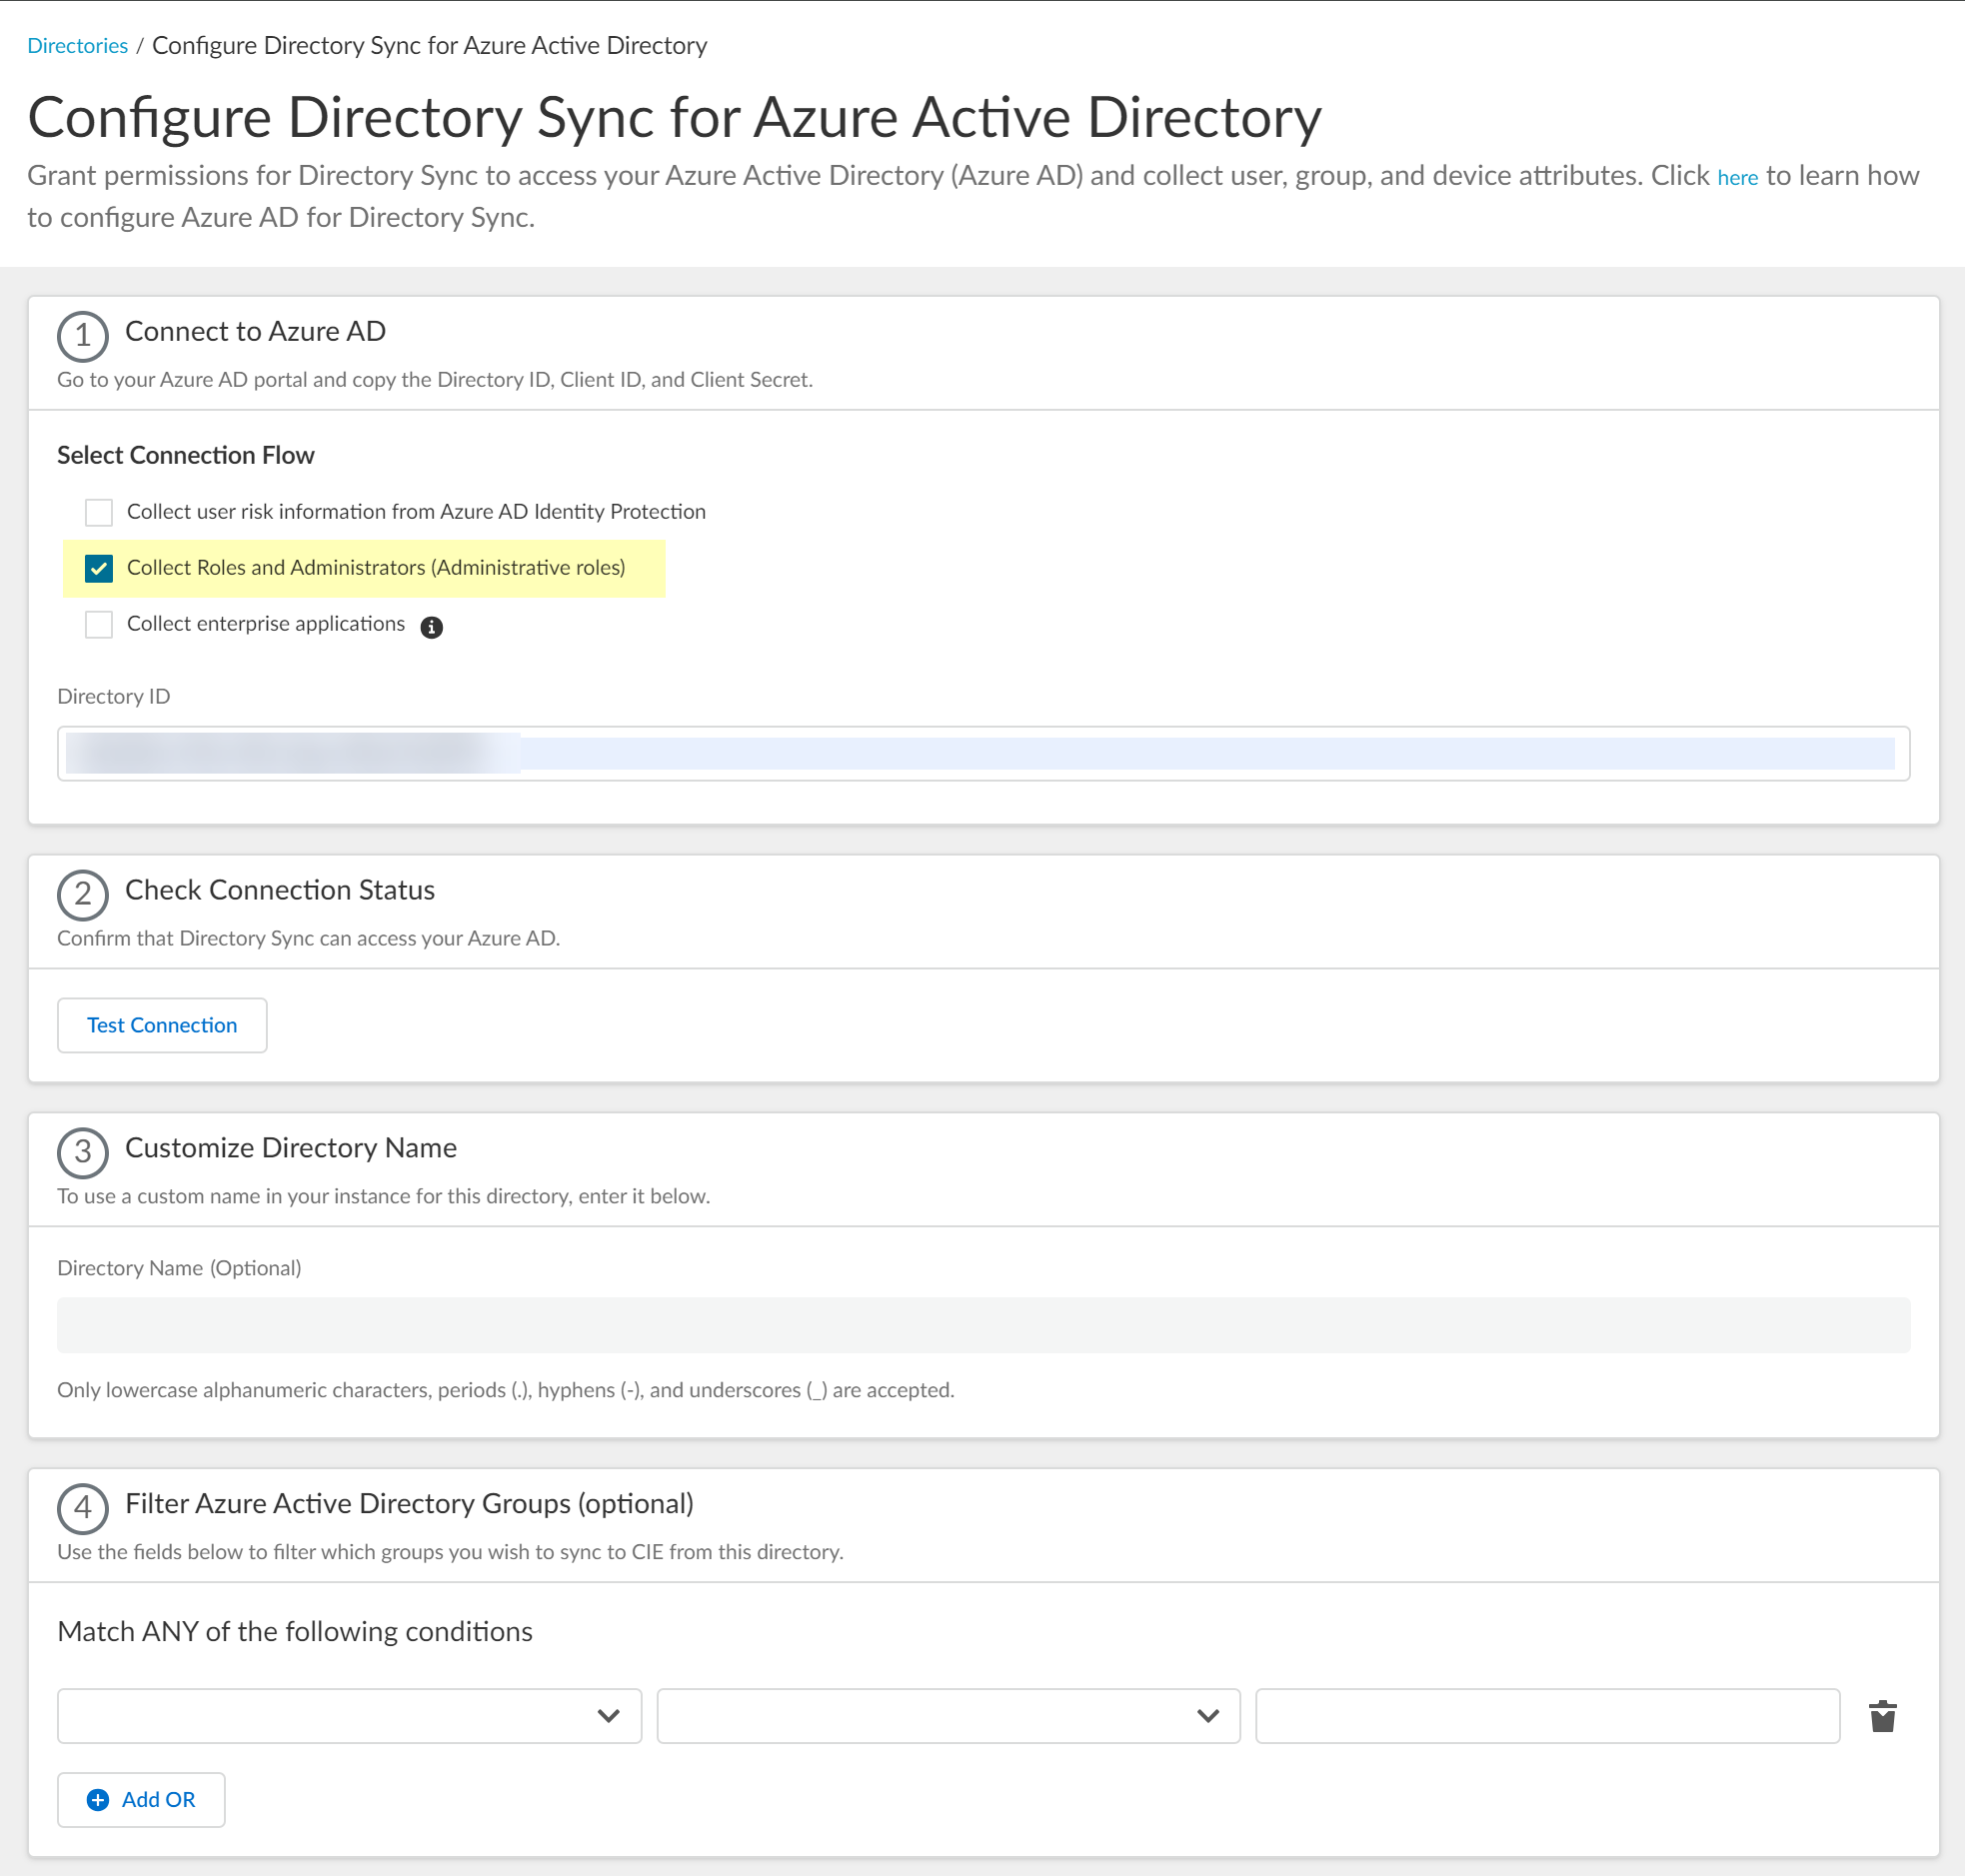
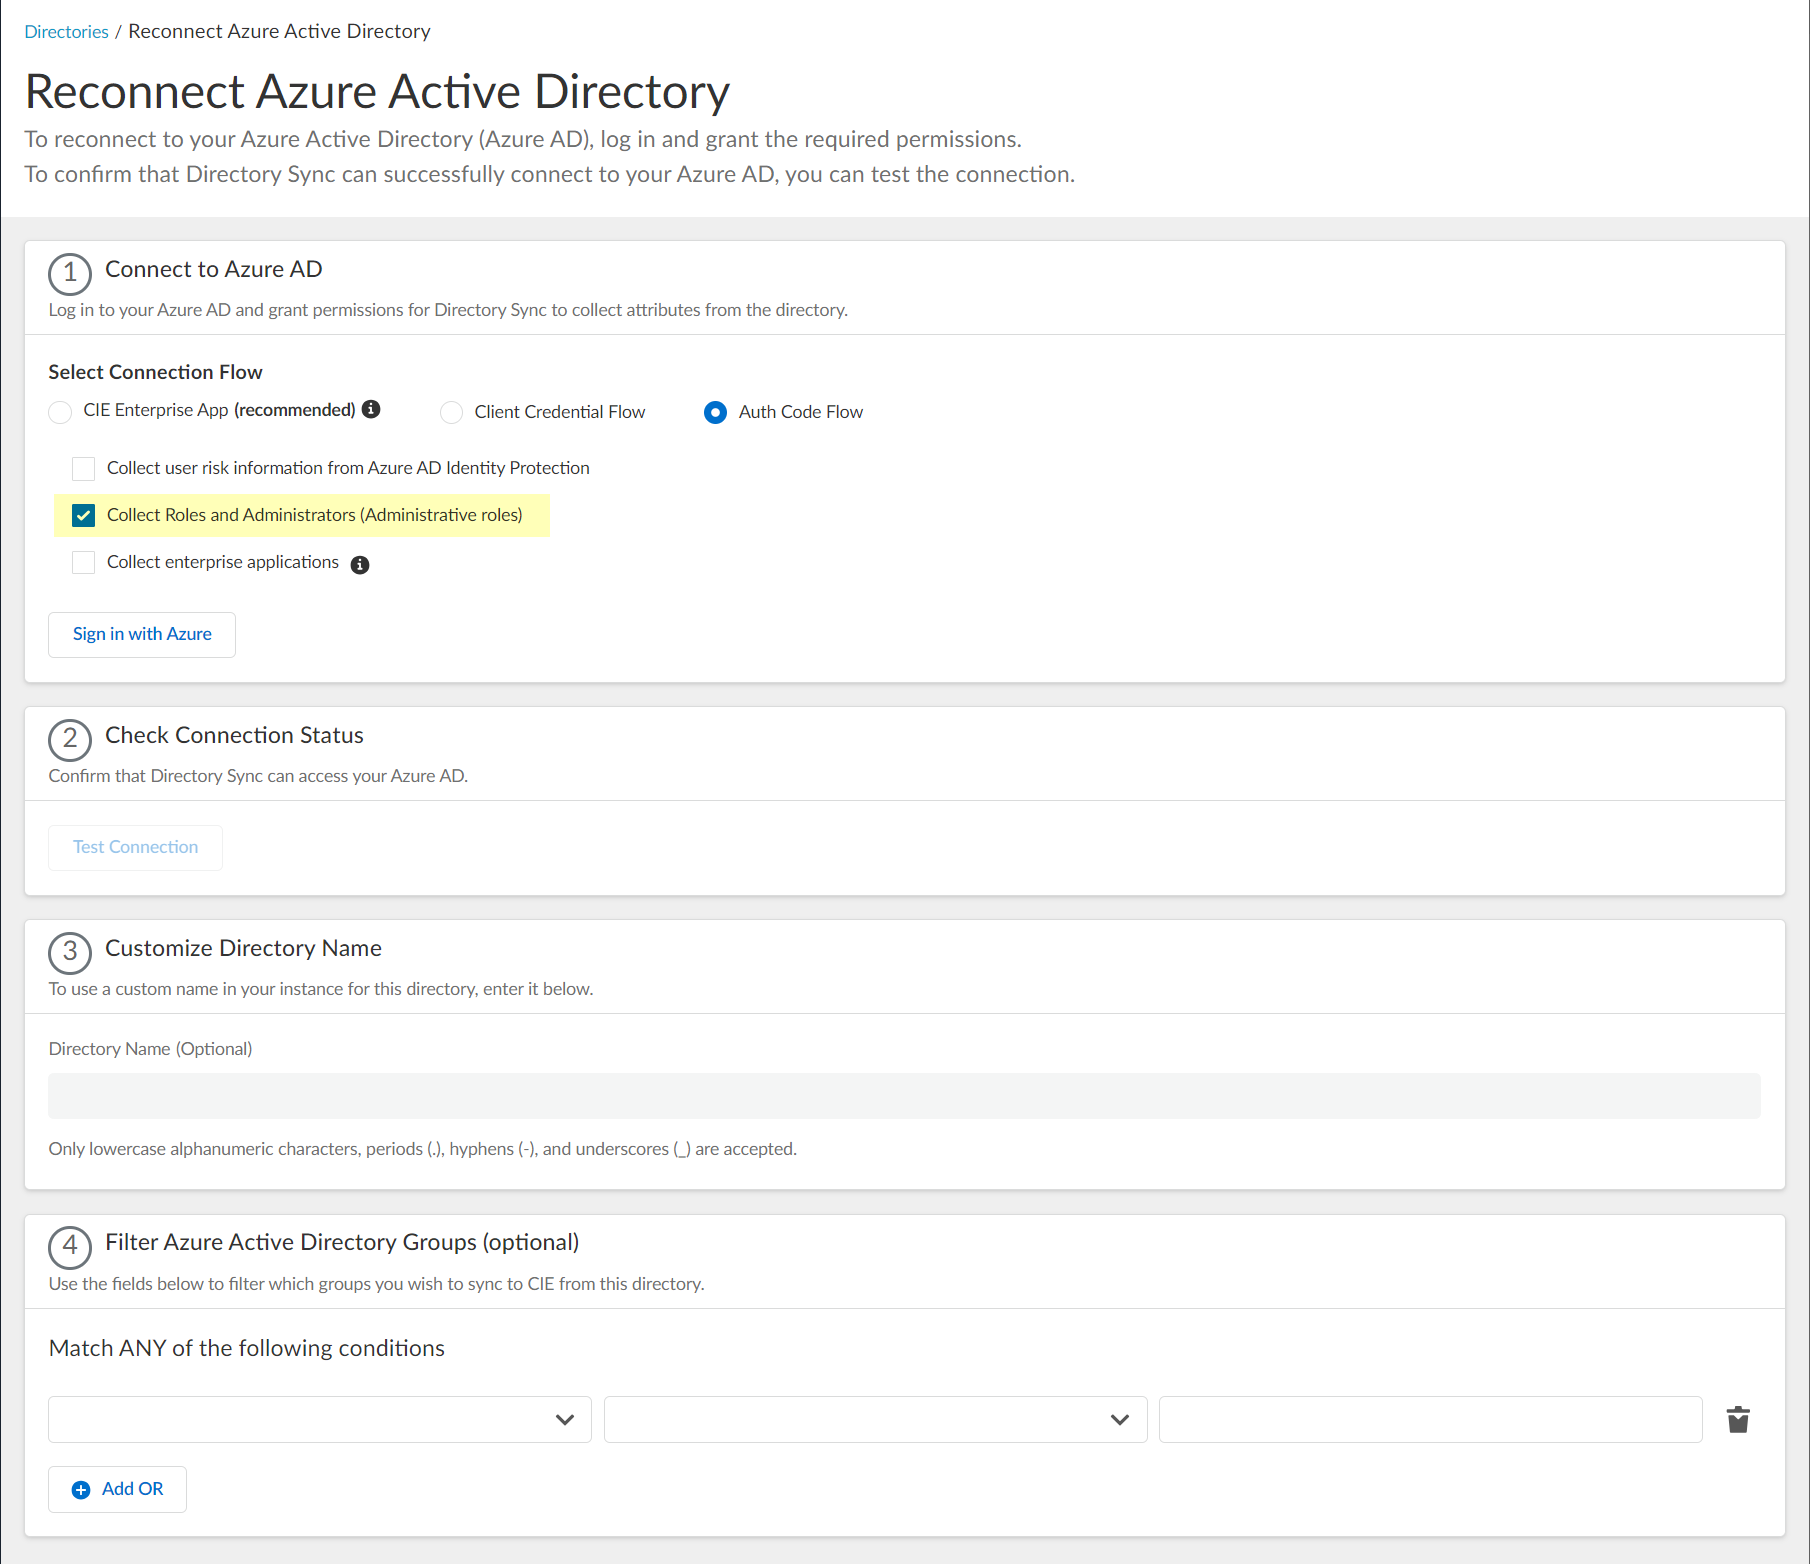
Collect Roles and Administrators:
Retrieves role assignments. Requires
Directory.Read.All
or
RoleManagement.Read.Directory
. (Enabled by default if associated with Cortex XDR).
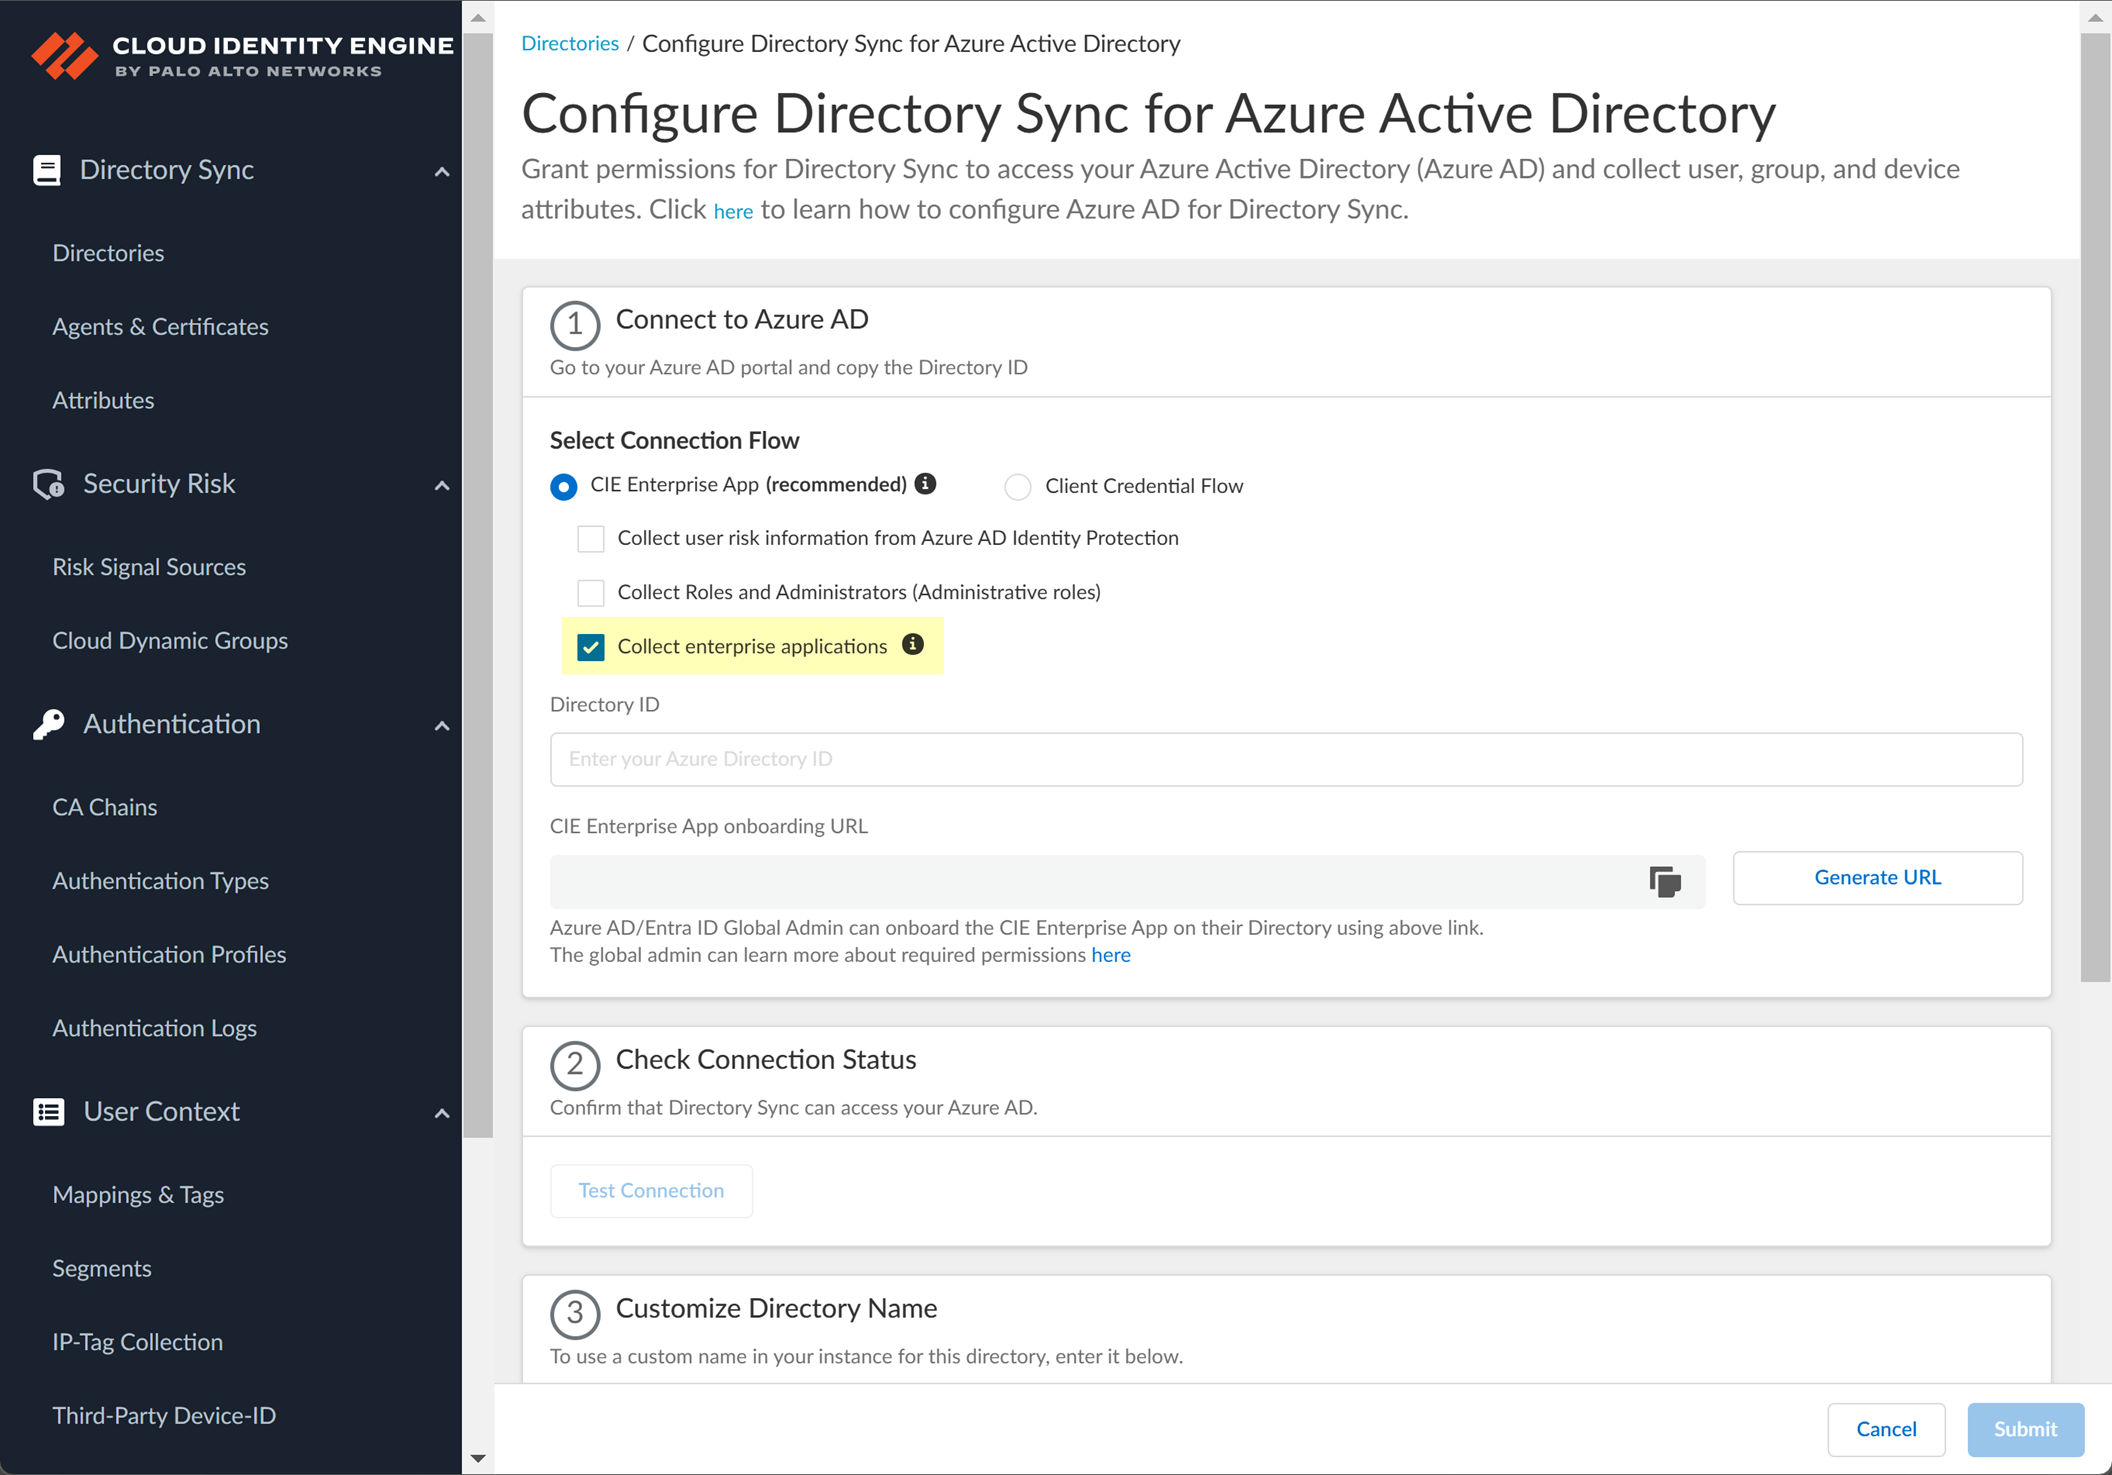
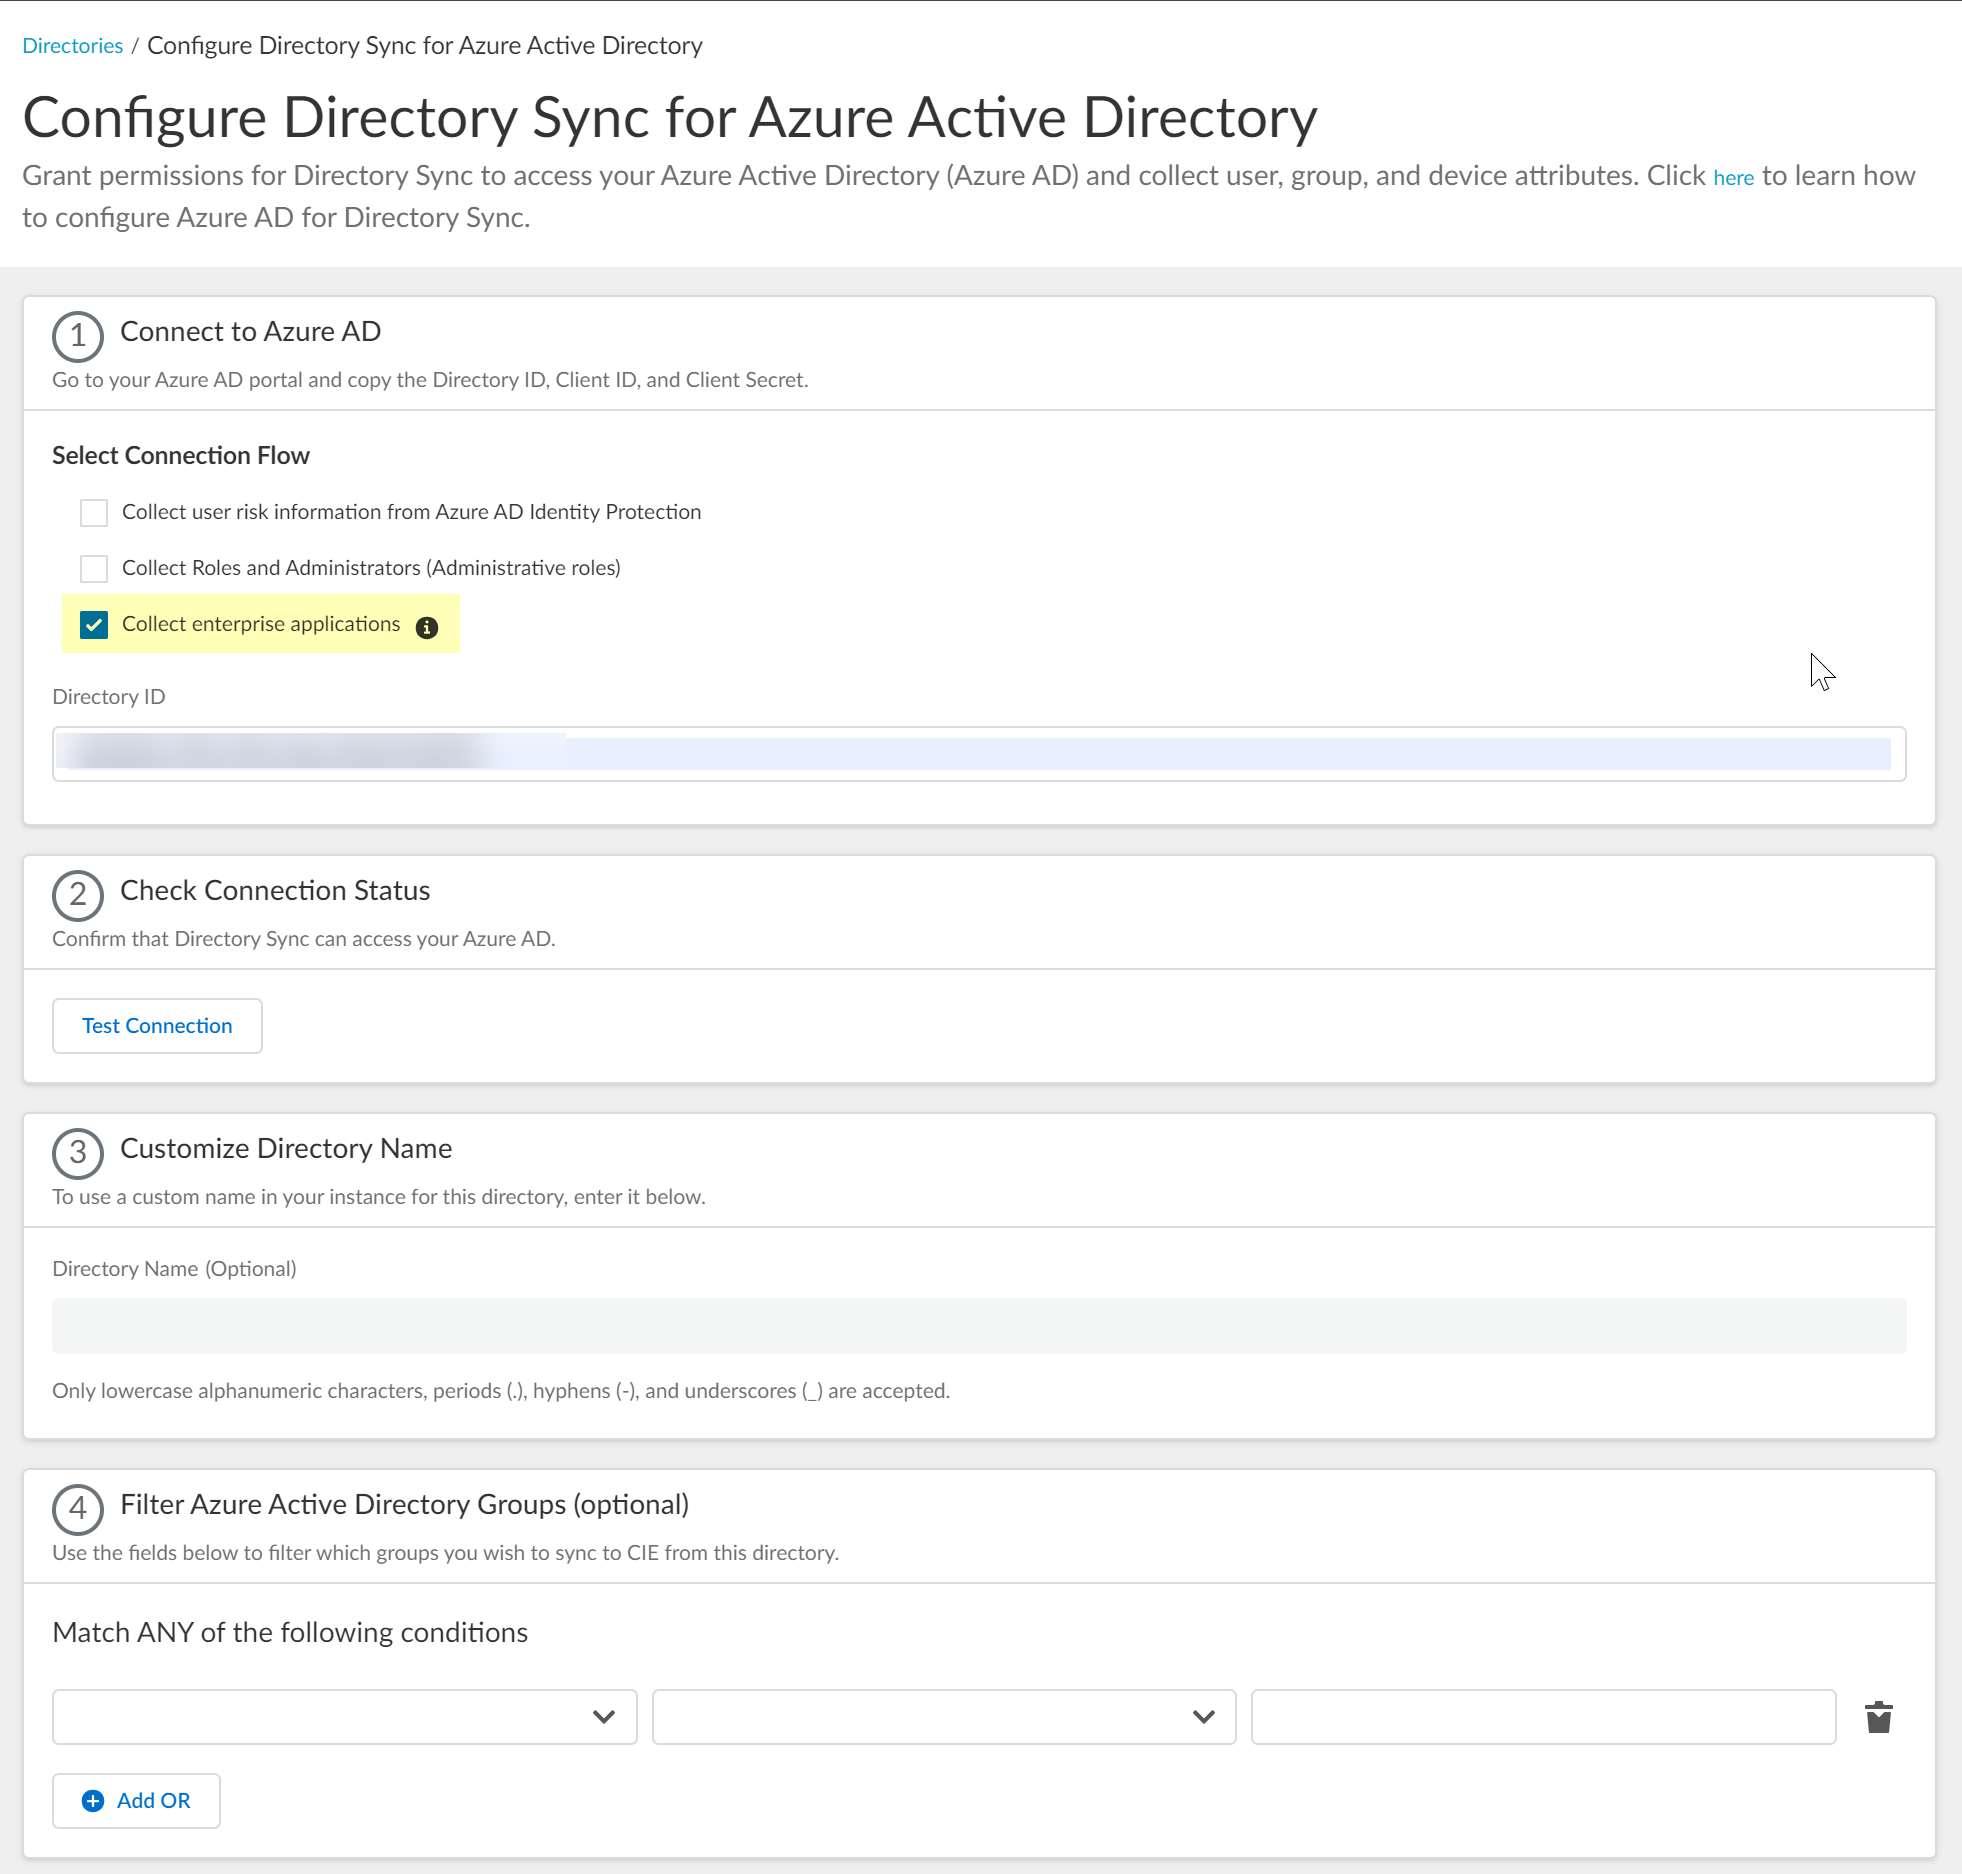
Collect enterprise applications:
Displays app data in CIE. Requires
Application.Read.All
. Deselect if not needed to reduce sync time.
[GOTCHA] Enabling options may require reconnecting the directory to grant new permissions. Do not revoke required permissions in Azure after setup.
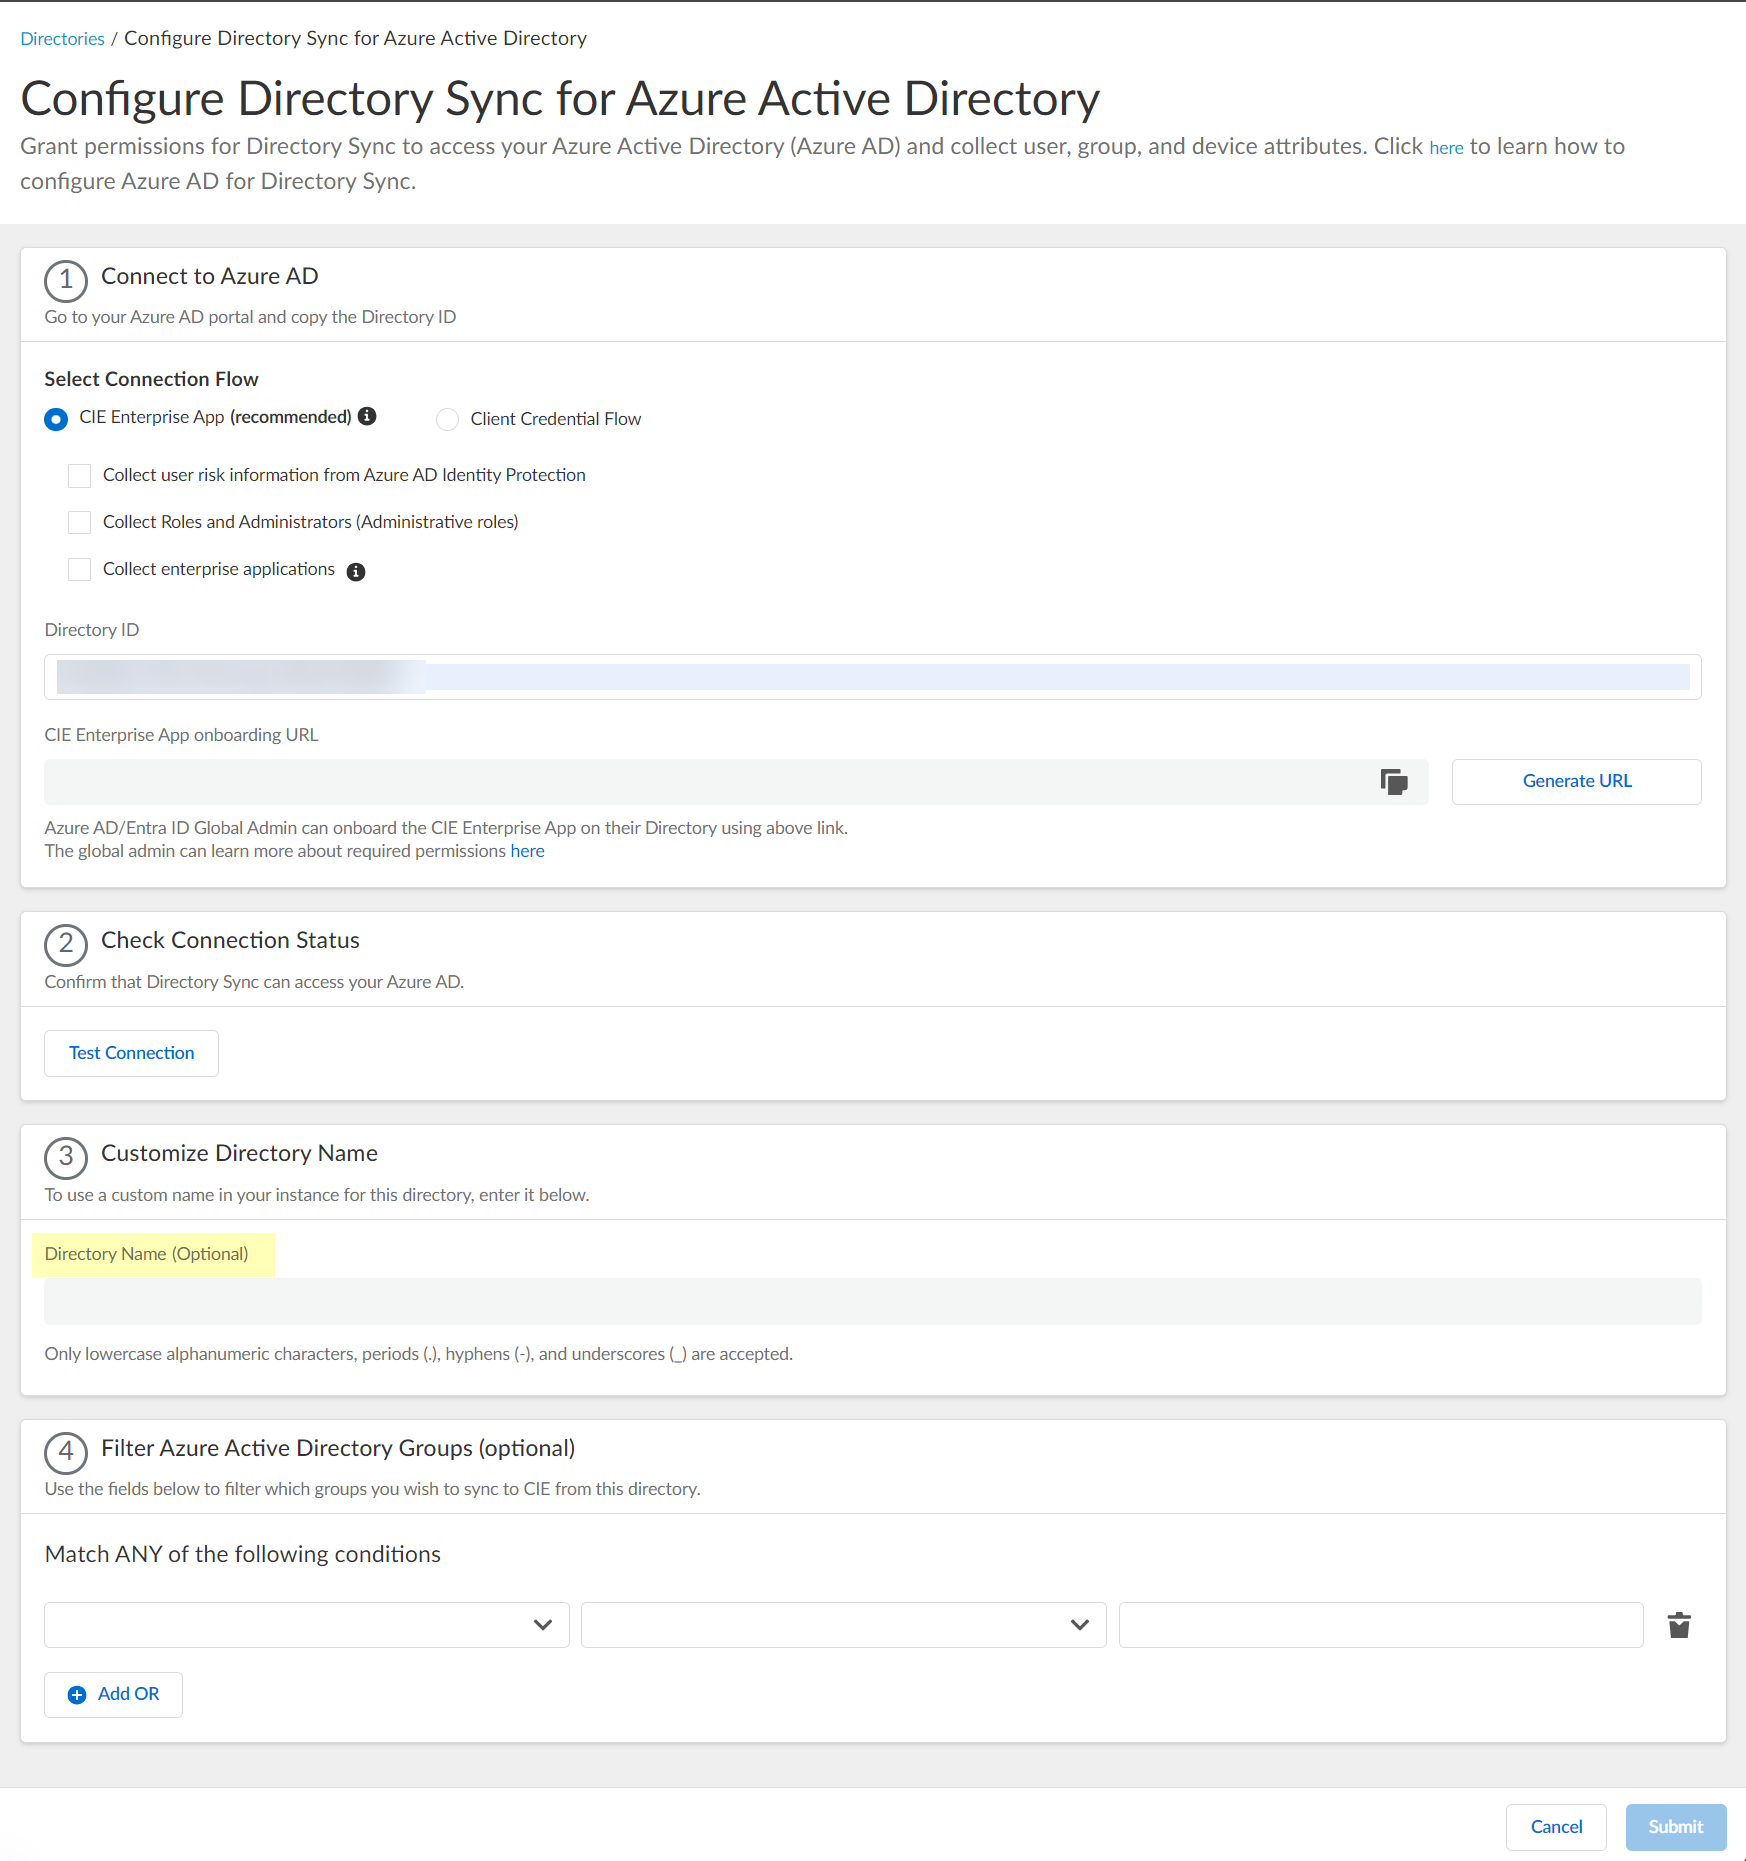
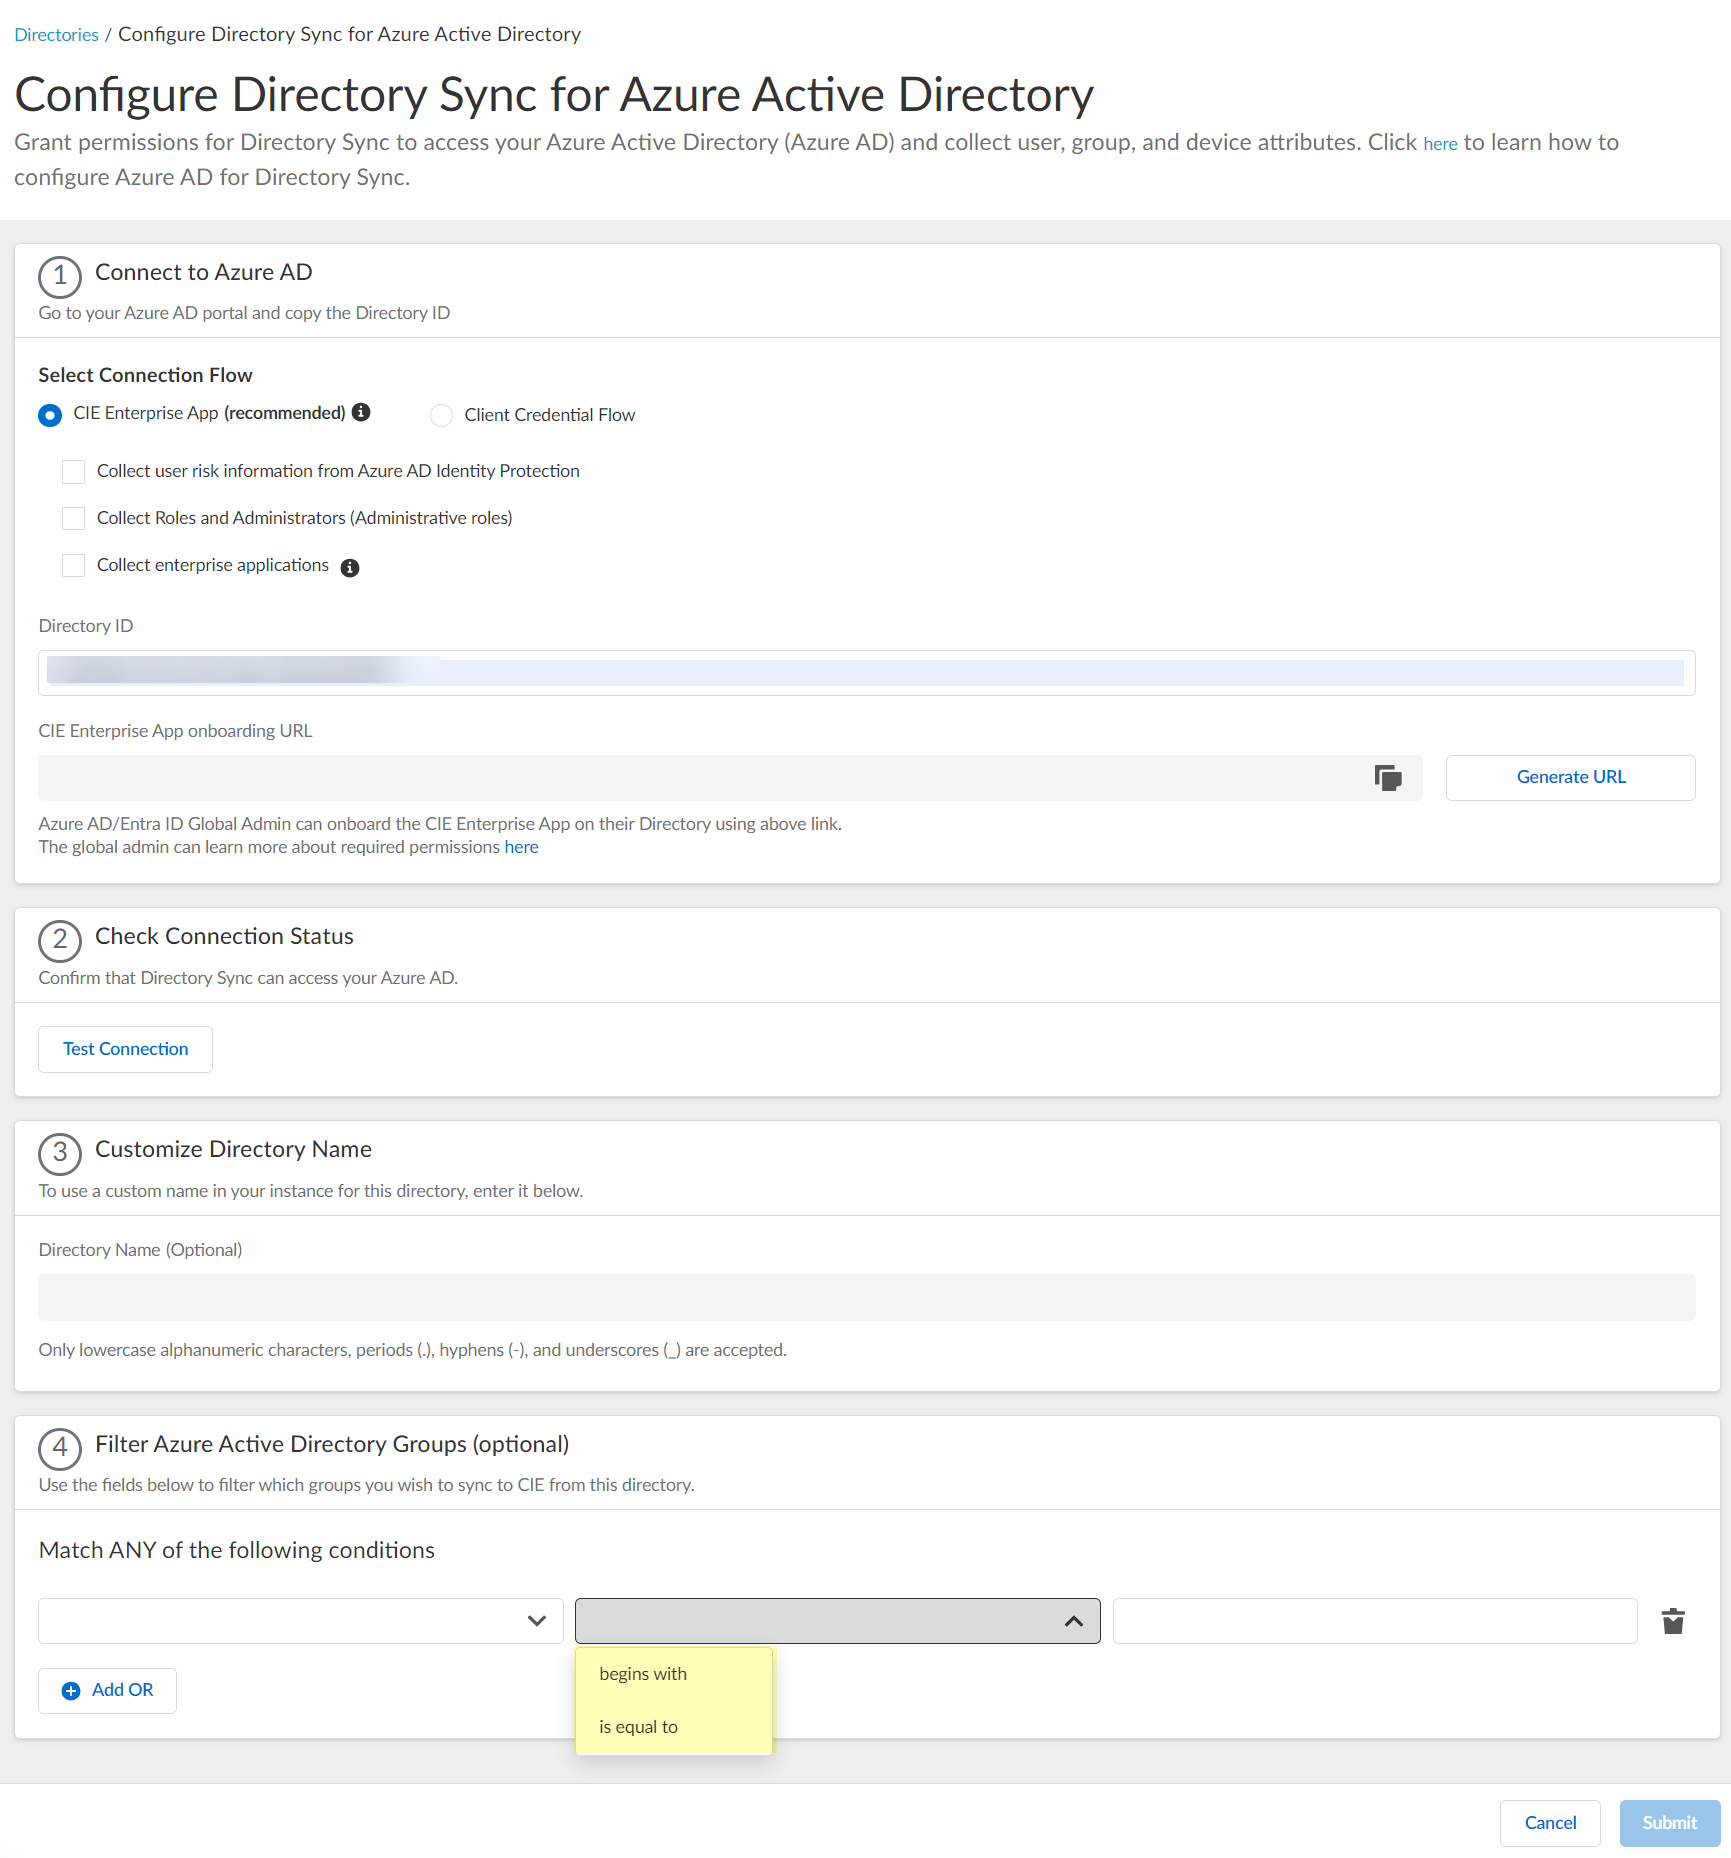
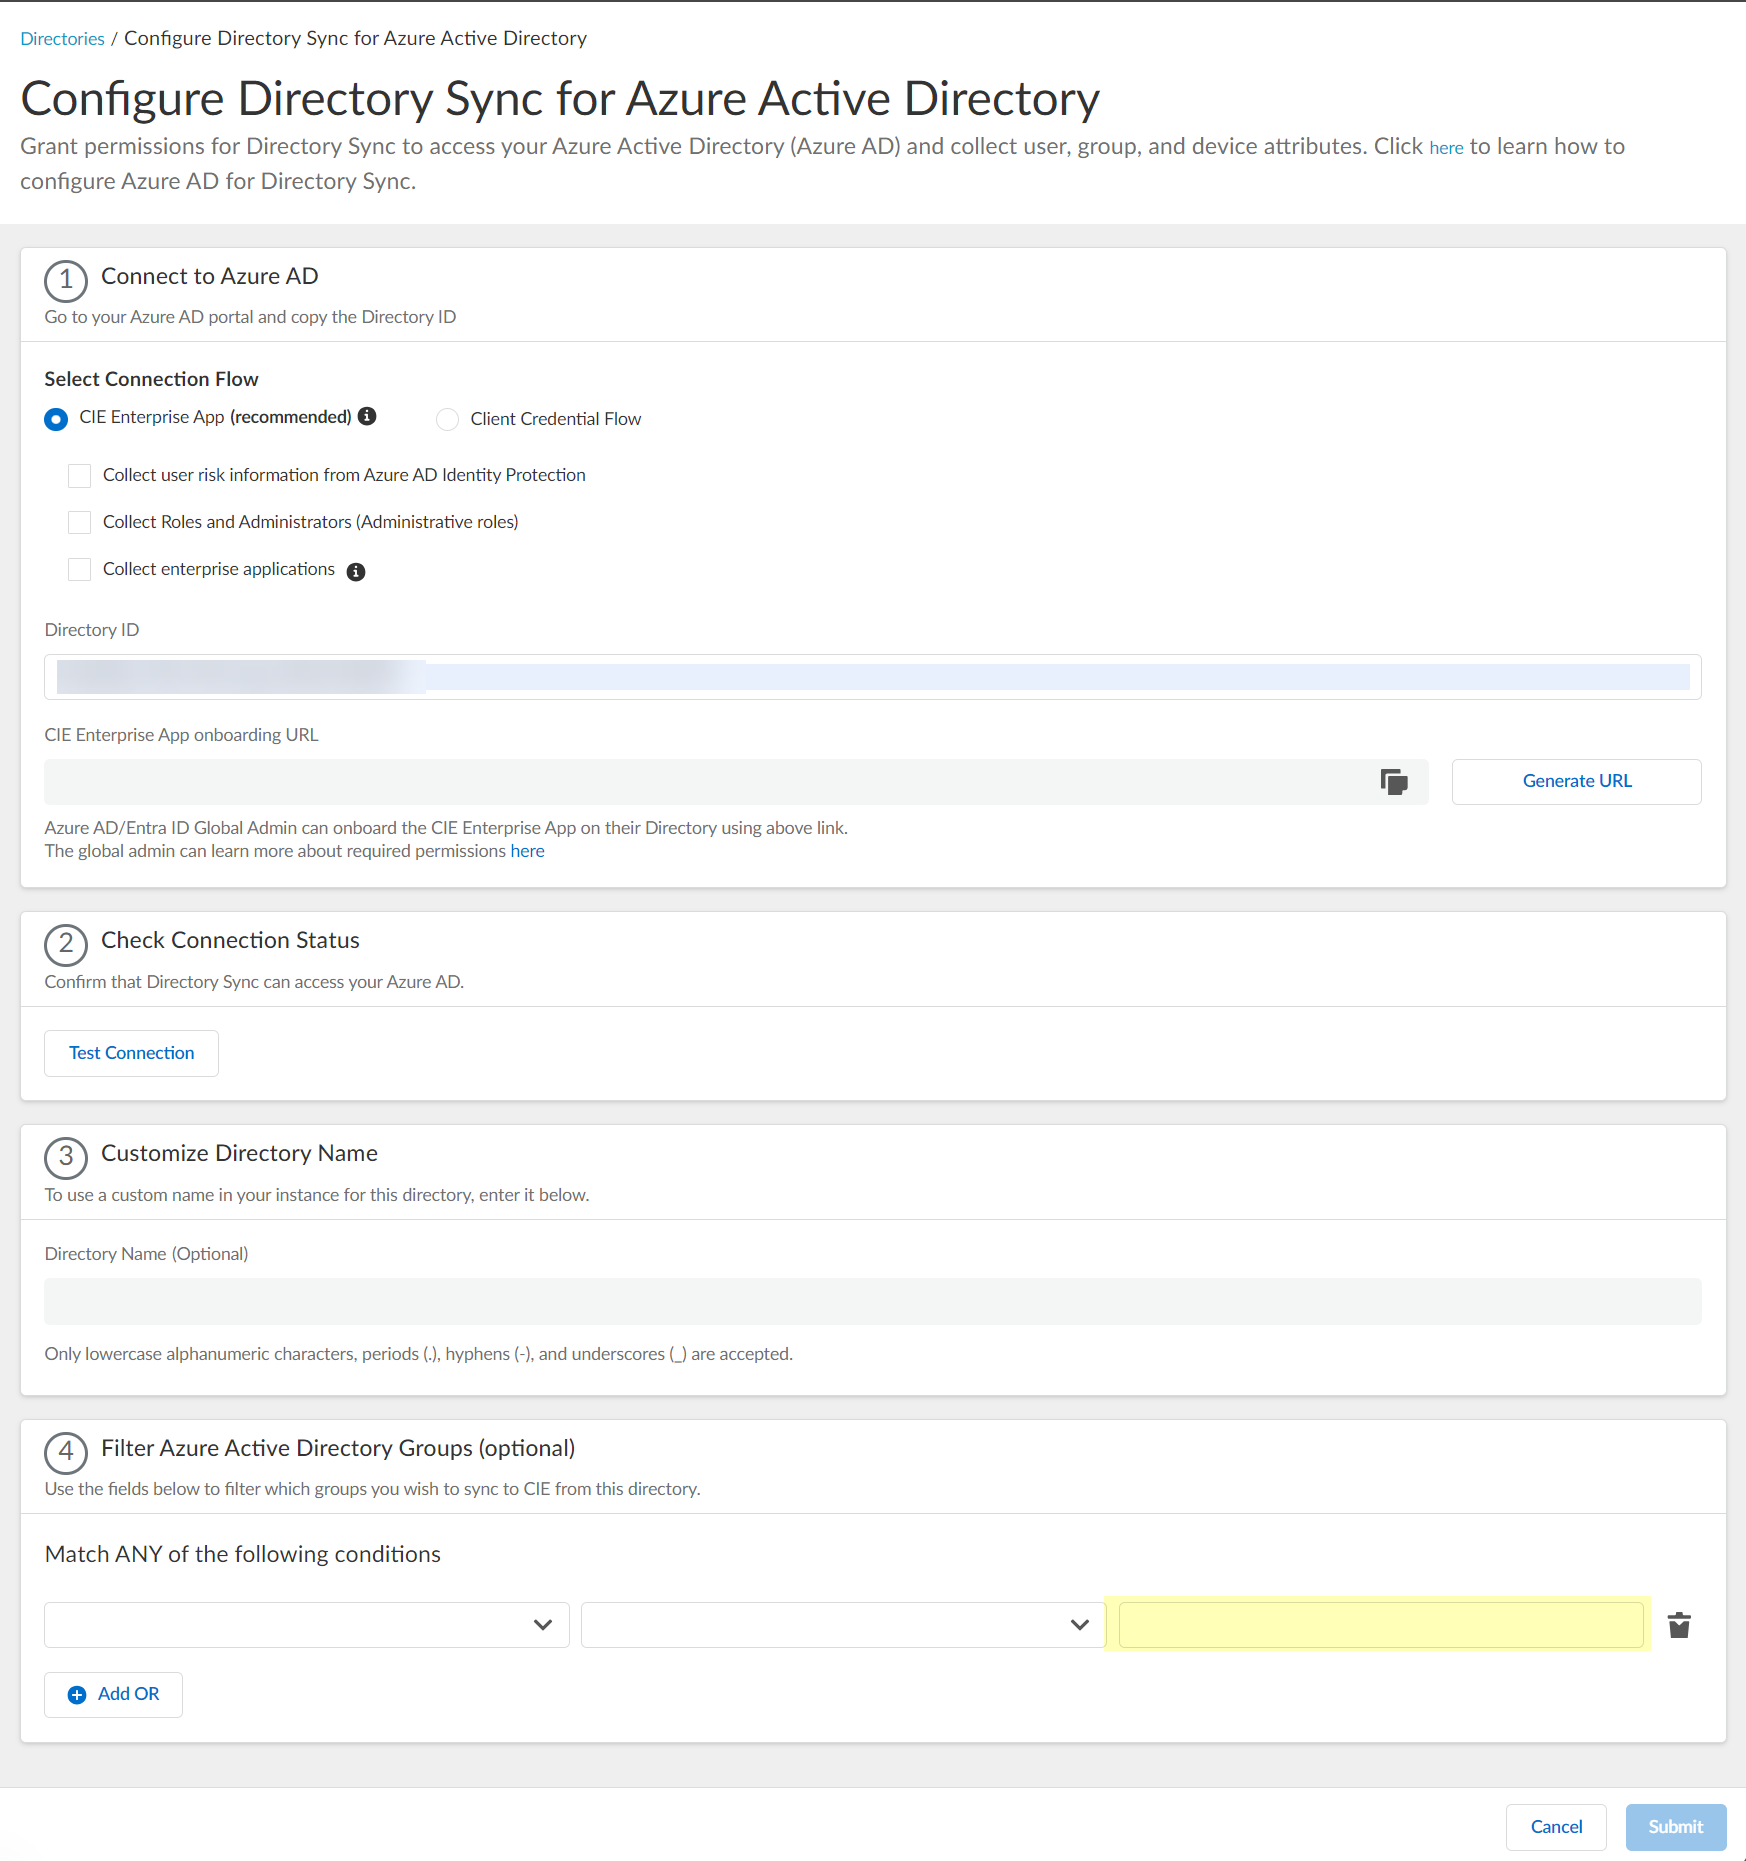
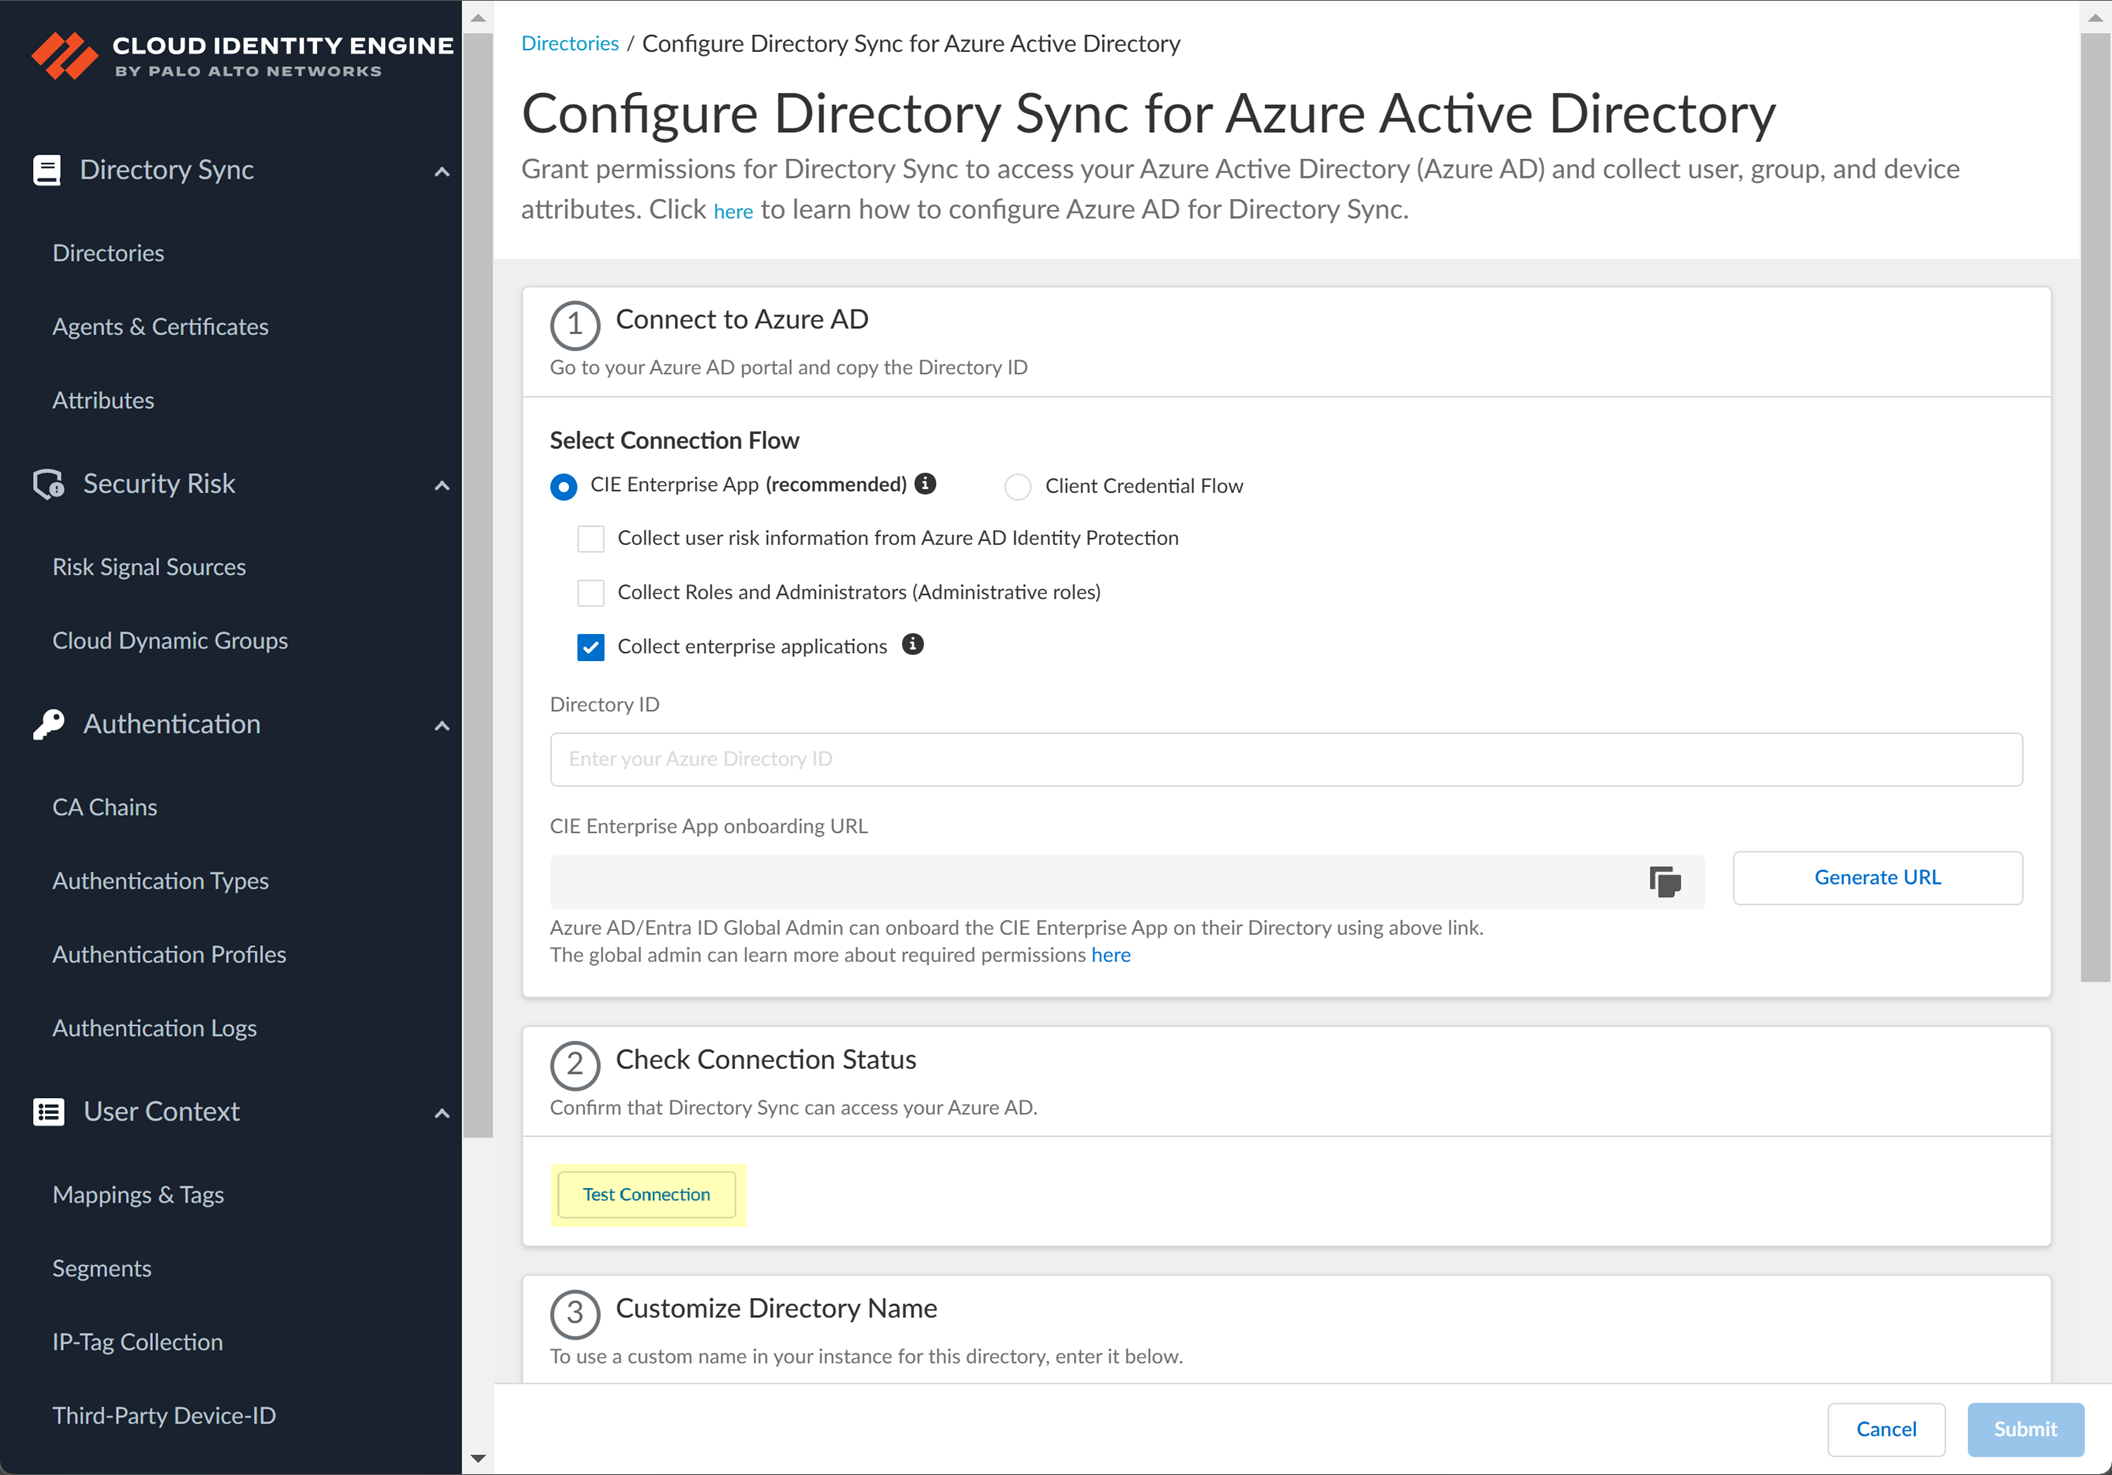
Configure Azure info in CIE:
Paste the copied
Directory ID
.
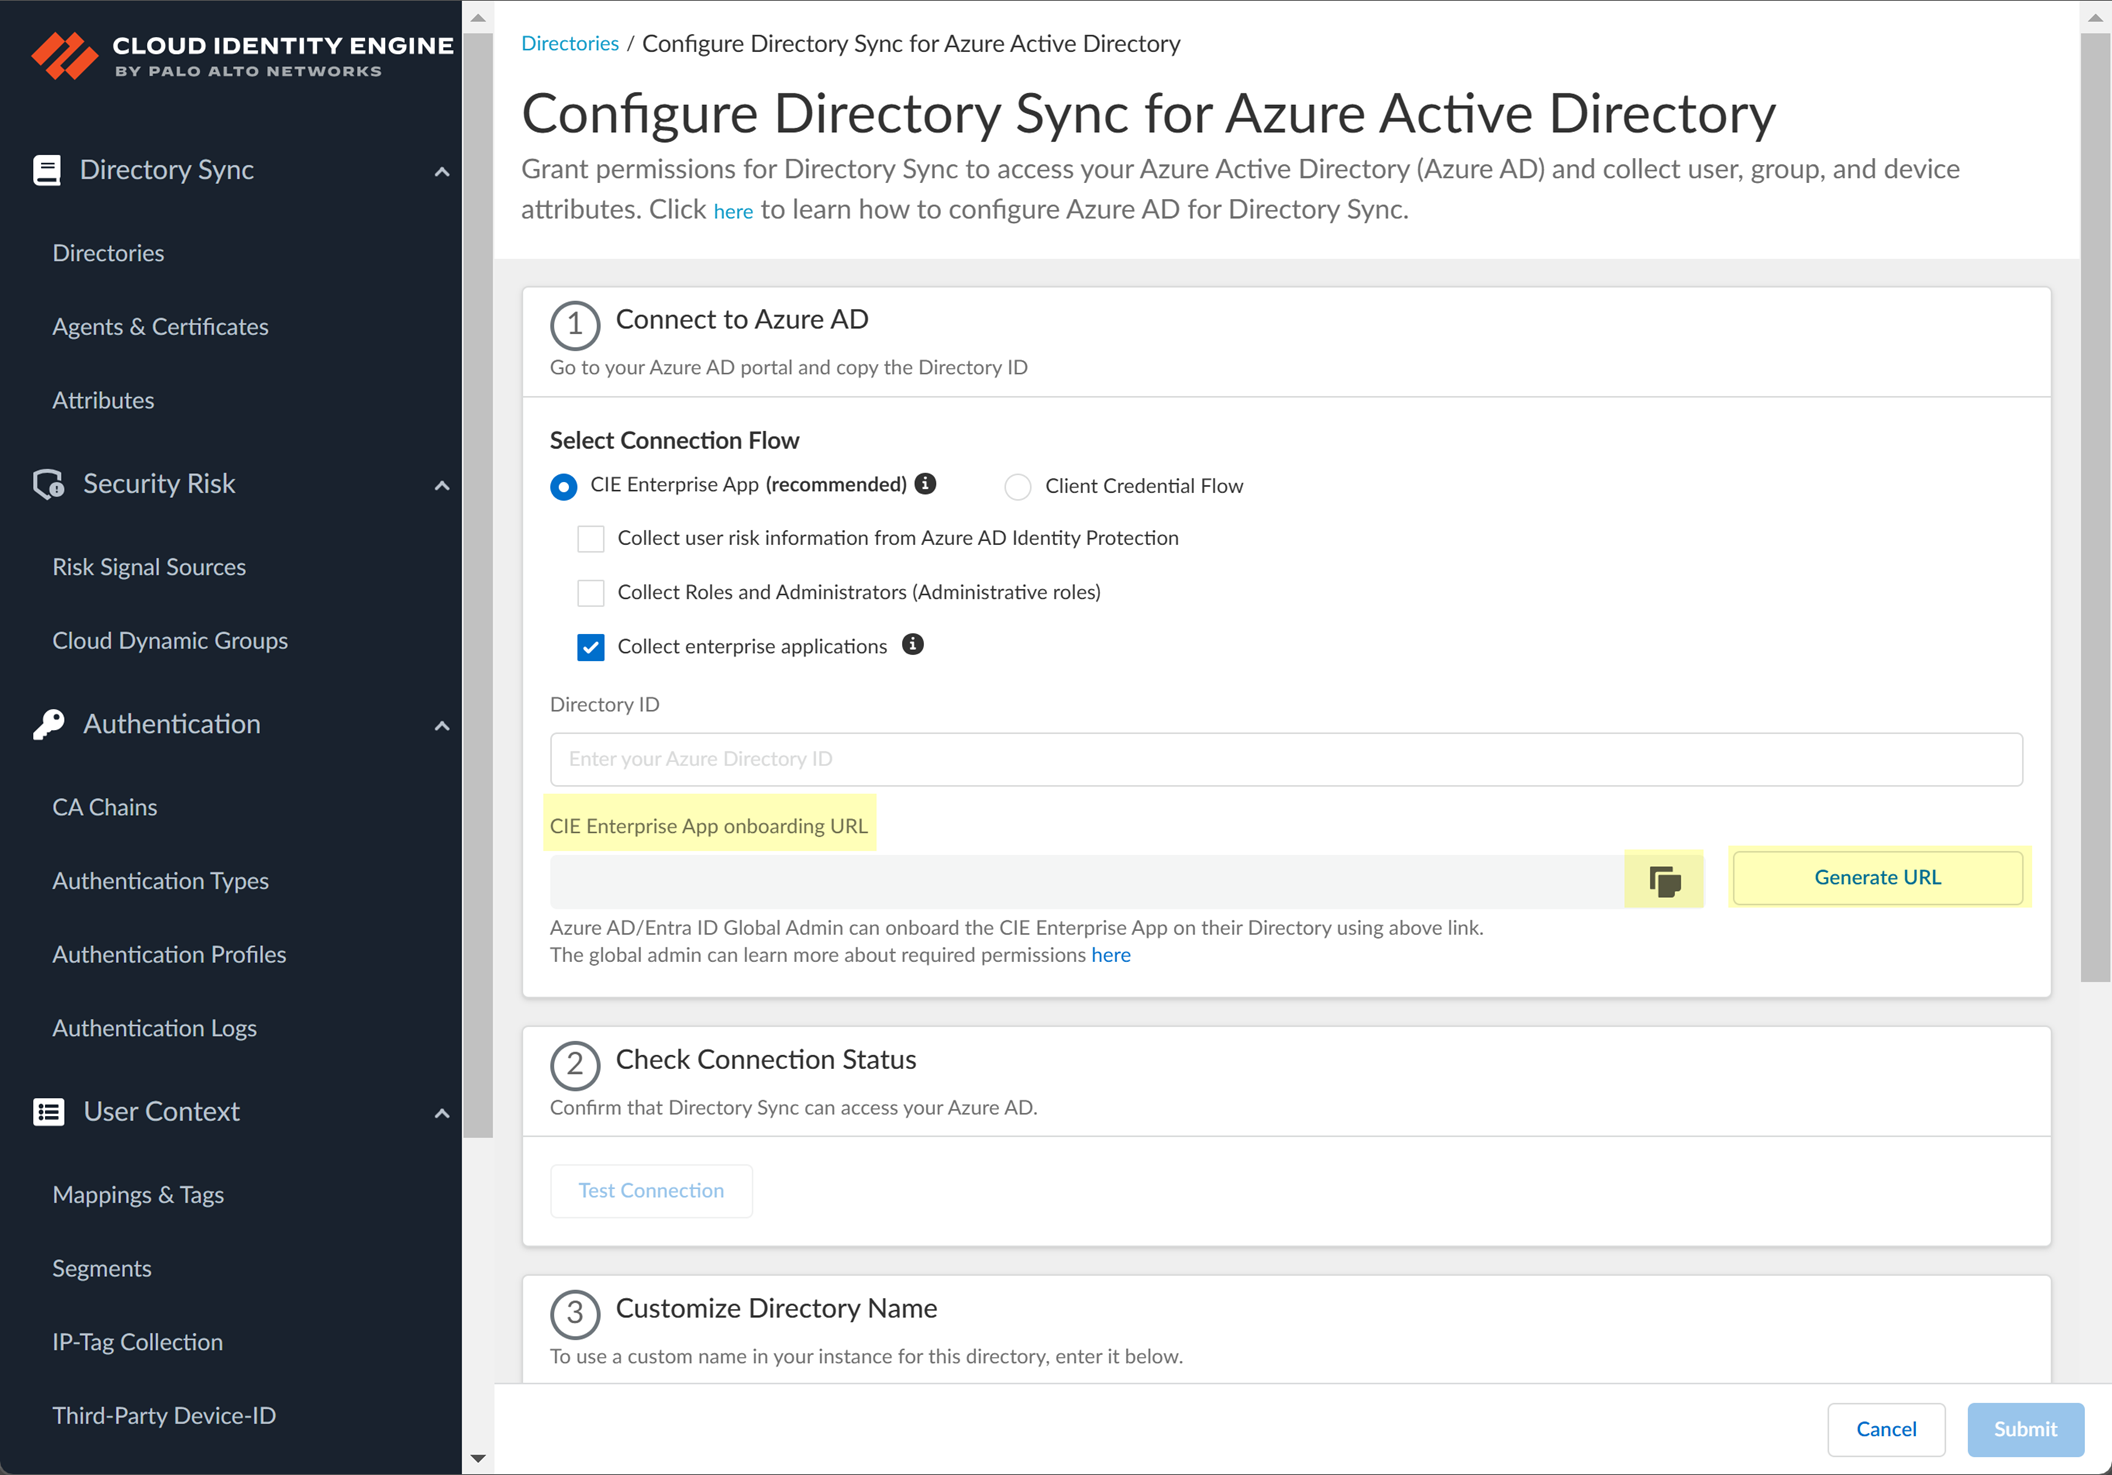
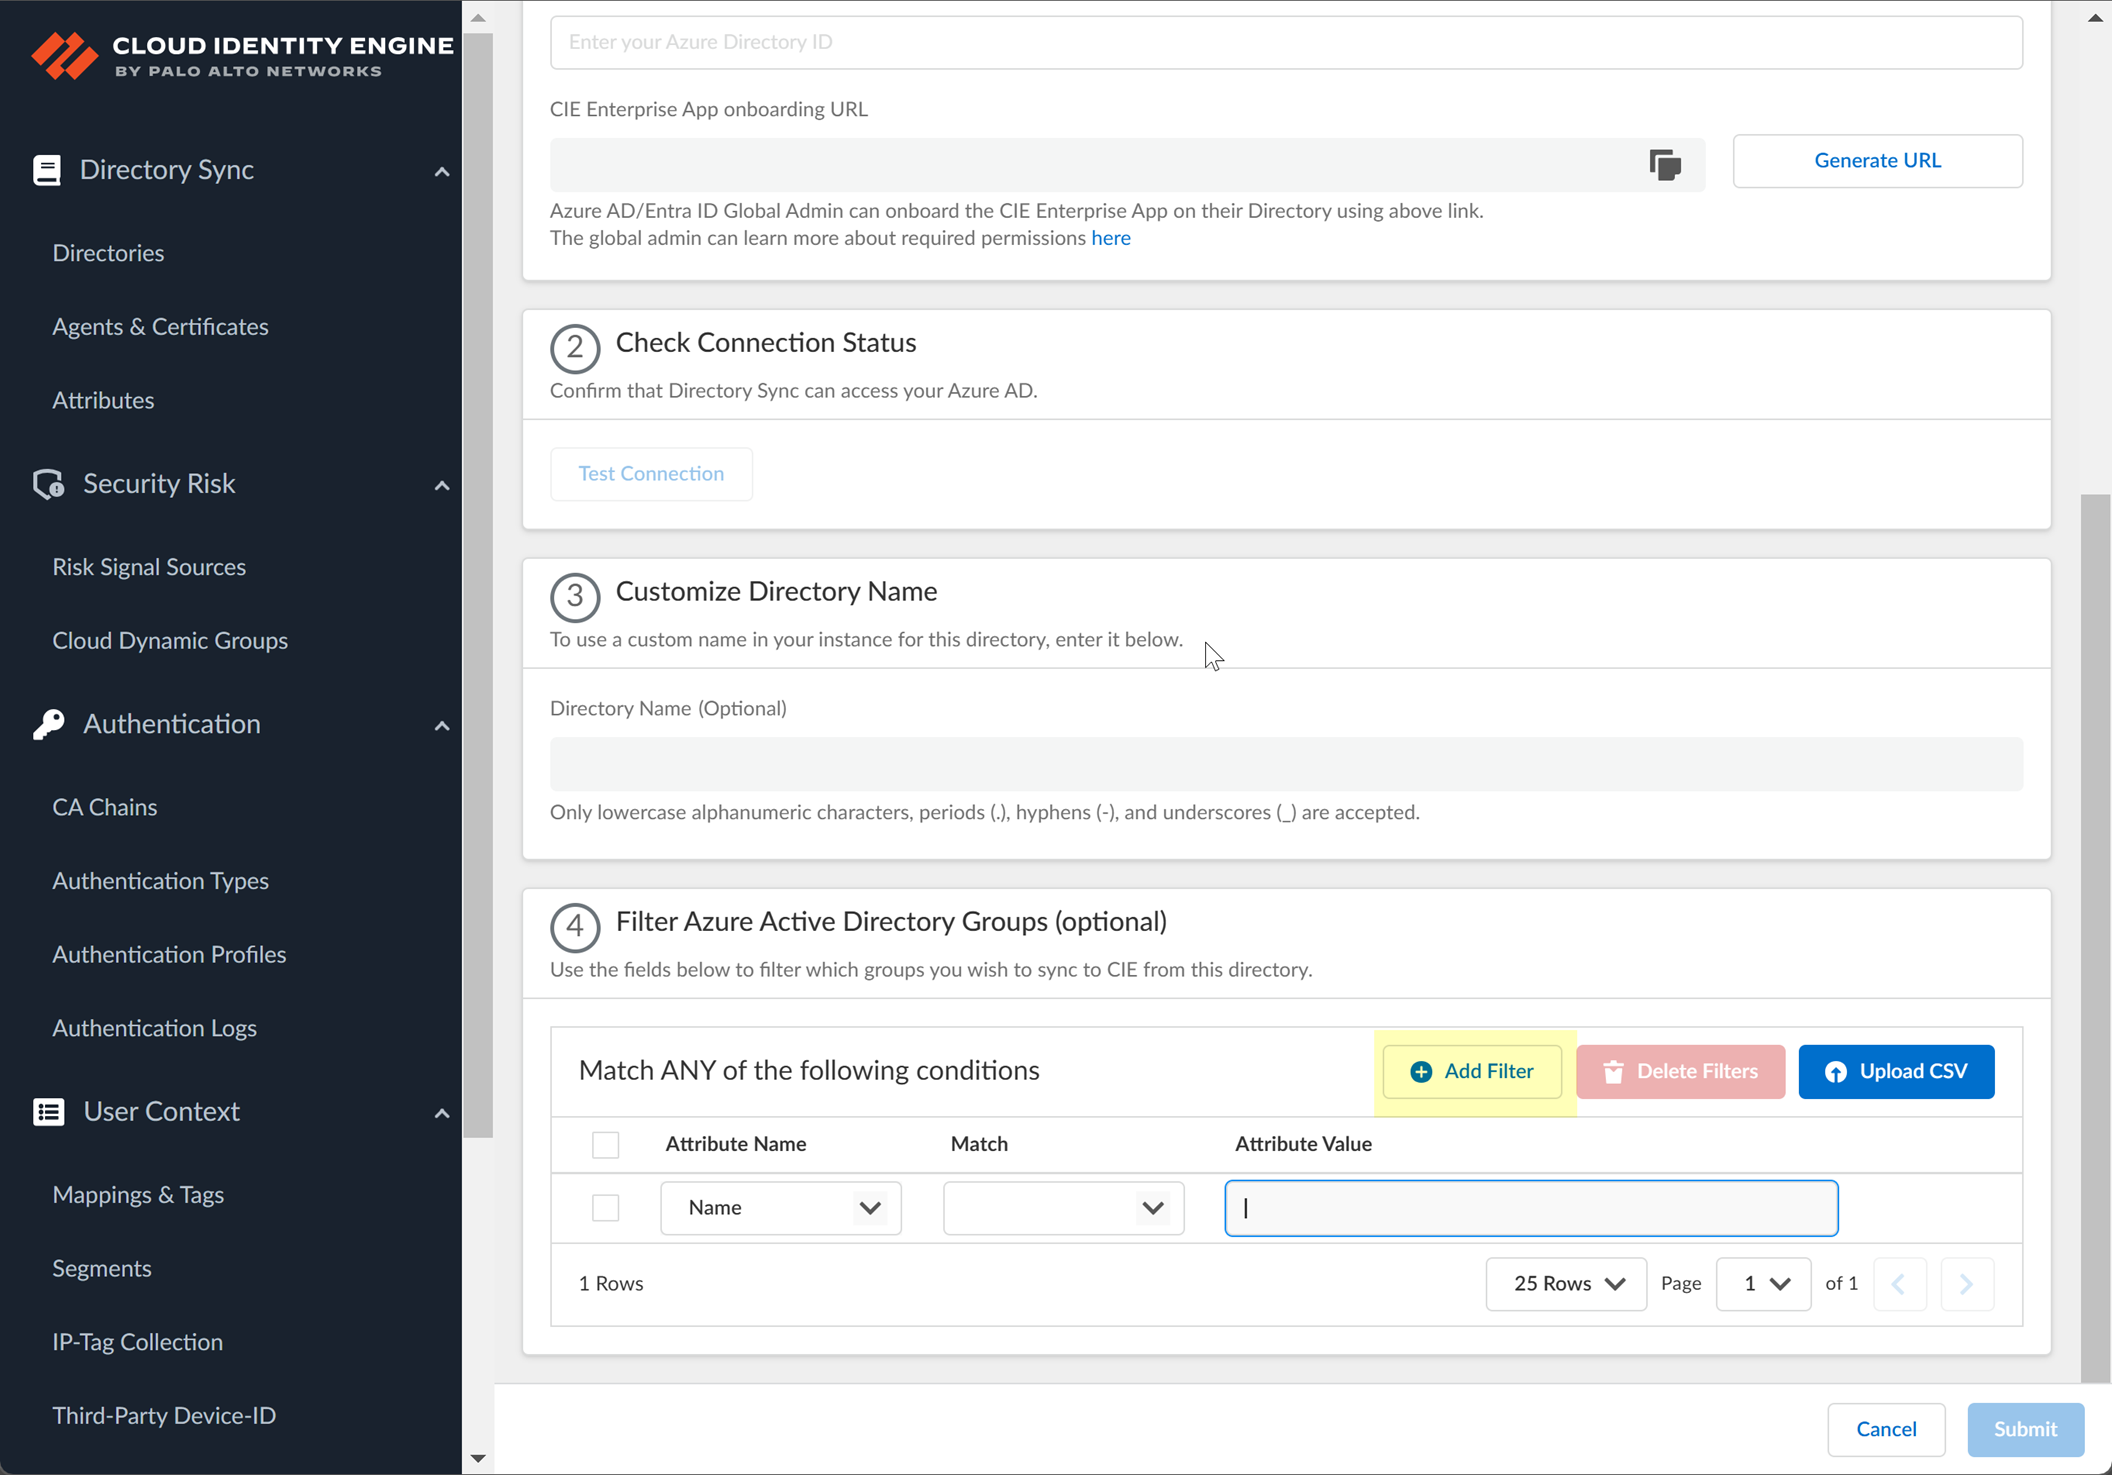
Click
Generate URL
, copy the
CIE Enterprise App onboarding URL
, and open it in a new tab.
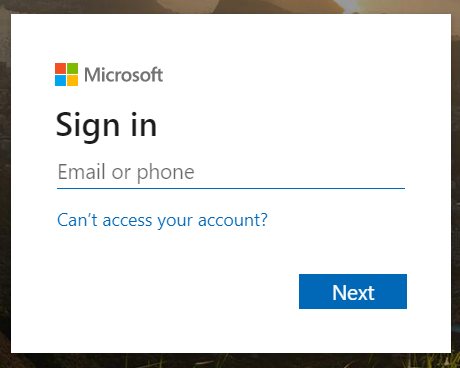
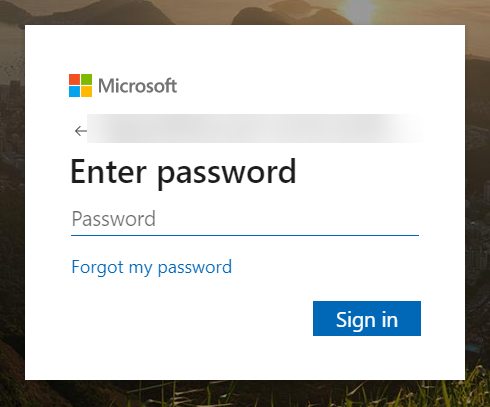
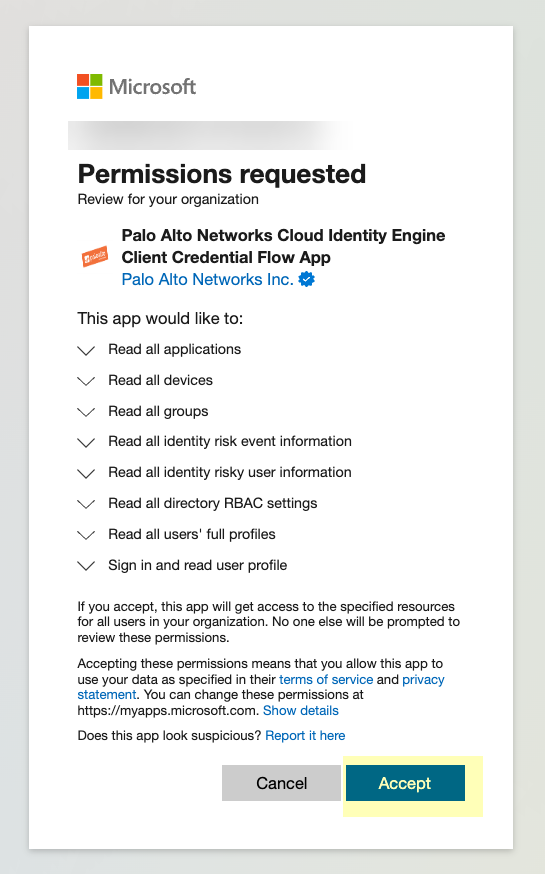
Sign in to Azure with a
Global Administrator
account.
Click
Accept
to grant required permissions (Device.Read.All, Group.Read.All, User.Read.All, User.Read, plus any selected optional permissions).
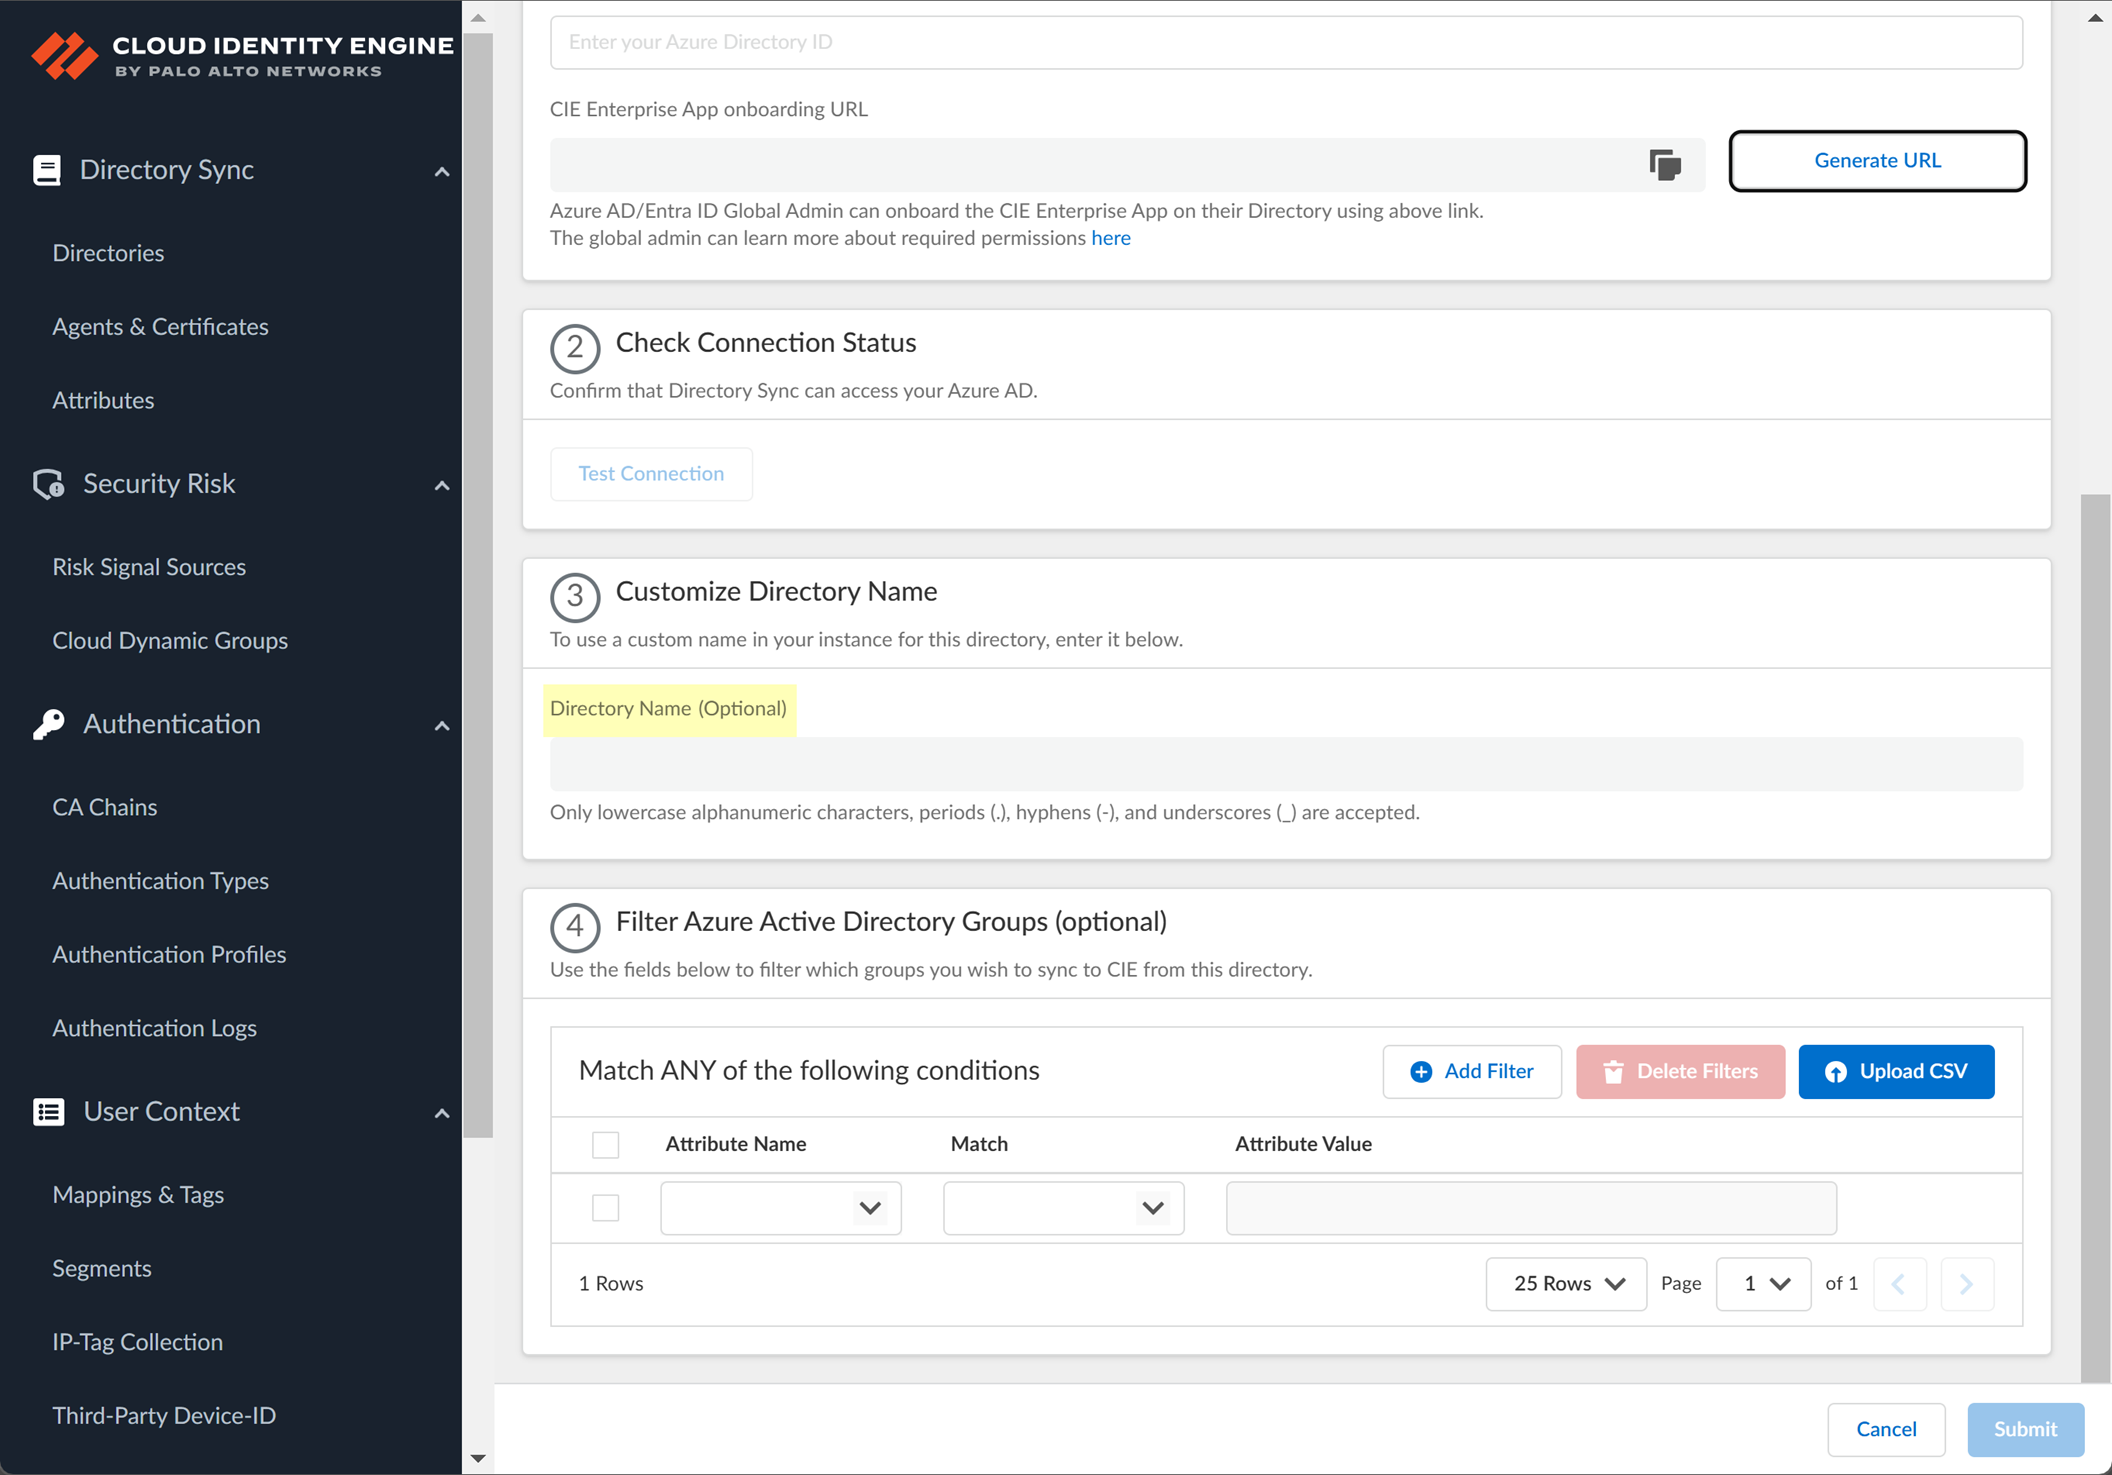
In CIE, click
Test Connection
.
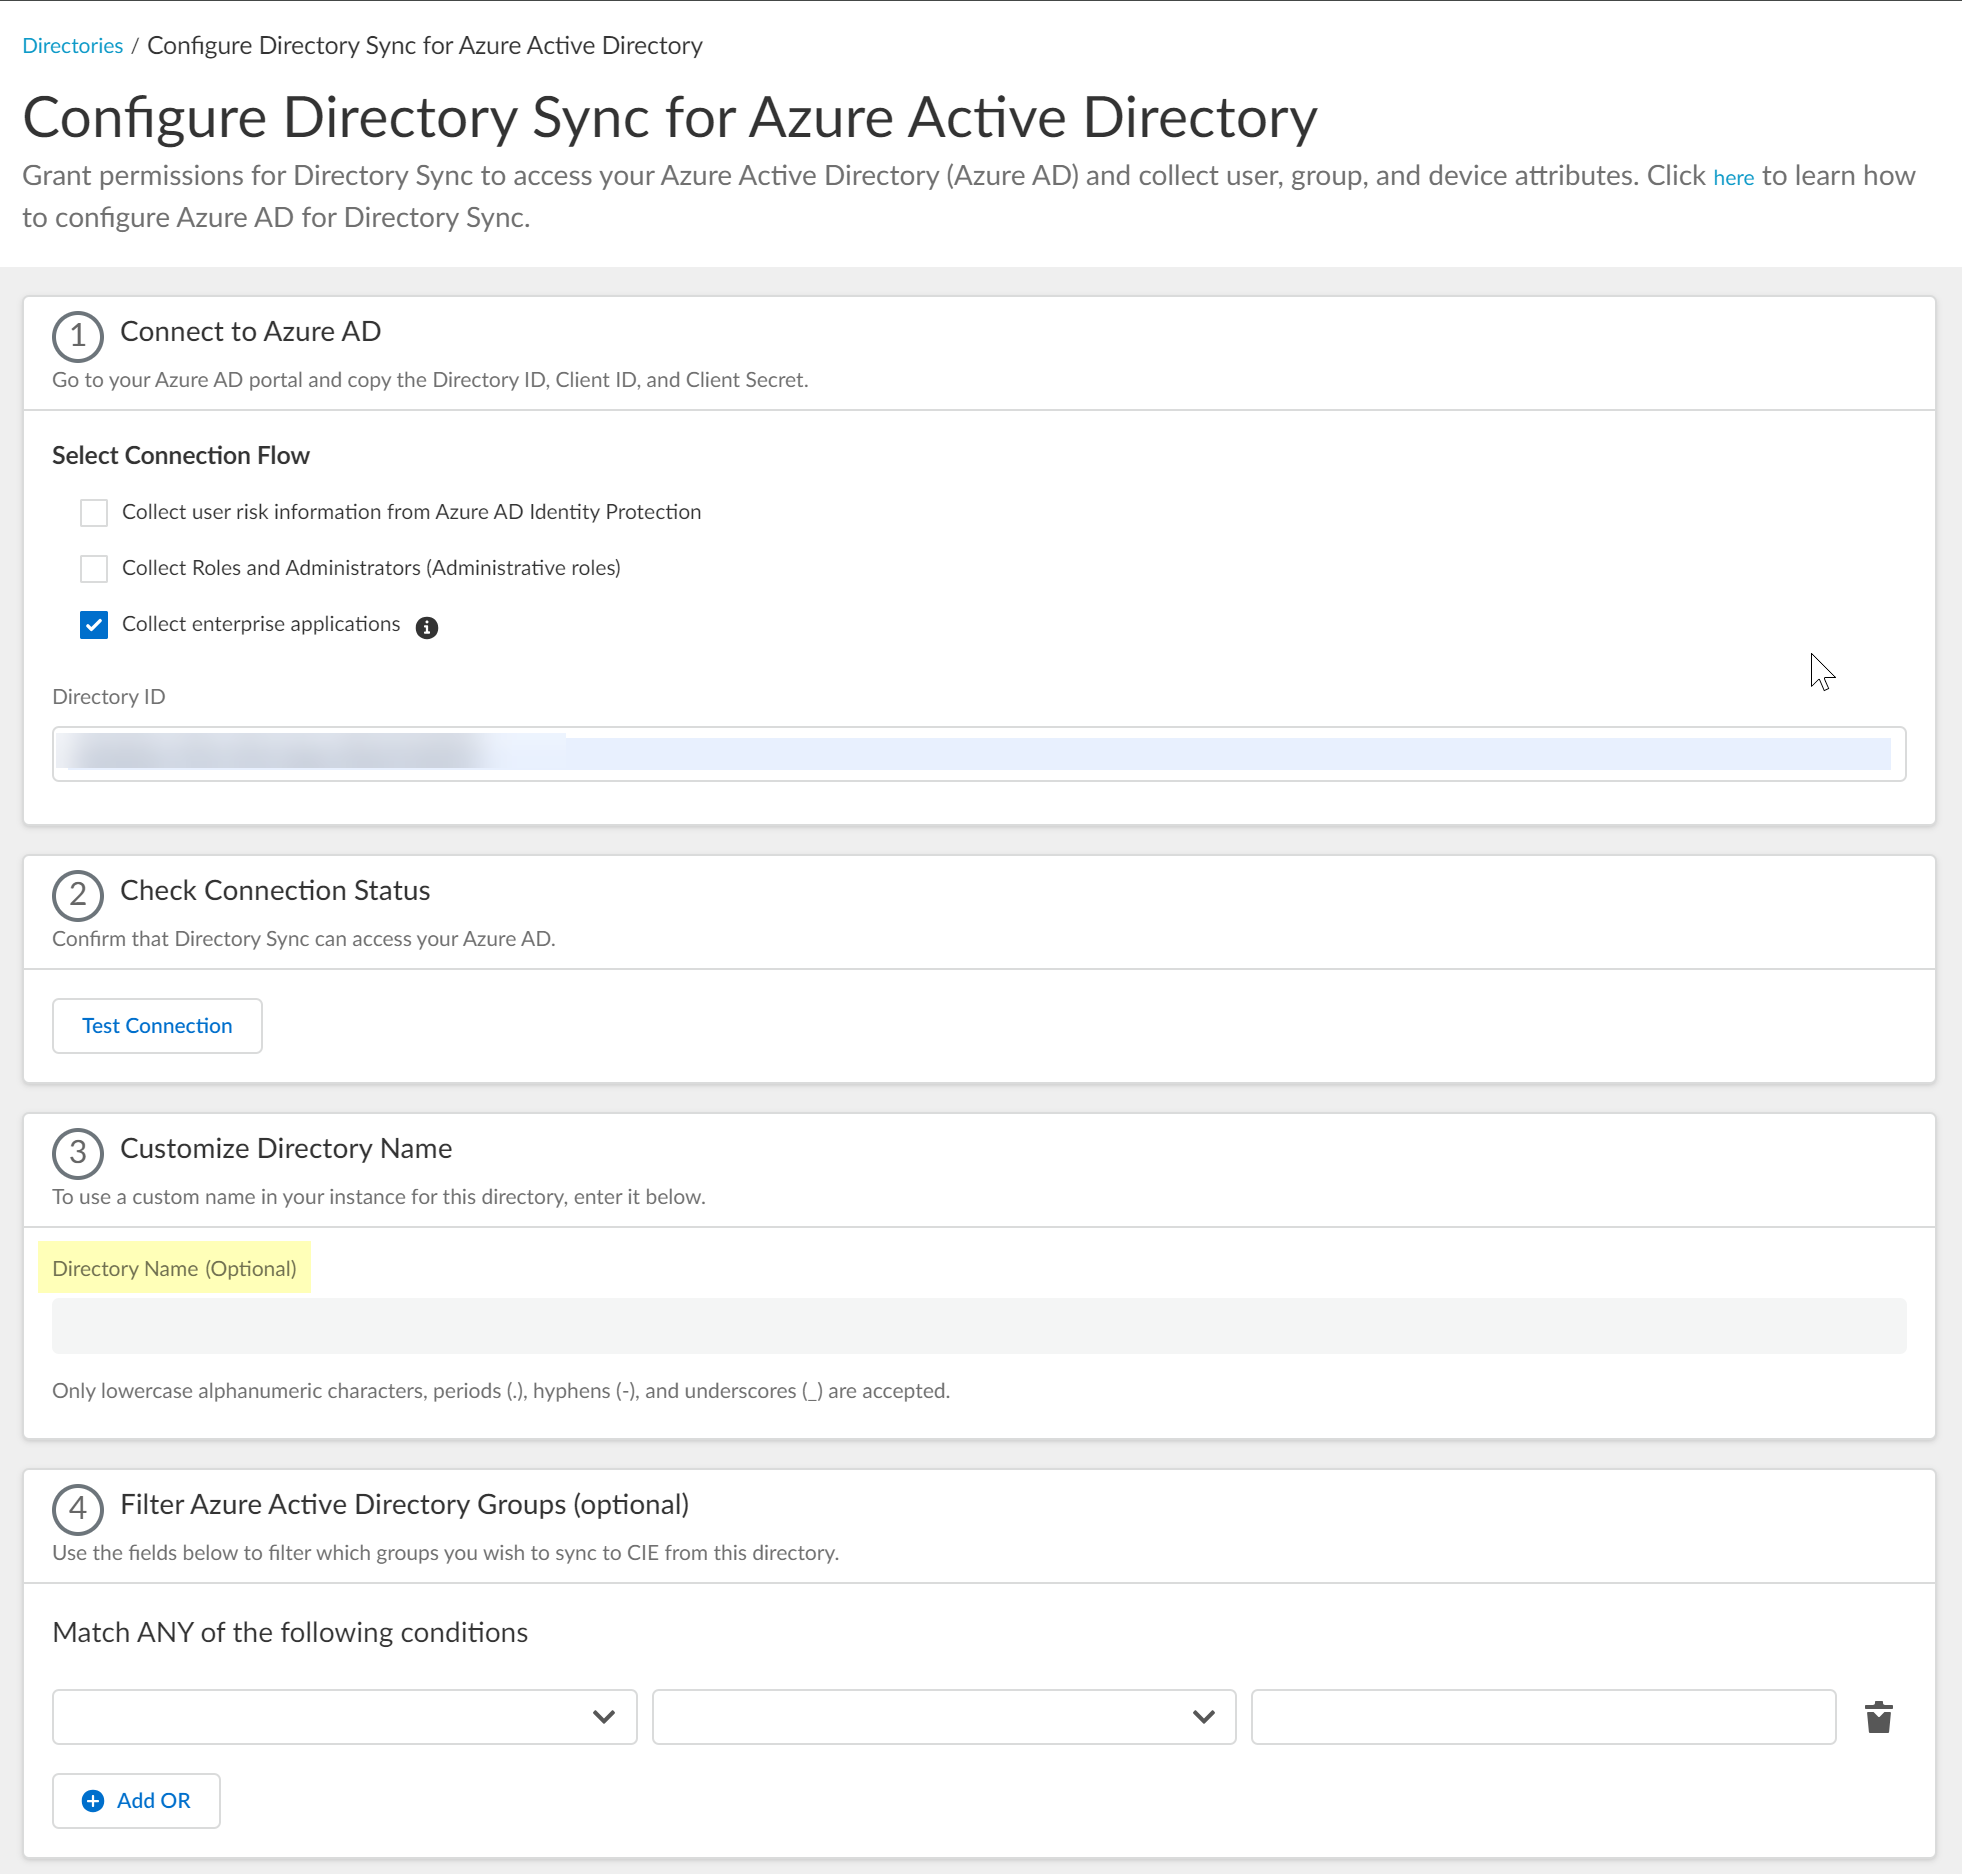
(Optional) Enter a custom
Directory Name
for display within CIE.
[GOTCHA] If collecting from both on-prem AD and Azure AD for the *same domain* in the *same CIE tenant*, customize the Azure AD name (e.g., add `.aad`).
Ensure this name matches in associated apps like Cortex XDR.
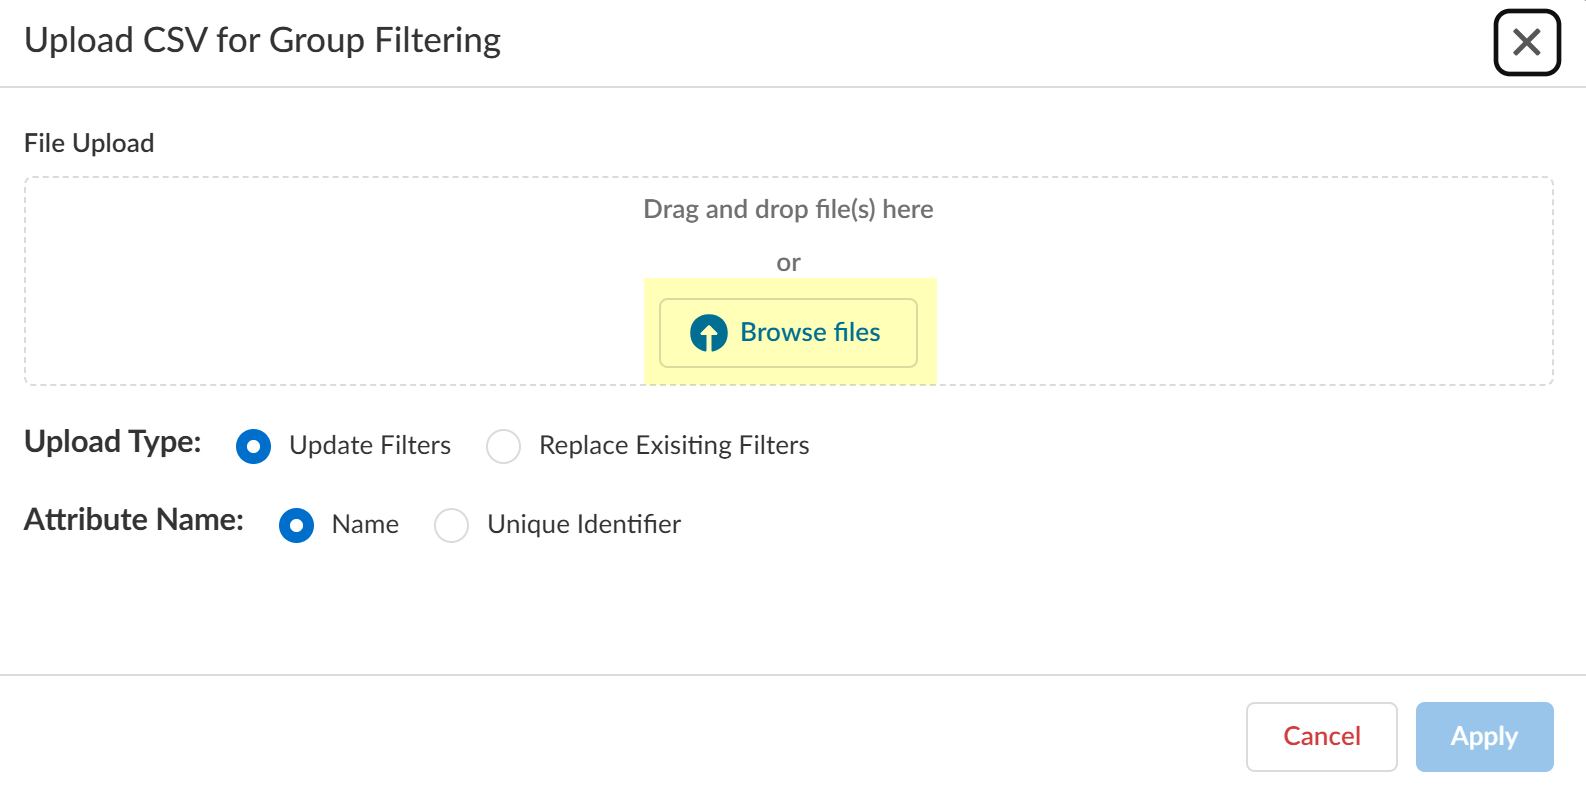
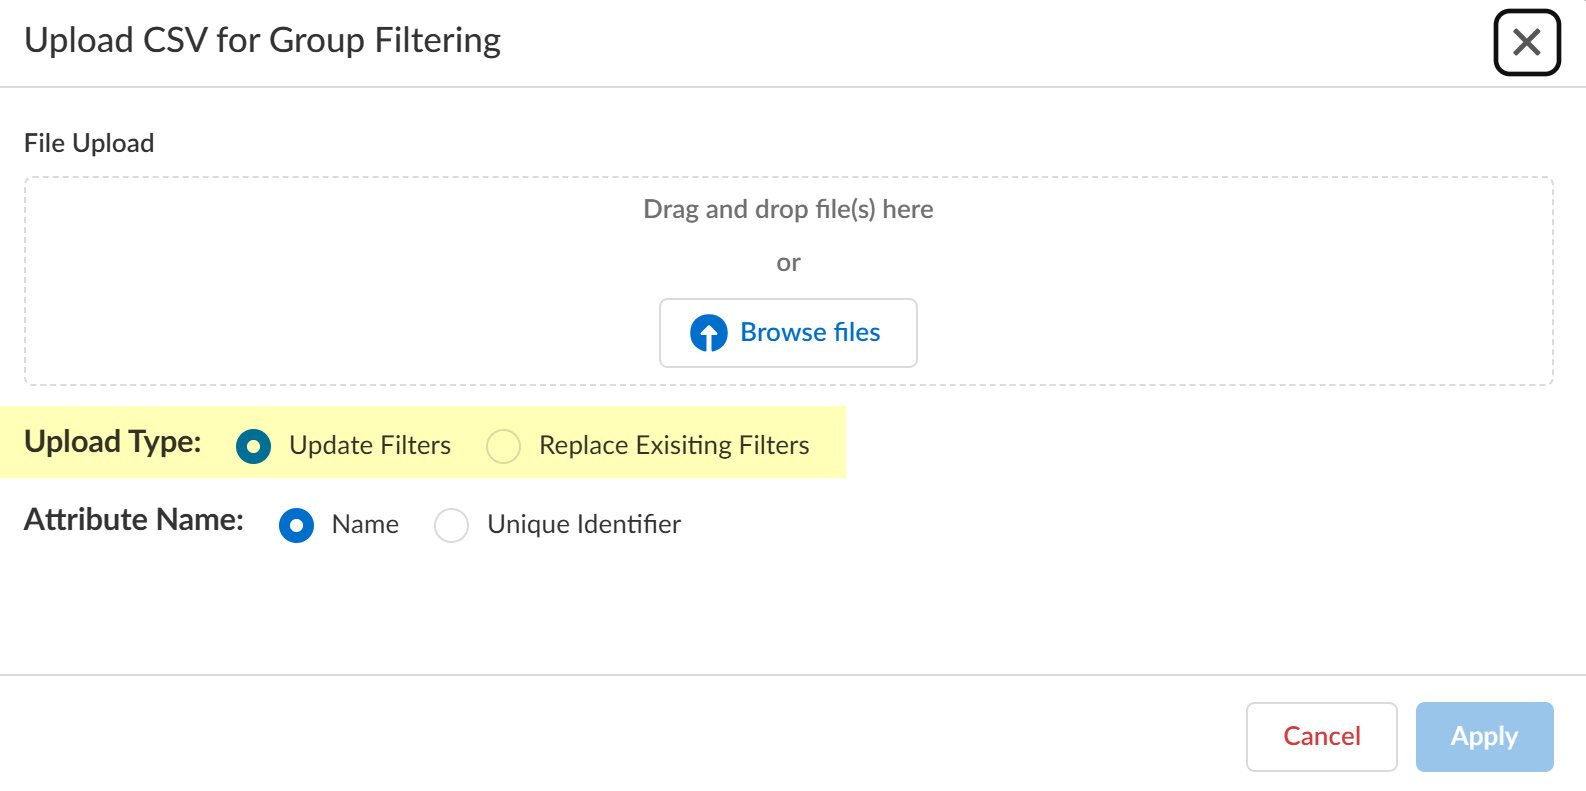
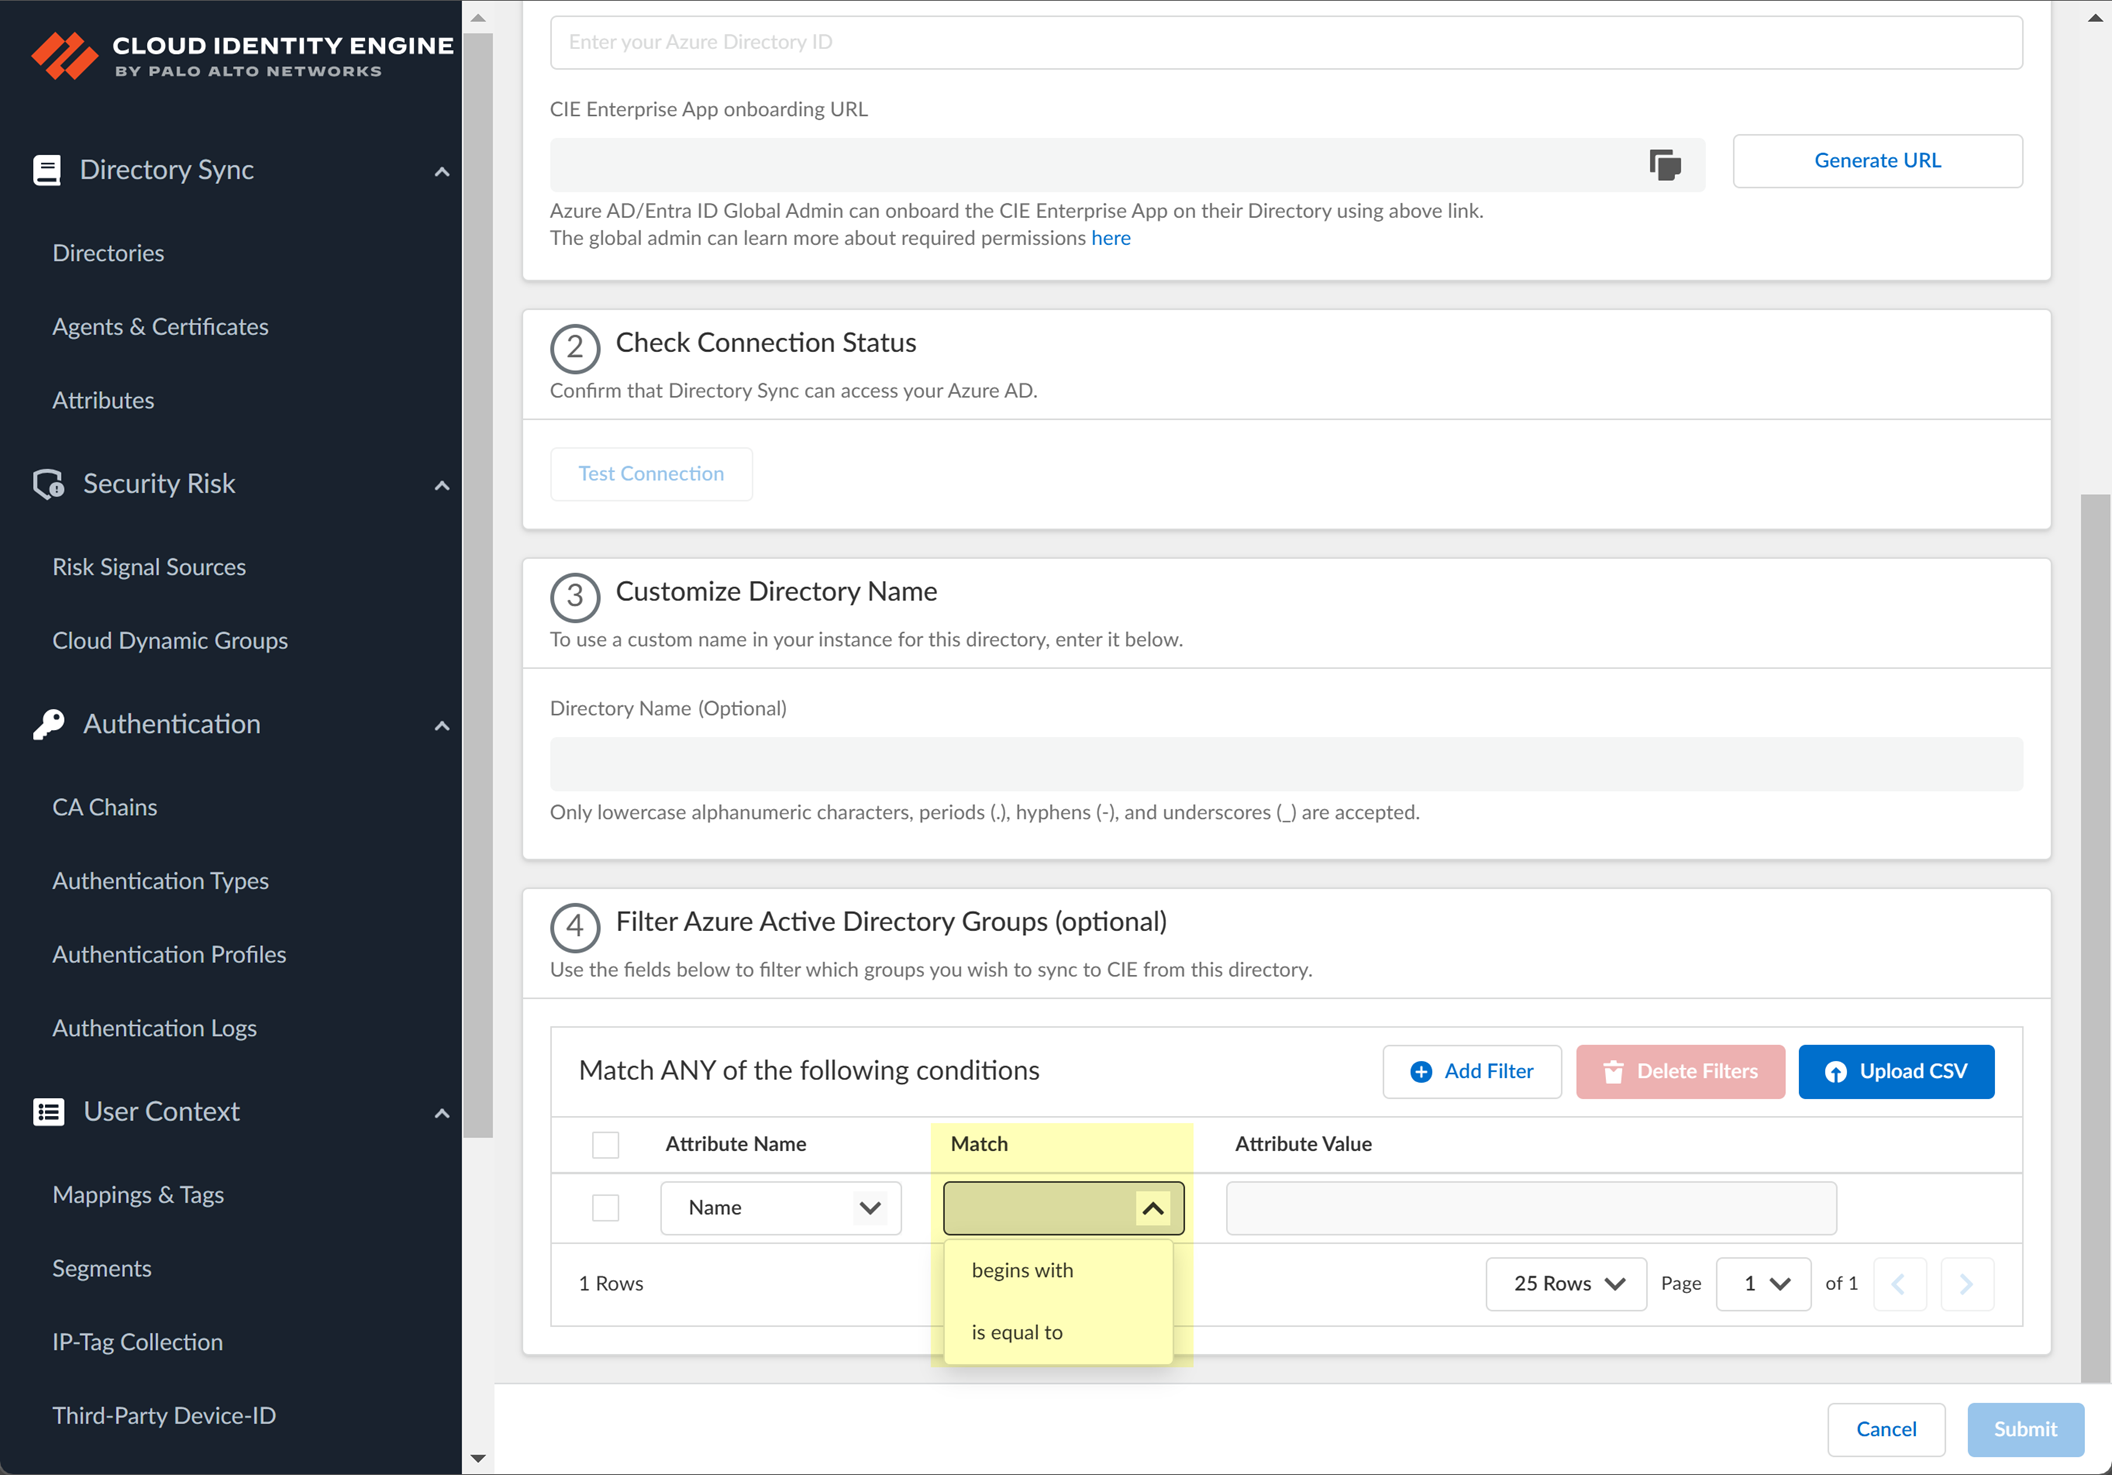
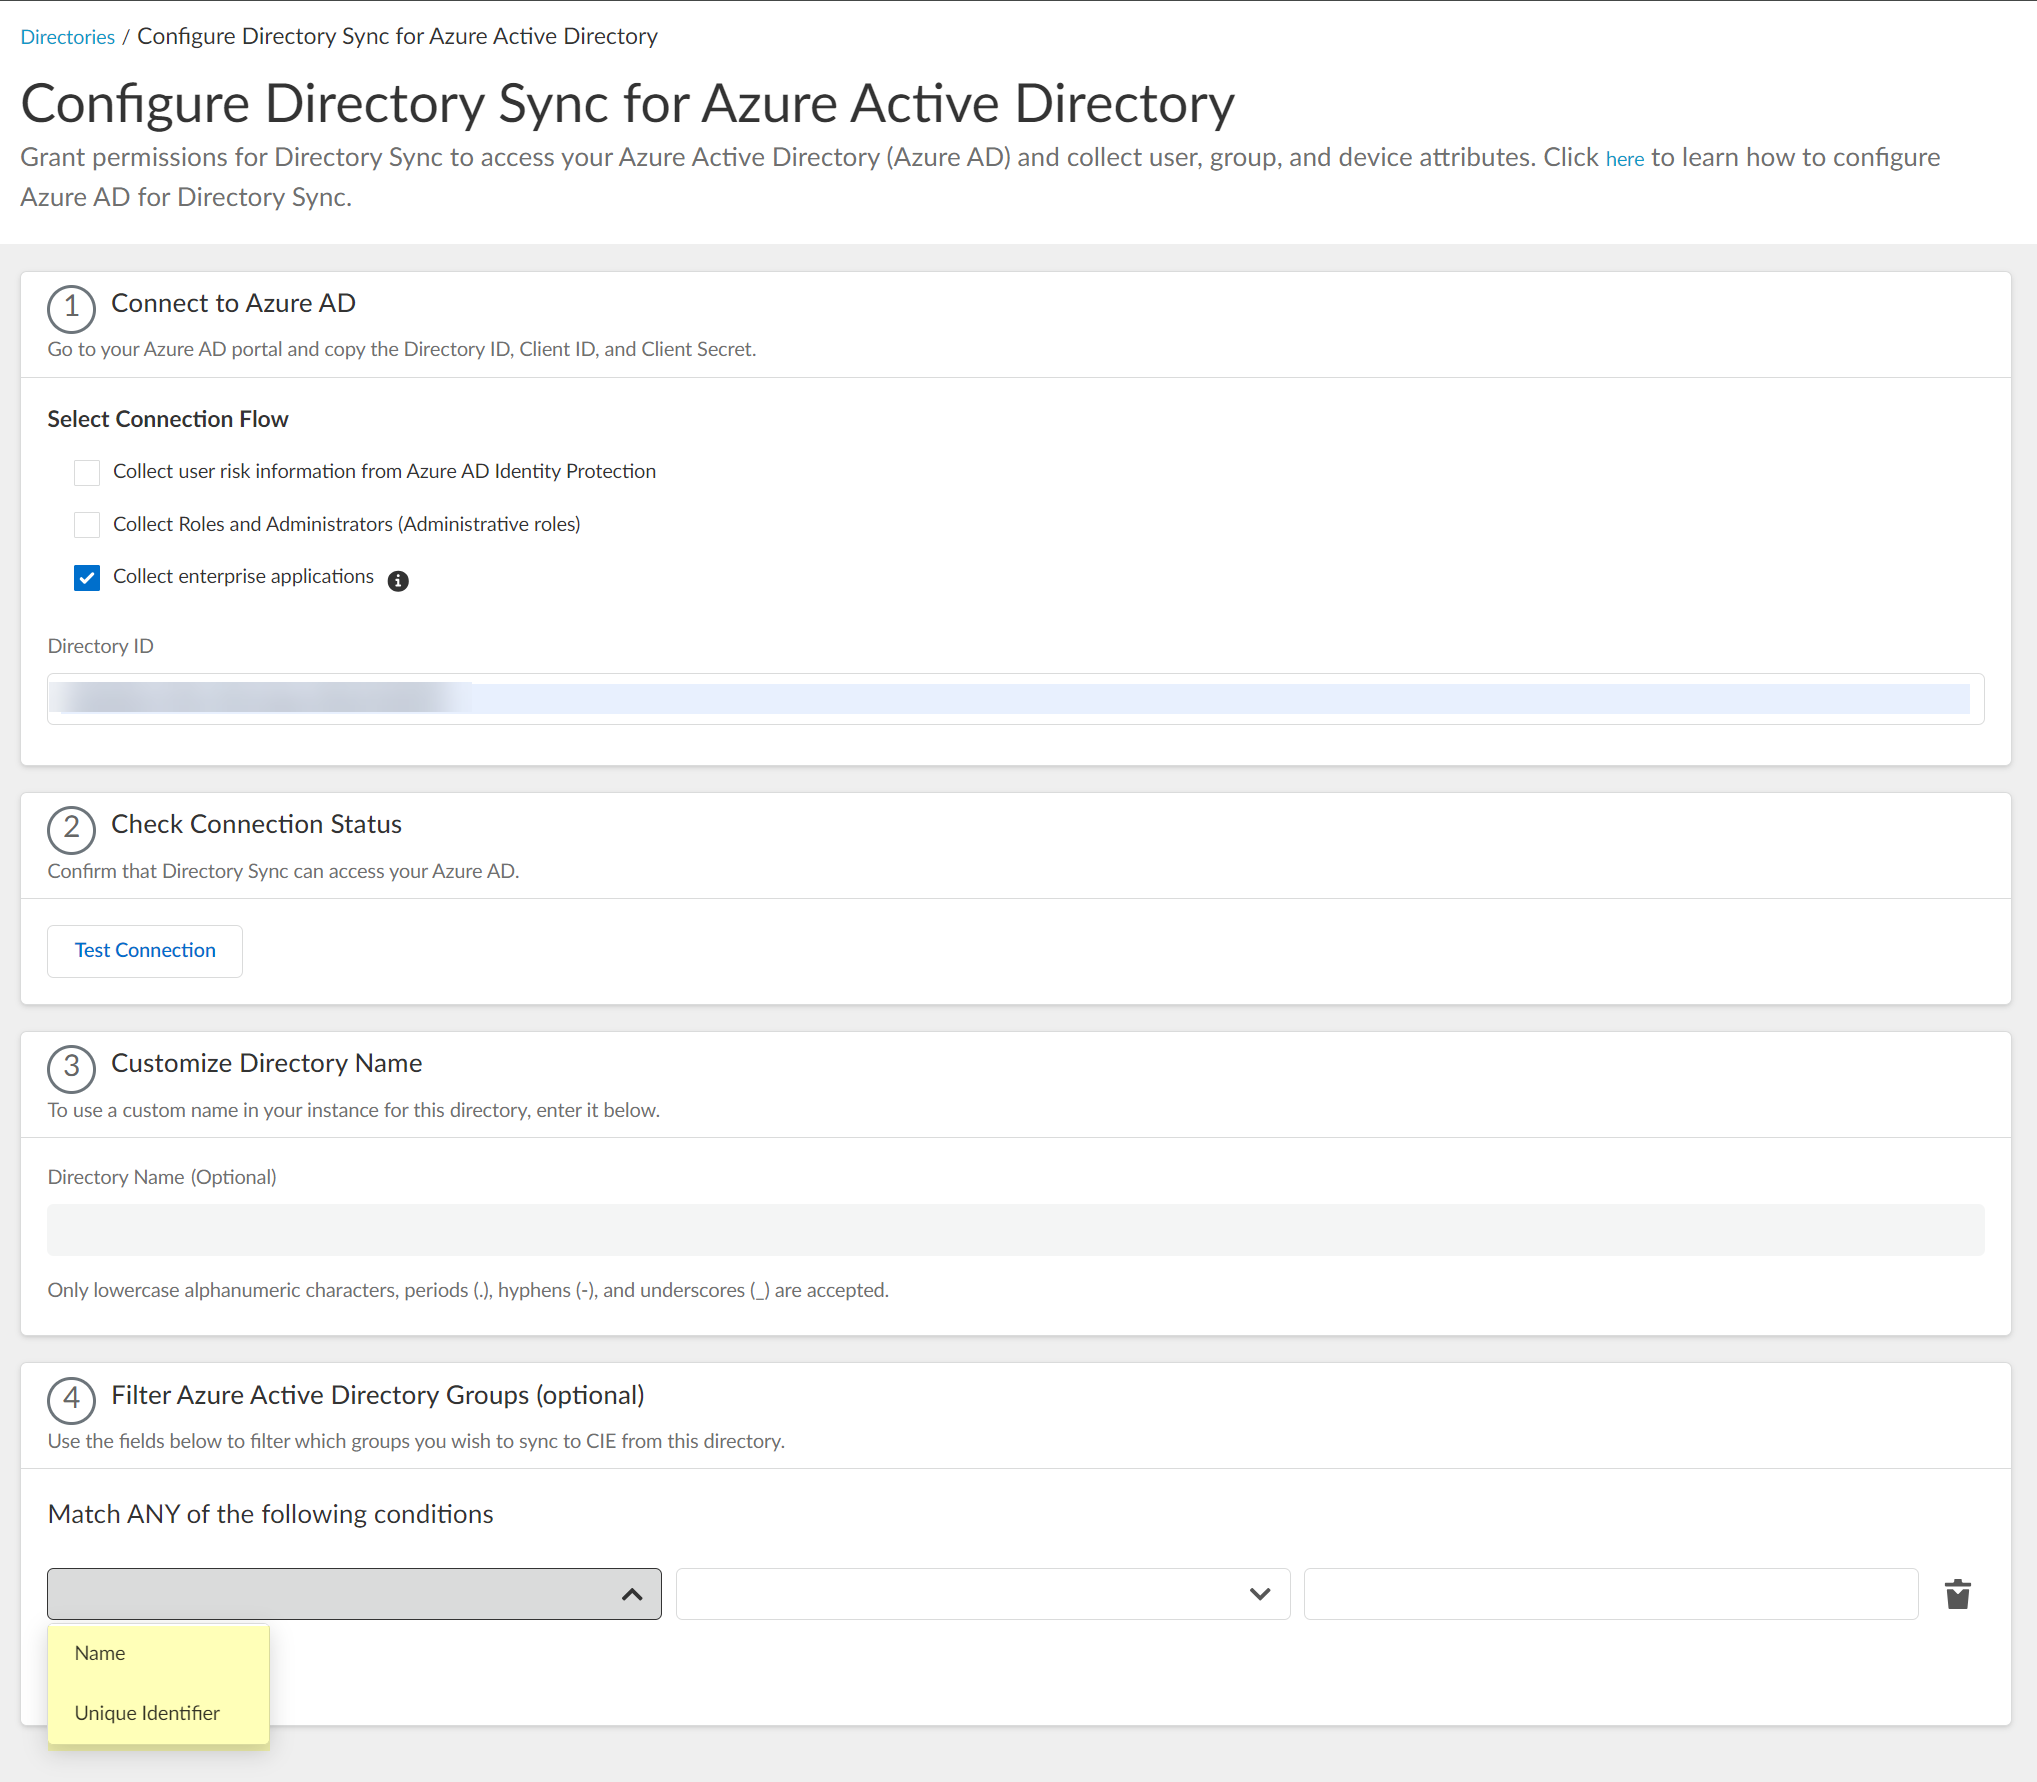
(Optional) Configure Group Filtering (alternative to SCIM for faster syncs):
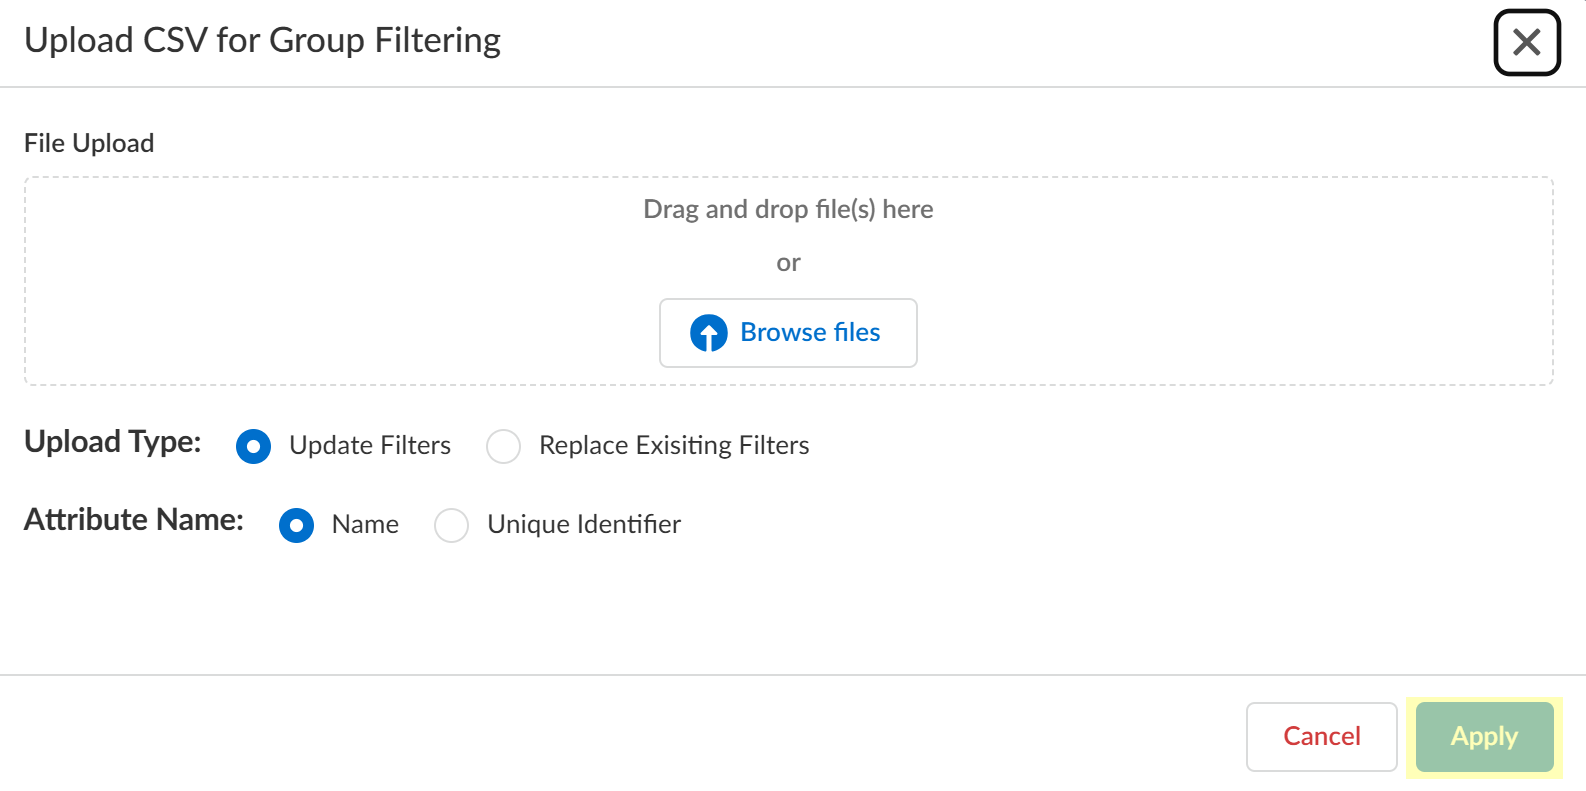
Upload CSV:
Upload a CSV file with group Names or Unique Identifiers. Choose Update or Replace mode.
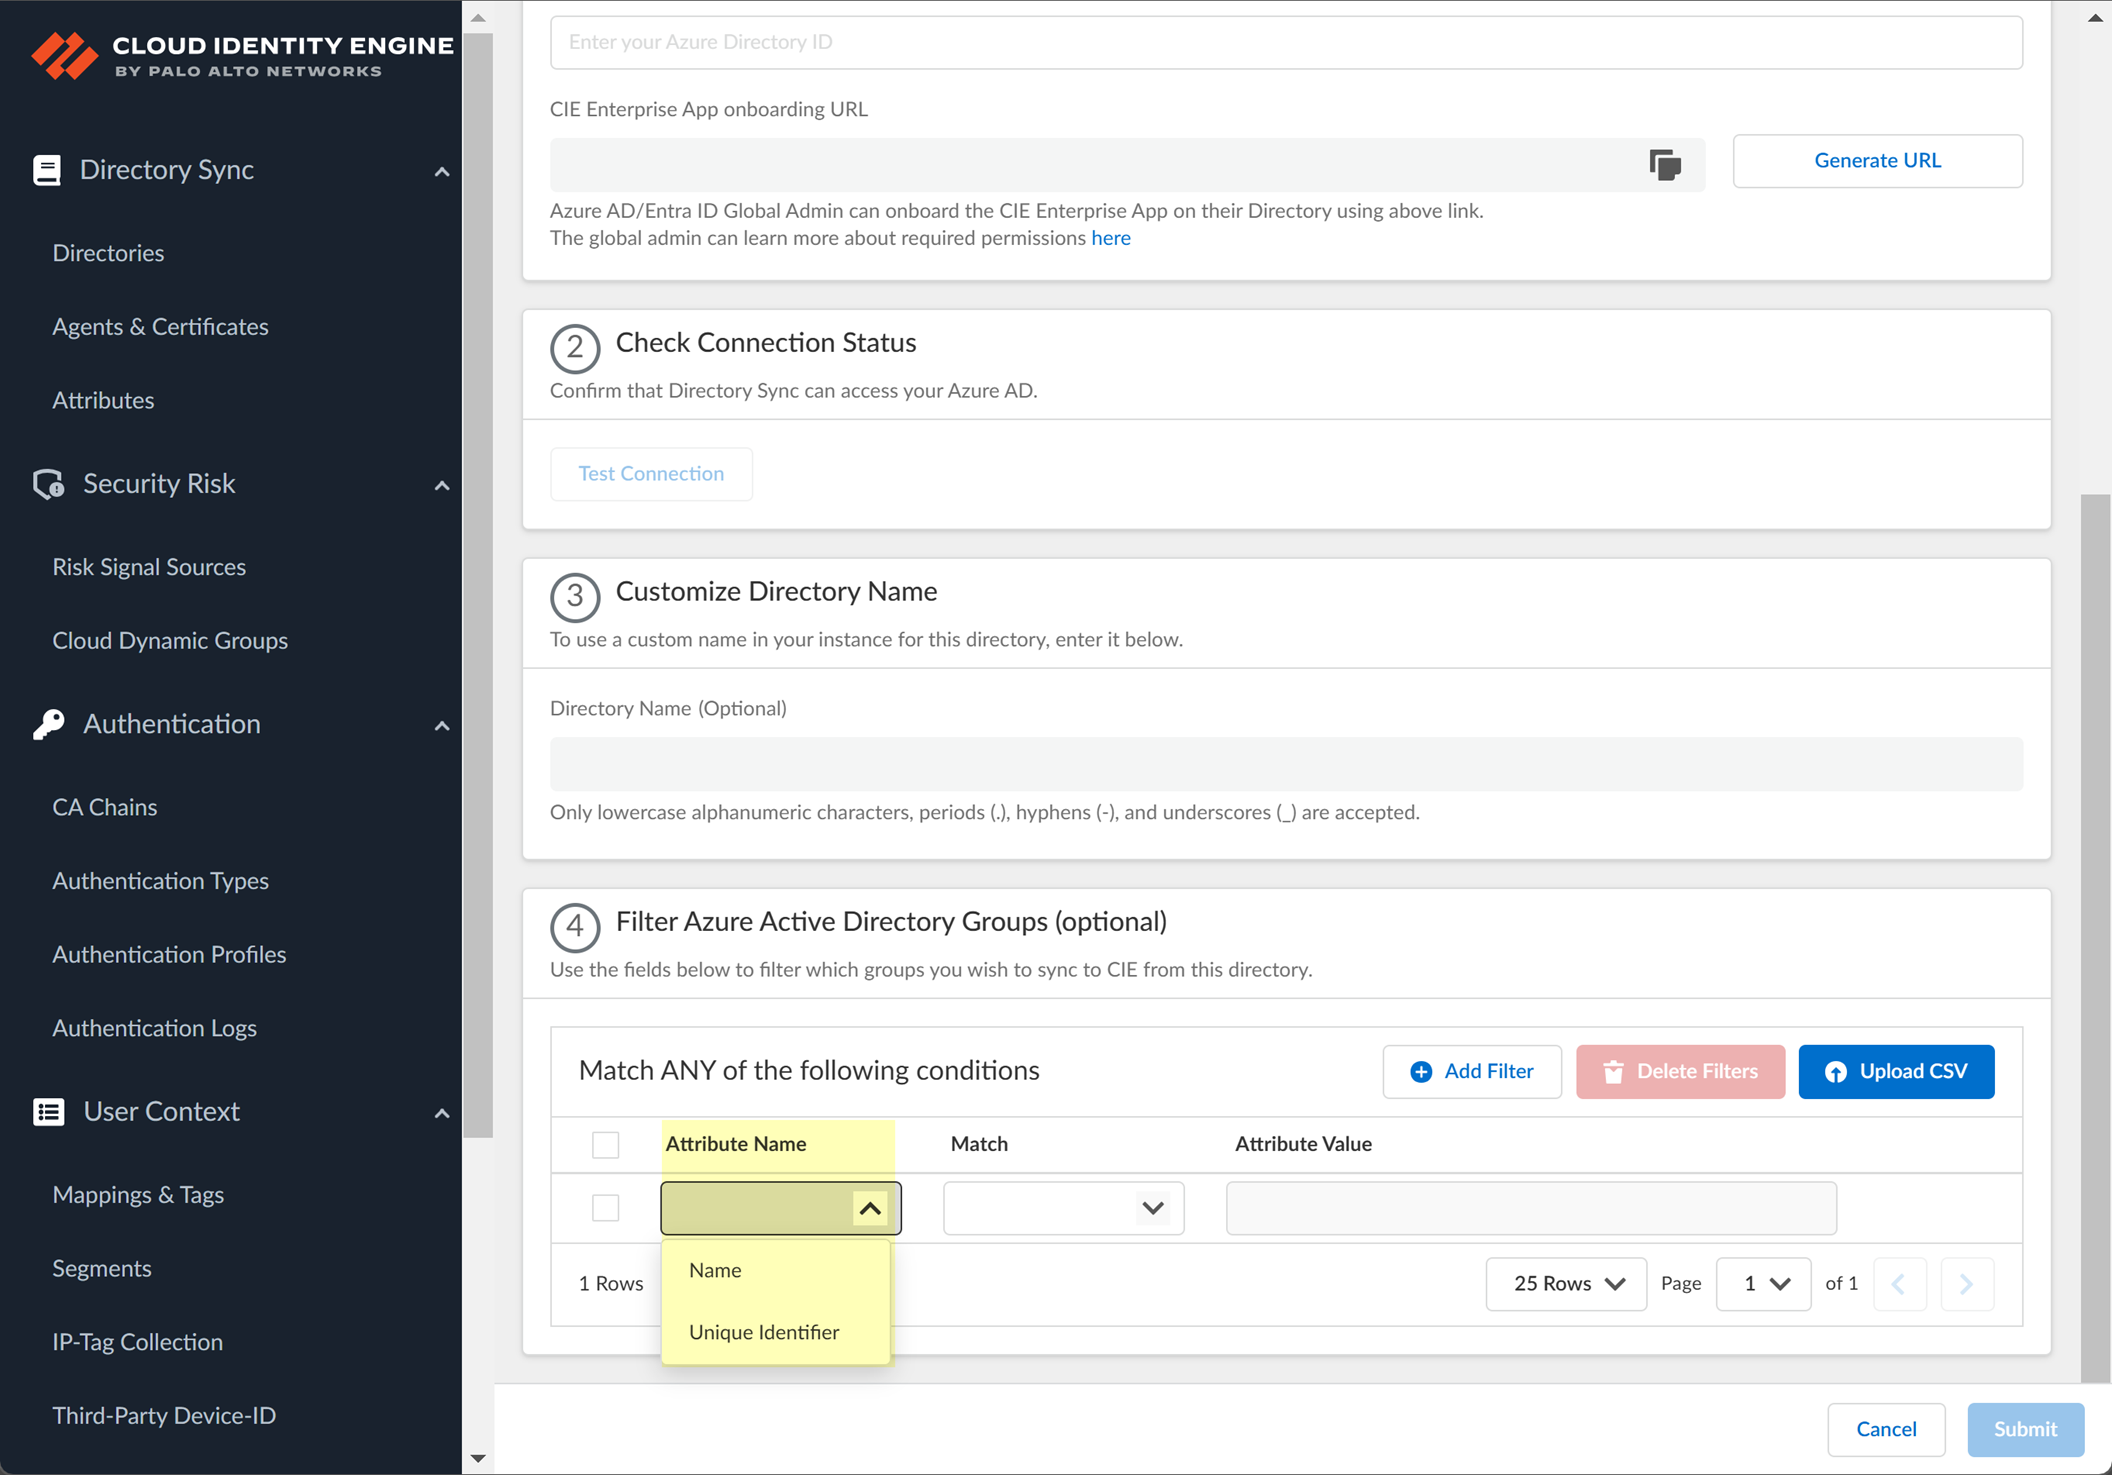
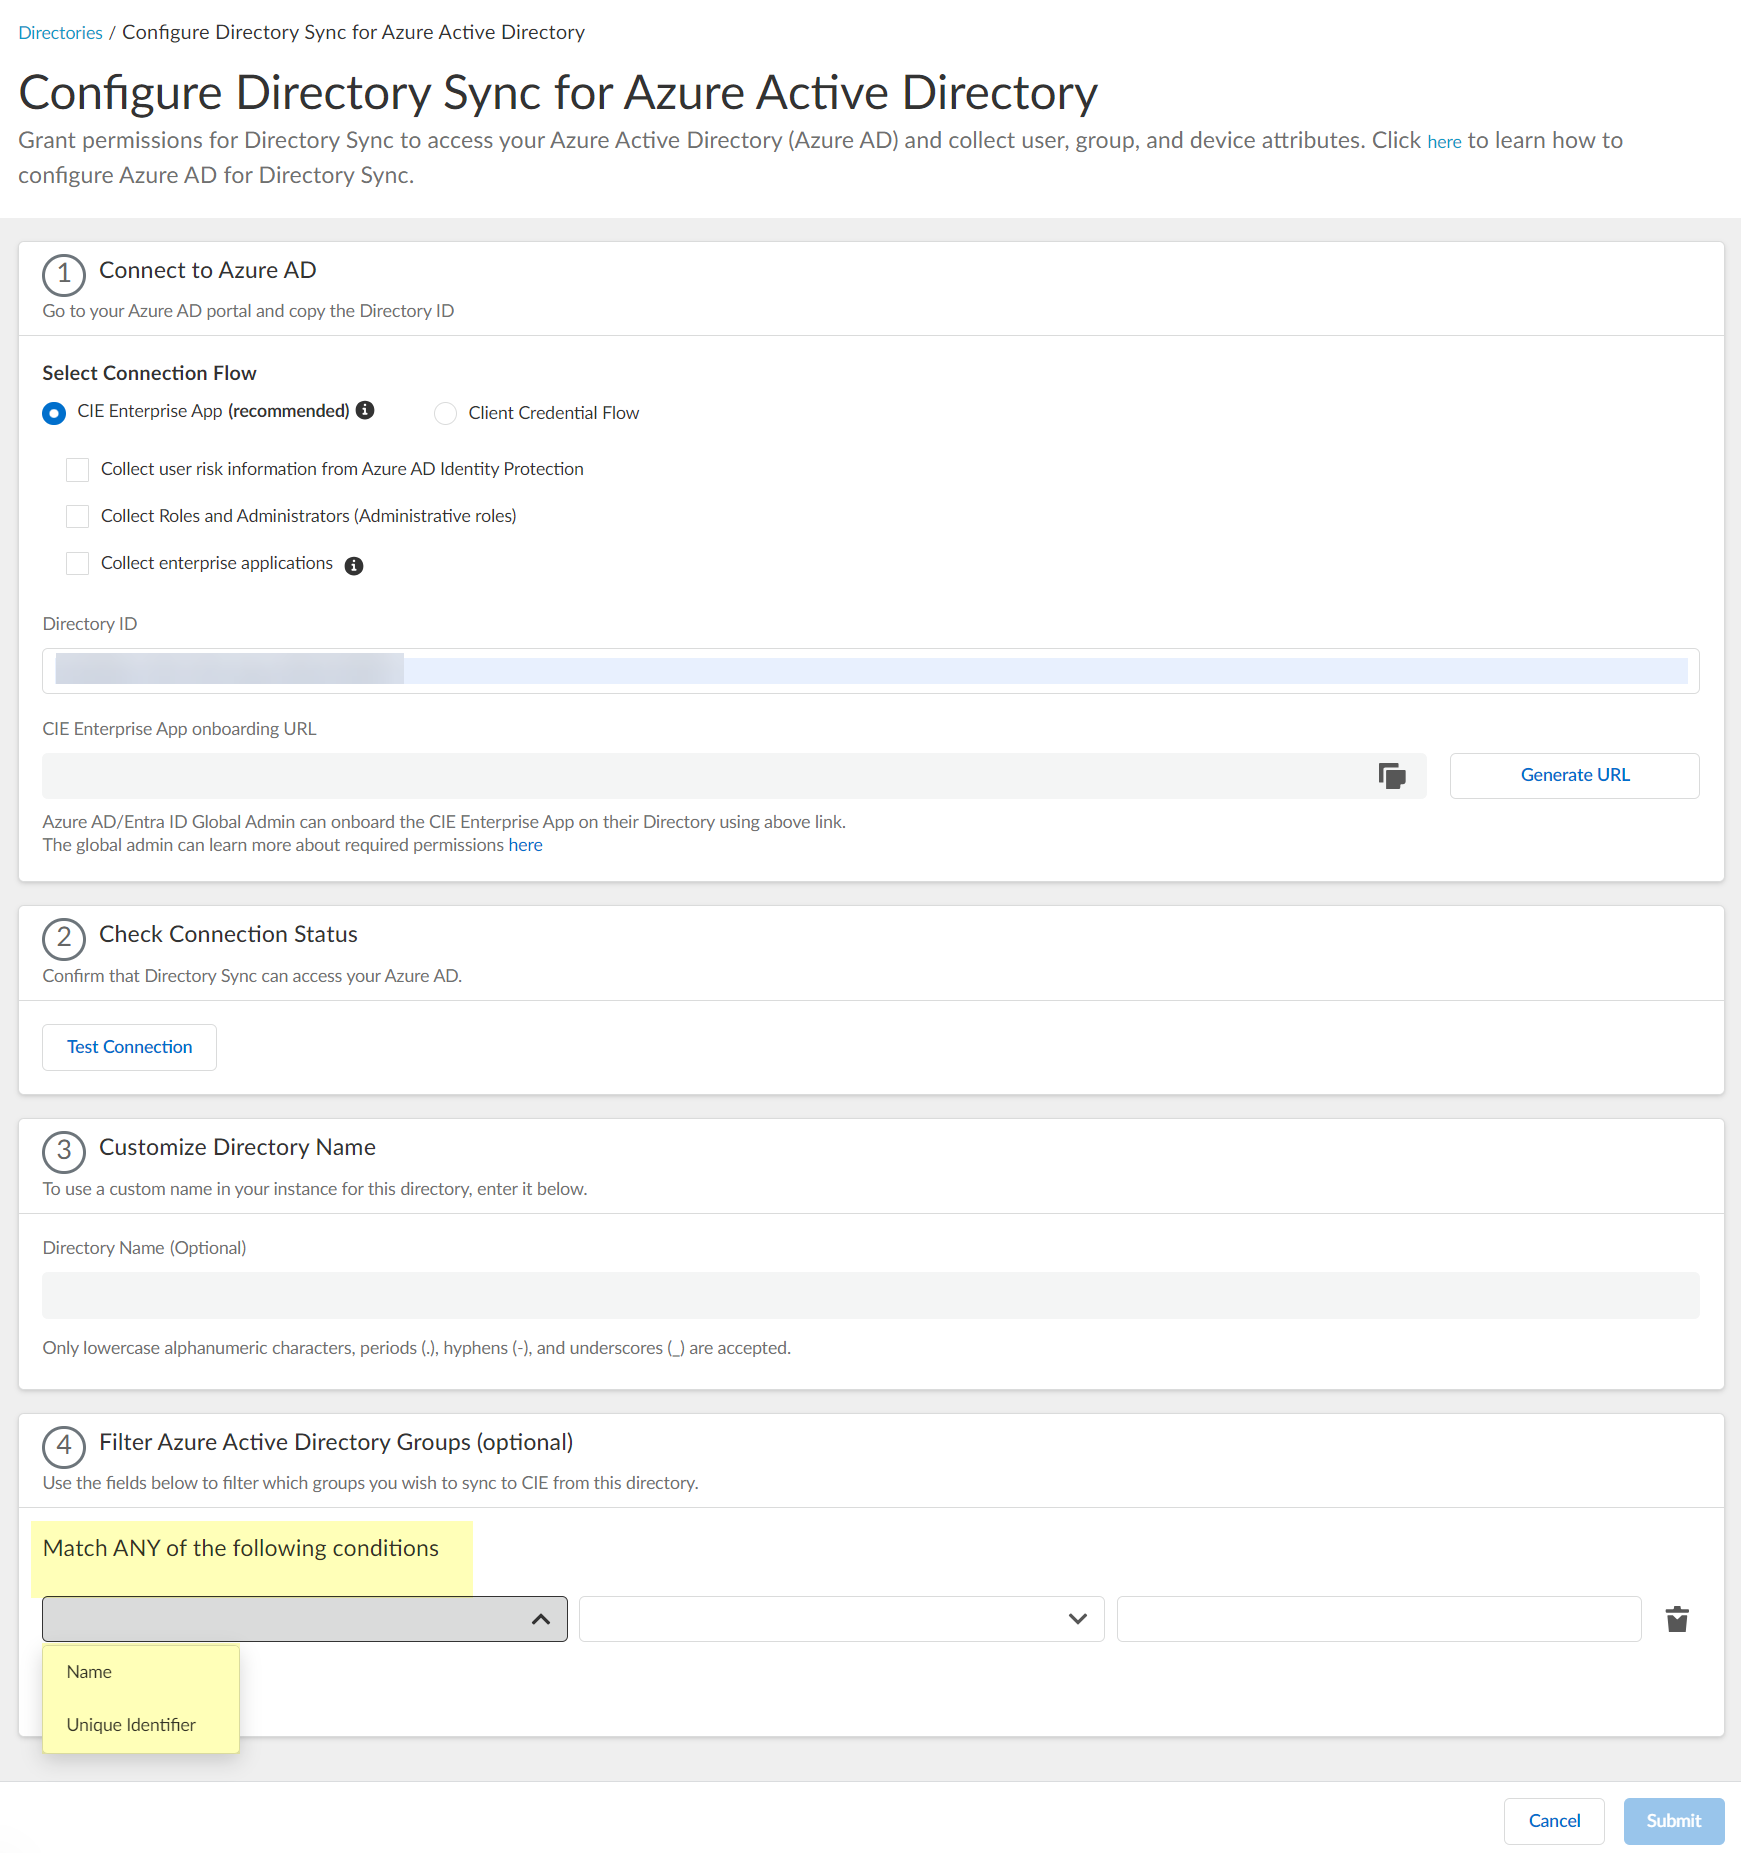
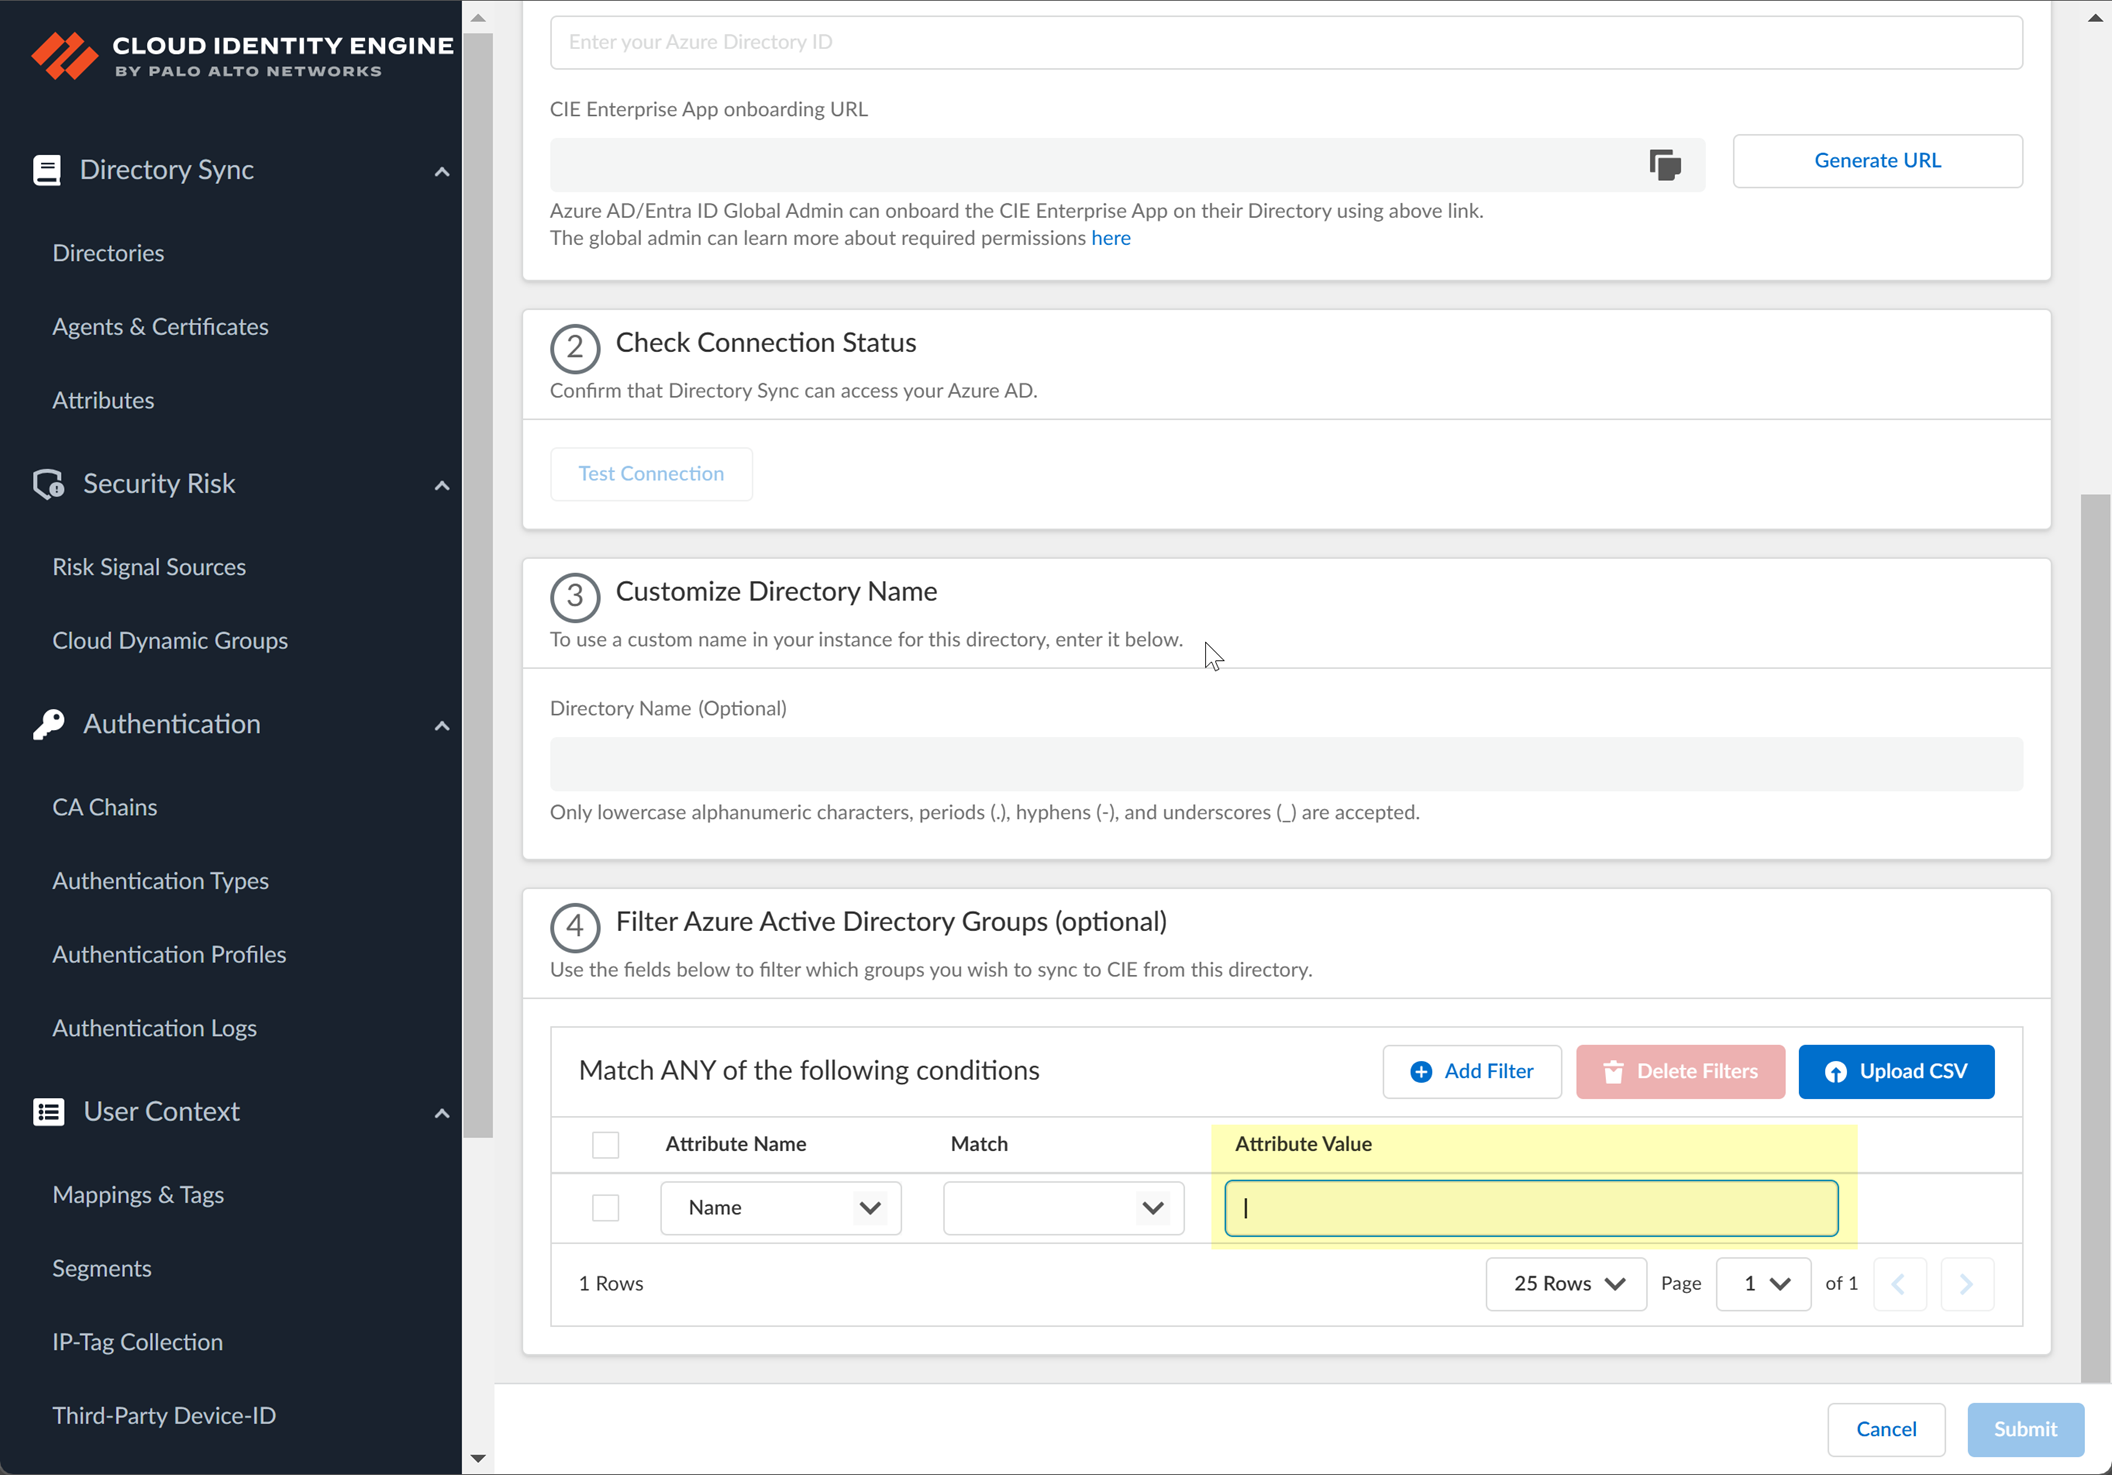
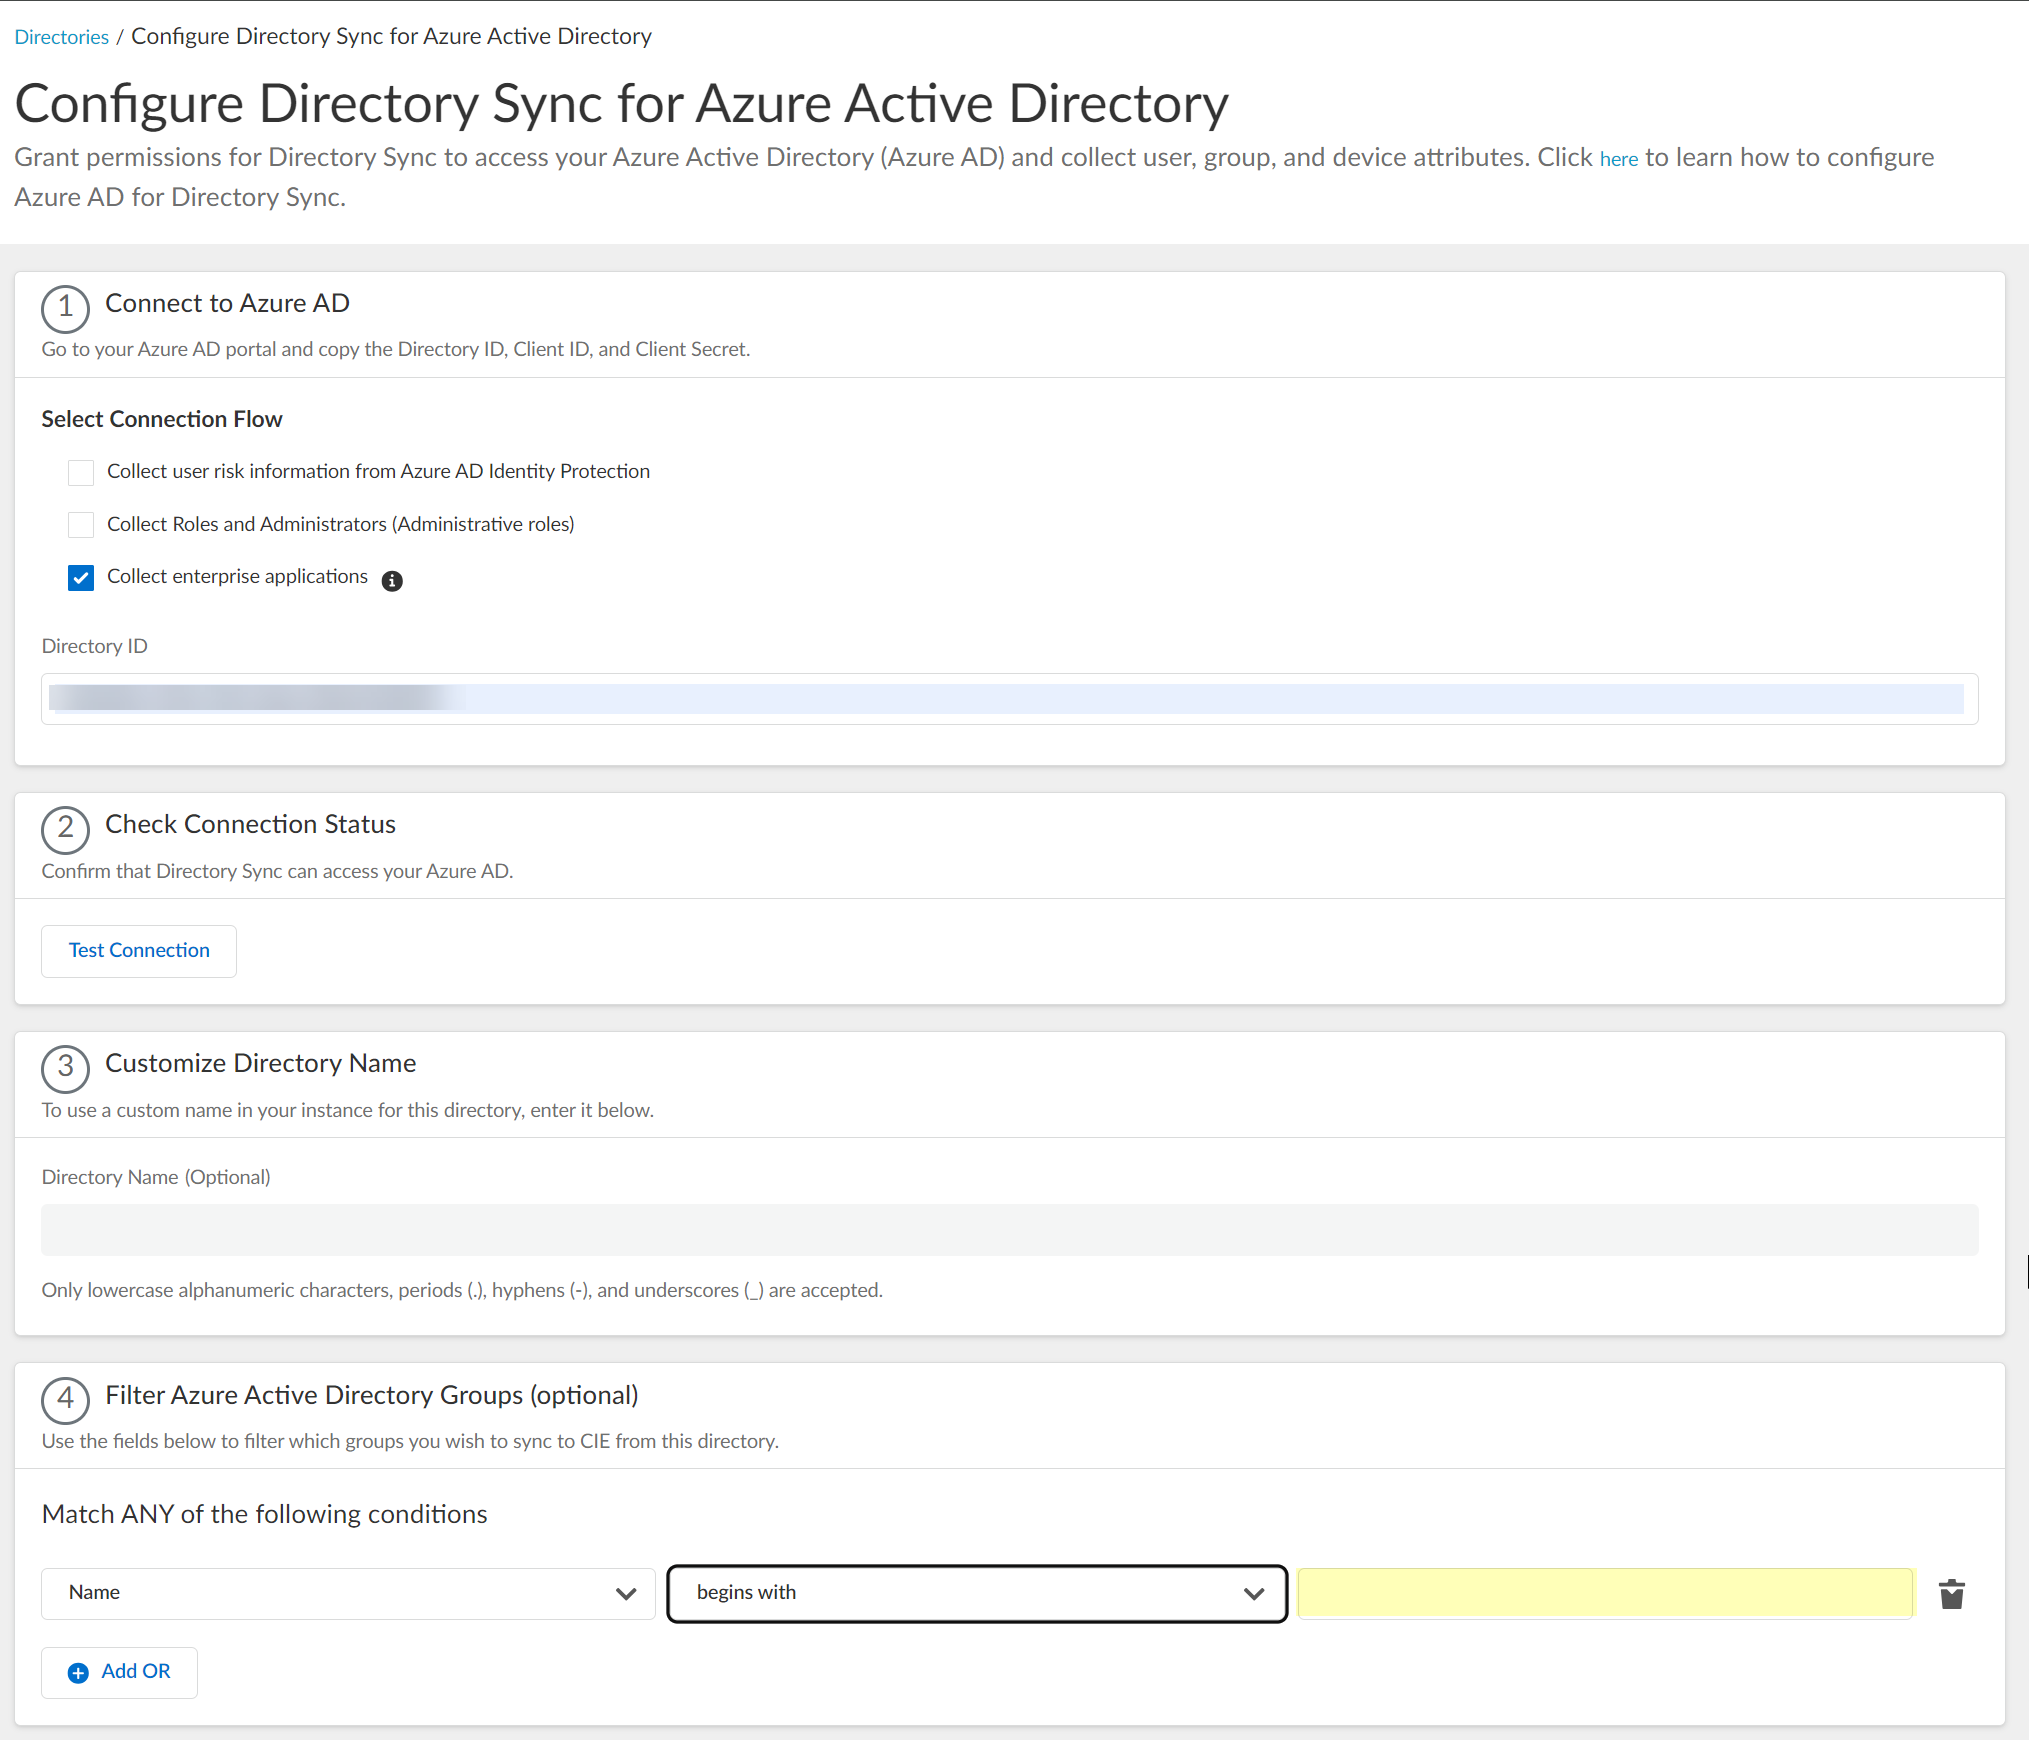
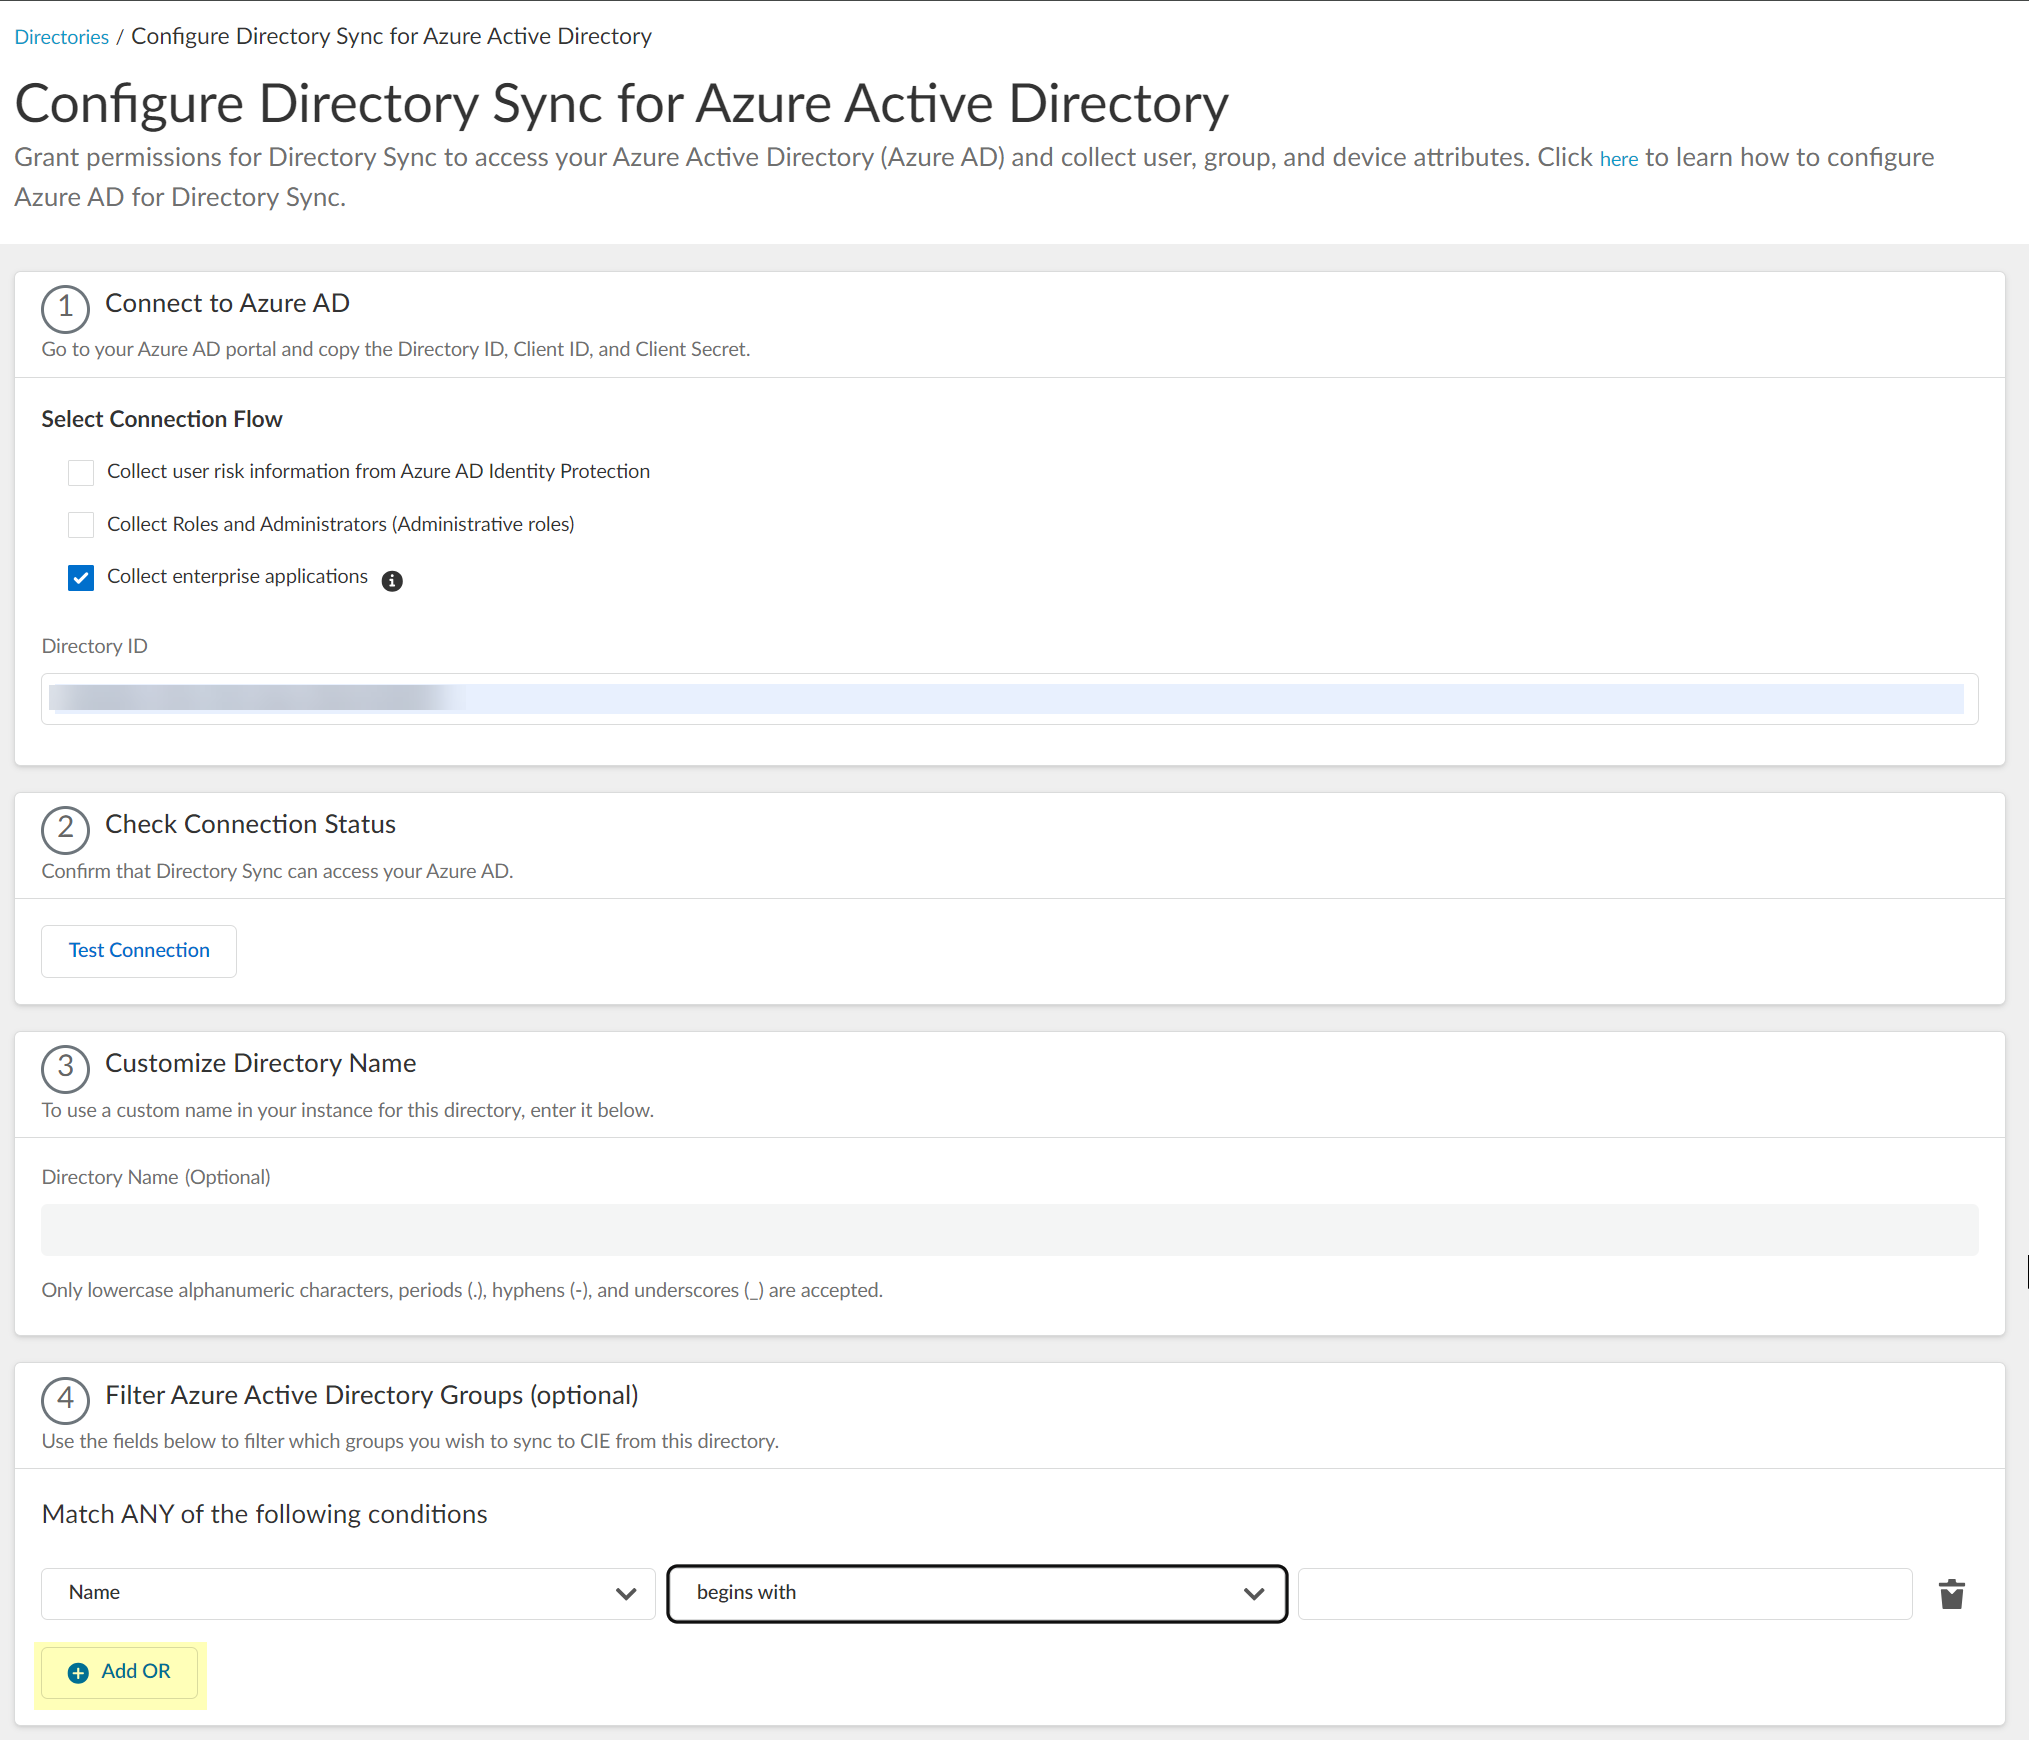
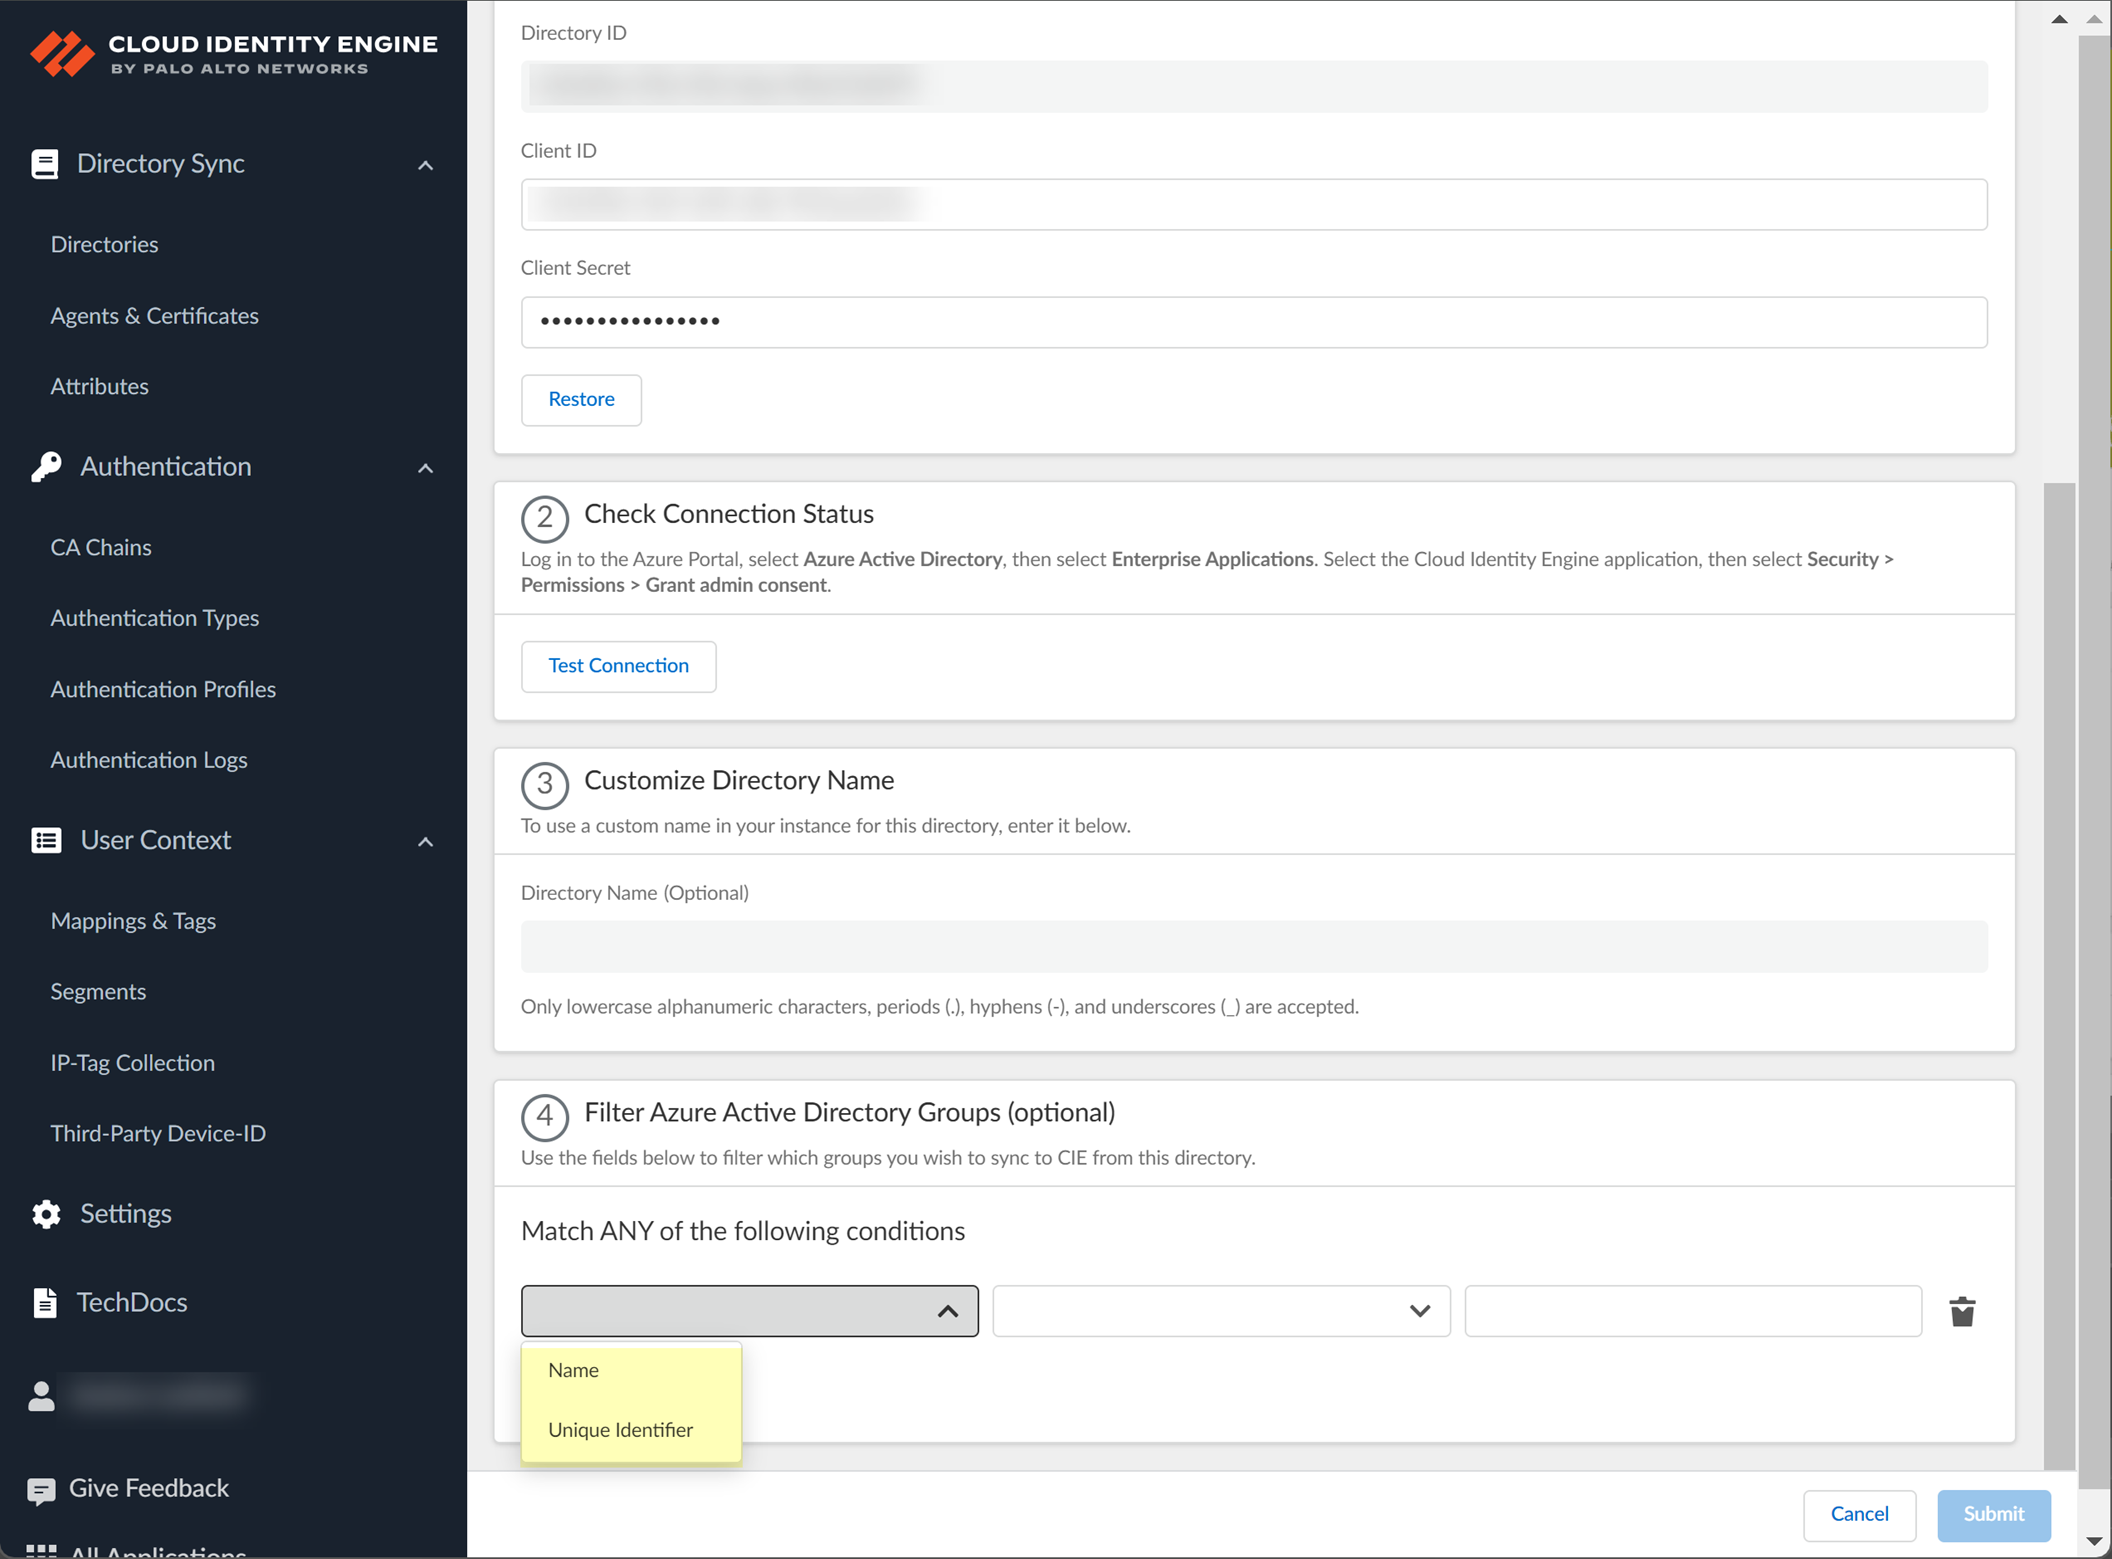
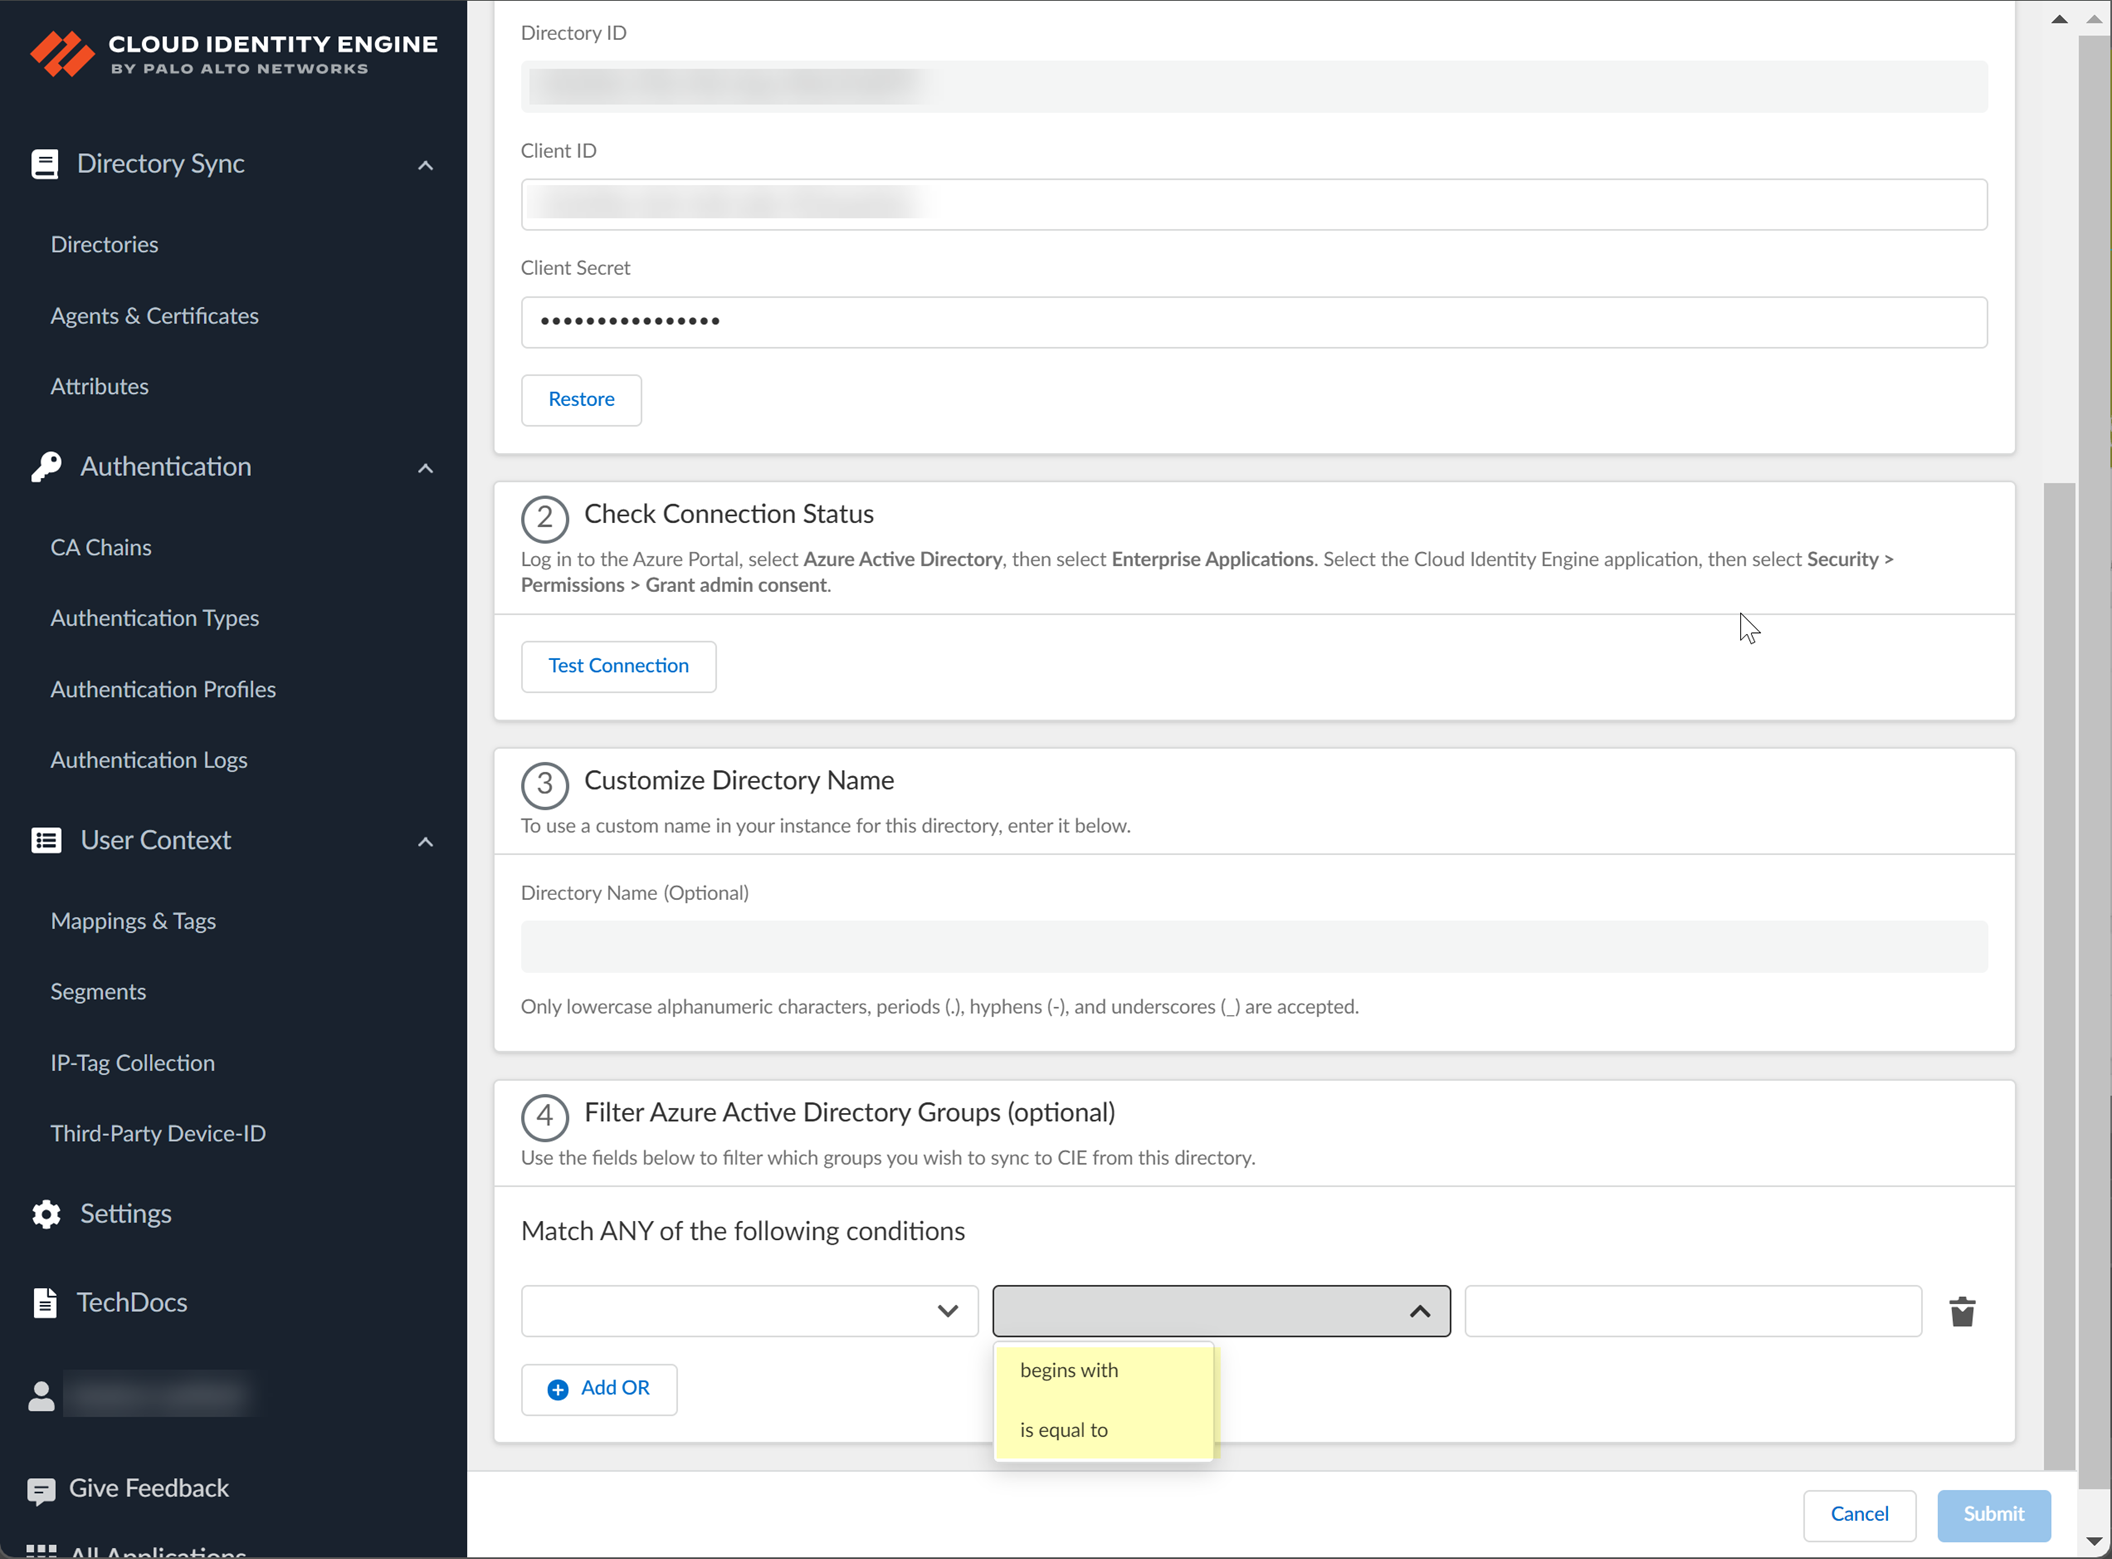
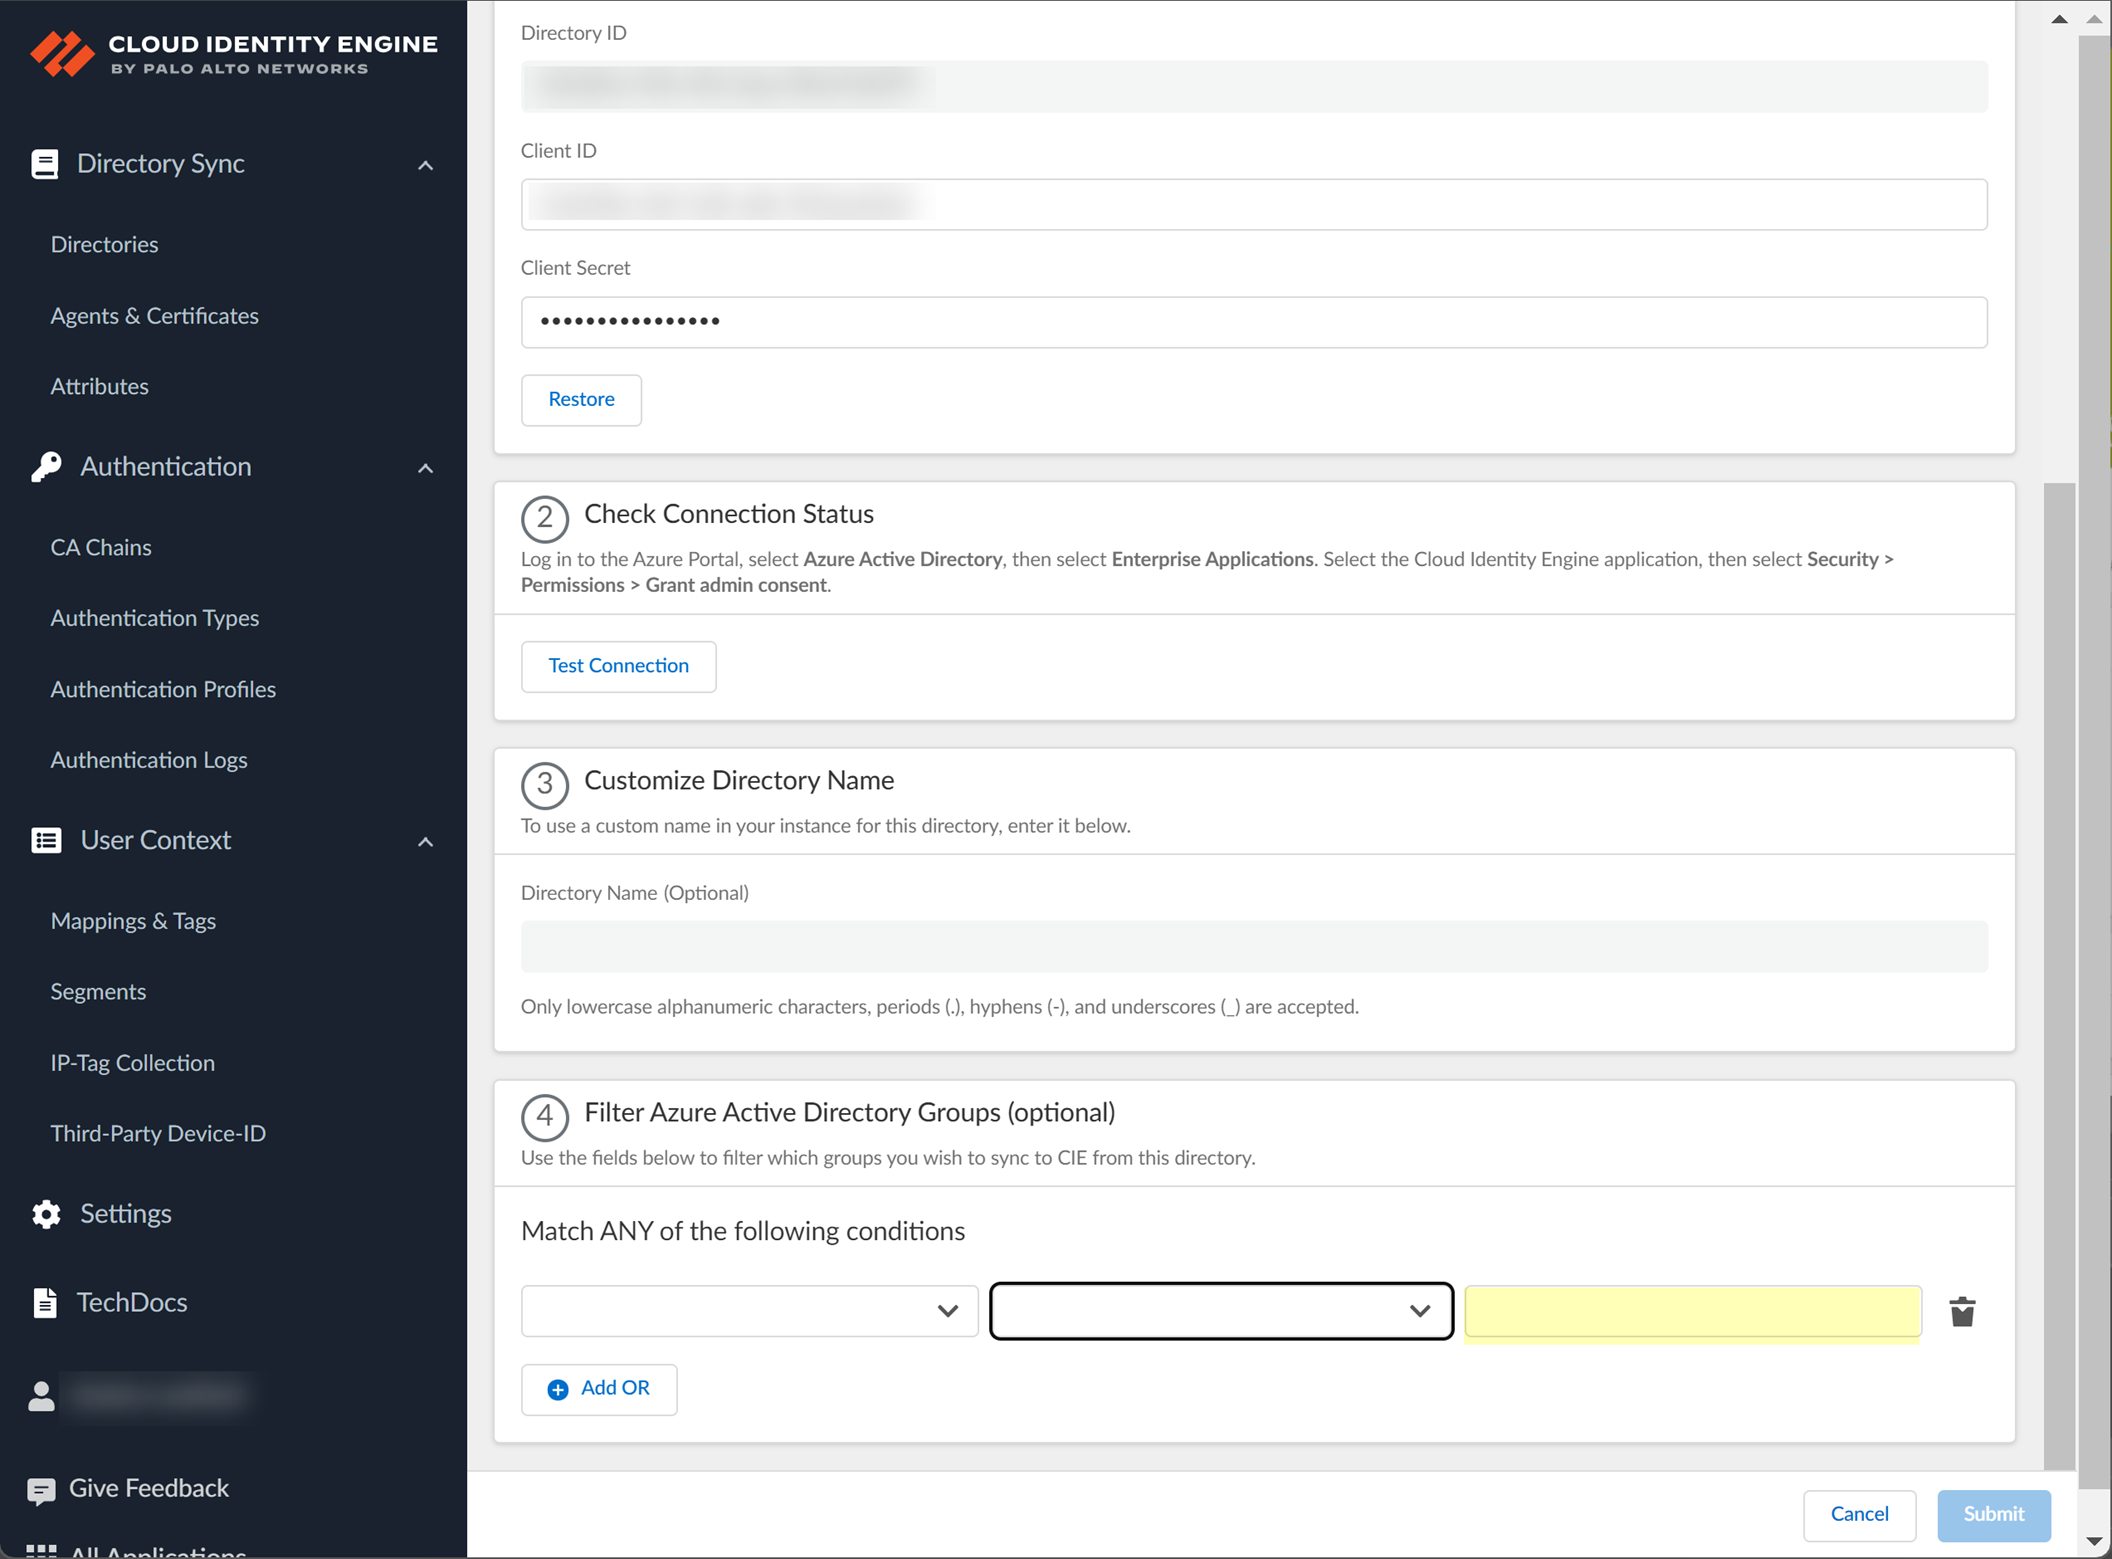
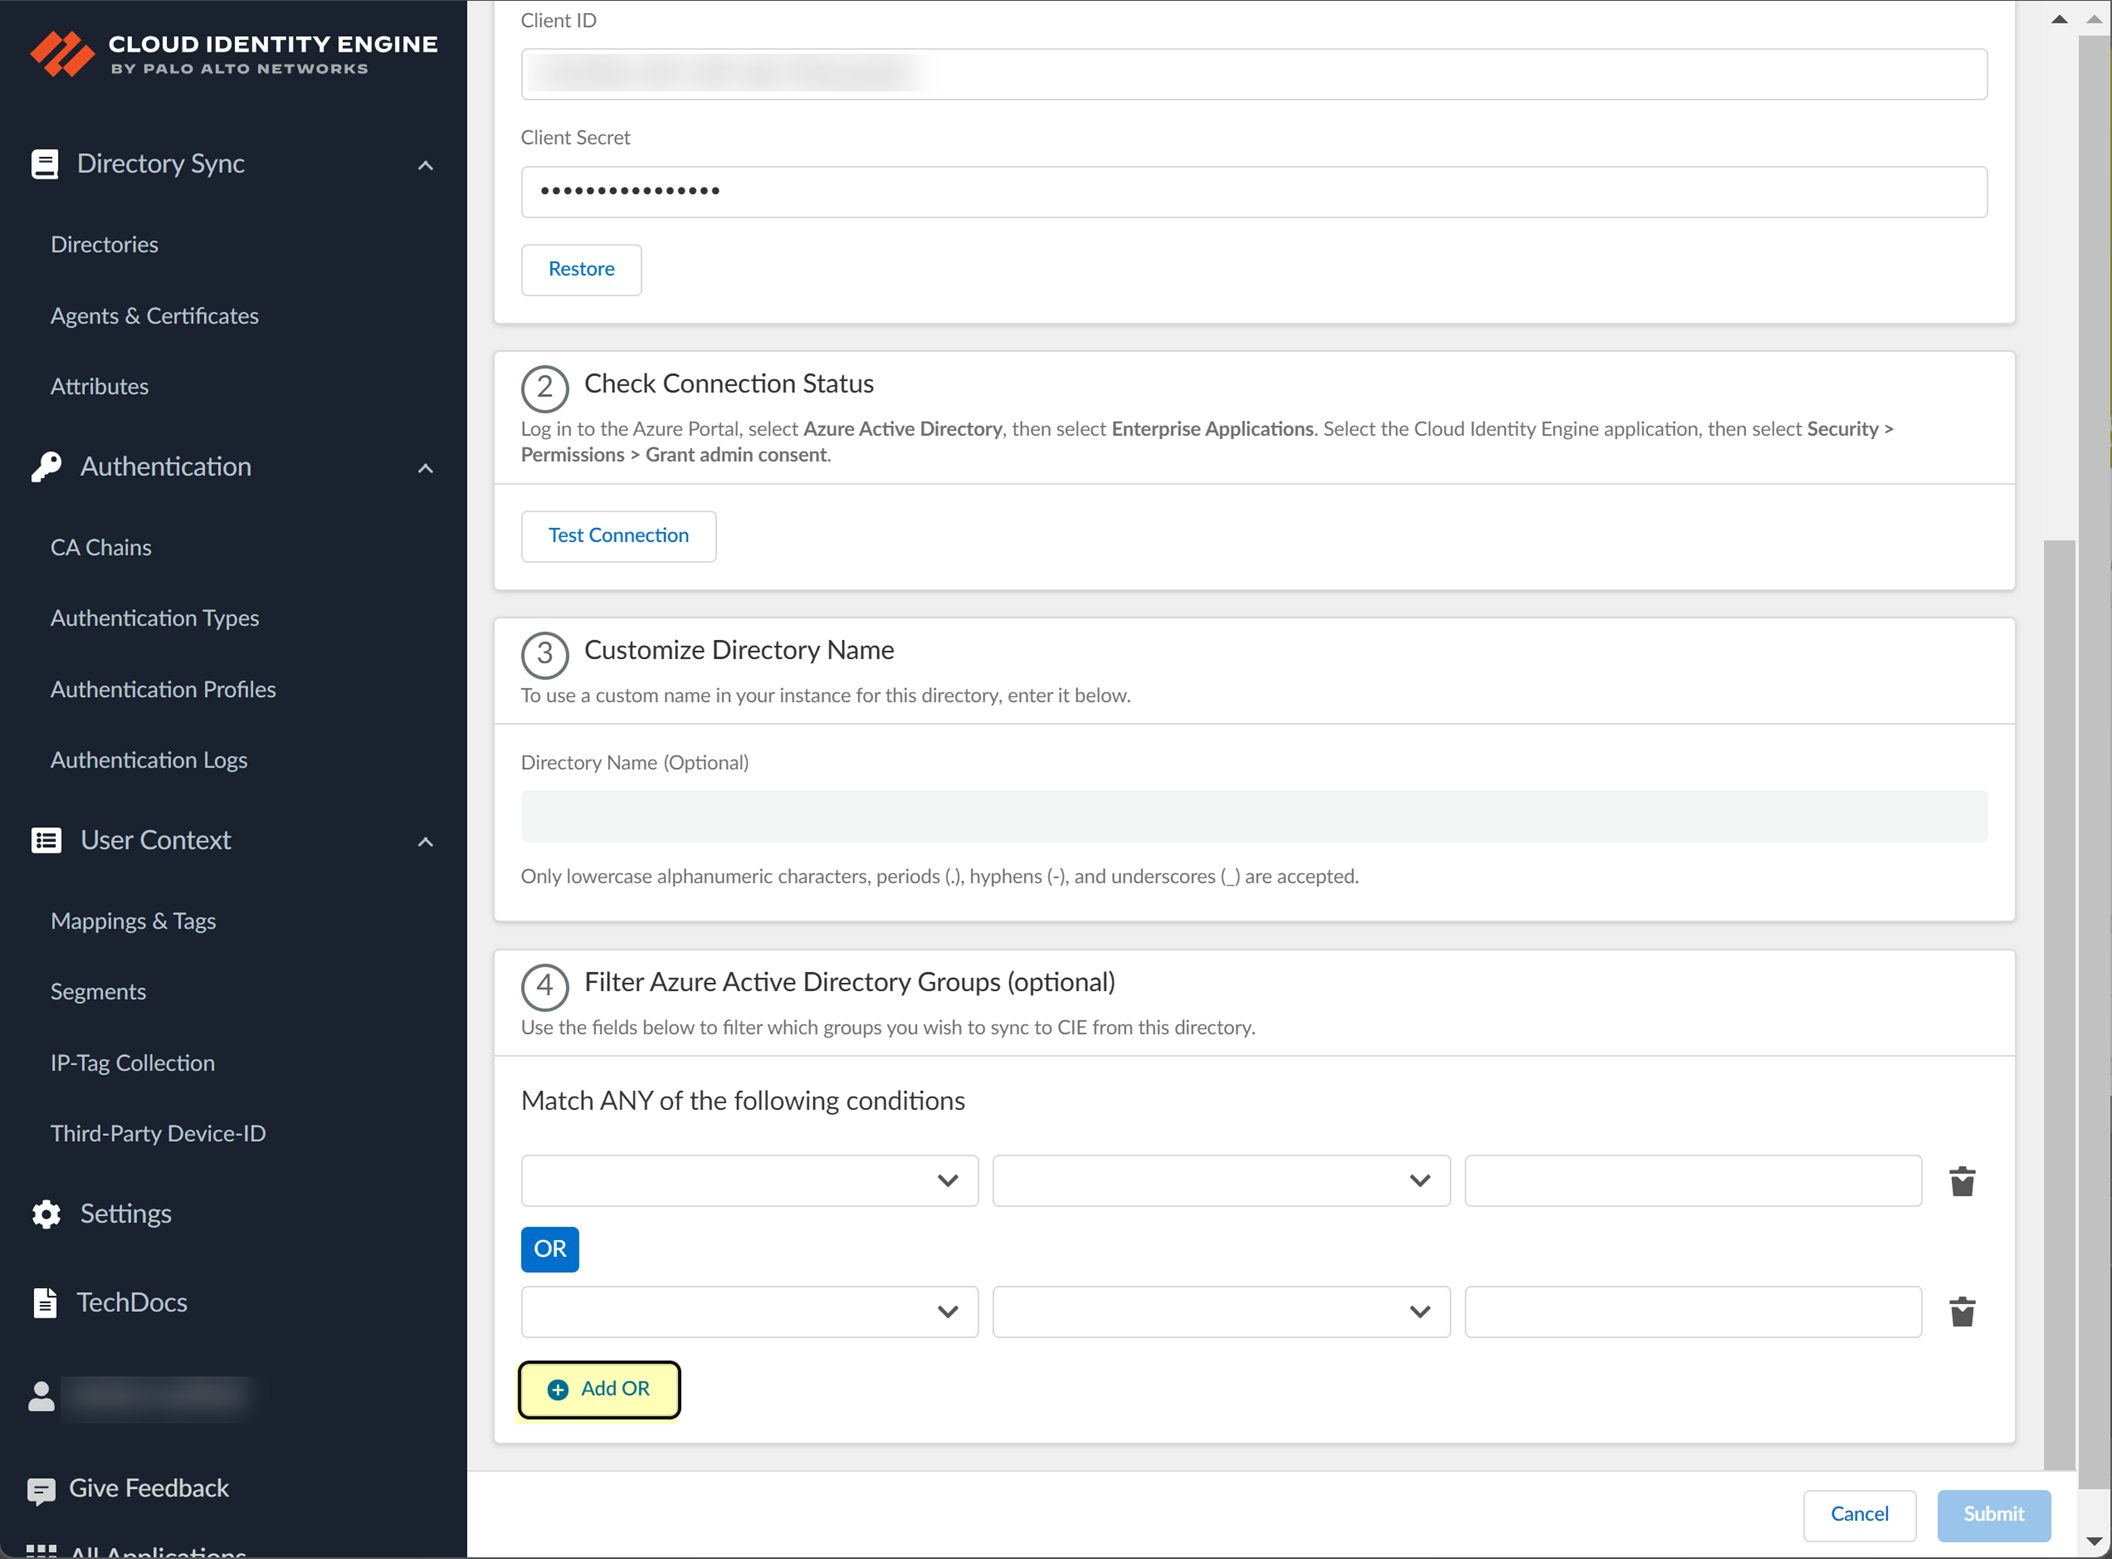
Manual Filter:
Select
Filter Azure Active Directory Groups
. Choose attribute (Name/Unique ID), operator (begins with/is equal to), enter value. Add more filters with OR/AND logic.
Click
Submit
. Verify directory information on the Directories page.
Configure Azure Using the Client Credential Flow
Uses a service account for Azure AD connection, enhancing security.
Recommended over the Enterprise App flow if Global Admin permissions are a concern long-term.
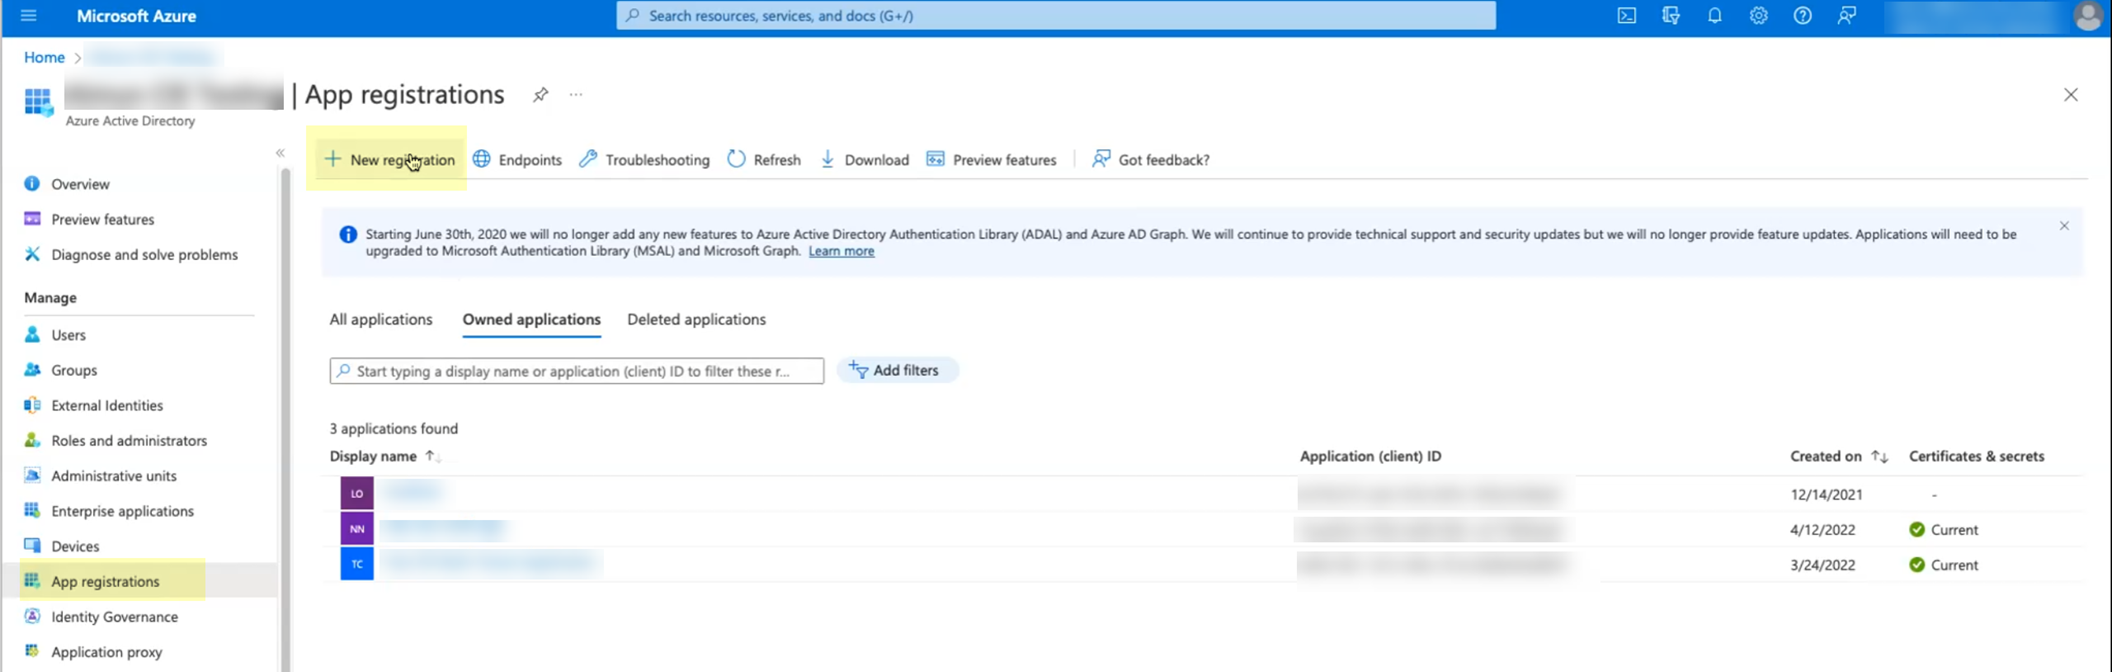
[GOTCHA] If this is the first CIE tenant setup, the CIE app won't be in the Azure gallery; you must create a custom app registration.
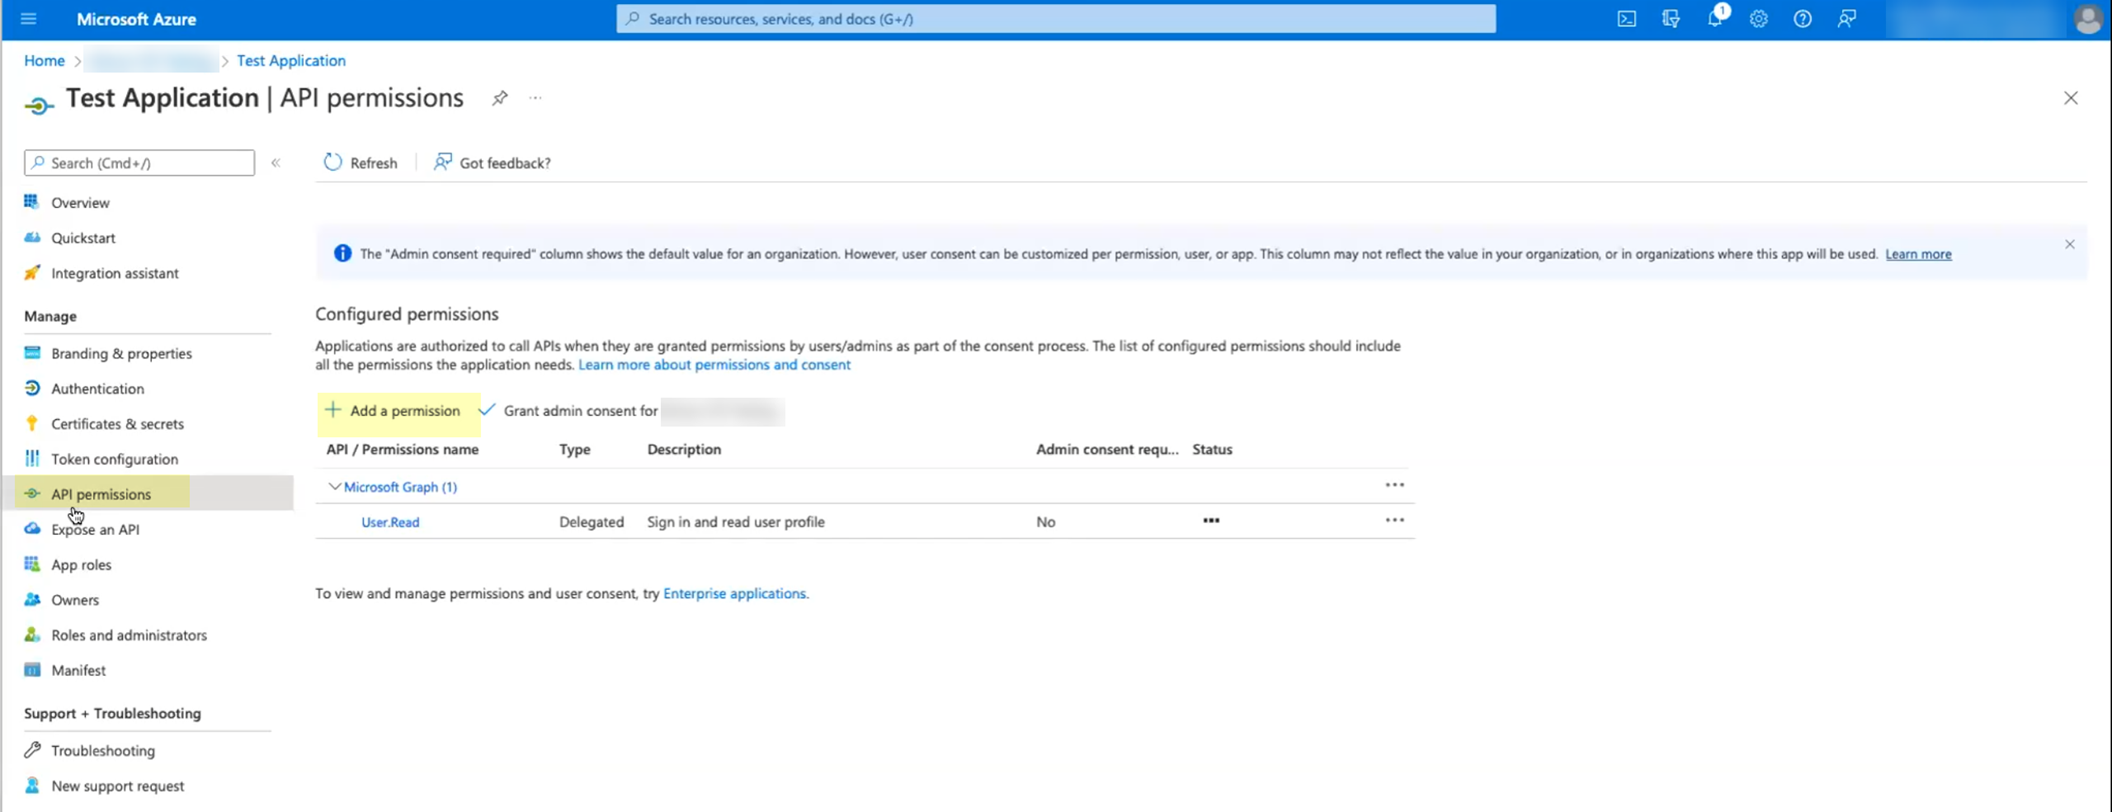
Grant required permissions in Azure Portal:
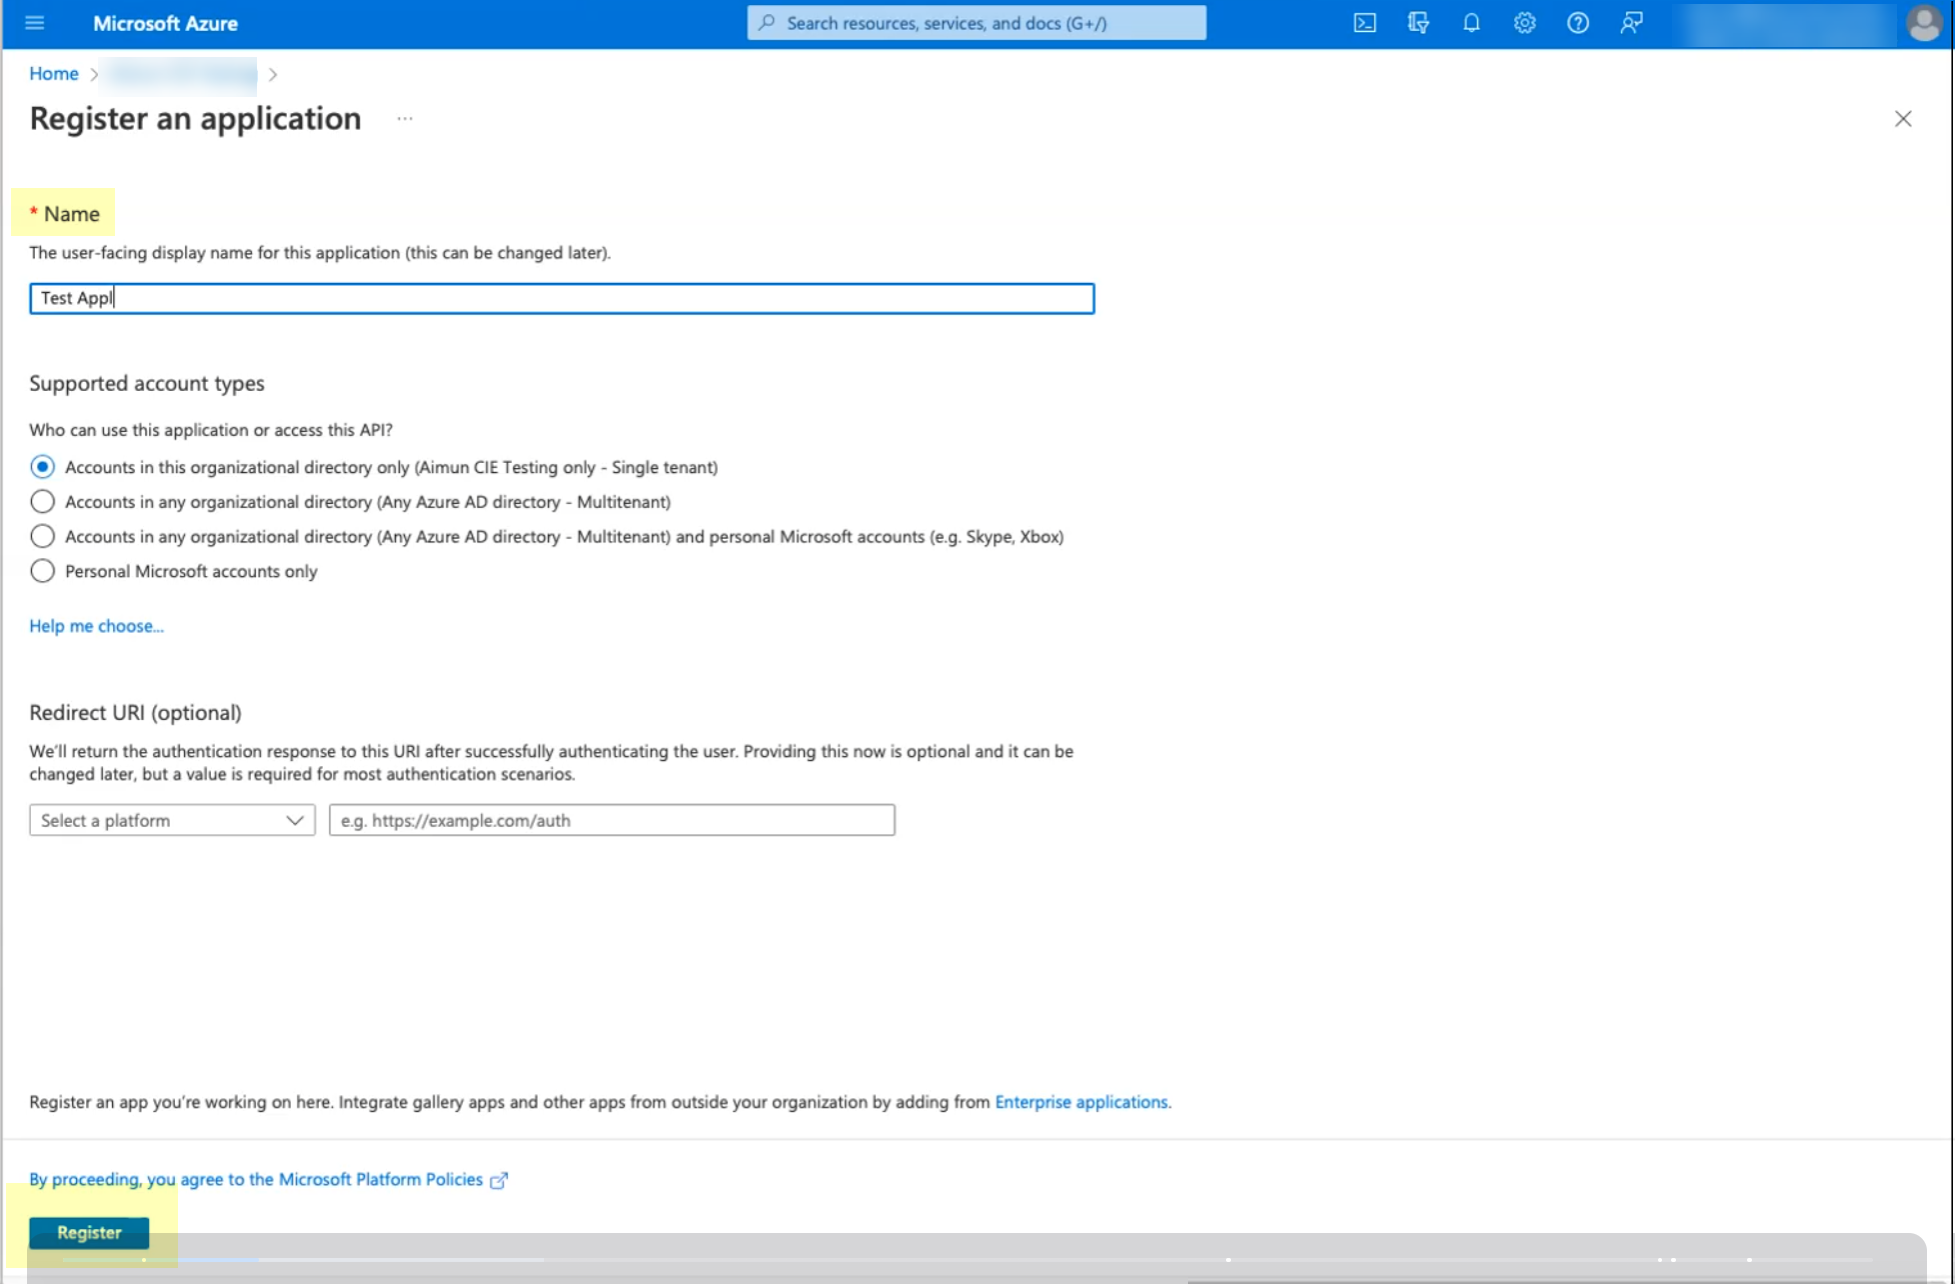
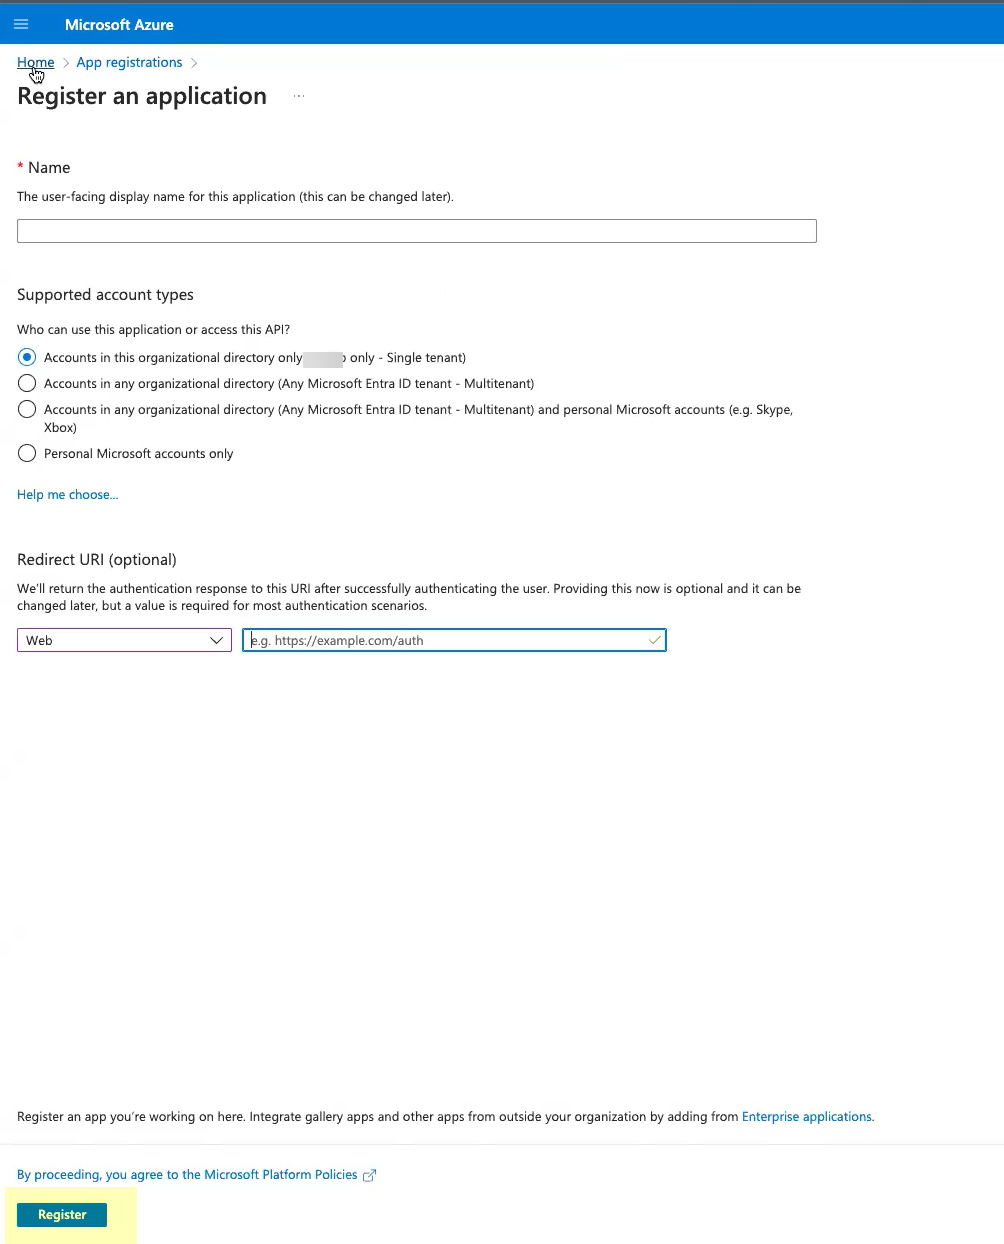
Go to Azure AD > App Registrations >
New registration
.
Enter a Name, click
Register
.
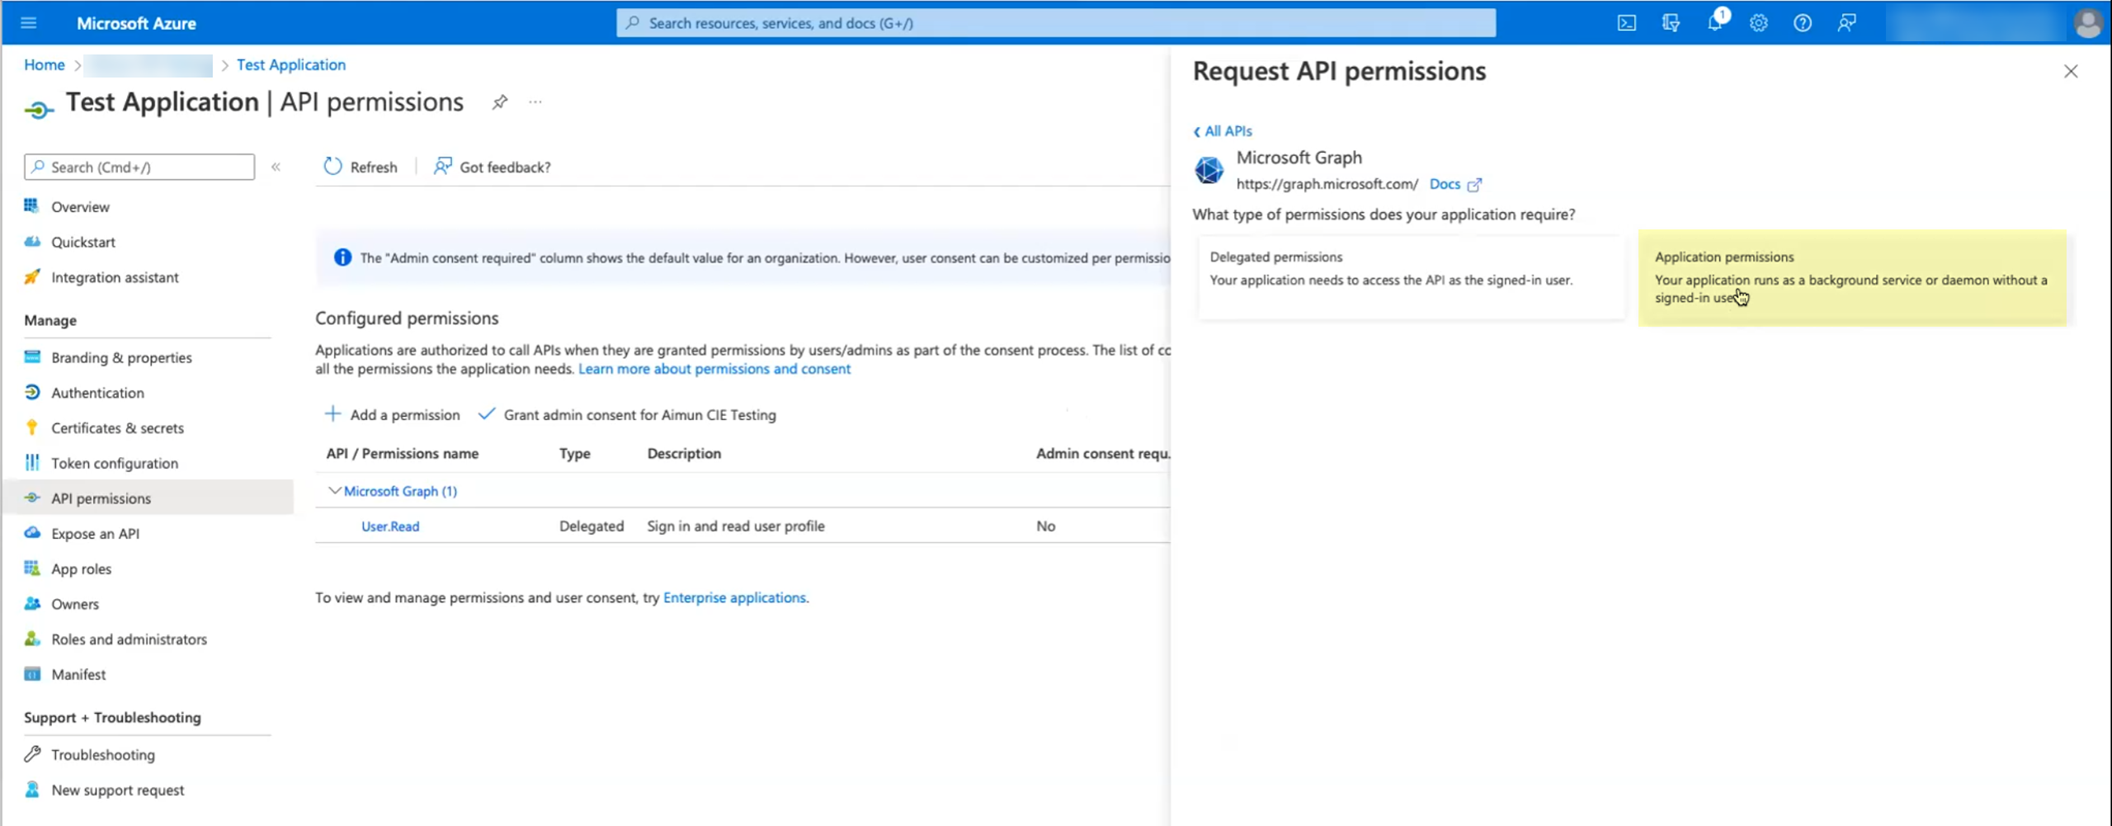
Go to API permissions >
Add a permission
> Microsoft Graph > Application permissions.
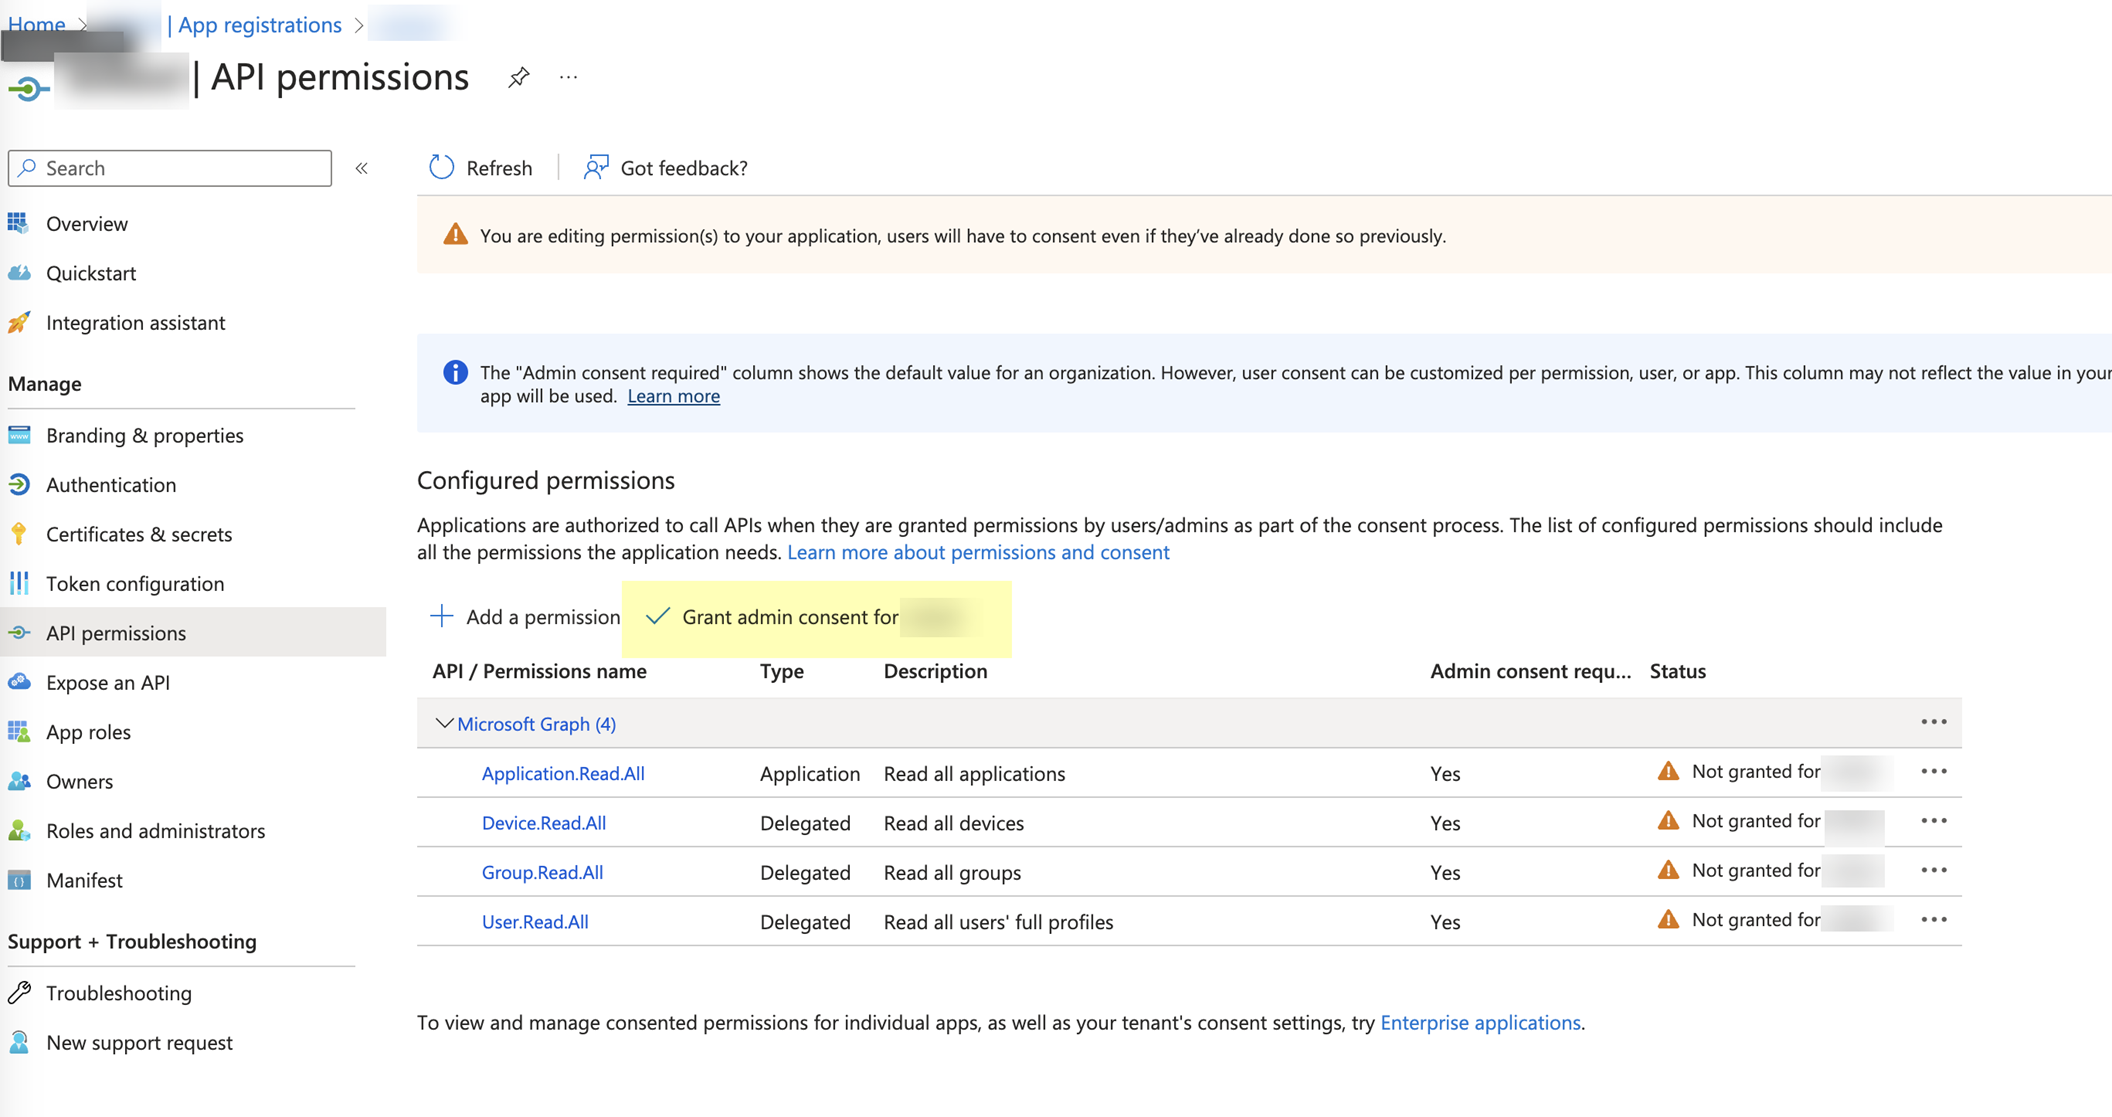
Click
Grant admin consent for [DirectoryName]
and confirm.
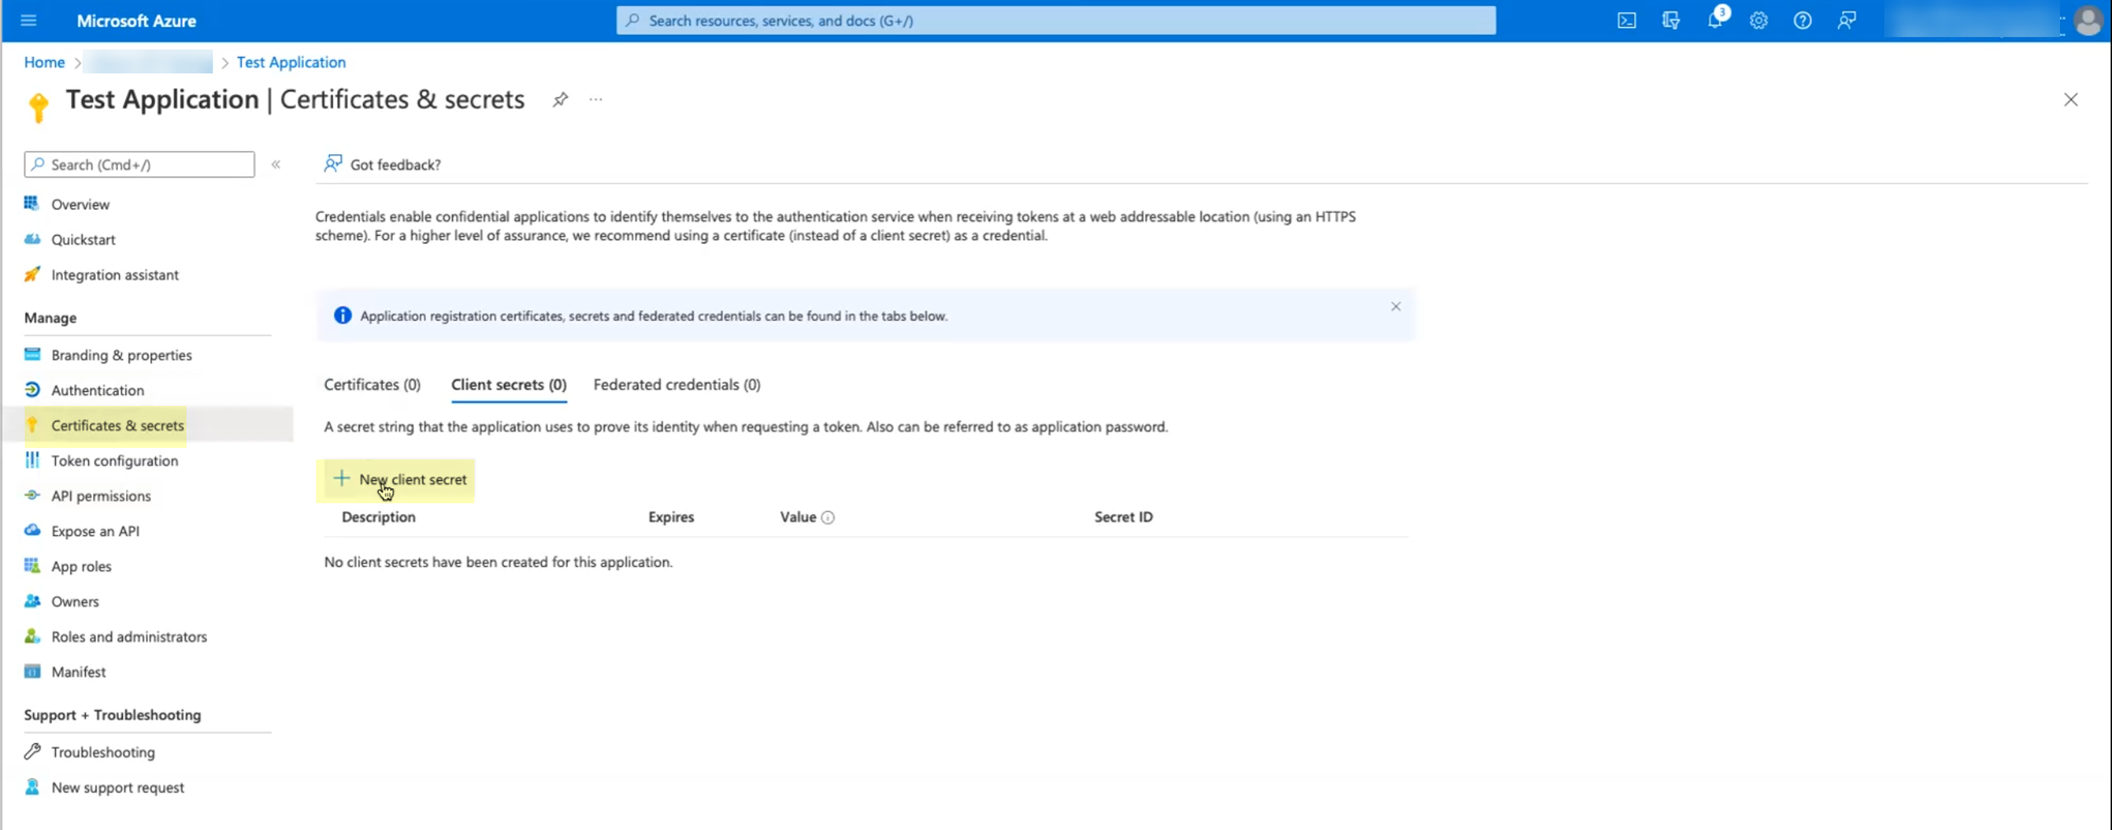
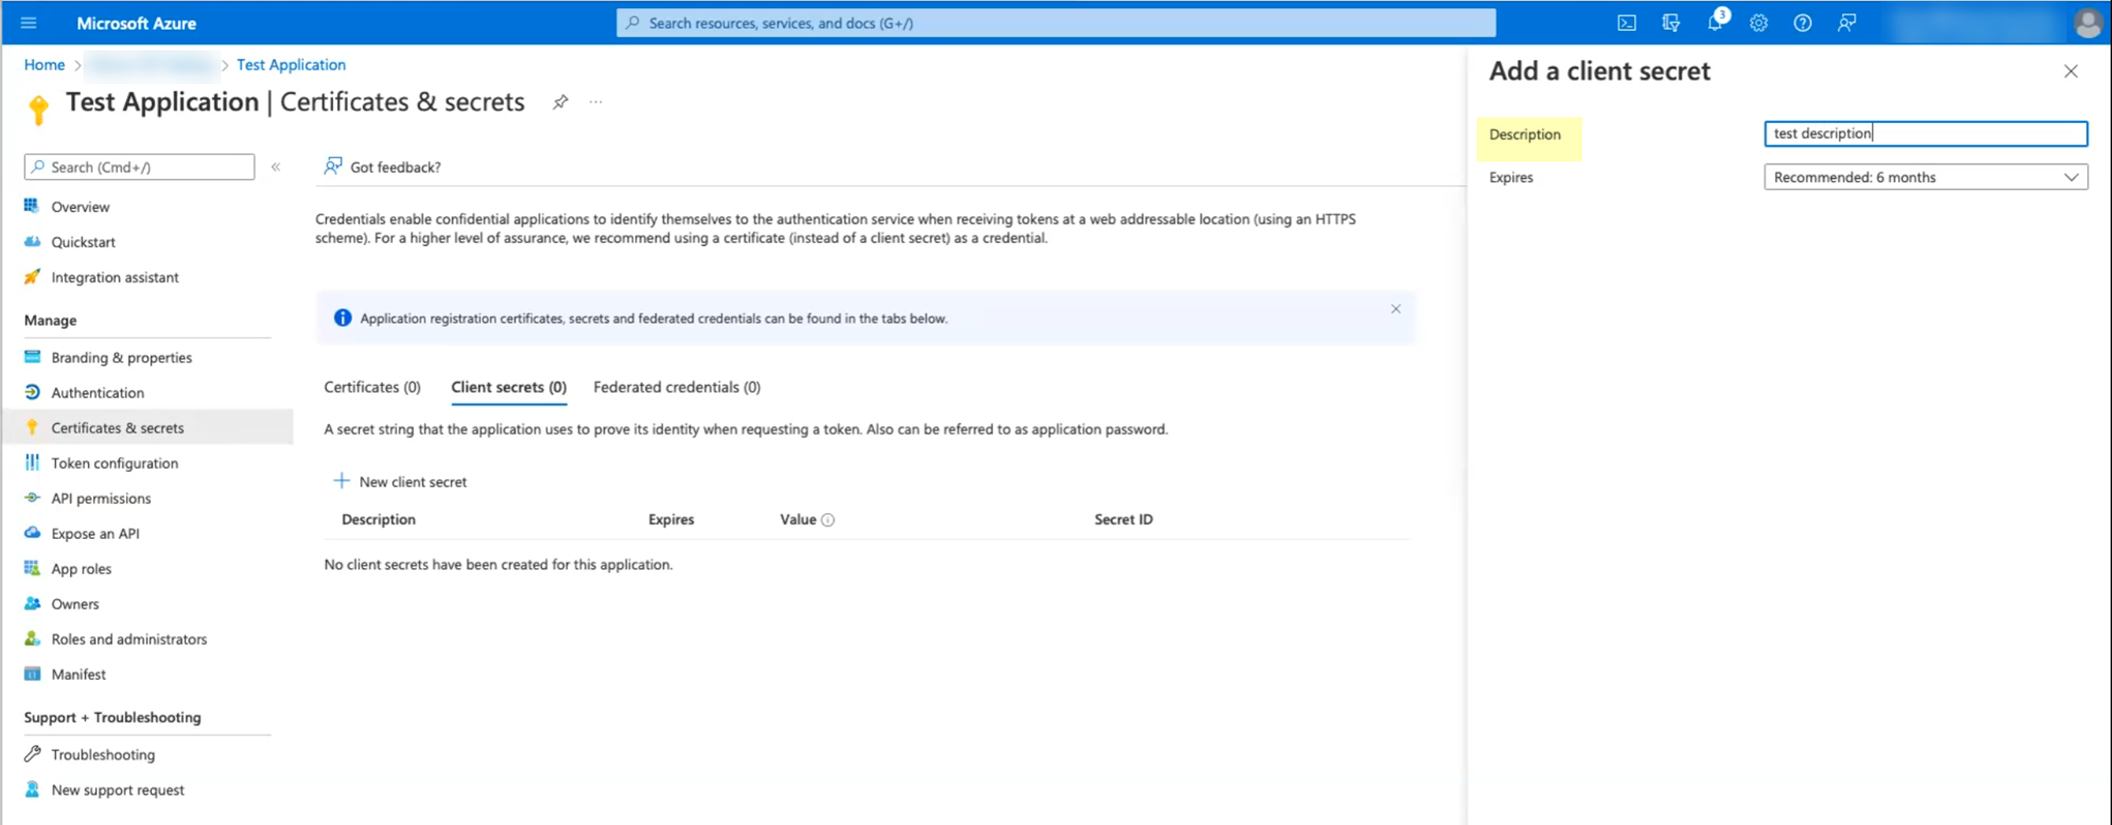
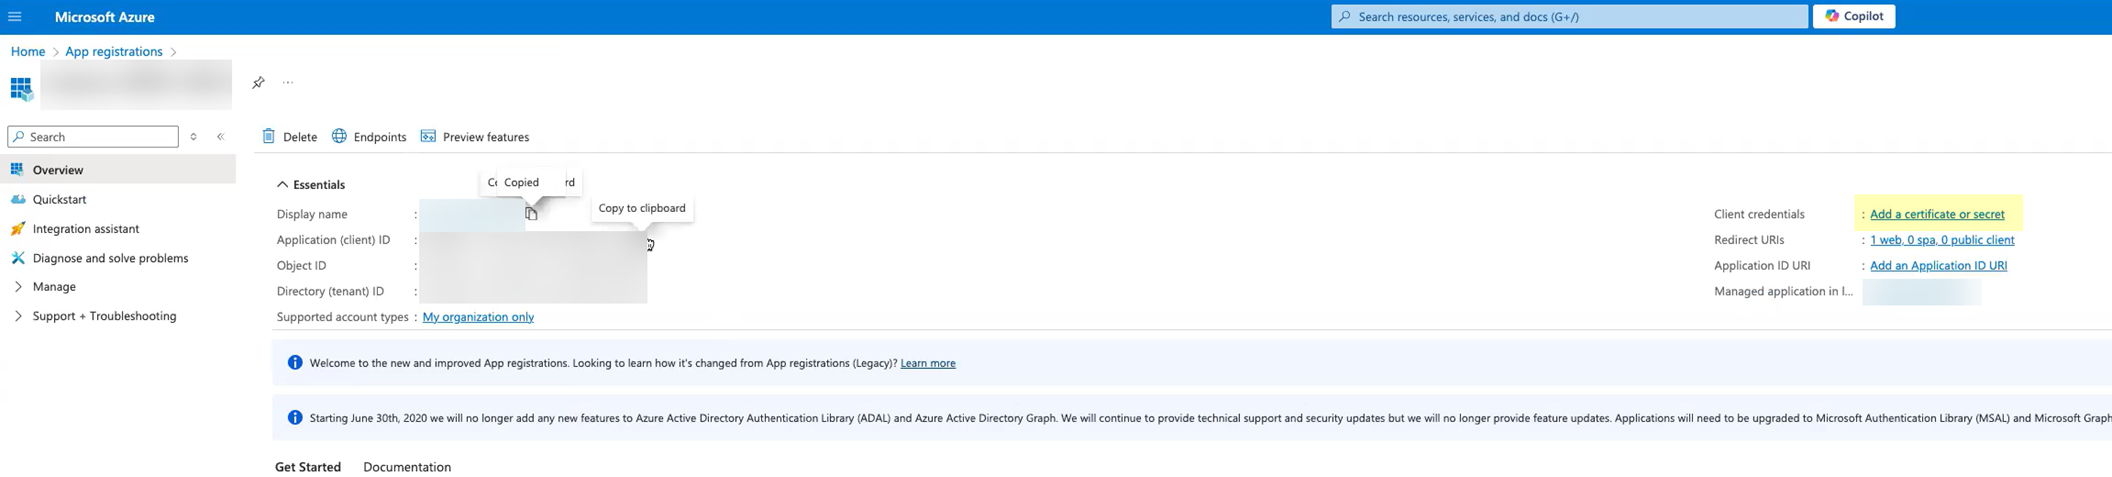
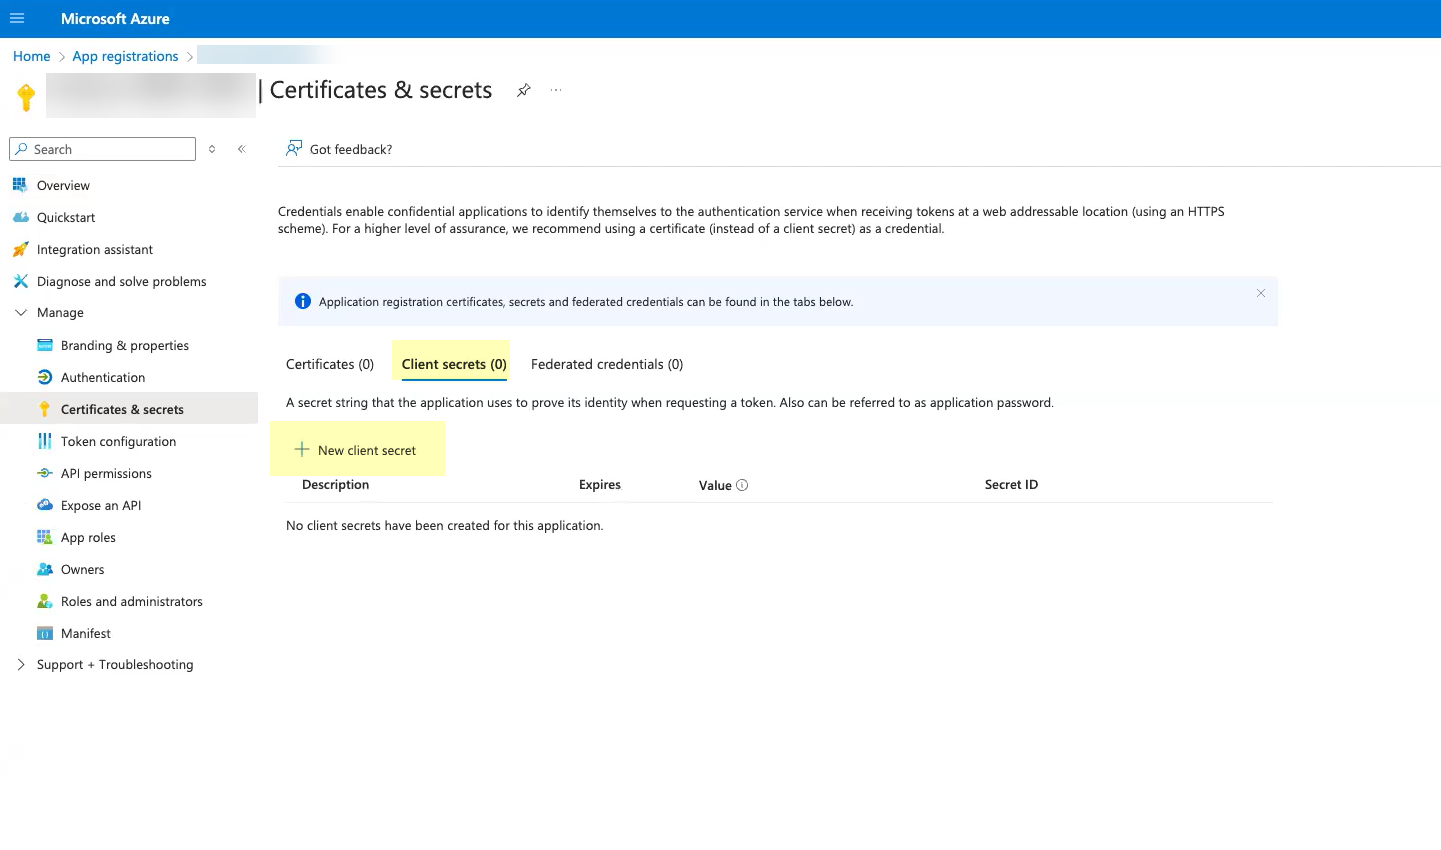
Collect configuration info from Azure Portal:
Go to the app registration > Certificates & secrets >
New client secret
.
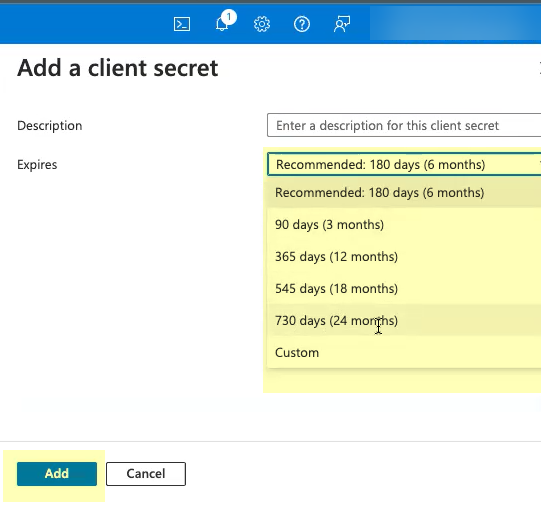
Enter Description, choose Expiry, click
Add
.
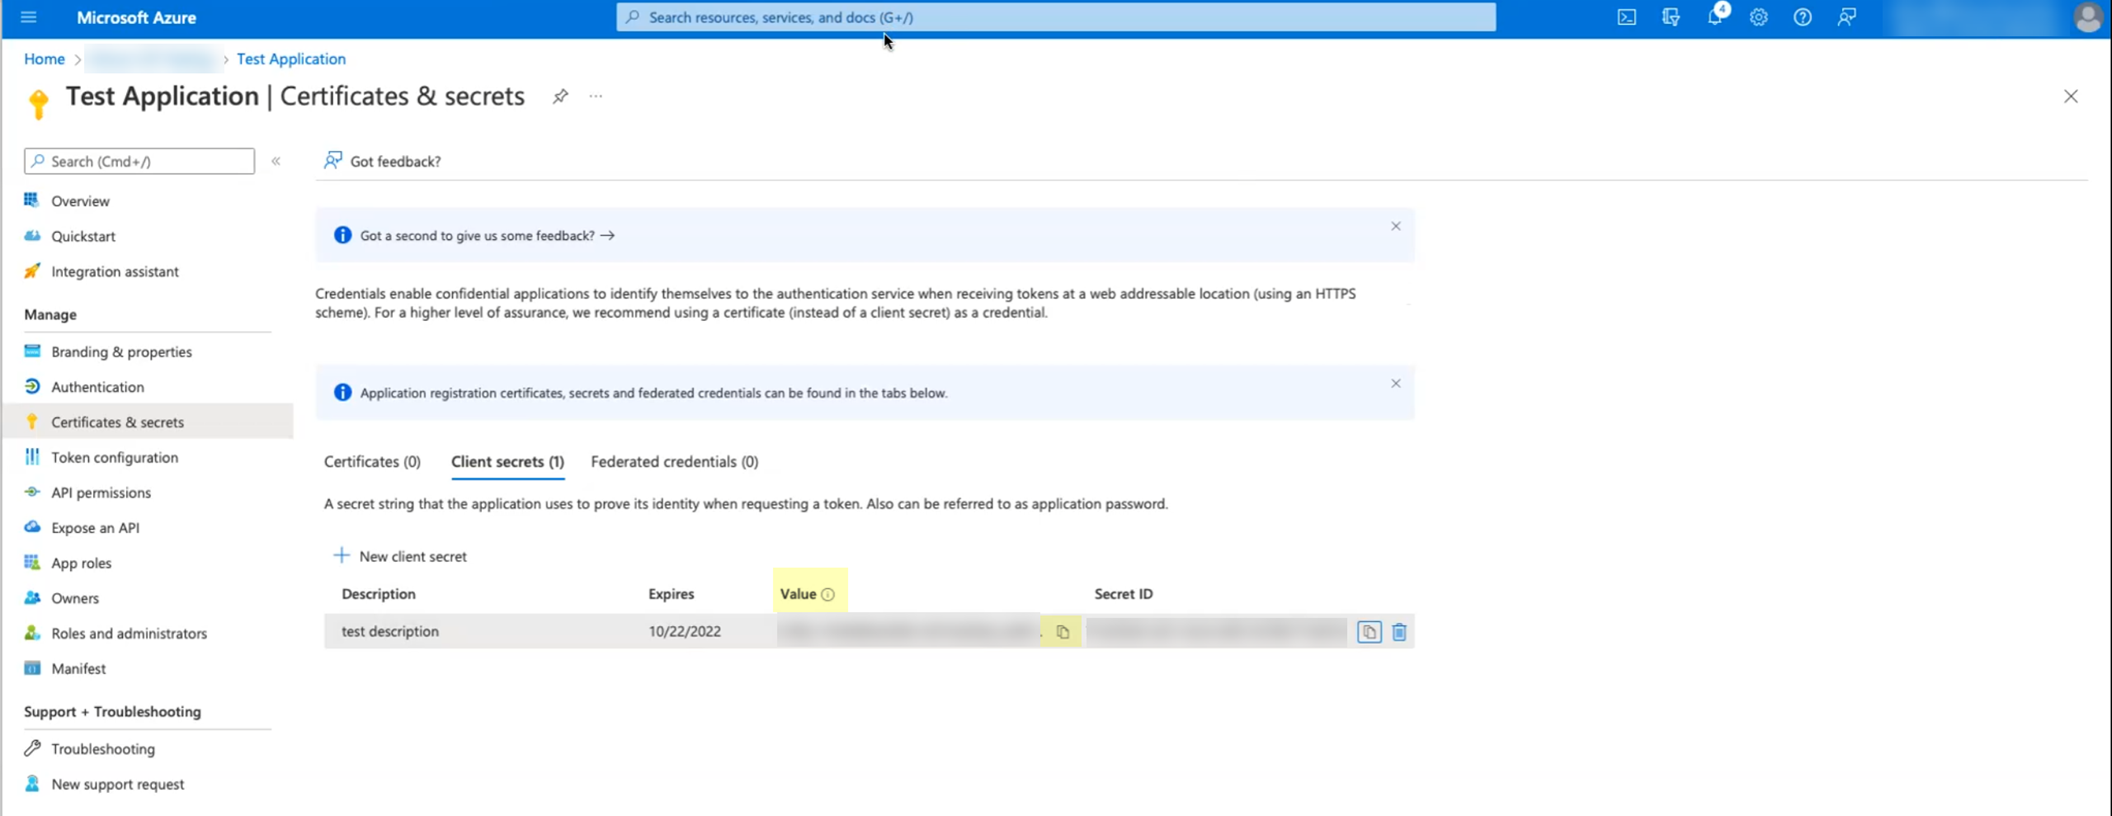
[GOTCHA] Note the expiry date. You must renew the secret before it expires and update CIE.
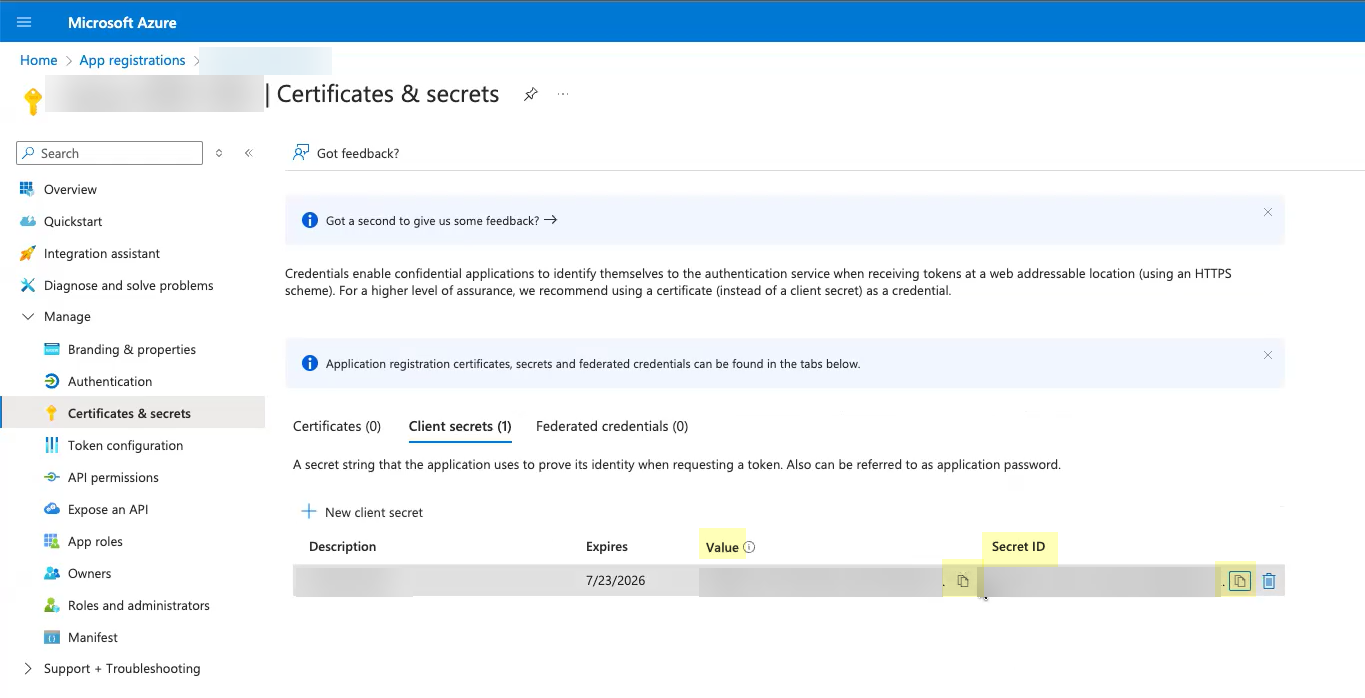
[CRITICAL] Copy the secret
Value
immediately and store securely. It's shown only once.
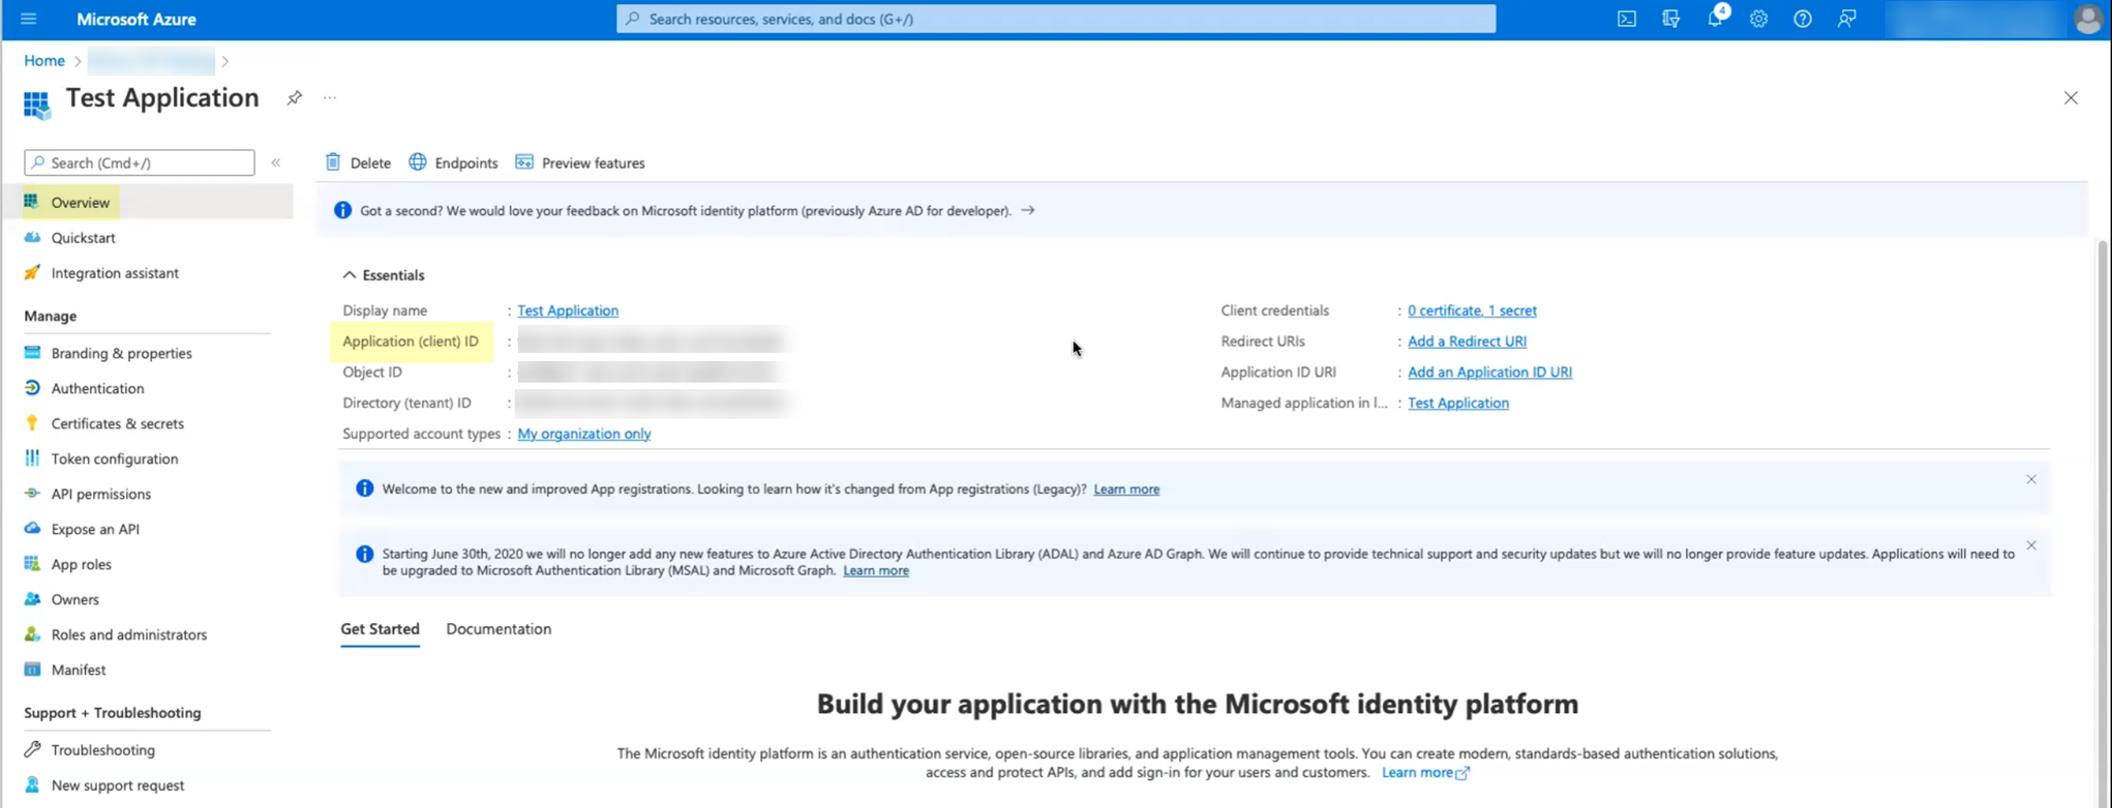
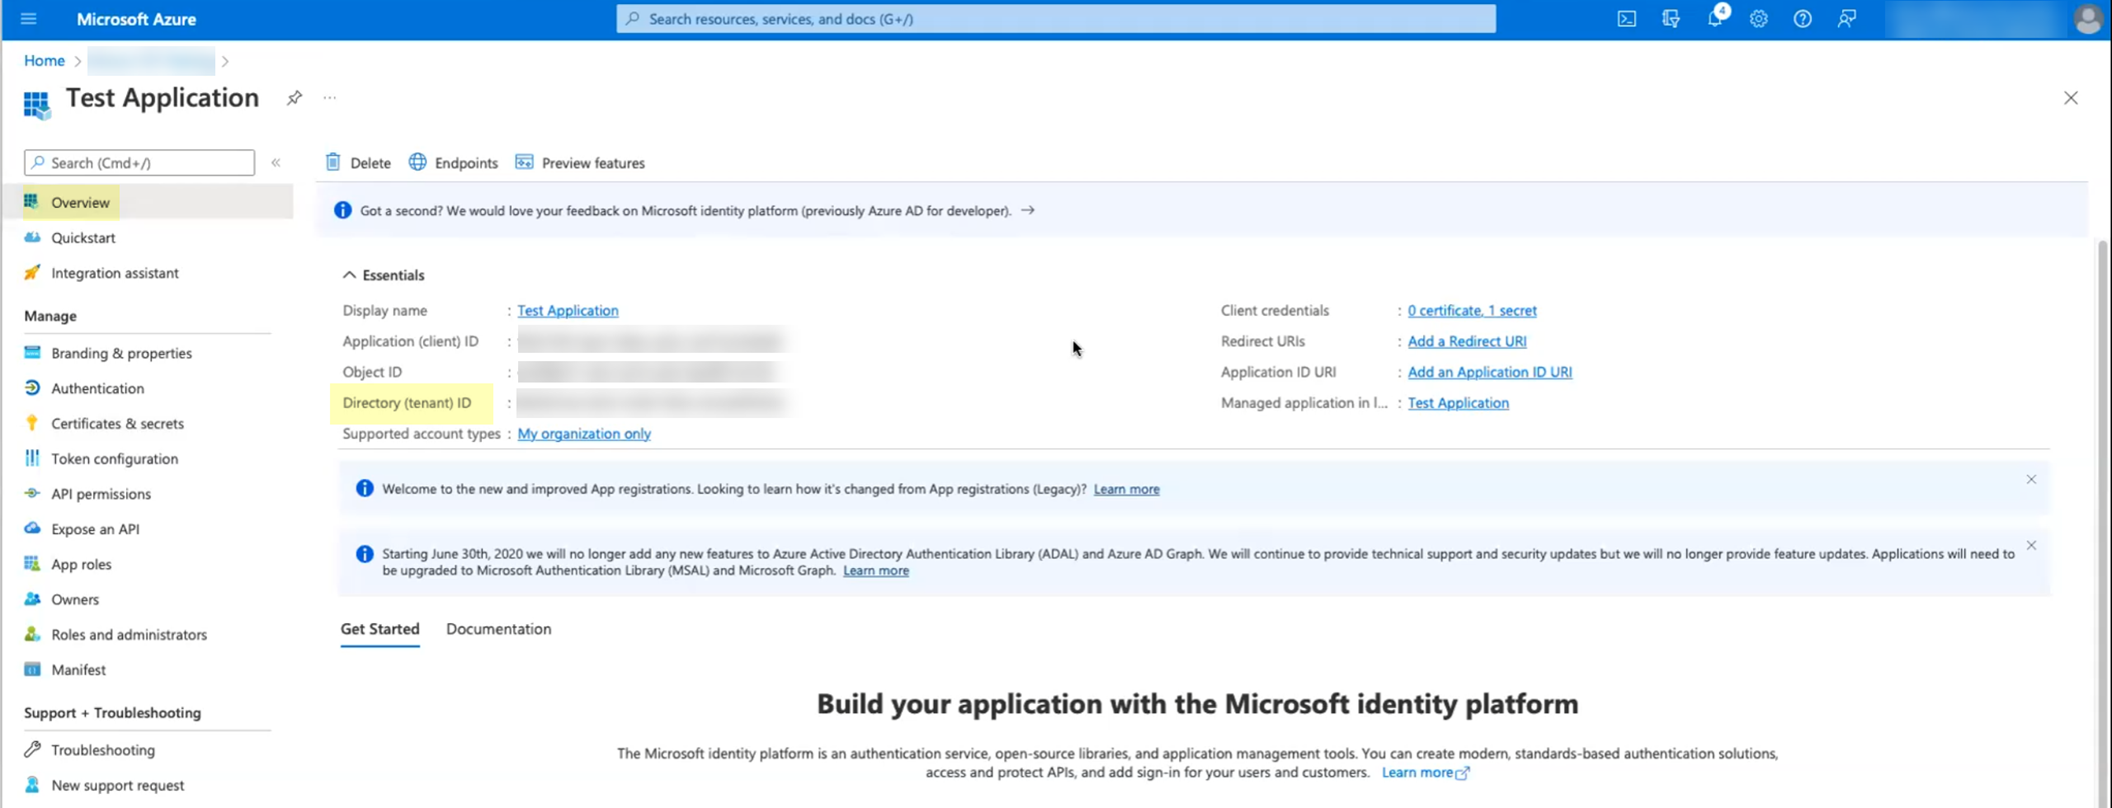
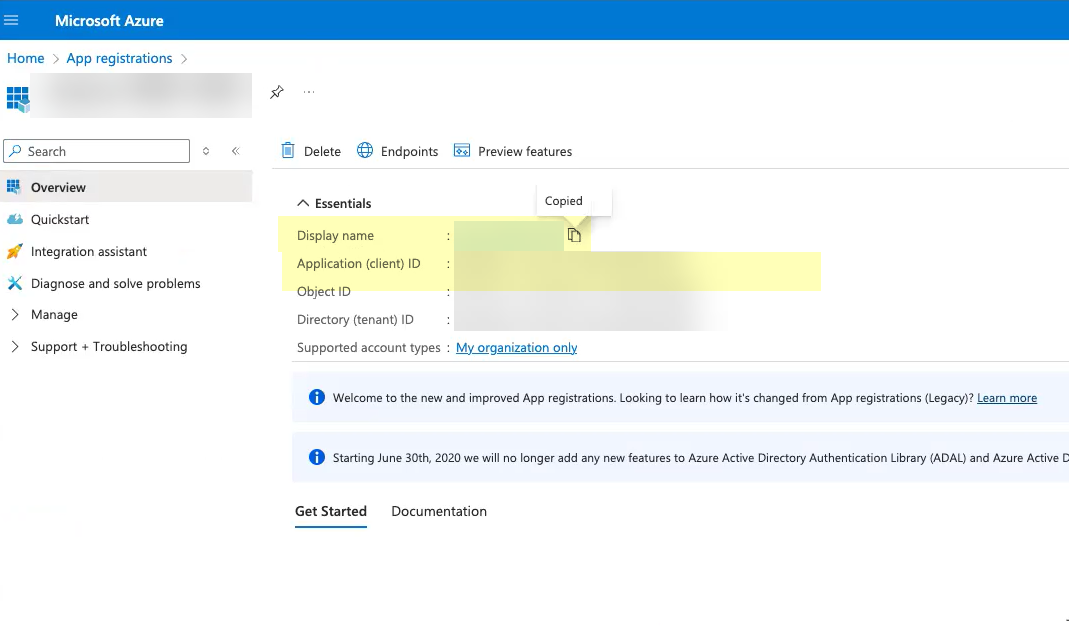
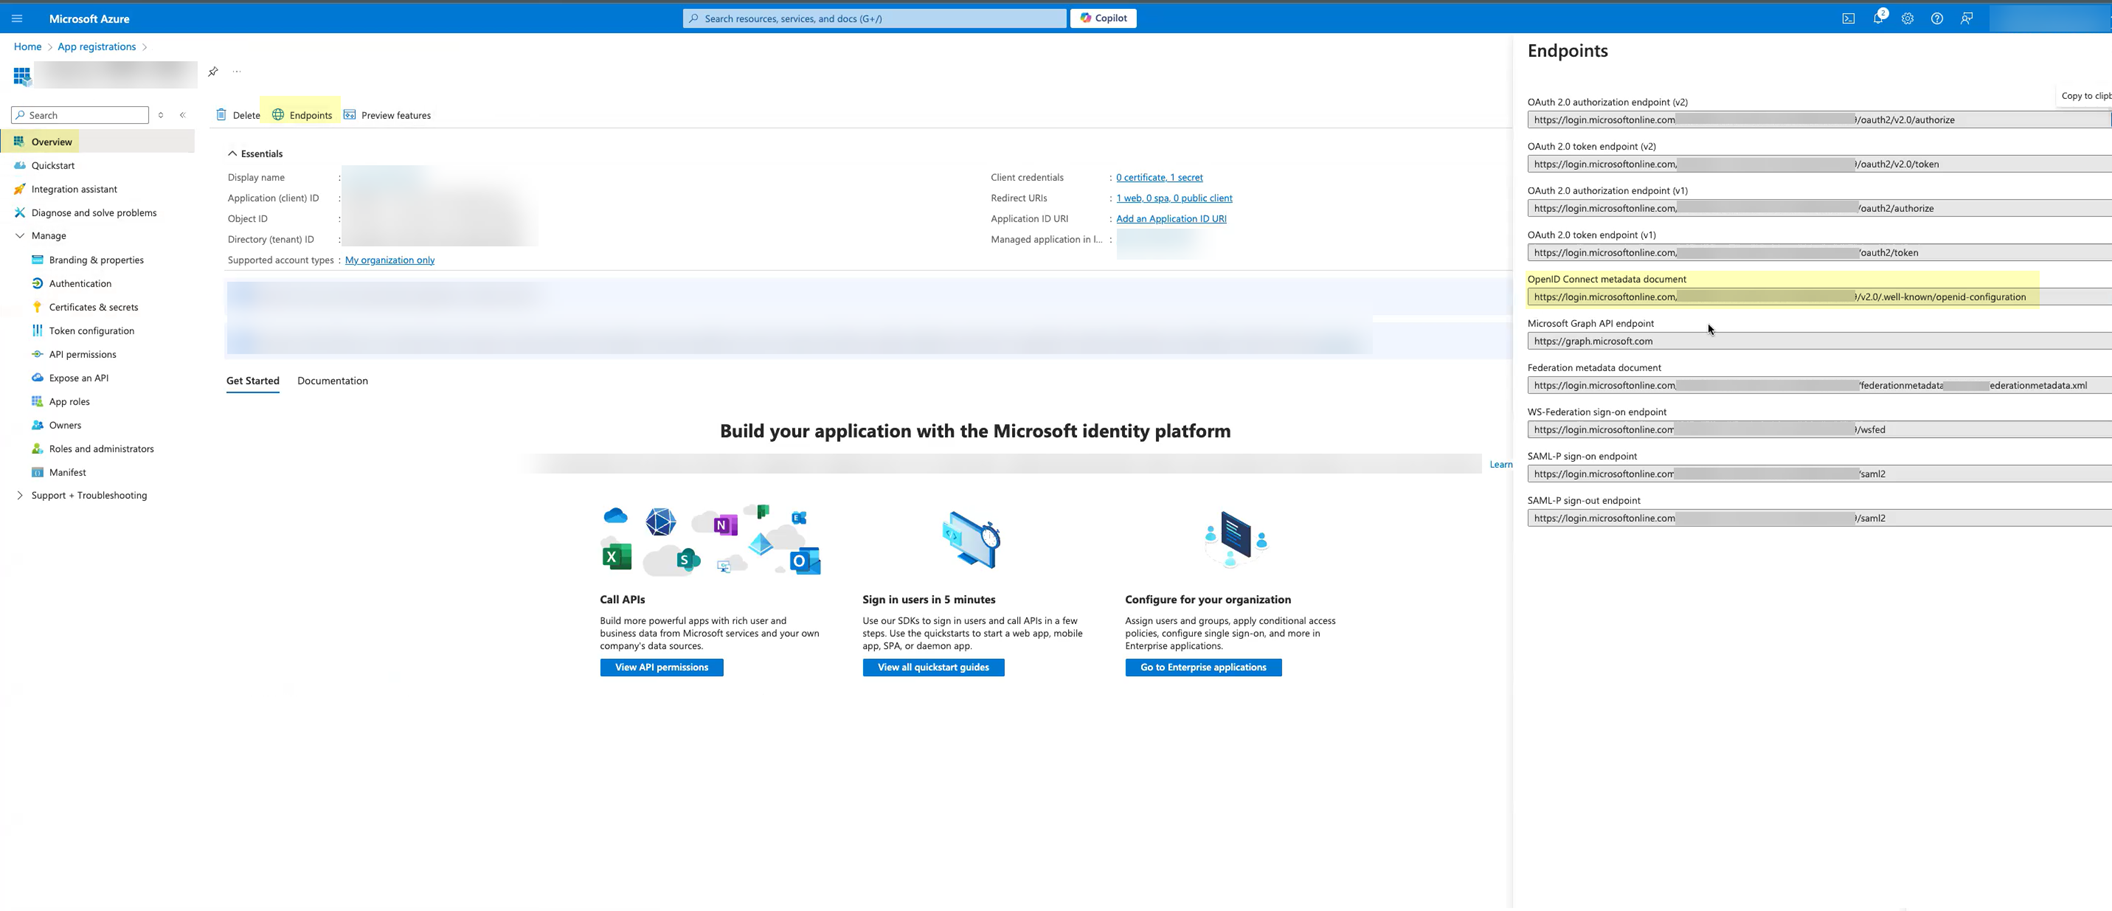
Go to Overview > Copy
Application (client) ID
and
Directory (tenant) ID
.
Add/Configure Azure AD directory in CIE:
Go to
Directories
>
Add New Directory
> Select
Azure
> Click
Set Up
. (Or select
Actions > Reconnect
for an existing directory).
Select Connection Flow:
Client Credential Flow
.
(Optional) Select additional info to collect (User Risk, Roles, Enterprise Apps). Grant corresponding permissions in Azure if selected.
Enter the IDs copied from Azure:
Azure
Directory (tenant) ID
-> CIE
Directory ID
Azure
Application (client) ID
-> CIE
Client ID
Enter the secret
Value
copied from Azure as the CIE
Client Secret
.
[CRITICAL] Click
Test Connection
. It must succeed.
(Optional)
Customize Directory Name
.
(Optional) Configure Group Filtering (see steps in Enterprise App section).
Click
Submit
.
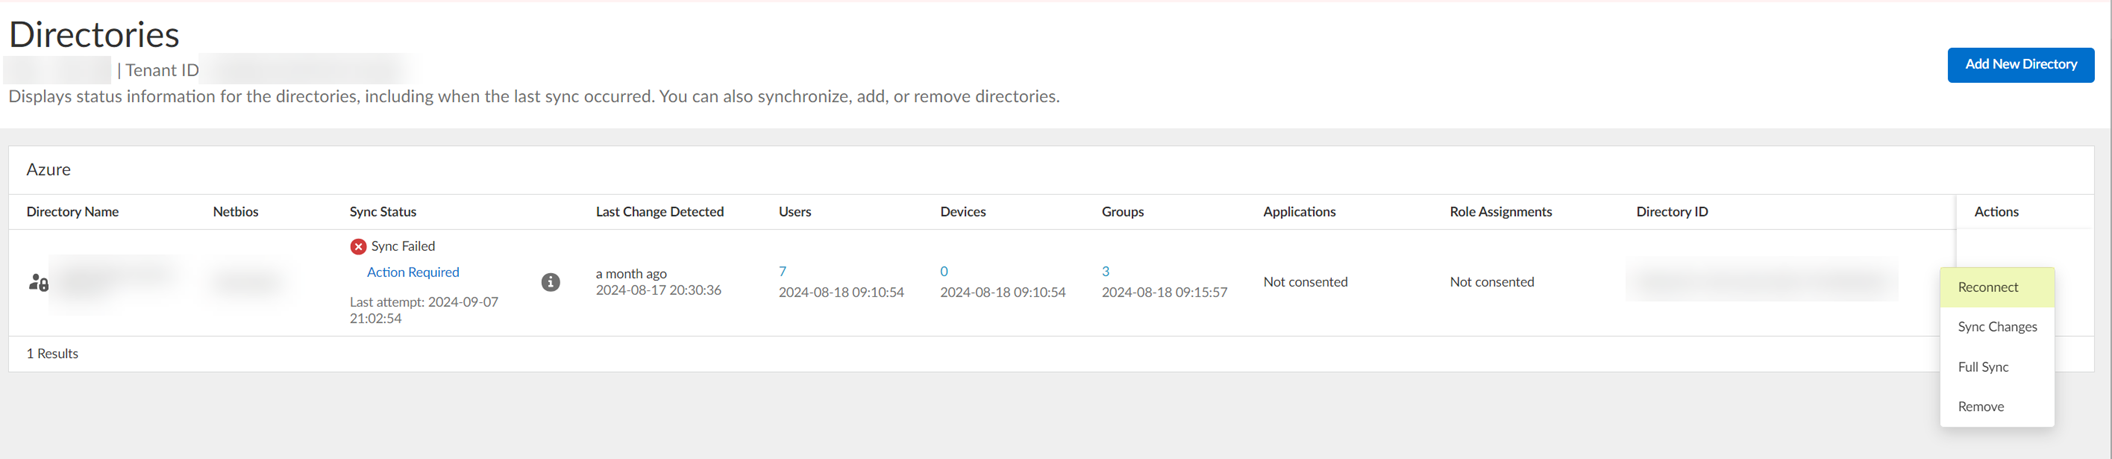
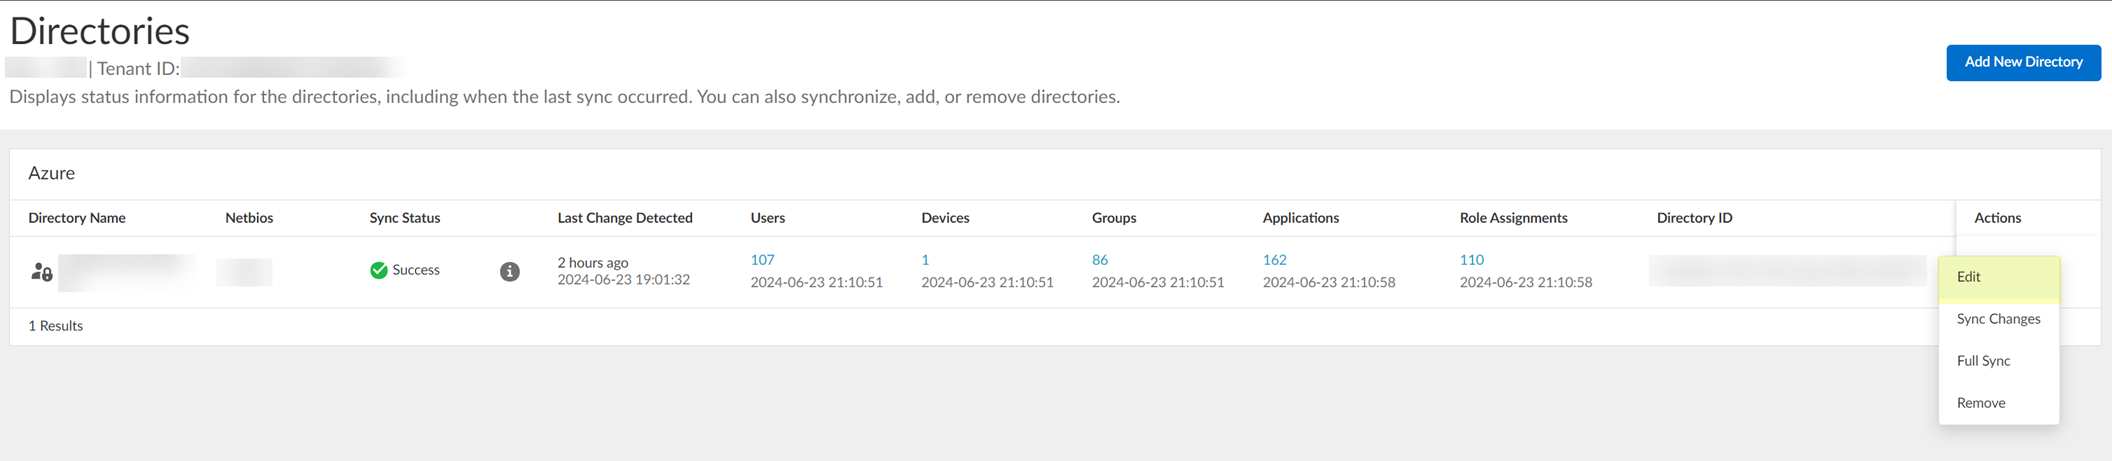
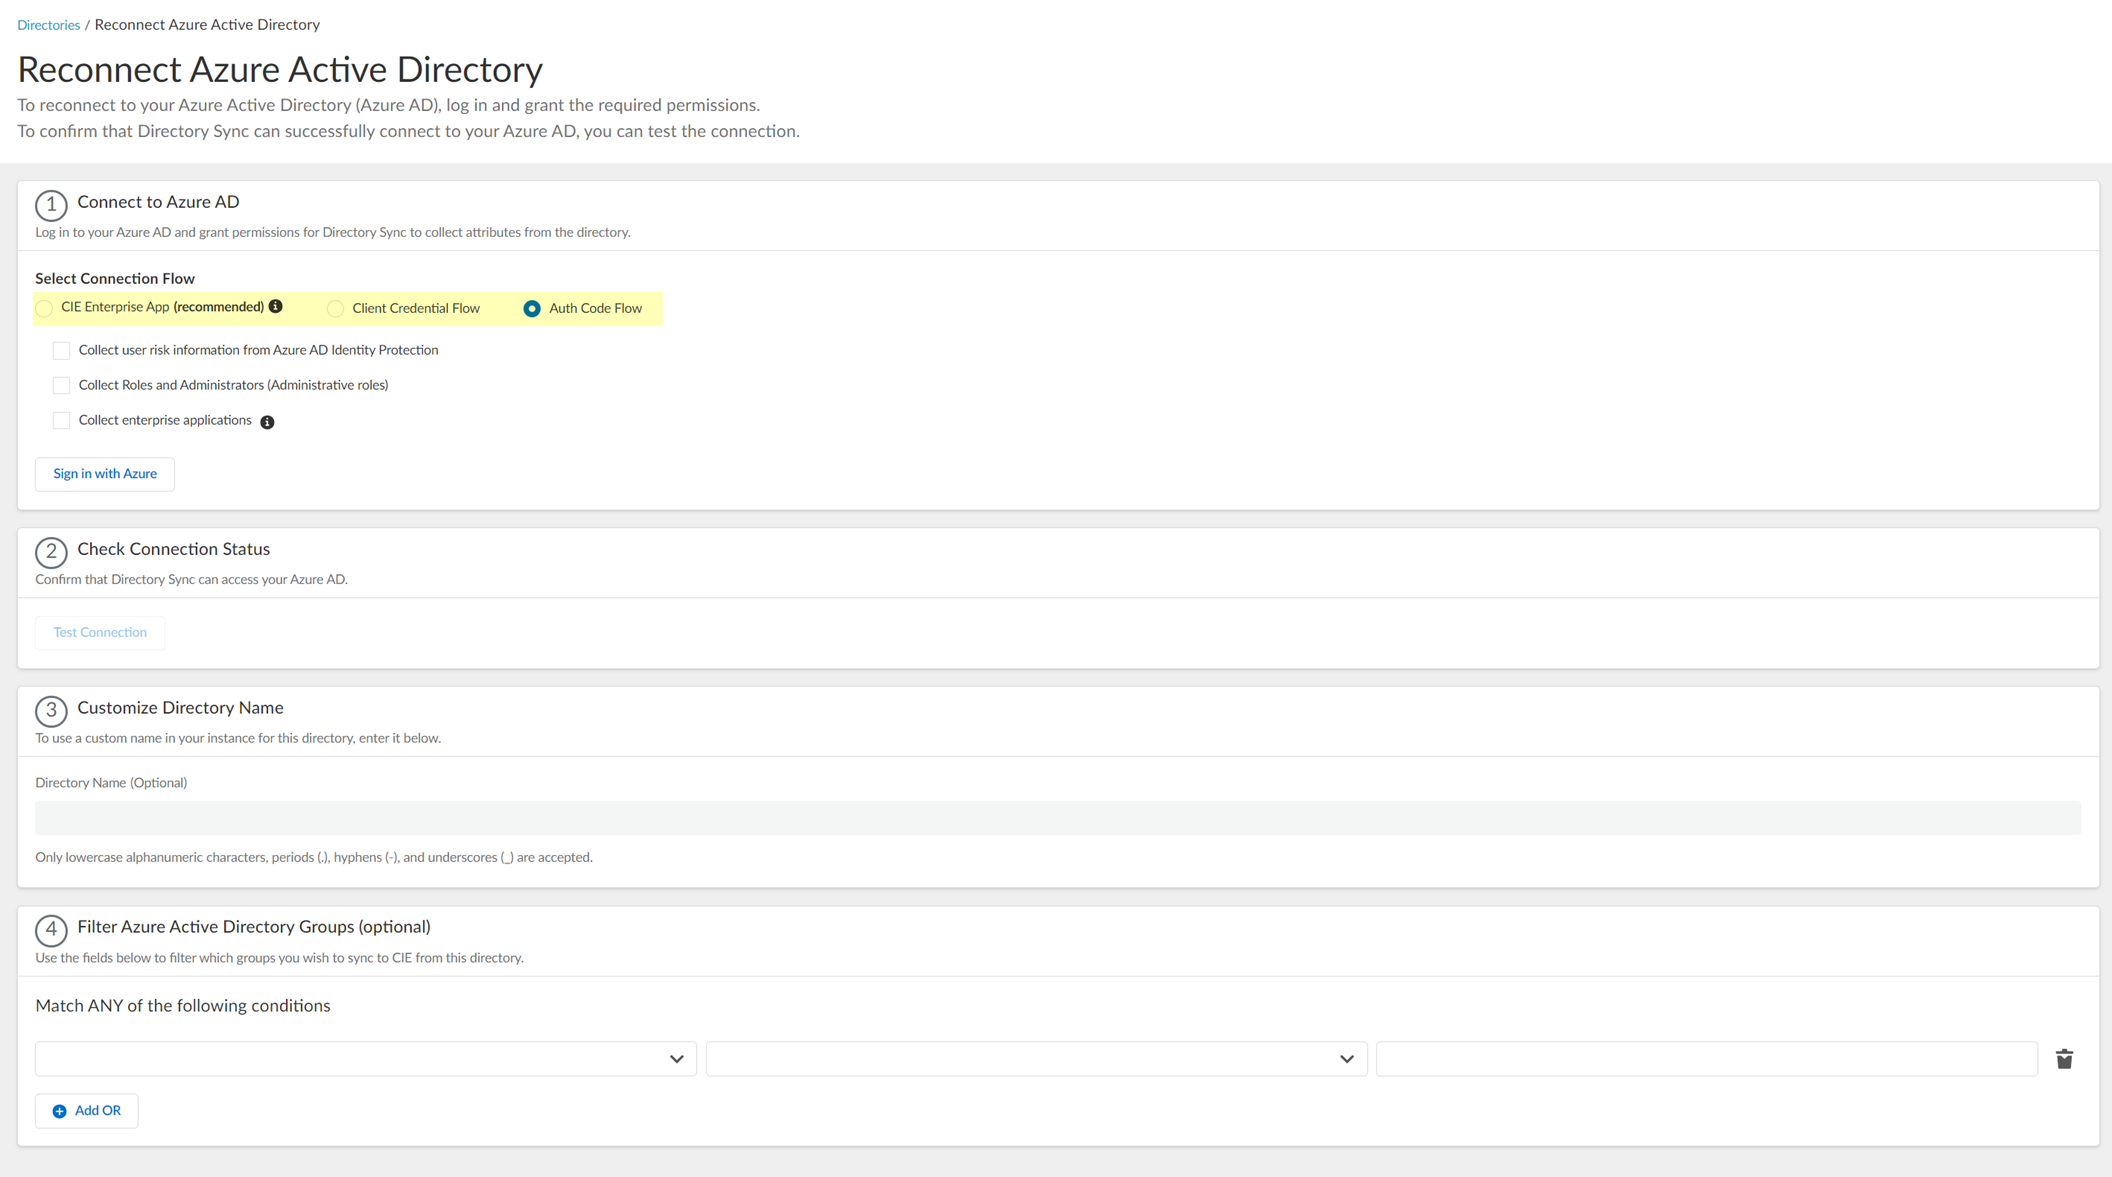
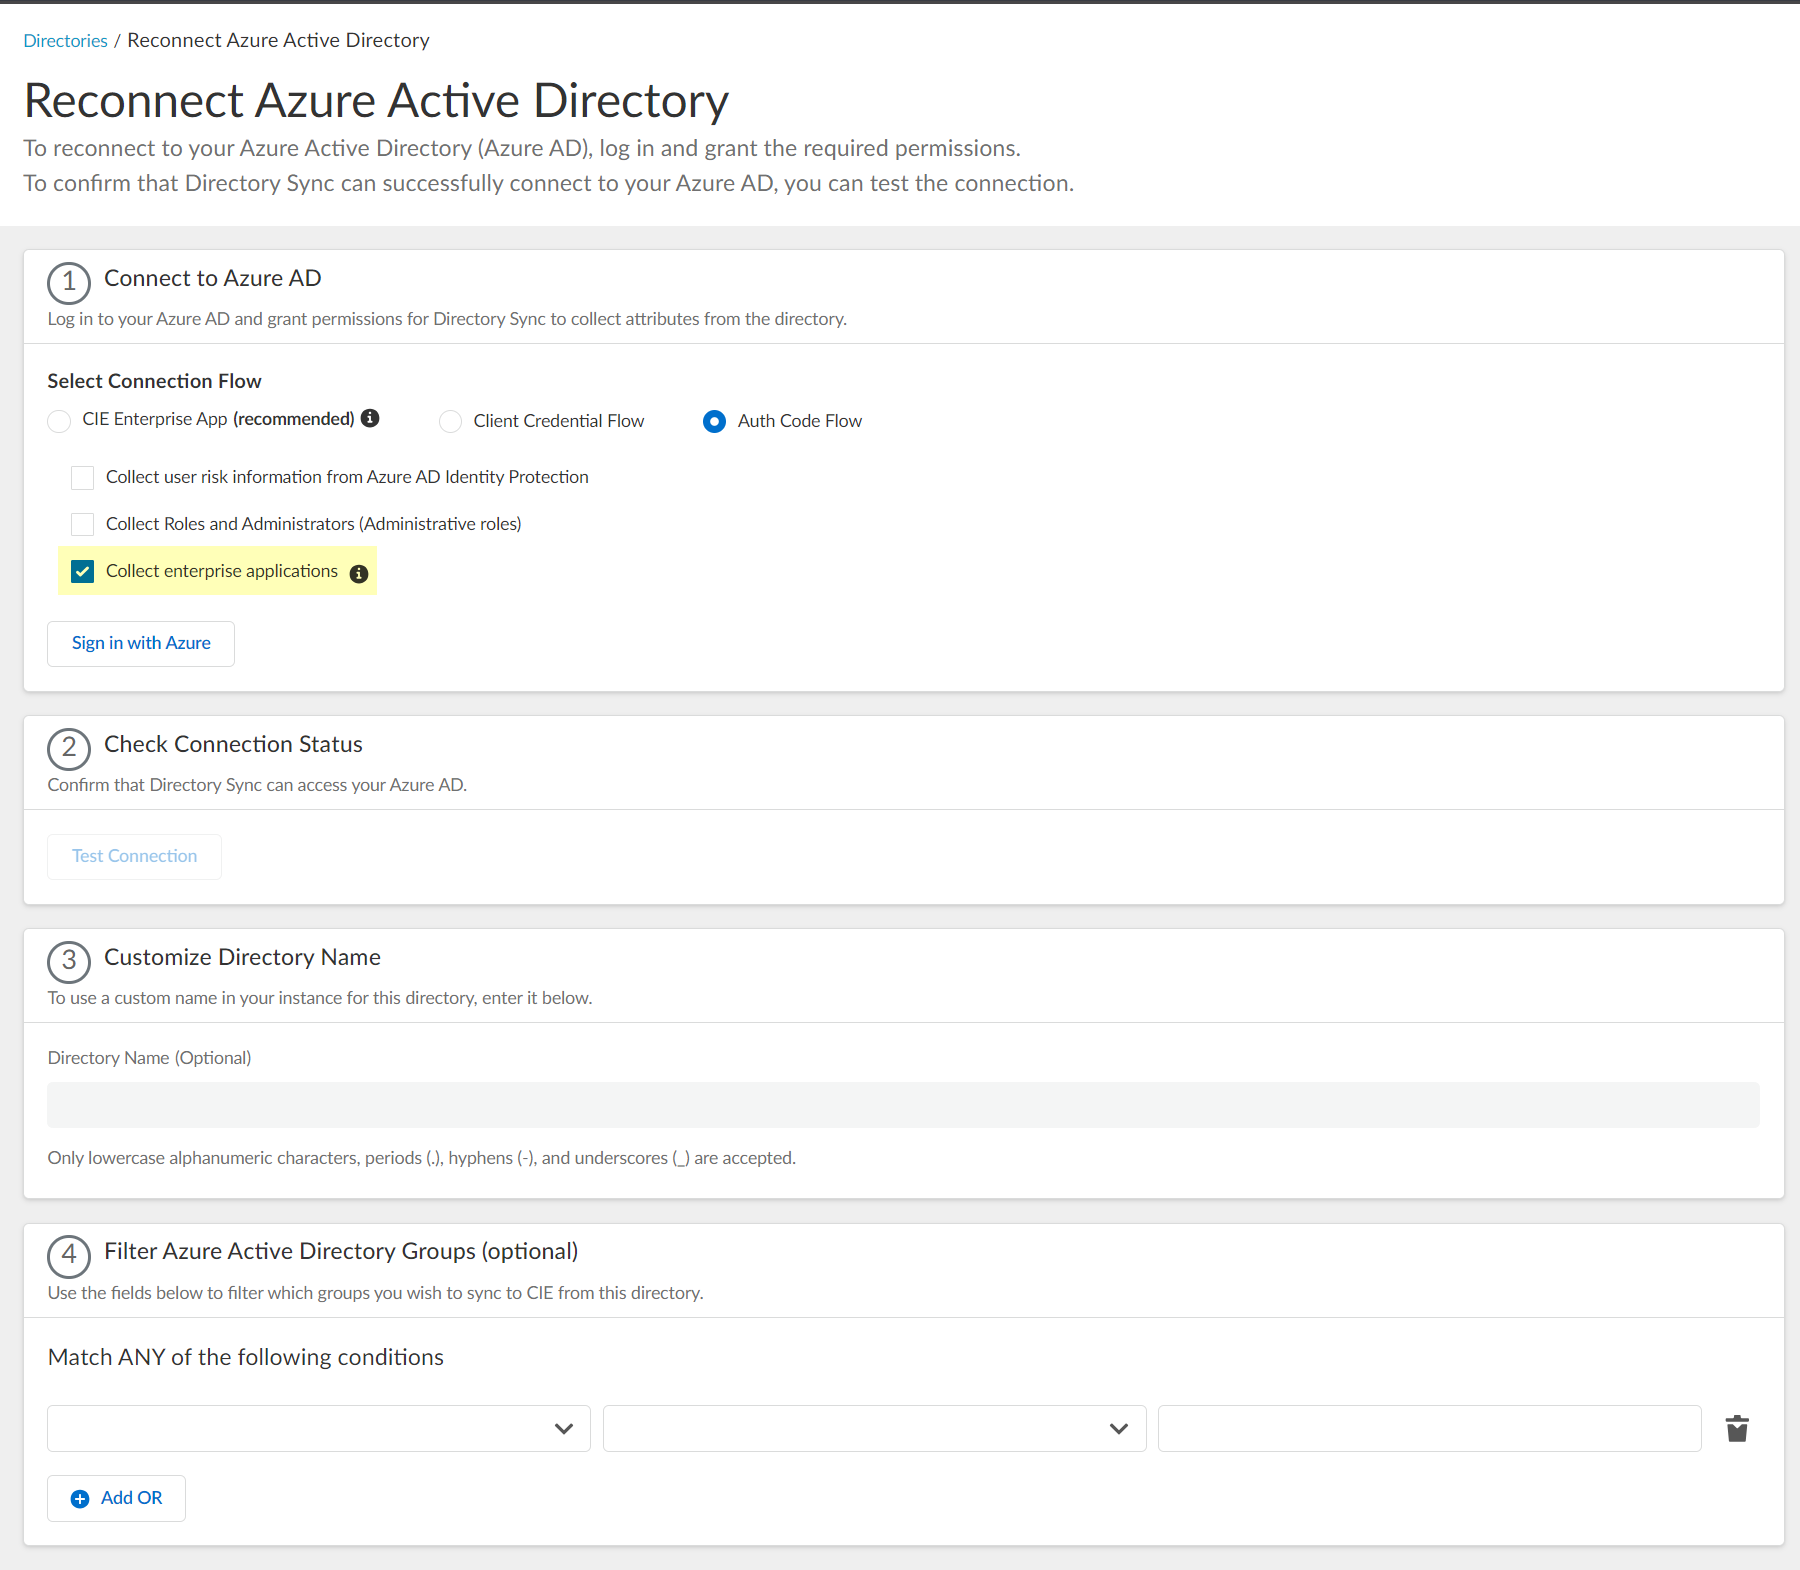
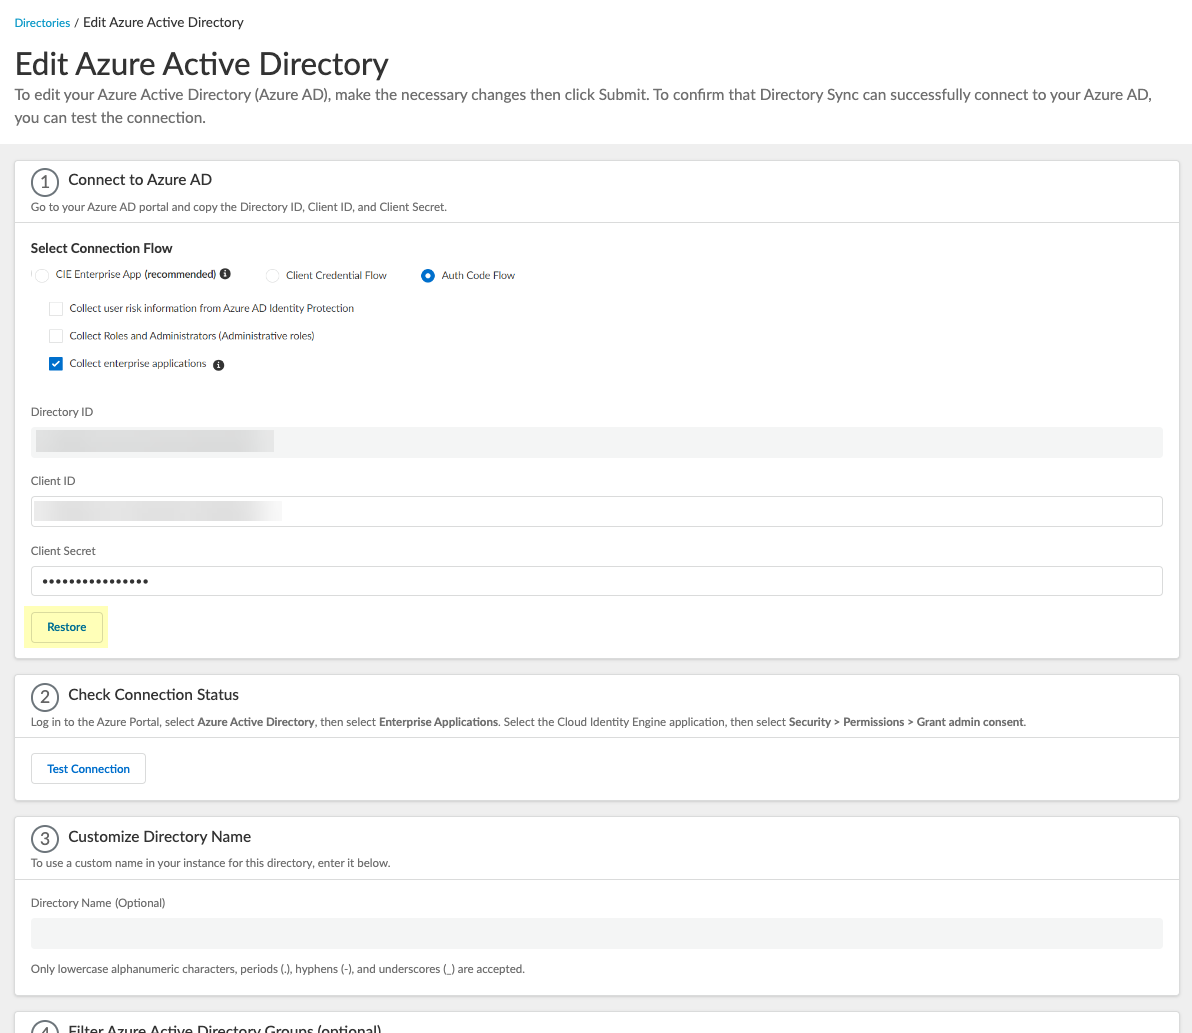
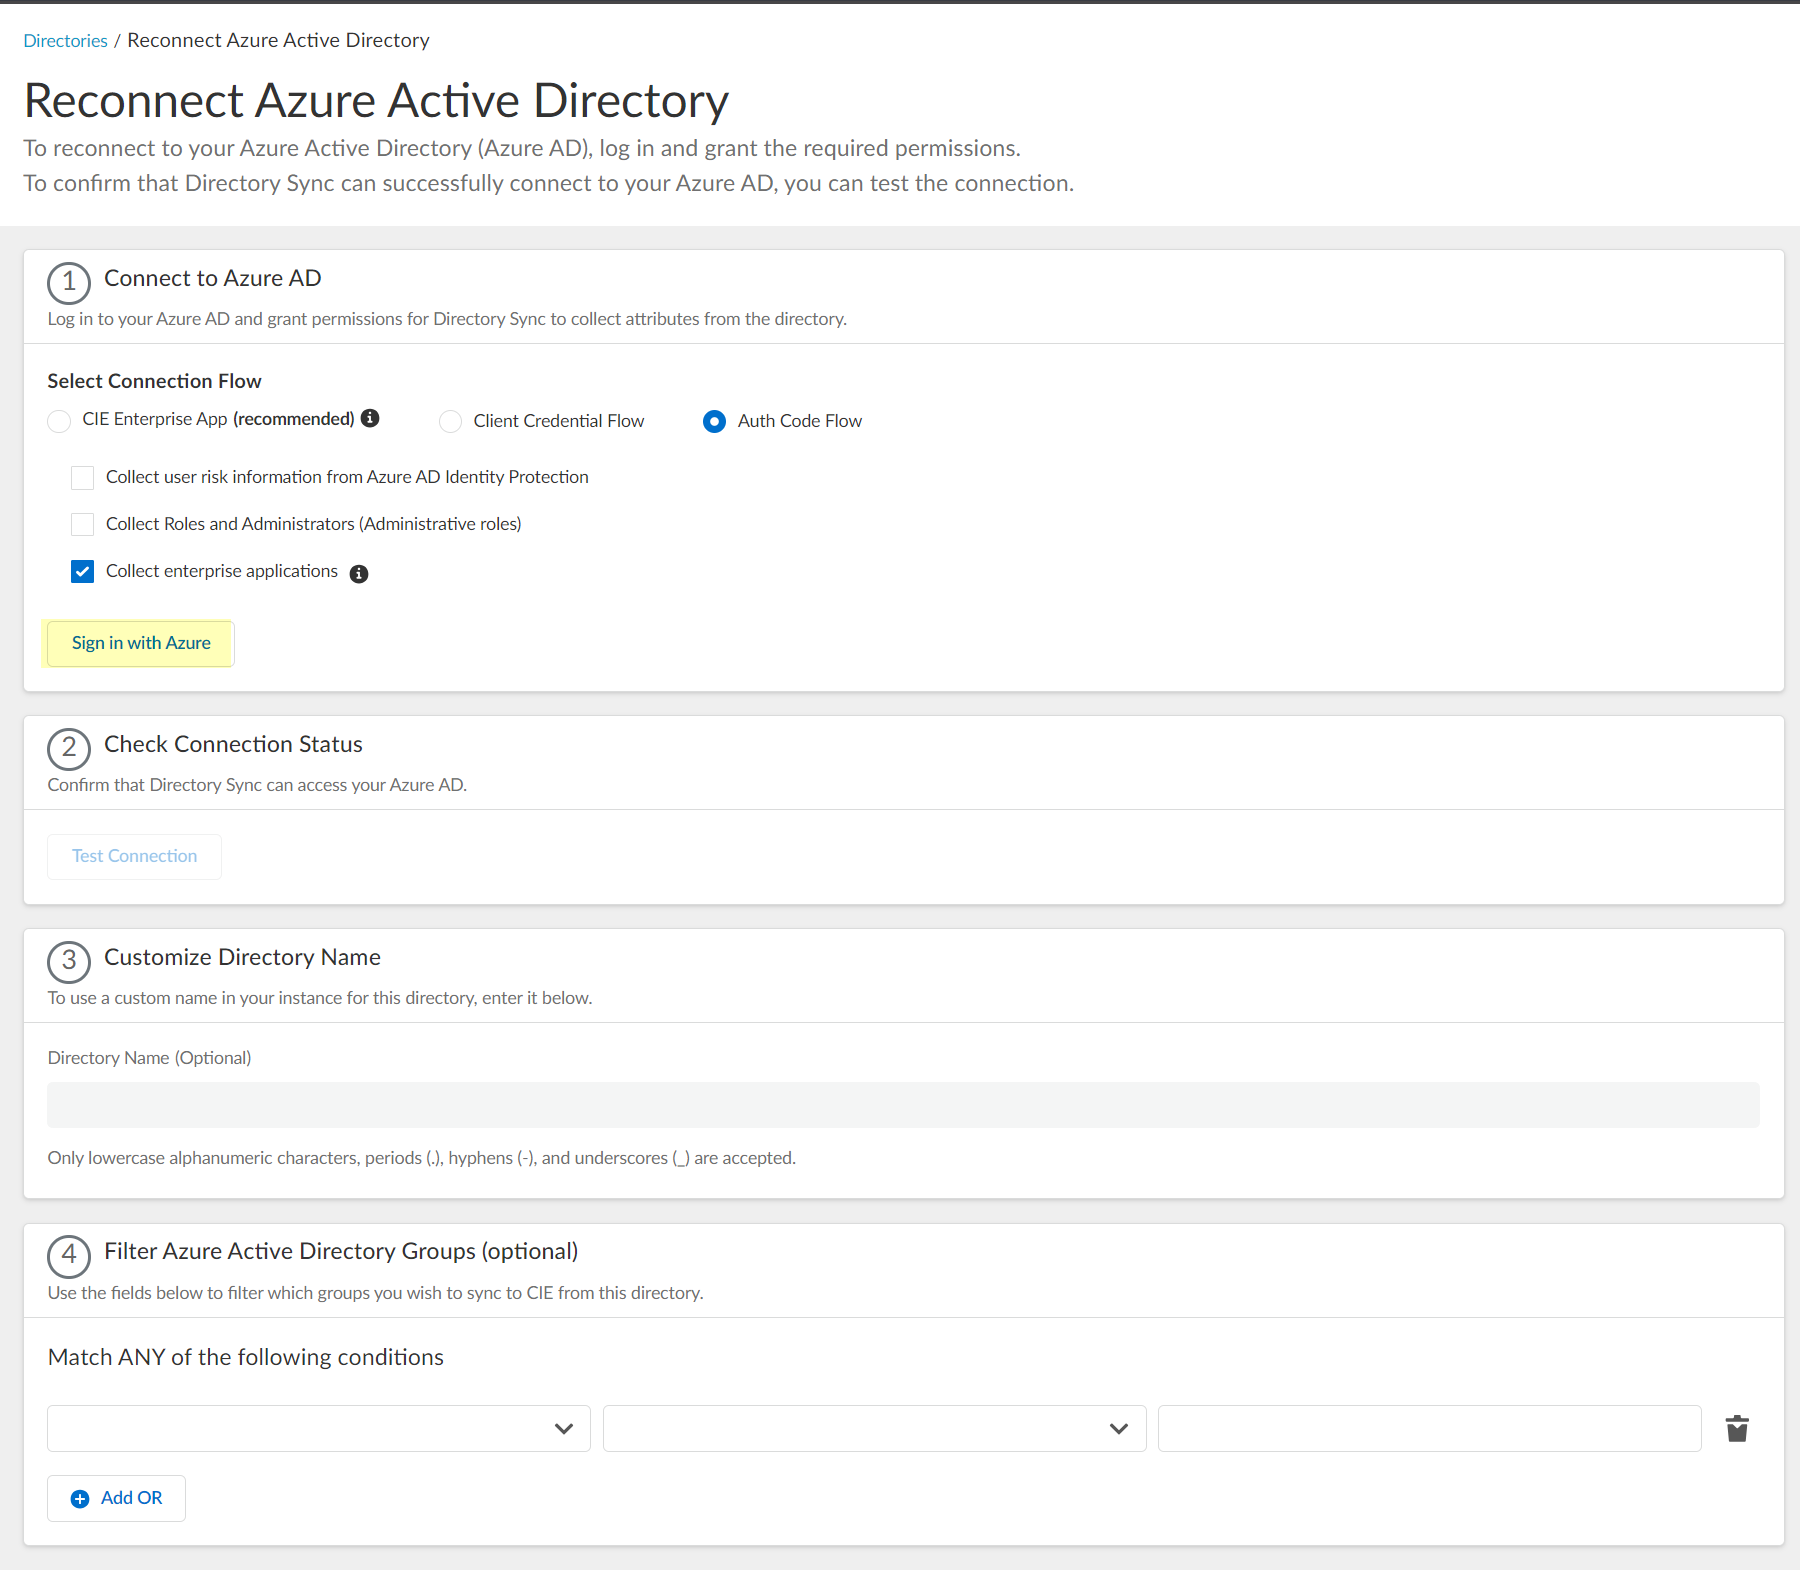
Reconnect or Edit Azure Active Directory
Use this to switch connection methods, enable/disable optional data collection, or update credentials.
In CIE: Go to
Directories
. Find the Azure directory.
Select
Actions > Reconnect
(if connection was previously active) or
Actions > Edit
(if never successfully connected).
Select the desired Connection Flow (
CIE Enterprise App
or
Client Credential Flow
).
Palo Alto Networks recommends CIE Enterprise App unless migrating away from it.
Adjust optional data collection checkboxes (User Risk, Roles, Apps) as needed. Grant/revoke permissions in Azure accordingly if changing these.
Follow the sign-in/credential entry steps corresponding to the chosen flow (similar to initial setup).
Enterprise App: Click
Sign in with Azure
(or
Restore
), log in with Global Admin, accept permissions.
Client Credential Flow: Enter Client ID and Client Secret.
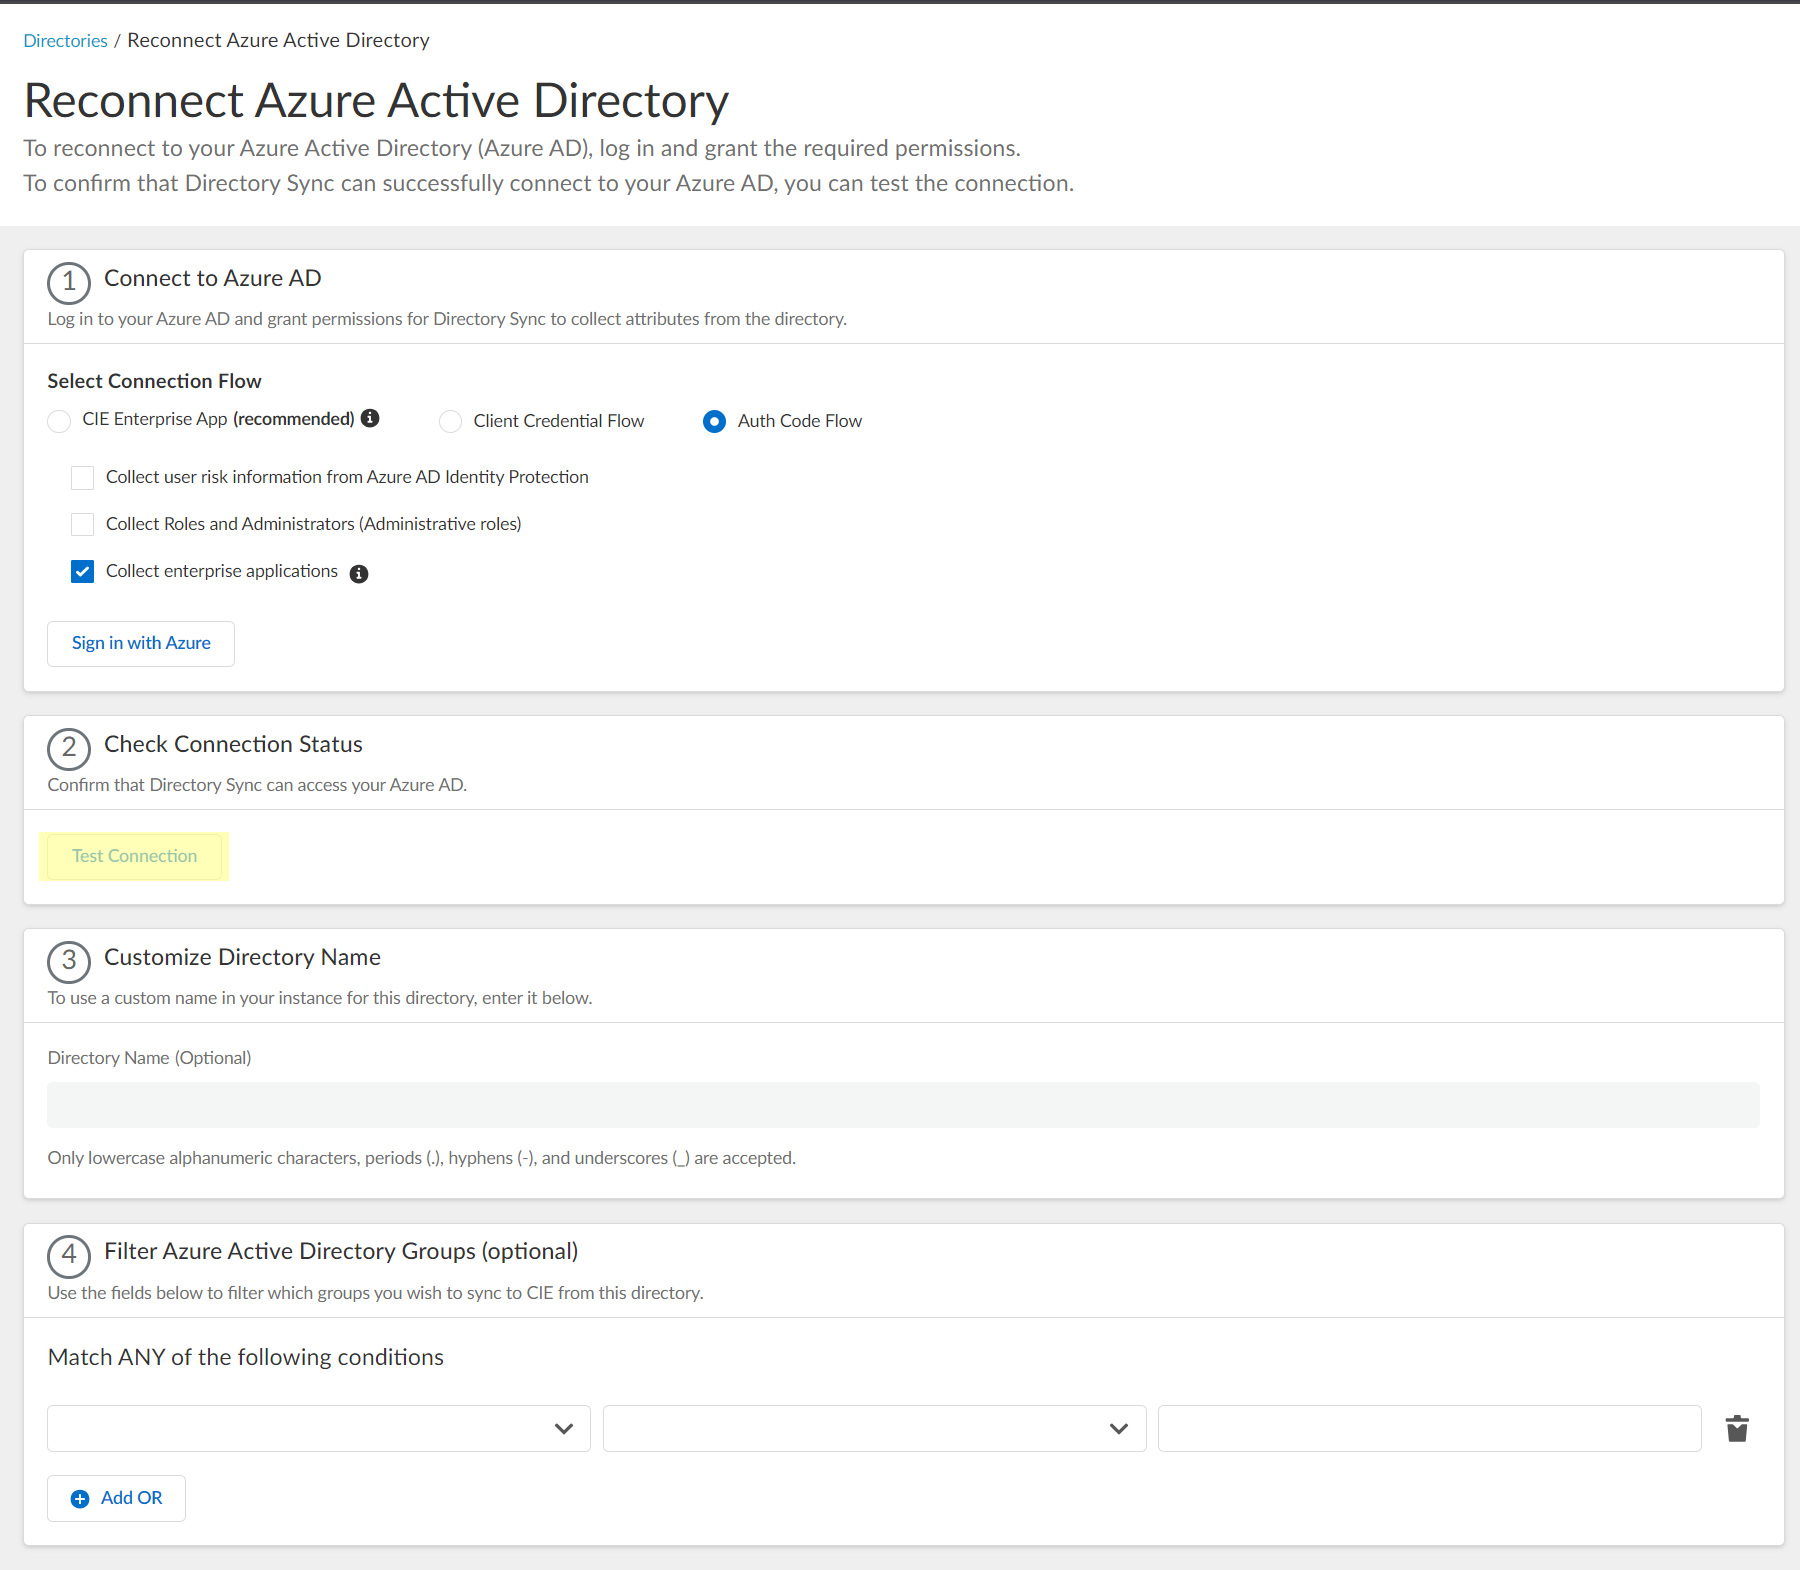
Click
Test Connection
.
(Optional) Update
Directory Name
.
(Optional) Update Group Filters.
Click
Submit
.
Revoke Cloud Identity Engine Permissions for Azure Active Directory
[CRITICAL] First, delete the directory from your CIE tenant (
Directories > Actions > Remove
).
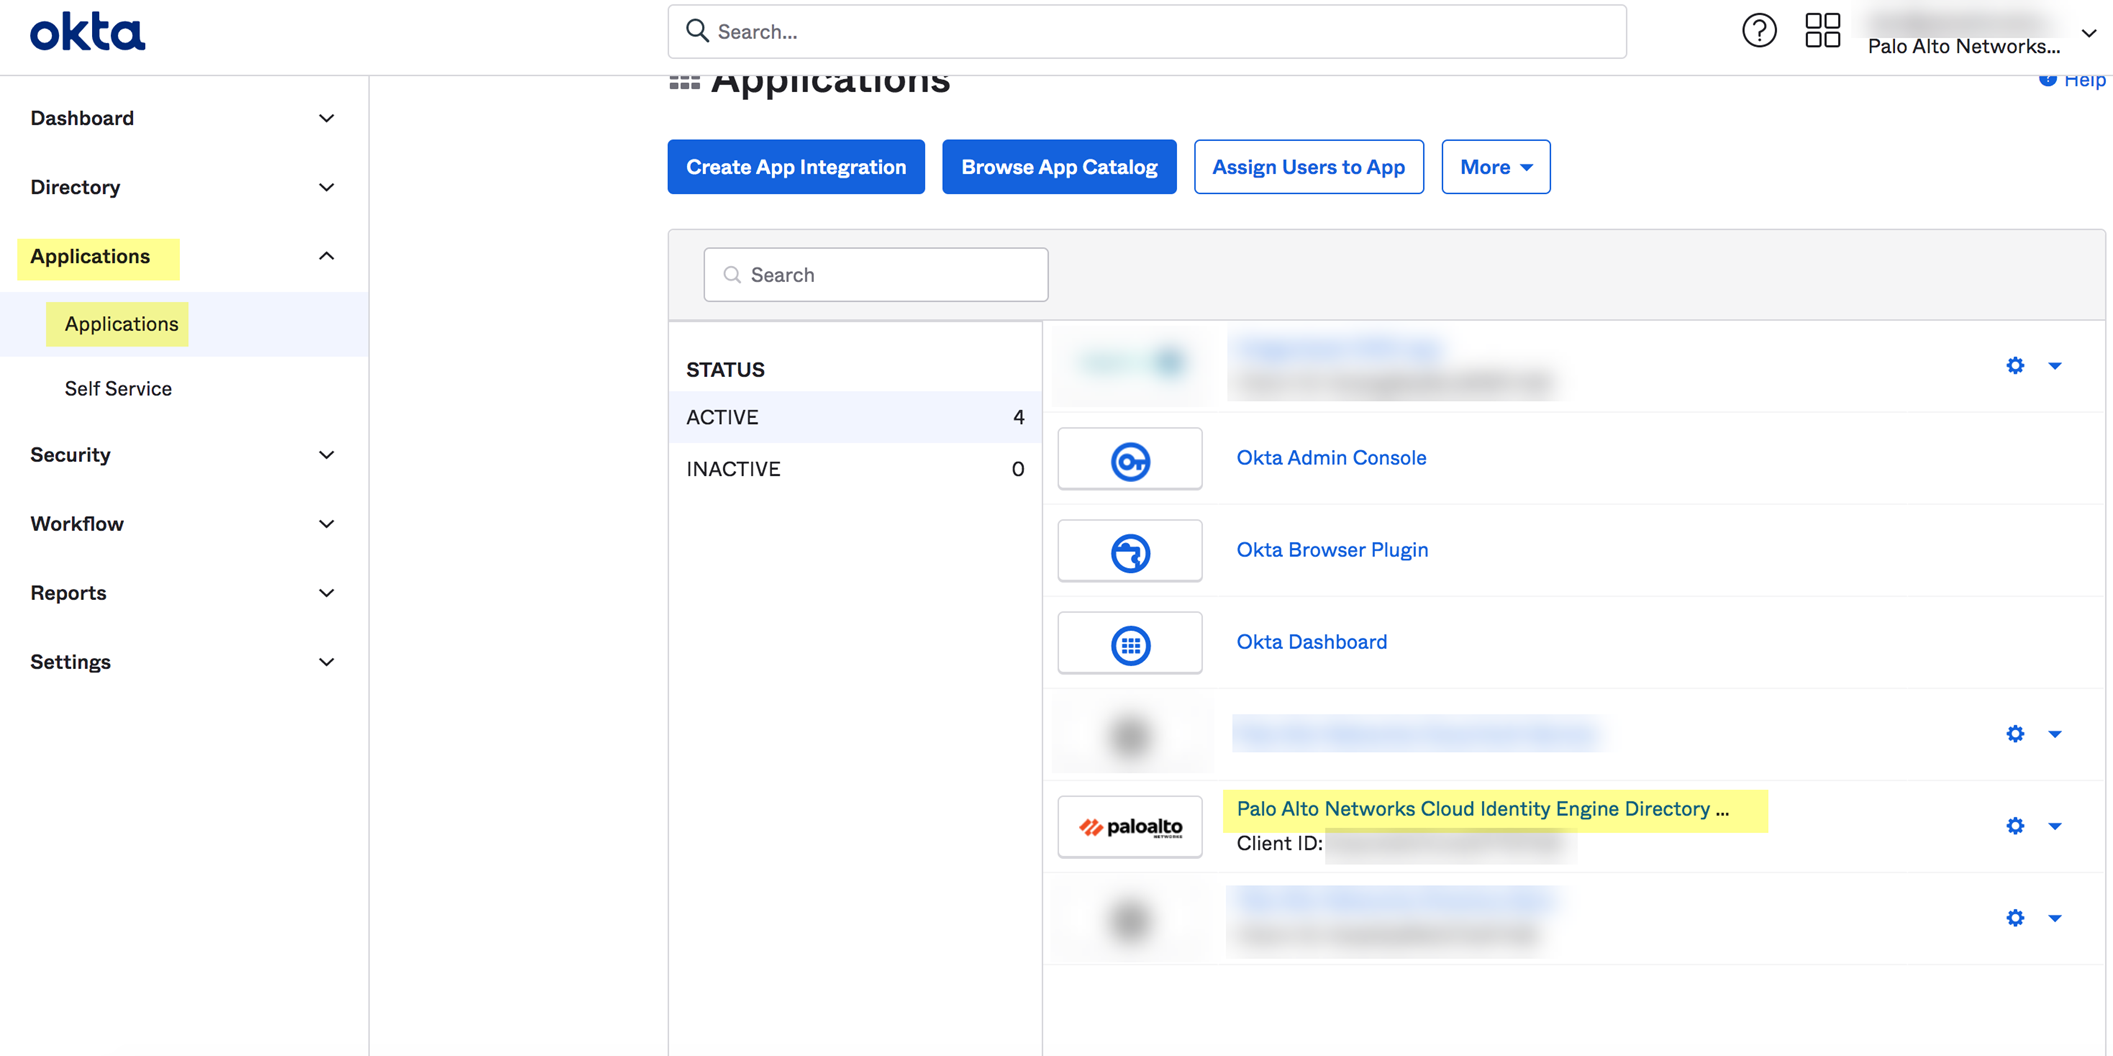
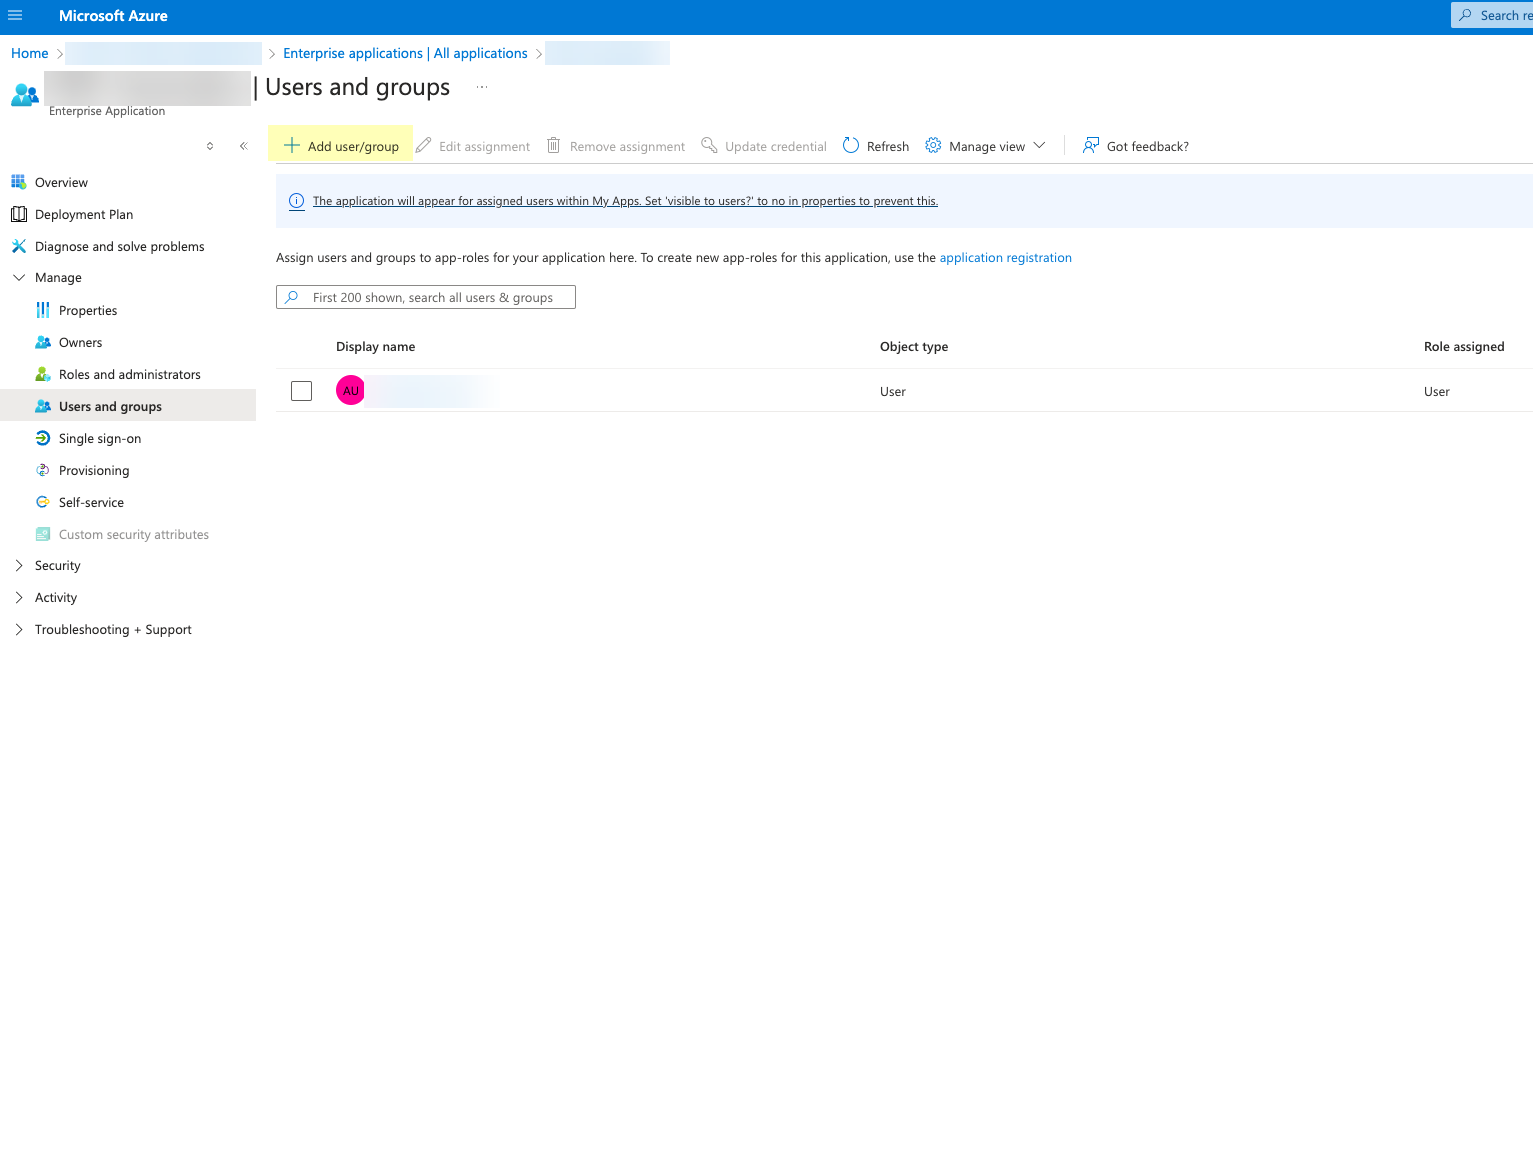
In Azure Portal: Go to Azure AD > Enterprise applications.
Select
All applications
, find and select the
Palo Alto Networks Cloud Identity Engine
app (or custom name).
Select
Properties
.
Click
Delete
and confirm.
Configure Okta Directory
[PCNSA/PCNSE] CIE integrates with Okta Directory to collect user/group attributes for policy and visibility.
[GOTCHA] You *must* create an OpenID Connect (OIDC) app integration in Okta for CIE Directory Sync, even if you use Okta for SAML authentication elsewhere. Using a SAML app integration will cause sync failures after the initial sync.
Two connection methods:
Auth Code Flow (Default):
Requires Okta admin login within CIE to make configuration changes.
Client Credential Flow:
Uses a service account/API token. More secure, requires initial setup of permissions in Okta but avoids subsequent logins in CIE for config changes.
Sync Schedule: Users/Groups/Devices sync on changes. Apps sync up to every 3 hours.
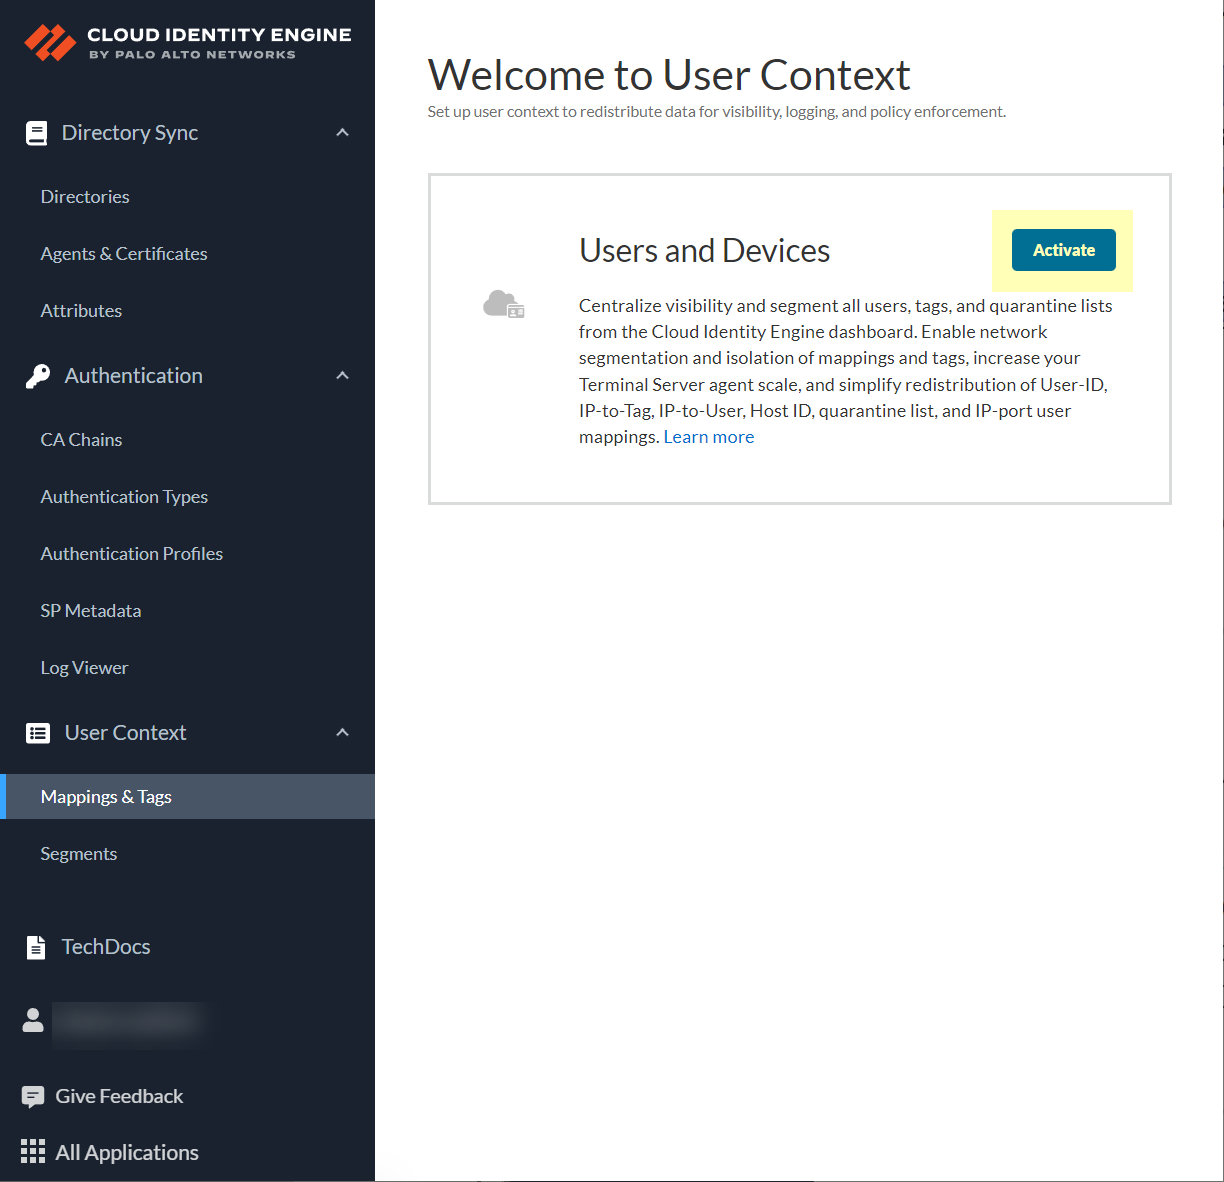
Deploy Auth Code Flow for Okta Directory
Activate CIE. Get the Sign-in redirect URI: Copy your CIE tenant URL (e.g.,
https://directory-sync.us.paloaltonetworks.com/directory?instance=...
) and replace everything after the domain with
/authorize
(e.g.,
https://directory-sync.us.paloaltonetworks.com/authorize
).
In Okta Admin Dashboard:
Create an Admin user specifically for the CIE integration.
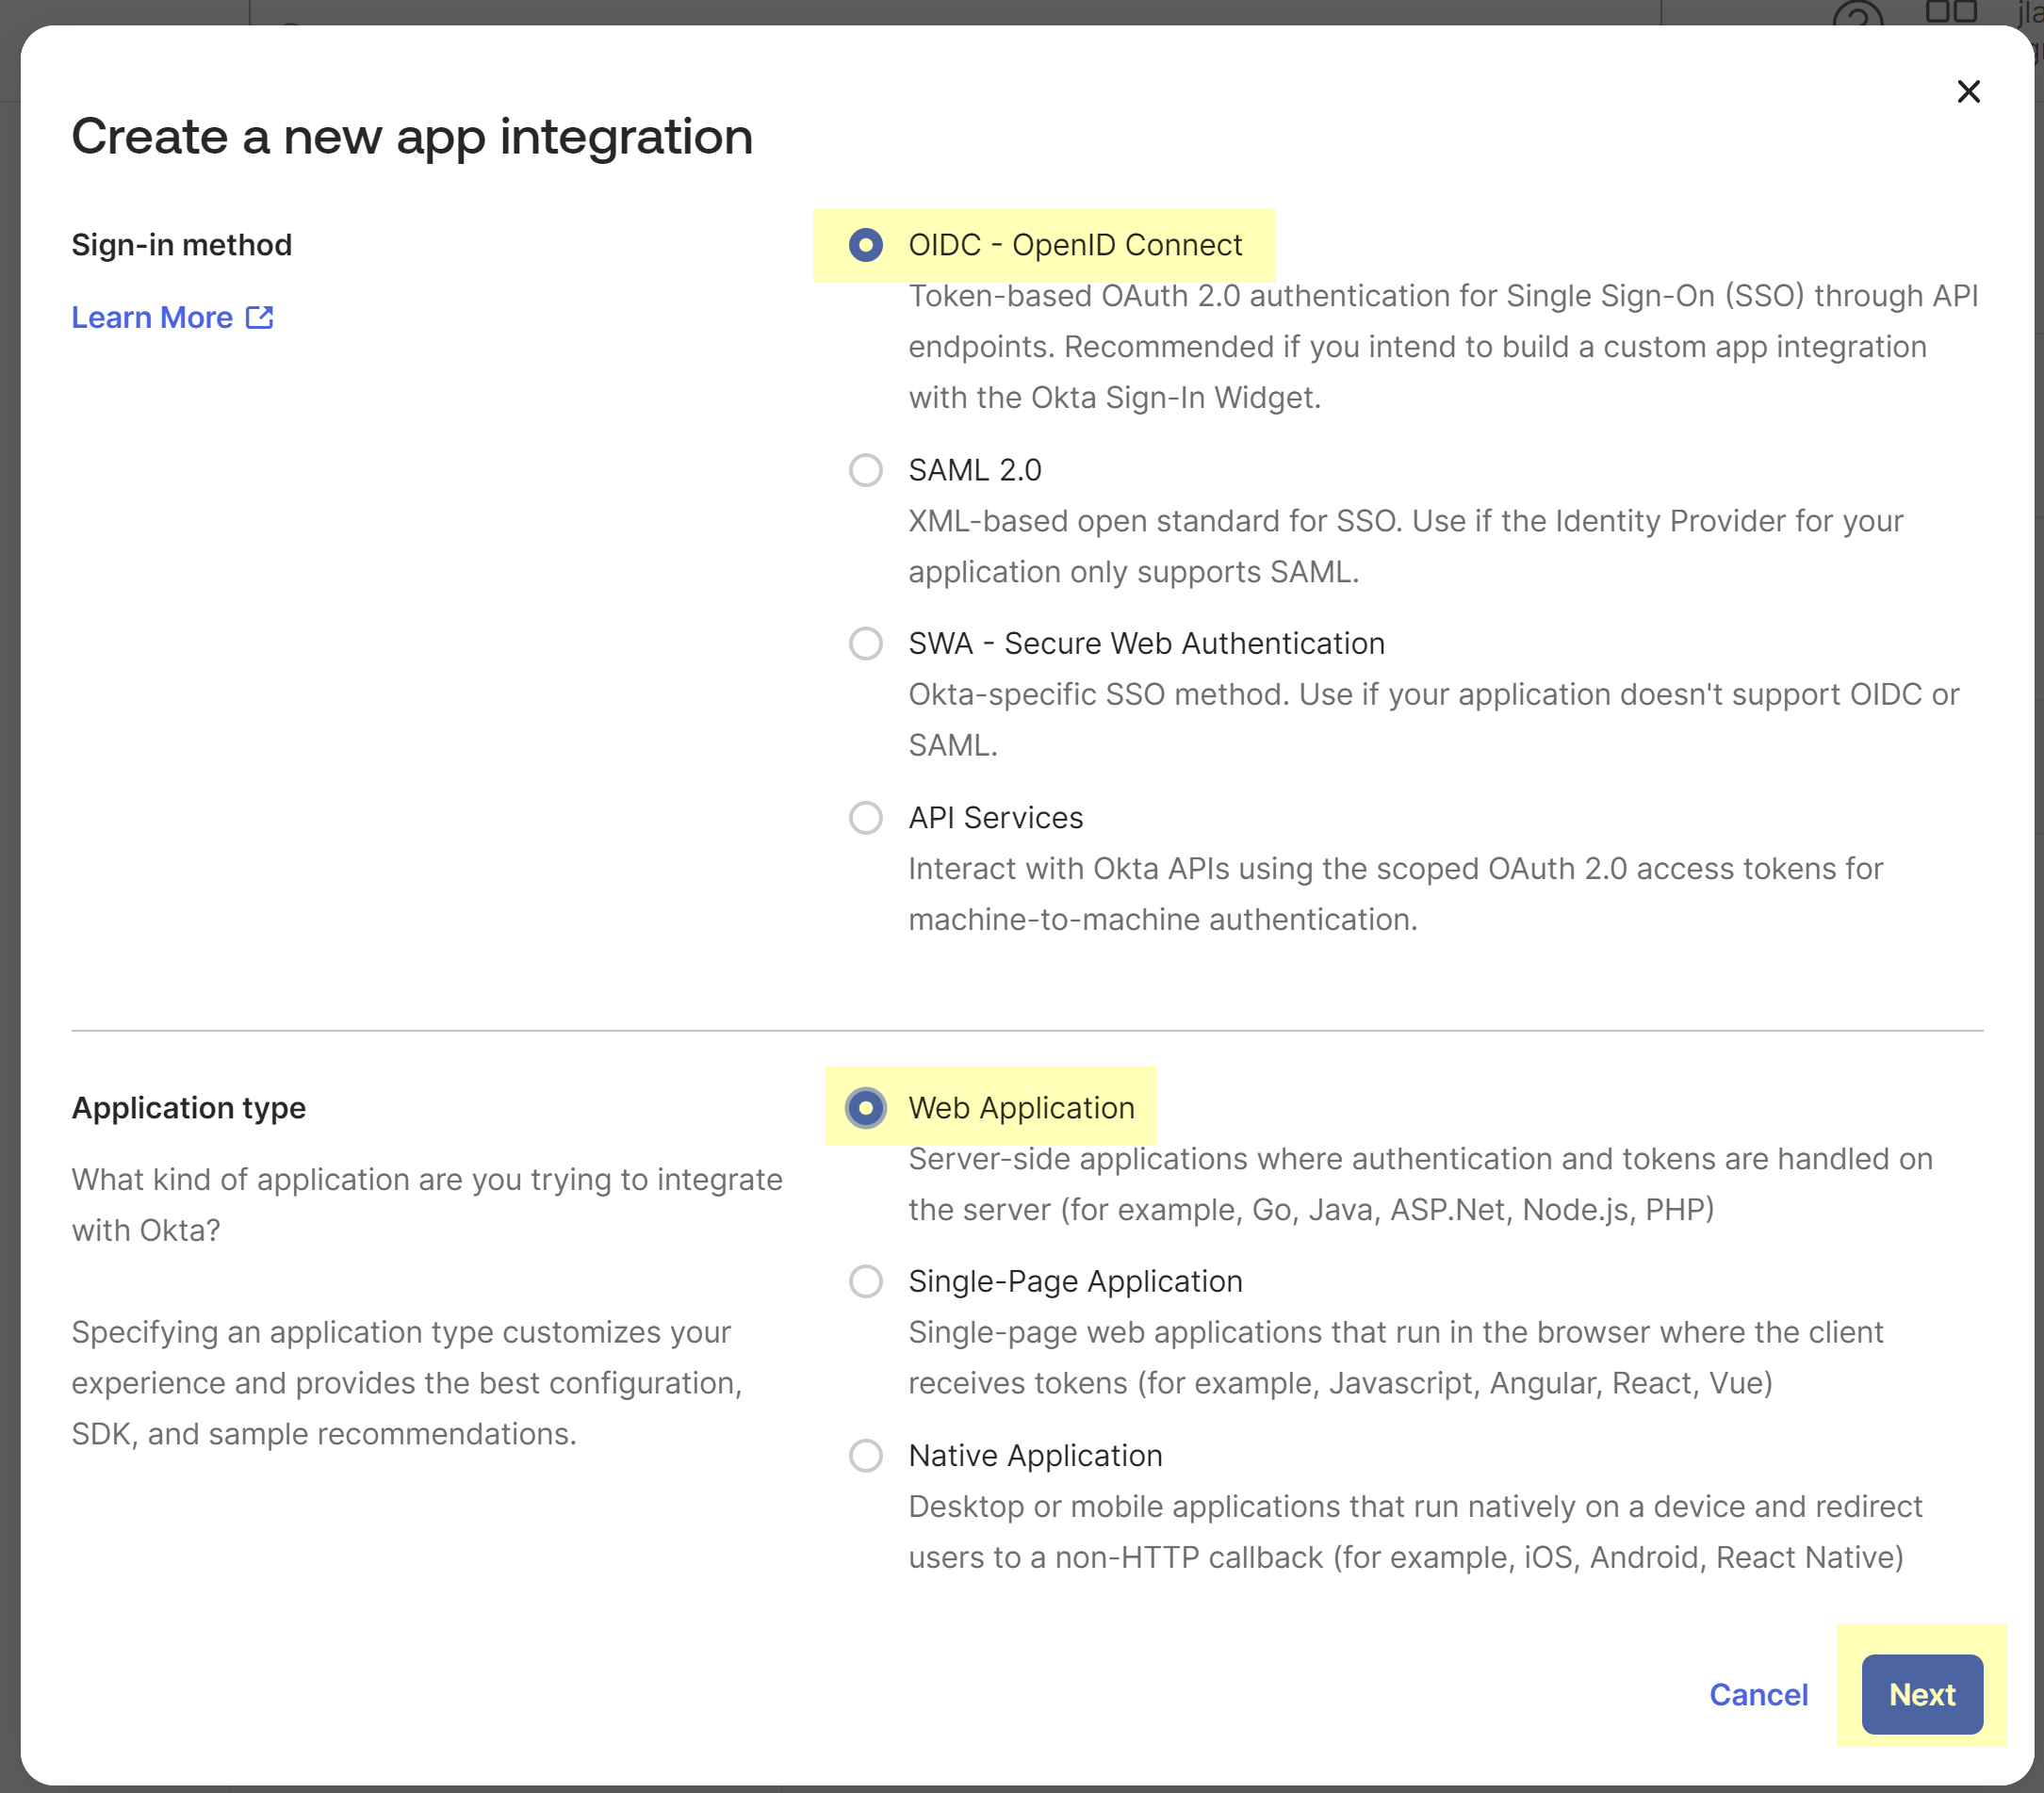
Create a new App Integration: Select
OIDC - OpenID Connect
and
Web Application
.
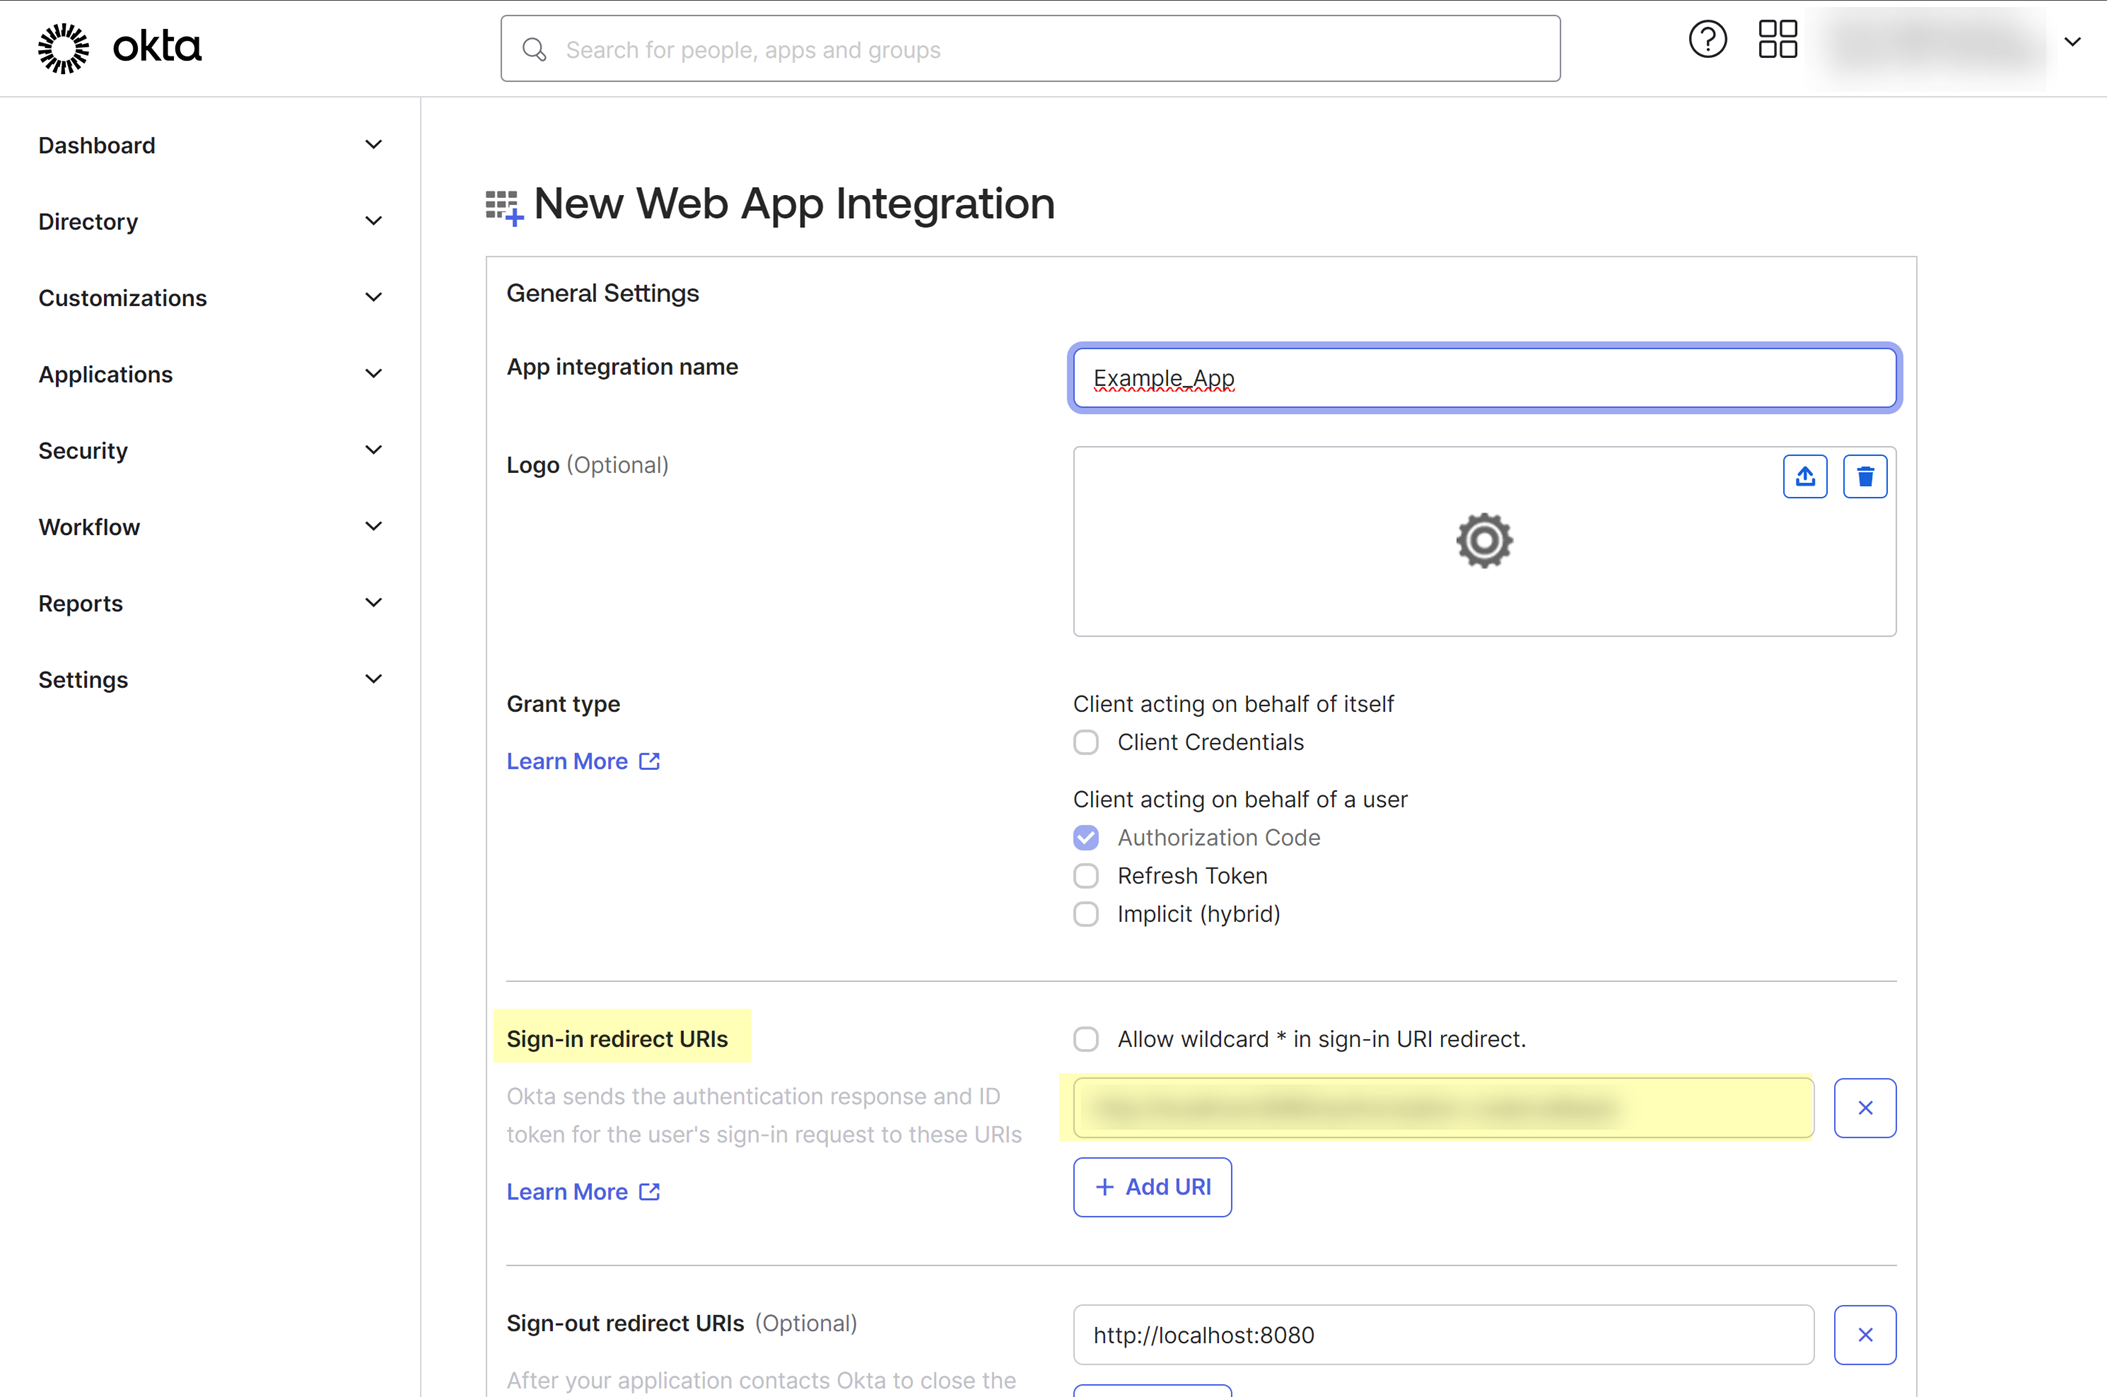
Paste the CIE Redirect URI (from step 1) into
Sign-in redirect URIs
.
Assign the app *only* to the dedicated admin user created earlier. Save.
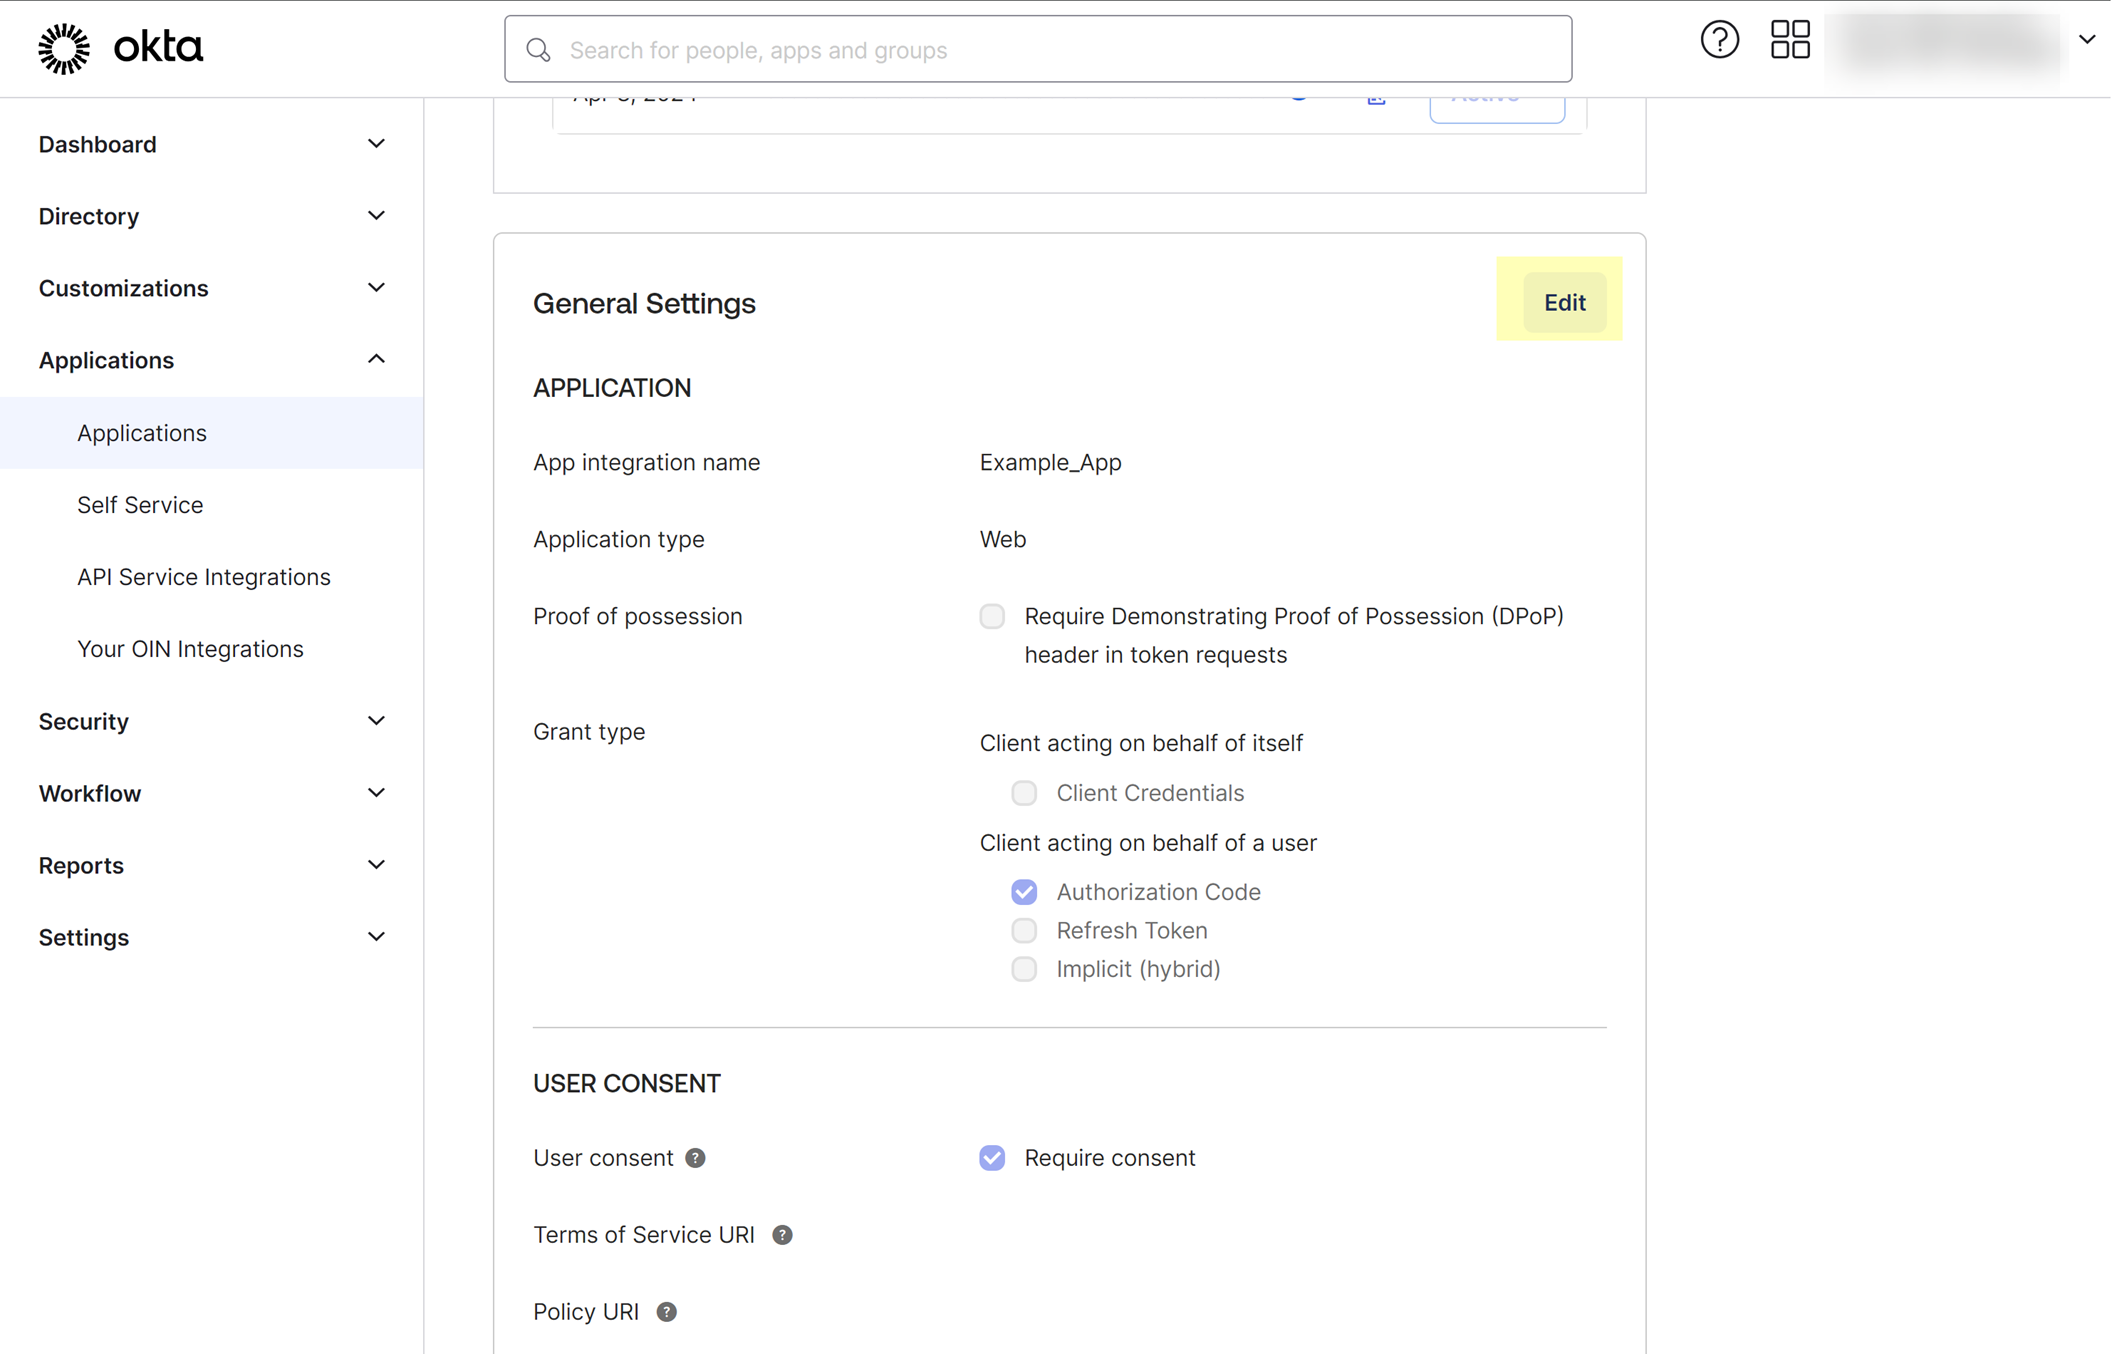
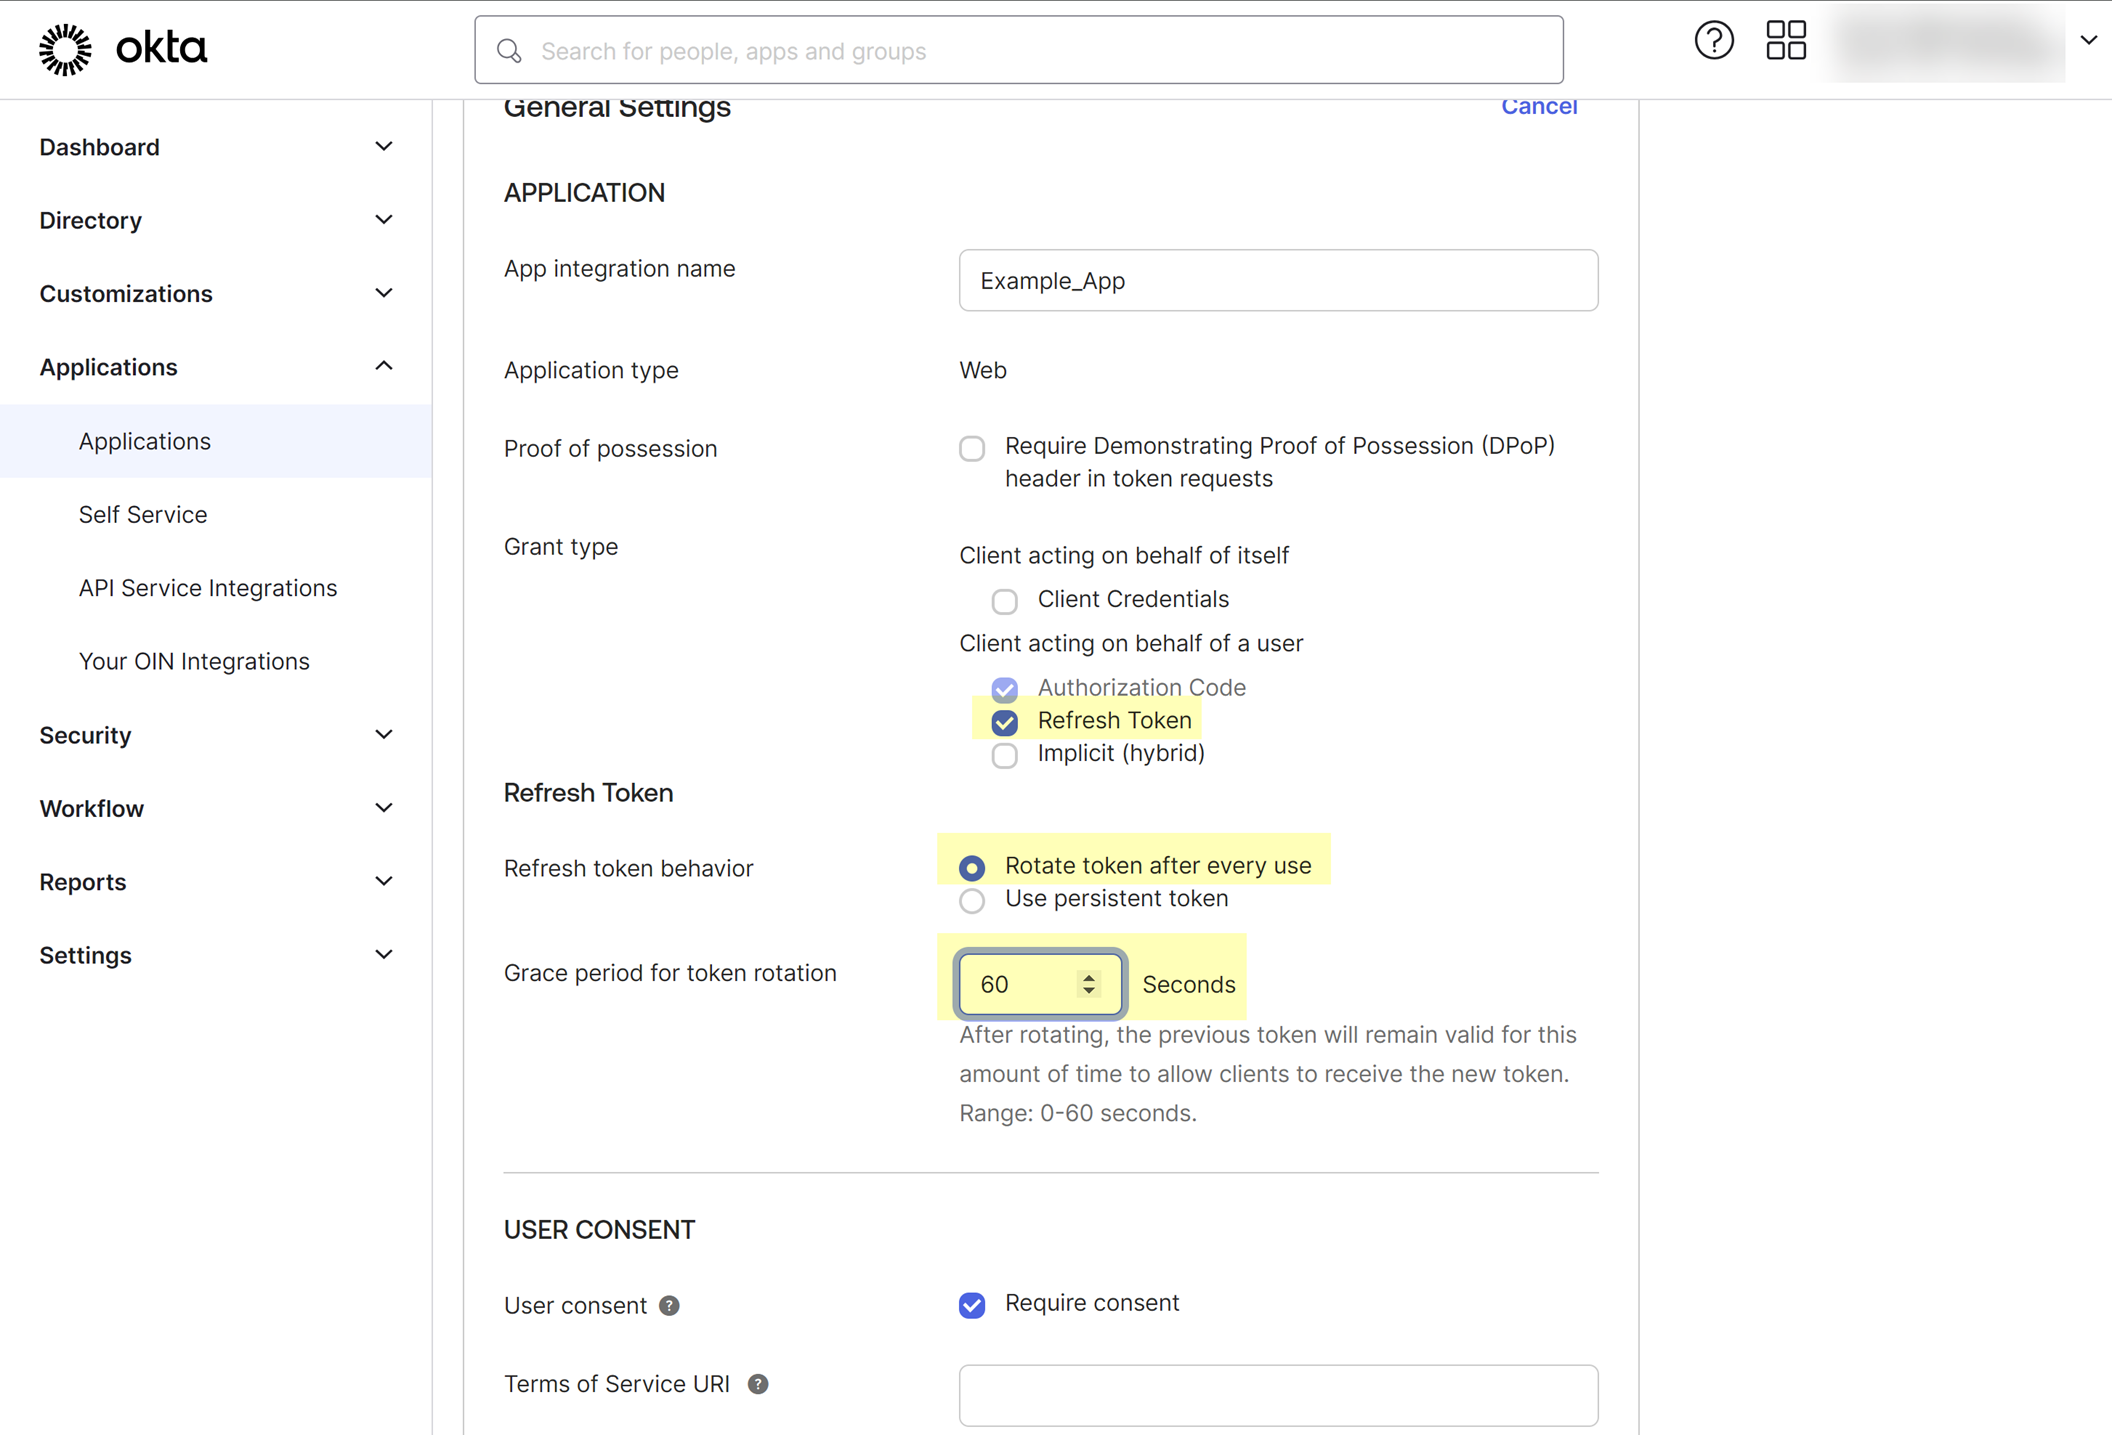
Configure the Okta App Integration:
Edit the app > General tab. Enable Grant type:
Refresh Token
.
Select
Rotate token after every use
. Set
Grace period
to 60 seconds. Save.
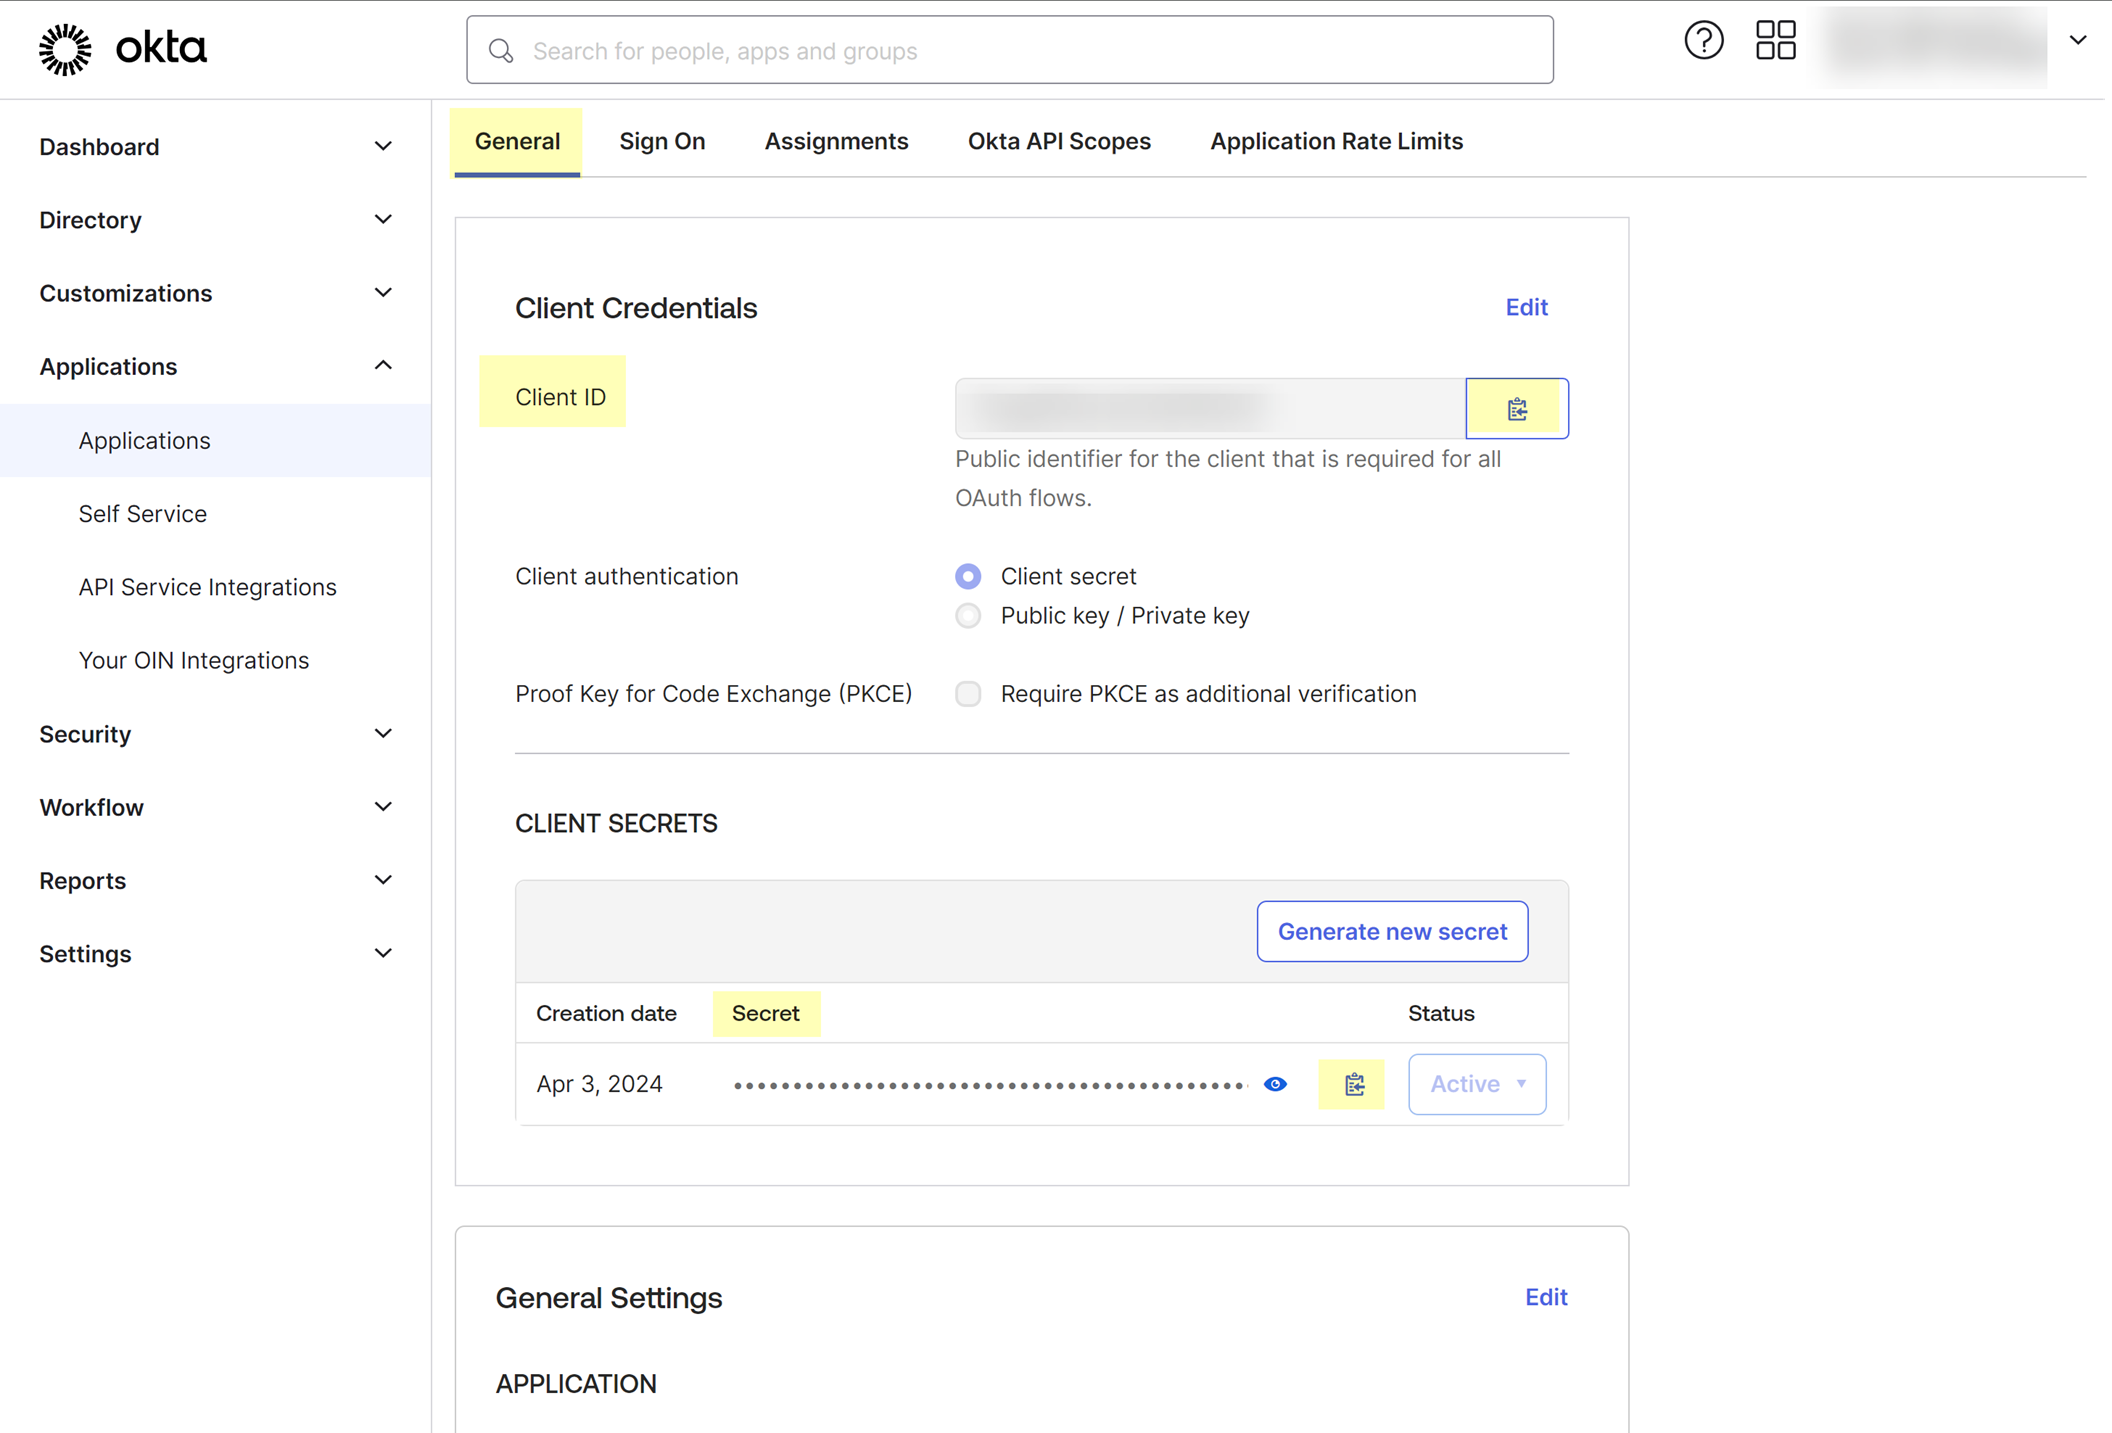
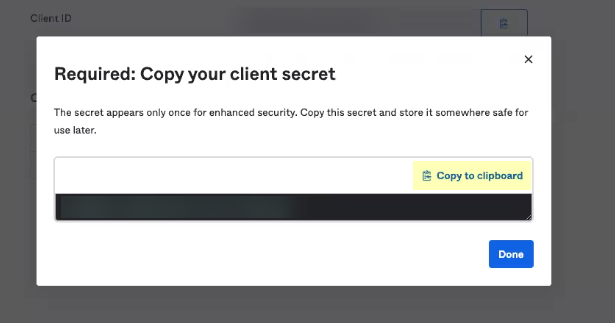
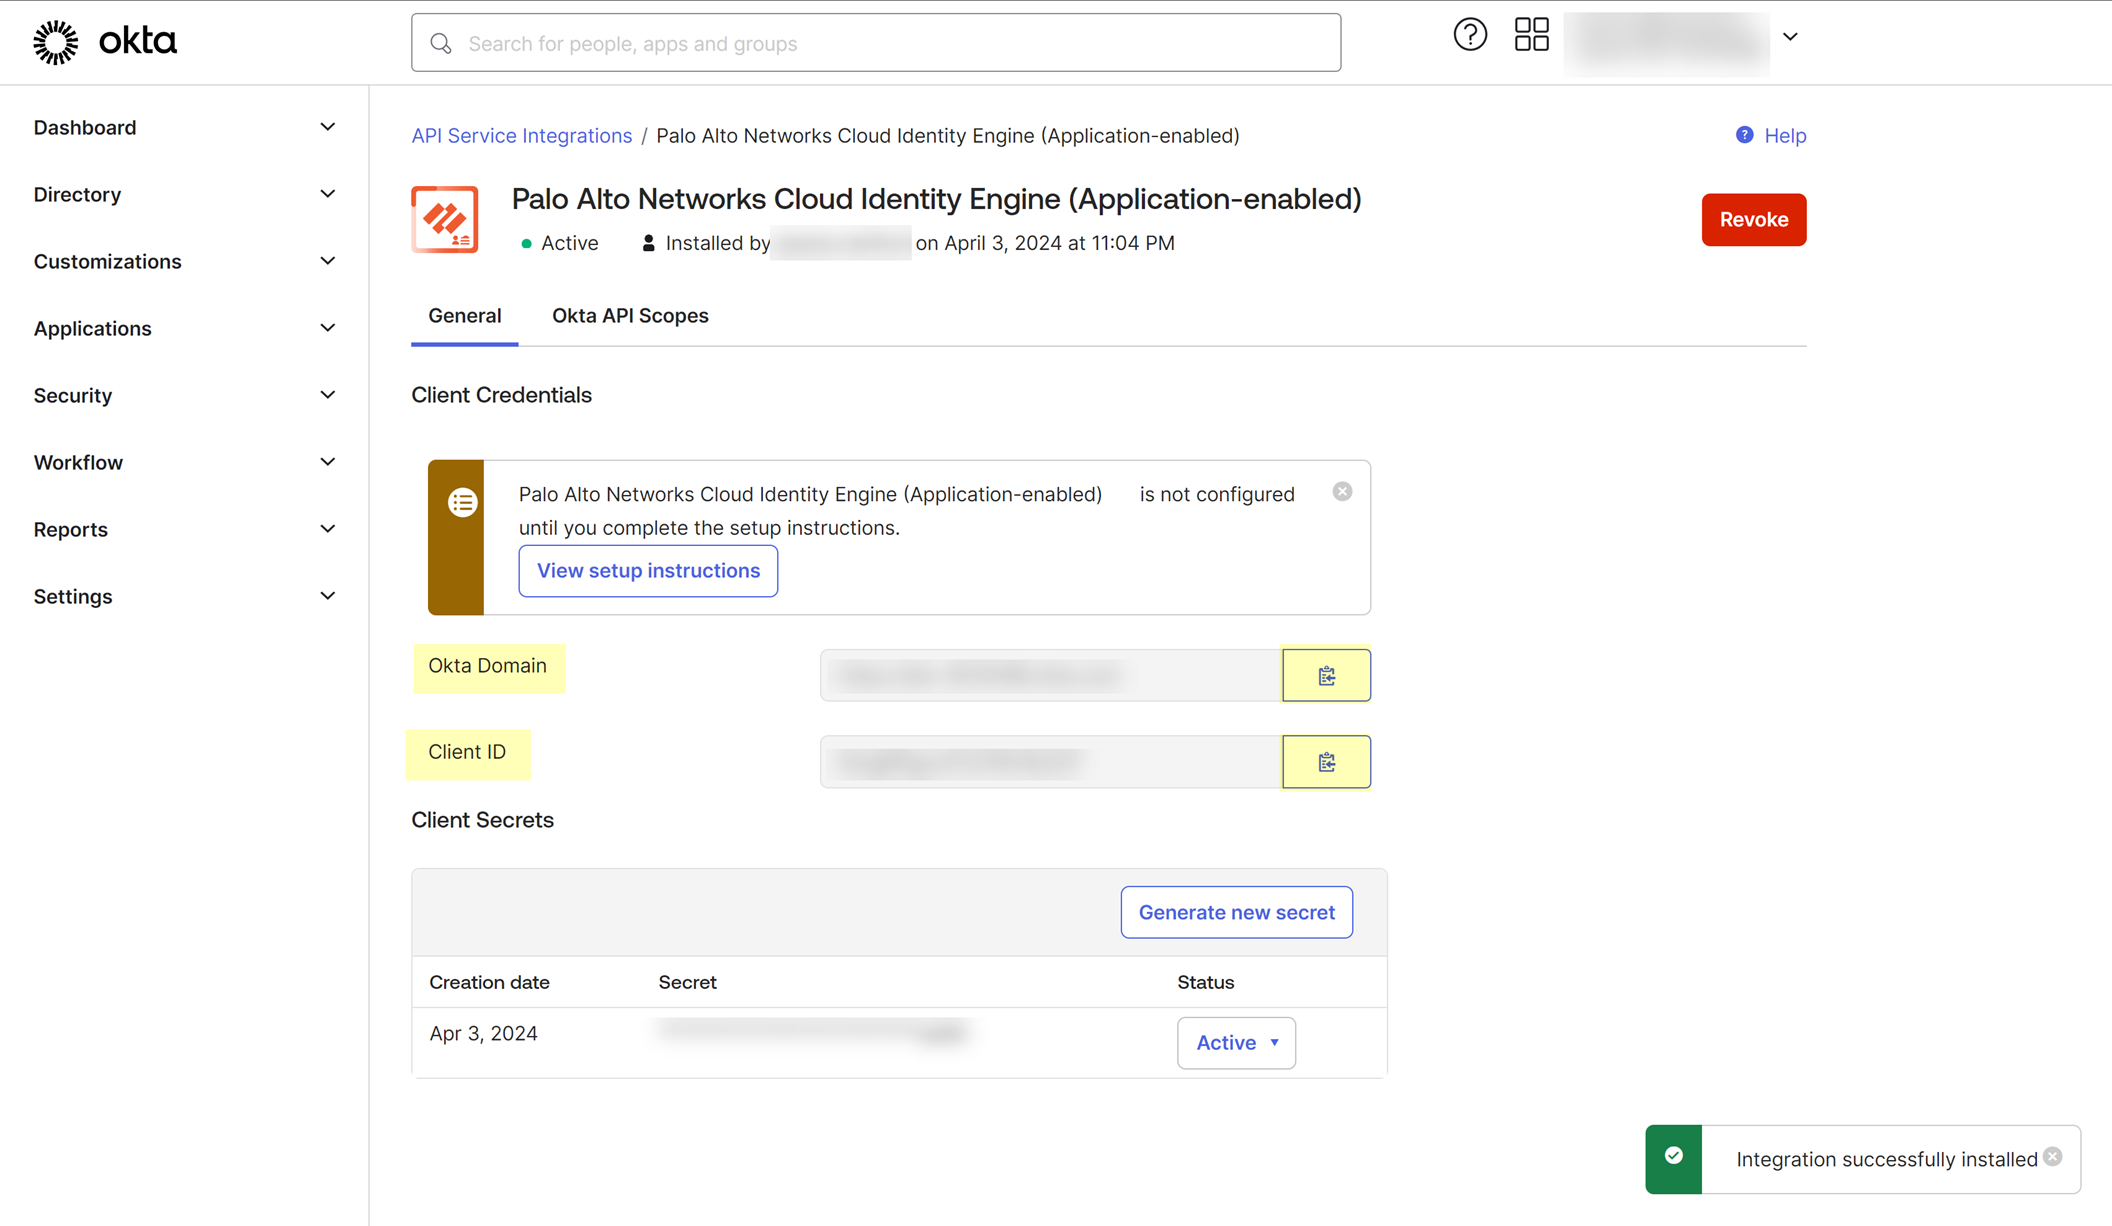
Obtain Okta App Credentials:
In the app's General tab, copy the
Client ID
and
Client secret
. Store securely.
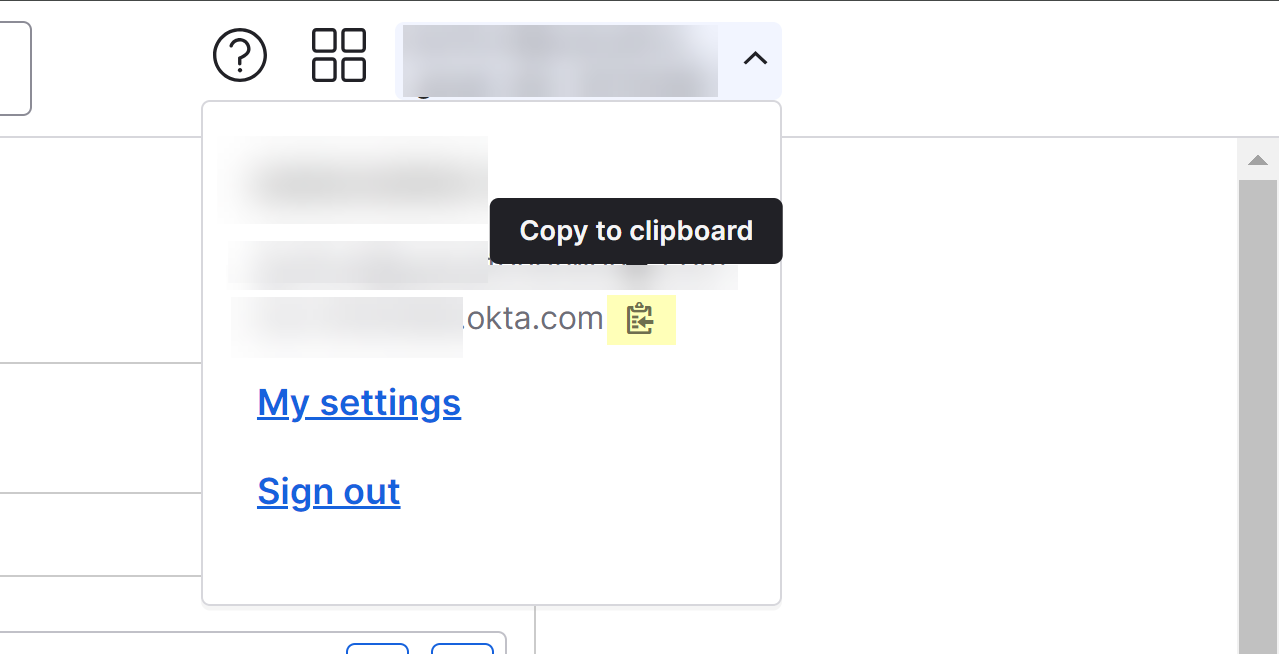
Find your Okta Domain (usually under your username dropdown in the top right). Copy and store securely.
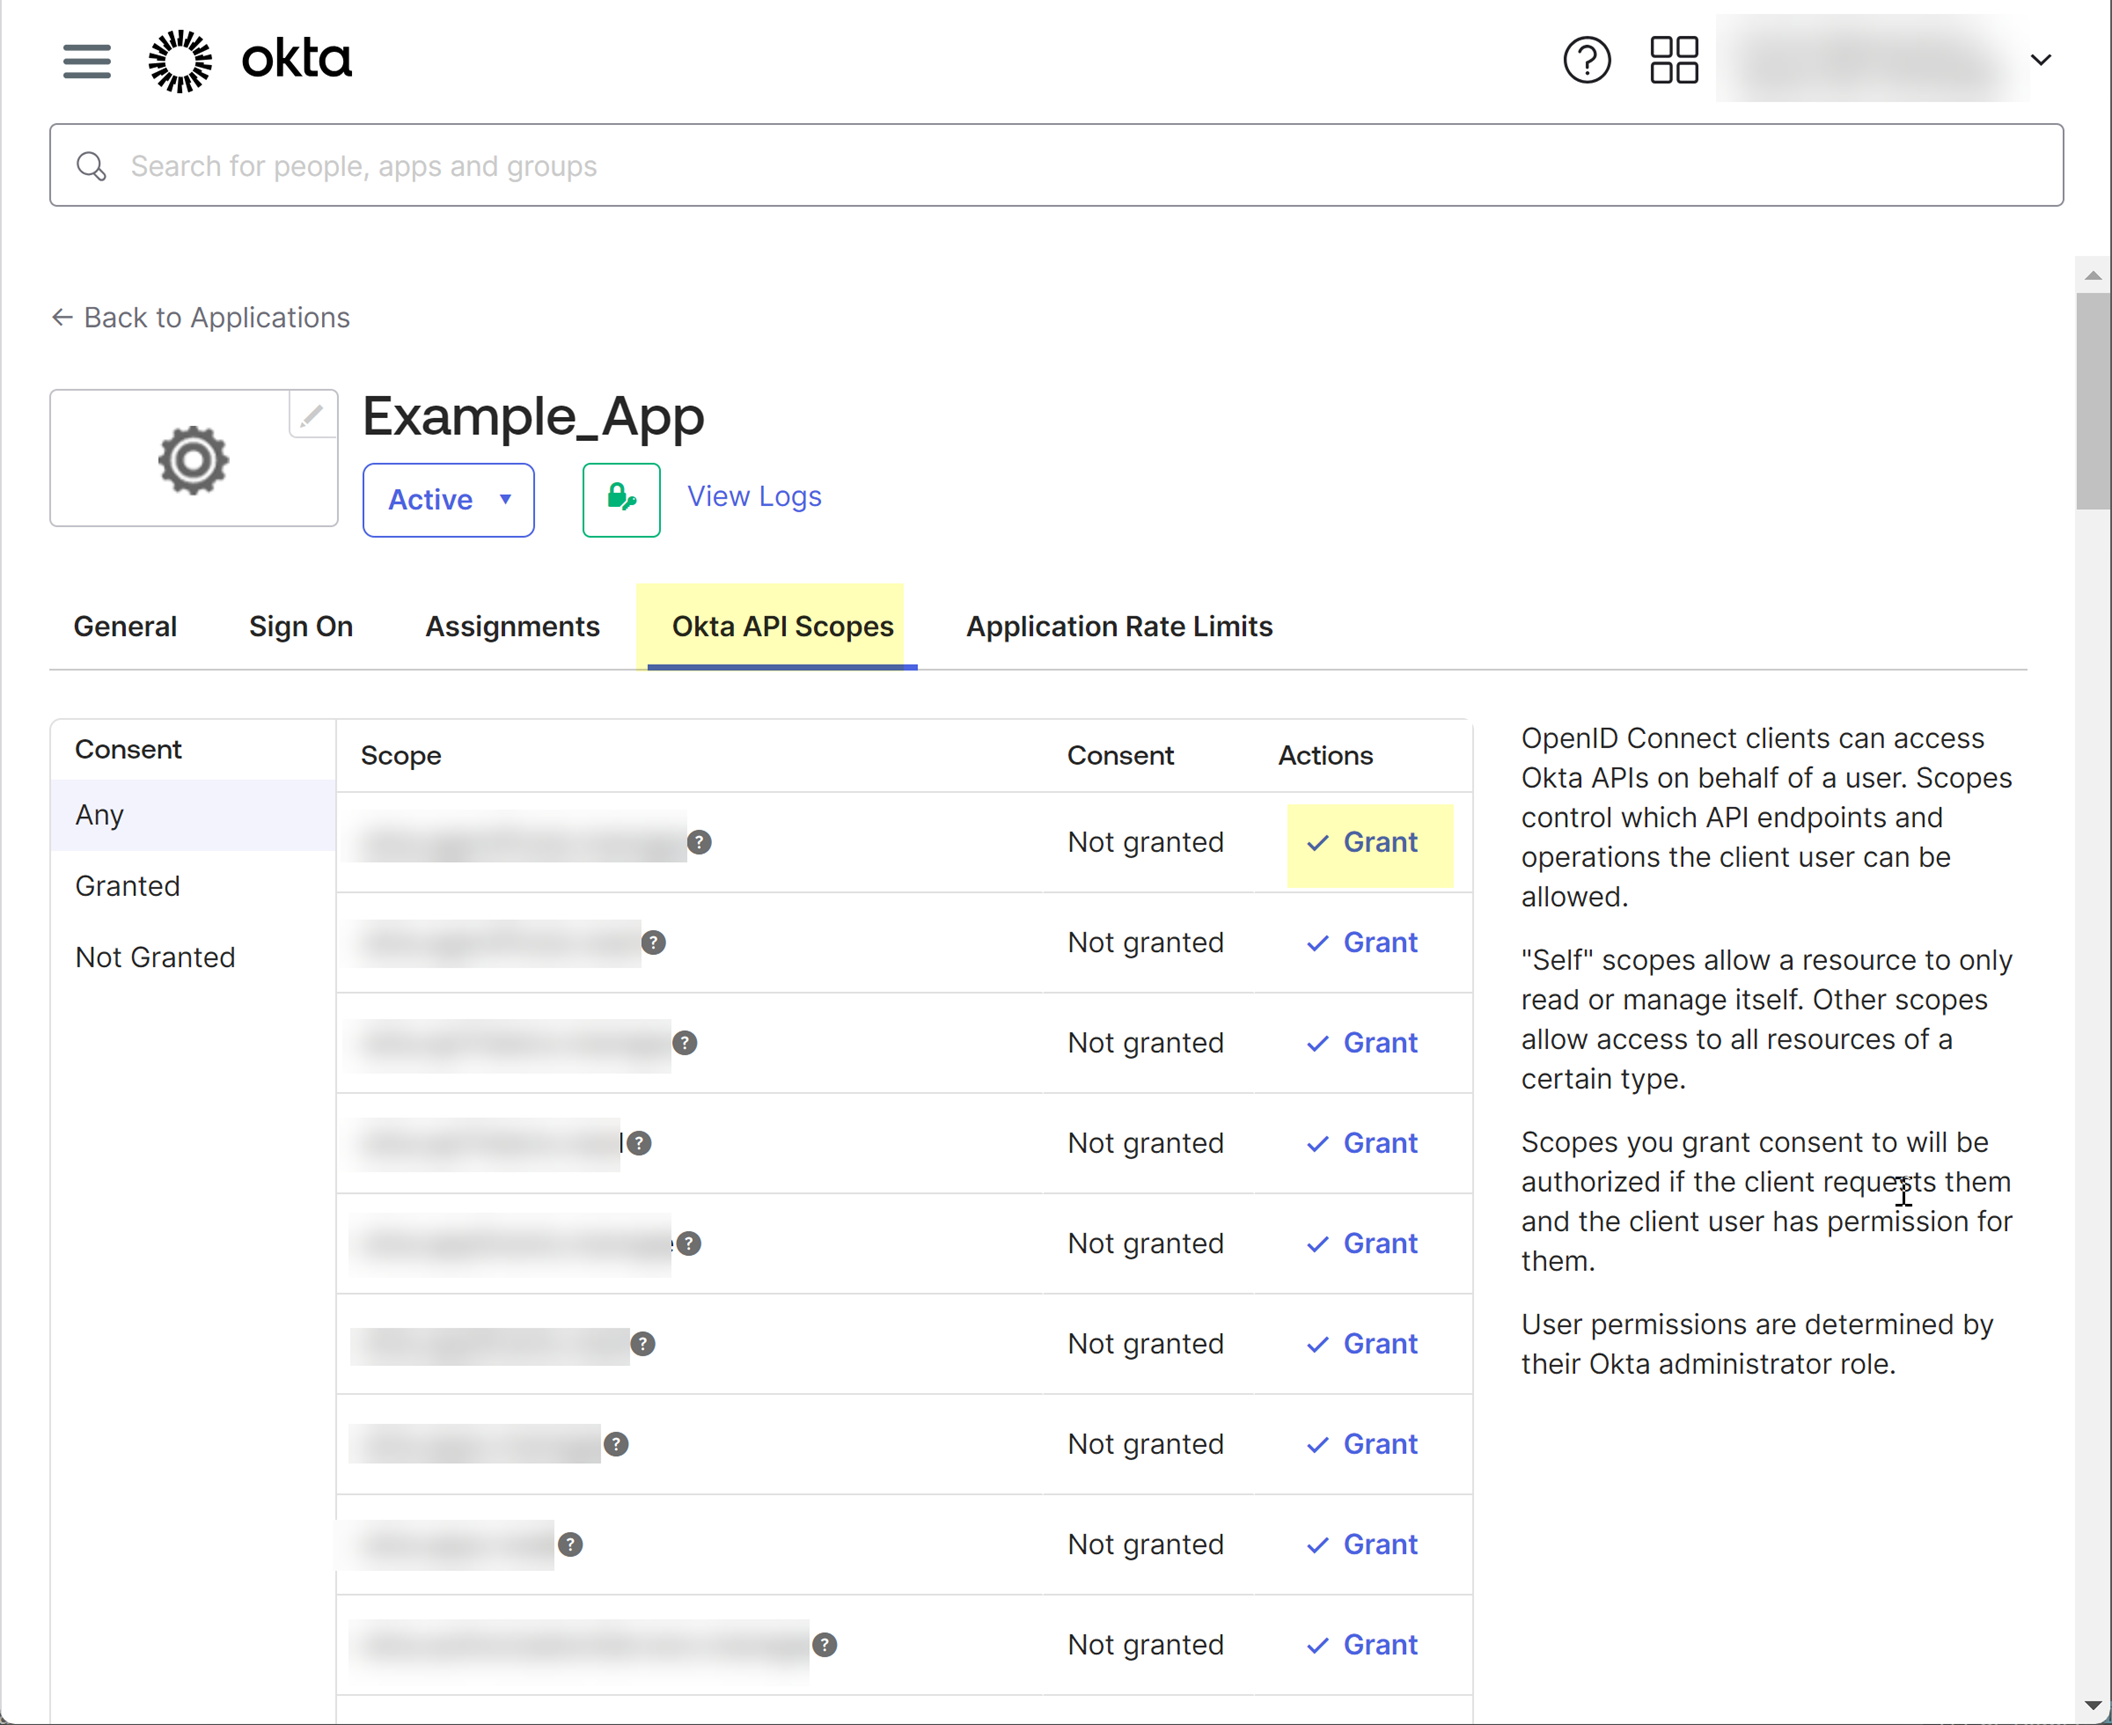
Assign API Scopes in Okta:
Go to Security > API > Authorization Servers tab. Select the 'default' server.
Go to Scopes tab >
Add Scope
. Grant consent for required scopes:
okta.groups.read
,
okta.logs.read
,
okta.users.read
,
okta.users.read.self
.
If collecting Enterprise App data, also grant
okta.apps.read
.
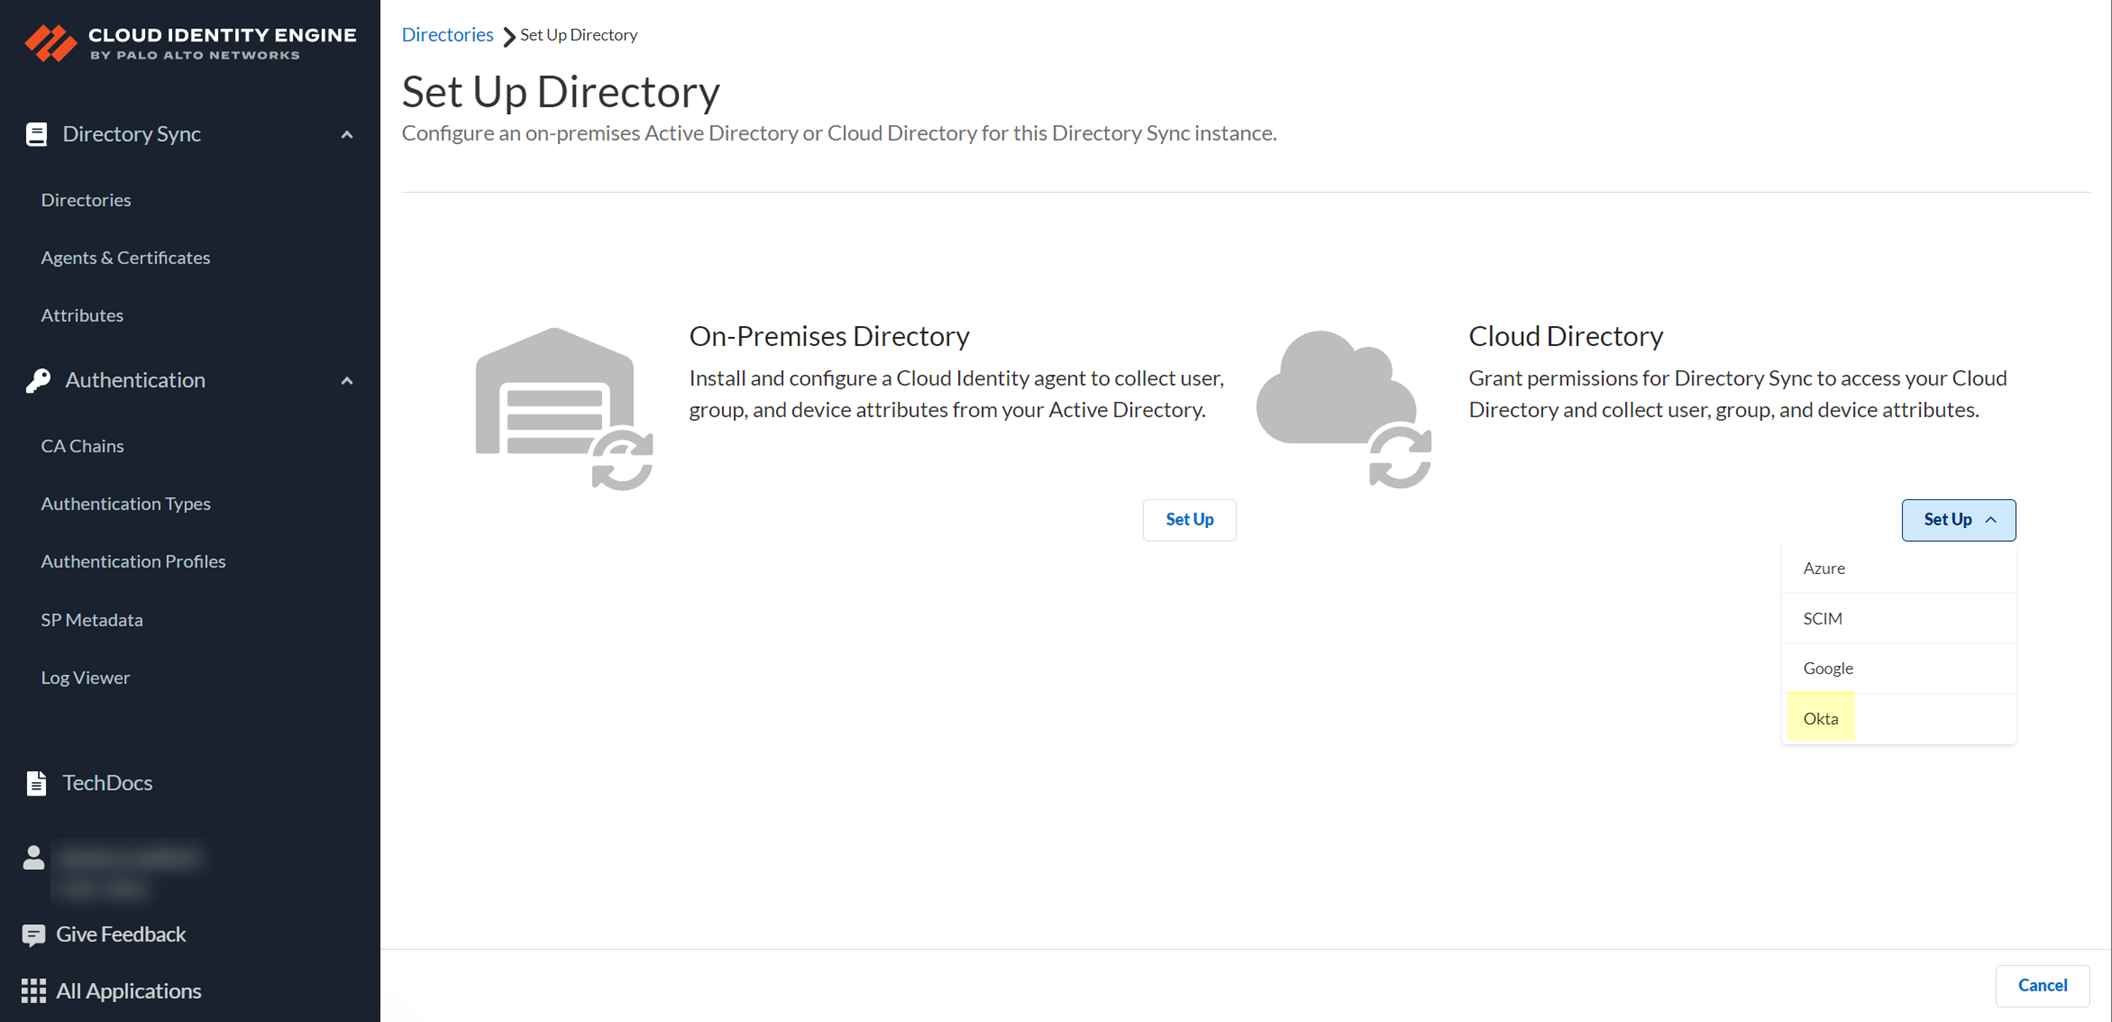
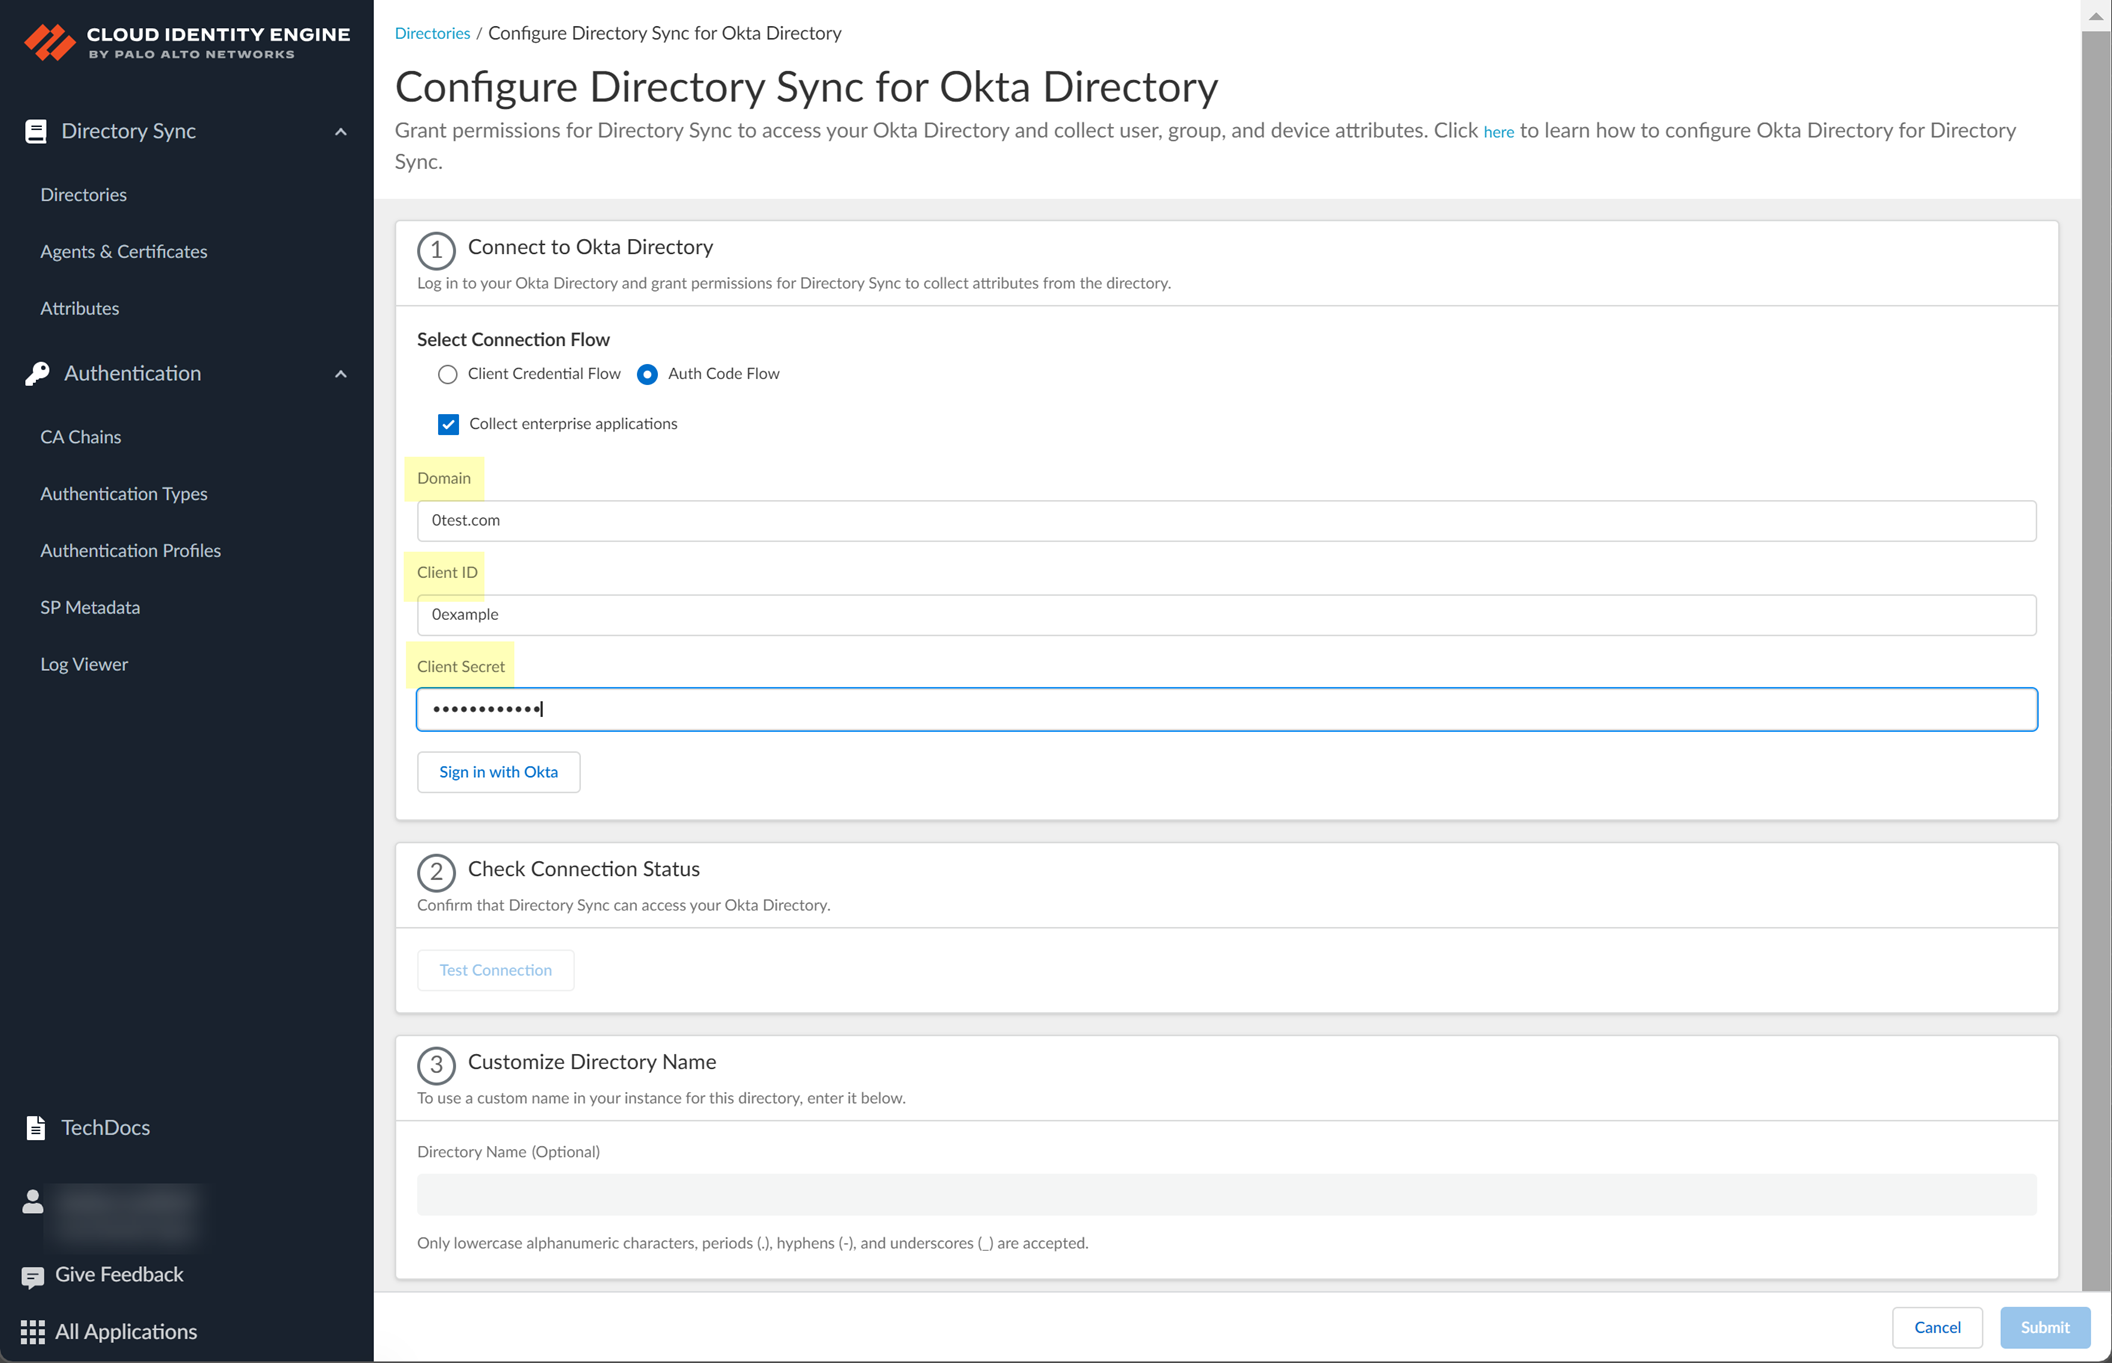
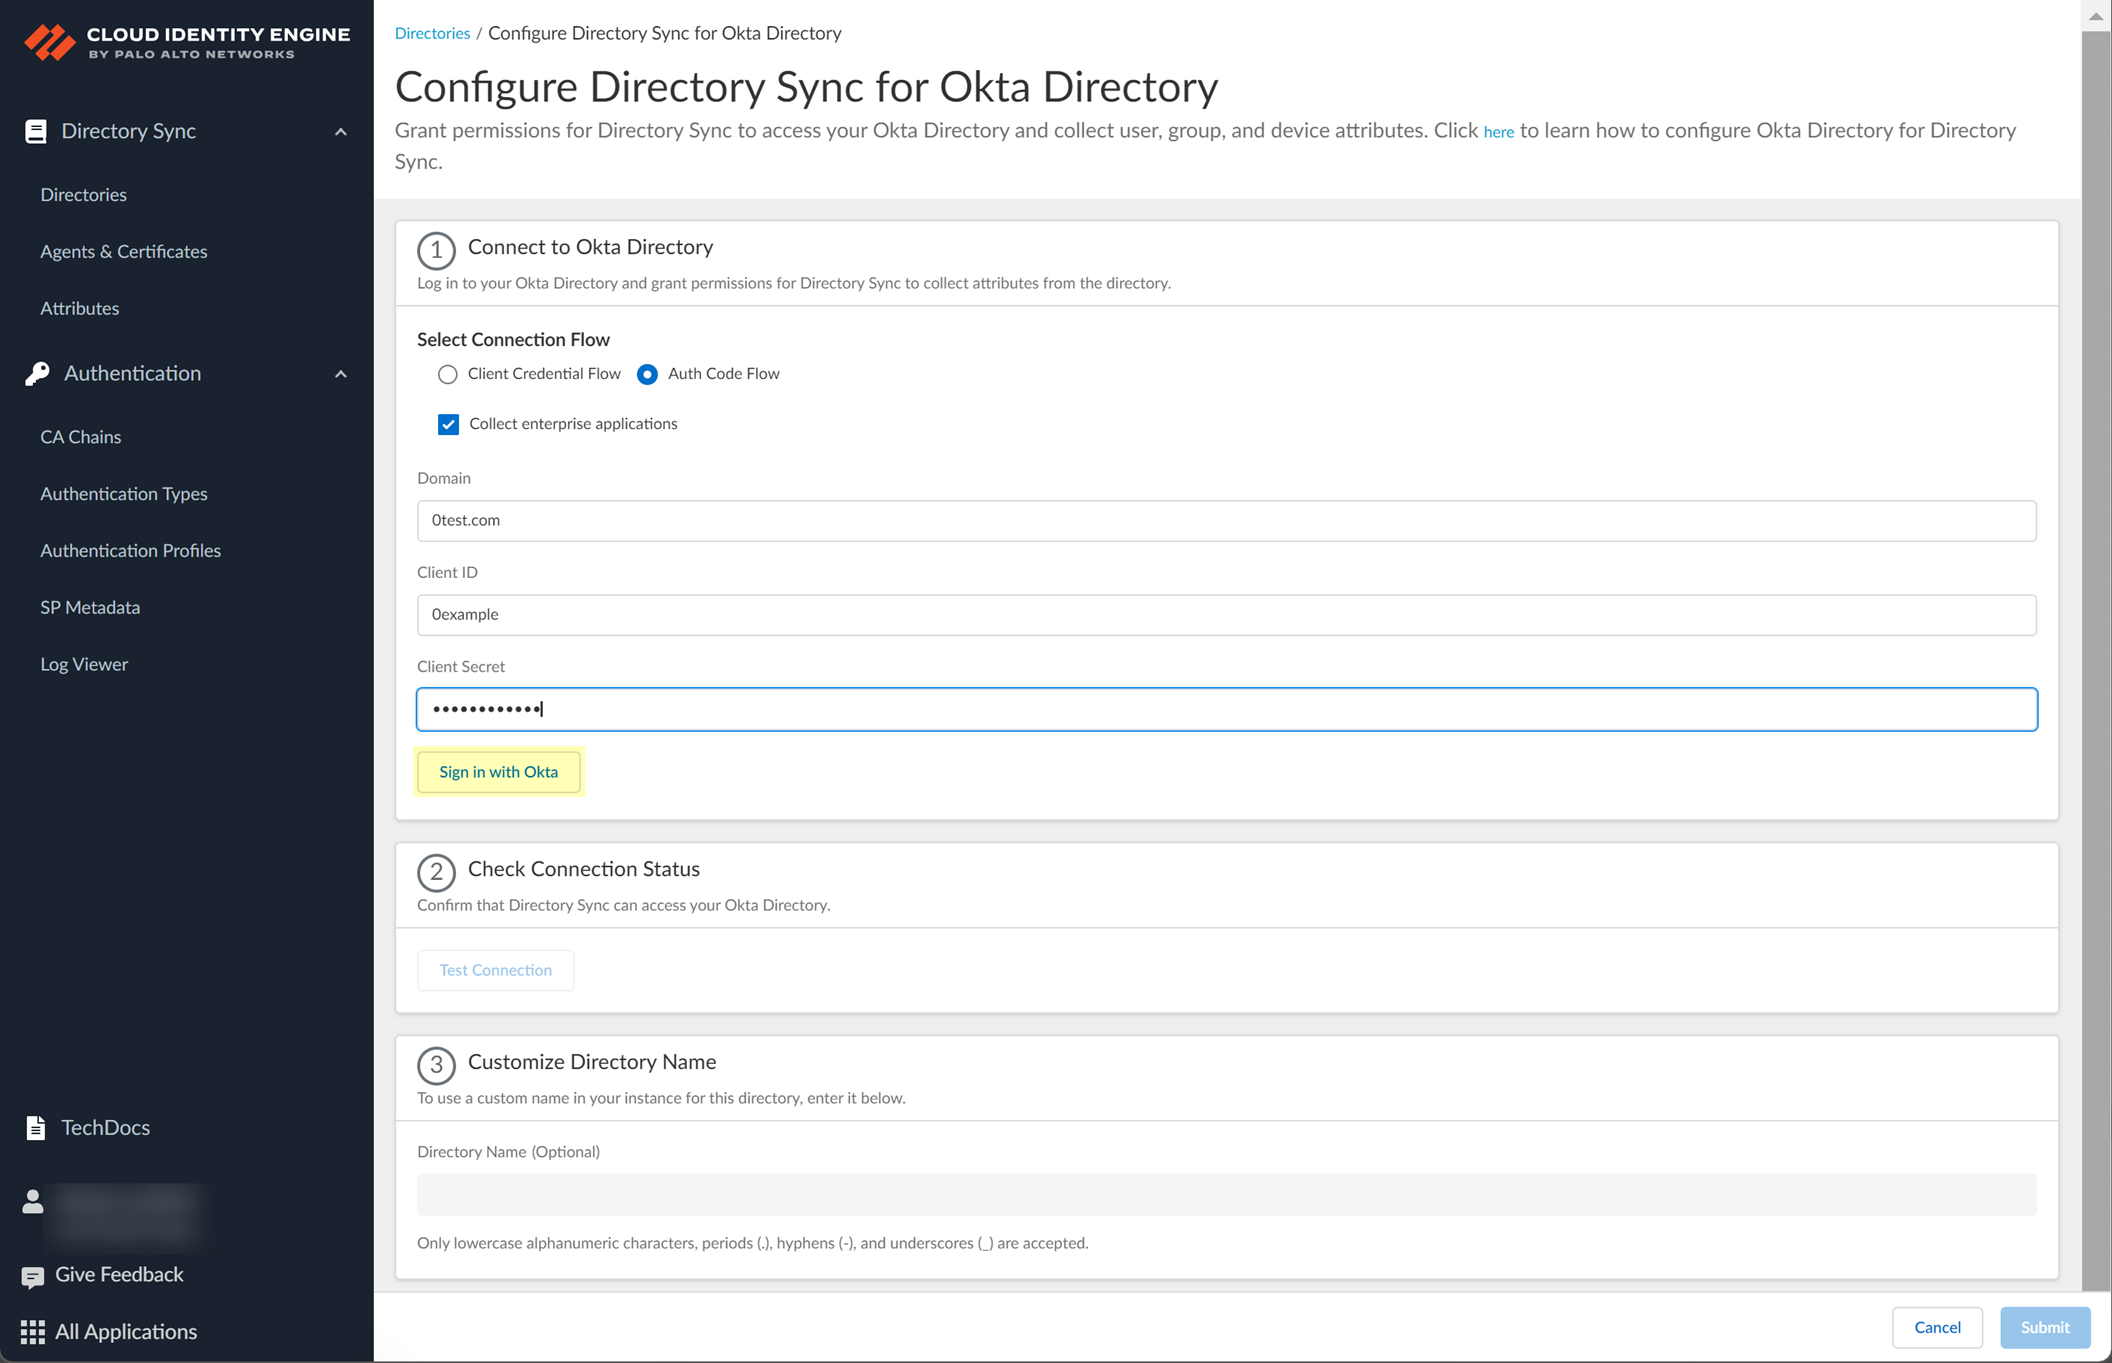
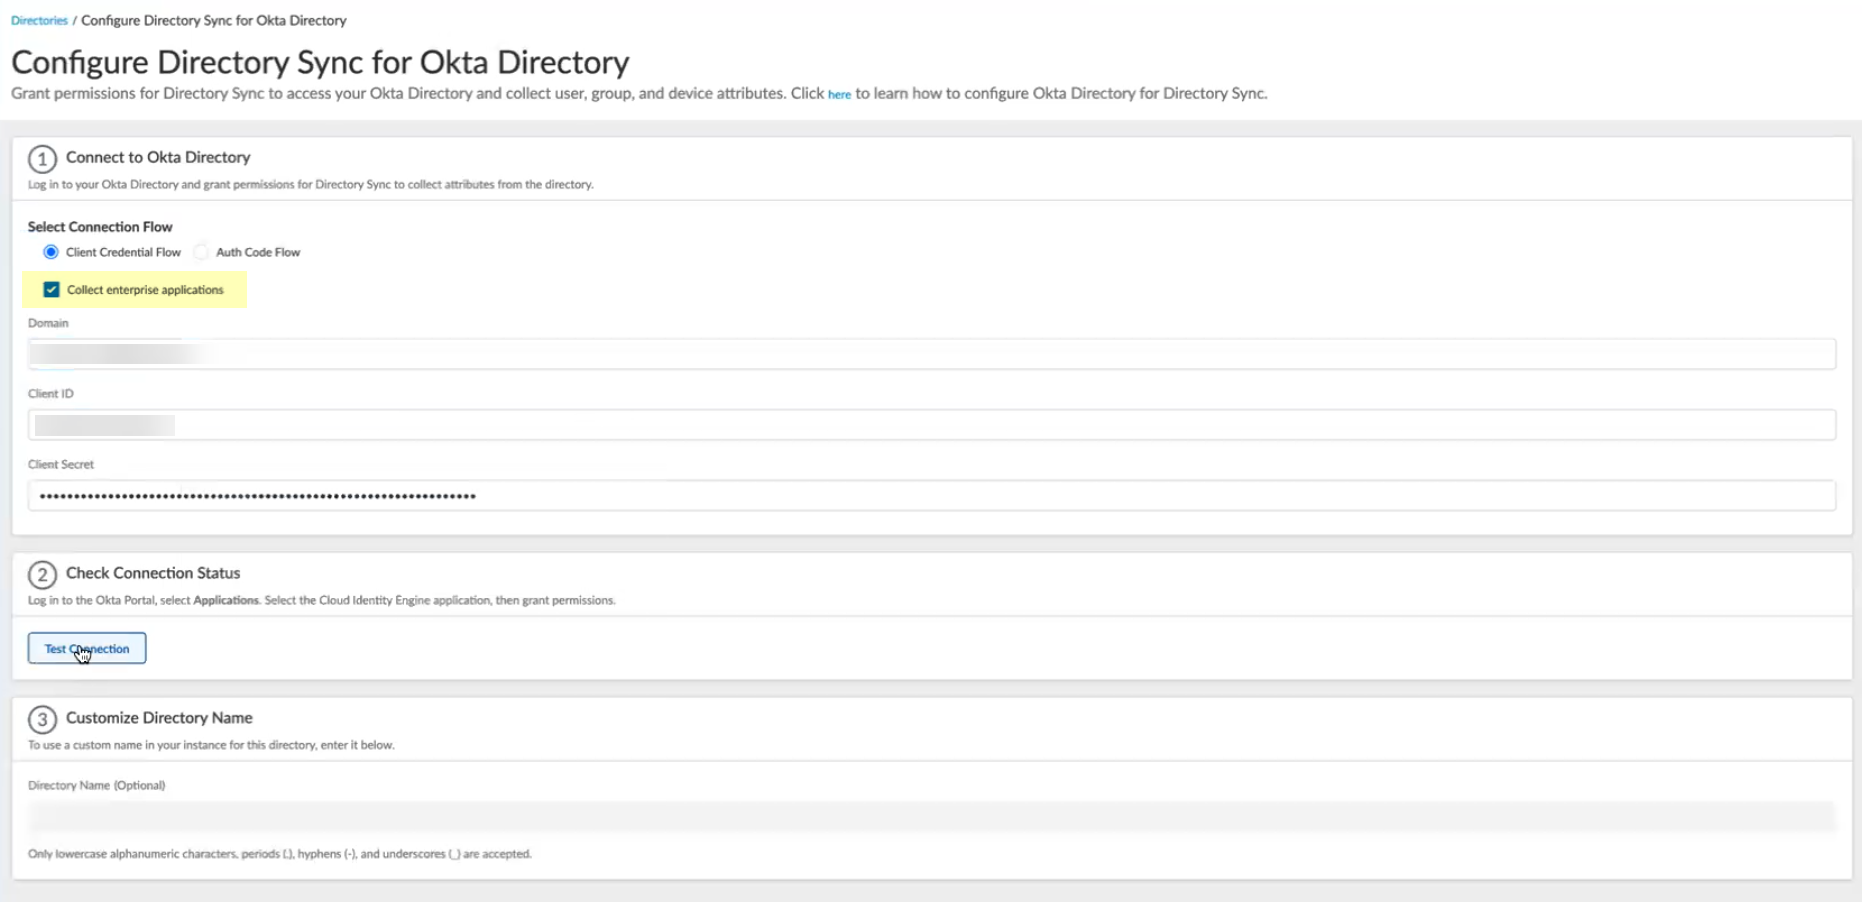
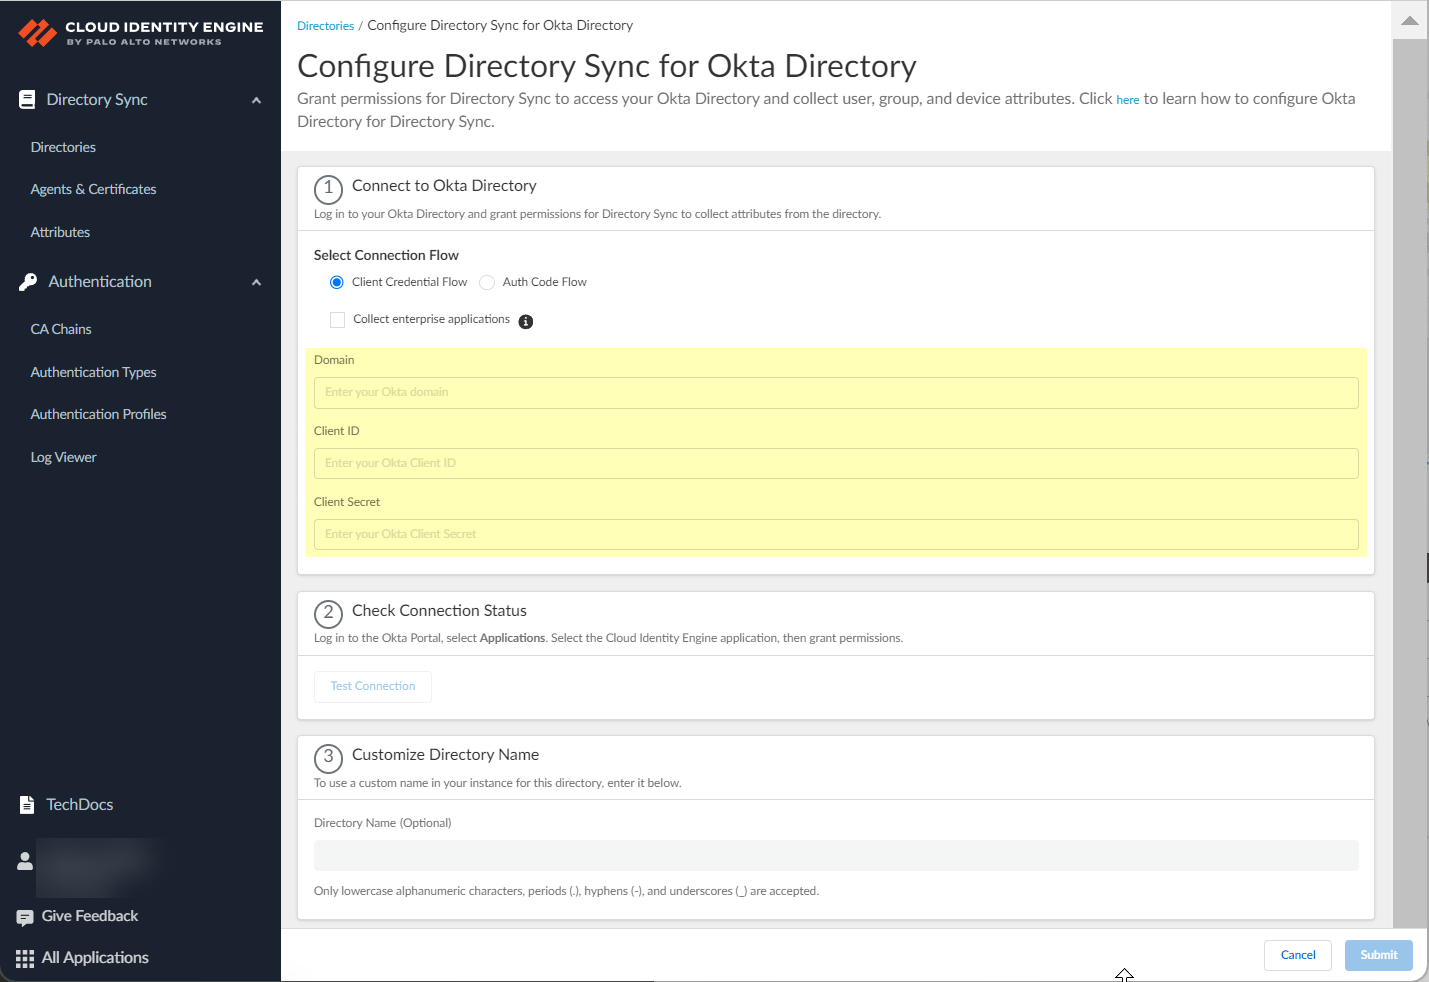
In CIE App: Go to
Directories
>
Add New Directory
> Select
Okta
> Click
Set Up
.
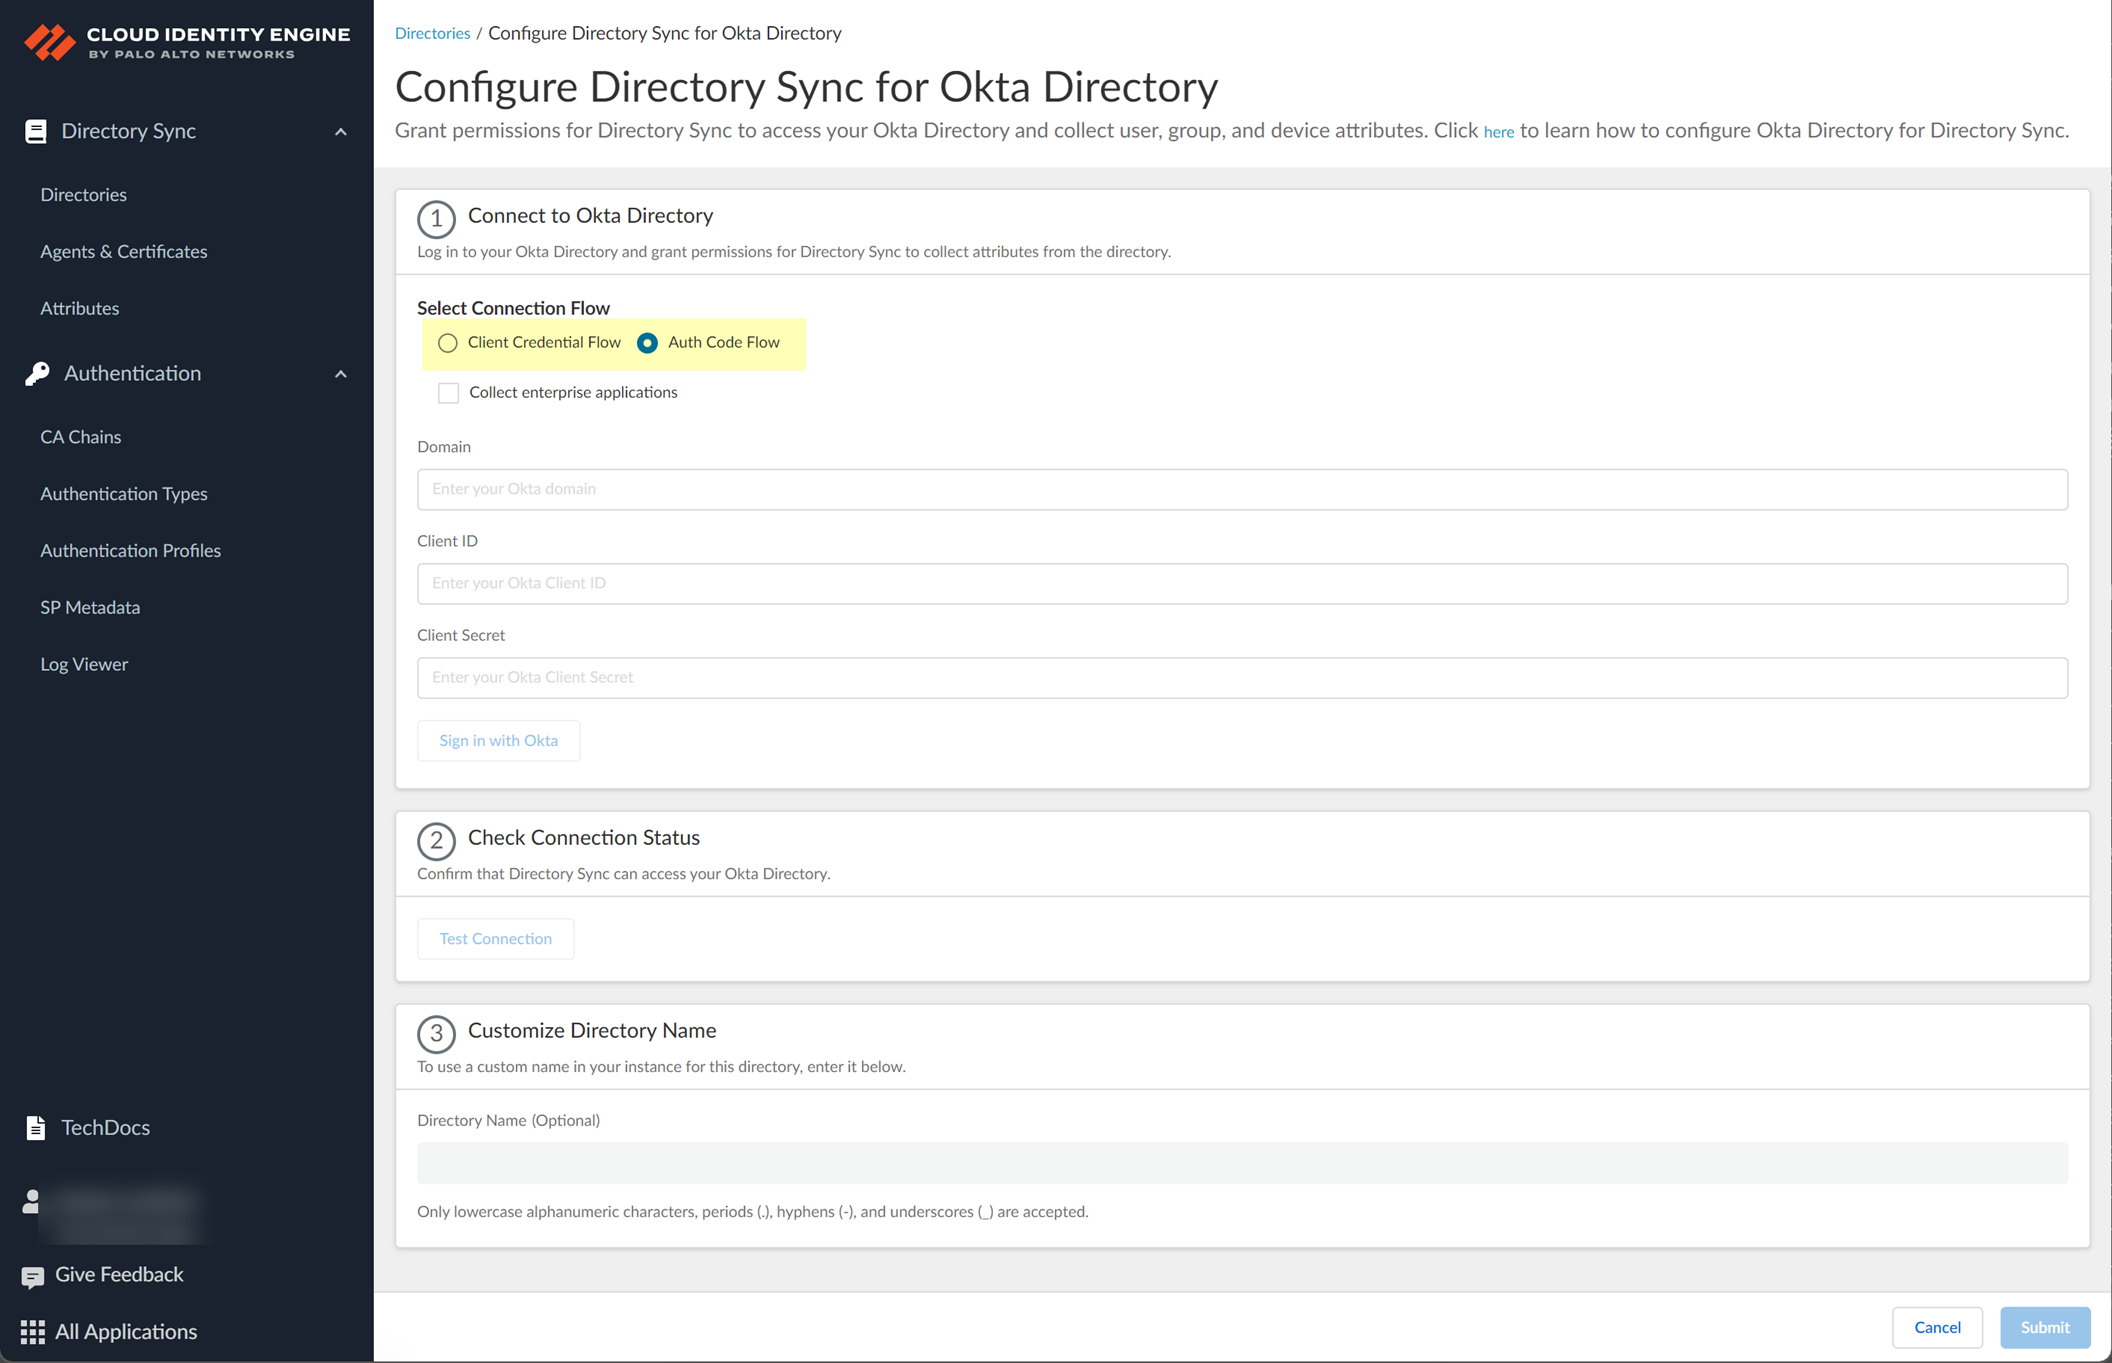
Select Connection Flow:
Auth Code Flow
.
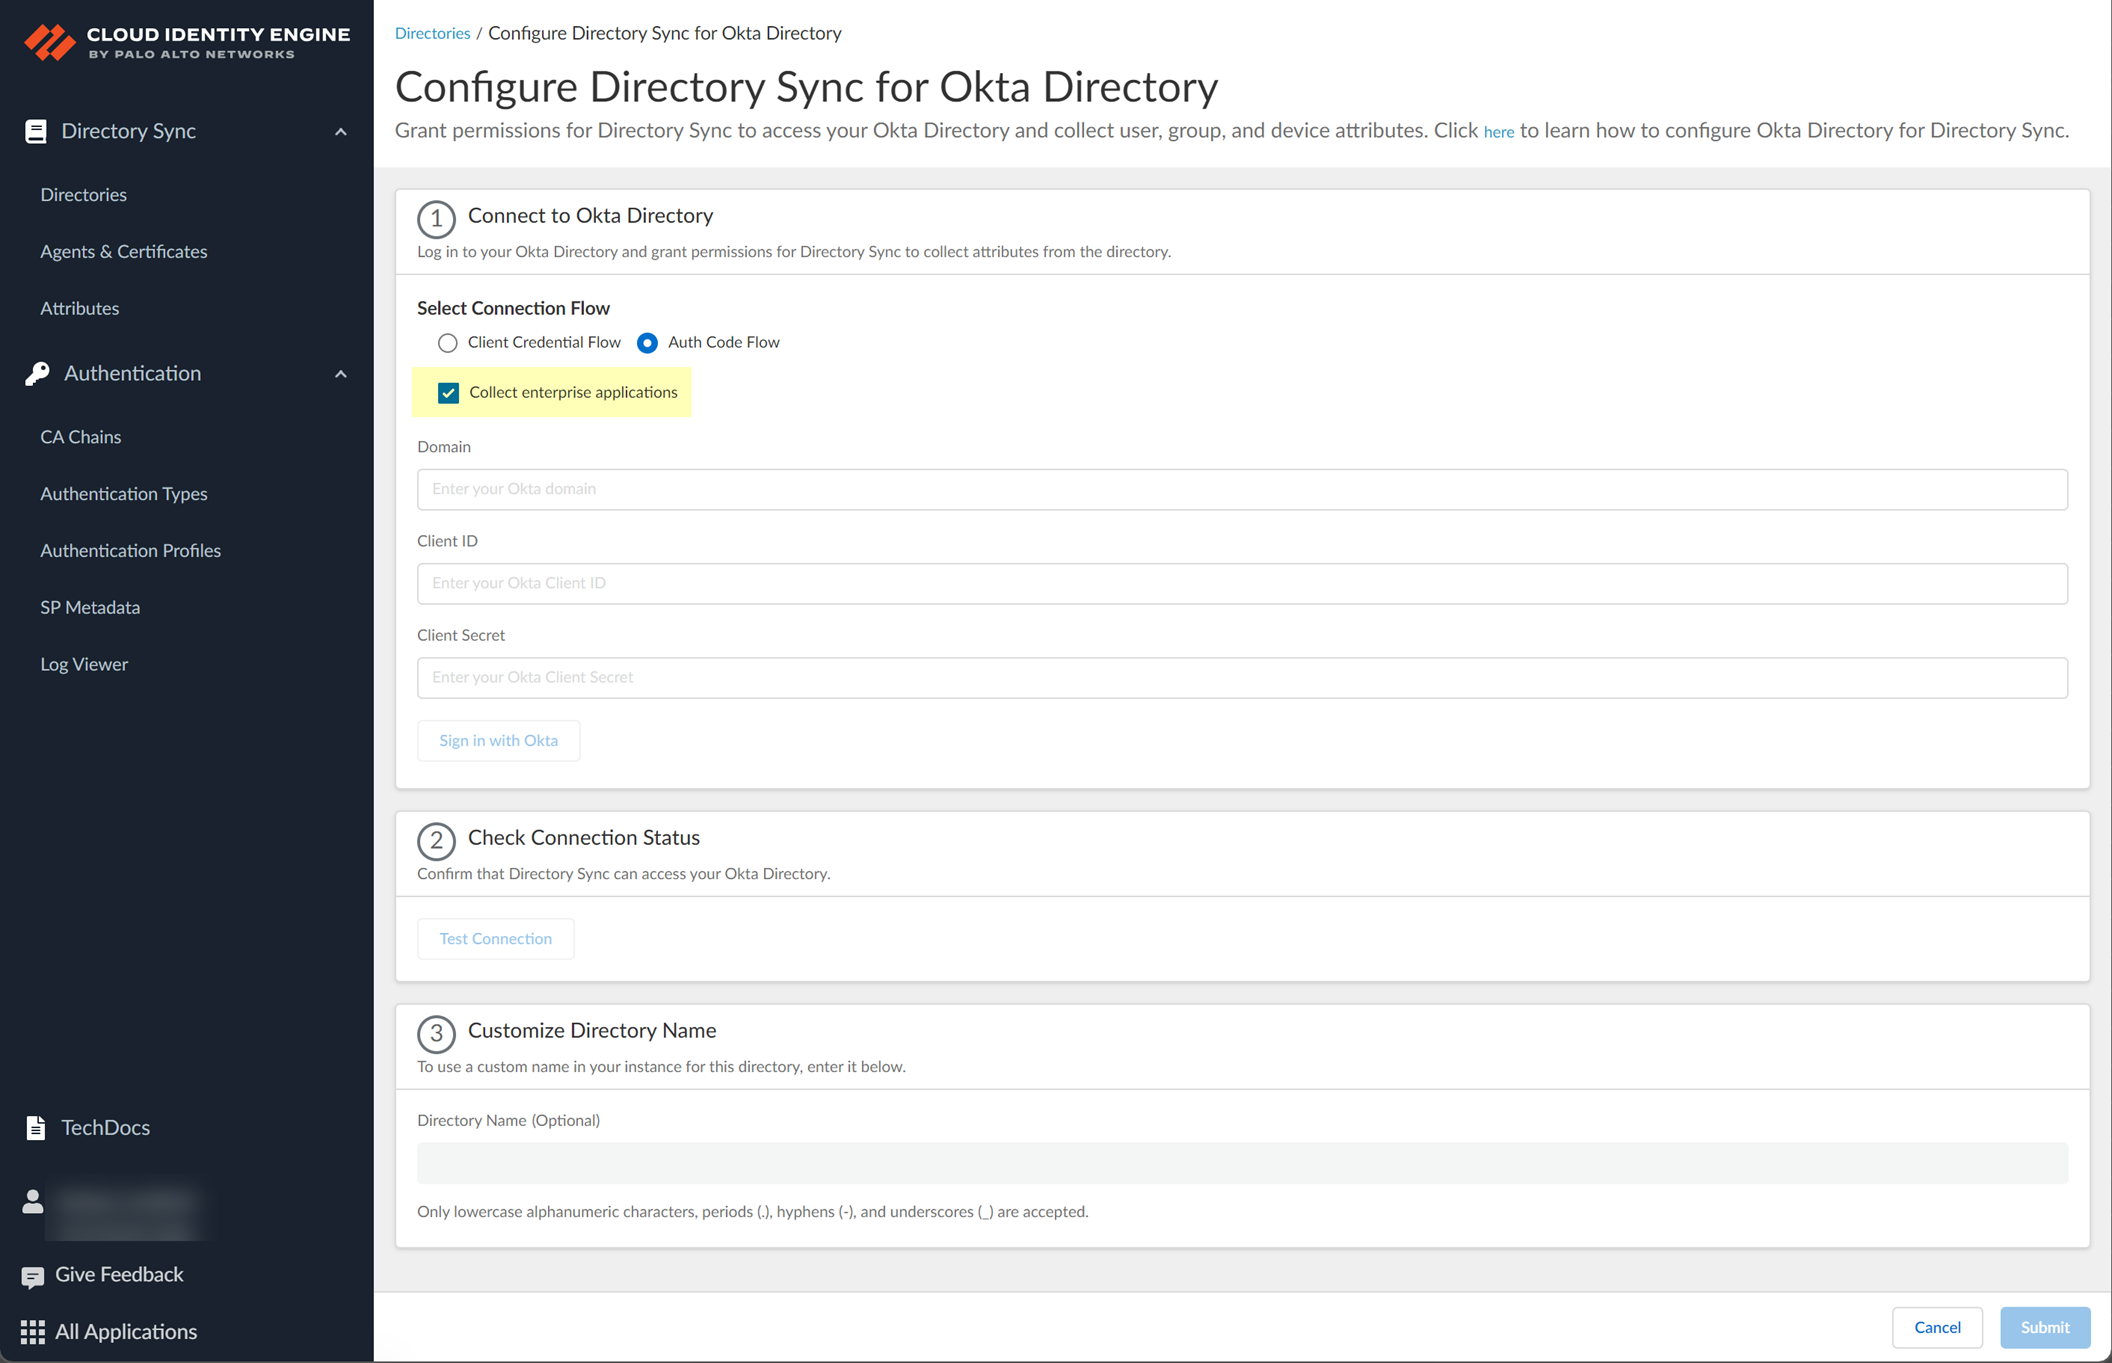
(Optional) Select
Collect enterprise applications
if needed (requires
okta.apps.read
scope).
Enter Okta info:
Paste Okta
Domain
(step 4b).
Paste
Client ID
and
Client Secret
(step 4a).
Click
Sign in with Okta
. Log in using the dedicated Okta admin user created in step 2a.
Click
Test Connection
.
(Optional)
Customize Directory Name
.
Click
Submit
.
[GOTCHA] The default Okta group "Everyone" is not supported by CIE due to performance recommendations from Okta.
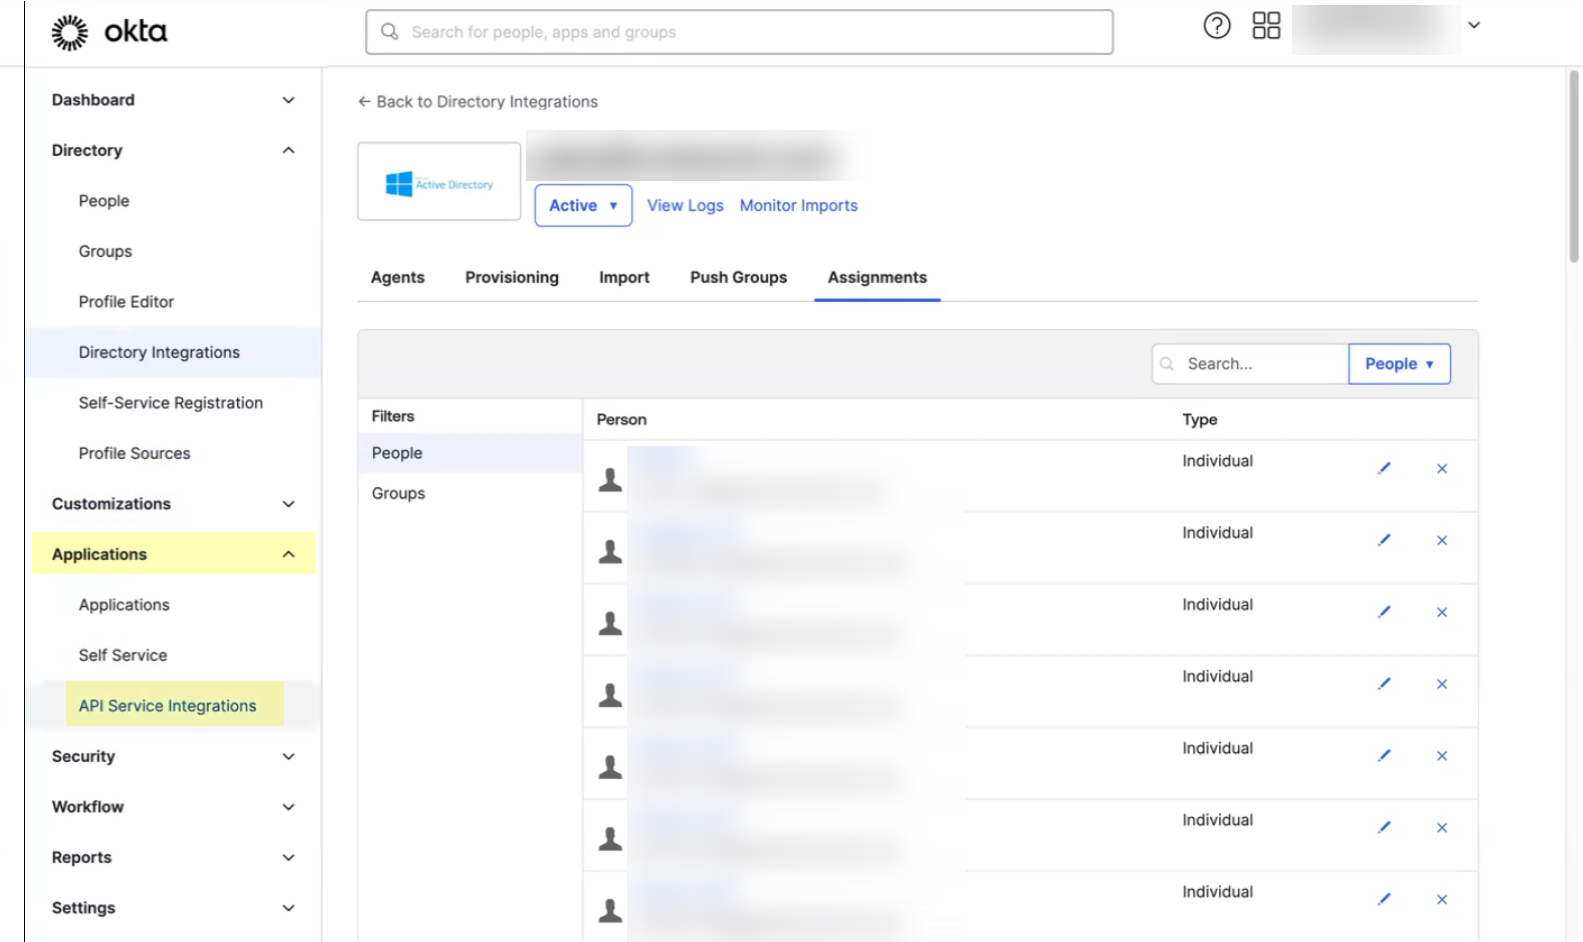
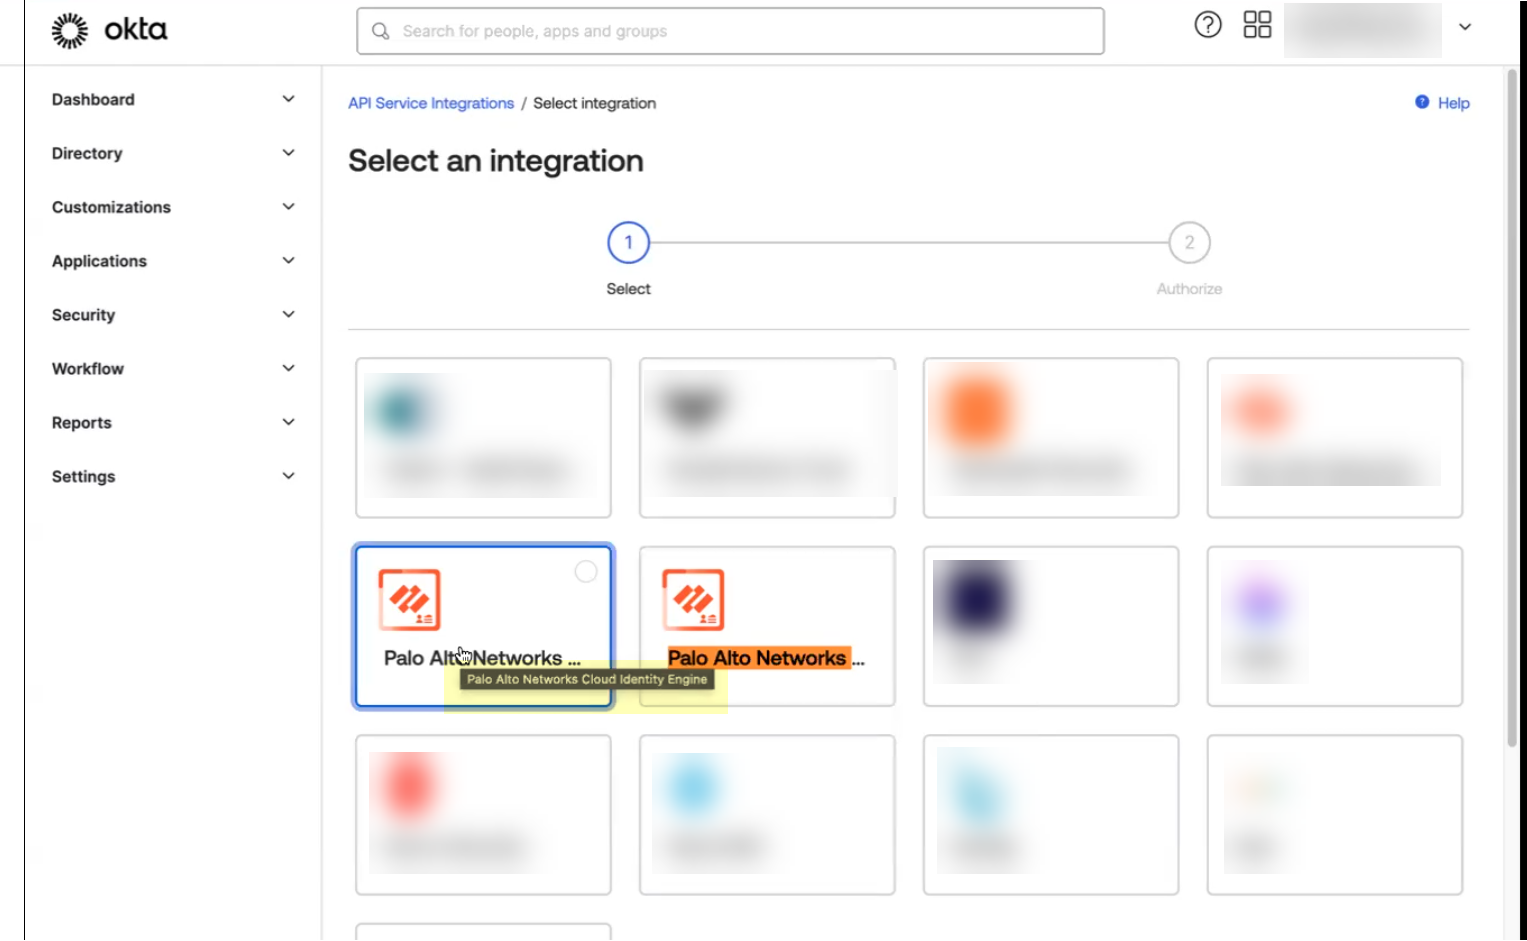
Deploy Client Credential Flow for Okta
Uses an API Service Integration in Okta for a more secure, service-account-based connection.
[GOTCHA] You MUST obtain a new Client ID and Secret specifically for the API Service Integration; credentials from the Auth Code Flow method are incompatible.
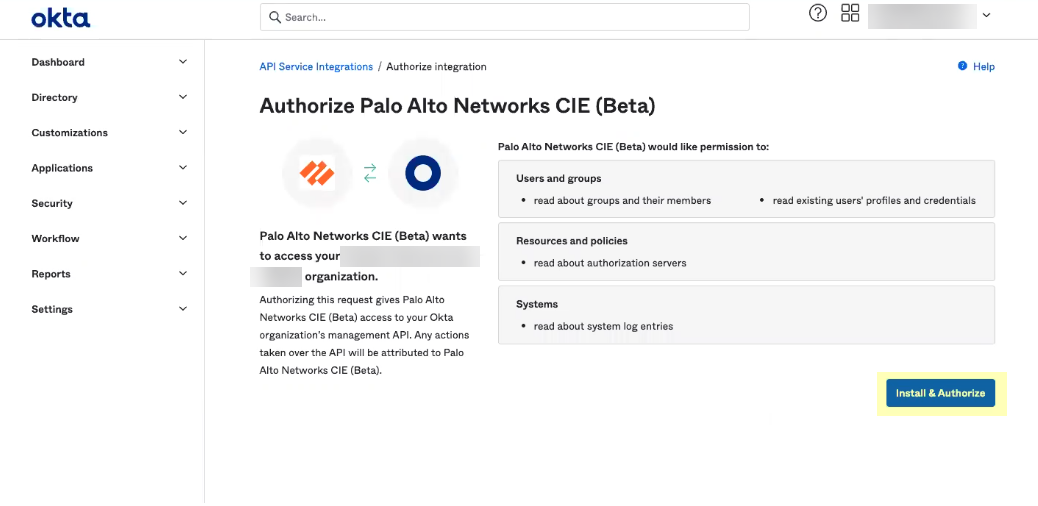
In Okta Admin Dashboard: Go to Applications >
API Service Integrations
.
Click
Add Integration
. Search for and select either:
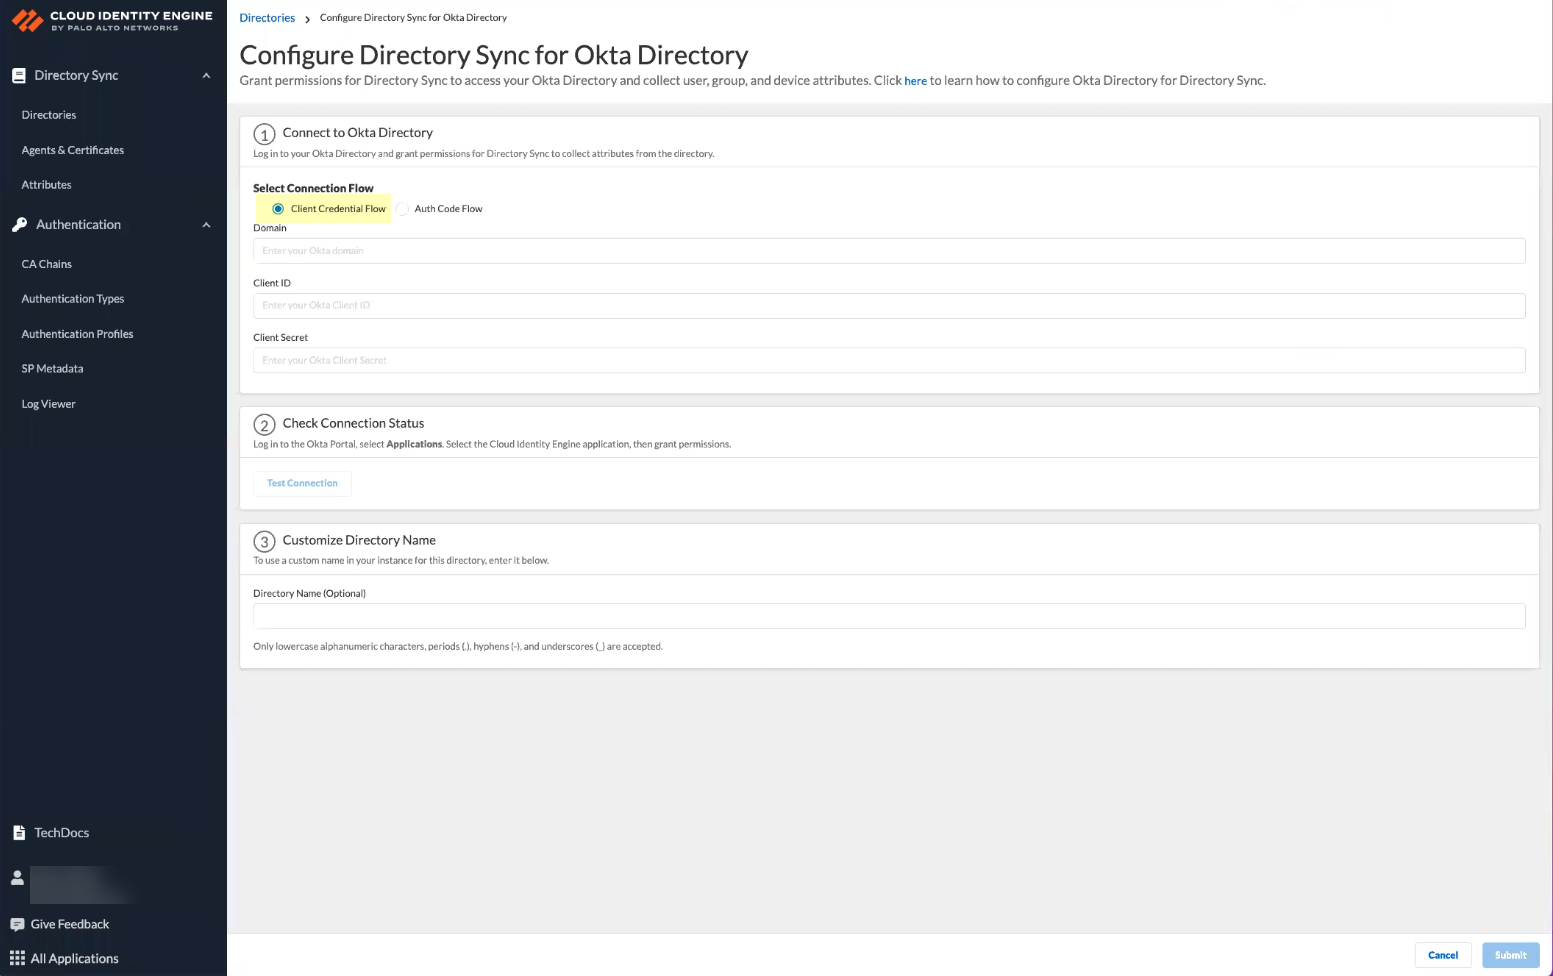
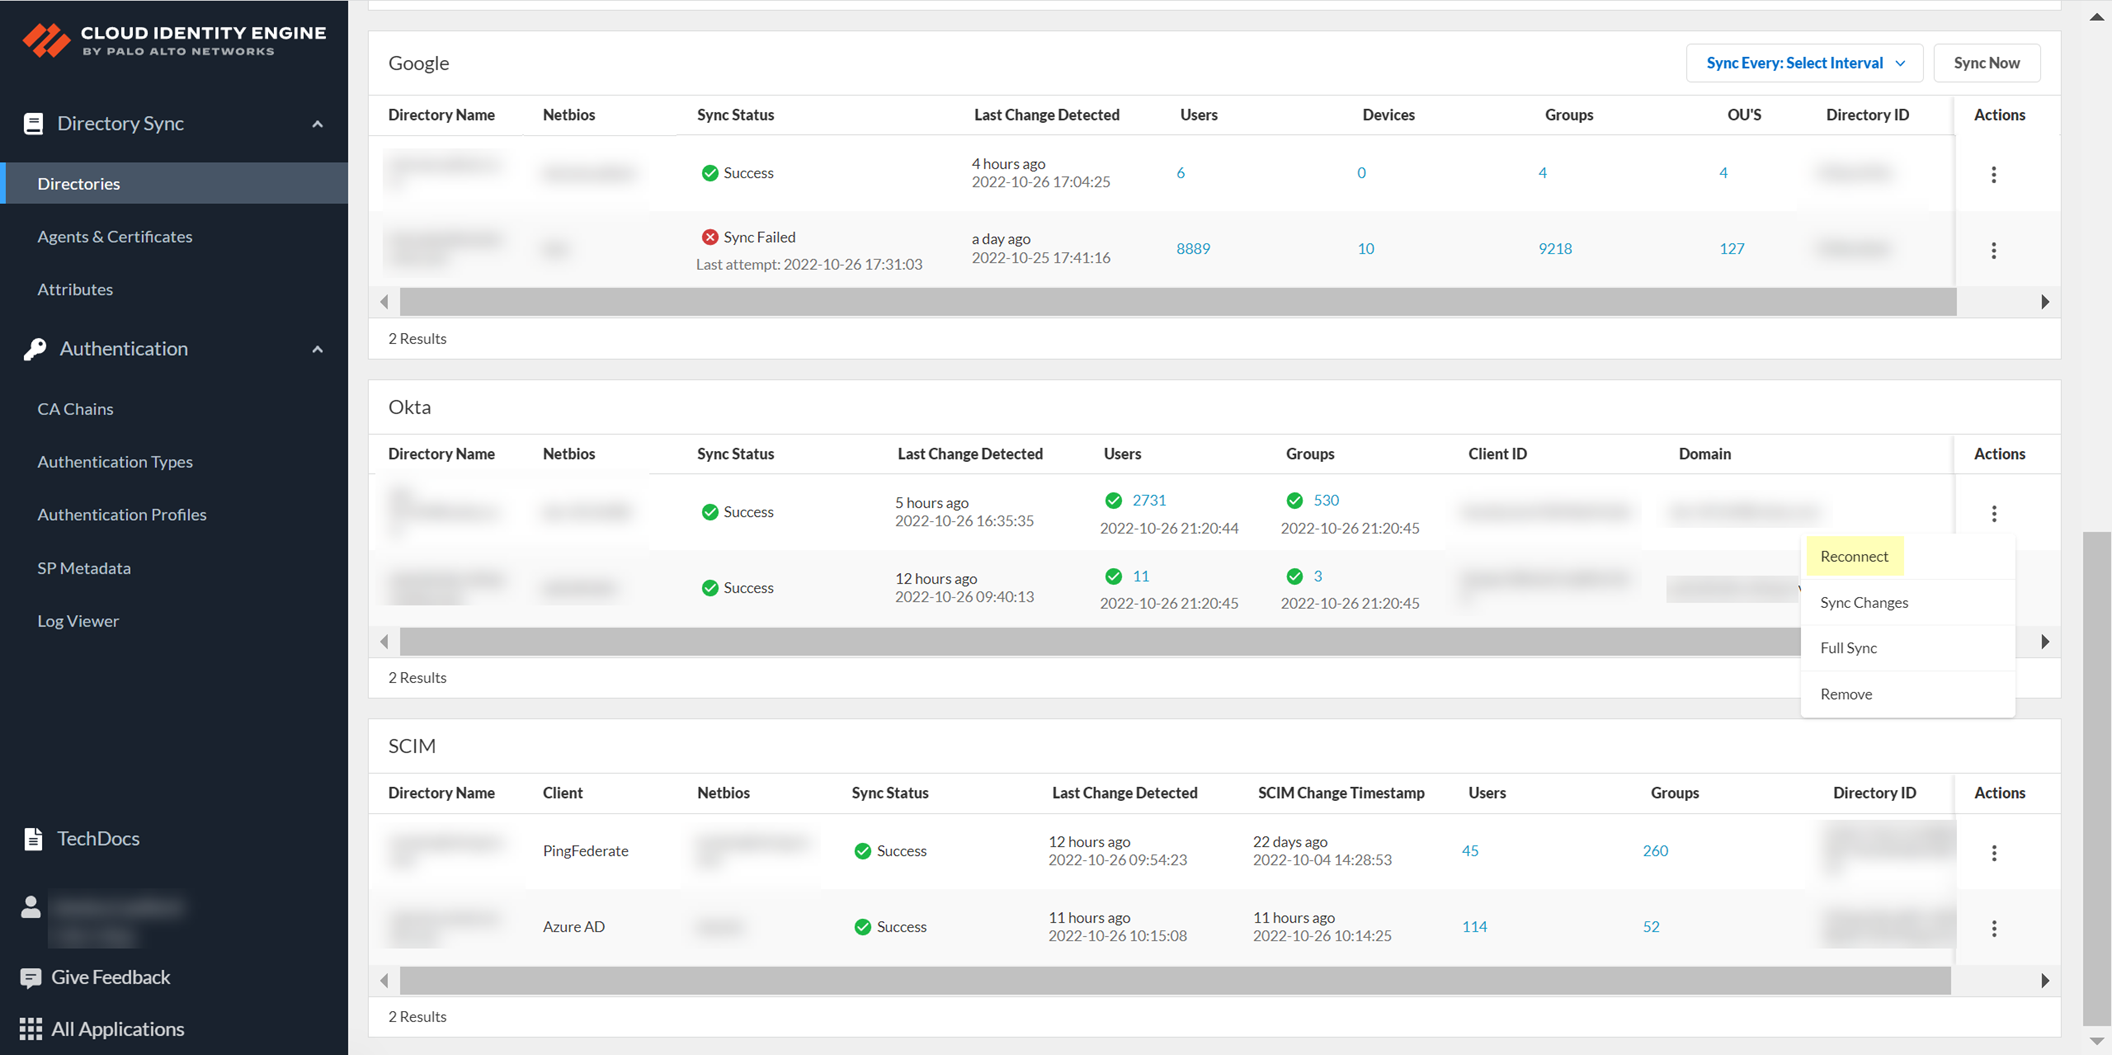
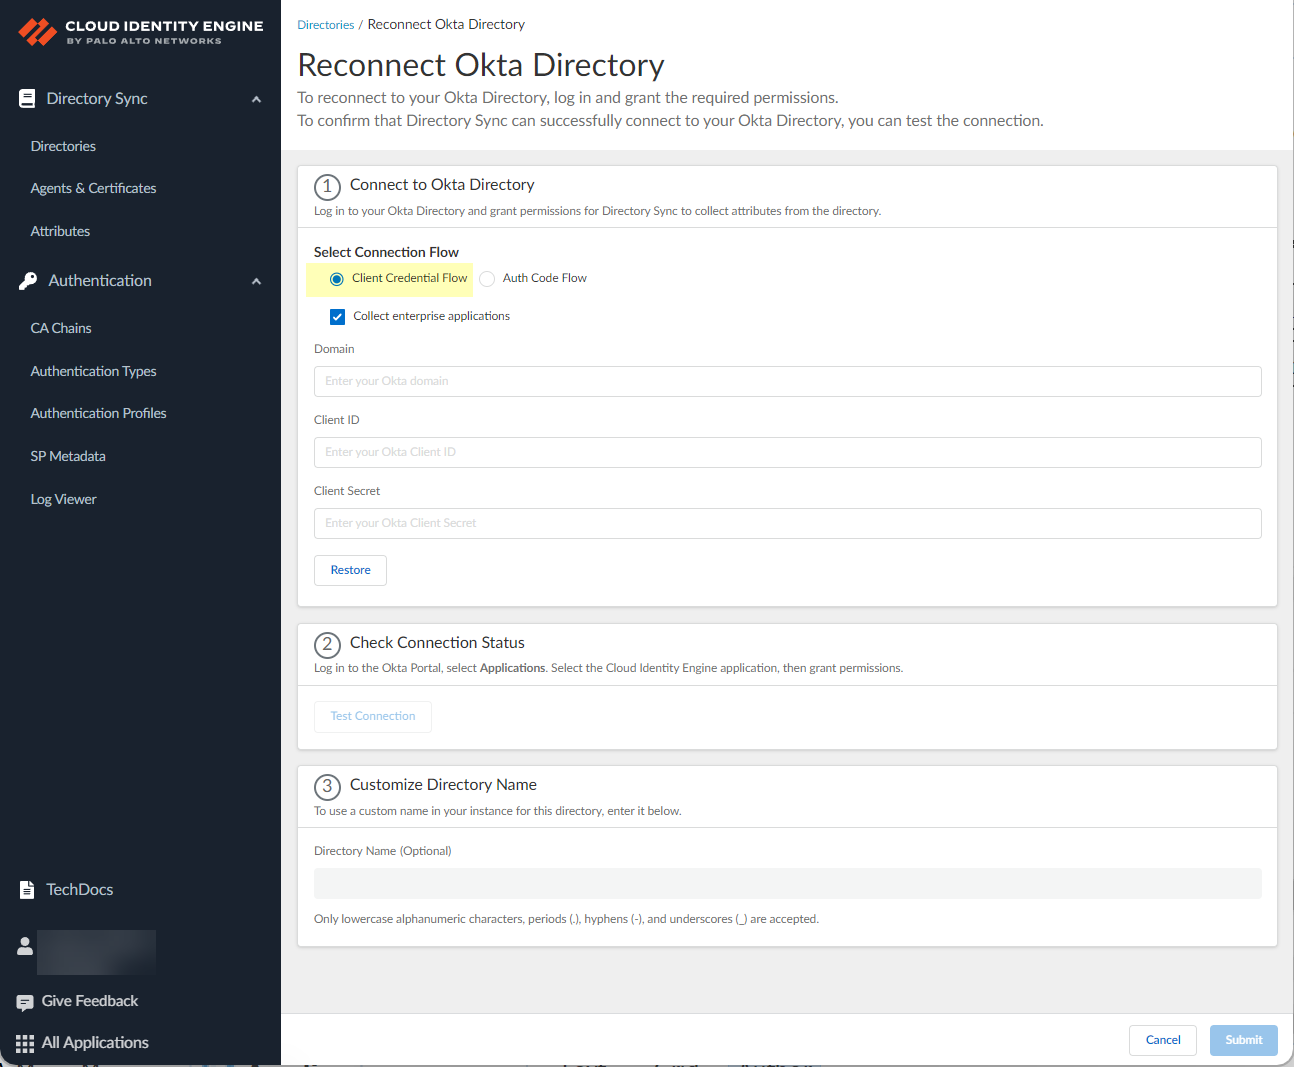
In CIE: Go to
Directories
. Find the Okta directory >
Actions > Reconnect
.
Adjust Connection Flow, Collect enterprise applications setting if needed.
Provide credentials/sign-in based on the chosen flow.
Click
Test Connection
.
(Optional) Update
Directory Name
.
Click
Submit
.
Remove Okta Directory
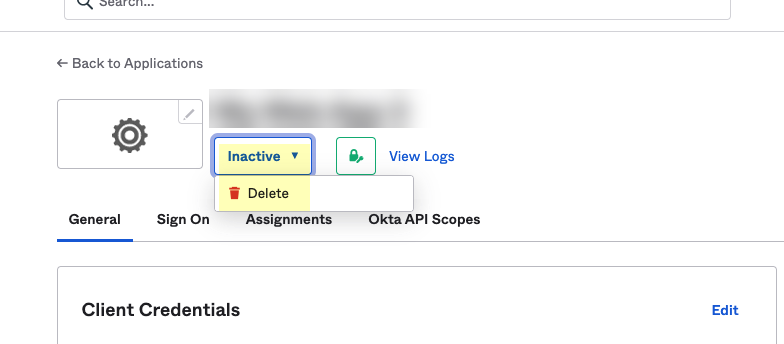
In Okta Admin Dashboard: Go to Applications > Applications. Select the CIE app integration.
Go to the app's General tab > App Settings > Click
Deactivate
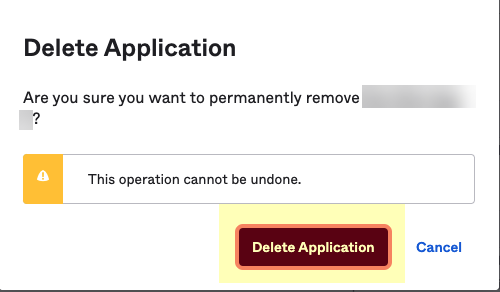
, then confirm. After deactivation, click
Delete
and confirm. (Or for API Service Integration, find it under Applications > API Service Integrations and delete).
In CIE App: Go to
Directories
. Find the Okta directory >
Actions > Remove
. Confirm deletion.
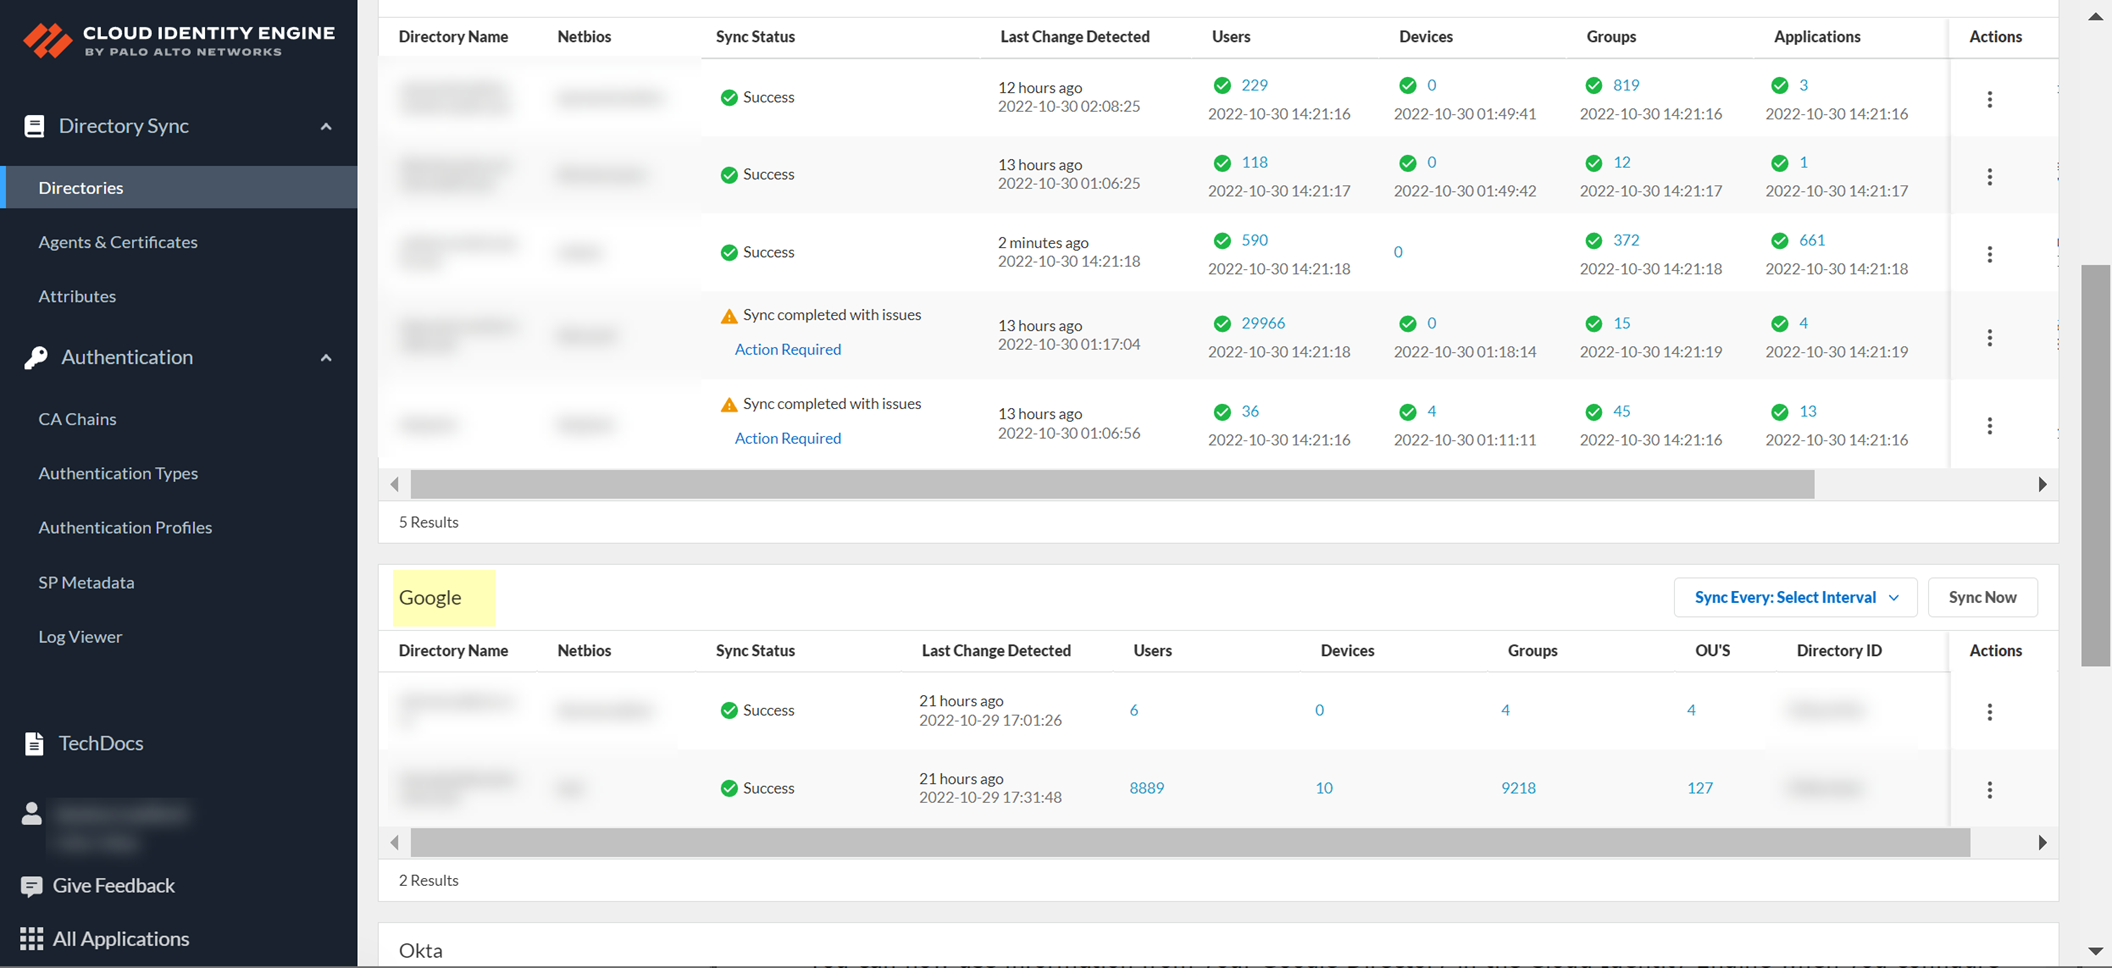
Configure Google Directory
Allows CIE to access Google Directory information for user identification and policy.
Activate CIE if not done.
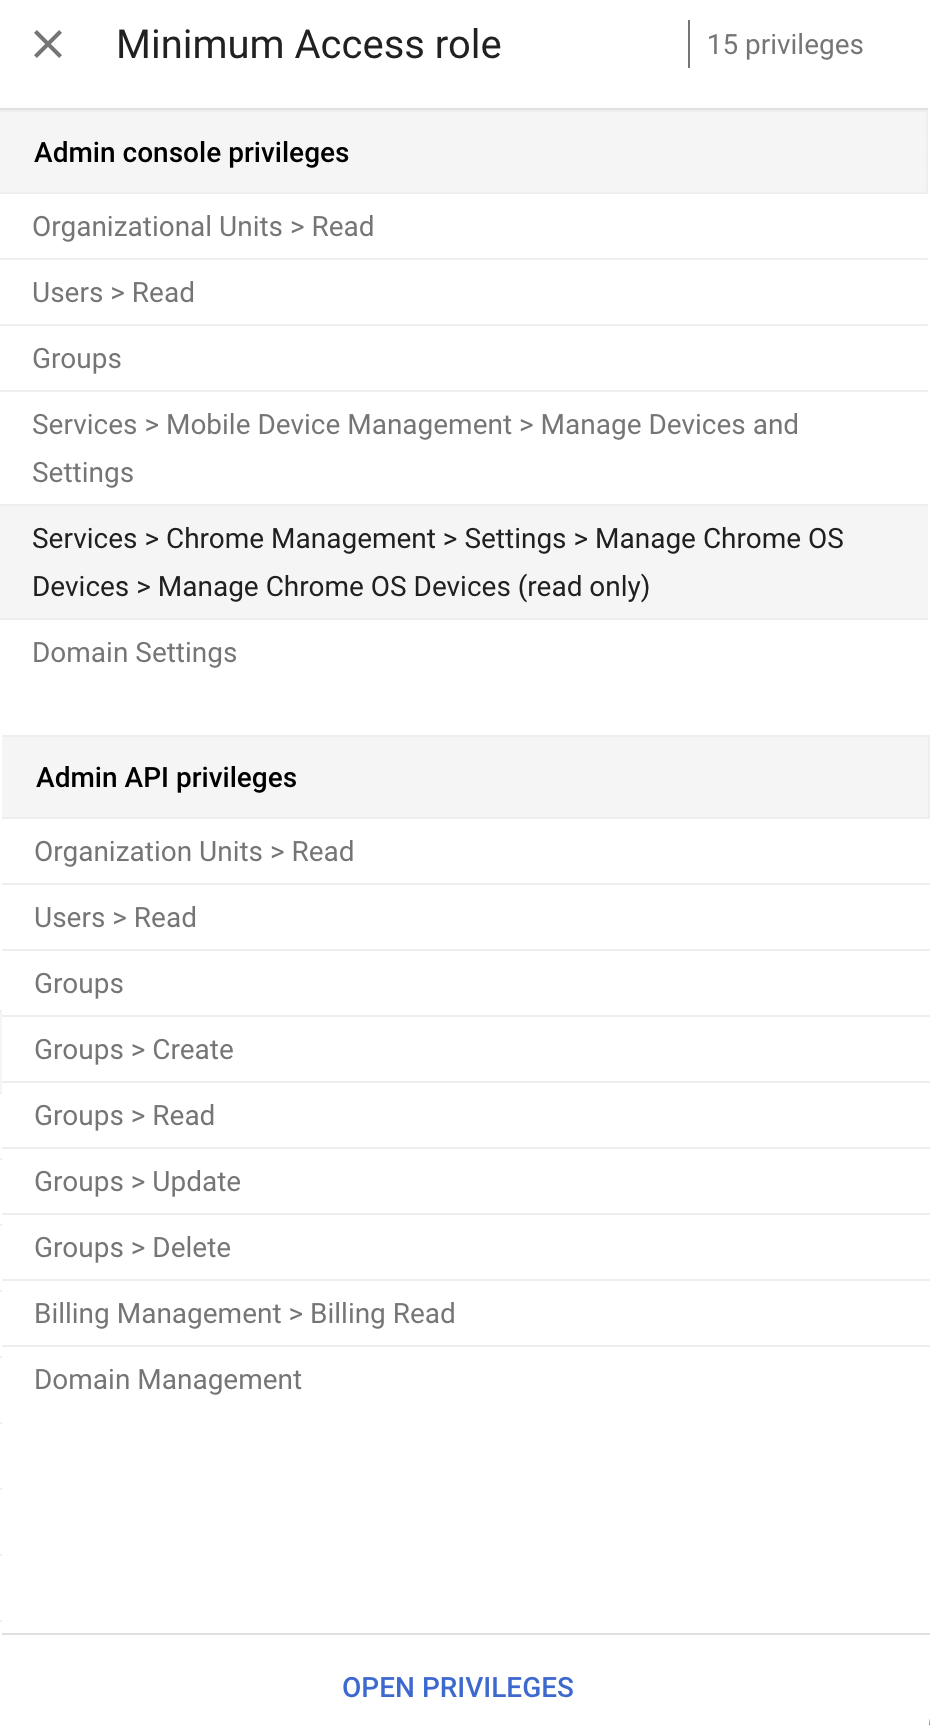
In Google Admin console: Configure Admin Roles with necessary privileges (OU Read, Users Read, Groups, Mobile Device Management, Chrome Management Read, Domain Settings, various Admin API Read/Write permissions).
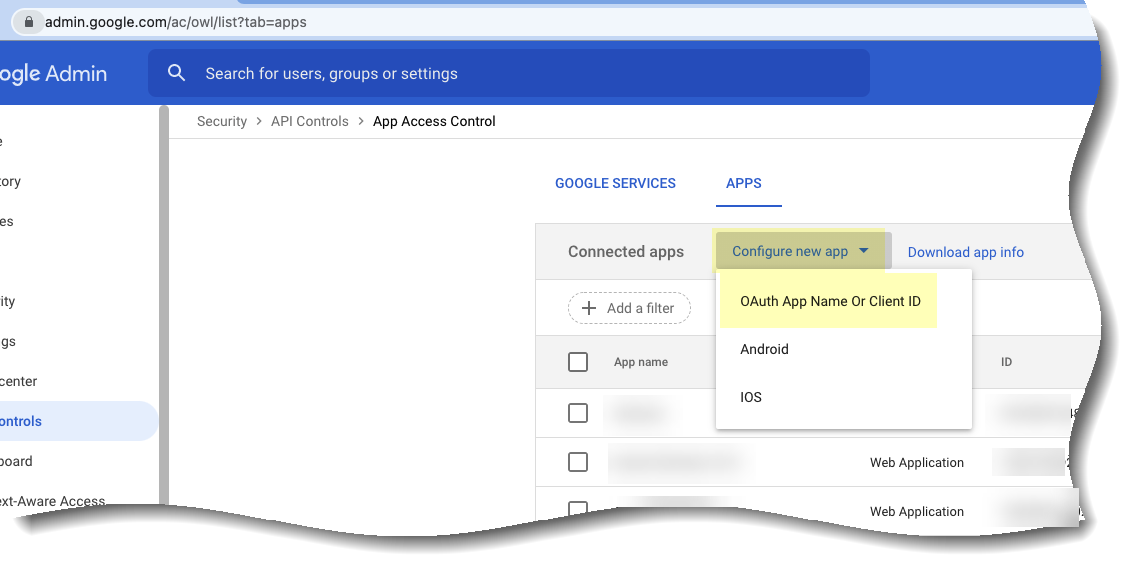
In Google Admin console: Go to Security > API controls > Manage Third-Party App Access.
Click
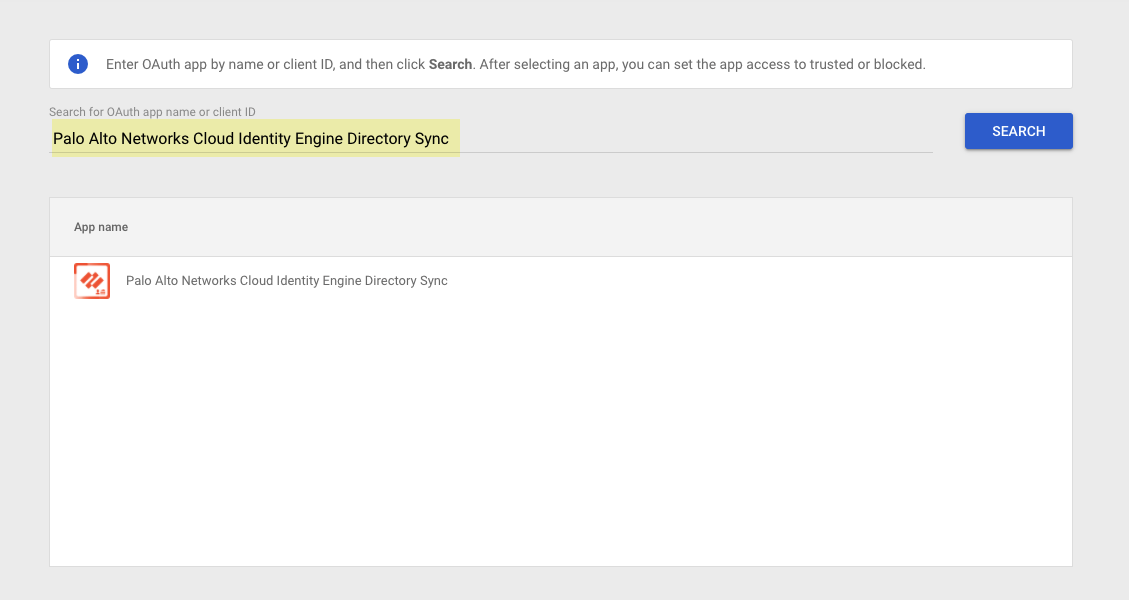
Configure new app > OAuth App Name Or Client ID
.
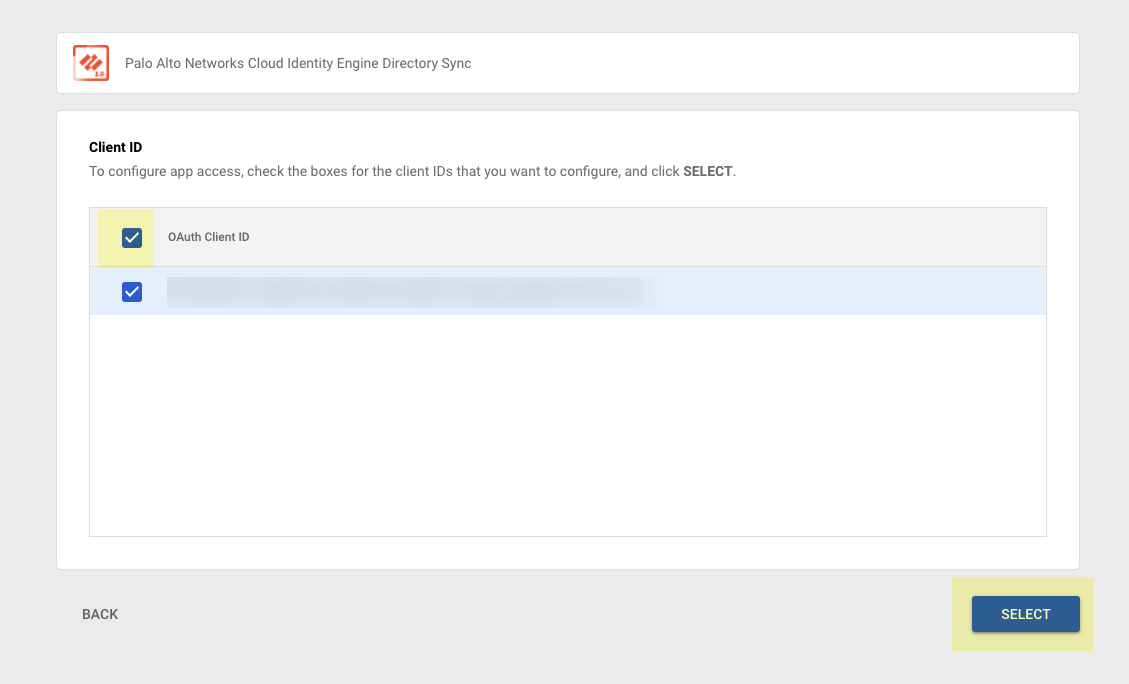
Select the app, ensure OAuth Client ID option is selected, click
Select
.
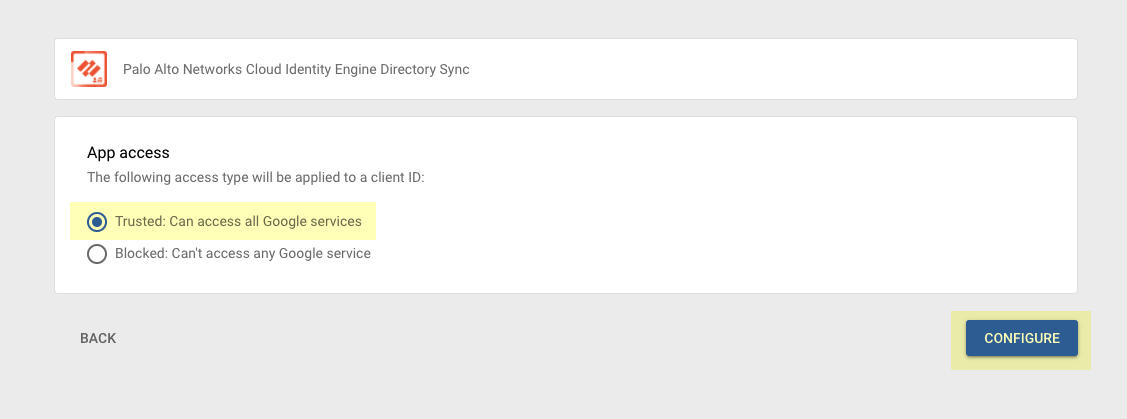
Set App access to
Trusted: Can access all Google services
. Click
Configure
.
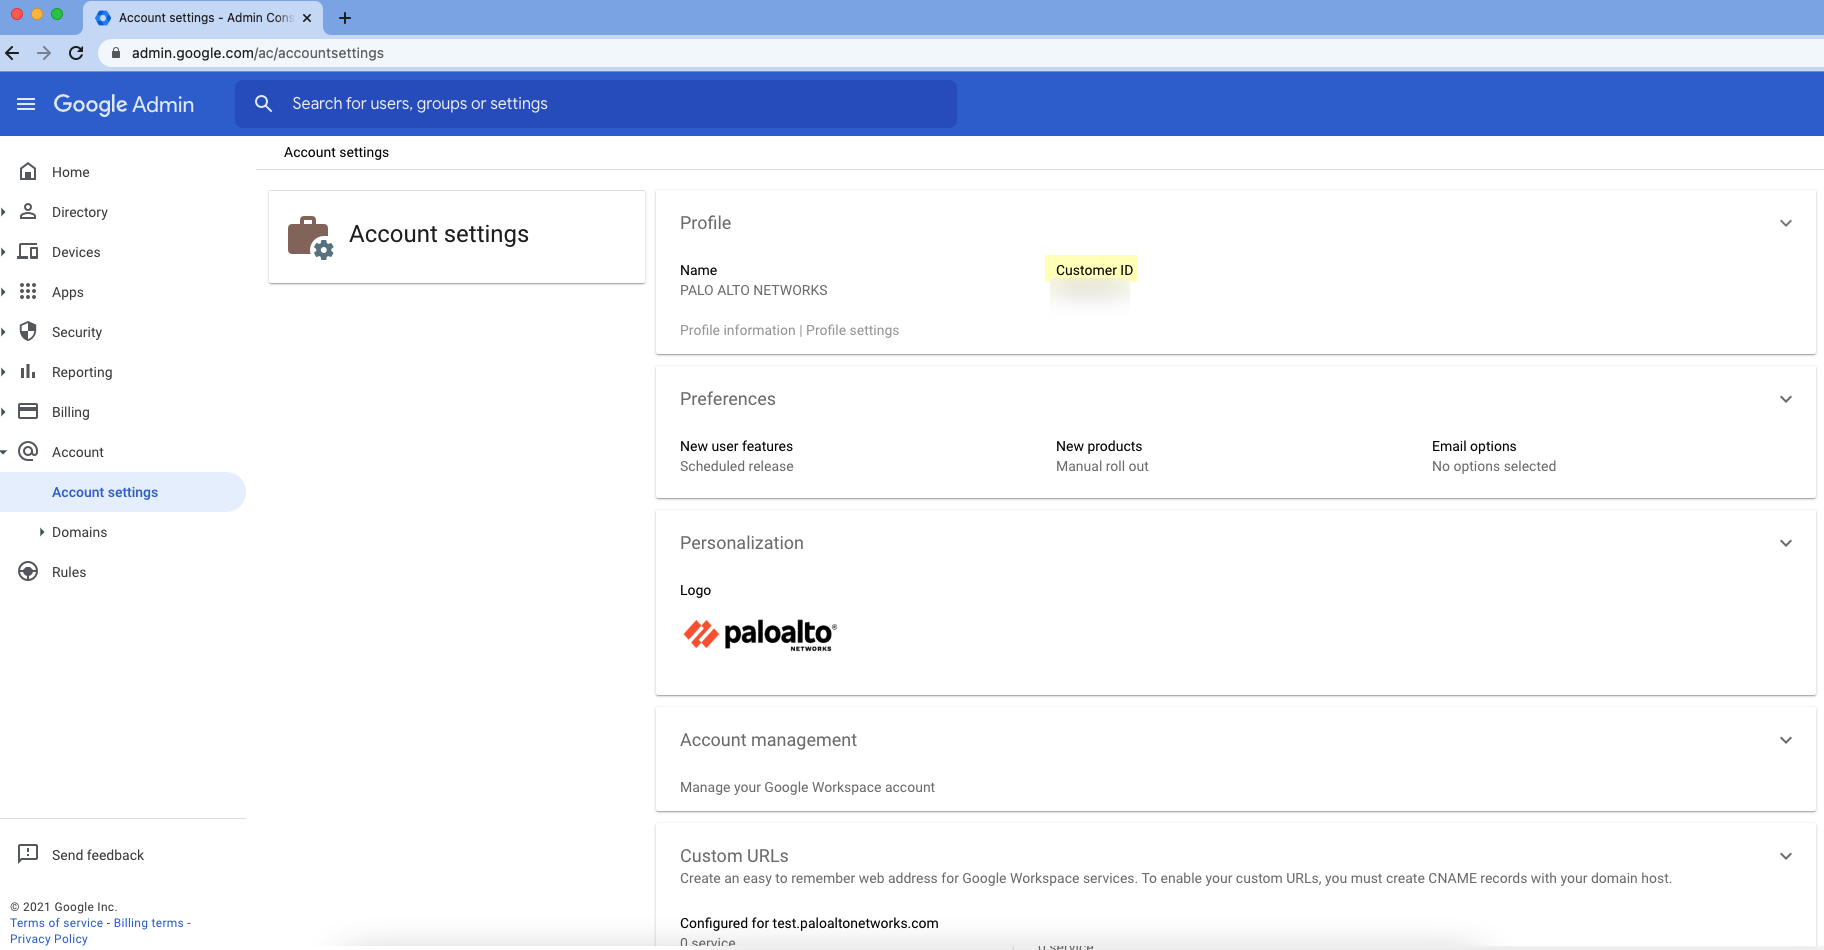
In Google Admin console: Go to Account > Account Settings. Copy the
Customer ID
.
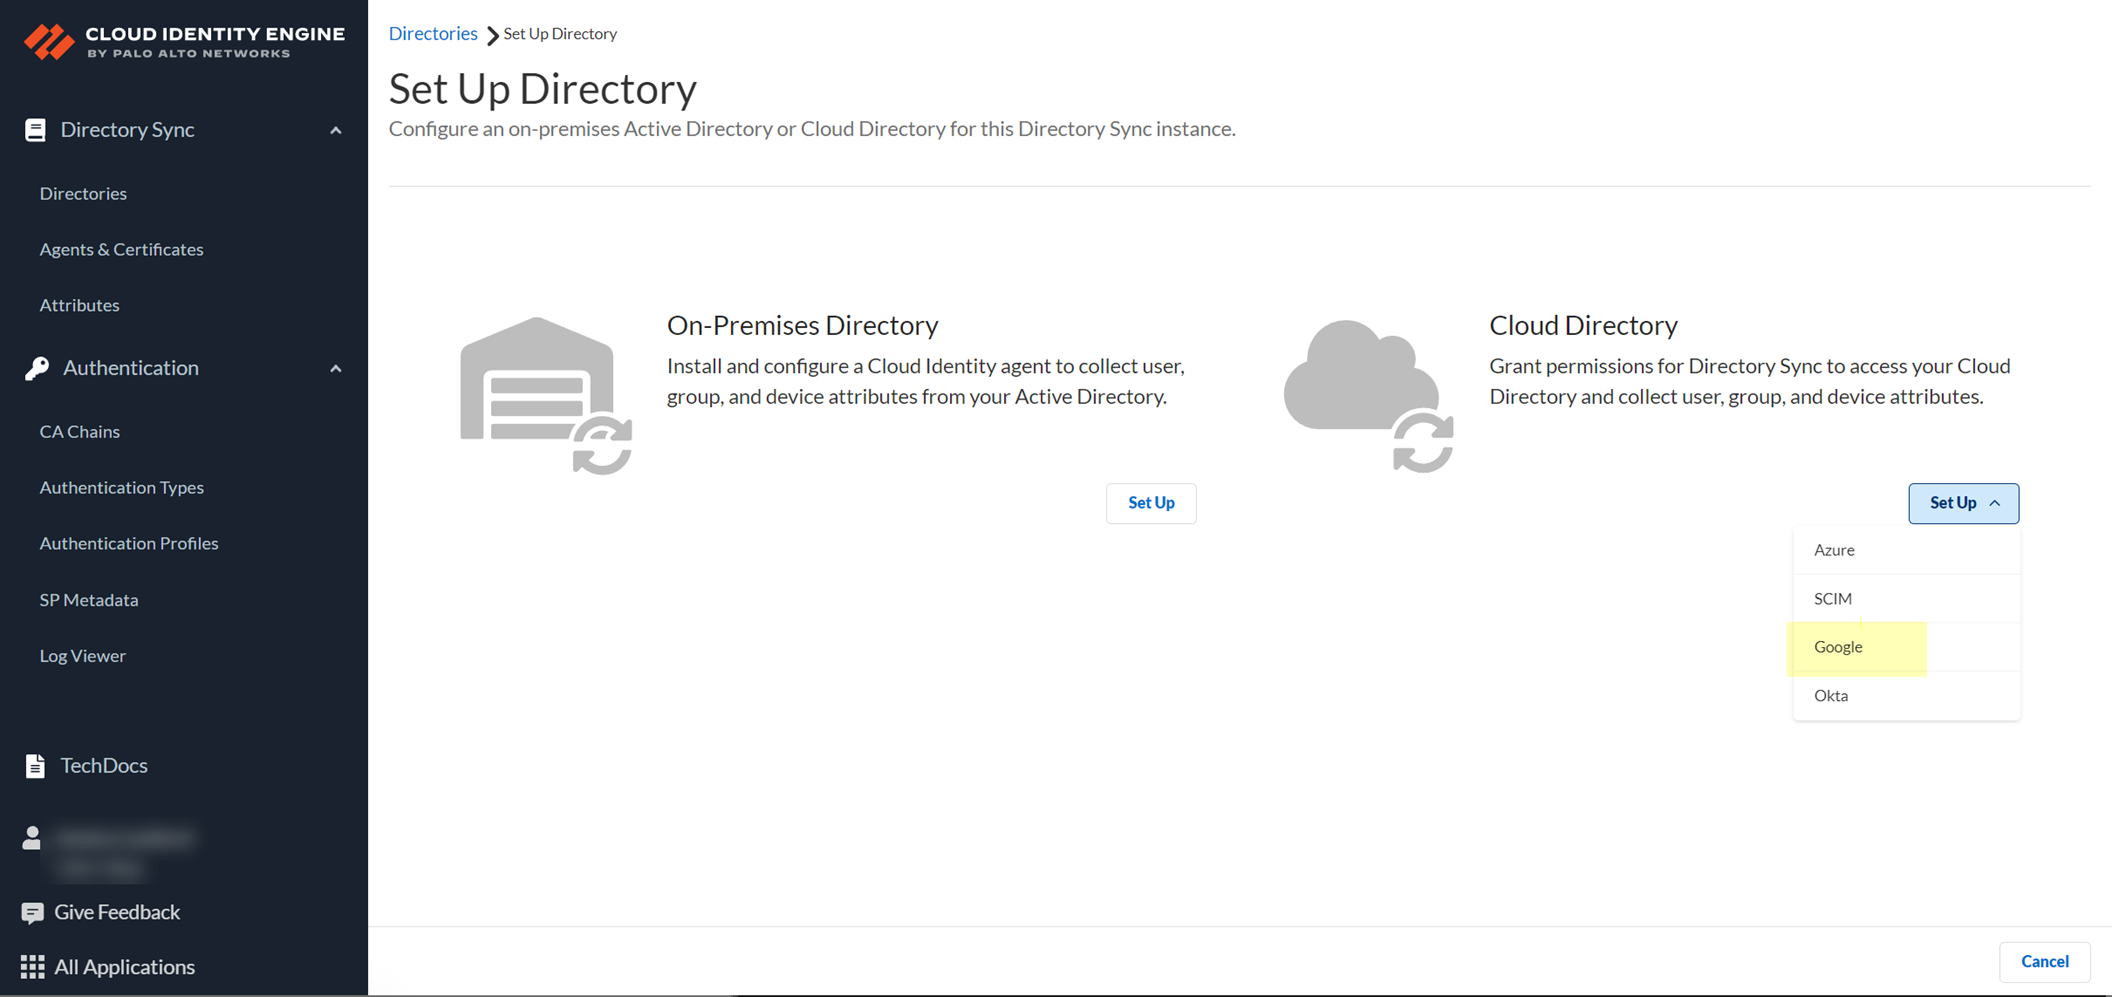
In CIE App: Go to
Directories
>
Add New Directory
> Select
Google
> Click
Set Up
.
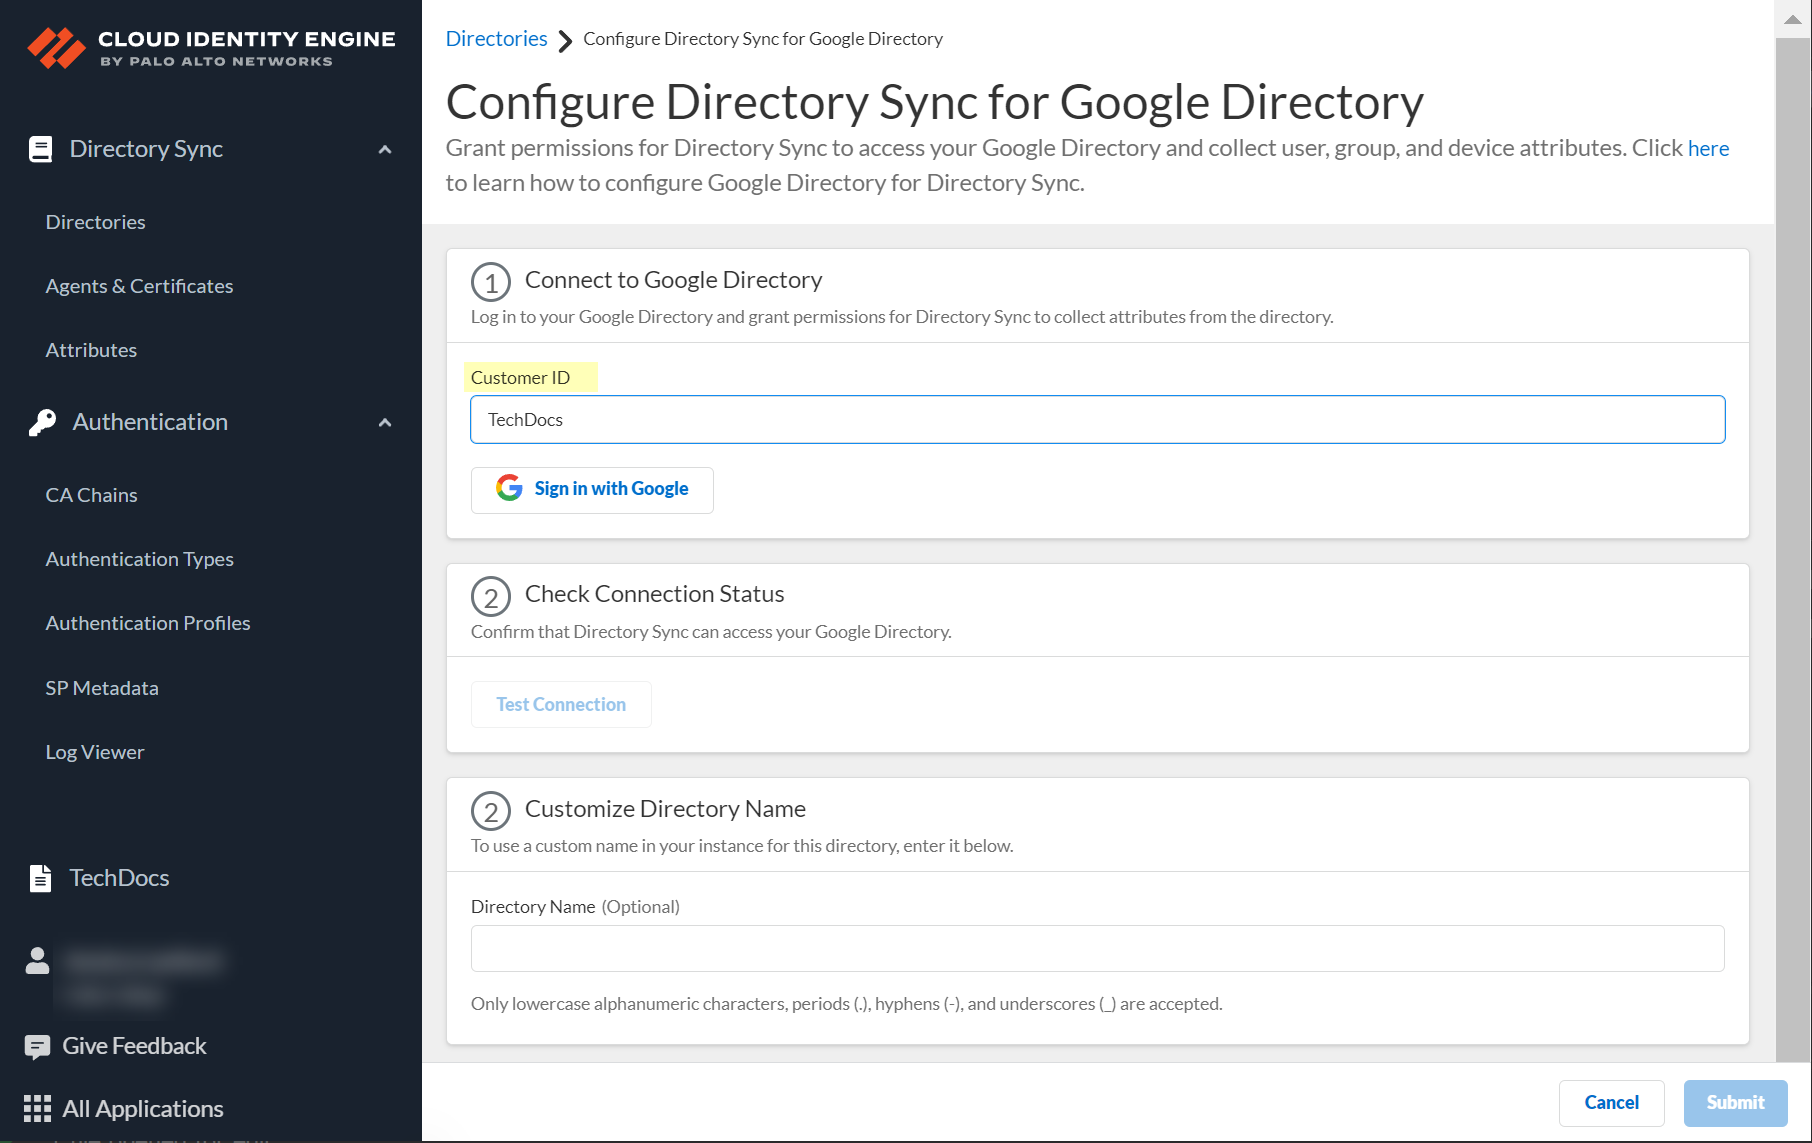
Paste the
Customer ID
.
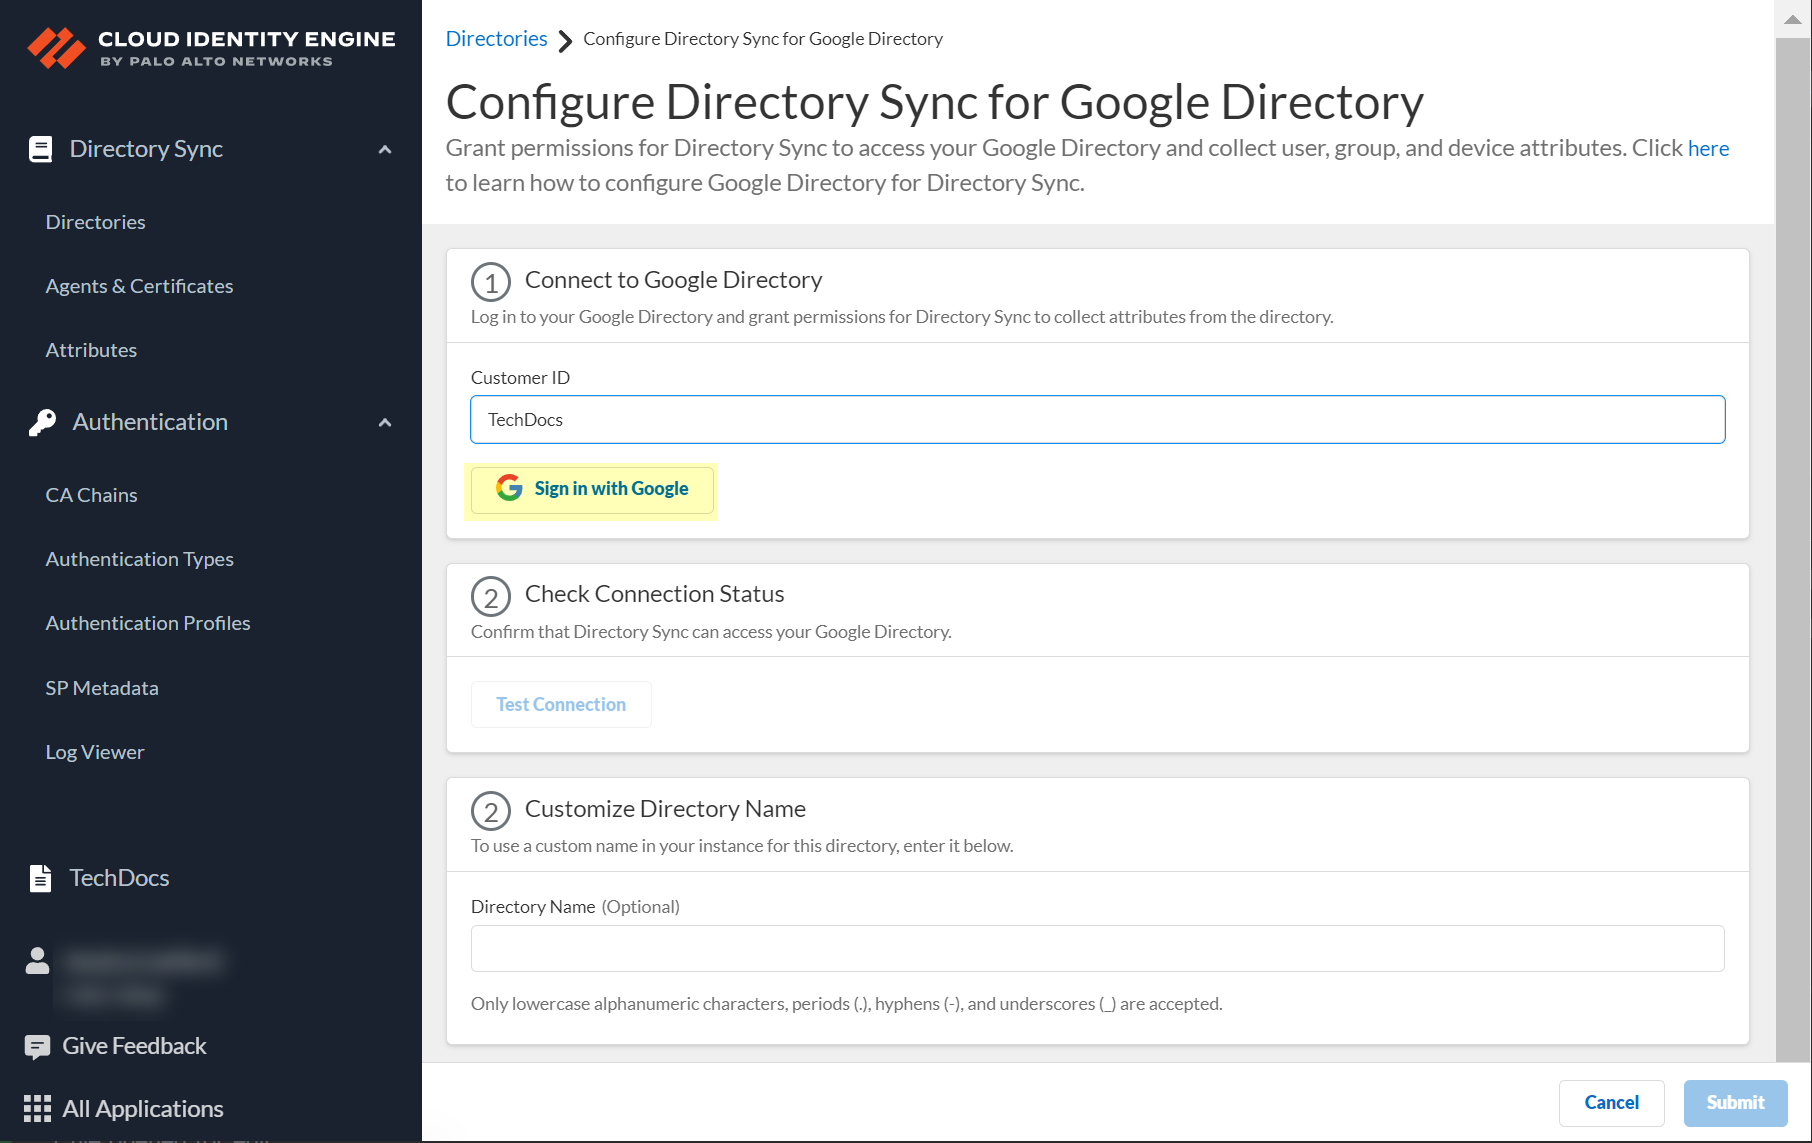
Click
Sign in with Google
and authenticate with the Google Admin account associated with the Customer ID. Grant permissions if prompted.
Click
Test Connection
.
(Optional)
Customize Directory Name
.
Click
Submit
.
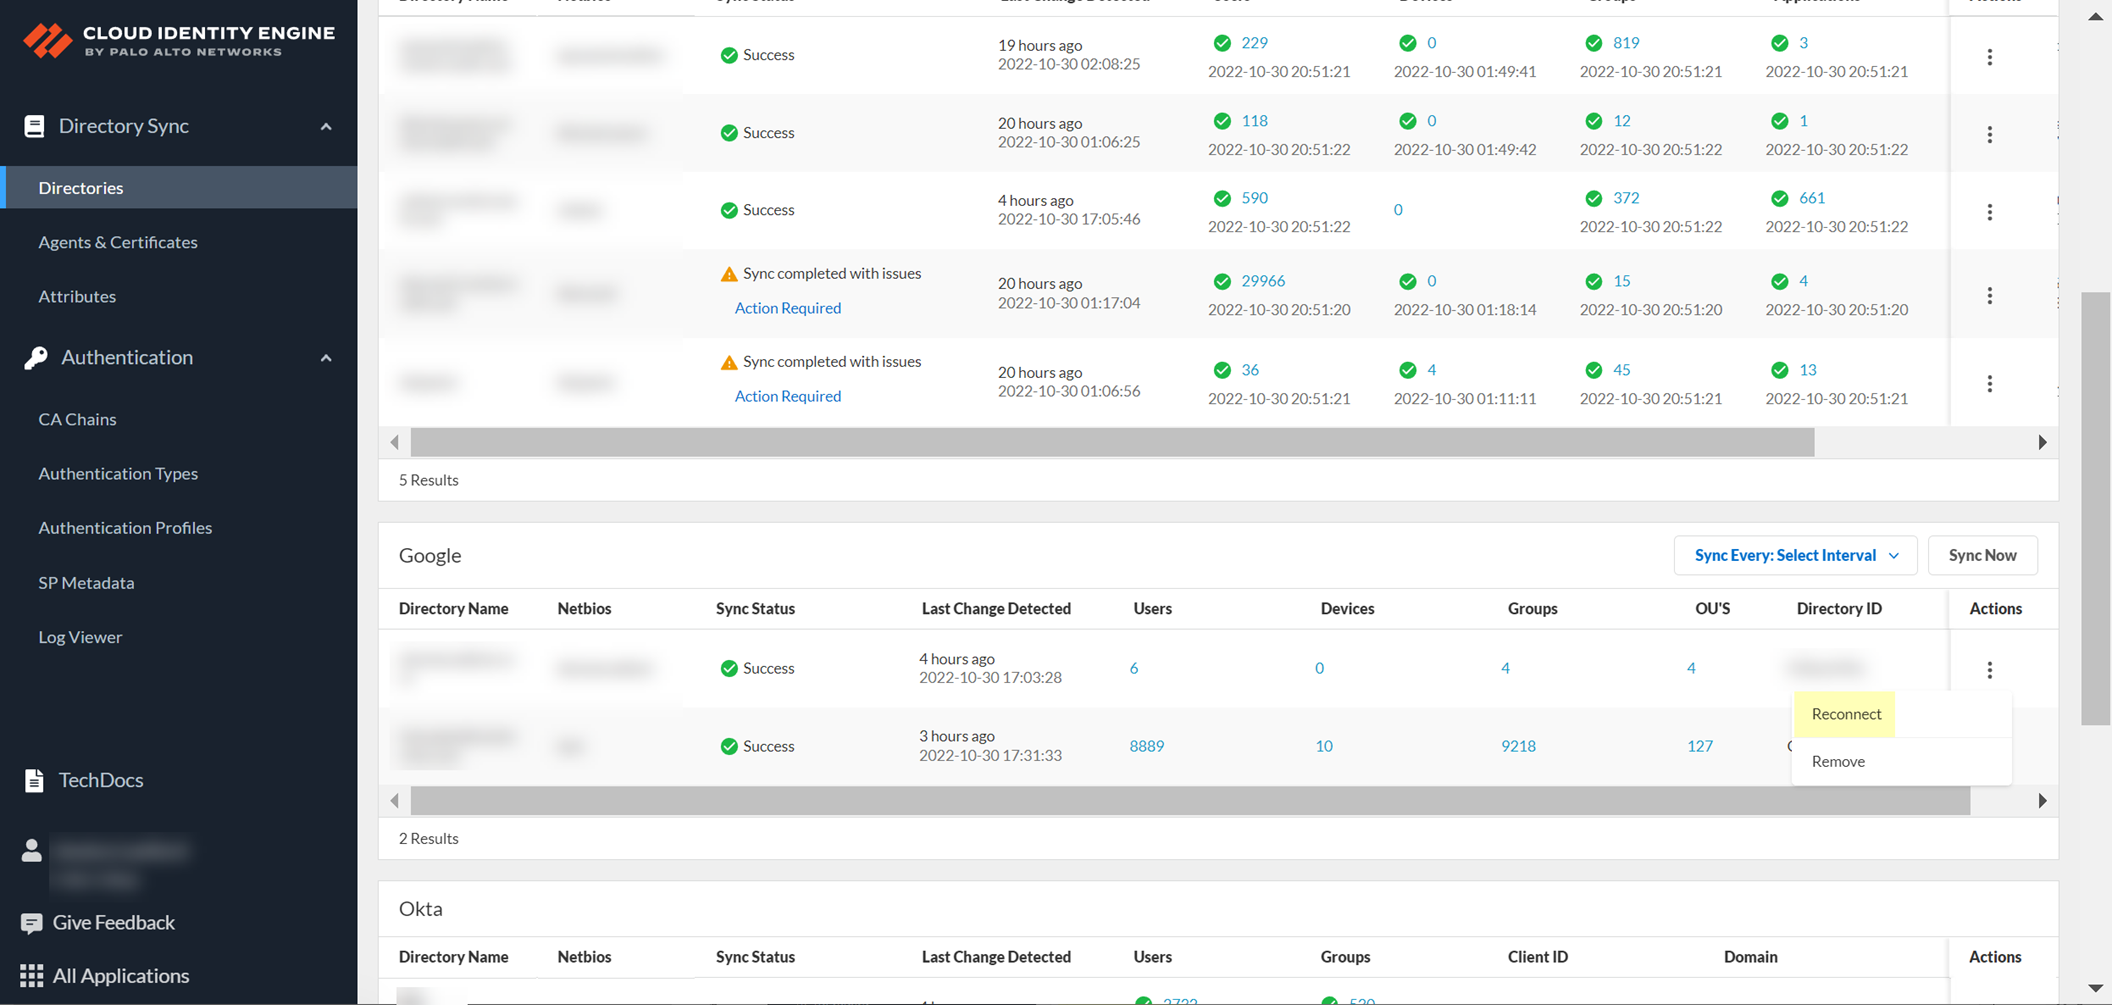
Reconnect Google Directory
In CIE: Go to
Directories
. Find the Google directory >
Actions > Reconnect
.
Click
Log in to Google
and re-authenticate.
Click
Test Connection
.
(Optional) Update
Directory Name
.
Click
Submit
.
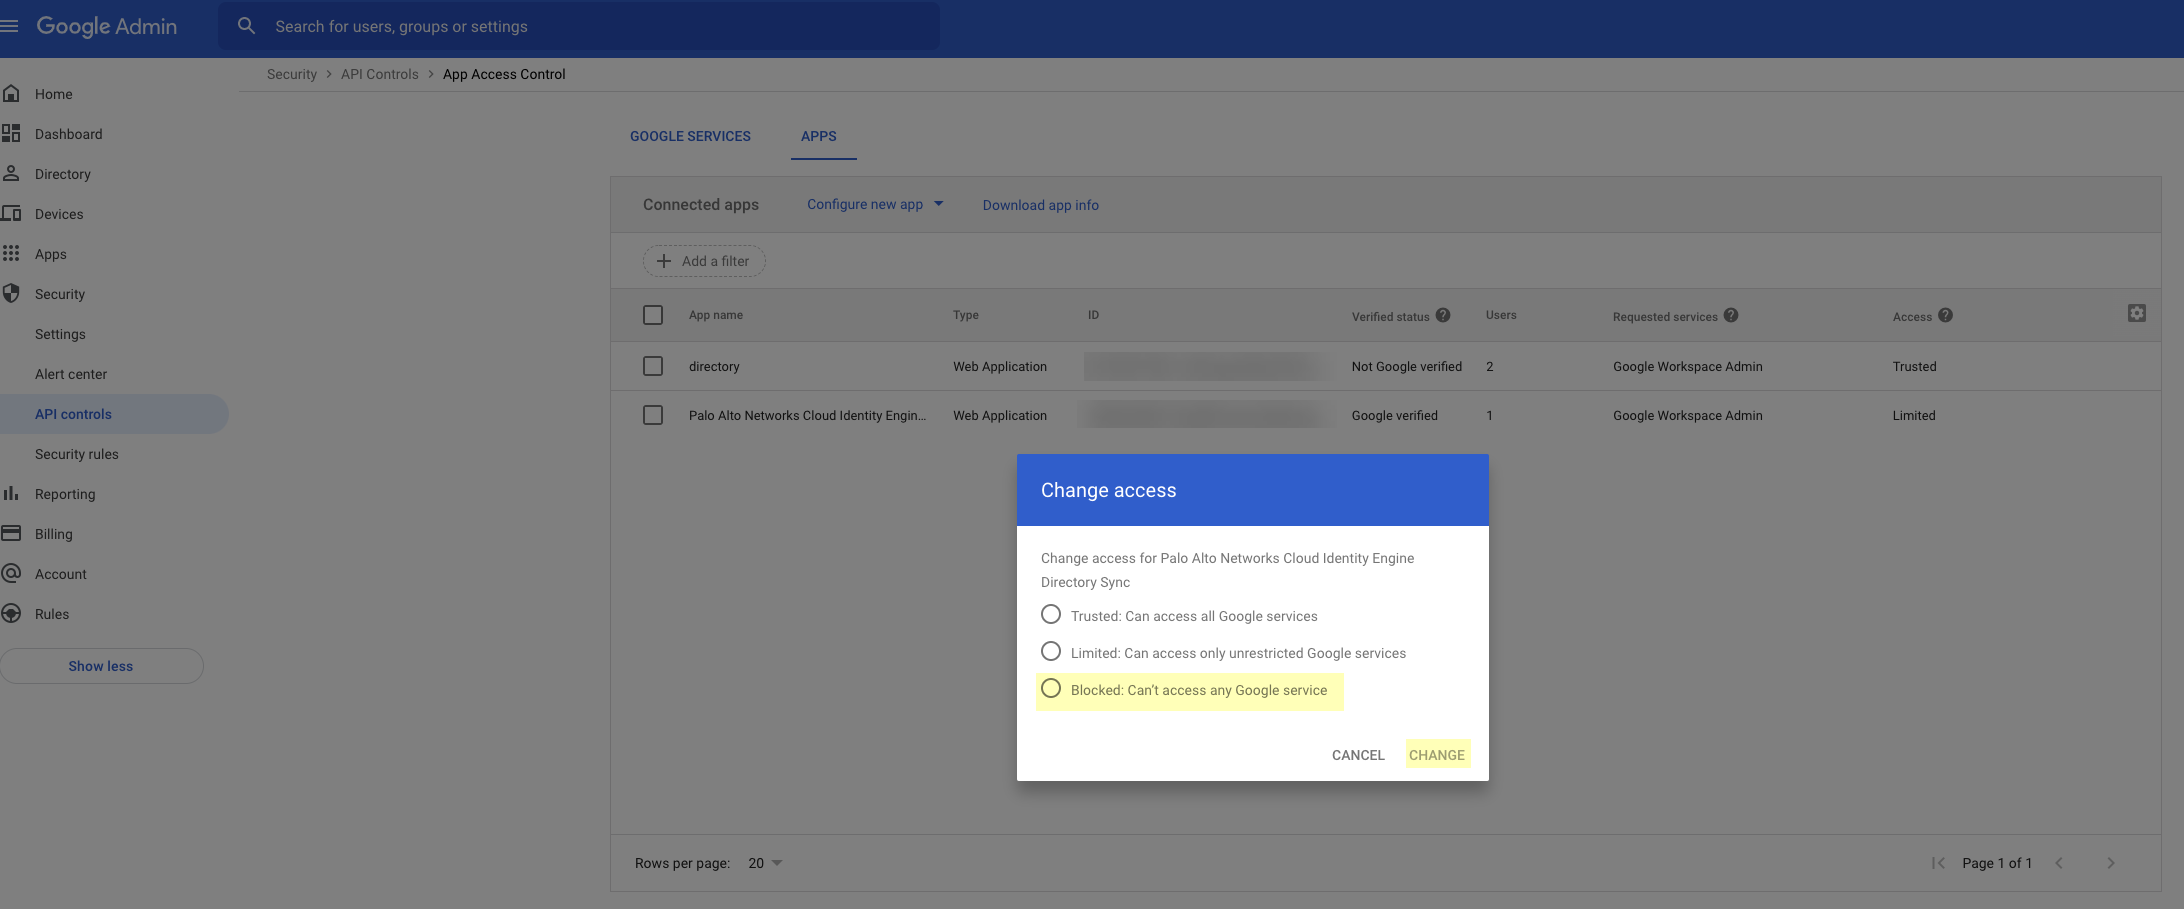
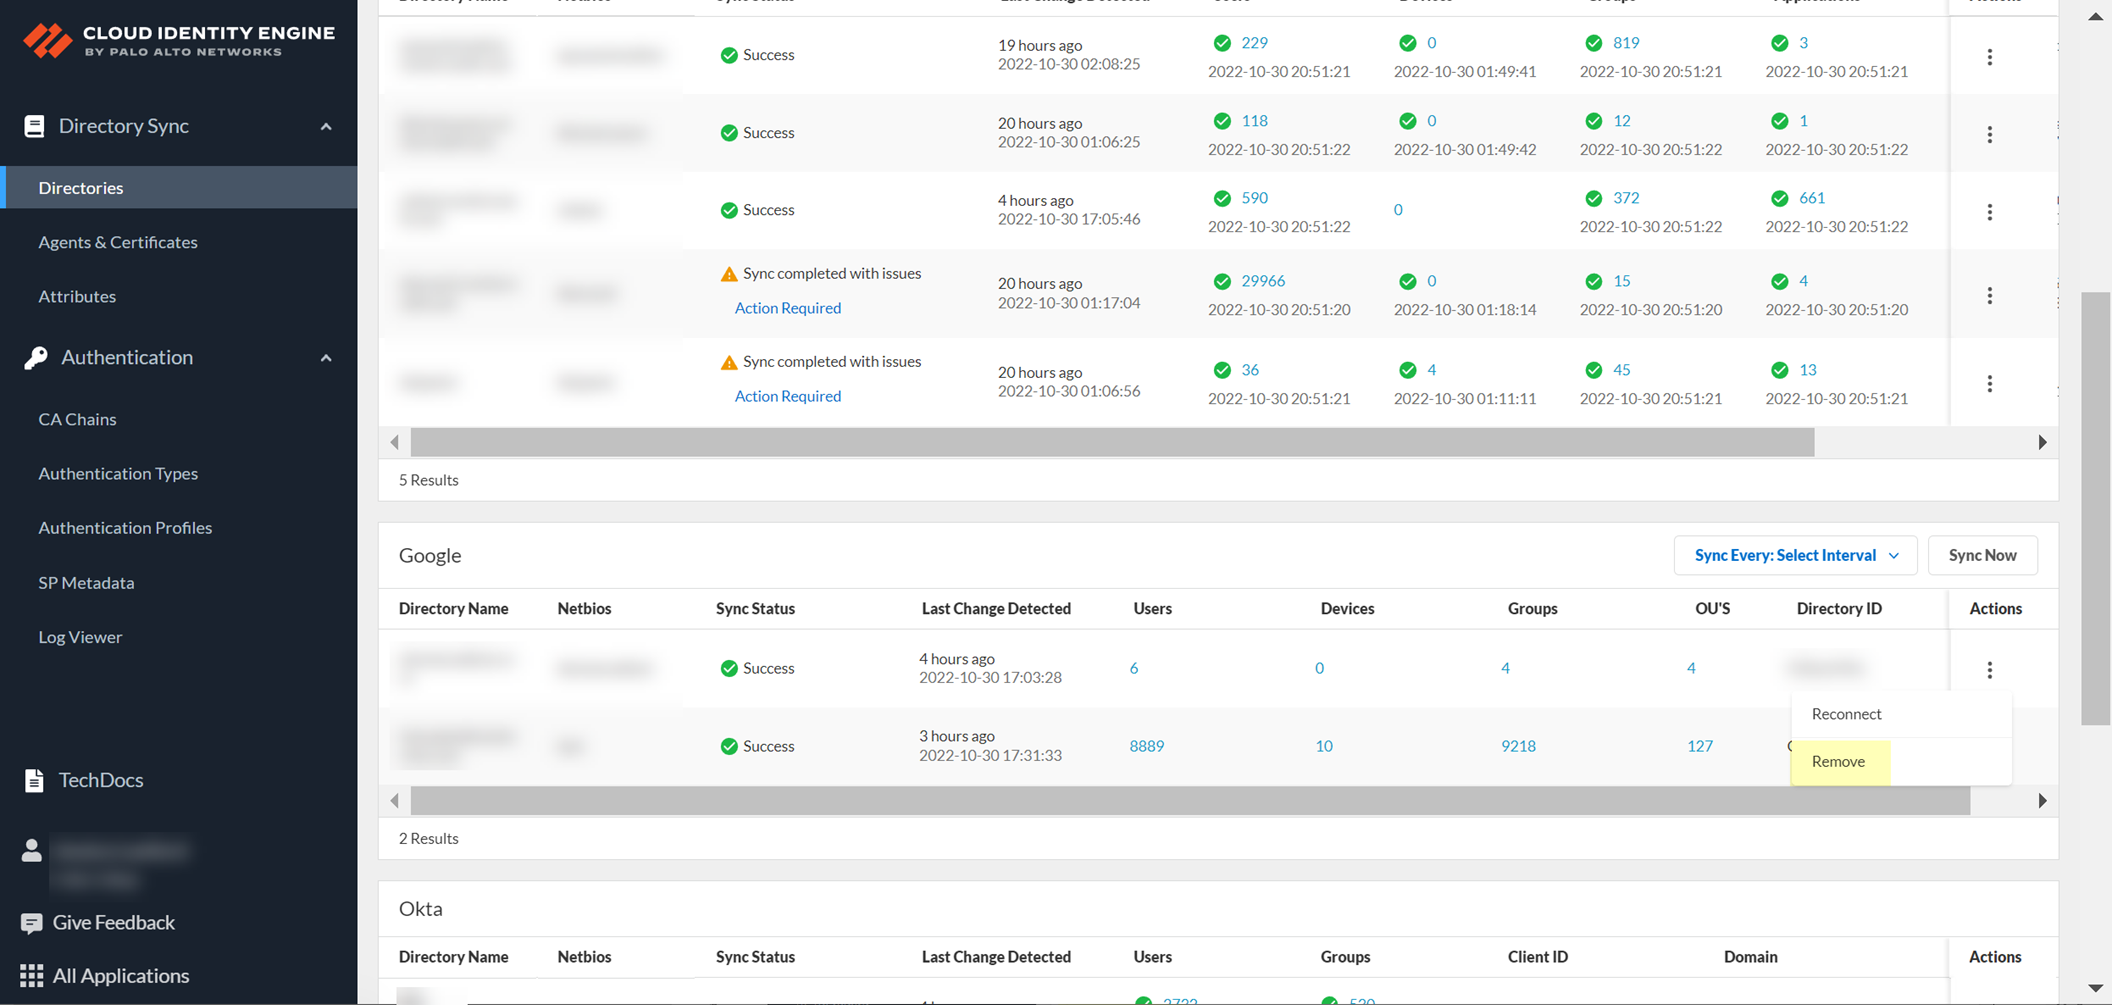
Remove Google Directory
In Google Admin console: Go to Security > API Controls > App Access Control.
Select the CIE app. Click
Change access
.
Select
Blocked: Can’t access any Google service
. Click
Change
.
In CIE App: Go to
Directories
. Find the Google directory >
Actions > Remove
. Confirm deletion.
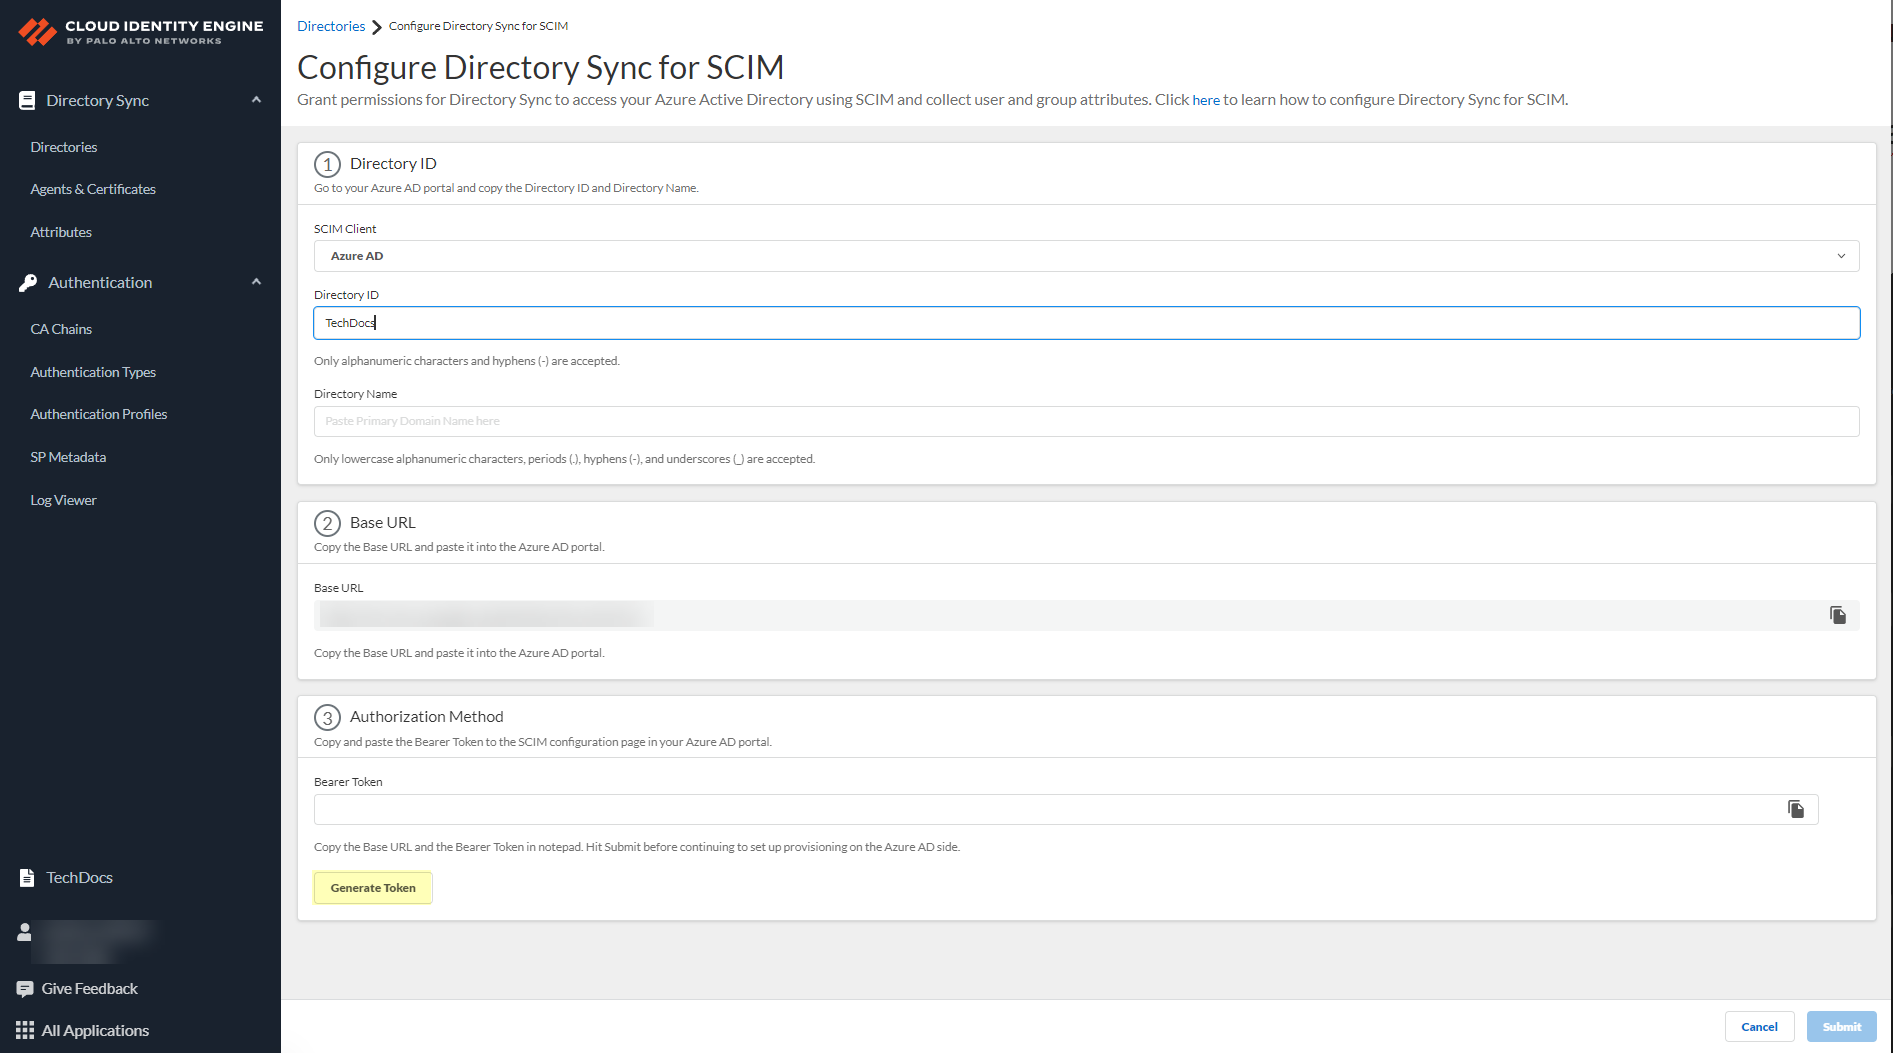
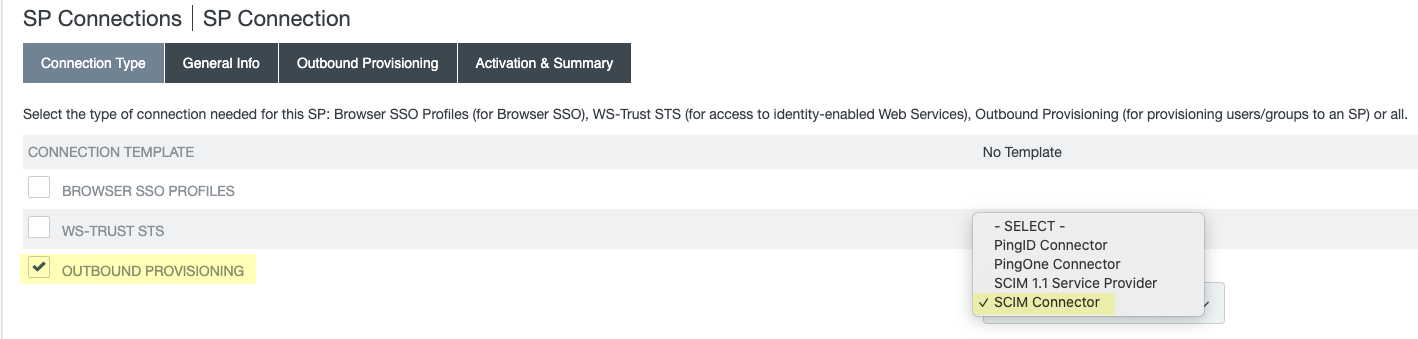
Configure SCIM Connector for the Cloud Identity Engine
[PCNSA/PCNSE] SCIM (System for Cross-Domain Identity Management) allows customized attribute collection from directories like Azure AD, PingFederate, and Okta.
You define which attributes are provisioned from the IdP side.
[GOTCHA] The SCIM gallery app does *not* support the `userType` attribute.
[CRITICAL] Configuration requires steps in *both* CIE and the SCIM client portal (Azure, PingFederate, Okta).
Complete predeployment steps in your SCIM client portal (Azure, PingFederate, or Okta - see specific subsections below).
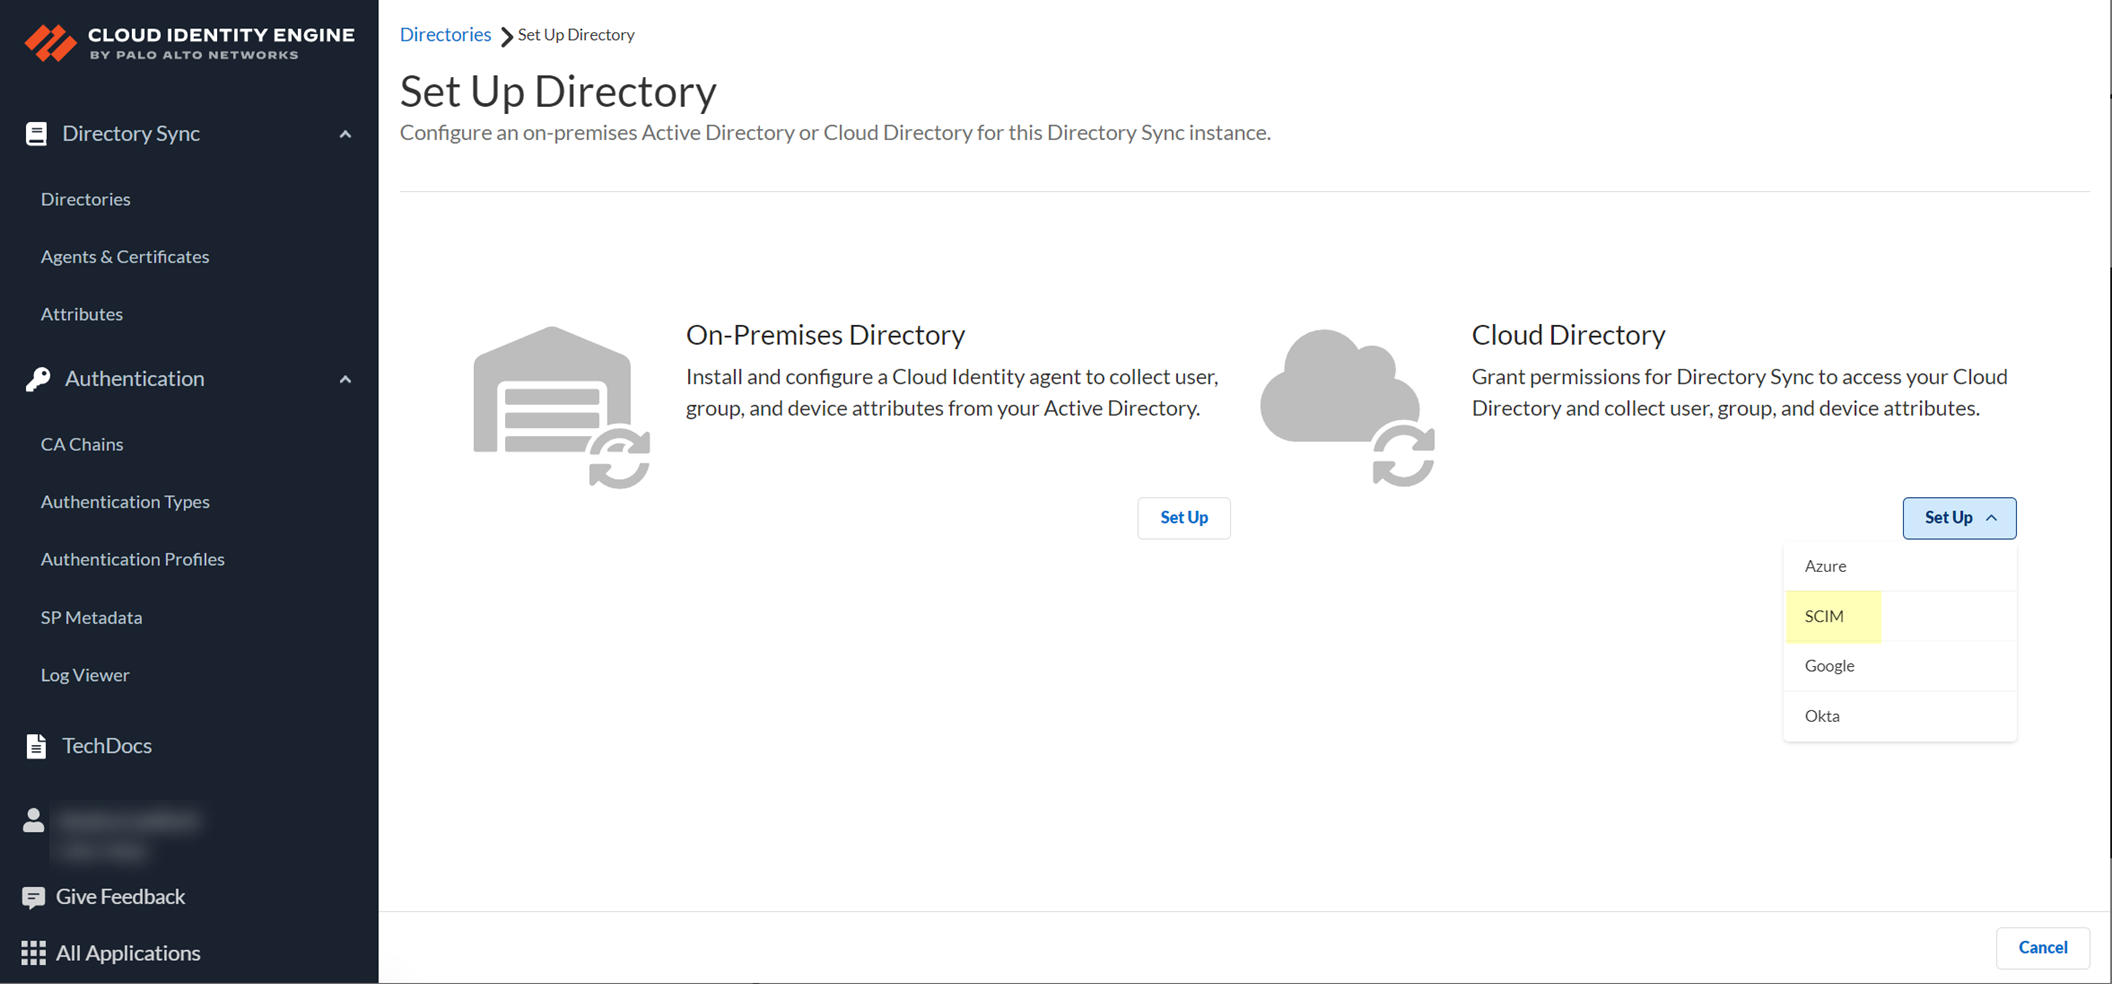
In CIE App: Go to
Directories
>
Add New Directory
> Select
SCIM
> Click
Set Up
.
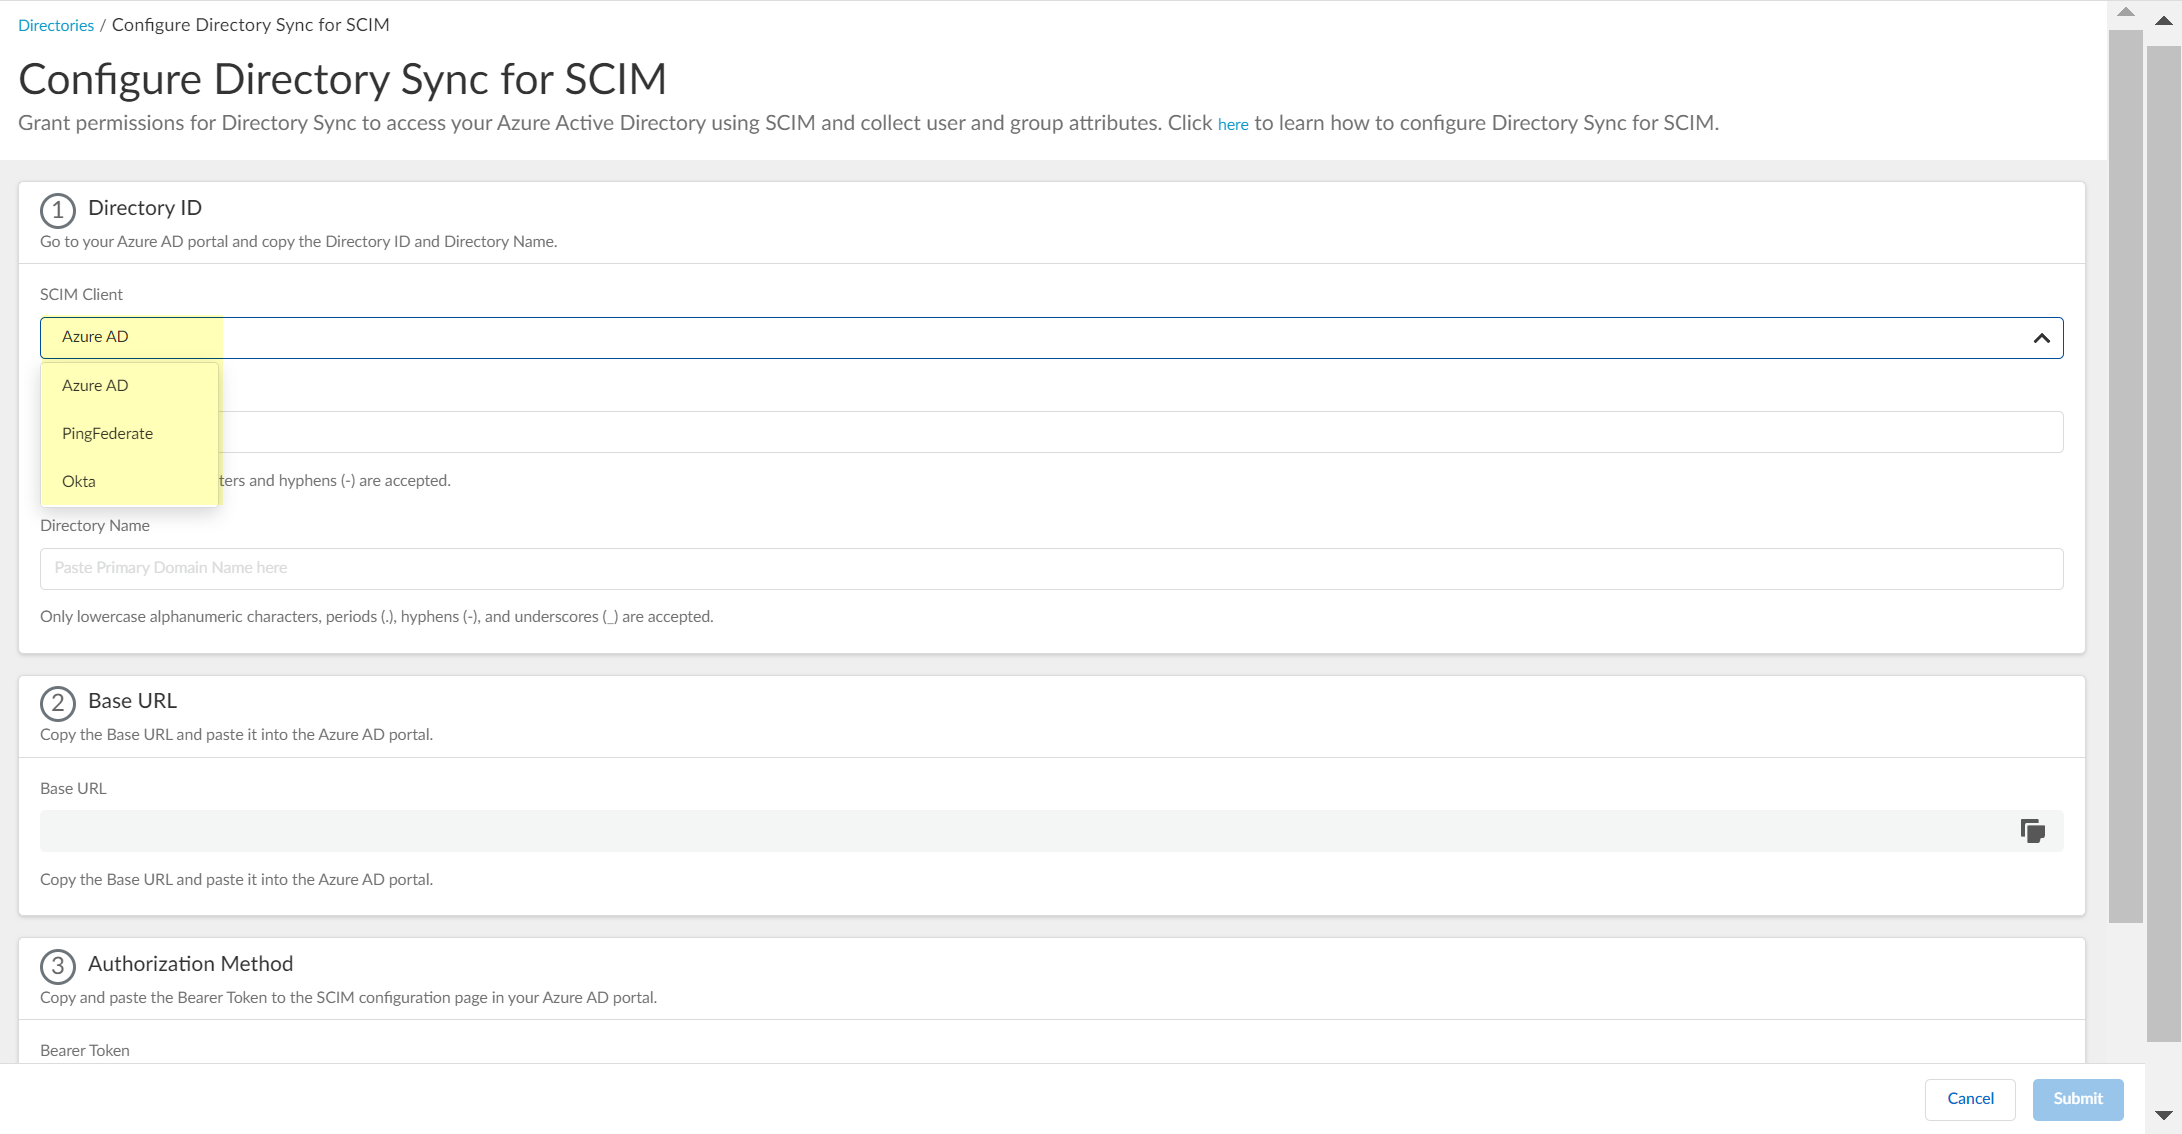
Select the
SCIM Client
(Azure AD, PingFederate, Okta).
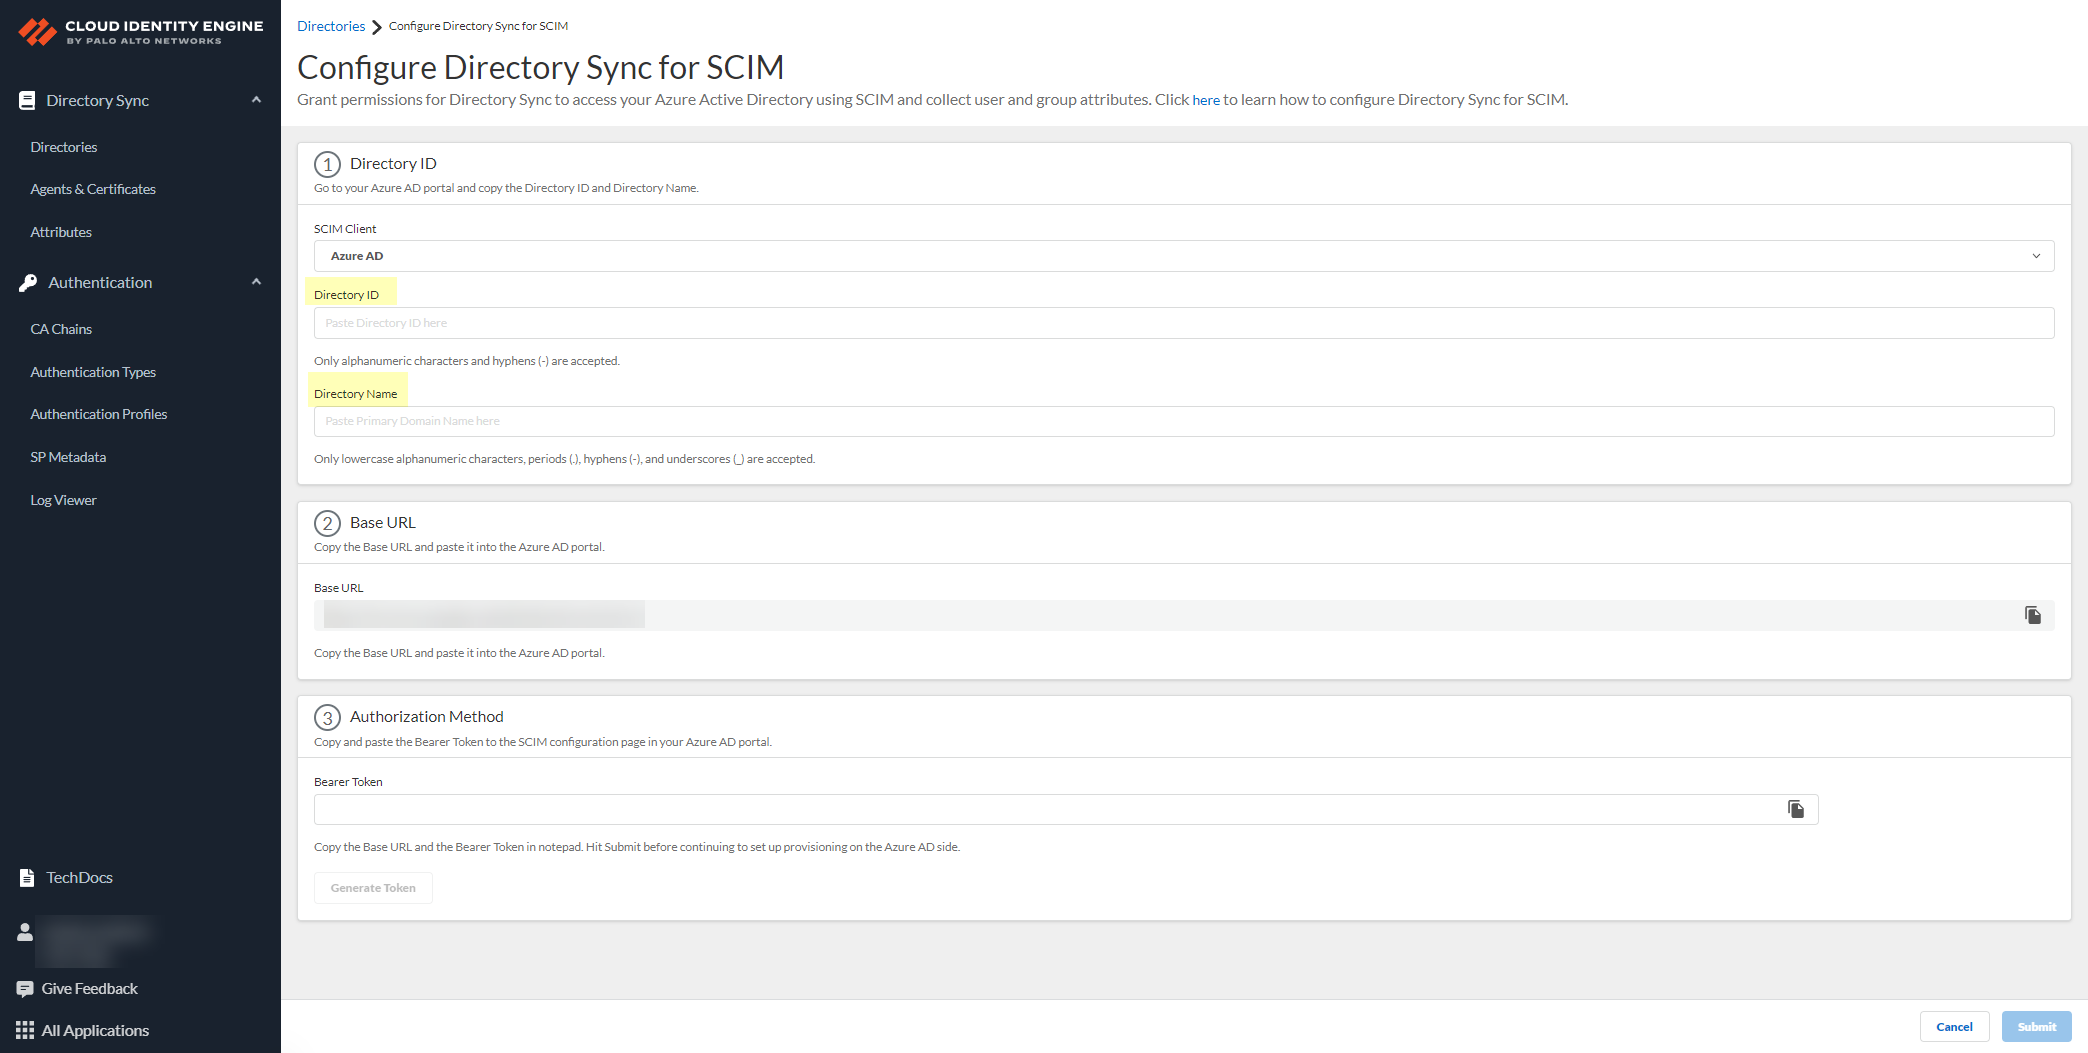
Obtain necessary IDs from your SCIM client portal (details vary by client).
Click
Generate Bearer Token
in CIE.
[CRITICAL] Copy the generated token immediately and store securely. You'll need it for the SCIM client config.
Click
Submit
in CIE to save the initial config.
[GOTCHA] You MUST submit before configuring the SCIM client.
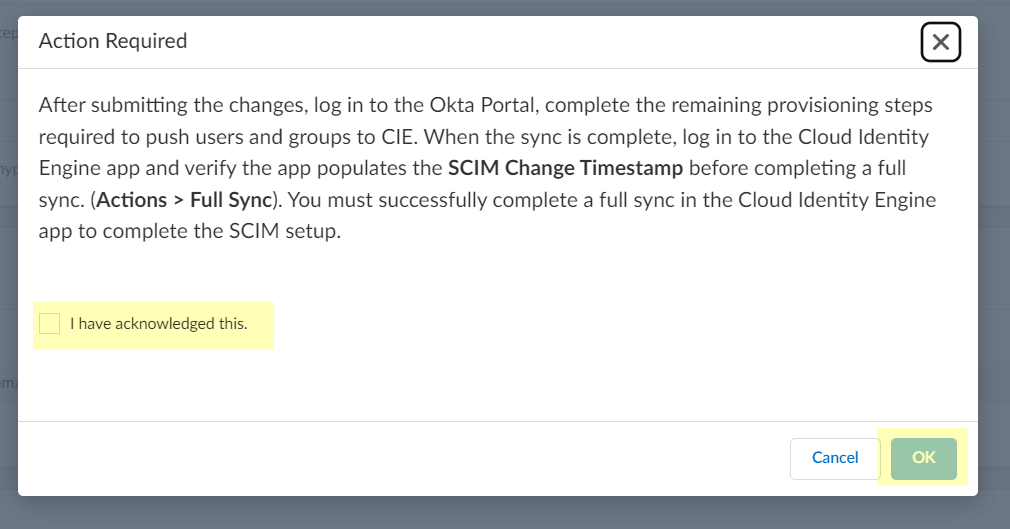
Acknowledge the post-configuration requirements prompt.
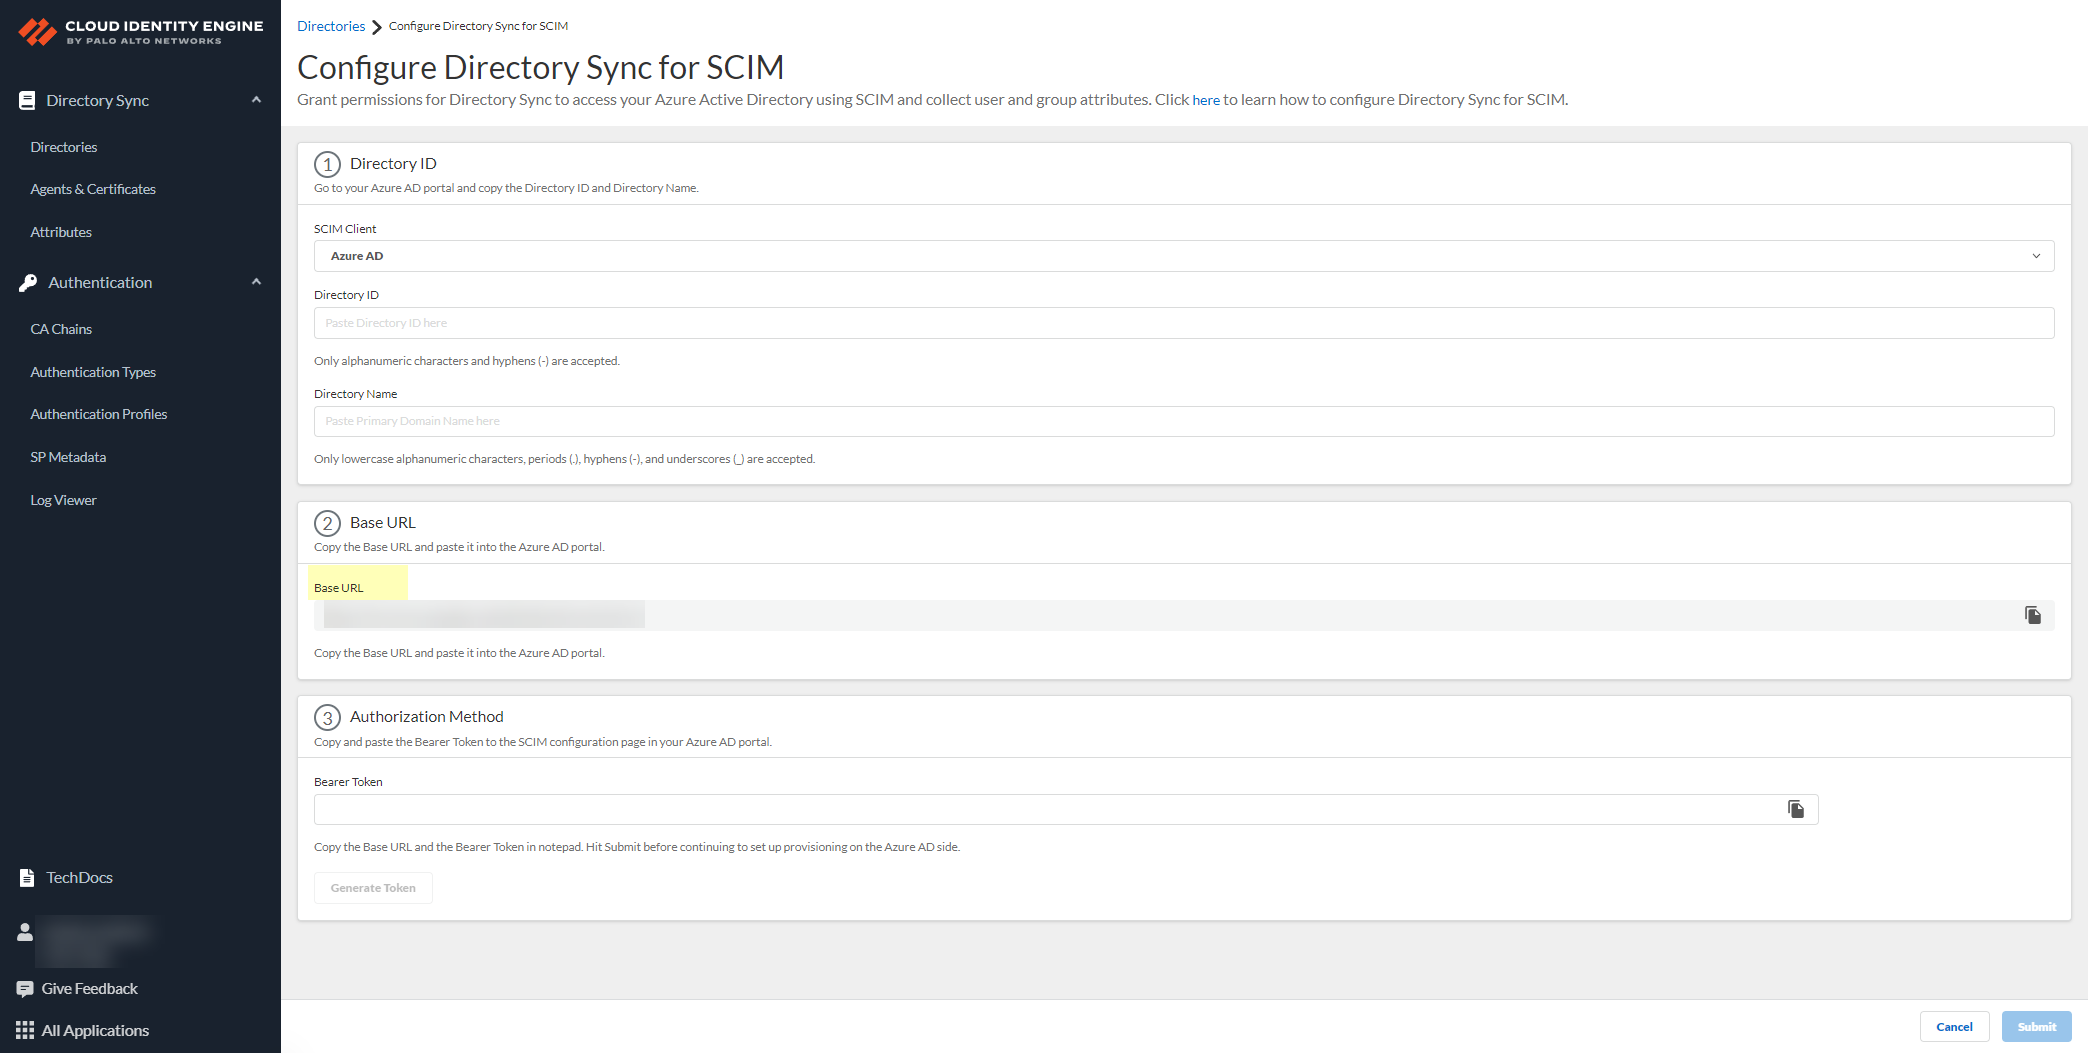
Complete post-configuration steps in your SCIM client portal using the Base URL and Bearer Token (see specific subsections).
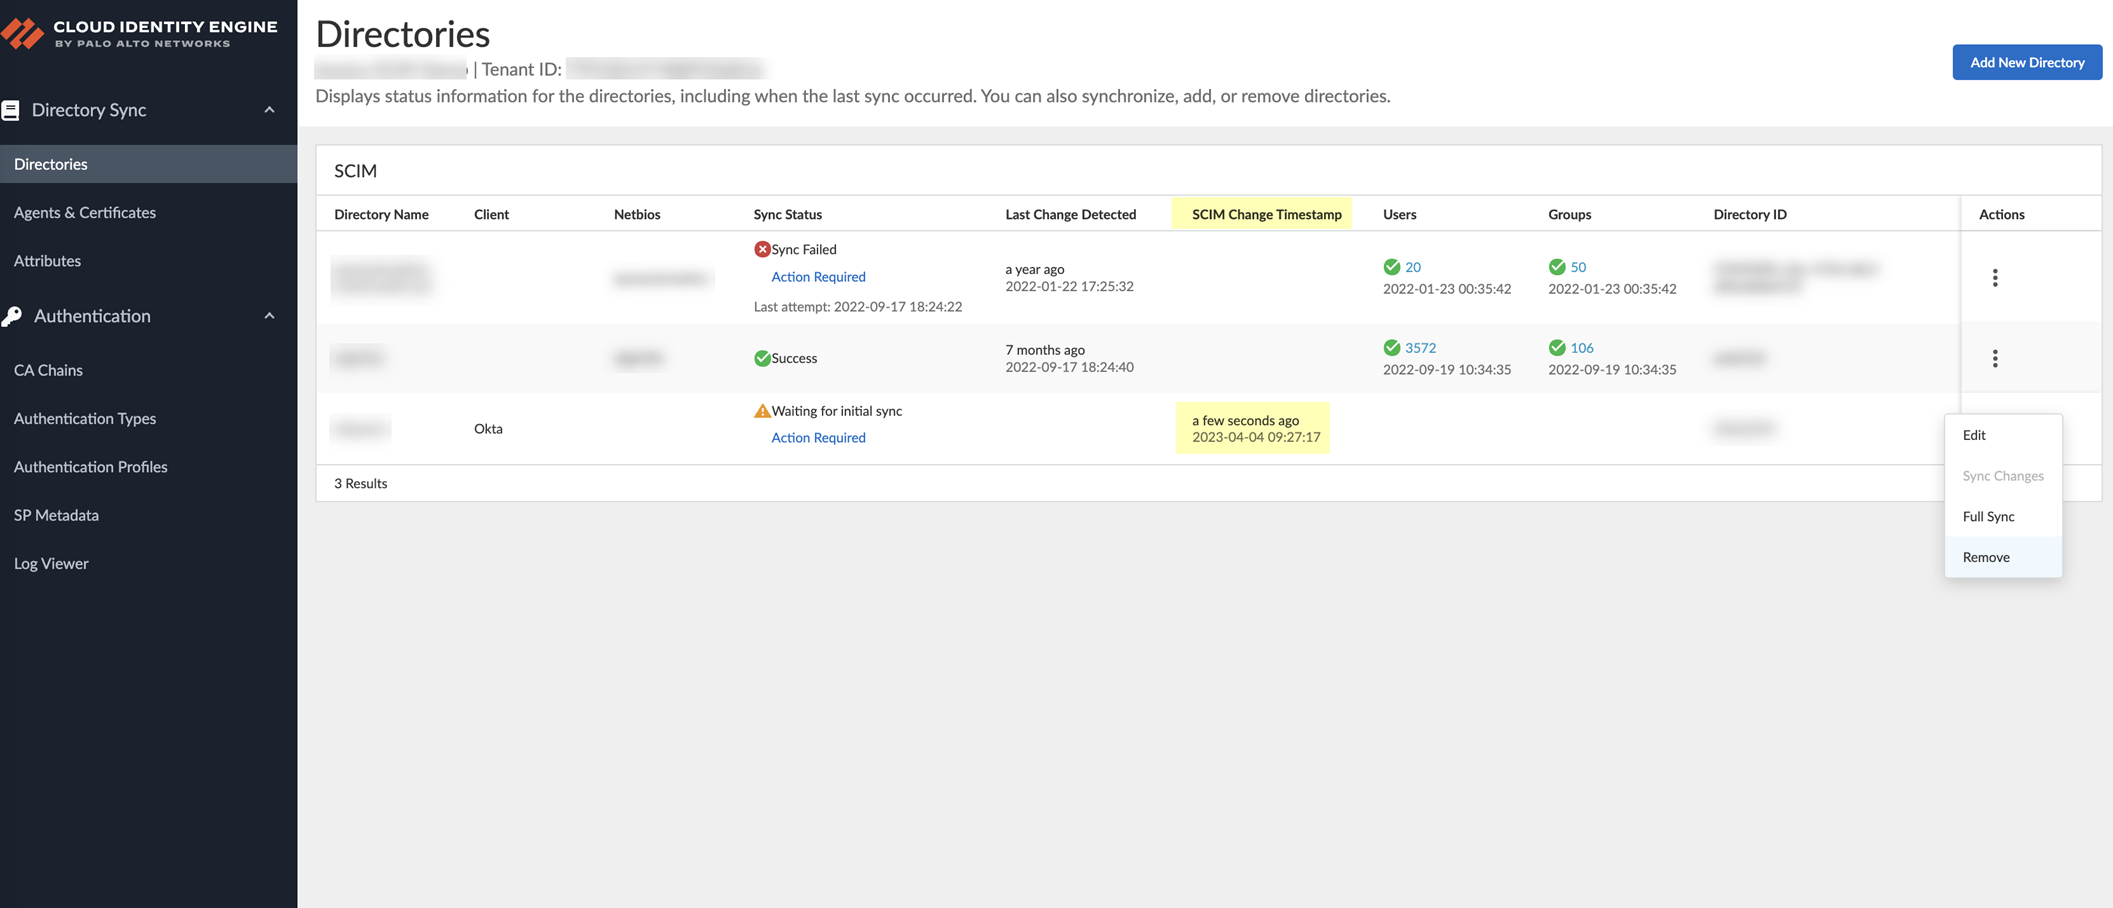
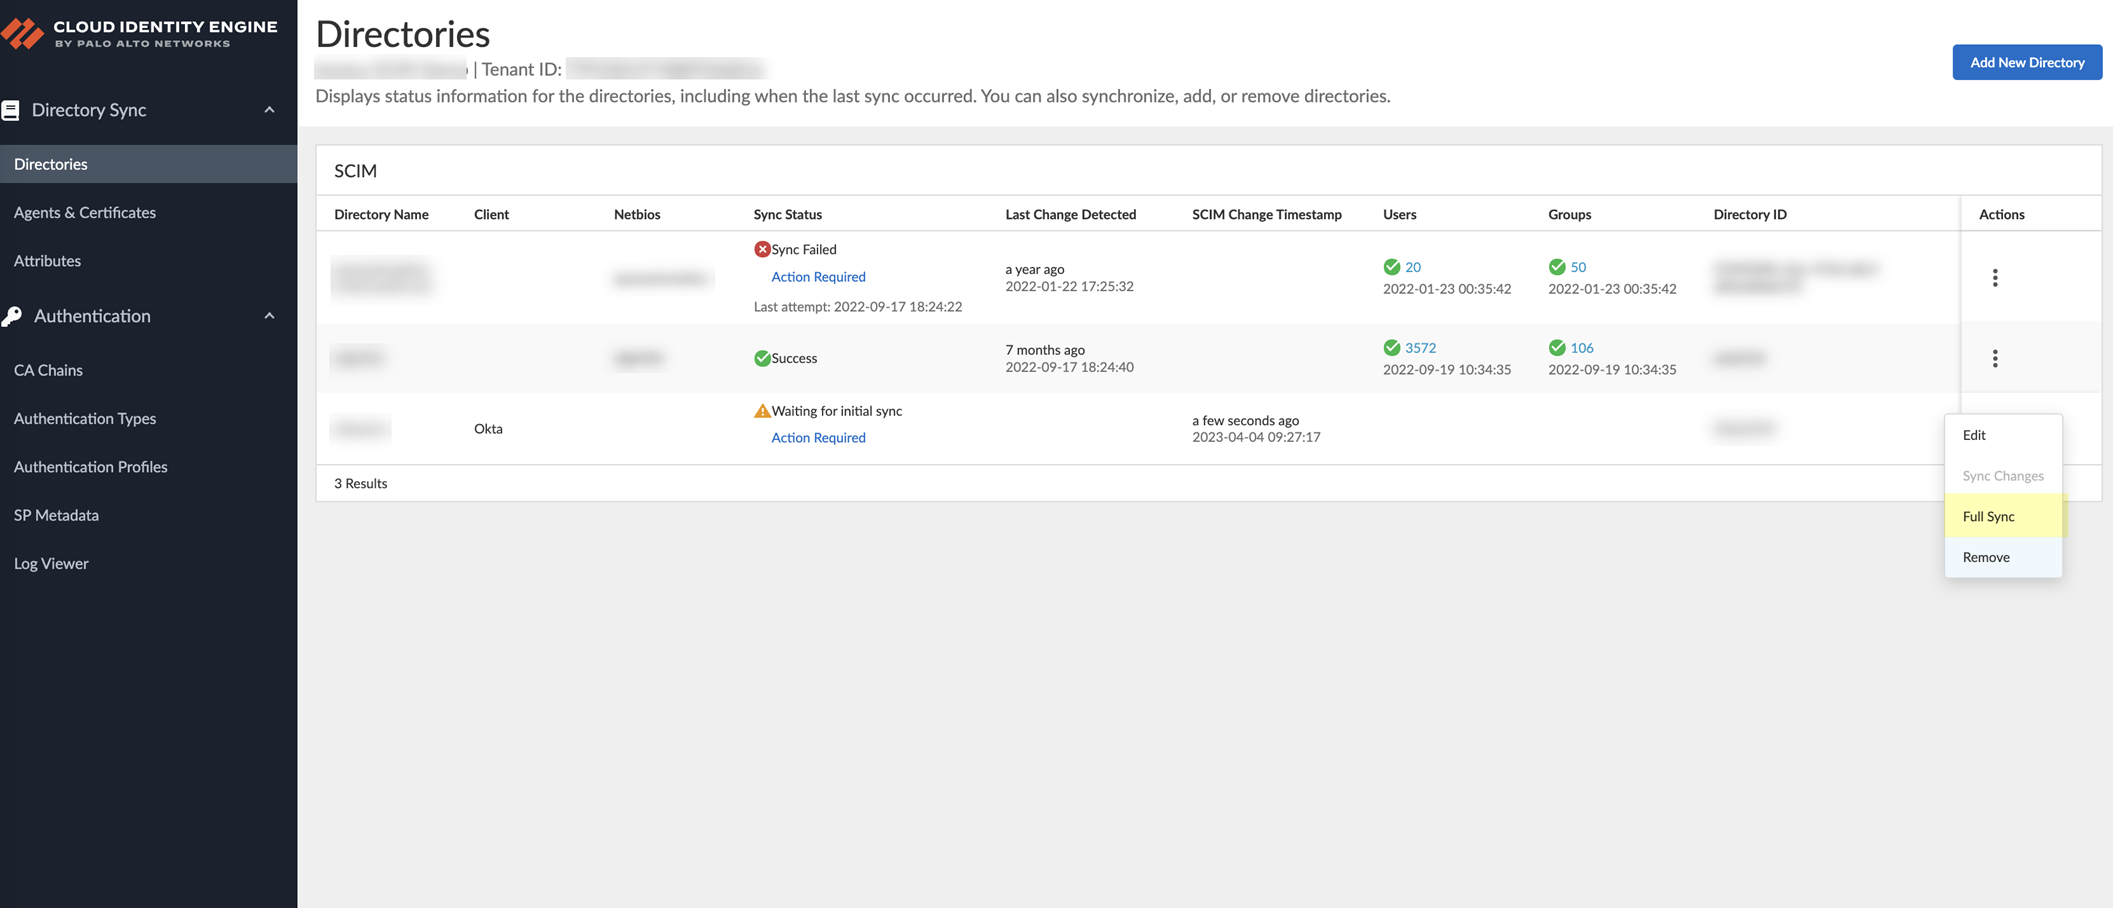
[CRITICAL] After configuring the SCIM client, return to CIE > Directories and perform a
Full Sync
for the SCIM directory to complete the setup.
Configure Azure Active Directory for SCIM Connector
(Requires steps in Azure Portal alongside CIE steps above)
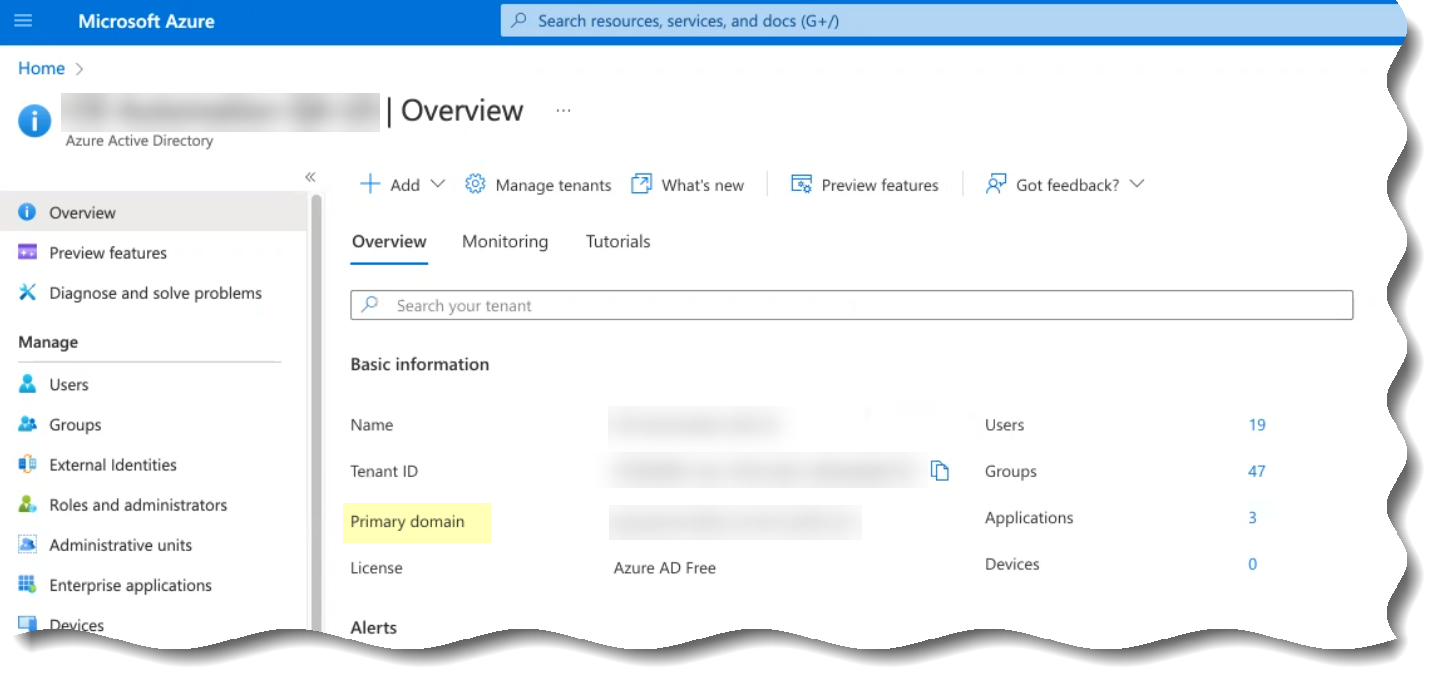
Predeployment (Azure Portal):
Go to Azure AD > Overview. Copy
Tenant ID
and
Primary domain
.
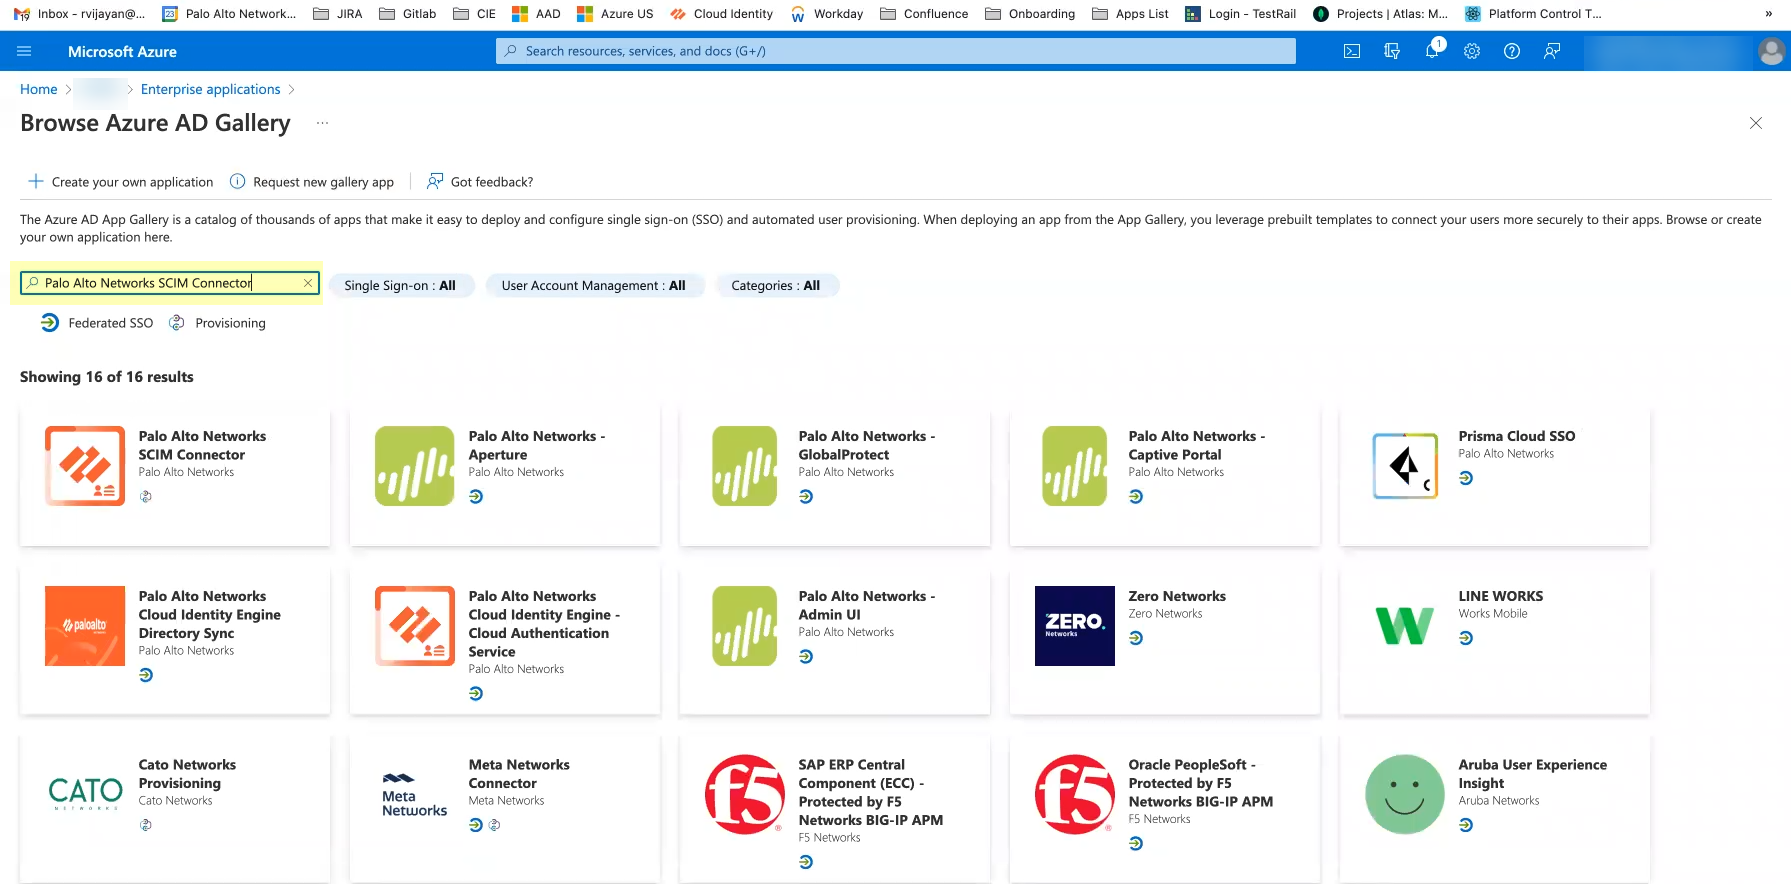
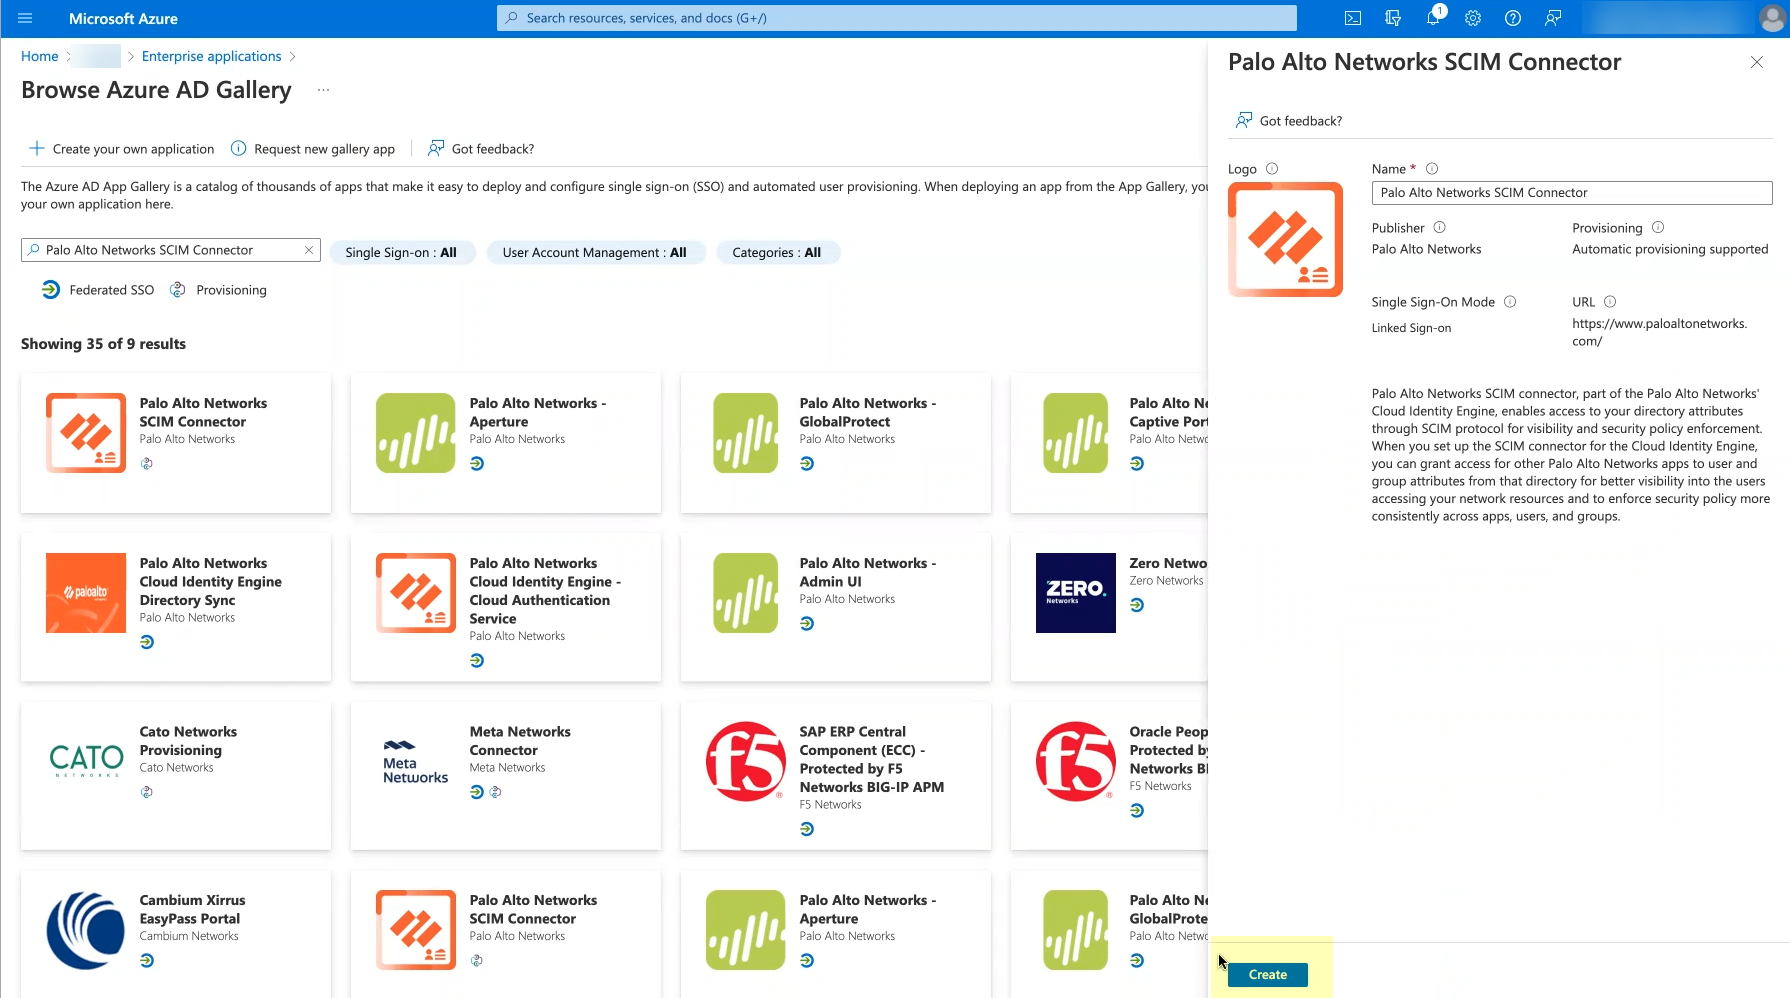
Go to Enterprise applications > New application > Search gallery for
Palo Alto Networks SCIM Connector
.
Select the app and click
Create
.
[GOTCHA] Azure SCIM requires unique `displayName` for groups. Duplicate names cause sync issues. Modify display names in Azure AD if needed for policy use.
Post-configuration (Azure Portal):
Select the created SCIM Connector app > Provisioning > Get Started.
Set Provisioning Mode to
Automatic
.
Under Admin Credentials:
Paste the CIE
Base URL
into
Tenant URL
.
Paste the CIE
Bearer Token
into
Secret Token
.
Click
Test Connection
(should succeed if CIE part was submitted). Save.
Go to Mappings. Edit attribute mappings for Groups and Users if needed (delete unused, add custom).
Recommended: Provision only necessary groups. Add parent groups *then* child groups if syncing subgroups.
(Optional) Under Settings, change Scope from "Sync only assigned users and groups" to "Sync all users and groups". Save.
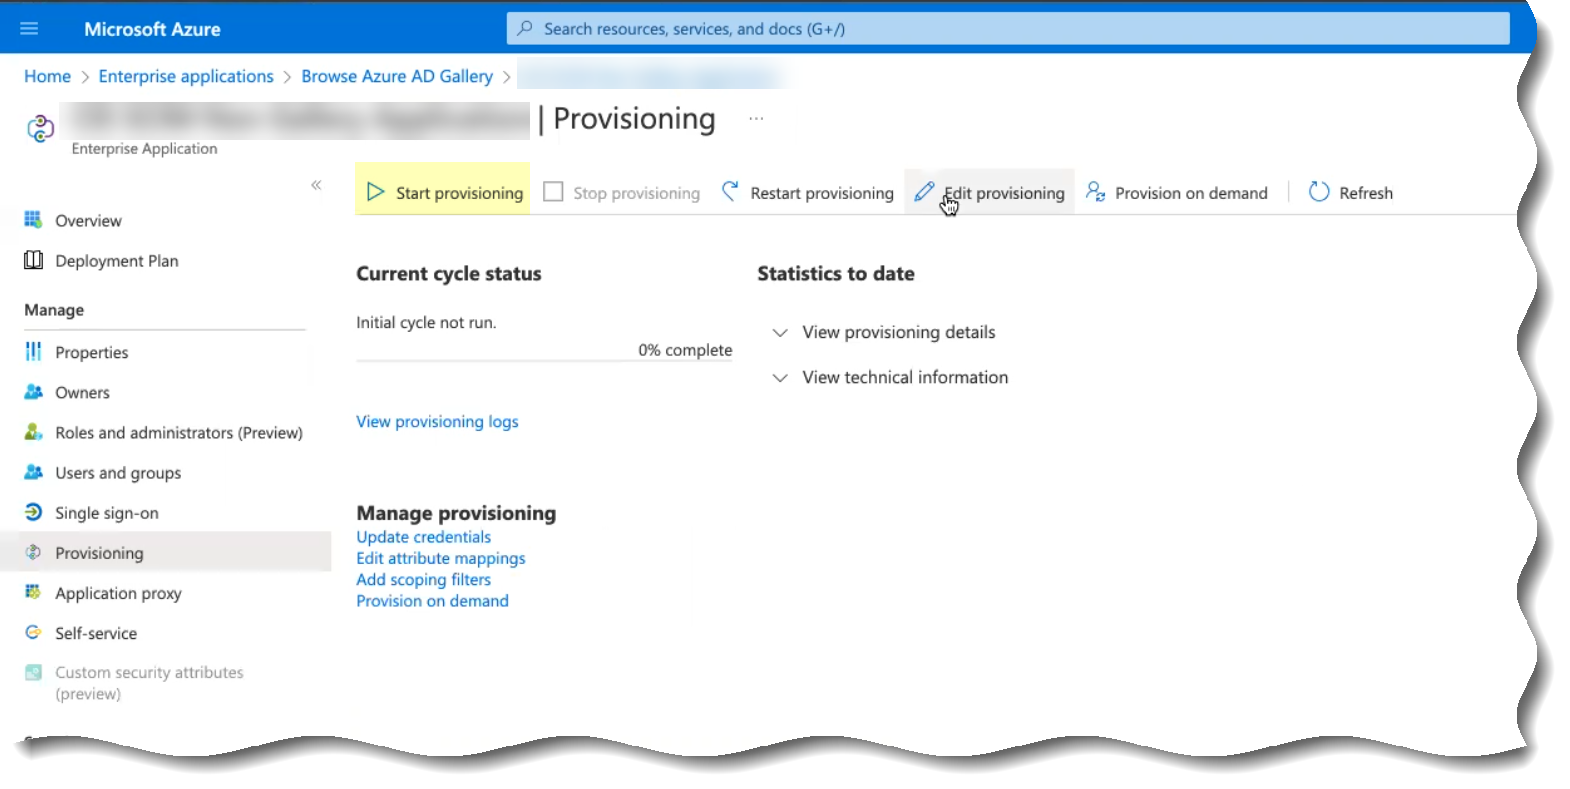
Go back to Provisioning overview > Click
Start provisioning
.
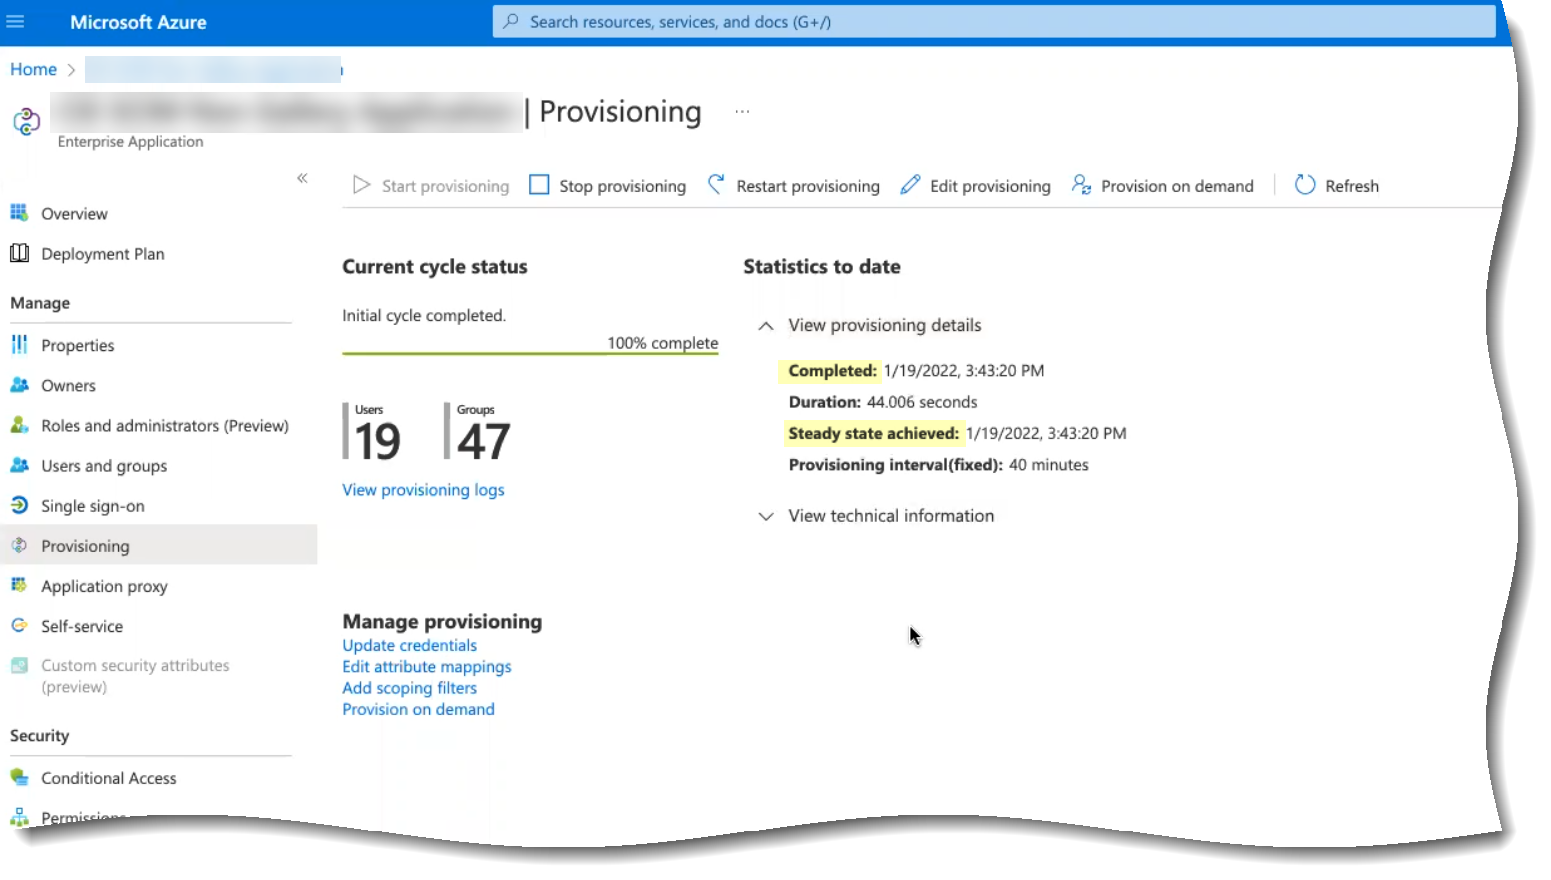
Wait for the initial cycle to complete. View details to verify Users/Groups counts.
[CRITICAL] Return to CIE > Directories. Verify SCIM Change Timestamp populates. Perform a
Full Sync
.
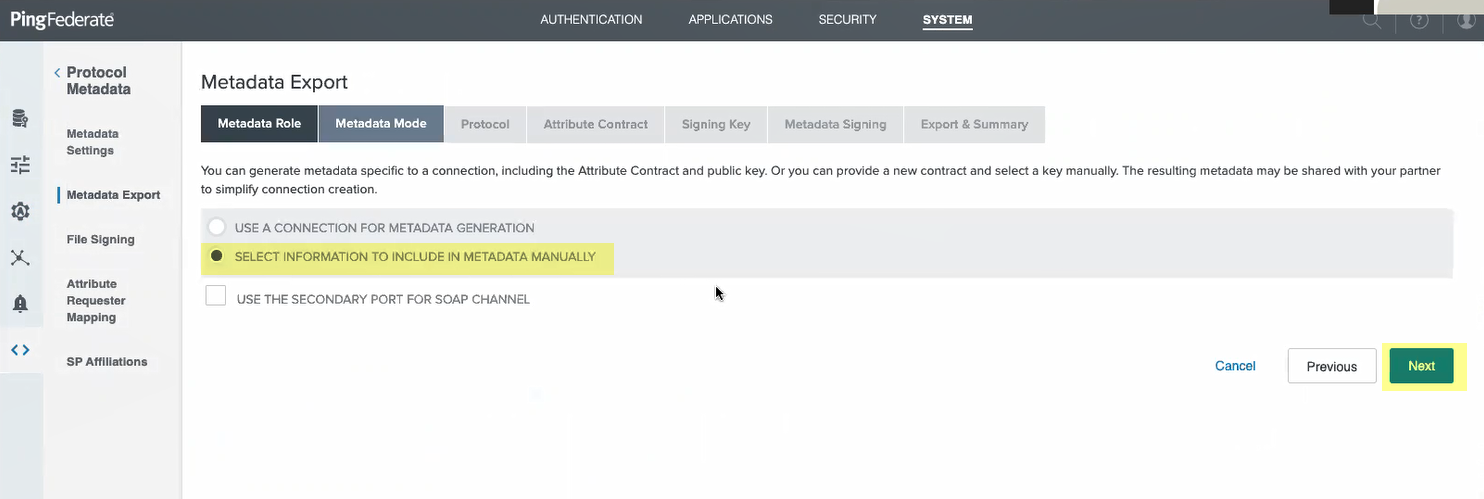
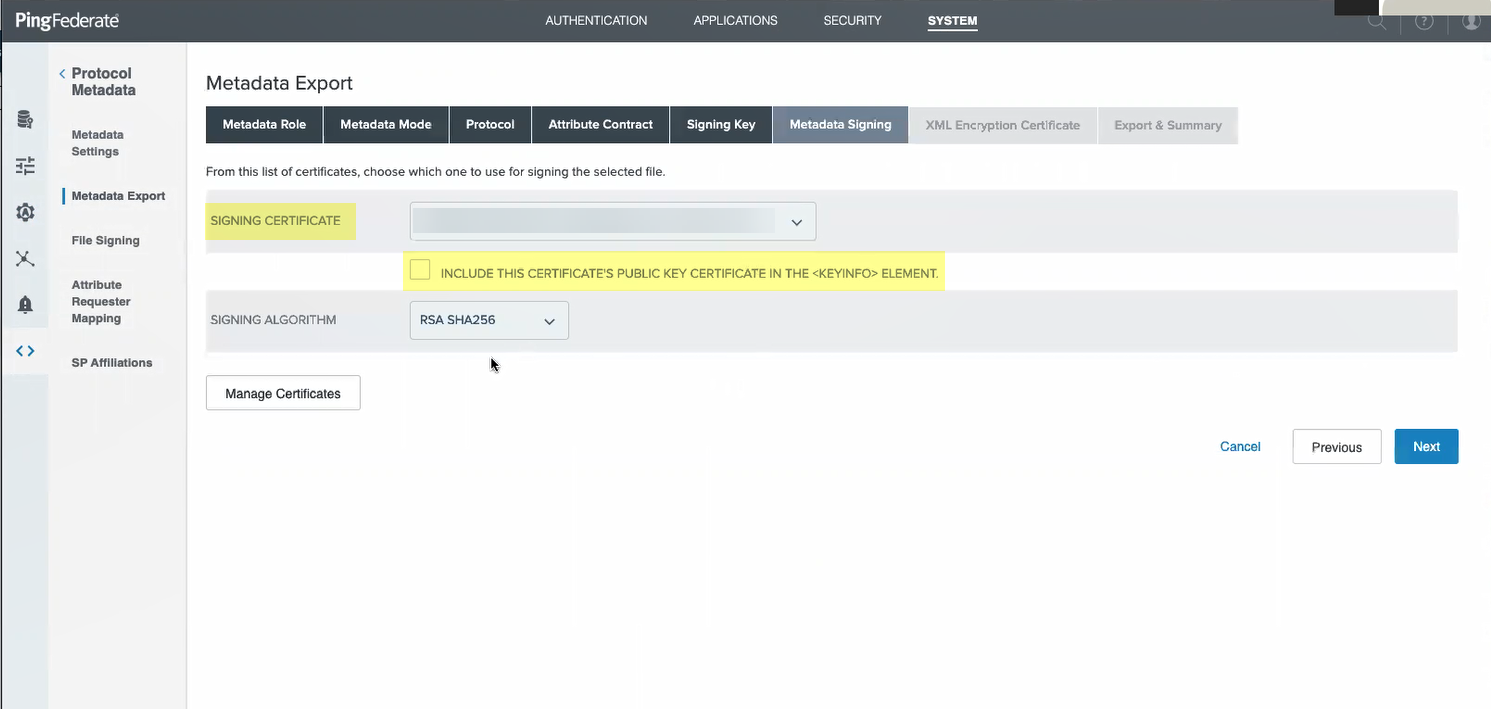
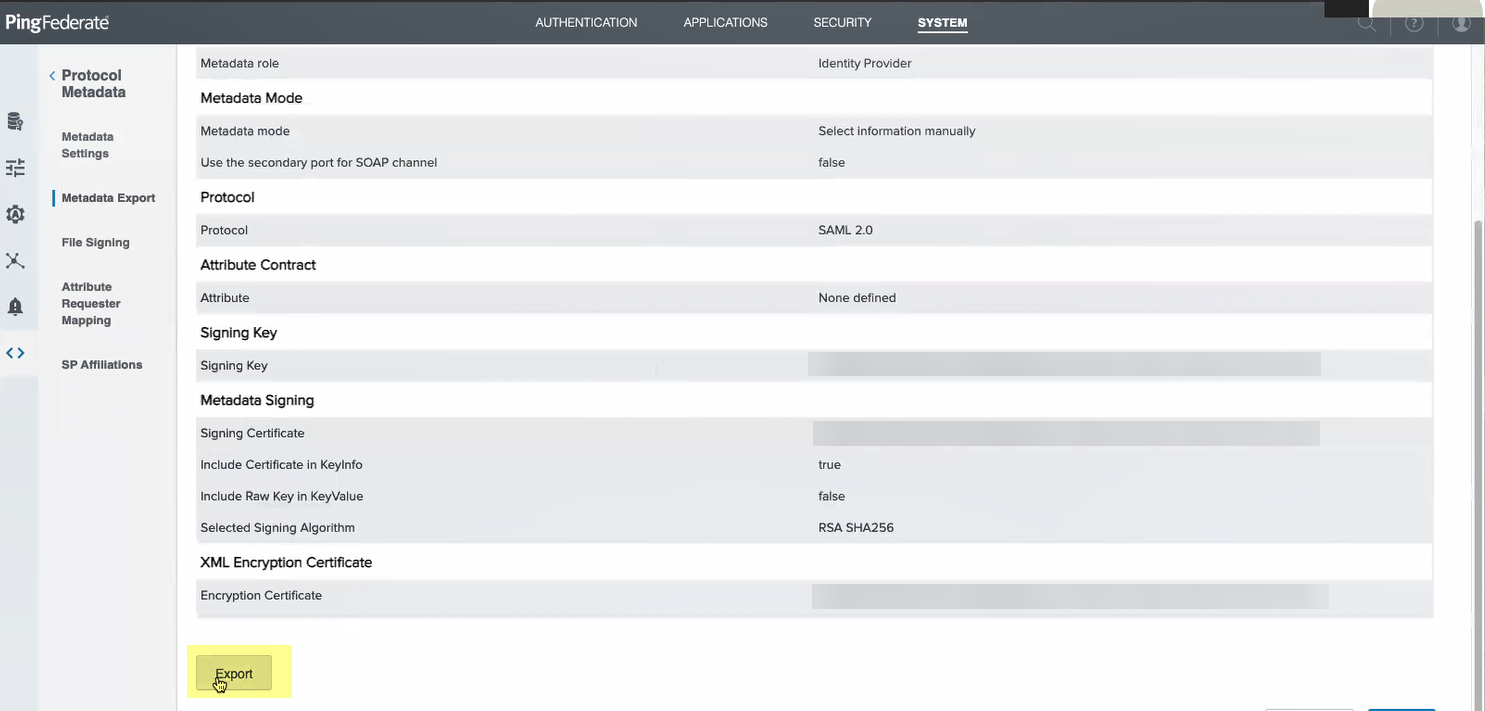
Configure PingFederate for SCIM Connector
(Requires steps in PingFederate Portal alongside CIE steps)
Predeployment (PingFederate):
Set up Data Store (LDAP type). Test connection. Copy
System ID
(remove `LDAP-` prefix) for CIE Directory ID. Copy
User
domain part for CIE Directory Name.
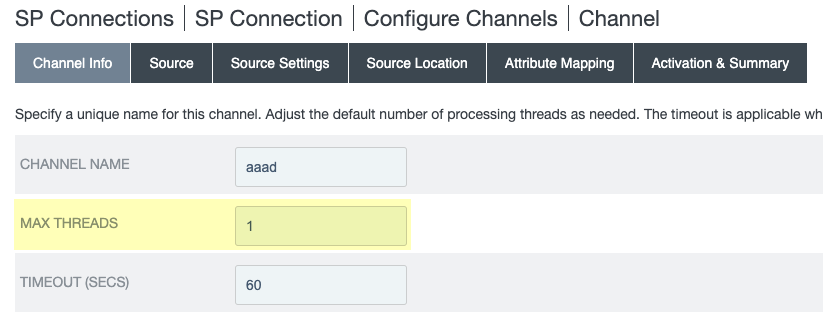
Enter Connection ID and Name. (Optional) Increase Max Threads under Channel Configuration for faster sync (recommended: 5).
Post-configuration (PingFederate):
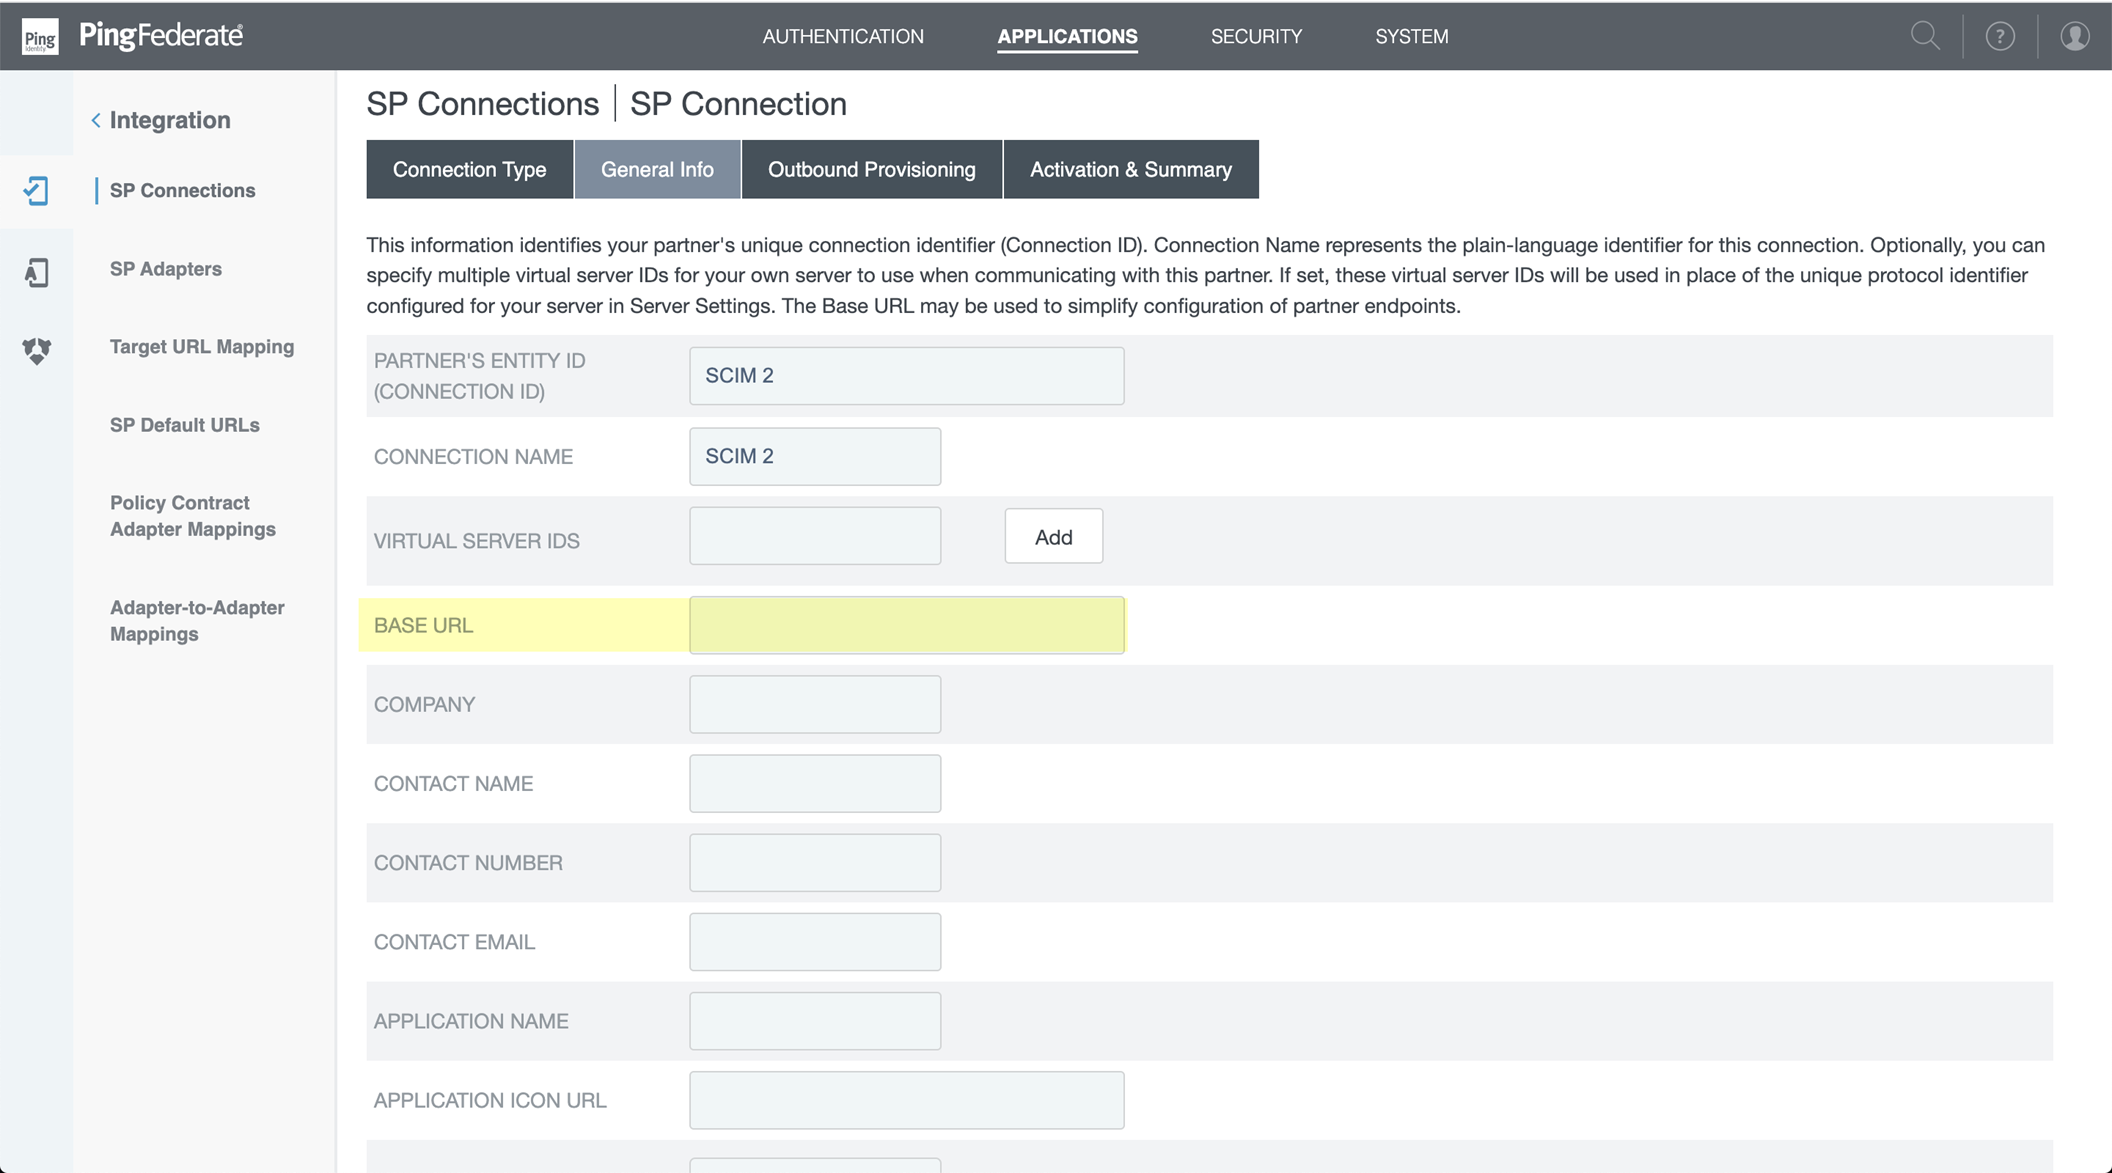
Go to Outbound Provisioning > Configure Provisioning > Target tab. Paste CIE
Base URL
.
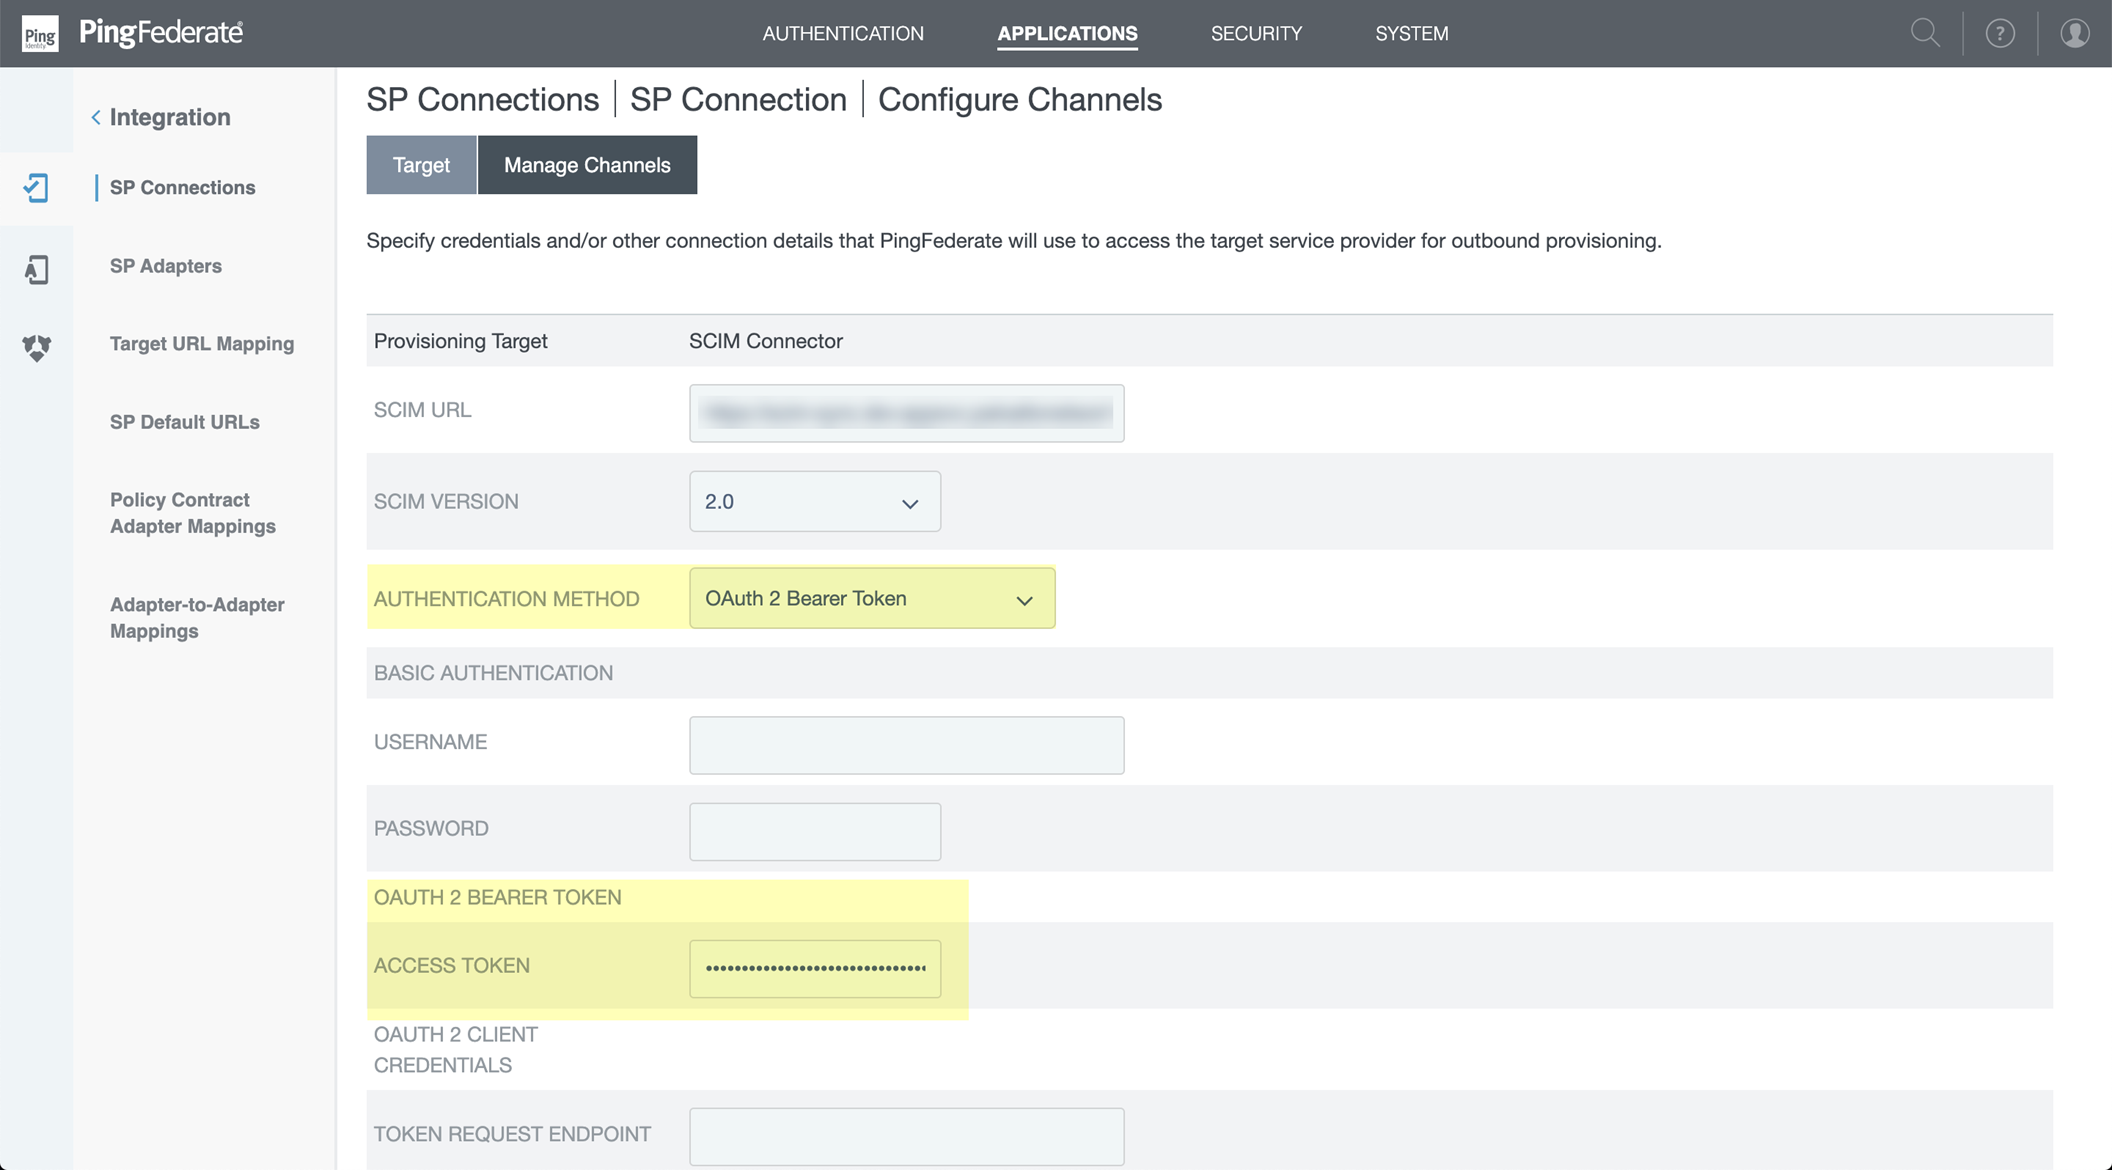
Go to Configure Channels > Manage Channels. Set Authentication Method to
OAuth 2 Bearer Token
. Paste CIE
Bearer Token
into Access Token.
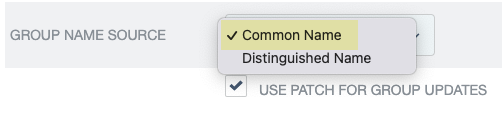
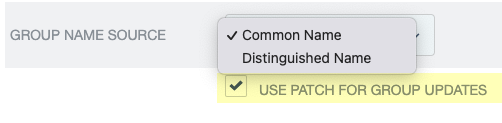
Set Group Name Source to
Common Name
. Select
Use patch for group updates
.
Configure Channels: Create channel, select Active Data Store, enter Base DN. Enter Group DN or Filter. Select Nested Search if needed.
[GOTCHA] SCIM Connector doesn't retain nested group hierarchy from PingFederate automatically. Either put the parent group in a container and use that DN, or use a filter like `(objectClass=user),(objectClass=group)` to get all members.
Edit Attribute Mapping: Change `userName*` to `userPrincipalName`.
Save connection.
Trigger sync in PingFederate (commit a change or use
provmgr.sh --reset-all -c [channel_number]
).
[CRITICAL] Return to CIE > Directories. Verify SCIM Change Timestamp populates. Perform a
Full Sync
.
Configure Okta Directory for SCIM Connector
(Requires steps in Okta Dashboard alongside CIE steps)
Capabilities: Create/Update/Deactivate Users, Import Users/Groups, Sync Password, Group Push.
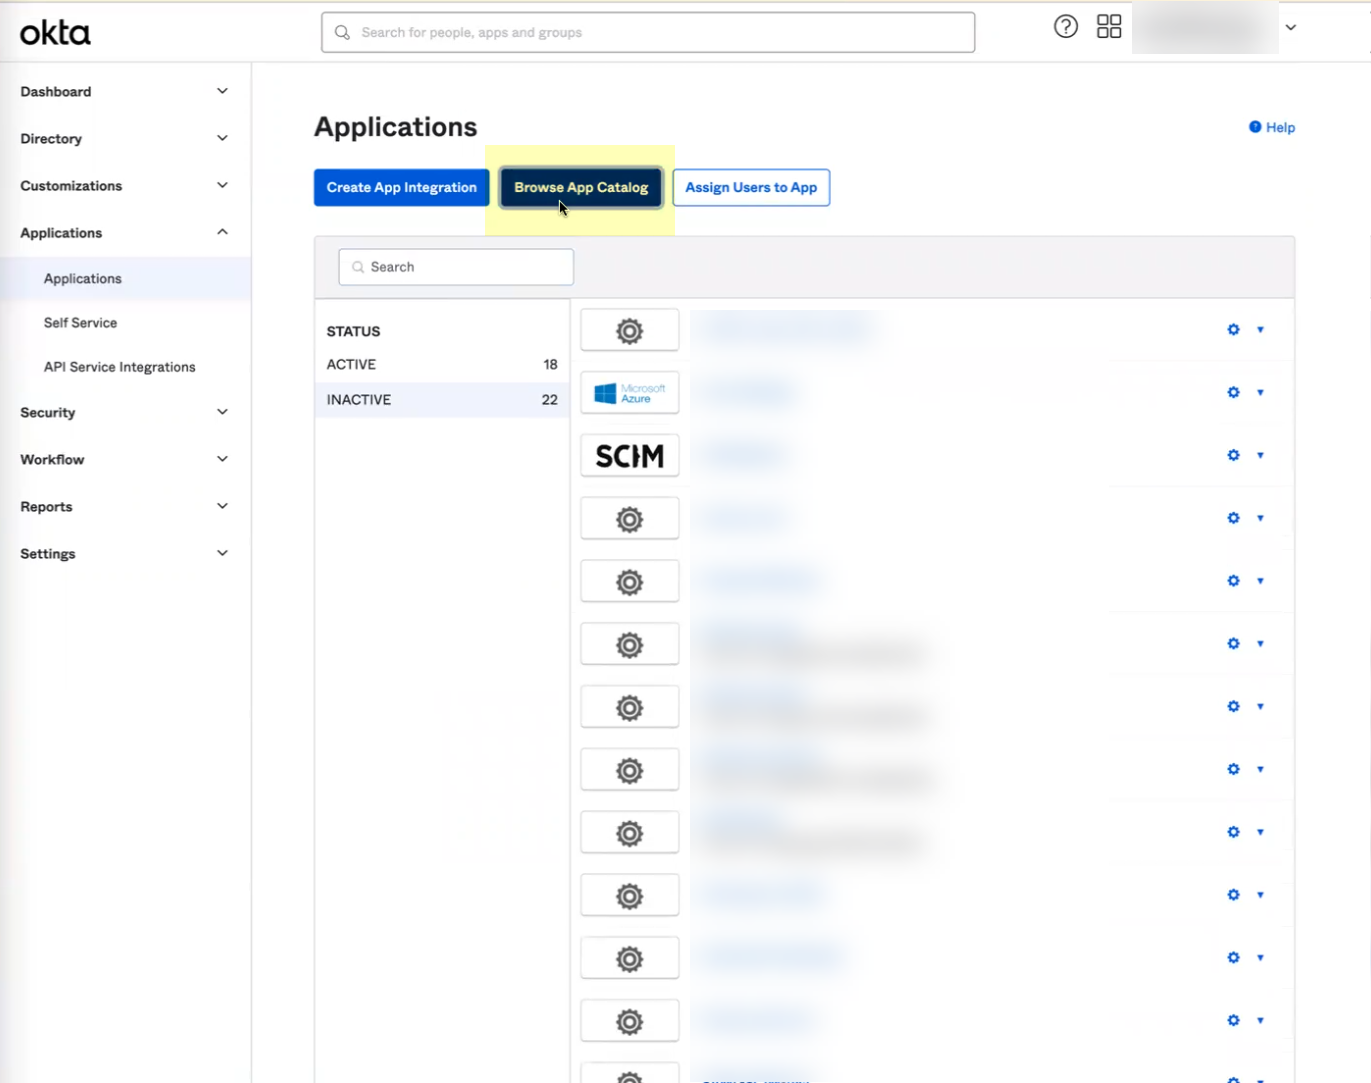
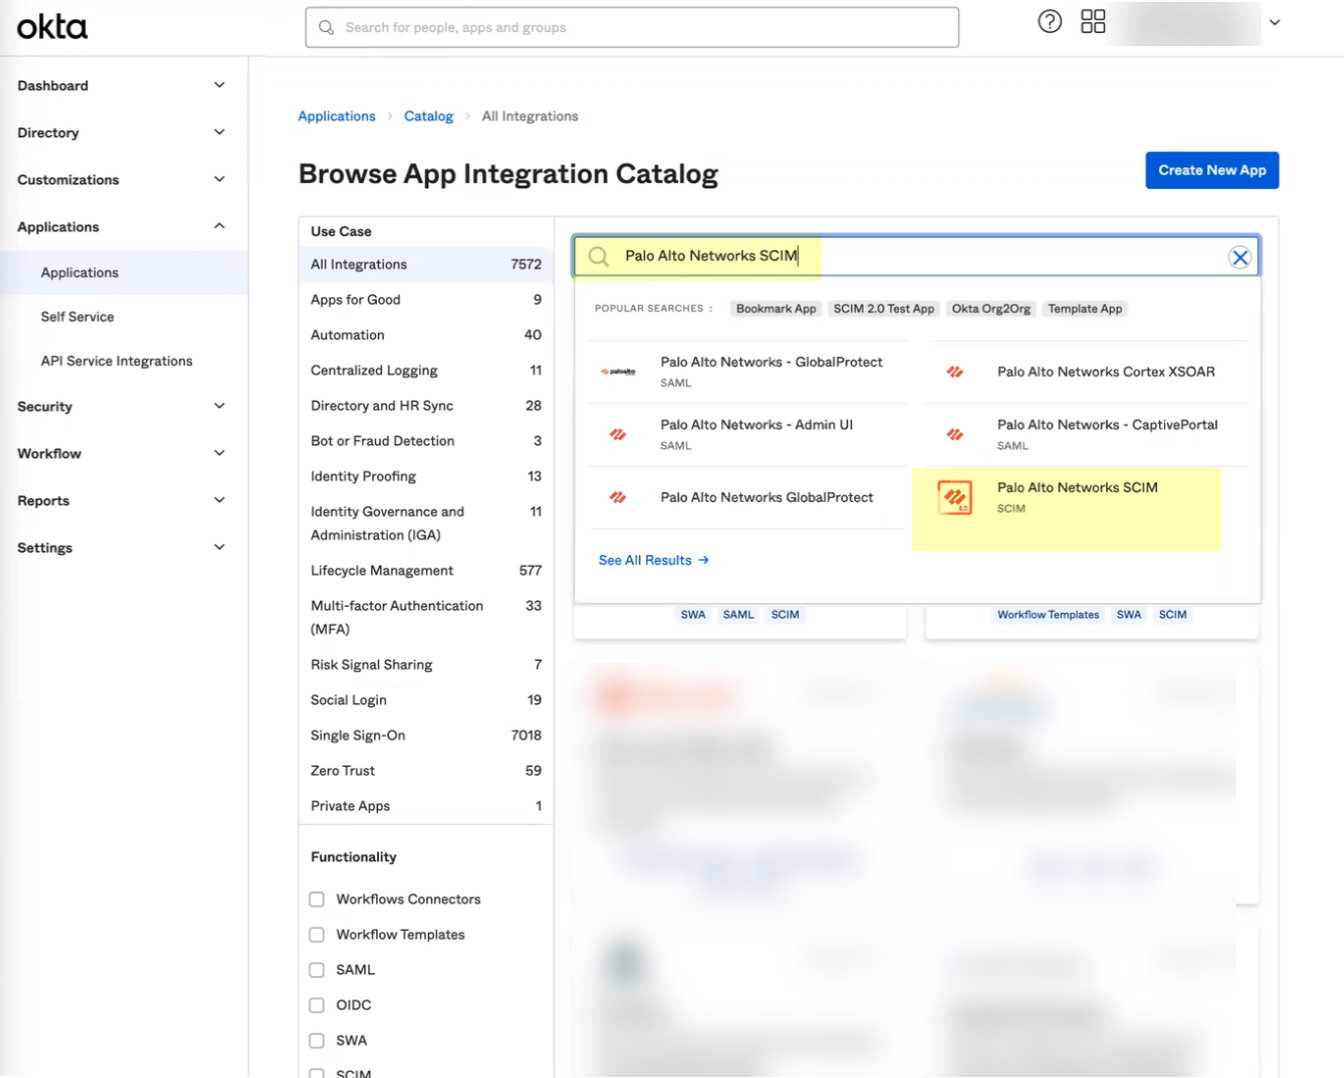
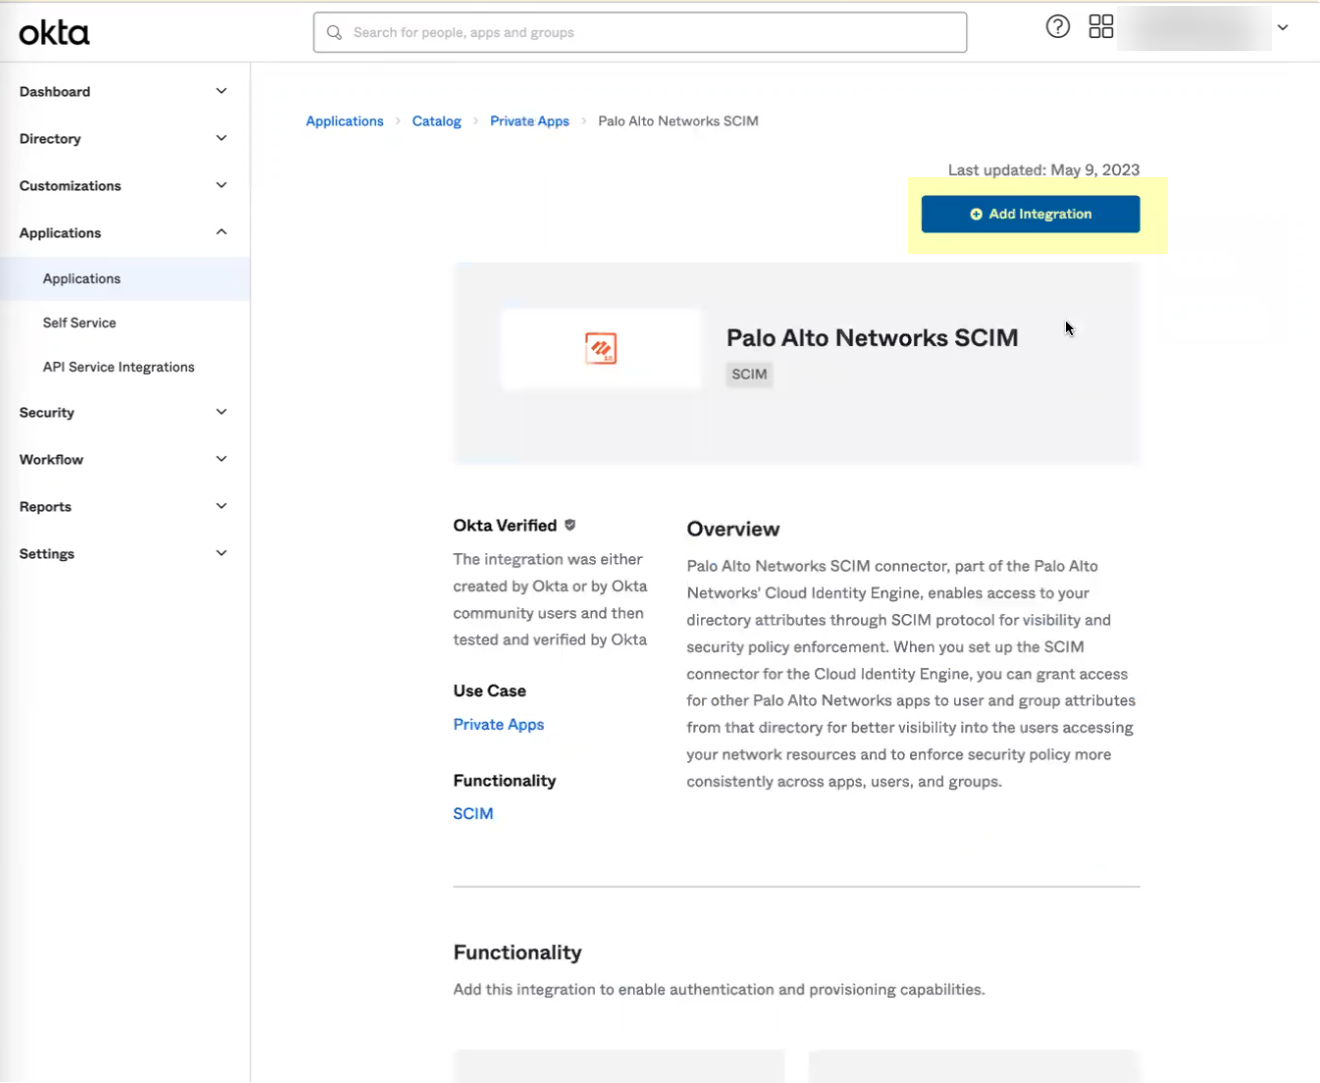
Predeployment (Okta):
Browse App Catalog, search for
Palo Alto Networks SCIM
.
Select the app and
Add Integration
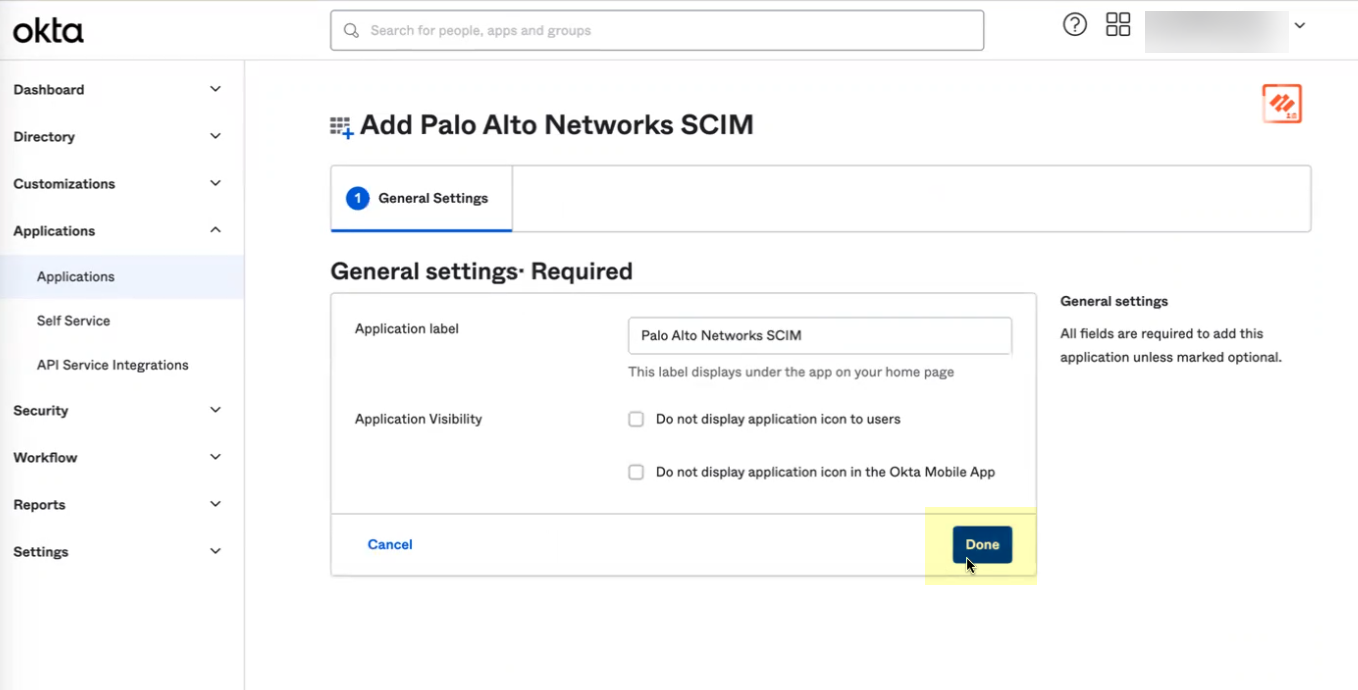
.
(Optional) Edit App Label. Click
Done
.
Copy your Okta domain name.
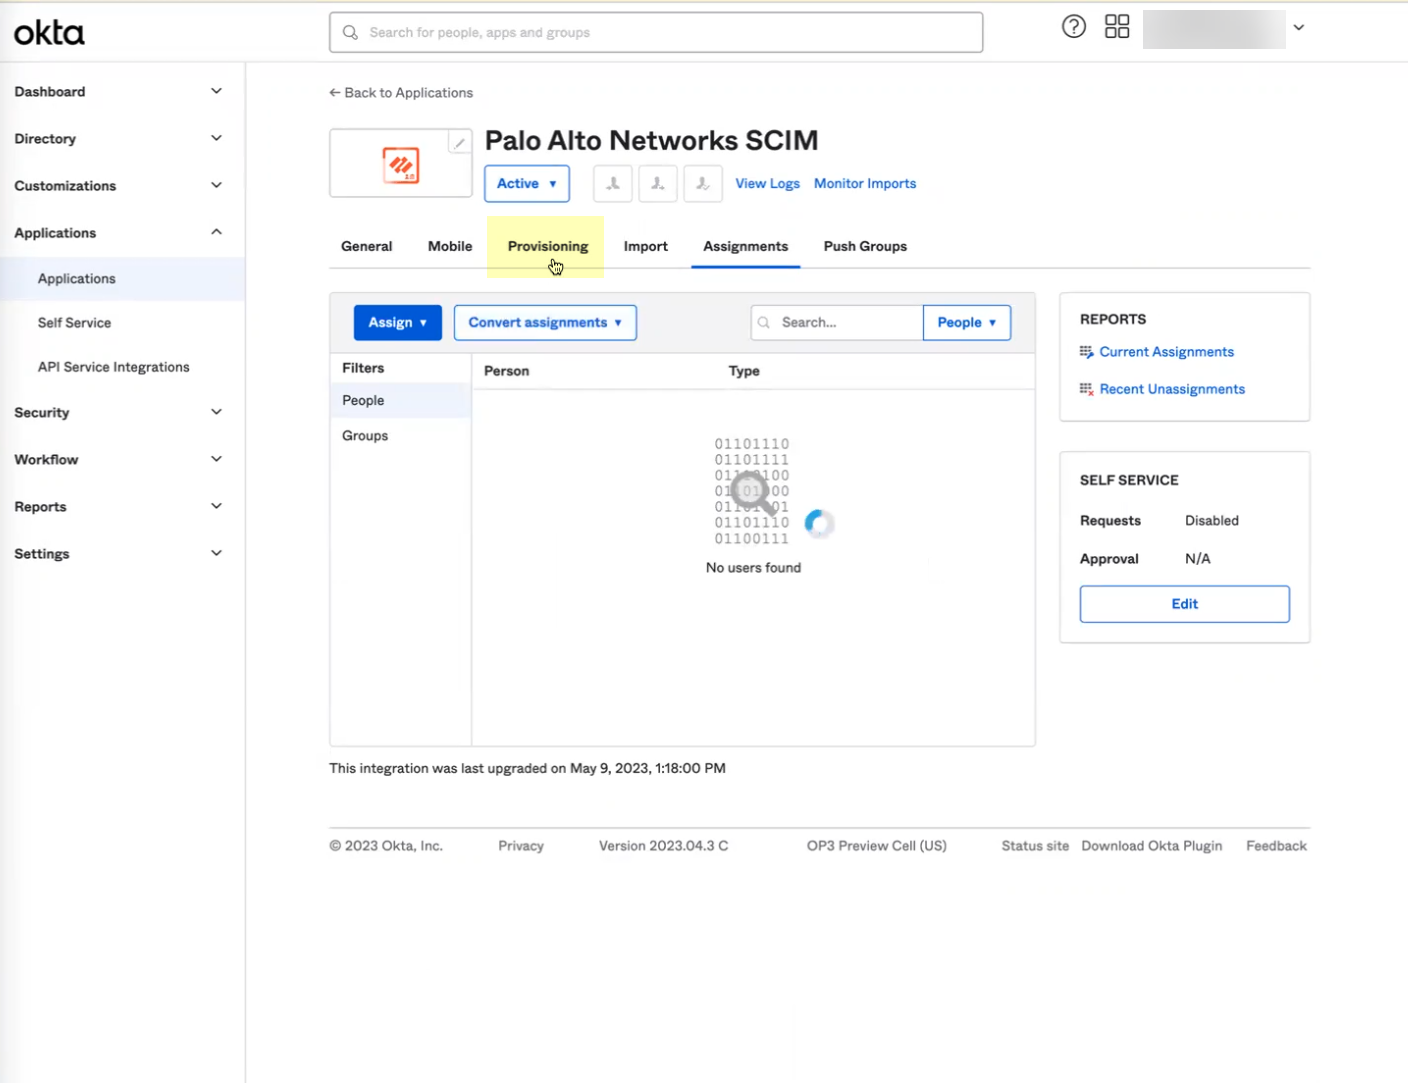
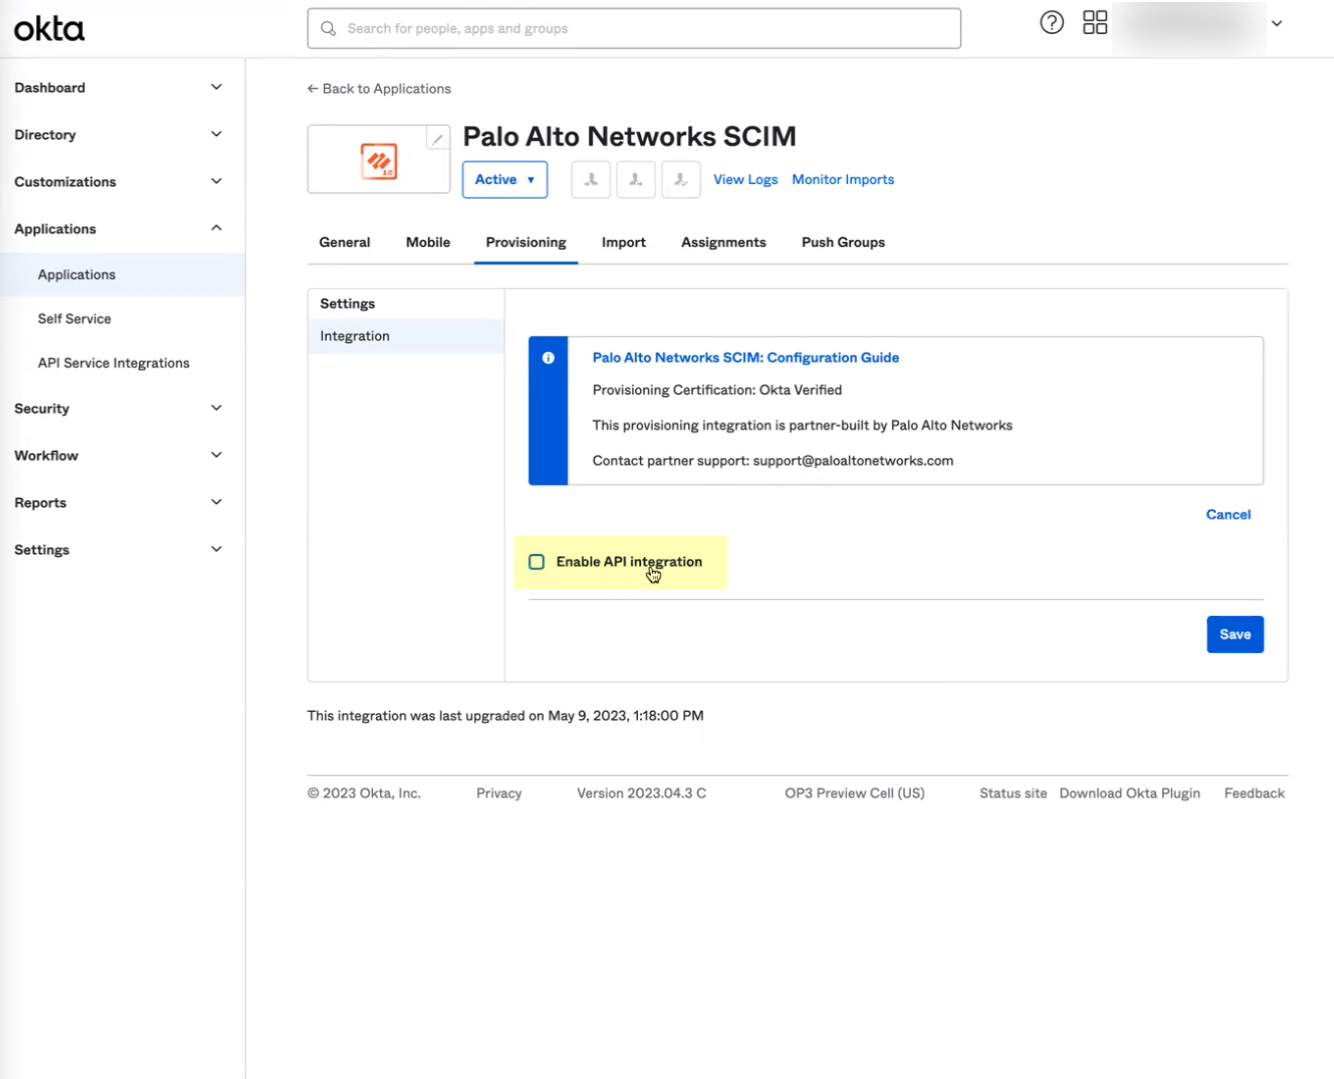
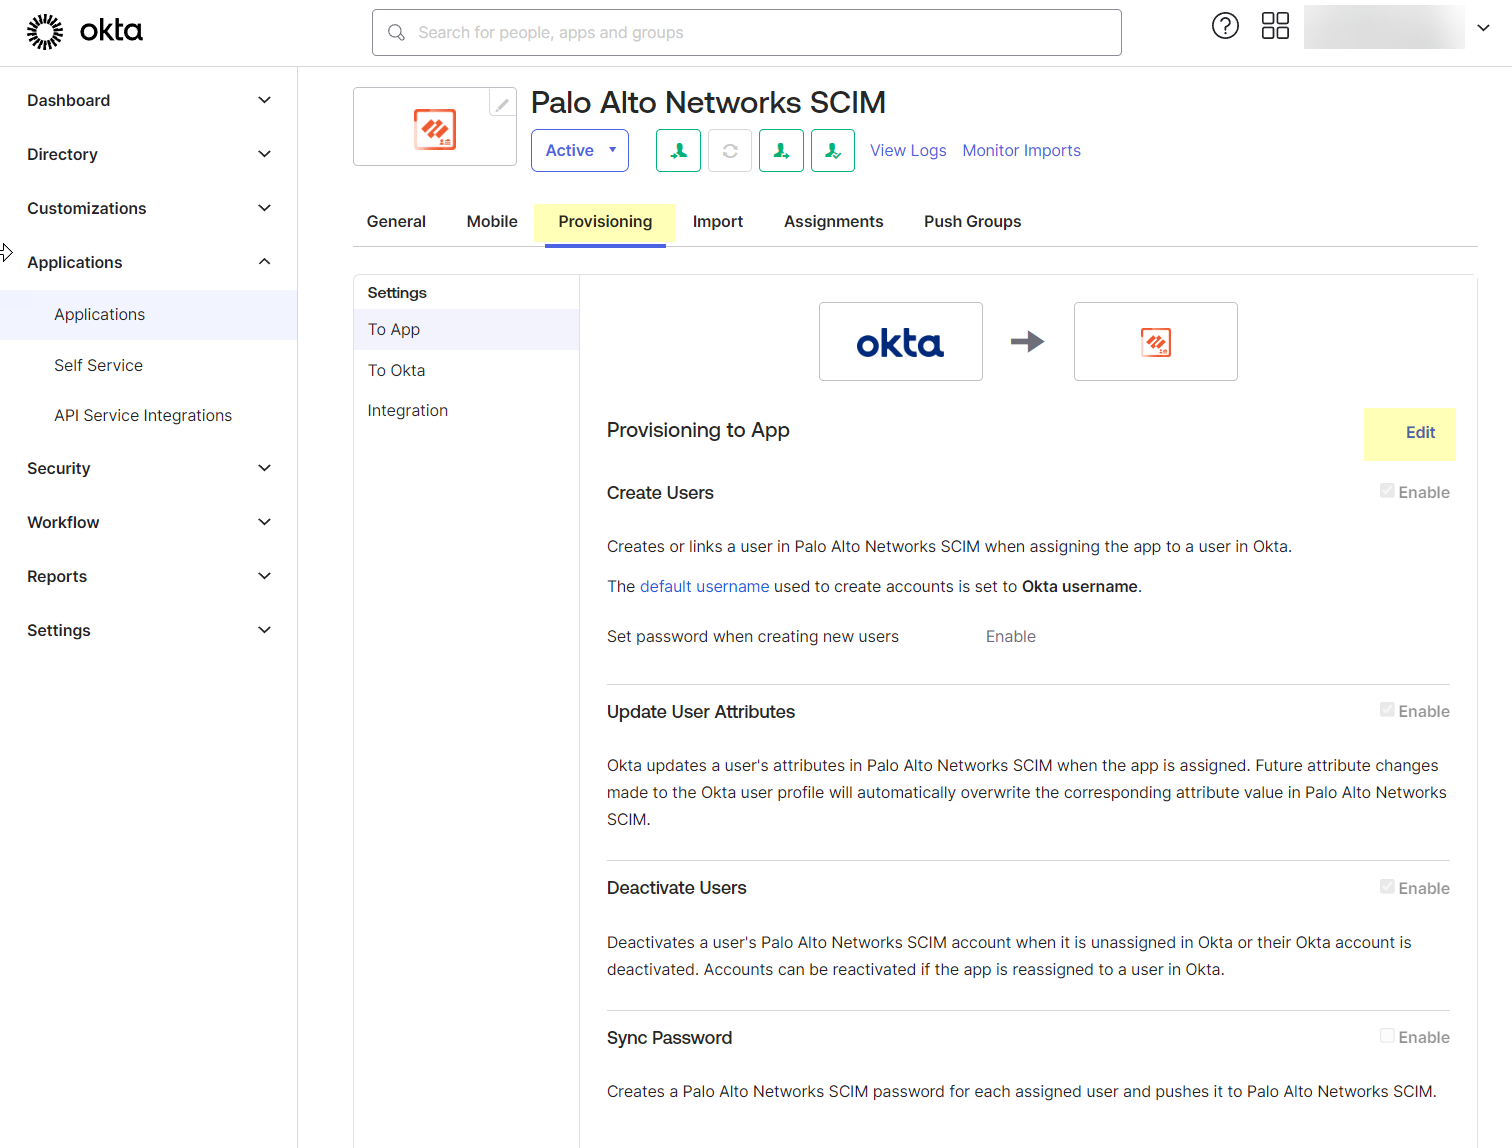
Post-configuration (Okta):
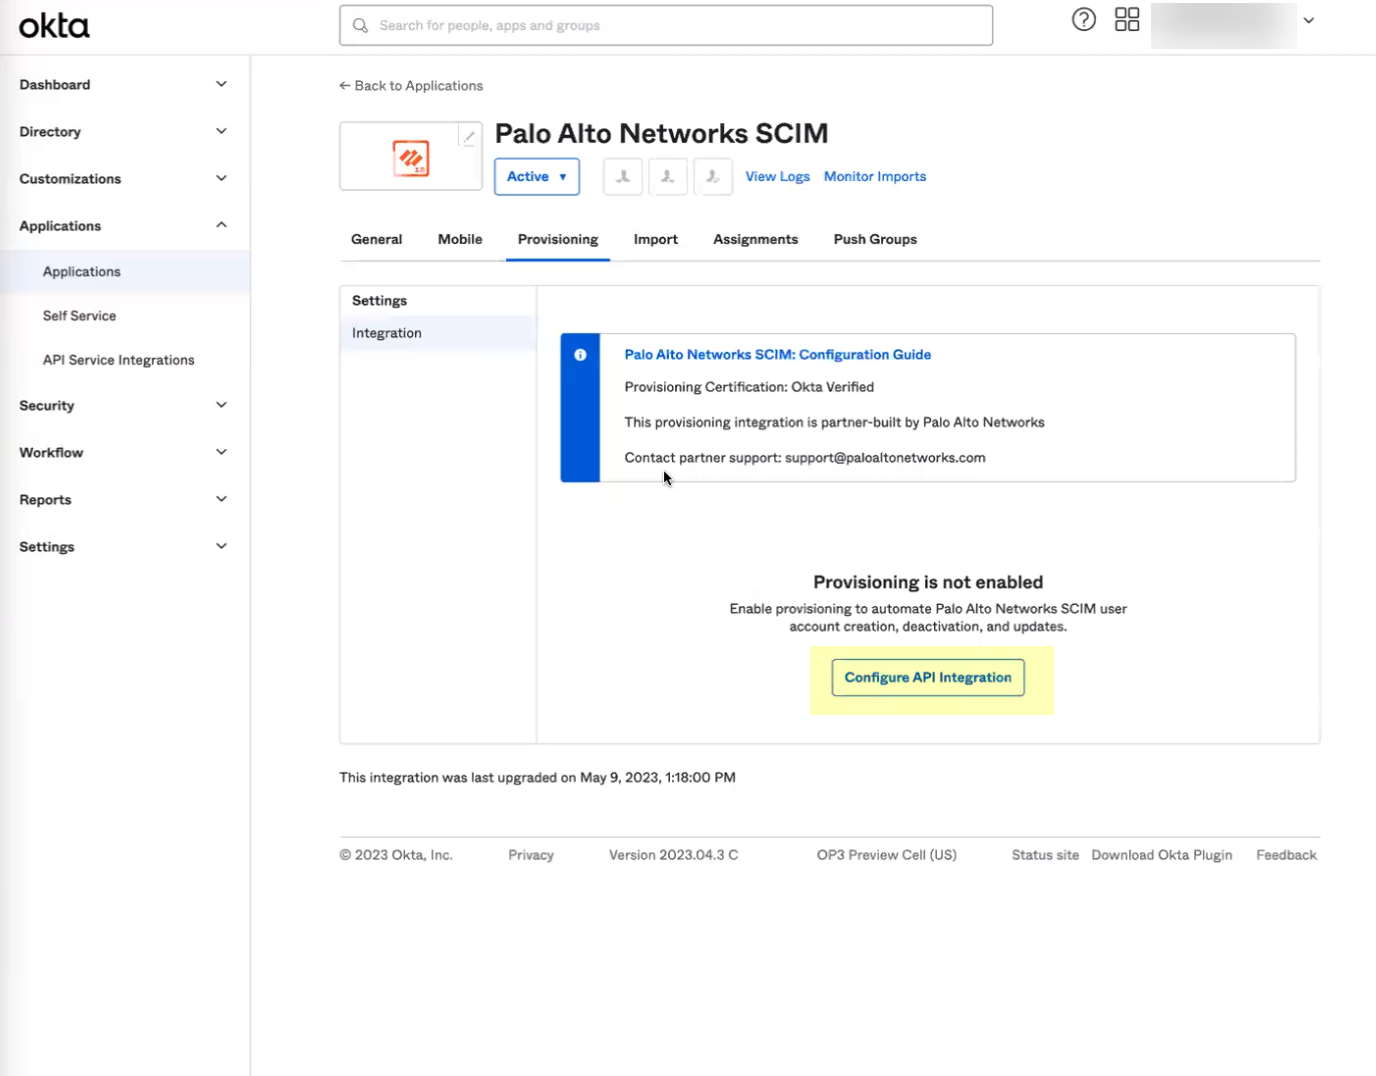
Select the SCIM app > Provisioning tab >
Configure API Integration
.
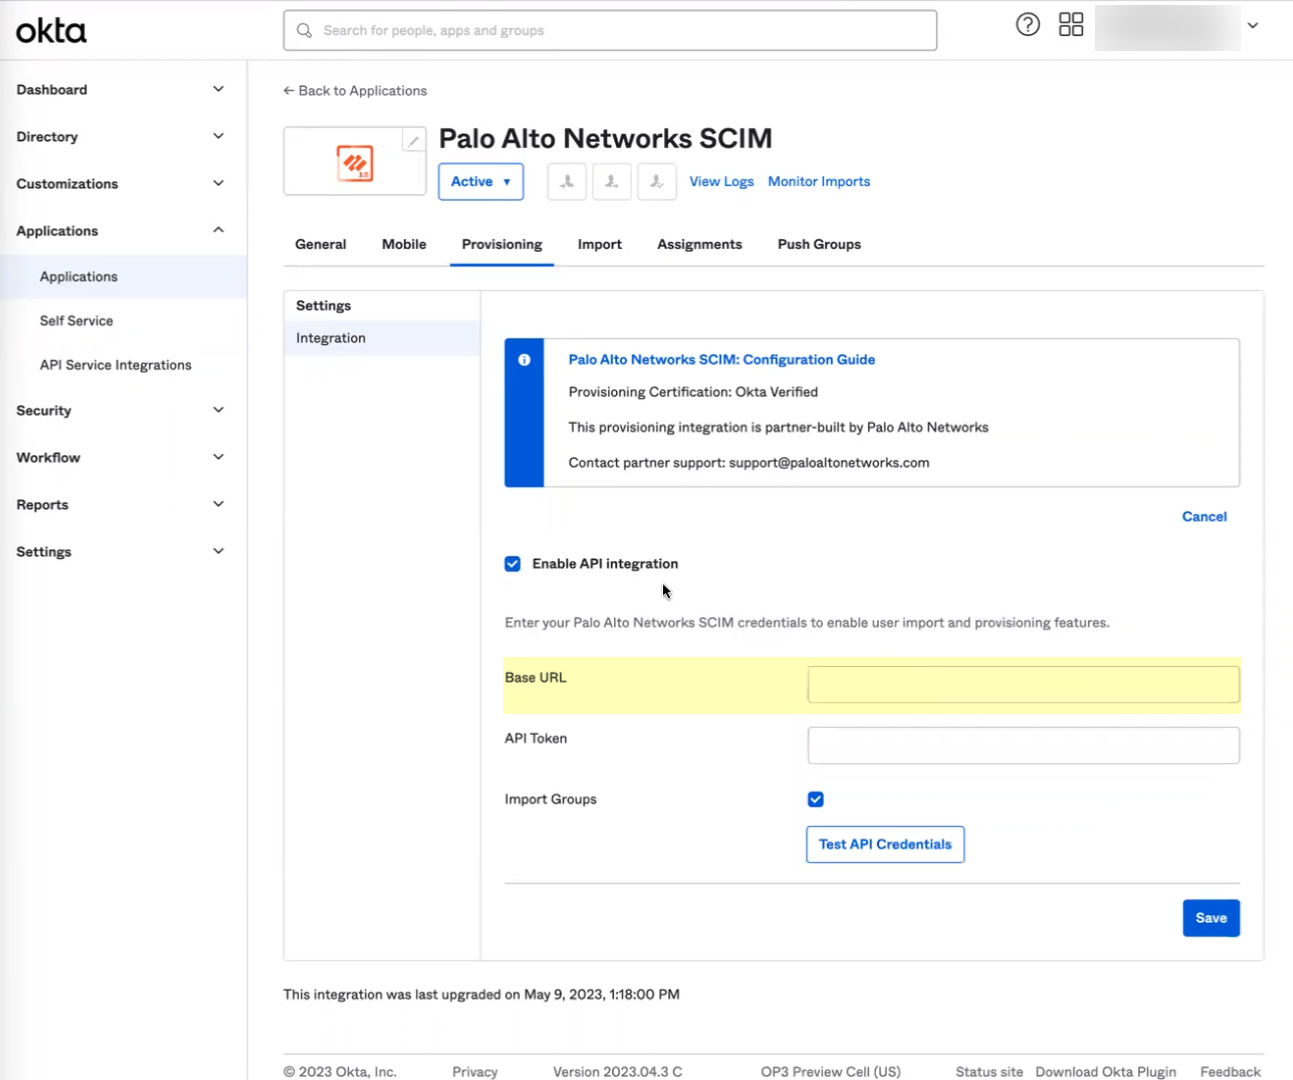
Enable
Enable API integration
.
Paste CIE
Base URL
.
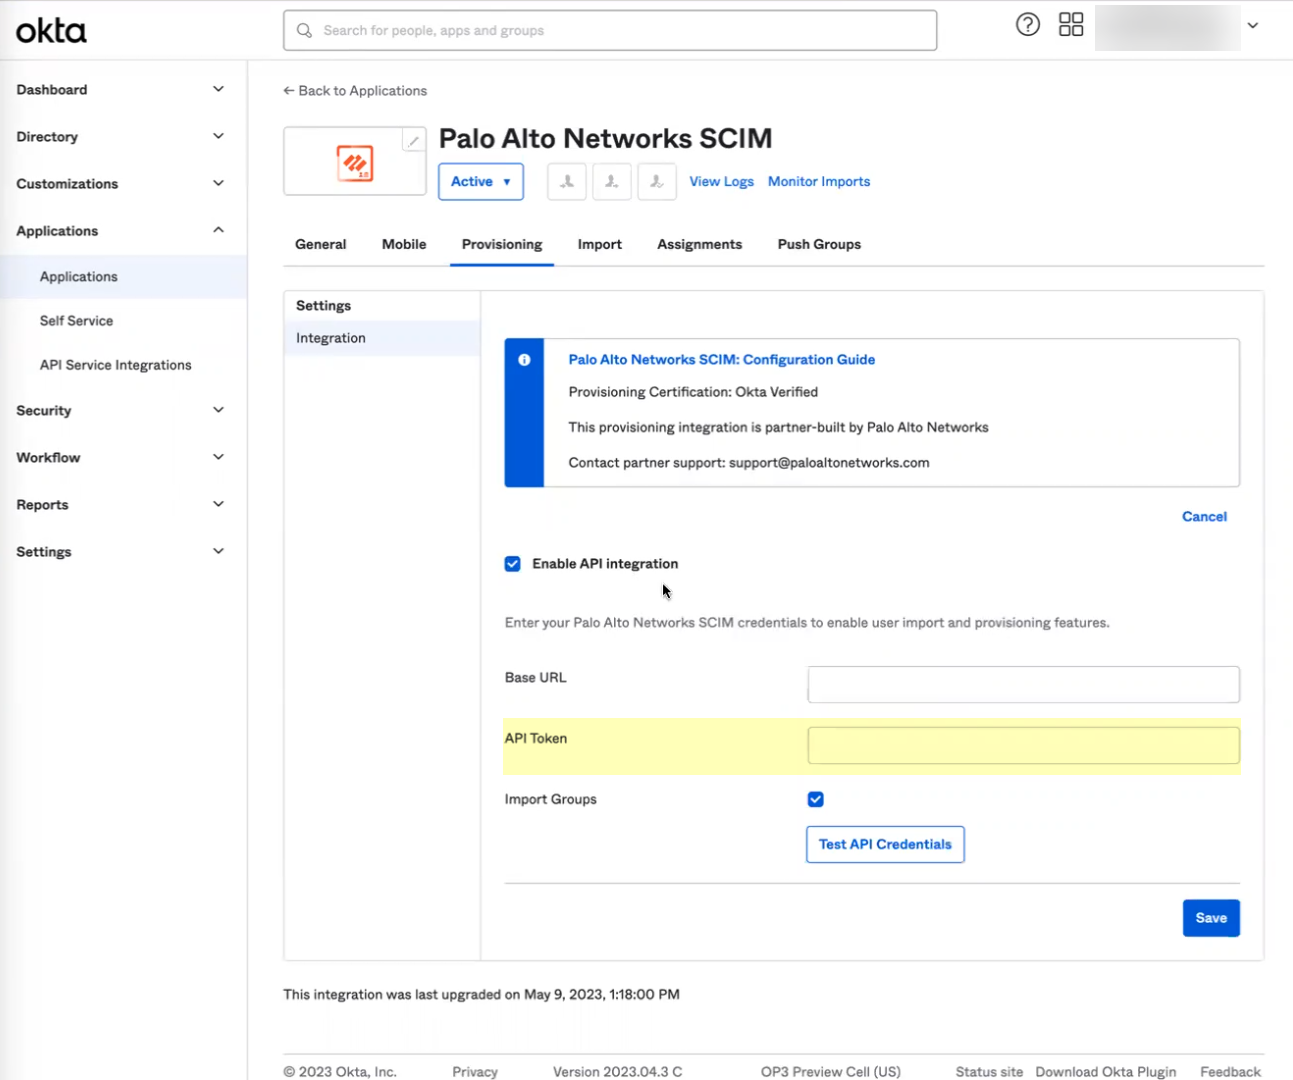
Paste CIE
Bearer Token
into
API Token
.
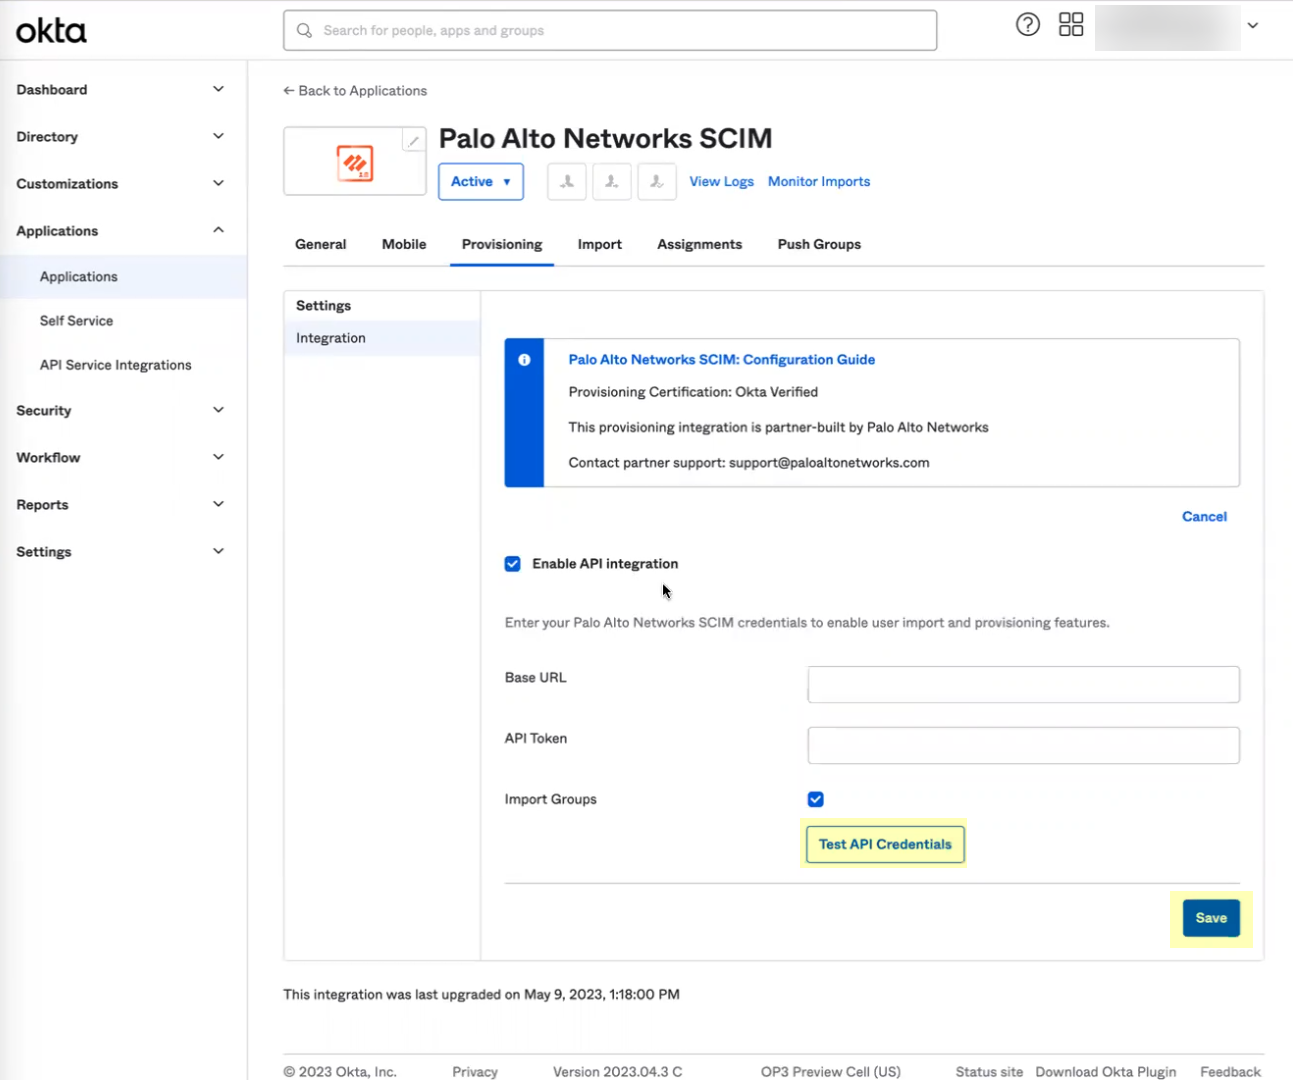
Click
Test API Credentials
. Save.
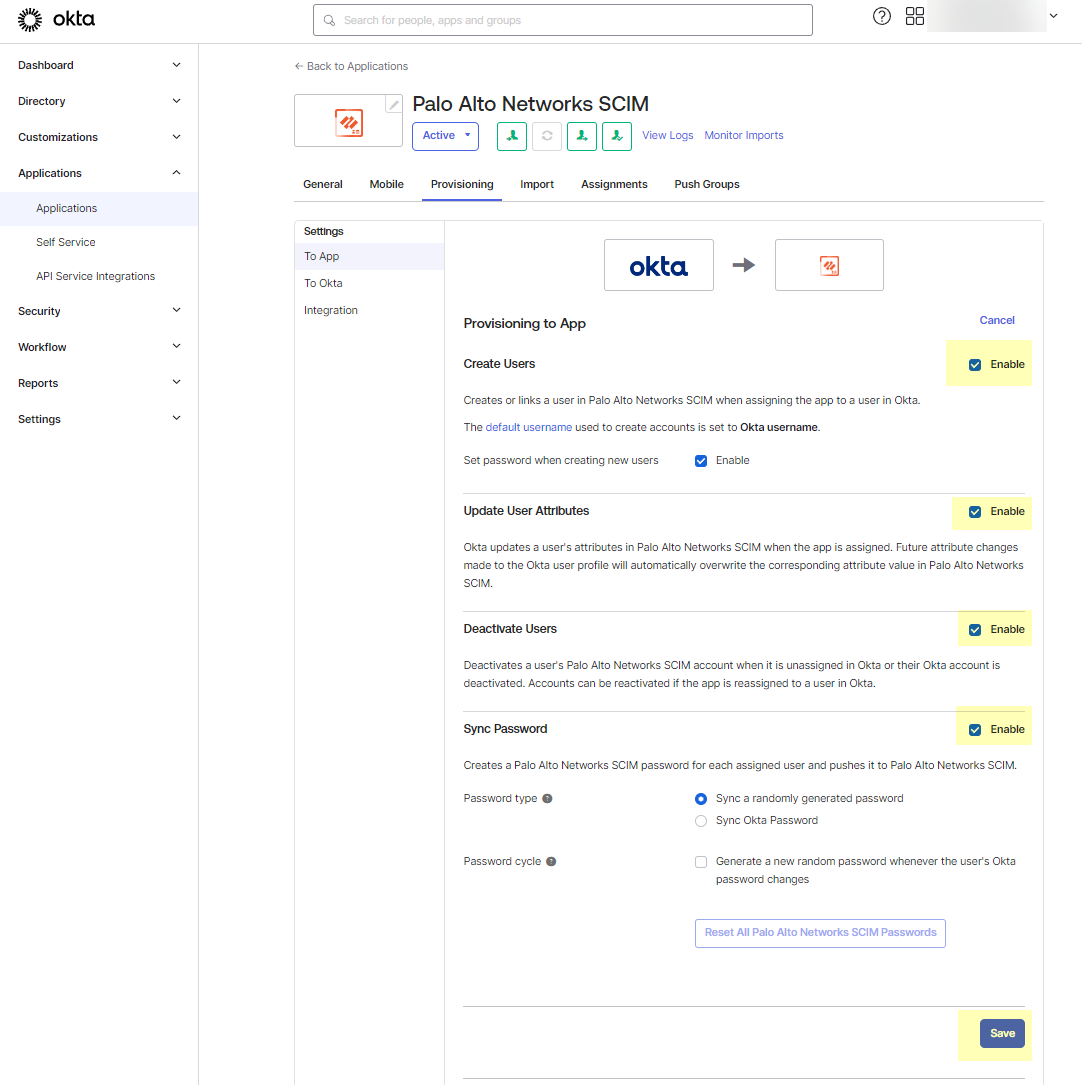
Under Provisioning to App > Edit Settings. Enable desired actions (Create Users, Update User Attributes, Deactivate Users). Save.
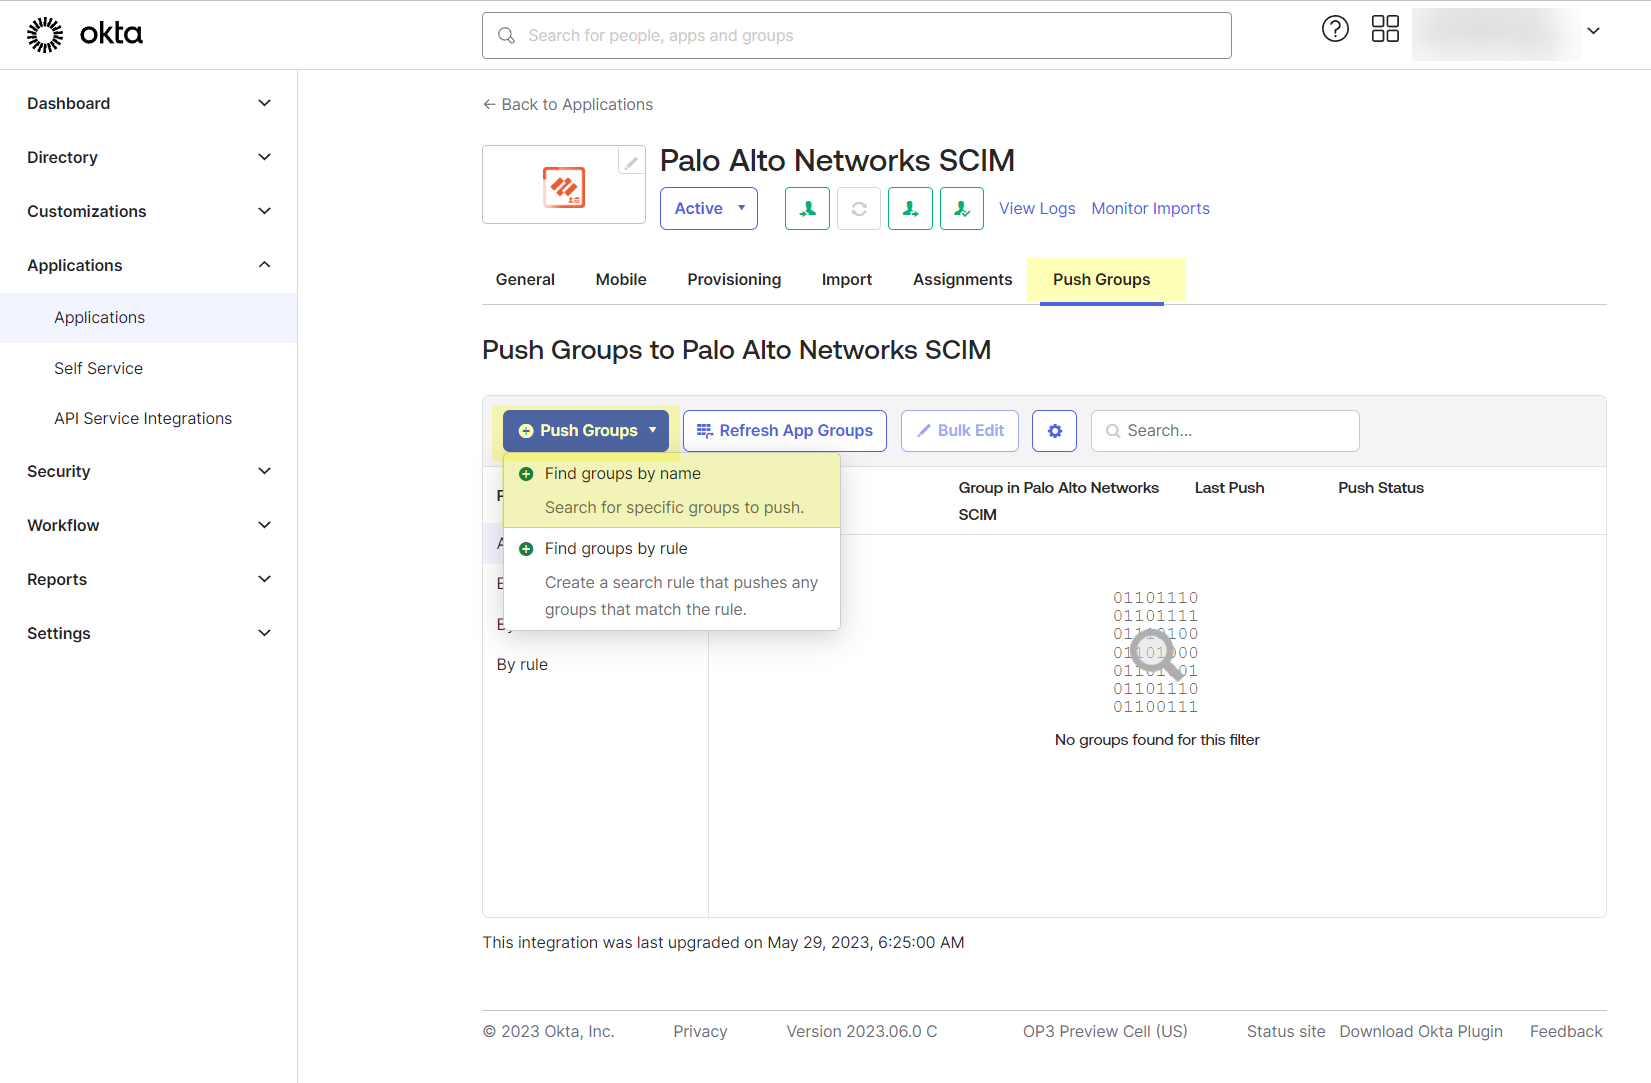
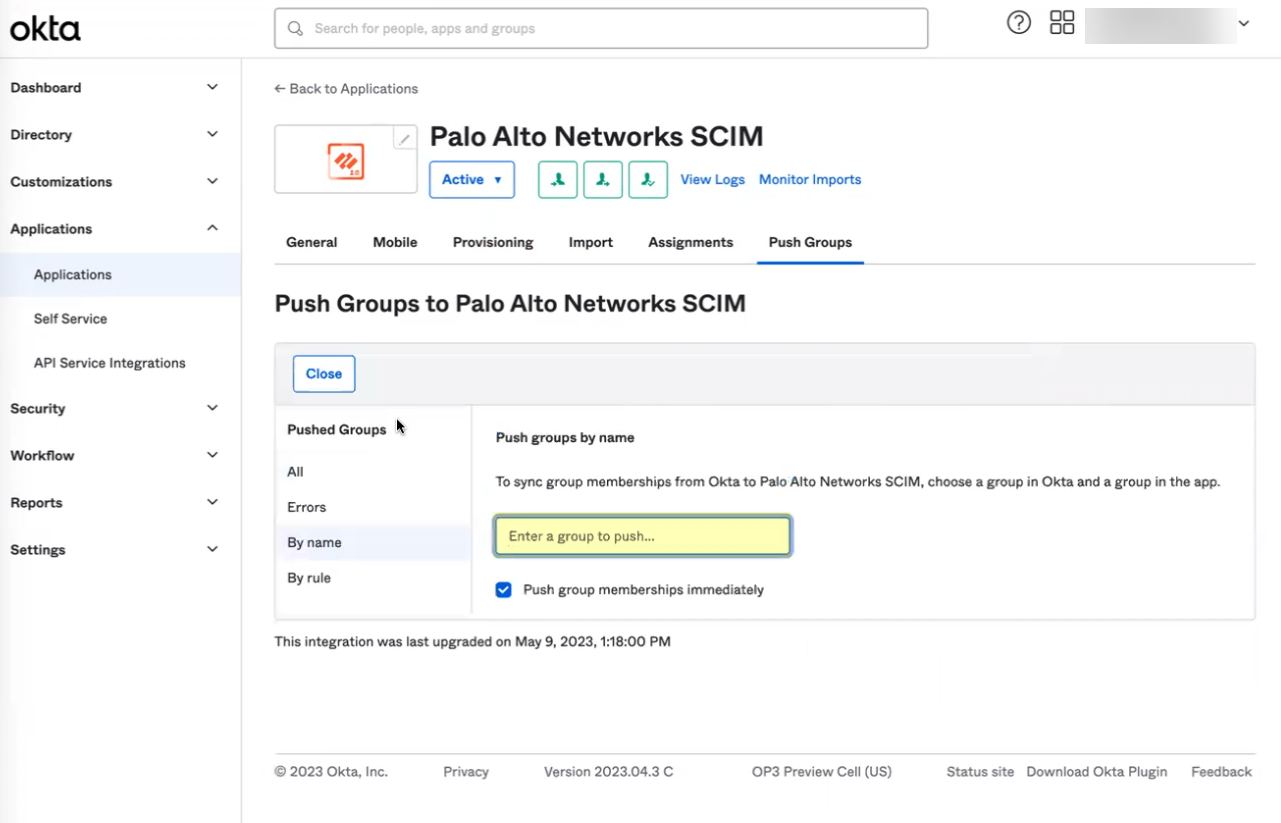
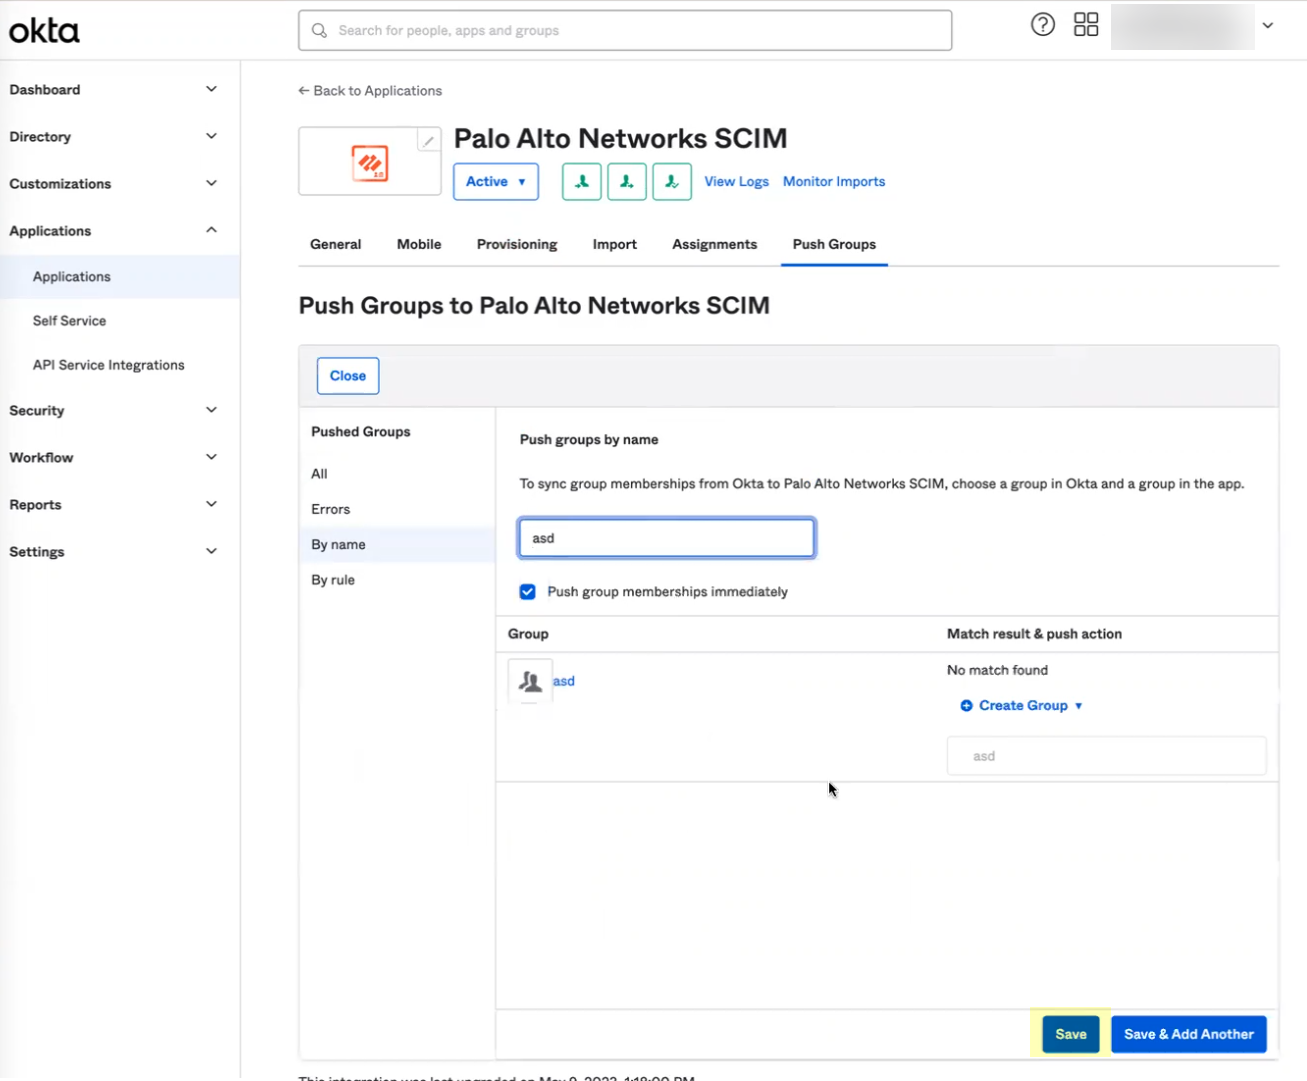
Go to Push Groups tab. Find and add groups to push to CIE. Save.
[CRITICAL] Return to CIE > Directories. Verify SCIM Change Timestamp populates. Perform a
Full Sync
.
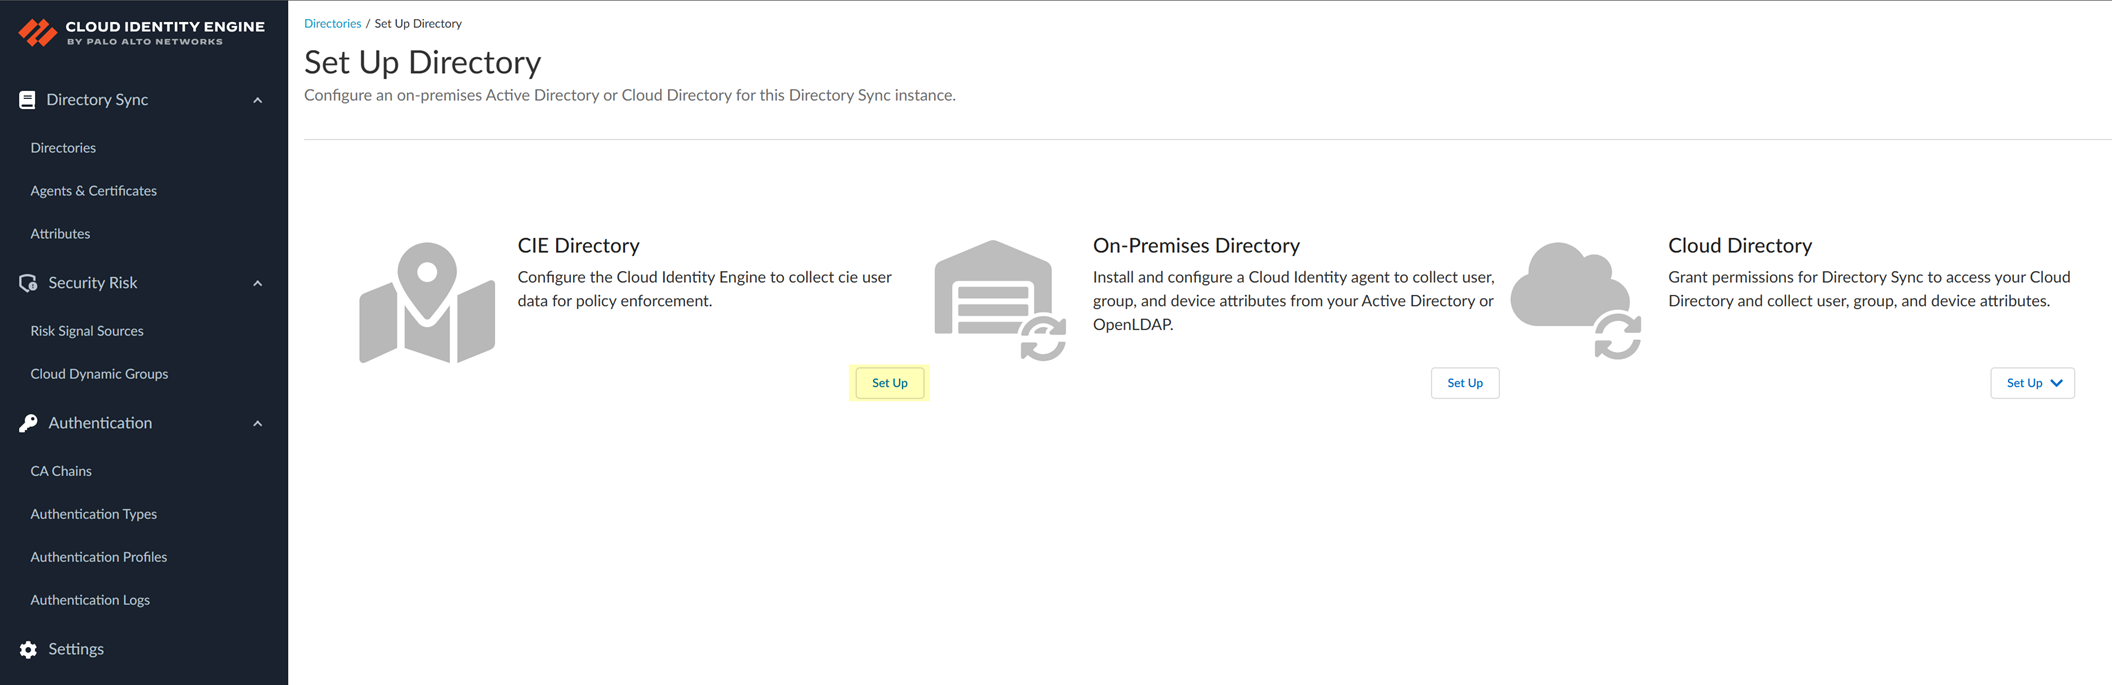
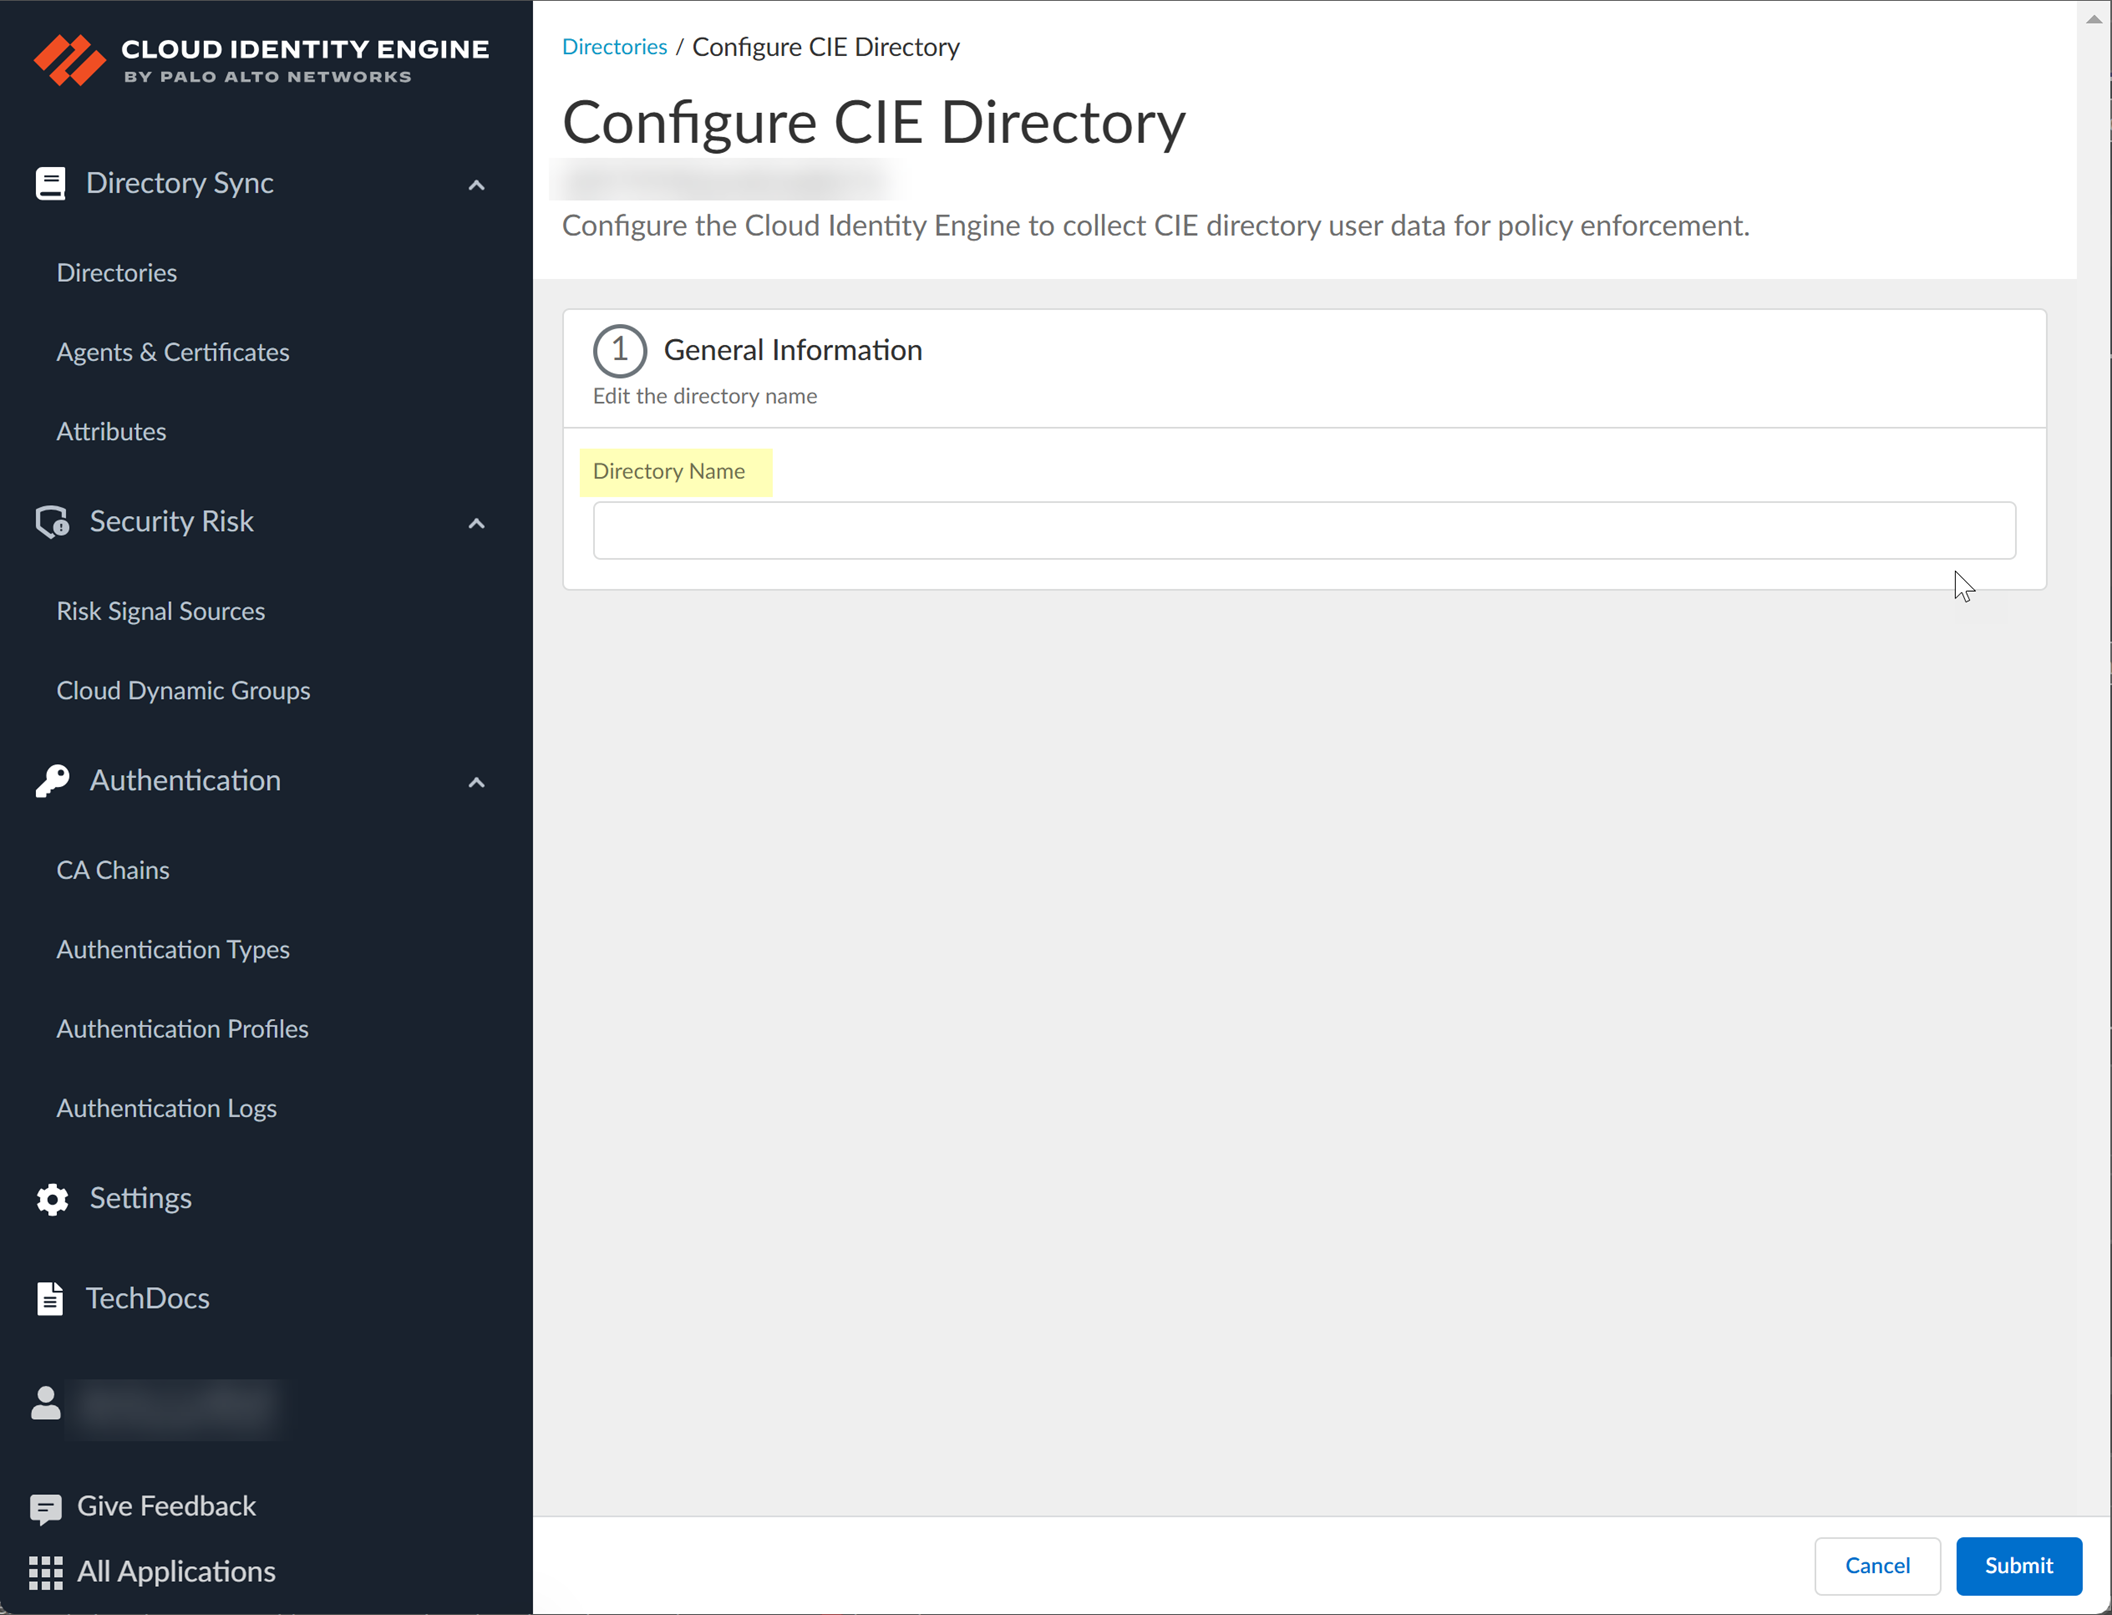
Configure a CIE Directory
Allows creating a local directory directly within the Cloud Identity Engine, useful for small user sets or specific use cases where an external directory isn't available or desired.
In CIE: Go to
Directories
>
Add New Directory
> Select
CIE Directory
> Click
Set Up
.
Enter a unique
Directory Name
. Click
Submit
. (Wait for creation).
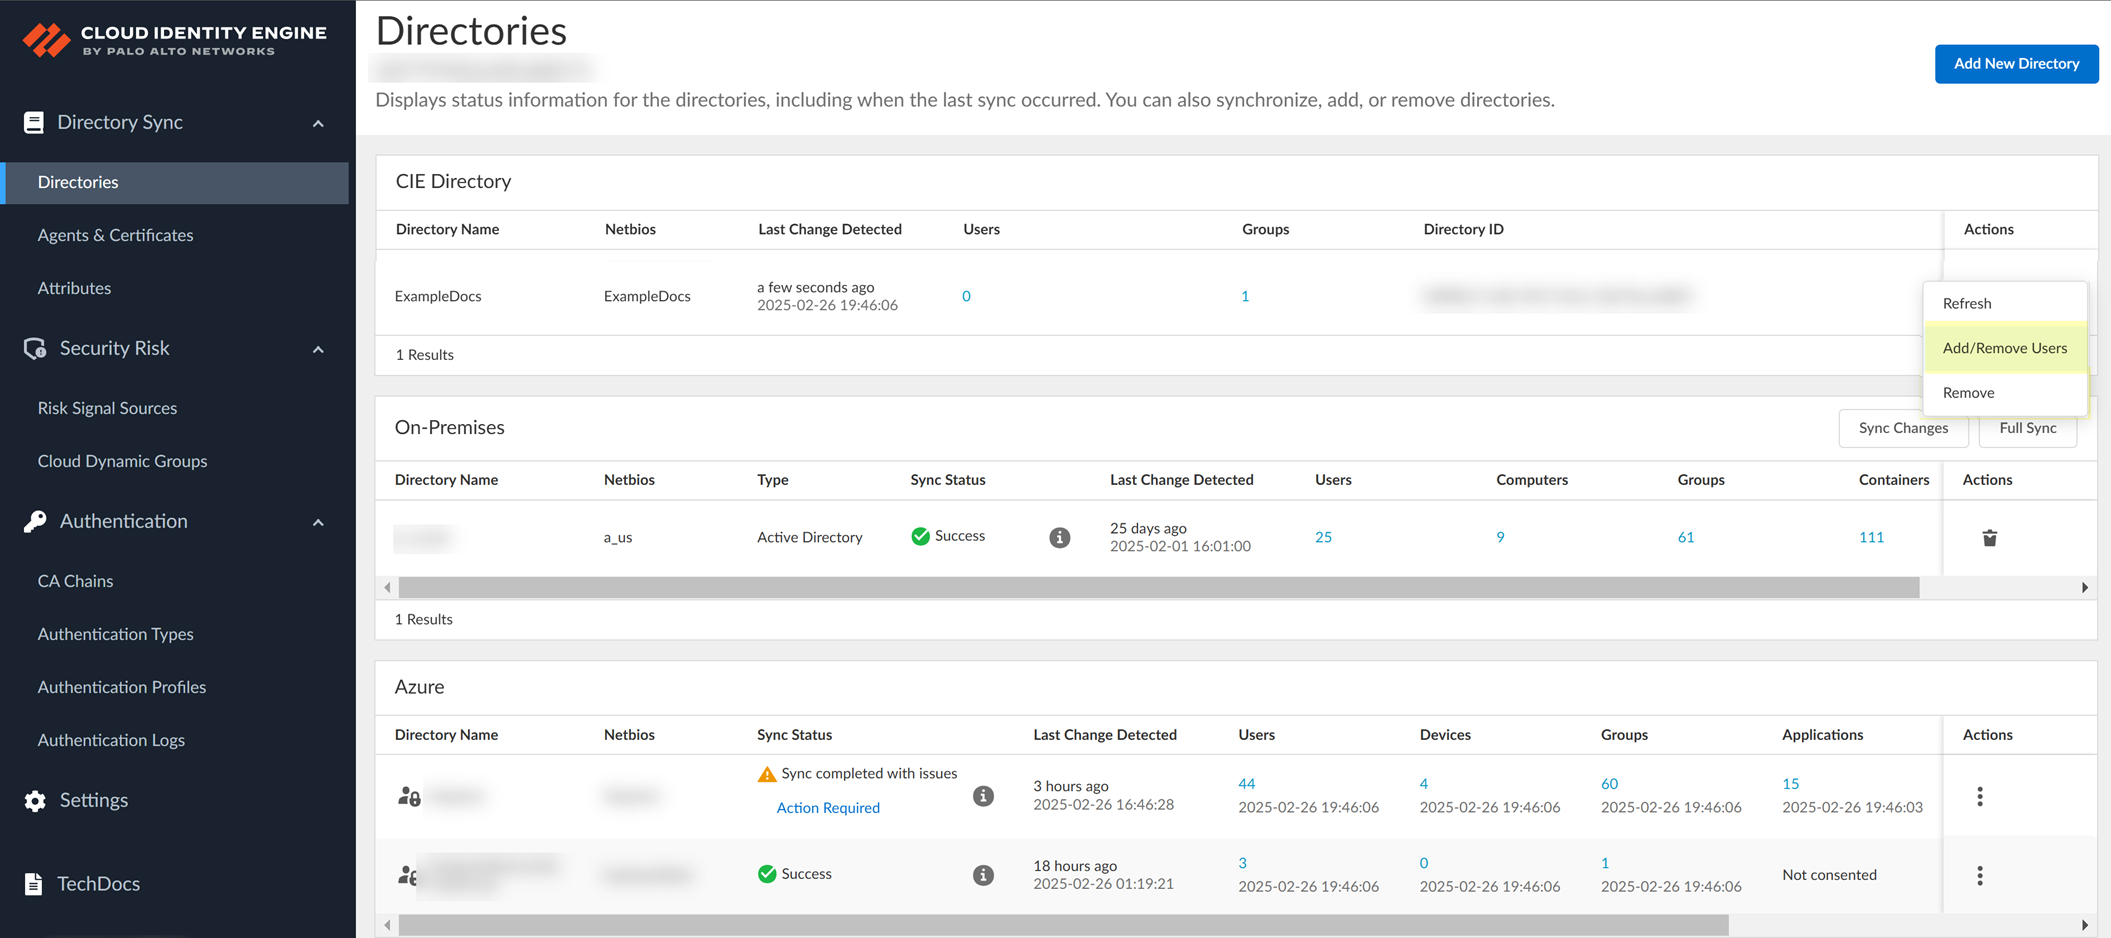
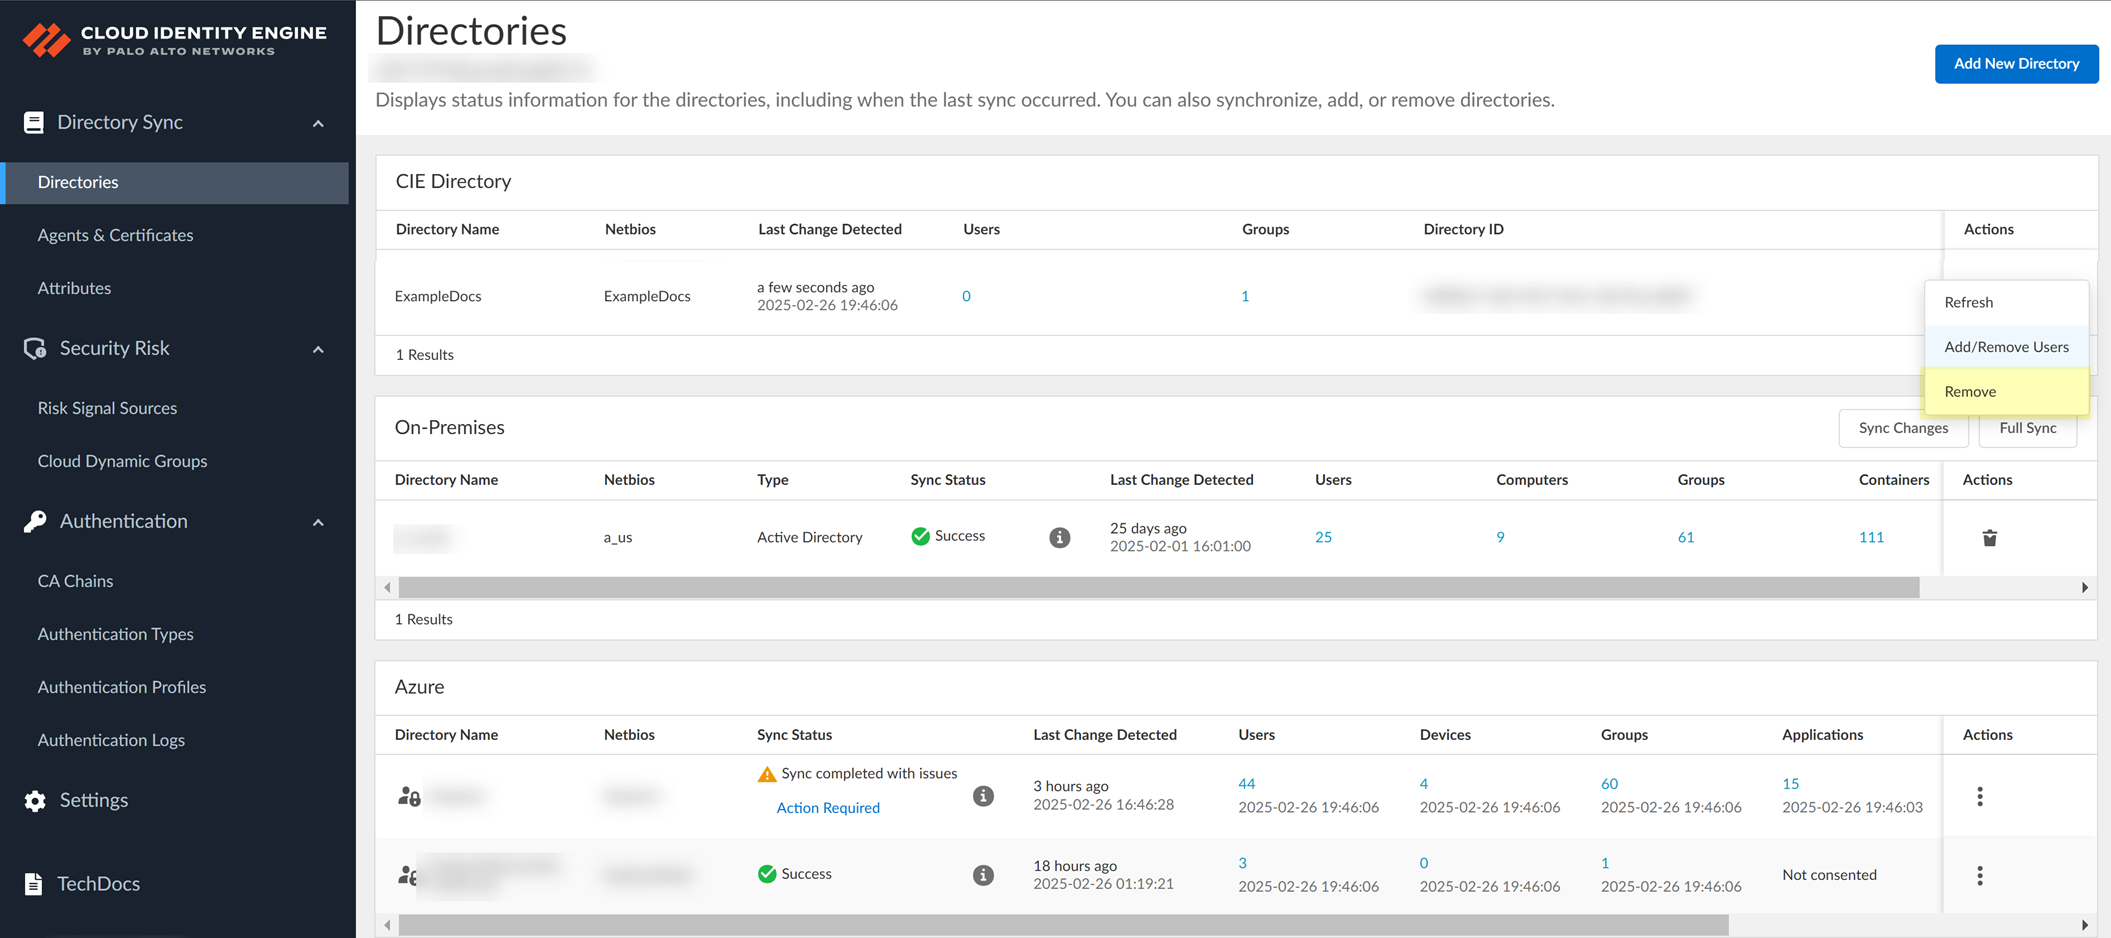
Go back to
Directories
page. Find the new CIE Directory >
Actions > Add/Remove Users
.
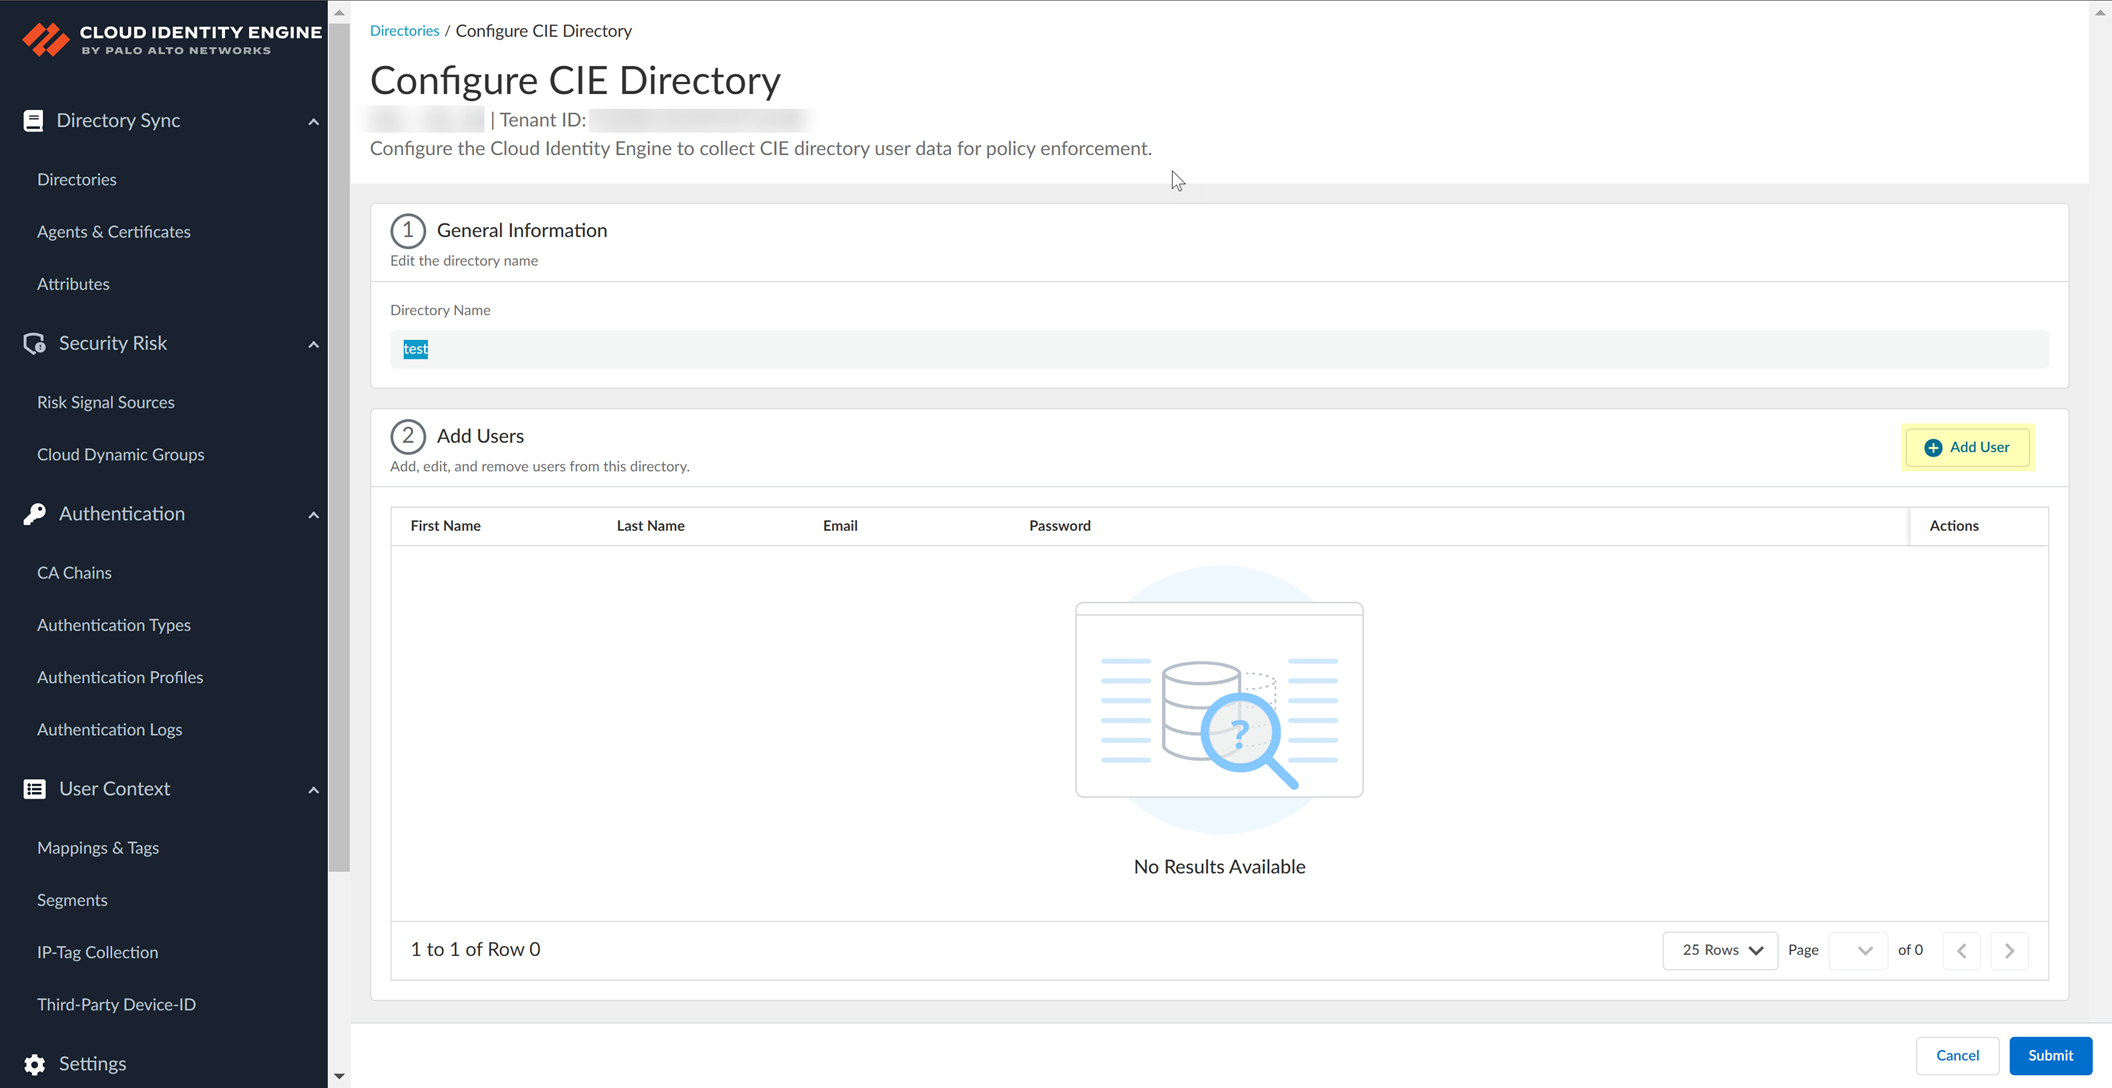
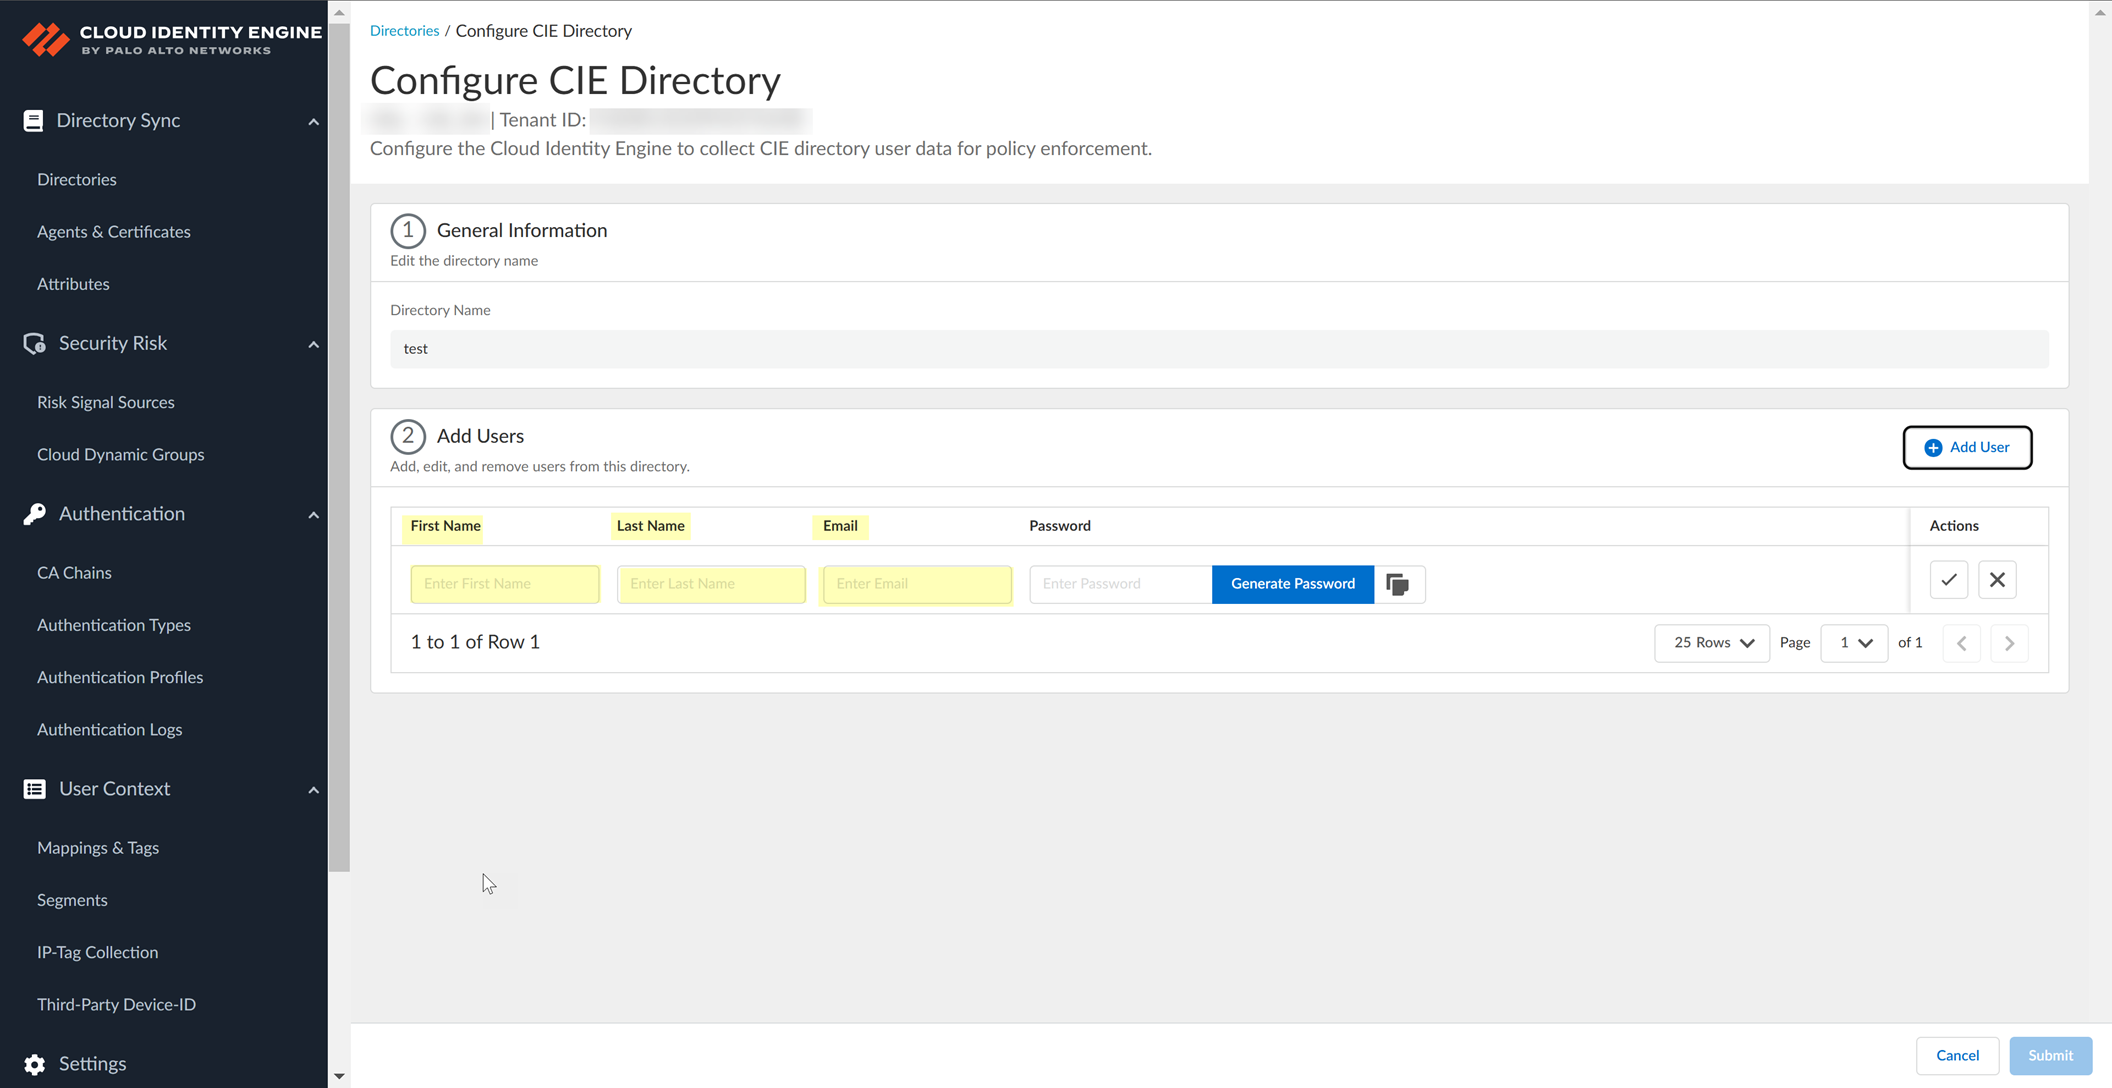
Click
Add User
.
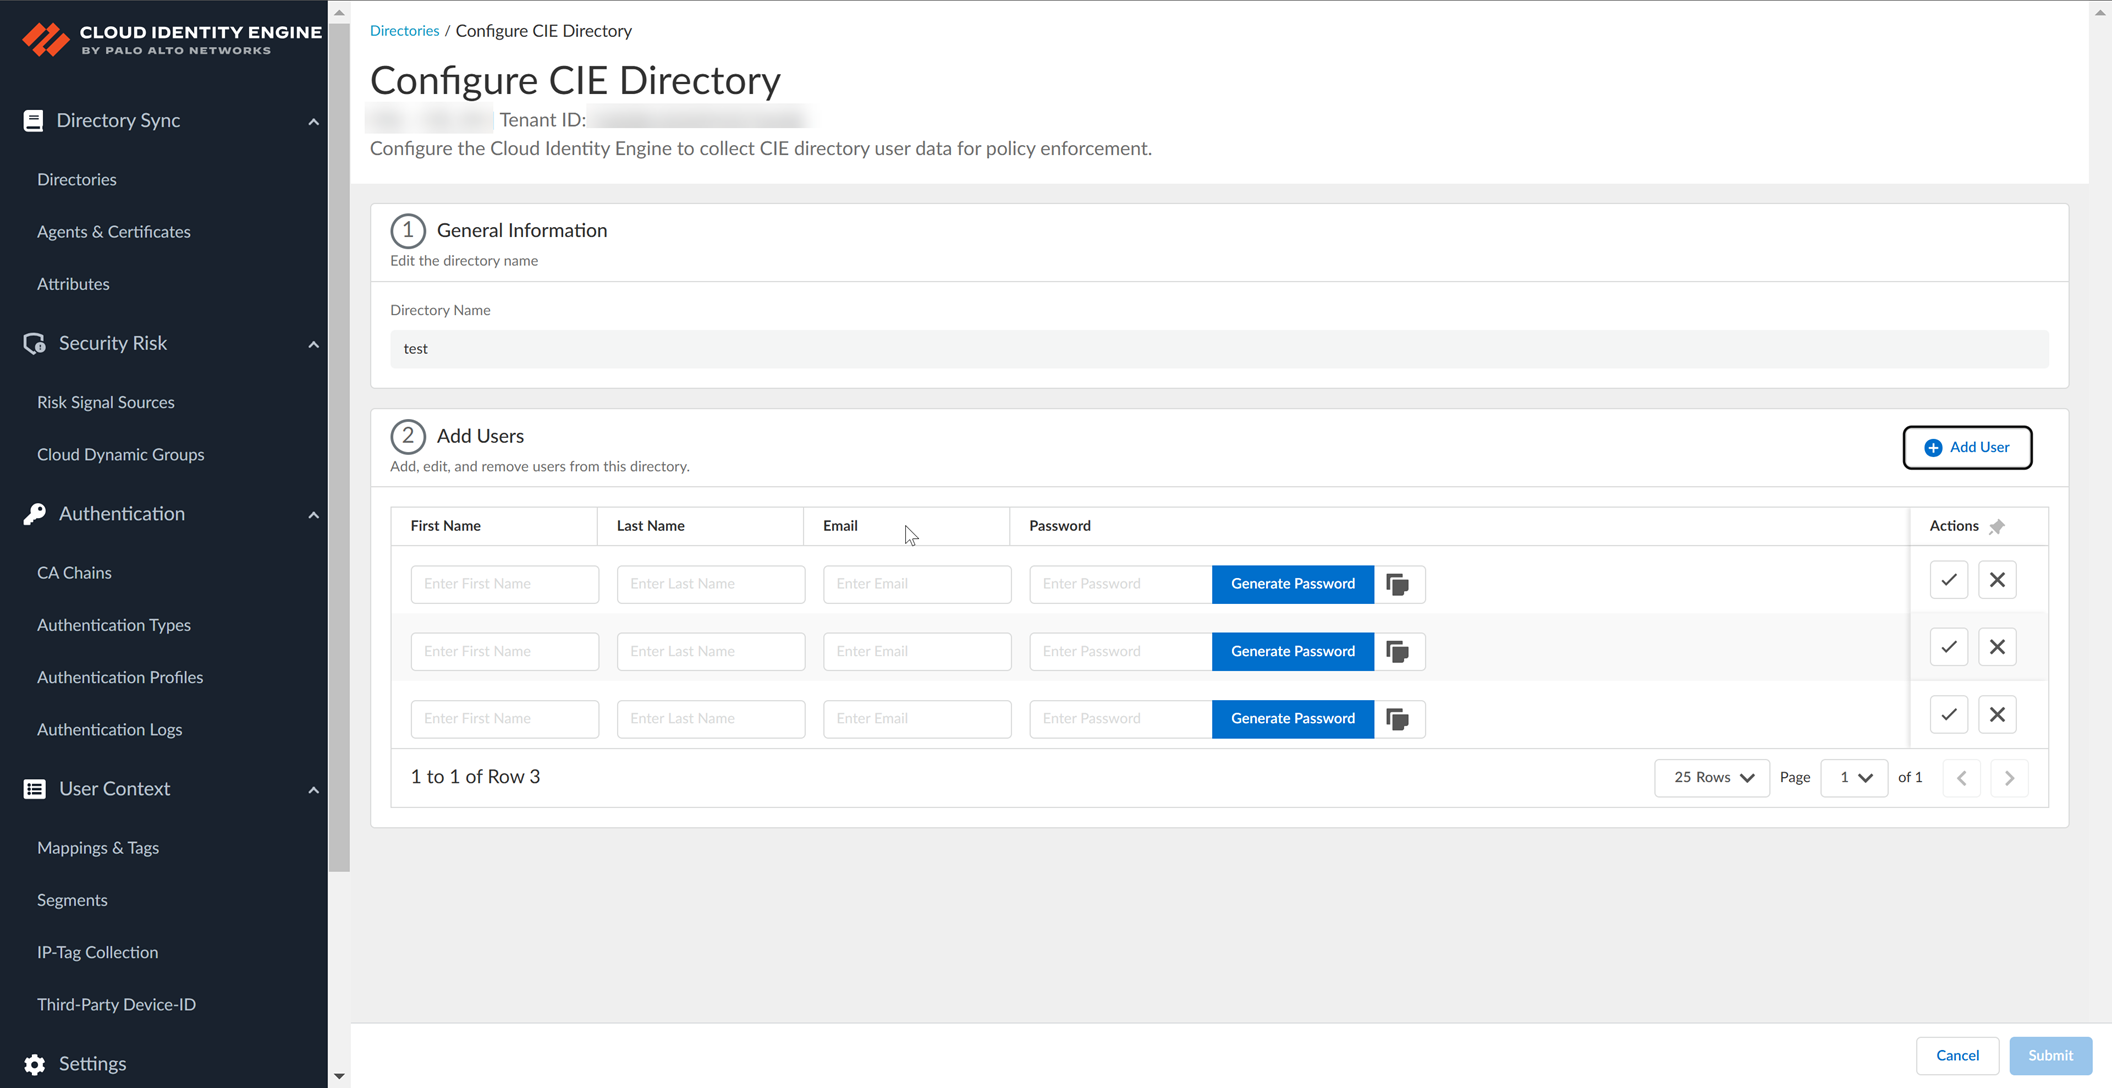
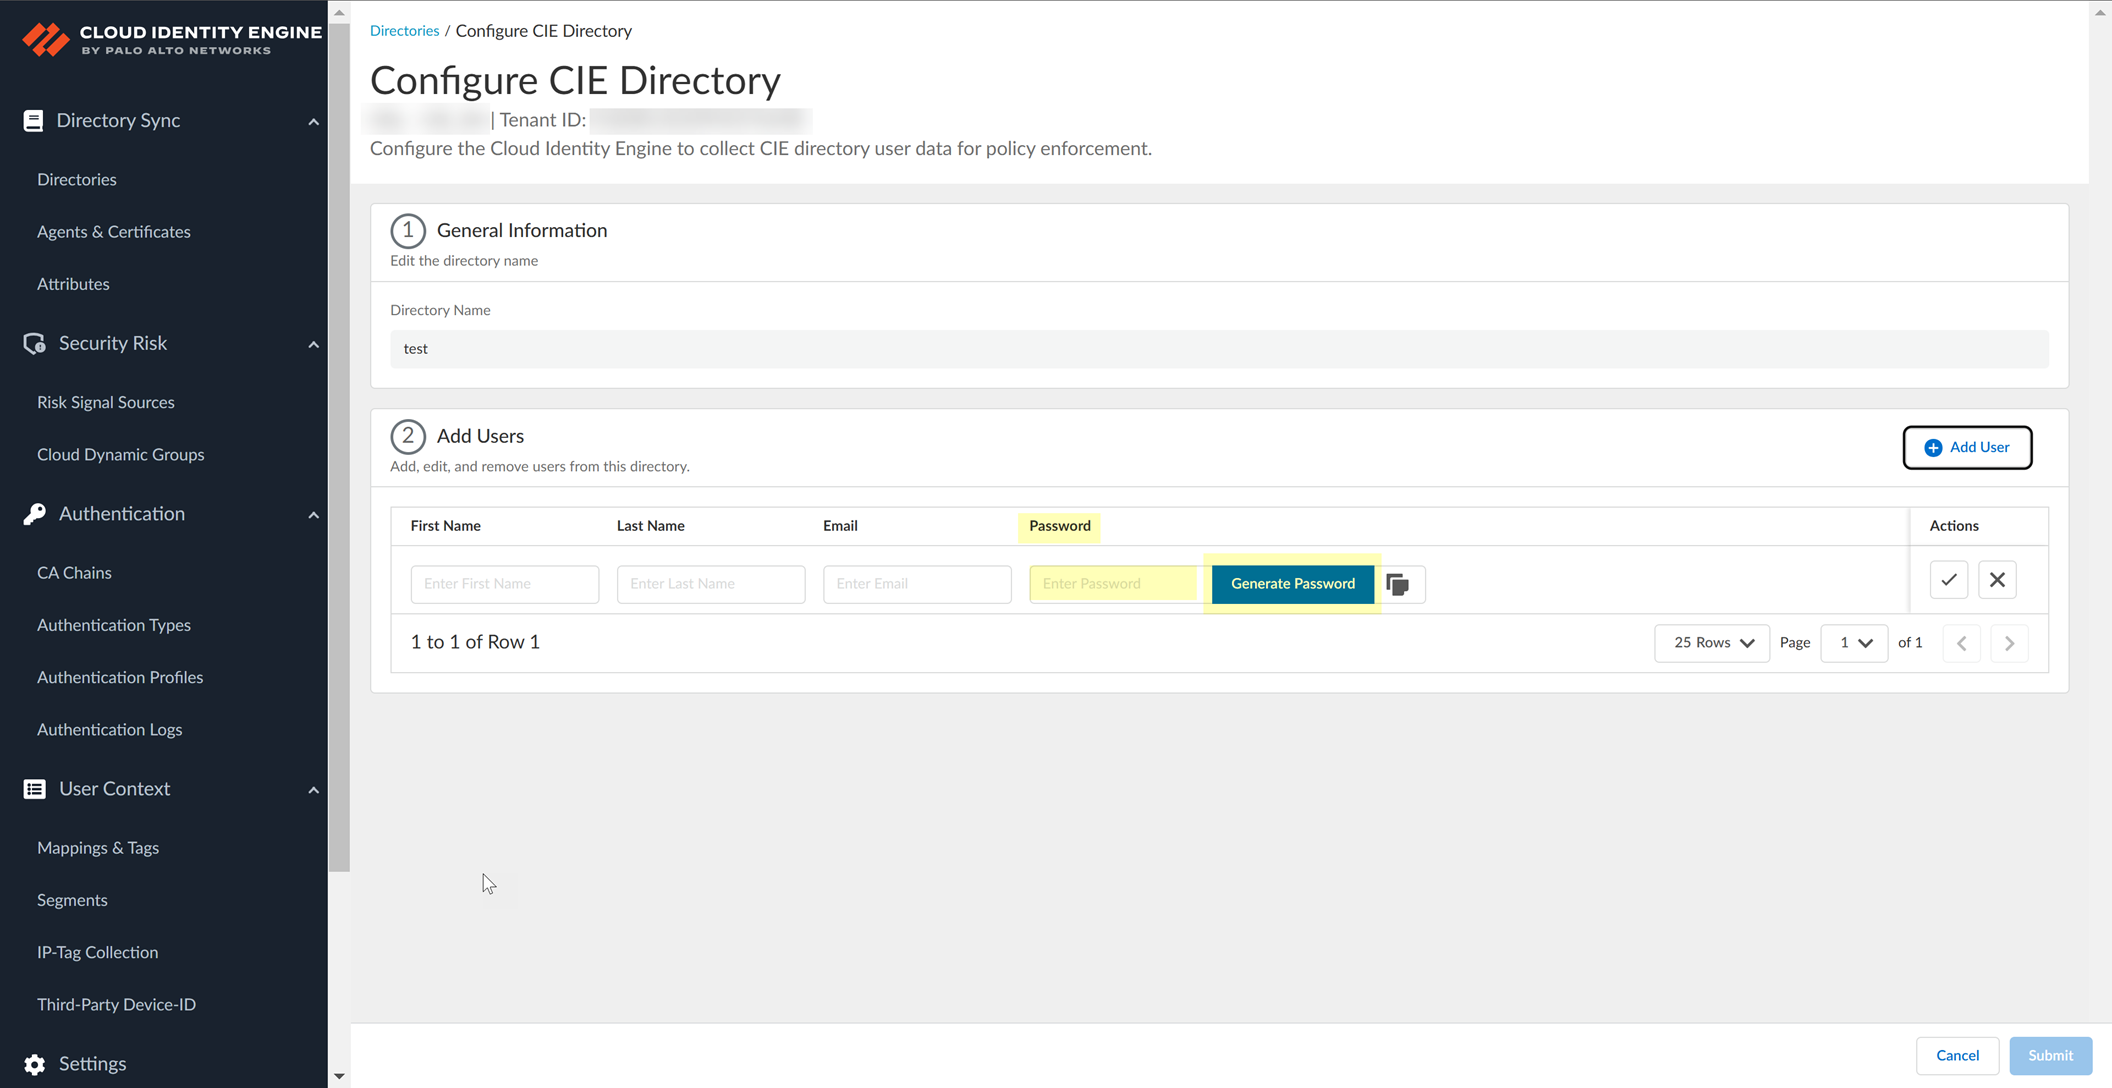
Enter First Name, Last Name, Email. Enter or Generate a password. Click Confirm checkmark.
Repeat to add more users (up to 200 supported).
Click
Submit
when finished adding users for this session.
Manage users using Edit
or Remove icons in the Add/Remove Users screen. Refresh directory or remove the entire CIE directory via the main Directories page actions.
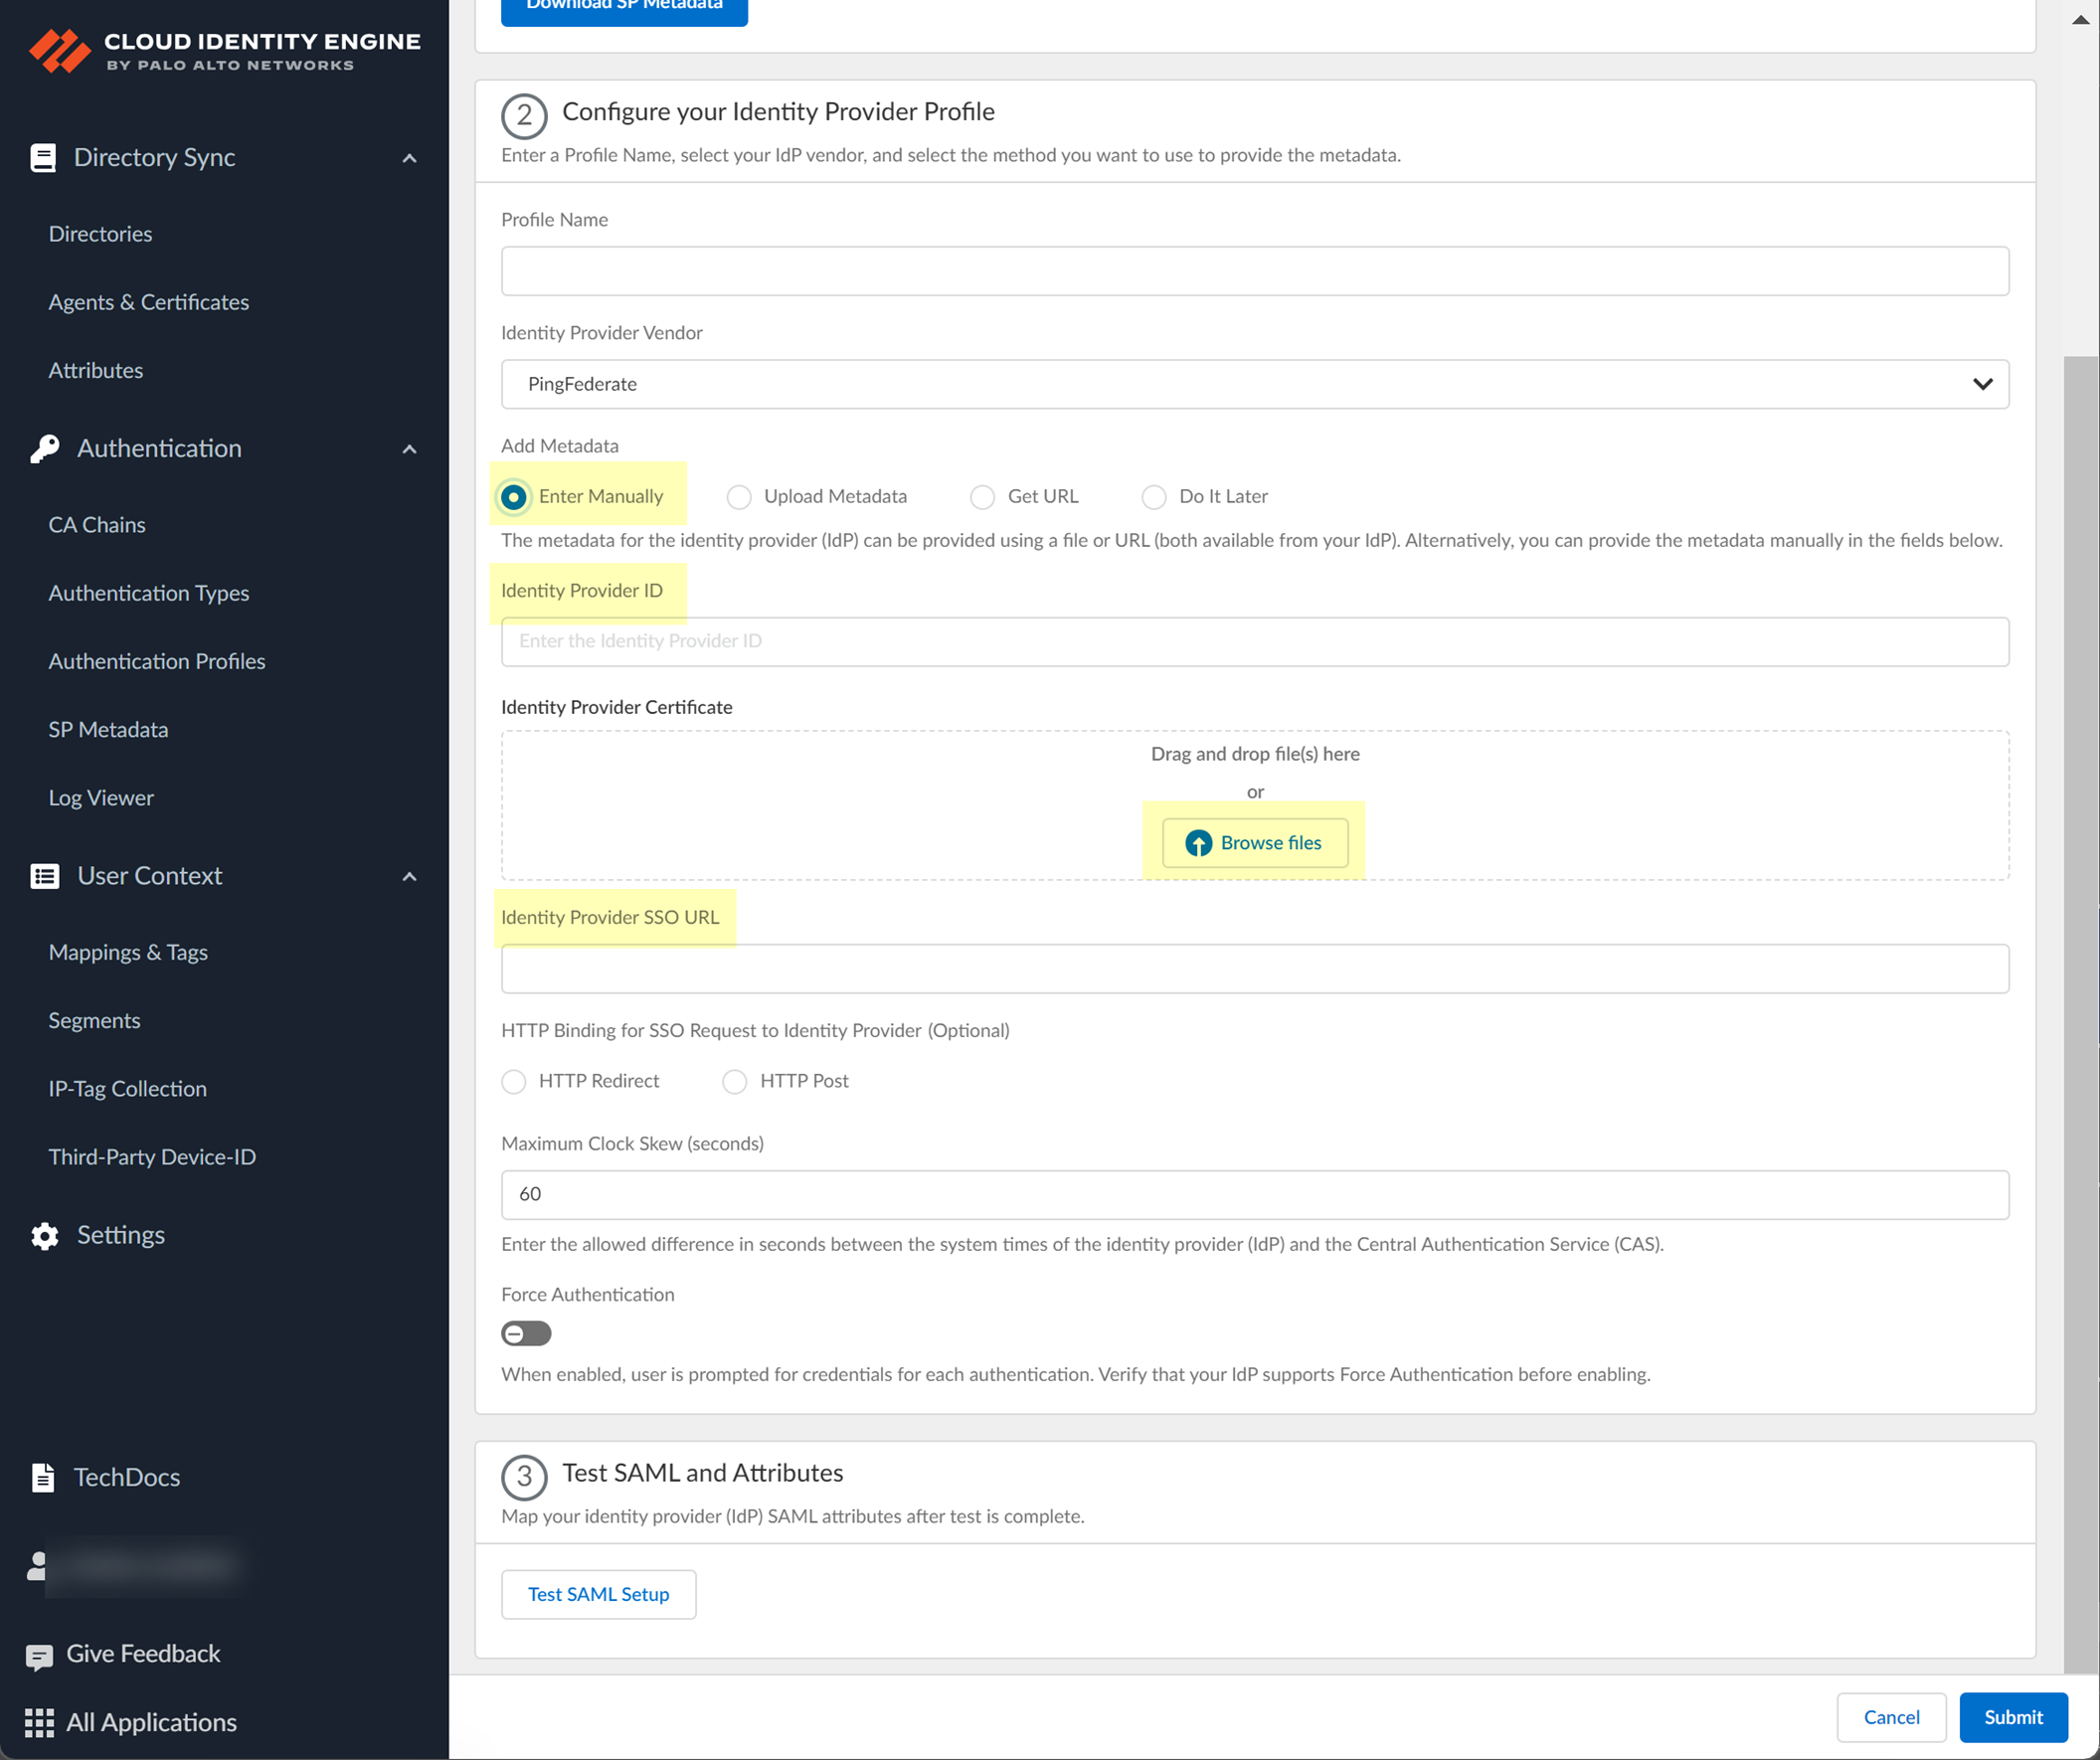
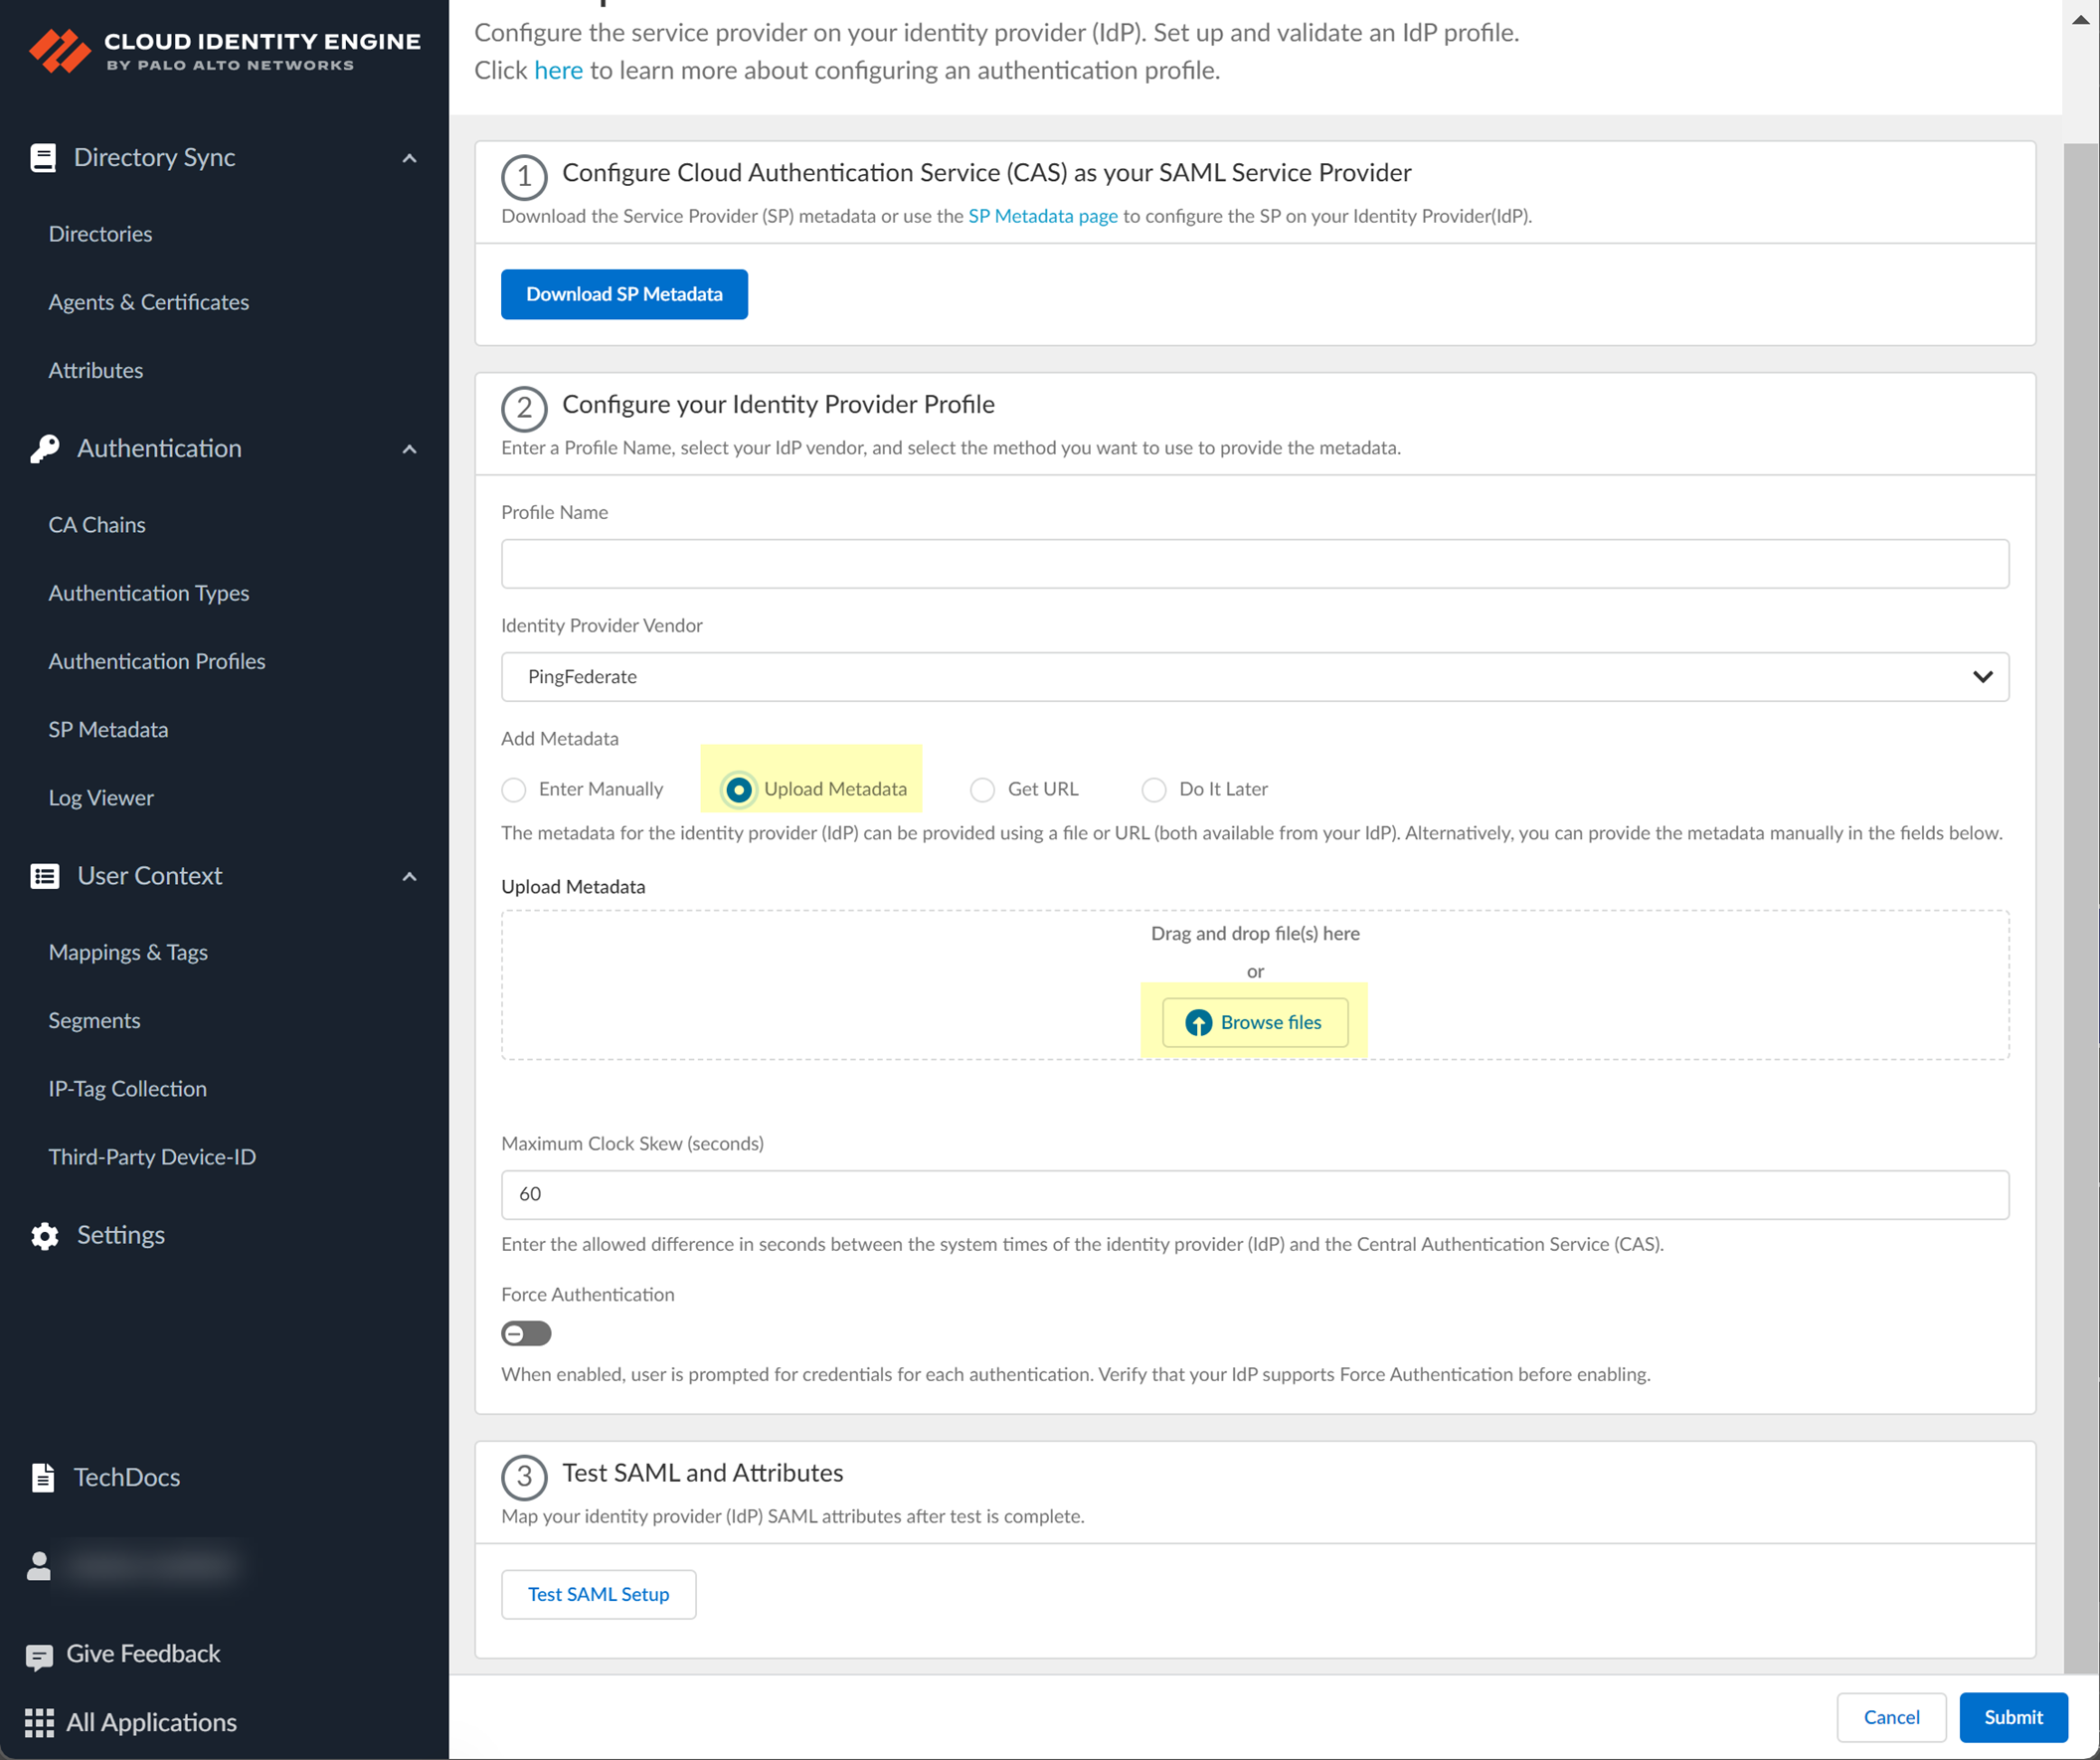
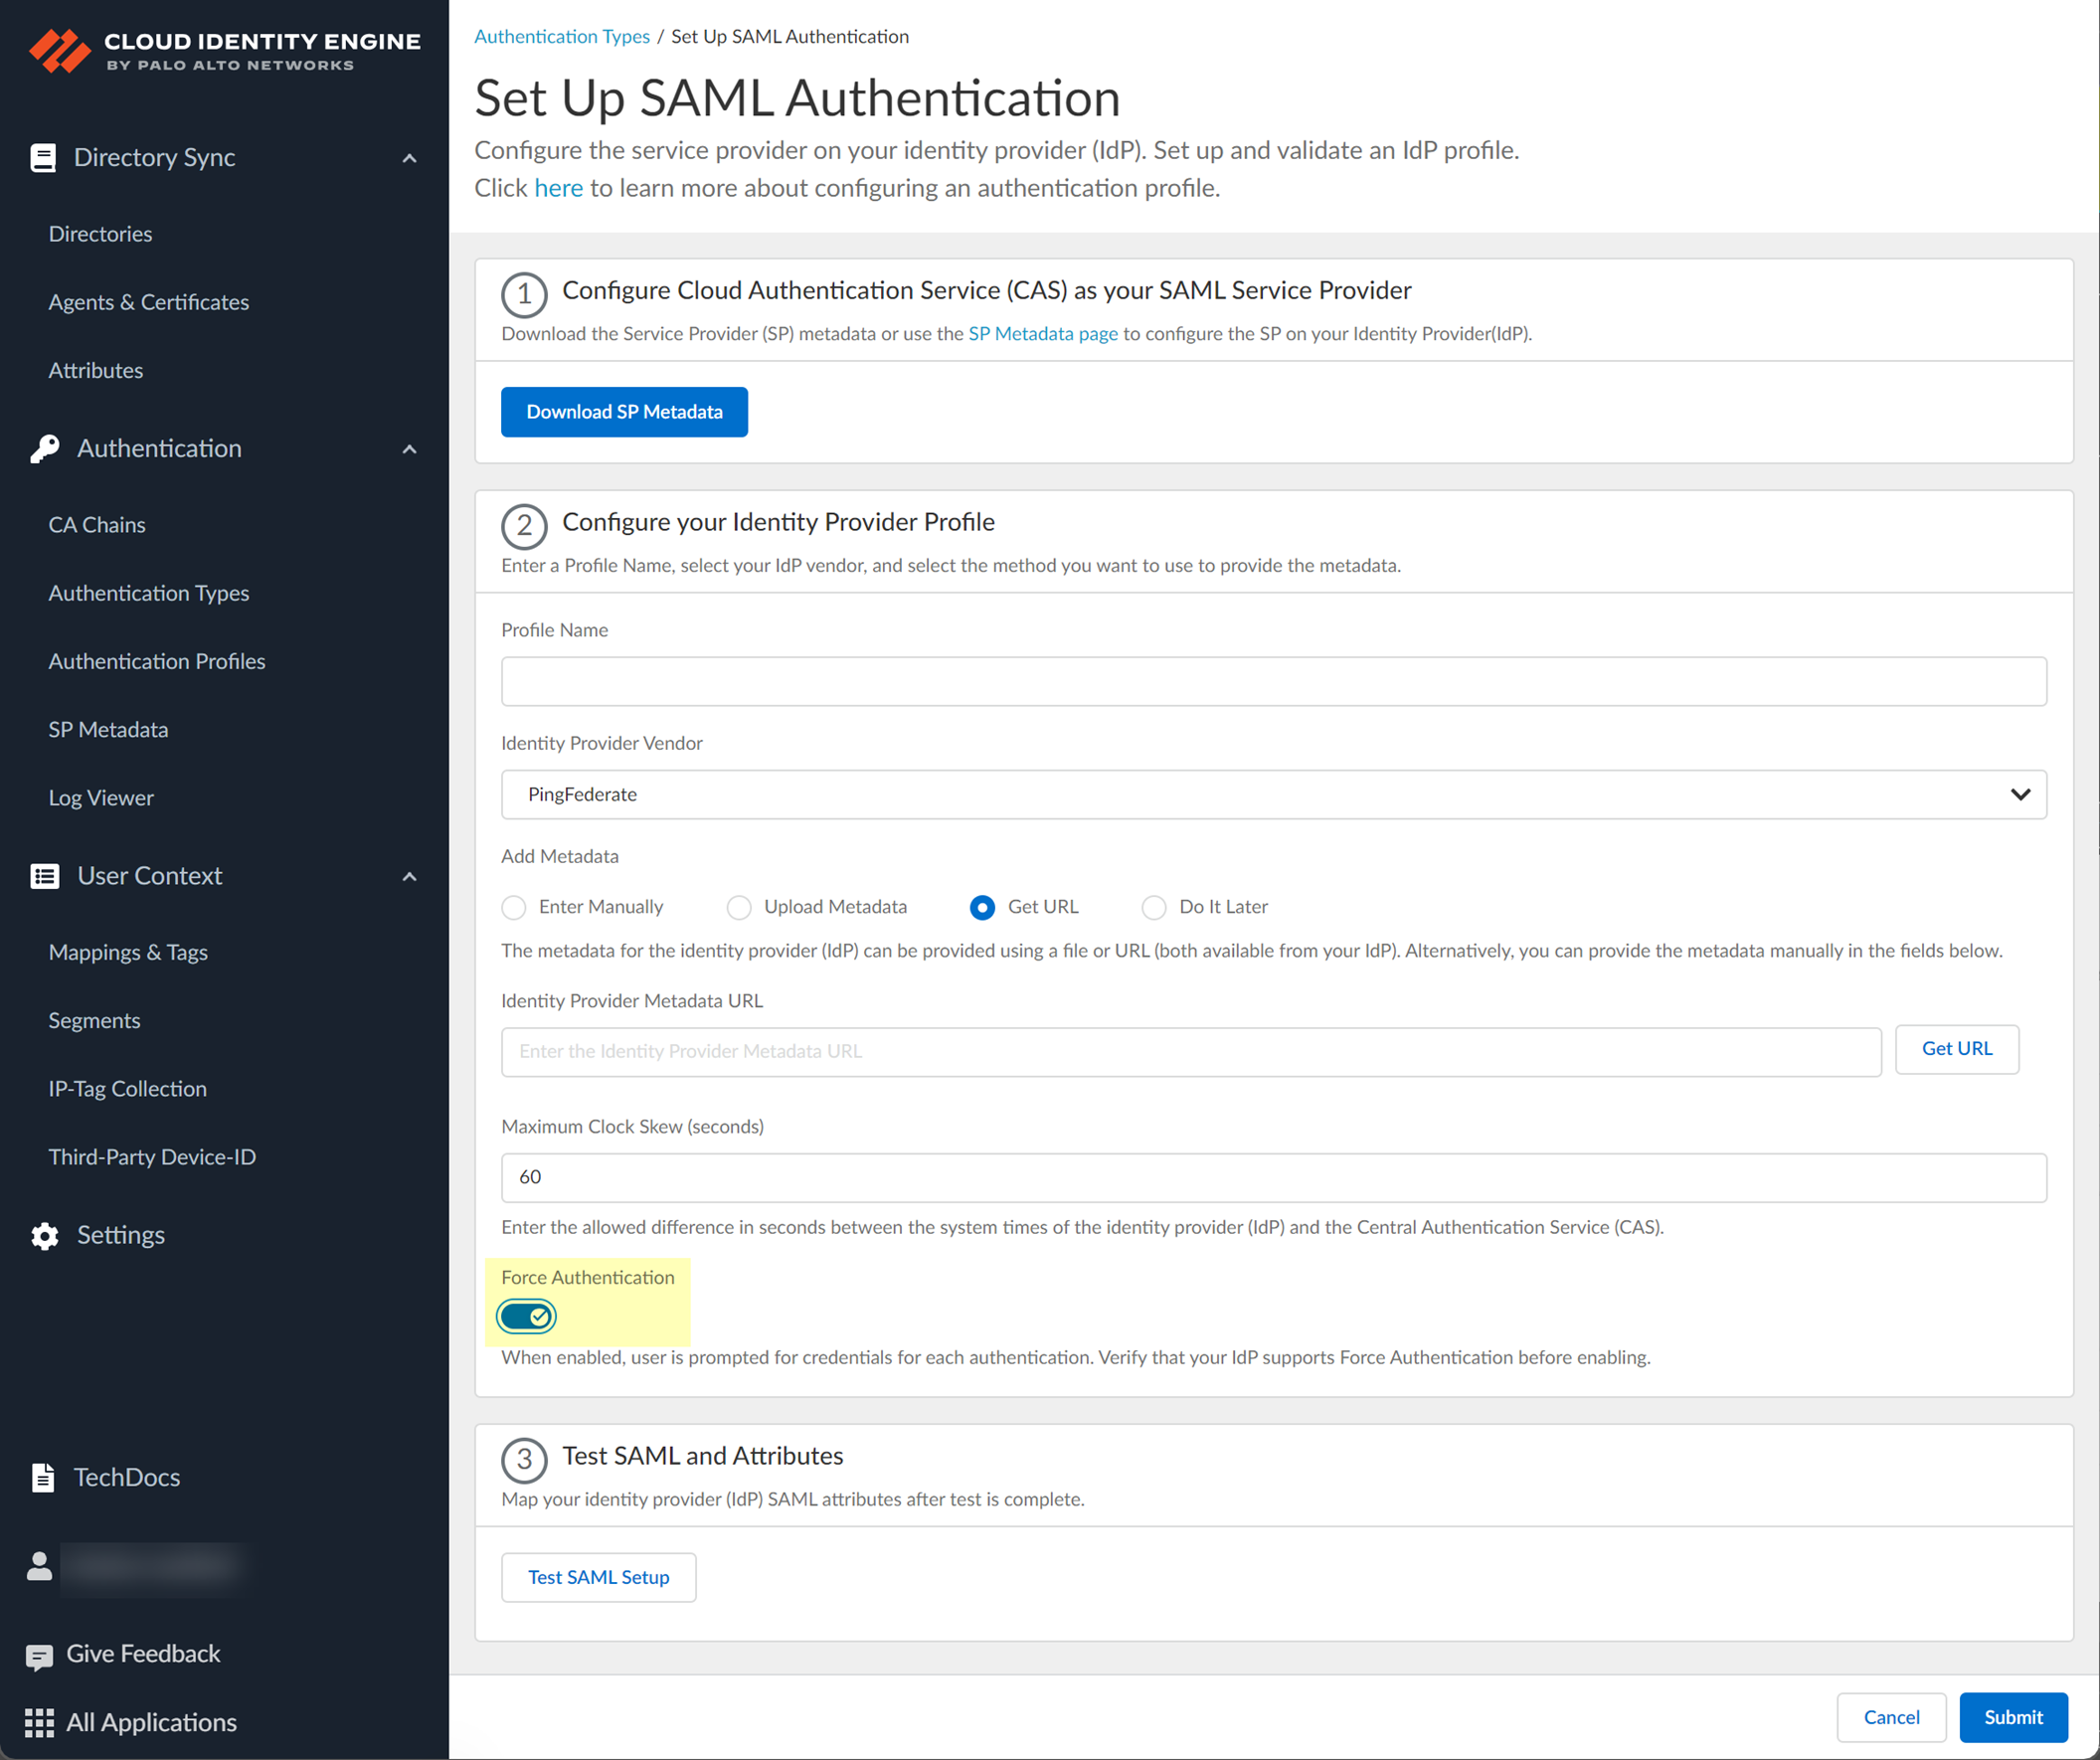
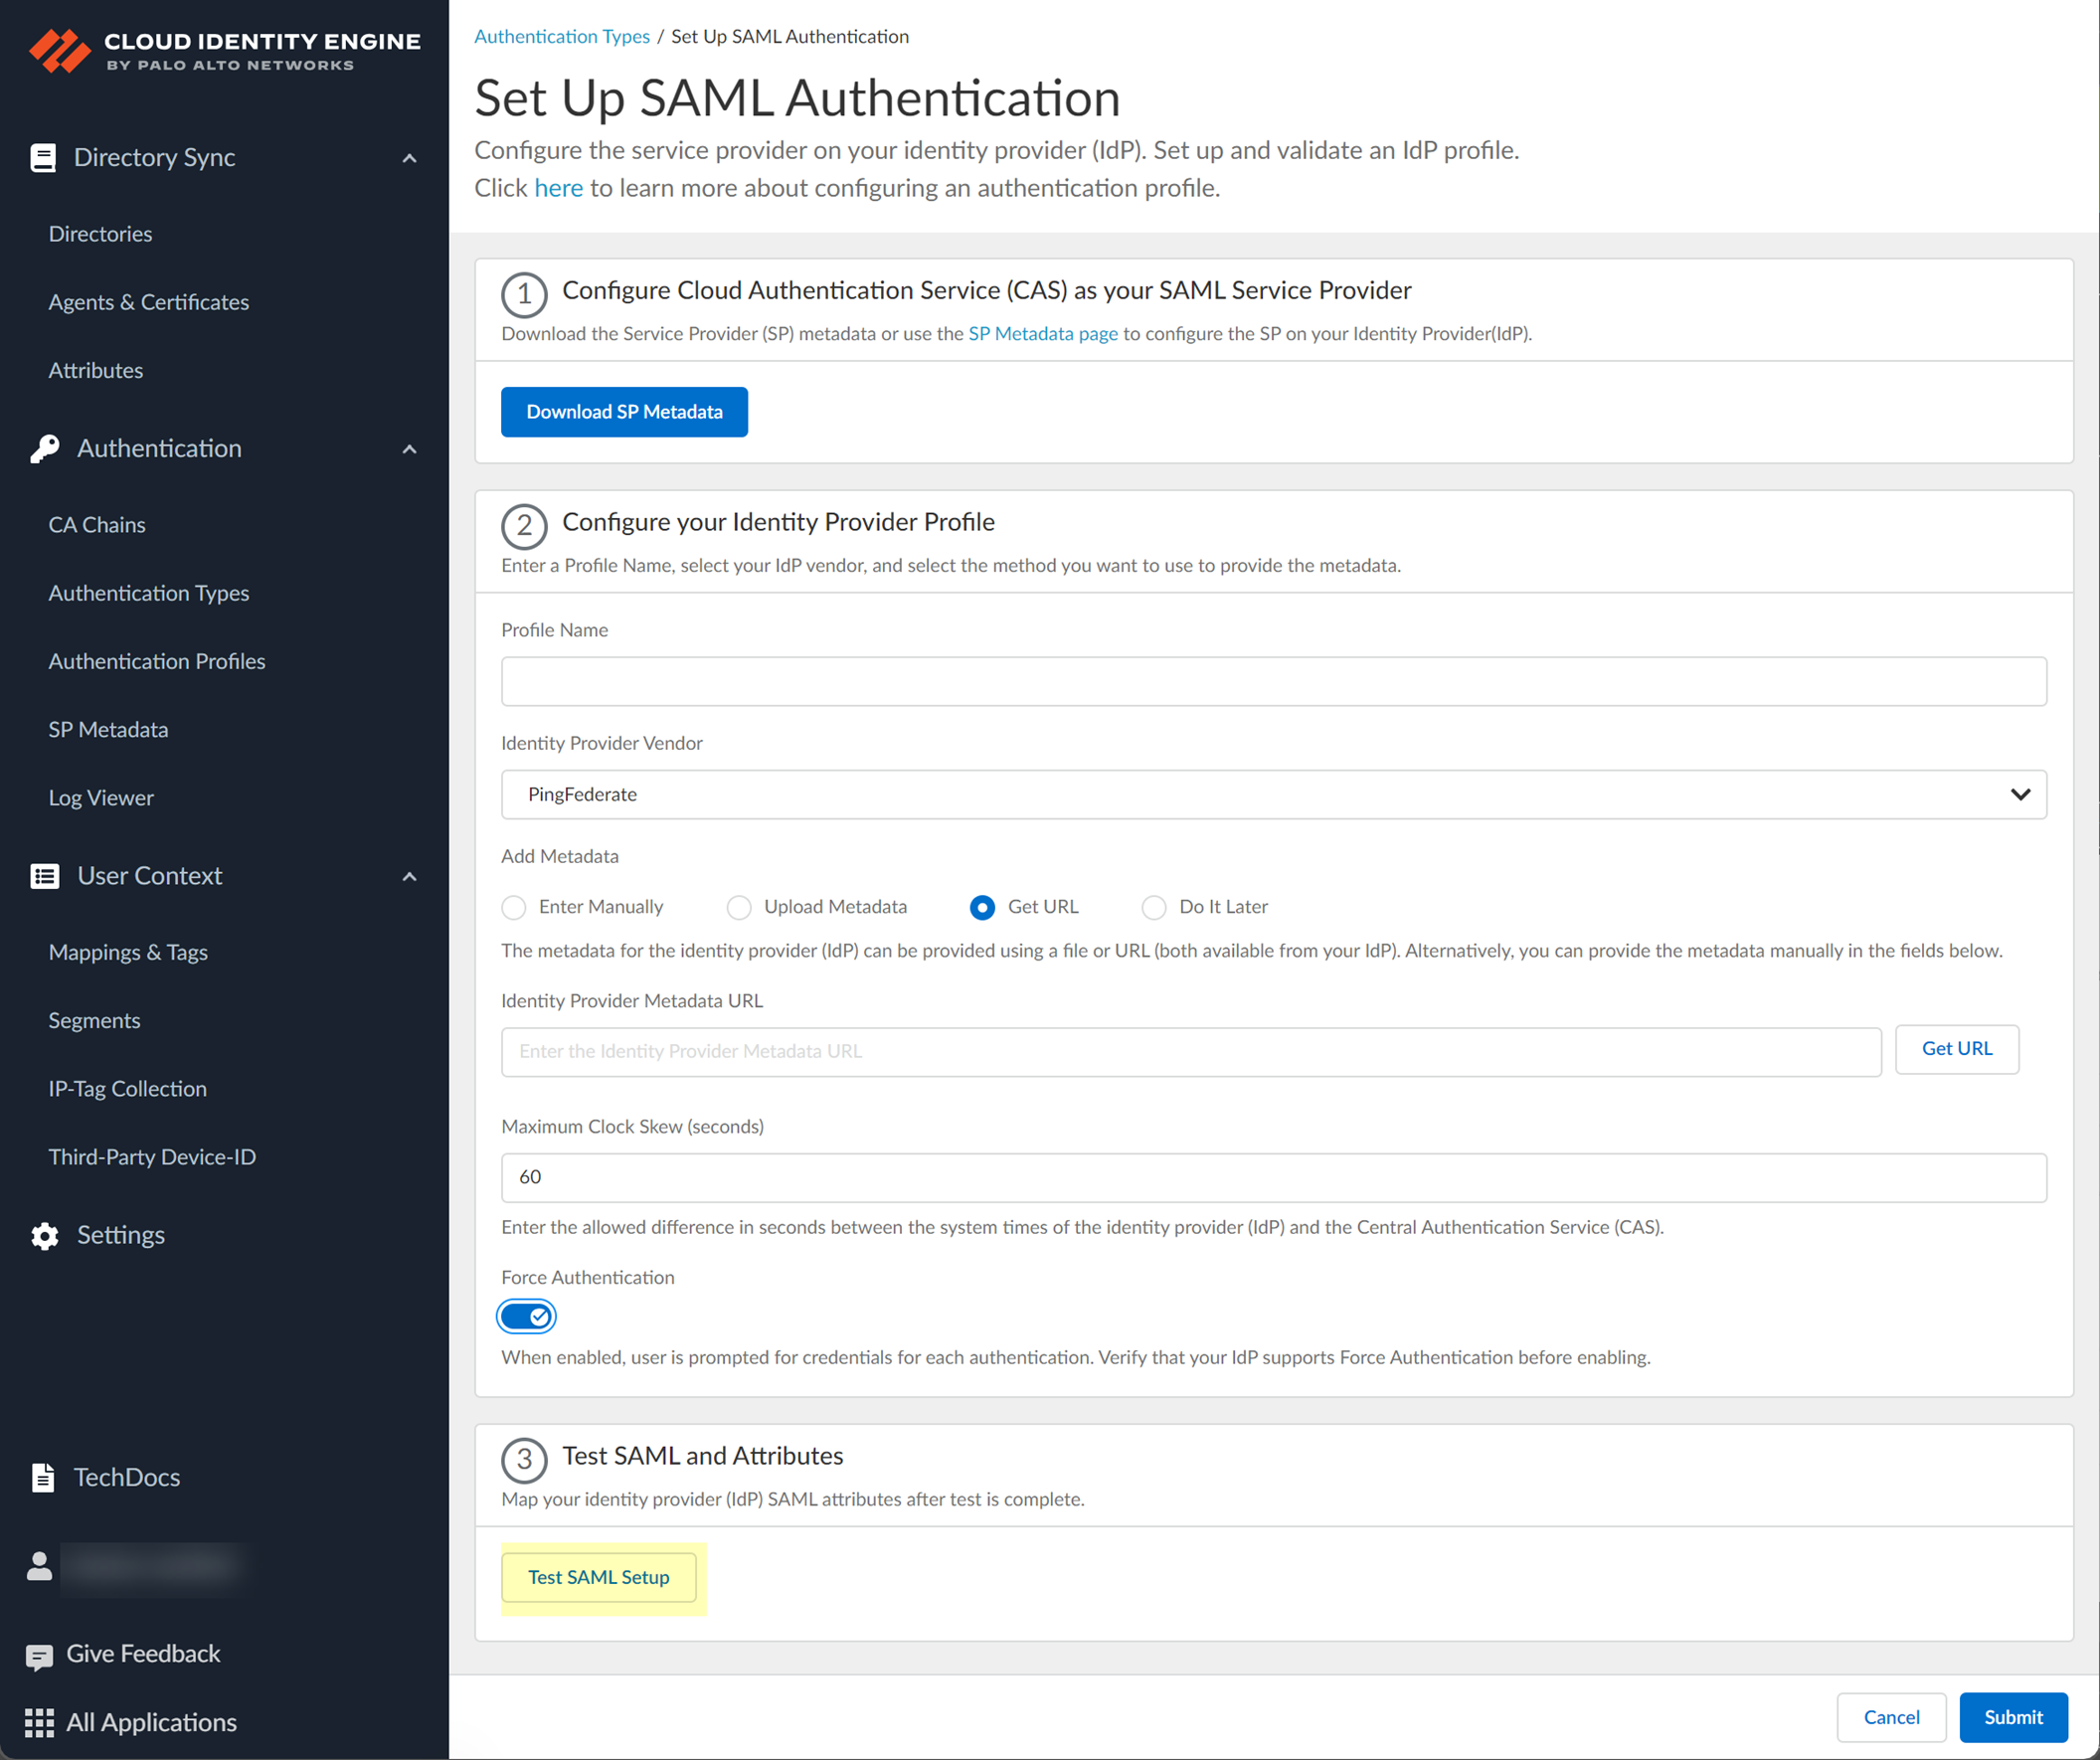
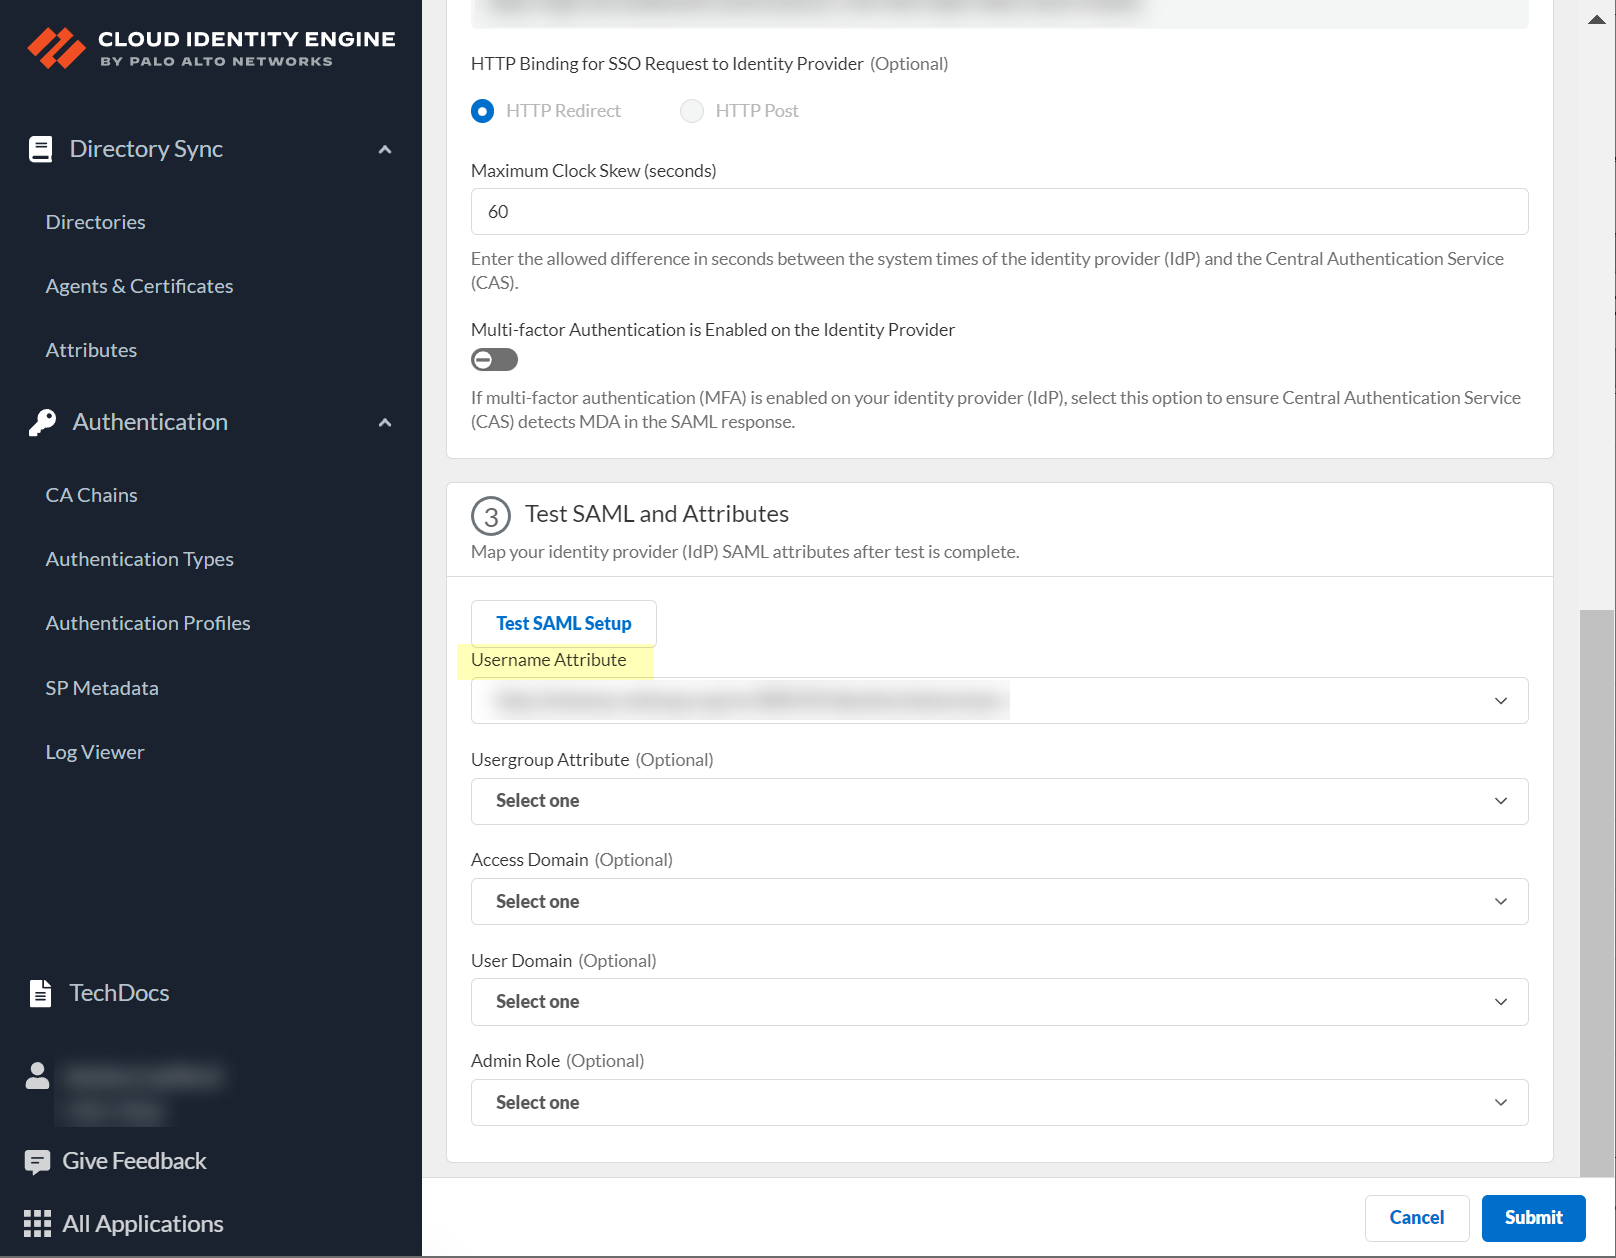
Authenticate Users with the Cloud Identity Engine
[PCNSA/PCNSE] CIE can authenticate users using SAML 2.0 IdPs, Client Certificates, or both.
This requires configuring Authentication Types and an Authentication Profile within CIE, and potentially configuring Authentication Portal and Authentication Policy on the firewall/Panorama.
Use a client certificate issued by a trusted CA chain for user authentication.
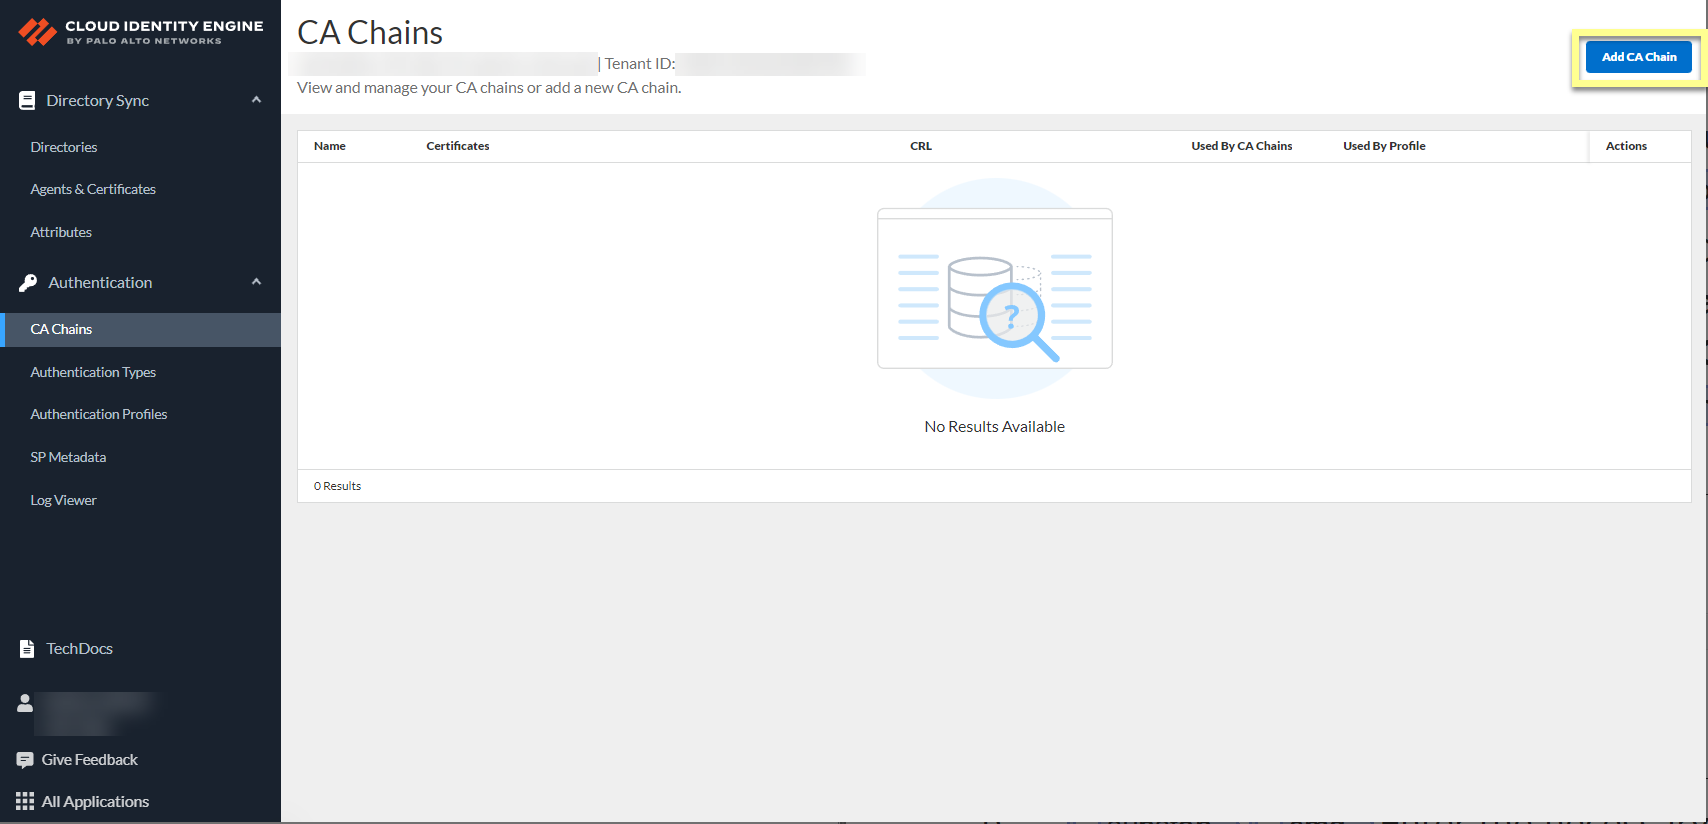
Configure CA Chain in CIE:
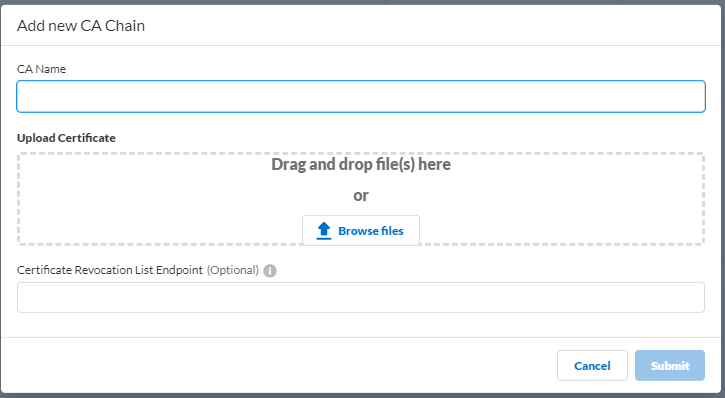
Go to Authentication > CA Chains >
Add CA Chain
.
Enter CA Name. Upload CA certificate(s) (root + intermediates, .crt or .pem).
(Optional but Recommended) Enter CRL Endpoint URL.
Submit.
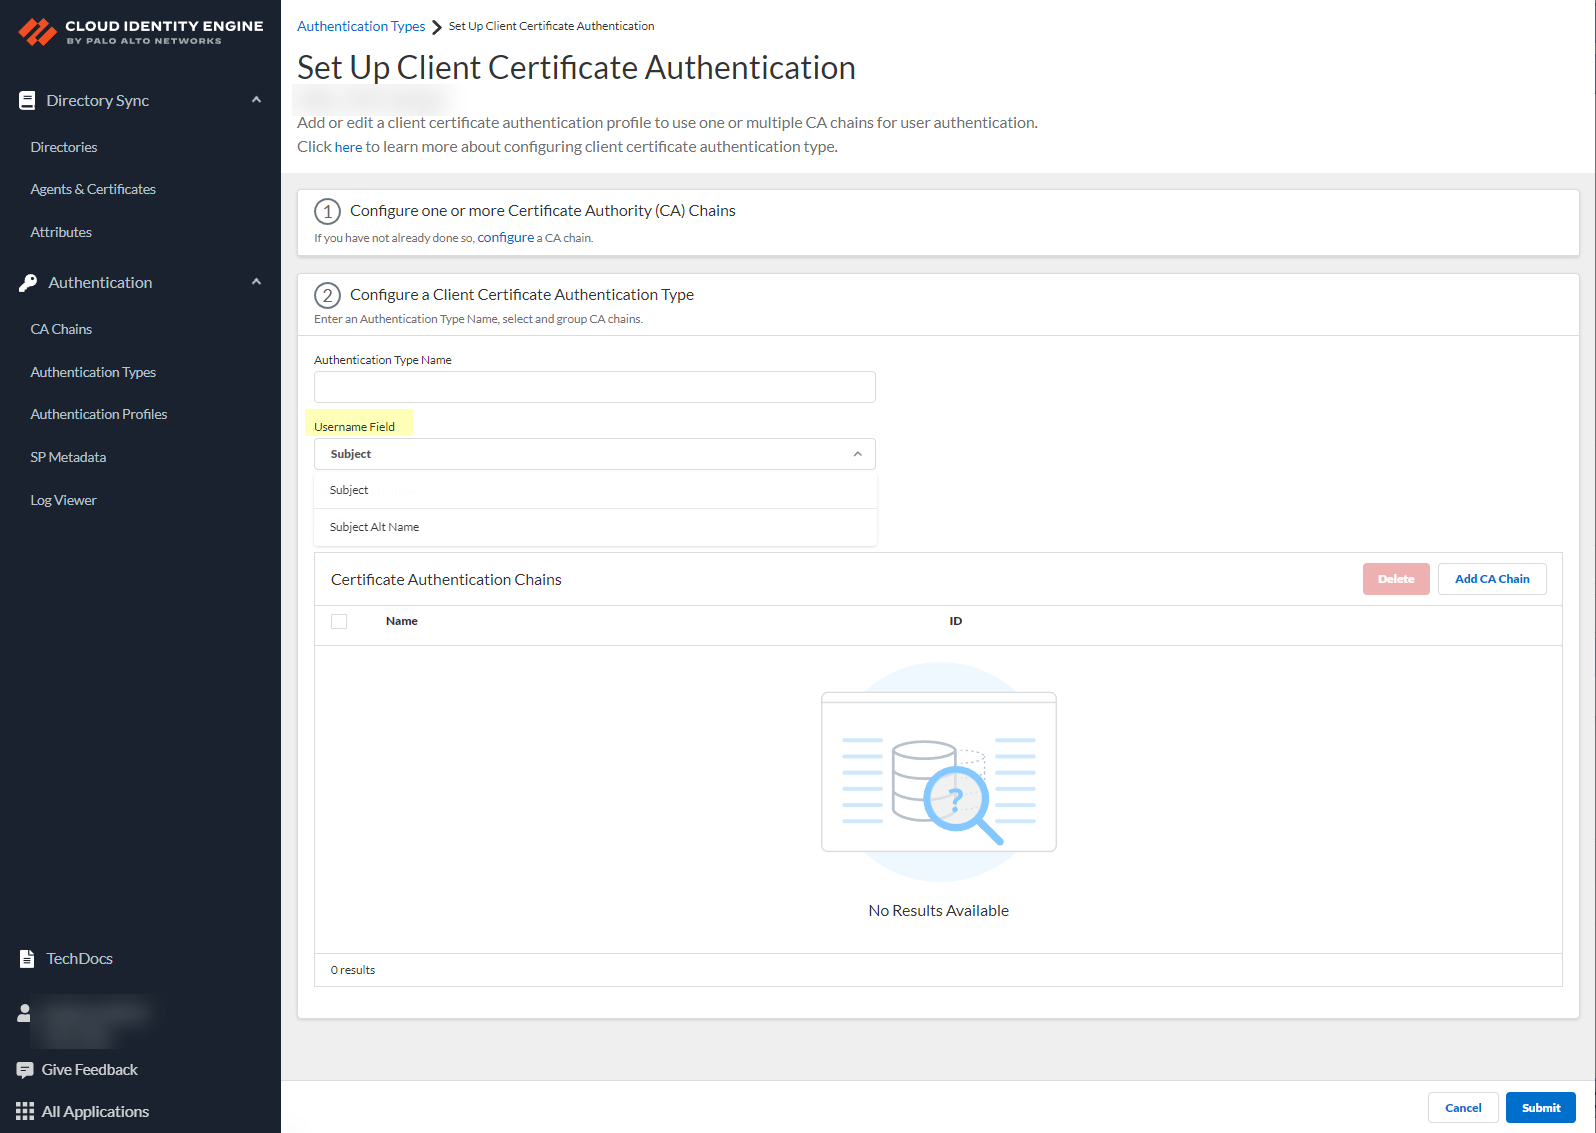
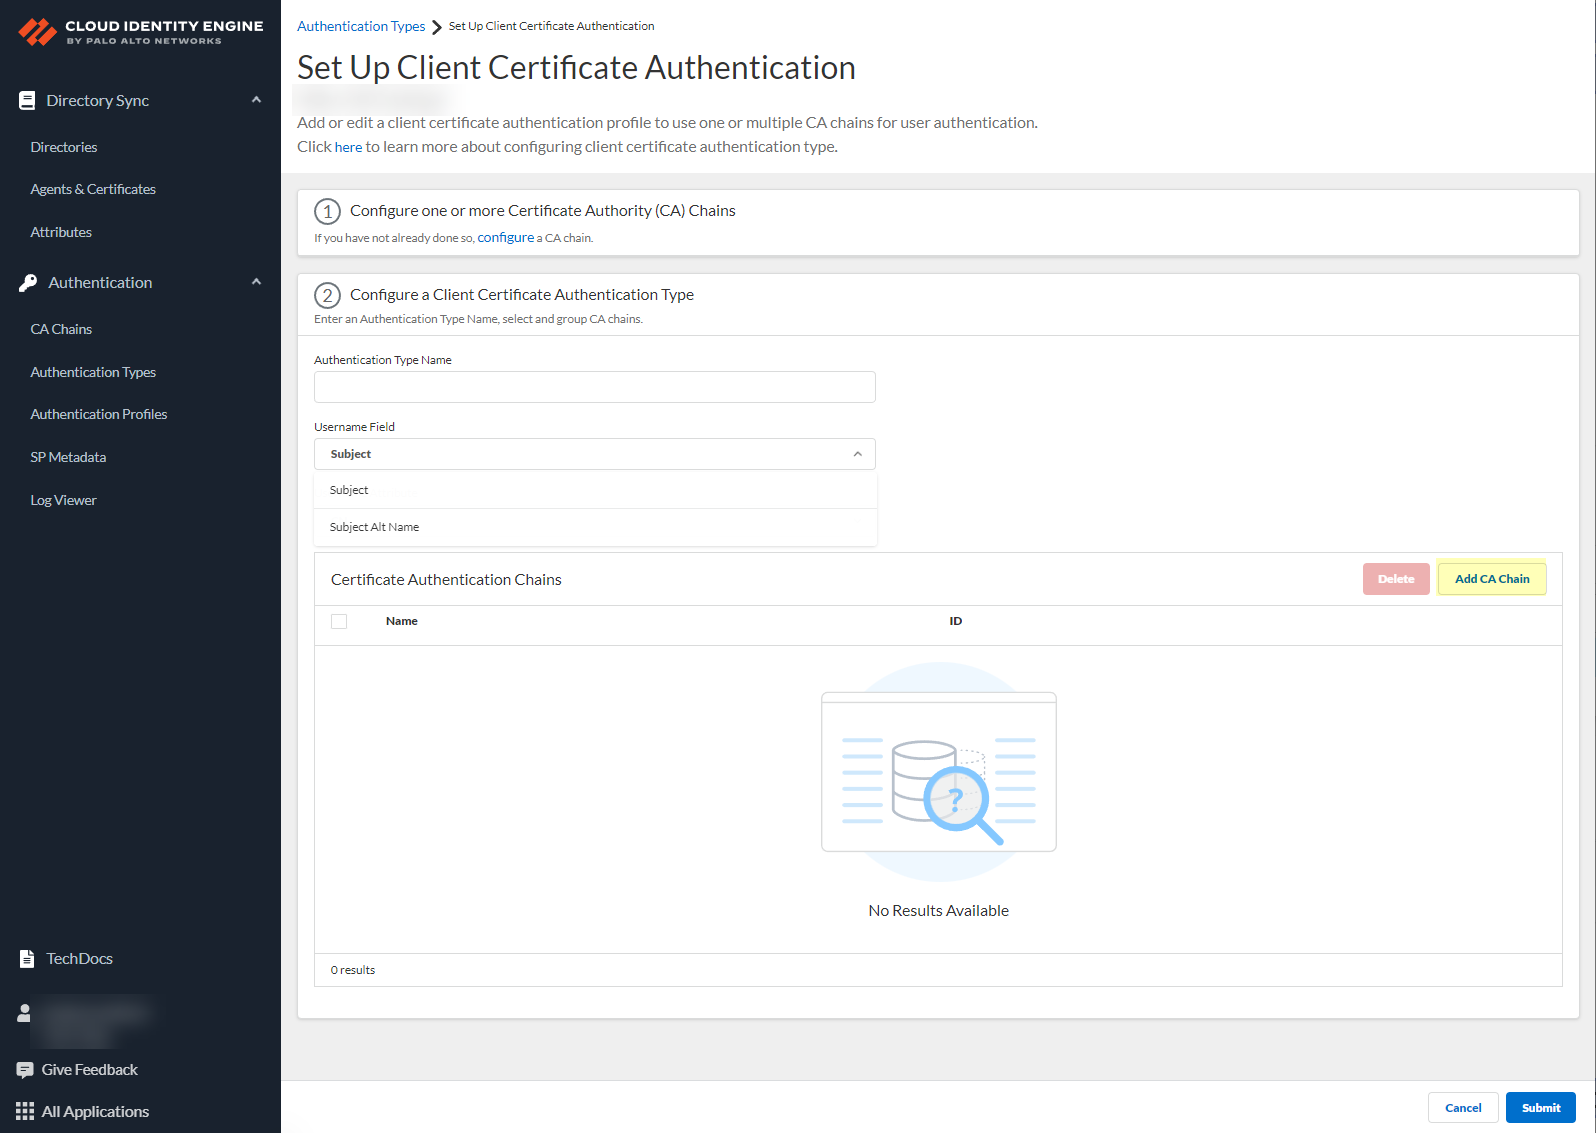
Configure Client Certificate Auth Type in CIE:
Go to Authentication Types > Add >
Client Certificate
> Set Up.
Enter Authentication Type Name.
Select
Username Field
(Subject or Subject Alt Name).
Select
Username Attribute
(CN if Subject; Email or UPN if Subject Alt Name).
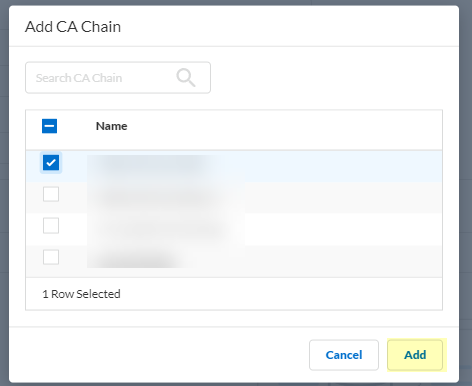
Click
Add CA Chain
. Select the chain(s) configured previously. Add.
Submit
.
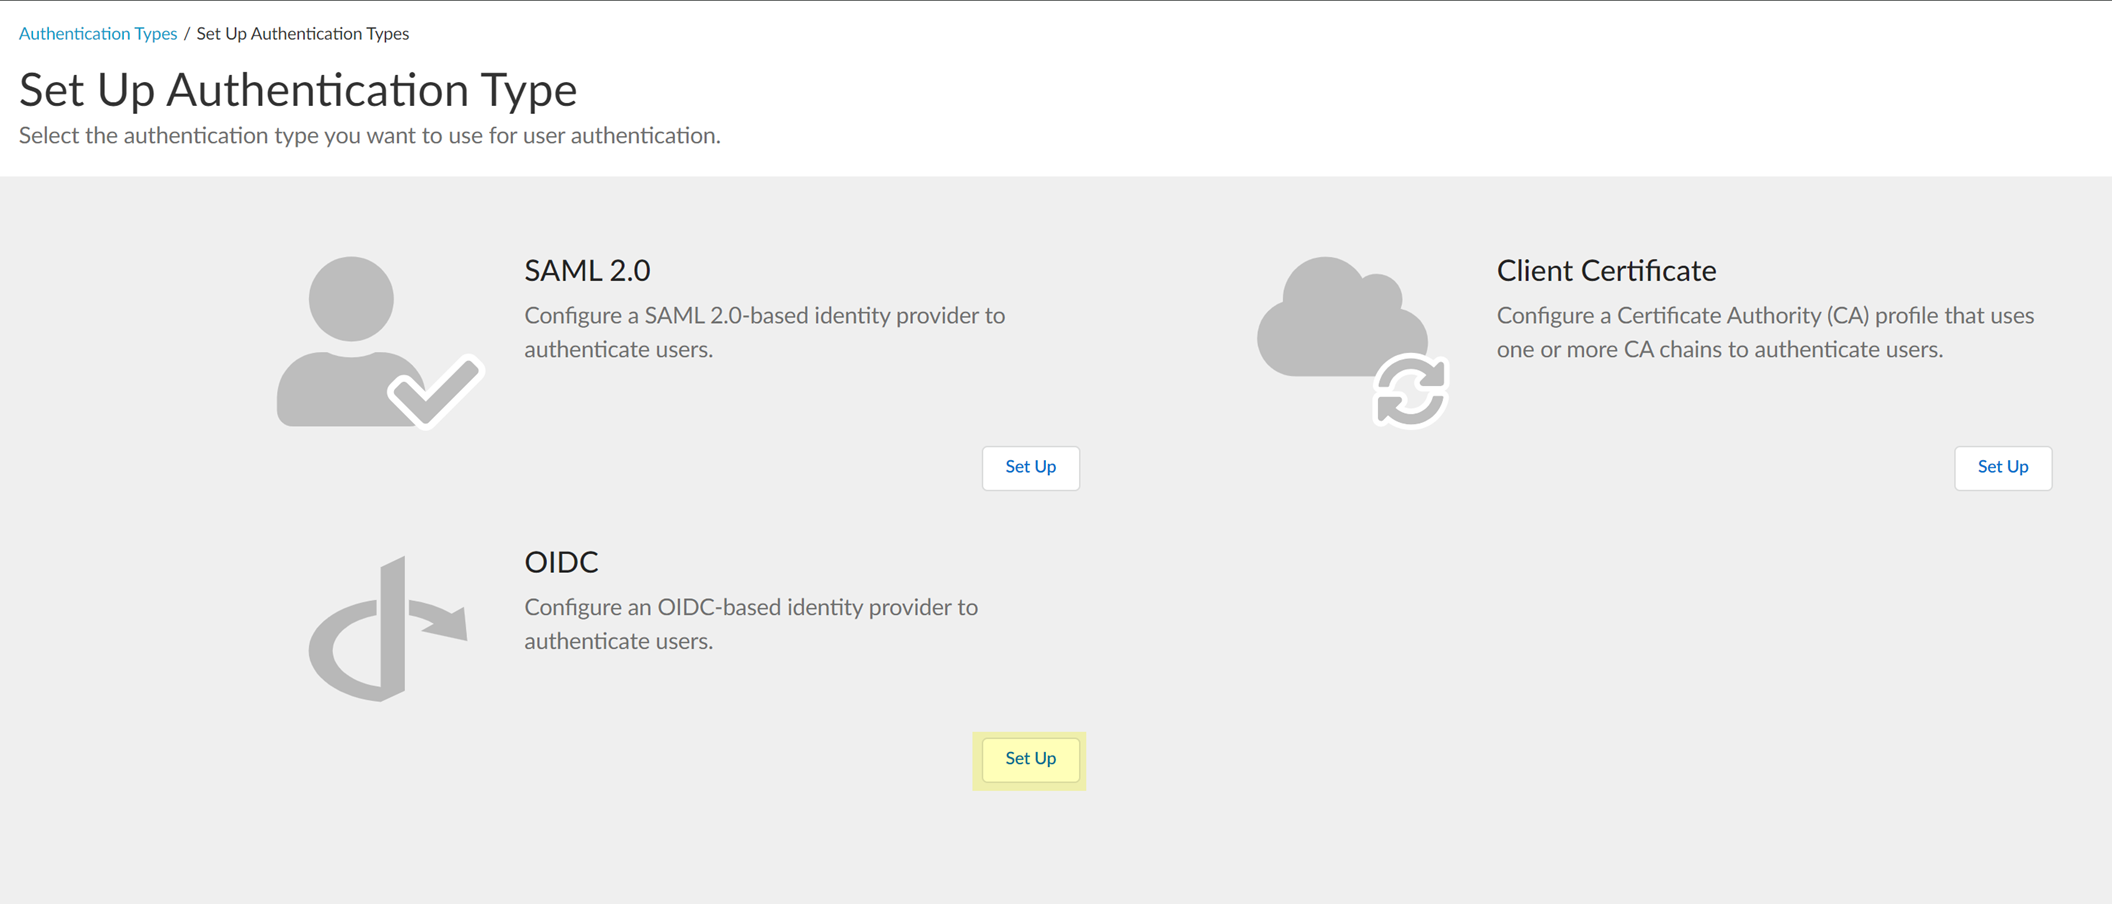
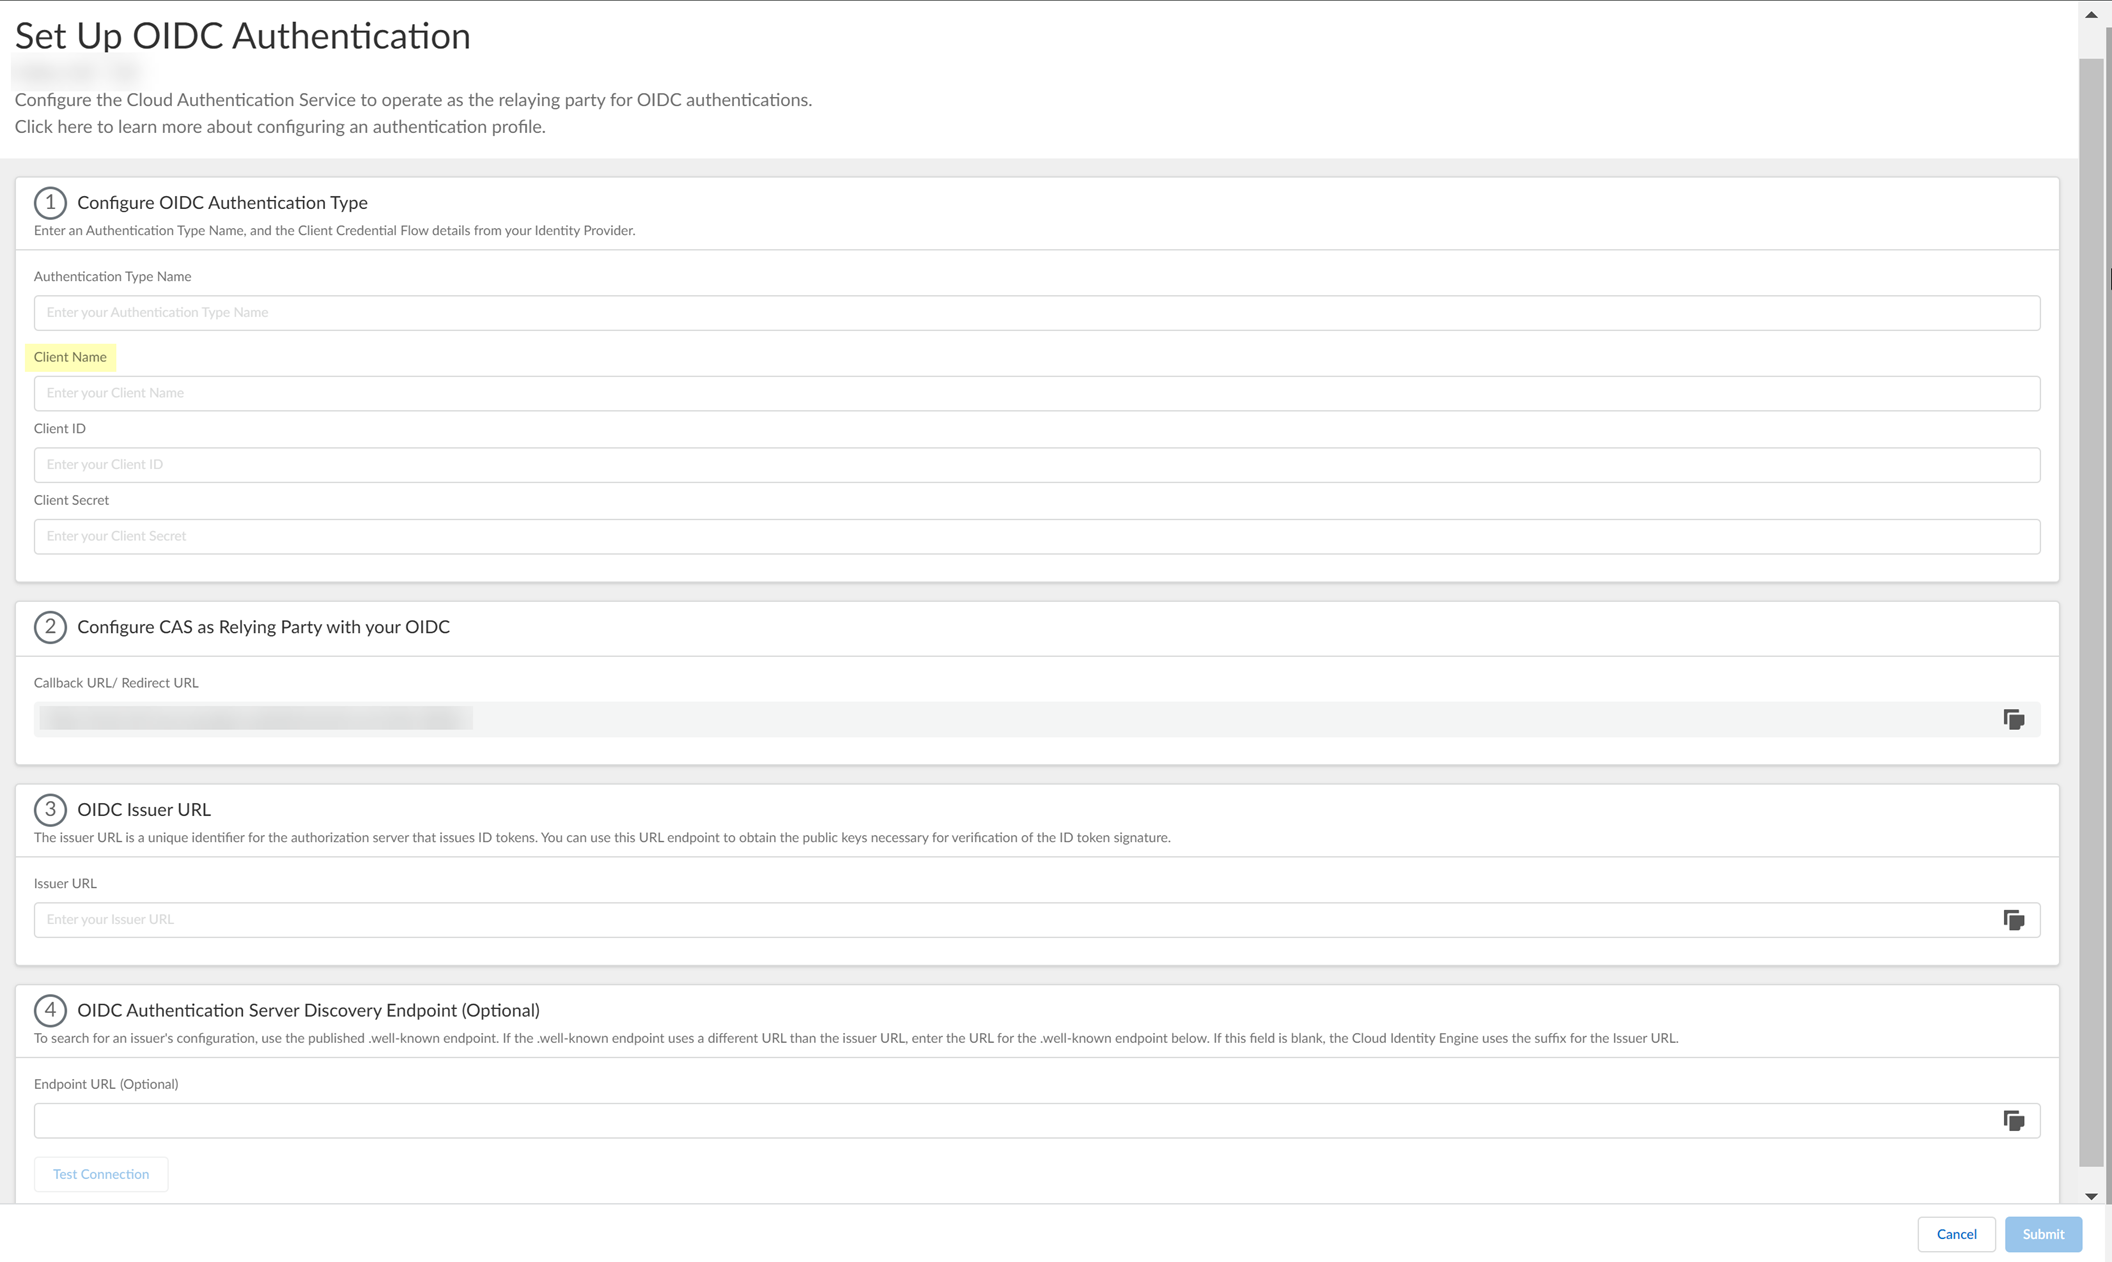
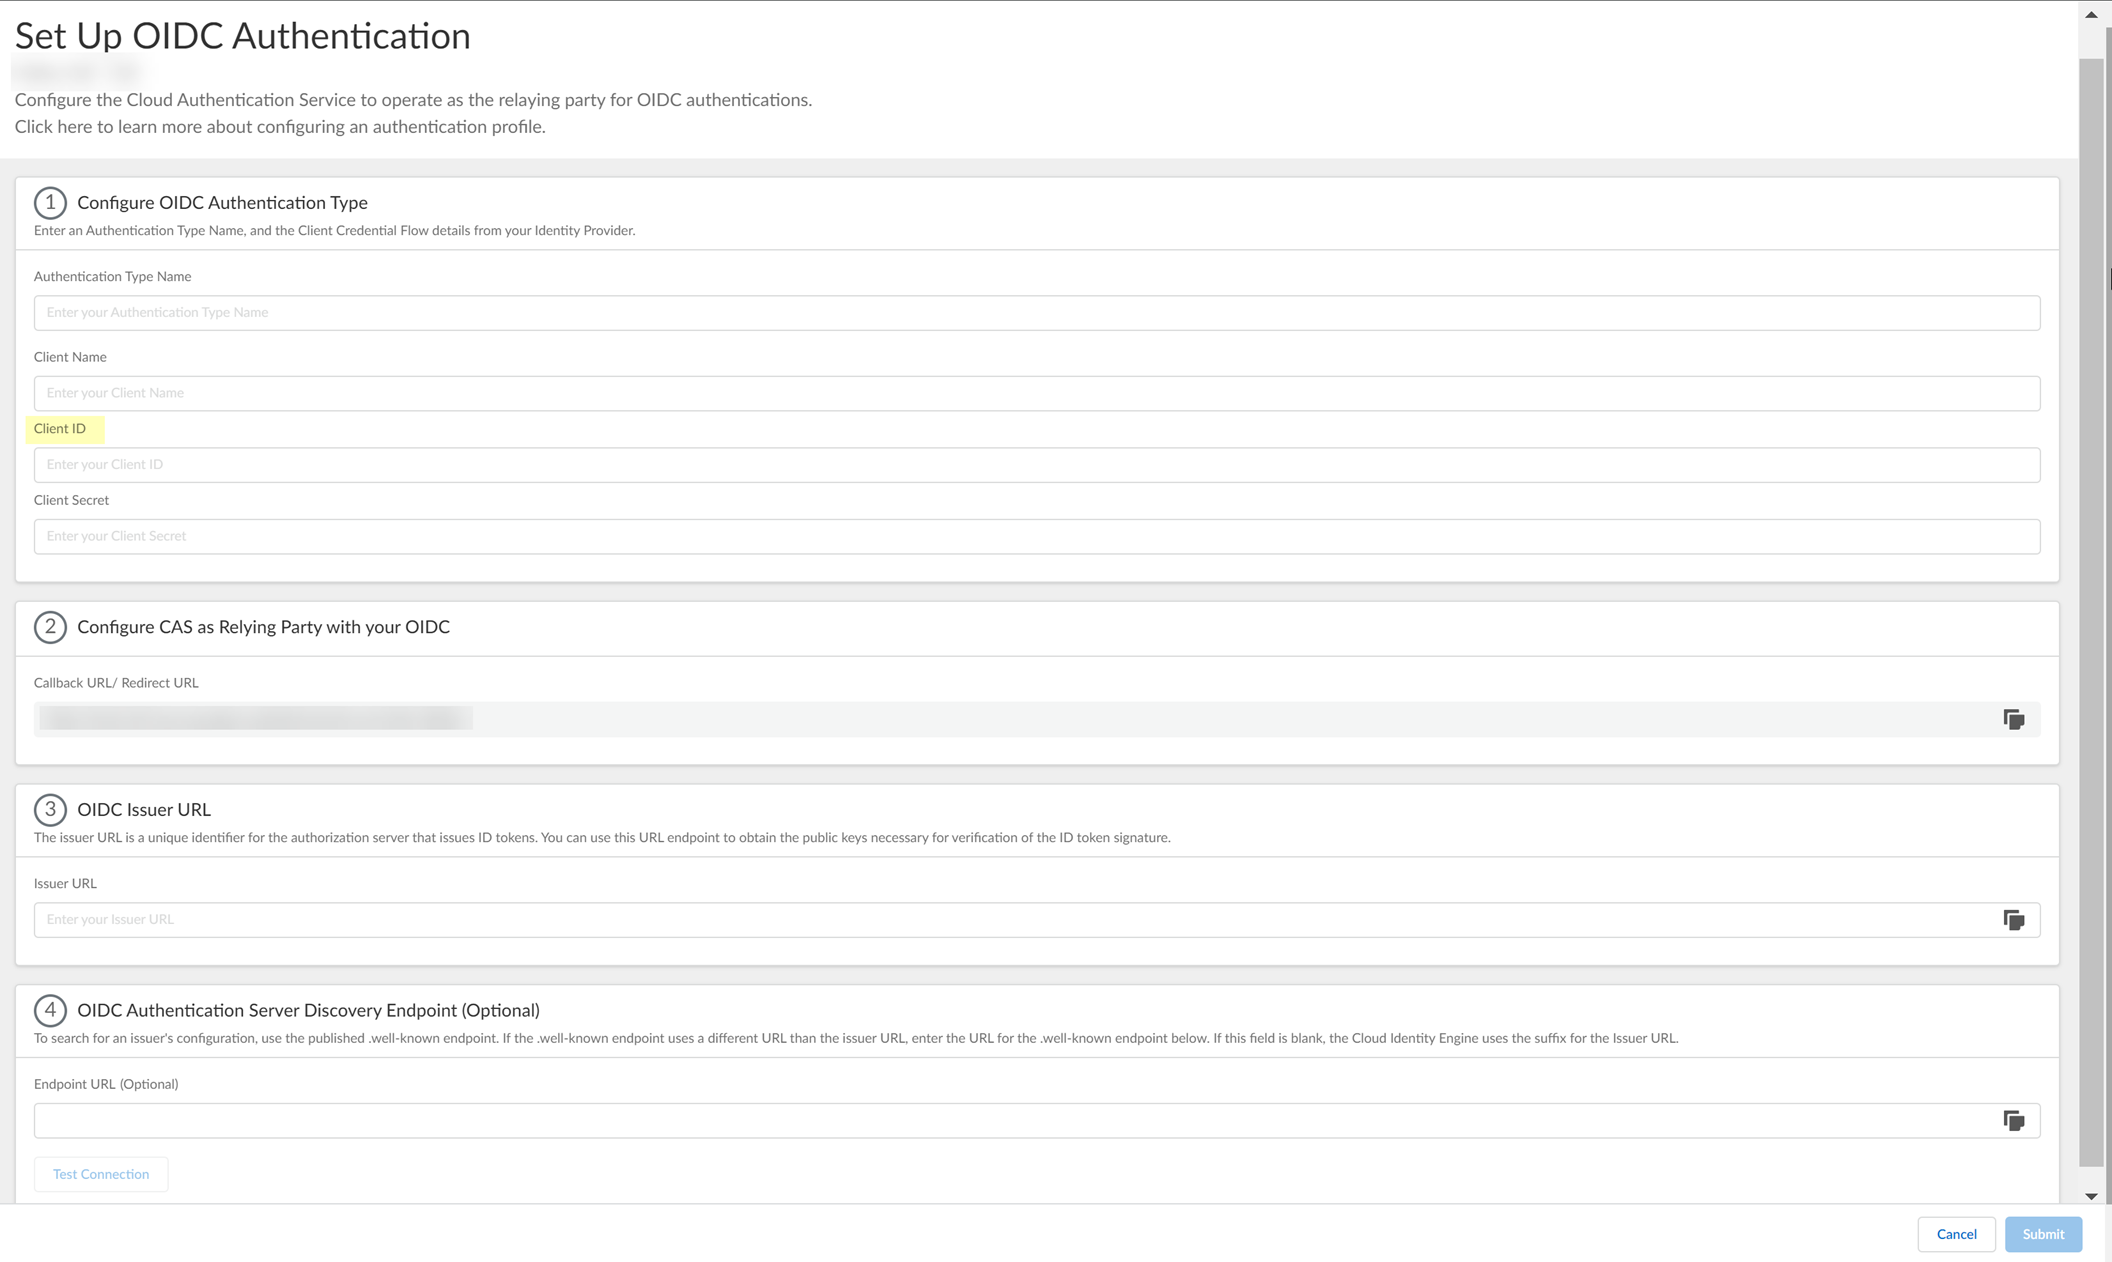
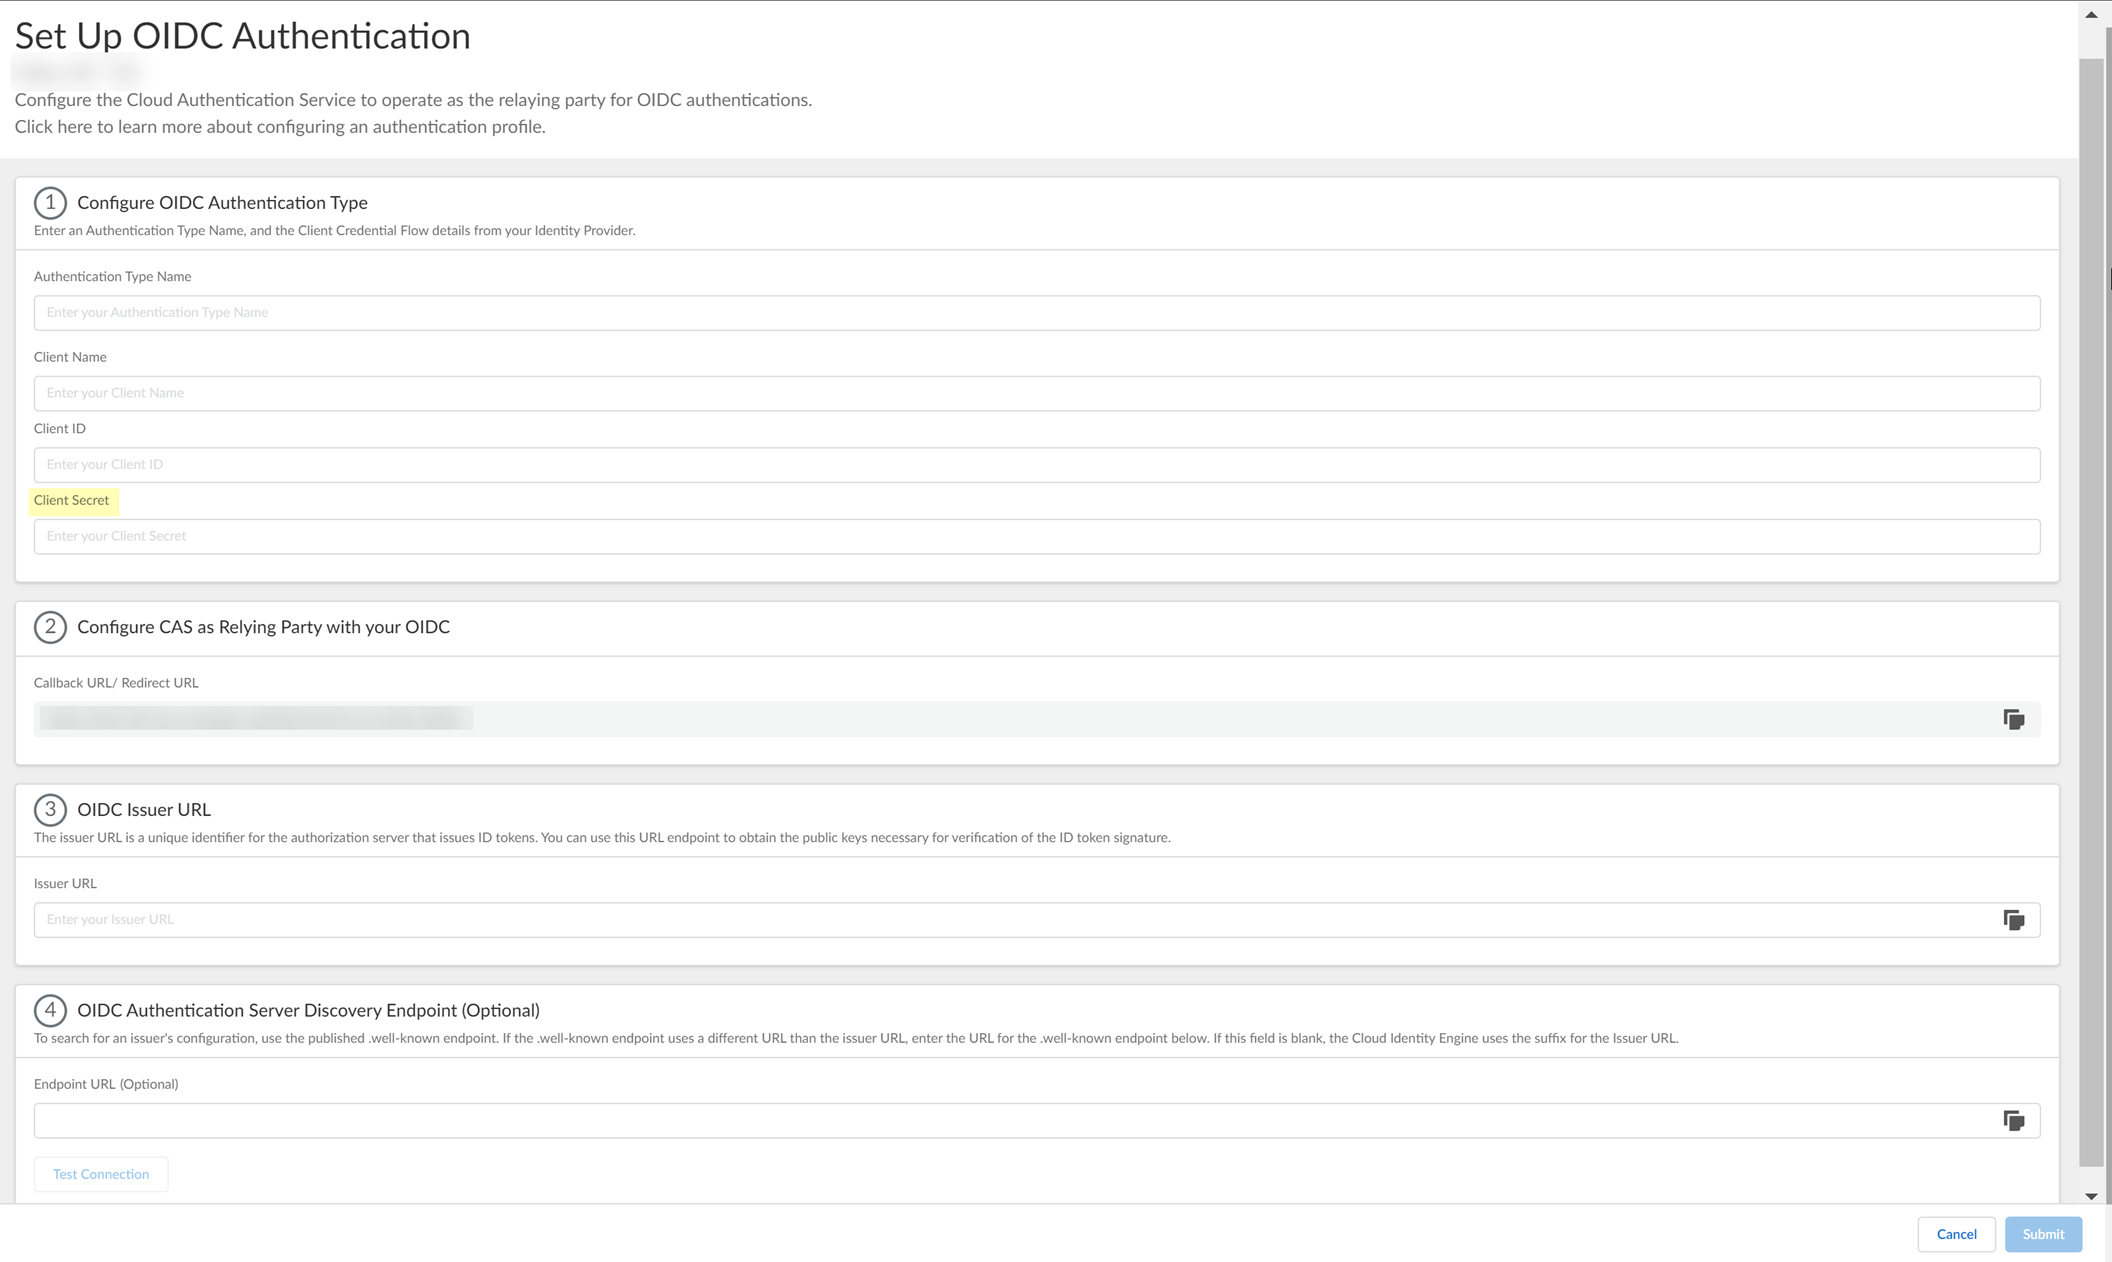
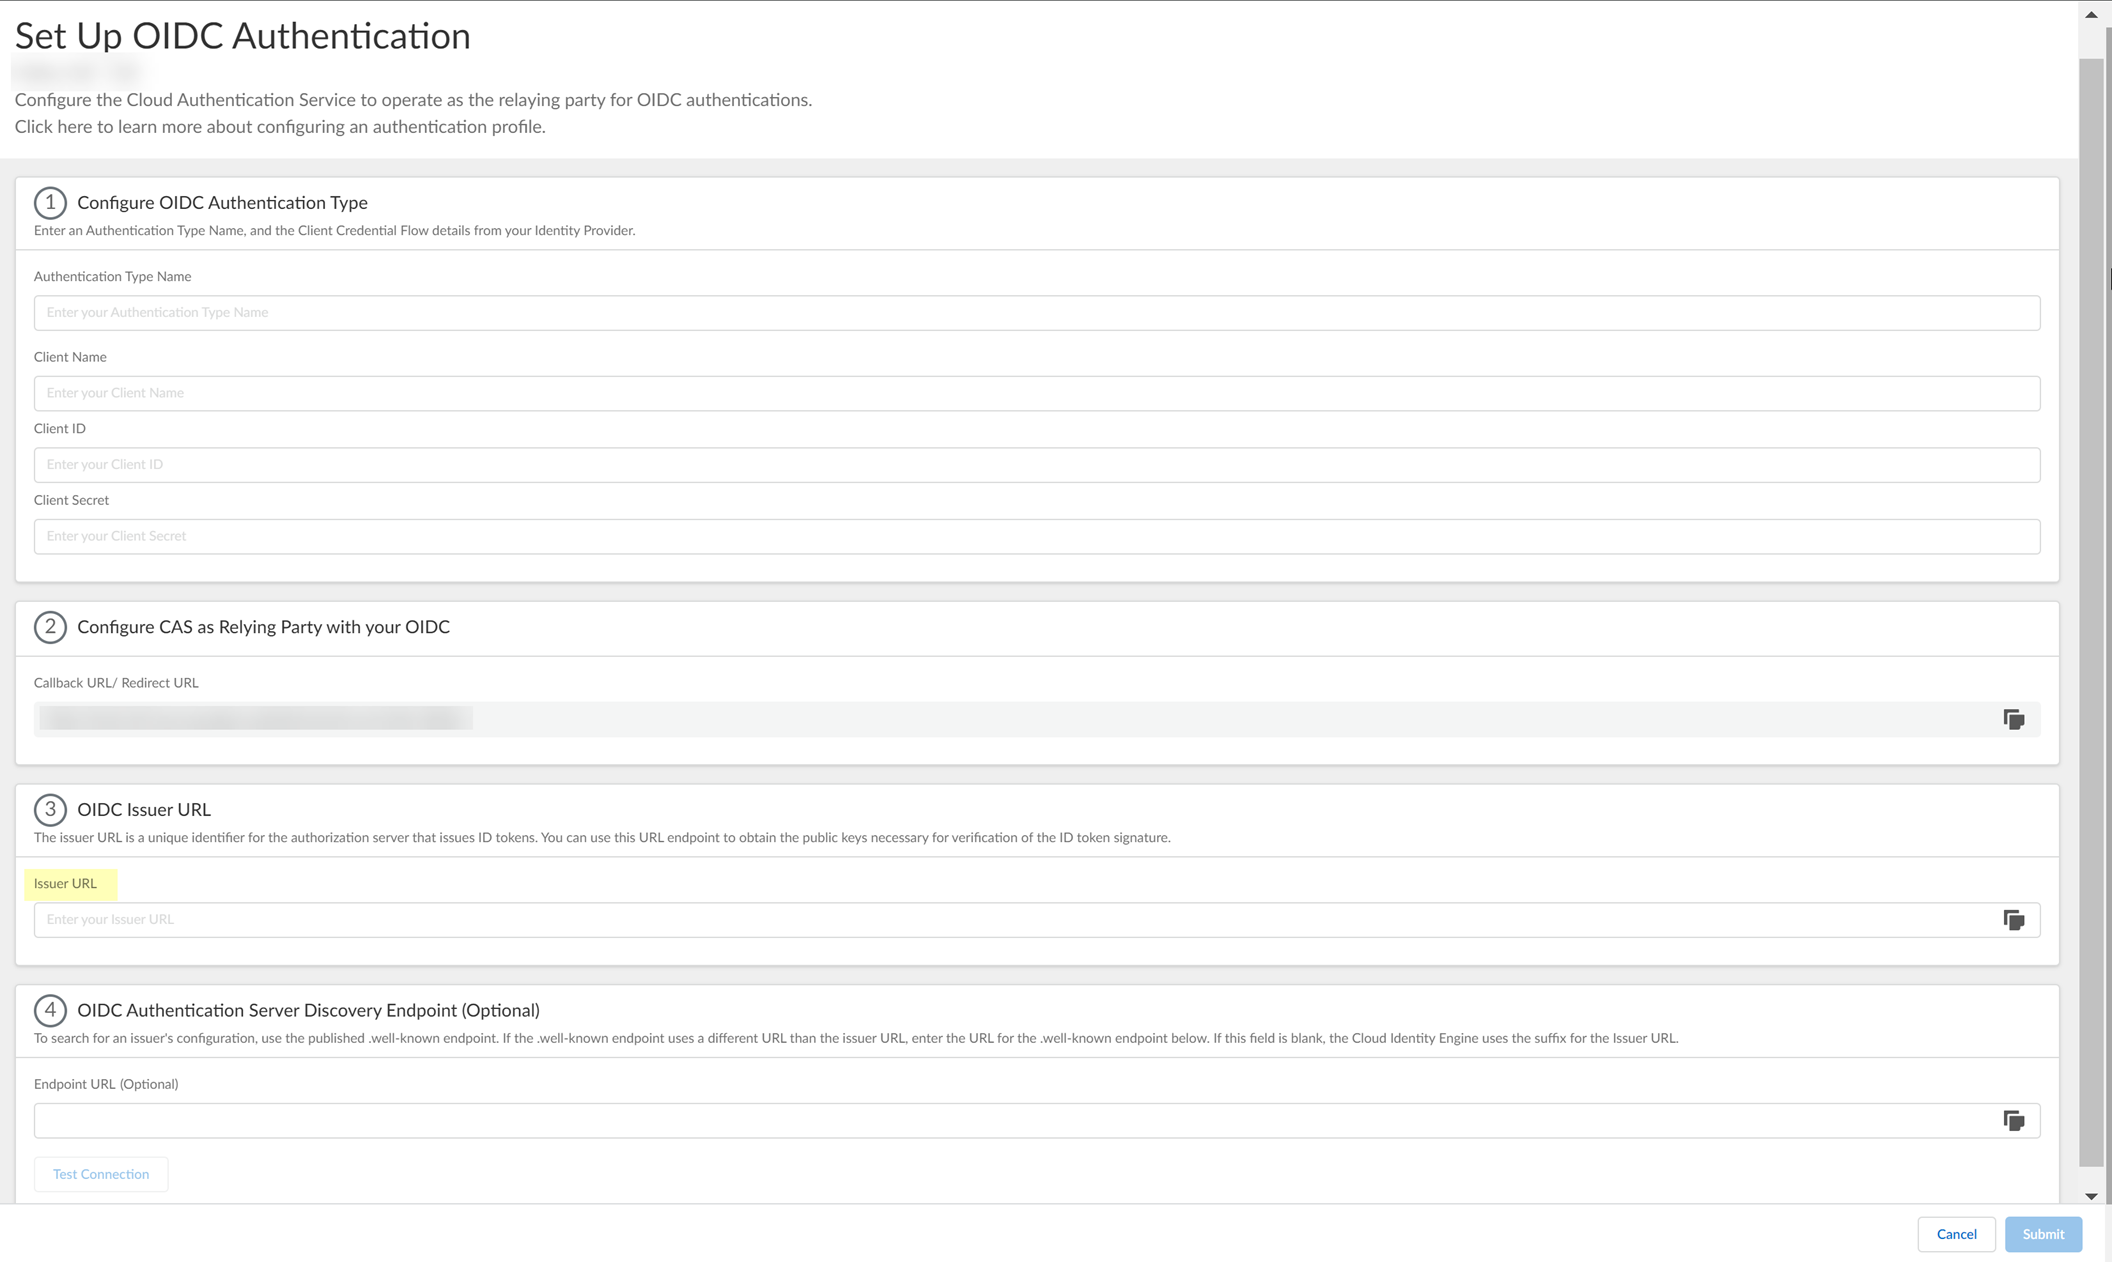
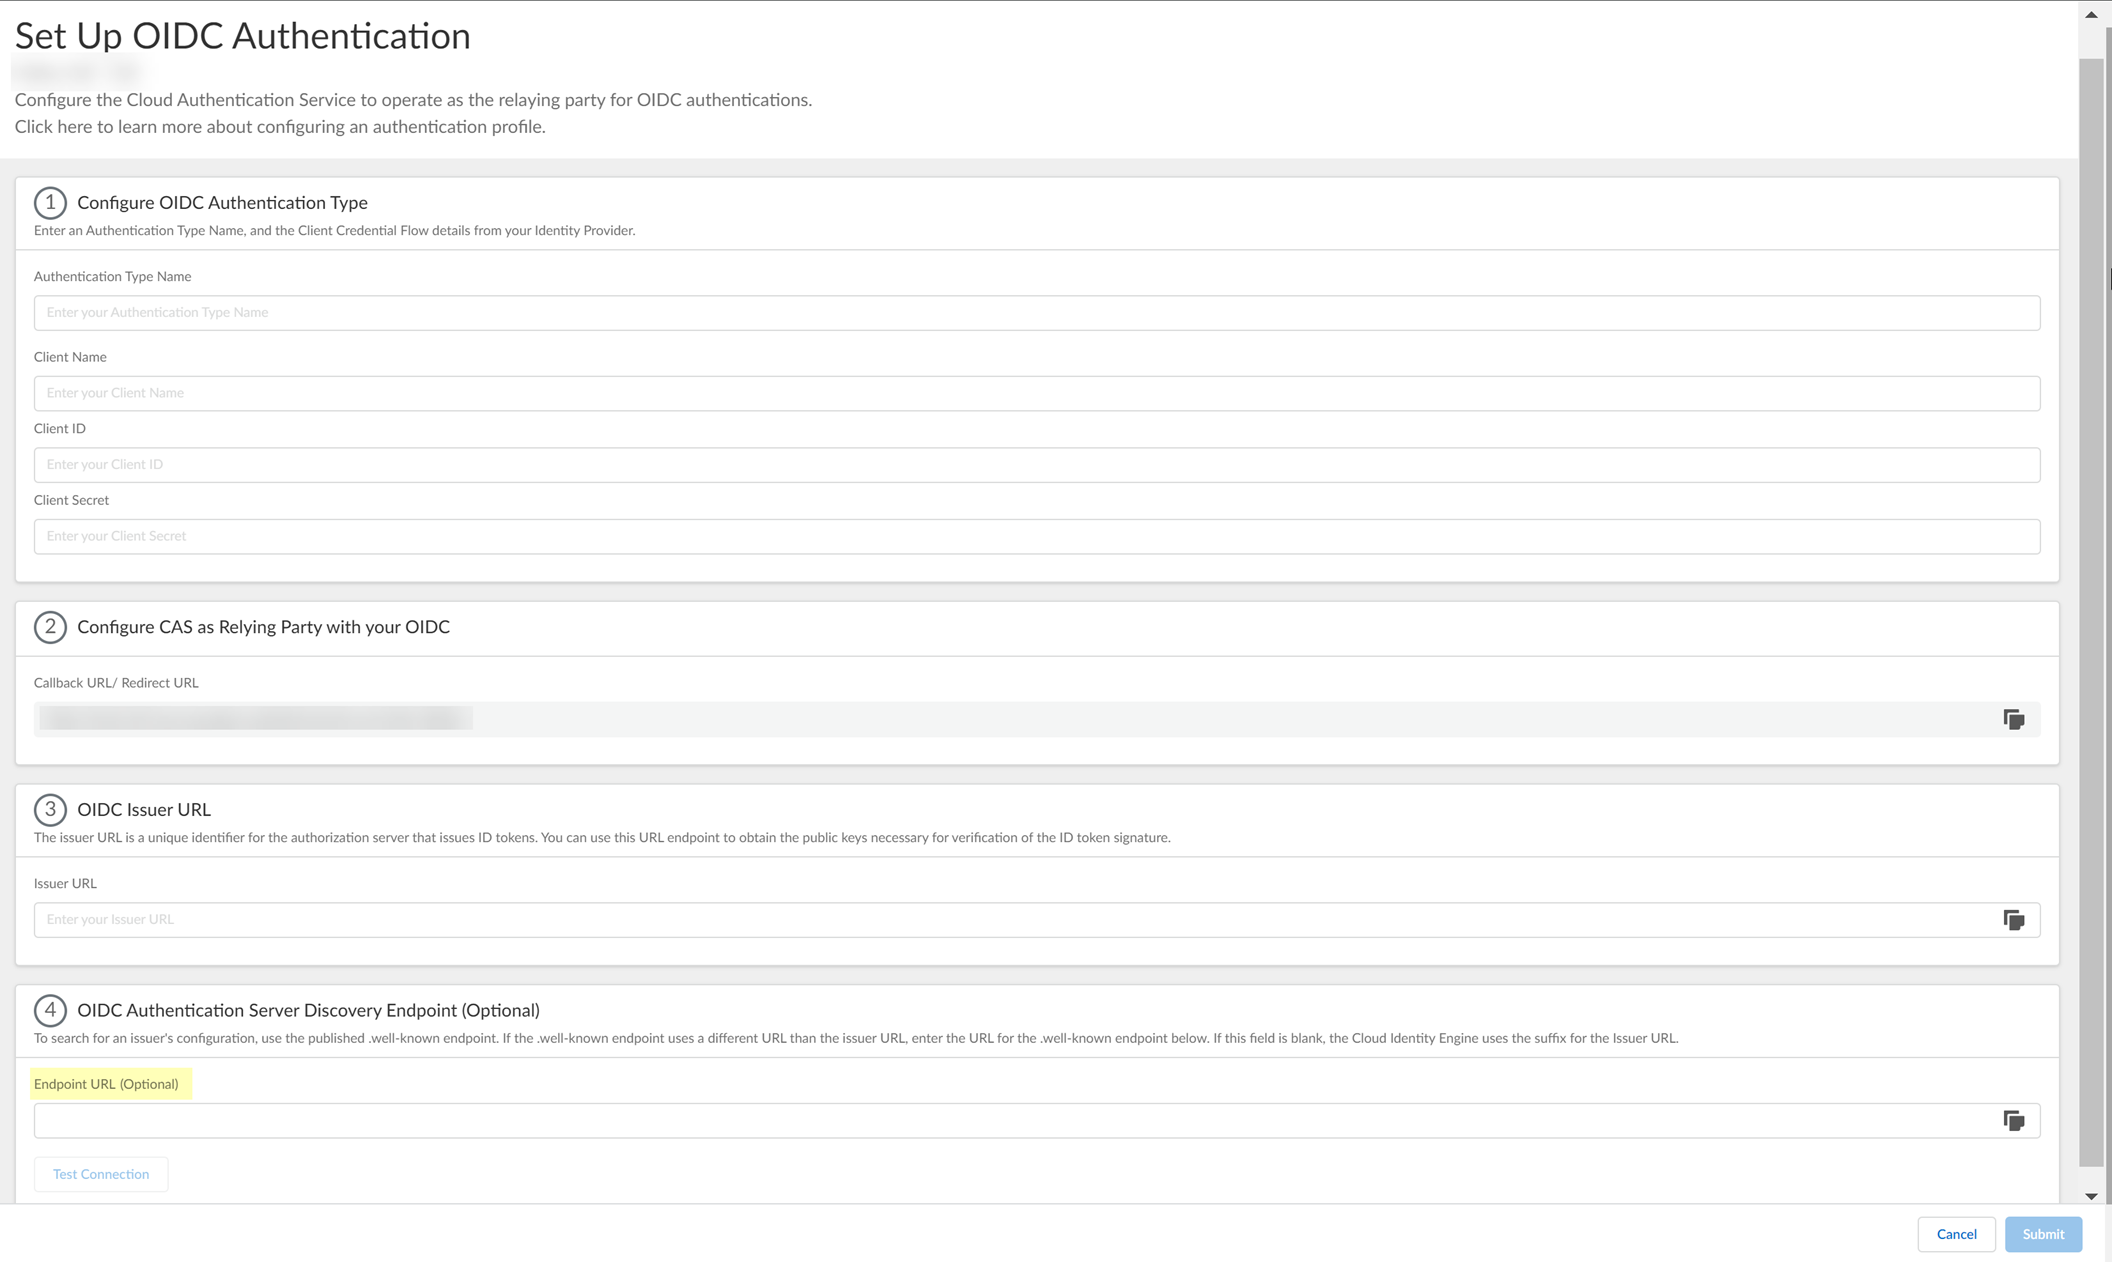
Configure an OIDC Authentication Type
OpenID Connect (OIDC) provides SSO flexibility.
[GOTCHA] Supports Prisma Access Browser; *does not* support GlobalProtect or Authentication Portal.
Username attribute is determined in order: email, preferred_username, username, sub.
Select your OIDC provider:
Azure AD
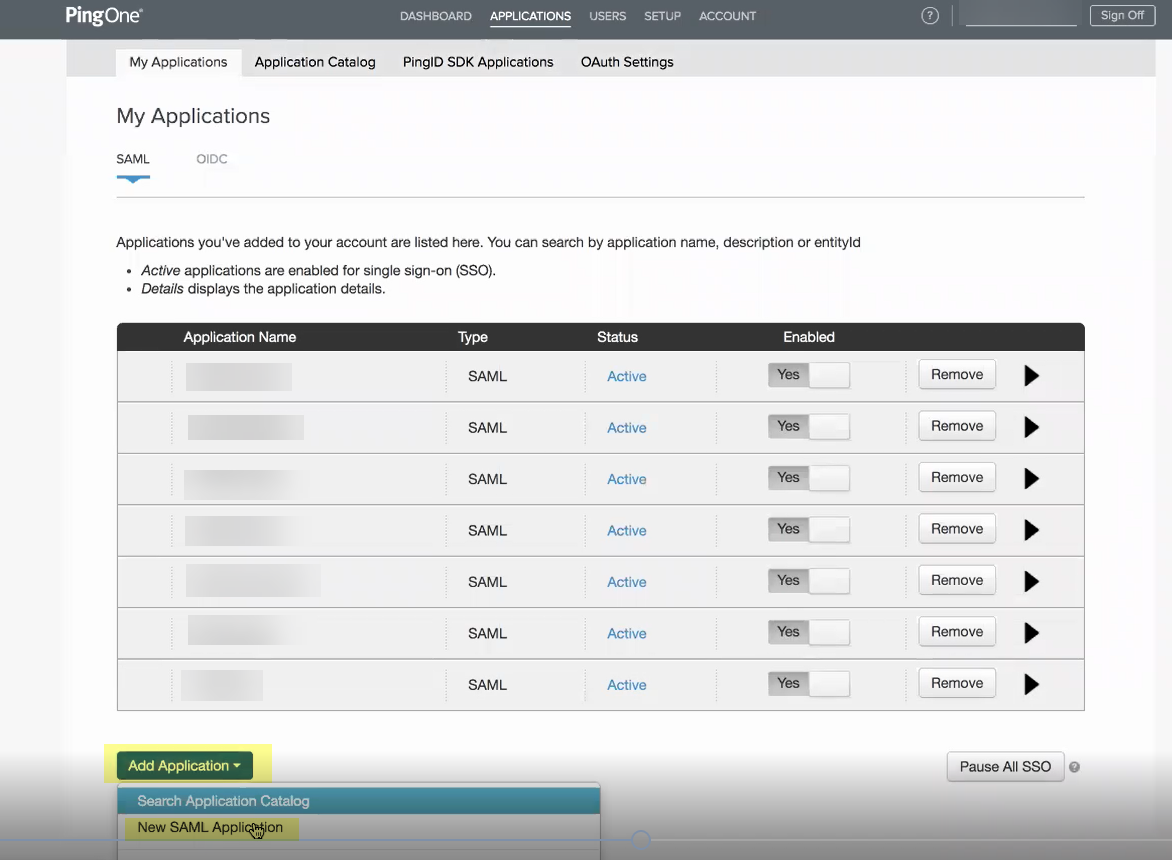
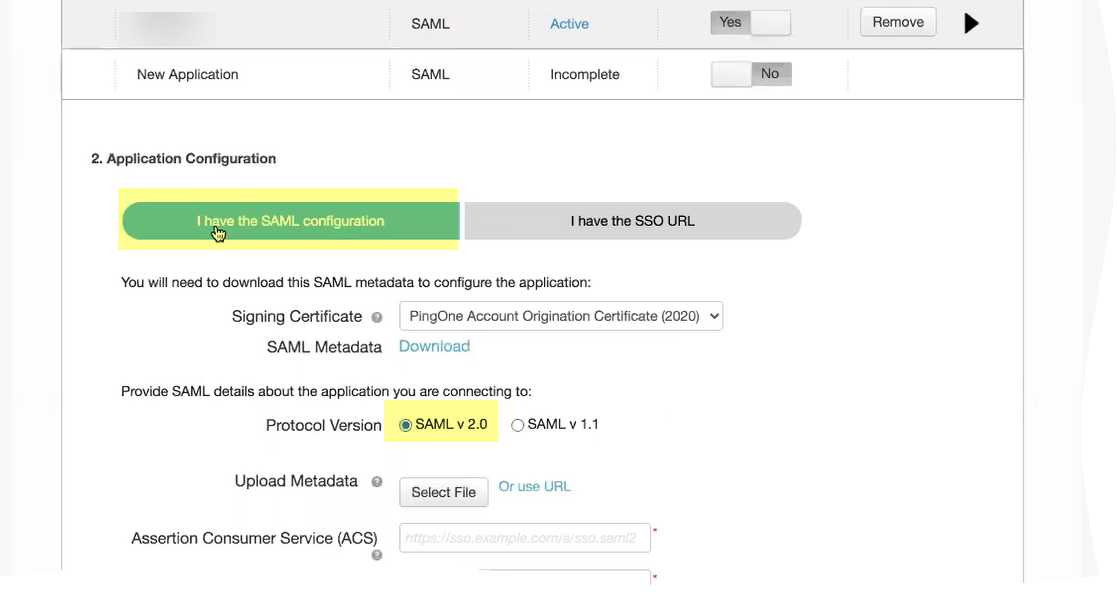
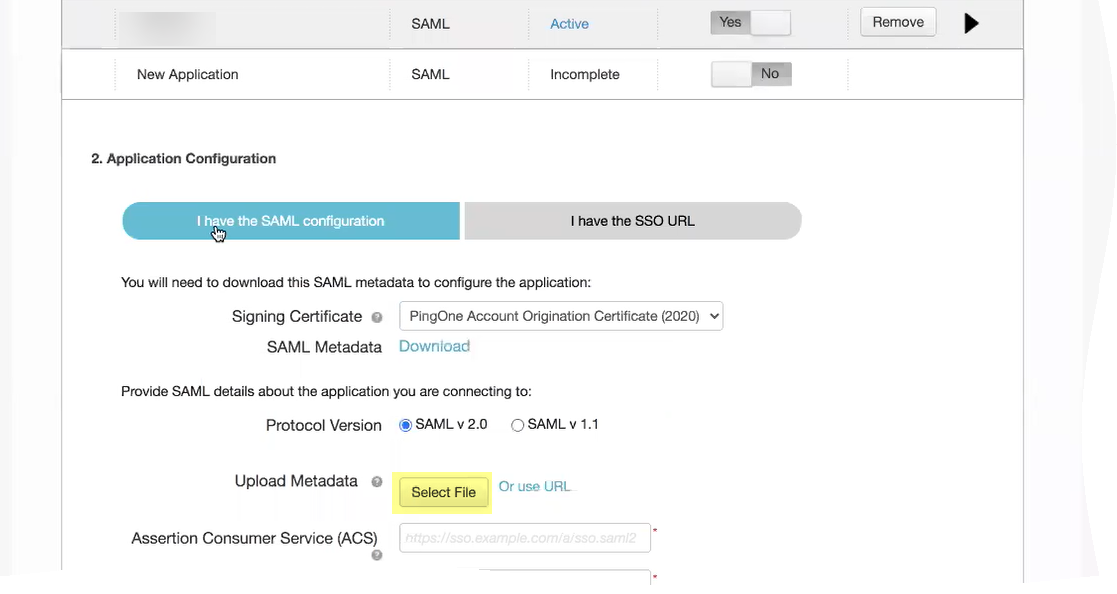
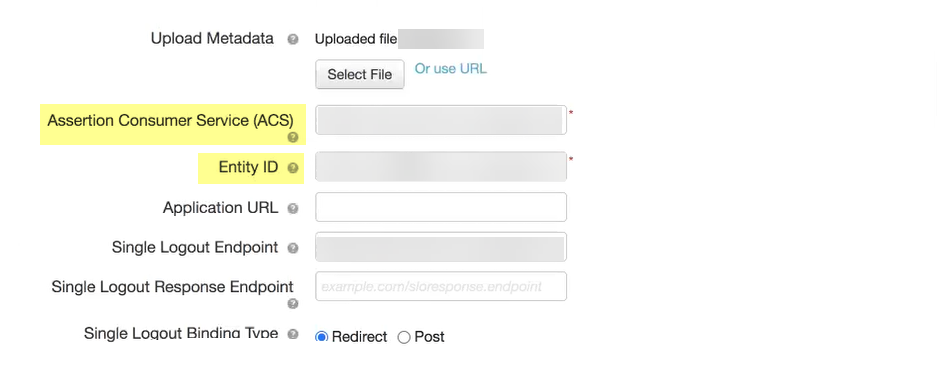
Okta
PingOne
Google
Configure OIDC for Azure
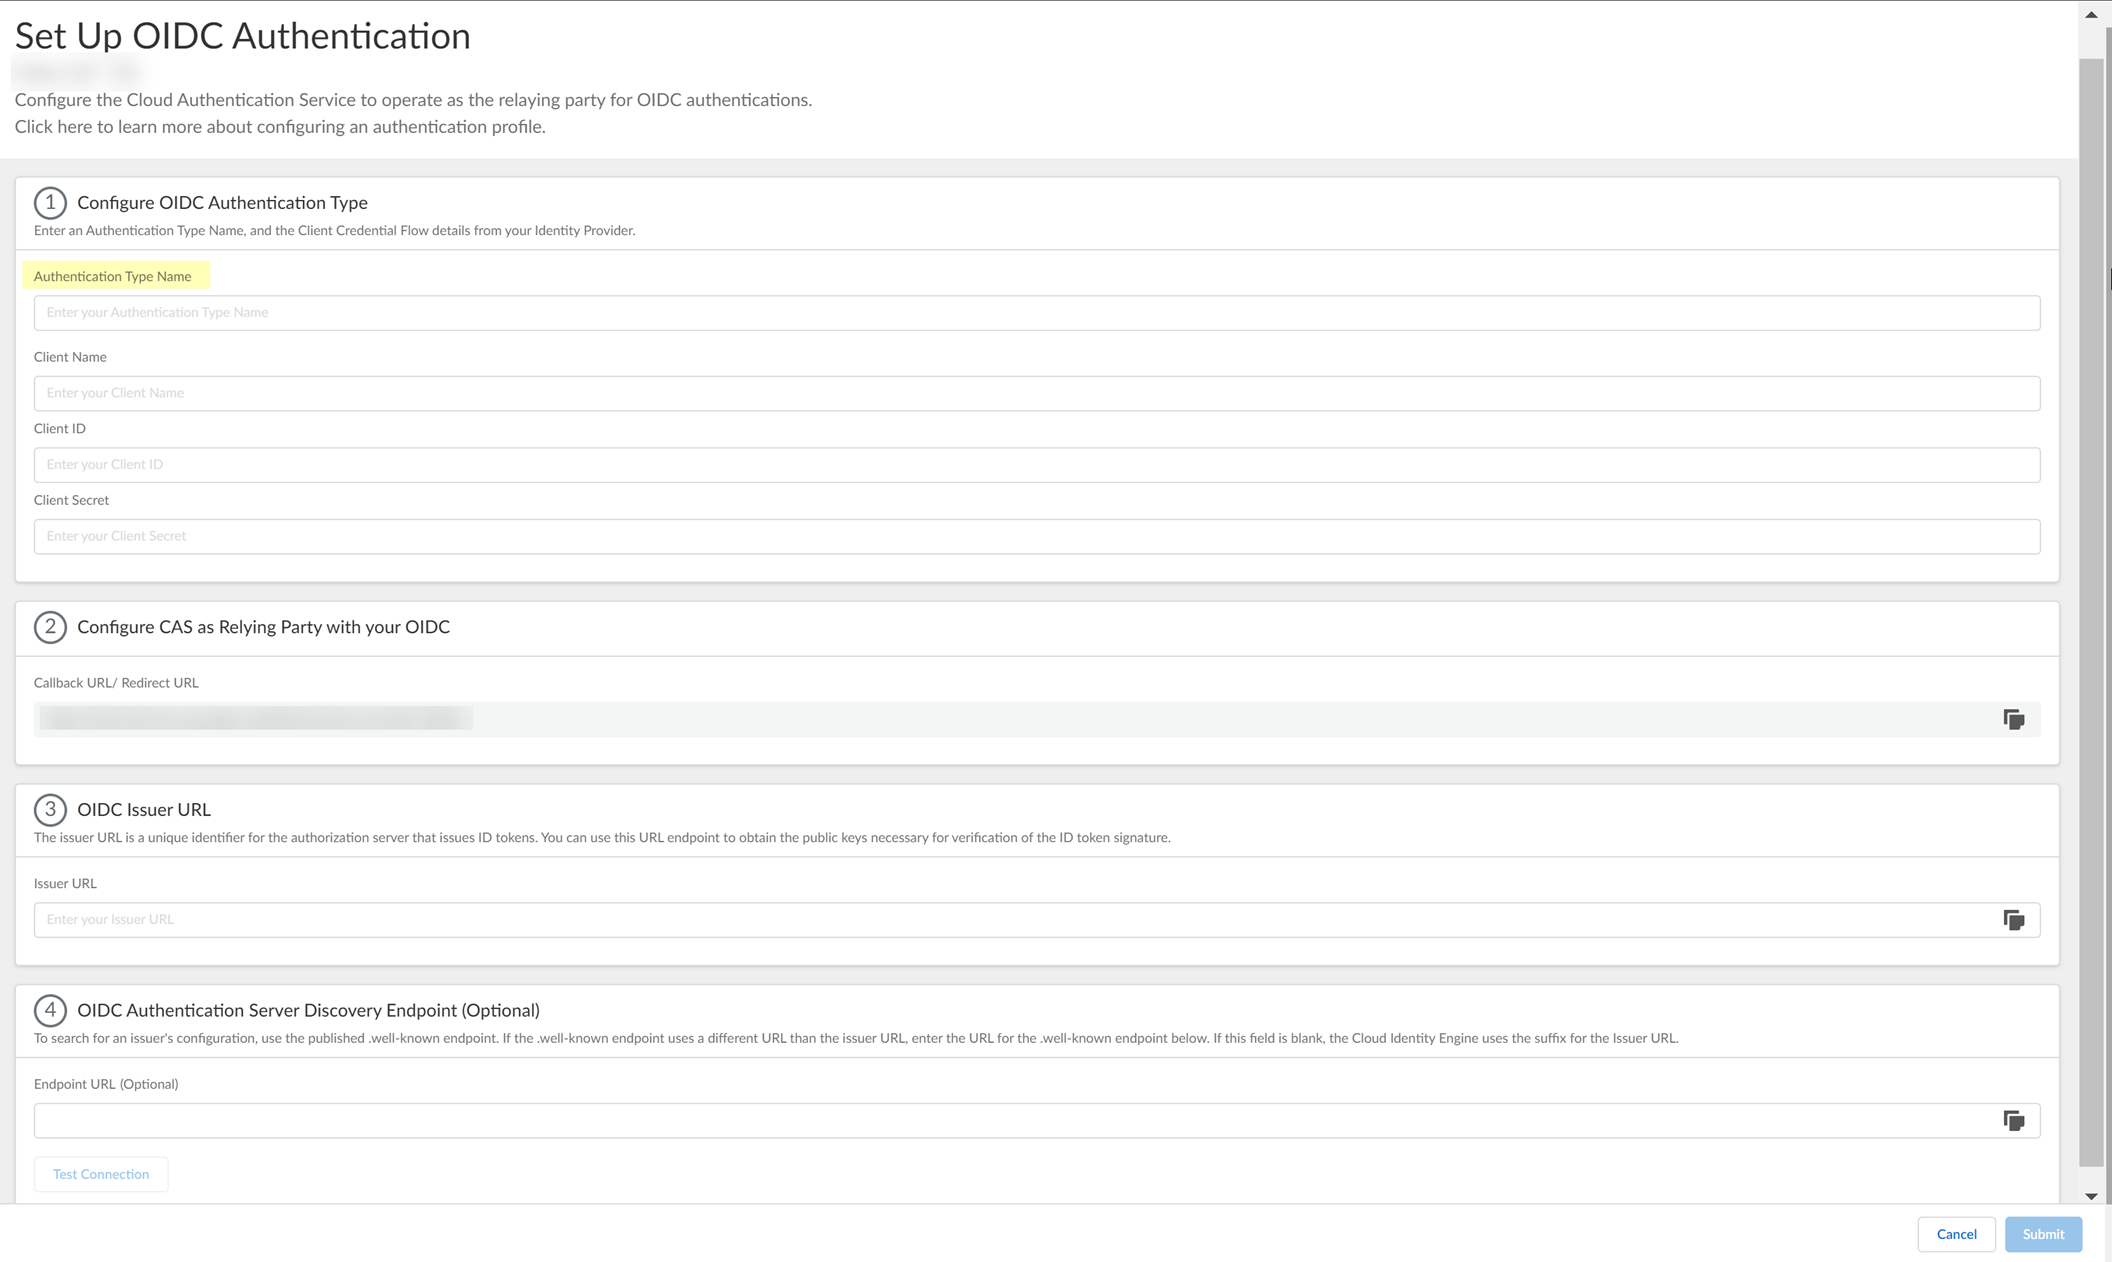
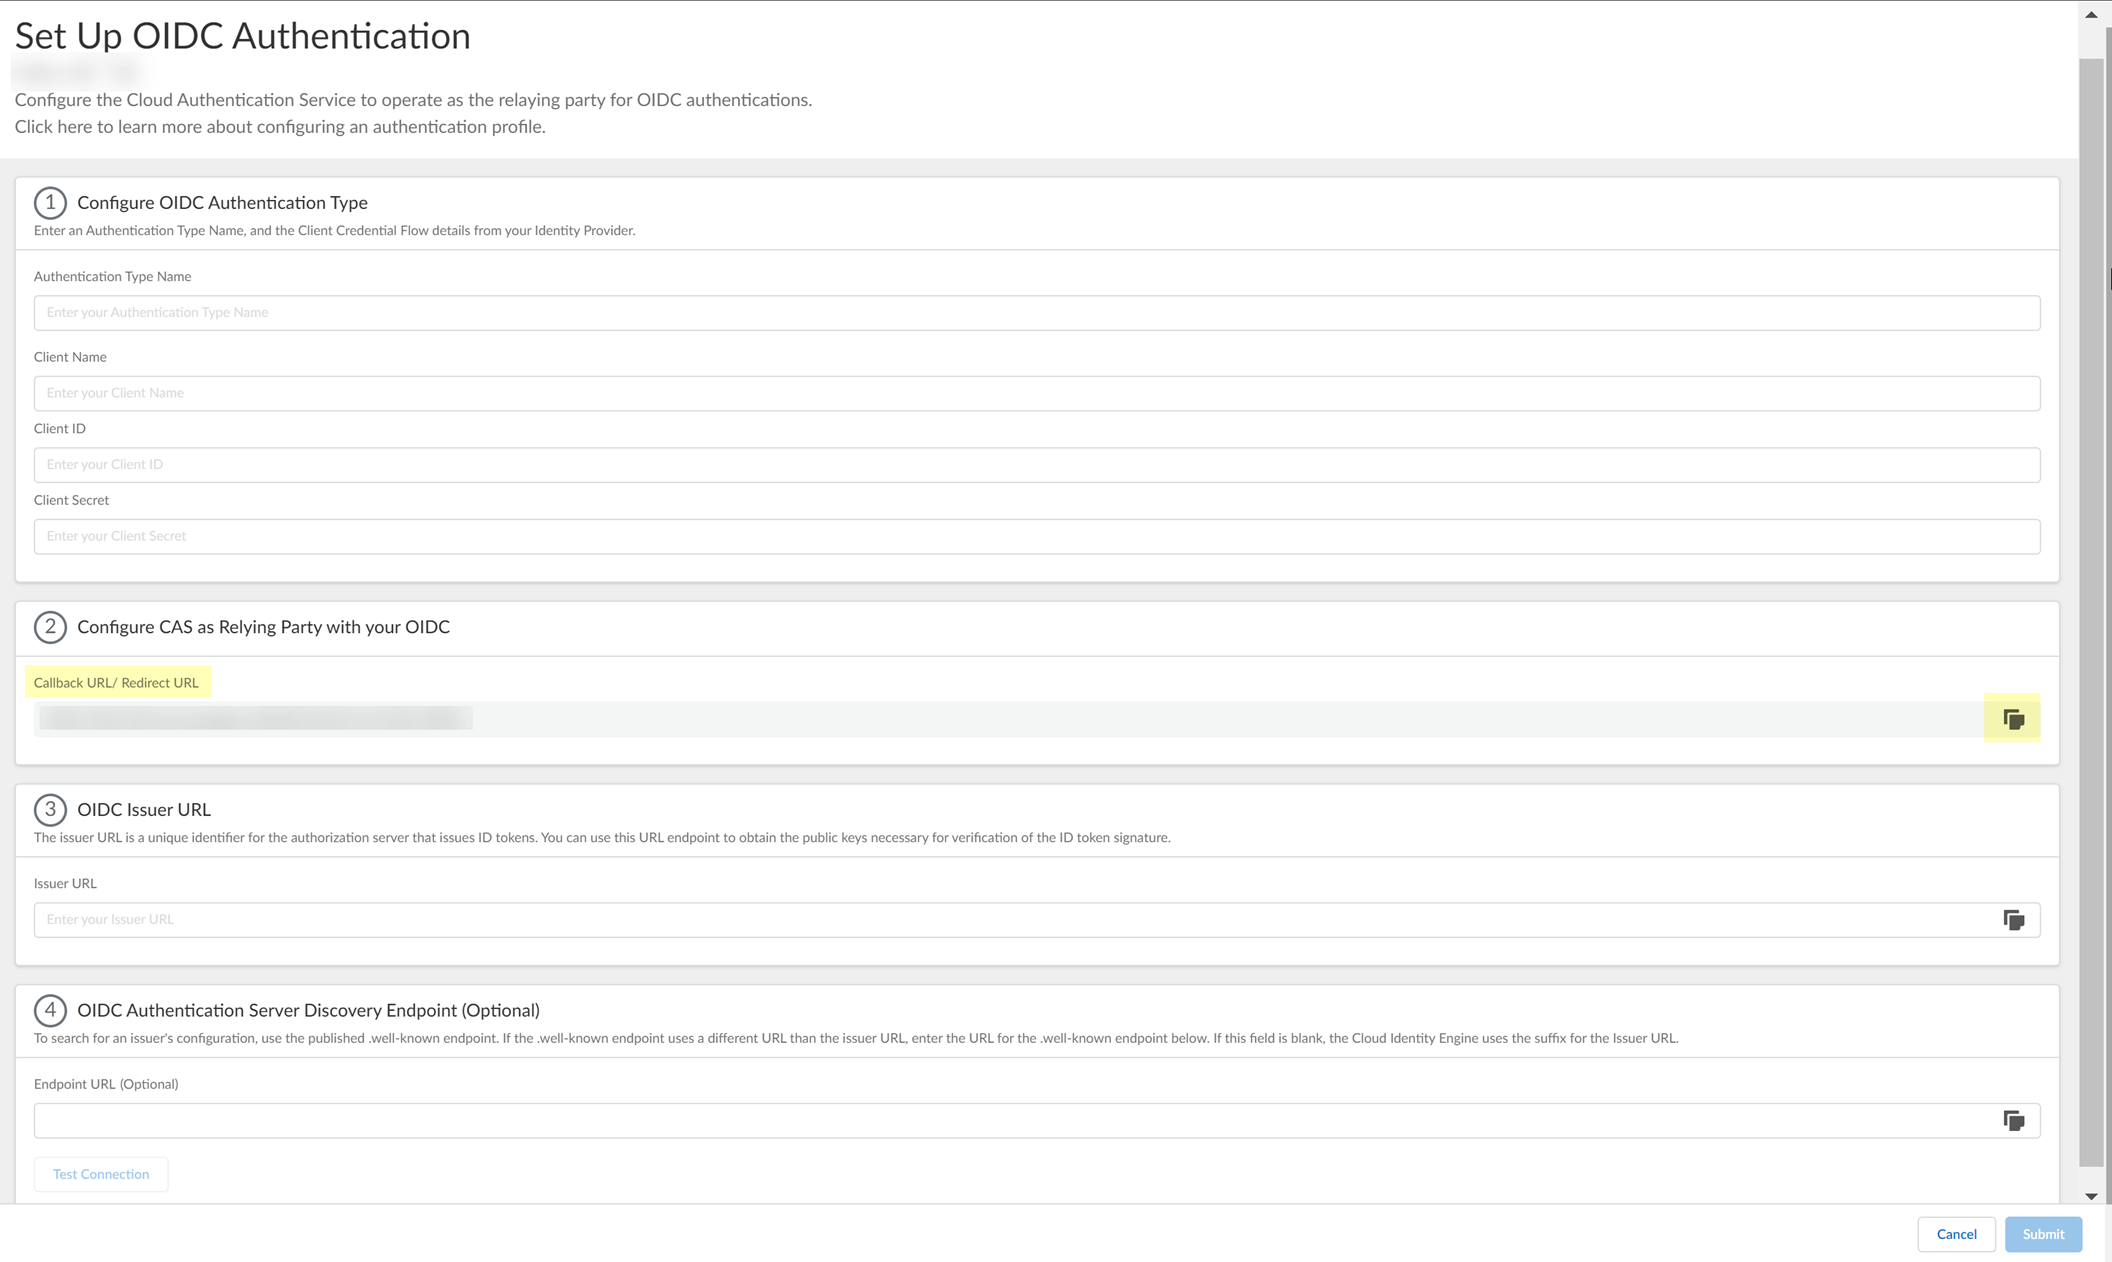
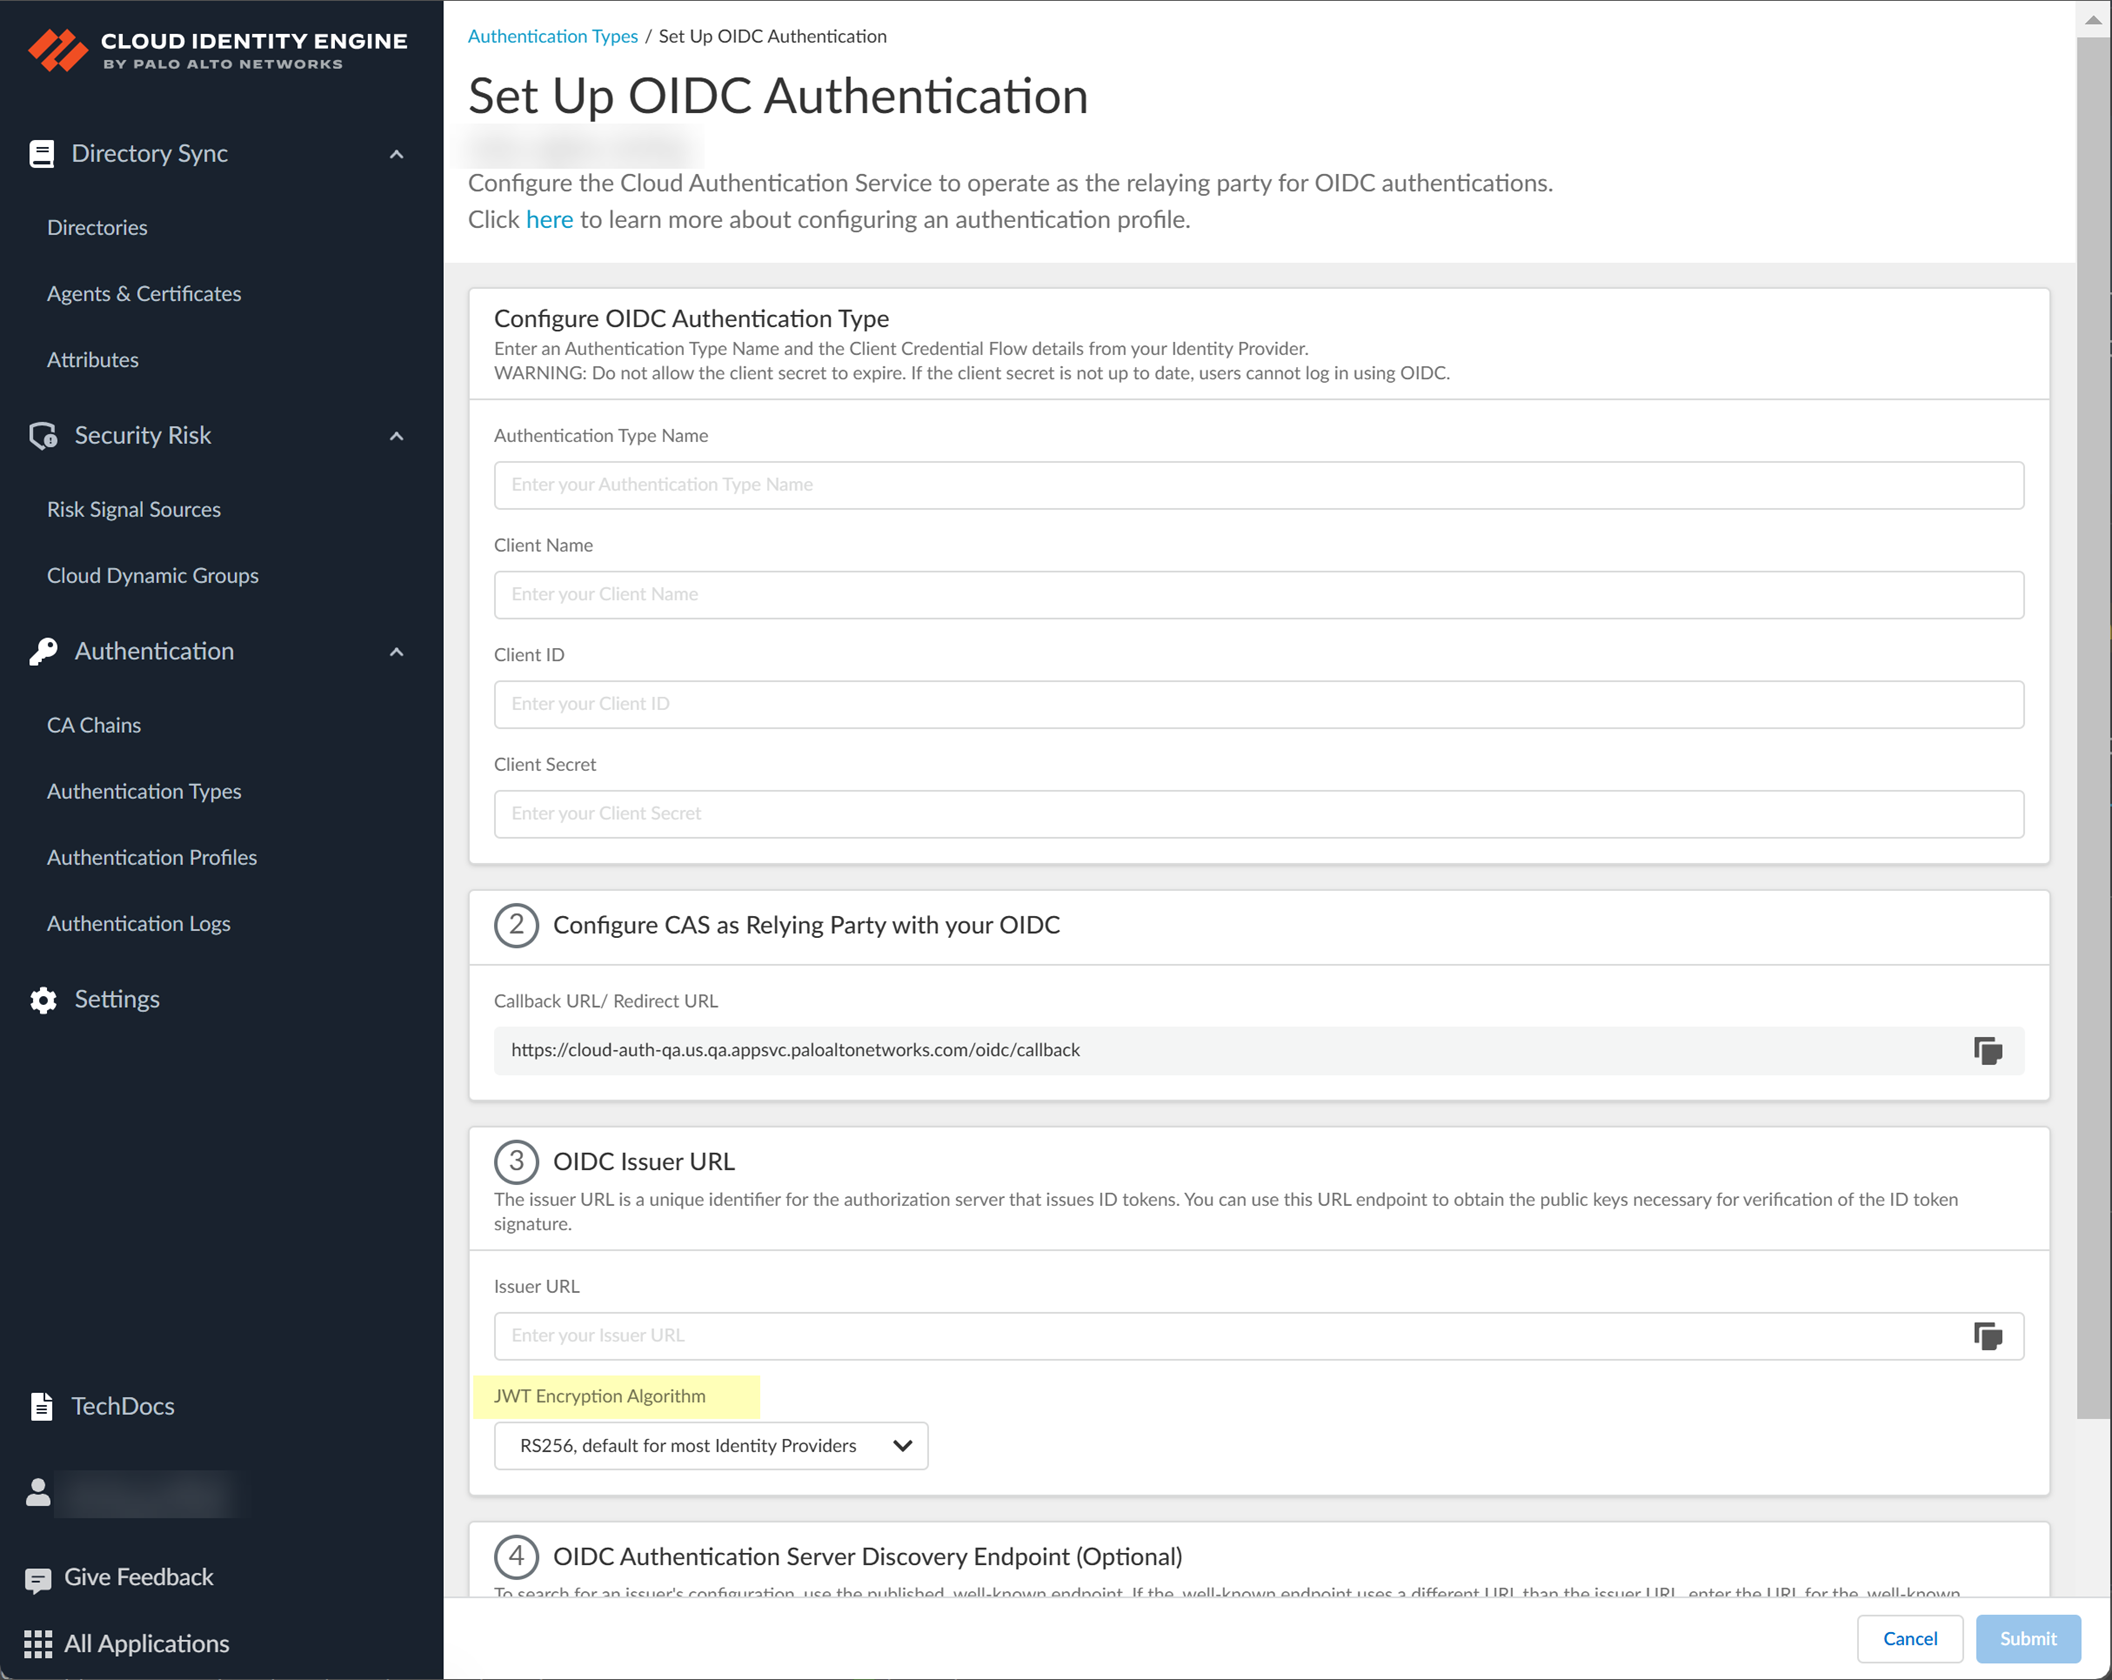
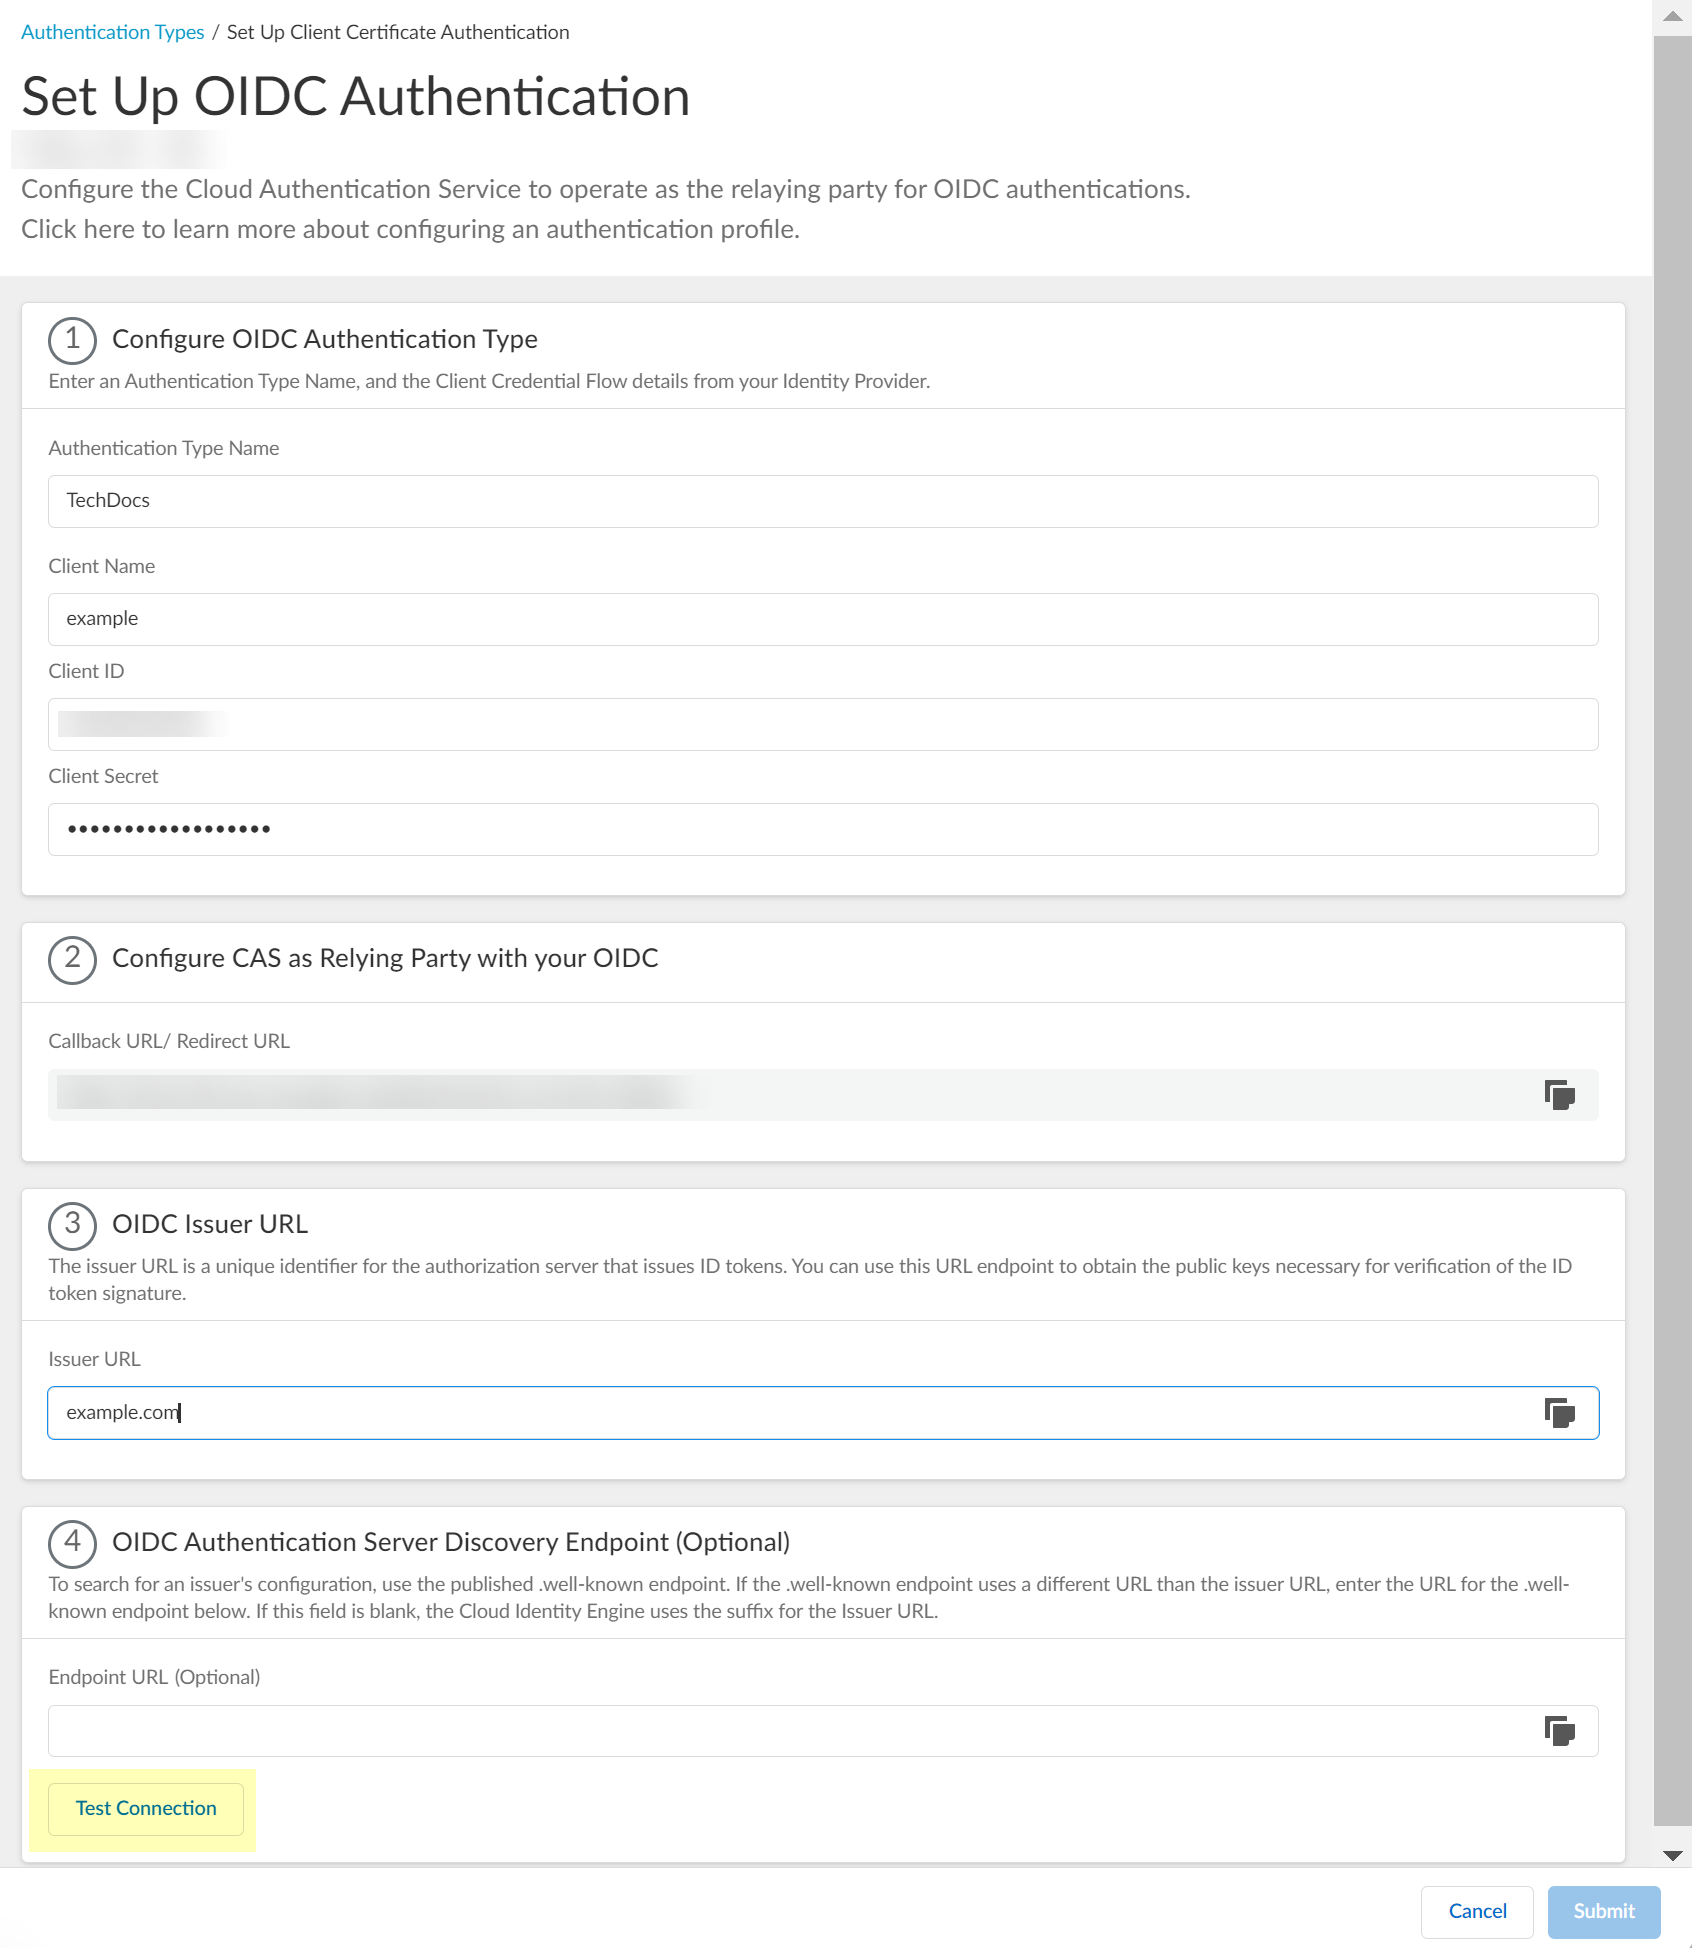
In CIE: Go to Authentication Types > Add > OIDC > Set Up.
Enter Auth Type Name. Copy the
Callback URL/Redirect URL
. Select JWT Encryption Algorithm.
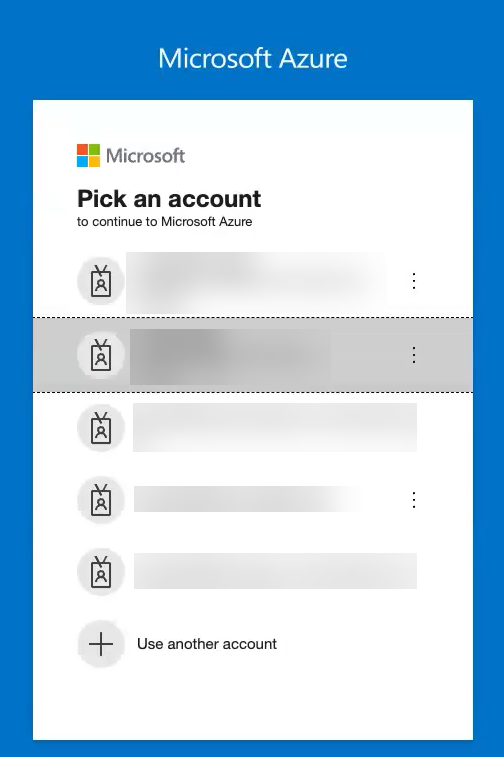
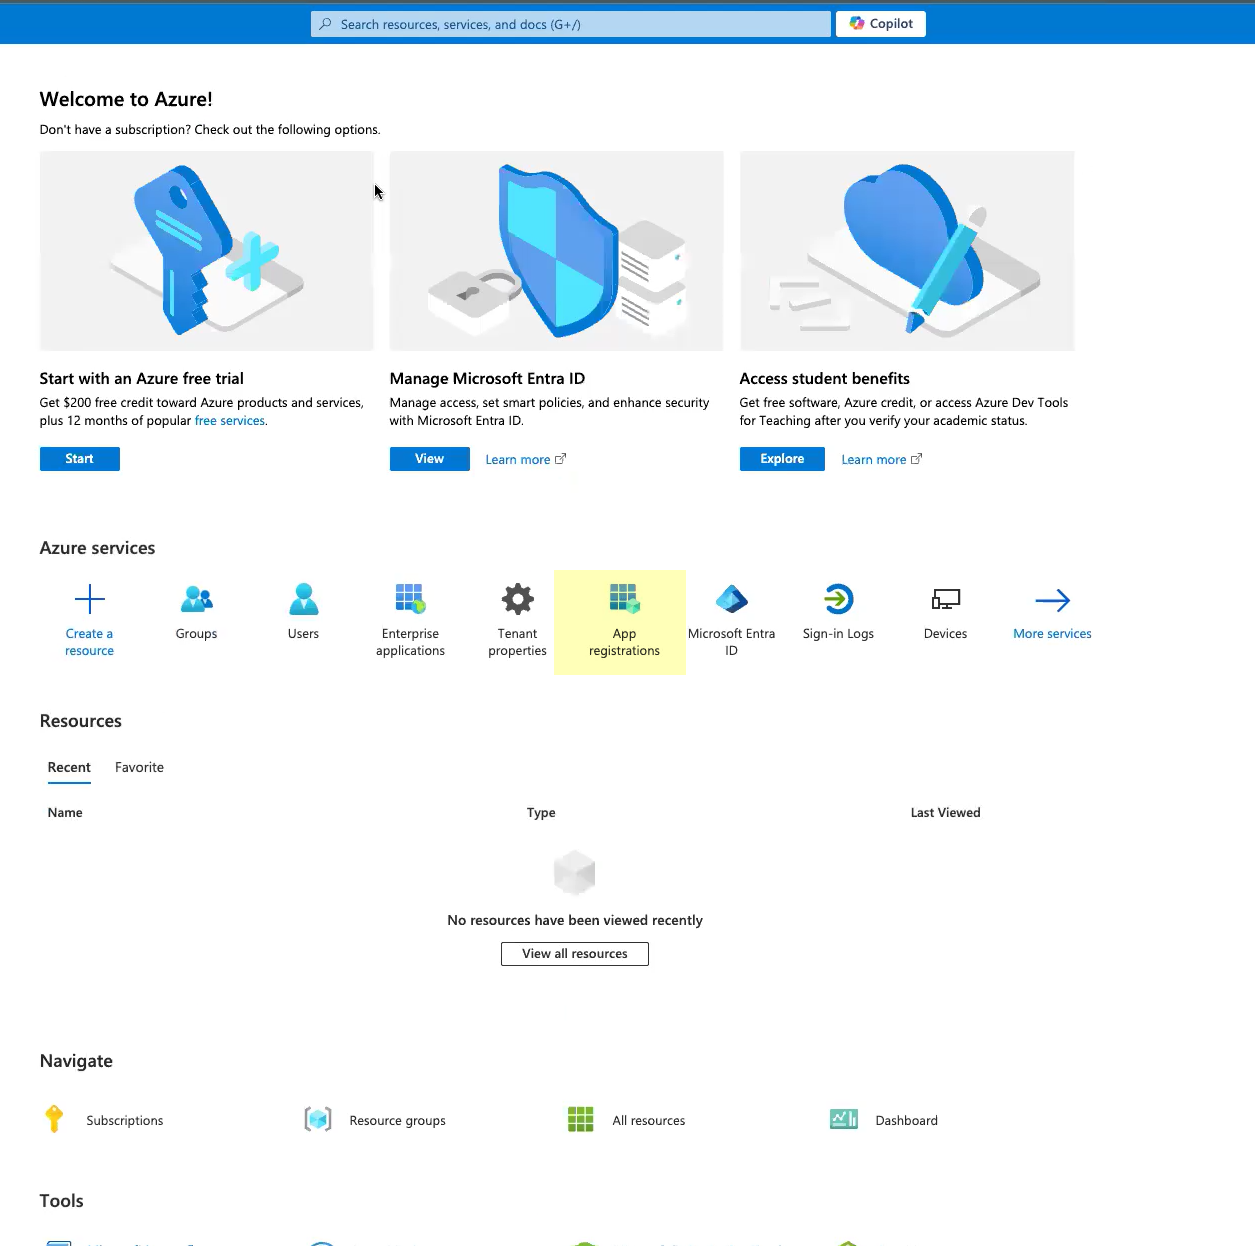
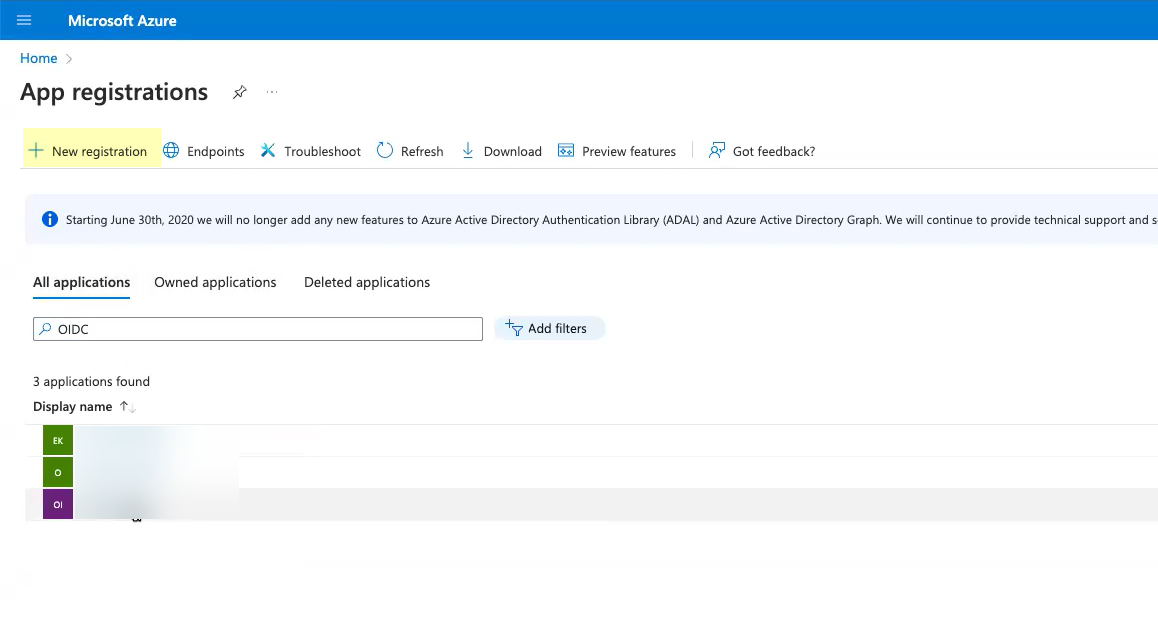
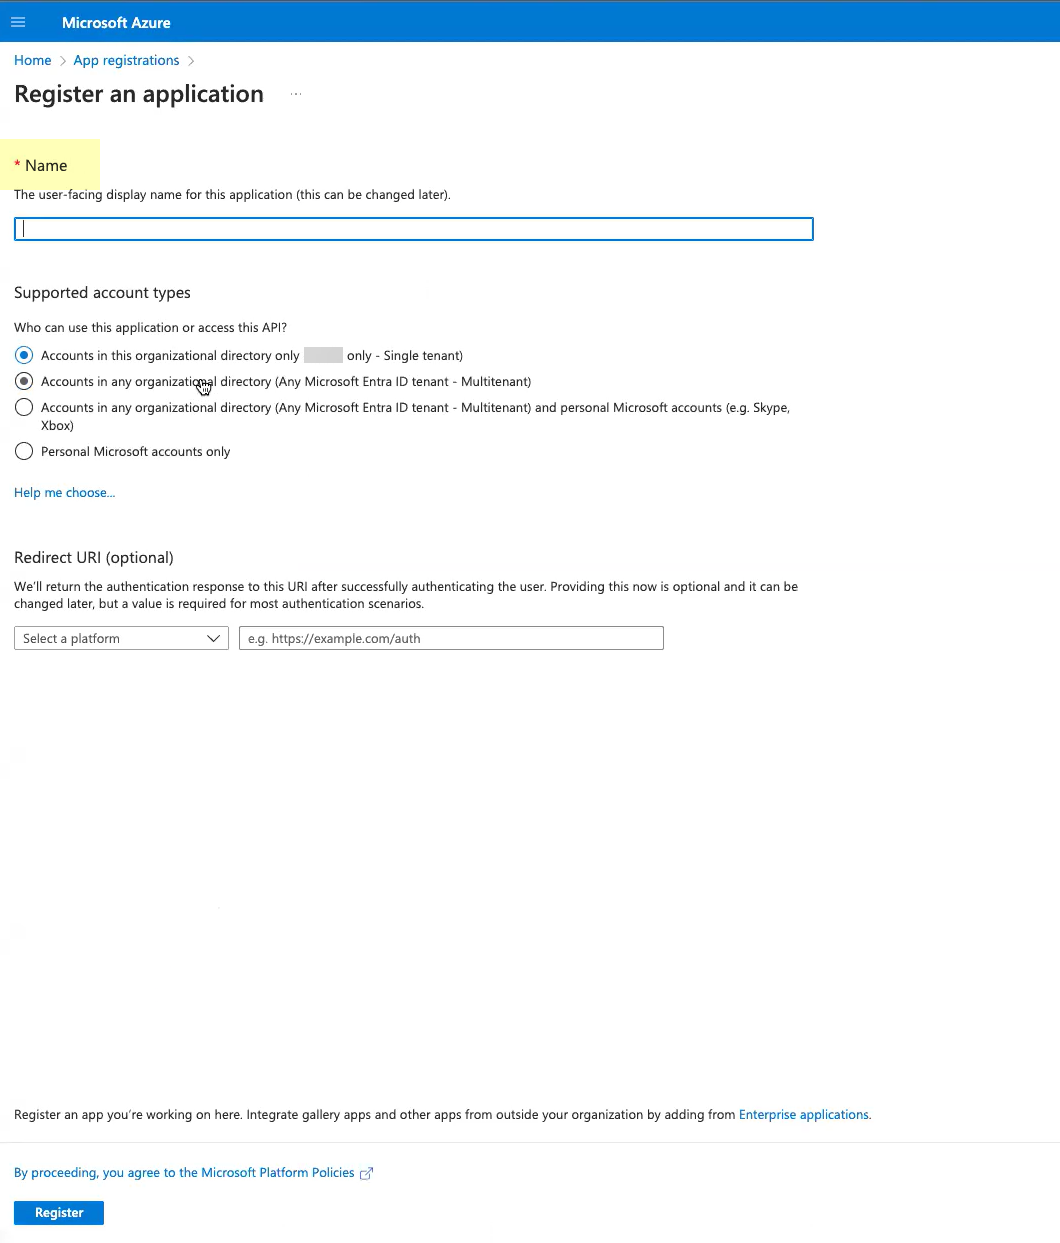
In Azure Portal: Go to Azure AD > App registrations > New registration.
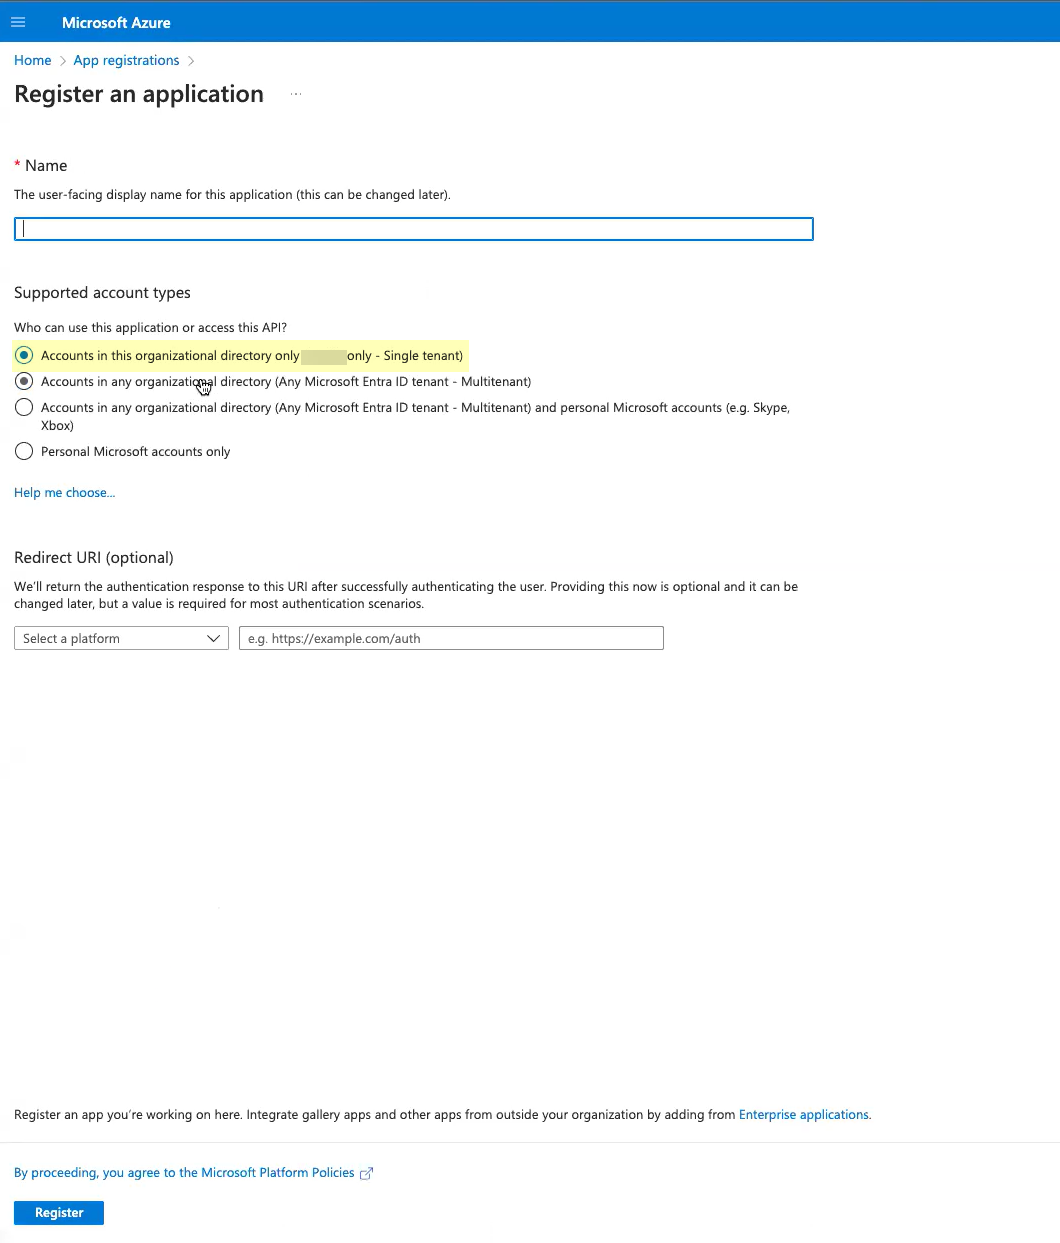
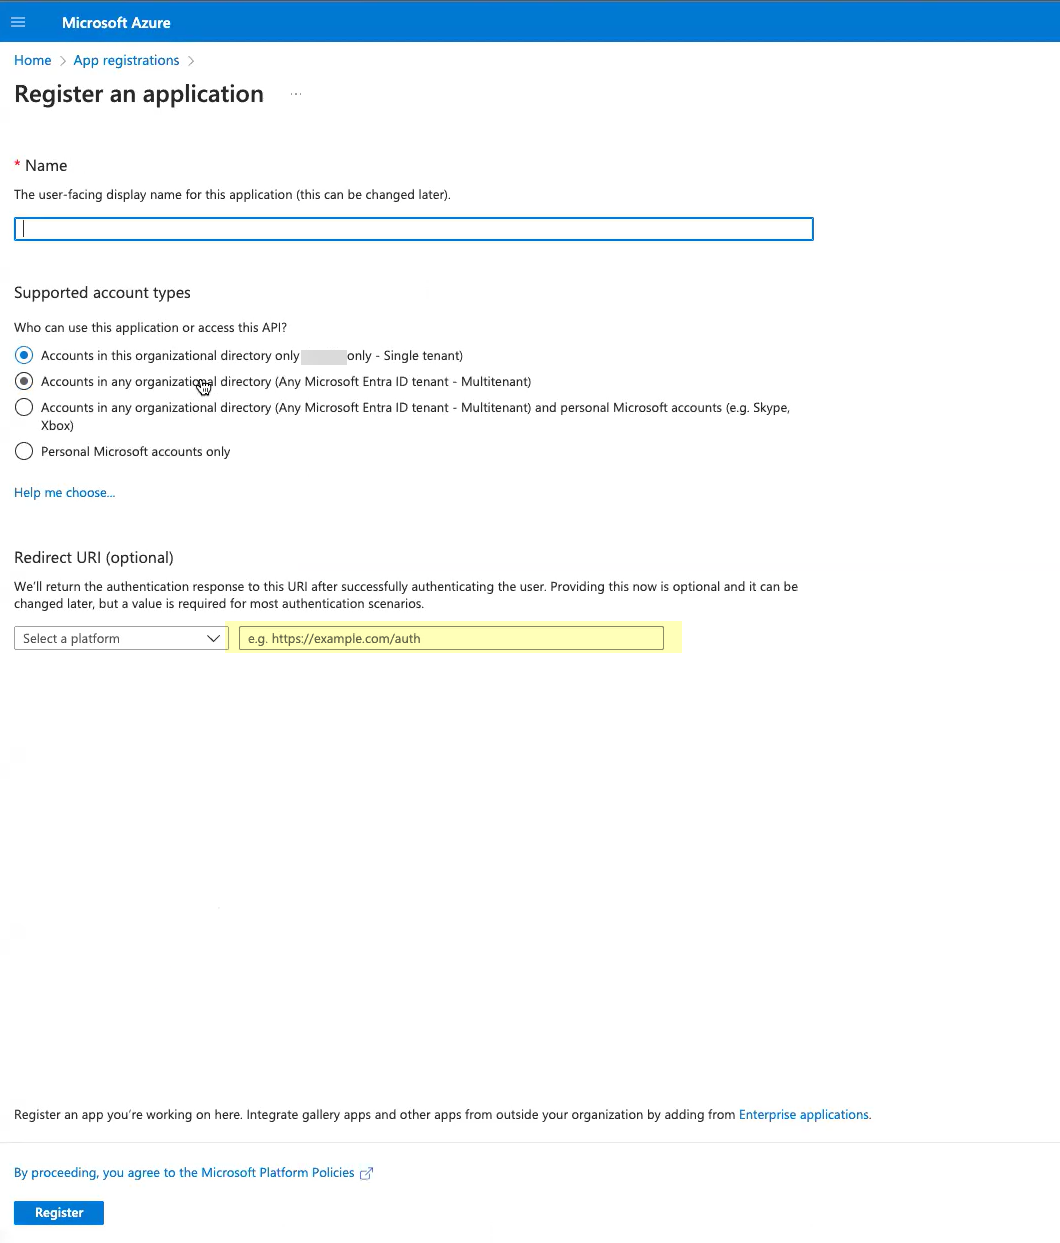
Enter Name. Select "Accounts in this organizational directory only". Enter CIE Callback URL as Redirect URI. Register.
Assign Users/Groups to the app registration.
Copy App (client) ID. Go to Certificates & secrets > New client secret. Create secret,
[CRITICAL] copy the secret Value immediately.
(Optional) Copy OIDC metadata document URL from Endpoints.
In CIE: Enter Client Name (Azure app name), Client ID, Client Secret. Enter Issuer URL:
https://login.microsoftonline.com/organizations/2.0/
. (Optional) Enter Endpoint URL.
Click
Test Connection
. Submit.
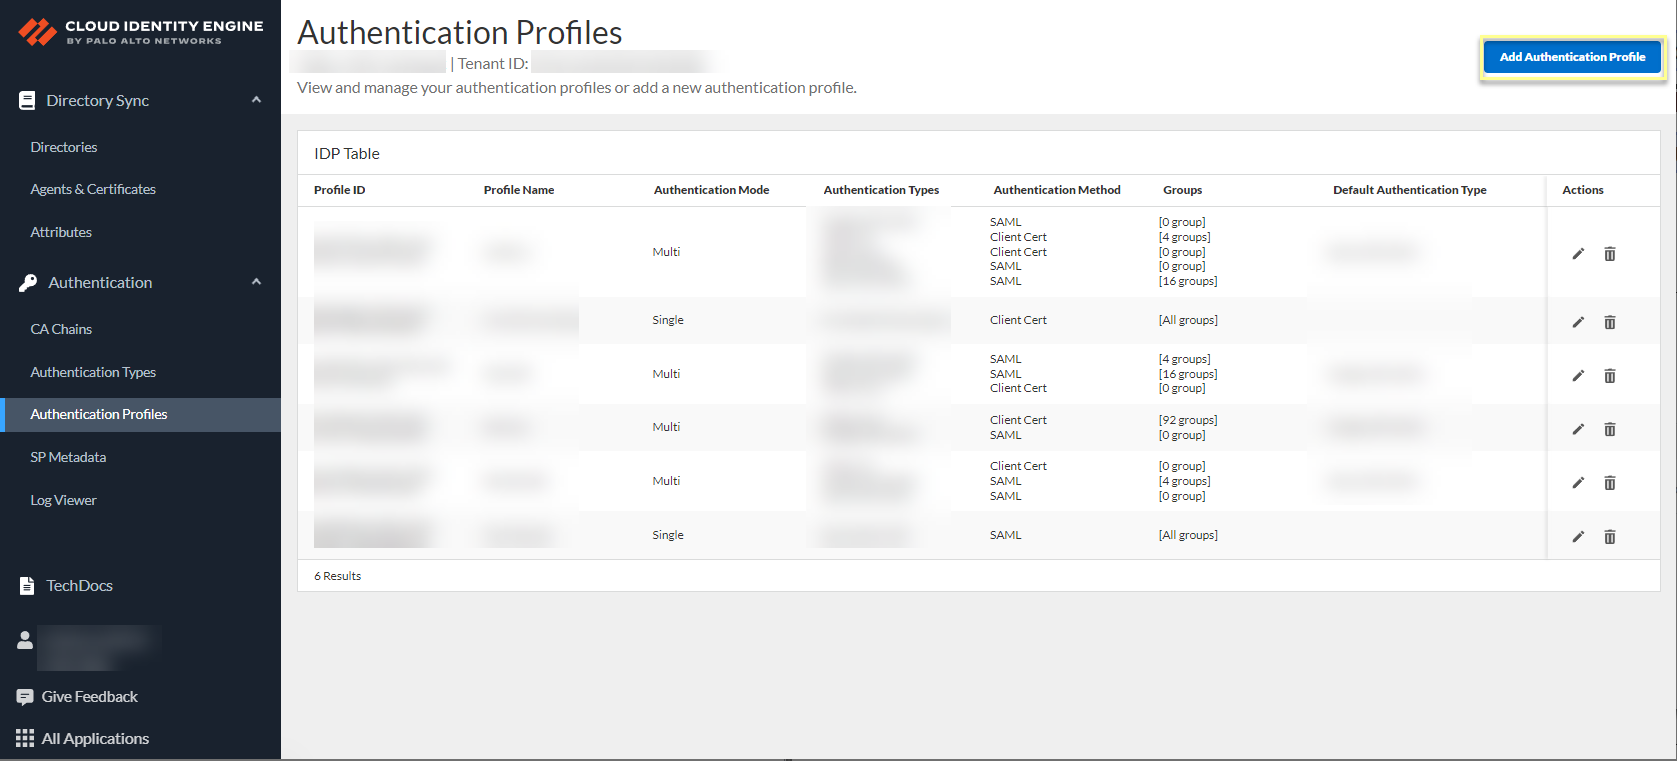
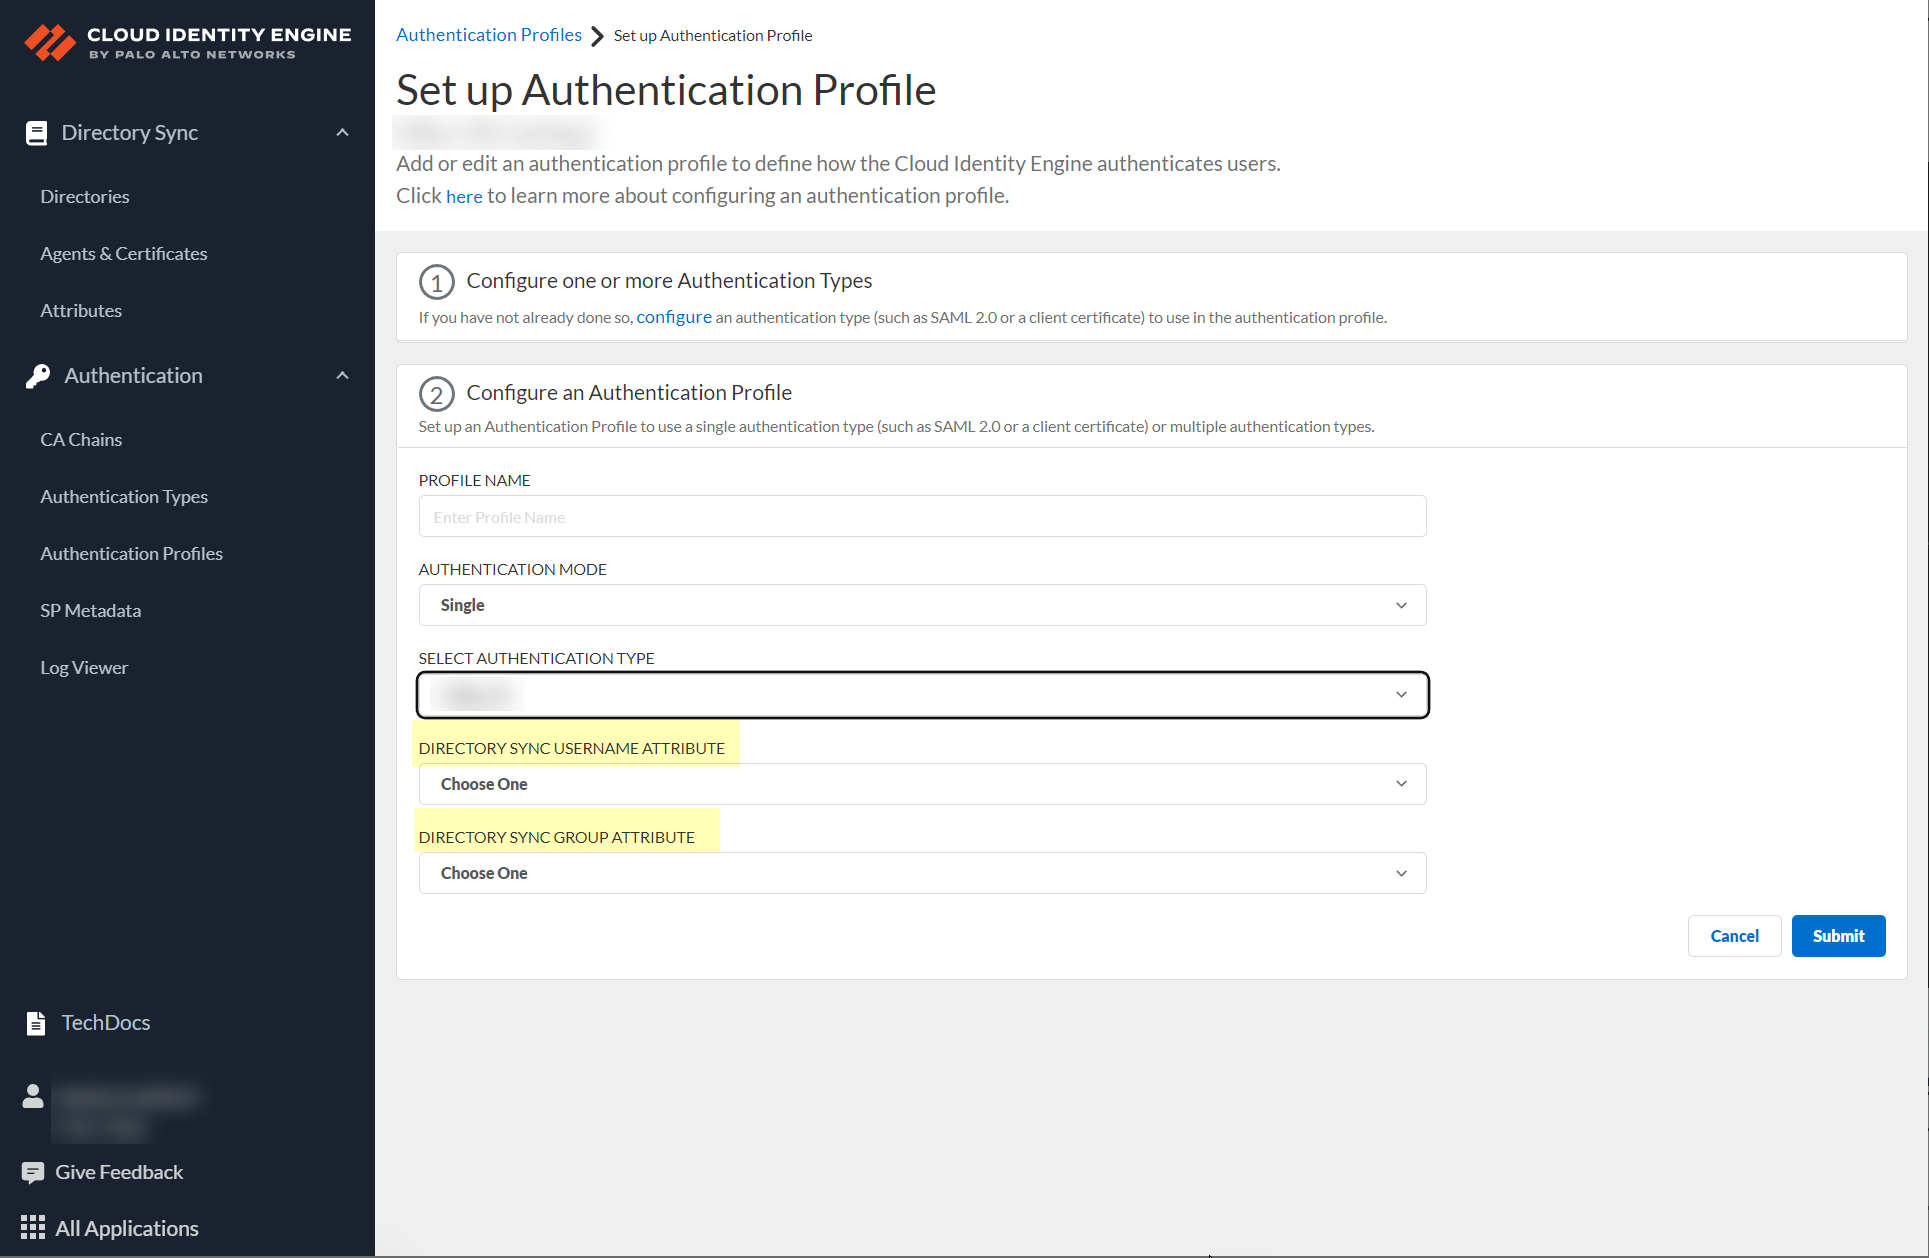
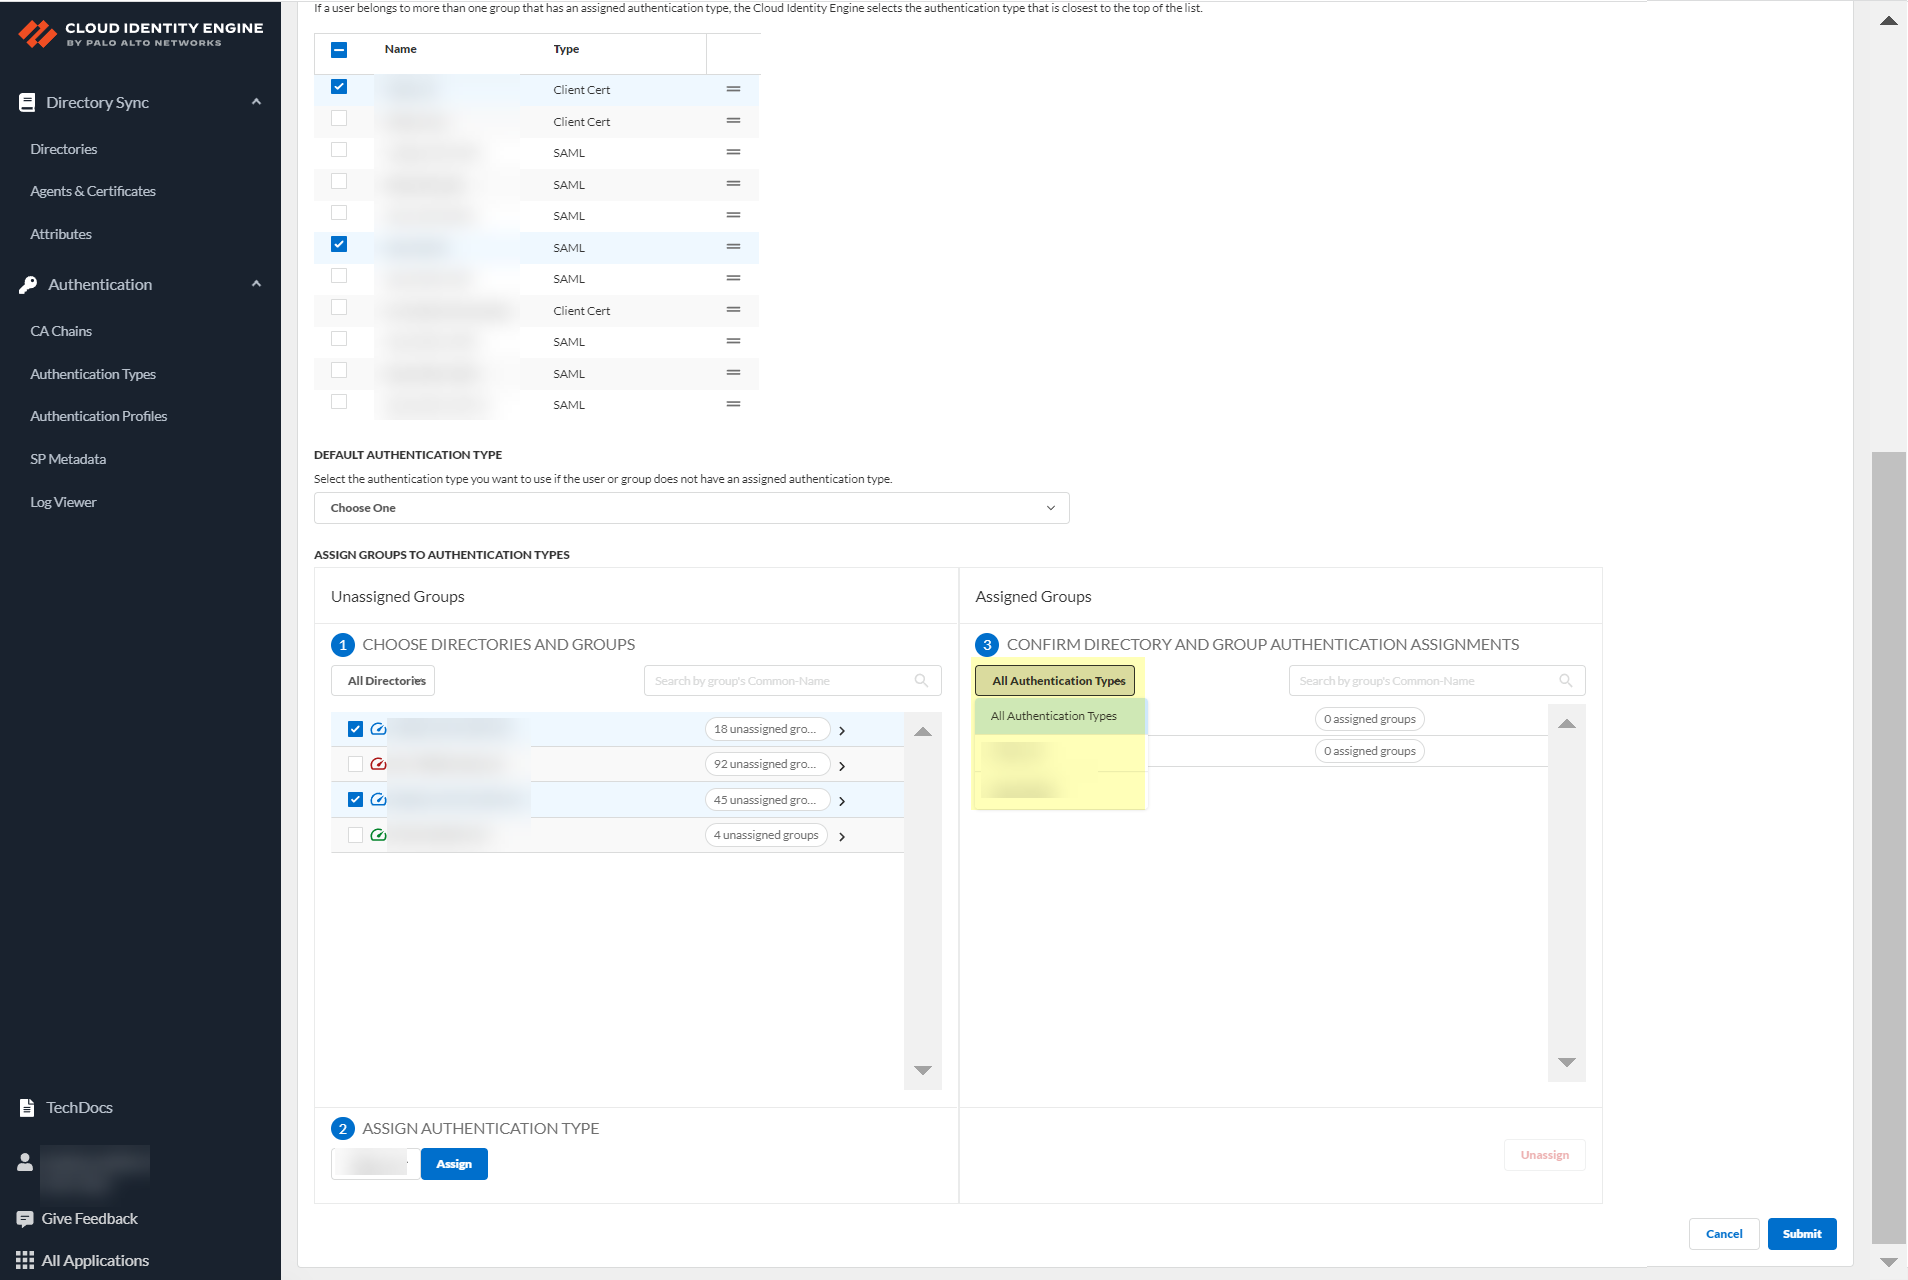
Set Up an Authentication Profile
[PCNSA/PCNSE] Defines which authentication types (SAML, Client Cert, OIDC) apply to which users/groups for authentication requests forwarded by the firewall/Panorama.
Using multiple authentication types requires a configured directory in CIE. Single Client Cert also usually requires a directory. Single SAML does not strictly require a directory config within CIE itself.
Go to Authentication > Authentication Profiles >
Add Authentication Profile
.
Ensure required Authentication Types (SAML/Cert/OIDC) are already configured.
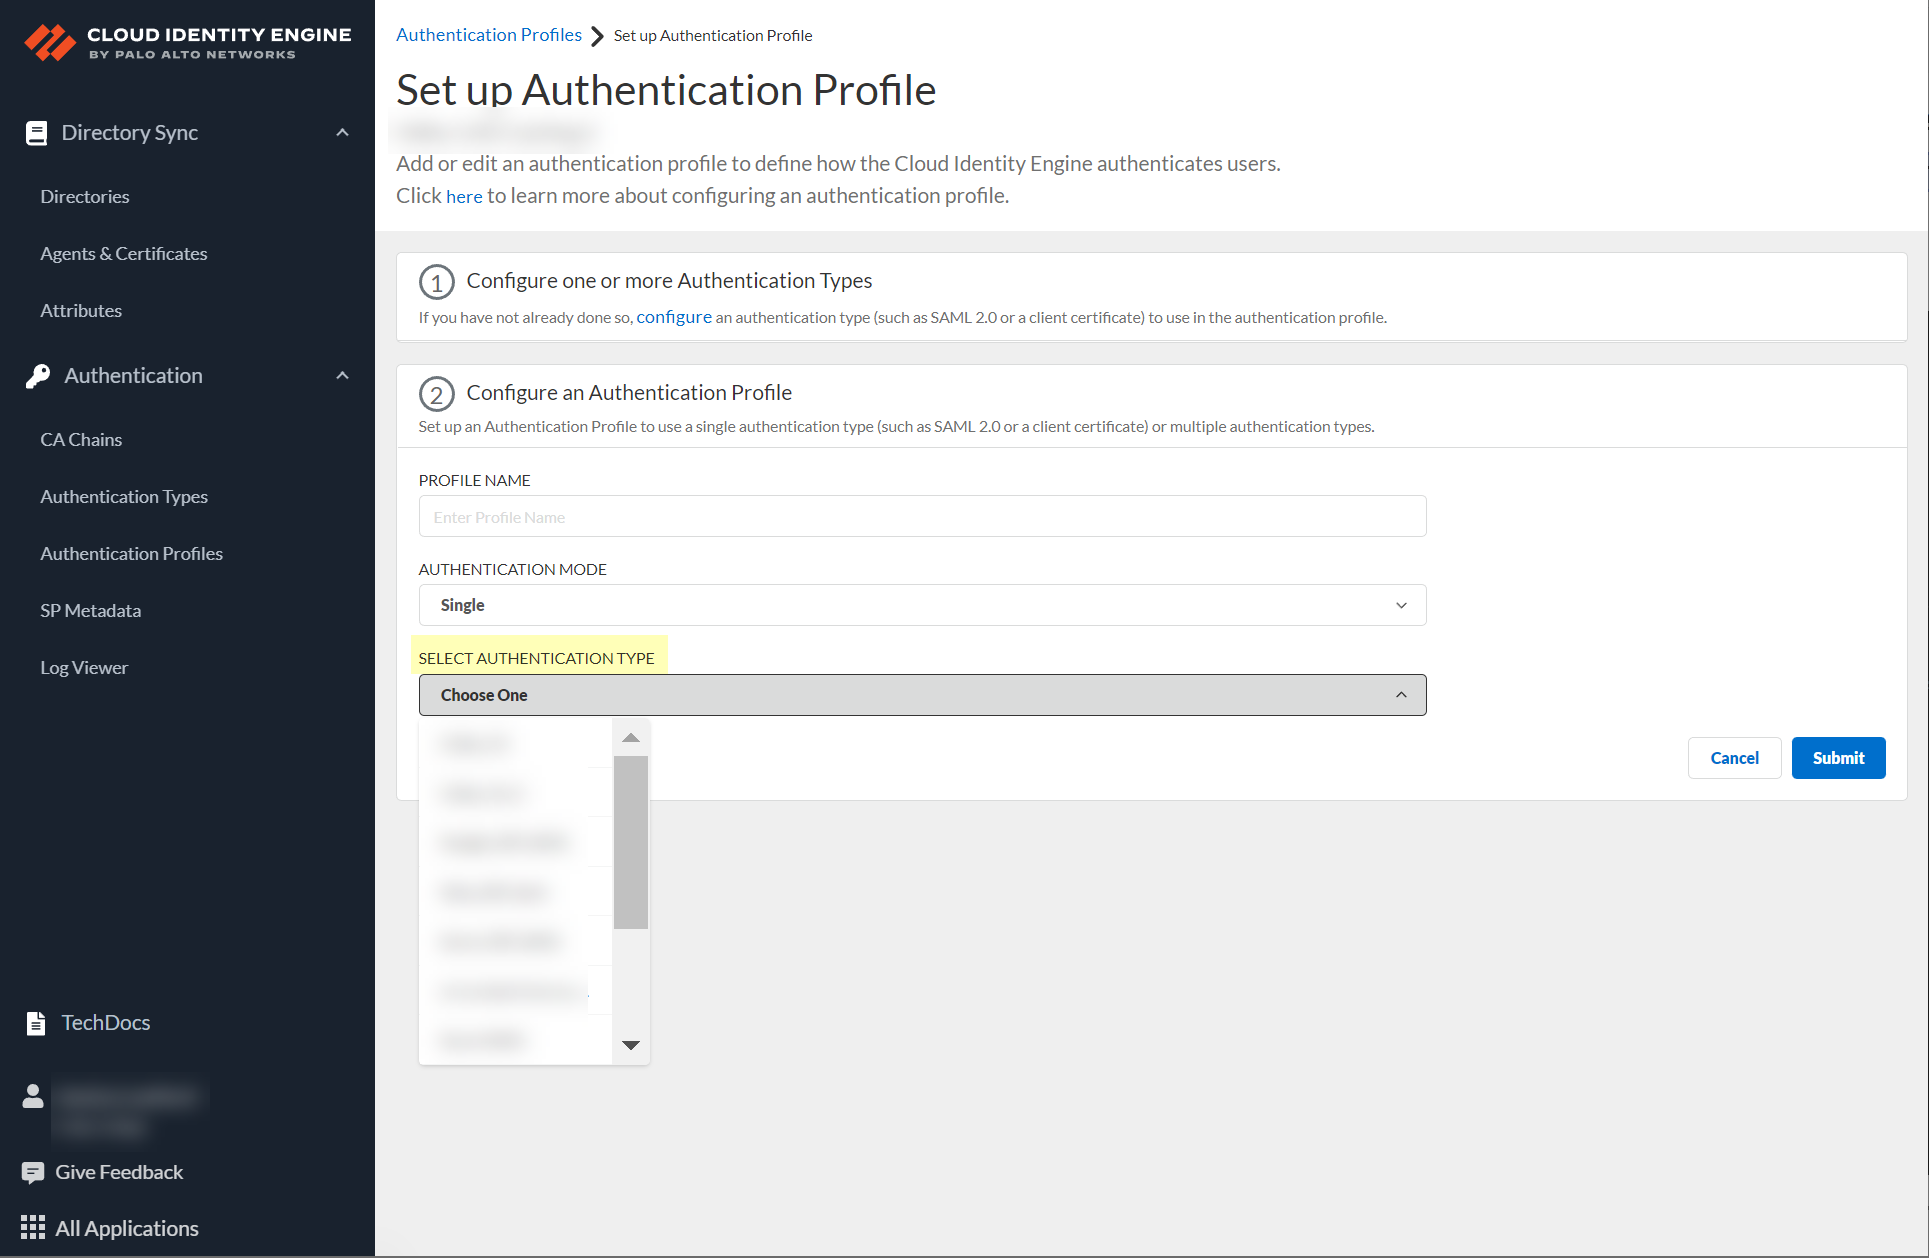
Enter a unique
Profile Name
.
Select
Authentication Mode
: Single or Multiple.
If Single: Select the specific Authentication Type.
If Multiple OR (Single + Client Cert): Select
Directory Sync Username Attribute
and
Group Attribute
.
[GOTCHA] For Client Cert auth, the Directory Sync Username Attribute *must* match the Username Attribute selected in the Client Cert Auth Type config.
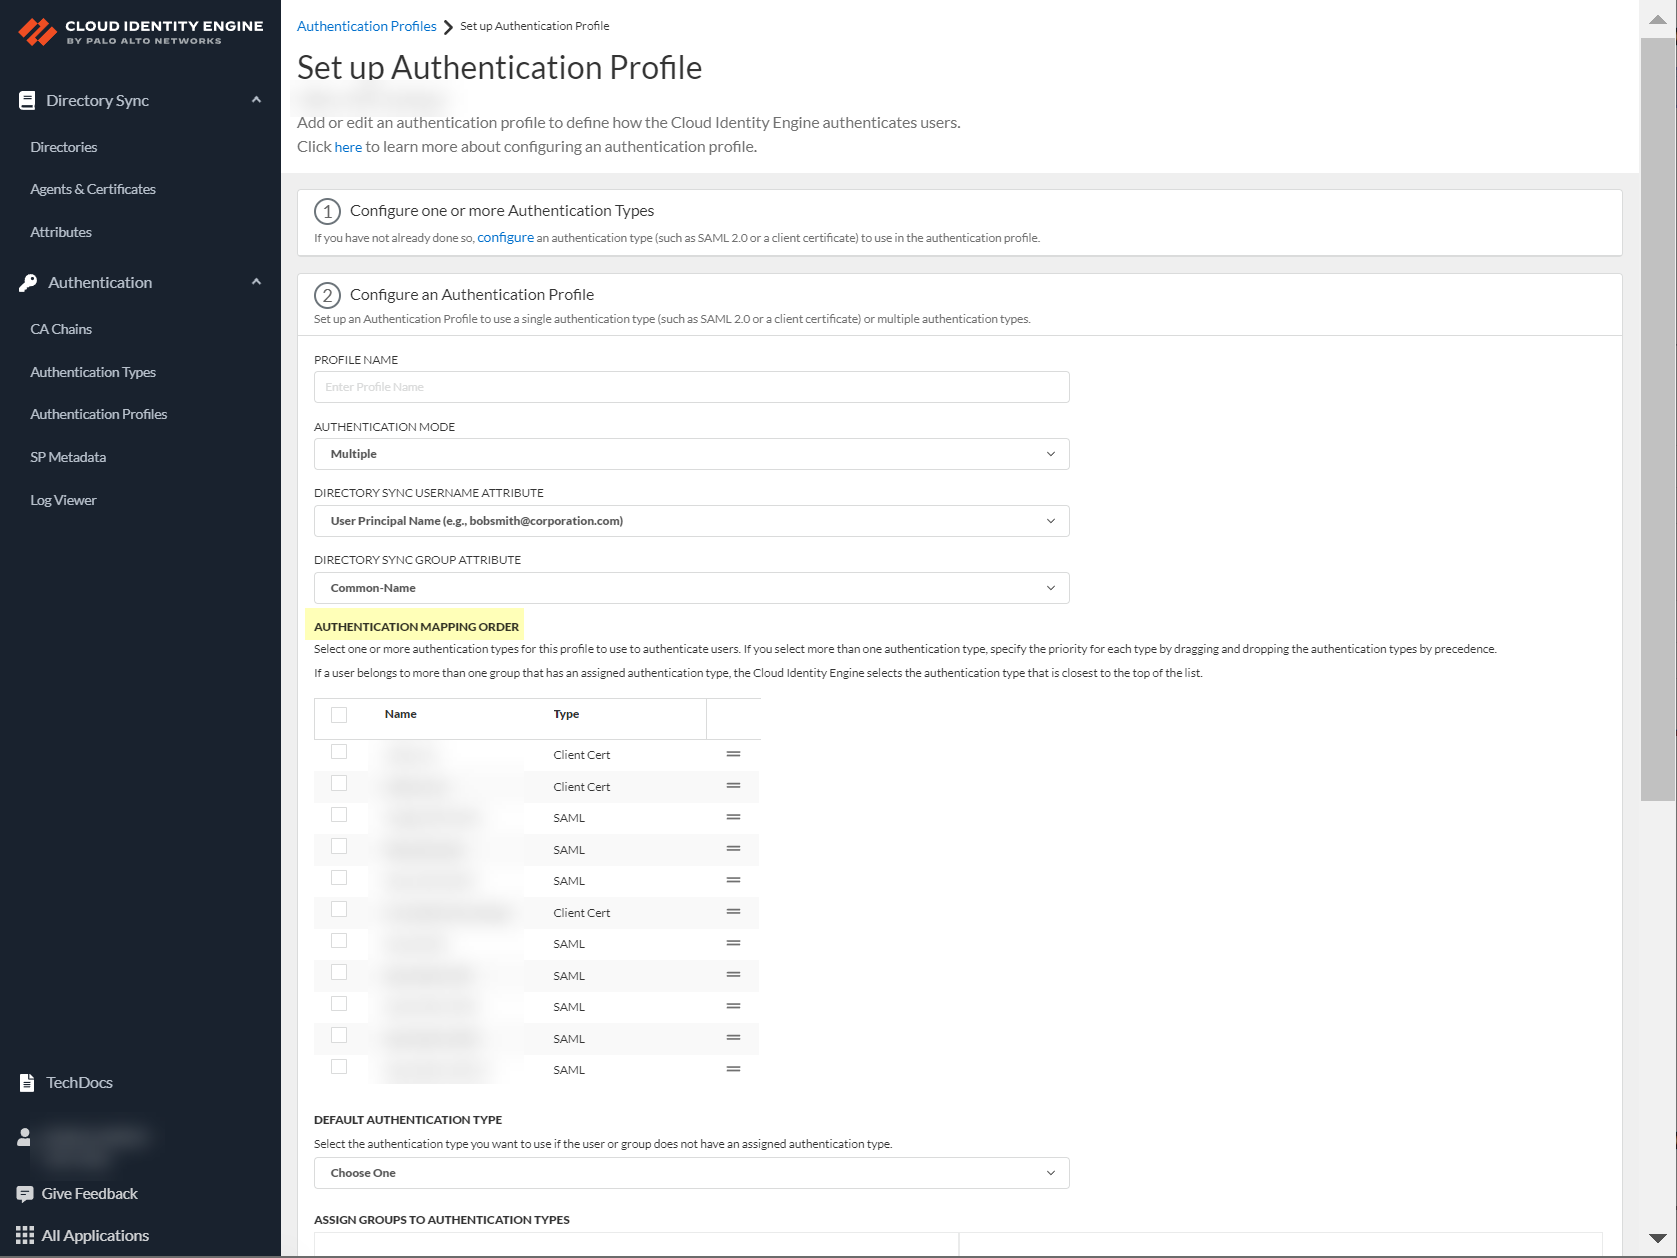
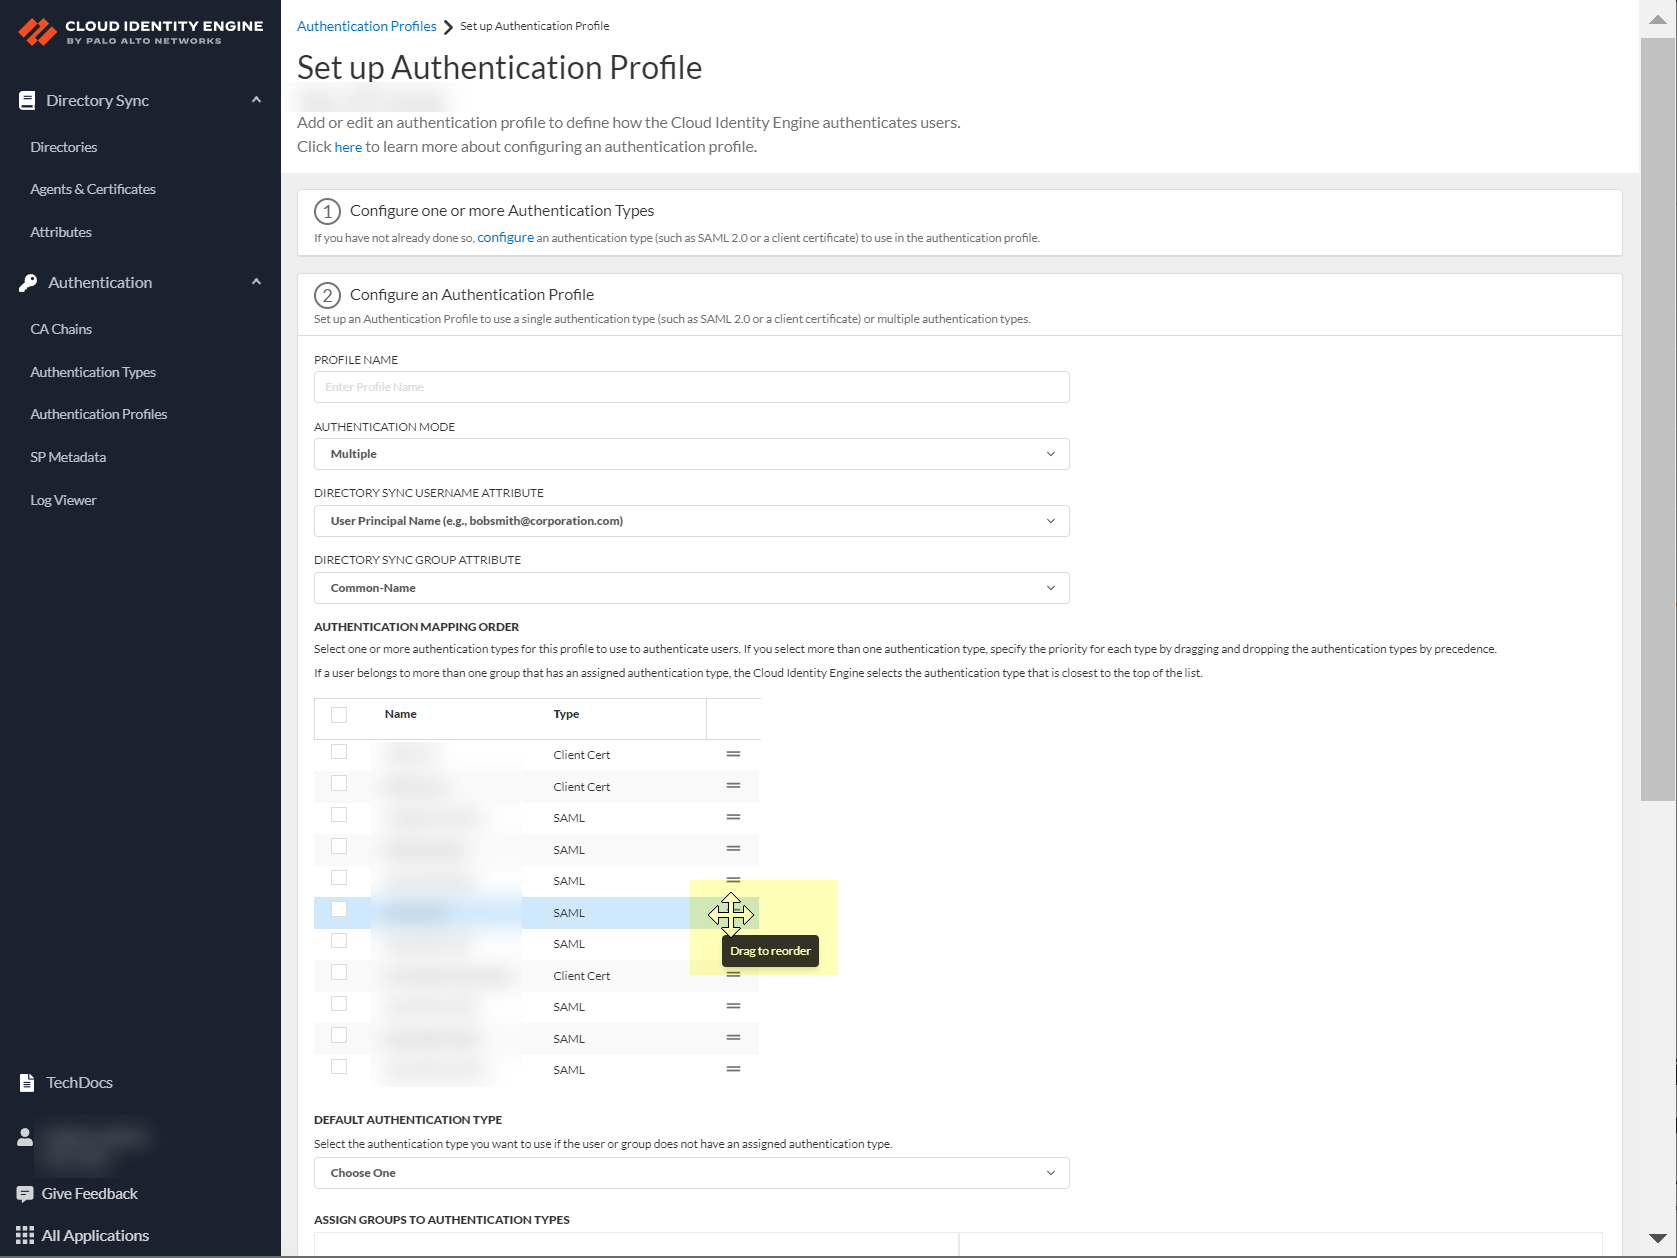
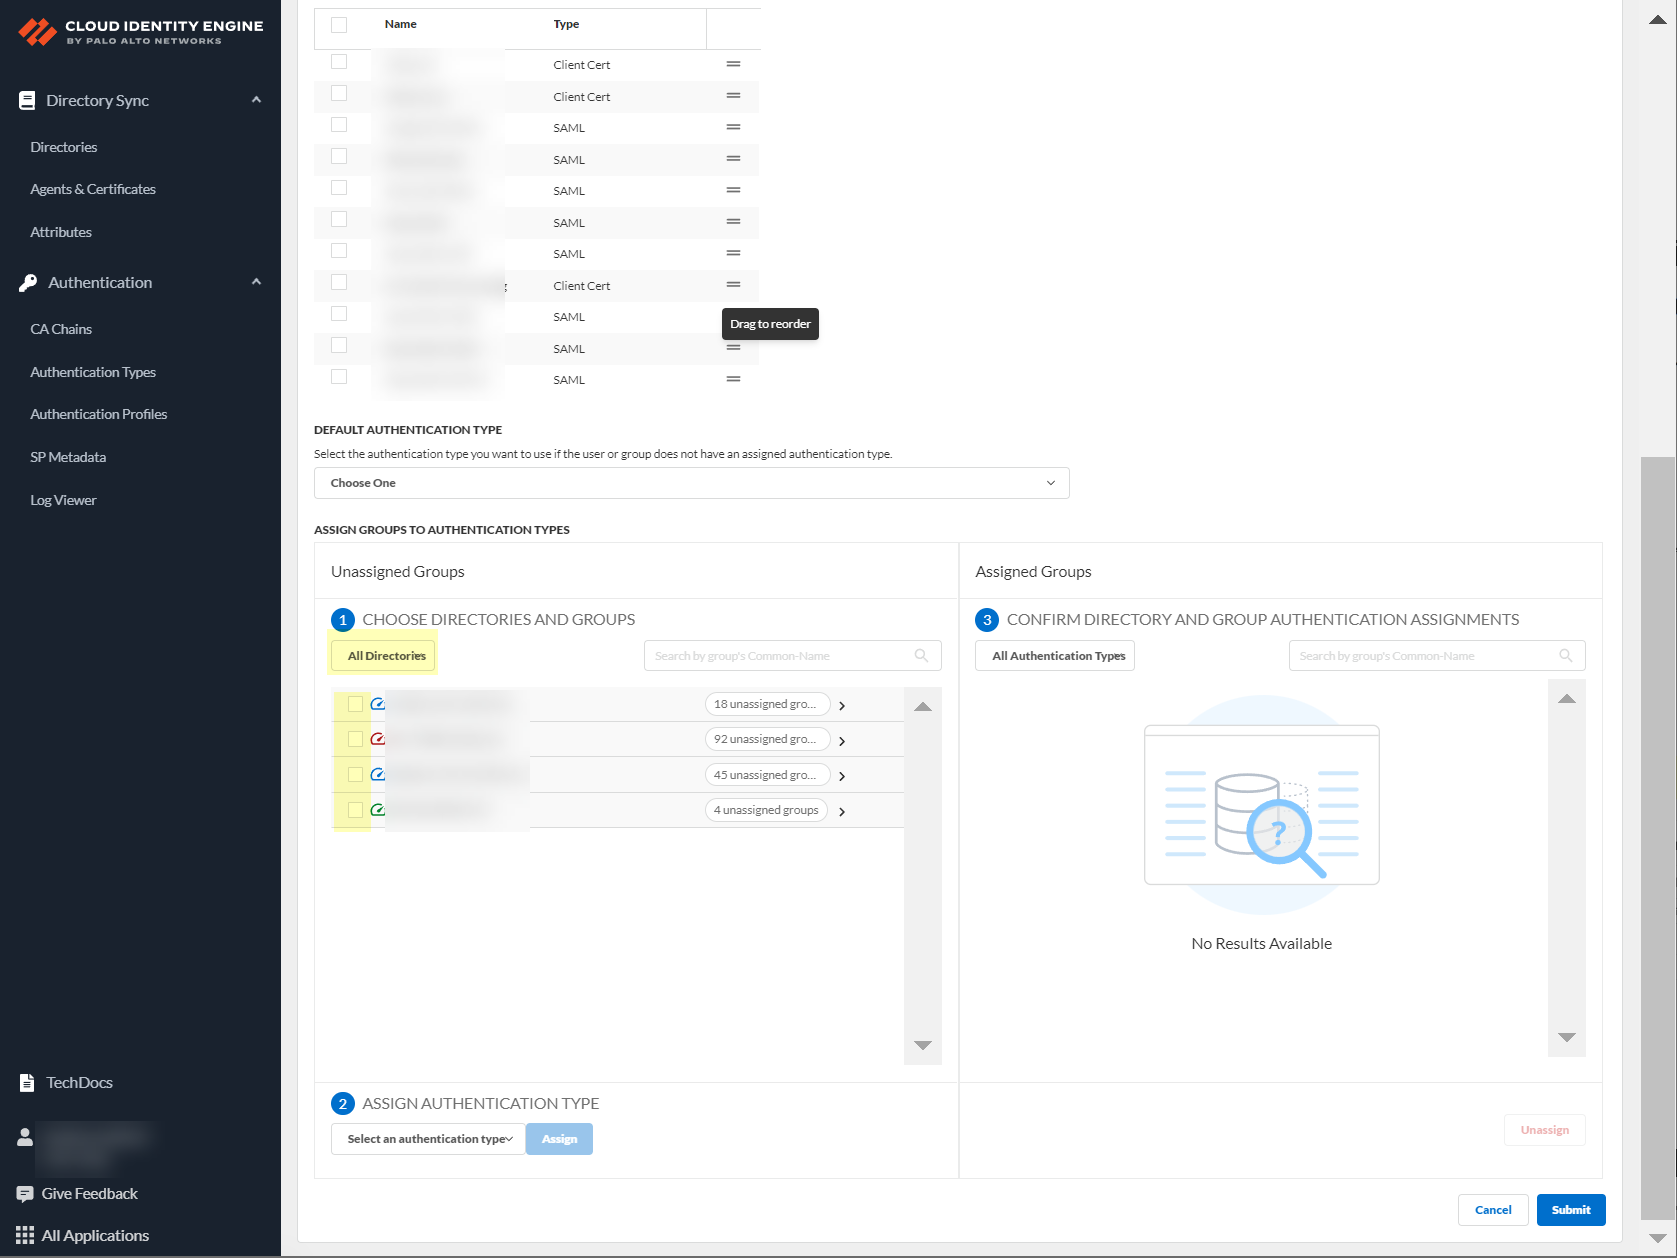
If Multiple: Define
Authentication mapping order
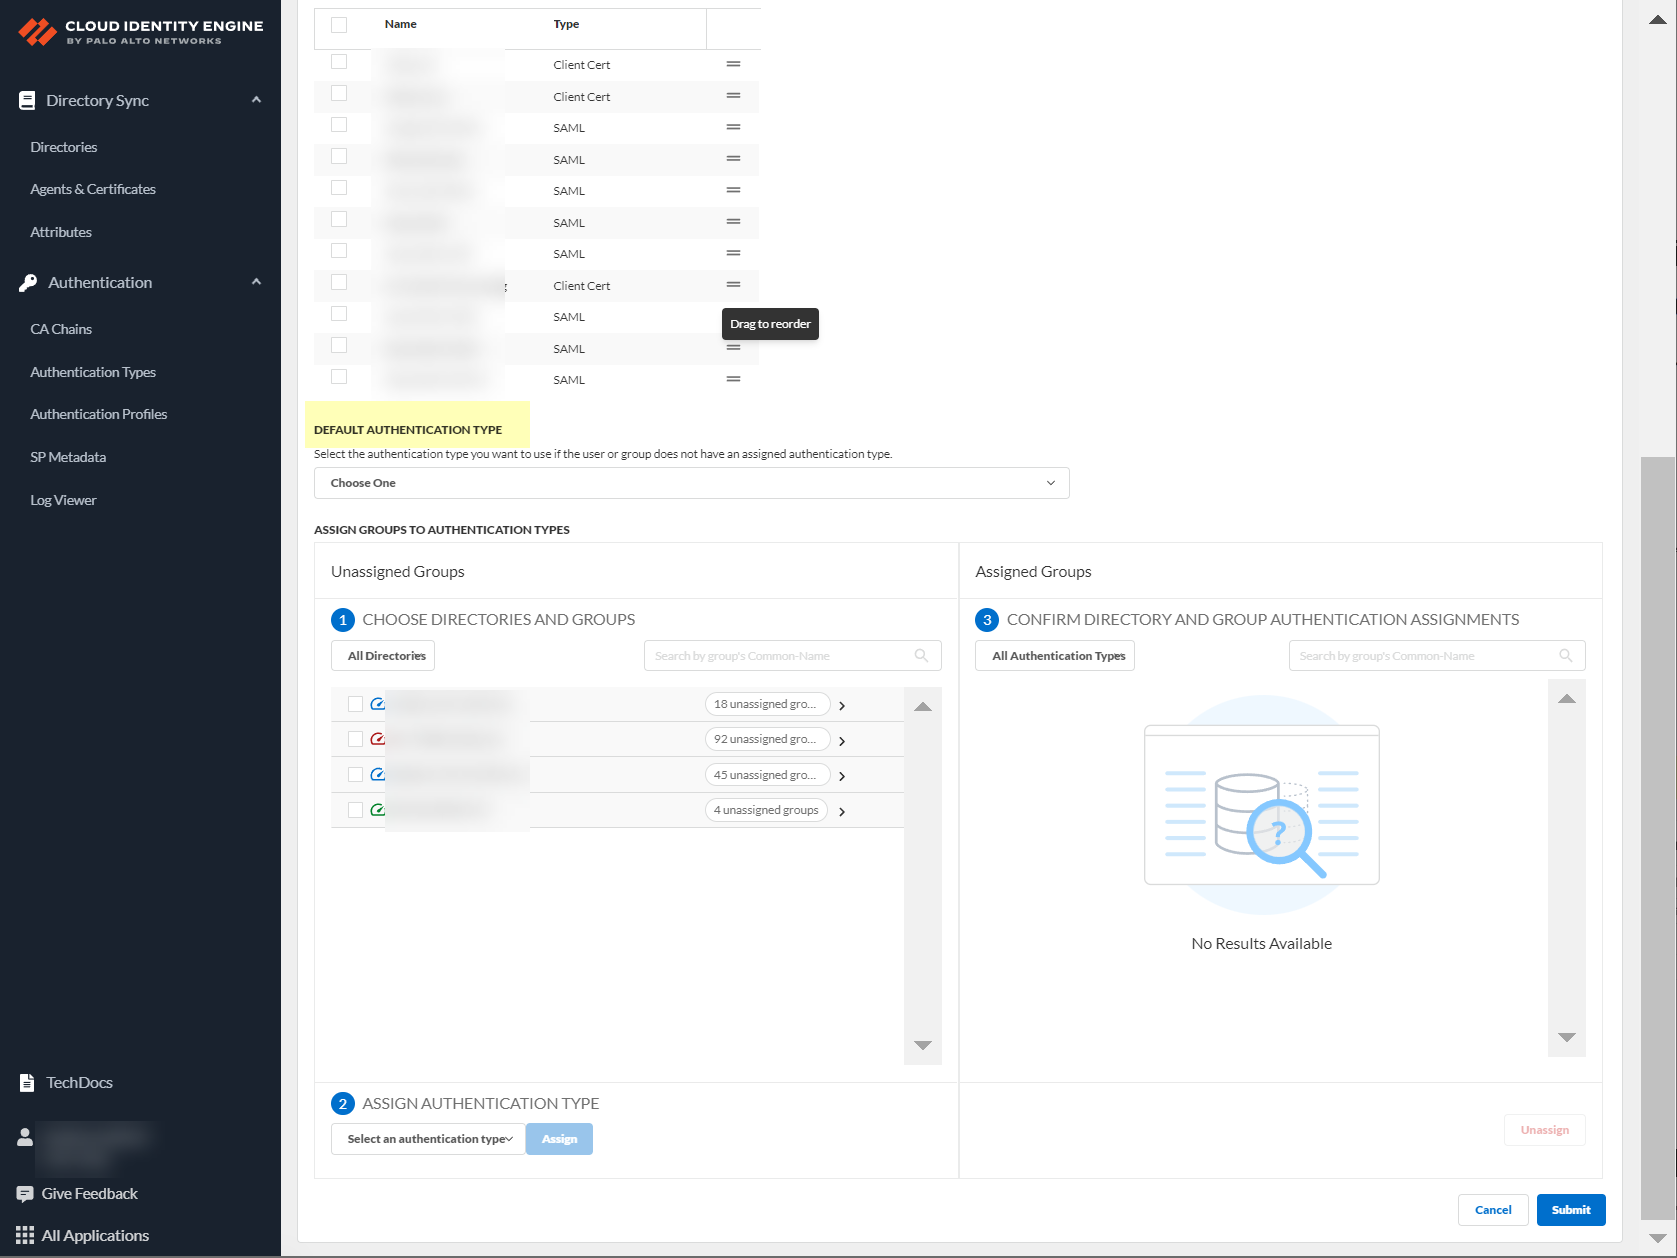
. Drag/drop configured Auth Types to set priority. Select the
Default authentication type
for users not in explicitly mapped groups.
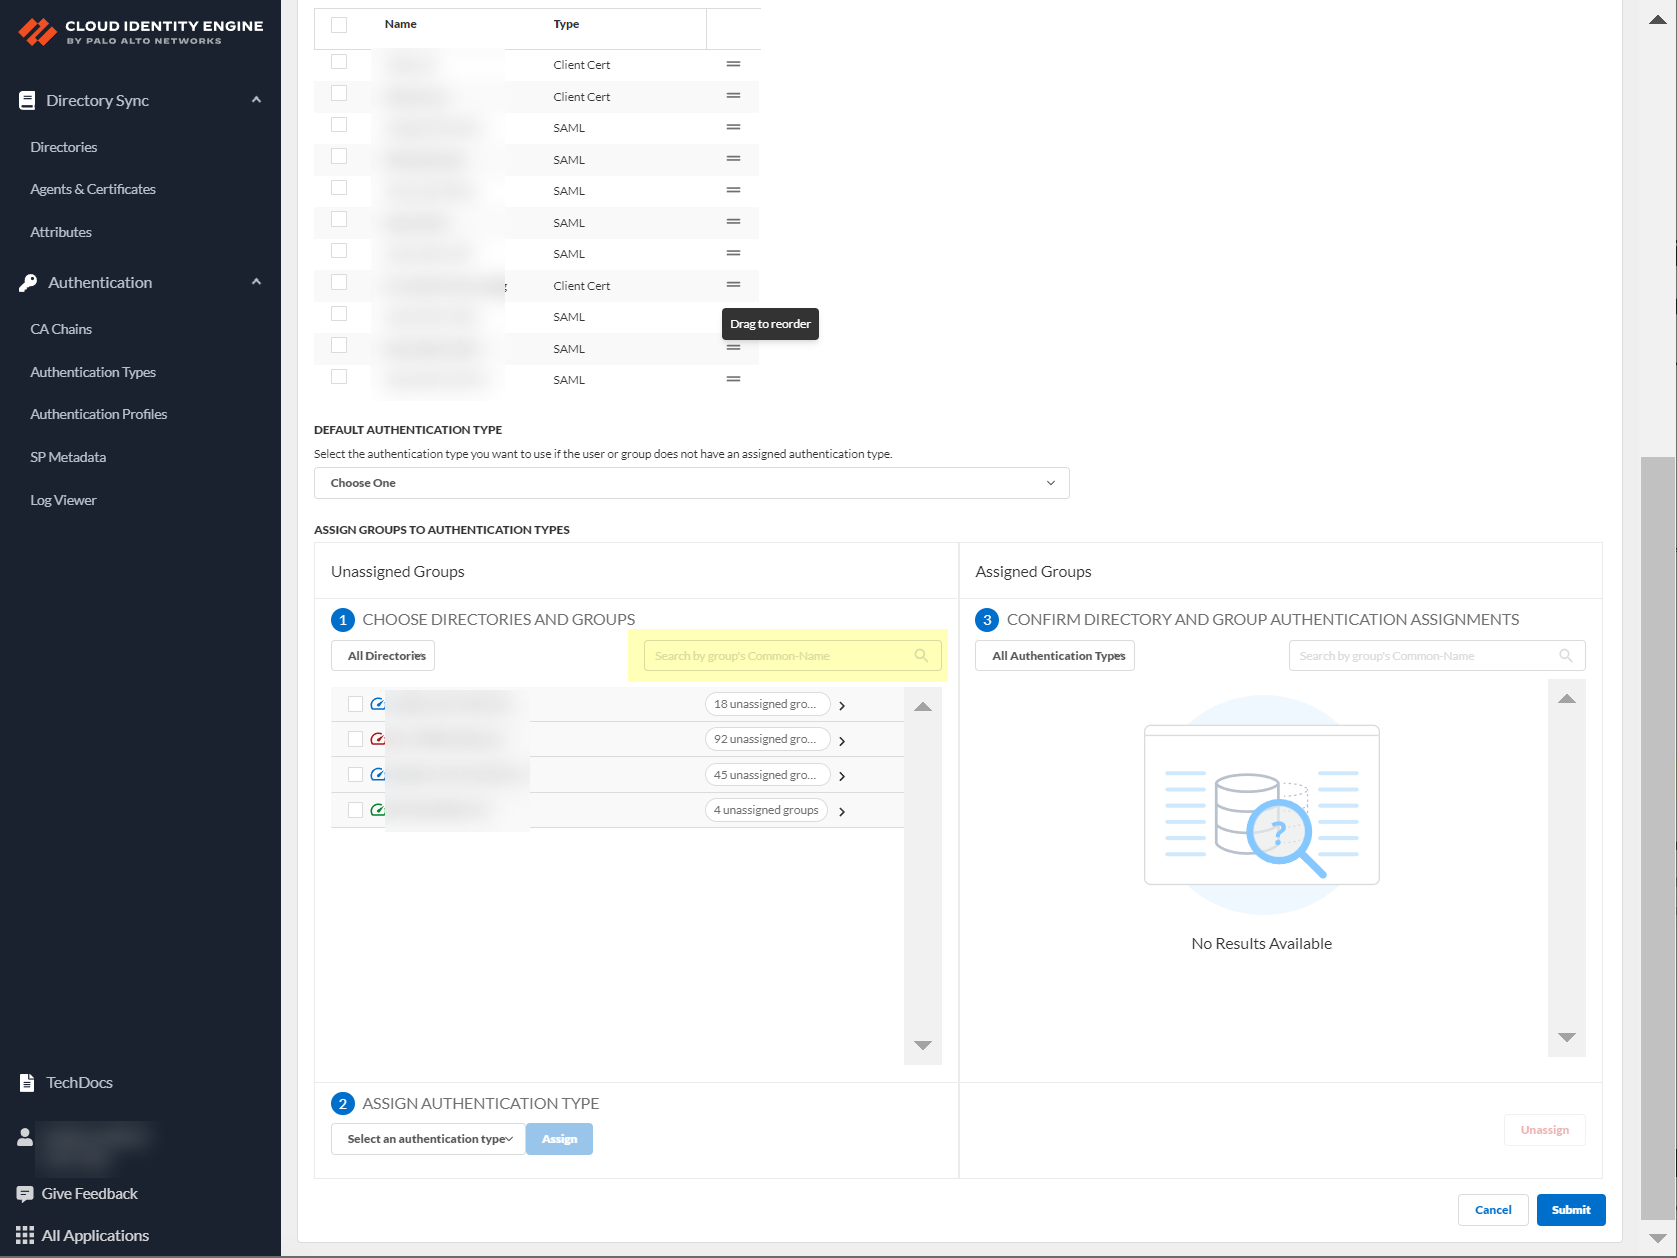
Click
Choose directories and groups
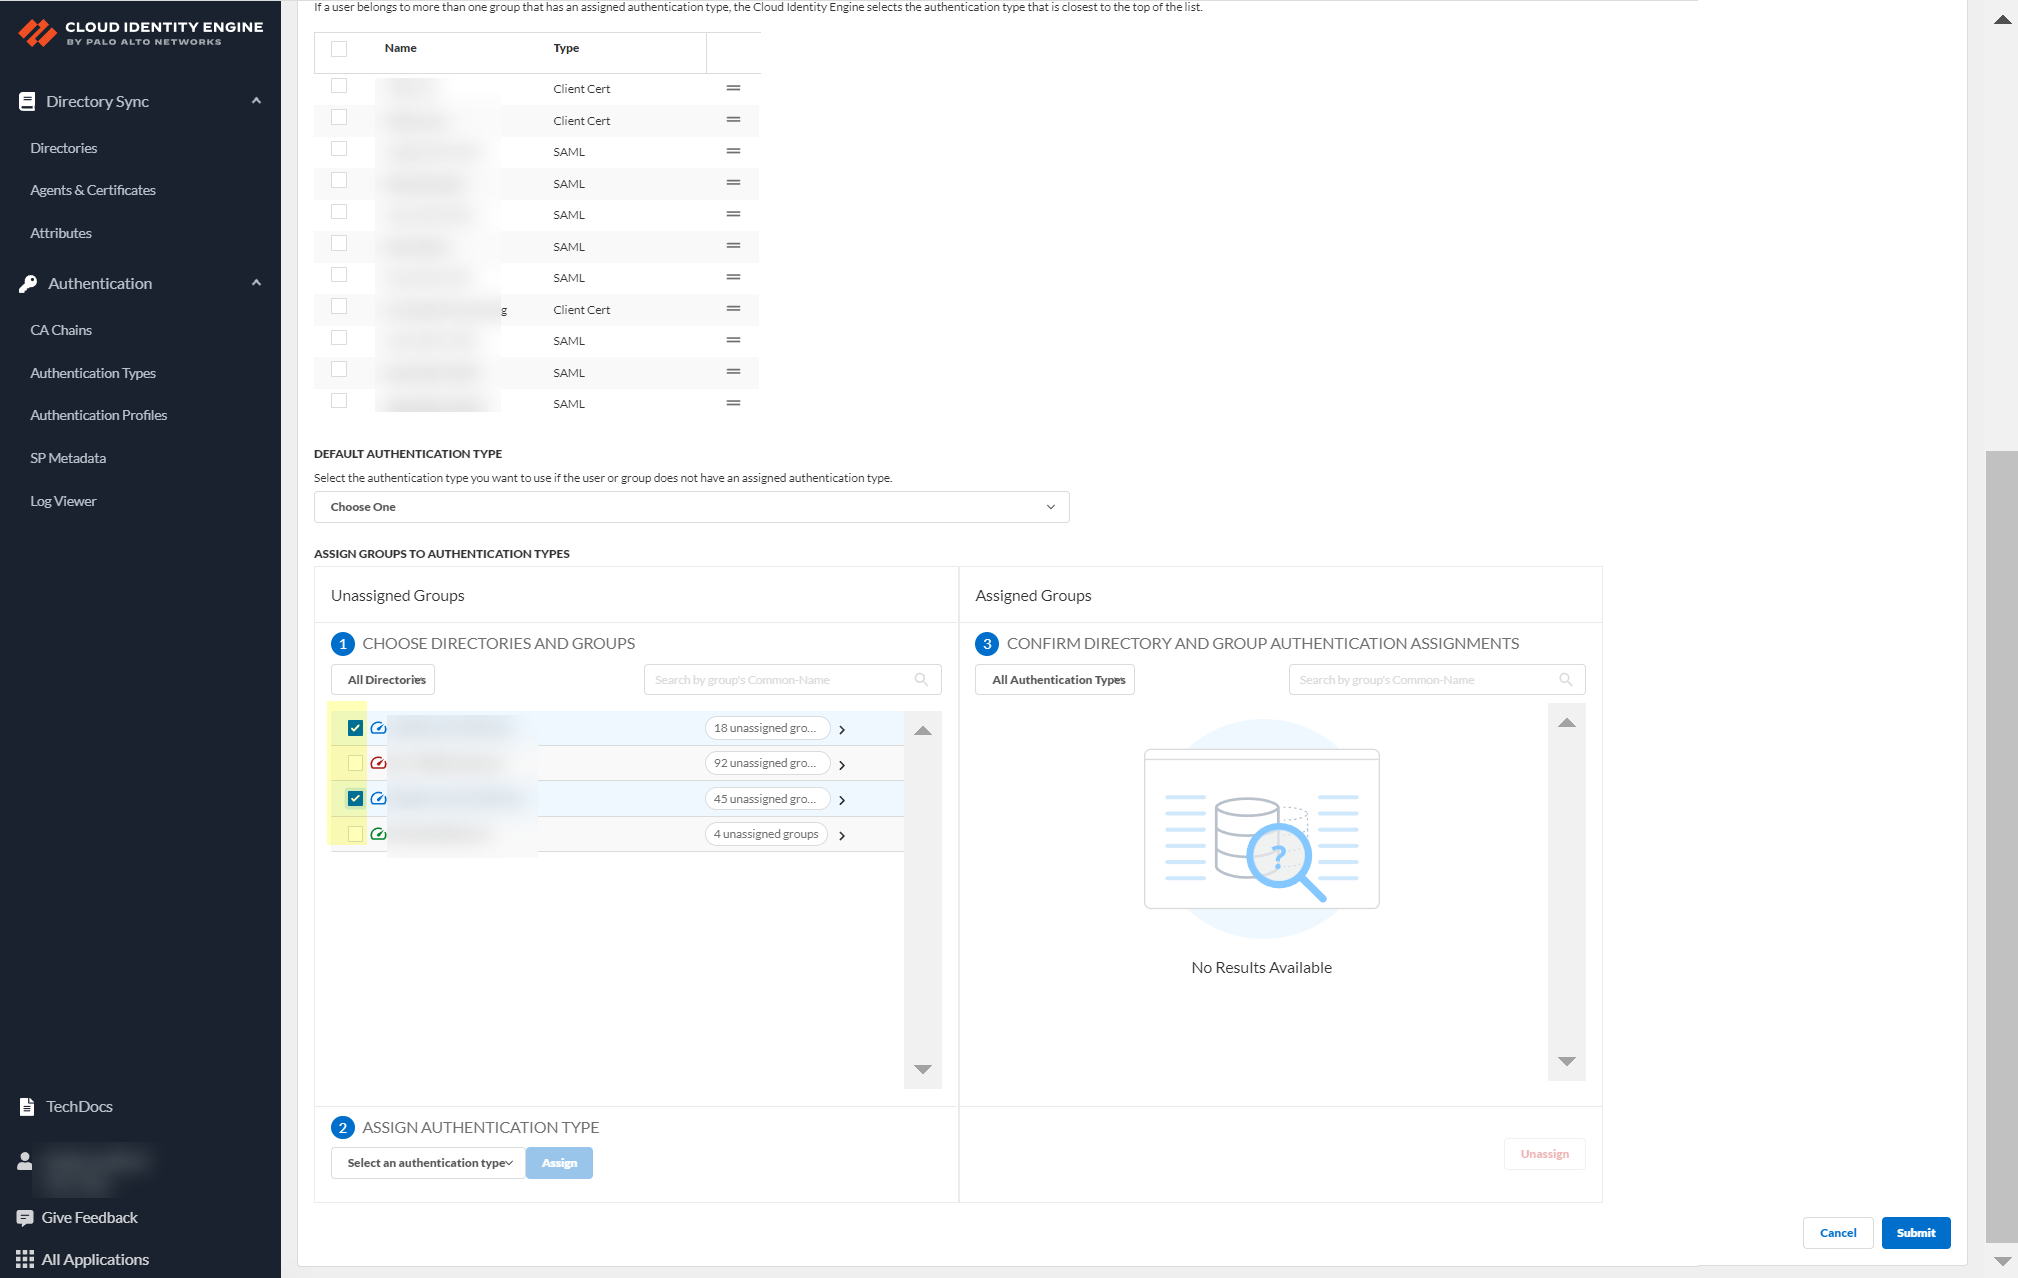
. Select "All Directories" or a specific one.
Select group(s) from the list.
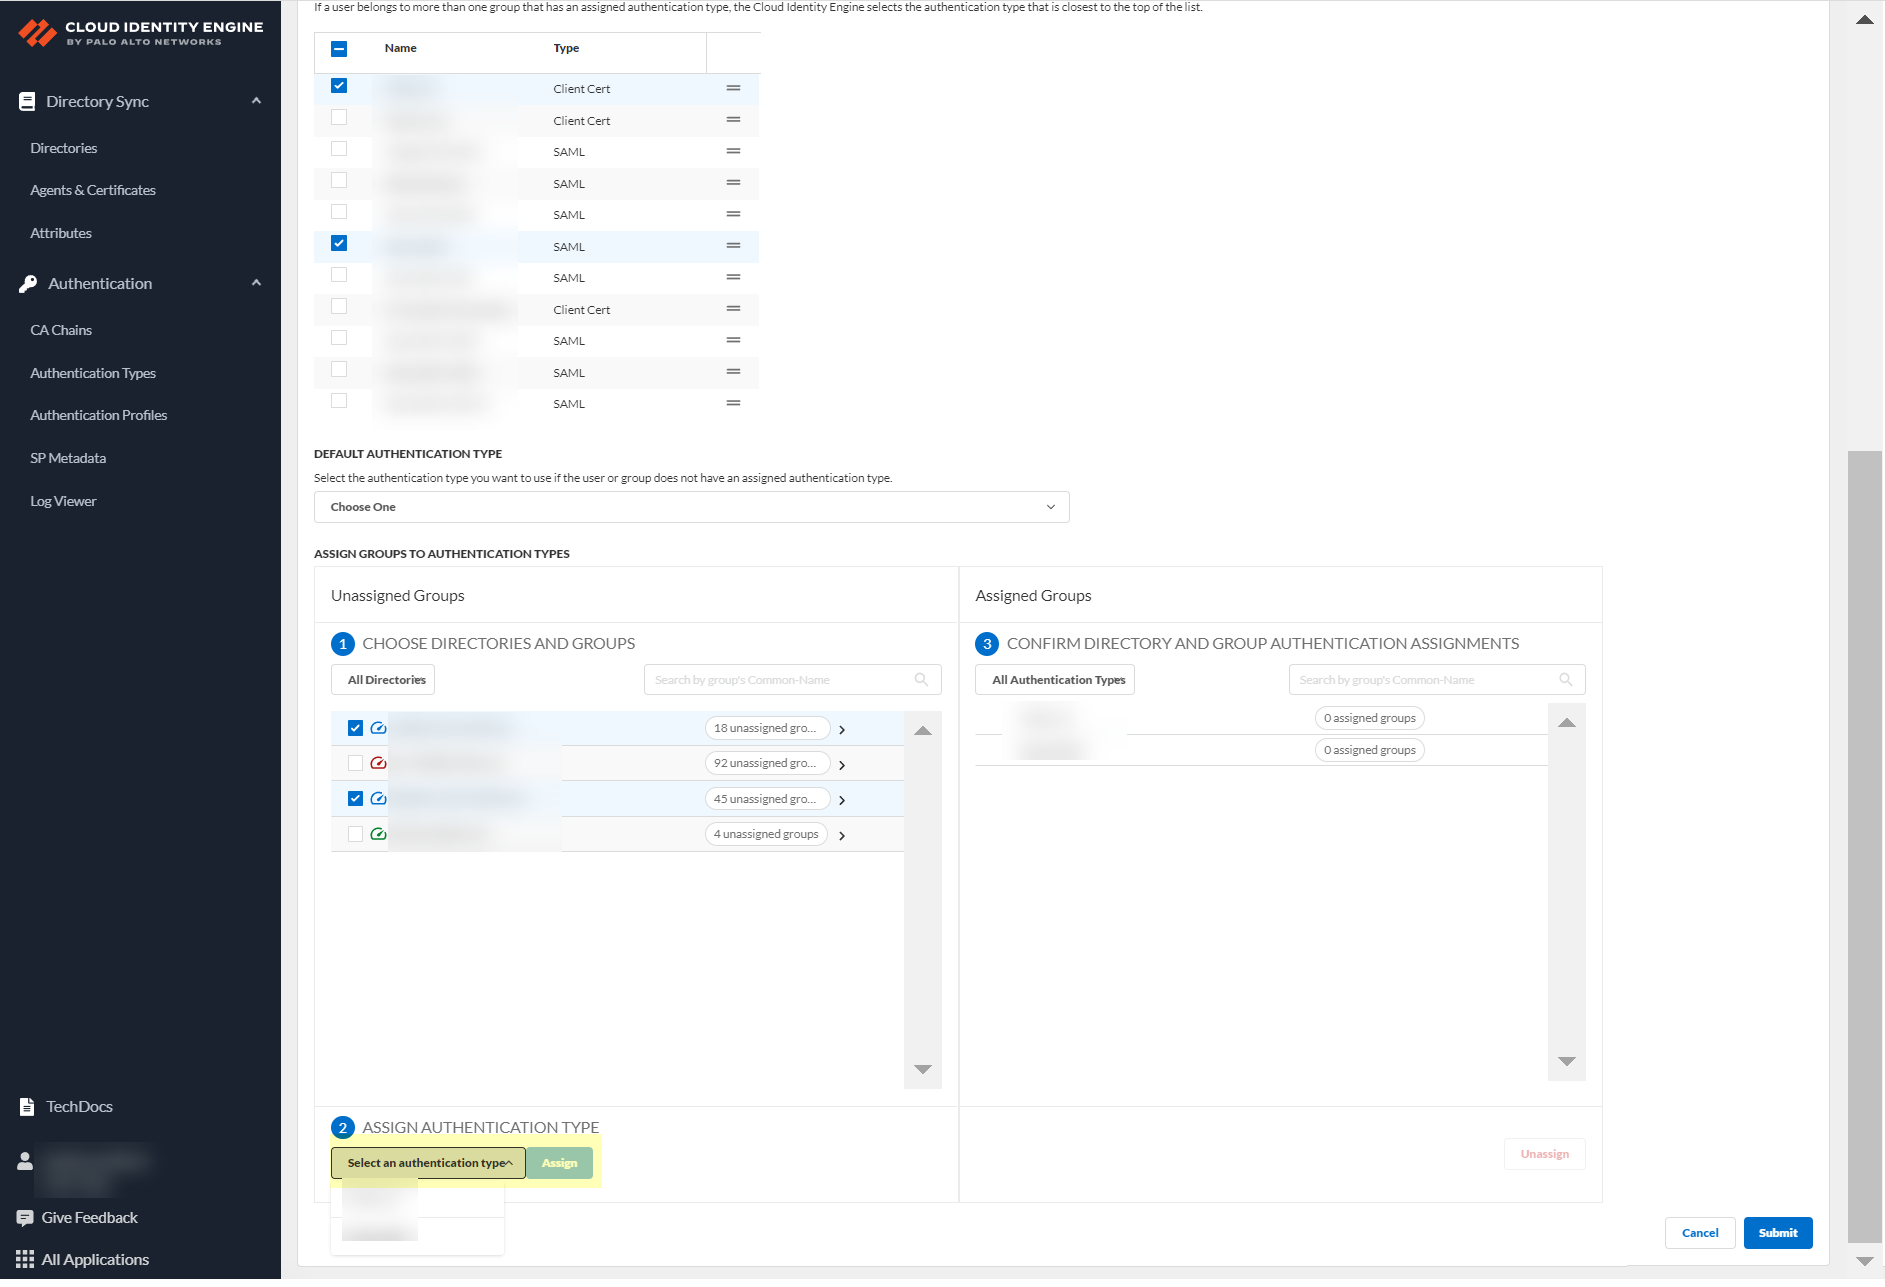
Click
Select an authentication type
and choose the type to apply to the selected group(s). Click
Assign
.
Review assignments. Click
Submit
.
Configure Cloud Identity Engine Authentication on the Firewall or Panorama
[PCNSA/PCNSE] Links the firewall/Panorama to CIE for authentication decisions based on CIE Auth Profiles. Requires PAN-OS configuration.
Prerequisites: CIE configured as Mapping Source, Auth Types configured in CIE, Auth Profile configured in CIE.
Steps marked "(Required for authentication policy rule only)" are needed specifically for Captive Portal/Authentication Policy redirection, not necessarily for admin auth or GlobalProtect/Prisma Access auth using CIE.
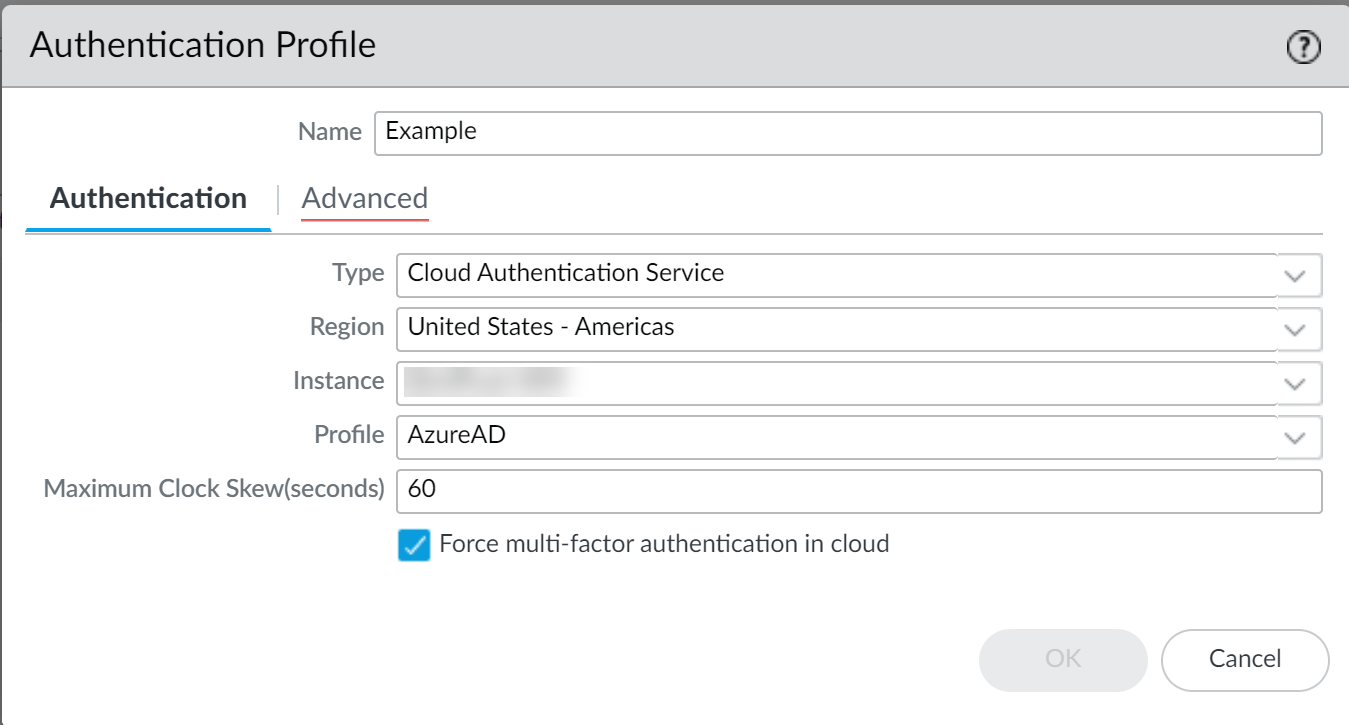
Configure Authentication Profile on Firewall/Panorama:
Go to Device > Authentication Profile > Add.
Enter Name. Type:
Cloud Authentication Service
.
Select CIE tenant
Region
and
Instance
.
Select the CIE Authentication
Profile
created earlier.
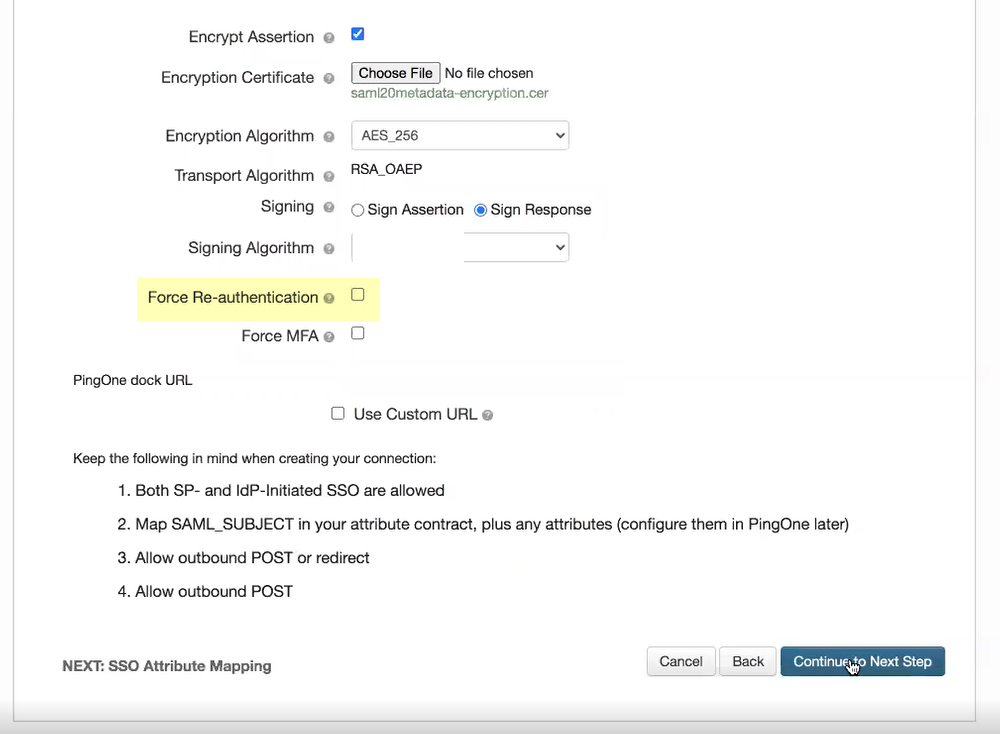
Set Max Clock Skew. Enable Force MFA if applicable. OK.
(Required for authentication policy rule only) Configure Authentication Portal:
Go to Device > User Identification > Authentication Portal Settings.
Edit. Select the CIE Authentication Profile created above.
Mode:
Redirect
. OK.
(Required for authentication policy rule only) Create Authentication Enforcement Object:
Go to Objects > Authentication > Add.
Enter Name. Authentication Method:
web-form
.
Select the CIE Authentication Profile. (Optional) Enter Message. OK.
Create Custom URL Category for CIE/IdP Traffic:
Go to Objects > Custom Objects > URL Category > Add.
Enter Name. Add sites:
*.apps.paloaltonetworks.com
(or specific regional URLs from table below) AND necessary IdP URLs (e.g.,
*.okta.com
,
*.microsoftonline.com
).
Create Security Policy Rule to allow this traffic (Source Zone: Trust, Dest Zone: Untrust, Application: ssl, web-browsing, Service: application-default, Category: select the custom category created above, Action: Allow).
Configure Interface Management Profile on the trust zone interface to enable Response Pages.
(Required for authentication policy rule only) Create Authentication Policy Rule: Source Zone: Trust, Dest Zone: Untrust, Destination Address: Any (or specific IPs needing auth), Service: HTTP/HTTPS, Action: Authentication Enforcement (select object created earlier).
(Panorama Only) Assign Cloud Identity Engine instance to Device Group(s): Panorama > Device Groups > [Select Group] > Cloud Identity Engine tab > Add > Select CIE Instance > OK.
Commit changes on Firewall/Panorama.
Test: Browse from a client behind the firewall to a resource requiring authentication. Verify redirect to IdP/Cert prompt and successful login. On firewall CLI, run
show user ip-user-mapping all
to verify mapping.
Manage the Cloud Identity Engine App
Tasks include managing tenants, attributes, viewing data, and configuring advanced features like User Context, Dynamic User Groups, Device-ID sharing, and IP-Tag collection.
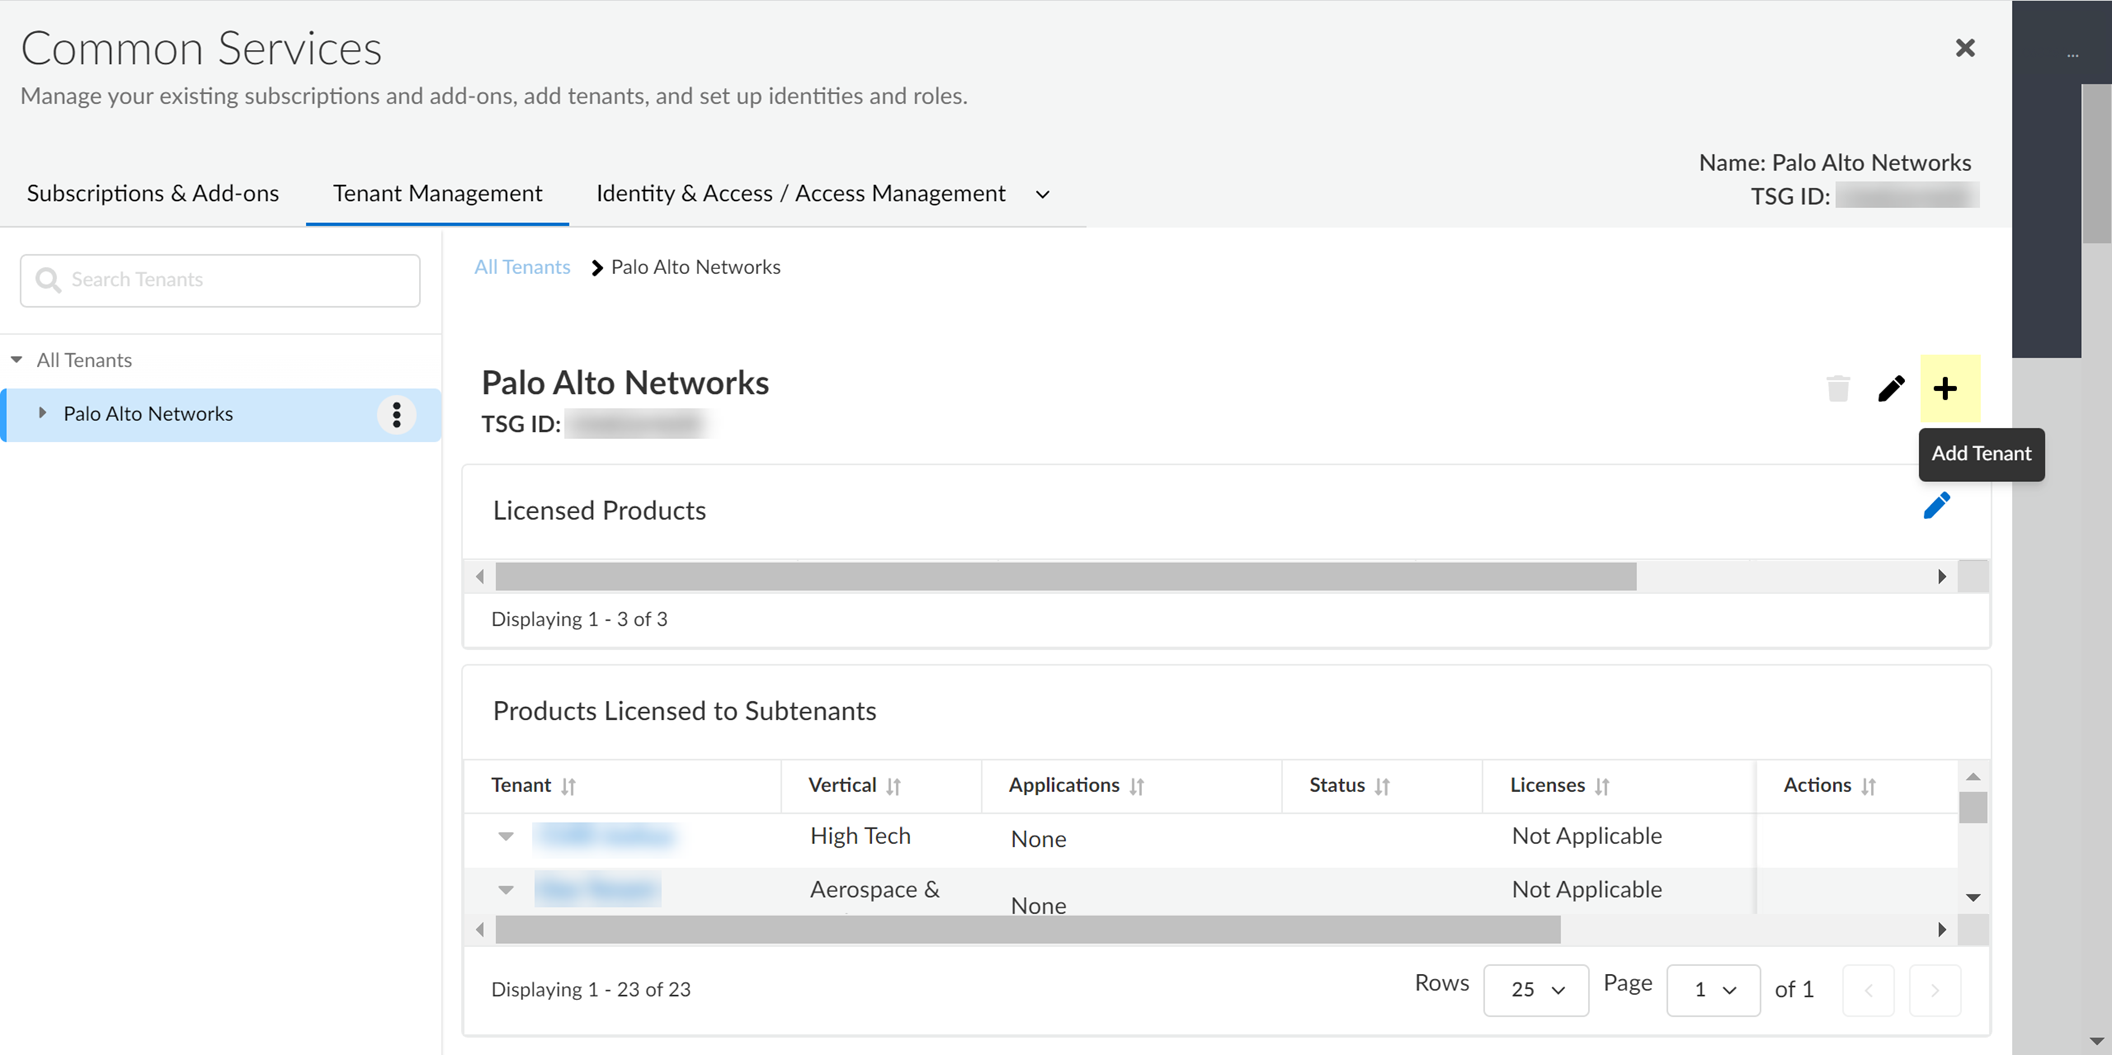
Cloud Identity Engine Tenants
A tenant is created automatically upon CIE activation. Each tenant collects attributes for multiple directories/domains within a *single region*.
Create multiple tenants for multi-region needs or data segmentation.
Manual sync options are available for immediate updates or troubleshooting.
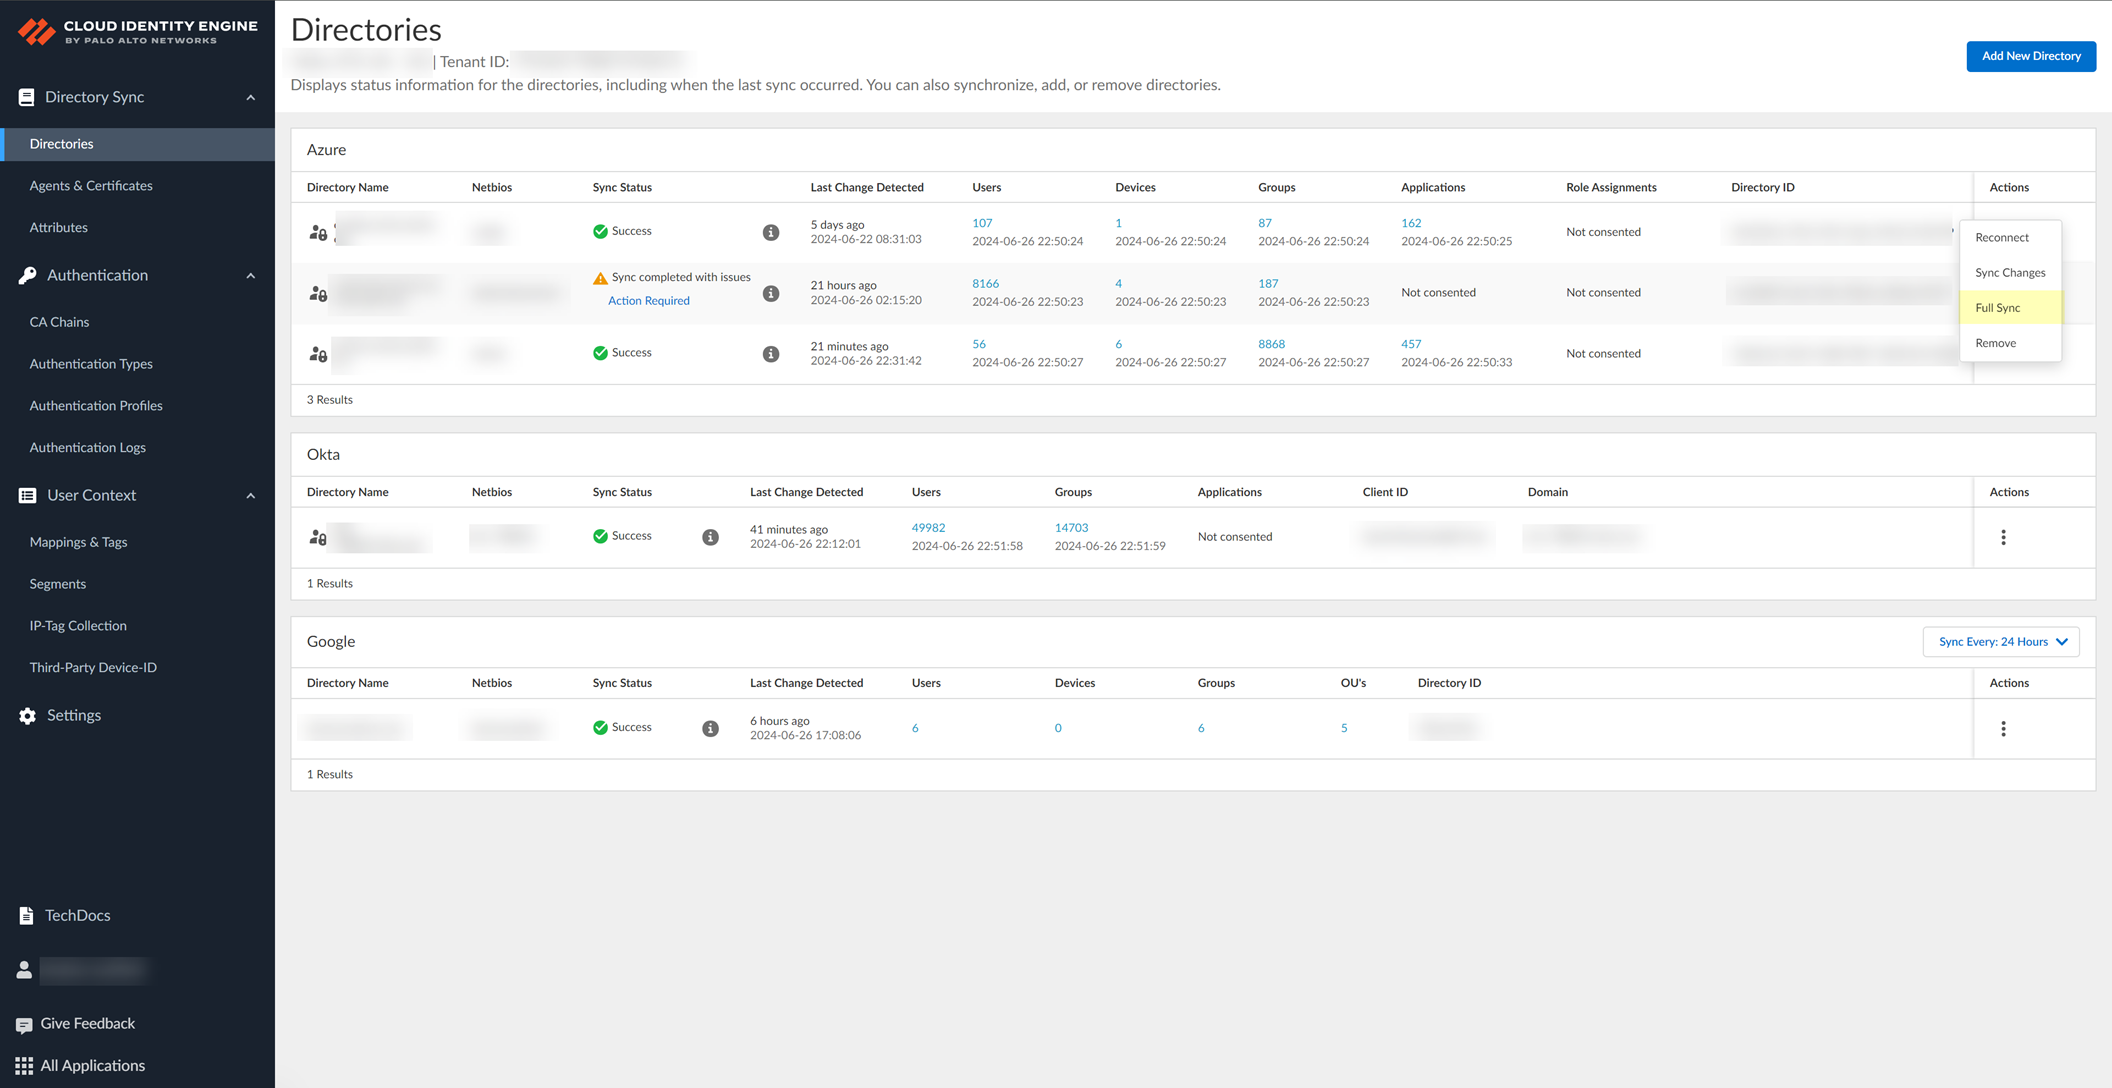
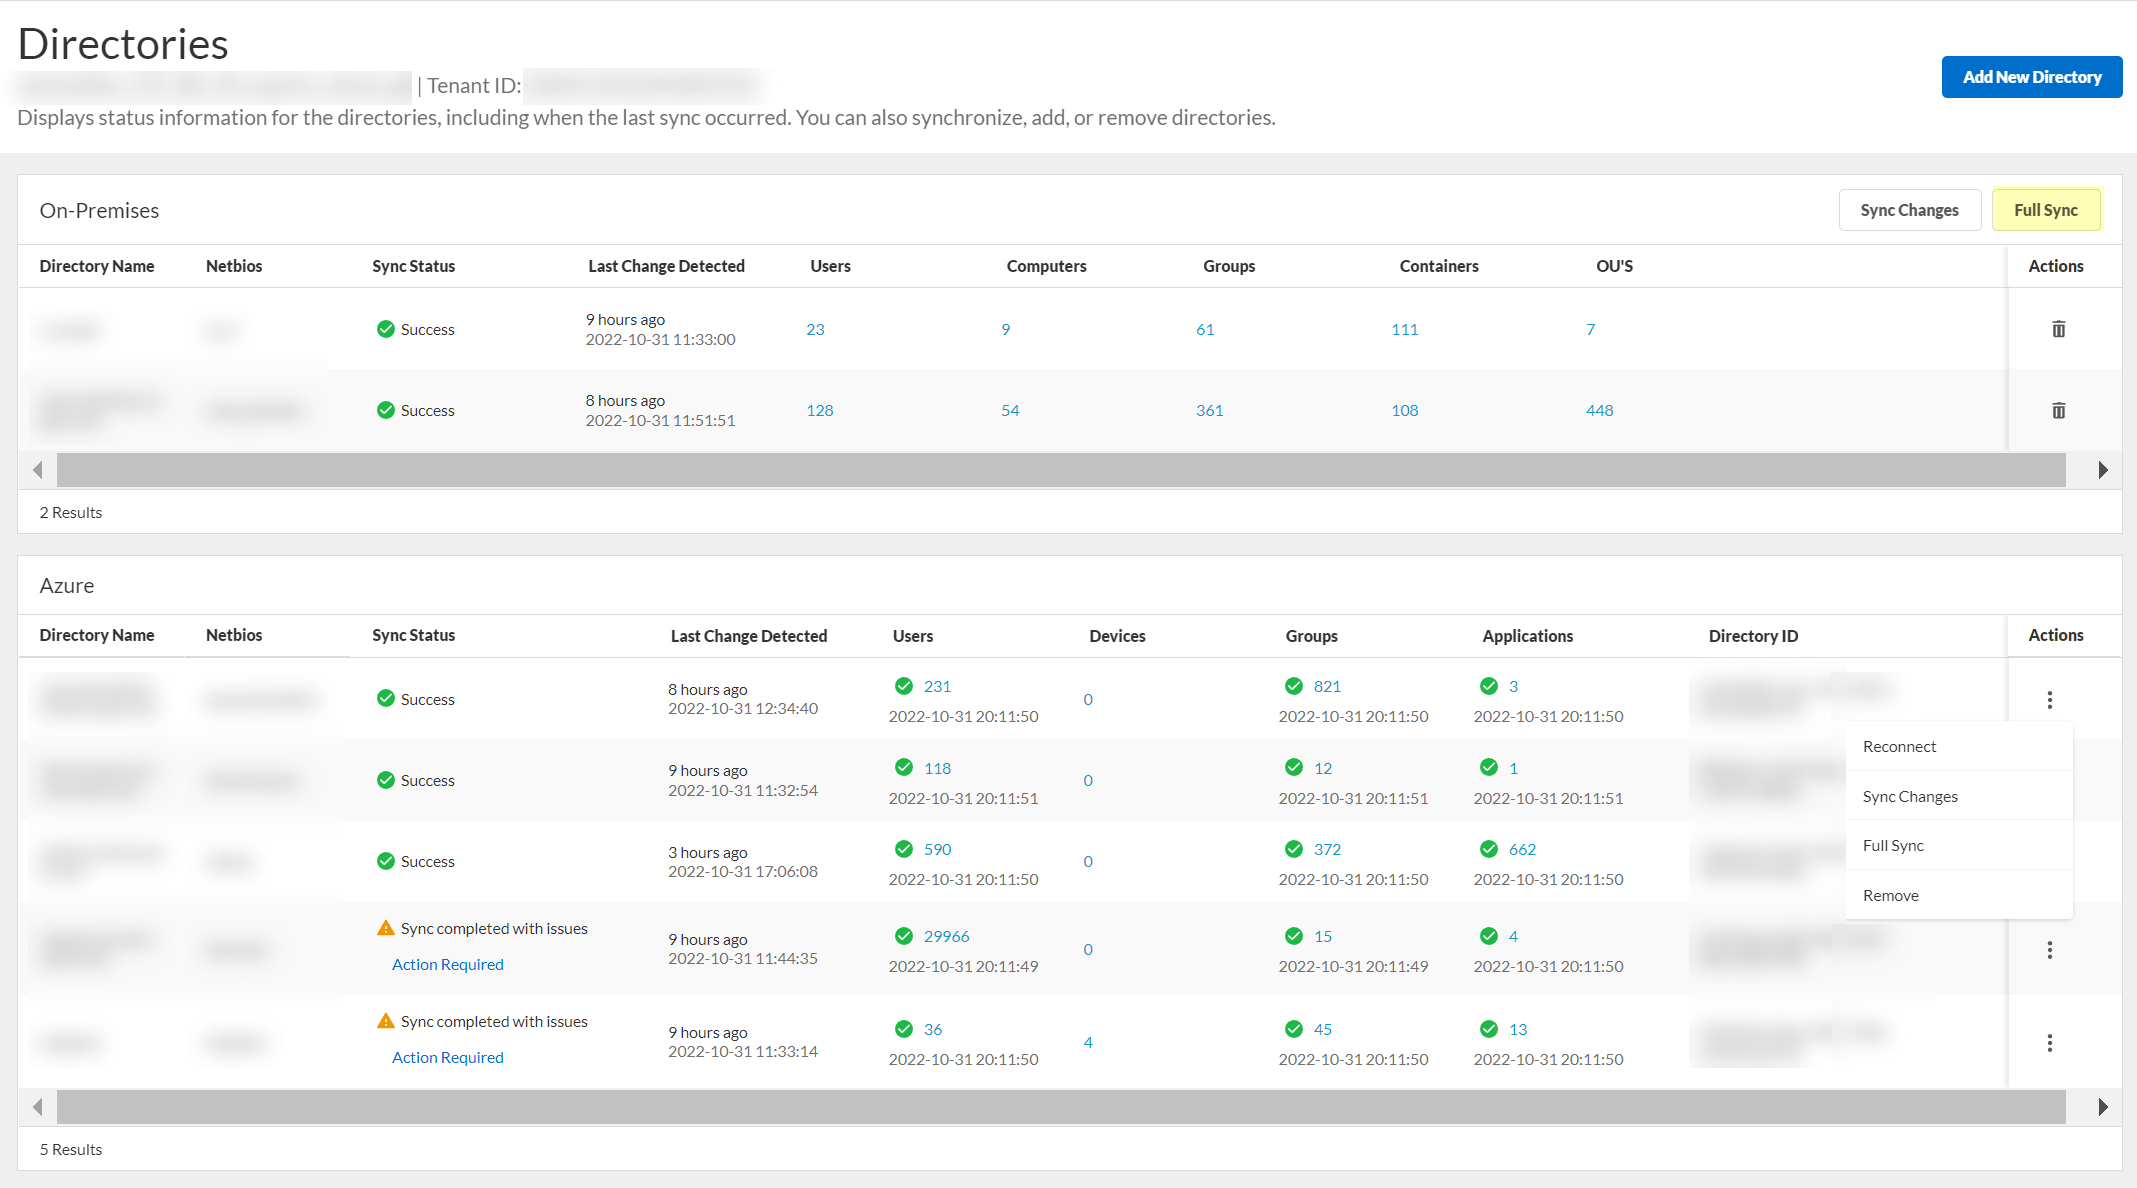
Synchronize All Attributes (Full Sync)
Recommended for troubleshooting or connectivity loss.
[GOTCHA] For on-prem directories, all agents/domains in the tenant must be active.
Log in to CIE app > Select tenant >
Directories
.
Click
Actions > Full Sync
for the desired directory type.
Wait for
Sync Status
to show
Success
.
[GOTCHA] Wait at least 90 seconds between manual full sync attempts.
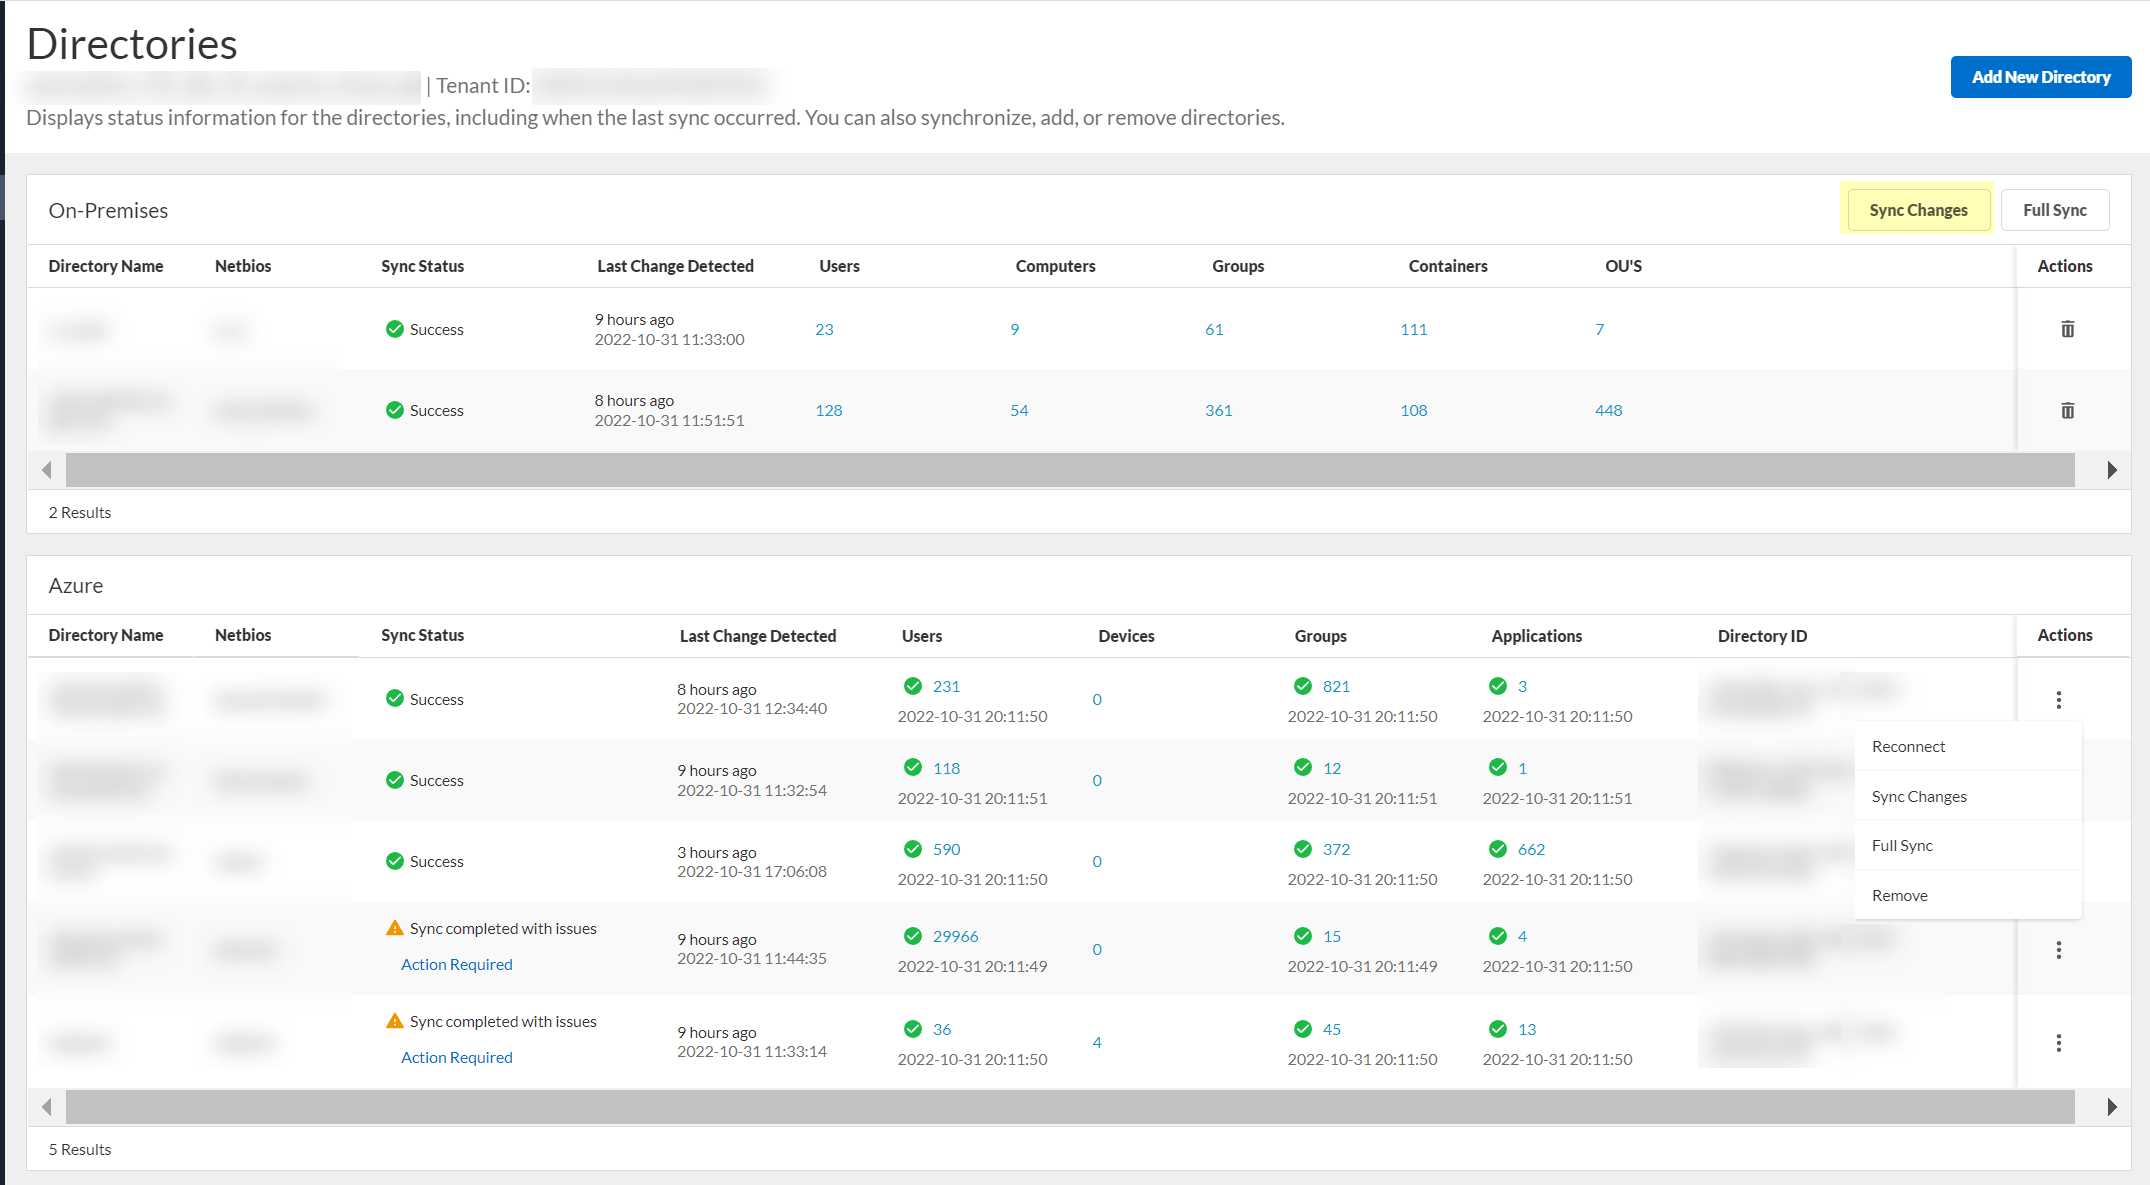
Synchronize Directory Changes (Incremental Sync)
Faster than full sync. Syncs changes since last successful sync.
[GOTCHA] Not available for Google Directory. Status may briefly show Success while sync is ongoing.
Make changes in your directory.
In CIE app > Select tenant >
Directories
.
Click
Actions > Sync Changes
for the directory type.
Set Synchronization Interval (Google Directory Only)
Log in to CIE app > Select tenant >
Directories
.
Click the current interval next to
Sync Every:
for the Google Directory.
Select desired interval (6, 12, or 24 Hours).
Synchronize CDUG Changes (Google Directory Only)
Manually syncs Cloud Dynamic User Group membership changes related to Google Directory.
Log in to CIE app > Select tenant >
Directories
.
Click
Sync CDUG Changes
.
Wait for
Sync Status
to show
Success
.
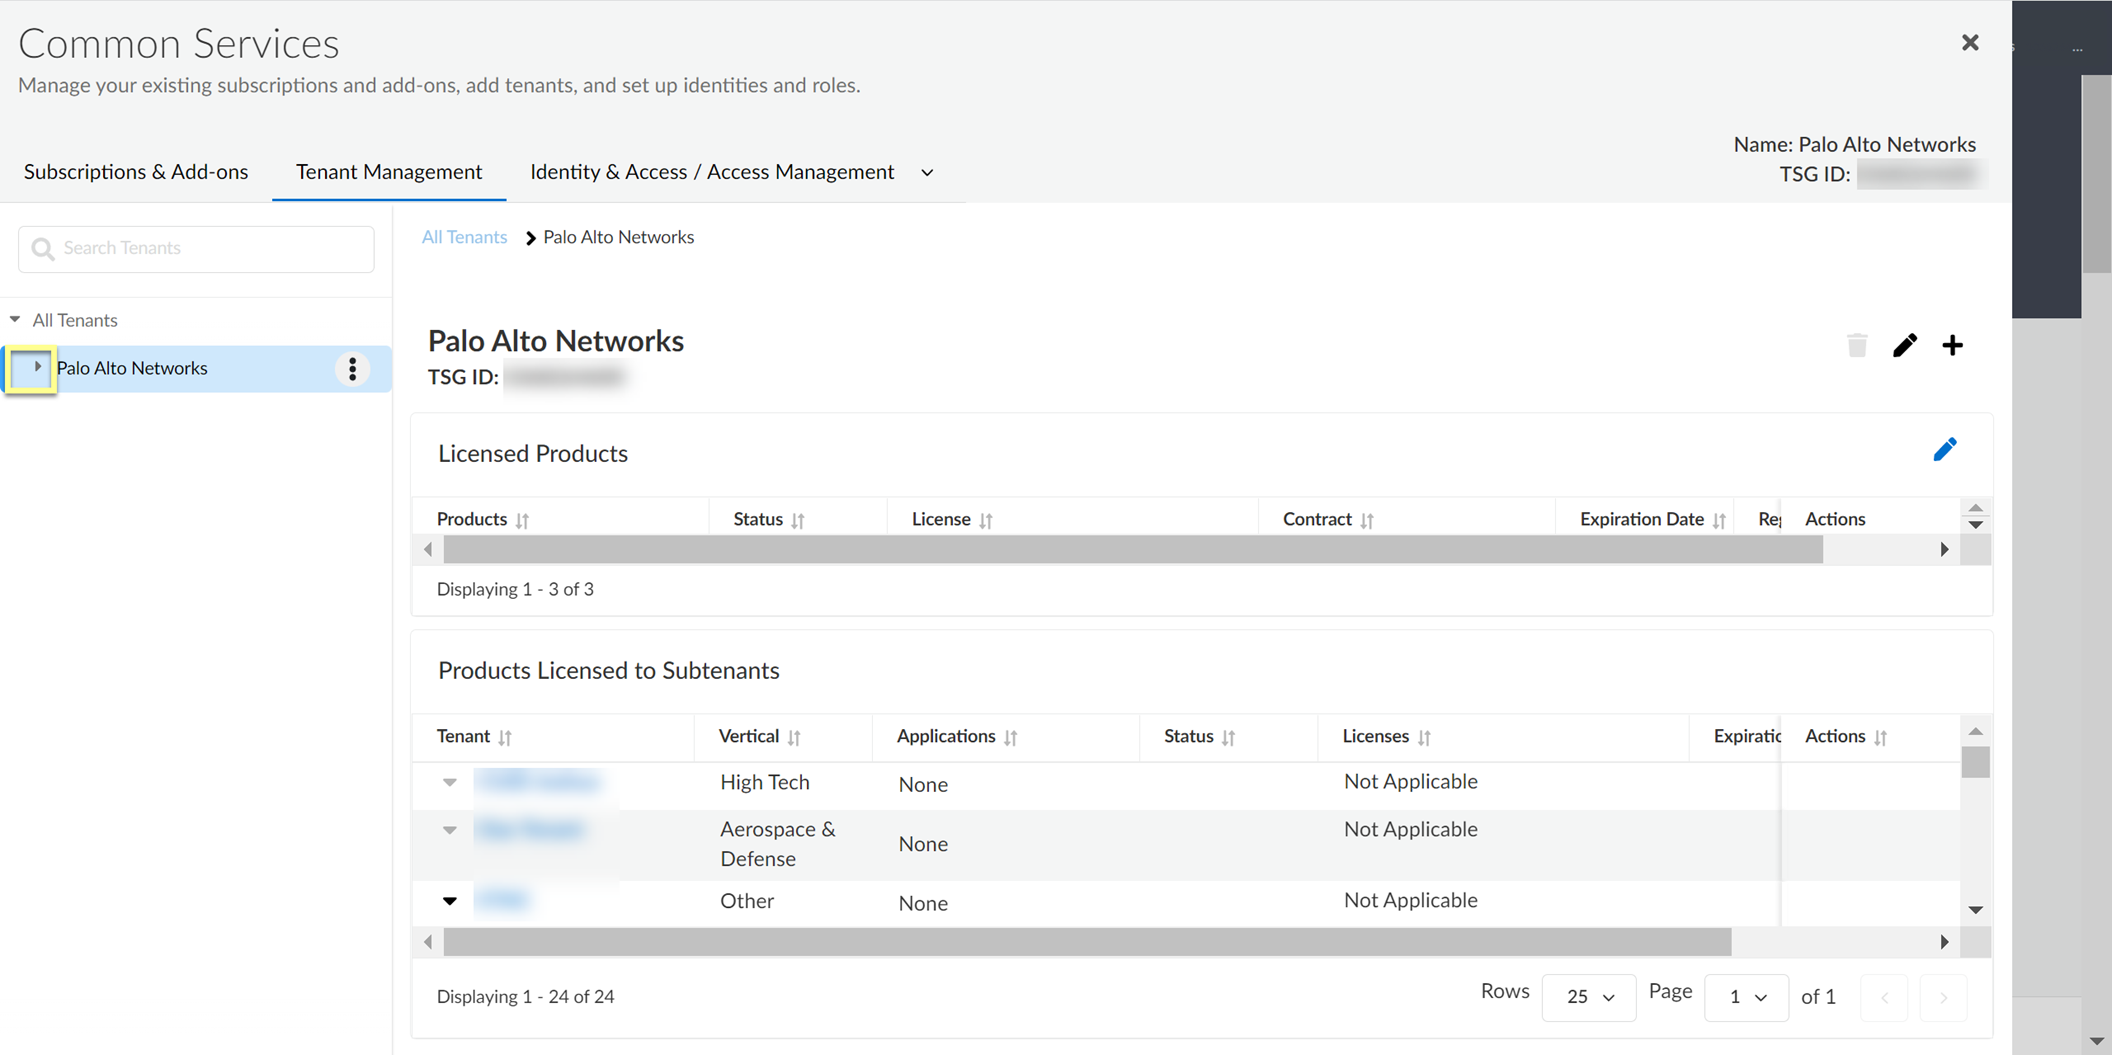
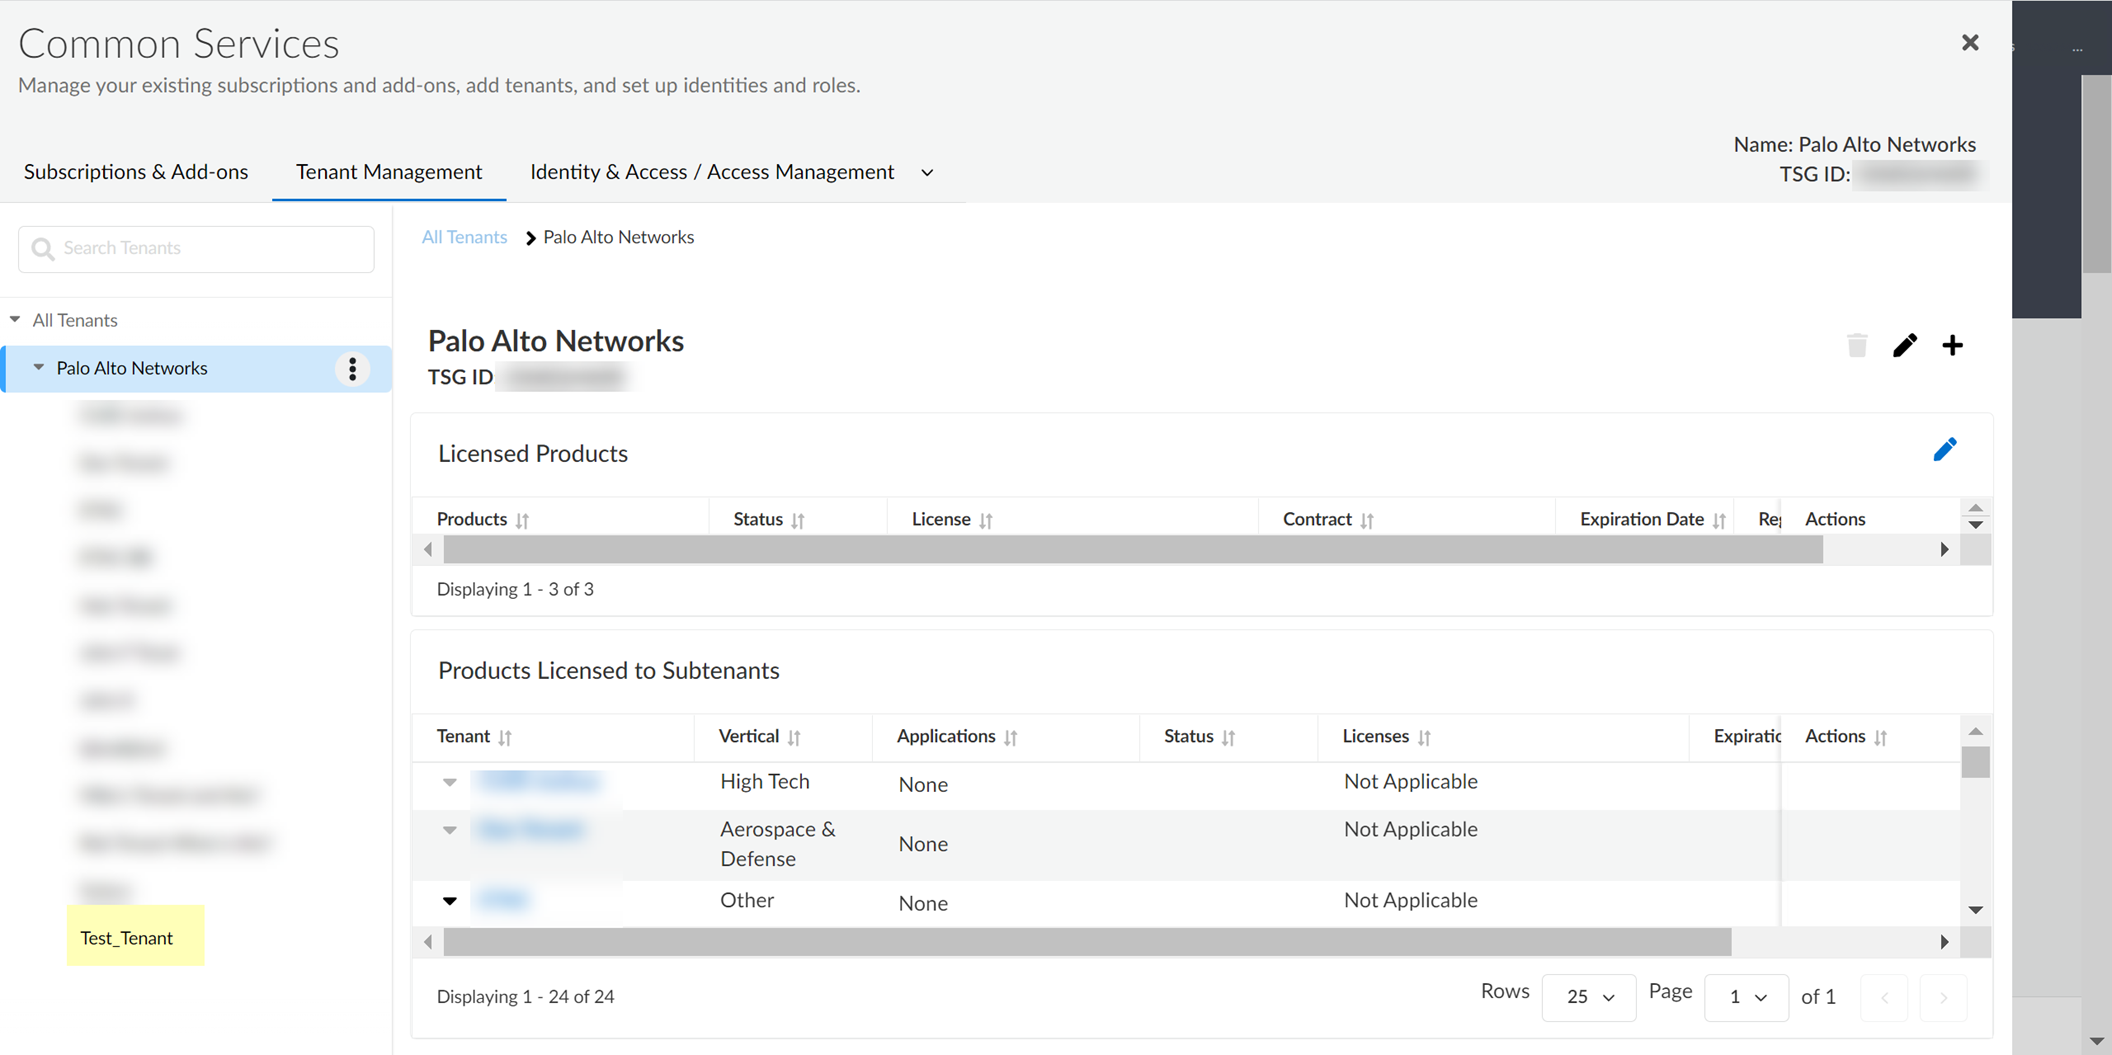
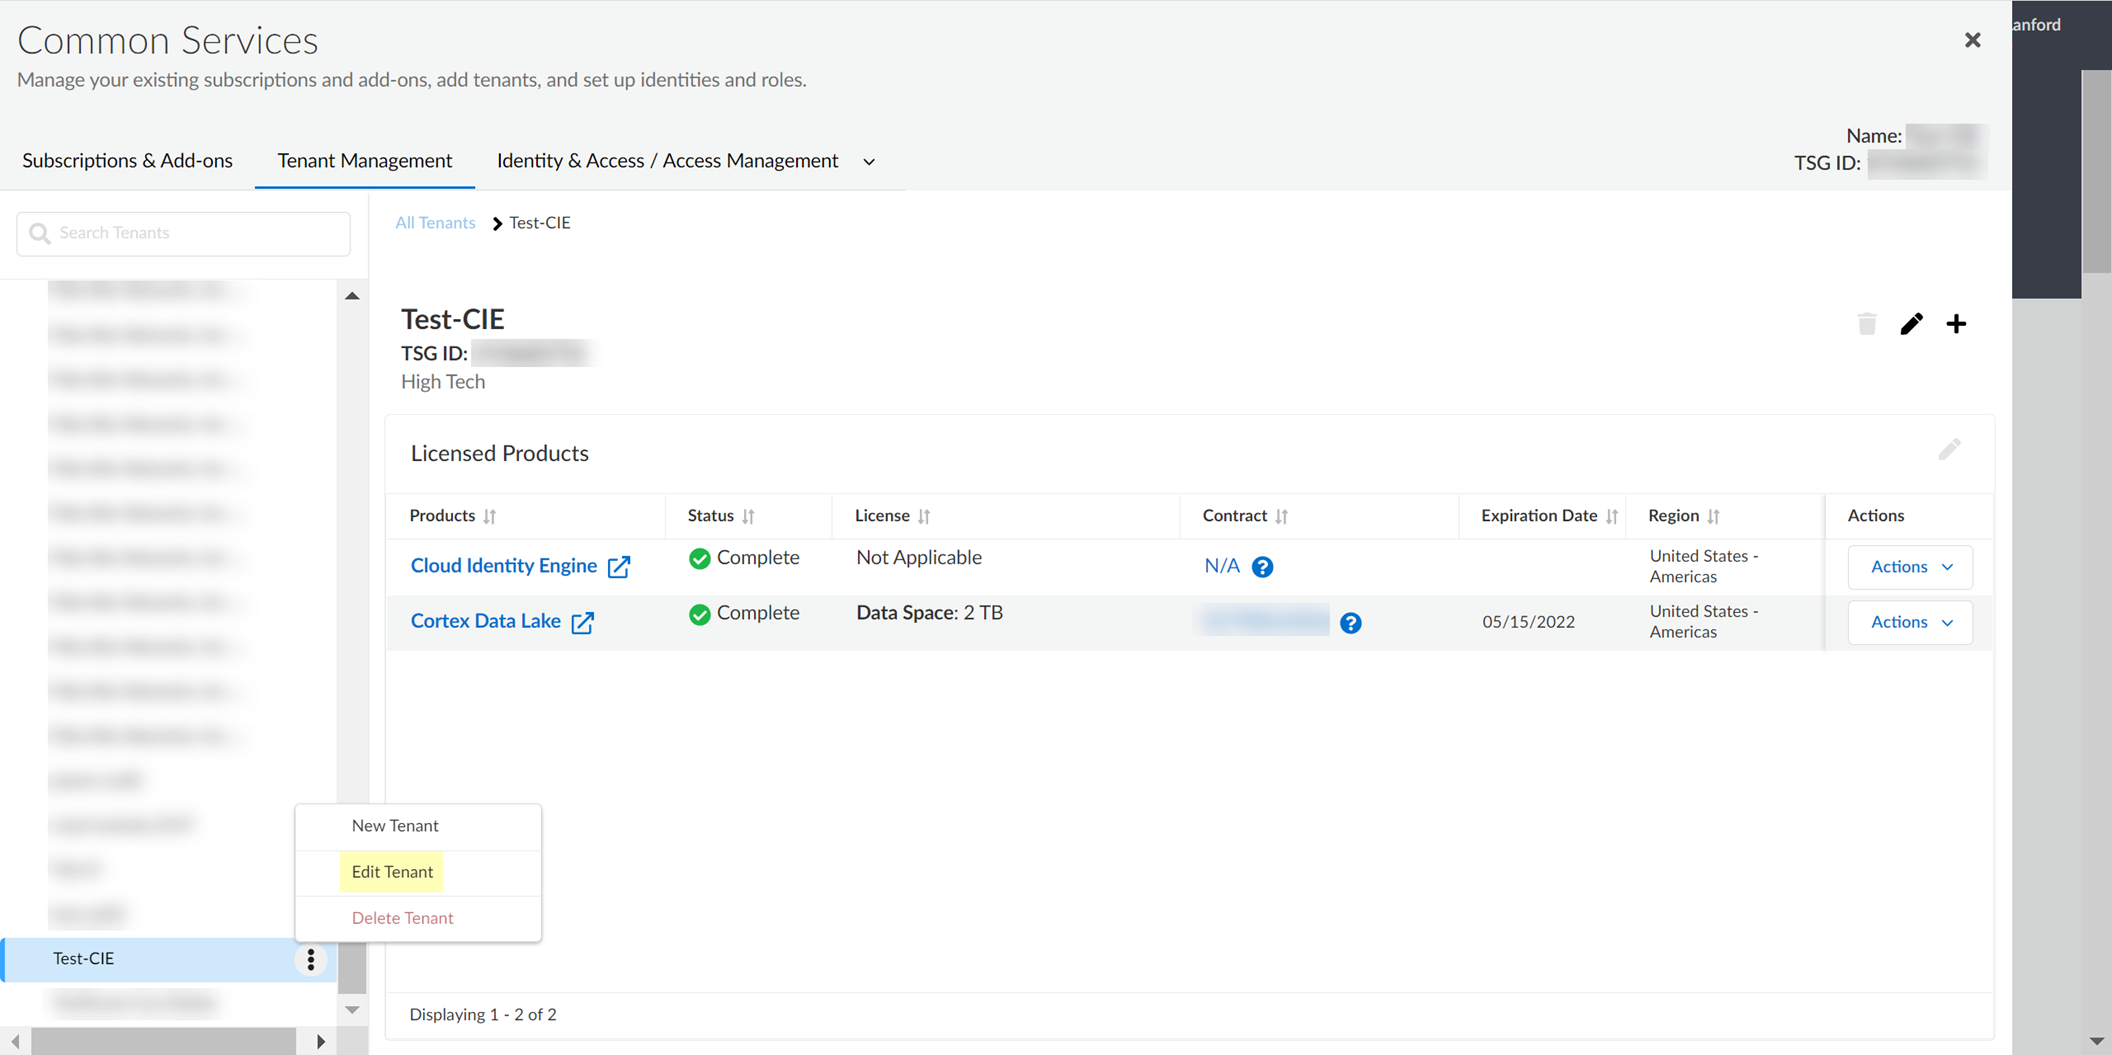
Rename Cloud Identity Engine Tenants
Log in to the hub >
Common Services > Tenant Management
.
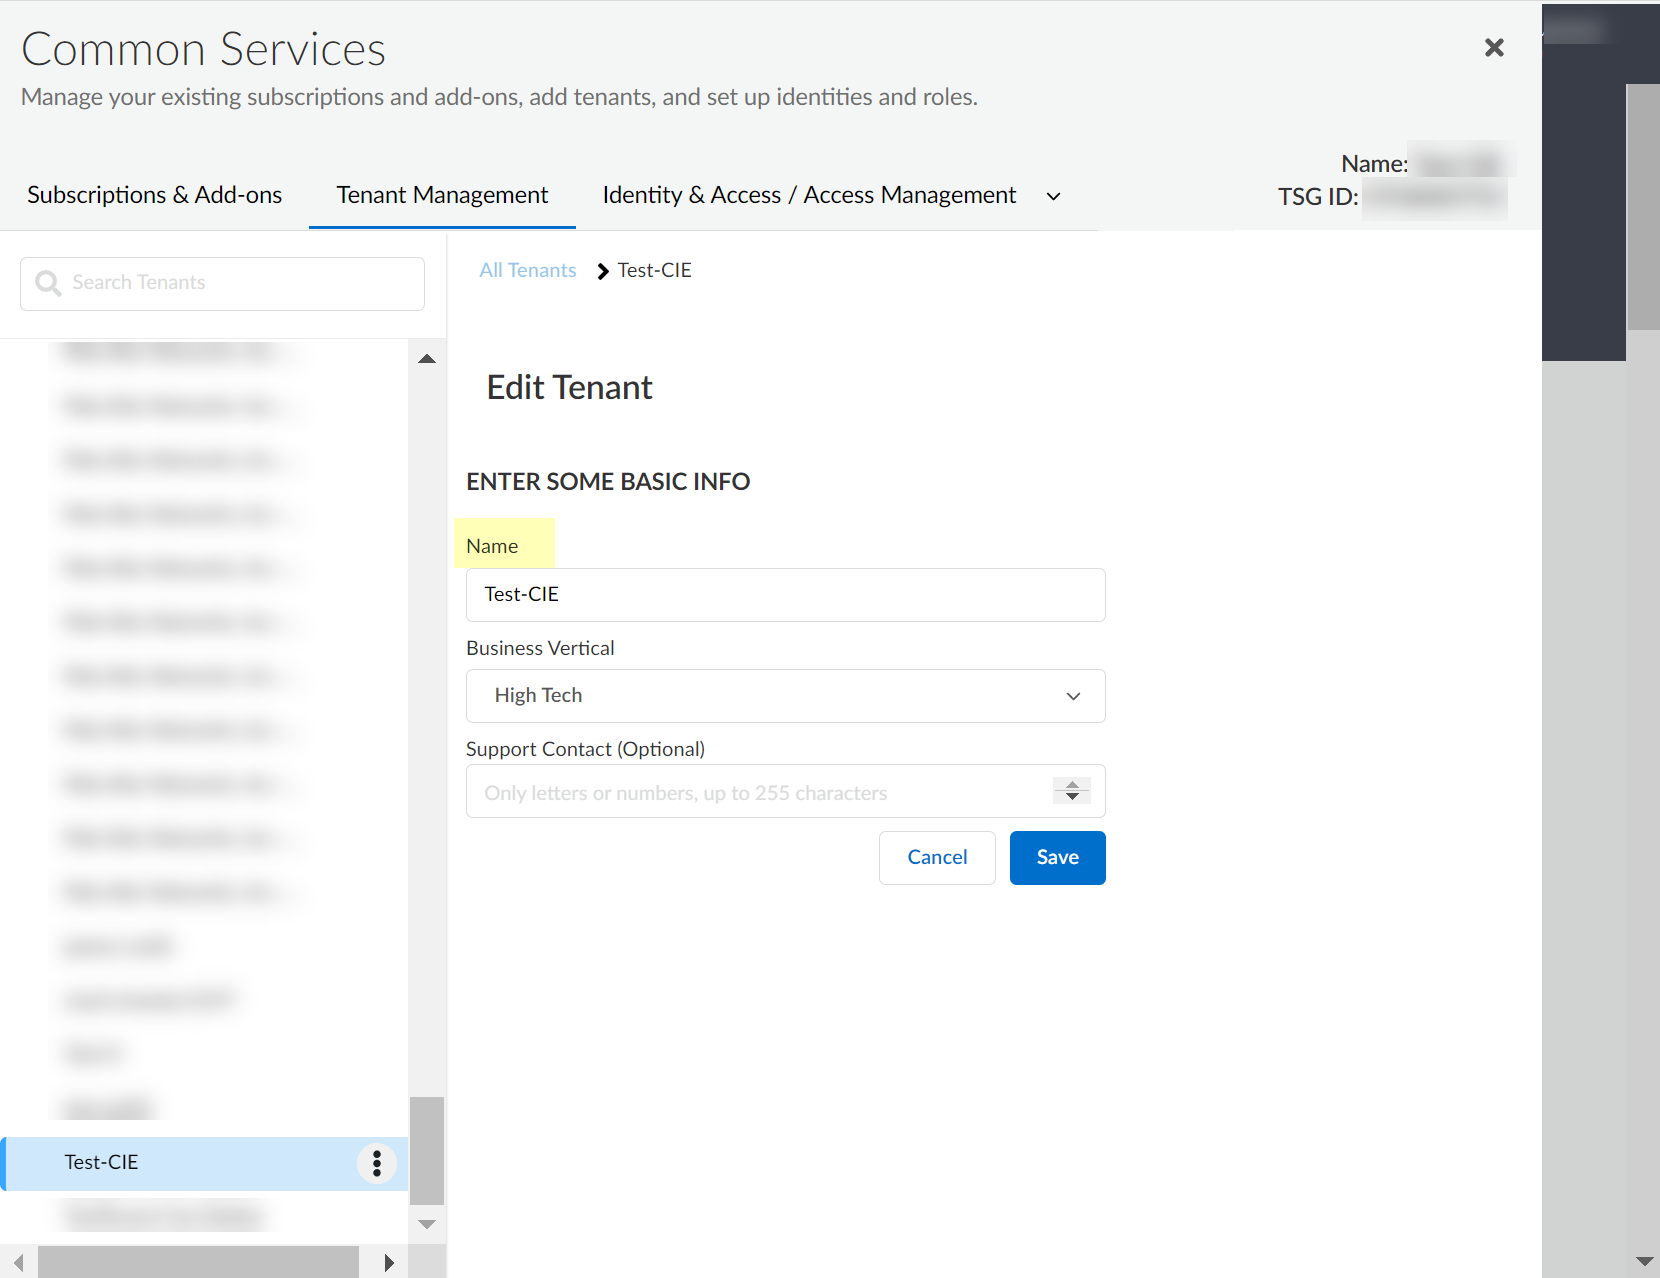
Select the tenant >
Edit Tenant
.
Enter the new
Name
. Click
Save
.
[GOTCHA] Region cannot be changed after creation.
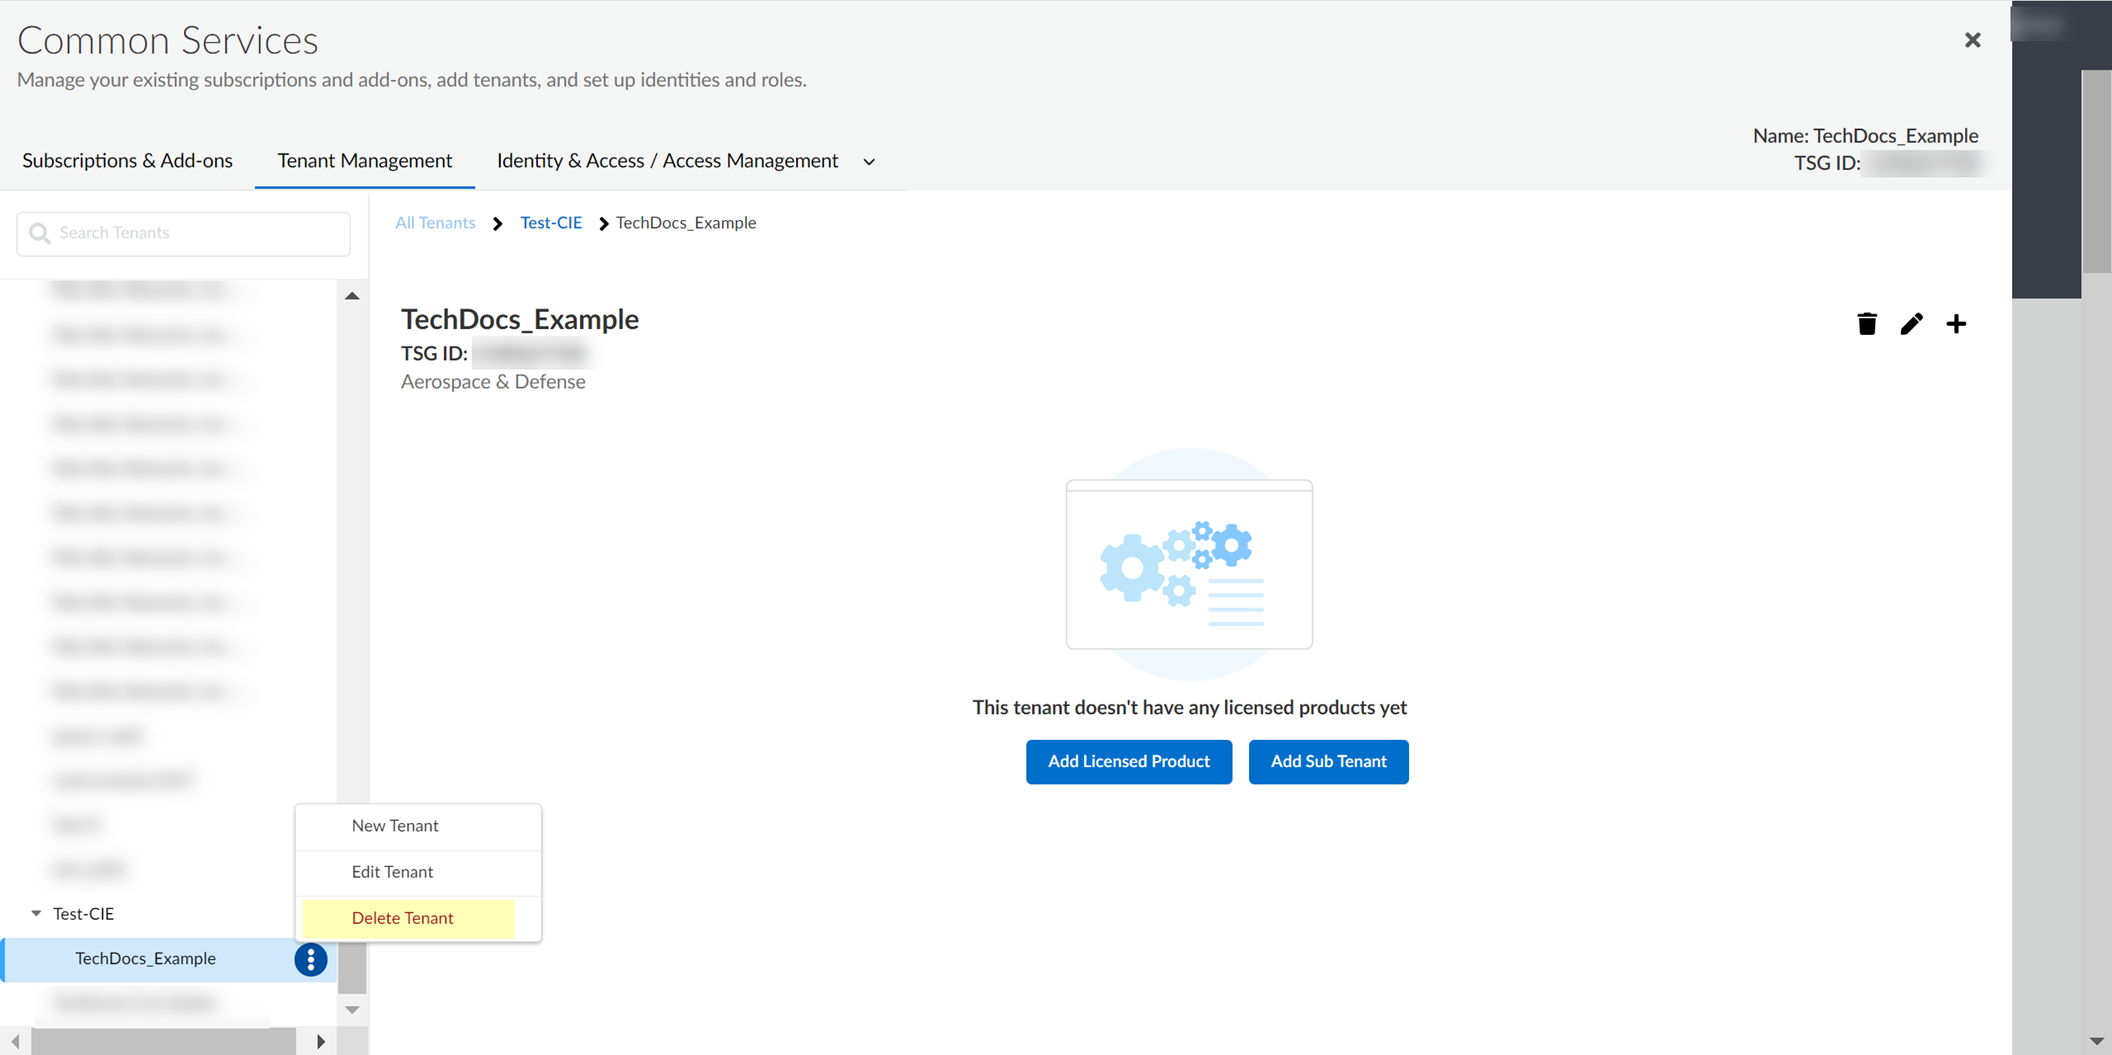
Delete Cloud Identity Engine Tenants
[GOTCHA] A tenant can only be deleted if no other application is using it.
(On-prem only) Stop and remove the associated Cloud Identity Agent(s).
Log in to the hub >
Common Services > Tenant Management
.
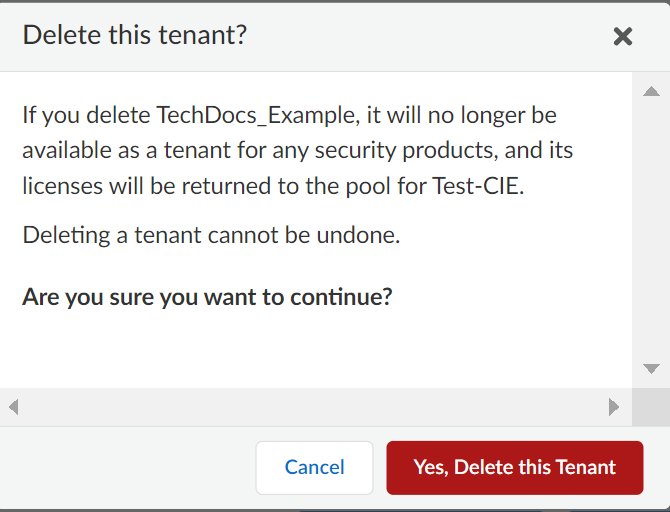
Select the tenant >
Delete Tenant
.
Confirm deletion.
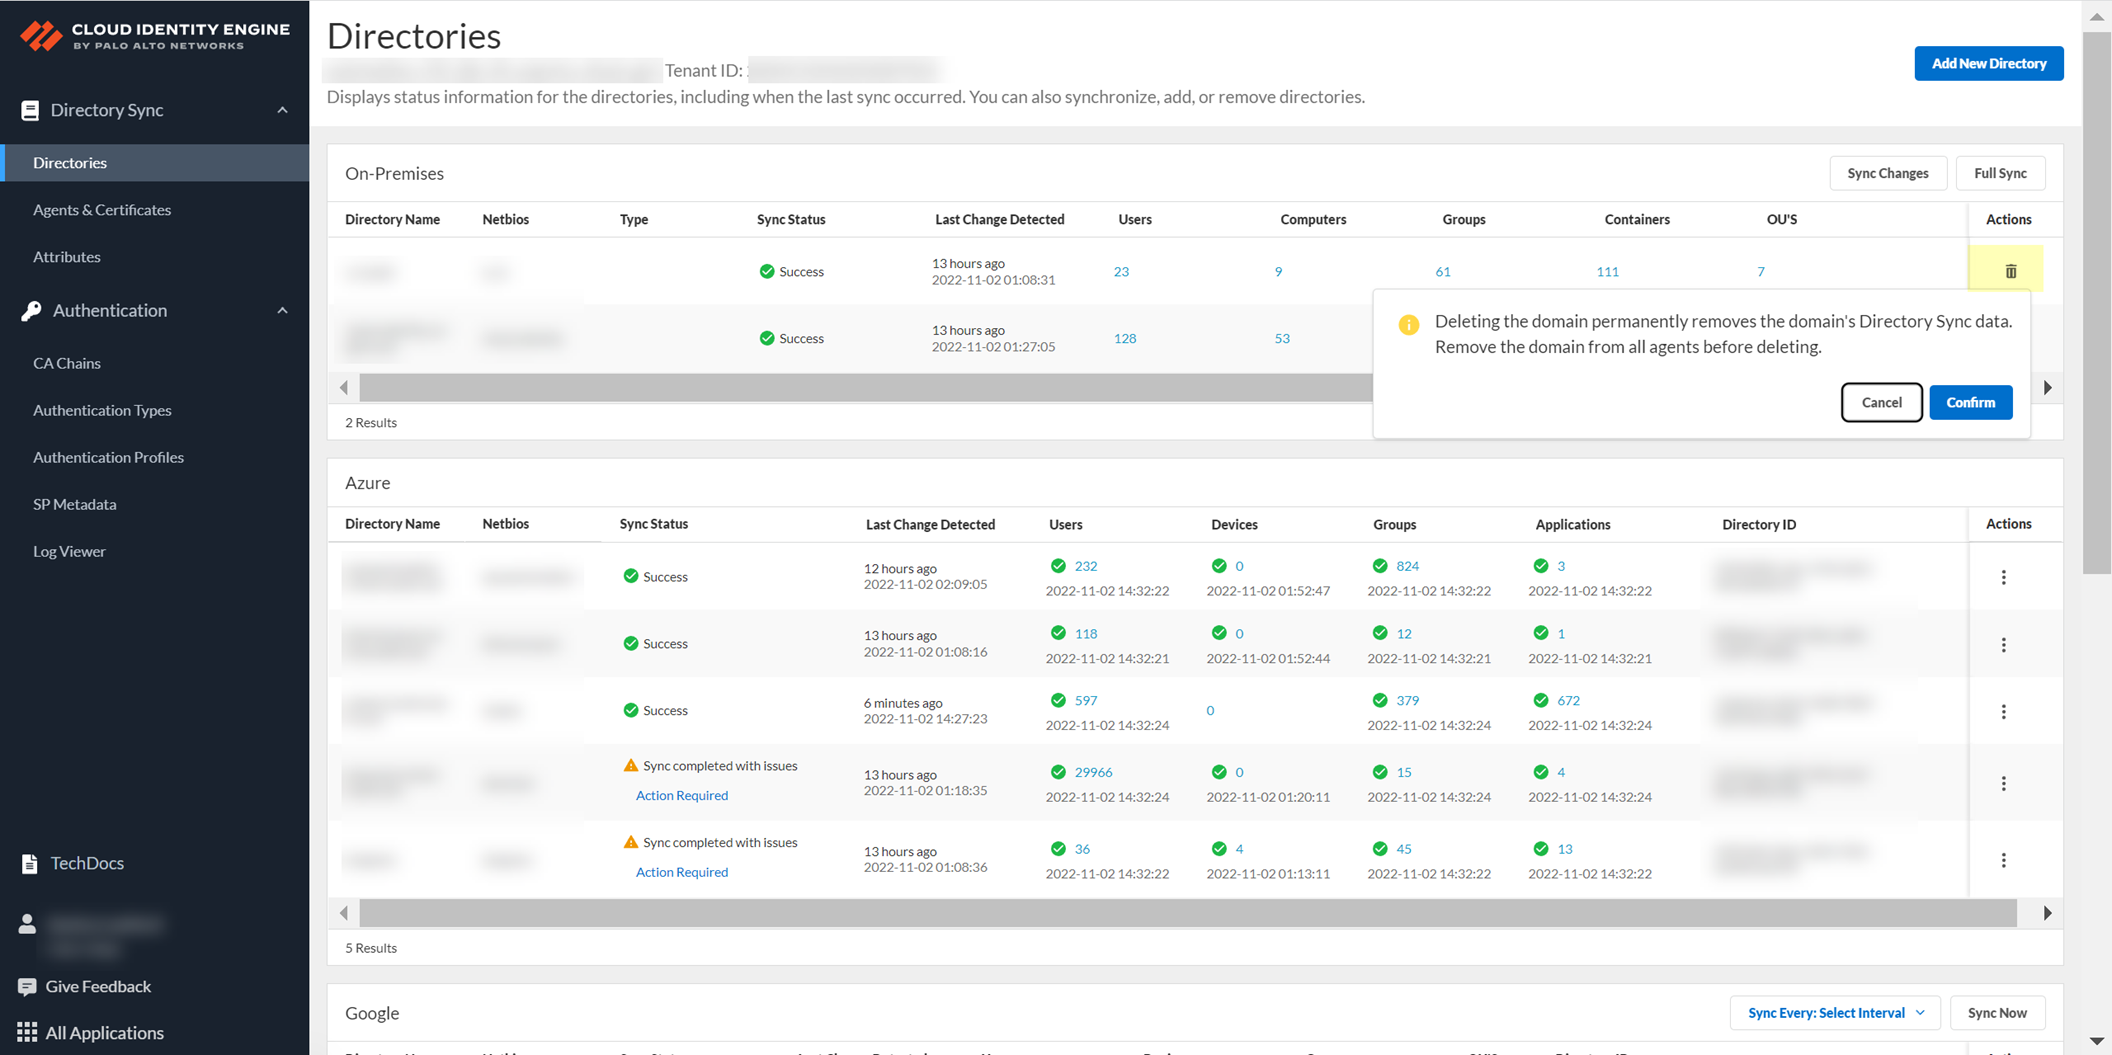
Delete Domains or Directories from Cloud Identity Engine Tenants
Delete Active Directory Domains
[CRITICAL] Must delete from agent config *first*, then from CIE app.
Log in to CIE app > Select tenant > Directory. Select domain > Remove. Confirm.
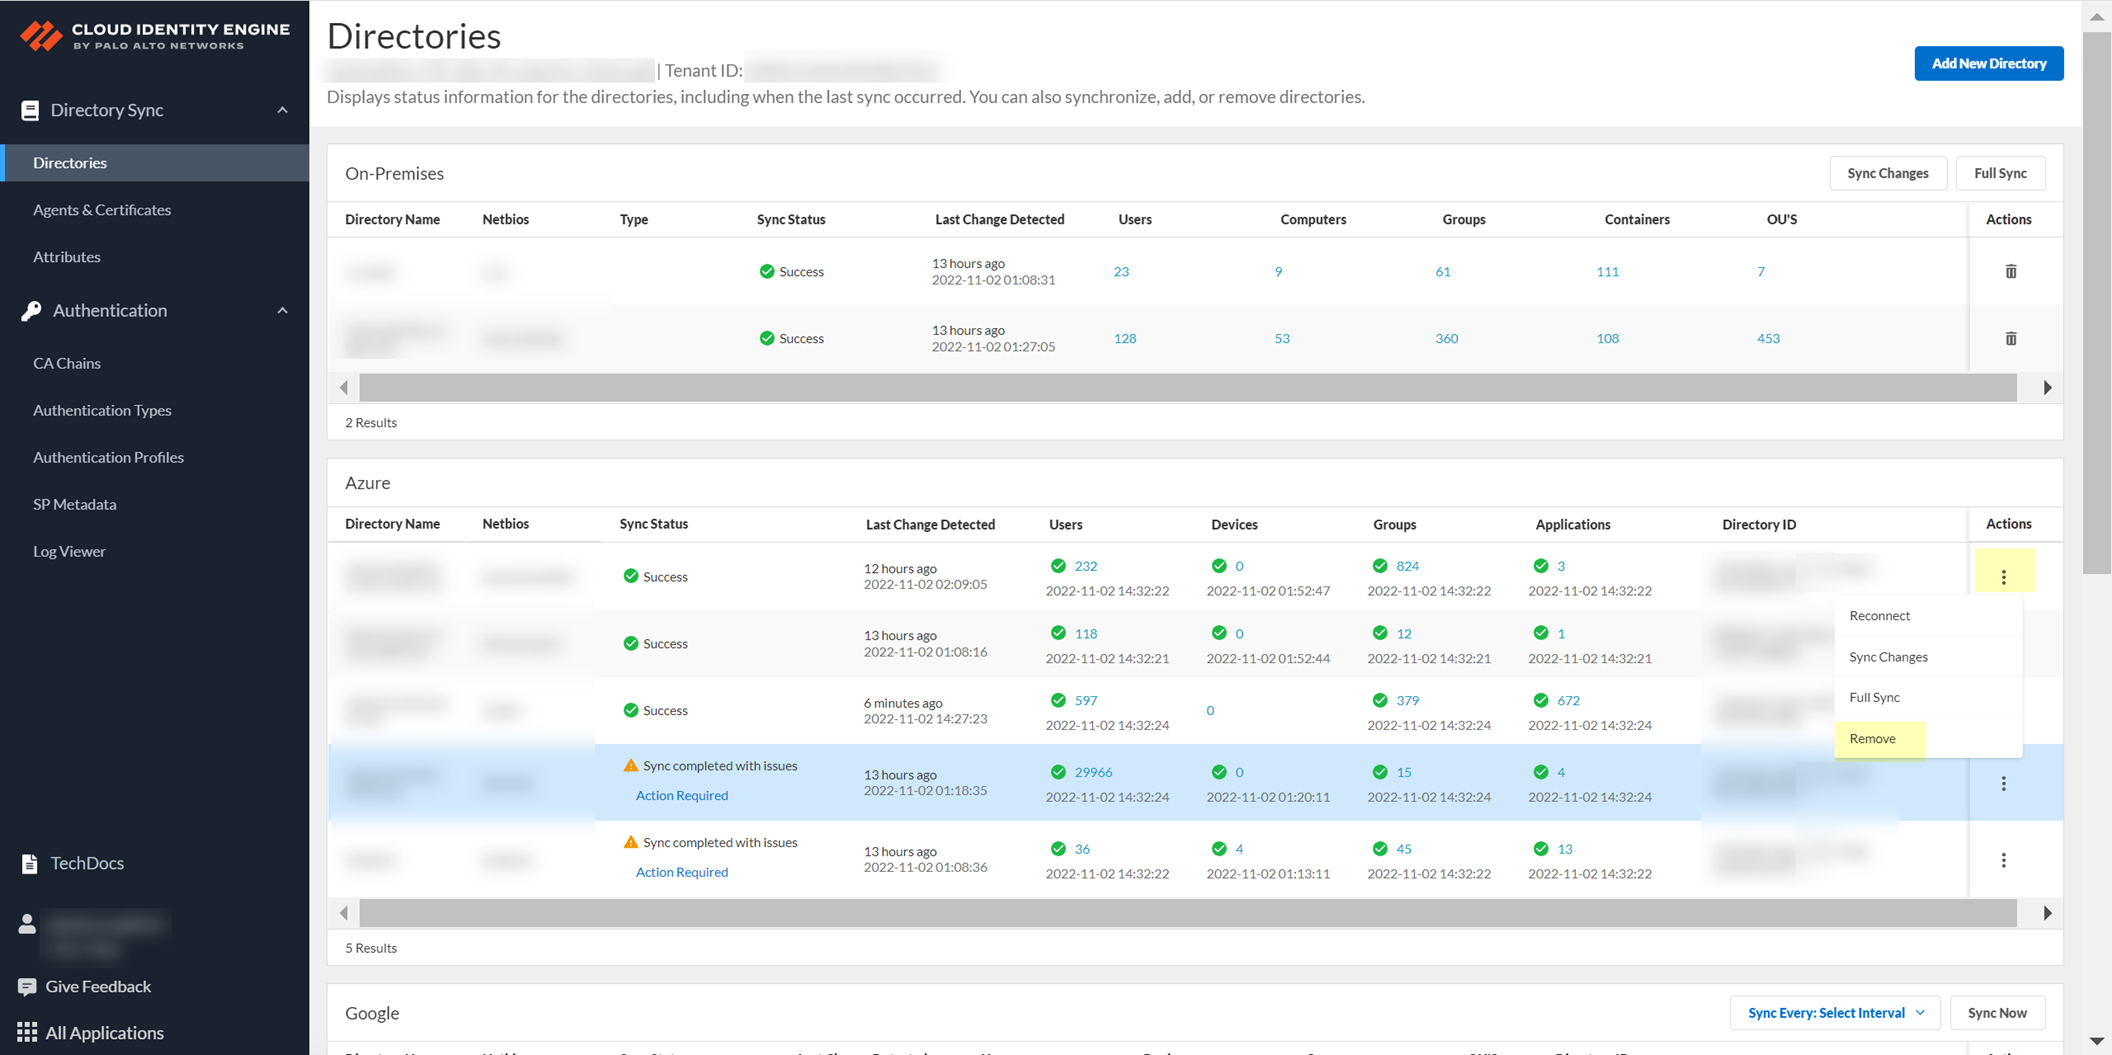
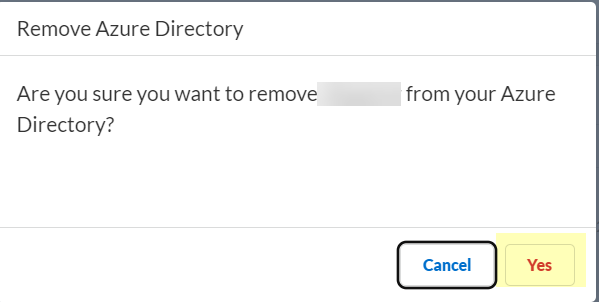
Delete Cloud-Based Directories
Log in to CIE app > Select tenant > Directory.
Select directory > Actions > Remove. Confirm.
Cloud Identity Engine Attributes
Attributes are unique identifiers (e.g., Distinguished Name) for directory objects (users, computers, groups). CIE uses default attribute names/formats per directory type. Custom attributes need mapping in CIE.
[GOTCHA] Invalid attributes can cause sync failures.
(Tables listing default attributes for each directory type - On-Prem AD, Azure AD, SCIM, Okta, Google, OpenLDAP - would follow here. Due to length, these are omitted but were present in the source.)
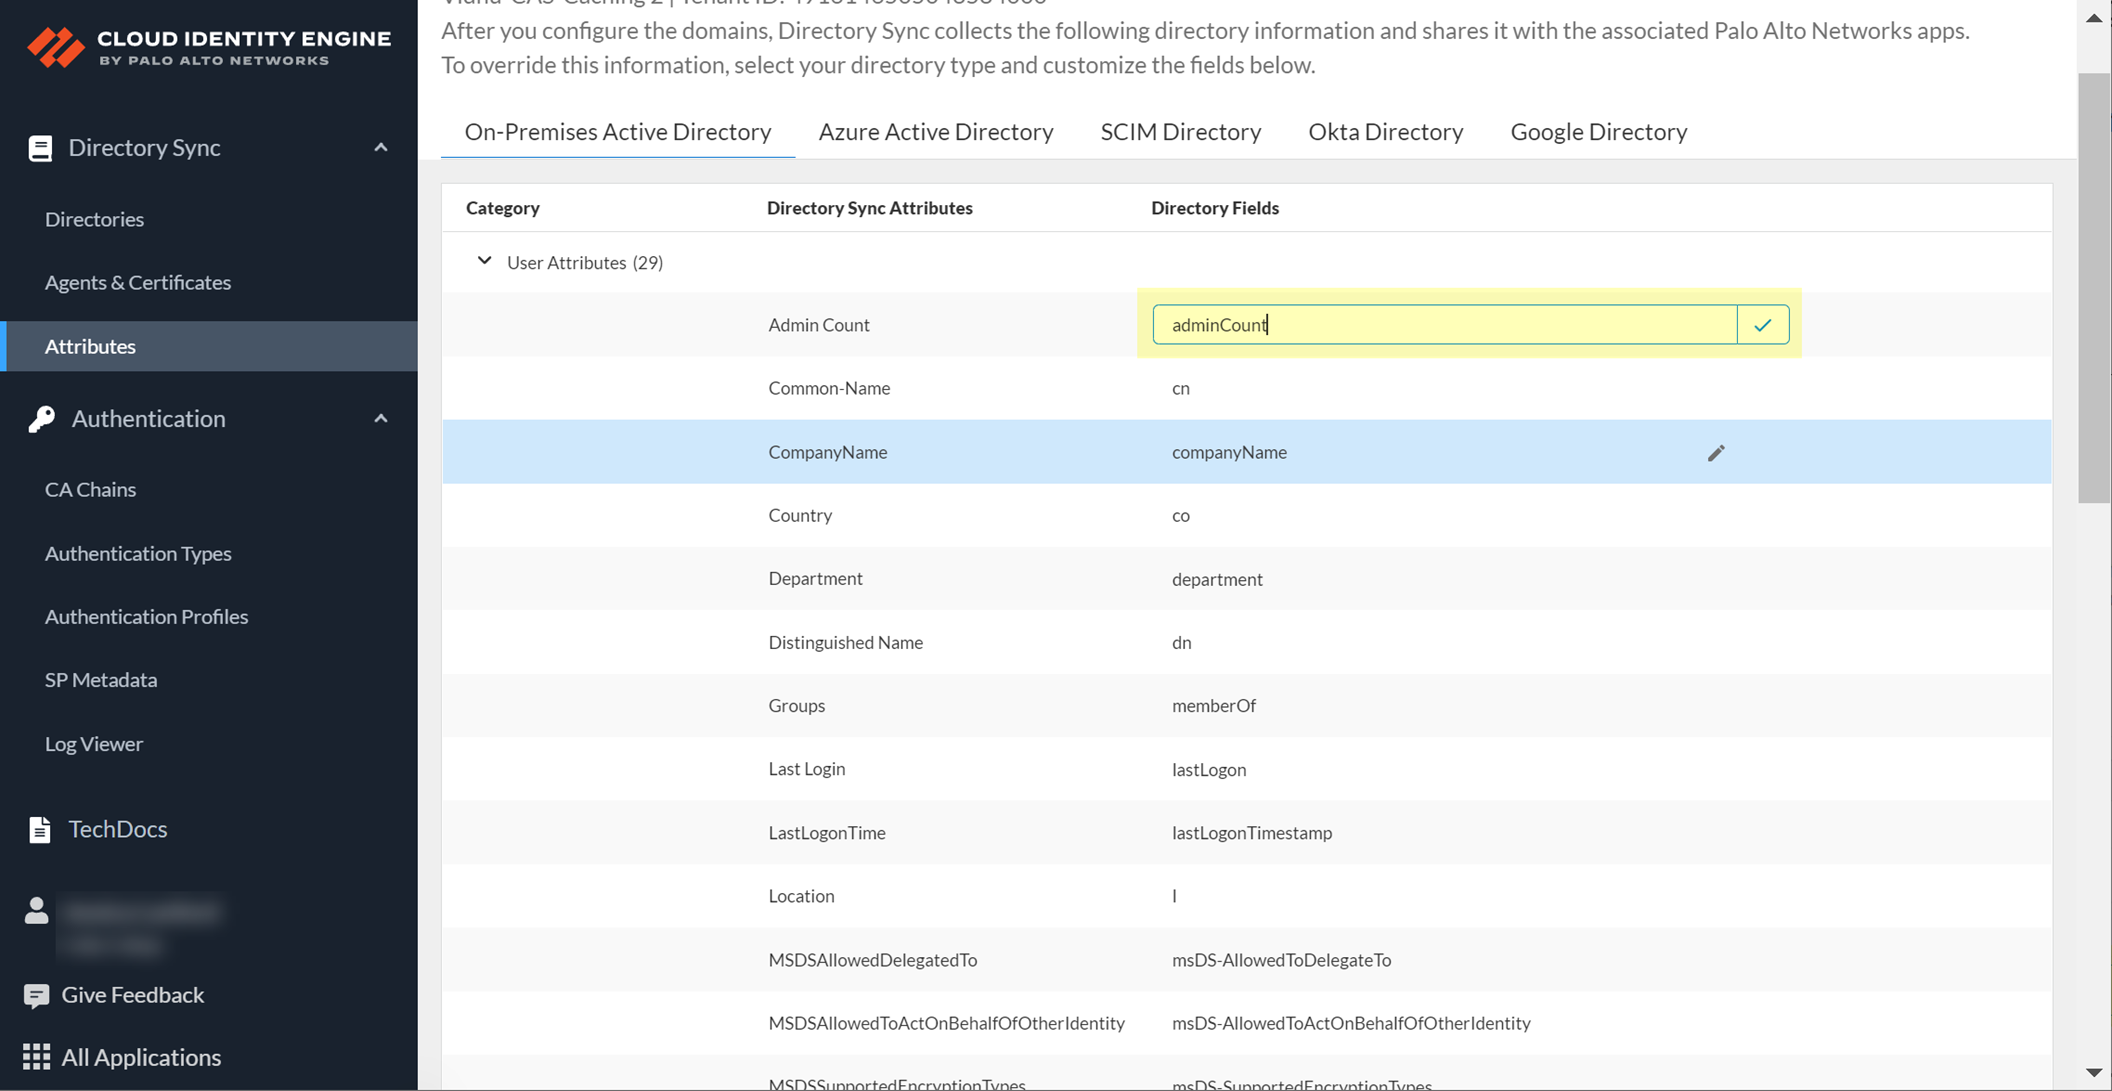
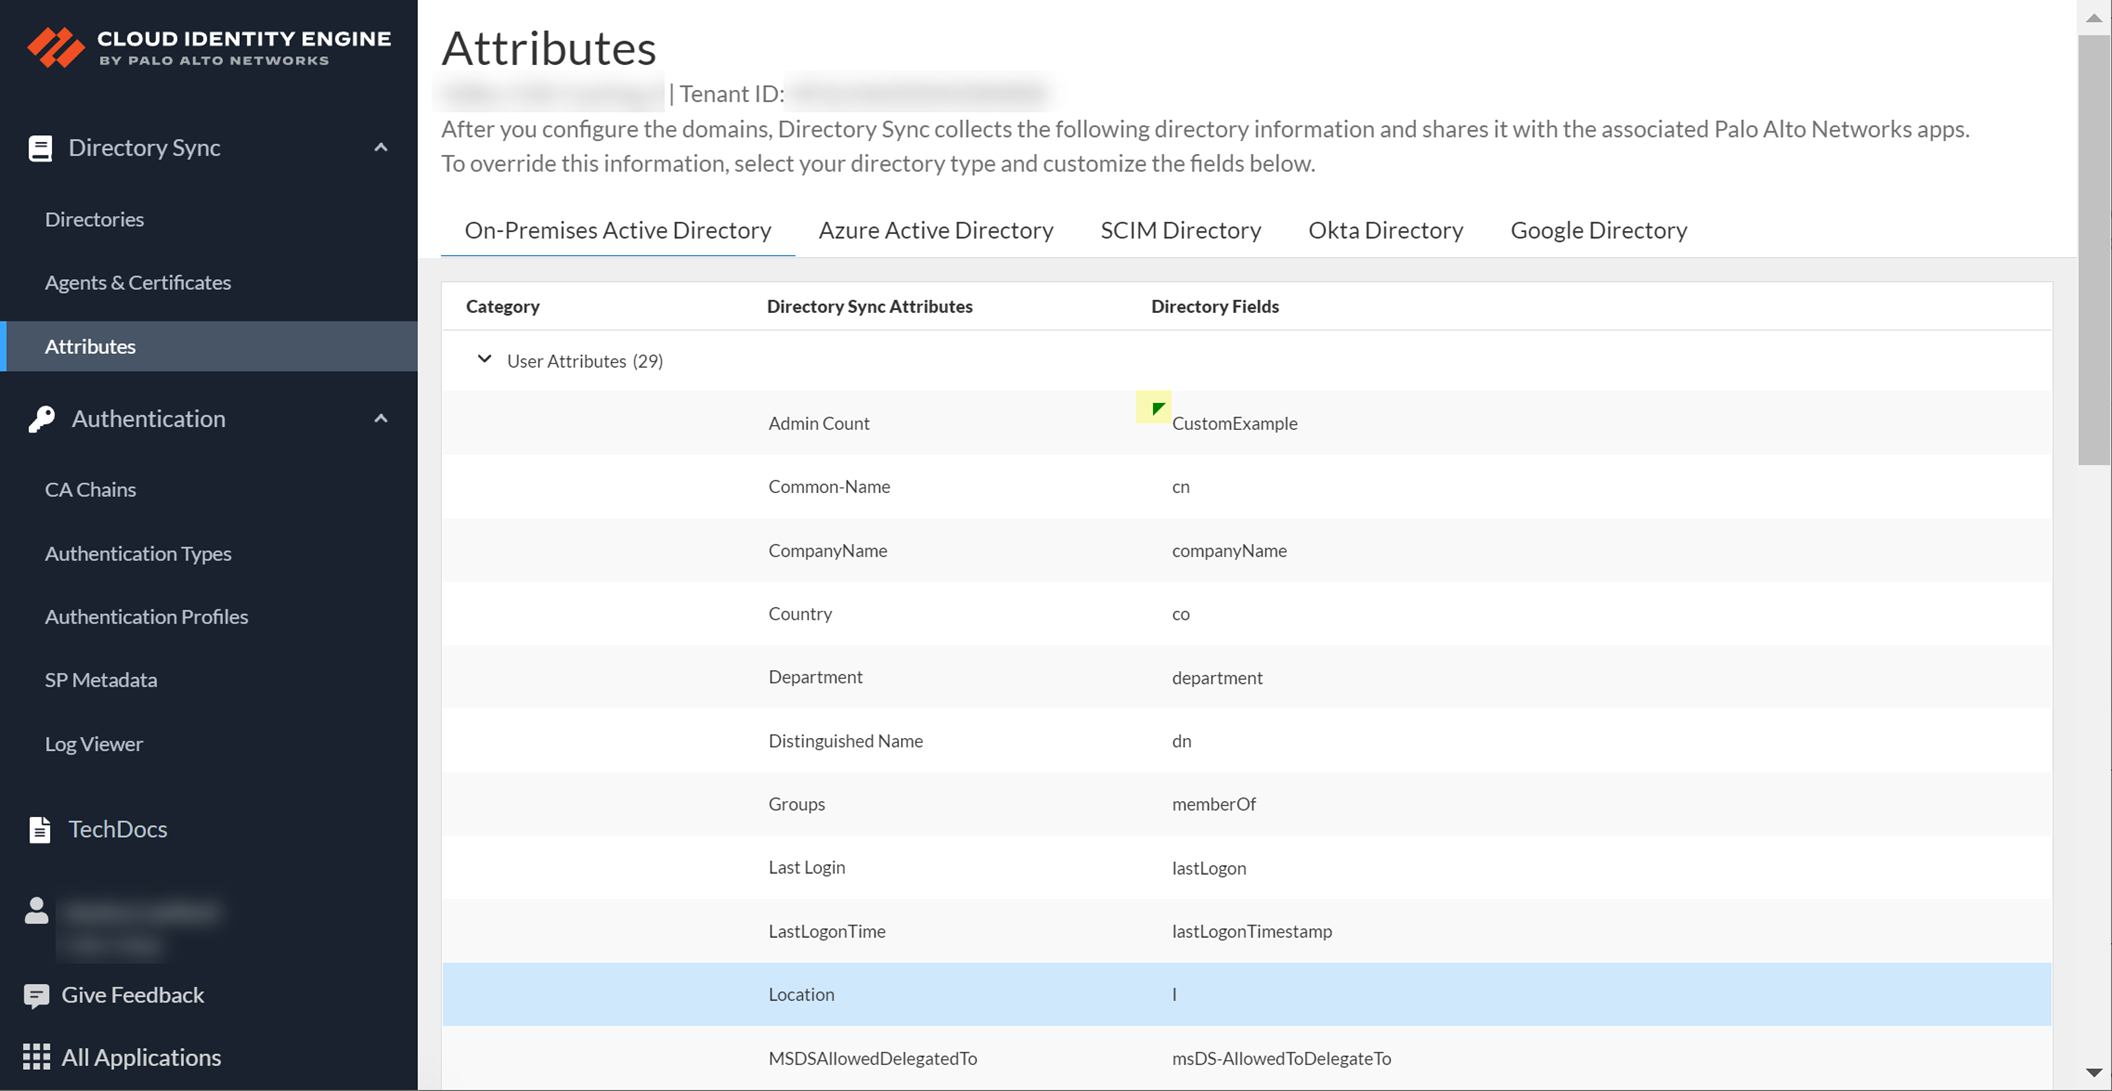
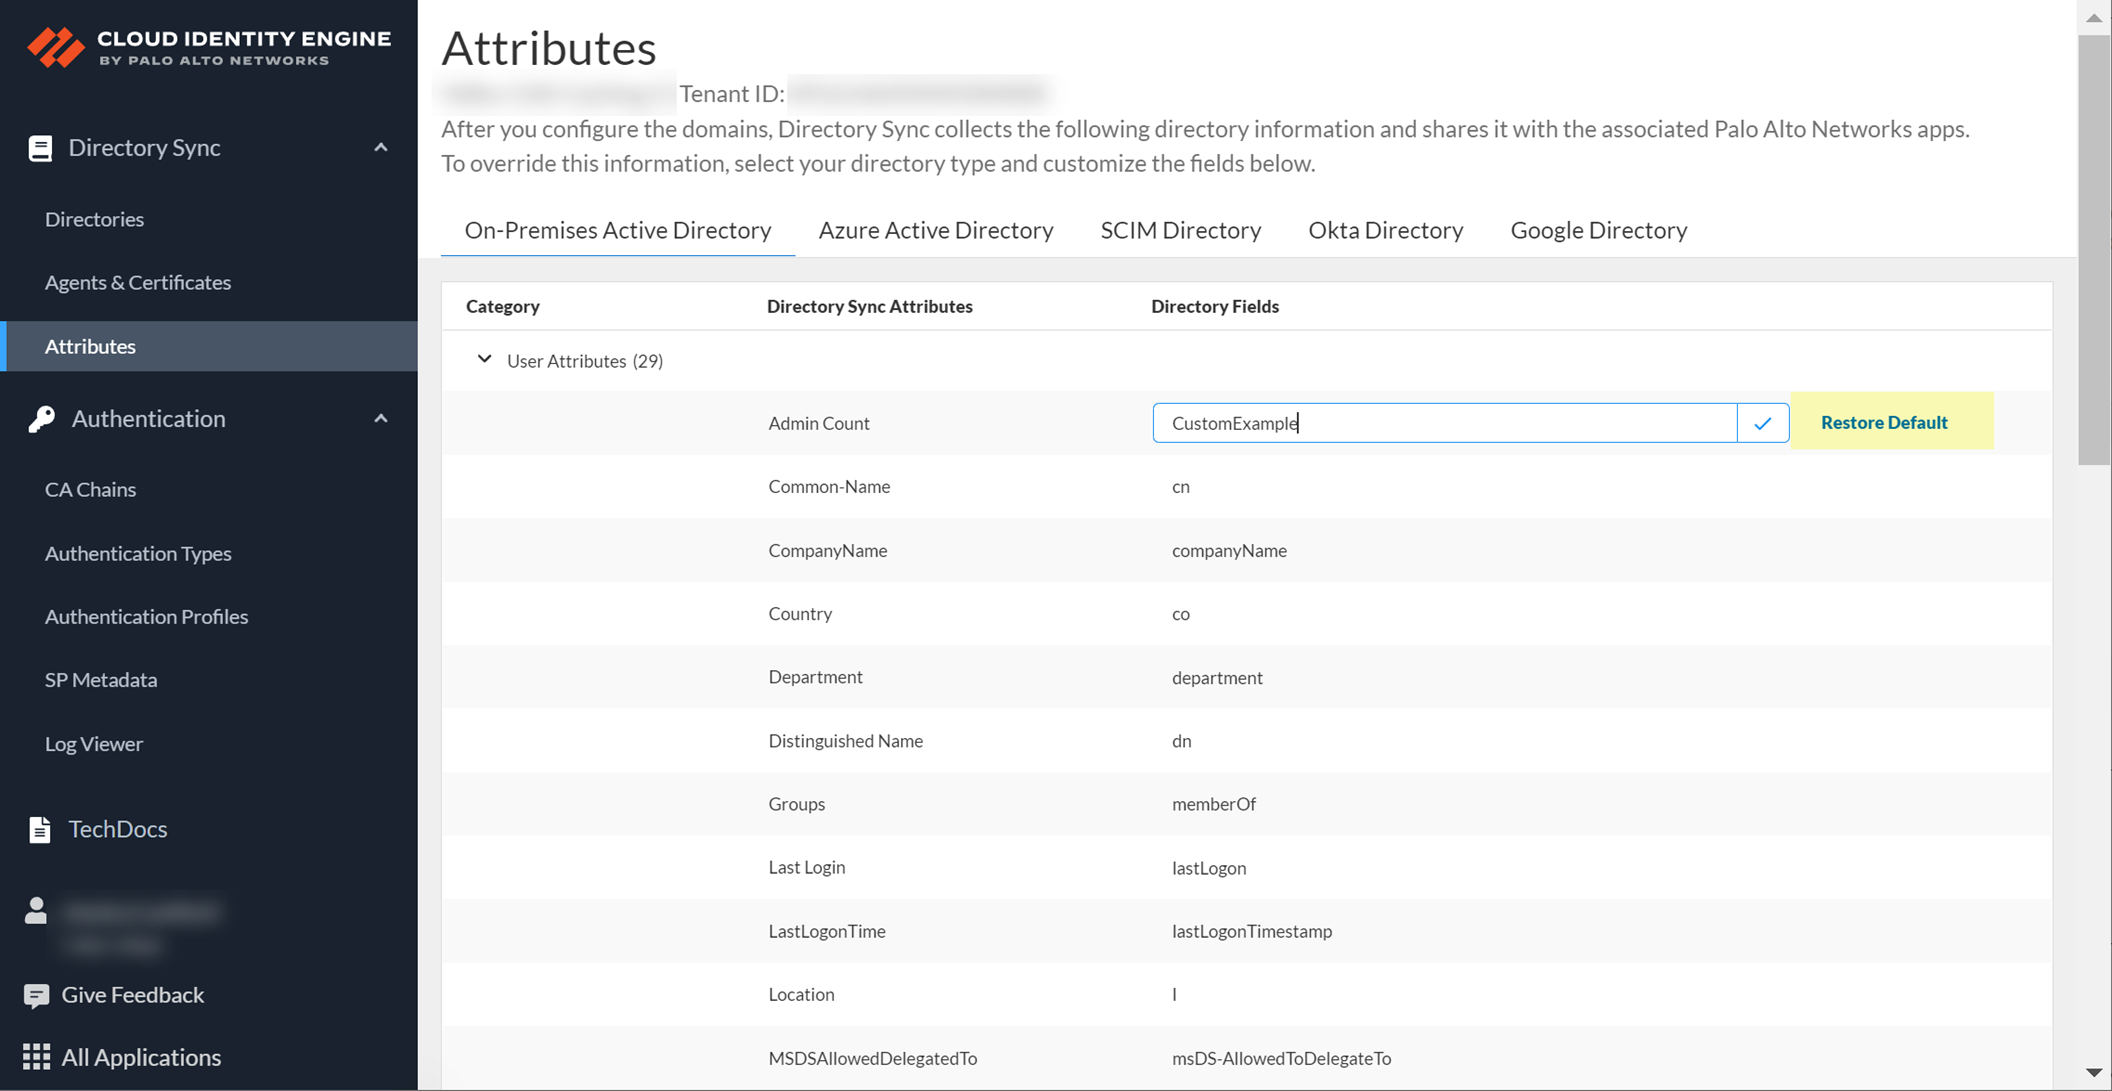
Collect Custom Attributes with the Cloud Identity Engine
Log in to CIE app > Select tenant >
Attributes
.
Select the directory type.
Click on the default attribute value you want to change.
Enter the custom attribute name from your directory. Click the checkmark.
To revert, select the custom attribute and click
Restore Default
.
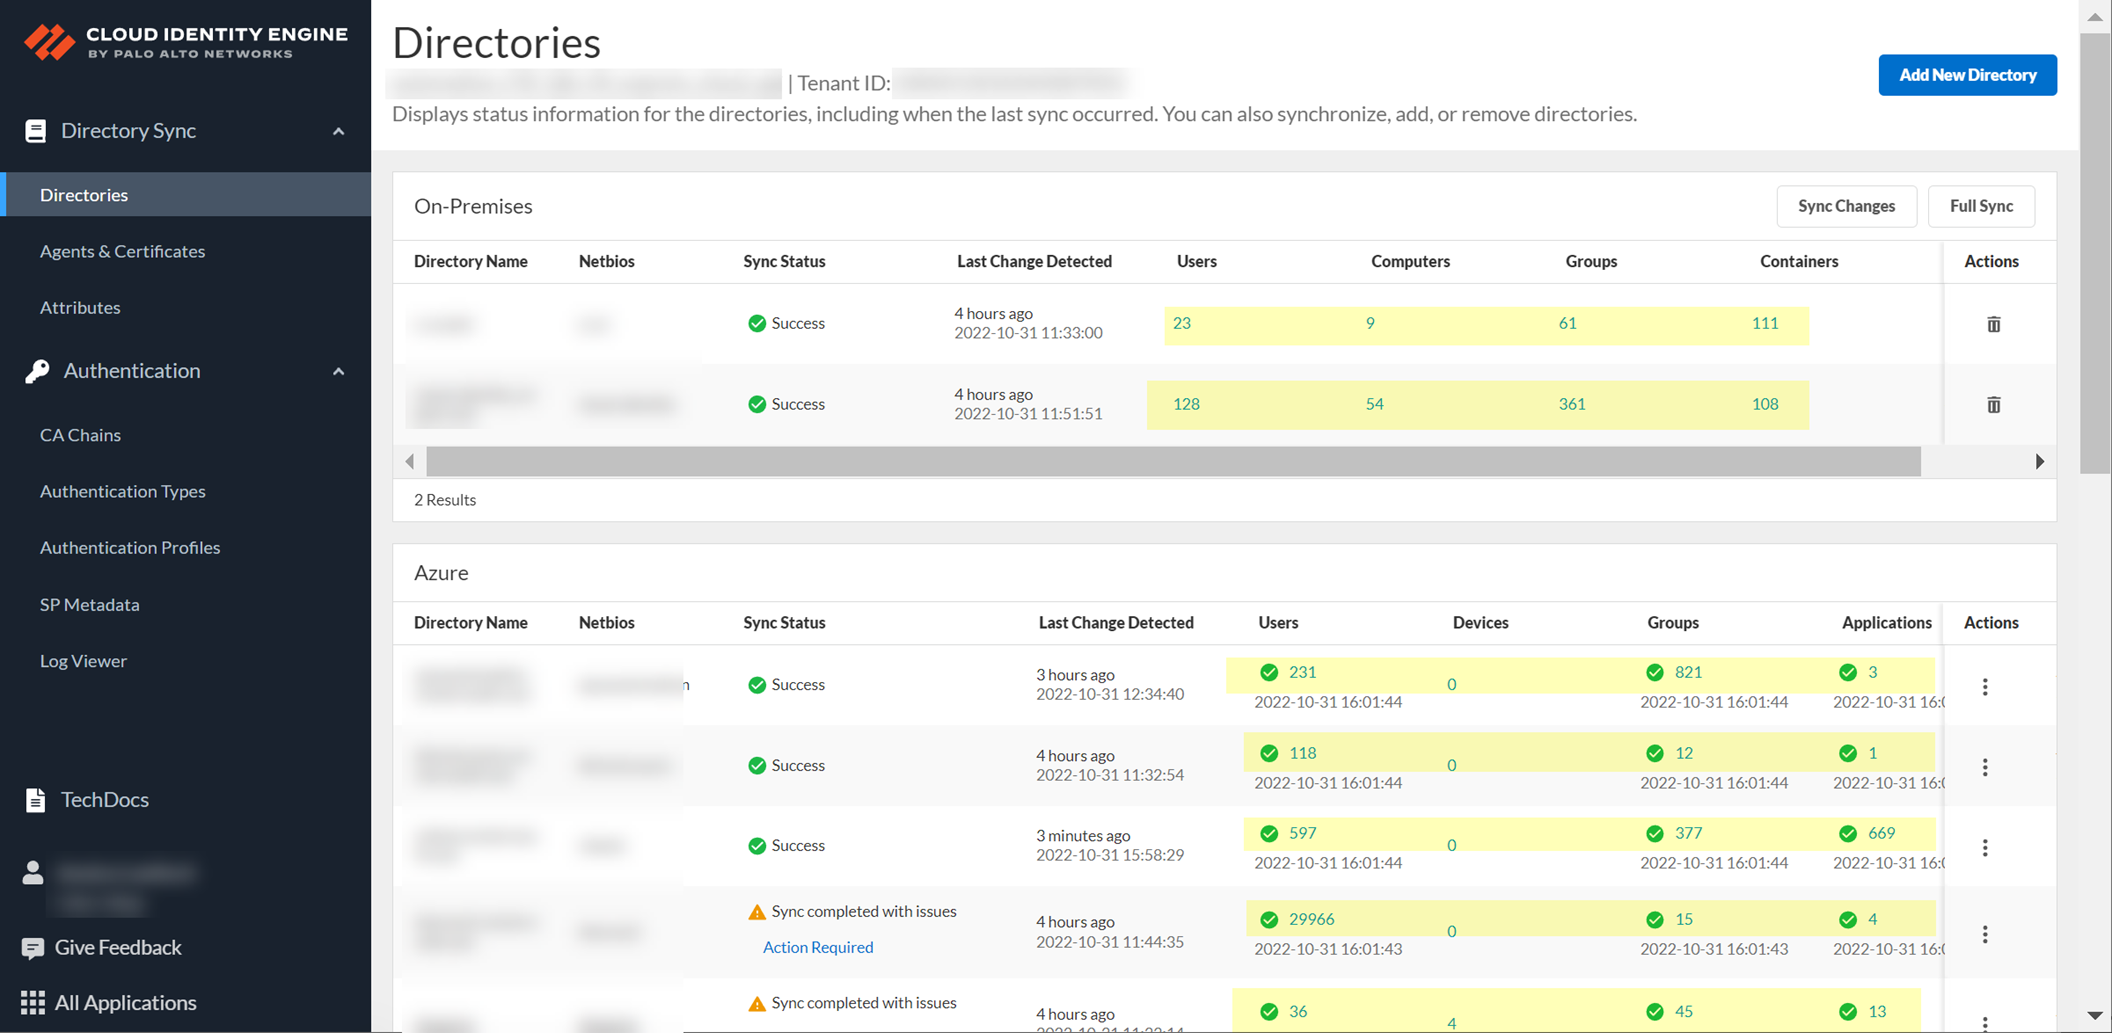
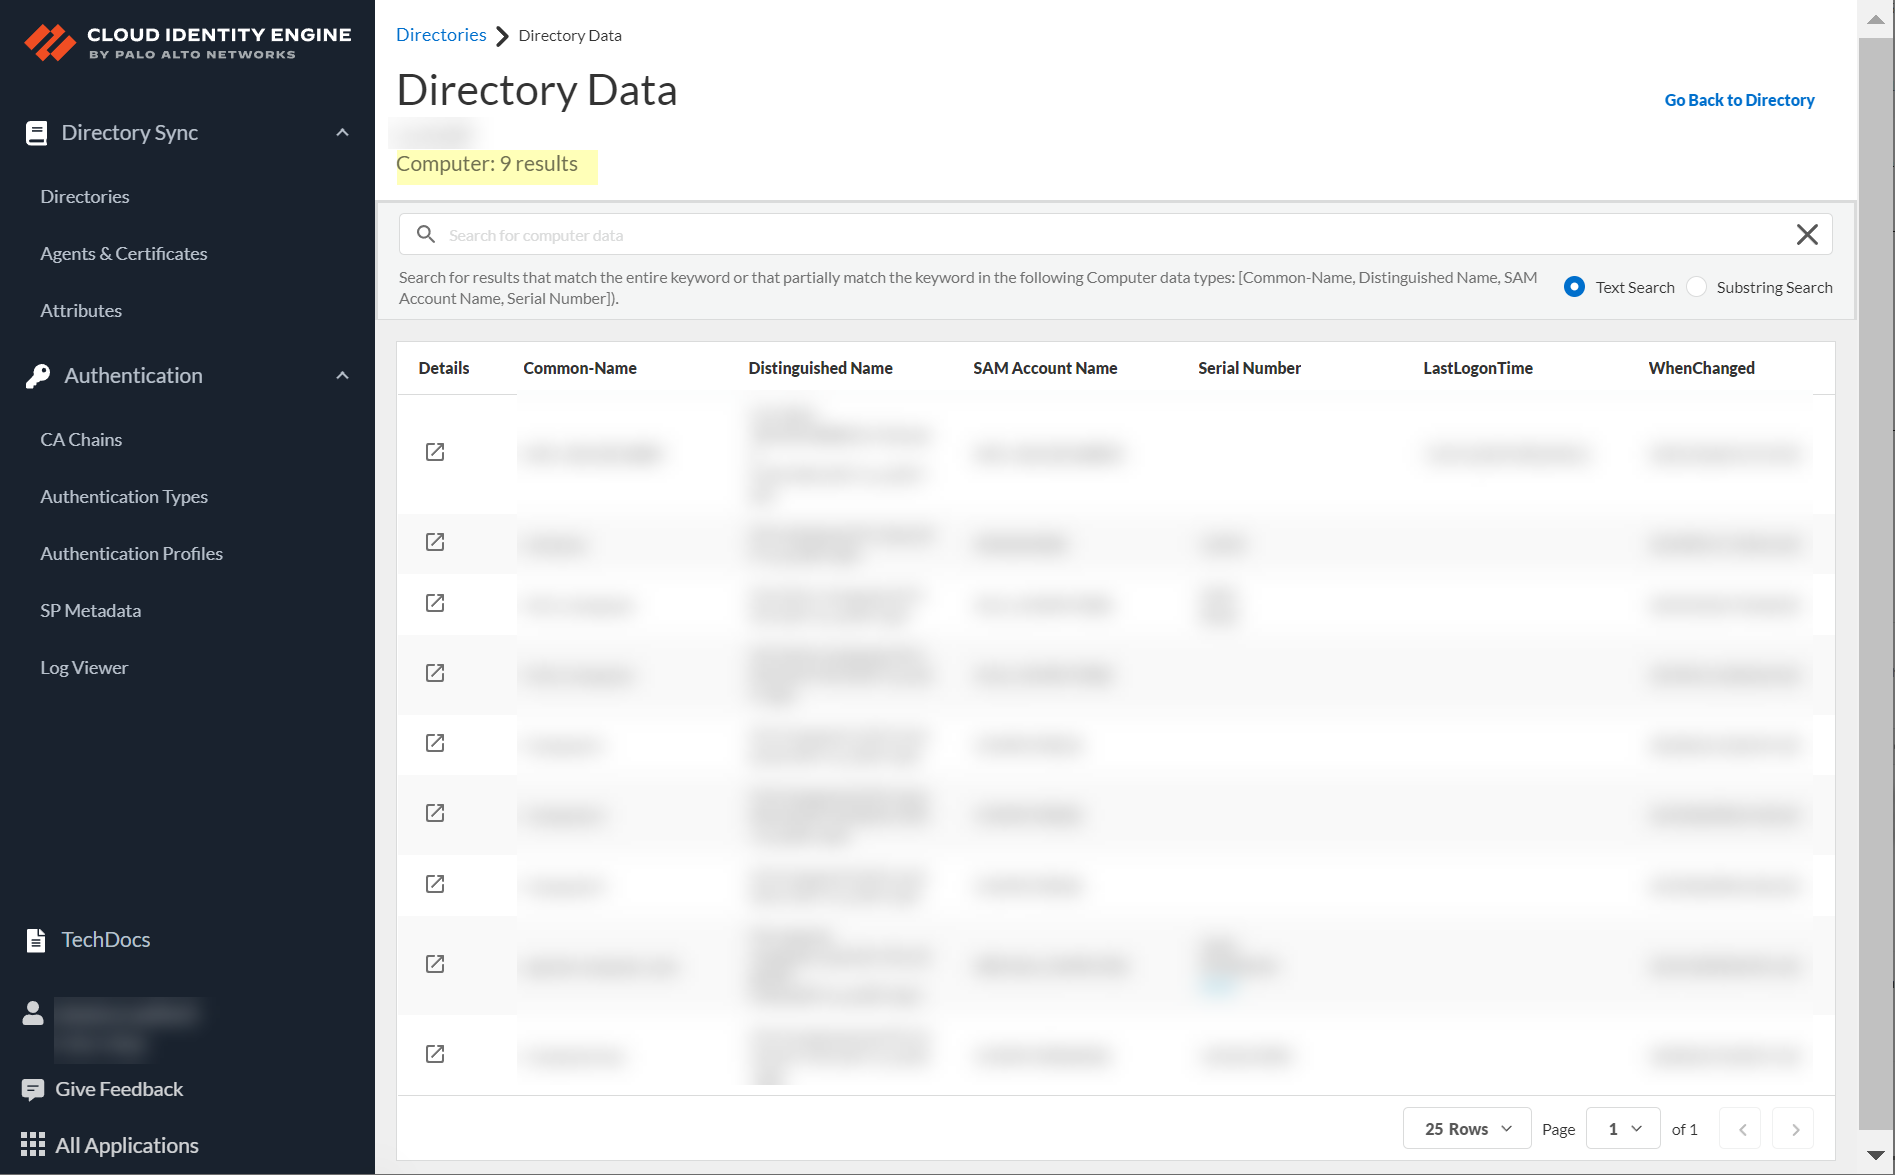
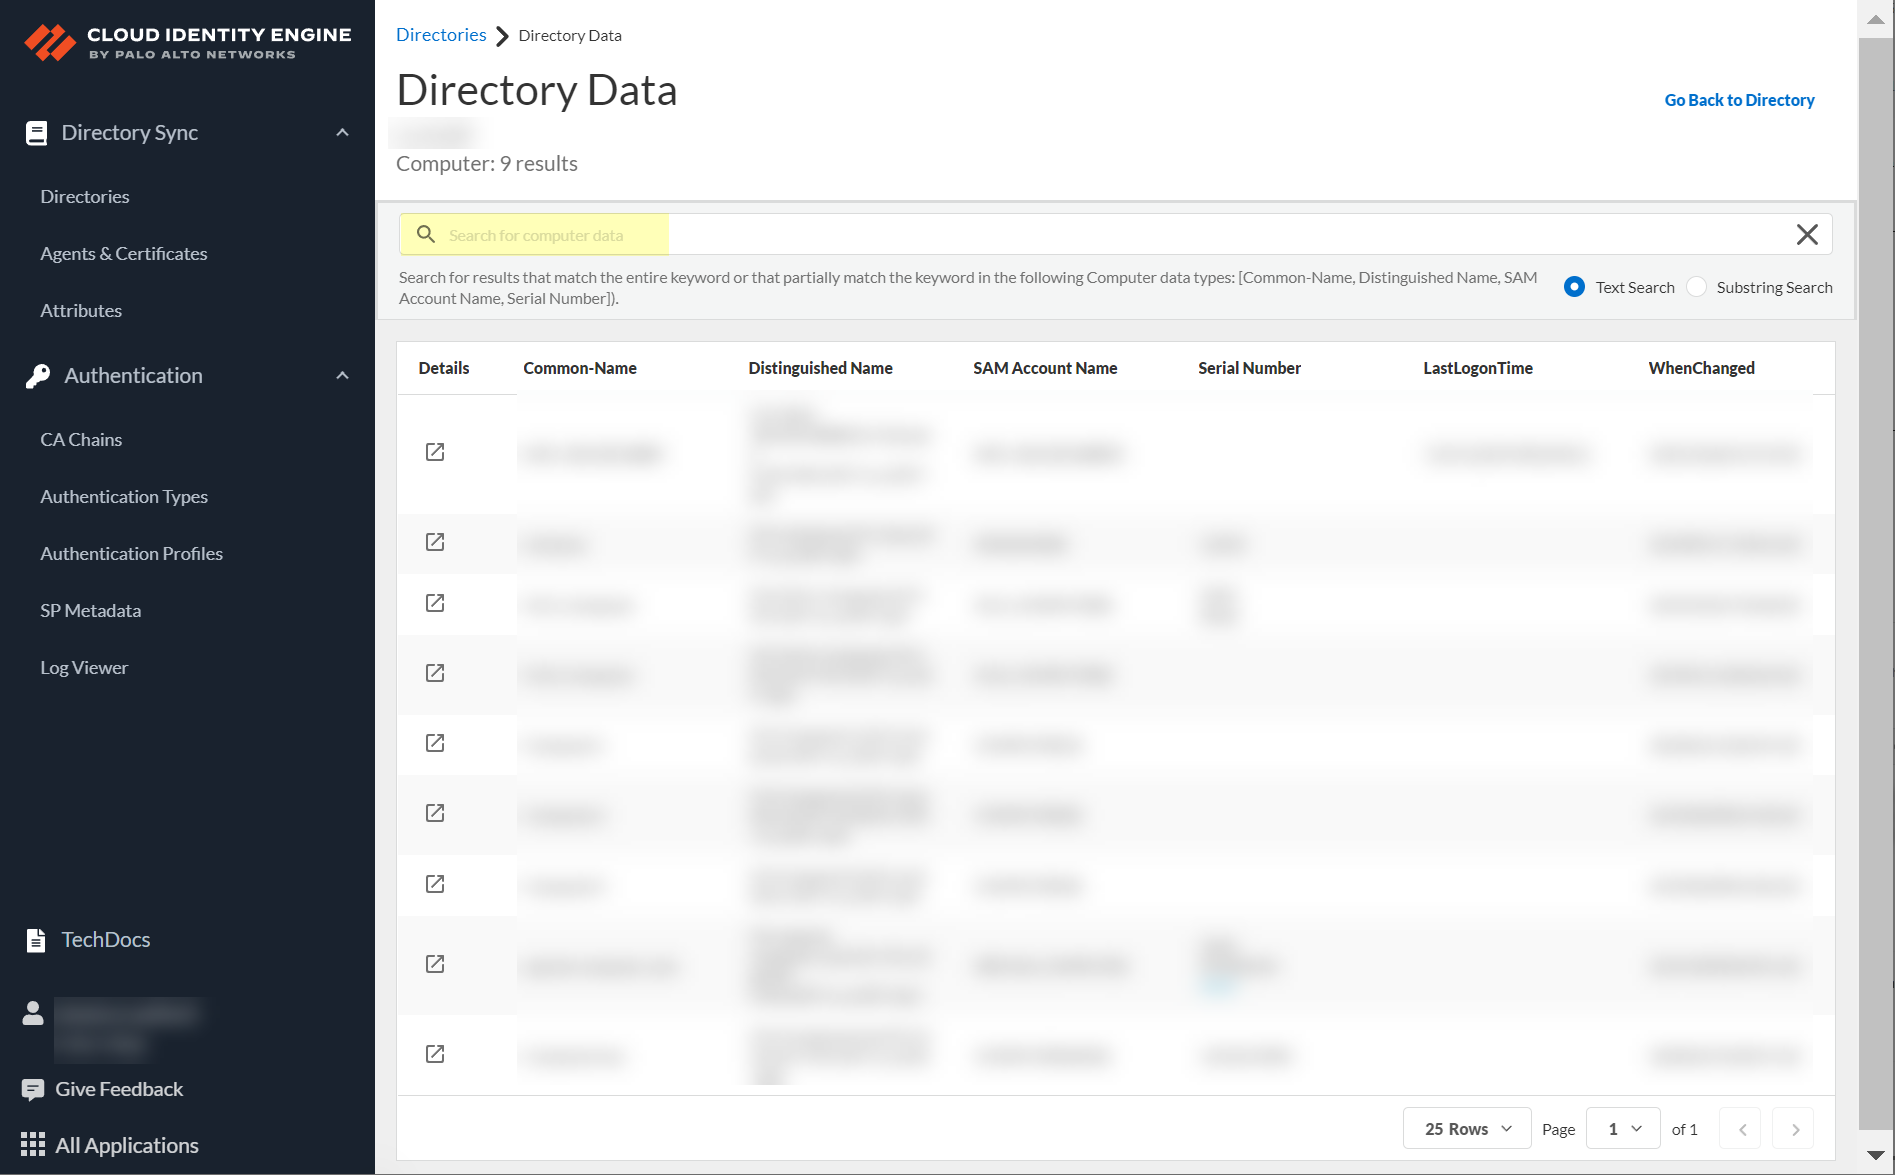
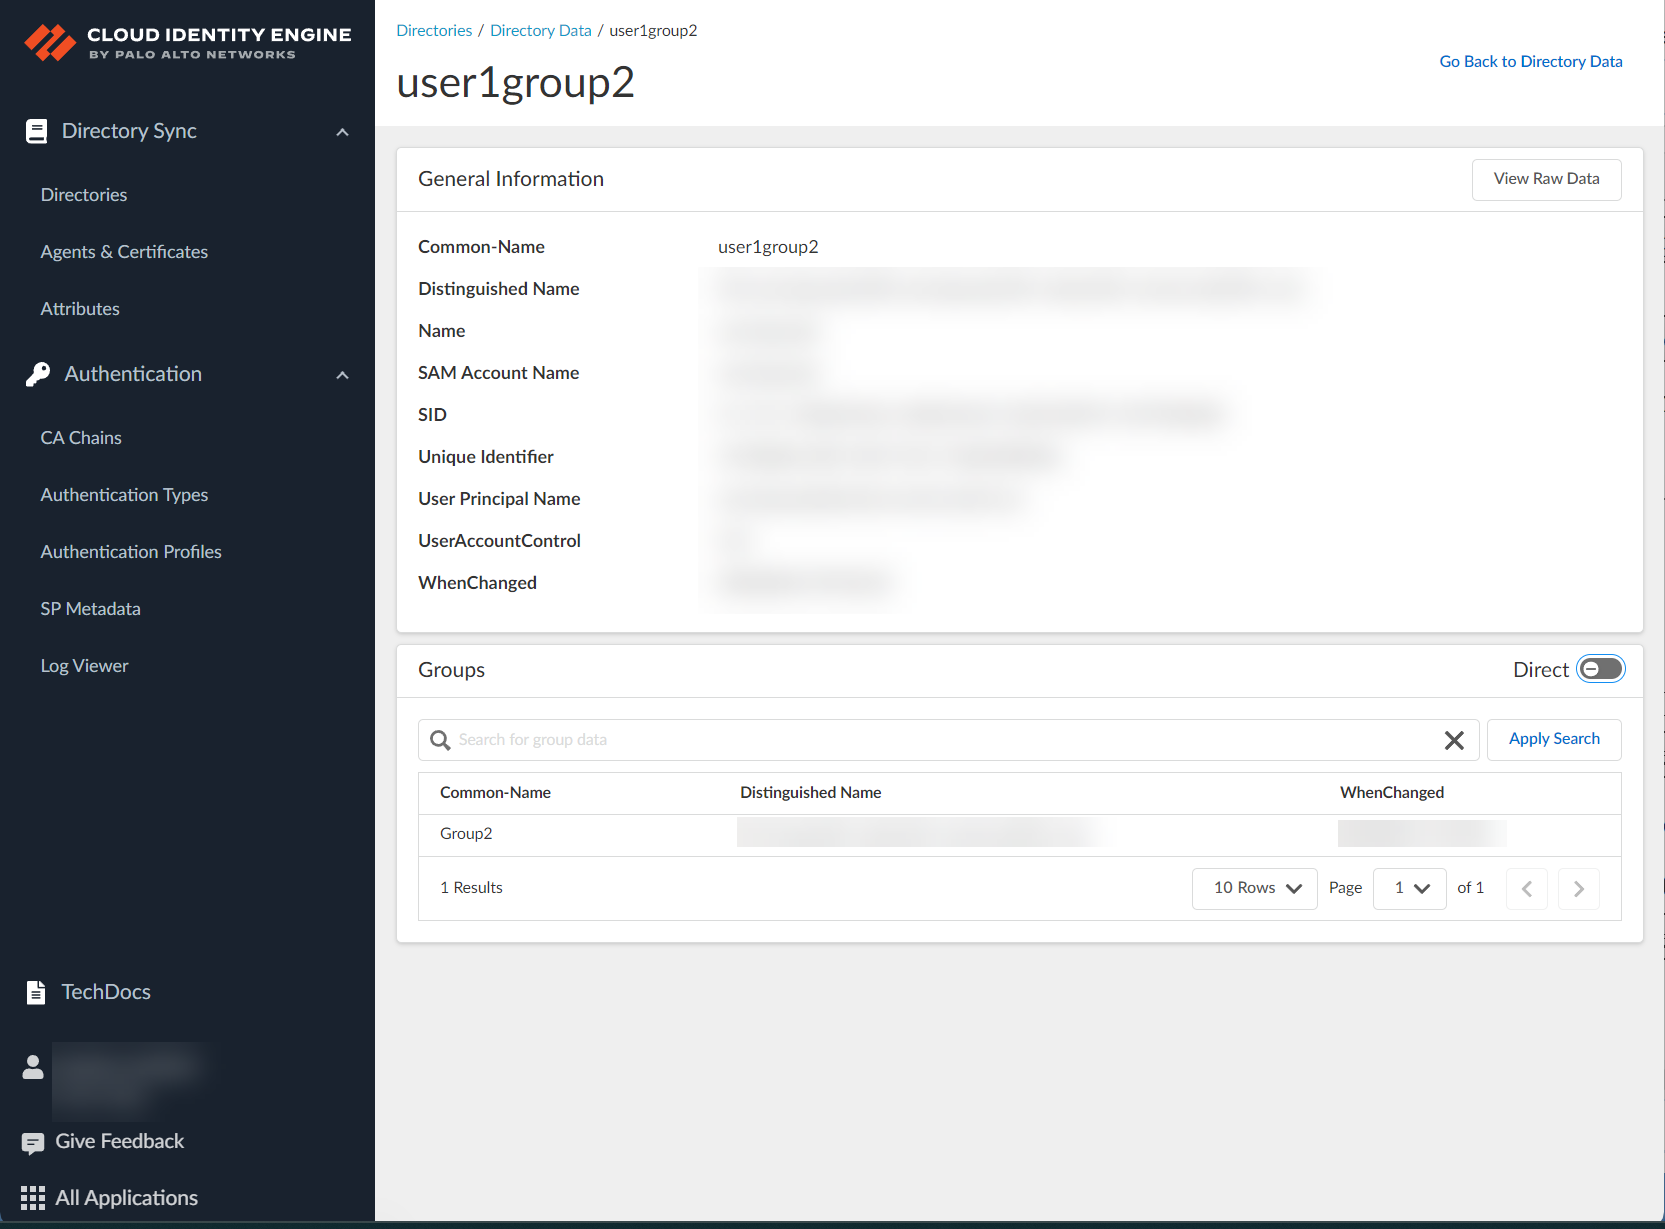
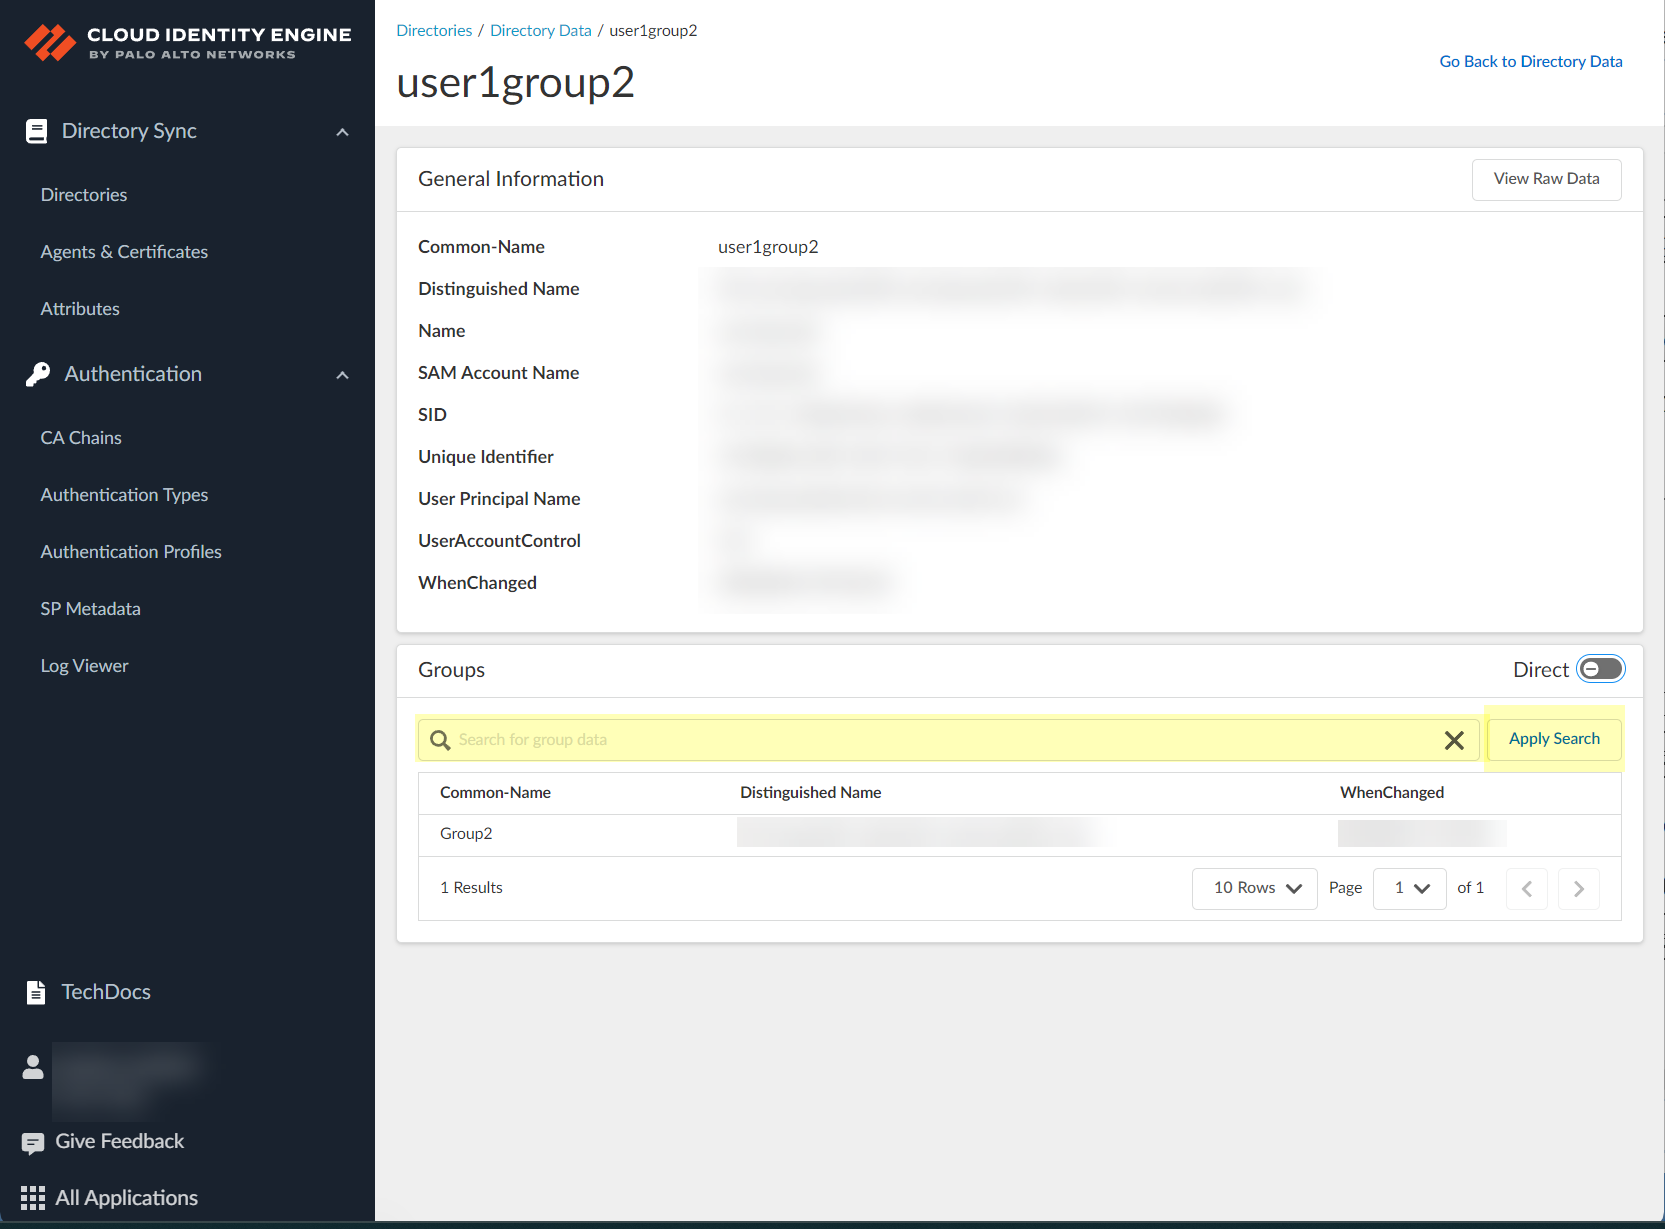
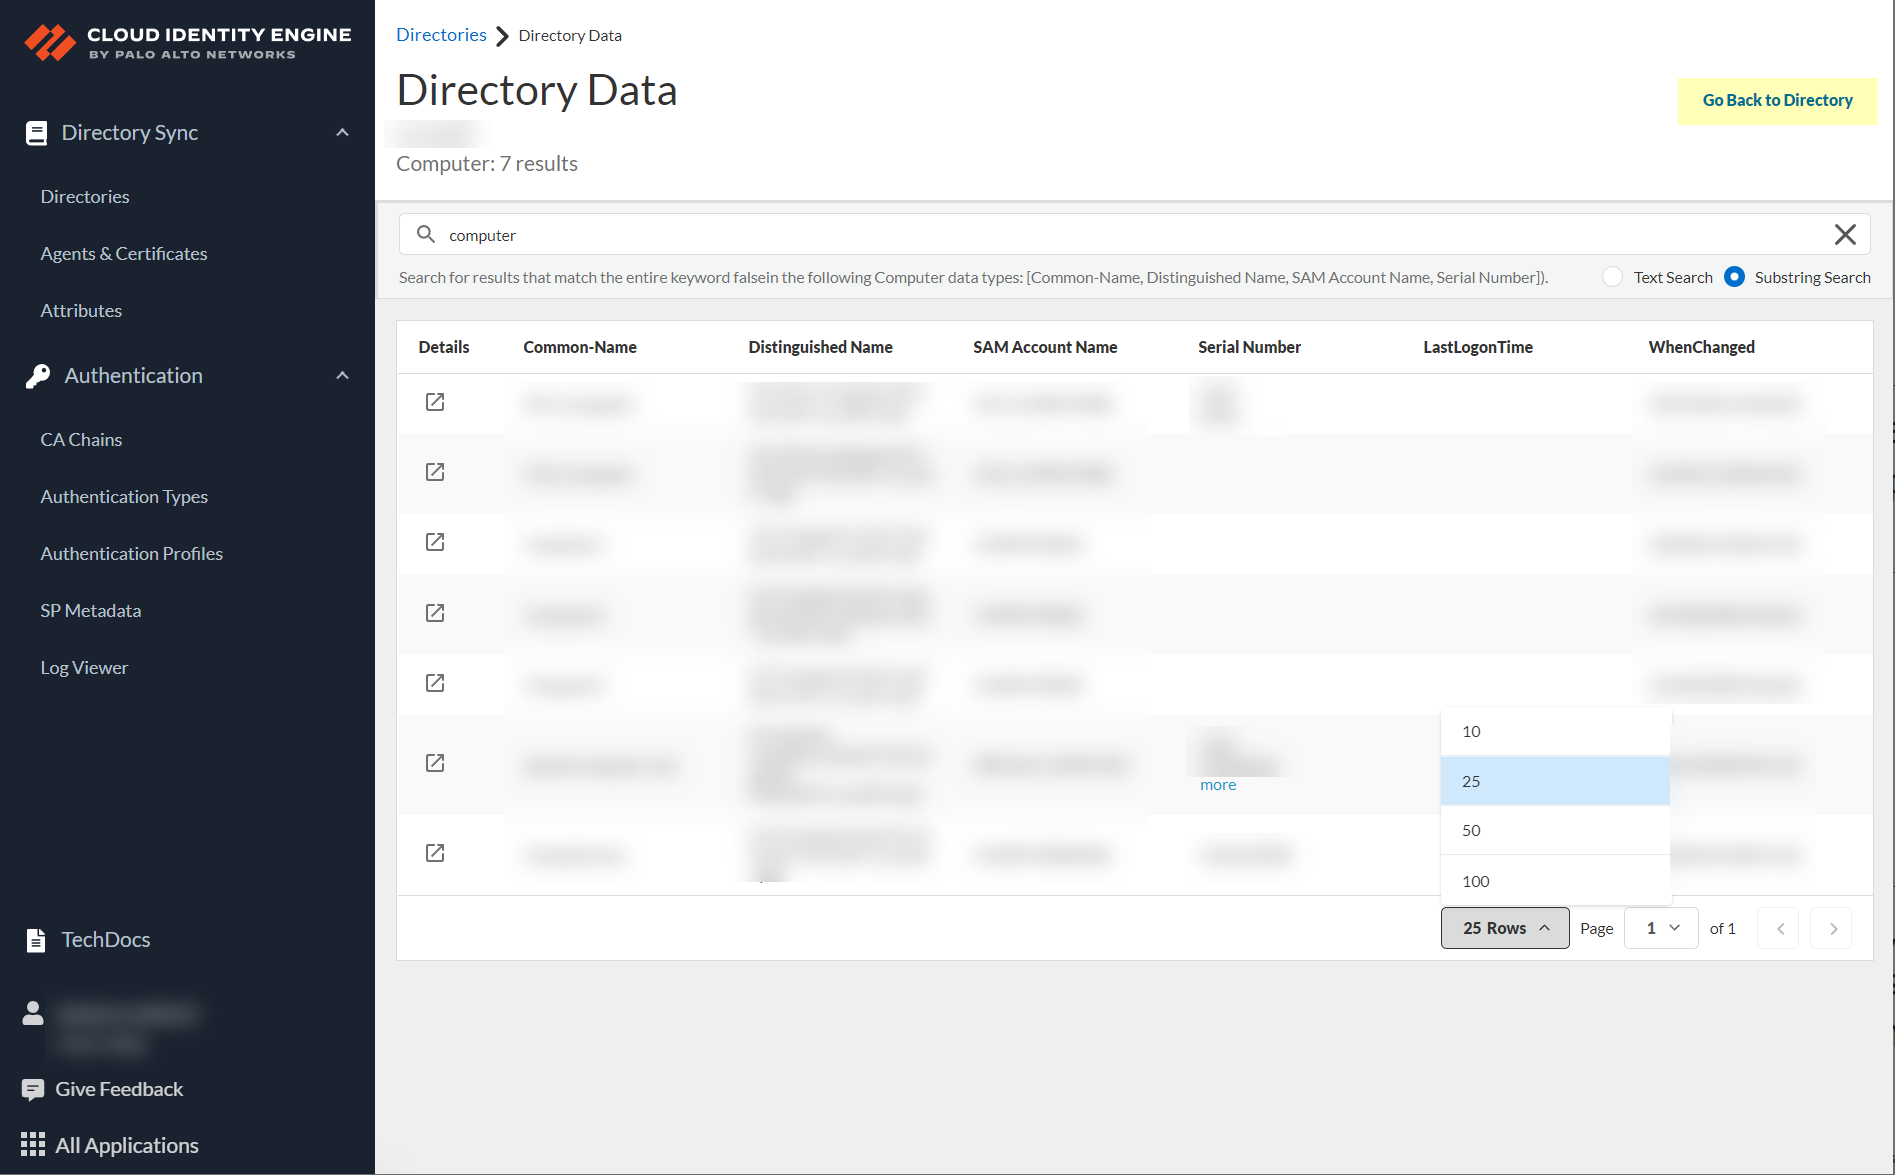
View Directory Data
Allows viewing collected data (users, groups, computers, etc.) and searching for specific objects.
Go to
Directories
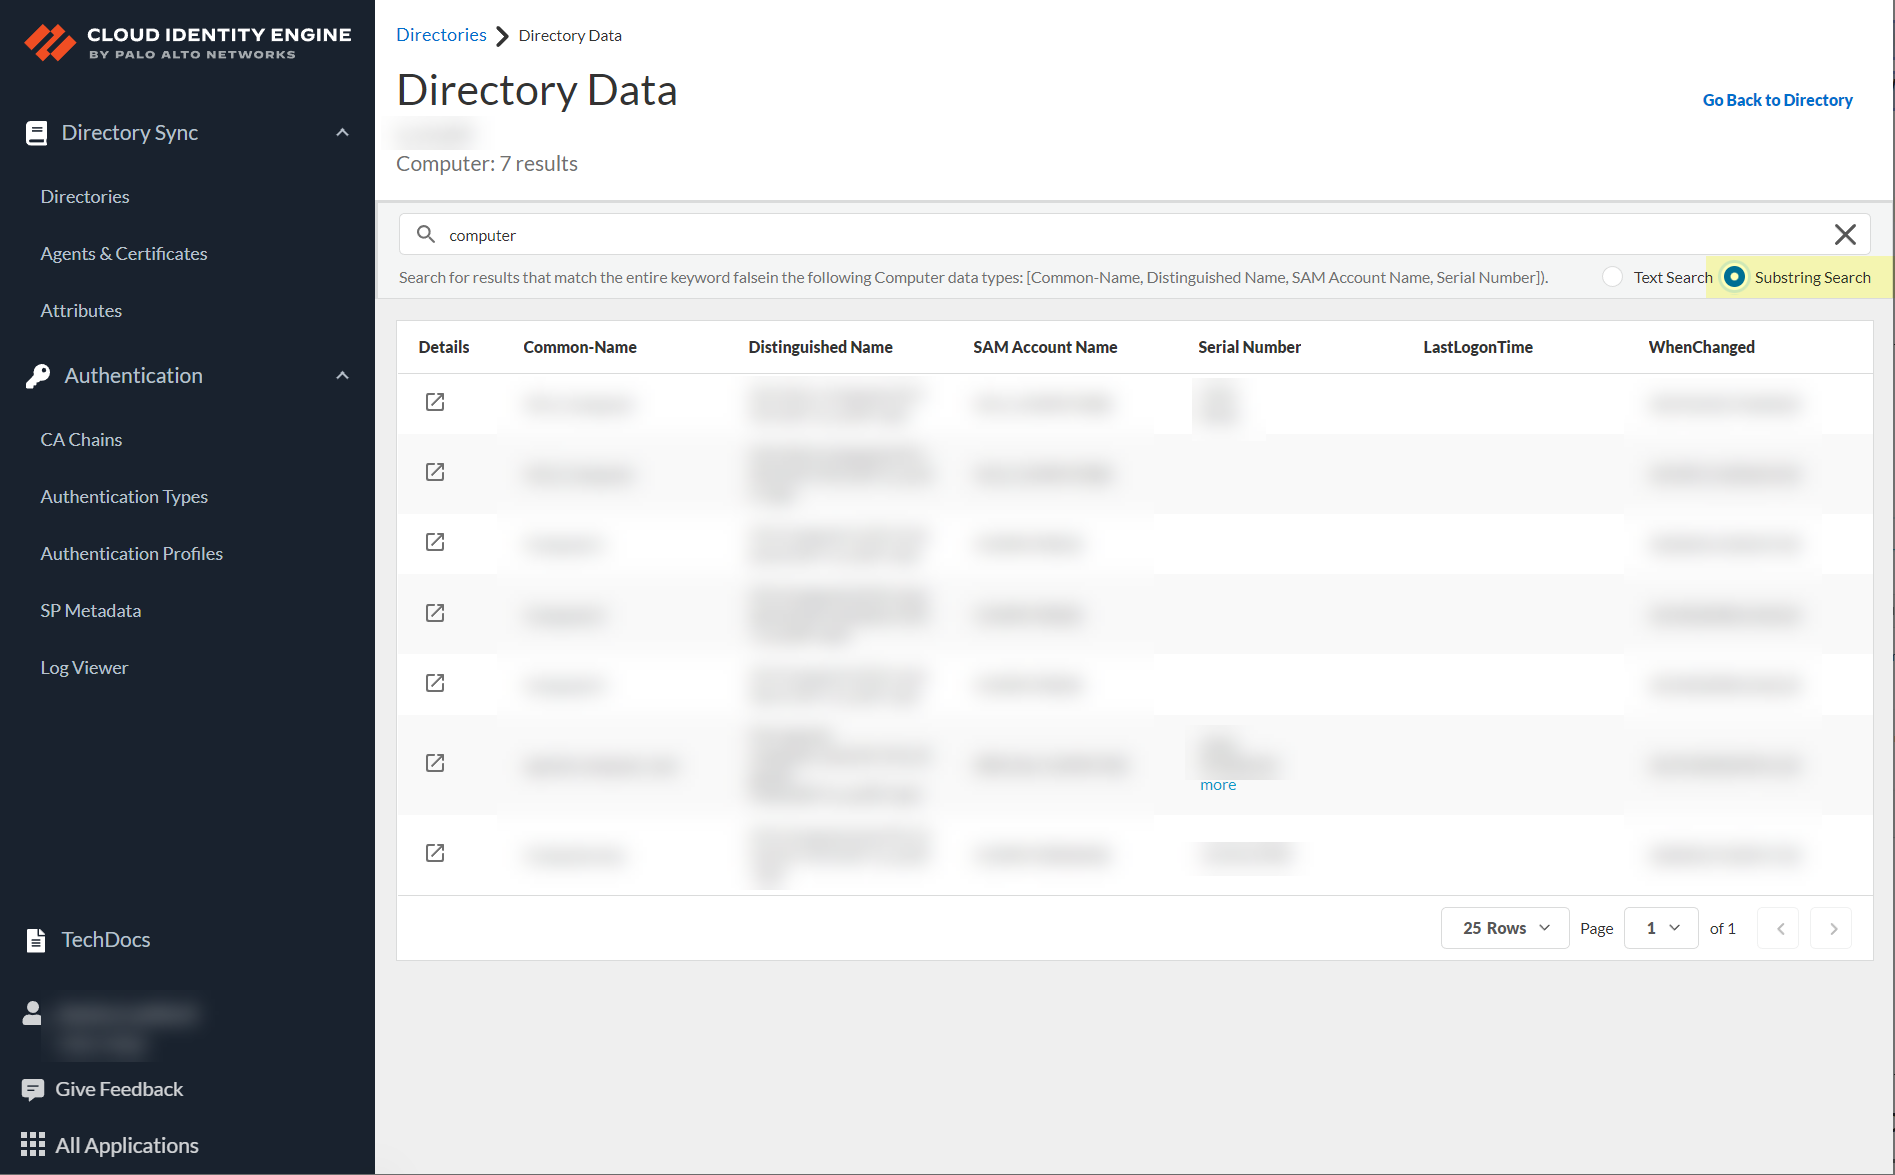
page. Click the count number under a category (e.g., Groups) to navigate to Directory Data.
Directory Data page displays objects. Use search bar (Text search or Substring match) to find specific items.
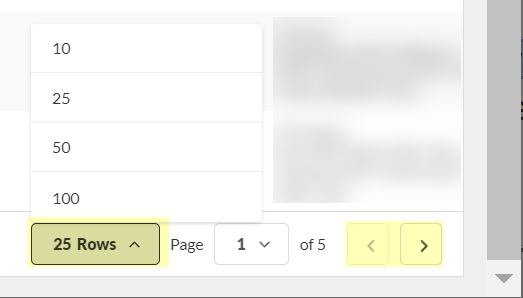
Use pagination controls to browse.
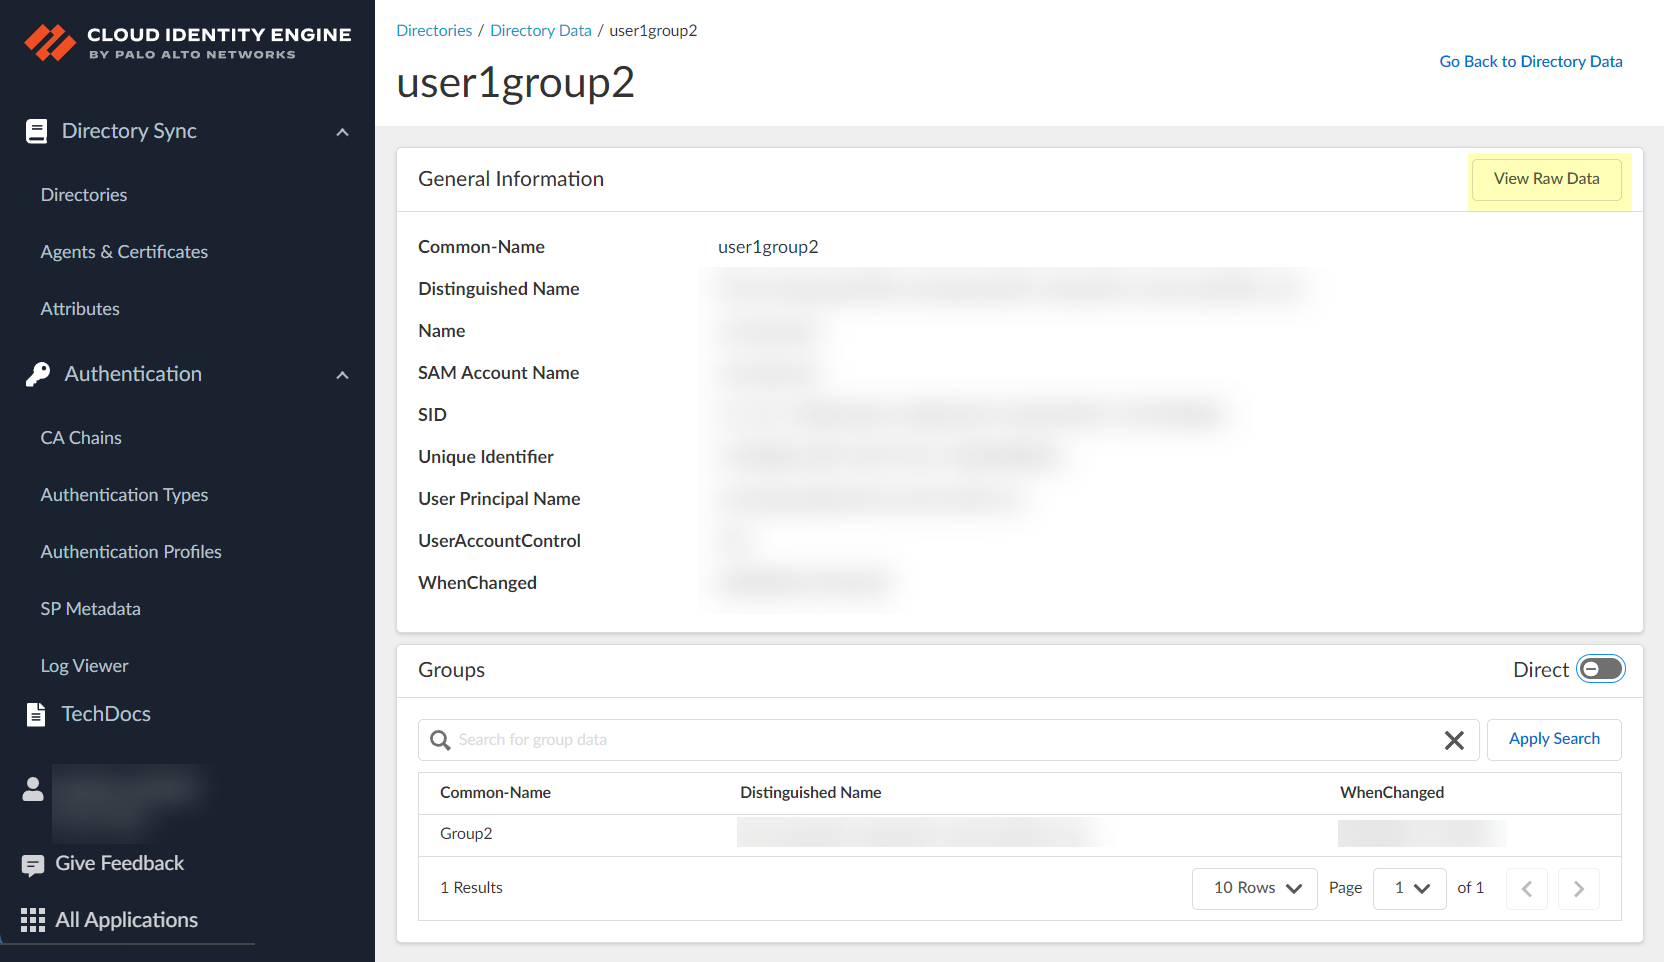
Click
Details
icon (
) for an object to see its attributes. User details show first ~2000 groups; Group details show first ~2000 members.
Click
View Raw Data
for full JSON data.
Use Copy icon (
) to copy raw data.
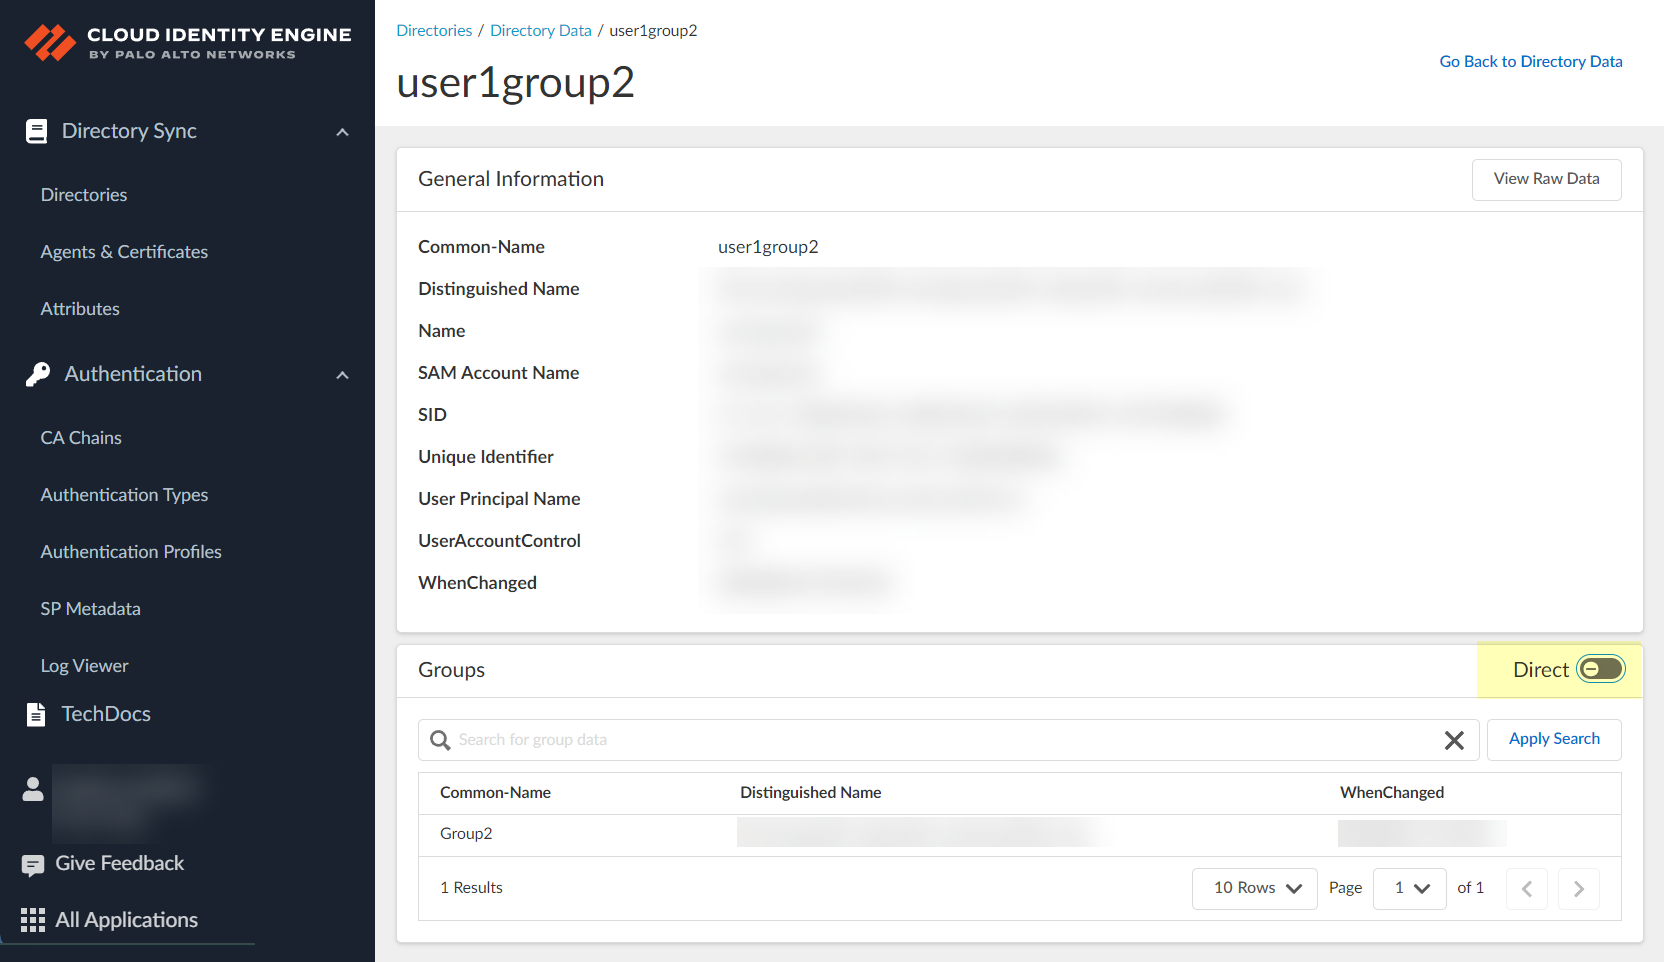
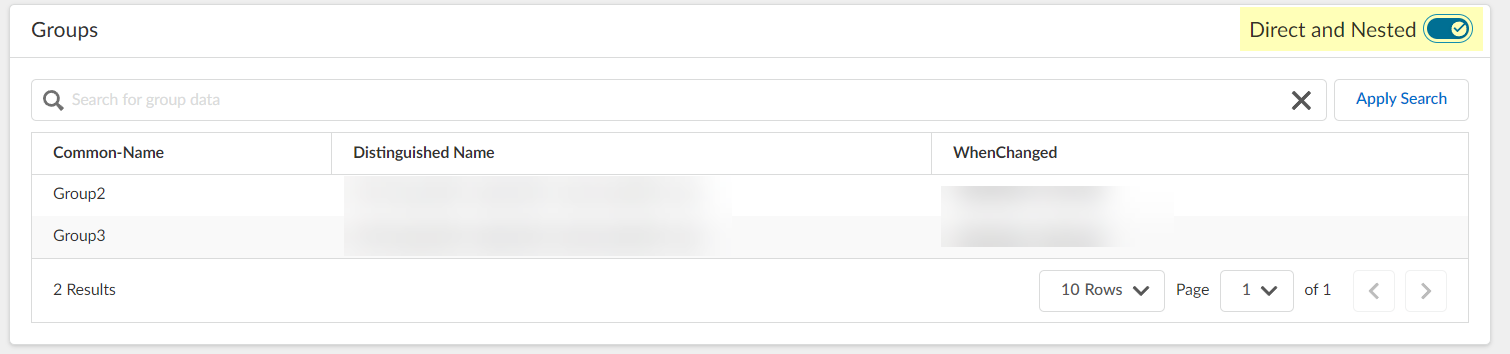
Toggle between
Direct
and
Direct and Nested
views for group membership.
Use search within the details view.
Click
Go Back to Directory
to return.
Cloud Identity Engine User Context
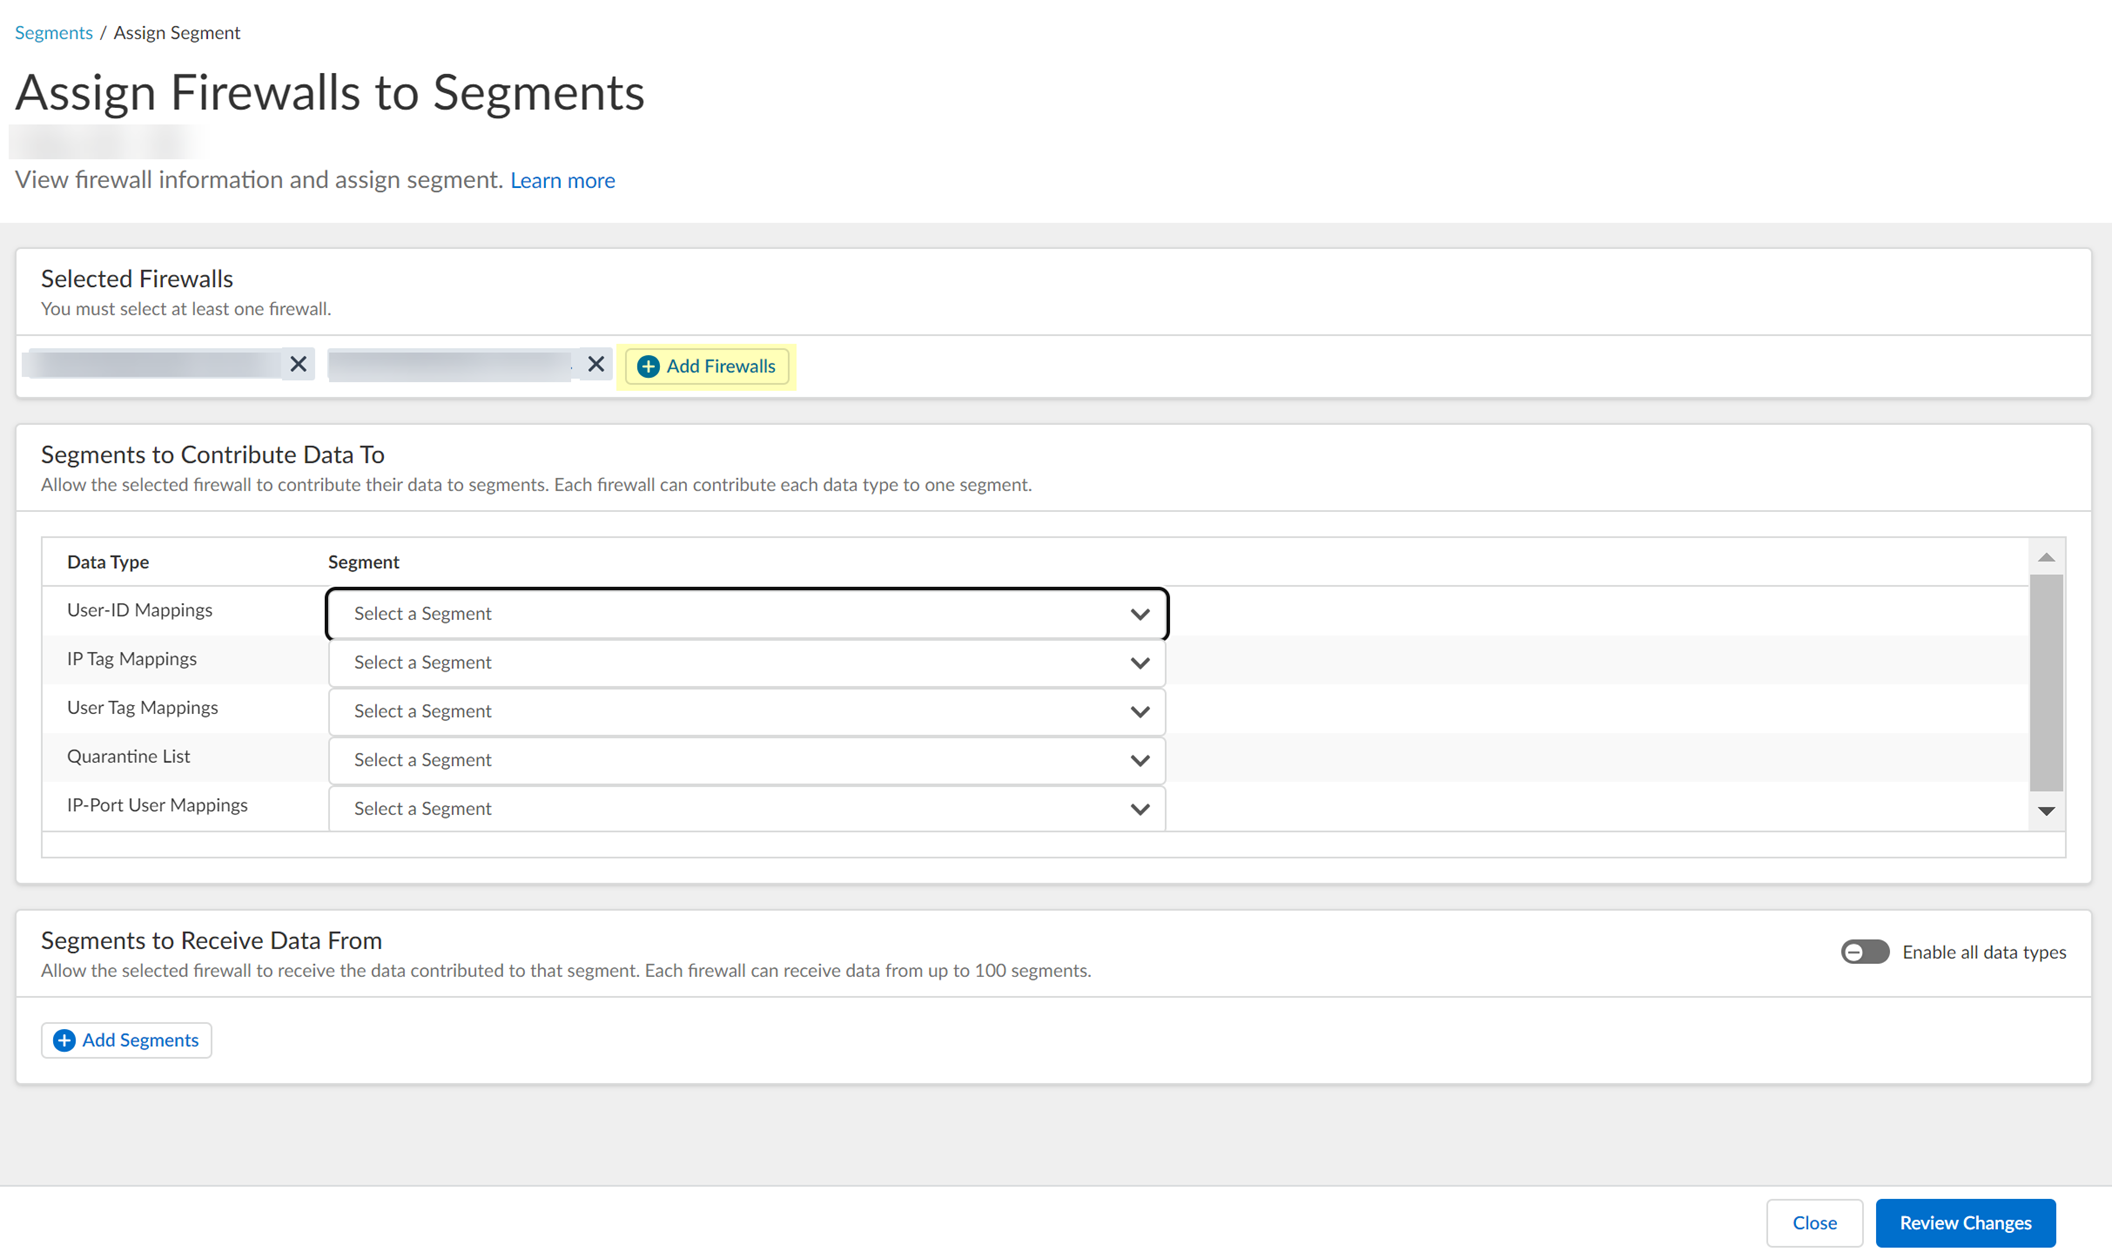
[PCNSA/PCNSE] User Context allows granular sharing of User-ID information (IP-User mappings, IP-Tags, User-Tags, Quarantine Lists, IP-Port mappings) between firewalls using segments.
Requires PAN-OS 11.0+.
Simplifies large-scale User-ID deployments, centralizes visibility, and improves VDI scalability.
Segment:
A group of firewalls.
Publishing Segment:
Sends data *from* its member firewalls.
Subscribed Segment:
Receives data *for* its member firewalls from publishing segments.
A firewall/Panorama can publish each data type to only ONE segment but can subscribe to data from up to 100 segments.
[GOTCHA] If using a User-ID Hub firewall with vSys, configure the hub firewall itself as a subscriber in the segment to ensure all vSys receive necessary data.
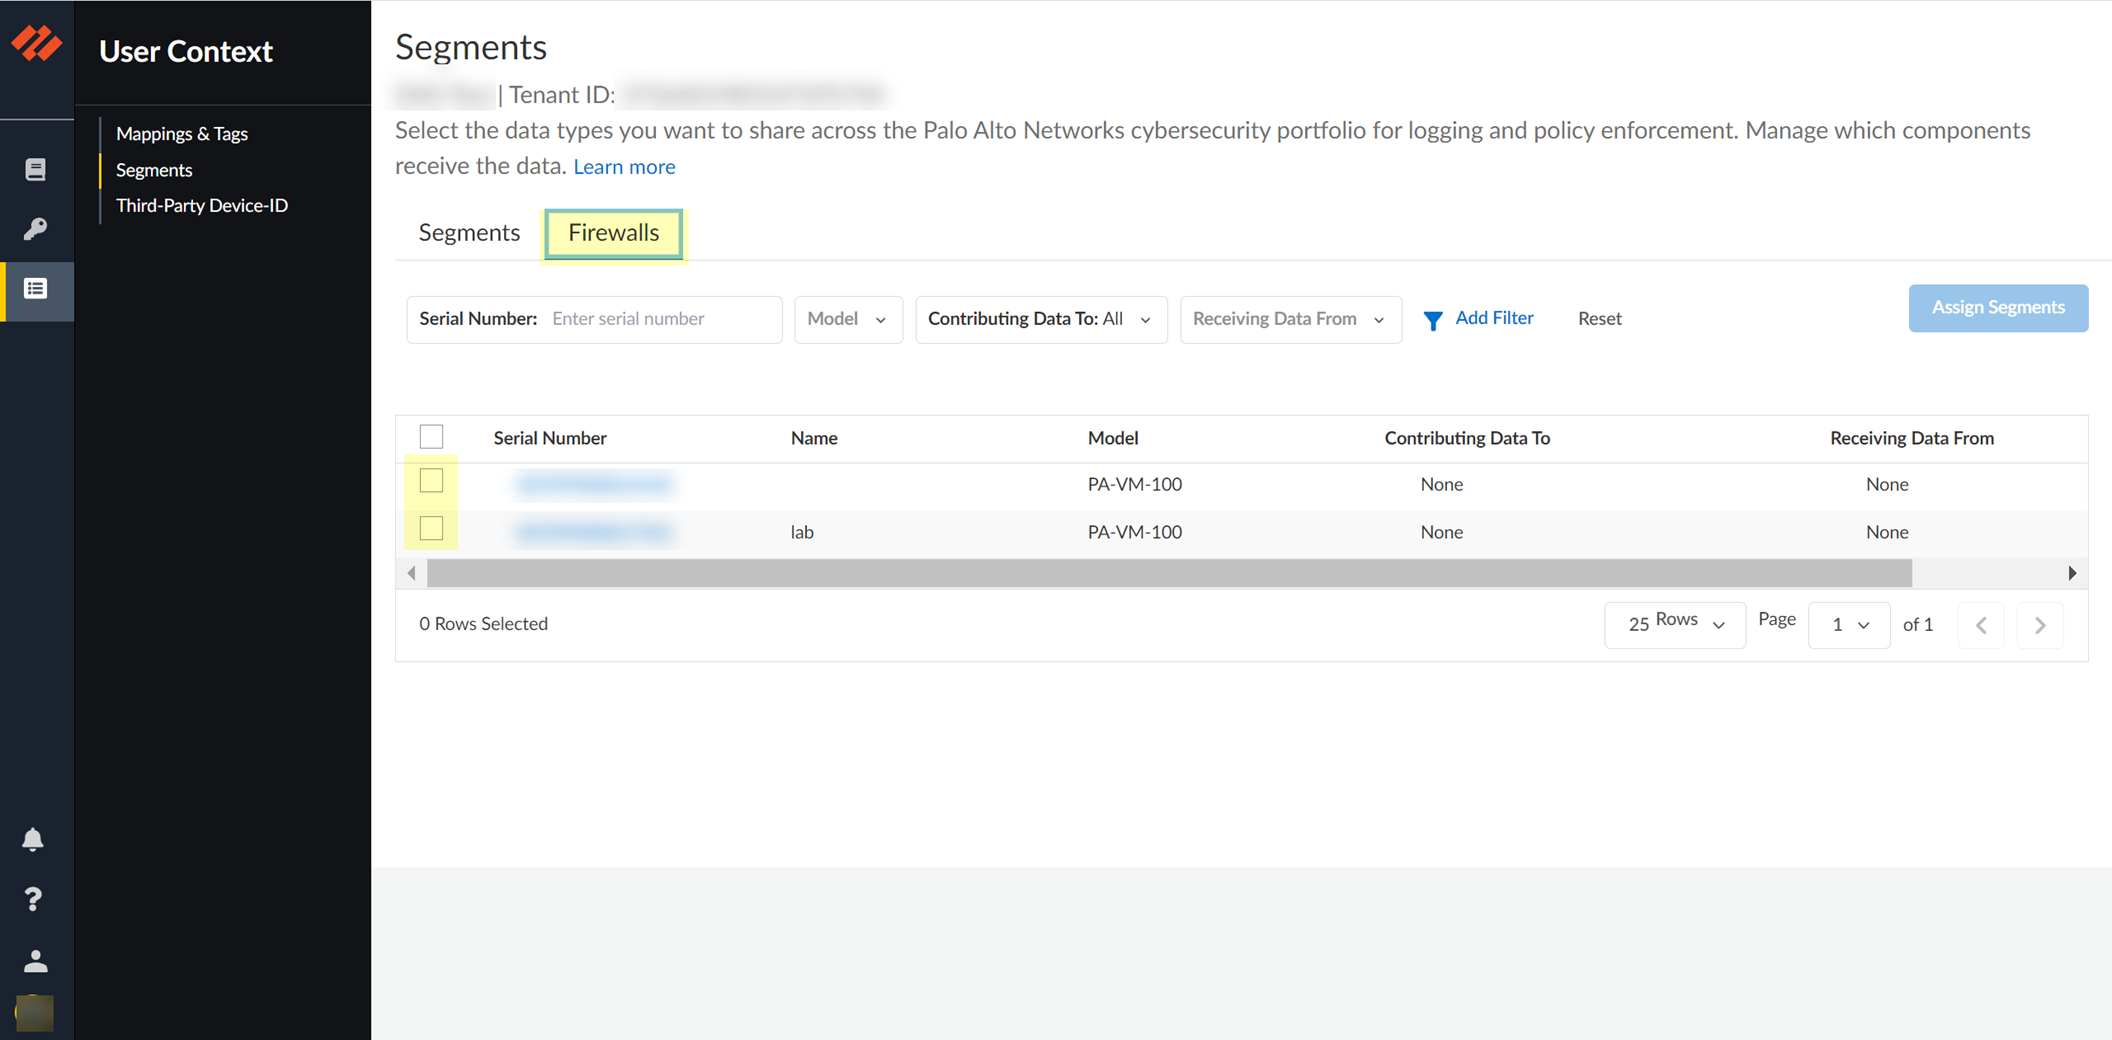
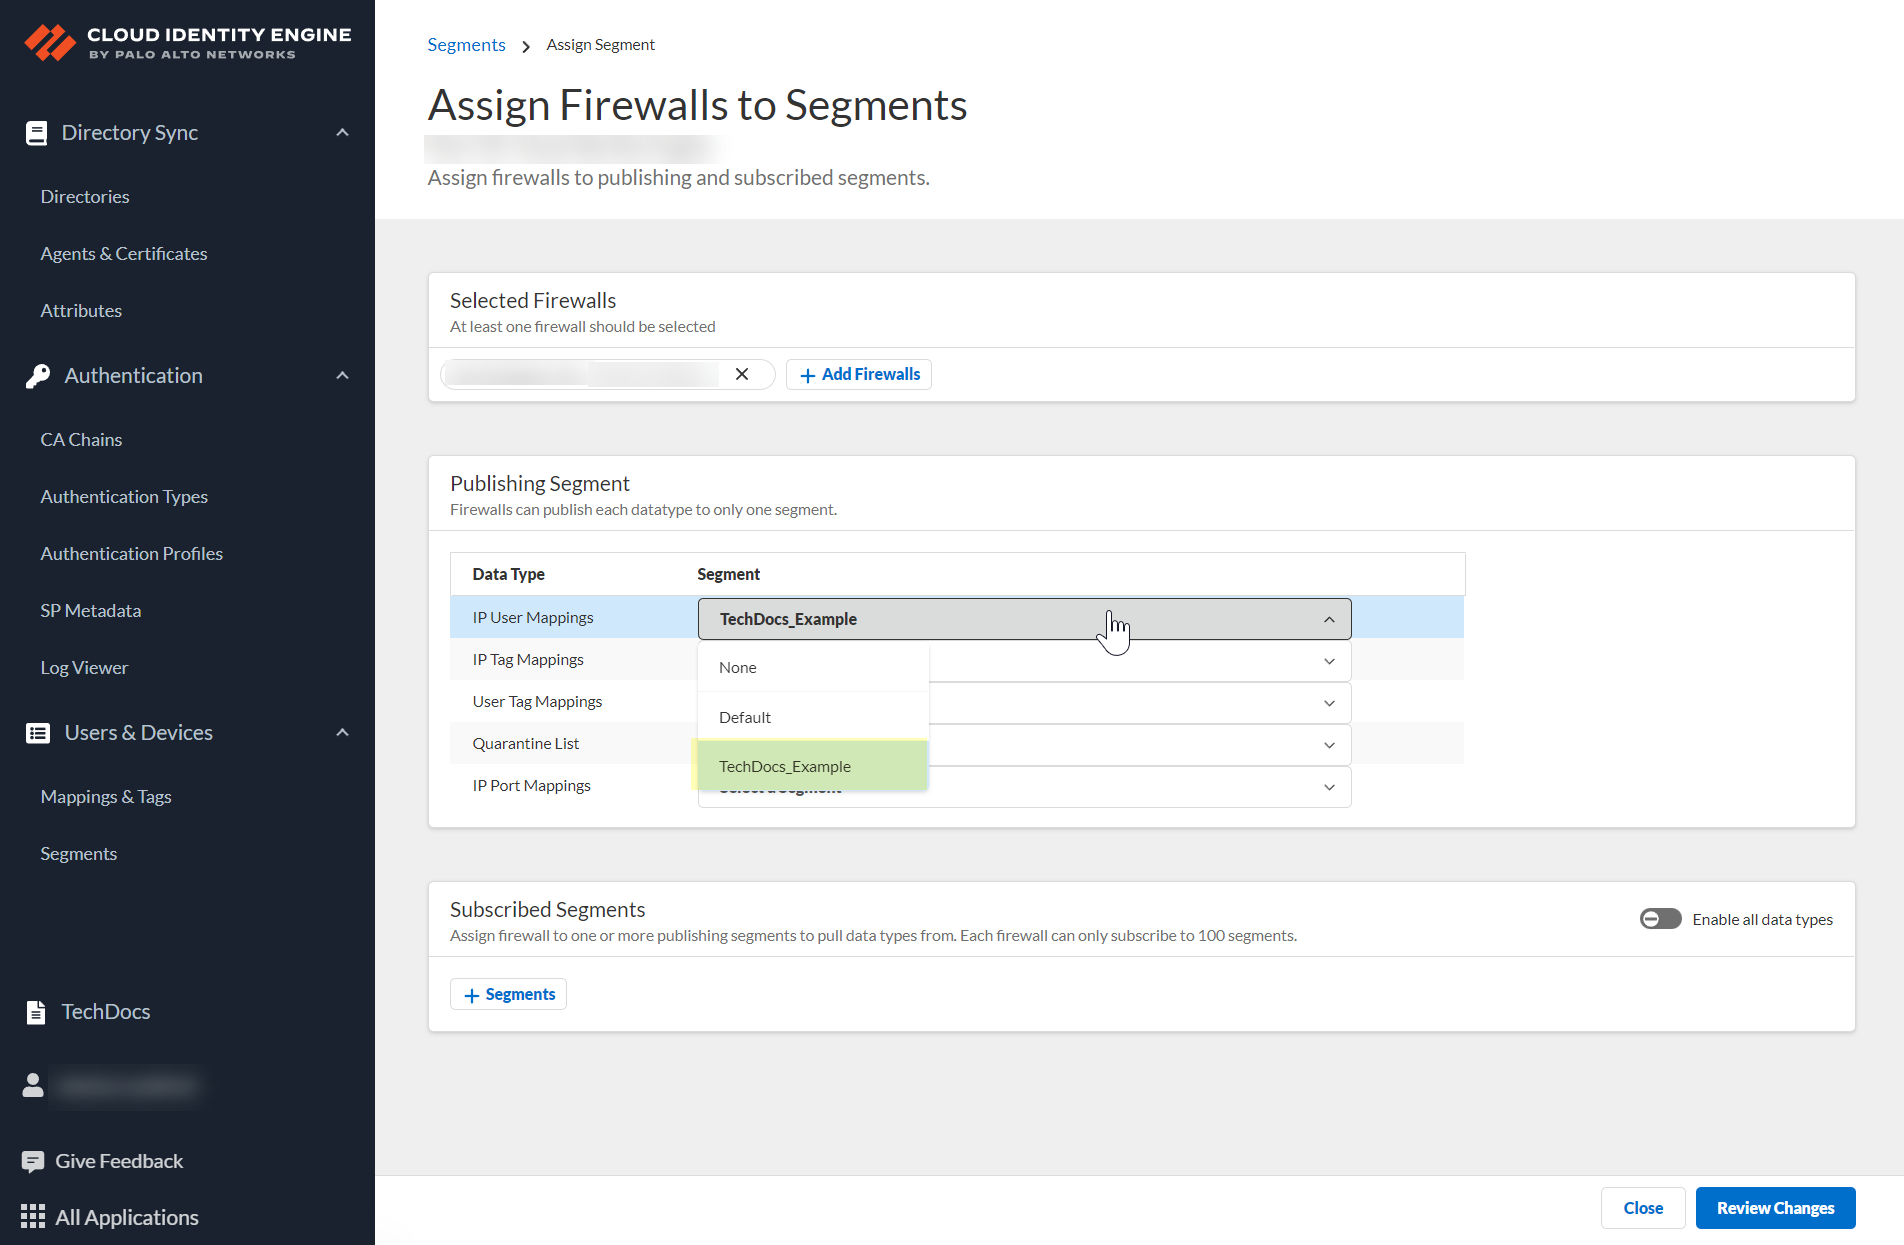
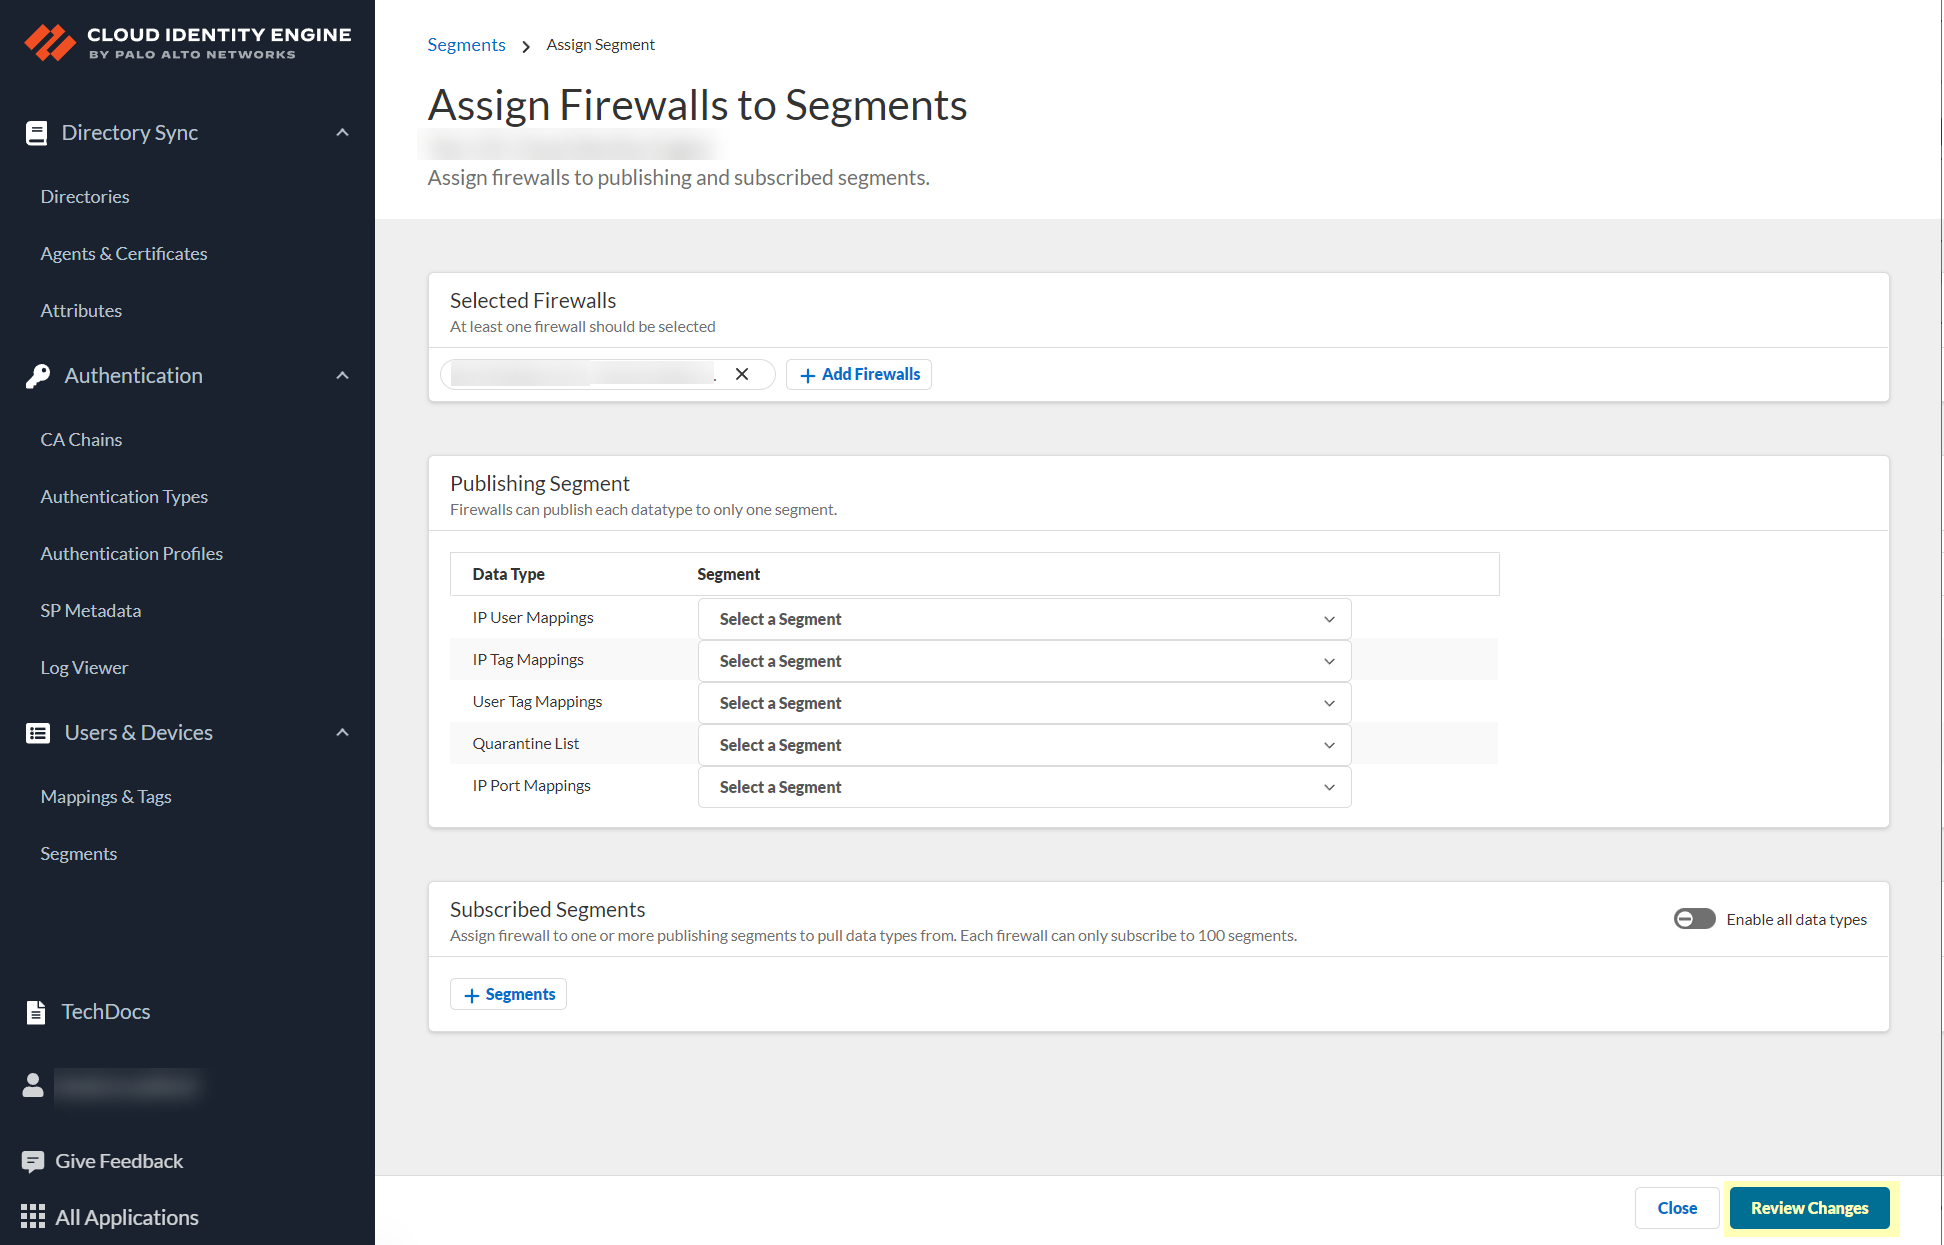
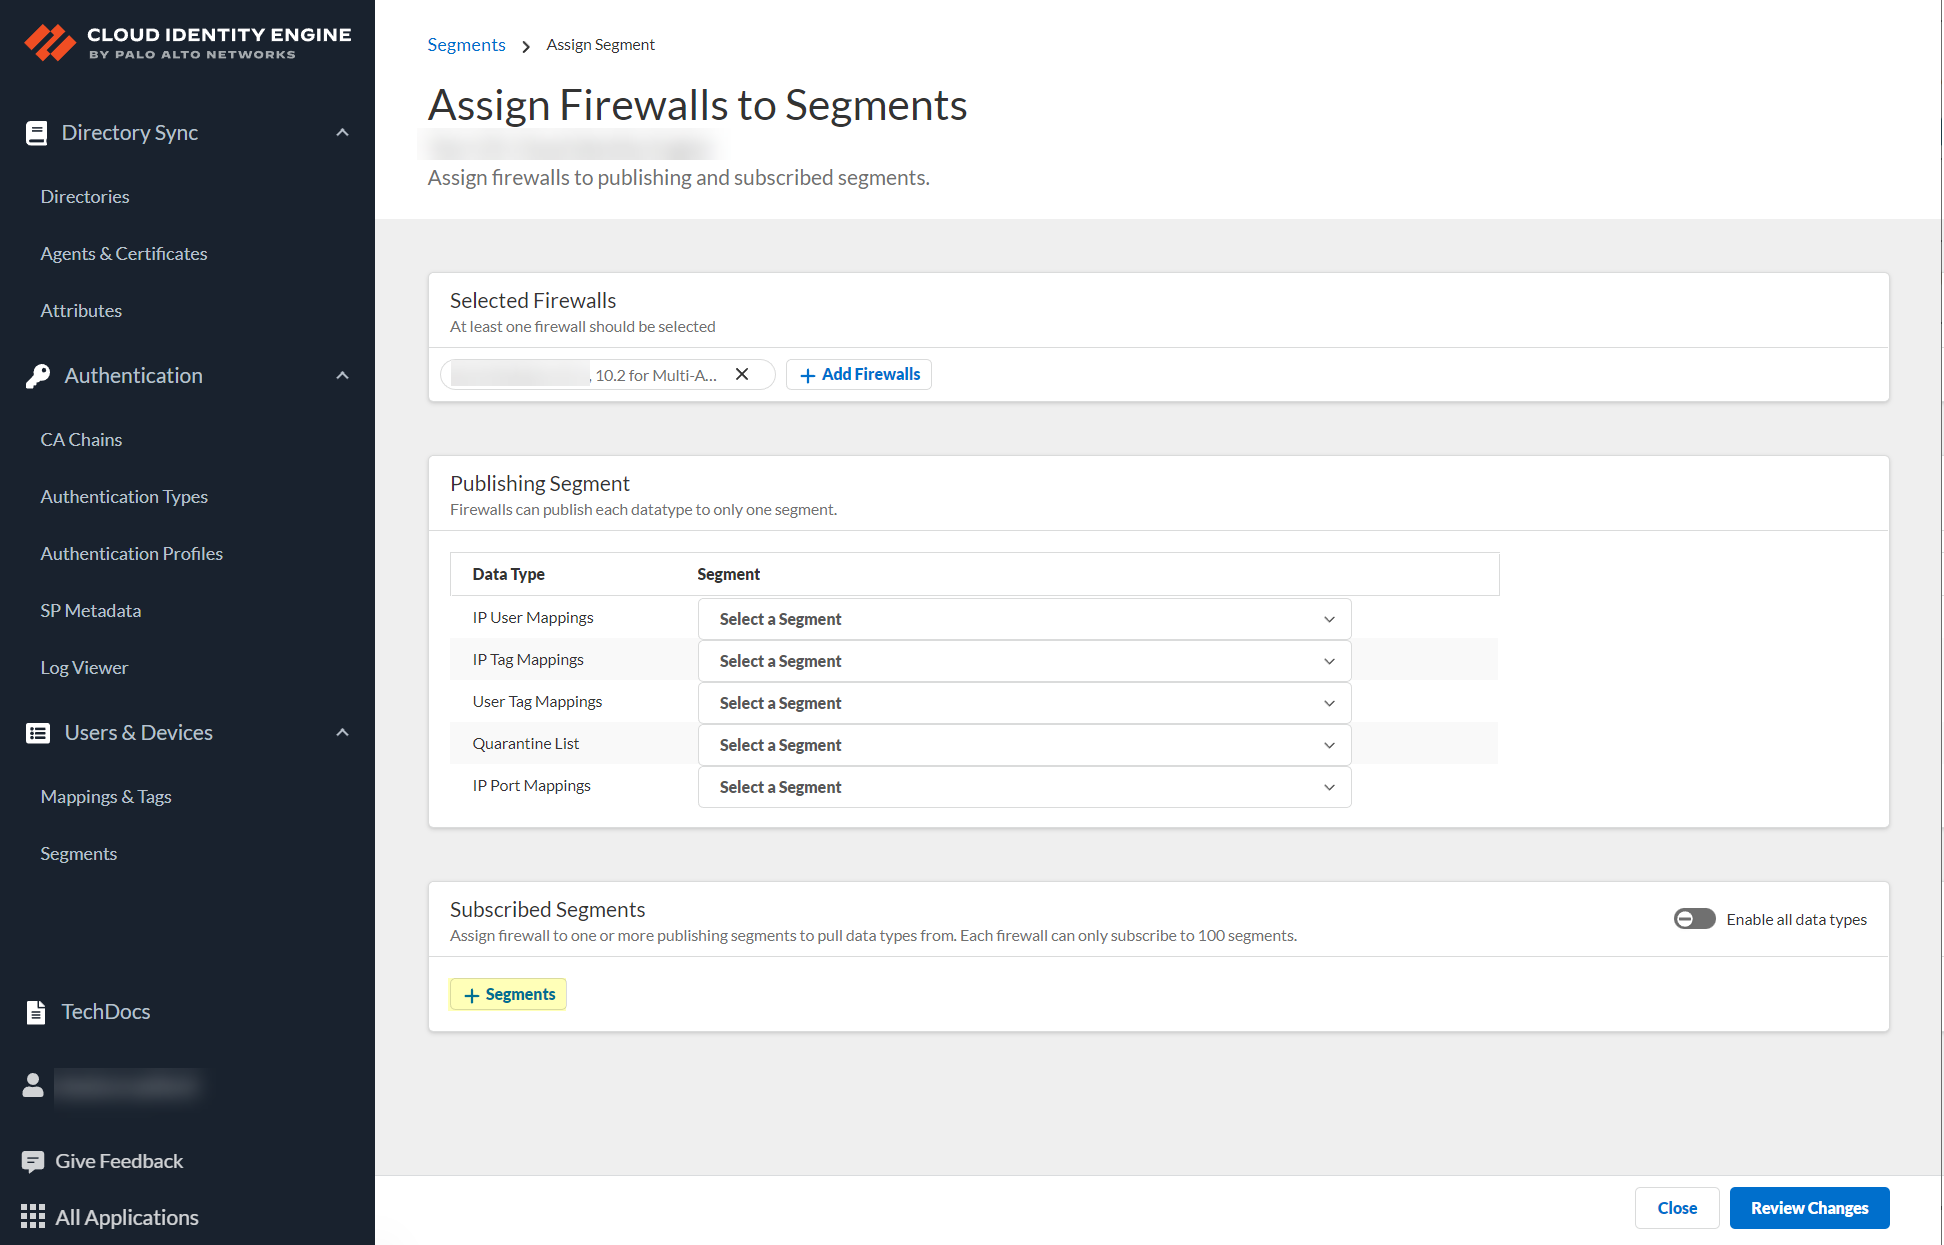
Data Publishing tab: Select the publishing segment for each Data Type (IP User Mappings, IP Tag Mappings, etc.).
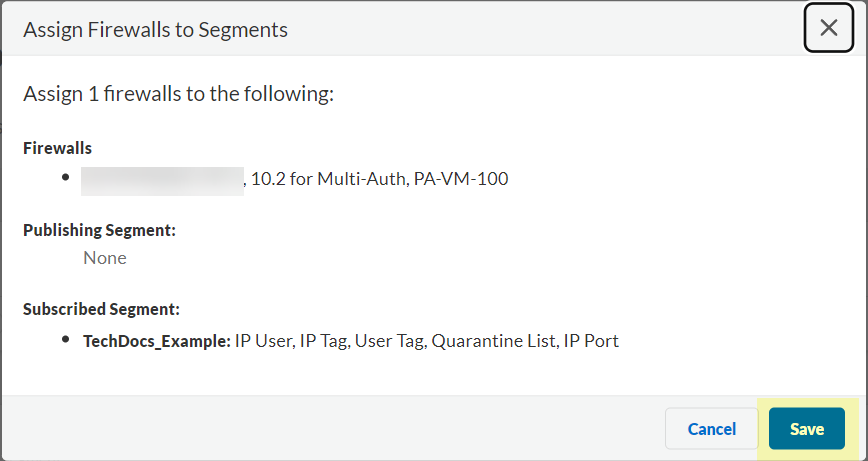
Review Changes > Save.
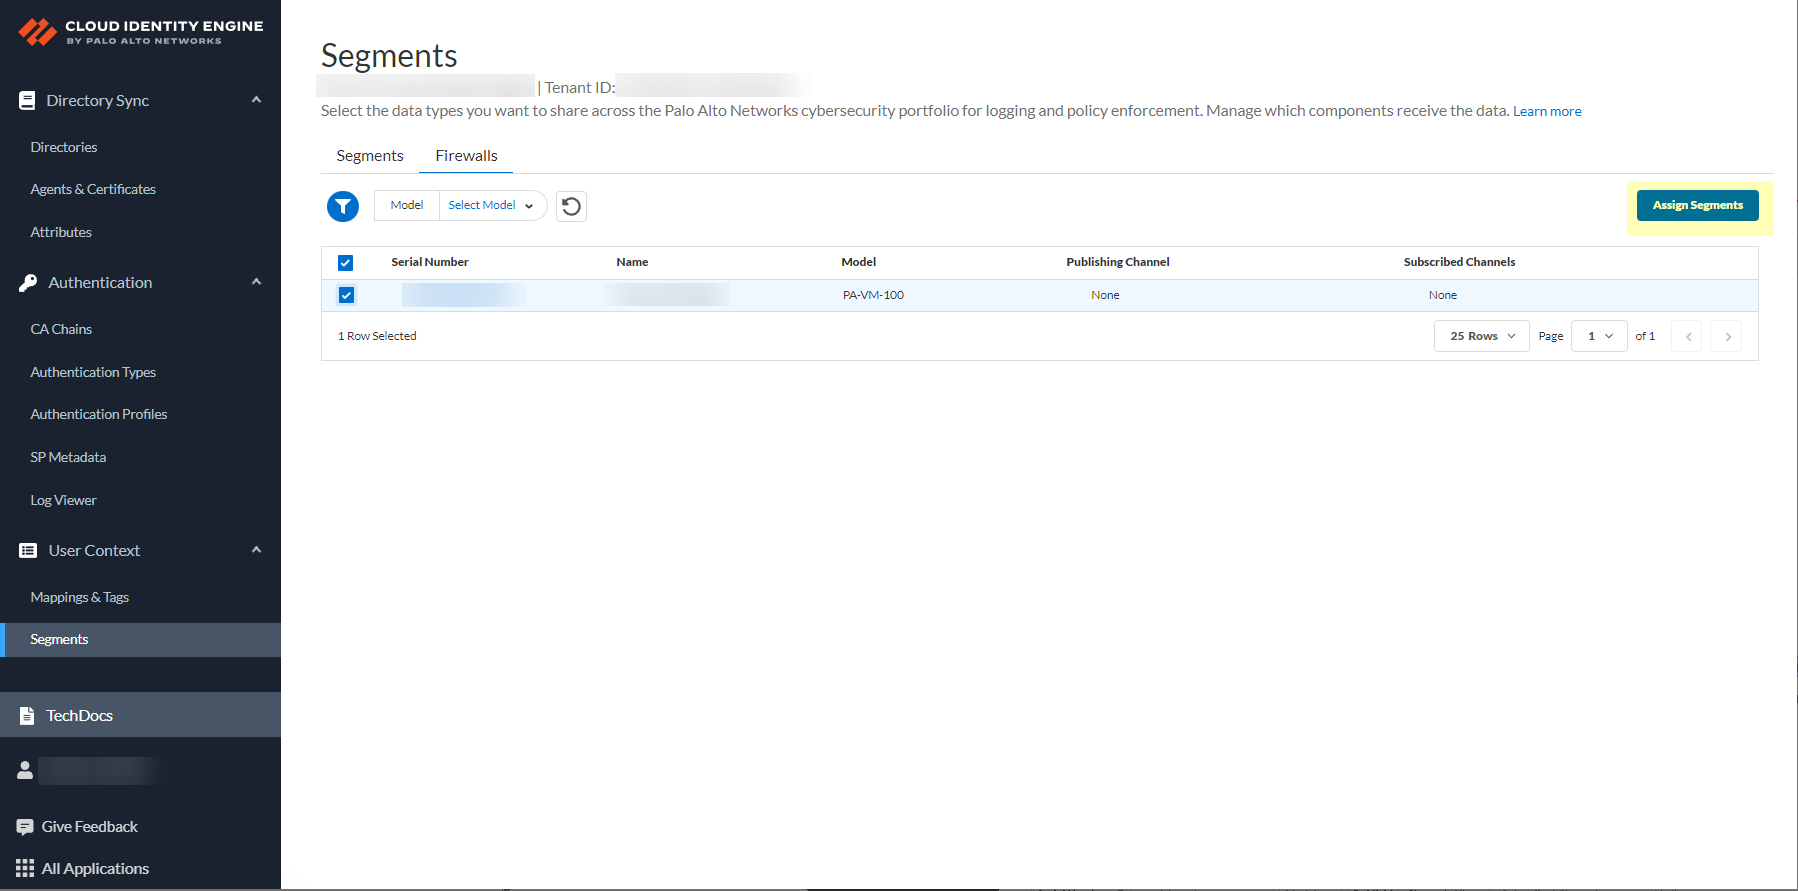
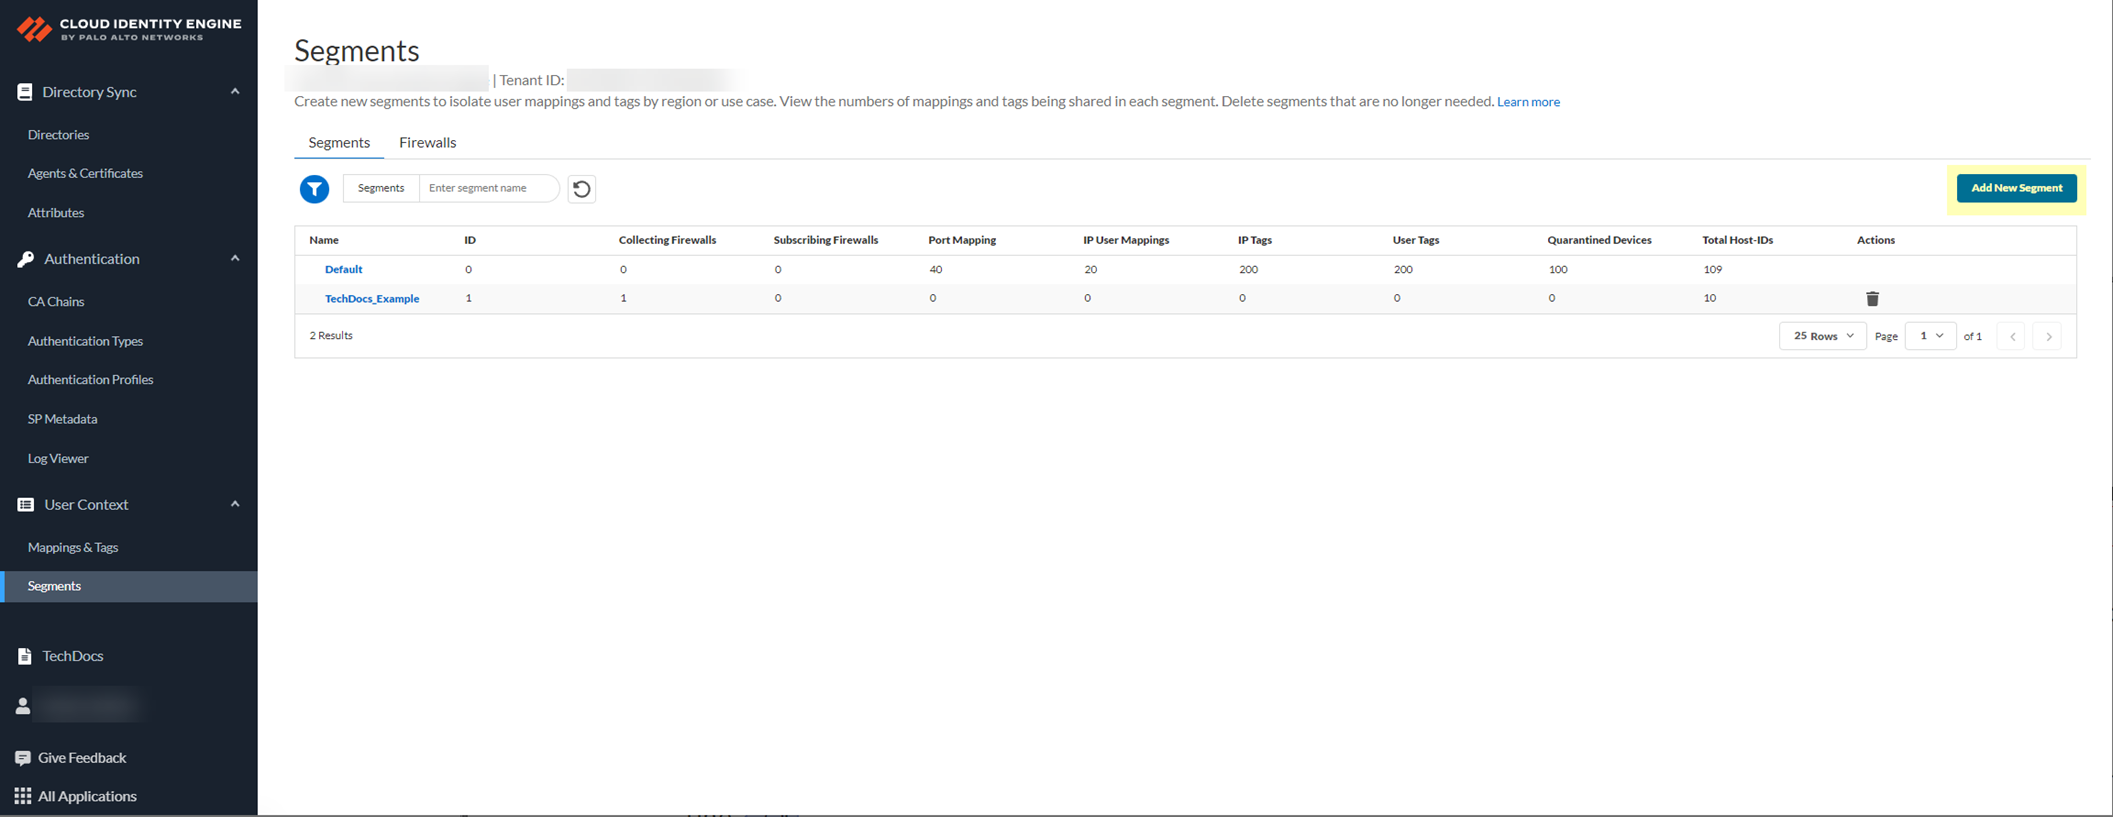
Configure Subscribing Segment (use Default or Add New):
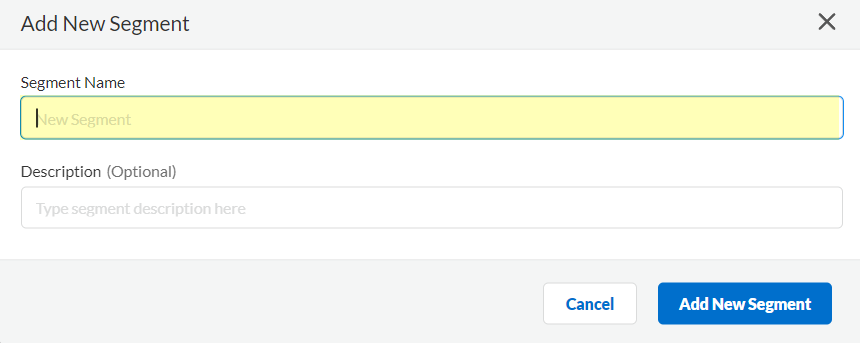
Add New Segment if needed (enter Name, Description).
Select the segment > Firewalls tab > Assign firewalls that should *receive* data.
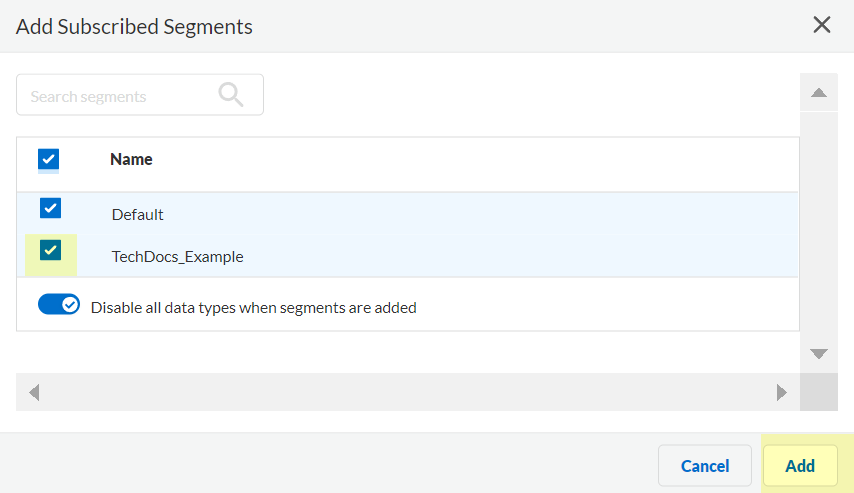
Segments tab: Click Add Segment(s). Select the Publishing Segment(s) this segment should subscribe to. Add.
Review Changes > Save.
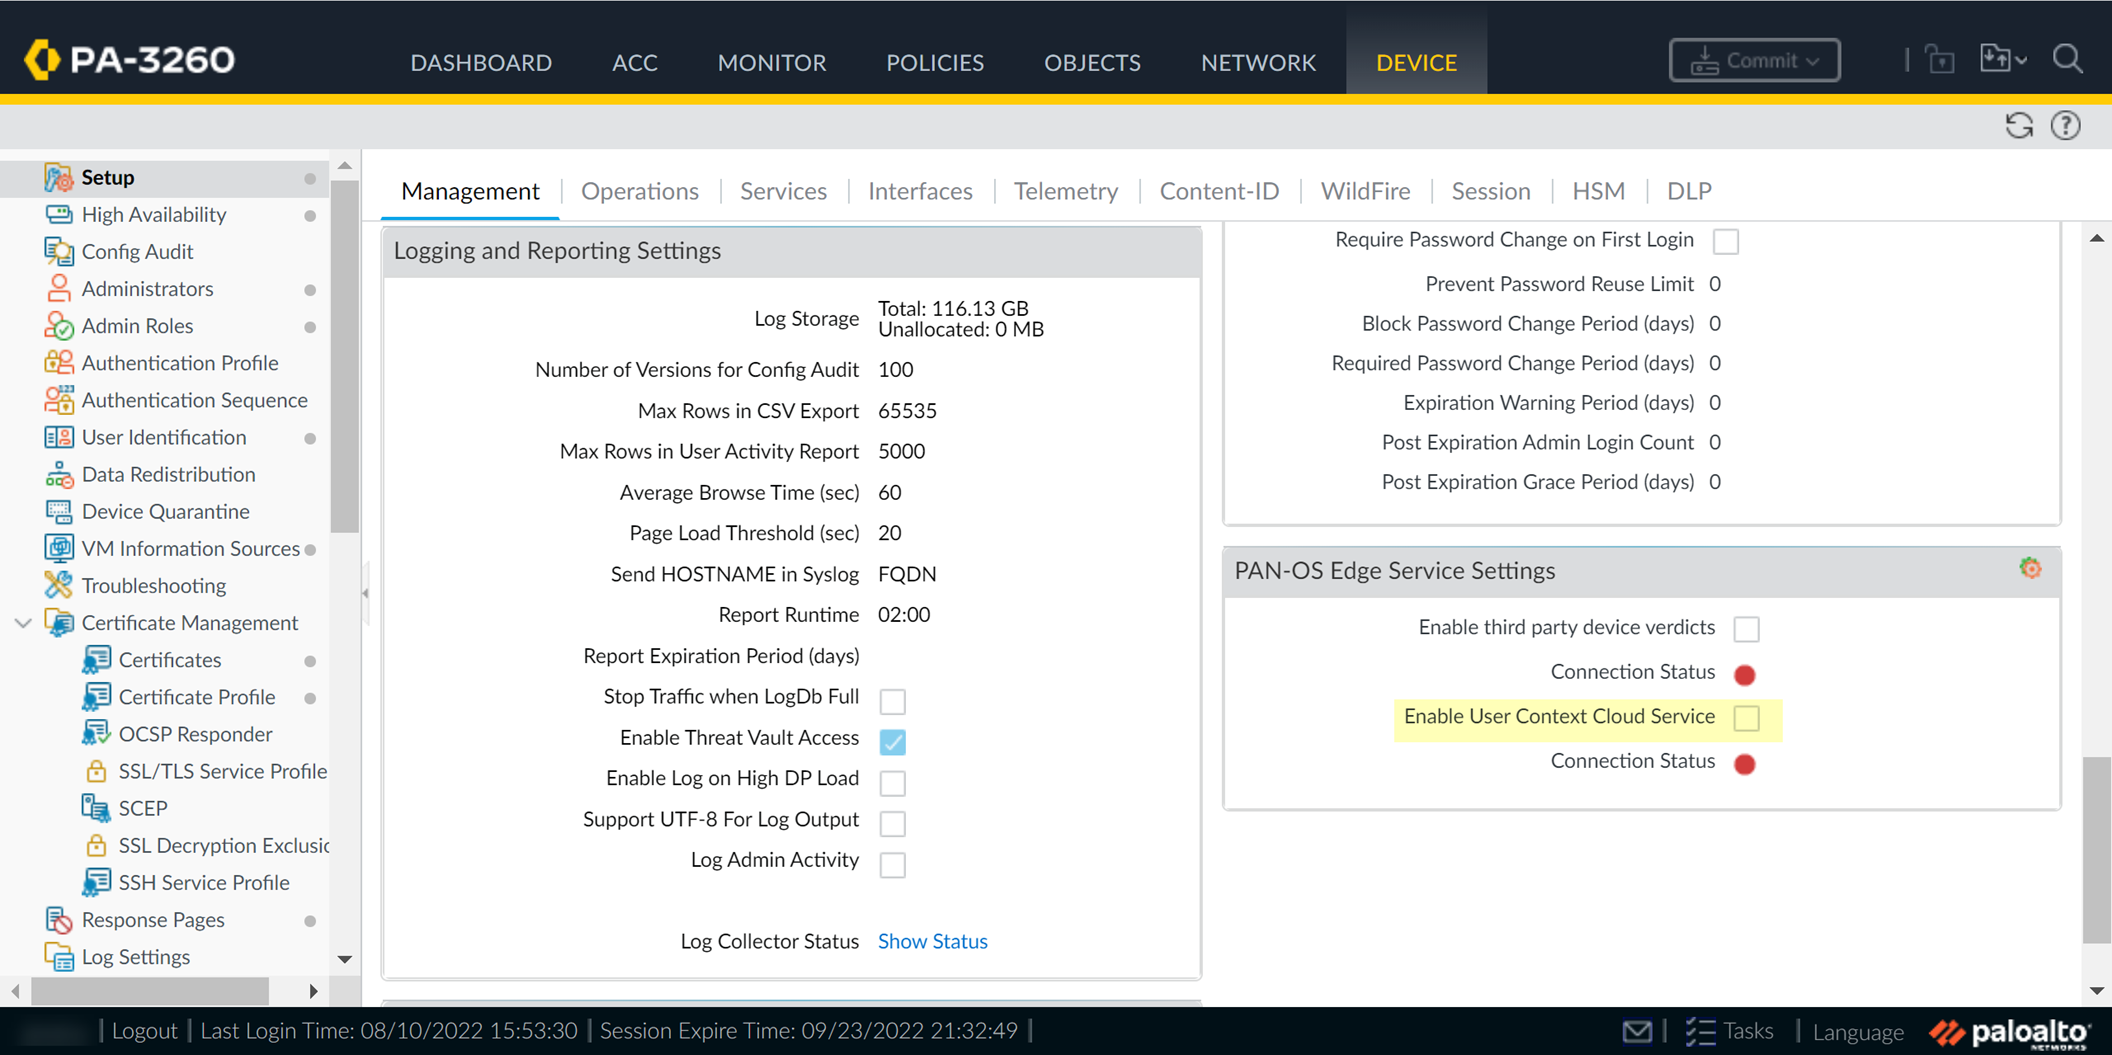
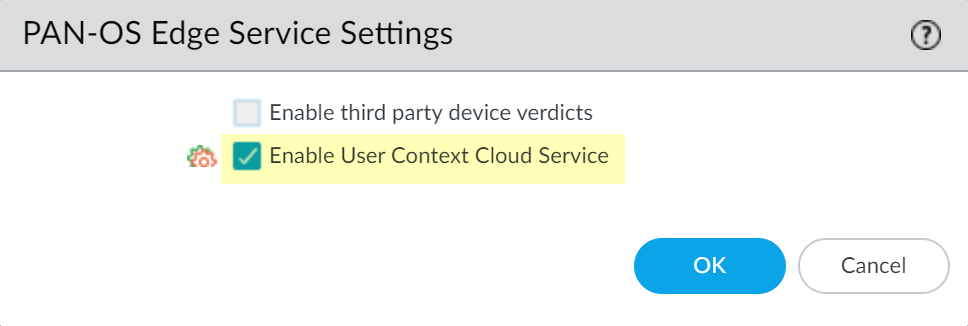
On Firewall/Panorama: Enable User Context Cloud Service:
Ensure Device Certificate is configured.
Go to Device > Setup > Management > PAN-OS Edge Service Settings > Edit.
Check
Enable User Context Cloud Service
. OK.
Commit.
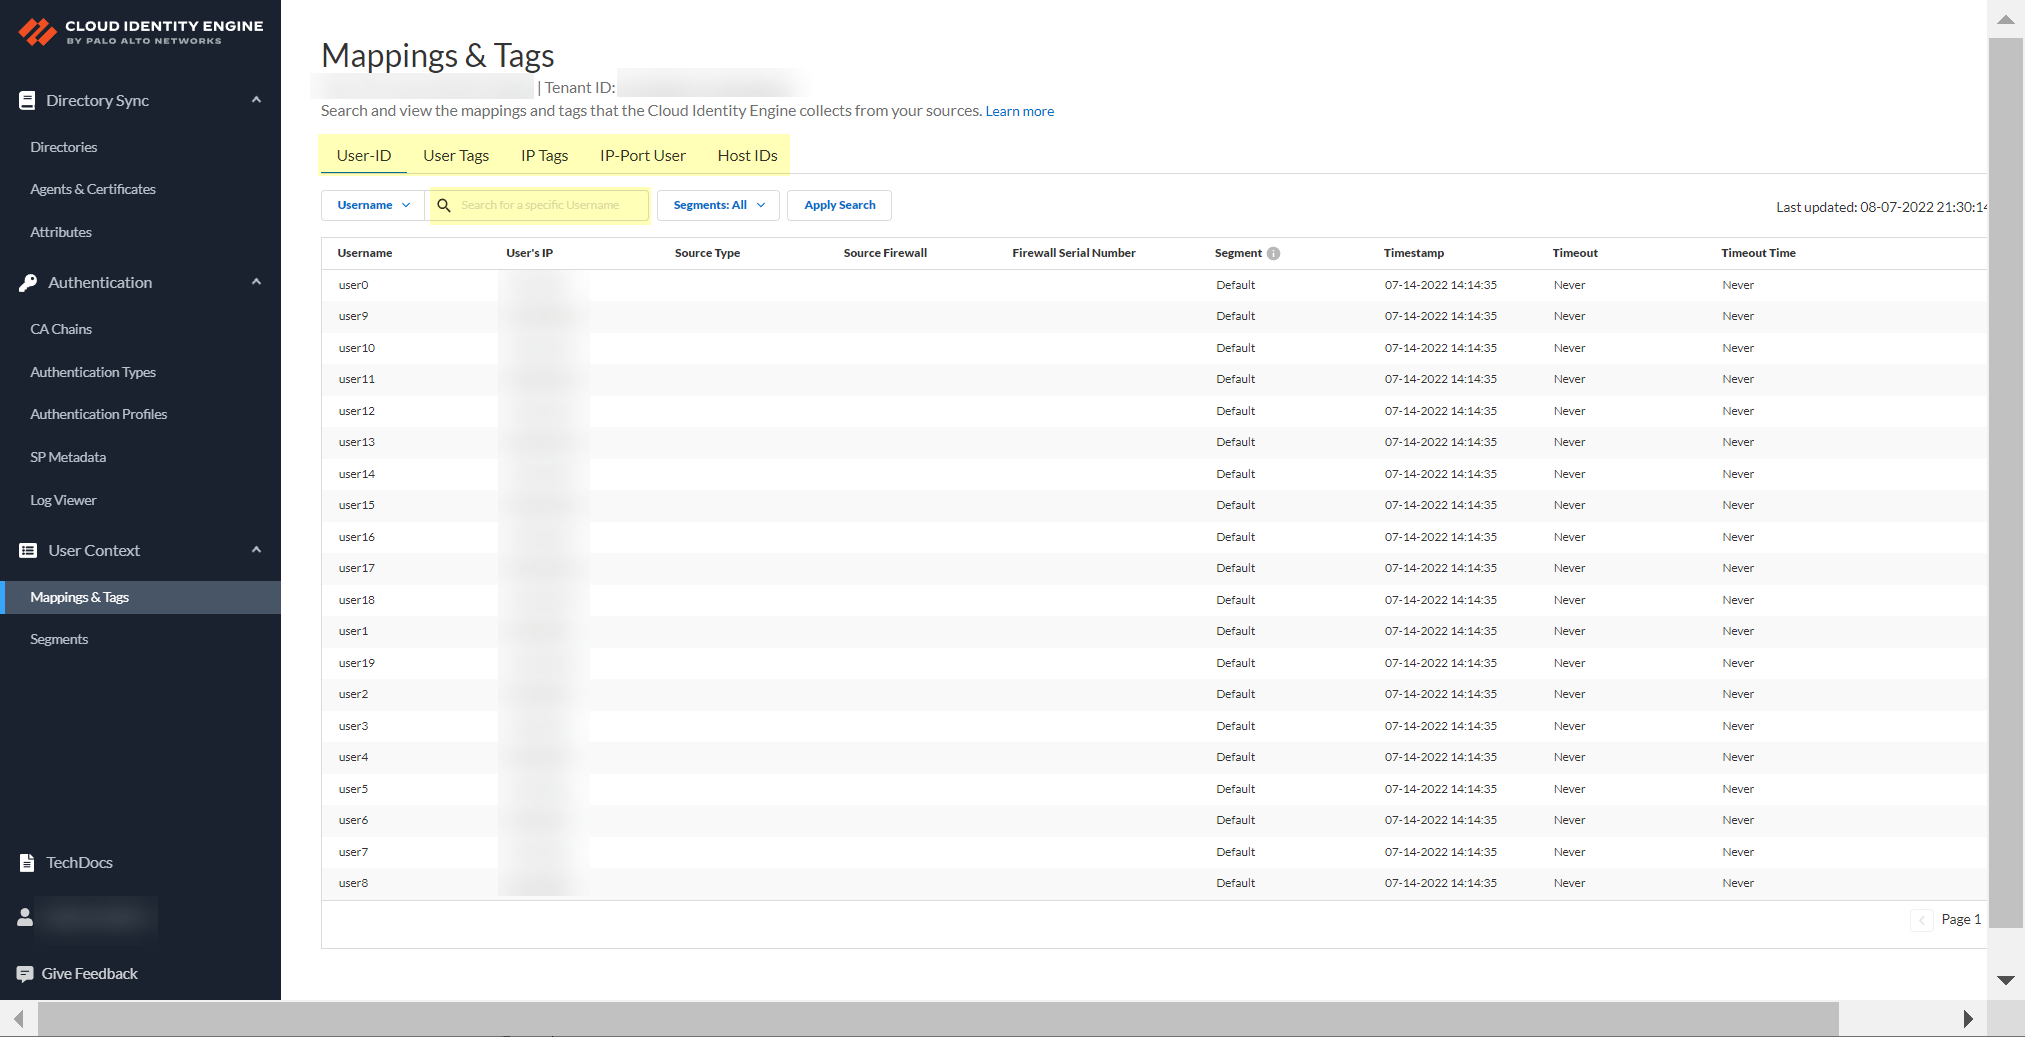
Verify:
On Firewall: Check Device > Setup > Management > PAN-OS Edge Service Settings > Connection Status shows Active.
In CIE App: Go to User Context > Mappings & Tags. Review received data (User-ID, User Tags, IP Tags, IP-Port User, Host IDs).
Manage the Cloud Identity Agent
Includes updating the agent, configuring logs, starting/stopping the connection, and managing certificates.
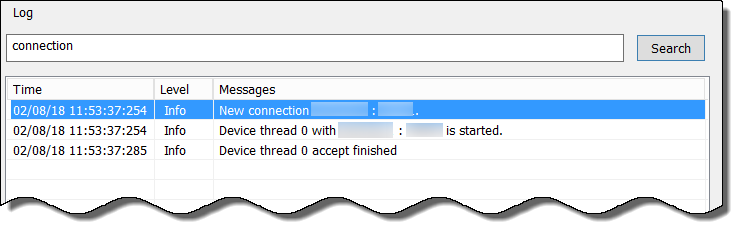
Configure Cloud Identity Agent Logs
Agent logs events locally. Use for monitoring and troubleshooting. Logs include UTC timestamps. Full history in
CloudIdAgentDebug.log
on the agent host.
Launch agent controller > File > Debug.
Select log level (None, Error, Warning, Information, Debug, Verbose).
Logging level determines which events are logged (selected level and higher severities).
[GOTCHA] Info/Warning/Error levels delete UI logs after writing to the debug file. Debug/Verbose store data permanently on disk until files are deleted.
Use
Monitoring > Search
(case-sensitive) to find specific log entries.
Use
Monitoring > Clear Log
to clear the UI display (does not delete file logs).
Update the Cloud Identity Agent
Using the latest agent version is strongly recommended.
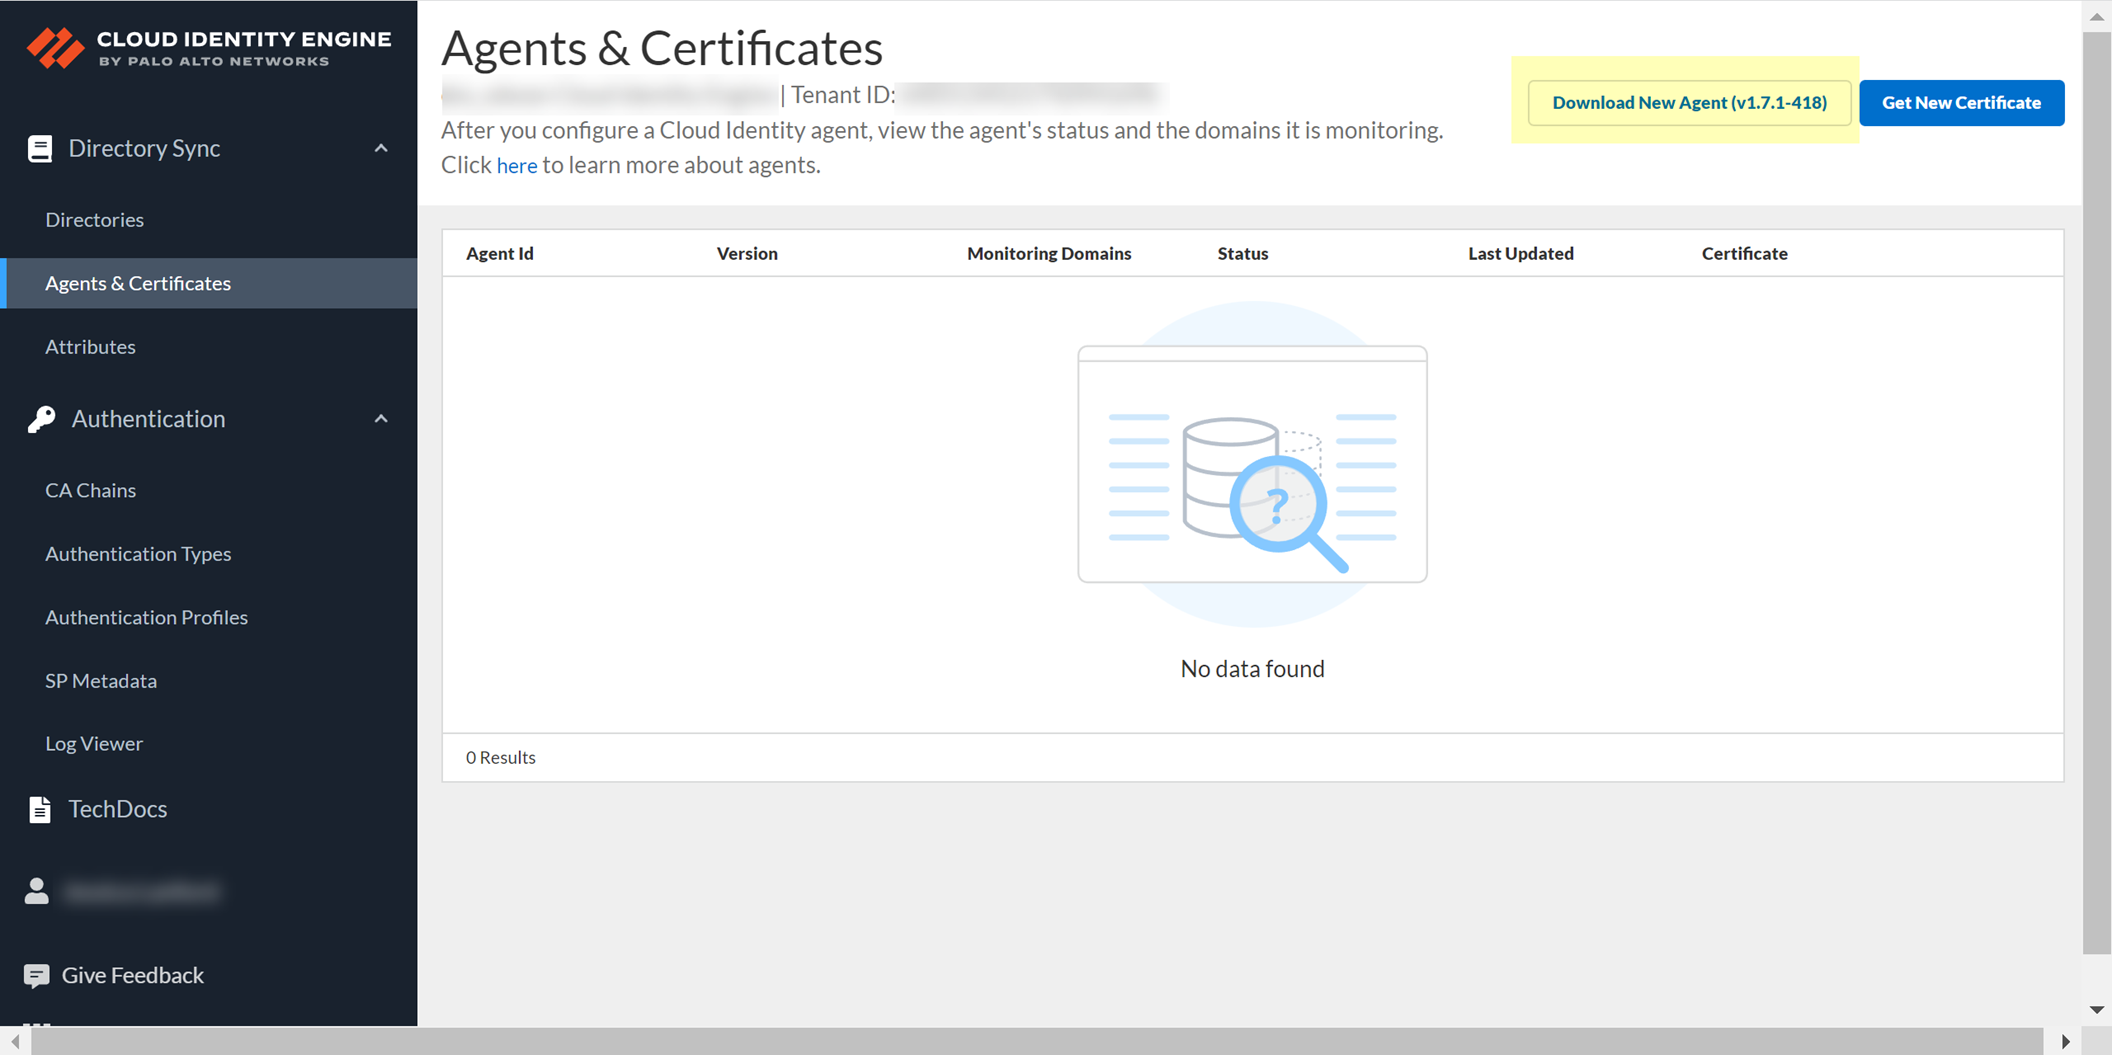
CIE app notifies if an update is available.
(Agent v1.7.0+ automatically backs up and restores config during upgrade).
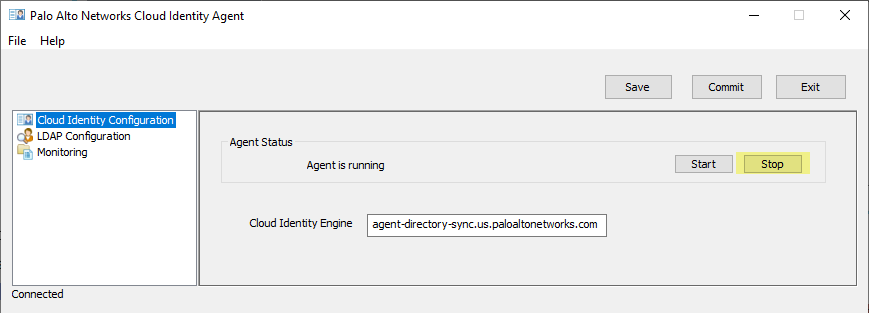
[CRITICAL] Stop the agent service connection first (Controller > Cloud Identity Configuration > Stop).
Uninstall the old agent via Windows Control Panel (Programs and Features).
Download the new agent from CIE app (Agents & Certificate > Download New Agent).
Install the new agent.
Start or Stop the Connection to the Cloud Identity Engine
Use to temporarily halt communication for maintenance or agent removal.
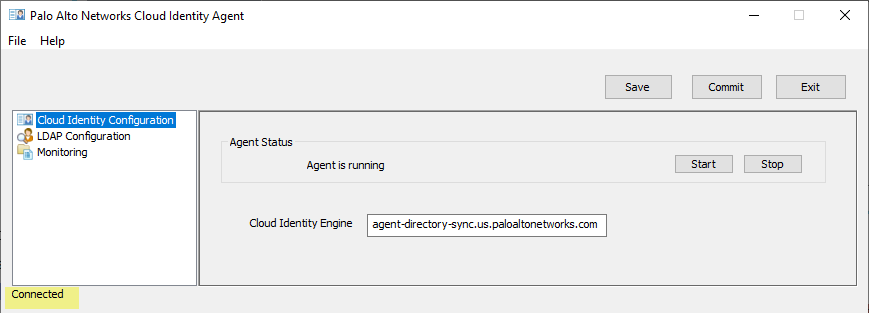
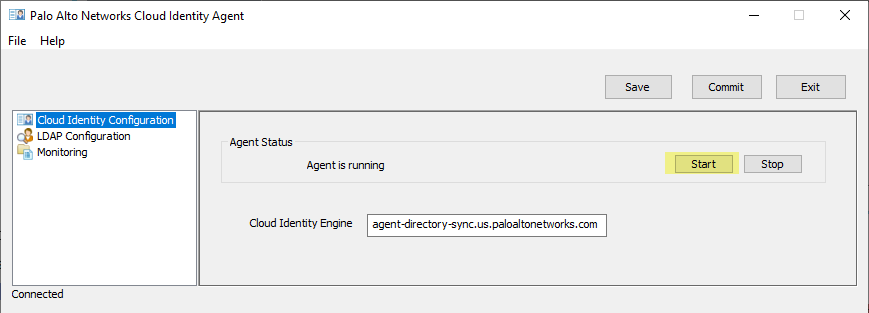
Launch agent controller > Cloud Identity Configuration. Status shown at bottom left.
Click
Start
to connect or
Stop
to disconnect.
Remove the Cloud Identity Agent
[CRITICAL] Agent must be stopped before removal.
Stop the agent service connection.
Uninstall agent from Windows Control Panel.
Log in to CIE app > Select tenant > Agents & Certificates.
Verify agent Status is Offline. Click
Remove Agent
.
Manage Cloud Identity Engine Certificates
[PCNSA/PCNSE] Agent uses unique certificates for mutual TLS authentication with CIE.
View cert details (ID, expiry) in CIE app > Agents & Certificates.
Agent v1.5.0+ auto-renews certificates before expiry.
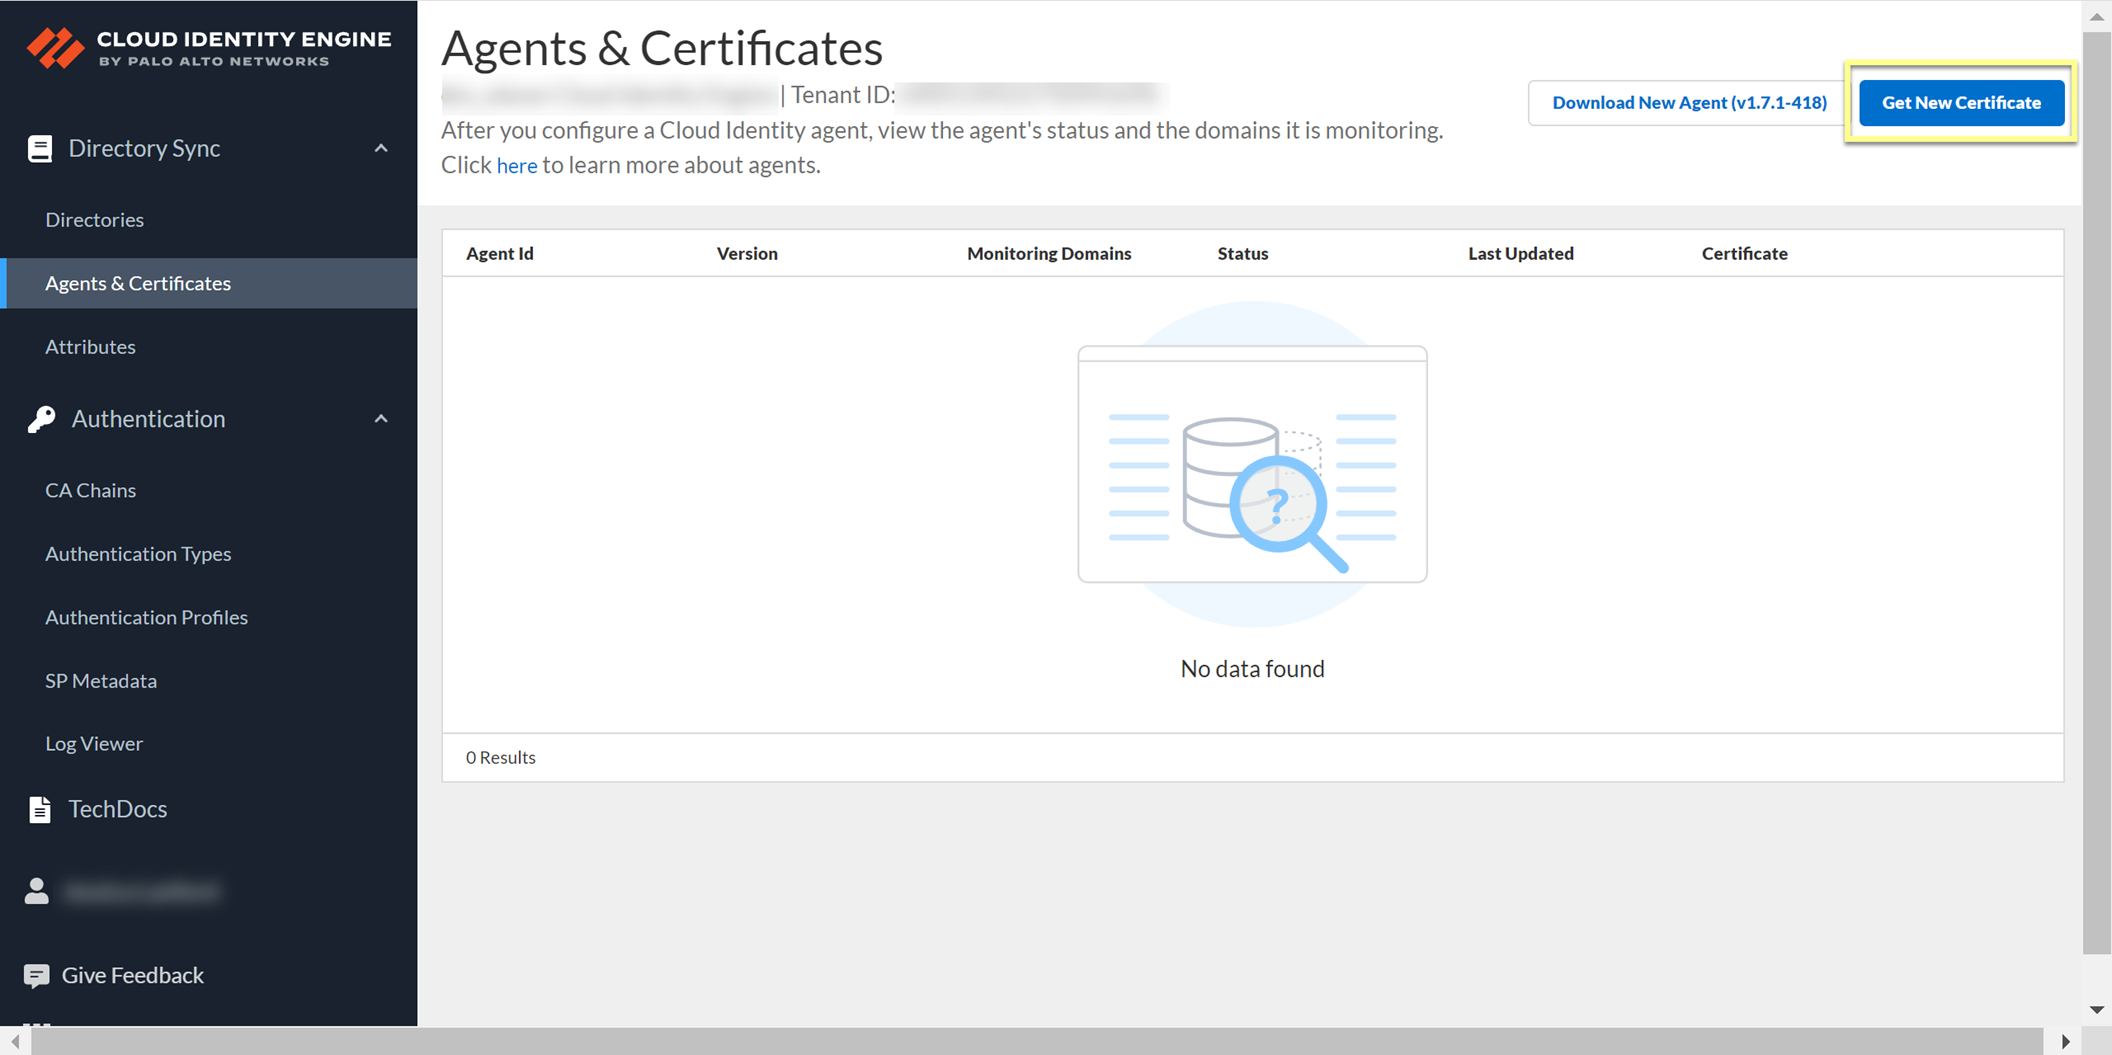
To manually generate a new cert: Click
Get New Certificate
.
Revoke Cloud Identity Agent Certificates
Use if a certificate is compromised.
Log in to CIE app > Select tenant > Agents & Certificates.
Click
Revoke
for the compromised certificate.
Delete the old certificate from the agent host (see next section).
Generate and install a new certificate.
Delete Obsolete Cloud Identity Agent Certificates
[CRITICAL] Must delete the old certificate from the agent host *before* installing a new one to prevent conflicts.
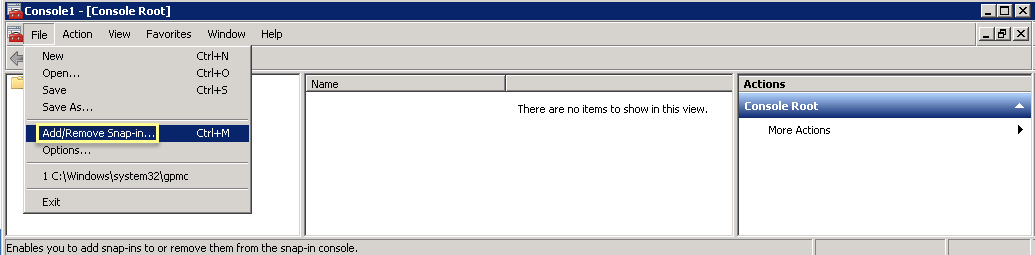
On agent host: Run `mmc.exe`.
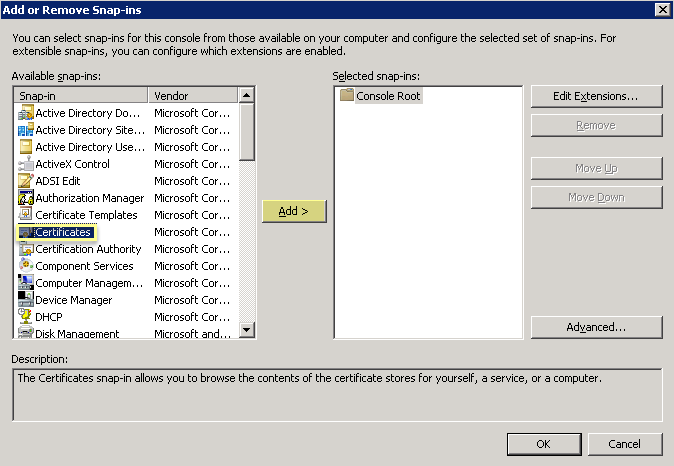
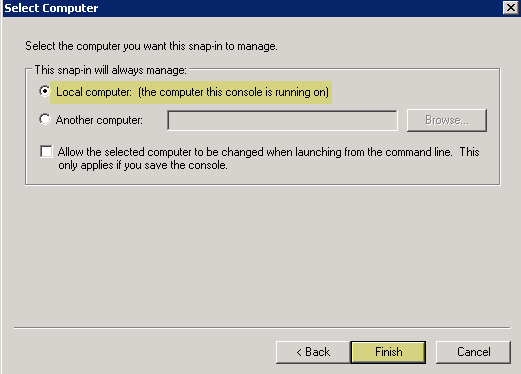
File > Add/Remove Snap-in > Certificates > Add.
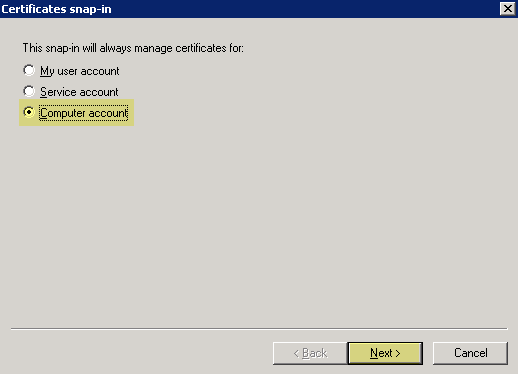
Select Computer account > Next > Local computer > Finish > OK.
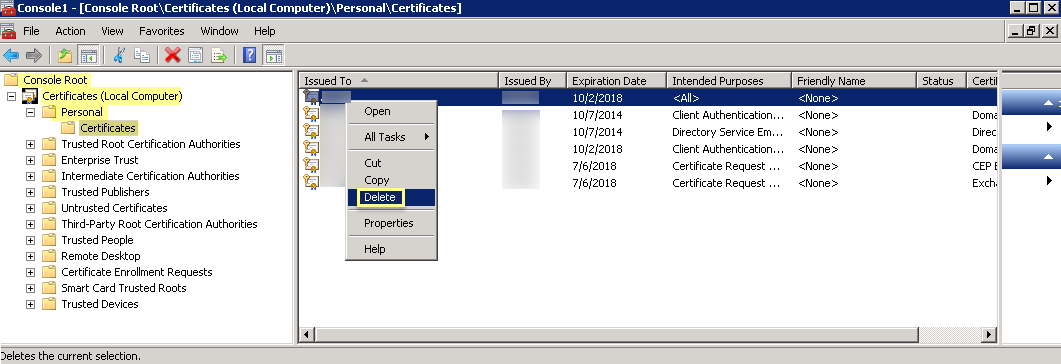
Navigate to Console Root > Certificates (Local Computer) > Personal > Certificates.
Find the old CIE agent certificate. Right-click > Delete. Confirm.
Install the new certificate.
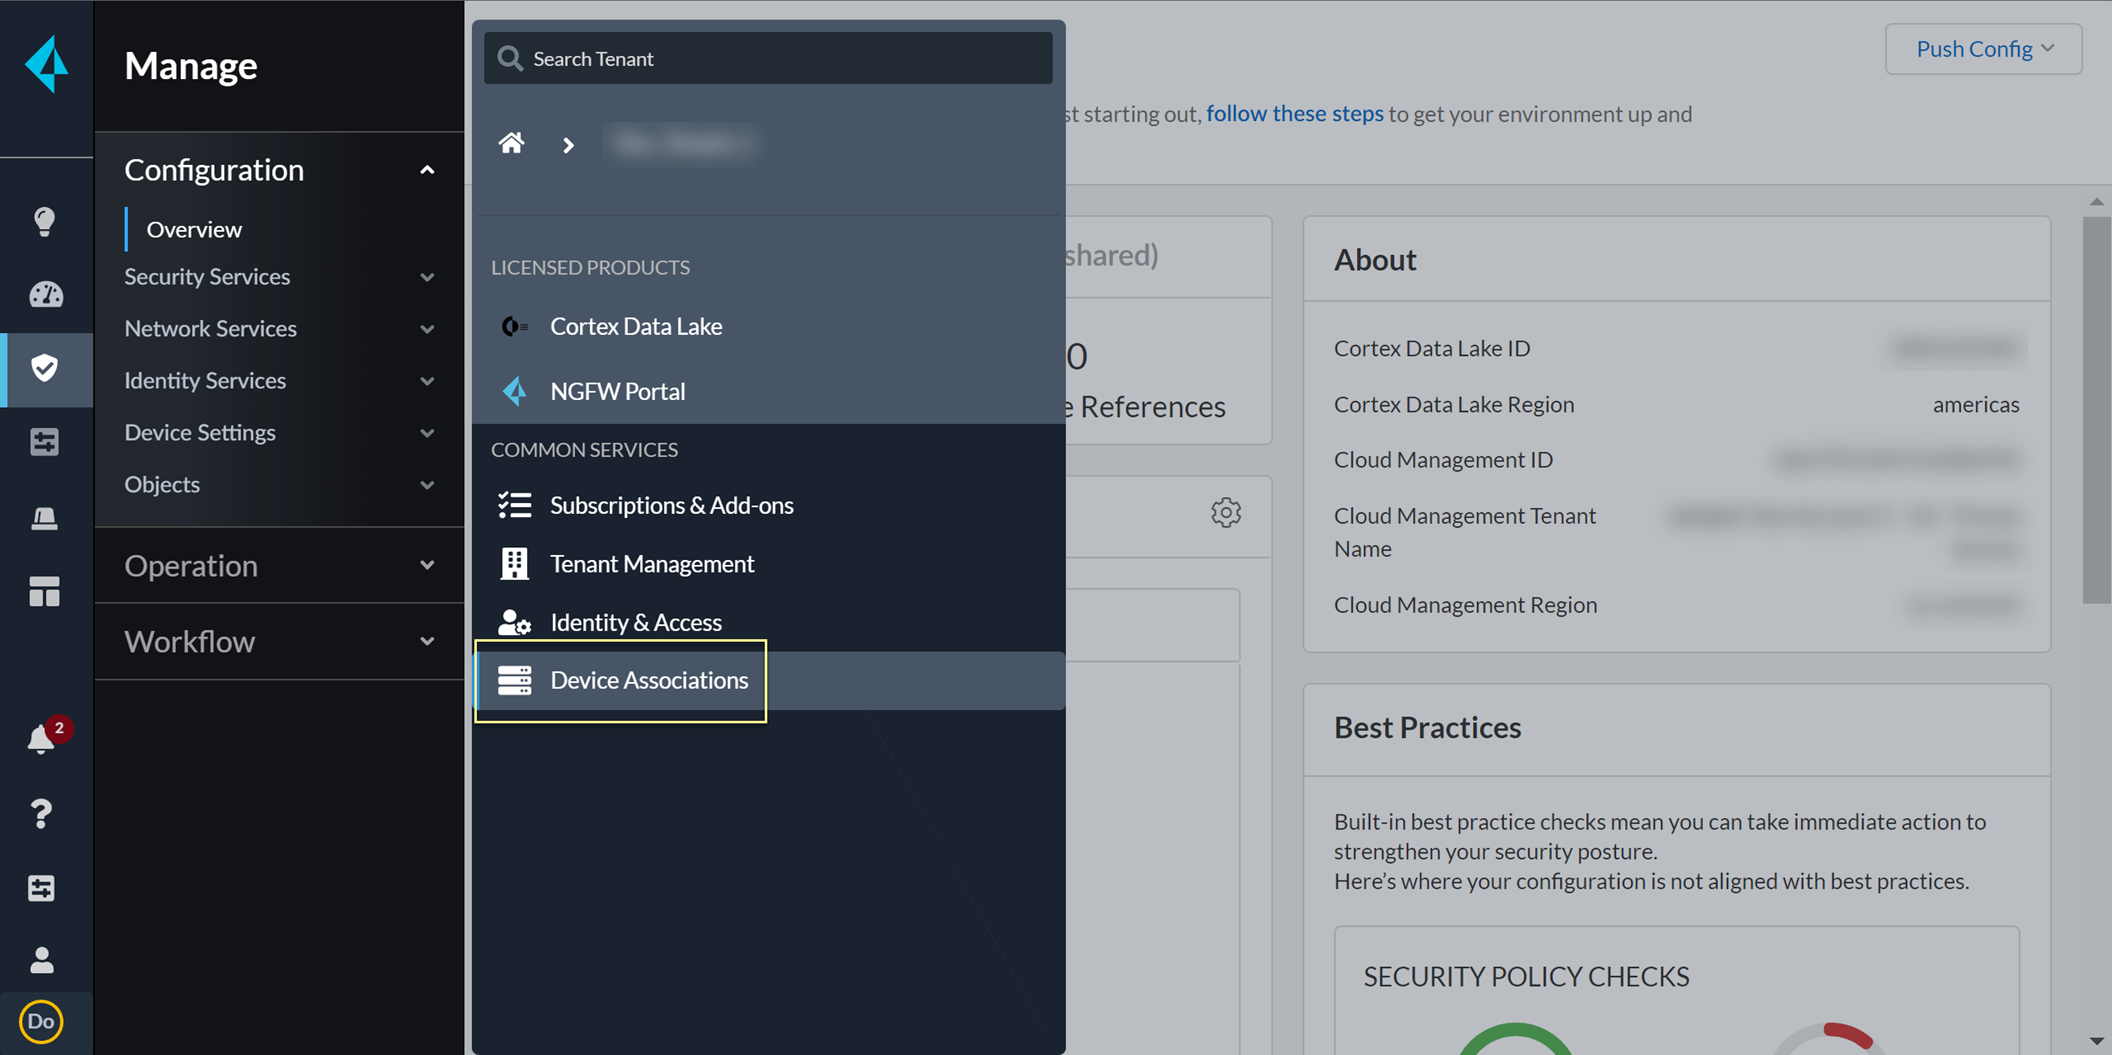
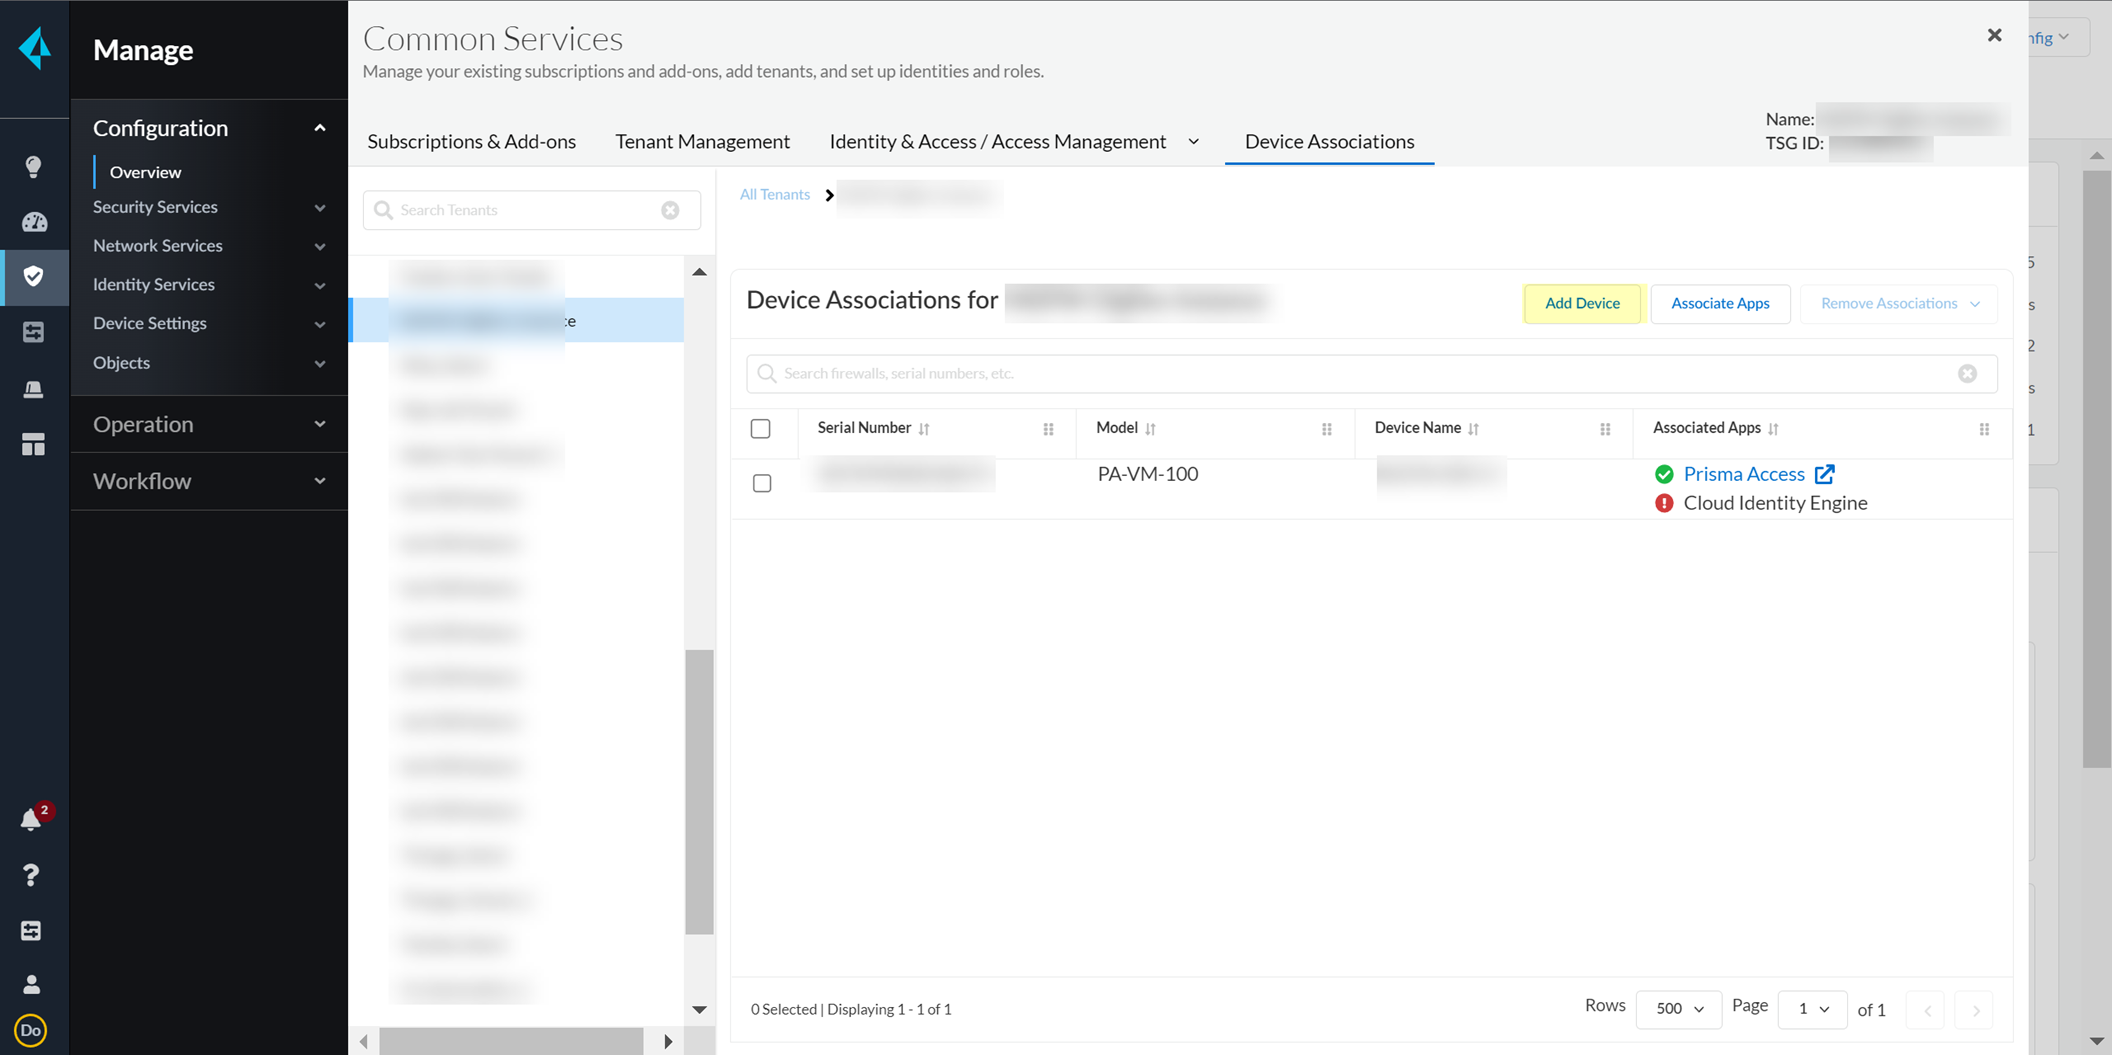
Associate the Cloud Identity Engine with Palo Alto Networks Apps
Required only if using the Support Account View in the Hub. Not needed for Tenant Account View within a single TSG.
Allows other PANW apps (like Cortex XDR, Prisma Access) to access CIE directory data.
Associate the Cloud Identity Engine During Activation
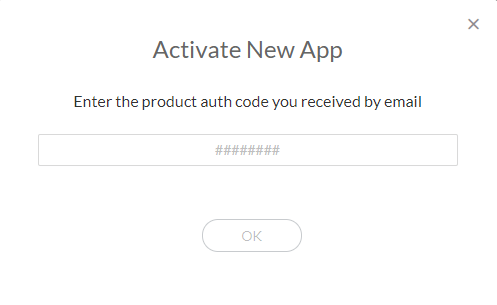
Activate the desired PANW cloud app using its Auth Code.
During app activation, enter required details (Instance Name, Region).
From the
Cloud Identity Engine
dropdown, select the compatible CIE tenant.
Agree and Activate.
Associate the Cloud Identity Engine with an Existing App
Log in to the hub > Settings (
) > Manage Apps.
Find the app row. Click the pencil icon or link under the Cloud Identity Engine column.
Select the desired CIE tenant from the dropdown. Click OK.
Diagrams
Authentication Flow (SAML Example)
sequenceDiagram
    participant User
    participant Firewall
    participant CIE as Cloud Identity Engine
    participant IdP as SAML Identity Provider

    User->>+Firewall: Request Resource (e.g., website)
    Note over Firewall: Auth Policy triggered
    Firewall->>+CIE: Redirect user for authentication (Auth Profile lookup)
    CIE->>+IdP: Redirect user to IdP (based on Auth Profile)
    User->>+IdP: Authenticates (enters credentials)
    IdP-->>-User: SAML Assertion (Authentication Success)
    User->>+CIE: Presents SAML Assertion
    CIE-->>-Firewall: Authentication successful confirmation
    Firewall-->>-User: Grants access to Resource
On-Premises Directory Sync Flow
graph TD
    A[Cloud Identity Agent] -- 1. Query (LDAP/S) --> B(On-Prem Directory);
    B -- 2. Return Attributes --> A;
    A -- 3. Sync Attributes (TLS) --> C(Cloud Identity Engine);
    C -- 4. Provide Data --> D[PANW Apps e.g., Prisma Access, Firewall];
Cloud Directory Sync Flow (e.g., Azure AD via API)
graph TD
    subgraph Cloud
        A[Cloud Identity Engine]
        B[Azure Active Directory]
    end
    A -- 1. API Call (Read Attributes) --> B;
    B -- 2. Return Attributes --> A;
    A -- 3. Provide Data --> C[PANW Apps e.g., Prisma Access, Firewall];
User Context Flow (Simplified)
graph TD
    subgraph Network Segment 1 (Publishing)
        FW1[Firewall 1]
        FW2[Firewall 2]
    end
    subgraph Network Segment 2 (Subscribing)
        FW3[Firewall 3]
    end
    subgraph Cloud
        CIE[Cloud Identity Engine - User Context Service]
    end

    FW1 -- Publishes IP-User Mappings --> CIE;
    FW2 -- Publishes IP-Tag Mappings --> CIE;
    CIE -- Distributes Mappings based on Subscription --> FW3;
Cloud Identity Engine Quiz
Answer all questions and click Submit to see your results.


 or Remove icons in the Add/Remove Users screen. Refresh directory or remove the entire CIE directory via the main Directories page actions.


 ) for an object to see its attributes. User details show first ~2000 groups; Group details show first ~2000 members.
 ) to copy raw data.

 ) > Manage Apps.