Cloud Identity Engine (CIE) Overview
The Cloud Identity Engine (CIE) provides centralized user identification and authentication for various network environments (on-premise, cloud-based, hybrid). It enables security policies based on users and groups rather than just IP addresses, enhancing security asset protection through behavior-based actions.
CIE offers flexibility by simplifying identity source configuration and scales as needs change. It maintains accurate, up-to-date user information by continually syncing directories, ensuring policy enforcement even if a cloud identity provider is temporarily unavailable.
CIE provides Palo Alto Networks cloud applications and services with read-only access to your directory information for user visibility and policy enforcement. The specific components required for deployment vary depending on whether CIE accesses an on-premises directory (like Active Directory) or a cloud-based directory (like Azure Active Directory).
CIE's authentication component allows configuring profiles for SAML 2.0-compliant identity providers (IdPs) (Google, Azure, Okta, PingOne, PingFederate) or client certificates. When an Authentication policy and the Authentication Portal are configured on the firewall, user access requests can be redirected through the IdP for authentication before granting access.
On-Premises Directory Configuration
To integrate CIE with an on-premises Active Directory or OpenLDAP directory:
- Install the Cloud Identity agent on a Windows server (agent host).
- Configure the agent to connect to your on-premises directory and CIE.
- Access the Cloud Identity Engine app on the hub to manage tenants and agents.
The agent collects attributes initially during tenant setup and then syncs them with CIE every five minutes (if a sync isn't in progress) based on the agent host's system time. This ensures directory information is available to Palo Alto Networks apps/services.
For communication:
- The agent uses TLS 1.1, 1.2, or 1.3 to communicate with CIE.
- The agent host uses TLS 1.1, 1.2, or 1.3 to communicate with the on-premises directory.
Important Point: We strongly recommend configuring TLS 1.3 for all CIE traffic. Agent versions 1.7.0+ use the latest TLS version by default.
Data transmitted to CIE and on the agent host is encrypted end-to-end. CIE locally encrypts agent data and removes it after transmission.
To set up CIE for on-premises directories, log in to the CIE app on the hub to generate a certificate for agent-CIE authentication.
Network Configuration for Cloud Identity Agent Traffic (On-Premises)
Ensure network connectivity for the agent, directory, and CIE based on your deployment and region.
- Allow traffic to the regional agent configuration endpoint hostname.
- Use the ssl App-ID in Security policy for traffic to CIE (following Decryption Best Practices).
- If a Palo Alto Networks firewall is between the agent and CIE:
- Use the paloalto-cloud-identity App-ID (requires ssl and web-browsing signatures) to allow traffic from the agent to CIE.
- Allow agent traffic to specific Godaddy URLs for certificate validation: http://crl.godaddy.com (port 80), http://ocsp.godaddy.com (port 80), https://certs.godaddy.com (port 443).
- If using SSL decryption, exclude traffic between the agent and CIE to allow mutual authentication.
- If a Palo Alto Networks firewall is between the agent and Active Directory:
- Use the ldap App-ID for LDAP protocol.
- Use the ssl App-ID for LDAPS or LDAP with STARTTLS protocols.
- If a non-Palo Alto Networks firewall is used:
- Allow LDAP/LDAPS traffic to the directory controller port (389/636) from the agent.
- Allow HTTPS traffic from the agent on port 443 to your CIE destination URL for the configured region.
- Allow traffic from the agent to the Godaddy URLs ( http://crl.godaddy.com , http://ocsp.godaddy.com on port 80; https://certs.godaddy.com on port 443).
Configure Domains for the Cloud Identity Engine
On-Premises Active Directory Domains
A single agent can communicate with multiple domains if the service account has query permissions for all configured domains. We recommend multiple domain controllers per domain for redundancy. For agent redundancy, configure multiple agents for a domain, ideally located near the domain controllers they query.
To get cross-domain memberships, configure those domains on the agent(s) and use LDAP or LDAPS (ports 389/636). Do not configure the agent to use the Global Catalog port (3268 for LDAP or 3269 for LDAPS).
Gotcha!: Do NOT use the Global Catalog ports (3268/3269) for AD configuration on the Cloud Identity agent.
Set Up the Cloud Identity Engine (On-Premises)
After activating CIE, select On-Premises as your directory type.
- Install and configure the Cloud Identity agent on a Windows server to communicate with your On-Prem AD/OpenLDAP and CIE. Generate a certificate for mutual authentication.
- Install the Cloud Identity Agent:
- Verify time sync on the agent host.
- Activate your CIE tenant.
- Download the agent from the CIE app on the hub.
- Install on a supported Windows server. Ensure TLS 1.2+ is enabled.
- Configure the Cloud Identity Agent:
- Ensure network allows agent traffic.
- Install the directory's CA certificate in the Local Computer Trusted Root CA store on the agent host.
- Launch the agent ( Start > Palo Alto Networks > Cloud Identity Agent ).
-
Select Cloud Identity Configuration and enter the regional agent configuration endpoint URL matching your CIE tenant region.
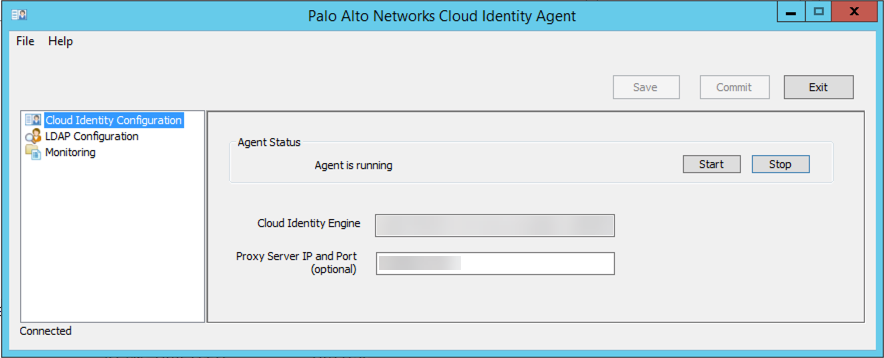
Screenshot showing the field for entering the regional agent configuration endpoint.
- (Optional) Enter Proxy IP Server and Port if using a proxy.
-
Configure LDAP Configuration:

Screenshot showing the LDAP configuration settings for the CIE agent.
- Enter the Bind DN for the service account. Use dsquery user -name username on AD server to find it.
- Enter the Bind Password. It's saved encrypted.
- Select a Protocol: LDAP (389, unencrypted), LDAPS (636, encrypted, requires CA cert), or LDAP with STARTTLS (389, encrypted, requires CA cert).
- Verify Bind Timeout (default 30s).
- Verify Search Timeout (default 15s).
-
Add your on-premises directory.
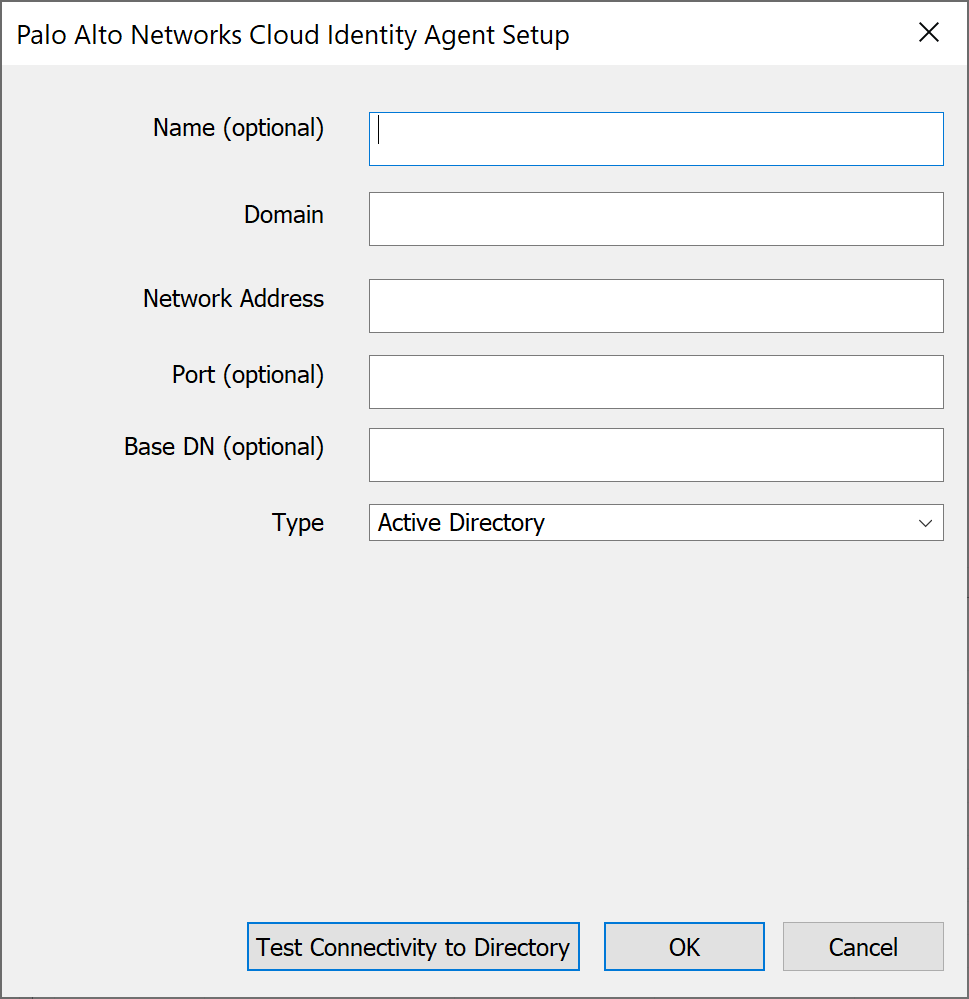
Screenshot showing the fields to add an on-premises directory to the CIE agent configuration.
- (Optional) Enter a Name.
- Enter the full Domain name. (Max 20 domains per agent).
- Enter the Network Address (IP or FQDN). Must be the original FQDN if used.
- (Optional) Enter Port (defaults: 636 LDAPS, 389 LDAP/STARTTLS). Gotcha!: Do NOT configure Global Catalog ports (3268/3269).
-
(Required for OpenLDAP) Enter the Base DN (e.g.,
DC=example,DC=com
).
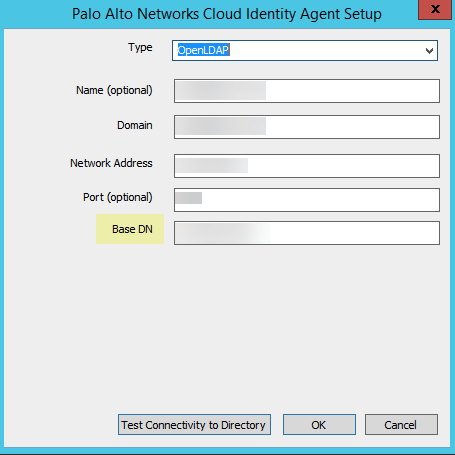
Screenshot highlighting the required Base DN field for OpenLDAP configurations.
OpenLDAP requires Base DN for searches. - Select Type: OpenLDAP or Active Directory. OpenLDAP requires groupsOfUniqueNames objectClass. Use Common-Name as Primary Name for apps like GlobalProtect.
- (Optional) Test Connectivity to Directory.
- Click OK. Adding a directory triggers a full sync. Ensure agents/domains are active before adding a new one.
- Commit changes to restart the agent and apply the configuration.
- Verify sync status in the CIE app (Directories page).
- (Optional) Configure additional agents for High Availability (HA) by configuring multiple agents for the same domain in the same tenant. Configurations must be identical. CIE communicates with one agent at a time; agents don't communicate with each other.
-
(Optional) Update the bind password using the command:
Use escape characters for special characters.CloudIdAgentCLI.exe ldap_bind_password:<password> - (Optional) Check log file CloudIdAgentCLIDebug.log for troubleshooting.
- Authenticate the Agent and the Cloud Identity Engine:
- Enter a unique Certificate Name (5-128 alphanumeric).
- Enter and re-enter a secure password (12-25 characters).
-
Click Download Certificate.
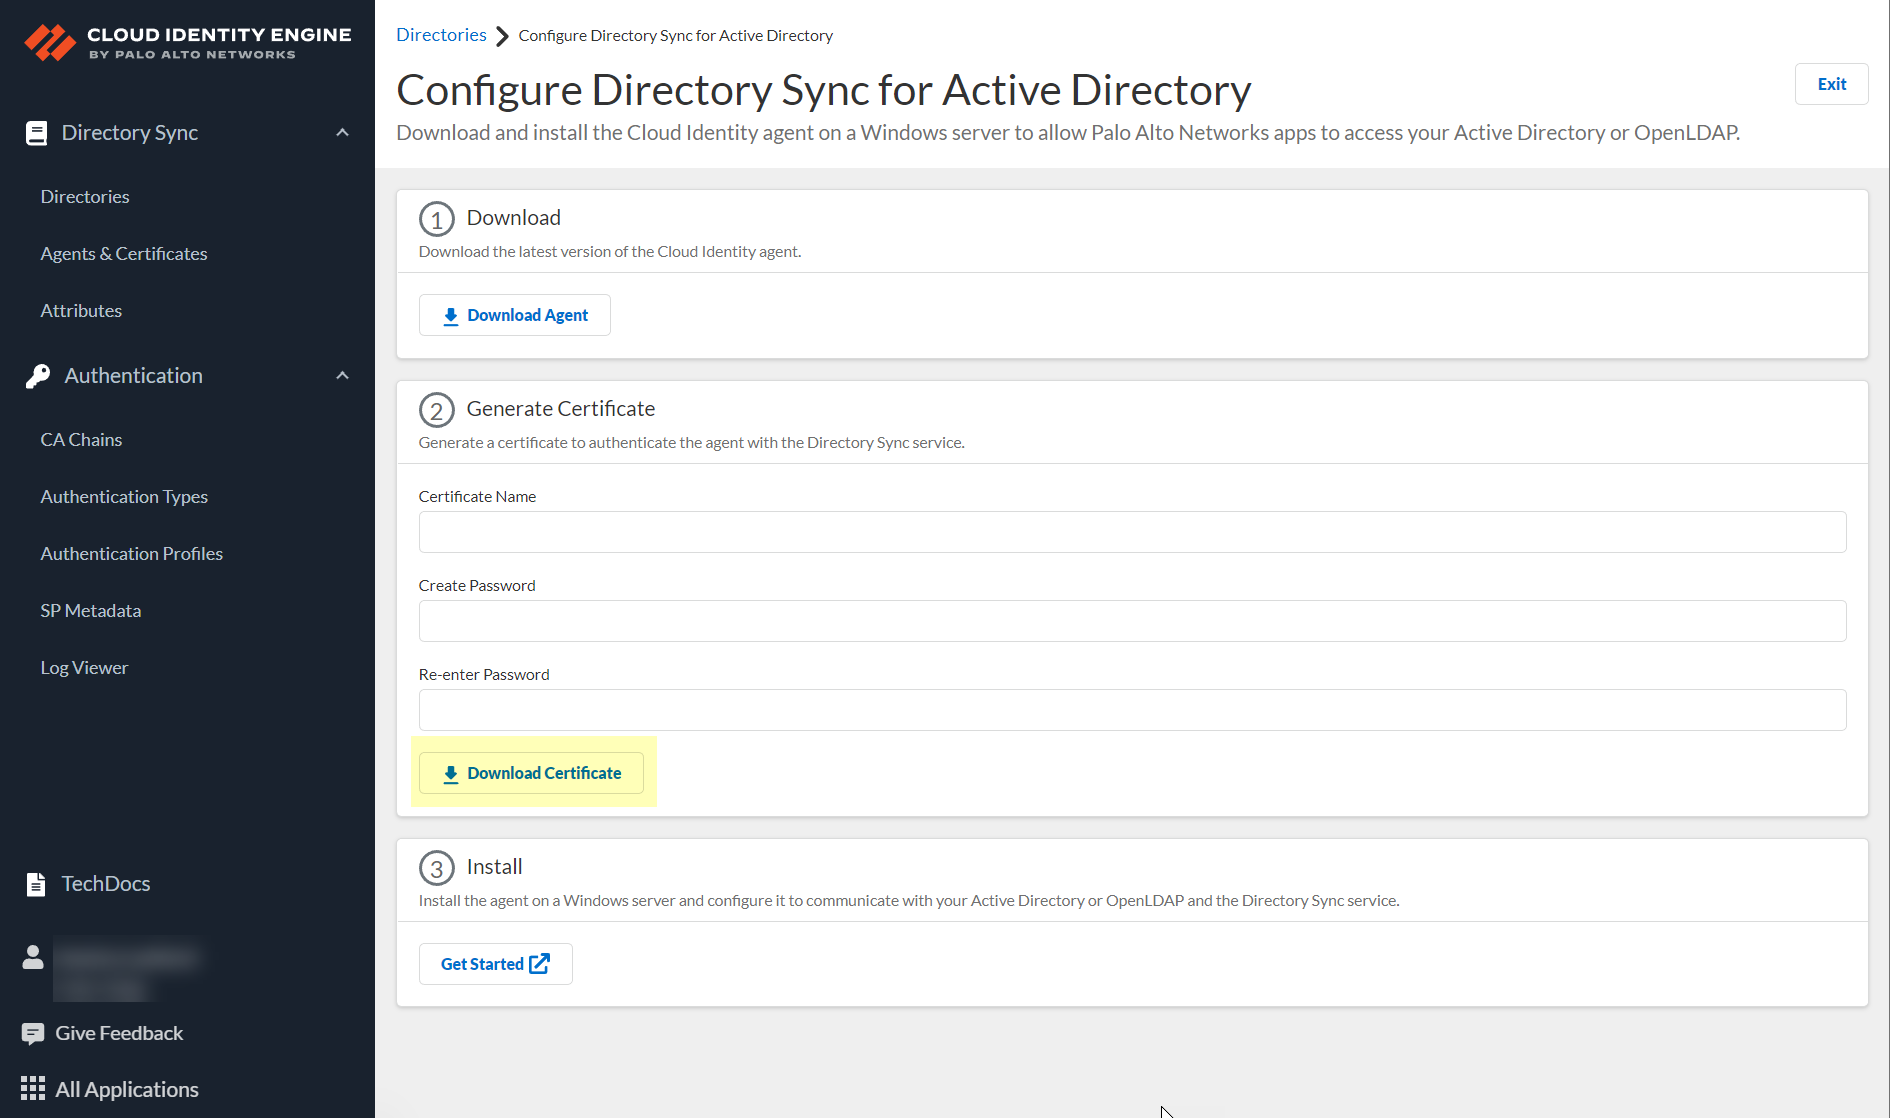
Screenshot showing the Download Certificate button in the CIE app.
- Store the certificate in the Local Computer Personal certificate store on the agent host.
Critical Point: The Cloud Identity agent requires a dedicated host. Do NOT install it on the same host as the User-ID agent or Terminal Server (TS) agent (unless you change the TS agent port).
Gotcha!: Avoid configuring the agent or performing the initial sync during the daily CRL reload time (typically 9:00-10:00 PM CDT/CEST).
Important Point: Do NOT manually edit agent configuration files; it may cause unexpected behavior.
| Region | Agent Configuration Endpoint |
|---|---|
| United States (US) | agent-directory-sync.us.paloaltonetworks.com |
| European Union (EU) | agent-directory-sync.eu.paloaltonetworks.com |
| United Kingdom (UK) | agent-directory-sync.uk.paloaltonetworks.com |
| Singapore (SG) | agent-directory-sync.sg.paloaltonetworks.com |
| Canada (CA) | agent-directory-sync.ca.apps.paloaltonetworks.com |
| Japan (JP) | agent-directory-sync.jp.apps.paloaltonetworks.com |
| Australia (AU) | agent-directory-sync.au.apps.paloaltonetworks.com |
| Germany (DE) | agent-directory-sync.de.apps.paloaltonetworks.com |
| United States - Government | agent-directory-sync.gov.apps.paloaltonetworks.com |
| India (IN) | agent-directory-sync.in.apps.paloaltonetworks.com |
| Switzerland (CH) | agent-directory-sync.ch.apps.paloaltonetworks.com |
| Spain (ES) | agent-directory-sync.es.apps.paloaltonetworks.com |
| Italy (IT) | agent-directory-sync.it.apps.paloaltonetworks.com |
| France (FR) | agent-directory-sync.fr.apps.paloaltonetworks.com |
| China (CN) | agent-directory-sync.cn.apps.prismaaccess.cn (Region accessible only within specified region) |
| Poland (PL) | agent-directory-sync.pl.apps.paloaltonetworks.com |
| Qatar (QA) | agent-directory-sync.qa.apps.paloaltonetworks.com |
| Taiwan (TW) | agent-directory-sync.tw.apps.paloaltonetworks.com |
| Israel (IL) | agent-directory-sync.il.apps.paloaltonetworks.com |
| Indonesia (ID) | agent-directory-sync.id.apps.paloaltonetworks.com |
| South Korea (KR) | agent-directory-sync.kr.apps.paloaltonetworks.com |
| Saudi Arabia (SA) | agent-directory-sync.sa.apps.paloaltonetworks.com |
CIE and the agent use mutual TLS authentication via a certificate. Generate a certificate in the CIE app and import it to the Local Computer store on the agent host. Certificates expire in 3 months; agent 1.5.0+ auto-renews.
Critical Point: Each agent needs a UNIQUE certificate for its specific tenant. Do NOT reuse certificates across agents or tenants.
After authentication, the agent provides directory attributes to CIE, which shares them with associated apps.
Cloud-Based Directory Configuration Overview
For cloud-based directories like Azure Active Directory (Azure AD), Okta Directory, or Google Directory, you must grant CIE permission to access your directory during configuration. You do *not* need to install or configure a Cloud Identity agent for cloud-based directories. CIE uses APIs to pull directory information.
Configure directories for communication with CIE by granting necessary permissions and providing connection details.
Optionally use SCIM provisioning to customize collected attributes, though direct API methods like Azure AD's group filtering can offer faster updates (5-minute intervals) compared to standard SCIM syncs (up to 40 minutes).
Configure Azure Active Directory
This configuration allows CIE to collect user, group, and device attributes from Azure AD for policy enforcement and visibility. Azure AD integration can be configured via two main methods: using the CIE Enterprise App (requires initial Global Admin consent) or the more secure Client Credential Flow (uses a service principal).
Set Up Azure Directory: Prerequisites and Overview
Requires a user account with Application Administrator or Cloud Application Administrator roles in Azure AD. The Global Administrator role is needed initially if you use the CIE Enterprise App method for granting consent.
CIE retrieves updates from Azure AD on a schedule:
- Users, Groups, and Devices: When CIE performs a directory sync (frequency depends on configuration and sync type).
- Enterprise Applications: Up to every 3 hours.
- Role Assignments: Up to every 24 hours.
Granting the required permissions automatically onboards the CIE Enterprise App into your Azure AD tenant, making the necessary APIs accessible to CIE.
Configure Azure Using the CIE Enterprise App Flow (Initial Global Admin Consent Recommended)
This method is simpler for the initial setup but requires an administrator with Global Administrator privileges to grant broad permissions once.
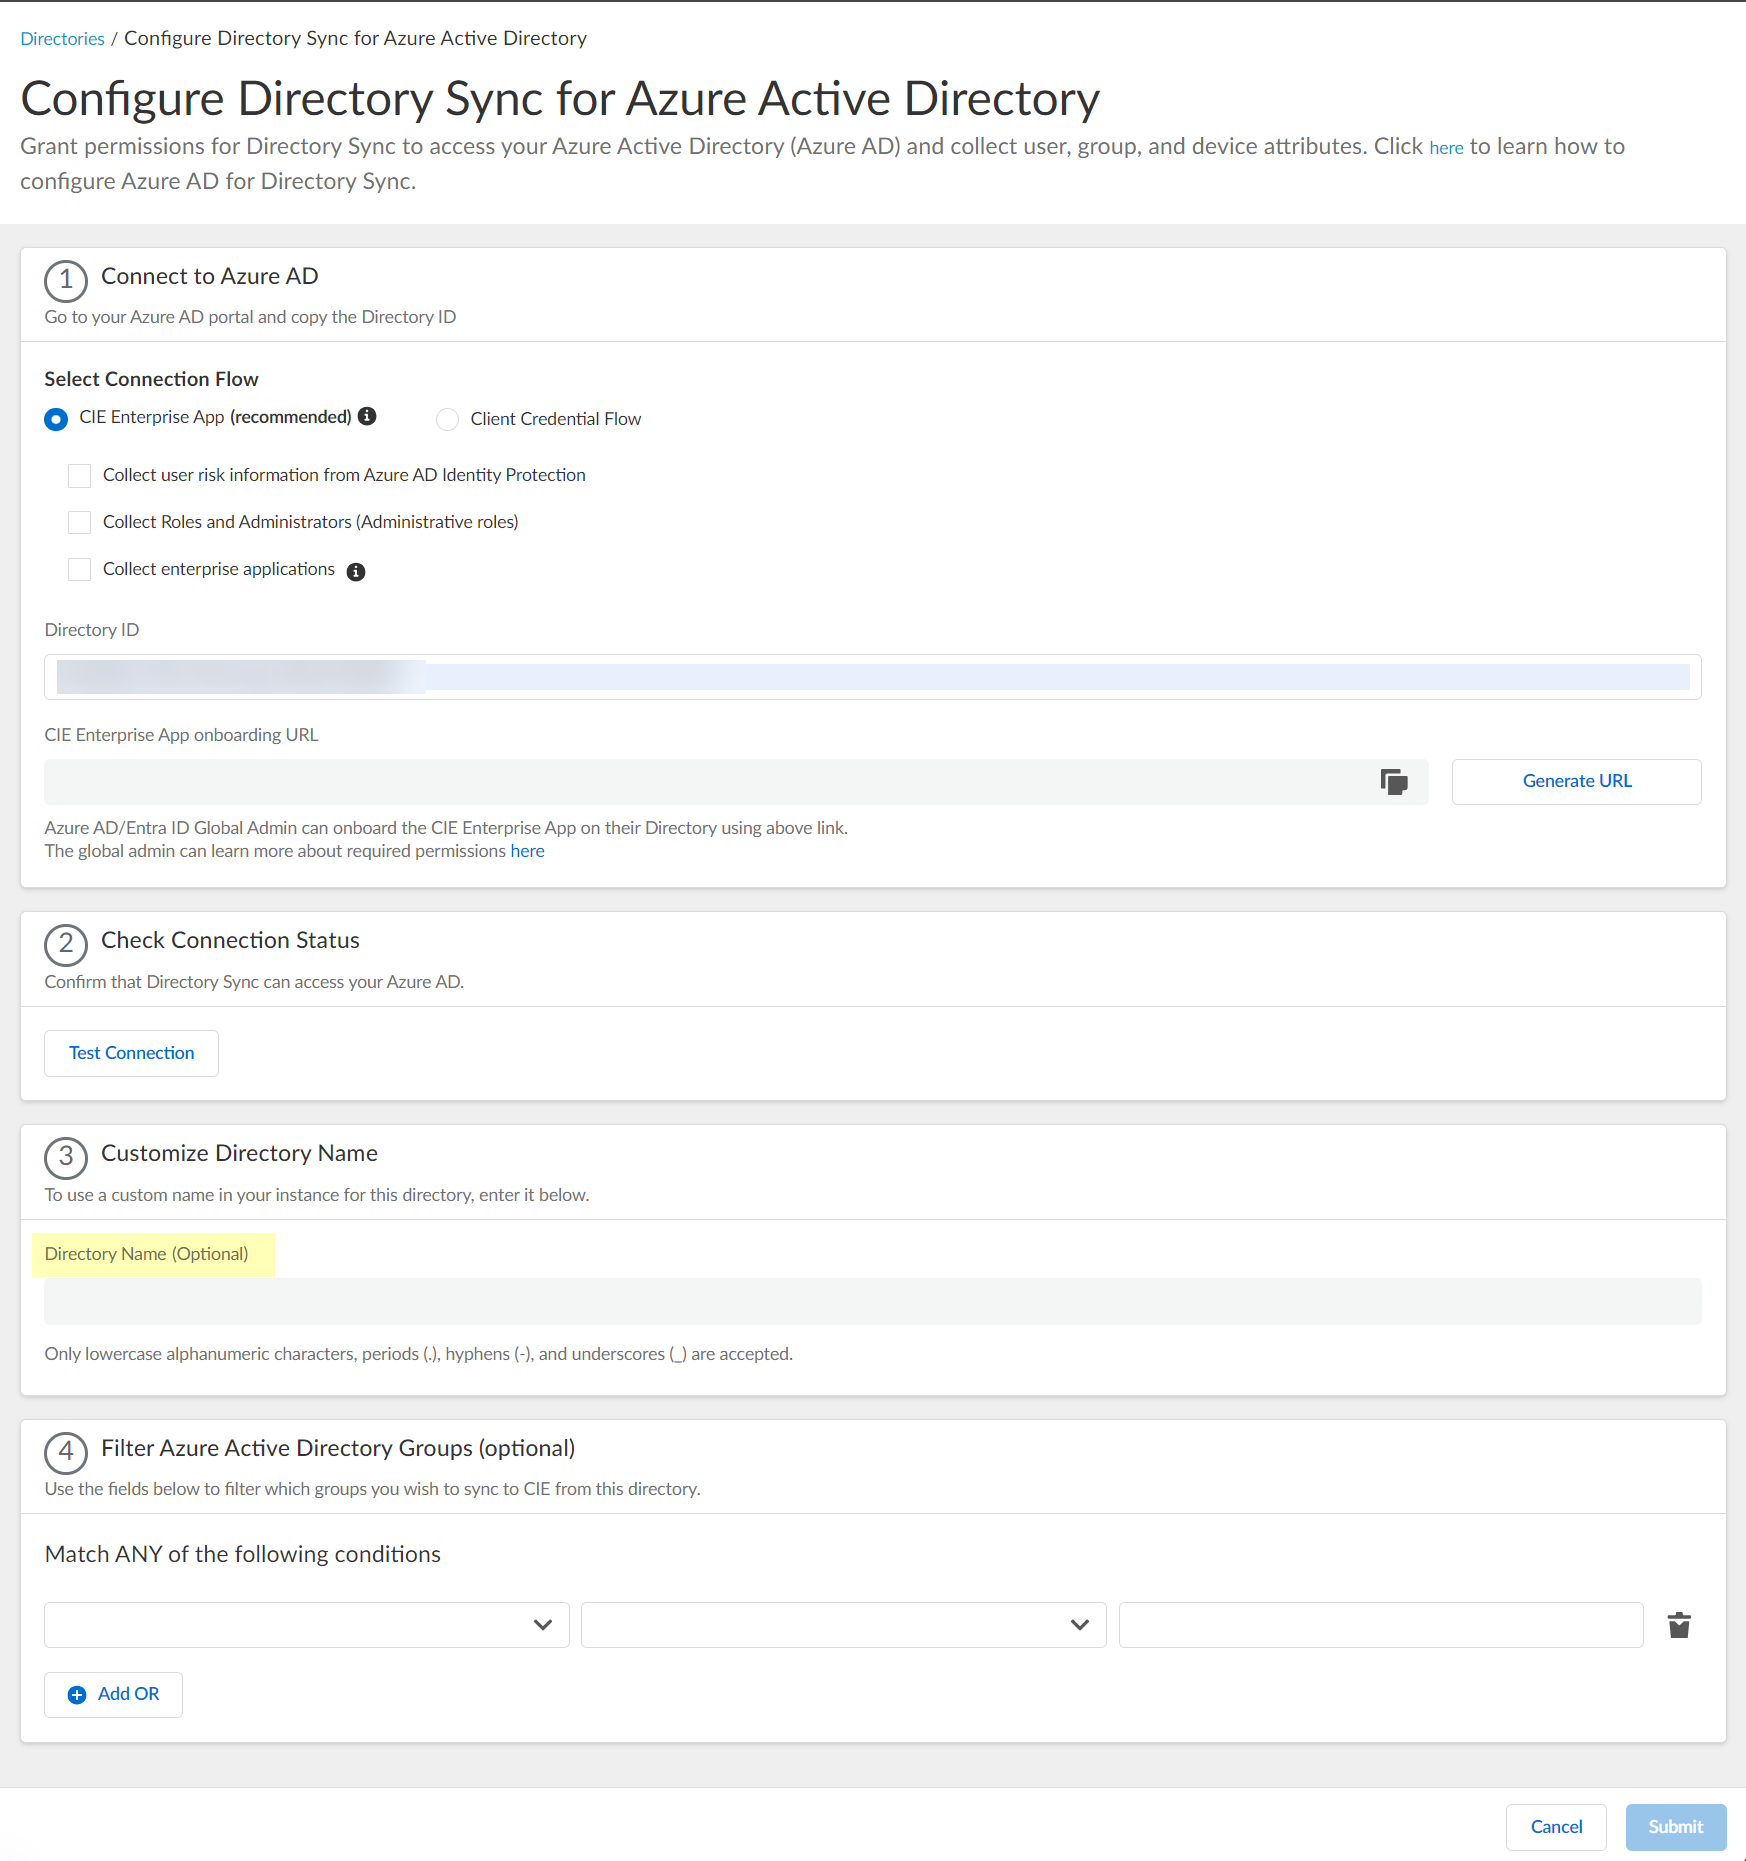
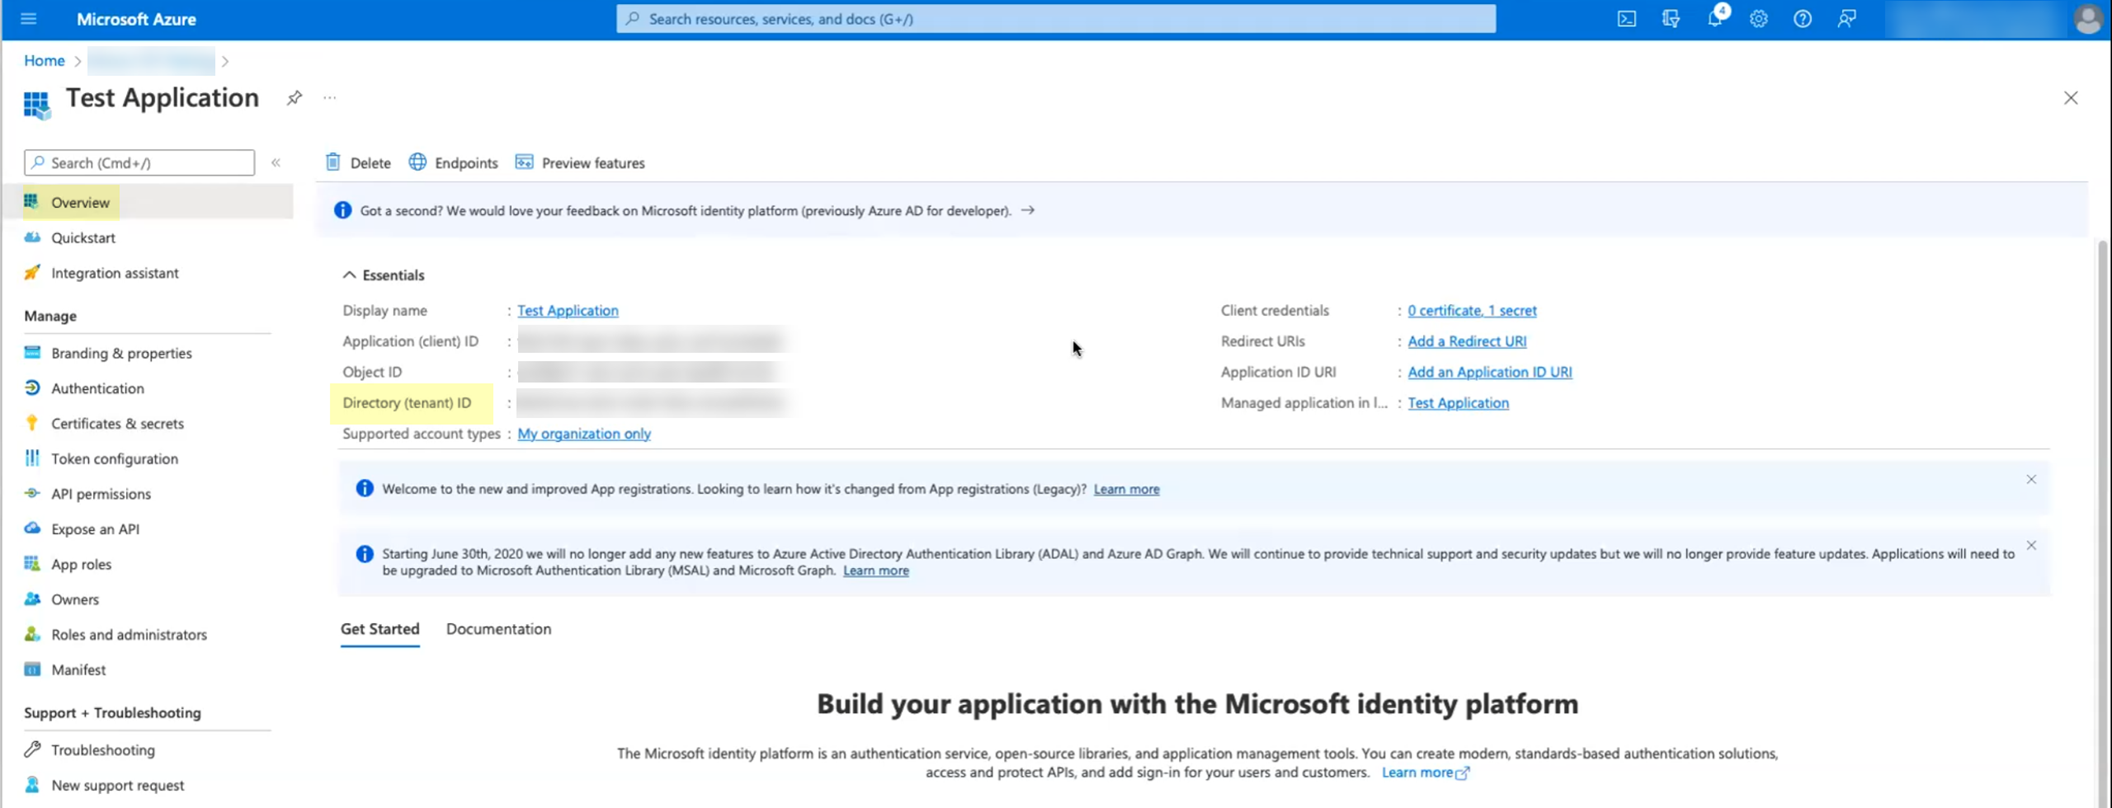
-
In the Azure admin portal, navigate to Azure Active Directory > Overview and copy the
Directory (tenant) ID
.

Screenshot highlighting the Directory (tenant) ID in the Azure admin portal.
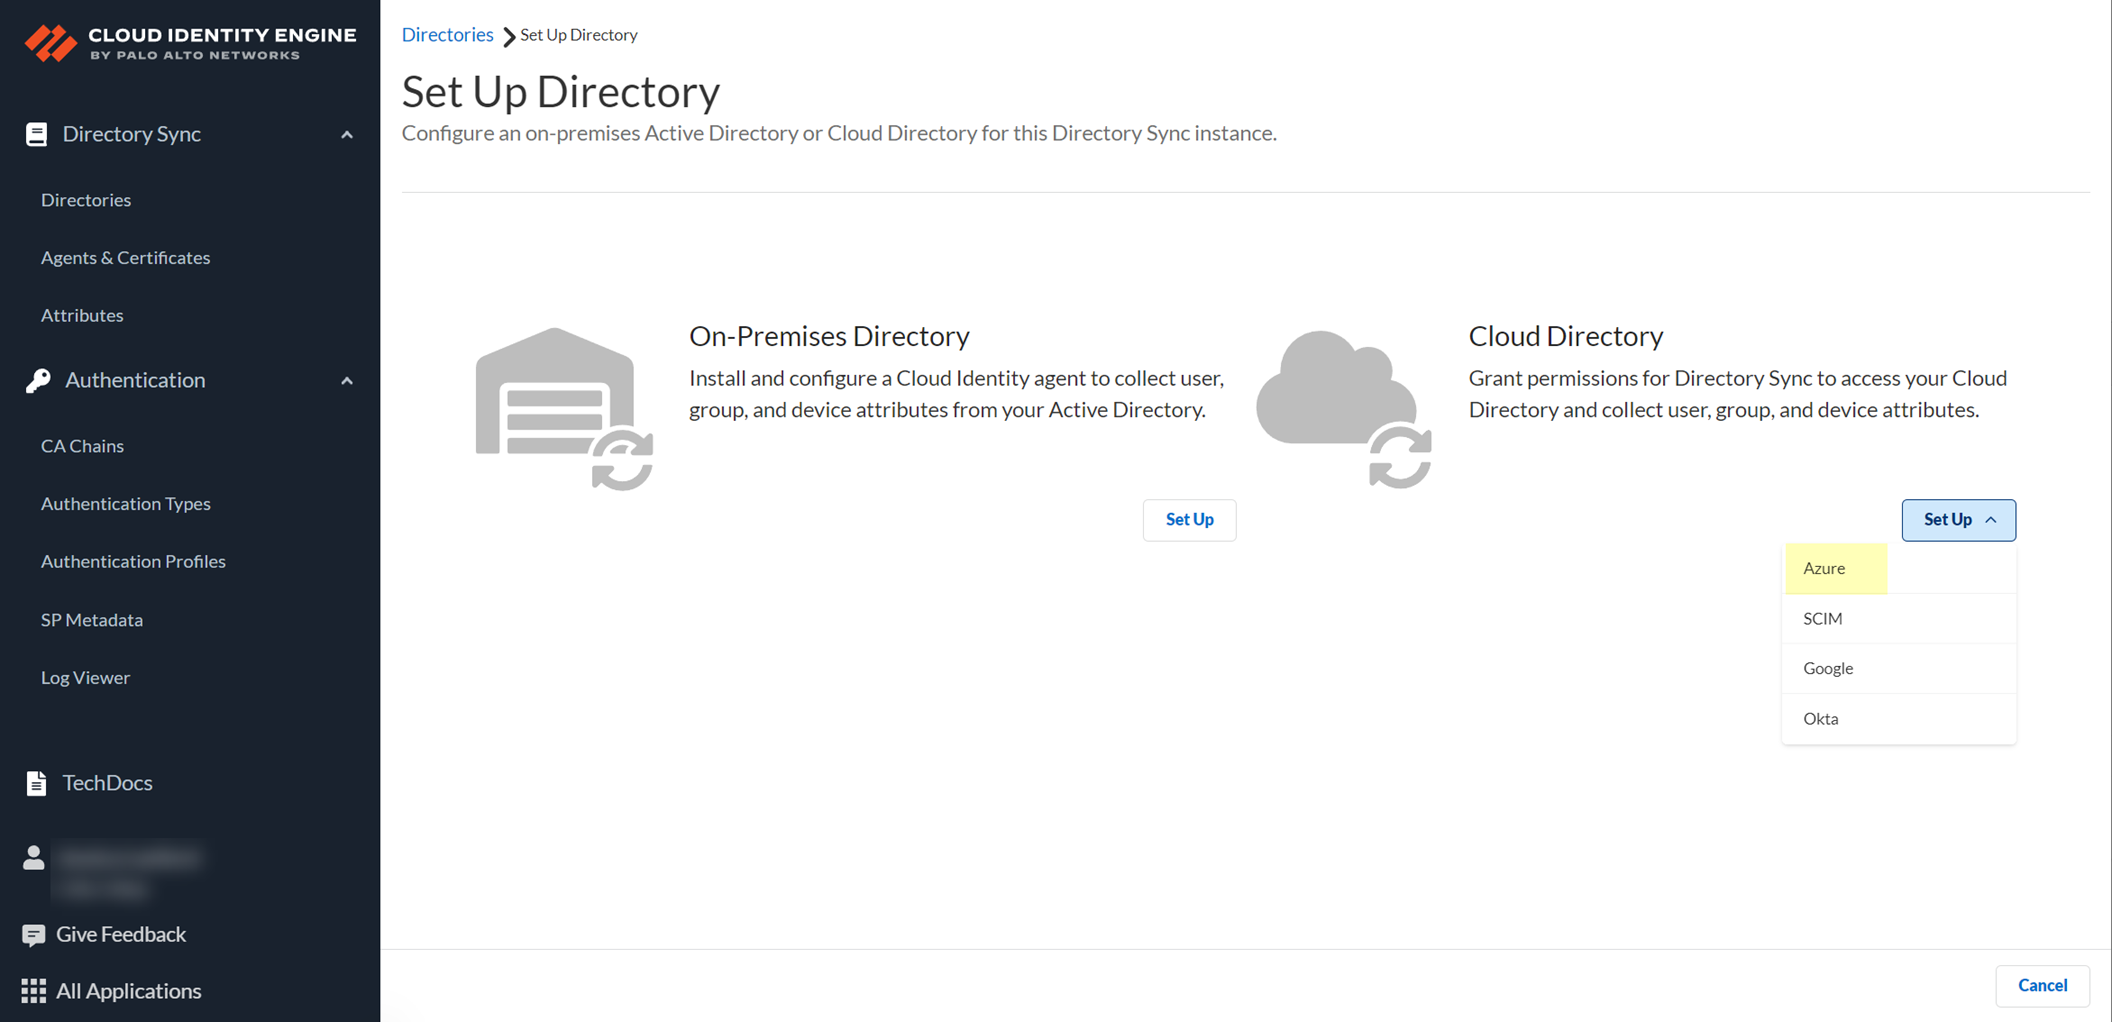
-
Log in to the CIE app on the hub. Navigate to Directories > Add New Directory > Set Up Azure.
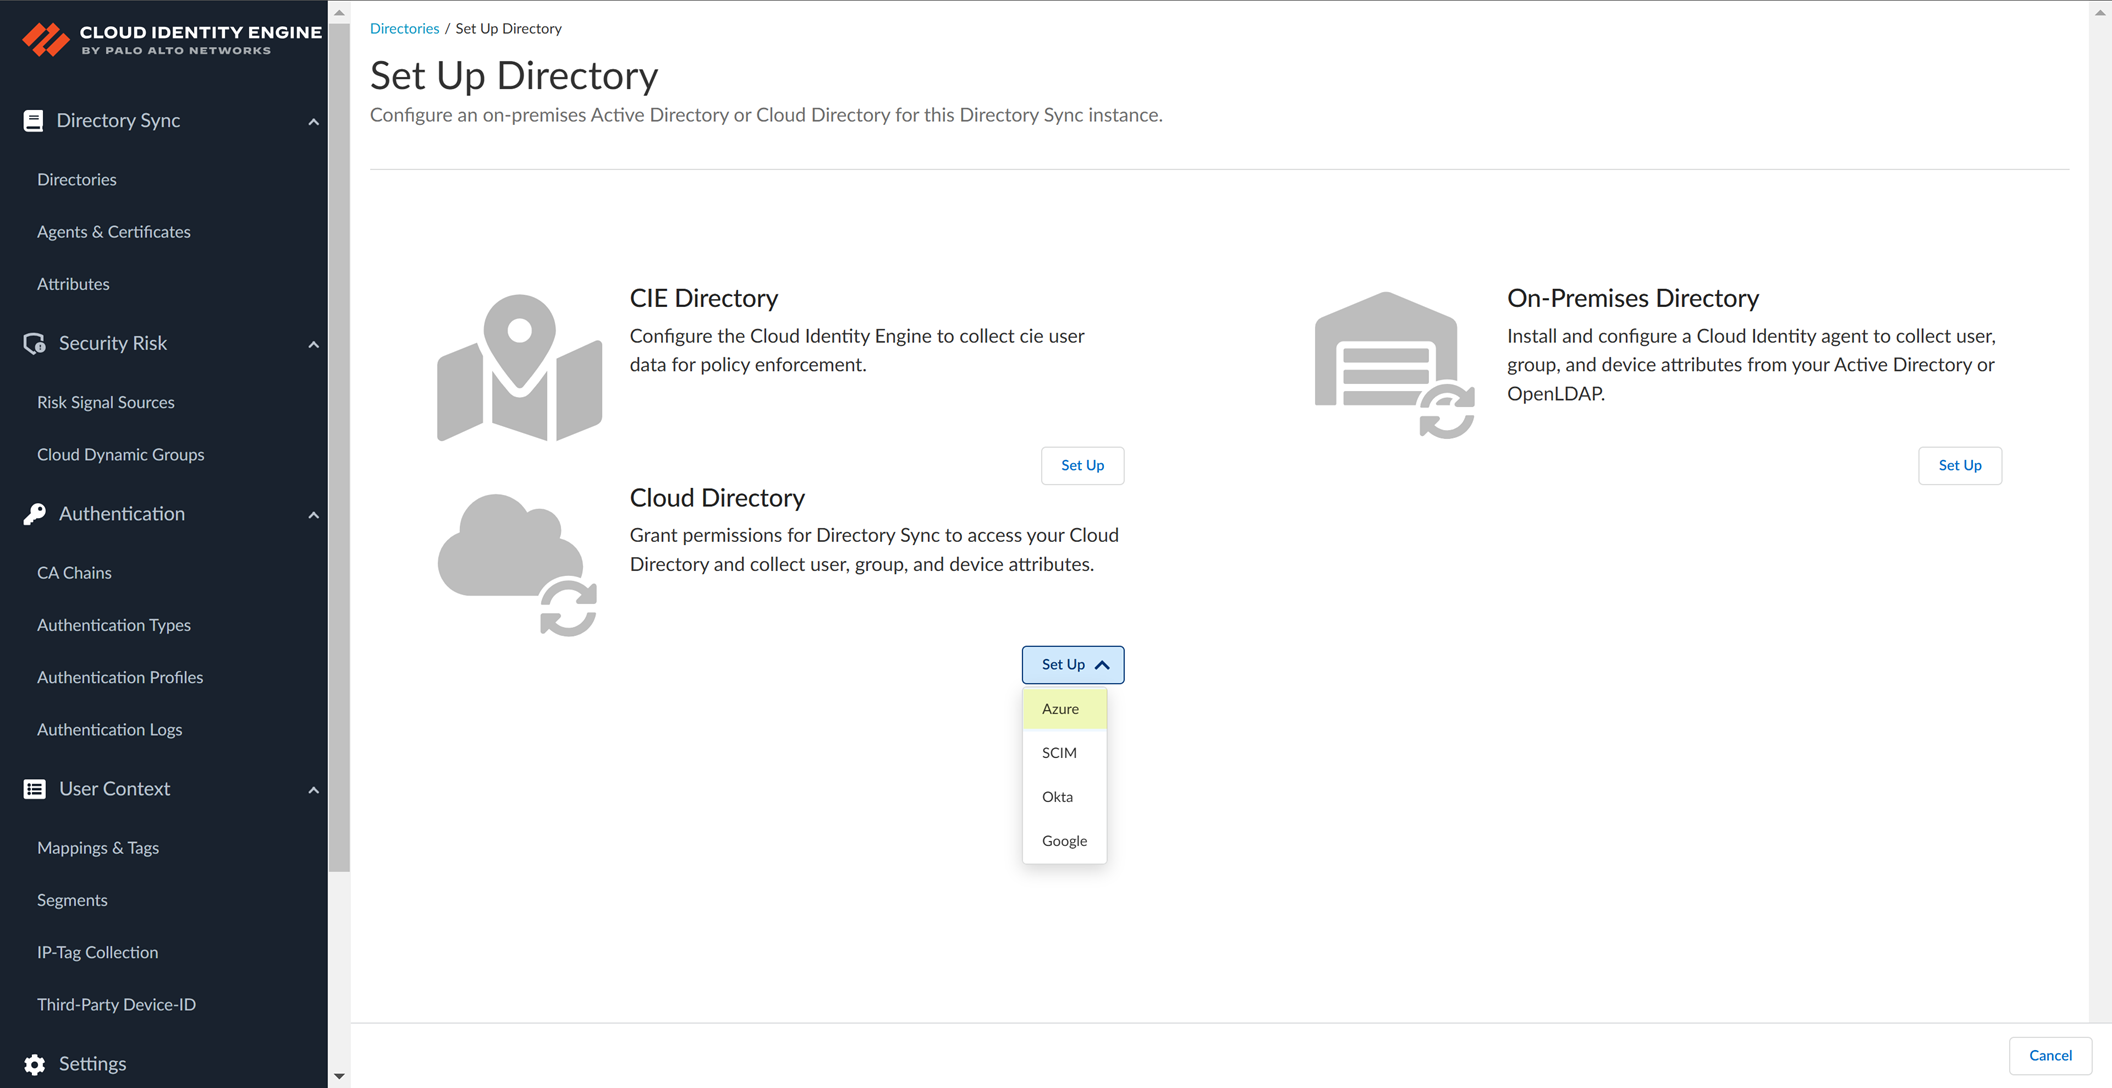
Screenshot showing the option to set up an Azure directory in the CIE app.
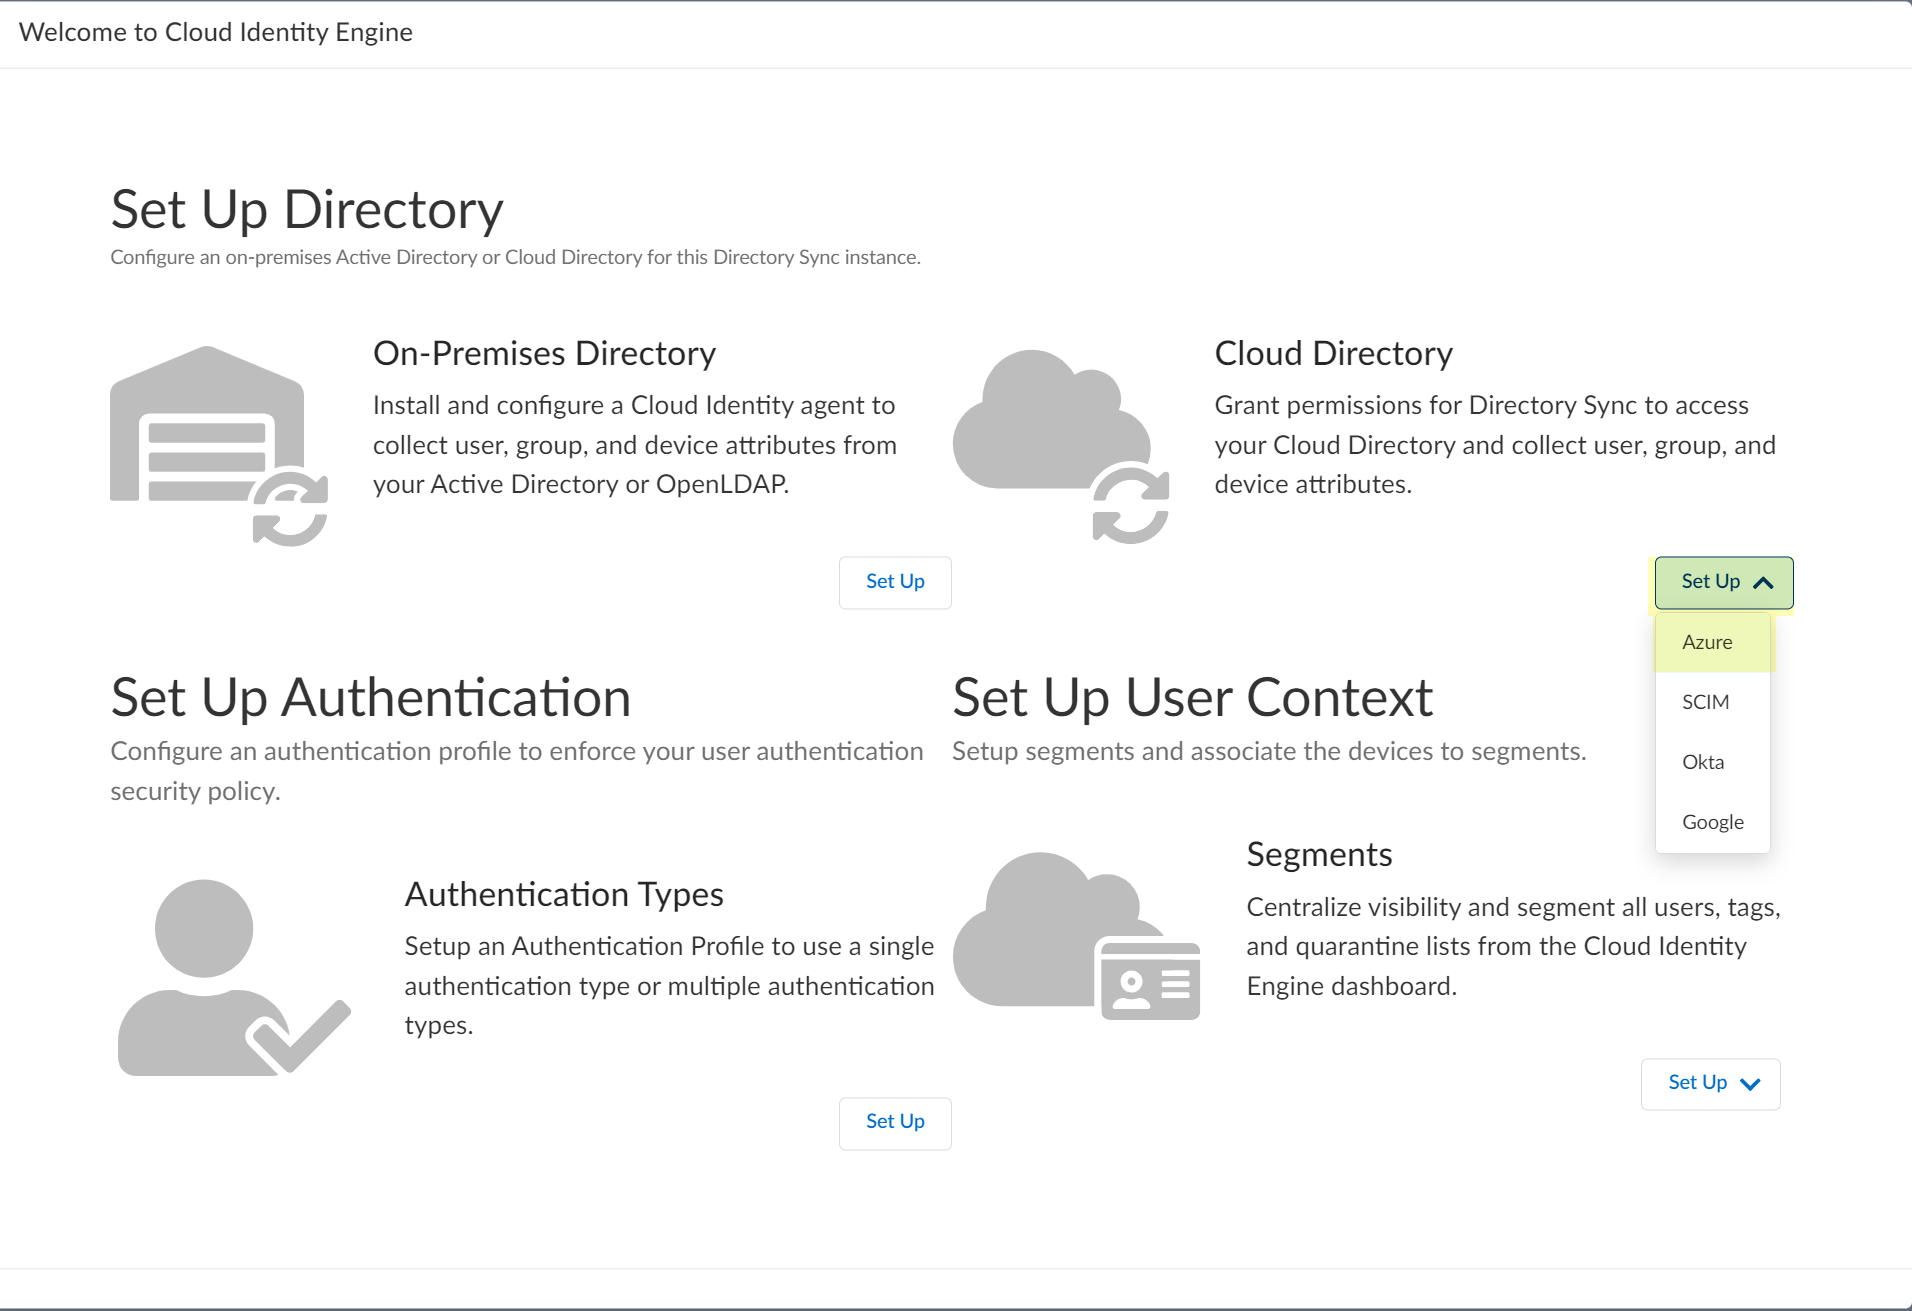
Screenshot prompting to choose the Azure setup method.
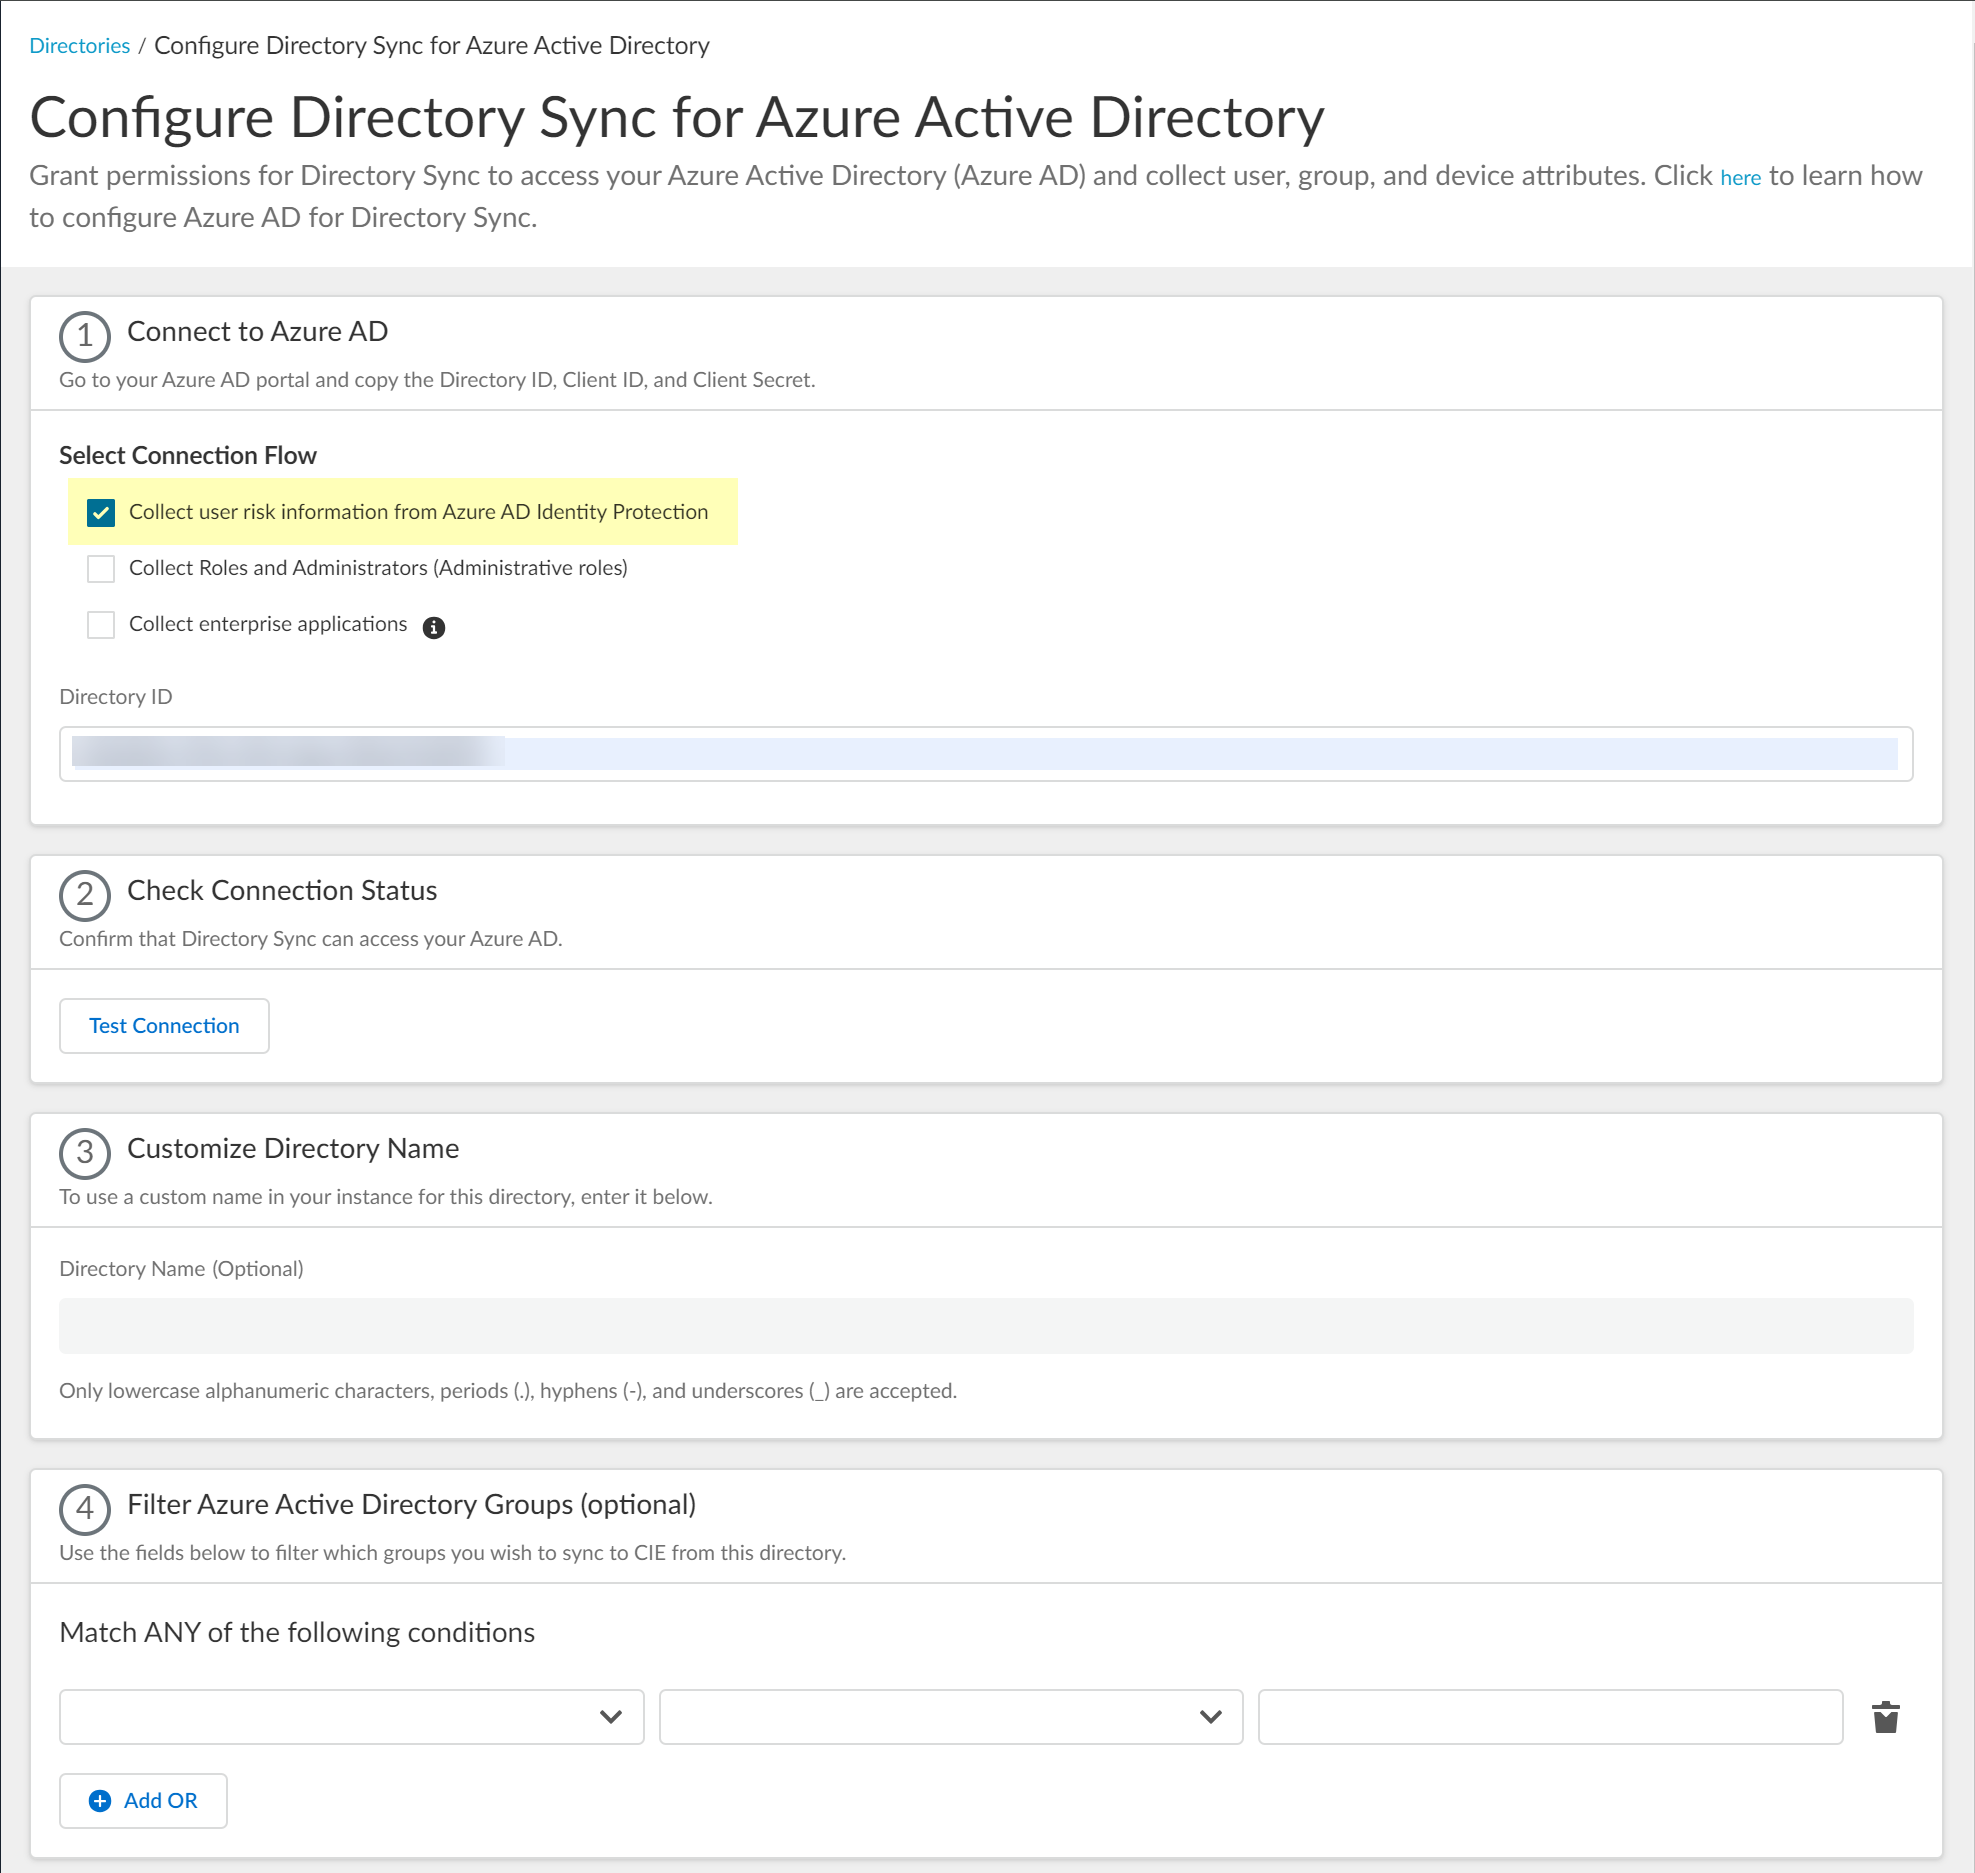
-
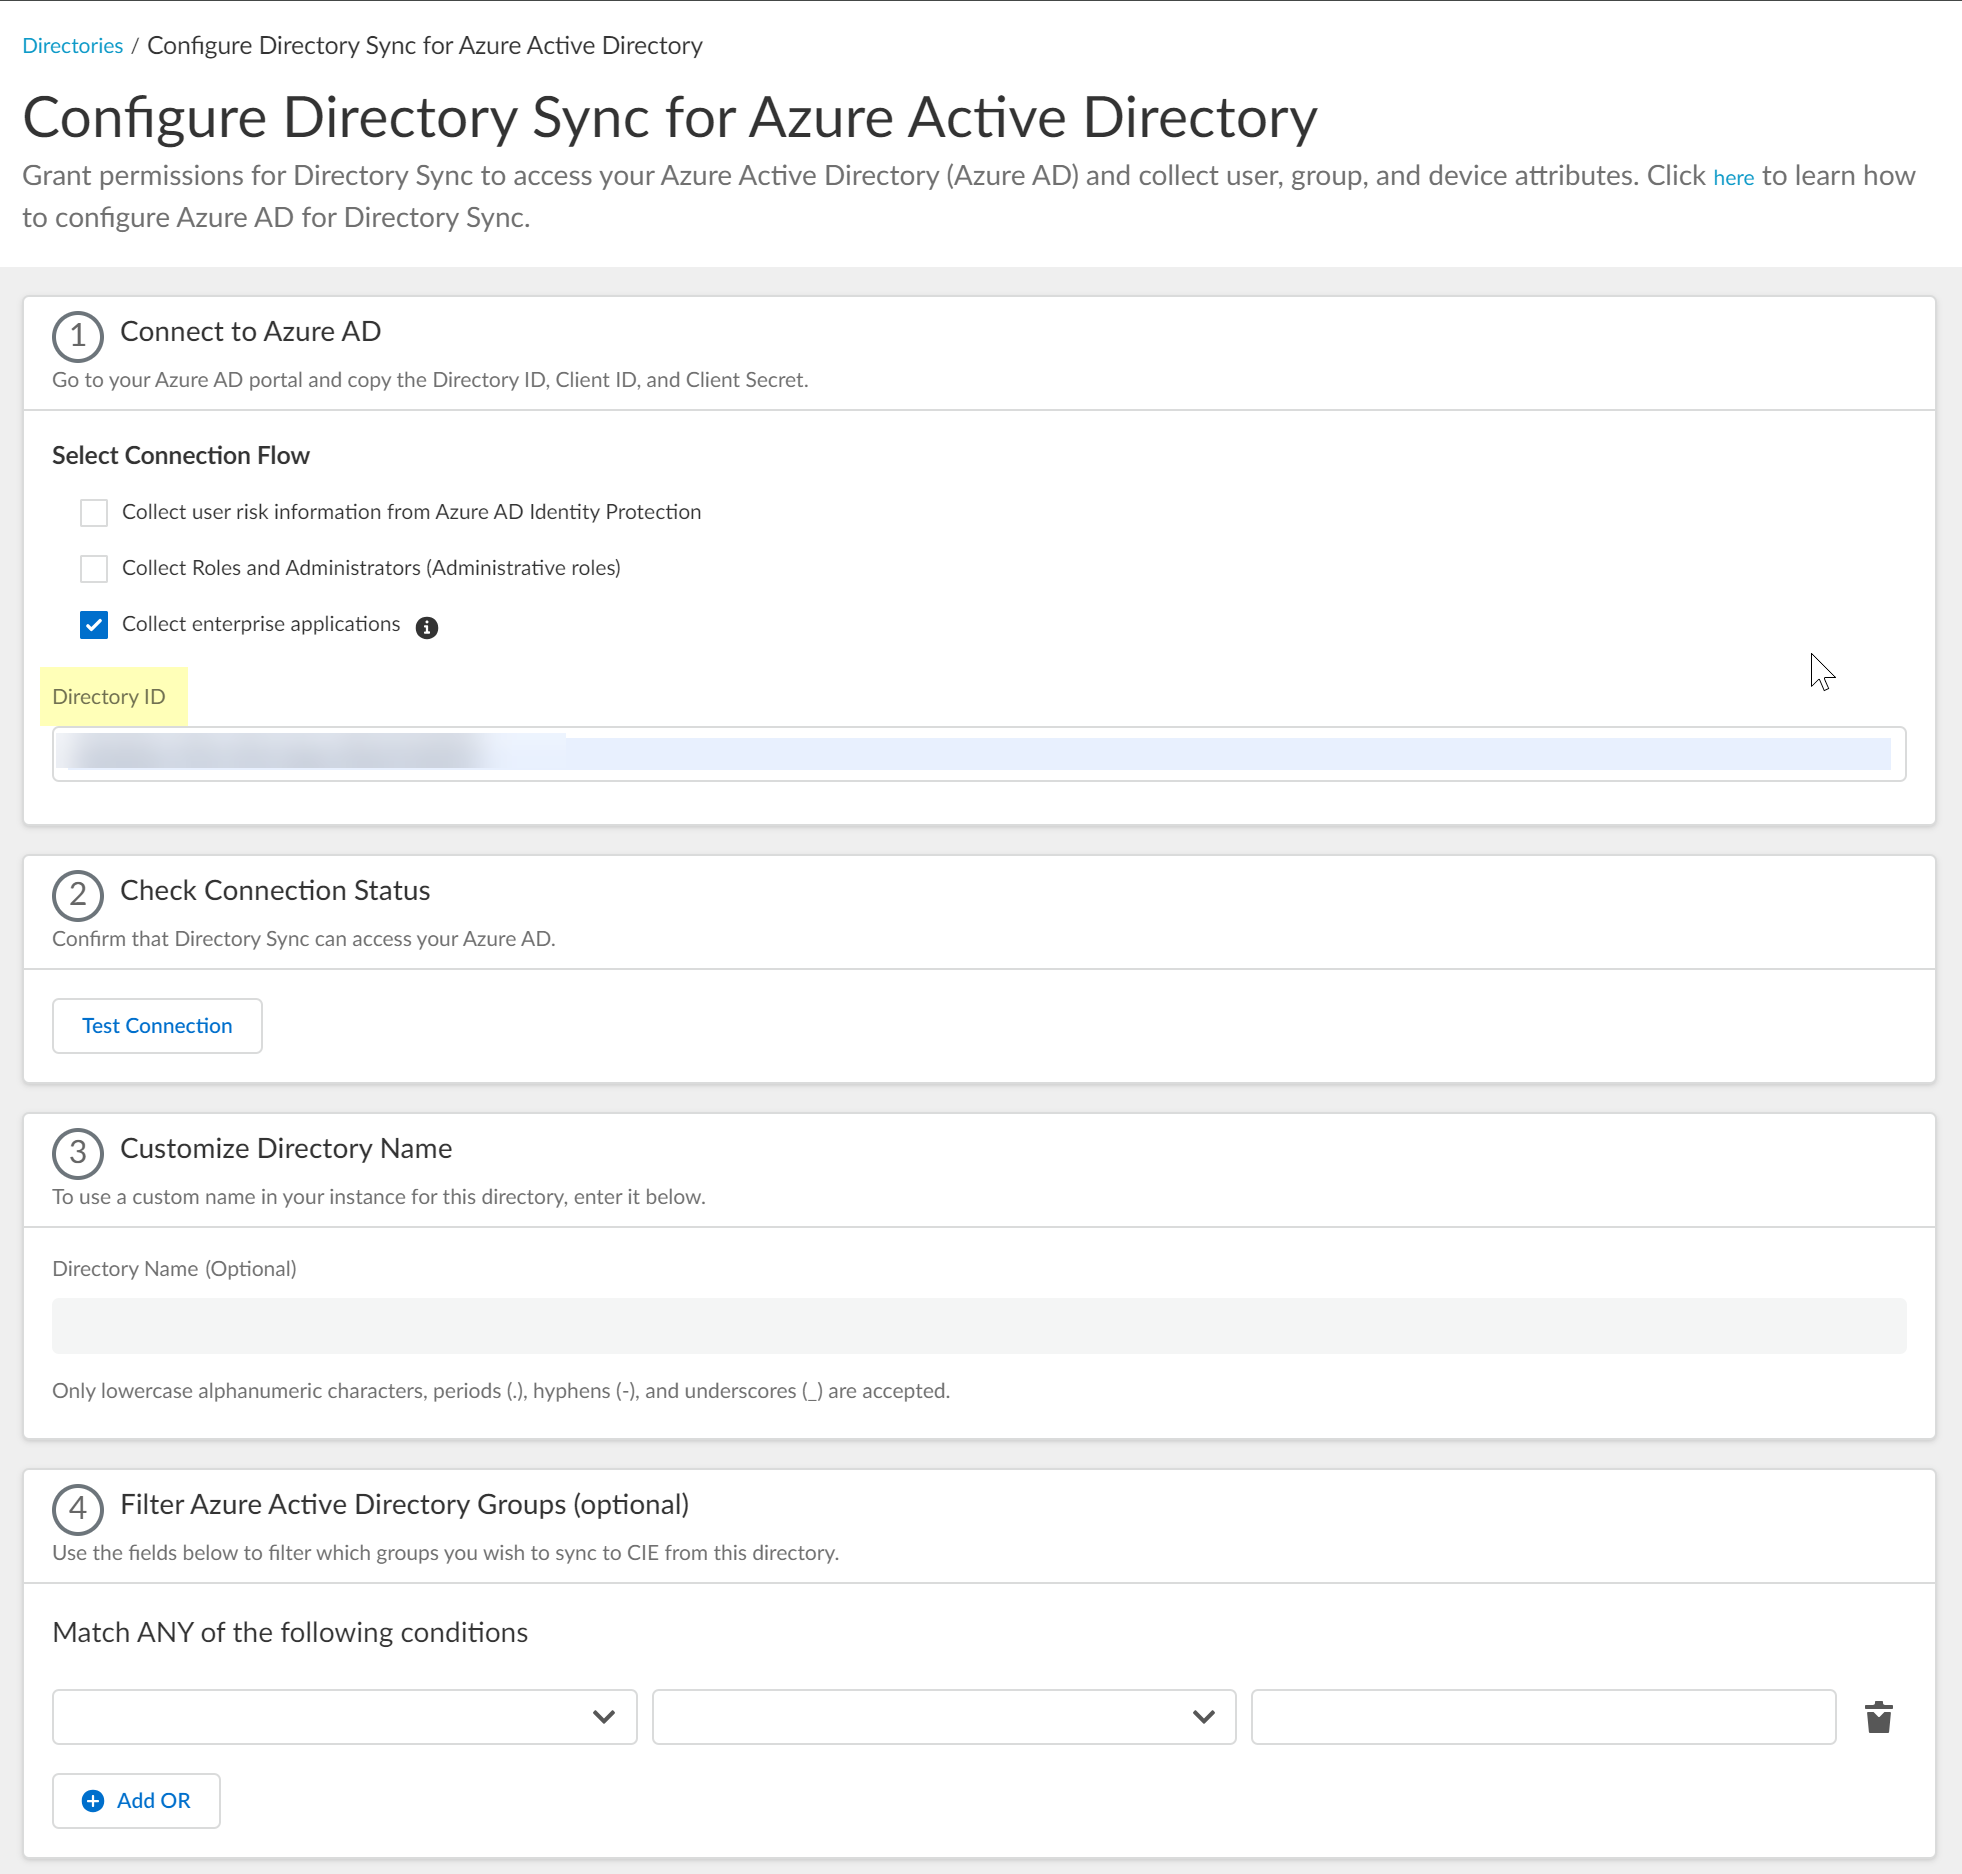
(Optional) Select additional information types to collect (User risk, Roles, Enterprise applications). Collecting these requires additional permissions in Azure AD, which will be requested during the consent step.
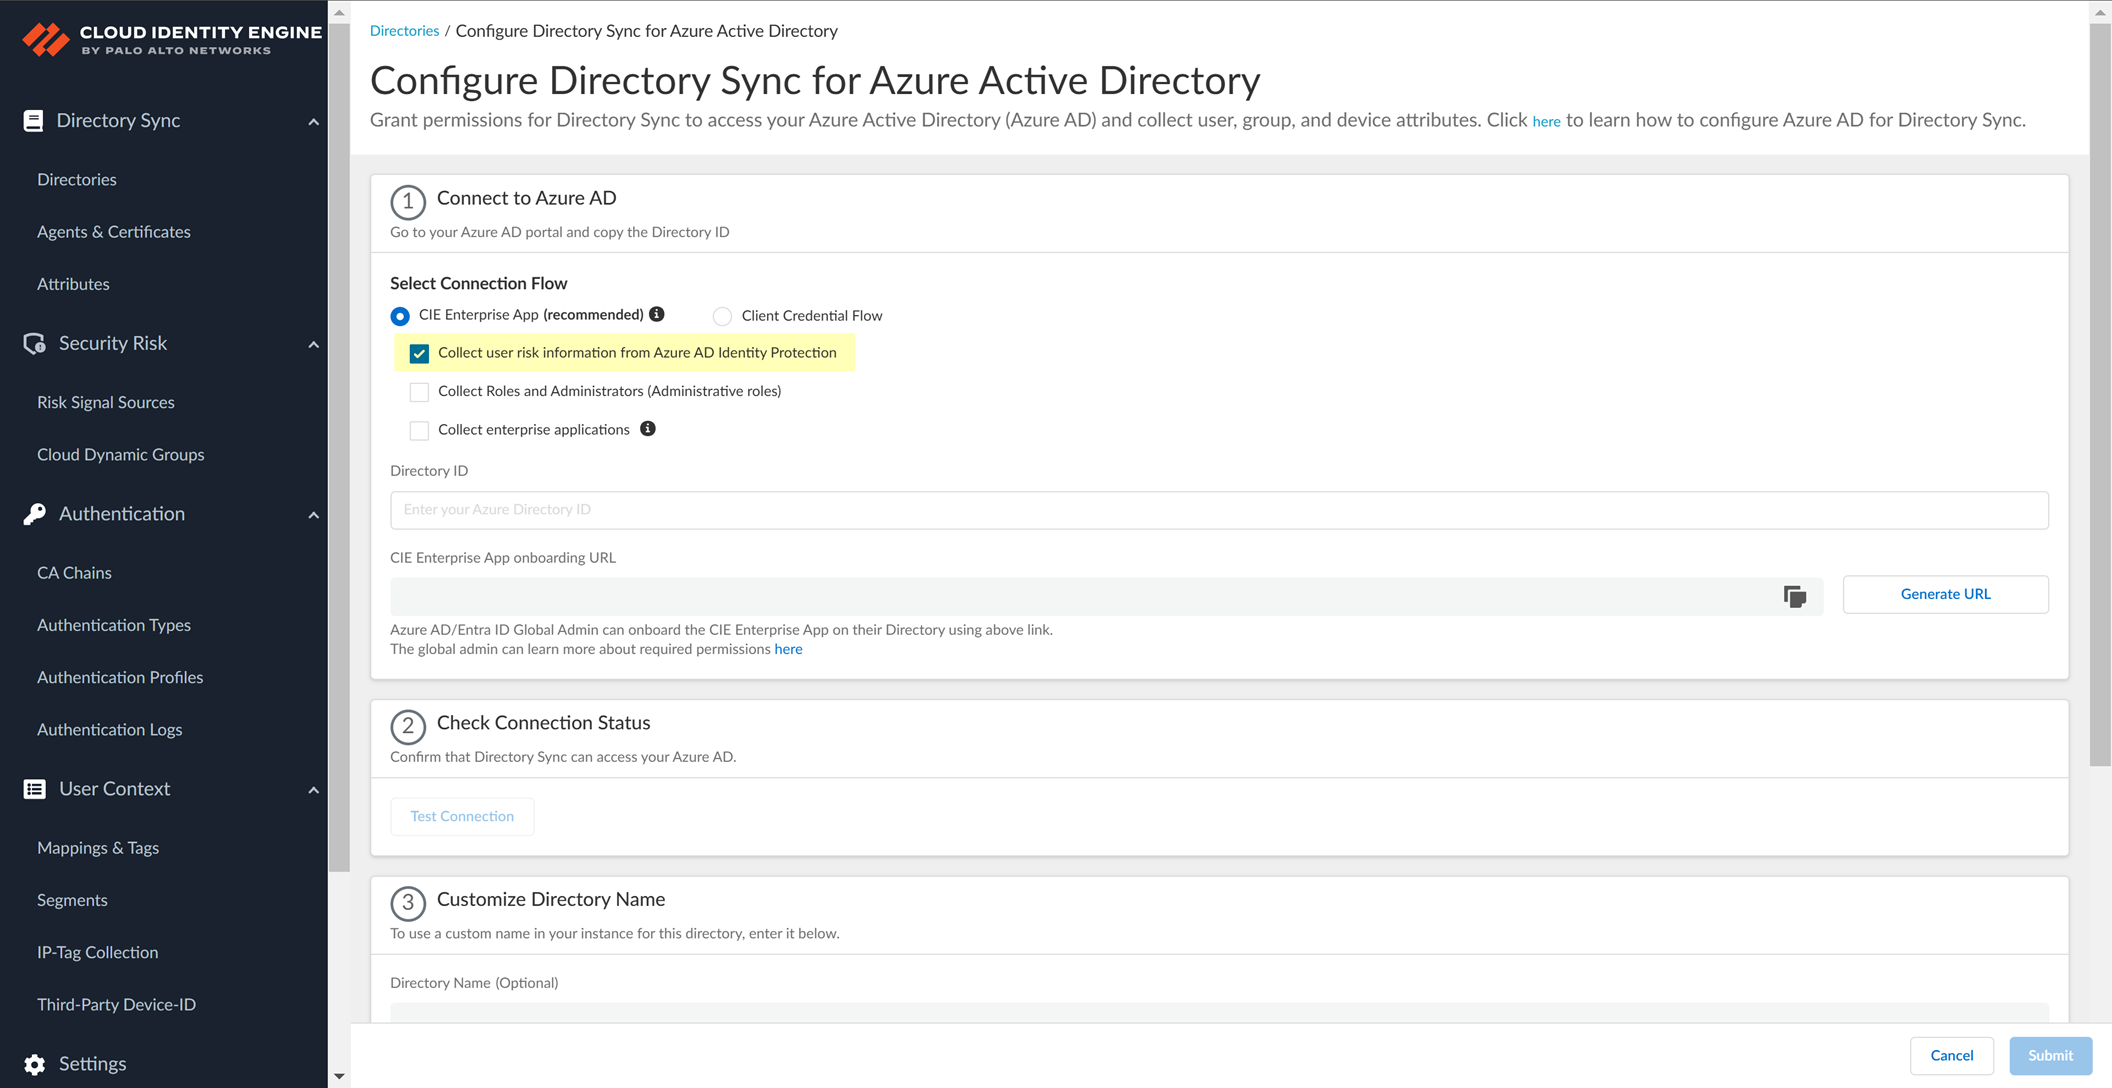
Screenshot showing optional data collection options for Azure AD integration.
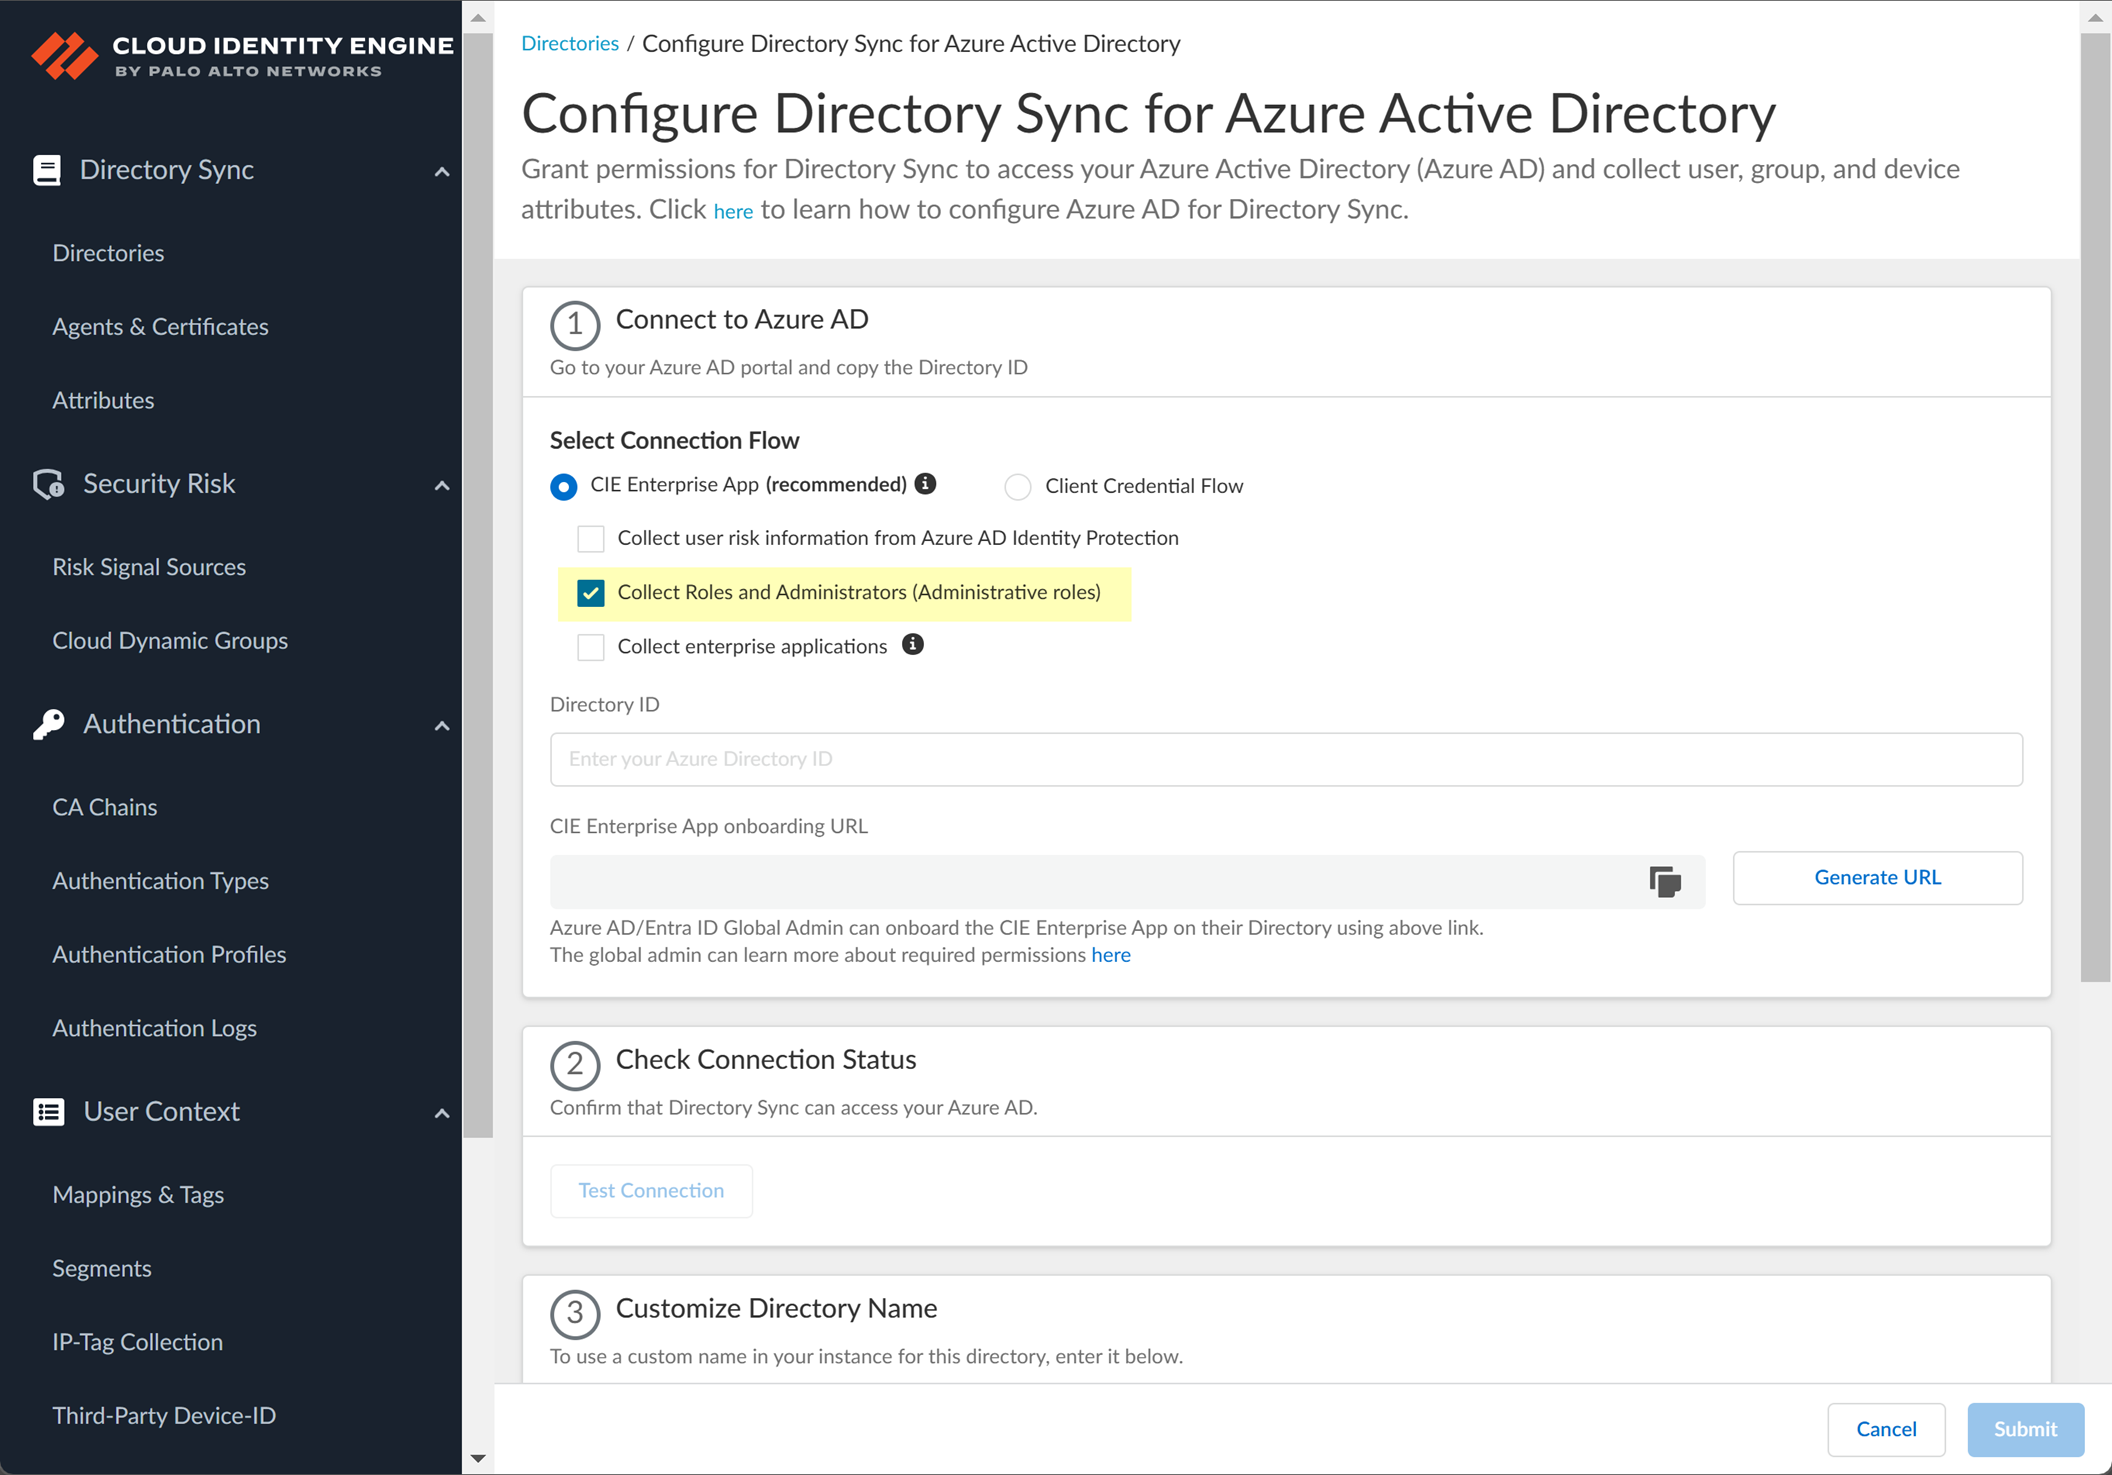
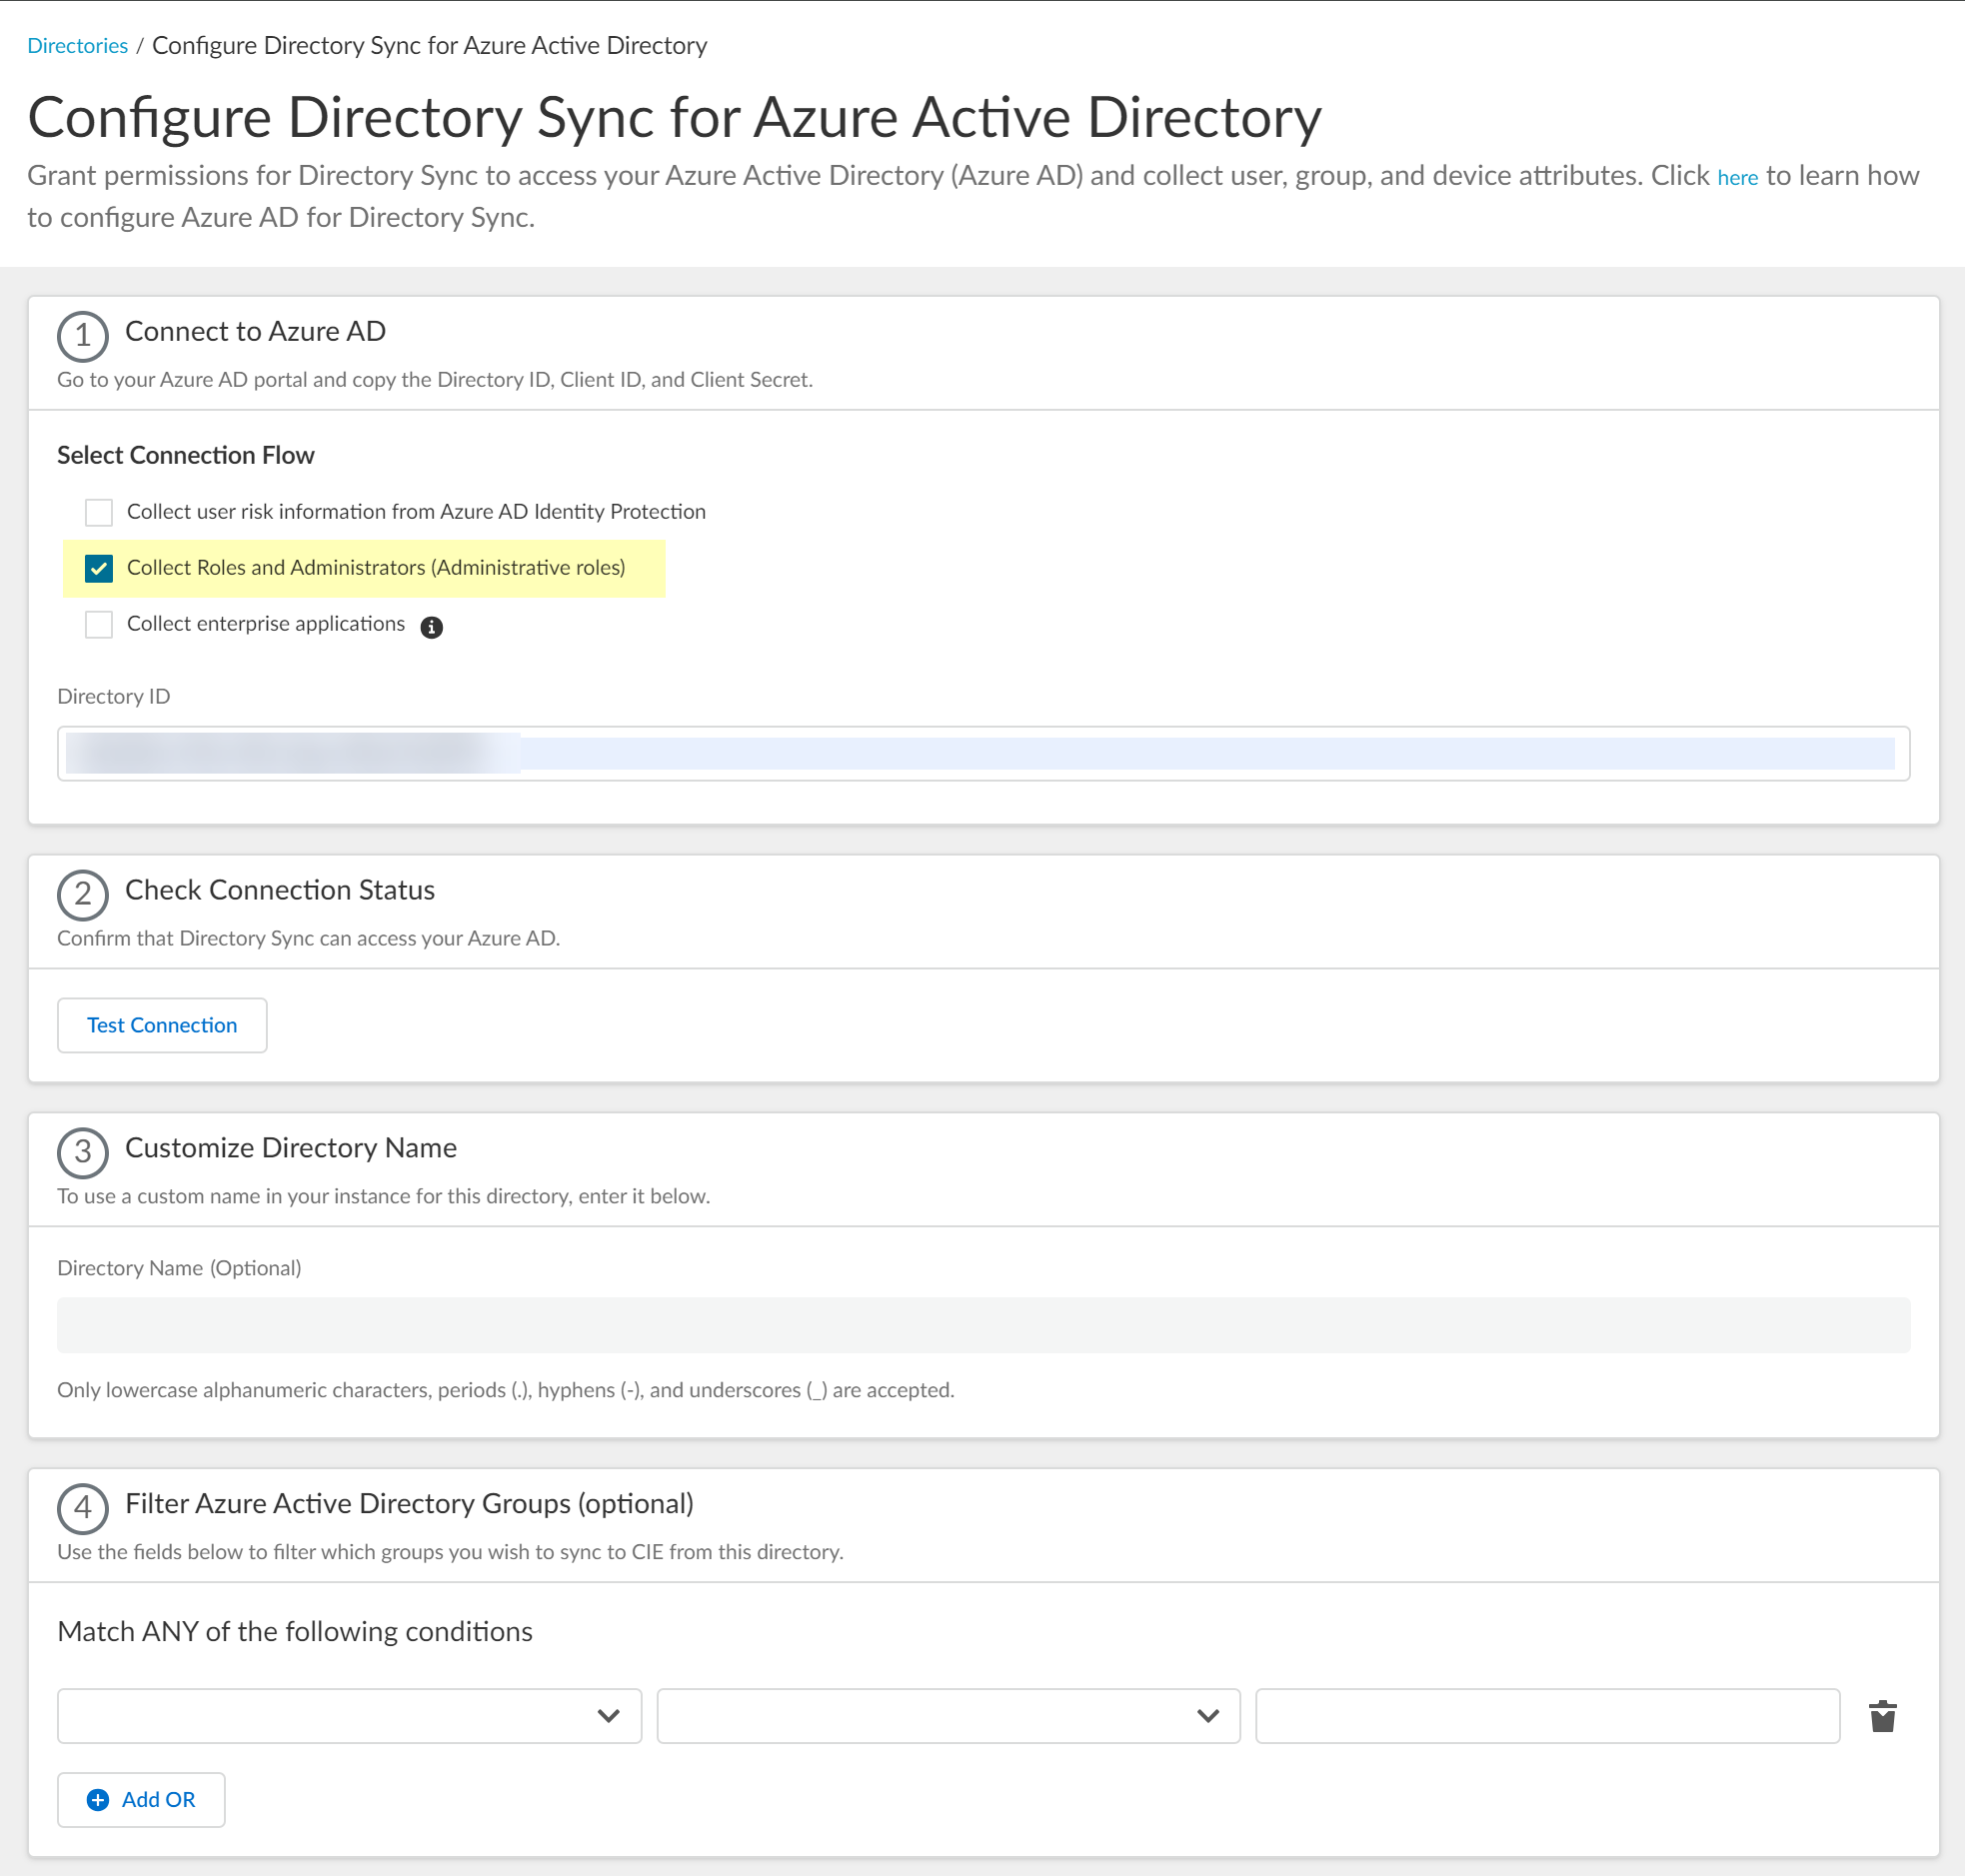
Screenshot showing the option to collect Roles and Administrators from Azure AD.
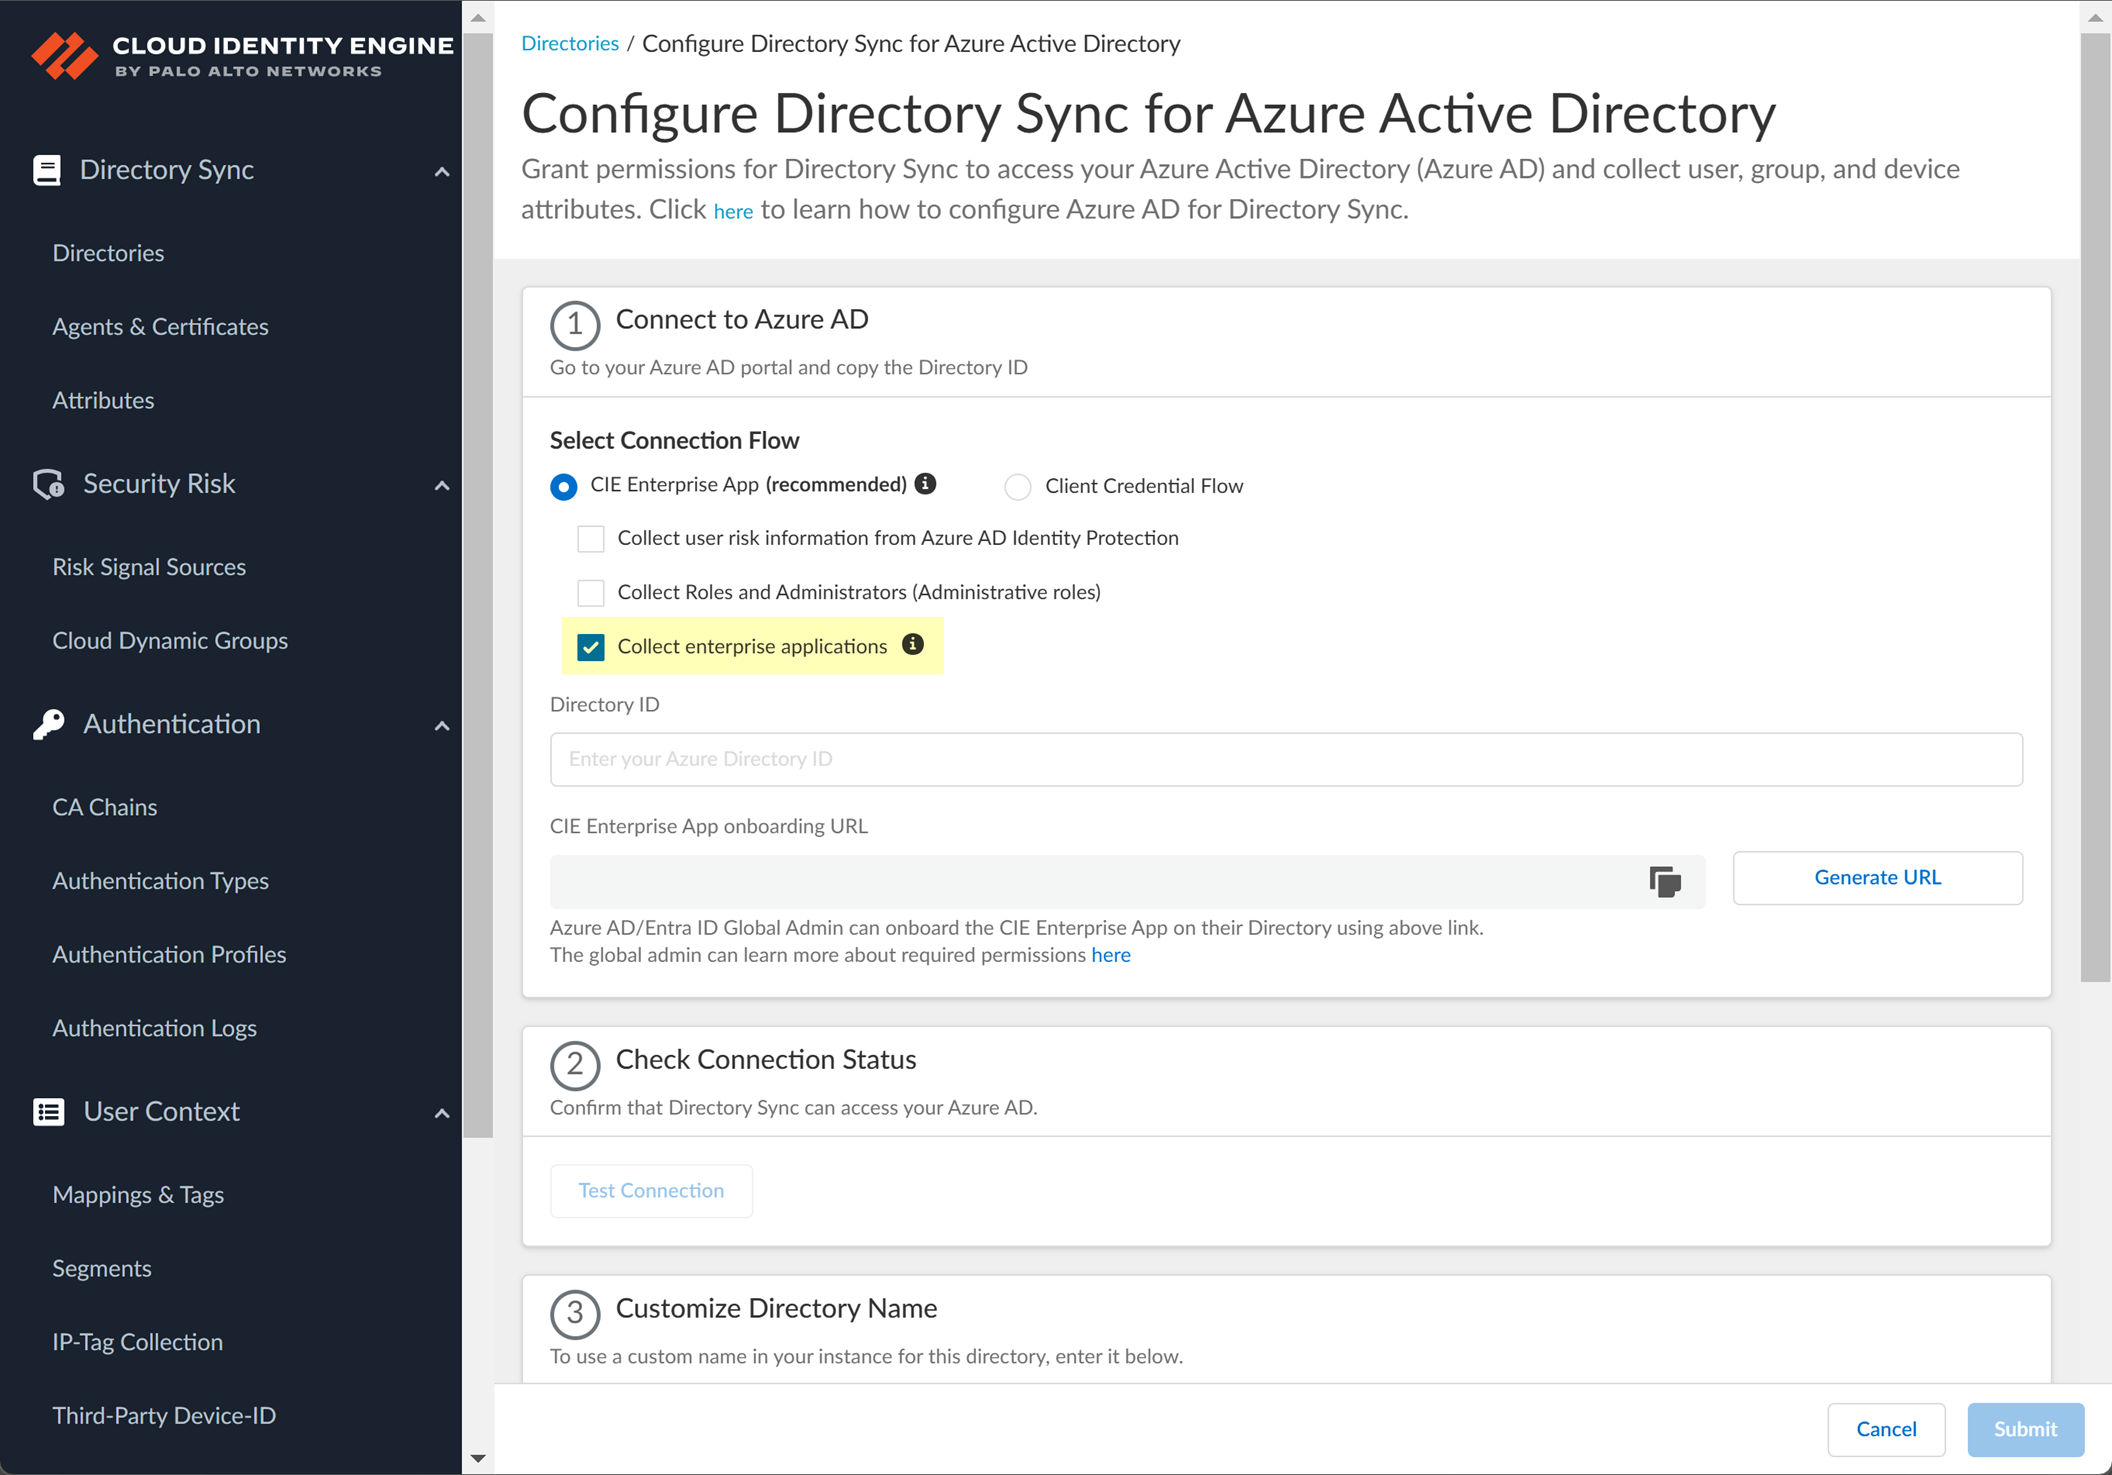
Screenshot showing the option to collect enterprise applications data from Azure AD.
-
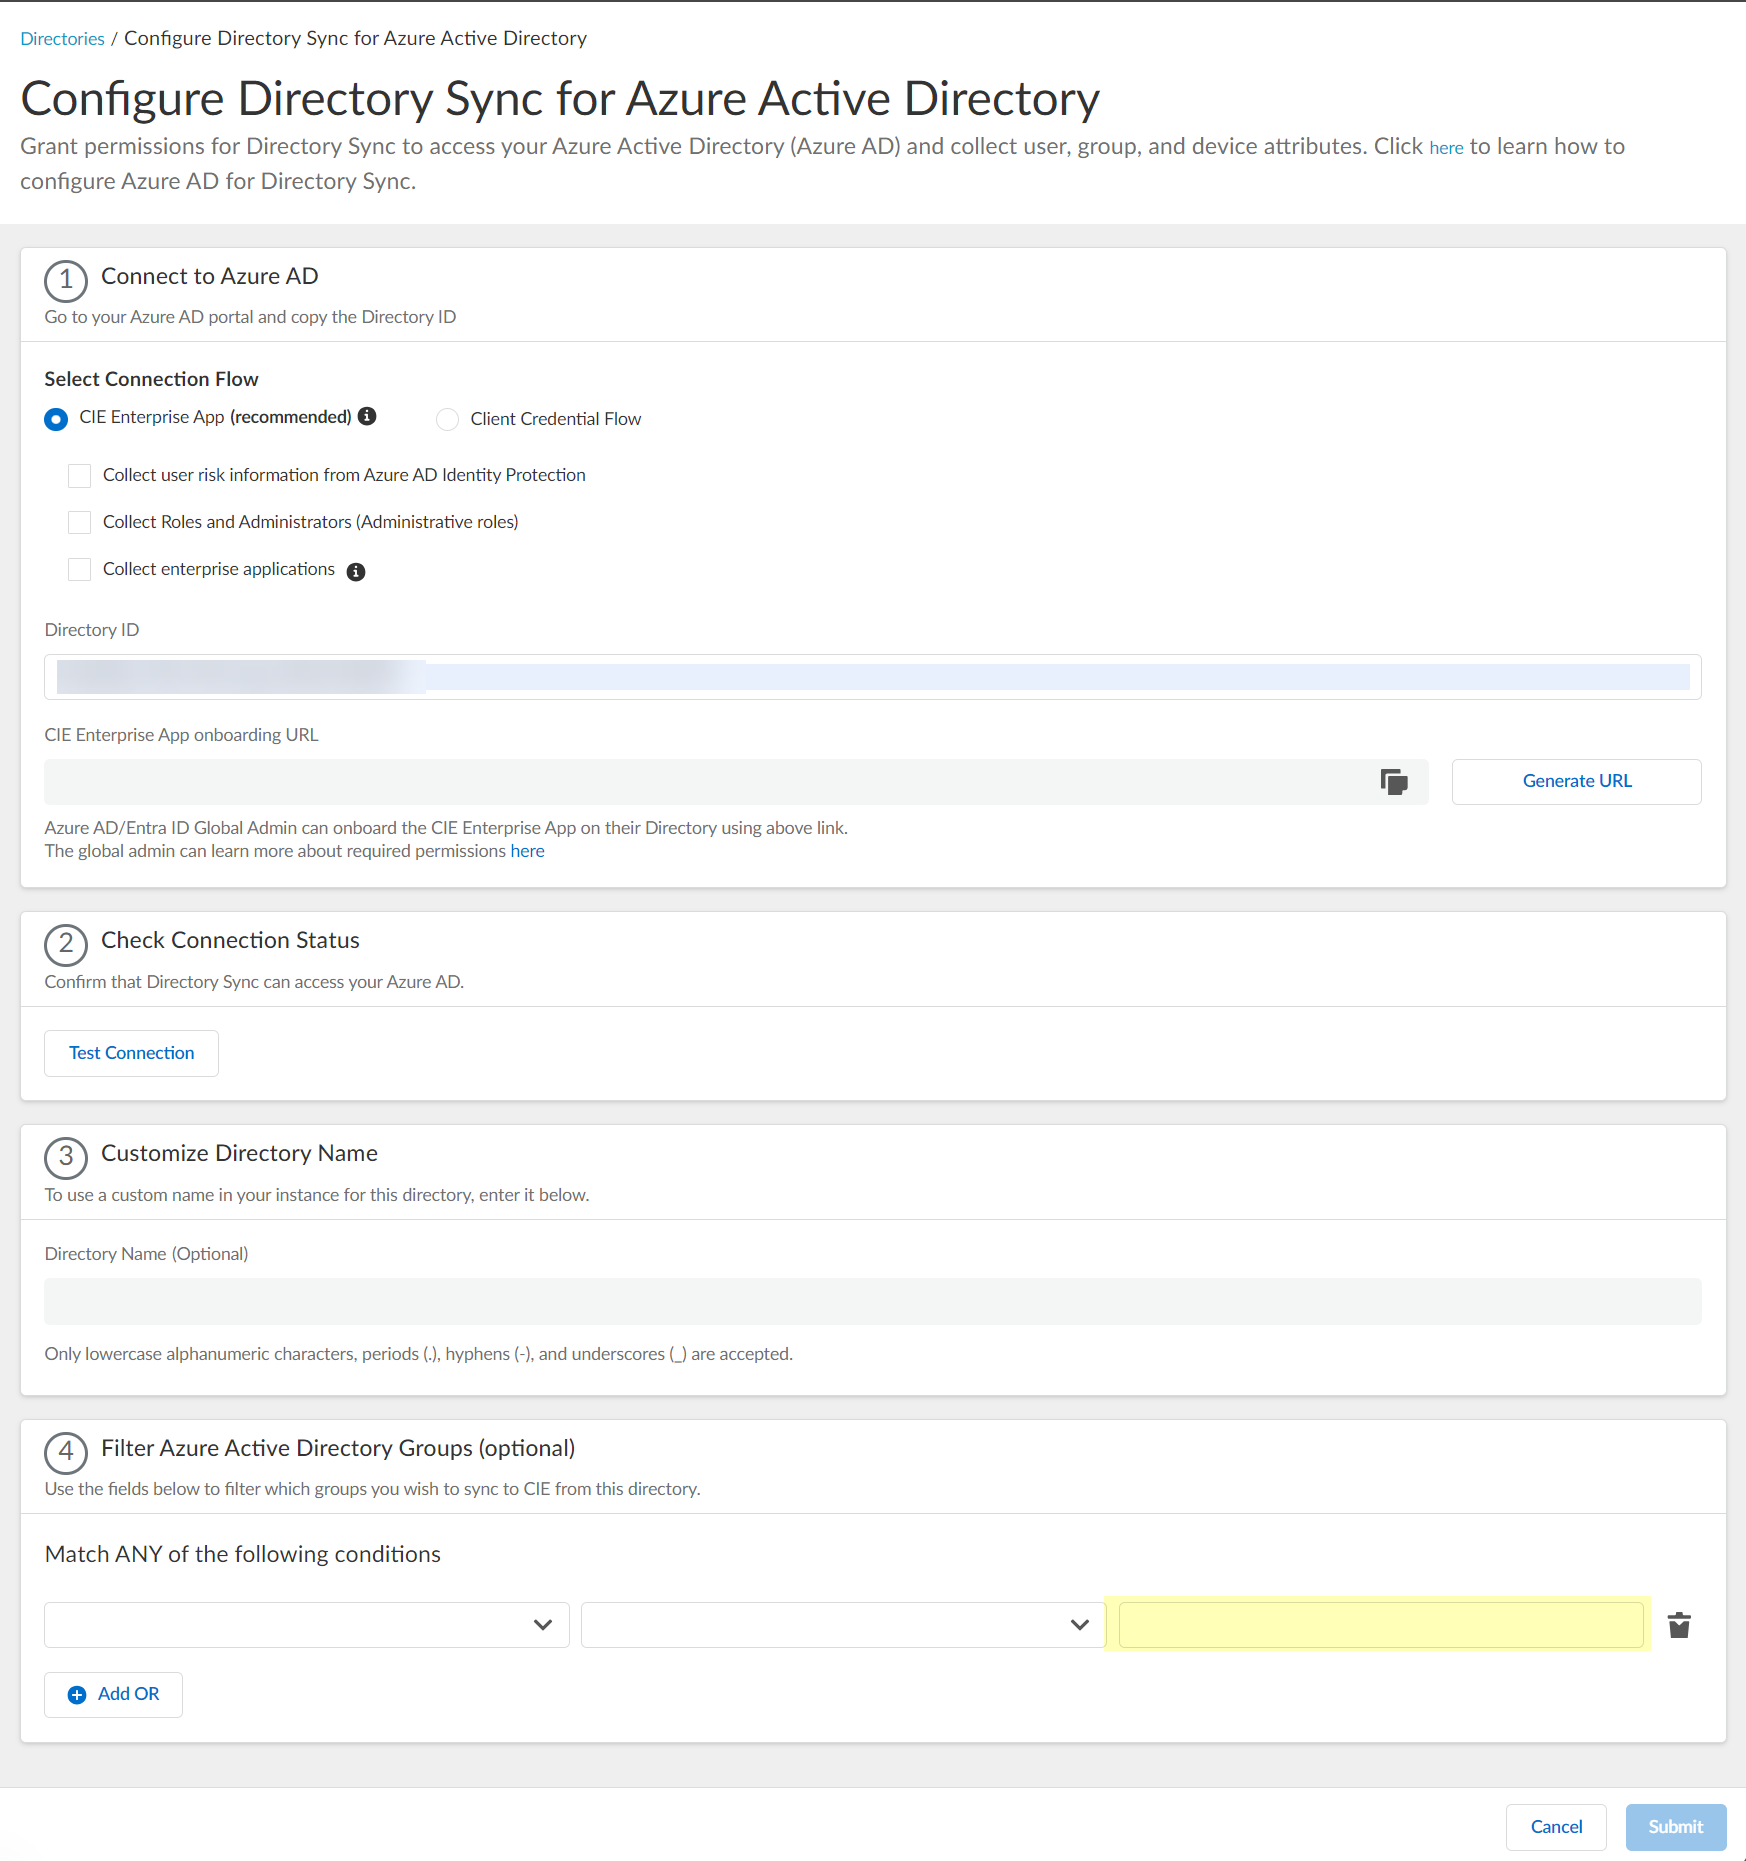
Configure Azure directory information in CIE:
-
Enter the
Directory ID
(Tenant ID) copied from Azure.
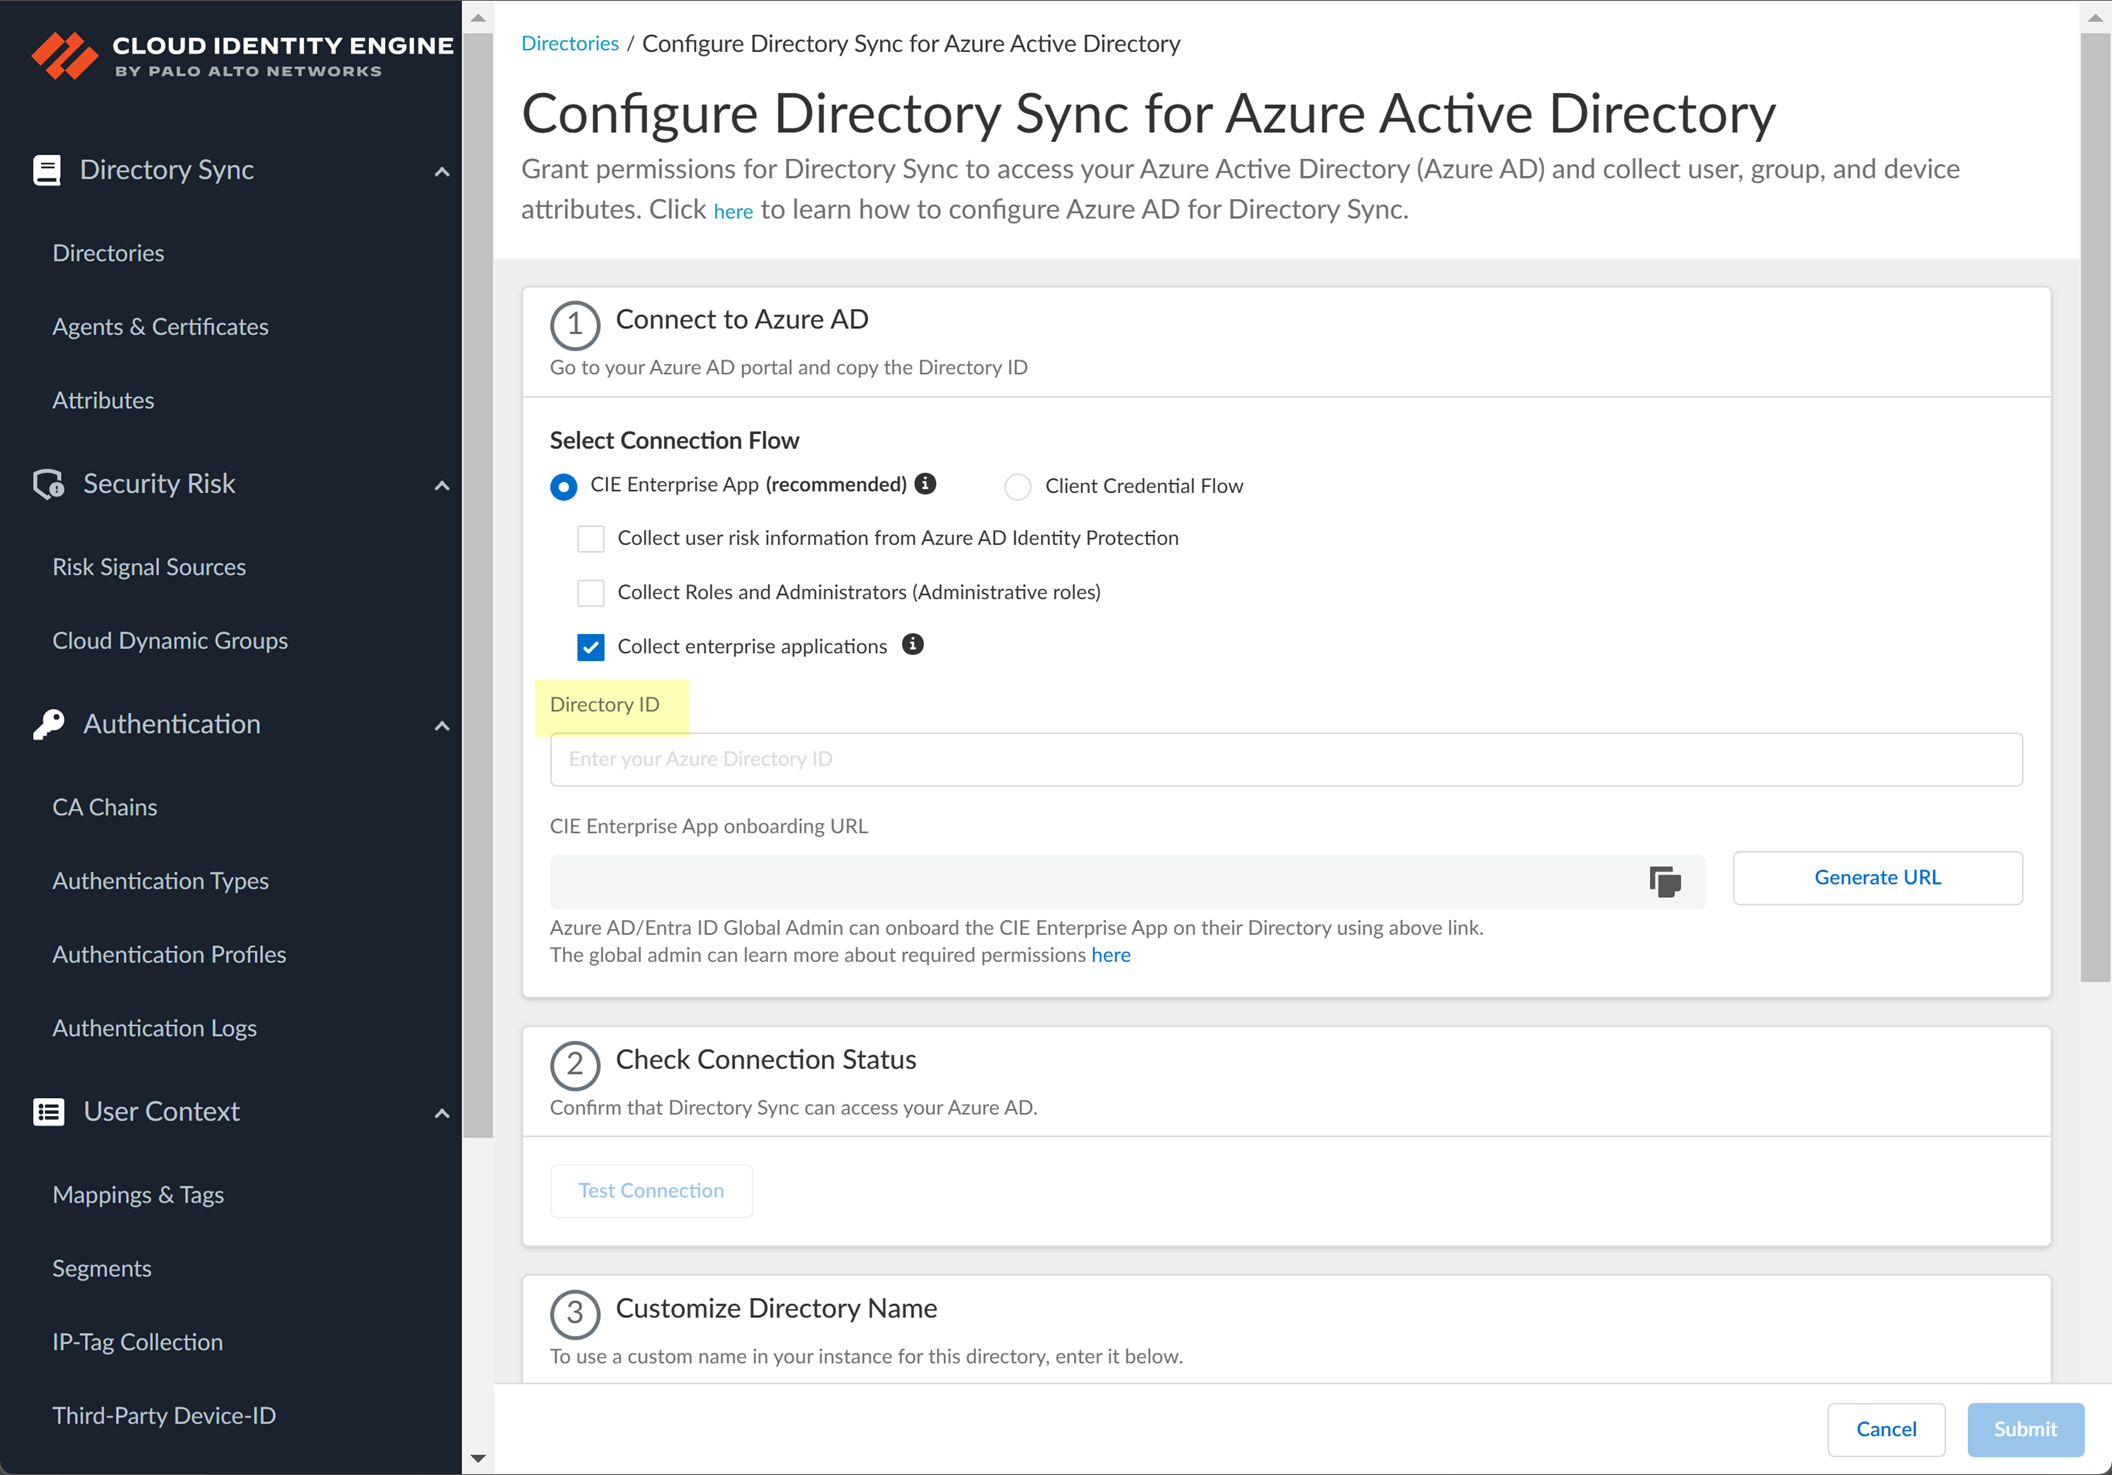
Screenshot showing the field to enter the Azure Directory ID.
-
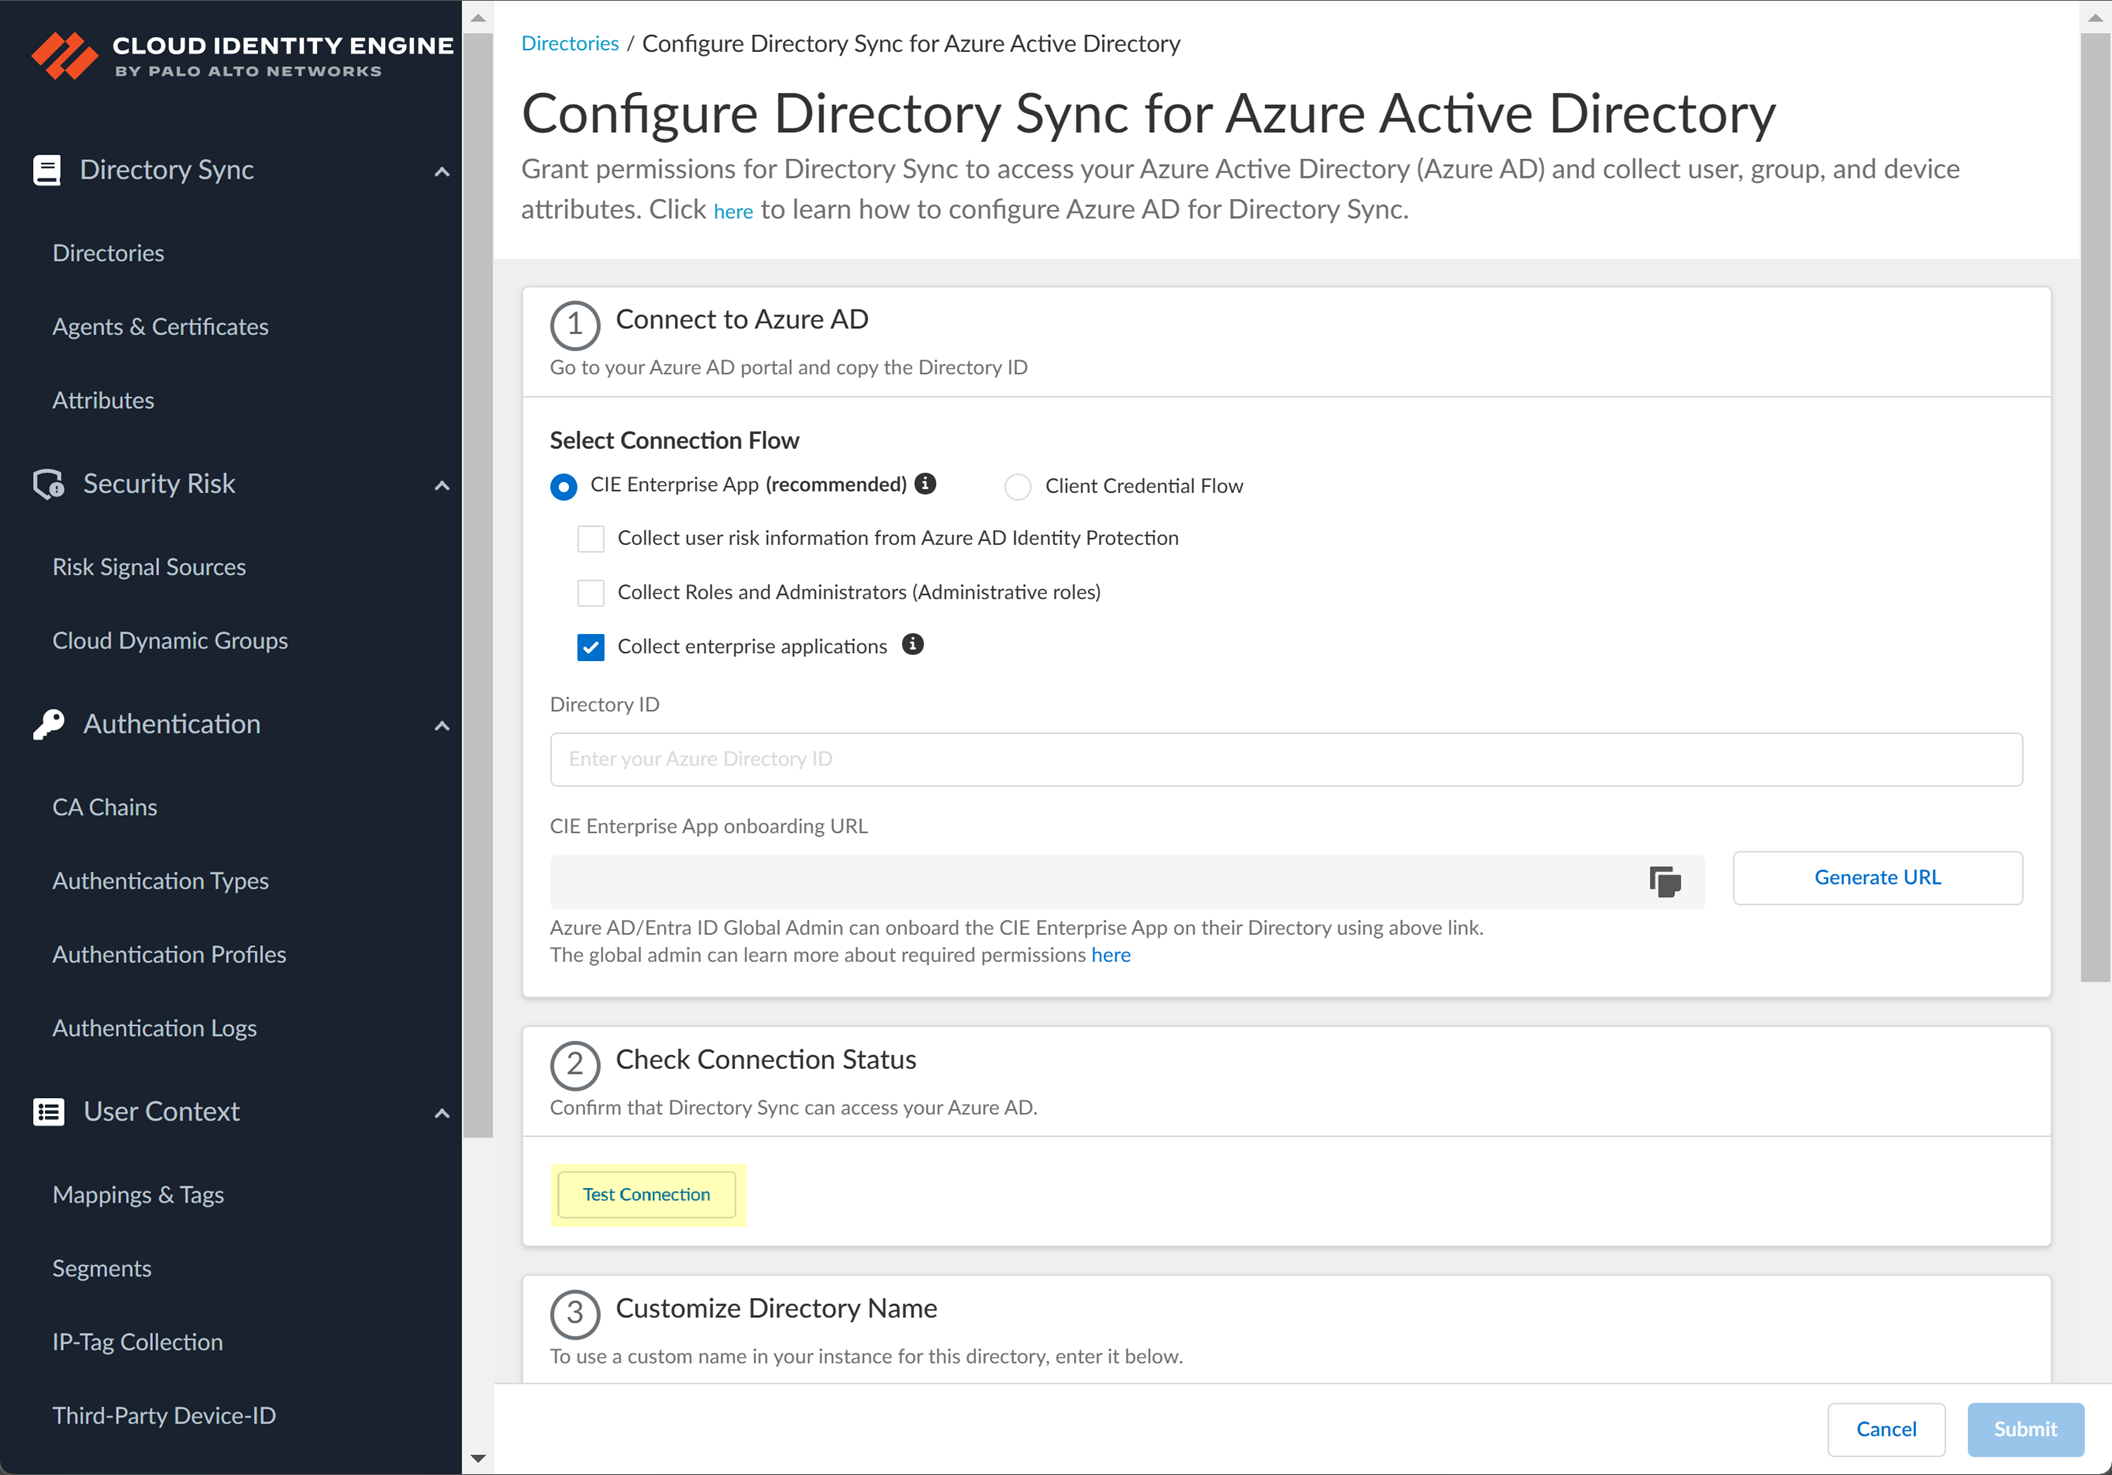
Click "Generate URL", then "Copy" the CIE Enterprise App onboarding URL. Open this URL in a new browser tab.
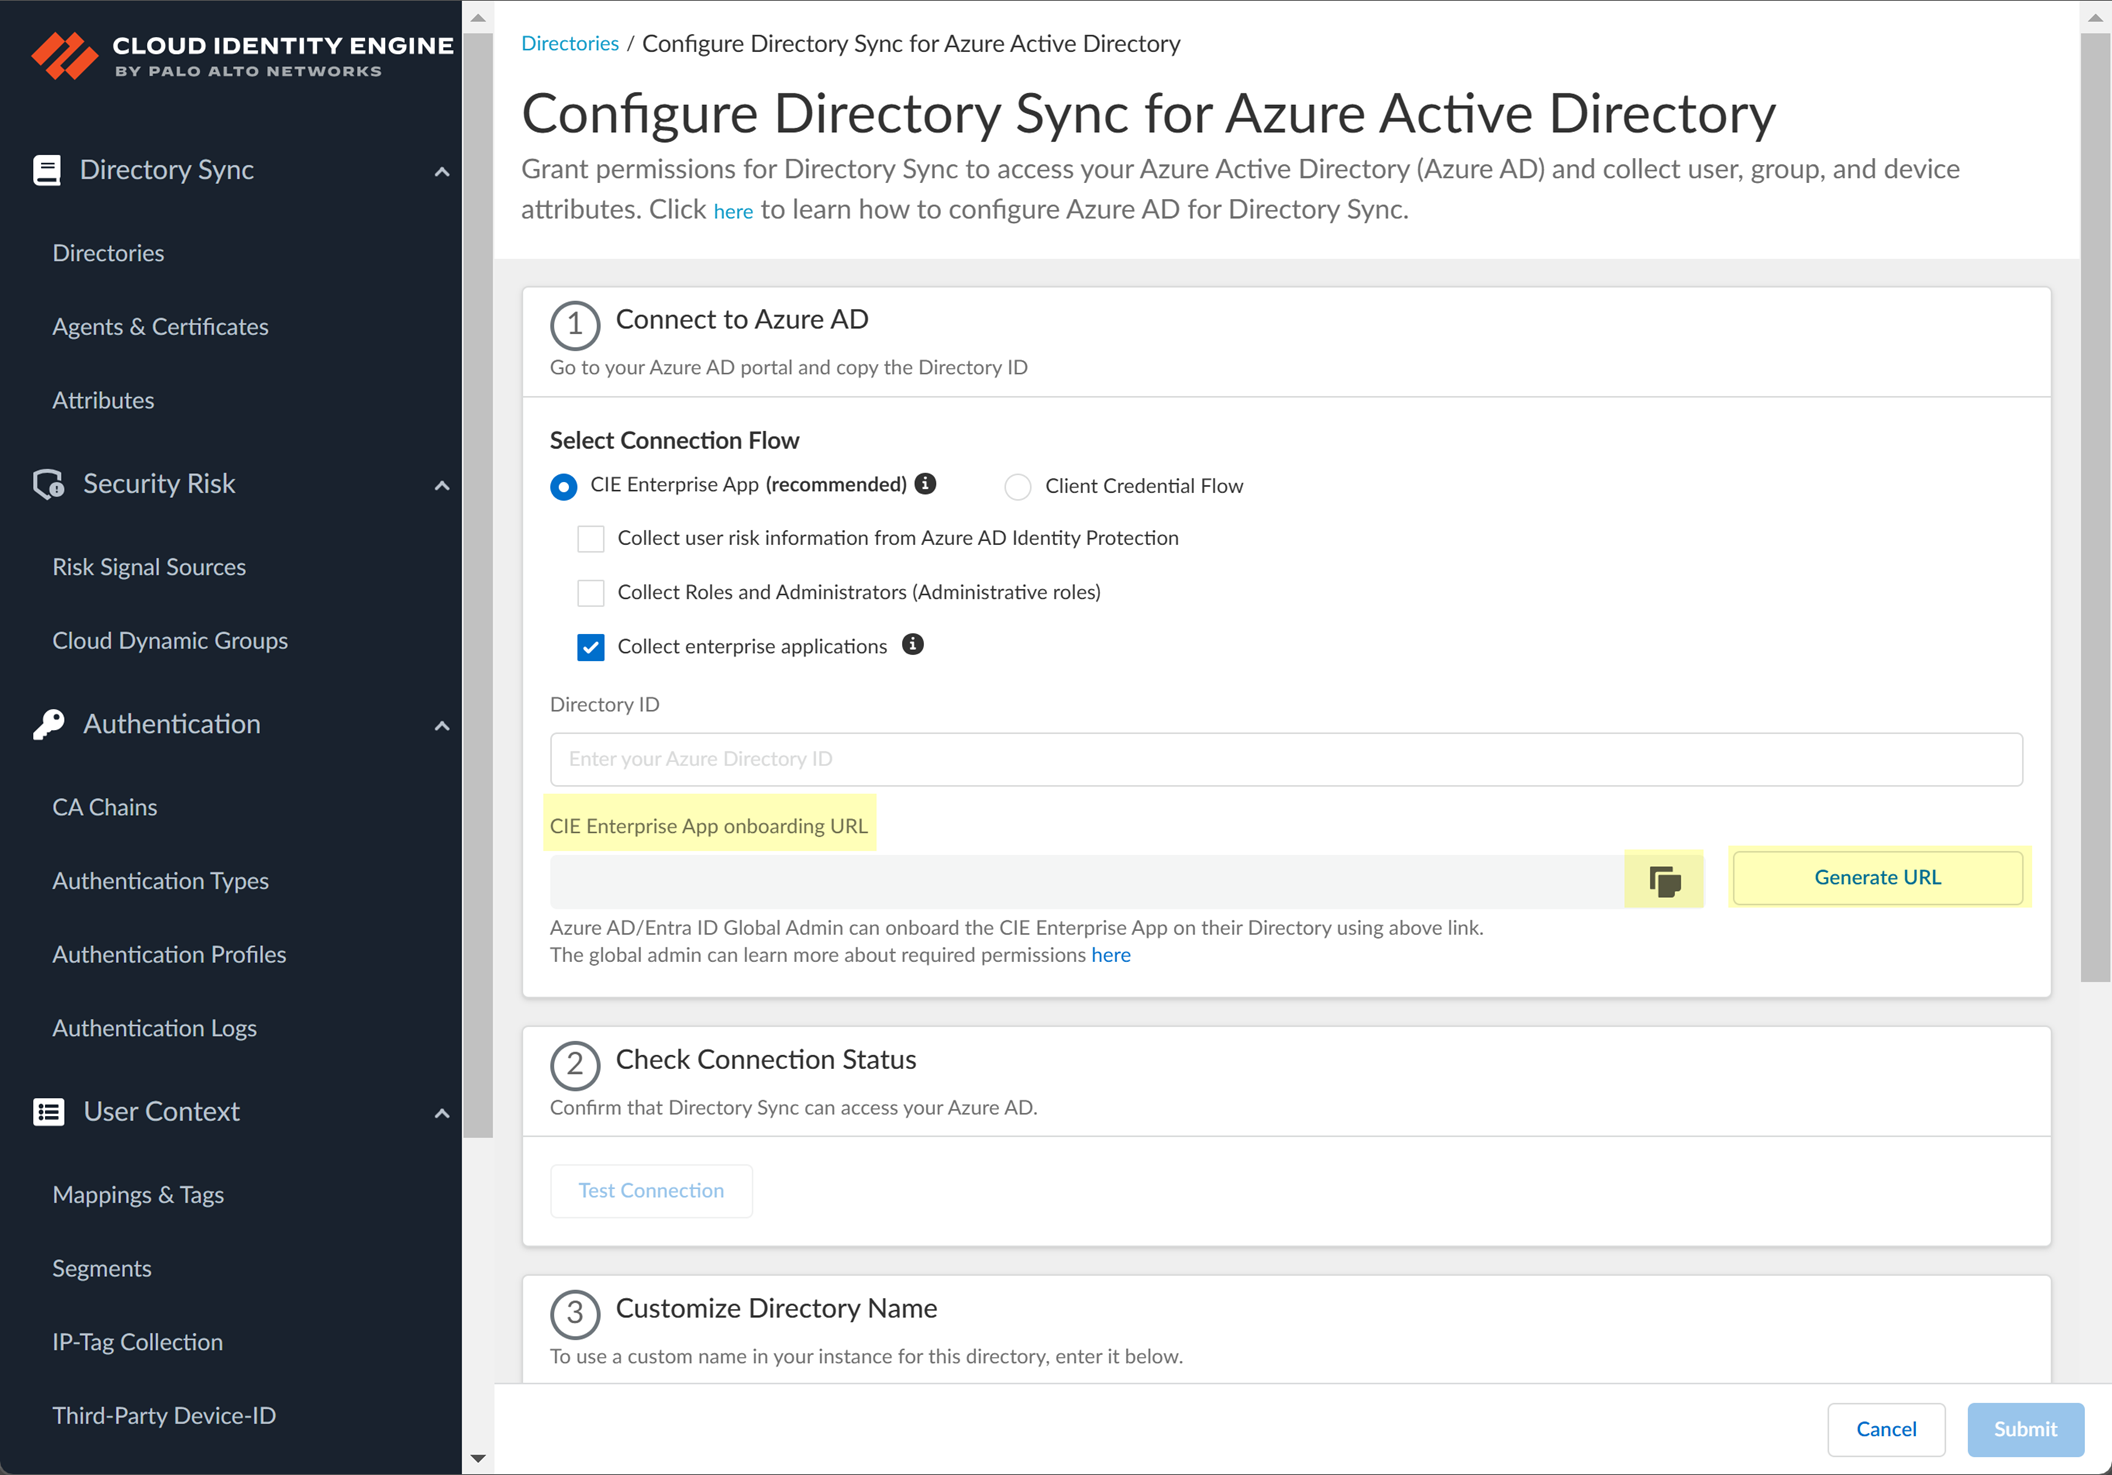
Screenshot showing the "Generate URL" and "Copy" buttons for the CIE Enterprise App onboarding URL.
-
Sign in to Azure via the URL using the Global Administrator account when prompted.
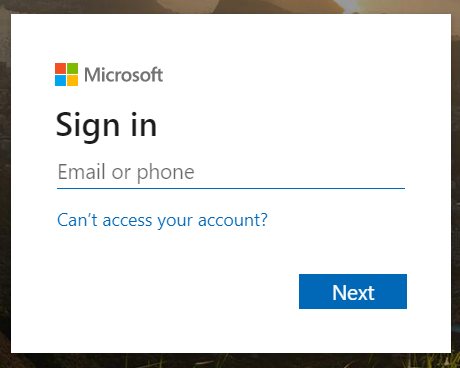
Screenshot of the Azure sign-in page where administrator credentials are entered to grant permissions.
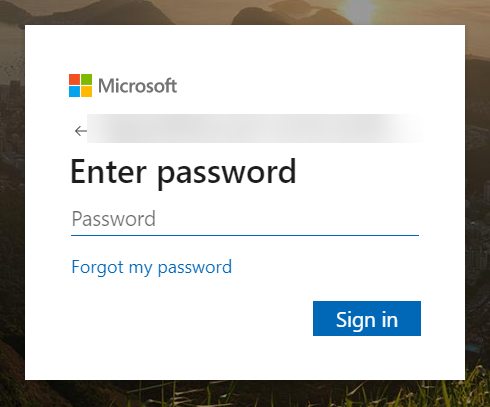
Screenshot of the Azure password entry page.
-
Review the requested permissions (based on optional data selected in step 3) and click "Accept" to grant consent for your organization.
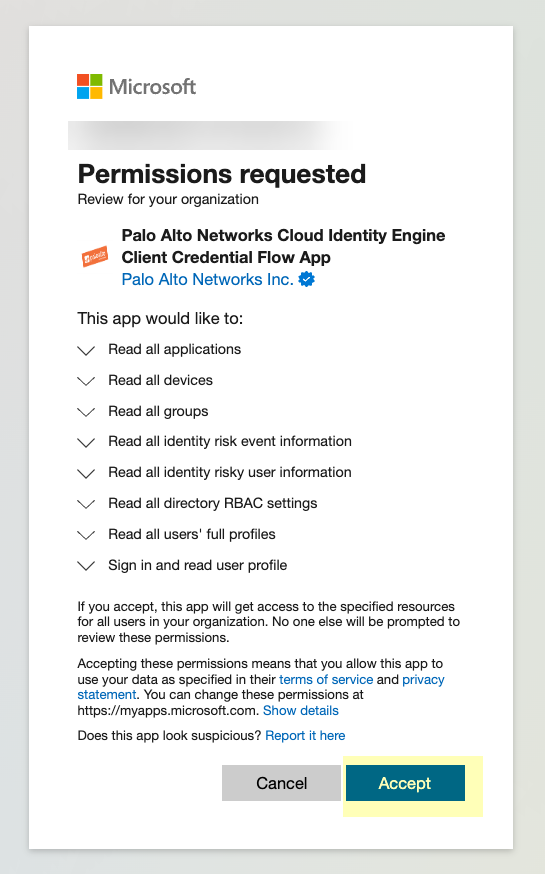
Screenshot showing the request for permissions from the CIE Enterprise App in Azure, requiring administrator consent.
-
Return to the CIE app tab and click "Test Connection" to verify successful communication and permission granting.

Screenshot showing the "Test Connection" button in the CIE app to verify connectivity to Azure AD.
-
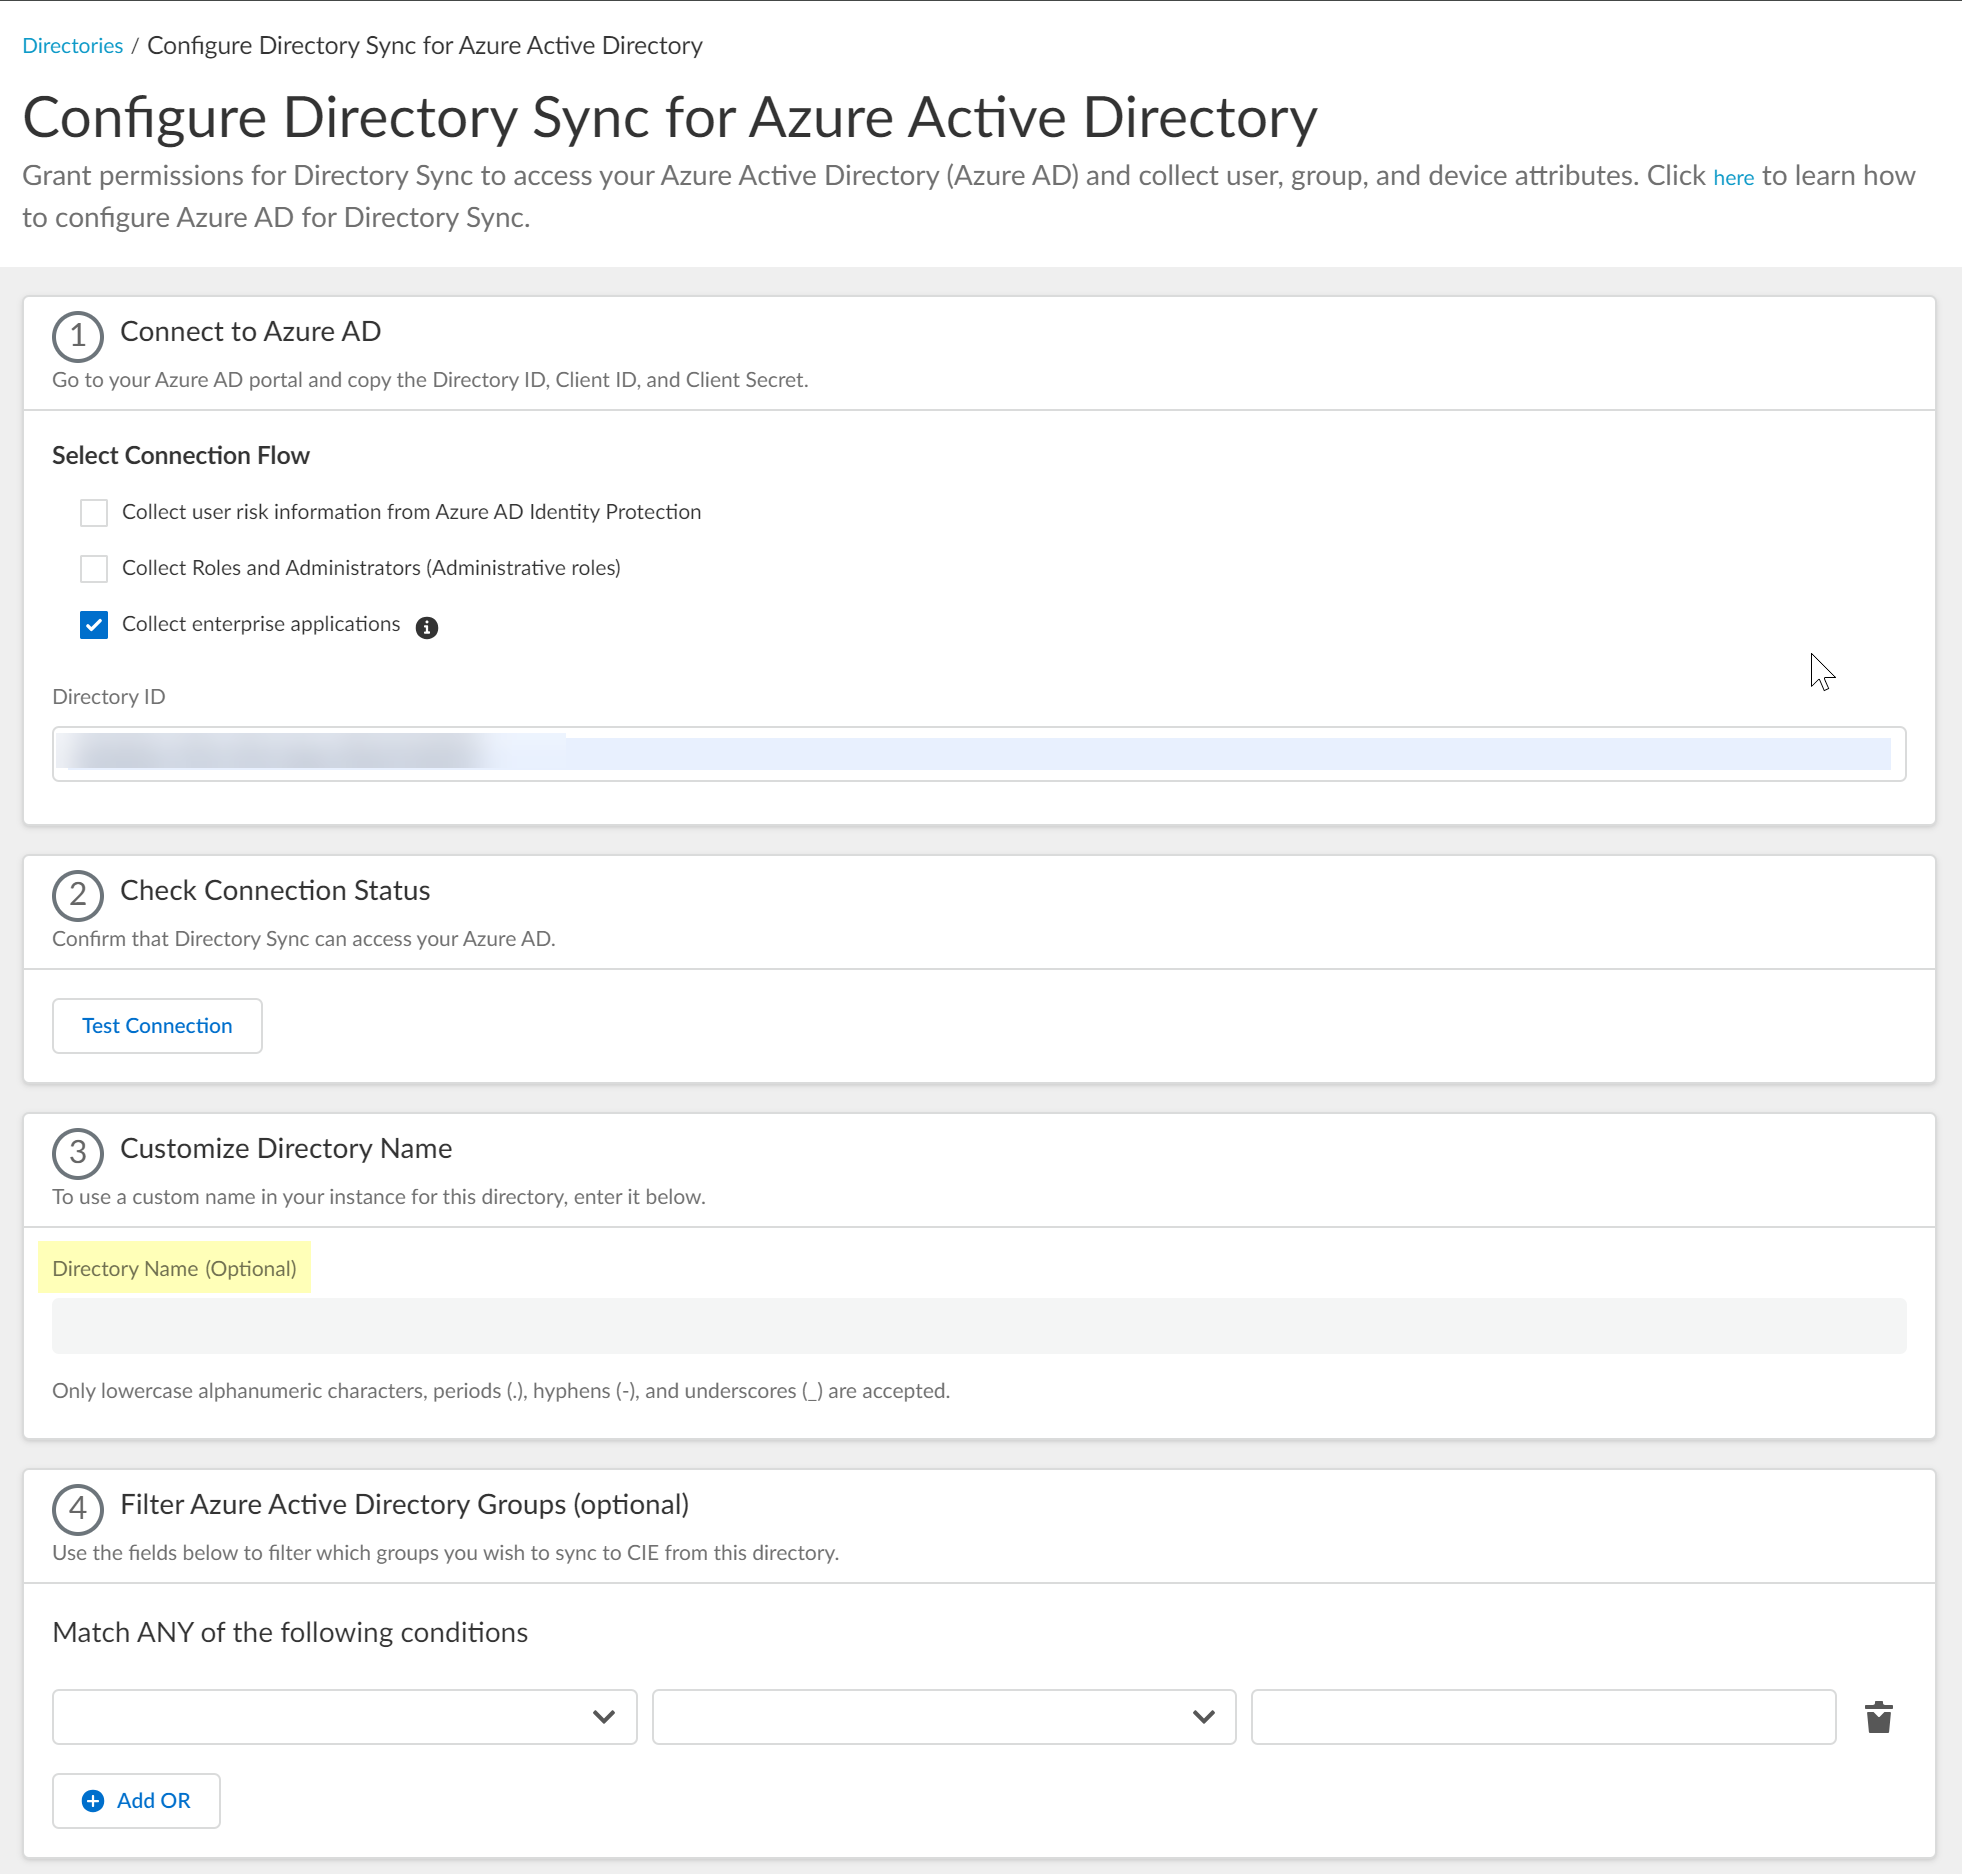
(Optional) Enter a custom
Directory Name
for display in CIE.
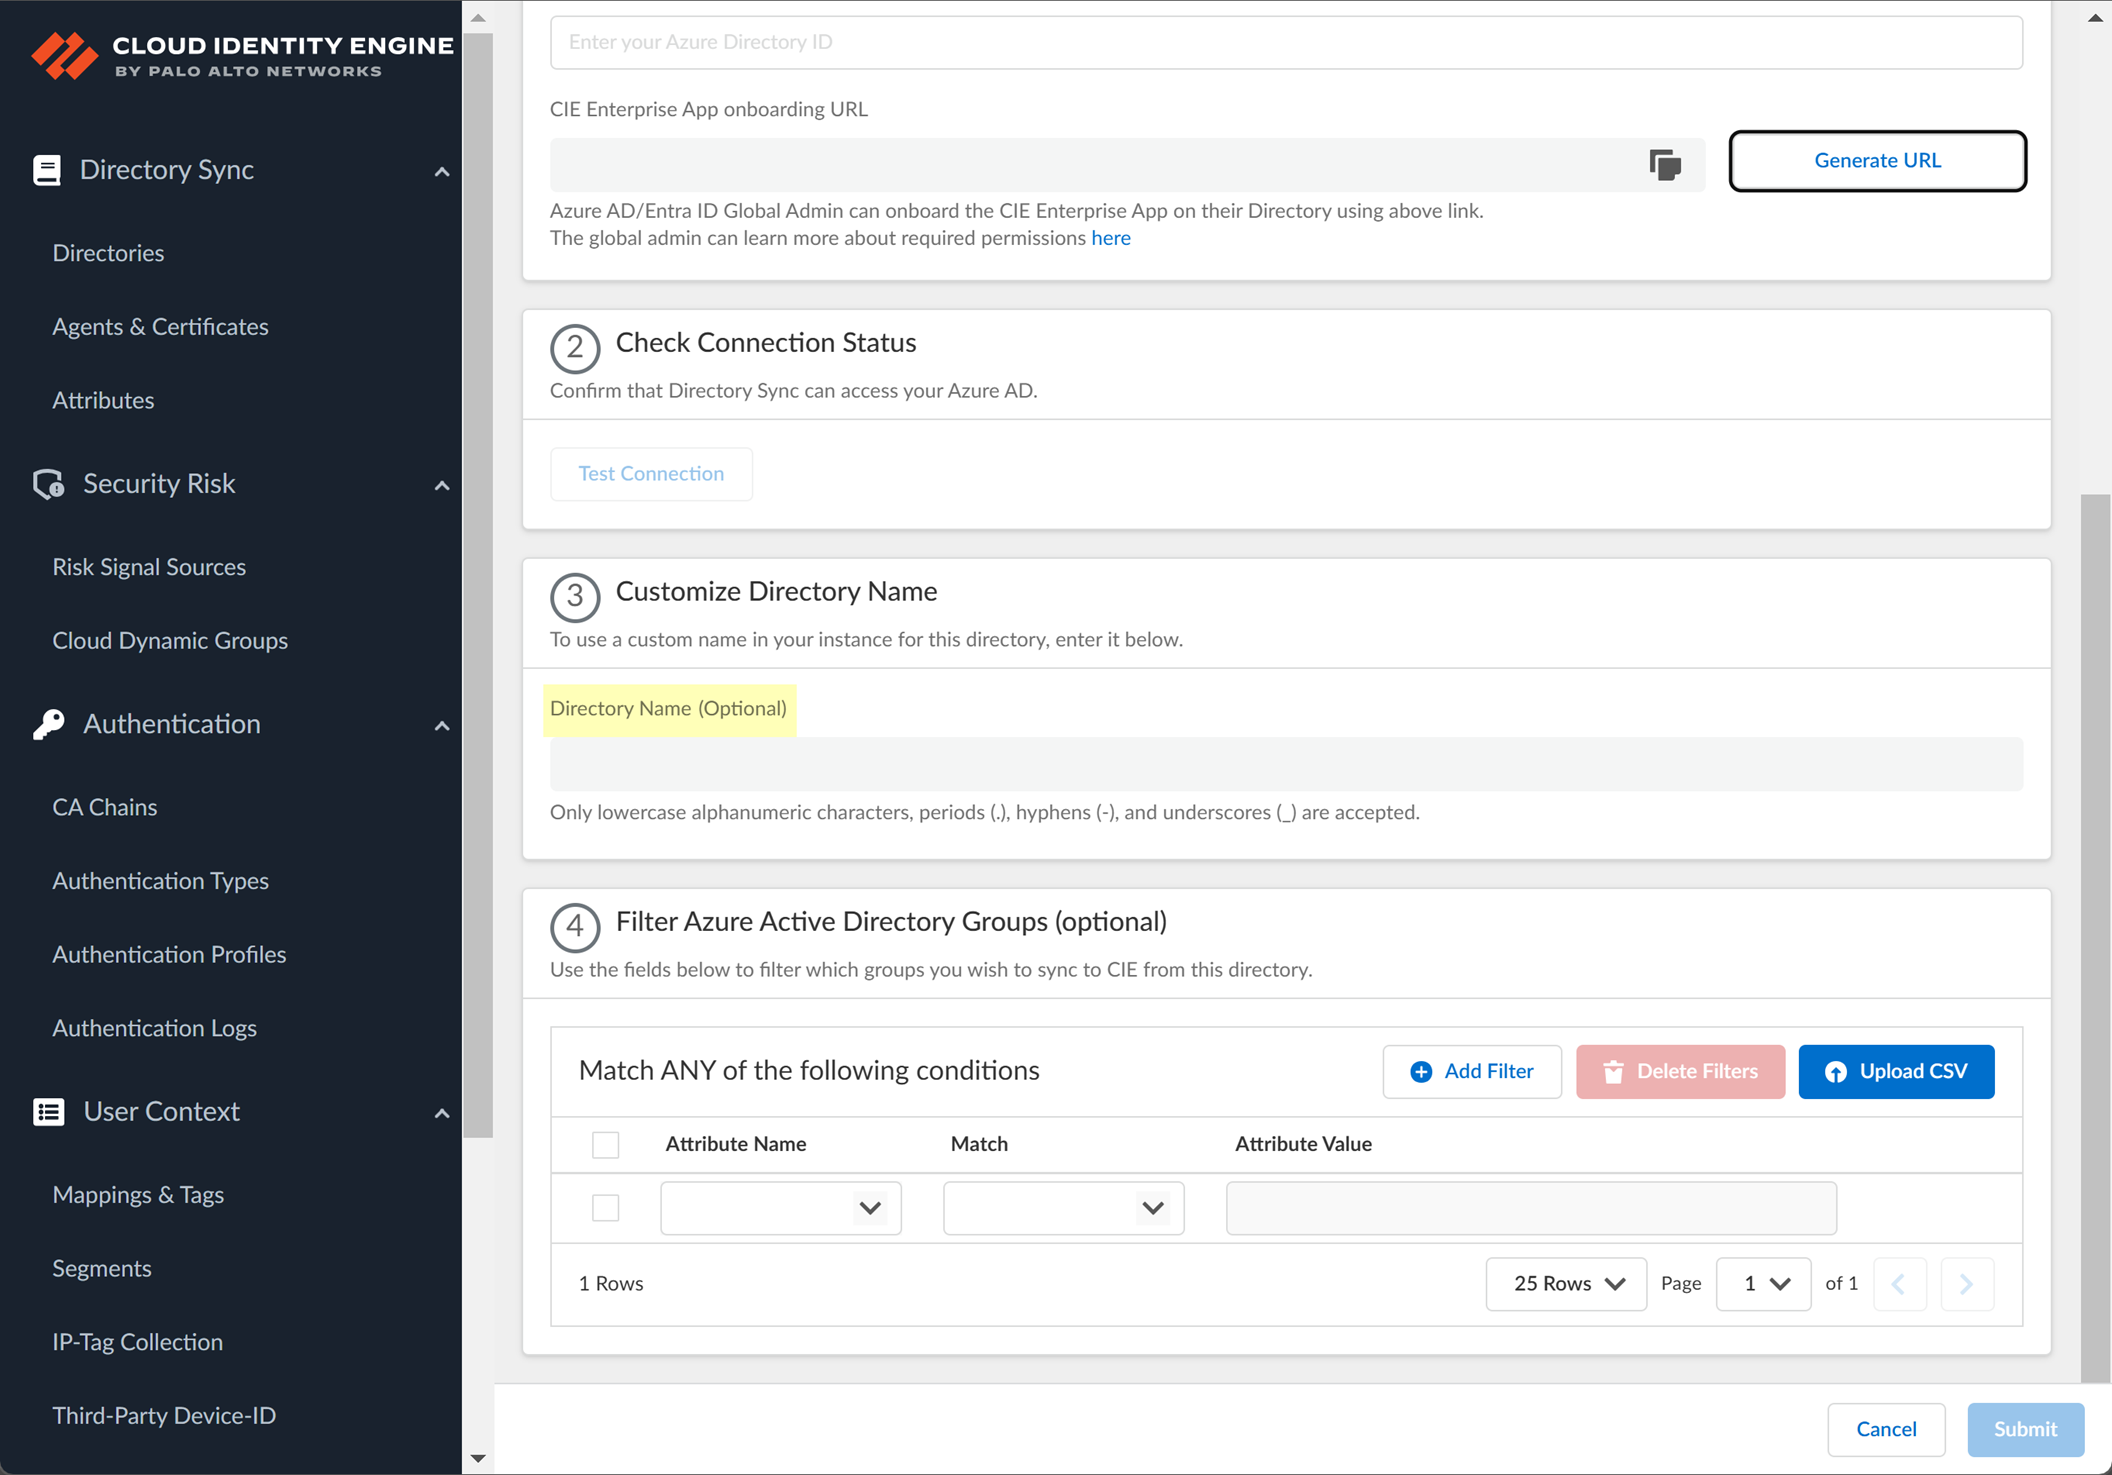
Screenshot showing the optional field to customize the directory name displayed in CIE.
Screenshot showing a summary of the Azure AD configuration in the CIE app before submission.
-
Enter the
Directory ID
(Tenant ID) copied from Azure.
-
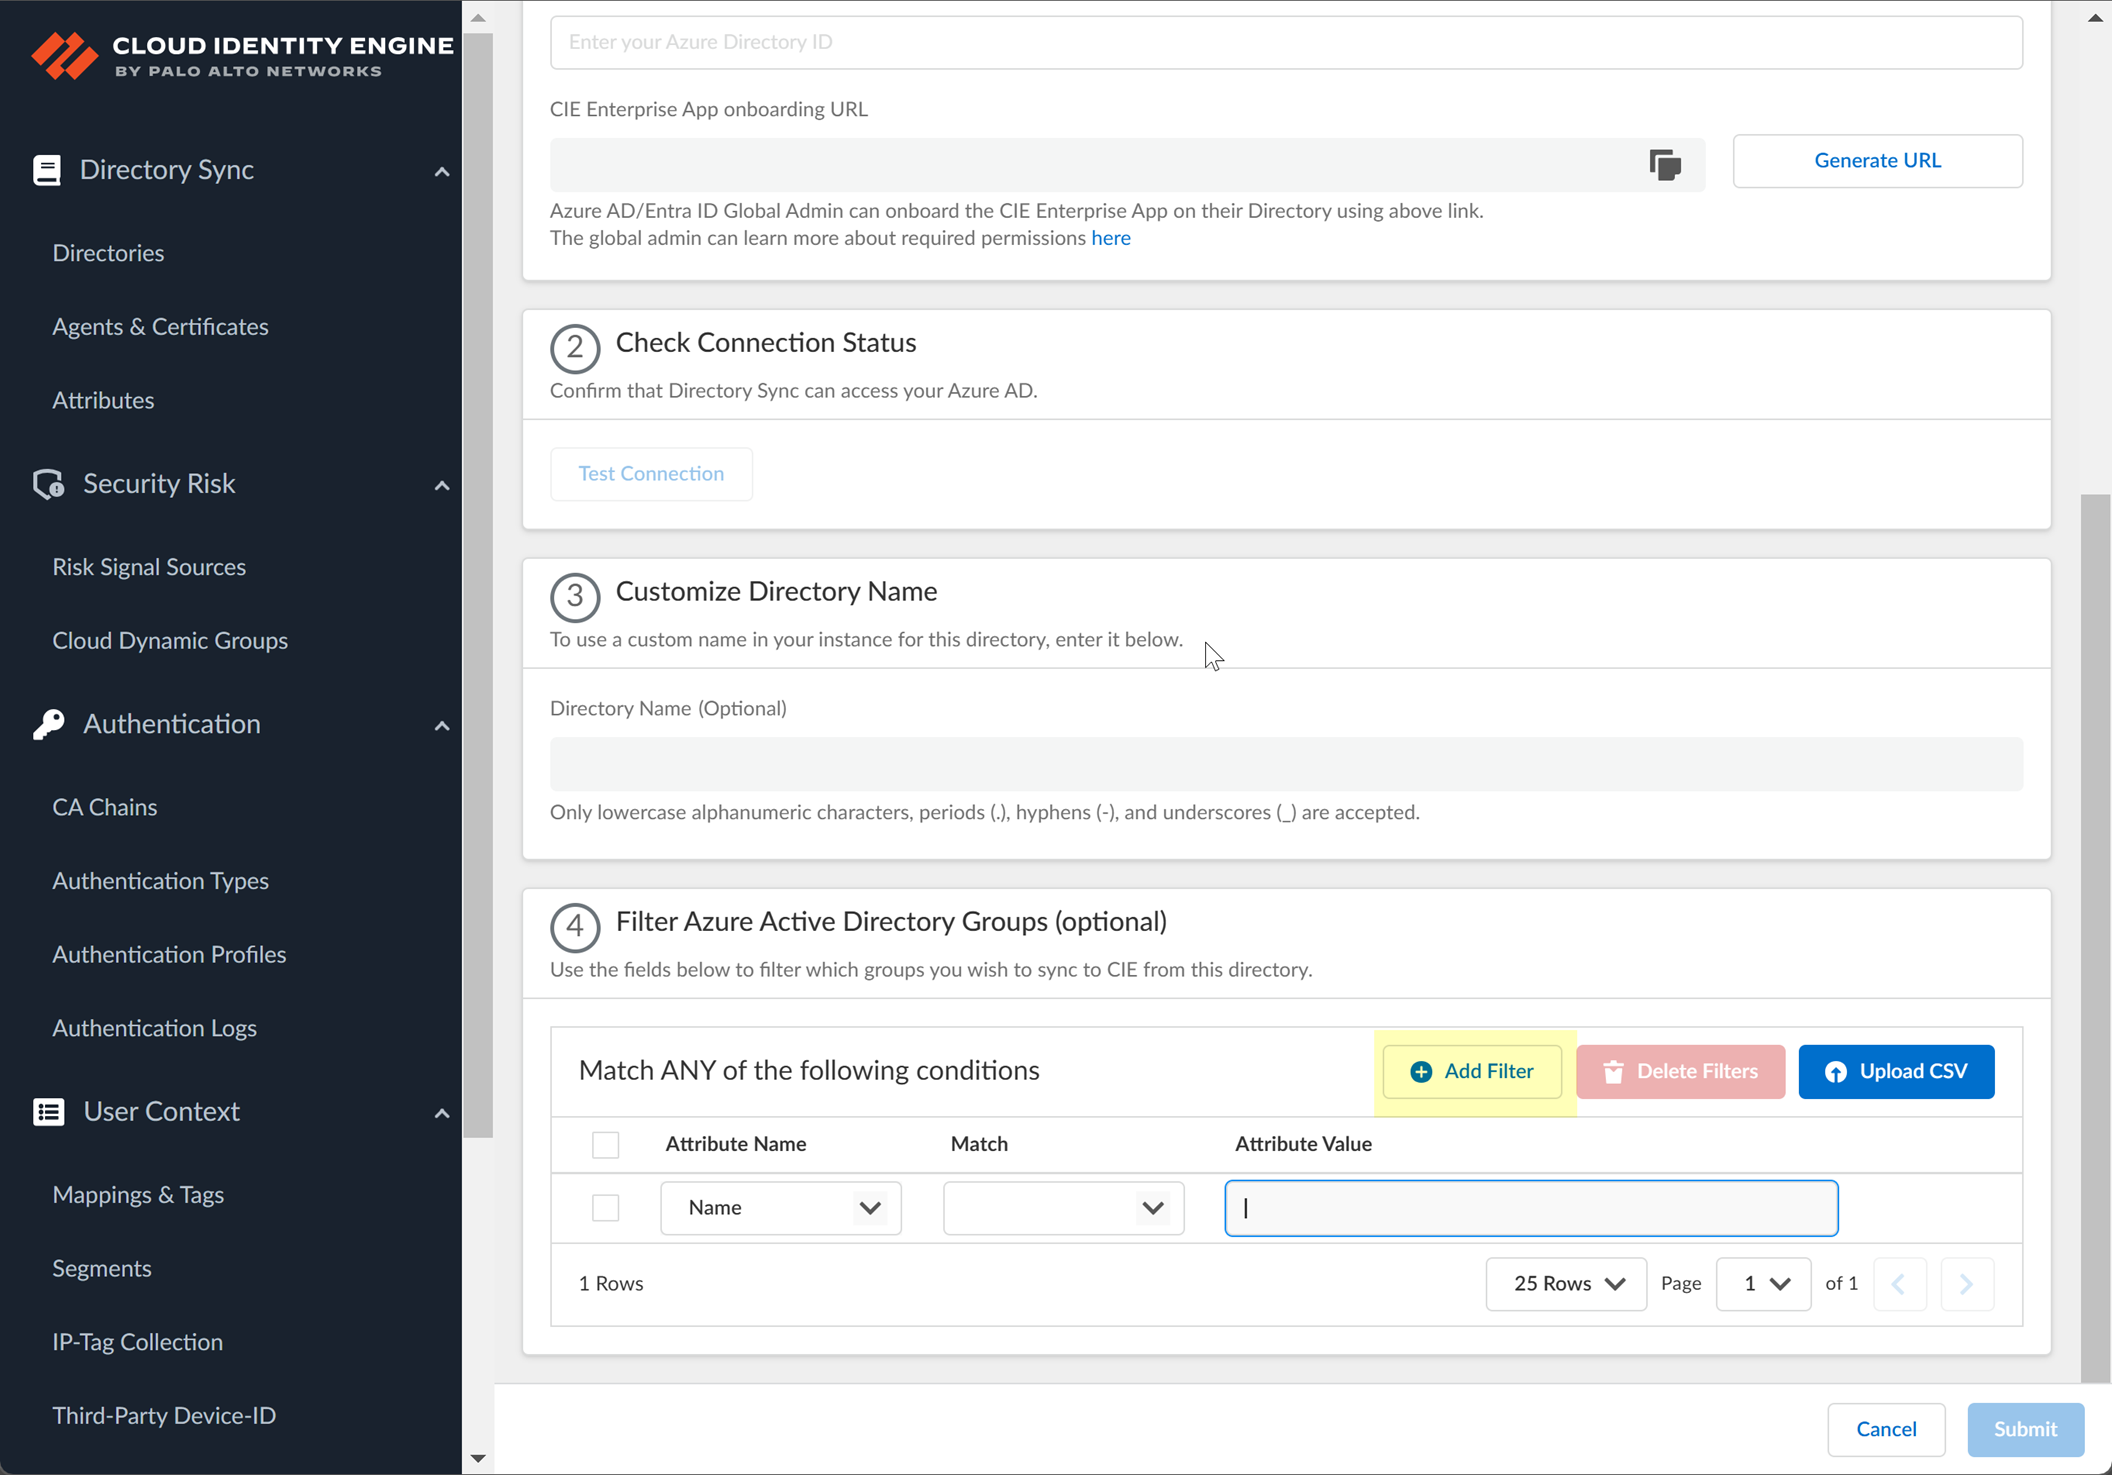
(Optional) Upload a .CSV file to filter which groups are synced. This can significantly reduce sync time if you only need a subset of groups. The CSV should contain a list of group names or unique identifiers.

Screenshot showing the "Upload CSV" button for filtering Azure AD groups.
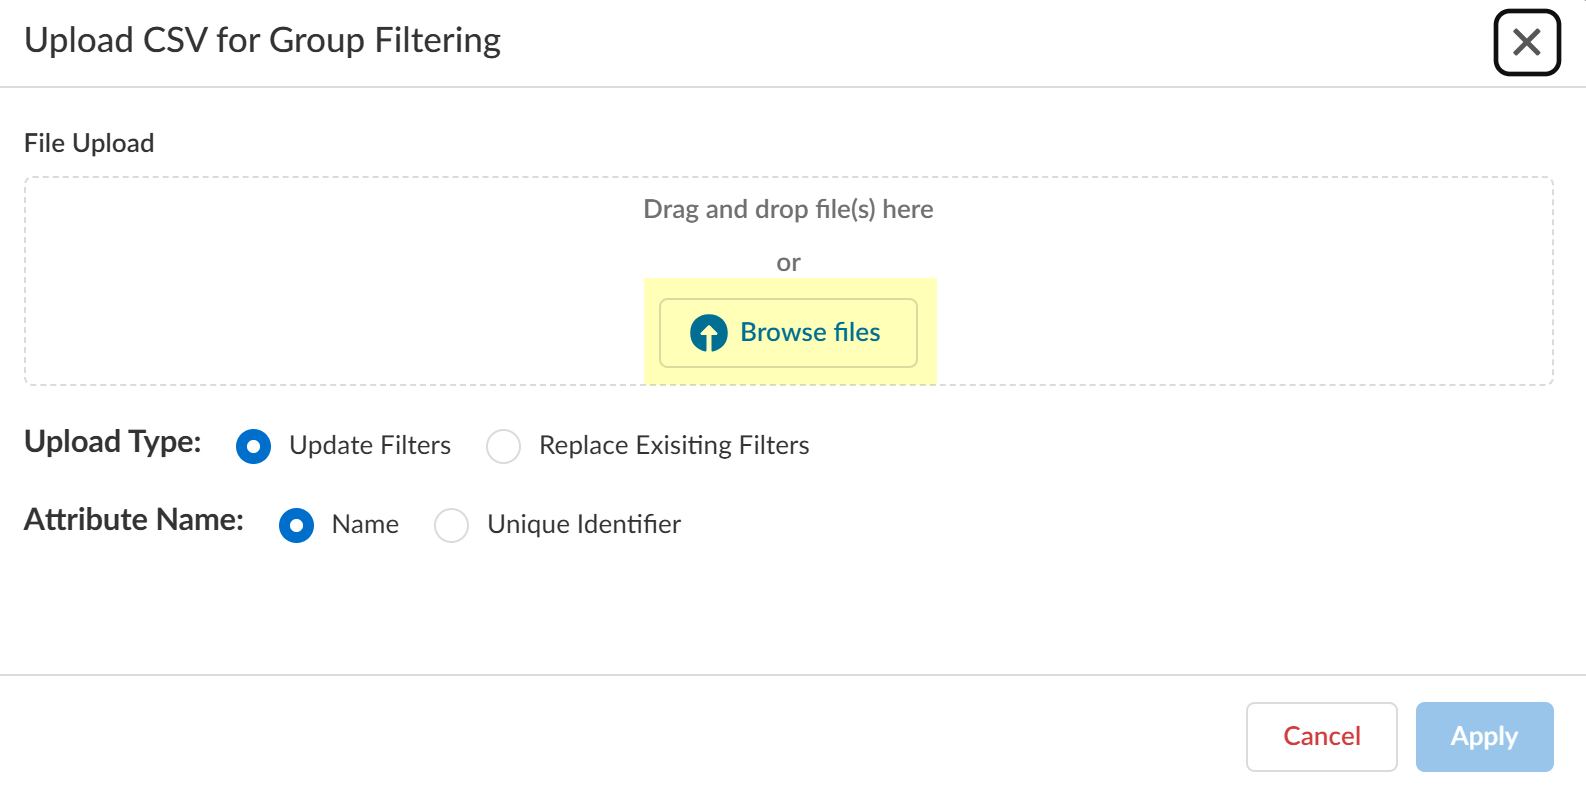
Screenshot of the dialog for uploading a CSV file to filter Azure AD groups.
- Click "Upload CSV".
- Drag or browse for the file.
-
Select Upload Type (Update or Replace Filters).
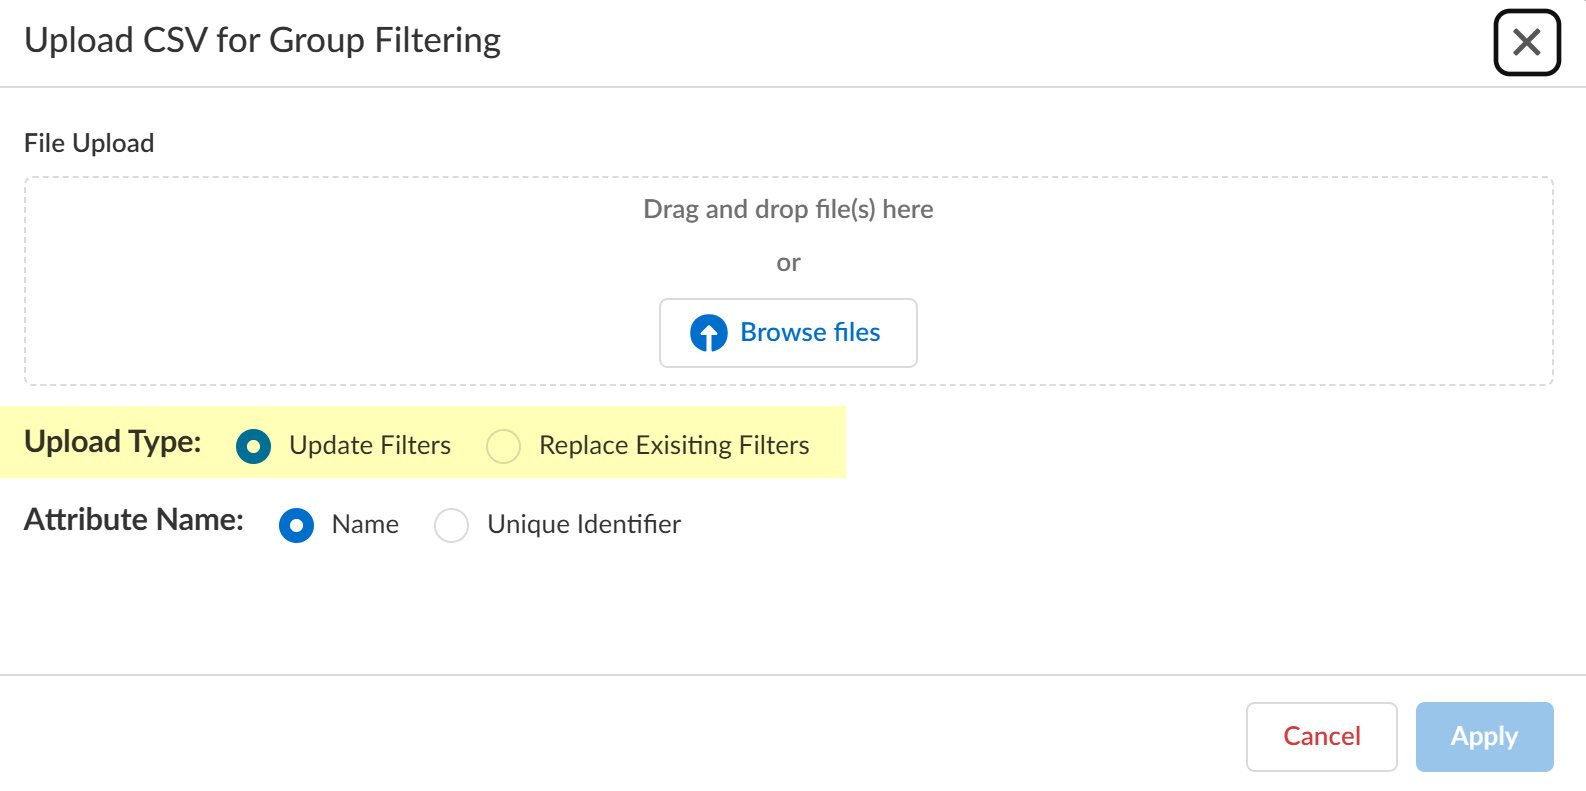
Screenshot showing the options to update or replace existing group filters via CSV upload.
- Select Attribute Name (Name or Unique Identifier) used in your CSV.
-
Click "Apply".
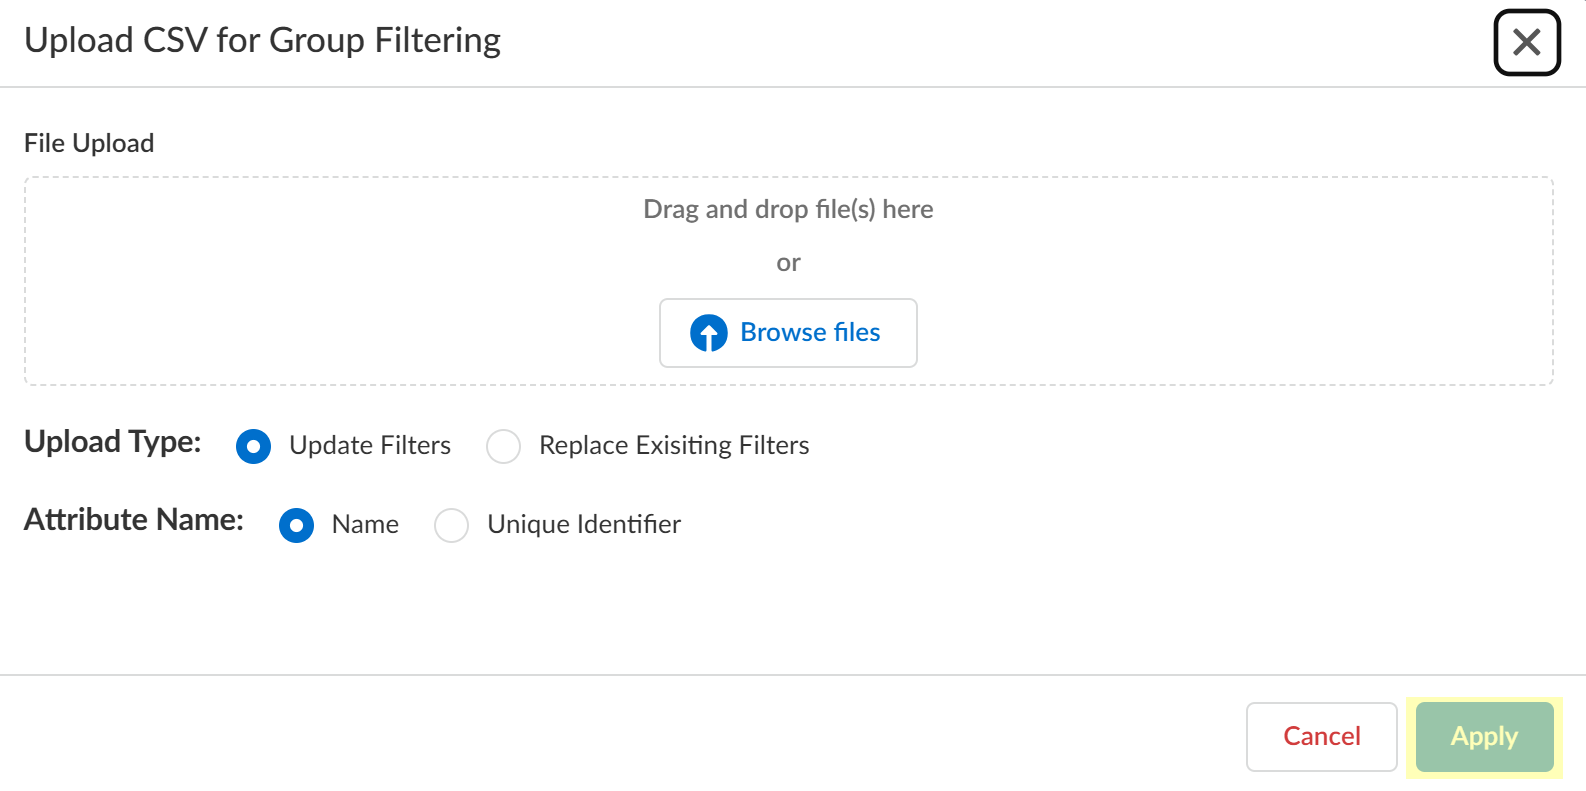
Screenshot showing the "Apply" button to confirm the CSV filter settings.
-
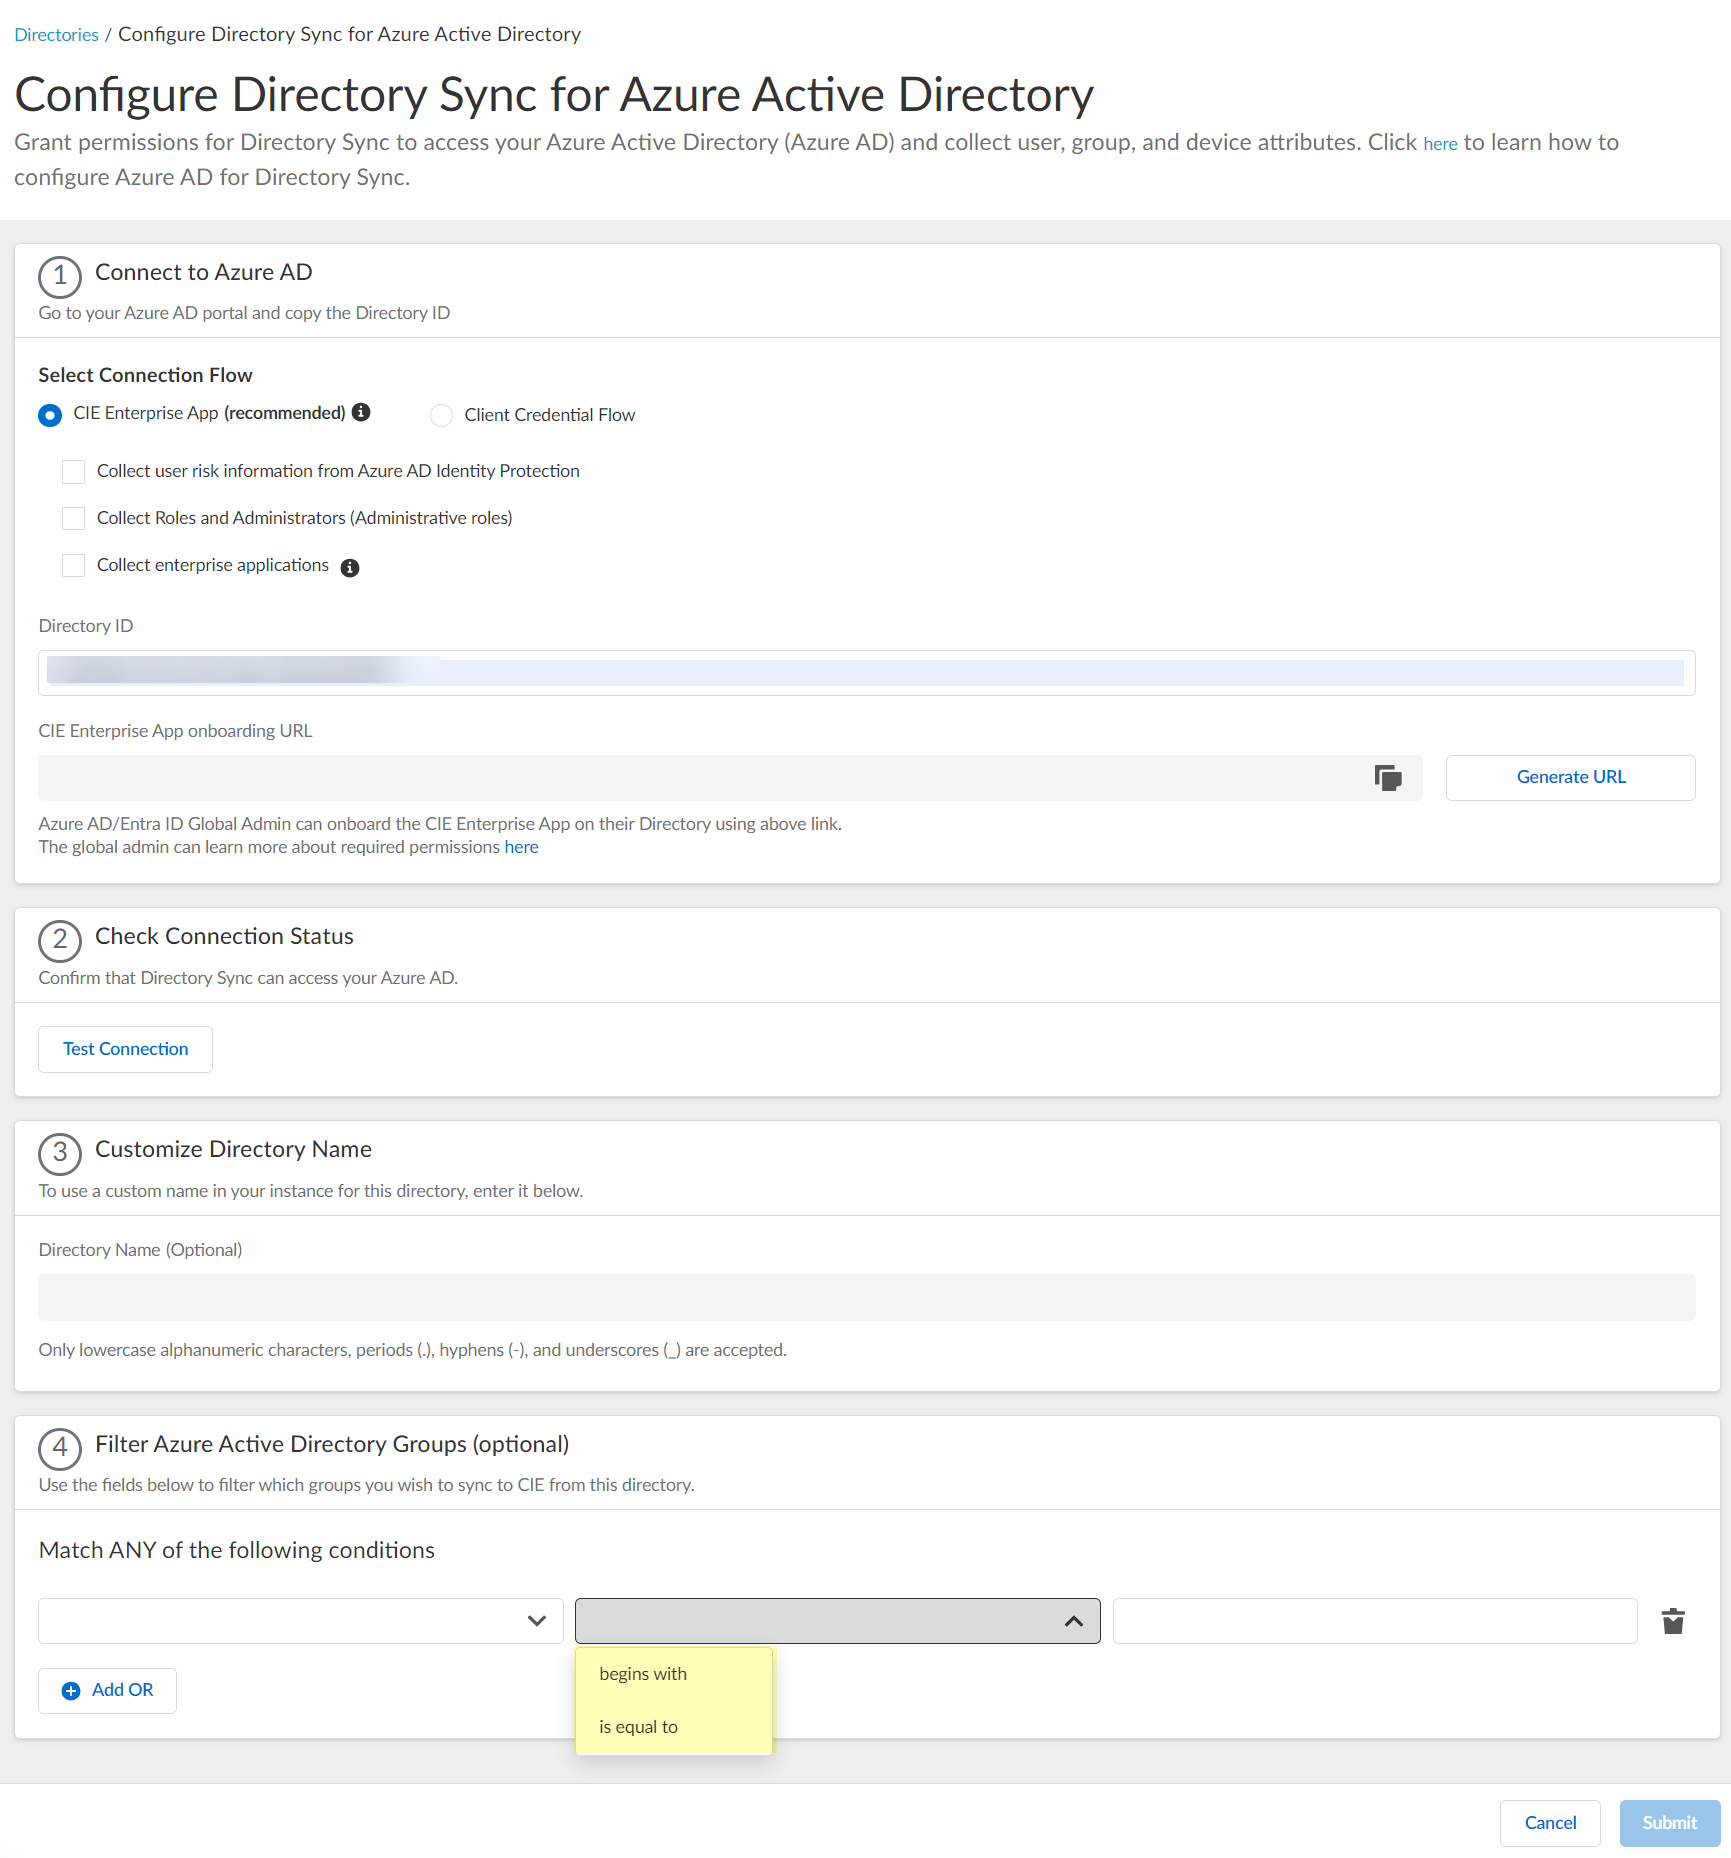
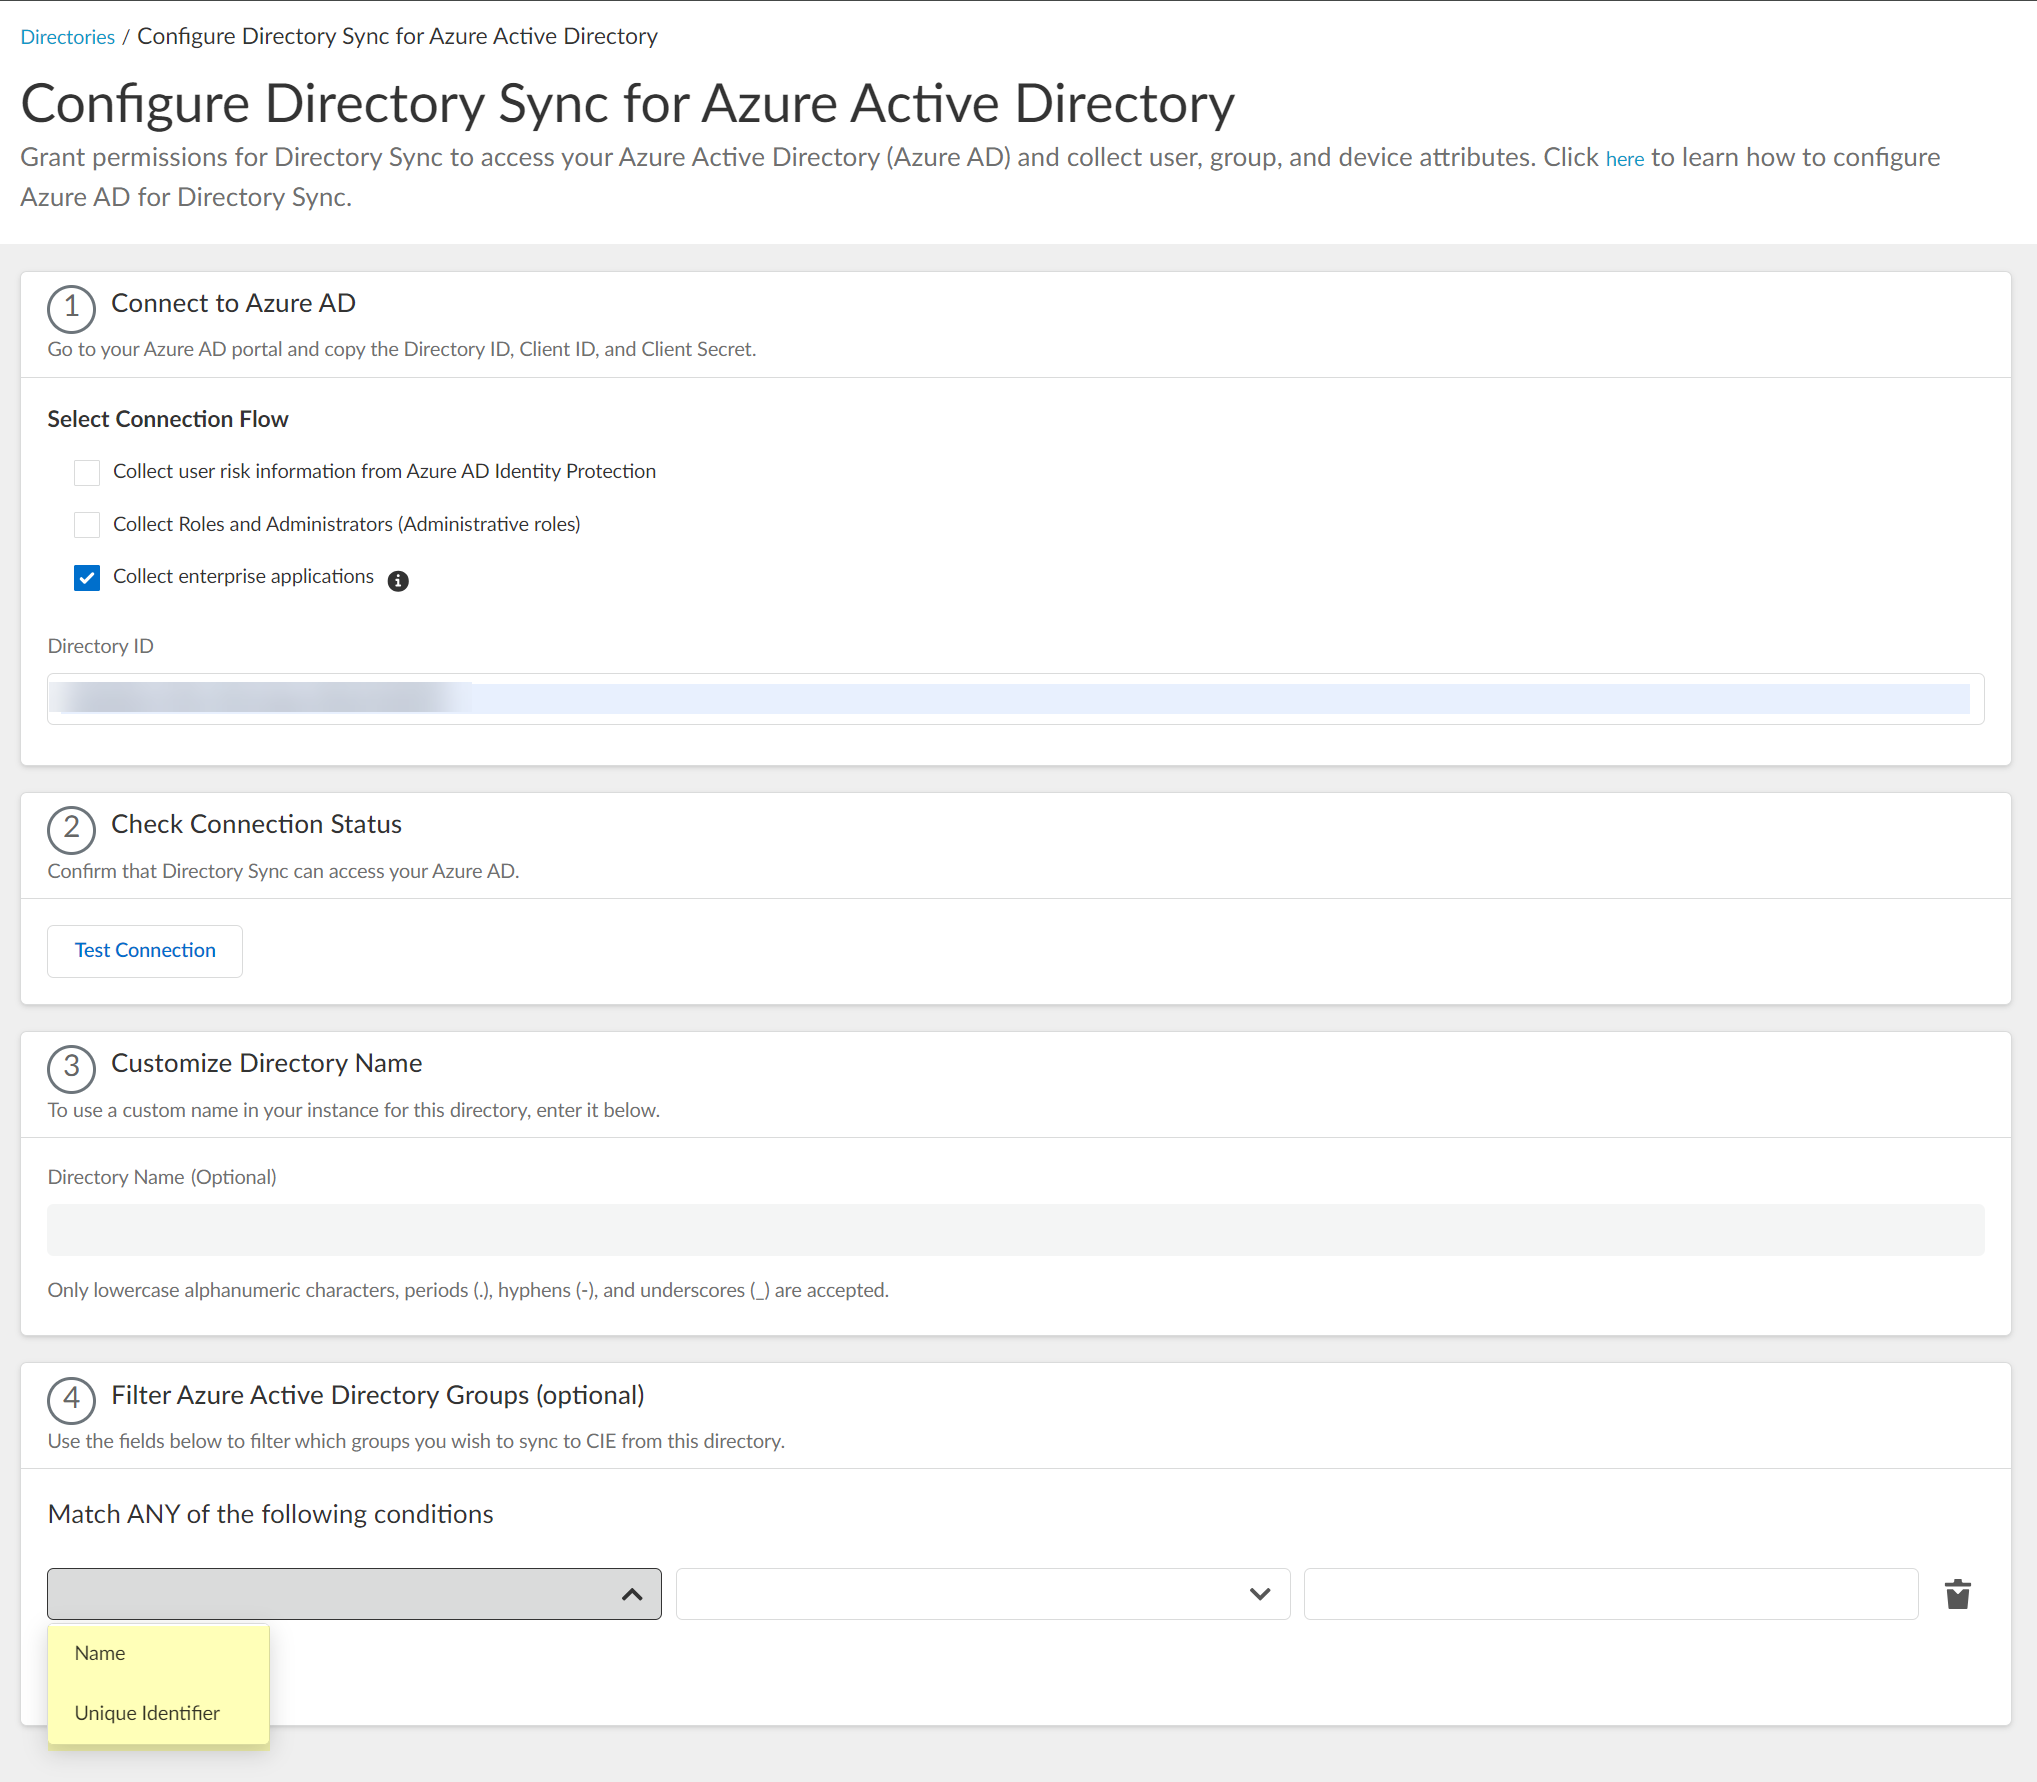
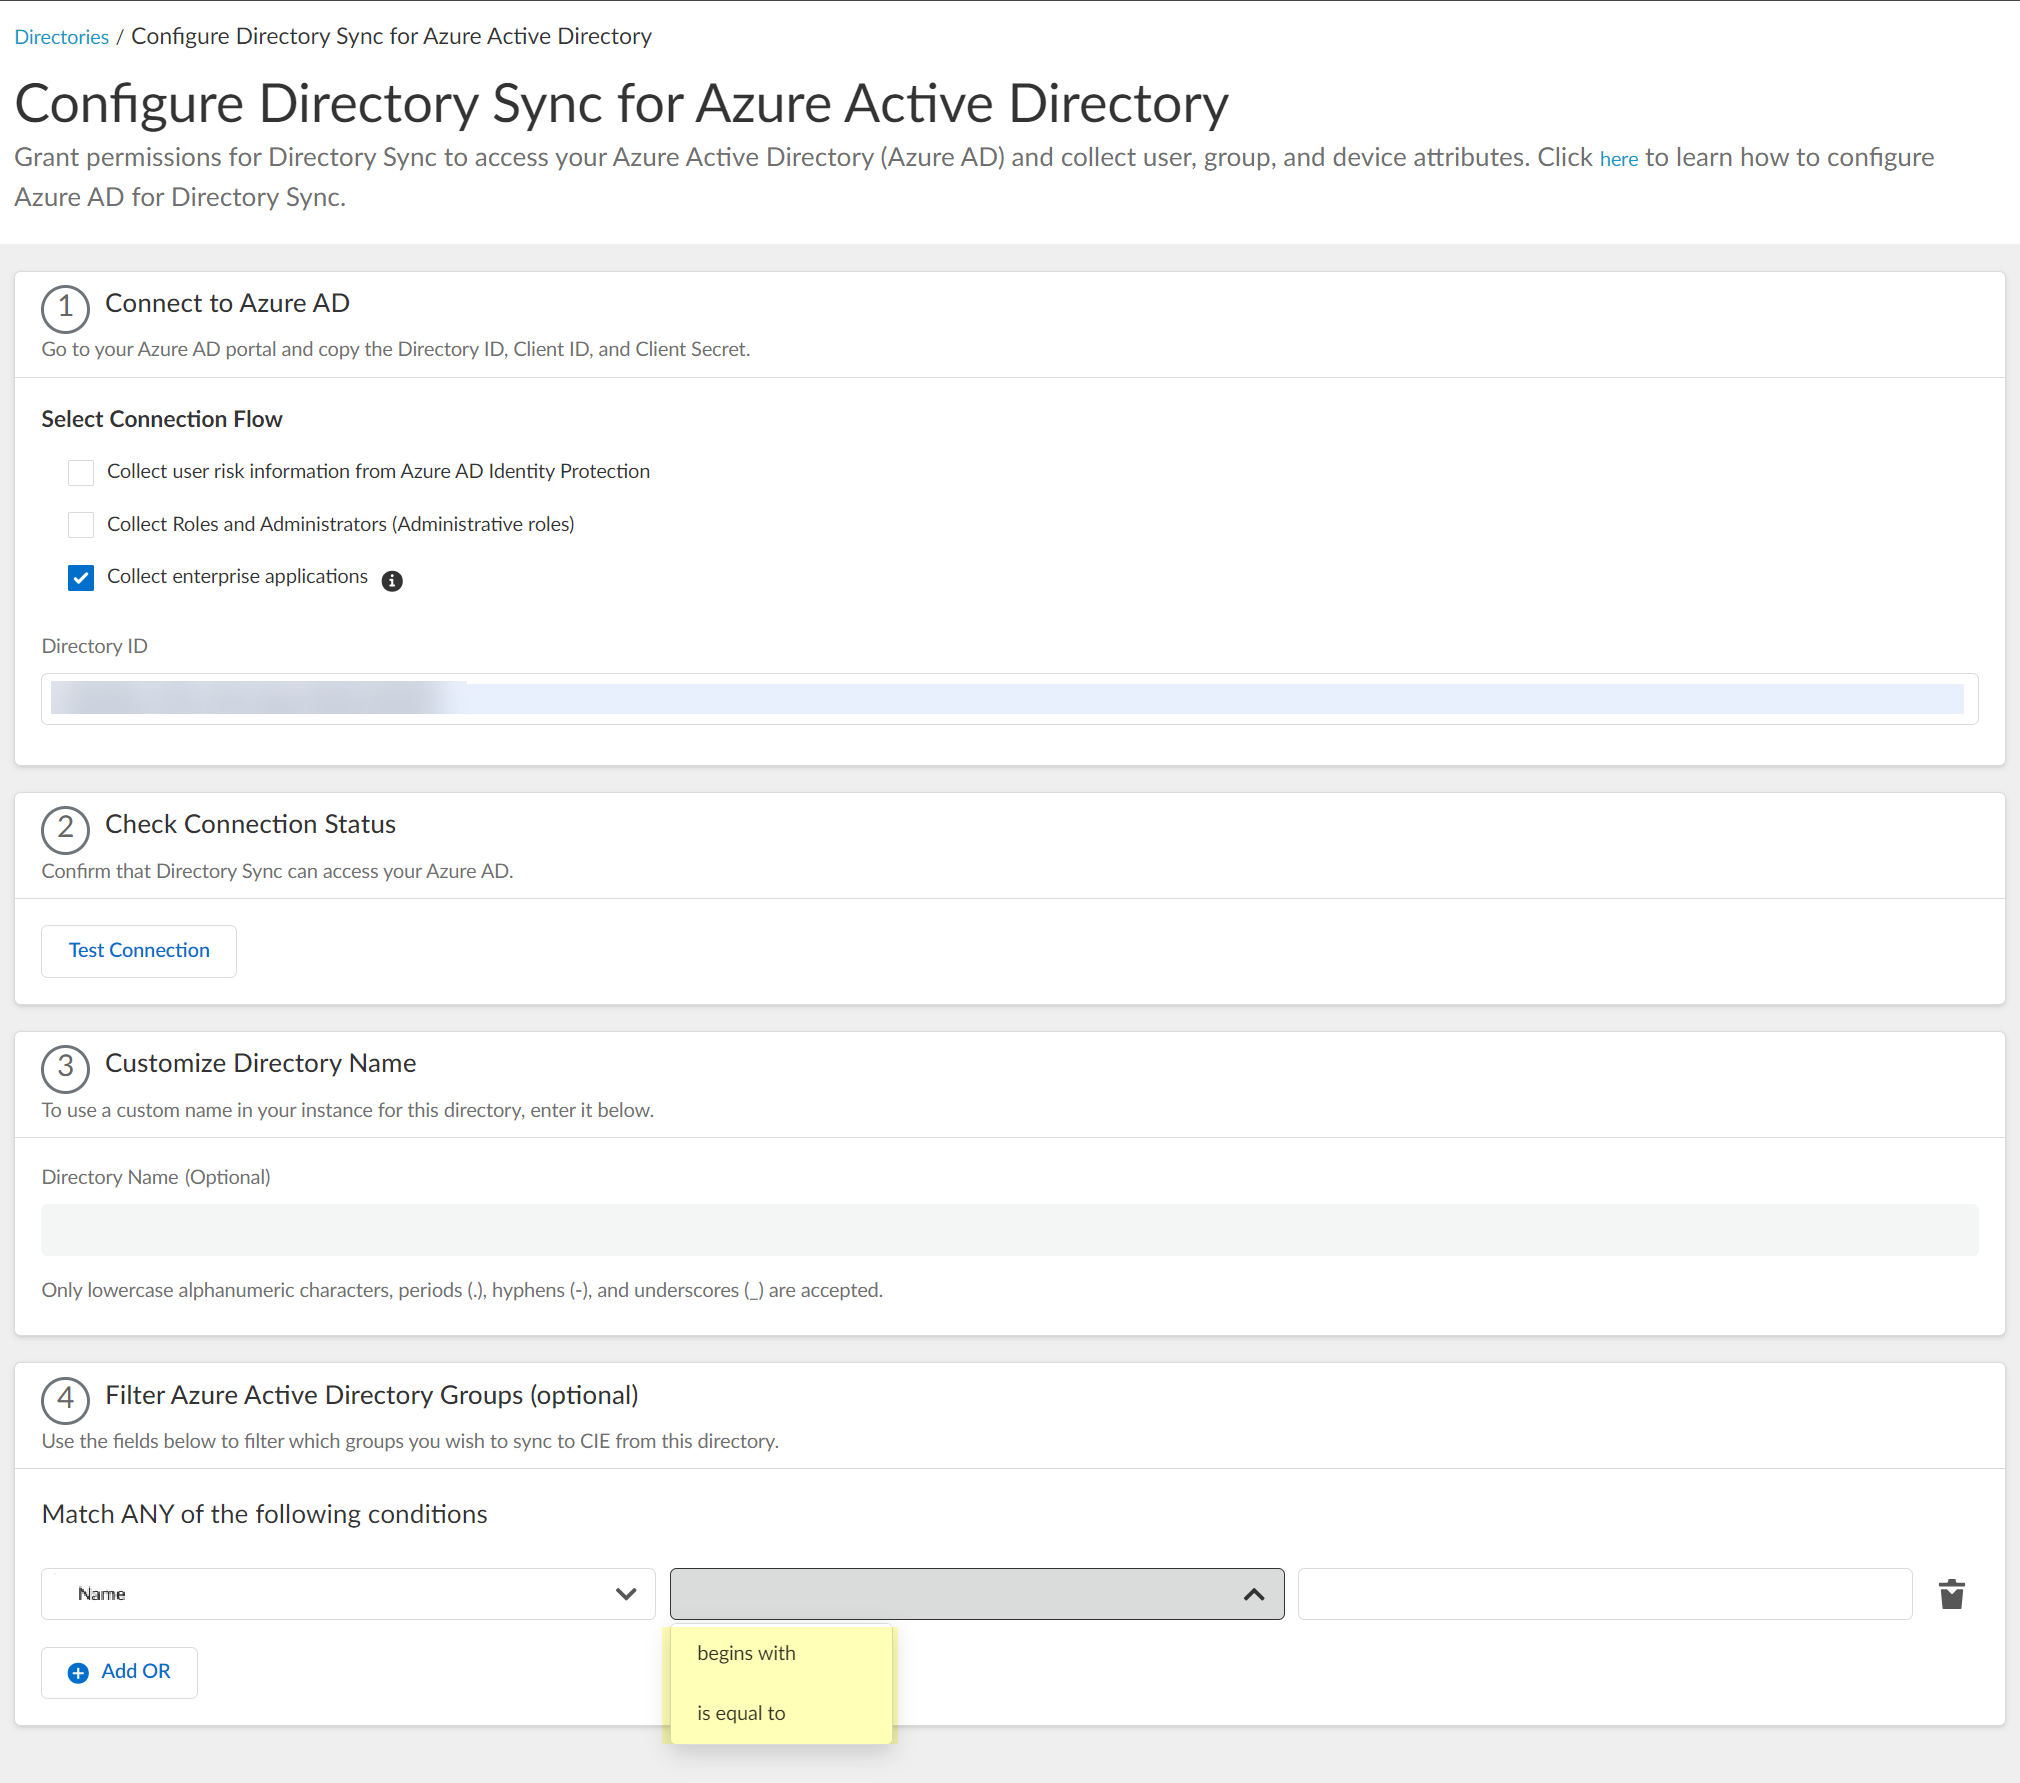
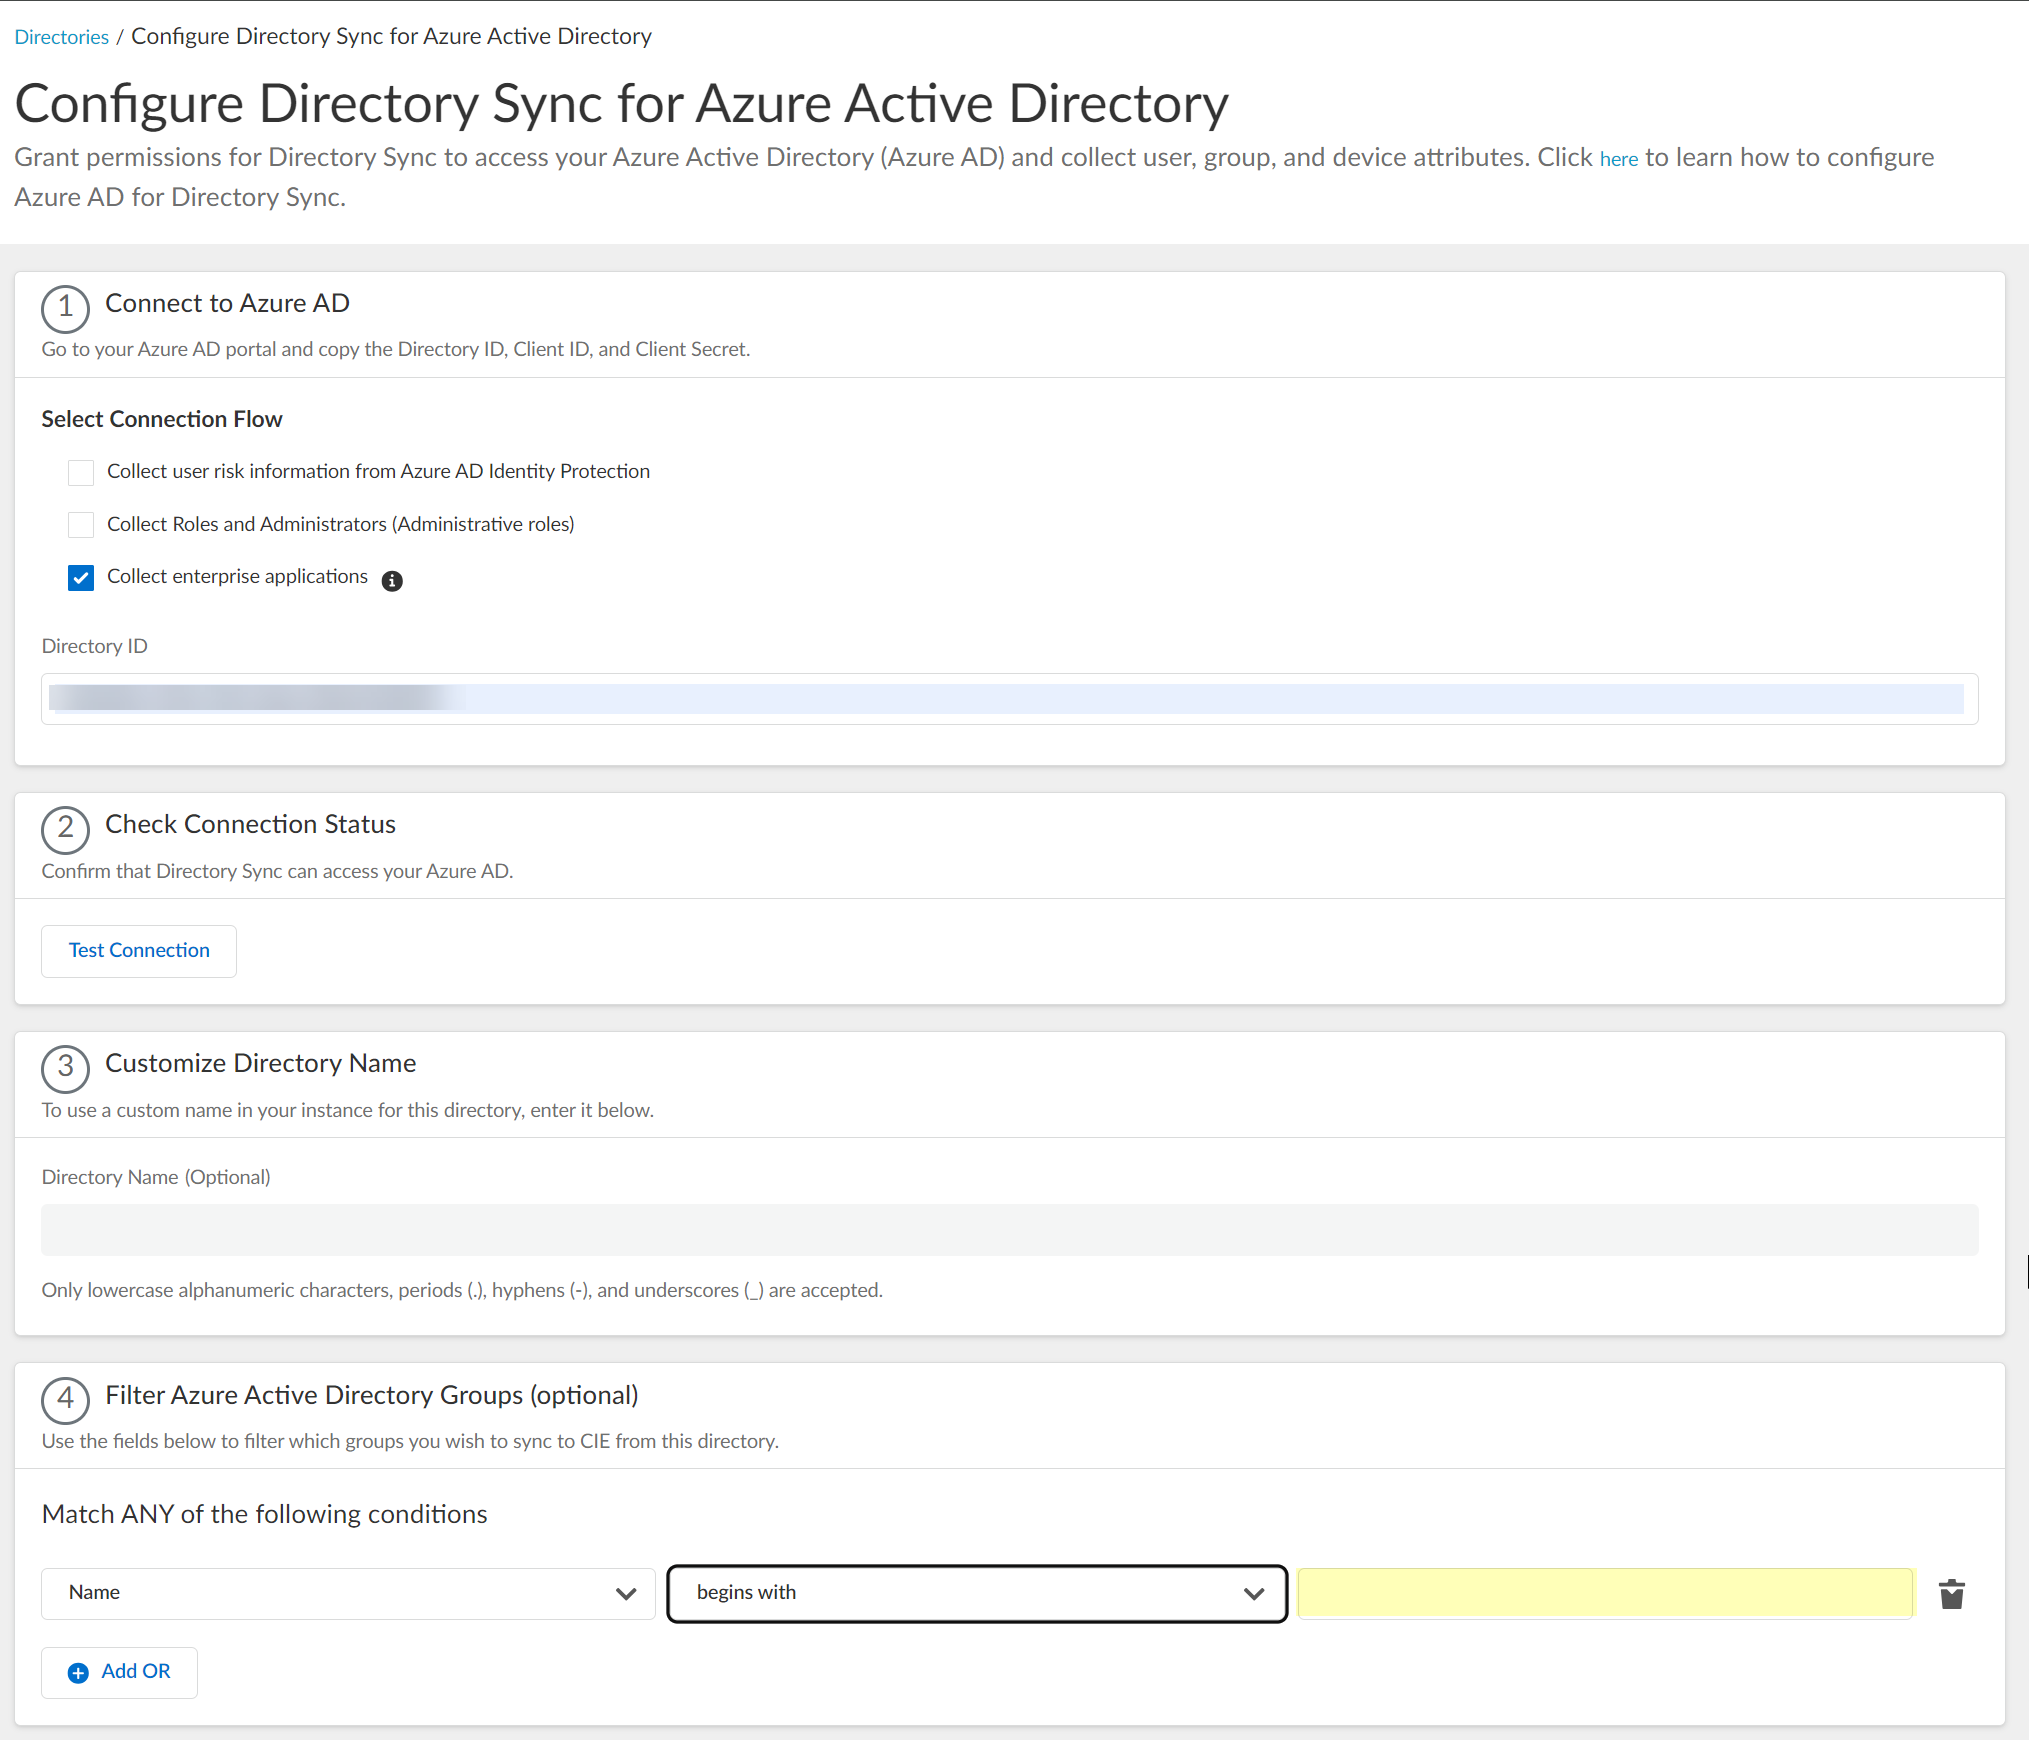
(Optional) Filter Azure Active Directory Groups by attribute (Name or Unique Identifier) directly within the CIE UI using operators (begins with, is equal to, etc.).
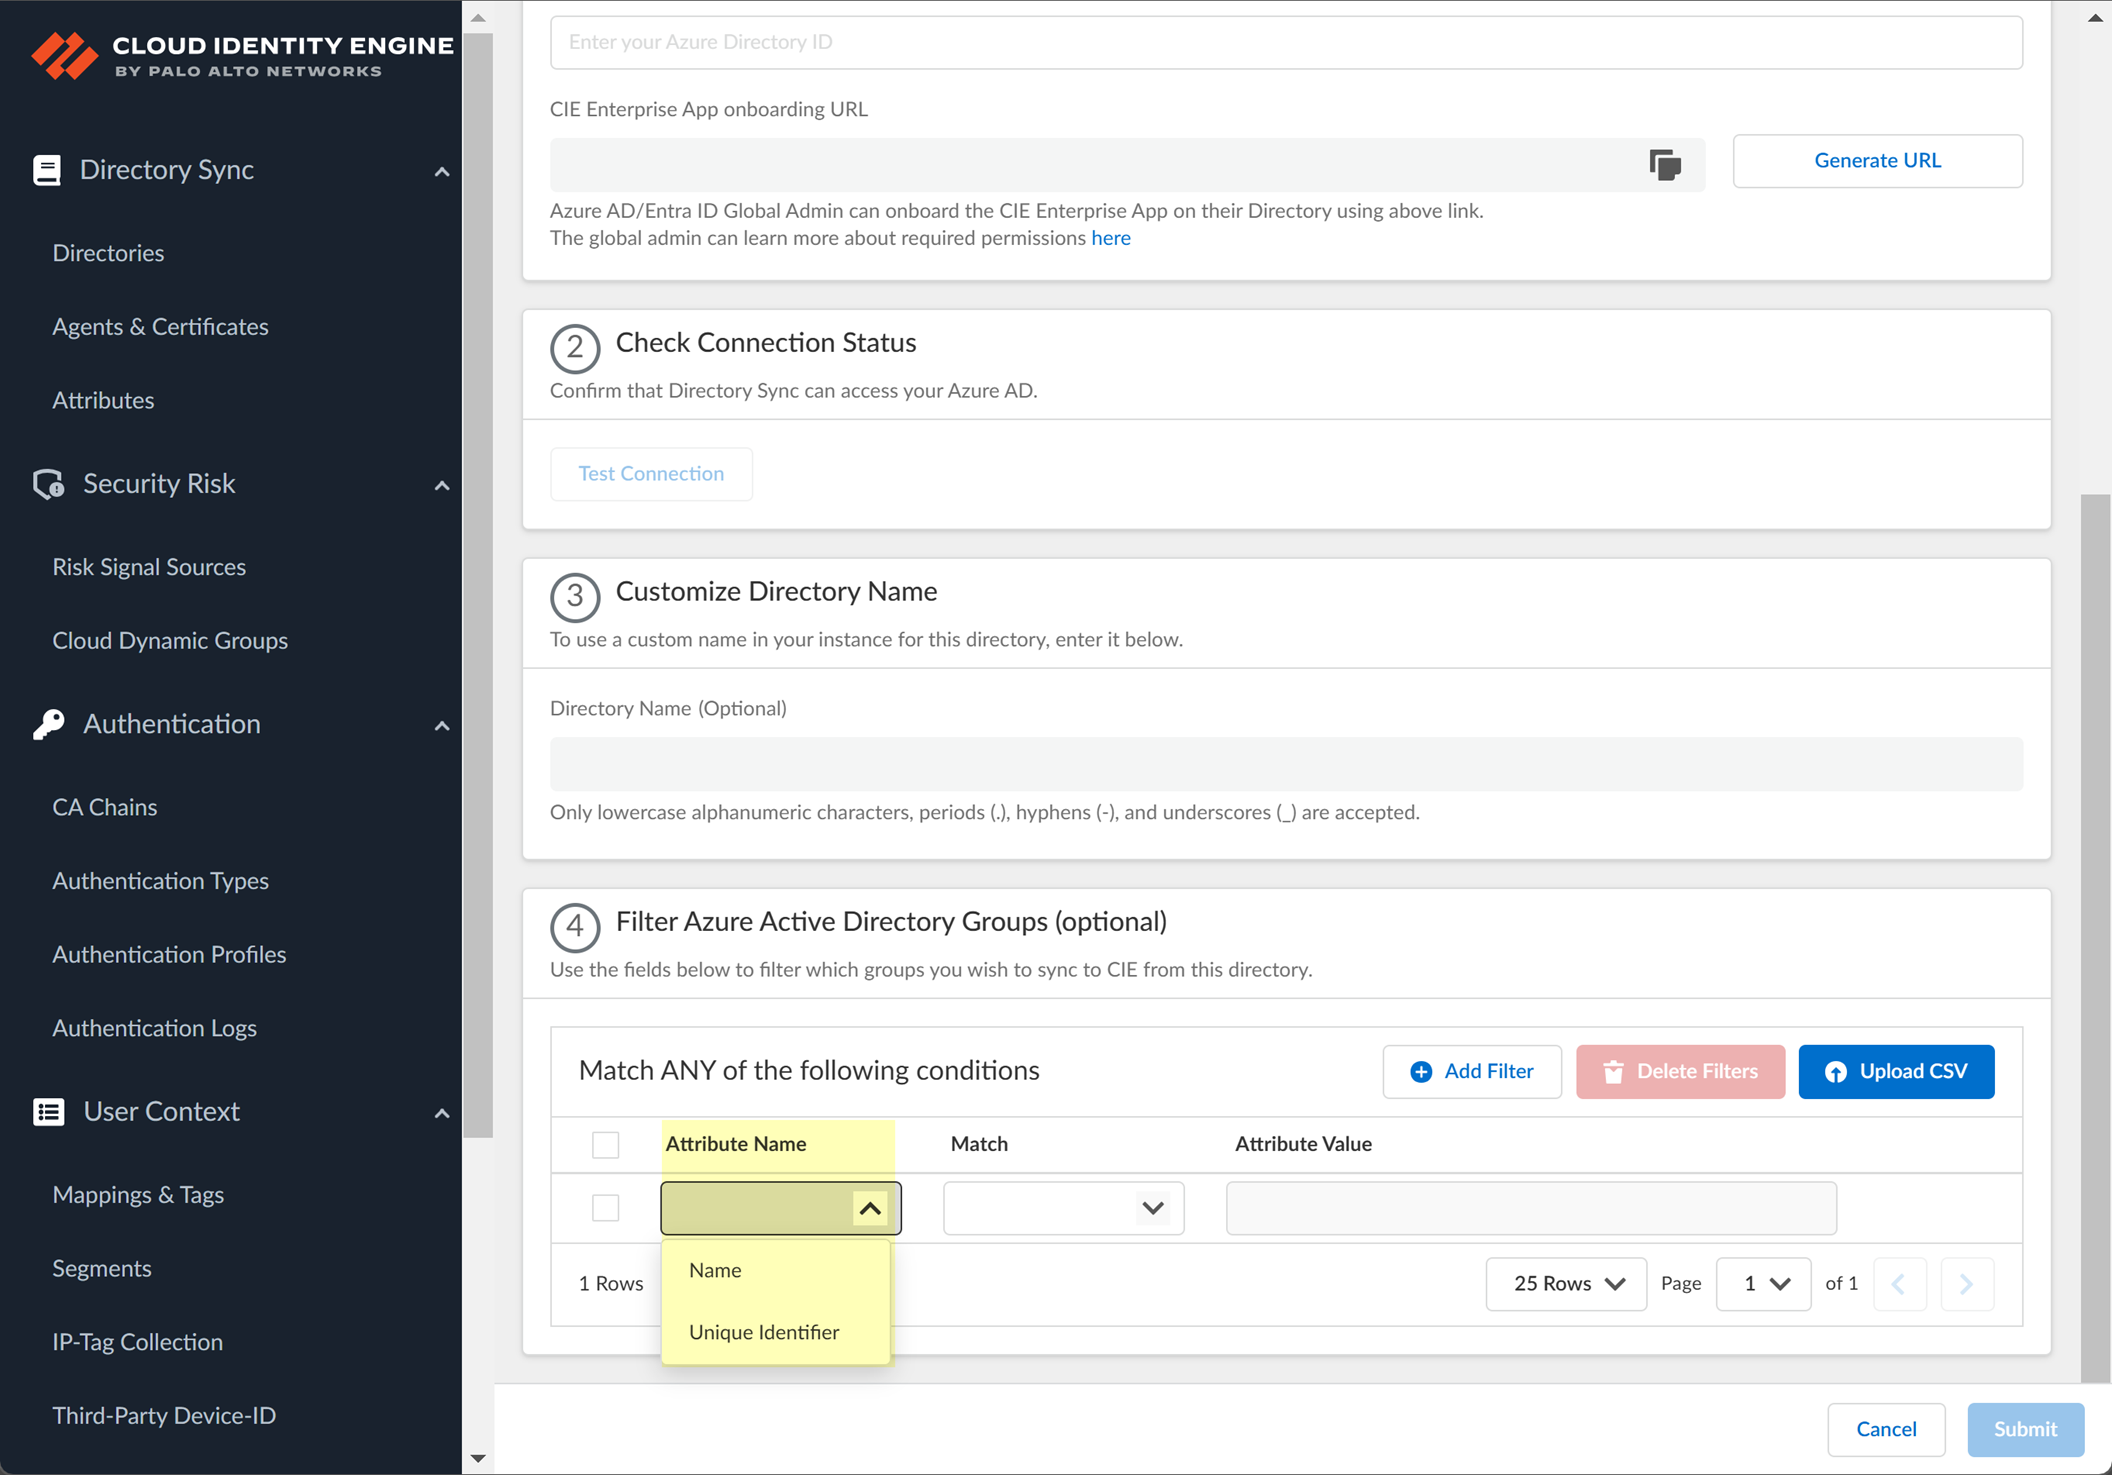
Screenshot showing the option to filter Azure AD groups by attribute.
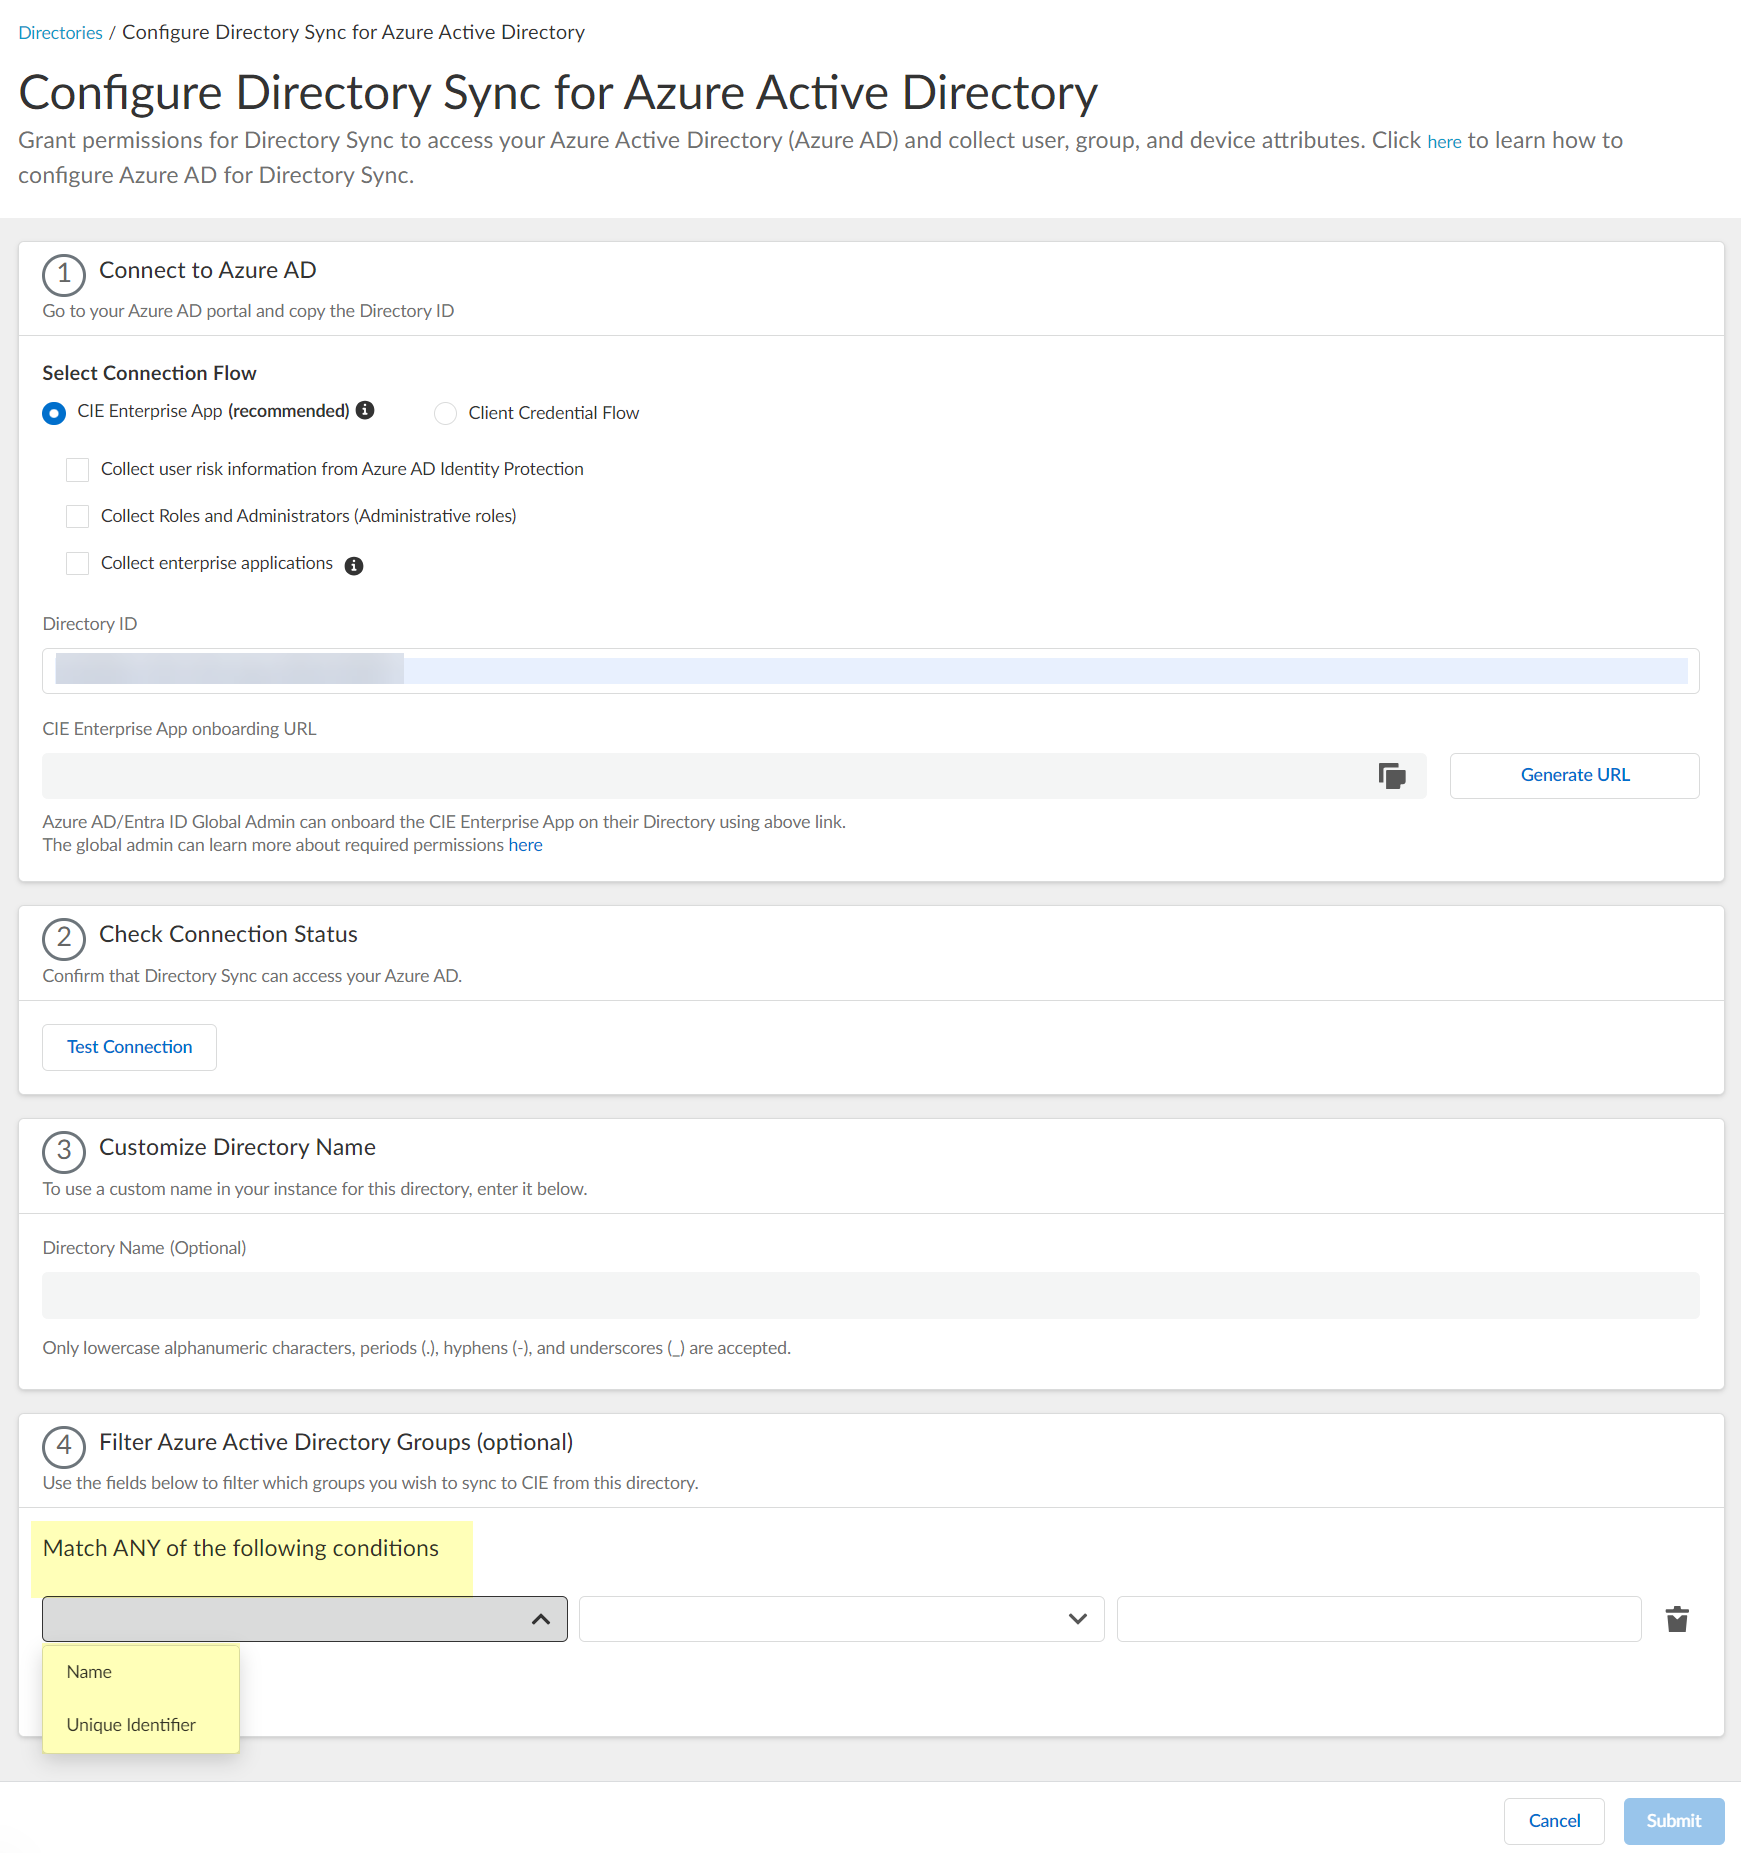
Screenshot showing the attribute, operator, and value fields for configuring Azure AD group filters.
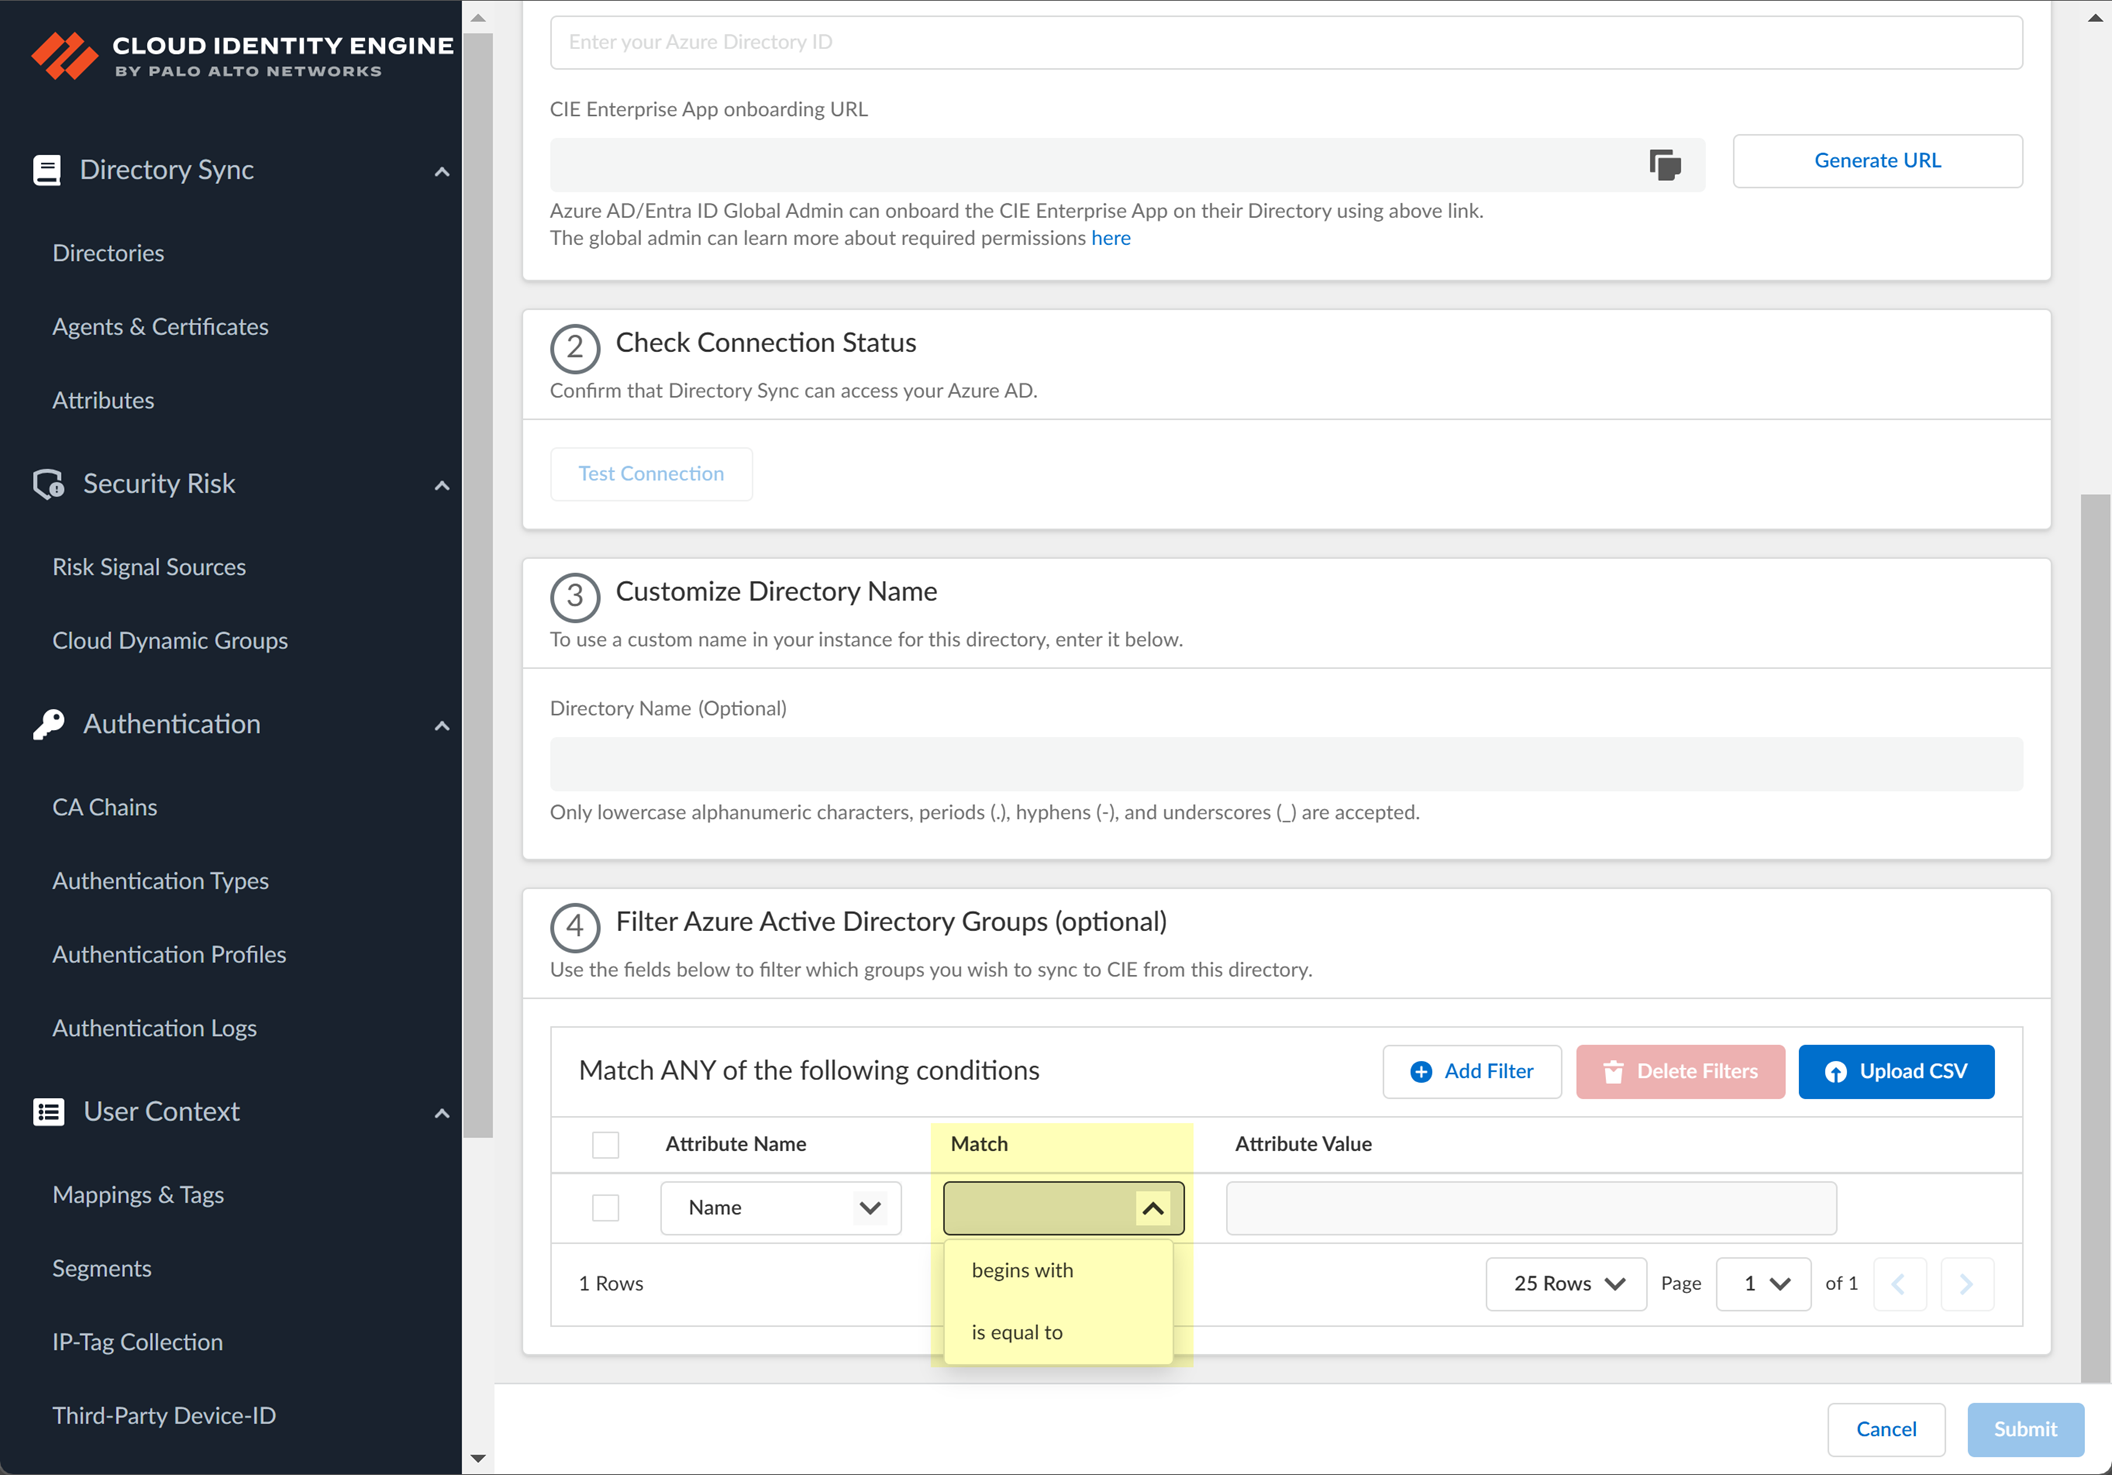
Screenshot showing the available operators for filtering Azure AD groups by name or identifier.
Screenshot showing the field to enter the value for Azure AD group filtering.
- Select the attribute (Name or Unique Identifier).
- Select the filter method (operator).
-
Enter the search query (the value to match).
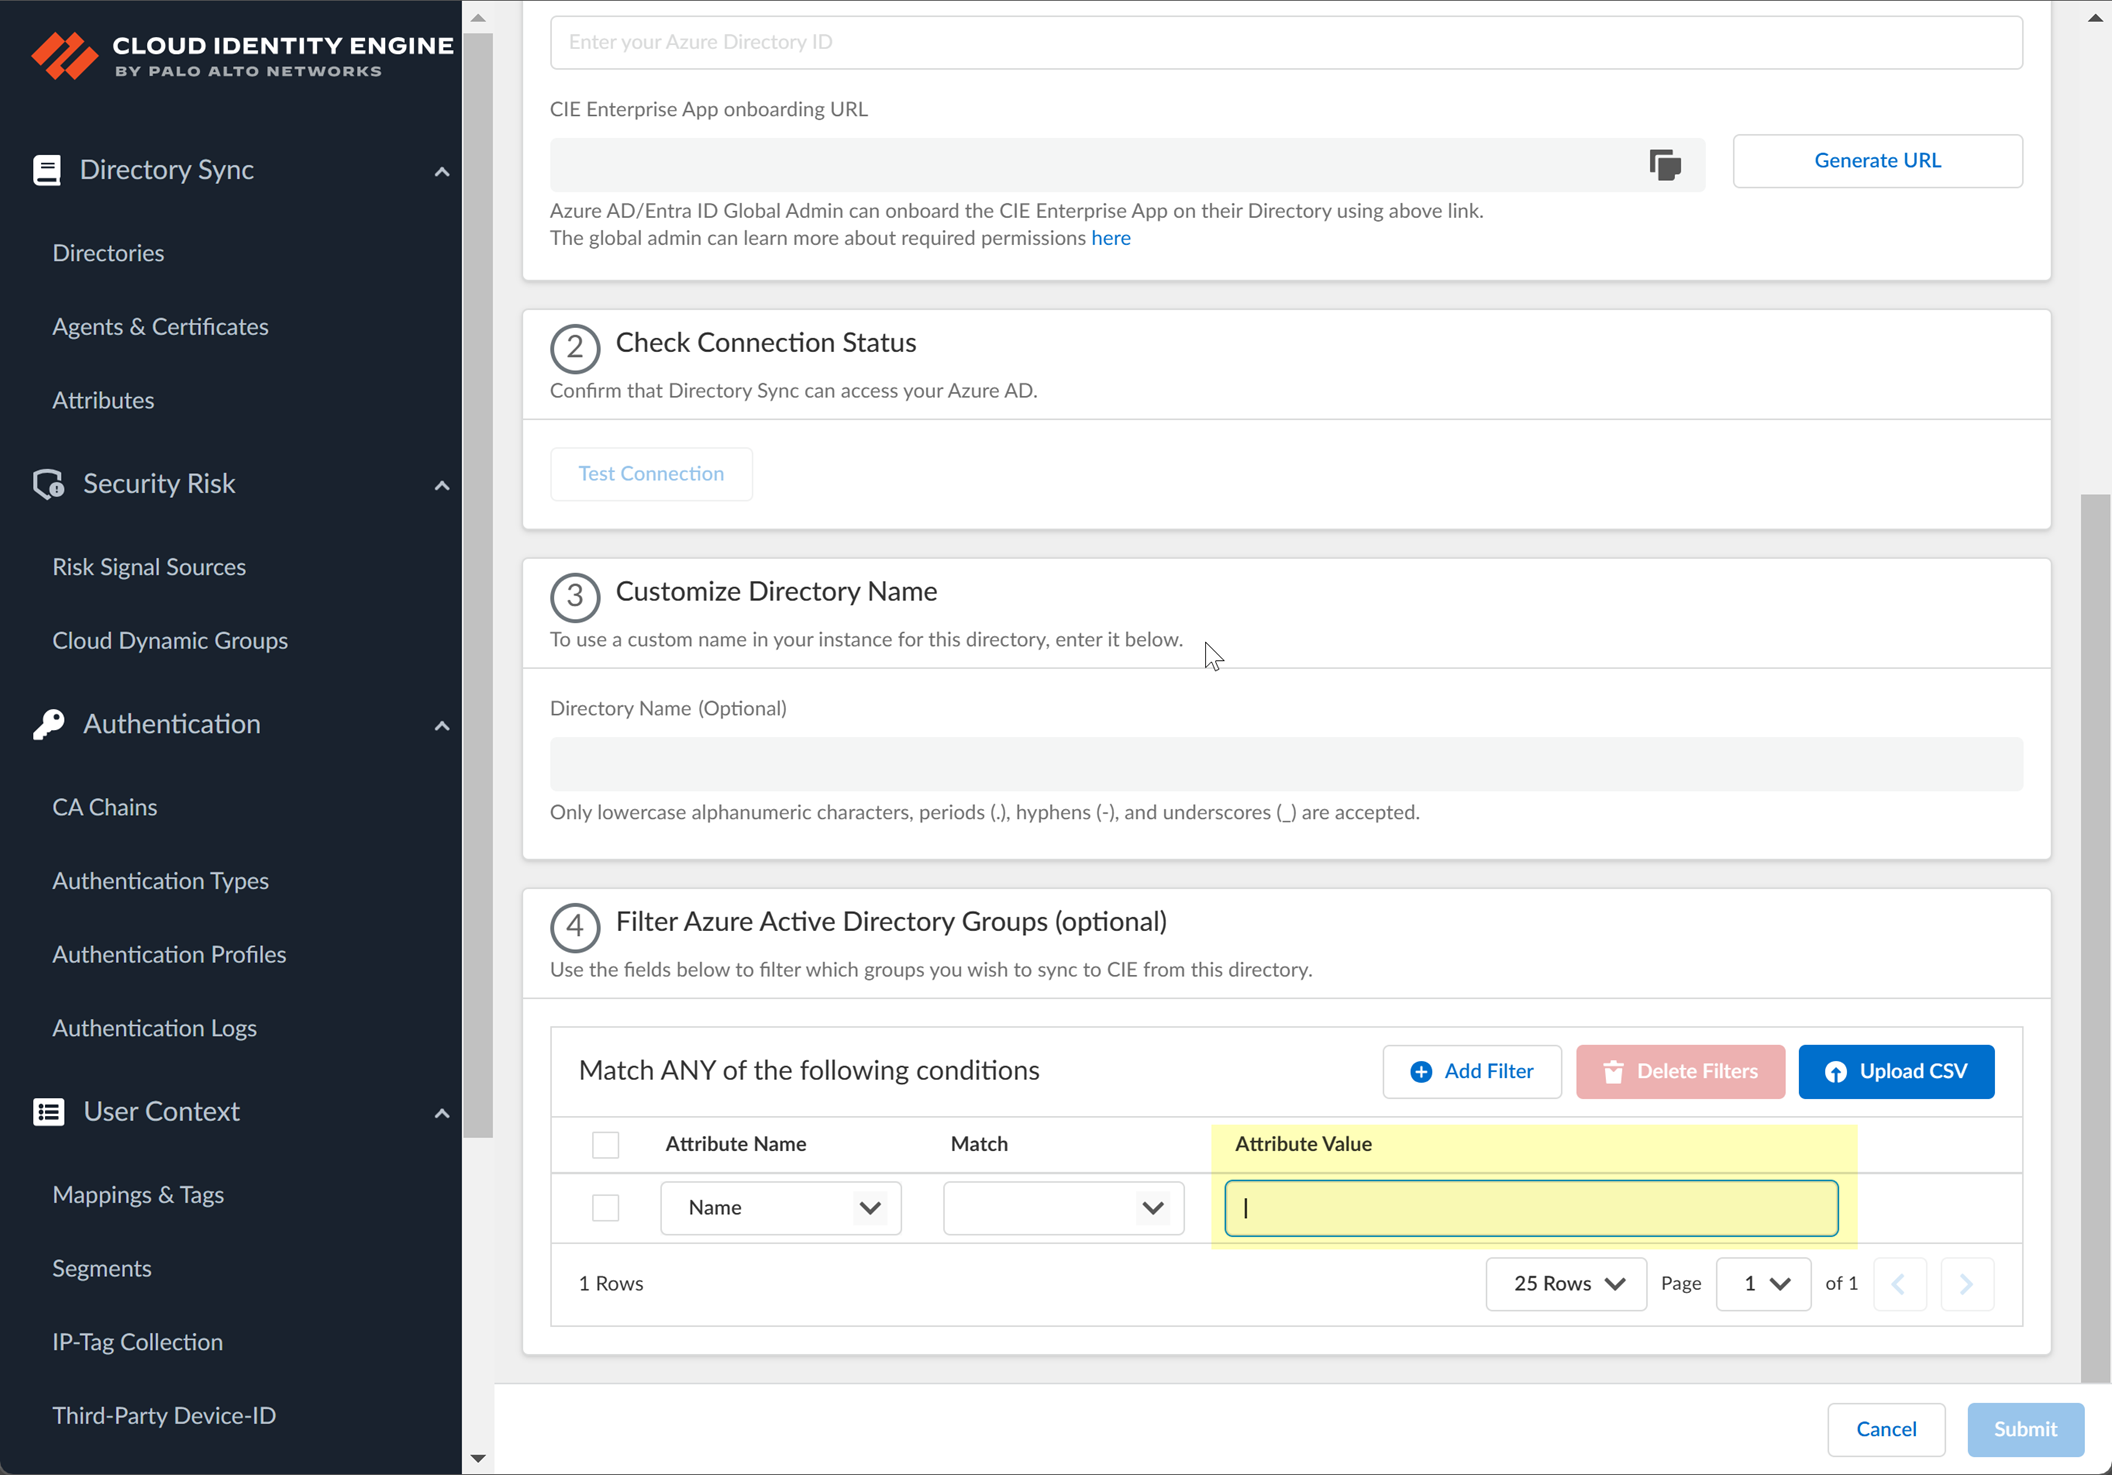
Screenshot showing the field for the group filter search query.
Screenshot showing the configured group filter criteria.
-
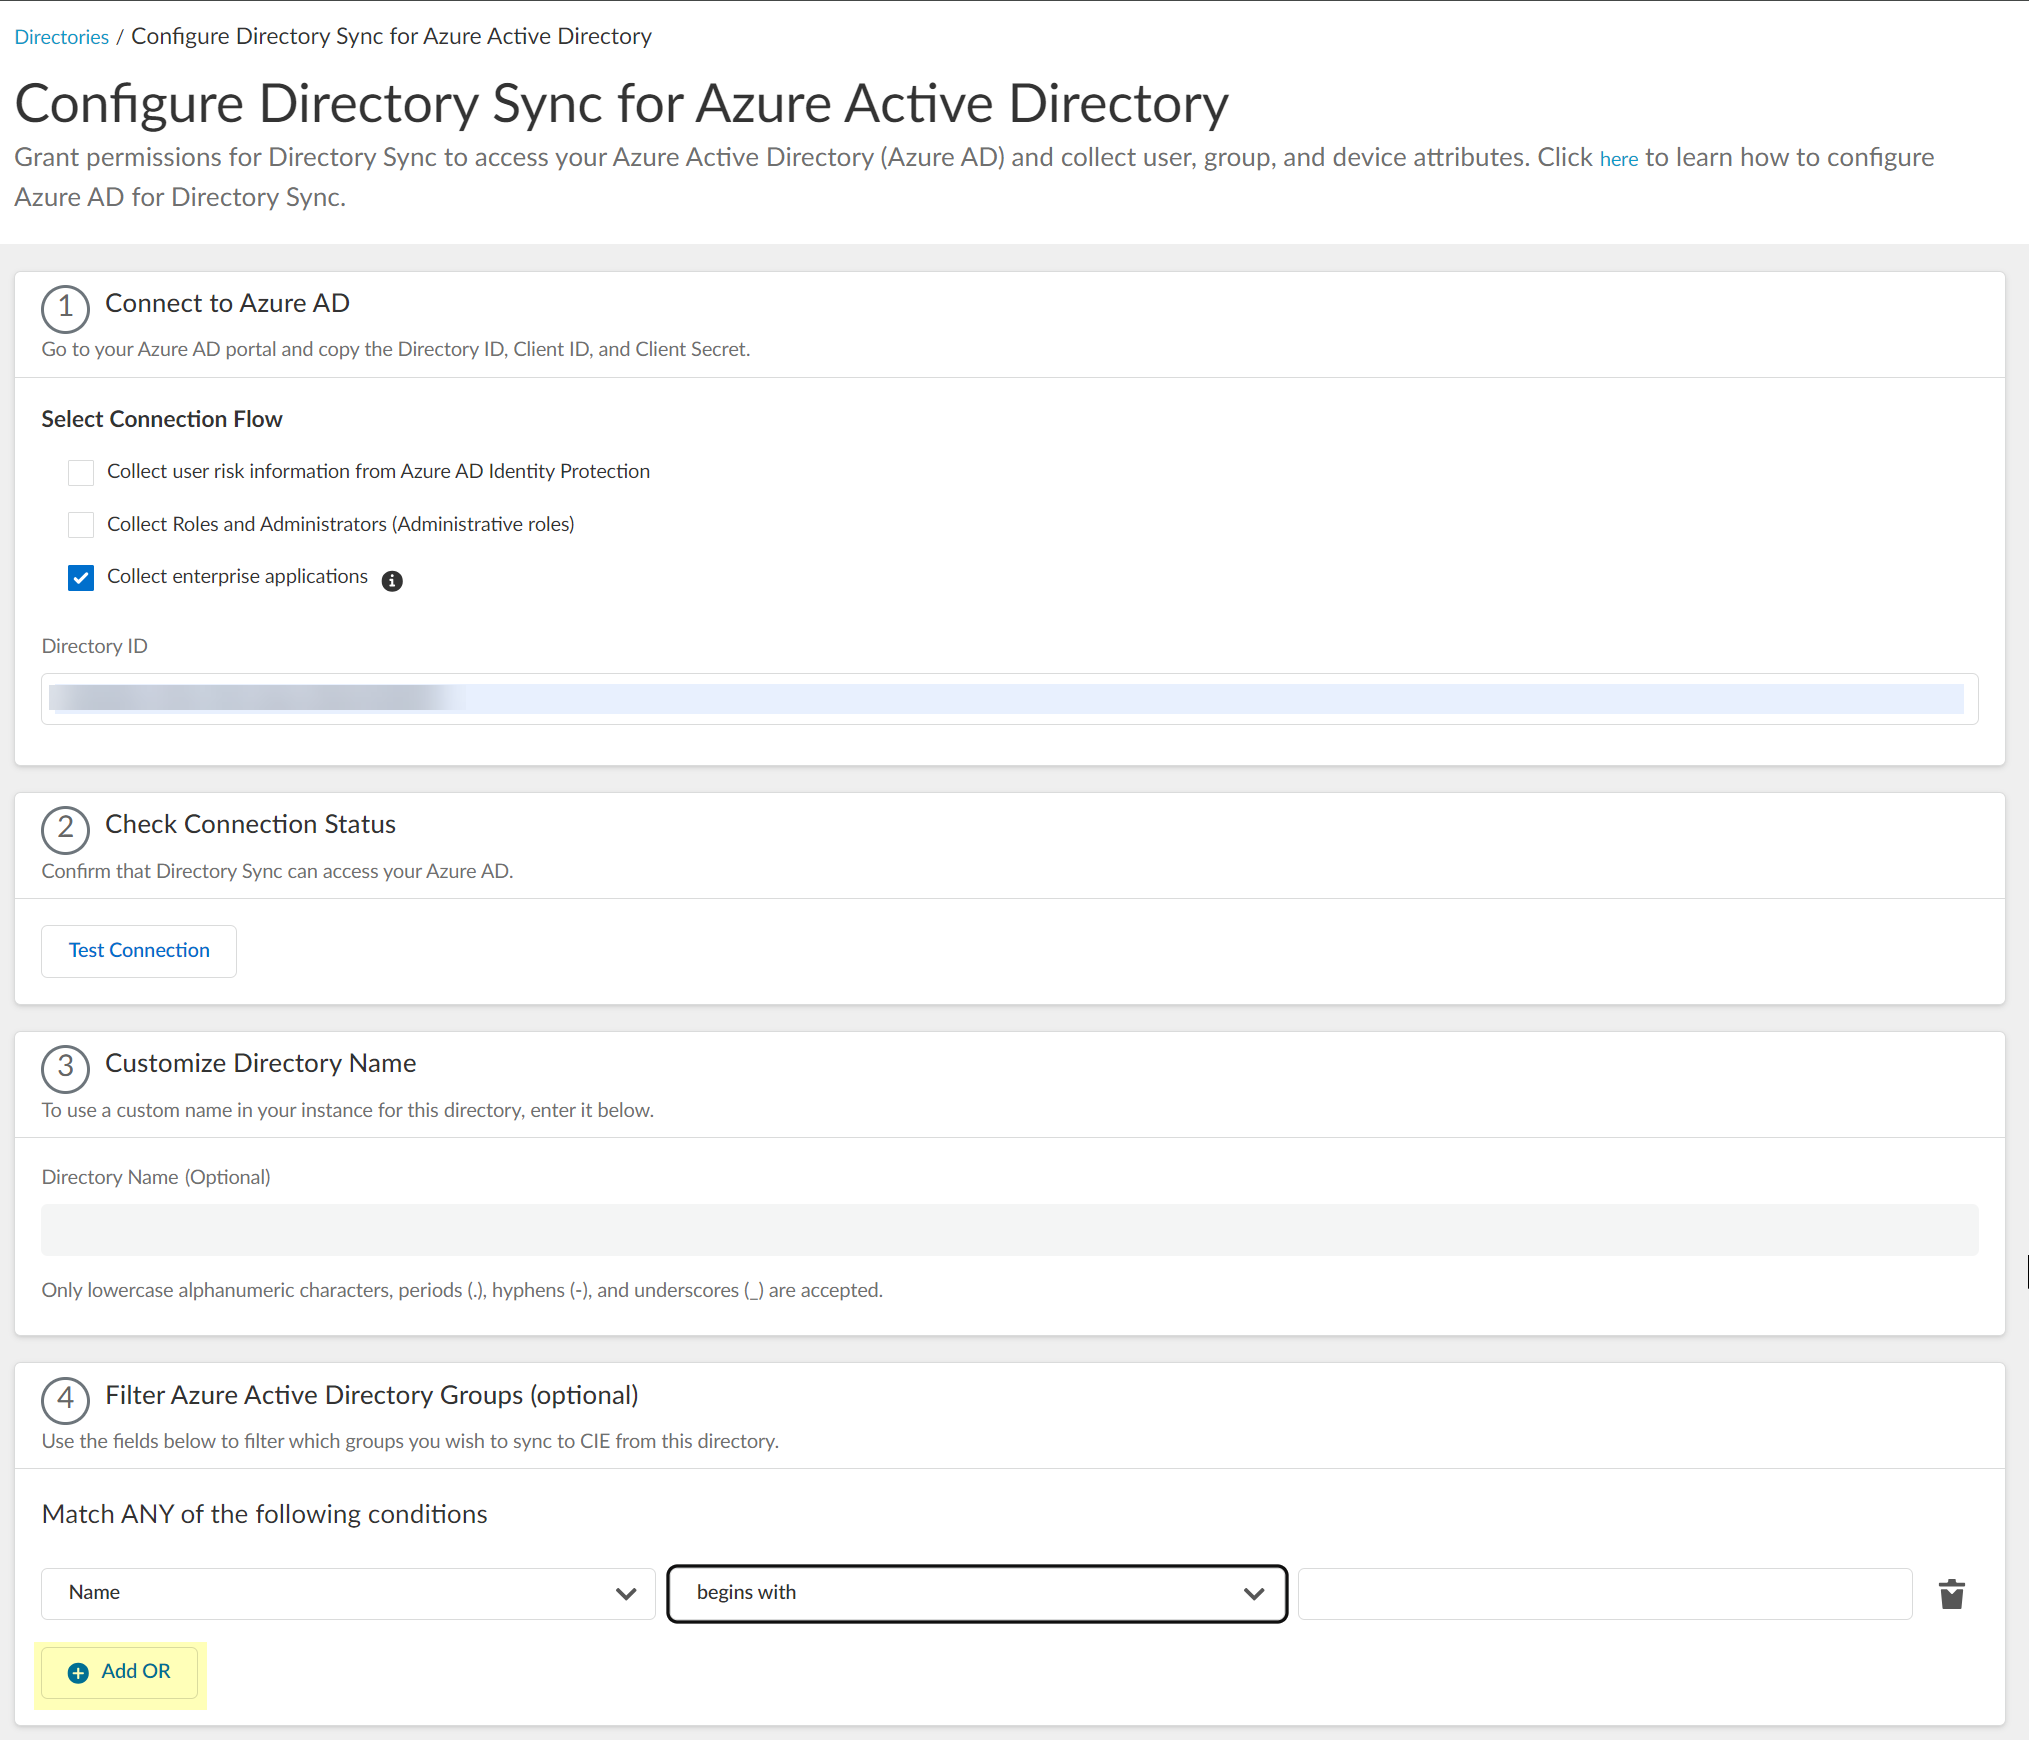
(Optional) Add additional OR/AND filters for more complex filtering logic.
Screenshot showing the options to add multiple criteria using AND/OR logic for group filters.
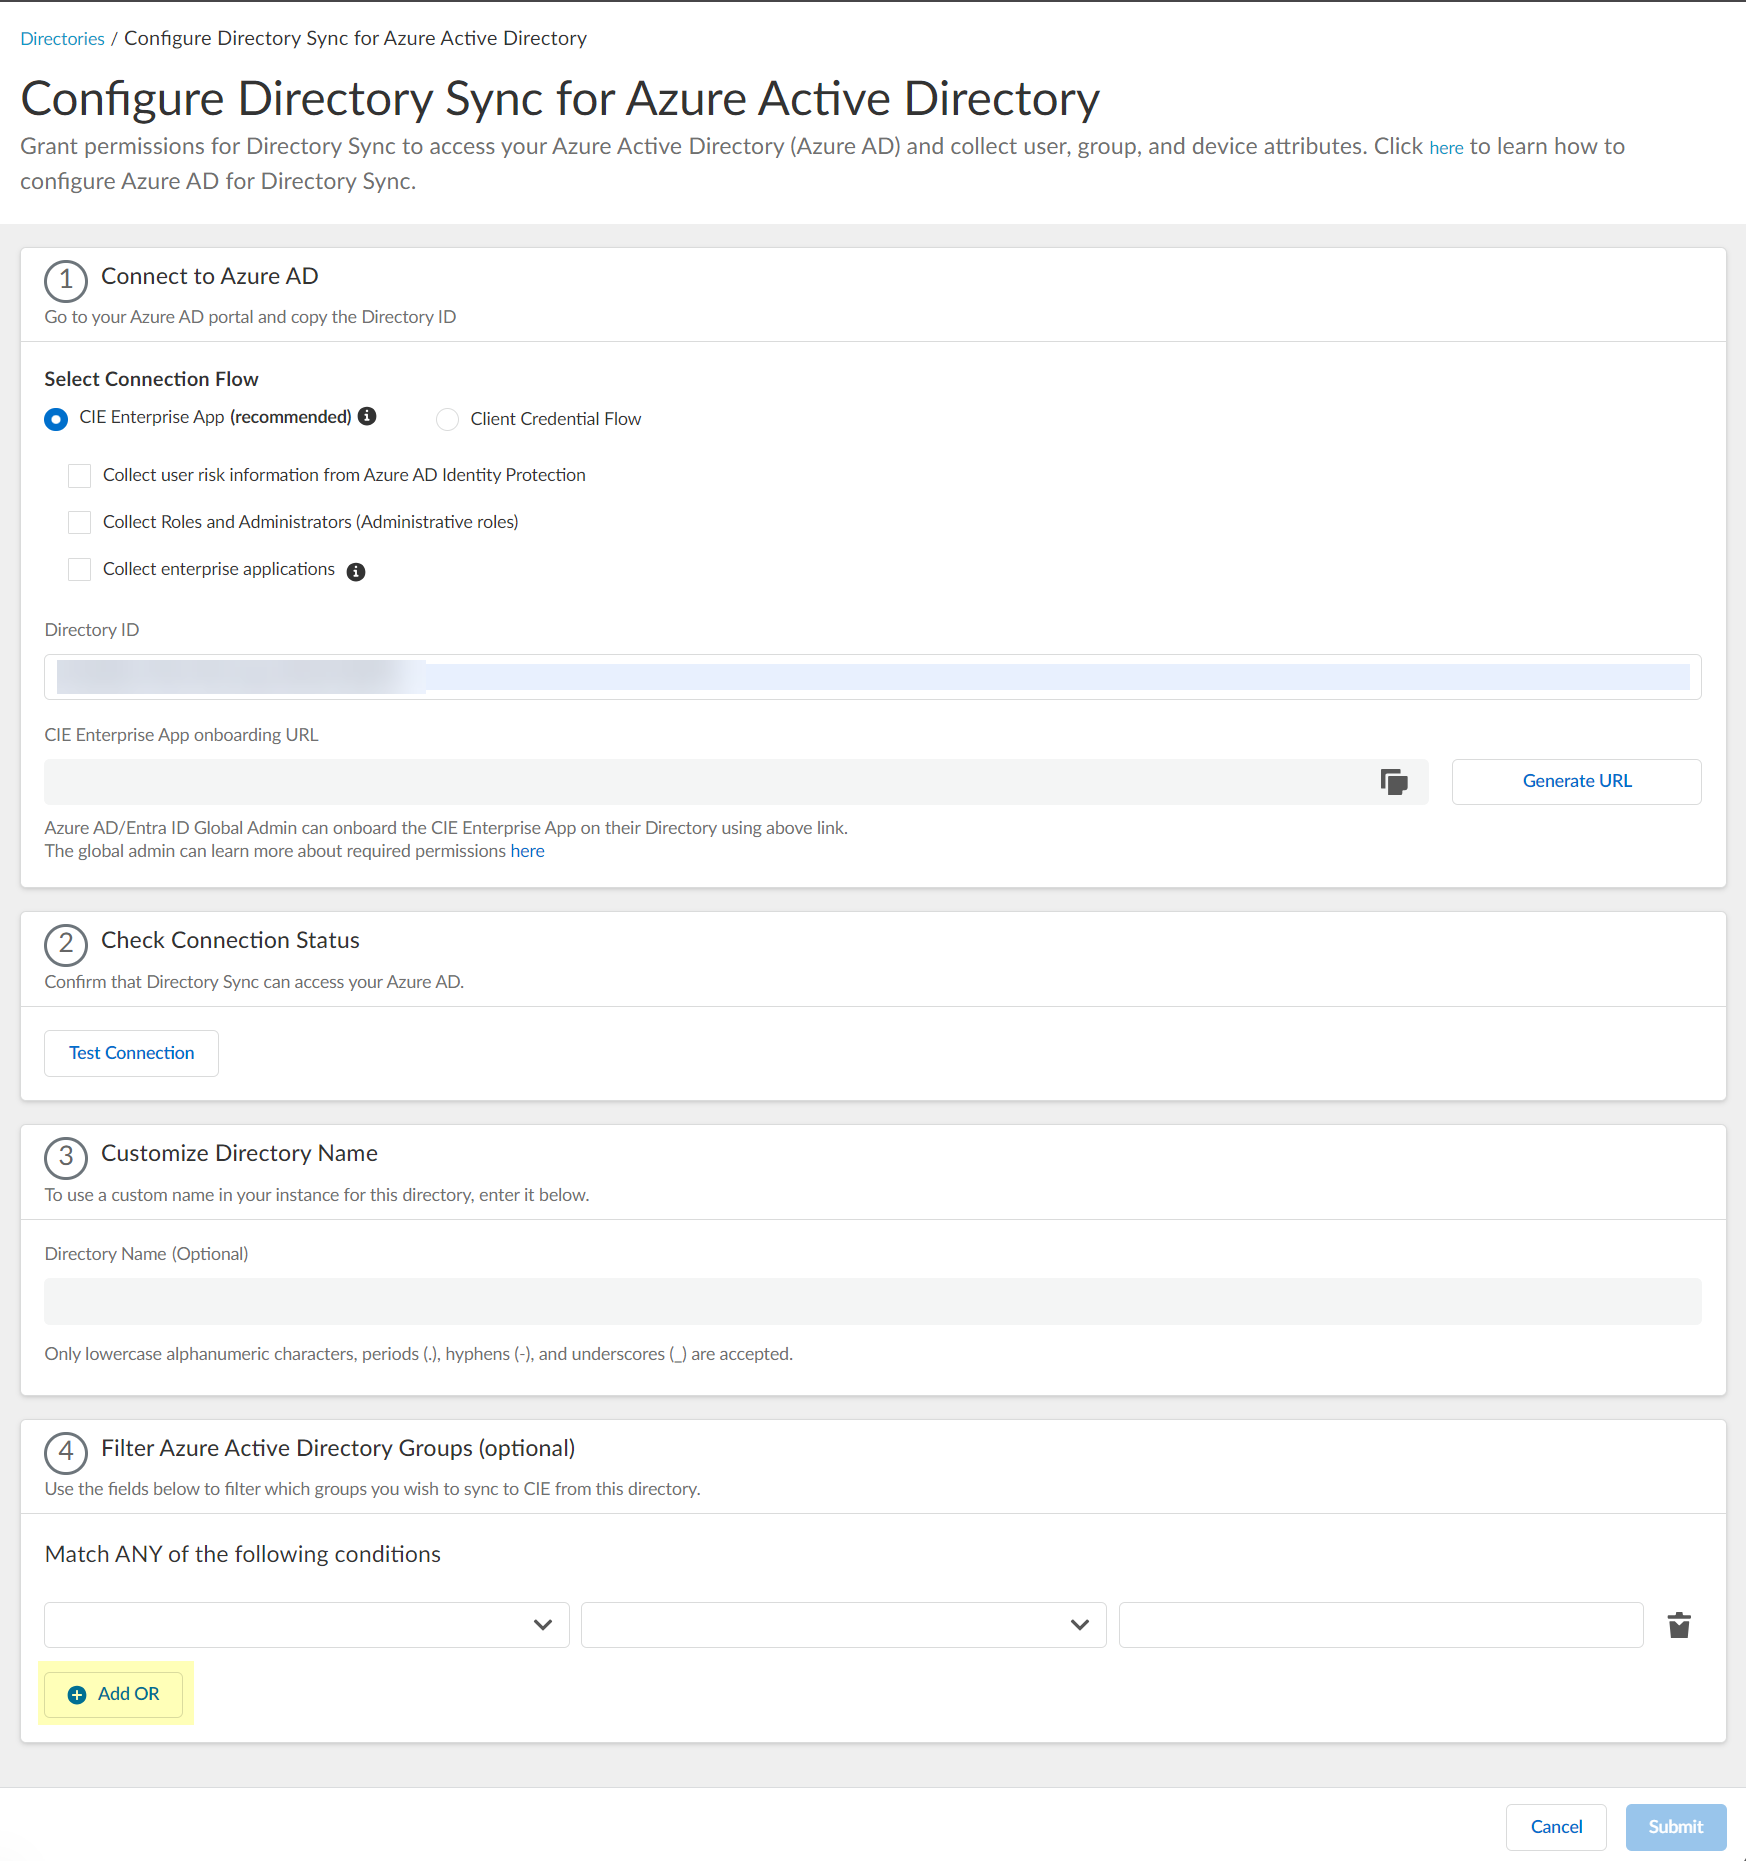
Screenshot showing multiple criteria configured for Azure AD group filtering.
- Click "Submit" to save the Azure AD directory configuration in CIE.
Configure Azure Using the Client Credential Flow (Recommended Alternative)
This method uses a service principal (application registration) in Azure AD to grant CIE read-only access via client ID and secret. It is the recommended approach for better security and granular control, as it doesn't require an interactive user login or Global Administrator role for ongoing syncs or configuration changes.
- Ensure your CIE tenant is activated.
-
Grant necessary permissions in the Azure Portal: Navigate to Azure Active Directory > App registrations > New registration.
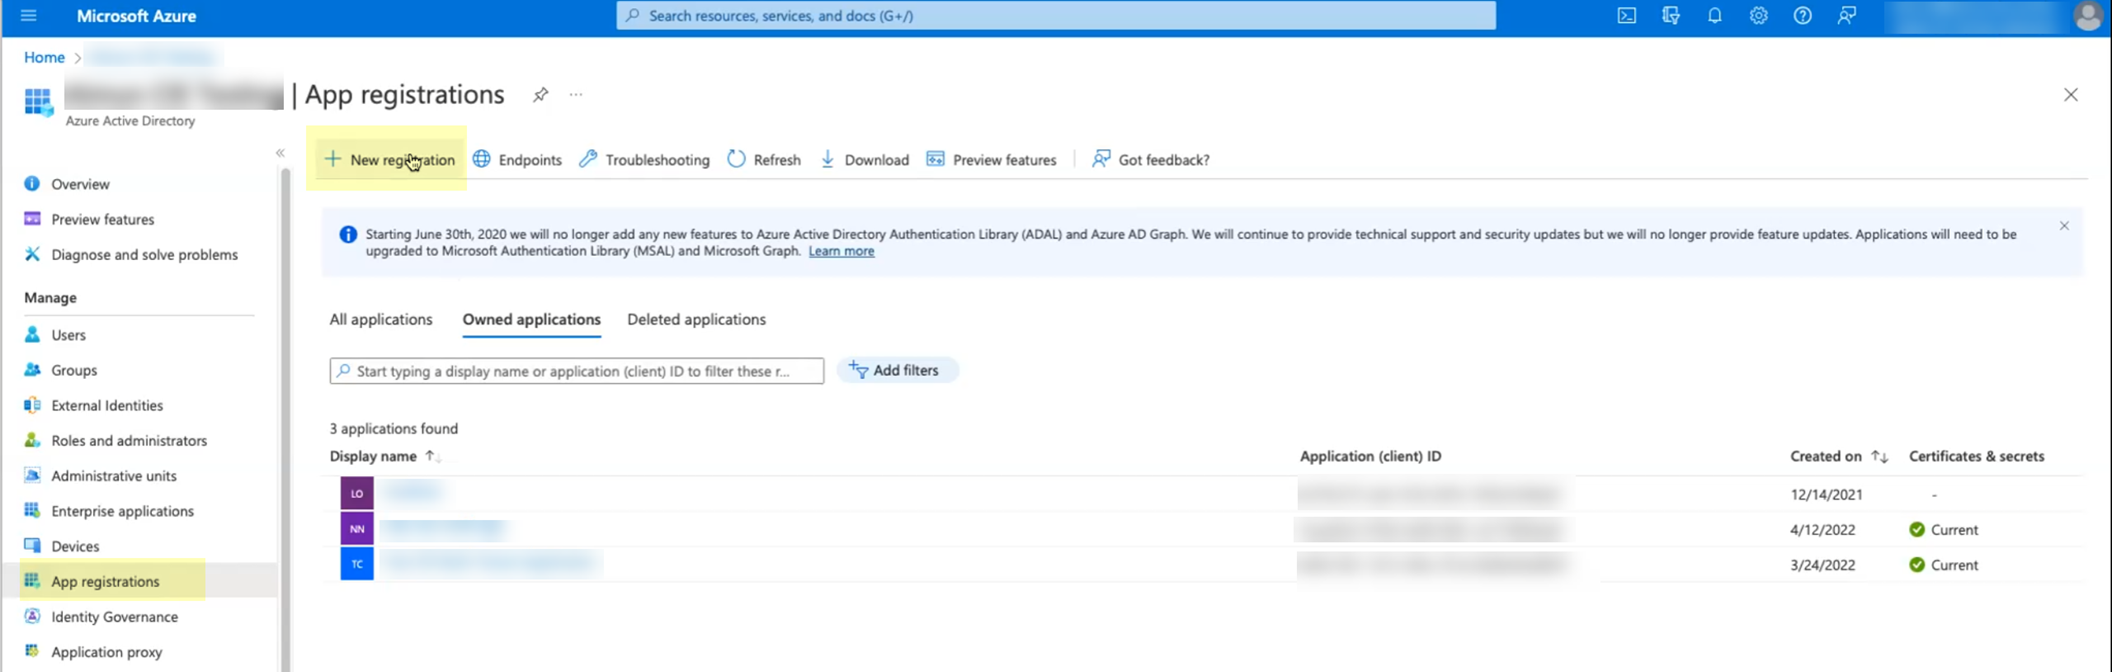
Screenshot showing the App Registrations section in the Azure Portal.
-
Enter a Name for the application registration (e.g.,
PaloAlto-CIE-DirectorySync
) and click "Register".
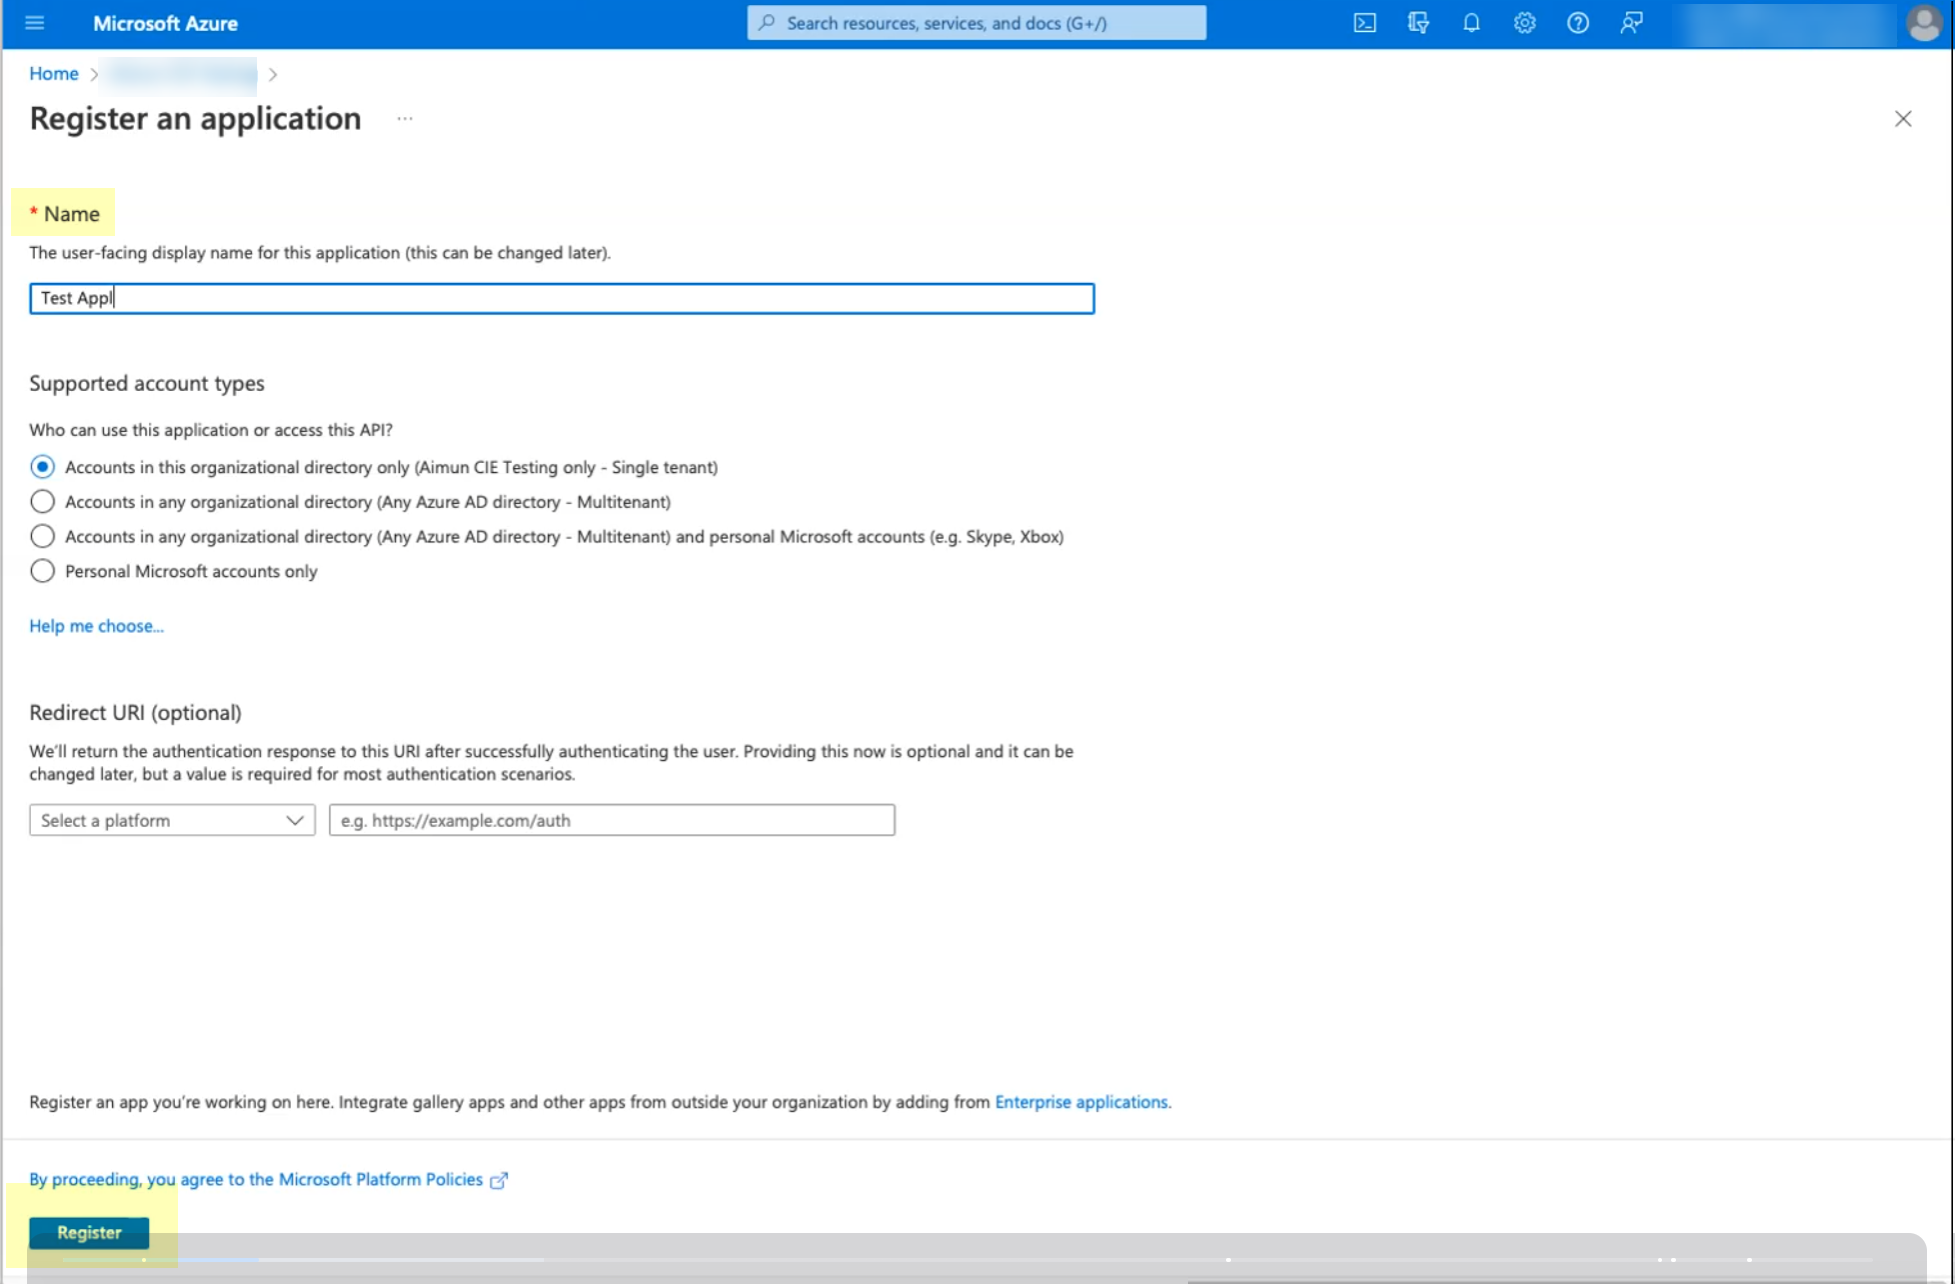
Screenshot showing the New registration details page in Azure Portal.
-
Once created, go to "API permissions" in the left menu and click "Add a permission".
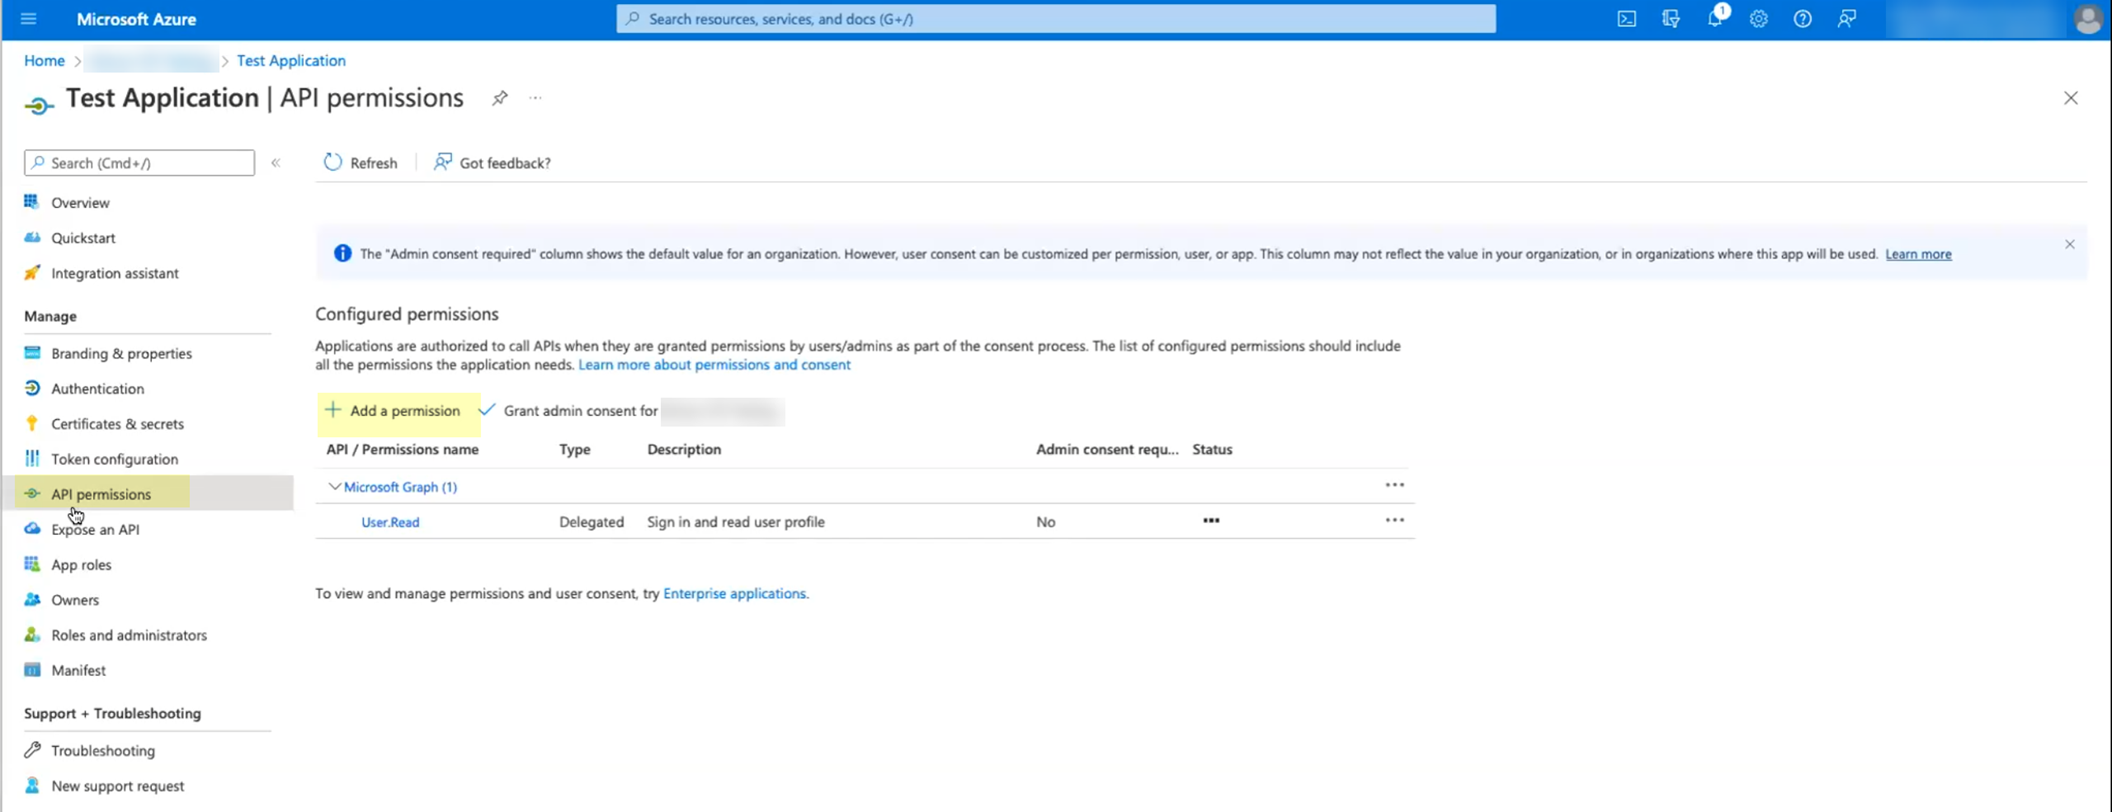
Screenshot showing the API permissions section for an Azure app registration.
-
Select "Microsoft Graph", then choose "Application permissions".
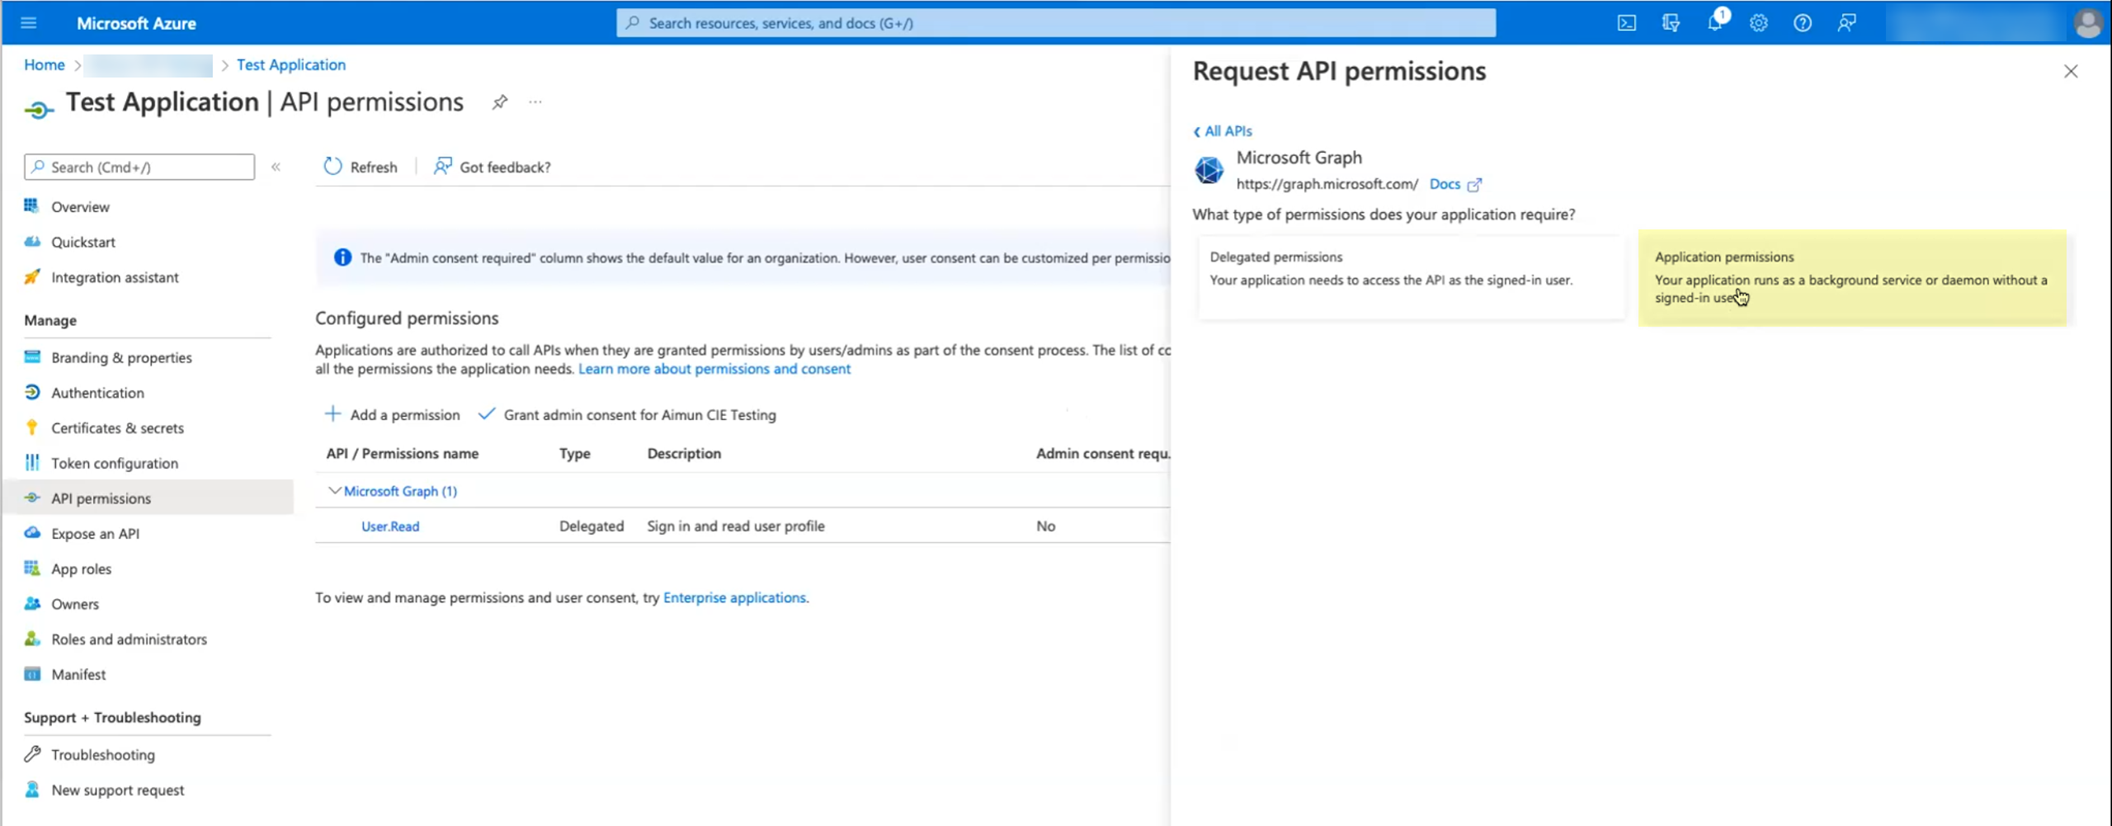
Screenshot showing the options to select permissions from Microsoft Graph.
-
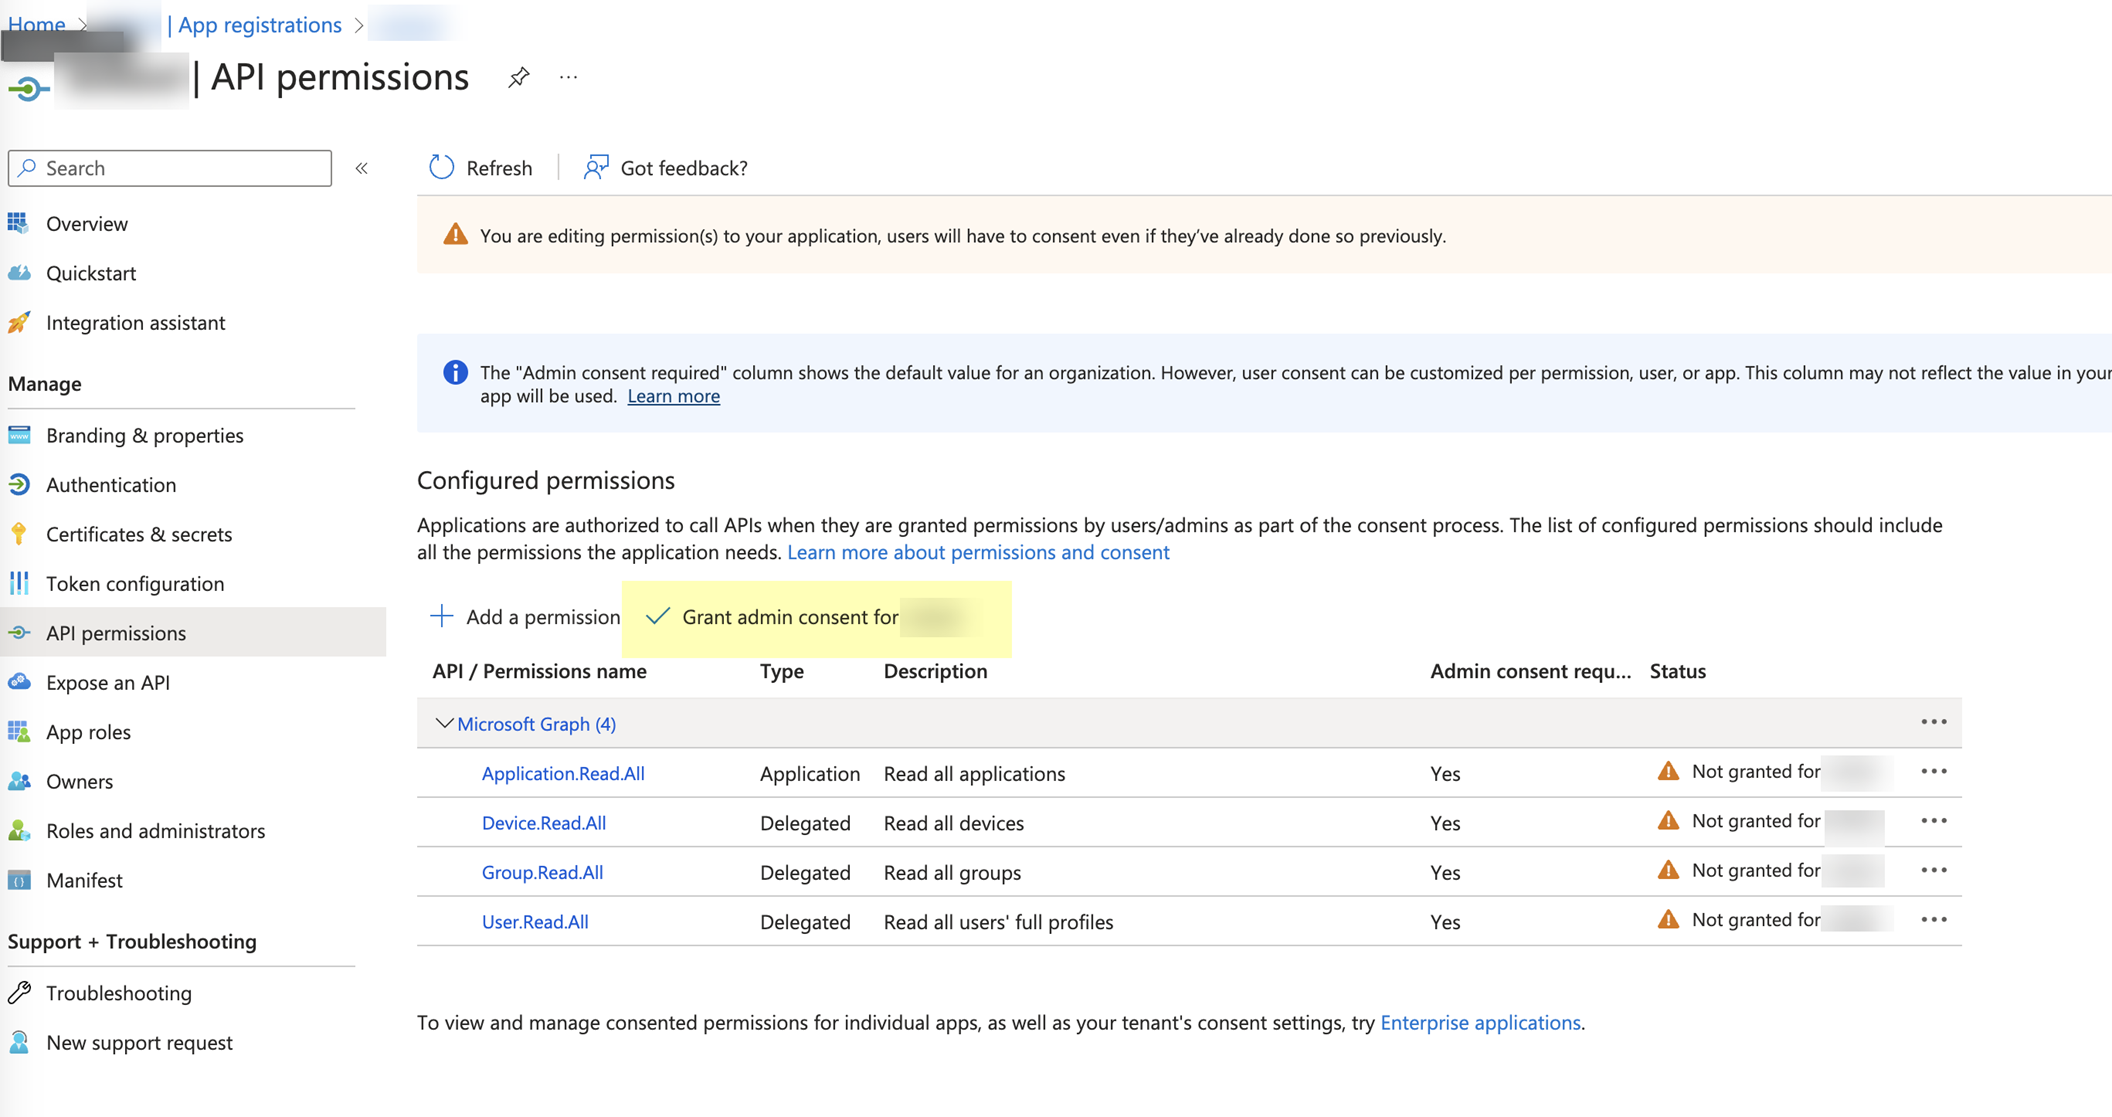
Select the following required permissions (check the boxes):
Device.Read.All, GroupMember.Read.All, User.Read.All
. Click "Add permissions".
Important Point: Minimum required Application permissions for basic user/group sync are GroupMember.Read.All and User.Read.All . Device.Read.All is needed for device collection. Alternatively, Directory.Read.All grants comprehensive read access and can replace the need for individual permissions like User.Read.All, GroupMember.Read.All, Device.Read.All. User.Read (Delegated) is typically not needed for Client Credential Flow.
-
Click "Grant admin consent for [Your Tenant Name]" and confirm by clicking "Yes". This requires an account with Global Administrator or Privileged Role Administrator role.
Screenshot showing the button to grant admin consent for the configured permissions in Azure.

Screenshot of the confirmation dialog for granting admin consent.
-
Enter a Name for the application registration (e.g.,
PaloAlto-CIE-DirectorySync
) and click "Register".
-
Collect necessary information from the Azure Portal for CIE configuration:
-
Still within the App registration, go to "Certificates & secrets" in the left menu, then click "New client secret".
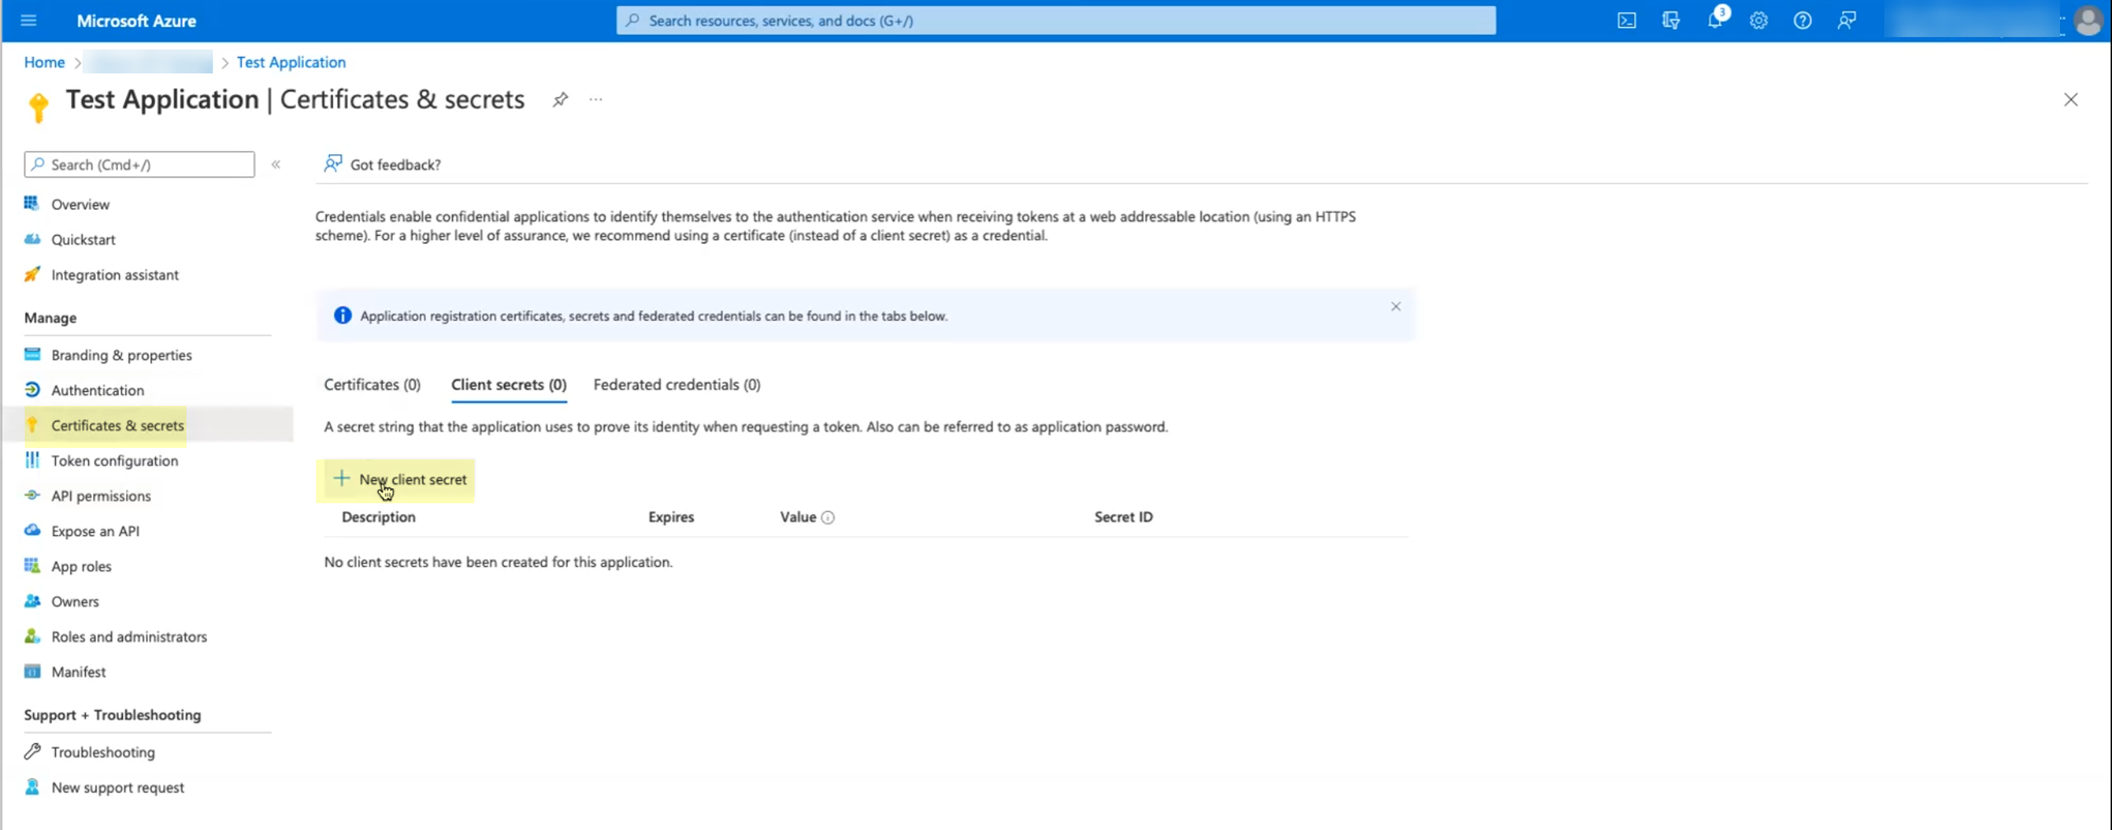
Screenshot showing the Certificates & secrets section in Azure Portal.
Screenshot showing the New client secret page in Azure Portal.
-
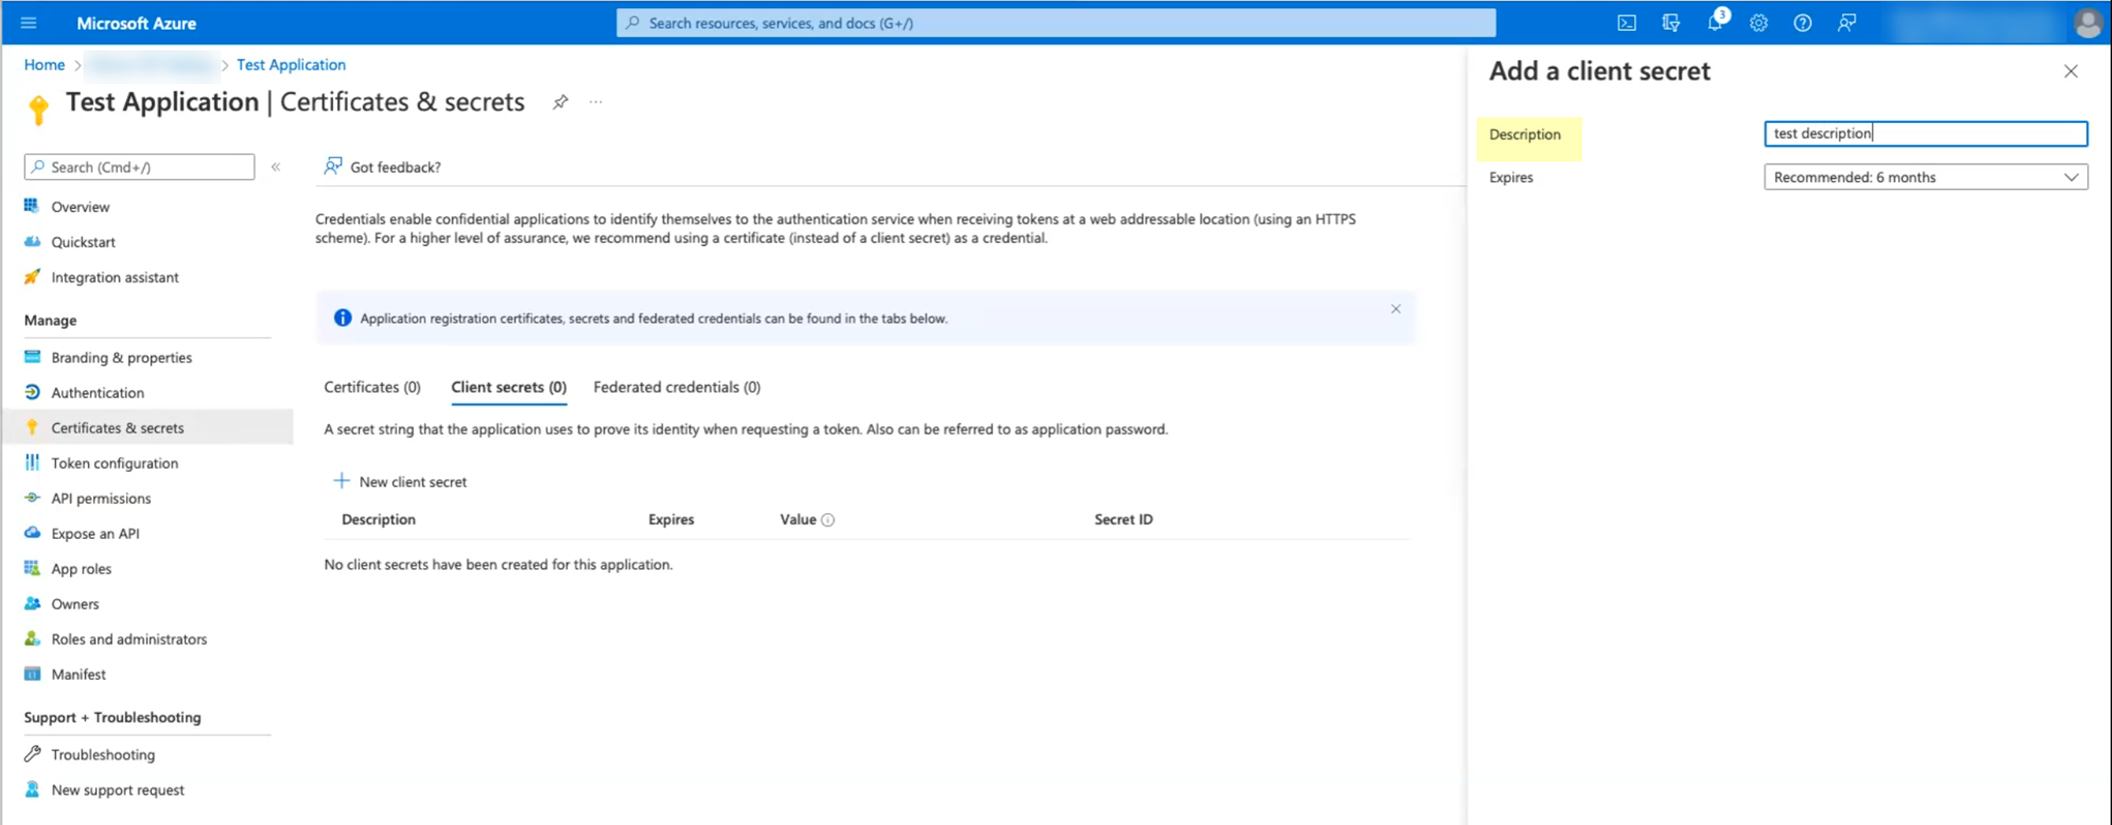
Enter a Description (e.g.,
CIE Client Secret
), select an expiration duration, and click "Add".
Screenshot showing the field to enter the client secret description.
-
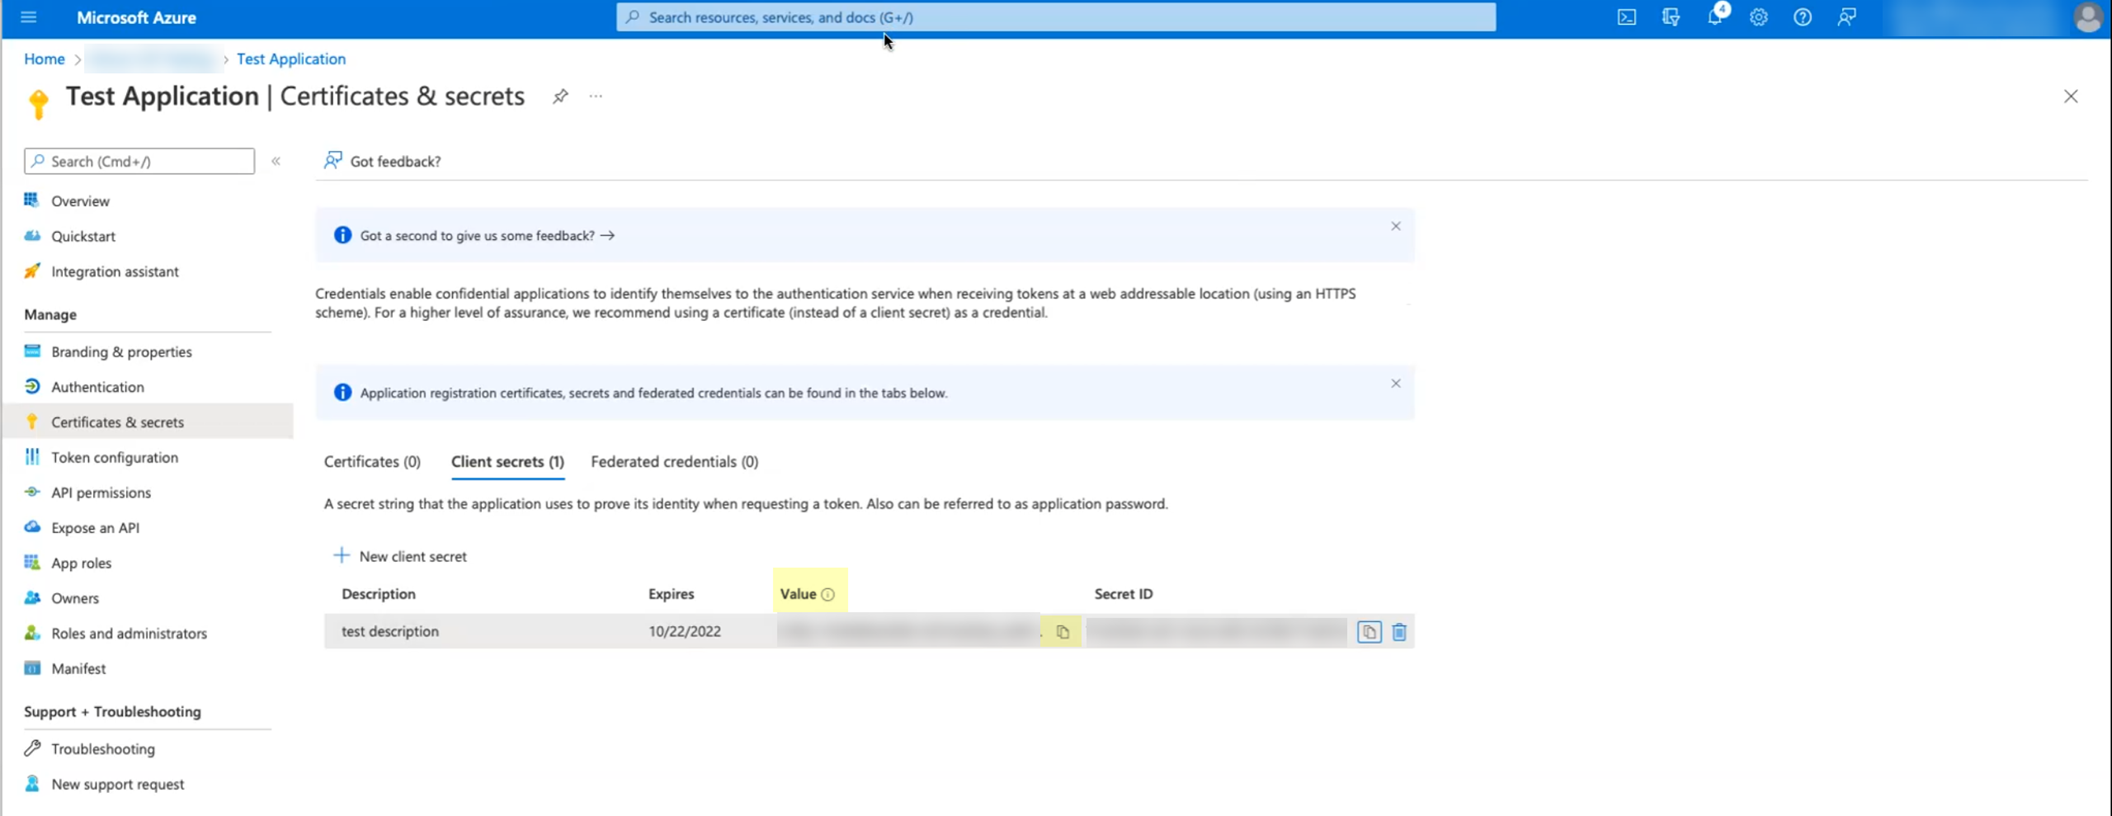
Copy the
Value
of the secret.
Screenshot showing the generated client secret value. Copy this securely as it's shown only once.
-
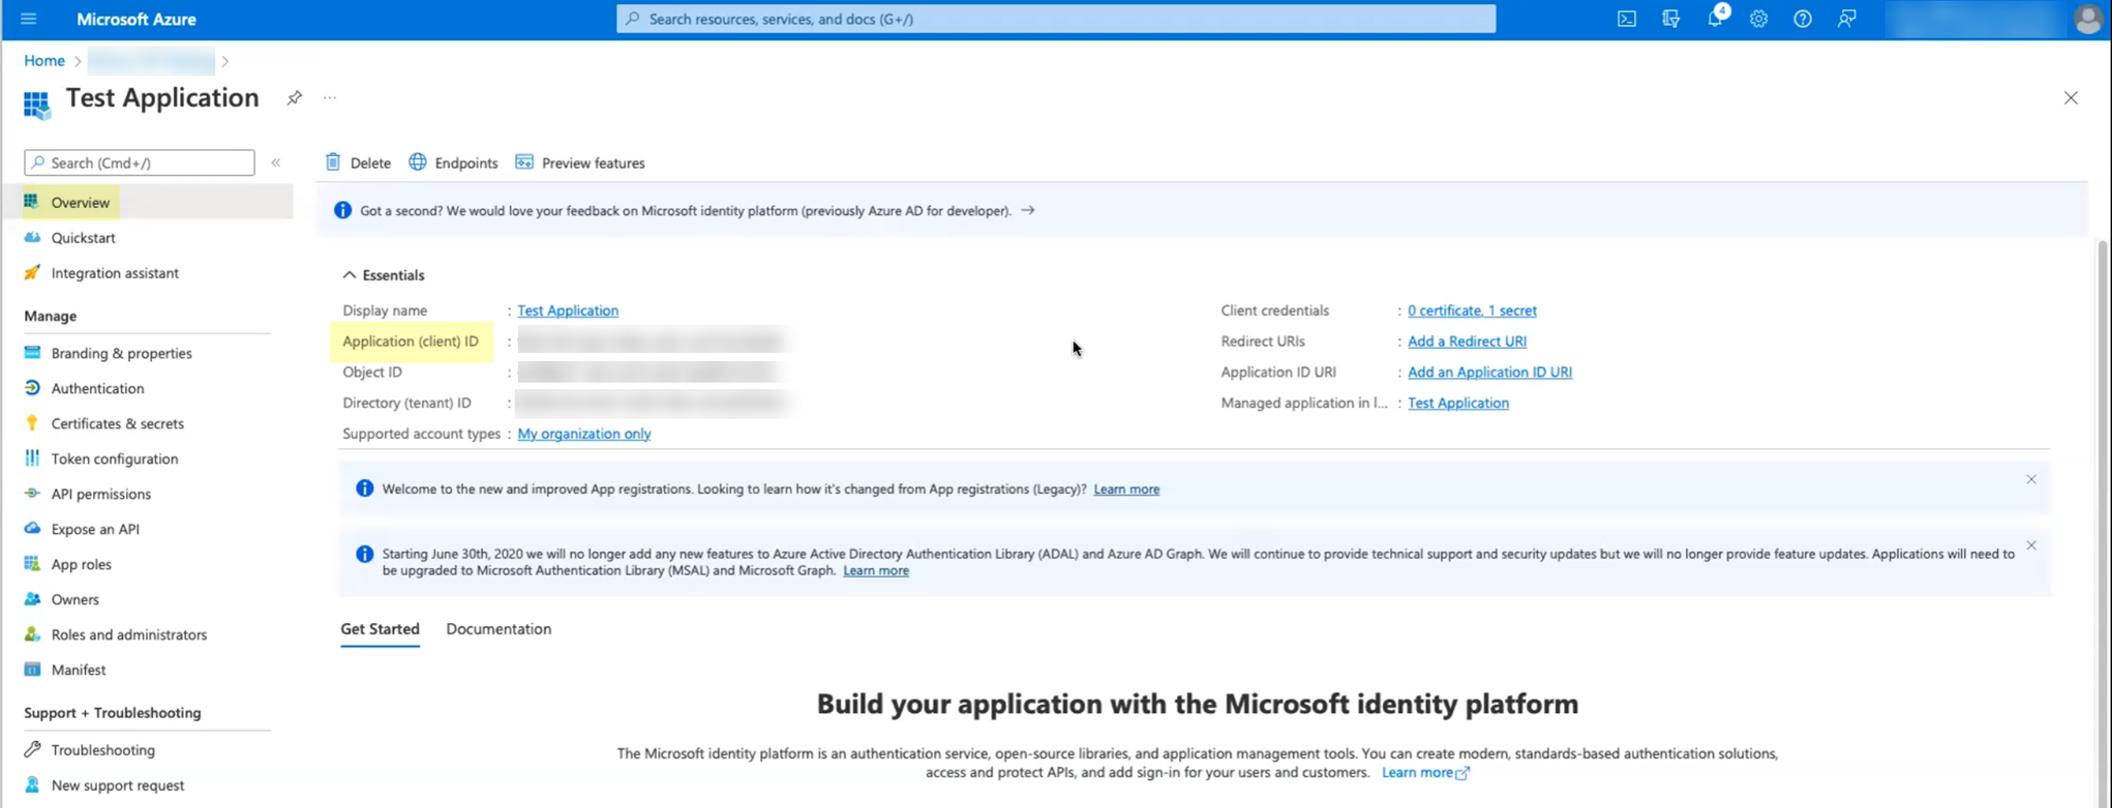
Go back to the "Overview" section of the App registration and copy the
Application (client) ID
.
Screenshot highlighting the Application (client) ID in the Azure Portal overview.
-
Copy the
Directory (tenant) ID
from the Overview page as well.
Screenshot highlighting the Directory (tenant) ID in the Azure Portal overview.
Gotcha!: Immediately copy the 'Value' of the secret displayed. This value is shown only ONCE and is needed for CIE configuration. Keep track of the client secret expiration date; you must configure a new one and update CIE when it expires.
-
Still within the App registration, go to "Certificates & secrets" in the left menu, then click "New client secret".
-
Add the Azure AD directory in CIE: Log in to the CIE app > Directories > Add New Directory > Set Up Azure.
Screenshot showing the option to set up an Azure directory in the CIE app.
-
Select
Client Credential Flow
.
Screenshot showing the option to select Client Credential Flow for Azure connection.
- Select optional data collection (User risk, Roles, Enterprise applications) if you granted the corresponding permissions in Azure.
-
Enter the
Directory ID
(Tenant ID),
Client ID
(Application ID), and paste the
Client Secret Value
copied from Azure.
Screenshot showing fields for Directory ID and Client ID in CIE Azure configuration.
-
Click "Test Connection" to verify the credentials and permissions.
Screenshot showing the "Test Connection" button in the CIE app to verify connectivity to Azure AD using Client Credential Flow.
-
(Optional) Customize the
Directory Name
.
Screenshot showing the optional field to customize the Azure directory name in CIE.
-
(Optional) Configure filtering for Azure AD Groups, either by uploading a CSV or using attribute-based filters directly in the UI (same steps as with Enterprise App flow, see step 5 in the previous section).
Screenshot showing the option to filter Azure AD groups by attribute.
Screenshot showing attribute, operator, and value fields for filtering Azure AD groups.
Screenshot showing the search query field for Azure AD group filtering.
Screenshot showing multiple criteria configured for Azure AD group filtering.
- Click "Submit" to save the Azure AD directory configuration. CIE will initiate a sync to pull data from Azure AD.
Configure Okta Directory
Integrating Okta Directory provides CIE with access to user, group, and potentially application data (if using the Application-enabled integration) from your Okta tenant. For directory sync, you need to create an API Service Integration in Okta, leveraging OpenID Connect (OIDC) principles for authentication, NOT a standard SAML application.
CIE retrieves updates from Okta:
- Users, Groups, and Devices: When CIE performs a directory sync.
- Enterprise Applications (if Application-enabled integration used): Up to every 3 hours.
Gotcha!: Do NOT use the default Okta group "Everyone" for policy rules on the firewall. Explicitly define groups you wish to use.
Deploy Client Credential Flow for Okta (Recommended)
This is the recommended method for connecting CIE to Okta Directory. It uses a service account created as an API Service Integration, providing a secure connection without requiring interactive user login for syncs. This requires obtaining a new Client ID and Secret from Okta.
-
In the Okta Admin Portal, navigate to Applications > API Service Integrations and click "Add Integration".

Screenshot showing the API Service Integrations section in Okta.
Screenshot showing the "Add Integration" button in Okta API Service Integrations.
-
Select the 'Palo Alto Networks Cloud Identity Engine (Application-enabled)' integration app if you want to collect enterprise application data, or 'Palo Alto Networks Cloud Identity Engine' for basic user/group/device sync. Click "Install & Authorize".
Screenshot showing selection of the "Palo Alto Networks Cloud Identity Engine (Application-enabled)" integration app in Okta.
Screenshot showing selection of the "Palo Alto Networks Cloud Identity Engine" integration app in Okta.
Screenshot showing the "Install & Authorize" button for the Okta API service integration.
-
After installation, the Client Secret is generated and displayed.
Immediately copy the Client Secret
(Value). It is shown only ONCE! Also copy the
Client ID
.
Screenshot showing the generated client secret in Okta. Copy this securely as it is shown only once.
-
Copy your Okta
Domain
(e.g.,
mycompany.okta.com
). Ensure you remove
https://
if it's included in the displayed URL.
Screenshot highlighting the Okta Domain and Client ID for the API service integration.
- Activate your CIE tenant if not already done.
-
Log in to the CIE app > Directories > Add New Directory > Set Up Cloud Directory > Select Okta.
Screenshot showing the option to set up an Okta directory in CIE.
-
Select
Client Credential Flow
.
Screenshot showing the option to select Client Credential Flow for Okta connection.
-
Select
Collect enterprise applications
if you used the Application-enabled integration in Okta.
Screenshot showing the option to collect enterprise applications data from Okta.
-
Paste the Okta
Domain
,
Client ID
, and
Client Secret
into the respective fields in CIE.
Screenshot showing the fields to enter Okta domain, Client ID, and Client Secret in CIE for Client Credential Flow.
-
Click "Test Connection" to verify the connection details.
Screenshot showing the "Test Connection" button for Okta configuration in CIE.
- (Optional) Customize the Directory Name .
-
Click "Submit" to save the Okta directory configuration. CIE will begin syncing data.
Screenshot showing the summary of the Okta configuration in CIE before submission.
Configure Google Directory (SCIM)
While Google Workspace is commonly used as an Identity Provider (IdP) for authentication with CIE (see IdP Auth section ), its directory information (users and groups) can also be synced to CIE using the SCIM protocol. This allows using Google Directory users and groups for policy enforcement on Palo Alto Networks devices integrated with CIE.
Configuring Google Directory for synchronization via SCIM involves:
- Setting up SCIM provisioning in your Google Workspace Admin console. This involves configuring an app integration that uses SCIM to communicate with an external system.
- Granting necessary permissions for the SCIM integration within Google Workspace to read user and group data.
- Obtaining the SCIM Base URL and a secret token provided by Google Workspace for this integration. This is typically done within the app configuration in the Google Admin console.
- In the CIE app on the hub, navigate to Directories > Add New Directory. Select the SCIM type and configure it using the SCIM Base URL and secret token obtained from Google Workspace.
Once configured and tested, CIE uses this SCIM integration to pull user and group data from your Google Directory. This data is then available for policy matching and other identity-based features across Palo Alto Networks platforms integrated with CIE.
User Authentication with Identity Providers (SAML/OIDC)
Configure a profile for a SAML 2.0-compliant IdP (Google, Azure, Okta, PingOne, PingFederate) or OIDC in CIE. Configure an Authentication policy and Authentication Portal on the firewall. The firewall redirects authentication requests to CIE, which then reroutes them to the configured IdP. Successful login grants user access. CIE supports configuring multiple IdPs for flexibility and scalability.
Important Point: OIDC auth type supports Prisma Access Browser, NOT GlobalProtect or Authentication Portal.
Configure Google Directory (SAML)
Integrates Google Directory info. CIE does NOT support the ForceAuthn attribute for Google IdP.
-
Prepare: Activate CIE, download SP Metadata from CIE (Auth > SP Metadata).
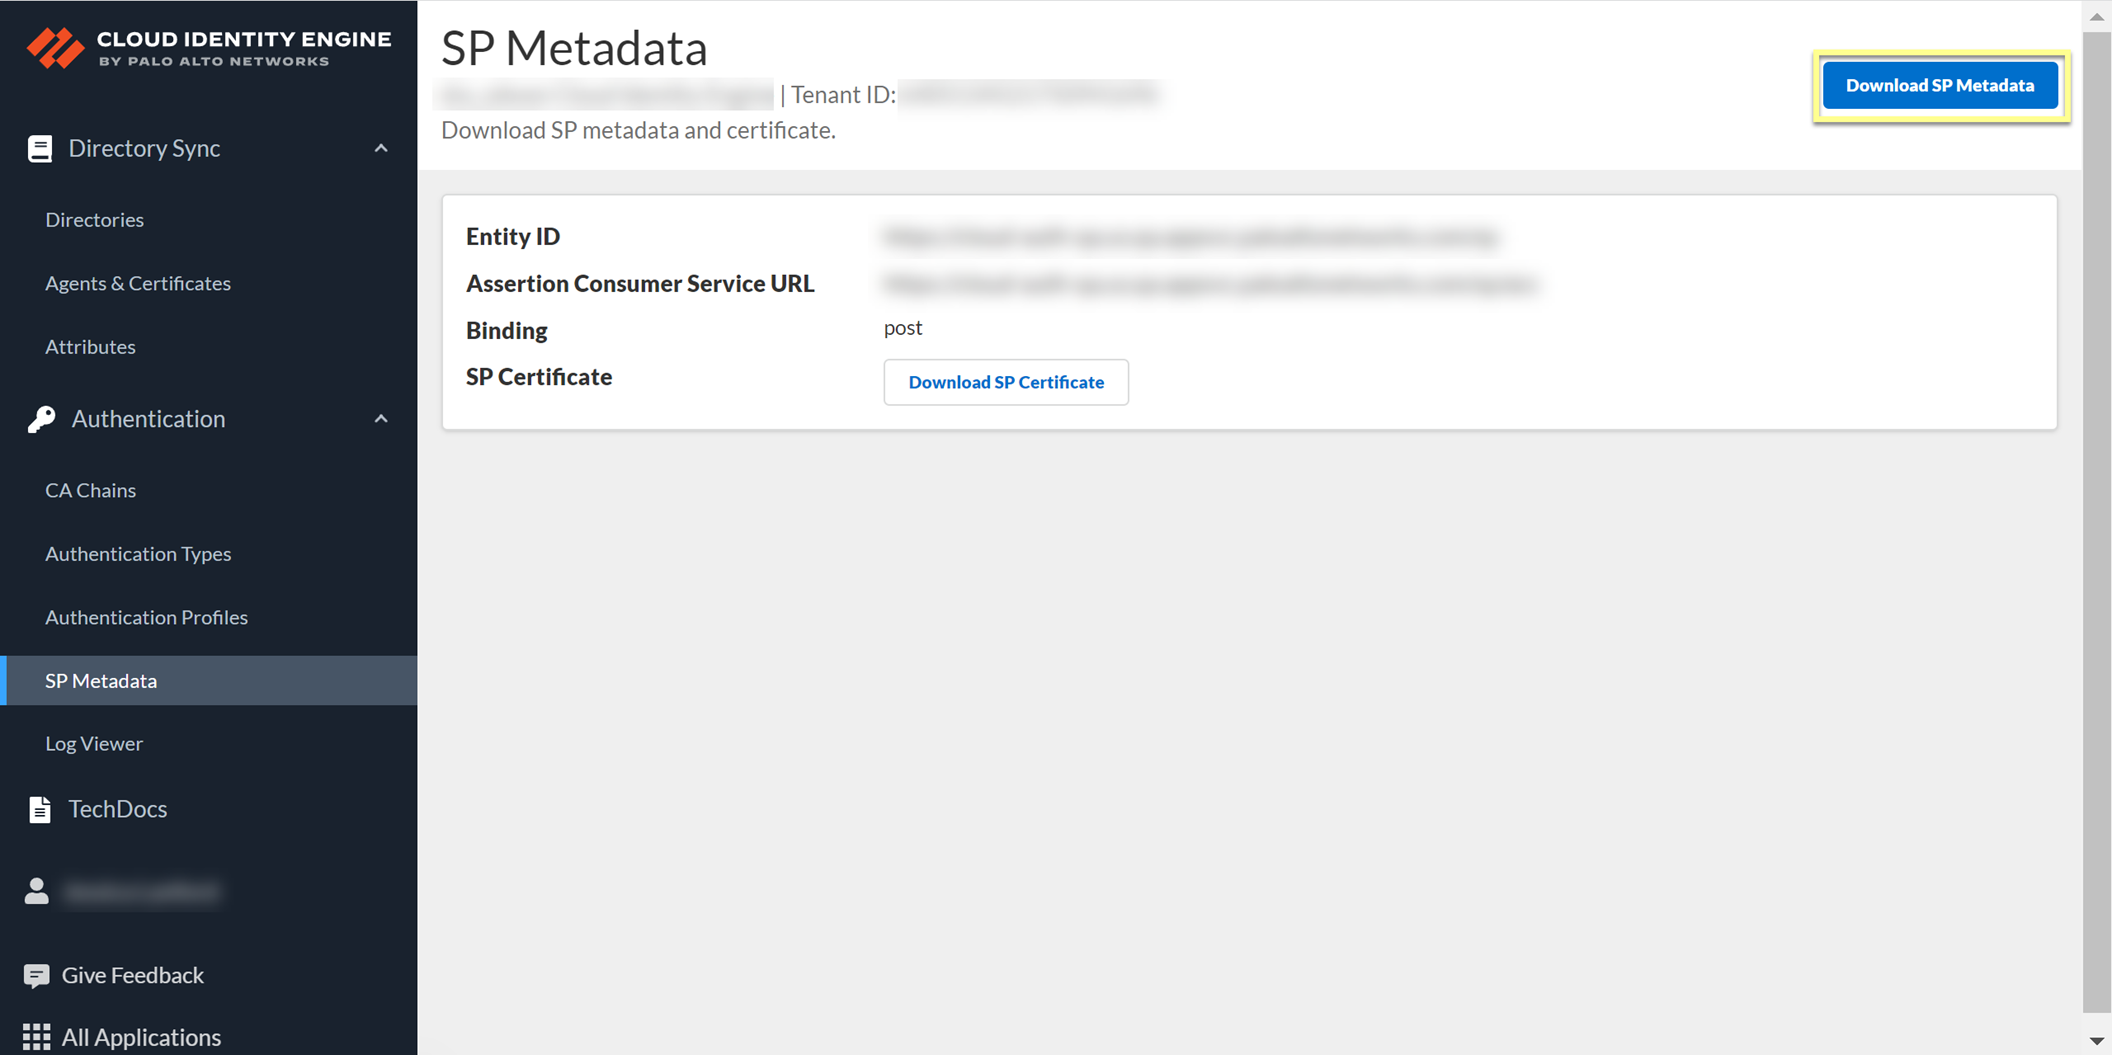
Screenshot showing the "Download SP Metadata" button in CIE.
Log in to Google Admin Console > Apps > SAML Apps > Add App > Add custom SAML app.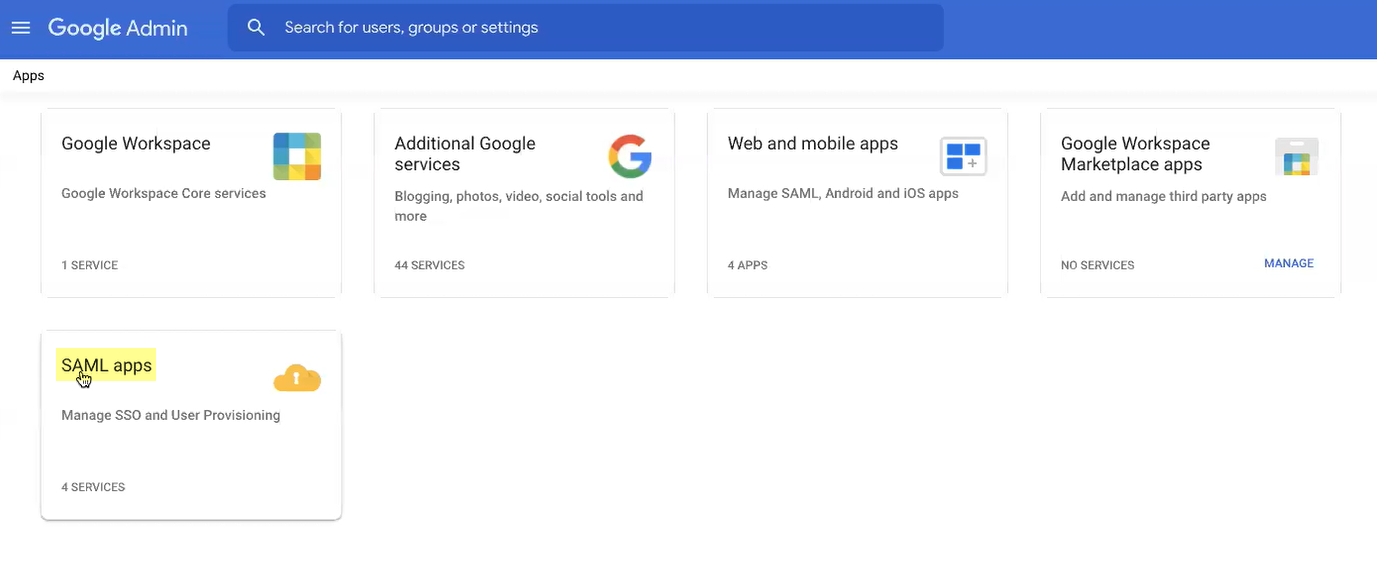
Screenshot showing the SAML Apps section in the Google Admin console.
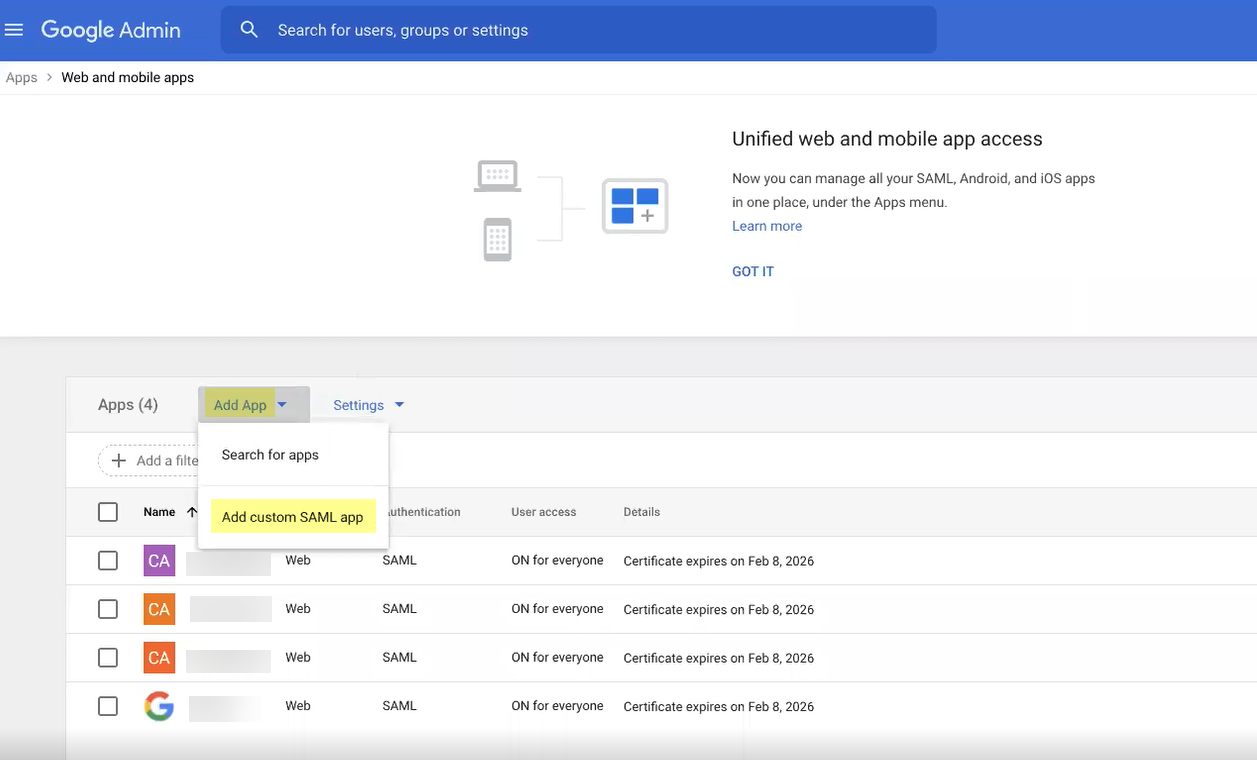
Screenshot showing the option to add a custom SAML app in Google Admin.
Enter App name, Continue. Download IdP metadata, Continue.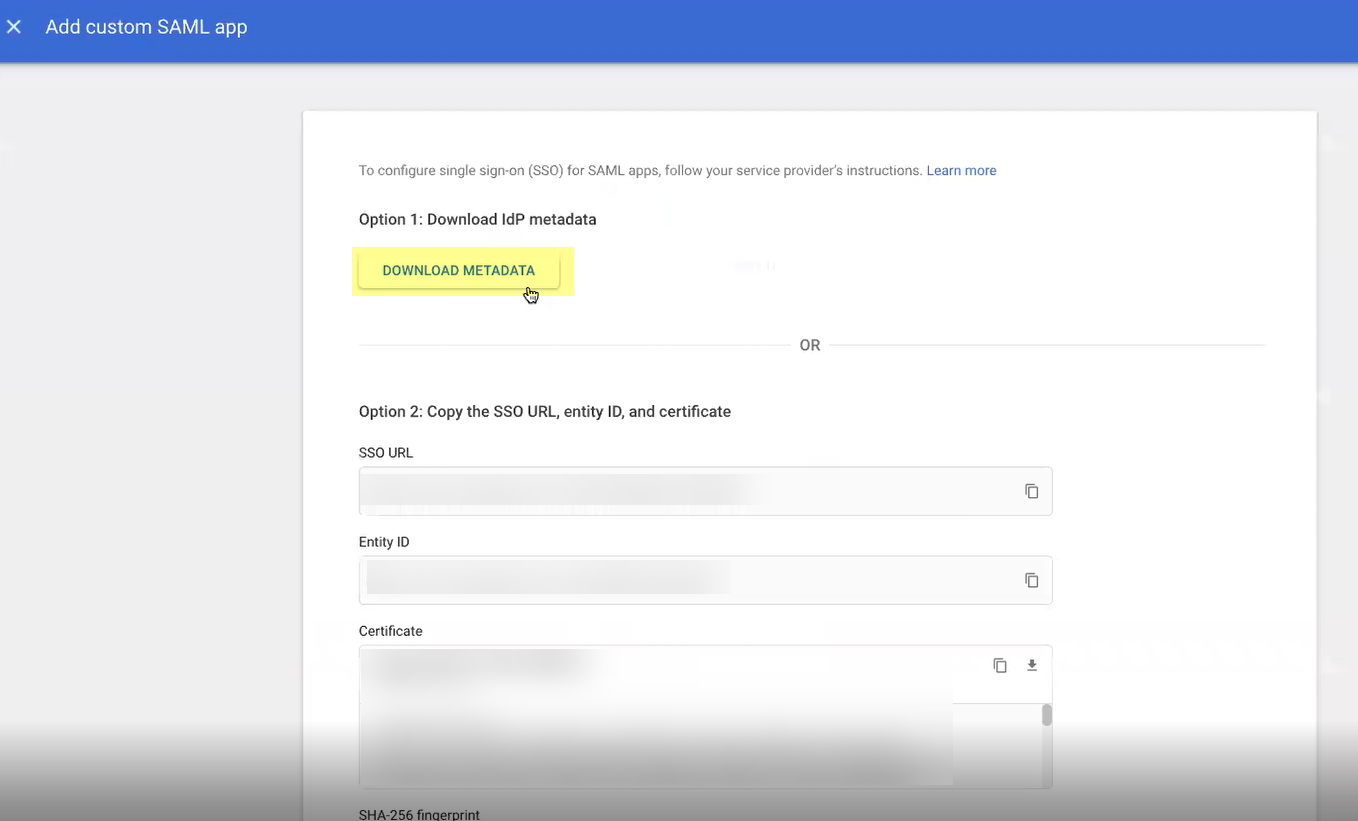
Screenshot showing the button to download IdP metadata in Google Admin.
Copy SP metadata from CIE (Entity ID, ACS URL), enter in Google Admin (Entity ID, ACS URL), Continue.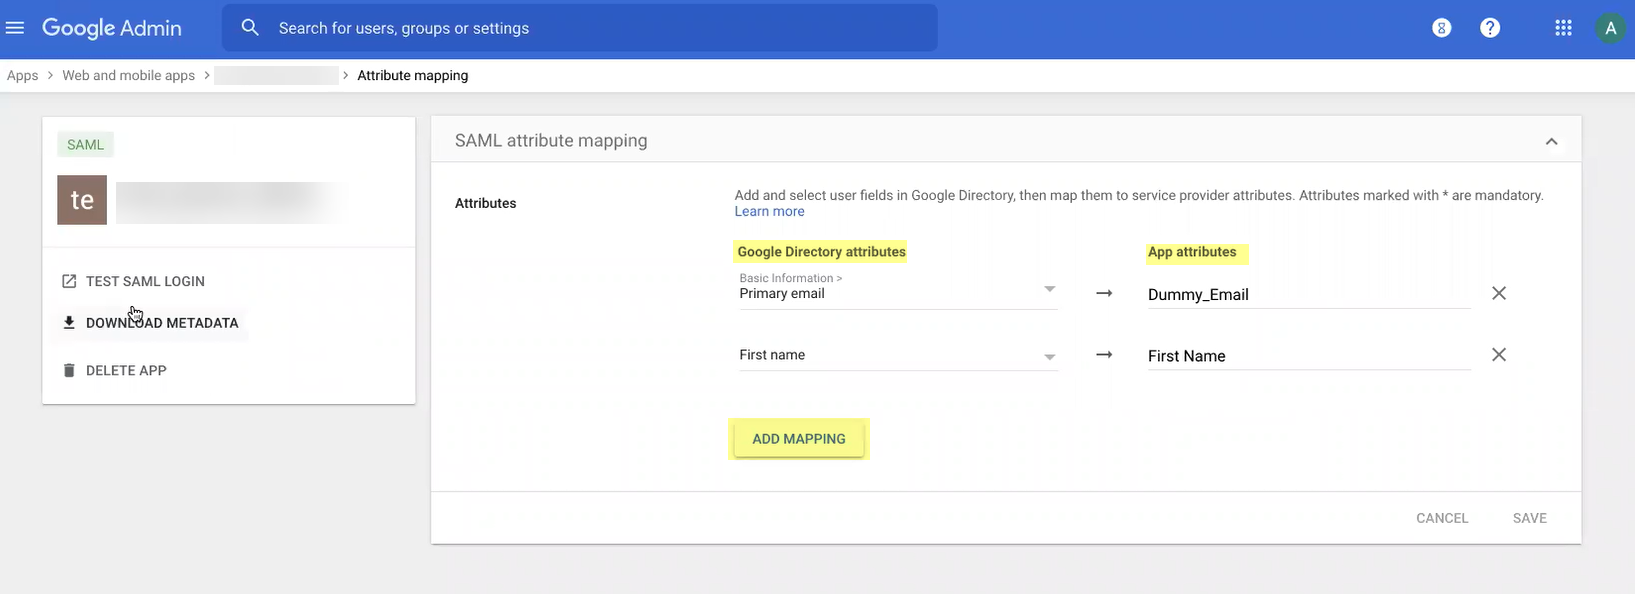
Table showing how to map CIE SP Metadata fields to Google Admin SAML settings.
Screenshot showing attribute mapping configuration in Google Admin for the custom SAML app.
Add mapping for Google Directory attributes to App attributes, Finish. View details, turn ON for everyone, Save.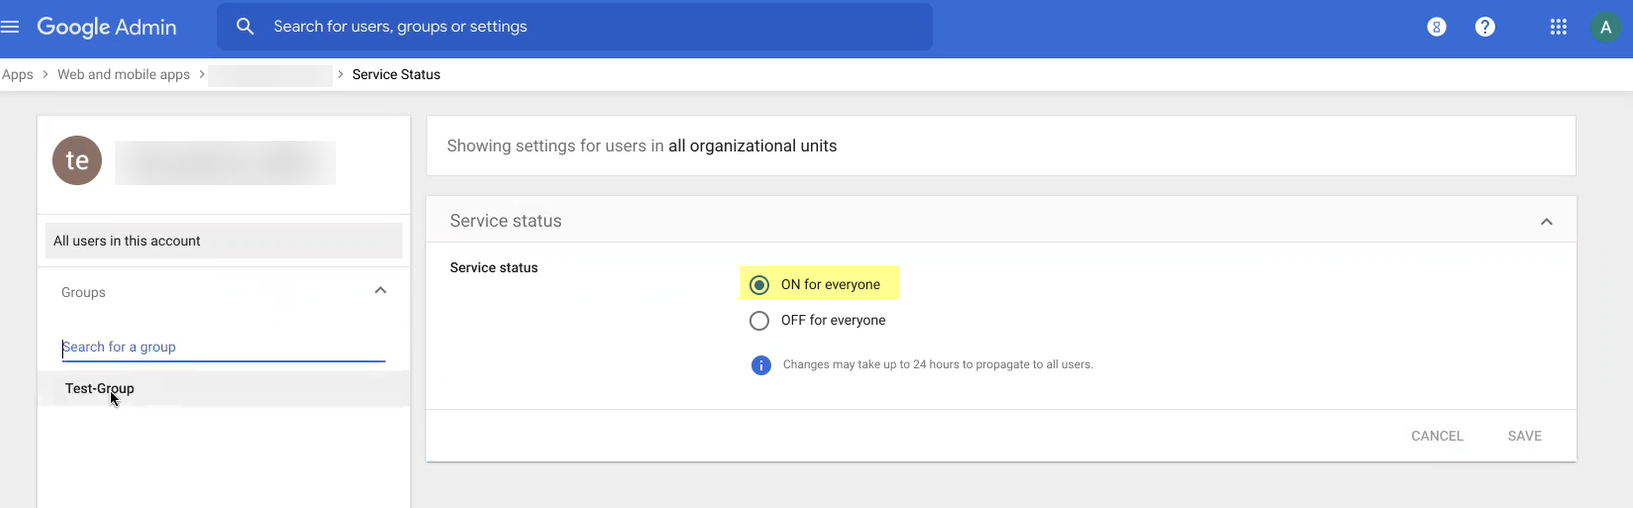
Screenshot showing the app details page in Google Admin, including the option to turn on the app.
Directory > Users > Specify users for Google auth.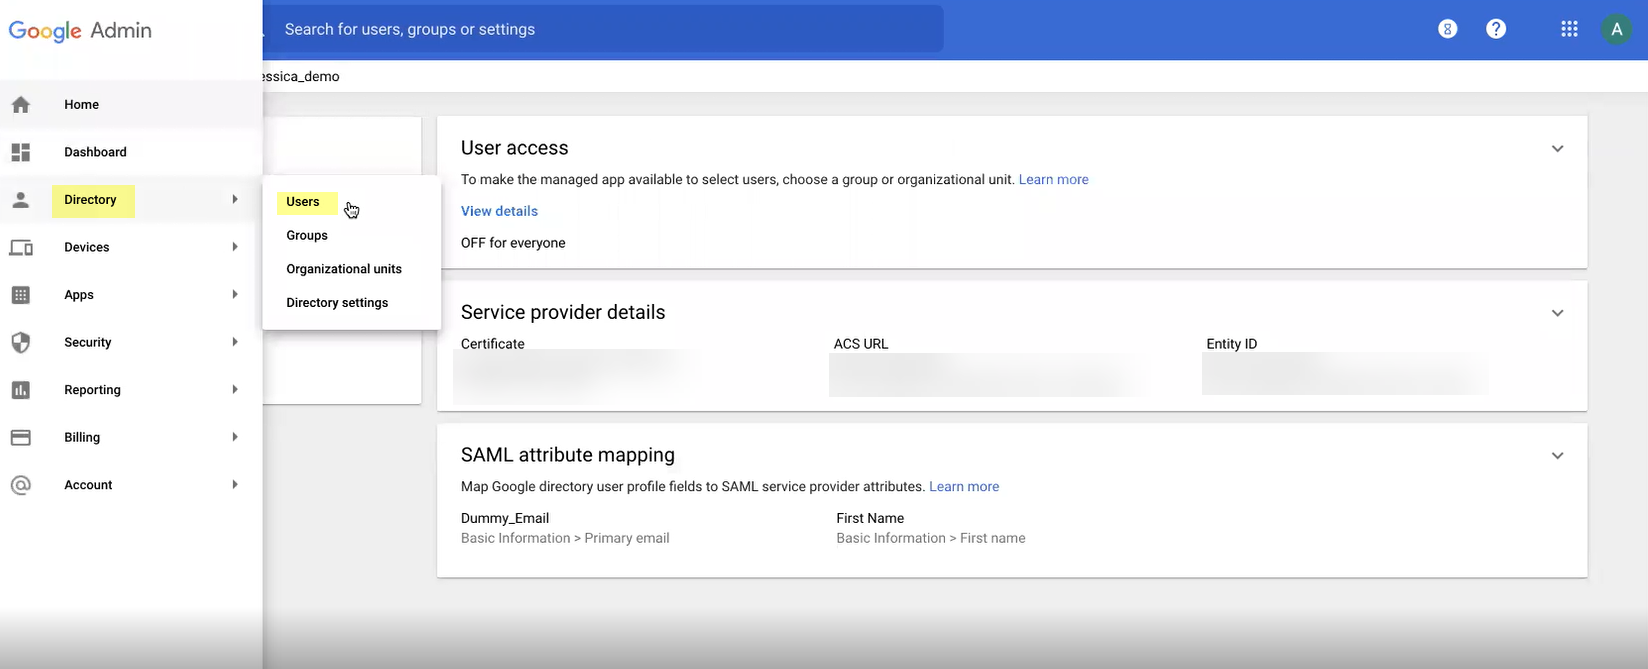
Screenshot showing the users list in Google Admin.
-
Add Google as auth type in CIE: Auth > Auth Types > Add New > Set Up SAML 2.0.
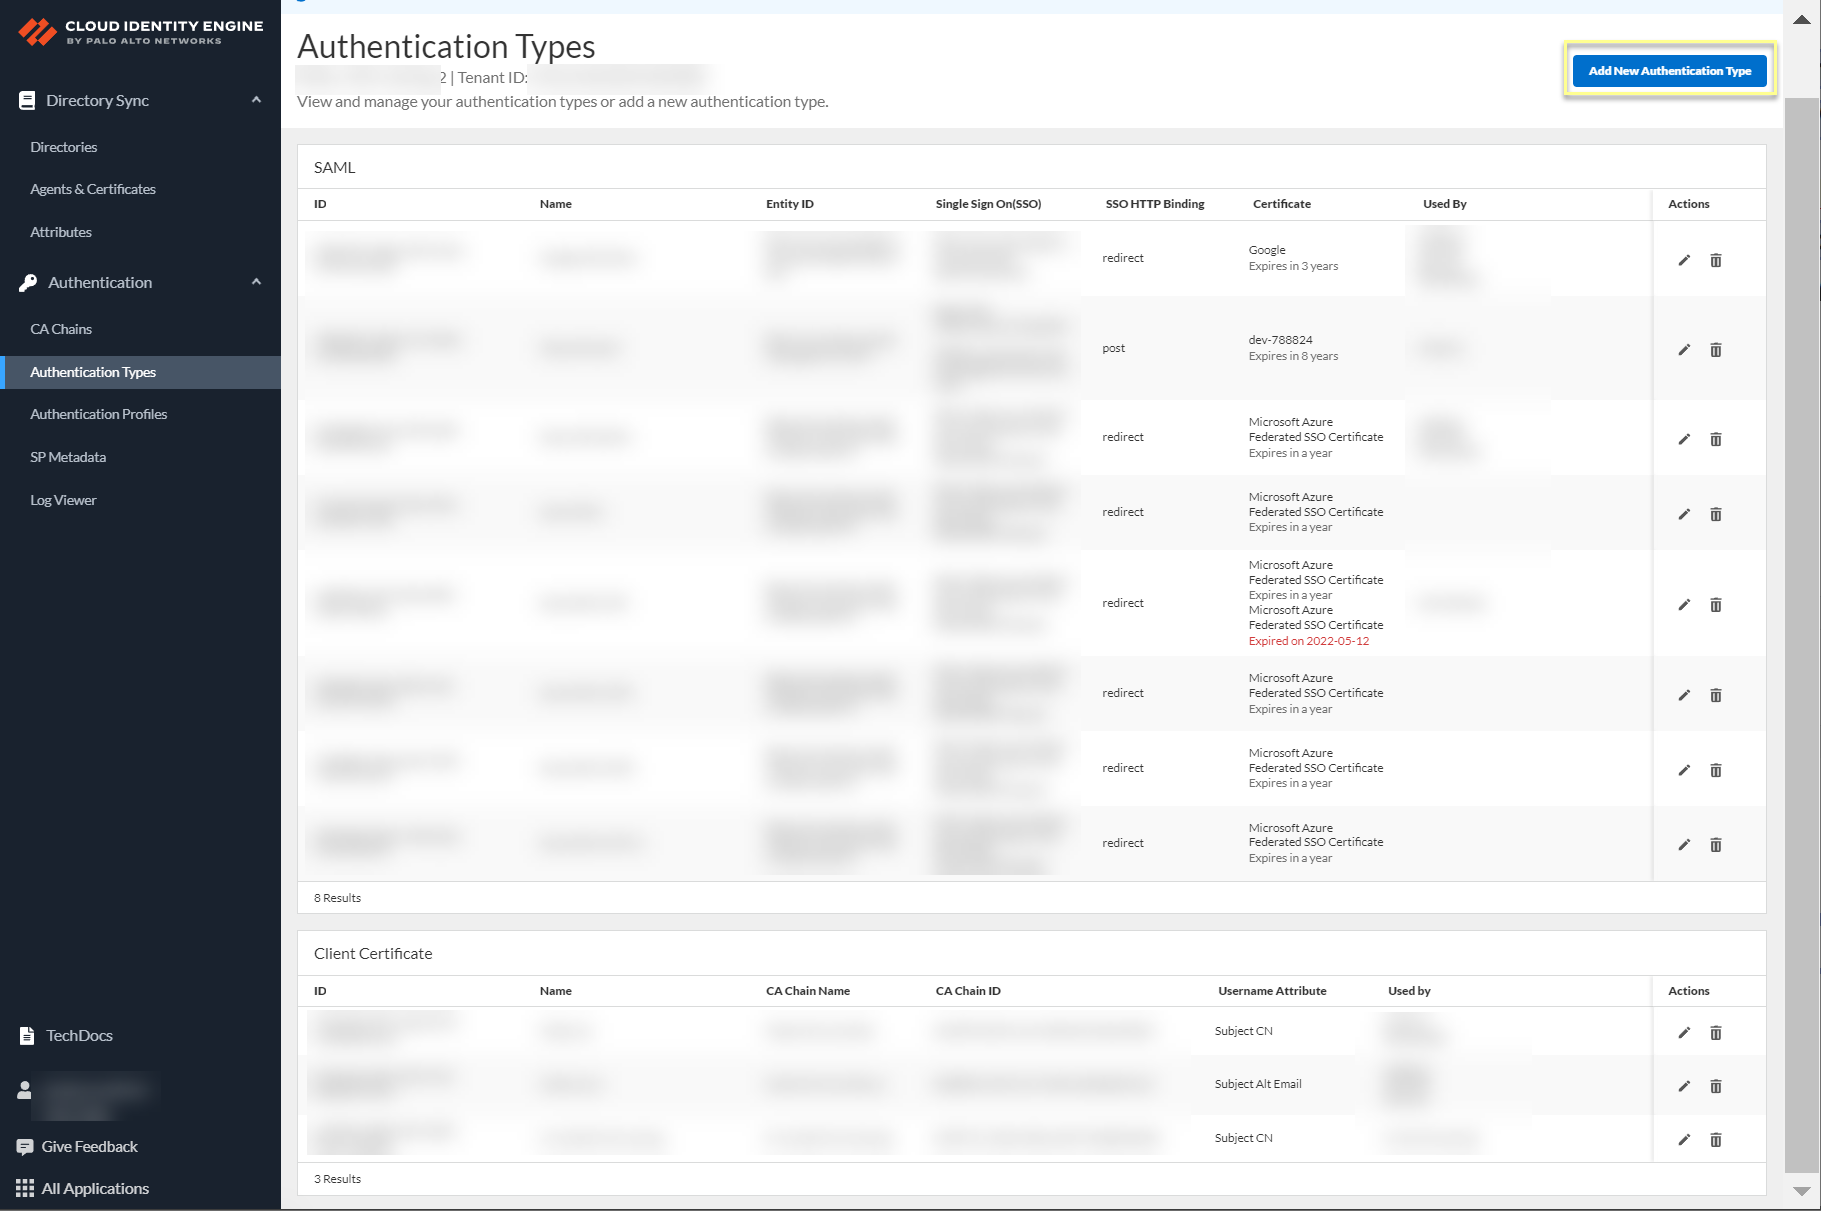
Screenshot showing the Add New Authentication Type button in CIE.
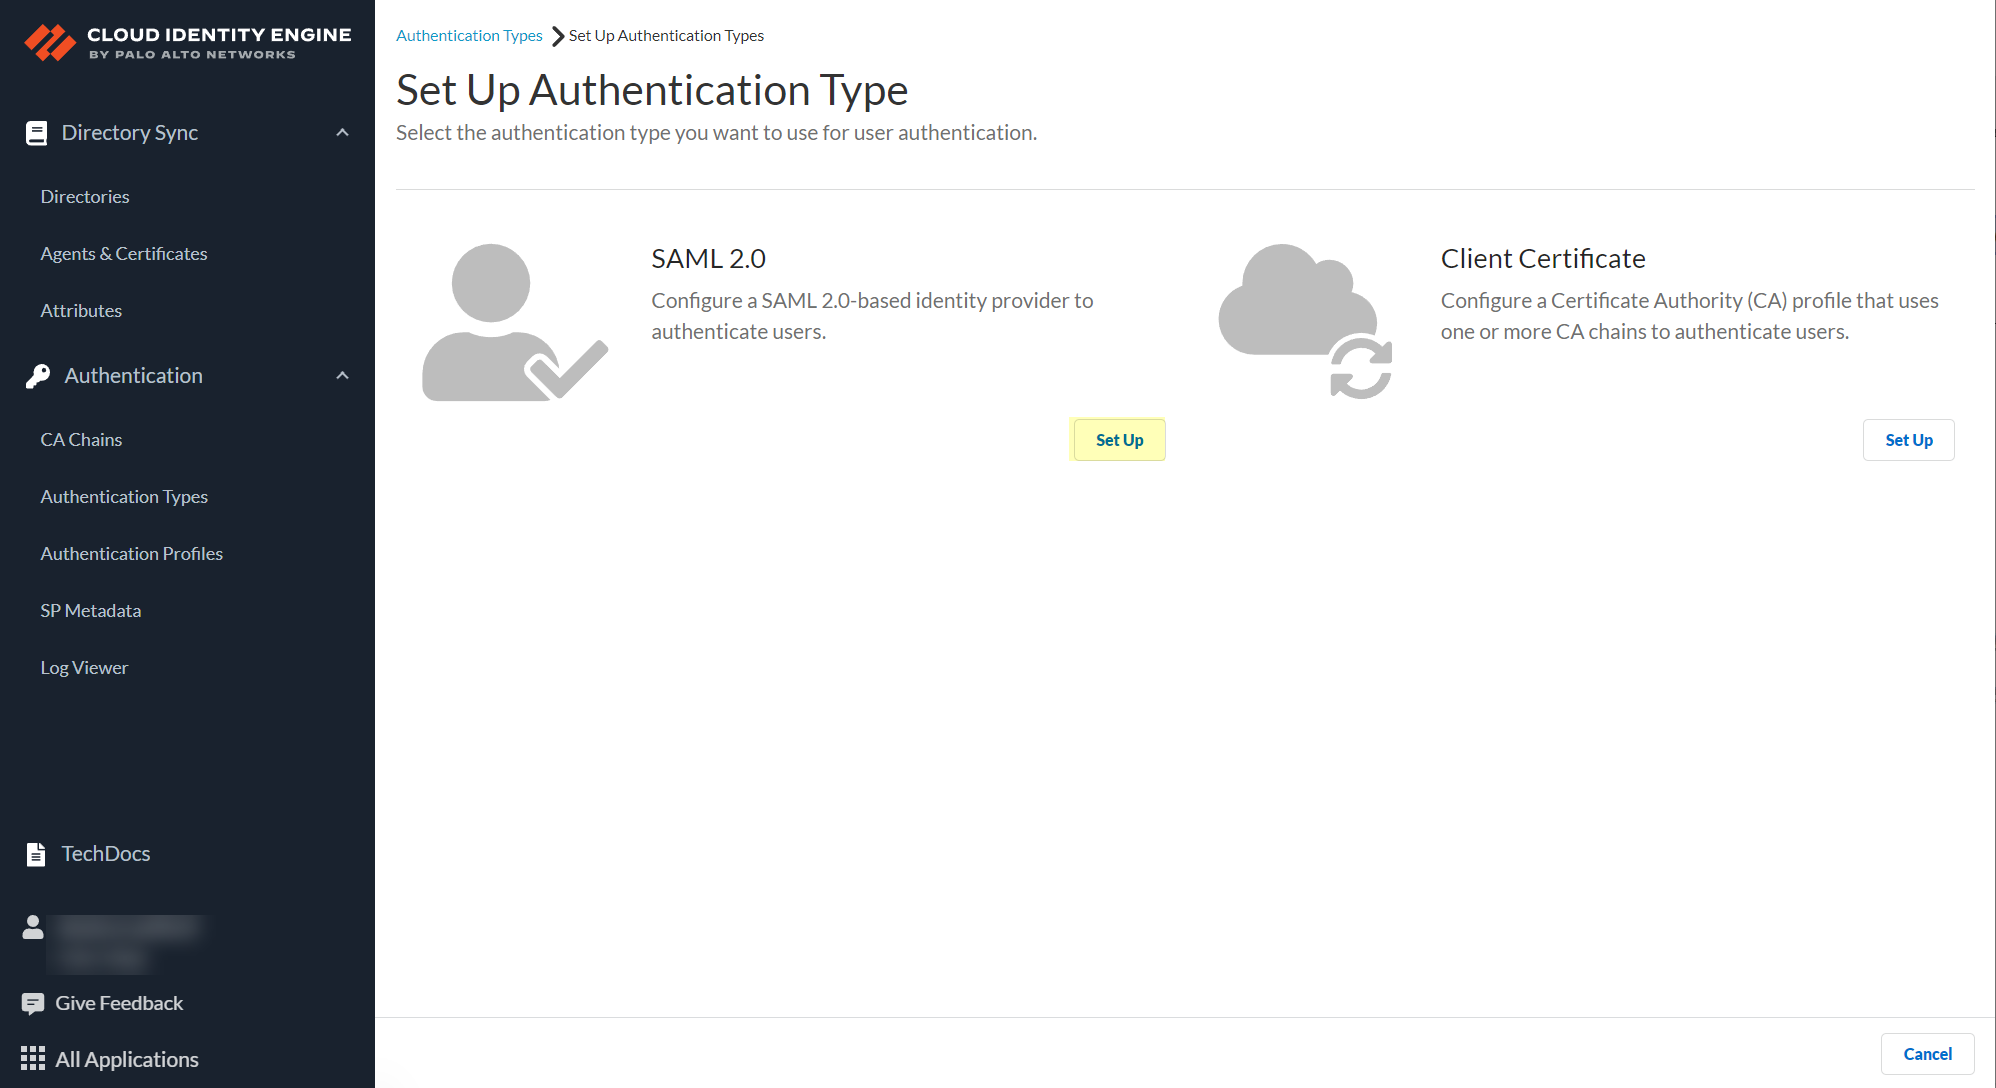
Screenshot showing the option to set up a SAML 2.0 authentication type in CIE.
Enter Profile Name, select Google as IdP Vendor.
Screenshot showing fields for Profile Name and Identity Provider Vendor in CIE SAML configuration.
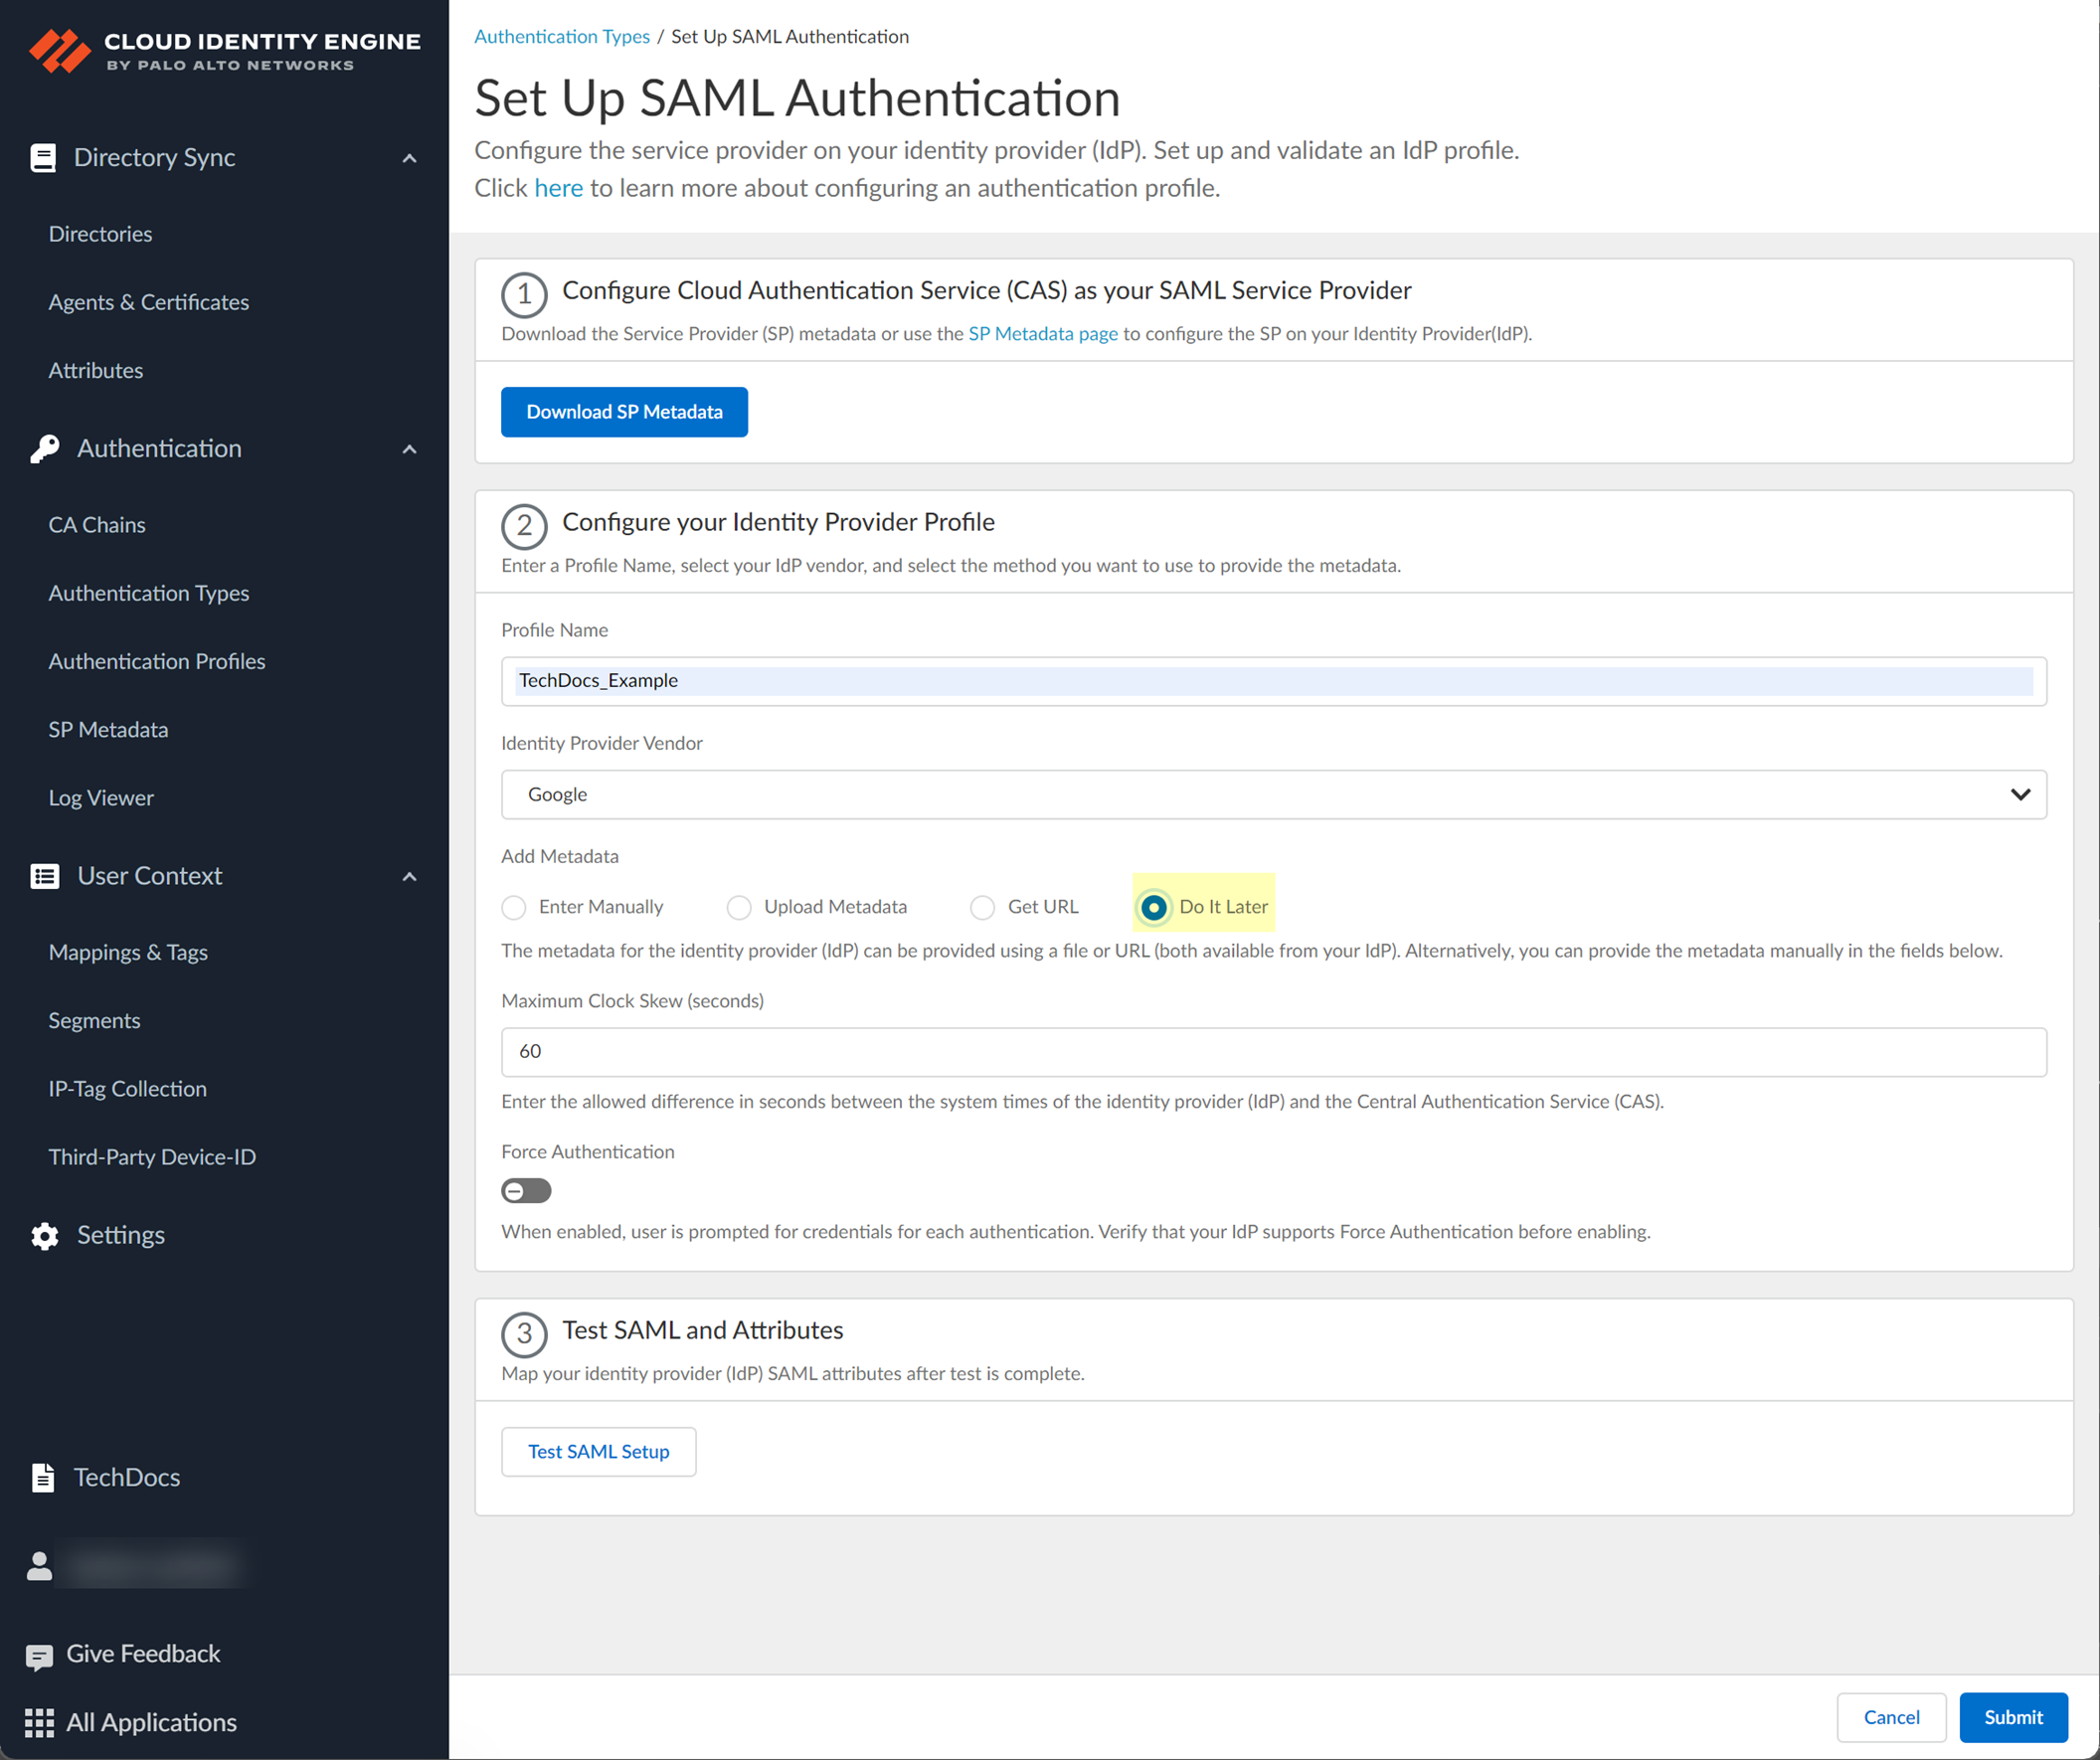
-
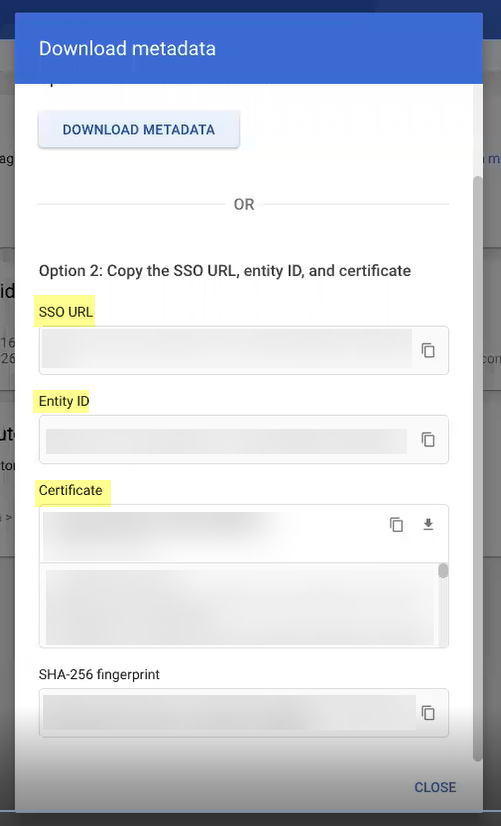
Add Metadata: Manually (copy IdP ID, SSO URL, Certificate from Google, enter in CIE) or Upload Metadata File (download metadata from Google, upload in CIE) or Get URL (copy SSO URL from Google, paste in CIE, Get URL).
Screenshot showing fields for manual Identity Provider metadata entry in CIE.

Screenshot showing the "Upload Metadata" option in CIE.
Screenshot showing the "Get URL" option for adding metadata in CIE.
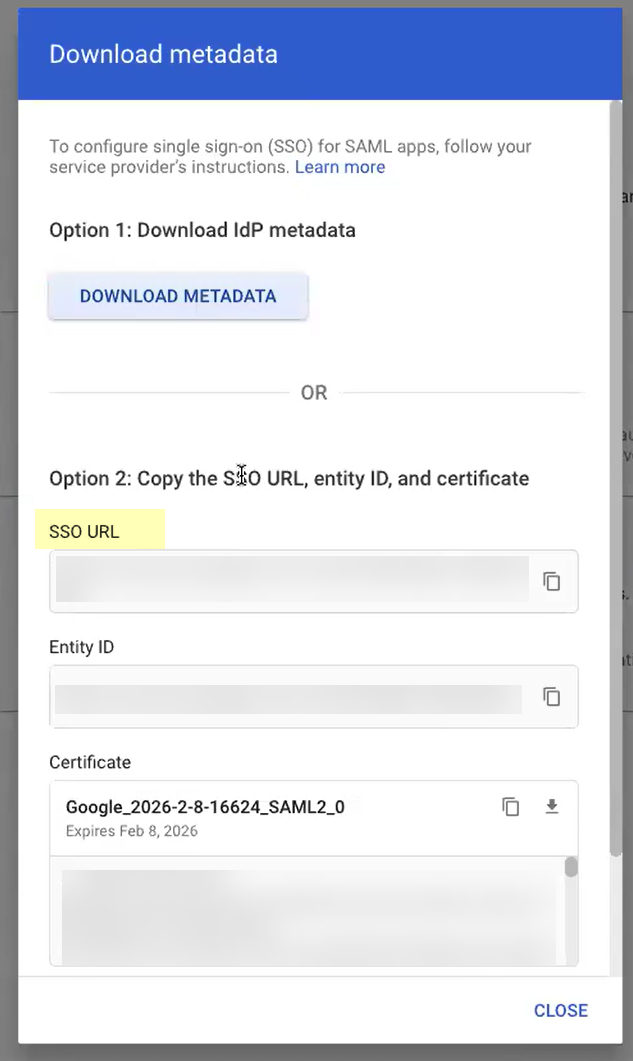
Screenshot highlighting the SSO URL in Google Admin metadata.
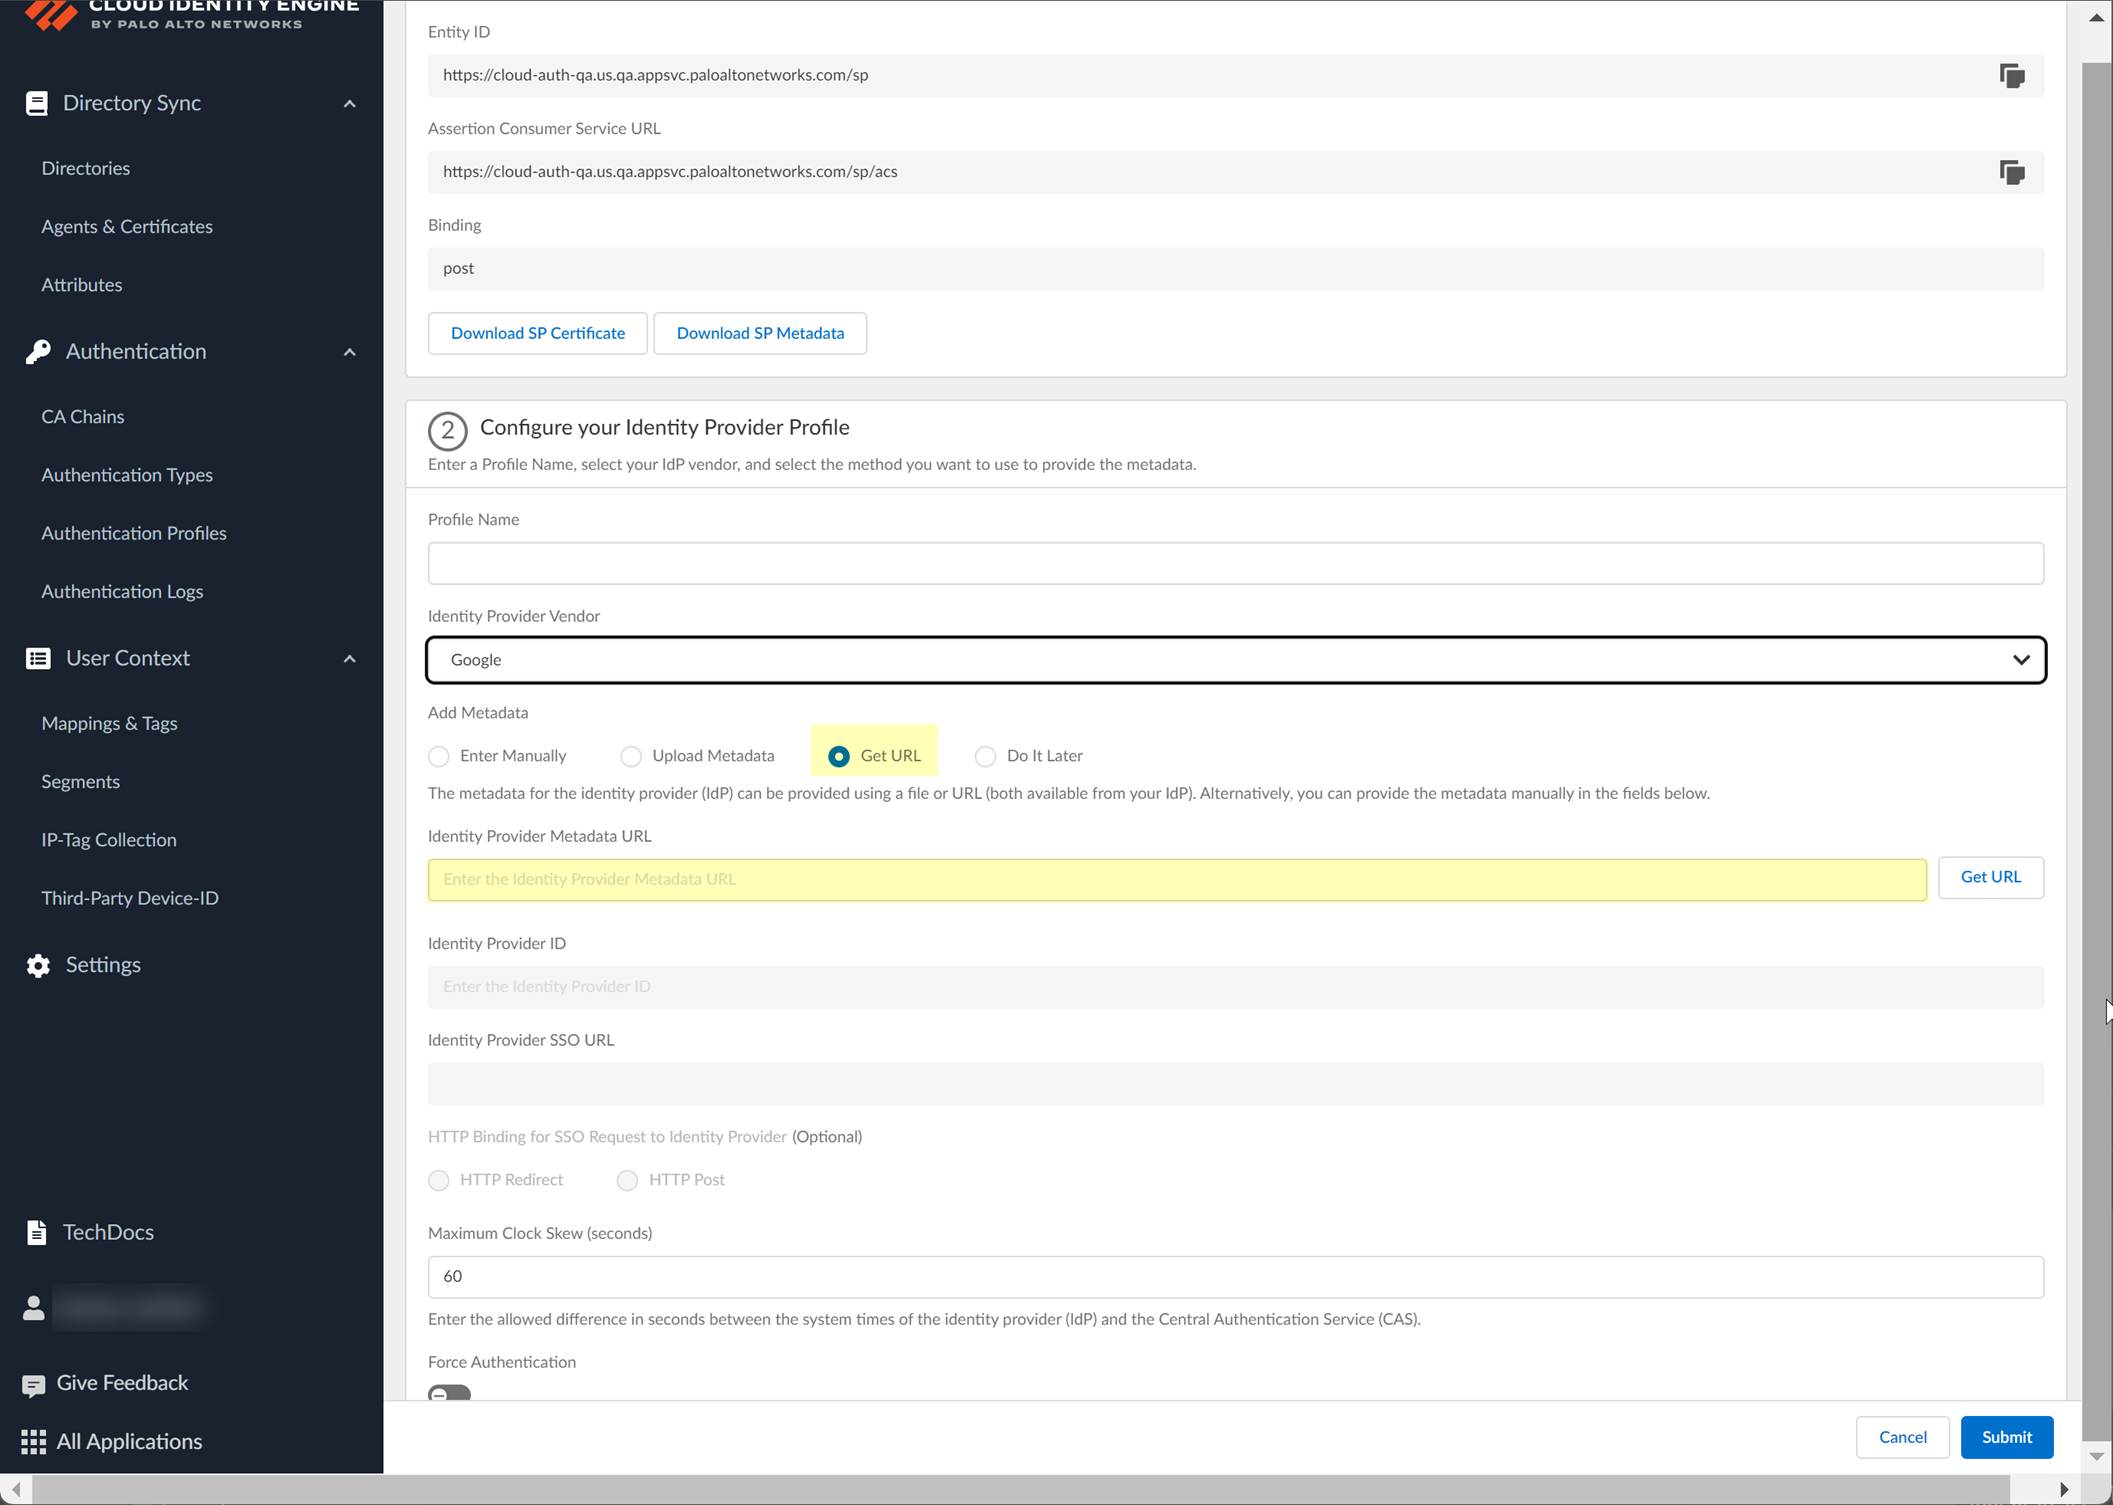
Screenshot showing the field to paste the metadata URL in CIE using the "Get URL" method.
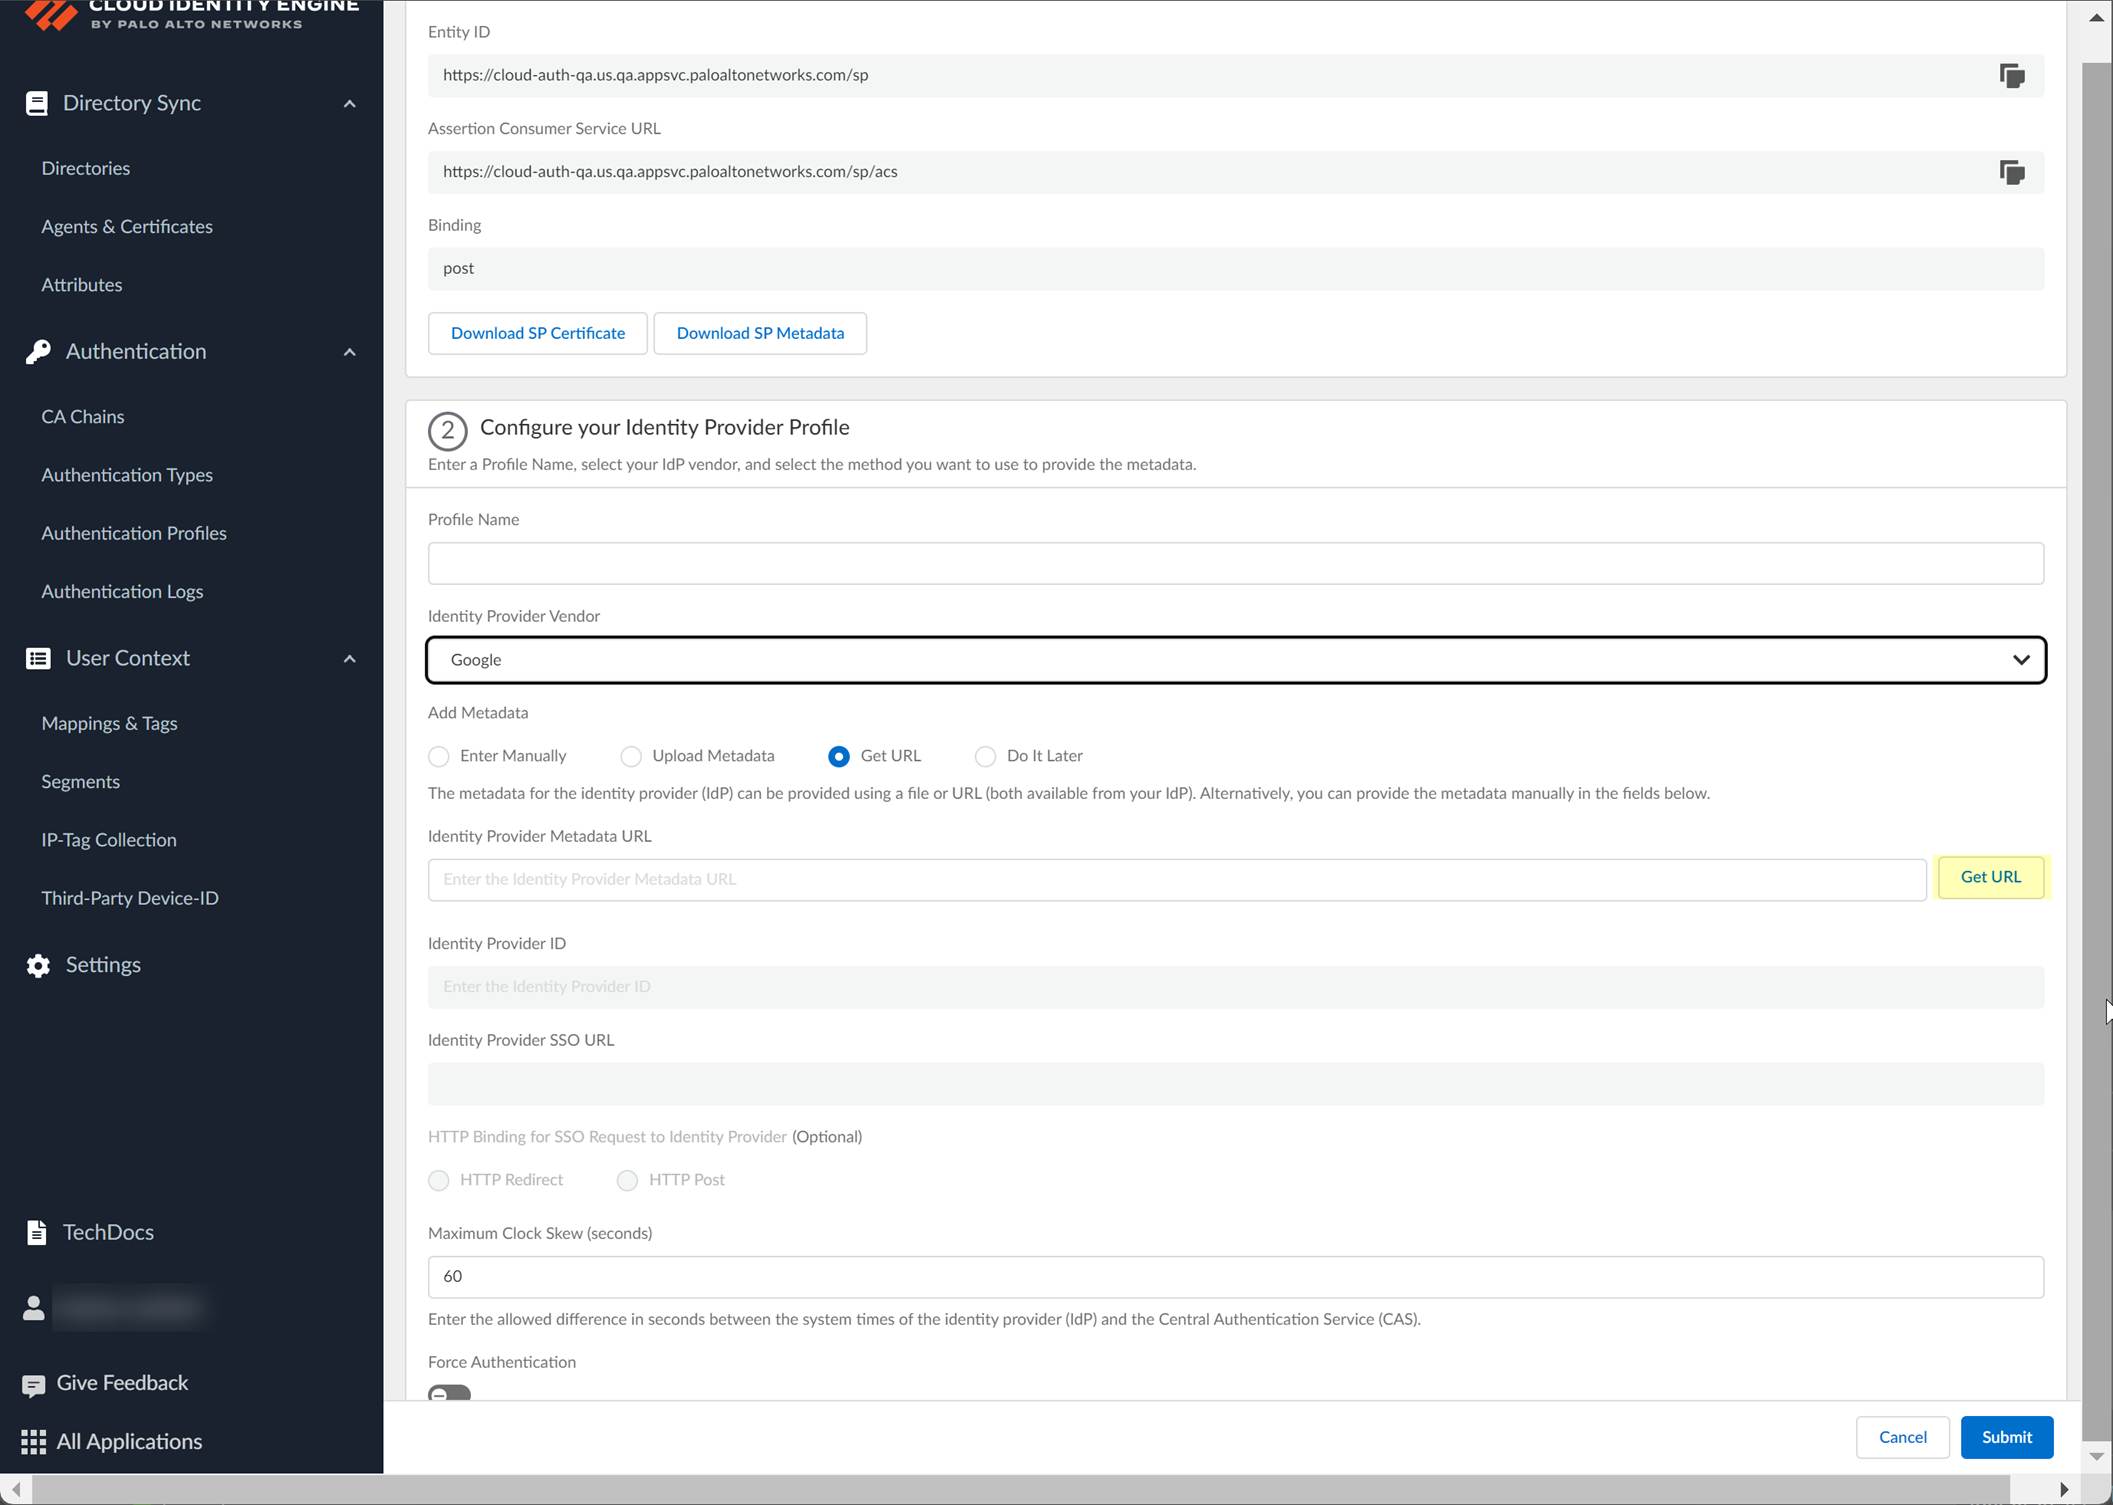
Screenshot showing CIE automatically populating IdP ID and SSO URL after successfully getting metadata from the URL.
- Select HTTP Binding for SSO Request.
- Specify Maximum Clock Skew (default 60s, range 1-900s).
-
Enable Force Authentication (if required for GlobalProtect reconnect).
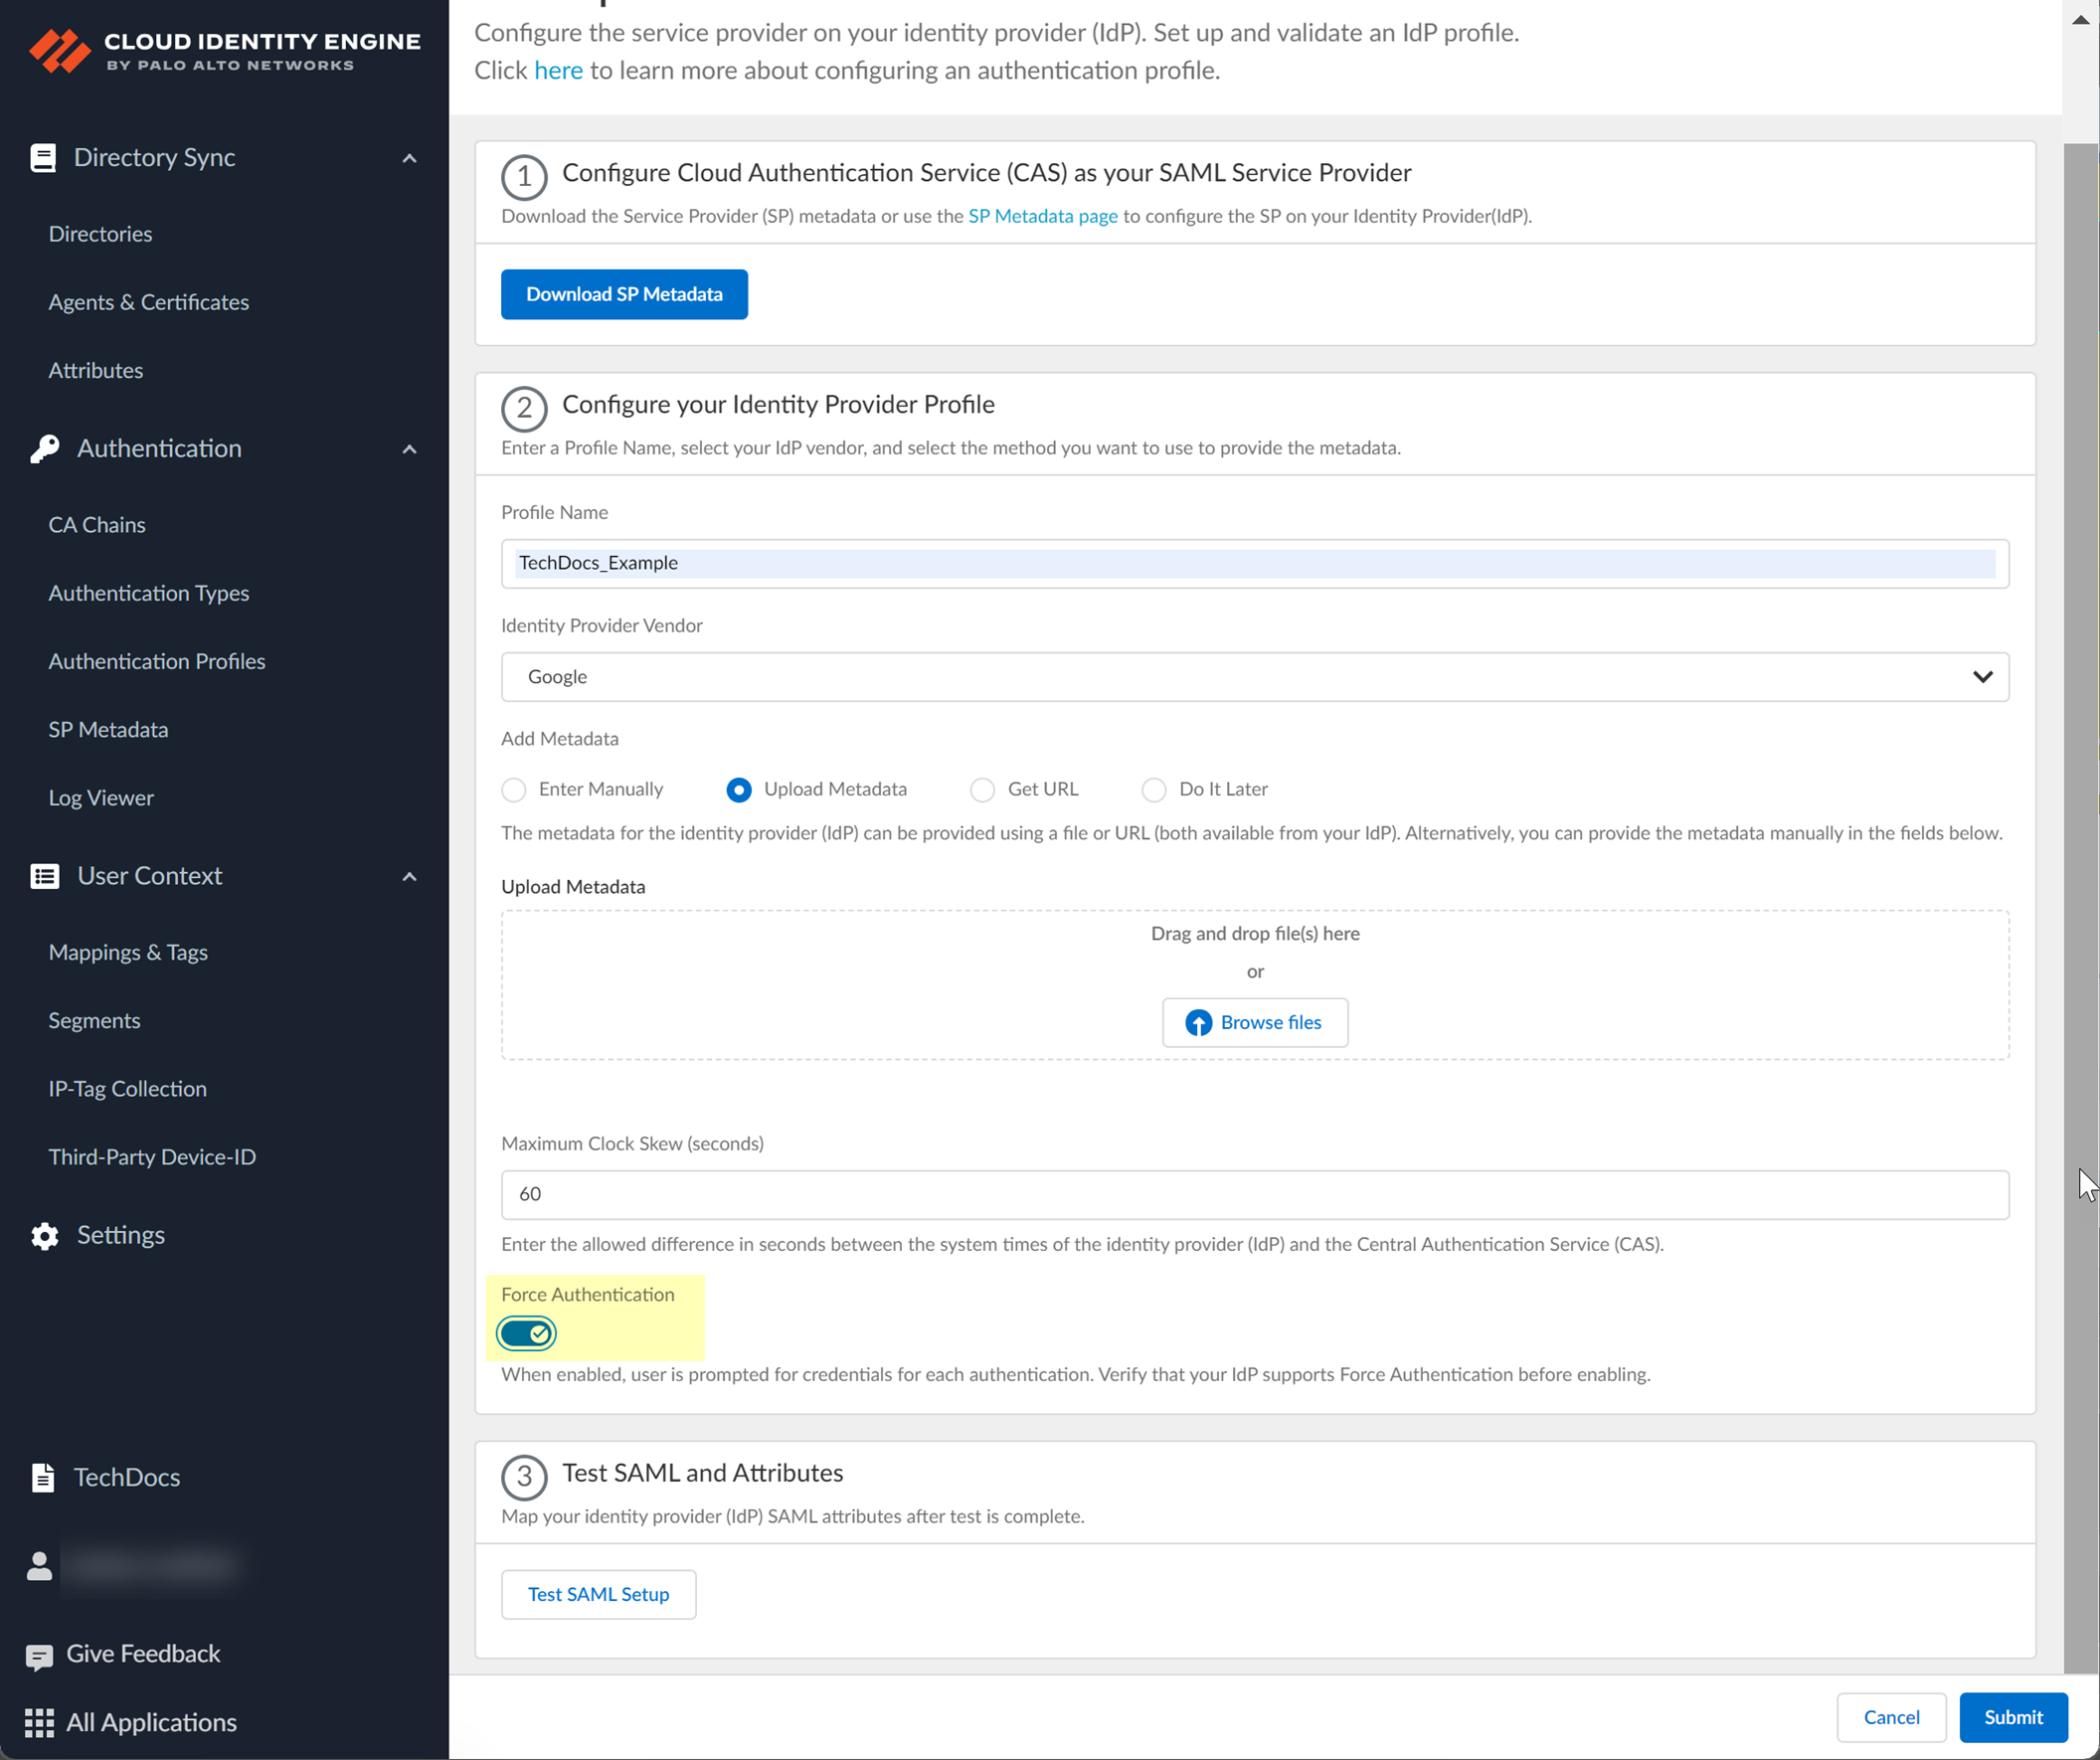
Screenshot showing the Force Authentication option in CIE SAML configuration.
-
Test SAML setup.

Screenshot showing the "Test SAML setup" button in CIE.
-
Select SAML attributes (
Username, Usergroup, Access Domain, User Domain, Admin Role
), Submit.
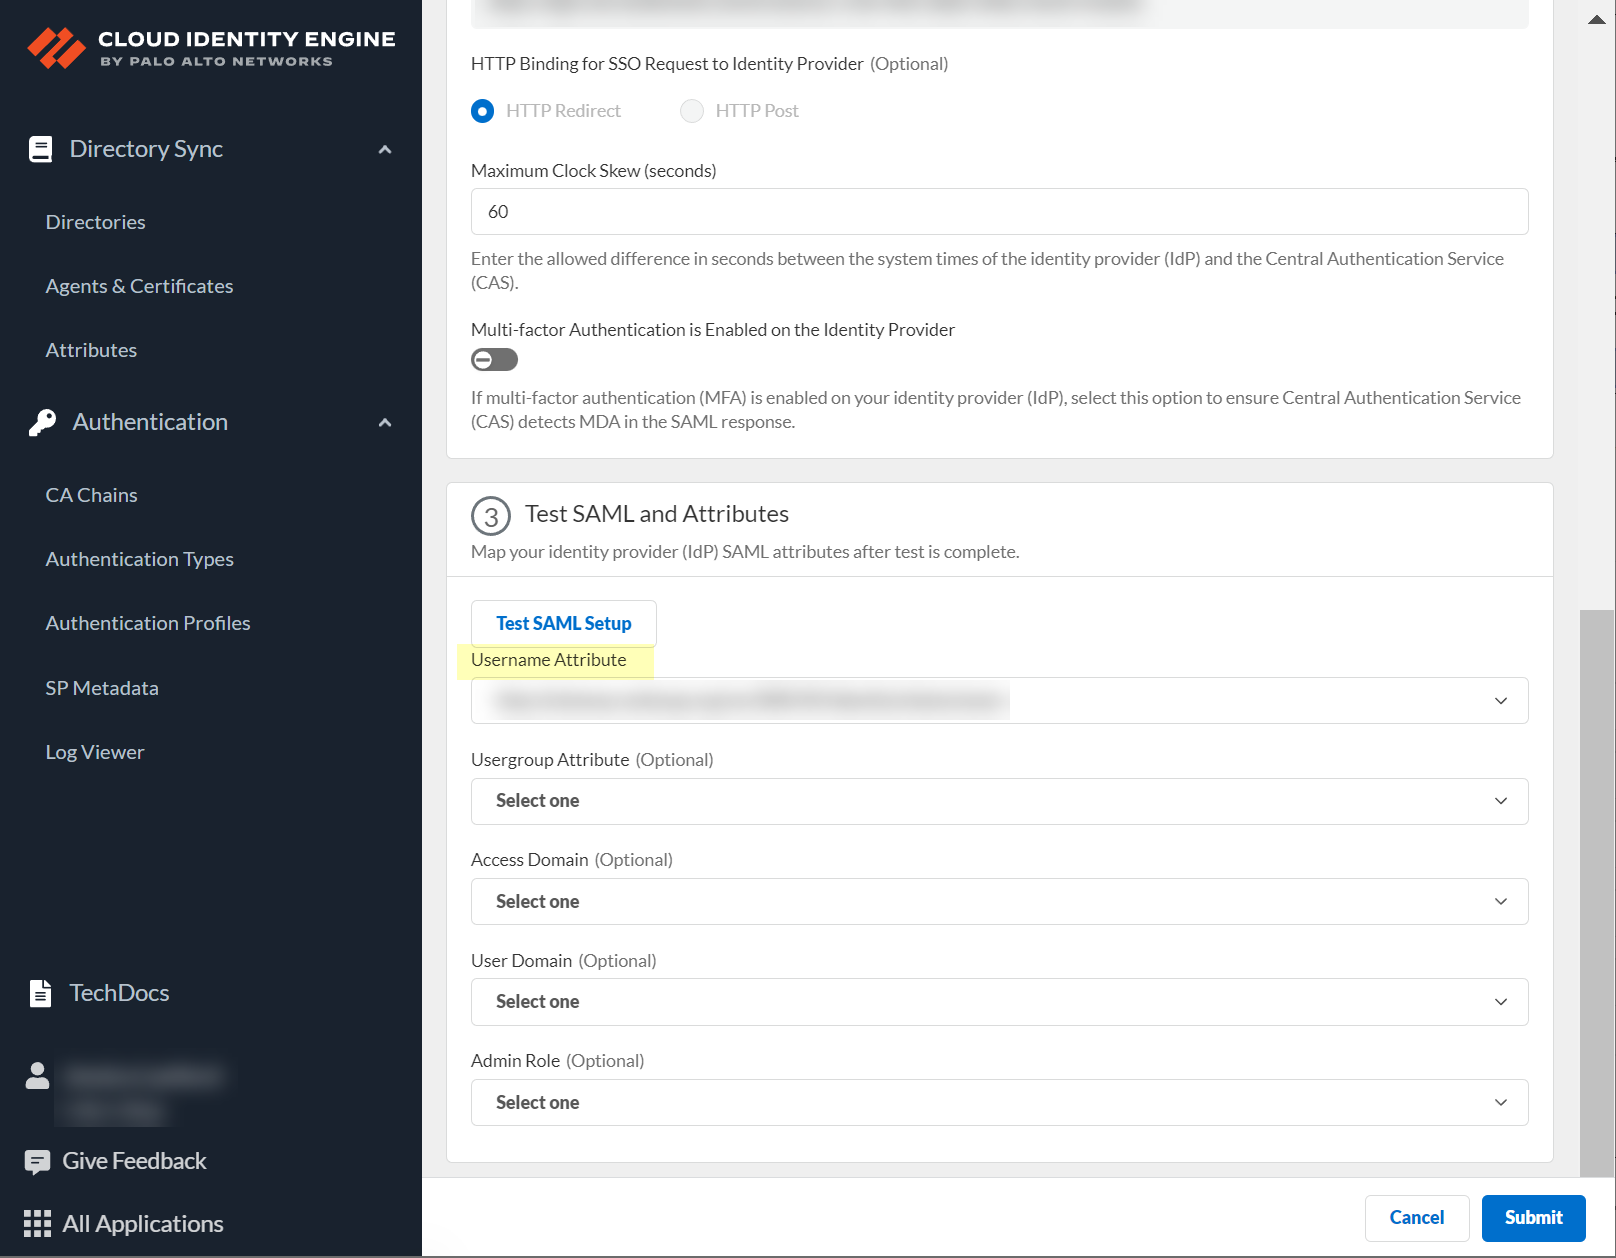
Screenshot showing fields to select SAML attributes (Username, Usergroup, etc.) in CIE.
Configure a SAML 2.0-Compliant IdP in the Cloud Identity Engine (Others)
For IdPs not listed as vendors, use the 'Others' option.
-
Obtain IdP info: Copy IdP ID, Certificate, SSO URL from your IdP. Download SP Metadata from CIE (Auth > SP Metadata).

Screenshot showing the "Download SP Metadata" button in CIE.
-
Configure in CIE: Auth > Auth Types > Add New > Set Up SAML 2.0.
Screenshot showing the Add New Authentication Type button in CIE.
Screenshot showing the option to set up a SAML 2.0 authentication type in CIE.
Enter Profile Name, select 'Others' as IdP Vendor.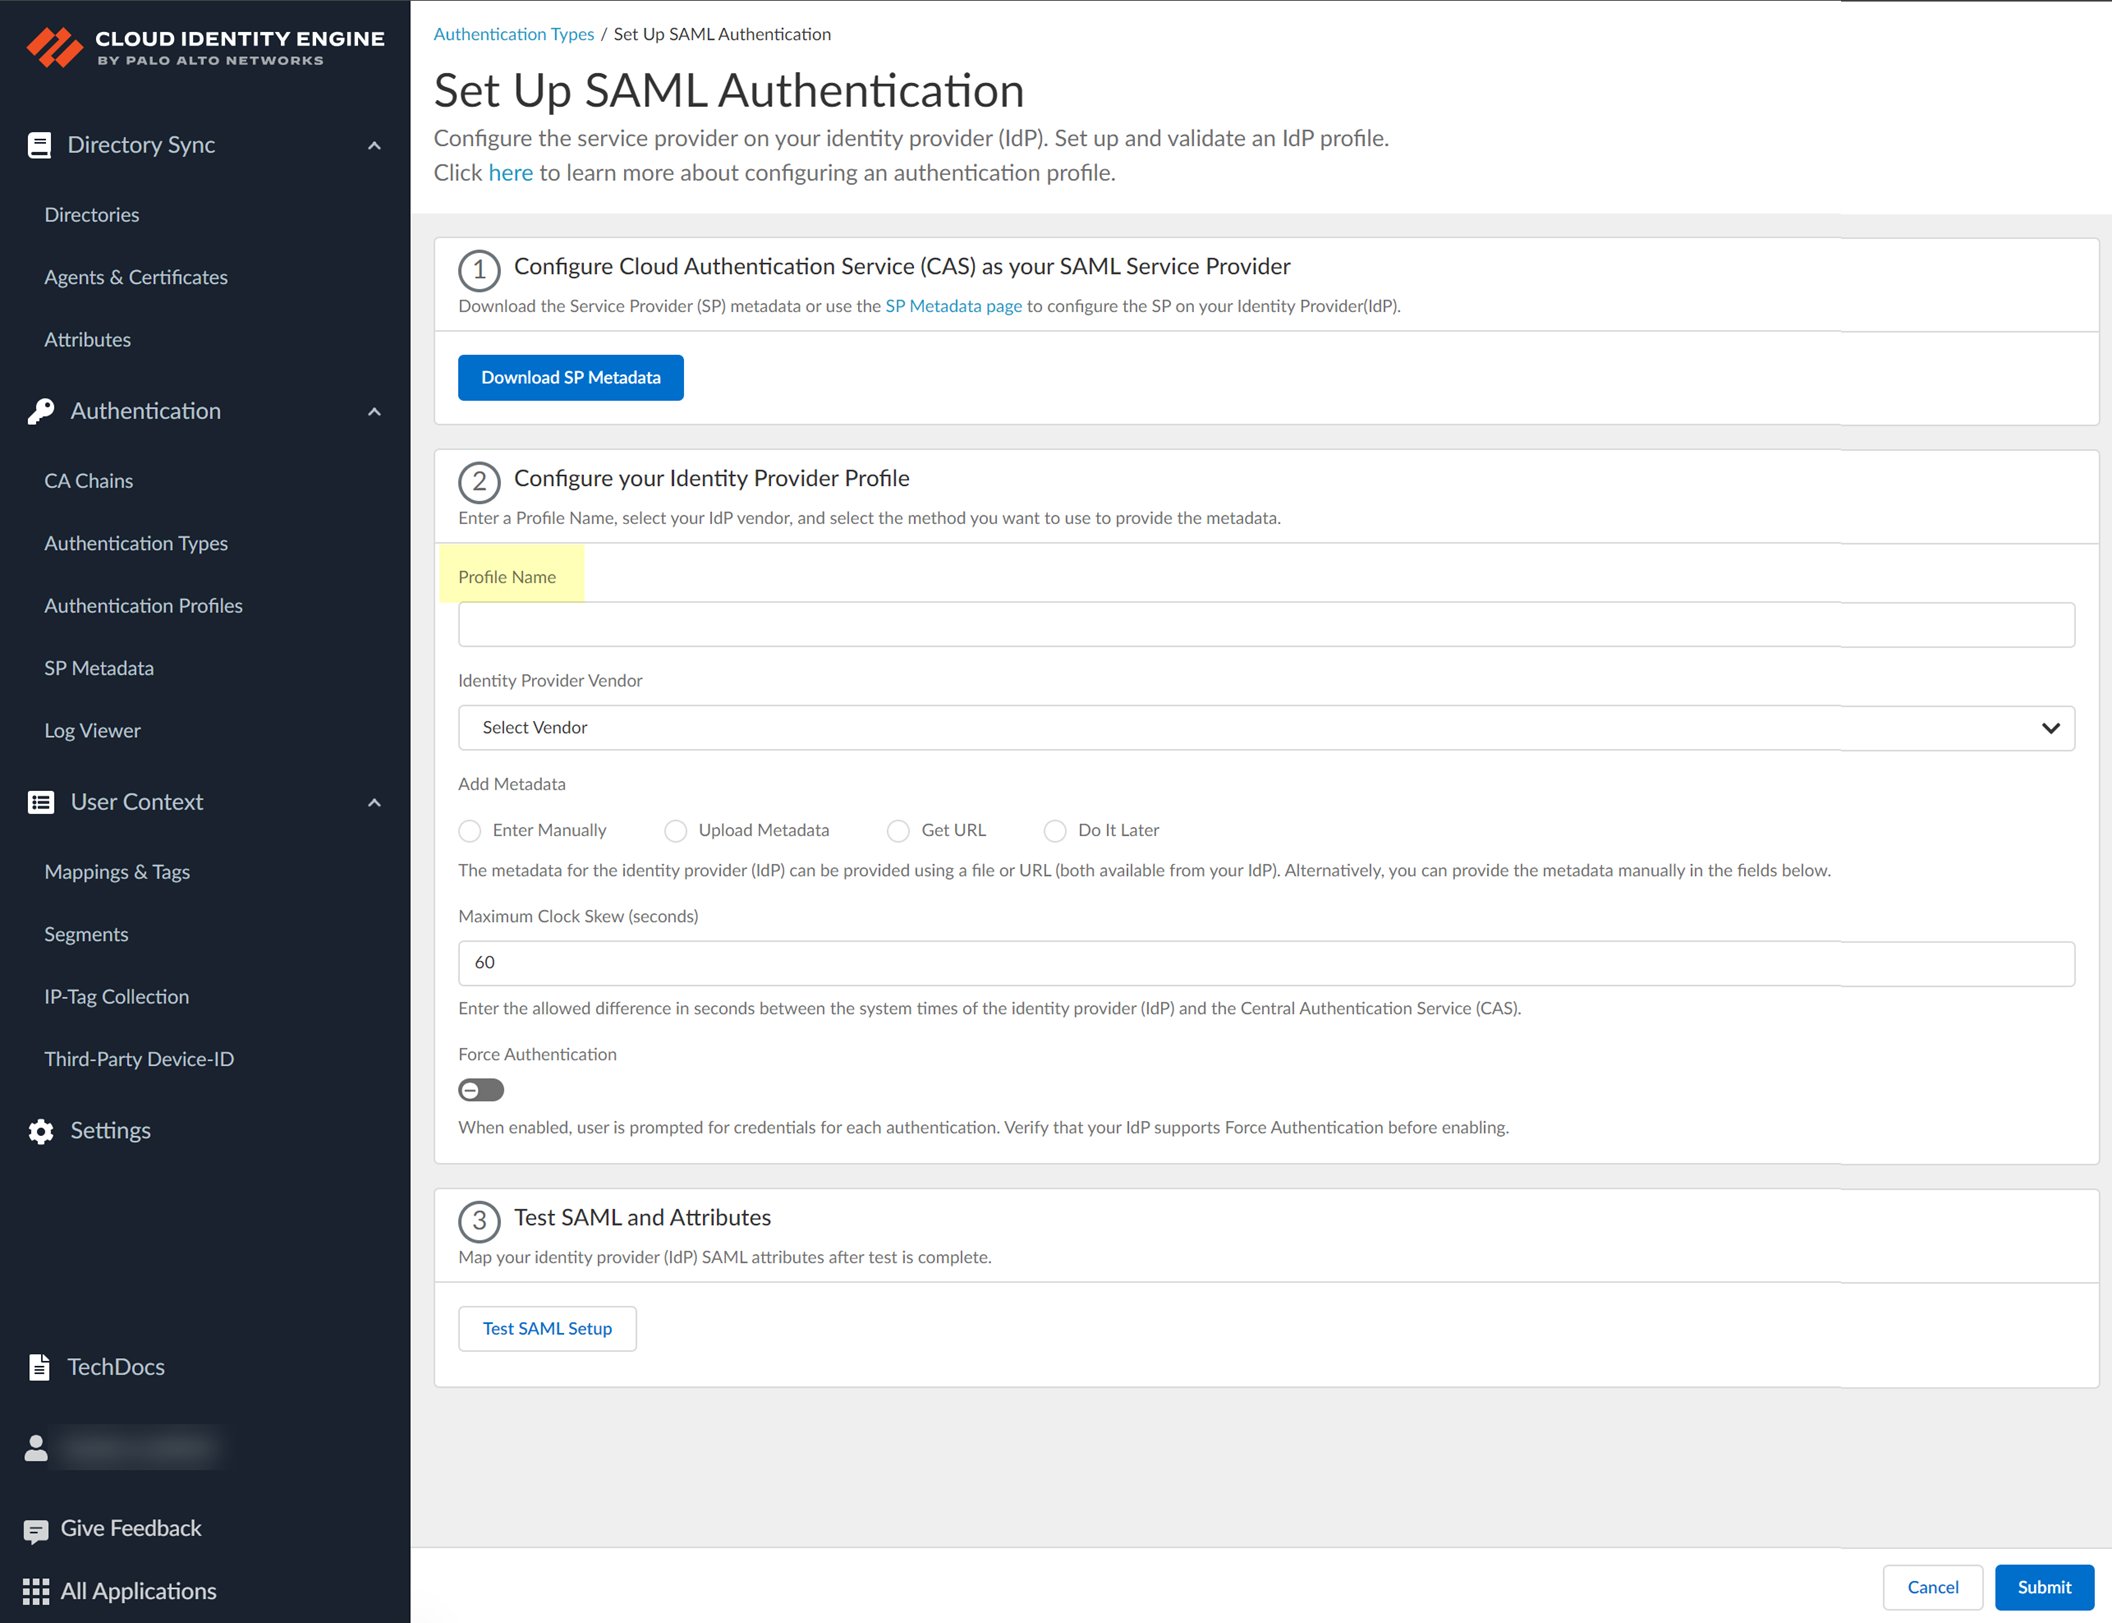
Screenshot showing fields for Profile Name and Identity Provider Vendor set to 'Others' in CIE SAML configuration.
-
Add Metadata: Manually (enter info from step 1.1), Upload File (upload metadata from IdP), or Get URL (paste metadata URL from IdP).
Screenshot showing the options for adding IdP metadata in CIE (Manual, Upload File, Get URL).
- Specify Maximum Clock Skew (default 60s).
- Enable Force Authentication (if required for GlobalProtect reconnect).
- Test SAML setup.
-
Select SAML attributes (
Username, Usergroup, Access Domain, User Domain, Admin Role
), Submit.
Screenshot showing fields to select SAML attributes (Username, Usergroup, etc.) in CIE.
User Authentication with a Client Certificate
Client certificates via a Certificate Authority (CA) chain can be configured in addition to or as an alternative to SAML 2.0 authentication.
Important Point: Client Certificate auth requires CA certificate installation on the agent host (for on-prem scenarios if agent is used) or devices accessing the portal.
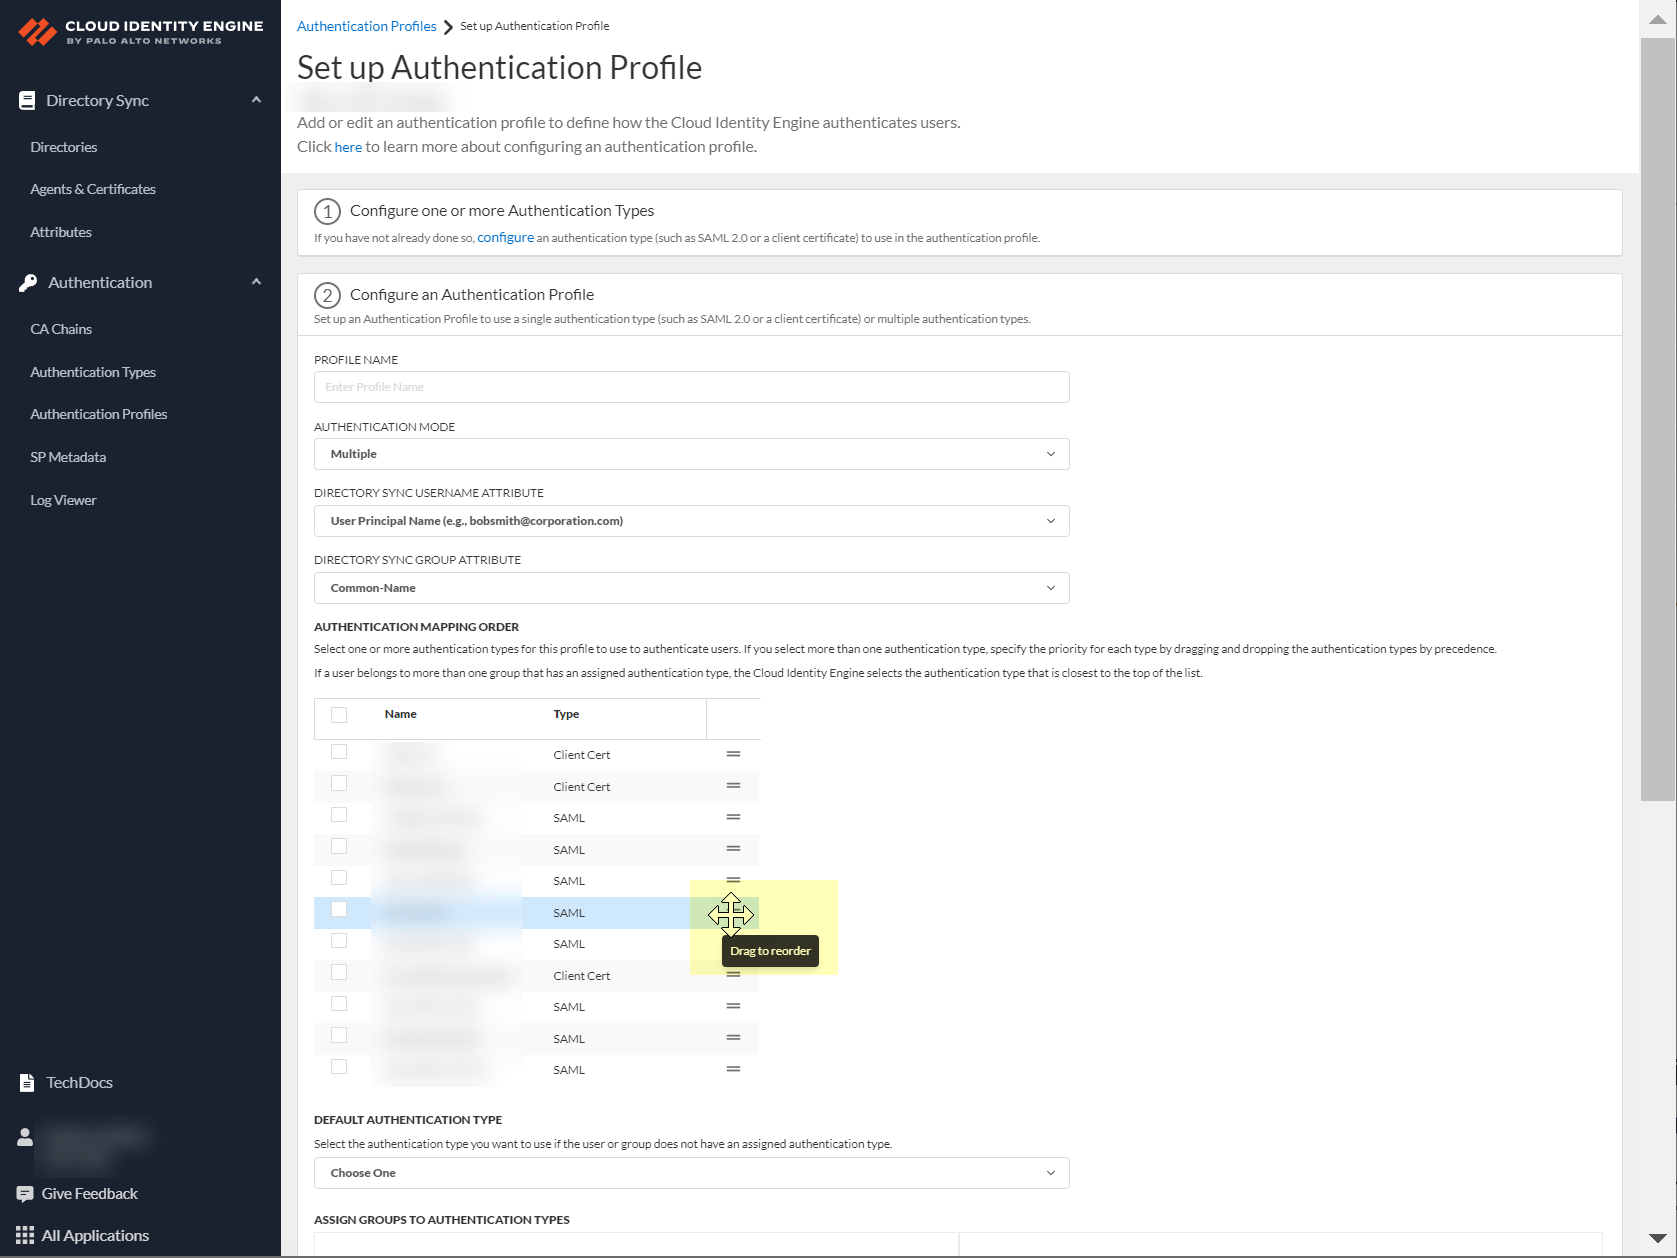
Set Up an Authentication Profile
Configures how users authenticate with CIE (single or multiple auth types). Required for firewall authentication policy, optional for admin/GP/Prisma Access.
Important Point: For multiple authentication types or client certificates, a directory must be configured in CIE. Not required for a single SAML type.
-
Authentication > Authentication Profiles > Add Authentication Profile.
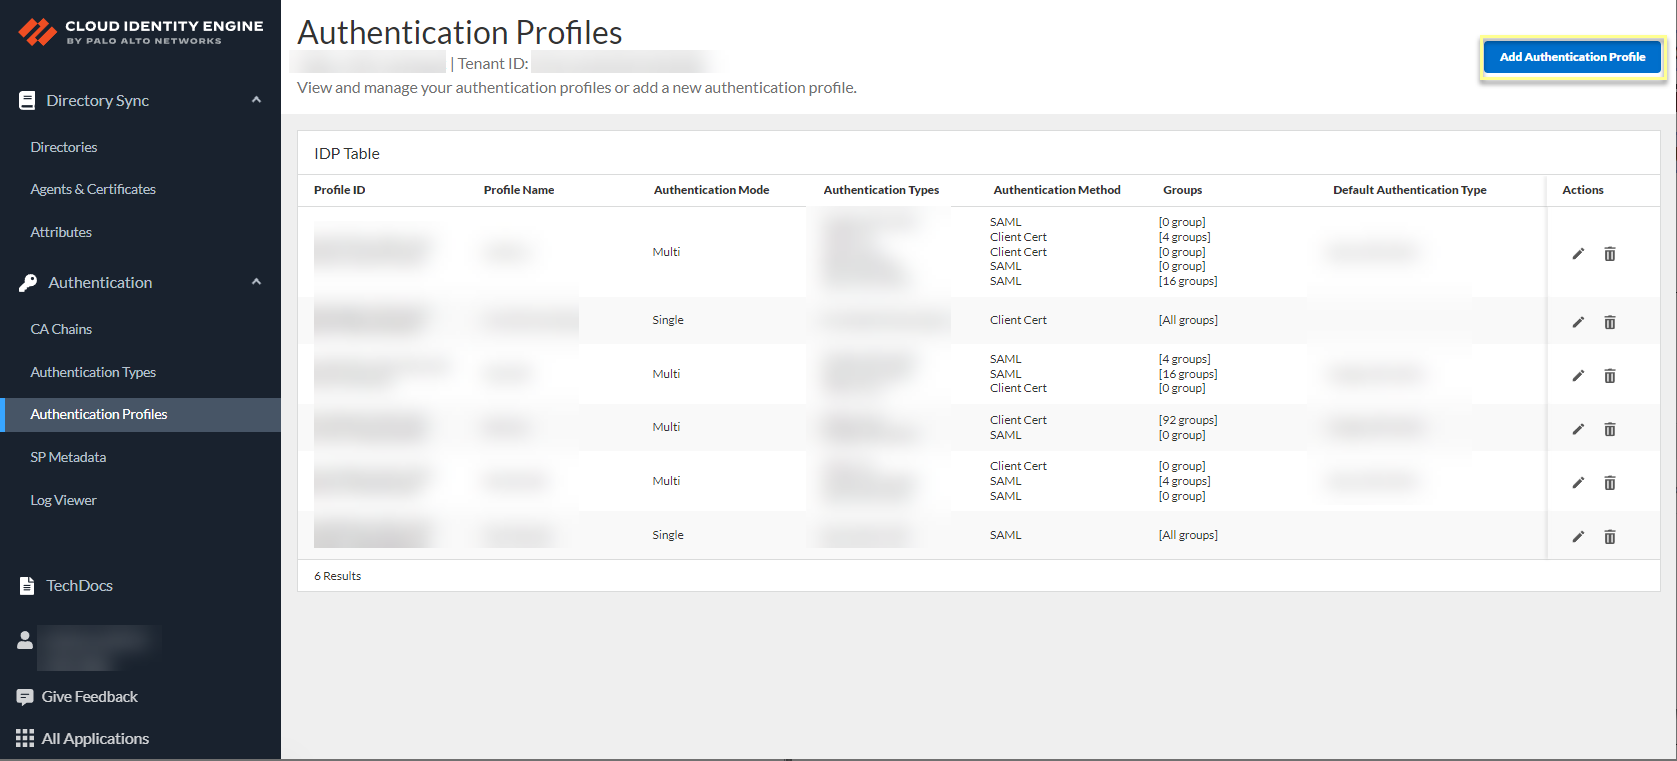
Screenshot showing the "Add Authentication Profile" button in CIE.
- Ensure authentication types are configured.
- Enter Profile Name.
-
Select Authentication Mode (Single or Multiple).

Screenshot showing the Authentication Mode options (Single or Multiple) in CIE.
If Single, select the authentication type.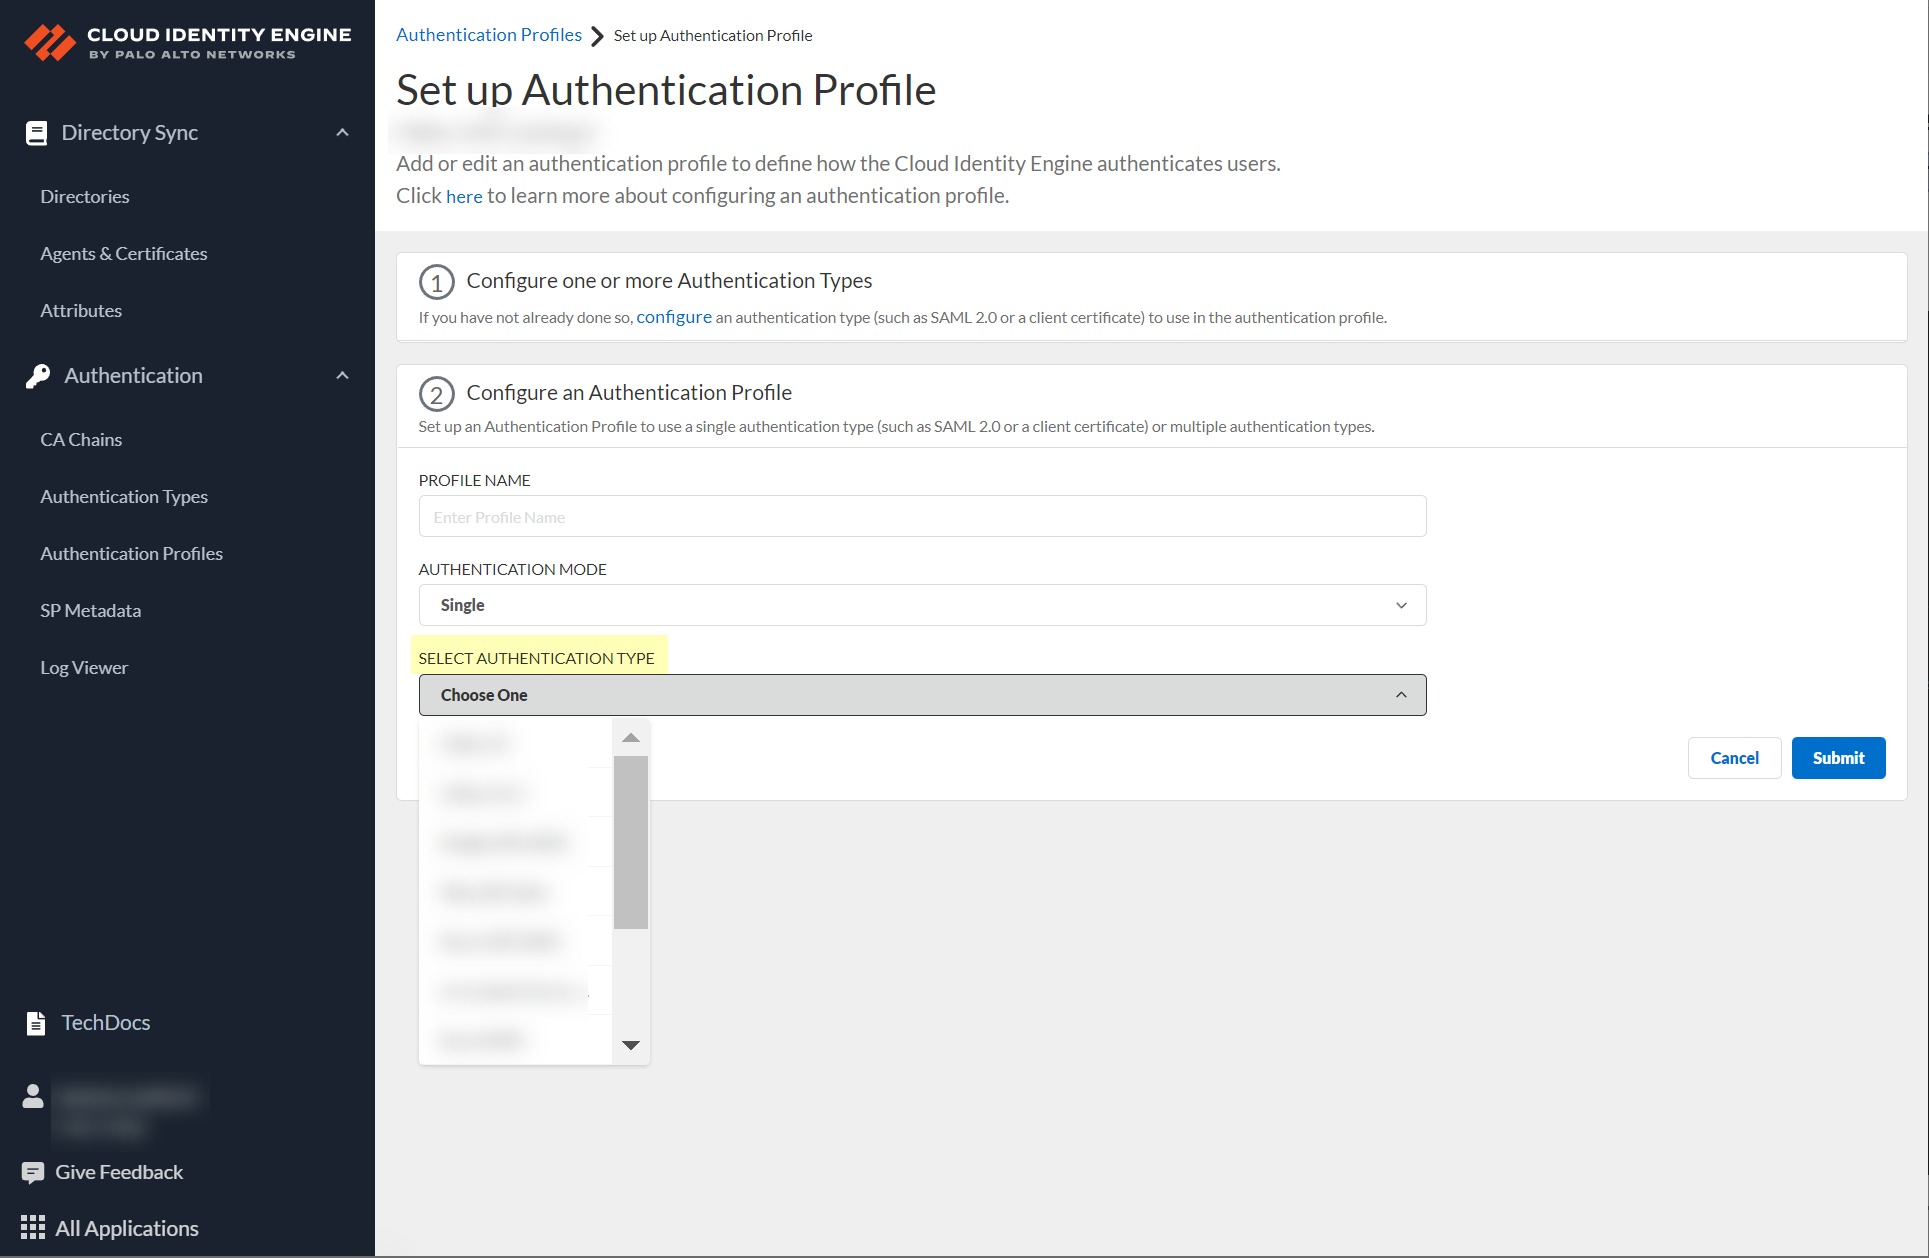
Screenshot showing the option to select a single authentication type.
-
(Multiple Mode or Single Client Cert) Select
Directory Sync Username Attribute
and
Group Attribute
.
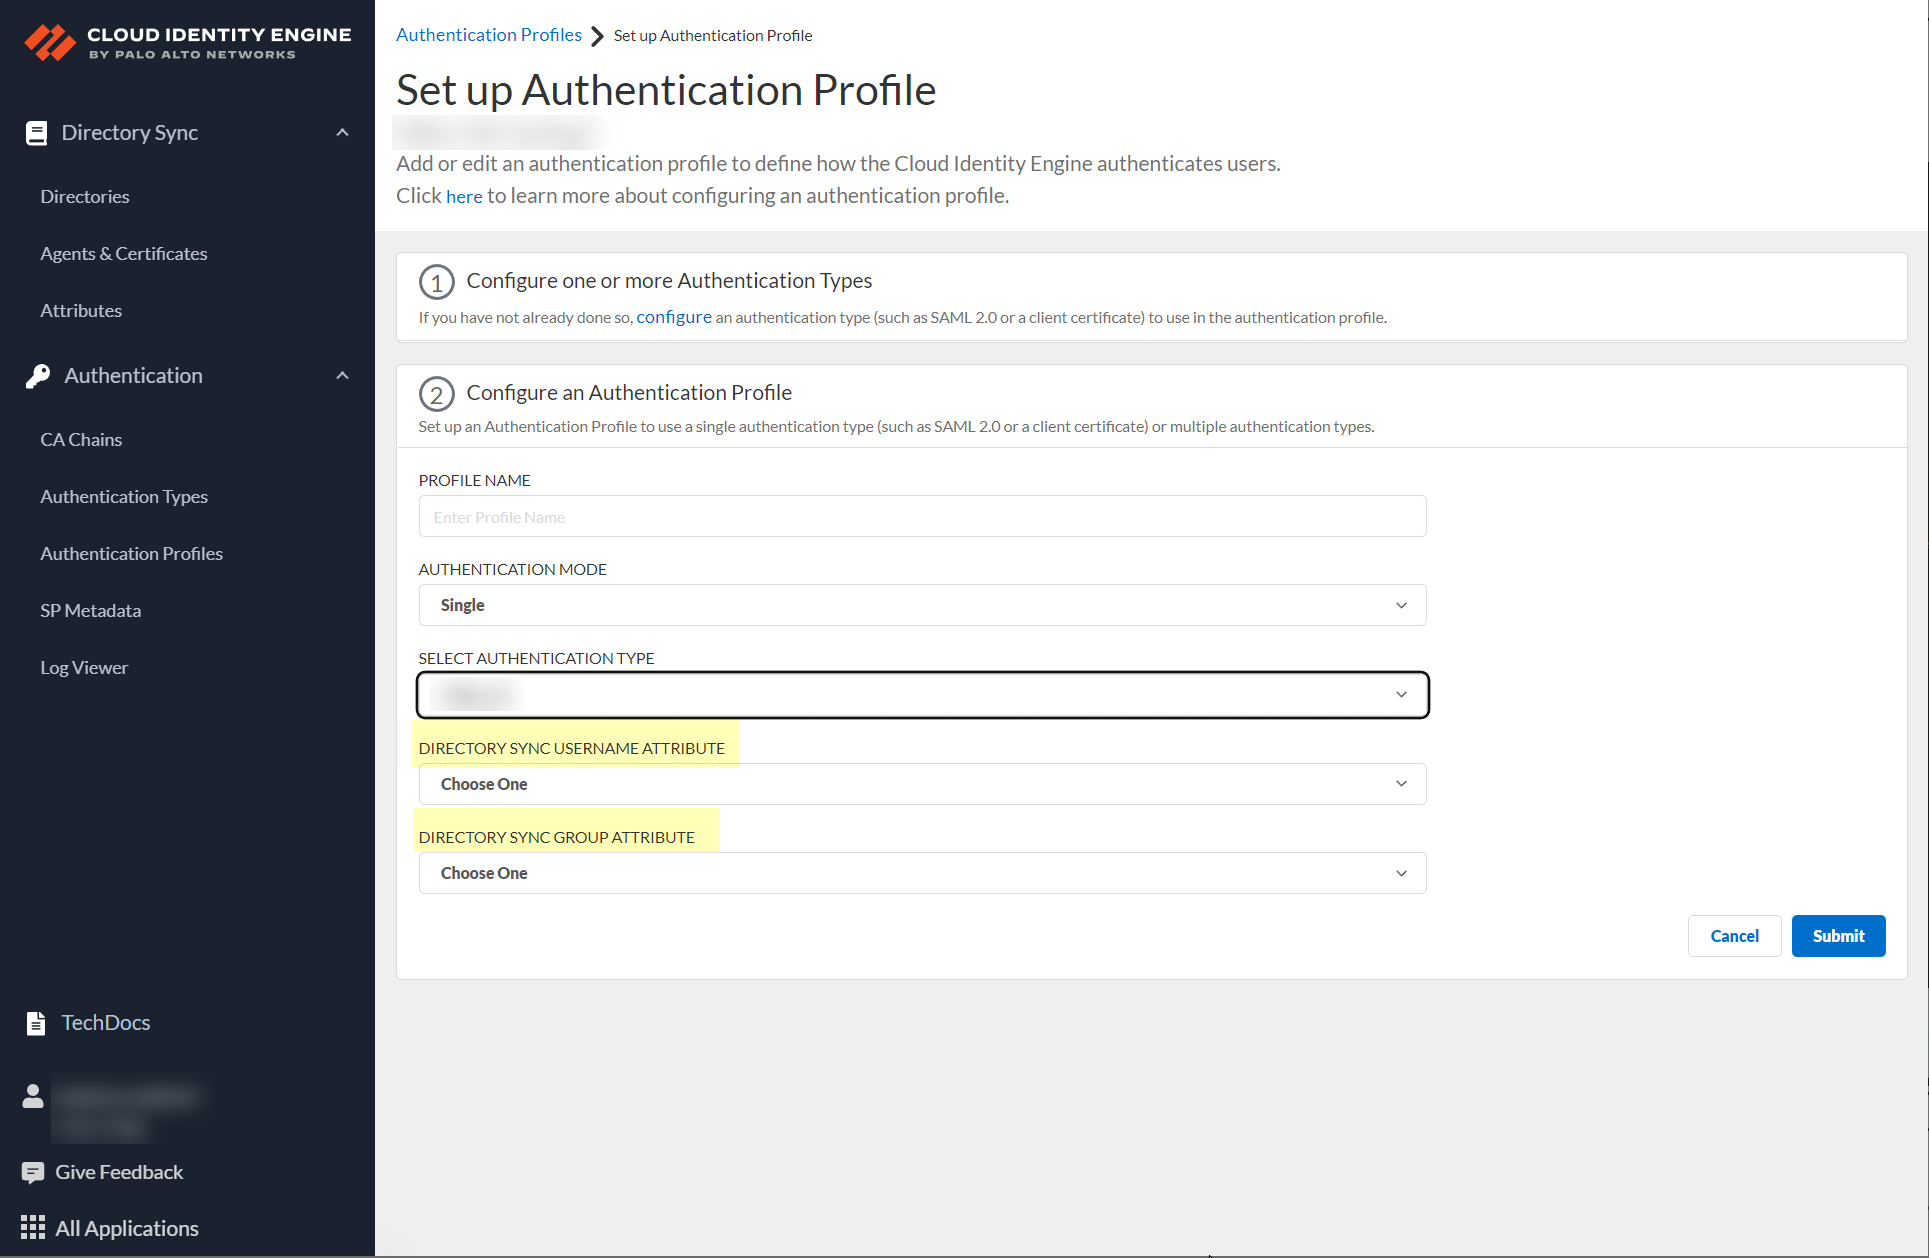
Screenshot showing the Directory Sync Username and Group Attribute fields.
Critical Point: Client Cert: Directory Sync Username Attribute MUST match Username Attribute in Client Cert config .
-
(Multiple Mode) Define Authentication mapping order.
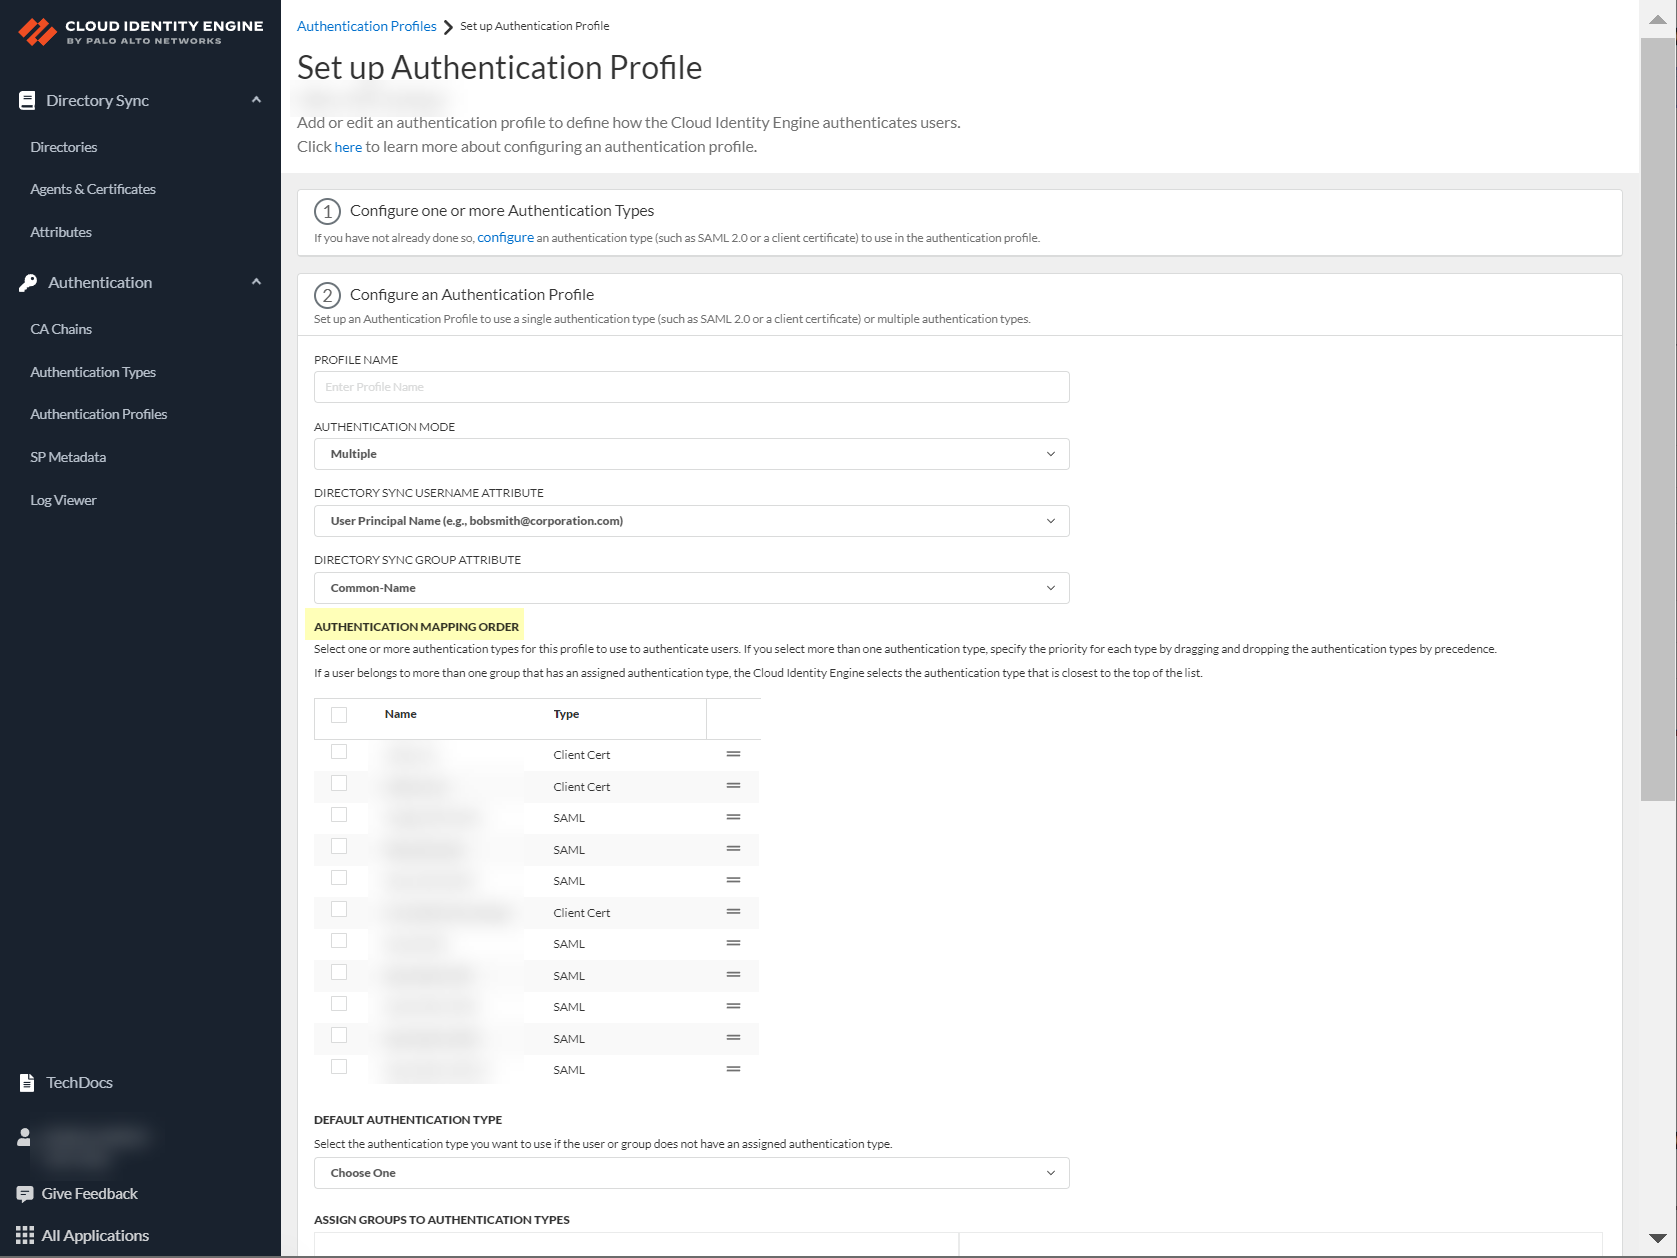
Screenshot showing the Authentication mapping order configuration for multiple authentication types.
-
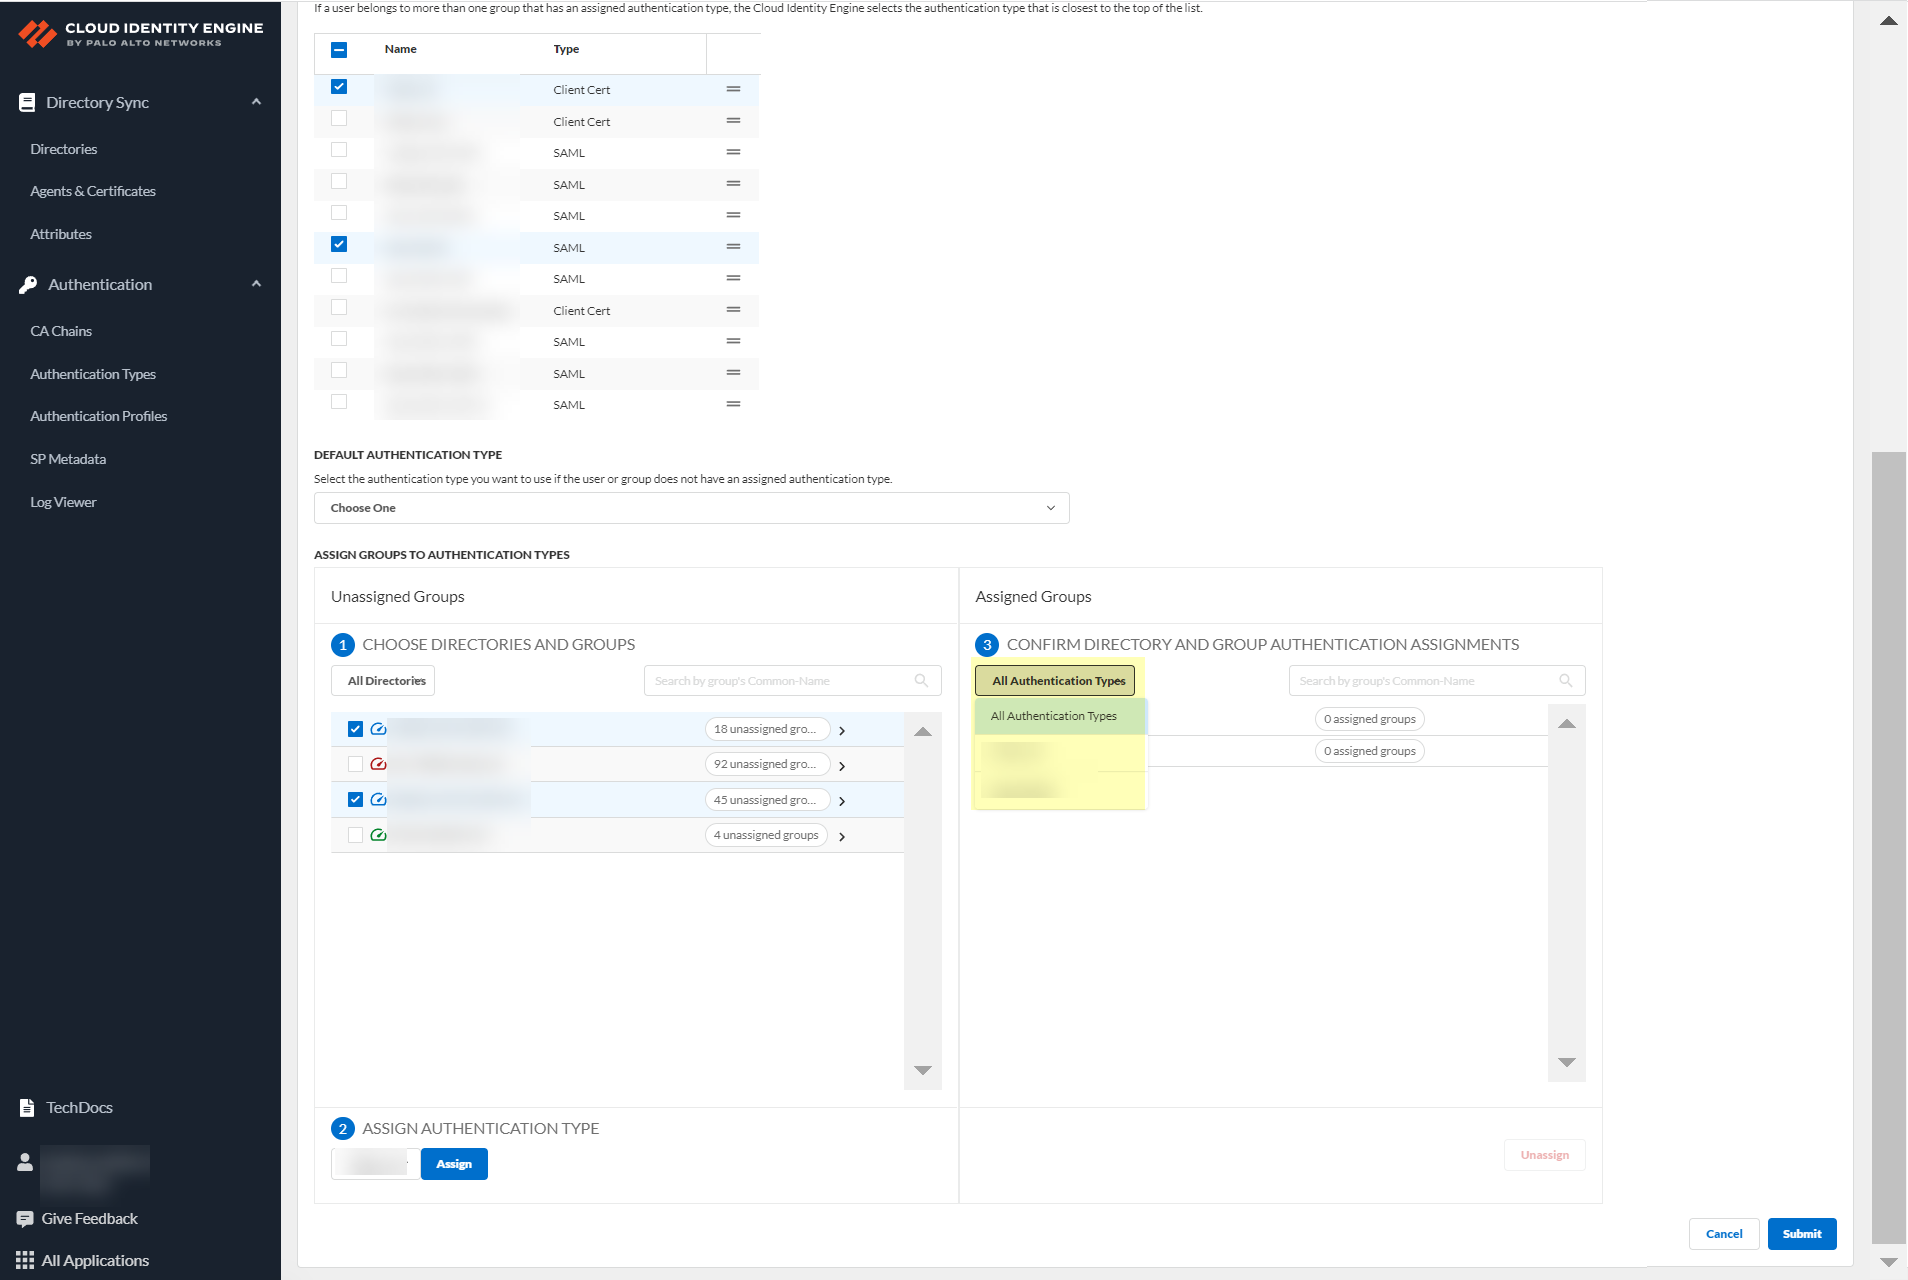
Select Default authentication type.
Screenshot showing the selection for the default authentication type.
Important Point: Best practice is to assign an auth type per group.
-
Choose directories and groups (select directory or All Directories).

Screenshot showing the options to choose directories and groups for authentication profile mapping.
Can search by Directory Sync Group Attribute.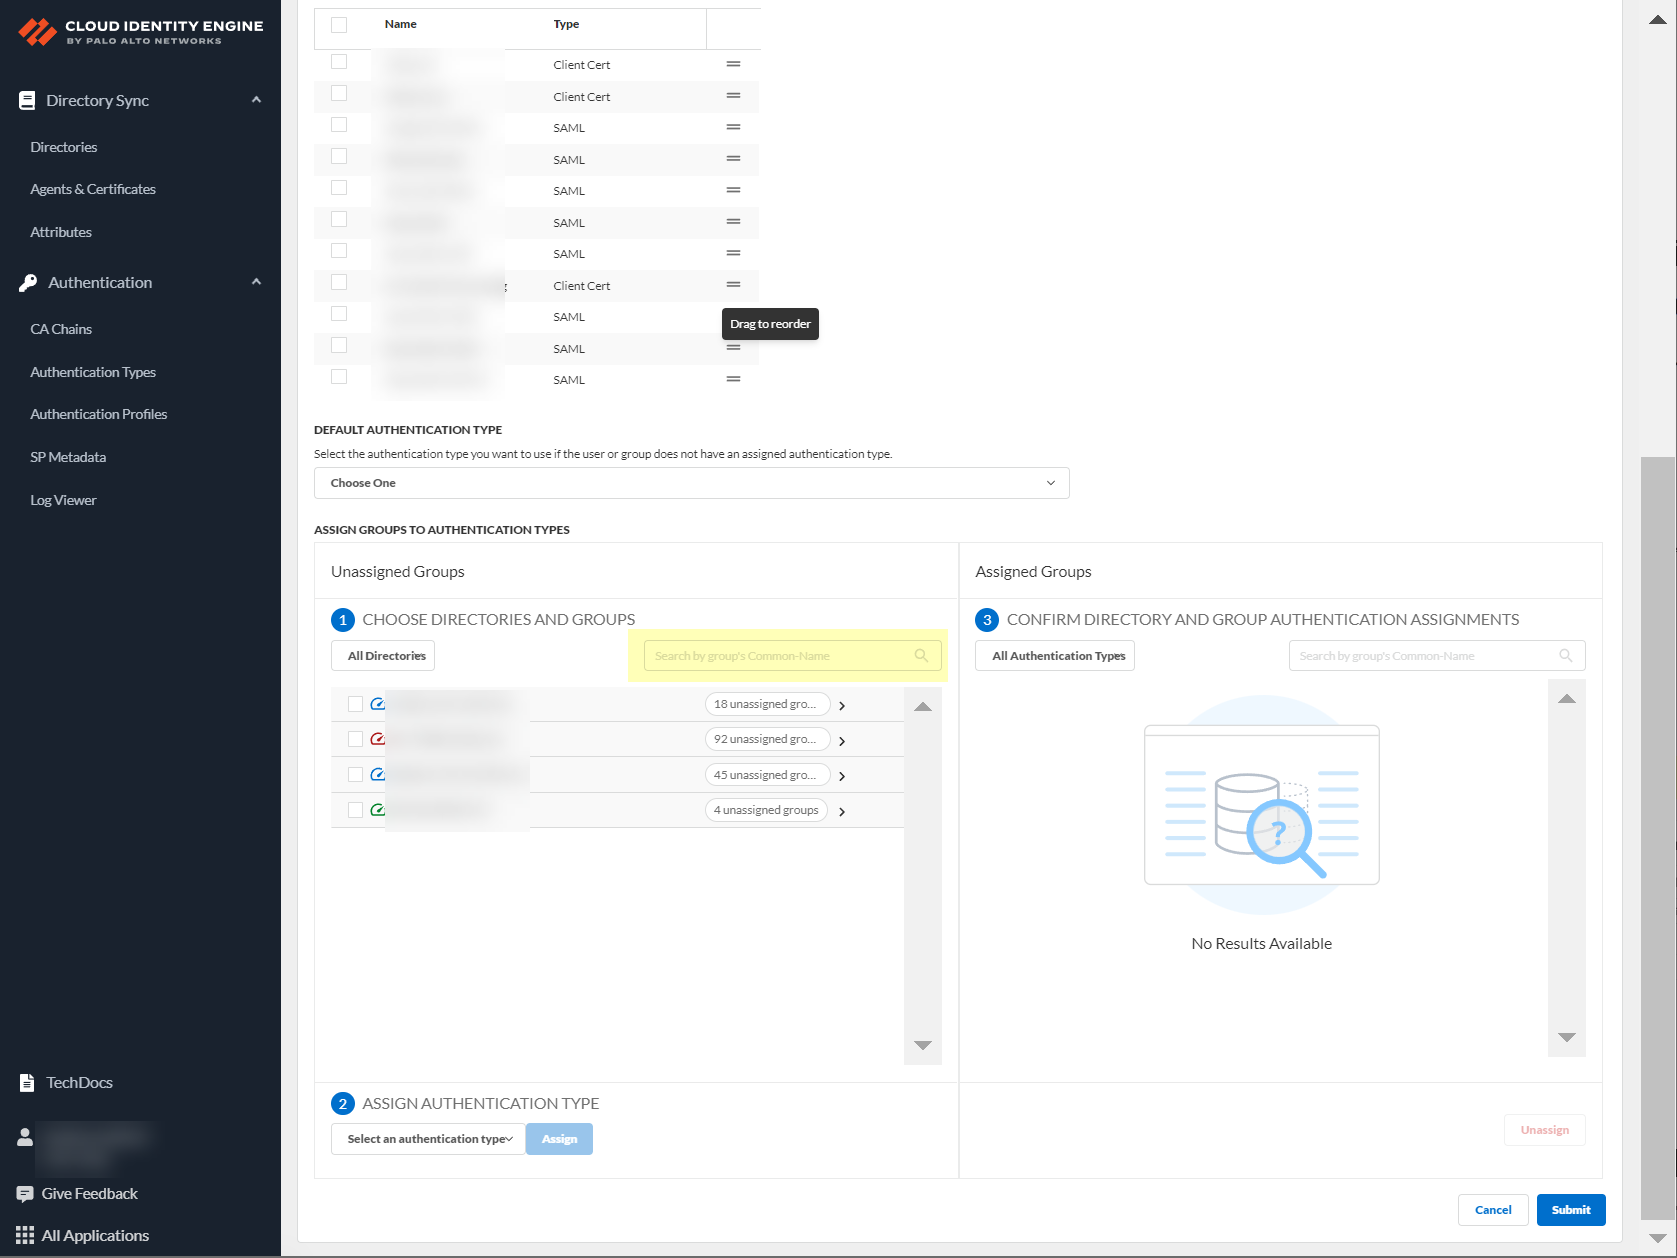
Screenshot showing the search bar for Directory Sync Group Attributes.
-
Select groups to authenticate.
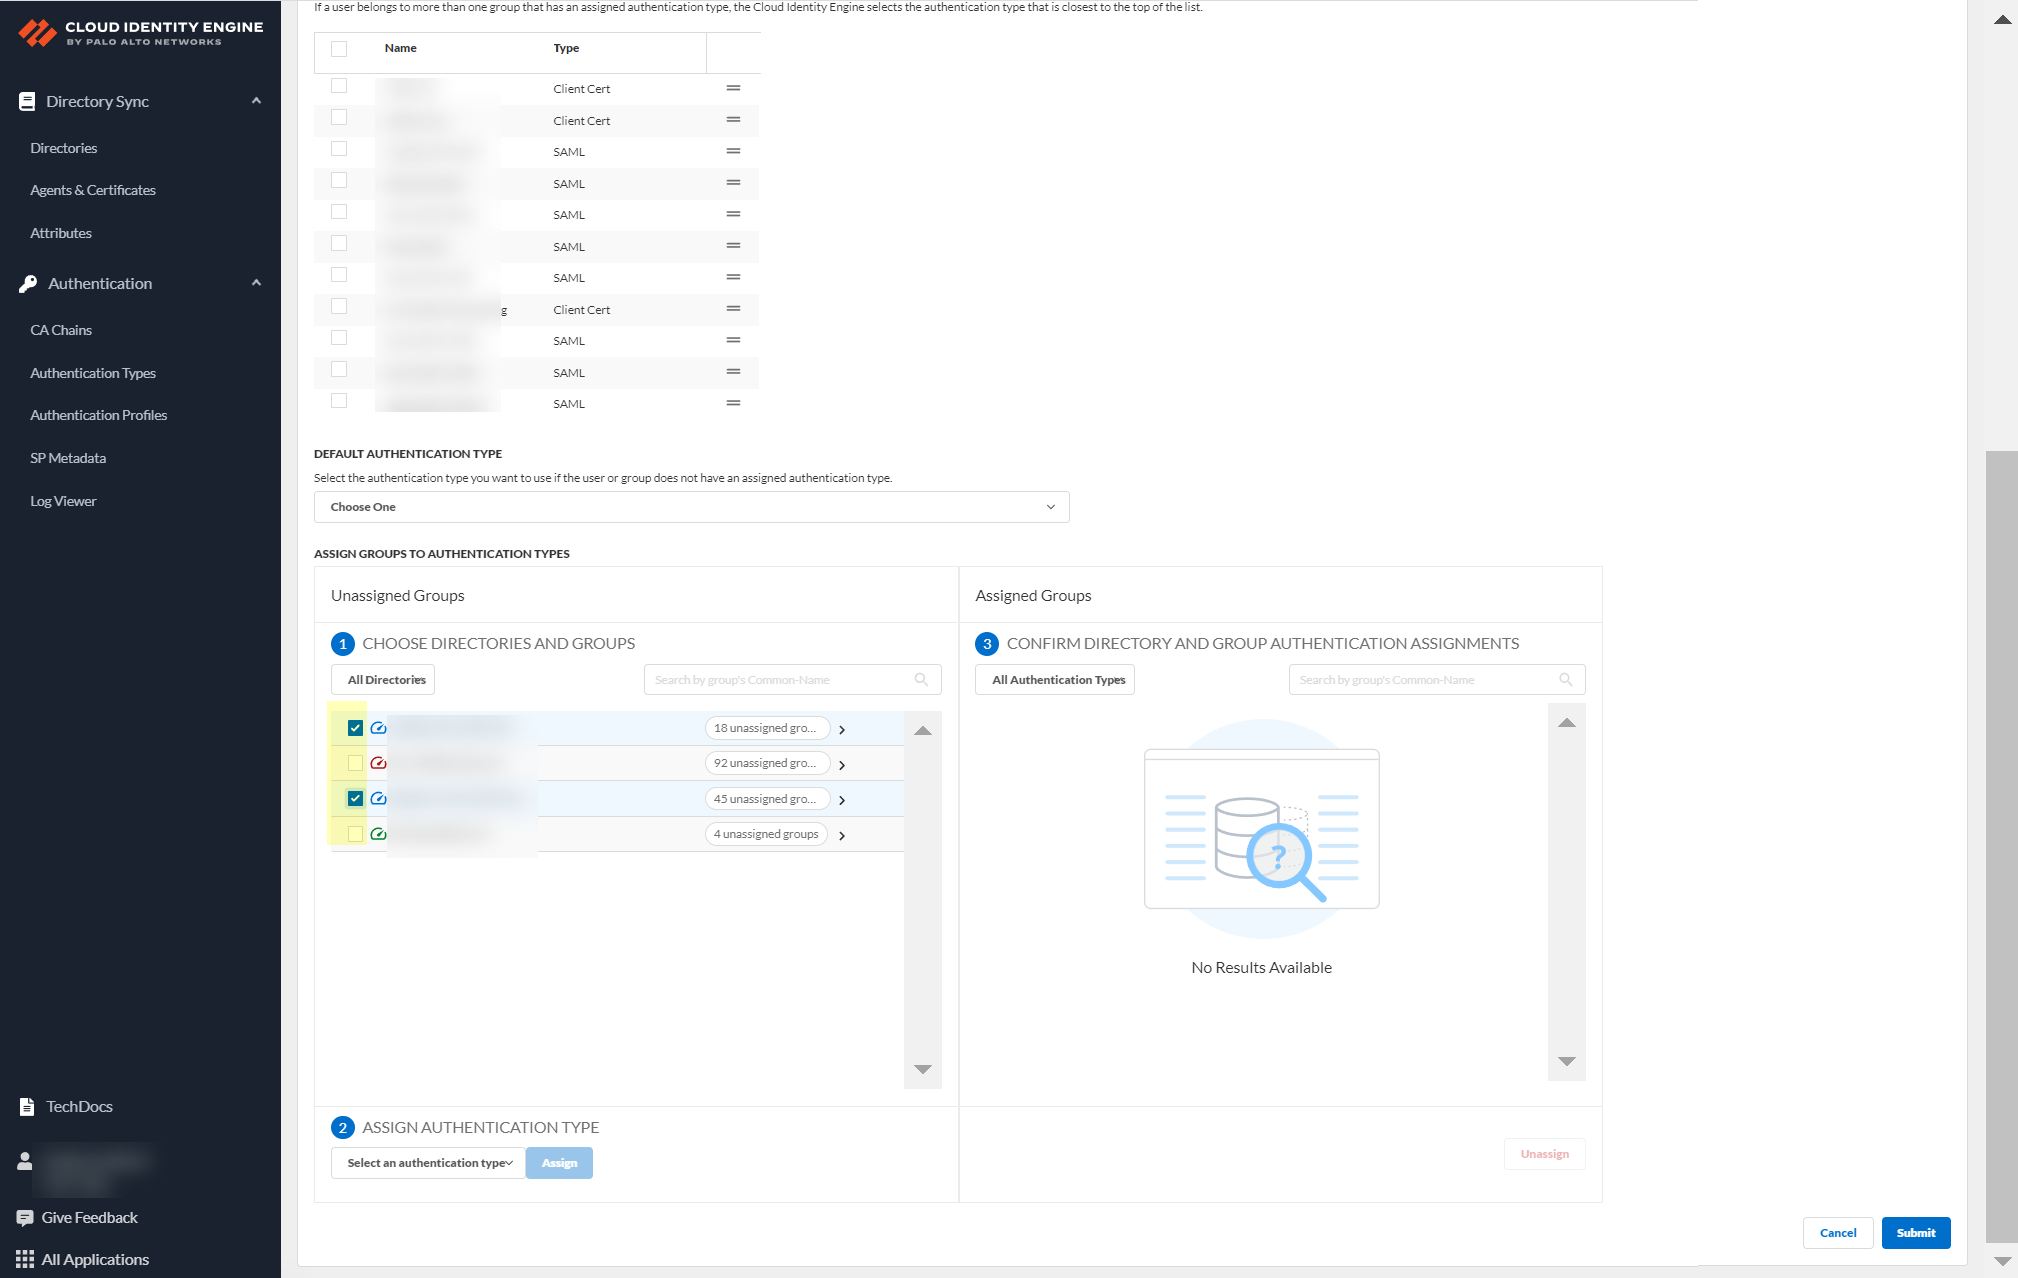
Screenshot showing the list of groups to select for assigning authentication types.
-
Select authentication type and Assign.
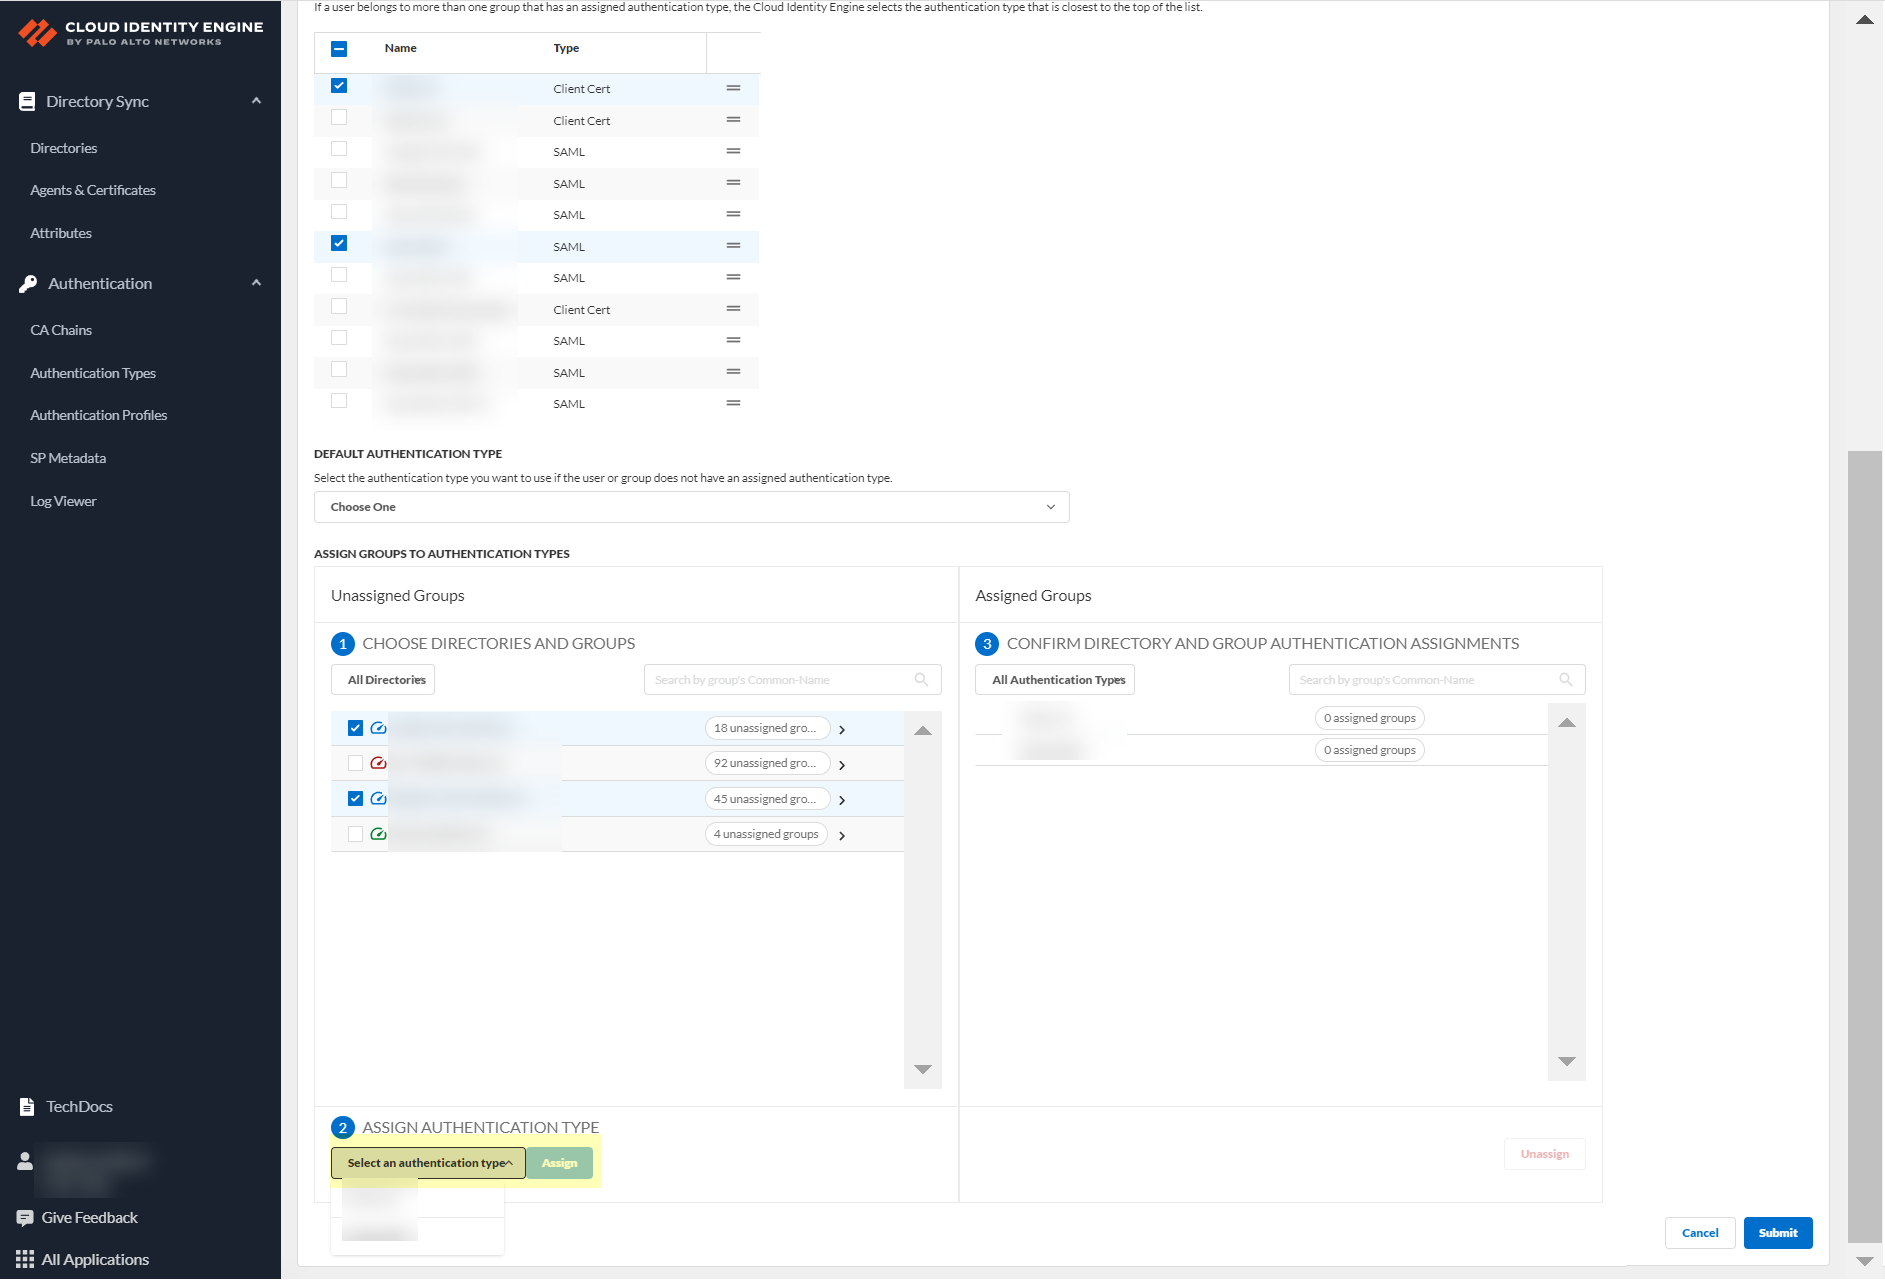
Screenshot showing the selection of an authentication type to assign to groups.
-
Review assignments.
Screenshot showing the review of assigned authentication types by group/directory.
- Submit changes.
Configure Cloud Identity Engine Authentication on the Firewall or Panorama
Links the CIE authentication profile to the firewall/Panorama for enforcement (Authentication policy, admin auth, GlobalProtect, Prisma Access).
-
Configure authentication profile on firewall/Panorama: Device > Authentication Profile > Add.
On Panorama: Device > Auth Profile (for managed devices) or Panorama > Auth Profile (for Panorama admins).
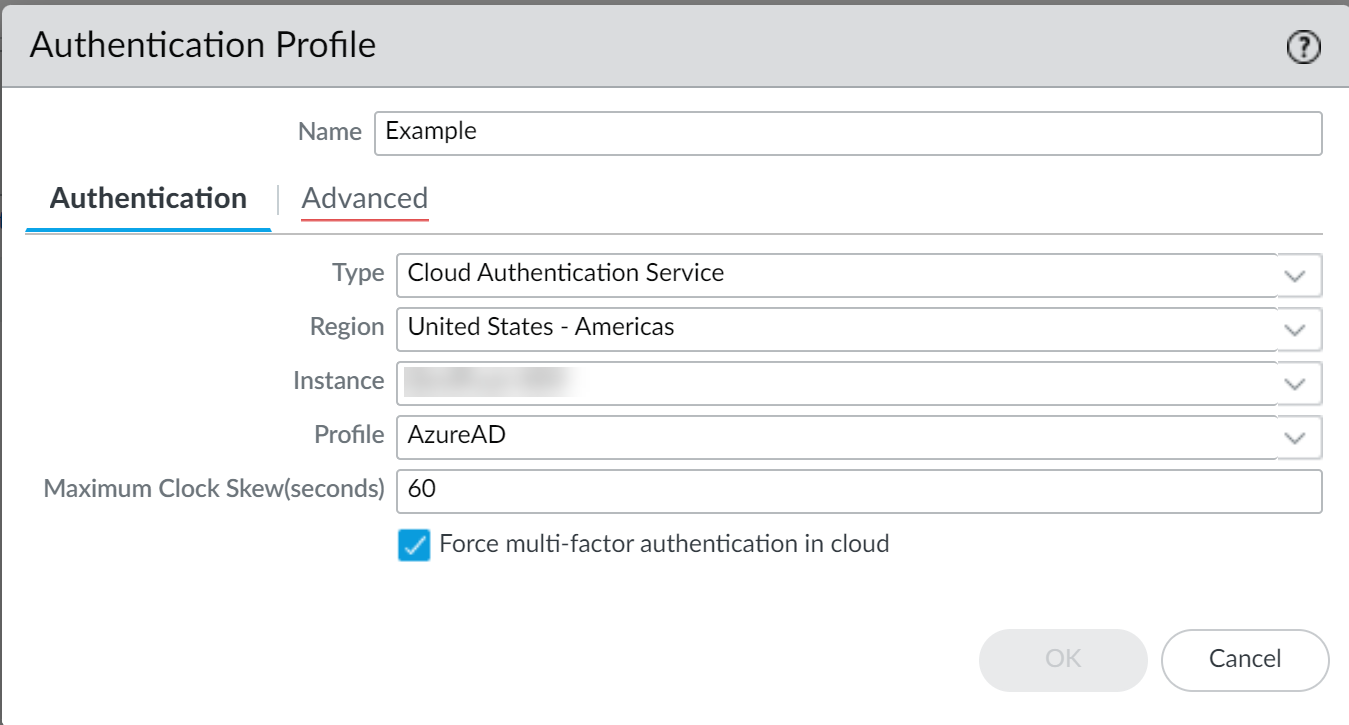
Screenshot showing the Authentication Profile configuration page on a Palo Alto Networks firewall.
- Enter Name.
- Select Type: Cloud Authentication Service .
- Select Region of CIE tenant.
- Select CIE Instance.
- Select Authentication Profile (from CIE).
- Specify Maximum Clock Skew (default 60s).
- Select Force multi-factor authentication in cloud (if applicable).
-
(Required for authentication policy rule only) Configure Authentication Portal: Device > User Identification > Authentication Portal Settings > Edit. Select Auth Profile from step 1, set Mode to Redirect. OK.
Important Point: Needed for Auth Policy rule (redirecting users to login page).
- (Required for authentication policy rule only) Create Authentication Enforcement object: Objects > Authentication > Add. Name, Authentication Method: web-form, Select Auth Profile from step 1. OK.
-
Create a custom URL category for CIE traffic URLs: Add URLs from table below.
CLI command shows URLs.show cloud-auth-service-regions - Create internet management profile enabling response pages.
- (Required for authentication policy rule only) Configure Authentication policy rule using the Auth Enforcement object and allowing traffic to the custom URL category.
- (Panorama only) Configure CIE for Panorama: Device > User Identification > Cloud Identity Engine (for managed devices) or Panorama > User Identification > Cloud Identity Engine (for Panorama admins). Then Panorama > Setup > Management > Edit Auth Settings > Select CIE auth profile. Panorama > Device Groups > Add/Edit > Select CIE, Add tenant. OK.
- Commit changes. Verify firewall redirects authentication requests to Cloud Authentication Service by accessing a webpage requiring authentication on a client device. Enter credentials.
| Region | Cloud Identity Engine Region-Based URL |
|---|---|
| United States |
cloud-auth.us.apps.paloaltonetworks.com
cloud-auth-service.us.apps.paloaltonetworks.com |
| Europe |
cloud-auth.nl.apps.paloaltonetworks.com
cloud-auth-service.nl.apps.paloaltonetworks.com |
| United Kingdom |
cloud-auth.uk.apps.paloaltonetworks.com
cloud-auth-service.uk.apps.paloaltonetworks.com |
| Singapore |
cloud-auth.sg.apps.paloaltonetworks.com
cloud-auth-service.sg.apps.paloaltonetworks.com |
| Canada |
cloud-auth.ca.apps.paloaltonetworks.com
cloud-auth-service.ca.apps.paloaltonetworks.com |
| Japan |
cloud-auth.jp.apps.paloaltonetworks.com
cloud-auth-service.jp.apps.paloaltonetworks.com |
| Australia |
cloud-auth.au.apps.paloaltonetworks.com
cloud-auth-service.au.apps.paloaltonetworks.com |
| Germany |
cloud-auth.de.apps.paloaltonetworks.com
cloud-auth-service.de.apps.paloaltonetworks.com |
| United States - Government |
cloud-auth-service.gov.apps.paloaltonetworks.com
cloud-auth.gov.apps.paloaltonetworks.com |
| India |
cloud-auth-service.in.apps.paloaltonetworks.com
cloud-auth.in.apps.paloaltonetworks.com |
| Switzerland |
cloud-auth-service.ch.apps.paloaltonetworks.com
cloud-auth.ch.apps.paloaltonetworks.com |
| Spain |
cloud-auth-service.es.apps.paloaltonetworks.com
cloud-auth-service.es.apps.paloaltonetworks.com |
| Italy |
cloud-auth-service.it.apps.paloaltonetworks.com
cloud-auth.it.apps.paloaltonetworks.com |
| China |
cloud-auth-service.cn.apps.prismaaccess.cn
cloud-auth.cn.apps.prismaaccess.cn (Region accessible only within specified region) |
| Poland |
cloud-auth-service.pl.apps.paloaltonetworks.com
cloud-auth.pl.apps.paloaltonetworks.com |
| Qatar |
cloud-auth-service.qa.apps.paloaltonetworks.com
cloud-auth.qa.apps.paloaltonetworks.com |
| Taiwan |
cloud-auth-service.tw.apps.paloaltonetworks.com
cloud-auth.tw.apps.paloaltonetworks.com |
| Israel |
cloud-auth-service.il.apps.paloaltonetworks.com
cloud-auth.il.apps.paloaltonetworks.com |
| Indonesia |
cloud-auth-service.id.apps.paloaltonetworks.com
cloud-auth.id.apps.paloaltonetworks.com |
| South Korea |
cloud-auth-service.kr.apps.paloaltonetworks.com
cloud-auth.kr.apps.paloaltonetworks.com |
| Saudi Arabia |
cloud-auth-service.sa.apps.paloaltonetworks.com
cloud-auth.sa.apps.paloaltonetworks.com |
Configure Security Risk for the Cloud Identity Engine
Obtains risk info (user/device) from sources like Azure Identity Protection and SentinelOne to create dynamic risky groups for adaptive policy enforcement. Enables closed-loop automation (users/devices removed from risky group upon remediation).
Integrates with Azure Identity Protection (user risk) and SentinelOne EDR (device risk). Bidirectional integration with Prisma Access and SentinelOne for automated quarantine.
User Risk from Azure AD Identity Protection requires Client Credential Flow for Azure AD and specific Azure permissions ( IdentityRiskyUser.Read.All , IdentityRiskEvent.Read.All ).
-
In CIE: Security Risk > Risk Sources > Add Risk Source.
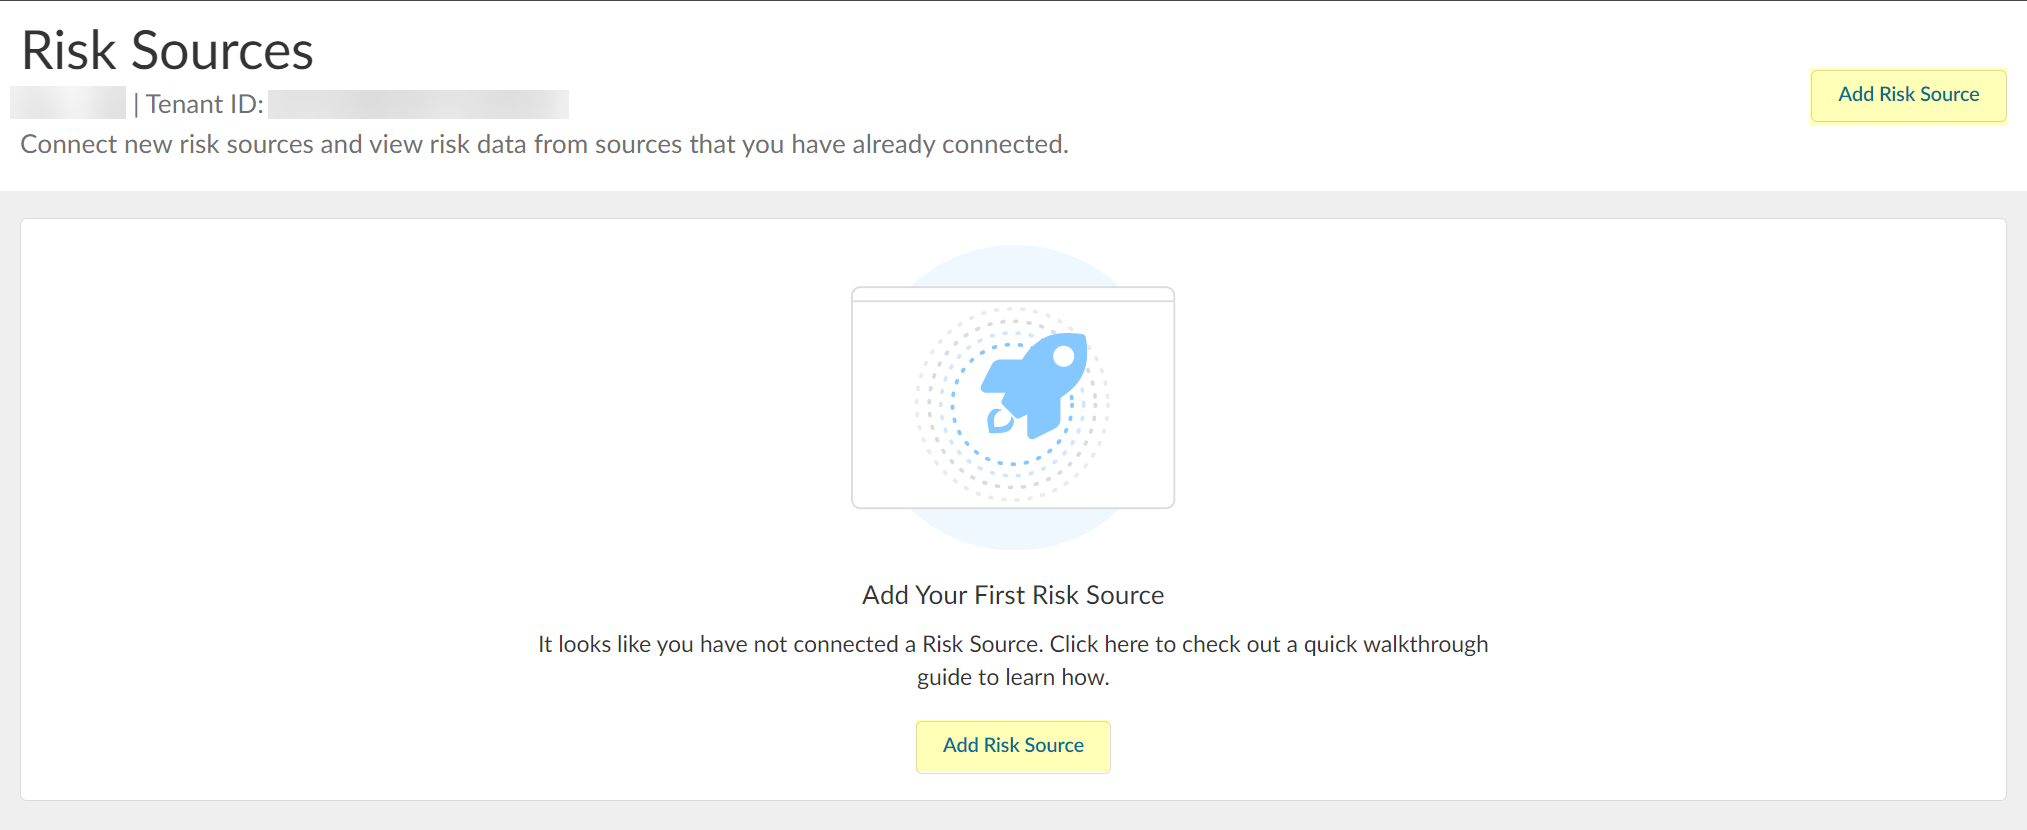
Screenshot showing the "Add Risk Source" button in the CIE Security Risk section.
-
Select risk source type (Azure or SentinelOne). Can configure max one of each.
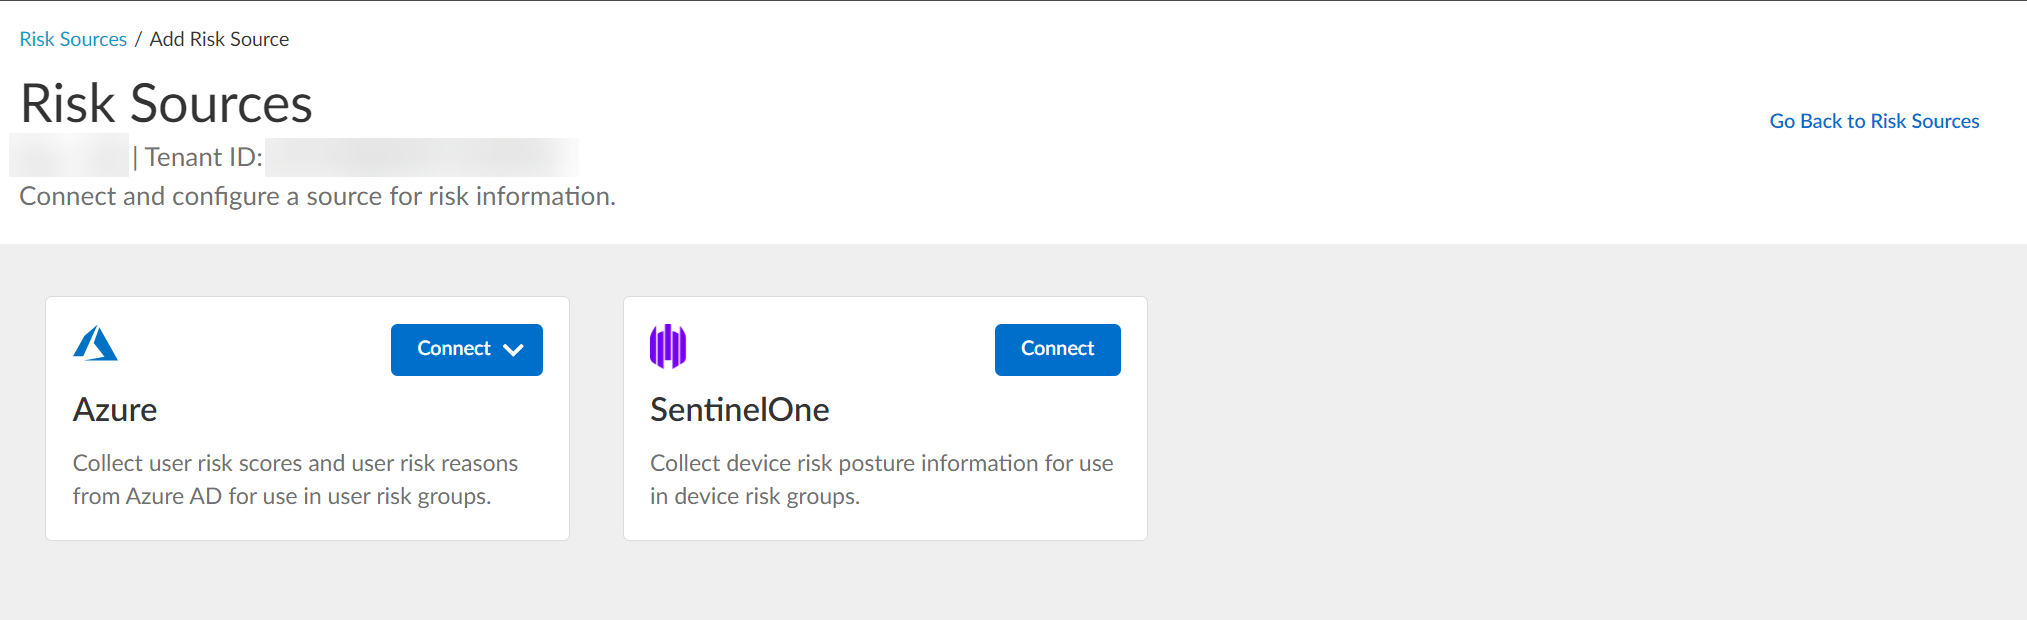
Screenshot showing the available Risk Source types (Azure, SentinelOne) in CIE.
-
Configure Azure risk source: Click Connect > Configure new Azure directory or select Existing Directory.
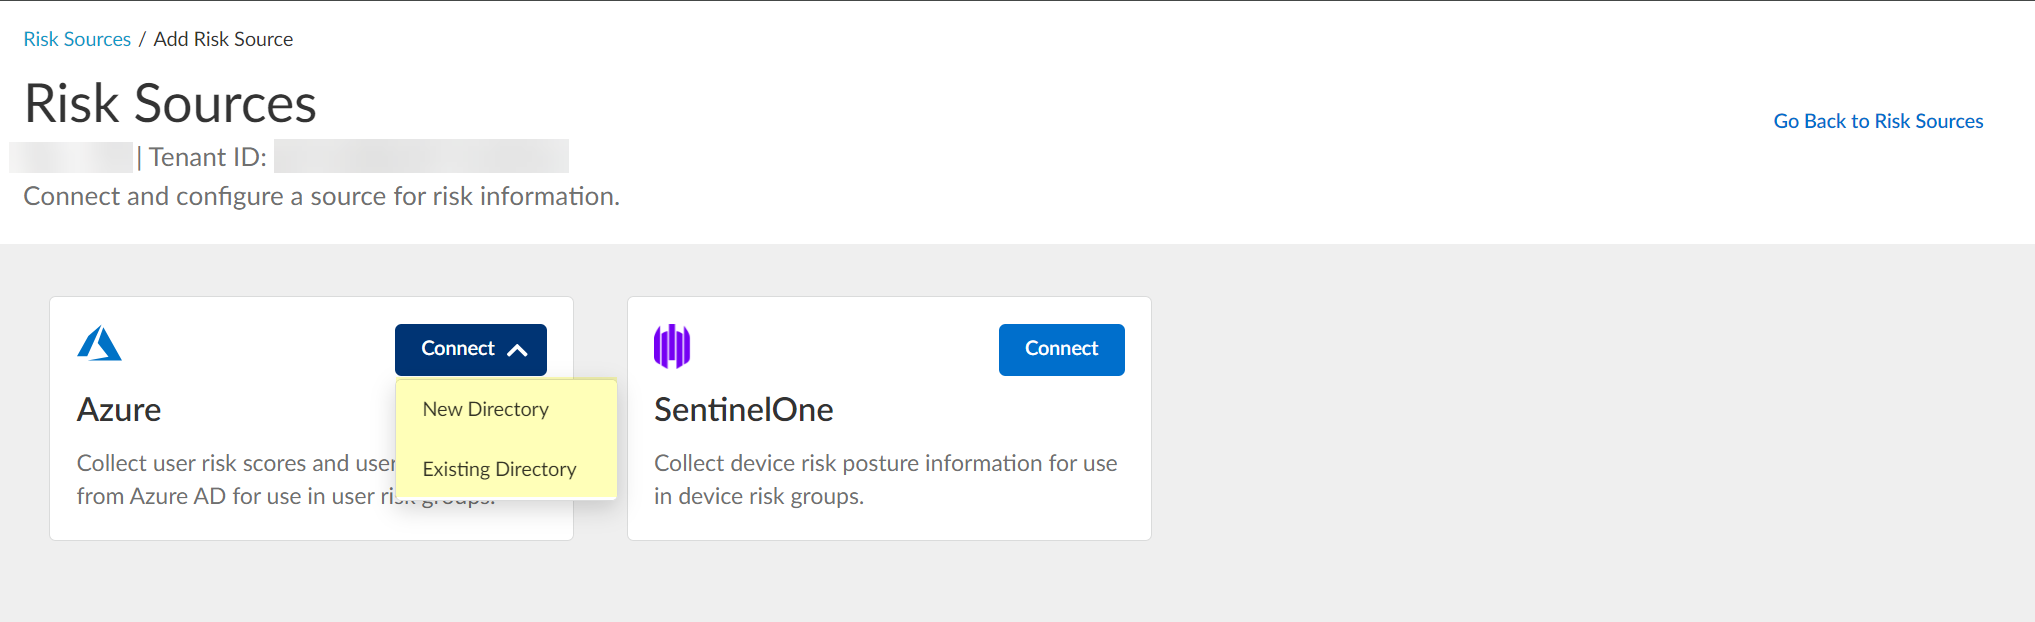
Screenshot showing the options to configure a new or select an existing Azure directory as a risk source.
- Configure SentinelOne risk source: Click Connect. (See next section).
Configure Azure for Security Risk in the Cloud Identity Engine
-
View/Edit dynamic risky user groups: Security Risk > Cloud Dynamic Groups > Risky User Group tab. View details or search. Edit to add contexts/attributes. Remove group if needed.
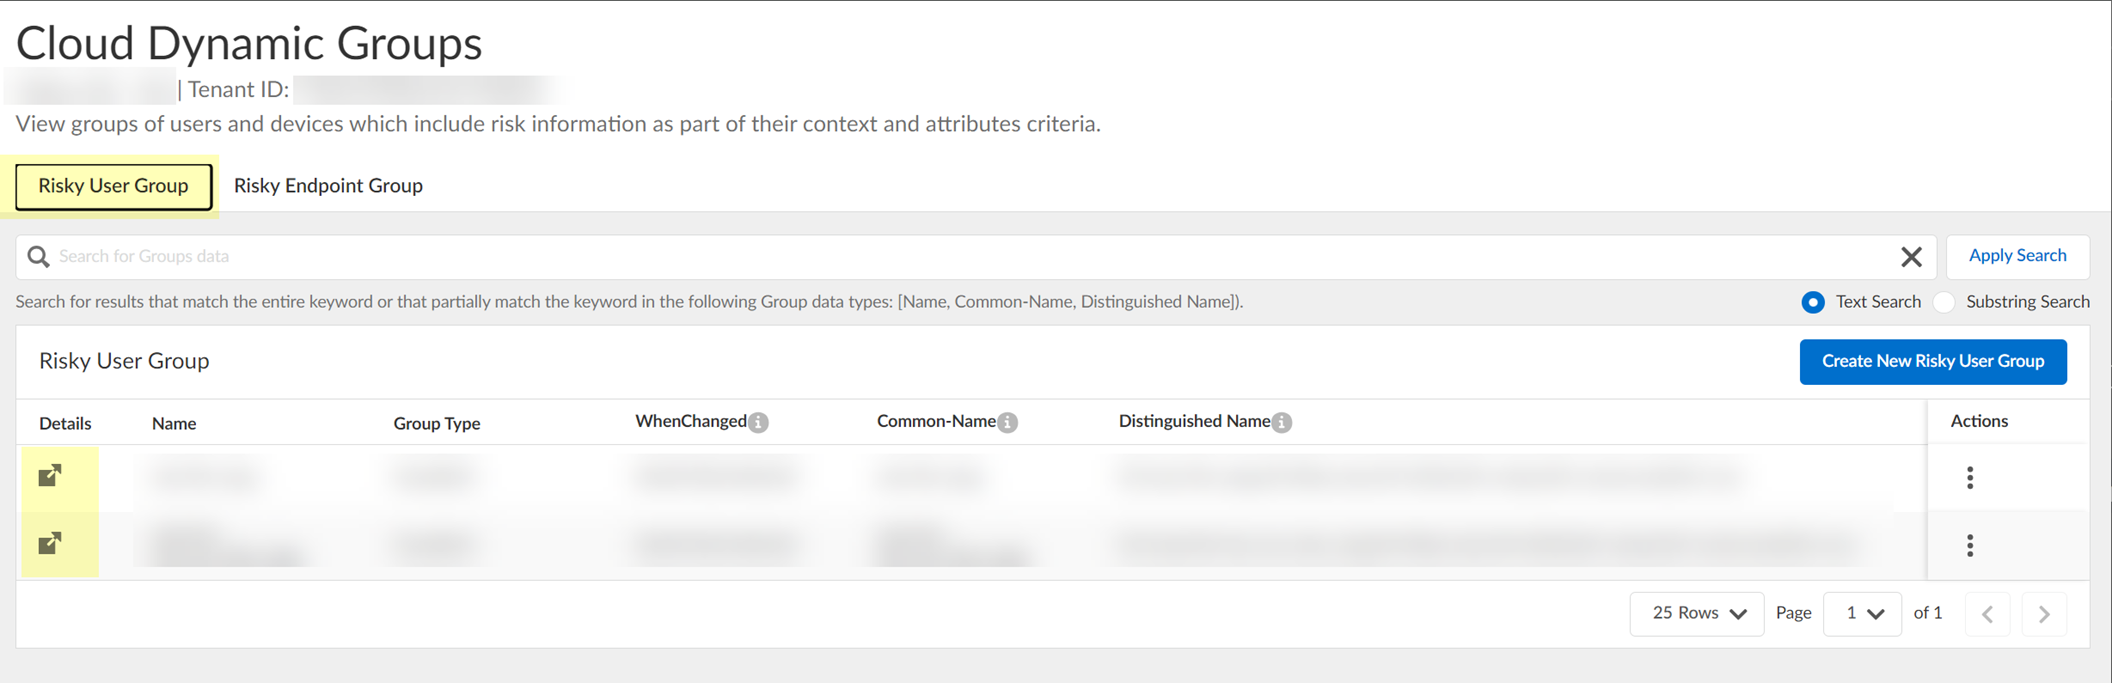
Screenshot showing the list of Dynamic Risky User Groups in CIE.
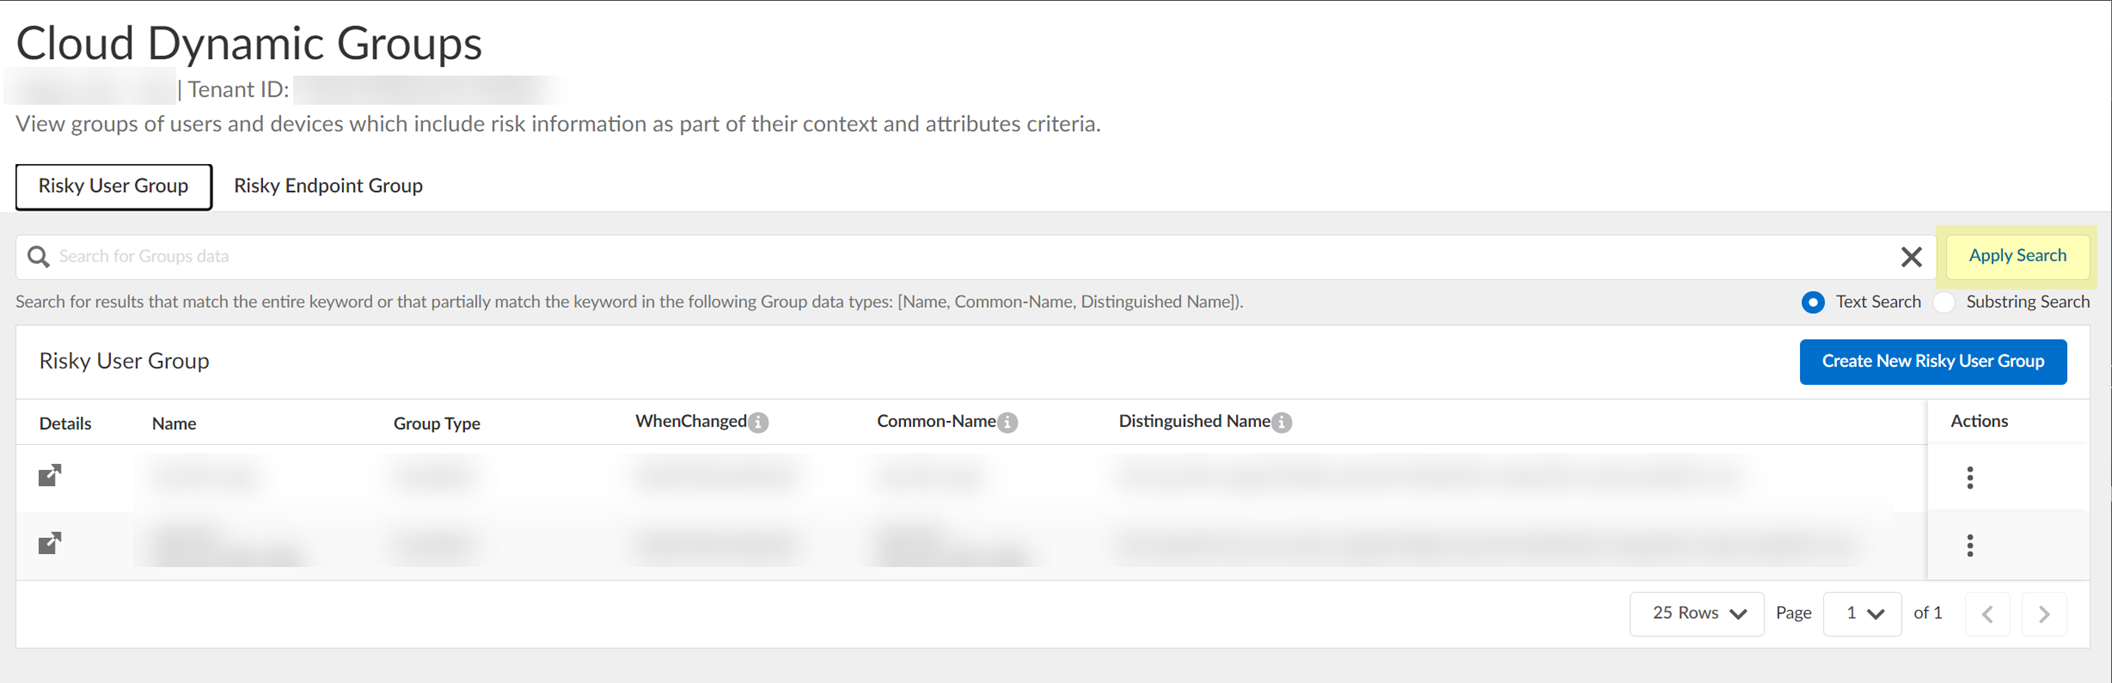
Screenshot showing the search bar for filtering dynamic groups.
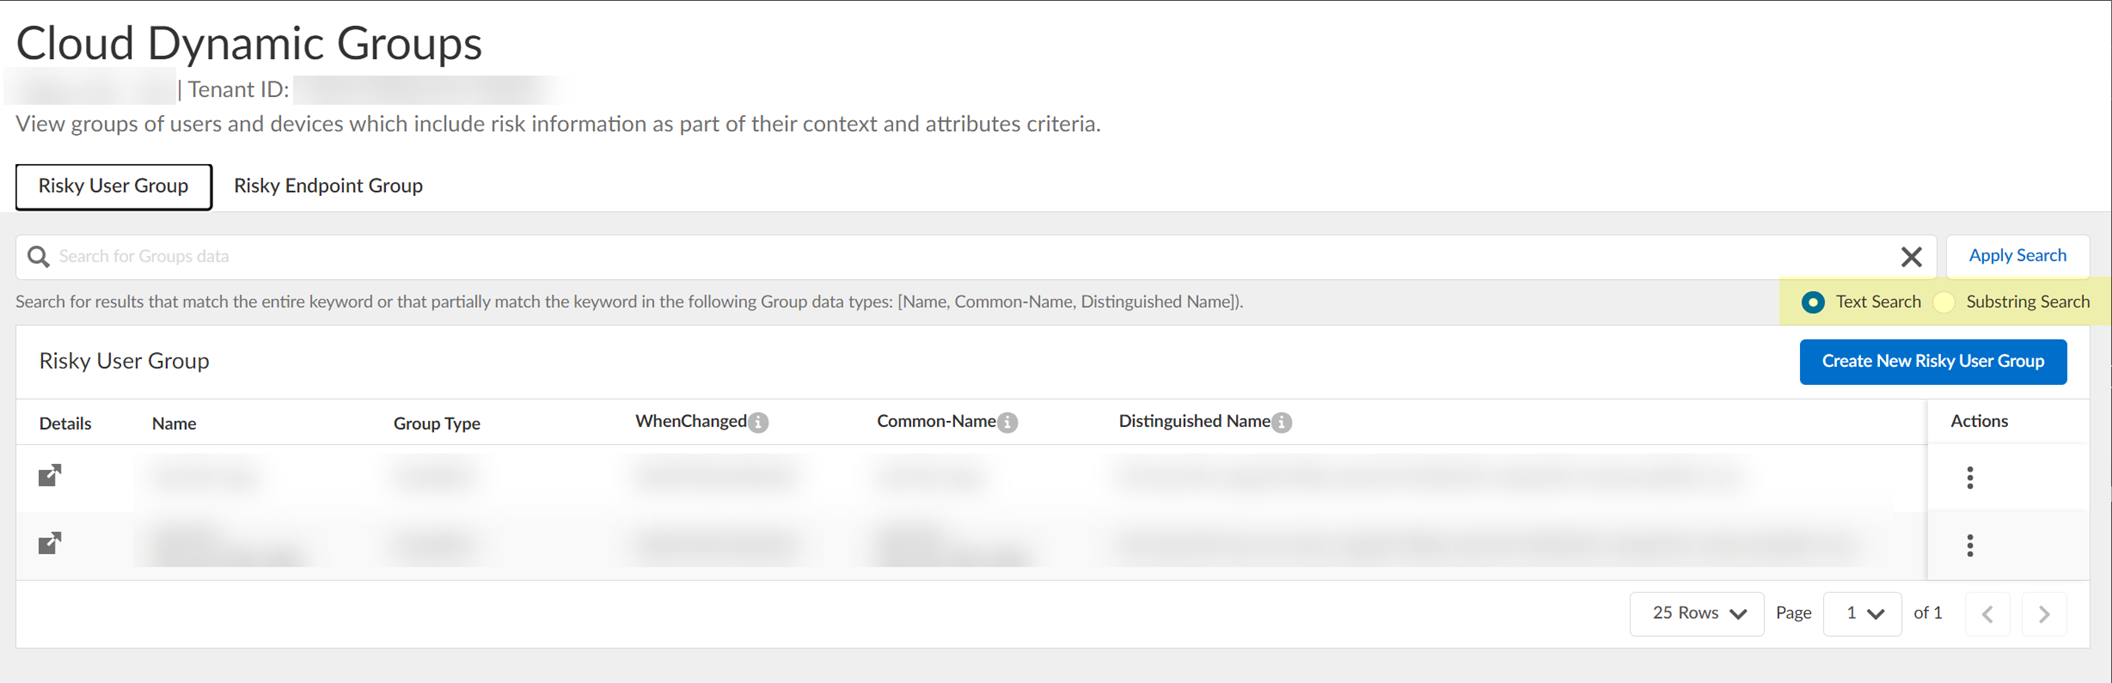
Screenshot showing text and substring search type options for filtering dynamic groups.
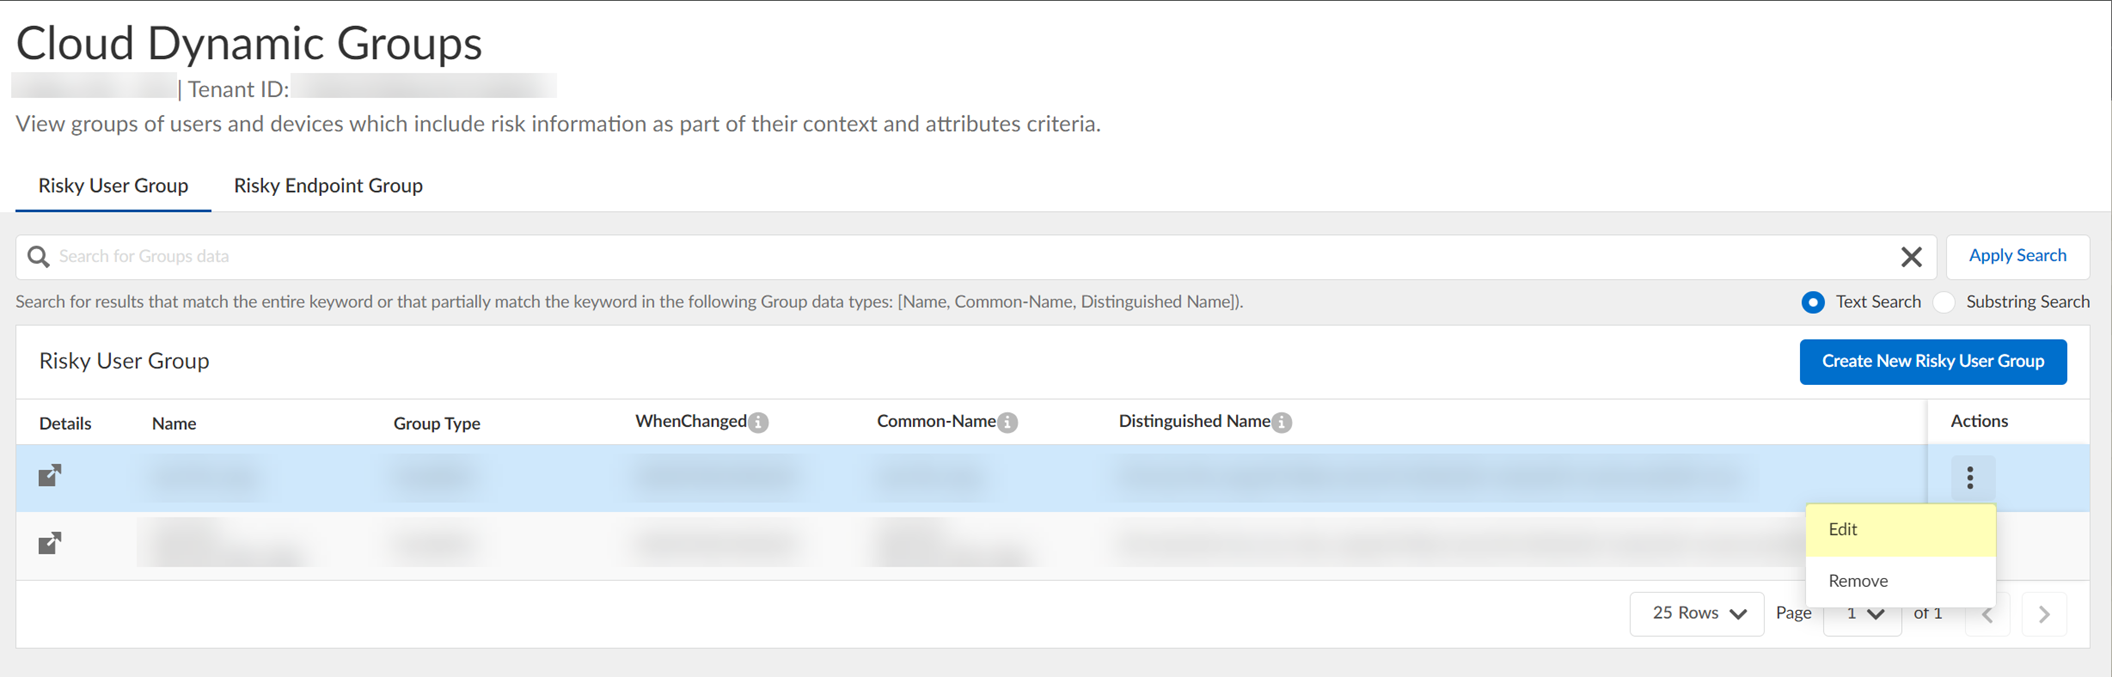
Screenshot showing the "Edit" option for a dynamic user group.
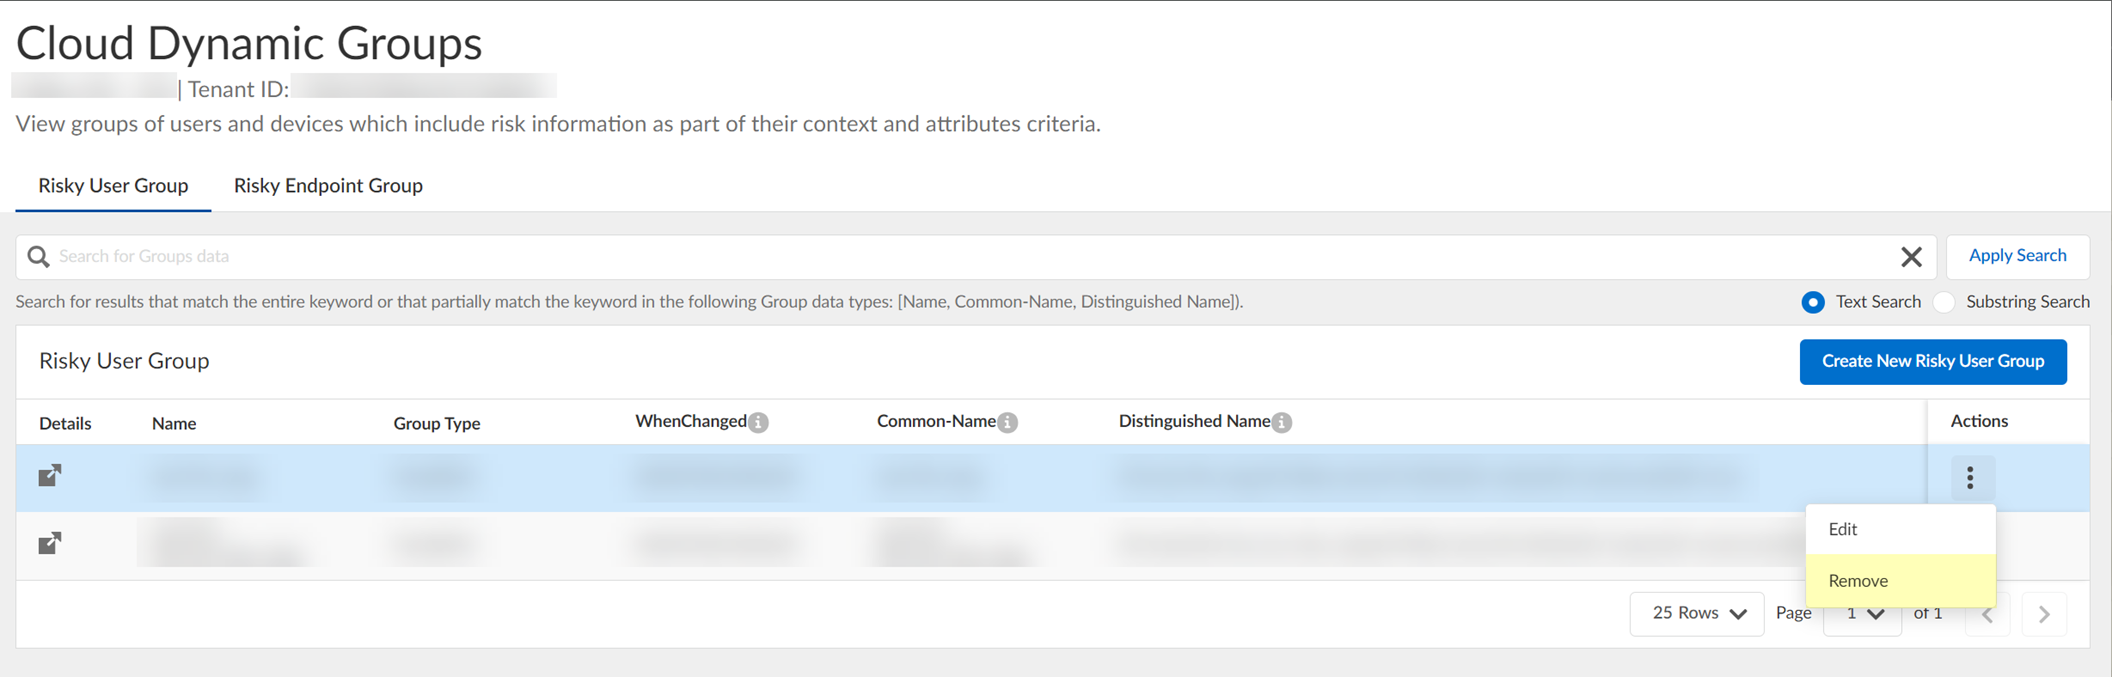
Screenshot showing the "Remove" option for a dynamic user group.
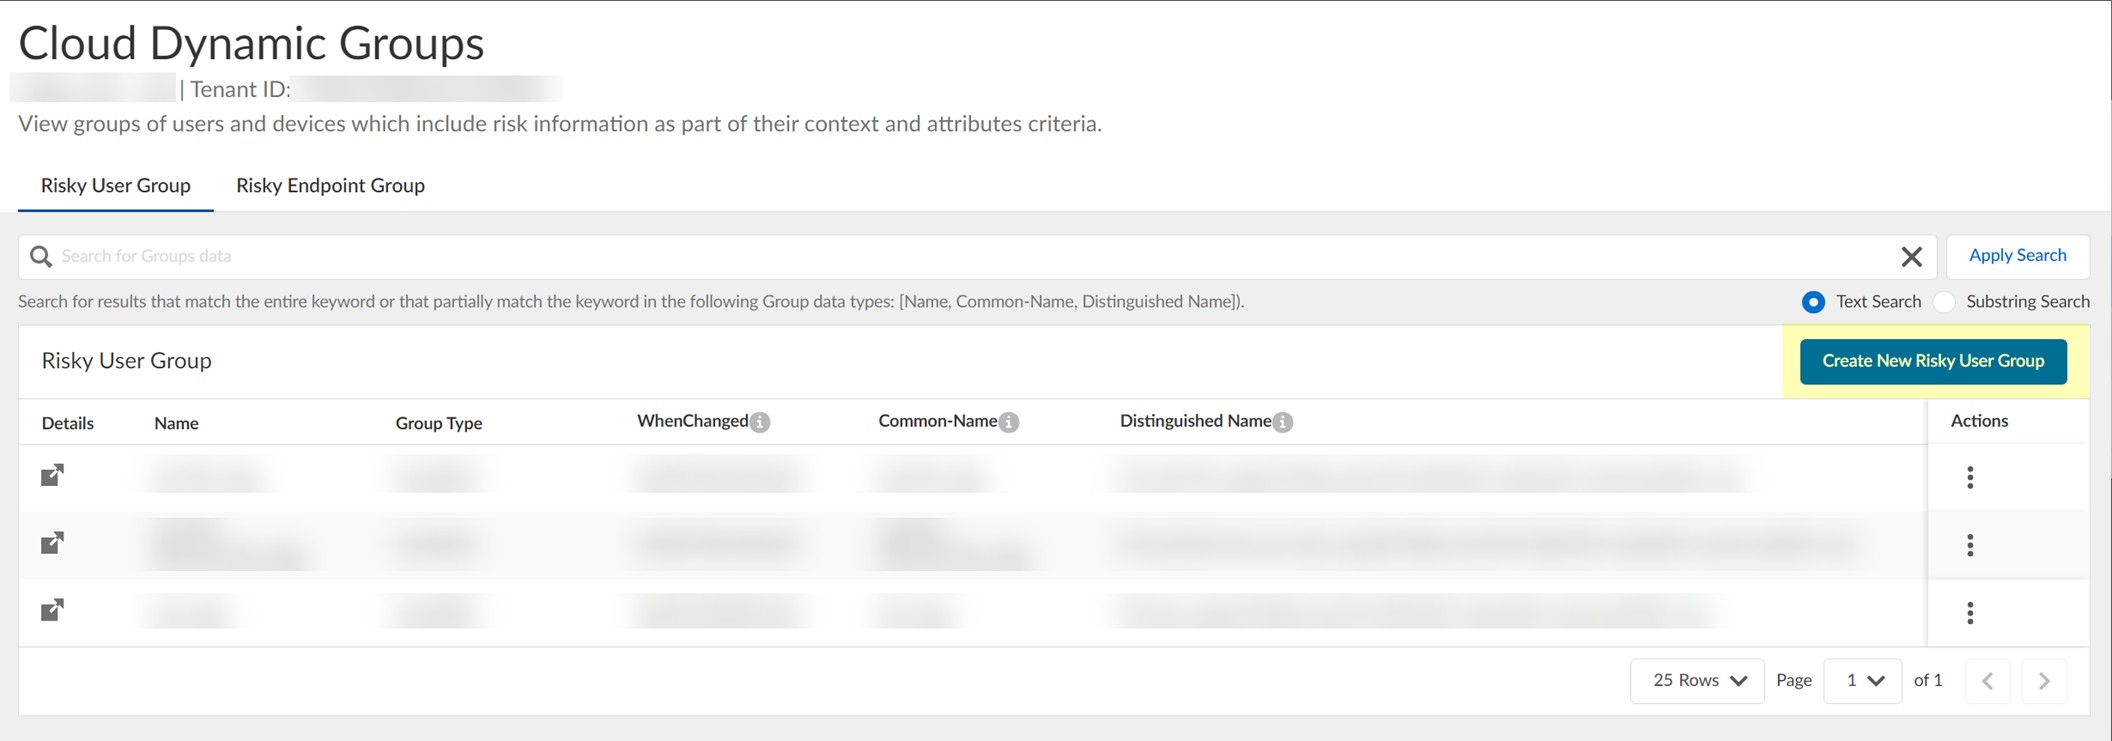
-
(Optional) Create new risky user group: Click Create New Risky User Group.
Screenshot showing the "Create New Risky User Group" button.
Select Category: Risky User.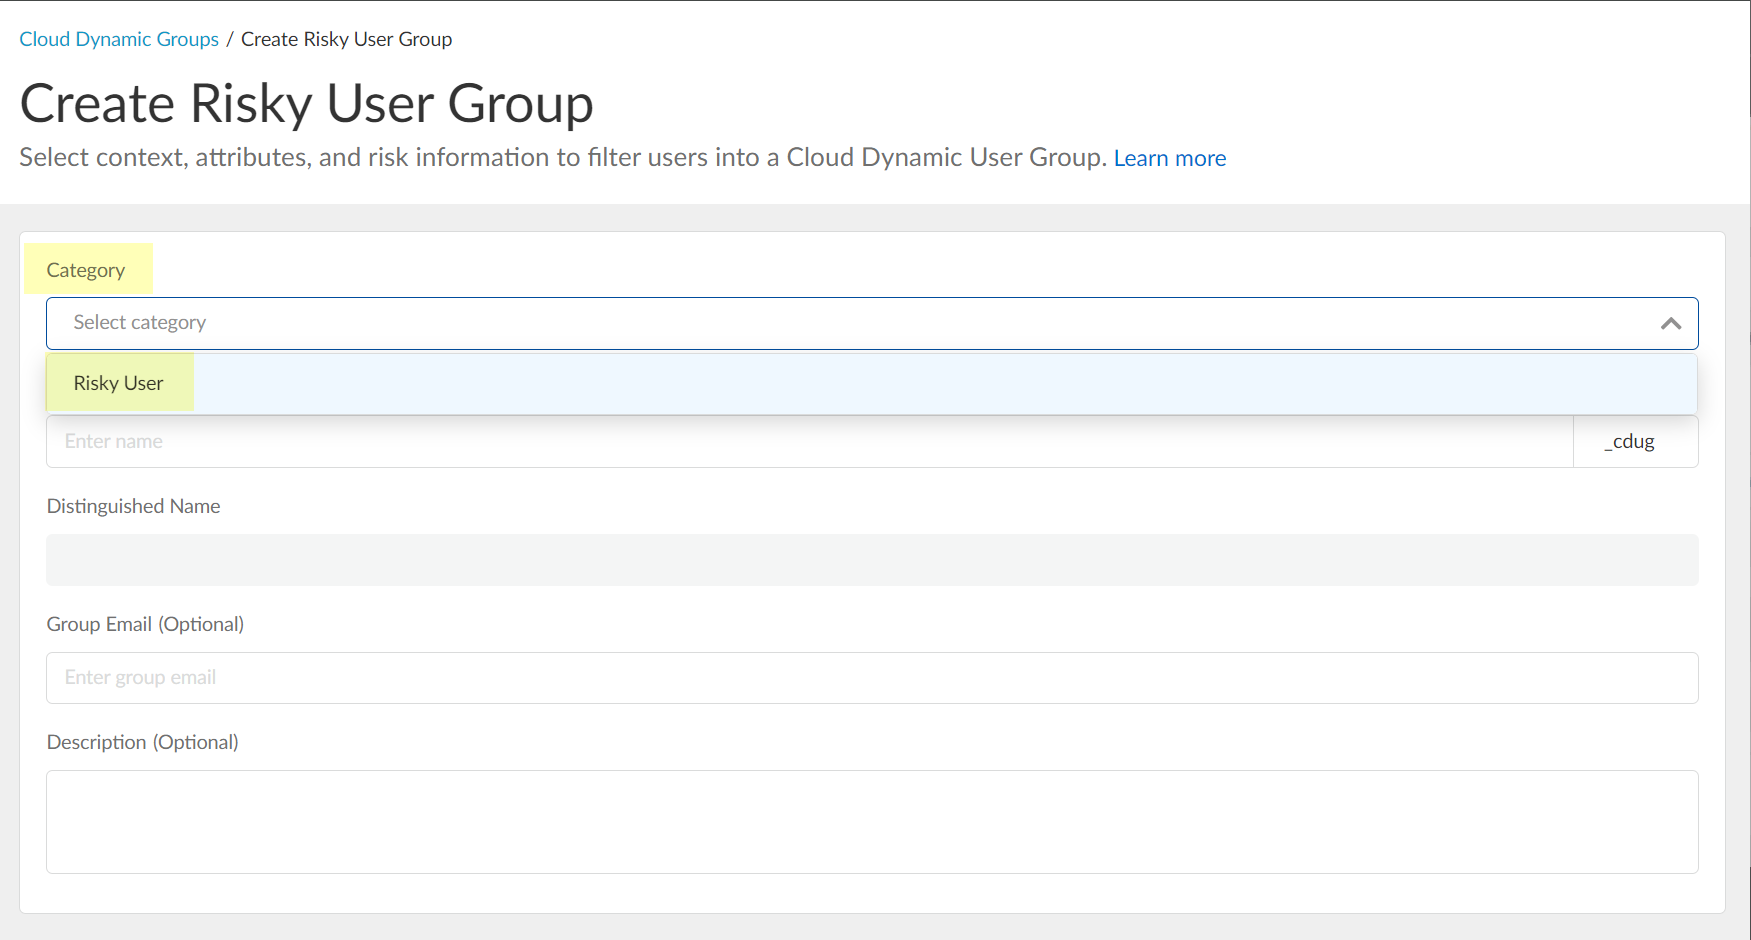
Screenshot showing the selection of "Risky User" as the category for a dynamic group.
Enter Common Name.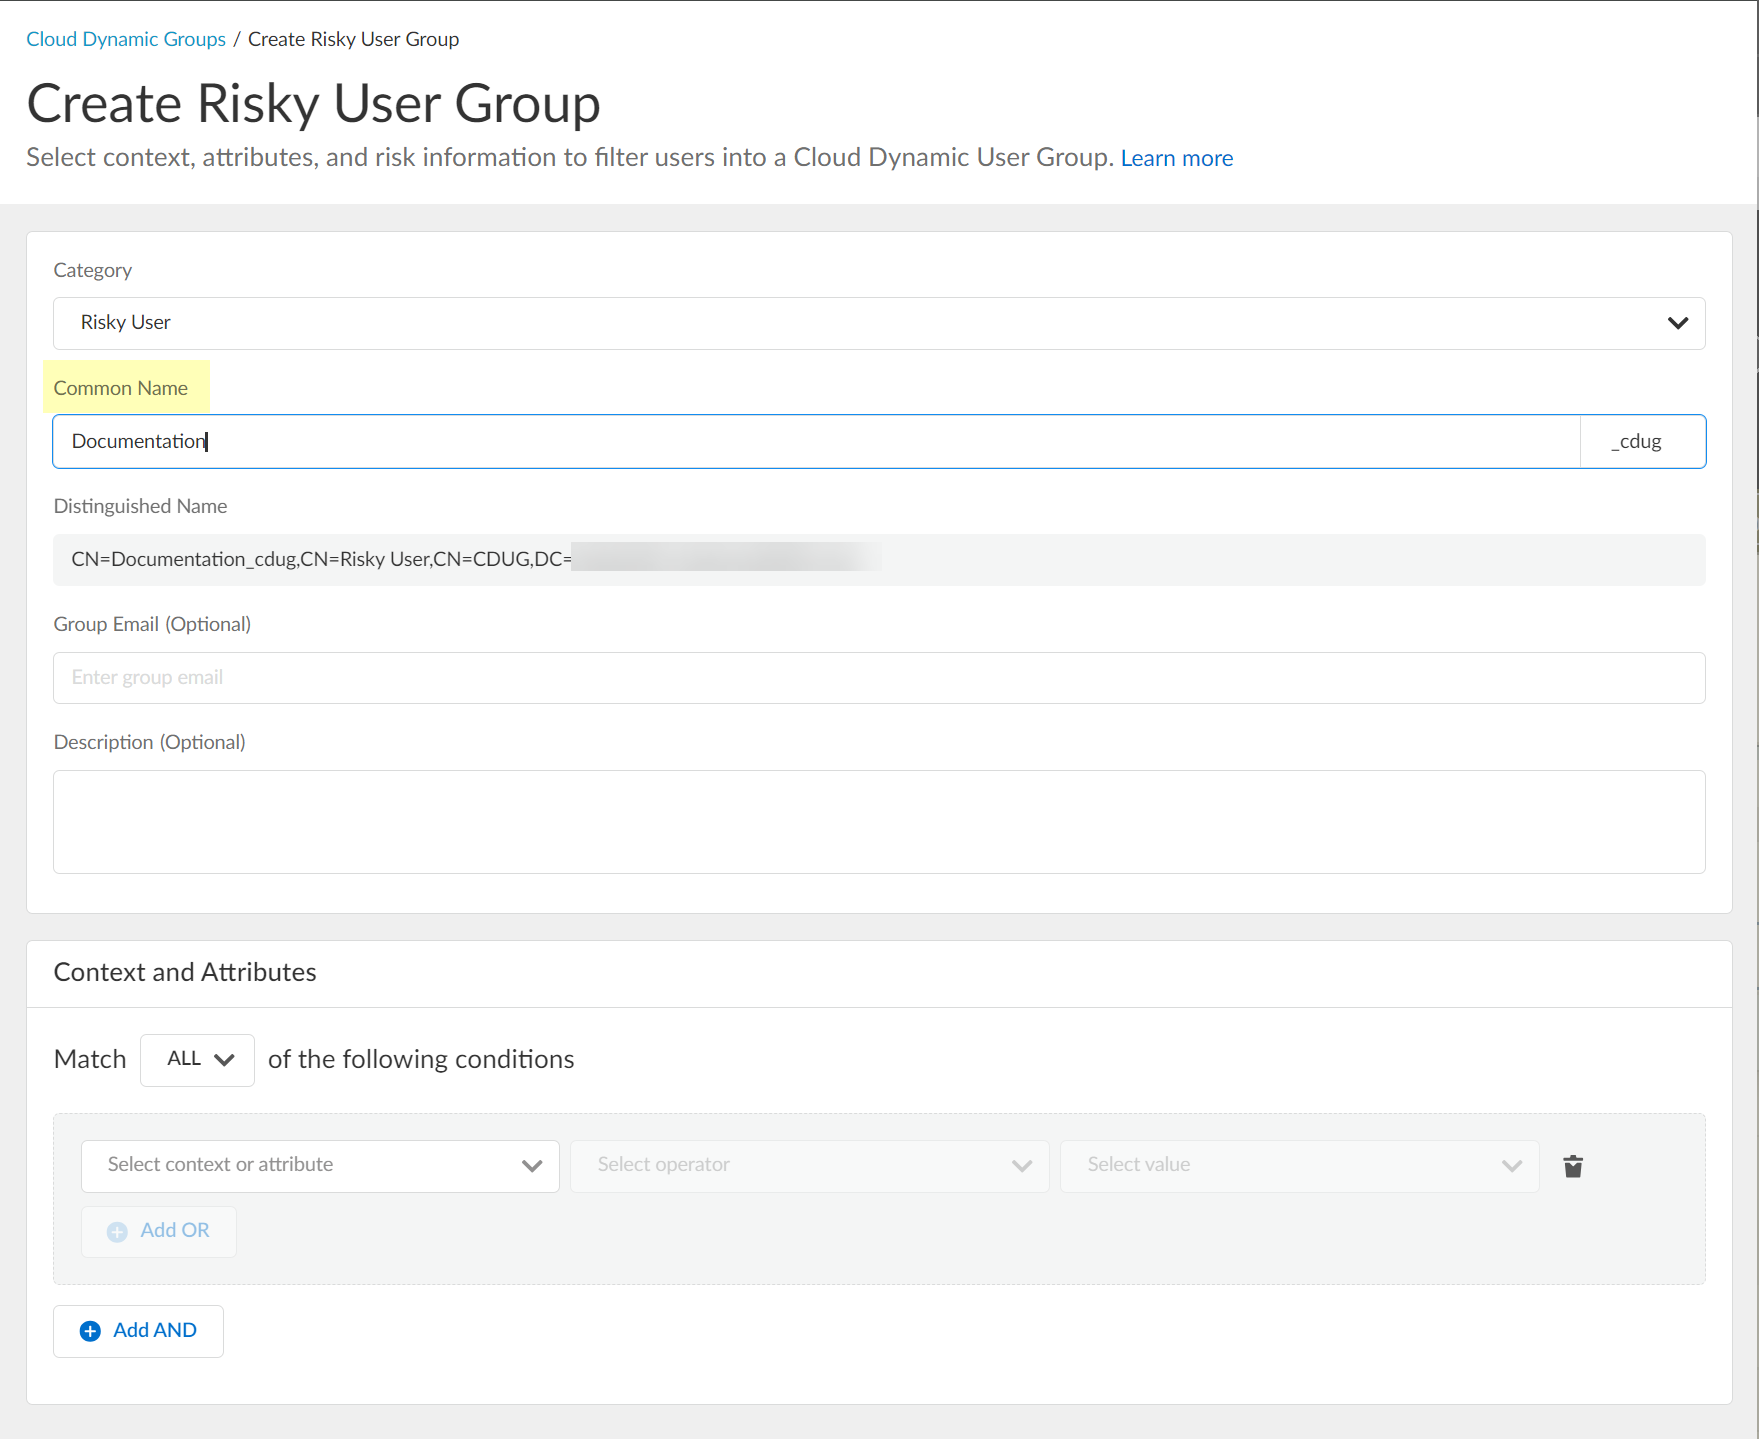
Screenshot showing the field to enter the Common Name for the dynamic risky user group.
(Optional) Enter Email, Description.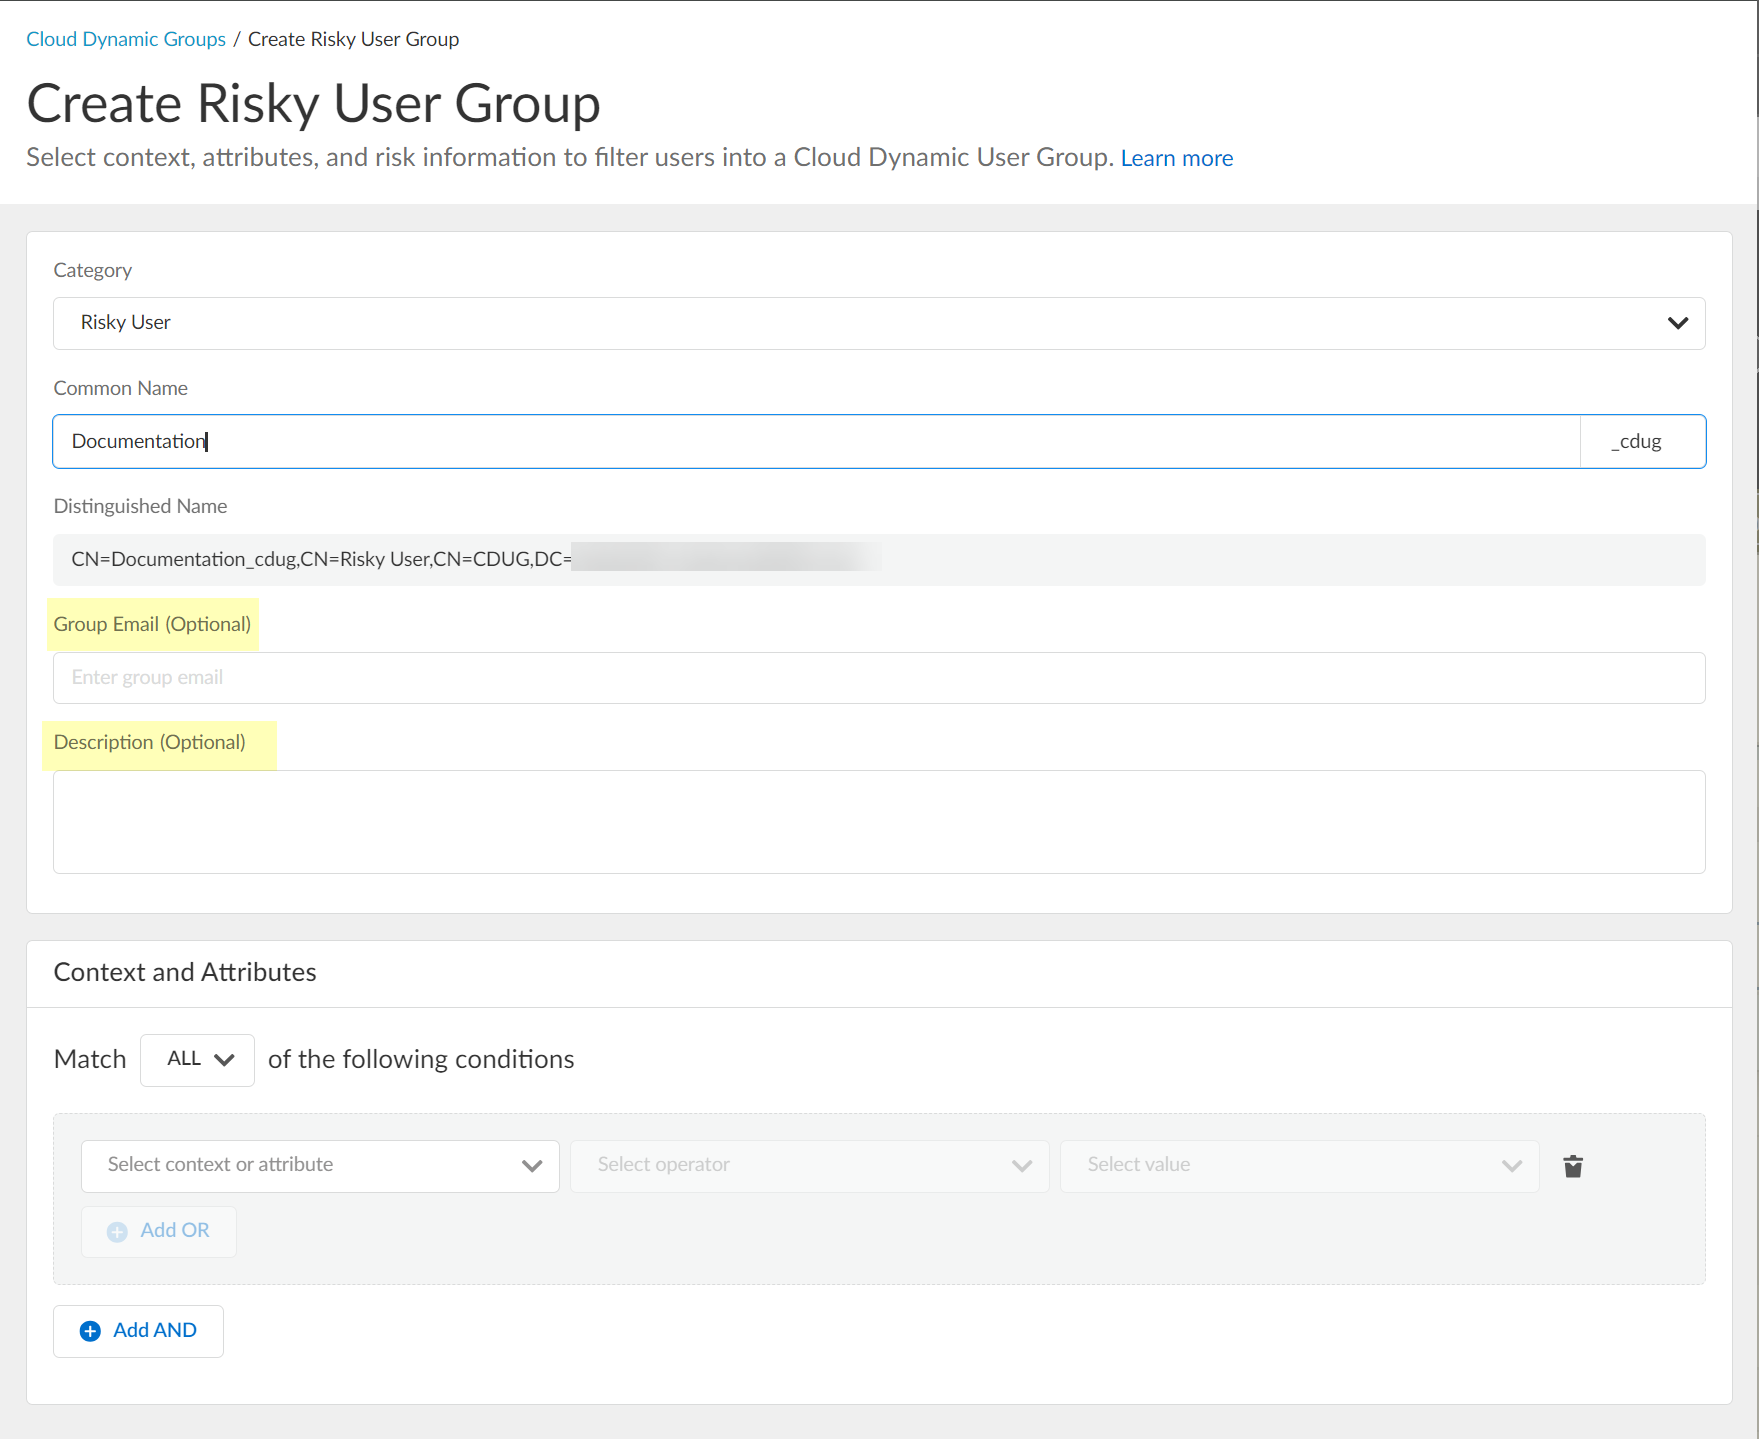
Screenshot showing optional fields for Group Email and Description.
Select context/attributes (e.g., risk level).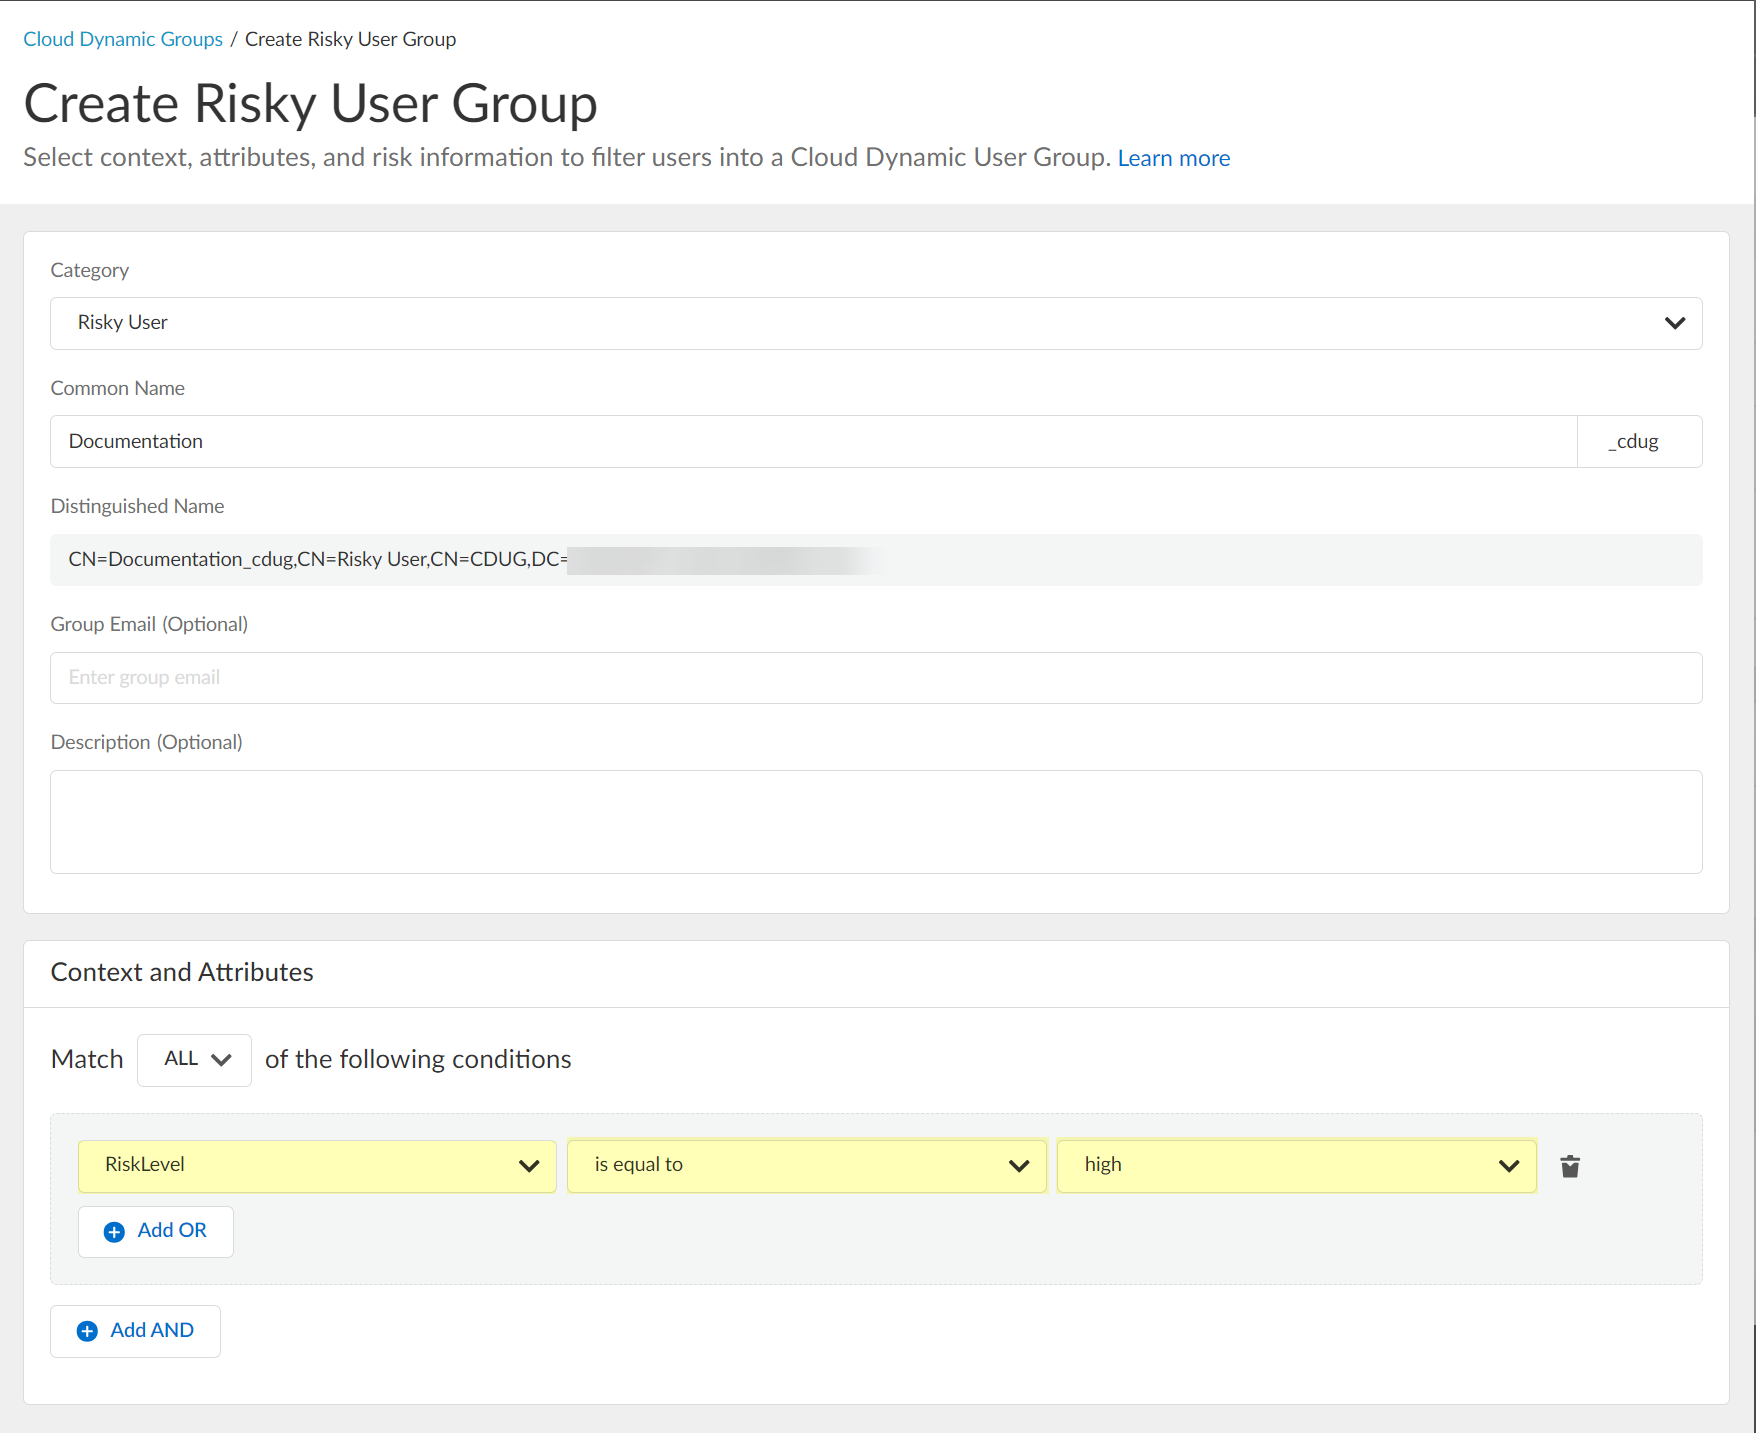
Screenshot showing the options to select context and attributes for the dynamic group criteria.
(Optional) Add OR/AND criteria.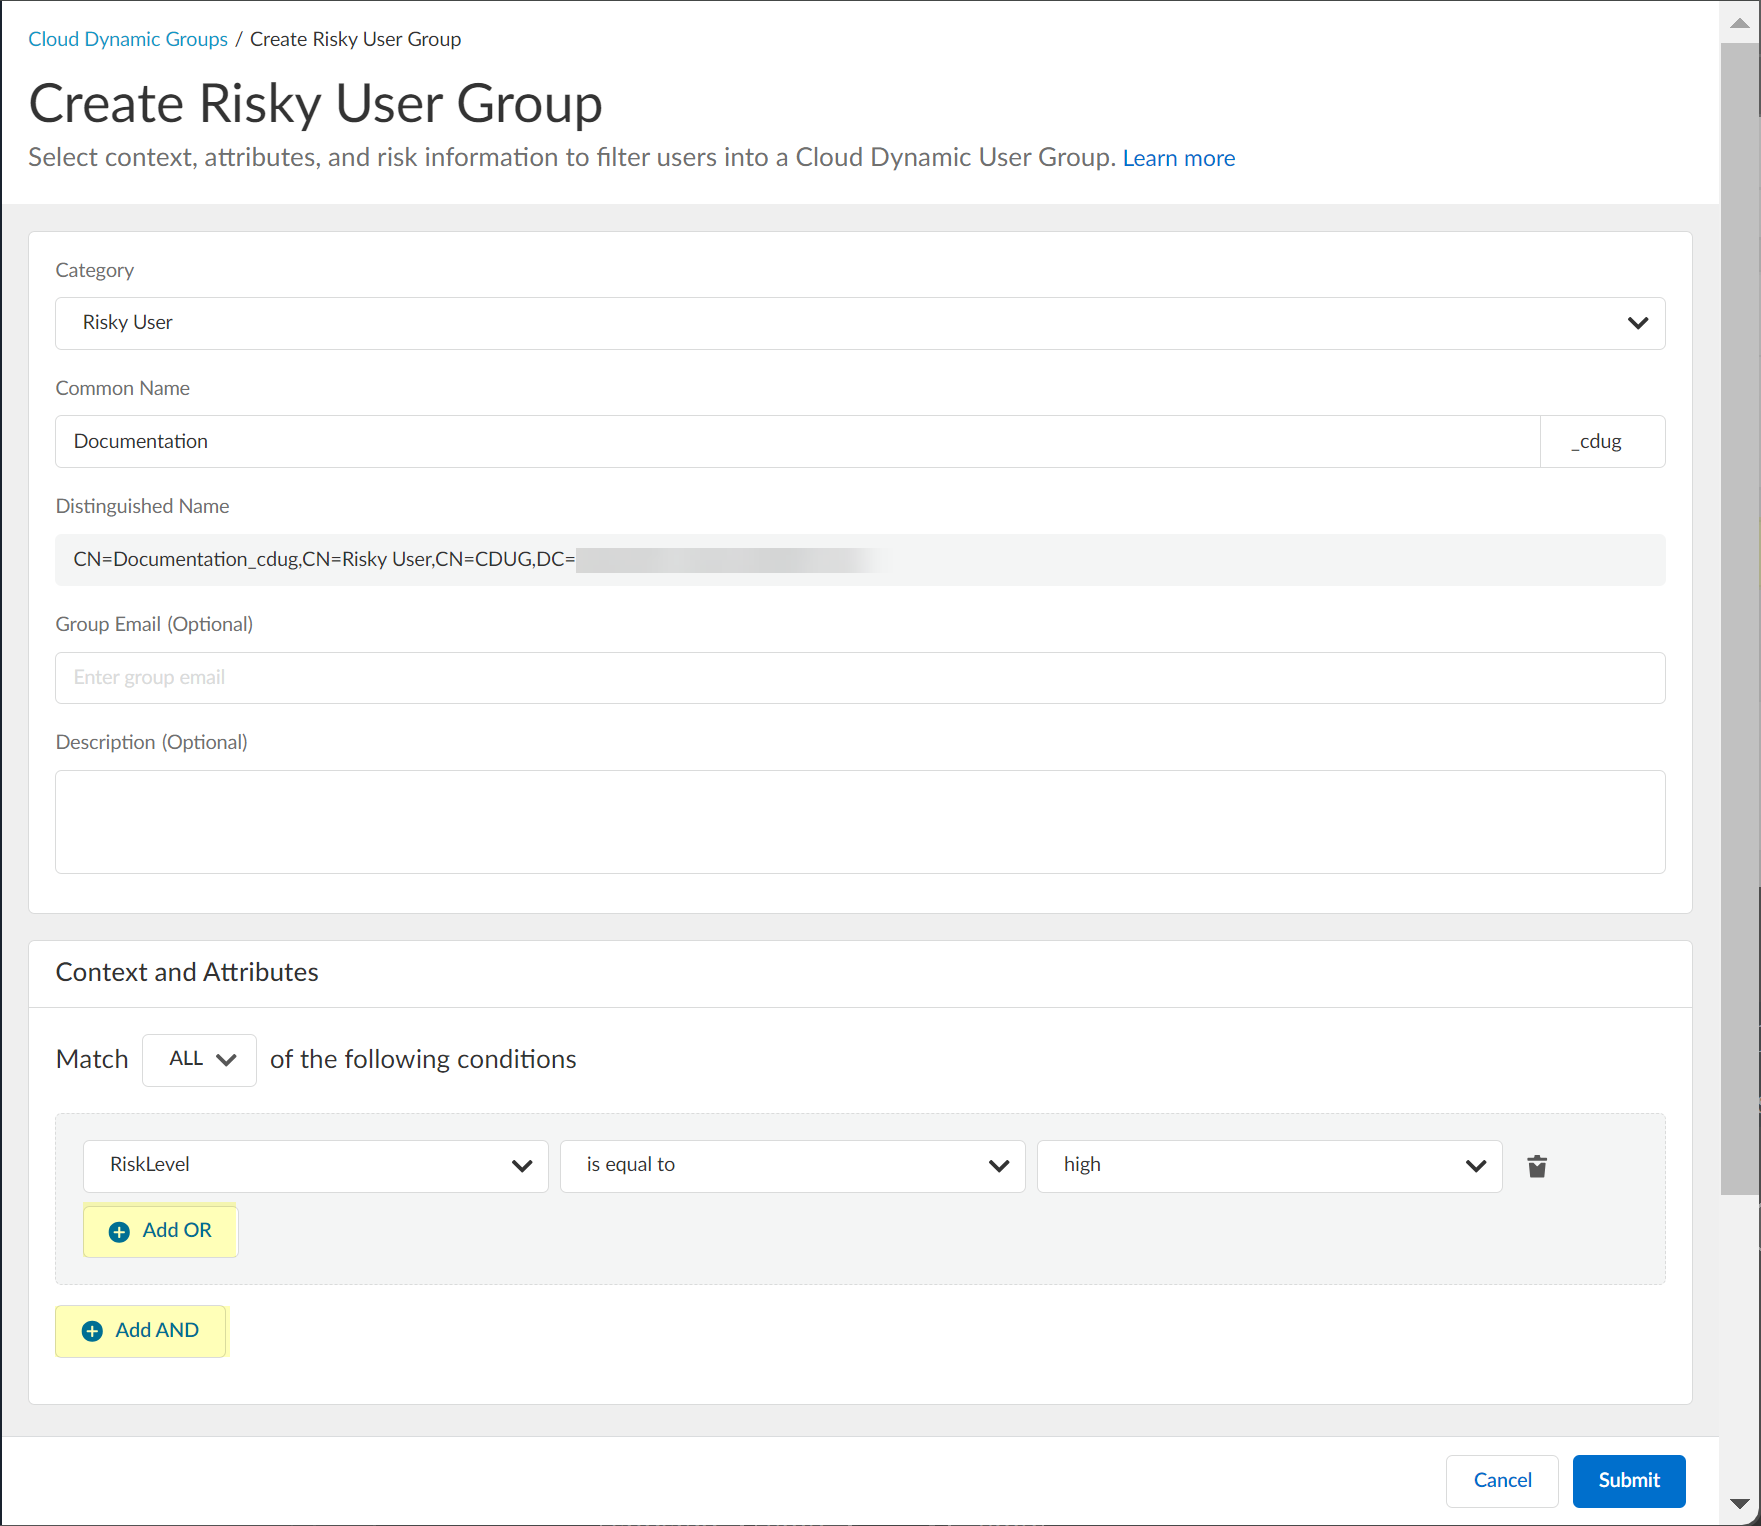
Screenshot showing the options to add multiple criteria using AND/OR logic for dynamic group definition.
Submit.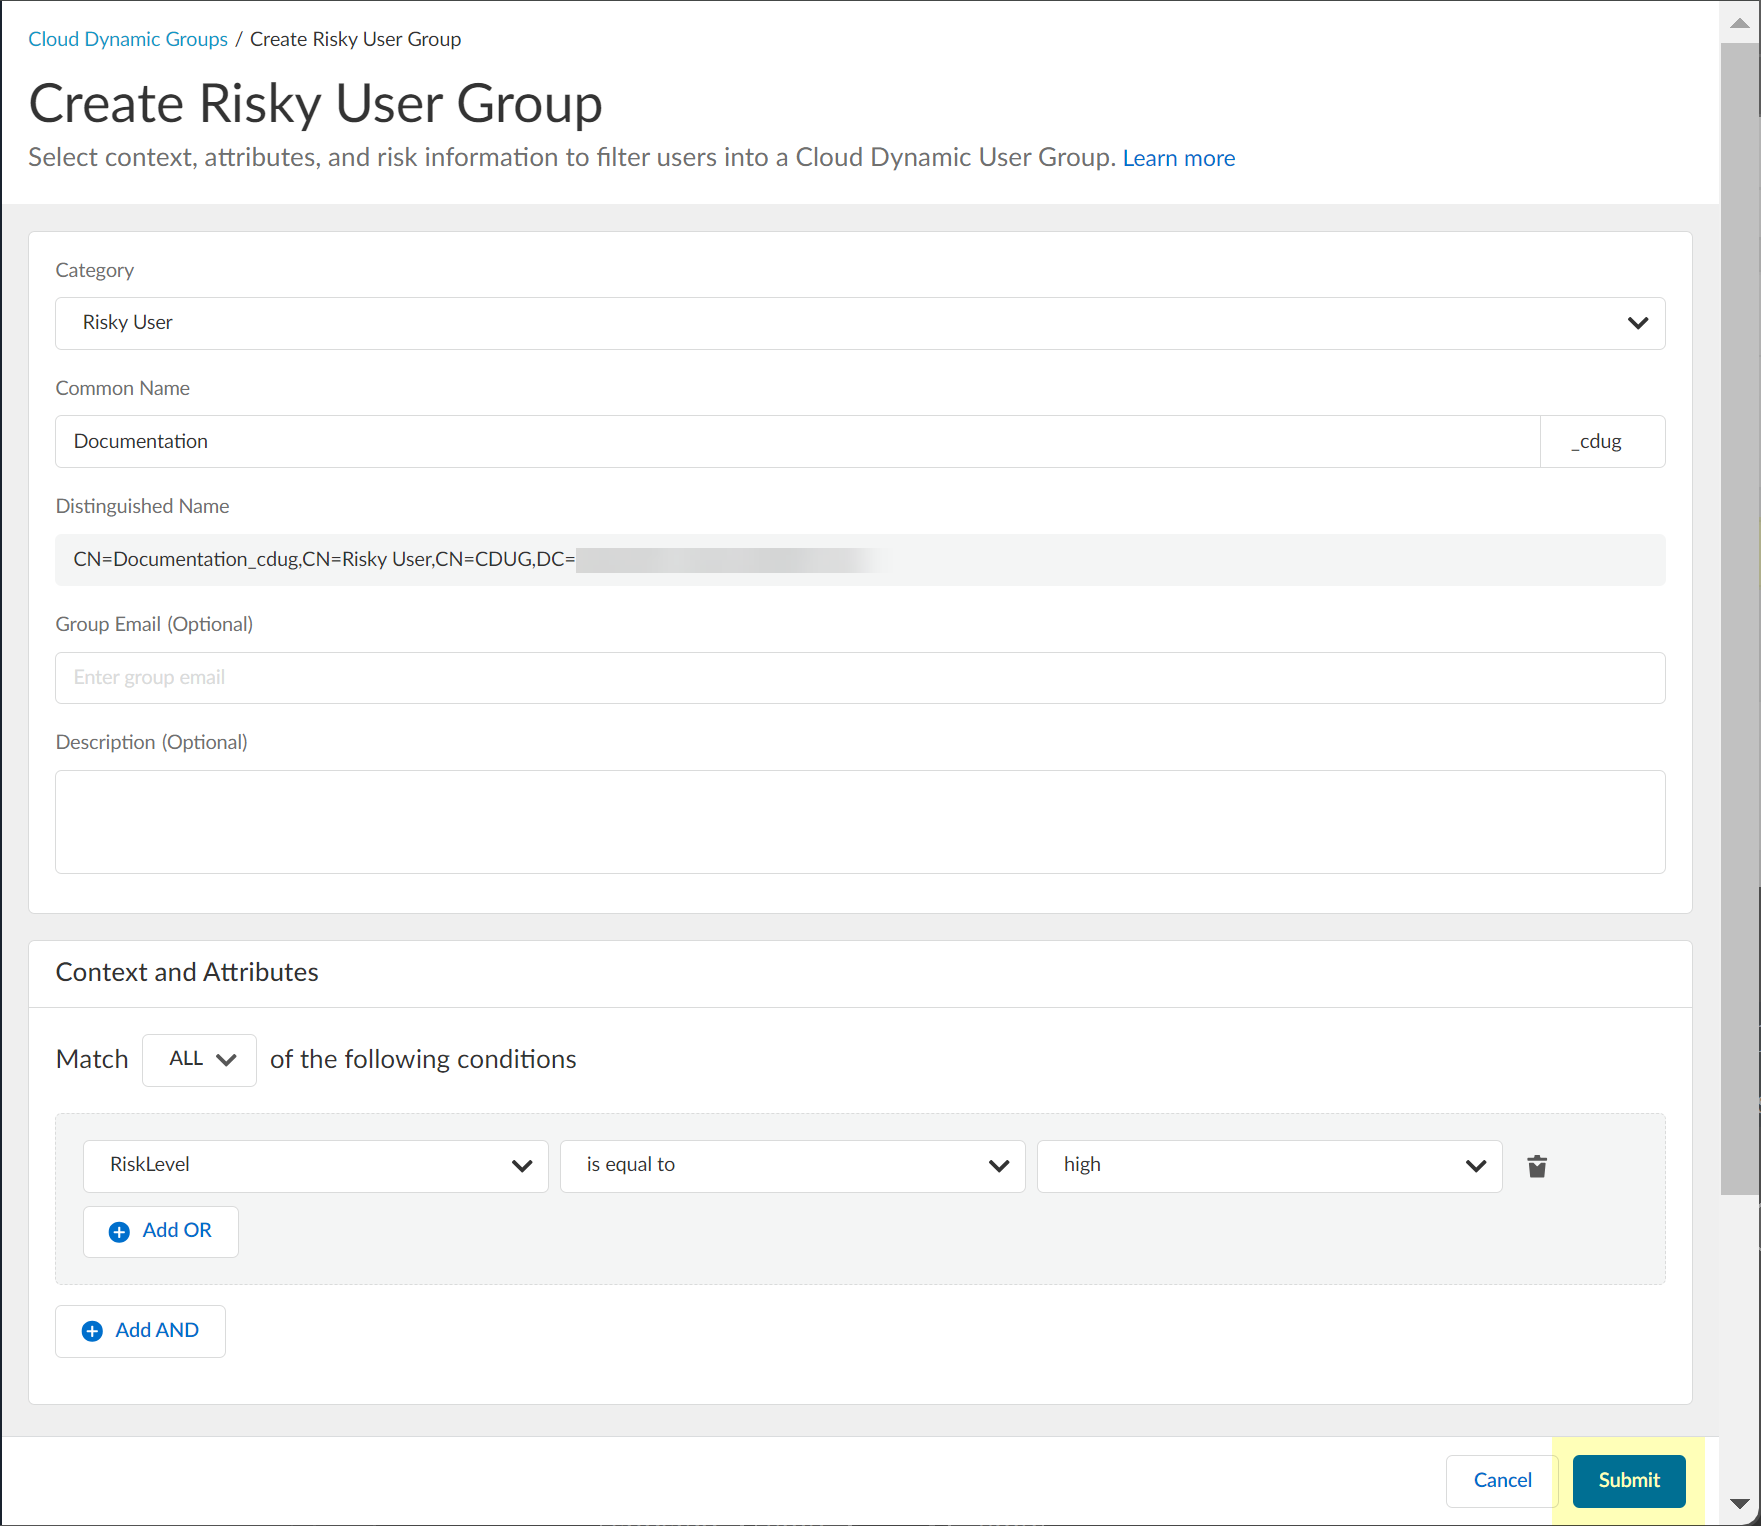
Screenshot showing the Submit button to create the dynamic group.
-
Verify user risk collection (locked user icon with green check).

Screenshot indicating successful collection of user risk information from Azure AD Identity Protection.
Configure SentinelOne for Security Risk in the Cloud Identity Engine
-
Collect SentinelOne info: Copy Endpoint URL (without /login).

Screenshot of the SentinelOne login URL, indicating to copy the part before '/login'.
Log in to SentinelOne > Settings > Users > Service Users > Create New Service User.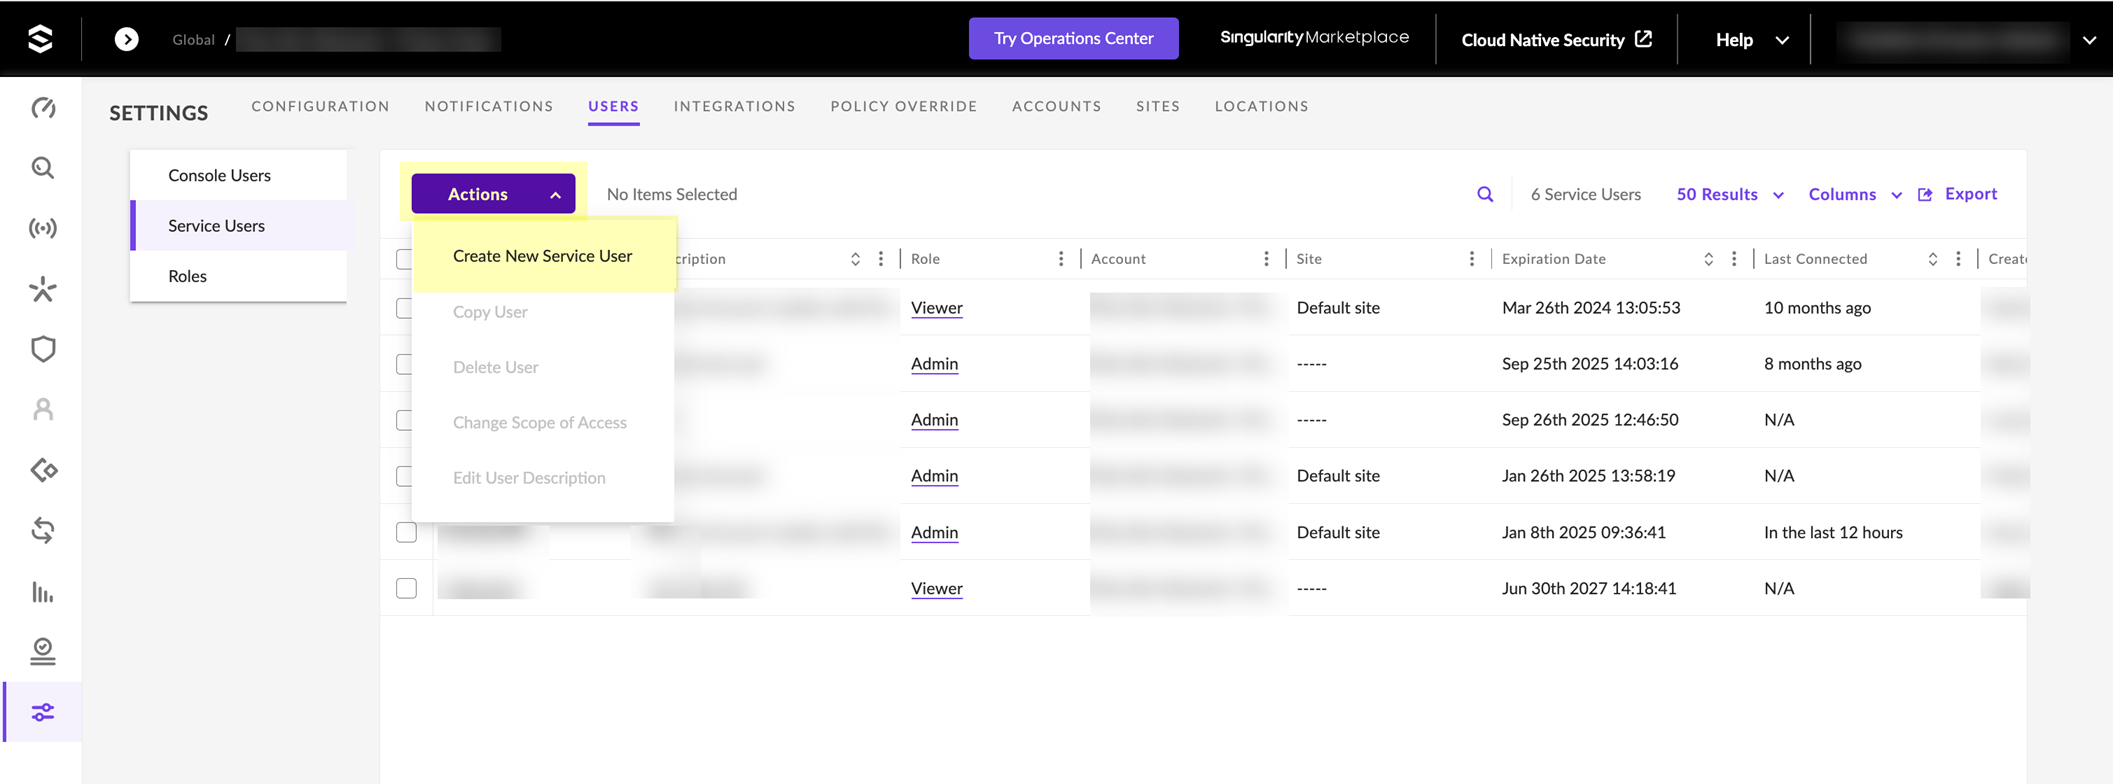
Screenshot showing the Service Users section in SentinelOne settings.
Enter Name, Expiration Date, Next.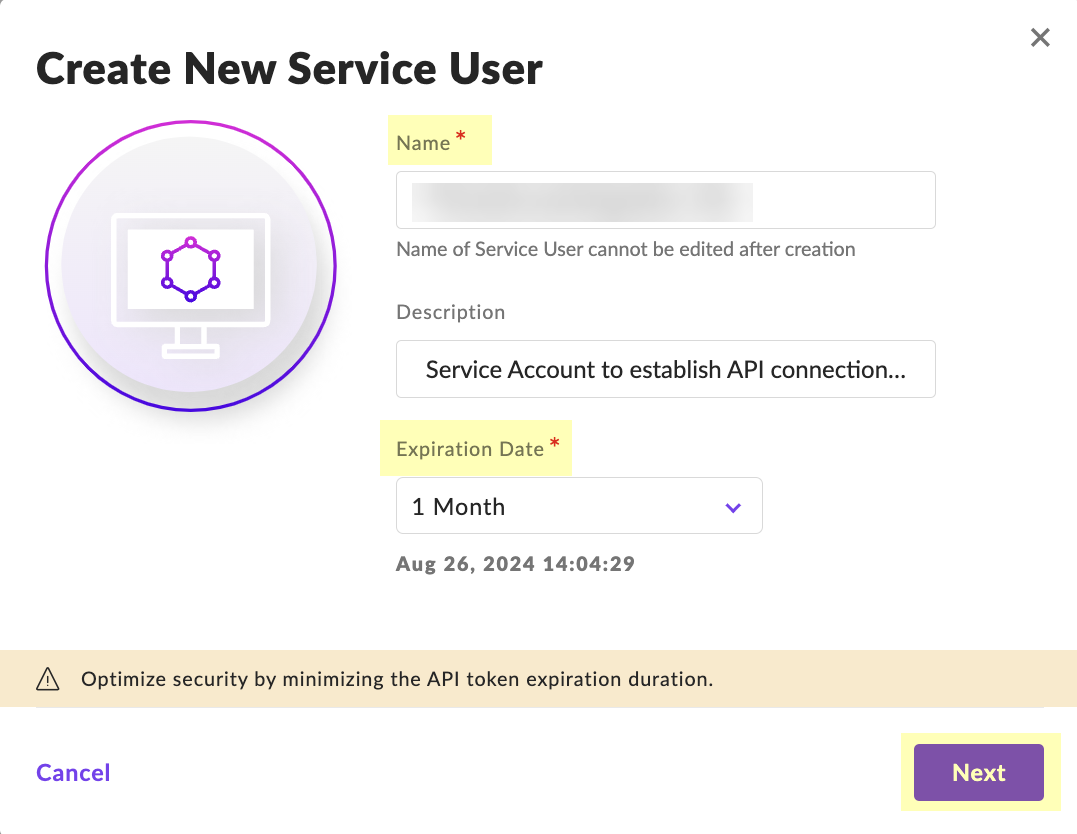
Screenshot showing fields to create a new service user in SentinelOne.
Select Scope, Create User.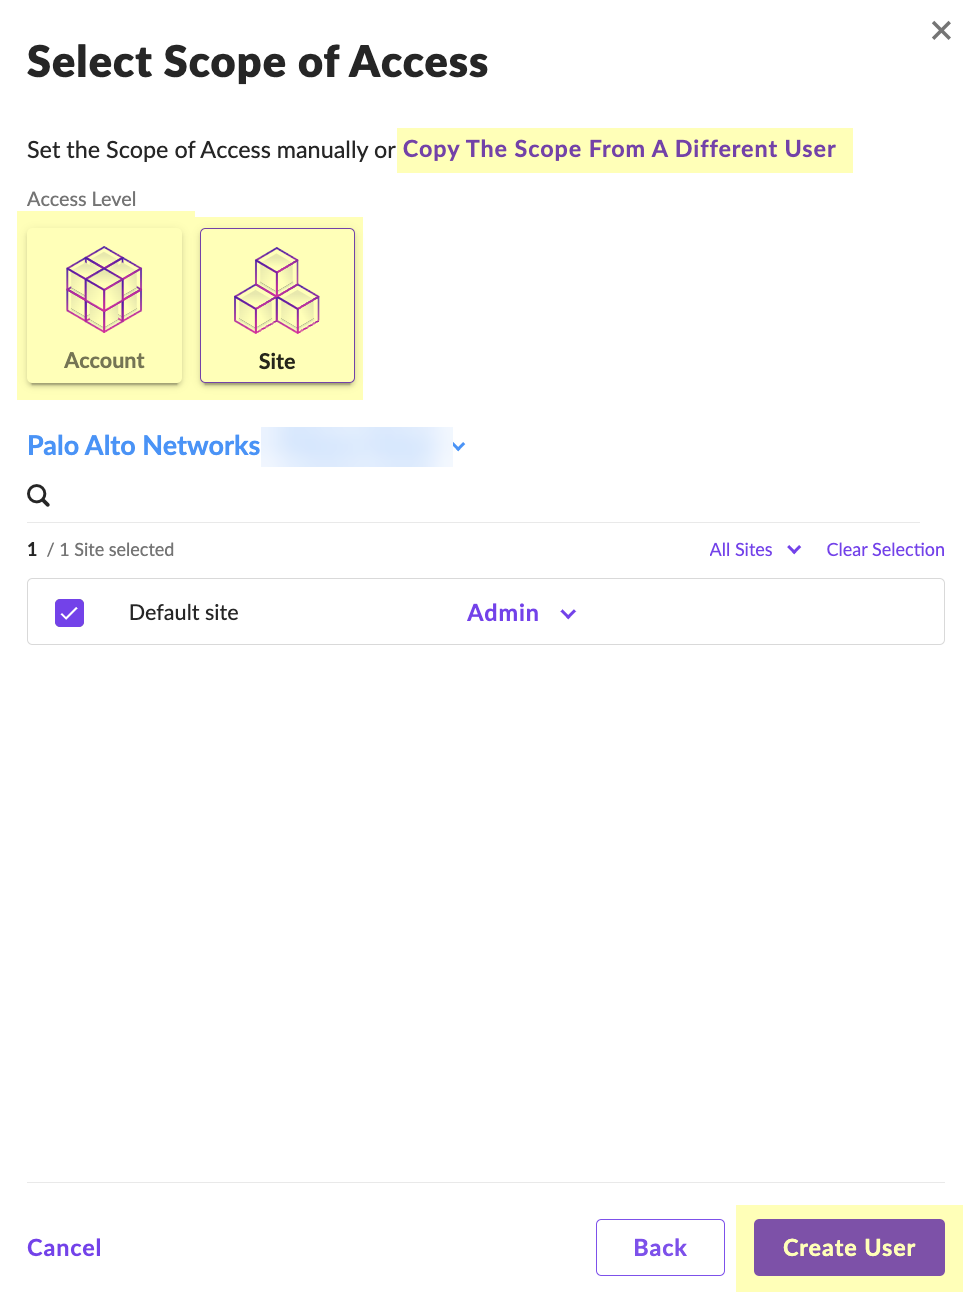
Screenshot showing the option to select the scope of access for the SentinelOne service user.
Enter 2FA code, Confirm.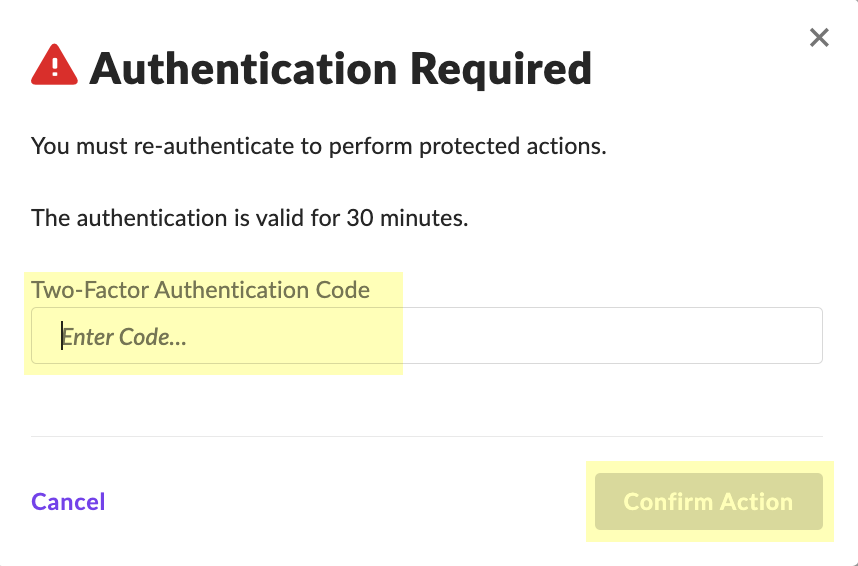
Screenshot of the 2-Factor Authentication confirmation prompt in SentinelOne.
Copy API Token (shown only once!).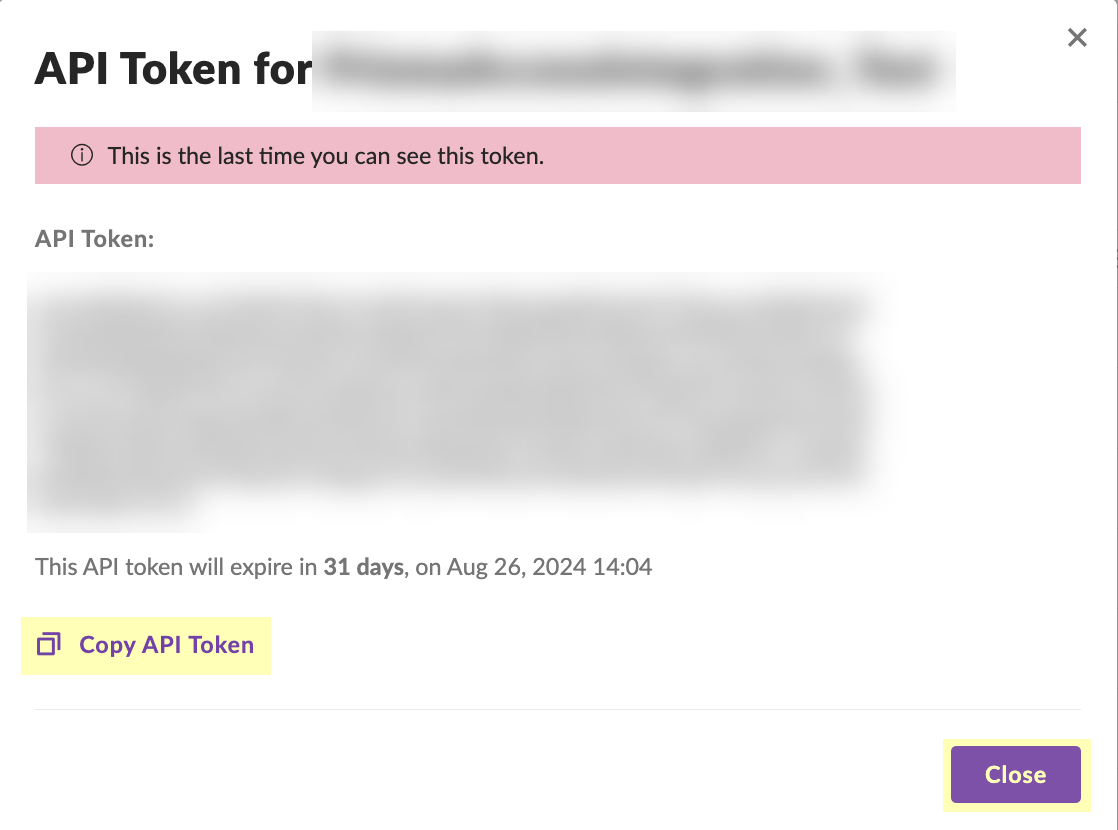
Screenshot showing the generated API Token in SentinelOne. Copy this securely as it is shown only once.
(Optional) Verify Site creation.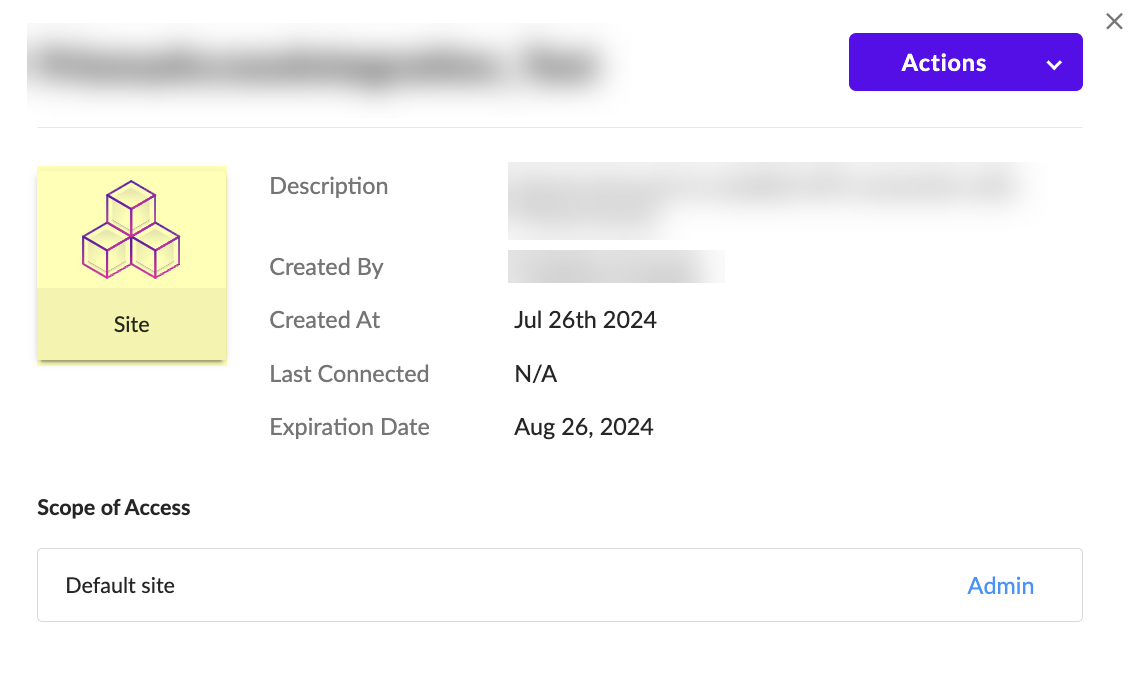
Screenshot showing the "Site" button to verify the creation of a site in SentinelOne.
-
Configure SentinelOne in CIE: Enter
Source Name
(lowercase).
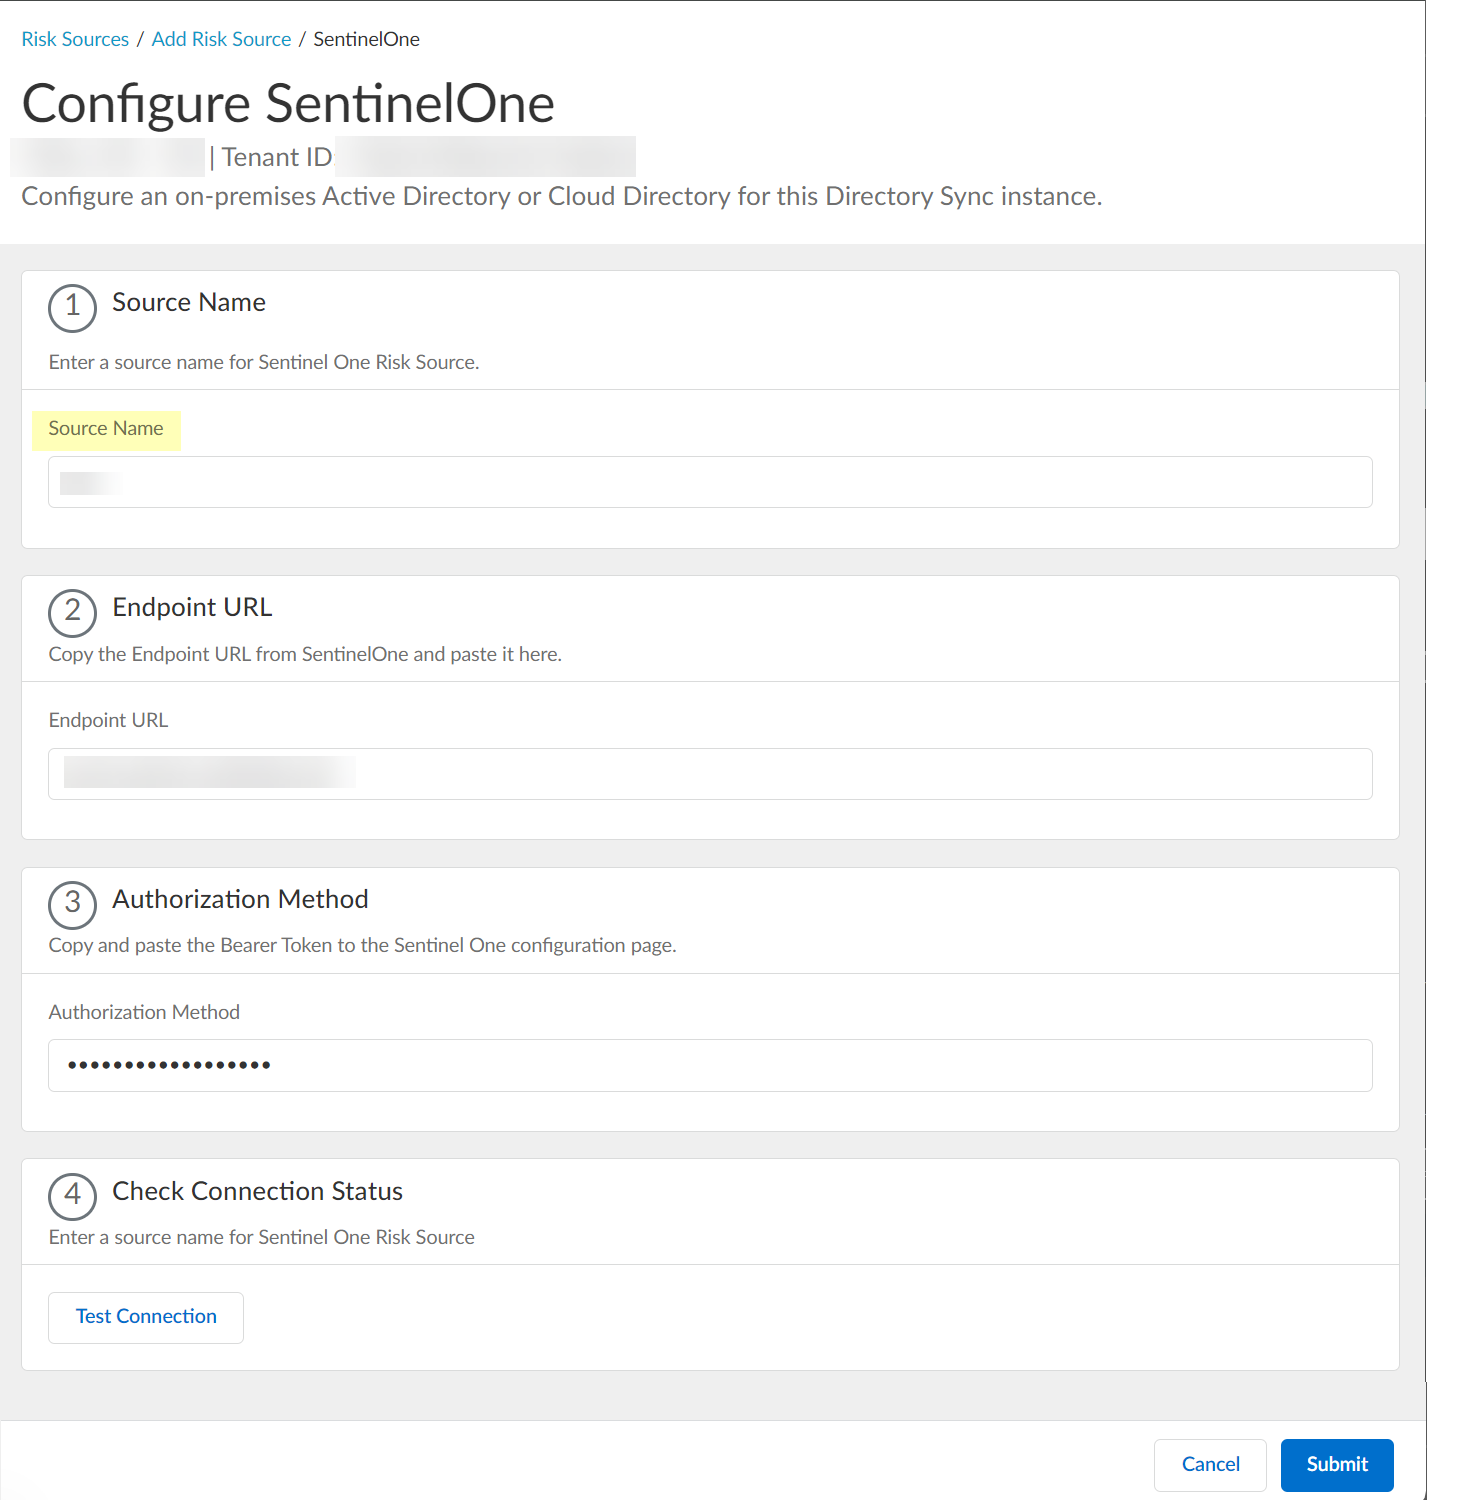
Screenshot showing the field to enter the Source Name for SentinelOne configuration in CIE. Must be lowercase.
Paste Endpoint URL (from step 1.1).
Screenshot showing the field to paste the SentinelOne Endpoint URL in CIE.
Paste API token as Authorization Method .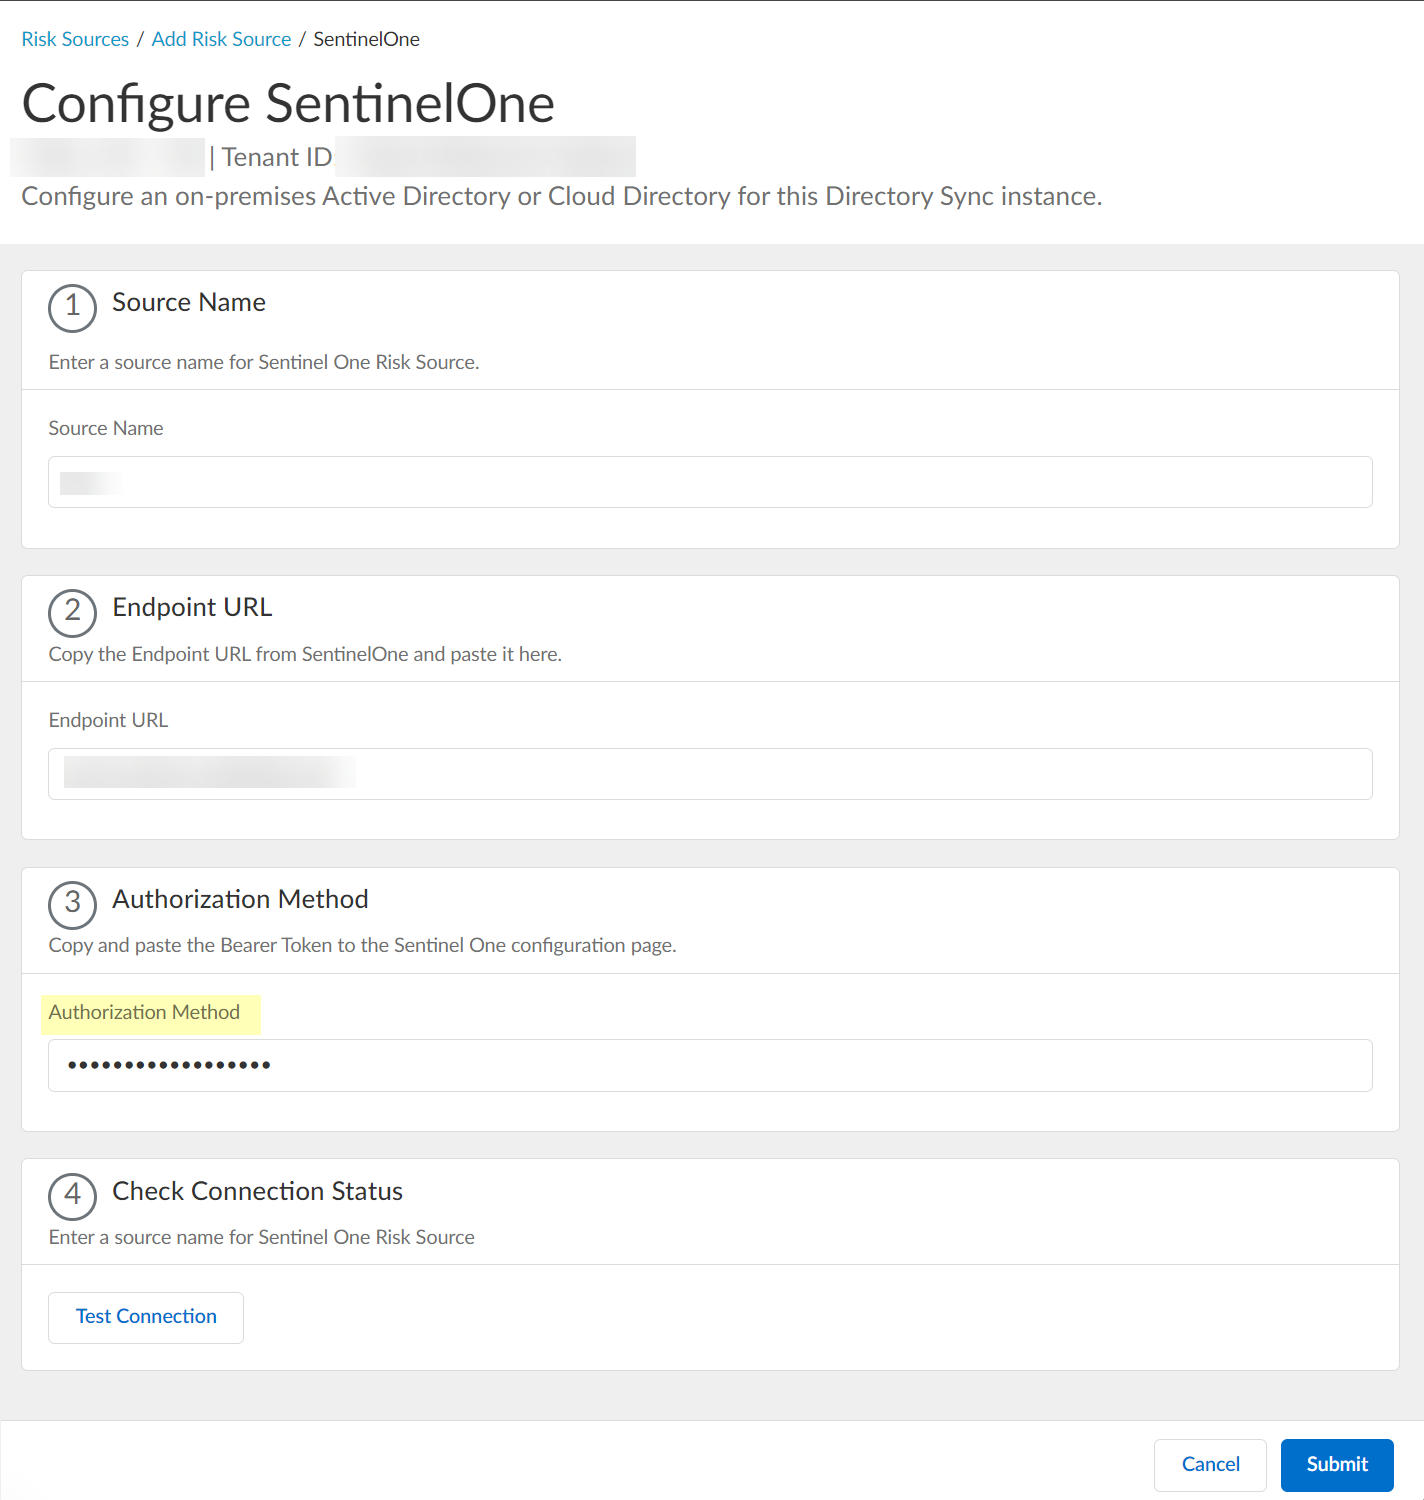
Screenshot showing the field to paste the API token for Authorization Method in CIE SentinelOne configuration.
Test Connection.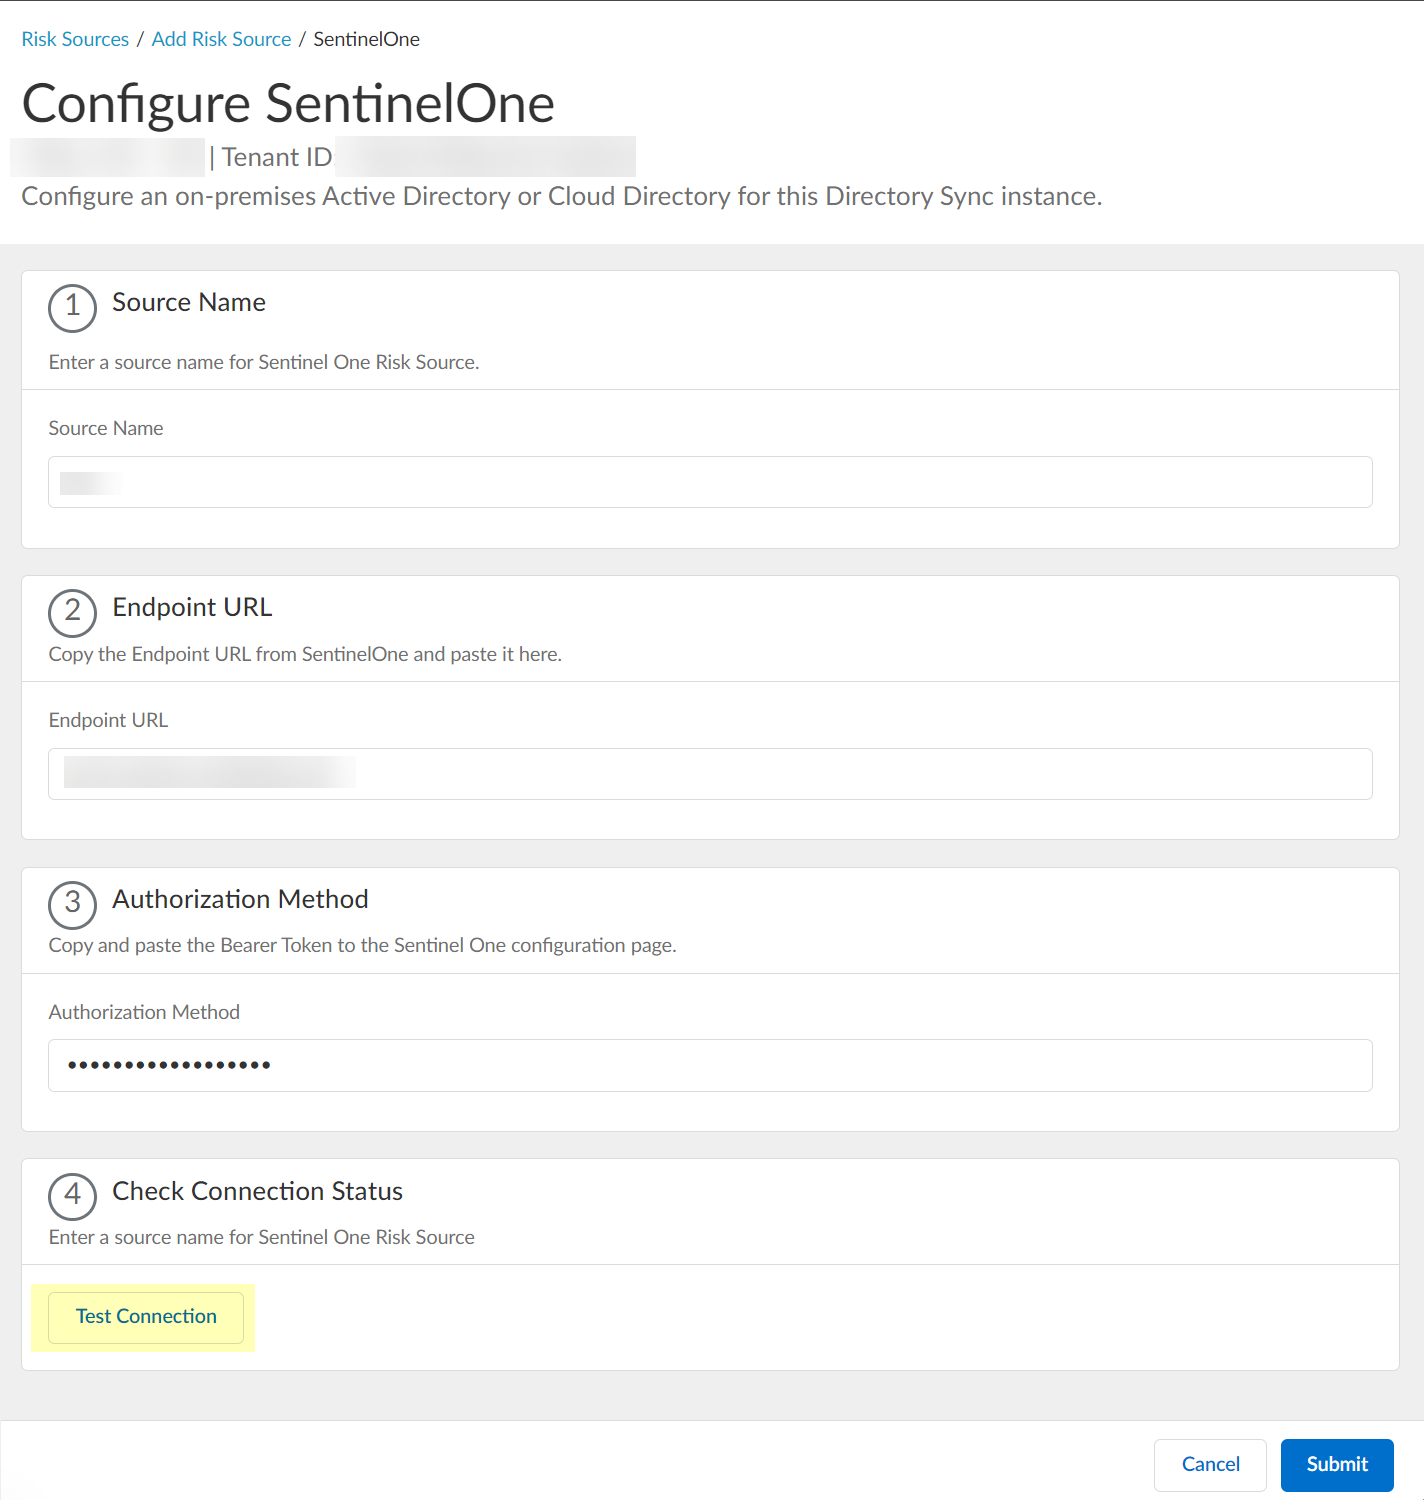
Screenshot showing the "Test Connection" button for SentinelOne configuration in CIE.
Submit.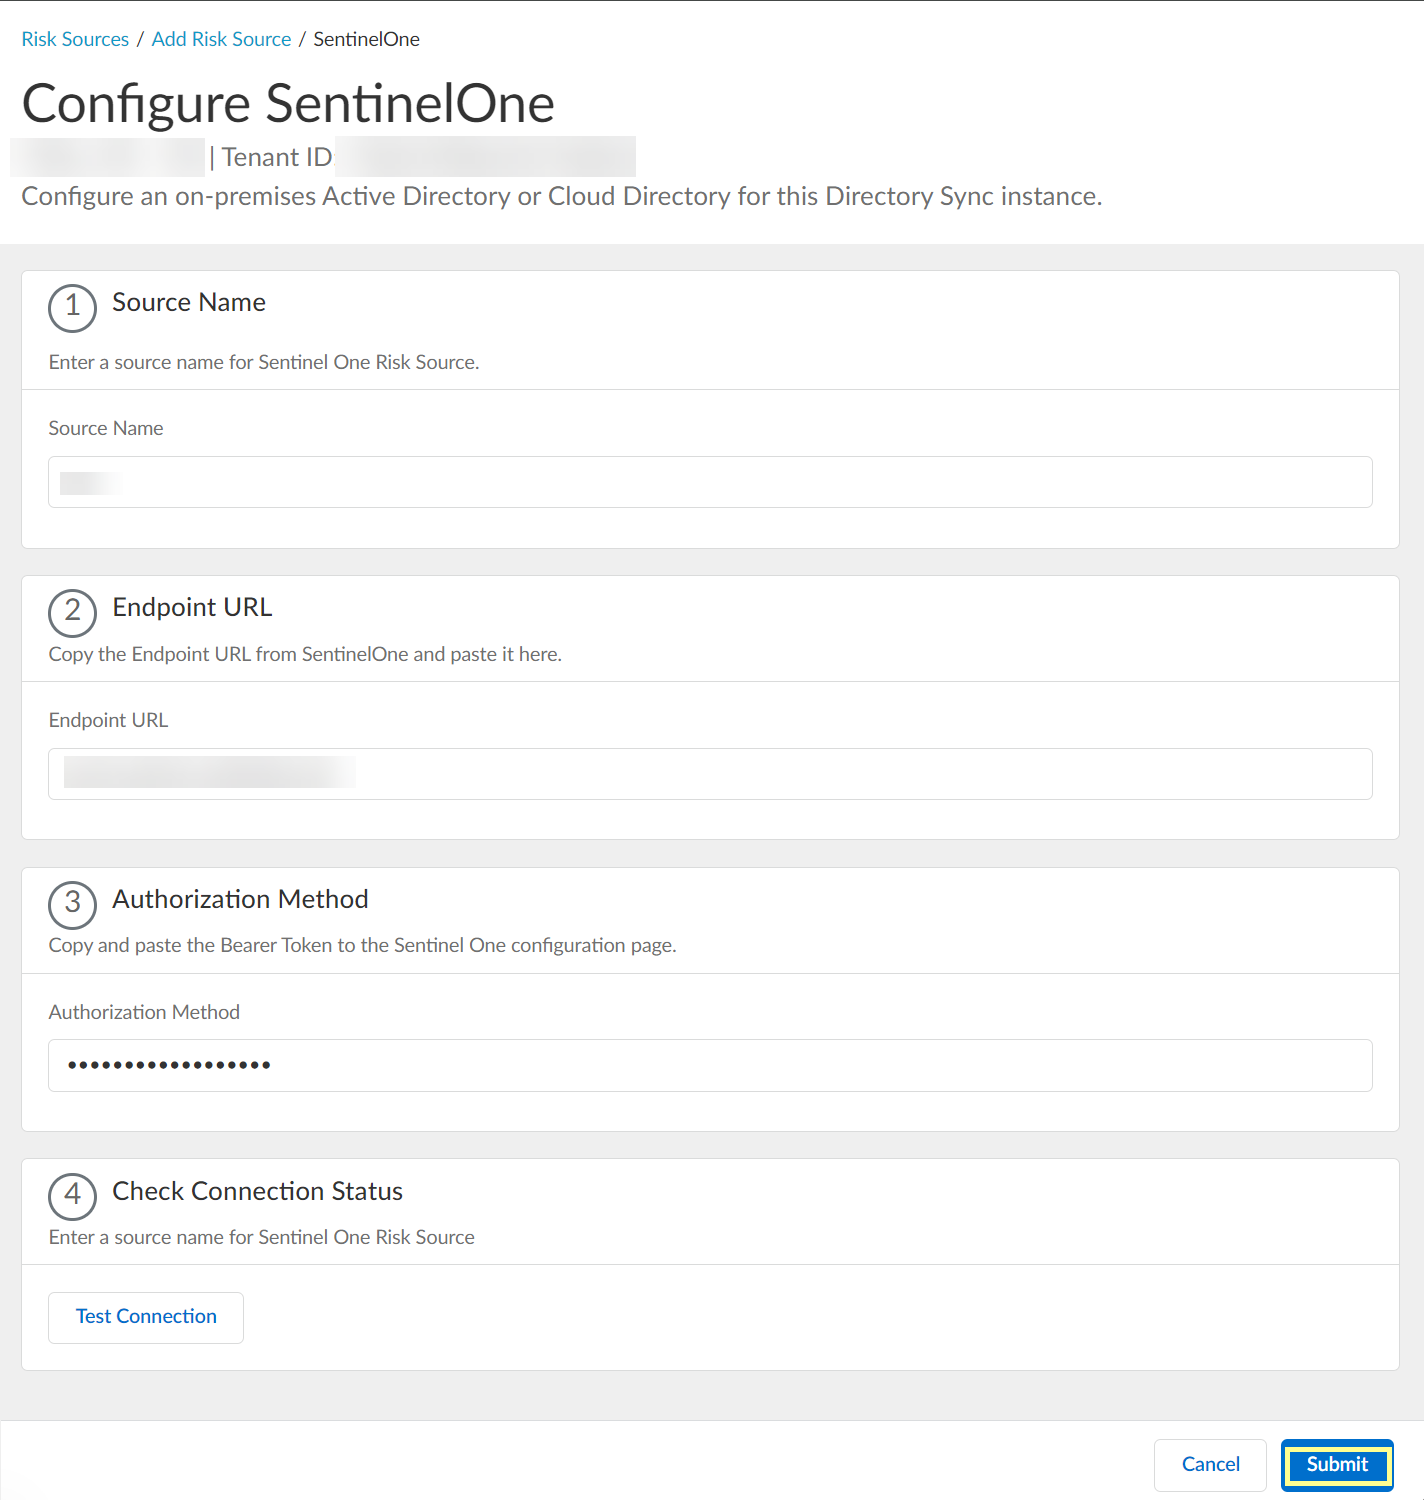
Screenshot showing the Submit button for SentinelOne configuration in CIE.
-
View/Edit dynamic risky endpoint groups: Security Risk > Cloud Dynamic Groups > Risky Endpoint Group tab.
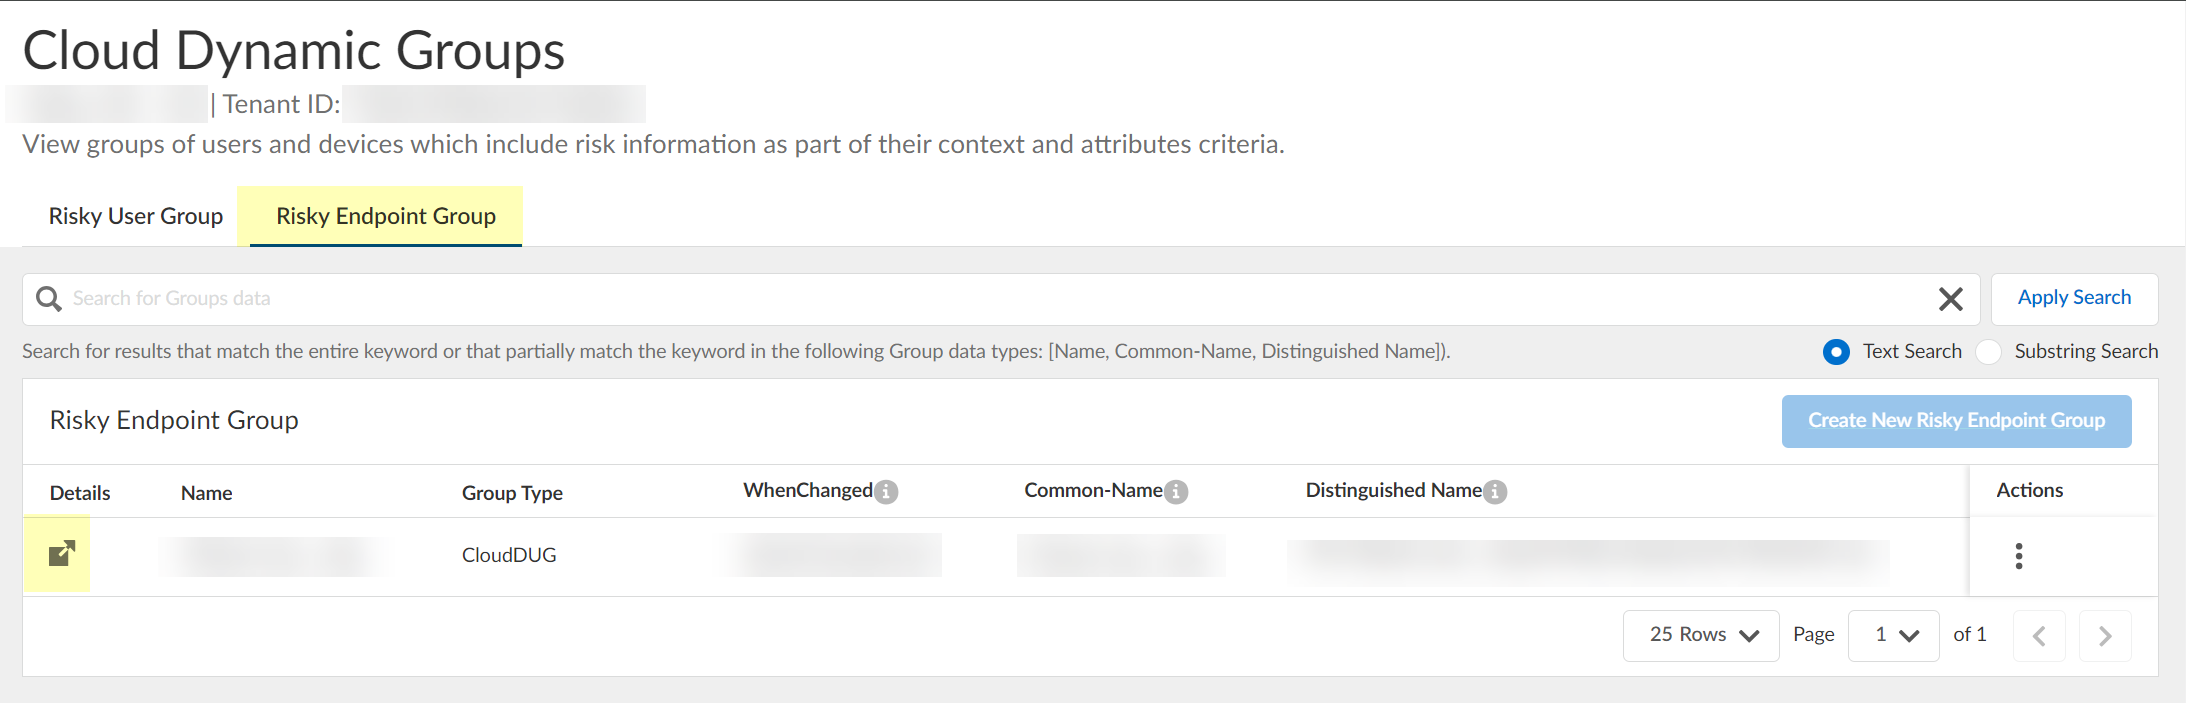
Screenshot showing the list of Dynamic Risky Endpoint Groups in CIE.
Search/Filter.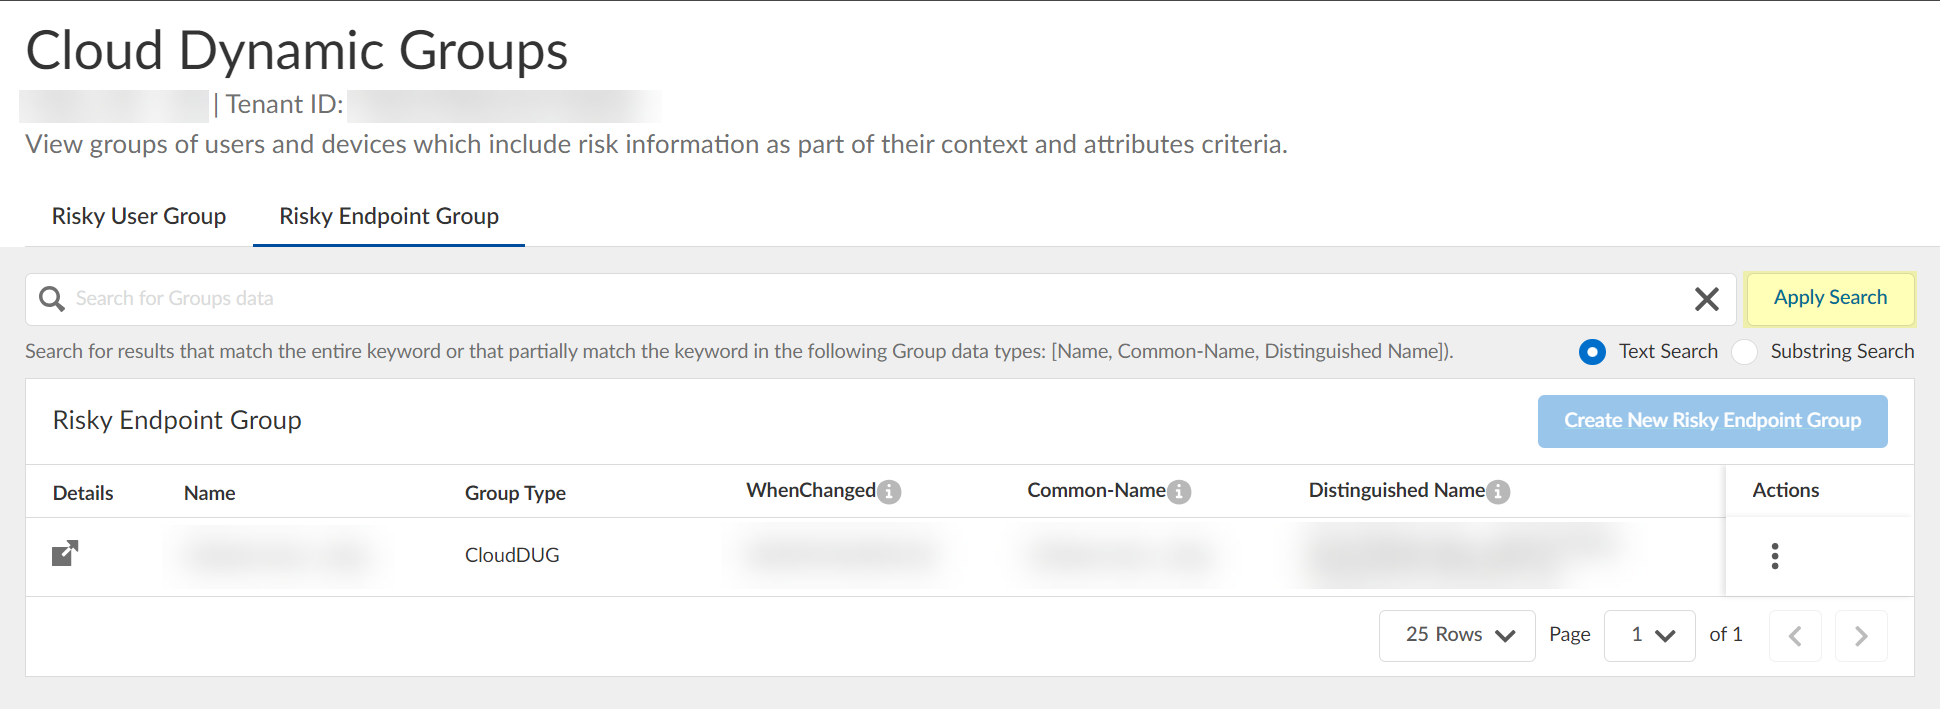
Screenshot showing the search bar for filtering dynamic groups.
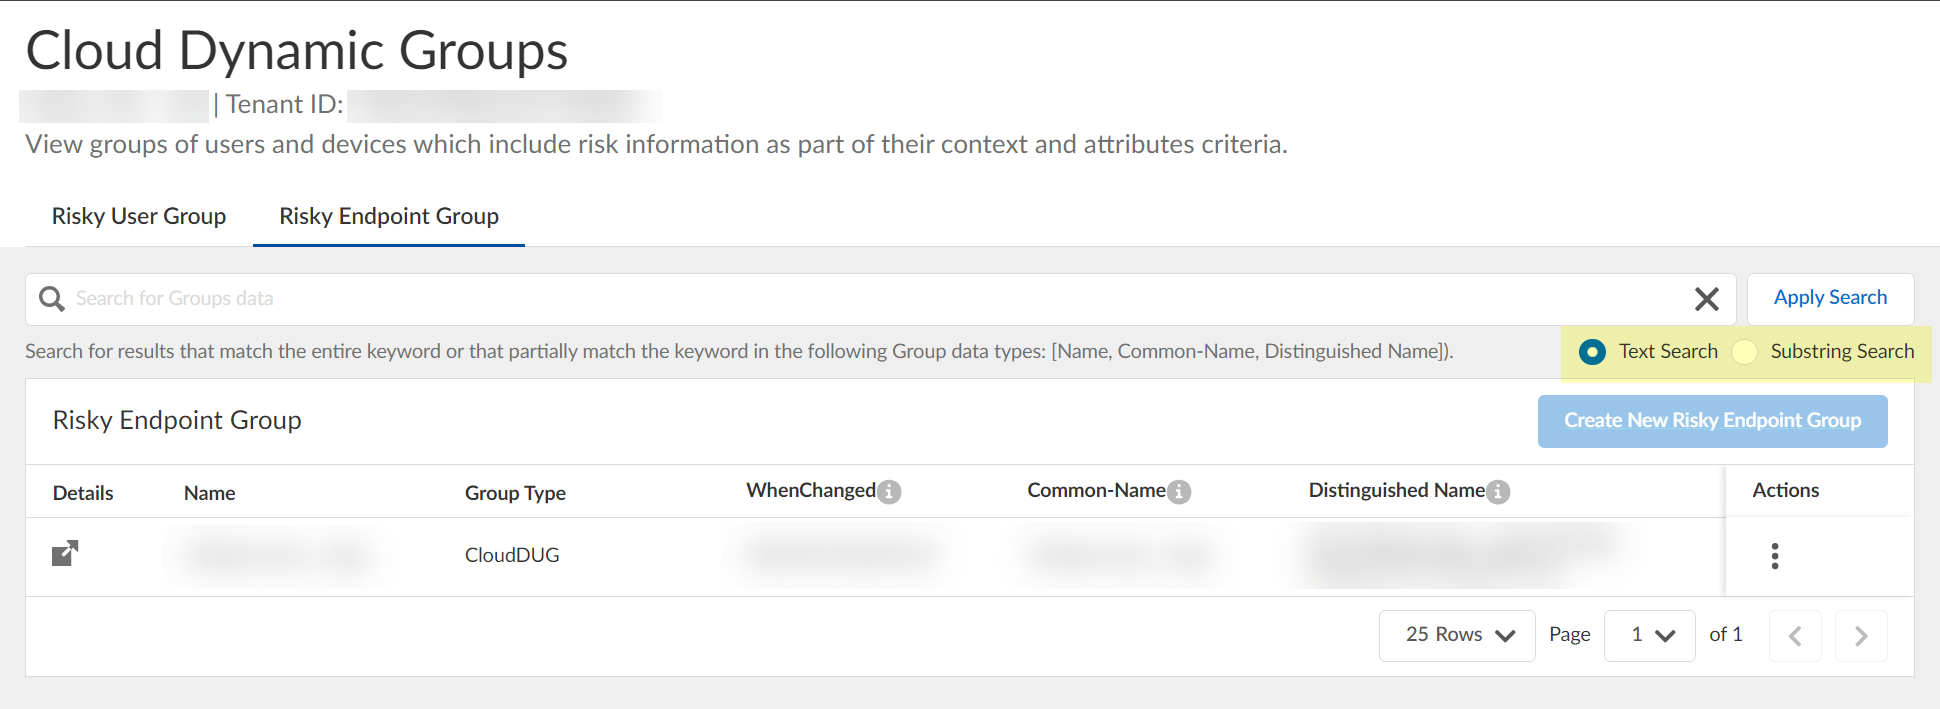
Screenshot showing text and substring search type options for filtering dynamic groups.
Specify context/attributes by Editing.
Screenshot showing the "Edit" option for a dynamic endpoint group.
(Optional) Delete group.
Screenshot showing the "Remove" option for a dynamic endpoint group.
Gotcha!: Cannot create a new dynamic risky endpoint group if one already exists.
-
Use Strata Cloud Manager to view quarantined devices: Manage > Configuration > NGFW and Prisma Access > Select Prisma Access scope.
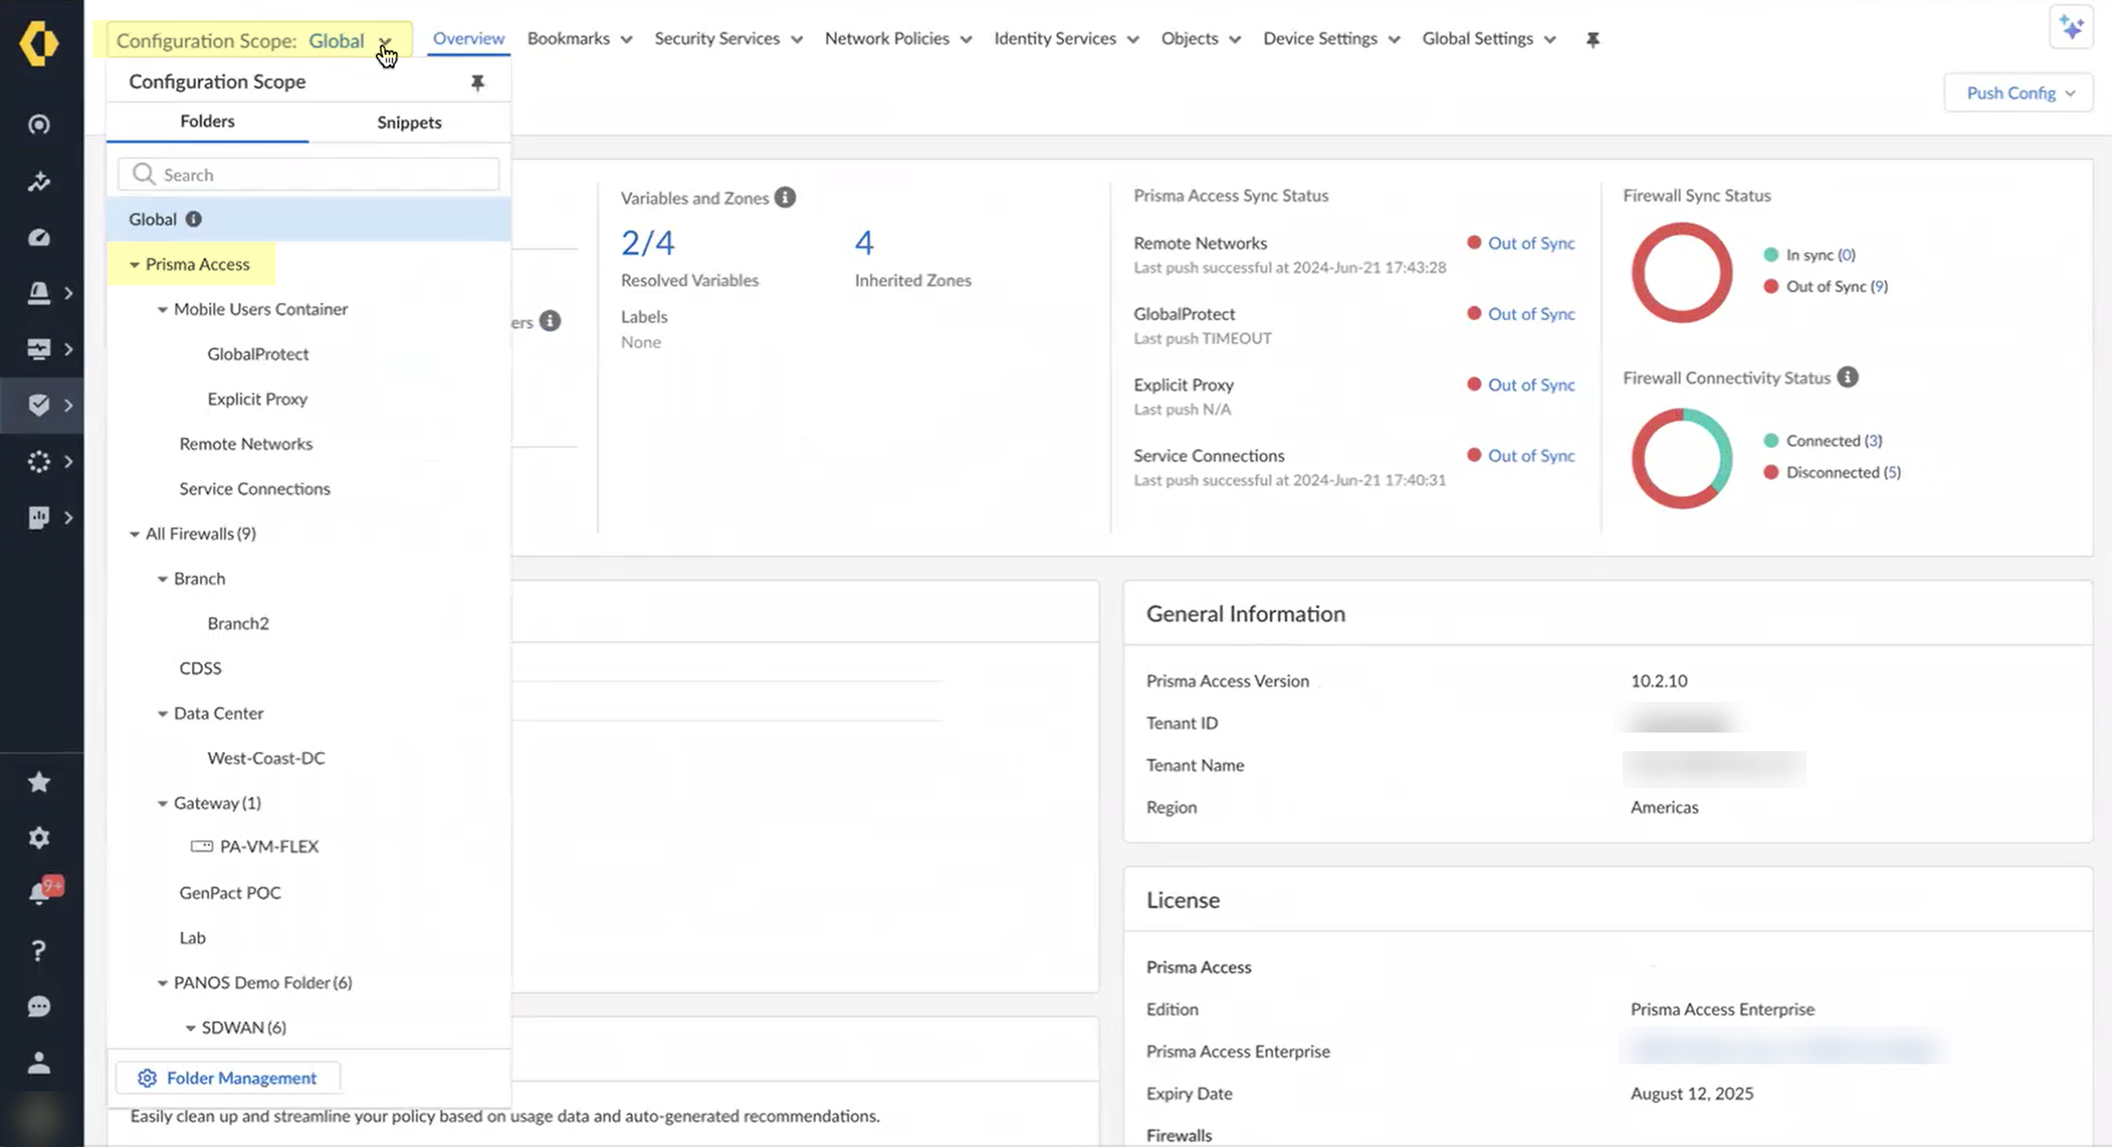
Screenshot showing the Configuration Scope selection in Strata Cloud Manager.
Objects > Quarantined Device List.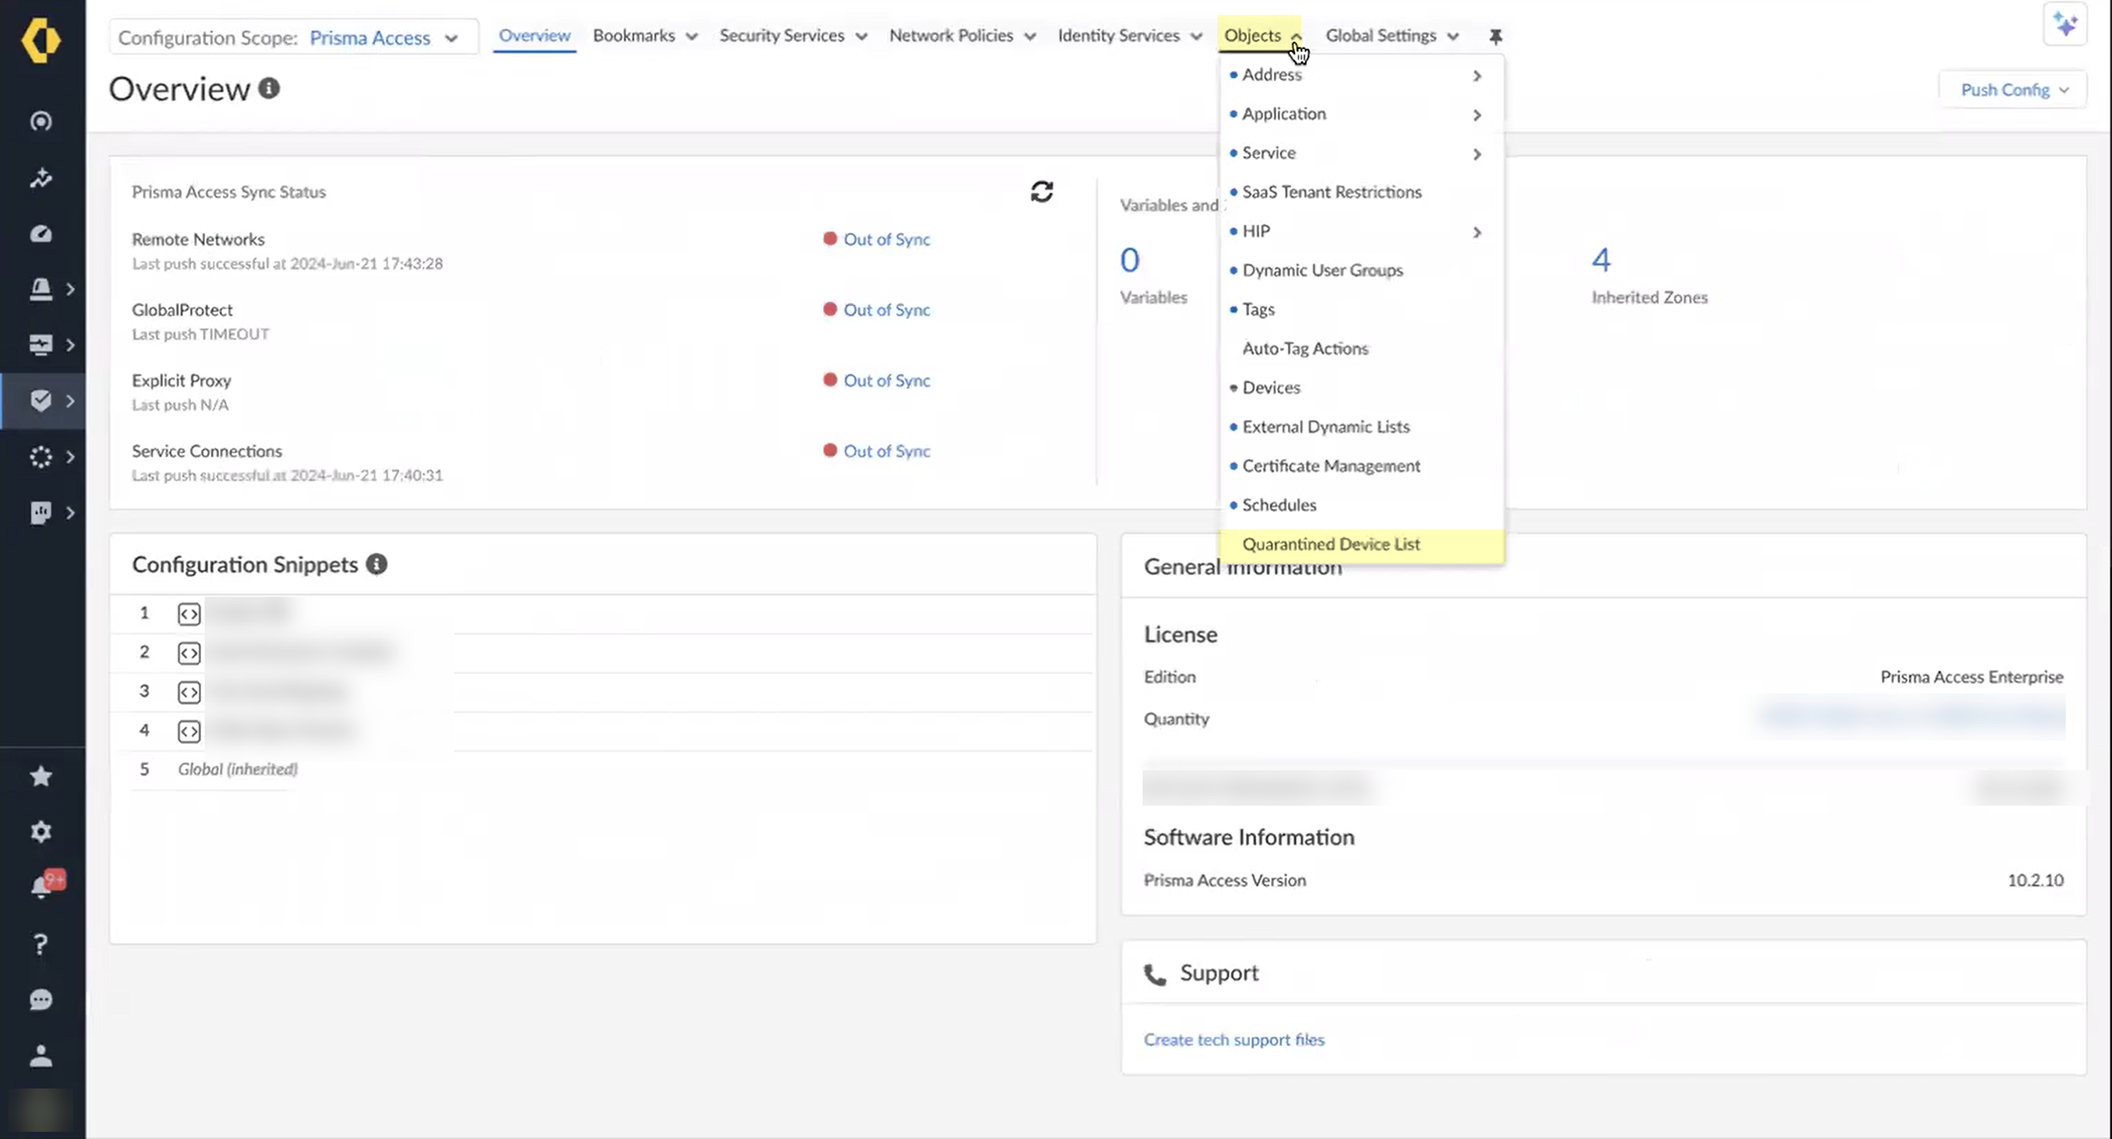
Screenshot showing the Quarantined Device List menu in Strata Cloud Manager.
Review list for remediation.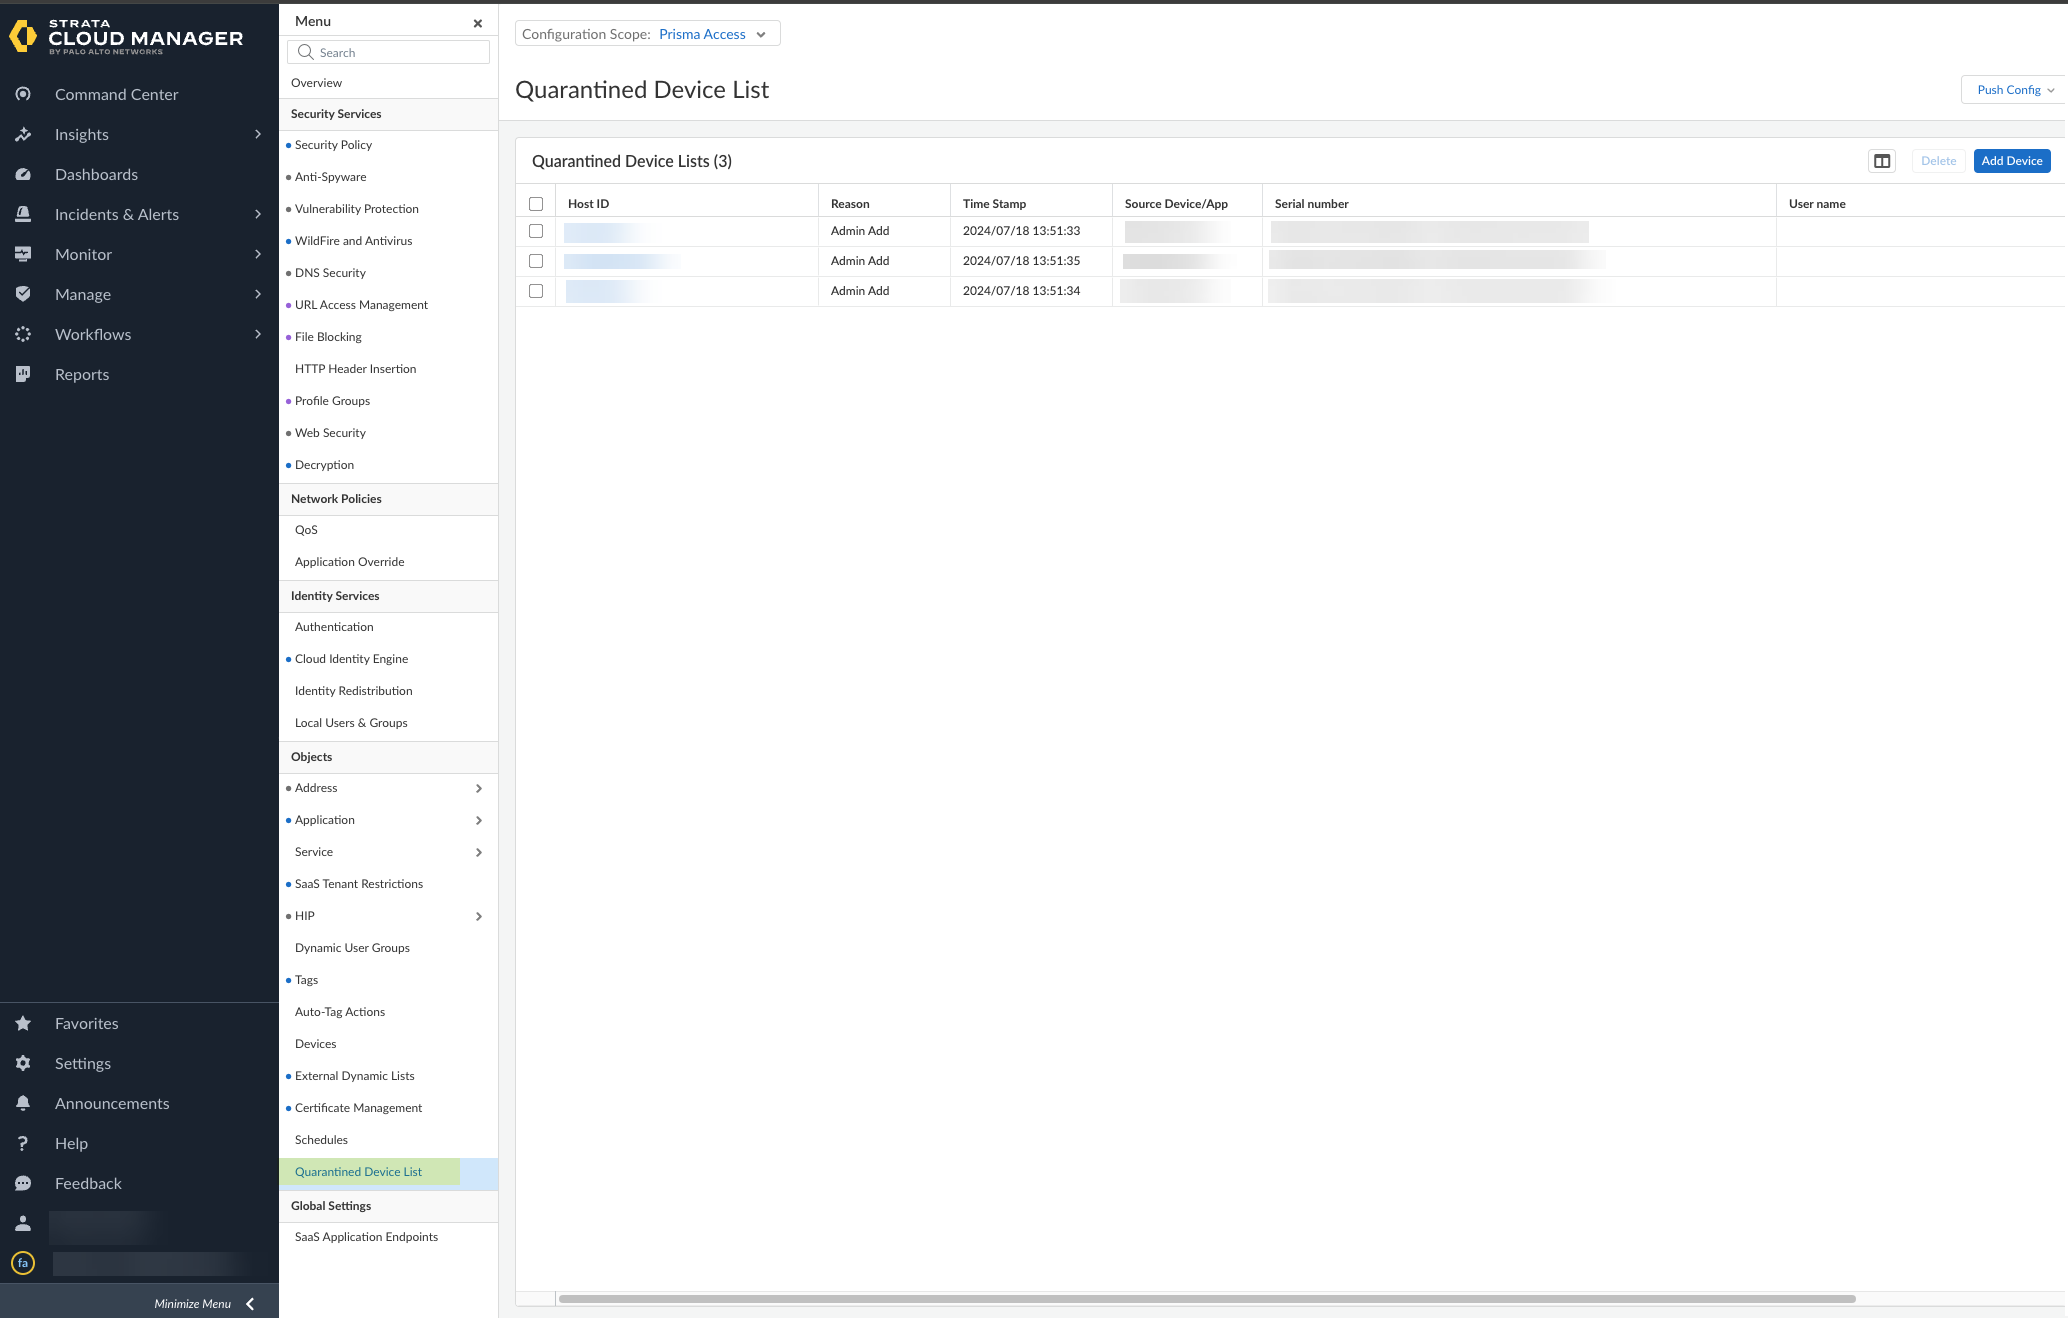
Screenshot showing the list of quarantined devices in Strata Cloud Manager.
Important Point: Do not manually remove devices from quarantine in Strata Cloud Manager/Panorama if quarantined by SentinelOne via CIE.
Configure Dynamic Privilege Access (DPA) in the Cloud Identity Engine
Allows isolating network resources per-project. Requires activation by Palo Alto Networks. DPA auth type is only for DPA; do not reuse for other auth types.
Gotcha!: Syncing new user groups for Azure SAML apps for DPA may take up to 3 hours. Wait for sync before assigning projects.
-
Configure an authentication type in CIE (Currently supports Azure AD SAML). Use
Dynamic service provider metadata
.
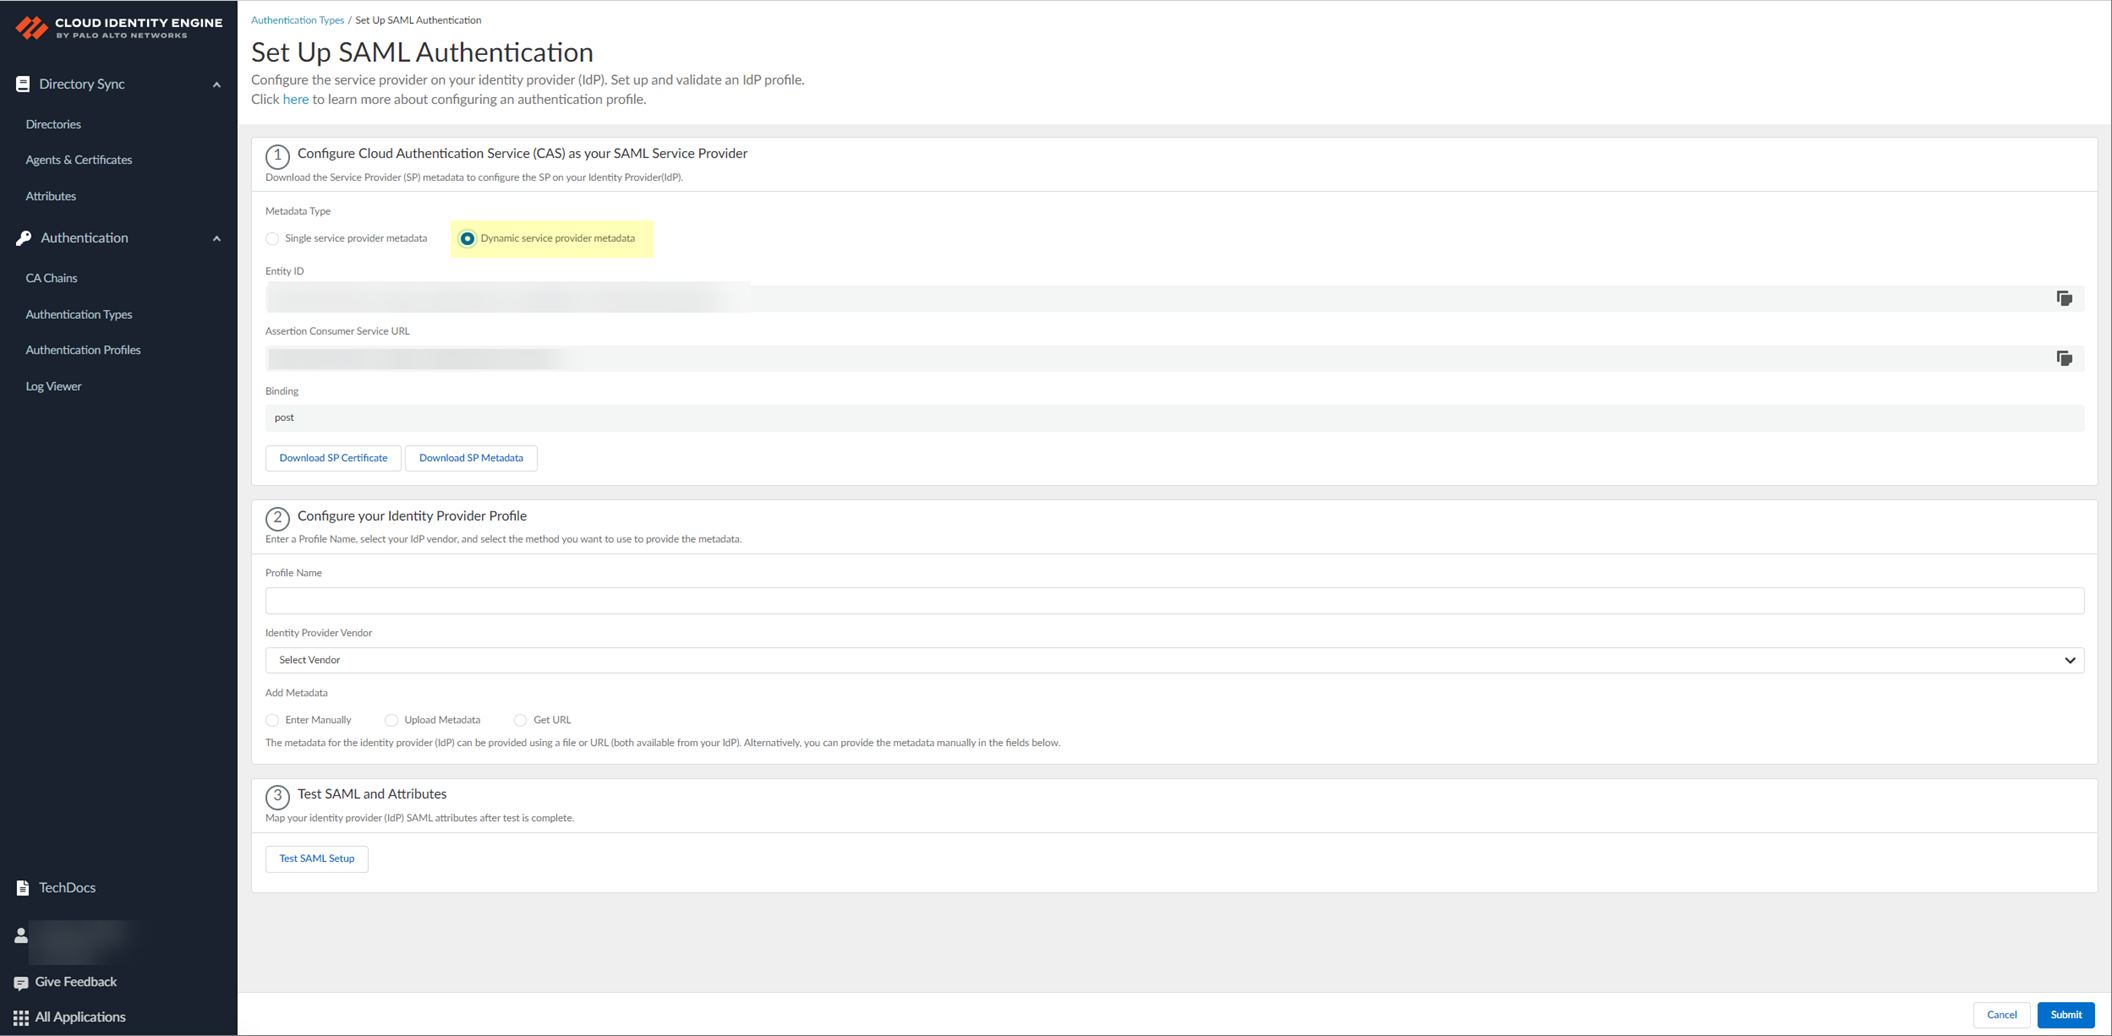
Screenshot showing the selection of "Dynamic service provider metadata" for SAML configuration in CIE.
-
Copy SP metadata (Entity ID, ACS URL) or download SP Metadata file from CIE. Import to IdP (Azure Portal).
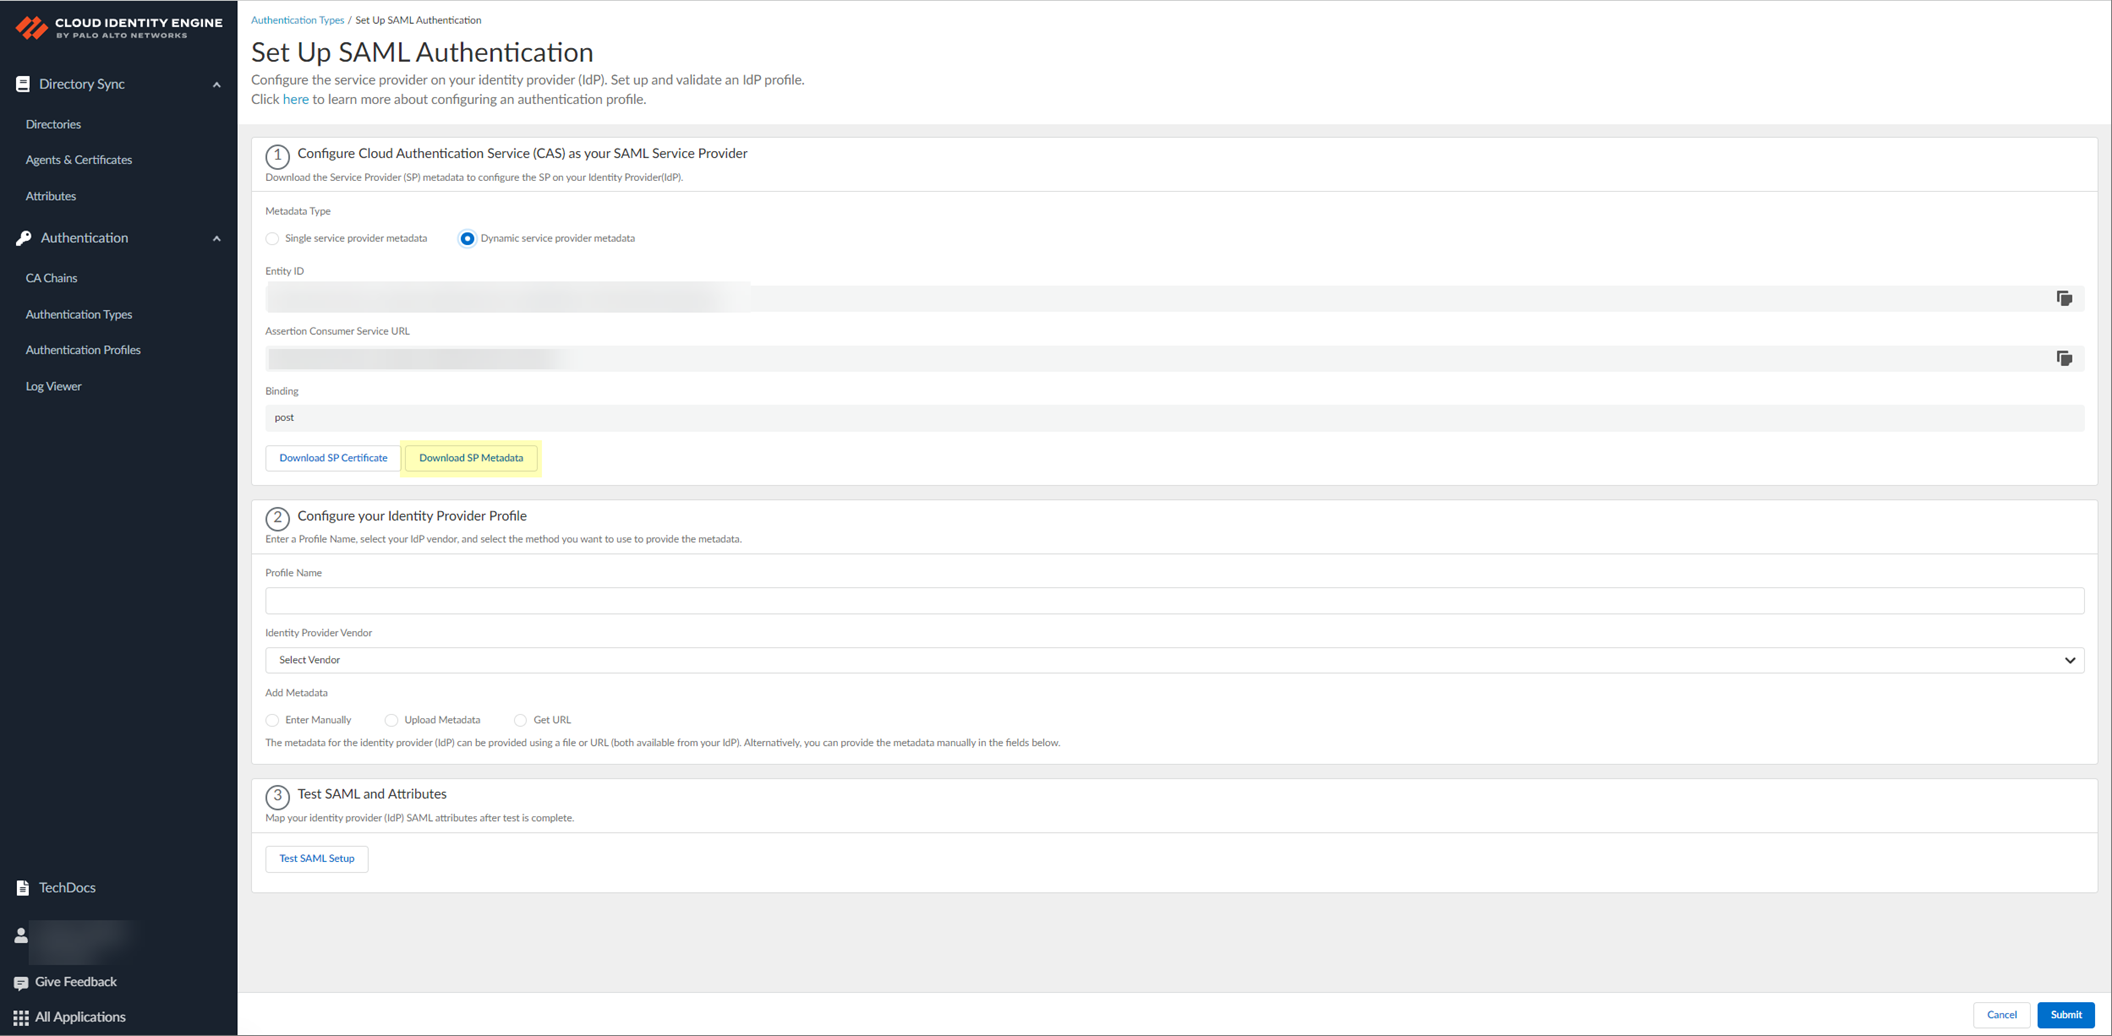
Screenshot showing Entity ID, Assertion Consumer Service URL, and Download SP Metadata options in CIE SP Metadata.
-
In IdP (Azure Portal), download CIE SAML application from gallery ('Palo Alto Networks Cloud Identity Engine - Cloud Authentication Service').
Icon representing the Palo Alto Networks Cloud Identity Engine - Cloud Authentication Service gallery application in Azure.
Create config, Set up single sign-on > SAML.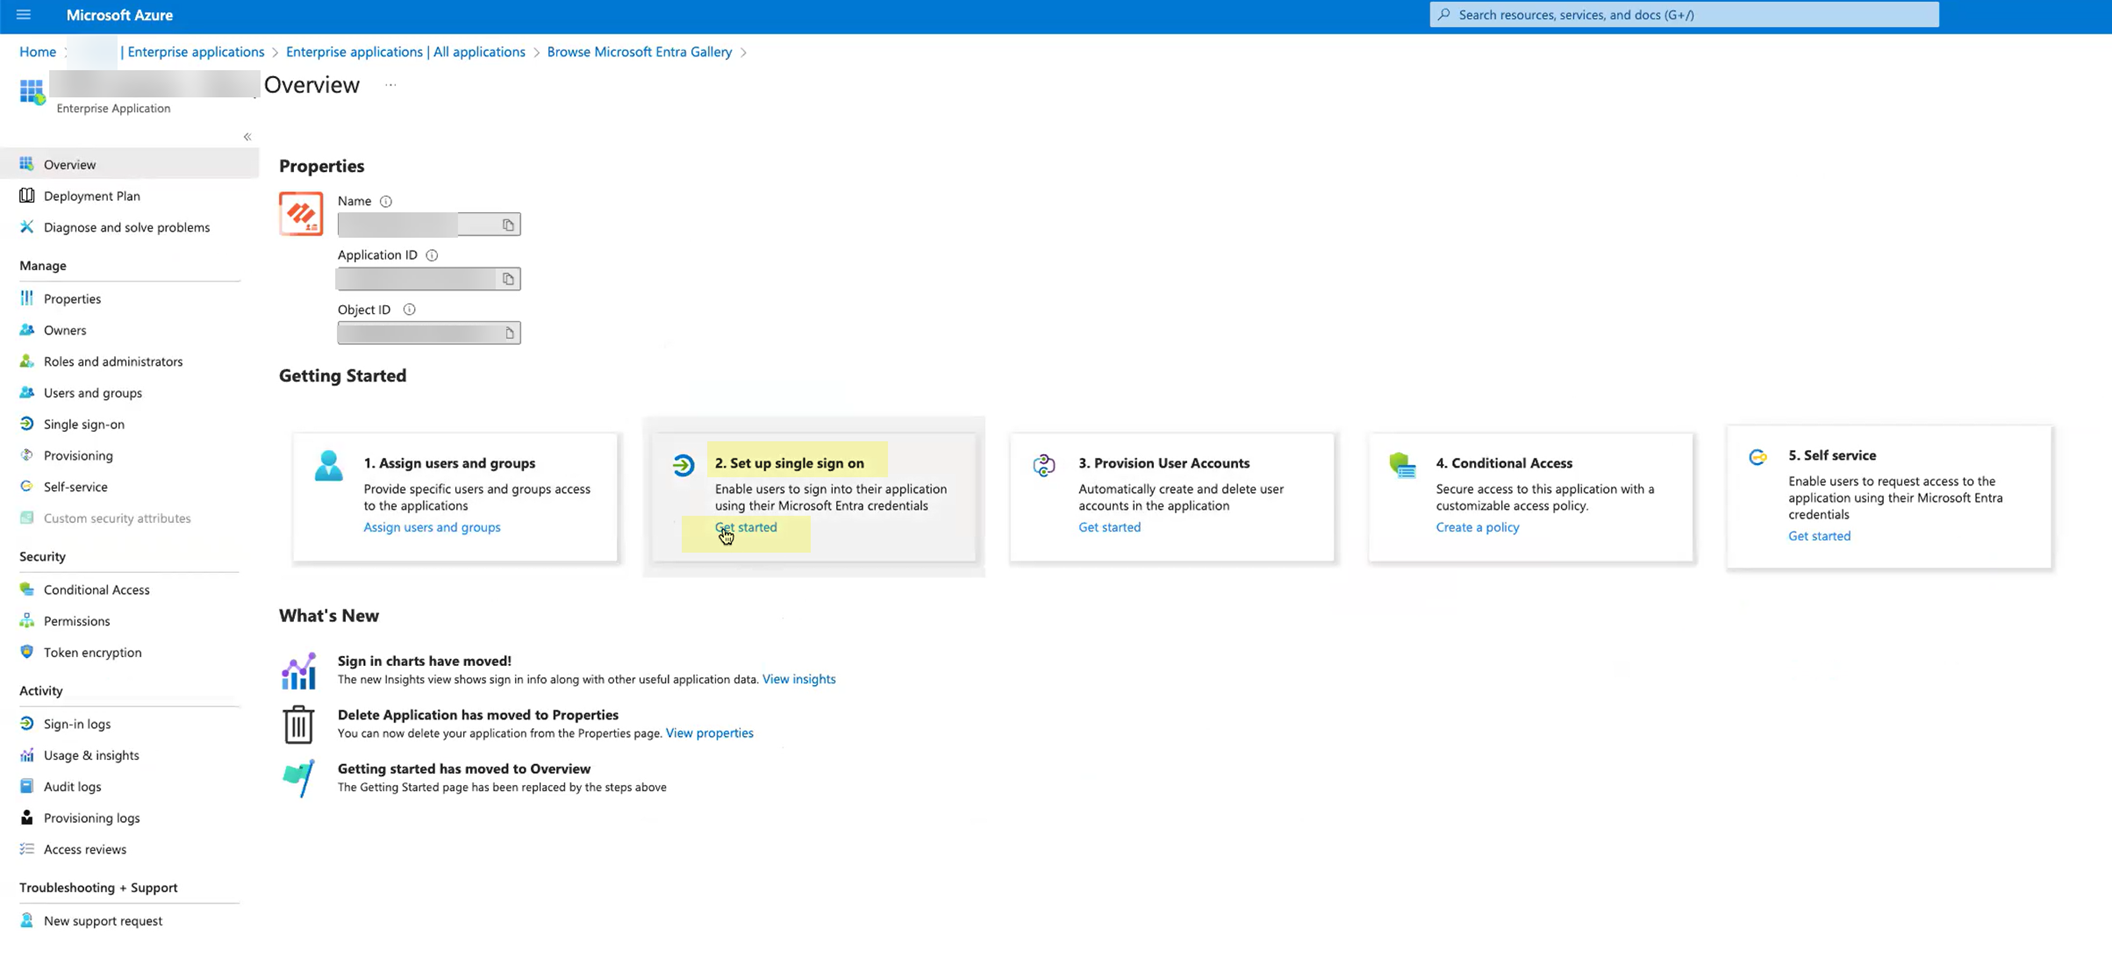
Screenshot showing the "Set up single sign-on" section in the Azure app configuration.
- Configure SAML app in IdP: Either paste Entity ID/ACS URL, enter regional Sign on URL ( https://<RegionUrl>.paloaltonetworks.com/sp/acs ), Save, Copy App Federation Metadata URL. OR Upload SP metadata file, Edit Basic SAML config, enter regional Sign on URL, Save, Copy App Federation Metadata URL.
- Assign your account (and others) to the application in IdP. Save.
-
Continue IdP config in CIE: Enter
App Federation Metadata URL
(from IdP) as Identity Provider Metadata URL in CIE, Click Get URL.
Screenshot showing the field to paste the IdP Metadata URL in CIE.
This Get URL step is mandatory. -
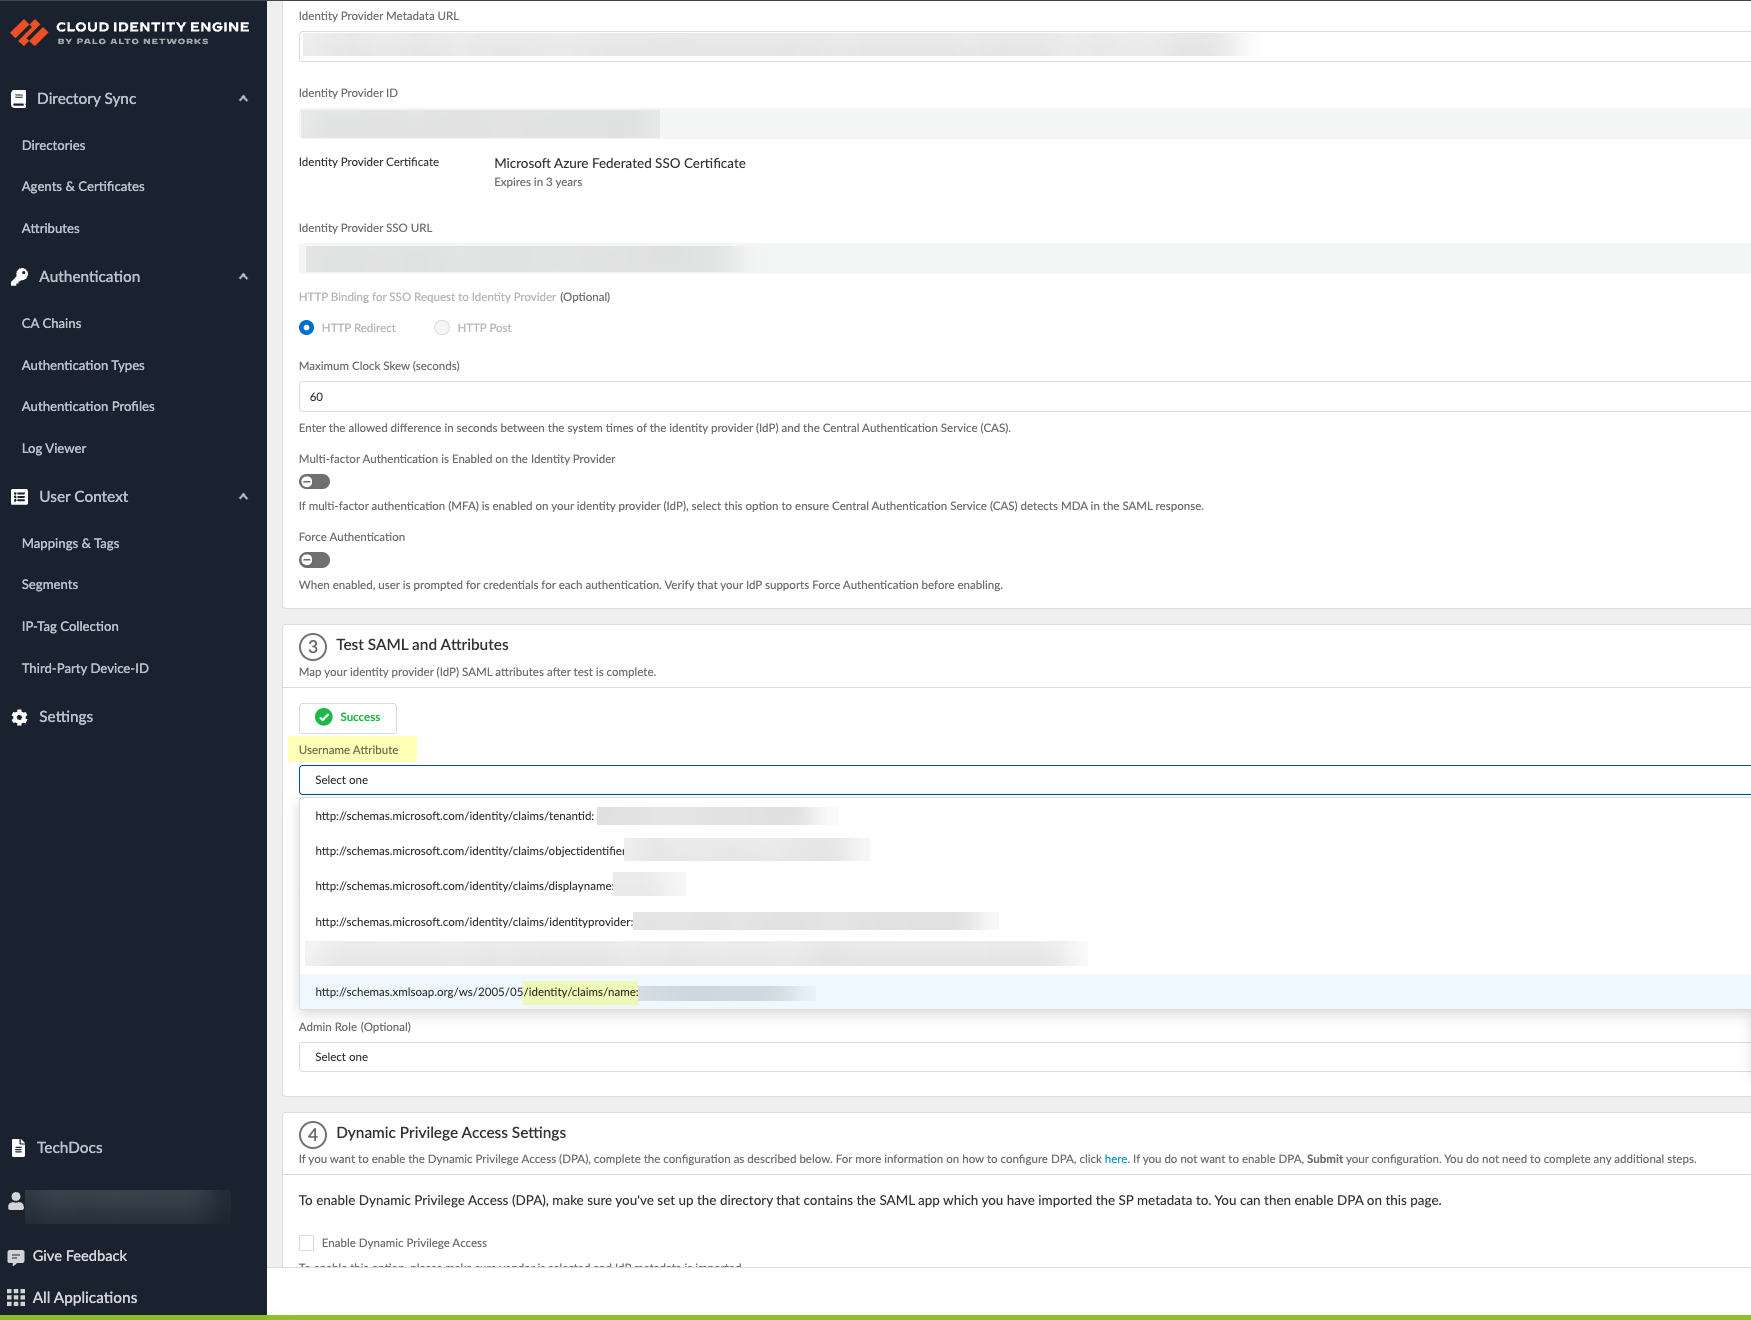
Configure SAML attributes (
Username Attribute is critical
, use
/identity/claims/name:
format for Azure).
Screenshot showing fields to select SAML attributes (Username, Usergroup, etc.) in CIE.
- Collect enterprise applications data from Azure directory if not already done. Submit update. This step is mandatory for DPA config.
-
Enable
Dynamic Privilege Access
in the CIE authentication profile. Click Detect Directory and SAML. Submit.
Screenshot showing the "Enable Dynamic Privilege Access" checkbox and "Detect Directory and SAML" button in CIE authentication profile.
- Configure an authentication profile in CIE using the DPA authentication type.
Cloud Identity Engine User Context
Provides granular control over data sharing (mappings, quarantine lists) across security devices. Requires PAN-OS 11.0+ . Centralizes visibility, increases scalability for VDI users.
User Context shares IP-to-username mappings, IP-port mappings (TS agent), user tags, IP tags, Host IDs, and quarantine lists via segments .
- Segment: Contains firewalls, can collect and share info.
- Publishing segment: Sends data from included firewalls to subscribed segments.
- Subscribed segment: Receives data from publishing segments.
Firewalls/Panorama can share multiple data types to one segment, but each data type from a single firewall/Panorama can only go to *one* segment. A firewall/Panorama can receive data from up to 100 segments.
Important Point: If a firewall is a User-ID hub, configure it as a subscriber in the segment to ensure all VSYS have access to both local and Cloud Service data.
-
Onboard CIE instance (activate, claim license, select CSP/tenant/region).
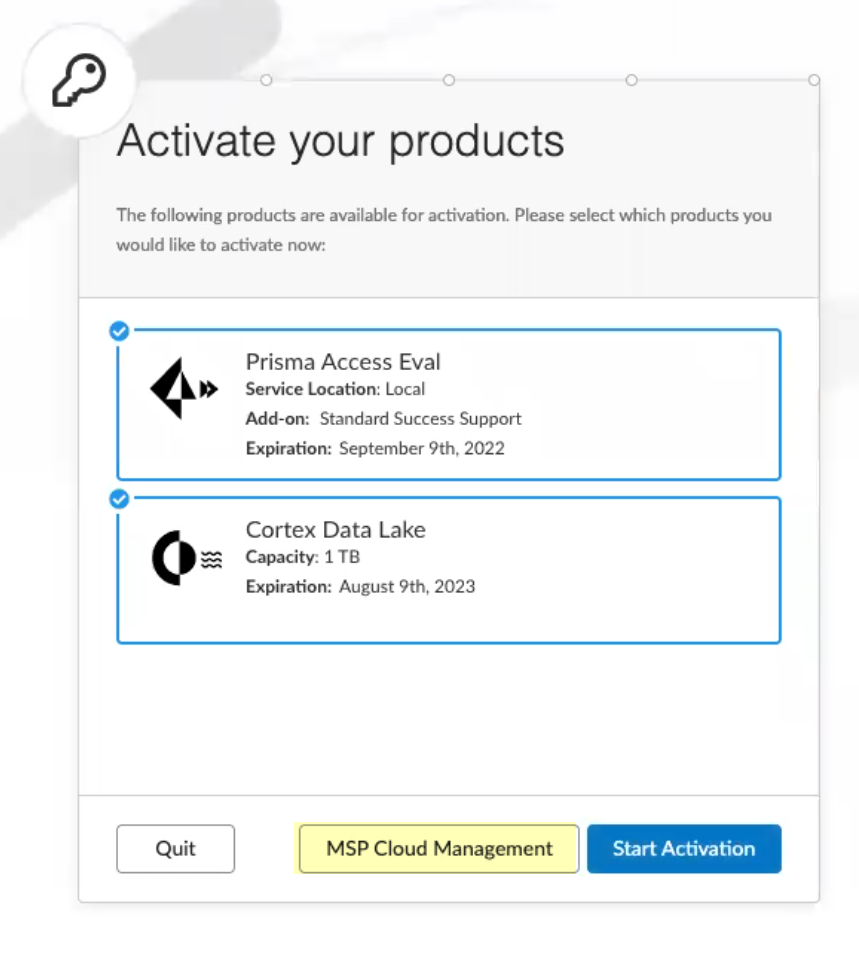
Screenshot showing the "MSP Cloud Management" screen during CIE onboarding.
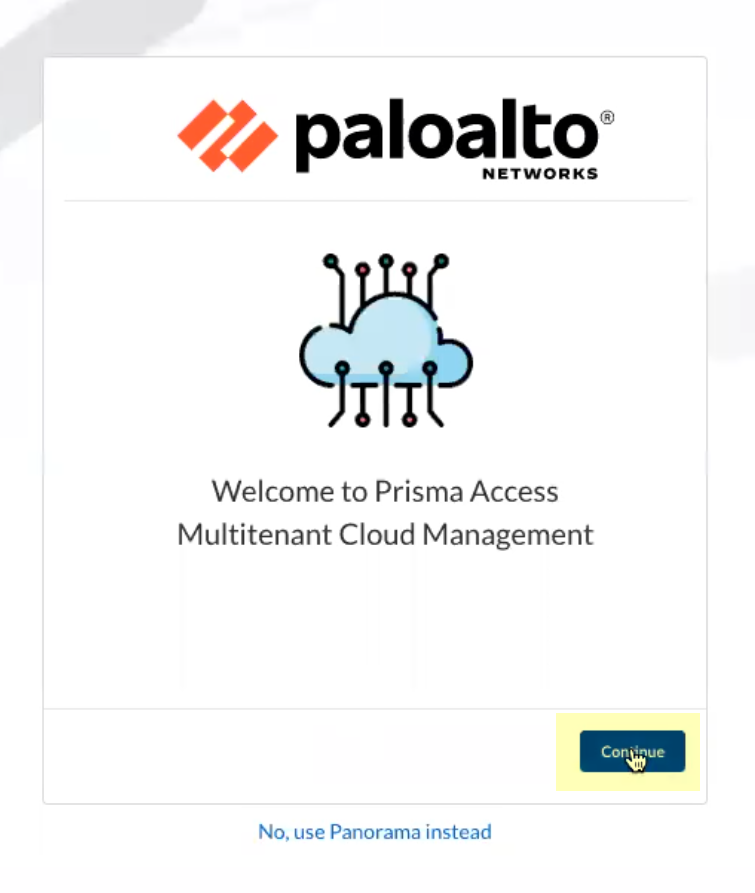
Screenshot showing the "Continue" button during the onboarding process.
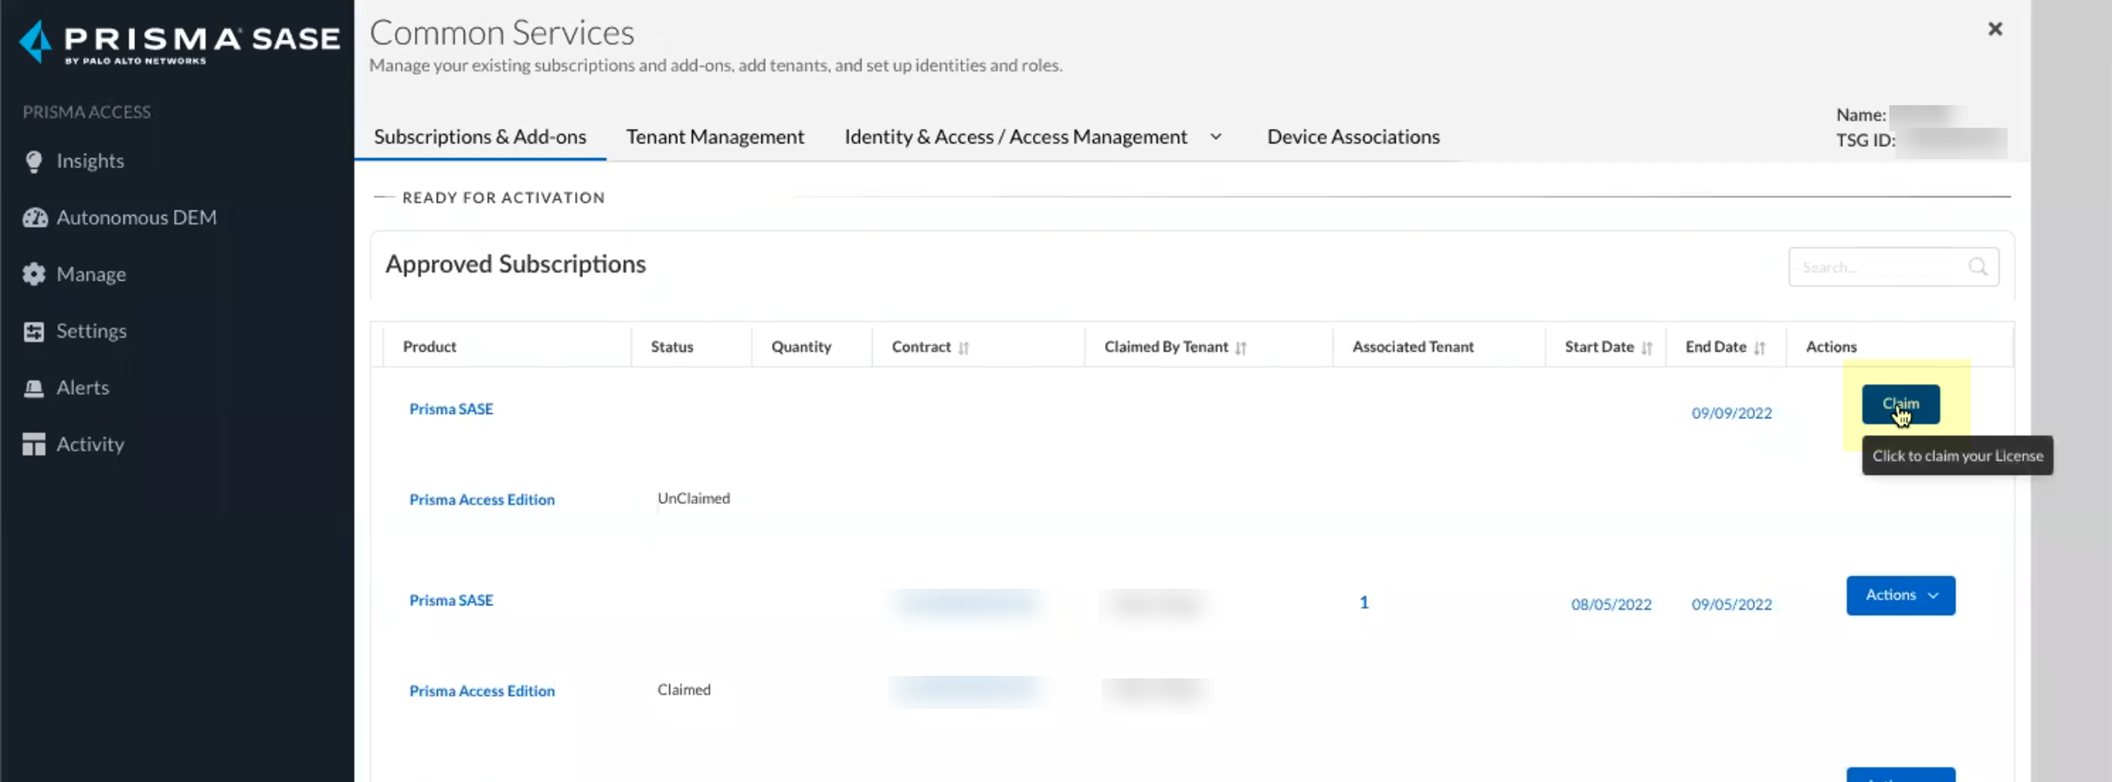
Screenshot showing the "Claim" license step during CIE onboarding.
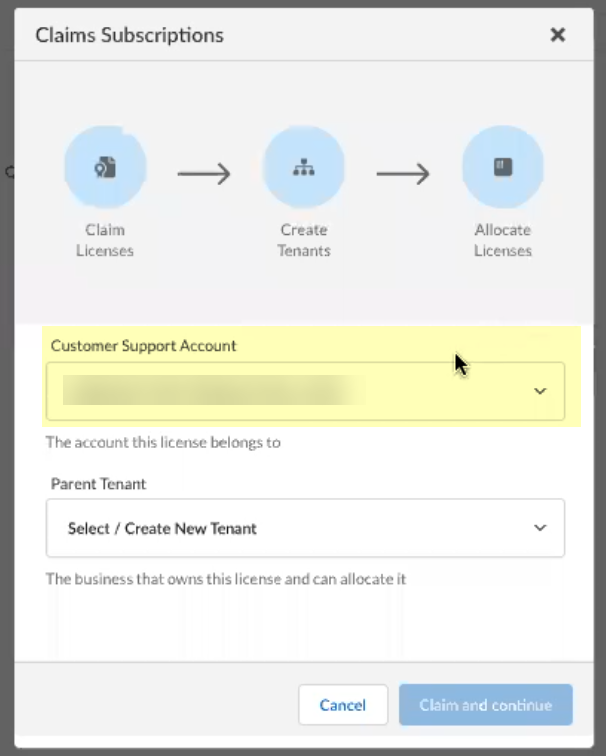
Screenshot showing the selection of the Customer Support Account during CIE onboarding.
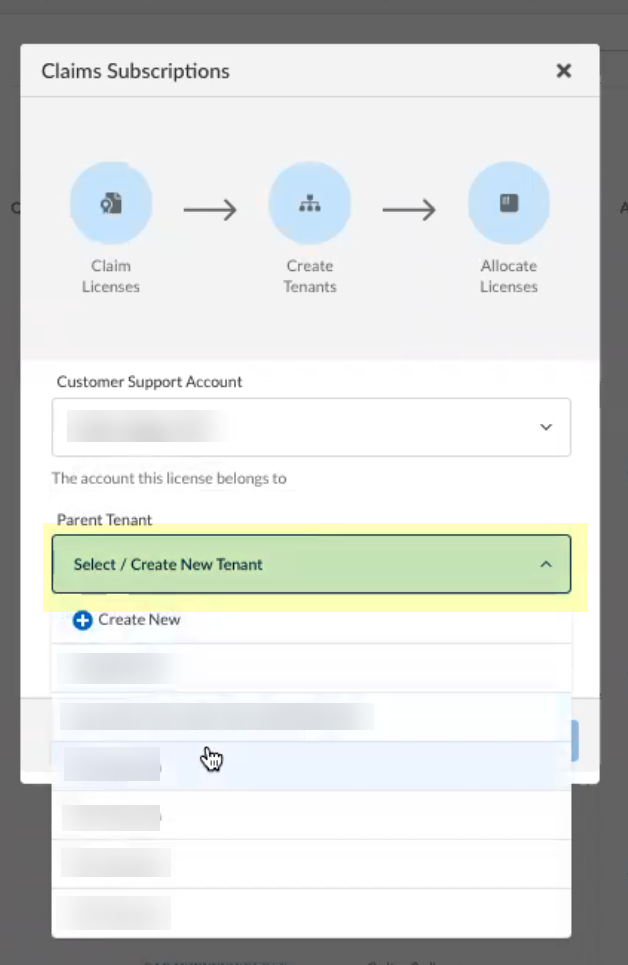
Screenshot showing the selection of the Parent Tenant during CIE onboarding.
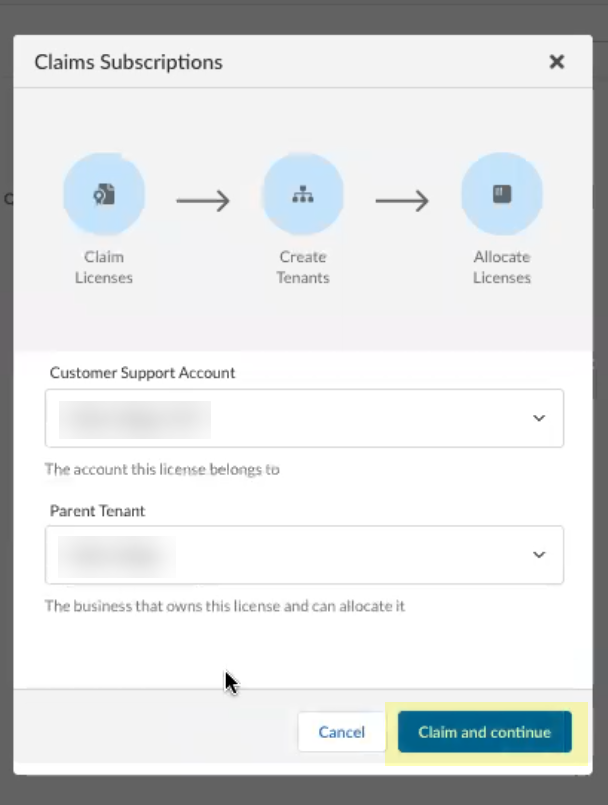
Screenshot showing the "Claim and continue" button to proceed with onboarding.

Screenshot showing the "Add Licensed Product" button to add the CIE license.

Screenshot showing the selection of the contract during CIE onboarding.
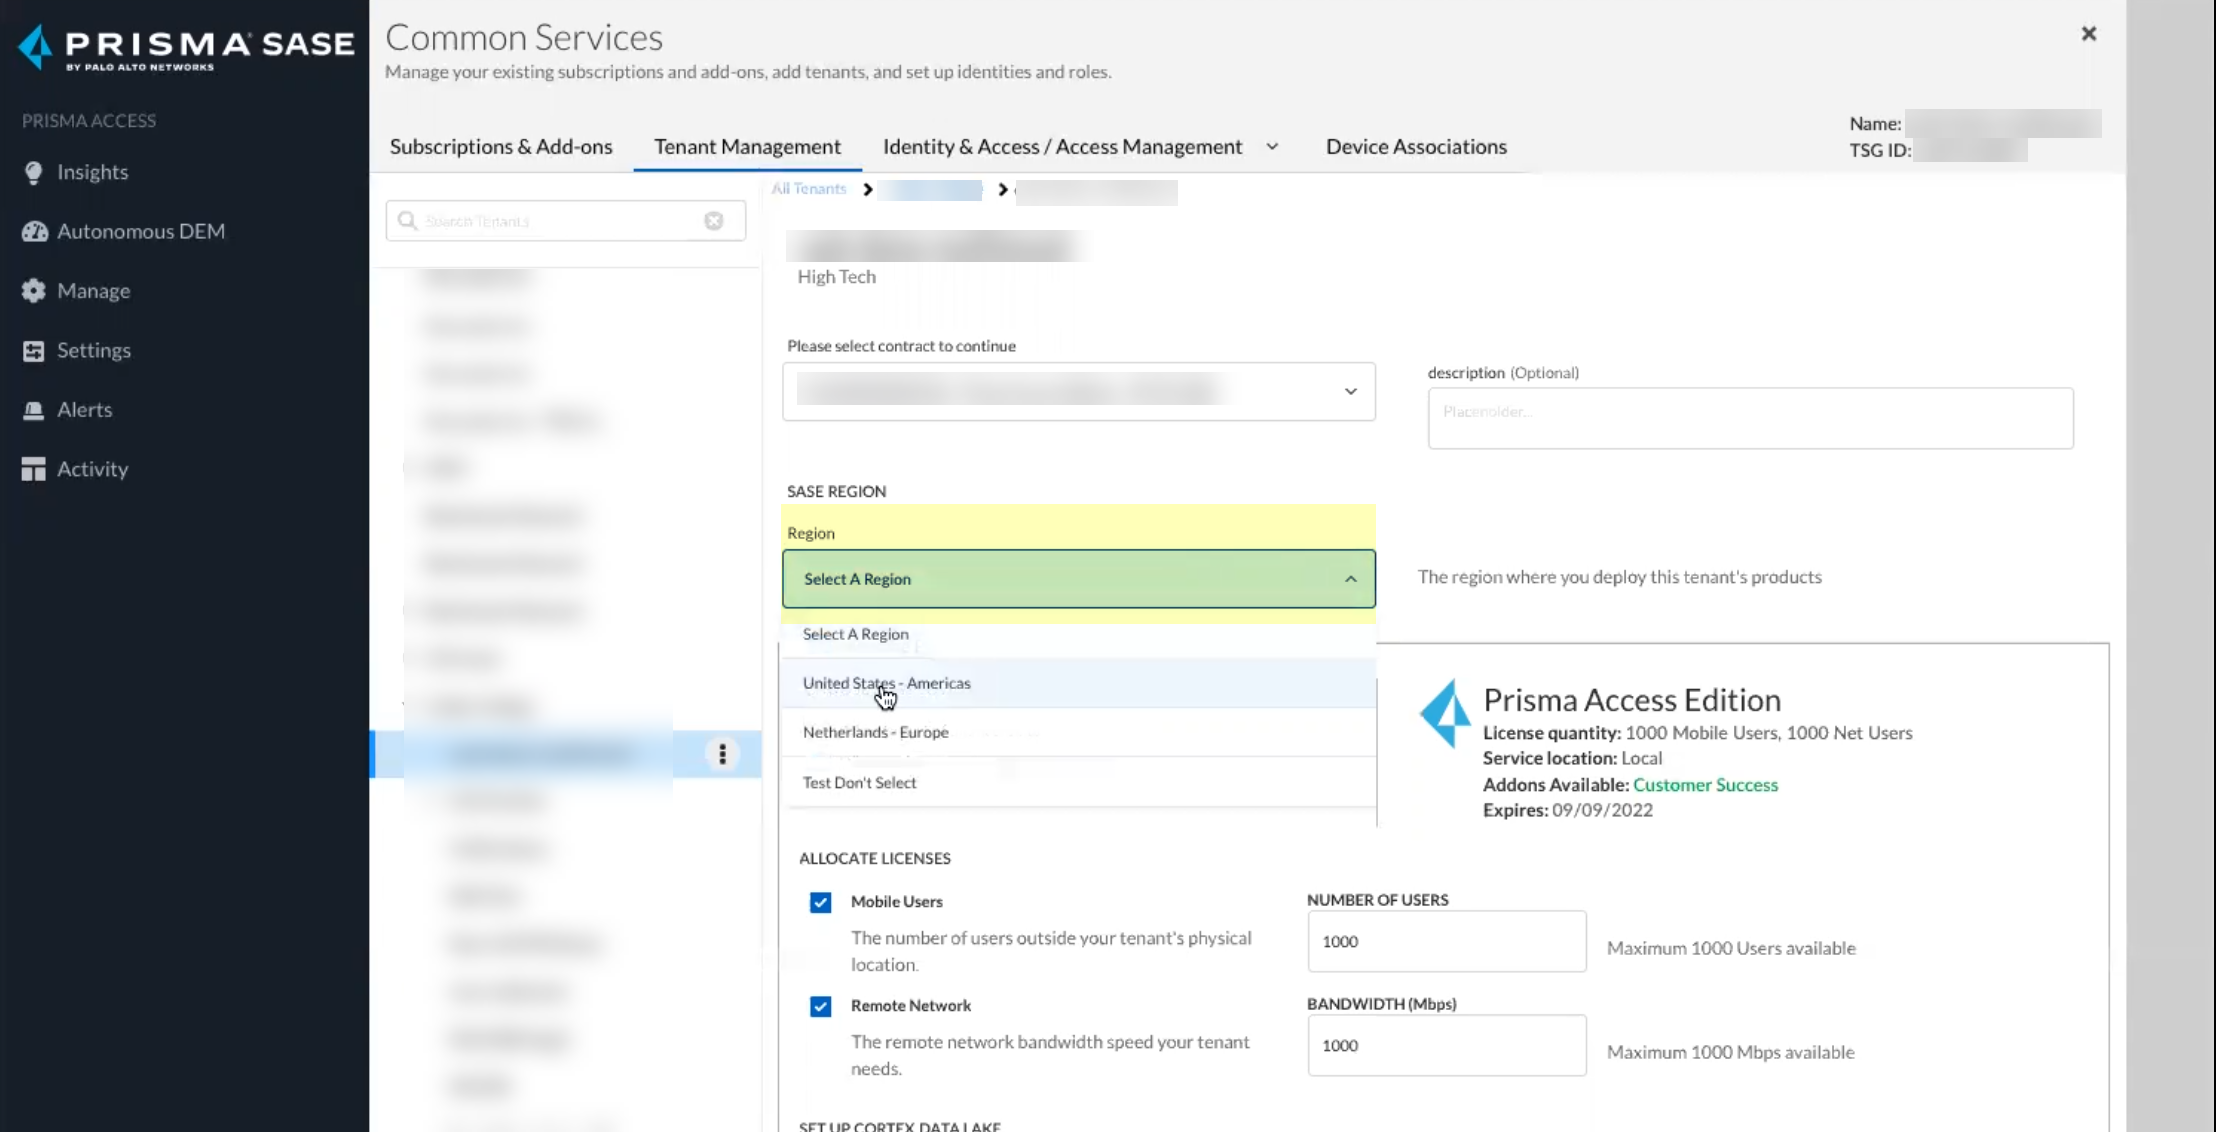
Screenshot showing the selection of the Region for the CIE instance during onboarding.
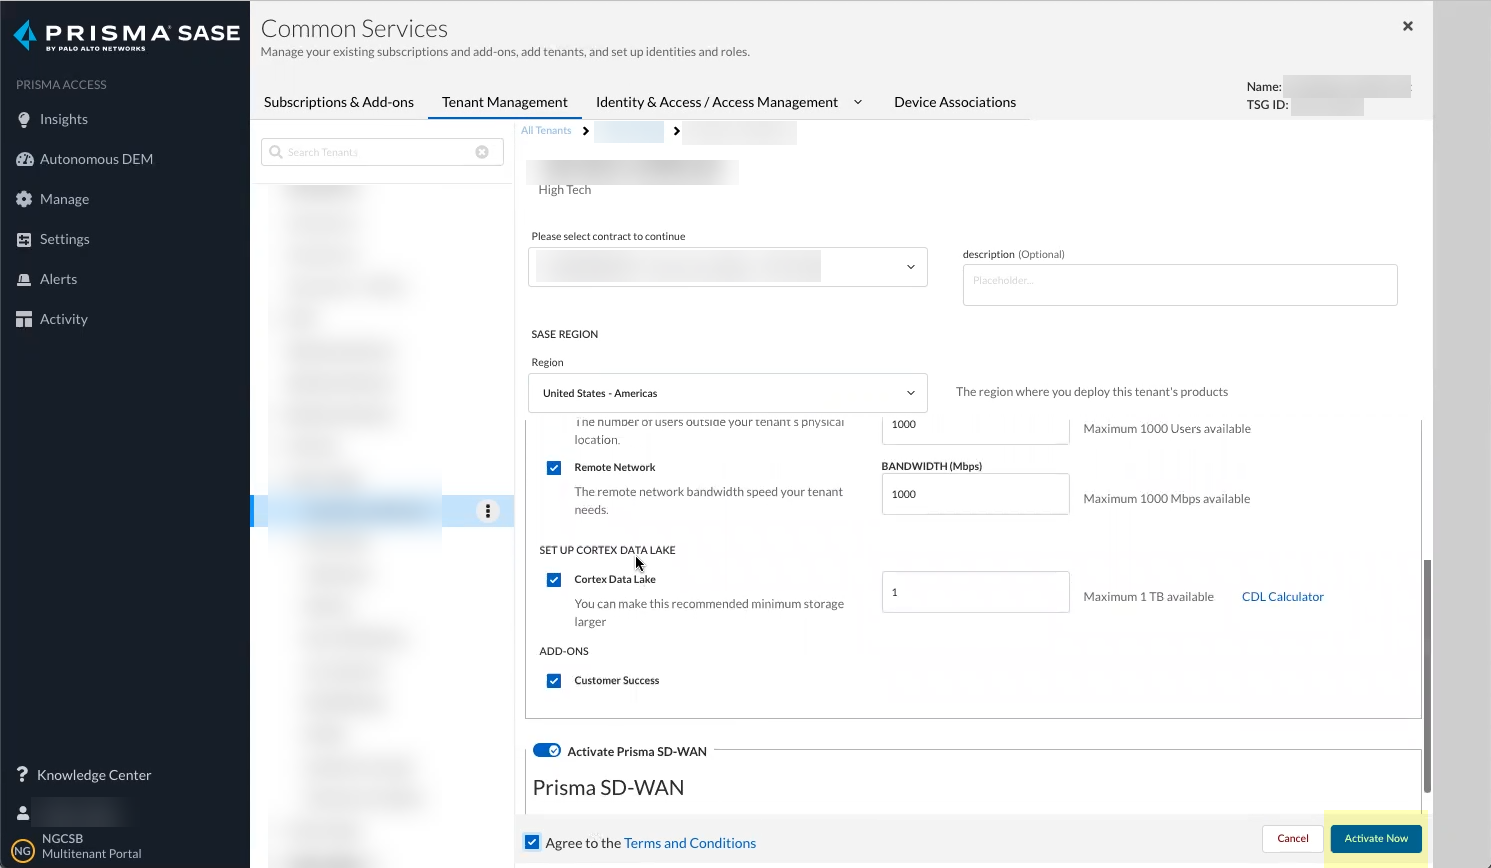
Screenshot showing the "Activate Now" button to complete the CIE onboarding.
Verify status is Complete.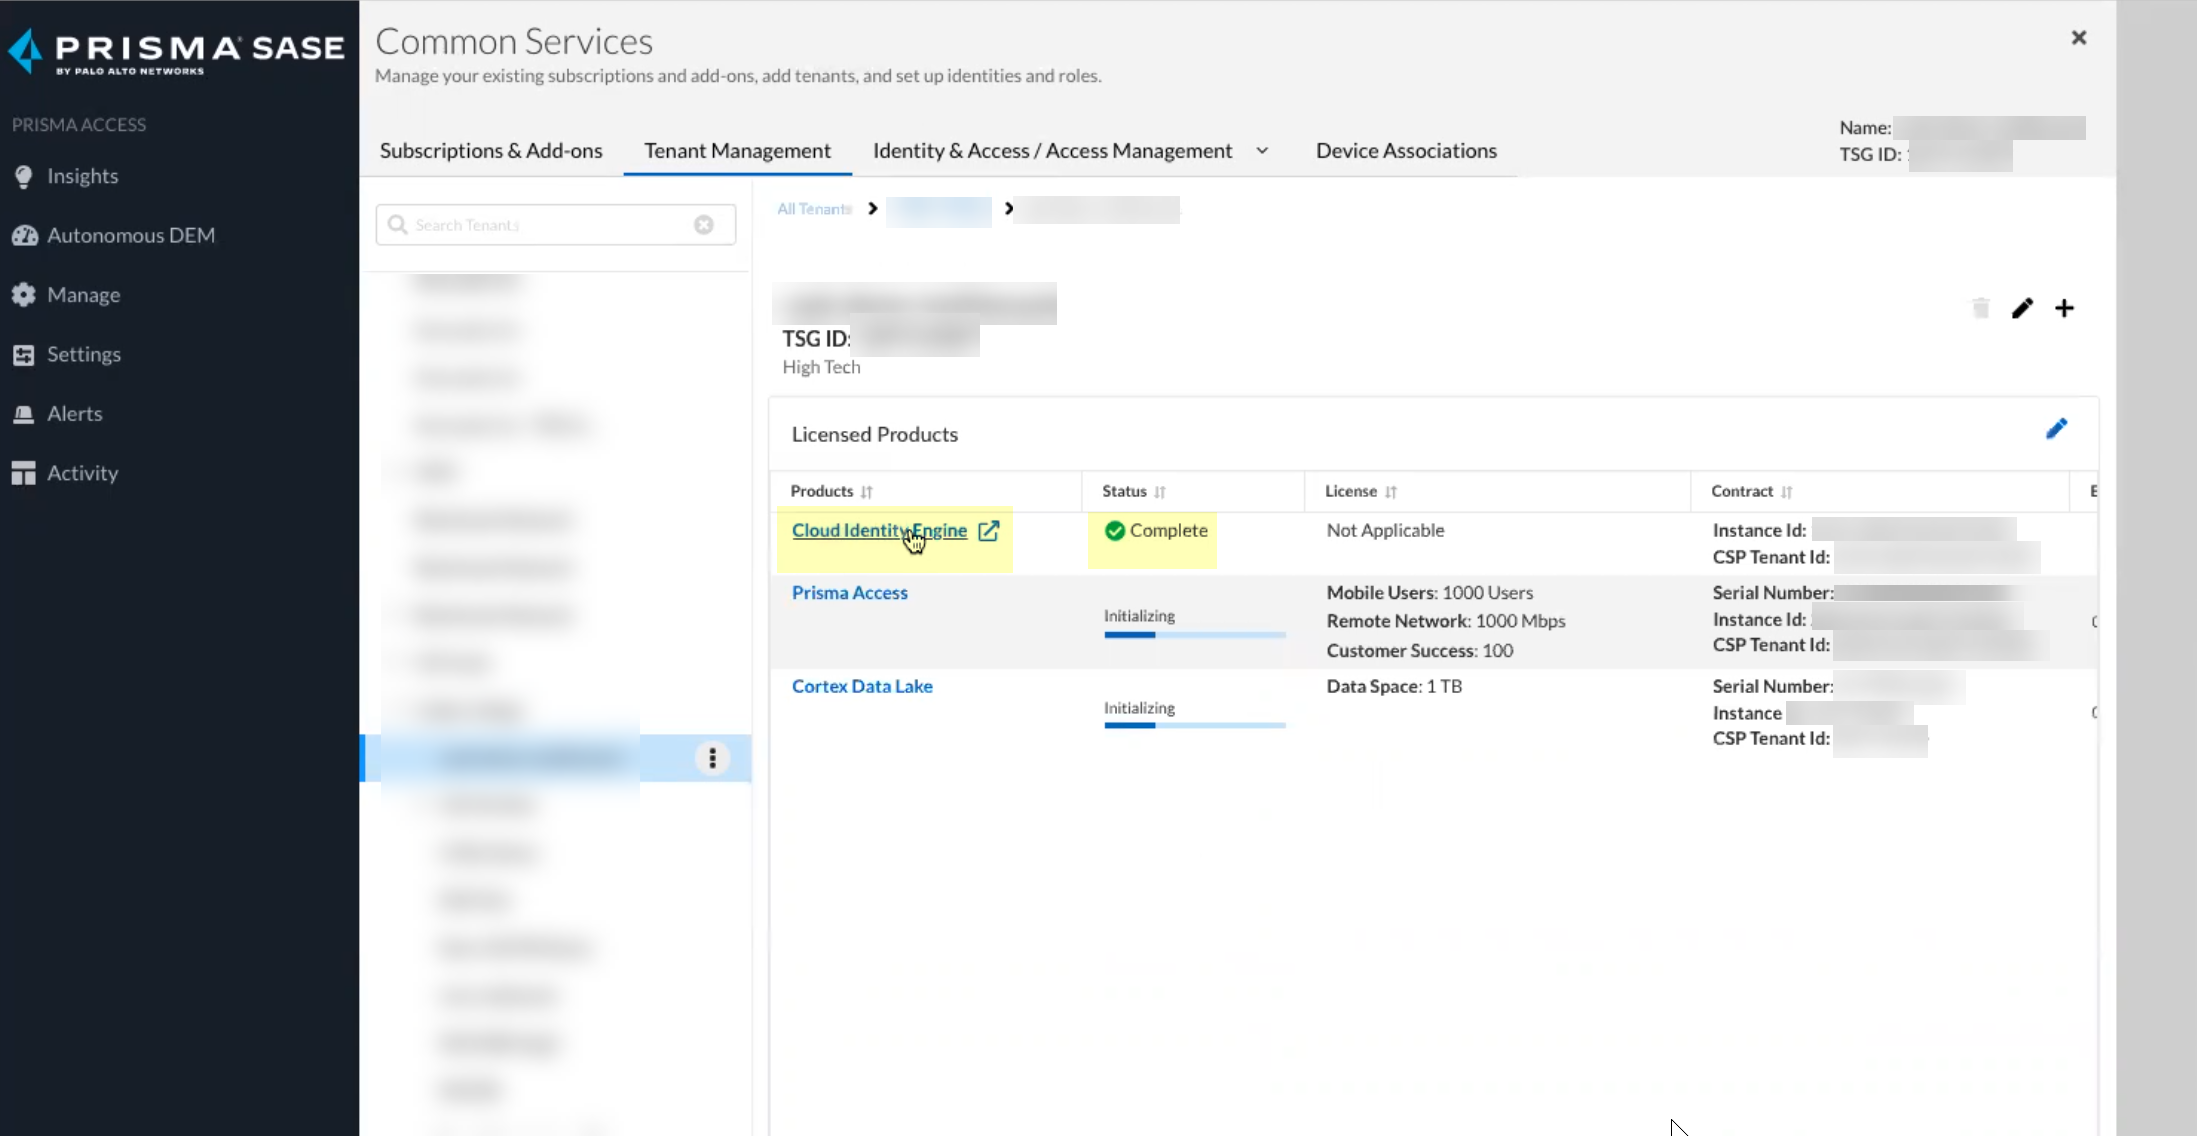
Screenshot showing the CIE status as "Complete" after successful onboarding.
Device Associations > Add Device.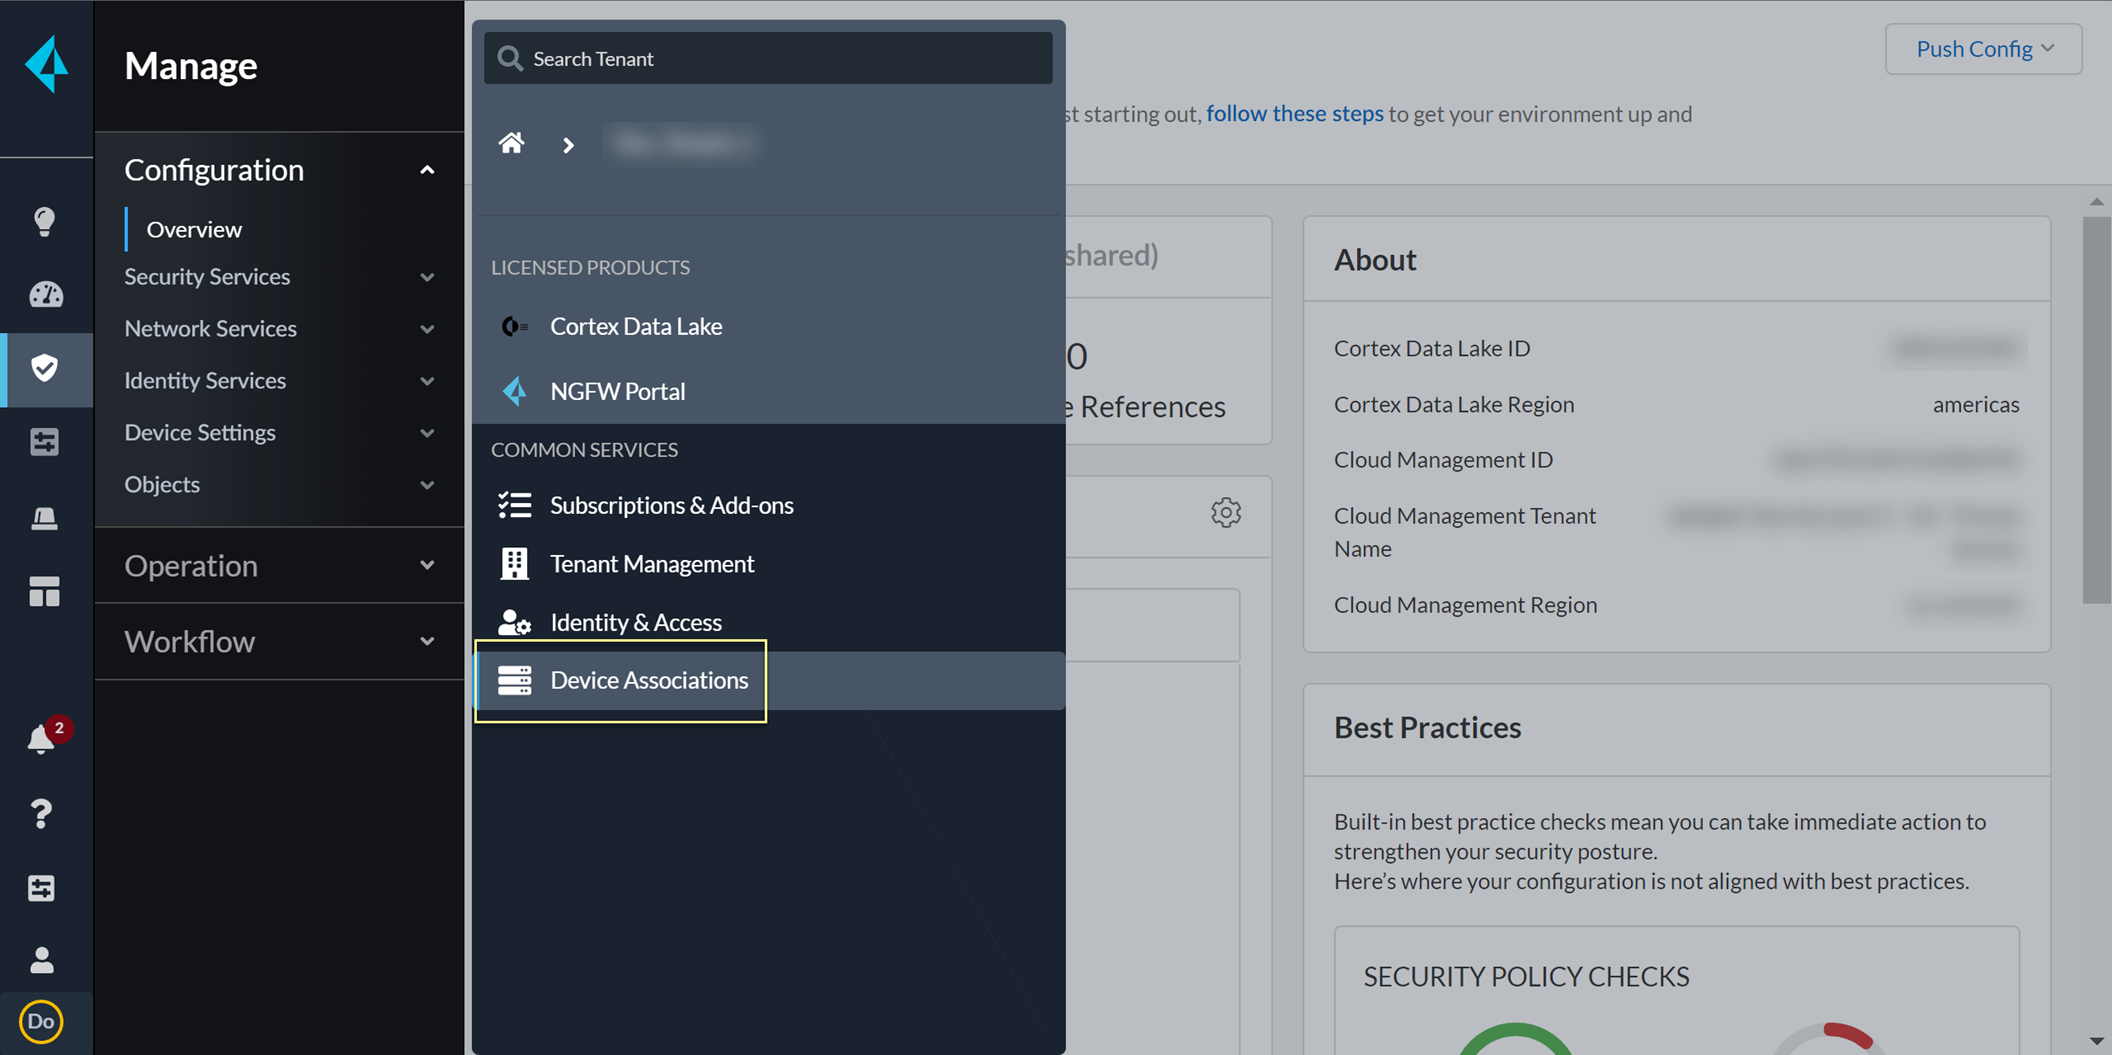
Screenshot showing the Device Associations menu in CIE.
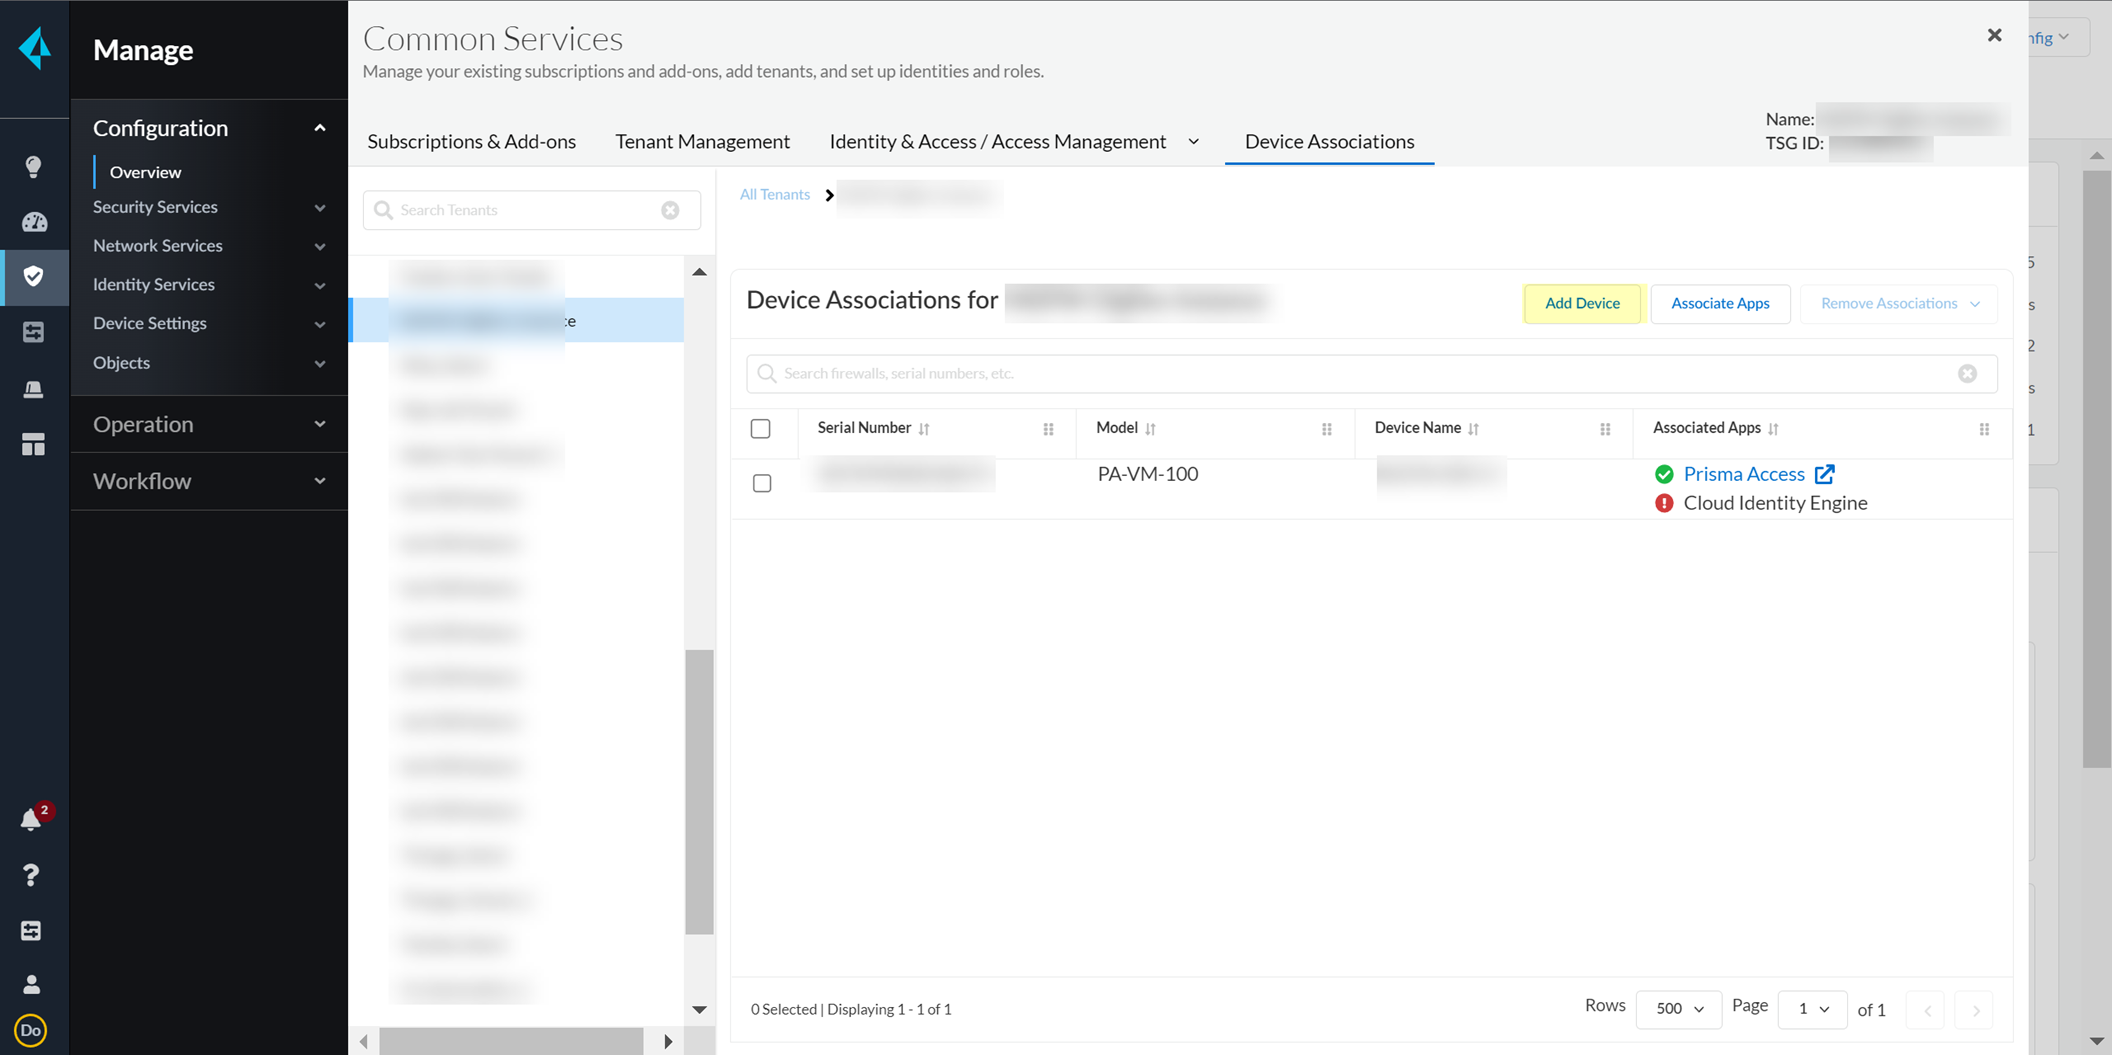
Screenshot showing the "Add Device" button in Device Associations.
Select CSP, enter firewall serial number, Select firewall, Save. Associate Apps > Select firewall > Select Cloud Identity Engine > Save.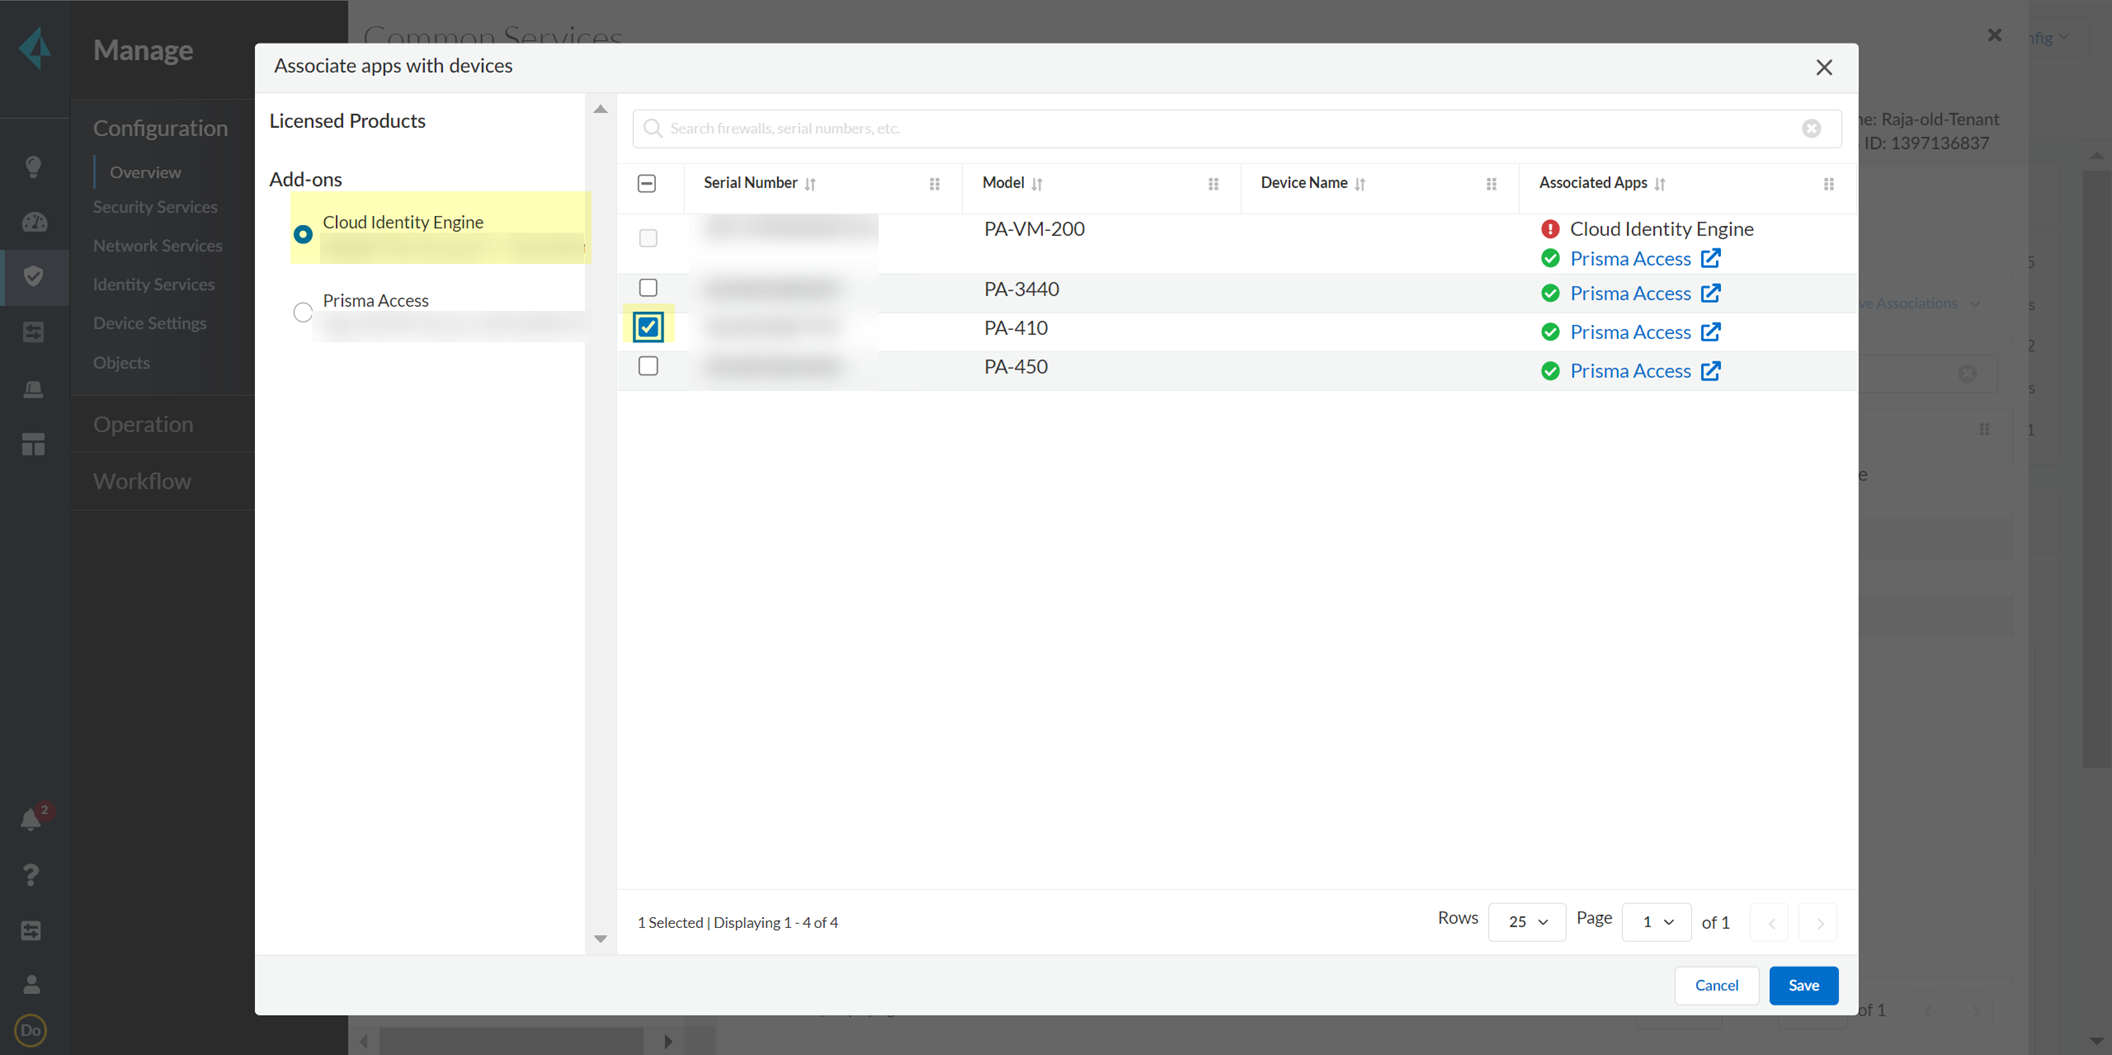
Screenshot showing the "Associate Apps" menu in Device Associations.
-
In CIE, User Context > Segments > Activate sharing for mappings.
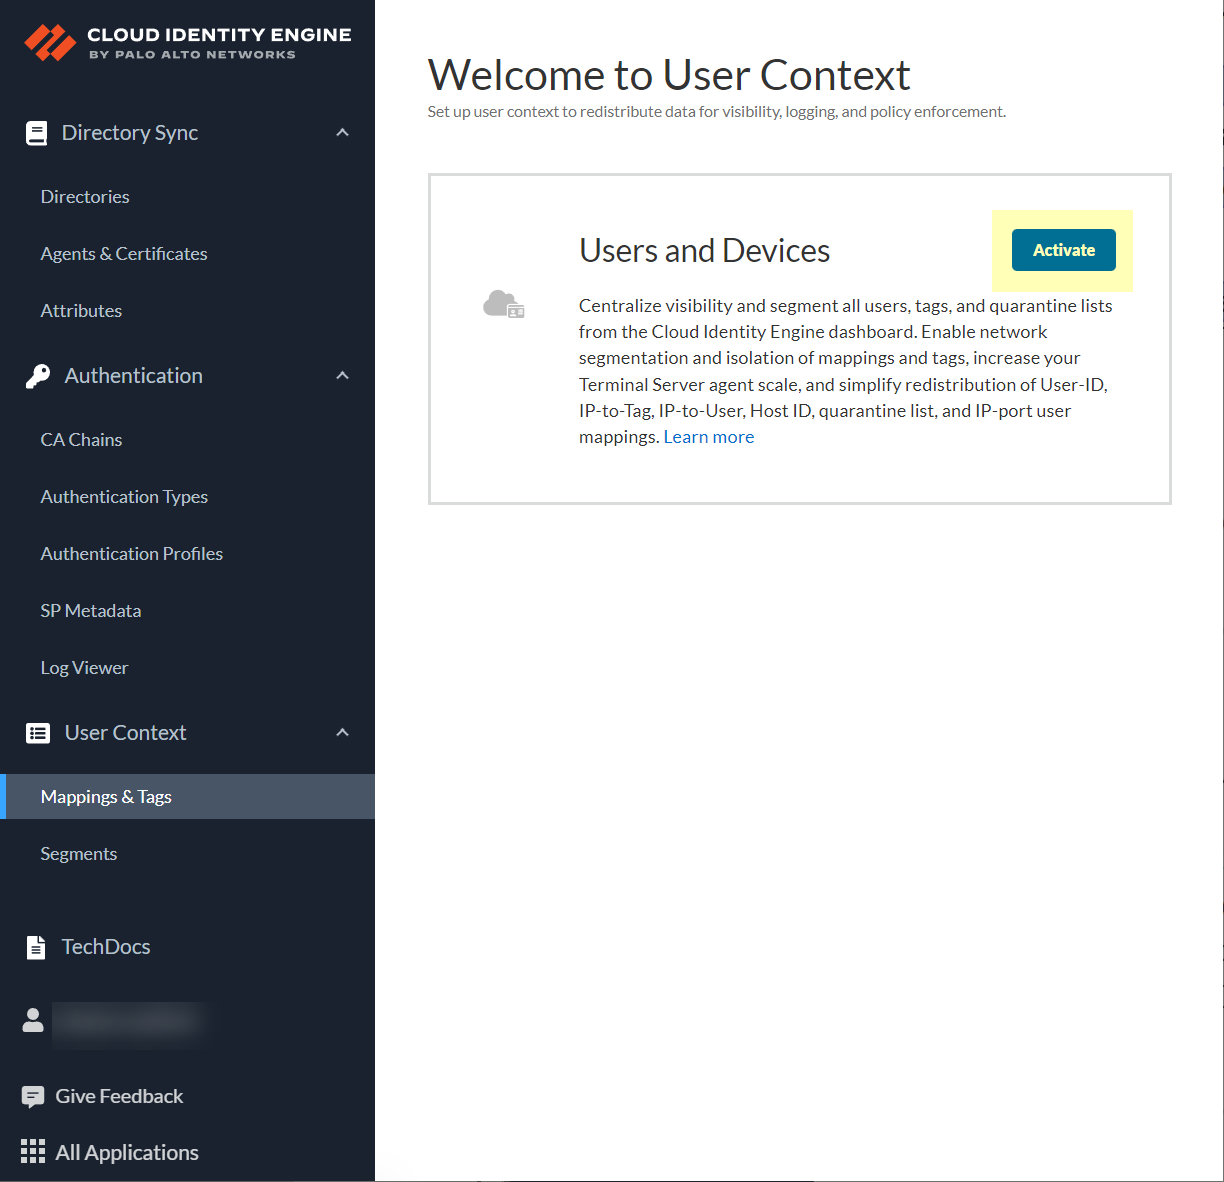
Screenshot showing the option to activate sharing for mappings in CIE User Context Segments.
-
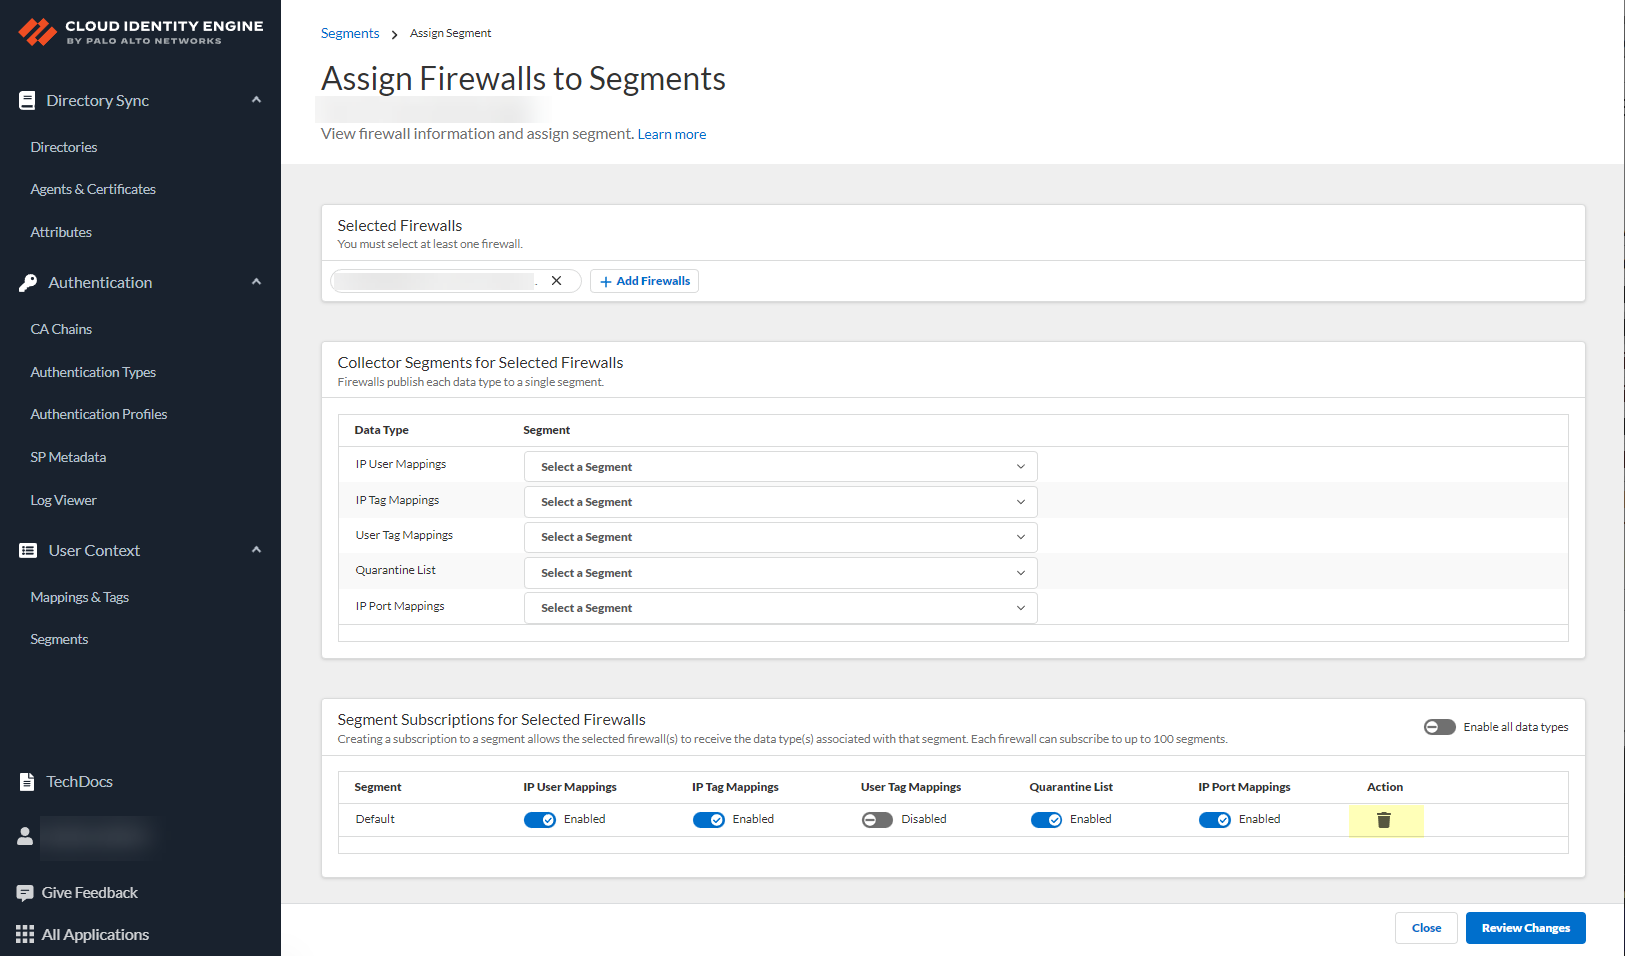
Configure default segment as publishing: Firewalls tab > select firewalls > Assign Segments (only PAN-OS 11.0+).
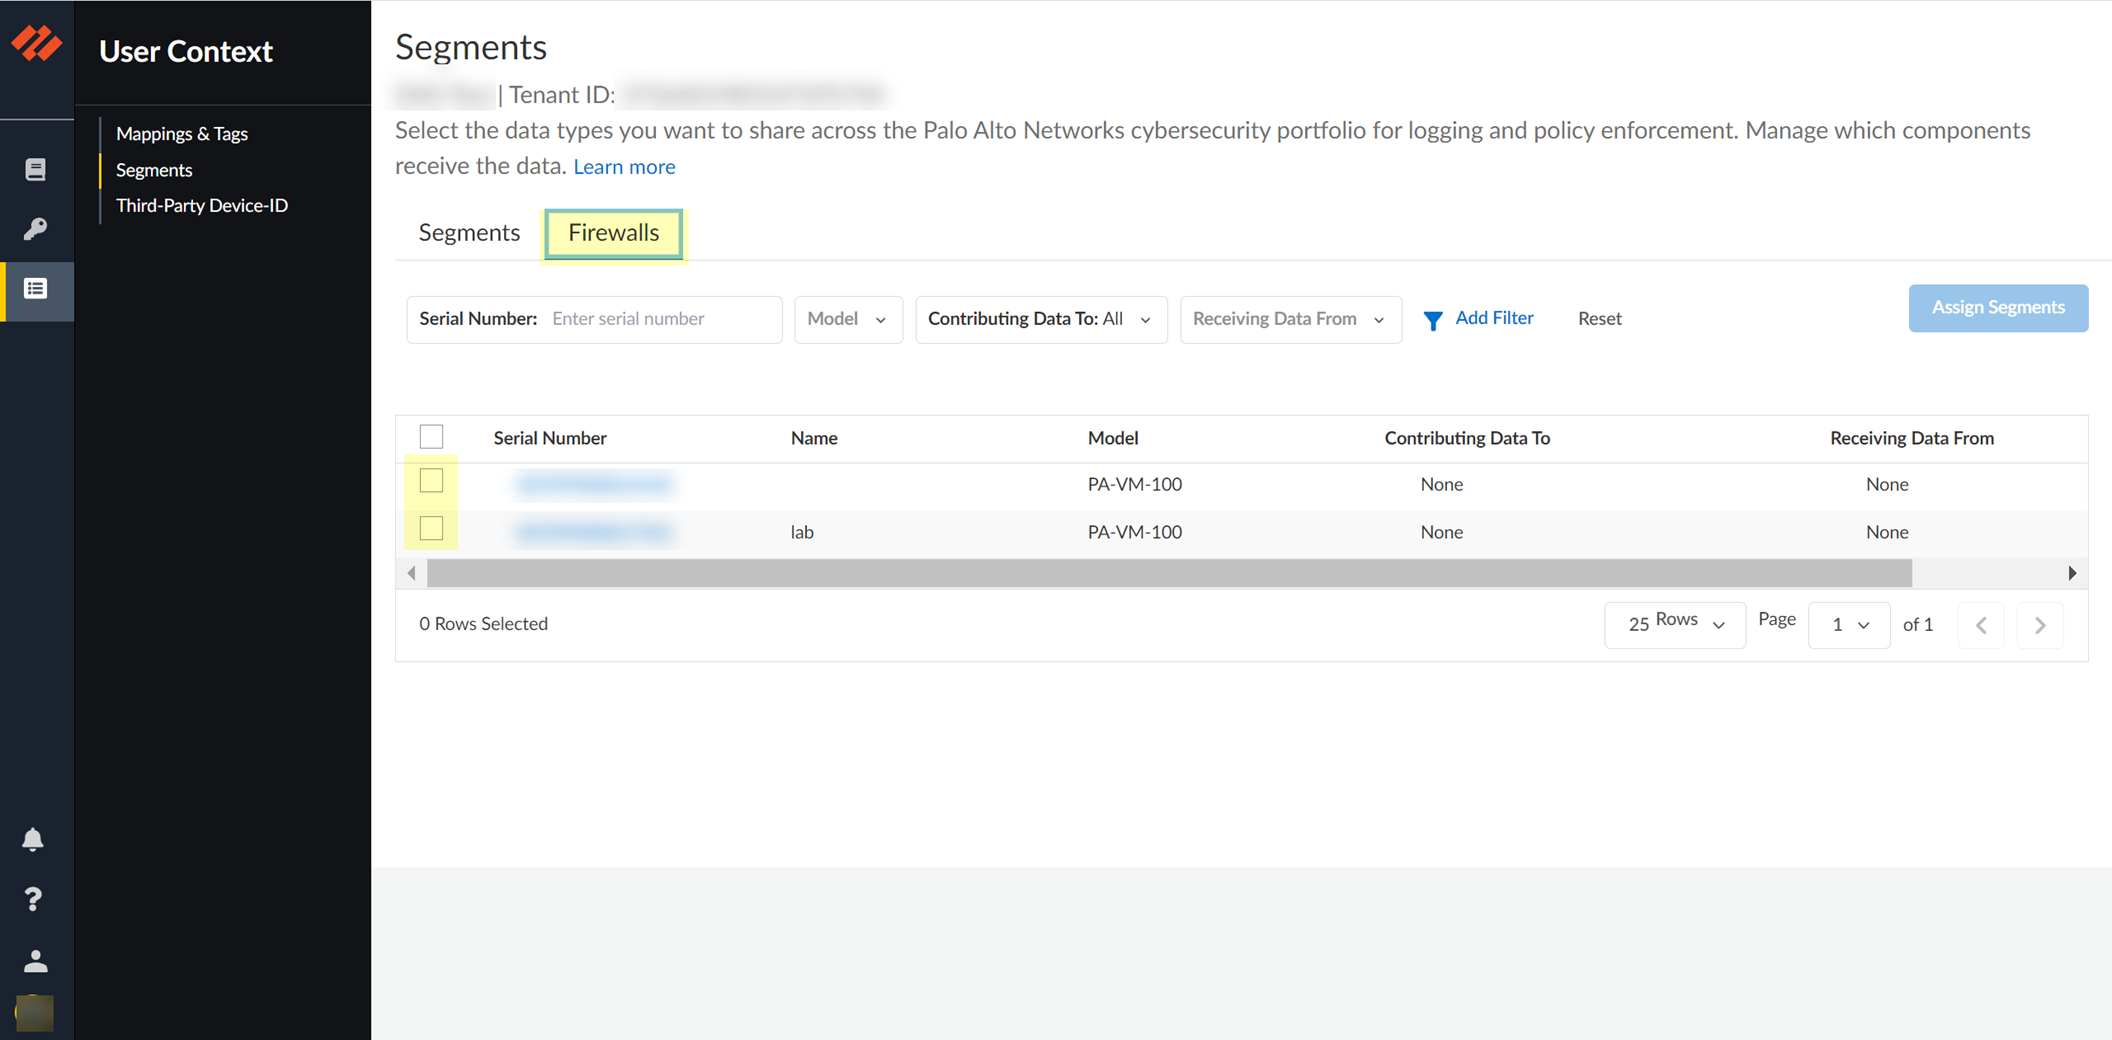
Screenshot showing the Firewalls tab in CIE User Context Segments.
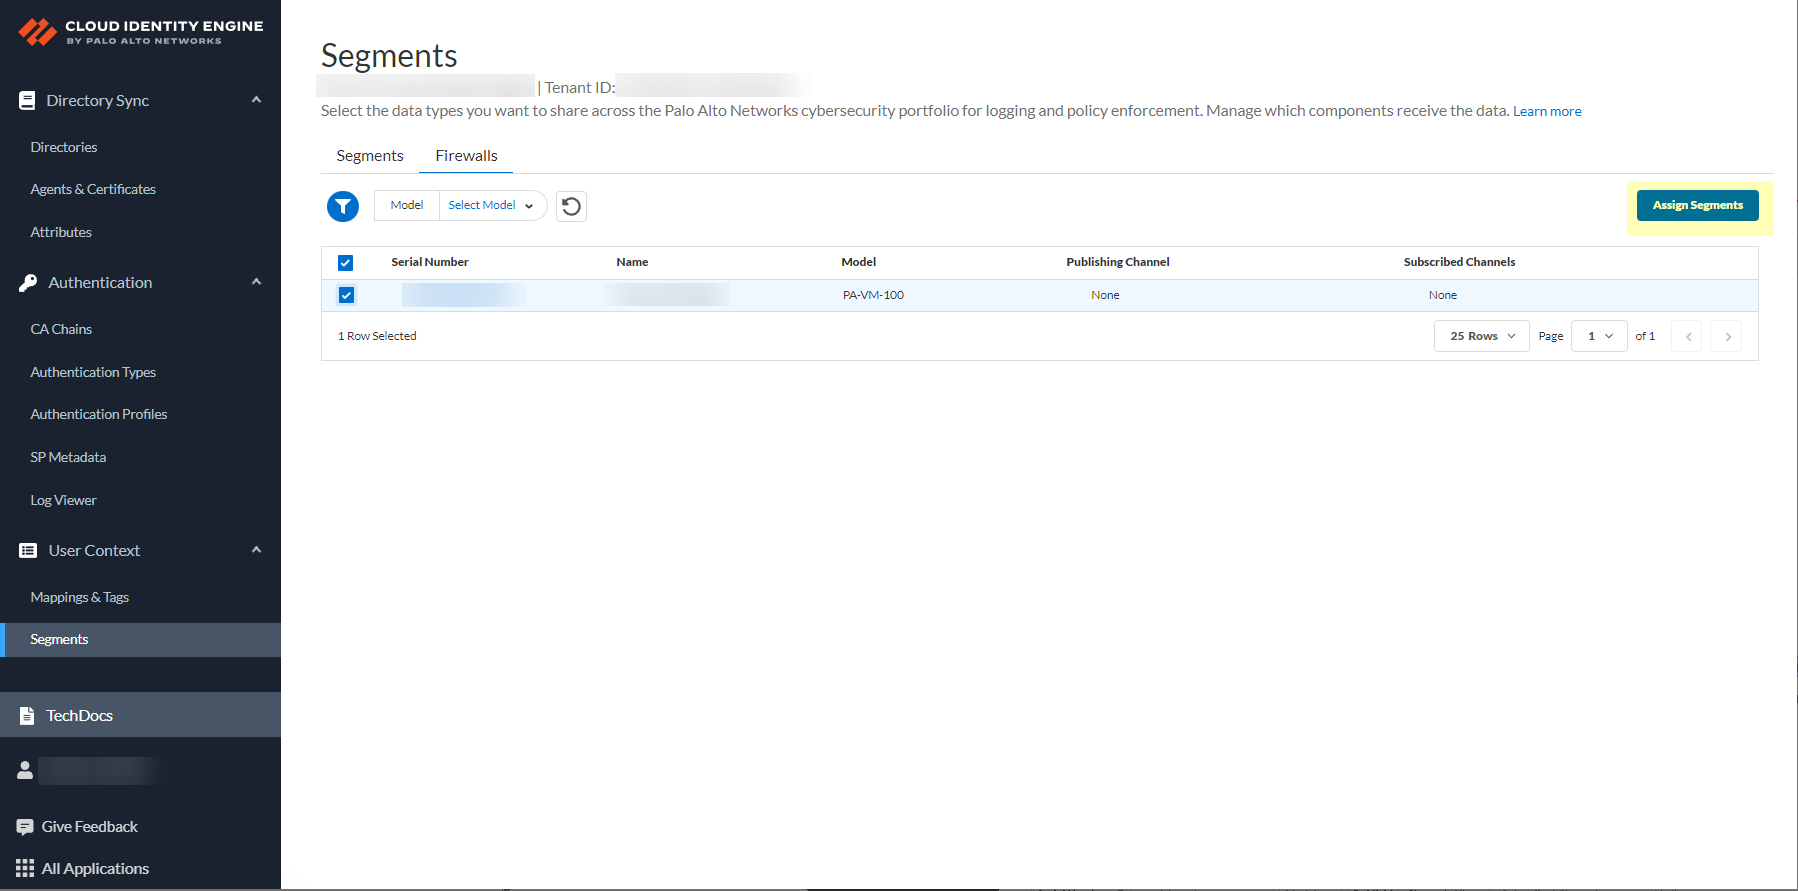
Screenshot showing the "Assign Segments" button.
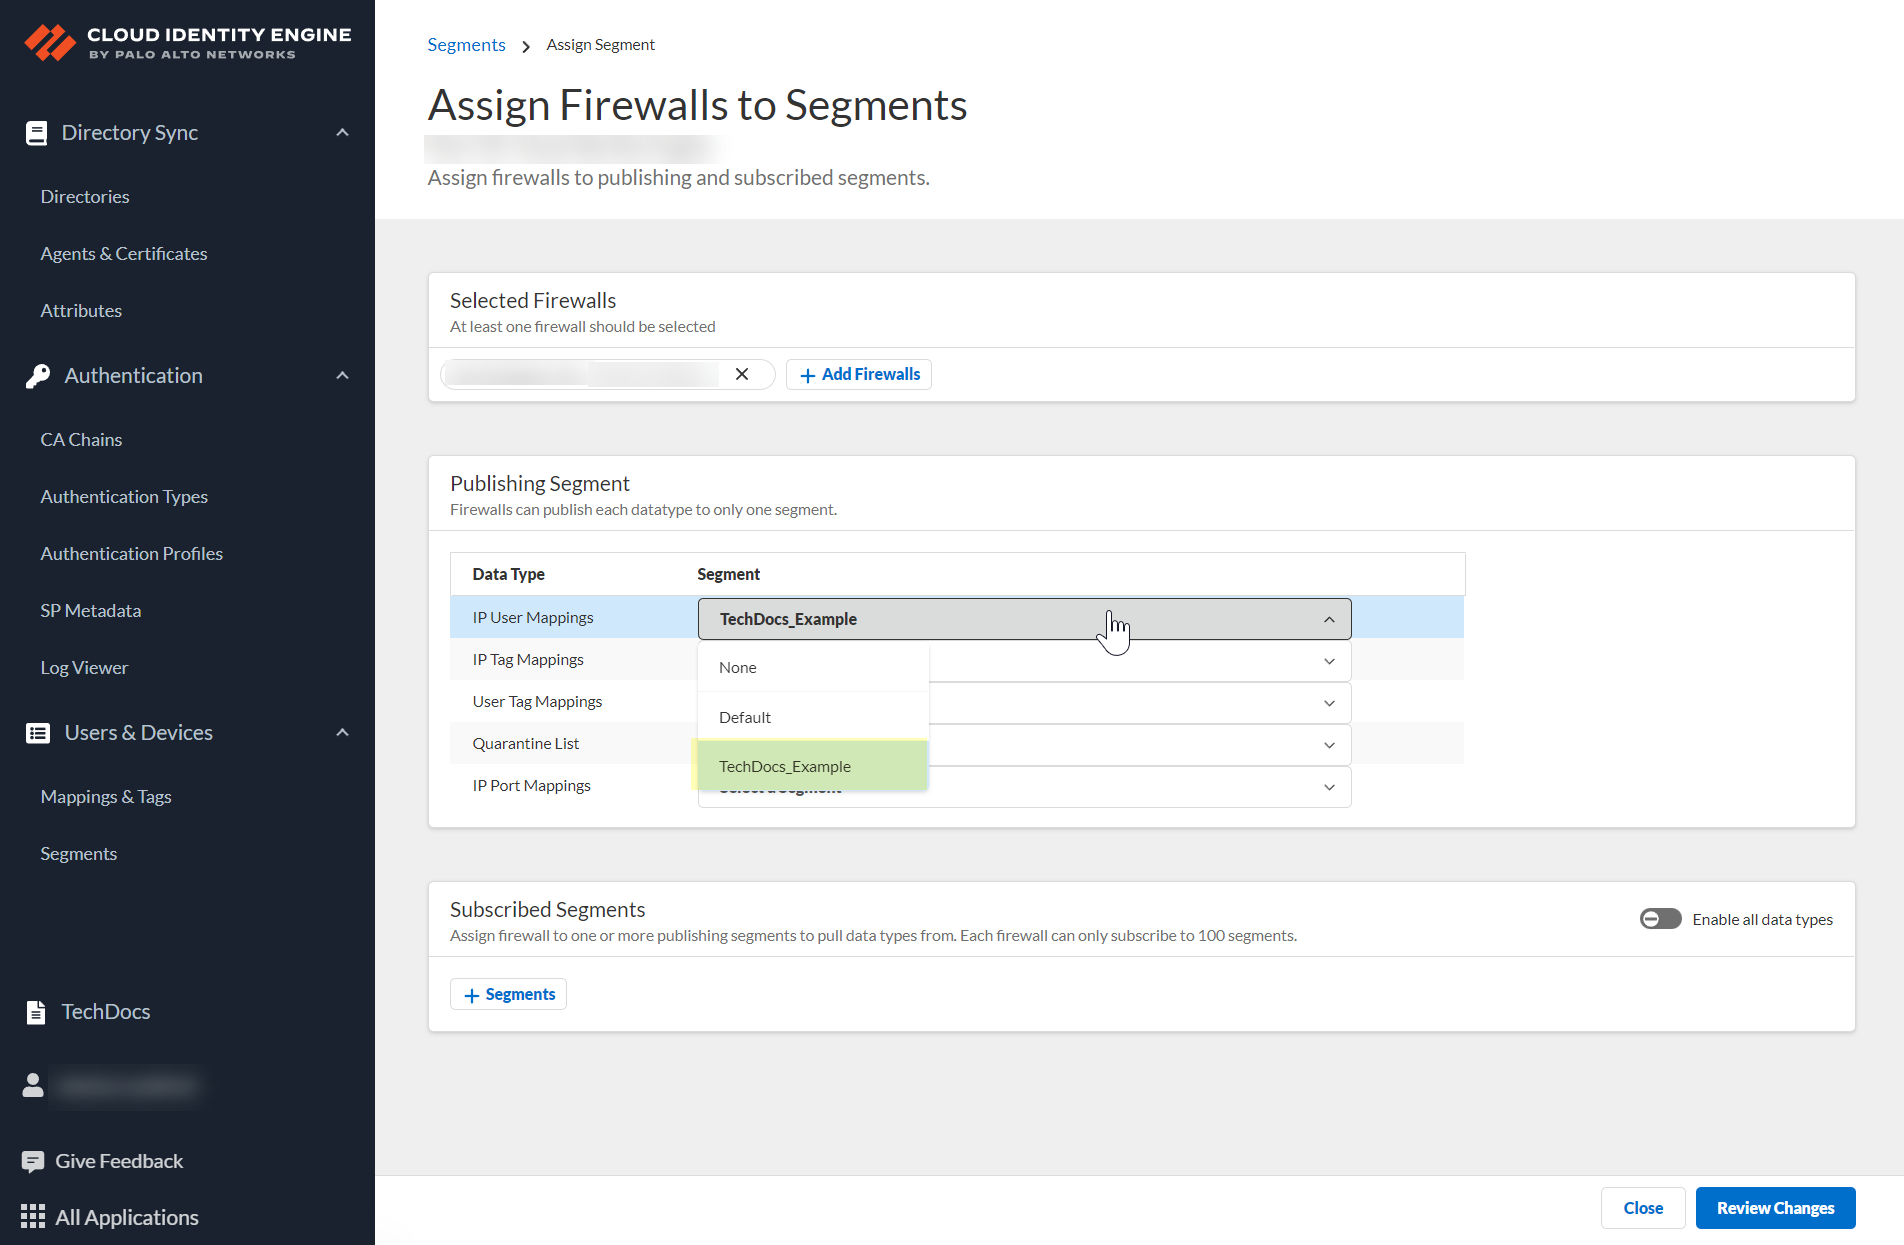
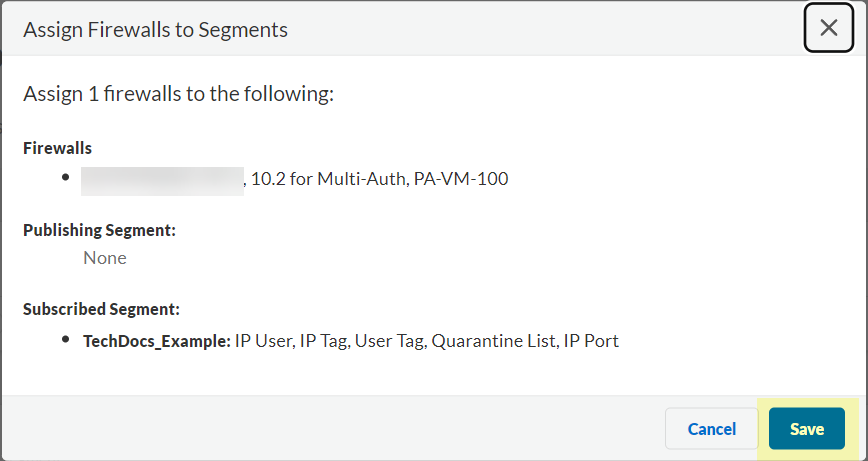
(Optional) Add Firewalls. For each Data Type (IP User, IP Tag, User Tag, Quarantine List, IP Port), select Segment to publish to.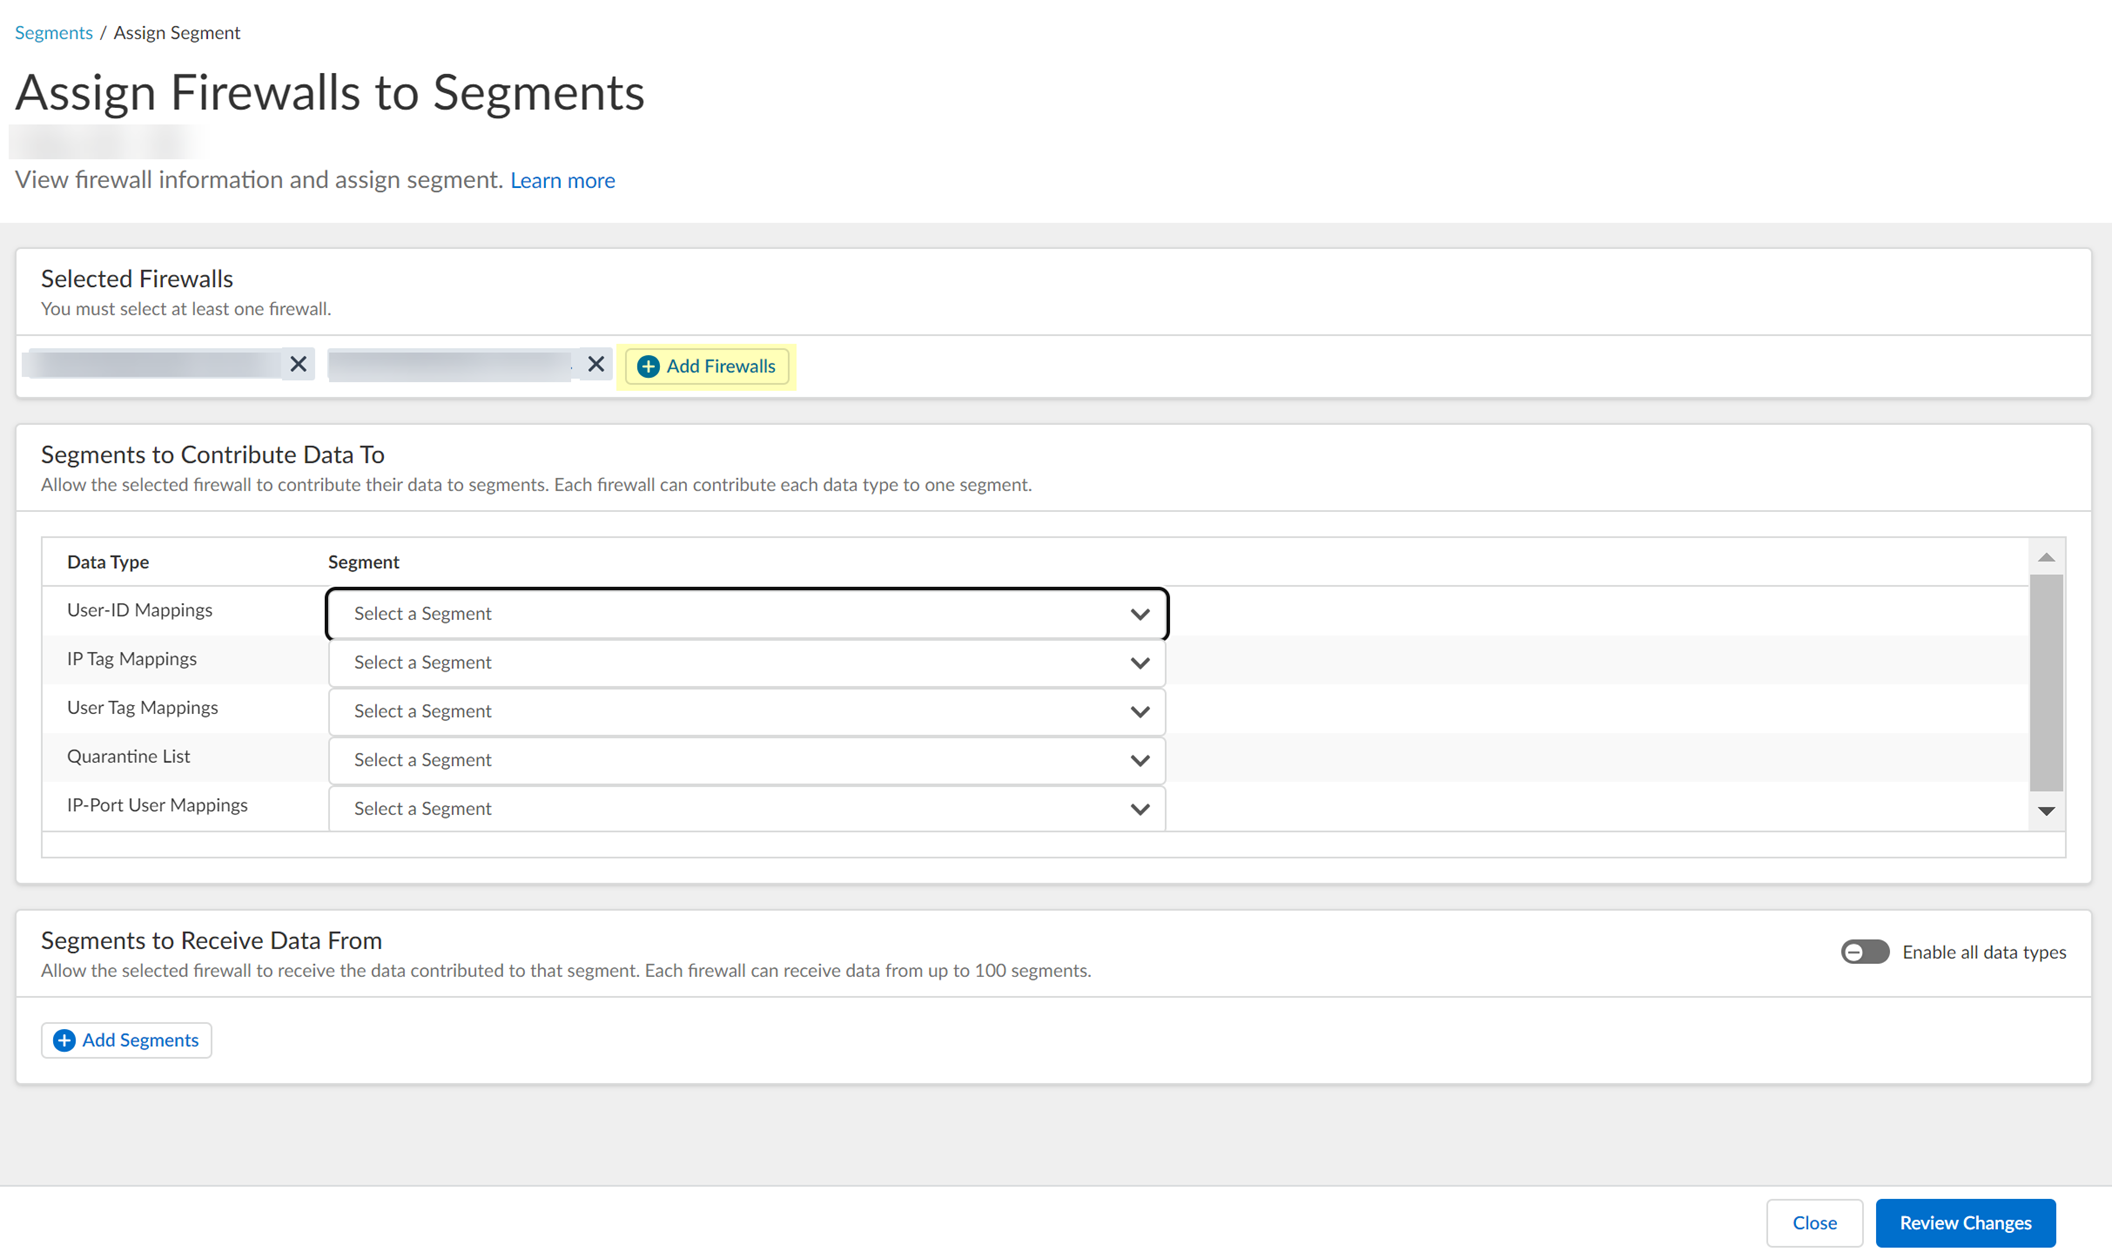
Screenshot showing the options to select which segment each Data Type is published to.
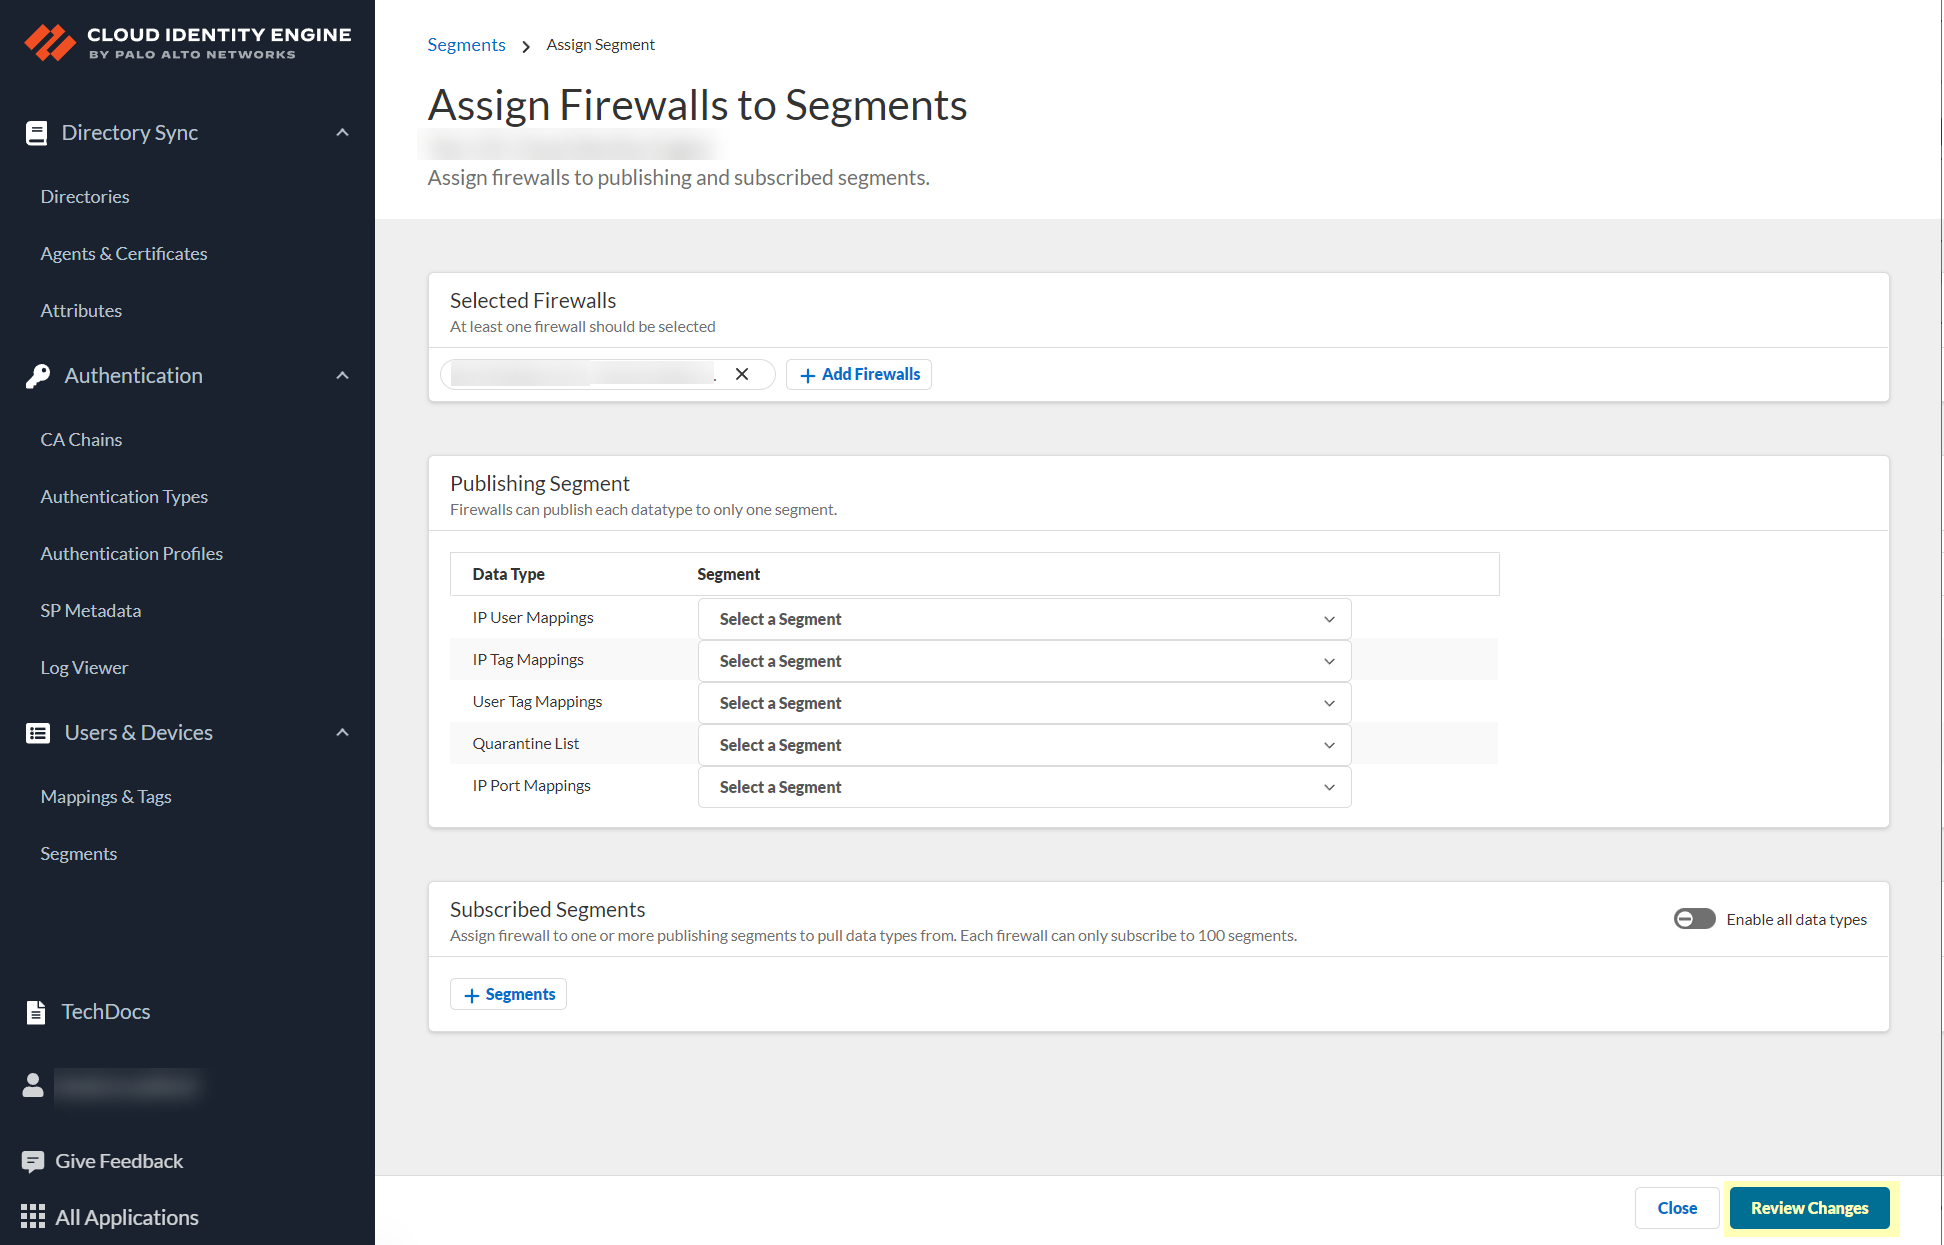
Review Changes > Save.Important Point: Each data type can be published to ONLY ONE segment per firewall .
Screenshot showing the "Review Changes" button for segment configuration.
Screenshot showing the Save button after reviewing changes.
Screenshot showing the confirmation message after saving segment changes.
-
Create a subscribed segment: User Context > Segments > Add New Segment. Name, Description. Add New Segment.
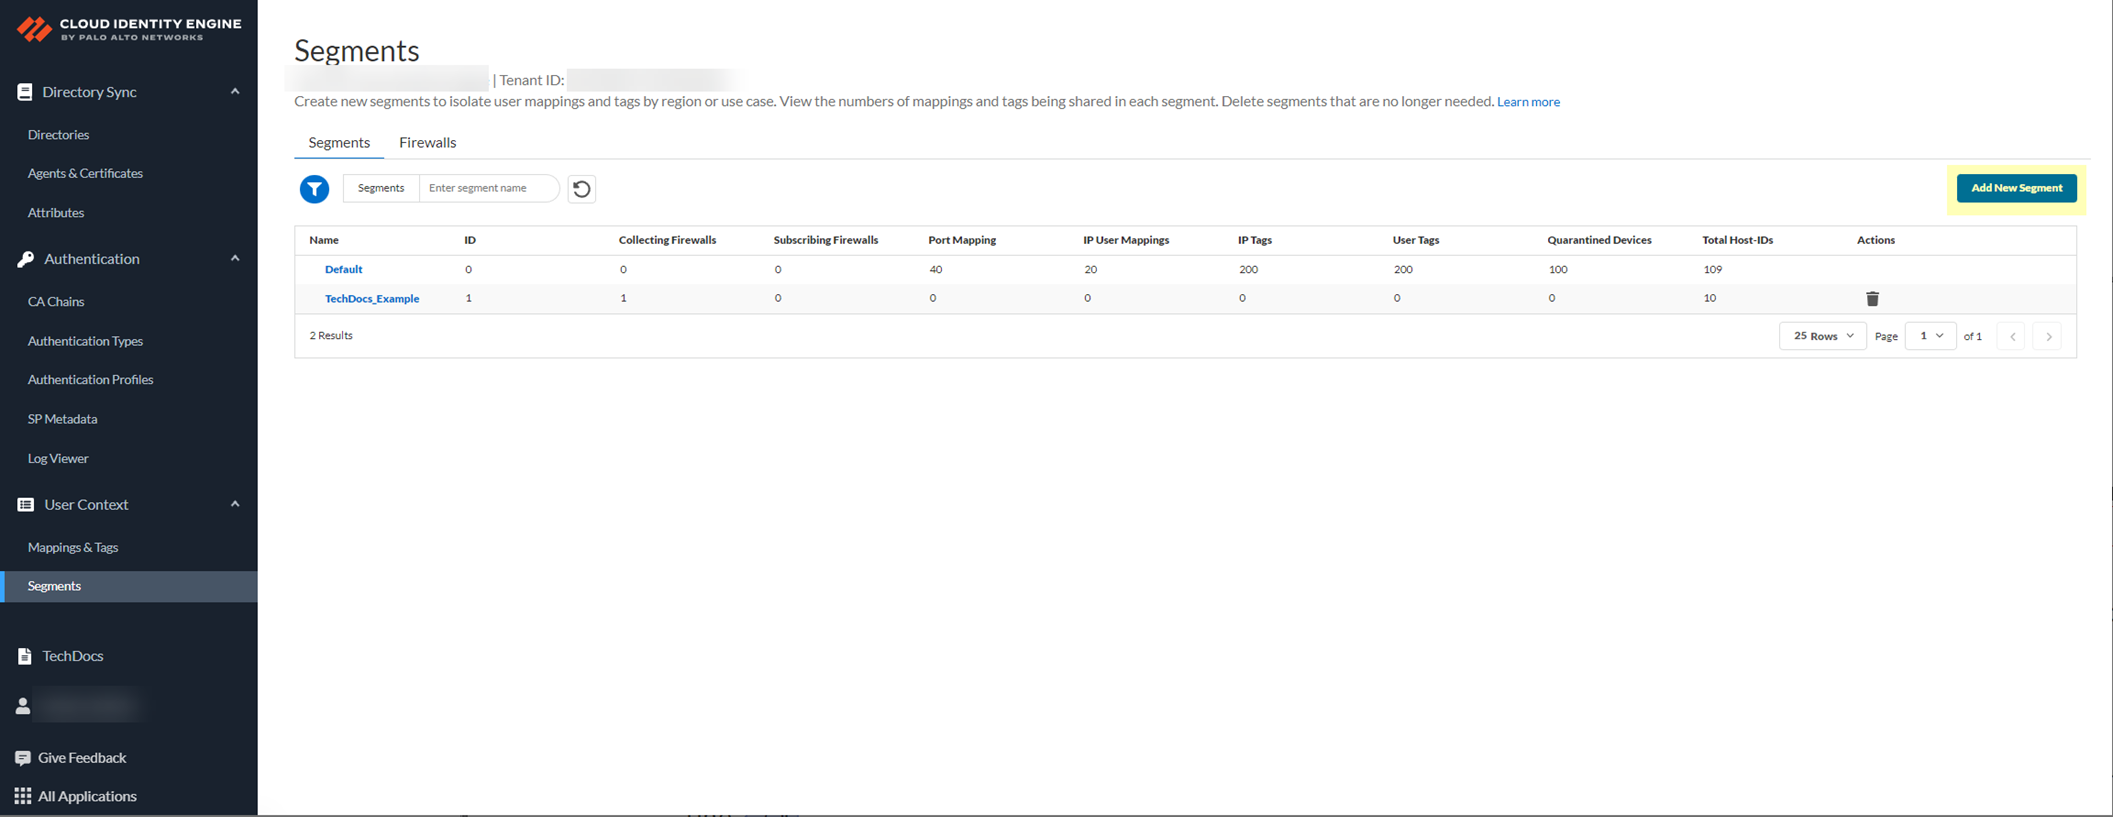
Screenshot showing the "Add New Segment" button.
Segments tab > Add segments to receive data from.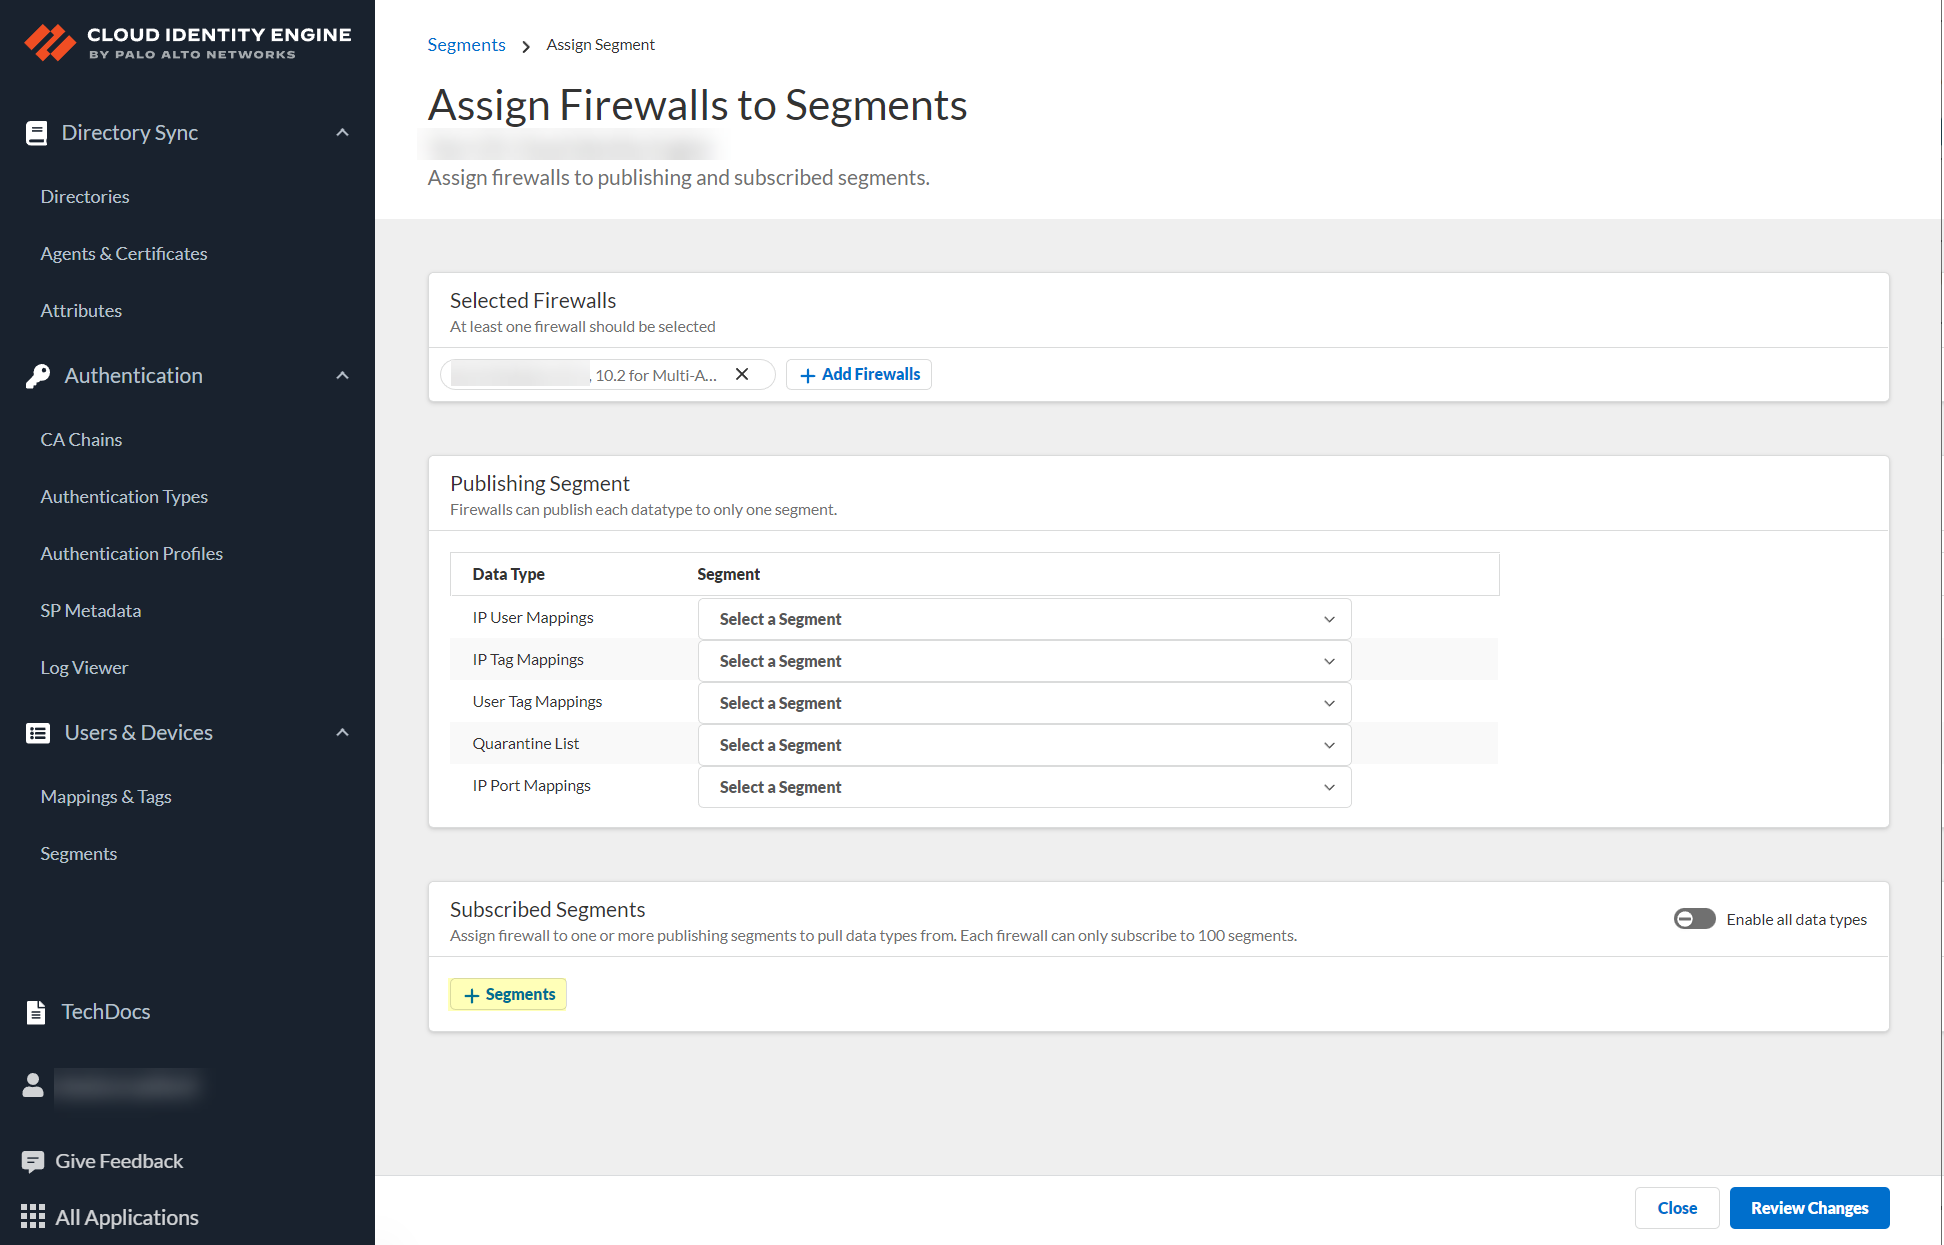
Screenshot showing the Segments tab within a segment configuration.
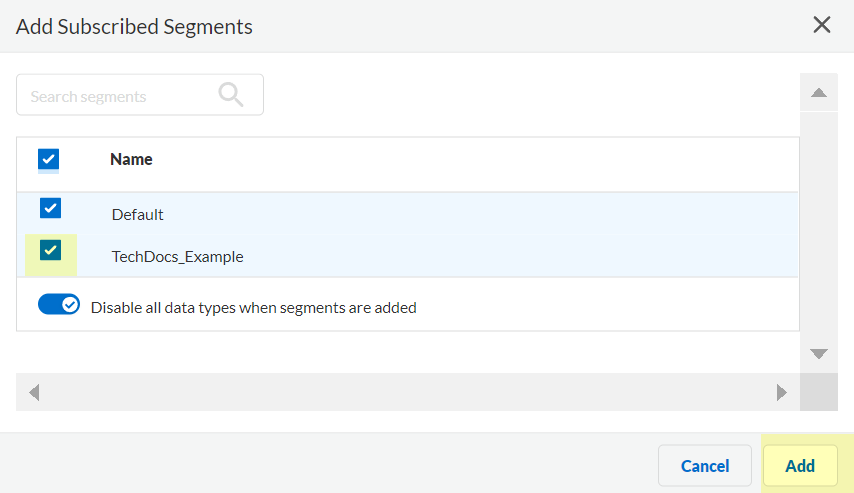
Screenshot showing the "Add Segments" button to subscribe to other segments.
-
(Optional) Edit segments: Enable/Disable data types for sharing. Delete segments.

Screenshot showing options to enable or disable sharing of specific data types within a segment.
Screenshot showing the option to delete a segment.
- Save configuration.
-
On firewall, enable User Context Cloud Service: Device > Management > Setup > PAN-OS Edge Service Settings > Edit. Ensure device certificate is configured. Enable
User Context Cloud Service
. OK.
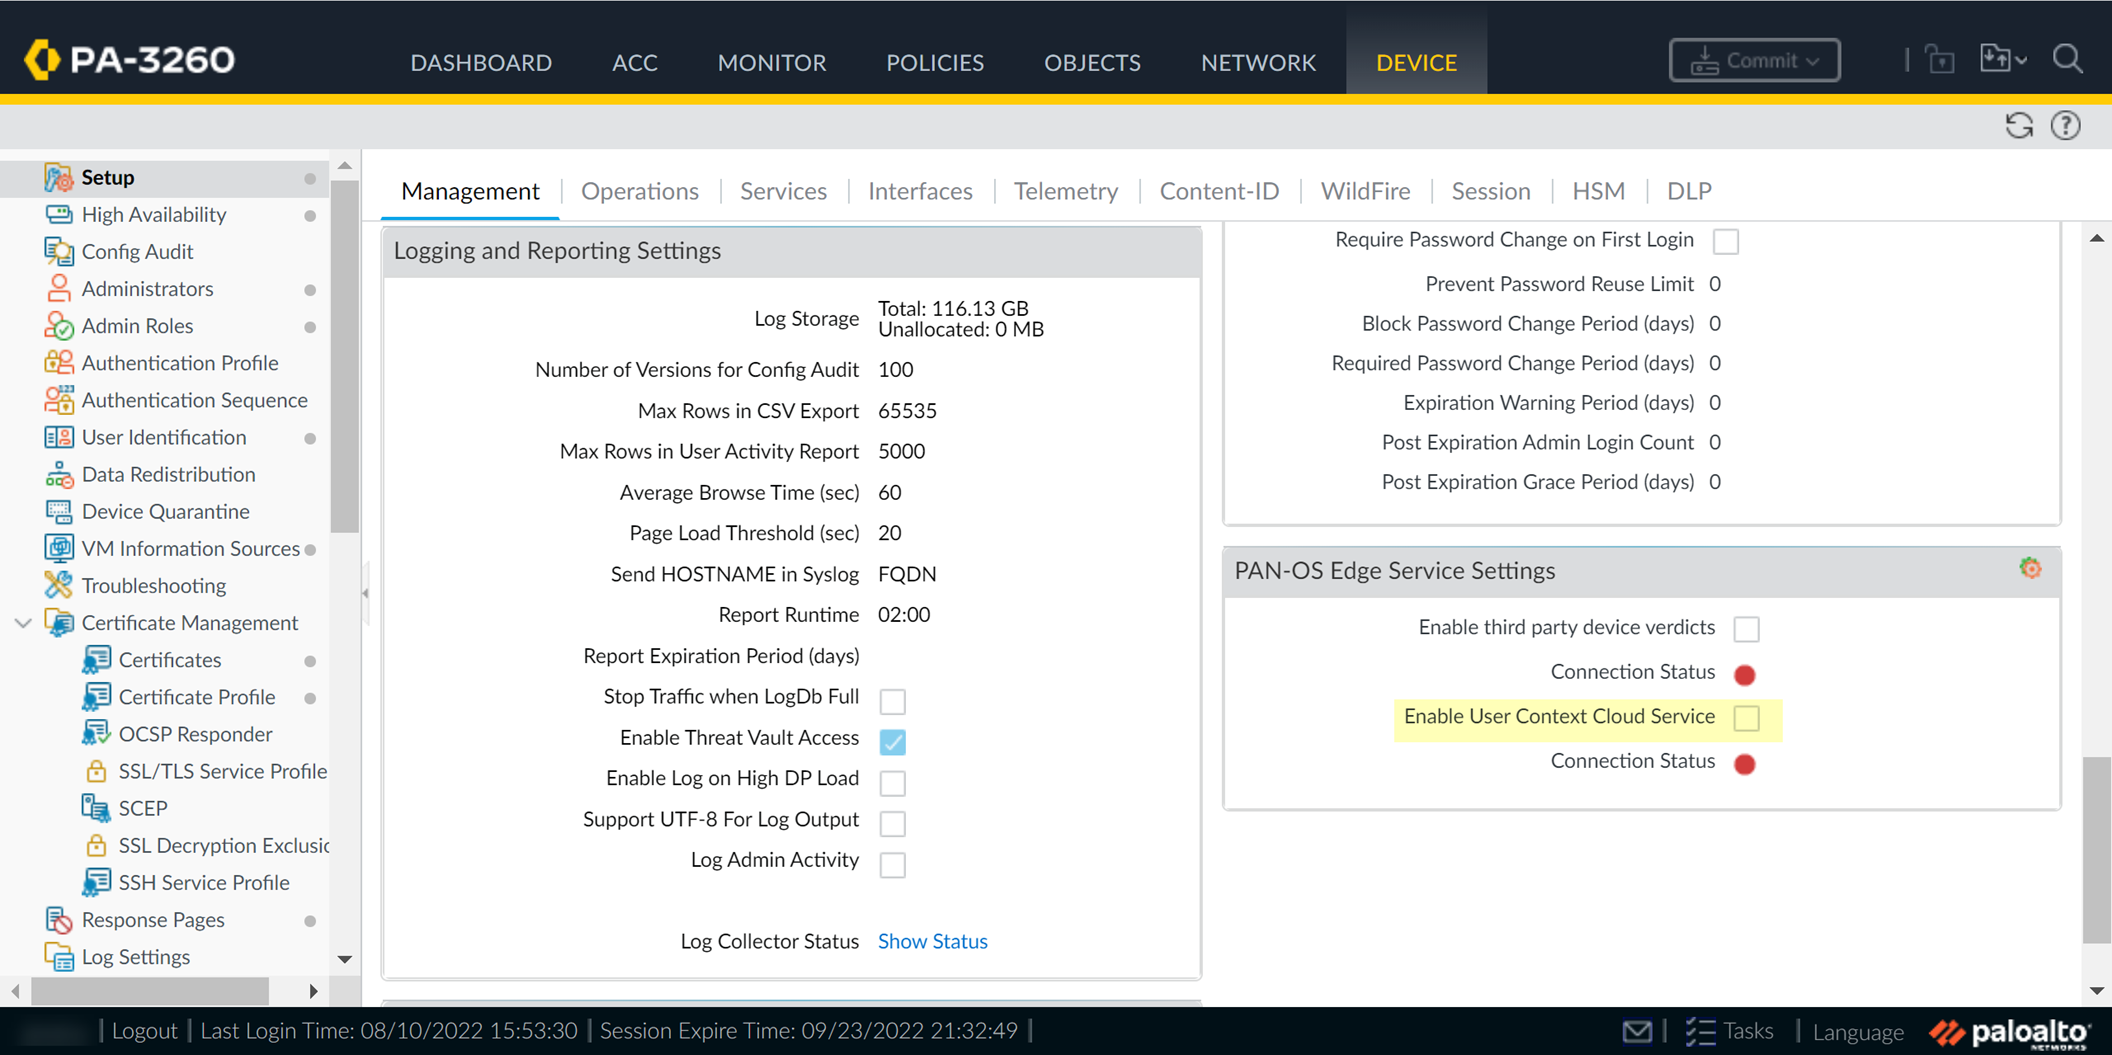
Screenshot showing the PAN-OS Edge Service Settings where User Context Cloud Service is enabled.
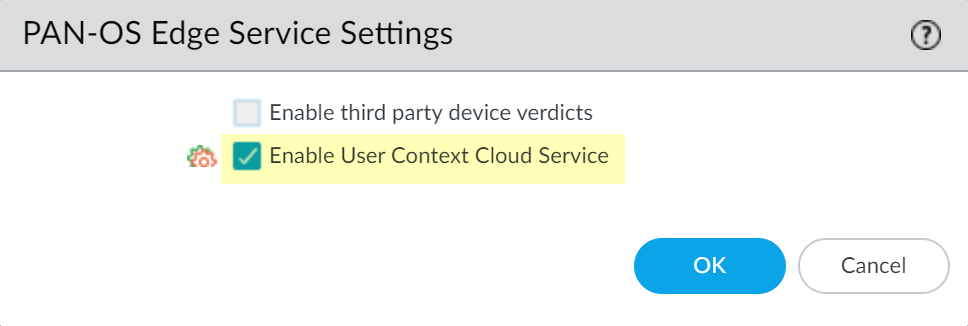
Screenshot highlighting the "Enable User Context Cloud Service" checkbox.
- Commit changes on firewall.
-
Verify User Context Status on firewall is active. View mappings/tags in CIE app: User Context > Mappings & Tags.

Screenshot showing the User Context Cloud Service Connection Status on the firewall.
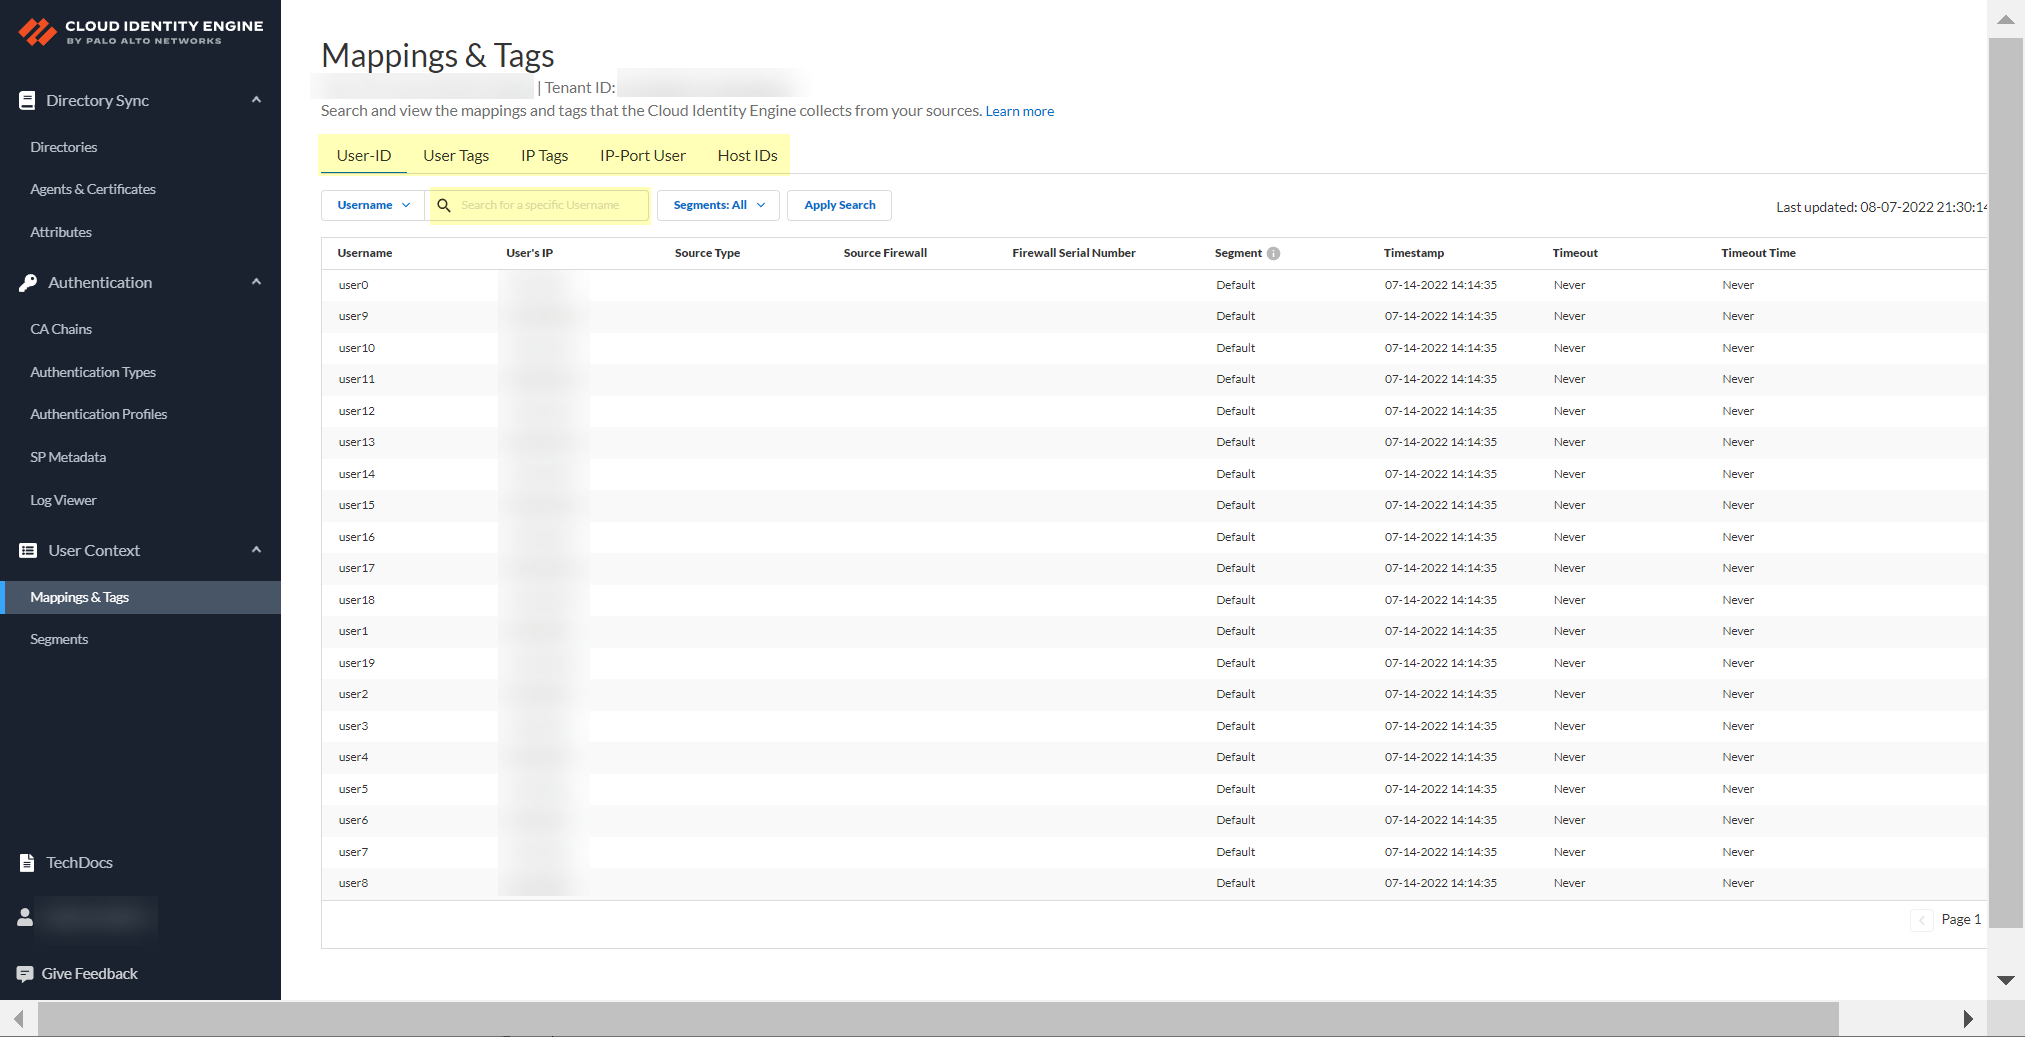
Screenshot showing the Mappings & Tags section in the CIE app to view collected data.
Can now use segments for user/group-based policy, authentication profiles, etc.
Configure Third-Party Device-ID
Leverage third-party IoT detection (verdicts) for Device-ID in Prisma Access. Third-Party service sends verdicts via API to CIE, which provides mappings to Prisma Access SPNs for device visibility and policy enforcement.
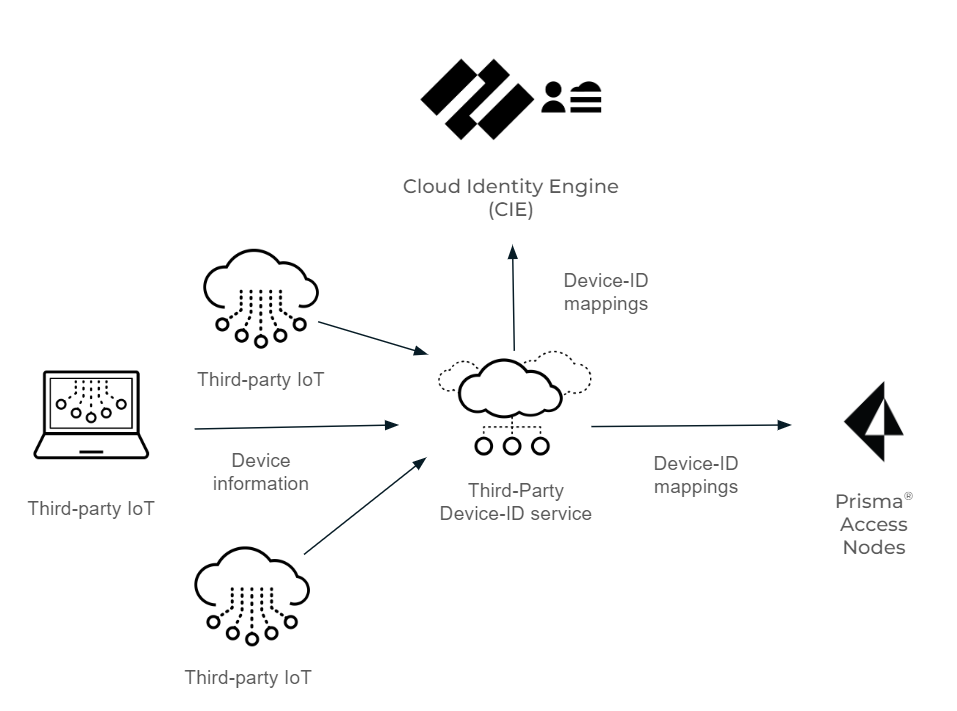
Diagram illustrating the flow of device verdicts from a third-party IoT solution, through the Third-Party Device-ID service and CIE, to Prisma Access SPNs.
Important Point: Obtain a certificate signing request (CSR) and its key for each third-party vendor from your network administrator before starting.
-
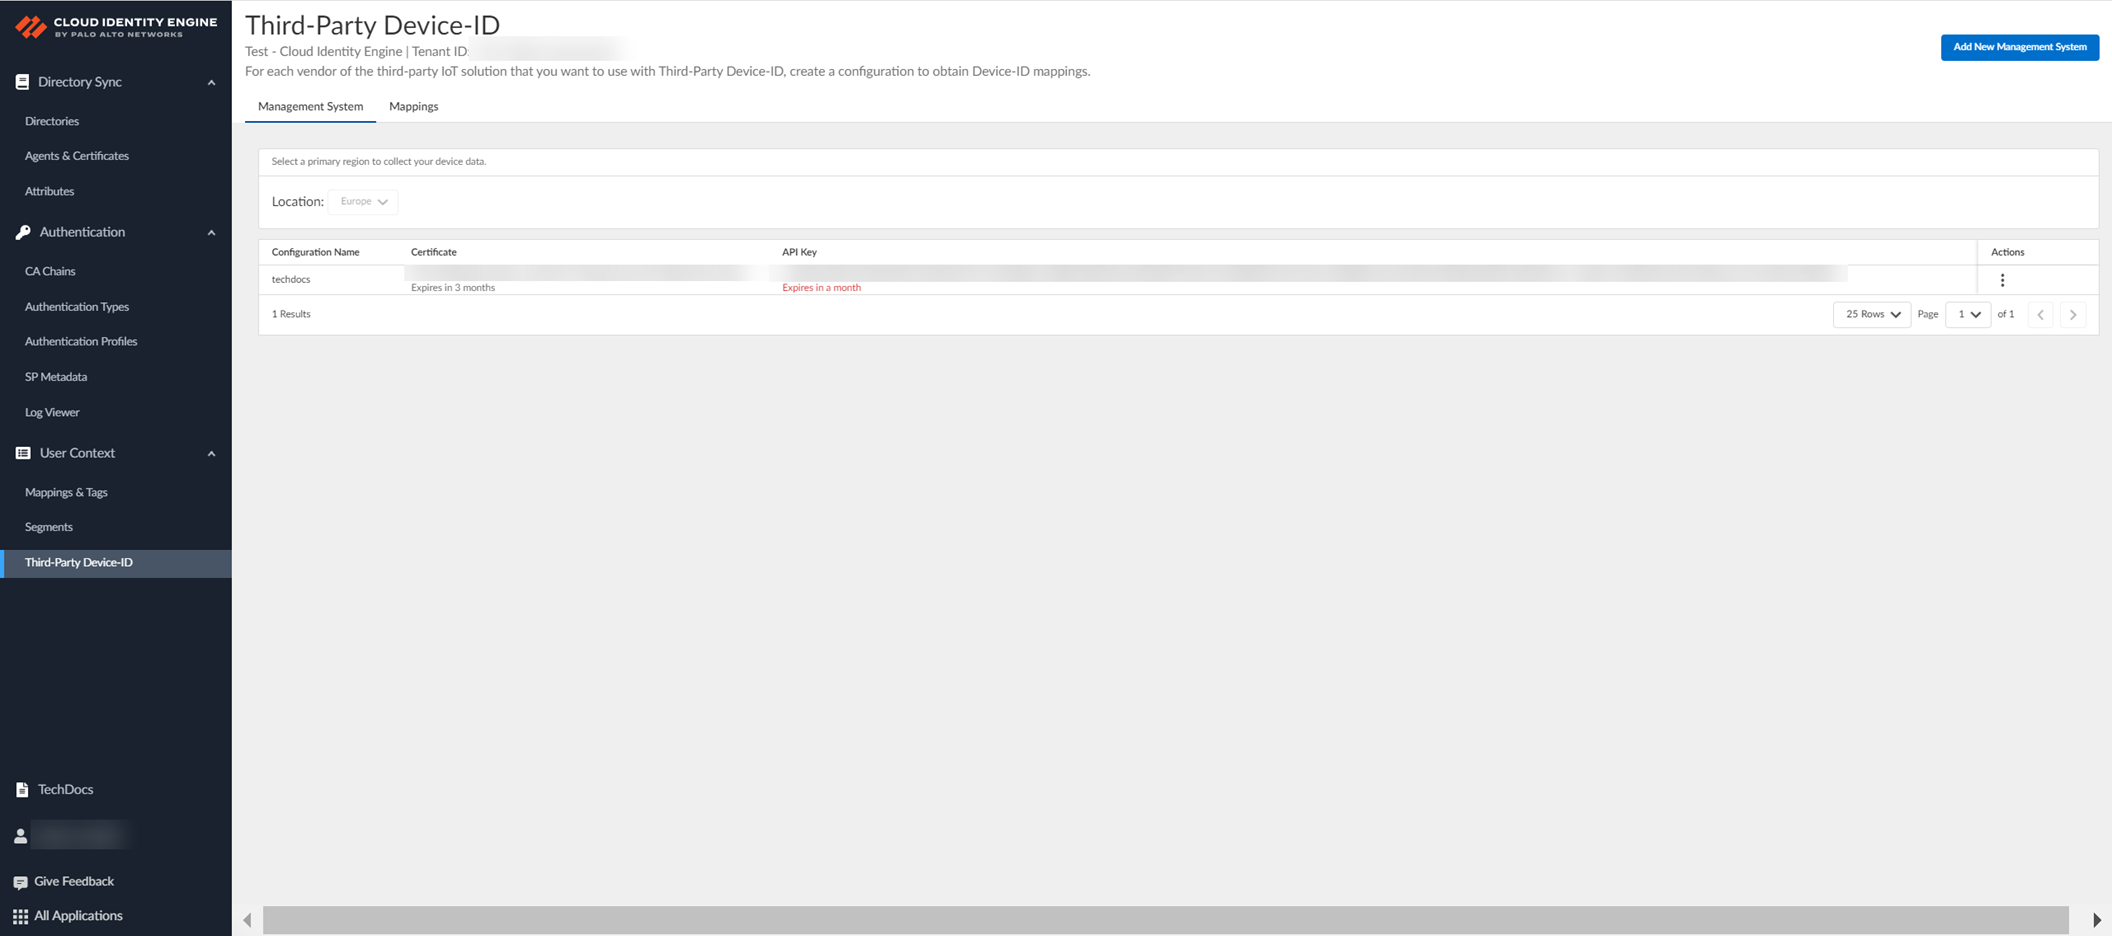
Activate Third-Party Device-ID in CIE: Hub > CIE > select tenant > User Context > Third-Party Device-ID.
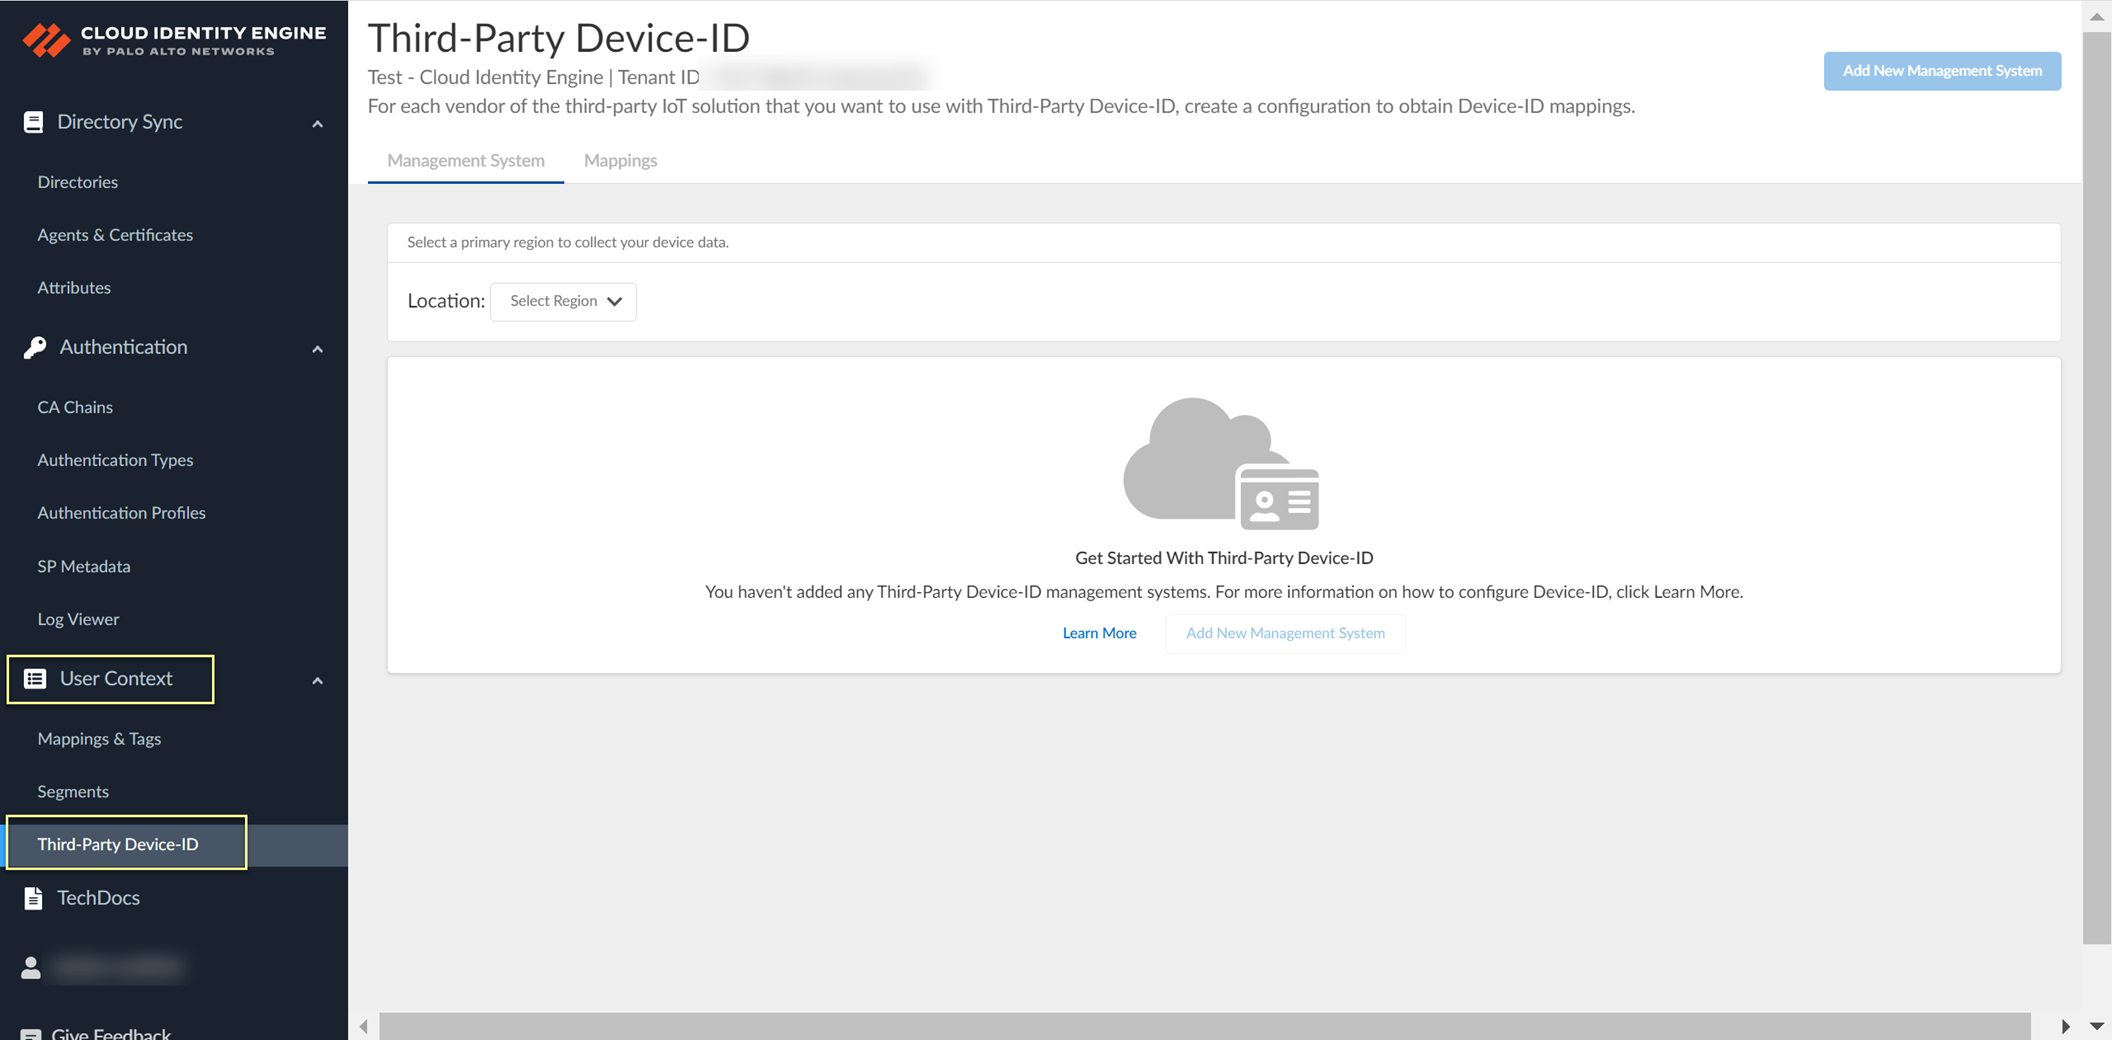
Screenshot showing the Third-Party Device-ID section in CIE User Context.
Select Location (region - cannot change later).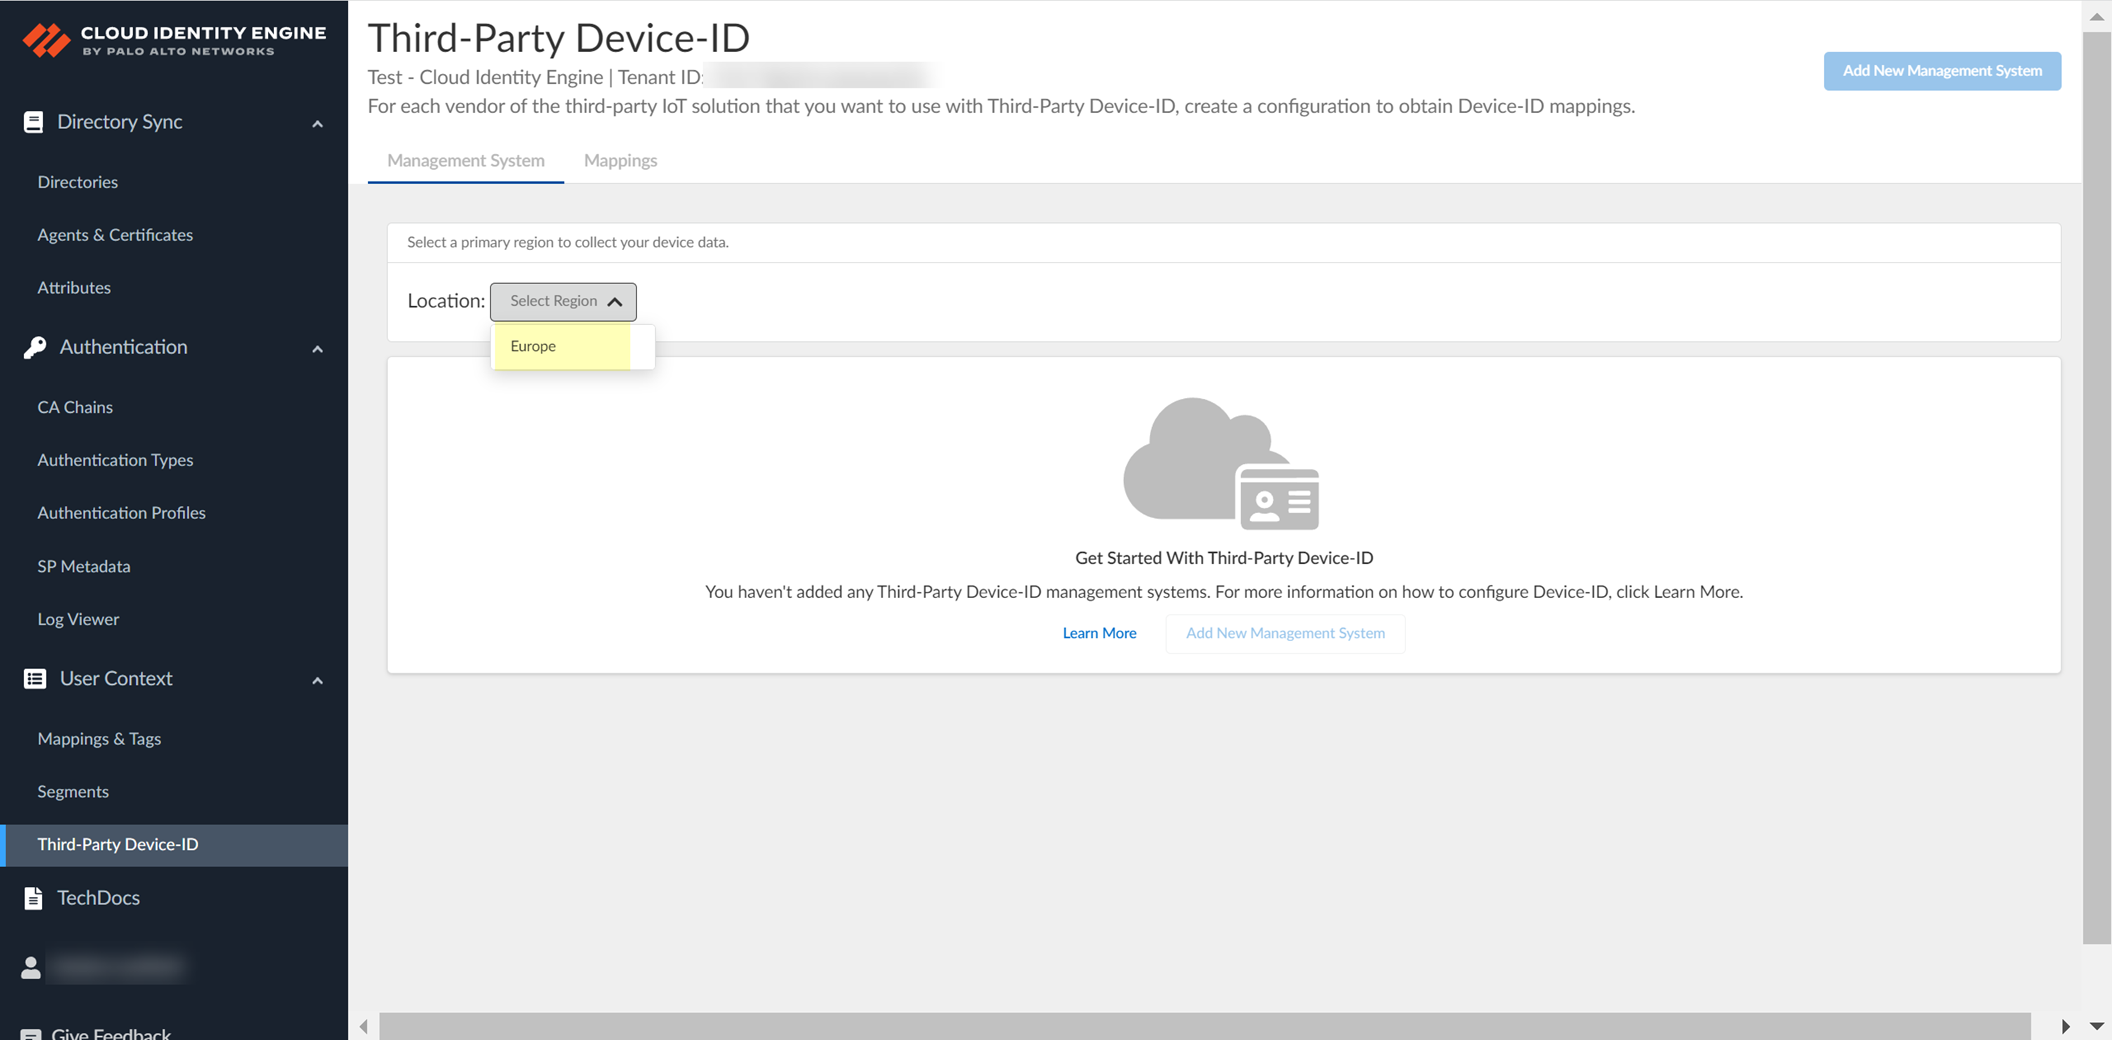
Screenshot showing the selection of the Location (region) for Third-Party Device-ID.
Add New Management System.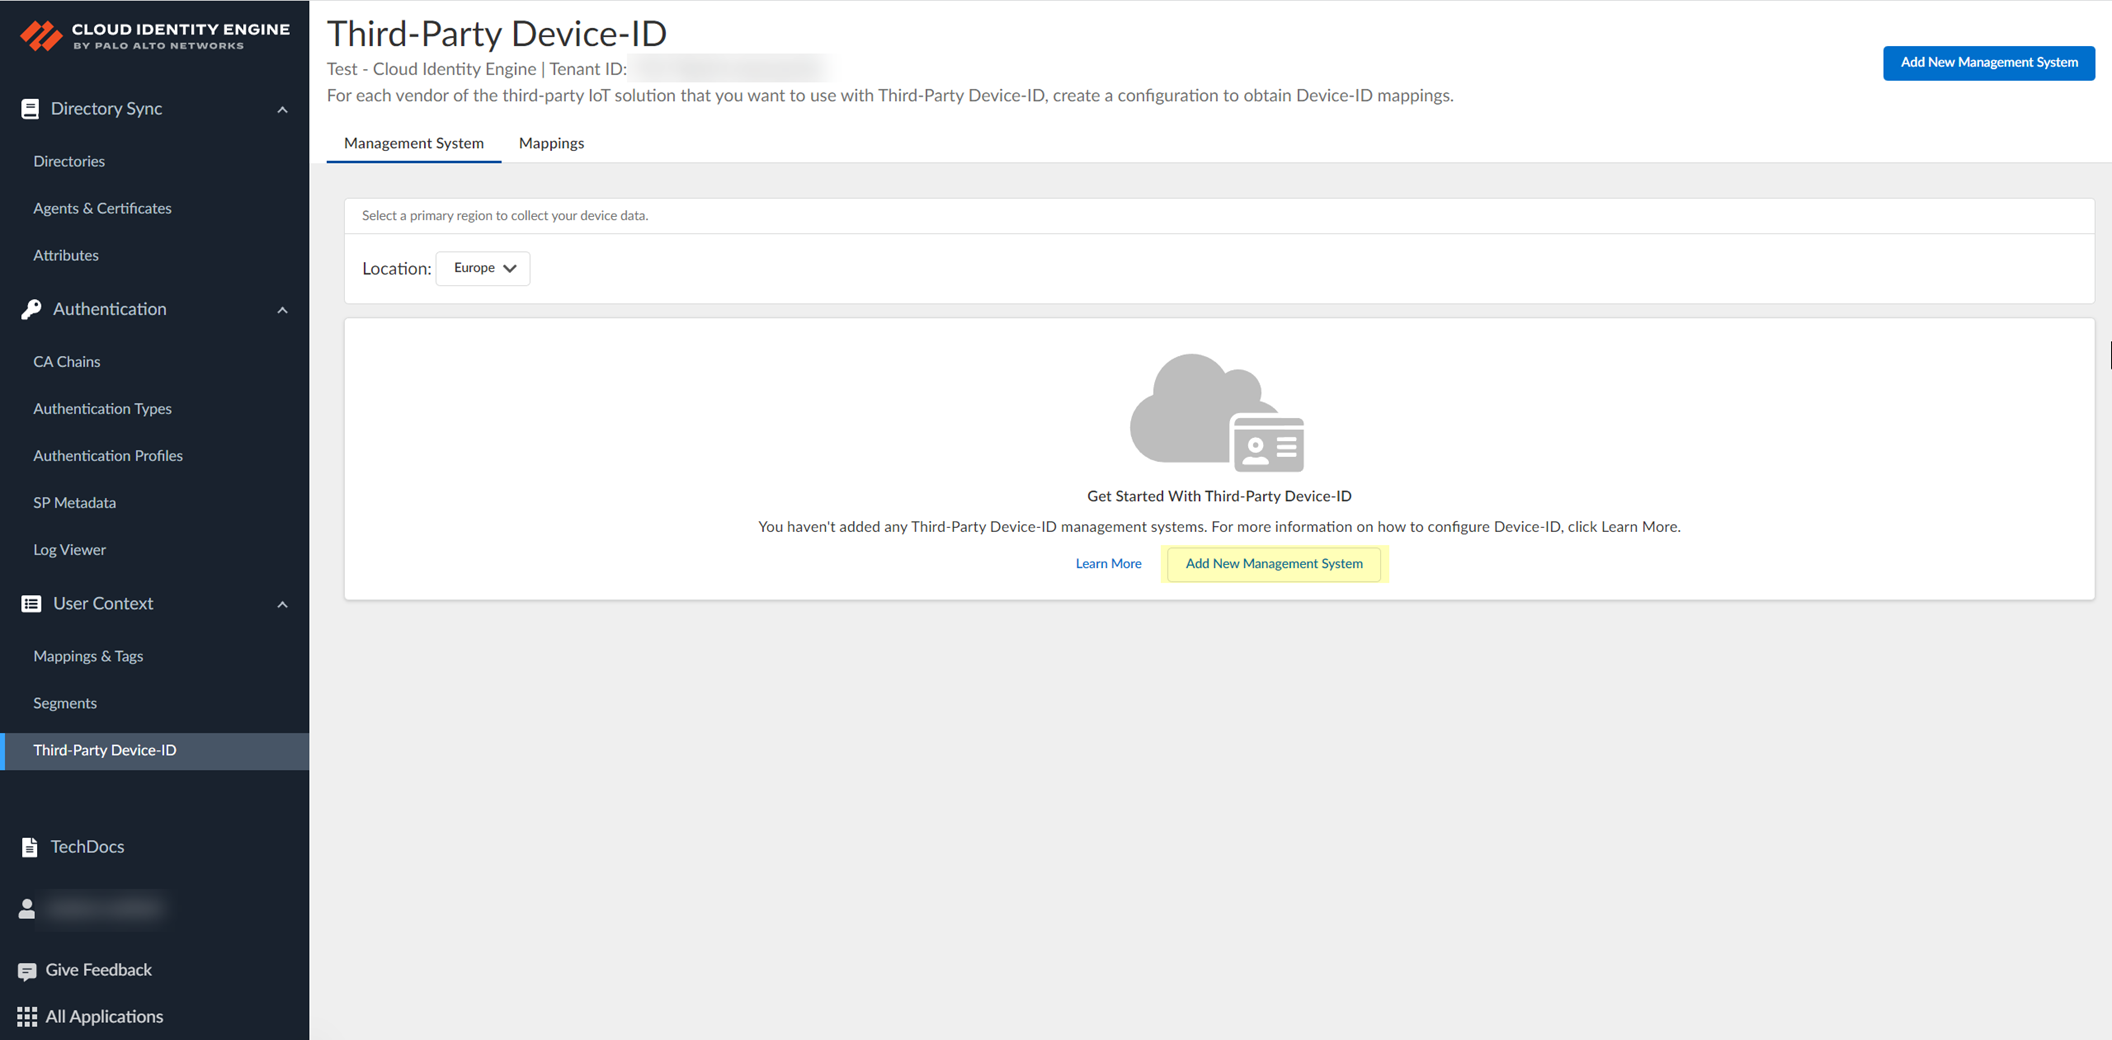
Screenshot showing the "Add New Management System" button.
-
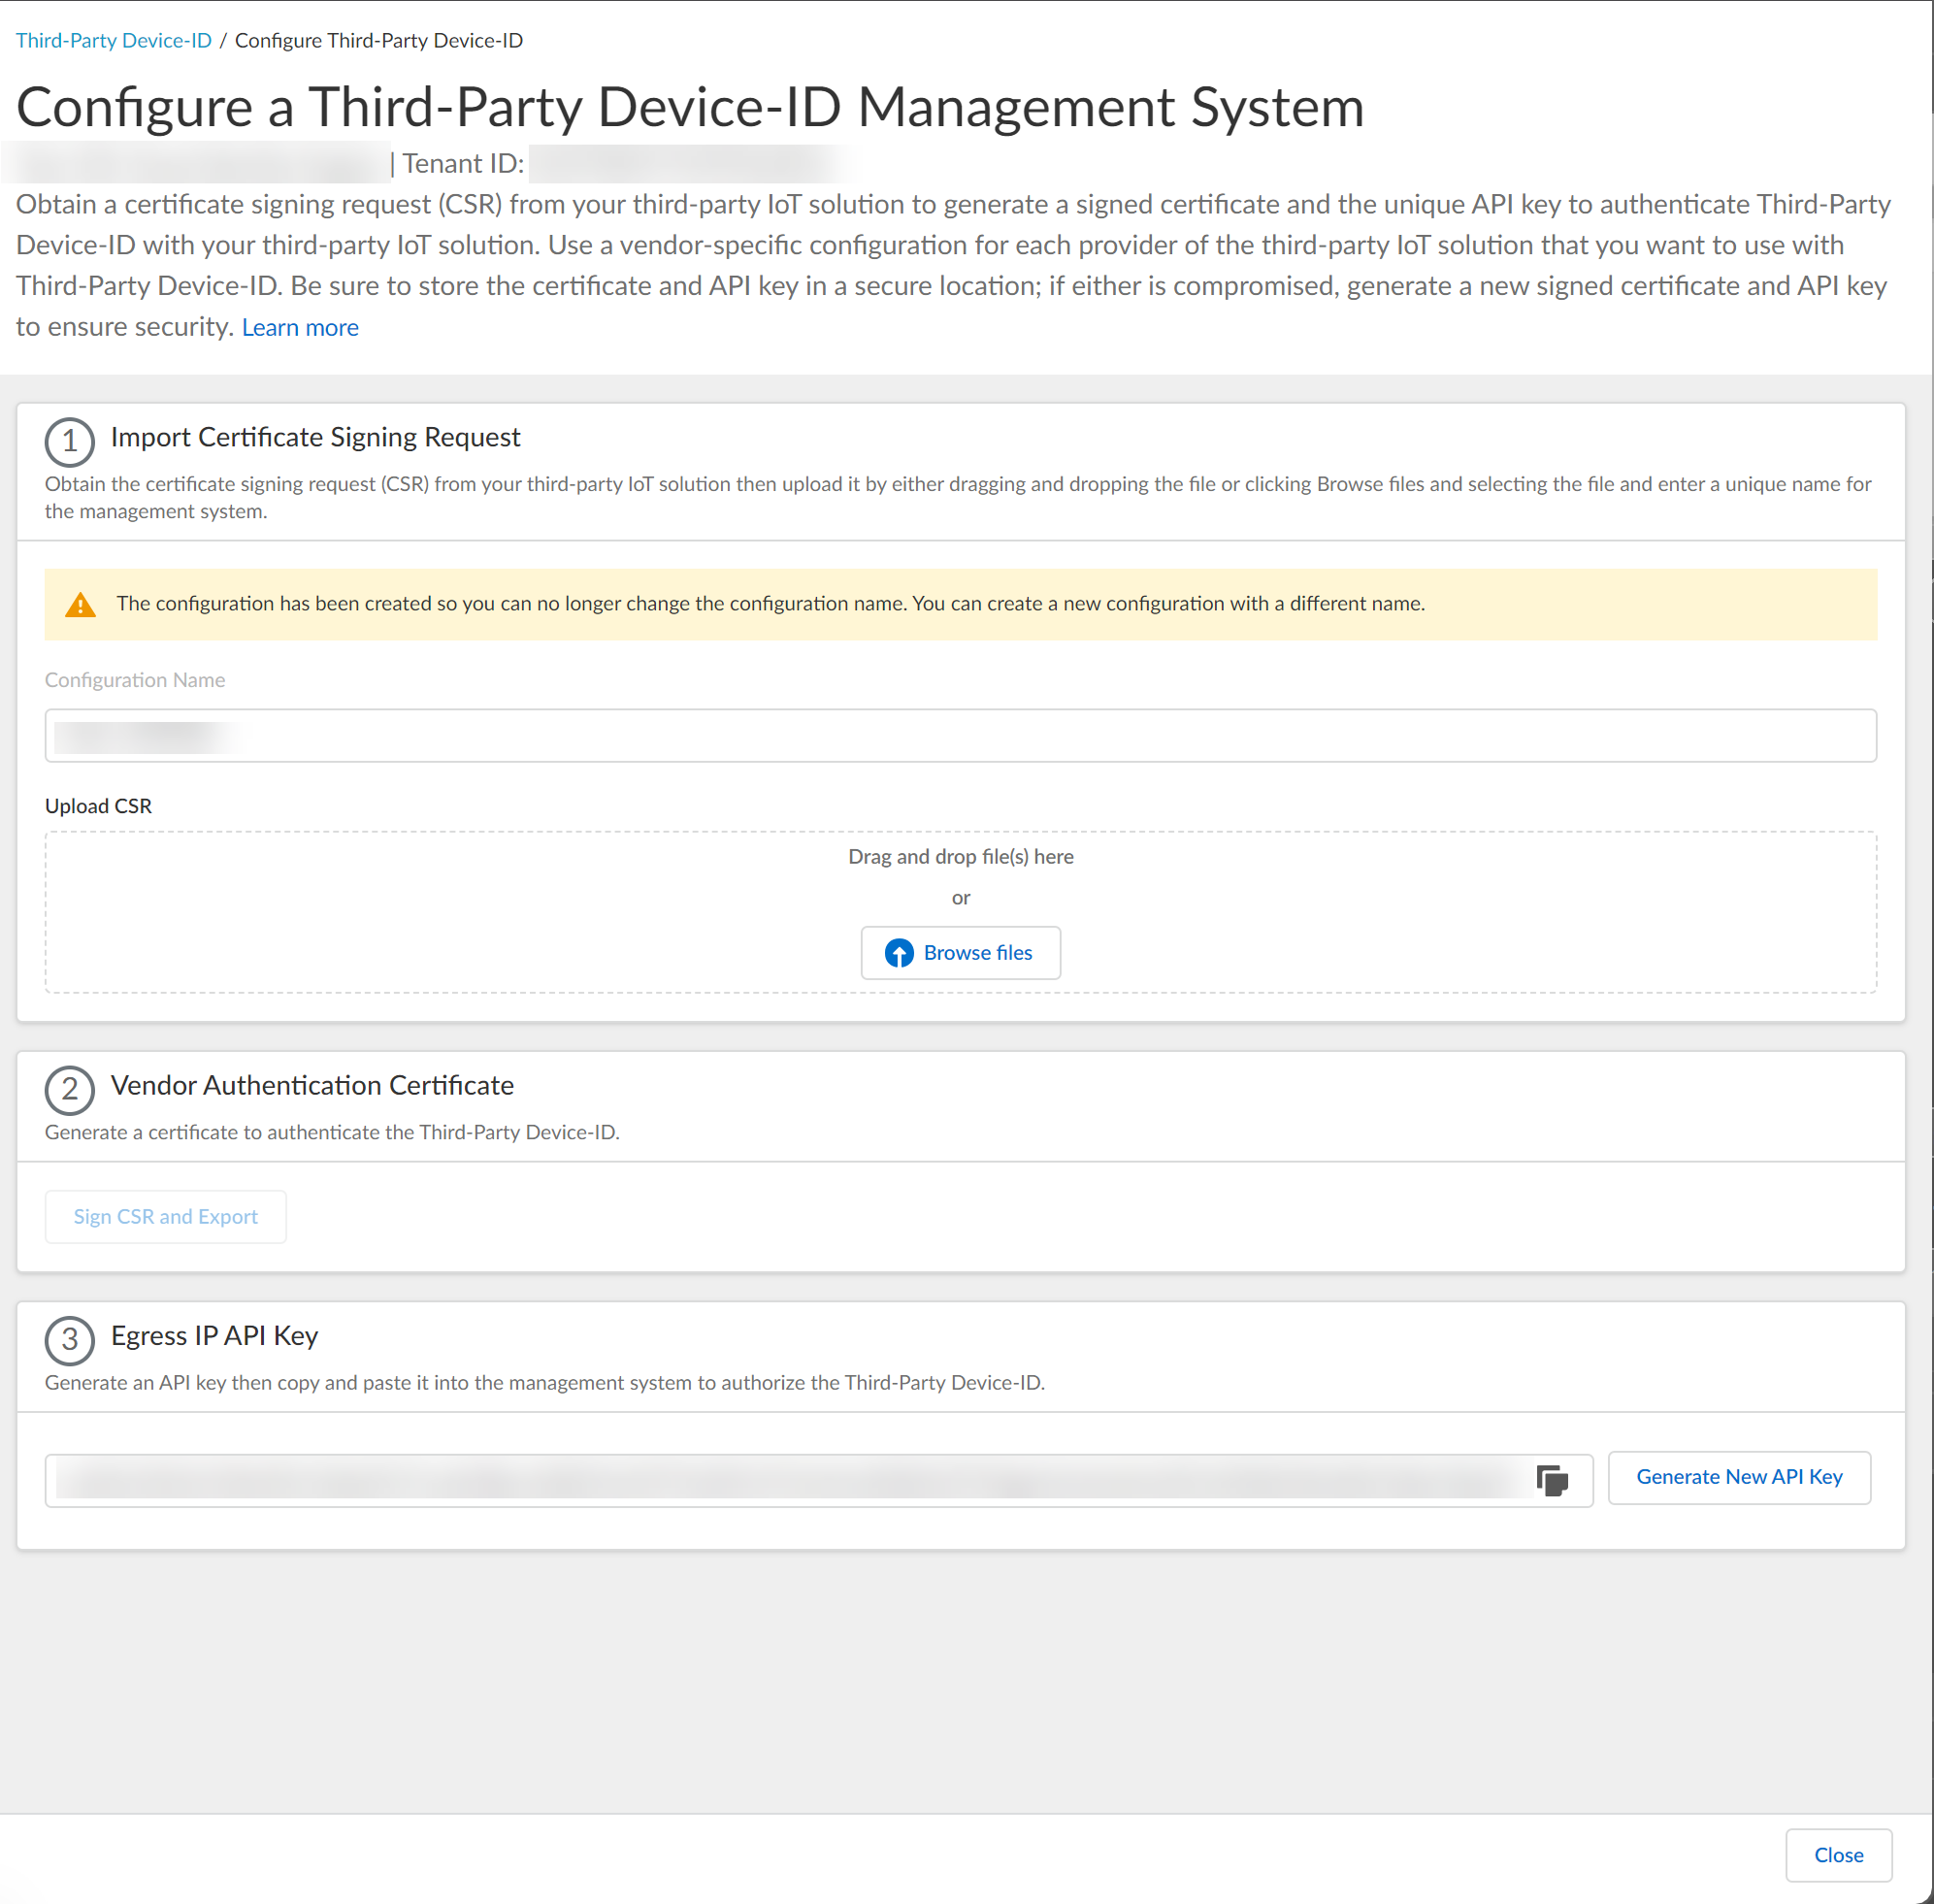
Upload CSR: Enter Configuration Name (e.g., vendor).
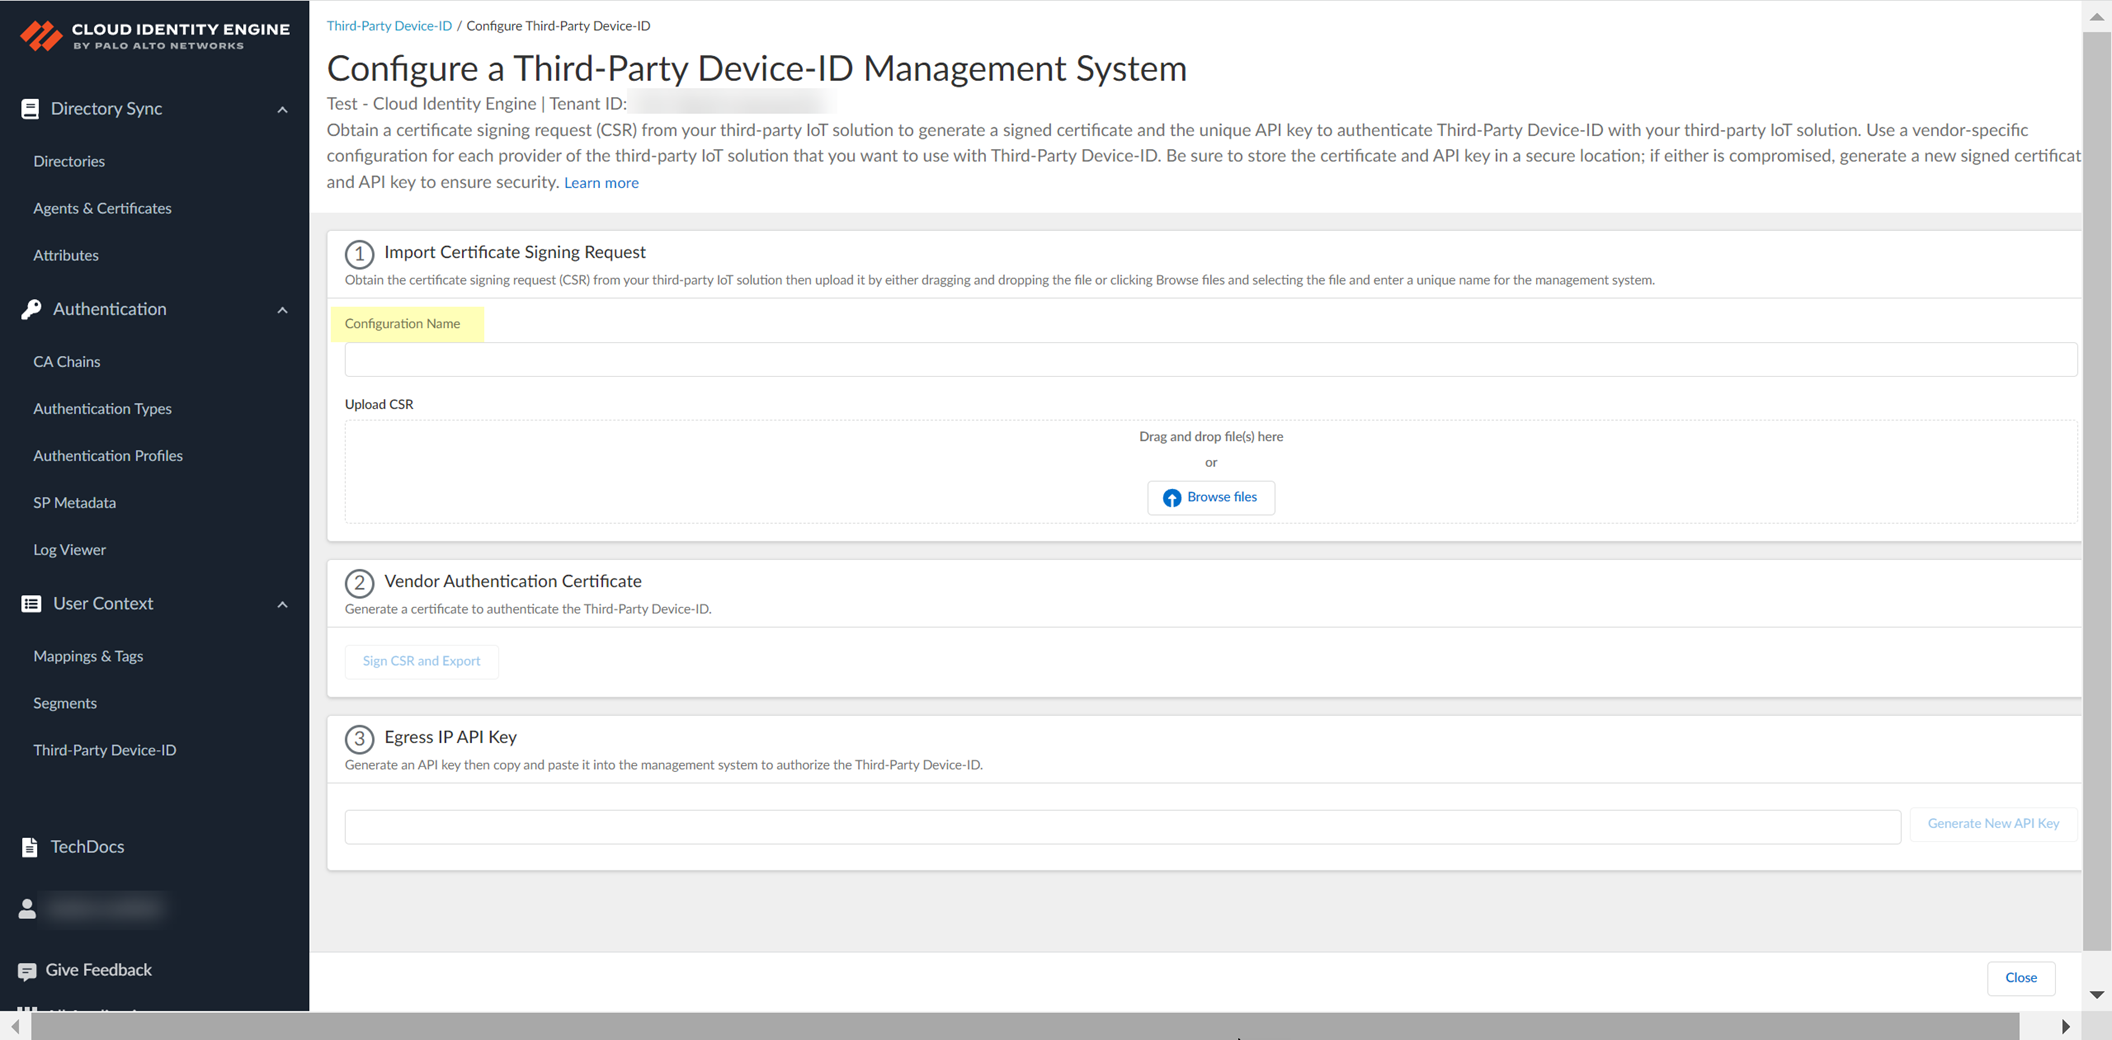
Screenshot showing the field for Configuration Name when adding a management system.
Browse/drag CSR file.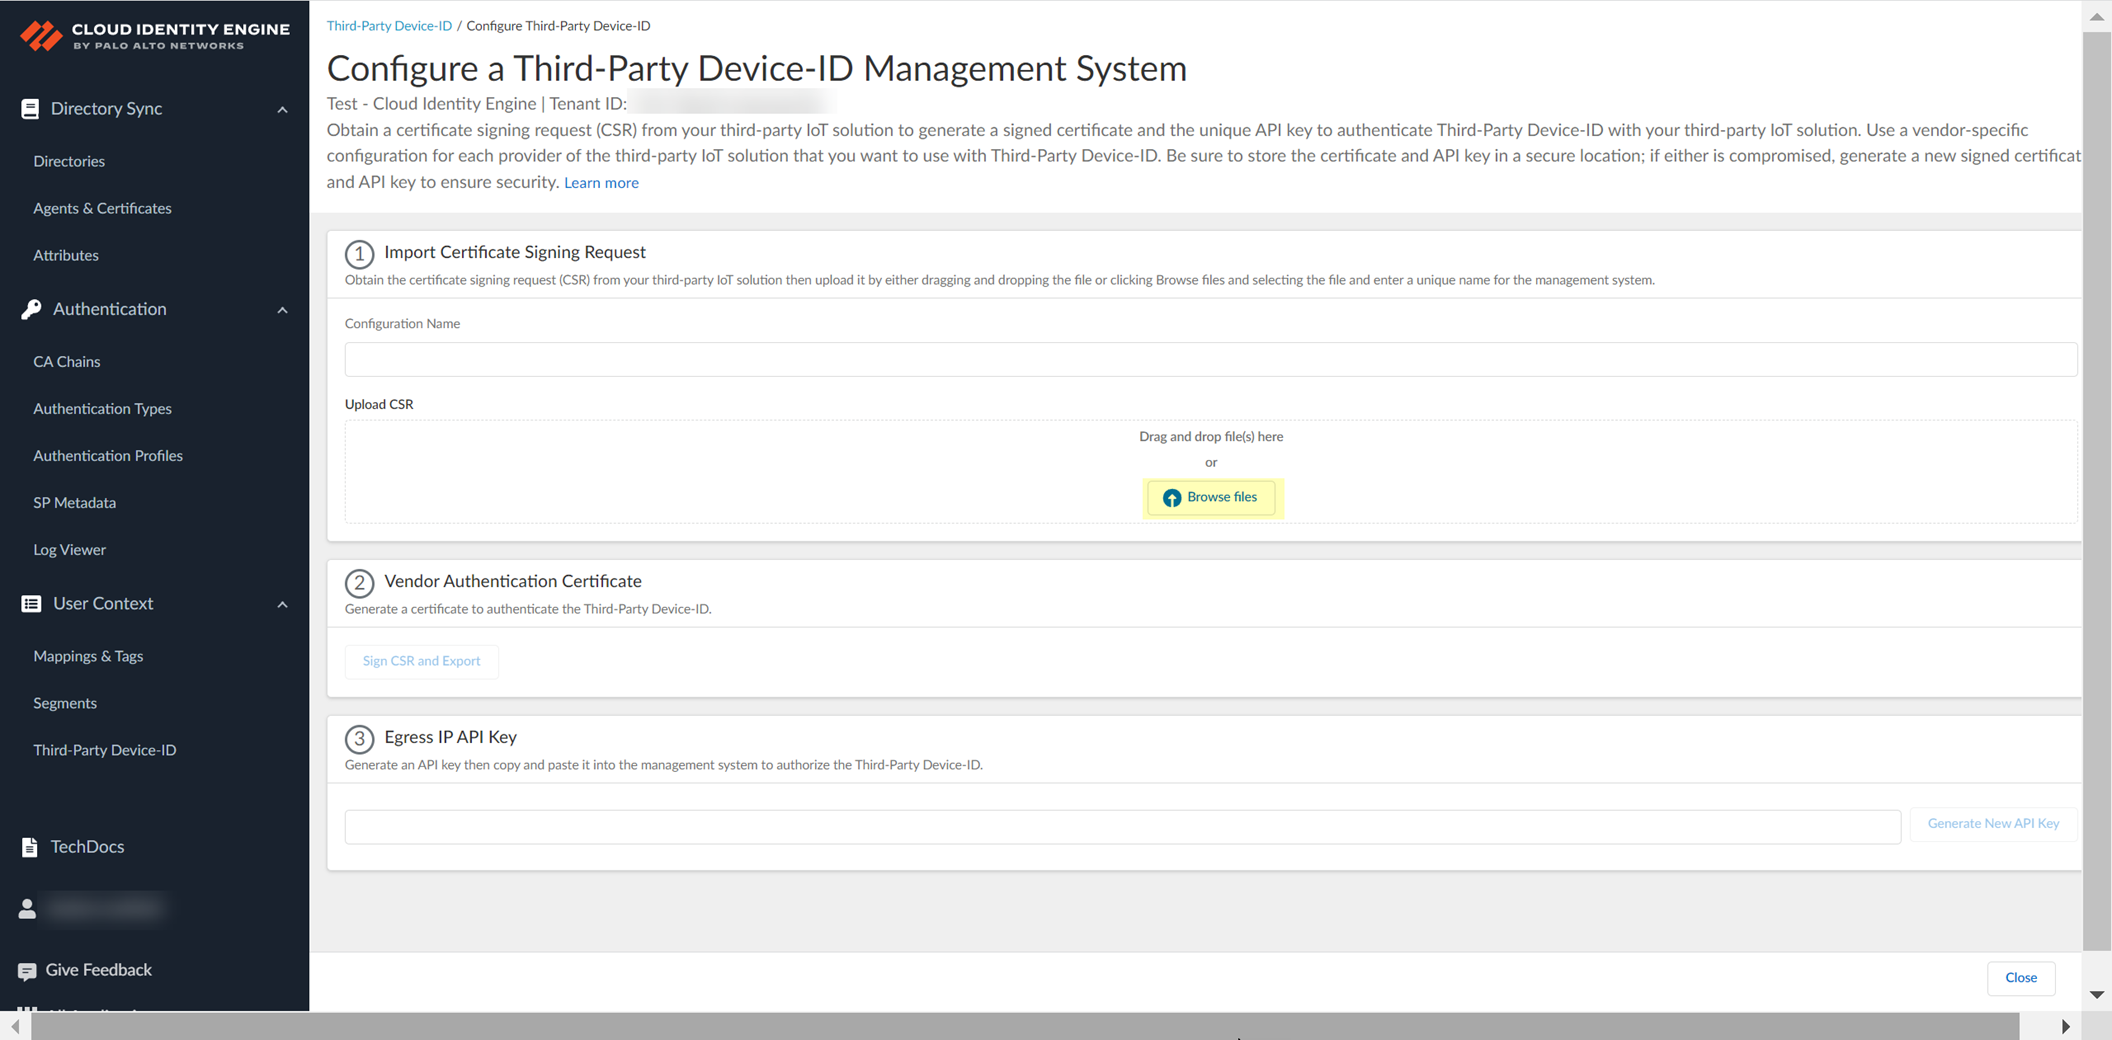
Screenshot showing the area to upload the Certificate Signing Request (CSR) file.
Gotcha!: Can only upload CSR once per config. New CSR needed for updates.
-
Obtain signed cert/API key: Sign CSR and Export (downloads signed cert).
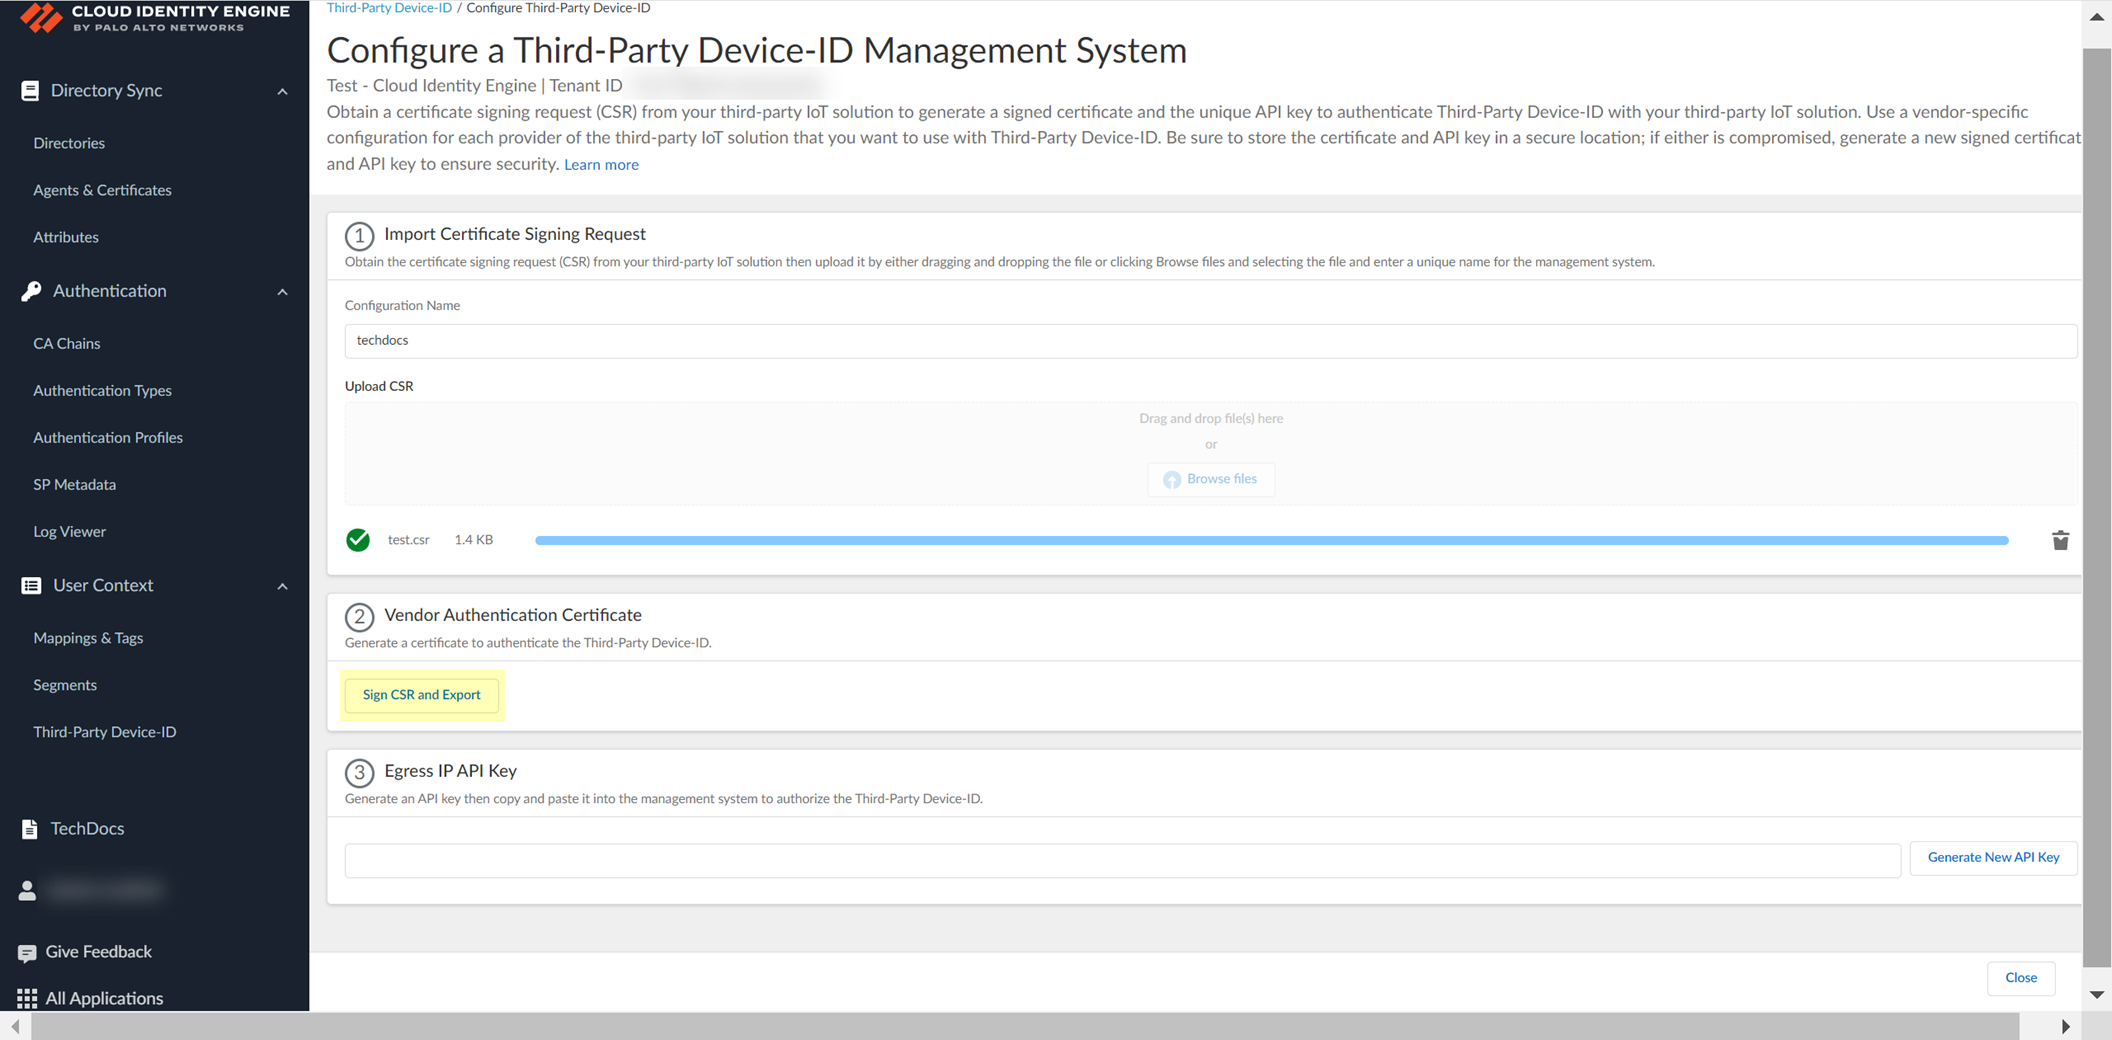
Screenshot showing the "Sign CSR and Export" button.
Generate New API Key.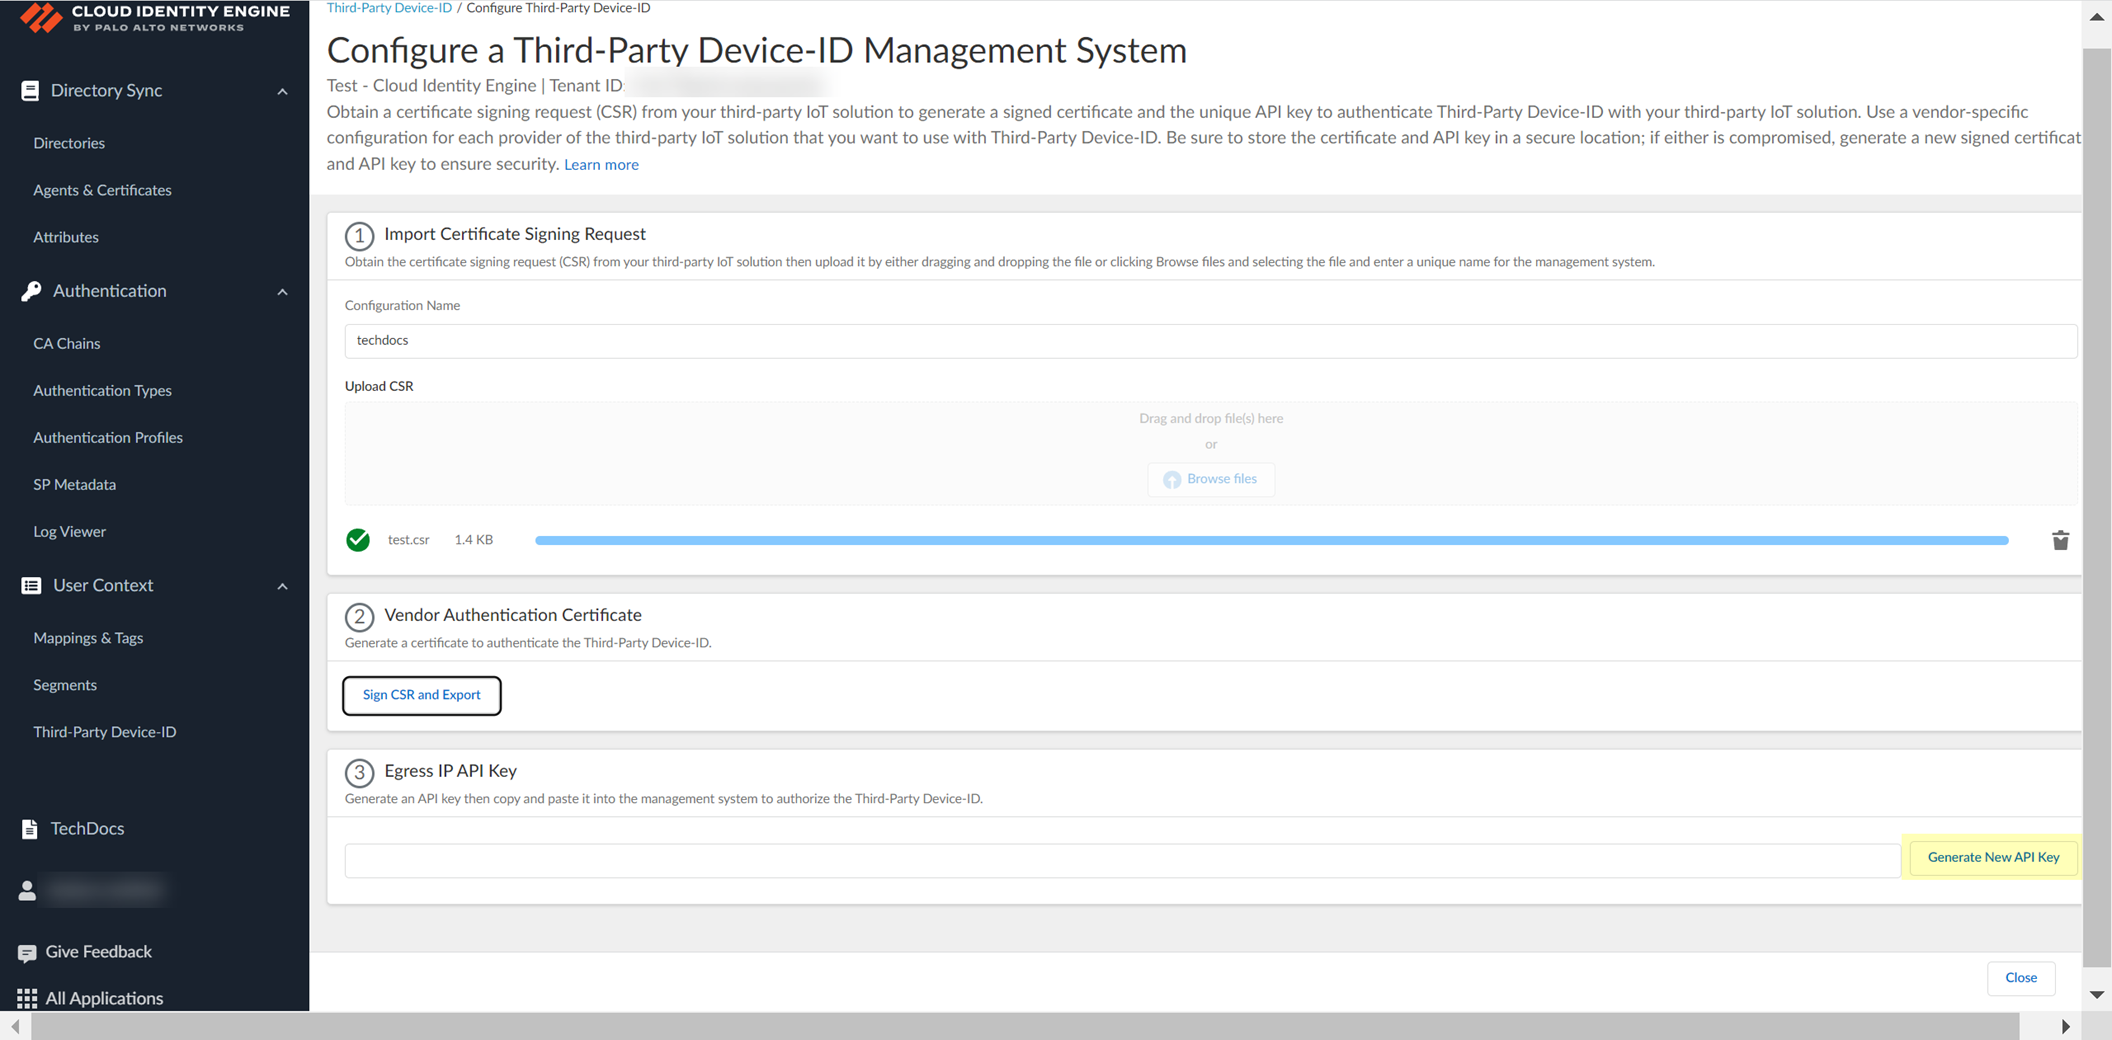
Screenshot showing the "Generate New API Key" button.
Copy API Key. Import signed cert and API key to third-party management system. Configure IoT solution to use them.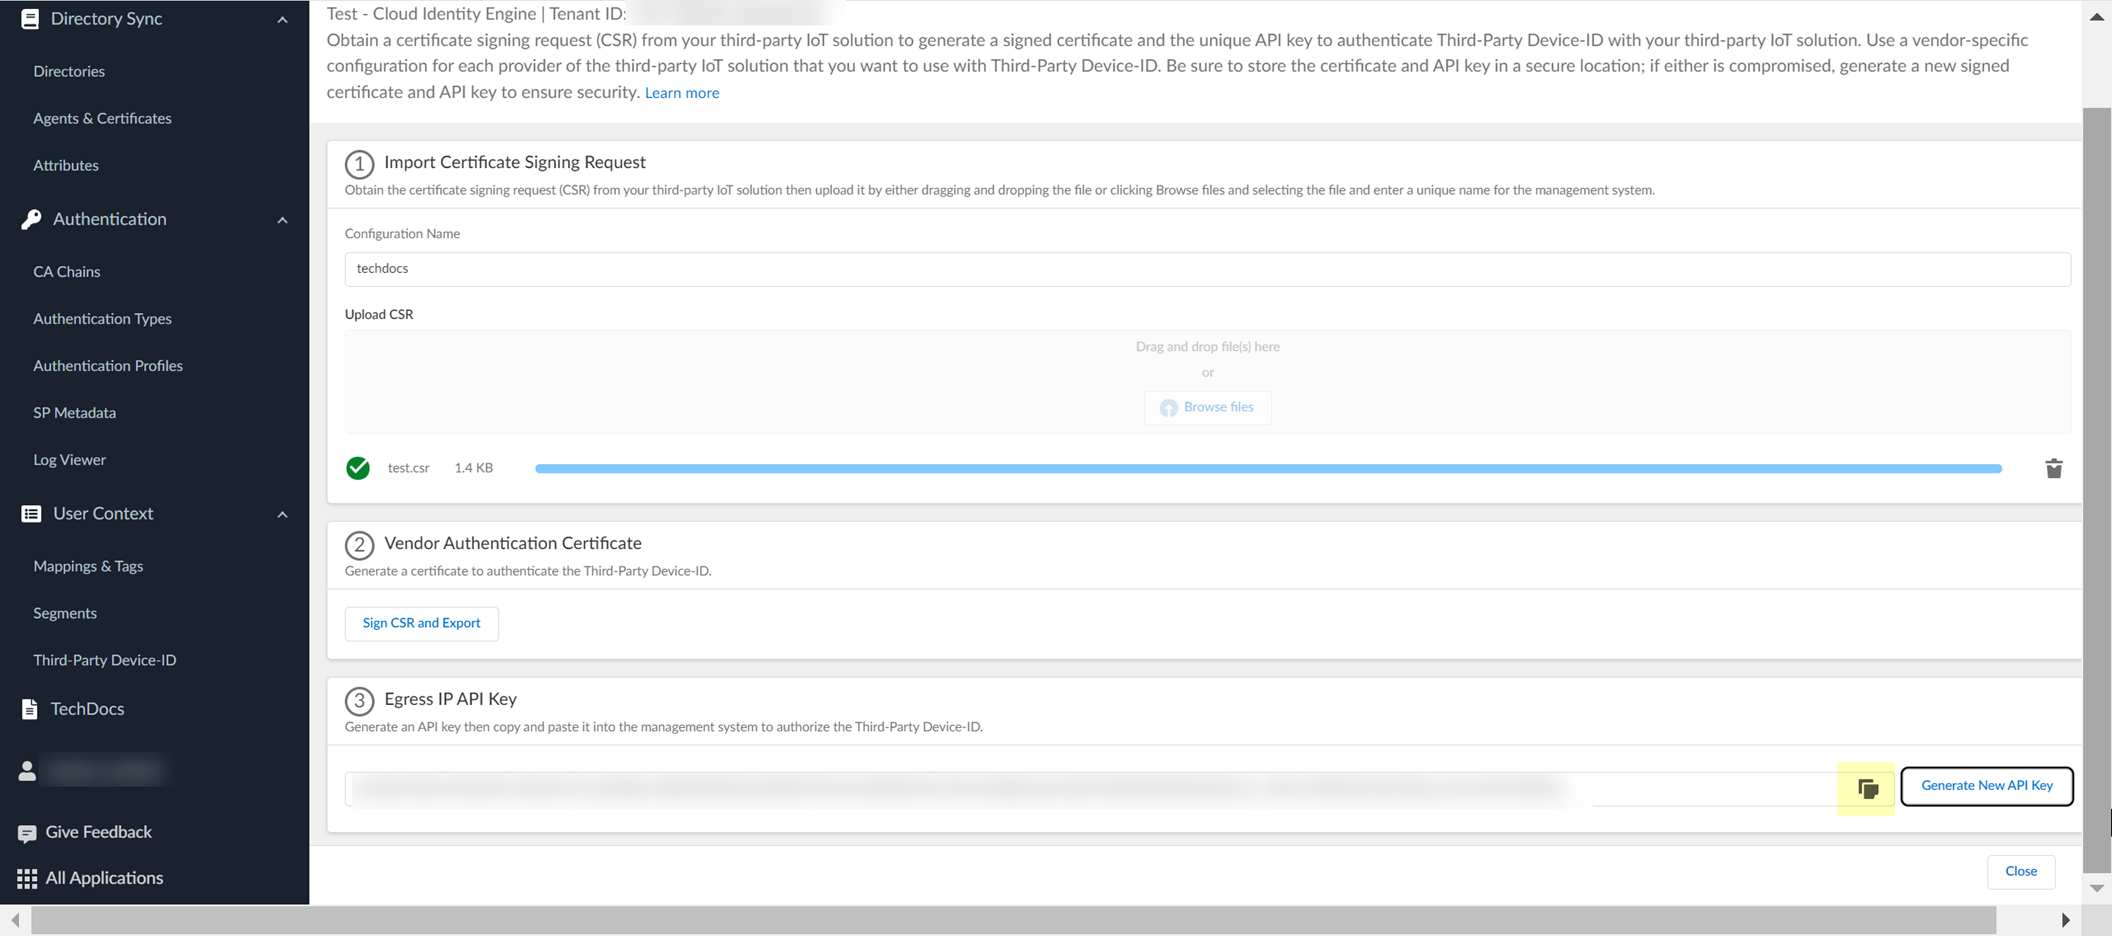
Screenshot showing the API Key displayed in CIE for copying.
Critical Point: Store signed cert and API key securely. Each vendor config needs UNIQUE cert and API key.
-
Review config info.
Screenshot showing the review page for the Third-Party Device-ID management system configuration.
-
After using API commands on third-party side, view Mappings in CIE to see IP-to-device mappings.

Screenshot showing the Mappings tab in CIE Third-Party Device-ID to view collected IP-to-device mappings.
-
View Management Systems for details.
Screenshot showing the Management Systems tab in CIE Third-Party Device-ID.
-
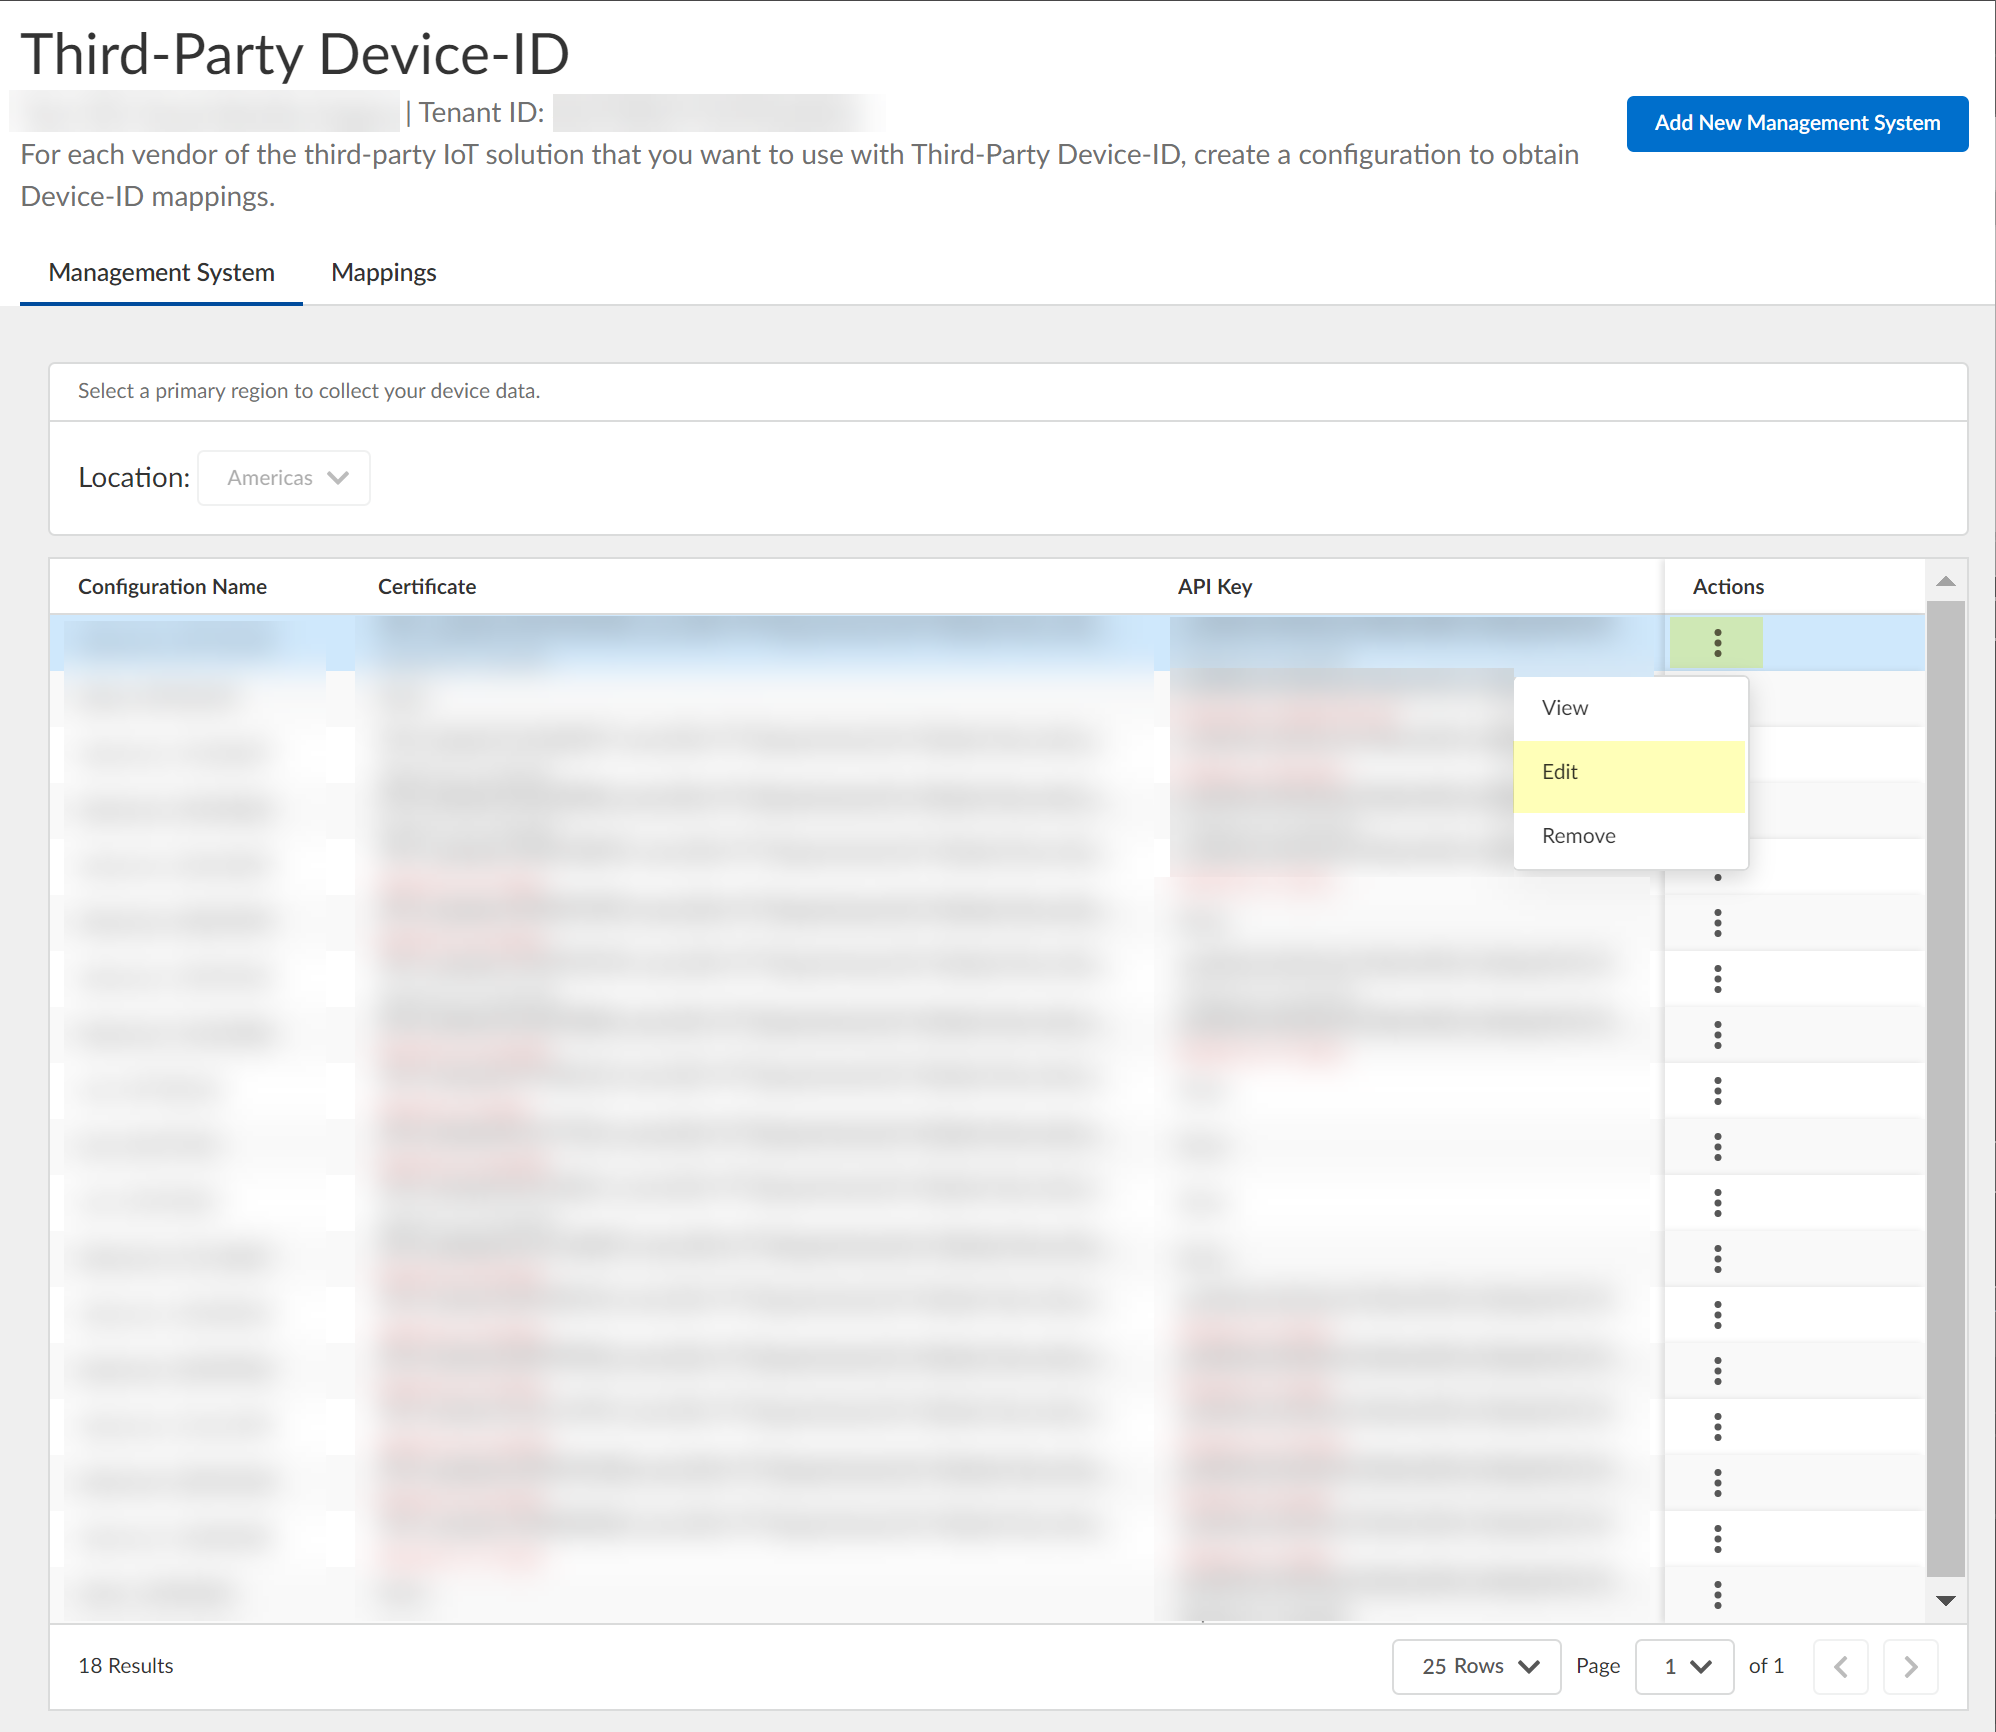
(Optional) Edit config (cannot change name).
Screenshot showing the "Edit" action for a management system configuration.
Screenshot of the dialog to edit the management system configuration.
-
(Optional) Remove config: Actions > Remove > Yes.

Screenshot showing the "Remove" action for a management system configuration.
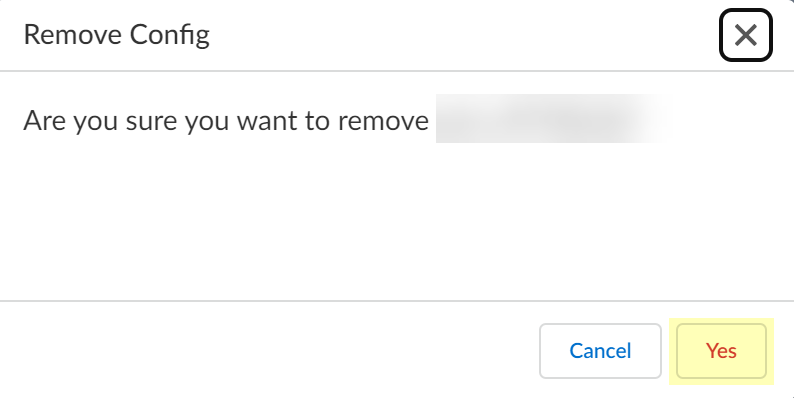
Screenshot of the confirmation dialog for removing a management system configuration.
Can now use APIs for management and Device-ID features (Device Dictionary).
Manage the Cloud Identity Agent
How to manage the agent post-installation (logs, update, certificates, start/stop).
Configure Cloud Identity Agent Logs
Logs CIE events on the agent host for monitoring/troubleshooting. Logs include timezone info in UTC.
- Launch agent.
- File > Debug.
- Select log level (None, Information, Warning, Error, Debug, Verbose). Higher levels include lower levels. Debug/Verbose store data permanently until deleted.
Search Cloud Identity Agent Logs
Important Point: Search terms are case-sensitive .
- From agent UI, Monitoring.
- Enter search terms.
-
Click Search. Results highlighted blue.
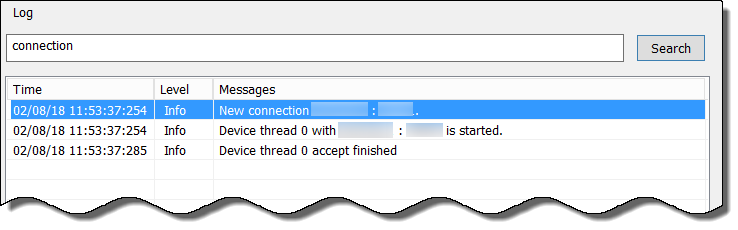
Screenshot showing the search function in the Cloud Identity Agent monitoring interface.
Clear Cloud Identity Agent Logs
Clears logs from the agent UI (does not delete from CloudIdAgentDebug log file).
- From agent UI, Monitoring.
- Click Clear Log.
Update the Cloud Identity Agent
Important Point: Using the latest version is strongly recommended.
Agent 1.7.0+ backs up configuration before removing old version and restores it upon new installation.
- Stop agent connection to CIE service. Verify status is Offline in CIE app.
- Uninstall outdated agent: Start > Control Panel > Programs and Features > Cloud Identity Agent > Uninstall .
- Log in to hub, select CIE app.
- Select CIE tenant > Agents & Certificates.
-
Click Download New Agent, Install the new agent.
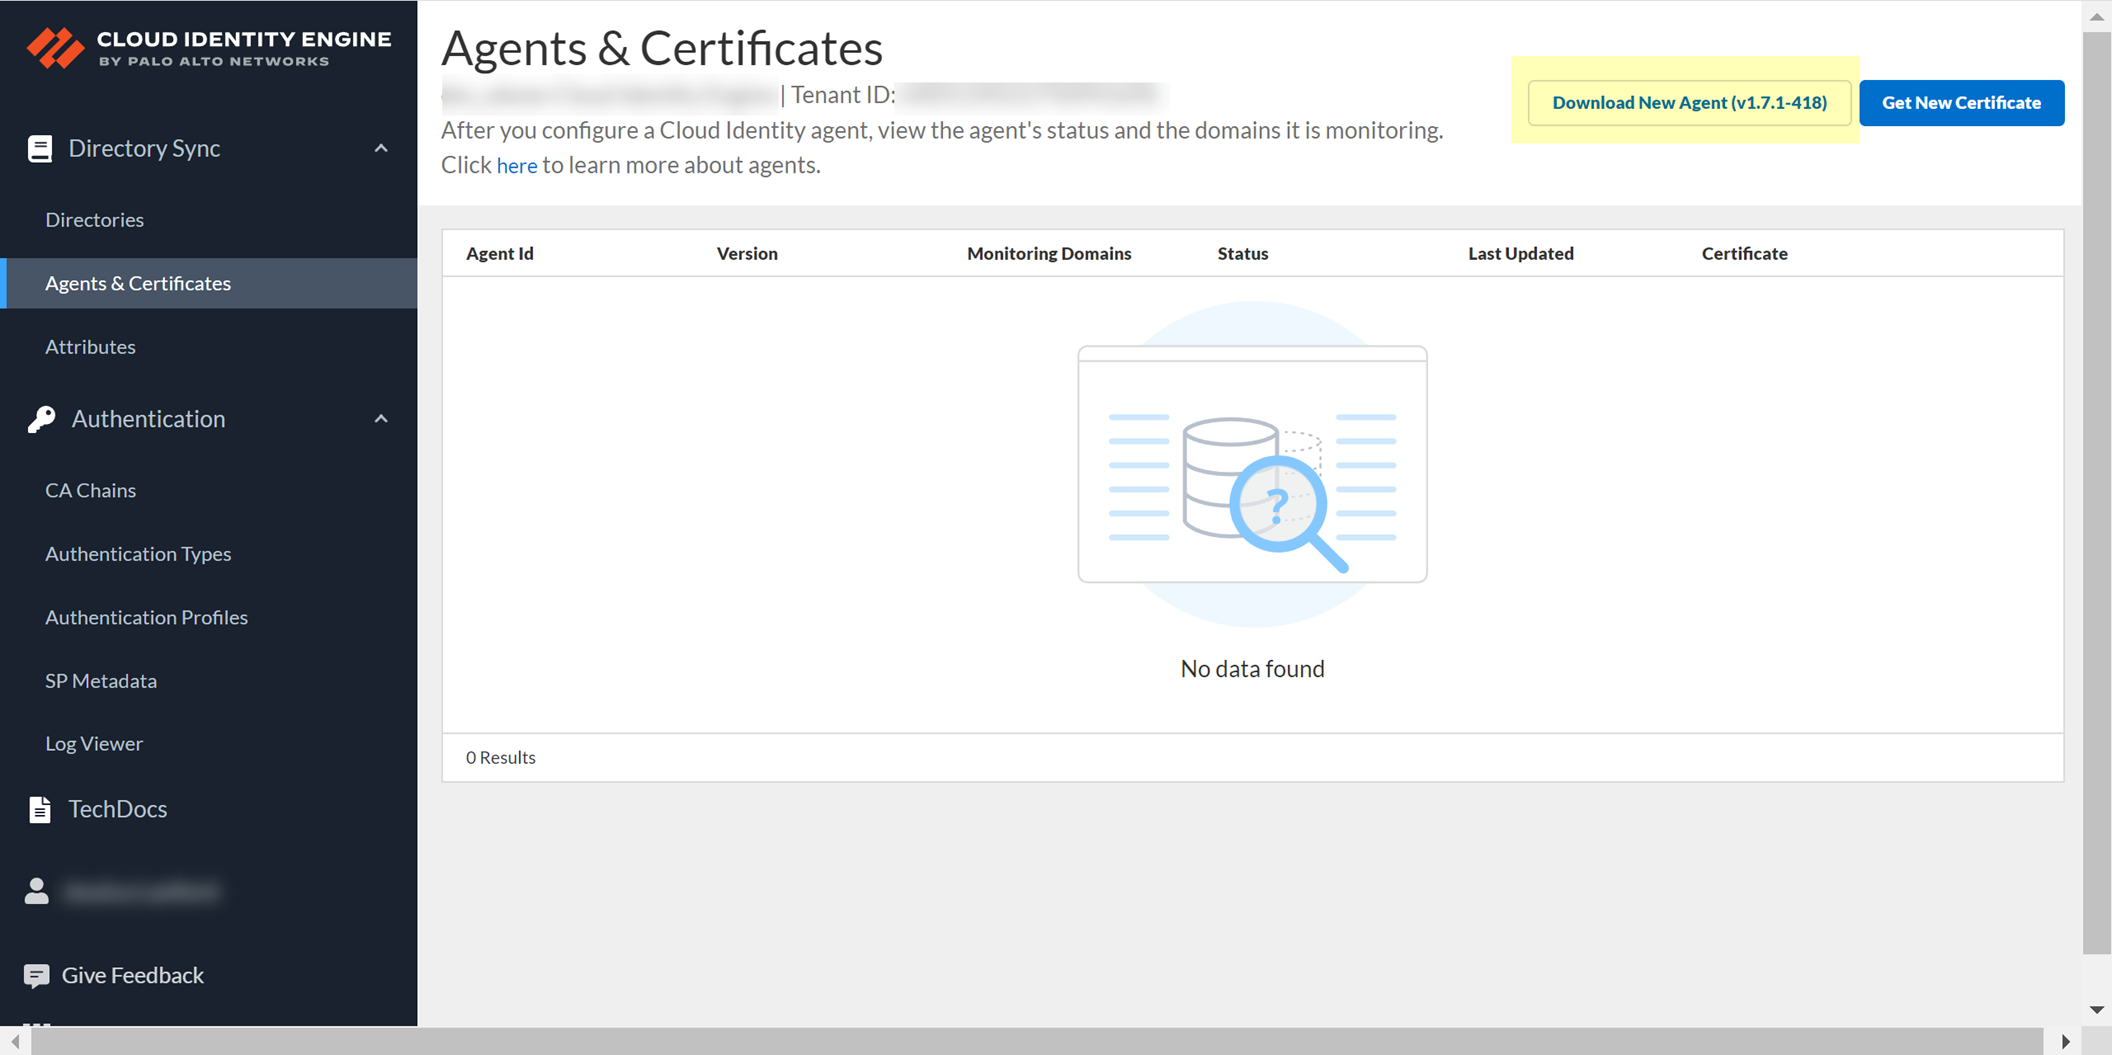
Screenshot showing the "Download New Agent" button in the CIE app.
Start or Stop the Connection to the Cloud Identity Engine
Controls agent-CIE synchronization.
-
On agent host, launch agent, select Cloud Identity Configuration. Connection status shown lower-left.
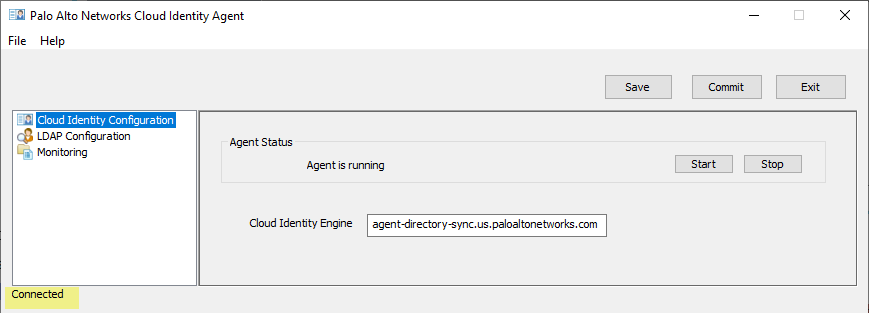
Screenshot showing the Cloud Identity Agent configuration window, highlighting the connection status.
-
Click Start (to connect) or Stop (to disconnect).
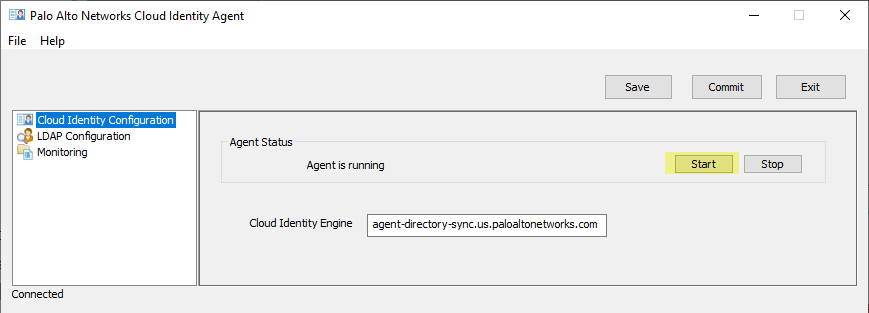
Screenshot showing the "Start" button to connect the agent to CIE.
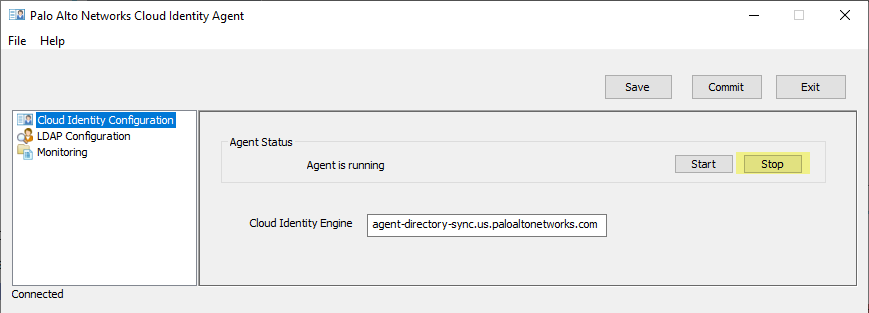
Screenshot showing the "Stop" button to disconnect the agent from CIE.
Remove the Cloud Identity Agent
- Stop agent connection to CIE. Agent status must be Offline.
- Uninstall agent from host: Start > Control Panel > Programs and Features > Cloud Identity Agent > Uninstall .
- Log in to hub, select CIE tenant.
- Agents & Certificates.
-
Confirm agent Status is Offline, Remove Agent (button available only if Offline).
Screenshot showing the "Remove Agent" button in the CIE app (available only when the agent is offline).
Manage Cloud Identity Engine Certificates
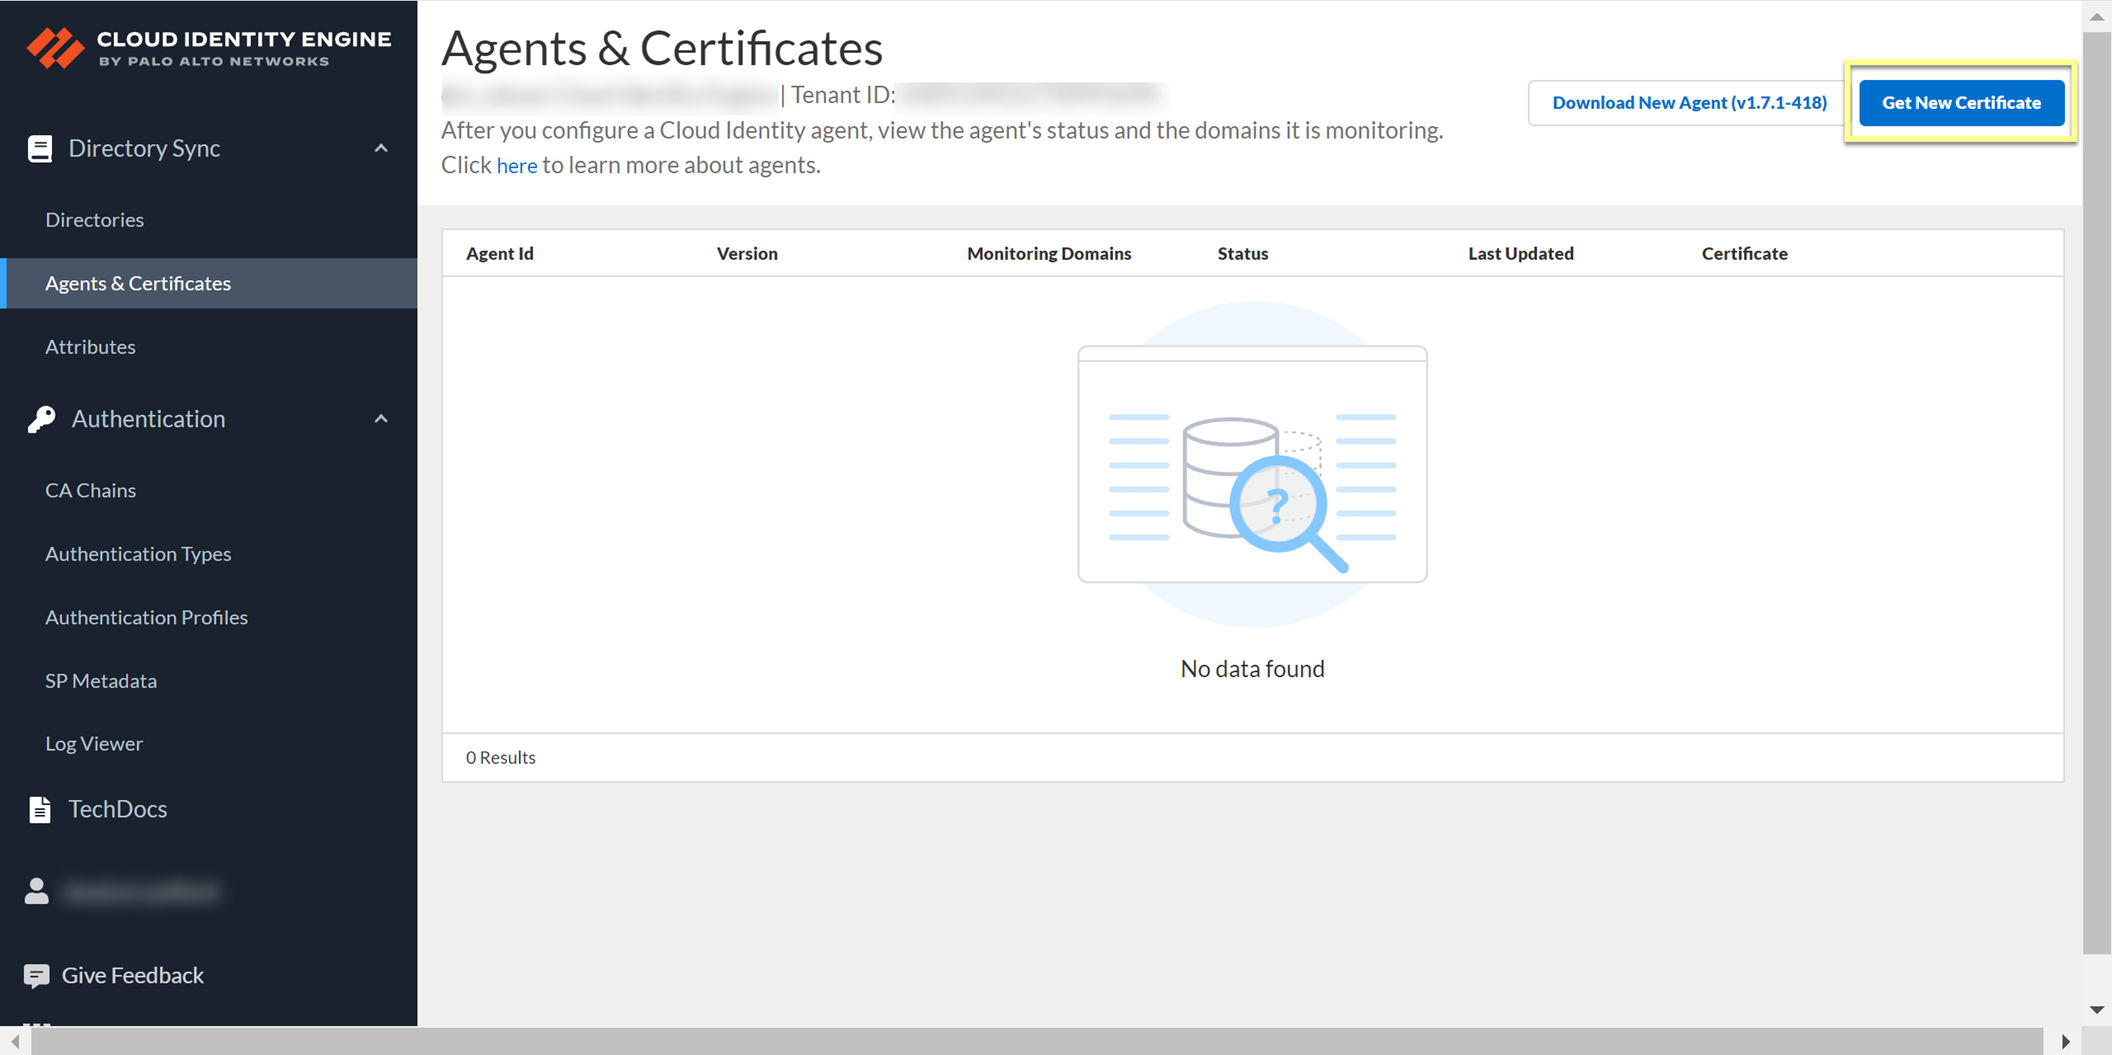
View certificate info on Agents & Certificates page. Agent 1.5.0+ auto-renews. To replace a compromised certificate, Revoke, Delete Obsolete, Generate New, Install.
- Revoke certificate (if compromised) in CIE app: Hub > CIE > select tenant > Agents & Certificates > Revoke.
-
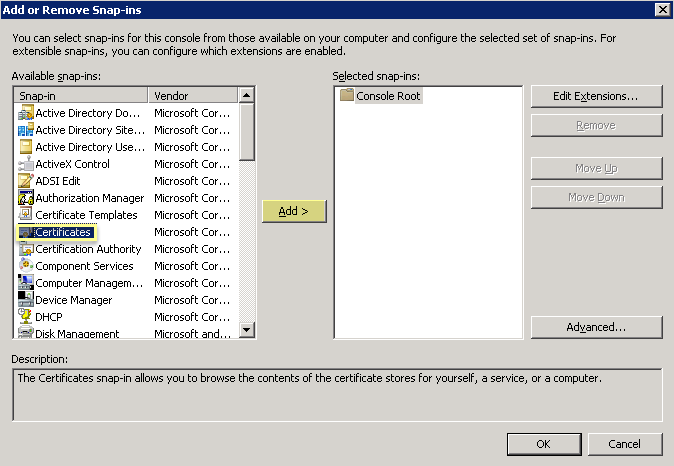
Delete Obsolete certificates from agent host: MMC > Add/Remove Snap-In > Certificates > Computer Account > Local Computer > Finish. OK. Navigate to Console Root\Certificates (Local Computer)\Personal\Certificates. Select old cert, Right-click > Delete. Confirm.
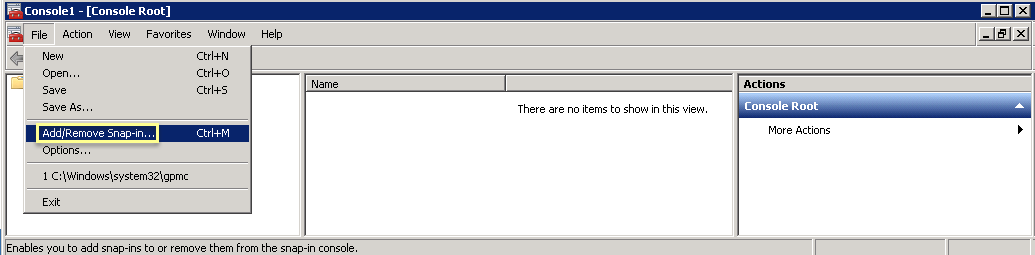
Screenshot of the "Add or Remove Snap-ins" window in Microsoft Management Console (MMC).
Screenshot selecting the Certificates snap-in in MMC.
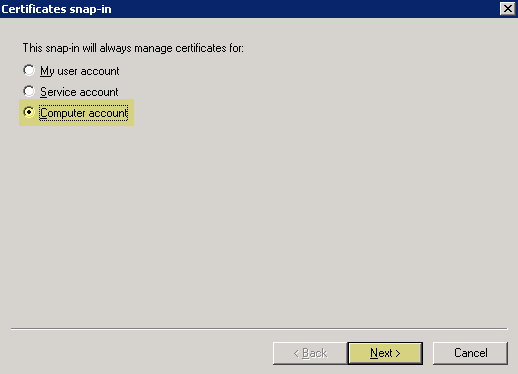
Screenshot selecting the "Computer account" option for the Certificates snap-in scope.
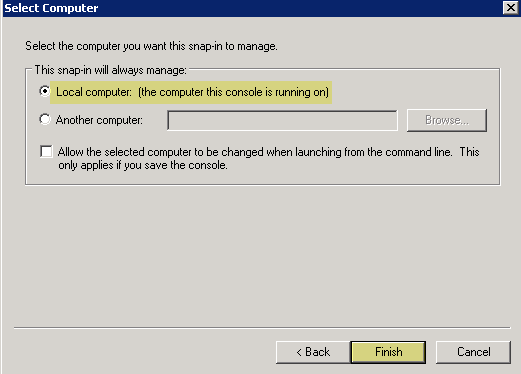
Screenshot selecting the "Local computer" option for the Certificates snap-in scope.
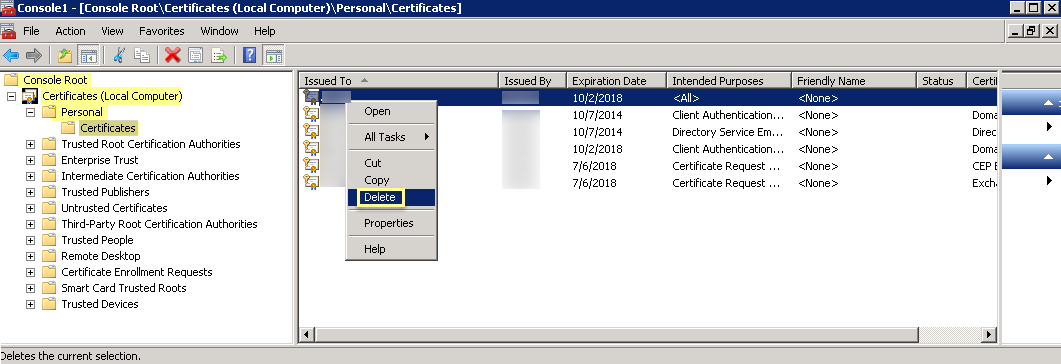
Screenshot showing the path to the Personal Certificates store in MMC.
-
Generate New certificate in CIE app > Install on agent host.
Screenshot showing the "Get New Certificate" button in the CIE app.
Manage the Cloud Identity Engine App
Features for managing tenants, attributes, viewing data, and configuring User Context, Dynamic Groups, and Third-Party Device-ID.
Cloud Identity Engine Tenants
One tenant created upon activation. Can create multiple tenants per region to isolate data or serve different apps. Each tenant can collect from multiple directories of different types.
Synchronize Cloud Identity Engine Tenants
Methods: Full sync (complete directory sync) or Sync Changes (incremental sync - not for Google). Default is incremental sync every 5 min (not Google) and weekly full sync (not Google). Google sync is based on selected interval.
Synchronize All Attributes (Full Sync)
Important Point: Recommended for troubleshooting or loss of connectivity. All agents/domains must be active for On-Prem AD full sync.
- Log in to hub > CIE app.
- Select directory > Directories.
-
Select Actions > Full Sync.
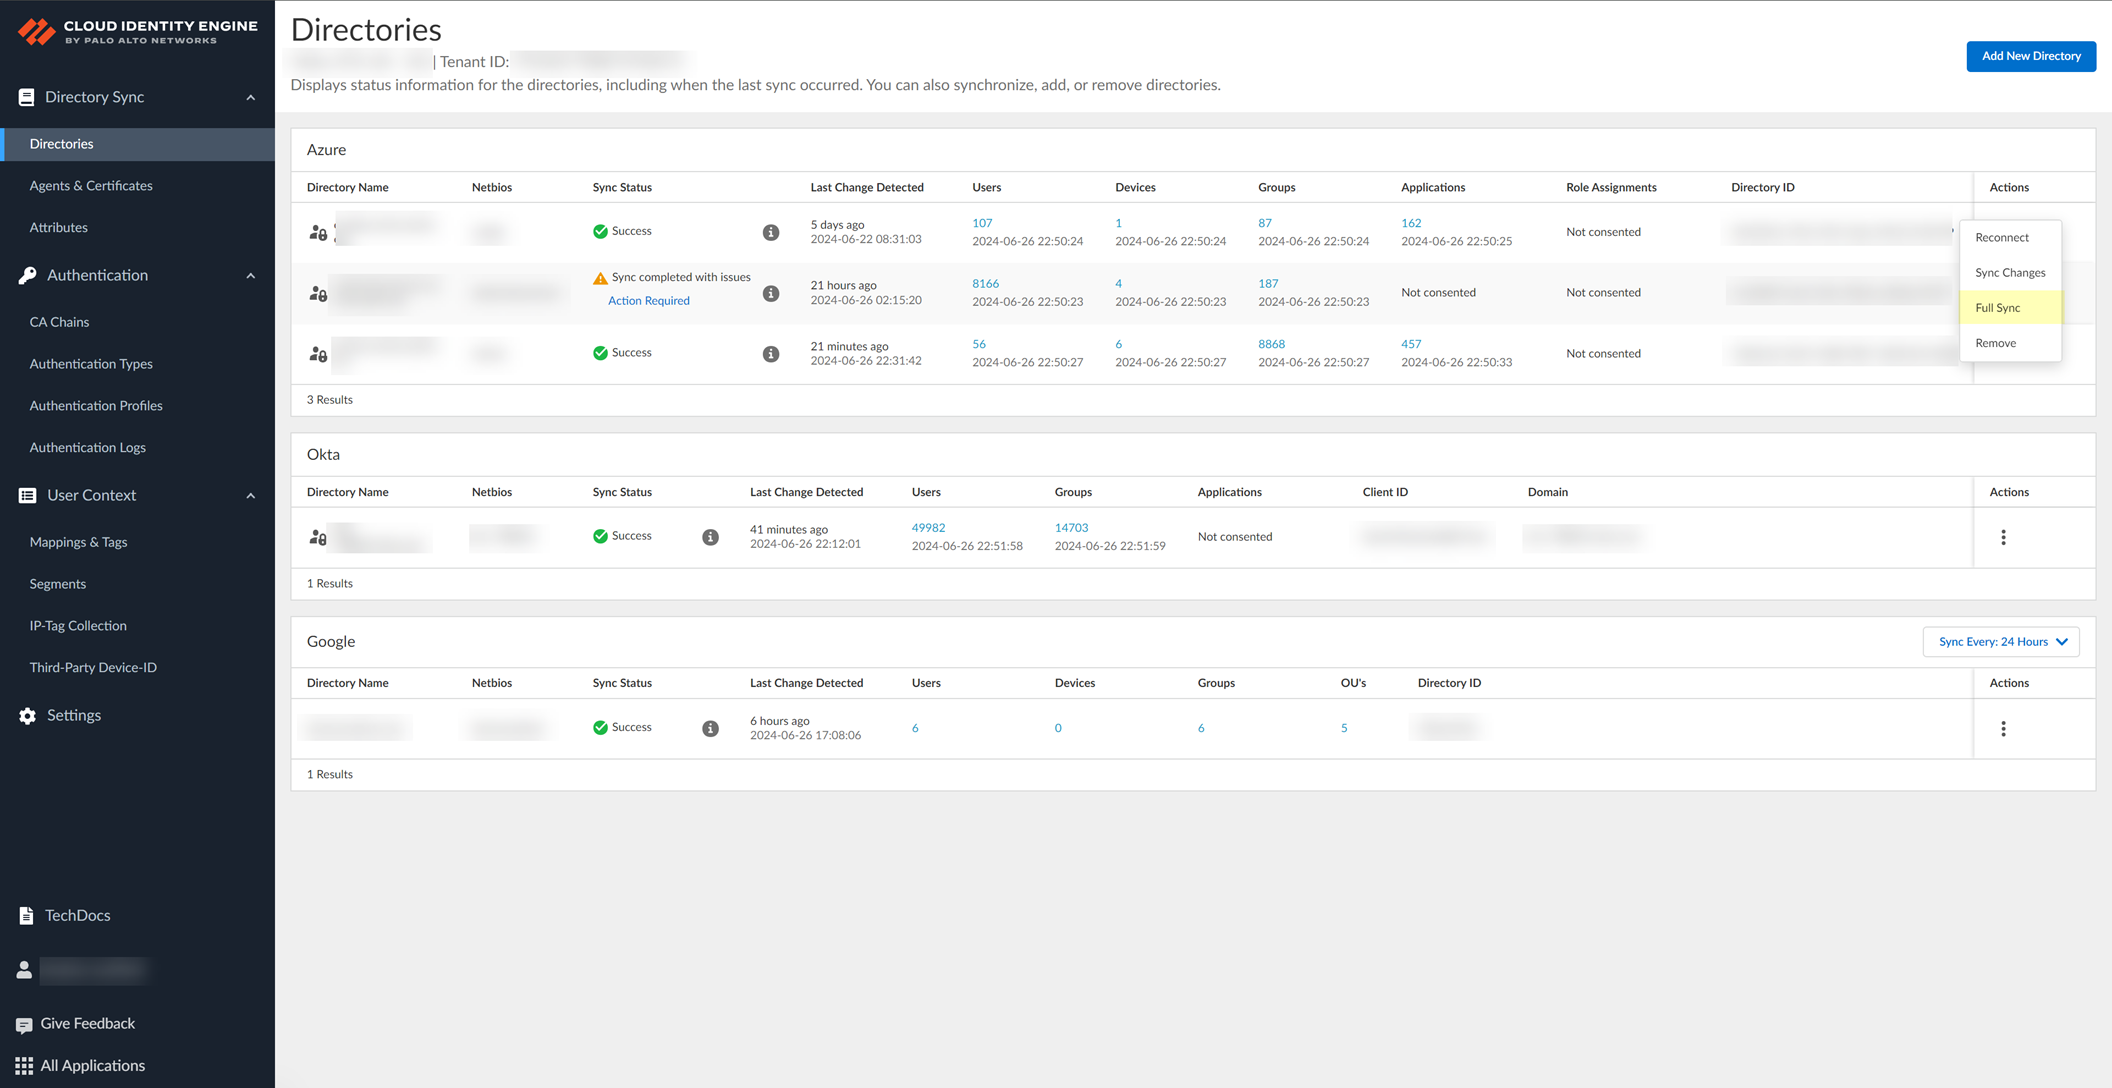
Screenshot showing the "Full Sync" action for a directory in the CIE app.
Screenshot showing the confirmation message when a full sync is initiated.
- Verify Sync Status is Success.
Gotcha!: Click Full Sync only ONCE. Wait at least 90 seconds between full syncs.
Synchronize Directory Changes (Incremental Sync)
Faster than full sync. Default for most directories every 5 min (not Google). Sync Status may show Success while in progress.
Gotcha!: Not available for Google Directory.
- Configure a directory.
-
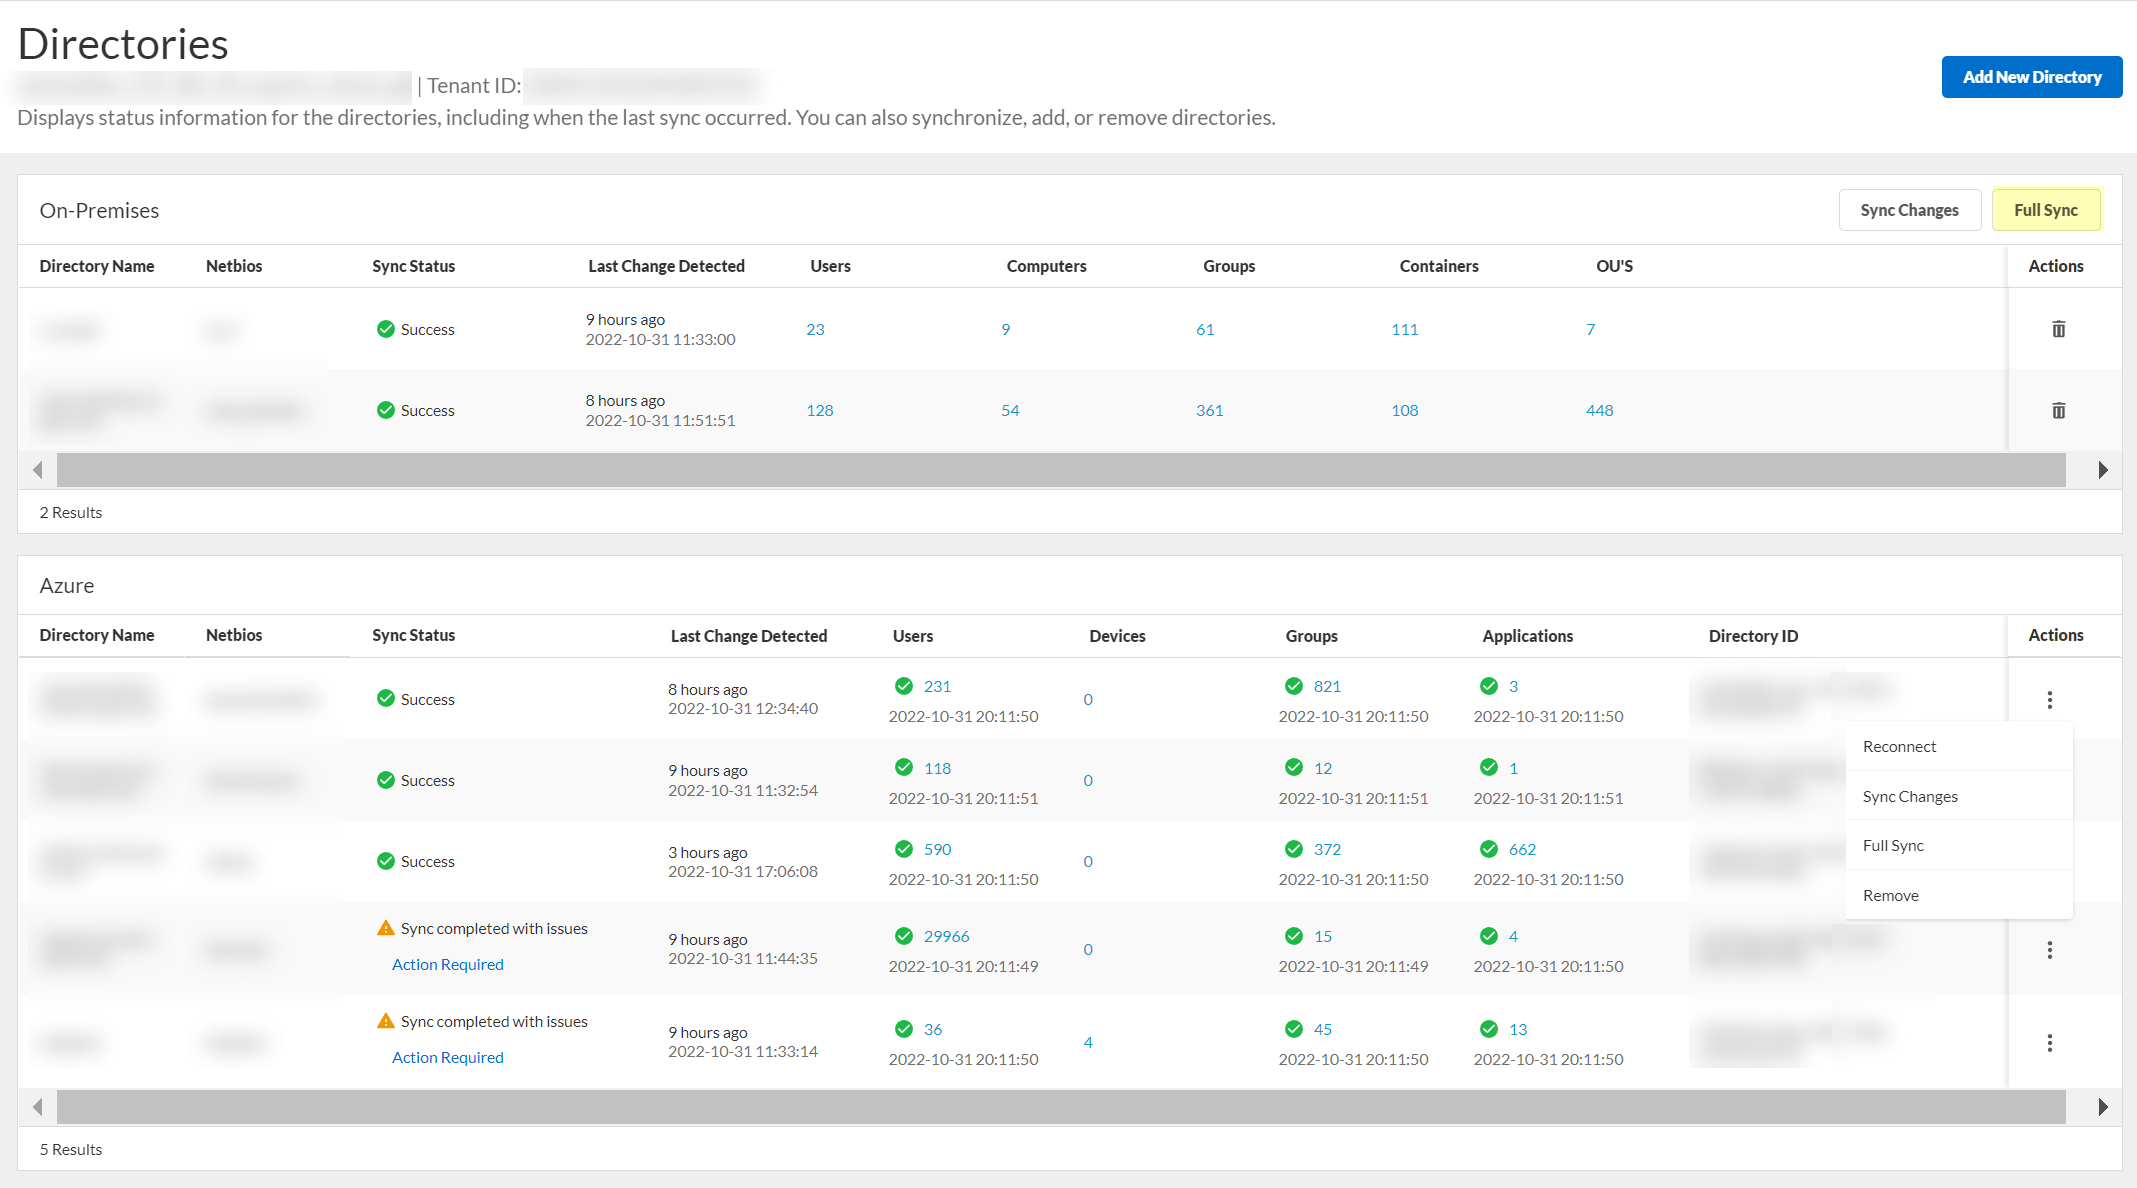
After changes, select Actions > Sync Changes.

Screenshot showing the "Sync Changes" action for a directory in the CIE app.
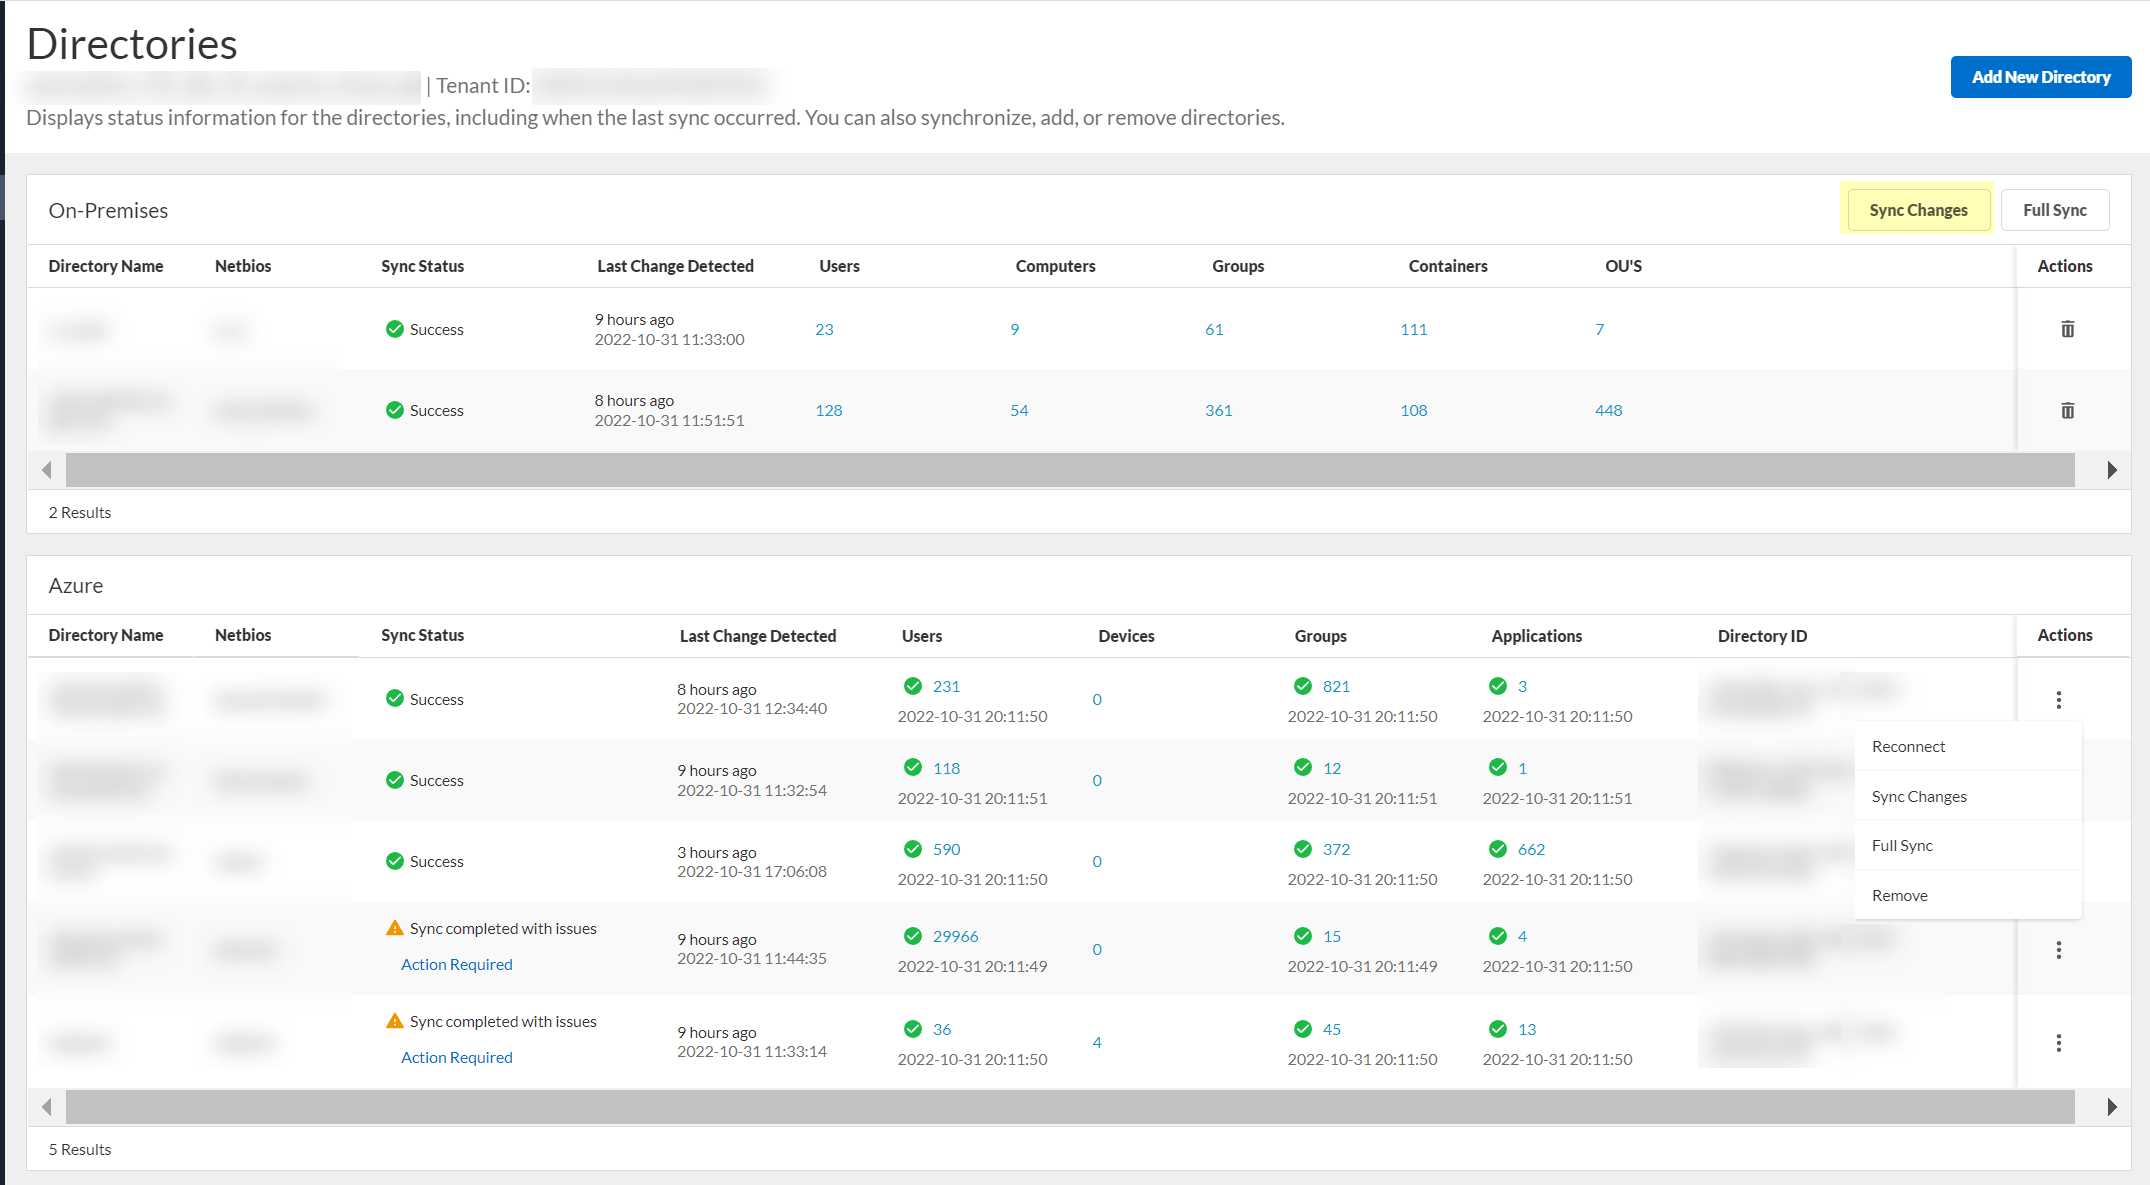
Screenshot showing the confirmation message when an incremental sync is initiated.
Set Synchronization Interval (Google Directory only)
- Log in to hub > CIE app > select tenant > Directories.
-
Click "Sync Every:" for the directory type > select interval (6, 12, 24 hours).

Screenshot showing the dropdown to set the synchronization interval for a directory.
Synchronize CDUG Changes (Google Directory only)
- Log in to hub > CIE app > select tenant > Directories.
-
Sync CDUG Changes.
Screenshot showing the "Sync CDUG Changes" button for Google Directory.
- Verify Sync Status is Success.
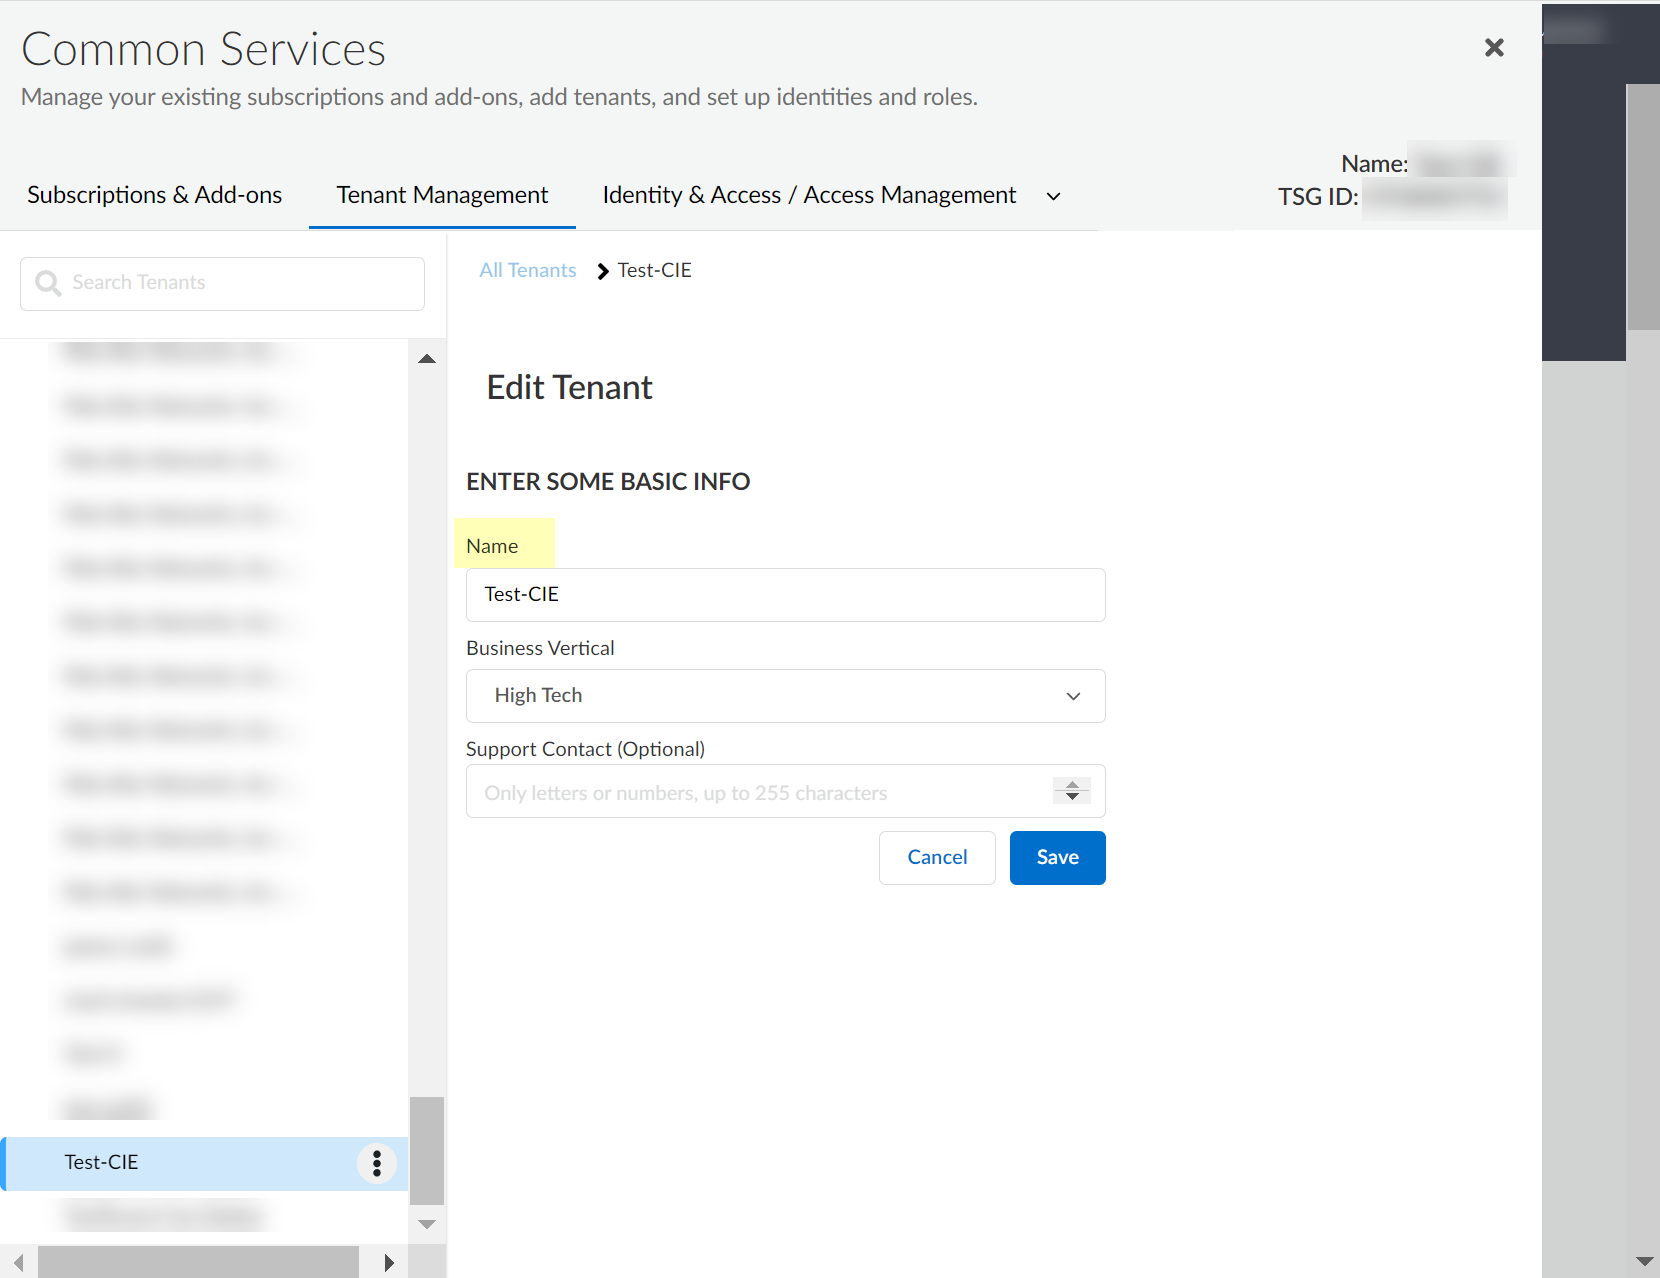
Delete Cloud Identity Engine Tenants
Critical Point: Cannot delete a tenant if another application is using it.
- (On-Prem AD only) Stop agent connection, Remove agent.
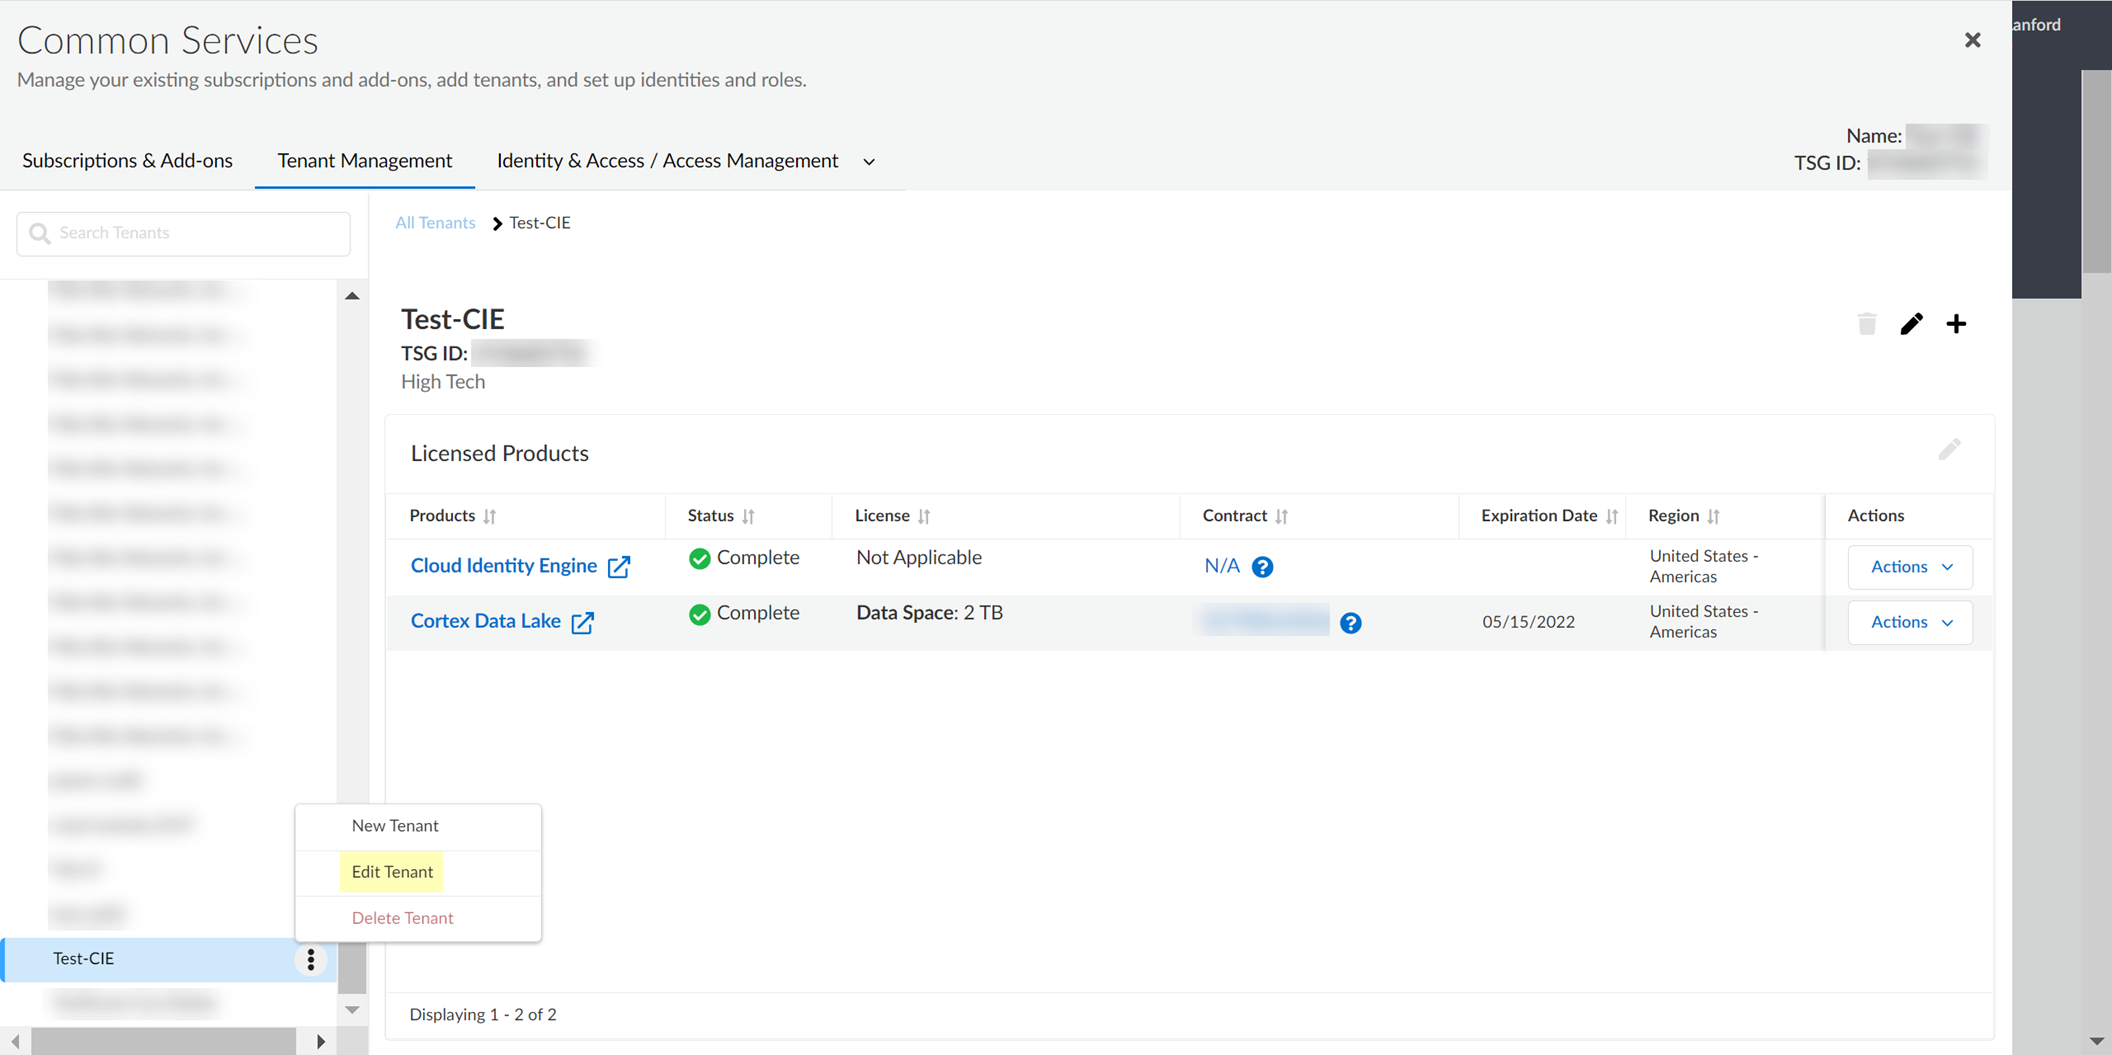
- Log in to hub > Common Services > Tenant Management.
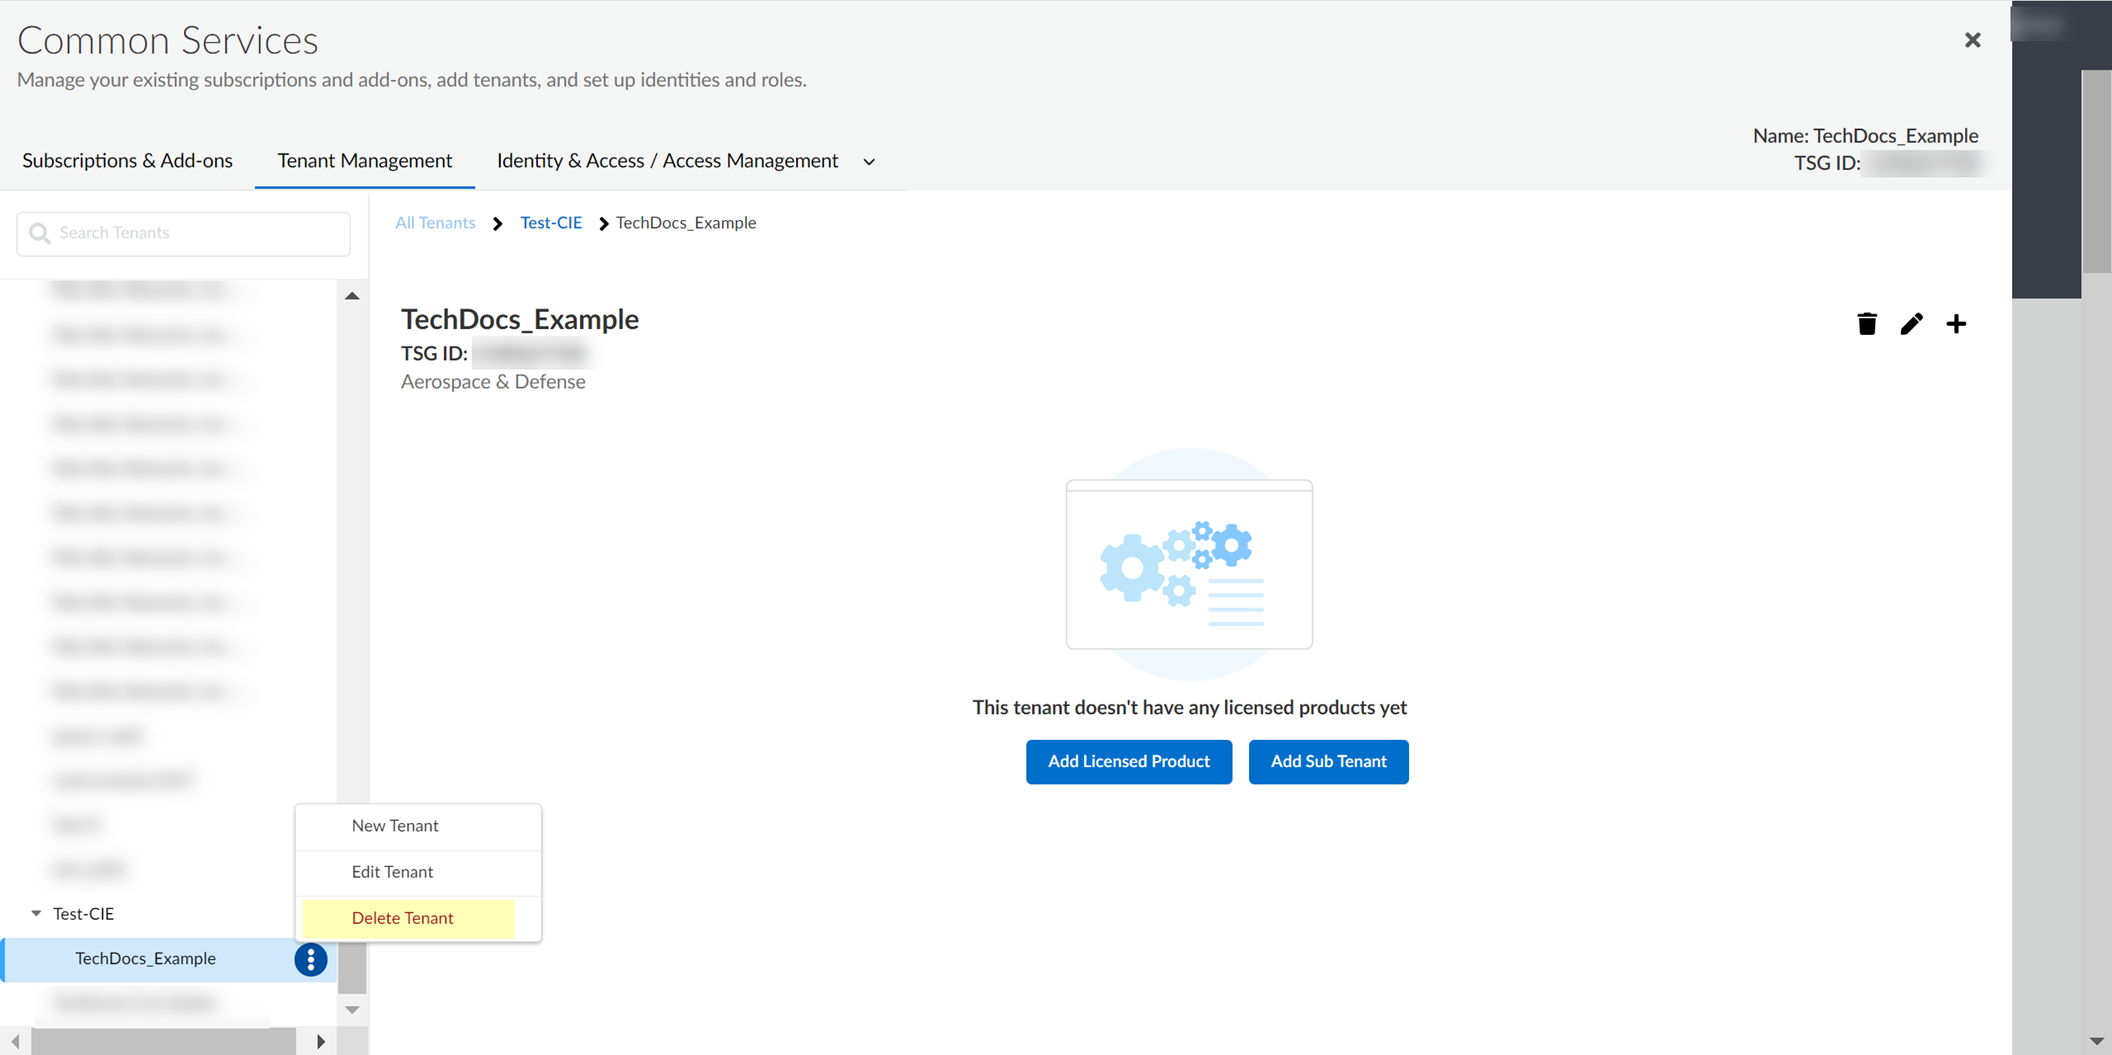
-
Select tenant > Delete Tenant.
Screenshot showing the "Delete Tenant" action in Tenant Management.
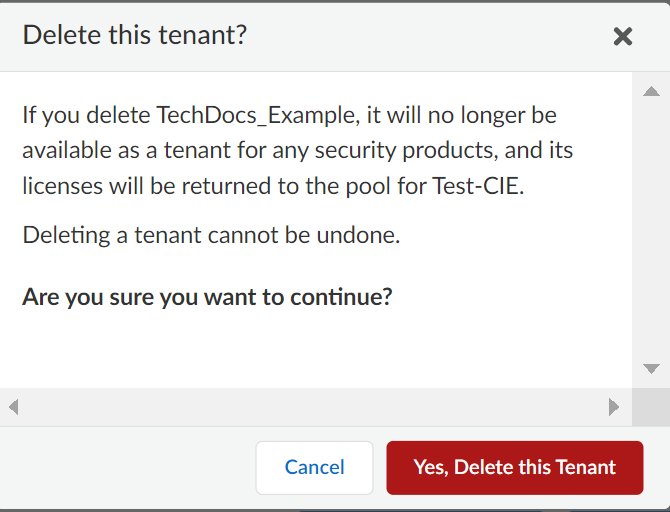
-
Confirm deletion.
Screenshot of the confirmation dialog for tenant deletion.
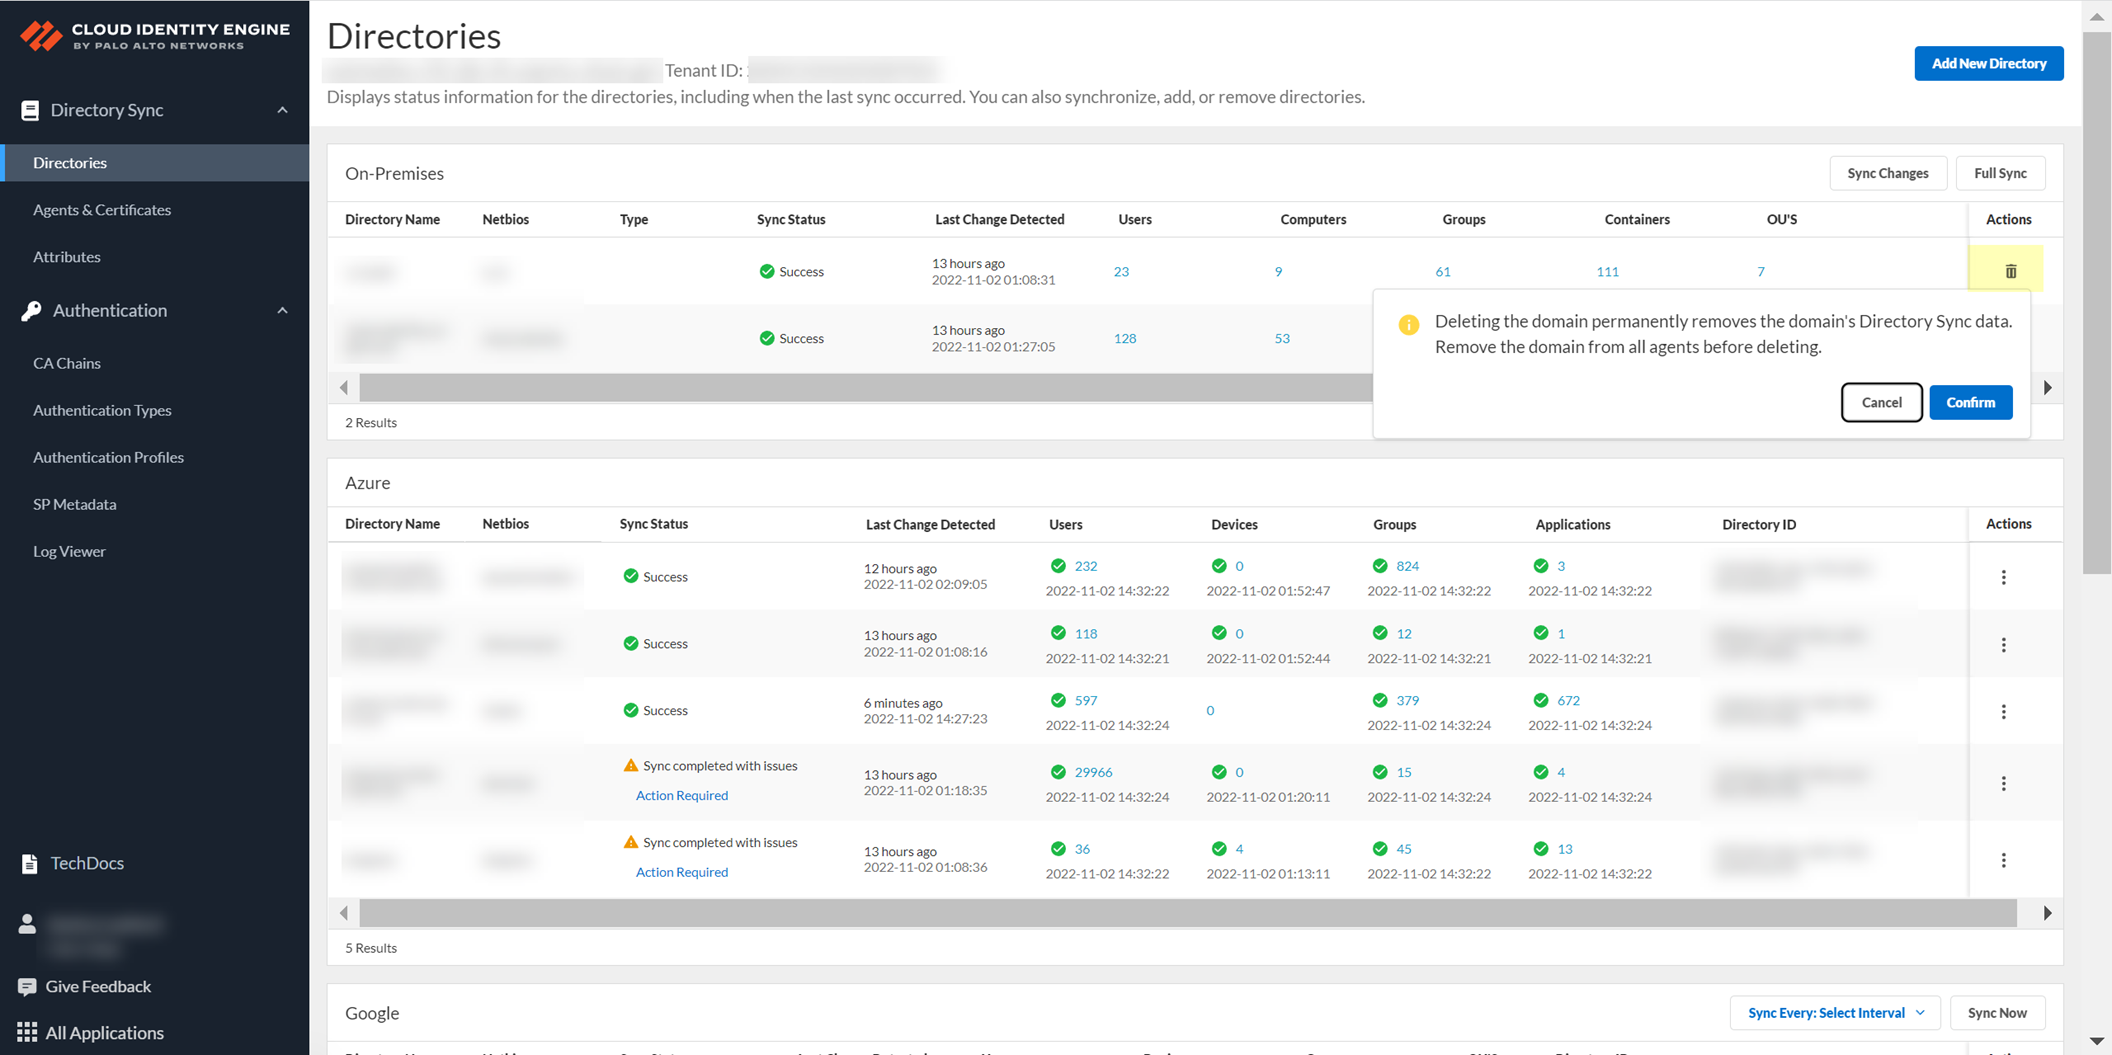
Delete Domains or Directories from Cloud Identity Engine Tenants
Procedure varies by directory type.
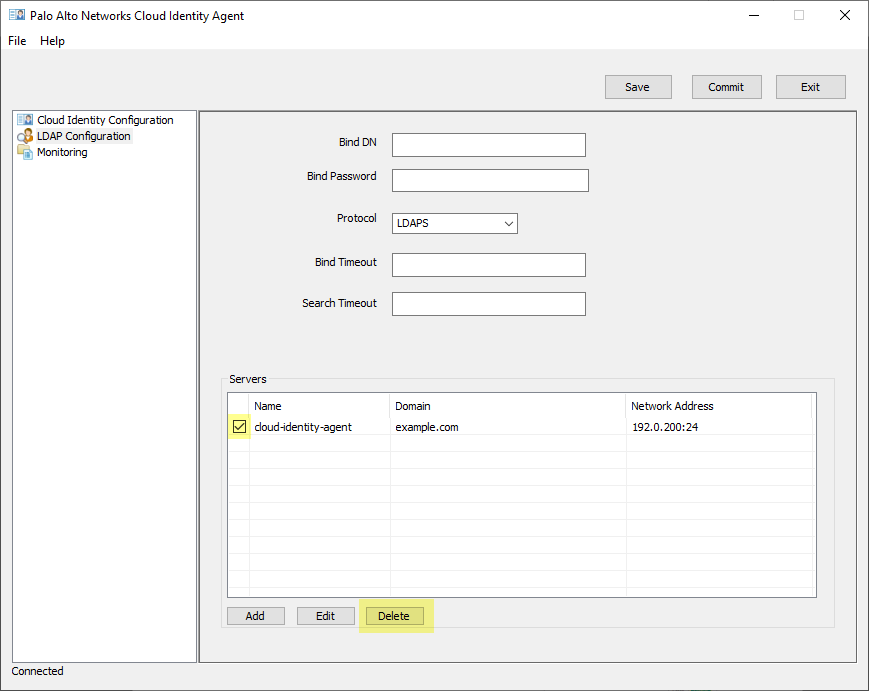
Delete Active Directory Domains (On-Prem)
- Launch agent > LDAP Configuration.
-
Select domain from Servers list > Delete.
Screenshot showing how to delete a domain from the Cloud Identity Agent configuration.
-
Commit changes in agent.
Critical Point: Must delete domain from agent config BEFORE deleting from CIE app, or it will be re-added.
- Log in to hub > CIE app > select tenant > Directory.
-
Remove domain > Confirm deletion.
Screenshot showing the "Remove" action for a domain in the CIE app Directory section.
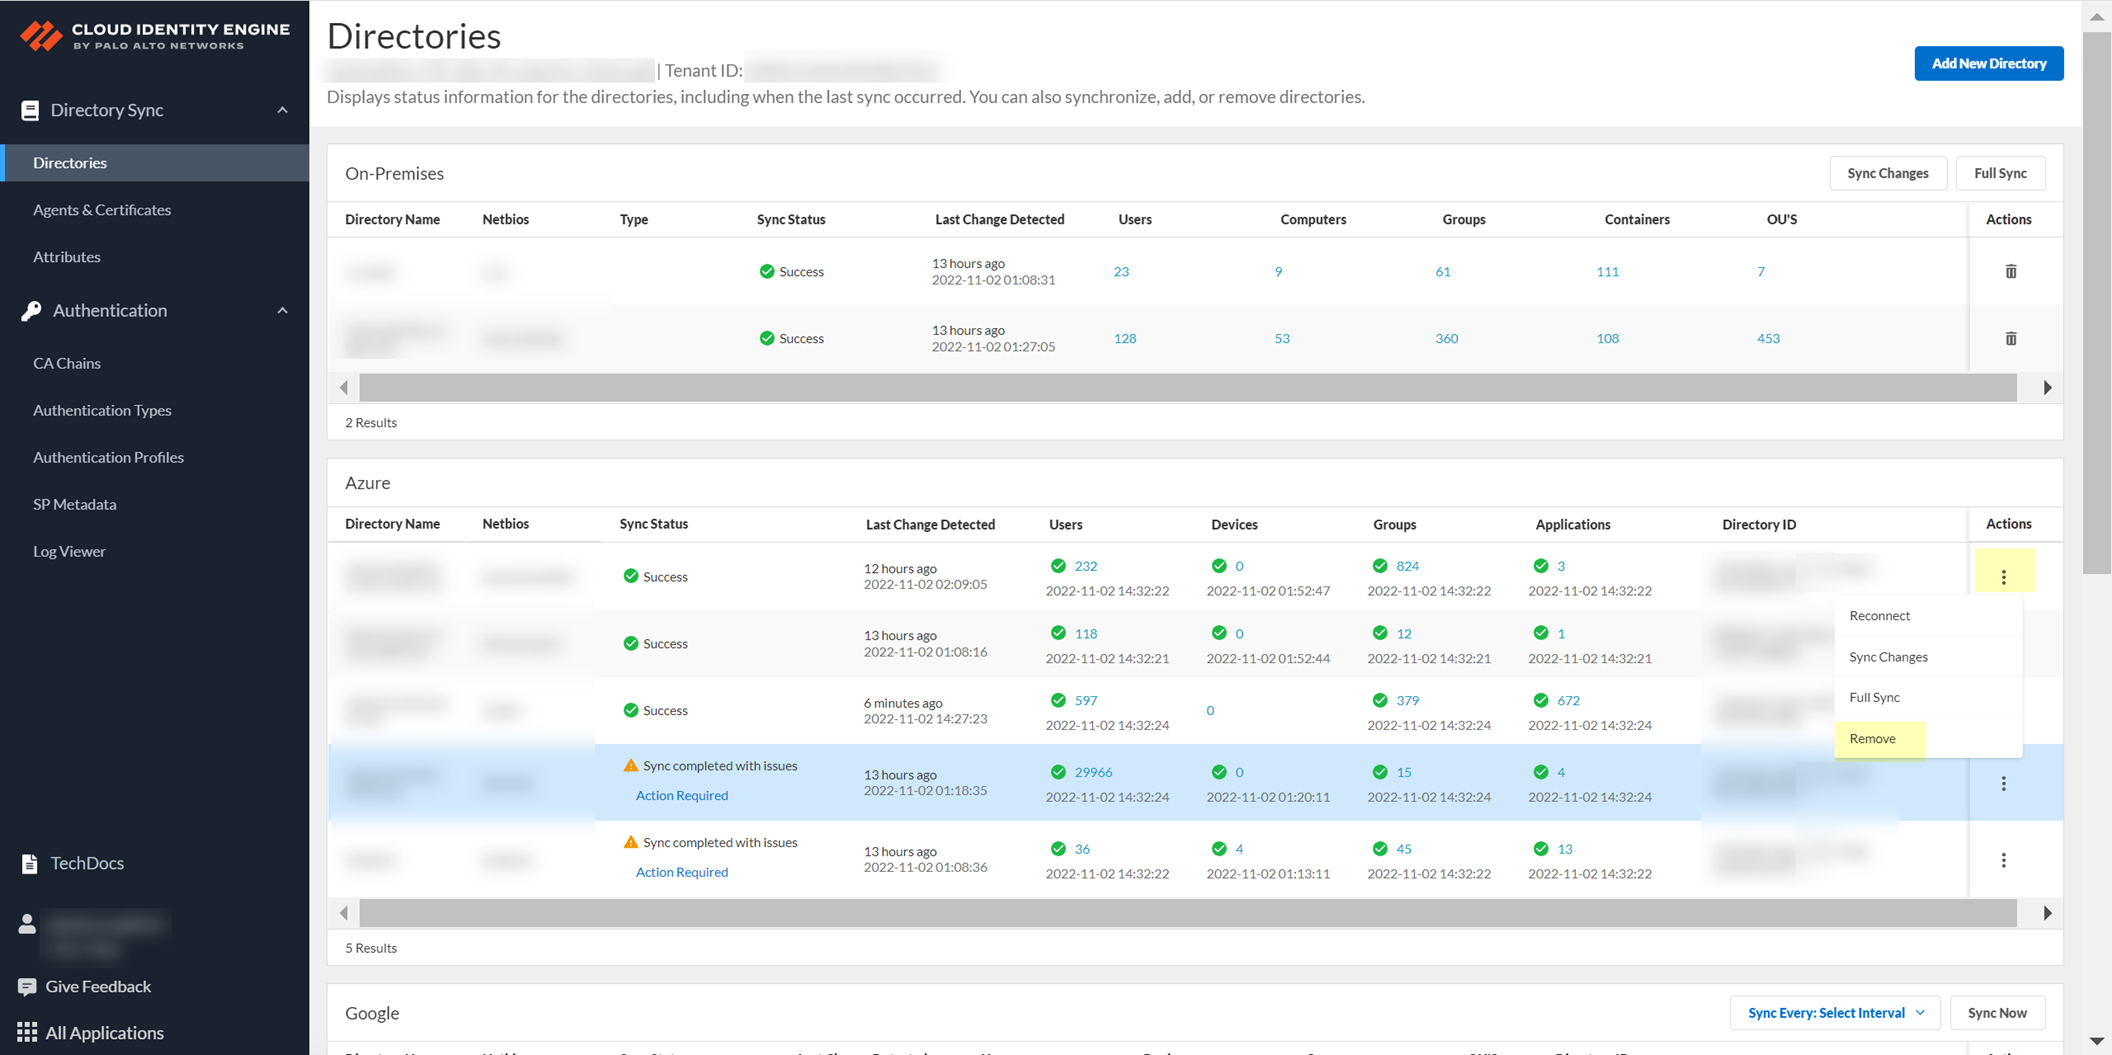
Delete Cloud-Based Directories
- Log in to hub > CIE app > select tenant > Directory.
-
Select Actions > Remove.
Screenshot showing the "Remove" action for a cloud-based directory in the CIE app Directory section.
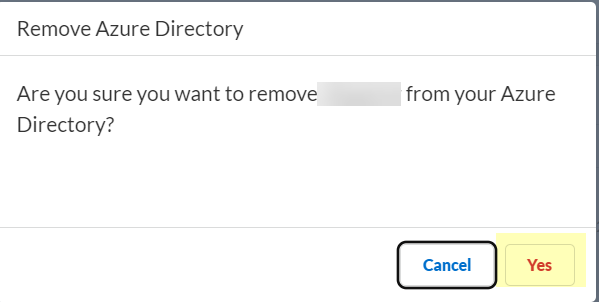
-
Click Yes to confirm.
Screenshot of the confirmation dialog for cloud-based directory deletion.
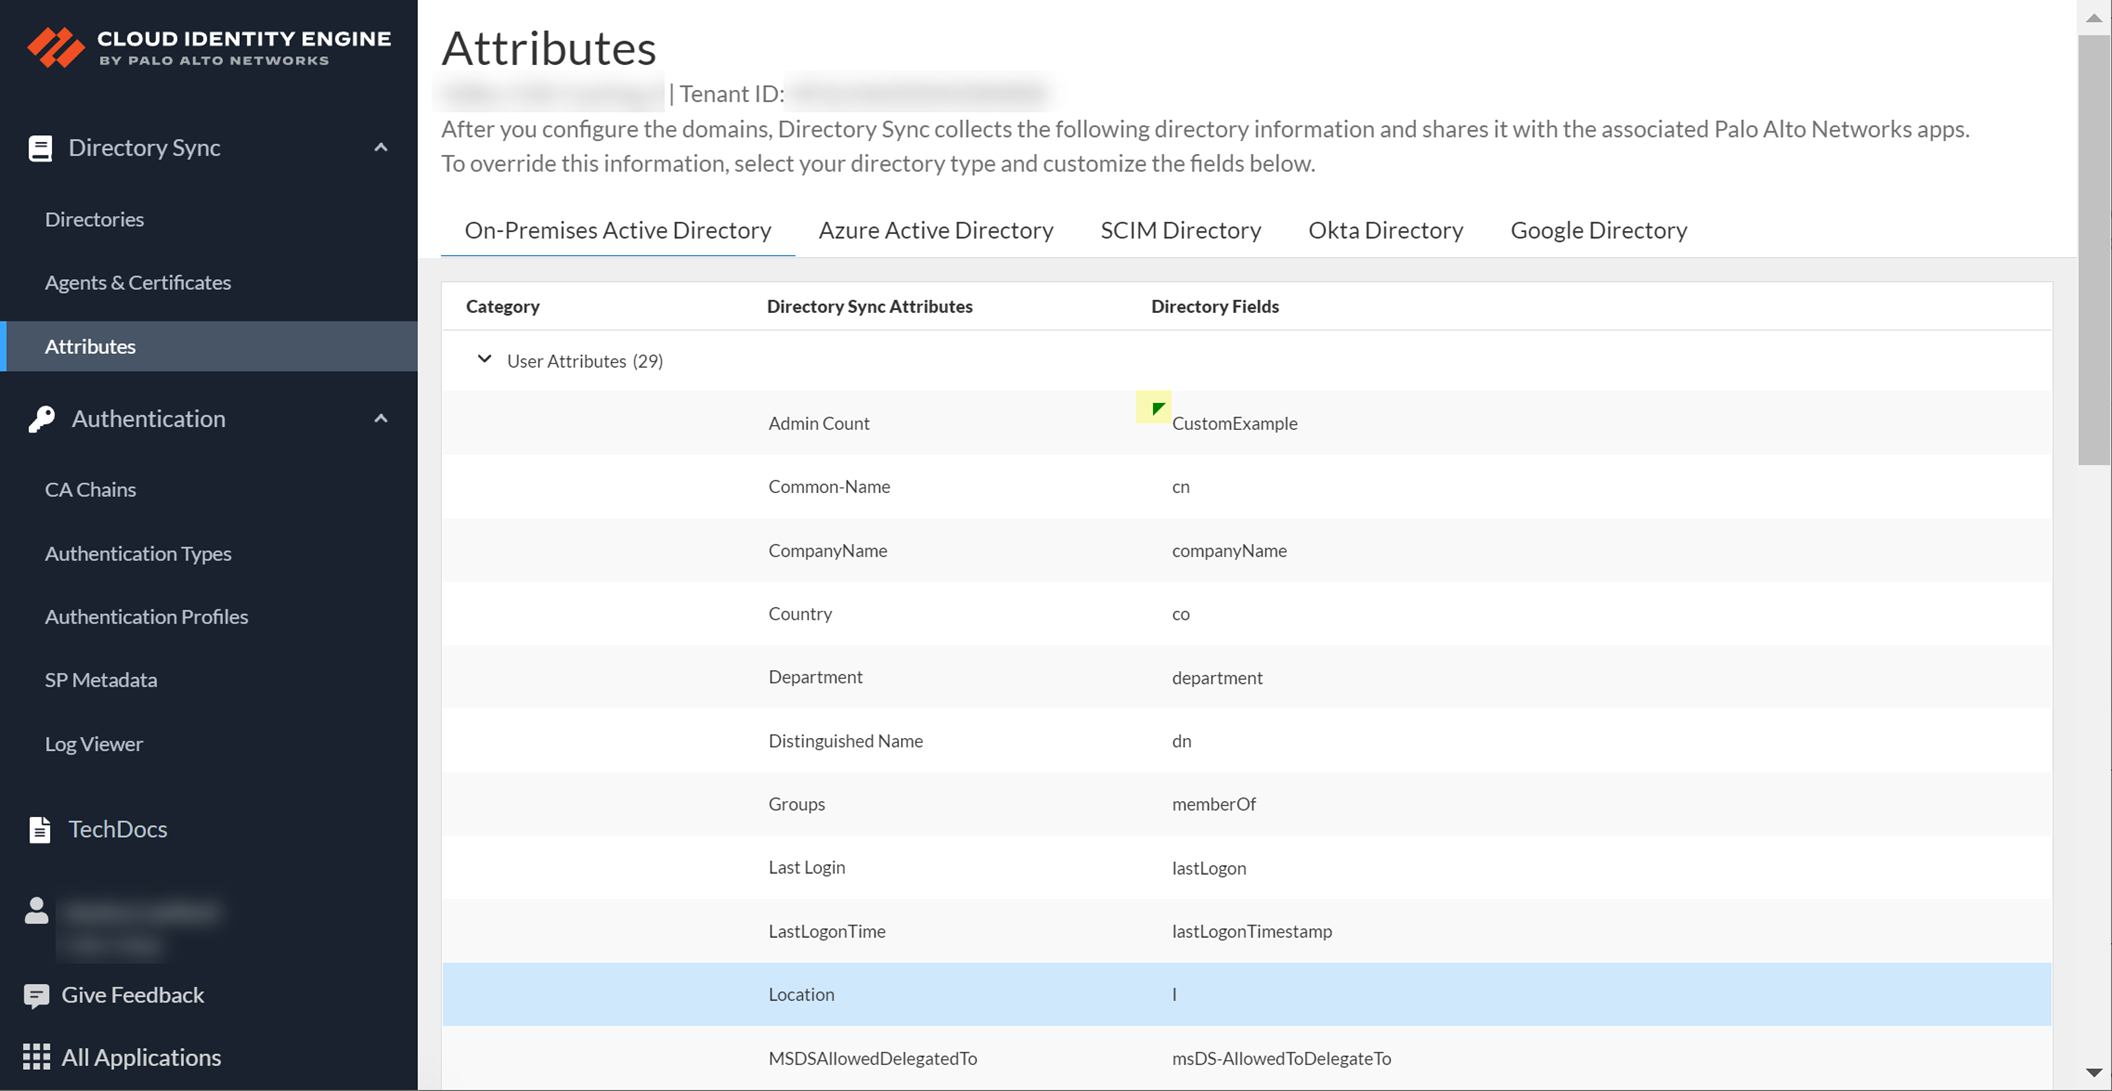
Cloud Identity Engine Attributes
CIE collects attributes (unique identifiers like Distinguished Name) for users, computers, groups, containers, OUs. Default formats are listed. Custom attributes must be specified in CIE.
Critical Point: Verify attributes are valid before sync. Invalid attributes cause initial sync failure.
Default attribute mappings are provided for various directory types (On-Prem AD, Azure AD, SCIM, Okta, Google, On-Prem OpenLDAP).
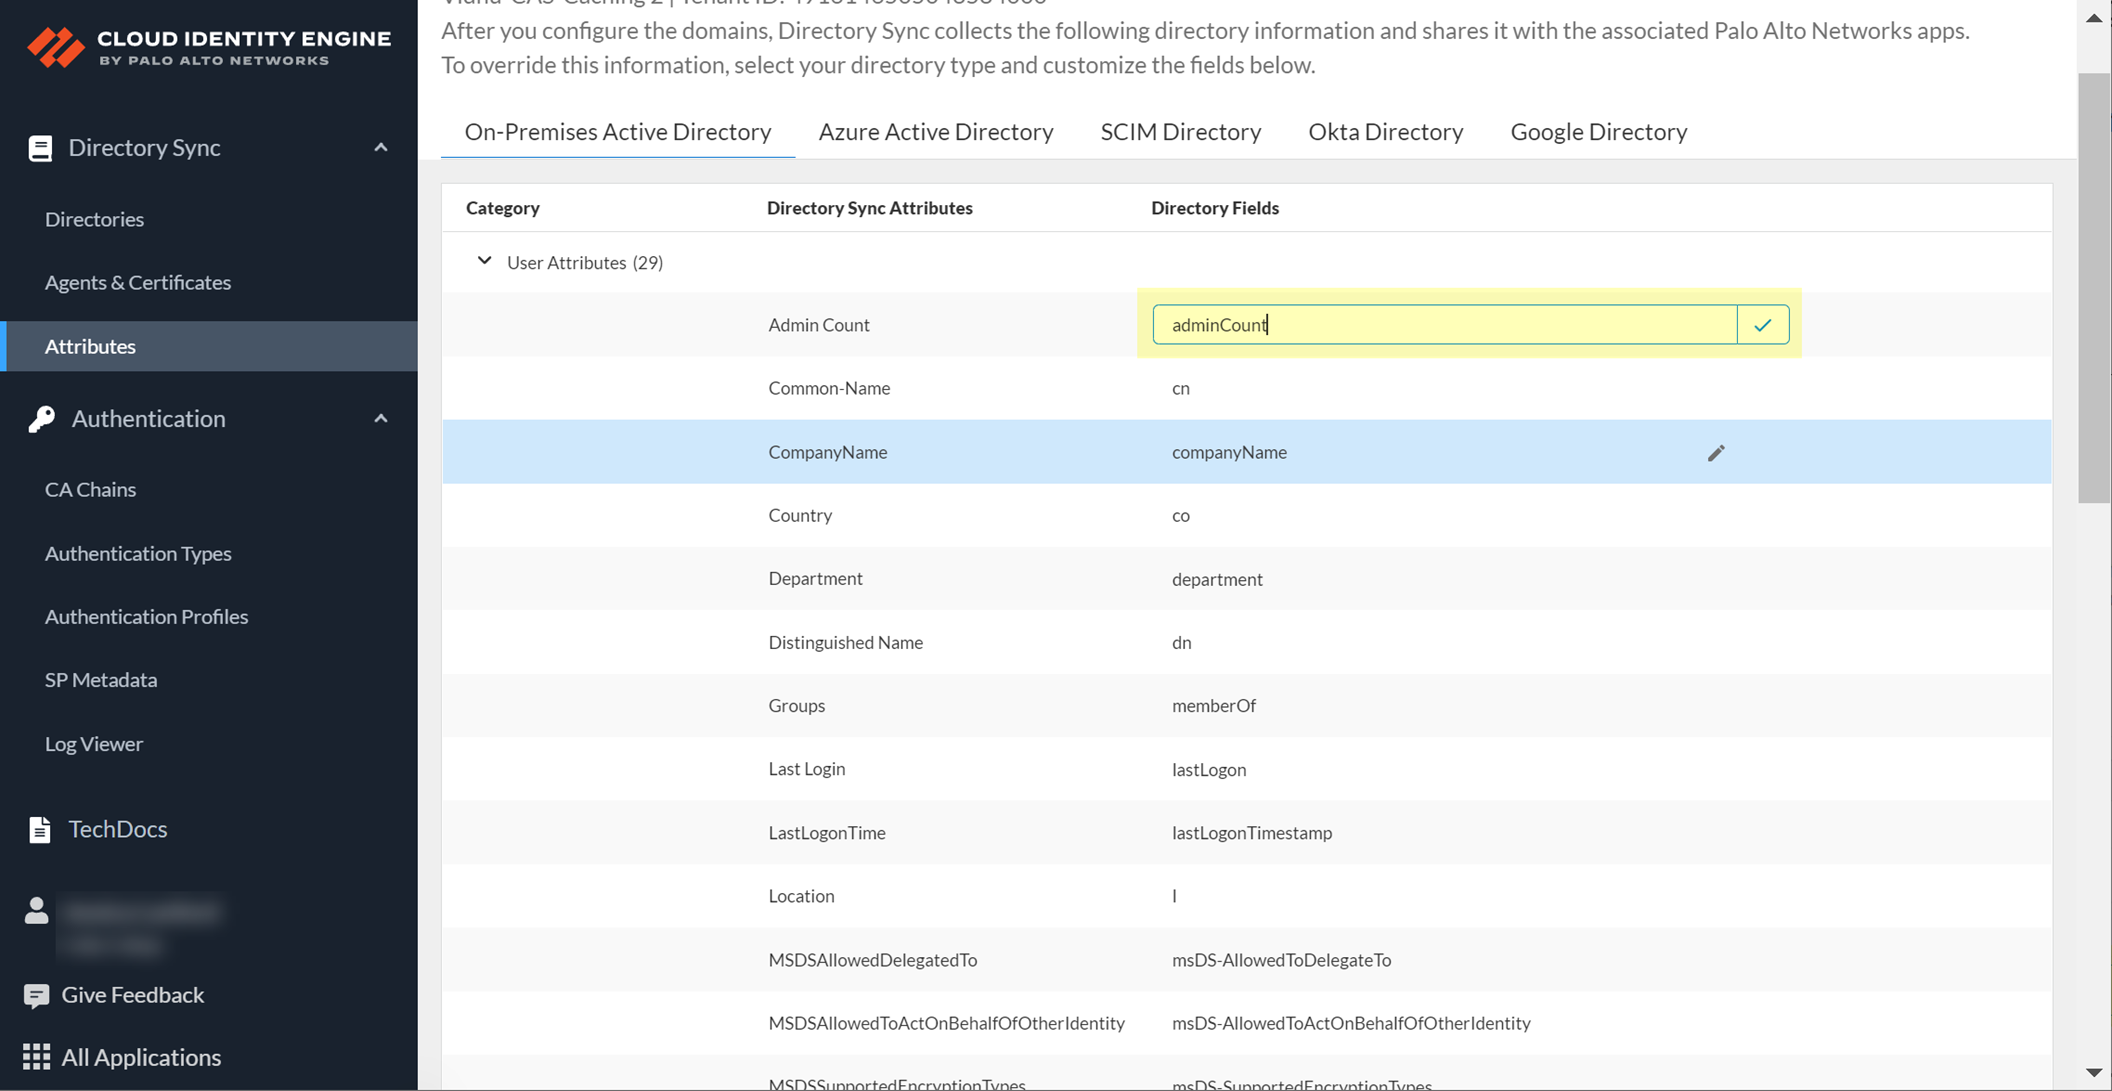
Collect Custom Attributes with the Cloud Identity Engine
Specify custom attributes in your directory if they don't use default formats.
- Log in to hub > select CIE tenant > Attributes.
- Select the directory type with custom attribute.
-
Select the custom attribute row (field becomes editable).
Screenshot showing a custom attribute field becoming editable in the CIE Attributes section.
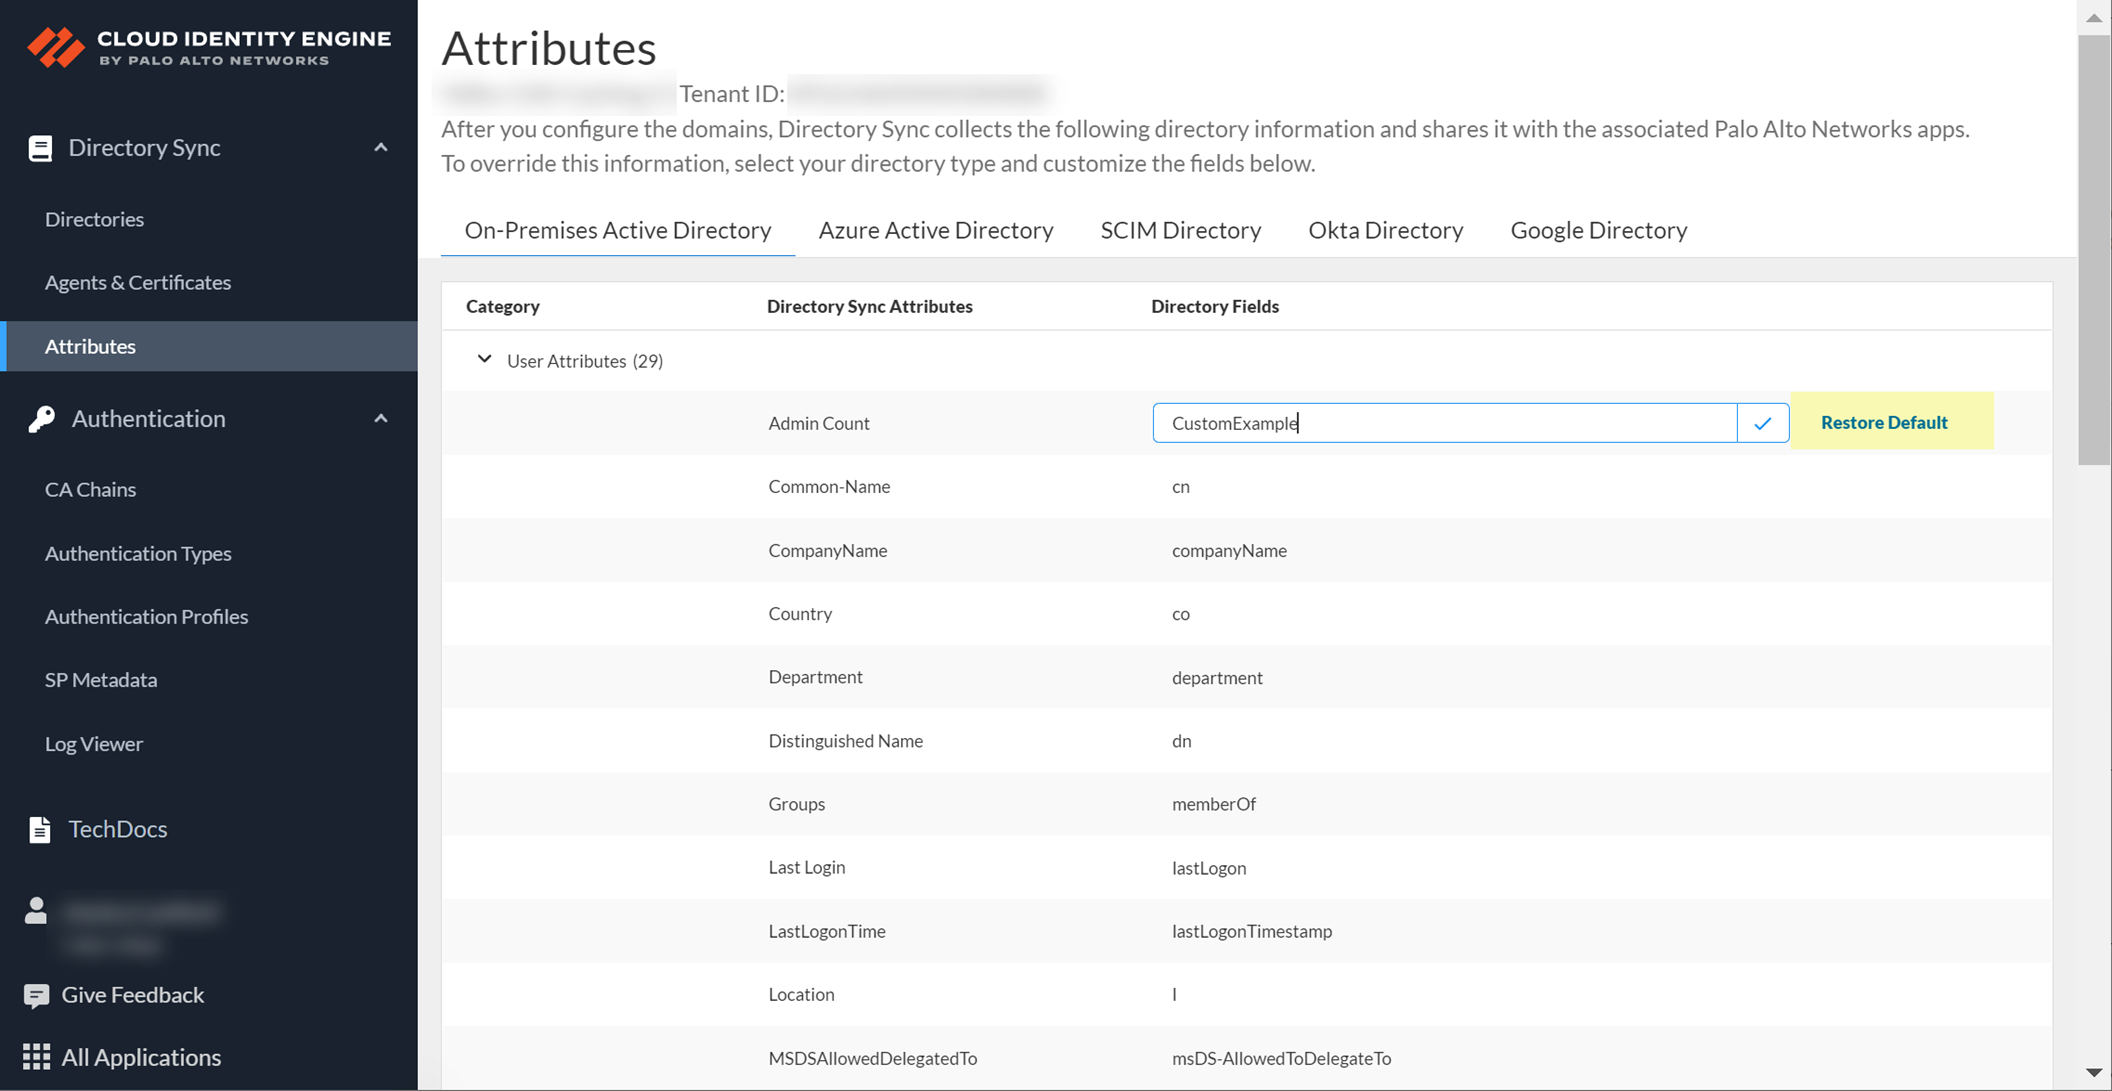
-
Enter the new value, confirm (checkmark).
Screenshot showing a modified custom attribute row with a green triangle indicating changes.
Gotcha!: Custom attributes cannot begin with an underscore (_).
Option to Restore Default attribute value.
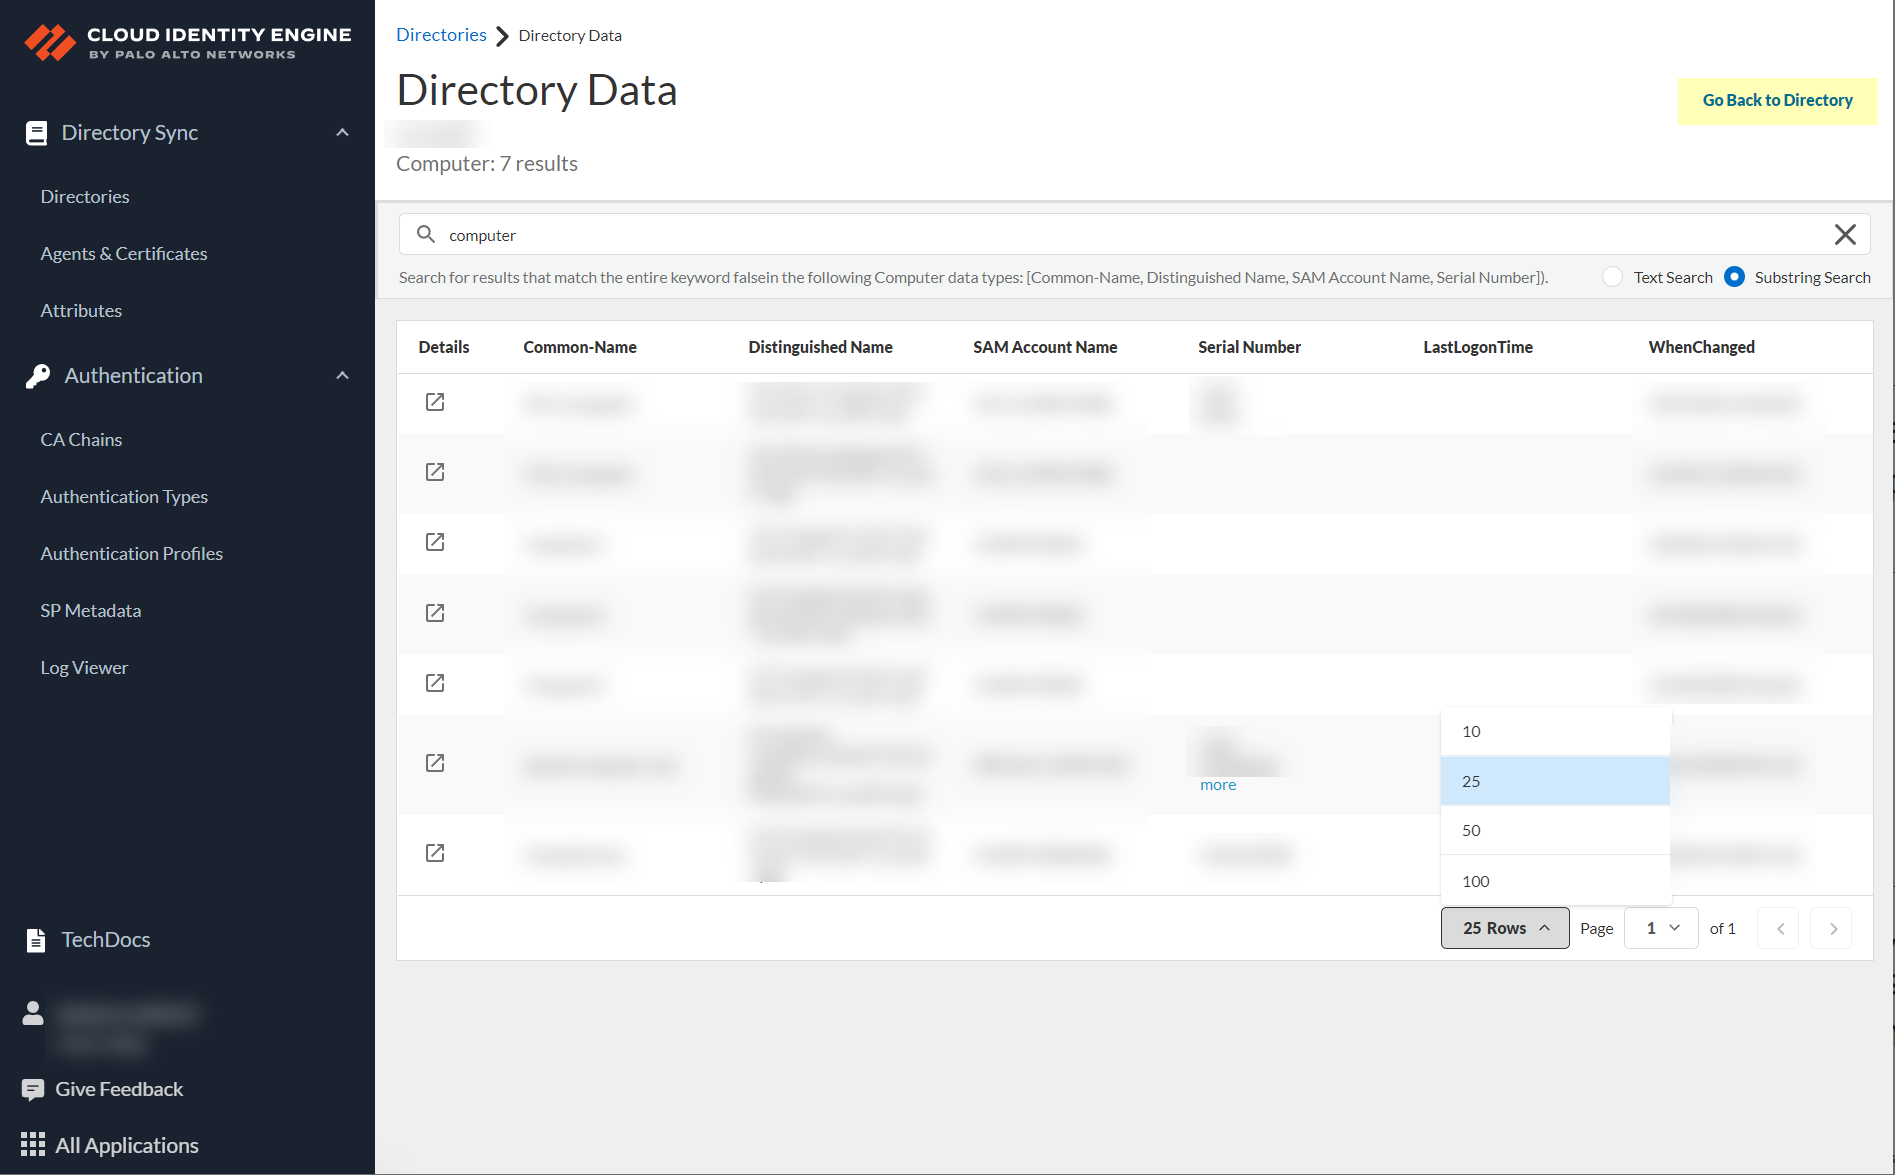
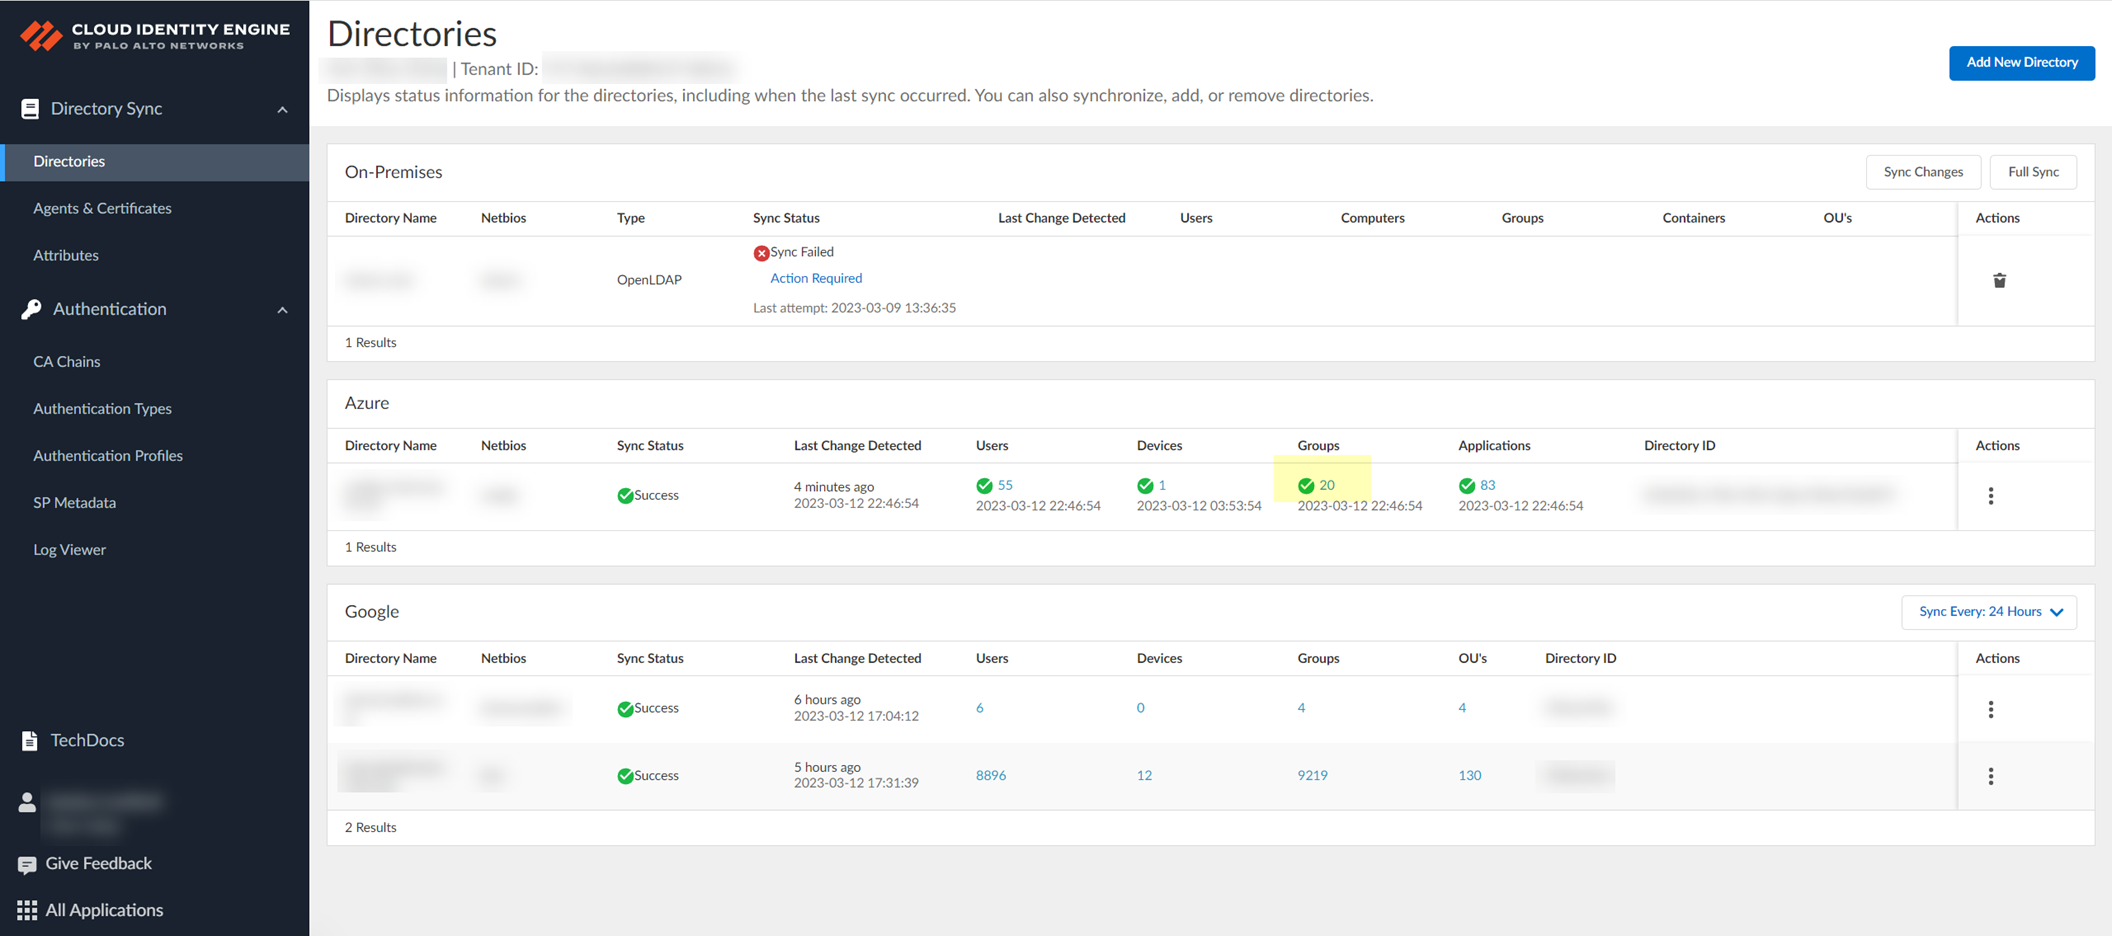
View Directory Data
View collected data (users, computers, groups, etc.) from your directory in the CIE app (Directories page > click number in object column). Search data (case-insensitive), view details (incl. flattened group members/user groups - max 2000 displayed), view raw data, copy details.
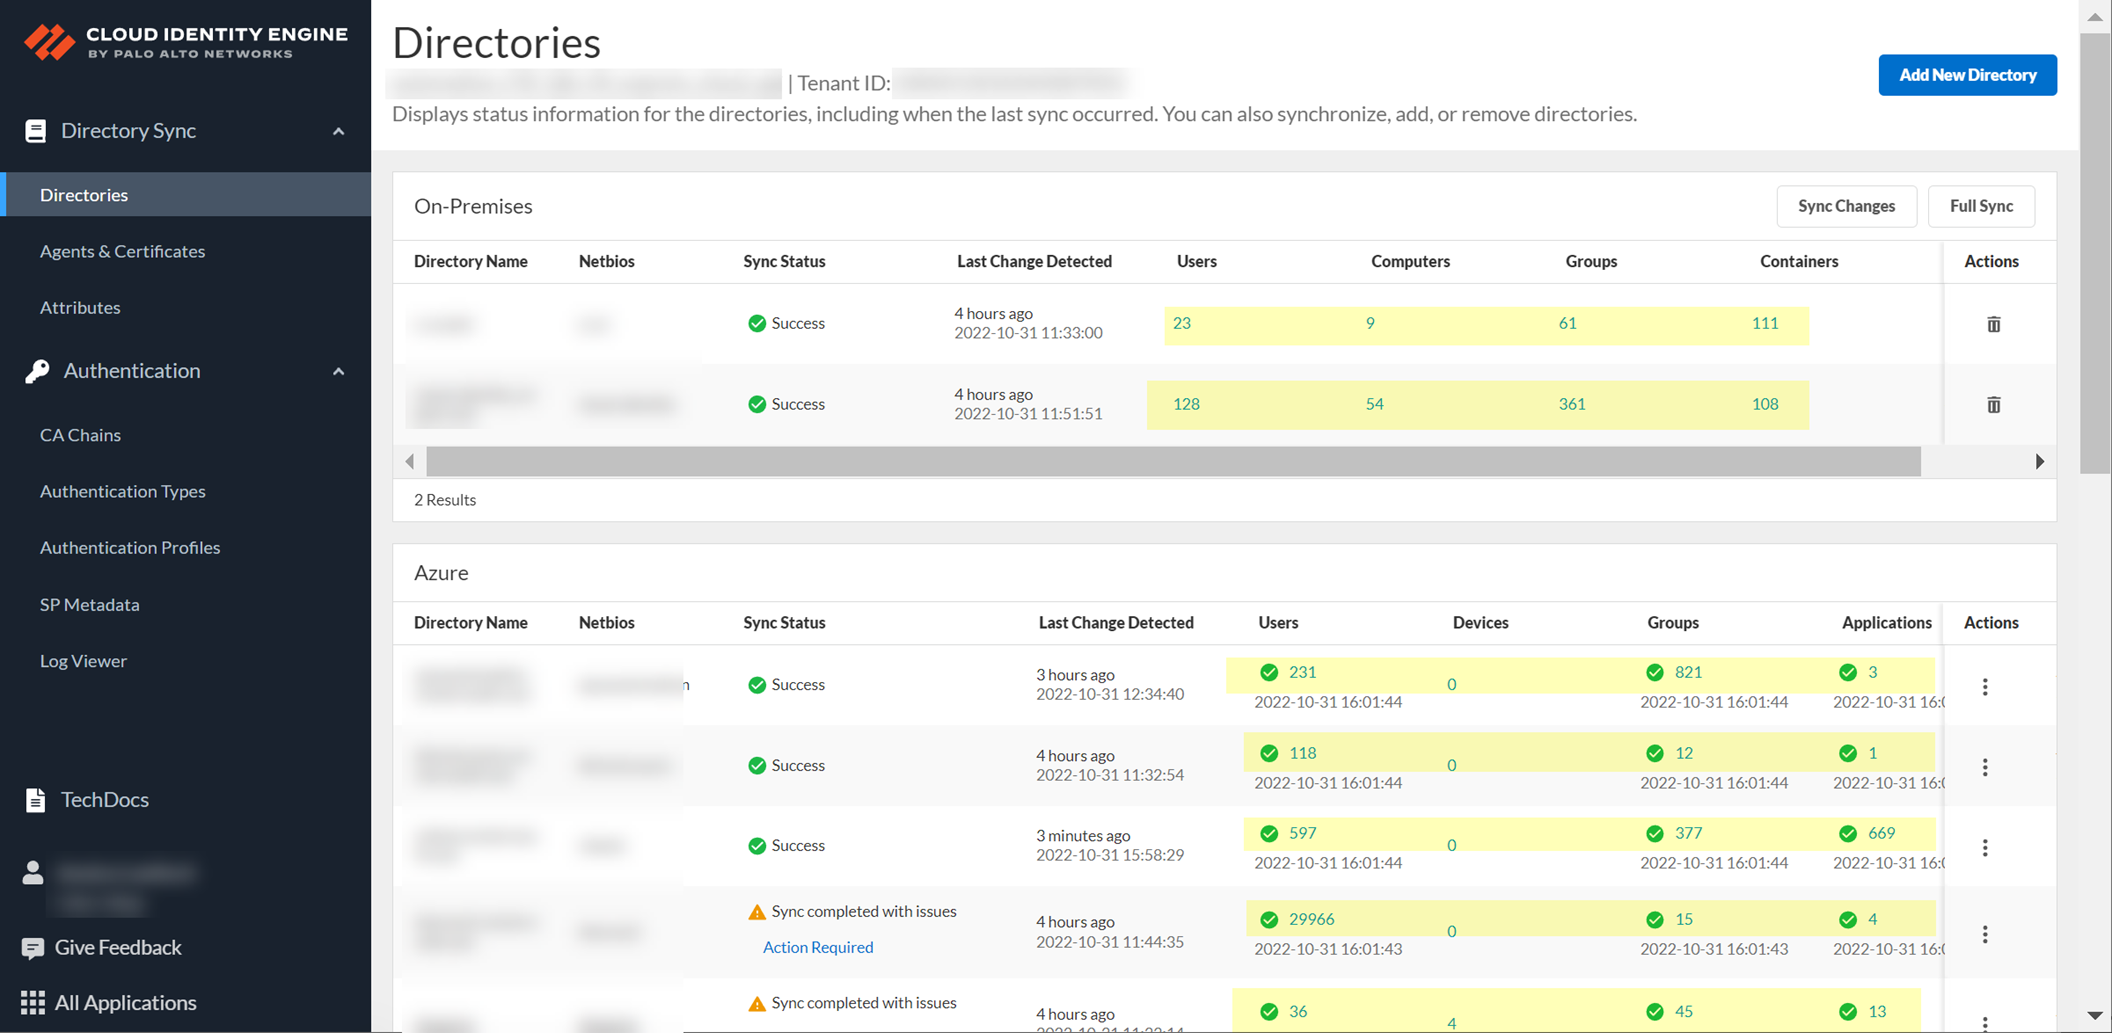
Screenshot showing directory data counts (Users, Computers, Groups, etc.) on the CIE Directories page.
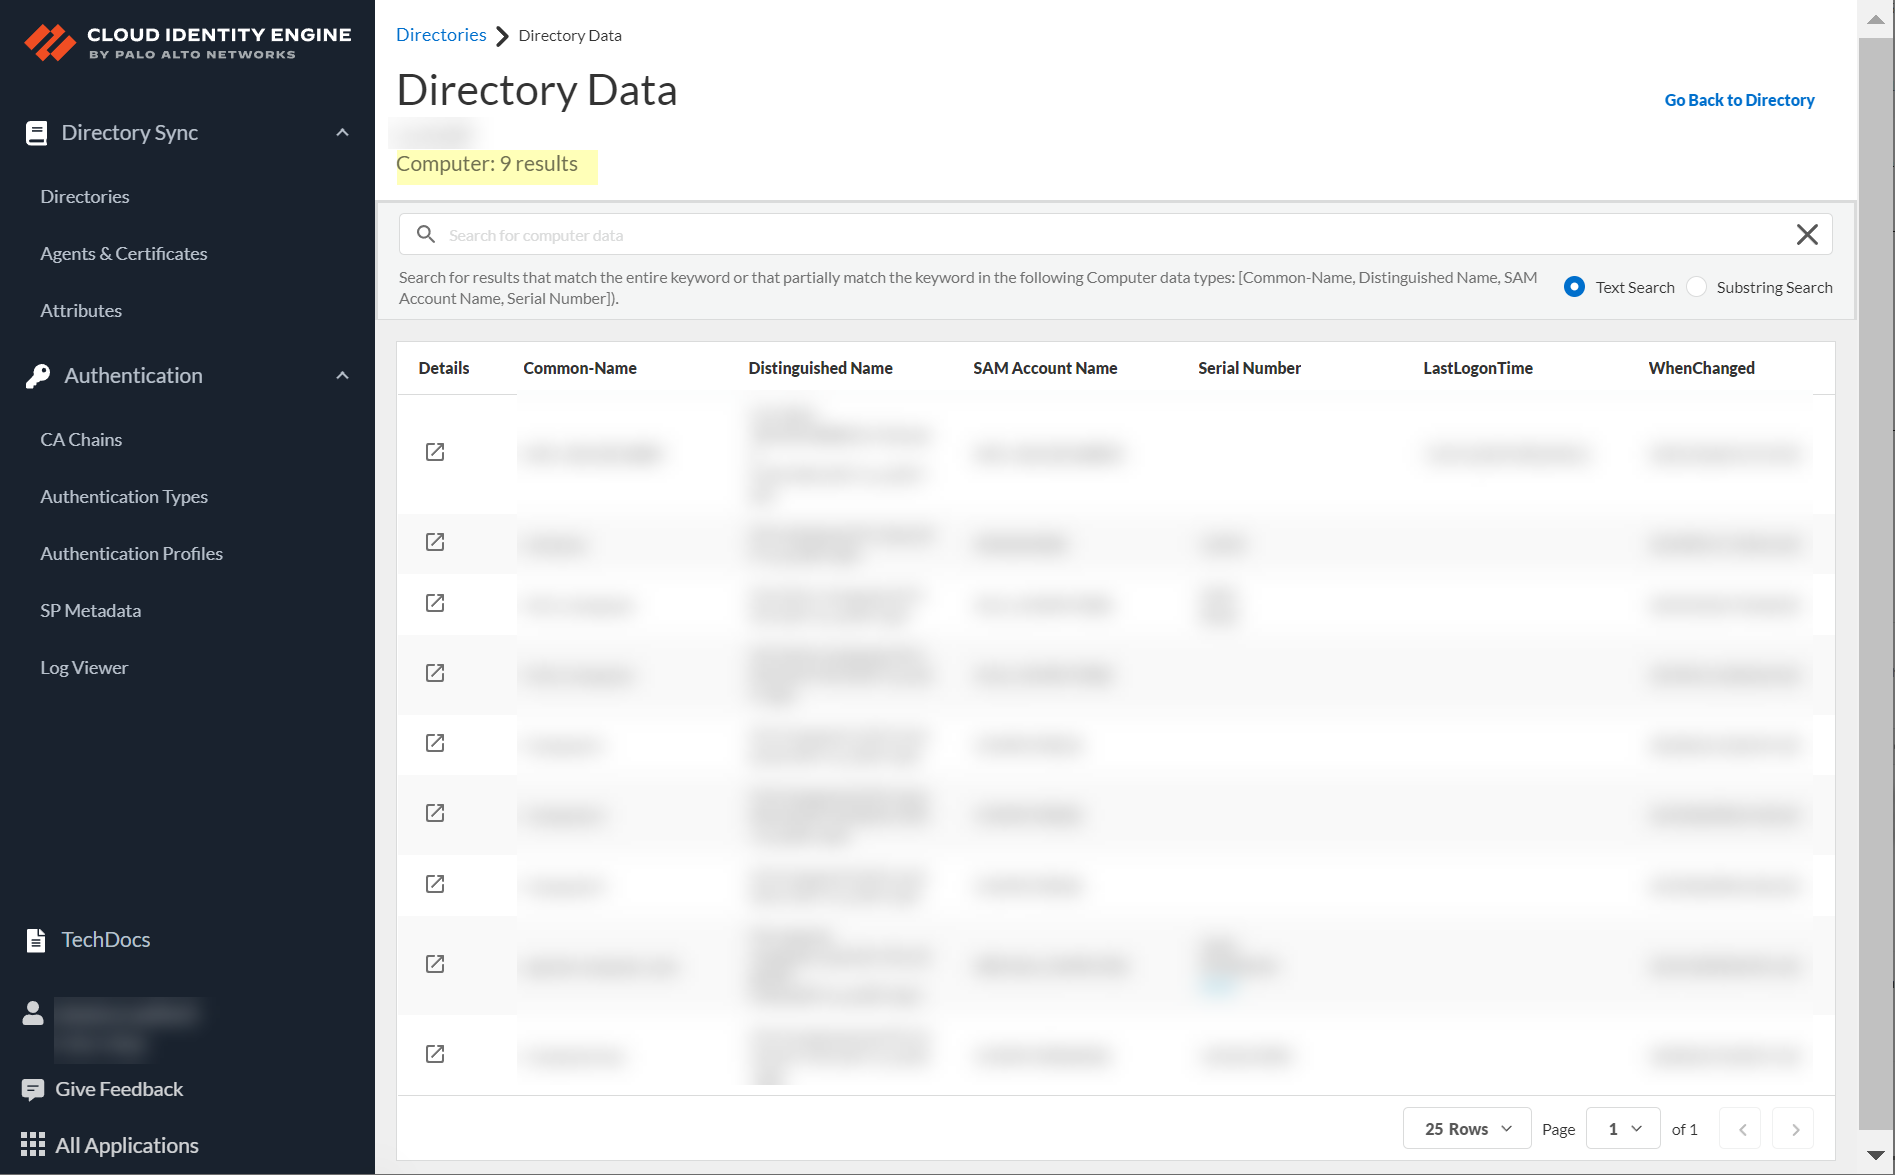
Screenshot showing the Directory Data page displaying a list of objects.
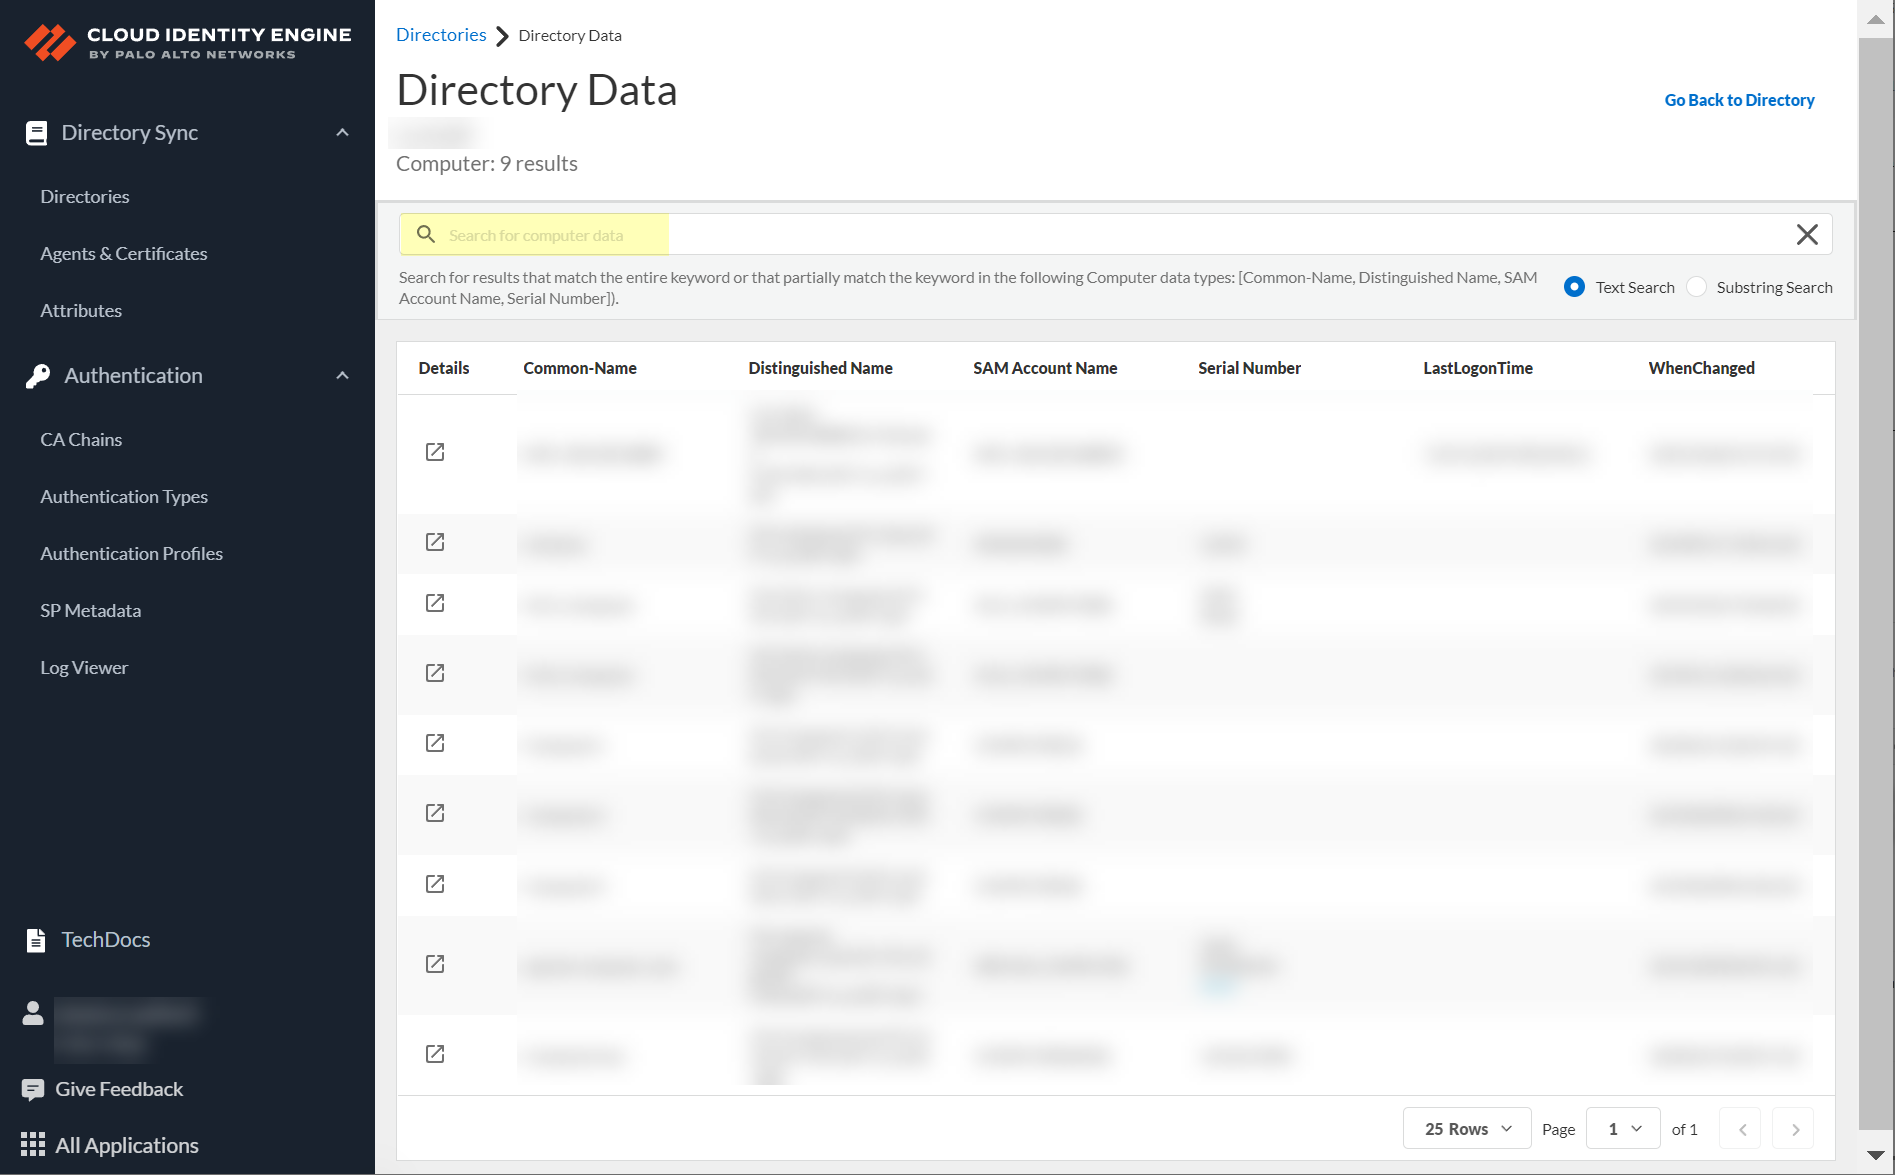
Screenshot showing the search bar on the Directory Data page.
Icon representing the "Copy" function.
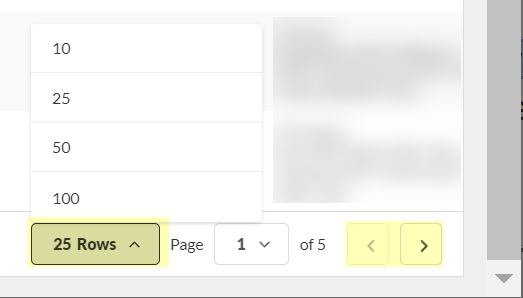
Screenshot showing pagination controls and rows per page selection on the Directory Data page.

Icon representing the "Details" button to view object attributes.
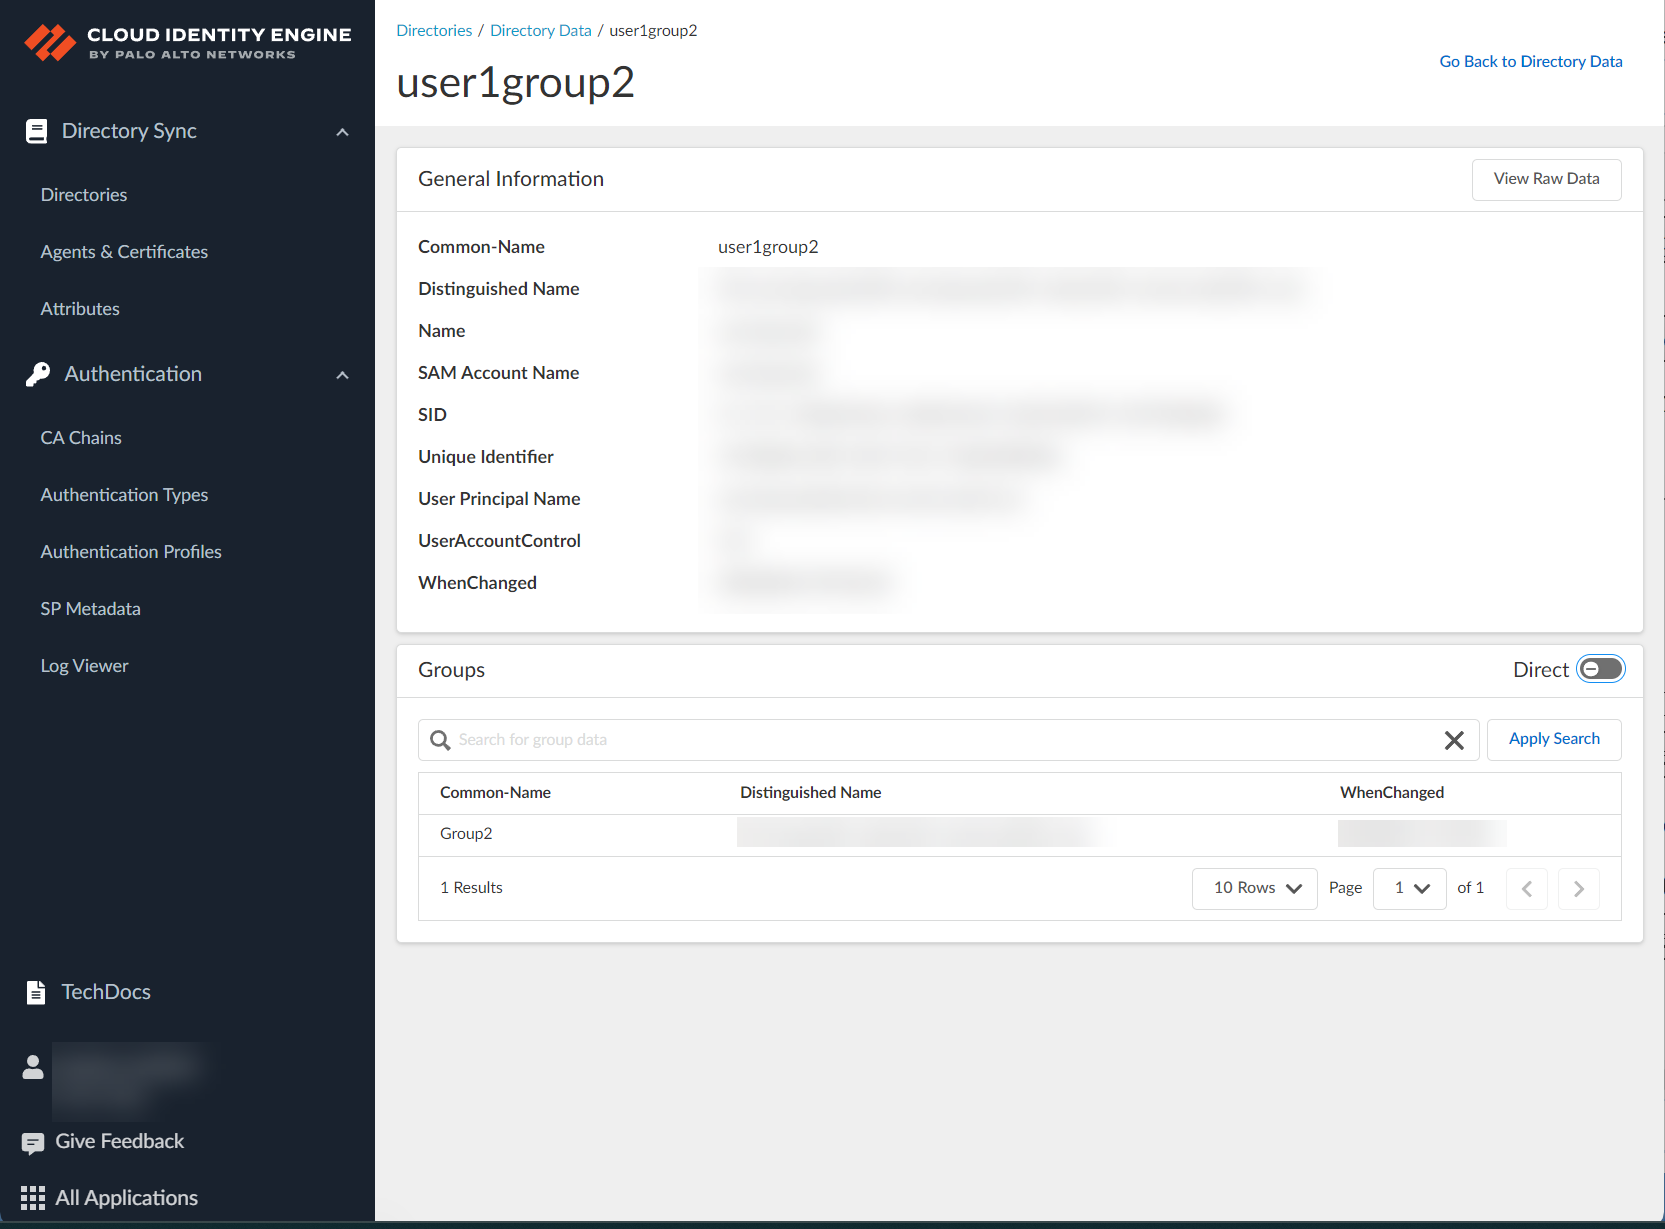
Screenshot showing detailed attributes for a selected object (user or group).
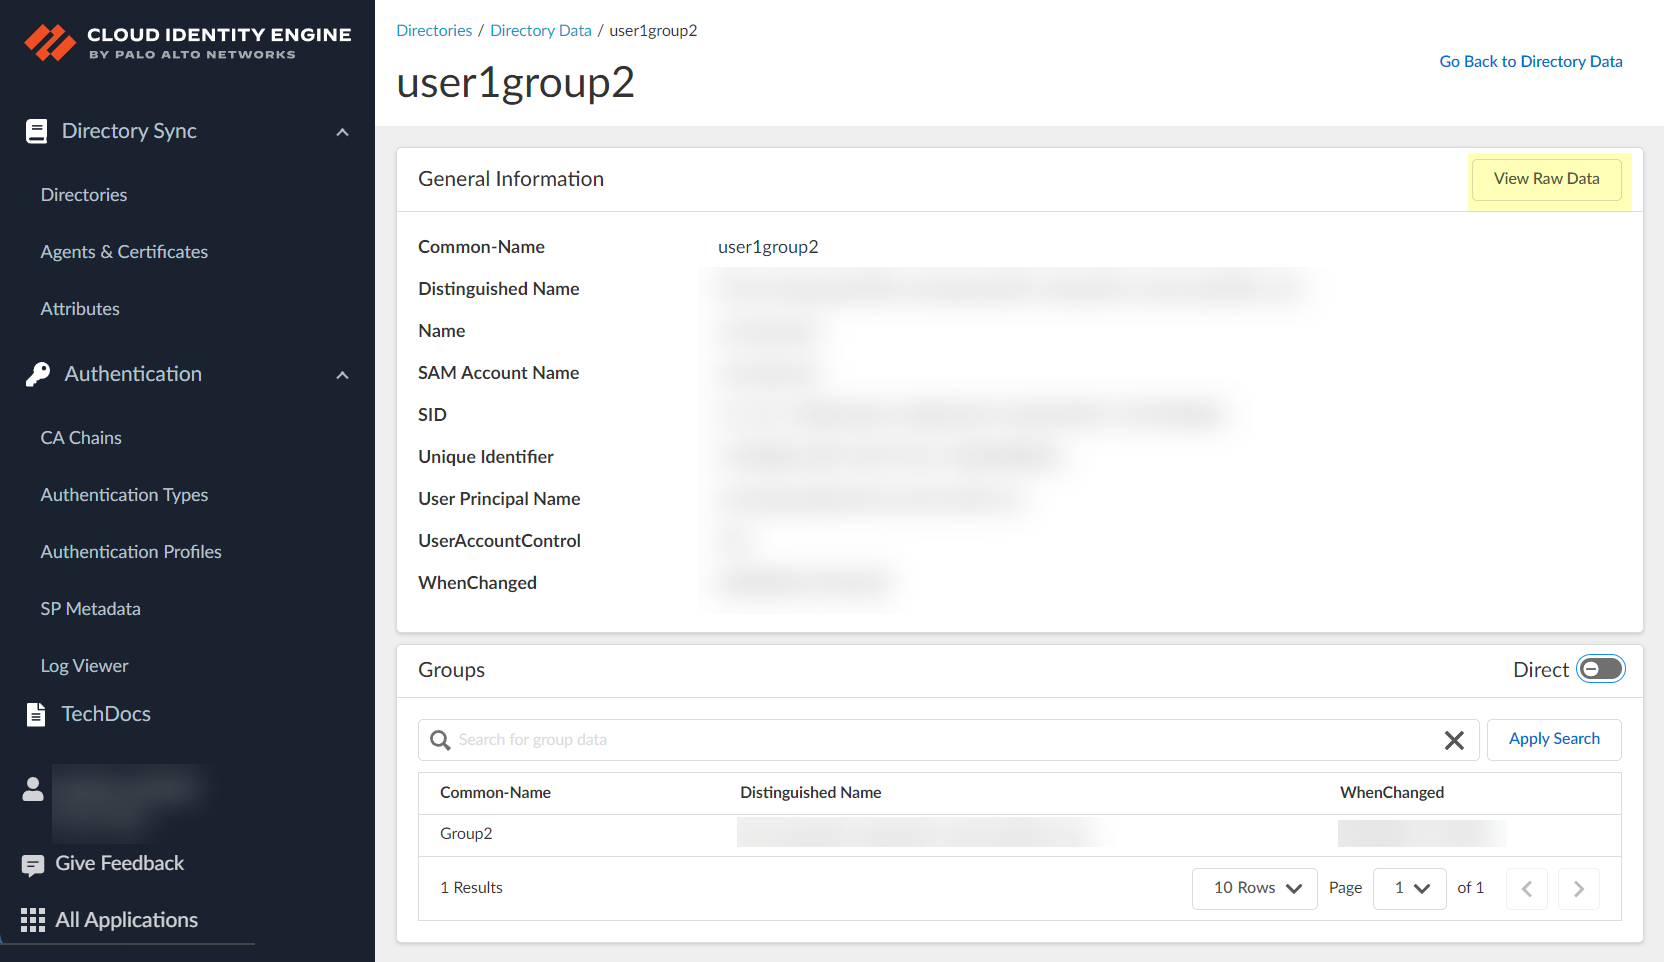
Screenshot showing the "View Raw Data" button to view all attributes for an object.
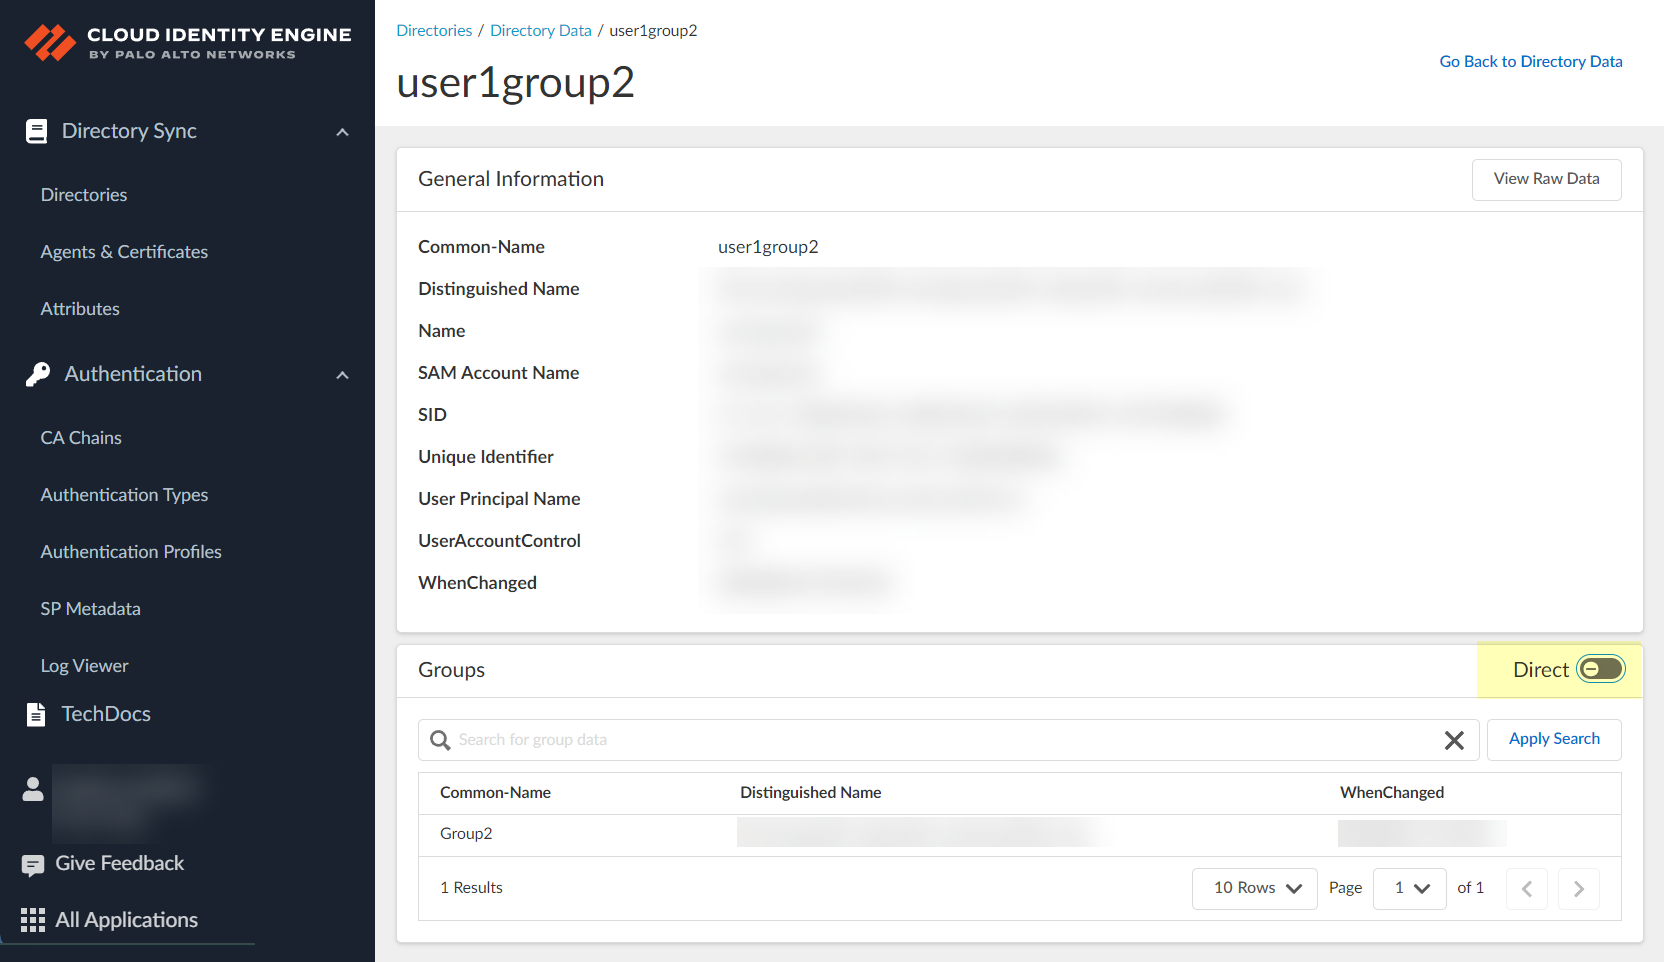
Screenshot showing the toggle to switch between "Direct" and "Direct and Nested" views for group/user relationships.
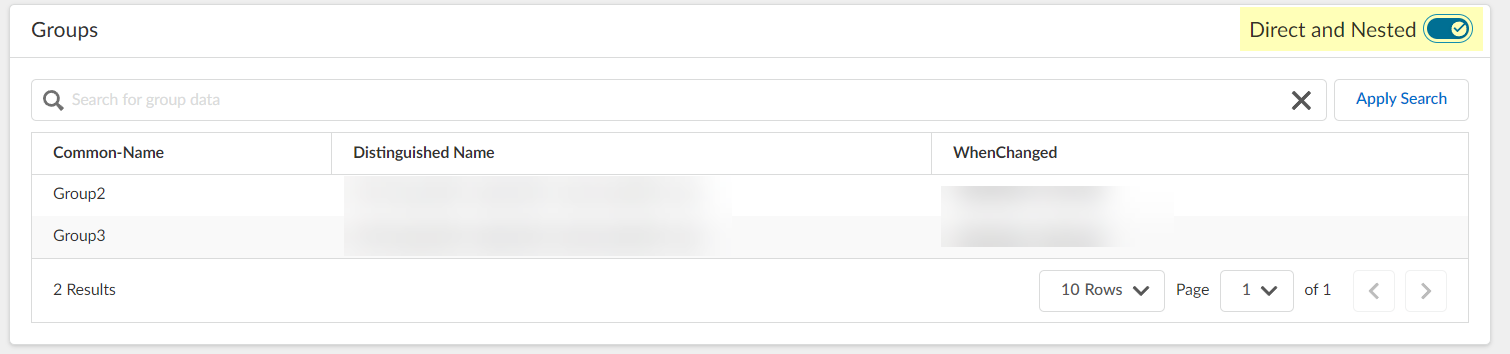
Note indicating that nested group information is not available for attribute-based Cloud Dynamic User Groups.
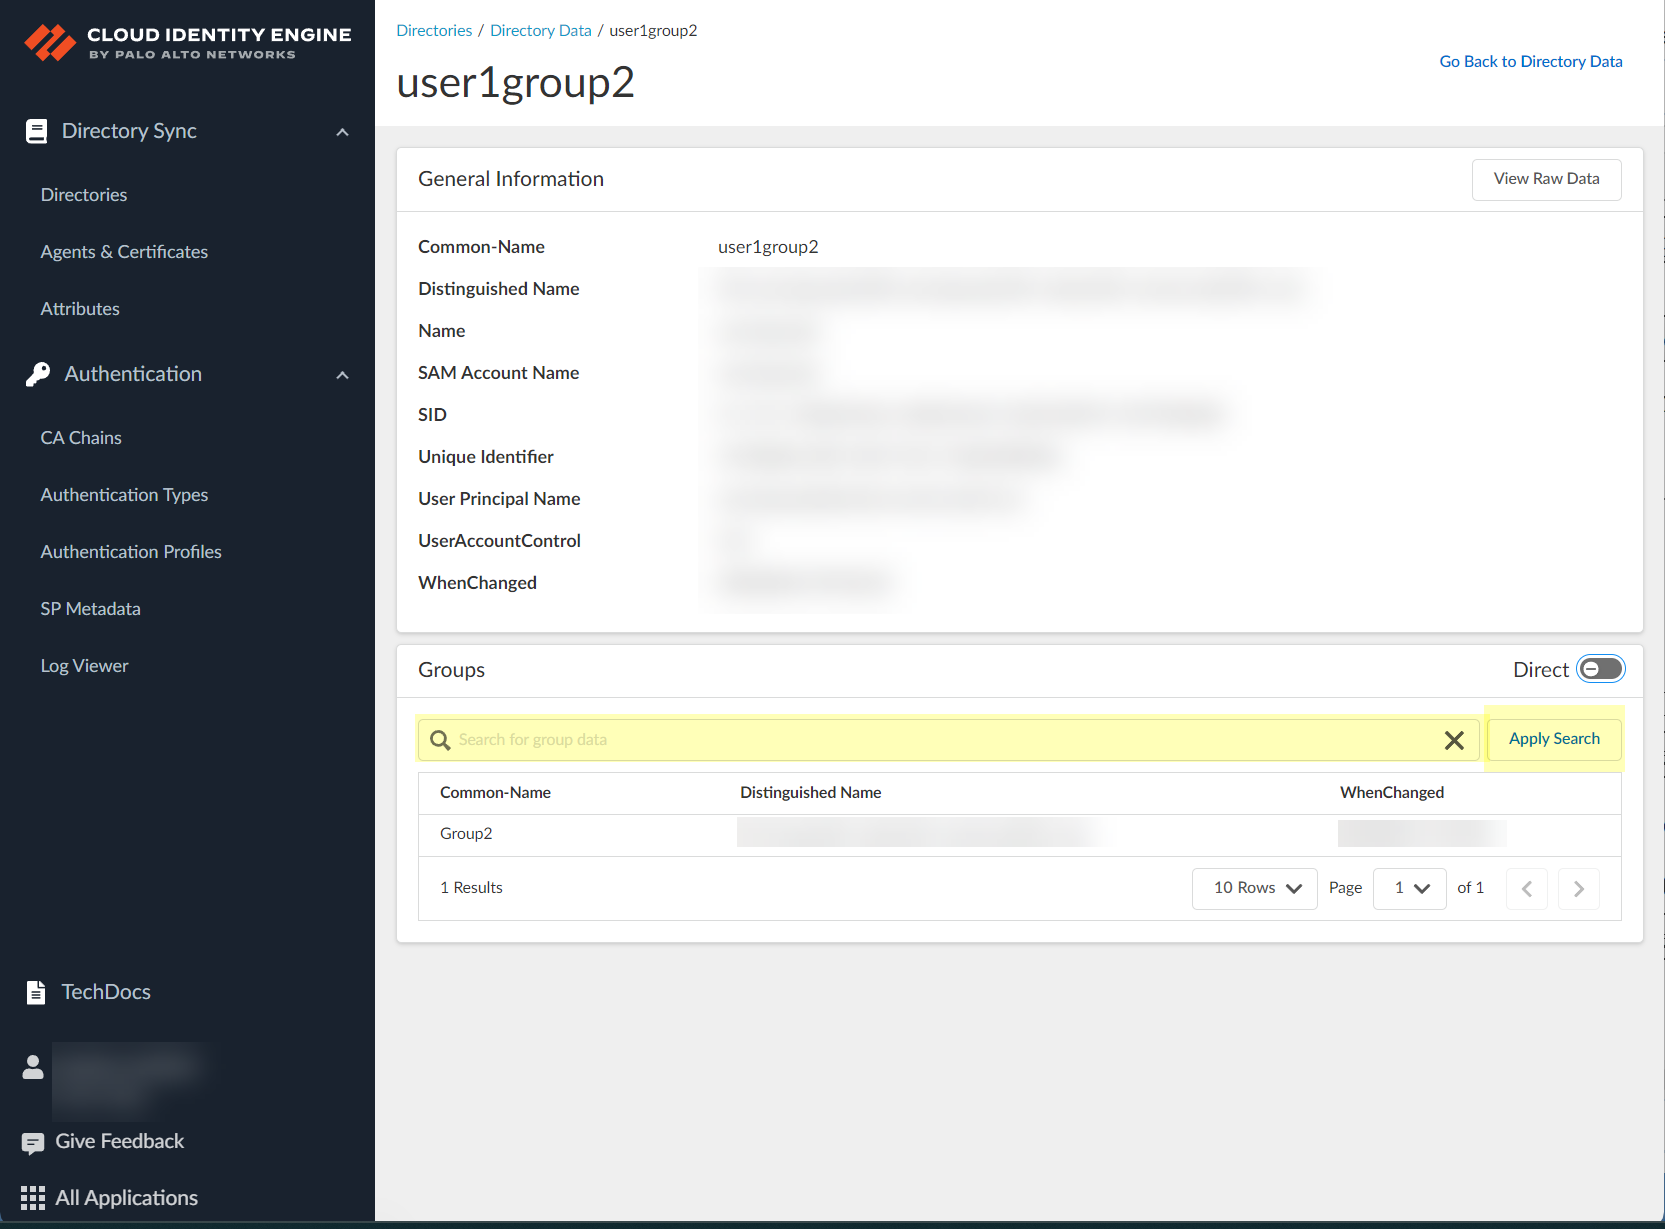
Screenshot showing the "Apply Search" button for filtering data within object details.
Screenshot showing the "Go Back to Directory" button to return to the main Directory page.
Create a Cloud Dynamic User Group (CDUG)
Provides adaptable, granular group membership based on specified criteria/attributes, updating automatically. Can be Attribute Based or On Demand Assignment (static).
Important Point: If using CDUG for Authentication Profile (SAML), users MUST be added to the SAML app in the IdP (Azure Portal).
Can use Azure AD Identity Protection risk info for risk-based CDUGs (requires Client Credential Flow and specific Azure permissions).
-
Configure directory (On-Prem or Cloud). (Azure AD User Risk only) Select Collect user risk information.

Screenshot showing the checkbox to collect user risk information from Azure AD.
Sync groups. -
In CIE app: Directories > click number in Groups column.
Screenshot showing the clickable count in the "Groups" column on the Directories page.
-
On Directory Data page, click Create New Dynamic User Group.
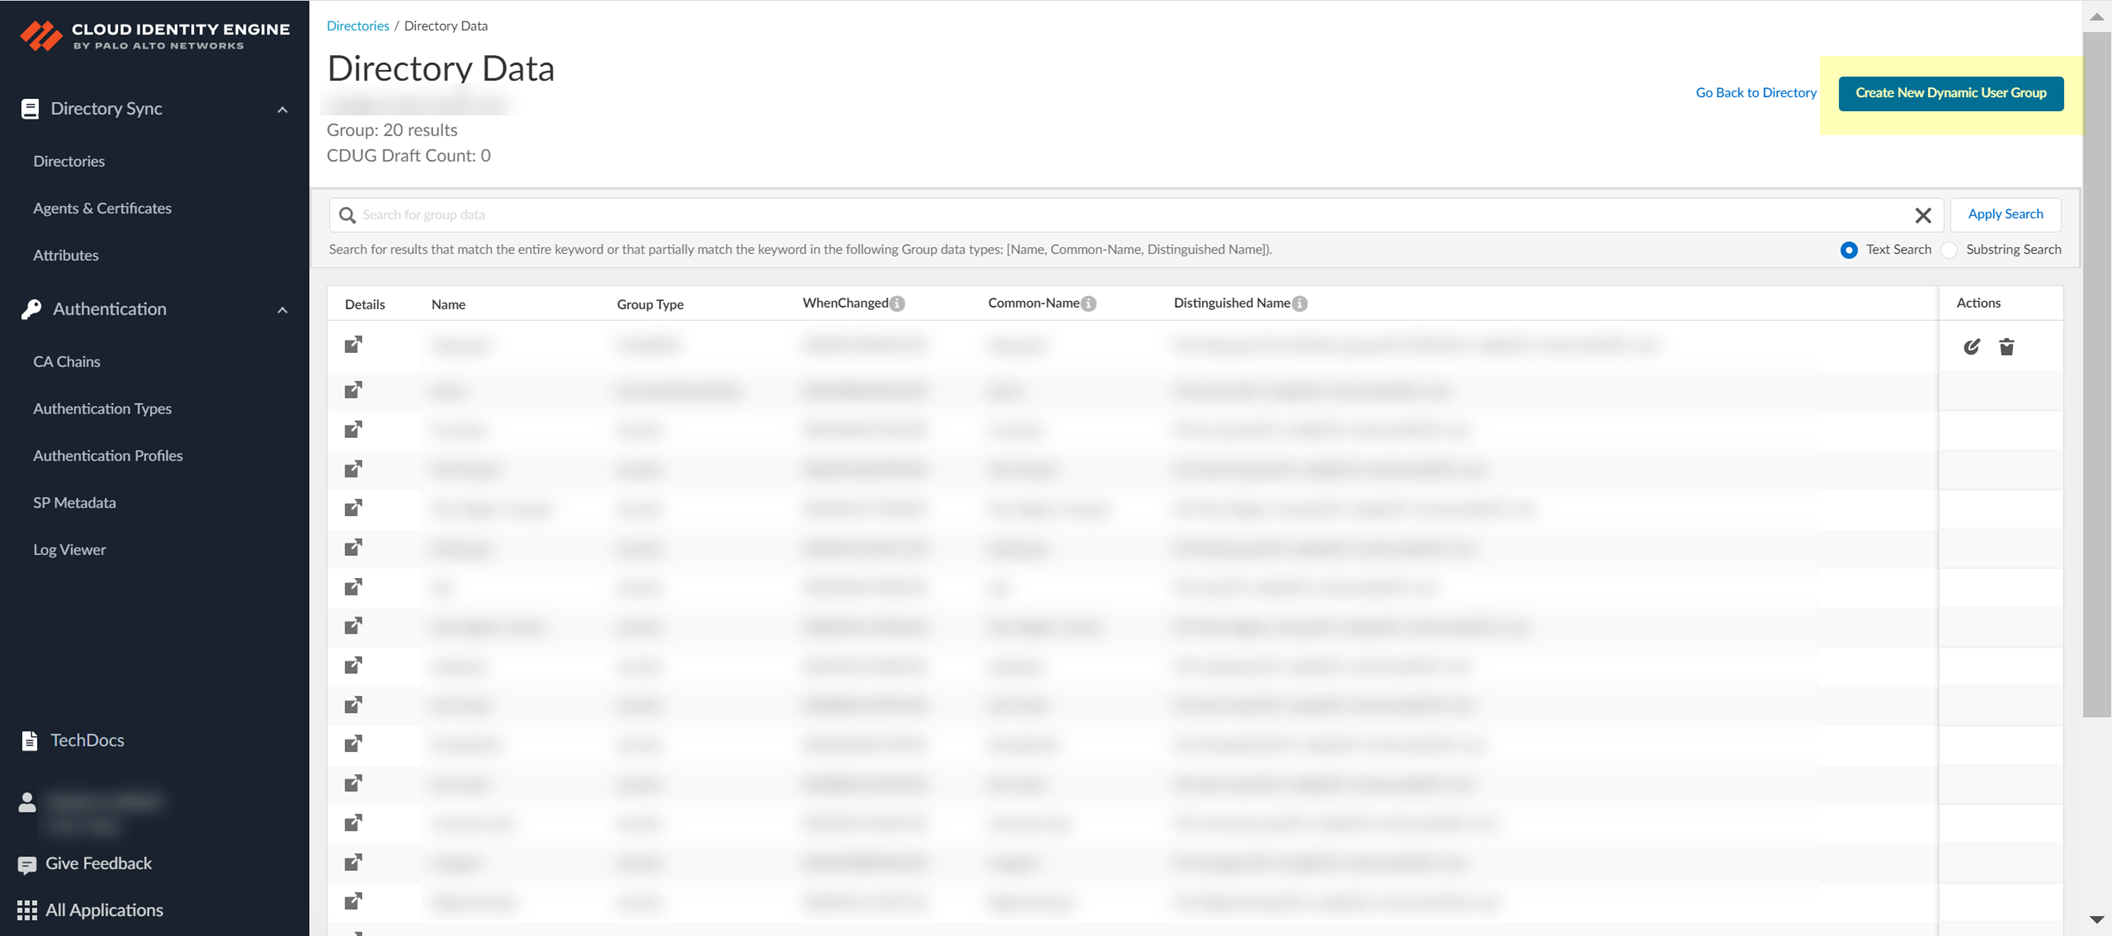
Screenshot showing the "Create New Dynamic User Group" button on the Directory Data page.
-
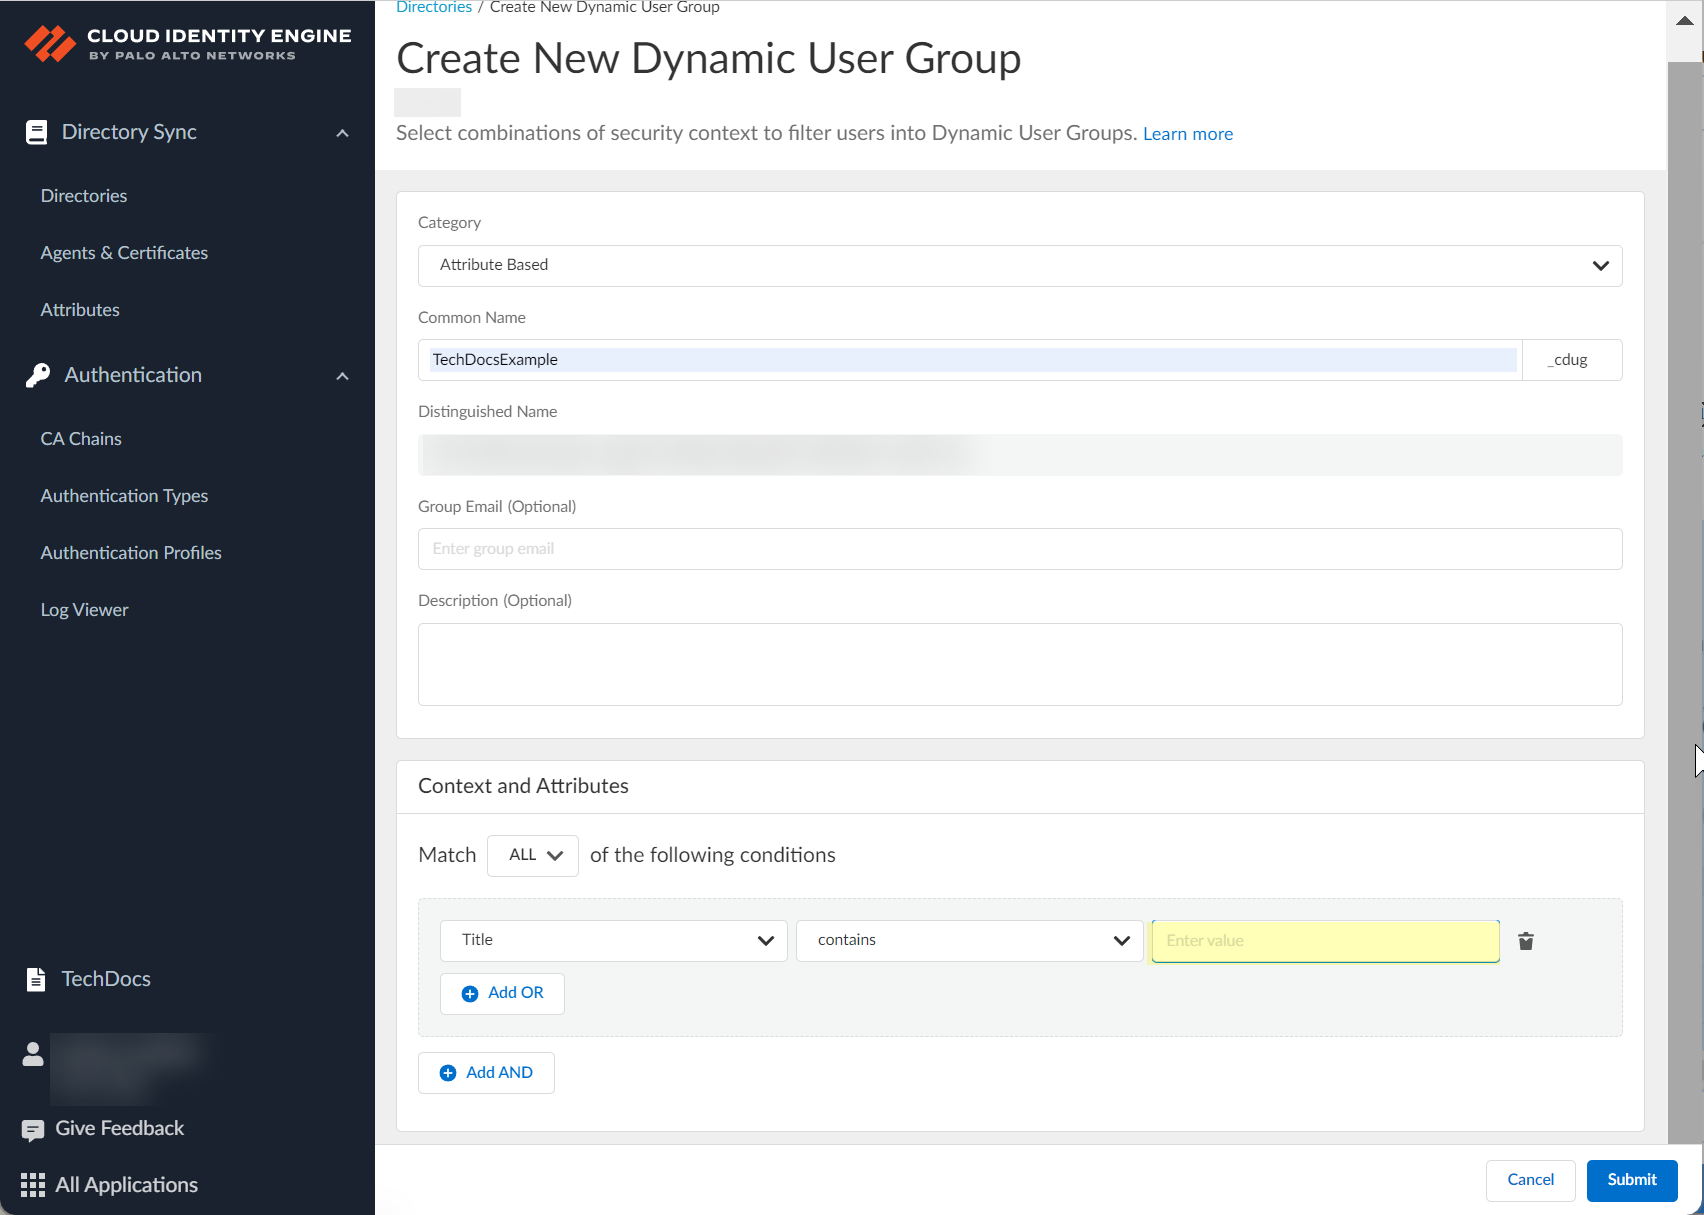
Select Category (Attribute Based or On Demand Assignment).
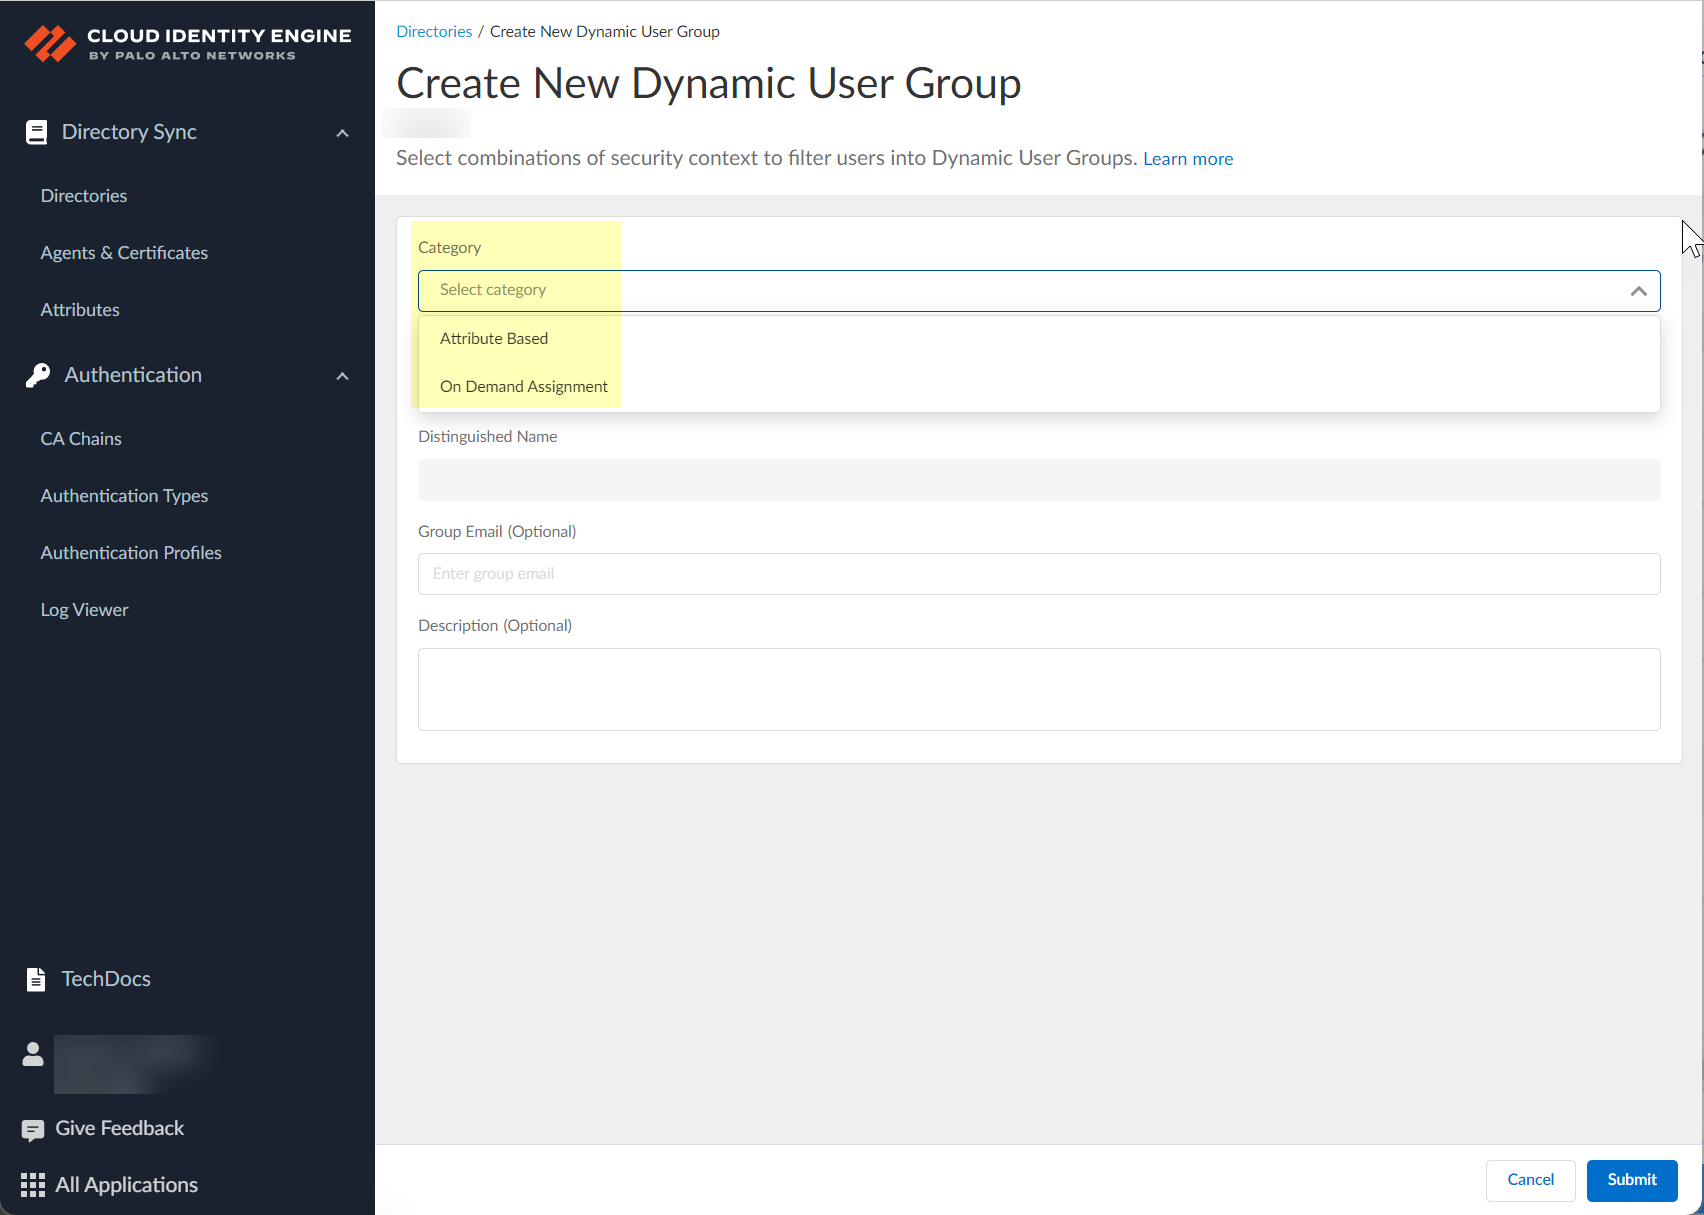
Screenshot showing the selection of the dynamic group category (Attribute Based or On Demand Assignment).
-
Enter Common Name (auto-generates Distinguished Name with _cdug suffix).
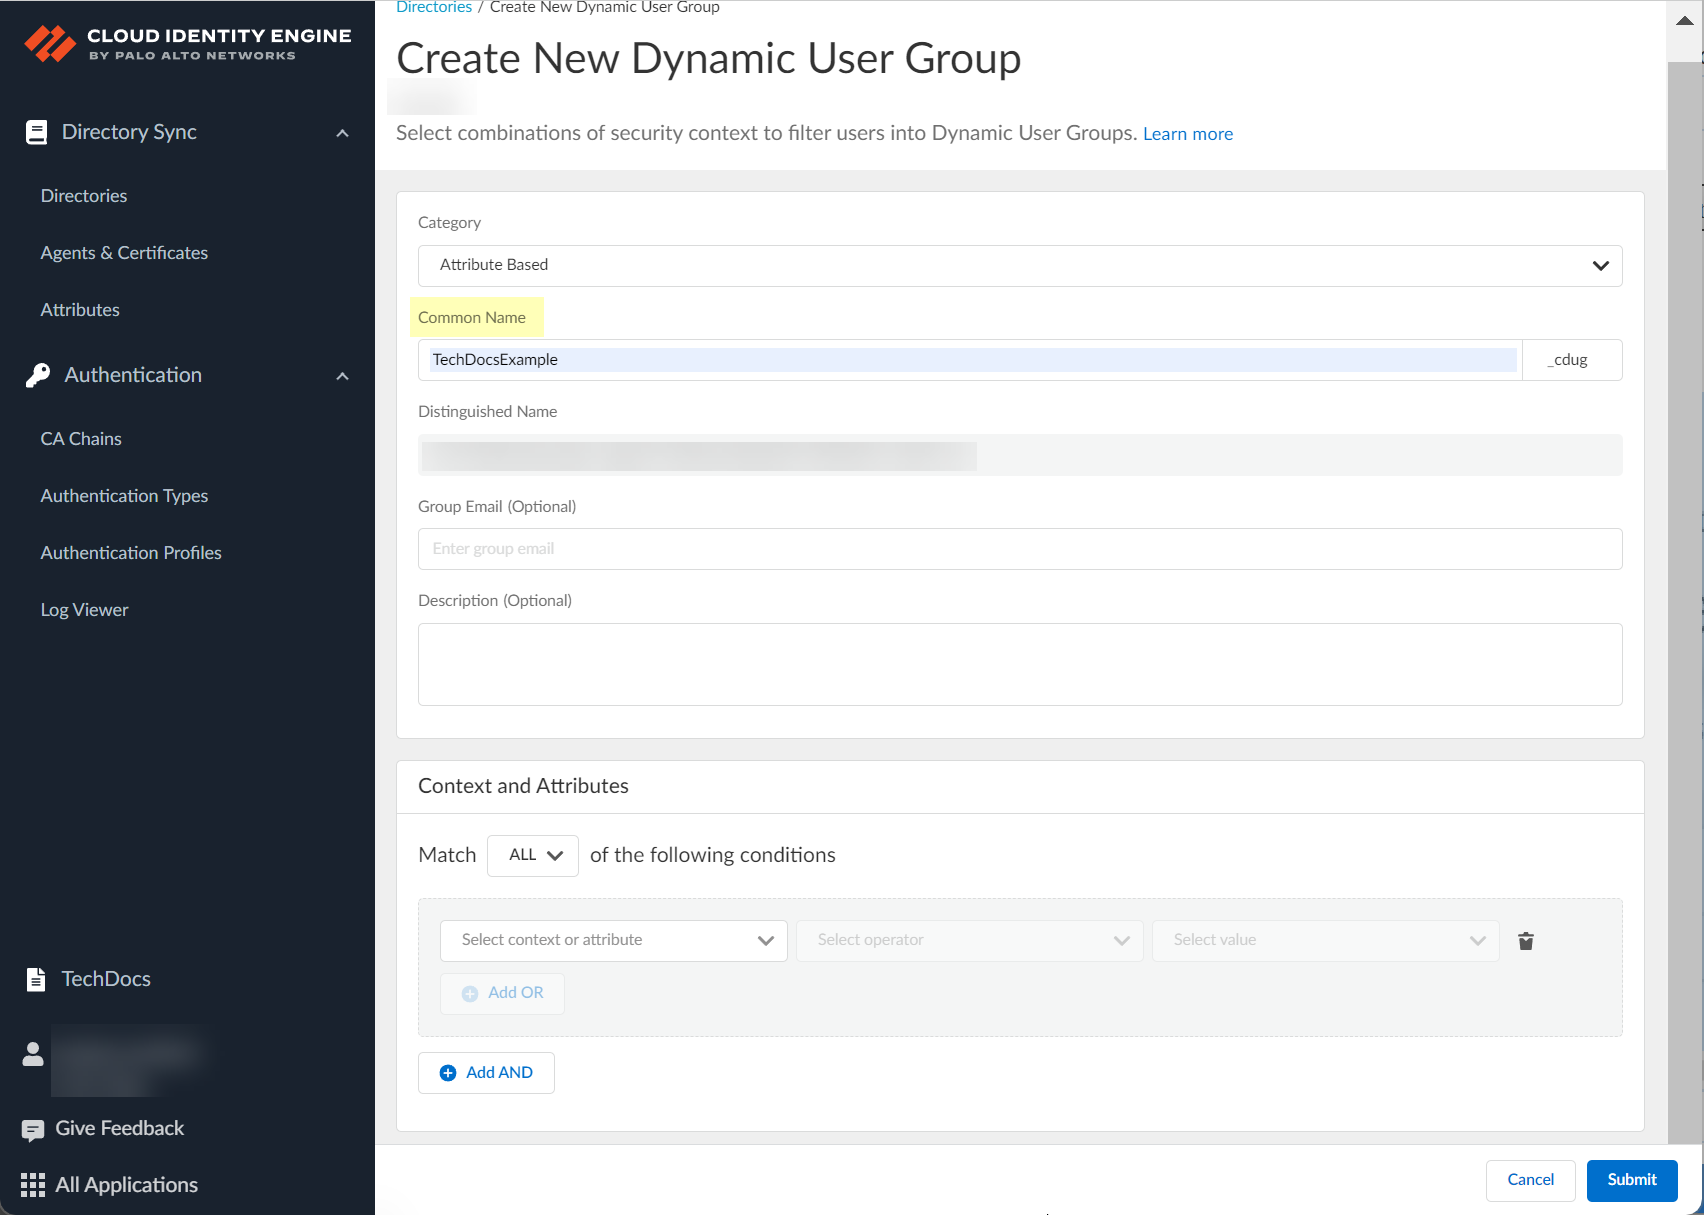
Screenshot showing the field for entering the Common Name for the dynamic group.
-
(Optional) Enter Group Email.

Screenshot showing the optional field for Group Email.
-
(Optional) Enter Description.

Screenshot showing the optional field for Description.
-
Define criteria (Attribute Based) or add users (On Demand Assignment).
-
(Attribute Based) Select Any/All criteria match.
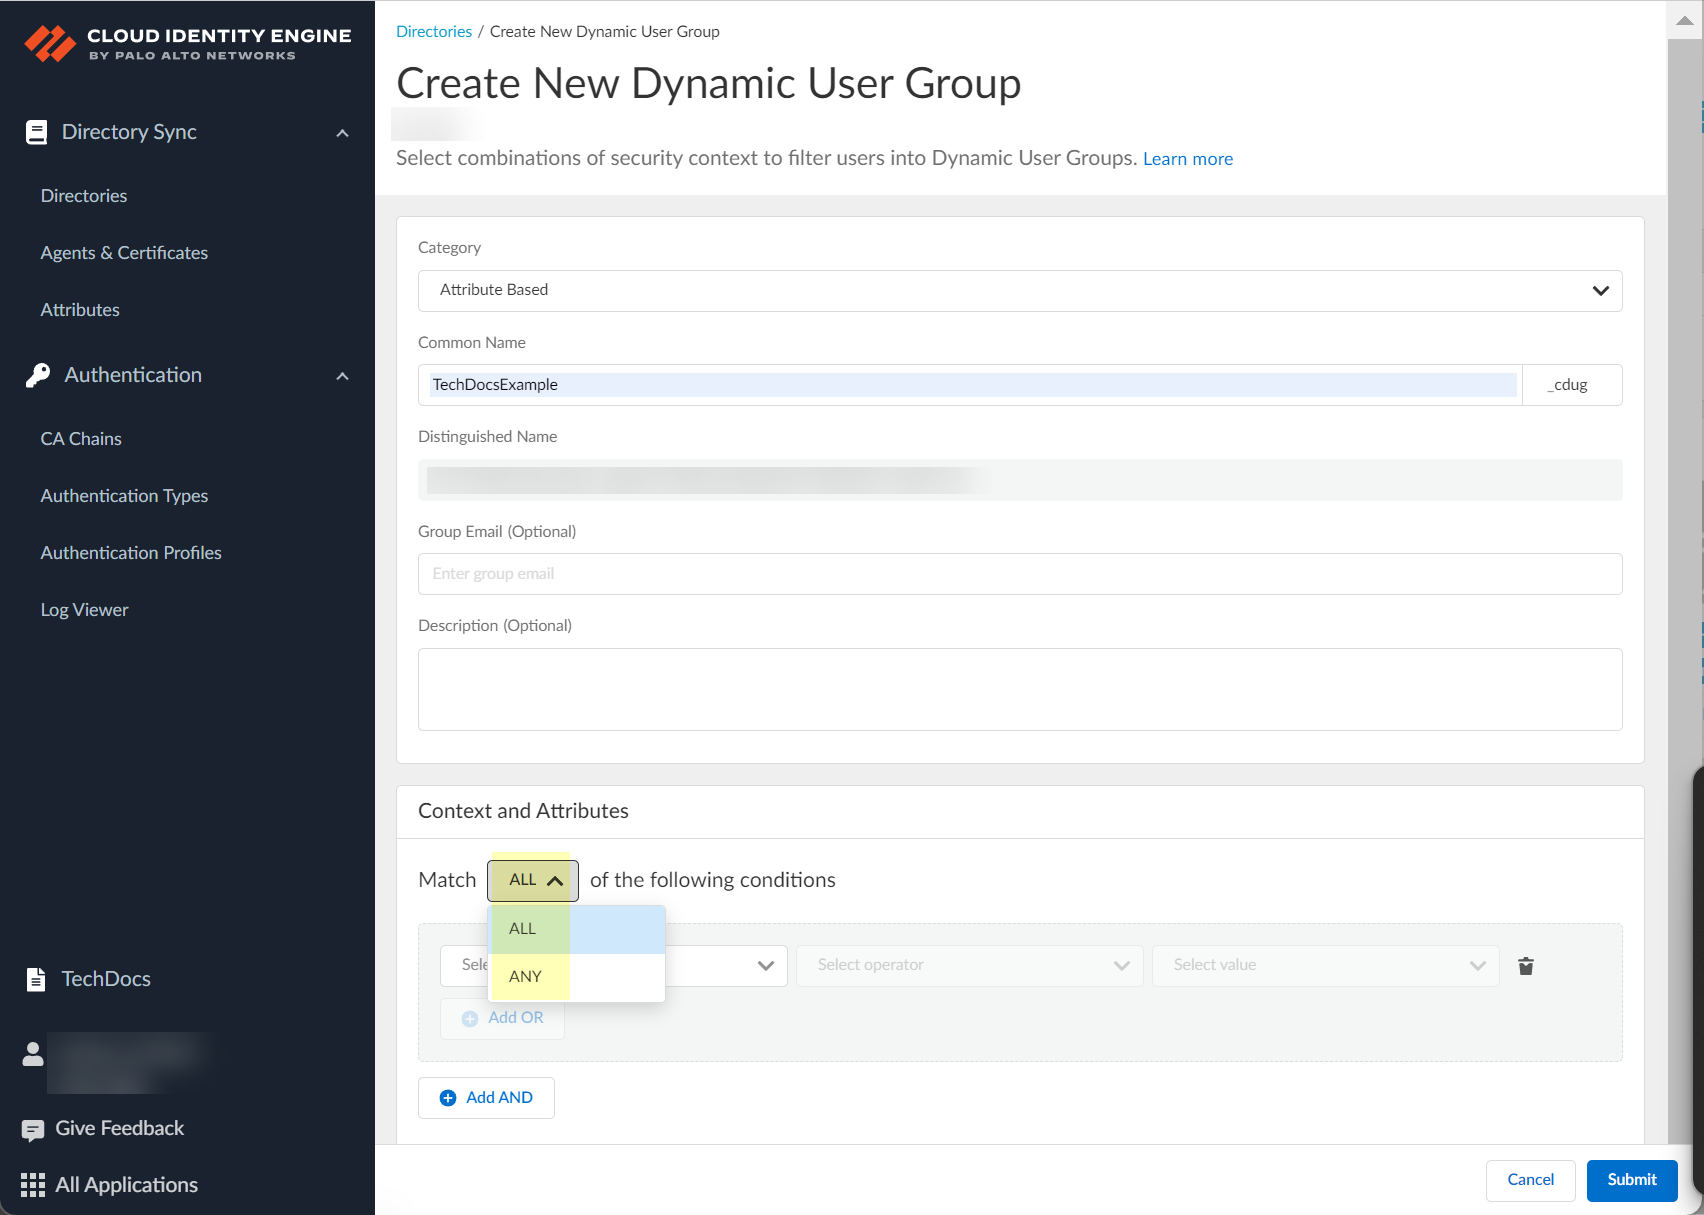
Screenshot showing the option to require members to match "Any" or "All" selected criteria.
-
(Attribute Based) Select context/attribute.
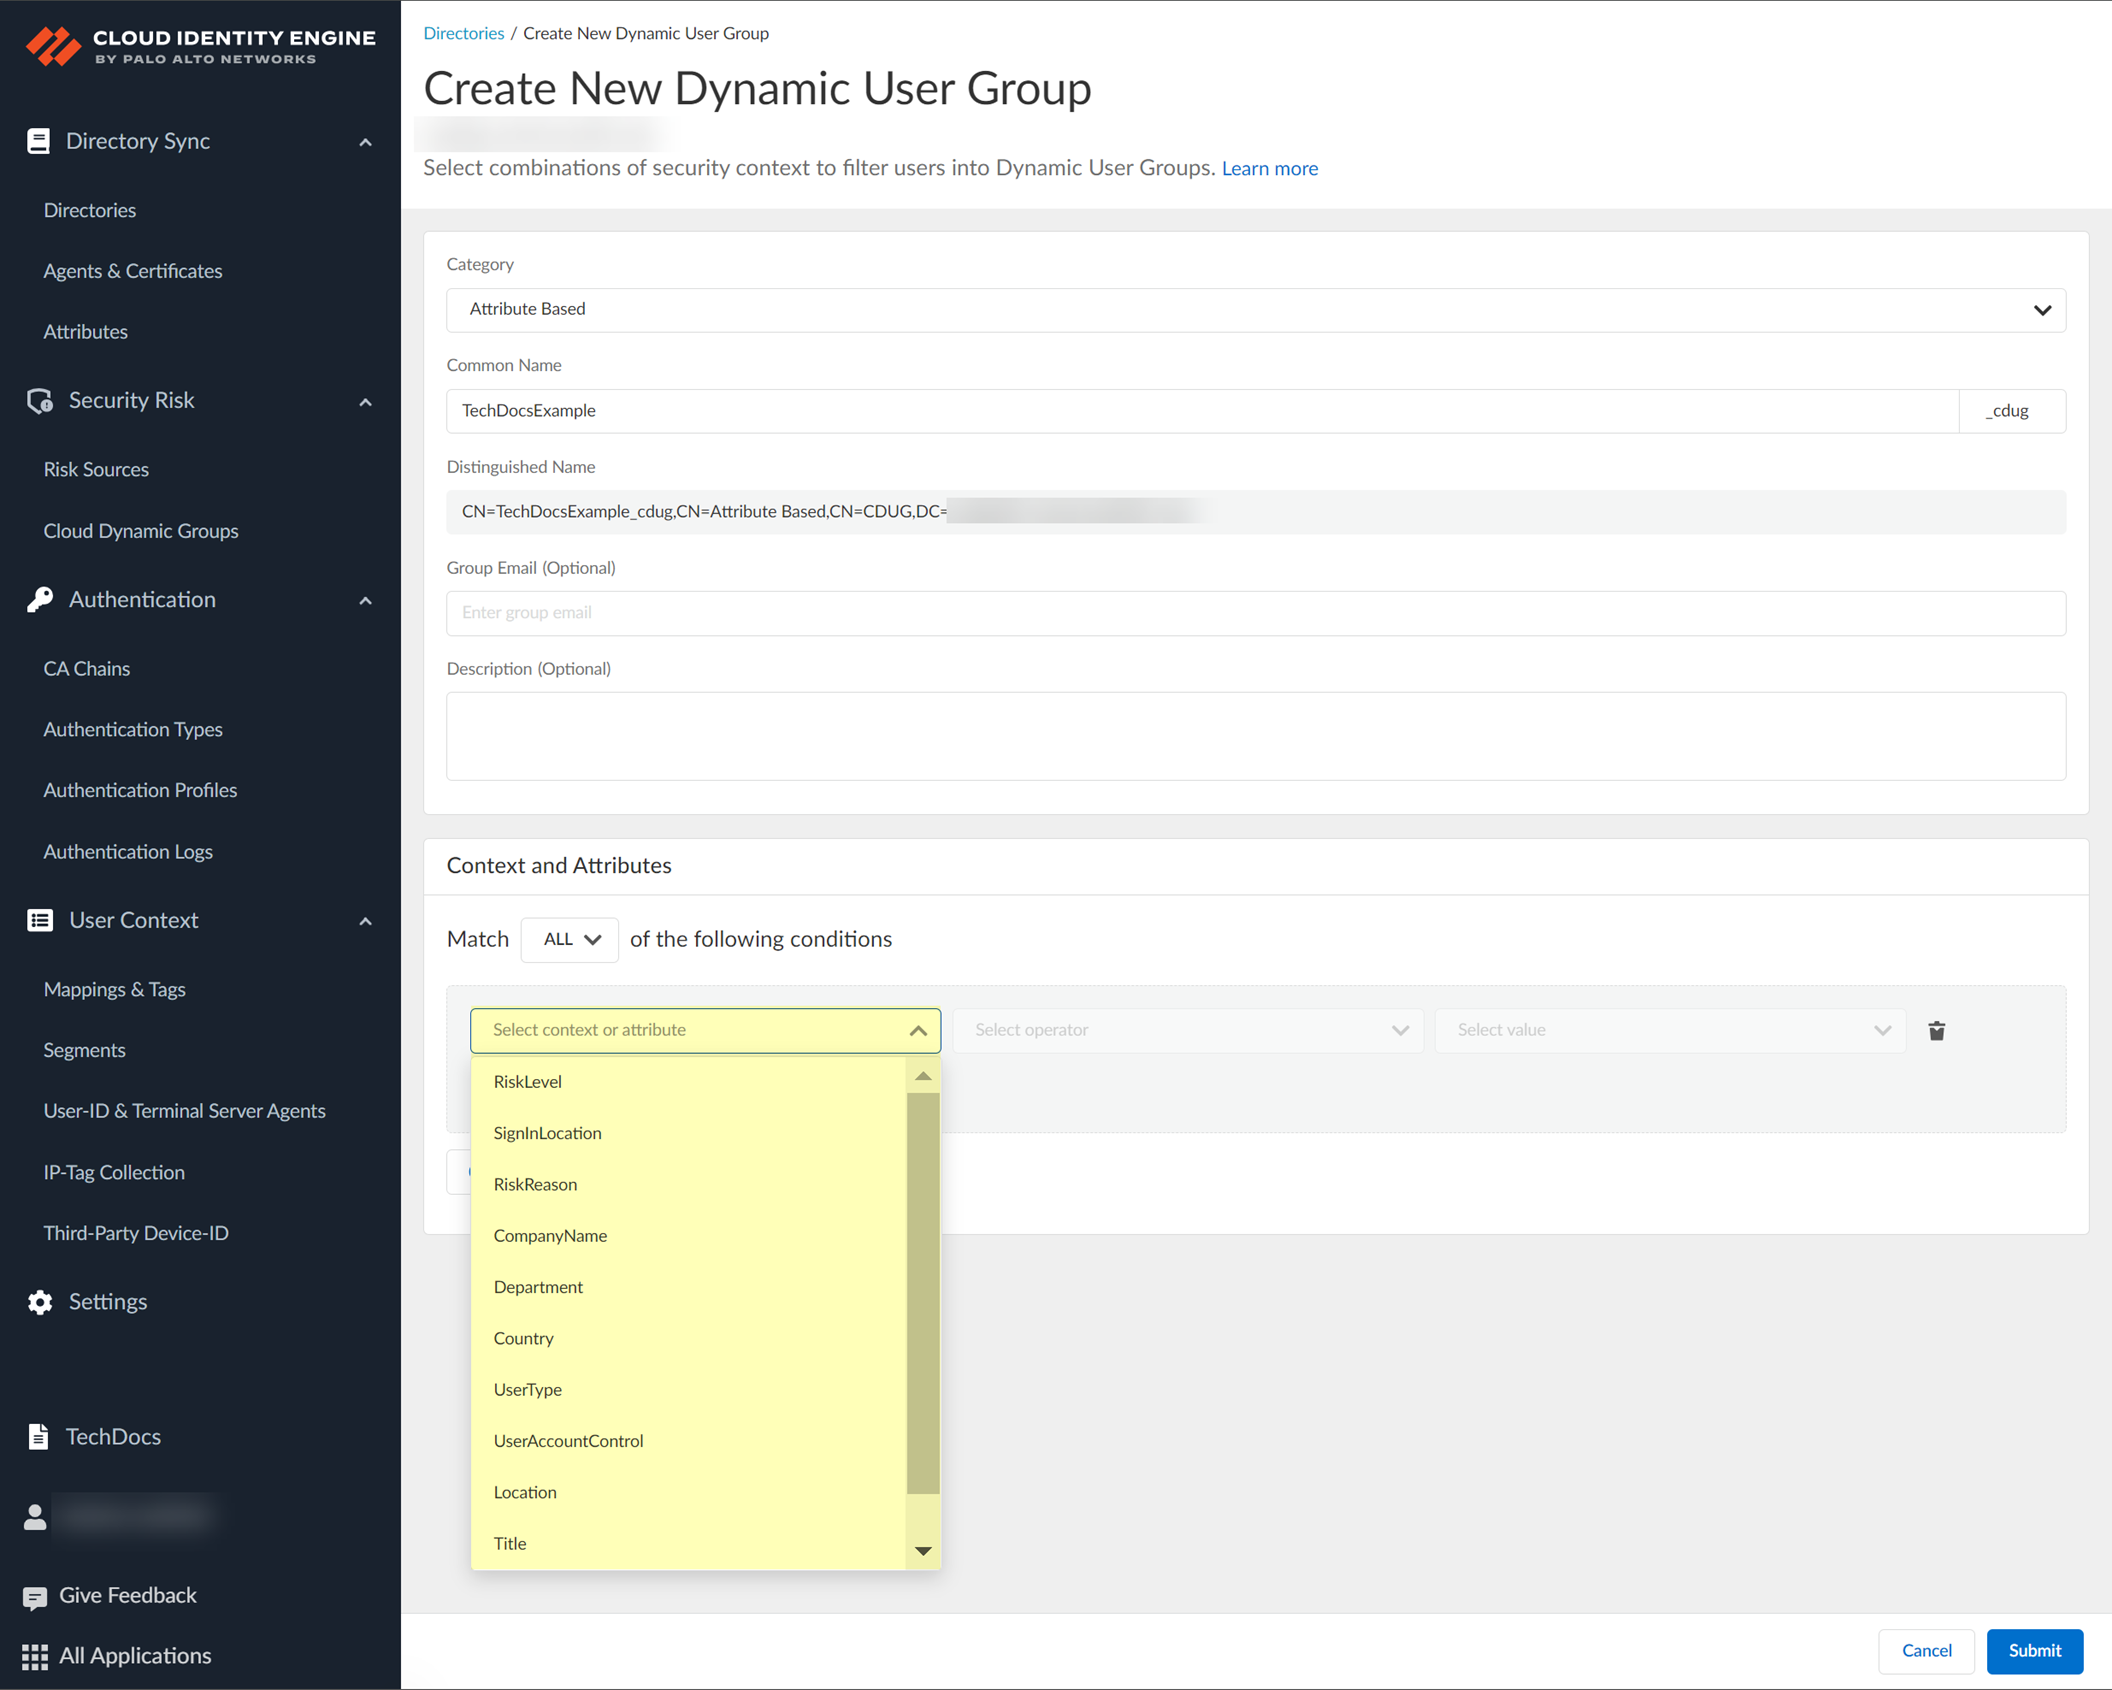
Screenshot showing the dialog to select context or attributes for dynamic group criteria.

Screenshot showing a selected context/attribute in the dynamic group criteria.
-
(Attribute Based) Select operator (is equal to, is equal to ANY of the following, is not equal to, contains, starts with).
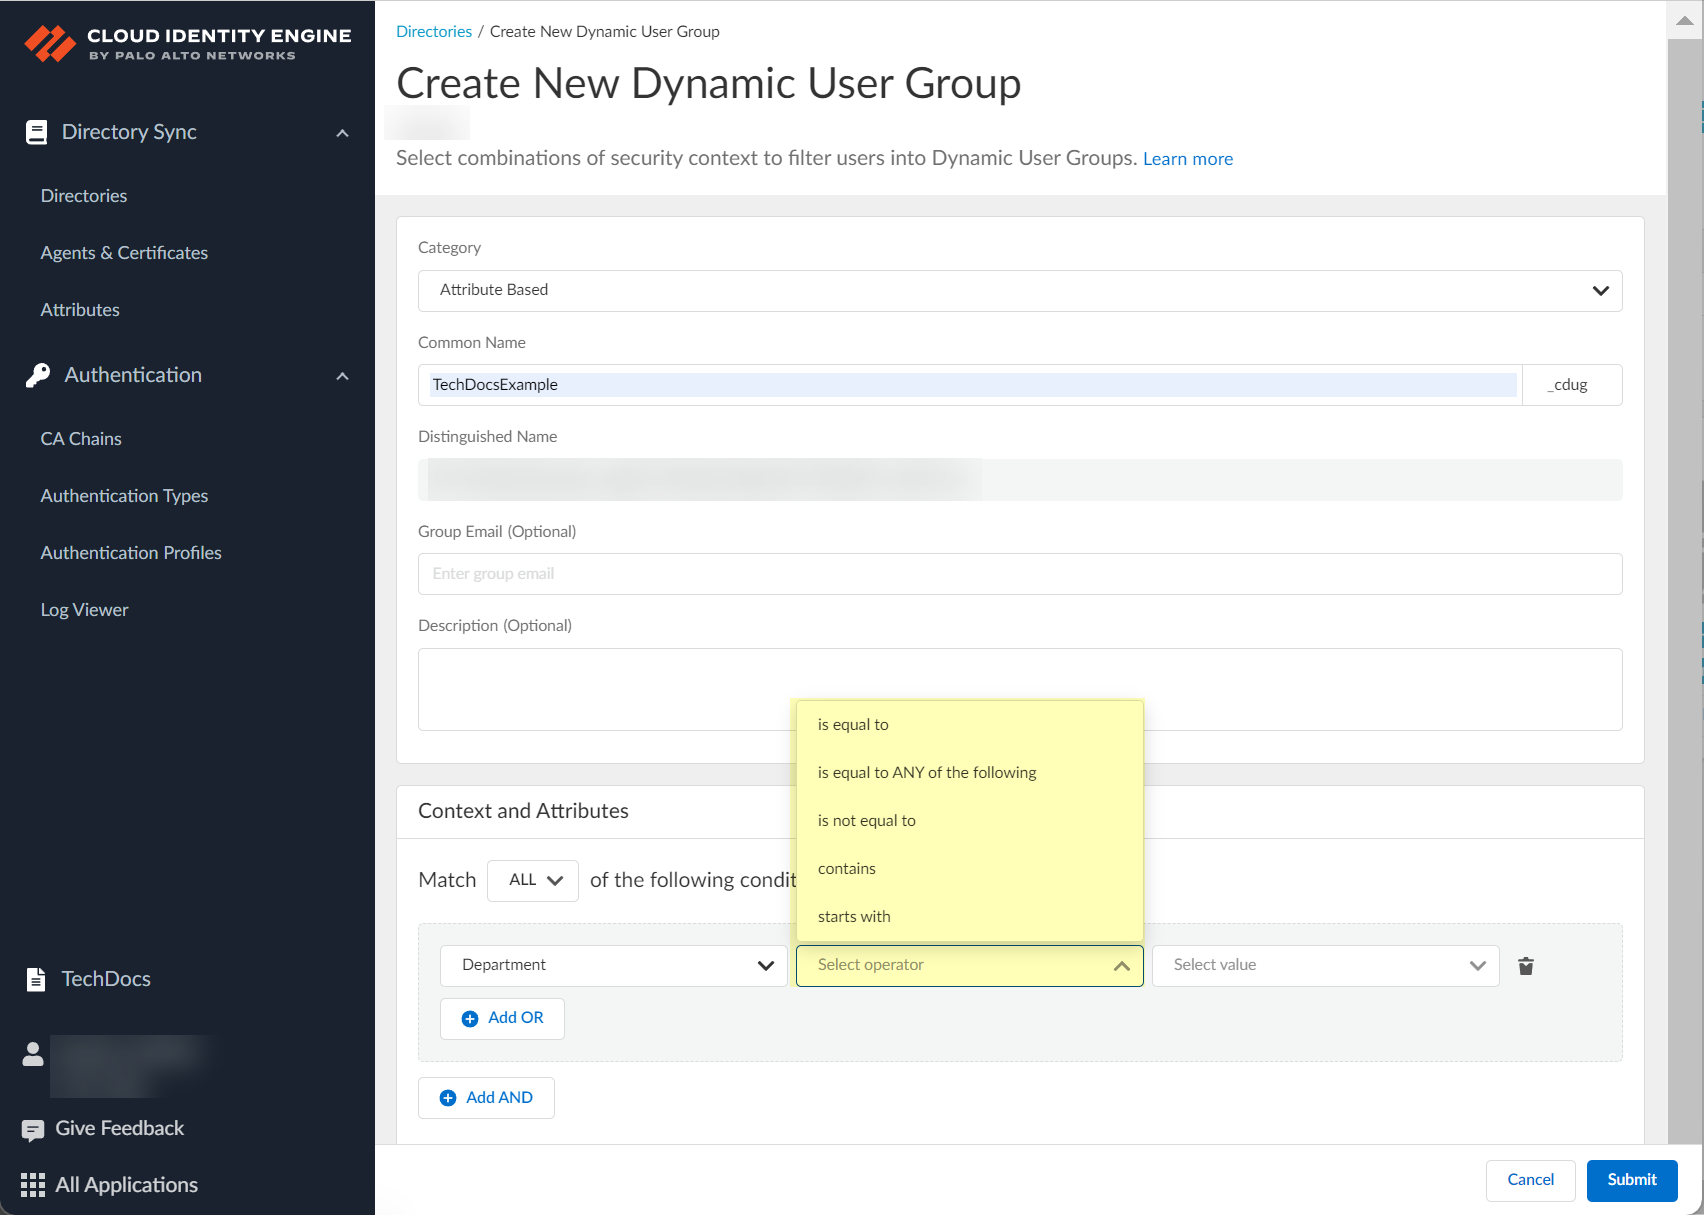
Screenshot showing the operator selection dropdown for dynamic group criteria.
-
(Attribute Based) Select/Enter value(s).
Screenshot showing the selection or entry of a value for the dynamic group criteria.
-
(Optional, Attribute Based) Add OR/AND criteria.
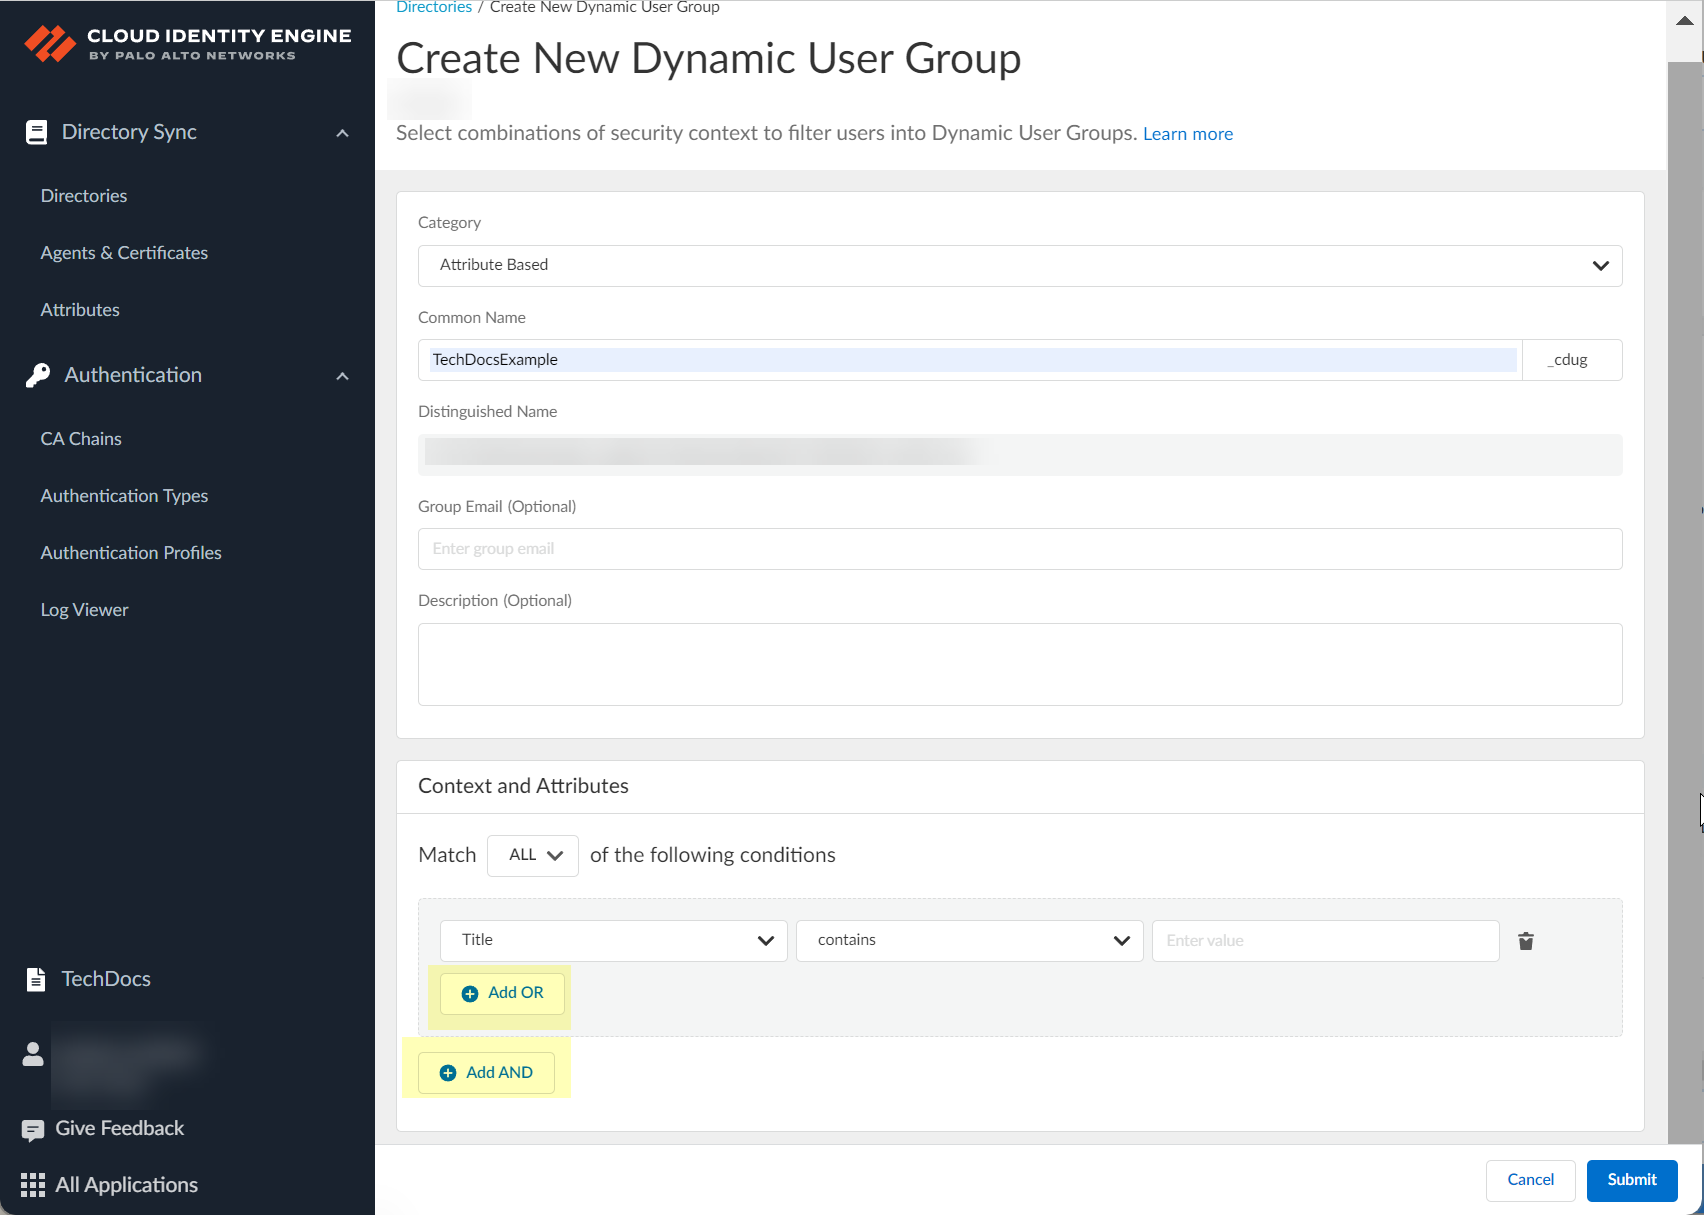
Screenshot showing the options to add additional criteria using OR/AND logic.
-
(On Demand Assignment) Add Users.
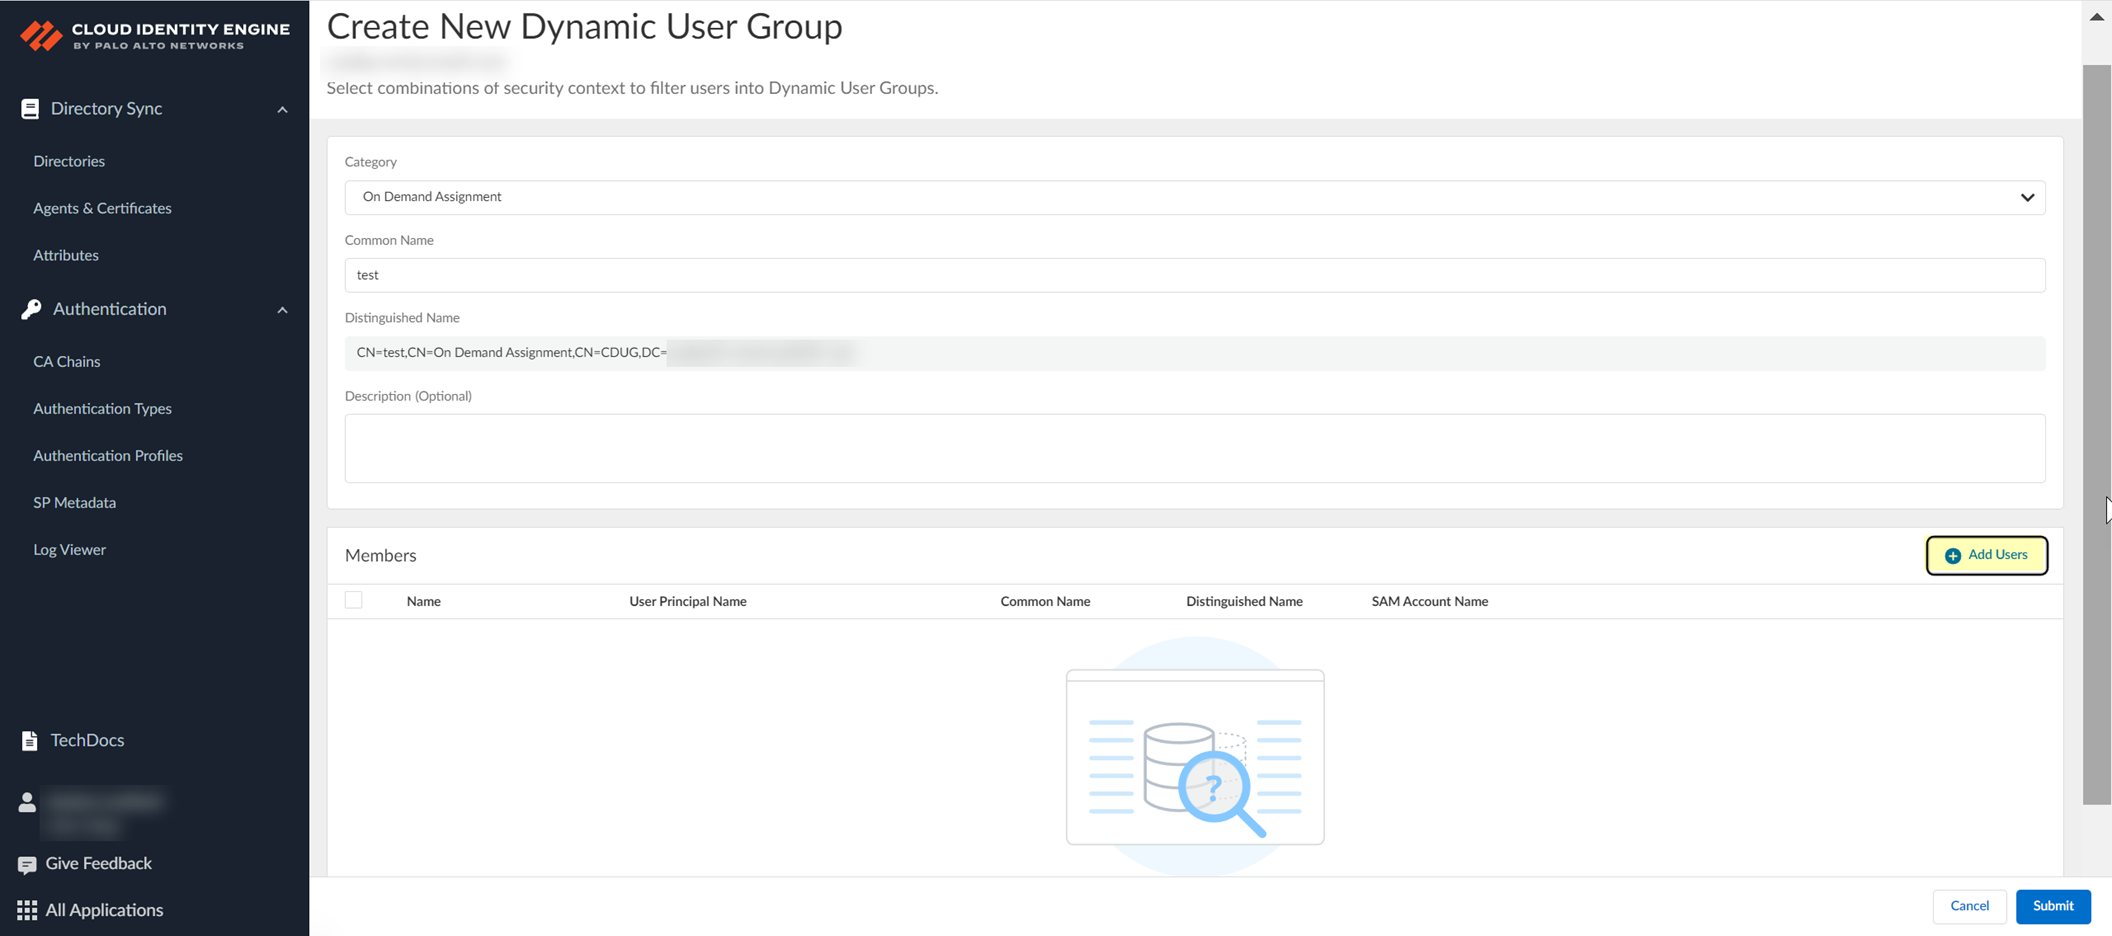
Screenshot showing the "Add Users" button for On Demand Assignment groups.
-
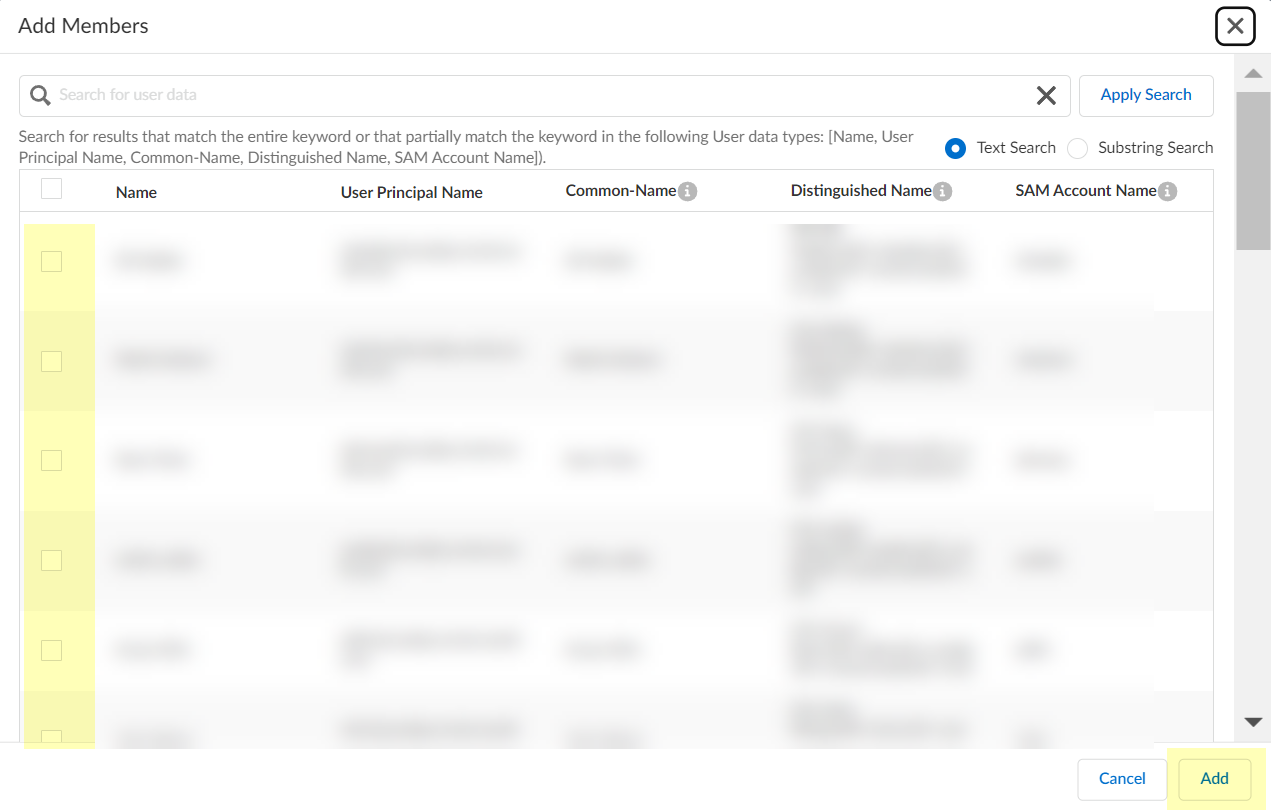
(On Demand Assignment) Select users, Add.
Screenshot showing the dialog to select users for an On Demand Assignment group.
Search/Filter users.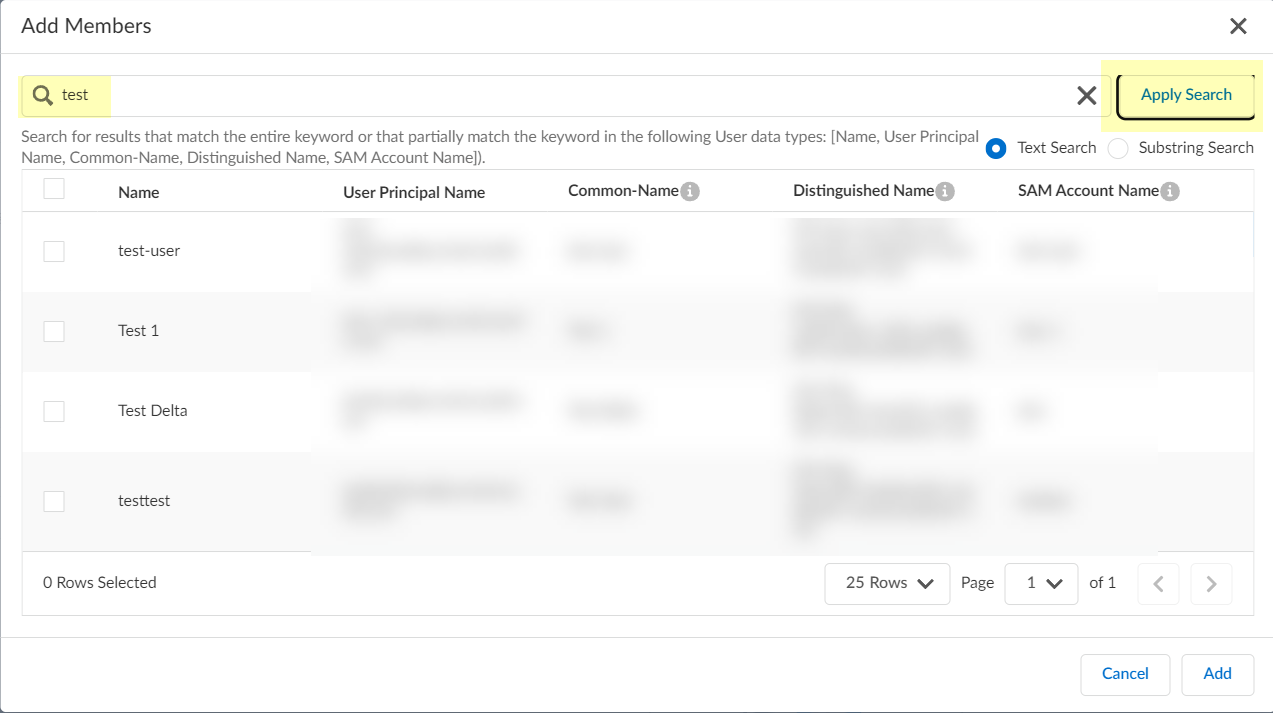
Screenshot showing the search and filter options for selecting users.
-
(Attribute Based) Select Any/All criteria match.
-
(Optional) Delete context/attribute from group definition.
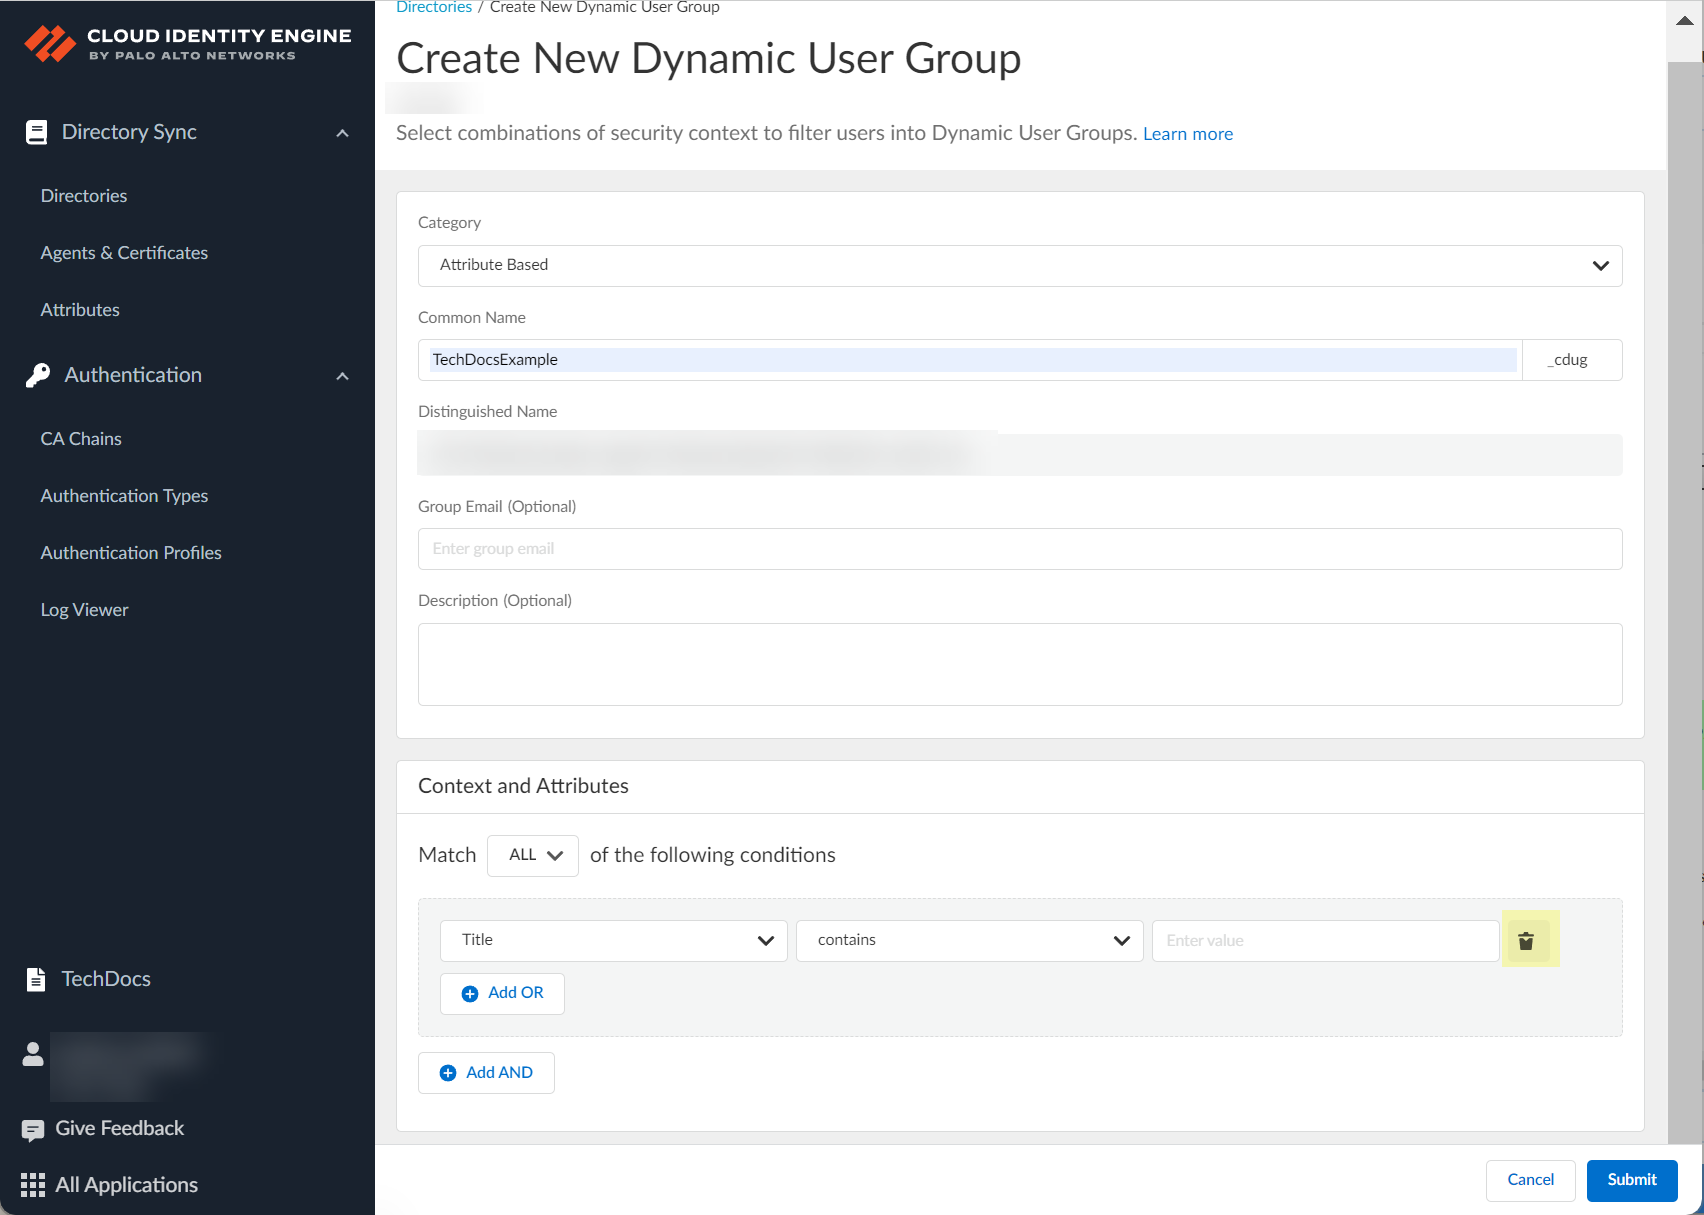
Screenshot showing the delete icon for a dynamic group criteria row.
-
(Optional) Remove user from On Demand Assignment group. Select checkbox > Remove User > Continue.
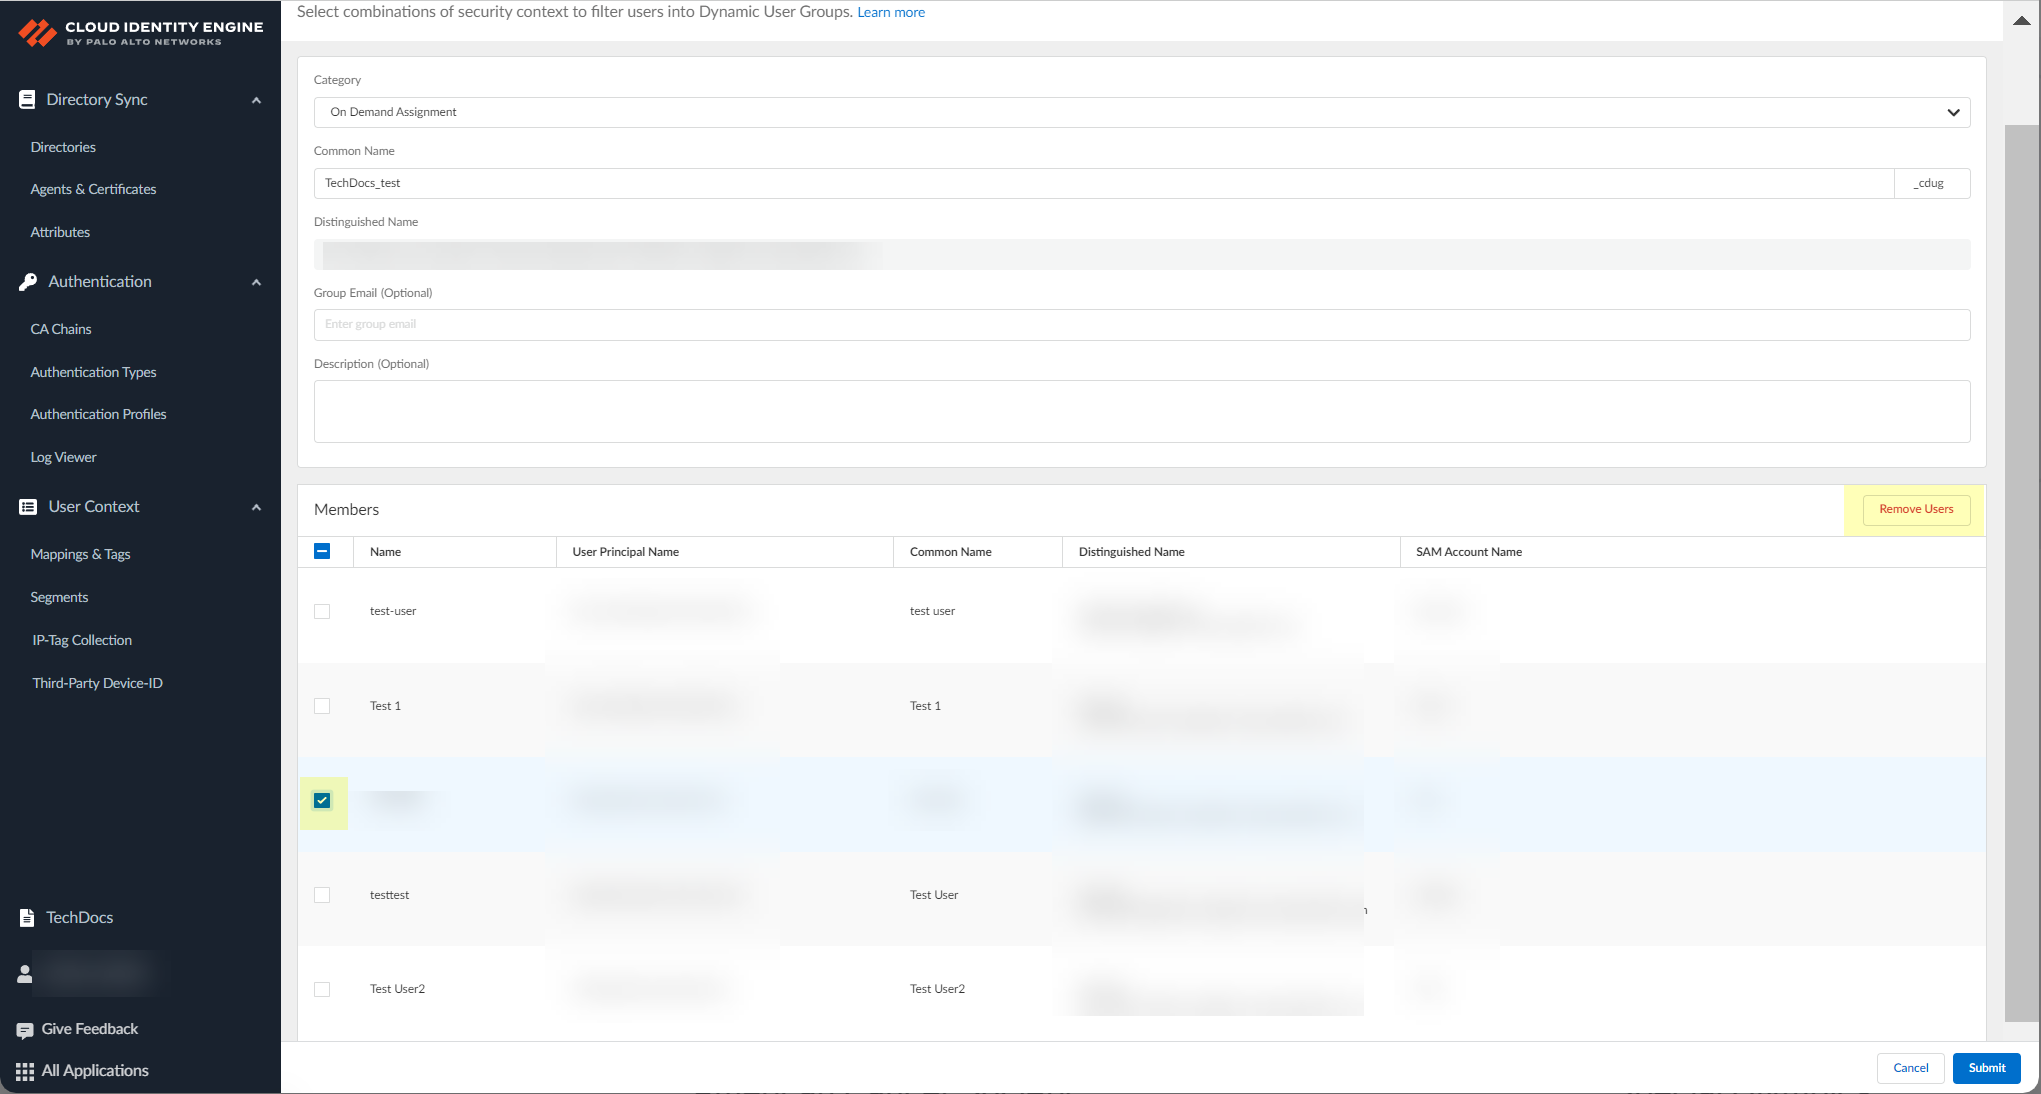
Screenshot showing the "Remove User" button for On Demand Assignment groups.
-
Submit to create CDUG.
Screenshot showing the Submit button to create the Cloud Dynamic User Group.
Can now use CDUG for group-based Security policy. -
(Azure AD User Risk only) Verify Collect User Risk is active (locked user icon + green check).
Screenshot indicating successful collection of user risk information from Azure AD Identity Protection.
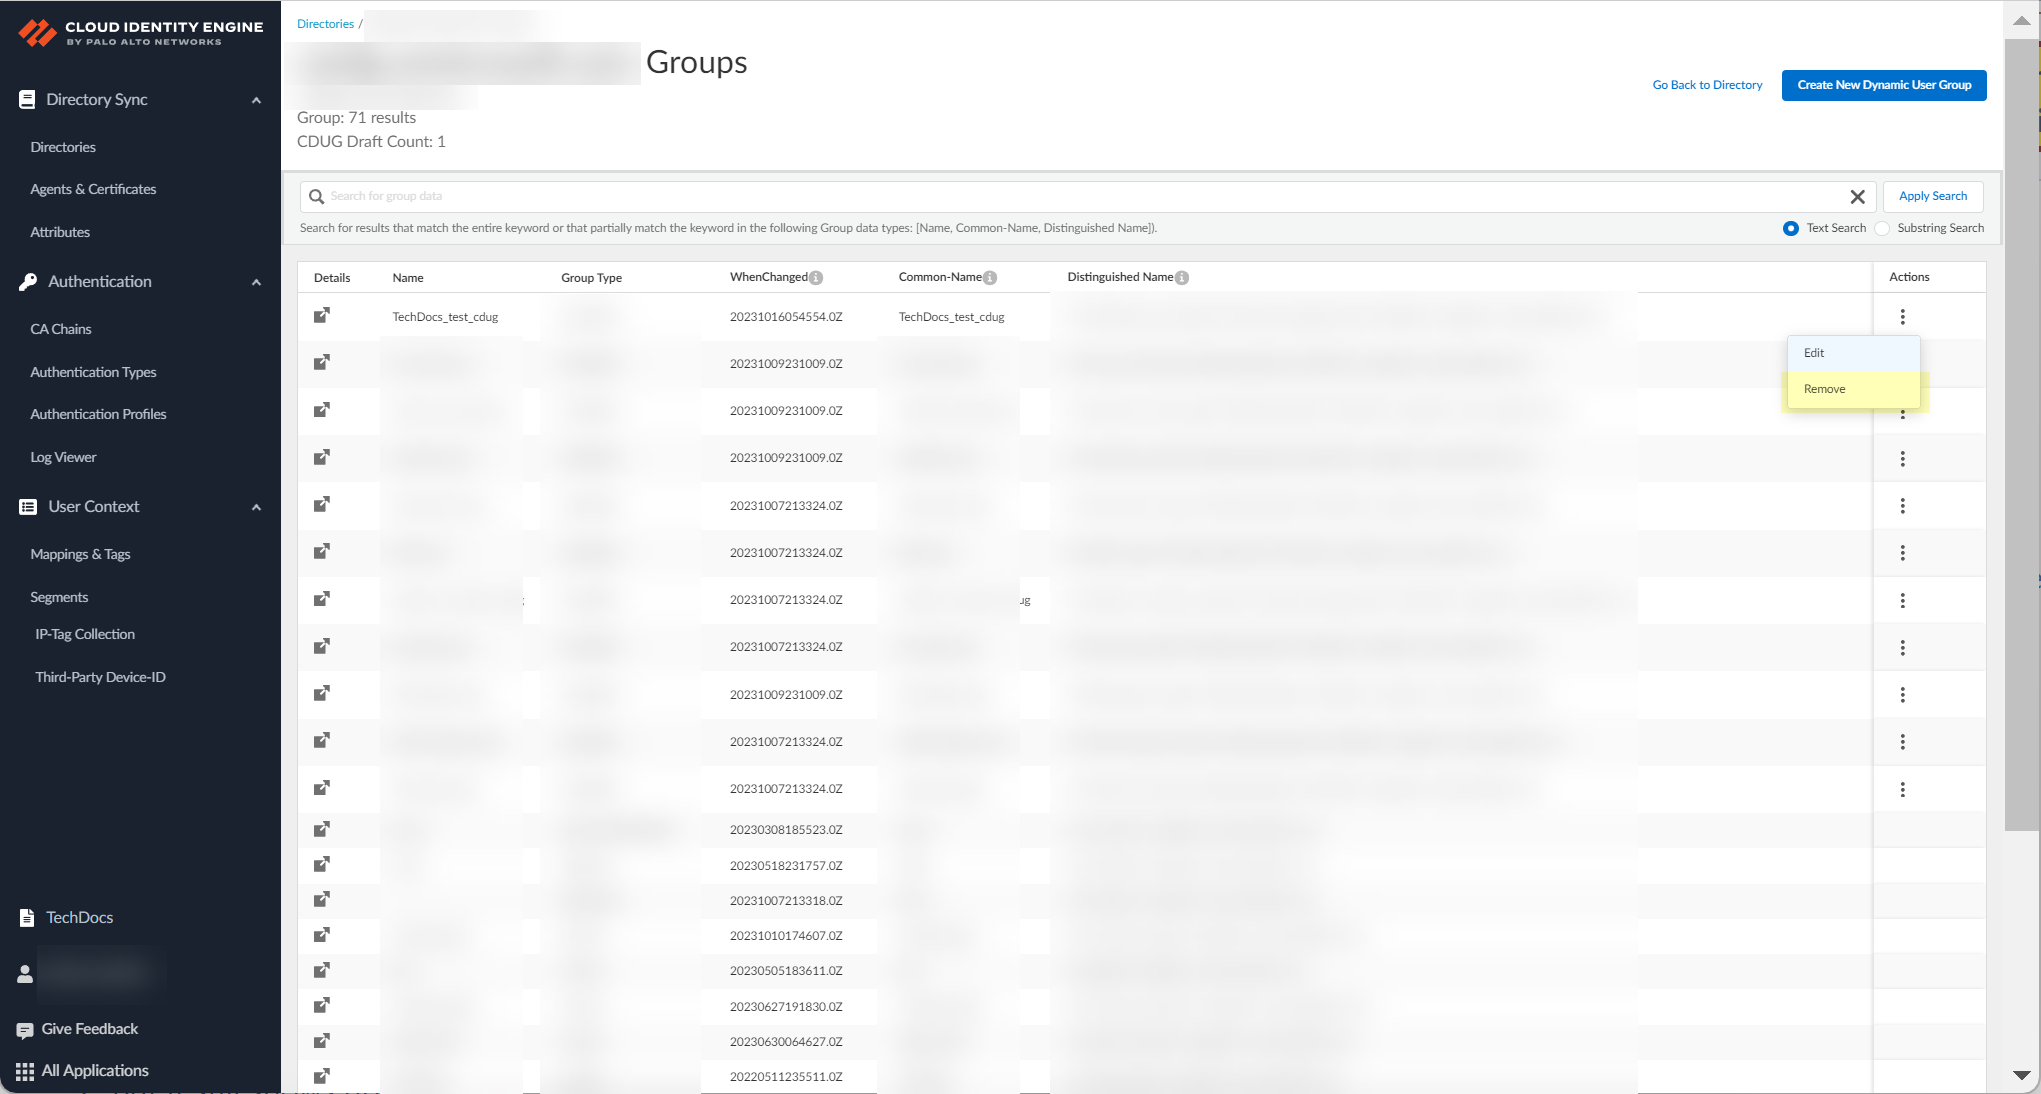
-
Remove CDUG: Ellipses > Remove.
Screenshot showing the "Remove" action for a Cloud Dynamic User Group.
PCNSE / PCNSA Focus
Key Concepts for Exams:
- CIE's core function: Centralized User-ID and Authentication (know the difference).
- Deployment types: On-Prem (agent needed), Cloud (no agent) .
- Agent requirements: Windows server, dedicated host (not User-ID/TS agent same port), TLS versions (recommend 1.3) .
- Authentication methods supported: SAML 2.0 (various IdPs), Client Certificates, OIDC (Prisma Access Browser) .
- CIE integration points: Firewalls (User-ID source, Auth Portal), Panorama, Prisma Access, Cortex XDR, Third-Party IoT .
- Visibility Scope: TSG vs CSP and their impact on firewall visibility.
- Dynamic User Groups: Attribute-based vs On Demand Assignment, use cases (risk-based policy) .
- SCIM Connector: Purpose (customize attributes), supported clients, requirements (unique group names for Azure AD) .
- User Context (PAN-OS 11.0+): Purpose (granular data sharing), segments (publishing/subscribed), data types shared .
- Agent management: Log levels, update process, certificate management (auto-renewal, manual revoke/delete).
Gotchas & Critical Points Recap:
- Do NOT install CIE agent on the same host/port as User-ID or TS agent.
- Do NOT use Global Catalog ports (3268/3269) for On-Prem AD configuration on the agent.
- Avoid configuring/initial sync during CRL reload time.
- Manual removal of circular references in Azure AD is strongly recommended for correct group membership.
- Each Cloud Identity agent needs a UNIQUE certificate for its specific tenant.
- Client Credential Flow requires prior permission granting in Azure/Okta. Client secrets have expiration dates and must be renewed.
- Custom Azure SAML DPA username attribute MUST be /identity/claims/name: format.
- User groups for Azure SAML DPA may take up to 3 hours to sync initially.
- Cannot manually remove devices from quarantine (via Strata Cloud Manager/Panorama) if they were quarantined by SentinelOne via CIE.
- Custom attributes cannot begin with an underscore (_).
- SCIM directory sync requires unique group names for the displayName attribute in Azure AD.
- Cannot create a new dynamic risky endpoint group if one already exists.
- Cannot delete a tenant if another application is using it.
- Must delete domain from agent config BEFORE deleting from CIE app.
Important Points Recap:
- Recommend TLS 1.3 for all CIE traffic.
- Assigning multiple roles can grant broader privileges (potentially Superuser).
- Associate Panorama with CIE if managing Prisma Access in the same TSG, especially with TSG scope.
- OpenLDAP requires specific attributes and group objectClass (groupsOfUniqueNames).
- Client Certificate auth requires CA certificate installation on the agent host.
- OIDC auth type supports Prisma Access Browser, NOT GlobalProtect or Authentication Portal.
- SCIM gallery app doesn't support userType attribute.
- SCIM filtering for Azure AD allows faster updates (5min vs 40min for native SCIM).
- Azure AD User Risk requires specific permissions for collection.
- SentinelOne integration provides device security posture and risk.
- Cloud Identity Agent log levels impact permanent data storage.
- Cloud Identity Agent log search is case-sensitive.
- CIE agent update requires stopping the service and uninstalling the old version.
- User-ID source configuration on firewall/Panorama retrieves info based on device certificate and service route.
- Firewall collects attributes ONLY for users/groups used in security policy rules from CIE.
- Maximum Clock Skew default is 60s for SAML.
- User Context requires PAN-OS 11.0+. Each data type on a firewall/Panorama can only be shared to ONE segment.
- Obtain CSR and key for Third-Party Device-ID setup.
Mermaid Diagrams
Mermaid Sequence Diagram: On-Prem AD Sync
sequenceDiagram
    participant Agent as Cloud Identity Agent
    participant OnPremAD as On-Premises Active Directory
    participant CIE as Cloud Identity Engine
    participant Firewall as Palo Alto Networks Firewall
    participant Panorama as Palo Alto Networks Panorama
    participant CloudApps as PN Cloud Apps (e.g. Cortex XDR)

    Agent->>OnPremAD: Query Directory Attributes (LDAP/LDAPS)
    activate OnPremAD
    OnPremAD-->>Agent: Return User, Group, Computer Attributes
    deactivate OnPremAD
    Agent->>CIE: Send Attributes (TLS)
    activate CIE
    CIE-->>Agent: Acknowledge Receipt
    deactivate Agent
    CIE->>CloudApps: Provide User/Group/Attribute Data
    activate CloudApps
    CloudApps-->>CIE: Acknowledge Data (Optional)
    deactivate CloudApps
    CIE->>Firewall: Provide User Mapping/Group Mapping/Attributes (via User-ID Source Profile)
    activate Firewall
    Firewall-->>CIE: Acknowledge Data
    deactivate Firewall
    opt If Firewall Managed by Panorama
        CIE->>Panorama: Provide User Mapping/Group Mapping/Attributes (via User-ID Source Profile)
        activate Panorama
        Panorama-->>CIE: Acknowledge Data
        deactivate Panorama
        Panorama->>Firewall: Push Configuration/Policies using User/Group Data
    end

    Note over CIE: Performs Initial Sync & Incremental Syncs
Mermaid Sequence Diagram illustrating the data flow for synchronizing user and group attributes from an On-Premises Active Directory to the Cloud Identity Engine and then to Palo Alto Networks Firewalls and Cloud Apps.
Mermaid Graph: CIE Architecture Overview
graph TD
    A[User/Device] --> B{Access Request}
    B --> C[Firewall/Panorama]
    C --> D{Authentication?}
    D -- Yes --> E[Cloud Authentication Service (CAS) via CIE]
    E --> F{IdP or Client Cert?}
    F -- IdP --> G[External SAML/OIDC Provider]
    F -- Client Cert --> H[CIE CA Chain Validation]
    G --> E
    H --> E
    E --> C
    D -- No / User-ID --> I[Cloud Directory Sync (CDS) via CIE]
    I --> J{Directory Type?}
    J -- On-Prem AD/LDAP --> K[Cloud Identity Agent]
    K --> L[On-Prem Directory]
    J -- Cloud AD/Okta/Google/SCIM --> M[Cloud Directory API/SCIM]
    M --> N[Cloud Directory]
    K --> I
    M --> I
    N --> M
    L --> K
    I --> C
    subgraph Security Risk
        O[Azure Identity Protection] --> P[CIE Security Risk]
        Q[SentinelOne EDR] --> P
        P --> I
        P --> C(via User Context Segments)
    end
    subgraph Identity Mapping Sources
        R[Cloud Providers (AWS/Azure/GCP)] --> S[CIE IP Tag Collection]
        T[3rd Party IoT Solution] --> U[CIE 3rd Party Device-ID]
        V[Local User-ID Agent] --> W[Firewall]
        W --> C(via User Context Segments)
        S --> I
        U --> I
        S --> C(via User Context Segments)
        U --> C(via User Context Segments)
    end

    C --> X[PN Cloud Apps (e.g. Cortex XDR)]
    I --> X
    P --> X
    S --> X
    U --> X


    style E fill:#f9f,stroke:#333
    style I fill:#ccf,stroke:#333
    style P fill:#e0e0ff,stroke:#333
    style S fill:#cfe2f3,stroke:#333
    style U fill:#f9f3cf,stroke:#333
    style W fill:#d0f0c0,stroke:#333
    style C fill:#d0f0c0,stroke:#333
    style X fill:#c0f0f0,stroke:#333
    style G fill:#f0c0c0,stroke:#333
    style H fill:#f0c0c0,stroke:#333
    style L fill:#f0c0c0,stroke:#333
    style N fill:#f0c0c0,stroke:#333
    style V fill:#f0f0f0,stroke:#333
Mermaid Graph illustrating the overall architecture of the Cloud Identity Engine, showing its components (CAS, CDS, Security Risk, IP Tag, Device ID) and their interactions with directories, identity providers, firewalls, and cloud applications.
Interactive Quiz
Test your knowledge of Palo Alto Networks Cloud Identity Engine.