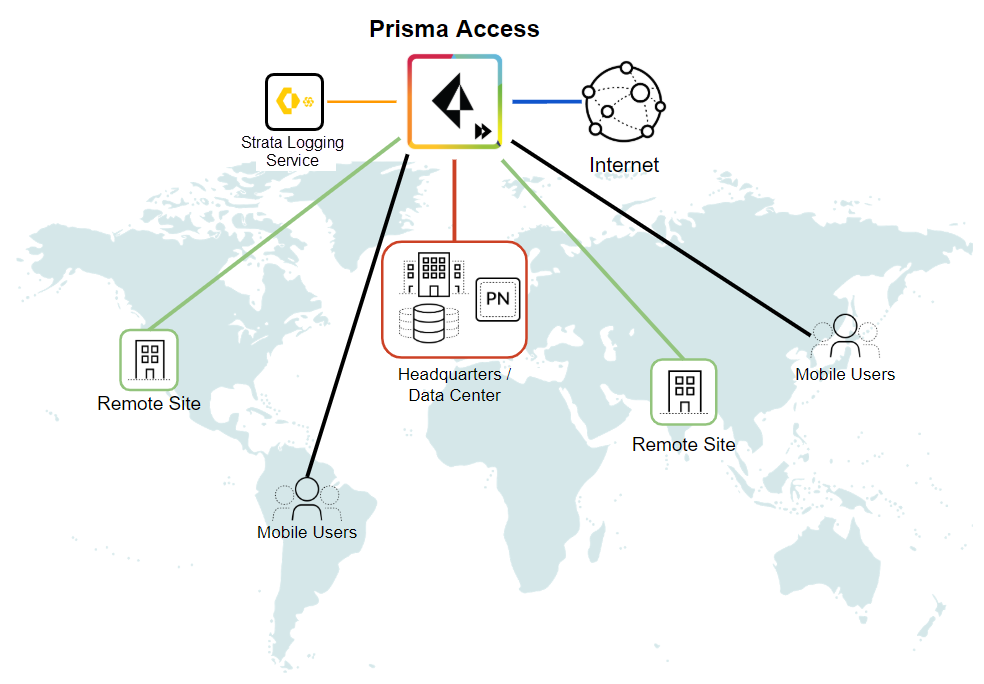
To keep your applications and data safe, you must secure all users at all locations all the time. But how do you do this when your footprint is expanding globally, more and more of your users are mobile, and your applications and data are moving out of your network and into the cloud? Prisma Access enables this consistent security by safely enabling your users to access cloud and data center applications as well as the internet, whether they are at your headquarters, branch offices, or on the road. Prisma Access consistently inspects all traffic across all ports, enabling secure access to the internet, as well as to your sanctioned SaaS applications, public cloud environments, and data centers and headquarters. Threat prevention, malware prevention, URL filtering, SSL decryption, and application-based policy capabilities are built-in to provide you with the same level of security no matter where your users are or what resources they are accessing. All Prisma Access logs are stored in the Strata Logging Service, providing centralized analysis, reporting, and forensics across all users, applications, and locations.
Prisma Access delivers protection at scale with global coverage so you don’t have to worry about things like sizing and deploying hardware firewalls at your branches or building out and managing appliances in collocation facilities. Prisma Access provides the network infrastructure to connect all of your remote branches, your headquarter sites, data centers, and mobile users without requiring you to build out your own global security infrastructure and expand your operational capacity.
With Prisma Access, Palo Alto Networks deploys and manages the security infrastructure globally to secure your remote networks and mobile users. Prisma Access encrypts the data end-to-end between Mobile User Security Processing Nodes (MU-SPNs) and Remote Network Security Processing Nodes (RN-SPNs), between SPNs and Service Connection Corporate Access Nodes (SC-CANs), and between SC-CANs and the datacenter.
Even if you don’t require a service connection for your HQ or data center, we recommend that you create one to allow network communication between mobile users and remote network locations, and between mobile users in different geographical locations.
You can deploy the GlobalProtect app to your users (available for smartphones, tablets, or laptops running Microsoft Windows, Apple macOS and iOS, Android, Google Chrome OS, and Linux) so that they can tunnel the traffic to Prisma Access for policy enforcement and threat prevention. The GlobalProtect app also provides host information profile (HIP) reporting so that you can create granular policies based on device state to ensure that endpoints adhere to your security standards—for example, they are equipped with the most up-to-date patches, encryption, and virus definitions—in order to access your most sensitive applications. Or, to enable secure access to users on unmanaged devices, you can enable Clientless VPN . Prisma Access dynamically scales in and out per region based on where your users are at the moment.
If your organization’s existing network already uses explicit proxies and deploys PAC files on your client endpoints, you can smoothly migrate to Prisma Access to secure mobile users’ outbound internet traffic.
The Importance of Internet Security
Securing internet access has never been more important and more challenging. Existing legacy solutions struggle to detect evasive and targeted phishing and other web-based attacks while at the same time neglecting new threats posed by unsecured DNS traffic. Palo Alto Networks Prisma Access has internet security with industry-first ML-powered Advanced URL Filtering and DNS Security services. Using Prisma Access, you can prevent evasive and targeted phishing and fileless attacks in real-time, and protect against the latest sophisticated DNS-based attacks.
Prisma Access Cloud Secure Web Gateway (SWG)
A secure web gateway is a crucial element in today's digital landscape due to the escalating complexity and frequency of cyberthreats. Cybercriminals continually devise new tactics and techniques to breach security defenses, one of which is to camouflage malicious code in seemingly legitimate websites. As users access these compromised websites, they inadvertently leak credentials or expose organizations to harmful code, which can wreak havoc if left unnoticed.
In such a risk-laden environment, the absence of a robust security gateway significantly amplifies the risk to an organization's digital assets. Such risk could lead to unauthorized access, data theft and disruption of business operations, especially with the increasing prevalence of widespread phishing and ransomware attacks. Without the security barrier provided by SWG, a ransomware attack could effectively hold an organization hostage, leading to financial and reputational harm.
The use of encrypted traffic is now commonplace, with HTTPS constituting the majority of web traffic. An organization is at risk of security threats concealed within encrypted channels if it lacks a SWG that can effectively decrypt and inspect this traffic.
However, using multiple point products for SWG, private app access, and CASB only complicates matters. Siloed products stitched together as one offering results in feature parity gaps and poor security outcomes, leaving you vulnerable for attacks. With these solutions, you get inconsistent security for internet and private apps.
To address these challenges, Prisma Access offers a unified product, converging management, policy, and data for all users and apps across all capabilities including ZTNA, SWG, NG-CASB, FWaaS, DLP, and more.
Customers can easily migrate from legacy on-premises and cloud-based proxy solutions toPrisma Access to gain inline visibility and control of internet and SaaS app traffic with industry-leading AI-powered security protections.
Using Prisma Access to Secure Users and Endpoints
Prisma Access is designed to prevent successful cyberattacks, and that’s why it does more than just secure the web. To stop cyberattacks, it’s necessary to inspect all traffic. Anything short of a full inspection of all traffic introduces a significant gap in security. Prisma Access consistently protects all traffic on all ports and from all applications, enabling your organization to:
Read more about Prisma Access and its solutions.
There are two ways you can manage Prisma Access, but you can't switch between the management interfaces after you activate your Prisma Access license (with the exception of using the migration workflow to go from a Prisma Access (Managed by Panorama) to a Prisma Access (Managed by Strata Cloud Manager) deployment). So, you must decide how you want to manage Prisma Access before you get started:
To manage Prisma Access from the cloud, use Strata Cloud Manager. With cloud management, you can quickly onboard branches and mobile users through task-driven workflows that allow you to set up and test your environment in minutes. Cloud management with Strata Cloud Manager simplifies the onboarding process by providing predefined internet access and decryption policy rules based on best practices. Quickly set up IPSec tunnels using defaults suitable for the most common IPSec-capable devices and turn on SSL decryption for recommended URL categories.
Strata Cloud Manager Command Center
The Strata Cloud Manager Command Center page appears when you launch your Strata Cloud Manager. This command center helps you in assessing the health of your network, better visibility, and an overview of your data. The command center has different dashboards to view different types of reports.
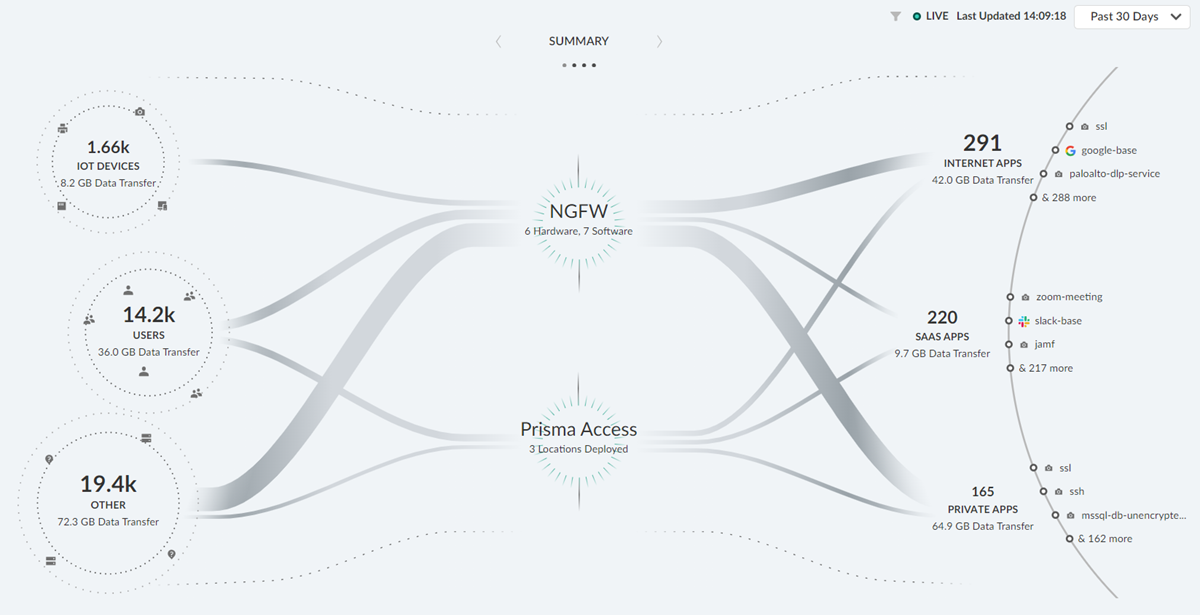
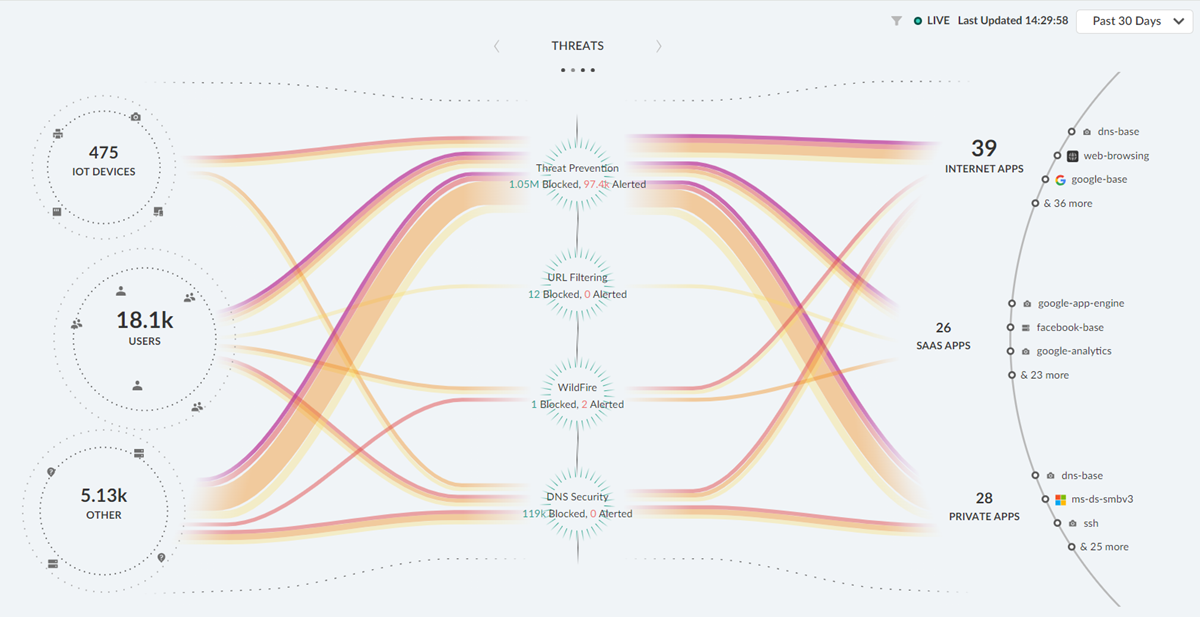

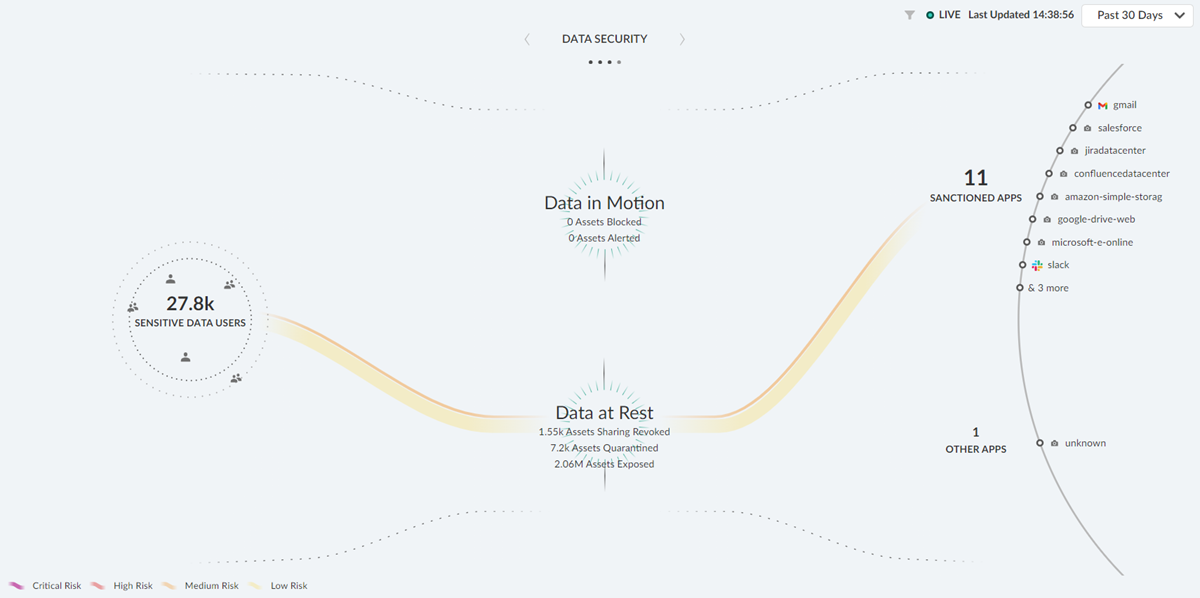
Click any of these categories in your dashboards to filter results accordingly.
Use the Cloud Services plugin on Panorama to set up and manage Prisma Access. This is a good option if you're already using Panorama to manage next-generation firewalls and you have a common policy that you want to use for access to your corporate applications.
Even if you're using Panorama to manage Prisma Access, you can still use Strata Cloud Manager for many Prisma Access visibility and monitoring features. Learn more.
After you decide which management option you want to use, get started by following the licensing and activation workflow for you option you have selected:
There are two ways you can choose from to manage Prisma Access:
These two management interfaces are how you handle onboarding, configuration, and security policy enforcement for your Prisma Access environment. However, Prisma Access also includes robust visibility and monitoring for your Prisma Access environment, and these features are provided on Strata Cloud Manager.
Importantly:
Regardless of the management interface you're using for Prisma Access (Strata Cloud Manager or Panorama), you can use Strata Cloud Manager for many of your Prisma Access visibility features, and to interact with add-on subscriptions like AI-Powered Autonomous DEM.
| Prisma Access Visibility and Monitoring Features on Strata Cloud Manager | |
|---|---|
| Autonomous DEM |
Provides native, end-to-end visibility and insights for all user traffic in your Secure Access Service Edge (SASE) environment. ADEM functionality is natively integrated into the GlobalProtect app and Prisma Access and therefore does not require you to deploy any additional appliances or agents. You can quickly isolate the source of digital experience problems, and simplify remediation.
This feature requires the Autonomous DEM add-on license to use with Prisma Access (Managed by Panorama) Access. |
| Dashboards and Reports in Strata Cloud Manager |
Visibility features in Strata Cloud Manager identify key findings that you can use to inform your policy updates and close enterprise security and user productivity gaps.
|
| Strata Cloud Manager Command Center |
The Command Center is an interactive, visual summary of the IoT devices, users, hosts, and traffic on your network. Utilizing the data from your cloud-delivered security and ADEM subscriptions, the Command center surfaces important information on the threats, user experience, and security of data on your network.
The Command Center allows you to interact with the data and visualize the relationships between events on the network, so that you can uncover anomalies or find ways to enhance your network security. |
Prisma Access uses a shared ownership model. Palo Alto Networks manages the underlying security infrastructure, ensuring it is secure, resilient, up-to-date and available to you when you need it. Your organization’s responsibility is to onboard locations and users, push policies, update them, query logs, and generate reports.
Palo Alto Networks manages the following parts of the security infrastructure. In addition to the security infrastructure, Prisma Access manages releases and upgrades:
Your organization manages the following components of the security infrastructure.
APIs for Prisma Access (Managed by Panorama)
In addition to the XML APIs that are available for configuration and management in Panorama, there are XML APIs for the Cloud Services plugin that you can use to perform tasks specific to Prisma Access. Use these APIs through a third-party service, application, or script to automate configuration and reporting tasks for Prisma Access.
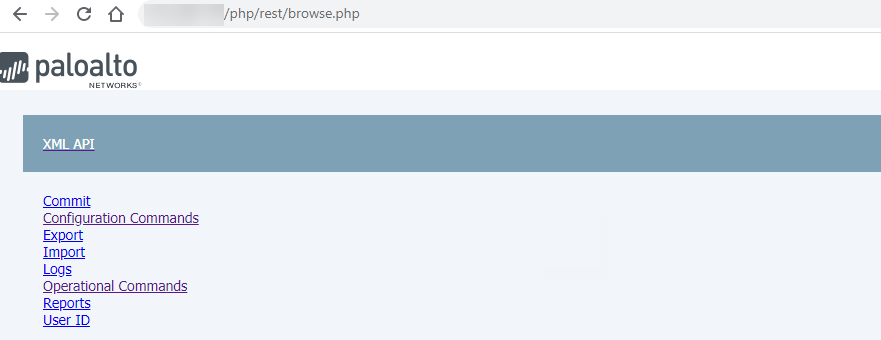
Access the Prisma Access (Managed by Panorama) API Using the Browser and Web Interface
To access the API using the browser, log in to the Panorama that manages Prisma Access with administrator privileges, then enter
/api
at the end of the URL. The URL changes to the XML API browser interface.
The Prisma Access APIs are located in the following XML Path Language (XPath) nodes in the XML tree:
XML API > Configuration Commands > devices > entry[@name='localhost.localdomain'] > plugins > cloud_services
XML API > Operational Commands > request > plugins > cloud_services > prisma-access
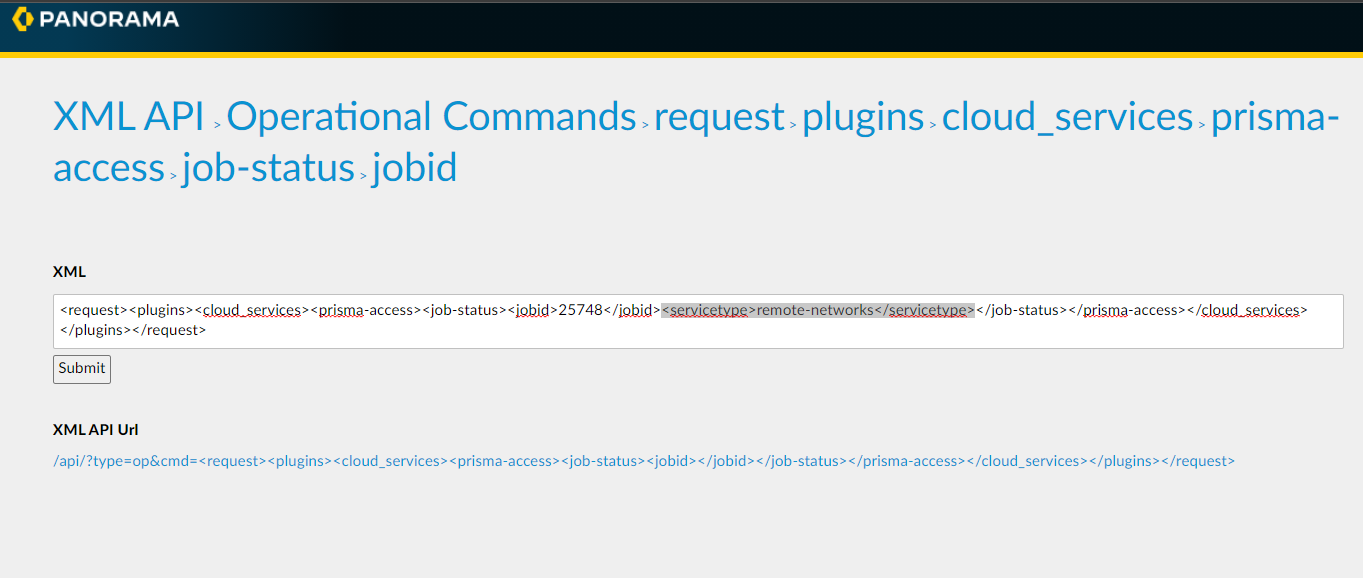
As you navigate in the XML tree, Prisma Access populates the tree in the
XML
area. You can enter required values in the
XML
area and click
Submit
to process an XML request. For example, to request the onboarding status of a job, navigate to
XML API > Operational Commands > request > plugins > cloud_services > prisma-access > job-status > jobid
, enter the Job id in the
jobid
field, enter the Service Type
servicetype
area, and click
Submit
to submit your request.
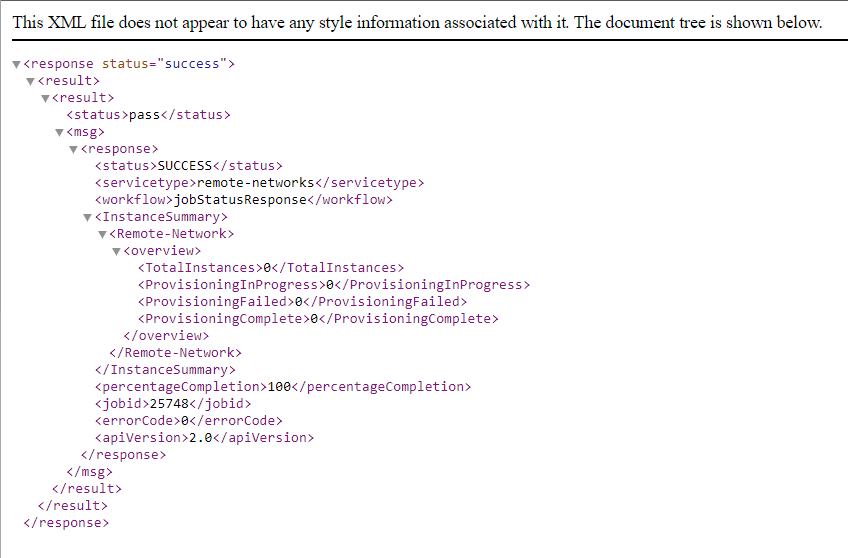
This XML only retrieves the onboarding status of a job. To retrieve the status of all commit operations, use the Prisma Access UI.
Prisma Access returns the output in XML format.
You can also use the web interface to find APIs in Panorama.
Use curl Commands to Retrieve Panorama Managed API Commands
If you prefer to use CLI to retrieve API command results, you can use APIs in conjunction with the API you use to retrieve public and infrastructure IP addresses for Prisma Access. To do so, use the following command:
Configuration Commands:
curl -k -X GET "https://<panorama-ip-address>/api/?key=<api-key>&type=config&cmd=<api-parameters></api-parameters>Operational Commands:
curl -k -X GET "https://<panorama-ip-address>/api/?key=<api-key>&type=op&cmd=<api-parameters></api-parameters>Where:
If you have a multi-tenant deployment, you add the name of the tenant for which you want to retrieve API information into the API.
For example, given a Prisma Access deployment that has the following parameters:
If you wanted to retrieve the number of active mobile users for that tenant, you would enter the following curl command:
curl -k -X GET "https://1.2.3.4/api/?key=12345abcde&type=op&cmd=<request><plugins><cloud_services><prisma-access><multi-tenant><tenant-name><entry%20name='tenant-1'></entry></tenant-name><remote-active-users-count/></multi-tenant></prisma-access></cloud_services></plugins></request>"Use CLI Commands with Prisma Access (Managed by Panorama)
Prisma Access allows you to use CLI commands to retrieve Prisma Access data. To access the CLI, establish a SSH connection using the IP address of the Panorama that manages Prisma Access.
The CLI uses the same modes and has the same behavior as PAN-OS commands, with the exception of entering the tenant name for multi-tenant deployments; you enter the tenant name using the
tenant-name <tenant-name>
command. For example, given a tenant name of
tenant-1
, enter the following command to retrieve to retrieve the active user count in a multi-tenant deployment:
admin-Panorama> request plugins cloud_services prisma-access multi-tenant remote-active-users-count tenant-name tenant-1

pass

Current User Count: 253
The Prisma Access Insights APIs allow you to query your Prisma Access Insights tenants for data resources. There are two versions of the APIs. The Prisma Access Insights 2.0 and 1.0 APIs both allow you to query your Prisma Access tenant for the health of your Prisma Access network deployment. The API calls are the same for both versions; however, each version uses different access tokens, and the mechanism by which you obtain an access token is different for each version.
To get started with Prisma Access Insights APIs, go to the Developer’s Guide at Welcome to Prisma SASE.
Prisma Access Insights API describes content specific to Prisma Access Insights APIs, as well as information about API version 2.0, API version 1.0, Prisma Access Insights API examples, and PAI FAQs.
About 2.0 APIs
Prisma Access Insights 2.0 APIs are intended for Prisma Access (Managed by Strata Cloud Manager) customers, where the tenants have been onboarded by Palo Alto Networks using a Tenant Service Group (TSG) identifier. To see whether your tenant uses TSG IDs, go to the Prisma Access hub, click on the Prisma Access Insights application name, and look in the Manage Apps section.
The 2.0 APIs can also be used by Prisma Access (Managed by Panorama) customers. In this case, if the Prisma Access (Managed by Panorama) deployment is multitenant, then only the supertenant has the TSG ID, and the subtenants are included in the header with the Strata Logging Service tenant ID.
API 2.0 Case
After supertenant migration to TSG ID, when querying for a subtenant:
The header needs the following information:
Prisma-Tenant:tsg_id:sub_tenant_id
About 1.0 APIs
Prisma Access Insights 1.0 APIs are intended for all Prisma Access (Managed by Strata Cloud Manager)single tenant customers, as well as Prisma Access (Managed by Panorama) single-tenant and multitenant customers.
API 1.0 Case
Before supertenant migration to TSG ID, when querying for a subtenant information using the 1.0 APIs, include the supertenant ID on the endpoint:
/api/sase/v1.0/resource/tenant/{super_tenant_id}/
Include the following header on the call:
Prisma-Tenant: {tenant_id}: {sub_tenant_id}
Previous: Prisma Access Insights APIs
Next: Prisma Access Releases and Upgrades
| Where Can I Use This? | What Do I Need? |
|---|---|
|
To begin the migration from Prisma Access (Managed by Panorama) to Prisma Access (Managed by Strata Cloud Manager), reach out to your Palo Alto Networks account team. |
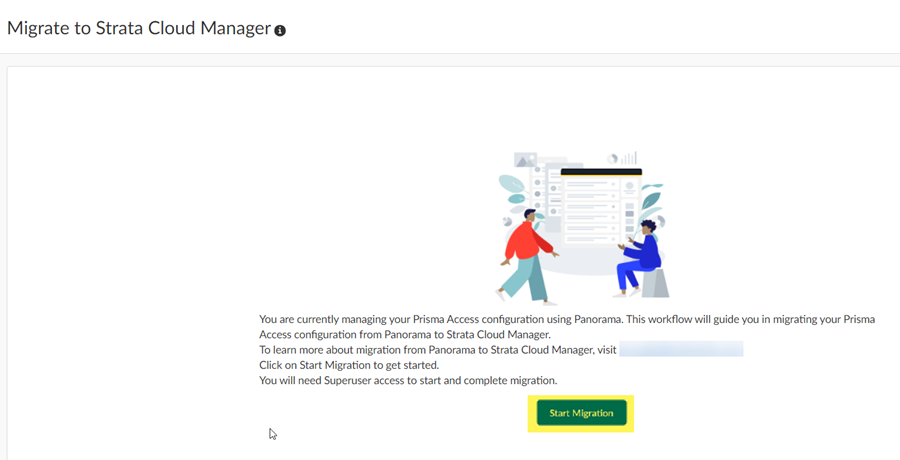
If you have an existing Prisma Access Deployment for which the configuration is managed by Panorama and want to migrate to Strata Cloud Manager for configuration management, Palo Alto Networks offers an in-product workflow that lets you migrate your existing Prisma Access configuration to Strata Cloud Manager.
Managing your Prisma Access configuration using Strata Cloud Manager instead of Panorama can offer you benefits such as:
Prepare to Migrate to Prisma Access (Managed by Strata Cloud Manager)
Before you start your migration, you should be aware of the minimum software requirements and the types of Prisma Access (Managed by Panorama) deployments you can migrate.
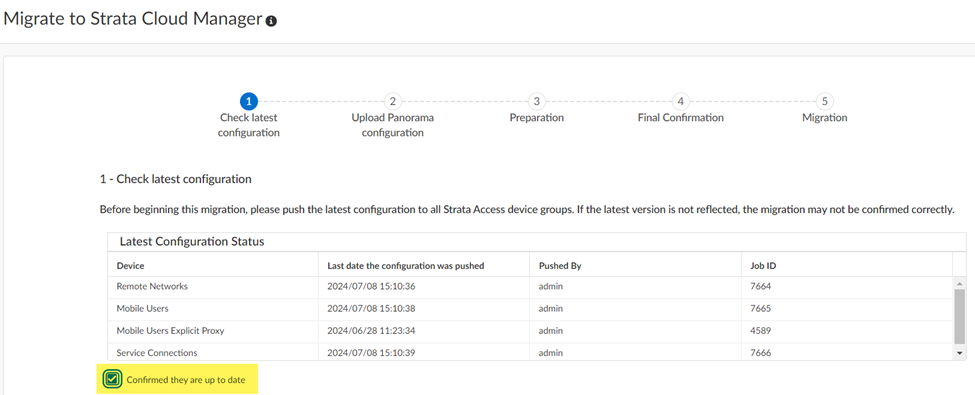
To migrate your Prisma Access (Managed by Panorama) to a Prisma Access (Managed by Strata Cloud Manager) deployment, complete the following steps.
At a high level, you:
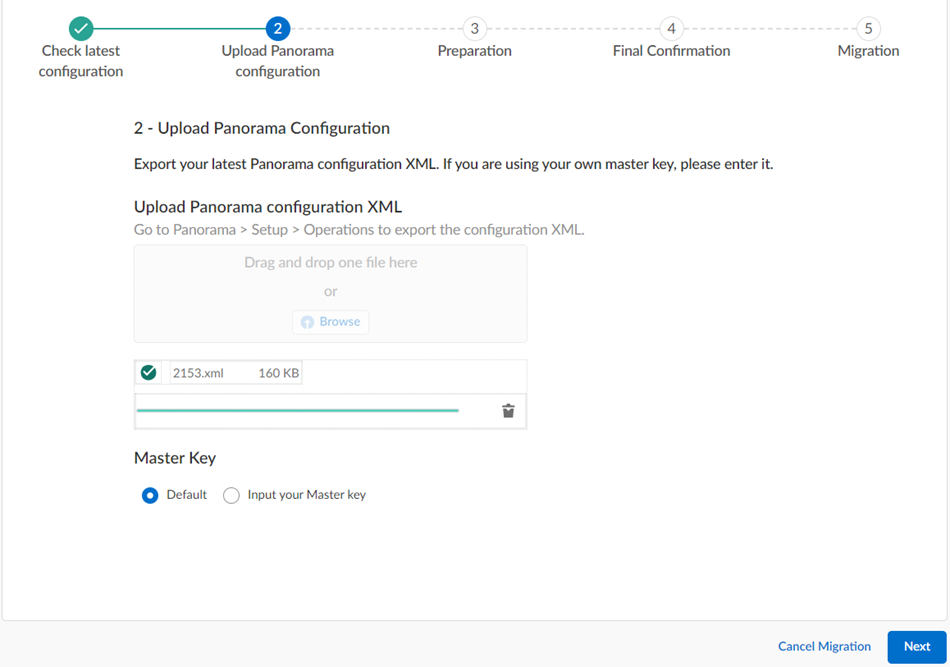
If your deployment uses the default Master Key, this step isn't required.
This .xml file is required to upload to Strata Cloud Manager during the migration process. Don't upload a techsupport file or any other file except an .xml configuration file.
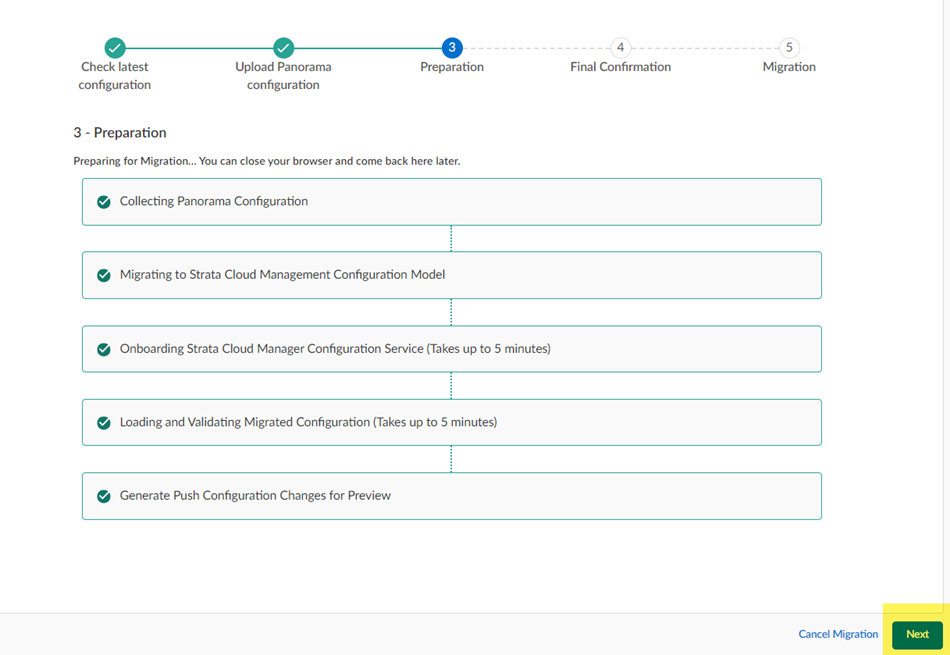
The migration program detects that you have a Panorama managed deployment.
The migration program begins.
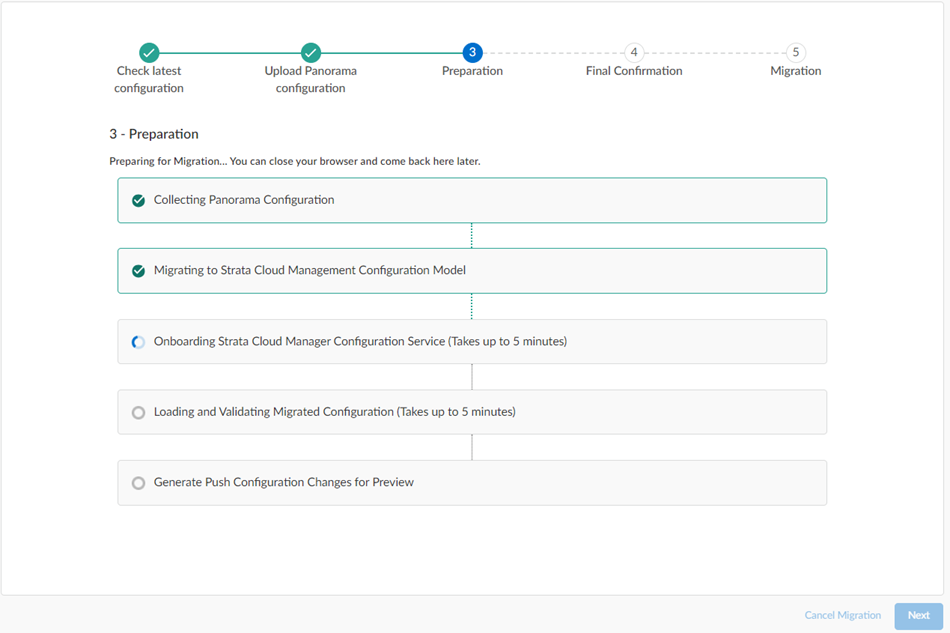
Wait for all the steps to complete.
unsupported configuration
, you can Trim the above configurations and proceed or Cancel migration .

Some unsupported configurations (such as a multitenant configuration) cancel the migration and the migration program can't resolve the issue; in this case, Cancel Migration .
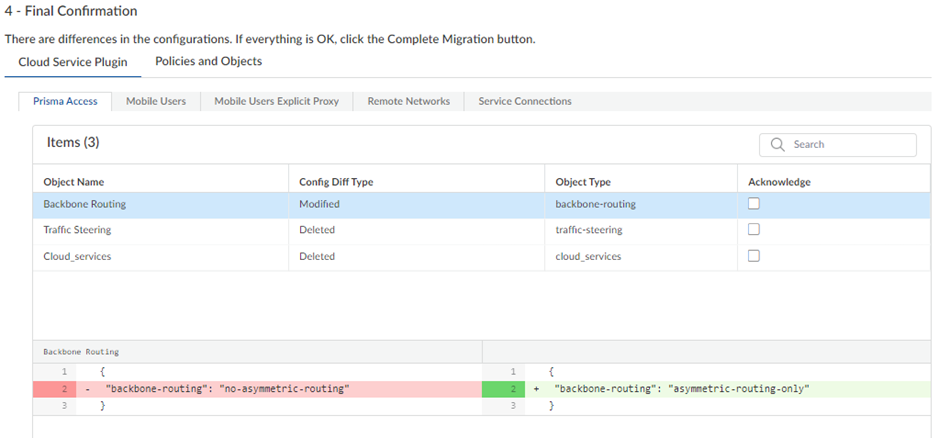
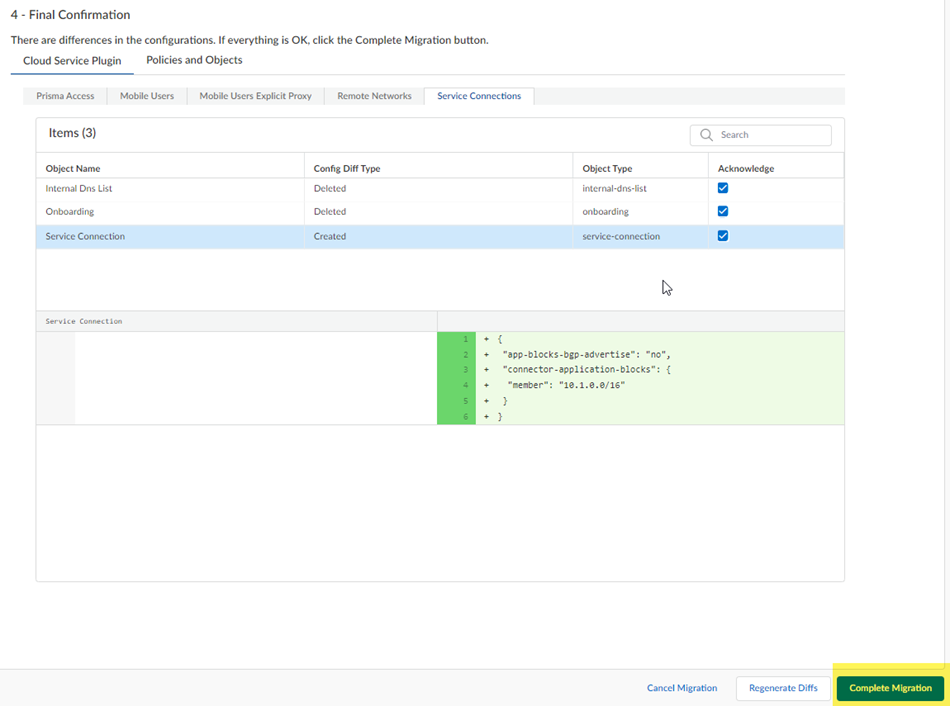
The migration program might make changes to your configuration to account for differences in the Panorama and the Strata Cloud Manager configuration or to fix unsupported functionality. If changes are required, the migration program shows those changes in a diff view with the new lines in green and the deleted lines in red.
Ignore any diffs that show the following object names; they don't affect your configuration:
Any changes you make are not committed to your configuration until you complete the migration and push your changes to Strata Cloud Manager.
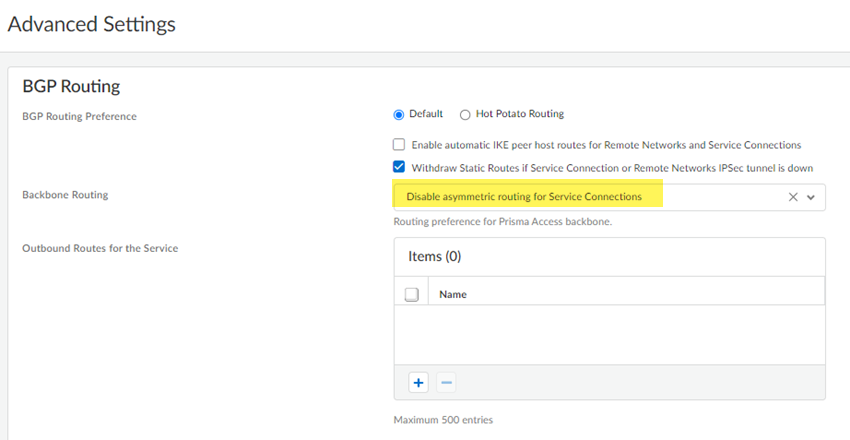
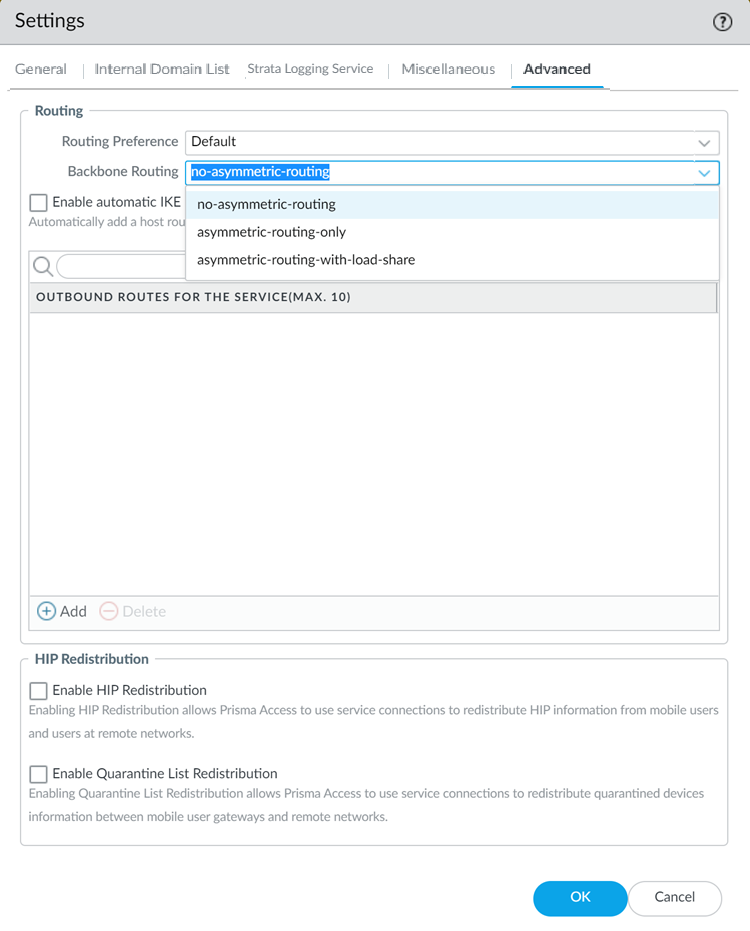
For the example in the previous step, the migration program made a change to Backbone Routing (from no-asymmetric-routing to asymmetric-routing-only ). To change this setting back to your original configuration, go to WorkflowsPrisma Access SetupService ConnectionsAdvanced Settings and change the Backbone Routing configuration to Disable Asymmetric Routing for Service Connections .
While not required, it can be useful to acknowledge each change as you make them, so you can keep track of them.
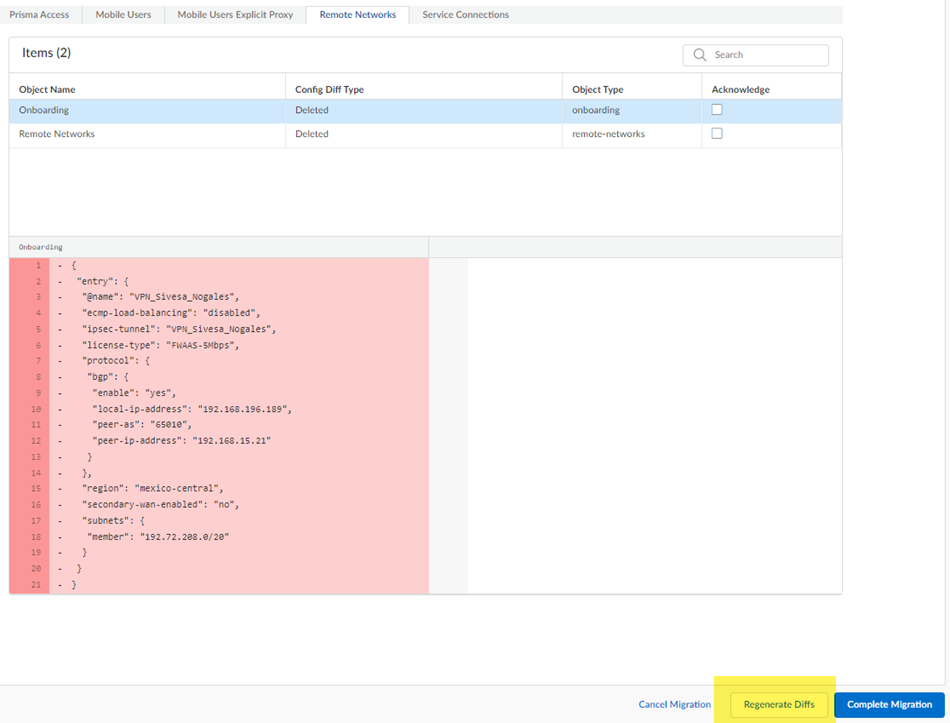
While not required, you can also Acknowledge your changes.
After you Complete Migration, you can't go back to a Panorama managed deployment and your deployment permanently uses Strata Cloud Manager for its management.
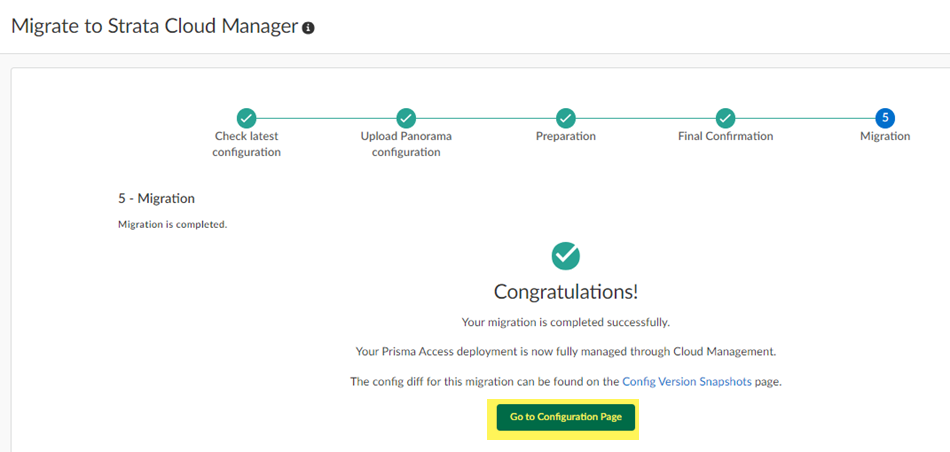
Your migrated deployment displays.

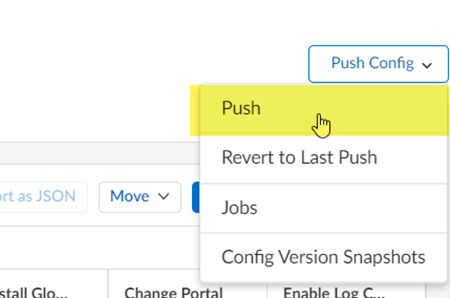
This Push operation ensures that your migration has successfully completed and that Prisma Access has applied all changes to your migrated configuration.
Prisma Access (Managed by Strata Cloud Manager) automatically performs dataplane upgrades, without any intervention required from you.
Prisma Access performs dataplane upgrades on the service to provide new security features and capabilities to help protect your organization’s end-users, business assets, and digital transformation. When a new version of Prisma Access requires a dataplane upgrade, you need to understand how the upgrade process works and have the required prerequisites in place before upgrading.
You can expect your dataplane to be upgraded one to two times a year. Some releases might offer an optional dataplane upgrade in addition to the required dataplane upgrades to support Prisma Access features that require it.
Dataplane Upgrade Overview
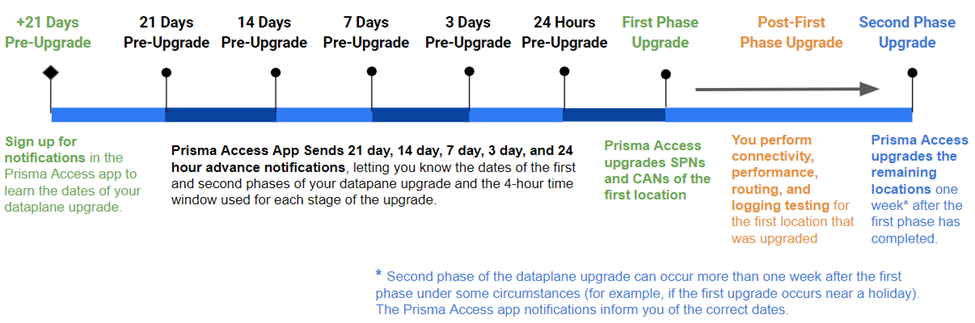
Prisma Access upgrades your dataplane in two phases on two weekend dates, and keeps you informed about the upgrade using Strata Cloud Manager. On a high level, the following steps are taken during the upgrade process.
You may see a date populated in Strata Cloud Manager before the 21-day notification, but this date may not be final until you receive your 21-day notification.
You can change and submit the first locations to upgrade and time window multiple times for a given tenant. The last submission that occurred seven days before the scheduled start date will be chosen by the service for the upgrade. You will not be able to make any changes within seven days of the upgrade start date.
If you make changes, it might take up to 30 minutes for the changes you made to be displayed in the Upgrade Dashboard on Insights. You will be notified via email alert when the Prisma Access has processed and completed the changes.
Palo Alto Networks strongly suggests that you select locations that reflect your entire deployment. For example, if you have a mobile user, service connection, and remote network deployment, select a location or locations that have all deployment types.
The technical support team will investigate the issue and take corrective actions that may also include rolling back to the previous dataplane version. This decision will be communicated to you via the technical support case.
The following figure shows the timeline used for the upgrade and includes the tasks that you will need to perform for the dataplane upgrade (shown in green), as well as the steps that Prisma Access performs.
The following section provides more details about the dataplane upgrade process.
After you sign up for notifications, Prisma Access informs you of the two weekend dates that will be used for the upgrade process and sends these notifications 21 days, 14 days, 7 days, 3 days, and 24 hours before the first phase of the upgrade will occur. The upgrade process occurs in two phases:
Palo Alto Networks attempts to upgrade the locations during the four-hour window that you select through Strata Cloud Manager. However, completing the required upgrades during this window is best-effort and Palo Alto Networks cannot guarantee that the locations will be upgraded during that time. If there are any issues during the upgrade, Palo Alto Networks will attempt the upgrade 24 hours after the original four-hour window.
For this reason, you should schedule a change request window for 72 hours starting at 8 p.m. local time on Friday and ending at 8 p.m. local time on Monday for each of the two weekends when the dataplane upgrade occurs. You will receive an email when the upgrade is complete.
Prisma Access makes the following changes to your deployment during Phase #1 of the upgrade.
| Deployment Type | What is Upgraded |
|---|---|
| Mobile Users—GlobalProtect Deployments |
Prisma Access upgrades:
|
| Mobile Users—Explicit Proxy Deployments | Prisma Access upgrades the Explicit Proxy nodes for the Explicit Proxy location or locations you specify. |
| Remote Network Deployments |
Prisma Access upgrades the backup (HA) remote network, also known as the
Remote Network Security Processing Node (RN-SPN)
, then makes the backup remote network the active node for the location or locations you specify. The backup remote network connection is not upgraded until the following weekend, when the active and backup nodes are upgraded for all locations.
If there are multiple RN-SPNs in the selected location, all primary nodes are upgraded to the new dataplane version. |
| Service Connections |
Prisma Access upgrades the backup (HA) service connection, also known as the Service Connection Corporate Access Node (SC-CAN), then makes the backup service connection the active node for the location or locations you specify. The backup service connection is not upgraded until the following weekend, when the active and backup nodes are upgraded for all locations.
If there are multiple SC-CANs in the selected location, all backup nodes are upgraded to the new dataplane version. |
| ZTNA Connectors | ZTNA Connectors are not upgraded; you can upgrade the ZTNA Connectors on an as-needed basis. |
Between the first and second upgrades, monitor the first upgraded locations and perform connectivity, performance, routing, and logging testing to make sure that the locations upgraded successfully. If you encounter a service-impacting failure after the upgrade, open a Support Case with Palo Alto Networks Technical Support for assistance. Palo Alto Networks will attempt to resolve the issue by rolling back the dataplane to a previous dataplane version within 24 hours.
The upgrade window can be longer. For example, if Phase #2 occurs during a national holiday in the United States of America, the second phase of the upgrade happens 14 days after the first phase instead of 7. The notifications you receive in Strata Cloud Manager show you the specific timeline for the upcoming dataplane upgrade.
The following example shows a sample dataplane upgrade procedure for a Mobile Users deployment with five gateways (MU-SPNs) and three SC-CANs. The US West location has two MU-SPNs as the result of an autoscale event (an extra MU-SPN was added after a large number of mobile users logged in to that location).
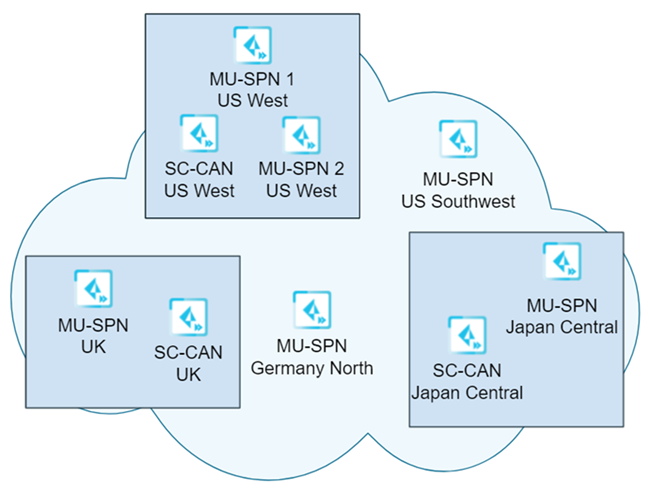
In this example, you selected a single location (US West) to upgrade first, and requested a four-hour upgrade window of 8:00 a.m. to 12:00 noon Saturday for the upgrade.
On the first upgrade weekend (Phase #1), the upgrade occurs for the SC-CANs and MU-SPNs in the US West location takes place between 8:00 a.m. and 12:00 p.m. Pacific Time on Saturday.
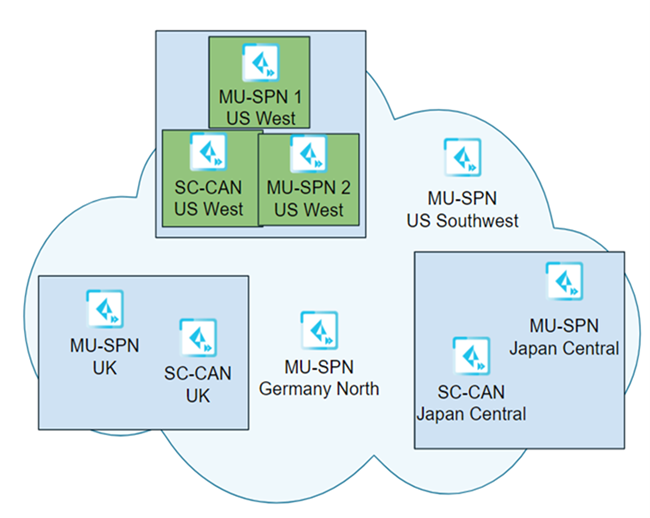
Seven days after the first location is upgraded, Palo Alto Networks upgrades the remaining components (Phase #2) using the same four-hour time window as was used for the first phase of the upgrade (8:00 a.m. to 12:00 p.m. on Saturday).
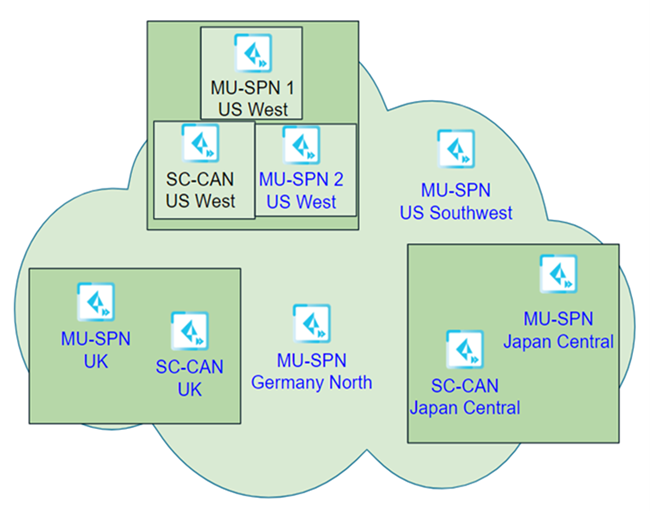
In this example, Prisma Access uses the following time zone information when upgrading the dataplane:
Use the following recommendations and requirements when adding an infrastructure subnet:
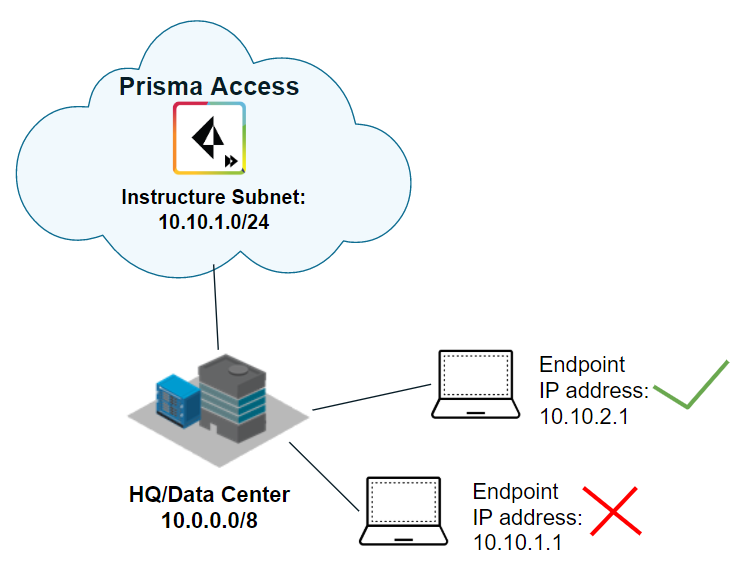
The following example shows a Prisma Access infrastructure subnet, 10.10.1.0/24, that you assigned from an existing supernet, 10.0.0.0/8. After you assign 10.10.1.0/24 as the infrastructure subnet, your organization cannot use any IP addresses from that subnet. For example, you can assign 10.10.2.1 to an endpoint, but 10.10.1.1 is not allowed because that IP address is part of the infrastructure subnet.
Before you can use Prisma Access to secure your remote networks and/or mobile users, configure an infrastructure subnet. Prisma Access uses IP addresses within this subnet to establish a network between your remote network locations, mobile users, headquarters and data center (if applicable). Prisma Access also uses service connections to access internal resources from your headquarters or data center location.
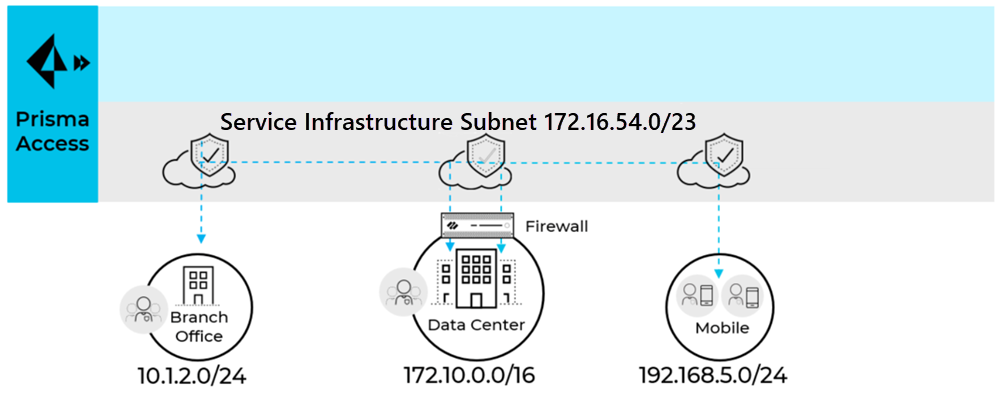
This sub-network will be an extension to your existing network. Hence, it should not overlap with any existing IP subnets in your network. The following example shows a 172.16.54.0/23 subnet that is being used for the Prisma Access infrastructure subnet.
For small networks with less than 50 sites and 2500 mobile users, consider a /24 subnet. For medium sized networks with less than 100 sites and less then 5000 mobile users, consider a /23 subnet. In most cases a /23 subnet is sufficient. If there are more than 100 sites or 5000 mobile users or expected future growth, contact Palo Alto Networks to evaluate whether you need a larger subnet size.
Learn how to set up Prisma Access.
The following workflow provides you with the summary steps that you take to install and configure Prisma Access (Managed by Panorama) Access.
If you are setting up a deployment that includes multiple instances of Prisma Access on a single Panorama (multitenancy), see . Most organizations do not have a need to create and manage multiple tenants.
In addition, if your Panorama appliance uses a ( PanoramaSetupServiceProxy Server ), or if you use SSL forward proxy with Prisma Access, be sure to add the following URLs and ports to an allow list on the proxy or proxy server.
If there is a Palo Alto Networks next-generation firewall between the Panorama appliance and the internet, you must add a security policy rule on the firewall to allow the paloalto-logging-service and paloalto-shared-services App-IDs from the Panorama appliance to the internet. These applications allow SSL-secured communication to Prisma Access and to Strata Logging Service that the Panorama appliance uses to query logs. If the Panorama appliance is behind a legacy Layer 4 firewall, permit ports 443 and 444 outbound from the Panorama to allow this traffic from the Panorama. Note that opening layer 4 ports instead of using Palo Alto Networks App-IDs is less secure and not recommended.
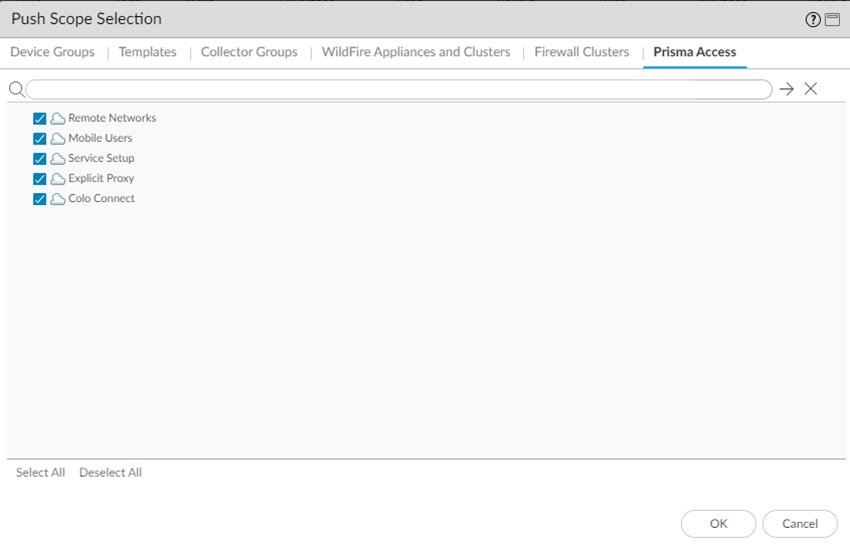
In order to push configuration—such as security policy, authentication policy, server profiles, security profiles, address objects, and application groups—to Prisma Access, you must either create new templates and device groups with the configuration settings you want to push to Prisma Access, or leverage your existing device groups and templates by adding them to the template stacks and device group hierarchies that Prisma Access creates when you onboard the service.
Prisma Access creates the following templates and device groups, depending on what you have purchased (for example, if you do not purchase an Explicit Proxy license, you will not see the Explicit Proxy templates and device groups):
Configuration is simplified in Prisma Access because you do not have to configure any of the infrastructure settings, such as interfaces and routing protocols. This configuration is automated and pushed from Panorama in the templates and device groups that the service creates automatically. You can configure any infrastructure settings that are required by the service, such as settings required to create IPSec VPN tunnels to the IPSec-capable devices at your remote network locations, directly from the plugin. Optionally, you can add templates and device group hierarchies to the configuration to simplify the service setup.
To simplify the service setup, create or import the templates and device groups you need before you begin the setup tasks for using Prisma Access.
When creating templates and device groups for Prisma Access, you do not need to assign managed devices to it. Instead, you will add them to the template stacks and device group hierarchies that Prisma Access creates. Do not add any of the templates or device groups created by Prisma Access to any other template stacks or device groups.
Prisma Access provides you with notifications about the service, including any dataplane upgrades, using notifications from this app.
Palo Alto Networks recommends changing the master key in Panorama and in the Cloud Services plugin as a security best practice and that you change the master key monthly.
Because the Panorama and Prisma Access master keys do not synchronize, Palo Alto Networks recommends that you do not automatically rotate the master key in Panorama without also synchronizing the master key in Prisma Access. You can use the Panorama UI or API commands to change the master keys.
Be sure to keep track of the master key you deploy because master keys cannot be recovered. When a master key expires, you must enter the current master key in order to configure a new master key. You must reset your Panorama appliance to factory default if you cannot provide the current master key when it expires.
Do not specify a Current Master Key .
Make a note of the master key you configured.
You can also change the master key by using API commands. This requires two steps–one to change the Panorama master key and one to change the Prisma Access master key. Use the following API commands to change the master key:
XML APIOperational Commandsrequestmaster-key
XML APIOperational Commandsrequestpluginscloud_servicesprisma-accesssync
If you don’t require access to your corporate resources, you should still create a service connection to enable access between mobile users and remote networks.
To set up GlobalProtect on Prisma Access (Managed by Panorama):
Under PanoramaCloud ServicesConfigurationMobile Users , map Internet to Untrust; Mobile-Users to Trust.
We recommend using local authentication as a first step to verify that the service is set up and your users have internet access. You can later switch to using your corporate authentication methods.
To create a Security policy to allow traffic to the Internet, select the Mobile_User_Device_Group PoliciesSecurityPrerulesAdd a rule. For example: Mobile-Users to Internet.
To secure mobile users with an explicit proxy:
You can onboard one location and then add additional locations using the bulk import capability.
You add these addresses to an allow list on your organization’s network to limit inbound access to your enterprise network and applications.
Prisma Access uses this subnet to create the network backbone for communication between your branch networks, mobile users and the Prisma Access security infrastructure, as well as with the HQ and data center networks you plan to connect to Prisma Access over service connections.
To enable communication between your remote network locations, mobile users, and the HQ or data centers that you plan on connecting to Prisma Access over service connections, set up the service infrastructure subnet. Prisma Access uses this subnet to create the network backbone for communication between your branch networks, mobile users and the Prisma Access security infrastructure, as well as with the HQ and data center networks you plan to connect to Prisma Access over service connections.
Before you can begin setting up Prisma Access to secure your remote networks and/or mobile users, you must configure an infrastructure subnet, which Prisma Access will use to create the network backbone for communication between your service connections, remote networks, and mobile users, as well as with the corporate networks you plan to connect to Prisma Access over service connections. Because a large number of IP addresses will be required to set up the infrastructure, you must use a /24 subnet (for example, 172.16.55.0/24) at a minimum. Be sure you follow all guidelines and requirements.
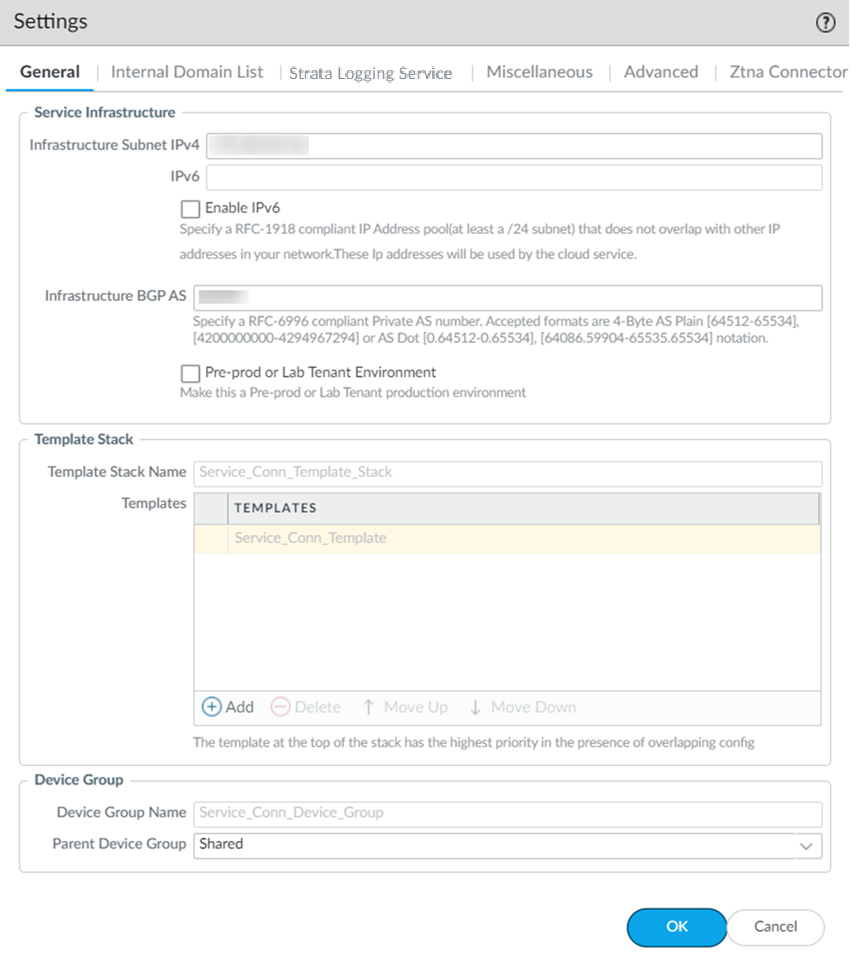
If you do not supply an AS number, the default AS number 65534 will be used.
When you enable a tenant as a pre-production or lab tenant, you can schedule upgrades for this tenant alone before upgrading other production tenants. The tenant receives notifications 24 to 48 hours before an upcoming upgrade.
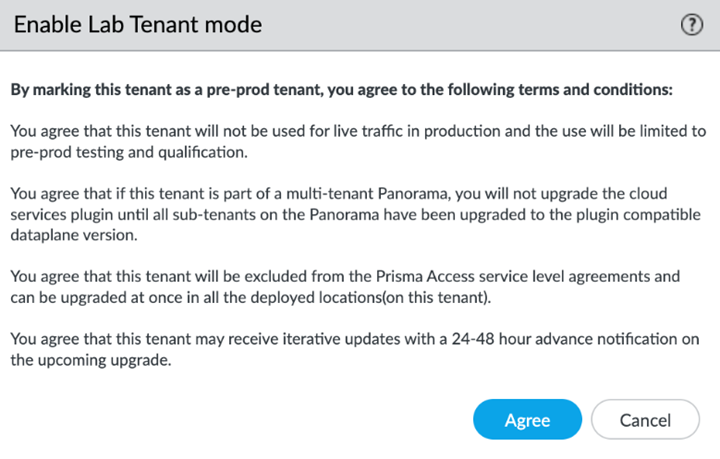
When you disable the tenant from pre-production or lab tenant, it is considered as a production tenant.
Prisma Access for Clean Pipe does not support this functionality.
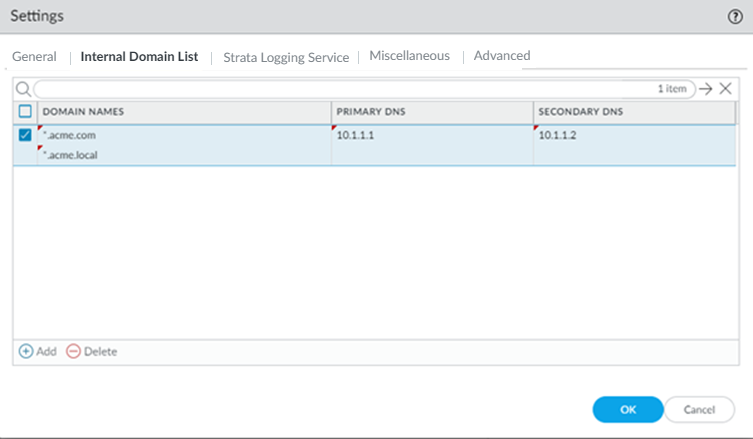
Use this step if you need Prisma Access to be able to resolve your internal domains to access services, such as LDAP servers, on your corporate network via service connections. For example, if you want a DNS lookup for your corporate domain to go exclusively to the corporate DNS server, specify the corporate domain and the corporate DNS servers here.
You can use a wildcard (*) in front of the domains in the domain list, for example *.acme.local or *.acme.com.
Do not enter a 127.0.0.1 address as it can cause Prisma Access internal routing issues.
The Cloud Services plugin automatically adds the following Log Settings ( DeviceLog Settings ) after a new installation or when removing non-Prisma Access templates from a Prisma Access template stack:
These Log Setting configurations automatically forward System, User-ID, HIP Match, and GlobalProtect logs to Strata Logging Service.
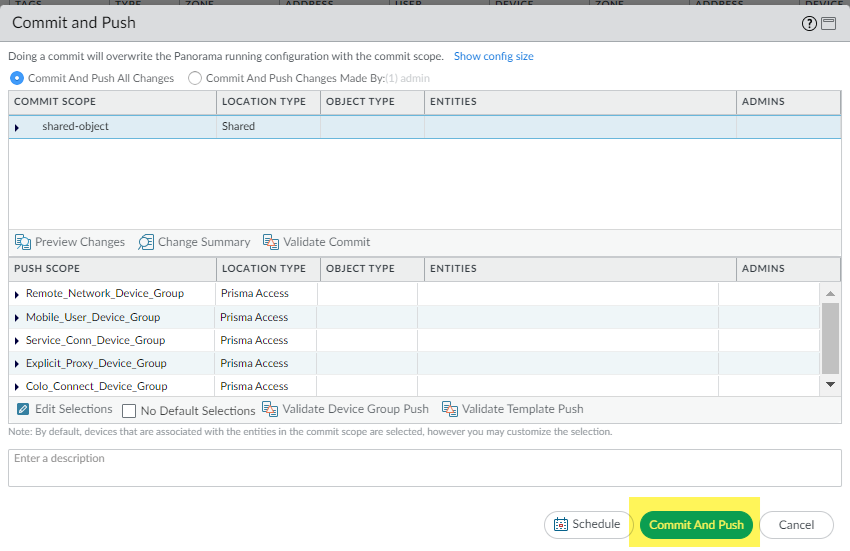
To apply log setting changes, perform the following steps, then commit and push your changes:
The way you enable log forwarding for other log types depends on the type. For logs that are generated based on a policy match, use a log forwarding profile. See the Strata Logging Service Getting Started Guide for more information.
If you use URLs in EDLs or custom URL categories and do not append a forward slash ( / ) to the URL, it is possible to allow more URLs than you intended. For example, entering example.com as a matching URL instead of example.com/ would also match example.com.website.info or example.com.br.
By selecting Append the ending token to the URLs in the URL filtering configuration , Prisma Access sets an ending token to URLs in EDLs or custom URL categories so that, if you enter example.com , Prisma Access treats it as it would treat example.com/ and only matches that URL.
If the majority of the traffic flows logged by the service connections are asymmetric, disabling service connection logging might be required to reduce the consumption of Strata Logging Service logging storage. If your deployment does not have asymmetric flows via the service connections, you do not need to disable logging.
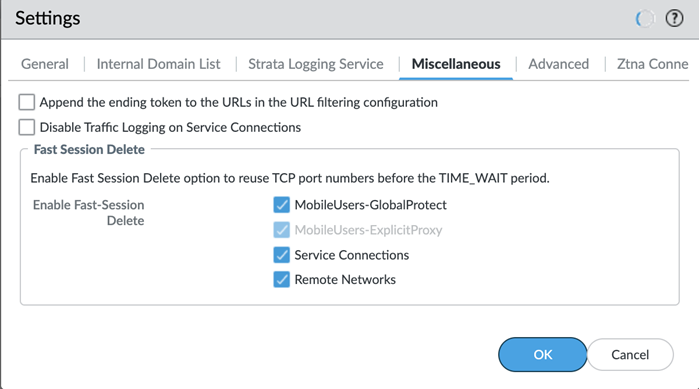
Fast-Session Delete allows Prisma Access to reuse TCP port numbers before the TCP TIME_WAIT period expires, and can be useful for SSL decrypted sessions that may be short-lived.
For Mobile Users—Explicit Proxy deployments, Fast-Session delete is a key part of its functionality and you cannot disable it.
You can specify network preferences to use either your organization’s network, or the Prisma Access network, to process the service connection traffic.
Changing the Prisma Access service connection routing method requires a thorough understanding of your organization’s topology and routing devices, along with an understanding of how Prisma Access routing works. We recommend that you read Routing for Service Connection Traffic carefully before changing the routing method from the default setting.
By default, the Prisma Access backbone requires that you have a symmetric network path for the traffic returning from the data center or headquarters location by way of a service connection. If you want to use ECMP or another load balancing mechanism for service connections from your CPE, you can enable asymmetric flows through the Prisma Access backbone.
Prisma Access removes the route in the following situations:
You cannot apply this change if tunnel monitoring is not enabled.
Prisma Access should automatically select the components that need to be committed.
If the status is Error , click the details link to view any errors.
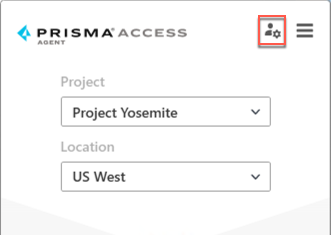
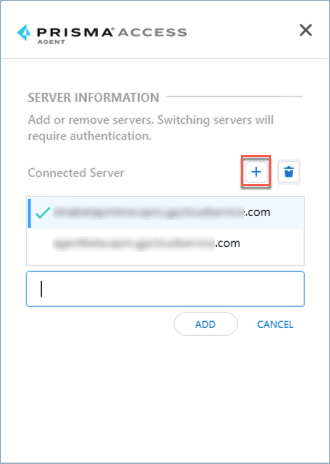
An instance of the Prisma Access server is also known as a tenant . If your administrators set up multiple Prisma Access servers, you can connect to a different server to access the network or the resources through that server.
For example, you need to work on a different project, but that project is only accessible on a different server. You will need to connect to that server before you can change to that project.
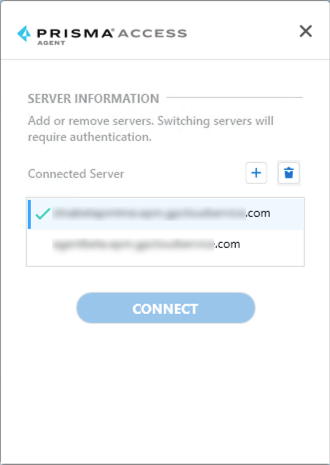
The format of the server name is <xxx>.epm.gpcloudservice.com without the https:// . The maximum length of the server name is 256 characters. The maximum number of servers allowed on this page is 20.
If your administrator allows it, you can temporarily disable the Prisma Access Agent. This is helpful on devices where other secure access apps, such as the GlobalProtect app, coexists with the Prisma Access Agent. In this case, you will have to disable the Prisma Access Agent before you can switch to the other app.
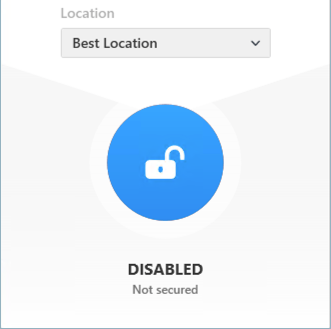
After you disable the Prisma Access Agent, the agent is in the disabled state, where:
To disable the Prisma Access Agent:
If you're disabling the agent for the first time or if you don't see the Disable link in the settings page, sign out of the Prisma Access Agent.
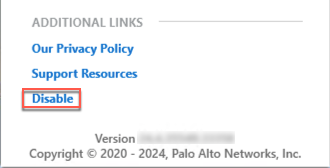
The Prisma Access Agent is disabled.

The Prisma Access Agent functionality will resume.
In some organizations, the Prisma Access Agent is installed on user devices that already have the GlobalProtect app installed. After installing the Prisma Access Agent, you can switch between the Prisma Access Agent and the GlobalProtect app as needed.
After switching to the GlobalProtect app, the Prisma Access Agent is in the disabled state. In the disabled state:
Both Prisma Access Agent and GlobalProtect use the same GlobalProtect port to listen to MFA requests (for additional authentication for certain applications), but only one agent can use the port at a time. When you disable the Prisma Access Agent, the port will be released for use by GlobalProtect.
You can use either the Prisma Access Agent app or the Prisma Access command-line tool (PACli) to switch between the two apps.
Before switching to the GlobalProtect™ app, you need to disable the Prisma Access Agent. If your administrator configured the feature to allow users to disable the Prisma Access Agent, you can use the app to disable the Prisma Access Agent. After you disable the Prisma Access Agent, you can start the GlobalProtect app.
Your administrator must contact the Palo Alto Networks team to enable this tenant-level feature. It's not available as an agent setting on Strata Cloud Manager.
If you're disabling the agent for the first time, open the Prisma Access Agent app and sign out of the Prisma Access Agent.
The Prisma Access Agent is disabled.
If the agent is in On-Demand mode, the Prisma Access Agent is enabled but remains disconnected. Click the lock icon to connect to the Prisma Access location.
Dynamic Privilege Access enables Prisma Access to apply different network and Security policy rules to mobile user flows based on the project your users are working on. Go to InsightsUsers in the Strata Cloud Manager Command Center to view user-based access information in your environment.
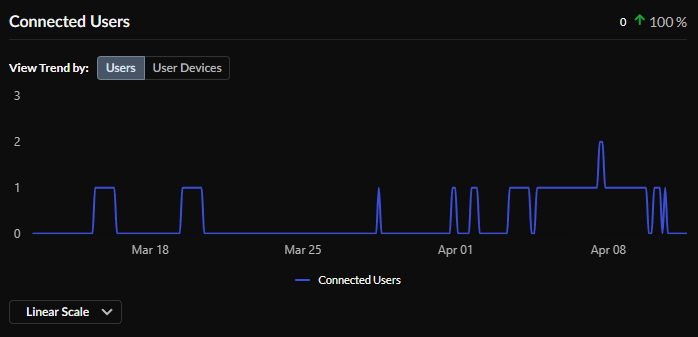
Connected Users
View Connected Users to view current connected users or connected user devices. The up or down arrow compares this time range with a previous time range to determine the difference, in percentage, in number of connected users or devices.
Select View Trend by Users to view the number of users currently connected to Prisma Access Agent, and click View Trend by User Devices to see the number of user devices currently connected to Prisma Access Agent.
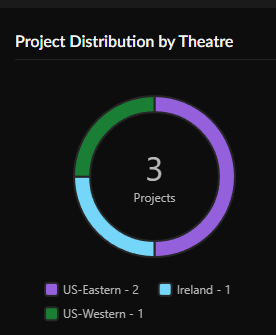
View Project Distribution by Theatre to see the number of projects by location, or theater.
The Users | Devices table shows the Project Name associated with each user and device. You can also see how many devices are connected by user, last login time, last source location, last connected Prisma Access location, the source Internet Protocol, and OS family and version.

Select any Project Name to go to the Projects page.
Select any User Name to view user details such as Activity and Connectivity .
Activity
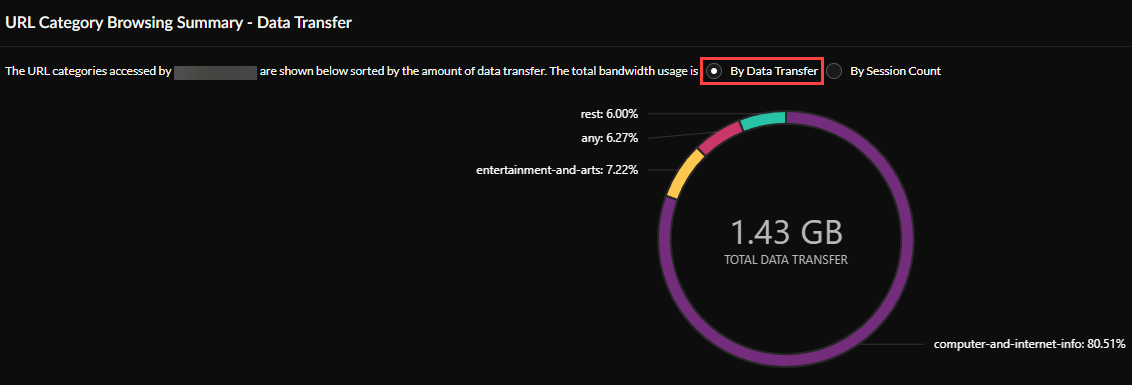
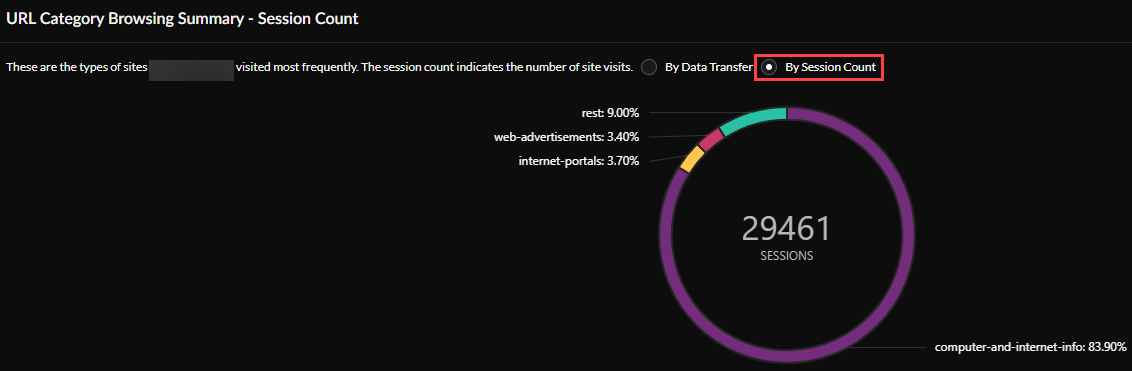
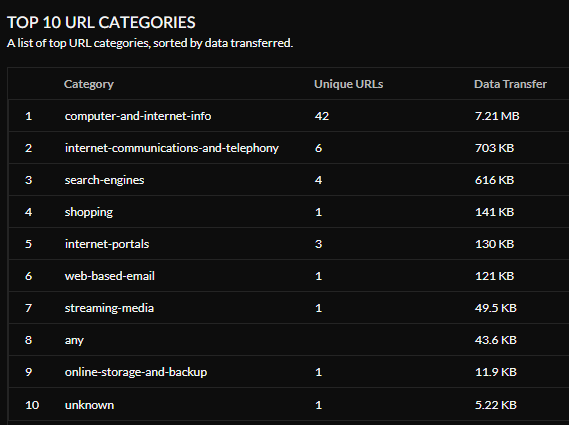
URL Browsing Category Summary- Data Transfer —View your browsing category data transfer summary By Data Transfer or By Session Count . You can also view a list of the Top 10 URL Categories , sorted by data transferred.
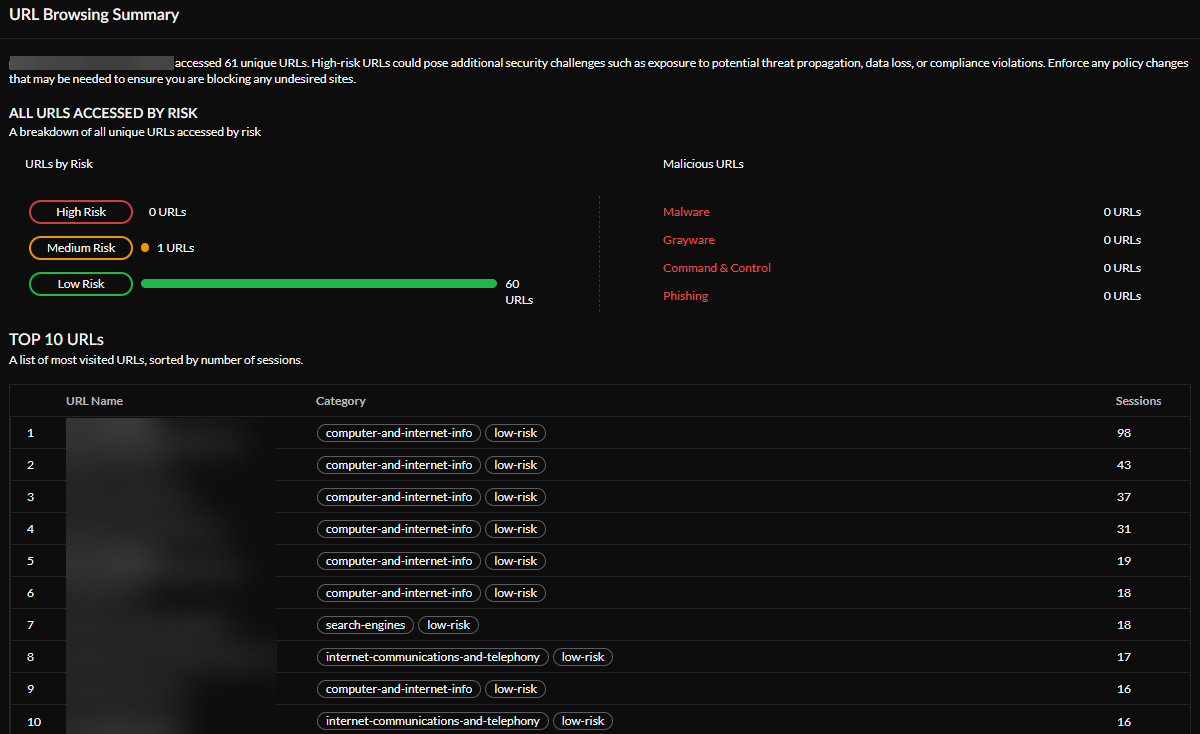
URL Browsing Summary —See your URL browsing summary, including all URLs that you accessed by risk. You can view a breakdown of URLs by risk (High, Medium, or Low) and see how many malicious URLs you accessed. You can also view a list of the Top 10 URLs visited, and how many times you visited each URL.
View URL Filtering Logs —Select View URL Filtering Logs to view details about total data transferred. The logs provide an audit trail for system, configuration, and network events. Network logs record all events where Prisma Access acts on your network.
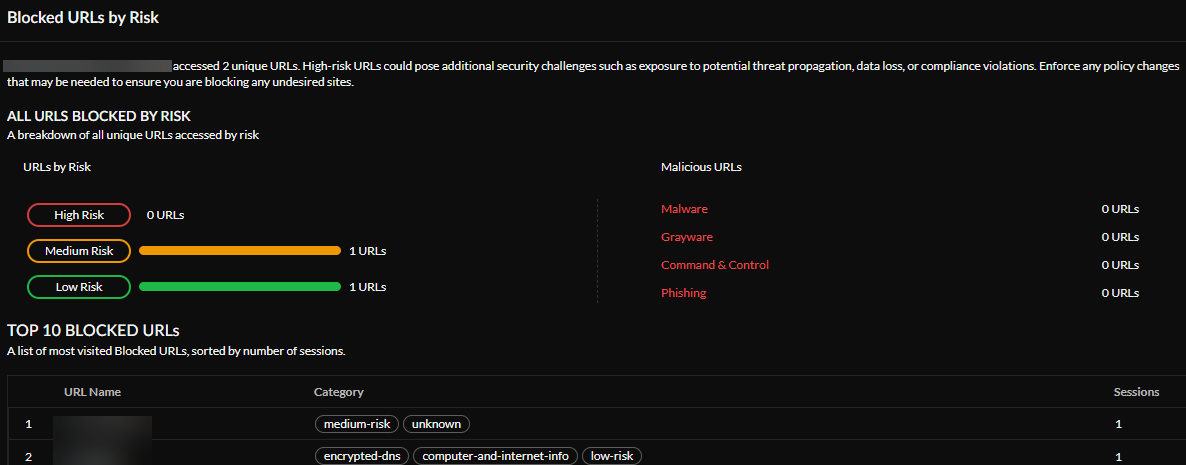
Blocked URLs by Risk —See whether you have accessed, or tried to access, any URLs blocked by risk. High-risk URLs might create additional security challenges, such as exposure to potential threat propagation, data loss, or compliance violations. Enforce any policy changes necessary to block any undesired sites. You can also see a list of the Top 10 Blocked URLs that you visited most, sorted by the number of sessions.
Severe Threats —See how many of your threats are severe. Severe threats are further broken down into Critical, High, and Medium threats. You can also view a list of the Top 10 Severe Threats Seen in your environment.

Connectivity
Select any User name to view information about the user's Connectivity during the Time Range selected.
Active Projects —You can see which projects were active during the time range you selected, and the date that each project became active.
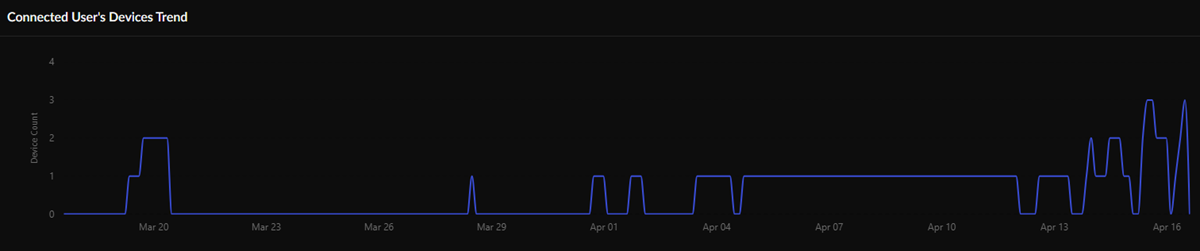
Connected User's Devices Trend and Connected User's Devices —On the main Users page, you could see all connected users and their projects. On the Connectivity page, view your individual Connected User's Devices trend during the time range selected and details about your Connected User's Devices , such as device name, last user source IP address, last private IP address, last user location, last login time, last logout time, and last session duration.

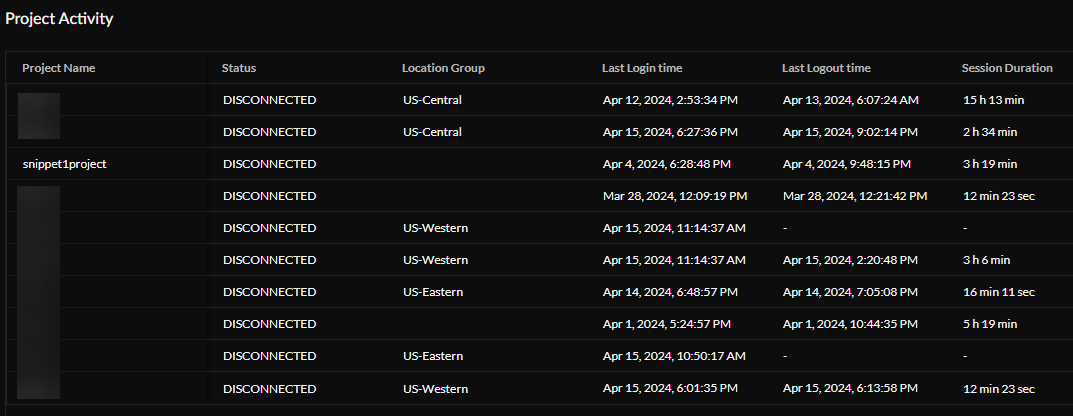
Project Activity —View a user's project activity by session. You can see the current status of a session, when the user logged into each project, when they logged out, and how long each session lasted.
Total User Activity by Project —View the time a user spent on each project during the time range selected.
Gain visibility into your Prisma Access Agent deployment by using Strata Cloud Manager to monitor your users' project activity. Go to Activity InsightsProjects in the Strata Cloud Manager Command Center to view project-based access information in your environment.
Projects
The Projects table provides an overall view about the projects your users access using Prisma Access during the selected time range. You can see each project's number of connected users, peak number of users, maximum allowed users, Prisma Access location groups, IP address pool allocated, the IP pool utilized, number of available IP addresses, and the last connected Prisma Access location.
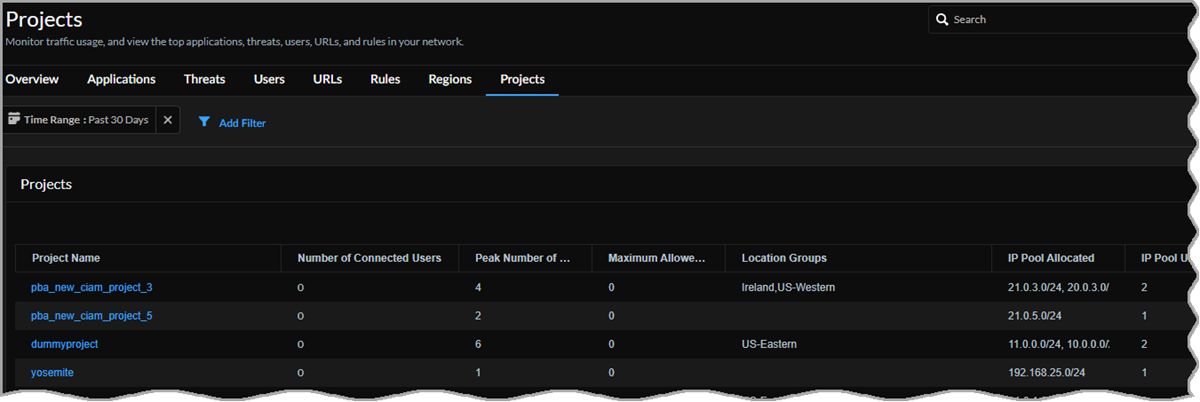
Select a Project Name to go to that project's details page. The project name (blurred in the following image) appears in the upper left corner of the page.
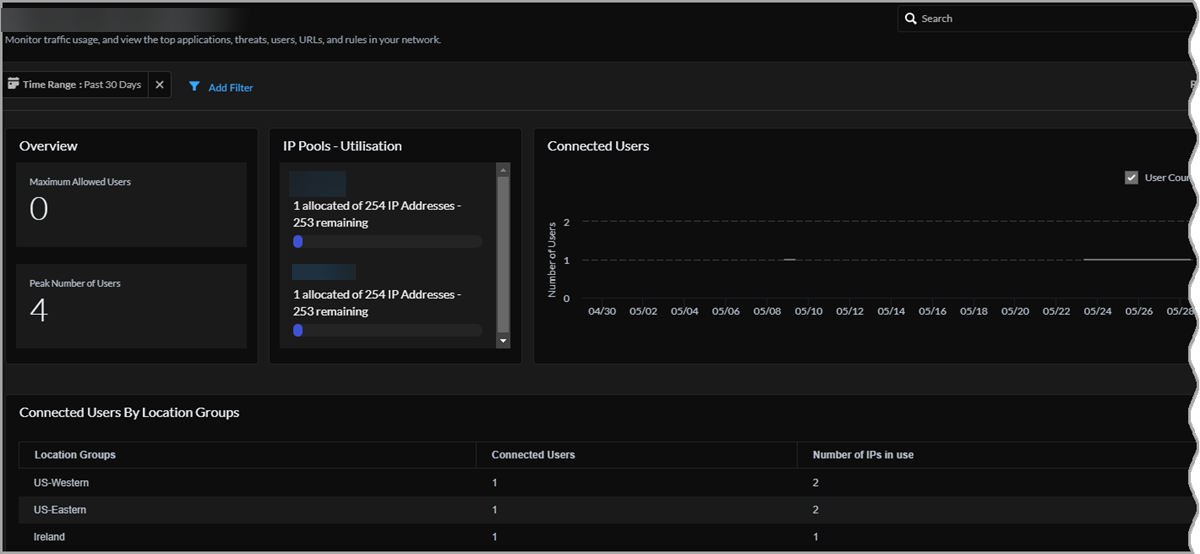
Overview
On the project details page, Overview shows the maximum allowed users for this project and the peak number of users during the selected time range.
IP Pools - Utilization
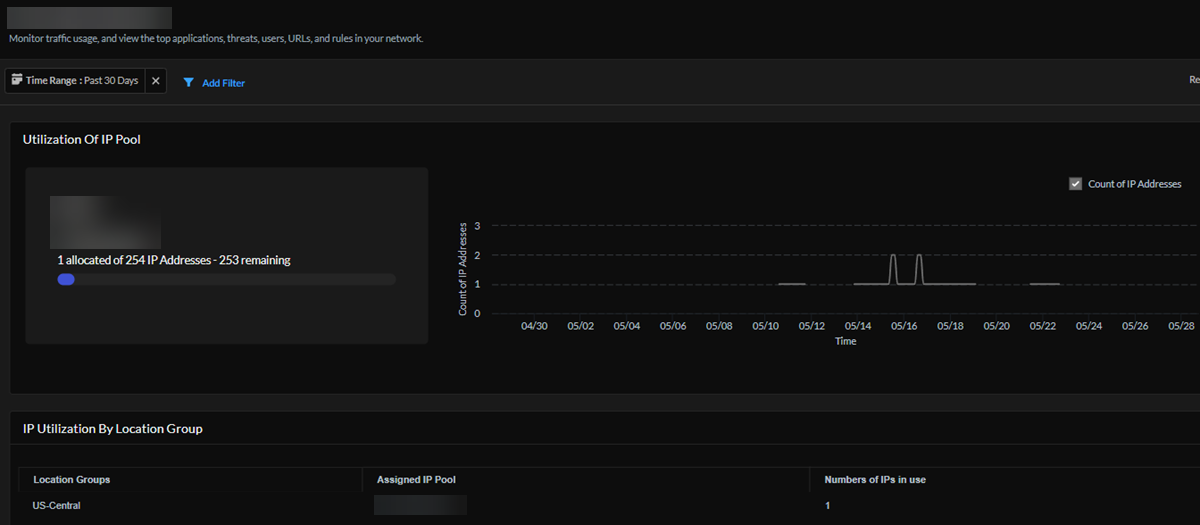
View the number of IPs in use and the number of IPs that are still available for the pools in this project. Select a specific IP pool to go to its details page (see the following image), where you can see this IP pool's utilization, the number of IP addresses used, and IP address utilization by Prisma Access location group.
Connected Users
View a graph of the users connected during the selected time range. Hover over any point in the graph to see the user count at that point.
Connected Users by Location Groups
View the number of users by the Prisma Access Location Group they're in. You can also see the number of IP addresses in use for each Location Group .
Automatic tunnel restoration enhances the end-user experience by maintaining consistent and efficient connectivity for Prisma Access Agents. This feature automatically restores secure connections after interruptions, reducing user frustration and minimizing work disruptions.
Automatic tunnel restoration is a standard feature of Prisma Access Agents so no configuration is required for it to work. To understand automatic tunnel restoration, you should be familiar with the following key concepts:
Connectivity Modes
Depending on how you configured the Prisma Access Agent, your users will connect to a gateway using one of the following modes:
Location Selection
Your users can connection to a location using (gateway) the following methods:
Monitoring and System Changes
Prisma Access Agent monitors various network and system changes, including:
Restoration Window
The Prisma Access Agent will attempt to restore the connection for up to 30 minutes after an interruption occurs. This time frame will help to significantly reduce manual reconnections due to changes in network conditions.
Tunnel restoration behavior differs depending on the connectivity mode for the agent.
Tunnel Restoration in Always On Mode
In Always On mode, the Prisma Access Agent actively attempts to maintain a constant connection:
Tunnel Restoration in On-Demand Mode
In On-Demand mode, the restoration behavior depends on how the connection was initiated:
In both modes, Prisma Access Agent monitors network and system changes to trigger restoration attempts when necessary, ensuring optimal connectivity within the 30-minute restoration window.