Prisma Access Overview
To keep your applications and data safe, you must secure all users at all locations all the time. But how do you do this when your footprint is expanding globally, more and more of your users are mobile, and your applications and data are moving out of your network and into the cloud? Prisma Access enables this consistent security by safely enabling your users to access cloud and data center applications as well as the internet, whether they are at your headquarters, branch offices, or on the road. Prisma Access consistently inspects all traffic across all ports, enabling secure access to the internet, as well as to your sanctioned SaaS applications, public cloud environments, and data centers and headquarters. Threat prevention, malware prevention, URL filtering, SSL decryption, and application-based policy capabilities are built-in to provide you with the same level of security no matter where your users are or what resources they are accessing. All Prisma Access logs are stored in the Strata Logging Service, providing centralized analysis, reporting, and forensics across all users, applications, and locations.
Prisma Access delivers protection at scale with global coverage so you don’t have to worry about things like sizing and deploying hardware firewalls at your branches or building out and managing appliances in collocation facilities. Prisma Access provides the network infrastructure to connect all of your remote branches, your headquarter sites, data centers, and mobile users without requiring you to build out your own global security infrastructure and expand your operational capacity.
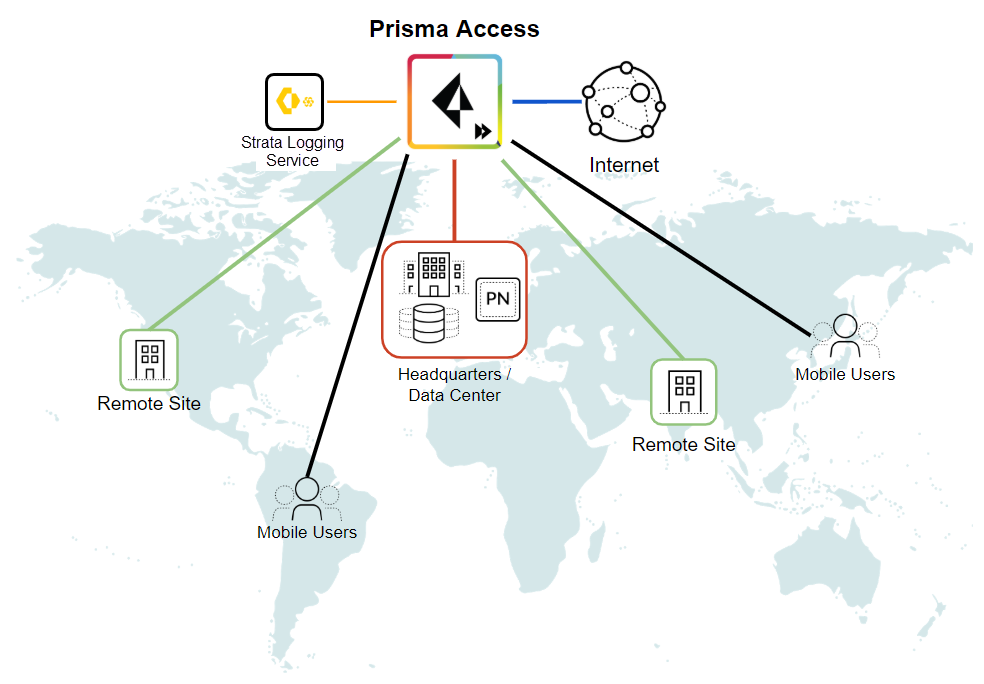
With Prisma Access, Palo Alto Networks deploys and manages the security infrastructure globally to secure your remote networks and mobile users. Prisma Access encrypts the data end-to-end between Mobile User Security Processing Nodes (MU-SPNs) and Remote Network Security Processing Nodes (RN-SPNs), between SPNs and Service Connection Corporate Access Nodes (SC-CANs), and between SC-CANs and the datacenter.
- Service Infrastructure —Prisma Access uses an internal service infrastructure to secure your organization’s network. You supply a subnet for the infrastructure, and Prisma Access uses the IP addresses within this subnet to establish a network infrastructure between your remote network locations and mobile users, and service connections to your internal network resources (if applicable). Internal communication within the cloud is established using dynamic routing.
- Service Connections —If your Prisma Access license includes it, you have the option to establish IPSec tunnels to allow communication between internal resources in your network and mobile users and users in your remote network locations. You could, for example, create a service connection to an authentication server in your organization’s HQ or data center.
Even if you don’t require a service connection for your HQ or data center, we recommend that you create one to allow network communication between mobile users and remote network locations, and between mobile users in different geographical locations.
- Mobile Users —Provides consistent security for your mobile users whether they are accessing applications at your data center, using SaaS applications, or browsing the internet. You can enable your mobile users to connect to Prisma Access through:
- GlobalProtect
You can deploy the GlobalProtect app to your users (available for smartphones, tablets, or laptops running Microsoft Windows, Apple macOS and iOS, Android, Google Chrome OS, and Linux) so that they can tunnel the traffic to Prisma Access for policy enforcement and threat prevention. The GlobalProtect app also provides host information profile (HIP) reporting so that you can create granular policies based on device state to ensure that endpoints adhere to your security standards—for example, they are equipped with the most up-to-date patches, encryption, and virus definitions—in order to access your most sensitive applications. Or, to enable secure access to users on unmanaged devices, you can enable Clientless VPN . Prisma Access dynamically scales in and out per region based on where your users are at the moment.
- Explicit Proxy
If your organization’s existing network already uses explicit proxies and deploys PAC files on your client endpoints, you can smoothly migrate to Prisma Access to secure mobile users’ outbound internet traffic.
- Remote Networks —Use remote networks to secure remote network locations, such as branches, and users in those branches with cloud-based next-generation firewalls. You can enable access to the subnetworks at each remote network location using either static routes, dynamic routing using BGP, or a combination of static and dynamic routes. All remote network locations that you onboard are fully meshed.
- ZTNA Connector —The Zero Trust Network Access (ZTNA) Connector lets you connect to your organization's private apps simply and securely. ZTNA Connector provides mobile users and users at branch locations access to your private apps using an automated secure tunnel, which eliminates the requirement of setting up IPSec tunnels and routing definitions to access the private apps. ZTNA Connector does not require any routing from the customer infrastructure and can provide access to applications that use overlapped IP addresses in your networks.
- Strata Logging Service —Prisma Access forwards all logs to Strata Logging Service ; as part of activating Prisma Access, you’ll specify the Strata Logging Service instance that you want to forward Prisma Access logs to. Log traffic does not use the licensed bandwidth you purchased for Prisma Access.
Secure Internet Traffic Using Prisma Access
The Importance of Internet Security
Securing internet access has never been more important and more challenging. Existing legacy solutions struggle to detect evasive and targeted phishing and other web-based attacks while at the same time neglecting new threats posed by unsecured DNS traffic. Palo Alto Networks Prisma Access has internet security with industry-first ML-powered Advanced URL Filtering and DNS Security services. Using Prisma Access, you can prevent evasive and targeted phishing and fileless attacks in real-time, and protect against the latest sophisticated DNS-based attacks.
Prisma Access Cloud Secure Web Gateway (SWG)
A secure web gateway is a crucial element in today's digital landscape due to the escalating complexity and frequency of cyberthreats. Cybercriminals continually devise new tactics and techniques to breach security defenses, one of which is to camouflage malicious code in seemingly legitimate websites. As users access these compromised websites, they inadvertently leak credentials or expose organizations to harmful code, which can wreak havoc if left unnoticed.
In such a risk-laden environment, the absence of a robust security gateway significantly amplifies the risk to an organization's digital assets. Such risk could lead to unauthorized access, data theft and disruption of business operations, especially with the increasing prevalence of widespread phishing and ransomware attacks. Without the security barrier provided by SWG, a ransomware attack could effectively hold an organization hostage, leading to financial and reputational harm.
The use of encrypted traffic is now commonplace, with HTTPS constituting the majority of web traffic. An organization is at risk of security threats concealed within encrypted channels if it lacks a SWG that can effectively decrypt and inspect this traffic.
However, using multiple point products for SWG, private app access, and CASB only complicates matters. Siloed products stitched together as one offering results in feature parity gaps and poor security outcomes, leaving you vulnerable for attacks. With these solutions, you get inconsistent security for internet and private apps.
To address these challenges, Prisma Access offers a unified product, converging management, policy, and data for all users and apps across all capabilities including ZTNA, SWG, NG-CASB, FWaaS, DLP, and more.
Customers can easily migrate from legacy on-premises and cloud-based proxy solutions toPrisma Access to gain inline visibility and control of internet and SaaS app traffic with industry-leading AI-powered security protections.
Using Prisma Access to Secure Users and Endpoints
Prisma Access is designed to prevent successful cyberattacks, and that’s why it does more than just secure the web. To stop cyberattacks, it’s necessary to inspect all traffic. Anything short of a full inspection of all traffic introduces a significant gap in security. Prisma Access consistently protects all traffic on all ports and from all applications, enabling your organization to:
- Prevent successful cyberattacks with proven security philosophies and threat intelligence for deep visibility and precise control that extends across your organization.
- Fully inspect all application traffic bidirectionally—including SSL or TLS-encrypted traffic—on all ports, whether communicating with the internet, with the cloud, or between branches.
- Benefit from comprehensive threat intelligence powered by automated threat data from Palo Alto Networks and hundreds of third-party feeds.
Read more about Prisma Access and its solutions.
How to Manage Prisma Access
There are two ways you can manage Prisma Access, but you can't switch between the management interfaces after you activate your Prisma Access license (with the exception of using the migration workflow to go from a Prisma Access (Managed by Panorama) to a Prisma Access (Managed by Strata Cloud Manager) deployment). So, you must decide how you want to manage Prisma Access before you get started:
- Prisma Access (Managed by Strata Cloud Manager)
To manage Prisma Access from the cloud, use Strata Cloud Manager. With cloud management, you can quickly onboard branches and mobile users through task-driven workflows that allow you to set up and test your environment in minutes. Cloud management with Strata Cloud Manager simplifies the onboarding process by providing predefined internet access and decryption policy rules based on best practices. Quickly set up IPSec tunnels using defaults suitable for the most common IPSec-capable devices and turn on SSL decryption for recommended URL categories.
Strata Cloud Manager Command Center
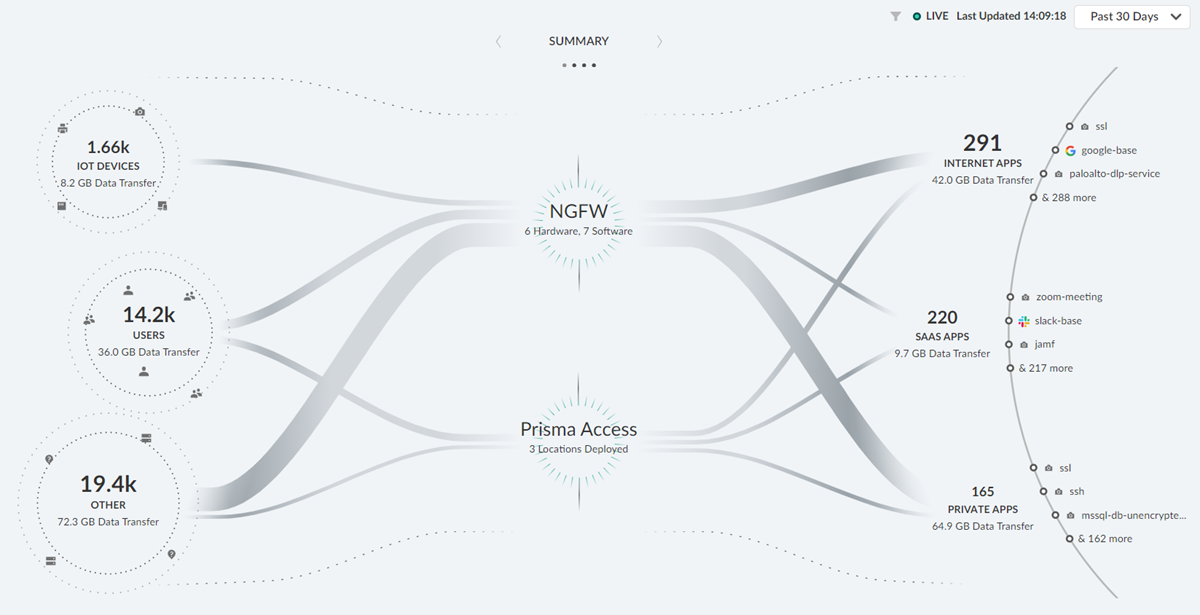
The Strata Cloud Manager Command Center page appears when you launch your Strata Cloud Manager. This command center helps you in assessing the health of your network, better visibility, and an overview of your data. The command center has different dashboards to view different types of reports.
- Summary : In the summary dashboard, you can view the different types of data sources, platform infrastructure, like NGFW or Prisma Access, through which the data flows from various data sources to different applications in your network.
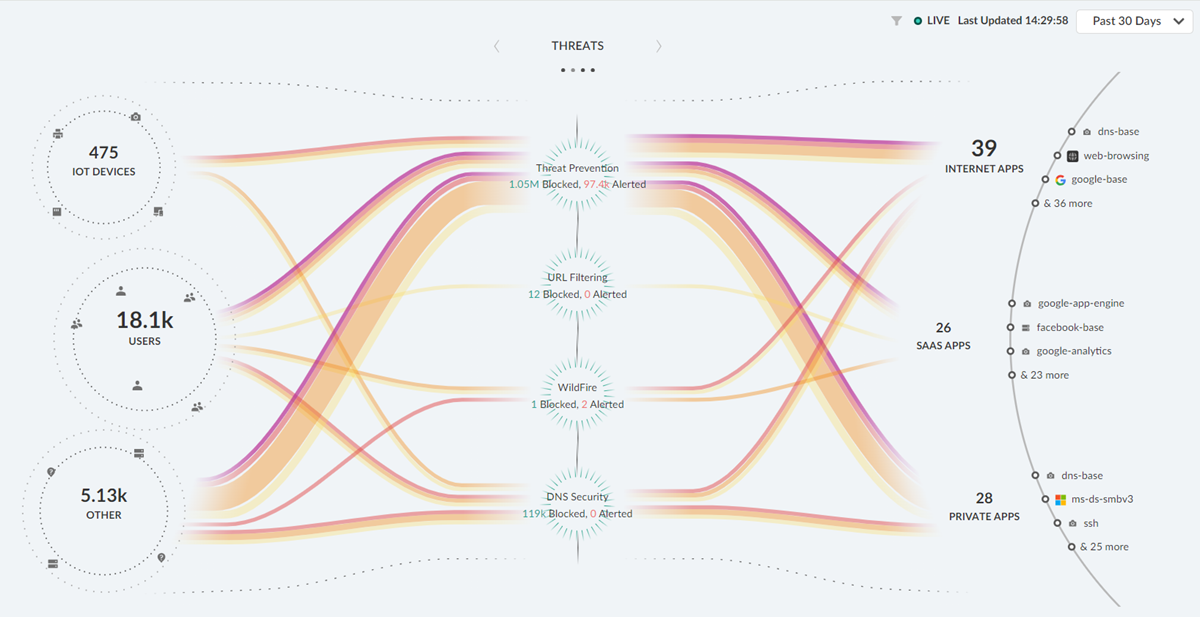
- Threats : In your threats dashboard, you can view the threats detected by your security applications. You can use this dashboard to monitor the blocked and allowed threats on your network or investigate areas of your network that might have a low percentage of inspected traffic.
- Operational Health : Shows the health and user experience on your network as it is monitored by ADEM. You can use this view to monitor the user experience on your network and review the severity of open incidents.

- Data Security : Shows the traffic within your network that has been flagged as having sensitive data by DLP and SaaS security subscriptions. You can use this view to monitor the data flowing through your firewalls and connected SaaS applications and the severity of any data risks on your network.

Click any of these categories in your dashboards to filter results accordingly.
- Prisma Access (Managed by Panorama)
Use the Cloud Services plugin on Panorama to set up and manage Prisma Access. This is a good option if you're already using Panorama to manage next-generation firewalls and you have a common policy that you want to use for access to your corporate applications.
Even if you're using Panorama to manage Prisma Access, you can still use Strata Cloud Manager for many Prisma Access visibility and monitoring features. Learn more.
After you decide which management option you want to use, get started by following the licensing and activation workflow for you option you have selected:
- To get started with Prisma Access (Managed by Panorama) , perform license activation from the customer support portal (CSP) and install the Cloud Services plugin on Panorama.
- To get started with Cloud Managed Prisma Access , perform license activation from the hub.
Prisma Access Visibility and Monitoring with Strata Cloud Manager
There are two ways you can choose from to manage Prisma Access :
- For Prisma Access (Managed by Strata Cloud Manager), you can use Strata Cloud Manager
- or you can use Panorama to manage Prisma Access
These two management interfaces are how you handle onboarding, configuration, and security policy enforcement for your Prisma Access environment. However, Prisma Access also includes robust visibility and monitoring for your Prisma Access environment, and these features are provided on Strata Cloud Manager.
Importantly:
Regardless of the management interface you're using for Prisma Access (Strata Cloud Manager or Panorama), you can use Strata Cloud Manager for many of your Prisma Access visibility features, and to interact with add-on subscriptions like AI-Powered Autonomous DEM.
|
Prisma Access Visibility and Monitoring Features on Strata Cloud Manager |
|
|
Provides native, end-to-end visibility and insights for all user traffic in your Secure Access Service Edge (SASE) environment. ADEM functionality is natively integrated into the GlobalProtect app and Prisma Access and therefore does not require you to deploy any additional appliances or agents. You can quickly isolate the source of digital experience problems, and simplify remediation. This feature requires the Autonomous DEM add-on license to use with Prisma Access (Managed by Panorama) Access. |
|
|
Visibility features in Strata Cloud Manager identify key findings that you can use to inform your policy updates and close enterprise security and user productivity gaps.
Explore data for the applications, threats, users, security subscriptions at work in your network
Many dashboards support reports, where you can share data offline and schedule for regular updates |
|
|
The Command Center is an interactive, visual summary of the IoT devices, users, hosts, and traffic on your network. Utilizing the data from your cloud-delivered security and ADEM subscriptions, the Command center surfaces important information on the threats, user experience, and security of data on your network. The Command Center allows you to interact with the data and visualize the relationships between events on the network, so that you can uncover anomalies or find ways to enhance your network security. |
|
Prisma Access uses a shared ownership model. Palo Alto Networks manages the underlying security infrastructure, ensuring it is secure, resilient, up-to-date and available to you when you need it. Your organization’s responsibility is to onboard locations and users, push policies, update them, query logs, and generate reports.
Palo Alto Networks manages the following parts of the security infrastructure. In addition to the security infrastructure, Prisma Access manages releases and upgrades :
- Prisma Access
- Strata Logging Service —We manage the delivery mechanism for logs.
- Content Updates —We manage releases and upgrades , including PAN-OS updates. For your mobile users, Prisma Access hosts several versions of the GlobalProtect app and you can select the active GlobalProtect app version from that list.
- Fault Tolerance —We manage the availability of the service.
- Auto Scaling —We automatically scale the service when you add service connections or remote networks, or when additional mobile users log in to one or more gateways in a single region.
- Provisioning —We provision the infrastructure with everything that is required.
- Service Monitoring —We monitor the service status and keep it functioning.
- Compute Location Mapping —Each Prisma Access location is mapped to security compute location based on optimized performance and latency, which means that, unless otherwise modified by a system administrator, the traffic in certain countries will be directed to a defined compute location. See the Prisma Access Privacy Data Sheet for the location-to-compute location mapping.
Your organization manages the following components of the security infrastructure.
- Users —You manage the onboarding of mobile users.
- Authentication —You manage the authentication of those users.
- Mobile device management (MDM) —You can control your organization's mobile devices that are protected with Prisma Access using your own MDM software.
- ( Prisma Access (Managed by Panorama) Only ) Panorama and Cloud Services plugin —You make sure that the Panorama on which the Cloud Services plugin is installed is running a Panorama version that supports the Cloud Services plugin . In addition, you upgrade the Cloud Services plugin in Panorama after we inform you that a new plugin is available.
- Policy creation and management —You plan for and create the policies in Panorama to use with Prisma Access.
- Log analysis and forensics —Prisma Access provides the logs, you provide the analysis and reporting, using integrated tools provided by us or by another vendor.
- On-premises security —You provide the on-premises security between micro-segmentations of your on-premises network. In some deployments, you can also direct all traffic to be secured with Prisma Access.
- Networking —You provide the network connectivity to Prisma Access.
- Monitoring —You monitor the on-premises network’s status.
- Service Connectivity —You provide the connectivity to the Prisma Access gateway for mobile users (for example, provide an ISP), and you also provide the on-premises devices used as the termination points for the IPSec tunnels used by the service connections and remote network connections.
- Onboarding —You onboard the mobile users, HQ/Data center sites, and branch sites.
- ( Prisma Access (Managed by Panorama) Only ) Back up —You manage the backup of the Panorama configuration.
APIs for Prisma Access (Managed by Panorama)
In addition to the XML APIs that are available for configuration and management in Panorama , there are XML APIs for the Cloud Services plugin that you can use to perform tasks specific to Prisma Access. Use these APIs through a third-party service, application, or script to automate configuration and reporting tasks for Prisma Access.
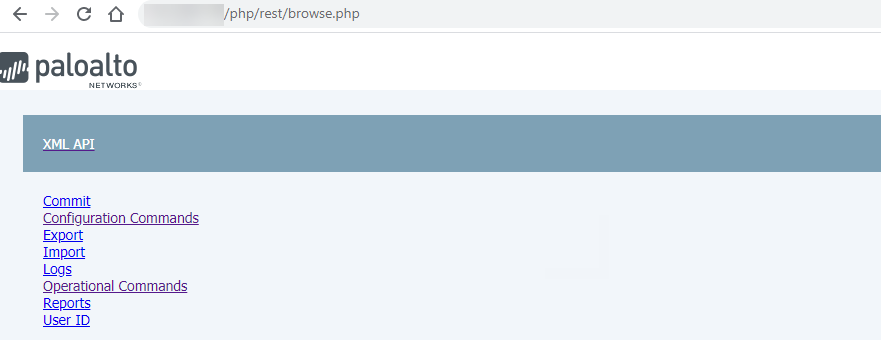
Access the Prisma Access (Managed by Panorama) API Using the Browser and Web Interface
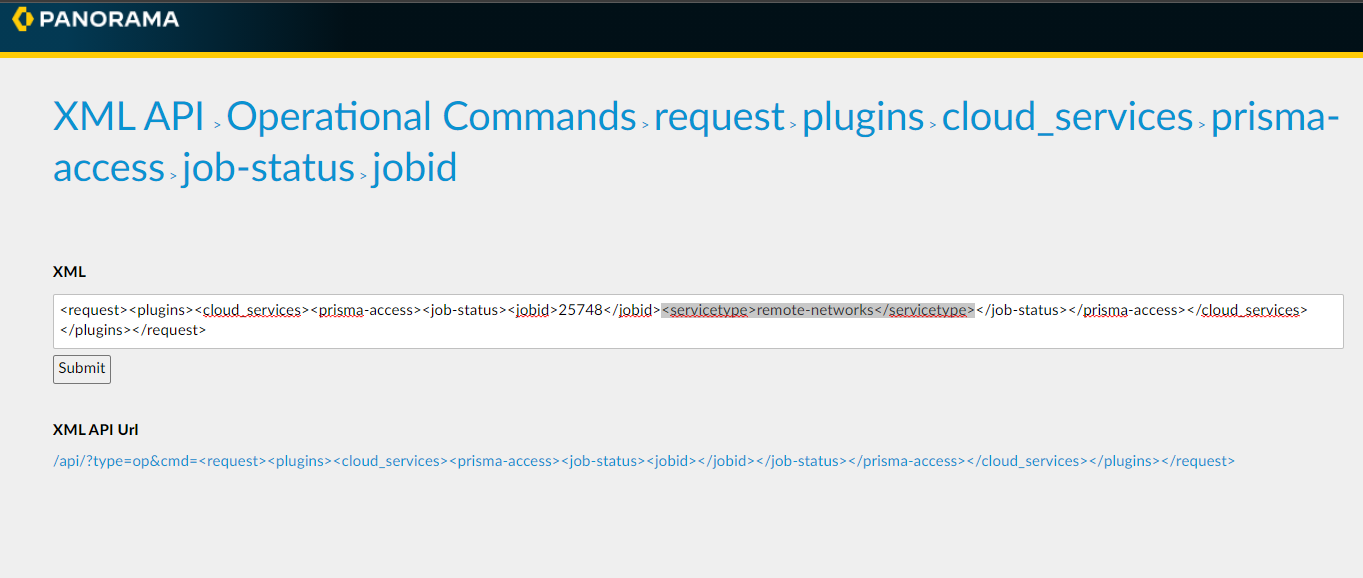
To access the API using the browser, log in to the Panorama that manages Prisma Access with administrator privileges, then enter /api at the end of the URL. The URL changes to the XML API browser interface.
The Prisma Access APIs are located in the following XML Path Language (XPath) nodes in the XML tree:
- Configuration Commands: XML APIConfiguration Commandsdevicesentry[@name='localhost.localdomain']pluginscloud_services
- Operational Commands: XML APIOperational Commandsrequestplugins cloud_servicesprisma-access
As you navigate in the XML tree, Prisma Access populates the tree in the XML area. You can enter required values in the XML area and click Submit to process an XML request. For example, to request the onboarding status of a job, navigate to XML APIOperational Commandsrequestpluginscloud_servicesprisma-accessjob-statusjobid , enter the Job id in the jobid field, enter the Service Type servicetype area, and click Submit to submit your request.
This XML only retrieves the onboarding status of a job. To retrieve the status of all commit operations, use the Prisma Access UI.
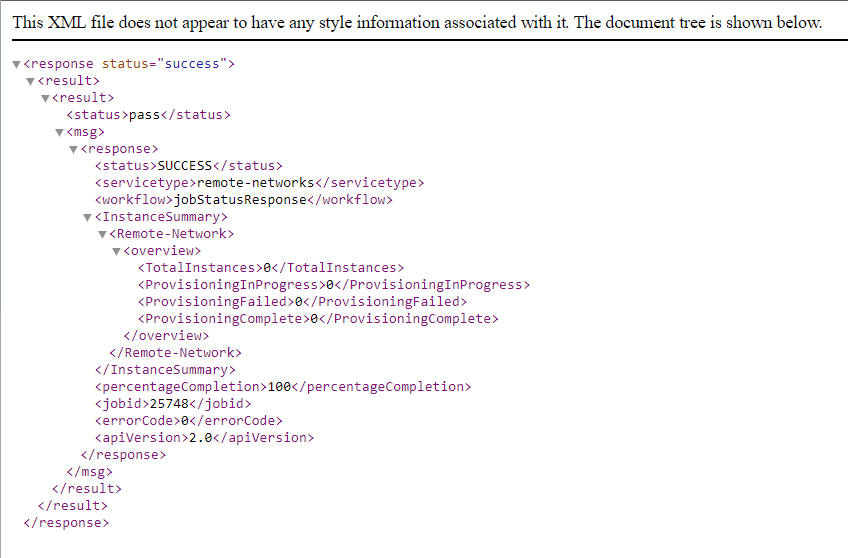
Prisma Access returns the output in XML format.
You can also use the web interface to find APIs in Panorama .
Use curl Commands to Retrieve Panorama Managed API Commands
If you prefer to use CLI to retrieve API command results, you can use APIs in conjunction with the API you use to retrieve public and infrastructure IP addresses for Prisma Access. To do so, use the following command:
Configuration Commands:
curl -k -X GET "https://<panorama-ip-address>/api/?key=<api-key>&type=config&cmd=<api-parameters></api-parameters>
Operational Commands:
curl -k -X GET "https://<panorama-ip-address>/api/?key=<api-key>&type=op&cmd=<api-parameters></api-parameters>
Where:
- <panorama-ip-address> is the IP address of the Panorama that manages Prisma Access.
- <api-key> is the API key retrieve ip addresses for Prisma Access ( PanoramaCloud ServicesConfigurationService SetupGenerate API Key ).
- <api-parameters> and </api-parameters> are the API parameters you use to retrieve the requested information from the API.
If you have a multi-tenant deployment, you add the name of the tenant for which you want to retrieve API information into the API.
For example, given a Prisma Access deployment that has the following parameters:
- Panorama IP Address: 1.2.3.4
- API key: 12345abcde
- Tenant name: tenant-1
If you wanted to retrieve the number of active mobile users for that tenant, you would enter the following curl command:
curl -k -X GET "https://1.2.3.4/api/?key=12345abcde&type=op&cmd=<request><plugins><cloud_services><prisma-access><multi-tenant><tenant-name><entry%20name='tenant-1'></entry></tenant-name><remote-active-users-count/></multi-tenant></prisma-access></cloud_services></plugins></request>"
Use CLI Commands with Prisma Access (Managed by Panorama)
Prisma Access allows you to use CLI commands to retrieve Prisma Access data. To access the CLI , establish a SSH connection using the IP address of the Panorama that manages Prisma Access.
The CLI uses the same modes and has the same behavior as PAN-OS commands, with the exception of entering the tenant name for multi-tenant deployments; you enter the tenant name using the tenant-name tenant-name command. For example, given a tenant name of tenant-1 , enter the following command to retrieve to retrieve the active user count in a multi-tenant deployment:
admin-Panorama> request plugins cloud_services prisma-access multi-tenant remote-active-users-count tenant-name tenant-1
pass
Current User Count: 253
Prisma Access Insights APIs
The Prisma Access Insights APIs allow you to query your Prisma Access Insights tenants for data resources. There are two versions of the APIs. The Prisma Access Insights 2.0 and 1.0 APIs both allow you to query your Prisma Access tenant for the health of your Prisma Access network deployment. The API calls are the same for both versions; however, each version uses different access tokens, and the mechanism by which you obtain an access token is different for each version.
To get started with Prisma Access Insights APIs, go to the Developer’s Guide at Welcome to Prisma SASE .
Prisma Access Insights API describes content specific to Prisma Access Insights APIs, as well as information about API version 2.0 , API version 1.0 , Prisma Access Insights API examples, and PAI FAQs .
About 2.0 APIs
Prisma Access Insights 2.0 APIs are intended for Prisma Access (Managed by Strata Cloud Manager) customers, where the tenants have been onboarded by Palo Alto Networks using a Tenant Service Group (TSG) identifier. To see whether your tenant uses TSG IDs, go to the Prisma Access hub , click on the Prisma Access Insights application name, and look in the Manage Apps section.
The 2.0 APIs can also be used by Prisma Access (Managed by Panorama) customers. In this case, if the Prisma Access (Managed by Panorama) deployment is multitenant, then only the supertenant has the TSG ID, and the subtenants are included in the header with the Strata Logging Service tenant ID.
API 2.0 Case
After supertenant migration to TSG ID, when querying for a subtenant:
The header needs the following information: Prisma-Tenant:tsg_id:sub_tenant_id
About 1.0 APIs
Prisma Access Insights 1.0 APIs are intended for all Prisma Access (Managed by Strata Cloud Manager)single tenant customers, as well as Prisma Access (Managed by Panorama) single-tenant and multitenant customers.
API 1.0 Case
Before supertenant migration to TSG ID, when querying for a subtenant information using the 1.0 APIs, include the supertenant ID on the endpoint:
/api/sase/v1.0/resource/tenant/{super_tenant_id}/
Include the following header on the call: Prisma-Tenant: {tenant_id}: {sub_tenant_id}
Migrate Prisma Access from Panorama to Strata Cloud Manager
Prisma Access Releases and Upgrades
|
Where Can I Use This? |
What Do I Need? |
|
To begin the migration from Prisma Access (Managed by Panorama) to Prisma Access (Managed by Strata Cloud Manager), reach out to your Palo Alto Networks account team. |
If you have an existing Prisma Access Deployment for which the configuration is managed by Panorama and want to migrate to Strata Cloud Manager for configuration management, Palo Alto Networks offers an in-product workflow that lets you migrate your existing Prisma Access configuration to Strata Cloud Manager.
Managing your Prisma Access configuration using Strata Cloud Manager instead of Panorama can offer you benefits such as:
- Continuous best practice assessments
- Secure default configurations
- Machine Learning (ML)-based configuration optimization
- Streamlined web security workflows
- An interactive visual summary ( Command Center ) that helps you to assess the health, security, and efficiency of the network
- Intuitive workflows for complex tasks
- Simple and secure management APIs
- Cloud-native architecture provides scalability, resilience, and global reach
- No hardware to manage or software to maintain
Prepare to Migrate to Prisma Access (Managed by Strata Cloud Manager)
Before you start your migration, you should be aware of the minimum software requirements and the types of Prisma Access (Managed by Panorama) deployments you can migrate.
- When to Migrate —Do not perform your upgrade during a dataplane or infrastructure upgrade. Check your upgrade preferences to see if you have an upcoming dataplane upgrade.
- One-Way Migration from Panorama to Prisma Access (Managed by Strata Cloud Manager) —You can only migrate from a Prisma Access (Managed by Panorama) to a Prisma Access (Managed by Strata Cloud Manager) deployment. After you migrate to Strata Cloud Manager, you cannot return to managing your Prisma Access deployment using Panorama.
- Minimum Panorama Version —A minimum Panorama version of 10.0 is required.
- Required Administrator Role —You must be logged in as a superuser in Strata Cloud Manager to begin the migration.
- Licensing Requirements —A valid Prisma Access license is required.
- Cloud Identity Engine —You must have integrated the Directory Sync component of the Cloud Identity Engine with the current Prisma Access (Managed by Panorama) tenant before migrating.
- Unsupported Functionalities —The migration program does not support the following Prisma Access functionalities:
- Data Filtering (as an alternative, use Enterprise DLP )
- FedRAMP deployments
- IoT Security
- Multi-tenant deployments
- SSH proxy
- Separate authentication for GlobalProtect portals and gateways
- Prisma SD-WAN and Prisma Access Migrations —If you migrate a Prisma Access and a Prisma SD-WAN deployment, Prisma Access and Prisma SD-WAN must share the same tenant service group ID ( TSG ID ).
- Config Diff Issues —When you run the config diff during the migration, ignore any diffs that show the following object names because they don't affect your configuration:
- Clientless-vpn crypto-settings
- Hip-profiles rename
- Mobile-user-redundancy
- Exclude-video-traffic
Migrate Your Prisma Access (Managed by Panorama) Deployment to Strata Cloud Manager
To migrate your Prisma Access (Managed by Panorama) to a Prisma Access (Managed by Strata Cloud Manager) deployment, complete the following steps.
At a high level, you:
- Make sure that you have successfully pushed the latest configuration to Prisma Access, have saved the latest configuration, and have exported an .xml configuration file from the Panorama that manages Prisma Access.
- Start the migration program from Strata Cloud Manager.
- Check the configuration differences (diffs) between the Panorama configuration and the migrated Strata Cloud Manager configuration.
- Resolve the diffs and complete the migration.
- Prepare your Panorama for the migration.
- Log in to the Panorama that manages Prisma Access with an administrative account that is assigned the superuser role.
- ( Optional ) If you have configured a custom Master Key for your Panorama and for Prisma Access, make a note of it.
If your deployment uses the default Master Key, this step isn't required.
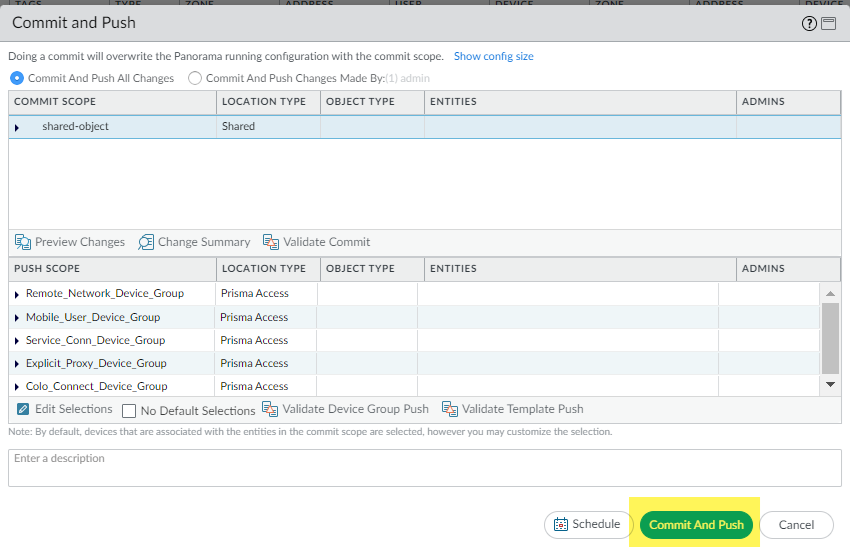
- Make sure that your current Panorama configuration is up to date and you have committed and pushed all your changes to Panorama and to Prisma Access by going to CommitCommit & Push and Preview Changes .
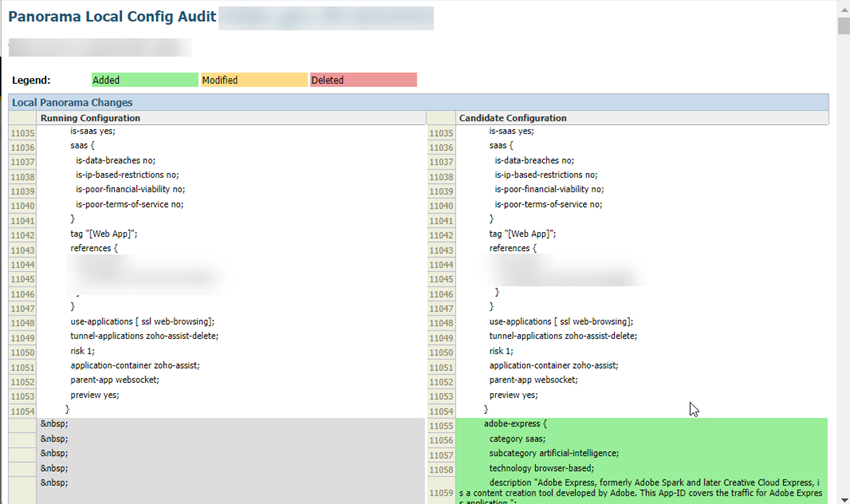
- ( Optional ) Check the diffs between the running config and the candidate config and determine whether you want to push those changes. If you want to commit and push the changes, Edit Selections and select the Prisma Access components you want to push in the Push Scope .
- ( Optional ) Commit and Push your changes.
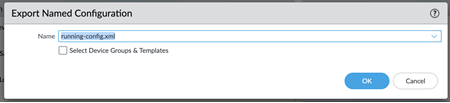
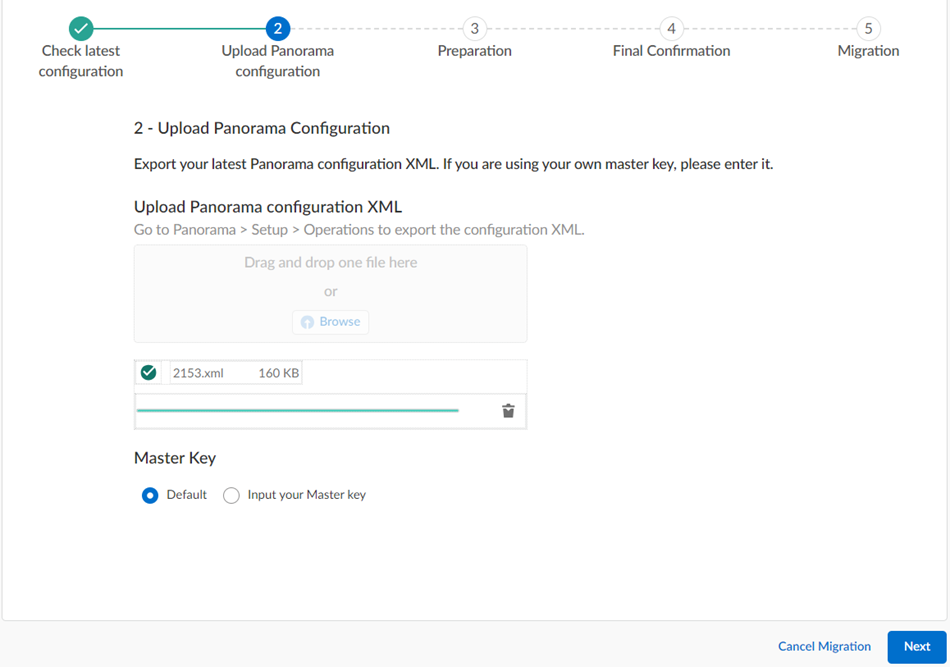
- Go to PanoramaSetupOperations and Export named Panorama configuration snapshot .
This .xml file is required to upload to Strata Cloud Manager during the migration process. Don't upload a techsupport file or any other file except an .xml configuration file.
- Select the running-config.xml configuration file and OK .
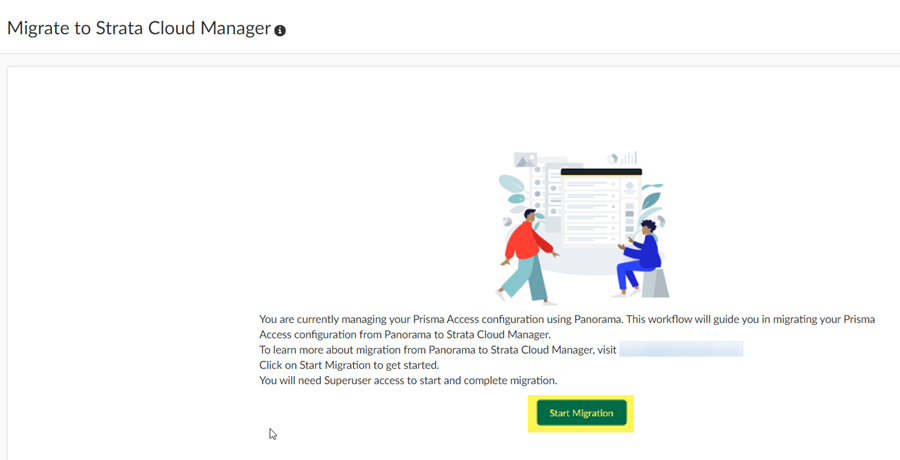
- Log in to Strata Cloud Manager as an administrator with a Superuser role and go to ManageConfigurationNGFW and Prisma Access .
The migration program detects that you have a Panorama managed deployment.
- Start Migration .
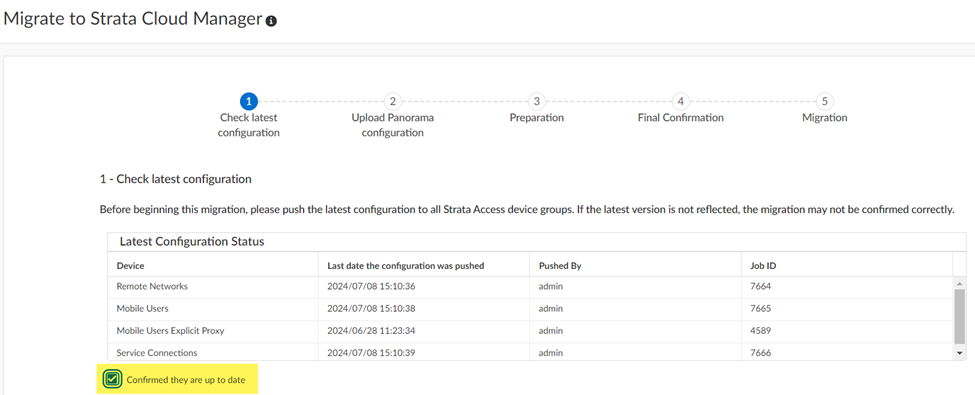
- The migration program asks you to make sure that your configuration is up to date and shows you the last user who updated it. After you have verified that this configuration has the latest changes, select Confirmed they are up to date and click Next .
- Select the Panorama configuration .xml file you downloaded in an earlier step by dragging and dropping it or Choose File .
- Input your Master Key , or if you did not create a custom master key , ask Strata Cloud Manager to use the Default one and click Next .
The migration program begins.
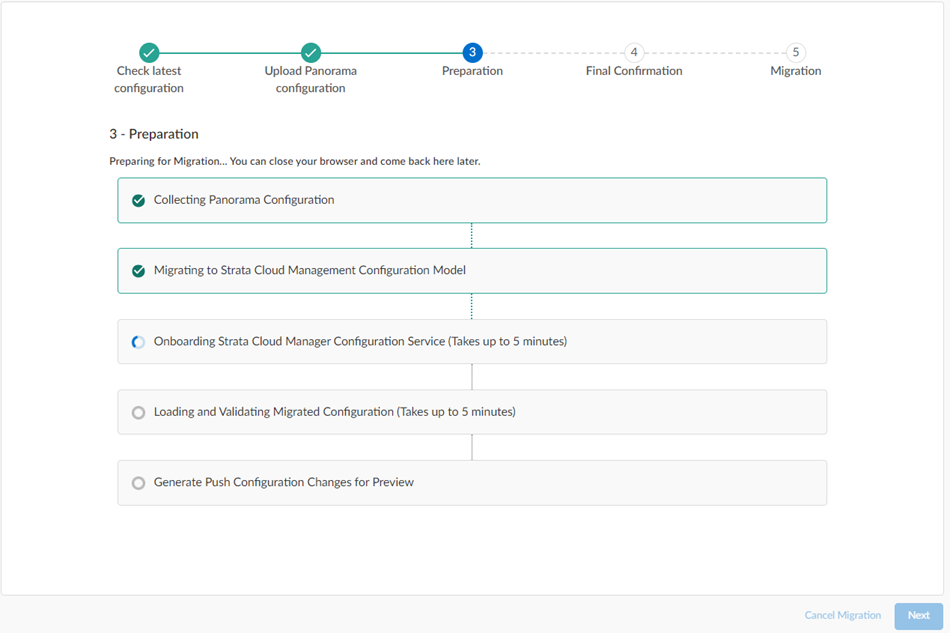
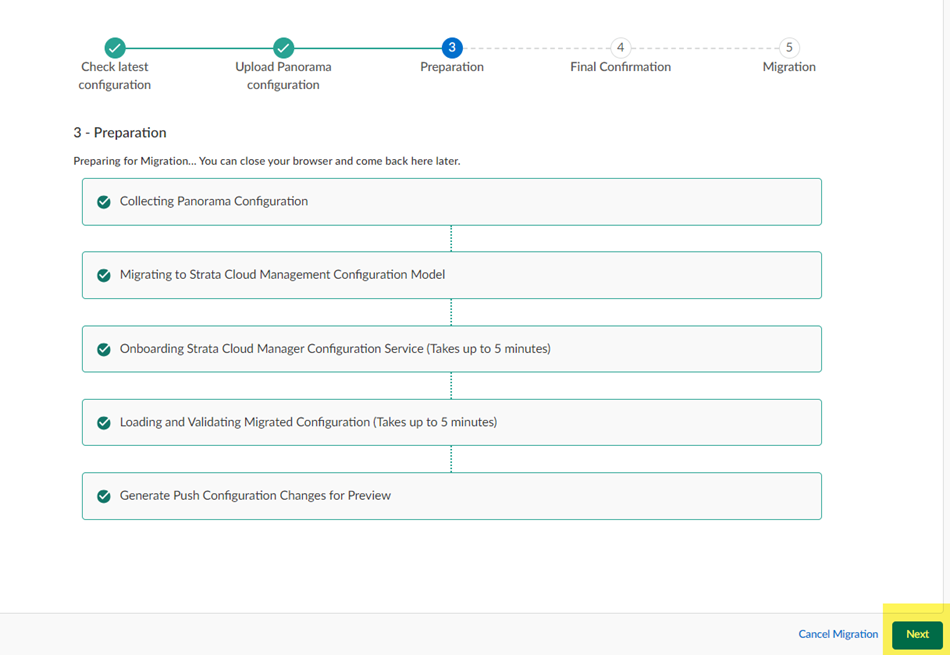
Wait for all the steps to complete.
- If, during migration, the program indicates that it encountered an
unsupported configuration
, you can Trim the above configurations and proceed or Cancel migration .
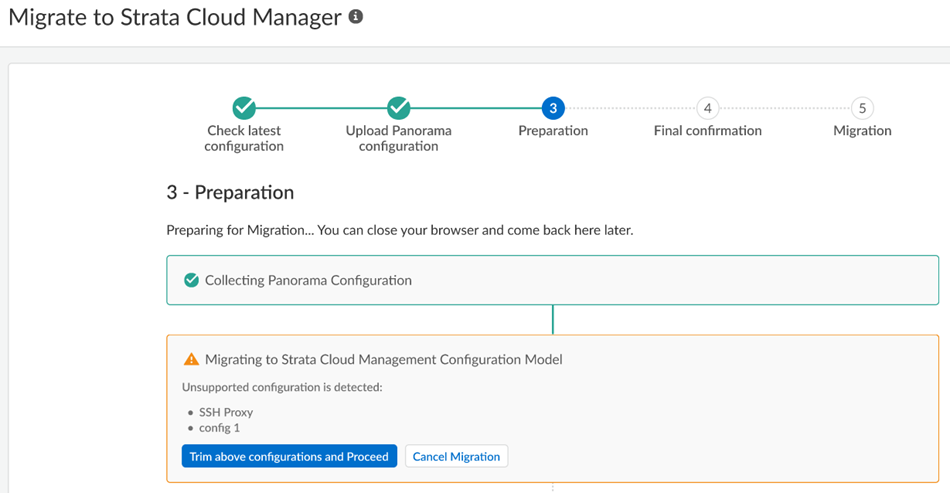
Some unsupported configurations (such as a multitenant configuration) cancel the migration and the migration program can't resolve the issue; in this case, Cancel Migration .
- After migration completes, click Next .
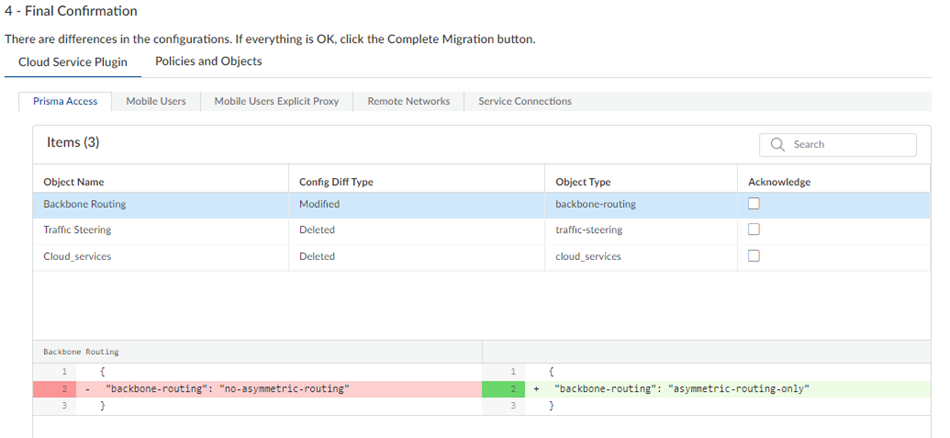
- If the migration program made changes, review them in the final confirmation screen.
The migration program might make changes to your configuration to account for differences in the Panorama and the Strata Cloud Manager configuration or to fix unsupported functionality. If changes are required, the migration program shows those changes in a diff view with the new lines in green and the deleted lines in red.
Ignore any diffs that show the following object names; they don't affect your configuration:
- Clientless-vpn crypto-settings
- Hip-profiles rename
- Mobile-user-redundancy
- Exclude-video-traffic
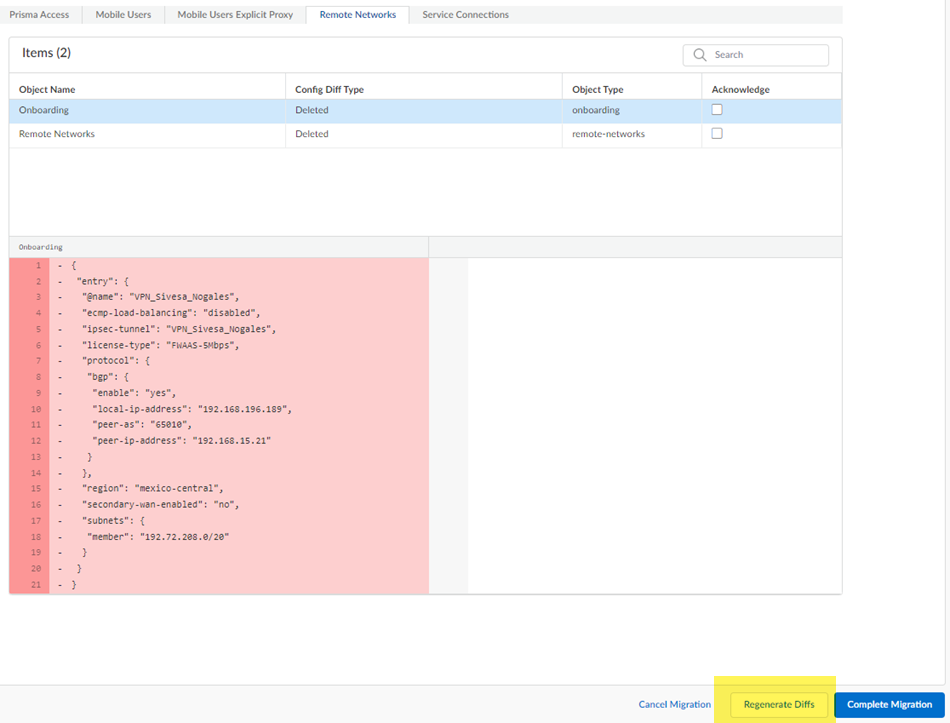
- ( Optional ) Make changes to the diffs.
Any changes you make are not committed to your configuration until you complete the migration and push your changes to Strata Cloud Manager.
- Navigate to the area in the Prisma Access configuration where you found the diffs and make changes to the configuration.
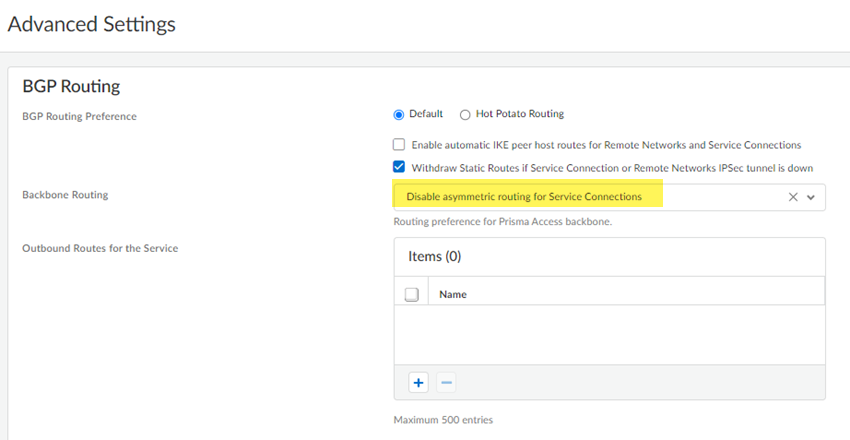
For the example in the previous step, the migration program made a change to Backbone Routing (from no-asymmetric-routing to asymmetric-routing-only ). To change this setting back to your original configuration, go to WorkflowsPrisma Access SetupService ConnectionsAdvanced Settings and change the Backbone Routing configuration to Disable Asymmetric Routing for Service Connections .
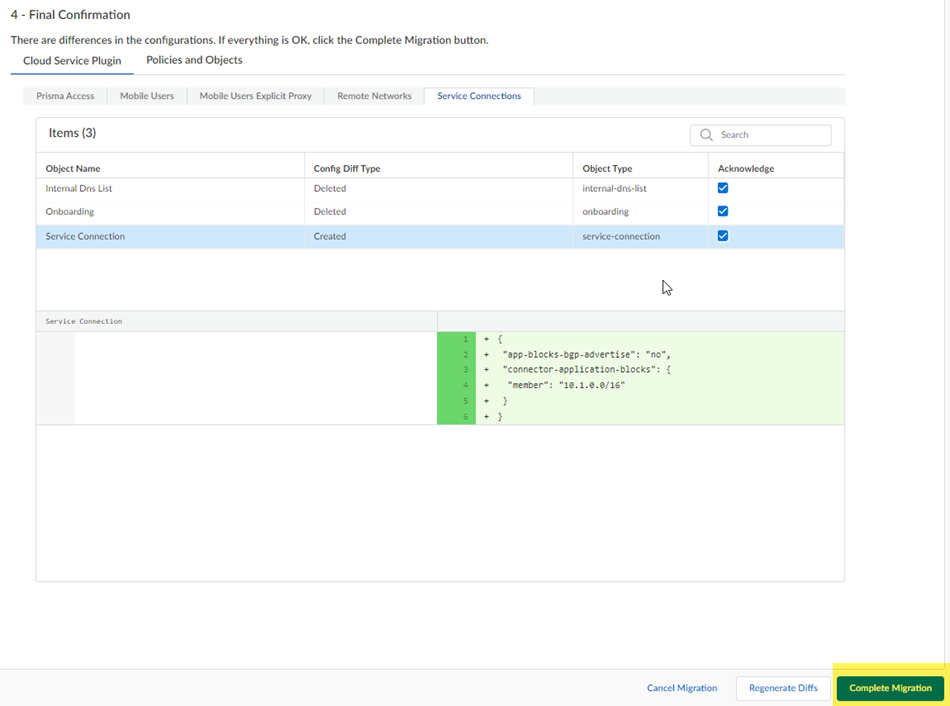
- ( Optional ) To keep track of your changes, Acknowledge them as you complete them.
While not required, it can be useful to acknowledge each change as you make them, so you can keep track of them.
- Continue to review the changes and make changes and acknowledge them.
- ( Optional ) If you have made any changes to the configuration, Regenerate Diffs to see the updated diffs.
- Complete Migration .
While not required, you can also Acknowledge your changes.
After you Complete Migration, you can't go back to a Panorama managed deployment and your deployment permanently uses Strata Cloud Manager for its management.
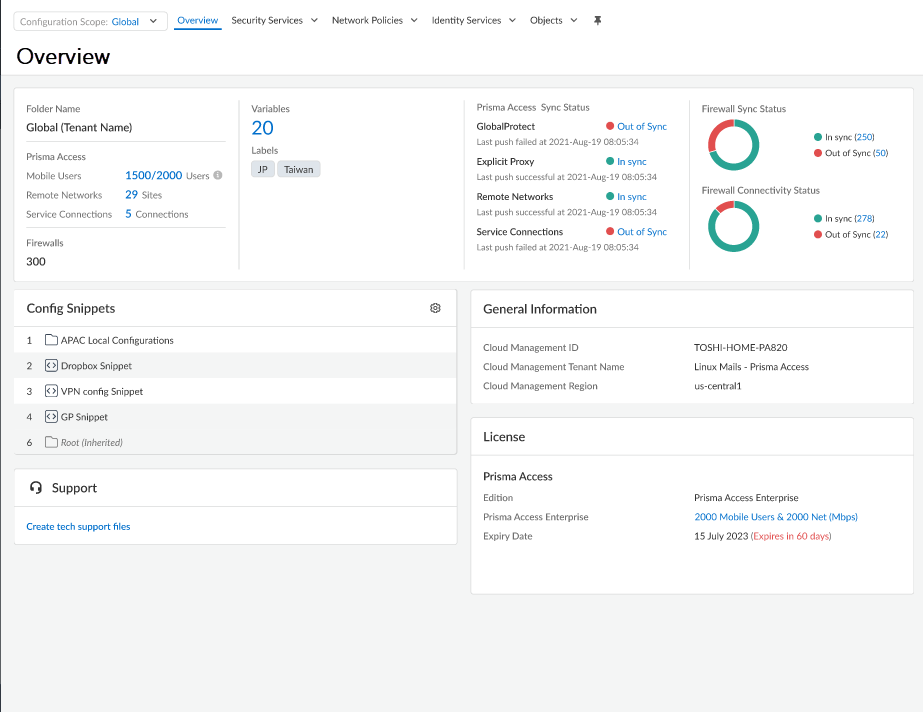
- ( Optional ) Go to Configuration Page to see your migrated configuration.
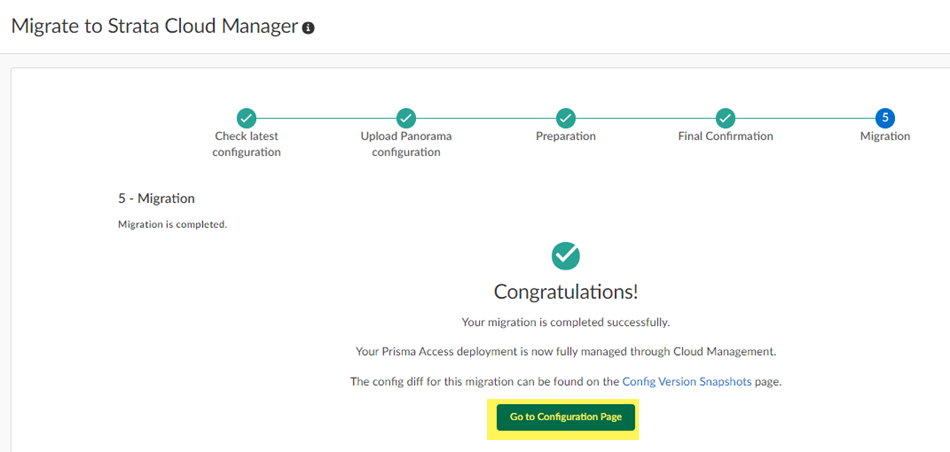
Your migrated deployment displays.
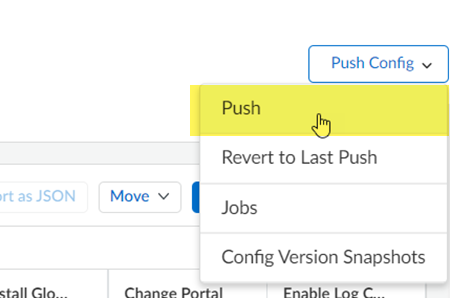
- Push ConfigPush to apply your migrated configuration changes.
This Push operation ensures that your migration has successfully completed and that Prisma Access has applied all changes to your migrated configuration.
- Make a note of any messages you received during the Push operation and, if you see any issues, make changes to your configuration as required.
Prisma Access Dataplane Upgrades
Prisma Access (Managed by Strata Cloud Manager) automatically performs dataplane upgrades, without any intervention required from you.
Prisma Access performs dataplane upgrades on the service to provide new security features and capabilities to help protect your organization’s end-users, business assets, and digital transformation. When a new version of Prisma Access requires a dataplane upgrade, you need to understand how the upgrade process works and have the required prerequisites in place before upgrading.
You can expect your dataplane to be upgraded one to two times a year. Some releases might offer an optional dataplane upgrade in addition to the required dataplane upgrades to support Prisma Access features that require it.
- Dataplane Upgrade Overview
- Dataplane Upgrade Example
Dataplane Upgrade Overview
Prisma Access upgrades your dataplane in two phases on two weekend dates, and keeps you informed about the upgrade using Strata Cloud Manager. On a high level, the following steps are taken during the upgrade process.
- An email notification from Strata Cloud Manager arrives 21 days before the scheduled dataplane upgrade start date. This email notification provides the dataplane upgrade start date for phase #1.
You may see a date populated in Strata Cloud Manager before the 21-day notification, but this date may not be final until you receive your 21-day notification.
- In the email, you are asked to select and submit the location or locations to upgrade first and the preferred time window for the upgrade through Strata Cloud Manager.
You can change and submit the first locations to upgrade and time window multiple times for a given tenant. The last submission that occurred seven days before the scheduled start date will be chosen by the service for the upgrade. You will not be able to make any changes within seven days of the upgrade start date.
If you make changes, it might take up to 30 minutes for the changes you made to be displayed in the Upgrade Dashboard on Insights. You will be notified via email alert when the Prisma Access has processed and completed the changes.
Palo Alto Networks strongly suggests that you select locations that reflect your entire deployment. For example, if you have a mobile user, service connection, and remote network deployment, select a location or locations that have all deployment types.
- Prisma Access will perform phase #1 of the upgrade on the selected location or locations within the local time window selected for those locations.
- If the selected upgrade locations have any combination of Mobile Users—GlobalProtect, Mobile Users—Explicit Proxy, Service Connections, or Remote Networks, the dataplane for each deployment will be upgraded to the required dataplane version, as described later in this section.
- Once the upgrade is complete in the first location, you’ll receive an email notification through Strata Cloud Manager. Palo Alto Networks recommends that you monitor the service for any new issues that occur immediately after the dataplane upgrade.
- In an unlikely occurrence where you see a new issue, report the issue to Palo Alto Networks technical support.
The technical support team will investigate the issue and take corrective actions that may also include rolling back to the previous dataplane version. This decision will be communicated to you via the technical support case.
- If there are no new issues or a new issue is not upgrade-related, Prisma Access will proceed with the dataplane upgrade on the following weekend.
- The upgrade of the remaining locations will take place during the same time window you selected for the first upgrade (in local time).
- After the dataplane upgrade completes, you will be notified via email alert.
- If a plugin upgrade is required after the dataplane upgrade, Palo Alto Networks recommends that you upgrade the plugin after the dataplane upgrade completes.
The following figure shows the timeline used for the upgrade and includes the tasks that you will need to perform for the dataplane upgrade (shown in green), as well as the steps that Prisma Access performs.
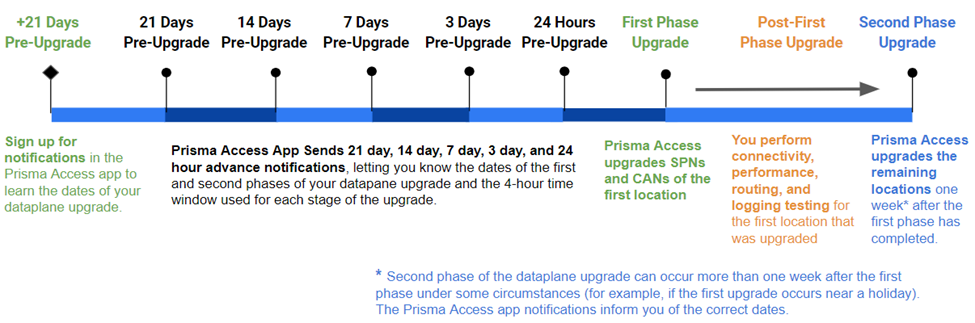
The following section provides more details about the dataplane upgrade process.
After you sign up for notifications , Prisma Access informs you of the two weekend dates that will be used for the upgrade process and sends these notifications 21 days, 14 days, 7 days, 3 days, and 24 hours before the first phase of the upgrade will occur. The upgrade process occurs in two phases:
- Phase #1 upgrades the location or locations you chose on the first weekend using the time window you provided and notifies you via email when the upgrade is complete. If you did not choose the locations to upgrade first, or did not select a time window, Prisma Access makes the choices for you.
Palo Alto Networks attempts to upgrade the locations during the four-hour window that you select through Strata Cloud Manager. However, completing the required upgrades during this window is best-effort and Palo Alto Networks cannot guarantee that the locations will be upgraded during that time. If there are any issues during the upgrade, Palo Alto Networks will attempt the upgrade 24 hours after the original four-hour window.
For this reason, you should schedule a change request window for 72 hours starting at 8 p.m. local time on Friday and ending at 8 p.m. local time on Monday for each of the two weekends when the dataplane upgrade occurs. You will receive an email when the upgrade is complete.
Prisma Access makes the following changes to your deployment during Phase #1 of the upgrade.
|
Deployment Type |
What is Upgraded |
|
Mobile Users—GlobalProtect Deployments |
Prisma Access upgrades:
|
|
Mobile Users—Explicit Proxy Deployments |
Prisma Access upgrades the Explicit Proxy nodes for the Explicit Proxy location or locations you specify. |
|
Remote Network Deployments |
Prisma Access upgrades the backup (HA) remote network, also known as the Remote Network Security Processing Node (RN-SPN) , then makes the backup remote network the active node for the location or locations you specify. The backup remote network connection is not upgraded until the following weekend, when the active and backup nodes are upgraded for all locations. If there are multiple RN-SPNs in the selected location, all primary nodes are upgraded to the new dataplane version. |
|
Service Connections |
Prisma Access upgrades the backup (HA) service connection, also known as the Service Connection Corporate Access Node (SC-CAN), then makes the backup service connection the active node for the location or locations you specify. The backup service connection is not upgraded until the following weekend, when the active and backup nodes are upgraded for all locations. If there are multiple SC-CANs in the selected location, all backup nodes are upgraded to the new dataplane version. |
|
ZTNA Connectors |
ZTNA Connectors are not upgraded; you can upgrade the ZTNA Connectors on an as-needed basis. |
Between the first and second upgrades, monitor the first upgraded locations and perform connectivity, performance, routing, and logging testing to make sure that the locations upgraded successfully. If you encounter a service-impacting failure after the upgrade, open a Support Case with Palo Alto Networks Technical Support for assistance. Palo Alto Networks will attempt to resolve the issue by rolling back the dataplane to a previous dataplane version within 24 hours.
- Seven days after Prisma Access upgrades the first location, Prisma Access upgrades the remainder of your locations (Phase #2 upgrade), using the same time window you selected for the first phase, and notifies you via email when the upgrade is complete.
The upgrade window can be longer. For example, if Phase #2 occurs during a national holiday in the United States of America, the second phase of the upgrade happens 14 days after the first phase instead of 7. The notifications you receive in Strata Cloud Manager show you the specific timeline for the upcoming dataplane upgrade.
Dataplane Upgrade Example
The following example shows a sample dataplane upgrade procedure for a Mobile Users deployment with five gateways (MU-SPNs) and three SC-CANs. The US West location has two MU-SPNs as the result of an autoscale event (an extra MU-SPN was added after a large number of mobile users logged in to that location).
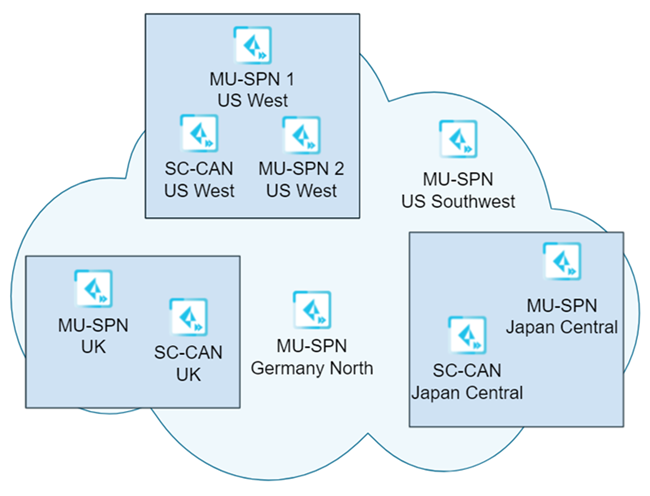
In this example, you selected a single location (US West) to upgrade first, and requested a four-hour upgrade window of 8:00 a.m. to 12:00 noon Saturday for the upgrade.
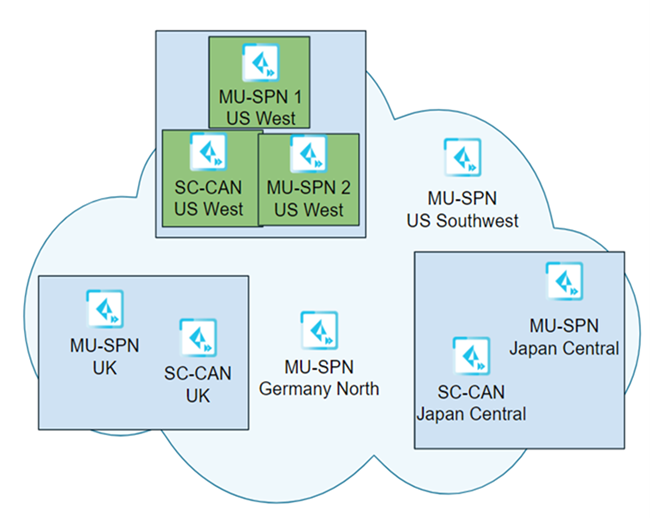
On the first upgrade weekend (Phase #1), the upgrade occurs for the SC-CANs and MU-SPNs in the US West location takes place between 8:00 a.m. and 12:00 p.m. Pacific Time on Saturday.
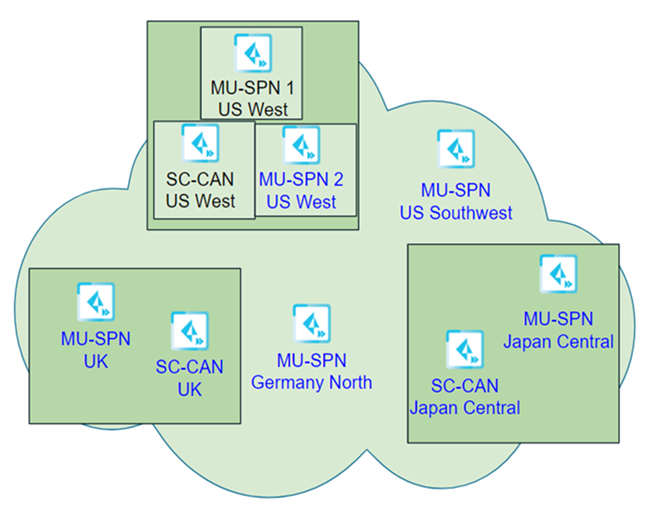
Seven days after the first location is upgraded, Palo Alto Networks upgrades the remaining components (Phase #2) using the same four-hour time window as was used for the first phase of the upgrade (8:00 a.m. to 12:00 p.m. on Saturday).
In this example, Prisma Access uses the following time zone information when upgrading the dataplane:
- The Japan Central MU-SPN and SC-CAN are upgraded using the local time in Japan.
- The UK MU-SPN and SC-CAN are upgraded using the local time in the UK.
- The US Southwest MU-SPN is upgraded using Pacific Time.
Prisma Access Setup
Use the following recommendations and requirements when adding an infrastructure subnet:
- You can assign Prisma Access an infrastructure subnet from an existing supernet in your organization’s IP address pool, but do not assign any of the IP addresses from the infrastructure subnet for any other use in your existing network.
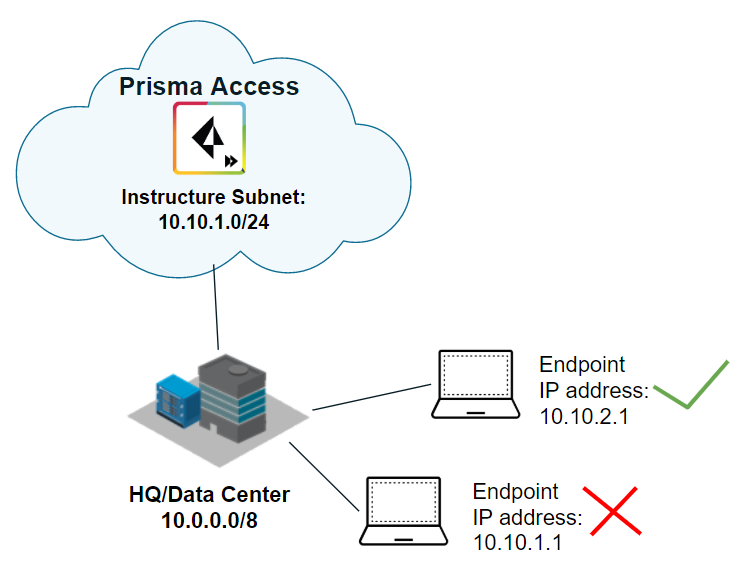
The following example shows a Prisma Access infrastructure subnet, 10.10.1.0/24, that you assigned from an existing supernet, 10.0.0.0/8. After you assign 10.10.1.0/24 as the infrastructure subnet, your organization cannot use any IP addresses from that subnet. For example, you can assign 10.10.2.1 to an endpoint, but 10.10.1.1 is not allowed because that IP address is part of the infrastructure subnet.
- If you create a new subnet for the infrastructure subnet, use a subnet that does not overlap with other IP addresses you use internally.
- (Recommended) Use an RFC 1918-compliant subnet. While the use of non-RFC 1918-compliant (public) IP addresses is supported, we don't recommend it because of possible conflicts with internet public IP address space.
- Do not specify any subnets that overlap with the following IP addresses and subnets, because Prisma Access reserves those IP addresses and subnets for its internal use.
- 169.254.0.0/16
- 100.64.0.0/10
- The subnet cannot overlap with the IP address pools you plan to use for the address pools you assign for your mobile users deployment.
- Because the service infrastructure can be very large, you must designate a /24 subnet at a minimum.
Set Up Prisma Access
Before you can use Prisma Access to secure your remote networks and mobile users, configure an infrastructure subnet. Prisma Access uses IP addresses within this subnet to establish a network between your remote network locations, mobile users, headquarters and data center (if applicable). Prisma Access also uses service connections to access internal resources from your headquarters or data center location.
This sub-network will be an extension to your existing network. Hence, it should not overlap with any existing IP subnets in your network. The following example shows a 172.16.54.0/23 subnet that is being used for the Prisma Access infrastructure subnet.
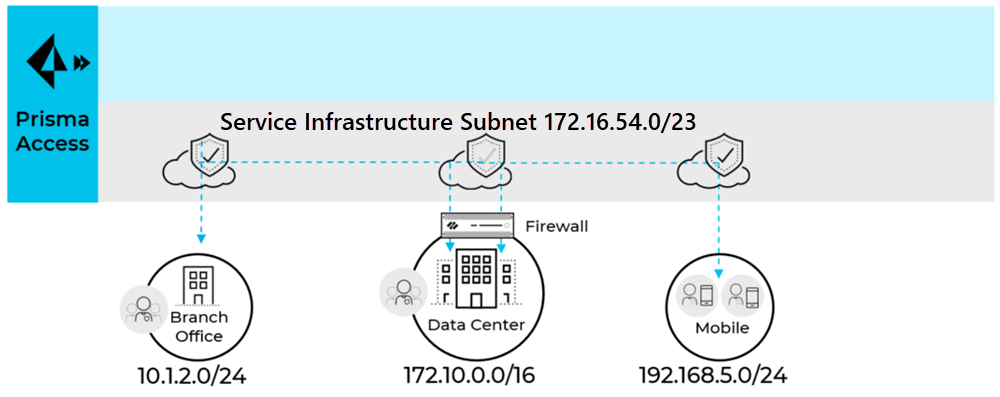
For small networks with less than 50 sites and 2500 mobile users, consider a /24 subnet. For medium sized networks with less than 100 sites and less then 5000 mobile users, consider a /23 subnet. In most cases a /23 subnet is sufficient. If there are more than 100 sites or 5000 mobile users or expected future growth, contact Palo Alto Networks to evaluate whether you need a larger subnet size.
Learn how to set up Prisma Access.
The following workflow provides you with the summary steps that you take to install and configure Prisma Access (Managed by Panorama) Access.
If you are setting up a deployment that includes multiple instances of Prisma Access on a single Panorama (multitenancy), see . Most organizations do not have a need to create and manage multiple tenants.
- Add the following URLs and ports to an allow list on any security appliance that you use with the Panorama appliance that manages Prisma Access.
In addition, if your Panorama appliance uses a ( PanoramaSetupServiceProxy Server ), or if you use SSL forward proxy with Prisma Access, be sure to add the following URLs and ports to an allow list on the proxy or proxy server.
- api.gpcloudservice.com (for Prisma Access)
- api.paloaltonetworks.com (for Prisma Access)
- apitrusted.paloaltonetworks.com (for Prisma Access)
- The FQDNs and ports required for Strata Logging Service
If there is a Palo Alto Networks next-generation firewall between the Panorama appliance and the internet, you must add a security policy rule on the firewall to allow the paloalto-logging-service and paloalto-shared-services App-IDs from the Panorama appliance to the internet. These applications allow SSL-secured communication to Prisma Access and to Strata Logging Service that the Panorama appliance uses to query logs. If the Panorama appliance is behind a legacy Layer 4 firewall, permit ports 443 and 444 outbound from the Panorama to allow this traffic from the Panorama. Note that opening layer 4 ports instead of using Palo Alto Networks App-IDs is less secure and not recommended.
- Add the ports used by Panorama to allow lists in your network.
- Identify your license requirements ; then Activate and install the Prisma Access components .
- Import your existing Panorama configuration to Prisma Access, or create new templates and device groups to begin configuration of Prisma Access.
In order to push configuration—such as security policy, authentication policy, server profiles, security profiles, address objects, and application groups—to Prisma Access, you must either create new templates and device groups with the configuration settings you want to push to Prisma Access, or leverage your existing device groups and templates by adding them to the template stacks and device group hierarchies that Prisma Access creates when you onboard the service.
Prisma Access creates the following templates and device groups, depending on what you have purchased (for example, if you do not purchase an Explicit Proxy license, you will not see the Explicit Proxy templates and device groups):
- Templates:
- Explicit_Proxy_Template
- Explicit_Proxy_Template_Stack
- Mobile_User_Template
- Mobile_User_Template_Stack
- Remote_Network_Template
- Remote_Network_Template_Stack
- Service_Conn_Template
- Service_Conn_Template_Stack
- Device Groups:
- Explicit_Proxy_Device_Group
- Mobile_User_Device_Group
- Remote_Network_Device_Group
- Service_Conn_Device_Group
Configuration is simplified in Prisma Access because you do not have to configure any of the infrastructure settings, such as interfaces and routing protocols. This configuration is automated and pushed from Panorama in the templates and device groups that the service creates automatically. You can configure any infrastructure settings that are required by the service, such as settings required to create IPSec VPN tunnels to the IPSec-capable devices at your remote network locations, directly from the plugin. Optionally, you can add templates and device group hierarchies to the configuration to simplify the service setup.
To simplify the service setup, create or import the templates and device groups you need before you begin the setup tasks for using Prisma Access.
When creating templates and device groups for Prisma Access, you do not need to assign managed devices to it. Instead, you will add them to the template stacks and device group hierarchies that Prisma Access creates. Do not add any of the templates or device groups created by Prisma Access to any other template stacks or device groups.
- Sign up for email notifications using Strata Cloud Manager.
Prisma Access provides you with notifications about the service, including any dataplane upgrades, using notifications from this app.
- Change the default master key for Panorama and in the Cloud Services plugin.
Palo Alto Networks recommends changing the master key in Panorama and in the Cloud Services plugin as a security best practice and that you change the master key monthly.
Because the Panorama and Prisma Access master keys do not synchronize, Palo Alto Networks recommends that you do not automatically rotate the master key in Panorama without also synchronizing the master key in Prisma Access. You can use the Panorama UI or API commands to change the master keys.
Be sure to keep track of the master key you deploy because master keys cannot be recovered. When a master key expires, you must enter the current master key in order to configure a new master key. You must reset your Panorama appliance to factory default if you cannot provide the current master key when it expires.
1. Change the master key in Panorama .
1. Select PanoramaMaster Key and Diagnostics .
Do not specify a Current Master Key .
2. Configure the New Master Key and Confirm Master Key .
Make a note of the master key you configured.
3. Configure the master key Lifetime and Time for Reminder .
4. Click OK .
2. Change the master key for Prisma Access by selecting PanoramaCloud ServicesConfigurationService OperationsEdit master key , then entering the same master key you entered for Panorama.
You can also change the master key by using API commands. This requires two steps–one to change the Panorama master key and one to change the Prisma Access master key. Use the following API commands to change the master key:
- Panorama: XML APIOperational Commandsrequestmaster-key
- Prisma Access: XML APIOperational Commandsrequestpluginscloud_servicesprisma-accesssync
- Enable the service infrastructure and service connections that allows communication between Prisma Access elements.
1. Plan to enable the service infrastructure and service connections.
2. Enable the service infrastructure .
3. Create a service connection to allow access to your corporate resources .
If you don’t require access to your corporate resources, you should still create a service connection to enable access between mobile users and remote networks.
- Prisma Access Mobile User Deployments and secure mobile users with GlobalProtect or Explicit Proxy , as required for your deployment.
To set up GlobalProtect on Prisma Access (Managed by Panorama):
1. Configure zones for mobile users by creating two zones in the Mobile_User_Template (for example, Mobile-Users and Internet) and mapping the zones . You should map any zone that is not Prisma Access connected users or HQ or branch offices to Untrust.
Under PanoramaCloud ServicesConfigurationMobile Users , map Internet to Untrust; Mobile-Users to Trust.
2. Configure authentication.
We recommend using local authentication as a first step to verify that the service is set up and your users have internet access. You can later switch to using your corporate authentication methods.
3. Configure Security policies for the device group.
To create a Security policy to allow traffic to the Internet, select the Mobile_User_Device_Group PoliciesSecurityPrerulesAdd a rule. For example: Mobile-Users to Internet.
4. Commit and push your changes to get started with the service.
5. Select PanoramaCloud ServicesStatusMonitorMobile Users to view the Status and verify that you can ping the Portal FQDN.
6. Validate that Prisma Access is securing Internet traffic for mobile users by downloading and installing the GlobalProtect app , using the app to connect to the portal as a mobile user (local user), browsing to a few websites on the internet, and checking the traffic logs on Panorama.
To secure mobile users with an explicit proxy:
7. Read the Explicit Proxy Configuration Guidelines .
8. Configure SAML Authentication . SAML authentication is required for Explicit Proxy.
9. Set up Group Mapping using the Cloud Identity Engine .
10. Complete the Explicit Proxy configuration.
11. Commit and Push your changes.
- Plan, create, and configure remote network connections.
1. Add one or more remote networks to Prisma Access.
You can onboard one location and then add additional locations using the bulk import capability.
2. Create a Security policy rule to allow traffic from the remote networks to HQ (For example: Trust to Trust).
3. Validate the connectivity between the service connection, remote network connection, and mobile users.
- Run the API Script Used to Retrieve Prisma Access IP Addresses and Use the Legacy Script to Retrieve Mobile User IP Addresses .
You add these addresses to an allow list on your organization’s network to limit inbound access to your enterprise network and applications.
- ( Optional ) Change the authentication method from local authentication to your organization’s authentication method.
1. Create an authentication profile that meets your organization’s requirements ( SAML , LDAP, RADIUS, etc).
2. If your organization uses an on-premises authentication server such as RADIUS or Active Directory, add the IP addresses that Prisma Access uses as its source IP address for internal requests ( Retrieve the IP Addresses for Prisma Access ) to allow lists in your network, or allow the IP addresses of the entire Infrastructure Subnet (Prisma Access takes the loopback IP address from this subnet).
3. Update the Authentication Profile for the Prisma Access portal and gateway to use this new authentication profile.
- ( Optional ) Forward logs from Strata Logging Service to an external Syslog receiver.
Configure the Prisma Access Service Infrastructure
Prisma Access uses this subnet to create the network backbone for communication between your branch networks, mobile users and the Prisma Access security infrastructure, as well as with the HQ and data center networks you plan to connect to Prisma Access over service connections.
To enable communication between your remote network locations, mobile users, and the HQ or data centers that you plan on connecting to Prisma Access over service connections, set up the service infrastructure subnet. Prisma Access uses this subnet to create the network backbone for communication between your branch networks, mobile users and the Prisma Access security infrastructure, as well as with the HQ and data center networks you plan to connect to Prisma Access over service connections.
Before you can begin setting up Prisma Access to secure your remote networks and/or mobile users, you must configure an infrastructure subnet, which Prisma Access will use to create the network backbone for communication between your service connections, remote networks, and mobile users, as well as with the corporate networks you plan to connect to Prisma Access over service connections. Because a large number of IP addresses will be required to set up the infrastructure, you must use a /24 subnet (for example, 172.16.55.0/24) at a minimum. Be sure you follow all guidelines and requirements .
- Select PanoramaCloud ServicesConfigurationService Setup and click the gear icon to edit the Settings.
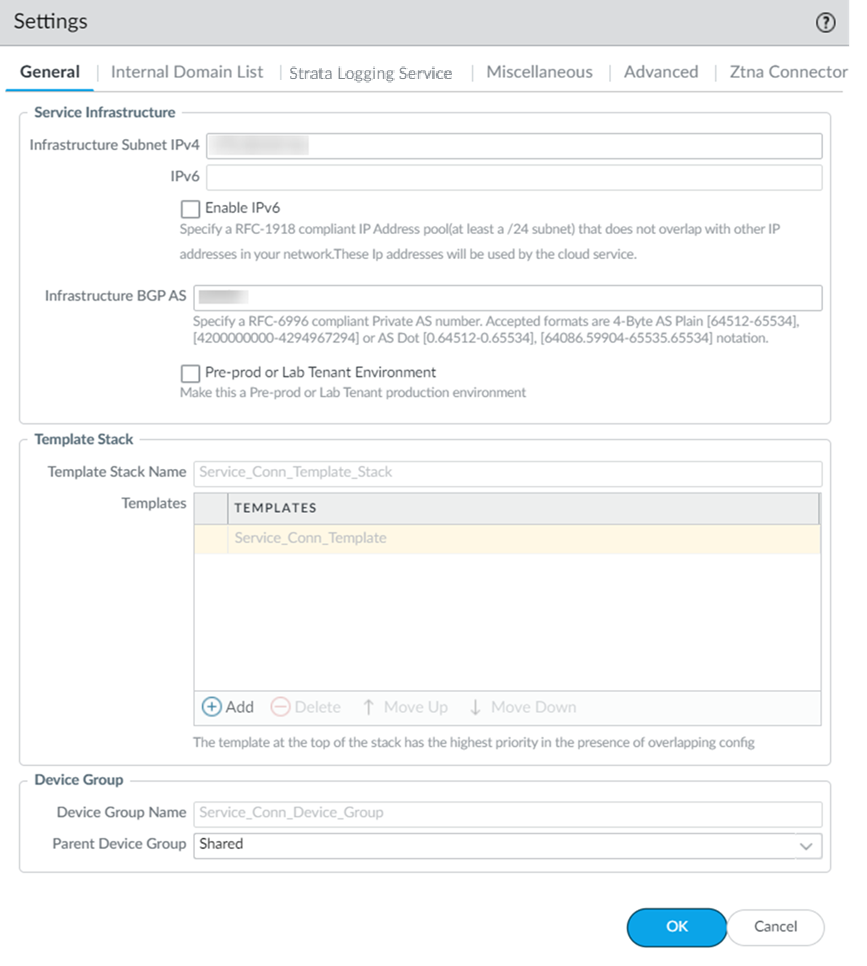
- On the General tab, specify an Infrastructure Subnet that meets the requirements, for example, 172.16.55.0/24.
- ( Optional ) If you are configuring IPv6 , select IPv6 for Internal Traffic and select an IPv6 subnet.
- ( Optional ) If you want to enable Prisma Access to use BGP to dynamically discover routes to resources on your remote networks and HQ/data center locations, enter the Infrastructure BGP AS you want to use within the Prisma Access infrastructure.
If you do not supply an AS number, the default AS number 65534 will be used.
- ( Optional ) Enable a tenant as Pre-prod or Lab Tenant Environment .
When you enable a tenant as a pre-production or lab tenant, you can schedule upgrades for this tenant alone before upgrading other production tenants. The tenant receives notifications 24 to 48 hours before an upcoming upgrade.
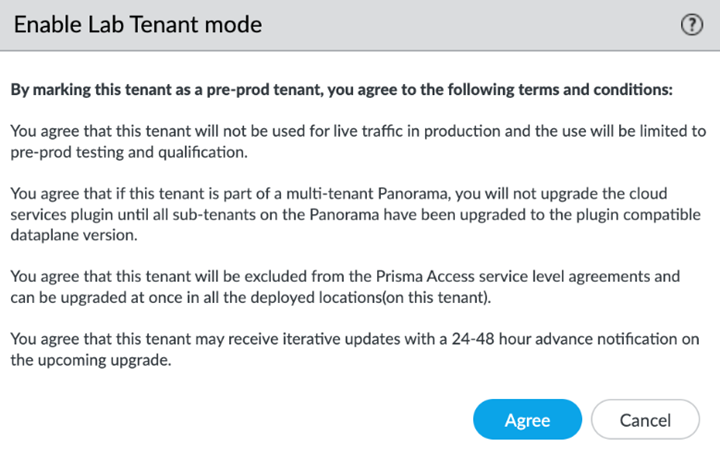
When you disable the tenant from pre-production or lab tenant, it is considered as a production tenant.
Prisma Access for Clean Pipe does not support this functionality.
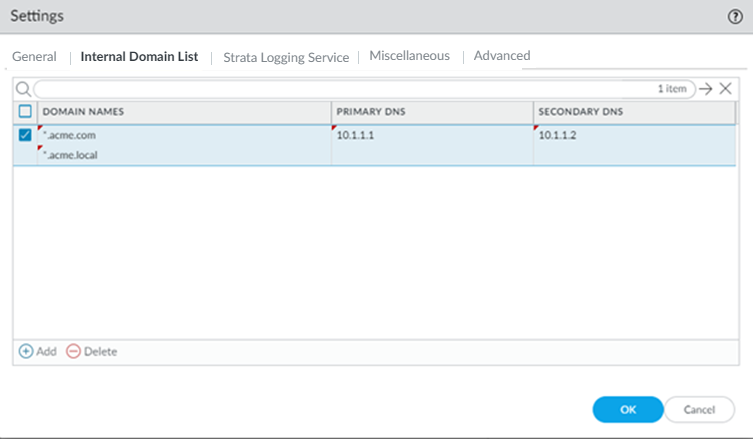
- ( Optional ) Enable Prisma Access to resolve your internal domains using your corporate DNS servers.
Use this step if you need Prisma Access to be able to resolve your internal domains to access services, such as LDAP servers, on your corporate network via service connections. For example, if you want a DNS lookup for your corporate domain to go exclusively to the corporate DNS server, specify the corporate domain and the corporate DNS servers here.
- Select the Internal Domain List tab.
- Add the Domain Names , Primary DNS , and Secondary DNS servers that you want Prisma Access to use to resolve your internal domain names.
You can use a wildcard (*) in front of the domains in the domain list, for example *.acme.local or *.acme.com.
Do not enter a 127.0.0.1 address as it can cause Prisma Access internal routing issues.
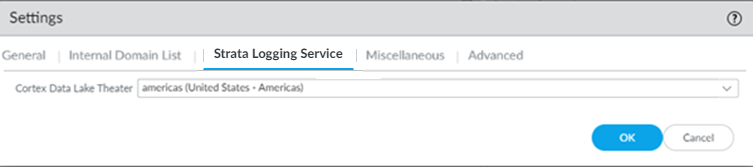
- Enable Strata Logging Service.
- Select the Strata Logging Service tab.
- Select a Strata Logging Service Theater and click OK .
- Configure the device groups you are using to push settings to Prisma Access with a Log Forwarding profile that forwards the desired log types to Panorama/Strata Logging Service .
The Cloud Services plugin automatically adds the following Log Settings ( DeviceLog Settings ) after a new installation or when removing non-Prisma Access templates from a Prisma Access template stack:
- Log Settings for System logs ( system-gpcs-default ), User-ID logs ( userid-gpcs-default ), HIP Match logs ( hipmatch-gpcs-default ), and GlobalProtect logs ( gp-prismaaccess-default ) are added to the Mobile_User_Template.
- Log Settings for System logs ( system-gpcs-default ), User-ID logs ( userid-gpcs-default ), and GlobalProtect logs ( gp-prismaaccess-default ) are added to the Remote_Network_Template.
- Log Settings for System logs ( system-gpcs-default ) and GlobalProtect logs ( gp-prismaaccess-default ) are added to the Service_Conn_Template.
These Log Setting configurations automatically forward System, User-ID, HIP Match, and GlobalProtect logs to Strata Logging Service.
To apply log setting changes, perform the following steps, then commit and push your changes:
- To apply the log setting to the mobile user template, select PanoramaCloud ServicesConfigurationMobile Users , click the gear icon to edit the settings, and click OK.
- To apply the log setting to the remote network template, select PanoramaCloud ServicesConfigurationRemote Networks , click the gear icon to edit the settings, and click OK.
- To apply the log setting to the service connection template, select PanoramaCloud ServicesConfigurationService Setup , click the gear icon to edit the settings, and click OK.
The way you enable log forwarding for other log types depends on the type. For logs that are generated based on a policy match, use a log forwarding profile. See the Strata Logging Service Getting Started Guide for more information.
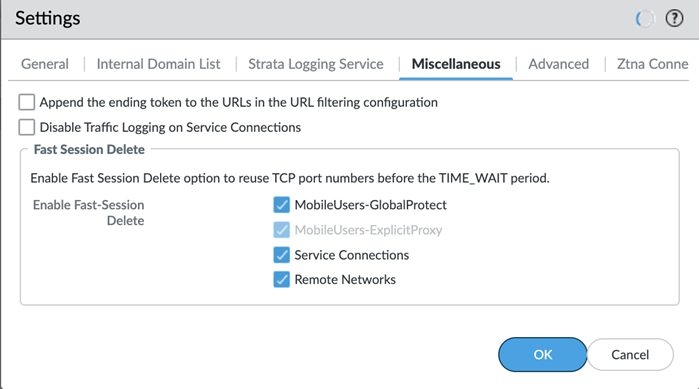
- ( Optional ) Configure Miscellaneous settings.
- ( Optional ) Append the ending token for URLs in external dynamic lists (EDLs) or custom URL categories by selecting Append the ending token to the URLs in the URL filtering configuration .
If you use URLs in EDLs or custom URL categories and do not append a forward slash ( / ) to the URL, it is possible to allow more URLs than you intended. For example, entering example.com as a matching URL instead of example.com/ would also match example.com.website.info or example.com.br.
By selecting Append the ending token to the URLs in the URL filtering configuration , Prisma Access sets an ending token to URLs in EDLs or custom URL categories so that, if you enter example.com , Prisma Access treats it as it would treat example.com/ and only matches that URL.
- ( Optional ) Disable Traffic Logging on Service Connections to disable logging on the service connections for your Prisma Access deployment.
If the majority of the traffic flows logged by the service connections are asymmetric, disabling service connection logging might be required to reduce the consumption of Strata Logging Service logging storage. If your deployment does not have asymmetric flows via the service connections, you do not need to disable logging.
- ( Optional ) To enable Fast-Session delete for Remote Networks, Service Connections, or Mobile Users —GlobalProtect deployments, select the check boxes for Mobile Users—GlobalProtect , Service Connections , or Remote Networks .
Fast-Session Delete allows Prisma Access to reuse TCP port numbers before the TCP TIME_WAIT period expires, and can be useful for SSL decrypted sessions that may be short-lived.
For Mobile Users—Explicit Proxy deployments, Fast-Session delete is a key part of its functionality and you cannot disable it.
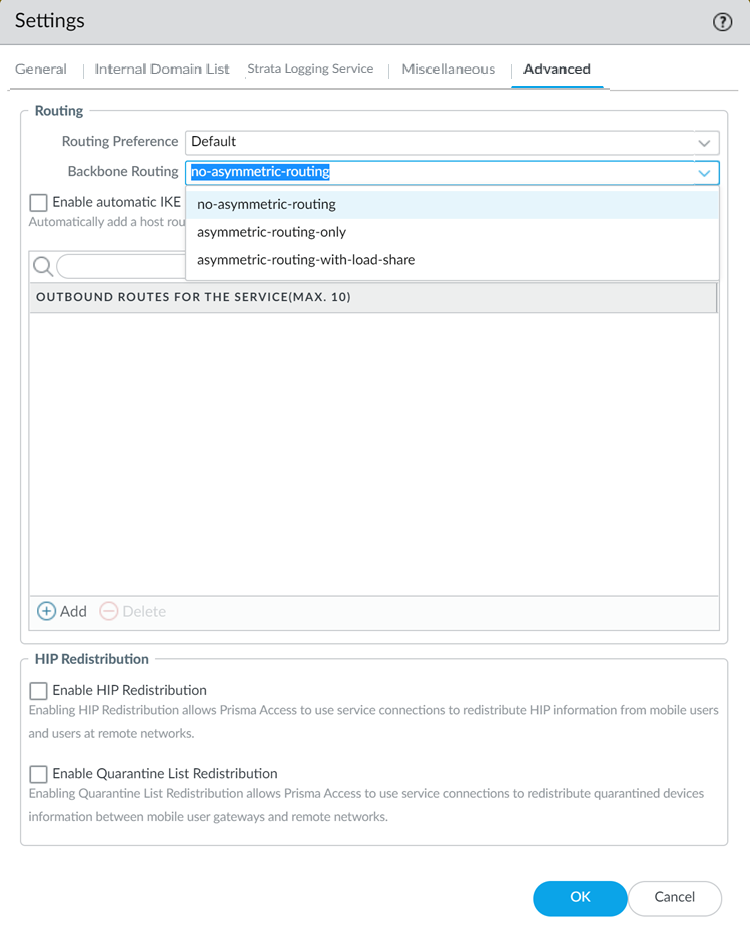
- ( Optional ) Configure Advanced settings (routing preferences, symmetric network path options for service connections, and HIP redistribution).
- Specify the Routing Preference to use with service connections.
You can specify network preferences to use either your organization’s network, or the Prisma Access network, to process the service connection traffic.
- Default —Prisma Access uses default routing in its internal network.
- Hot potato routing —Prisma Access hands off service connection traffic to your organization’s WAN as quickly as possible.
Changing the Prisma Access service connection routing method requires a thorough understanding of your organization’s topology and routing devices, along with an understanding of how Prisma Access routing works. We recommend that you read Routing for Service Connection Traffic carefully before changing the routing method from default.
- Configure the Backbone Routing to use for the service connections.
By default, the Prisma Access backbone requires that you have a symmetric network path for the traffic returning from the data center or headquarters location by way of a service connection. If you want to use ECMP or another load balancing mechanism for service connections from your CPE, you can enable asymmetric flows through the Prisma Access backbone.
- Select no-asymmetric-routing to require symmetric flows across the service connection backbone.
- Select asymmetric-routing-only to allow Prisma Access to use asymmetric flows across the service connection backbone.
- If you have multiple service connections to a location, you can take advantage of load balancing in your Prisma Access deployment by selecting asymmetric-routing-with-load-share (the default setting). However, load balancing is done on a best-effort basis, and load balancing will fail if one of the service connections goes down.
- Redistribute HIP Information with Prisma Access to use service connections to redistribute HIP information from mobile users and users at remote networks.
- Identification and Quarantine of Compromised Devices in a Prisma Access GlobalProtect Deployment to have Prisma Access identify and quarantine compromised devices that are connected with the GlobalProtect app.
- Withdraw Static Routes if Service Connection or Remote Network IPSec tunnel is down if you want Prisma Access to remove static routes when a tunnel goes down without a backup tunnel.
Prisma Access removes the route in the following situations:
- The primary tunnel goes down and there is no secondary tunnel.
- If a primary and secondary tunnel is configured, but both go down.
You cannot apply this change if tunnel monitoring is not enabled.
- ( Optional ) If you want to route remote network and service connection IPSec tunnel packets to the static IKE gateways over the internet, Enable automatic IKE peer host routes for Remote Networks and Service Connections .
- ( Optional ) Specify Outbound Routes for the Service (Max 10) by adding up to 10 prefixes for which Prisma Access adds static routes on all service connections and remote network connections. Prisma Access then routes traffic to these prefixes over the internet.
- Click OK to save the Service Setup settings.
- Commit all your changes to Panorama and push the configuration changes to Prisma Access.
- Click CommitCommit to Panorama .
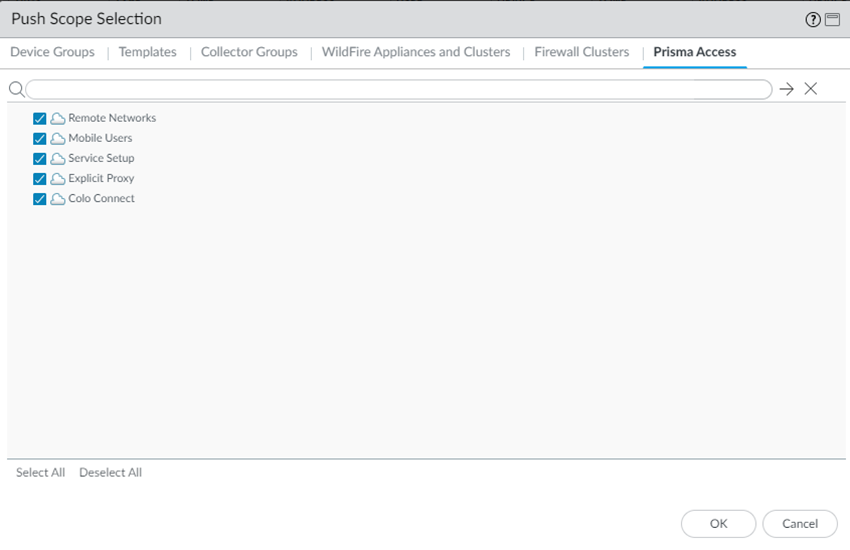
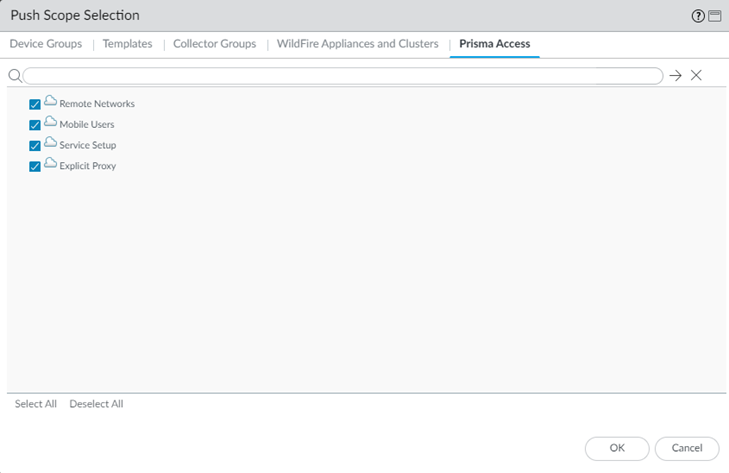
- Click CommitPush to Devices and click Edit Selections .
- On the Prisma Access tab, make sure Service setup is selected and then click OK .
Prisma Access should automatically select the components that need to be committed.
- Click Push .
- Verify that Prisma Access is successfully connected to Strata Logging Service.
- Select PanoramaCloud ServicesStatusStatusStrata Logging Service and verify that the Status is OK .
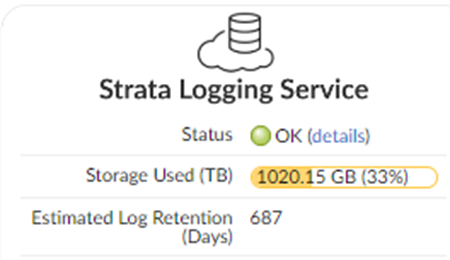
If the status is Error , click the details link to view any errors.
- Continue setting up Prisma Access:
Mobile Users: IP Address Allocation
After you set up your Prisma Access deployment, it is useful to know when IP addresses change so that you can pro-actively plan your infrastructure, retrieve the IP addresses, and add the required IP addresses to allow lists accordingly. The IP address changes can be the result of changes you made (for example, adding another mobile users location) or changes that Prisma Access performs automatically (for example, a large number of mobile users accesses a single Prisma Access gateway).
After you deploy Prisma Access for users for the first time, Prisma Access assigns two public and, if applicable, egress IP addresses for each portal and gateway. The public IP addresses are unique and not shared with any other Prisma Access deployment. If an IP address allocated to you by Palo Alto Networks remains unused for six months, it will be reclaimed. This includes IP addresses that were activated and then deactivated, and have remained deactivated for six months. For instance, if public IP addresses were allocated to your tenant for a specific location and that location was not enabled for six months, Prisma Access may reclaim those IP addresses. Similarly, if you onboarded and then deboarded a mobile user location, Palo Alto Networks can reclaim the IP address used for that location six months after deboarding.
If you have a multitenant setup, Prisma Access adds dedicated IP addresses for each tenant.
Since the public IP address is the source IP address used by Prisma Access for requests made to an internet-based destination, you may need to know what the public IP address are and add them to an allow list in your network to provide your users access to resources such as SaaS applications or publicly-accessible partner applications.
New public IP addresses can be added to the tenant if the following events occur:
- A large number of mobile users access a location in the same location.
To address the capacity requirement to service large number of users, Prisma Access may add one or more gateways, Prisma Access adds one or more gateways to accommodate the increased number of users, assigns one or more of the existing public IP addresses to the new gateway, and adds a new set of IP addresses to the mobile user locations to replace the ones that were used.
- You add one or more locations to your deployment.
When you add more locations, Prisma Access adds another gateway and a new set of IP addresses for each new location you add.
Because Prisma Access enables more public IP addresses after a scaling event and after you add a location, you should add an IP change event notification URL , or use the API to retrieve mobile user addresses, to be notified of IP address changes in your Prisma Access infrastructure. You can then add any added or changed addresses to an allow list.
Example: Public IP Address Scaling Examples (Mobile Users)
The following examples illustrate the mobile user public IP address allocation process that Prisma Access uses during a scaling event or when you add a new location.
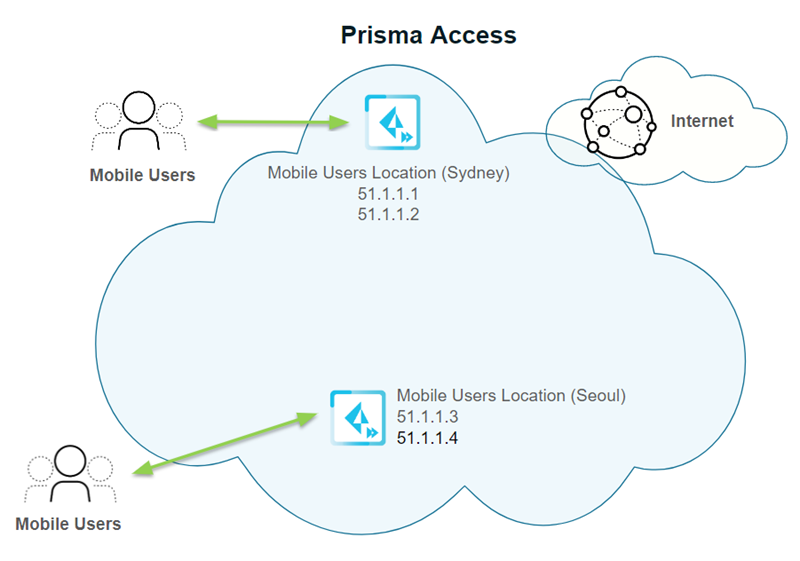
In the following example, you specified two locations in the Asia Pacific region for a new mobile user deployment: Sydney and Seoul. Each location is given two gateway IP addresses.
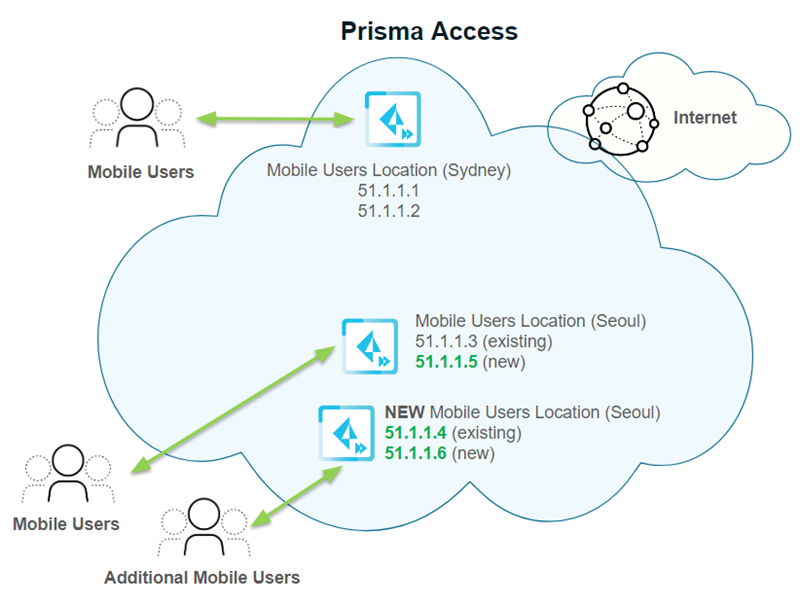
Then a large number of users log in to the Seoul location. To accommodate these extra users, Prisma Access adds a second gateway for the Seoul location, takes one of the gateway addresses from the first Seoul gateway (51.1.1.4) and assigns it to the second Seoul gateway. It then adds two additional IP addresses (51.1.1.5 and 51.1.1.6 in this example) and adds them to the two Seoul gateways.
Then you add another location, Tokyo, in the Asia Pacific region. Prisma Access creates two new IP addresses for the new gateway (51.1.1.7 and 51.1.1.8).
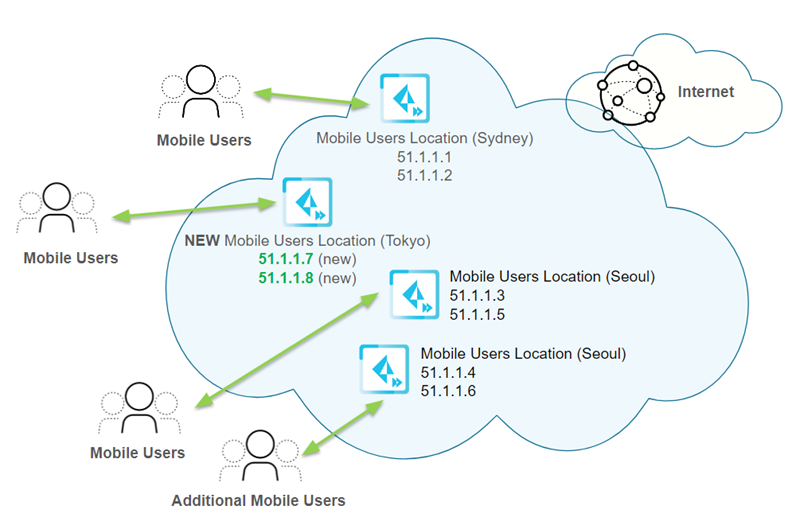
Each time you add a location or have a scaling event, you should retrieve the new egress and gateway IP addresses that Prisma Access assigned and add them to an allow list in your network. Prisma Access keeps two sets of IP addresses at all times for all active gateways in each location.
Loopback IP Address Allocation (Mobile Users)
Loopback addresses are IP addresses used by Prisma Access for requests made to an internal source and are assigned from the infrastructure subnet . Loopback IP addresses can change for mobile users during an infrastructure or dataplane upgrade.
Loopback IP addresses do not change for service connections or remote network connections during an infrastructure or dataplane upgrade; only mobile user loopback IP addresses can change.
Prisma Access allocates the loopback IP addresses from the infrastructure subnet that you specify when you enable the Prisma Access infrastructure . You can add the entire infrastructure subnet to an allow list and avoid planning for mobile user loopback IP changes during an infrastructure or dataplane upgrade. To find the infrastructure subnet, select:
- Prisma Access (Managed by Strata Cloud Manager): WorkflowsPrisma Access SetupPrisma AccessInfrastructure Settings and view the Infrastructure Subnet
- Prisma Access (Managed by Panorama): PanoramaCloud ServicesStatusNetwork DetailsService Infrastructure and view the Infrastructure Subnet
Retrieve these addresses using the API used to retrieve public IP and loopback IP addresses.
The following example shows a Prisma Access deployment that has an infrastructure subnet of 172.16.0.0/16. Prisma Access has assigned loopback IP addresses 172.16.0.1 and 172.16.0.3 for mobile users from the infrastructure subnet.
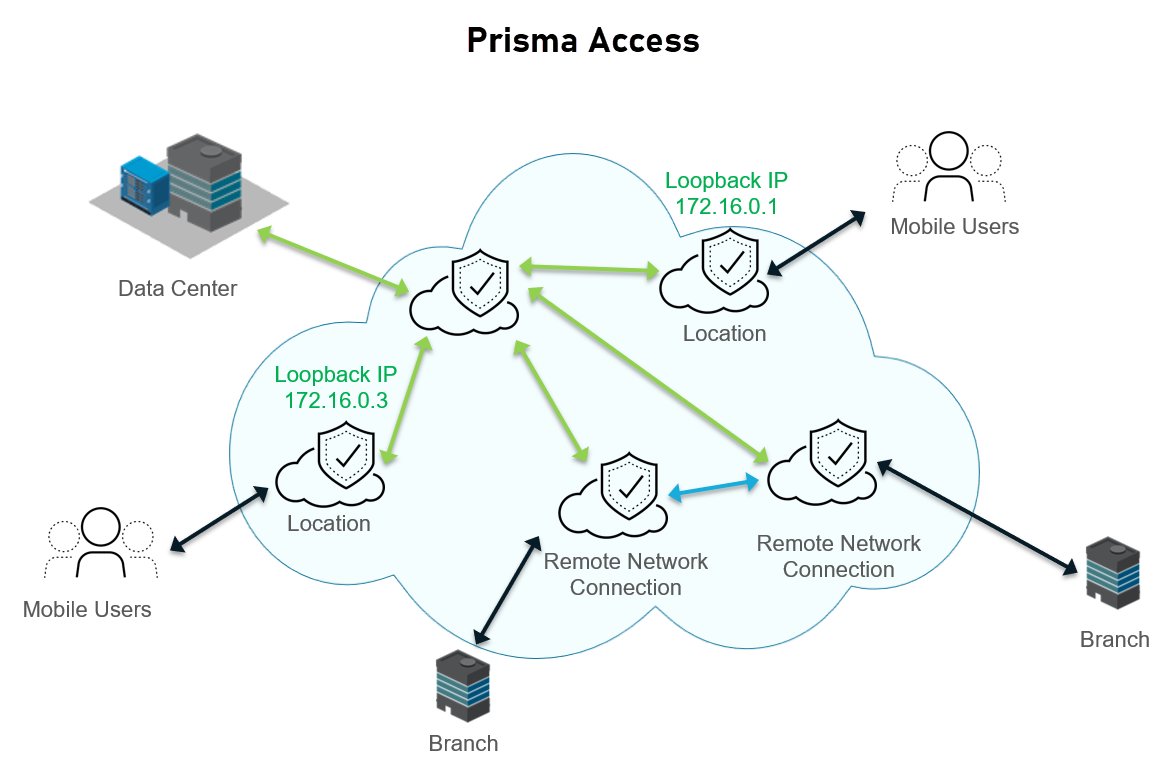
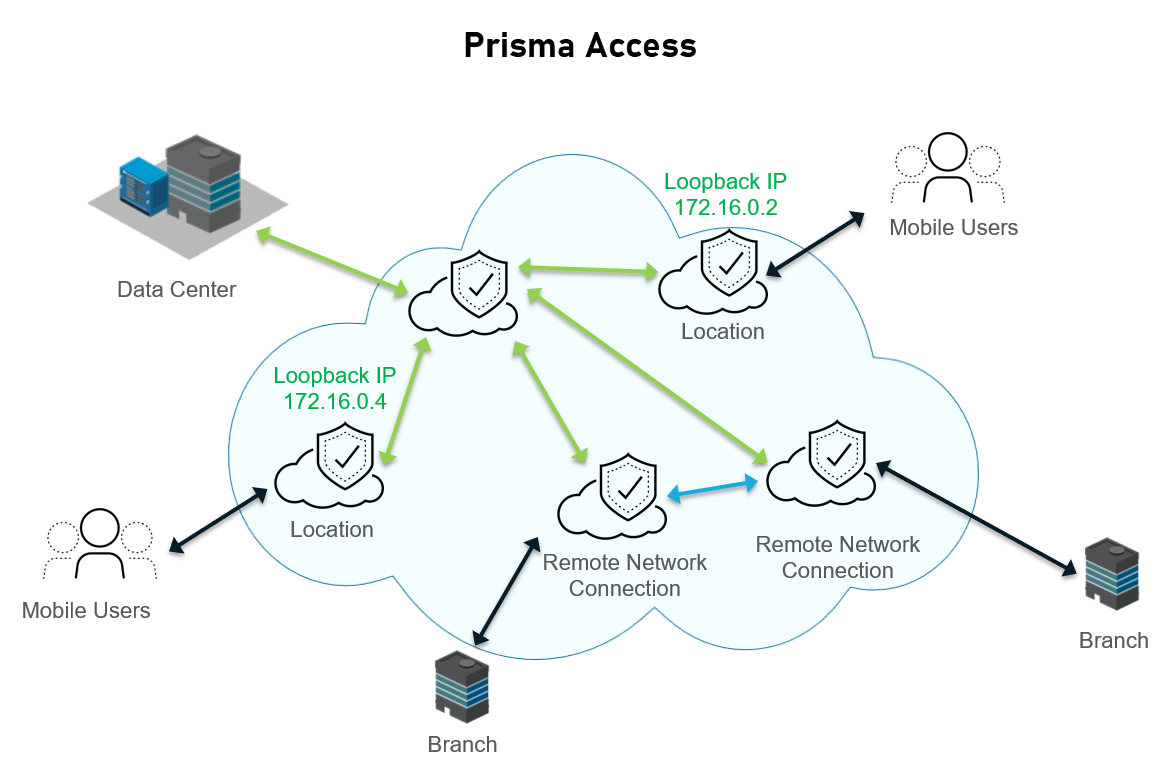
After in infrastructure or dataplane upgrade (for example, to prepare for a new release of the Cloud Services plugin), Prisma Access assigns two different IP addresses for mobile users from the infrastructure subnet (172.16.0.1 is changed to 172.16.0.2 and 172.16.0.3 is changed to 172.16.0.4).
Remote Networks: IPSec Termination Nodes and Service IP Addresses
When you onboard a remote network , you associate it with an IPSec Termination Node , and each IPSec termination node has a Service IP Address associated with it. You use this address as the peer IP address for your CPE when you set up the IPSec tunnel for the remote network connection. Each termination node can provide you up to 1,000 Mbps of bandwidth. Associating more than 1,000 Mbps of bandwidth to a compute location provides you with more than one Service IP Address .
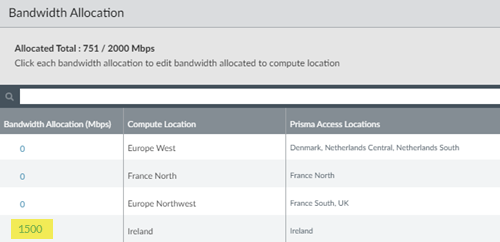
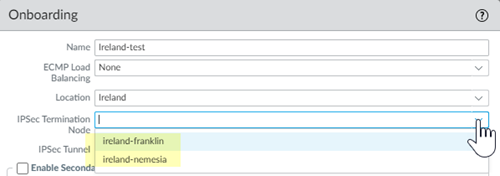
When you onboard a remote network in an Ireland compute location, you are given a choice of two IPSec termination nodes, because the total bandwidth is more than 1,000 Mbps.
Each IPSec termination node has its own Service IP Address , as can be seen in PanoramaCloud ServicesStatusNetwork DetailsRemote Networks .

Remote Networks: IP Address Changes Related To Bandwidth Allocation
This section applies if you have a legacy Prisma Access deployment that allocates bandwidth by location. Any new deployments allocate bandwidth by compute location; to learn about how Prisma Access allocates those IP addresses, see Remote Networks: IPSec Termination Nodes and Service IP Addresses .
The public IP addresses are unique and not shared with any other Prisma Access deployment. If an IP address allocated to you by Palo Alto Networks remains unused for six months, it will be reclaimed. This includes IP addresses that were activated and then deactivated, and have remained deactivated for six months. For instance, if public IP addresses were allocated to your tenant for a specific location and that location was not enabled for six months, Prisma Access may reclaim those IP addresses. Similarly, if you onboarded and then deboarded a mobile user location, Palo Alto Networks can reclaim the IP address used for that location six months after deboarding.
Take care when increasing the bandwidth of an existing connection, because the IP address of a remote network can change if that increase causes the bandwidth in a location to exceed 500 Mbps.
In addition, egress IP addresses can change if Prisma Access creates a new Prisma Access compute location and you decide to use this new compute location with locations you have already onboarded.
These bandwidth guidelines apply only when you upgrade an existing connection. A single remote network connection, even a 1000 Mbps (Preview) connection, always receives a single Service IP Address , regardless of its size.
The 1000 Mbps bandwidth option is in preview mode. The throughput during preview is delivered on a best-effort basis and the actual performance will vary depending upon the traffic mix.
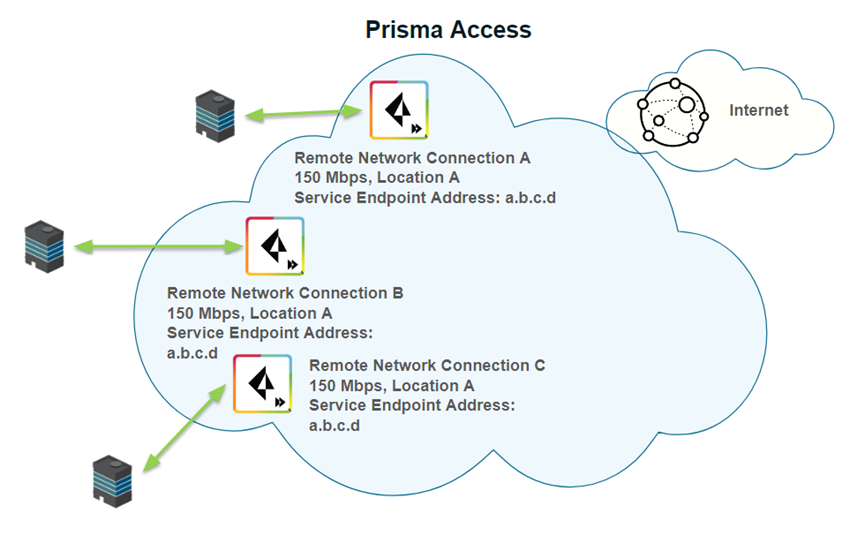
The following example shows three remote network connections in the same location, each with a bandwidth of 150 Mbps. Since the total bandwidth is 500 Mbps, Prisma Access assigns a single IP address for all connections in the location.
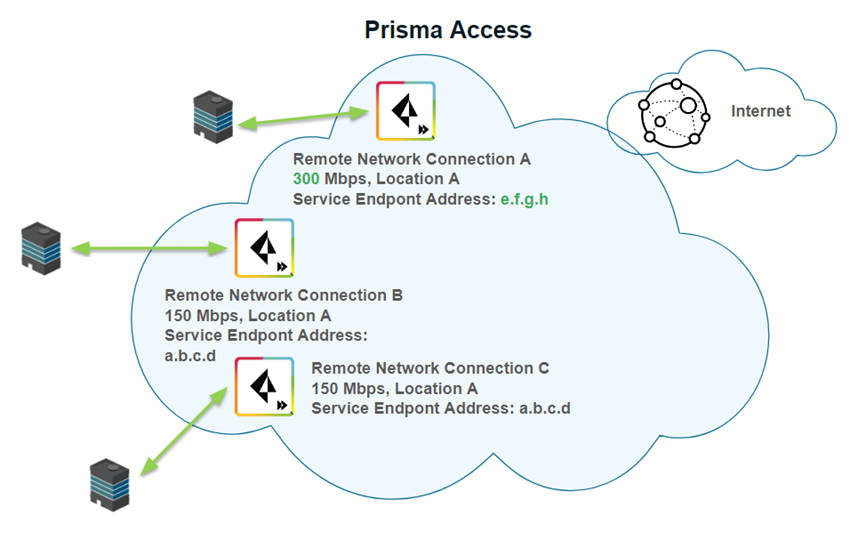
The following example shows the bandwidth of remote network connection A being increased from 150 Mbps to 300 Mbps. Since the total bandwidth of all connections is now more than 500 Mbps, Prisma Access assigns a new service IP address for the connection with the additional bandwidth. The other service IP addresses remain unchanged.
Conversely, given four remote networks with a bandwidth of 100 Mbps, if you increase the bandwidth of one of the remote networks to 100 Mbps, the Service IP Address of that remote network does not change because the total bandwidth is now 500 Mbps.
If you reduce the bandwidth of a remote network connection, the Service IP Address does not change.
To find the service IP addresses in Panorama, select PanoramaCloud ServicesStatusNetwork Details tab and click the Remote Networks radio button to display the Service IP Address for the remote networks, or use the API script.
Remote Networks: Service IP Address and Egress IP Address Allocation
Prisma Access has more than 100 locations available to accommodate worldwide deployments and provide a localized experience. Two locations might map to the same , which you use as the peer IP address when you set up the IPSec tunnel for the remote network connection. However, the locations might use different egress IP addresses to make sure that the user gets the correct default language for the region.
Service connections do not support language localization because egress to the internet is not supported over service connections. Prisma Access allocates only one service IP address per service connection, and that IP address is geographically registered to the compute location that corresponds to the location you specify during onboarding.
The following example shows a customer deployment with two remote network locations deployed in Canada: Central Canada and Canada East. Prisma Access assigned the same Service IP Address to both locations. When you configure the remote network tunnel, use this IP address as the peer IP address when you create the IPSec tunnel for the remote network connection.

However, Canada East uses a different default language (French) than Central Canada (English). For this reason, Prisma Access assigns them different egress IP addresses. If you run the API script for egress IP addresses, you will receive two different IP addresses for these two locations.
Retrieve the IP Addresses for Prisma Access
If you are manually adding IP addresses of your Prisma Access infrastructure to an allow list in your network, or if you're using an automation script to enforce IP-based restrictions to limit inbound access to enterprise applications, you should understand what these addresses do and why you need to allow them, as well as the tasks you perform to retrieve them.
Prisma Access does not provision these IP addresses until after you complete your Prisma Access configuration. After your deployment is complete, you retrieve these IP addresses using an API script. The API script uses an API key that you obtain from the Prisma Access UI and a .txt file you create which specifies the addresses you want to retrieve.
While you don't perform these tasks until after you complete your Prisma Access configuration, it's useful to understand these concepts in advance, so you understand what to do after your deployment is complete.
The public IP addresses are unique and not shared with any other Prisma Access deployment. If an IP address allocated to you by Palo Alto Networks remains unused for six months, it will be reclaimed. This includes IP addresses that were activated and then deactivated, and have remained deactivated for six months. For instance, if public IP addresses were allocated to your tenant for a specific location and that location was not enabled for six months, Prisma Access may reclaim those IP addresses. Similarly, if you onboarded and then deboarded a mobile user location, Palo Alto Networks can reclaim the IP address used for that location six months after deboarding.
If you are manually adding IP addresses of your Prisma Access infrastructure to an allow list in your network, or if you are using an automation script to enforce IP-based restrictions to limit inbound access to enterprise applications, you should understand what these addresses do and why you need to allow them, as well as the tasks you perform to retrieve them.
Prisma Access does not provision these IP addresses until after you complete your Prisma Access configuration. After your deployment is complete, you retrieve these IP addresses using an API script. The API script uses an API key that you obtain from the Prisma Access UI and a .txt file you create which specifies the addresses you want to retrieve.
If you have a Mobile Users—GlobalProtect deployment, you can use the Prisma Access UI instead of this API to manage public IP address allocation and confirm that the IP addresses have been added to your allow lists before Prisma Access releases the IP addresses. In this way, Prisma Access only provisions the IP addresses that you have allow listed.
The following table provides you with a list of the IP address that Prisma Access uses for each deployment type, along with the keyword you use when you run the API script to retrieve the IP addresses, and describes whether or not you should add them to your organization’s allow lists.
|
Deployment Type |
IP Address Type |
Description |
|
Mobile Users—GlobalProtect |
Prisma Access gateway ( gp_gateway ) |
Gateway IP addresses. You must add both gateway and portal IP addresses to allow lists for your mobile user deployments. Mobile users connect to a Prisma Access gateway to access internal or internet resources, such as SaaS or public applications, for which you have provided access. For mobile users, during initial deployment, Prisma Access assigns two IP addresses for each location you deploy. |
|
Prisma Access portal ( gp_portal ) |
Portal IP addresses. You must add both gateway and portal IP addresses to allow lists for your mobile user deployments. Mobile users log in to the Prisma Access portal to receive their initial configuration and gateway location. |
|
|
Network Load Balancer ( network_load_balancer ) |
Ingress IP addresses ( IP Optimization deployments only). |
|
|
Loopback IP addresses |
The source IP address used by Prisma Access for requests made to an internal source, and is assigned from the Configure the Prisma Access Service Infrastructure (Panorama) . Add the loopback IP address to an allow list in your network to give Prisma Access to internal resources such as RADIUS or Active Directory authentication servers. Palo Alto Networks recommends that you allow all the IP addresses of the entire infrastructure subnet in your network, because loopback IP addresses can change. To find the infrastructure subnet, select PanoramaCloud ServicesStatusNetwork DetailsService Infrastructure . The subnet displays in the Infrastructure Subnet area. To retrieve loopback IP addresses, use the legacy API script . |
|
|
Mobile Users—Explicit Proxy |
Authentication Cache Service (ACS) |
The address for the Prisma Access service that stores the authentication state of the explicit proxy users. This address is only used for explicit proxy for mobile users . |
|
Network Load Balancer |
The address that Prisma Access uses for the network load balancer. |
|
|
Remote Network |
Remote Network IP addresses ( remote_network ) |
The Service IP Addresses that Prisma Access assigns for the Prisma Access remote network connection, and Remote Networks: Service IP Address and Egress IP Address Allocation that Prisma Access uses to make sure that remote network users get the correct default language for their region. Add these addresses to allow lists in your network to give Prisma Access to internet resources. |
|
Loopback IP addresses |
The source IP address used by Prisma Access for requests made to an internal source, and is assigned from the Configure the Prisma Access Service Infrastructure (Panorama) . Add the loopback IP address to an allow list to give Prisma Access to internal resources such as RADIUS or Active Directory authentication servers. To retrieve loopback IP addresses, use the legacy API script . |
|
|
Clean Pipe |
Clean Pipe IP Addresses ( clean_pipe ) |
Add these IP addresses to an allow list to give the Clean Pipe service access to internet resources. |
|
Loopback IP addresses |
The source IP address used by Prisma Access for requests made to an internal source, and is assigned from the Configure the Prisma Access Service Infrastructure (Panorama) . Add the loopback IP address to an allow list to give Prisma Access to internal resources such as RADIUS or Active Directory authentication servers. To retrieve loopback IP addresses, use the legacy API script . |
Prisma Access provides an API script that you can use to retrieve the public and private IP addresses it uses in its infrastructure. If you need to add public IP addresses to allow lists in your organization’s network, use the following steps to retrieve these IP addresses with the API script.
This command does not retrieve loopback addresses; to retrieve loopback IP addresses, use the legacy API .
- Get the API key.
You need this key to authenticate to Prisma Access and retrieve the list of IP addresses using the API command. Only a Panorama administrator or Superuser can generate or access this API key.
- Select PanoramaCloud ServicesConfigurationService Setup .
- Select Generate API Key .
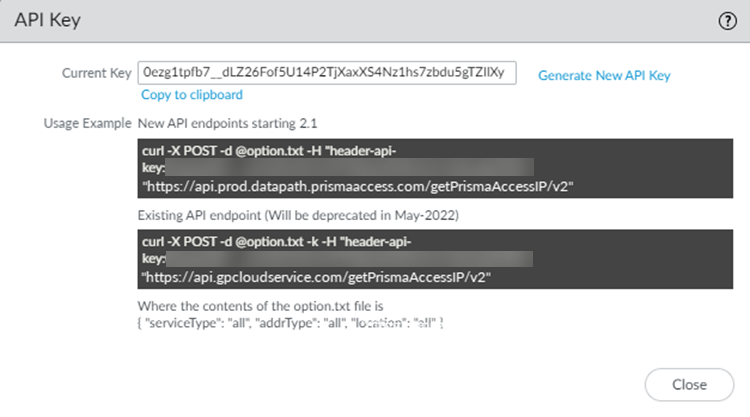
If you have already generated an API key, the Current Key displays. If you haven’t yet generated a key or want to replace the existing key to meet audit or compliance check for key rotation, click Generate New API Key for a new key.
- Create a .txt file and put the API command options in the file.
Using the API the command to use is a two-step process. First, you create a .txt file, specifying the parameters for the IP addresses to retrieve, and save the file in a folder that is reachable from the location where you run the command. Then, you run the API and specify the name and location of the .txt file you created in the command.
Specify the following keywords and arguments in the .txt file. See API Examples for Retrieving Prisma Access IP Addresses for examples. The examples in this document use a file name of option.txt but you can specify any file name, as long as you reference it in the command.
|
Argument |
Possible choices (keywords) |
Comments |
|
serviceType |
all remote_network gp_gateway gp_portal clean_pipe swg_proxy rbi |
all —Retrieves IP addresses you need to add to an allow list for all service types (Remote Networks, Mobile Users (both gateways and portals), and Clean Pipe, as applicable to your deployment). remote_network —Retrieves IP addresses you need to add to an allow list for remote network deployments. gp_gateway —Retrieves the Mobile Users—GlobalProtect gateway IP addresses you need to add to an allow list for mobile user deployments. gp_portal —Retrieves the Mobile Users—GlobalProtect portal IP addresses you need to add to an allow list for mobile user deployments. clean_pipe —Retrieves the IP addresses you need to add to an allow list for clean pipe deployments. swg_proxy —Retrieves the egress IP addresses for each deployed Explicit Proxy location and the authentication cache service (ACS). rbi —Retrieves the egress IP addresses you need to add to an allow list for Remote Browser Isolation (RBI) deployments to connect to SaaS Applications. |
|
addrType |
all active service_ip auth_cache_service network_load_balancer |
all or active —Retrieves all the IP addresses you need to add to an allow list. This API does not retrieve loopback IP addresses. To retrieve loopback IP addresses, use the legacy API . service_ip —Retrieves the Service IP Address , which you use as the peer IP address when you set up the IPSec tunnel for the remote network connection. auth_cache_service —Retrieves the IP address for the explicit proxy ACS (applicable to Explicit Proxy deployments only). network_load_balancer —Retrieves the IP addresses for the network load balancer (applicable to Mobile Users—GlobalProtect with IP Optimization enabled and Mobile Users—Explicit Proxy deployments). If you have implemented IP Optimization (available with Prisma Access 5.0 and later), be sure you review the allow listing considerations and how to implement the gp_gateway and network_load_balancer IP addresses in your Mobile Users—GlobalProtect deployment. |
|
actionType |
pre_allocate |
Mobile User deployments only —An actionType of pre_allocate allows you to retrieve IP addresses or subnets for Prisma Access gateways and portals for mobile user deployments. Use this with a serviceType of gp_gateway to retrieve pre-allocated gateway IP addresses and a serviceType of gp_portal to retrieve pre-allocated portal IP addresses. Retrieving the pre-allocated IP addresses lets you add the gateway and portal IP addresses to your organization’s allow lists before you onboard mobile user locations, which in turn gives mobile users access to external SaaS apps immediately after you onboard the locations. |
|
location |
all deployed |
all —Retrieves the IP addresses from all locations. For mobile user deployments, this keyword retrieves the IP addresses for both locations you added during onboarding, and locations you did not add. deployed —Retrieves IP addresses in all locations that you added during mobile user onboarding. This keyword is applicable to mobile user deployments only. Prisma Access associates IP addresses for every mobile user location during provisioning, even if you didn’t select that location during mobile user onboarding . If you specify all , the API command retrieves the IP addresses for all mobile user locations, including ones you didn’t select for the deployment. If you specify deployed , the API command retrieves only the IP addresses for the locations you selected during onboarding. |
Specify the options in the .txt file in the following format:
 {
  "serviceType": "service-type", Â
  "addrType": "address-type",
  "location": "location"
  }
- Enter the following command to retrieve the IP addresses:
- To use the newer API that was introduced in Prisma Access 2.1, enter the following command:
 curl -X POST --data @option.txt -H header-api-key:Current-API-Key "https://api.prod.datapath.prismaaccess.com/getPrismaAccessIP/v2"
As of May 2023, some Panorama managed deployments use https://api.prod6.datapath.prismaaccess.com/getPrismaAccessIP/v2 (note the prod6 in the URL instead of prod).
- To use the legacy API, enter the following command. This command uses a legacy API endpoint that will be deprecated in May 2022:
 curl -X POST --data @option.txt -k -H header-api-key:Current-API-Key "https://api.gpcloudservice.com/getPrismaAccessIP/v2"
- Where option.txt is the .txt file you created in a previous step and Current-API-Key is the Prisma Access API key.
- For example, given a .txt filename of option.txt and an API key of 12345abcde , use the following API command to retrieve the public IP address for all locations:
- Â curl -X POST --data @option.txt -H header-api-key:12345abcde "https://api.prod.datapath.prismaaccess.com/getPrismaAccessIP/v2"
- The API command can return a large amount of information. To make the output more readable, if you have Python installed, you can add | python -m json.tool at the end of the cURL command.
- The API command returns the addresses in the following format:
- Â {
- Â Â "result": [Â Â Â Â Â Â Â
- Â Â Â {Â Â Â Â Â Â Â Â Â Â Â
- Â Â Â Â "address_details": [
- Â Â Â Â Â {
- Â Â Â Â Â Â Â "address": "1.2.3.4"Â Â Â
- Â Â Â Â Â Â Â "allow_listed": false
- Â Â Â Â Â Â Â "addressType": "address-type"
- Â Â Â Â Â Â Â "serviceType": "service-type"
- Â Â Â Â Â Â Â Â }
- Â Â Â Â Â Â ],
- Â Â Â Â Â Â Â "addresses": [
- Â Â Â Â Â Â Â Â Â "1.2.3.4"
- Â Â Â Â Â Â Â ]
- Â Â Â Â Â Â Â "zone": "zone-name",
- Â Â Â Â Â "zone_subnet": [zone-subnet
- ]
- },
- Â "status": "success"
- Where:
- address_details shows the details of the address for each location.
- serviceType shows the type of IP address (either remote network ( remote_network ), Prisma Access gateway ( gp_gateway ), Prisma Access portal ( gp_portal ), Clean Pipe ( clean_pipe ), or Remote Browser Isolation ( rbi ).
- addressType specifies the type of address specified with the addrType keyword (either active or pre-allocated if you're preallocating IP addresses for mobile user locations).
- address shows the IP address you need to add to your allow lists.
If the API returns multiple IP addresses, Prisma Access summarizes the IP addresses in the addresses field.
- addresses lists all the IP addresses for the location that you need to add to your allow lists.
- zone is the Prisma Access location associated with the IP addresses.
- zone_subnet is the subnet for mobile user gateways and portals. Prisma Access also provides this subnet if you're preallocating IP addresses for mobile user locations.
If there are any problems with the options in the .txt file, the API returns an error similar to the following:
 {"status": "error","result": "Invalid json format in the request. trace_id: xxxxxxxxx-xxxx-xxxx-xxxx-xxxxxxxxxxxx "}
- Update the allow lists on your on-premises servers or SaaS application policy rules with the IP addresses you retrieved.
IP Optimization for Mobile Users—GlobalProtect Deployments
IP Optimization is a set of architectural enhancements that reduce the overall number of IP addresses in your deployment, simplifying your allow listing workflows while improving resiliency and enabling faster onboarding of Prisma Access tenants.
- Simpler Public IP Address Allow Listing for Mobile Users—GlobalProtect Deployments –Adding a Prisma Access location or experiencing a scaling event at an existing Prisma Access location could lead to new IP addresses being allocated to the mobile user security processing node (MU-SPN).
It's a best practice to
retrieve the egress and ingress IP addresses
that Prisma Access assigns and in your network to avoid SaaS application or corporate firewall disruption. This can result in a situation where you're managing a large number of IP addresses. IP Optimization reduces the number of IP addresses you have to manage.
Make a note of the following additional requirements for IP Optimization:
- IP Optimization requires Prisma Access 5.0 or later for Mobile Users optimization , and can be enabled when you set up GlobalProtect for the first time.
- When you set up GlobalProtect for the first time, you’ll be asked whether or not you want to enable Prisma Access IP Optimization.
- The following functionality is not supported with IP Optimization:
Allow Listing Considerations for IP Optimization Deployments
When you use the API to retrieve Prisma Access IP addresses for IP Optimization, there are two sets of IP addresses you need to add:
- serviceType of gp_gateway and gp_portal —The egress IP addresses the Prisma Access service uses for the cloud gateways and portals. Add these addresses to your network allow lists to provide access to internet or SaaS apps.
- addrType of network_load_balancer —The ingress IP addresses that you need to add to your NGFW allow list or client endpoint policies. Internet or SaaS apps do not see these IP addresses; however, you need to add them to your network in the following scenarios:
- If you have users in a remote site who are behind an on-premises perimeter NGFW, add the network_load_balancer IP addresses to the NGFW security policies to allow those users to connect to Prisma Access.
- To allow ingress IP access across Windows, macOS, and Linux systems, add the network_load_balancer IP addresses to your endpoint security controls, including:
- Windows Defender or Firewall allow list rules
- macOS application firewall exceptions
- Linux firewall allow list rules
Prisma Access Zones
On a firewall, zones are associated with interfaces. But within Prisma Access, the networking infrastructure is automatically set up for you. This means that you no longer need to worry about configuring interfaces and associating them with the zones your create. However, to enable consistent security policy enforcement, you must create zone mappings so that Prisma Access will know whether to associate a zone with an internal (trust) interface or an external (untrust) interface. This will ensure that your security policy rules are enforced properly. By default, all of the zones you push to Prisma Access are set to untrust. You should leave any zones associated with internet-bound traffic, including your sanctioned SaaS applications, set to untrust. However, for all zones that enable access to applications on your internal network or in your data center, you must map them to trust. Notice in the example below, all sanctioned SaaS applications—Office 365 and Salesforce in this case—are segmented into the sanctioned-saas zone to enable visibility and policy enforcement over the use of these applications. To enable Prisma Access to associate the sanctioned-saas zone with an external-facing interface, you must map this zone to untrust. Similarly, the eng-tools and dc-apps zones provide access to applications in the corporate office and you must therefore designate them as trusted zones.
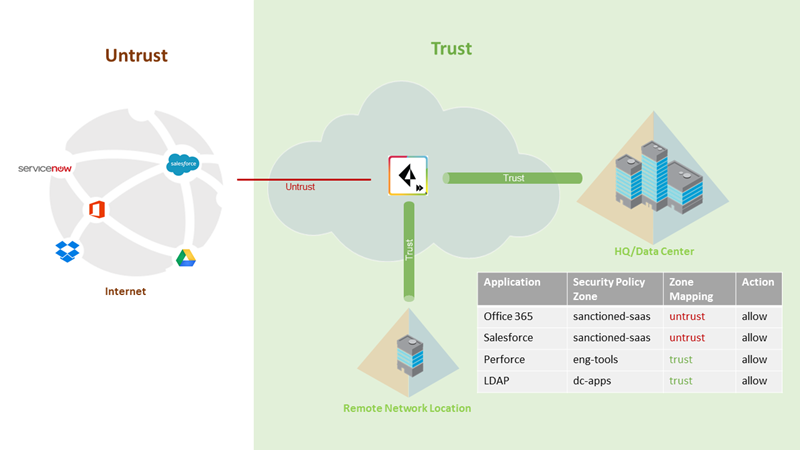
Prisma Access supports three zones (trust, untrust, and Clientless VPN) and simplifies policy creating by setting them up for you.
|
Zone |
Description |
|
Trust |
Zone containing all trusted and on-boarded IP addresses, service connections, or mobile users within the corporate network. |
|
Untrust |
All untrusted IP addresses, service connections, or mobile users outside of the corporate network. By default, any IP address or mobile user that is not trusted is inherently untrusted. |
|
Clientless VPN |
Secure remote access to common enterprise web applications that use HTML, HTML5, and Javascript technologies. Users have the advantage of secure access from SSL-enabled web browsers without installing client software. This is useful when you need to enable partner or contractor access to applications, and to safely enable unmanaged assets, including personal devices. The zone for Clientless VPN is mapped to the trust zone by default; this setting cannot be changed. |
Prisma Access logs that display a zone of inter-fw are logs used for communication within the Prisma Access infrastructure.
When creating zones, do not use any of the following names for the zones, because these are names used for internal zones:
- trust
- untrust
- inter-fw
- Any name you use for the remote networks (remote network names are used as the source zone in Strata Logging Service logs)
Prisma Access logs that display a zone of inter-fw are logs used for communication within the Prisma Access infrastructure.
DNS for Prisma Access
Prisma Access allows you to specify DNS servers to resolve both domains that are internal to your organization and external domains. Do this to provide access to services on your corporate network—like LDAP and DNS servers—especially if you plan to set up service connections to provide access to these type of resources at HQ or in data centers. Prisma Access supports DNS resolution for mobile users- Global Protect and remote networks deployments . DNS queries for domains in the Internal Domain List are sent to your local DNS servers to ensure that resources are available to Prisma Access remote network users and mobile users.
For example, if you want a DNS lookup for your corporate domain to go exclusively to the corporate DNS server, specify the corporate domain and the corporate DNS servers here. To ensure that endpoints use the DNS Proxy IP Address , they must be configured to resolve DNS via the IP address shown in WorkflowPrisma Access SetupPrisma AccessPrisma Access DNS Proxy IP Address .
Set up Prisma Access to resolve internal domains.
- Set up internal domain lists that apply to all traffic.
- Select PanoramaCloud ServicesConfigurationService Setup and click the gear icon to edit the Settings.
- Select the Internal Domain List tab.
- Add the Domain Names, Primary DNS, and Secondary DNS servers that you want Prisma Access to use to resolve your internal domain names.
You can use a wildcard (*) in front of the domains in the domain list, for example *.acme.local or *.acme.com.
- Add internal domain lists that apply only to specific mobile user deployments or remote network sites.
- Configure DNS settings:
- Mobile Users —Go to PanoramaCloud ServicesConfigurationMobile Users - GlobalProtect and select the external gateway > and click Network Services .
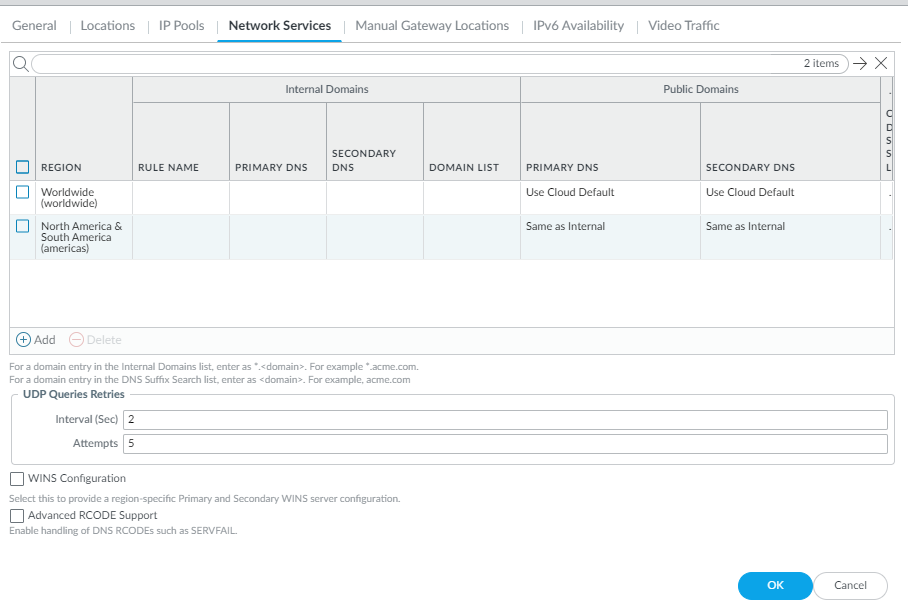
- Remote Networks —Go to PanoramaCloud ServicesConfigurationRemote Networks > Settings > DNS Proxy .
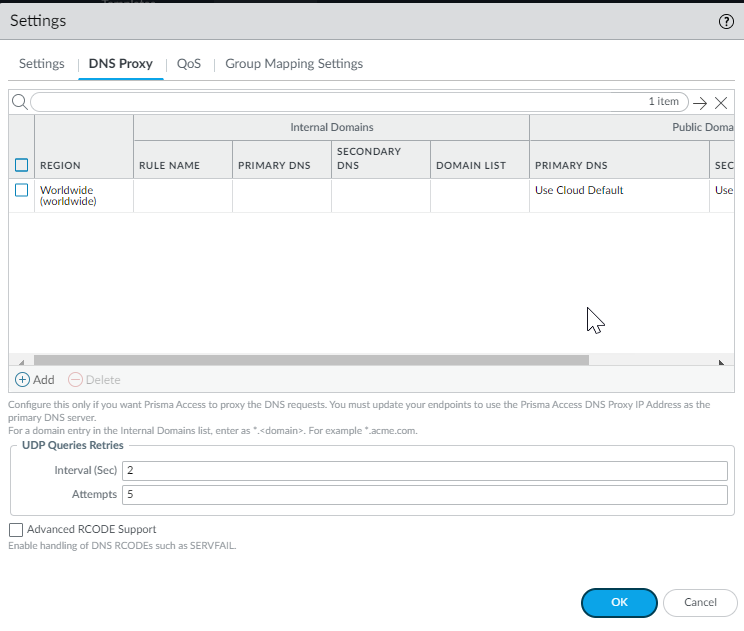
- Use the Worldwide default (the Prisma Access default DNS server) or customize settings based on region. In either case, select the region to adjust and customize the DNS settings for that region.
- Add one or more rules to configure the DNS settings for Internal Domain .
- Enter a unique Rule Name for the rule.
- You want your internal DNS server to only resolve the domains you specify, enter the domains to resolve in the Domain List. Specify an asterisk in front of the domain; for example, *.acme.com. You can specify a maximum of 1,024 domain entries.
Prisma Access has a predefined rule to resolve *.amazonaws.com domains using the Cloud Default server. If you want your internal DNS servers to resolve a more-specific *.amazonaws.com domain (for example, *.s3.amazonaws.com), enter the URL in the Domain List. Prisma Access evaluates the domain names from longest to shortest, then from top to boom in the list.
- If you have a Custom DNS server that can access your internal domains, specify the Primary DNS and Secondary DNS server IP addresses, or select Use Cloud Default to use the default Prisma Access DNS server.
- Specify the DNS settings for Public Domains .
- Use Cloud Default —Use the default Prisma Access DNS server.
- Same as Internal Domains —Use the same server that you use to resolve internal domains. When you select this opon, the DNS Server used to resolve public domains is same as the server configured for the first rule in the Internal Domains section.
- Custom DNS server —If you have a DNS server that can access your public (external) domains, enter the Primary DNS server address in that field.
- ( Optional ) You can Add a DNS Suffix to specify the suffix that the client should use locally when an unqualified hostname is entered that it cannot resolve, for example, acme.local. Do Prisma Access Administrator’s Guide (Panorama Managed) not enter a wildcard (*) character in front of the domain suffix (for example, acme.com). You can add multiple suffixes.
- Allow traffic from all addresses in your mobile user IP address pool to-your DNS servers.
The DNS proxy in Prisma Access sends the requests to the DNS servers you specify. The source address in the DNS request is the first IP address in the IP pool you assign to the region. To ensure that your DNS requests can reach the servers you will need to make sure that you allow traffic from all addresses in your mobile user IP address pool to your DNS servers.
High Availability for Prisma Access
Deploying Panorama appliances in a high availability (HA) configuration provides redundancy in case of a system or network failure and ensures that you have continuous connectivity to Prisma Access. In an HA configuration, one Panorama appliance peer is the active-primary and the other is the passive-secondary. In the event of a failover, the secondary peer becomes active and takes over the role of managing Prisma Access.
To simplify the HA set up, configure the Panorama appliances in HA after you purchase Prisma Access and Strata Logging Service auth codes and components and associate the serial number of the primary Panorama appliance on which you plan to install the Cloud Services plugin with the auth codes, but before you activate and install Panorama Managed Prisma Access . However, you can also use this process to configure existing Panorama appliances that already have the plugin installed.
Whether you are just getting started with a new pair of Panorama appliances, or you have already set up your standalone Panorama appliance and completed the licensing and installation procedures, make sure to check the prerequisites before you enable HA:
- You must register the Panorama appliance HA peers to the same customer account on the Customer Support Portal (CSP) .
- The Panorama appliance peers must be of the same form factor (hardware appliances of the same model or identical virtual appliances) and same OS version and must have the same set of licenses. The premium support license is required for Prisma Access and Strata Logging Service.
- The serial number of the primary Panorama appliance is tied to your Prisma Access and Strata Logging Service auth codes. If you have installed and set up the plugin on a standalone Panorama appliance, ensure that you use that Panorama appliance as the primary peer. If you need to assign this standalone peer as the secondary Panorama appliance, contact Palo Alto Networks support for assistance with transferring the license to the primary Panorama appliance peer before you continue.
If you disable HA for a Panorama pair and revert to a configuration where a single Panorama manages Prisma Access, you must re-verify your account to prevent errors when retrieving the status of Prisma Access components.
To set up your Panorama appliances in an HA configuration, complete the following steps.
Set the primary Panorama appliance as Primary and the secondary Panorama appliance as Secondary and be sure that the serial number of your primary Panorama appliance is tied to your Prisma Access and Strata Logging Service auth codes.
- Make sure that the primary (active) and secondary (passive) Panorama appliances are synchronized and that the HA link state between them is up.
- Access the Dashboard on the primary Panorama appliance and select WidgetsSystemHigh Availability to display the HA widget.
- Sync to peer , click Yes , and wait for the Running Config to display Synchronized .
- Make sure that the Local peer is active .
- Access the Dashboard on the passive Panorama appliance and select WidgetsSystemHigh Availability to display the HA widget.
- Verify that the Running Config displays Synchronized .
- Make sure that the Local peer is passive .
- Install the Prisma Access components on the primary Panorama appliance.
- Log in to the primary Panorama appliance and select PanoramaLicenses .
- Click Retrieve the license keys from license server .
- Activate and install Panorama Managed Prisma Access , including generating a one-time password (OTP) and verifying your account.
- Check that HA is enabled.
- On the primary Panorama appliance, Access the CLI and enter the following operational command:
tail follow yes mp-log plugin_cloud_services.log
- Find the following text in the log output, where X is the serial number of the primary Panorama appliance and Y is the serial number of the secondary Panorama appliance:
- 2017-11-06 15:14:07.790 -0800 INFO: [hainfo] Sending update to CSP for HA peer serial information to https://updates.paloaltonetworks.com/licensesvc/licenseservice.asmx/PanoramaHAInfo (https://updates.paloaltonetworks.com/licensesvc/licenseservice.asmx/PanoramaHAInfo)
- 2017-11-06 15:14:07.791 -0800 INFO: [hainfo] Data string is primarypanoramasn=<varname>X</varname> &secondarypanoramasn=<varname>Y</varname>
- 2017-11-06 15:14:17.595 -0800 INFO: [hainfo] HTTP_CODE 200, RESPONSE: <?xml version="1.0" encoding="utf-8"?> <PanoramaHA xmlns:xsi="http://www.w3.org/2001/XMLSchema-instance (http://www.w3.org/2001/XMLSchema-instance)" xmlns:xsd="http://www.w3.org/2001/XMLSchema (http://www.w3.org/2001/XMLSchema)" xmlns="http://www.paloaltonetworks.com/ (http://www.paloaltonetworks.com/)"> <success>true</success>
- </PanoramaHA>
2017-11-06 15:14:17.596 -0800 INFO: [hainfo] Cached HA Peer's serial number <varname>Y</varname>
- Log in to the Customer Support Portal (CSP) and select AssetsCloud Services to verify that both Panorama peers are tied to your Prisma Access and Strata Logging Service licenses.
- Check the fields for the primary and secondary Panorama appliance.
The Auth Code, Model Name, License Description, and Expiration Date fields should be the same for the primary and secondary Panorama appliance, because Palo Alto Networks has associated the Prisma Access license automatically to the secondary Panorama appliance.
- Log in to the secondary Panorama appliance and activate and install Panorama Managed Prisma Access .
When you log in to the Customer Support Portal (CSP) to generate the OTP, make sure that you specify the serial number for the secondary Panorama appliance.
- Commit your changes on the primary and secondary Panorama appliance.
- CommitCommit and Push your changes.
- Click OK and Push .
- Verify that the primary and secondary Panorama appliances are still in a synchronized state.
Predefined Templates: Onboard a Service Connection or Remote Network
Prisma Access includes predefined IPSec templates for common third-party IPSec and SD-WAN devices. These profiles expedite and simplify the onboarding of service connections and remote network connections that use one of these devices to terminate the connection.
Sharing a common template also allows you to onboard multiple remote connections of the sane type with commonly-shared cryptos, pre-shared keys, and Peer identifiers.
- Predefined Templates: Onboard a Service Connection or Remote Network
- Supported IKE and IPSec Cryptographic Profiles for Common SD-WAN Devices
Prisma Access provides you with the following predefined templates that you can use to set up IPSec tunnels between your on-premises device and Prisma Access:
- IPSec Tunnels ( NetworkIPSec Tunnels ) under Remote_Network_Template and Service_Conn_Template.
- IKE Gateways ( NetworkNetwork ProfilesIKE Gateways ) under Remote_Network_Template and Service_Conn_Template.
- IPSec Crypto Profiles ( NetworkNetwork ProfilesIPSec Crypto ) under Remote_Network_Template and Service_Conn_Template.
- IKE Crypto Profiles ( NetworkNetwork ProfilesIKE Crypto ) under Remote_Network_Template and Service_Conn_Template.
Currently, templates for the following vendors are available:
In addition to the following templates, we provide a Generic template that you can use with any on-premises device that is not listed here.
- Cisco appliances:
- Cisco Integrated Services Routers (ISRs)
- Cisco Adaptive Security Appliances (ASAs)
- Citrix
- Prisma SD-WAN (formerly CloudGenix)
- Riverbed
- Silver Peak
To onboard a service connection or remote network connection using the templates provided by Prisma Access, complete the following task.
- In Panorama, perform configuration so that the templates display in Panorama.
When you upgrade the Cloud Services plugin, the new templates do not automatically display. Complete this step once after upgrading to have the templates permanently display. New installations perform this initial configuration as part of their first-time setup and this extra step is not required.
You can also complete this step if you delete these templates and need to retrieve them.
- For service connections, select PanoramaCloud ServicesConfigurationService Setup , click the gear icon in the Settings area to open the Settings , then click OK .
- For remote network connections, select PanoramaCloud ServicesConfigurationRemote Networks , click the gear icon in the Settings area to open the Settings , then click OK .
- Select Network , then select the correct Template (either Remote_Network_Template if you are
creating a remote network connection
or Service_Conn_Template if you are creating a service connection).
- Determine the type of device that is used to terminate the service connection or remote network connection, and find a template to use with that device.
If your SD-WAN or IPSec device is not on the list, use the generic profiles.
- Select NetworkNetwork ProfilesIKE Gateways and make the following changes to the IKE gateway profile for your device:
You can use the IPSec crypto and IKE crypto profiles with no changes; however, you must make specific changes to the IKE gateway profile to match the network settings.
- ( Optional ) If you know the public IP address of the on-premises device that will be used to set up the IPSec tunnel with Prisma Access, set a static IP address by specifying a Peer IP Address Type of IP and enter the Peer Address for the IPSec tunnel.
- If using a pre-shared key for the IPSec tunnel, specify a Pre-shared Key .
- Specify a Peer Identification of either IP Address or User FQDN .
Be sure that you match the settings you specify here when you configure the device used to terminate the other side of the IPSec tunnel.
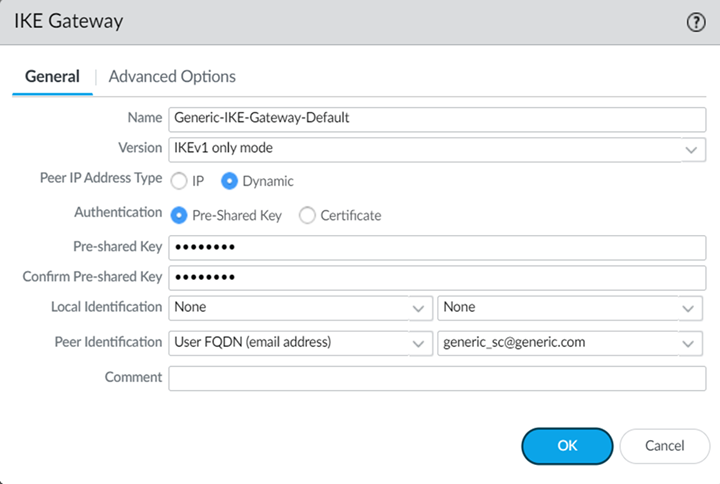
- Onboard the service connection or remote network connection , specifying the IPSec tunnel configuration that matches the device on the other side of the IPSec tunnel.
- ( Optional ) If you need to add a backup tunnel (Secondary WAN) for a service connection or remote connection, perform the following additional configuration steps.
Configuring a Secondary WAN is not supported in the following deployments:
- If your secondary WAN is set up in active-active mode with the Primary IPSec tunnel.
- If your customer premises equipment (CPE) is set up in an Equal Cost Multipath (ECMP) configuration with the Primary and Secondary IPSec tunnel.
3. Create a new IKE Gateway for the backup tunnel, copying the settings from the predefined template you want to duplicate.
The following example creates a backup tunnel configuration for generic networking devices.

4. Under Advanced Options , specify the IKE Crypto Profile for the predefined template you want to use.
Palo Alto Networks recommends that you use GCM ciphers instead of CBC ciphers for IPSec tunnels.
If you are onboarding a Prisma SD-WAN, select Enable Passive Mode .
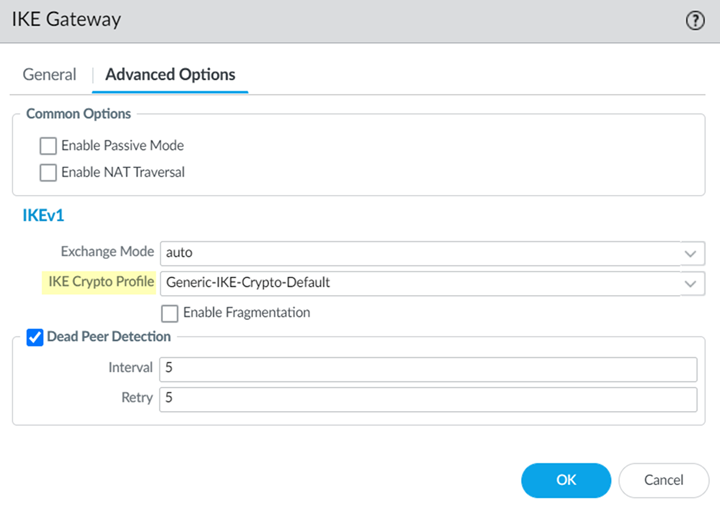
5. Create a new IPSec Tunnel , specifying the new IKE gateway you created, but copying all the other settings from the default template.
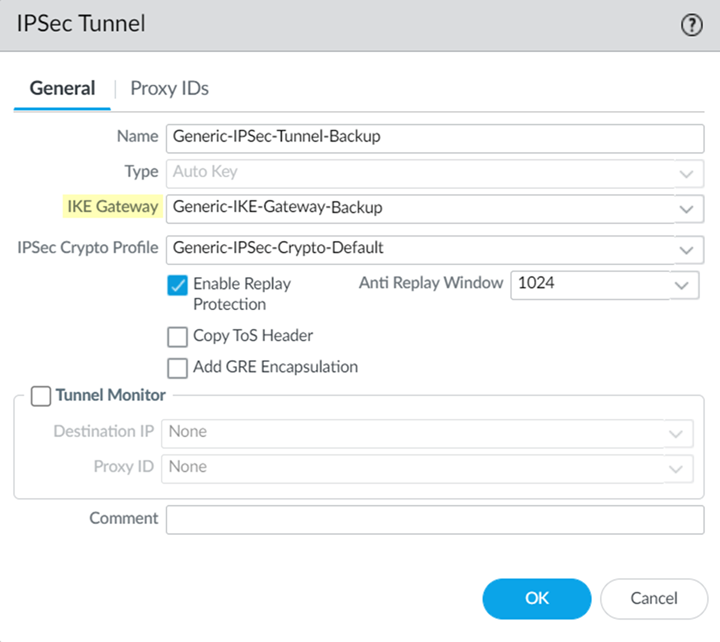
6. When you onboard the service connection or remote network connection, Enable Secondary WAN and specify the tunnel you created for the backup WAN.
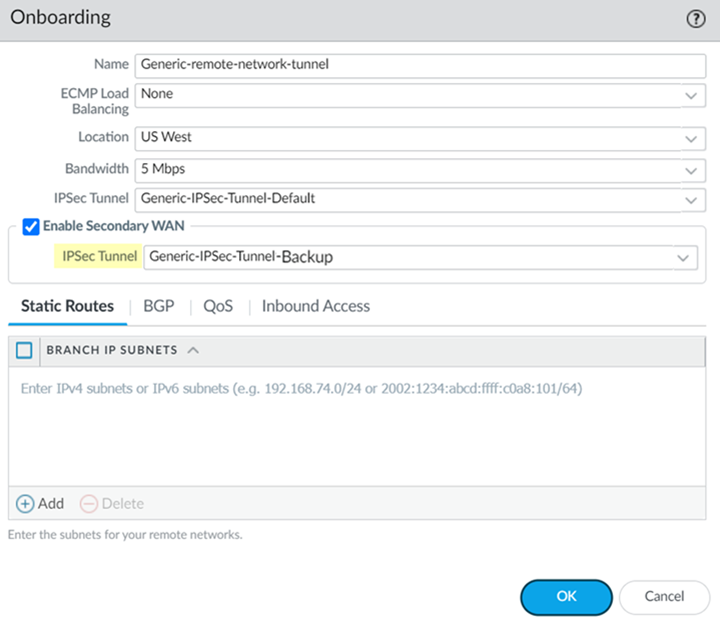
- Complete the configuration of the service connection or remote network connection by matching the cryptos, pre-shared key, and Peer identifiers on the device that is used to terminate the other side of the IPSec tunnel.
- ( Optional ) If you need to onboard multiple remote network connections that use the same types of networking devices, Export the configuration of the remote network, edit the settings, then Import that configuration.
Prisma Access Service Connections
A service connection, also known as a Corporate Access Node (CAN), allows mobile users and users at remote networks access to private apps and resources and lets your mobile users and remote networks communicate with each other.
In addition to Service Connections, Palo Alto Networks provides you with other services you can use to access private apps:
- ZTNA Connector —The Zero Trust Network Access (ZTNA) Connector lets you connect Prisma Access to your organization's private apps simply and securely. ZTNA Connector provides mobile users and users at branch locations access to your private apps using an automated secure tunnel. You can also automatically discover private apps for ZTNA to protect using the Cloud Identity Engine.
- Prisma Access —Colo-Connect allows you to use Prisma Access to secure private apps using a cloud interconnect that can provide high-bandwidth service connections.
Palo Alto Networks recommends always creating a service connection in your Prisma Access deployment. All service connections have these characteristics:
Expand all
Collapse all
- A service connection allows access to the resources in your HQ or data center.
- A service connection allows remote networks and mobile users to communicate with each other.
- Service connections do not support language localization because egress to the internet is not supported over service connections. Prisma Access allocates only one service IP sddress per service connection, and that IP address is geographically registered to the compute location that corresponds to the location you specify during onboarding.
The number of service connections you receive depends on your Prisma Access license.
Expand all
Collapse all
- If you have a ZTNA or Enterprise license, the number of service connections depends on your License edition. If you have a Local edition, you can configure a maximum of two service connections; if you have a Worldwide edition, you can configure a maximum of five service connections.
- If you manage multiple tenants and have a ZTNA or Enterprise license, the number of service connections per tenant depends on the number of units you allocate per tenant and the type of license you have.
Before you can start configuring your service connections, review what information you need to gather first .
Plan a Service Connection
Create service connections to allow Prisma Access to perform the following tasks:
Expand all
Collapse all
- Allow access to the resources in your HQ or data center.
- Allow remote networks and mobile users to communicate with each other.
Gather this HQ or Data Center Information
Before you begin to configure a service connection , gather the following information for each of your HQ or data centers to which you want Prisma Access to be able to connect.
No need to gather this information if you are creating a service connection only to allow mobile users to access remote network locations.
For Prisma Access (Managed by Strata Cloud Manager) and Prisma Access (Managed by Panorama) Service Connections:
- IPSec-capable firewall, router, or SD-WAN device connection at your corporate site.
- IPSec settings for terminating the primary VPN tunnel from Prisma Access to the IPSec-capable device on your corporate network.
- IPSec settings for terminating the secondary VPN tunnel from Prisma Access to the IPSec-capable device on your corporate network.
If you have an existing template that contains IPSec tunnel, Tunnel Monitoring, and IPSec Crypto Profile configurations, you can add that template to the template stack to simplify the process of creating the IPSec tunnels. Or, you can edit the Service_Conn_Template that gets created automatically and create the IPSec configurations required to create the IPSec tunnel back to the corporate site. Prisma Access also provides you with a set of predefined IPSec templates for some commonly-used network devices, and a generic template for any device that is not included in the predefined templates.
- List of IP subnetworks at the site.
- List of internal domains that Prisma Access must be able to resolve.
- IP address of a corporate access node at your network’s site to which Prisma Access can send ICMP ping requests for IPSec tunnel monitoring.
Make sure that this address is reachable by ICMP from the entire Prisma Access infrastructure subnet.
- Network reachability settings for the service infrastructure subnet.
Make the entire service infrastructure subnet reachable from the HQ or data center. Prisma Access uses IP addresses for all control plane traffic from this subnet.
For Prisma Access Panorama Service Connections Only:
This information is only required when planning Service Connections in Prisma Access (Managed by Panorama) .
- The service account for your authentication, if required for access.
- The routing type (either static or dynamic (BGP)) to use with service connections.
In order for Prisma Access (Managed by Panorama) to route users to the resources they need, you must provide the routes to the resources. You can do this in one or more of the following ways:
- Define a static route to each subnetwork or specific resource that you want your users to be able to access.
- Configure BGP between your service connection locations and Prisma Access.
- Use a combination of both methods
Configure a Service Connection in Prisma Access
Use a Service Connection to Enable Access between Mobile Users and Remote Networks
|
Where Can I Use This? |
What Do I Need? |
|
|
Create service connections to allow Prisma Access to perform the following tasks:
Expand all
Collapse all
- Allow access to the resources in your HQ or data center.
- Allow remote networks and mobile users to communicate with each other.
To configure a service connection for Prisma Access Panorama to allow access to private apps or internal corporate resources, complete the following steps.
Do not use CLI to onboard and configure service connections. If you require the use of CLI to onboard service connections, reach out to your Palo Alto Networks team.
- Select PanoramaCloud ServicesConfigurationService Connection .
- Add a new service connection to one of your corporate network sites.
- Specify a Name for the corporate site.
- Select the Location closest to where the site is located.
See this section for a list of Prisma Access locations.
Locations denoted with two asterisks are Local Zones . These locations place compute, storage, database, and infrastructure services close to large population and industry centers; however, they also have some limitations . To add a local zone, reach out to your Palo Alto Networks representative.
- Select or add a new IPSec Tunnel configuration to access the firewall, router, or SD-WAN device at the corporate location:
Expand all
Collapse all
- If you're using an existing IPSec Tunnel configuration, select it from the drop-down. Note that the tunnel you're creating for each service connection connects Prisma Access to the IPSec-capable device at each corporate location. The peer addresses in the IKE Gateway configuration must be unique for each tunnel. You can, however, reuse some of the other common configuration elements, such as crypto profiles.
- To create a new IPSec Tunnel configuration:
- If the IPSec-capable device at your HQ or data center location uses policy-based VPN:
- To detect and neutralize against reply attacks:
- To preserve the original ToS information:
- To enable tunnel monitoring for the service connection:
- BGP and hot potato routing deployments only —Select a service connection to use as the preferred backup ( Backup SC ).
You can select any service connection that you have already added. Prisma Access uses the Backup SC you select as the preferred service connection in the event of a link failure. Selecting a backup service connection can prevent asymmetric routing issues if you have onboarded more than two service connections. This choice is available in hot potato routing mode only.
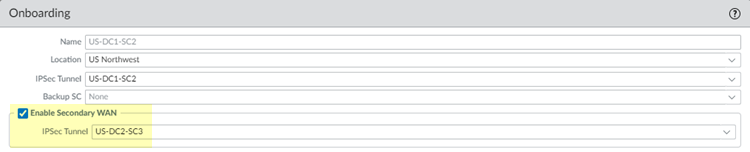
- If you have a secondary WAN link at this location, select Enable Secondary WAN and then select or configure an IPSec Tunnel the same way you did to set up the primary IPSec tunnel.
If the primary WAN link goes down, Prisma Access detects the outage and establishes a tunnel to the headquarters or data center location over the secondary WAN link. If the primary WAN link becomes active, the link switches back to the primary link.
Configuring a secondary WAN isn't supported in the following deployments:
- If your secondary WAN is set up in active/active mode with the primary IPSec tunnel.
- If your customer premises equipment (CPE) is set up in an Equal Cost Multipath (ECMP) configuration with the primary and secondary IPSec tunnel.
If you use static routes, tunnel failover time is less than 15 seconds from the time of detection, depending on your WAN provider.
If you configure BGP routing and have enabled tunnel monitoring, the shortest default hold time to determine that a security parameter index (SPI) is failing is the tunnel monitor, which removes all routes to a peer when it detects a tunnel failure for 15 consecutive seconds. In this way, the tunnel monitor determines the behavior of the BGP routes. If you do not configure tunnel monitoring, the hold timer determines the amount of time that the tunnel is down before removing the route. Prisma Access uses the default BGP HoldTime value of 90 seconds as defined by RFC 4271, which is the maximum wait time before Prisma Access removes a route for an inactive SPI. If the peer BGP device has a shorter configured hold time, the BGP hold timer uses the lower value.
When the secondary tunnel is successfully installed, the secondary route takes precedence until the primary tunnel comes back up. If the primary and secondary are both up, the primary route takes priority.
If you use a different BGP peer for the secondary (backup) connection, Prisma Access does not honor the Multi-Exit Discriminator (MED) attributes advertised by the CPE. This caveat applies if you use multiple BGP peers on either remote network connections or service connections.
- ( Optional ) Enable source NAT for Mobile Users—GlobalProtect IP pool addresses, IP addresses in the Infrastructure subnet, or both.
You can specify a subnet at one or more service connections that are used to NAT traffic between Prisma Access GlobalProtect mobile users and private applications and resources at a data center.
- Enable Data Traffic source NAT —Performs NAT on Mobile User IP address pool addresses so that they are not advertised to the data center, and only the subnets you specify at the service connections are advertised and routed in the data center.
- Enable Infrastructure Traffic source NAT —Performs NAT on addresses from the Infrastructure subnet so that they are not advertised to the data center, and only those subnets you specify at the service connections are advertised and routed in the data center.
- User-ID —When selected, Prisma Access uses this service connection for identity redistribution.
User-ID Redistribution Management —Sometimes, granular controls are needed for user-ID redistribution in particularly large scale Prisma Access deployments. User-ID Redistribution Management lets you manually disable the default identity redistribution behavior for certain service connections by removing the check mark in the User ID column, and then select specific service connections to be used for identity redistribution. It's not necessary to do this for most configurations. Contact Palo Alto Networks support to activate this functionality.
- IP Pool —Specify the IP address pool used to perform NAT on the mobile user IP address pool, Infrastructure subnet, or both.
Use a private IP (RFC 1918) subnet or a suitable subnet that is routable in your routing domain, and does not overlap with the Mobile Users—GlobalProtect IP address pool or the Infrastructure subnet. Enter a subnet between /25 and /32.
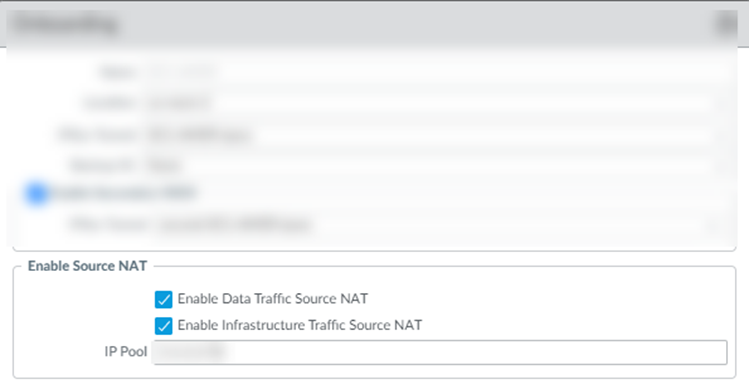
- Enable routing to the subnetworks or individual IP addresses at the corporate site that your users will need access to.
Prisma Access uses this information to route requests to the appropriate site. The networks at each site can't overlap with each other or with IP address pools that you designated for the service infrastructure or for the Prisma Access for Users IP pools. You can configure Static Routes , BGP , or a combination of both.
To configure Static Routes :
1. On the Static Routes tab, click Add and enter the subnetwork address (for example, 172.168.10.0/24) or individual IP address of a resource, such as a DNS server (for example, 10.32.5.1/32) that your remote users will need access to.
2. Repeat for all subnets or IP addresses that Prisma Access will need access to at this location.
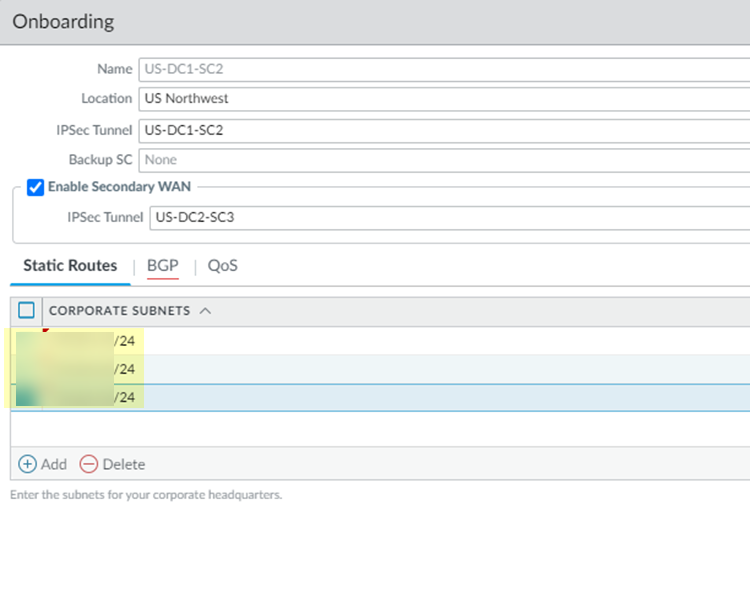
To configure BGP :
3. On the BGP tab, select Enable .
When you enable BGP, Prisma Access sets the time-to-live (TTL) value for external BGP (eBGP) to 8 to accommodate any extra hops that might occur between the Prisma Access infrastructure and your customer premises equipment (CPE) that terminates the eBGP connection.
Prisma Access does not accept BGP default route advertisements for either service connections or remote network connections.
4. ( Optional ) Select from the following choices:
- To add a no-export community for Corporate Access Nodes (Service Connections) to the outbound prefixes from the eBGP peers at the customer premises equipment (CPE), set Add no-export community to Enabled Out . This capability is Disabled by default.
Don't use this capability in hot potato routing mode.
- To prevent the Prisma Access BGP peer from forwarding routes into your organization’s network. Don’t Advertise Prisma Access Routes .
By default, Prisma Access advertises all BGP routing information, including local routes and all prefixes it receives from other service connections, remote networks, and mobile user subnets. Select this check box to prevent Prisma Access from sending any BGP advertisements, but still use the BGP information it receives to learn routes from other BGP neighbors.
Since Prisma Access does not send BGP advertisements if you select this option, you must configure static routes on the on-premises equipment to establish routes back to Prisma Access.
- To reduce the number of mobile user IP subnet advertisements over BGP to your customer premises equipment (CPE), specify Prisma Access to summarize the subnets before it advertises them by selecting Summarize Mobile User Routes before advertising .
By default, Prisma Access advertises the mobile users IP address pools in blocks of /24 subnets ; if you summarize them, Prisma Access advertises the pool based on the subnet you specified. For example, Prisma Access advertises a public user mobile IP pool of 10.8.0.0/20 using the /20 subnet, rather than dividing the pool into subnets of 10.8.1.0/24, 10.8.2.0/24, 10.8.3.0/24, and so on, before advertising them. Summarizing these advertisements can reduce the number of routes stored in CPE routing tables. For example, you can use IP pool summarization with cloud VPN gateways (Virtual Private Gateways (VGWs) or Transit Gateways (TGWs)) that can accept a limited number of routes.
If you have hot potato routing enabled and you enable route summarization, Prisma Access no longer prepends AS-PATHs, which might cause asymmetric routing. Be sure that your return traffic from the data center or headquarters location has guaranteed symmetric return before you enable route summarization with hot potato routing.
5. ( Optional ) Select an MRAI timer value.
BGP routing offers a timer you can use to tailor BGP routing convergence in your network called the Minimum Route Advertisement Interval (MRAI) . MRAI acts to rate-limit updates on a per-destination basis, and the BGP routers wait for at least the configured MRAI time before sending an advertisement for the same prefix. A smaller number gives you faster convergence time but creates more advertisements in your network. A larger number decreases the number of advertisements that can be sent, but can also make routing convergence slower. You decide the number to put in your network for the best balance between faster routing convergence and fewer advertisements.
Configure an MRAI range of between 1 and 600 seconds, with a default value of 30 seconds.
6. Enter the IP address assigned as the Router ID of the eBGP router on the data center/HQ network for which you're configuring this service connection as the Peer Address .
7. Enter the Peer AS , which is the autonomous system (AS) to which the firewall virtual router or BGP router at your data center/HQ network belongs.
8. ( Optional ) Enter an address that Prisma Access uses as its Local IP address for BGP.
Specifying a Local Address is useful where the device on the other side of the connection (such as an Amazon Web Service (AWS) Virtual Private Gateway) requires a specific local IP address for BGP peering to be successful. Make sure that the address you specify does not conflict or overlap with IP addresses in the Infrastructure subnet or subnets in the service connection.
You must configure a static route on your CPE to the BGP Local Address .
If you use IPV6 support for your service connection , you can configure IPv6 addresses as well as IPv4 addresses. You also need to enable IPv6 networking globally in your Prisma Access infrastructure before you can use IPv6 addressing.
9. ( Optional ) Enter and confirm a Secret passphrase to authenticate BGP peer communications.
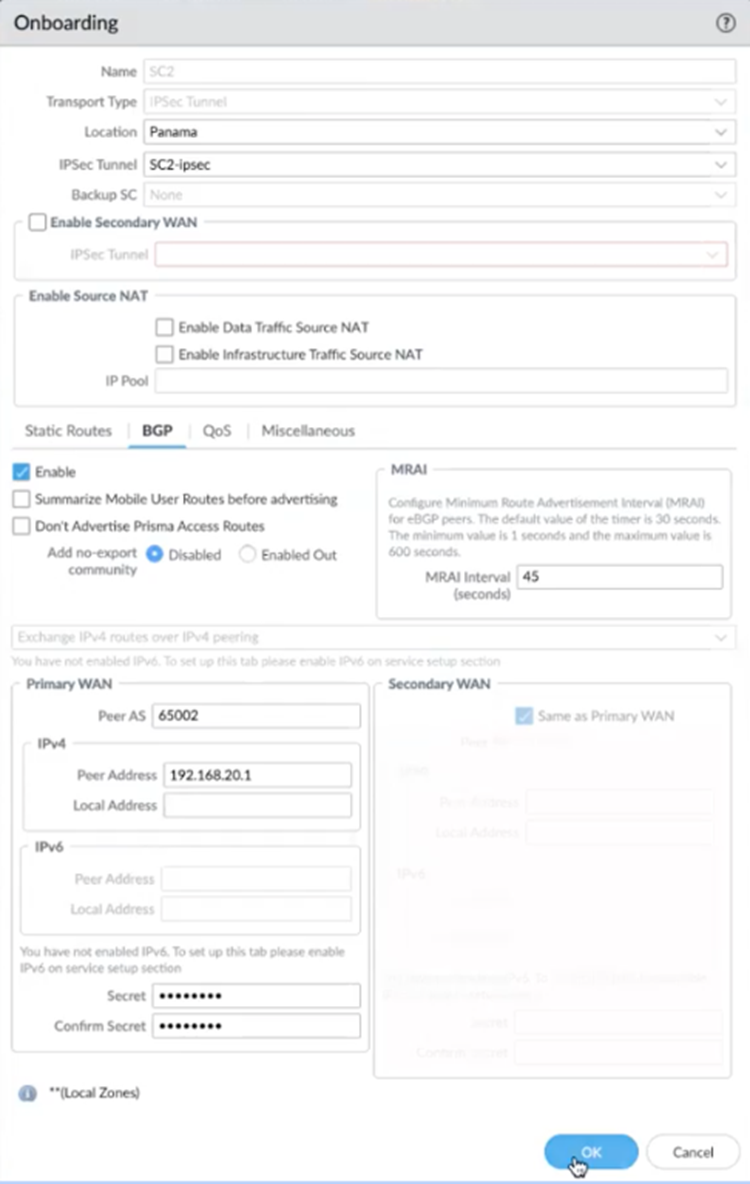
- ( Optional ) If you configured a Secondary WAN and you need to change the Peer Address or Local Address for the secondary (backup) BGP peer, deselect Same as Primary WAN and enter a unique Peer and, optionally, Local IP address for the secondary WAN.
In some deployments (for example, when using BGP to peer with an AWS VPN gateway ), the BGP peer for the primary and secondary WAN might be different. In those scenarios, you can choose to set a different BGP peer for the secondary WAN.
For BGP deployments with secondary WANs, Prisma Access sets both the primary and secondary tunnels in an UP state, but follows normal BGP active-backup behavior for network traffic. Prisma Access sets the primary tunnel as active and sends and receives traffic through that tunnel only; if the primary tunnel fails, Prisma Access detects the failure using BGP rules, sets the secondary tunnel as active, and uses only the secondary tunnel to send and receive traffic.
- ( Optional ) Enable Quality of Service for the service connection and specify a QoS profile or add a New QoS Profile .
You can create QoS Profiles to shape QoS traffic for remote network and service connections and apply those profiles to traffic that you marked with PAN-OS security policies, traffic that you marked with an on-premises device, or both PAN-OS-marked and on-premises-marked traffic. See QoS for Remote Networks for details.
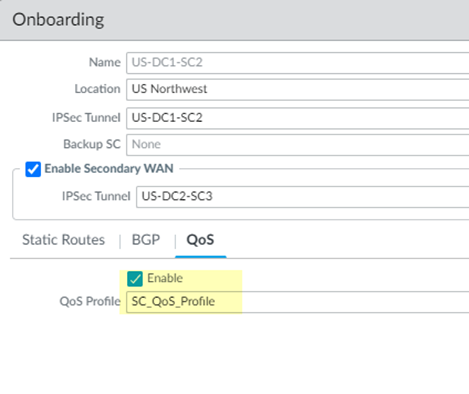
- ( Optional ) Configure Miscellaneous settings.
1. ( Optional ) Disable Traffic Logging on Service Connections to disable logging on the service connections for your Prisma Access deployment.
If the majority of the traffic flows logged by the service connections are asymmetric, disabling service connection logging might be required to reduce the consumption of Strata Logging Service logging storage. If your deployment does not have asymmetric flows via the service connections, you don't need to disable logging.
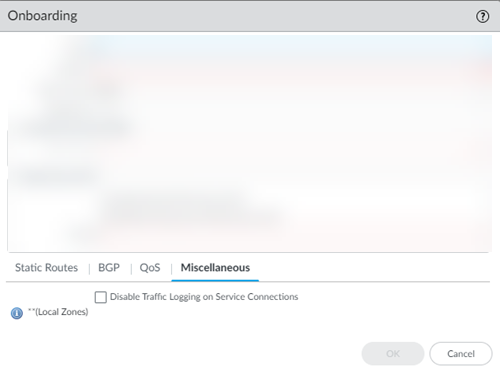
- Commit your changes to Panorama and push the configuration changes to Prisma Access.
1. Click CommitCommit and Push .
2. Edit Selections and, in the Prisma Access tab, make sure that Service Setup is selected in the Push Scope , then click OK .
3. Click Commit and Push .
- Add more service connections by repeating Step 2 through Step 11.
- Configure the IPSec tunnel or tunnels from your IPSec-capable device on your corporate network back to Prisma Access.
1. To determine the IP address of the tunnel within Prisma Access, select PanoramaCloud ServicesStatusNetwork Details , click the Service Connection radio button, and note the Service IP Address for the site.
The Service IP Address is the public-facing address that you will need to connect to when you create the tunnel from your IPSec-capable device back to the service connection.

2. On your IPSec-capable device at the corporate location, configure an IPSec tunnel that connects to the Service IP Address within Prisma Access and commit the change on that device so that the tunnel can be established.
To verify that the service connection has been successfully set up, select Panorama > Cloud Services > Status > Status and check that the Status is OK .
If you created a service connection with placeholder values to enable communication between mobile users and users at remote networks, you do not need to verify the service connection status.
The Deployment Status area allows you to view the progress of onboarding and deployment jobs before they complete, as well as see more information about the status of completed jobs.
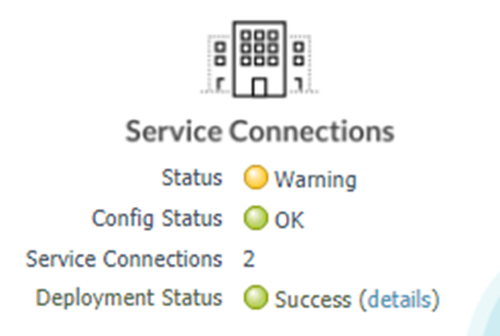
If the status is not OK , hover over the Status icon to view any errors.
To see a graphical representation of the service connection along with status details, select Service Connection on the Monitor tab.
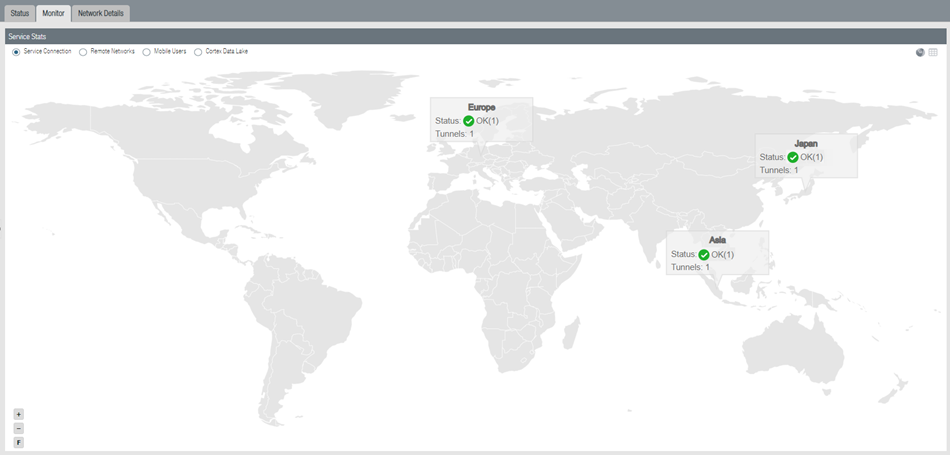
Select a region to get more detail about that region.
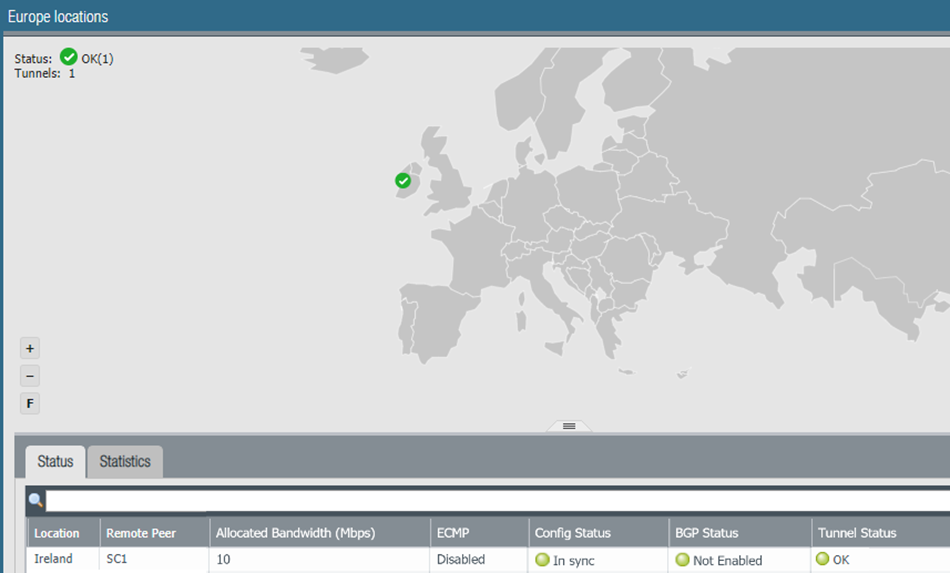
Click the tabs below the map to see additional information about the service connections.
Status tab:
- Location —The location where your service connection is deployed.
- Remote Peer —The corporate location to which this s service infrastructure is setting up an IPSec tunnel.
- Allocated Bandwidth —The number of service connections you have allocated multiplied by 300 Mbps.
This number does not reflect the available service connection bandwidth.
While each service connection provides approximately 1 Gbps of throughput, the actual throughput is dependent on several factors, including:
- Traffic mix (for example, frame size)
- Latency and packet loss between the service connection and the headquarters location or data center
- Service provider performance limits
- Customer termination device performance limits
- Other customer data center traffic
- ECMP —If you have equal cost multipath (ECMP) configured for this service connection. Since ECMP is not used for service connections, this status is Disabled .
- Config Status —The status of your last configuration push to the service. If the local configuration and the configuration in the cloud match, the Config Status is In sync . If you have made a change locally, and not yet pushed the configuration to the cloud, this may display the status Out of sync . Hover over the status indicator for more detailed information. After committing and pushing the configuration to Prisma Access, the Config Status changes to In sync .
- BGP Status —Displays information about the BGP state between the firewall or router at your corporate/headquarters location and Prisma Access where the service connection is established. Although you might temporarily see the status pass through the various BGP states ( Idle , Active , Open send , Open pend , Open confirm , most commonly, the BGP status shows:
- Connect —The router at your data center/headquarters is trying to establish the BGP peer relationship with Prisma Access.
- Established —The BGP peer relationship has been established.
This field will also show if the BGP connection is in an error state:
- Warning —There has not been a BGP status update in more than eight minutes. This may indicate an outage on the firewall.
- Error —The BGP status is unknown.
- Tunnel Status —The operational status of the connection between Prisma Access and your service connection.
Statistics tab:
- Location —The location where your service connection is deployed.
- Remote Peer —The corporate location to which the service connection is setting up an IPSec tunnel.
- Ingress Bandwidth (Mbps) —The bandwidth from the HQ/data center location to Prisma Access.
- Ingress Peak Bandwidth (Mbps) —The peak load from the HQ/data center location into the cloud service.
- Egress Bandwidth (Mbps) —The bandwidth from Prisma Access into the HQ/data center location.
- Egress Peak Bandwidth (Mbps) —The peak load from Prisma Access into the HQ/data center location.
- QoS —Select this button to display a graphic chart that shows a real-time and historical QoS statistics, including the number of dropped packets per class. This chart displays only for service connections or remote network connections that have QoS enabled.
If you configured BGP, you can check its status by selecting PanoramaCloud ServicesStatusNetwork DetailsService ConnectionShow BGP Status .

The BGP Status dialog displays. This table provides you with the following information:
- Peer —Routing information for the BGP peer, including status, total number of routes, configuration, and runtime statistics and counters. The total number of routes display in the bgpAfiIpv4-unicast Counters area, in the Incoming Total and Outgoing Total fields.
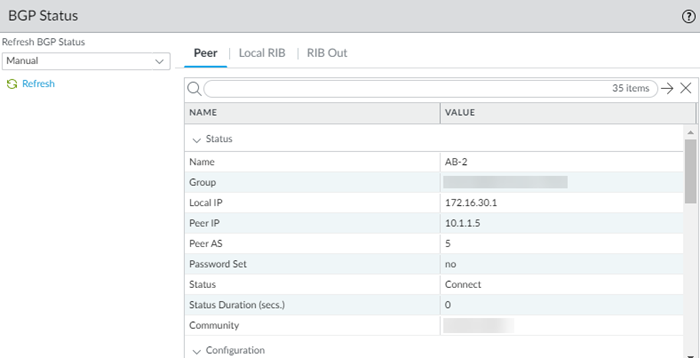
- Local RIB —BGP routes that Prisma Access uses locally. Prisma Access selects this information from the BGP RIB-In table, which stores the information sent by neighboring networking devices, applies local BGP import policies and routing decisions, and stores the Local RIB information in the Routing Information Base (RIB).
Note that only the first 256 entries are shown. To view additional entries, enter a subnet or IP address in the Filter field and click Apply Filter to view a subset of the routing entries up to a maximum of 256.
- RIB Out —Routing information that Prisma Access advertises to its peers through BGP update messages.
Use a Service Connection to Enable Access between Mobile Users and Remote Networks
To configure a service connection to connect mobile users and remote networks, Add a service connection using the following values:
- Specify a Region that is close to your mobile users.
- Add an IPSec Tunnel and IKE Gateway , using placeholder values.
- Add placeholder Corporate Subnets .
Since Prisma Access doesn’t route any traffic through this tunnel, any value that does not conflict or overlap with other configured subnets is valid.
The following example shows a Prisma Access deployment with mobile users in different geographical areas and remote networks. The remote network connections are connected in a mesh network in the Prisma Access infrastructure, but the mobile users cannot connect to the remote networks. In addition, the mobile users in different geographic areas cannot connect to each other without a service connection.

After you add a service connection, the service connection connects the mobile users and the remote networks in a hub-and-spoke network.
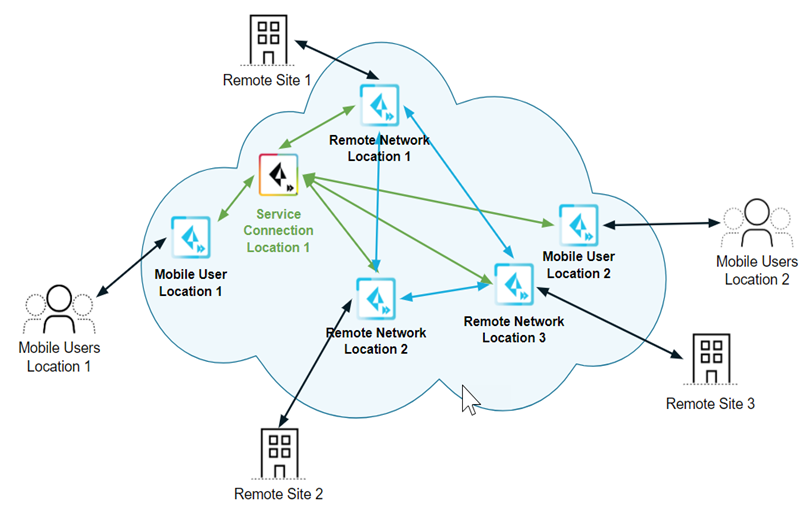
Another case where a service connection of this type is useful is when the service connection is far from the mobile users. The following figure shows an example of this network deployment.
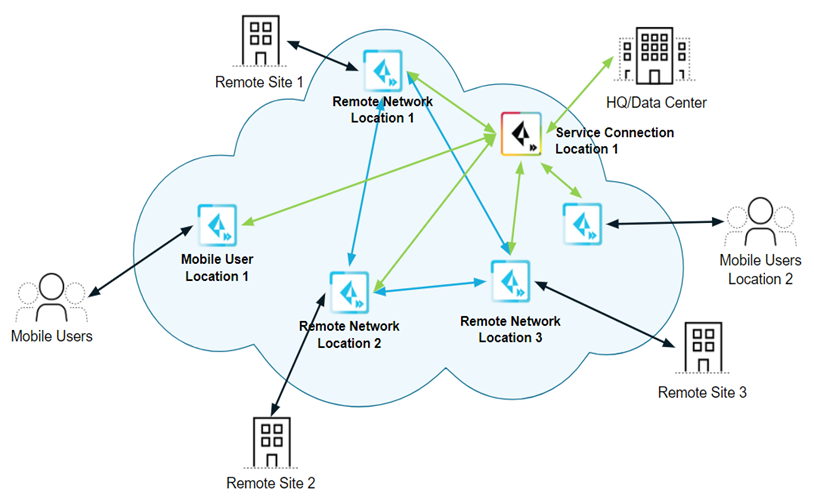
Adding a second service connection that is closer to the mobile users creates a more efficient network between the mobile users and remote networks.
Dynamic Routing Considerations for Service Connections
How It Works — Routing Service Connection Traffic
Prisma Access uses BGP for dynamic routing, and uses BGP path selection to install routes in the route table. When Prisma Access routes traffic to your headquarters or data center using service connections, it uses routing methods that direct that traffic effectively. Prisma Access uses a default routing model that was designed to fit the majority of network deployments; however, not all organization’s networks are the same. To fit a wider range of deployments, Prisma Access allows you choose another mode for service connection routing. The following sections describe the BGP routing methods that Prisma Access uses, along with the factors you need to consider in your organization’s network before changing Prisma Access’ default method of service connection routing.
Changing the Prisma Access service connection routing method requires a thorough understanding of your organization’s topology and routing devices, along with an understanding of how Prisma Access routing works as described in this section. We recommend that you read this section carefully before changing the routing method from the default setting.
Prisma Access supports static routing and dynamic routing using BGP for service and remote network connections; this section assumes that you use BGP routing for your Prisma Access deployments. When you select BGP routing, your organization’s network learns BGP information from Prisma Access.
Routing Modes for Service Connections
You can choose from the following routing modes with Prisma Access:
- Default routing—This is the current routing model that Prisma Access uses.
Use this routing mode if you want Prisma Access to use BGP best path-selection mechanisms without adjusting any of the BGP attributes. In this mode, Prisma Access will honor any attribute advertised by the customer premises equipment (CPE).
- Hot Potato routing—Prisma Access hands off the traffic as quickly as it can to your organization’s network.
Use this routing method if you want your organization’s network to perform the majority of routing decisions.
Prisma Access Default Routing
The following figure shows an example of Prisma Access routing service connection traffic in default routing mode. The organization’s network has three separate networks in three data centers and does not have a backbone connecting the networks. In default routing mode, mobile user pools are advertised equally on the three networks, as shown at the bottom of the figure.
Note that, when Prisma Access advertises mobile user routes, it before advertising them; thus, it advertises the /20 mobile user subnets in chunks of /24 as prefixes are consumed by the gateways.
Make a note of how Prisma Access uses BGP route advertisements:
- Prisma Access does not adjust the default BGP attributes for mobile user advertised routes (Prisma Access adds its AS number to the route advertisements).
- Prisma Access advertises mobile user routes in and adds BGP community values in the routes it advertises through the service connection. The following figure shows a mobile user deployment with three service connections and three different IP address blocks specified for the : 192.168.64.0/20 for the Asia, Australia & Japan region, 192.168.72.0/20 for the Africa, Europe & Middle East region, and 192.168.48.0/20 for the North America & South America region. Prisma Access divides these routes into block of /24 and advertises them with an Prisma Access’ AS number of 65534 , but also appends the BGP community values to the advertisements ( Z for Asia, Y for EU, and X for US). Those routes are shown in the middle of the figure. In this way, you can differentiate service connections in your network, even though Prisma Access assigns the same AS number to them.
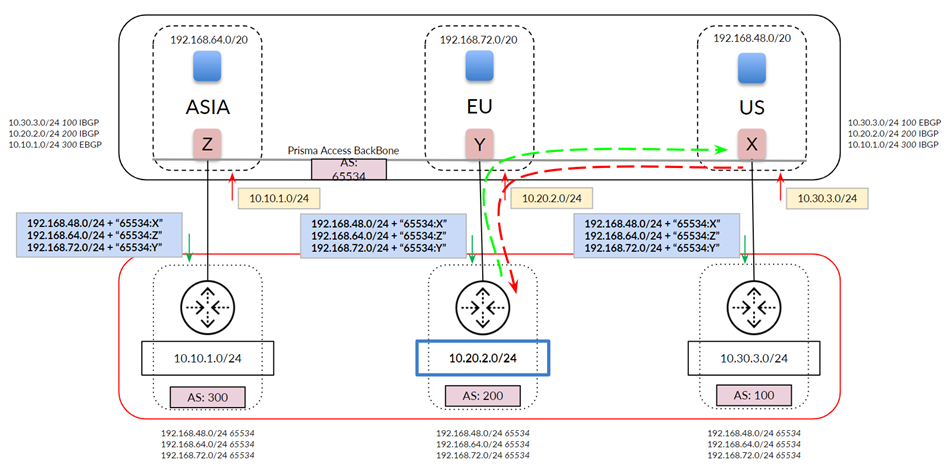
The following figure shows a more common network with a full-mesh eBGP backbone. The figure shows the routes that Prisma Access has learned from your organization’s network on the top right. Note the extra routes that Prisma Access has learned through the Prisma Access backbone (iBGP) and your organization’s backbone (eBGP).
For traffic between mobile users in the North America & South America region (US in the diagram) and the data center in your organization’s Africa, Europe & Middle East region (EU in the diagram), Prisma Access chooses the path through the EU service connection because it prefers routes with a shorter AS-PATH.
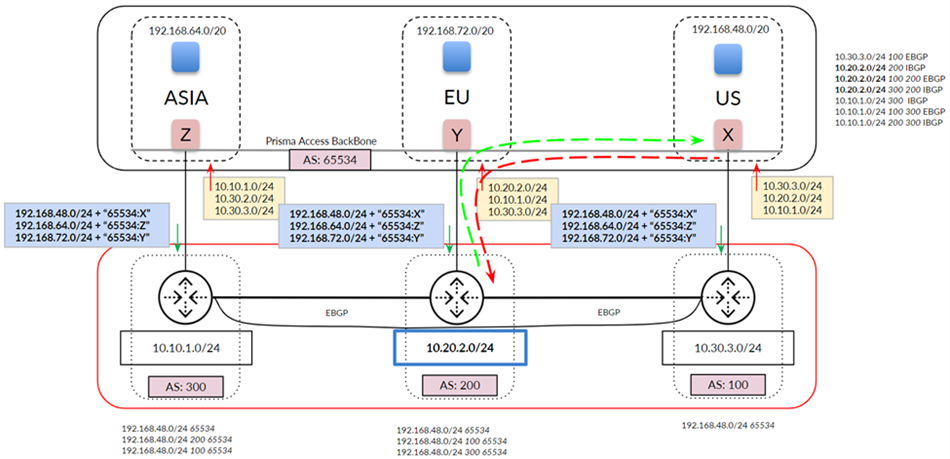
In deployments with a full-mesh eBGP backbone, asymmetry can arise when Prisma Access cannot reach a particular data center due to an ISP/CPE failure at the customer’s data center. The following figure shows what could happen when the link to the EU service connection goes down. Your network detects the link failure and builds a new route table for AS 200. Traffic from the US service connection to AS 200 uses the path through AS 100 because the eBGP route for your backbone between AS 200 and AS 100 is preferred to the iBGP route between service connections EU and US. However, return traffic is not guaranteed through the same path because the on-premises CPE can choose either path (shown in red) to return the traffic.
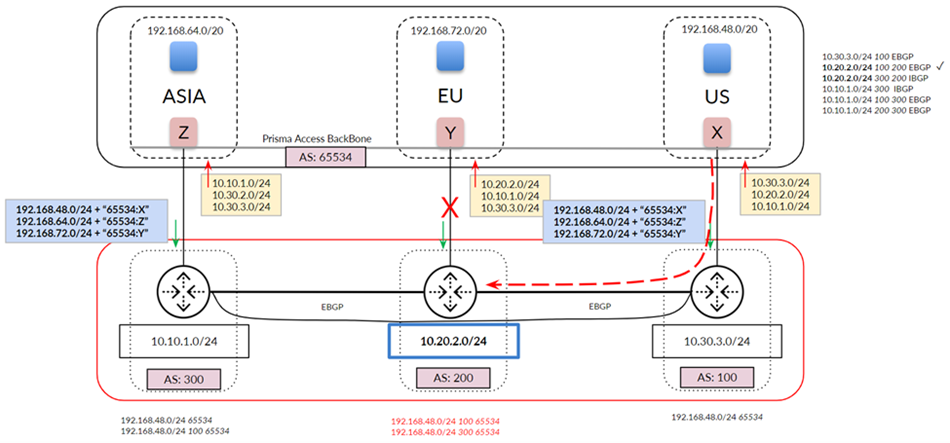
The previous examples show a network whose routes have not been aggregated (that is, you have not performed route summarization before you send the BGP route advertisements to Prisma Access). The following example shows a network that summarizes its routes to 10.0.0.0/8 before sending to Prisma Access. If you select default routing, this configuration can lead to asymmetric routing issues, because Prisma Access cannot determine the correct return path from the summarized routes.
If your Prisma Access deployment has Remote Networks, Palo Alto Networks does not recommend the use of route summarization on Service Connections. Route summarization on service connections is for Mobile Users deployments only.
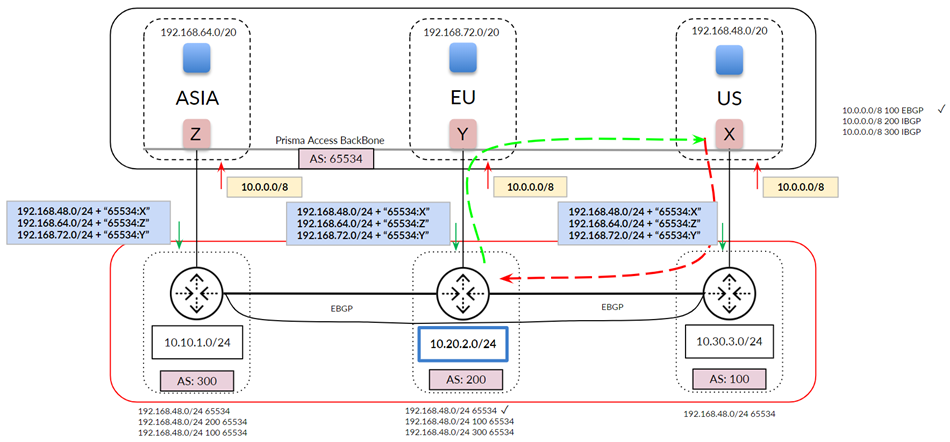
If you use route aggregation for mobile users, we strongly recommend that you enable hot potato routing instead of default routing, where Prisma Access hands off the traffic as quickly as possible to your organization’s network. In addition, we recommend that you select a Backup SC as described in the following section for each service connection to have a deterministic routing behavior.
Hot Potato Routing
When you select Hot Potato Routing , Prisma Access egresses the traffic bound to service connections/data centers from its internal network as quickly as possible.
With hot potato routing, Prisma Access prepends the AS path (AS-PATH) to the BGP prefix advertisements sent from gateways. This prepending is performed when the prefixes are advertised out of the service connection to your organization’s on-premises CPE. Prisma Access prepends the AS-PATHs so that your CPE gives the correct preference to the primary and secondary tunnels, so that if the primary tunnel goes down, your CPE chooses the secondary tunnel as the backup.
If you specified a different IP address for the secondary (backup) BGP peer, Prisma Access adds more prepends based on the tunnel type, as shown in the following table.
|
Prefix Type |
Service Connection Tunnel Type |
Number of As-Path Prepends |
Total AS-PATHs Seen on the CPE |
|
Gateway prefixes from primary service connection |
Primary or Secondary tunnel with the same BGP peer IP address |
0 |
1 |
|
Gateway prefixes from backup service connection |
Primary or Secondary tunnel with the same BGP peer IP address |
3 |
4 |
|
Gateway prefixes from all other service connections |
Primary or Secondary tunnel with the same BGP peer IP address |
6 |
7 |
|
Gateway prefixes from primary service connection |
Secondary tunnel with a different BGP peer IP address |
1 |
2 |
|
Gateway prefixes from backup service connection |
Secondary tunnel with a different BGP peer IP address |
4 |
5 |
|
Gateway prefixes from all other service connections |
Secondary tunnel with a different BGP peer IP address |
7 |
8 |
Specify a Backup Service Connection so that Prisma Access to uses that service connection as the backup when a service connection link fails.
The following figure shows a hot potato routing configuration for traffic between the US service connection and AS 200, with the EU service connection configured as the Backup Service Connection of the US connection. Using hot potato routing, Prisma Access sends the traffic from its closest exit path through the US service connection. The return traffic takes the same path through AS100 because this path has a shorter AS-PATH to the mobile user pool in the US location. Prisma Access prepends the AS-PATH to its prefix advertisements depending on whether the tunnel is a primary tunnel, a backup tunnel, or not used for either primary or backup.
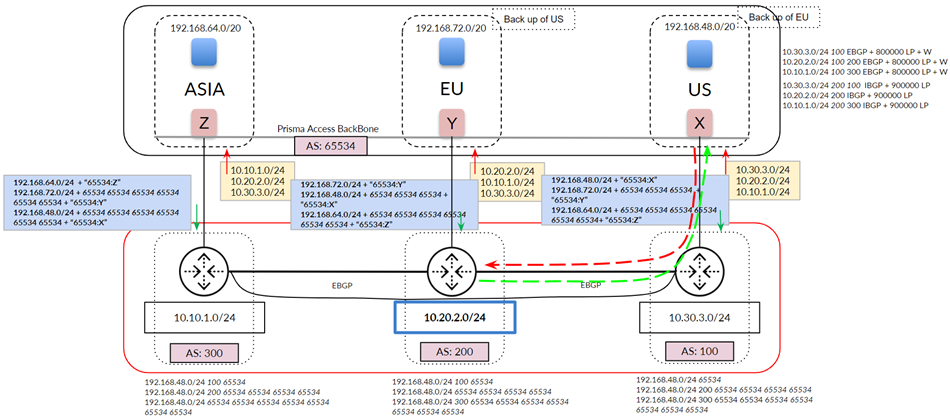
Because you have set up a backup service connection, if the link to the US service connection goes down, hot potato routing sends the traffic out using its shortest route through the EU service connection. This routing scenario also applies to networks that use route aggregation.
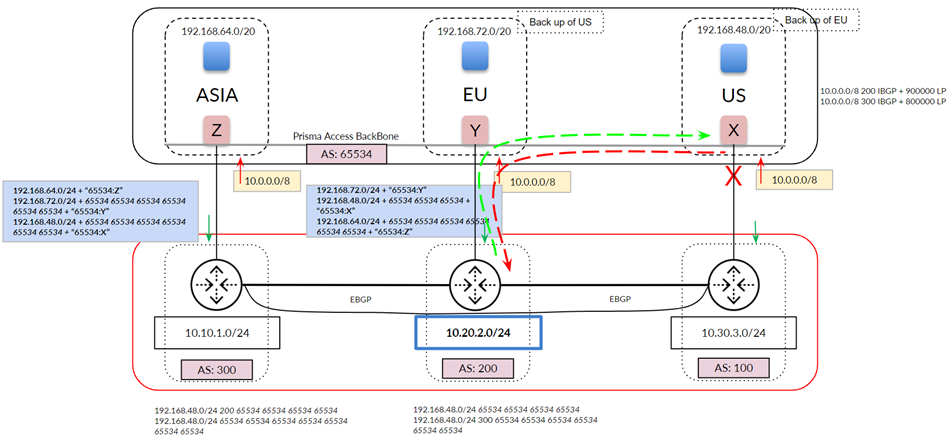
You can also use backup service connections for multiple service connections in a single region. The following figure shows a Prisma Access deployment with two service connections in the North America region. In this case, you specify a Backup Service Connection of US-E for the US-W service connection, and vice versa, to ensure symmetric routing.
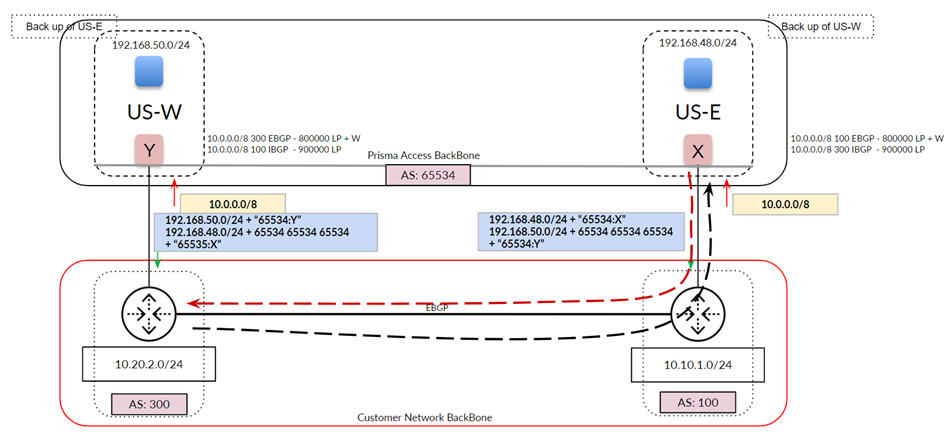
Prisma Access ZTNA Connector
The Zero Trust Network Access (ZTNA) Connector lets you connect Prisma Access to your organization's private apps simply and securely. ZTNA Connector provides mobile users and users at branch locations access to your private apps using an automated secure tunnel. Because the ZTNA Connector sets up the tunnels automatically, you don't have to manually set up IPSec tunnels and routing to the data center or headquarters locations, public cloud locations, and partner networks where your private apps are located.
The ZTNA Connector VMs you deploy automatically connect to the closest Prisma Access location ensuring the best possible latency, in addition to scaling bandwidth access up to 2 Gbps per Connector and 8 Gbps per Connector Group.
Prisma Access denies all access by default, and an administrator must explicitly allow access to a resource using a policy rule, based on our patented User-ID, App-ID, and Device-ID constructs, helping you to reduce the attack surface and the security risks. Once a connection is allowed, we continuously verify the trust of that connection, continuously inspect for security threats, and continuously inspect for data leakage. In addition, the private IP addresses of your applications are not exposed when you use the Prisma Access ZTNA Connector.
ZTNA Connector Components
- Connectors —Connectors are the virtual machines that build tunnels to Prisma Access. ZTNA Connector automates tunnel management without you having to specify IPSec and IKE settings. You onboard Connectors in VMs, which you onboard in a cloud service (Amazon Web Services (AWS), Google Cloud Platform (GCP), Microsoft Azure, or in a virtual server (VMware ESXi), or in a Kernel-based Virtual Machine (KVM). Palo Alto Networks recommends that you deploy the VM in the same subnet as the onboarded application to Prisma Access. You can also provide a different subnet, as long as there is a route to the applications from the Connector.
After you deploy the Connector VM, Prisma Access manages the VM, including providing you with options to upgrade the VM version. After installing the ZTNA Connector VM, it discovers the nearest Prisma Access location and initiates a secure IPSec tunnel to Prisma Access.
- Connector Groups —A Connector Group is a logical grouping of connectors and apps. By adding multiple connectors in a Connector Group, you provide tunnel redundancy and increased bandwidth to the apps within the group. Each Connector Group supports up to four connectors.
If you want to provide access to specific apps using different connectors, place the connectors in separate groups.
- Targets —The private apps that ZTNA Connector onboards to Prisma Access. You can define specific apps to which you want to provide access using FQDN ( FQDN Targets ), wildcards ( Wildcard Targets ), or IP addresses or subnets where the apps are located. Or, you can have ZTNA Connector automatically discover apps by pulling them from an IdP connected to CIE.
Use Cases for ZTNA Connector
Use ZTNA Connector in these scenarios:
- Connect to Private Apps —Use ZTNA Connector for all client-initiated traffic that connects to private apps.
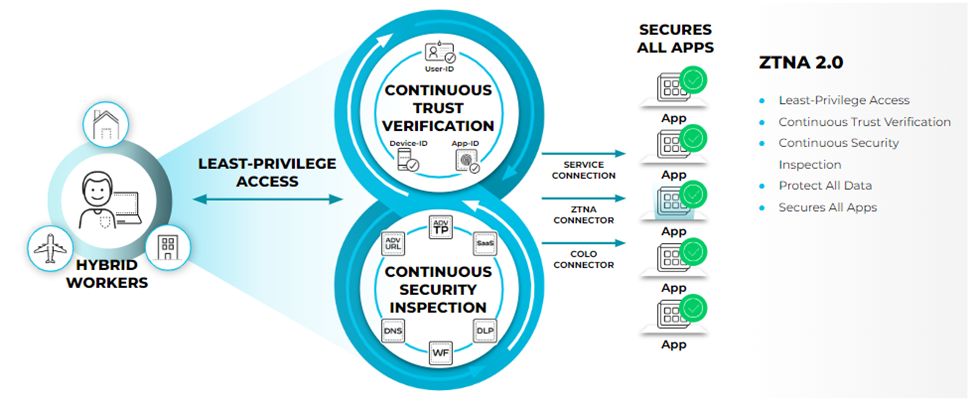
- Overlapped Private Networks —If you're a network administrator in a large enterprise that has acquired or merged with another organization, two networks might use address ranges that overlap (for example, RFC 1918 private network address space). To provide access to apps that are hosted in overlapped networks to your users, routing and NAT configuration can become tedious. ZTNA Connector simplifies app access in overlapped networks by allowing you to connect to apps using FQDNs, FQDN wildcards, and IP subnets, without you having to configure IP routing.
ZTNA Connector provides your users secure access to the private apps using ZTNA-Connector Tunnel Terminators (ZTTs).
When you activate a ZTNA Connector in a compute region, ZTT nodes are automatically onboarded. ZTNA Connector automatically forms IPSec tunnels with ZTTs. ZTT nodes in a region remain active for 24 hours after all connectors in that region are deleted. If a new connector is deployed within 24 hours after all connectors are deleted in the same region, it reuses the existing ZTT. If a new ZTNA Connector is activated after 24 hours, a new ZTT is created.
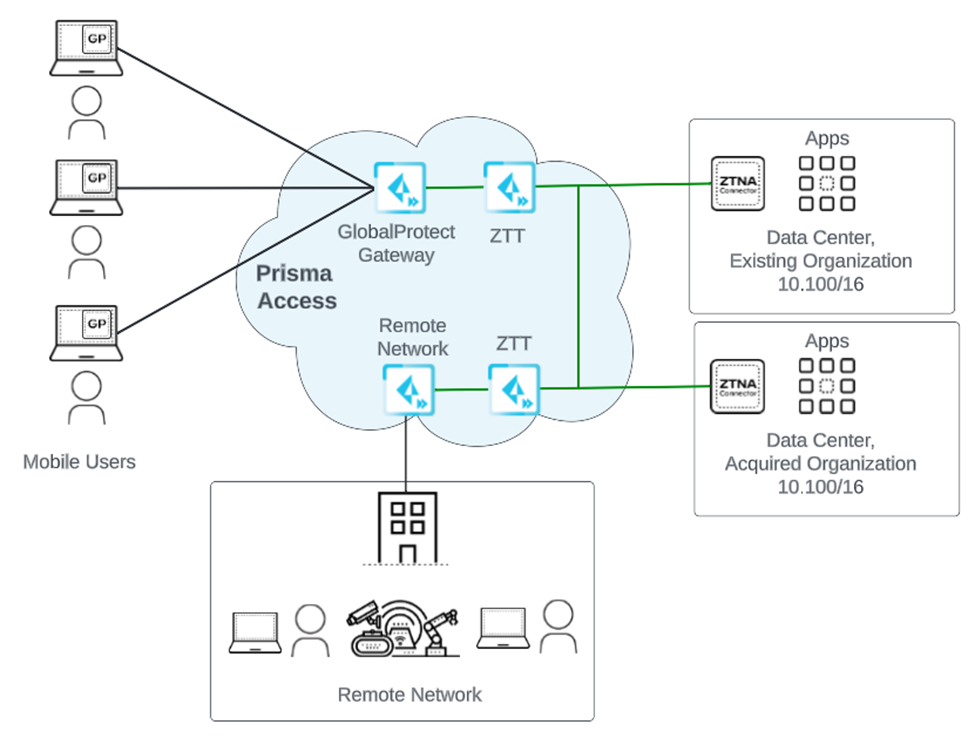
- Data Center to Cloud Migration —If your organization is migrating your on-premises apps to the cloud (either migrating your existing on-premises applications using "lift and shift" or developing cloud-native apps), you can host apps in cloud VPCs in AWS, GCP, Azure, or other cloud providers. If you have hundreds or thousands of VPCs, ZTNA Connector can accelerate the process of providing cloud-delivered app access.
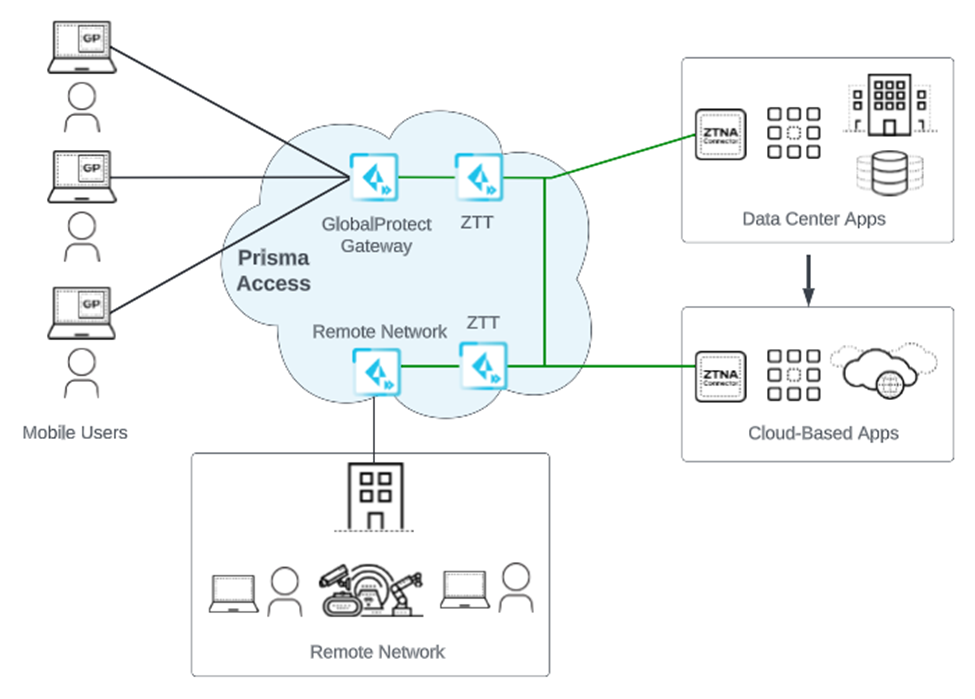
- Access to Applications in Business Partner Networks —Some organizations access apps hosted in their business partner’s networks. Using service connections to connect these apps requires manual routing and NAT configuration. ZTNA Connector allows you to connect to these apps without performing manual IP routing configuration.
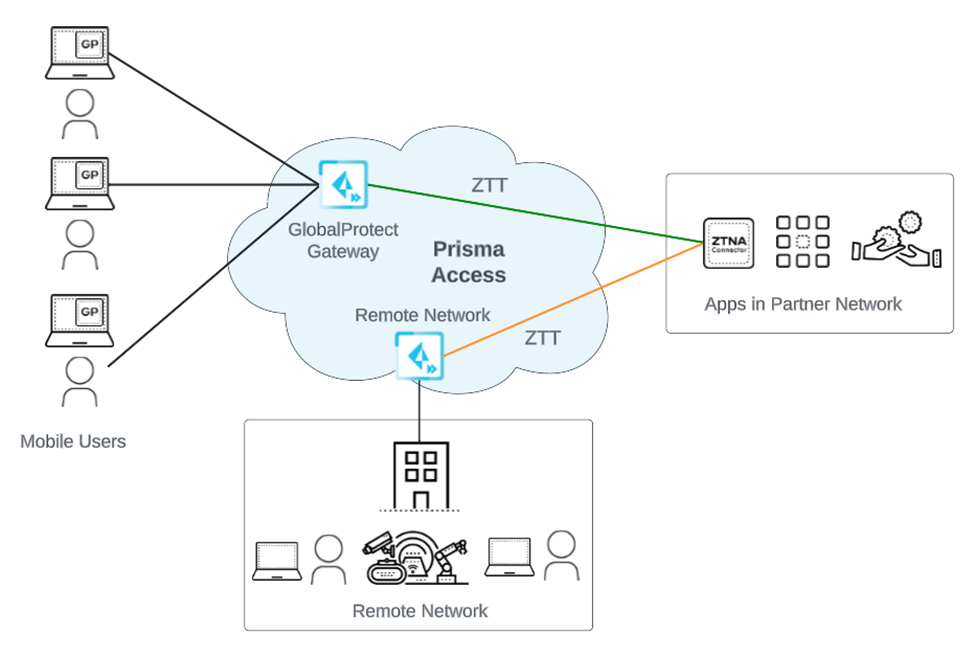
Supported Use Cases for Service Connections and ZTNA Connector
ZTNA Connector isn't a replacement for service connections. It can complement or coexist with service connections, allowing you flexibility in how you secure private apps. If you have already deployed service connections, you can continue to use them, unless you want to move to a different application access model. The following table shows the supported and unsupported use cases for service connections or ZTNA Connector. A check mark indicates that the use case is supported; a dash (—) indicates that it's not supported.
|
Use Case |
ZTNA Connector Support |
Service Connection Support |
|
Access to applications in overlapped networks |
√ |
— |
|
Access to all ports and protocols for client-initiated application traffic |
√ |
√ |
|
Automatic tunnel establishment to Prisma Access |
√ |
— |
|
Automatic Prisma Access location discovery |
√ |
— |
|
Automatic scaling of Prisma Access locations for up to 8 Gbps throughput |
√ |
— |
|
Access to private apps using IP addresses and subnets |
√ |
√ |
|
Server-initiated traffic (such as a remote help desk) reaching out to a managed device (GlobalProtect mobile user or remote network). |
— |
√ |
|
Applications or services that require a unique client IP address |
√ |
√ |
|
Access to applications with dynamic ports (such as FTP Active mode or VoIP) |
— |
√ |
|
Hybrid deployments with on-premises next-generation firewalls where policy rules based on User-ID are applied |
√ |
√ |
ZTNA Connector 2.0 Principles
ZTNA Connector lets you connect your private apps to Prisma Access using the following ZTNA Connector 2.0 principles:
- Device Posture and Risk —Using policy rules based on User-ID in Prisma Access, you can define a posture for users and devices (both mobile user and IoT devices) to prevent unauthorized access to the private apps. You can also create common policy rules between ZTNA Connector and Prisma Access.
- User Authentication and Least Privilege Access —Using user authentication and policy rules based on user or group, you can implement the principle of least privilege (PoLP) to provide users access to the apps they require, while blocking access to the apps they don't require.
- Threat and Data Loss Prevention —Prisma Access and ZTNA Connector use advanced security features such as Advanced Threat Prevention, Advanced URL Filtering, SaaS Security, Advanced WildFire, and Enterprise DLP to make sure that your private apps and app data are secure.
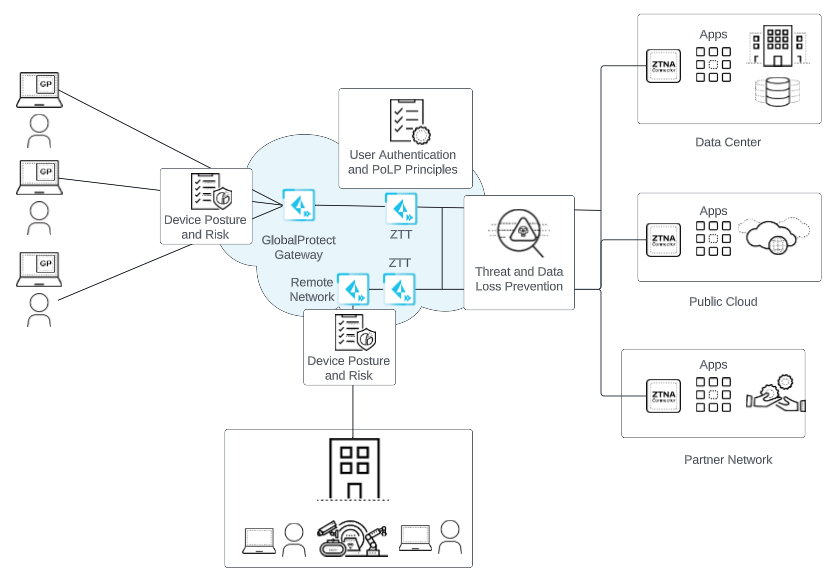
ZTNA Connector Requirements and Guidelines
Before you configure ZTNA Connector, be sure that you understand the Connector requirements and limits, as well as the guidelines you should follow when deploying it.
Supported Prisma Access Versions and Requirements
- Upgrade any Prisma Access release earlier than 5.0, including any Innovation releases, to a minimum version of 5.0.
- For Prisma Access (Managed by Panorama), upgrade the Cloud Services plugin version to a minimum version of 4.0. Upgrade to the latest Cloud Services plugin to unlock the latest features.
Scale and Throughput Considerations
ZTNA Connector supports the following maximum values:
- 10,000 applications per tenant across all Connector Groups
- 200 Connectors per tenant
- 1000 applications per Connector Group
- 4 connectors per Connector Group
- 100,000 concurrent sessions per Connector
Each Connector can support 100,000 concurrent connections. A Connector Group can have a maximum of 4 connectors for up to 400,000 concurrent connections per Connector Group.
- 26 compute regions
- 1 Gbps throughput per connector
App Support
ZTNA Connector provides access to all of your private app traffic, with the following exceptions:
- ZTNA Connector does not support the following:
- Traffic originating from the data center (such as SCCM or remote help desk traffic).
- Clientless VPN.
- Applications that perform port hopping (such as VoIP or Active Mode FTP).
- Application-level gateway (ALG) apps such as Active Mode FTP and SIP.
- Windows-integrated authentication for applications (such as NTLM or Kerberos) is only supported if you onboard the data center domain controllers and resources as IP address subnets. SAML, OAuth, and LDAP are supported.
- Communication between apps behind a service connection and apps behind a ZTNA Connector.
For example, you host a Windows Active Directory (AD) server behind a service connection (since AD servers are not supported behind a ZTNA Connector), and host an FTP (Filezilla) server behind a ZTNA Connector. If the FTP server requires authentication to the Windows AD server, authentication fails, because you can't use Prisma Access as a backbone between the Service Connection Corporate Access Node (SC-CAN) and the ZTNA Connector Tunnel Terminator (ZTT).
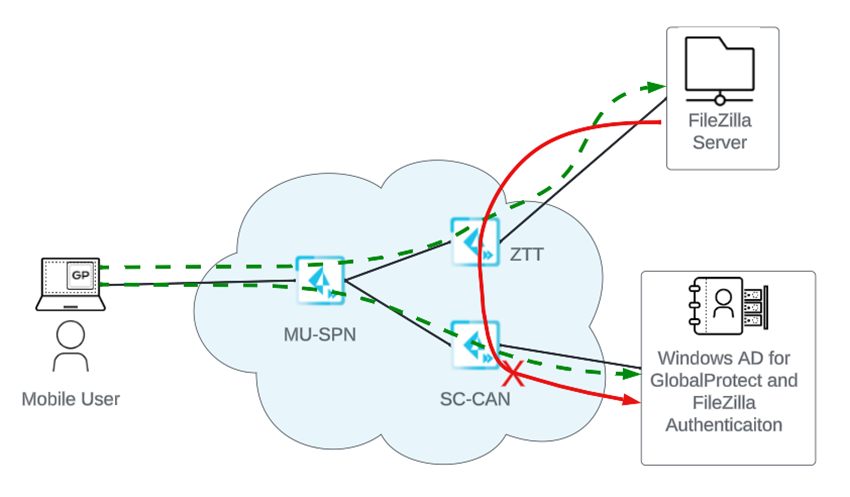
Feature and Functionality Restrictions
Keep in mind the following restrictions when setting up and configuring a ZTNA Connector deployment:
- Don't use special characters, including < > ! @ # $ % ^ & and Chinese, Japanese, or Korean characters, in ZTNA object names.
- Interoperability with Service Connections —You can use service connections and ZTNA Connector in the same tenant; however, make sure that subnets advertised from the data center to the service connection do not overlap with any subnets used by ZTNA Connector for the same purpose. For example, make sure that subnets advertised from a data center to Prisma Access service connections using static routes or BGP do not overlap with subnets used in ZTNA Connector IP subnet-based application targets .
- The following functionalities are not supported with the default Prisma Access deployment; reach out to your Palo Alto Networks team to activate them:
- Using RFC 6598 Addresses for your with ZTNA Connector
- Connector Group Guidelines —When adding connector groups, use the following recommendations:
- All apps in a single Connector Group should use the same DNS server for DNS resolution.
- If you're accessing apps from a data center or headquarters location, all apps in the Connector Group should be from the same data center or headquarters location.
- Don't add connectors in two or more regions in a single Connector Group . All connectors in a Connector Group should be in the same region.
- You can specify up to a four connector groups per FQDN target or wildcard target. Be sure that, when you assign connector groups per FQDN target or wildcard target, you don't assign the same app to more than four connectors per region.
For example, you have assigned the same app (either an FQDN target or a wildcard target) to four connector groups, each group has a single connector, and all connectors are in the same region. This configuration is acceptable because you're not assigning more than four connectors per app in a single region.
However, if you assign the same app (either an FQDN target or a wildcard target) to three connector groups, each group has two connectors, and all connectors are in the same region, that is an invalid configuration, because you're assigning six connectors to the same app in a single region.
- Some ZTNA Connectors such as AWS-based connectors or Azure-based connectors support autoscaling, where AWS or Azure monitors network bandwidth utilization on the connectors and automatically adjusts capacity to maintain app performance. When network bandwidth utilization on connectors drops, AWS or Azure triggers auto scale-in. If scale-in occurs in a ZTNA Connector, existing long-lived sessions handled by the ZTNA Connector marked for scale-in terminate prematurely. This behavior does not impact new traffic sessions initiated after scale-in. For long-lived sessions, such as SSH or RDP, ZTNA Connector terminates the session during scale-in, and you must reconnect that session.
Supported Application Hosting Environments
You can deploy your ZTNA Connector VMs in the following data center environments with the specified minimum requirements:
|
Cloud Provider |
Instance Size |
CPU Size |
Memory Size |
Disk Size |
|
Amazon AWS |
m5.xlarge per region |
4 vCPUs |
16 GB |
40 GB |
|
Google Cloud Platform (GCP) |
n2-standard-4 per region |
4 vCPUs |
16 GB |
40 GB |
|
Microsoft Azure |
Standard_D4_v3 per region |
4 vCPUs |
16 GB |
40 GB |
|
KVM |
Uses qcow image |
4 vCPUs |
16 GB |
40 GB |
|
Hyper-V |
Uses vhd image |
4 vCPUs |
8 GB memory per VM |
40 GB |
|
VMware ESXi |
Uses OVA image. Supported on vSphere and directly on ESXi Hosts |
4 vCPUs per VM |
8 GB memory per VM |
40 GB disk (Thick Provisioned) |
|
For VMware ESXi, vMotion, VM snapshots, or migrations are not supported for Connector VMs. For KVM, Live Migrations and snapshots are not supported on Connector VMs. |
||||
It's your responsibility to host the VMs and ensure that they can connect to the internet.
AWS, GCP, and Azure have ZTNA Connectors you can acquire in their respective Marketplaces. You can download the VMware ESXi Open Virtualization Application (OVA) file and the KVM qcow file from the Palo Alto Customer Support Portal.
Network Requirements
The following networking requirements enable connectivity between ZTNA Connector and Prisma Access:
- After you enable ZTNA Connector Prisma Access sets up a DNS proxy for DNS requests using the DNS rules set up for Remote Networks and Mobile Users—GlobalProtect .
- UDP payload size, including headers, should not exceed an MTU size of 1,300 bytes on the path to the ZTNA application server. Palo Alto Networks recommends keeping packets at or below this MTU size.
- Allow outbound UDP port 4500 and UDP 500 from the WAN interface (port 1) IP address for IPSec and IKE connectivity to the ZTNA Tunnel Terminator (ZTT). If you want to limit enabling an outbound UDP port 500 and 4500 connection to a single IP address, enable it for the PA Service IP address (under WorkflowsZTNA ConnectorConnectors ) of the ZTNA Connector.

- If ZTNA Connector uses a public IP address for its internet interface, you must allow a IP/50 Encapsulating Security Payload (ESP).
- Allow outbound TCP port 443 from the WAN interface (port 1) IP address HTTPS connectivity to the ZTNA Connector Controllers.
- ZTNA Connector autoconfigures both the Prisma Access ZTT side of the IPSec tunnel and the ZTNA Connector side. The algorithms configured for DH Group/Encryption/Hash for both IKE and ESP are: ecp384/aes256/sha512.
- Don't terminate the IPSec tunnel that ZTNA Connector creates and uses to access the private apps.
- ( Mobile Users—GlobalProtect deployments only ) When you first onboard an application in ZTNA Connector, you must refresh the GlobalProtect app so mobile users receive the updated DNS server configuration. If you removed an application from ZTNA Connector, you must refresh the GlobalProtect app so mobile users can receive the updated DNS server configuration.
- If there is a firewall between the ZTNA Connector and the private app, the firewall must allow access to the app from the ZTNA Connector (that is, you must allow access to the app server's resolved IP addresses, protocols, and ports for the private app).
In addition, you need to allow the protocol (either TCP or ICMP) that you configured for the application target health probes to the app. The connector application probes the app server to determine if it can provide access to the app, and you can configure the Probing Type for the Application Target to be tcp ping , icmp ping , or none (no probing). If you specify tcp ping , the firewall must allow TCP access to the app; if you specify icmp ping , the firewall must allow ICMP echo request and reply for the app.
- Be sure that you allow ICMP in your data center before using the ping and traceroute diagnostic tools . Some cloud environments have ICMP disallowed for security concerns; in this case, these tools don't display any activity.
The traceroute diagnostic tool also uses random UDP ports, so you must allow all UDP and ICMP error replies for the traceroute tool to function.
- Make sure you have configured DNS entries on the local interfaces to allow ZTNA Connector to resolve the app FQDNs, and that ZTNA Connector and access the DNS server at UDP port 53 (the port used for DNS resolution).
- ( ZTNA Connector versions 5.0 and later ) Make sure that you have configured security rules in your network to permit ZTNA Connectors to perform application probes into your data center. ZTNA Connectors use their data center interface IP address as the source IP address of the application probing to the application servers. If the application probing is successful, the Application Status is Up and user sessions to ZTNA Connector have the same data center interface IP address as the source IP address. If the application probing is unsuccessful, the Application Status is Down ; in this case, you can use the ping and tcp ping diagnostic tools to test connections to the application.
- If you use RFC 6598 shared addresses within your network, you must specify blocks of IP addresses that ZTNA Connector can use for routing between Prisma Access and your connectors and between Prisma Access and your private apps.
- If you need to restrict the list of IP addresses and FQDNs that you add to your organization's allow lists, add the ones listed in
IP Addresses and FQDNs to Allow for ZTNA Connector
.
For example, if you're setting up a ZTNA Connector in the United States, add the following URLs to your organization's allow lists:
- https://controller.cgnx.net
- https://locator.cgnx.net
- https://controller.hood.cgnx.net
- https://vmfg.hood.cgnx.net
- https://sdwan-stats-hood-us.cgnx.net
- time.nist.gov (for NTP)
- 0.cloudgenix.pool.ntp.org (for NTP)
- 1.cloudgenix.pool.ntp.org (for NTP)
- 2.cloudgenix.pool.ntp.org (for NTP)
- 3.cloudgenix.pool.ntp.org (for NTP)
Limit DNS resolution of the previous FQDNs to IPv4 resolution. ZTNA Connector does not support establishing connection to the controller FQDNs using IPv6.
- Disable the SSL decryption for sessions to the Controllers.
IP Addresses and FQDNs to Allow for ZTNA Connector
To ensure smooth functioning of ZTNA Connector, add the following URLs and IP addresses to your allow lists.
|
Service Name |
Port |
Direction |
Source Interface Internet Protocol |
Destination and IP Addresses |
|
ZTNA Connector access to Prisma Access |
443 |
Outbound |
ZTNA Connector WAN port |
https://controller.cgnx.net Address: 52.8.93.87 Address: 52.8.25.40 https://locator.cgnx.net Address: 18.223.78.55 Address: 52.15.45.235 hood: 52.40.98.31 34.218.98.185 sugarloaf: 18.200.102.82 18.200.135.33 faber: 18.139.242.53 54.255.61.109 https://vmfg.cgnx.net Address: 52.53.122.104 Address: 52.53.102.7 https://controller.elcapitan.cgnx.net Address: 52.8.93.87 Address: 52.8.25.40 https://vmfg.elcapitan.cgnx.net Address: 52.53.122.104 Address: 52.53.102.7 https://controller.hood.cgnx.net Address: 52.32.167.5 Address: 54.70.168.33 https://vmfg.hood.cgnx.net Address: 50.112.136.184 Address: 34.210.34.87 https://controller.sugarloaf.cgnx.net Address: 108.128.176.192 Address: 18.200.144.58 https://vmfg.sugarloaf.cgnx.net Address: 99.81.179.99 Address: 99.80.52.255 https://sdwan-stats-hood-us.cgnx.net https://sdwan-stats-elcapitan-us.cgnx.net https://sdwan-stats-hood-jp.cgnx.net https://sdwan-stats-elcapitan-jp.cgnx.net https://sdwan-stats-hood-sg.cgnx.net https://sdwan-stats-elcapitan-sg.cgnx.net https://sdwan-stats-hood-au.cgnx.net https://sdwan-stats-elcapitan-au.cgnx.net https://sdwan-stats-hood-in.cgnx.net https://sdwan-stats-elcapitan-in.cgnx.net https://sdwan-stats-hood-ca.cgnx.net https://sdwan-stats-elcapitan-ca.cgnx.net https://sdwan-stats-sugarloaf-eu.cgnx.net https://sdwan-stats-sugarloaf-de.cgnx.net https://sdwan-stats-sugarloaf-uk.cgnx.net https://controller.bowfell.cgnx.net Address: 13.41.243.90 Address: 18.171.17.23 https://vmfg.bowfell.cgnx.net Address: 52.56.35.36 Address: 52.56.224.242 https://controller.faber.cgnx.net Address: 52.74.47.220 Address: 13.251.109.27 https://vmfg.faber.cgnx.net Address: 18.142.153.59 Address: 52.74.58.219 h ttps://controller.townsend.cgnx.net Address: 13.55.31.41 Address: 3.106.168.215 https://vmfg.townsend.cgnx.net Address: 52.64.177.240 Address: 13.55.164.51 https://sdwan-stats-faber-sg.cgnx.net https://sdwan-stats-bowfell-uk.cgnx.net https://sdwan-stats-townsend-au.cgnx.net |
|
NTP |
123 |
Outbound |
ZTNA Connector WAN and LAN ports |
time.nist.gov 0.cloudgenix.pool.ntp.org 1.cloudgenix.pool.ntp.org 2.cloudgenix.pool.ntp.org 3.cloudgenix.pool.ntp.org |
|
DNS |
53 |
Outbound |
ZTNA Connector WAN and LAN ports |
Customer or Provider DNS servers |
Certificate Management
To ensure trust between parties in a secure communication session, Prisma Access uses digital certificates. Each certificate contains a cryptographic key to encrypt plaintext or decrypt ciphertext. Each certificate also includes a digital signature to authenticate the identity of the issuer. The issuer must be in the list of trusted certificate authorities (CAs) of the authenticating party. Optionally, the authenticating party verifies the issuer did not revoke the certificate. Prisma Access uses certificates to secure features like decryption and authentication, and to secure communication between all the clients, servers, users, and devices connecting to your network.
For applications onboarded to ZTNA Connector, set up your certificates, add certificate authorities, and define certificate checks using Prisma Access .
Enable ZTNA Connector
Before you can set up ZTNA Connector, you must enable it within Prisma Access. Before you enable ZTNA Connector, do the following:
- Review the ZTNA Connector Requirements and Guidelines .
- Identify your Application IP and Connector IP address blocks. You must reserve a separate address pool to reserve for use within Prisma Access internally to route traffic to the connectors and private applications you’ll be onboarding. Prisma Access resolves the FQDNs of the applications you onboard to ZTNA Connector to the IP addresses in the Application IP address block. Similarly, Prisma Access uses the Connector IP address block to route traffic from the remote network or mobile user to the appropriate ZTNA Connector.
You should reserve at least a /16 subnet for the address pool. Use RFC 1918 or RFC 6598 addresses. You can specify an RFC 1918 address pool during ZTNA Connector setup instead of RFC 6598; however, you cannot change the address pool type back to RFC 6598 after you specify RFC 1918.
Use the following workflow to enable ZTNA Connector in Prisma Access (Managed by Panorama).
You must define separate IP address blocks for your connectors and your applications and the blocks cannot overlap with:
- Each other
- The Prisma Access infrastructure subnet
- The GlobalProtect IP address pool
- If you are using service connections with ZTNA Connector, subnets advertised from a data center to the Prisma Access service connection using static routes or BGP
- Configure the IP address blocks that Prisma Access will use internally to route traffic to the ZTNA Connector and the private apps you onboard.
- Select PanoramaCloud ServicesConfigurationService Setup and Edit the Settings .

- On the ZTNA Connector tab Add an Application IP Block .
You can add a single Application IP Block, or multiple blocks depending on your deployment. For example, if 100.64.10.0/24 and 100.64.11.0/24. You can also Enable Advertise Application IP Block to Remote Networks .
- Set the Connector IP Blocks that Prisma Access will use internally to route traffic between mobile users, remote networks and the connector VMs in your data centers.
You can add a single Connector IP Block, or multiple blocks depending on your deployment. For example, enter 100.65.10.0/24 and 100.65.11.0/24.
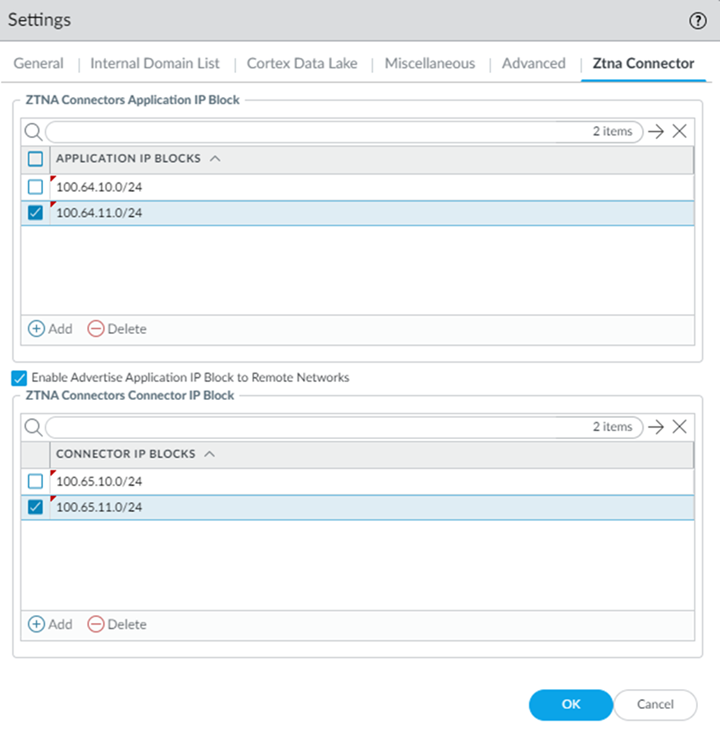
- Click OK to save the IP address block configuration and then Commit and push the configuration.
- Launch ZTNA Connector from the Cloud Services Plugin on Panorama.
- Select PanoramaCloud ServicesZTNA Connector .
- Click Strata Cloud Manager to launch ZTNA Connector in Strata Cloud Manager on the hub.
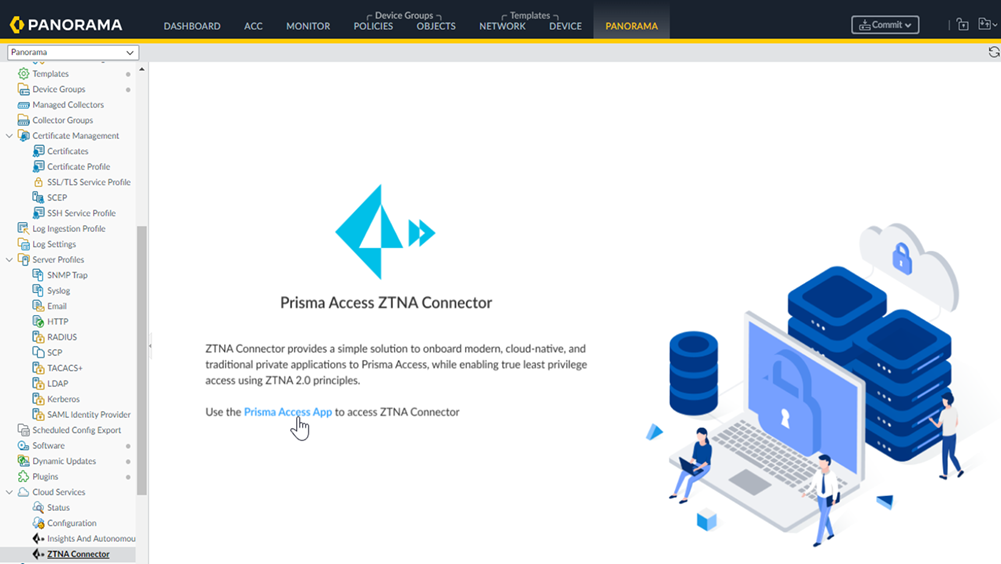
- From Strata Cloud Manager, select SettingsZTNA Connector .
- Prisma Access begins setting up the infrastructure for the ZTNA Connector. This may take a few minutes.
- When onboarding finishes, the ZTNA Connector Overview displays.
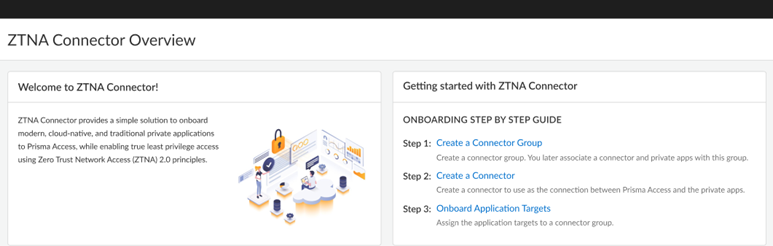
Configure ZTNA Connector
After you Enable ZTNA Connector you can begin setting up the ZTNA Connector components:
- Identify your Application IP and Connector IP address blocks and, add the IP address blocks in Prisma Access.
Refer to the following recommendation for the IP address blocks:
- Assign a separate IP address for each application.
- Assign each Connector a minimum of a /27 IP address block (minimum of 32 IP addresses per connector).
- Assign a unique IP address to each Connector group.
You can add more Connectors or Application Blocks to accommodate as required.
If you use RFC 6598 addresses within your network, you must reserve a separate RFC 6598 IP address pool to reserve for use within Prisma Access internally to route traffic to the connectors and private applications you’ll be onboarding.
- Create a Connector Group.
Connector Groups are logical groupings of connectors and applications. There are many different ways to group applications and connectors. You can group connectors in different geographic locations for redundancy. Or, you can create multiple connectors in the same data center for increased throughput. For simplified policy management, you may want to group applications that are used by the same user groups. Create your Connector Groups first, and then add the connectors and applications to the groups.
Repeat this step as needed to create all of the Connector Groups you need to group your connectors and applications.
1. Select WorkflowsZTNA Connector , select Overview or Connector Groups , and Create Connector Group .
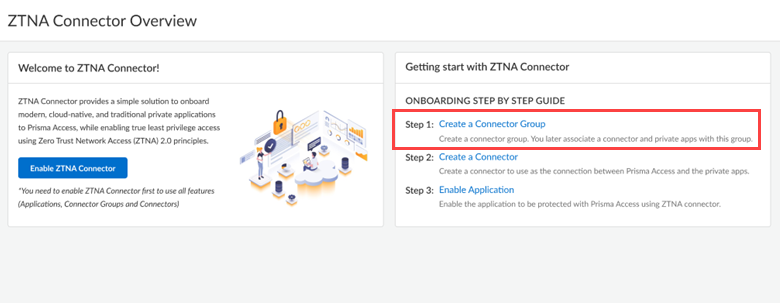
2. Give the Connector group a Name , enable Preserve User ID , and, optionally, provide a Description for it.
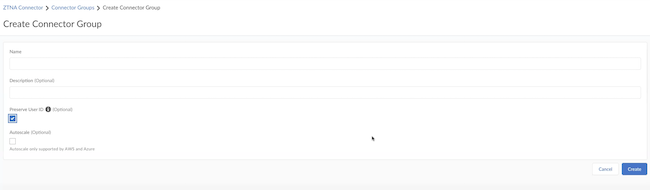
3. ( Optional ) If your data center is in Azure or AWS and you want to use the Auto Scale functionality, select Autoscale . If you have enabled this functionality, you don't have to create a Connector.
4. Create the Connector group.
- Create a Connector and add them to a Connector Group only when you select a non auto-scale Connector Group.
Create Connectors and add them to the Connector Group.
Connectors represent the VMs running in your data centers that connect to Prisma Access. You must create the Connector within Prisma Access, and use the provided secret/key to onboard the corresponding Connector VM in your data center.
Repeat this step as needed to create as many connectors as you need to connect your data center apps to Prisma Access.
- Select WorkflowsZTNA Connector , select Overview or Connectors , and Create Connector .
- Enter a Name for the Connector.
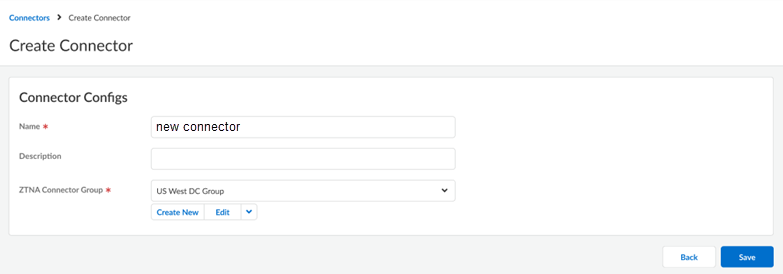
- ( Optional ) Add a Description for the Connector.
- Select the Connector Group where the Connector should be added.
For routing simplicity and fastest access to data center servers, Palo Alto Networks recommends that the connectors and servers be in the same subnet.
- Create the Connector.
To keep the ZTNA Connectors up-to-date, you can update their software version Icons in the ZTNA ConnectorConnector Groups show you the status of the connectors and if an upgrade is available.
- Retrieve the key and secret that you will use to set up the Connector.
You use the Key and Secret values when you set up the VMs in a later step.
1. Autoscale Connector Group —Follow the steps listed below:
- Go to WorkflowsZTNA ConnectorConnector Groups .
- Select Copy Token in the Actions area of your auto scale Connector Group; then, copy the Key and Secret values.
You use the Key and Secret to associate the cloud instance or VM you create with the Connector.
2. Non-autoscale Connector Group —Follow the steps listed below:
- Select WorkflowsZTNA ConnectorConnectors .
- Select the Connector that you want to deploy.
- Select Copy Token in the Actions area; then, copy the Key and Secret values.
You use the Key and Secret to associate the cloud instance or VM you create with the Connector.
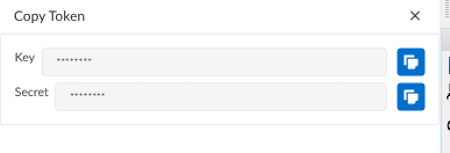
- Deploy your ZTNA Connector VMs in your data center .
- ( Optional ) Select WorkflowsZTNA ConnectorConnector Groups , make a note of the PA Service IP address of the Connector Group, and add this IP address to your organization's allow lists.
You can see PA Service IP under Connector Groups only after you onboard your Connector.
If required, add this IP address to your allow lists so that your network can transmit and receive ZTNA Connector traffic.
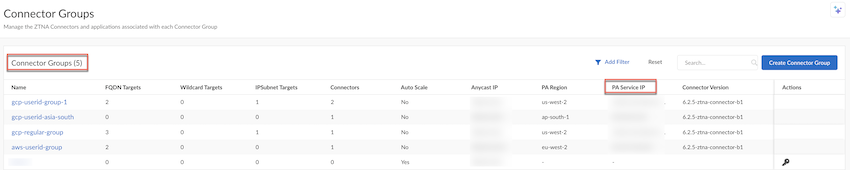
- Add the targets to the Connector Groups.
Set up targets to access the private apps in the data centers through your ZTNA Connector VMs. You can add targets based on FQDN wildcards, FQDNs, or IP subnets; ZTNA Connector does the work of setting up the networking and DNS settings required for your mobile users and users at branch offices to reach the apps securely through Prisma Access.
1. Select WorkflowsZTNA ConnectorApplication Targets .
2. Select the type of target you want to create.
With the commitless app onboarding enhancement, onboarding applications now takes less than a minute, allowing a quick access to the applications. This feature also allows you to onboard a larger number of applications.
Limitations:
- You can't add the same FQDN in multiple application targets (with different port/protocol).
- When you add or delete a wildcard target, a commit happens on MU or RN to add or delete DNS proxy forwarding rules. However, subsequent wildcard application discovery of FQDNs matching the wildcard does not require any additioanl commits, thereby, onboarding apps quickly for you immediate access to them.
To enable the commitless app onboarding feature, update the Prisma Access dataplane to version 11.2.3 and later.
- Wildcard Targets —Use a wildcard (for example, *.example.com) for the target. When users access sites that match the wildcard, those apps are automatically onboarded for access from ZTNA Connector for your mobile users and remote network users. For example, given a wildcard of *.example.com, when users access the app at app1.example.com, ZTNA Connector automatically creates the configuration to onboard that child app with its specific FQDN, protocol, and port.
In addition, when users access an app based on a wildcard (for example, app1.example.com based on the *.example.com wildcard), the app is discovered and automatically onboarded as an FQDN Target .
- Go to Wildcard Targets and Create Wildcard Target .
- Enter a unique Name for the target.
- Enter the Connector Group to associate with the target.
The Group must be a type of FQDN/Wildcard .
Starting with Prisma Access 5.0.1, you can select multiple connector groups for both wildcard and FQDN targets, up to a maximum of four connector groups per wildcard or FQDN target. Use the guidelines when selecting multiple connector groups per target.
- Enter the Wildcard to use with the target.
Enter it in the format of .example.com or .my.example.com (the UI implicitly adds the asterisk to the front of the wildcard). Do not allow all sites by specifying a wildcard of *.*, example.*.com, or *.com.
- Select the Protocol ( tcp , udp or both).
- ( Optional ) To enable ICMP protocol from a GlobalProtect user to a ZTNA Connector data center, select Allow ICMP Protocol .
- Select the Port to use for the app.
Enter a single port, multiple ports using commas between the ports, a range of ports using dashes, or both. Do not add spaces after the commas. Select Any port to match any ports you specify, or select Match and enter the port or ports to match.
If you have selected both under Protocol , you have to add ports to TCP Port and UDP Port
When you enter a range in TCP Port field, under Advanced Settings , icmp ping and none Probing Type gets activated.
- Enter a Probing Type of tcp ping , icmp ping , or none , depending on the protocol you select.
If you select tcp ping , select a probing port , and enter a single port. The port does not have to be in the range of ports you entered in the port and protocol area. ZTNA connector determines the reachability of the app by performing a tcp ping from the probing port to the FQDN's resolved IP address. If the ping is successful, the app is considered Up .
You can also edit the probing port, which you have added during application onboarding. When the probe port is updated, ZTNA Connector starts tcp probing application on the updated port and the application status is updated accordingly.
If you select icmp ping , ZTNA Connector performs an ICMP ping to the FQDN's resolved IP address. If a response is received to the ICMP ping, the app is considered Up .
If you select none , no probing is performed and the application is always marked as Up .
- Select Activated and Create the target.
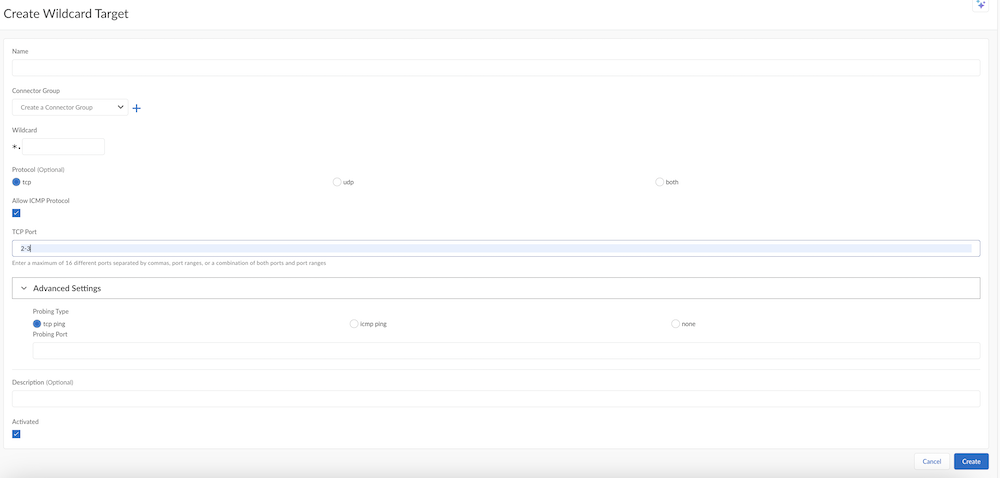
- FQDN Targets —to create a target for a single FQDN, create an FQDN target.
Starting with Prisma Access 5.0, for Connector groups having 5.0 or higher ZTNA Connector version, if an application FQDN resolves to multiple private IP addresses, the ZTNA connector performs an application probe to determine the status of all resolved IP addresses and load balances the FQDN access to multiple resolved IP addresses that have an application status of Up.
To create an FQDN target, go to FQDN Targets and Create FQDN Target . You create an FQDN target the same as you create an FQDN wildcard, substituting the FQDN wildcard with a single FQDN.
Starting with Prisma Access 5.0.1, you can select multiple connector groups per FQDN target as well as wildcard targets, up to a maximum of four connector groups per FQDN or wildcard targets. Use the guidelines when configuring multiple connector groups per target.
Applications that are discovered as the result of a wildcard target also display here. When users access sites that match the wildcard, those apps are automatically onboarded for access from ZTNA Connector for your mobile users and remote network users. For example, given a wildcard of *.example.com, when users access the app at app1.example.com, ZTNA Connector automatically adds that app to the list of FQDN targets.
After an FQDN application is discovered from a parent wildcard target, any changes to the wildcard target are not updated in the discovered application. In addition, the same discovered FQDN is not rediscovered. If the characteristics for the discovered FQDN application require updating, perform a manual update on the discovered application using these steps.

- IP Subnet —Create an IP subnet-based target to find apps based on IP subnets instead of FQDNs.
- Go to IP Subnets and Create Subnet Rule .
- Enter a unique Name for the target.
- Enter the Connector Group to associate with the target.
The Group must be a type of IP Subnet .
- Specify the data center IP Subnets to which the connector in the group provides IP routing access.
All connectors in the group provide routing access to the specified IP subnets. You can select a single IP address in the form of 10.1.1.1/32, a single subnet, or multiple subnets separated by commas. Enter a maximum of 16 subnets.
The IP subnet must be routable within the tenant's IP Fabric and the IP subnets cannot overlap with any other IP subnets in the tenant, including:
- Other IP routable subnets, including static routes configured by user on Panorama, routes advertised from the branch to the remote network, or routes advertised from the data center to the service connection.
- ZTNA FQDN Application IP subnets
- ZTNA Connector IP subnets
- Infrastructure subnet IP addresses
- Mobile Users—GlobalProtect IP address pools
- Select Activated and Create the target.
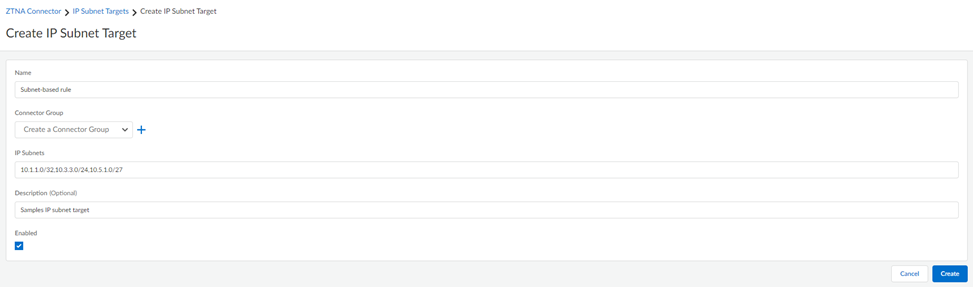
- Add the applications that are auto-discovered by ZTNA Connector to the Connector Group.
1. Set Up Auto Discovery of Applications Using Cloud Identity Engine
2. Select WorkflowsZTNA ConnectorApplication TargetsDiscovered Application Targets .
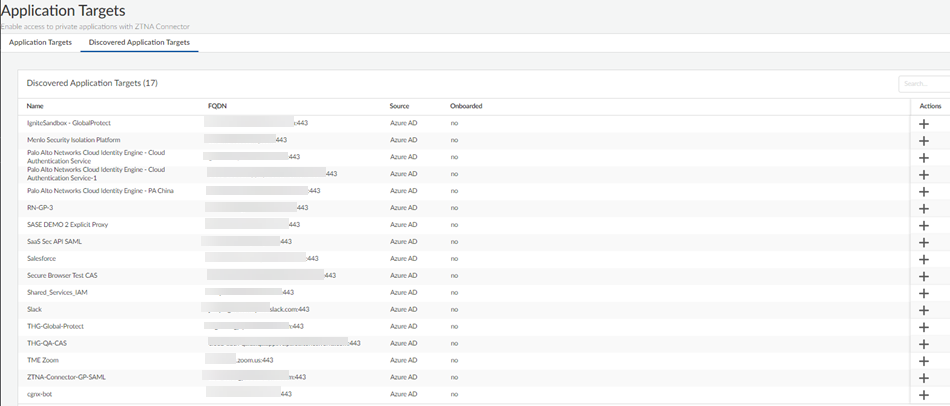
3. Click + under Actions to add the application to a Connector group.
4. Give the application a unique Name .
5. Select the ZTNA Connector Group to associate with the app.
6. Enter the Probing Type ( tcp ping , icmp ping , or none ).
- If you select tcp ping , you also select a probing port . The port does not have to be in the range of ports you entered in the port and protocol area. If you select tcp ping for the probing type, Palo Alto Networks recommends that you to use this same port for the probing port .
ZTNA connector determines the reachability of the app by performing a tcp ping from the probing port to the FQDN's resolved IP address. If the ping is successful, the app is considered Up .
- You can also edit the probing port, which you have added during application onboarding. When the probe port is updated, ZTNA Connector starts tcp probing application on the updated port and the application status is updated accordingly.
- If you select icmp ping , ZTNA Connector performs an ICMP ping to the FQDN. If a response is received to the ICMP ping, ZTNA Connector sets the status of the application as Up .
- If you select none , no probing is performed and the application is always marked as Up .
7. Select Enabled .
8. Create the application target.
- Create security policy rules to allow users access to the apps in the connectors.
- ( Optional ) View Monitor: Data Centers ZTNA Connectors to see how your ZTNA connectors and connector groups are performing.
- ( Optional ) If you encounter issues with accessing private apps using ZTNA Connector, use the ping, traceroute, and nslookup diagnostic tools to check app reachability.
Delete Connector IP Blocks
You Enable ZTNA Connector and add the required Connector IP Blocks that Prisma Access will use internally to route traffic between mobile users, remote networks and the connector VMs in your data centers. Previously, you were unable to do any changes to the Connector IP Blocks after its creation. However, now you can delete or update the Connector IP Blocks . Follow the procedure mentioned to delete or update the blocks.
Complete the following procedure to delete the Connector IP Blocks.
- Go to PanoramaCloud ServicesConfigurationService Setup and click the gear to edit the Settings .
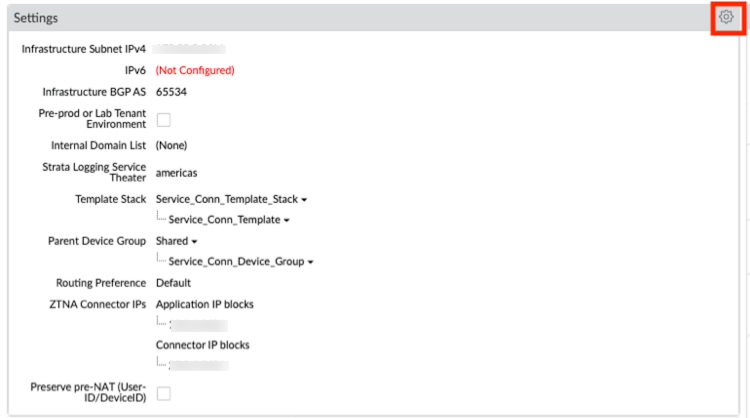
- Select Ztna Connector .
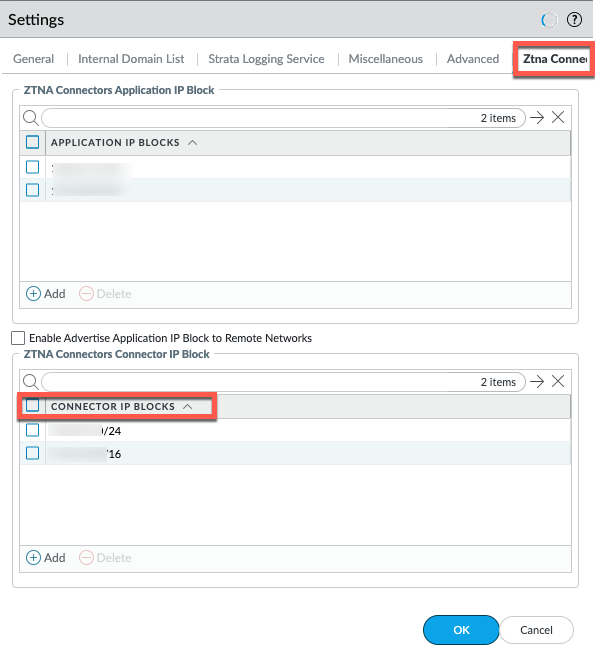
- Select the check box next to the connector block you want to delete and click OK to save the configuration.
- Select Commit and push the configuration change.
A message appears after the commit is passed.
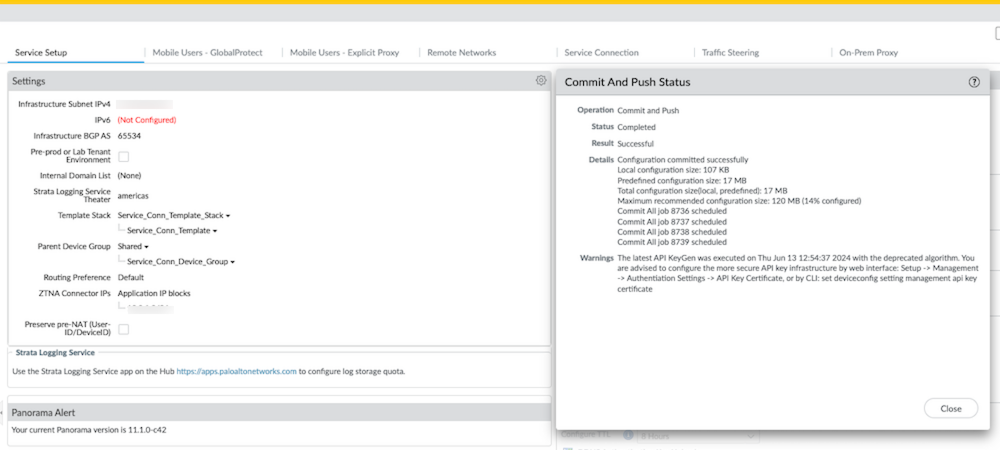
If you have created any ZTNA Connector objects such as connectors, applications, wildcards, and connector-groups before and you attempt to delete the Connector IP Block without deleting the ZTNA Connector objects, commit and push fails.
In this case, delete the ZTNA Connector objects, delete the required Connector IP Block , and then Commit and push twice. The first commit fails but the second passes.
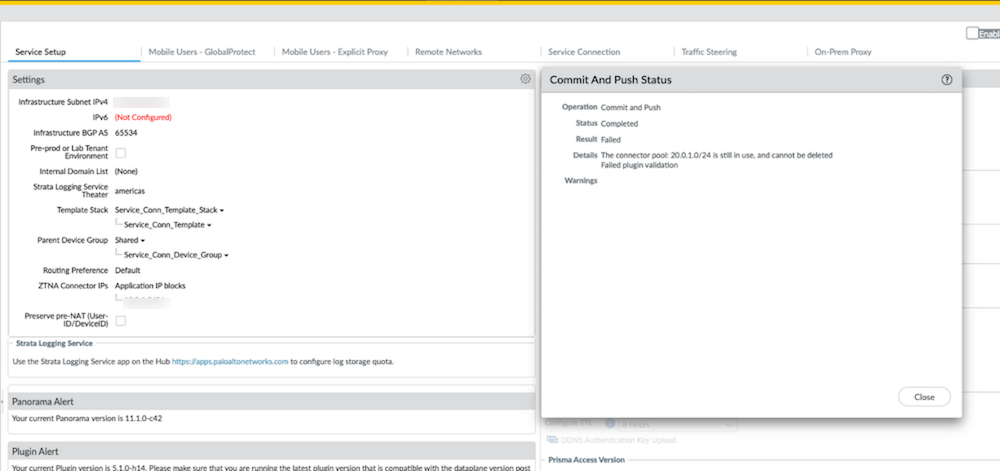
Set Up Auto Discovery of Applications Using Cloud Identity Engine
In order for ZTNA Connector to auto-discover applications that are defined in Azure Active Directory or Okta Directory, you must configure the following:
- Activate the Cloud Identity Engine in the hub and create your first tenant.
You must select Collect enterprise applications when you configure your cloud-based directory in Azure or Okta .
- Select the type of directory that you want the Cloud Identity Engine to access.
- Configure a cloud-based directory, such as Azure Active Directory (Azure AD) or Okta Directory to communicate with the Cloud Identity Engine.
The following IdPs are supported for use with application discovery:
- Azure AD
- Okta
Private AWS Application Target Discovery
In a modern networking infrastructure, thousands of private applications are deployed across on-premises and in multicloud data centers. The networking teams are not aware of the applications running in their network or within a particular subnet in the network leading to a lack of application visibility.
To provide a secure access to applications, you have to manually enter the FQDN, port, application, and be aware of the dependency this application has on the other applications.
Private application target discovery provides a way to discover the applications hosted in the cloud environment and allows those applications to be onboarded on the ZTNA Connector solution. It also connects to the cloud provider network, does the discovery, and stores it in the database. It also provides APIs to the different services to get the discovered applications. If the user has only a service connection instead of a ZTNA Connector, only application targets are discovered.
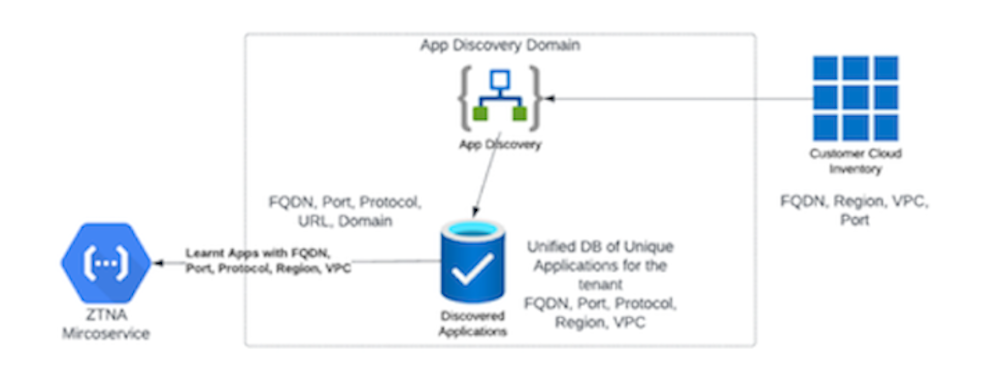
The private application target discovery identifies:
- FQDN
- Port of the application
- Protocol of the application
Make sure you activate cloud identity engine (CIE) before you enable the private application discovery feature.
Complete the following steps to add a cloud account, an IAM role in AWS, and discover the target applications.
- Get the CloudFormation template (CFT) to add a cloud account.
- Navigate to Application Targets ( WorkflowsZTNA ConnectorApplication Targets ).
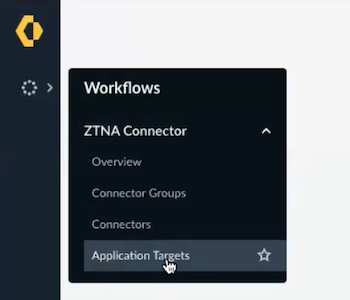
- On the Application Targets page, select Discovered Targets , and then select Manage Target Discovery Accounts .

- Select Enable Target Discovery , and then select Enable .

- On the Manage Target Discovery Accounts page, select Add Cloud Account .
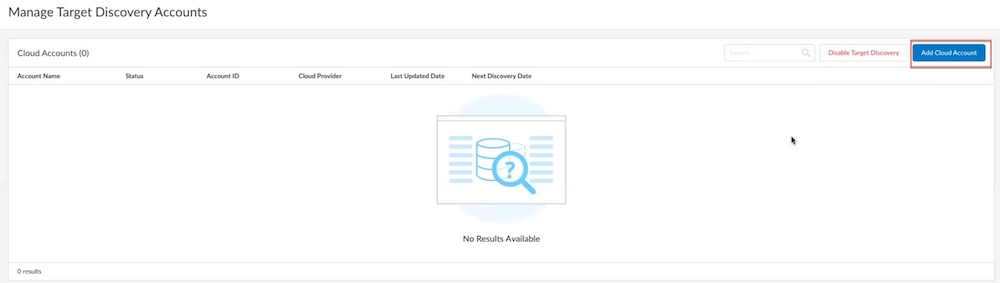
- Add the Account Name , and click the check box under Cloud Account Enabled . Add the AWS Account ID , and click Download IAM Role CFT to download the file.
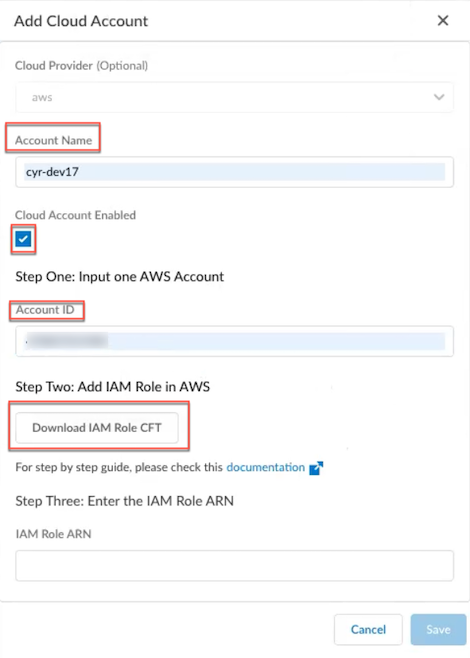
- Create the IAM role in AWS.
- Navigate to the AWS application, select your account, and Sign in .
- Navigate to CloudFormationStacksCreate stackWith new resources (standard) to create the stack.

- On the Create stack page, under Prerequisite-Prepare template , select Choose an existing template . Under Specify template , select Upload a template file . Upload the previously downloaded file in Step 1, and select Next .
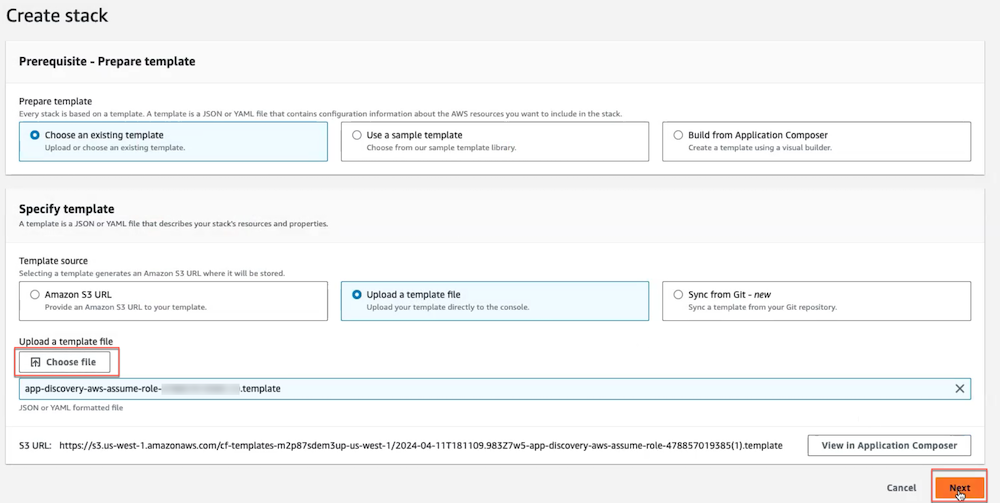
- Add Stack name , AppDisRoleName , and select Next .
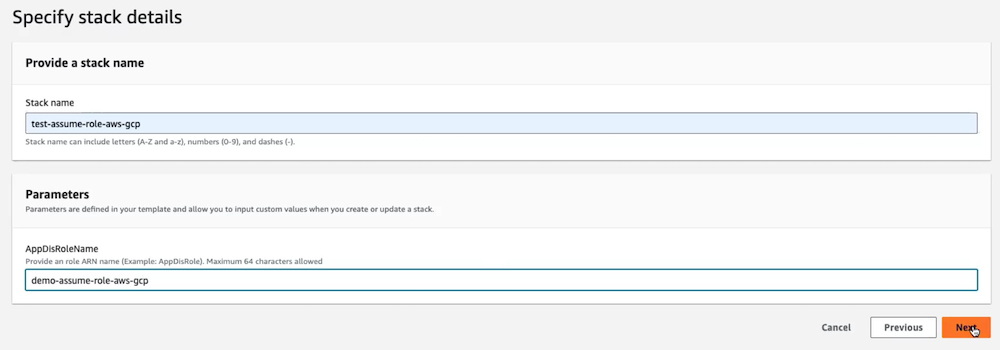
- On the Configure stack options page, don't make any updates, and select Next .
- Review the changes. Select the check box under Capabilities to acknowledge the creation of IAM resources with custom names, and then select Submit .

- Navigate to IAMRoles and search for the role name you defined. Select the role name and copy the ARN for the role.

- Paste the ARN in the IAM Role ARN text field, and then select Verify . When the ARN is verified, select Save .
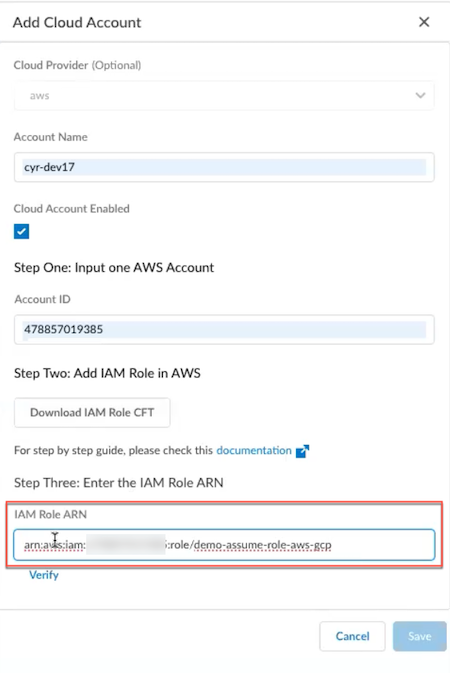
If you add a wrong ARN in the IAM Role ARN text field, the verification fails and an error message appears.
After you add the account, you can see the status, account ID, and other details. The refresh period for the discovery is 24 hours. You can also add multiple accounts to the same tenant.
- To identify the discovered apps, select Discovered Targets . You can find the list of identified applications under Discovered Application Targets .

- ( Optional ) Delete the cloud account.
To delete your cloud account and add a new one without disabling target discovery, follow this procedure. However, these steps are mandatory if you want to disable target discovery functionality.
- Under Manage Target Discovery Accounts , click the Account Name that you want to delete.
- Disable Cloud Account Enabled , and select Update . When the account is updated, select Delete . The account is deleted.
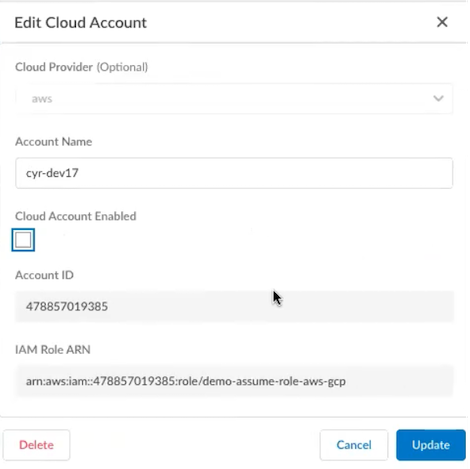
- ( Optional ) Disable target discovery.
Make sure all the cloud accounts are deleted before you disable the target discovery.
- Select Disable Target Discovery , and then select Disable Target Discovery .
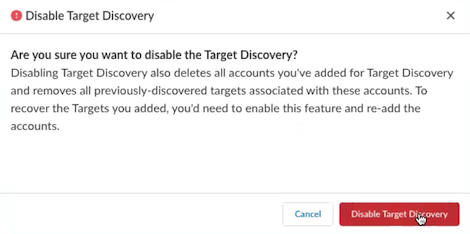
Security Policy for Apps Enabled with ZTNA Connector
ZTNA Connector does not enforce policy; it seamlessly extends your existing Prisma Access security policy to the applications it enables for Prisma Access. This means you can use a common policy across all your applications and data centers, and you don't need to author your security policy separately for apps onboarded to ZTNA Connector.
However, as part of setting up ZTNA Connector, you do need to make sure that your security policy:
Allows traffic between Prisma Access and ZTNA Connector
For this, follow the ZTNA Connector Requirements and Guidelines to make sure that ZTNA Connector can connect to Prisma Access.
Users can access the applications behind the ZTNA Connector
To ensure your users can access ZTNA Connector apps, follow the steps here for the interface you're using to manage Prisma Access.
After you onboard apps to ZTNA Connector, you should set up policy rules to allow and control access for those apps. The procedure to create and apply policy differs on whether your apps are defined by
wildcards
,
IP Subnets
, or
FQDNs
.
Wilcard-based apps ( ( SettingsZTNA ConnectorApplication TargetsWildcard Targets ) require that you create a custom URL category; however, that type of category only enforces policy for HTTP and HTTPS traffic, and other traffic (such as SSH) isn't allowed. For this reason, you need to temporarily allow access to all apps by allowing traffic to the ZTNA Connector Application IP blocks.
After ZTNA Connector learns the FQDNs that are based on the wildcards, you can disable the policy that allows Application IP Block traffic and apply policy enforcement based on the learned FQDNs.
- Create a policy to allow the IP addresses for the ZTNA Connector Application IP Blocks.
- From the ZTNA Connector UI, go to WorkflowsPrisma Access SetupPrisma AccessPrisma Access Setup and make a note of the Application IP Blocks under ZTNA Connector IPs.
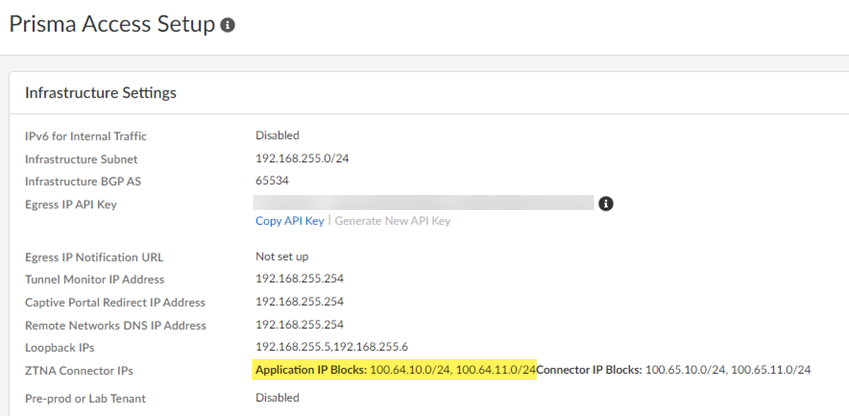
- Go to ObjectsAddresses and Add address objects based on the IP addresses you retrieved.
- Go To ObjectsAddress Groups and Add the address objects you created to an address group.
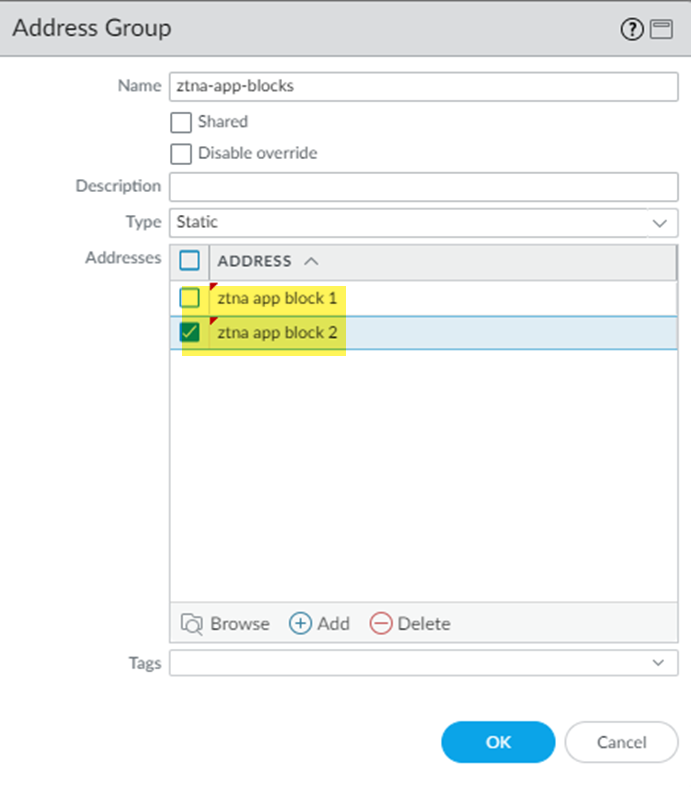
- Go to PoliciesSecurity Pre Rules and Add a Security policy to allow access to all application IP address blocks, specifying the Address Group you created in an earlier step.
Adding this Security policy allows all traffic from wildcard-based app traffic to be passed while ZTNA Connector discovers the apps based on wildcards. Without the rule to allow the Application IP Blocks, users can't access wildcard-based apps.
You can leave this policy in place until ZTNA Connector discovers the wildcard-based apps. Then, you can choose to disable this policy and add Security policy rules for each of the discovered apps.

- After ZTNA Connector has discovered the apps based on wildcards, configure a Security policy for the apps that you added using FQDNs.
- Go to WorkflowsZTNA ConnectorApplication TargetsFQDN Targets and make a note of the FQDNs used by the apps.
- Create an Address object for the FQDN ( ObjectsAddresses ).
Select either the Mobile_User_Device_Group or the Remote_Network_Device_Group , depending on whether mobile users or users at branch sites will be accessing the private apps behind ZTNA Connector.
- Add an address object with the Type of FQDN and enter the FQDN of the discovered application.
Enter the FQDNs for the FQDN targets.
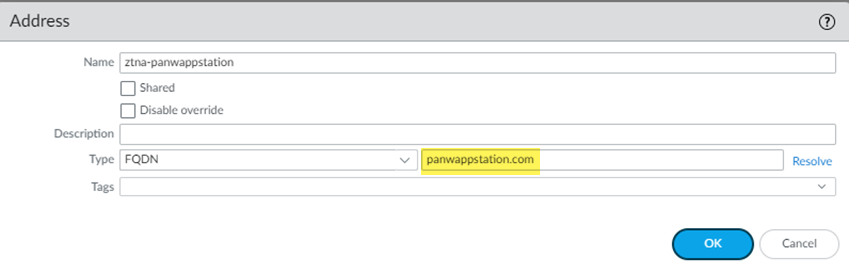
- Go to PoliciesSecurityPre Rules and Add a Security policy to allow access to the discovered apps.
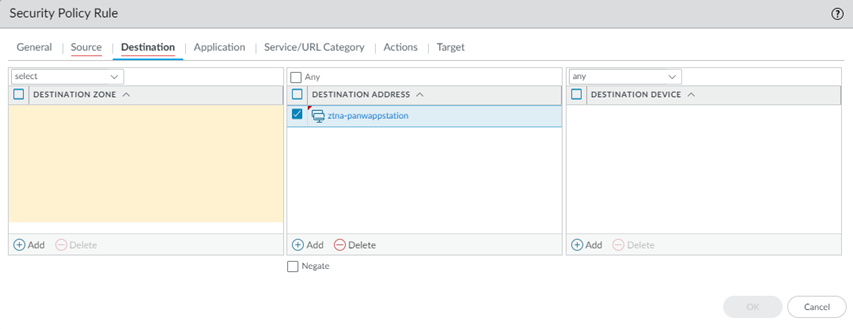
- Commit and Push your changes.
- ( Optional ) After you have created the Security policy based on FQDNs, remove the policy based on the IP application blocks.
If you created ZTNA Connector application targets based on IP subnets ( SettingsZTNA ConnectorConnectorsApplication TargetsIP Subnets ), complete the following steps to allow access to the apps.
- Go to WorkflowsZTNA ConnectorApplication TargetsIP Subnets and make a note of the IP subnets used by the apps.
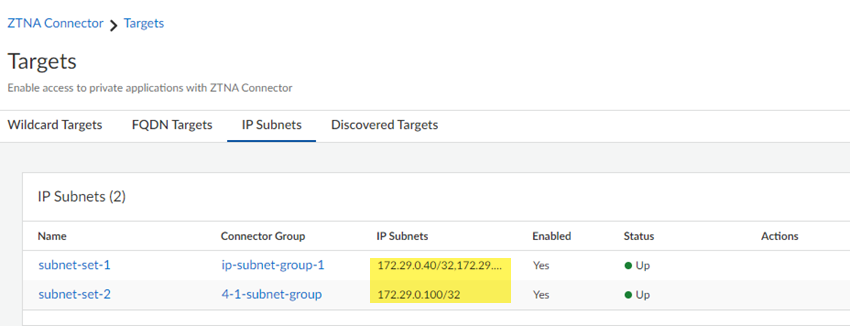
- Create a policy to allow the IP addresses for the IP subnets used for the apps.
- Go to ManageConfigurationNGFW and Prisma AccessObjectsAddressAddresses and Add address objects based on the IP addresses you retrieved.

- Go To ObjectsAddress Groups and Add the addresses you created to the address groups.

- Go to PoliciesSecurityPre Rules and Add a Security policy to allow access to the IP subnets for the apps, specifying the Addresses you created in an earlier step.
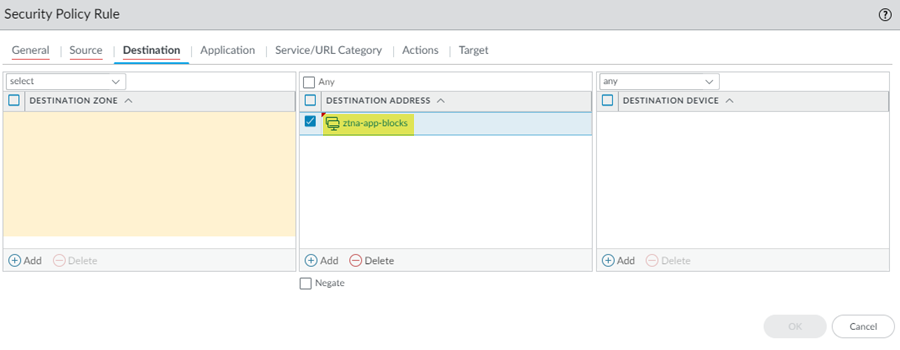
- Push Config to save and push your configuration changes.
If you have added targets based on FQDNs ( SettingsZTNA ConnectorConnectorsApplication TargetsFQDN Targets ), create an address object and a Security policy to allow access to the apps by completing the following steps.
- Configure a Security policy for the apps that you added using FQDNs.
- Go to WorkflowsZTNA ConnectorApplication TargetsFQDN Targets and make a note of the FQDNs used by the apps.
- Create an Address object for the FQDN ( ObjectsAddresses ).
Select either the Mobile_User_Device_Group or the Remote_Network_Device_Group , depending on whether mobile users or users at branch sites will be accessing the private apps behind ZTNA Connector.
- Add an address object with the Type of FQDN and enter the FQDN of the discovered application.
Enter the FQDNs for all discovered apps.
- Optional Go to ManageConfigurationNGFW and Prisma AccessSecurity ServicesSecurity PolicyPre Rules and Add a Security policy to allow access to the discovered apps.
- Push Config to save and push your configuration changes.
Onboard the ZTNA Connector VM in Your Data Center
After you configure your Connector groups, connectors, and application targets within Prisma Access, you must deploy the Connector VM in your data center. To simplify Connector onboarding, deployment templates for each data center environment are available from the Palo Alto Networks Customer Support Portal or from the cloud provider marketplace. The template you use depends on whether you’re planning to use a
one-arm deployment or a two-arm deployment
.
Supported ZTNA Connector Deployments
ZTNA Connector initiates the connection to the Prisma Access public IP address in the cloud, and you don't need to define any ingress firewall security rules. However, because ZTNA Connector initiates the connection, you'll need to add egress rules to allow ZTNA Connector access to the cloud controller and the IPSec connection to the Prisma Access dataplane. ZTNA Connector initiates the connection to the Prisma Access public IP address in the cloud. For this reason, you need the following egress rules so that ZTNA Connector can create an IPSec tunnel to Prisma Access:
- Internet Facing —Allow egress for HTTPS (TCP 443) and IKE/IPSec (UDP 500 and 4500)
- Data Center Facing —Allow egress application ports.
For example, allow egress application ports HTTP (80) and HTTPS (443). These example ports are TCP ports. If your data center uses different ports, allow those ports instead.
You can deploy the Connector VM in the following deployment topologies:
- One-Arm Deployment
One-arm deployments are only supported in cloud native environments such as AWS, Azure, or GCP. For on-premise deployments such as ESXi or a Kernel-based Virtual Machine (KVM) or Microsoft Hyper-V, use the two-arm deployment.
In this deployment, your ZTNA Connector is on a data center subnet that is private, with access to the internet through a data center router. Access to applications can be either locally on the same subnet, or through the data center router.
The following diagram shows a sample ZTNA Connector network deployment using a one-arm deployment.
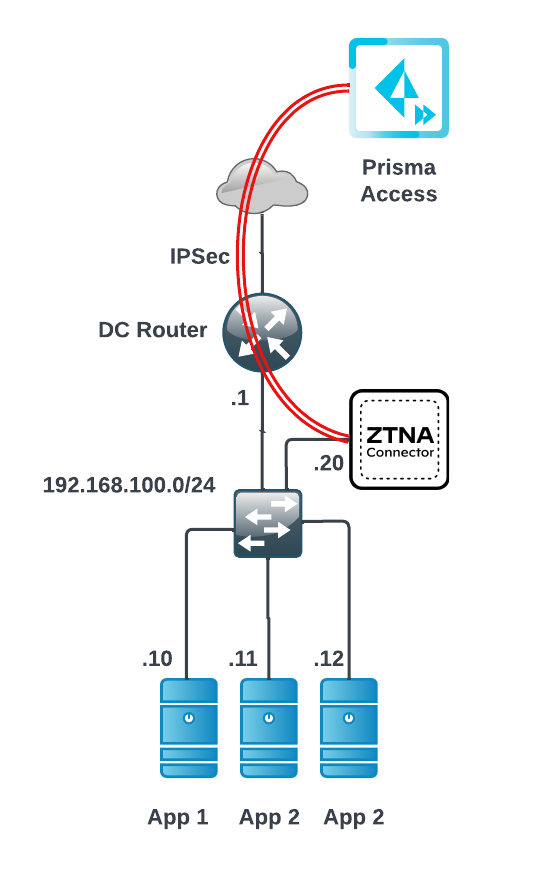
- Two-Arm deployment
If you want more control over your ingress and egress security rules, or if you have an on-premise VM deployment, you can use a two arm deployment, where one interface faces the internet and one faces the data center.
When setting up IP addresses on a two-arm connector, make sure that you have set up the IP address assignments for ZTNA Connector correctly before you power on the VM. For example, the following sample diagram uses 192.168.10.10 and 192.168.10.20 IP addresses. Given these sample addresses, set up the ports on ZTNA Connector for 192.168.10.10 and 192.168.100.20, or Prisma Access cannot reach the apps in the data center through ZTNA Connector. 192.168.10.10 and 192.168.100.20 are sample IP addresses and you do not have to use these IP addresses for your deployment to function.
The following diagram shows a sample ZTNA Connector network deployment using a two-arm deployment.
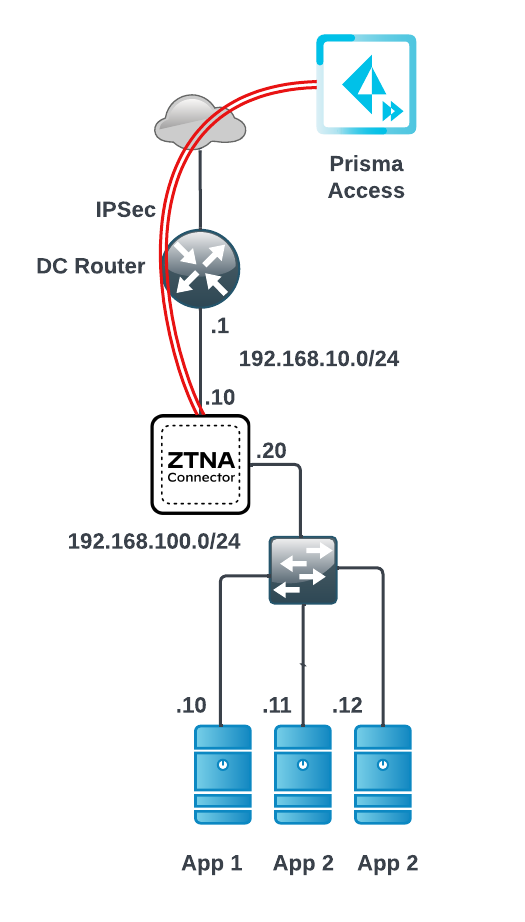
Monitor ZTNA Connector
All of the ZTNA Connector components provide clear status information, logs, and diagnostic tools to help you troubleshoot any issues that arise. Use the following tools to monitor your ZTNA Connector deployment.
- View the status of your applications and Connectors from within the Prisma SASE platform.
- Select WorkflowsZTNA ConnectorApplication Targets and verify that the Status of all Application Targets is Up .
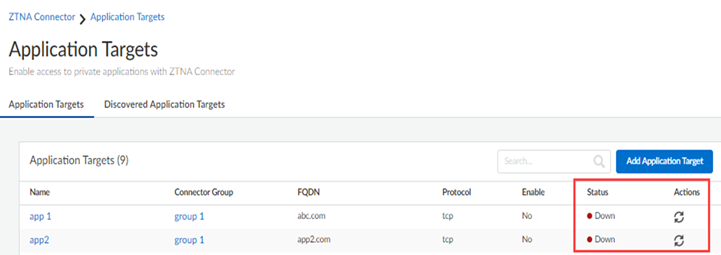
If the status shows Down , the Connector can't reach your application. After you fix the issue with the application, click the refresh status button in the Action column and verify that the Status changes to Up (the status automatically refreshes once per minute).
The status is also Up if the application is reachable from ZTNA connector (using the last successful DNS resolution result) but the DNS resolution of the Application FQDN fails from the ZTNA connector.
- Select WorkflowsZTNA ConnectorConnectors and make sure the Status of all Connectors is Up .
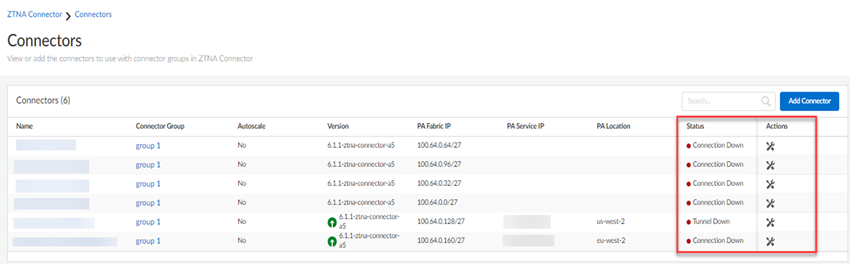
If the Status shows Tunnel Down , it indicates that the IPSec tunnel between the Connector VM and Prisma Access is down. If the Status shows Connection Down it indicates that the Connector VM is down. Click the diagnostics icon
![]()
to launch a remote shell connection to the Connector to troubleshoot the issue. You can run a ping , TCP Ping , traceroute , nslookup , or dump overview to help you diagnose the connectivity issue.
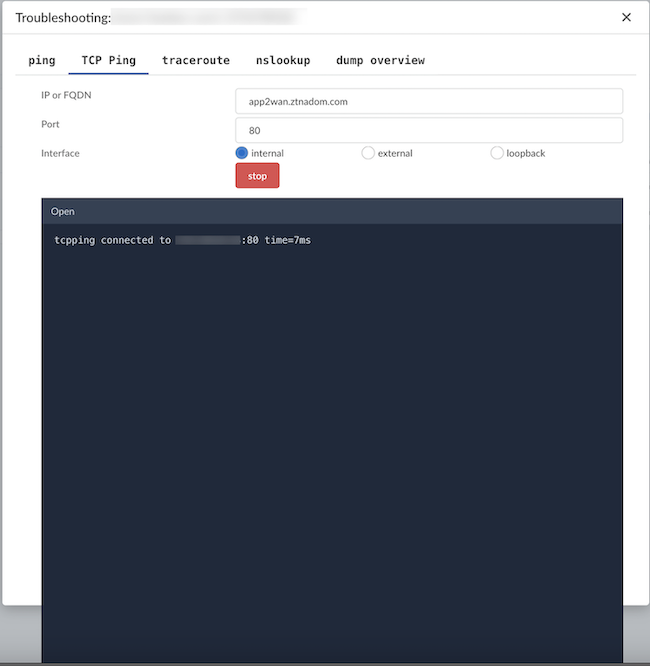
Preserve User-ID Mapping for ZTNA Connector Connections with Source NAT
You can use ZTNA Connector in Prisma Access to secure private applications. To limit access to the applications based on User-ID, you can deploy a Next-Generation Firewall (NGFW) in the data center or headquarters location where the private applications are located; then, configure policy rules on the NGFW based on User-ID mapping.
If your deployment uses NGFW in the data center or headquarters location where the private applications are located, and ZTNA Connector does source NAT, the NGFW can't retrieve the User-ID mapping because the NGFW can't retrieve the user device's source IP address. If the NGFW can't retrieve this source IP address, it can't enforce the zone-based Security policy rules you have created on it based on User-ID mapping.
ZTNA Connector has the following responsibilities to enable User-ID within the NGFW secured data center:
- Provide a secure connection from the NGFW to the regional ZTNA Connector Tunnel Terminators (ZTTs) for the NGFW to connect to its User-ID redistribution agent.
- For FQDN applications, with the health probe set to tcp ping , application probe the data center applications to determine if the application is up and reachable from this individual connector.
- Optionally, encapsulate user-to-app post-NAT data center IP address packets within a Generic Network Virtualization Encapsulation (Geneve) packet including the original source IP address.
The following diagram illustrates the network elements that provide the source IP address to User-ID mapping to the NGFW and deliver Geneve encapsulated data packets including the original Prisma Access source IP address option to the NGFW. These elements enable the NGFW to effectively enforce security policy rules based on User-ID.
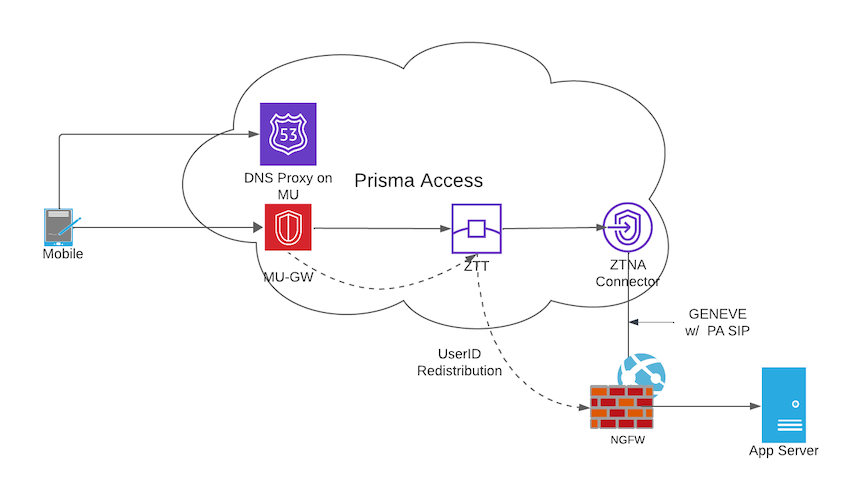
Restrictions:
- User-ID Support with ZTNA Connector is only available post these versions:
- NGFW version: 11.2.0 version and later
- ZTNA Connector version: 6.2.4-ztna-connector-b3 version and later
- ICMP probing isn't supported for FQDN targets, which are attached to User-ID based connector groups.
- NGFW service route configuration for an User-ID agent only supports interfaces with static IP addresses. If the NGFW interface is configured to be in a dynamic mode (IP address assignment through DHCP), the User-ID channel from NGFW to ZTT can't establish support for the ZTNA Connector User-ID. To resolve this issue, set up static IP addressing on the NGFW interface to support the User-ID agent configuration.
- Diagnostic tools like ping and traceroute are not supported for User-ID based connectors.
This procedure assumes that you have the following network configurations in place:
- You have deployed an NGFW at the headquarters or data center where the private apps are located.
- You have created trust and untrust zones to match the zones in Prisma Access and applied security policy rules based on those zones on the NGFW. These security policy rules include the User-ID enforcement.
To make sure that your network distributes the User-ID mapping to the headquarters or data center, complete the following steps, which enables NGFW to enforce the security policy rules based on the User-ID mapping it learns from GlobalProtect.
- Create a Connector Group, enable Preserve User ID , and add the Connectors .
- Deploy and on-board the connectors in your data center and check if the tunnels are up and functioning.

- Go to Connector and make a note of the User ID Redistribution Agent IP and User ID Port Range for your connector. You require these IP addresses and port ranges to configure User-ID Redistribution agents on NGFW.
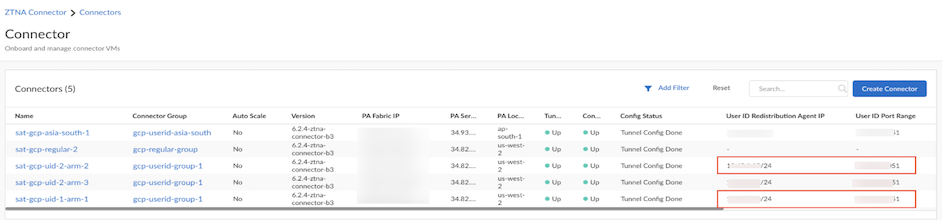
Also, go to Connector Groups and make a note of the Anycast IP . This IP address is required to configure NGFW security policy rules to allow TCP application probing from this source IP address.
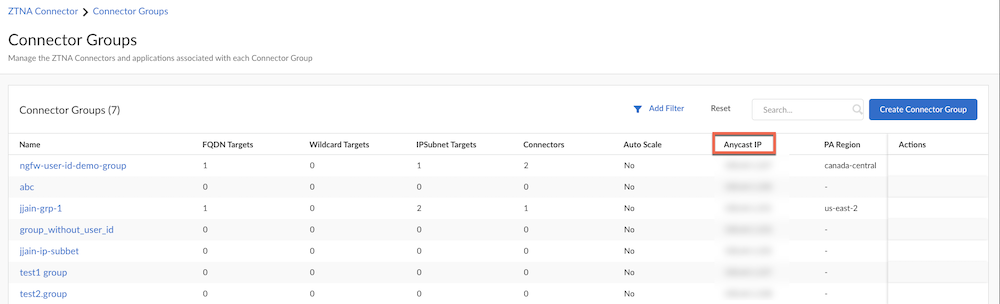
- Enter Pre-NAT Identification parameters on the NGFW.
- Log in to the NGFW UI, and go to NetworkZones and Add two zones (zone for interface connecting ZTNA Connector and zone for interface connecting application server) or select the existing one.
- Select the following Pre-NAT Identification parameters for the zone with interface connecting ZTNA Connector:
- User-ID —Preserves the mobile user User-ID mapping used before the IP addresses were NATed. Enable this if you're using User-ID in the security policy rules.
- Source Lookup —Enables you to match the original Source IP address received from GlobalProtect.
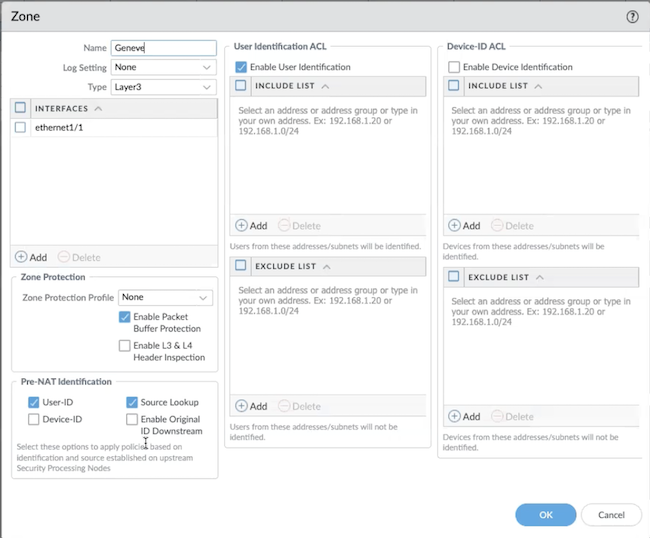
- For the interface connecting to the application server zone, you don't have to select any Pre-NAT Identification parameters.
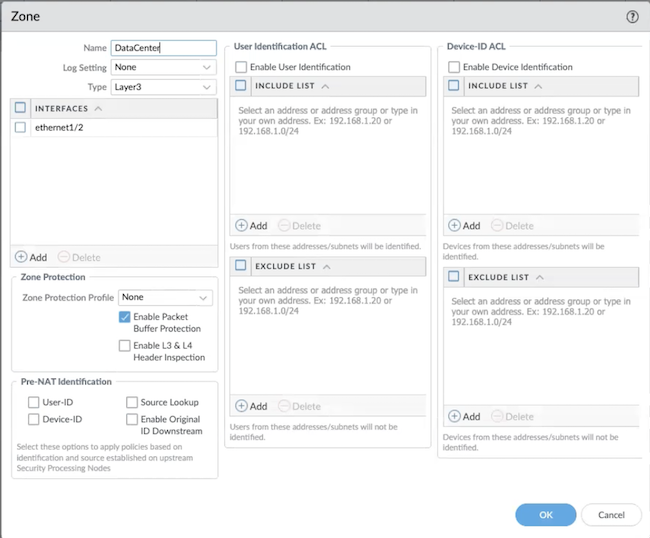
- OK and Commit your changes.
- Add the IP addresses to the interfaces.
- Go to NetworkInterfacesEthernet .
- Select the interface that connects to the ZTNA Connector and the application server, and configure them. Add the Interface name , and the Interface type to Layer 3 .
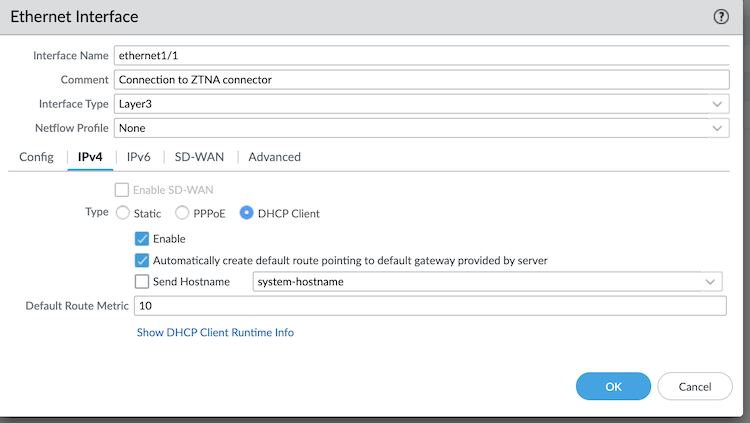
- For the Ethernet interface connected to the application server, deselect the Automatically create default route pointing to default gateway provided by server check box.
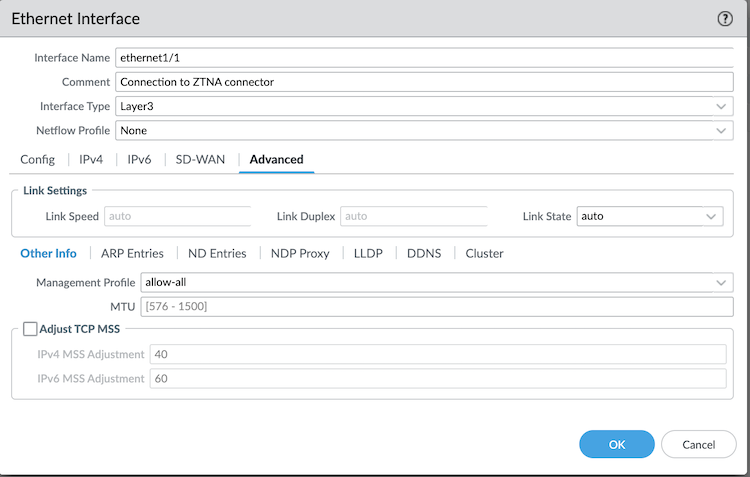
- Go to Interfaces and add the static IP addresses to the interfaces. Add the ZTNA Connector facing interface into the ZTNA Connector zone (Geneve) and the application server facing interface into the application server zone (Data Center).
- Create a command-line interface (CLI) session with the NGFW and enter the following command in the configuration mode:
set deviceconfig setting preserve-prenat-feature yes
If you need to disable this feature in the future, enter set deviceconfig setting preserve-prenat-feature no.
- When setting up User-ID redistribution, you must add a redistribution agent entry for each port within the specified range from step 3 User ID Port Range . For example, if the range is 55050-55055, you have to configure six entries, aligning with the number of ZTNA Connector regions you have deployed.
For each port in the range, select one IP address from User ID Redistribution Agent IP in step 3 for the Host field. If you want redundancy at the ZTNA Connector level, you can choose two addresses from User ID Redistribution Agent IP and apply the full port range for both IP addresses. Alternatively, all the ports on all the IP addresses in User ID Redistribution Agent IP can be configured.
Add a redistribution agent for each of the ports in the range User ID Port Range with one or more of the addresses in User ID Redistribution Agent IP .
- On the NGFW UI, go to Device and then select Data Redistribution .
- Click Add , add the Name and select the Enabled check box.
- Select Host and Port , add User ID Redistribution Agent IP from step 3 in Host , and add User ID Port Range copied in step 3.
- Enable the IP User Mappings check box and click OK .

- Commit to save the configuration.
- On the NGFW UI, go to DeviceSetupServicesService Route ConfigurationCustomizeUID agent .
- Under IPv4 , select the SOURCE INTERFACE as Ethernet1/1 (interface facing the ZTNA Connector), and add the SOURCE ADDRESS .
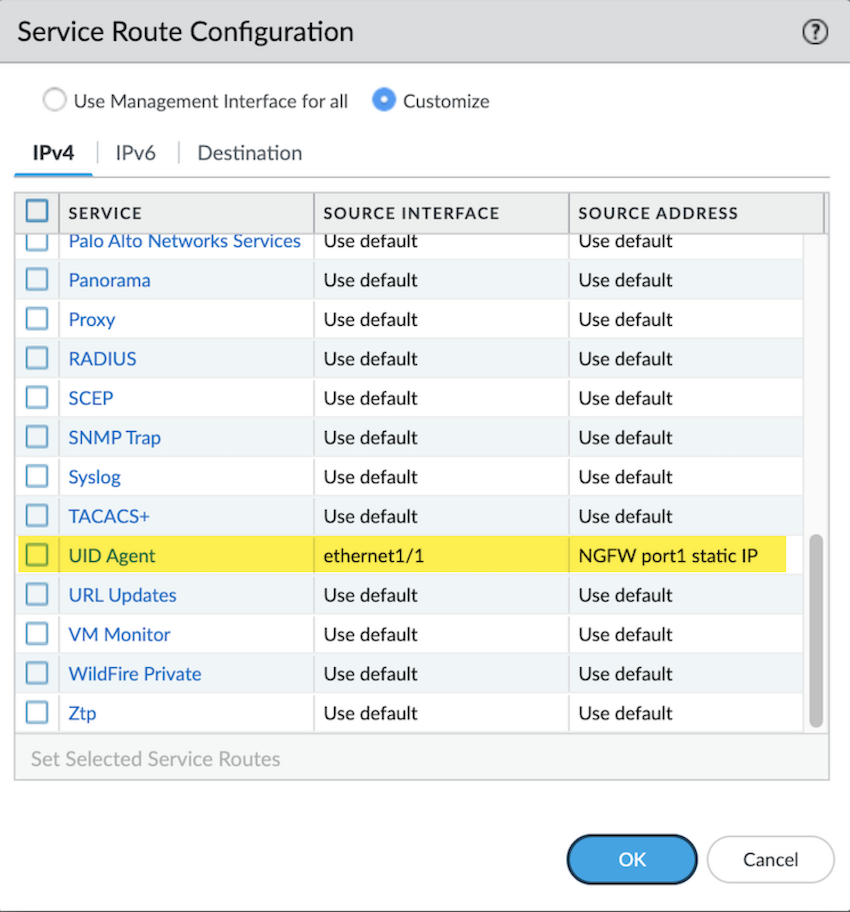
- Add a security policy rule to enable TCP packets with the source IP address. Add the source IP address, which is the Anycast IP address copied in step 3 and click OK .
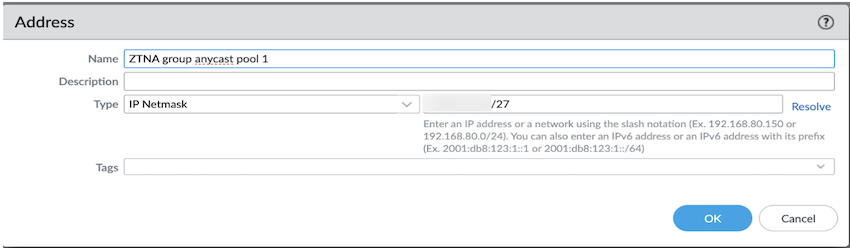
- ( Optional ) Enable TCP Probing.
- To create a FQDN Target:
- Go to WorkflowsApplication TargetsFQDN Targets and click Create FQDN Target .
- Add a Name and select the Connector Group .
- Enable tcp , specific , tcp ping , and Enabled . Add the Port and click Create .
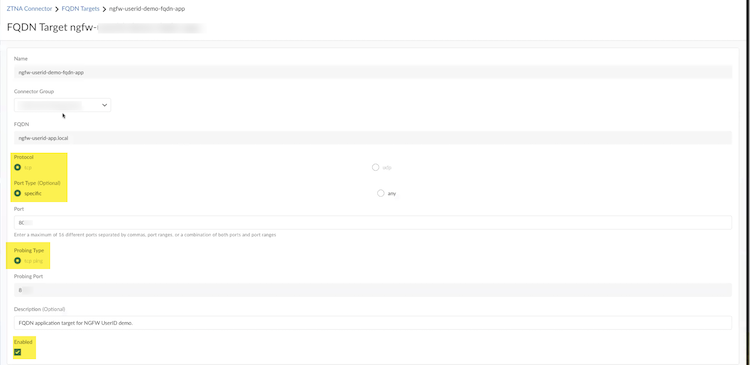
- On the NGFW UI, go to Policies and define the User-ID based policies.

Configure Dynamic Privilege Access Settings
For IT Enterprise and IT Enabled Services (ITES) companies that need to control which users have access to their customer projects, Dynamic Privilege Access provides a seamless, secure, and compartmentalized way for your users to access only those projects that they are assigned to. These companies typically assign several customer projects to employees and provide siloed access to these projects so that so that an authorized user can access only one customer project at a time.
What Is Dynamic Privilege Access?
Dynamic Privilege Access is a feature in Prisma Access that provides dynamic privileges for your users based on the workflow or project that your users select in the Prisma Access Agent. Your users can have dynamic privileges based on the combination of the user group and IP pool that is assigned to a project. This unique combination defines a project. With Dynamic Privilege Access, you can isolate resources in your network so that they are only accessible to your users according to the projects they are assigned to.
A new predefined role called the Project Admin is available on Prisma Access to allow project administrators to create and manage project definitions. Project administrators have the ability to map projects to select Prisma Access location groups, and create IP address assignments using DHCP based on the project and location group. Project administrators can manage only the projects that they are assigned to in Strata Cloud Manager.

When your end users log in to a Prisma Access Agent that is enabled for Dynamic Privilege Access on their managed devices, the following workflow takes place:
- Your end user selects a project that they are assigned to (for example, Project 1).
- Their identity is authenticated in Cloud Identity Engine, which maps the user's user group to the project.
- Upon successful authentication, and their user group matches the project criteria set up by the project admin, the user has access to resources in the network through project-specific settings for Project 1 and security rules that provide security posture and access control on a per-project basis. The security infrastructure applies security rules to restrict user access to only the resources and applications belonging to that project. Access to resources and applications from other projects isn't allowed.
- When the user switches to a different project (for example, Project 2), they are signed out of the previous project (Project 1). They can then access the resources for the second project based on the project-specific settings and security rules for that project.
You can gain visibility into your Prisma Access Agent deployment by using Strata Cloud Manager to monitor your users' project activity, and view the service consumption and security posture in your network.
Enable Dynamic Privilege Access for Prisma Access Through Common Services
With Dynamic Privilege Access, IT administrators can map end users to several customer projects. An authorized user is allowed access to only one customer project at a time.
Dynamic Privilege Access is an optional feature during the activation of a new Prisma Access tenant. After you enable this feature and the tenant is activated, DPA is set for the life of the tenant, and you can't disable it.
The option to enable DPA is available only once during the first activation of a new Prisma Access tenant. After the tenant is activated, the option is hidden for all the following activations, including add-ons and renewals. It's not available for existing tenants.
- Contact your Palo Alto Networks account representative to activate this functionality for your tenant.
- Activate the license for your Prisma Access (Managed by Strata Cloud Manager).
- Ensure to allocate licenses , plan your service connections , and add additional locations accordingly.
- Enable available add-ons .
- Select the check box for Dynamic Privilege Access .

- Agree to the Terms and Conditions .
- Activate Now . The products and add-ons that you're activating (such as Prisma Access or Strata Logging Service) are now provisioned. As the subscriptions are activating, the progress status will display. When the process is complete, the tenant status displays as Up . You now have a tenant provisioned with instances of the products that you purchased. The tenant has one user — the account that you used when you began this process.
- To complete the remaining product setup, you must access the products you purchased and perform any required post-installation configuration. For information about your products, see:
- Open APIs
- Strata Logging Service
- Prisma Access (Managed by Strata Cloud Manager)
- Cloud Identity Engine Getting Started Guide
- Add user access and assign roles .
Provide access to users as Project Admin based on projects.
Authorize User Group Mapping in Cloud Identity Engine for Dynamic Privilege Access
Before you begin, make sure that you have completed the following prerequisites:
- Contact your Palo Alto Networks account representative to activate the Dynamic Privilege Access functionality.
- Activate the Cloud Identity Engine and create your first tenant.
- Set up the Cloud Identity Engine.
In this workflow, we have used Azure as the IdP. You can also use Okta as your IdP.
- From Strata Cloud Manager, open the Cloud Identity Engine app associated with your tenant.
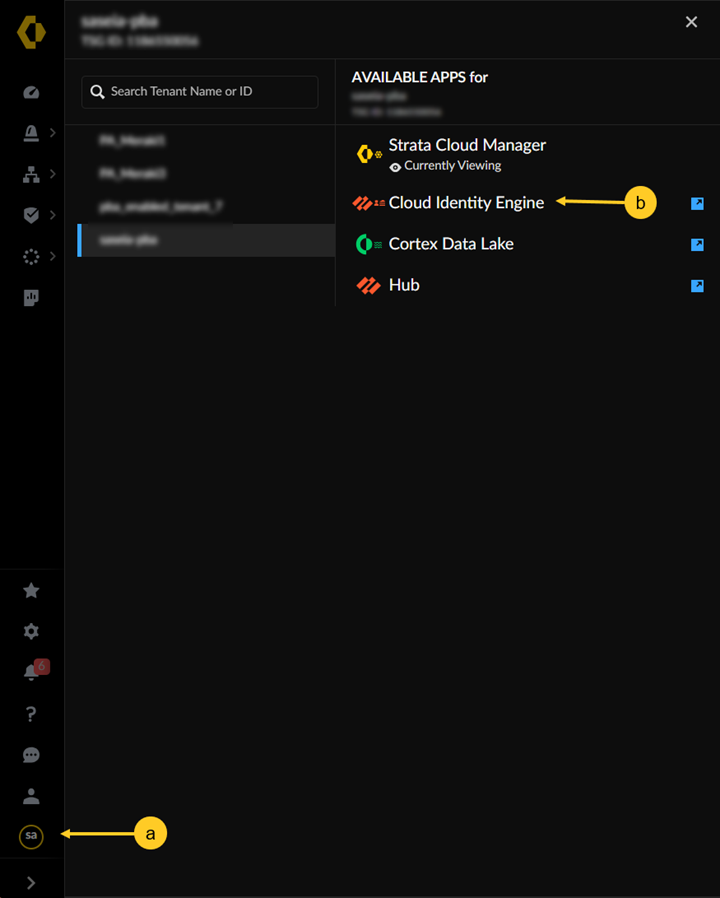
- Add an Azure directory or an Okta directory as IdP for mobile users.
- Download the SP Metadata in the Cloud Identity Engine app.
- Go to AuthenticationAuthentication TypesAdd New Authentication Type .
- Set Up a SAML 2.0 authentication type.
Select Dynamic service provider metadata .
- Download SP Metadata .
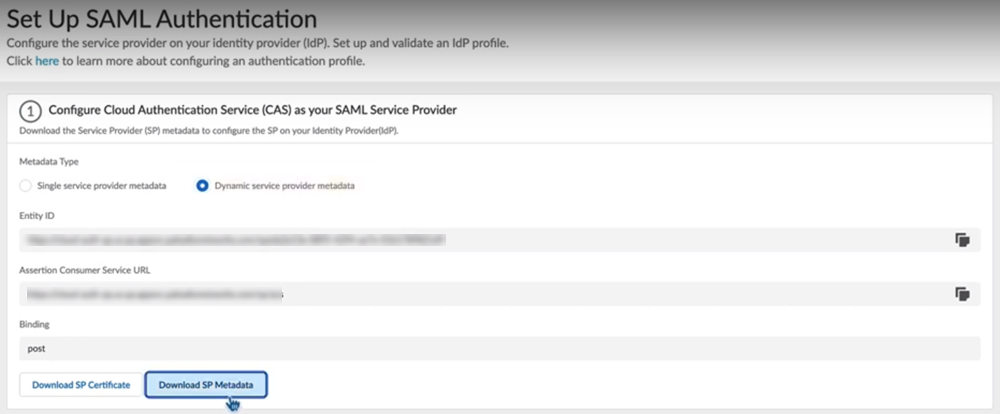
- Log in to the Azure Portal and select Azure Active Directory .
Make sure you complete all the necessary steps in the Azure portal.
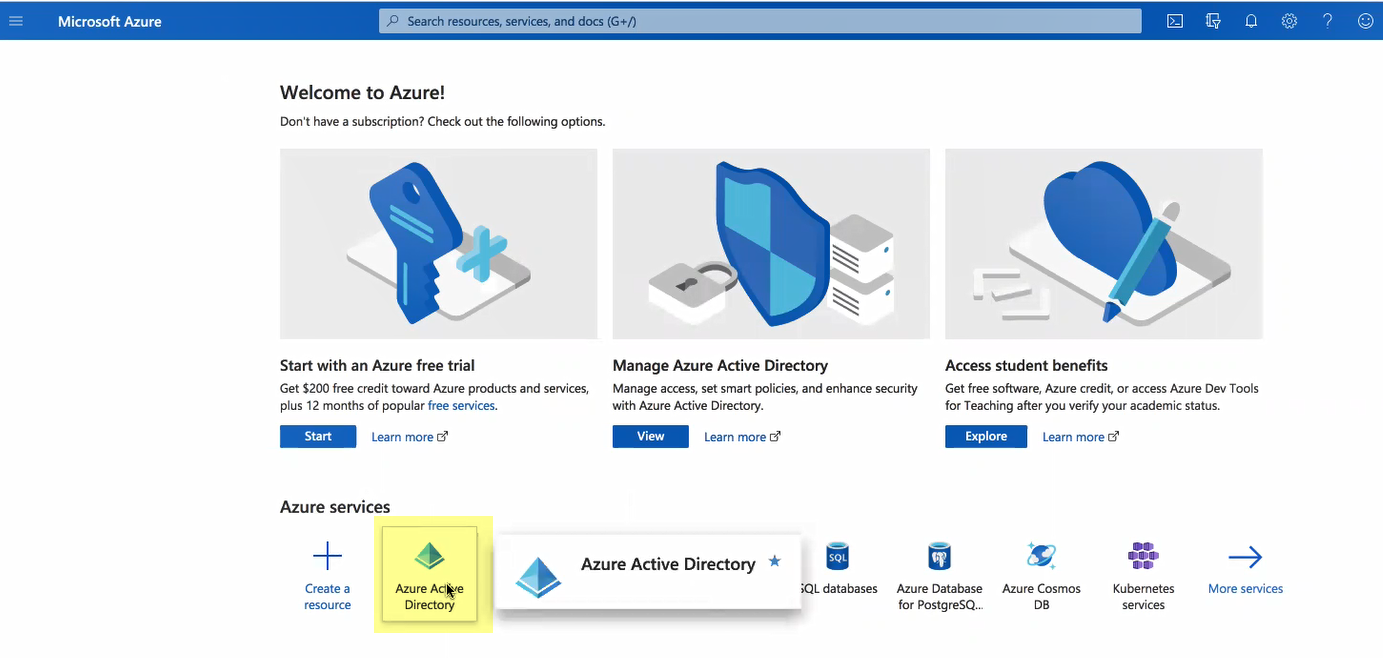
If you have more than one directory, Switch directory to select the directory you want to use with the Cloud Identity Engine.
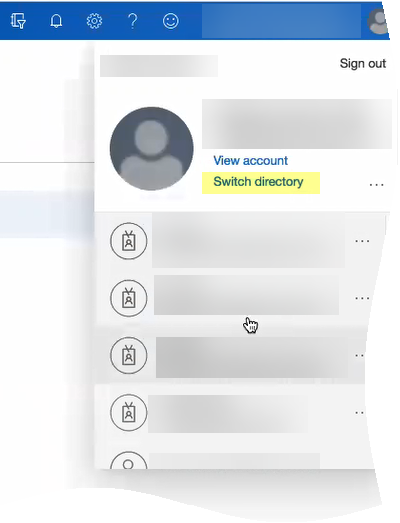
- Select Enterprise applications and click New application .
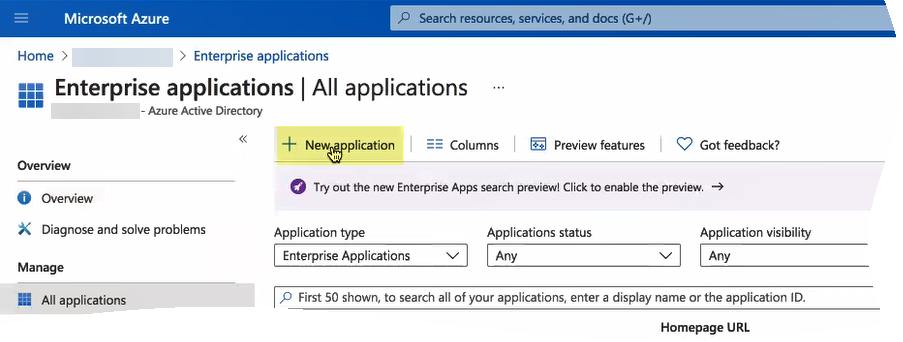
- Search for Palo Alto Networks Cloud Identity Engine - Cloud Authentication Service and create the Azure Active Directory (AD) single sign-on integration.
Customize the app name if required while creating the application.
- After the application loads, select Users and groups , then Add user/group to Assign them to this application.
Select the users and groups you want to use the Azure IdP in the Cloud Identity Engine for authentication.
Be sure to assign the account you're using so you can test the configuration when it's complete. You may need to refresh the page after adding accounts to successfully complete the test.
- Set up single sign-on then select SAML .
- Upload Metadata File by browsing to the metadata file that you downloaded from the Cloud Identity Engine app in step
3.c
and click Add .
- After the metadata uploads, enter your regional endpoint as the Sign-on URL using the following format: https://<RegionUrl>.paloaltonetworks.com/sp/acs (where <RegionUrl> is your regional endpoint).
Alternatively, copy the reply URL to the sign on URL.
- Save your configuration.
- Configure conditional access policy to enable MFA on selected user groups.
- Go to your application's OverviewConditional AccessCreate a policy .
- Add a New Policy .
- Enter a name for the policy.
- In Users section, include Select users and groups and choose your project groups accordingly.
- Verify the Target resources .
- Select the Conditions that trigger the policy.
- Grant access in Access Controls using Require multifactor authentication .
- Enable the policy by toggling the selector to On , and Create the conditional access.
- Add your IdP vendor as an authentication type.
- Select Single sign-onSAML Certificates and copy the App Federation Metadata URL .
- In the Cloud Identity Engine app, select AuthenticationAuthentication TypesAdd New Authentication Type .
- Set Up a SAML 2.0 authentication type.
- Under Configure your Identity Provider Profile , enter a Profile Name .
- Select Azure as your IDP Vendor .
- Select Get URL , paste the URL from step
5.a
, and Get URL to get the metadata.
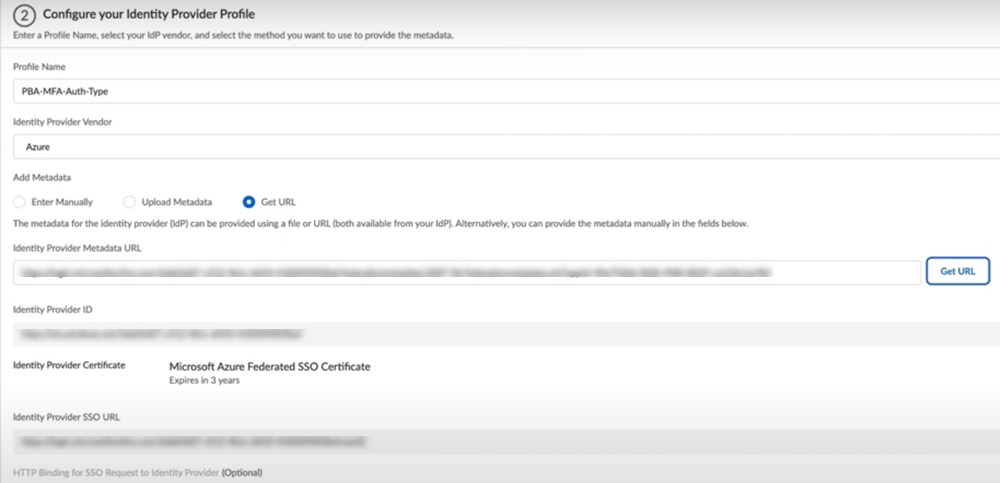
- Enable Multi-factor Authentication is Enabled on the Identity Provider .
- Test SAML Setup to verify the profile configuration.
- Select the SAML attributes you want Prisma Access to use for authentication.
- Enable Dynamic Privilege Access .
Ensure to sync the directory you added in step
2
and the SAML app.
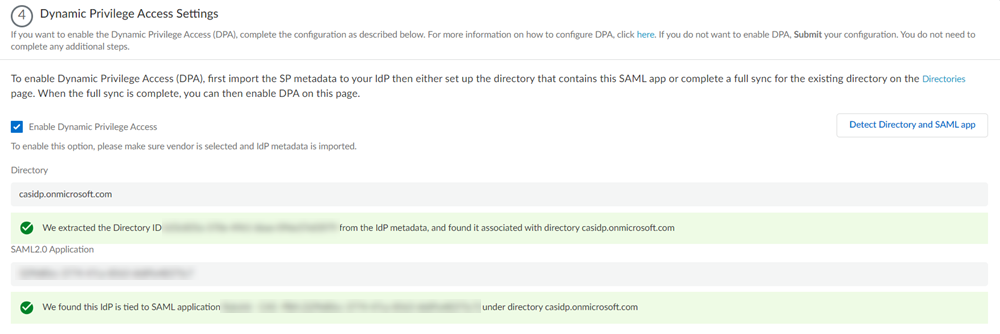
- Submit the IdP profile.
- Repeat steps from
3
to
5
to configure the SAML app for user groups that don't require MFA.
Don't enable MFA in step
5.g
for user groups that don't require MFA.
- Add an authentication profile for MFA user groups and non-MFA user groups.
- Select AuthenticationAuthentication ProfilesAdd Authentication Profile .
- Enter a PROFILE NAME .
- Select an Authentication Mode .
- Select the Authentication Type from step
5
or
6
, based on the user groups requiring MFA, and Submit .
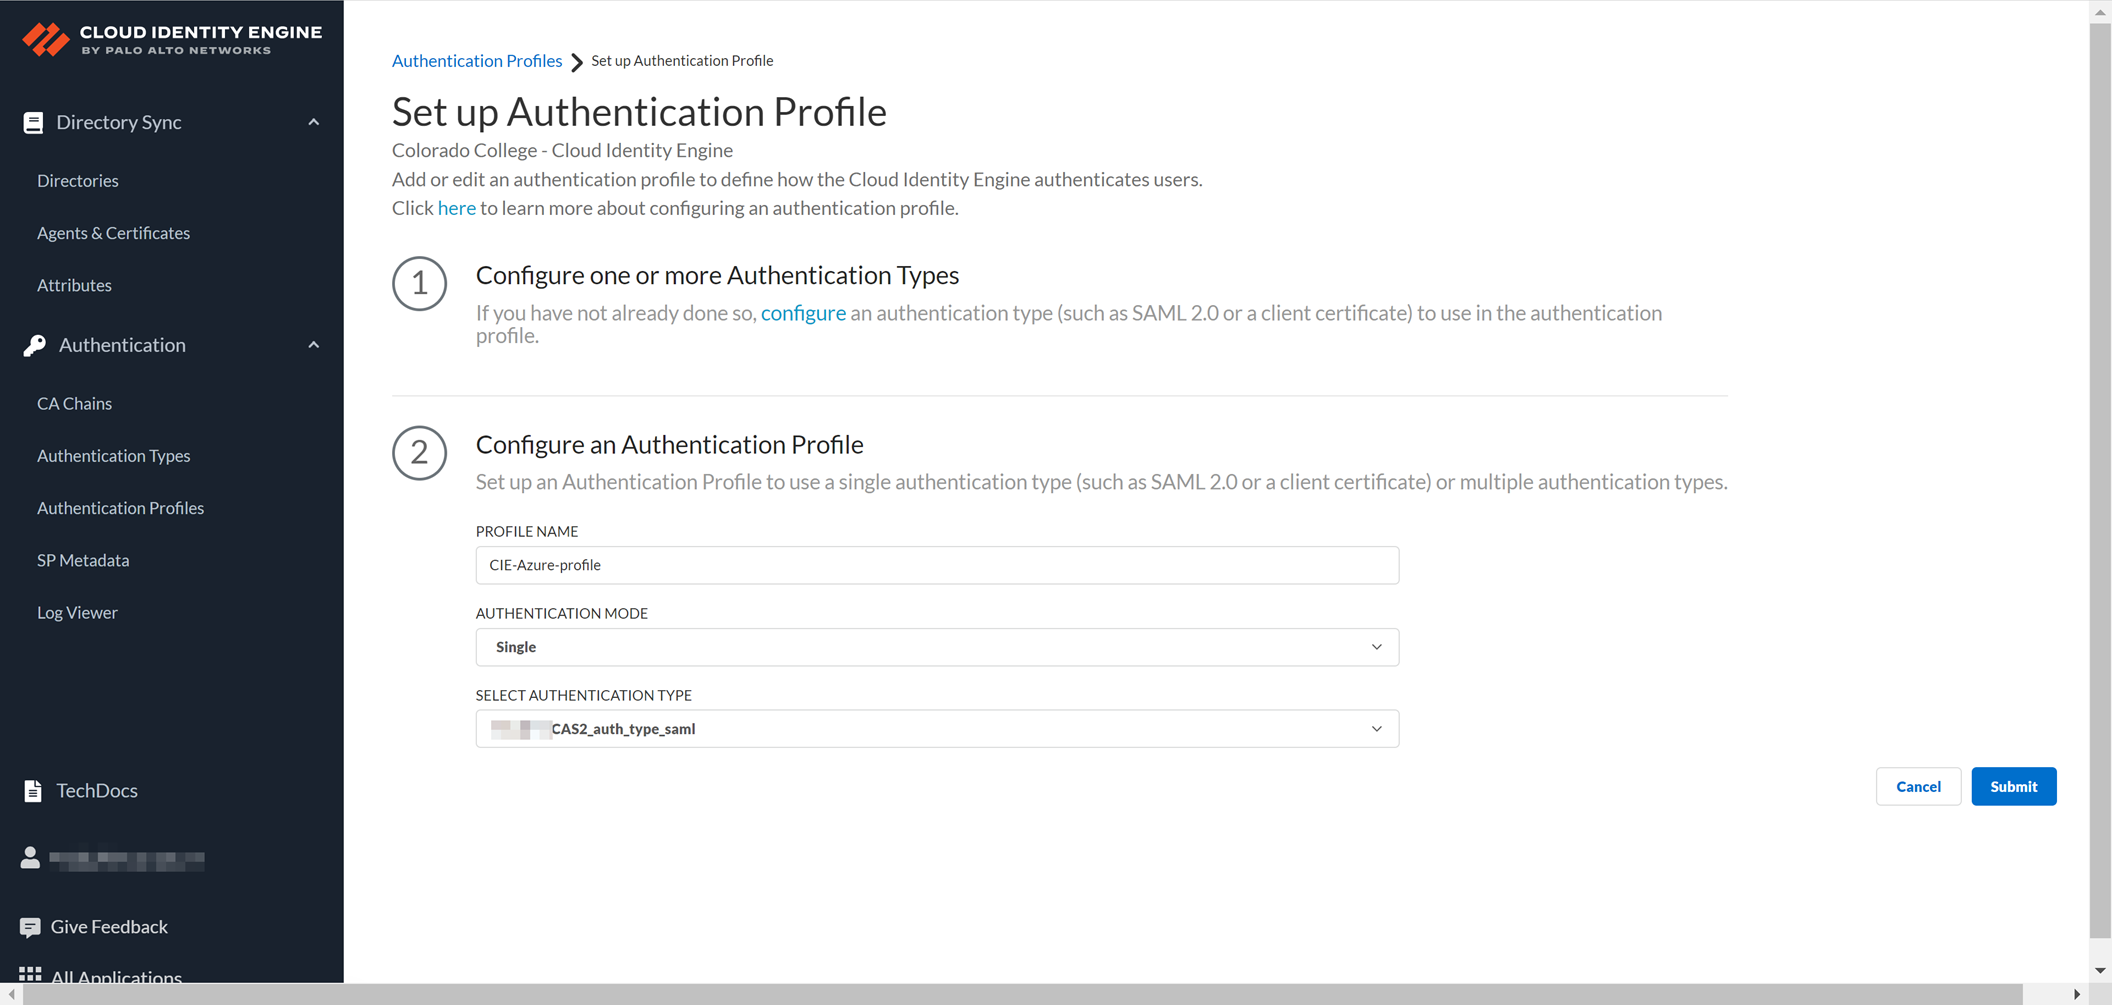
- Add the authentication profile from Cloud Identity Engine to Prisma Access.
- In Strata Cloud Manager, select ManageConfigurationNGFW and Prisma AccessIdentity ServicesAuthenticationAuthentication Profiles .
Ensure to set the configuration scope to the Access Agent mobile users container.
- Add Profile .
- Select Cloud Identity Engine as your Authentication Method .
- Enter a Profile Name .
- Select the Profile you added in the Cloud Identity Engine app from step
7
.
- Save the changes.
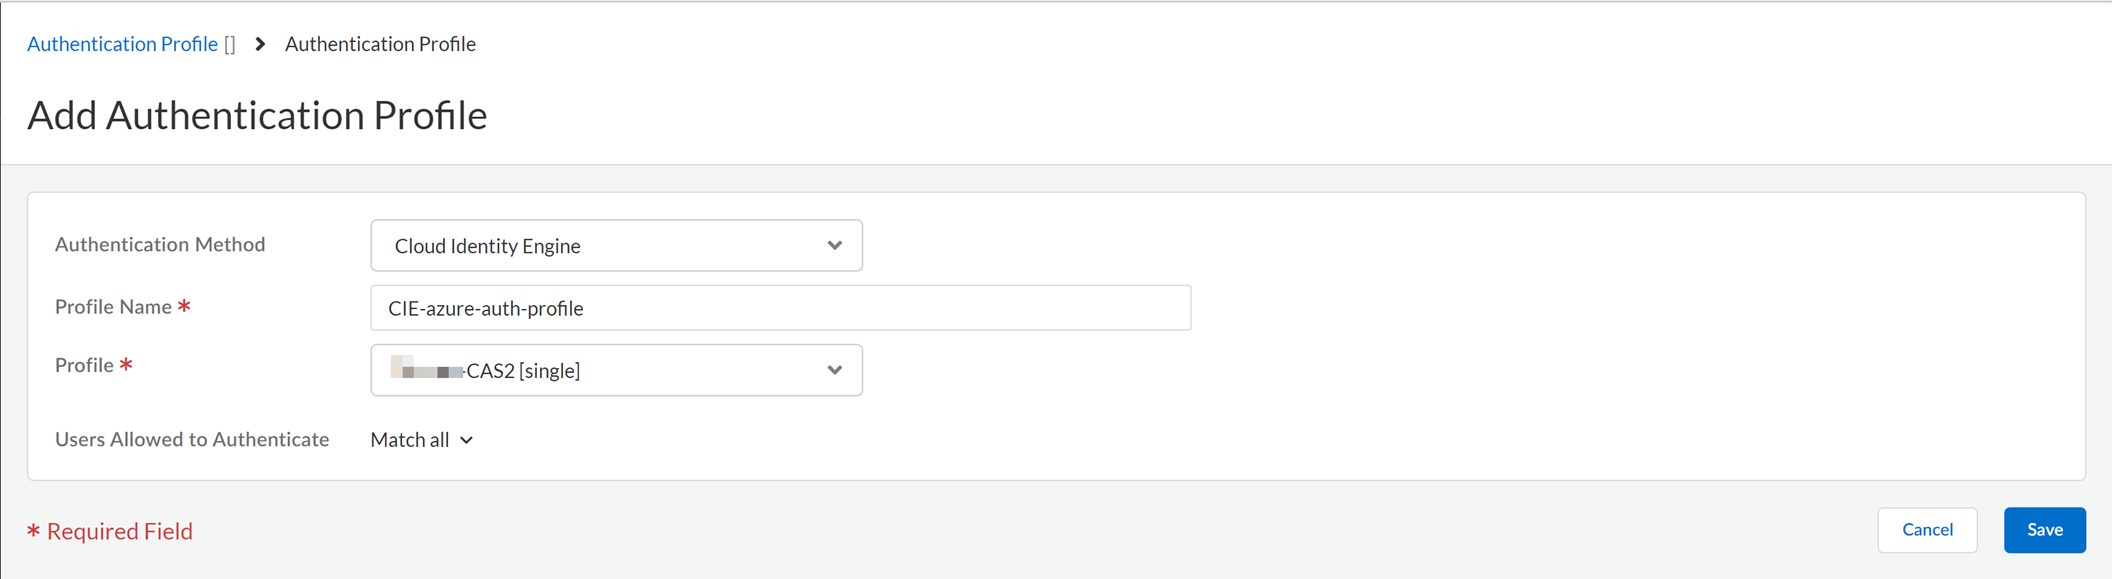
- Attach the authentication to mobile users.
- Launch Prisma Access from your Strata Cloud Manager.
- Select ManageConfigurationNGFW and Prisma Access .
- Set the scope to the project snippet you created, and navigate to Security ServicesSecurity Policy .
- Create a policy to allow traffic only from a particular project DHCP range and that project-based user group.
Enable the Access Agent
Before you can onboard your users, you must enable Access Agent as a mobile user connection type using Strata Cloud Manager. After you enable the connection type, the Prisma Access Agents installed on mobile user devices will be able to send traffic to Prisma Access.
Before you begin to enable the Prisma Access Agent, ensure that you Authorize User Group Mapping in Cloud Identity Engine for Dynamic Privilege Access .
- Select WorkflowsPrisma Access SetupMobile Users .
- Enable the Access Agent.
Explicit Proxy is not supported for Prisma Access Agent.
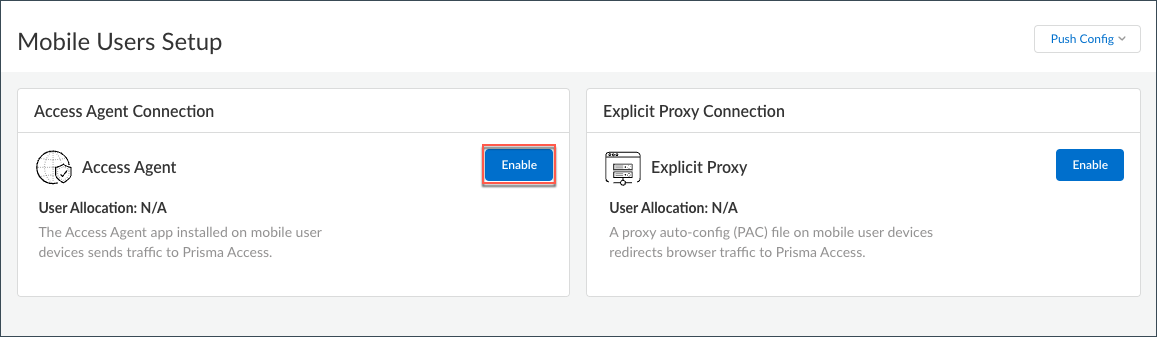
- Click Access Agent Setup to begin onboarding your mobile users.
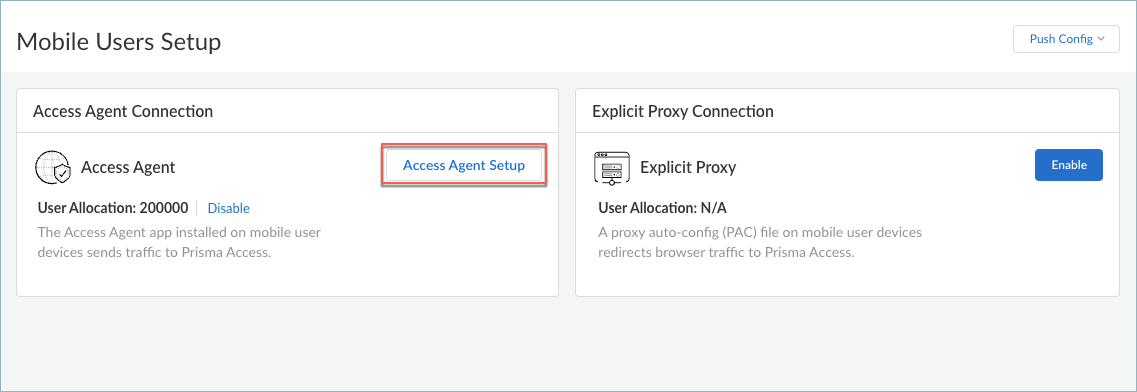
The Access Agent Setup page appears.
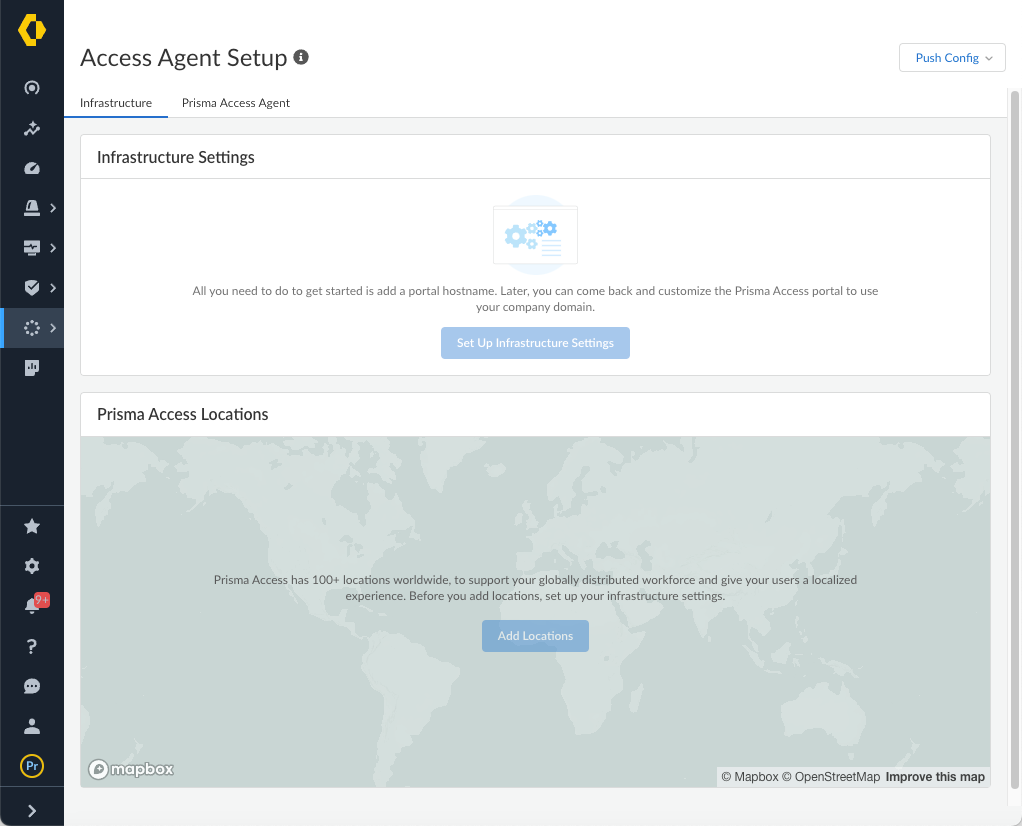
Set Up the Agent Infrastructure for Dynamic Privilege Access
Configure infrastructure settings for Prisma Access Agent so that Prisma Access can provision your mobile user environment. Then, select the Prisma Access locations where your Prisma Access Agent users will connect to.
You can also optionally
enable SC-NAT support for Dynamic Privilege Access
if you have created service connections to access private apps in their data center or headquarters location, or
enable route summarization for Dynamic Privilege Access
to reduce the number of routes that are sent to the network.
Configure Infrastructure Settings
To enable Prisma Access for internet access only for users, Prisma Access provides a default IP address pool and a cloud default DNS server. However, if you want your mobile users to access internal resources at your headquarters, data centers, or at remote network sites to which you onboarded to Prisma Access, you must allocate client IP address pools. Prisma Access uses the IP address pools to assign IP addresses to your mobile users and set up the Prisma Access service infrastructure .
Before you configure the infrastructure settings, ensure that you configure at least one project. Otherwise, when you try to commit and push the infrastructure settings, the commit will fail. For more information, refer to Create a Project .
- In Strata Cloud Manager, select WorkflowsPrisma Access SetupAccess AgentInfrastructure .
- If you're setting up the infrastructure for the first time, click Set Up Infrastructure Settings . Otherwise, edit the Infrastructure Settings .
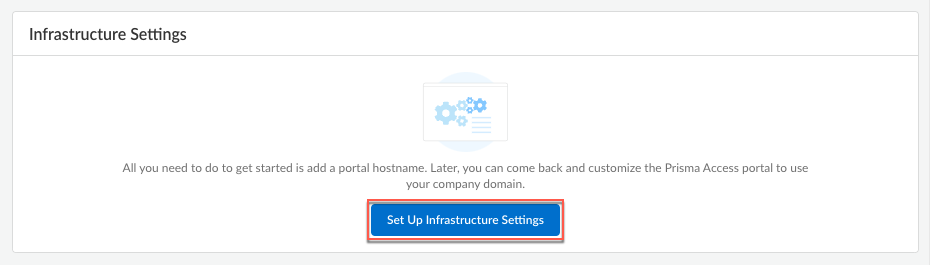
- Add a hostname to the Domain Name for the service that Prisma Access Agents connect to.
By default, users can access the service using an FQDN based on your hostname and the .epm.gpcloudservice.com domain.

- In Client IP Pool Allocation , Prisma Access provides a DHCP server that will manage the assignment of IP addresses to your endpoints for Dynamic Privilege Access.
The project name and the location group ID from Prisma Access are part of the DHCP request. Each Prisma Access Agent connecting to a specific project is assigned an IP address from that project's IP subnet. When a user changes to a different project, a different IP address is assigned to the Prisma Access Agent from the project's IP subnet.
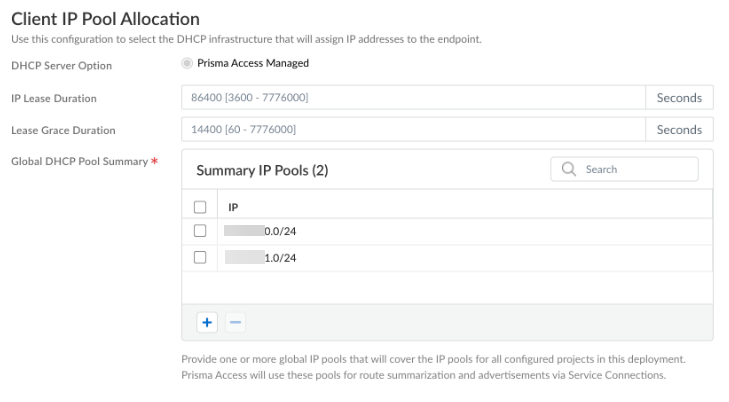
You can configure the following options:
- IP Lease Duration —Specify the amount of time (in seconds) for which the DHCP server allocates a network address to a Prisma Access Agent. The default IP address lease duration is 86,400 seconds.
- Lease Grace Duration —Specify the amount of time that the Prisma Access Agent can continue to use its IP address lease after the lease expires. The default lease grace duration is 14,400 seconds.
- Global DHCP Pool Summary —Select the IP pool on which you want to
enable SC-NAT
or configure and select the global summary IP pools for
route summarization
.
- Save the infrastructure settings.
Select Prisma Access Locations
Select the Prisma Access locations where you want to support Prisma Access Agent users. The location groups are used for Dynamic Privilege Access.
- In Strata Cloud Manager, select WorkflowsPrisma Access SetupAccess AgentInfrastructure .
- If you are setting up the infrastructure for the first time, Add Locations . Otherwise, edit the Prisma Access Locations .

- Select the Prisma Access locations where your mobile users will connect to.
Depending on your license agreement , you can select either Local or Worldwide locations. The map shows the regions where you can deploy Prisma Access for Users. In addition, Prisma Access provides multiple locations within each region to ensure that your users can connect to a location that provides a user experience tailored to the users’ locale. For the best performance, Select All . Alternatively, select specific locations within each selected region where your users will need access. By limiting your deployment to a single region, you can have more granular control over your deployed regions and exclude regions required by your policy or industry regulations.
For Prisma Access Agents, you can deploy Prisma Access to the following Strata Logging Service regions:
- US
- India
- Germany
- Netherlands
- United Kingdom
- Japan
- Canada
- Singapore
- France
- Australia
- Switzerland
- Israel
This list will be updated as more regions become available.
For the best user experience if you are limiting the number of locations, choose locations that are closest to your users or in the same country as your users. If a location isn’t available in the country where your mobile users reside, choose a location that is closest to your users for the best performance.
The images in this section are provided for illustrative purposes only.
13. Select an available region on the map.
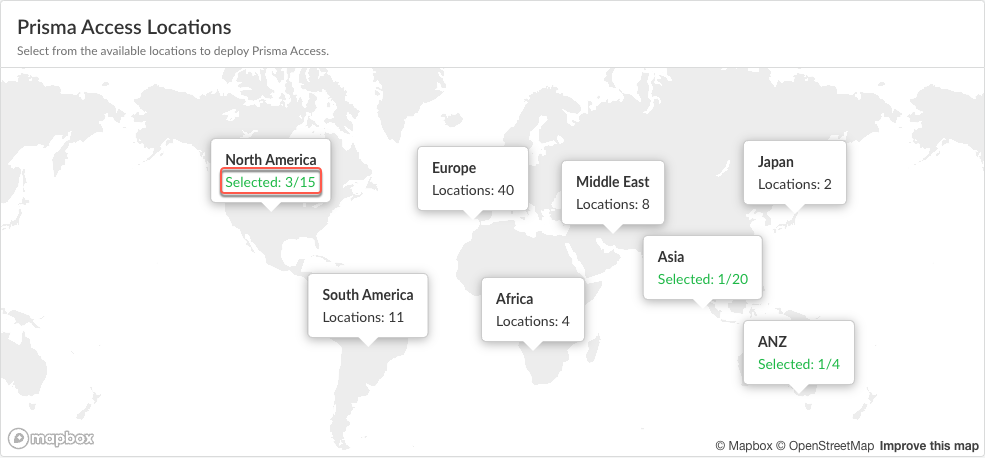
14. Click the plus sign + on the locations that you want to add.
You can switch between the Map and List views. You can also Select All locations.
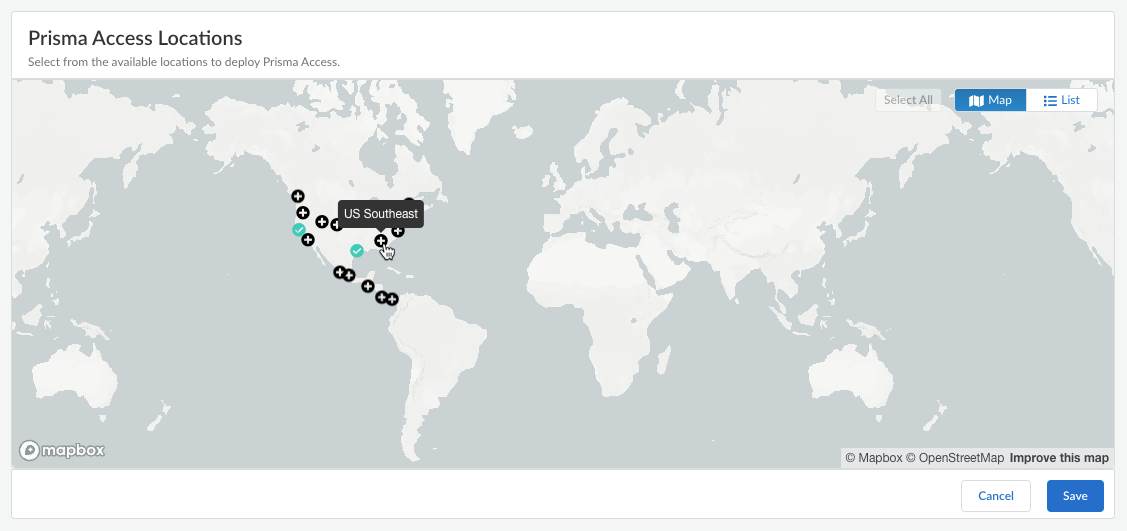
In the list view, you can select from the list of available locations to deploy Prisma Access. You can select All sites within a region.
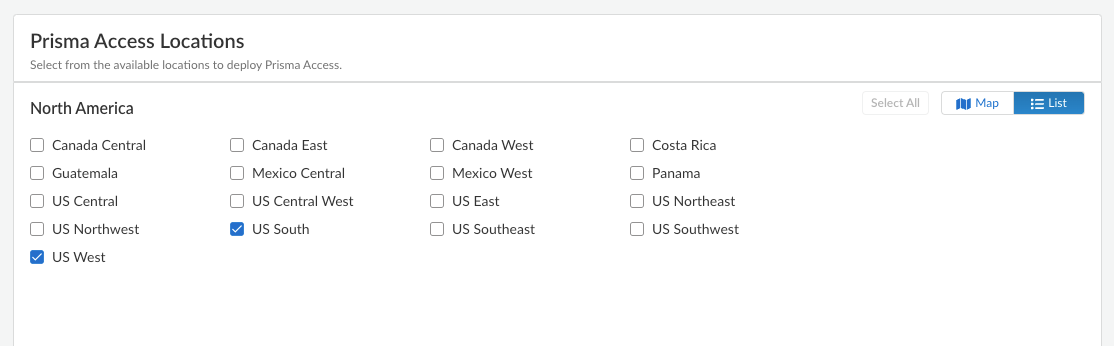
15. Save your Prisma Access location settings.
- ( Optional ) Restrict access to your SaaS applications from unauthorized users.
You can enable the egress IP allow lists for existing mobile user deployments and during new user onboarding. If you enable egress IP allow lists for existing Prisma Access deployments, Prisma Access migrates all the egress IP addresses already allocated for your locations to the egress IP allow lists. For new Prisma Access deployments, enable the egress IP allow list while onboarding the Prisma Access Agent mobile users. Every time you add a location or have an auto scaling event, you should retrieve the new egress IP addresses that Prisma Access allocates and add them to allow lists in your SaaS applications. You can then push the configuration to your Prisma Access deployment to confirm the egress IP allow lists allocated for your locations.
1. Enable Egress IP Allowlist to display the IP addresses for onboarded Prisma Access locations.

2. Copy and add the allocated addresses to the allow lists of your SaaS applications.
3. Migrate to confirm the IP addresses allocated for the onboarded locations in Prisma Access.
4. Retrieve the IP addresses for new onboarded locations or during an auto scaling event.
- Select the Location name to find the new egress IP addresses allocated to the location.
- Add these IP addresses to the allow lists for your SaaS applications before you confirm them in Prisma Access.
- Save the allocated egress IP addresses.
Enable SC-NAT Support for Dynamic Privilege Access
Use SC-NAT support for Dynamic Privilege Access (DPA) if you use DPA and have created service connections to access private apps in your data center or headquarters location. Multiple projects in your DPA environment can experience IP address exhaustion if the IP addresses of the infrastructure subnet overlap. To fix this issue, Prisma Access can implement source NAT (SNAT) for IP addresses, which:
- Lets Prisma Access map a single IP address for a mobile user accessing private apps using a service connection
- Provides you with SNAT for easy routing
- Eliminates IP Pool overlap
- Eliminates IP Pool IPv4 exhaustion between Prisma Access and your data center or headquarters location
DPA customers can onboard client locations to Prisma Access using service connections. However, multiple projects may have large IP pools on multiple data centers, leading to potential exhaustion of private IP pools. To solve this issue, Dynamic Privilege Access in Prisma Access offers support for SC-NAT with defined pools. Customers have the option to use SC-NAT instead of the infrastructure subnet in order to divide up the IP pools. If you enable SC-NAT for a service connection corporate access node (SC-CAN), SC-NAT will always be supported for that service connection.
With DPA enabled, you can turn SC-NAT on (to use SC-NAT) or off (to use the Infrastructure Subnet) per project.
- In Strata Cloud Manager, select WorkflowsPrisma Access SetupService Connections .
- Select a service connection from the Service Connections table.
- Click the check box for Data Traffic Source NAT .
- After you click the Data Traffic Source NAT check box, you see the mandatory IP Pool field. Enter the subnets for which you want to enable SC-NAT.
- Save your changes.
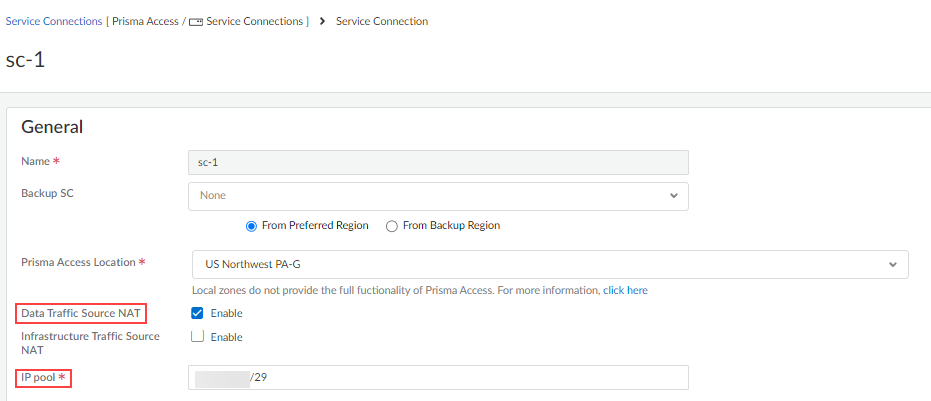
Enable Route Summarization for Dynamic Privilege Access
For enterprises that have on-premises hardware with limited capacity, such as simple cloud routers that can accommodate only a few hundred routes, Prisma Access can summarize Mobile User (MU) routes when advertising the routes to the on-premises network. Route summarization minimizes the requirements on these devices by staying within the route capacity on the data center.
To enable route summarization, you can configure global summary pools, which are lists of large IP pools that can be used across multiple projects. When a user connects to a project using the Prisma Access Agent and the agent is assigned an IP address within the range of a global summary pool, the Prisma Access service connection advertises the global summary pool instead of the smaller aggregate route.
To help illustrate route summarization for projects, consider the following scenario:
- You configure a global summary pool of 10.10.0.0/16 and enable the route summarization option on service connection SC-A .
- User-A connects to Project-A , which is assigned the IP project pool of 10.10.10.0/24. Upon connection, the Prisma Access Agent acquires the 10.10.10.10/32 IP address.
- User-B connects to Project-B , which is assigned the IP project pool of 10.10.11.0/24. Upon connection, the Prisma Access Agent acquires the 10.10.11.10/32 IP address.
- In this case, the service connection advertises only one subnet (the global summary pool of 10.10.0.0/16) instead of the /24 aggregate routes to the on-premises network through eBGP.
- Prisma Access won't summarize IP pools that are not part of a project.
- Project IP pools within a project can overlap, and global summary IP pools can overlap as well.
- The global summary pools should be large IP pools that contain the project IP Pools that are associated with multiple projects.
To enable route summarization for projects in Strata Cloud Manager:
- Configure the project IP pools in the project settings in ManageNGFW and Prisma Access<Snippet> ObjectsDynamic Privilege AccessProjects .
- Configure the global summary IP pools
in WorkflowsPrisma Access SetupAccess AgentInfrastructure Settings .
- Enable route summarization in the service connection.
- Go to WorkflowsPrisma Access SetupService Connections .
- Select a service connection from the Service Connections table.
- Edit the Routing settings.
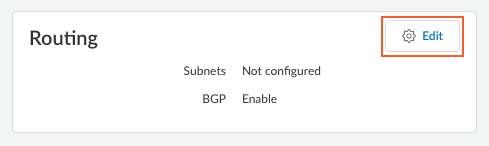
- Select Summarize Mobile User Routes before advertising .
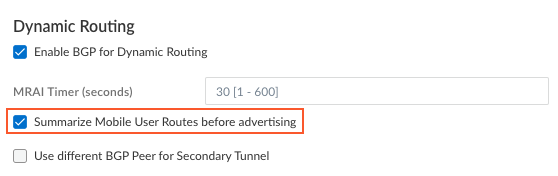
- Save the routing settings.
- Save the service connection settings.
- Perform an all admins push configuration to Prisma Access.
Create a Snippet
You can create a snippet to group the configurations of Prisma Access Agents that you can quickly push to your deployments. Snippets are used to standardize a common base configuration for a set of project-based deployments, allowing you to quickly onboard new devices with a known good configuration and reducing the time required to onboard a new device.
After you create the snippet, you will associate the snippet to a scope, assign a user to the scope, and grant the user the Project Admin role. The user can then log in as the Project Admin and use the snippet to manage the project settings for the Prisma Access Agent. The Project Admin can only change the Prisma Access Agent settings for the snippets that they are assigned to.
To create a snippet, complete the following steps:
- Log in to Strata Cloud Manager as the Superuser.
- Select ManageConfigurationNGFW and Prisma Access .
- Select Overview and expand the Configuration Scope to view the Snippets .
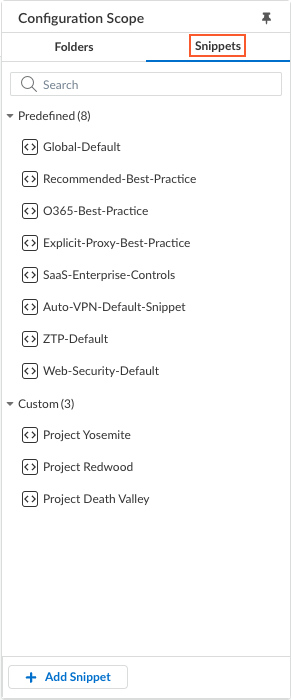
- Add Snippet and enter the following details:
- Enter a Name for the snippet.
- ( Optional ) Enter a Description for the snippet.
- ( Optional ) Assign one or more Labels .
You can select an existing label or create a new label by typing the label you wanted to create.
- To ensure that object names are unique across a snippet, Add prefix to object names is enabled by default.
Choose whether to Auto generate a random prefix or select Manual and add your own Prefix Value . The prefix value can be alphanumeric and have a maximum of six characters.
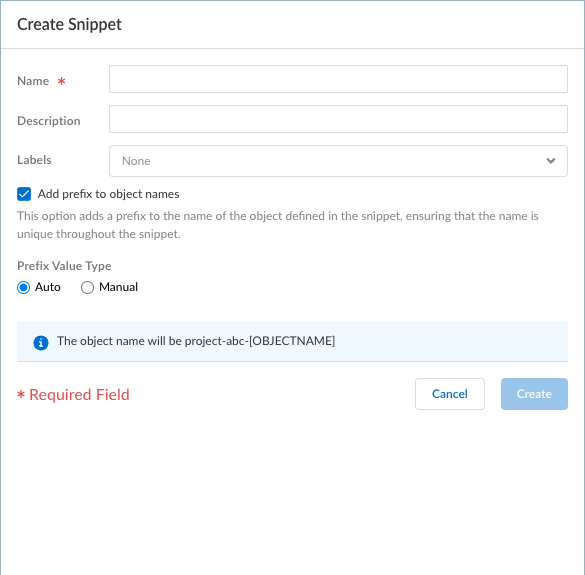
The prefix will have the format xxxxxx- . When you add an object, Strata Cloud Manager will prepopulate the object name with the prefix.
- Create the snippet.
After you create the snippet, you're in the Configuration Scope for the snippet. All configurations you create while in the snippet scope occurs only for the snippet.
- Associate the snippet to the Access Agent folder.
- In the Overview page of your snippet, select the Snippet Associations settings.
- Select Access Agent from the Config trees .
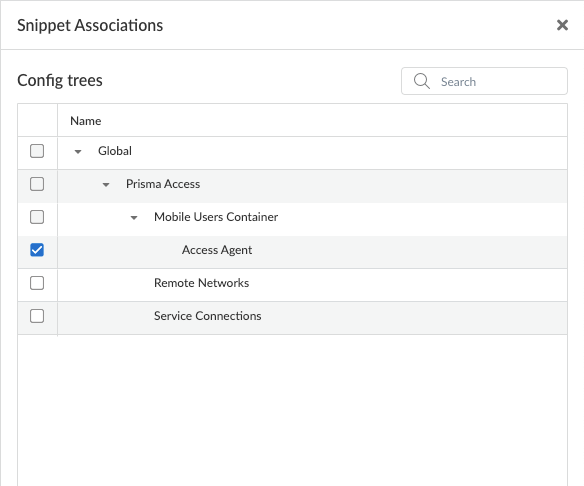
- Click the X to close the Snippet Associations window.
Access Agent appears in the list of Snippet Associations.
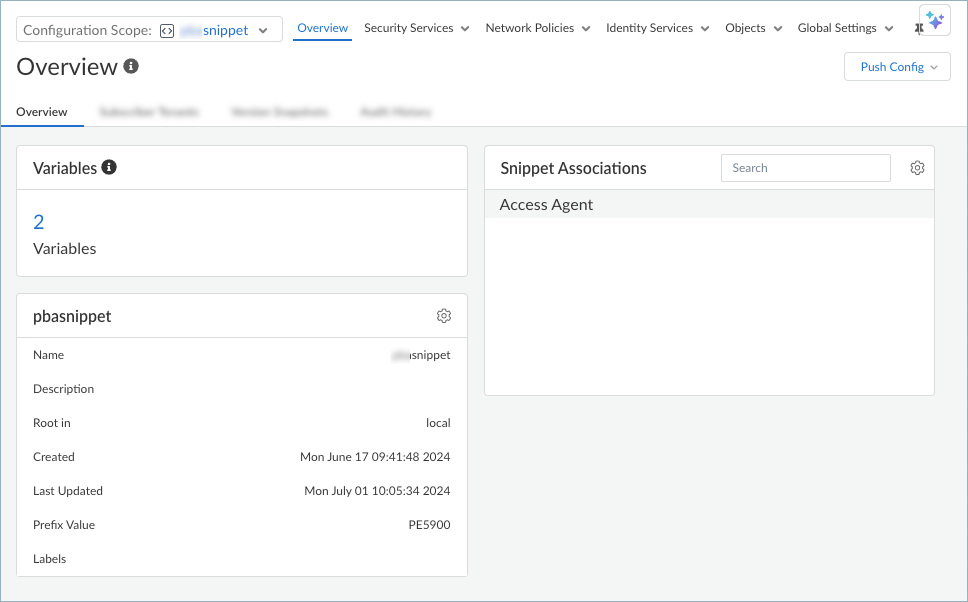
- If you have not done so already, create an identity for the user who will be managing projects and assign the Project Admin Push role to the user.
- From Strata Cloud Manager, select SettingsIdentity & Access .
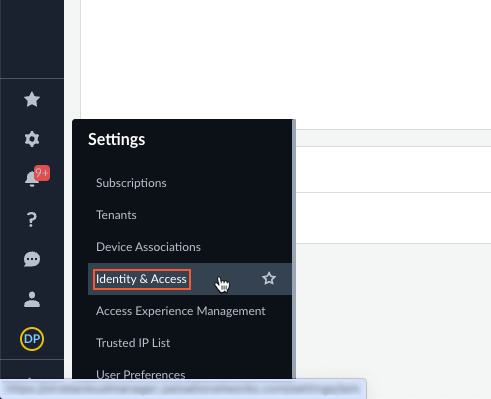
- Select Add Identity .
- Enter the Identity Address for the user who will be the project administrator and click Next .
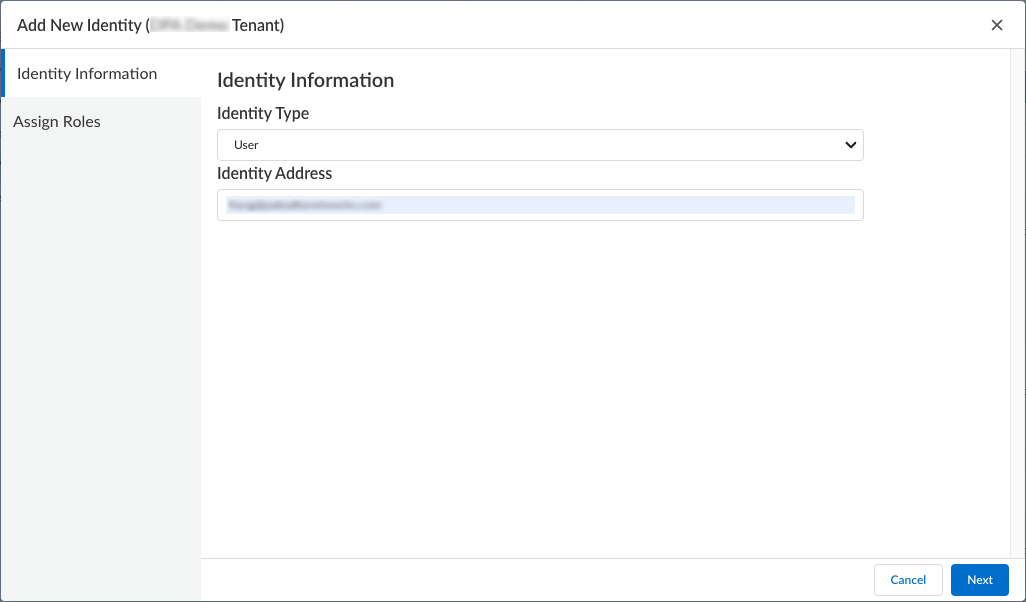
- Select Add AccessPrisma Access & NGFW Configuration and select the Project Admin Push role for the user.

- Click Submit .
- Create a management scope for the snippet and assign a user to that scope.
- Select ManageAccess ControlScope Management .
- Create New Scope .
- Enter a Name for the scope and view the Snippets .
- Associate the snippet to the scope. Select the snippet that you created and Add it.
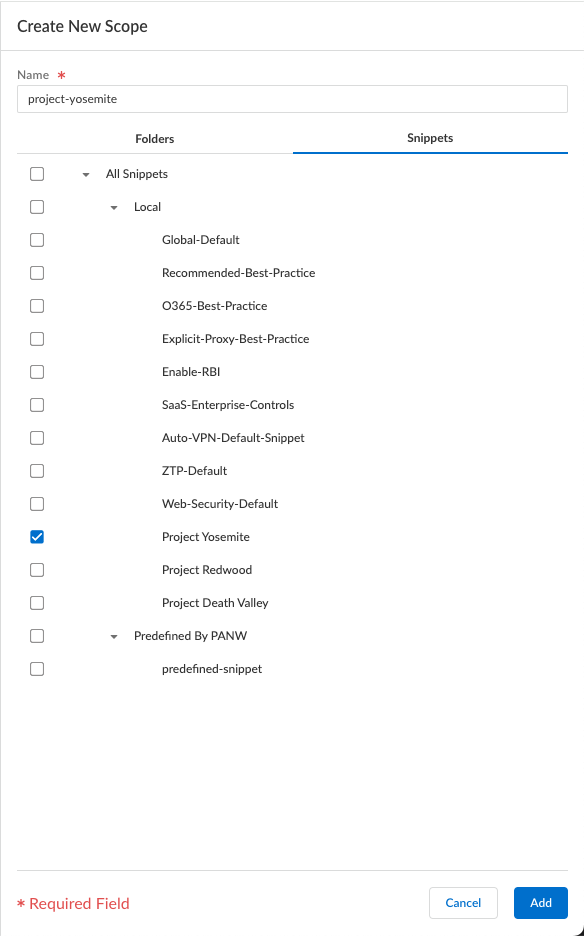
- In the Scope Objects, Assign Users to the scope that you created for your snippet.
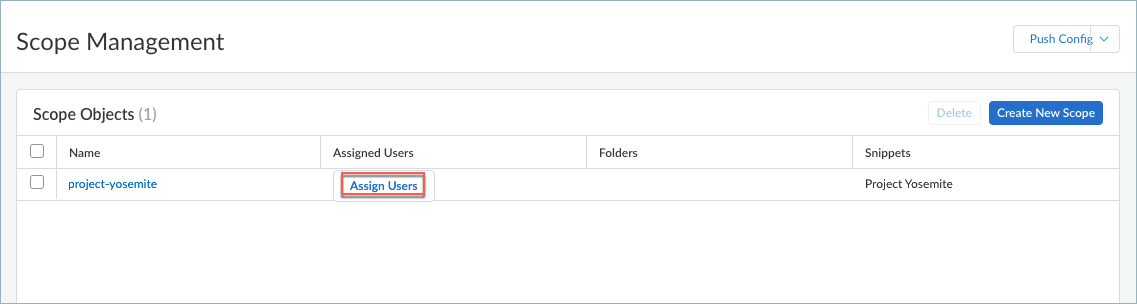
- Assign a user to the scope by selecting a user from the list and giving the user the Project Admin role.
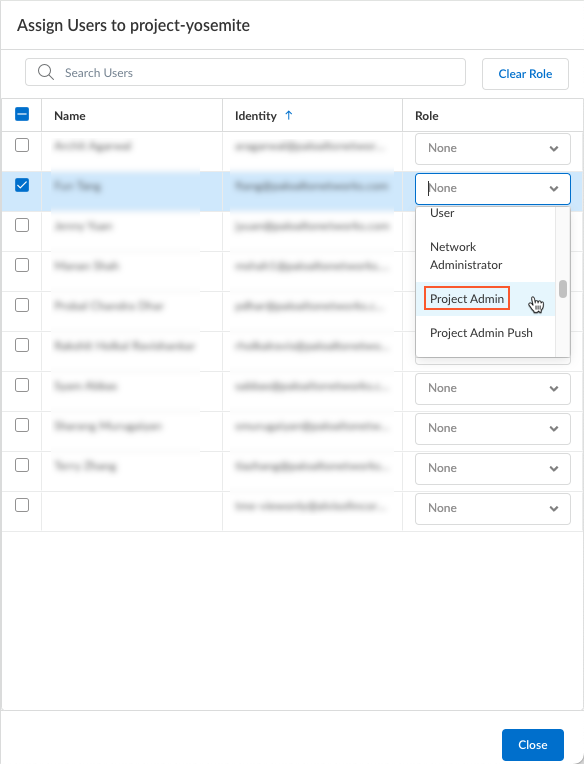
- Close the window.
- Push the configuration.
- Select ManageOperationsPush Config .
- Select the All Admins admin scope and select Push ConfigPush .
After the push config operation is completed, the snippet is created and the roles are associated with the snippet.
The assigned user (project admin) can now log in to Strata Cloud Manager and configure project-specific using the snippet that you created. The user can view other scopes that they are not assigned to, but they cannot interact with them, such as changing any configurations.
Configure Project-Specific Prisma Access Agent Settings
After the Superuser administrator sets up the infrastructure , creates a snippet and assigns the snippet to you, you can log in as the Project Admin to set up project-specific Prisma Access Agents settings, such as private IP, split-tunnel, and DNS information that will be assigned to endpoints when they log in to a project using the Prisma Access Agent.
You can create project-specific settings for one or more Prisma Access Agents or use the default agent settings. You can use a different agent for each project that you managed, or share an agent with multiple projects.
Configure Forwarding Profiles to Manage Agent Traffic for Dynamic Privilege Access Agents
Forwarding Profiles provides a single pane-of-glass to configure and manage traffic forwarding rules and traffic enforcement, such as setting up split tunnel settings and managing traffic outside of the tunnel connection. Forwarding profiles improves on the disjointed configuration of traffic policies experienced with other mobile access agents, and greatly extends the limit on how many rules and entries that you can configure. By simplifying the related configurations and improving clarity, you can focus on how you want endpoint traffic to be routed and enforced.
The forwarding profile is a profile type that contains several logical and ordered sections. These sections illustrate the various phases a connection passes before the agent determines how the connection should be steered. This organizational structure can help you understand why traffic is being routed a certain way by presenting the ordered entries in each section. Within each section, you can add, edit, remove, or reorder entries.
Once you set up the forwarding profiles, you can assign them to users or user groups in the Agent Settings page.
Traffic forwarding rules are applied from the top down in the forwarding profile. Therefore, configure the forwarding profile in a top-down manner, such as configuring the most specific rules first and the least specific rules last.
Forwarding Rules
A forwarding profile consists of a set of traffic forwarding rules that specify what source application or destination domain and destination IP address traffic goes through the tunnel or outside the tunnel, whether to split DNS traffic, and what traffic enforcement is in effect. Traffic that matches a rule is forwarded to Prisma Access according to the traffic forwarding specifications. The specifications in a forwarding rule are organized into the following sections:
- Source Applications —Specifies the private or SaaS apps for which the rule applies to. When traffic from an endpoint matches the source app, the traffic is routed according to the forwarding rule.
- Destinations —Specifies the domains and IP addresses that the rule applies to. When traffic matches the destinations (specified as FQDNs or IP addresses), the traffic is routed according to the forwarding rule.
Traffic Enforcement
Each forwarding profile also contains traffic enforcement settings that allow you to:
- Block all outbound traffic that does not match any forwarding rules
- Block outbound LAN access when the agent is connected to the tunnel
- Block inbound access when the agent is connected to the tunnel
To configure a forwarding profile, complete the following steps:
- Log in to Strata Cloud Manager as the Project Admin.
- Select ManageConfigurationNGFW and Prisma AccessOverview and expand the Configuration Scope to view the Snippets .
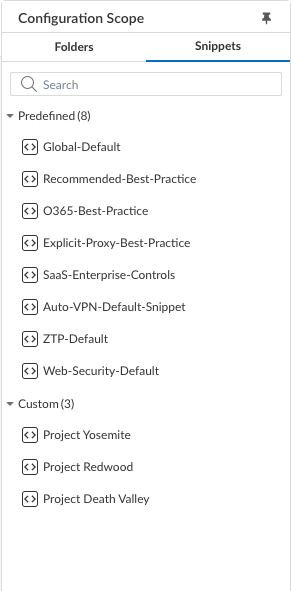
- Select the snippet that the Superuser admin assigned to you.
You can also view the snippets that are not assigned to you, but you cannot interact with them, such as to change the configuration.
- Select ObjectsDynamic Privilege Access to open the Dynamic Privilege Access settings.
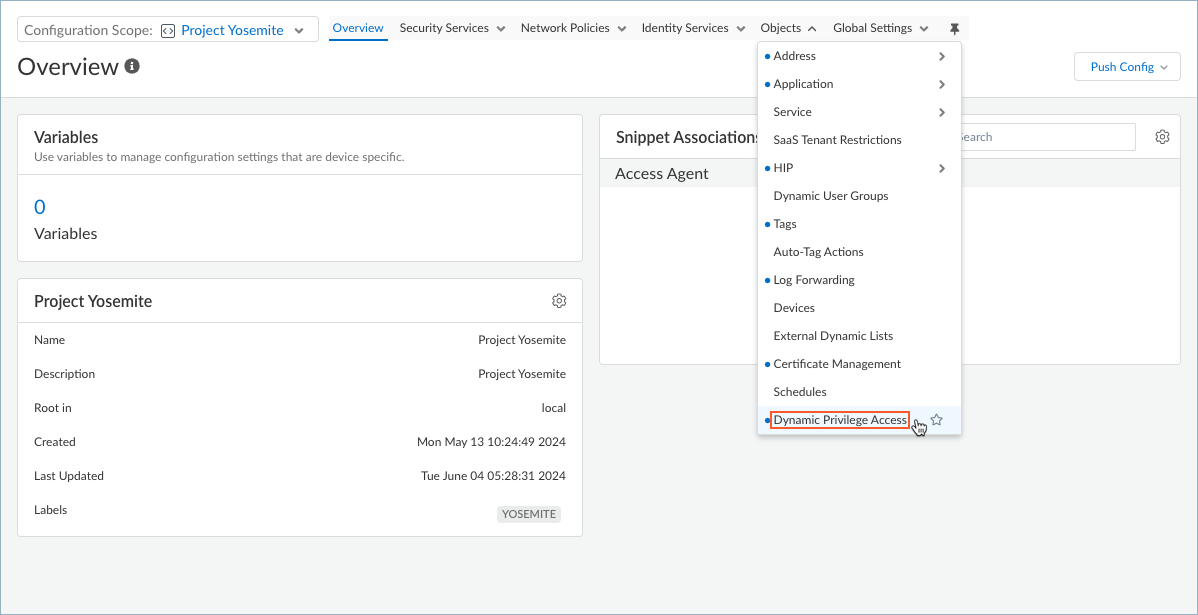
- Select Forwarding Profiles and edit the Forwarding Profiles Setup .
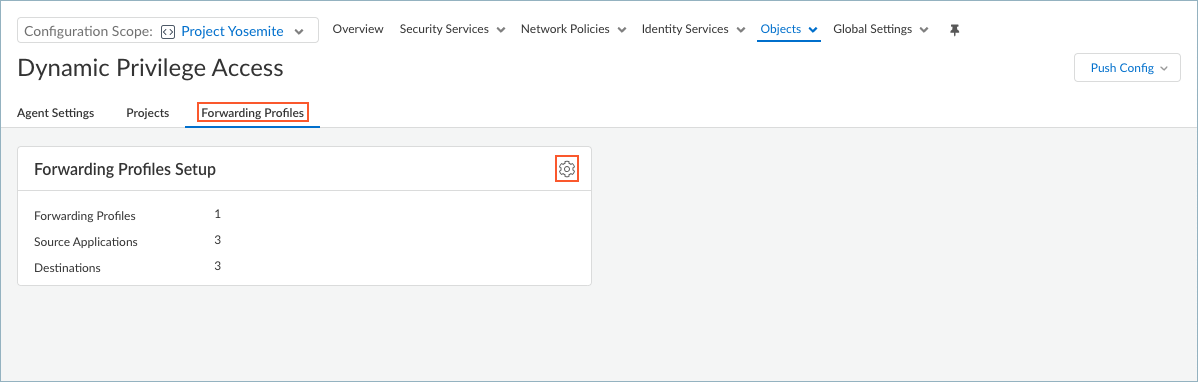
- Set up Source Applications if you want to create split tunnels based on the SaaS or public cloud application name.
- In the Forwarding Profiles Setup page, select Source ApplicationsAdd Source Application .
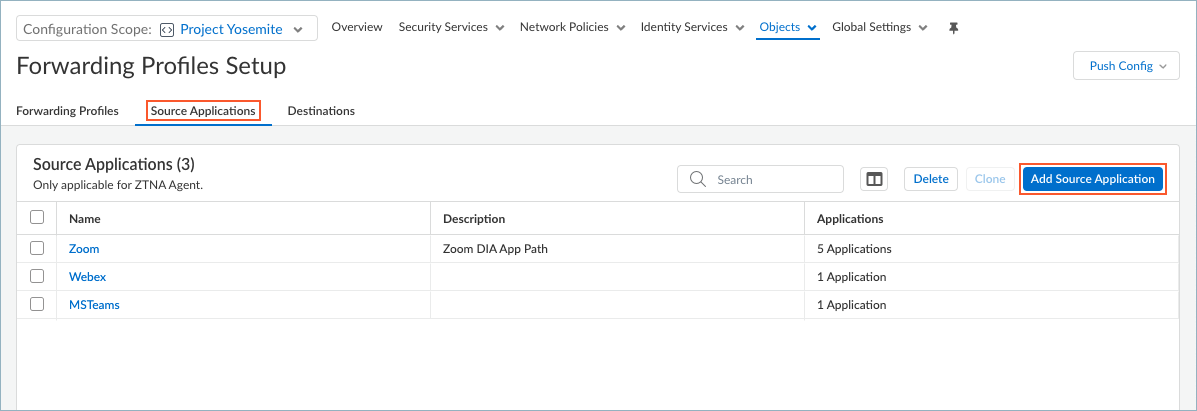
- Enter a meaningful Name for the application that you want to add.
- Click + in the Applications table and enter the complete path of the application. You can add one or more applications to manage whether to exclude or include the application traffic in the tunnel.
If you choose to exclude application traffic (by selecting Direct connectivity in the forwarding rule), traffic from these applications is sent through the physical adapter on the endpoints rather than the tunnel (the virtual adapter).
If you choose to include application traffic (by selecting Tunnel connectivity in the forwarding rule), traffic from these applications is routed to Prisma Access, even if it meets the exclude traffic criteria.
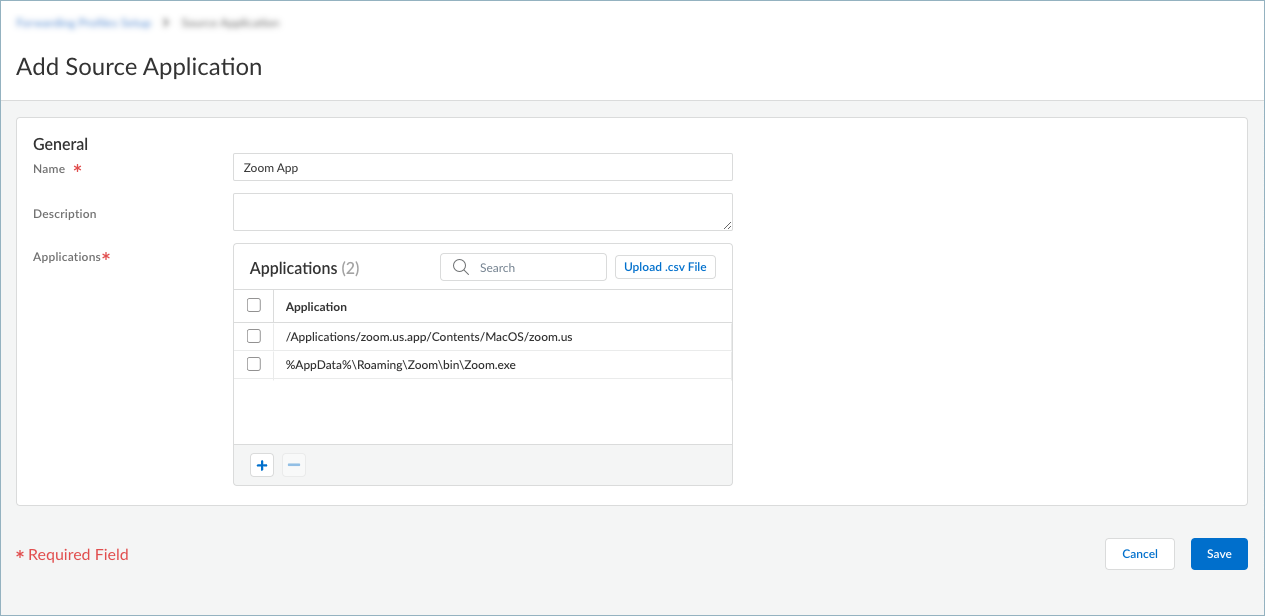
For example, to manage traffic from the Zoom application, add the following complete paths:
- Windows endpoints: %AppData%\Roaming\Zoom\bin\Zoom.exe
- macOS endpoints: /Applications/zoom.us.app/Contents/MacOS/zoom.us
If you have a list of applications in a text file in comma-separated values format (.csv), you can Upload .csv File .
- Save the source application.
- Repeat these steps to add more source applications.
- Set up Destinations if you want to create split tunnels based on the destination domain or access routes.
- In the Forwarding Profiles Setup page, select DestinationsAdd Destination .
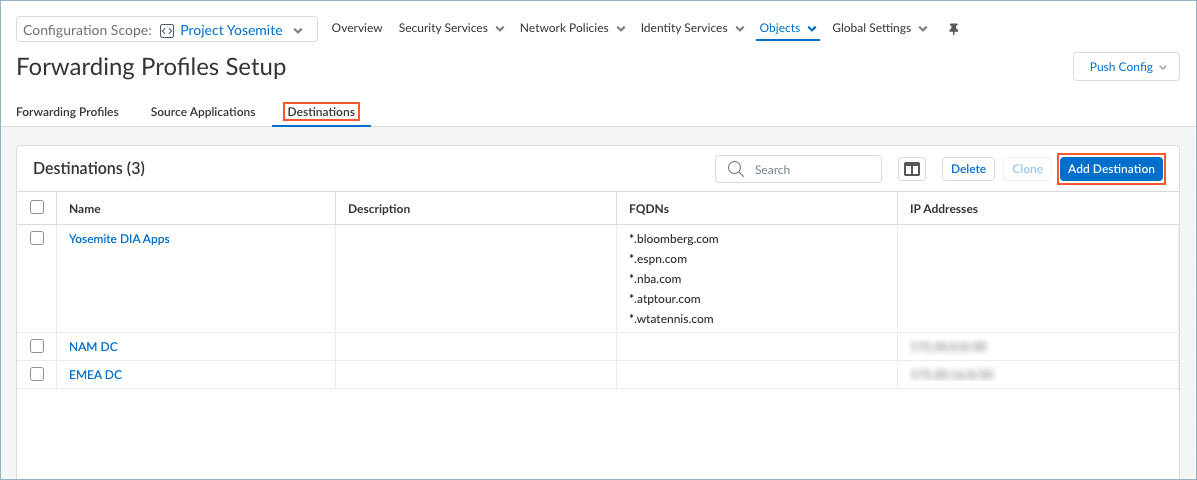
- Enter a meaningful Name for the destination that you want to add.
- Add a destination by specifying the domain name, access route, or both.
- To add a destination domain, click + in the FQDNs table and enter the FQDN for the destination domain. You can optionally add a port. If you do not specify a port, all ports for the specified domain are subjected to the forwarding rule. You can add one or more domains for traffic management.
If you choose to exclude traffic based on the domain name (by selecting Direct connectivity in the forwarding rule), traffic from the domain is sent through the physical adapter on the endpoints rather than the tunnel (the virtual adapter).
If you choose to include traffic based on the domain name (by selecting Tunnel connectivity in the forwarding rule), traffic from the domain is routed to Prisma Access, even if it meets the exclude traffic criteria.
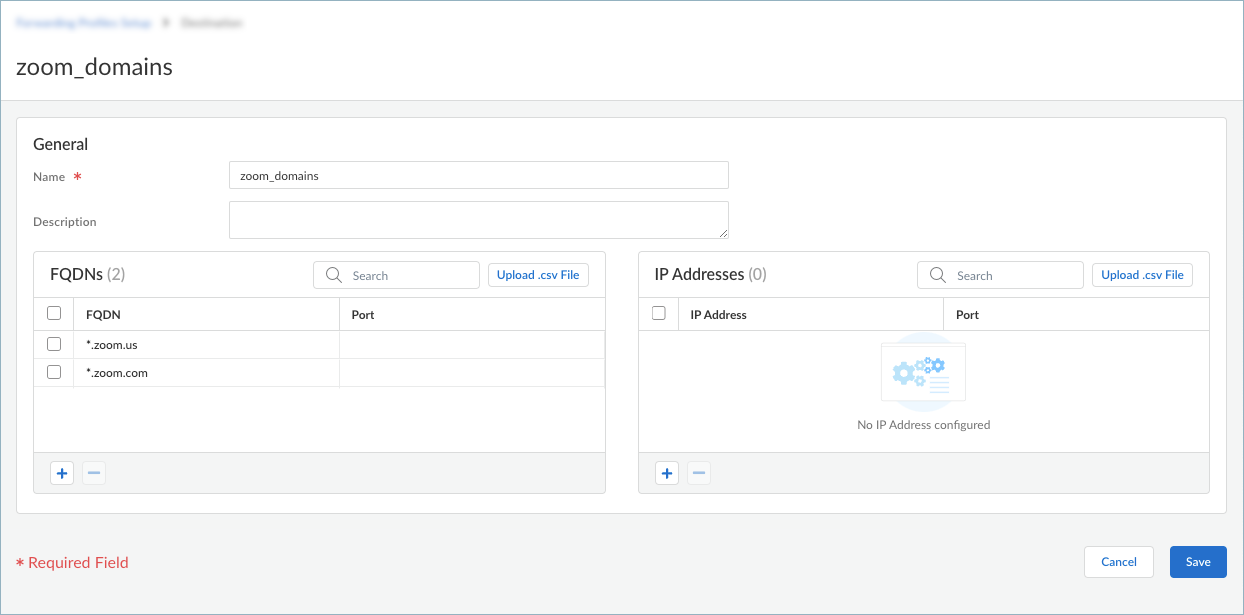
- To add an access route, click + in the IP Addresses table and enter a destination subnet. You can add one or more access routes for traffic management.
Do not include wildcard characters in the IP address. Wildcards in IP addresses are not supported in forwarding profiles.
If you do not include or exclude routes or applications, every request is routed through the tunnel (without a split tunnel). Also, all traffic is inspected and subjected to policy enforcement whenever users connect to Prisma Access.
When you define split tunnel traffic to exclude access routes (by selecting Direct connectivity in the forwarding rule), these routes are sent through the physical adapter on the endpoint instead of being sent through the tunnel via the virtual adapter (the tunnel). By excluding split tunnel traffic by access routes, you can send latency-sensitive or high-bandwidth traffic outside of the tunnel, while all other traffic is routed through the tunnel for inspection and policy enforcement by the gateway.
When you define split tunnel traffic to include access routes (by selecting Tunnel connectivity in the forwarding rule), the gateway pushes these routes to the remote users’ endpoints to specify what traffic these endpoints can send through the tunnel.
Specify excluded routes that are more specific than included routes; otherwise, you might exclude more traffic than intended.
If you have a list of IP addresses in a text file in .csv format, you can Upload .csv File .
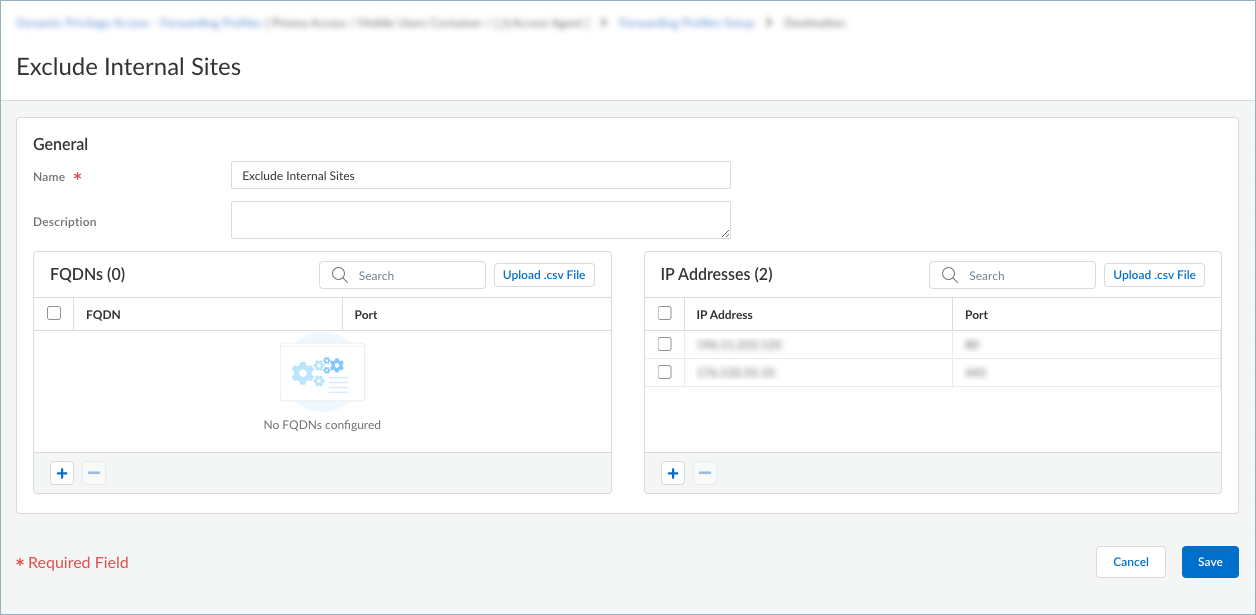
- Save the destinations.
- Repeat these steps to add more destinations.
- Create a forwarding profile that allows or excludes traffic based on the source applications or destinations that you configured.
- To add a forwarding profile, select Forwarding ProfilesAdd Forwarding ProfilePrisma Access Agent .
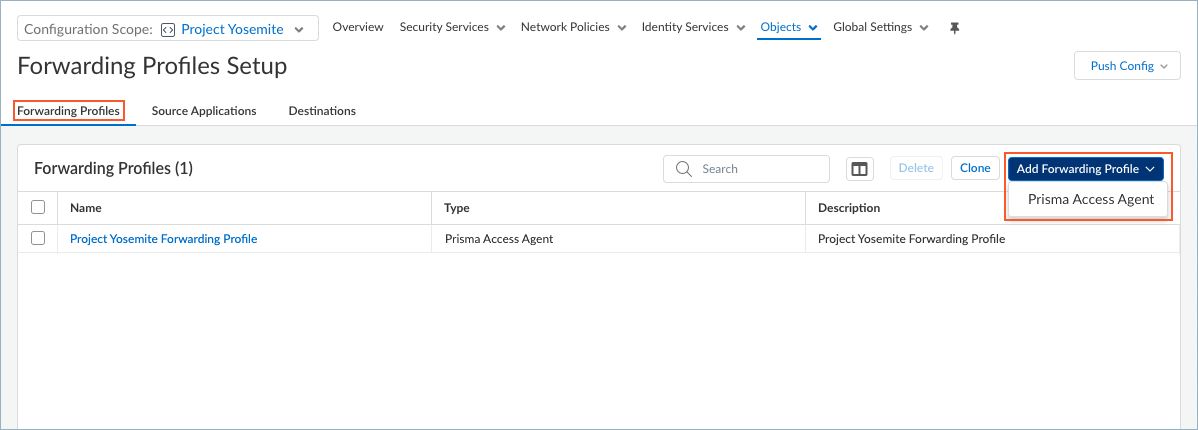
To edit a forwarding profile, select the name of the profile in the Forwarding Profiles table.
- Enter a meaningful Name for the forwarding profile.
- Add a forwarding rule.
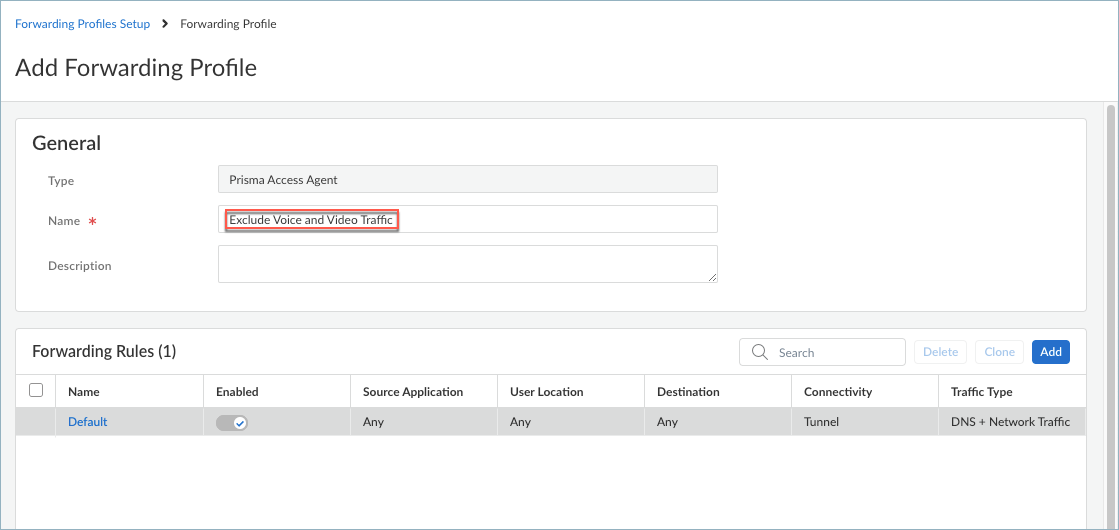
The Forwarding Rules table shows the rules that make up the forwarding profile. All forwarding profiles contain the Default forwarding rule, which sends all DNS and network traffic through the tunnel. Any new rules that you add are placed above the default rule. You cannot delete or move the default forwarding rule, but you can change its Connectivity setting.
- Enter the specifications for the forwarding rule.
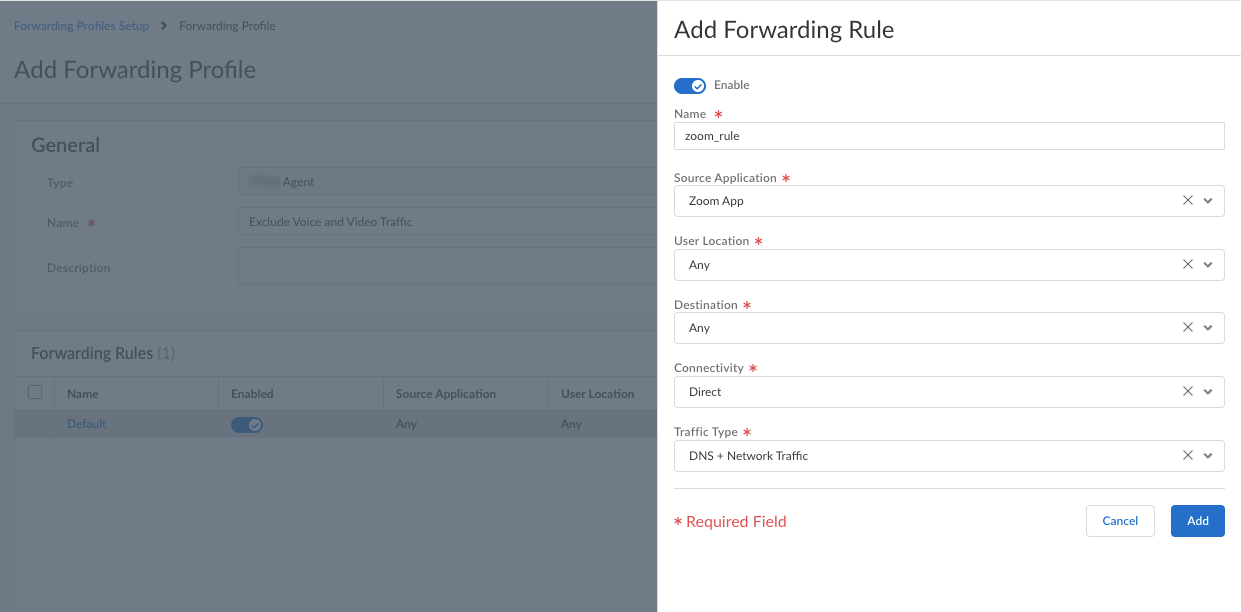
1. Enable the rule.
2. Enter a Name for the rule.
3. Select the Source Application that you defined previously. If you select Any , the forwarding rule will apply to traffic from any source applications.
The rule will match only if the connection is made by the specified source application.
4. Select a User Location . If you did not set up a user location or if you allow the rule to match any user location, select Any . (Does not apply to Dynamic Privilege Access enabled agents.)
The rule will match only if an endpoint is connected to the user location that you specify.
5. Select a Destination that you defined previously. If you select Any , the forwarding rule will apply to traffic from any destination domain or IP address.
The rule will match only if the connection destination matches the specified destination domain or IP address.
6. Select the Connectivity :
- Direct —Sends the traffic outside of the tunnel. All traffic for the selected application or destination is sent directly to the physical adapter on the endpoint without inspection.
- Tunnel —Sends the traffic through the tunnel. All traffic going to the selected application or destination is sent through the tunnel to Prisma Access for inspection and policy enforcement.
7. Select the Traffic Type :
Specify whether to use split DNS to allow users to direct their DNS queries for applications and resources over the tunnel or outside the tunnel in addition to network traffic.
- DNS + Network Traffic —Ensures that the split tunnel based on the destination domain you specified for inclusions or exclusions are applied to the DNS traffic and the associated network application traffic for that domain.
- Network Traffic —Includes or excludes rules that are applied only to network application traffic and not to DNS traffic. All DNS traffic goes through the tunnel regardless of the split tunnel based on the destination domain that you specified for inclusions or exclusions.
For Windows agents, the DNS + Network Traffic split tunnel option is not supported for application-based split tunnel rules. If you set up split tunneling to include or exclude traffic from the tunnel based on application names and select DNS + Network Traffic , DNS query packets for excluded and included apps will not honor the split tunnel rule.
- Add the forwarding rule.
The rule is added to the Forwarding Rules table. You can add multiple rules to the forwarding profile.
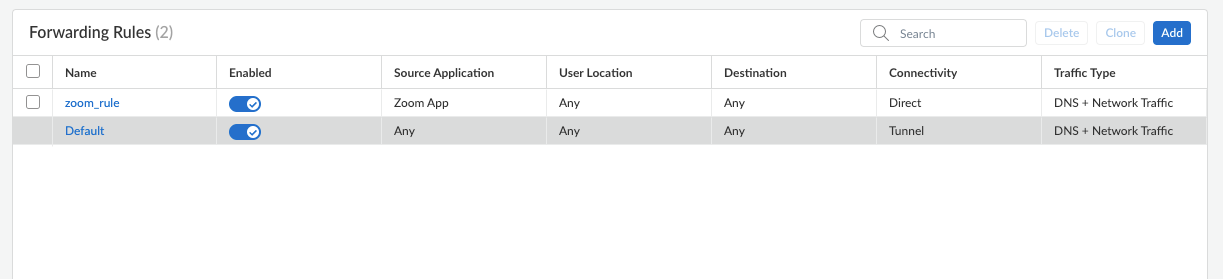
- Configure the Traffic Enforcement options to determine how you want traffic to be enforced.

Be sure that to deselect all these options as they are not recommended for Dynamic Privilege Access.
- Block all other unmatched outbound connections —When enabled, blocks all connections that do not match any of the forwarding rules. The traffic will not be sent through the tunnel.
- Block outbound LAN access when connected to the tunnel —When enabled, blocks direct access to the local network when the agent is connected to the tunnel.
Blocking access to your local network causes all traffic from being sent to the local adapter. In addition, your users won't be able to access resources on the local subnet, such as printers. Split tunnel traffic based on access route, destination domain, and application still works as expected.
If you disable this option, your end users can access local resources without requiring them to first connect to Prisma Access using the Prisma Access Agent.
- Block inbound access when connected to the tunnel —When enabled, blocks all inbound connections from the tunnel.
- Save your forwarding profile.
- Push the configuration by selecting Push ConfigPush . This action will make your forwarding profile available for selection in the Agent Settings page.
Verify and Troubleshoot Forwarding Profile Configurations for Dynamic Privilege Access Agents
After you configure a forwarding profile, you can verify whether the traffic is being directed as intended by viewing the traffic log files. You can view the traffic logs in the log viewer or by using the Prisma Access command-line tool (PACli) on an endpoint.
- To view the traffic log files from the log viewer or Strata Logging Service:
- Select Incidents & AlertsLog Viewer .
- View the Firewall/Traffic logs for more details.
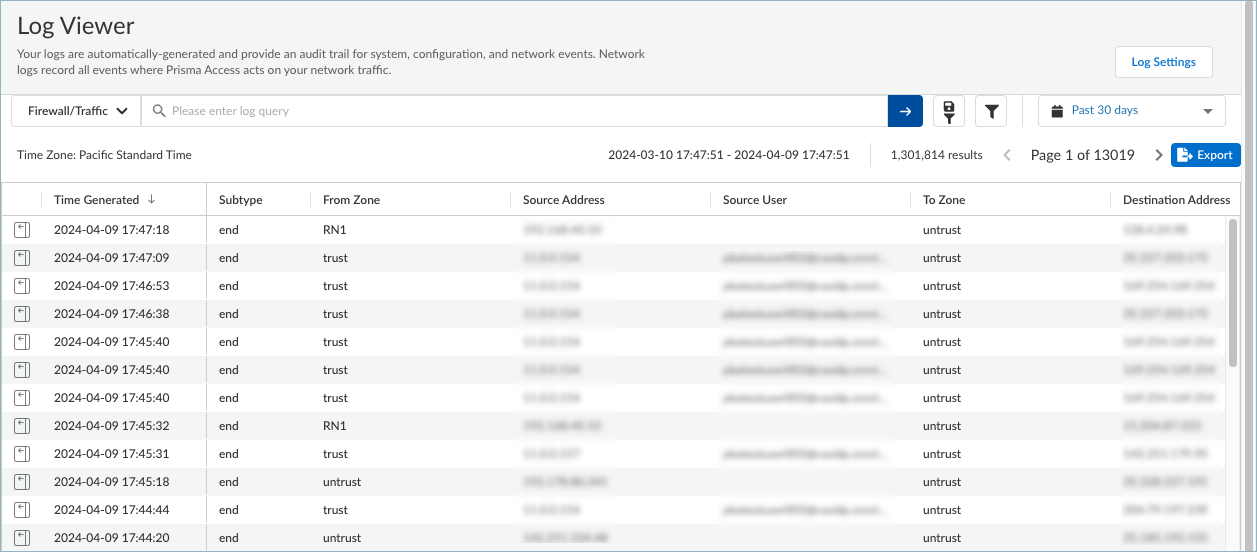
- To view the traffic log files on an endpoint:
- Start the Start the remote shell in ManagePrisma Access Agent or open a Windows command prompt or macOS terminal window on an end user's device.
- To show the forwarding rules in a forwarding profile, issue the following command:
- On Windows:
"C:\Program Files\Palo Alto Networks\Prisma Access Agent\pacli" traffic show
- On macOS:
/Applications/Prisma\ Access\ Agent.app/Contents/Helpers/pacli traffic show
- If you set up an environment variable for the PACli tool (pacli), you can just enter pacli traffic show .
-
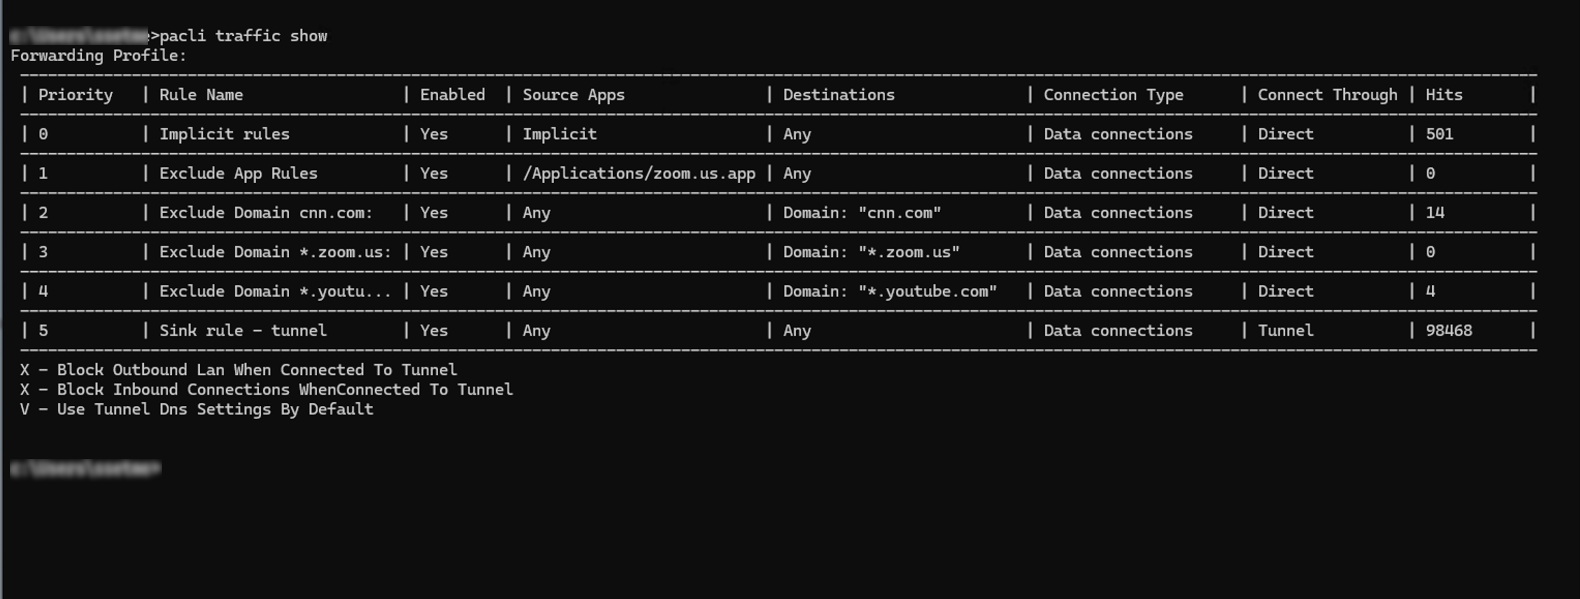
- The sample PACli command-line output shows a table containing the forwarding rules that are in effect in the forwarding profile, including the priorities of the forwarding rules. The traffic enforcement selections for the forwarding profile are also shown. This table corresponds to the forwarding rules that you set up in your forwarding profile.
- To show the details of a forwarding rule, issue the following command:
pacli traffic show <number>
Where <number> is the number in the Priority column, for example:
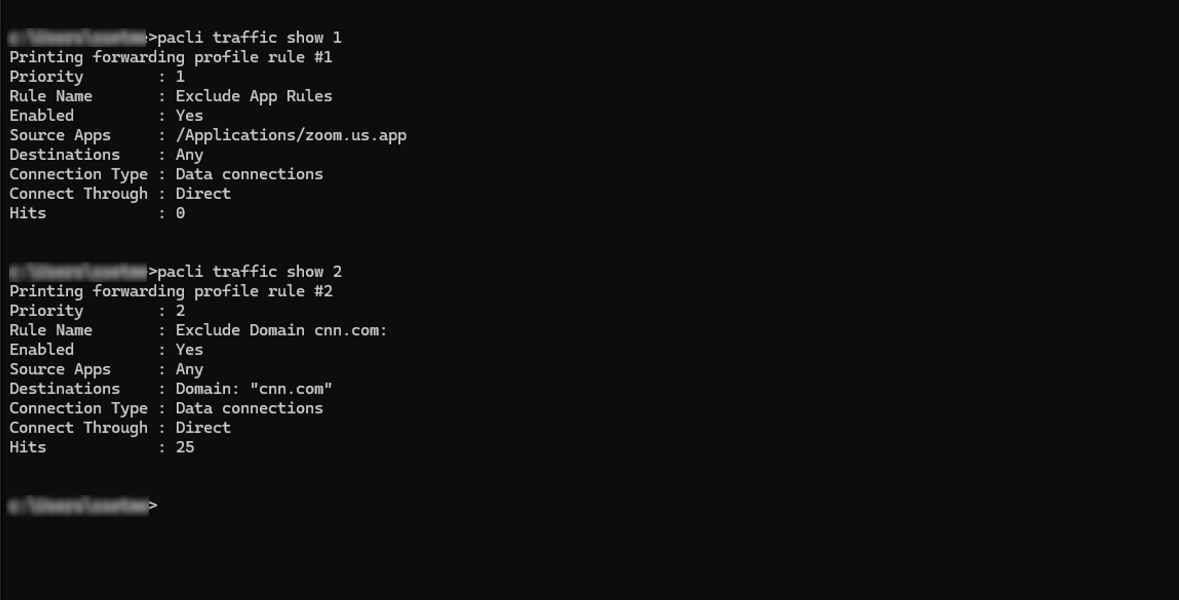
- To troubleshoot split tunnel issues, you might need to examine what agent traffic is inside or outside the tunnel. You can do this by showing the Prisma Access Agent connection log. Issue the following command:
pacli traffic log
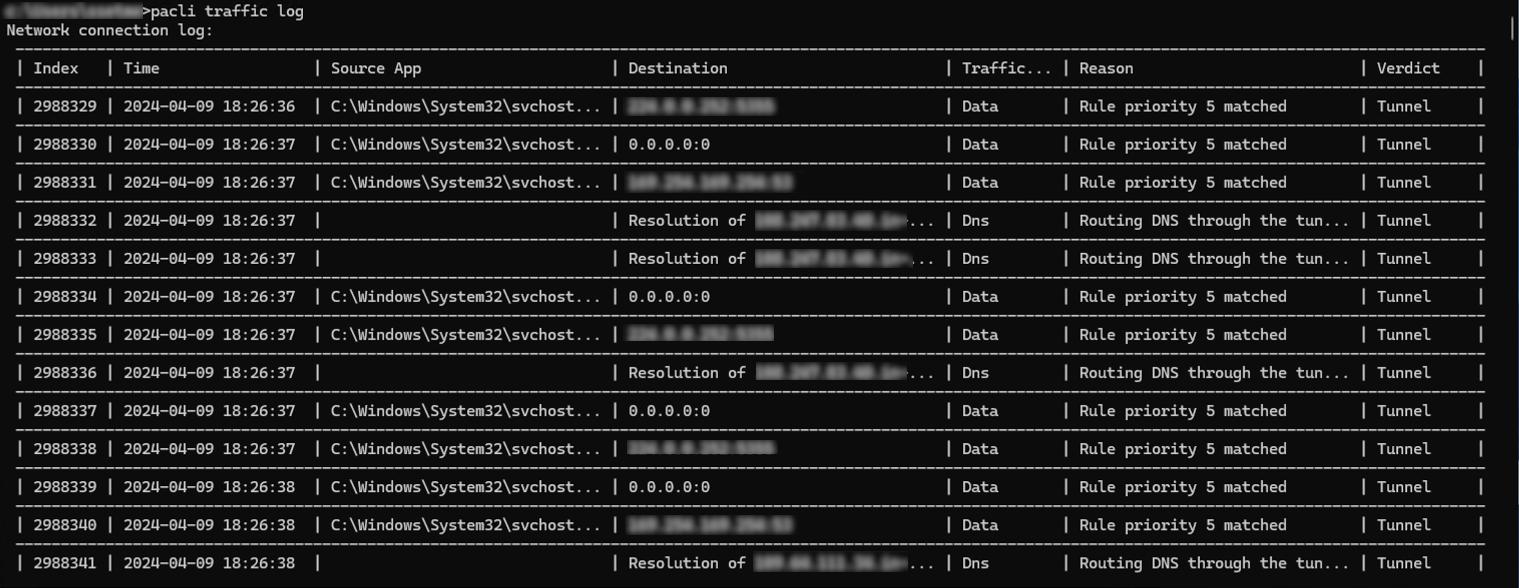
To show an individual log entry, issue the following command:
pacli traffic log <index>
Where <index> corresponds to the index number for the entry. For example:
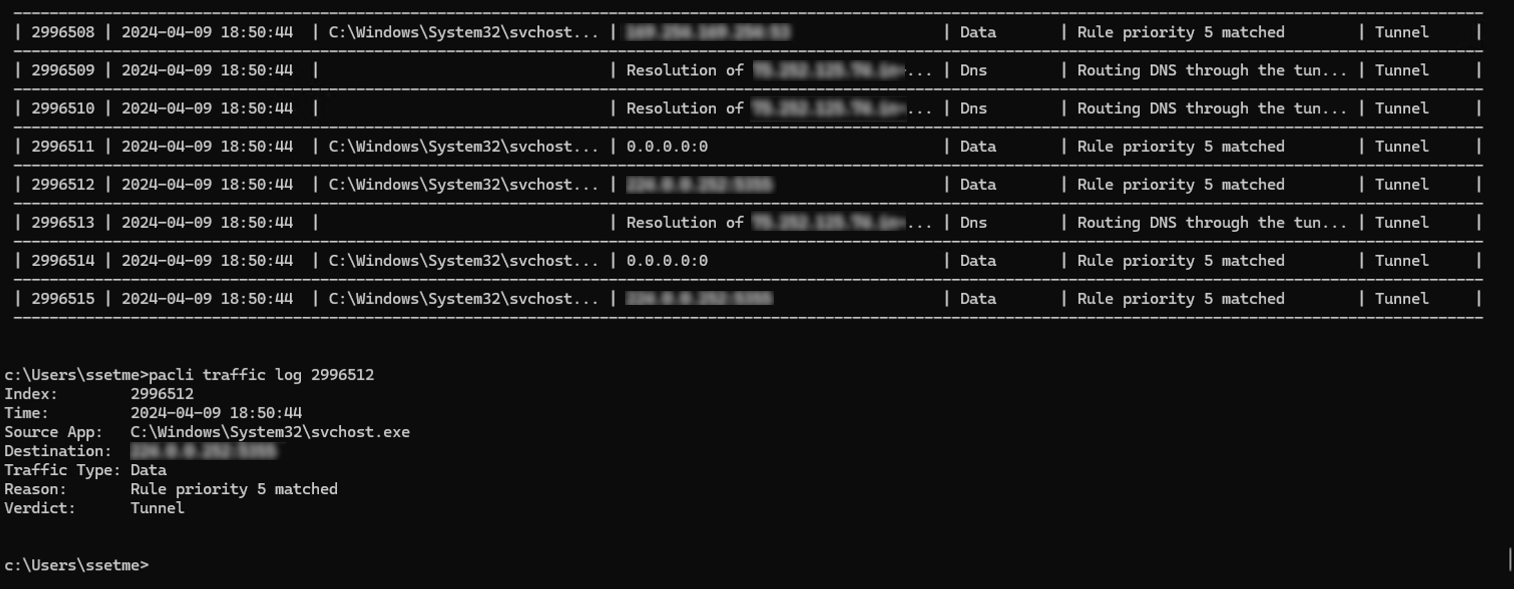
You can also export the connection log to a file for further analysis by issuing:
pacli traffic log export <filename>
Configure Prisma Access Agent App Settings for Dynamic Privilege Access
Strata Cloud Manager provides the default Prisma Access Agent app configurations that apply to all user groups in all projects. You can add an app configuration to customize how your end users in a project interact with the Prisma Access Agent.
- Log in to Strata Cloud Manager as the Project Admin.
- Select ManageConfigurationNGFW and Prisma AccessOverview and expand the Configuration Scope to view the Snippets .
- Select the snippet that the Superuser admin assigned to you.
You can also view the snippets that are not assigned to you, but you cannot interact with them, such as to change the configuration.
- Select ObjectsDynamic Privilege Access to open the Dynamic Privilege Access settings.
- Select the Agent Settings tab.
- Strata Cloud Manager provides you with the default agent settings. If you don't want to use the default settings. Select Add Agent Settings .
To edit the settings for an agent, select an agent name from the table.
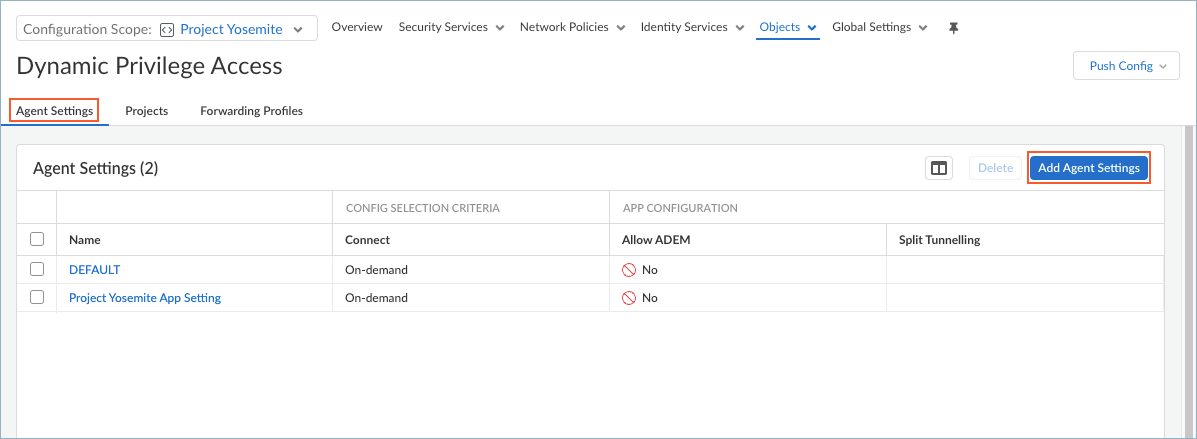
- Create an app configuration rule. The configuration rule associates one or more projects with certain settings that are specific to those projects.
- Enter a Name for the rule.
- Specify the Match Criteria by adding Projects . Users and groups that match the Project criteria will receive the app settings when they log in to the project using the Prisma Access Agent.
- To deploy the configuration to all users, set Projects to Any .
- To deploy the configuration to users who log in to specific projects, set Projects to Add Projects and select from the list of projects.
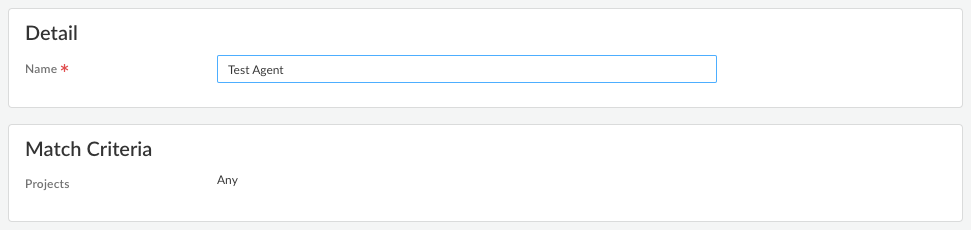
- Configure the app settings for the Prisma Access Agent.
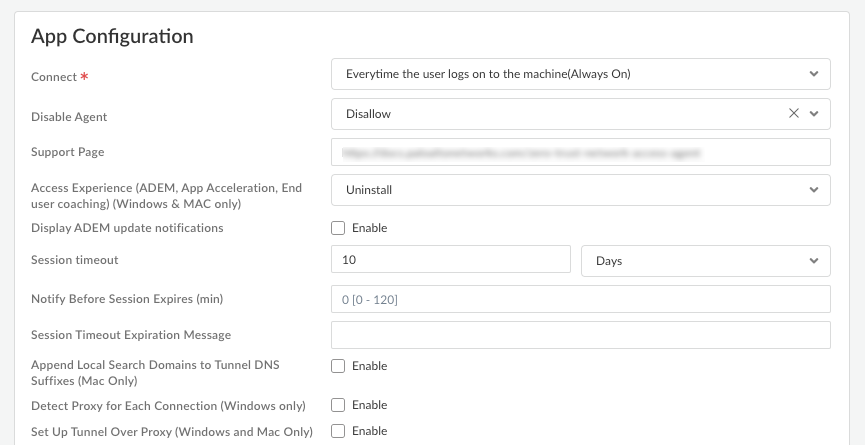
- Connect —Specify how the Prisma Access Agent connects to Prisma Access. This setting is required.
- Select Every time the user logs on to the machine (Always on) to automatically establish a connection to Prisma Access every time the user logs on to an endpoint.
- Select Only when the user clicks Connect (On demand) to connect to Prisma Access only when the user clicks Connect (the lock icon) in the Prisma Access Agent.
- Support Page —Enter the website that users can access for assistance when they click Support Resources in the Prisma Access Agent.
The default support page is the website for the Prisma Access Agent documentation
- Access Experience (ADEM, App Acceleration, End user coaching) (Windows & MAC only) —Specify whether to install the ADEM Access Experience agent during the Prisma Access Agent app installation and allow end users to enable or disable user experience tests from the app.
- Install
- No action (The agent state remains as is)
- Uninstall
For details about getting started with ADEM on Cloud Managed Prisma Access, see Get Started with Autonomous DEM .
- Display ADEM update notifications — Enable this setting to display notifications from ADEM when an update is available on the endpoint.
- Session timeout —Prisma Access Agent user sessions are created when a user connects to the gateway (location) and successfully authenticates. The session is then assigned to a specific gateway that determines which traffic to tunnel based on any defined split tunnel rules. The minimum Prisma Access dataplane version must be 11.2.
Specify the amount of time that must elapse before the session times out due to inactivity. This setting is required.
If you're using the Nebula (10.2) dataplane in Prisma Access, the Session timeout value isn’t configurable and by default is seven days.
- Append Local Search Domains to Tunnel DNS Suffixes (Mac only) — Enable this setting to append tunnel DNS search domains to local DNS search domains on macOS endpoints. Appending tunnel search domains to an endpoint's local DNS search domains enables users to quickly access local and remote corporate websites and servers that they visit frequently without entering the complete address.
- Detect Proxy for Each Connection (Windows only) — Enable this setting to automatically detect the proxy at every connection. Disable this setting if you want to automatically detect the proxy for the gateway connection and use that proxy for subsequent connections to Prisma Access.
- Set Up Tunnel Over Proxy (Windows and Mac Only) — Enable this setting to configure network traffic behavior based on Prisma Access Agent proxy use. Select Enable to require the Prisma Access Agent to use proxies. Disable this setting if you want to require the Prisma Access Agent to bypass proxies. Based on the Prisma Access Agent proxy use, endpoint OS, and tunnel type, network traffic will behave differently.
If you disable this option, Prisma Access Agent will bypass the proxies. All HTTP or HTTPS traffic that matches the proxy or PAC file rules is required to traverse the Prisma Access Agent tunnel before reaching the intended destination. By bypassing proxies, you can prevent users from setting up a personal proxy to access web resources without going through the tunnel for inspection and policy enforcement.
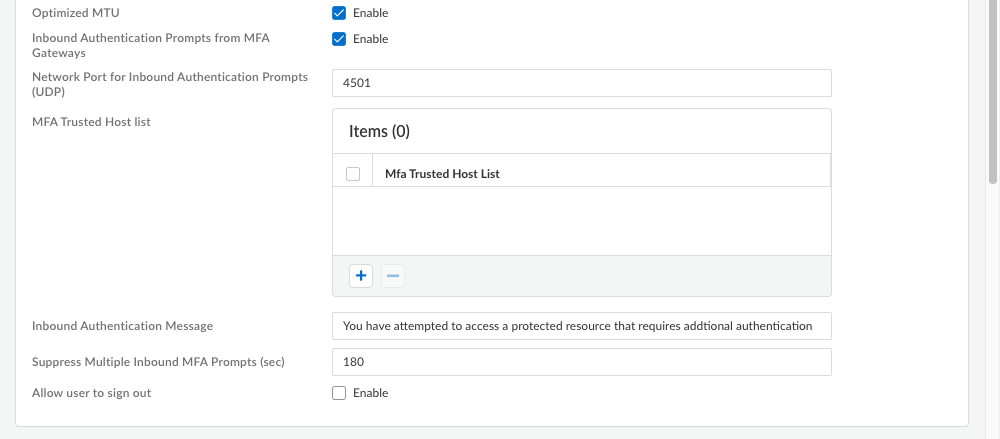
- Inbound Authentication Prompts from MFA Gateways —To support multi-factor authentication (MFA), a Prisma Access Agent endpoint must receive and acknowledge UDP prompts that are inbound from the gateway. Enable this setting to allow a Prisma Access Agent endpoint to receive and acknowledge the UDP prompts. This setting is enabled by default. Disable this setting to block UDP prompts from the gateway.
- Network Port for Inbound Authentication Prompts (UDP) —Specifies the port number a Prisma Access Agent endpoint uses to receive inbound authentication prompts from MFA gateways. The default port is 4501. To change the port, specify a number 1-65535.
- MFA Trusted Host list — Add the hosts for firewalls or authentication gateways that a Prisma Access Agent endpoint can trust for multi-factor authentication. When an endpoint receives a UDP message on the specified network port, the Prisma Access Agent displays an authentication message only if the UDP prompt comes from a trusted gateway.
- Inbound Authentication Messages —Customize a notification message to display when users try to access a resource that requires additional authentication.
When users try to access a resource that requires additional authentication, Prisma Access Agent receives a UDP packet containing the inbound authentication prompt and displays this message. The UDP packet also contains the URL for the Authentication Portal page you specified when you configured multi-factor authentication. Prisma Access Agent automatically appends the URL to the message.
For example:
You have attempted to access a protected resource that requires additional authentication. Do you want to continue?
The message can have 255 or fewer characters.
- Suppress Multiple Inbound MFA Prompts (sec) —Specify the number of seconds to wait before Prisma Access Agent can suppress multiple inbound UDP prompts. The default is 180 seconds.
- Allow user to sign out — Enable this setting to permit your users to sign out of the Prisma Access Agent. This setting is disabled by default.
- Select a Forwarding Profile that you configured previously to manage how traffic flows between the agent and Prisma Access.
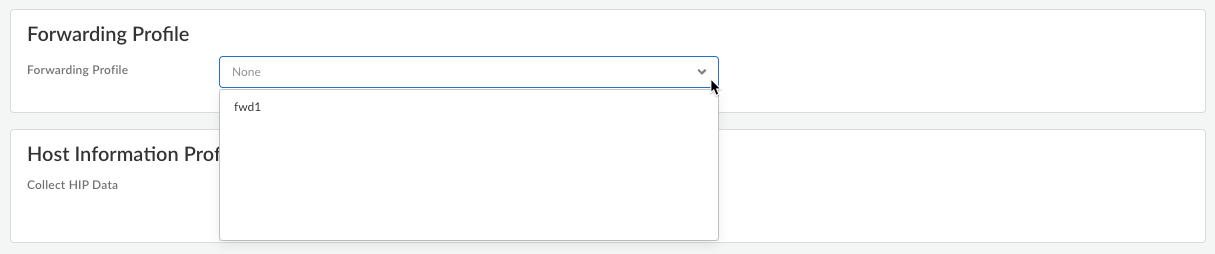
- Configure DNS settings for Dynamic Privilege Access.
- Configure Host Information Profile settings
- When you have finished setting up the Prisma Access Agent settings, click Save .
Configure DNS Settings for Dynamic Privilege Access
You can configure DNS servers to enable Prisma Access to resolve your internal domains.
- From Strata Cloud Manager, select ManageConfigurationNGFW and Prisma AccessOverview and expand the Configuration Scope to view the Snippets .
- Select the snippet that the Superuser admin assigned to you.
- Select ObjectsDynamic Privilege Access to open the Dynamic Privilege Access settings.
- Select the Agent Settings tab.
- Add Agent Settings or select an existing setting from the Agent Setting table.
- Enter the Primary DNS server and Secondary DNS server that Prisma Access should use to resolve internal domain names.
- You can add a Client DNS Suffix List to specify the suffix that the client should use locally when an unqualified hostname is entered that it can't resolve, for example, acme.local .
Do not enter a wildcard (*) character in front of the domain suffix (for example, acme.com). You can add multiple suffixes.
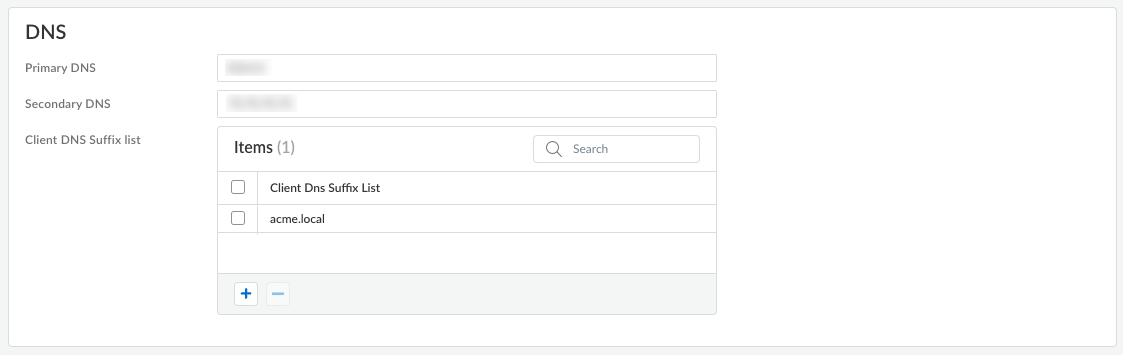
Configure HIP Data Collection Settings for Dynamic Privilege Access
The Prisma Access Agent collects information about the host it's running on and submits this host information to the gateway upon successful connection. The gateway matches this raw host information submitted by the Prisma Access Agent against any host information profile (HIP) objects and HIP Profiles that you have defined. If it finds a match, it generates an entry in the HIP Match log. Additionally, if it finds a HIP Profile match in a policy rule, it enforces the corresponding security policy.
In the HIP Notifications tab of the Edit Global Agent Settings page, you can create HIP notifications, create and manage HIP objects, and create and manage HIP Profiles that apply to the Prisma Access Agent across all endpoints.
Here, you can define custom HIP data that you want the Prisma Access Agent to collect. When this option is enabled, the Prisma Access Agent collects data from devices running macOS or Windows operating systems.
For example, a custom check could enable you to know whether a certain application is installed or running on an endpoint. The data that you define to be collected in a custom check is included in the raw host information data that the Prisma Access Agent collects and then submits to the gateway when the Prisma Access Agent connects.
- From Strata Cloud Manager, select ManageConfigurationNGFW and Prisma AccessOverview and expand the Configuration Scope to view the Snippets .
- Select the snippet that the Superuser admin assigned to you.
- Select ObjectsDynamic Privilege Access to open the Dynamic Privilege Access settings.
- Select the Agent Settings tab.
- Add Agent Settings or select an existing configuration from the Agent Setting table.
- In the Host Information Profile (HIP) section, select Collect HIP Data to enable HIP data collection on the endpoints that logged in using a project.
- Select Show Advanced Options .

- Specify the Max Wait Time (in seconds) that the Prisma Access Agent should search for HIP data before submitting the available data. The range is 10-60 seconds; the default is 20 seconds.
- Select the Certificate Profile that the gateway uses to match the machine certificate sent by the Prisma Access Agent.
If you want to use a certificate profile that isn't on the list, Add Certificate Profile .
- ( Required ) Name —Enter a name for the certificate profile. The name is case-sensitive and must be unique. Use only letters, numbers, spaces, hyphens, and underscores.
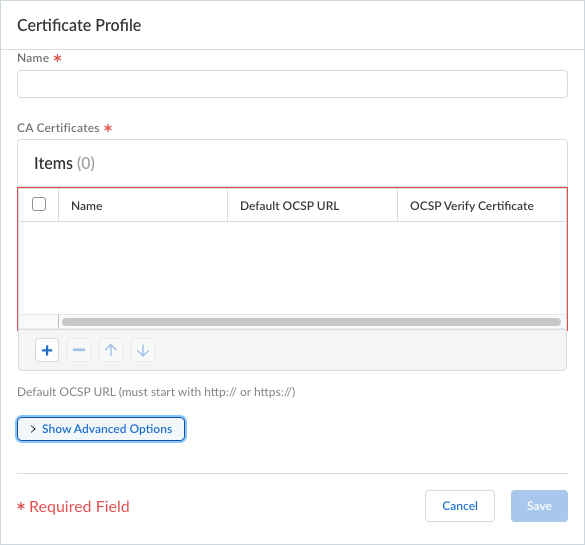
- ( Required ) CA Certificates — Add a CA Certificate to assign to the profile.
Optionally, if the gateway uses the Online Certificate Status Protocol (OCSP) to verify certificate revocation status, configure the following fields to override the default behavior. For most deployments, these fields do not apply.
- By default, the gateway uses the Authority Information Access (AIA) information from the certificate to extract the OCSP responder information. To override the AIA information, enter a Default OCSP URL (starting with http:// or https:// ).
- By default, the gateway uses the certificate selected in the CA Certificate field to validate OCSP responses. To use a different certificate for validation, select it in the OCSP Verify CA Certificate field.
- Show Advance Options —Shows more options for the certificate profile.
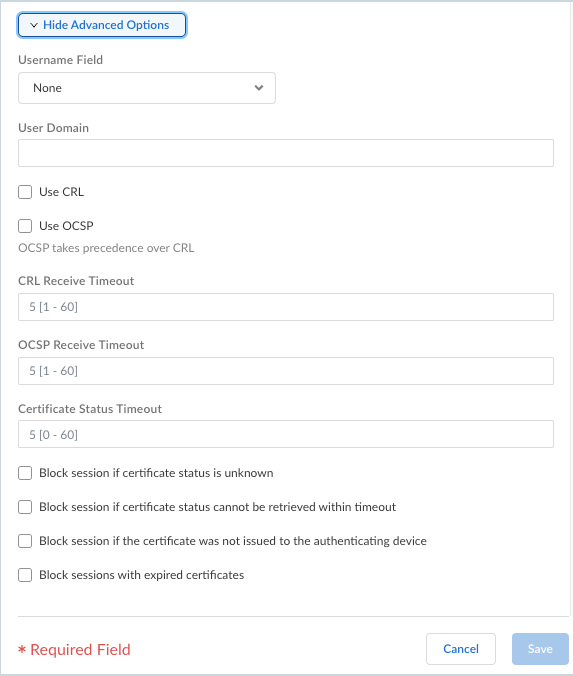
- Username Field —If Prisma Access Agent uses only certificates for gateway authentication, Prisma Access uses the certificate field you select in the Username Field drop-down as the username and matches it to the IP address for the User-ID service:
- Subject —The Common Name.
- Subject Alt —The Email or Principal Name.
- None —Typically for the Prisma Access Agent device authentication.
- User Domain —Enter the NetBIOS domain so that Prisma Access can map users through the User-ID.
- Use CRL —Select this option to use a certificate revocation list (CRL) to verify the revocation status of certificates.
- USE OCSP —Select this option to use OCSP to verify the revocation status of certificates.
If you select both OCSP and CRL, the gateway first tries OCSP, and only falls back to the CRL method if the OCSP responder is unavailable.
- CRL Receive Timeout —Specify the interval (1-60 seconds) after which the gateway stops waiting for a response from the CRL service.
- OCSP Receive Timeout —Specify the interval (1-60 seconds) after which the gateway stops waiting for a response from the OCSP responder.
- Certificate Status Timeout —Specify the interval (1-60 seconds) after which the gateway stops waiting for a response from any certificate status service and applies any session blocking logic you define.
- Block session if certificate status is unknown —Select this option if you want the gateway to block sessions when the OCSP or CRL service returns a certificate revocation status of unknown . Otherwise, the gateway proceeds with the sessions.
- Block sessions if certificate status cannot be retrieved within timeout —Select this option if you want the gateway to block sessions after it registers an OCSP or CRL request timeout. Otherwise, the gateway proceeds with the sessions.
- Block sessions if the certificate was not issued to the authenticating device —Select this option if you want the gateway to block sessions when the serial number attribute in the subject of the client certificate does not match the host ID that the Prisma Access Agent reports for the endpoint. Otherwise, the gateway allows the sessions. This option applies only to Prisma Access Agent certificate authentication.
Save your settings when you're done.
- Edit Custom Checks to define any custom data you want to collect from the hosts running this configuration.

For example, if you have any required applications that are not included in the Vendor or Product lists for creating HIP objects, you can create a custom check to determine whether that application is installed (it has a corresponding Windows registry or Mac plist key) or is currently running (has a corresponding running process):
- Windows — Add a check for a particular Registry Key or Registry Value. To restrict data collection to a specific Registry Value, Add and then define the specific registry values.
- Mac — Add a check for a particular Plist key or Key value. To restrict the data collection to specific key values, Add the Key values. Click OK to save the settings.
- Process List — Add the processes you want to check for on user endpoints to see if they are running. For example, to determine whether a software application is running, add the name of the executable file to the process list. You can add a process to the Windows tab, the Mac tab, or both.
Save the custom check settings when you are done.
- When you have finished configuring the project-specific Prisma Access Agent settings, Save the configuration
Create a Project
Add projects that you want users to access using the Prisma Access Agent. Only a project-admin can create and manage the project definitions.
- Select ManageConfigurationNGFW and Prisma Access .
- Set the scope to the project snippet you created, and navigate to ObjectsDynamic Privilege AccessProjectsAdd Project .
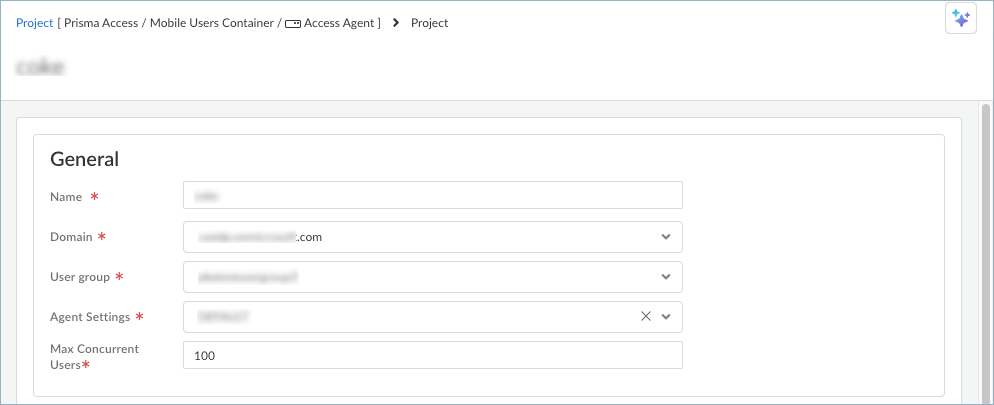
- Enter a project Name .
- Select the Domain you added in the Cloud Identity Engine, and the User Group mapped to the directory.
- Select the Agent Settings you added previously, and the Max Concurrent Users for the project.
- Select Prisma Access Location Groups . The list of location groups are populated based on the locations where you add the GlobalProtect gateways.
The project that you're creating is associated with IP pools and location groups. Users will acquire the IP addresses based on which project and Prisma Access compute location they connect to using the Prisma Access Agent. A project can only connect to the location within the location group that is associated with the project. You can select Click here for detailed mapping to see the mapping between the Prisma Access location groups and the Prisma Access compute locations.
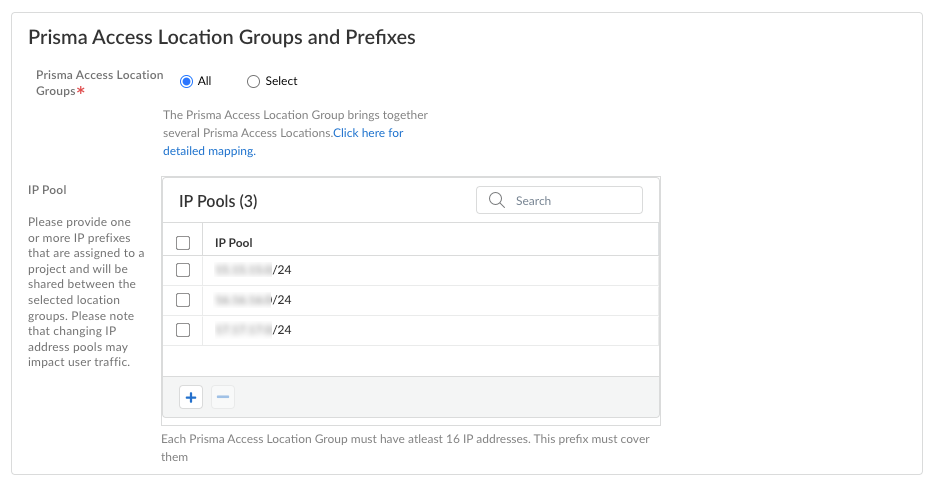
- Add or select the IP Pools for your project. The IP prefixes are assigned to your project and will be shared between the Prisma Access location groups you selected.
These project IP pools can be summarized to reduce the number of routes that are sent to the network.
- Save the project settings.
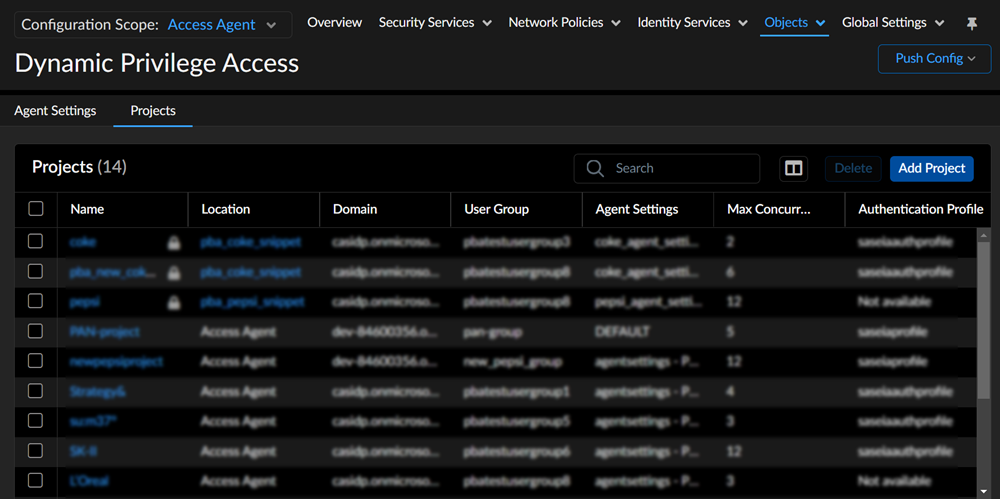
- When you select a project snippet in your configuration scope, you can access only the settings and details related to that particular project.
- When you log in to Strata Cloud Manager as a project admin or a project push admin, you can only view the project details you have access. If you select the configuration scope of another project snippet, you cannot access the settings and details of another project.
- To switch between projects, you have to re-log in to Strata Cloud Manager as a different project admin or project push admin using the credentials of different projects.
- Push your changes.
After you create a project in Prisma Access, it can take up to 15 minutes before the user can authenticate to that project using the Prisma Access Agent.
Traffic Steering for Dynamic Privilege Access
Use traffic steering to forward a project's traffic to a service connection and project-specific routes.
- Select WorkflowsPrisma Access SetupService Connections .
- Add a service connection .
- Edit the Advanced Settings to route the traffic.
- Add Rule under Traffic Steering for your projects.
- Match the Source with users and add the project DHCP range as Source Address Entities .
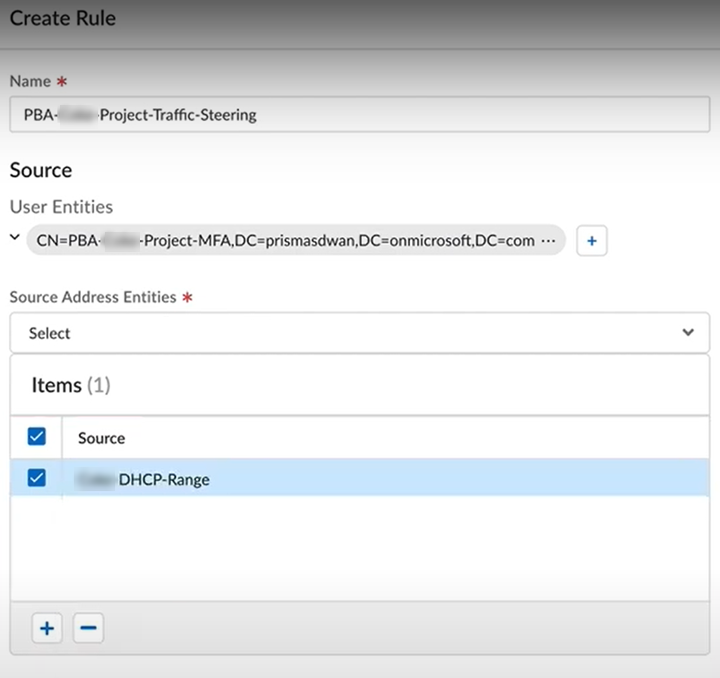
- Match the Destination address entities.
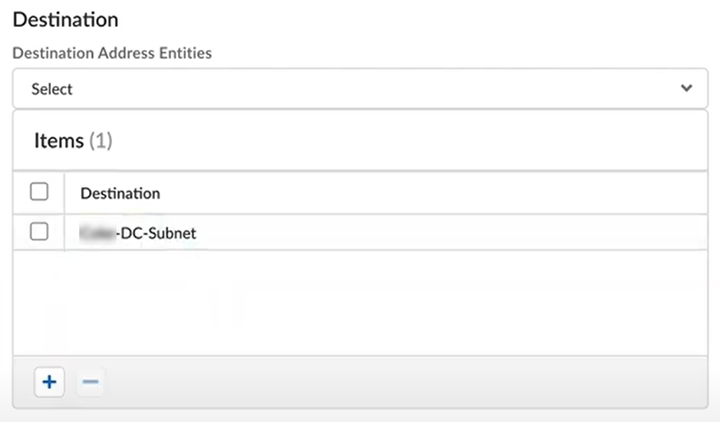
- Select the services, and actions.
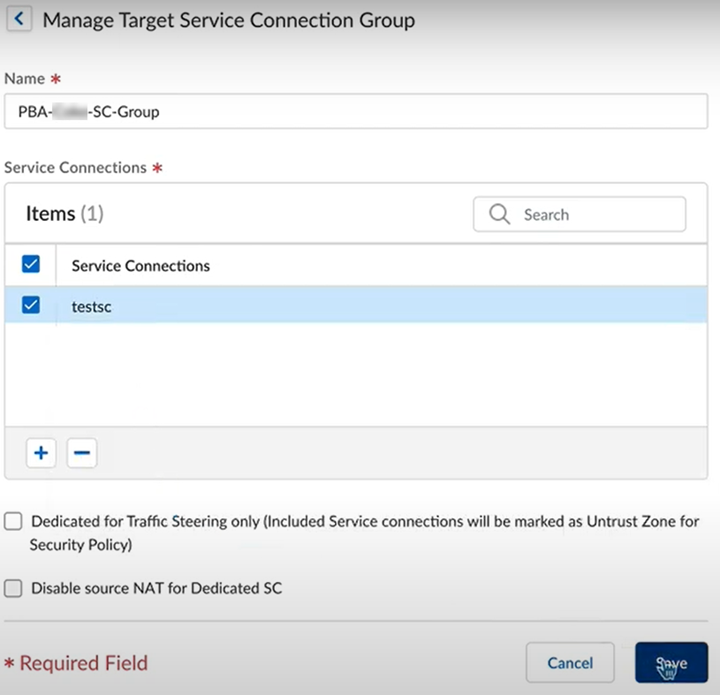
- Save and push the changes.
Set Up the Prisma Access Agent for Dynamic Privilege Access
Your end users will use the Prisma Access Agent to access your organization's network based on the customer projects that your users are assigned to.
After you set up the project-specific agent settings and created the projects , you can configure other Prisma Access Agent settings such as staged rollouts and global agent settings.
You can configure the following Prisma Access Agent settings:
Configure Staged Rollouts for the Prisma Access Agent
The Prisma Access Agent upgrade rollout functionality provides administrators with a way to upgrade groups of devices in a specific order. With upgrade rollouts, you no longer have to rely on mobile device management (MDM) software, such as Jamf Pro and Microsoft Intune, to upgrade Prisma Access Agents.
Stage upgrade rollouts can occur only after the initial deployment or installation of the Prisma Access Agent on your end users' devices.
Before you begin, learn about staged rollouts of Prisma Access Agents .
To stage the rollout of Prisma Access Agent upgrades, you can configure upgrade rings with match criteria based on users, groups, and operating systems. Devices that match the criteria are upgraded in the order of the upgrade rings (Ring 0 to Ring 4, Default ring).
You can optionally define upgrade rings when you onboard mobile users using the Access Agent Setup page for the Prisma Access Agent. If you choose not to define upgrade rings during the initial agent configuration, all devices are placed in the default ring. You can return to Prisma Access Agent Setup page later to define the upgrade rings and push the configuration to Prisma Access. These changes will take effect during the next staged rollout, or after you stop and start a staged rollout.
To configure an upgrade ring:
- In Strata Cloud Manager, select WorkflowsPrisma Access SetupAccess AgentPrisma Access Agent .
- In the Staged Rollouts section, click Add Ring .
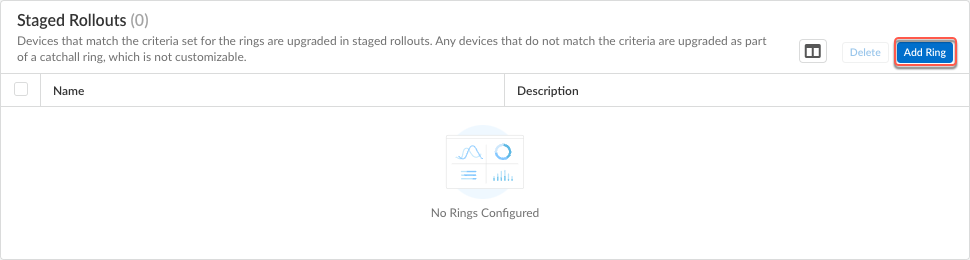
- Select a predefined Name for the ring. You can select from Ring0 to Ring4 . The first ring that you will add is Ring0 .
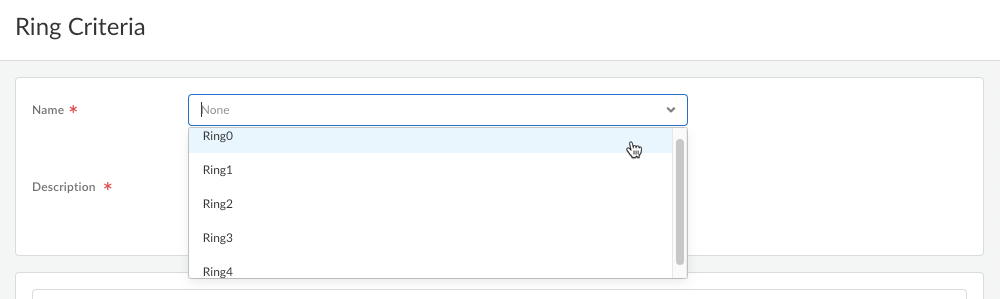
- Enter a meaningful Description for the ring.
- Specify the criteria for the ring based on the User , Groups , or Device OS attributes.
- Add a criteria.
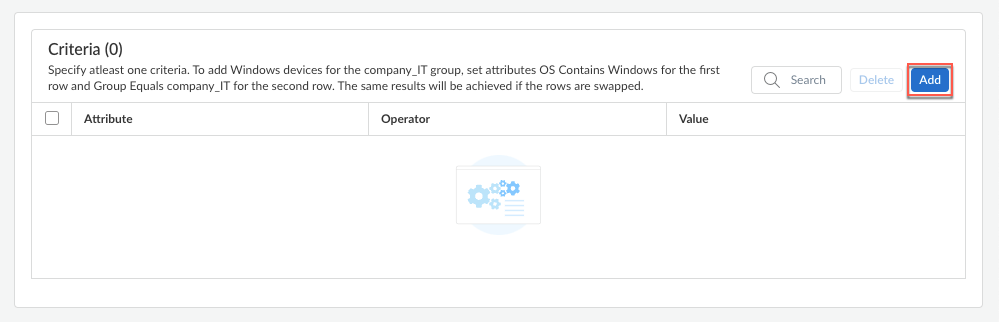
- For each criterion, select an Attribute , Operator , Value , and then click Add . You can select only one attribute and operator per criterion. The value depends on what you selected for the attribute and operator:
- For the Username attribute:
- If you select OperatorContains , select or search for a username from the Value list. To start a search, start typing the username. You can select one or more usesrnames from the list.
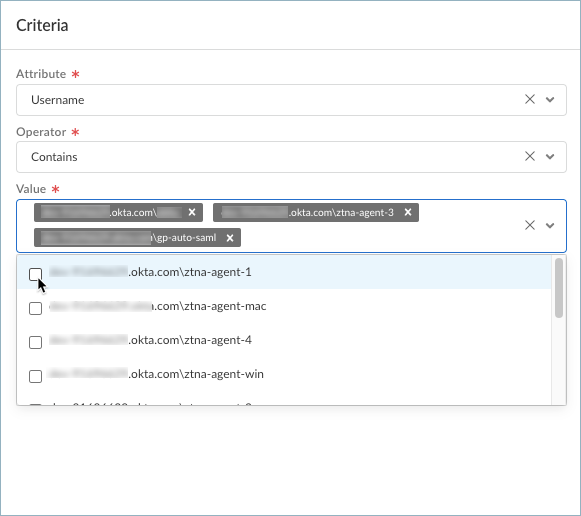
- If you select OperatorEquals , select or search for a username from the Value list. To start a search, start typing the username. You can select one usesrname from the list.
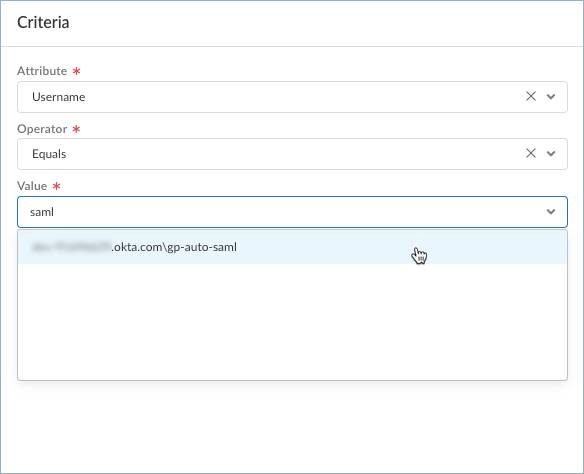
- For the Groups attribute:
- If you select OperatorContains , select or search for a group from the Value list. To start a search, start typing the group name. You can select one or more groups from the list.
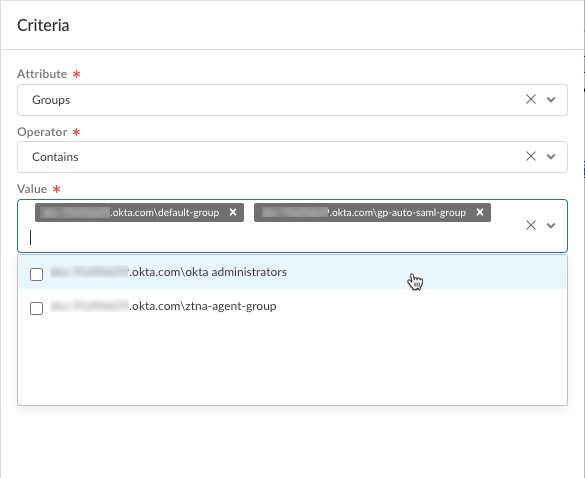
- If you select OperatorEquals , select or search for a group from the Value list. To start a search, start typing the group name. You can one group from the list.
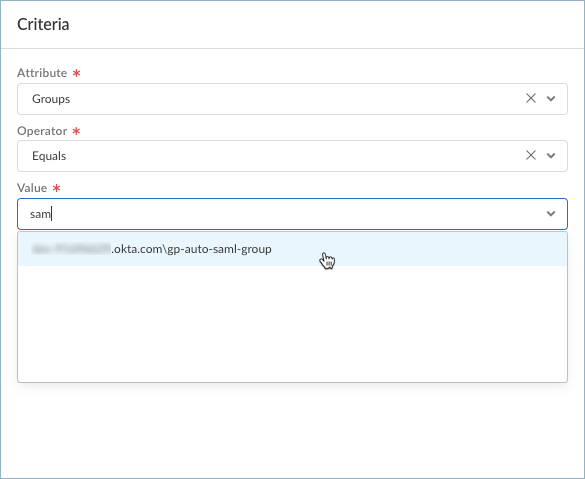
- For the OS attribute, select an OS type ( Windows or macOS ). Then:
- If you select OperatorContains , search for or select one or more OS versions from the Value list. To start a search, start typing the OS and version. You can select one or more OS versions from the list.
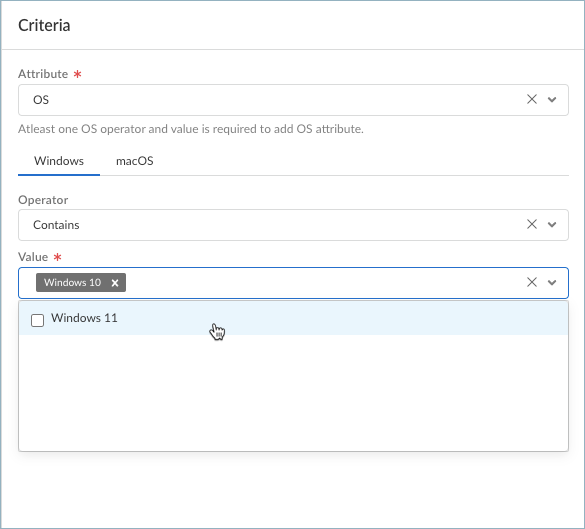
- If you select the Greater than or Less than operator, search for or select an OS version from the Value list. To start a search, start typing the OS and version. You can select one OS version from the list.
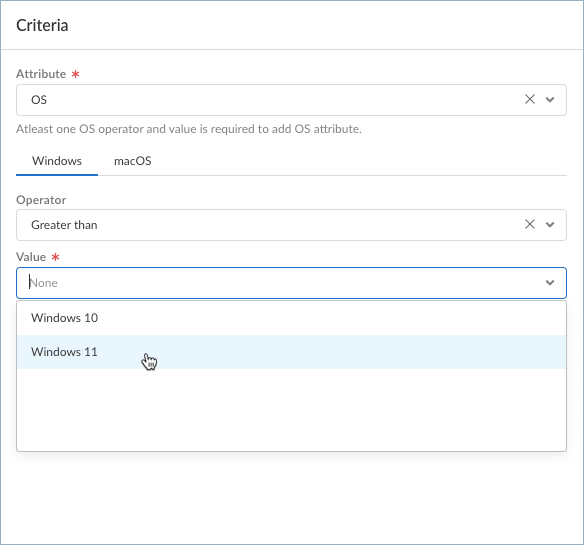
- If needed, Add more criteria. You can specify up to three criteria per ring.
You can use an attribute only once per ring. After you add a criteria using an attribute, that attribute will no longer appear in the Attribute drop-down.
After you added the criteria, the criteria is displayed in the Criteria table in the Ring Criteria page. When Prisma Access evaluates the criteria, the values listed in the same cell are evaluated using the logical OR operator, while the attributes and values between the rows are evaluated using the logical AND operator.
For instance, the criteria in the following image will match those devices that belong in the gp-auto-saml-group or Okta Administrators group and run the Windows 11 operating system.
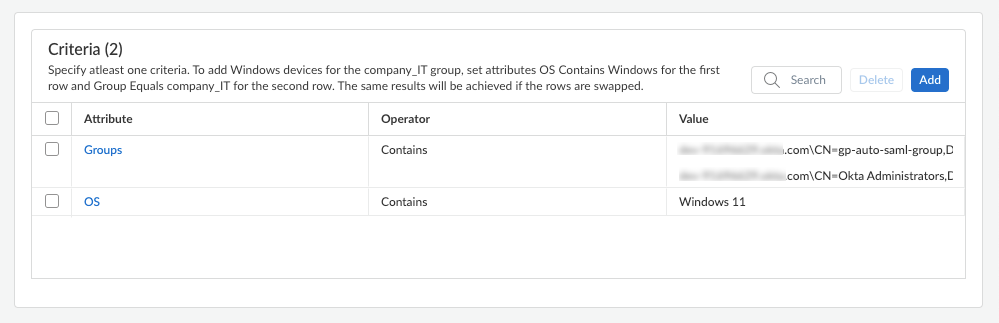
- Save the ring criteria.
- To create more rings, repeat steps 2-5. You can create a total of five rings (Ring 0 to Ring 4).
- Push the configuration to Prisma Access.
- Select Push ConfigPush .
- Enter a Description for the job.
- Select the GlobalPrisma AccessMobile UsersAccess Agent container and click Push .
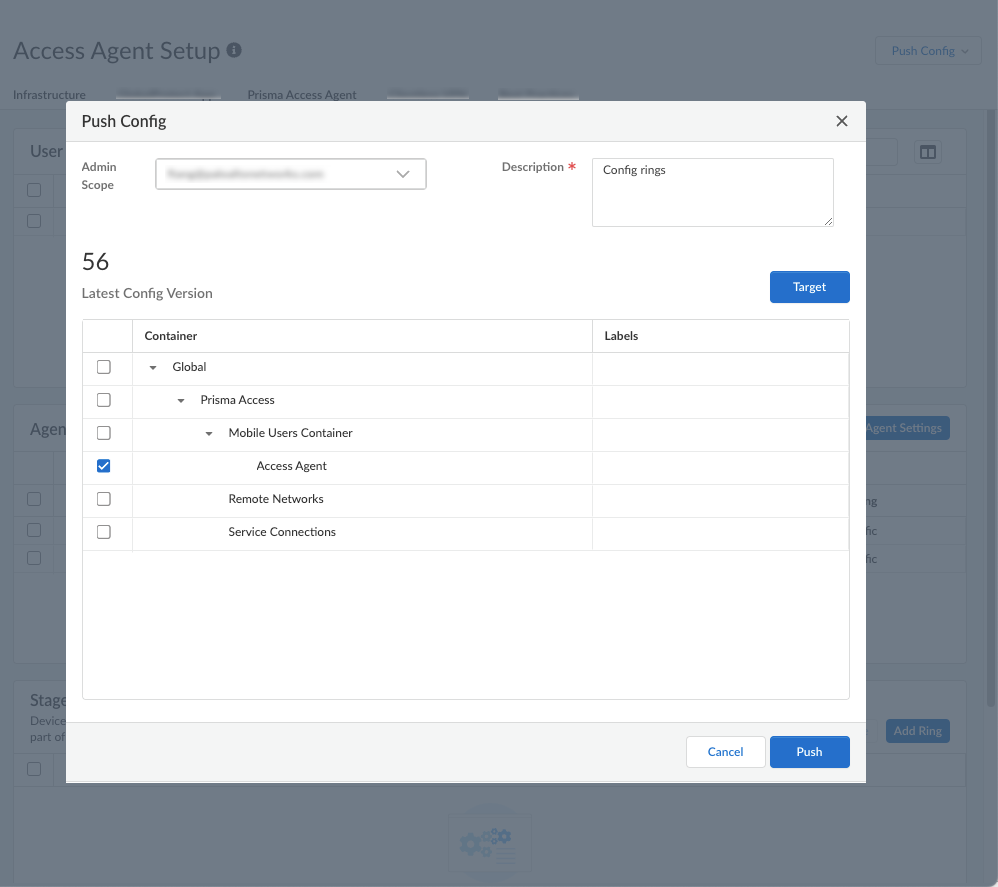
- Wait for the job to finish and Close the Jobs dialog.
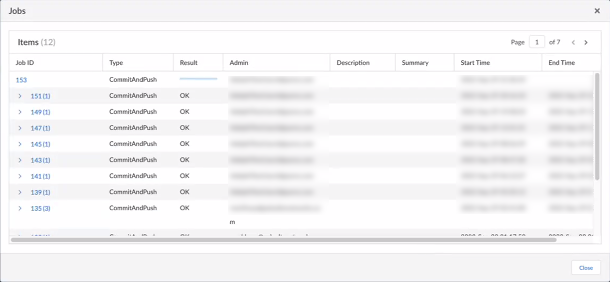
- You can monitor the staged rollout in the Inventory page ( ManagePrisma Access Agent ).
Configure General Global Settings for Prisma Access Agents
You can customize the global agent settings that apply to Prisma Access Agents across all endpoints.
General global agent settings include setting up the anti-tamper feature that prevents users from tampering with the Prisma Access Agent, such as uninstalling it from an end user's device. In addition, you can configure the authentication override settings, the inactivity timeout setting, and block the login of quarantined devices.
- From Strata Cloud Manager, select WorkflowsPrisma Access SetupAccess AgentPrisma Access Agent .
- Edit the Global Agent Settings .

- Select General .
- Configure an anti-tamper unlock password.
You can safeguard the Prisma Access Agent by enabling the anti-tamper feature, which prevents any unauthorized user from tampering with the Prisma Access Agent. The anti-tamper feature can protect the following Prisma Access Agent resources on your endpoints:
- Prisma Access Agent folders and files—Unauthorized users cannot delete or rename any Prisma Access Agent-related files and folders.
- Prisma Access Agent services and host information profile (HIP) processes—Unauthorized users cannot stop any Prisma Access Agent-related services and HIP processes. The HIP processes collect information about the host that the Prisma Access Agent is running on and submits the host information to Prisma Access for inspection. If a user tries to stop a process, they must supply the anti-tamper unlock password.
- Prisma Access Agent Registry keys (on Windows) or .plist file (on macOS)—Unauthorized users cannot delete or update the Windows Registry keys or .plist file for the Prisma Access Agent.
- The PACli command-line interface—Unauthorized users cannot disable the Prisma Access Agent or the anti-tamper feature using the PACli command-line interface. Administrators and authorized users who need to perform certain actions for troubleshooting at the command line must provide the anti-tamper unlock (supervisor) password when prompted.
To unlock the anti-tamper feature to troubleshoot the Prisma Access Agent, you need to set up an anti-tamper unlock password (also known as the supervisor password).
5. Enable the anti-tamper unlock password.
If you don't enable the anti-tamper password, no password is assigned, and a user can enter any password (including an empty password) when prompted at the Prisma Access Agent command line.
If you disable the anti-tamper password after enabling it, users can run certain PACli commands on the agent, such as the pacli disable , pacli hip status , pacli protect disable , and pacli switchto GlobalProtect commands, without providing the supervisor password. They only need to press Enter when prompted for the password.
6. Enter the Password , and then Confirm Password by reentering the password. The password must have a minimum of eight alphanumeric characters.
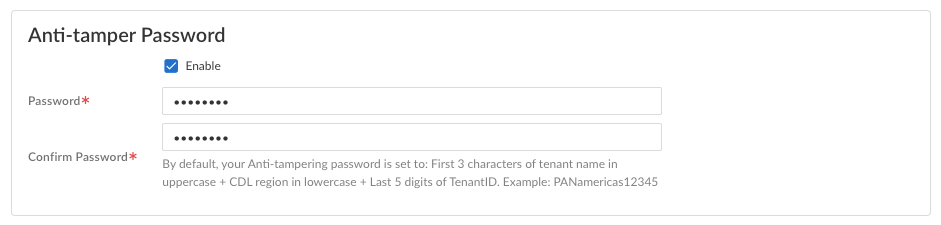
If you do not provide a password, the default password will be used. By default, the anti-tamper password is set to the first three characters of the Prisma Access tenant name in uppercase, plus the Prisma Access Data Region in lowercase, plus the last five digits of the Prisma Access Instance ID , for example: PANamericas56789 .
You can obtain the Prisma Access Instance ID and Data Region by selecting SettingsTenants<your_tenant> and selecting the View Support Info tool tip next to the serial number for Prisma Access.
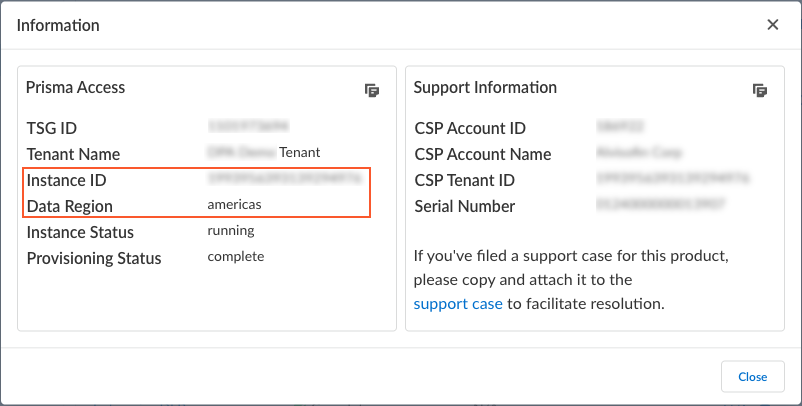
To provide a higher level of security for your agents, override the default anti-tamper unlock password by setting up a new secure password.
- Configure Authentication Override settings to allow Prisma Access to generate and accept secure, encrypted cookies for user authentication. Authentication override allows the user to provide login credentials only once during the specified Cookie Lifetime .
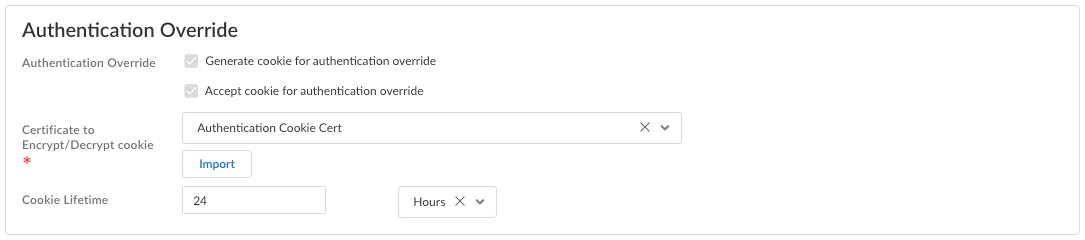
- Generate cookie for authentication override —Enables Prisma Access to generate encrypted endpoint-specific cookies and issue authentication cookies to the endpoint.
- Accept cookie for authentication override —Enables Prisma Access to authenticate users with a valid, encrypted cookie. When the app presents a valid cookie, Prisma Access verifies that the cookie was encrypted by Prisma Access originally, decrypts the cookie, and then authenticates the user.
- Certificate to Encrypt/Decrypt Cookie —Select an RSA certificate to use to encrypt and decrypt the cookie.
- Cookie Lifetime —Specifies the hours, days, or weeks for which the cookie is valid (default is 24 hours). The range for hours is 1-72; the range for weeks is 1-52; and the range for days is 1-365. After the cookie expires, the user must reenter their login credentials. Prisma Access then encrypts a new cookie to send to the agent. This value can be the same as or different from the cookie lifetime that you configure.
- Configure Timeout settings for the Prisma Access Agent.
The Inactivity Logout setting applies to both Prisma Access Agent and GlobalProtect. Any changes you make will be reflected and used for GlobalProtect, and vice versa.
- Inactivity Logout —Specify the amount of time after which idle users are logged out of the Prisma Access Agent.
You can use the inactivity logout period to enforce a security policy to monitor traffic from endpoints while connected to Prisma Access and to quickly log out inactive Prisma Access Agent sessions. You can enforce a shorter inactivity logout period. Users are logged out if the Prisma Access Agent has not routed traffic through the tunnel or if the gateway does not receive a HIP check from the endpoint within the configured time period.
- Block Login for Quarantined Devices to prevent Prisma Access Agent users from logging in from quarantined devices.
If a user attempts to log in from a quarantined device when this setting is enabled, the Prisma Access Agent notifies the user that the device is quarantined and the user cannot log in from that device. If this setting is not enabled, the user receives the notification but is able to log in from that device.
The Block Login for Quarantined Devices setting applies to both Prisma Access Agent and GlobalProtect. Any changes you make will be reflected and used for GlobalProtect, and vice versa.
- Save your settings.
Configure HIP Notifications for the Dynamic Privilege Access Prisma Access Agent
In the HIP Notifications tab of the Edit Global Agent Settings page, you can create host information profile notifications, create and manage HIP objects, and create and manage HIP Profiles that apply to the Prisma Access Agent across all endpoints.
The Prisma Access Agent collects information about the host it's running on and submits this host information to the gateway upon successful connection. The gateway matches this raw host information submitted by the Prisma Access Agent against any HIP objects and HIP Profiles that you have defined. If it finds a match, it generates an entry in the HIP Match log. Additionally, if it finds a HIP Profile match in a policy rule, it enforces the corresponding security policy.
HIP checks are performed when the app connects to the gateway and subsequent checks are performed hourly while the Prisma Access Agent is connected. The gateway can request an updated HIP report if the previous HIP check has changed. Only the latest HIP report is retained on the gateway per endpoint.
Using host information profiles for policy enforcement enables granular security that ensures the remote hosts accessing your critical resources are adequately maintained and adhere with your security standards before they are allowed access to your network resources. For example, before allowing access to your most sensitive data systems, you might want to ensure that the hosts accessing the data have encryption enabled on their hard drives. You can enforce this policy by creating a security rule that only allows access to the application if the hard drives on the endpoint are encrypted.
In addition, for endpoints that are not in compliance with this rule, you can create a notification message that alerts users as to why they have been denied access. You can also provide a link to the location where they can access the installation program for the missing encryption software. To allow the user to access that file share, you will have to create a corresponding security rule allowing access to the particular share for hosts with that specific HIP Profile match. You have the option to configure HIP notifications for both HIP match and nonmatch. The notification can be sent as a pop-up message or a system tray balloon.
You can complete the following tasks:
Create a HIP Notification for the Dynamic Privilege Access Prisma Access Agent
When the HIP report matches the HIP profile or object, a corresponding HIP notification is sent. You can define the notification messages that end users see.
Deciding whether to display a notification message when the user's configuration matches or does not match a HIP Profile in the policy depends largely on your policy and what a HIP match (or nonmatch) means for the user. That is, does a match mean they are granted full access to your network resources, or does it mean they have limited access due to a noncompliance issue?
For example, suppose you create a HIP Profile that matches if the required corporate antivirus and antispyware software patches are not installed. You could create a HIP notification message for users who match the HIP Profile, informing them that they need to install the patches. Alternatively, if your HIP Profile matches when those same patches are installed, you might want to create the message for users who do not match the profile.
- From Strata Cloud Manager, select WorkflowsPrisma Access SetupAccess AgentPrisma Access Agent .
- Edit the Global Agent Settings .
- Select HIP Notifications and click Add .
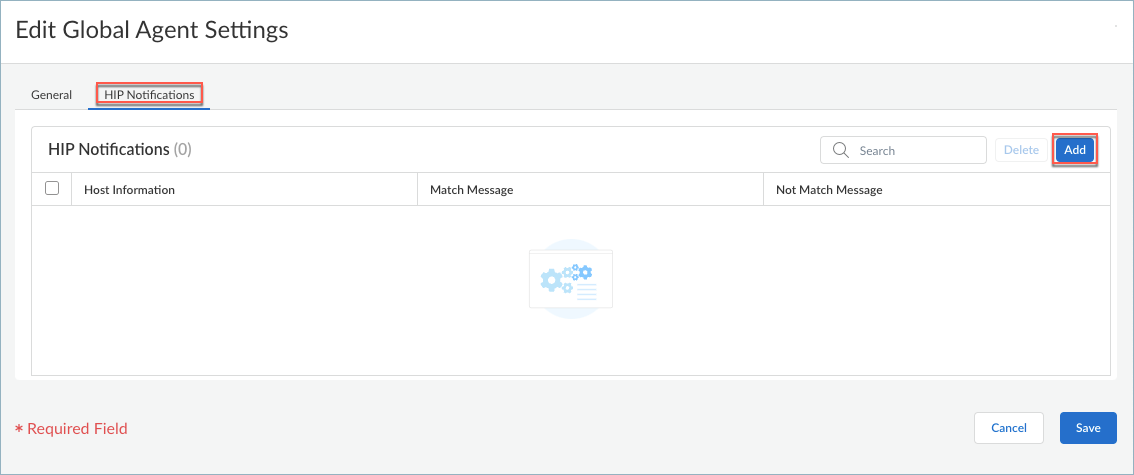
- Select the HIP Profile to which this message applies from the Host Information drop-down.
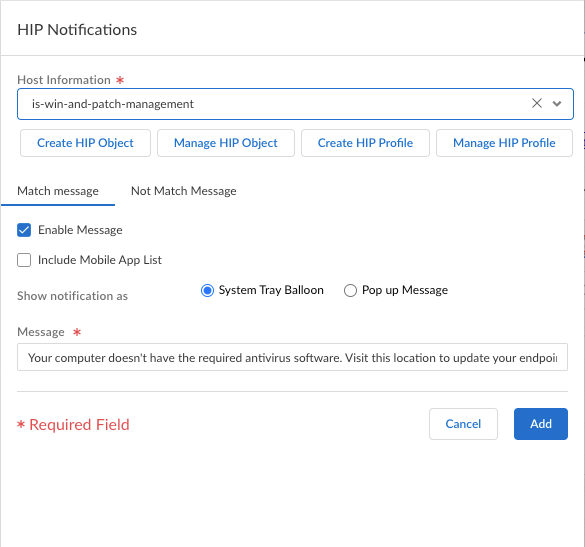
If there are no HIP Profiles, you need to create a HIP Profile.
- Depending on whether you want to display the message when the corresponding HIP Profile is matched or not matched, select Match Message or Not Match Message . In some cases, you might want to create messages for both a match and a nonmatch, depending on what objects you are matching and what your objectives are for the policy.
- Select Enable Message , and then select whether you want to display the message as a System Tray Balloon or a Pop Up Message .
- Enter your Message text and then click Add .
- Repeat this procedure for each message that you want to define.
Create and Manage HIP Objects for the Dynamic Privilege Access Prisma Access Agent
HIP objects consist of the matching criteria used to filter out the host information that you're interested in using to enforce policy from the raw data reported by the Prisma Access Agent. For example, while the raw host data might include information about several antivirus packages that are installed on the endpoint, you might only be interested in one particular application. In this case, you would create a HIP object to match the specific antivirus software you're interested in enforcing.
The best way to determine what HIP objects you need is to determine how you will use the host information you collect to enforce the policy. Keep in mind that the HIP objects themselves are merely building blocks that enable you to create the HIP Profiles that are used in your security policies. Therefore, try to keep your objects simple by matching on one item. This item could be the presence of a particular type of required software, membership in a specific domain, or a specific OS. By doing this, you will have the flexibility to create a granular HIP-augmented policy.
- You can configure HIP objects from ManageConfigurationNGFW and Prisma AccessObjectsHIPHIP Objects .
- Click Add HIP Object .
- Enter a Name and Description for the object.
- Select the tab that corresponds to the category of host information you're interested in matching against, and then select the check box to enable the object to match against the category.
For example, to create an object that looks for information about antivirus or antispyware software, select the Anti-Malware tab, and then select the Anti-Malware check box to enable the corresponding fields. Complete the fields to define the desired matching criteria.
For example, the following image shows how to create a HIP object that matches if the endpoint has the AVAST Free Antivirus software application installed, has Real Time Protection enabled, and has malware definitions that have been updated within the last five days.
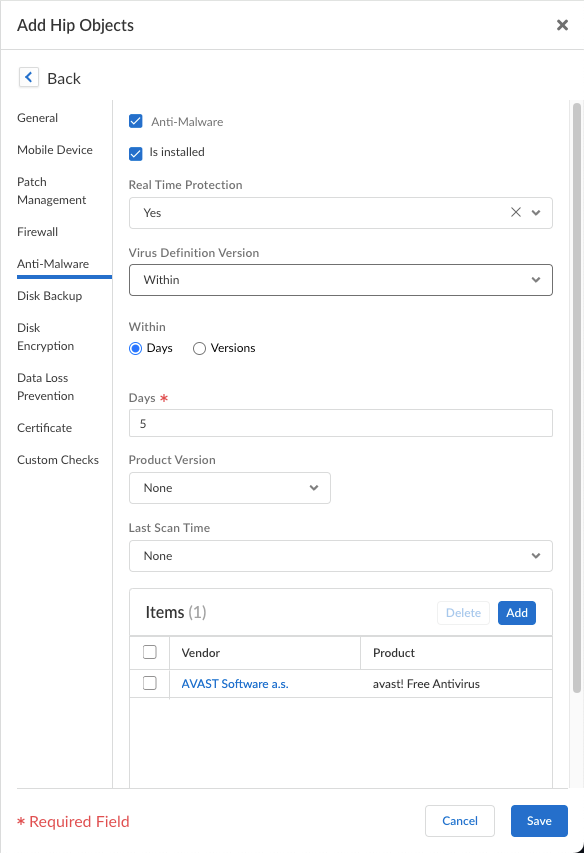
Repeat this step for each category you want to match against in this object. For more information, see Table: Data Collection Categories .
- Save and Add your HIP object.
- To manage your HIP objects, you can select an existing object from the HIP notifications table or click Add in the Edit Global Agent Settings page to open the HIP notifications window.
From there, click Manage HIP Object to view the list of HIP objects that you configured. You can select a HIP object and Delete , Clone , or Move it.
Create and Manage HIP Profiles for the Dynamic Privilege Access Prisma Access Agent
A HIP Profile is a collection of host information profile objects that are evaluated together, either for monitoring or for security policy enforcement. When you create your HIP Profiles, you can combine the HIP objects and HIP Profiles you previously created by using Boolean logic, such that when a traffic flow is evaluated against the resulting HIP Profile, it either matches or does not match. If there is a match, the corresponding policy rule is enforced. If there is no match, the flow is evaluated against the next rule, as with any other policy matching criteria.
- You can configure HIP Profiles from ManageConfigurationNGFW and Prisma AccessObjectsHIPHIP Profiles .
- Click Add HIP Profile .
- Enter a Name and Description to identify the profile.
- Click within the Match field to open the HIP Profile builder.
- Select the HIP object or profile that you want to use as match criteria from the list.
- Select a Boolean operator ( And , And ). If you want the HIP Profile to evaluate the object as a match only when the criteria in the object are not true for a flow, select the Not check box before adding the object.
- Select another HIP object or profile to evaluate against the first HIP object.
- Continue adding match criteria for the profile that you're building, making sure to select the appropriate Boolean operator radio button ( And or Or ) between each addition, and using the Not check box when appropriate. The HIP Profile can contain up to 2,048 characters in length.
- When creating a complex Boolean expression, you must manually add the parenthesis in the proper places in the Match text box to ensure that the HIP Profile is evaluated using the logic you intend.

- Save and Add your HIP Profile.
- To manage your HIP Profiles, you can select an existing profile from the HIP Notifications table or click Add in the Edit Global Agent Settings page to open the HIP Notifications window.
From there, click Manage HIP Profile to view the list of HIP Profiles that you have configured. You can select a HIP Profile and Delete , Clone , or Move it. You can also Add a HIP Profile from here.
Create HIP-Enabled Security Rules on Your Gateways
As a best practice, you should create your security rules and test that they match the expected flows (based on the source and destination criteria) before adding your HIP profiles. By doing this, you can better determine the proper placement of the HIP-enabled rules within the policy.
- On the firewall that's hosting your gateway, select PoliciesSecurity , and then select the rule to which you want to add a HIP profile.
- On the Source tab, make sure the Source Zone is a zone for which you enabled User-ID.
- On the Source tab under Source Device , Add the HIP Profiles used to identify devices (you can add up to 63 HIP profiles to a rule).
- Click OK to save the rule.
- Commit the changes.
Push the Prisma Access Agent Configuration
After you complete the Prisma Access Agent configuration or update the configuration, you must push the configuration to Prisma Access.
Create at least one project before you can push the commit, otherwise the commit will fail.
- Select WorkflowsPrisma Access SetupAccess Agent .
- Select Push ConfigPush .
- Enter a Description for the job.
- Select the GlobalPrisma AccessMobile UsersAccess Agent container and click Push .
- Wait for the job to finish and Close the Jobs dialog.
Download the Dynamic Privilege Access Enabled Prisma Access Agent Package
After you have configured the Prisma Access Agent and project-specific Prisma Access Agent settings, you can download the Prisma Access Agent package so that you can make it available for download and installation by your end users.
In addition, ensure that you download the configuration file. Your agent and project-specific agent configurations, along with the Prisma Access tenant ID and the server domain, are saved to the Prisma Access Agent configuration file. The configuration file will be used during the installation and registration of the Prisma Access Agent.
- Download the Prisma Access Agent package and configuration file.
- Select ManagePrisma Access AgentInventory .
- Click Download Agent .
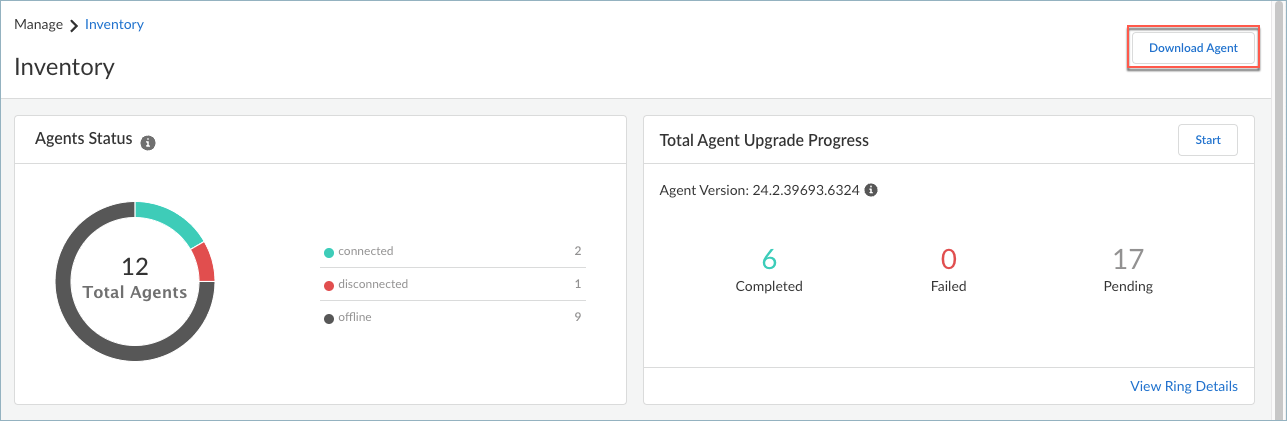
- Click the down arrow corresponding to the items that you want to download.
Ensure that you download the Configuration file because it will be used during the installation and registration of the Prisma Access Agent.
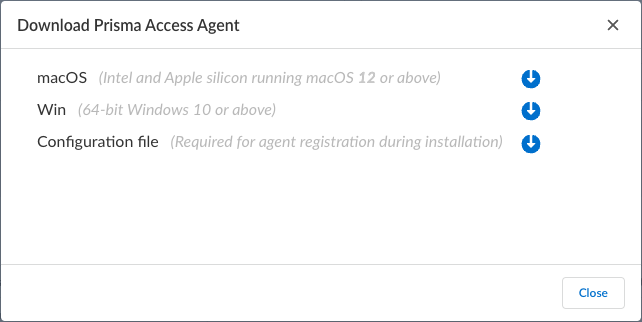
- Save the package to a location on your system and Close the Download Agent dialog.
- Upload the package to a central location in your organization's network or distribute the package so that your end users can download and install the Prisma Access Agent.
Use the Prisma Access Agent to Access Your Projects
If your organization is an IT or IT Enabled Services (ITES) company that needs to control which users have access to their customer projects, Dynamic Privilege Access provides a seamless, secure, and compartmentalized way for you to access only those projects that are assigned to you.
If your administrator has set up Prisma Access and the Prisma Access Agent for Dynamic Privilege Access, you can use the Prisma Access Agent to access and work on the projects that you are assigned to.
After you log in to your project, you can access your organization's network, resources in the network, or software-as-a-service applications that are specific to the project. Learn how to:
Install the Prisma Access Agent
If your administrator did not push the Prisma Access Agent to your device, you can manually install the Prisma Access Agent on your macOS or Windows device.
The Prisma Access Agent and GlobalProtect app can coexist on the same device, but only one of them can connect to Prisma Access. If the GlobalProtect app is also installed and enabled on your device, the Prisma Access Agent installation will automatically disable the GlobalProtect app. To use the GlobalProtect app after installing the Prisma Access Agent, you will need to switch to the GlobalProtect app .
To manually install the Prisma Access Agent on your Windows device.
- Obtain the Prisma Access Agent package that your administrator provided to you. The package name is in the following format:
PrismaAccessAgent_x64_<version>.msi
- In your Downloads folder (or wherever you placed the installation package), double-click the installation package icon and follow the prompts to install the Prisma Access Agent.
- When the setup wizard appears, click Next to continue.
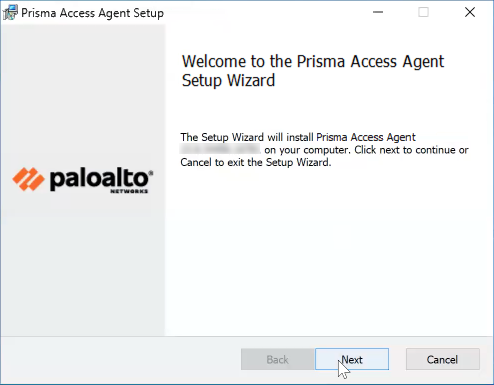
- Review the end-user license agreement, select I accept the terms in the License Agreement , and click Next .
- Click Install to begin the installation.
- When prompted to allow this app to make changes to your device , click Yes .
- When the installation is complete, click Finish .
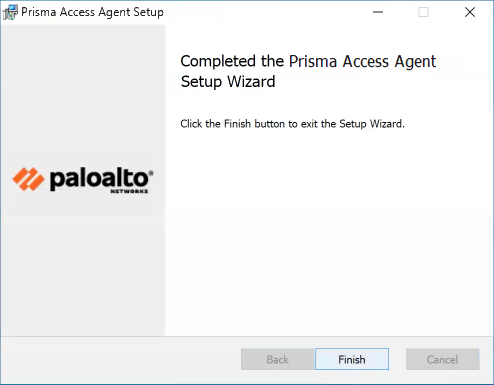
- If your administrator configured the agent to install the Autonomous DEM agent along with the Prisma Access Agent, click OK so that you won't be prompted again.
You can uninstall the Prisma Access Agent manually if you no longer need to use it. Keep in mind that by uninstalling the agent, you will no longer have access to your corporate network, and your endpoint won't be protected by your organization's security policies.
Before you begin, if the anti-tamper feature is enabled for the Prisma Access Agent, you must obtain the anti-tamper unlock password from the administrator. To uninstall the agent, you must have administrator privileges.
Complete the following steps to uninstall the Prisma Access Agent:
- Disable the Prisma Access Agent.
- Run the following command in a Command Prompt window:
C:/Program Files/Palo Alto\ Networks/Prisma Access Agent/PACli.exe" protect disable
- If prompted for the supervisor password, enter the anti-tamper unlock password.
- Uninstall the Prisma Access Agent from Settings.
- On Windows 11:
- Open the Start menu.
- Select SettingsAppsInstalled Apps .
- Scroll to Prisma Access Agent .
- Select More OptionsUninstall .
- When prompted to continue with the uninstall, click Yes .
- On Windows 10:
- Open the Start menu.
- Select SettingsAppsApps & Features .
- Scroll to Prisma Access Agent .
- Select MoreUninstall .
- When prompted to continue with the uninstall, click Yes .
Log in to the Dynamic Privilege Access Enabled Prisma Access Agent
To access your organization's network, resources, SaaS applications, or the internet, log in to the Prisma Access Agent using your login credentials.
After you log in to the Prisma Access Agent, you’re automatically connected to your network using the best location (sometimes called a gateway). The agent automatically selects the best location to provide you with the best performance to provide a better experience, such as viewing websites in your local language. When your device is outside your organization's network, the agent finds the best location to give you the best performance when connecting to the network.
Before you begin, the Prisma Access Agent must be installed on your device. Typically, your administrator will deploy the Prisma Access Agent to the device that you use to access your organization's network, resources, and applications. The agent is configured according to policy rules defined by your administrator and deployed to your device. However, if your administrator did not deploy the Prisma Access Agent to your device, you will need to manually install the Prisma Access Agent .
Depending on how Prisma Access is set up in your organization, your administrator should provide you with the following login information:
- The name of the Prisma Access server hosting the service that manages your Prisma Access Agent. There can be multiple servers depending on the Prisma Access setup.
- The name of the projects that you work on if your organization uses Dynamic Privilege Access . Dynamic Privilege Access enables you to access your organization's network and resources based on the project you are assigned to, so you won't accidentally access another project's resources. If you are assigned to work on more than one project, you can easily switch projects .
Depending on the settings for your operating system, the app icons and app interface can appear in dark mode or light mode.
Log in to the Prisma Access Agent by completing the following steps:
- Launch the Prisma Access Agent by clicking the Prisma Access Agent icon
![]()
from the macOS menu bar or Windows taskbar.
- Select the Server Name of the Prisma Access server that your administrator provided and click Connect .
The format of the server name is <xxx>.epm.gpcloudservice.com (without the https:// protocol). The maximum length of the server name is 256 characters.
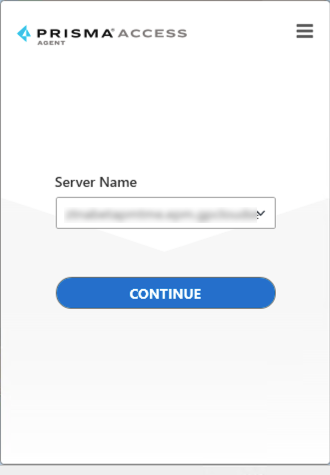
- Enter the project name that your administrator sent you and Continue .
The maximum length for the project name is 32 characters.

- In the login page that appears in your default web browser, sign in to your organization's single sign-on (SSO) app, such as Okta or Azure Active Directory (AD), by entering your login credentials for your organization.
If your administrator enabled multi-factor authentication (MFA), you’ll need to complete additional verification in the browser when you log in.
- When your web browser prompts you, click Open Prisma Access Agent .
( Optional ) If you don’t want the browser to prompt you the next time you log in, select Always allow <site> to open these types of links in the associated app , then click Open Prisma Access Agent (if supported by your default web browser).
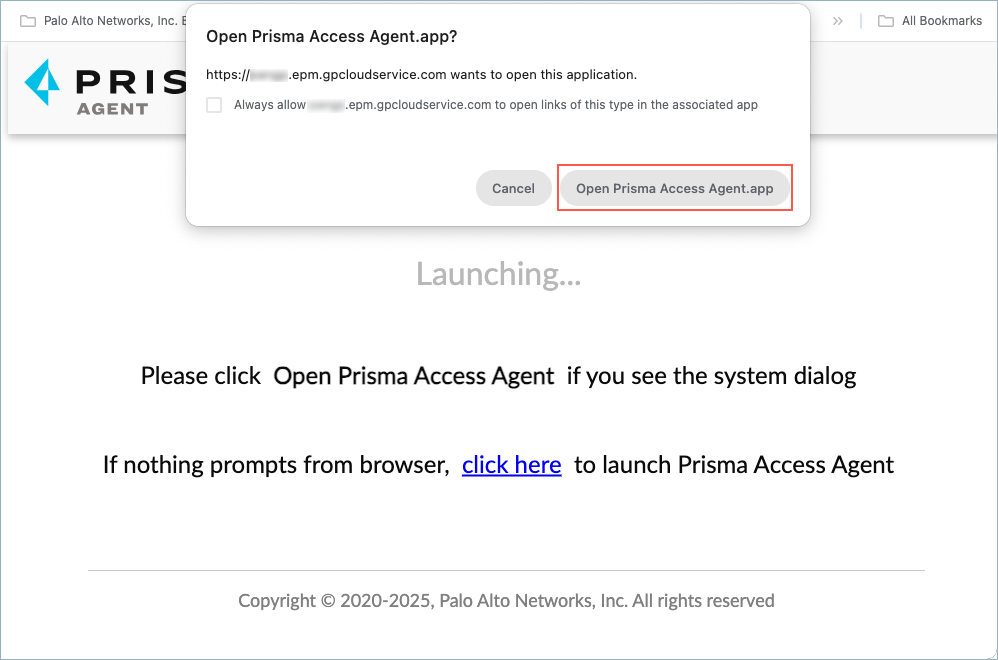
- Wait while Prisma Access Agent connects to Prisma Access.
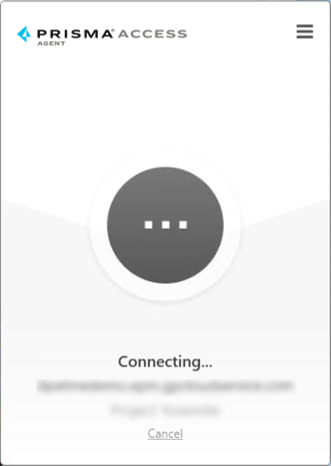
- After successfully logging in, you’re connected automatically to the best available Prisma Access location. If you signed in using a project, you are connected to the best available location for your project.
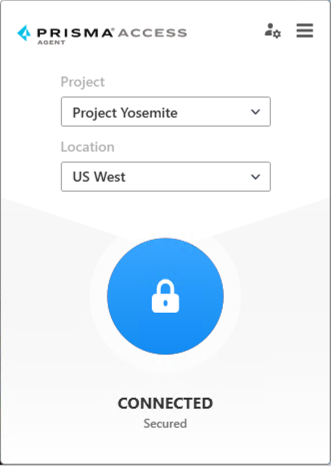
You can now access your organization's resources and SaaS apps, along with secure access to the internet.
If your administrator enabled Always On mode for Prisma Access Agent, you cannot disconnect from Prisma Access due to your organization's policy. However, you can still change Prisma Access locations.
If your administrator enabled On Demand mode for Prisma Access Agent, you must click the lock icon to connect to Prisma Access.
Change Preferences for the Dynamic Privilege Access Enabled Prisma Access Agent
Use the Prisma Access Agent preferences window to view information about your device and to change options for your agent, such as enabling desktop notifications.
- Launch the Prisma Access Agent by clicking the Prisma Access Agent icon
![]()
from the macOS menu bar or Windows taskbar.
- Click the hamburger menu to open the preferences window.
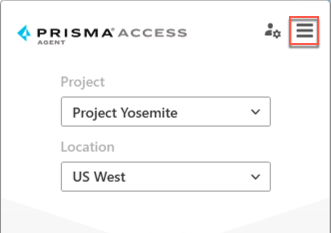
- In the preferences window, you can view the following information:
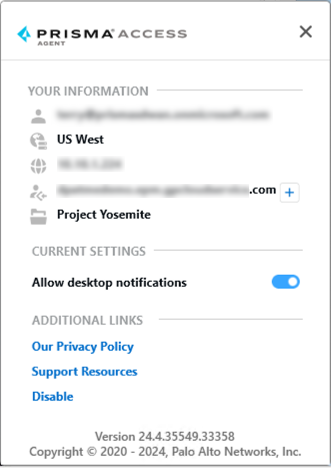
|
Icon |
Description |
|
|
Your user ID. |
|
|
The Prisma Access location that your device is connected to. |
|
|
The IP address of the Prisma Access location. |
|
|
The hostname or IP address for the administrative interface (server) that you're connected to. You can click the plus ( + ) icon to connect to a different server. |
|
|
The project you're signed in to. |
- To receive Prisma Access Agent notifications in the menu bar (on macOS) or taskbar (on Windows), Allow desktop notifications . This setting is enabled by default.
The desktop notifications will adhere to any "do not disturb" settings that you set at the time of installation. The operating system will prompt you to allow notifications from Prisma Access Agent at the time of installation.
- To understand what data Prisma Access Agent collects and how the information is used, view Our Privacy Policy .
- To get assistance on issues that you might encounter with Prisma Access Agent, click Support Resources .
- If your administrator permits it, you can Sign Out of Prisma Access Agent.
- If you administrator enabled the feature, you can Disable the Prisma Access Agent so that you can switch to the GlobalProtect app (if it is installed on your device).
- View the version of your Prisma Access Agent.
- To close the window, click the X .
Connect the Dynamic Privilege Access Enabled Prisma Access Agent to a Different Location
After you log in to Prisma Access Agent, you’re automatically connected to the best available Prisma Access location. If you want to change locations, you can do so using the Location drop-down.
- Launch the Prisma Access Agent by clicking the Prisma Access Agent icon
![]()
from the macOS menu bar or Windows taskbar.
- Select a different Location . You can Search for a location or choose a location from the list.
The list of available locations are sorted according to the best experience based on response time, availability, and other factors. The location that offers the best experience is listed as Best Location .
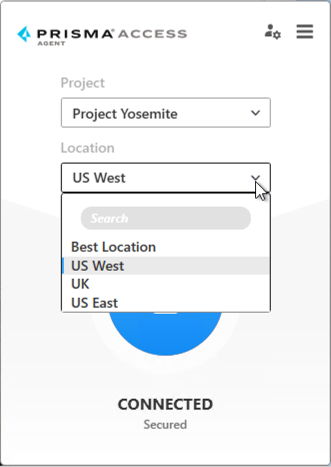
- If your administrator enabled On Demand mode for the Prisma Access Agent, click the lock icon to connect to the newly selected location. Otherwise, Prisma Access Agent proceeds to changing locations.
Switch to a Different Project
If you're assigned to multiple projects in your organization, you can switch to another project to access the network and resources associated with that project.
If the project you're trying to switch to is accessible from a different server, you will need to switch to that server first.
- Launch the Prisma Access Agent by clicking the Prisma Access Agent icon
![]()
from the macOS menu bar Windows taskbar.
- Select a different Project . You can Search for a location or choose a location from the list.
You must be assigned to the project that you're switching to.
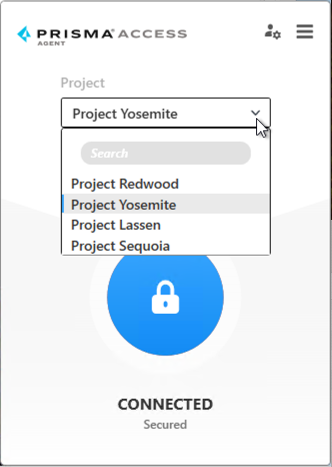
- If your administrator enabled On Demand mode for the Prisma Access Agent, click the lock icon to switch projects. Otherwise, Prisma Access Agent proceeds to switching projects.
- Each time you switch projects, Prisma Access Agent disconnects from the current project and connects to the newly selected project. You might be prompted to Open the Prisma Access Agent again.
Connect the Dynamic Privilege Access Enabled Prisma Access Agent to a Different Server
An instance of the Prisma Access server is also known as a tenant . If your administrators set up multiple Prisma Access servers, you can connect to a different server to access the network or the resources through that server.
For example, you need to work on a different project, but that project is only accessible on a different server. You will need to connect to that server before you can change to that project.
- Launch the Prisma Access Agent by clicking the Prisma Access Agent icon
![]()
from the macOS menu bar or Windows taskbar.
- Edit the server settings by selecting the server management icon.
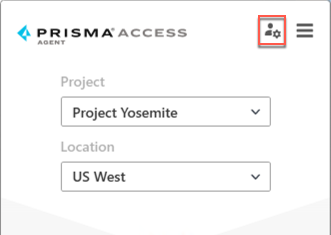
- The server information appears showing the server that you're connected to. If other servers are listed, you can select one and Connect to it.
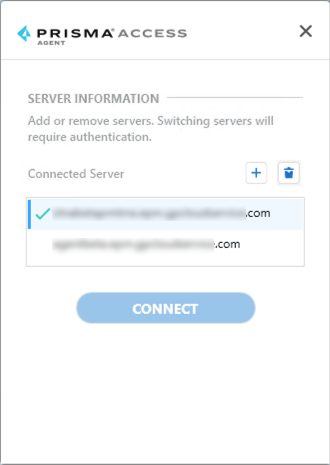
- If you need to add a server, complete the following steps:
- Click the + sign.
- Enter the new server name (provided by your administrator) and Add it.
The format of the server name is <xxx>.epm.gpcloudservice.com without the https:// . The maximum length of the server name is 256 characters. The maximum number of servers allowed on this page is 20.
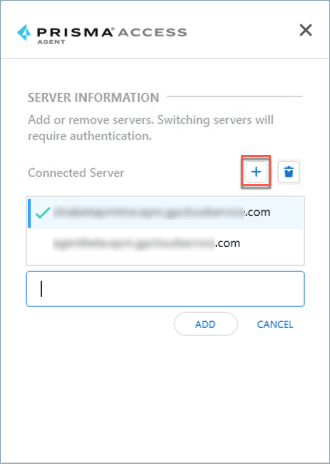
- After adding the server, select it and click Connect .
- When the Confirmation window appears, click Yes to disconnect from the current server and connect to the other server. You will need to provide your sign-on credentials again.
- When prompted, log in to the new server by providing the project name (if applicable).